Cloud Storage User's Guide - bol.com
372
Quick Start Guide www.zyxel.com Cloud Storage NAS Series Version 5.1 Edition 1 Copyright © 2015 ZyXEL Communications Corporation User’s Guide Default Login Details Web Address nas326 nas542 nas540 nas520 User Name admin Password 1234
-
Upload
khangminh22 -
Category
Documents
-
view
2 -
download
0
Transcript of Cloud Storage User's Guide - bol.com
Quick Start Guide
www.zyxel.com
Cloud StorageNAS Series
Version 5.1Edit ion 1
Copyright © 2015 ZyXEL Com m unicat ions Corporat ion
User ’s Guide
Default Login Deta ilsWeb Address nas326
nas542nas540nas520
User Nam e adm in
Password 1234

Related Documentation and Online Support
Cloud Storage User’s Guide
2
Related Documentation and Online Support
IMPORTANT!
READ CAREFULLY BEFORE USE.
KEEP THIS GUIDE FOR FUTURE REFERENCE.
Screenshots and graphics in this book may differ slight ly from your product due to differences in your product firmware or your com puter operat ing system. Every effort has been made to ensure that the inform at ion in this m anual is accurate.
Related Documentation• Quick Start Guide
The Quick Start Guide shows how to connect the NAS and get up and running r ight away.
• Web Configurator Online Help
The embedded Web Help contains descript ions of individual screens and supplementary inform at ion.
Online Support Information
Visit our product support website at ht tp: / / www.zyxel.com / support / support_landing.shtm l and choose from these topics:
• ZyXEL Support Center - Acquire firmware, software, FAQ, product applicat ion or other support files for ZyXEL devices.
• Dow nloads - Acquire firmware, software, dr iver or other support files for ZyXEL devices.
• Know ledge Base - Find art icles related to product applicat ions, FAQ, and user experience.
• W arranty I nform at ion - ZyXEL offers warranty to the or iginal end user (purchaser) that the product is free from any material or workm anship defects for a specific period ( the Warranty Period) from the date of purchase. The Warranty Period varies by region.
• Product Regist ra t ion - Register your ZyXEL product to receive the latest dr ivers and firmware updates.

Contents Overview
Cloud Storage User’s Guide
3
Contents Overview
Getting to Know Your NAS ......................................................................................................................14
Getting Started ........................................................................................................................................19
Accessing Your Cloud Remotely .............................................................................................................26
zCloud .....................................................................................................................................................30
Managing Users, Groups, and Shares ....................................................................................................33
Backing Up, Retrieving, and Syncing Files .............................................................................................34
Web Desktop at a Glance ..................................................................................................................36
Web Configurator ....................................................................................................................................38
Storage Manager ....................................................................................................................................47
Status Center ........................................................................................................................................103
Control Panel .......................................................................................................................................106
Videos, Photos, Music, & File Browser .................................................................................................124
Administrator .........................................................................................................................................139
Managing Packages ..............................................................................................................................144
Tutorials ................................................................................................................................................146
Technical Reference ........................................................................................................................201
Status Screen ........................................................................................................................................203
System Setting ......................................................................................................................................205
Applications ...........................................................................................................................................213
Packages ..............................................................................................................................................246
Auto Upload ..........................................................................................................................................262
Dropbox .................................................................................................................................................274
Using Time Machine with the NAS ........................................................................................................278
Users .....................................................................................................................................................281
Groups ..................................................................................................................................................287
Shares ...................................................................................................................................................291
WebDAV ................................................................................................................................................300
Maintenance Screens ...........................................................................................................................302
Protect ...................................................................................................................................................321
Troubleshooting ....................................................................................................................................337

Table of Contents
Cloud Storage User’s Guide
4
Table of Contents
Related Documentation and Online Support .....................................................................................2
Contents Overview ..............................................................................................................................3
Table of Contents .................................................................................................................................4
Chapter 1Getting to Know Your NAS....................................................................................................... ..........14
1.1 Overview ...........................................................................................................................................14
1.2 LEDs .................................................................................................................................................15
1.3 Hard Disks .........................................................................................................................................16
1.4 SD Card ............................................................................................................................................16
1.5 Power Button .....................................................................................................................................16
1.6 COPY/SYNC Button ..........................................................................................................................17
1.7 RESET Button ...................................................................................................................................17
Chapter 2Getting Started ....................................................................................................................................19
2.1 Overview ...........................................................................................................................................19
2.2 FindMe ..............................................................................................................................................19
2.3 NAS Starter Utility .............................................................................................................................19
2.3.1 NAS Seeker Screen ................................................................................................................20
2.3.2 Main NAS Starter Utility Screen ...............................................................................................21
2.3.3 Directory of the NAS ................................................................................................................22
2.3.4 Network Drive ..........................................................................................................................23
2.3.5 Configure System Settings ......................................................................................................23
Chapter 3Accessing Your Cloud Remotely.......................................................................................................26
3.1 myZyXELCloud Service ....................................................................................................................26
3.2 ZyXEL Drive ......................................................................................................................................26
3.2.1 ZyXEL Drive Welcome .............................................................................................................26
3.2.2 NAS and File List .....................................................................................................................27
3.2.3 Uploading and Media Streaming .............................................................................................28
Chapter 4zCloud..................................................................................................................................................30
4.1 Using zCloud .....................................................................................................................................30
4.2 zCloud TV Streaming ........................................................................................................................31
Table of Contents
Cloud Storage User’s Guide
5
Chapter 5Managing Users, Groups, and Shares ............................................................................................. .33
5.1 Managing Users, Groups, and Shares ..............................................................................................33
Chapter 6Backing Up, Retrieving, and Syncing Files...................................................................................... 34
6.1 About Backups ..................................................................................................................................34
6.2 Managing a USB Device and USB Backups .....................................................................................34
6.3 Remote Backups ...............................................................................................................................34
6.4 Internal Backups ...............................................................................................................................34
6.5 Cloud Backups ..................................................................................................................................35
6.6 Synchronizing Files ...........................................................................................................................35
Part I: Web Desktop at a Glan ce..................................................................... 36
Chapter 7Web Configurator................................................................................................................................38
7.1 Overview ...........................................................................................................................................38
7.2 Accessing the NAS Web Configurator ..............................................................................................38
7.3 Desktop ............................................................................................................................................41
7.3.1 Status Zone .............................................................................................................................43
7.3.2 Grouping Icons ........................................................................................................................44
Chapter 8Storage Manager.................................................................................................................................47
8.1 Overview ...........................................................................................................................................47
8.2 Storage Manager Overview ..............................................................................................................47
8.3 Internal Storage ................................................................................................................................49
8.3.1 Creating a Volume ...................................................................................................................55
8.3.2 Managing a Volume .................................................................................................................56
8.3.3 Creating a Volume on Disk Group ...........................................................................................64
8.3.4 Editing a Volume on Disk Group ..............................................................................................69
8.3.5 Disk Group ...............................................................................................................................69
8.3.6 Hard Disk .................................................................................................................................74
8.4 iSCSI .................................................................................................................................................81
8.4.1 iSCSI LUNs Screens ...............................................................................................................82
8.4.2 iSCSI Targets Screens ...........................................................................................................86
8.5 External Storage ...............................................................................................................................95
8.5.1 What You Need to Know About External Storage ....................................................................95
8.5.2 External Storage Screen .........................................................................................................95
8.5.3 Format the Volume ..................................................................................................................97

Table of Contents
Cloud Storage User’s Guide
6
8.6 Technical Reference ..........................................................................................................................98
Chapter 9Status Center.....................................................................................................................................103
9.1 Overview .........................................................................................................................................103
9.1.1 System Information ................................................................................................................103
9.1.2 Network .................................................................................................................................104
Chapter 10Control Panel ...................................................................................................................................106
10.1 Overview .......................................................................................................................................106
10.2 What You Can Do .........................................................................................................................106
10.3 What You Need to Know ...............................................................................................................106
10.4 TCP/IP Screens ............................................................................................................................107
10.4.1 Configuring General TCP/IP Settings ..................................................................................107
10.4.2 Configuring Network Interface .............................................................................................108
10.4.3 Configuring Web Configurator ............................................................................................. 112
10.4.4 Configuring Network Diagnosis ........................................................................................... 113
10.5 UPnP Port Mapping Screen .......................................................................................................... 113
10.5.1 UPnP and the NAS’s IP Address ......................................................................................... 114
10.5.2 UPnP and Security .............................................................................................................. 115
10.5.3 The NAS’s Services and UPnP ........................................................................................... 115
10.5.4 UPnP Router ....................................................................................................................... 116
10.5.5 Configuring UPnP Port Mapping ......................................................................................... 116
10.6 Terminal Screen ........................................................................................................................... 119
10.7 DyDNS Screen .............................................................................................................................120
10.8 FW Upgrade Screen ....................................................................................................................122
Chapter 11Videos, Photos, Music, & File Browser.......................................................................................... .124
11.1 Overview .......................................................................................................................................124
11.2 File Browser .................................................................................................................................124
11.2.1 Configure Share Screen .....................................................................................................126
11.2.2 Share and Folder Names .....................................................................................................128
11.3 Photo .............................................................................................................................................128
11.3.1 Exif and Google Maps (Photos) ...........................................................................................130
11.3.2 Slideshow (Photos) ..............................................................................................................131
11.4 Music .............................................................................................................................................132
11.4.1 Now Playing (Music) ............................................................................................................134
11.5 Video .............................................................................................................................................134
11.6 Playzone Settings ..........................................................................................................................136
11.7 Application Zone ............................................................................................................................138
11.8 Media Server .................................................................................................................................138
Table of Contents
Cloud Storage User’s Guide
7
11.9 iTunes Server ................................................................................................................................138
Chapter 12Administrator ....................................................................................................................................139
12.1 Overview .......................................................................................................................................139
12.2 Administrator Screens ..................................................................................................................139
12.2.1 Global Administrator Icons .................................................................................................140
12.2.2 Navigation Panel ................................................................................................................140
12.2.3 Main Window ......................................................................................................................142
12.2.4 Status Messages ................................................................................................................142
12.2.5 Common Administrator Screen Icons .................................................................................142
12.2.6 Session Example (Windows) ...............................................................................................142
Chapter 13Managing Packages .........................................................................................................................144
13.1 About Packages ............................................................................................................................144
13.2 Managing Packages ......................................................................................................................144
13.3 Available Packages .......................................................................................................................145
Chapter 14Tutorials .............................................................................................................................................146
14.1 Overview .......................................................................................................................................146
14.2 Windows 7 Network ......................................................................................................................146
14.2.1 If the NAS Icon Does Not Display ........................................................................................148
14.2.2 NAS Icon Right-click Options ..............................................................................................149
14.3 Windows 7 Network Map ..............................................................................................................150
14.4 Playing Media Files in Windows 7 .................................................................................................152
14.5 Windows 7 Devices and Printers ..................................................................................................152
14.5.1 Windows 7 Desktop Shortcut ..............................................................................................153
14.6 File Sharing Tutorials ....................................................................................................................155
14.6.1 Creating a User Account .....................................................................................................155
14.6.2 Creating a Share .................................................................................................................156
14.6.3 Creating a Group .................................................................................................................157
14.6.4 Accessing a Share From Windows Explorer .......................................................................158
14.6.5 Accessing a Share Using FTP .............................................................................................160
14.6.6 Accessing a Share Through the Web Configurator .............................................................161
14.7 Download Service Tutorial ............................................................................................................162
14.7.1 Copying/Pasting a Download Link .......................................................................................162
14.7.2 Configuring the Download Service Preferences ..................................................................165
14.7.3 Using Download Service Notification ...................................................................................168
14.8 Printer Server Tutorial ...................................................................................................................171
14.9 Copy and Flickr Auto Upload Tutorial ...........................................................................................173
14.10 FTP Uploadr Tutorial ...................................................................................................................174

Table of Contents
Cloud Storage User’s Guide
8
14.11 Web Configurator’s Security Sessions ........................................................................................177
14.11.1 Customizing the NAS’s Certificate .....................................................................................177
14.11.2 Downloading and Installing Customized Certificate ...........................................................179
14.11.3 Turn on the NAS’s Web Security .......................................................................................182
14.12 Using FTPES to Connect to the NAS ..........................................................................................188
14.13 Using a Mac to Access the NAS .................................................................................................189
14.13.1 Finder ................................................................................................................................189
14.13.2 Go Menu ............................................................................................................................191
14.14 How to Use the BackupPlanner ..................................................................................................191
14.14.1 Creating an Archive Backup ..............................................................................................192
14.14.2 Creating a Synchronization Backup ..................................................................................194
14.14.3 Restoring Archived Files by Backup Job ...........................................................................196
14.14.4 Restoring by Backup Files .................................................................................................198
Part II: Technical Reference. ......................................................................... 201
Chapter 15Status Screen ....................................................................................................................................203
15.1 Overview .......................................................................................................................................203
15.2 Status Screen ................................................................................................................................203
Chapter 16System Setting..................................................................................................................................205
16.1 Overview .......................................................................................................................................205
16.2 What You Can Do .........................................................................................................................205
16.3 What You Need to Know ...............................................................................................................205
16.4 Package Management Screen .....................................................................................................207
16.4.1 Displaying the Package Information ...................................................................................208
16.5 Server Name Screen ....................................................................................................................209
16.6 Date/Time Screen .........................................................................................................................210
Chapter 17Applications ......................................................................................................................................213
17.1 Overview .......................................................................................................................................213
17.2 What You Can Do .........................................................................................................................213
17.3 What You Need to Know ...............................................................................................................213
17.4 FTP Server Screen .......................................................................................................................215
17.5 Media Server Screens .................................................................................................................216
17.5.1 Media Server Share Publish Screen .................................................................................217
17.5.2 Media Server Logitech® Media Server Screen .................................................................218
17.6 iTunes Server Screen ..................................................................................................................218

Table of Contents
Cloud Storage User’s Guide
9
17.7 Download Service Screen .............................................................................................................219
17.7.1 Adding a Download Task .....................................................................................................222
17.7.2 Configuring General Download Settings .............................................................................223
17.7.3 Configuring the P2P Download Settings .............................................................................225
17.7.4 Edit IP Filter ........................................................................................................................227
17.7.5 Selecting Files to Download ................................................................................................228
17.7.6 Displaying the Task Information ..........................................................................................229
17.8 Web Publishing Screen .................................................................................................................230
17.9 Print Server Screen ......................................................................................................................231
17.9.1 Print Server Rename ..........................................................................................................232
17.10 Copy/Sync Button Screen ...........................................................................................................232
17.11 Technical Reference ....................................................................................................................234
17.11.1 Sharing Media Files on Your Network ................................................................................234
17.11.2 Download Service ..............................................................................................................235
17.11.3 Download Service Notification ...........................................................................................236
17.11.4 P2P Download Security .....................................................................................................236
17.11.5 Web Publishing Example ...................................................................................................238
17.11.6 Web Publishing ..................................................................................................................240
17.11.7 Printer Sharing ...................................................................................................................240
17.11.8 Copying Files .....................................................................................................................241
17.11.9 Synchronizing Files ............................................................................................................242
17.12 Syslog Server Screen ................................................................................................................243
Chapter 18Packages ...........................................................................................................................................246
18.1 Overview .......................................................................................................................................246
18.2 What You Can Do .........................................................................................................................246
18.3 NFS Screen .................................................................................................................................247
18.3.1 Add/Edit NFS Share ...........................................................................................................248
18.3.2 NFS Session .......................................................................................................................249
18.4 TFTP Server Screen ...................................................................................................................250
18.5 pyLoad Screen ..............................................................................................................................251
18.6 ownCloud Setup ............................................................................................................................251
18.7 Memopal .......................................................................................................................................254
18.8 GoogleDriveClient ........................................................................................................................256
18.8.1 Account Setting Screen .......................................................................................................256
18.8.2 Account Setting Add Screen ................................................................................................258
18.8.3 Update Period Screen .........................................................................................................261
Chapter 19Auto Upload ......................................................................................................................................262
19.1 Overview .......................................................................................................................................262
19.2 What You Can Do .........................................................................................................................262
Table of Contents
Cloud Storage User’s Guide
10
19.3 What You Need to Know ...............................................................................................................262
19.4 Flickr/YouTube Screen .................................................................................................................262
19.4.1 Configuring the Flickr Settings ............................................................................................263
19.4.2 Configuring the YouTube Settings ......................................................................................267
19.5 FTP Uploadr Screen .....................................................................................................................270
19.5.1 Adding or Editing an FTP Server Entry ..............................................................................271
19.5.2 FTP Uploadr Preferences Screen ......................................................................................272
Chapter 20Dropbox .............................................................................................................................................274
20.1 Overview .......................................................................................................................................274
20.2 Dropbox Screen ............................................................................................................................274
20.3 How to Use Dropbox with the NAS ...............................................................................................276
Chapter 21Using Time Machine with the NAS................................................................................................ ..278
21.1 Overview .......................................................................................................................................278
21.2 Time Machine Screen ...................................................................................................................278
21.3 Using Time Machine .....................................................................................................................278
Chapter 22Users..................................................................................................................................................281
22.1 Overview .......................................................................................................................................281
22.2 What You Can Do .........................................................................................................................281
22.3 Users Screen ...............................................................................................................................281
22.3.1 User Icons ...........................................................................................................................283
22.3.2 Adding or Editing an Account .............................................................................................283
22.3.3 Usernames ..........................................................................................................................284
22.4 Displaying User Info ......................................................................................................................285
Chapter 23Groups ...............................................................................................................................................287
23.1 Overview .......................................................................................................................................287
23.2 What You Can Do .........................................................................................................................287
23.3 Groups Screen .............................................................................................................................287
23.3.1 Adding or Editing a Group ...................................................................................................288
23.3.2 Group Names ......................................................................................................................289
Chapter 24Shares................................................................................................................................................291
24.1 Overview .......................................................................................................................................291
24.2 What You Can Do .........................................................................................................................291
24.3 Shares Screen .............................................................................................................................291

Table of Contents
Cloud Storage User’s Guide
11
24.3.1 Adding or Editing Share ......................................................................................................293
24.3.2 Configuring Advanced Share Access .................................................................................294
24.3.3 Public and ANONYMOUS Share Access Rights .................................................................295
24.4 Recycle Bin Configuration Screen ...............................................................................................295
24.4.1 Recycle Bins ........................................................................................................................295
24.4.2 Configuring Recycle Bins ....................................................................................................296
24.5 Share Browser Screen .................................................................................................................296
24.5.1 Moving or Copying Files .....................................................................................................298
Chapter 25WebDAV.............................................................................................................................................300
25.1 Overview .......................................................................................................................................300
25.2 WebDAV Screen ...........................................................................................................................300
25.3 How to Use NetDrive with the NAS ...............................................................................................301
Chapter 26Maintenance Screens .......................................................................................................................302
26.1 Overview .......................................................................................................................................302
26.2 What You Can Do .........................................................................................................................302
26.3 Power Screen ...............................................................................................................................302
26.3.1 Editing the Power Control Schedule Screen ......................................................................304
26.4 Log Screen ...................................................................................................................................306
26.4.1 Report Config Screen ..........................................................................................................307
26.4.2 Email Setting ......................................................................................................................308
26.4.3 Report Setting .....................................................................................................................308
26.4.4 Syslog Server Setting .........................................................................................................309
26.5 Configuration Screen ...................................................................................................................310
26.6 SSL Certification .......................................................................................................................... 311
26.6.1 Modifying or Creating a Certificate .....................................................................................312
26.7 Shutdown Screen .........................................................................................................................313
26.8 Unpair myZyXELcloud Screen ......................................................................................................314
26.9 Technical Reference ......................................................................................................................314
26.9.1 Log Classes .........................................................................................................................314
26.9.2 Log Severity Levels .............................................................................................................315
26.9.3 Log Messages .....................................................................................................................315
Chapter 27Protect ...............................................................................................................................................321
27.1 Overview .......................................................................................................................................321
27.2 What You Can Do .........................................................................................................................321
27.3 Backup Screens ............................................................................................................................321
27.3.1 Backup: Step 1 ....................................................................................................................322
27.3.2 Backup: Step 2 ....................................................................................................................323
Table of Contents
Cloud Storage User’s Guide
12
27.3.3 Backup: Step 3 ....................................................................................................................325
27.3.4 Backup: Step 4 ....................................................................................................................326
27.3.5 Edit Job Screen ...................................................................................................................327
27.3.6 Edit Job: Step 1 ...................................................................................................................328
27.3.7 Edit Job: Step 2 ...................................................................................................................329
27.3.8 Restore Archive Screen .......................................................................................................330
27.3.9 Restore Archive: Step 1 .......................................................................................................330
27.3.10 Restore Archive: Step 2 .....................................................................................................331
27.3.11 Restore Archive: Step 3 .....................................................................................................331
27.4 Restore Screen .............................................................................................................................332
27.4.1 Restore: Step 1 ....................................................................................................................332
27.4.2 Restore: Step 2 ....................................................................................................................334
27.4.3 Restore: Step 3 ....................................................................................................................334
27.4.4 Restore: Step 4 ....................................................................................................................335
27.5 Configuration File Backup and Restoration ...................................................................................336
Chapter 28Troubleshooting................................................................................................................................337
28.1 Troubleshooting Overview ............................................................................................................337
28.2 Power, Hardware, Connections, and LEDs ...................................................................................337
28.3 NAS Starter Utility .........................................................................................................................339
28.4 NAS Login and Access .................................................................................................................340
28.4.1 Enabling Scripting of Safe ActiveX Controls ........................................................................341
28.5 I Cannot Access The NAS ............................................................................................................343
28.6 Users Cannot Access the NAS .....................................................................................................344
28.7 External USB Drives .....................................................................................................................345
28.8 Storage ..........................................................................................................................................345
28.9 Firmware .......................................................................................................................................346
28.10 File Transfer ................................................................................................................................346
28.11 Networking ..................................................................................................................................347
28.12 Some Features’ Screens Do Not Display ....................................................................................347
28.13 Media Server Functions ..............................................................................................................348
28.14 Download Service Functions .......................................................................................................350
28.15 Web Publishing ...........................................................................................................................350
28.16 Auto Upload ................................................................................................................................351
28.17 Package Management ................................................................................................................352
28.18 Backups ......................................................................................................................................352
28.19 Google Drive ...............................................................................................................................353
Appendix A Product Specifications ..................................................................................................354
Appendix B Customer Support ........................................................................................................355
Appendix C Legal Information .........................................................................................................361

Table of Contents
Cloud Storage User’s Guide
13
Index ..................................................................................................................................................366

Cloud Storage User’s Guide
14
CHAPTER 1
Getting to Know Your NAS
1.1 Overview
Use the NAS as your own personal cloud. Here are som e key features:
Start using ZyXEL NAS instant ly w ith FindMe - Use ZyXEL FindMe to discover your NAS on your home network and get in cont rol in under 15 seconds. Then do an easy installat ion with no need to install a NAS ut ilit y.
Access and share f iles from your NAS w herever you are - Using the ZyXEL Drive m obile app m akes it easy.
Create a shared cloud space for people w ithout a NA S - Provide your cloud space for your fr iends or fam ily members when you share a folder from the NAS with the ZyXEL Drive m obile app. Your fr iends and fam ily m em bers don’t need to purchase an addit ional NAS - just install the ZyXEL Drive mobile app on their mobile devices.
Protect your data from dr ive fa ilure - The NAS’s RAI D 1 capability clones contents from one drive to another. I f a dr ive is damaged or corrupted, you st ill have another dr ive to restore from or use.
Get up and running quick ly w i th the easy- to- use inter face - The ZyXEL NSM (NAS Stat ion Managem ent ) 5.1 intelligent desktop provides a r ich feature set of tools with an easy- to-understand GUI design to help you get things done quickly. The m ult itasking capability through a m ult i-window interface enables you to quickly get applicat ions up and running.
Check your NAS w h ile you’re aw ay - Even if you have several ZyXEL NAS devices, visit the myZyXELcloud Web portal from anywhere to see their health status at a glance.
St ream m ult im edia contents to your big screen TV - Bring your favorite mult imedia files on the NAS to the big screen. ZyXEL zCloud app lets you play your favorite videos, m usic, or photos on your big screen with TV st ream ing devices such as Apple TV, Google Chrom ecast , Roku 3, and Am azon Fire TV; or direct ly on sm art TVs like those from Sam sung and LG.
Chapter 1 Getting to Know Your NAS
Cloud Storage User’s Guide
15
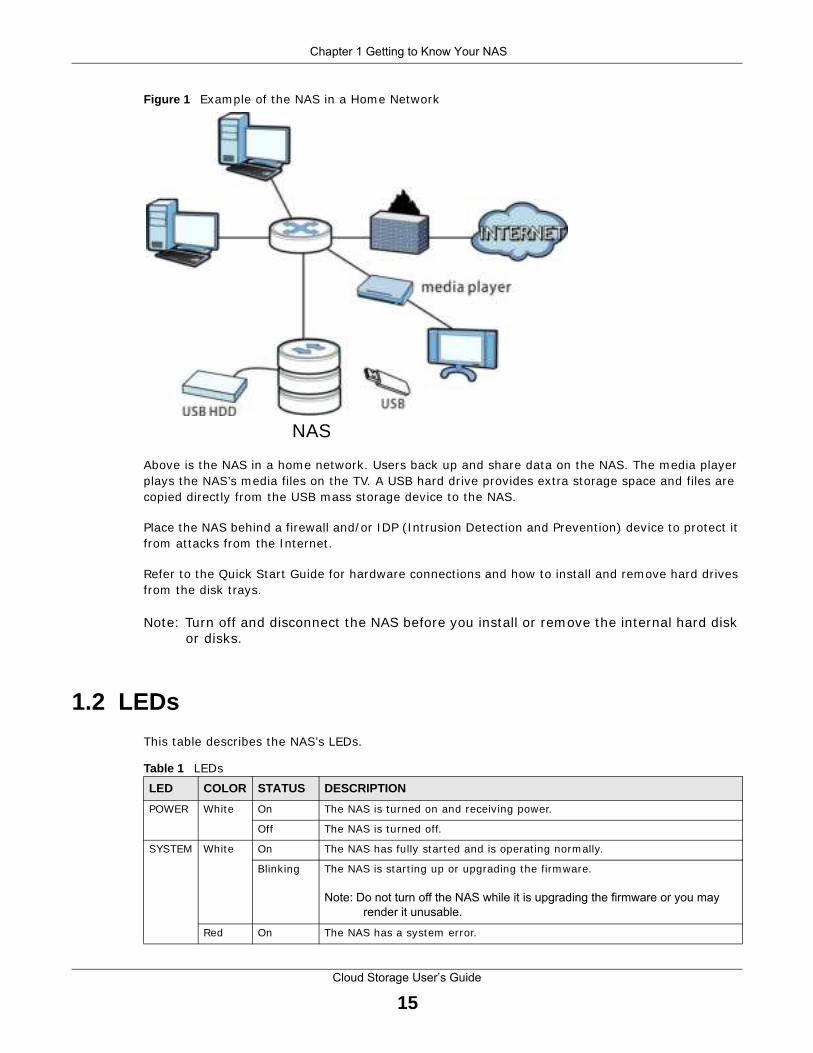
Figure 1 Exam ple of the NAS in a Hom e Network
Above is the NAS in a home network. Users back up and share data on the NAS. The m edia player plays the NAS’s media files on the TV. A USB hard dr ive provides ext ra storage space and files are copied direct ly from the USB m ass storage device to the NAS.
Place the NAS behind a firewall and/ or I DP ( I nt rusion Detect ion and Prevent ion) device to protect it from at tacks from the I nternet .
Refer to the Quick Start Guide for hardware connect ions and how to install and rem ove hard drives from the disk t rays.
Note: Turn off and disconnect the NAS before you install or rem ove the internal hard disk or disks.
1.2 LEDs
This table describes the NAS’s LEDs.
NAS
Table 1 LEDs
LED COLOR STATUS DESCRIPTION
POWER White On The NAS is turned on and receiving power.
Off The NAS is turned off.
SYSTEM White On The NAS has fully started and is operat ing norm ally.
Blinking The NAS is start ing up or upgrading the firm ware.
Note: Do not turn off the NAS while it is upgrading the firmware or you may
render it unusable.
Red On The NAS has a system error.

Chapter 1 Getting to Know Your NAS
Cloud Storage User’s Guide
16
1.3 Hard Disks
The NAS has internal hard disk bays. I nstall SATA (Serial Advanced Technology At tachm ent ) hard disks. Note that the SATA hard disks are t reated as internal or SATA volum es. Any hard disk connected to a USB port is considered an external or USB volum e.
1.4 SD Card
Use up to a 128 GB SDXC card with the front panel SD card slot . The SD card slot works with the COPY/ SYNC but ton (see Sect ion 1.6 on page 17 for details) .
1.5 Power Button
Use the power but ton on the front panel to turn the NAS on or off.
• Press the power but ton for one second to turn on the NAS.
HDD White On The hard disk dr ive is connected properly to the NAS. This LED stays on white when the hard disk dr ive is in hibernat ion if you do not enable sleeping HDD LED blinking.
Blinking The NAS is saving data to the hard disk dr ive.
Slow Blinking
Sleeping HDD LED blinking is enabled and the hard disk dr ive is in hibernat ion.
Red On The NAS detected an error on the hard disk dr ive ( like a bad sector for exam ple) . The NAS automat ically t r ies to recover a bad sector, but the LED stays red unt il the NAS restarts.
Off The NAS cannot detect a hard disk in the disk bay or the LED is disabled.
COPY White On A USB device is connected to the NAS and the NAS is ready to copy.
Blinking The NAS is copying or synchronizing files.
Red On Copying or synchronizing files to or from the USB or SD failed.
Off No USB device is connected.
LAN1 / LAN2
Green On The NAS has a successful 10/ 100 Mbps Ethernet connect ion.
Blinking The 100M LAN is sending or receiving packets.
Off The NAS does not have a 10/ 100 Mbps Ethernet connect ion.
Am ber On The NAS has a successful 1000 Mbps Ethernet connect ion.
Blinking The 1000 M LAN is sending or receiving packets.
Off The NAS does not have a 1000 Mbps Ethernet connect ion.
Table 1 LEDs (cont inued)
LED COLOR STATUS DESCRIPTION
Chapter 1 Getting to Know Your NAS
Cloud Storage User’s Guide
17
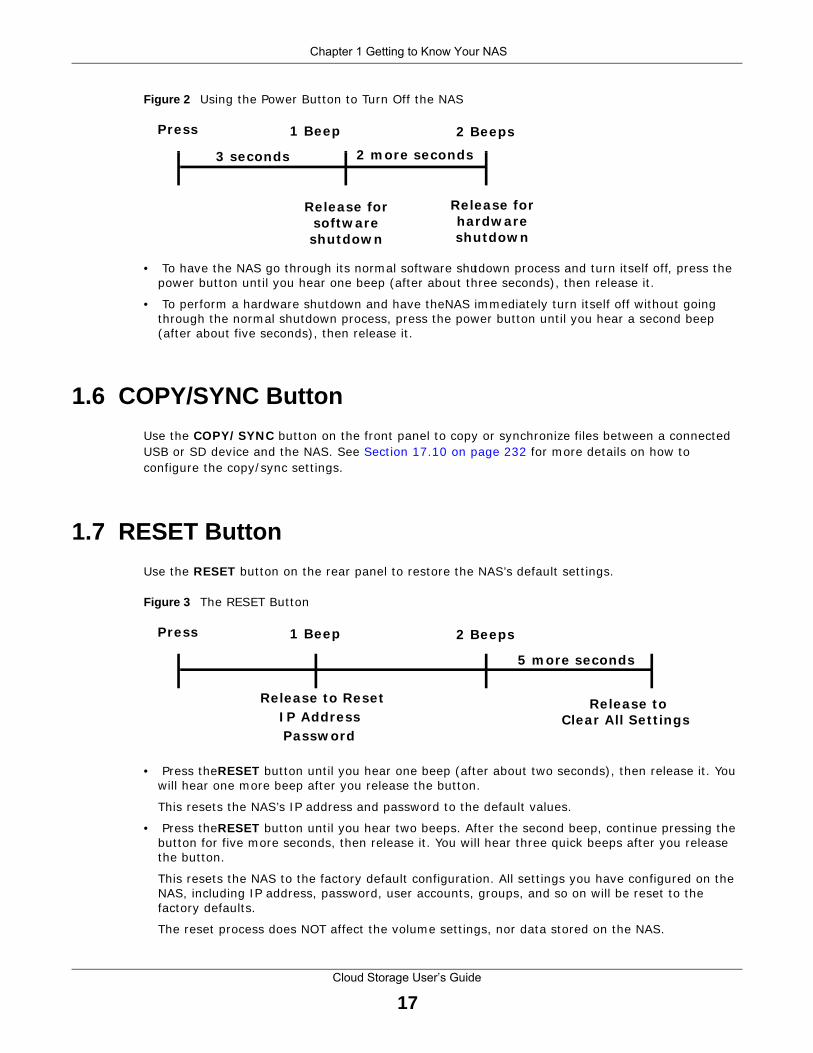
Figure 2 Using the Power But ton to Turn Off the NAS
• To have the NAS go through its norm al software shutdown process and turn itself off, press the power but ton unt il you hear one beep (after about three seconds) , then release it .
• To perform a hardware shutdown and have the NAS im m ediately turn itself off without going through the norm al shutdown process, press the power but ton unt il you hear a second beep (after about five seconds) , then release it .
1.6 COPY/SYNC Button
Use the COPY/ SYNC but ton on the front panel to copy or synchronize files between a connected USB or SD device and the NAS. See Sect ion 17.10 on page 232 for m ore details on how to configure the copy/ sync set t ings.
1.7 RESET Button
Use the RESET but ton on the rear panel to restore the NAS’s default set t ings.
Figure 3 The RESET But ton
• Press the RESET but ton unt il you hear one beep (after about two seconds) , then release it . You will hear one more beep after you release the but ton.
This resets the NAS’s I P address and password to the default values.
• Press the RESET but ton unt il you hear two beeps. After the second beep, cont inue pressing the but ton for five m ore seconds, then release it . You will hear three quick beeps after you release the but ton.
This resets the NAS to the factory default configurat ion. All set t ings you have configured on the NAS, including I P address, password, user accounts, groups, and so on will be reset to the factory defaults.
The reset process does NOT affect the volum e set t ings, nor data stored on the NAS.
Press 1 Beep 2 Beeps
2 m ore seconds
Release for
3 seconds
Release forsoftw are
shutdow nhardw areshutdow n
Press 1 Beep 2 Beeps
I P AddressPassw ord
Clear All Set t ings
5 m ore seconds
Release toRelease to Reset

Chapter 1 Getting to Know Your NAS
Cloud Storage User’s Guide
18
You should periodically back up your configurat ion file to your computer (see Sect ion 26.5 on page 310 for details about m anaging the NAS’s configurat ion file) . You could then restore your configurat ion in the event that you or som eone else reset the NAS to the factory defaults.
Note: Keep the NAS in a secure locat ion in order to prevent unauthorized reset of the device.
You m ay need to close and re-open the NAS Starter Ut ility to discover the NAS. This is because the NAS automat ically re-acquires I P address informat ion, so its I P address m ay change. I f no I P address inform at ion is assigned, the NAS uses Auto-I P to assign itself an I P address and subnet m ask. For exam ple, you could connect the NAS direct ly to your com puter. I f the com puter is also set to get an I P address autom at ically, the com puter and the NAS will choose addresses for them selves and be able to com m unicate.
Cloud Storage User’s Guide
19
CHAPTER 2
Getting Started
2.1 Overview
Use FindMe or the NAS Starter Ut ility to find and access the NAS and the files on it .
The NAS Starter Ut ility supports Windows XP, Windows Vista, Windows 7, and Windows 8. Click Help to open a Web Help page about the NAS Starter Ut ilit y screens.
Note: I nstalling this version of the NAS Starter Ut ility uninstalls previous versions.
Note: Refer to the Quick Start Guide for your NAS’s hardware connect ions and the steps for installing the NAS Starter Ut ility.
2.2 FindMe
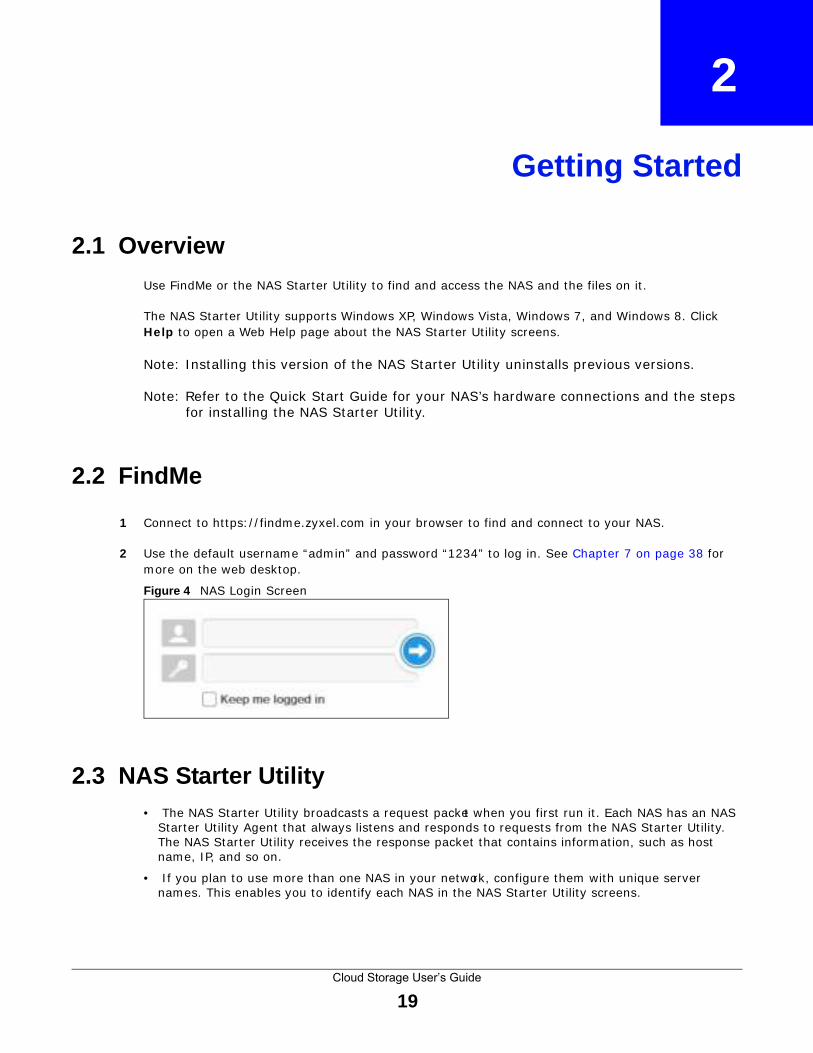
1 Connect to ht tps: / / findm e.zyxel.com in your browser to find and connect to your NAS.
2 Use the default usernam e “adm in” and password “1234” to log in. See Chapter 7 on page 38 for more on the web desktop.
Figure 4 NAS Login Screen
2.3 NAS Starter Utility• The NAS Starter Ut ility broadcasts a request packet when you first run it . Each NAS has an NAS
Starter Ut ility Agent that always listens and responds to requests from the NAS Starter Ut ility. The NAS Starter Ut ility receives the response packet that contains inform at ion, such as host name, I P, and so on.
• I f you plan to use more than one NAS in your network, configure them with unique server names. This enables you to ident ify each NAS in the NAS Starter Ut ility screens.

Chapter 2 Getting Started
Cloud Storage User’s Guide
20
2.3.1 NAS Seeker Screen
Use this screen to view the NASs in your network. The NAS’s Server Nam e . The default is ‘NAS’ followed by the number of your model ( ‘NAS5 4 0 ’ for example) . See Sect ion 2.3.5 on page 23 for how to change it to a m ore recognizable one in your network.
Click the NAS Star ter Ut ilit y icon on your desktop or in the Windows system t ray to start the NAS Starter Ut ility. Alternat ively you can click Star t > Program s > ZyXE L > NAS Star ter Ut ilit y .
Figure 5 NAS Starter Ut ility Desktop I con
Figure 6 NAS Starter Ut ility Windows System Tray I con
The first t ime you open the NAS Starter Ut ility the discovery screen appears as follows.
Figure 7 NAS Seeker
The following table describes the labels in this screen.
Table 2 NAS Seeker
LABEL DESCRIPTION
Connect Select a NAS and click this to connect to it .
Refresh Click this to refresh the screen. The NAS Starter Ut ility does not autom at ically refresh.
Chapter 2 Getting Started
Cloud Storage User’s Guide
21
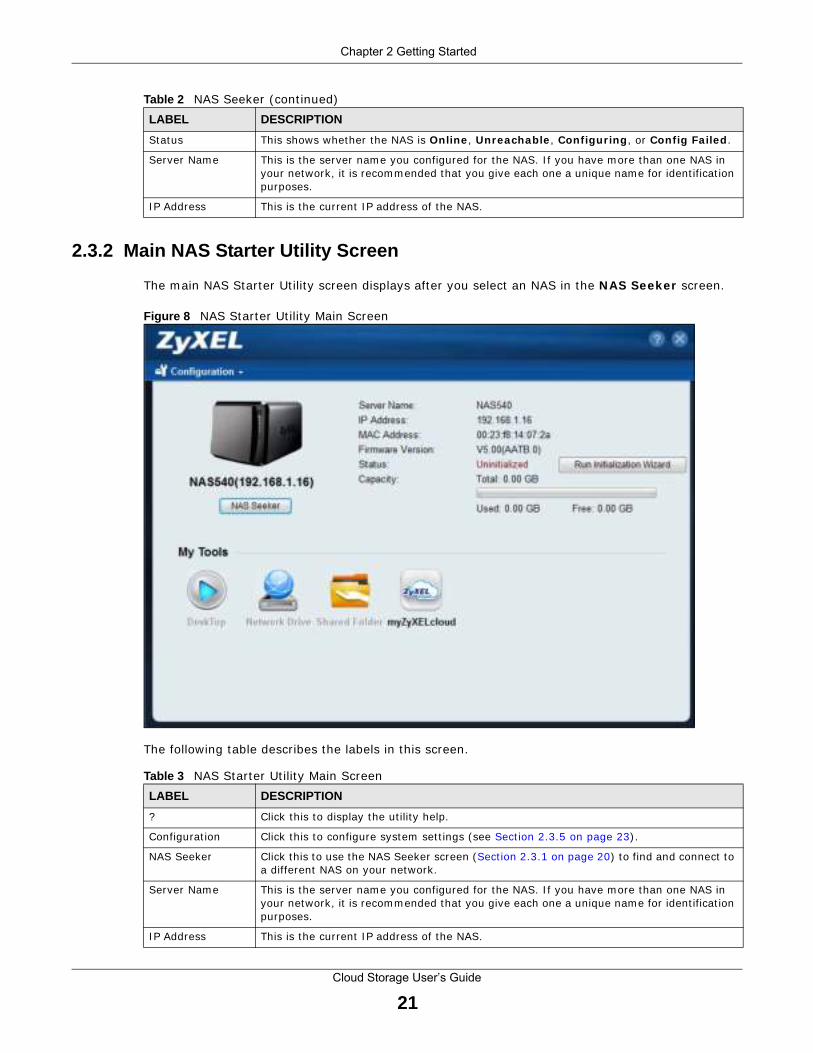
2.3.2 Main NAS Starter Utility Screen
The m ain NAS Starter Ut ility screen displays after you select an NAS in the NAS Seeker screen.
Figure 8 NAS Starter Ut ility Main Screen
The following table describes the labels in this screen.
Status This shows whether the NAS is Online , Unreachable , Configur ing , or Config Fa iled .
Server Nam e This is the server nam e you configured for the NAS. I f you have m ore than one NAS in your network, it is recomm ended that you give each one a unique name for ident ificat ion purposes.
I P Address This is the current I P address of the NAS.
Table 2 NAS Seeker (cont inued)
LABEL DESCRIPTION
Table 3 NAS Starter Ut ilit y Main Screen
LABEL DESCRIPTION
? Click this to display the ut ility help.
Configurat ion Click this to configure system set t ings (see Sect ion 2.3.5 on page 23) .
NAS Seeker Click this to use the NAS Seeker screen (Sect ion 2.3.1 on page 20) to find and connect to a different NAS on your network.
Server Nam e This is the server nam e you configured for the NAS. I f you have m ore than one NAS in your network, it is recomm ended that you give each one a unique name for ident ificat ion purposes.
I P Address This is the current I P address of the NAS.

Chapter 2 Getting Started
Cloud Storage User’s Guide
22
2.3.3 Directory of the NAS
I n the m ain NAS Starter Ut ility screen click Shared Folder to log into the NAS’s file directory in Windows Explorer. Enter the adm inist rator user name and password and click Login .
Figure 9 Login
The ut ility opens the NAS’s directory in Windows Explorer.
Figure 10 Directory
MAC Address This is the NAS’s unique physical hardware address (MAC) .
Firm ware Version This shows the version of firm ware the NAS is current ly using.
Status This shows whether the NAS is Online , Uninit ia lized , Unreachable , Configur ing , or Config Fa iled .
Run I nit ializat ion Wizard
This but ton displays if the NAS detects that the NAS has not yet configured any of the installed hard disks. Click this but ton to go to the Web Configurator login screen (see Sect ion 7.2 on page 38) .
Capacity This shows the NAS’s total, in-use, and remaining storage capacity.
DeskTop Click this but ton to go to the Web Configurator login screen (see Sect ion 7.2 on page 38) .
Network Drive Click this to add the NAS as a network drive in your com puter ’s Windows Explorer.
Shared Folder Click this to log into the NAS’s file directory in Windows Explorer.
myZyXELcloud Click this to go to mycloud.zyxel.com to set up a free DDNS hostname for the NAS so you can connect to it easily from the I nternet .
Table 3 NAS Starter Ut ilit y Main Screen (cont inued)
LABEL DESCRIPTION

Chapter 2 Getting Started
Cloud Storage User’s Guide
23
2.3.4 Network Drive
I n the m ain NAS Starter Ut ility screen click Netw ork Dr ive to add the NAS as a network drive in your computer ’s Windows Explorer.
Enter your user nam e and password and click Login to be able to add the NAS’s shares to which you have access as network drives. Otherwise select Guest and click Login to be able to add the NAS’s public shares as network drives.
Figure 11 Login
Select a share on the NAS and the dr ive let ter on your computer to which you want to m ap it . The shares that each user can select to m ap depends on the user ’s perm issions. For example, if share1 is pr ivate to user1, then only user1 is allowed to m ap share1. The table displays the NAS shares that are already mapped to dr ive let ters on your com puter. After you click Apply you can see the new drive in Windows Explorer (My Com puter) where you can access and use it like your com puter ’s other dr ives.
Figure 12 Network Drive
2.3.5 Configure System Settings
Use these screens to be able to change the NAS’s server name, t ime zone, PPPoE, I P address, subnet m ask, default gateway, or DNS set t ings.

Chapter 2 Getting Started
Cloud Storage User’s Guide
24
Click Configurat ion > System Set t ing in the m ain ut ility screen to display the following screen.
Figure 13 NAS Starter Ut ility > Configurat ion > System Set t ing
The following table describes the labels in this screen.
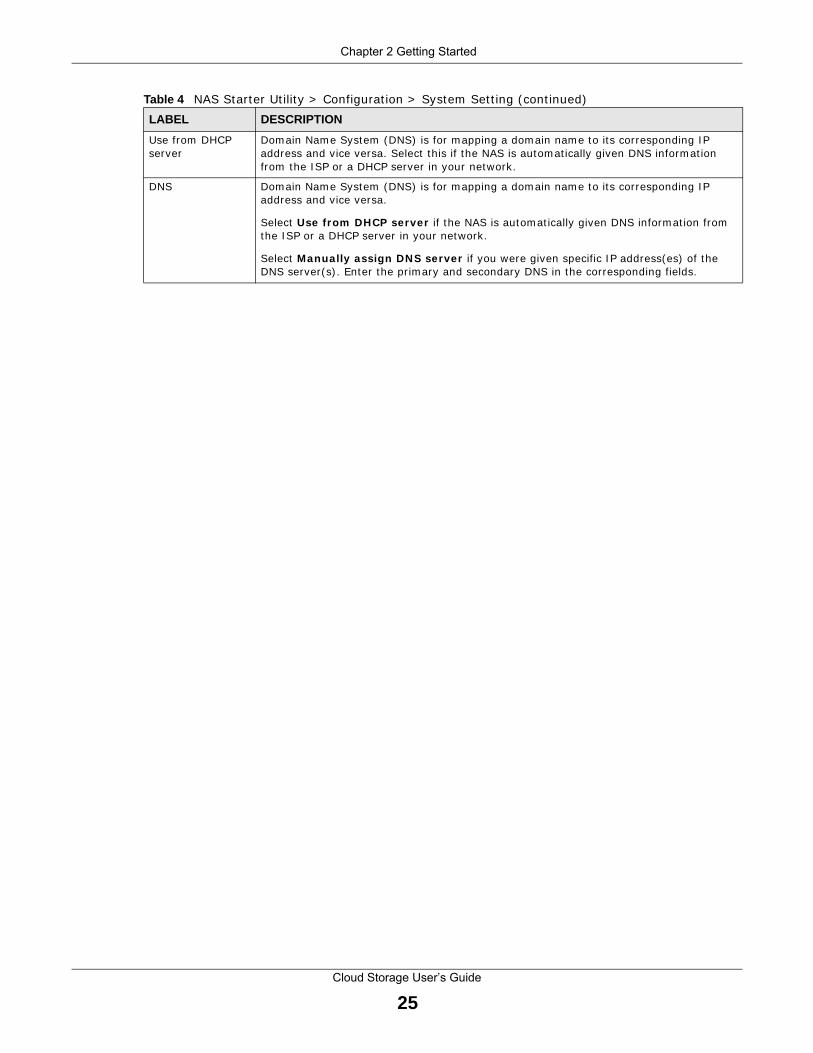
Table 4 NAS Starter Ut ilit y > Configurat ion > System Set t ing
LABEL DESCRIPTION
Server Nam e Specify a nam e to uniquely ident ify the NAS on your network. You can enter up to 15 alphanum eric characters with m inus signs allowed but not as the last character. The nam e m ust begin with an alphabet ic character (a-z) and is case sensit ive.
Tim e Zone Choose the t im e zone of your locat ion. This will set the t ime difference between your t im e zone and Greenwich Mean Tim e (GMT) .
Enable PPPoE Connect ion
Click this if your I nternet connect ion requires you to enter a user name and password to connect to the I nternet . Enter your user nam e and password
I P Address Use these fields to configure the I P address of the LAN interface through which you are connected to the NAS.
When the LAN interfaces are set to stand-alone, this configures the I P address of the LAN interface in the sam e subnet as your com puter. I t configures LAN1 if both LAN interfaces are in the sam e subnet as your com puter.
I f you use the adm inist rator configurat ion screens to set the LAN interfaces to link aggregat ion, this configures the I P address that both LAN interfaces share.
Automat ically get I P address
Select this if the NAS is autom at ically assigned an I P address from the I SP or a DHCP server in your network.
Manually assign I P address
Select this if you want to assign the NAS a fixed I P address, subnet m ask and default gateway.
Note: Do not configure an IP address that is already in use in your network. This results to
a network IP address conflict and makes the NAS inaccessible.
Chapter 2 Getting Started
Cloud Storage User’s Guide
25
Use from DHCP server
Dom ain Nam e System (DNS) is for m apping a dom ain nam e to its corresponding I P address and vice versa. Select this if the NAS is autom at ically given DNS inform at ion from the I SP or a DHCP server in your network.
DNS Dom ain Nam e System (DNS) is for m apping a dom ain nam e to its corresponding I P address and vice versa.
Select Use from DHCP server if the NAS is autom at ically given DNS inform at ion from the I SP or a DHCP server in your network.
Select Manually assign DNS server if you were given specific I P address(es) of the DNS server(s) . Enter the pr im ary and secondary DNS in the corresponding fields.
Table 4 NAS Starter Ut ilit y > Configurat ion > System Set t ing (cont inued)
LABEL DESCRIPTION

Cloud Storage User’s Guide
26
CHAPTER 3
Accessing Your Cloud Remotely
Use the NAS to set up your own secure personal cloud. Keep your videos, photos, m usic, and files safely at hom e and under your cont rol. Access, share, and st ream files from anywhere using your PC, Mac computer, and mobile devices.
3.1 myZyXELCloud Service
Use the myZyXELCloud service at ht tps: / / mycloud.zyxel.com to set up a free hostnam e like name.zyxel.m e and set the NAS to use it . This lets you easily access the NAS through the I nternet . The myZyXELcloud Web portal also lets you m onitor the NAS’s health from anywhere.
3.2 ZyXEL Drive
Use the ZyXEL Drive app to st ream or download photos, videos, and m usic to your Android or iOS phone through the I nternet . You can also upload files from your phone to the NAS.
After set t ing up the myZyXELCloud service, go to ht tp: / / zyxel.to/ zdrive to get the ZyXEL Drive app for your Android or iOS phone.
Log in, sign-up, and start playing.
3.2.1 ZyXEL Drive Welcome
Com m unity Shar ing - Send invitat ion links to fr iends and fam ily to convenient ly share selected NAS folders.
DirectConnect - Privately and securely access your NAS content from anywhere.

Chapter 3 Accessing Your Cloud Remotely
Cloud Storage User’s Guide
27
Figure 14 ZyXEL Drive Welcome
3.2.2 NAS and File List
My ow n NAS - Access and share files from your own NAS.
Shared W ith Me - Access files on som eone else’s NAS folder that they have shared with you.

Chapter 3 Accessing Your Cloud Remotely
Cloud Storage User’s Guide
28
Figure 15 NAS and File List
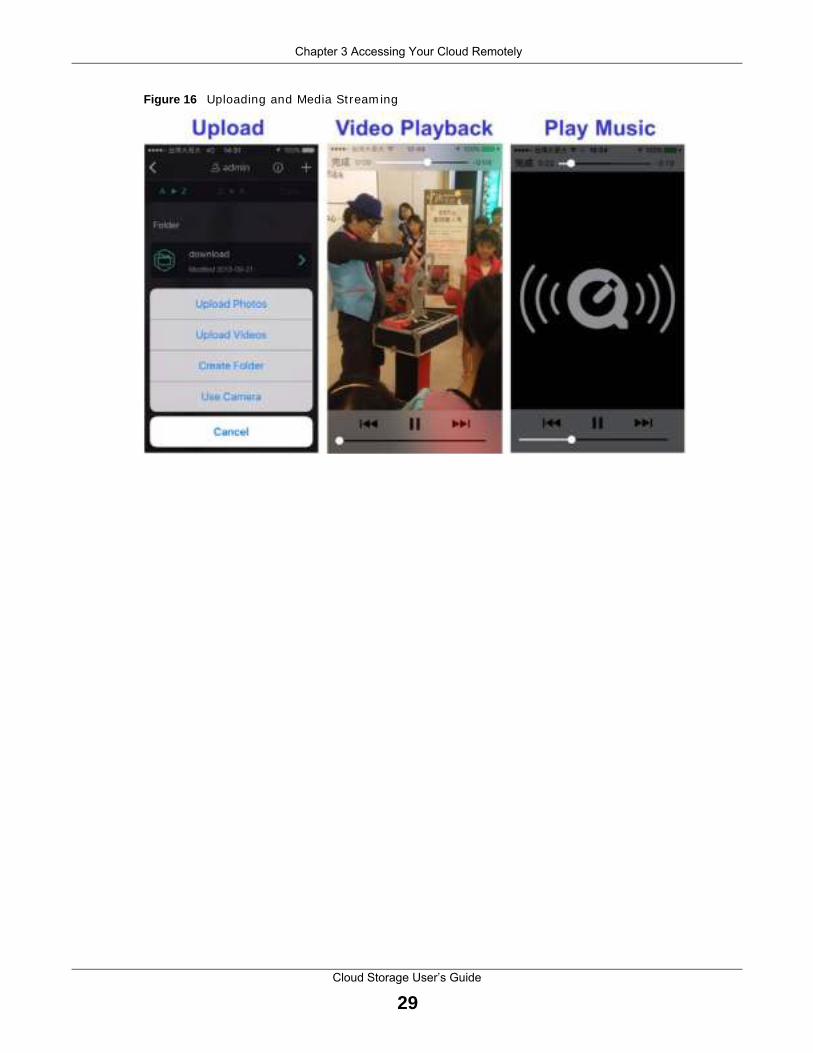
3.2.3 Uploading and Media Streaming
Use ZyXEL Drive to upload photos and videos from your m obile device to the NAS. You can also st ream videos and m usic stored on the NAS.
Chapter 3 Accessing Your Cloud Remotely
Cloud Storage User’s Guide
29
Figure 16 Uploading and Media St ream ing
Cloud Storage User’s Guide
30
CHAPTER 4
zCloud
ZyXEL zCloud app lets you play your favorite mult imedia files on the NAS on your big screen TV. Use TV st ream ing devices such as Apple TV, Google Chrom ecast , Roku 3, and Am azon Fire TV; or play files direct ly on sm art TVs like those from Sam sung and LG.
• Browse your m edia contents from your NAS direct ly on your Android or iOS device.
• View photos stored on your NAS with the app's built - in slideshow.
• Play m usic stored on your NAS.
• Watch videos stored on your NAS .
• Upload files from your Android device to your NAS.
• Upload photos and videos from your iOS device to your NAS.
• Browse and manage files stored on the NAS.
• Com pat ibility: Requires Android 4.0.3 or later or iOS 7 or 8.
4.1 Using zCloud
I nstall the zCloud app from Google Play or the Apple App store. Then tap the zCloud icon to open it .
Figure 17 zCloud I con
The m ain m enu displays.
Chapter 4 zCloud
Cloud Storage User’s Guide
31
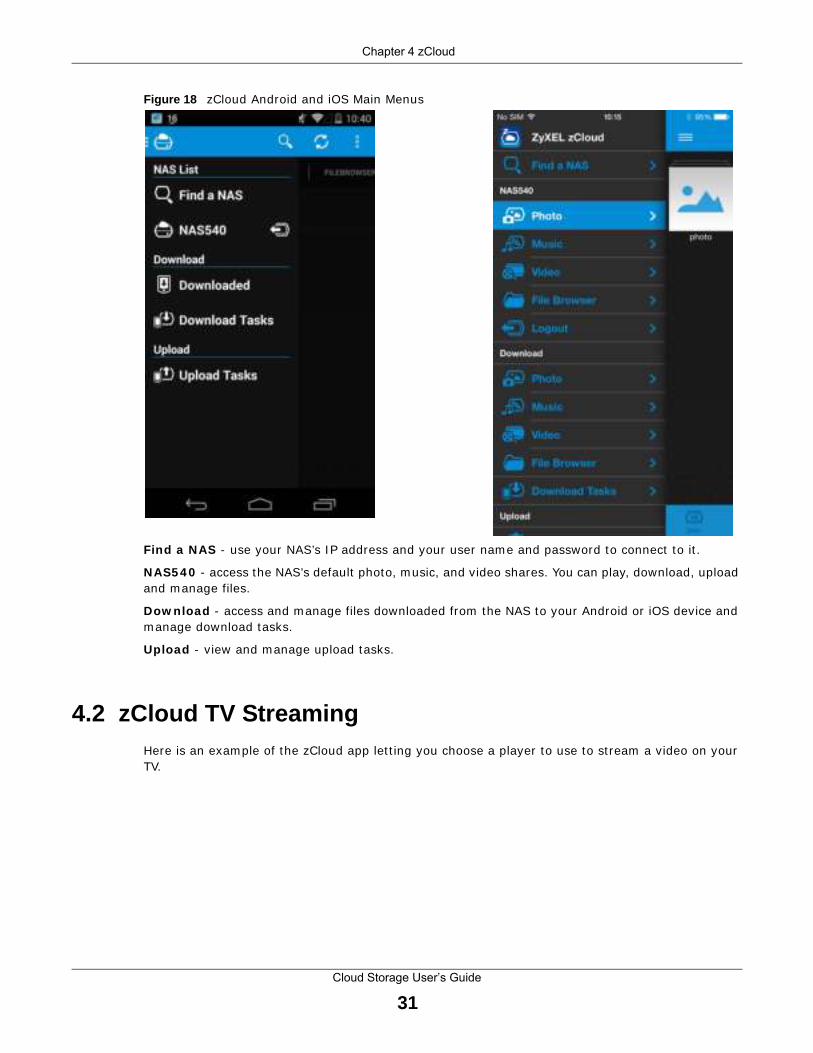
Figure 18 zCloud Android and iOS Main Menus
Find a NAS - use your NAS’s I P address and your user nam e and password to connect to it .
NAS5 4 0 - access the NAS’s default photo, m usic, and video shares. You can play, download, upload and manage files.
Dow nload - access and manage files downloaded from the NAS to your Android or iOS device and m anage download tasks.
Upload - view and manage upload tasks.
4.2 zCloud TV Streaming Here is an exam ple of the zCloud app let t ing you choose a player to use to st ream a video on your TV.

Chapter 4 zCloud
Cloud Storage User’s Guide
32
Figure 19 zCloud Android and iOS TV St ream ing
Cloud Storage User’s Guide
33
CHAPTER 5
Managing Users, Groups, and Shares
5.1 Managing Users, Groups, and Shares• Use the Users screens (Chapter 22 on page 281) to create and m anage adm inist rator and user
accounts.
• Use the Groups screens (Chapter 23 on page 287) to create and m anage groups of user accounts. You can assign users to groups and grant individual groups access r ights to specific shares.
• Use the Shares screens (Chapter 24 on page 291) to manage access perm issions mapped to specific folders on a volume. A share is equivalent to the Windows concept of a shared folder. Map a share to a network drive for easy and fam iliar file t ransfer for Windows users.

Cloud Storage User’s Guide
34
CHAPTER 6
Backing Up, Retrieving, and Syncing Files
6.1 About Backups
Backup before you need it . The NAS’s m ult iple backup m ethods m ake it easy to follow the 3-2-1 backup rule:
• At least 3 copies of data
• Stored on at least 2 different media
• With at least 1 copy off-site.
6.2 Managing a USB Device and USB Backups
Use the USB ports and SD card slot to copy or synchronize files between a connected USB or SD device and the NAS. You can use the USB drive or SD card for off-site backups.
• Use the Copy/ Sync but ton on the front panel to copy or synchronize files between a connected USB or SD storage device and the NAS. See Sect ion 17.10 on page 232 to configure the copy/sync set t ings.
• Use the NAS’s Backup screens (Sect ion 27.3 on page 321) to schedule backups of files and folders on your NAS to a USB device or SD card. See Sect ion 14.14.2 on page 194 for an example.
6.3 Remote Backups
Use the NAS’s Backup screens (Sect ion 27.3 on page 321) to schedule backups of files and folders on your NAS to another ZyXEL NAS or a NAS using rsync.
• See Sect ion 14.14.1 on page 192 for an example of backing up to a remote NAS.
• Use the Restore screens (Sect ion 27.4 on page 332) to restore previous backups based on the backup job. See Sect ion 14.14.3 on page 196 for an exam ple.
• I f you deleted an archive backup job or the NAS or the RAI D array containing the backup job failed, you can restore by backup files. See Sect ion 14.14.3 on page 196 for an example.
6.4 Internal Backups
Use the NAS’s Backup screens (Sect ion 27.3 on page 321) to schedule backups of files and folders on your NAS to another folder on the NAS.
Chapter 6 Backing Up, Retrieving, and Syncing Files
Cloud Storage User’s Guide
35
• See Sect ion 14.14.2 on page 194 for an example of how to back up the NAS to another NAS.
• Use the Restore screens (Sect ion 27.4 on page 332) to restore previous backups based on the backup job. See Sect ion 14.14.3 on page 196 for an exam ple.
6.5 Cloud Backups
Use the NAS with cloud services for off-site backups and synchronizat ion.
• Use Dropbox (Chapter 20 on page 274) to log the NAS into your Dropbox account to easily m ove files to your NAS and have the NAS download * .torrent files.
• Use Mem opal (Sect ion 18.7 on page 254) to back up files on the NAS to your Mem opal online backup and storage account .
6.6 Synchronizing Files
Besides backups, the NAS also provides pure synchronizat ion solut ions.
Note: Synchronizat ion is not backup. When you delete a file in one locat ion, synchronizat ion deletes it in the other locat ion. Do not store your only copy of a docum ent in a synchronized folder.
• Use the GoogleDr iveClient package (Sect ion 18.8 on page 256) to two-way synchronize local NAS folders and Google Drive accounts. Changes in the Google Drive account appear in the local sync folder and changes in the local sync folder appear in the Google Drive account .
• Use the ow nCloud package (Sect ion 18.6 on page 251) to host your own private cloud on the NAS. The ownCloud package lets the NAS work as an ownCloud server so com puters and m obile devices using the ownCloud client can access, sync, and share files across devices.

36
PART IWeb Desktop at a
Glance

37
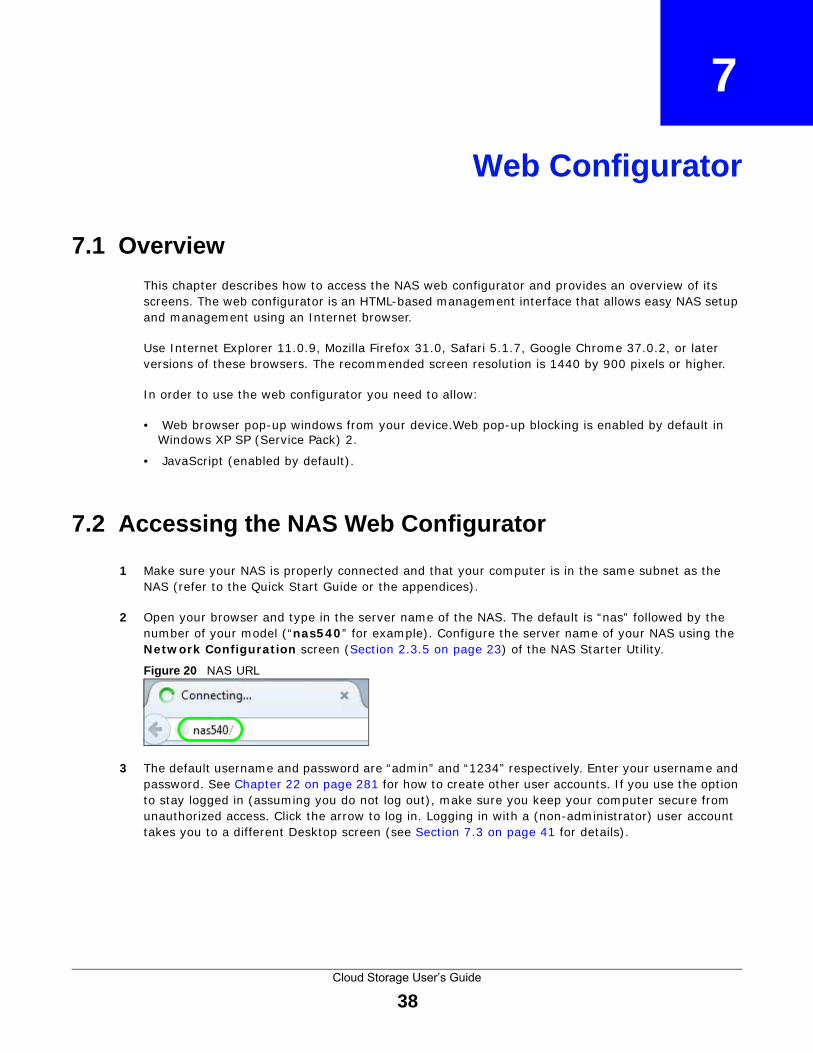
Cloud Storage User’s Guide
38
CHAPTER 7
Web Configurator
7.1 Overview
This chapter describes how to access the NAS web configurator and provides an overview of its screens. The web configurator is an HTML-based managem ent interface that allows easy NAS setup and managem ent using an I nternet browser.
Use I nternet Explorer 11.0.9, Mozilla Firefox 31.0, Safari 5.1.7, Google Chrom e 37.0.2, or later versions of these browsers. The recommended screen resolut ion is 1440 by 900 pixels or higher.
I n order to use the web configurator you need to allow:
• Web browser pop-up windows from your device. Web pop-up blocking is enabled by default in Windows XP SP (Service Pack) 2.
• JavaScript (enabled by default ) .
7.2 Accessing the NAS Web Configurator
1 Make sure your NAS is properly connected and that your com puter is in the sam e subnet as the NAS ( refer to the Quick Start Guide or the appendices) .
2 Open your browser and type in the server nam e of the NAS. The default is “nas” followed by the num ber of your model ( “nas5 4 0 ” for exam ple) . Configure the server name of your NAS using the Netw ork Configurat ion screen (Sect ion 2.3.5 on page 23) of the NAS Starter Ut ilit y.
Figure 20 NAS URL
3 The default username and password are “adm in” and “1234” respect ively. Enter your username and password. See Chapter 22 on page 281 for how to create other user accounts. I f you use the opt ion to stay logged in (assum ing you do not log out ) , m ake sure you keep your com puter secure from unauthorized access. Click the arrow to log in. Logging in with a (non-adm inist rator) user account takes you to a different Desktop screen (see Sect ion 7.3 on page 41 for details) .

Chapter 7 Web Configurator
Cloud Storage User’s Guide
39
Figure 21 NAS Login Screen
Make sure you have a backup of any existing data in the hard disk before installing it in the NAS . Creating a volume formats the hard disk and deletes all data in the process.
4 This screen displays if you have not created a volum e yet . Click Create Volum e to m ake a volum e or click the x to close the screen to go to the Desktop (Sect ion 7.3 on page 41) .
Figure 22 Welcom e Screen
5 Select Create single volum e on RAI D for a sim ple set up. Go to Sect ion 8.3.1 on page 55 for details. Select Create Mult iple volum es on disk group to be able to create m ore than one storage volum e. Go to Sect ion 8.3.3 on page 64 for details.
Figure 23 Create Volume

Chapter 7 Web Configurator
Cloud Storage User’s Guide
40
I f you choose Exist ing on disk group , you will go to the screens below after clicking Next .
Figure 24 Exist ing on Disk Group
I f this is the first t ime the NAS has created a volum e, it needs to reboot after the volum e is created. Click Yes to reboot or No to go to the Desktop.

Chapter 7 Web Configurator
Cloud Storage User’s Guide
41
Figure 25 Reboot
7.3 Desktop
The Desktop screen displays after you log in. Hover your mouse over the heading bar icons to display their nam es.

Chapter 7 Web Configurator
Cloud Storage User’s Guide
42
Figure 26 Desktop (Adm inist rator)
Figure 27 Desktop (User)
Note: The Web Configurator session autom at ically t im es out if left idle for 15 m inutes. Sim ply log back into the NAS if this happens to you.
1 Desktop - click this to m inim ize all windows so you can see the desktop. Click it again to restore the windows to their previous state.
Status Zone
12 3 4 5 6 7
8 9 1 0 1 1
1 21 3
1 4 1 5
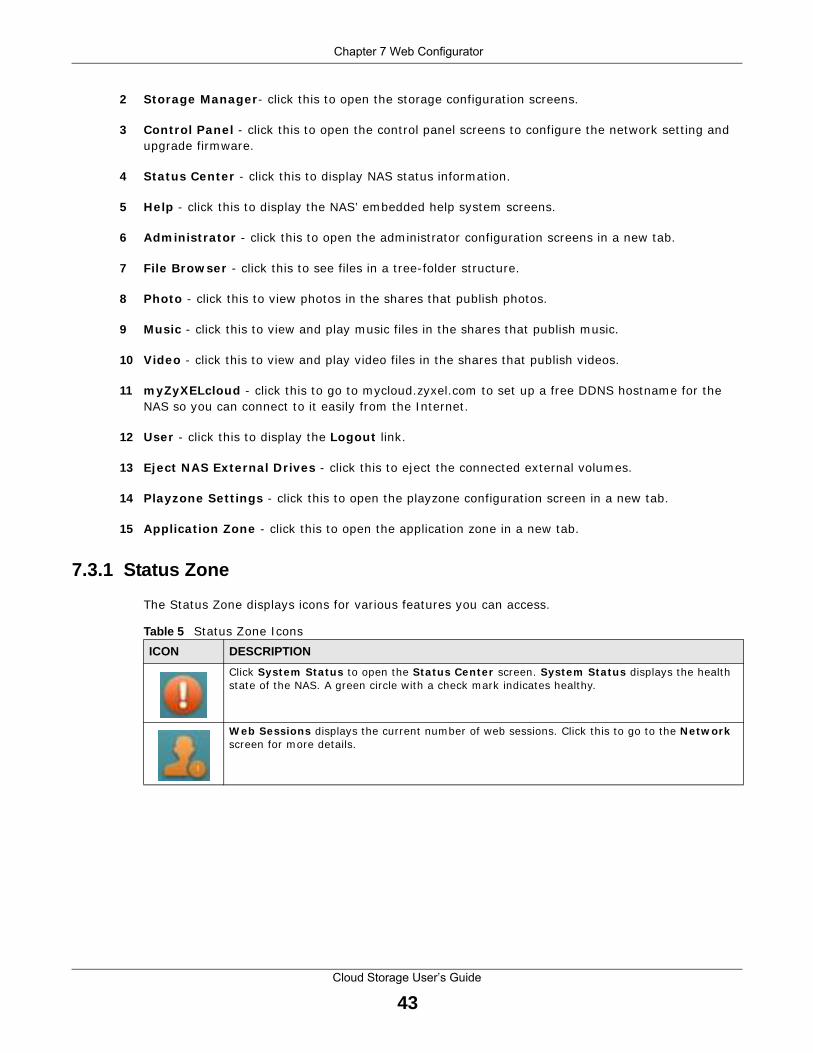
Chapter 7 Web Configurator
Cloud Storage User’s Guide
43
2 Storage Manager - click this to open the storage configurat ion screens.
3 Cont rol Panel - click this to open the cont rol panel screens to configure the network set t ing and upgrade firmware.
4 Status Center - click this to display NAS status inform at ion.
5 Help - click this to display the NAS’ em bedded help system screens.
6 Adm inist ra tor - click this to open the adm inist rator configurat ion screens in a new tab.
7 File Brow ser - click this to see files in a t ree- folder st ructure.
8 Photo - click this to view photos in the shares that publish photos.
9 Music - click this to view and play music files in the shares that publish music.
10 Video - click this to view and play video files in the shares that publish videos.
11 m yZyXELcloud - click this to go to mycloud.zyxel.com to set up a free DDNS hostnam e for the NAS so you can connect to it easily from the I nternet .
12 User - click this to display the Logout link.
13 Eject NAS External Dr ives - click this to eject the connected external volum es.
14 Playzone Set t ings - click this to open the playzone configurat ion screen in a new tab.
15 Applicat ion Zone - click this to open the applicat ion zone in a new tab.
7.3.1 Status Zone
The Status Zone displays icons for various features you can access.
Table 5 Status Zone I cons
ICON DESCRIPTION
Click System Status to open the Status Center screen. System Status displays the health state of the NAS. A green circle with a check m ark indicates healthy.
W eb Sessions displays the current num ber of web sessions. Click this to go to the Netw ork screen for m ore details.

Chapter 7 Web Configurator
Cloud Storage User’s Guide
44
7.3.2 Grouping Icons
You can drag one icon to another one and make them a group as shown below.
Click this to select widgets to show on the status bar.
Select or clear the widgets to show or hide on the Status bar. Click OK to save your changes or Cancel to exit this screen without saving changes.
Click this to hide or show the status bar.
Table 5 Status Zone I cons (cont inued)
ICON DESCRIPTION
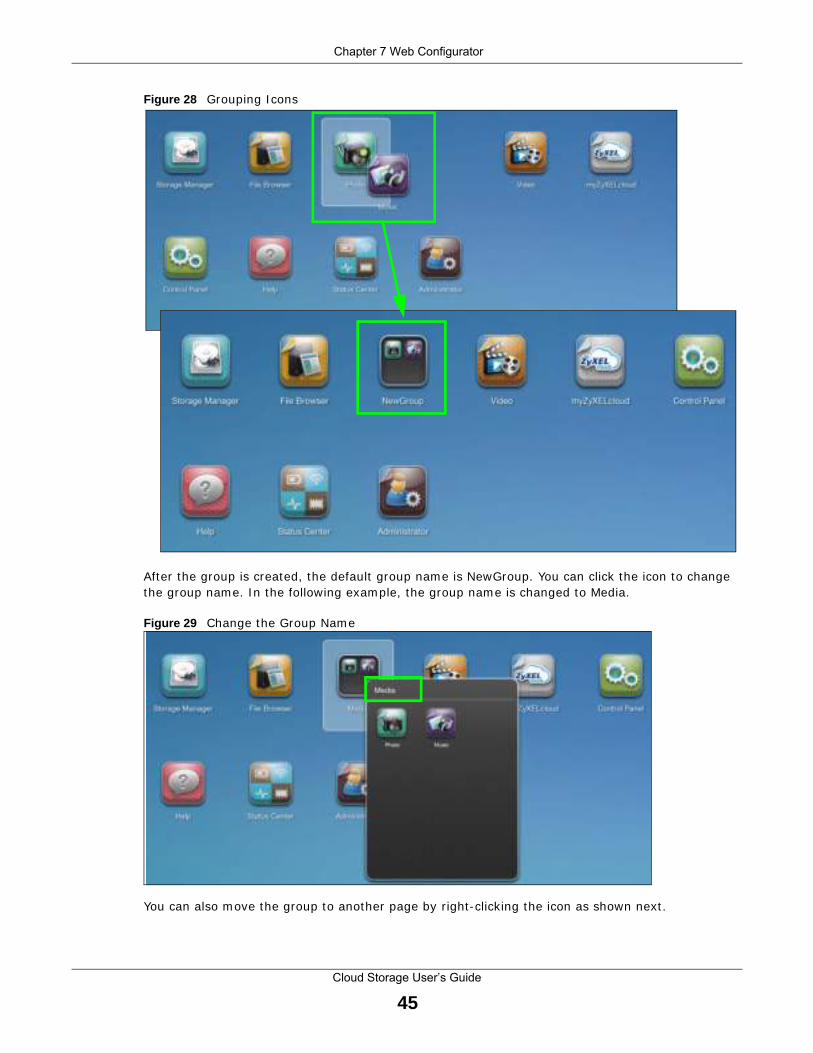
Chapter 7 Web Configurator
Cloud Storage User’s Guide
45
Figure 28 Grouping I cons
After the group is created, the default group name is NewGroup. You can click the icon to change the group name. I n the following example, the group name is changed to Media.
Figure 29 Change the Group Name
You can also m ove the group to another page by r ight-clicking the icon as shown next .
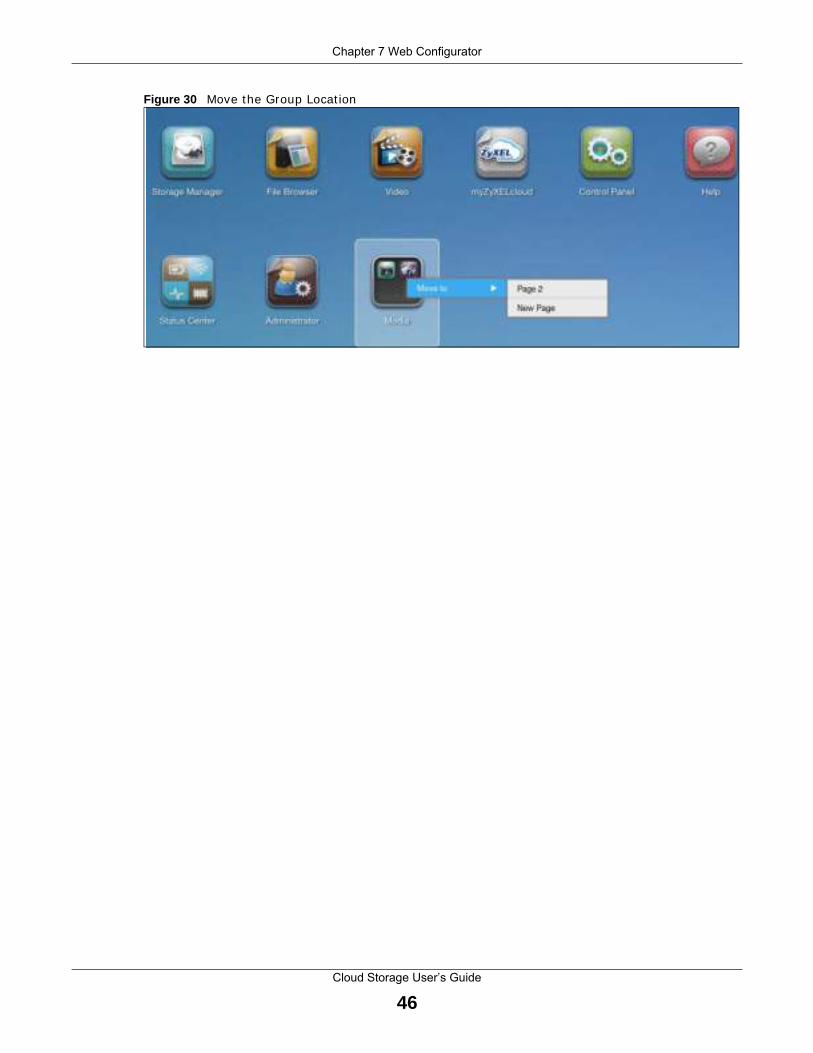
Chapter 7 Web Configurator
Cloud Storage User’s Guide
46
Figure 30 Move the Group Locat ion

Cloud Storage User’s Guide
47
CHAPTER 8
Storage Manager
8.1 Overview
This chapter displays the status of both internal and external storage, and int roduces how to configure disk groups, volum es, and iSCSI funct ions. Click Storage Manager on the Desktop to go to the following screens in a new window.
8.2 Storage Manager Overview
Click Storage Manager on the Desktop to display the status of both internal and external storage, and configure disk groups, volum es, and iSCSI funct ions.
The Storage Manager Overview screen displays the status, current storage configurat ion and volum e usage of internal volum es and capacity usage of external volumes.
Figure 31 Storage Manager > Overview > I nternal Volumes

Chapter 8 Storage Manager
Cloud Storage User’s Guide
48
Figure 32 Storage Manager > Overview > External Volum es
The following table describes the labels in this screen.
Table 6 Storage Manager > Overview
LABEL DESCRIPTION
Storage The circular icon displays the overall health state of the NAS.
A green circle with a check m ark indicates healthy.
An orange circle with an exclamat ion m ark indicates at tent ion. This appears when a volum e or disk group is degraded. Click Repair to repair it .
An red circle with an exclamat ion m ark indicates danger. This appears when a volum e or disk group is crashed. You cannot recover the volum e.
Volum e Usage This shows how m uch of each volum e is current ly used.
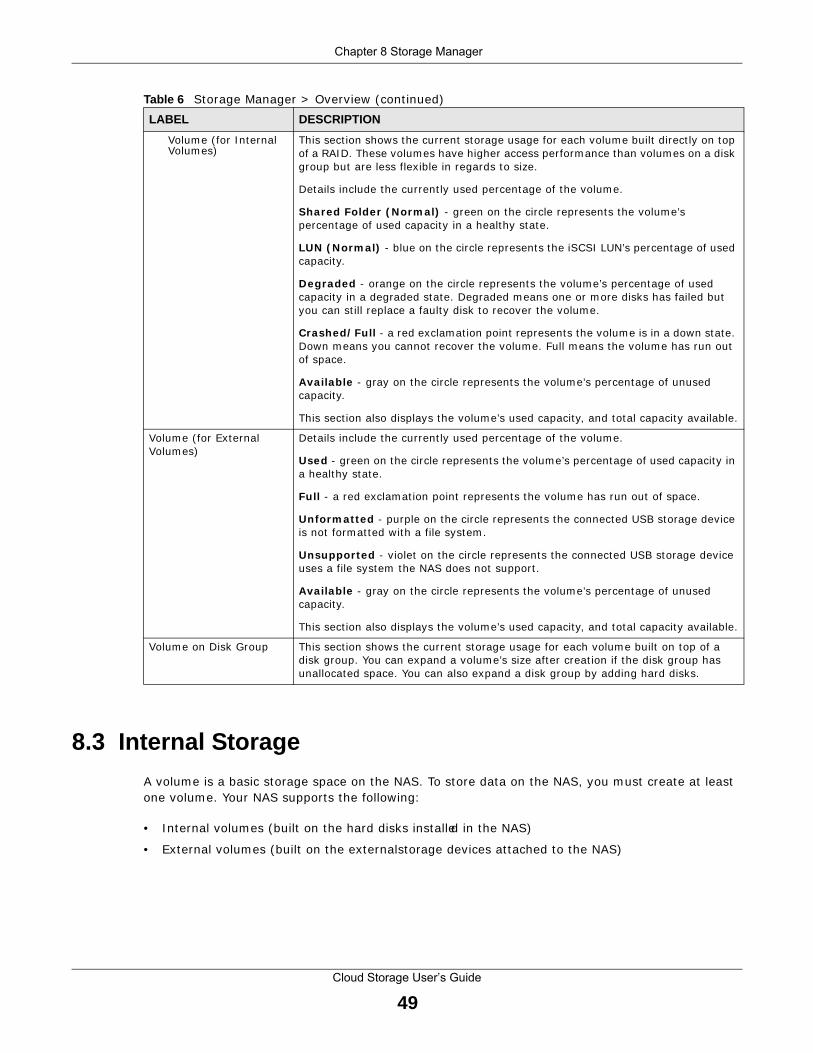
Chapter 8 Storage Manager
Cloud Storage User’s Guide
49
8.3 Internal Storage
A volum e is a basic storage space on the NAS. To store data on the NAS, you m ust create at least one volume. Your NAS supports the following:
• I nternal volumes (built on the hard disks installed in the NAS)
• External volumes (built on the external storage devices at tached to the NAS)
Volum e ( for I nternal Volum es)
This sect ion shows the current storage usage for each volum e built direct ly on top of a RAI D. These volumes have higher access perform ance than volum es on a disk group but are less flexible in regards to size.
Details include the current ly used percentage of the volum e.
Shared Folder ( Norm al) - green on the circle represents the volum e’s percentage of used capacity in a healthy state.
LUN ( Norm al) - blue on the circle represents the iSCSI LUN’s percentage of used capacity.
Degraded - orange on the circle represents the volum e’s percentage of used capacity in a degraded state. Degraded m eans one or m ore disks has failed but you can st ill replace a faulty disk to recover the volum e.
Crashed/ Full - a red exclamat ion point represents the volume is in a down state. Down m eans you cannot recover the volume. Full m eans the volume has run out of space.
Available - gray on the circle represents the volum e’s percentage of unused capacity.
This sect ion also displays the volum e’s used capacity, and total capacity available.
Volum e ( for External Volum es)
Details include the current ly used percentage of the volum e.
Used - green on the circle represents the volume’s percentage of used capacity in a healthy state.
Full - a red exclam at ion point represents the volum e has run out of space.
Unform at ted - purple on the circle represents the connected USB storage device is not form at ted with a file system .
Unsupported - v iolet on the circle represents the connected USB storage device uses a file system the NAS does not support .
Available - gray on the circle represents the volum e’s percentage of unused capacity.
This sect ion also displays the volum e’s used capacity, and total capacity available.
Volum e on Disk Group This sect ion shows the current storage usage for each volum e built on top of a disk group. You can expand a volum e’s size after creat ion if the disk group has unallocated space. You can also expand a disk group by adding hard disks.
Table 6 Storage Manager > Overview (cont inued)
LABEL DESCRIPTION
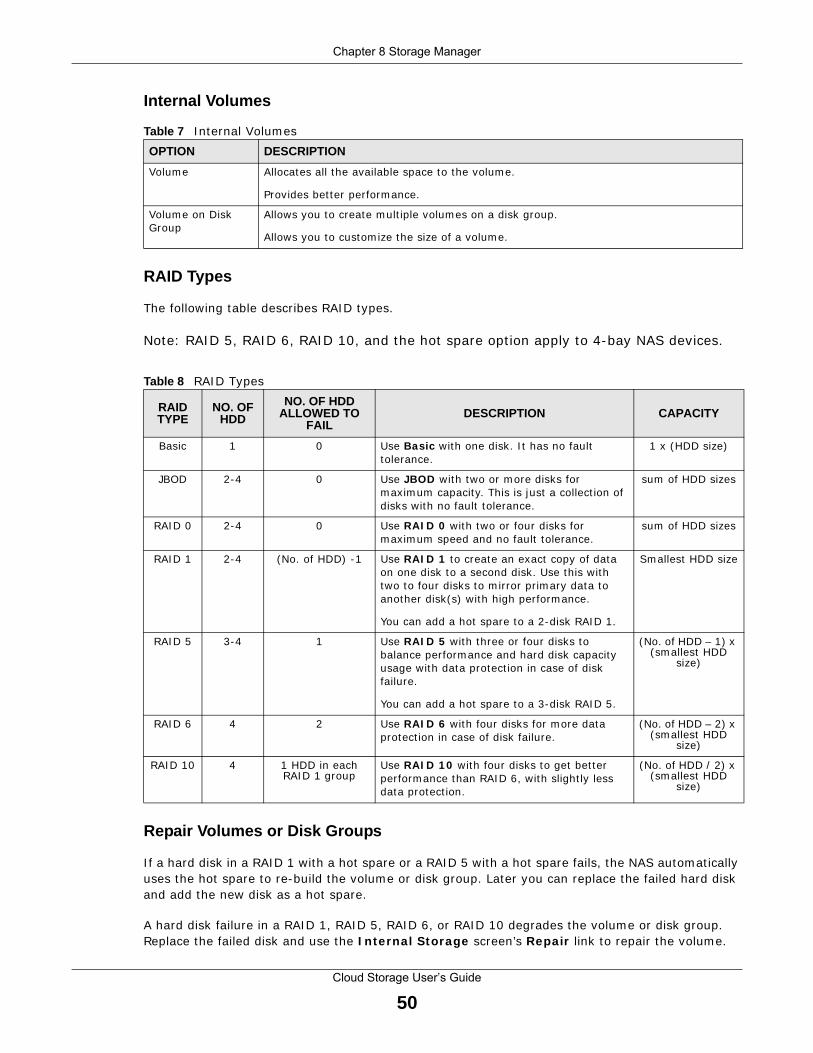
Chapter 8 Storage Manager
Cloud Storage User’s Guide
50
Internal Volumes
RAID Types
The following table describes RAI D types.
Note: RAI D 5, RAI D 6, RAI D 10, and the hot spare opt ion apply to 4-bay NAS devices.
Repair Volumes or Disk Groups
I f a hard disk in a RAI D 1 with a hot spare or a RAI D 5 with a hot spare fails, the NAS autom at ically uses the hot spare to re-build the volume or disk group. Later you can replace the failed hard disk and add the new disk as a hot spare.
A hard disk failure in a RAI D 1, RAI D 5, RAI D 6, or RAI D 10 degrades the volume or disk group. Replace the failed disk and use the I nternal Storage screen’s Repair link to repair the volum e.
Table 7 I nternal Volum es
OPTION DESCRIPTION
Volum e Allocates all the available space to the volum e.
Provides bet ter perform ance.
Volum e on Disk Group
Allows you to create mult iple volumes on a disk group.
Allows you to custom ize the size of a volum e.
Table 8 RAI D Types
RAID TYPE
NO. OF HDD
NO. OF HDD ALLOWED TO
FAILDESCRIPTION CAPACITY
Basic 1 0 Use Basic with one disk. I t has no fault tolerance.
1 x (HDD size)
JBOD 2-4 0 Use JBOD with two or m ore disks for maxim um capacity. This is just a collect ion of disks with no fault tolerance.
sum of HDD sizes
RAI D 0 2-4 0 Use RAI D 0 with two or four disks for maxim um speed and no fault tolerance.
sum of HDD sizes
RAI D 1 2-4 (No. of HDD) -1 Use RAI D 1 to create an exact copy of data on one disk to a second disk. Use this with two to four disks to m irror prim ary data to another disk(s) with high perform ance.
You can add a hot spare to a 2-disk RAI D 1.
Sm allest HDD size
RAI D 5 3-4 1 Use RAI D 5 with three or four disks to balance perform ance and hard disk capacity usage with data protect ion in case of disk failure.
You can add a hot spare to a 3-disk RAI D 5.
(No. of HDD – 1) x (sm allest HDD
size)
RAI D 6 4 2 Use RAI D 6 with four disks for m ore data protect ion in case of disk failure.
(No. of HDD – 2) x (sm allest HDD
size)
RAI D 10 4 1 HDD in each RAI D 1 group
Use RAI D 1 0 with four disks to get bet ter perform ance than RAI D 6, with slight ly less data protect ion.
(No. of HDD / 2) x (sm allest HDD
size)

Chapter 8 Storage Manager
Cloud Storage User’s Guide
51
Change RAID Type
You can change the following RAI D types without losing stored data. This can help you m anage your storage capacity as you add m ore disks.
Expand Volumes or Disk Groups
As your content grows, you can do the following to expand the storage capacity of a volume or disk group without losing stored data.
Use the Volum e screen to configure and manage internal volumes. From the I nterna l Storage screen, click Volum e to open the screen as shown.
Table 9 I nternal Volum es
RAID TYPE WHAT YOU CAN CHANGE IT TO
Basic RAI D 1
RAI D 1 RAI D 1 with a hot spare or RAI D 5
RAI D 5 RAI D 5 with a hot spare or RAI D 6
Table 10 Expand Volum es and Disk Groups
EXPANSION METHOD DESCRIPTION
Using unallocated disk space
You can add m ore storage space to a volum e if there is st ill some space unallocated on the sam e disk group.
Adding disks You can add one or m ore disks to a JBOD, RAI D 1 or RAI D 5.
The hard disk you want to add m ust have capacity equal to or greater than the sm allest disk in the volum e or disk group.
Replacing with larger disks
You can replace sm aller disks in a RAI D 1, RAI D 5, or RAI D 6 with larger disks.
Replace disks one-by-one.
Replace the sm allest disk in the volum e or disk group first .
After replacing a disk, you m ust use the I nterna l Storage screen’s Manage link to repair the volum e.
Wait for the repair process to com plete before you replace another disk.

Chapter 8 Storage Manager
Cloud Storage User’s Guide
52
Figure 33 I nternal Storage Volum e
The following table describes the labels in this screen.
Table 11 I nternal Storage > Volum e
LABEL DESCRIPTION
Volum e
Use this sect ion to configure and m anage volum es built on hard disks direct ly.
Create Click this to form at internal hard disks and create a new volume. All data on the disk(s) will be lost .
Note: This button is not available while the NAS is creating, deleting, or changing the
RAID type of any volume or disk group.
A pop-up screen appears if all installed hard disks are used by other volum es or disk groups. You will need to install another hard disk into the NAS if any disk t ray is available or rem ove unnecessary volum es or disk groups to release the storage space. Click OK to close this screen.
No Disk in NAS
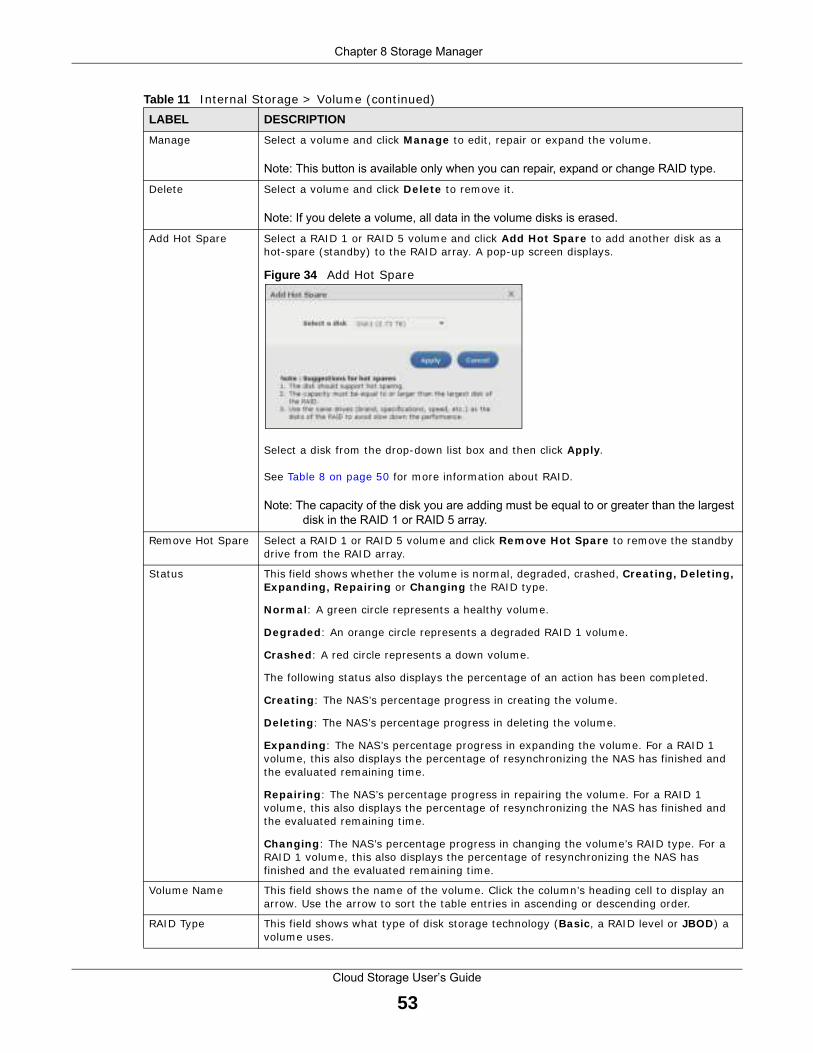
Chapter 8 Storage Manager
Cloud Storage User’s Guide
53
Manage Select a volum e and click Manage to edit , repair or expand the volum e.
Note: This button is available only when you can repair, expand or change RAID type.
Delete Select a volum e and click Delete to rem ove it .
Note: If you delete a volume, all data in the volume disks is erased.
Add Hot Spare Select a RAI D 1 or RAI D 5 volum e and click Add Hot Spare to add another disk as a hot-spare (standby) to the RAI D array. A pop-up screen displays.
Figure 34 Add Hot Spare
Select a disk from the drop-down list box and then click Apply .
See Table 8 on page 50 for m ore inform at ion about RAI D.
Note: The capacity of the disk you are adding must be equal to or greater than the largest
disk in the RAID 1 or RAID 5 array.
Rem ove Hot Spare Select a RAI D 1 or RAI D 5 volum e and click Rem ove Hot Spare to rem ove the standby drive from the RAI D array.
Status This field shows whether the volum e is norm al, degraded, crashed, Creat ing, Delet ing, Expanding, Repair ing or Changing the RAI D type.
Norm al : A green circle represents a healthy volum e.
Degraded : An orange circle represents a degraded RAI D 1 volum e.
Crashed : A red circle represents a down volum e.
The following status also displays the percentage of an act ion has been com pleted.
Creat ing : The NAS’s percentage progress in creat ing the volum e.
Delet ing : The NAS’s percentage progress in delet ing the volum e.
Expanding : The NAS’s percentage progress in expanding the volum e. For a RAI D 1 volum e, this also displays the percentage of resynchronizing the NAS has finished and the evaluated remaining t im e.
Repair ing : The NAS’s percentage progress in repair ing the volum e. For a RAI D 1 volum e, this also displays the percentage of resynchronizing the NAS has finished and the evaluated remaining t im e.
Changing : The NAS’s percentage progress in changing the volum e’s RAI D type. For a RAI D 1 volum e, this also displays the percentage of resynchronizing the NAS has finished and the evaluated rem aining t im e.
Volum e Name This field shows the name of the volum e. Click the colum n’s heading cell to display an arrow. Use the arrow to sort the table ent r ies in ascending or descending order.
RAI D Type This field shows what type of disk storage technology (Basic , a RAI D level or JBOD ) a volum e uses.
Table 11 I nternal Storage > Volum e (cont inued)
LABEL DESCRIPTION

Chapter 8 Storage Manager
Cloud Storage User’s Guide
54
Usage This field shows the percentage of the volum e being used, the percentage that is available, and the total disk size.
Hot Spare This field shows the nam e of the standby disk if there is any for a RAI D 1 or RAI D 5 volum e. Otherwise, it shows not suppor ted .
Volum e on Disk Group
Use this sect ion to configure and m anage volum es built on disk groups.
Create Click this to form at internal hard disks and create a new volum e on a disk group. All data on the disks will be lost .
Note: This button is unavailable when a volume or disk group is being created, deleted or
changing the RAID type.
Edit Select a volum e and click Edit to expand the volume’s capacity.
Delete Select a volum e and click Delete to rem ove it .
Note: If you delete a volume, all data in the volume disks is erased.
Note: Deleting a volume on a disk group here does not delete the corresponding disk
group. To delete a disk group, click Internal Storage > Disk Group .
Disk Group X This field shows the nam e of the disk group, the percentage of the disk group size that is available, the disk group size being used, and the total disk group size.
Status This field shows whether the volum e is norm al, degraded, crashed, Creat ing, Delet ing, Expanding, Repair ing or Changing the RAI D type.
Norm al : A green circle represents a healthy volum e.
Degraded : An orange circle represents a degraded RAI D 1 volum e.
Crashed : A red circle represents a down volum e.
The following status also displays the percentage of an act ion has been com pleted.
Creat ing : The NAS’s percentage progress in creat ing the volum e.
Delet ing : The NAS’s percentage progress in delet ing the volum e.
Expanding : The NAS’s percentage progress in expanding the volum e. For a RAI D 1 volum e, this also displays the percentage of resynchronizing the NAS has finished and the evaluated remaining t im e.
Repair ing : The NAS’s percentage progress in repair ing the volum e. For a RAI D 1 volum e, this also displays the percentage of resynchronizing the NAS has finished and the evaluated remaining t im e.
Changing : The NAS’s percentage progress in changing the volum e’s RAI D type. For a RAI D 1 volum e, this also displays the percentage of resynchronizing the NAS has finished and the evaluated rem aining t im e.
Volum e Name This field shows the name of the volum e. Click the colum n’s heading cell to display an arrow. Use the arrow to sort the table ent r ies in ascending or descending order.
File System This field shows what file system the volum e uses. At the t im e of writ ing, your NAS uses the EXT4 f ile system fo r interna l volum es.
Usage This field shows the percentage of the volum e being used, the percentage that is available, and the total disk group size.
Table 11 I nternal Storage > Volum e (cont inued)
LABEL DESCRIPTION

Chapter 8 Storage Manager
Cloud Storage User’s Guide
55
8.3.1 Creating a Volume
Use the Create Volum e screen to configure a volum e direct ly on a disk/ RAI D, which has bet ter perform ance. Click Create in the Volum e sect ion of the I nterna l Storage > Volum e screen to open the screen as shown.
Note: Create a volum e on a disk group instead if you want to have m ult iple volum es on a disk. See Sect ion 8.3.3 on page 64 for m ore inform at ion. Moreover, the m axim um size for one volum e is 16TB.
Figure 35 Create Volume
The following table describes the labels in this screen.
Table 12 Create Volum e
LABEL DESCRIPTION
Step 1. Select Disks and RAI D Type
Select disks This sect ion lists all available hard disks in the table and displays the disk t rays where they are current ly installed on the graphic at the r ight .
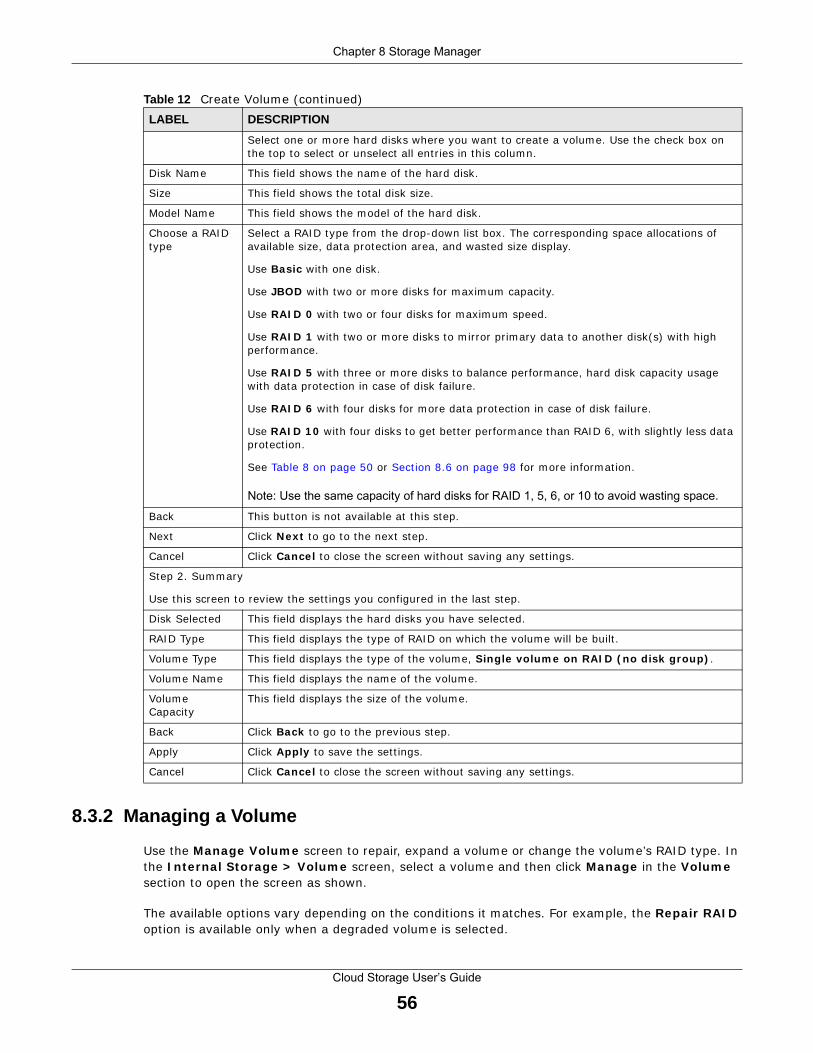
Chapter 8 Storage Manager
Cloud Storage User’s Guide
56
8.3.2 Managing a Volume
Use the Manage Volum e screen to repair, expand a volume or change the volume’s RAI D type. I n the I nterna l Storage > Volum e screen, select a volume and then click Manage in the Volum e sect ion to open the screen as shown.
The available opt ions vary depending on the condit ions it m atches. For exam ple, the Repair RAI D opt ion is available only when a degraded volume is selected.
Select one or m ore hard disks where you want to create a volum e. Use the check box on the top to select or unselect all ent r ies in this colum n.
Disk Nam e This field shows the nam e of the hard disk.
Size This field shows the total disk size.
Model Nam e This field shows the m odel of the hard disk.
Choose a RAI D type
Select a RAI D type from the drop-down list box. The corresponding space allocat ions of available size, data protect ion area, and wasted size display.
Use Basic with one disk.
Use JBOD with two or m ore disks for m axim um capacity.
Use RAI D 0 with two or four disks for m axim um speed.
Use RAI D 1 with two or m ore disks to m irror pr imary data to another disk(s) with high perform ance.
Use RAI D 5 with three or m ore disks to balance perform ance, hard disk capacity usage with data protect ion in case of disk failure.
Use RAI D 6 with four disks for m ore data protect ion in case of disk failure.
Use RAI D 1 0 with four disks to get bet ter perform ance than RAI D 6, with slight ly less data protect ion.
See Table 8 on page 50 or Sect ion 8.6 on page 98 for m ore inform at ion.
Note: Use the same capacity of hard disks for RAID 1, 5, 6, or 10 to avoid wasting space.
Back This but ton is not available at this step.
Next Click Next to go to the next step.
Cancel Click Cancel to close the screen without saving any set t ings.
Step 2. Sum m ary
Use this screen to review the set t ings you configured in the last step.
Disk Selected This field displays the hard disks you have selected.
RAI D Type This field displays the type of RAI D on which the volume will be built .
Volum e Type This field displays the type of the volum e, Single volum e on RAI D ( no disk group) .
Volum e Name This field displays the nam e of the volume.
Volum e Capacity
This field displays the size of the volum e.
Back Click Back to go to the previous step.
Apply Click Apply to save the set t ings.
Cancel Click Cancel to close the screen without saving any set t ings.
Table 12 Create Volum e (cont inued)
LABEL DESCRIPTION

Chapter 8 Storage Manager
Cloud Storage User’s Guide
57
Figure 36 Manage Volum e (Repair RAI D)
A

Chapter 8 Storage Manager
Cloud Storage User’s Guide
58
Figure 37 Manage Volum e (Expand the volum e by adding disk(s) )
A
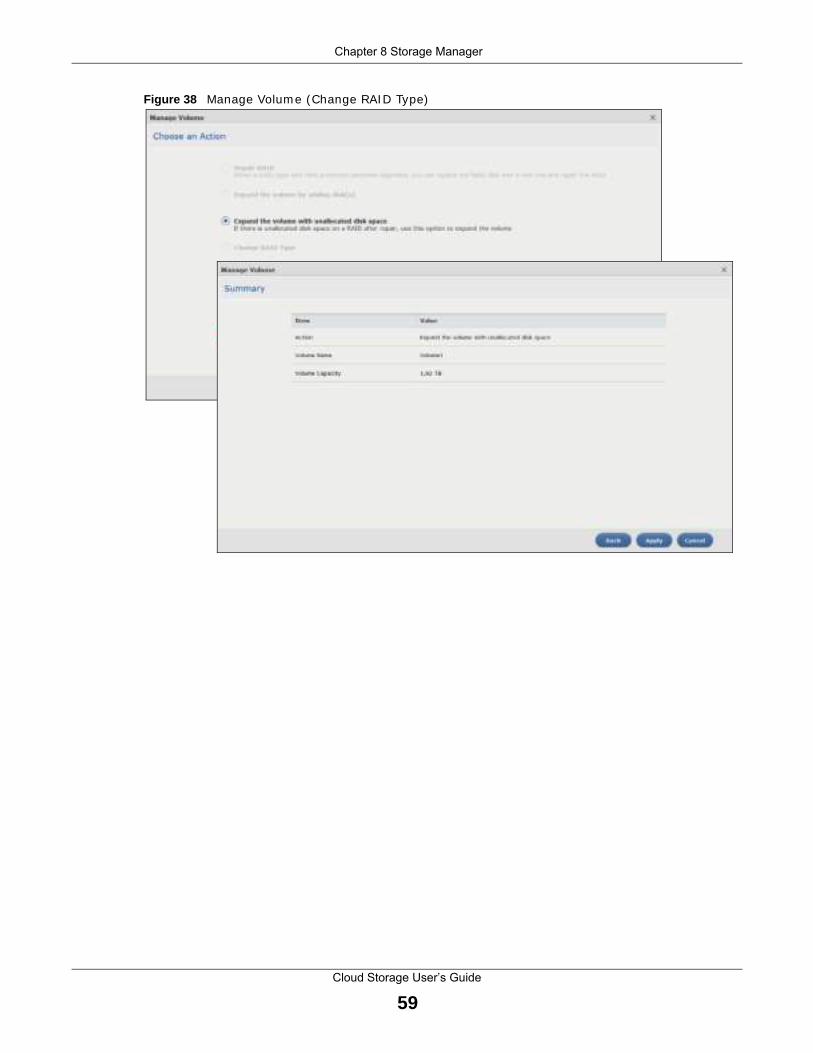
Chapter 8 Storage Manager
Cloud Storage User’s Guide
59
Figure 38 Manage Volum e (Change RAI D Type)

Chapter 8 Storage Manager
Cloud Storage User’s Guide
60
Figure 39 Manage Volum e (Change RAI D Type)
A

Chapter 8 Storage Manager
Cloud Storage User’s Guide
61
The following table describes the labels in this screen.
Table 13 Manage Volum e
LABEL DESCRIPTION
Repair RAI D Select this to repair a degraded RAI D volum e.
Expand the volum e by adding disk(s)
Select this to add one or m ore disks to a JBOD, RAI D 1 or RAI D 5 volum e. You can add a disk to increase an array’s capacity or to use as a hot-spare (standby) . When you add a disk to an exist ing array, you do not have to re-create shares, access r ights and so on as you would if you create a new volum e.
Note: This option is available when a disk has not been allocated to any volume or disk group
yet.
Expand the volum e with unallocated disk space
Select this to add more storage space to a volum e if there is st ill some space unallocated on the sam e disk group. Select this if the NAS fails to expand a volum e by adding disk(s) and the final volume capacity is not as expected. For exam ple, you want to expand a 1 TB RAI D 1 volum e by adding two m ore 1 TB disks. The volume size should be 2 TB after expansion, however, you just see 1 TB. Use this opt ion to fix the issue.
Change RAI D Type
Select this if you want to change the volum e’s RAI D type from Basic to RAI D 1, RAI D 1 to RAI D 5, or RAI D 5 to RAI D 6.
The following describes labels on the following screens after you select Repair RAI D in this screen.
Step 1. Select Disks
A This shows the nam e of the volume you have selected.
Status This field displays the status of the volume.
RAI D Type This field displays the type of RAI D on which the volume is built .
Disk I nfo
Status This field displays the status of the disk.
Disk Nam e This field displays the nam e of the disk.
Size This field displays the total capacity of the disk.
Model Nam e This field displays the m odel of the disk.
Select a disk to replace the failed one
This sect ion lists all available hard disks in the table and displays the corresponding disk t ray of the disks you selected on the graphic at the r ight .
Select one or m ore hard disks for increasing the volum e’s capacity. Use the check box on the top to select or unselect all ent r ies in this colum n.
Disk Nam e This field shows the nam e of a hard disk.
Size This field shows the total disk size.
Model Nam e This field shows the m odel of the hard disk.
Expected Capacity
This field shows the corresponding space allocat ions of available size, data protect ion area, and wasted size according to your select ions on hard disks above.
Note: Use the same capacity of hard disks for RAID 1, 5, 6, or 10 to avoid wasting space.
Back Click Back to go to the previous step.
Next Click Next to go to the next step.
Cancel Click Cancel to close the screen without saving any set t ings.
Step 2. Sum m ary
Use this screen to review the set t ings you configured in the last step.
Act ion This field displays for what the configurat ion is.
Volum e Name This field displays the nam e of the volume.
Disk Selected This field displays the hard disks you have selected.

Chapter 8 Storage Manager
Cloud Storage User’s Guide
62
Volum e Capacity
This field displays the total available size of the volume.
Back Click Back to go to the previous step.
Apply Click Apply to save the set t ings.
Cancel Click Cancel to close the screen without saving any set t ings.
The following describes labels on the following screens after you select Expand the volum e by adding disk ( s) in this screen.
Step 1. Select Disks
A This shows the nam e of the volume you have selected.
Status This field displays the status of the volume.
RAI D Type This field displays the type of RAI D on which the volume is built .
Disk I nfo
Status This field displays the status of the disk.
Disk Nam e This field displays the nam e of the disk.
Size This field displays the total capacity of the disk.
Model Nam e This field displays the m odel of the disk.
Select disk(s) to add
This sect ion lists all available hard disks in the table and displays the corresponding disk t ray of the disks you selected on the graphic at the r ight .
Select one or m ore hard disks for increasing the volum e’s capacity. Use the check box on the top to select or unselect all ent r ies in this colum n.
Disk Nam e This field shows the nam e of a hard disk.
Size This field shows the total disk size.
Model Nam e This field shows the m odel of the hard disk.
Expected Capacity
This field shows the corresponding space allocat ions of available size, data protect ion area, and wasted size according to your select ions on hard disks above.
Note: Use the same capacity of hard disks for RAID 1, 5, 6, or 10 to avoid wasting space.
Back Click Back to go to the previous step.
Next Click Next to go to the next step.
Cancel Click Cancel to close the screen without saving any set t ings.
Step 2. Sum m ary
Use this screen to review the set t ings you configured in the last step.
Act ion This field displays for what the configurat ion is.
Volum e Name This field displays the nam e of the volume.
Disk Selected This field displays the hard disks you have selected.
Volum e Capacity
This field displays the total available size of the volume.
Back Click Back to go to the previous step.
Apply Click Apply to save the set t ings.
Cancel Click Cancel to close the screen without saving any set t ings.
The following describes labels on the following screens after you select Expand the volum e w ith unallocated disk space in this screen.
Sum mary
Act ion This field displays for what the configurat ion is.
Table 13 Manage Volume (cont inued)
LABEL DESCRIPTION
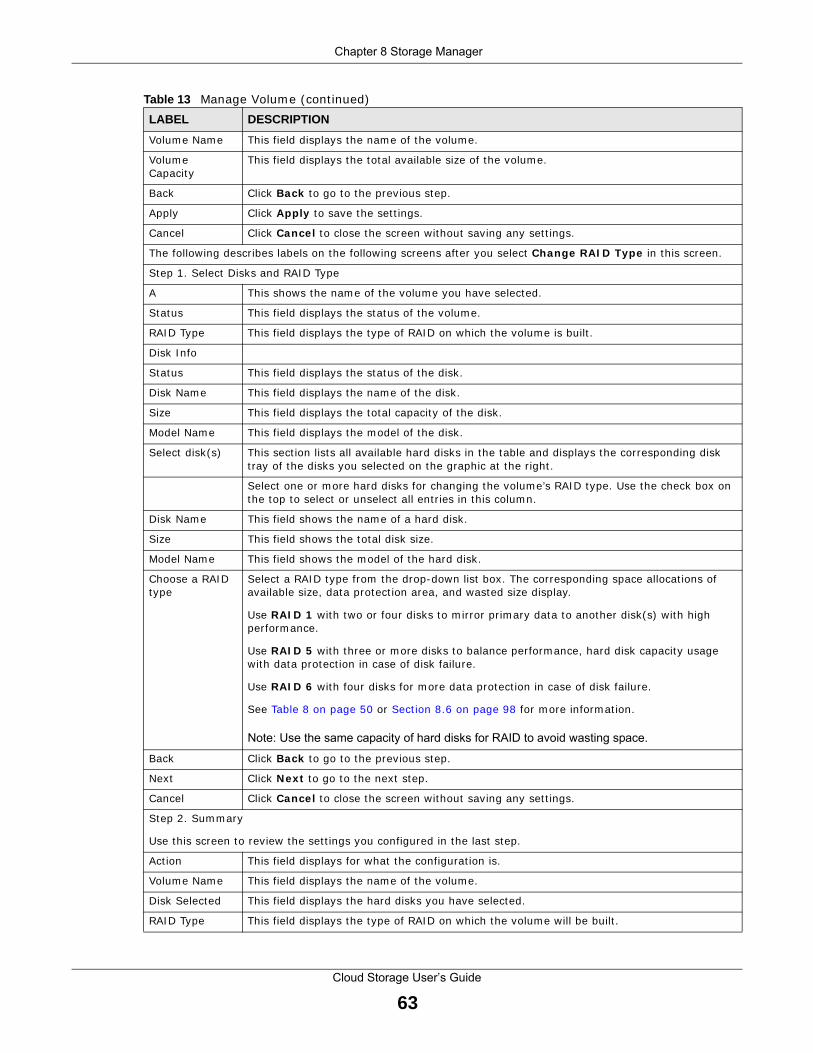
Chapter 8 Storage Manager
Cloud Storage User’s Guide
63
Volum e Name This field displays the nam e of the volume.
Volum e Capacity
This field displays the total available size of the volume.
Back Click Back to go to the previous step.
Apply Click Apply to save the set t ings.
Cancel Click Cancel to close the screen without saving any set t ings.
The following describes labels on the following screens after you select Change RAI D Type in this screen.
Step 1. Select Disks and RAI D Type
A This shows the nam e of the volume you have selected.
Status This field displays the status of the volume.
RAI D Type This field displays the type of RAI D on which the volume is built .
Disk I nfo
Status This field displays the status of the disk.
Disk Nam e This field displays the nam e of the disk.
Size This field displays the total capacity of the disk.
Model Nam e This field displays the m odel of the disk.
Select disk(s) This sect ion lists all available hard disks in the table and displays the corresponding disk t ray of the disks you selected on the graphic at the r ight .
Select one or m ore hard disks for changing the volum e’s RAI D type. Use the check box on the top to select or unselect all ent r ies in this colum n.
Disk Nam e This field shows the nam e of a hard disk.
Size This field shows the total disk size.
Model Nam e This field shows the m odel of the hard disk.
Choose a RAI D type
Select a RAI D type from the drop-down list box. The corresponding space allocat ions of available size, data protect ion area, and wasted size display.
Use RAI D 1 with two or four disks to m irror pr im ary data to another disk(s) with high perform ance.
Use RAI D 5 with three or m ore disks to balance perform ance, hard disk capacity usage with data protect ion in case of disk failure.
Use RAI D 6 with four disks for m ore data protect ion in case of disk failure.
See Table 8 on page 50 or Sect ion 8.6 on page 98 for m ore inform at ion.
Note: Use the same capacity of hard disks for RAID to avoid wasting space.
Back Click Back to go to the previous step.
Next Click Next to go to the next step.
Cancel Click Cancel to close the screen without saving any set t ings.
Step 2. Sum m ary
Use this screen to review the set t ings you configured in the last step.
Act ion This field displays for what the configurat ion is.
Volum e Name This field displays the nam e of the volume.
Disk Selected This field displays the hard disks you have selected.
RAI D Type This field displays the type of RAI D on which the volume will be built .
Table 13 Manage Volume (cont inued)
LABEL DESCRIPTION

Chapter 8 Storage Manager
Cloud Storage User’s Guide
64
8.3.3 Creating a Volume on Disk Group
Use the Create Volum e on Disk Group screen to configure a volum e on an exist ing or new disk group. Click Create in the Volum e on Disk Group sect ion of the I nterna l Storage > Volum e screen to open the screen as shown.
Note: I t is suggested to create a volum e direct ly on a disk instead of on a disk group if high perform ance is im portant to you. See Sect ion 8.3.1 on page 55 for m ore inform at ion.
Volum e Capacity
This field displays the total size of the volum e.
Back Click Back to go to the previous step.
Apply Click Apply to save the set t ings.
Cancel Click Cancel to close the screen without saving any set t ings.
Table 13 Manage Volume (cont inued)
LABEL DESCRIPTION

Chapter 8 Storage Manager
Cloud Storage User’s Guide
65
Figure 40 Create Volume on an Exist ing Disk Group
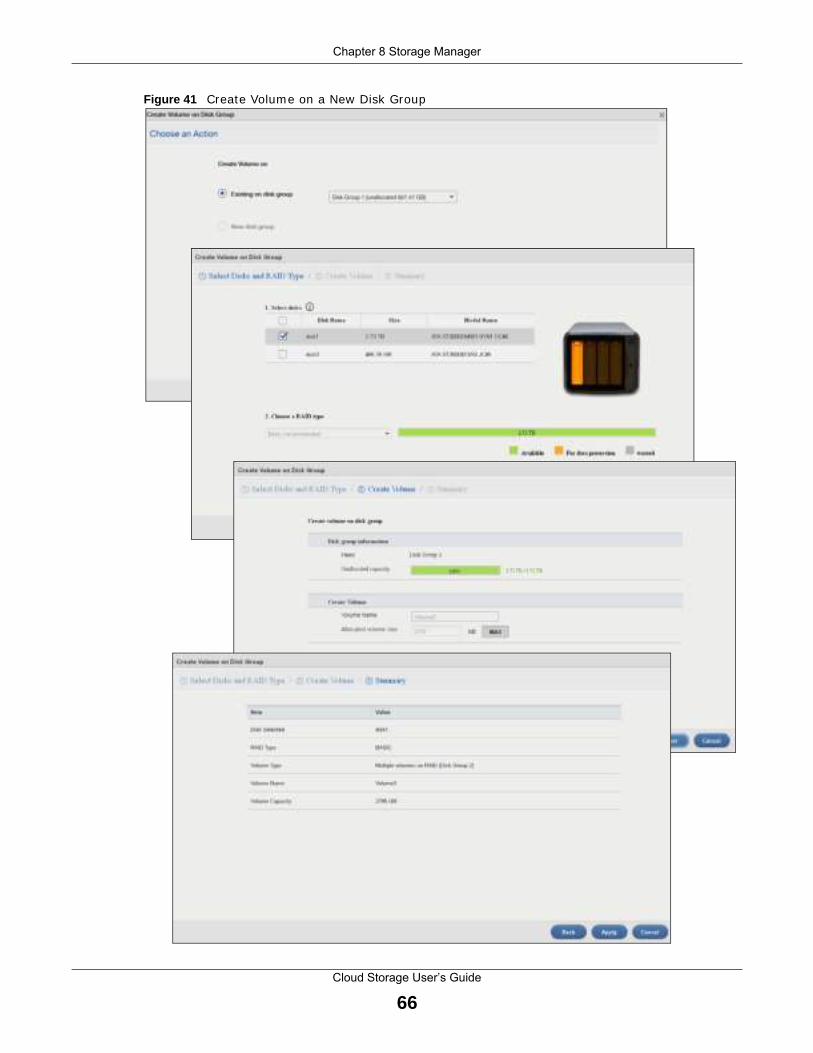
Chapter 8 Storage Manager
Cloud Storage User’s Guide
66
Figure 41 Create Volume on a New Disk Group
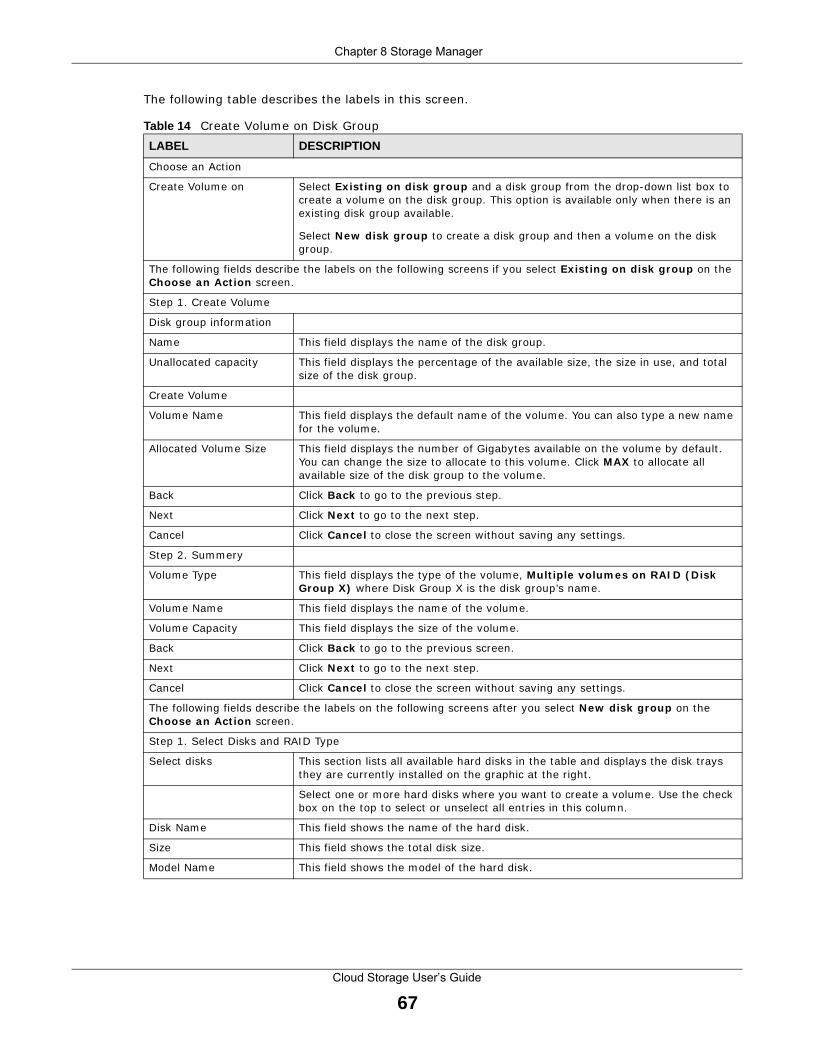
Chapter 8 Storage Manager
Cloud Storage User’s Guide
67
The following table describes the labels in this screen.
Table 14 Create Volum e on Disk Group
LABEL DESCRIPTION
Choose an Act ion
Create Volum e on Select Ex ist ing on disk group and a disk group from the drop-down list box to create a volum e on the disk group. This opt ion is available only when there is an exist ing disk group available.
Select New disk group to create a disk group and then a volume on the disk group.
The following fields describe the labels on the following screens if you select Exist ing on disk group on the Choose an Act ion screen.
Step 1. Create Volum e
Disk group inform at ion
Nam e This field displays the nam e of the disk group.
Unallocated capacity This field displays the percentage of the available size, the size in use, and total size of the disk group.
Create Volum e
Volum e Name This field displays the default name of the volum e. You can also type a new name for the volum e.
Allocated Volum e Size This field displays the num ber of Gigabytes available on the volum e by default . You can change the size to allocate to this volum e. Click MAX to allocate all available size of the disk group to the volum e.
Back Click Back to go to the previous step.
Next Click Next to go to the next step.
Cancel Click Cancel to close the screen without saving any set t ings.
Step 2. Sum m ery
Volum e Type This field displays the type of the volum e, Mult iple volum es on RAI D ( Disk Group X) where Disk Group X is the disk group’s nam e.
Volum e Name This field displays the nam e of the volum e.
Volum e Capacity This field displays the size of the volum e.
Back Click Back to go to the previous screen.
Next Click Next to go to the next step.
Cancel Click Cancel to close the screen without saving any set t ings.
The following fields describe the labels on the following screens after you select New disk group on the Choose an Act ion screen.
Step 1. Select Disks and RAI D Type
Select disks This sect ion lists all available hard disks in the table and displays the disk t rays they are current ly installed on the graphic at the r ight .
Select one or m ore hard disks where you want to create a volum e. Use the check box on the top to select or unselect all ent r ies in this colum n.
Disk Nam e This field shows the nam e of the hard disk.
Size This field shows the total disk size.
Model Nam e This field shows the m odel of the hard disk.

Chapter 8 Storage Manager
Cloud Storage User’s Guide
68
Choose a RAI D type Select a RAI D type from the drop-down list box. The corresponding space allocat ions of available size, data protect ion area, and wasted size display.
Use Basic with one disk.
Use JBOD with two or m ore disks for m axim um capacity.
Use RAI D 0 with two or four disks for m axim um speed.
Use RAI D 1 with two or m ore disks to m irror pr im ary data to another disk(s) with high perform ance.
Use RAI D 5 with three or m ore disks to balance perform ance, hard disk capacity usage with data protect ion in case of disk failure.
Use RAI D 6 with four disks for m ore data protect ion in case of disk failure.
Use RAI D 1 0 with four disks to get bet ter perform ance than RAI D 6, with slight ly less data protect ion.
See Table 8 on page 50 or Sect ion 8.6 on page 98 for m ore inform at ion.
Note: Use the same capacity of hard disks for RAID 1, 5, 6, or 10 to avoid wasting
space.
Back Click Back to go to the previous screen.
Next Click Next to go to the next step.
Cancel Click Cancel to close the screen without saving any set t ings.
Step 2. Create Volum e
Disk group inform at ion
Nam e This field displays the nam e of the disk group.
Unallocated capacity This field displays the percentage of the available size, the size in used, and total size of the disk group.
Create Volum e
Volum e Name This field displays the default name of the volum e. You can also type a new name for the volum e.
Volum e Capacity This field displays the num ber of Gigabytes available on the volum e by default . You can set the size to allocate for this volume. Click MAX to allocate all available capacity of the disk group to the volum e.
Back Click Back to go to the previous step.
Next Click Next to go to the next step.
Cancel Click Cancel to close the screen without saving any set t ings.
Step 3. Sum m ary
Use this screen to review the set t ings you configured in the last step.
Disk Selected This field displays the hard disk(s) on which the RAI D array will be built .
RAI D Type This field displays the type of RAI D on which the volum e will be built .
Volum e Type This field displays the type of the volum e, Mult iple volum es on RAI D ( Disk Group X) where Disk Group X is the disk group’s nam e.
Volum e Name This field displays the nam e of the volum e.
Volum e Capacity This field displays the size of the volum e.
Back Click Back to go to the previous step.
Apply Click Apply to save the set t ings.
Cancel Click Cancel to close the screen without saving any set t ings.
Table 14 Create Volum e on Disk Group (cont inued)
LABEL DESCRIPTION
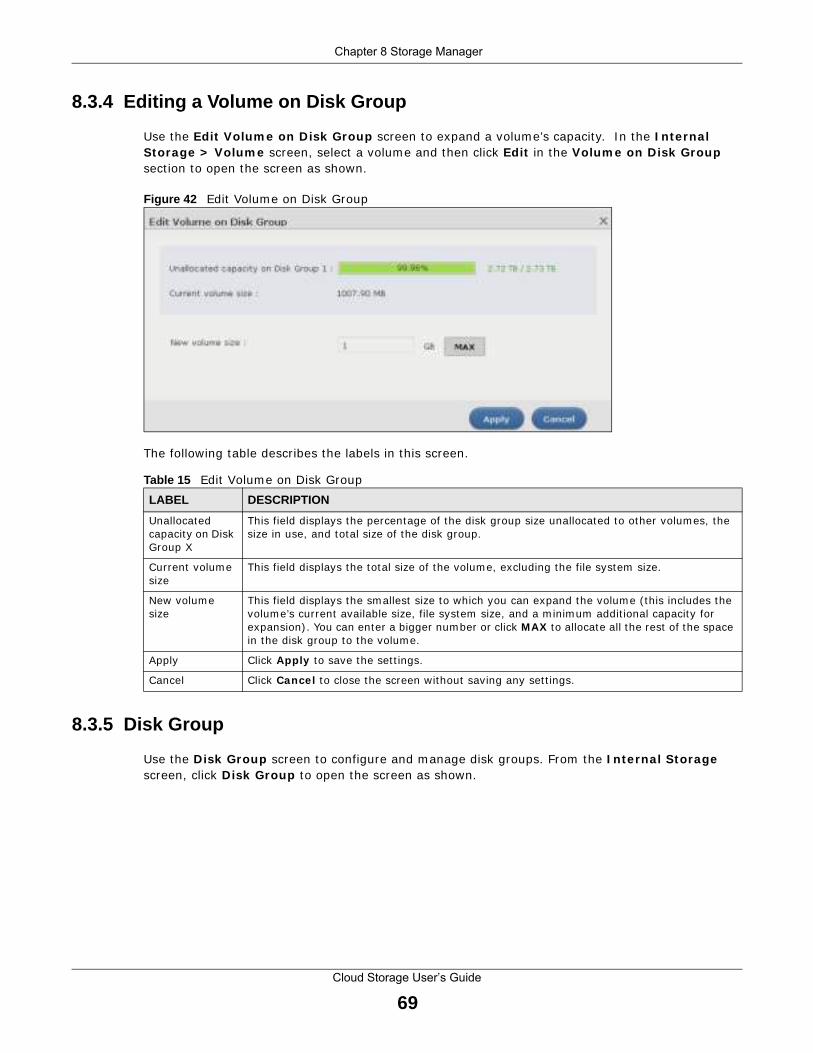
Chapter 8 Storage Manager
Cloud Storage User’s Guide
69
8.3.4 Editing a Volume on Disk Group
Use the Edit Volum e on Disk Group screen to expand a volume’s capacity. I n the I nterna l Storage > Volum e screen, select a volum e and then click Edit in the Volum e on Disk Group sect ion to open the screen as shown.
Figure 42 Edit Volum e on Disk Group
The following table describes the labels in this screen.
8.3.5 Disk Group
Use the Disk Group screen to configure and m anage disk groups. From the I nternal Storage screen, click Disk Group to open the screen as shown.
Table 15 Edit Volum e on Disk Group
LABEL DESCRIPTION
Unallocated capacity on Disk Group X
This field displays the percentage of the disk group size unallocated to other volum es, the size in use, and total size of the disk group.
Current volum e size
This field displays the total size of the volum e, excluding the file system size.
New volum e size
This field displays the sm allest size to which you can expand the volum e ( this includes the volum e’s current available size, file system size, and a m inim um addit ional capacity for expansion) . You can enter a bigger num ber or click MAX to allocate all the rest of the space in the disk group to the volum e.
Apply Click Apply to save the set t ings.
Cancel Click Cancel to close the screen without saving any set t ings.

Chapter 8 Storage Manager
Cloud Storage User’s Guide
70
Figure 43 Disk Group
The following table describes the labels in this screen.
Table 16 Disk Group
LABEL DESCRIPTION
Create Click this to form at internal hard disks and create a new disk group. All data on the disk(s) will be lost .
Note: This button is not available while the NAS is creating, deleting, or changing the RAID
type of any volume or disk group.
Manage Select a volum e and click Manage to edit , repair, or expand the volum e.
Note: This button is available only when you can repair, expand or change RAID type.
Delete Select a disk group and click Delete to rem ove it .
Note: If you delete a disk group, all data in the disk group is erased.
Add Hot Spare Select a RAI D 1 or RAI D 5 disk group and click Add Hot Spare to add another disk as a hot-spare (standby) to the RAI D array. See Sect ion 8.6 on page 98 for m ore inform at ion.
Note: The capacity of the disk you are adding must be equal to or greater than the largest
disk in the RAID 1 or RAID 5 array.
Note: You need four hard disks installed to use RAID 5 with hotspare.
Rem ove Hot Spare
Select a RAI D 1 or RAI D 5 disk group and click Rem ove Hot Spare to rem ove the standby dr ive from the RAI D array.

Chapter 8 Storage Manager
Cloud Storage User’s Guide
71
Disk Group X This field shows the nam e of the disk group and whether it is norm al, degraded, crashed, Creat ing, Delet ing, Expanding, Repair ing or Changing the RAI D type.
Norm al : A green circle represents a healthy volum e.
Degraded : An orange circle represents a degraded RAI D 1 volum e.
Crashed : A red circle represents a down volume.
The following status also displays the percentage of an act ion has been com pleted.
Creat ing : The NAS’s percentage progress in creat ing the volum e.
Delet ing : The NAS’s percentage progress in delet ing the volum e.
Expanding : The NAS’s percentage progress in expanding the volum e. For a RAI D 1 volum e, this also displays the percentage of resynchronizing the NAS has finished and the evaluated rem aining t im e.
Repair ing : The NAS’s percentage progress in repair ing the volum e. For a RAI D 1 volume, this also displays the percentage of resynchronizing the NAS has finished and the evaluated rem aining t ime.
Changing : The NAS’s percentage progress in changing the volum e’s RAI D type. For a RAI D 1 volum e, this also displays the percentage of resynchronizing the NAS has finished and the evaluated rem aining t im e.
RAI D Type This field shows the type of the RAI D over which this disk group is running.
Unallocated This field shows the percentage of the disk group size that is available, the disk group size being used, and the total disk group size.
Disk I nfo
Status This field shows the status of the disk.
Disk Nam e This field shows the nam e of the disk.
Size This field shows the total size of the disk.
Model Nam e This field shows the m odel of the disk.
Hot Spare
Table 16 Disk Group (cont inued)
LABEL DESCRIPTION

Chapter 8 Storage Manager
Cloud Storage User’s Guide
72
8.3.5.1 Creating a Disk Group
Use the Create Disk Group screen to create a disk group. From the Storage > Disk Group screen, click the Create but ton to open the screen as shown.
Status This field shows the status of the hot-spare disk.
This field shows the nam e of the disk group and whether it is norm al, degraded, crashed, Creat ing, Delet ing, Expanding, Repair ing or Changing the RAI D type.
Norm al : A green circle represents a healthy volum e.
Degraded : An orange circle represents a degraded RAI D 1 volum e.
Crashed : A red circle represents a down volume.
The following status also displays the percentage of an act ion has been com pleted.
Creat ing : The NAS’s percentage progress in creat ing the volum e.
Delet ing : The NAS’s percentage progress in delet ing the volum e.
Expanding : The NAS’s percentage progress in expanding the volum e. For a RAI D 1 volum e, this also displays the percentage of resynchronizing the NAS has finished and the evaluated rem aining t im e.
Repair ing : The NAS’s percentage progress in repair ing the volum e. For a RAI D 1 volume, this also displays the percentage of resynchronizing the NAS has finished and the evaluated rem aining t ime.
Changing : The NAS’s percentage progress in changing the volum e’s RAI D type. For a RAI D 1 volum e, this also displays the percentage of resynchronizing the NAS has finished and the evaluated rem aining t im e.
Disk Nam e This field shows the nam e of the hot-spare disk.
Size This field shows the total size of the hot-spare disk.
Model Nam e This field shows the m odel of the hot-spare disk.
Table 16 Disk Group (cont inued)
LABEL DESCRIPTION
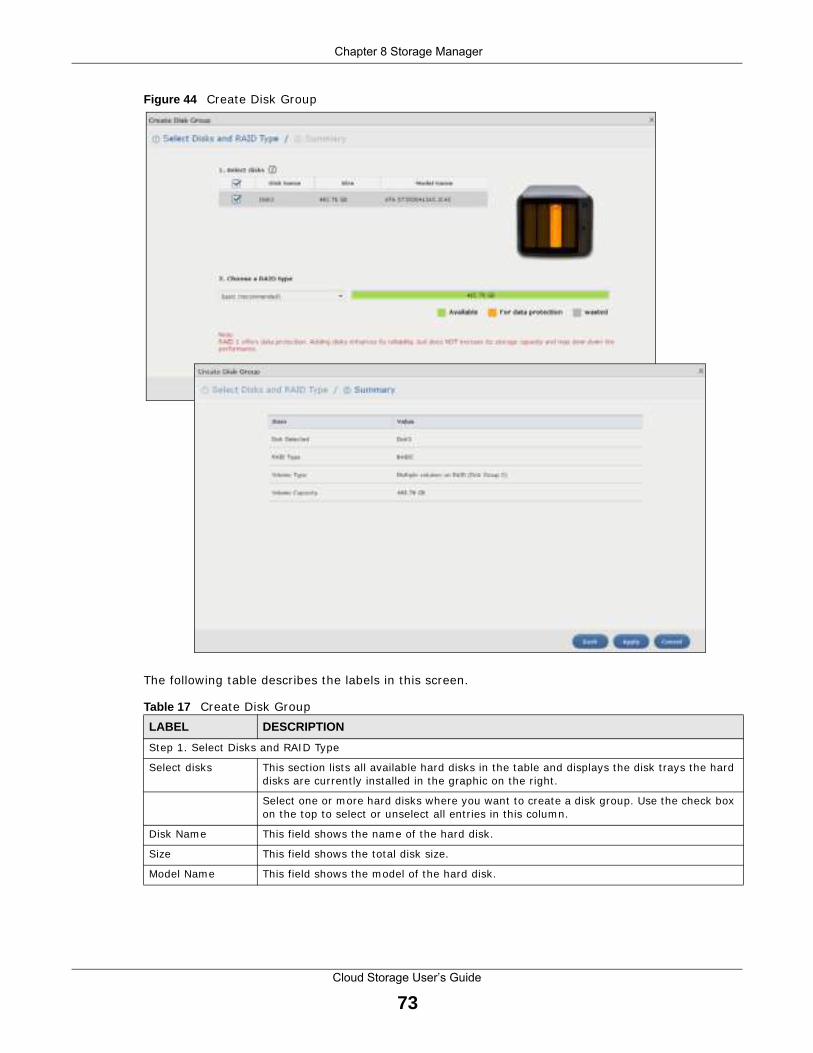
Chapter 8 Storage Manager
Cloud Storage User’s Guide
73
Figure 44 Create Disk Group
The following table describes the labels in this screen.
Table 17 Create Disk Group
LABEL DESCRIPTION
Step 1. Select Disks and RAI D Type
Select disks This sect ion lists all available hard disks in the table and displays the disk t rays the hard disks are current ly installed in the graphic on the r ight .
Select one or m ore hard disks where you want to create a disk group. Use the check box on the top to select or unselect all ent r ies in this column.
Disk Nam e This field shows the nam e of the hard disk.
Size This field shows the total disk size.
Model Nam e This field shows the m odel of the hard disk.
Need Graphic!
Chapter 8 Storage Manager
Cloud Storage User’s Guide
74
8.3.6 Hard Disk
Use the Hard Disk screen to view all disk inform at ion. From the Storage screen, click Hard Disk to open the screen as shown.
Choose a RAI D type
Select a RAI D type from the drop-down list box. The corresponding space allocat ions of available size, data protect ion area, and wasted size display.
Use Basic with one disk.
Use JBOD with two or m ore disks for m axim um capacity.
Use RAI D 0 with two or four disks for m axim um speed.
Use RAI D 1 with two or m ore disks to m irror pr imary data to another disk(s) with high perform ance.
Use RAI D 5 with three or m ore disks to balance perform ance, hard disk capacity usage with data protect ion in case of disk failure.
Use RAI D 6 with four disks for m ore data protect ion in case of disk failure.
Use RAI D 1 0 with four disks to get bet ter perform ance than RAI D 6, with slight ly less data protect ion.
See Table 8 on page 50 or Sect ion 8.6 on page 98 for m ore inform at ion.
Note: Use the same capacity of hard disks for RAID 1, 5, 6, or 10 to avoid wasting space.
Back Click Back to go to the previous screen.
Next Click Next to go to the next step.
Cancel Click Cancel to close the screen without saving any set t ings.
Step 2. Sum m ary
Use this screen to review the set t ings you configured in the last step.
Disk Selected This field displays the hard disk(s) on which the RAI D array will be built .
RAI D Type This field displays the type of RAI D on which the volum e will be built .
Volum e Type This field displays the type of the volum e, Mult iple volum es on RAI D ( Disk Group X) where Disk Group X is the disk group’s nam e.
Volum e Capacity This field displays the size of the volum e.
Back Click Back to go to the previous step.
Apply Click Apply to save the set t ings.
Cancel Click Cancel to close the screen without saving any set t ings.
Table 17 Create Disk Group (cont inued)
LABEL DESCRIPTION

Chapter 8 Storage Manager
Cloud Storage User’s Guide
75
Figure 45 Hard Disk
The following table describes the labels in this screen.
8.3.6.1 S.M.A.R.T
Use the S.M.A.R.T screens to view hard disk health indicators. Self Monitor ing, Analysis, and Report ing Technology (S.M.A.R.T) detects and reports the reliability of hard disks using standard indicators (called “at t r ibutes” ) , to help you ant icipate possible disk failures.
Note: The available S.M.A.R.T inform at ion var ies from one hard disk vendor to another.
From the I nterna l Storage > Hard Disk screen, select a disk and click S.M.A.R.T to open the screen as shown.
Table 18 Hard Disk
LABEL DESCRIPTION
Status This field shows the status of an installed hard disk.
Norm al: A green circle displays. This represents the volum e is funct ioning norm ally.
Crashed : A red circle displays. This represents the volum e is down.
Disk Nam e This field shows the nam e of the hard disk.
Used by This field shows the nam e of a volum e or disk group built on the hard disk if any. This field also displays the RAI D type the volum e or disk group is using.
Size This field shows the total size of the hard disk.
Model Nam e This field shows the m odel of the hard disk.
Temperature This field shows the temperature of the hard disk in degrees celsius (oC) and fahrenheit (oF) .
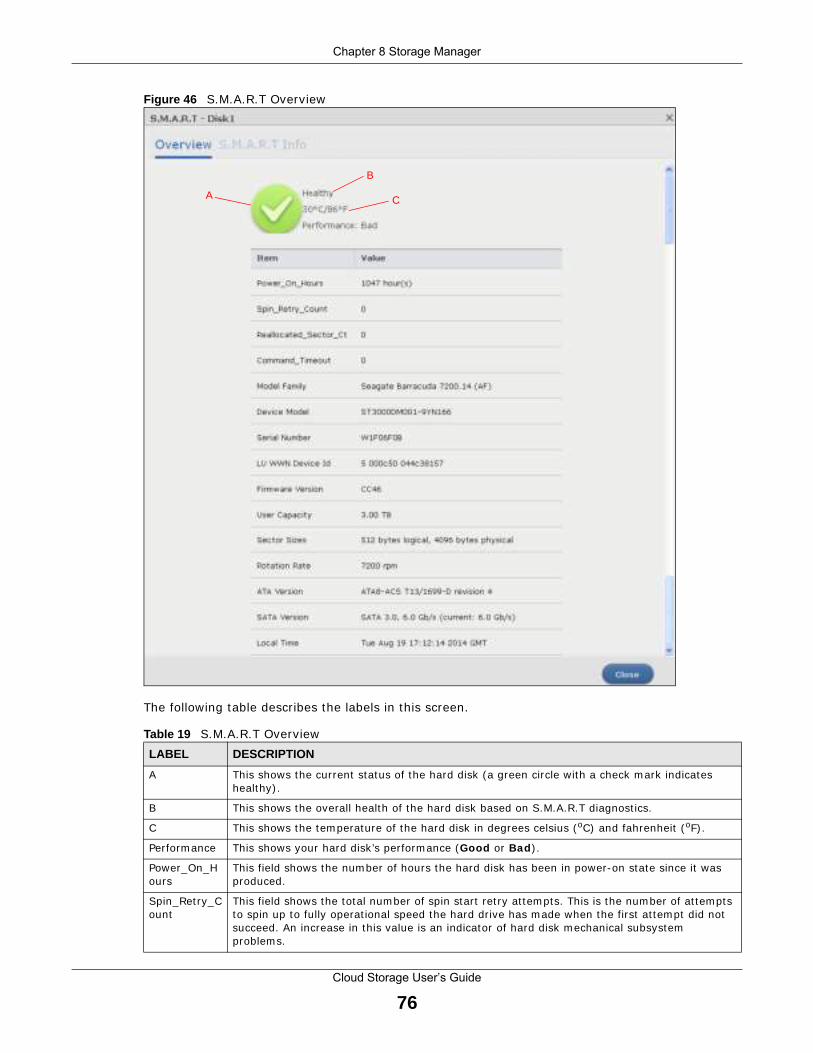
Chapter 8 Storage Manager
Cloud Storage User’s Guide
76
Figure 46 S.M.A.R.T Overview
The following table describes the labels in this screen.
Table 19 S.M.A.R.T Overview
LABEL DESCRIPTION
A This shows the current status of the hard disk (a green circle with a check m ark indicates healthy) .
B This shows the overall health of the hard disk based on S.M.A.R.T diagnost ics.
C This shows the tem perature of the hard disk in degrees celsius (oC) and fahrenheit (oF) .
Perform ance This shows your hard disk’s perform ance (Good or Bad ) .
Power_On_Hours
This field shows the num ber of hours the hard disk has been in power-on state since it was produced.
Spin_Ret ry_Count
This field shows the total num ber of spin start ret ry at tem pts. This is the num ber of at tempts to spin up to fully operat ional speed the hard dr ive has m ade when the first at tem pt did not succeed. An increase in this value is an indicator of hard disk m echanical subsystem problem s.
A
B
C

Chapter 8 Storage Manager
Cloud Storage User’s Guide
77
8.3.6.2 SMART Info
Use this screen to display m ore details inform at ion about the volum e.
Click S.M.A.R.T I nfo in the S.M.A.R.T Overview screen to display the following.
Reallocated_Sector_Ct
This field shows the total num ber of reallocated sectors on the hard dr ive. When the hard dr ive detects a read/ write/ ver ificat ion error, it m arks the sector as “ reallocated” and t ransfers the data to a specially reserved (spare) area. The process is also known as rem apping with “ reallocated” sectors known as rem aps. The more sectors the hard disk has to reallocate, the slower read and write speeds becom e.
Com m and_ Tim eout
This field shows the temperature of the hard disk in degrees celsius (oC) and fahrenheit (oF) .
Model Fam ily This field shows the m odel fam ily of the hard disk.
Device Model This field shows the hard disk m odel num ber that uniquely ident ifies a hard disk.
Serial Number
This field shows this individual hard disk’s ser ial num ber from the m anufacturer.
LU WWN Device I d
This field shows the hard disk’s Logical Unit World Wide Nam e Device I dent ifier.
Firm ware Version
This field shows the version num ber of the hard disk’s internal operat ing software.
User Capacity
This field shows the hard disk’s usable size.
Sector Sizes This field shows the sector size of the hard disk. A sector is the smallest physical storage unit on a hard disk. Norm ally it is 512 bytes.
Rotat ion Rate This field shows the rotat ional speed of the hard disk, m easured in revolut ions per m inute ( rpm ) .
ATA Version This field shows the hard disk’s Advanced Technology At tachm ent version num ber.
SATA Version This field shows the hard disk’s Serial ATA (SATA) version num ber.
Local Tim e This field shows the local t im e that the hard disk is using.
SMART support
This field shows whether or not the hard disk is SMART-capable.
SMART support
This field shows whether or not the hard disk has SMART m onitor ing turned on.
Close Click this but ton to close the screen.
Table 19 S.M.A.R.T Overview (cont inued)
LABEL DESCRIPTION

Chapter 8 Storage Manager
Cloud Storage User’s Guide
78
Figure 47 S.M.A.R.T I nfo
The following table describes the labels in this screen.
Table 20 S.M.A.R.T I nfo
LABEL DESCRIPTION
I D This is the ident ificat ion num ber used to tag a hard disk at t r ibute.
This is standard across all S.M.A.R.T-enabled storage devices. However it depends on the storage vendor which at t r ibutes it will allow S.M.A.R.T to diagnose.
At t r ibute This refers to an at t r ibute of the hard disk that S.M.A.R.T can assess. At t r ibutes descr ibe the hard disk’s physical state, perform ance, wear-and- tear, and so on.
Value This is a value that corresponds to the Raw Data . Com pare this with the Threshold .
S.M.A.R.T com presses the raw value(s) into a digit from 1 to 253, where 1 indicates the worst scenario while 253 indicates the best scenario.
The values 100 or 200 usually represent the m ean or norm al value.
Worst This is the lowest value at tained by the hard disk since S.M.A.R.T started its assessment of the hard disk.
Threshold This is the at t r ibute’s threshold value. I f the at t r ibute’s current norm alized value is less than or equal to the threshold, the at t r ibute has failed. An at t r ibute value close to or below the threshold indicates the hard drive is no longer reliable.
Type This shows S.M.A.R.T’s assessm ent of the hard disk.
Old_ age indicates end-of-product life from old-age (normal wearing out ) if the at t r ibute value is less than or equal to the threshold.
Pre- fa il indicate im m inent hard dr ive failure if the at t r ibute value is less than or equal to the threshold.
Note that just because an at t r ibute is of the Pre- fail type does not m ean your hard dr ive is ready to fail. I t only m eans this if the current norm alized value of the at t r ibute is less than or equal to the threshold.
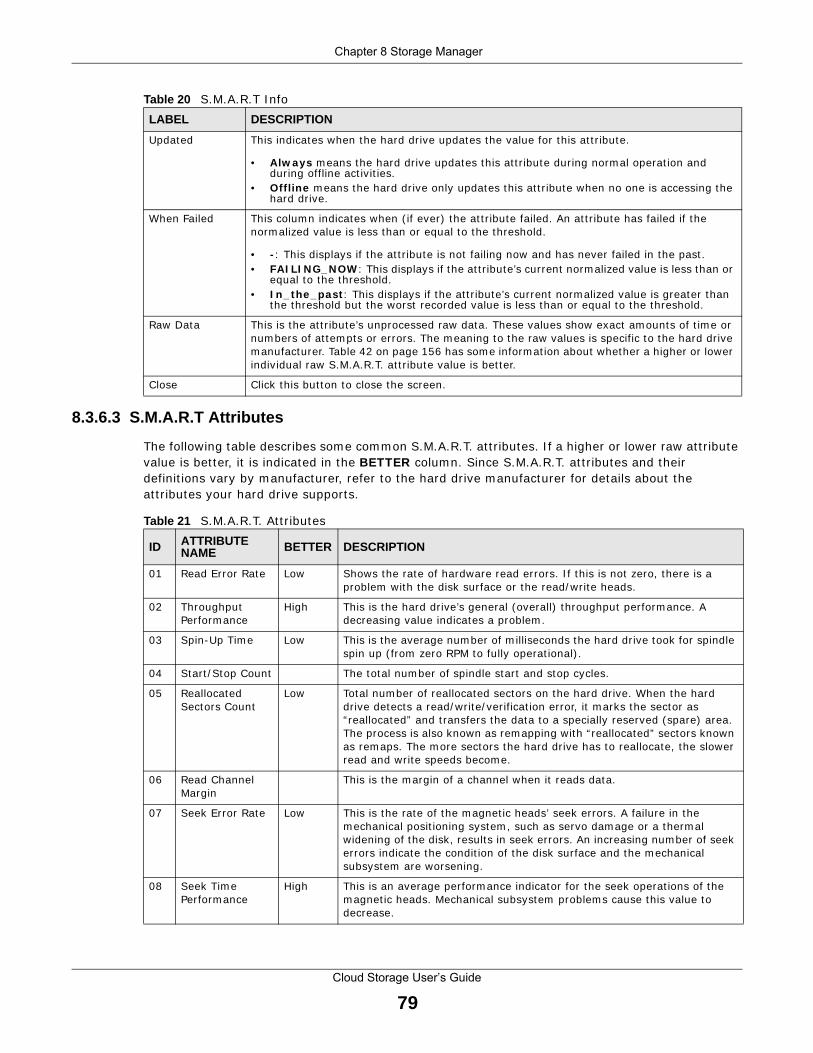
Chapter 8 Storage Manager
Cloud Storage User’s Guide
79
8.3.6.3 S.M.A.R.T Attributes
The following table describes som e com m on S.M.A.R.T. at t r ibutes. I f a higher or lower raw at t r ibute value is bet ter, it is indicated in the BETTER column. Since S.M.A.R.T. at t r ibutes and their definit ions vary by m anufacturer, refer to the hard dr ive m anufacturer for details about the at t r ibutes your hard dr ive supports.
Updated This indicates when the hard dr ive updates the value for this at t r ibute.
• Alw ays m eans the hard drive updates this at t r ibute during norm al operat ion and during offline act ivit ies.
• Offline m eans the hard dr ive only updates this at t r ibute when no one is accessing the hard dr ive.
When Failed This column indicates when ( if ever) the at t r ibute failed. An at t r ibute has failed if the norm alized value is less than or equal to the threshold.
• - : This displays if the at t r ibute is not failing now and has never failed in the past .• FAI LI NG_ NOW : This displays if the at t r ibute’s current norm alized value is less than or
equal to the threshold.• I n_ the_ past : This displays if the at t r ibute’s current norm alized value is greater than
the threshold but the worst recorded value is less than or equal to the threshold.
Raw Data This is the at t r ibute’s unprocessed raw data. These values show exact am ounts of t im e or num bers of at tem pts or errors. The m eaning to the raw values is specific to the hard drive m anufacturer. Table 42 on page 156 has som e inform at ion about whether a higher or lower individual raw S.M.A.R.T. at t r ibute value is bet ter.
Close Click this but ton to close the screen.
Table 20 S.M.A.R.T I nfo
LABEL DESCRIPTION
Table 21 S.M.A.R.T. At t r ibutes
ID ATTRIBUTE NAME BETTER DESCRIPTION
01 Read Error Rate Low Shows the rate of hardware read errors. I f this is not zero, there is a problem with the disk surface or the read/ write heads.
02 Throughput Perform ance
High This is the hard drive’s general (overall) throughput perform ance. A decreasing value indicates a problem .
03 Spin-Up Tim e Low This is the average num ber of m illiseconds the hard dr ive took for spindle spin up ( from zero RPM to fully operat ional) .
04 Start / Stop Count The total num ber of spindle start and stop cycles.
05 Reallocated Sectors Count
Low Total num ber of reallocated sectors on the hard dr ive. When the hard drive detects a read/ write/ ver ificat ion error, it m arks the sector as “ reallocated” and t ransfers the data to a specially reserved (spare) area. The process is also known as rem apping with “ reallocated” sectors known as rem aps. The m ore sectors the hard drive has to reallocate, the slower read and write speeds becom e.
06 Read Channel Margin
This is the m argin of a channel when it reads data.
07 Seek Error Rate Low This is the rate of the m agnet ic heads’ seek errors. A failure in the m echanical posit ioning system , such as servo dam age or a therm al widening of the disk, results in seek errors. An increasing number of seek errors indicate the condit ion of the disk surface and the m echanical subsystem are worsening.
08 Seek Tim e Perform ance
High This is an average perform ance indicator for the seek operat ions of the m agnet ic heads. Mechanical subsystem problems cause this value to decrease.
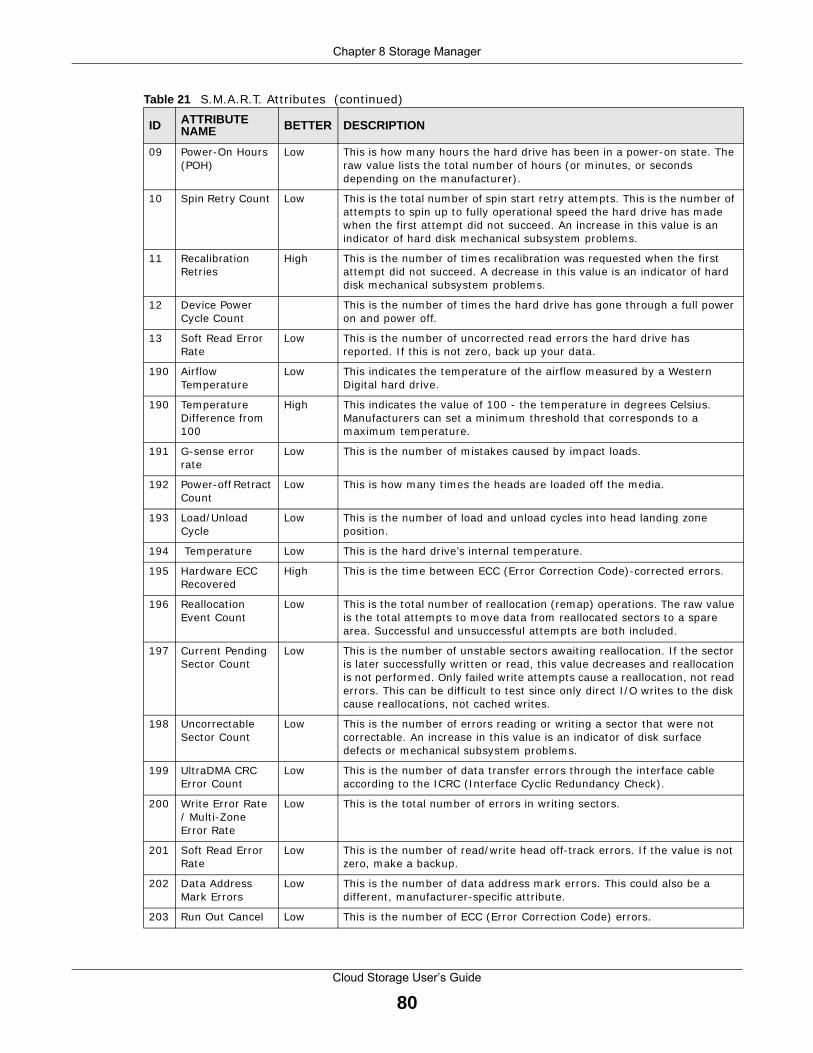
Chapter 8 Storage Manager
Cloud Storage User’s Guide
80
09 Power-On Hours (POH)
Low This is how m any hours the hard drive has been in a power-on state. The raw value lists the total num ber of hours (or m inutes, or seconds depending on the m anufacturer) .
10 Spin Ret ry Count Low This is the total num ber of spin start ret ry at tem pts. This is the num ber of at tem pts to spin up to fully operat ional speed the hard dr ive has made when the first at tem pt did not succeed. An increase in this value is an indicator of hard disk m echanical subsystem problem s.
11 Recalibrat ion Ret r ies
High This is the num ber of t im es recalibrat ion was requested when the first at tem pt did not succeed. A decrease in this value is an indicator of hard disk m echanical subsystem problem s.
12 Device Power Cycle Count
This is the num ber of t im es the hard dr ive has gone through a full power on and power off.
13 Soft Read Error Rate
Low This is the num ber of uncorrected read errors the hard dr ive has reported. I f this is not zero, back up your data.
190 Air flow Temperature
Low This indicates the tem perature of the air flow measured by a Western Digital hard dr ive.
190 Temperature Difference from 100
High This indicates the value of 100 - the tem perature in degrees Celsius. Manufacturers can set a m inim um threshold that corresponds to a maximum tem perature.
191 G-sense error rate
Low This is the number of m istakes caused by impact loads.
192 Power-off Ret ract Count
Low This is how m any t im es the heads are loaded off the m edia.
193 Load/ Unload Cycle
Low This is the num ber of load and unload cycles into head landing zone posit ion.
194 Tem perature Low This is the hard dr ive’s internal tem perature.
195 Hardware ECC Recovered
High This is the t im e between ECC (Error Correct ion Code) -corrected errors.
196 Reallocat ion Event Count
Low This is the total number of reallocat ion ( rem ap) operat ions. The raw value is the total at tempts to m ove data from reallocated sectors to a spare area. Successful and unsuccessful at tem pts are both included.
197 Current Pending Sector Count
Low This is the num ber of unstable sectors await ing reallocat ion. I f the sector is later successfully writ ten or read, this value decreases and reallocat ion is not perform ed. Only failed write at tem pts cause a reallocat ion, not read errors. This can be difficult to test since only direct I / O writes to the disk cause reallocat ions, not cached writes.
198 Uncorrectable Sector Count
Low This is the num ber of errors reading or writ ing a sector that were not correctable. An increase in this value is an indicator of disk surface defects or m echanical subsystem problem s.
199 Ult raDMA CRC Error Count
Low This is the num ber of data t ransfer errors through the interface cable according to the I CRC ( I nterface Cyclic Redundancy Check) .
200 Write Error Rate / Mult i-Zone Error Rate
Low This is the total num ber of errors in writ ing sectors.
201 Soft Read Error Rate
Low This is the num ber of read/ write head off- t rack errors. I f the value is not zero, m ake a backup.
202 Data Address Mark Errors
Low This is the num ber of data address m ark errors. This could also be a different , m anufacturer-specific at t r ibute.
203 Run Out Cancel Low This is the num ber of ECC (Error Correct ion Code) errors.
Table 21 S.M.A.R.T. At t r ibutes (cont inued)
ID ATTRIBUTE NAME BETTER DESCRIPTION
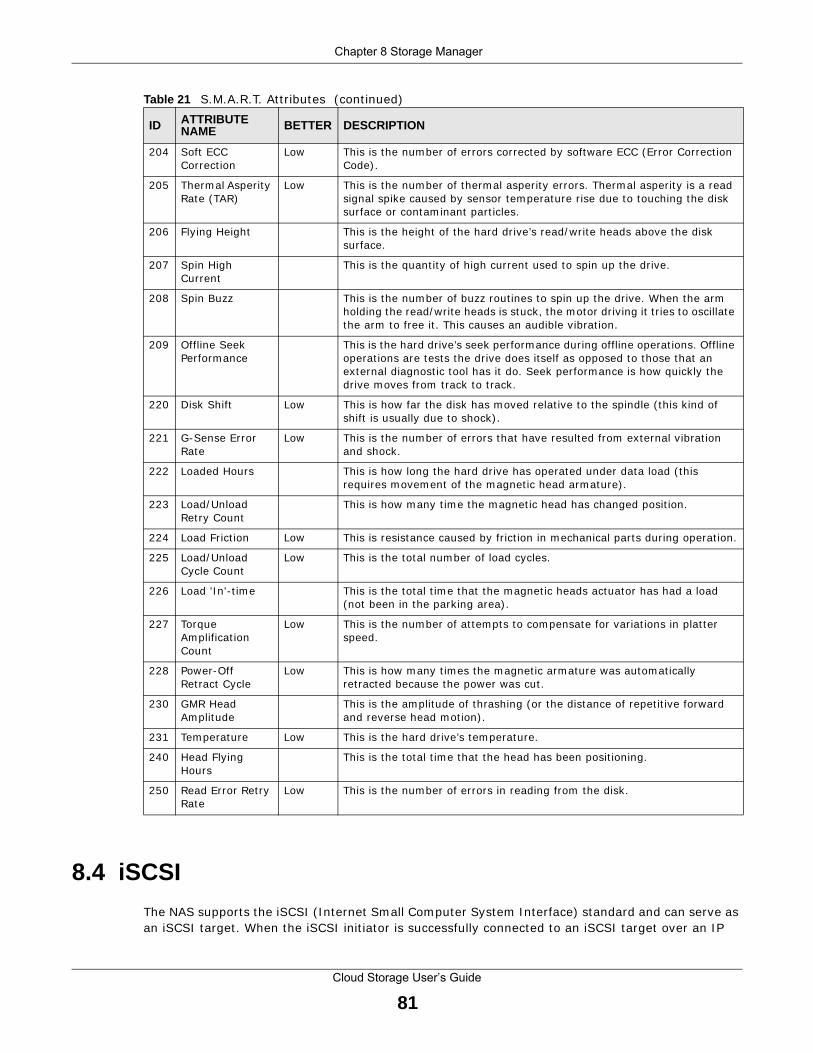
Chapter 8 Storage Manager
Cloud Storage User’s Guide
81
8.4 iSCSI
The NAS supports the iSCSI ( I nternet Small Computer System I nterface) standard and can serve as an iSCSI target . When the iSCSI init iator is successfully connected to an iSCSI target over an I P
204 Soft ECC Correct ion
Low This is the num ber of errors corrected by software ECC (Error Correct ion Code) .
205 Therm al Asperity Rate (TAR)
Low This is the num ber of therm al asperity errors. Therm al asperity is a read signal spike caused by sensor temperature r ise due to touching the disk surface or contam inant part icles.
206 Flying Height This is the height of the hard dr ive’s read/ write heads above the disk surface.
207 Spin High Current
This is the quant ity of high current used to spin up the dr ive.
208 Spin Buzz This is the num ber of buzz rout ines to spin up the drive. When the arm holding the read/ write heads is stuck, the m otor driv ing it t r ies to oscillate the arm to free it . This causes an audible vibrat ion.
209 Offline Seek Perform ance
This is the hard dr ive’s seek perform ance during offline operat ions. Offline operat ions are tests the dr ive does itself as opposed to those that an external diagnost ic tool has it do. Seek perform ance is how quickly the drive m oves from t rack to t rack.
220 Disk Shift Low This is how far the disk has m oved relat ive to the spindle ( this kind of shift is usually due to shock) .
221 G-Sense Error Rate
Low This is the num ber of errors that have resulted from external vibrat ion and shock.
222 Loaded Hours This is how long the hard dr ive has operated under data load ( this requires m ovem ent of the m agnet ic head armature) .
223 Load/ Unload Ret ry Count
This is how m any t im e the magnet ic head has changed posit ion.
224 Load Frict ion Low This is resistance caused by fr ict ion in m echanical parts during operat ion.
225 Load/ Unload Cycle Count
Low This is the total num ber of load cycles.
226 Load 'I n'- t im e This is the total t im e that the m agnet ic heads actuator has had a load (not been in the parking area) .
227 Torque Amplificat ion Count
Low This is the num ber of at tem pts to com pensate for var iat ions in plat ter speed.
228 Power-Off Ret ract Cycle
Low This is how m any t im es the m agnet ic arm ature was autom at ically ret racted because the power was cut .
230 GMR Head Amplitude
This is the am plitude of thrashing (or the distance of repet it ive forward and reverse head m ot ion) .
231 Tem perature Low This is the hard dr ive’s tem perature.
240 Head Flying Hours
This is the total t im e that the head has been posit ioning.
250 Read Error Ret ry Rate
Low This is the number of errors in reading from the disk.
Table 21 S.M.A.R.T. At t r ibutes (cont inued)
ID ATTRIBUTE NAME BETTER DESCRIPTION

Chapter 8 Storage Manager
Cloud Storage User’s Guide
82
network, data t ransm ission and storage m anagem ent can be processed through the network. I n other words, you can access and m anage the target the sam e way as a locally at tached drive.
I n the following exam ple, a branch office has a NAS nam ed NAS1 . You want to expand your data storage capacity by accessing an iSCSI LUN (Logical Unit Num ber) volum e called VOL1 on NAS1 over the I nternet . Your computer is the iSCSI init iator and the NAS is the iSCSI target . When the init iator is successfully connected to the target , your com puter can use VOL1 on the NAS as its own internal storage.
The configurat ion steps are as follows:
1 Create an iSCSI LUN Volum e for the iSCSI target in NAS1.
2 Configure NAS1 as an iSCSI target .
Figure 48 iSCSI Connect ion Exam ple
8.4.1 iSCSI LUNs Screens
This sect ion enables you to create, up-m ap, and delete LUN volumes, as well as display the volum es’ inform at ion. Click Storage Manager > iSCSI > iSCSI LUNs to display the following screen.
TI
LAN W AN
NAS1
VOL1
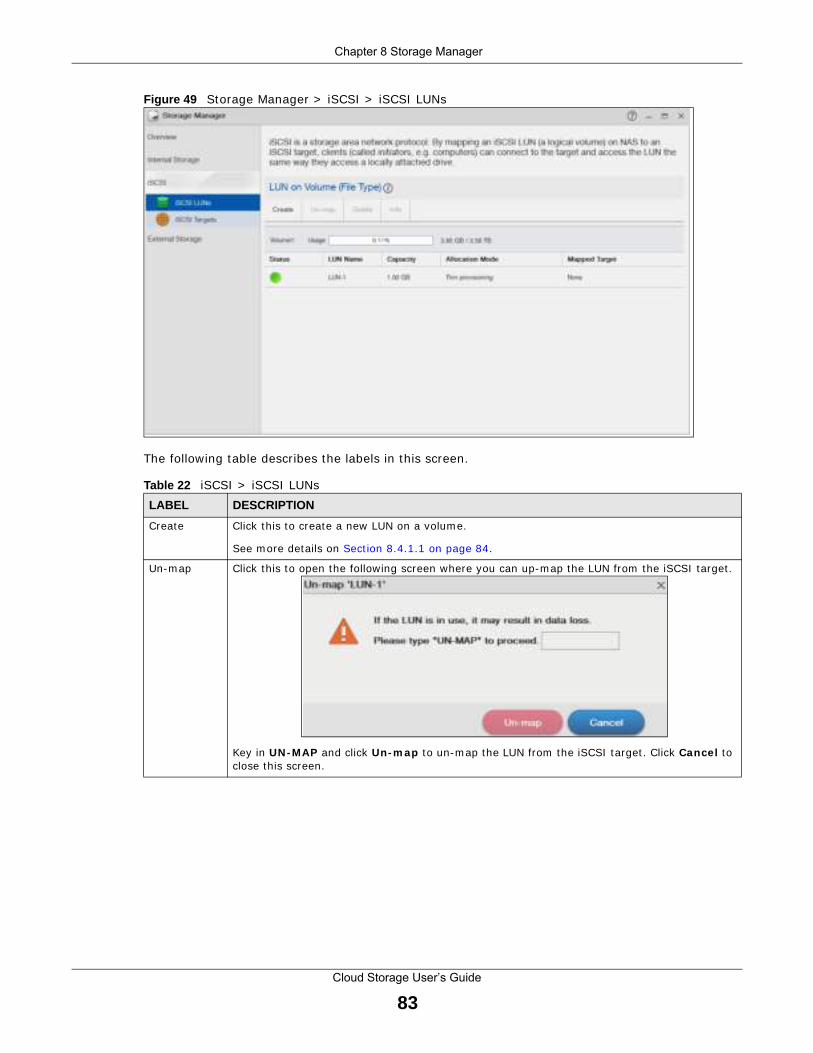
Chapter 8 Storage Manager
Cloud Storage User’s Guide
83
Figure 49 Storage Manager > iSCSI > iSCSI LUNs
The following table describes the labels in this screen.
Table 22 iSCSI > iSCSI LUNs
LABEL DESCRIPTION
Create Click this to create a new LUN on a volume.
See m ore details on Sect ion 8.4.1.1 on page 84.
Un-m ap Click this to open the following screen where you can up-m ap the LUN from the iSCSI target .
Key in UN- MAP and click Un- m ap to un-m ap the LUN from the iSCSI target . Click Cancel to close this screen.

Chapter 8 Storage Manager
Cloud Storage User’s Guide
84
8.4.1.1 Creating a New LUN
A LUN is a unit of storage shared over iSCSI that can be m apped to an iSCSI target . You must create an iSCSI LUN volum e before you configure an iSCSI target for it . Click Create in the iSCSI LUNs sect ion of the Storage Manager > iSCSI screen to open the screens as shown.
Delete Click this to open the following screen where you can delete an exist ing LUN.
Key in DELETE and click Delete to rem ove an exist ing LUN. Click Cancel to close this screen.
I nfo Click this item to check detailed informat ion about the LUN.
Nam e - Displays the name of the LUN.
Locat ion - Displays the name of the volum e the LUN is located in.
Capacity - Displays the size of the LUN.
Allocat ion m ode - Displays the allocat ion method the LUN applies.
W rite Back - Displays whether the write back feature is enabled or disabled.
Mapped iSCSI Target - Displays the iSCSI target nam e the LUN is m apped to.
Table 22 iSCSI > iSCSI LUNs (cont inued)
LABEL DESCRIPTION

Chapter 8 Storage Manager
Cloud Storage User’s Guide
85
Figure 50 Creat ing a New LUN

Chapter 8 Storage Manager
Cloud Storage User’s Guide
86
The following table describes the labels in these screens.
8.4.2 iSCSI Targets Screens
The iSCSI target refers to the storage resource that is actually at tached to the iSCSI storage device. The init iator can m anage the assigned disk volume on the iSCSI target over the I nternet as if it was the init iator ’s internal storage volum e.
iSCSI Targets allows you to create, edit , and delete an iSCSI target and map a target to an exist ing LUN. Click Storage Manager > iSCSI > iSCSI Targets to show the following screen.
Table 23 Create a New LUN
LABEL DESCRIPTION
Step 1. Set Up LUN Propert ies
Nam e Type a LUN nam e in this field.
Note: Valid characters for the name are 0-9, a-z, and A-Z, and the maximum length is 30
characters. The “-” symbol is allowed as well, but cannot be the first character.
Locat ion Select a volume to create the LUN on.
Capacity Type the size of the LUN in this field.
Allocat ion Mode Select the m ethod the NAS uses to allocate storage space to the LUN.
Thin provisioning - Allocate space only when an init iator writes data to it .
I nstant a llocat ion - Allocate the specified disk space to the LUN when you create the LUN.
Enable Write Back Select this opt ion to increase the write perform ance. Write Back is a feature that collects data in the hard disk’s cache m em ory first and perm anent ly writes data into the hard disk when the system is idle.
Note: It also creates a serious data integrity hazard. Data loss may occur if the NAS
experiences unexpected power loss before it has time to write the cached data to
the hard disk.
Next Click Next to go to the next step.
Cancel Click Cancel to close the screen without saving any set t ings.
Step 2. Sum m ary
Use this screen to review the set t ings you configured in the last step.
Nam e Displays the nam e of the LUN.
Locat ion Displays the nam e of the volum e the LUN is located in.
Capacity Displays the size of the LUN.
Allocat ion Mode Displays the allocat ion m ethod the LUN applies.
Write Back Displays whether the Write Back feature is enabled or disabled.
Back Click Back to go to the previous step.
Apply Click Apply to save the set t ings.
Cancel Click Cancel to close the screen without saving any set t ings.

Chapter 8 Storage Manager
Cloud Storage User’s Guide
87
Figure 51 Storage Manager > iSCSI > iSCSI Targets
The following table describes the labels in these screens.
Table 24 iSCSI > iSCSI Targets
LABEL DESCRIPTION
Create Click this to create a new iSCSI target .
See m ore details on Sect ion 8.4.2.1 on page 88.
Edit Click this to m odify the configurat ion of the iSCSI target .
See m ore detailed on Sect ion 8.4.2.2 on page 92.
Disable / Enable
Disable - Click this to open the following screen where you can deact ivate an exist ing target .
Key in DI SABLE and click Disable to deact ivate the target . Click Cancel to close this screen.
Enable - When the iSCSI is disabled, click Enable will act ivate the target .
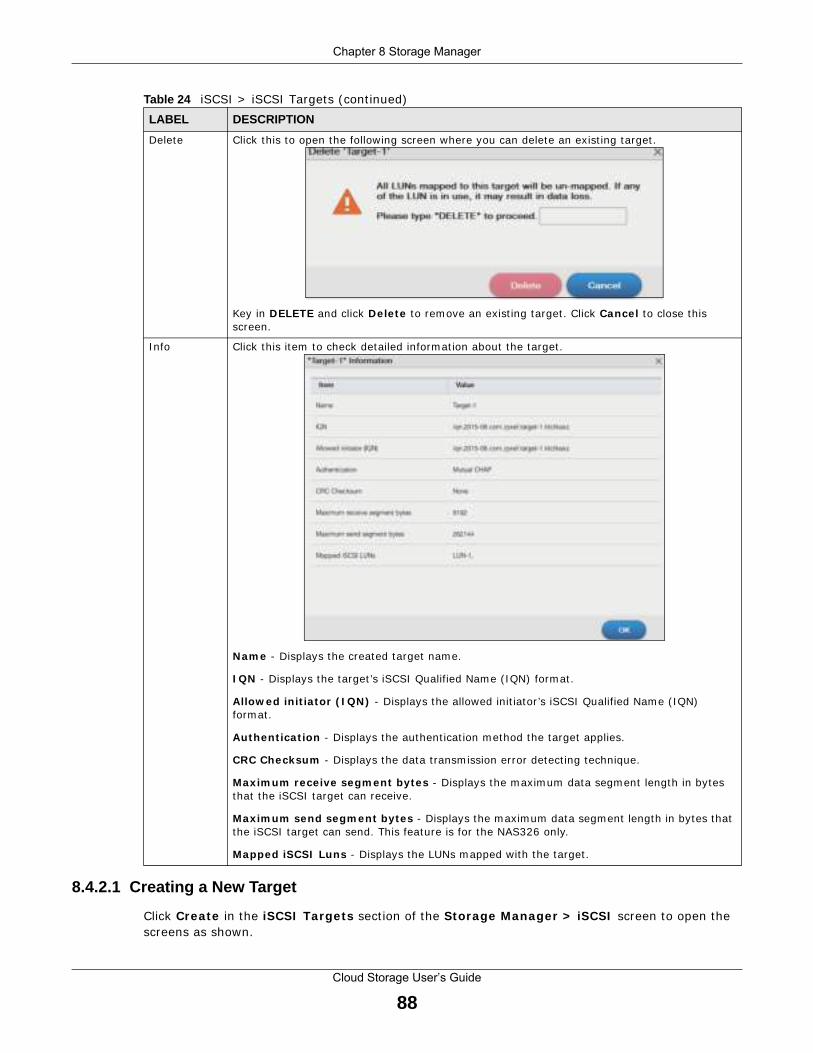
Chapter 8 Storage Manager
Cloud Storage User’s Guide
88
8.4.2.1 Creating a New Target
Click Create in the iSCSI Targets sect ion of the Storage Manager > iSCSI screen to open the screens as shown.
Delete Click this to open the following screen where you can delete an exist ing target .
Key in DELETE and click Delete to rem ove an exist ing target . Click Cancel to close this screen.
I nfo Click this item to check detailed inform at ion about the target .
Nam e - Displays the created target nam e.
I QN - Displays the target ’s iSCSI Qualified Nam e ( I QN) form at .
Allow ed in it ia tor ( I QN) - Displays the allowed init iator ’s iSCSI Qualified Nam e ( I QN) form at .
Authent ica t ion - Displays the authent icat ion method the target applies.
CRC Checksum - Displays the data t ransm ission error detect ing technique.
Maxim um receive segm ent bytes - Displays the m axim um data segm ent length in bytes that the iSCSI target can receive.
Maxim um send segm ent bytes - Displays the m aximum data segment length in bytes that the iSCSI target can send. This feature is for the NAS326 only.
Mapped iSCSI Luns - Displays the LUNs m apped with the target .
Table 24 iSCSI > iSCSI Targets (cont inued)
LABEL DESCRIPTION
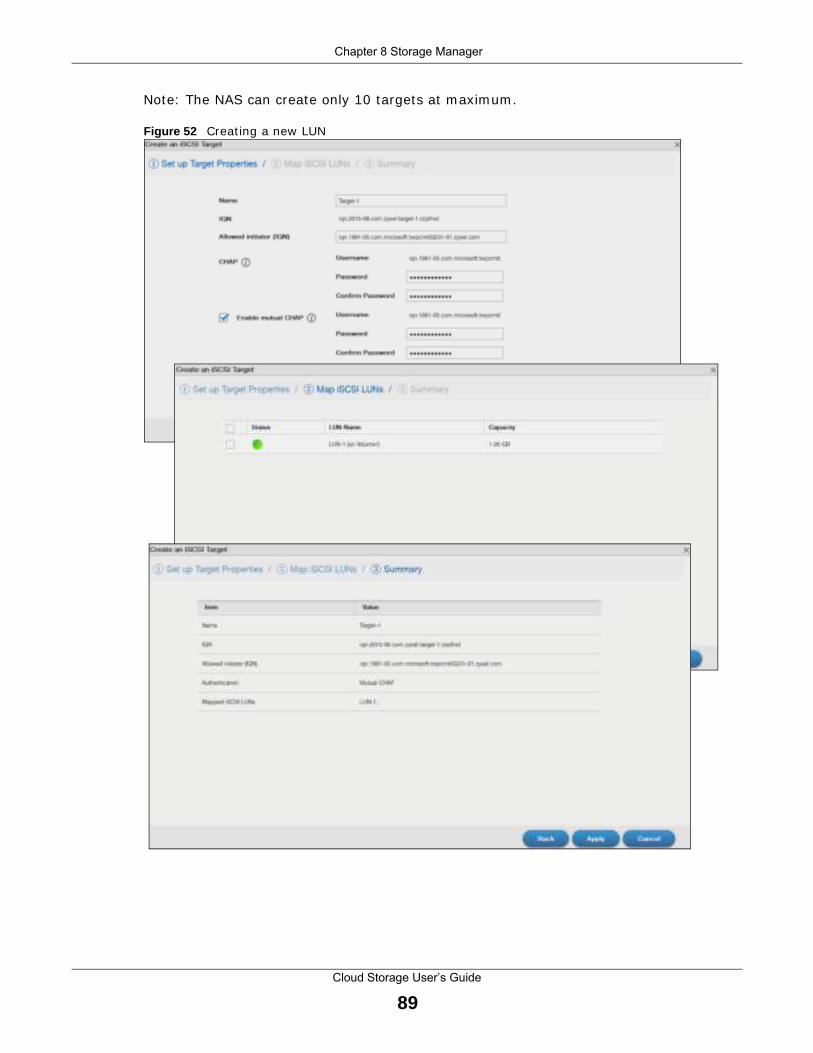
Chapter 8 Storage Manager
Cloud Storage User’s Guide
89
Note: The NAS can create only 10 targets at m axim um .
Figure 52 Creat ing a new LUN
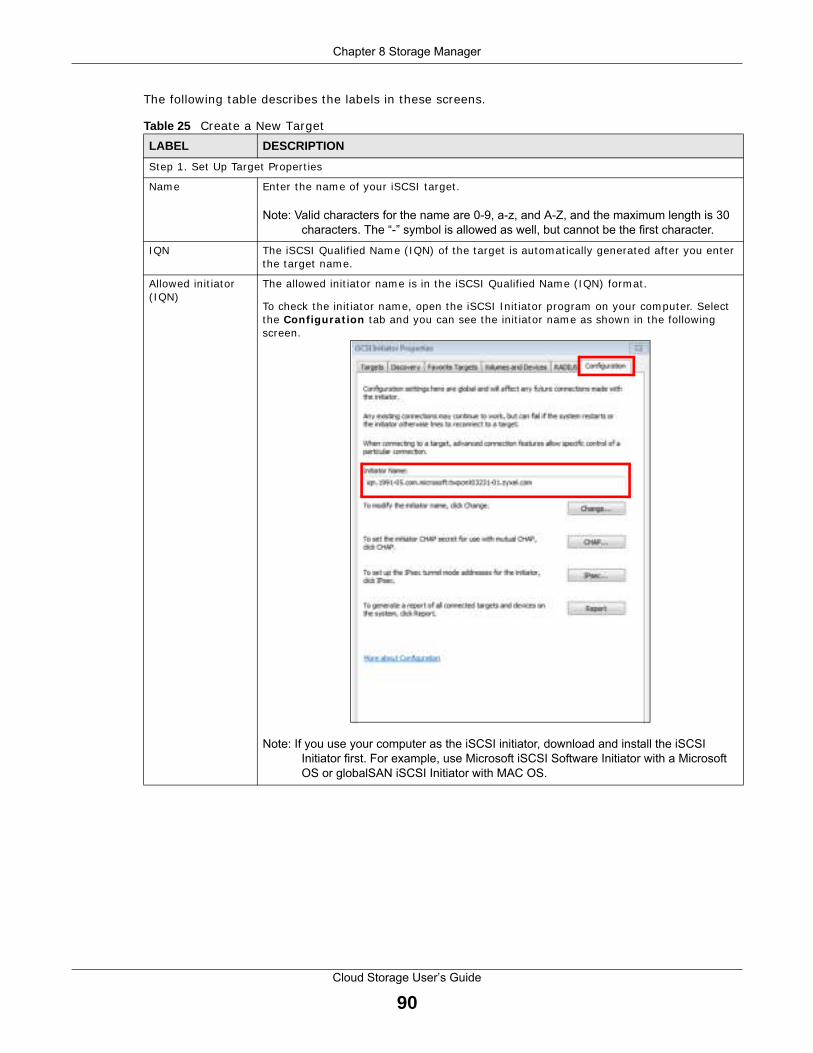
Chapter 8 Storage Manager
Cloud Storage User’s Guide
90
The following table describes the labels in these screens.
Table 25 Create a New Target
LABEL DESCRIPTION
Step 1. Set Up Target Propert ies
Nam e Enter the nam e of your iSCSI target .
Note: Valid characters for the name are 0-9, a-z, and A-Z, and the maximum length is 30
characters. The “-” symbol is allowed as well, but cannot be the first character.
I QN The iSCSI Qualified Nam e ( I QN) of the target is automat ically generated after you enter the target nam e.
Allowed init iator ( I QN)
The allowed init iator nam e is in the iSCSI Qualified Nam e ( I QN) form at .
To check the init iator nam e, open the iSCSI I nit iator program on your com puter. Select the Configurat ion tab and you can see the init iator nam e as shown in the following screen.
Note: If you use your computer as the iSCSI initiator, download and install the iSCSI
Initiator first. For example, use Microsoft iSCSI Software Initiator with a Microsoft
OS or globalSAN iSCSI Initiator with MAC OS.

Chapter 8 Storage Manager
Cloud Storage User’s Guide
91
CHAP I f the iSCSI target has configured Challenge Handshake Authent icat ion Protocol (CHAP) here, the init iator needs to enter the secret before the init iator connects to the target . The target will authent icate the init iator with the usernam e and password (shared secret ) . The connect ion fails if the usernam e and password are not entered correct ly.
Usernam e - The user nam e is for the init iator to authent icate the init iator when at tem pt ing connect ion.
Passw ord - The password is for the target to authent icate the init iator when at tem pt ing connect ion.
Confirm passw ord - Re- type the password to make sure you entered it correct ly.
Note: Valid characters for password are 0-9, a-z, and A-Z.
Enable m utual CHAP
Mutual CHAP is a two-way authent icat ion between the iSCSI init iator and the target . I f the init iator has configured CHAP authent icat ion, the target m ust enter the secret that ’s set up by the init iator when at tempt ing connect ion.
Select this check box to perform mutual CHAP on the target .
Usernam e - The user nam e is for the init iator to authent icate the init iator when at tem pt ing connect ion.
Passw ord - The password is for the target to authent icate the init iator when at tem pt ing connect ion.
Confirm passw ord - Re- type the password to make sure you entered it correct ly.
Note: Valid characters for password are 0-9, a-z, and A-Z.
Next Click Next to go to the next step.
Cancel Click Cancel to close the screen without saving any set t ings.
Step 2. Map iSCSI LUNs
Use this screen to m ap the iSCSI target to an exist ing LUN.
Note: One iSCSI target can map to several LUN, but one LUN can only map to one target.
Status Displays the status of the iSCSI LUN(s) .
LUN Name Displays the LUN nam e.
Capacity Displays the size of the iSCSI LUN(s) .
Back Click Back to go to the previous step.
Next Click Next to go to the next step.
Cancel Click Cancel to close the screen without saving any set t ings.
Step 3. Sum m ary
Use this screen to review the set t ings you configured in the last step.
Nam e Displays the iSCSI target nam e.
I QN Displays the I QN of the target .
Allowed init iator ( I QN)
Displays the I QN of the allowed init iator.
Authent icat ion Displays the CHAP authent icat ion m ethod the target applies.
Mapped iSCSI LUNs
Displays the iSCSI LUN the target m aps to.
Back Click Back to go to the previous step.
Table 25 Create a New Target (cont inued)
LABEL DESCRIPTION

Chapter 8 Storage Manager
Cloud Storage User’s Guide
92
8.4.2.2 Editing a Created Target
You can edit iSCSI target set t ings such as allowed init iator ( I QN) , CHAP, and CRC checksum after you create a target . Click Storage Manager > iSCSI Targets and select Edit to open the following screens.
Properties
The Proper t ies screen allows you to edit the allowed init iator ( I QN) , CHAP authent icat ion features as shown in the following screen.
Figure 53 iSCSI Targets > Edit > Propert ies
Apply Click Apply to save the set t ings.
Cancel Click Cancel to close the screen without saving any set t ings.
Table 25 Create a New Target (cont inued)
LABEL DESCRIPTION
Table 26 iSCSI Targets > Edit > Propert ies
LABEL DESCRIPTION
Nam e Displays the nam e of your iSCSI target .
I QN Displays the iSCSI Qualified Nam e ( I QN) of the target .
Allowed init iator ( I QN)
The allowed init iator nam e is in the iSCSI Qualified Nam e ( I QN) form at . You can connect with another init iator by changing the allowed init iator I QN.
The system will display a prom pt if you enter an invalid character or usernam e of unacceptable length in this field.

Chapter 8 Storage Manager
Cloud Storage User’s Guide
93
Map iSCSI LUNs
I f the exist ing iSCSI target doesn’t map to any iSCSI LUN, go to Map iSCSI LUNs to configure the mapping.
Figure 54 iSCSI Targets > Edit > Map iSCSI LUNs
CHAP Usernam e - The user nam e is for the init iator to authent icate the init iator when at tem pt ing connect ion.
Passw ord - The password is for the target to authent icate the init iator when at tem pt ing connect ion.
Confirm passw ord - Re- type the password to make sure you entered it correct ly.
Note: Valid characters for password are 0-9, a-z, and A-Z, and the valid length is 12-14
characters.
Enable m utual CHAP
Select this check box to perform mutual CHAP on the target .
Usernam e - The user nam e is for the target to authent icate the init iator when at tem pt ing connect ion.
Passw ord - The password is for the target to authent icate the init iator when at tem pt ing connect ion.
Confirm passw ord - Re- type the password to make sure you entered it correct ly.
Note: Valid characters for password are 0-9, a-z, and A-Z, and the valid length is 12-14
characters.
Apply Click Apply to save your changes.
Cancel Click Cancel to close the screen without saving any set t ings.
Table 26 iSCSI Targets > Edit > Propert ies (cont inued)
LABEL DESCRIPTION
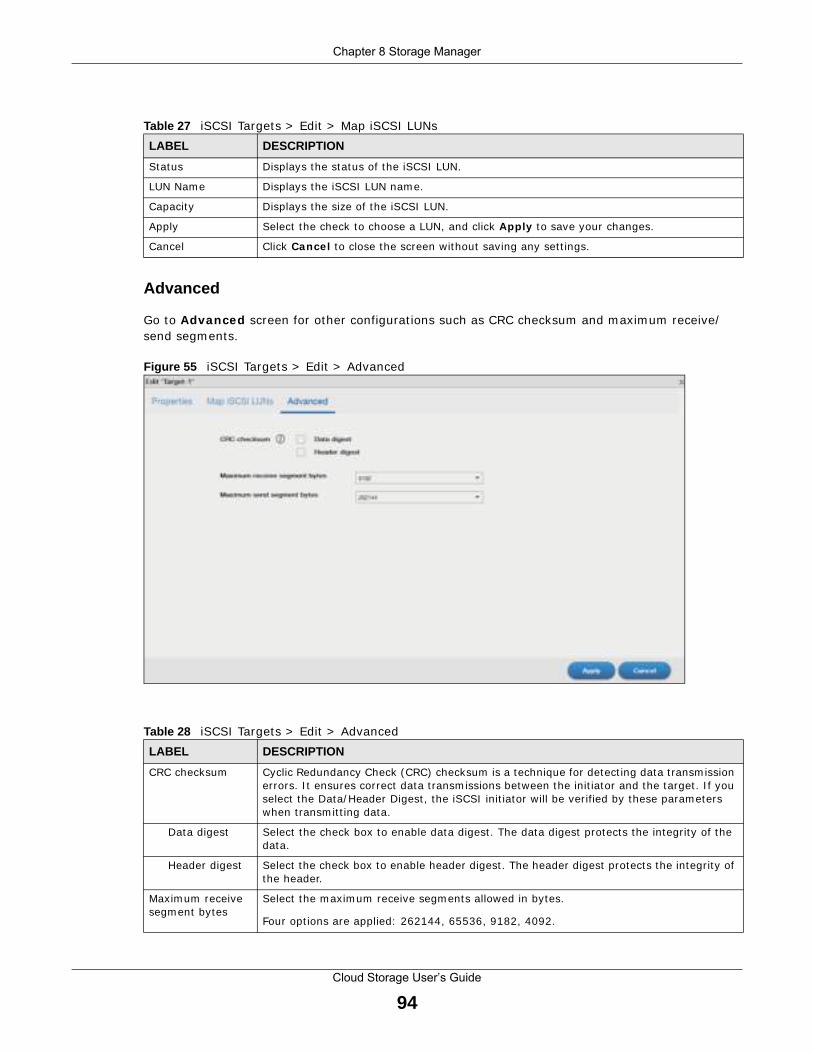
Chapter 8 Storage Manager
Cloud Storage User’s Guide
94
Advanced
Go to Advanced screen for other configurat ions such as CRC checksum and m axim um receive/send segments.
Figure 55 iSCSI Targets > Edit > Advanced
Table 27 iSCSI Targets > Edit > Map iSCSI LUNs
LABEL DESCRIPTION
Status Displays the status of the iSCSI LUN.
LUN Name Displays the iSCSI LUN nam e.
Capacity Displays the size of the iSCSI LUN.
Apply Select the check to choose a LUN, and click Apply to save your changes.
Cancel Click Cancel to close the screen without saving any set t ings.
Table 28 iSCSI Targets > Edit > Advanced
LABEL DESCRIPTION
CRC checksum Cyclic Redundancy Check (CRC) checksum is a technique for detect ing data t ransm ission errors. I t ensures correct data t ransm issions between the init iator and the target . I f you select the Data/ Header Digest , the iSCSI init iator will be verified by these param eters when t ransm it t ing data.
Data digest Select the check box to enable data digest . The data digest protects the integrity of the data.
Header digest Select the check box to enable header digest . The header digest protects the integr ity of the header.
Maxim um receive segm ent bytes
Select the m axim um receive segm ents allowed in bytes.
Four opt ions are applied: 262144, 65536, 9182, 4092.

Chapter 8 Storage Manager
Cloud Storage User’s Guide
95
8.5 External Storage
This chapter covers the m anagem ent of external volum es and disks.
Use the Externa l Storage screen (Sect ion 8.5.2 on page 95) to display inform at ion on all external volum es, configure volum es’ nam e and form at volum es.
8.5.1 What You Need to Know About External Storage
Disk
USB-at tached storage disks and SD cards are t reated as external disks/ volum es.
Volume
A volume is a storage area on a disk or disks. You can create volum es on SD cards or external disks at tached to the USB ports. You cannot spread a volum e across external disks like you can with internal disks.
8.5.2 External Storage Screen
Click Storage Manager > External Storage in the navigat ion panel to display the following screen. Use this screen to form at and edit external volum es on USB-connected storage and SD cards.
Maxim um send segm ent bytes
Select the m aximum send segm ents allowed in bytes.
Four opt ions are applied: 262144, 65536, 9182, 4092.
Note: This feature is for the NAS326 only.
Apply Click Apply to save your changes.
Cancel Click Cancel to close the screen without saving any set t ings.
Table 28 iSCSI Targets > Edit > Advanced (cont inued)
LABEL DESCRIPTION

Chapter 8 Storage Manager
Cloud Storage User’s Guide
96
Figure 56 Storage Manager > External Storage
The following table describes the labels in this screen.
Table 29 Storage Manager > External Storage
LABEL DESCRIPTION
Form at Click this to form at the connected USB disk.
See Sect ion 8.5.3 on page 97 for m ore inform at ion.
Edit Click this to m odify the volume nam e.
Volum e nam e -
• Type a volum e nam e from 1 to 31 characters. • Acceptable characters are all alphanumeric characters and " " [ spaces] , "_"
[ underscores] , and " ." [ per iods] .• The first character m ust be alphanum eric (A-Z 0-9) .• The last character cannot be a space " " .
Apply - Click this to save your change and renam e the volum e.
Cancel - Click this to exit this screen without saving changes.

Chapter 8 Storage Manager
Cloud Storage User’s Guide
97
8.5.3 Format the Volume
This allows you to form at the connected USB disk. Click External Storage > Form at to show the following screen.
Note: Form at t ing the disk will also delete all your data in the USB dr ive. I f the connected external volum e has m ore than one part it ion, you can choose which part it ion you want to form at .
Eject Click this to eject the external volum e.
Click Yes to eject the volum e or No to exit this screen without saving changes.
Status This field shows whether the volum e is Norm al , Unsuppor ted, or Unform at ted .
Norm al m eans the USB connected device is funct ioning properly.
Unsuppor ted means the USB connected device uses a file system the NAS does not support .
Unform at ted m eans the USB connected device is not form at ted with a file system .
Note: There is no explicit message from CIFS that tells users their volume is degraded or
down.
Volum e Name This field displays the volume nam e. I f the status is Unsuppor ted or Unform at ted , the volum e nam e displays “ - - ”.
File System This field displays the file system that an external (USB or SD) volume is using.
Disk(s) This field shows to which USB port the disk is connected.
Capacity This field shows total disk size, the percentage of the volum e being used and the percentage that is available. I f the status is Unsuppor ted , the capacity displays “Unknown”. I f the status is Unform at ted , the capacity displays “ - - ”.
Shared Folder This field displays the folder that shares files. Roll your m ouse over the link and click it to display the files in the File Browser.
Table 29 Storage Manager > External Storage (cont inued)
LABEL DESCRIPTION
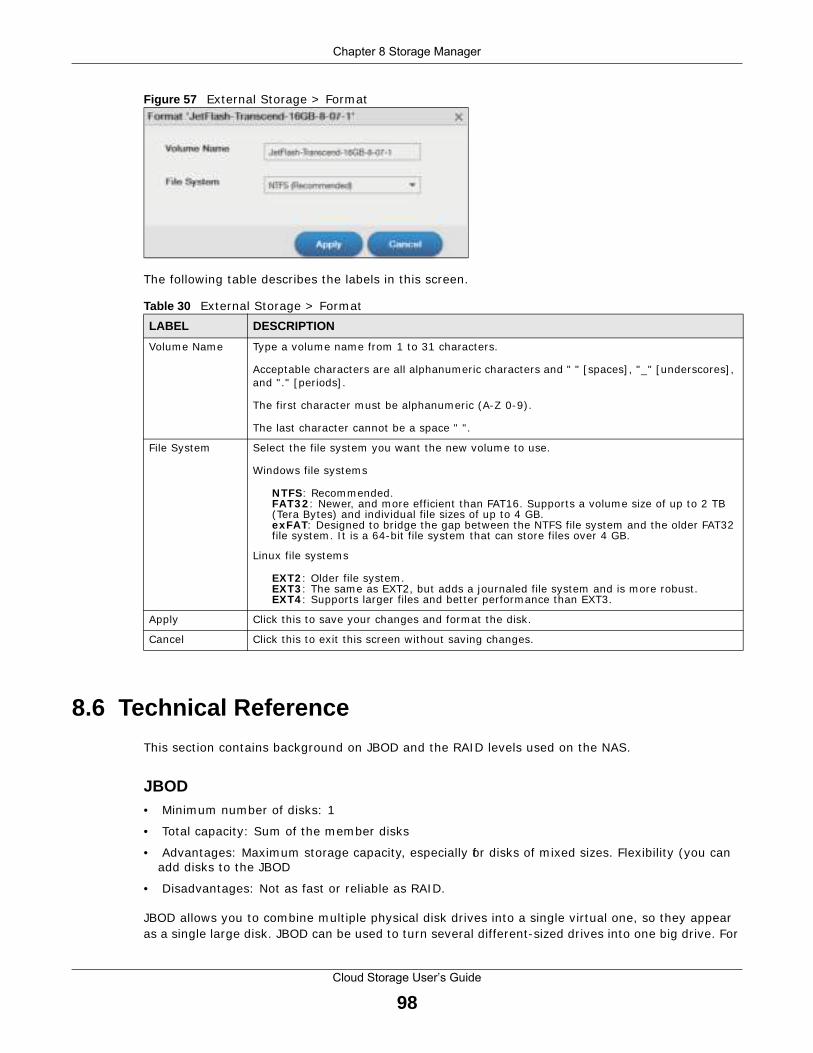
Chapter 8 Storage Manager
Cloud Storage User’s Guide
98
Figure 57 External Storage > Format
The following table describes the labels in this screen.
8.6 Technical Reference
This sect ion contains background on JBOD and the RAI D levels used on the NAS.
JBOD• Minim um number of disks: 1
• Total capacity: Sum of the m em ber disks
• Advantages: Maxim um storage capacity, especially for disks of m ixed sizes. Flexibilit y (you can add disks to the JBOD
• Disadvantages: Not as fast or reliable as RAI D.
JBOD allows you to com bine m ult iple physical disk dr ives into a single vir tual one, so they appear as a single large disk. JBOD can be used to turn several different-sized drives into one big drive. For
Table 30 External Storage > Form at
LABEL DESCRIPTION
Volum e Nam e Type a volum e nam e from 1 to 31 characters.
Acceptable characters are all alphanum eric characters and " " [ spaces] , "_" [ underscores] , and " ." [ periods] .
The first character m ust be alphanumeric (A-Z 0-9) .
The last character cannot be a space " " .
File System Select the file system you want the new volum e to use.
Windows file system s
NTFS: Recom m ended.FAT3 2 : Newer, and m ore efficient than FAT16. Supports a volum e size of up to 2 TB (Tera Bytes) and individual file sizes of up to 4 GB.exFAT : Designed to br idge the gap between the NTFS file system and the older FAT32 file system . I t is a 64-bit file system that can store files over 4 GB.
Linux file system s
EXT2 : Older file system .EXT3 : The sam e as EXT2, but adds a journaled file system and is m ore robust .EXT4 : Supports larger files and bet ter perform ance than EXT3.
Apply Click this to save your changes and form at the disk.
Cancel Click this to exit this screen without saving changes.
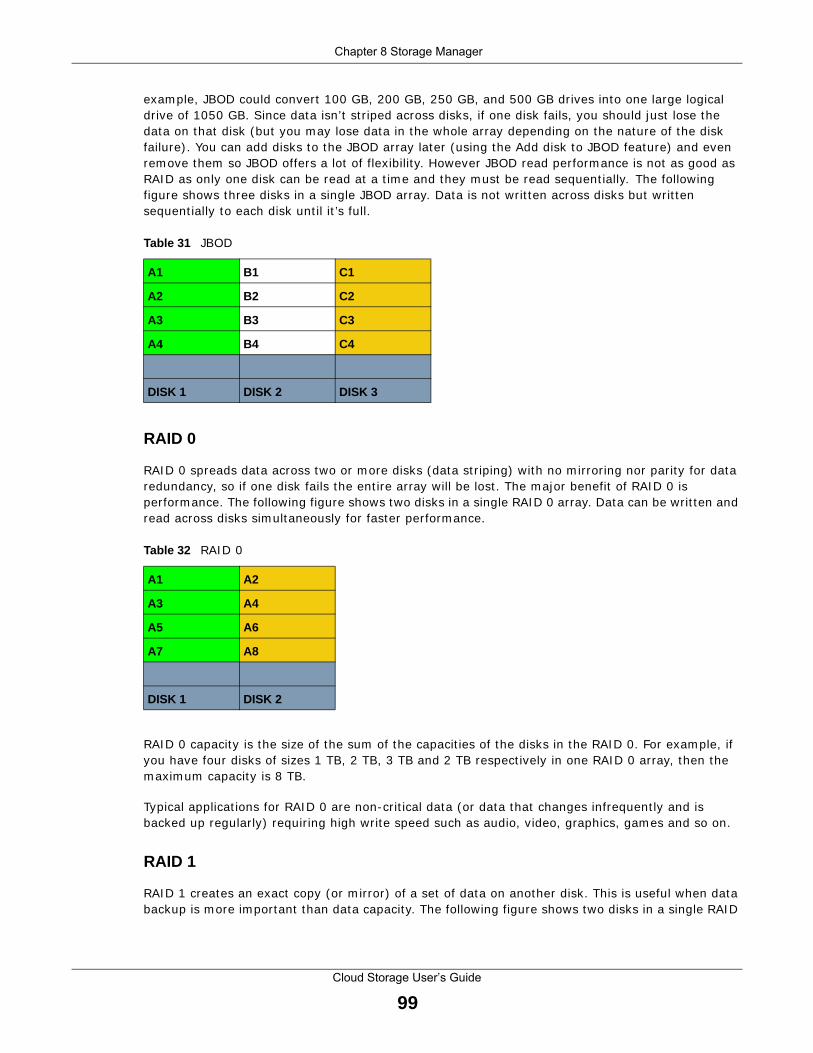
Chapter 8 Storage Manager
Cloud Storage User’s Guide
99
example, JBOD could convert 100 GB, 200 GB, 250 GB, and 500 GB drives into one large logical dr ive of 1050 GB. Since data isn’t st r iped across disks, if one disk fails, you should just lose the data on that disk (but you may lose data in the whole array depending on the nature of the disk failure) . You can add disks to the JBOD array later (using the Add disk to JBOD feature) and even rem ove them so JBOD offers a lot of flexibility. However JBOD read perform ance is not as good as RAI D as only one disk can be read at a t im e and they m ust be read sequent ially. The following figure shows three disks in a single JBOD array. Data is not writ ten across disks but writ ten sequent ially to each disk unt il it ’s full.
RAID 0
RAI D 0 spreads data across two or m ore disks (data st r iping) with no m irror ing nor parity for data redundancy, so if one disk fails the ent ire array will be lost . The m ajor benefit of RAI D 0 is perform ance. The following figure shows two disks in a single RAI D 0 array. Data can be writ ten and read across disks sim ultaneously for faster performance.
RAI D 0 capacity is the size of the sum of the capacit ies of the disks in the RAI D 0. For example, if you have four disks of sizes 1 TB, 2 TB, 3 TB and 2 TB respect ively in one RAI D 0 array, then the m axim um capacity is 8 TB.
Typical applicat ions for RAI D 0 are non-crit ical data (or data that changes infrequent ly and is backed up regularly) requir ing high write speed such as audio, video, graphics, games and so on.
RAID 1
RAI D 1 creates an exact copy (or m irror) of a set of data on another disk. This is useful when data backup is m ore important than data capacity. The following figure shows two disks in a single RAI D
Table 31 JBOD
A1 B1 C1
A2 B2 C2
A3 B3 C3
A4 B4 C4
DISK 1 DISK 2 DISK 3
Table 32 RAI D 0
A1 A2
A3 A4
A5 A6
A7 A8
DISK 1 DISK 2

Chapter 8 Storage Manager
Cloud Storage User’s Guide
100
1 array with m irrored data. Data is duplicated across two disks, so if one disk fails, there is st ill a copy of the data.
As RAI D 1 uses m irror ing and duplexing, a RAI D 1 array needs an even num ber of disks ( two or four for the NAS) .
RAI D 1 capacity is lim ited to the size of the sm allest disk in the RAI D array. For exam ple, if you have two disks of sizes 150 GB and 200 GB respect ively in one RAI D 1 array, then the m aximum capacity is 150 GB and the remaining space (50 GB) is unused.
Typical applicat ions for RAI D 1 are those requiring high fault tolerance without need of large am ounts of storage capacity or top perform ance, for exam ple, account ing and financial data, sm all database systems, and enterprise servers.
RAID 6
RAI D 6 can tolerate two sim ultaneous drive failures by calculat ing dual dist r ibuted parity data on st r iped data across disks. Dual parity provides ext ra data protect ion, however, it is slower to write than most other RAI D levels.
RAI D 6 uses parity to store redundant data on space equal to the size of two disks for later data recovery. Therefore, on a RAI D 6 array, only 50% of the space is available as usable capacity. I f you have four disks of sizes 1TB, 1TB, 2TB, 2TB respect ively in one RAI D 6 array, then the maximum capacity of the array is the capacity of the smallest dr ive (1TB, 1TB, 2TB, 2TB) * (Number of disks - 2) = 1TB * (4-2) = 2TB. The rem aining space (2 TB) is unused.
Table 33 RAI D 1
A1 A1
A2 A2
A3 A3
A4 A4
DISK 1 DISK 2
Table 34 RAI D 6
RAID 6
A1 A2 AP AQ
B1 BP BQ B2
CP CQ C1 C2
DQ D1 D2 DP
DISK 1 DISK 2 DISK 3 DISK 4

Chapter 8 Storage Manager
Cloud Storage User’s Guide
101
RAID 10
RAI D 10 (RAI D 1+ 0) is a nested RAI D where two RAI D 1 arrays are stored on the physical disks with a RAI D 0 array on top. I t is a st r ipe of m irrors. RAI D 1 provides redundancy while RAI D 0 boosts perform ance. The following figure shows two disks in two RAI D 1 arrays. Data is duplicated across two disks, so if one disk fails, there is st ill a copy of the data. These two arrays are configured as a single RAI D 0 array for faster perform ance.
Typical applicat ions for RAI D 10 are those requir ing both high perform ance and reliabilit y such as enterprise servers and high-end m oderate-sized database system s. RAI D 10 is often used in place of RAI D 1 or RAI D 5 by those requir ing higher perform ance. I t m ay be used instead of RAI D 1 for applicat ions requir ing more capacity.
RAID 5
RAI D 5 provides the best balance of capacity and performance while providing data redundancy. I t provides redundancy by st r iping data across three disks and keeps the parity inform at ion (AP) on the fourth disk ( in each st r ipe) . I n case of disk failure, data can be recovered from the surviving disks using the parity inform at ion. When you replace the failed disk, the reconst ructed data is writ ten onto the new disk. Re-synchronize the array to have it return to its or iginal state. The following example shows data st r ipped across three disks (A1 to A3 in the first st r ip for example) with parity inform at ion (AP) on the fourth disk.
The capacity of a RAI D 5 array is the sm allest disk in the RAI D set m ult iplied by one less than the num ber of disks in the RAI D set . For exam ple, if you have four disks of sizes 150 GB, 150 GB, 200
Table 35 RAI D 10
RAID 0
RAID 1 RAID 1
A1 A1 A2 A2
A3 A3 A4 A4
A5 A5 A6 A6
A7 A7 A8 A8
DISK 1 DISK 2 DISK 3 DISK 4
Table 36 RAI D 5
A1 A2 A3 AP
B1 B2 BP B3
C1 CP C2 C3
DP D1 D2 D3
DISK 1 DISK 2 DISK 3 DISK 4

Chapter 8 Storage Manager
Cloud Storage User’s Guide
102
GB and 250 GB respect ively in one RAI D 5 array, then the maximum capacity is 450 GB (3 * 150 GB, the smallest disk size) and the remaining space (300 GB) is unused.
Typical applicat ions for RAI D 10 are t ransact ion processing, relat ional database applicat ions, enterprise resource planning and other business systems. For write- intensive applicat ions, RAI D 1 or RAI D 1+ 0 are probably bet ter choices, as the performance of RAI D 5 will begin to substant ially decrease in a write-heavy environment .
Hot-spare
A RAI D 1 or RAI D 5 array with a hot-spare operates as a three-disk RAI D 1 or RAI D 5 array with the fourth disk on standby. The standby disk autom at ically com es into play if a disk in the array fails. The advantage of a hot-spare is that if a disk fails, then the array resynchronizes autom at ically with the standby disk and operates at healthy array speed after the resynchronizat ion.
Note: You need four hard disks installed to use RAI D 10, RAI D 5 or RAI D 5 with hot-spare.
RAID and Data Protection
I f a hard disk fails and you’re using a RAI D 1, RAI D 10, or RAI D 5 array then your data will st ill be available (but at degraded speeds unt il you replace the hard disk that failed and re-synchronize the array) . However, RAI D cannot protect against file corrupt ion, virus at tacks, files incorrect ly deleted or m odified, or the NAS malfunct ioning.
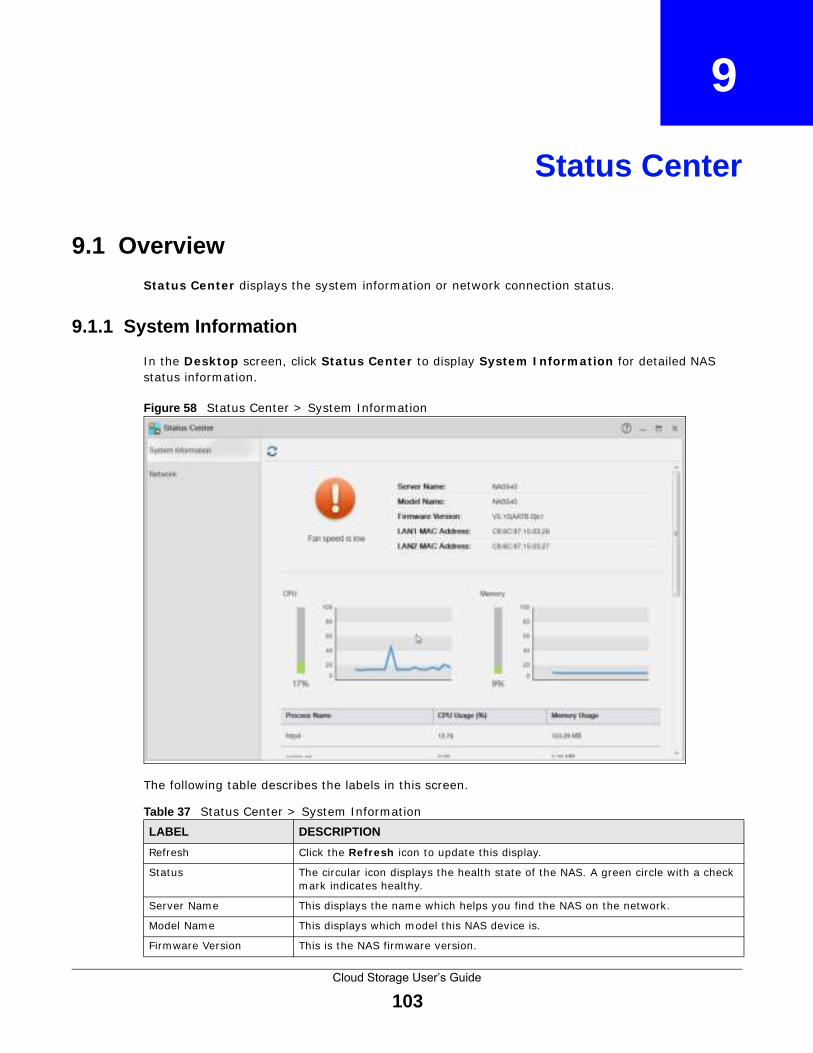
Cloud Storage User’s Guide
103
CHAPTER 9
Status Center
9.1 Overview
Status Center displays the system inform at ion or network connect ion status.
9.1.1 System Information
I n the Desktop screen, click Status Center to display System I nform at ion for detailed NAS status inform at ion.
Figure 58 Status Center > System I nform at ion
The following table describes the labels in this screen.
Table 37 Status Center > System I nformat ion
LABEL DESCRIPTION
Refresh Click the Refresh icon to update this display.
Status The circular icon displays the health state of the NAS. A green circle with a check m ark indicates healthy.
Server Nam e This displays the nam e which helps you find the NAS on the network.
Model Nam e This displays which model this NAS device is.
Firm ware Version This is the NAS firm ware version.

Chapter 9 Status Center
Cloud Storage User’s Guide
104
9.1.2 Network
The Netw ork screen display the NAS connect ion status. From Status Center screen, click Netw ork to open the screen as shown.
Figure 59 Status Center > System I nform at ion
LAN1 MAC Address This displays the NAS’s unique physical hardware address (MAC) for the LAN1 Ethernet port . You need the MAC address to register the product at myZyXEL.com . Custom er support m ay also request it for t roubleshoot ing purposes.
LAN2 MAC Address This displays the NAS’s unique physical hardware address (MAC) for the LAN2 Ethernet port .
CPU This displays a sum mary of CPU usage by all current processes.
Note: If too many users are using the NAS then the NAS may appear sluggish.
Mem ory This shows how m uch of the NAS's total m em ory is being used.
Process Nam e This displays the top 10 processes that occupy the most CPU usage.
CPU Usage This displays a sum m ary of CPU usage by all current processes.
Mem ory Usage This shows how m uch of the NAS's total m em ory is being used.
CPU Tem perature This displays the tem perature near the NAS’s CPU. The NAS generates an em ergency log if the tem perature goes out of the norm al operat ing range. I f the tem perature goes even higher, the NAS shuts down autom at ically to avoid dam age from overheat ing. I f the NAS overheats, m ake sure the fans are working and it is in a well vent ilated place.
Fan Speed This is the RPM (Rotat ions Per Minute) of the NAS’s fans.
Table 37 Status Center > System I nformat ion (cont inued)
LABEL DESCRIPTION
Chapter 9 Status Center
Cloud Storage User’s Guide
105
The following table describes the labels in this screen.
Table 38 Status Center > Network
LABEL DESCRIPTION
Type Displays the type of the user account .
User Displays the user nam e.
Groups Displays the group the current user belongs to.
WAN/ LAN Displays whether the connect ion is from the WAN or the LAN.
Service Nam e Displays the service nam e.
I P Address Displays the I P address of the user.
Tim e Displays the connect ion t im e.
Delete Click this to disconnect the user.

Cloud Storage User’s Guide
106
CHAPTER 10
Control Panel
10.1 Overview
This chapter discusses the Cont rol Panel screens. Use the Cont rol Panel screens to configure network set t ings and upload firmware.
10.2 What You Can Do• Use the TCP/ I P screen (Sect ion 10.4 on page 107) to configure the NAS’s TCP/ I P network
connect ion set t ings such as the team ing m ode and I P addresses.
• Use the PPPoE screen (Sect ion 10.4.2.2 on page 111) to configure PPPoE set t ings for a direct I nternet connect ion.
• Use the UPnP Por t Mapping screen (Sect ion 10.5 on page 113) to automat ically configure your I nternet gateway’s firewall and Network Address Translat ion (NAT) to allow access to the NAS from the I nternet .
• Use the Term inal screen (Sect ion 10.6 on page 119) to enable or disable Telnet and SSH access.
• Use the DyDNS screen (Sect ion 10.7 on page 120) to configure the dom ain nam e set t ings of your NAS.
• Use the FW Upgrade screen (Sect ion 10.8 on page 122) to upload new firmware.
10.3 What You Need to Know
IP Address
The NAS needs an I P address to com m unicate with other devices on your network. The NAS can get an I P address autom at ically if you have a device on your network that gives them out . Or you can assign the NAS a stat ic ( fixed) I P address.
DNS Server Address
A DNS (Domain Name System) server maps domain names ( like www.zyxel.com) to their corresponding num erical I P addresses. This lets you use dom ain nam es to access web sites without having to know their I P addresses. The NAS can receive the I P address of a DNS server automat ically (along with the NAS’s own I P address) . You can also m anually enter a DNS server I P address in the NAS.

Chapter 10 Control Panel
Cloud Storage User’s Guide
107
PPPoE
Point- to-Point Protocol over Ethernet (PPPoE) allows the NAS to establish a direct I nternet connect ion if you do not have a router. PPPoE is a dial-up connect ion. You need a username and password from your I nternet Service Provider ( I SP) to set up the connect ion.
10.4 TCP/IP Screens
Use the TCP/ I P screens to have the NAS use a dynam ic or stat ic I P address, subnet m ask, default gateway, PPPoE and DNS servers, and to test the network connect ion.
10.4.1 Configuring Ge neral TCP/IP Settings
Click Cont rol Panel > Netw ork > TCP/ I P > Genera l Set t ings in the navigat ion panel to open the following screen. This screen allows you to configure the default gateway and DNS server.
Note: I f you change the NAS’s I P address, you need to log in again after you apply changes.
Figure 60 Cont rol Panel > Network > TCP/ I P > General Set t ings

Chapter 10 Control Panel
Cloud Storage User’s Guide
108
The following table describes the labels in this screen
10.4.2 Configuring Network Interface
Use the Netw ork I nter face screen to edit the I Pv4 or I Pv6 set t ings of LAN 1 and LAN 2, set up port t runking, and configure PPPoE set t ings. Click Cont rol Panel > Netw ork > TCP/ I P > Netw ork I nter face in the navigat ion panel to open the following screen.
Figure 61 Control Panel > Network > TCP/ I P > Network I nterface
Table 39 Control Panel > Network > TCP/ I P > General Set t ings
LABEL DESCRIPTION
Default Gateway Select the LAN interface to use as the default gateway.
DNS Server DNS (Dom ain Nam e System ) is for m apping a dom ain nam e to its corresponding I P address and vice versa. I f you have the I P address(es) of the DNS server(s) , enter them .
Automat ically Select the opt ion to have the NAS get a DNS server address automat ically.
Manually Select this opt ion to choose a stat ic DNS server address. Type the DNS server I P address(es) into the fields below.
Prim ary DNS Server
Type a pr im ary DNS server I P address.
Secondary DNS Server
Type a secondary DNS server I P address.
Apply Click this to save your TCP/ I P configurat ions. After you click Apply , the NAS restarts. Wait unt il you see the Login screen or unt il the NAS fully boots and then use the NAS Starter Ut ility to rediscover it .
Reset Click this to restore your previously saved set t ings.

Chapter 10 Control Panel
Cloud Storage User’s Guide
109
The following table describes the labels in this screen.
Table 40 Control Panel > Network > TCP/ I P > Network I nterface
LABEL DESCRIPTION
Status Display data t ransm ission rate and t ransm ission system .
I nterface Display the interface name.
I P Set t ings Display the I P set t ings (automat ically or m anually) of an interface.
I P Address Display the I P address of an interface.
Subnet Mask Display the subnet m ask of an interface.
Create Click it to open the following screen to set up a port t runking.
For adding a port t runking, see Sect ion 10.4.2.1 on page 110.
Automat ically Select this opt ion to have the interface get I P address inform at ion autom at ically.
I f no I P address inform at ion is assigned, the NAS uses Auto- I P to assign itself an I P address and subnet m ask. For exam ple, you could connect the NAS direct ly to your com puter. I f the computer is also set to get an I P address autom at ically, the com puter and the NAS will choose addresses for them selves and be able to com municate.
Manually Select this opt ion for the interface to use fixed TCP/ I P inform at ion. You m ust fill in the following fields.
I P Address - Type an I P address in this field.
Subnet Mask - Type an I P subnet m ask in this field.
Default Gatew ay - Type a default gateway address in this field.
Create Click this to save the set t ings and create a port t runk.
Cancel Click this to return to the previous screen without saving.
Edit Click this to m odify the I Pv4 or I Pv6 set t ings of LAN 1 and LAN 2.
For edit ing the PPPoE set t ings, see Sect ion 10.4.2.2 on page 111.
I Pv4 Set t ings Click this to configure the following I Pv4 set t ings.
Autom at ica lly - Select this opt ion to have the interface get I P address inform at ion autom at ically.
Manually - Select this opt ion for the interface to use fixed TCP/ I P inform at ion.
• I P Address - Type an I P address in this field.• Subnet Mask - Type an I P subnet m ask in this field.• Default Gatew ay - Type a default gateway address in this field.
I Pv6 Set t ings Click this to configure the following I Pv6 set t ings.
Mode -
• Select Auto to have the Device use the I Pv6 prefix from the connected router ’s Router Advert isem ent (RA) to generate an I Pv6 address.
• Select Manual if you have a fixed I Pv6 address assigned by your I SP.• Select Disable to not assign any I Pv6 address for the NAS.
Address - Enter the I Pv6 address assigned by your I SP.
Subnet prefix length - Enter the address prefix length to specify how m any m ost significant bits in an I Pv6 address com pose the network address. The range is 0 to 128
Default Gatew ay - Enter the I P address of the next-hop gateway. The gateway is a router or switch on the same segm ent as your Device's interface(s) . The gateway helps forward packets to their dest inat ions.
Apply Click this to save your TCP/ I P configurat ions. After you click Apply , the NAS restarts. Wait unt il you see the Login screen or unt il the NAS fully boots and then use the NAS Starter Ut ility to rediscover it .
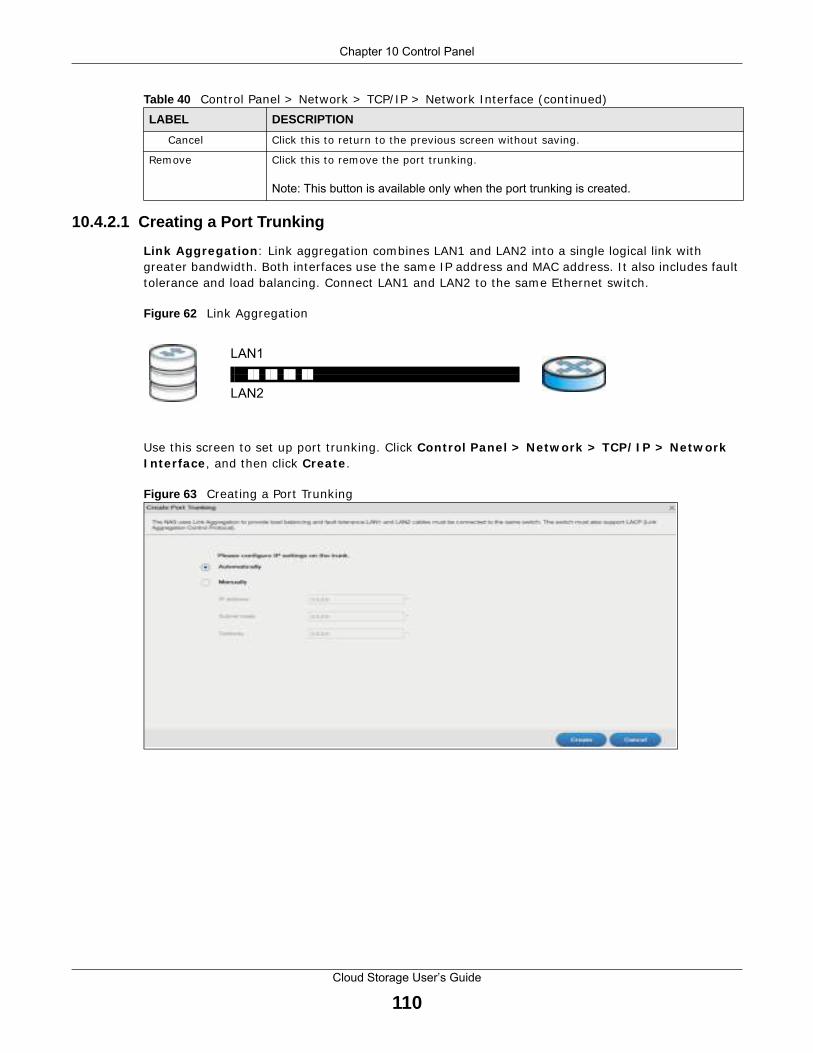
Chapter 10 Control Panel
Cloud Storage User’s Guide
110
10.4.2.1 Creating a Port Trunking
Link Aggregat ion : Link aggregat ion com bines LAN1 and LAN2 into a single logical link with greater bandwidth. Both interfaces use the sam e I P address and MAC address. I t also includes fault tolerance and load balancing. Connect LAN1 and LAN2 to the sam e Ethernet switch.
Figure 62 Link Aggregat ion
Use this screen to set up port t runking. Click Cont rol Panel > Netw ork > TCP/ I P > Netw ork I nter face , and then click Create .
Figure 63 Creat ing a Port Trunking
Cancel Click this to return to the previous screen without saving.
Rem ove Click this to rem ove the port t runking.
Note: This button is available only when the port trunking is created.
Table 40 Control Panel > Network > TCP/ I P > Network I nterface (cont inued)
LABEL DESCRIPTION
LAN1
LAN2

Chapter 10 Control Panel
Cloud Storage User’s Guide
111
The following table describes the labels in this screen.
10.4.2.2 Configur ing PPPoE Settings
Use this screen to configure PPPoE set t ings for a direct I nternet connect ion. Select the ppp0 interface and then click Edit .
Figure 64 Cont rol Panel > Network > TCP/ I P > Network I nterface > PPPoE
The following table describes the labels in this screen.
Table 41 Control Panel > Network > TCP/ I P > Network I nterface > Create
LABEL DESCRIPTION
Automat ically Select this opt ion to have the interface get I P address inform at ion autom at ically.
I f no I P address inform at ion is assigned, the NAS uses Auto- I P to assign itself an I P address and subnet m ask. For exam ple, you could connect the NAS direct ly to your com puter. I f the computer is also set to get an I P address autom at ically, the com puter and the NAS will choose addresses for them selves and be able to com municate.
Manually Select this opt ion for the interface to use fixed TCP/ I P inform at ion. You m ust fill in the following fields.
I P Address - Type an I P address in this field.
Subnet Mask - Type an I P subnet m ask in this field.
Default Gatew ay - Type a default gateway address in this field.
Create Click this to save the set t ings and create a port t runking.
Cancel Click this to return to the previous screen without saving.
Table 42 Control Panel > Network > TCP/ I P > Network I nterface > PPPoE
LABEL DESCRIPTION
Enable PPPoE to direct ly connect to the I nternet
Select or clear this field to enable or disable PPPoE.
Usernam e Enter the usernam e exact ly as your I SP assigned. I f assigned a nam e in the form user@dom ain where dom ain ident ifies a service nam e, then enter both com ponents exact ly as given.
Password Enter the password associated with the usernam e above.
Show password Select this field to reveal the password hidden behind aster isks or clear this field to hide the password.

Chapter 10 Control Panel
Cloud Storage User’s Guide
112
10.4.3 Configuring Web Configurator
Click Cont rol Panel > Netw ork > TCP/ I P > W eb Configurator to configure the port num ber of HTTP and HTTPs.
Figure 65 Cont rol Panel > Network > TCP/ I P > Web Configurator
The following table describes the labels in this screen.
Apply Click this to save your changes.
Cancel Click this to return to the previous screen without saving.
Table 42 Control Panel > Network > TCP/ I P > Network I nterface > PPPoE (cont inued)
LABEL DESCRIPTION
Table 43 Control Panel > Network > TCP/ I P > Web Configurator
LABEL DESCRIPTION
Port Num ber Specify the port num ber of HTTP connect ion.
Note: The port number 8082 is reserved for media streaming.
Enable HTTPS connect ion
Select or clear this field to enable or disable HTTPS connect ion.
Port Num ber Specify the port num ber of HTTPS connect ion.
Allow only HTTPS connect ion
Select this field to allow connect ion to the Web Configurator via HTTPS only. Clear this field to allow connect ion to the Web Configurator via both HTTP and HTTPS.
Apply Click this to save your changes.
Cancel Click this to return to the previous screen without saving.
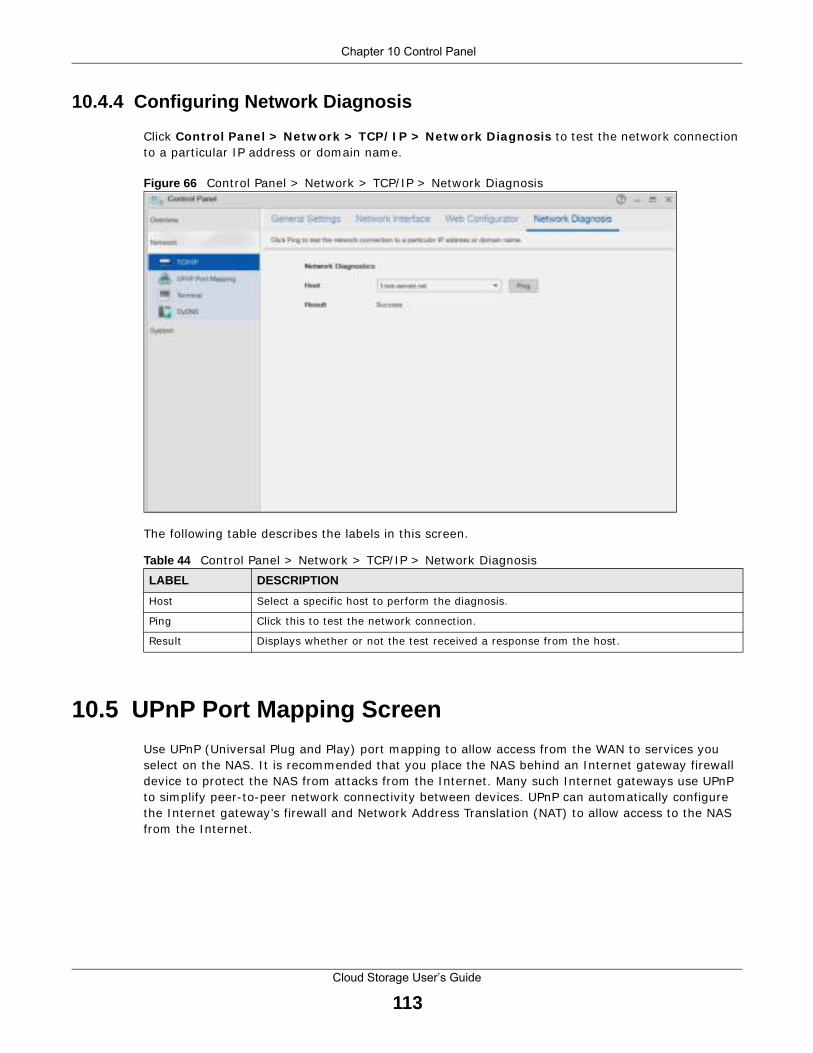
Chapter 10 Control Panel
Cloud Storage User’s Guide
113
10.4.4 Configuring Network Diagnosis
Click Cont rol Panel > Netw ork > TC P/ I P > Netw ork Diagnosis to test the network connect ion to a part icular I P address or dom ain nam e.
Figure 66 Cont rol Panel > Network > TCP/ I P > Network Diagnosis
The following table describes the labels in this screen.
10.5 UPnP Port Mapping Screen
Use UPnP (Universal Plug and Play) port m apping to allow access from the WAN to services you select on the NAS. I t is recom m ended that you place the NAS behind an I nternet gateway firewall device to protect the NAS from at tacks from the I nternet . Many such I nternet gateways use UPnP to simplify peer- to-peer network connect ivity between devices. UPnP can autom at ically configure the I nternet gateway’s firewall and Network Address Translat ion (NAT) to allow access to the NAS from the I nternet .
Table 44 Control Panel > Network > TCP/ I P > Network Diagnosis
LABEL DESCRIPTION
Host Select a specific host to perform the diagnosis.
Ping Click this to test the network connect ion.
Result Displays whether or not the test received a response from the host .

Chapter 10 Control Panel
Cloud Storage User’s Guide
114
Figure 67 UPnP for FTP Access
I n the above example, UPnP creates a firewall rule and NAT port forwarding mapping to send FTP t raffic (using TCP port number 21) from the public I P address a.b.c.d to the NAS’s pr ivate I P address of 192.168.1.20.
Use the NAS’s UPnP Port Mapping screen to configure the UPnP set t ings your I nternet gateway uses to allow access from the WAN ( I nternet ) to services you select on the NAS. You can also set which port I nternet users need to use in order to access a specific service on the NAS.
Note: To use UPnP port m apping, your I nternet gateway m ust have UPnP enabled.
I f your I nternet gateway supports Port Address Translat ion (PAT is som et im es included with a port forwarding feature) , you can have the I nternet users use a different TCP port num ber from the one the NAS uses for the service.
Figure 68 UPnP Port Address Translat ion for FTP Exam ple
I n the above example, the I nternet gateway uses PAT to accept I nternet user FTP sessions on port 2100, t ranslate them to port 21, and forward them to the NAS.
10.5.1 UPnP and the NAS’s IP Address
I t is recom m ended that the NAS use a stat ic I P address (or a stat ic DHCP I P address) if you will allow access to the NAS from the I nternet . The UPnP-created NAT mappings keep the I P address the NAS had when you applied your set t ings in the UPnP Port Mapping screen. They do not automat ically update if the NAS’s I P address changes.
Note: WAN access stops working if the NAS’s I P address changes.
For example, if the NAS’s I P address was 192.168.1.33 when you applied the UPnP Port Mapping screen’s set t ings and the NAS later gets a new I P address of 192.168.1.34 through DHCP, WAN access stops working because the I nternet gateway st ill t r ies to forward t raffic to I P address 192.168.1.33. Since you can no longer access the NAS from the WAN, you would have to access the NAS from the LAN and re-apply your UPnP Port Mapping screen set t ings to update the I nternet gateway’s UPnP port m appings.
TCP: 21TCP: 21
192.168.1.20
a.b.c.d
TCP: 2100TCP: 21
192.168.1.20
a.b.c.d

Chapter 10 Control Panel
Cloud Storage User’s Guide
115
Figure 69 UPnP Using the Wrong I P Address
10.5.2 UPnP and Security
UPnP’s automated nature makes it easier to use than manually configuring firewall and NAT rules, but it is also less secure. Using UPnP m ay m ake your network m ore suscept ible to snooping and hacking at tacks.
10.5.3 The NAS’s Services and UPnP
This sect ion int roduces the NAS’s services which an I nternet gateway can use UPnP to allow access to and from the I nternet .
CIFS (Windows File Sharing)
Com m on I nternet File System (CI FS) is a standard protocol supported by m ost operat ing system s in order to share files across the network. Using UPnP port mapping for CI FS allows users to connect from the I nternet and use program s like Windows Explorer to access the NAS’s shares to copy files from the NAS, delete files on the NAS, or upload files to the NAS from the I nternet .
I f you configure UPnP port mapping to allow CI FS access from the WAN but cannot get it to work, you may also have to configure the I nternet gateway to also allow NetBI OS t raffic. See Sect ion 16.3 on page 205 for m ore on CI FS.
FTP
File Transfer Protocol is a standard file t ransfer service used on the I nternet . Using UPnP port m apping for FTP allows rem ote users to use FTP from the I nternet to access the NAS’s shares. A user with read and write access to a share can copy files from the share, delete files from the share, or upload files to the share. See Sect ion 17.4 on page 215 for m ore on FTP. I f you use UPnP to allow FTP access from the WAN, you m ay want to use a different WAN port num ber ( instead of the default of port 21) to m ake it m ore secure. Rem em ber to tell the rem ote users to use the custom port num ber when using FTP to access the NAS.
HTTP (Web Configurator)
You can use UPnP port m apping to allow access to the NAS’s managem ent screens. I f you use UPnP to allow web configurator access from the WAN, you may want to use a different WAN port num ber ( instead of the default of port 80) to make it m ore secure. Remember to use the custom port num ber when accessing the NAS’s web configurator from the I nternet .
192.168.1.34
a.b.c.d
192.168.1.33
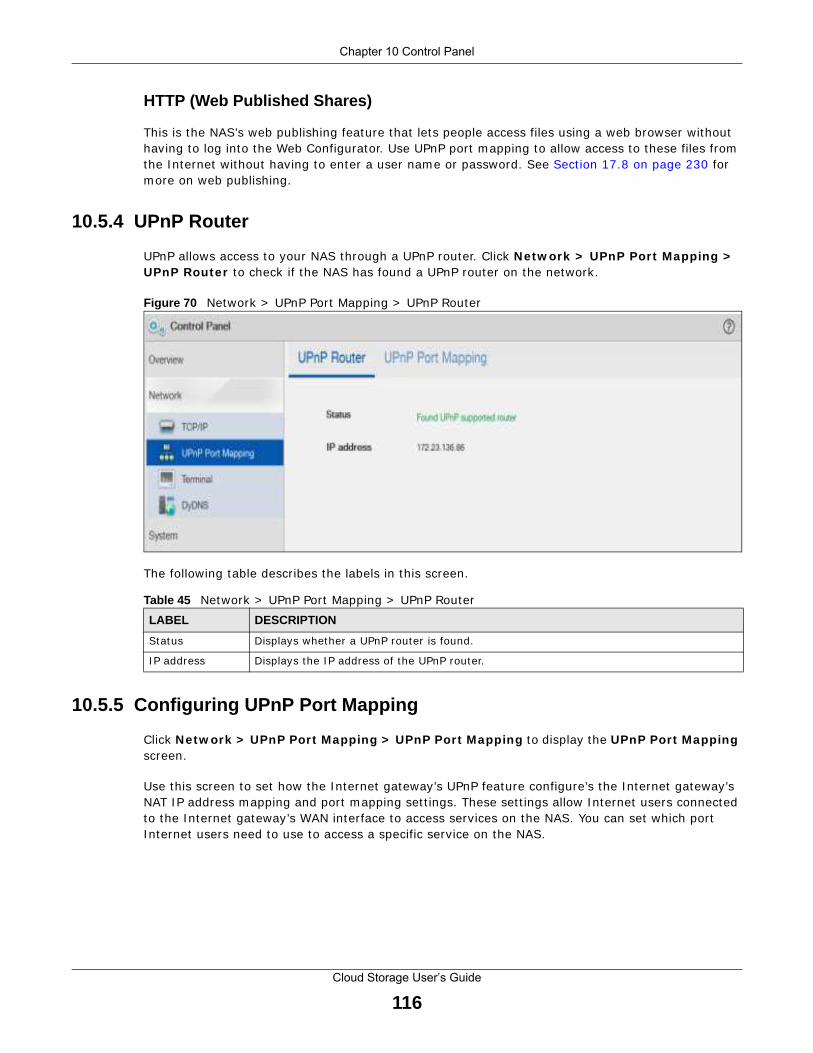
Chapter 10 Control Panel
Cloud Storage User’s Guide
116
HTTP (Web Published Shares)
This is the NAS’s web publishing feature that lets people access files using a web browser without having to log into the Web Configurator. Use UPnP port mapping to allow access to these files from the I nternet without having to enter a user nam e or password. See Sect ion 17.8 on page 230 for more on web publishing.
10.5.4 UPnP Router
UPnP allows access to your NAS through a UPnP router. Click Netw ork > UPnP Por t Mapping > UPnP Router to check if the NAS has found a UPnP router on the network.
Figure 70 Network > UPnP Port Mapping > UPnP Router
The following table describes the labels in this screen.
10.5.5 Configuring UPnP Port Mapping
Click Netw ork > UPnP Port Mapping > UPnP Port Mapping to display the UPnP Port Mapping screen.
Use this screen to set how the I nternet gateway’s UPnP feature configure’s the I nternet gateway’s NAT I P address mapping and port m apping set t ings. These set t ings allow I nternet users connected to the I nternet gateway’s WAN interface to access services on the NAS. You can set which port I nternet users need to use to access a specific service on the NAS.
Table 45 Network > UPnP Port Mapping > UPnP Router
LABEL DESCRIPTION
Status Displays whether a UPnP router is found.
I P address Displays the I P address of the UPnP router.

Chapter 10 Control Panel
Cloud Storage User’s Guide
117
Figure 71 Network > UPnP Port Mapping > UPnP Port Mapping
The following table describes the labels in this screen.
Table 46 Network > UPnP Port Mapping > UPnP Port Mapping
LABEL DESCRIPTION
Add Click this to add a service and create a port m apping rule.
See m ore details on Sect ion 10.5.5.1 on page 118.
Rem ove Click this to open the following screen where you can rem ove a port m apping rule.
Click Yes to rem ove the selected port m apping rule or No to close this screen.
Enabled/ Disabled Use this to enable or disable a selected port m apping rule.
Status Displays the status of the port mapping rule. A green circle indicates the port m apping rule is enabled and you can access the service. A grey circle indicates the port m apping rule is disabled. A red circle indicates the router ’s set t ings failed to be changed. “ - ” indicates a new m apping rule.
Service This read-only field ident ifies a service on the NAS.
LAN Port Displays the NAS’s internal port num ber for the service.
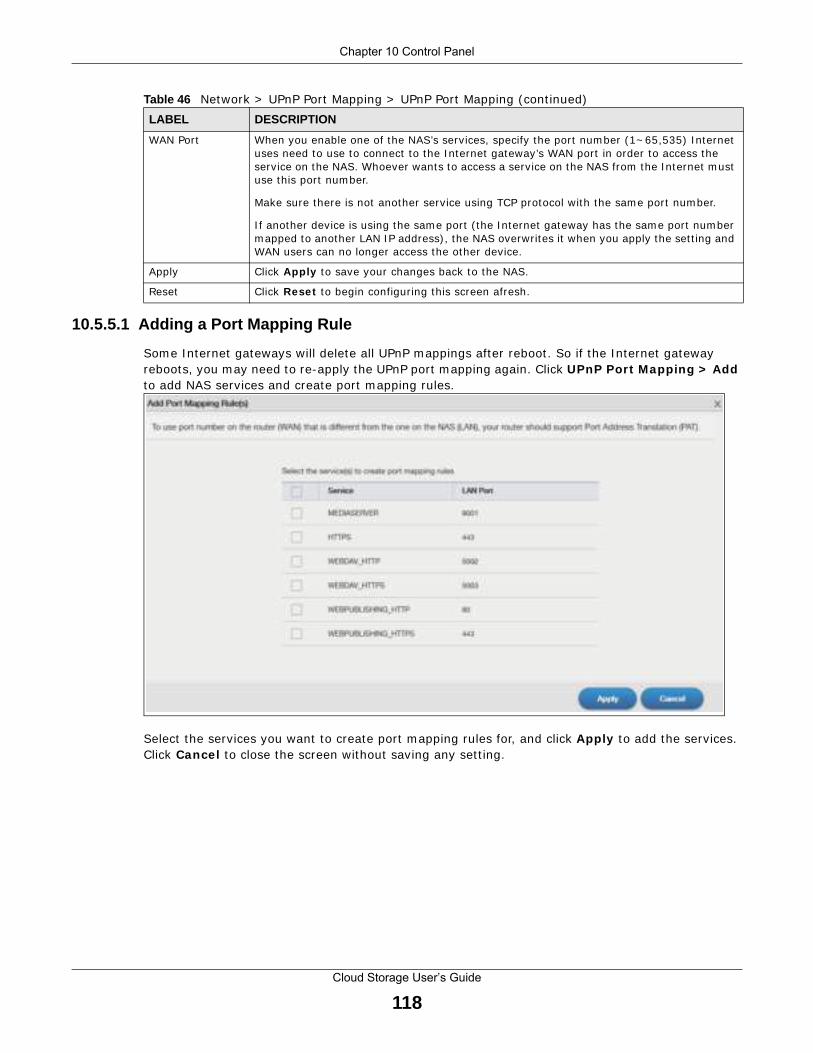
Chapter 10 Control Panel
Cloud Storage User’s Guide
118
10.5.5.1 Adding a Port Mapping Rule
Som e I nternet gateways will delete all UPnP m appings after reboot . So if the I nternet gateway reboots, you m ay need to re-apply the UPnP port m apping again. Click UPnP Port Mapping > Add to add NAS services and create port m apping rules.
Select the services you want to create port m apping rules for, and click Apply to add the services. Click Cancel to close the screen without saving any set t ing.
WAN Port When you enable one of the NAS’s services, specify the port num ber (1~ 65,535) I nternet uses need to use to connect to the I nternet gateway’s WAN port in order to access the service on the NAS. Whoever wants to access a service on the NAS from the I nternet m ust use this port num ber.
Make sure there is not another service using TCP protocol with the sam e port num ber.
I f another device is using the sam e port ( the I nternet gateway has the sam e port num ber m apped to another LAN I P address) , the NAS overwrites it when you apply the set t ing and WAN users can no longer access the other device.
Apply Click Apply to save your changes back to the NAS.
Reset Click Reset to begin configuring this screen afresh.
Table 46 Network > UPnP Port Mapping > UPnP Port Mapping (cont inued)
LABEL DESCRIPTION

Chapter 10 Control Panel
Cloud Storage User’s Guide
119
Note: The default of the WAN port for the newly created service displays -1. Specify the port num ber from 1 to 65,535, or you cannot access that service from the I nternet .
10.6 Terminal Screen
Use this screen to enable or disable Telnet and SSH (Secure SHell) access to the NAS.
Telnet or SSH access lets you use line com m ands to configure the NAS. Use these com m ands at your own r isk. The vendor takes no responsibility for any changes you m ake using the com m ands.
Click Cont rol Panel > Netw ork > Term inal in the navigat ion panel to open the following screen.
Figure 72 Control Panel > Network > Term inal
Chapter 10 Control Panel
Cloud Storage User’s Guide
120
The following table describes the labels in this screen.
10.7 DyDNS Screen
Use this to enable and configure Dynam ic DNS.
Dynam ic DNS (DyDNS) allows you to update your current dynam ic I P address with a dynam ic DNS service so that anyone can contact you (such as through NetMeet ing or CUSeeMe) . You can also access your FTP server or Web site on your own com puter using a dom ain nam e ( for instance myhost .dhs.org, where myhost is a nam e of your choice) that will never change instead of using an I P address that changes each t im e you reconnect . Your fr iends or relat ives will always be able to call you even if they don't know your I P address.
Click Cont rol Panel > Netw ork > DyDNS to open the following screen.
Table 47 Control Panel > Network > Term inal
LABEL DESCRIPTION
Enable Telnet Service
Select this to enable Telnet access to the NAS. Clear it to not allow Telnet access to the NAS.
To use Telnet , log in as “adm in” or “ root ” and use the adm in password.
Enable SSH Service
Select this to enable SSH access to the NAS. Clear it to not allow SSH access to the NAS.
To use SSH, log in as “adm in” or “ root ” and use the adm in password.
Apply Click this to save your changes.
Reset Click this to restore previously saved set t ings.
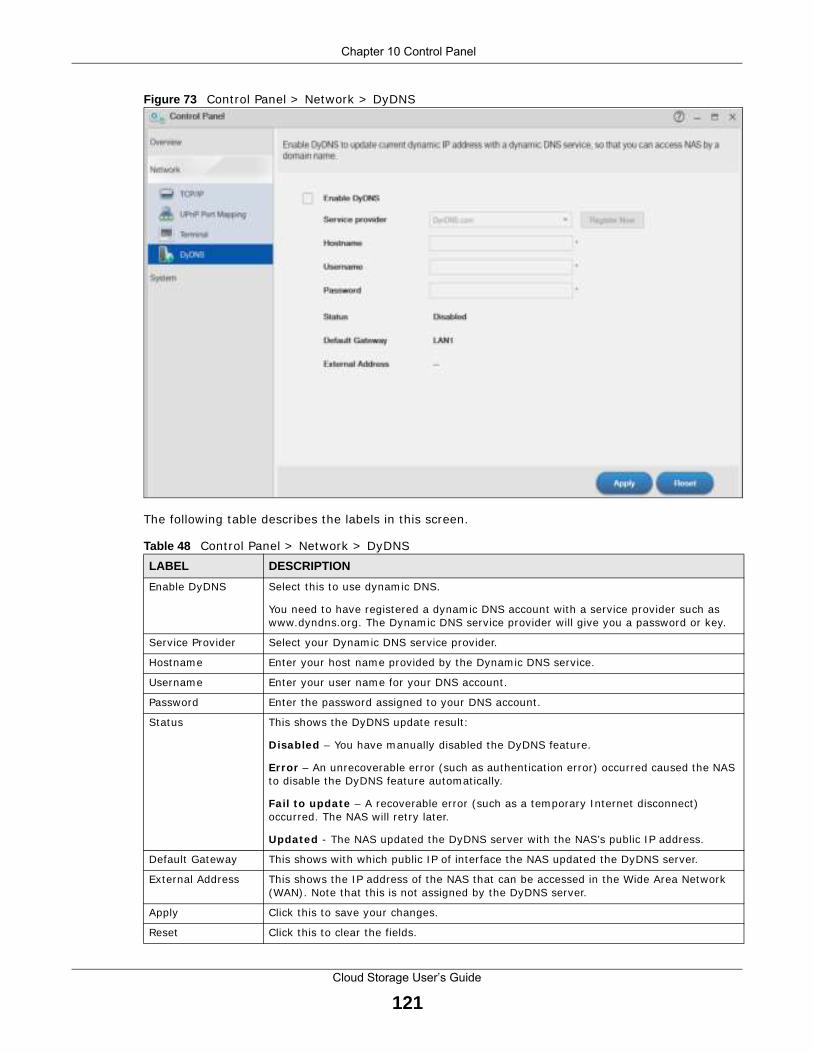
Chapter 10 Control Panel
Cloud Storage User’s Guide
121
Figure 73 Cont rol Panel > Network > DyDNS
The following table describes the labels in this screen.
Table 48 Control Panel > Network > DyDNS
LABEL DESCRIPTION
Enable DyDNS Select this to use dynam ic DNS.
You need to have registered a dynam ic DNS account with a service provider such as www.dyndns.org. The Dynam ic DNS service provider will give you a password or key.
Service Provider Select your Dynam ic DNS service provider.
Hostnam e Enter your host nam e provided by the Dynam ic DNS service.
Usernam e Enter your user nam e for your DNS account .
Password Enter the password assigned to your DNS account .
Status This shows the DyDNS update result :
Disabled – You have m anually disabled the DyDNS feature.
Error – An unrecoverable error (such as authent icat ion error) occurred caused the NAS to disable the DyDNS feature autom at ically.
Fail to update – A recoverable error (such as a tem porary I nternet disconnect ) occurred. The NAS will ret ry later.
Updated - The NAS updated the DyDNS server with the NAS’s public I P address.
Default Gateway This shows with which public I P of interface the NAS updated the DyDNS server.
External Address This shows the I P address of the NAS that can be accessed in the Wide Area Network (WAN) . Note that this is not assigned by the DyDNS server.
Apply Click this to save your changes.
Reset Click this to clear the fields.

Chapter 10 Control Panel
Cloud Storage User’s Guide
122
10.8 FW Upgrade Screen
Use this screen to upgrade the NAS firmware. You should first have downloaded the latest firmware files from the ZyXEL website.
Do not turn off the NAS while it is upgrading the firmware or you may render it unusable.
Click Cont rol Panel > System > FW Upgrade to open the following screen. Latest Firm w are Check allows you to check the latest firmware version and perform the upgrade.
Figure 74 Cont rol Panel > System > FW Upgrade > Latest Firmware Check
The following table describes the labels in this screen.
Table 49 Control Panel > System > FW Upgrade > Latest Firmware Check
LABEL DESCRIPTION
Model Nam e Displays the model name of you NAS
Current Firm ware Version
Displays the current firm ware version of your NAS
Last Check Displays the last checking t ime. I f no, it is blank.
Check Now Click this to check ZyXEL’s server for updated firm ware.
Periodically Check for Latest Firm ware Automat ically
Select this to have the NAS regular ly check ZyXEL’s server for updated firm ware. The NAS not ifies you at login if a new firm ware is available.
Click Apply to save this field’s set t ing.
Status Displays the firm ware checking status or error m essages. I f there is no previous checking inform at ion, it displays - - .
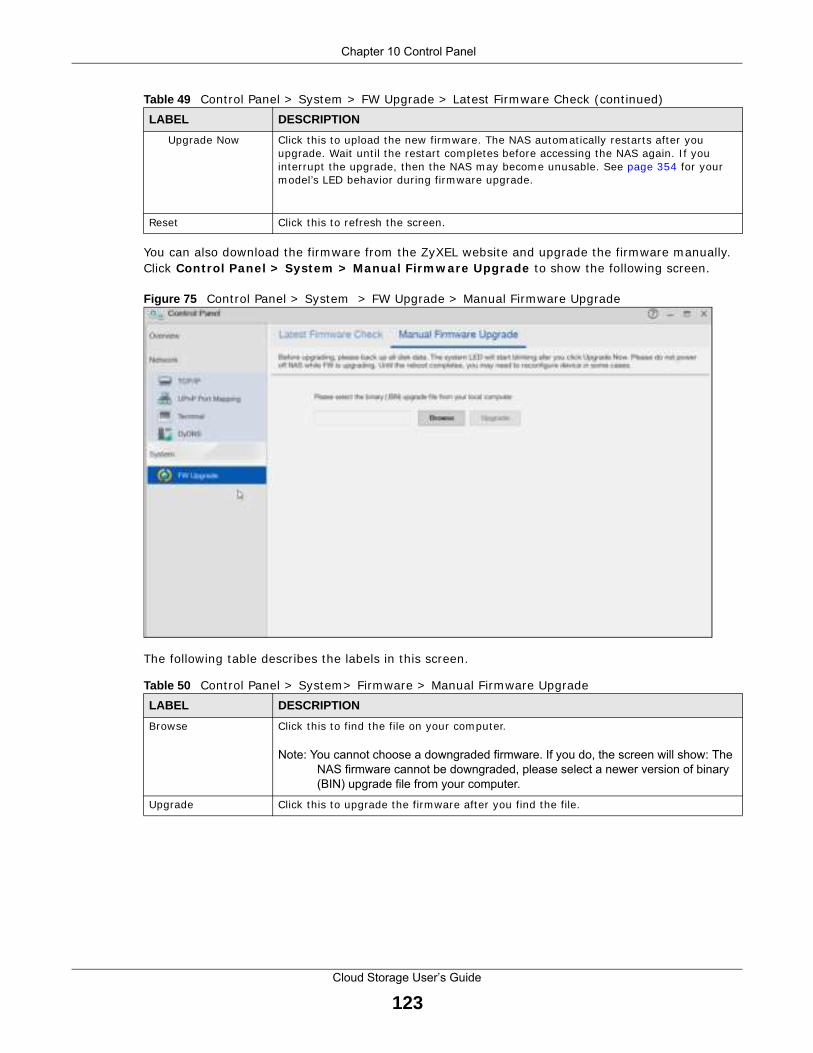
Chapter 10 Control Panel
Cloud Storage User’s Guide
123
You can also download the firmware from the ZyXEL website and upgrade the firmware manually. Click Cont rol Panel > System > Manual Firm w are Upgrade to show the following screen.
Figure 75 Cont rol Panel > System > FW Upgrade > Manual Firmware Upgrade
The following table describes the labels in this screen.
Upgrade Now Click this to upload the new firmware. The NAS autom at ically restarts after you upgrade. Wait unt il the restart completes before accessing the NAS again. I f you interrupt the upgrade, then the NAS m ay becom e unusable. See page 354 for your m odel’s LED behavior during firm ware upgrade.
Reset Click this to refresh the screen.
Table 50 Control Panel > System > Firmware > Manual Firmware Upgrade
LABEL DESCRIPTION
Browse Click this to find the file on your com puter.
Note: You cannot choose a downgraded firmware. If you do, the screen will show: The
NAS firmware cannot be downgraded, please select a newer version of binary
(BIN) upgrade file from your computer.
Upgrade Click this to upgrade the firmware after you find the file.
Table 49 Control Panel > System > FW Upgrade > Latest Firmware Check (cont inued)
LABEL DESCRIPTION

Cloud Storage User’s Guide
124
CHAPTER 11
Videos, Photos, Music, & File Browser
11.1 Overview
This chapter int roduces the File Brow ser , Photo , Music , Video , Media Server and the iTunes Server for sharing m edia files.
11.2 File Browser
Click File Brow ser on the Desktop to open the following screen in a new tab. Use the file browsing screens to play, open, upload, and download files. A share is a set of user access perm issions for a specific folder on a volum e (gives som eone access to a folder) . I t is equivalent to the Windows concept of a shared folder, but the access rights are independent of the folder (you configure the share and the folder separately) . You can m ap a share to a network dr ive for easy and fam iliar file t ransfer for Windows users.
• A folder icon with a hand indicates a share.
• The adm inist rator owns and manages the public shares.
• Double-click a m edia file to open it . Double-click other types of files to be able to save them .
• Click to the r ight of a file or folder nam e to select it .
• Use the [ SHI FT] key to select a range of ent r ies. Hold down the [ CTRL] key to select m ult iple individual ent r ies.
• Drag and drop files to open a screen that lets you choose whether to copy or m ove them .
• You can upload files of up to 2 GB in size.
• You can download individual files of up to 4 GB in size with Mozilla Firefox and I nternet Explorer 7 and later or up to 2 GB in size with I nternet Explorer 6.
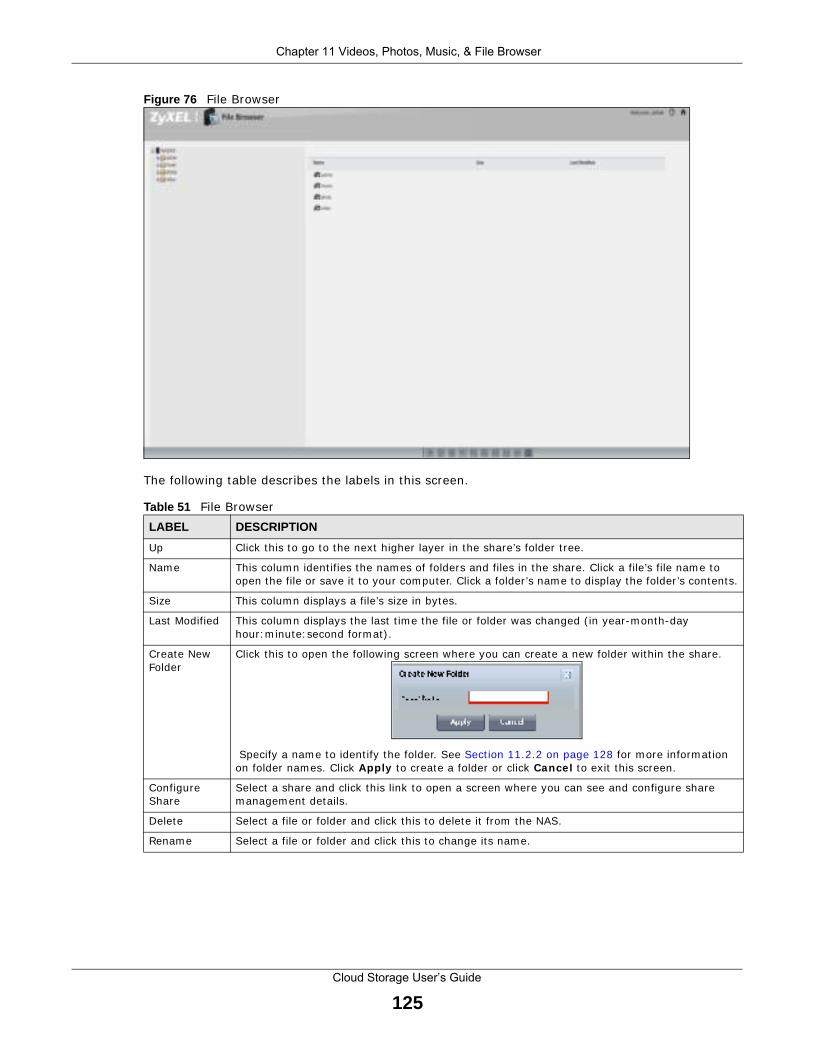
Chapter 11 Videos, Photos, Music, & File Browser
Cloud Storage User’s Guide
125
Figure 76 File Browser
The following table describes the labels in this screen.
Table 51 File Browser
LABEL DESCRIPTION
Up Click this to go to the next higher layer in the share’s folder t ree.
Nam e This colum n ident if ies the nam es of folders and files in the share. Click a file’s file nam e to open the file or save it to your com puter. Click a folder ’s nam e to display the folder ’s contents.
Size This colum n displays a file’s size in bytes.
Last Modified This colum n displays the last t im e the file or folder was changed ( in year-m onth-day hour: m inute: second form at ) .
Create New Folder
Click this to open the following screen where you can create a new folder within the share.
Specify a nam e to ident ify the folder. See Sect ion 11.2.2 on page 128 for m ore inform at ion on folder names. Click Apply to create a folder or click Cancel to exit this screen.
Configure Share
Select a share and click this link to open a screen where you can see and configure share m anagem ent details.
Delete Select a file or folder and click this to delete it from the NAS.
Renam e Select a file or folder and click this to change its name.

Chapter 11 Videos, Photos, Music, & File Browser
Cloud Storage User’s Guide
126
11.2.1 Configure Share Screen
I n the File Brow ser screen, select a share and click Configure Share to open the following screen where you can see and configure share managem ent details.
Upload Click this to open the following screen where you can add files to the share.
Use the Brow se but ton to locate your file/ s and click Apply to upload the file. Click Cancel to close this screen.
Note: Do not refresh the screen while an upload is going on.
Download Select a file and click this to save the file to your com puter.
Note: Do not refresh the screen while a download is going on.
Com press Select files or folders and click this to com press them into a zip file.
Decom press Select a zipped file and click this to create a folder nam ed after the zip file and save the decom pressed files into the folder.
Restore When you are in a recycle bin folder, select a folder or file and click this to restore it .
Refresh Click this to update the inform at ion displayed in the screen.
Note: Do not refresh the screen while an upload or download is in progress.
Table 51 File Browser (cont inued)
LABEL DESCRIPTION
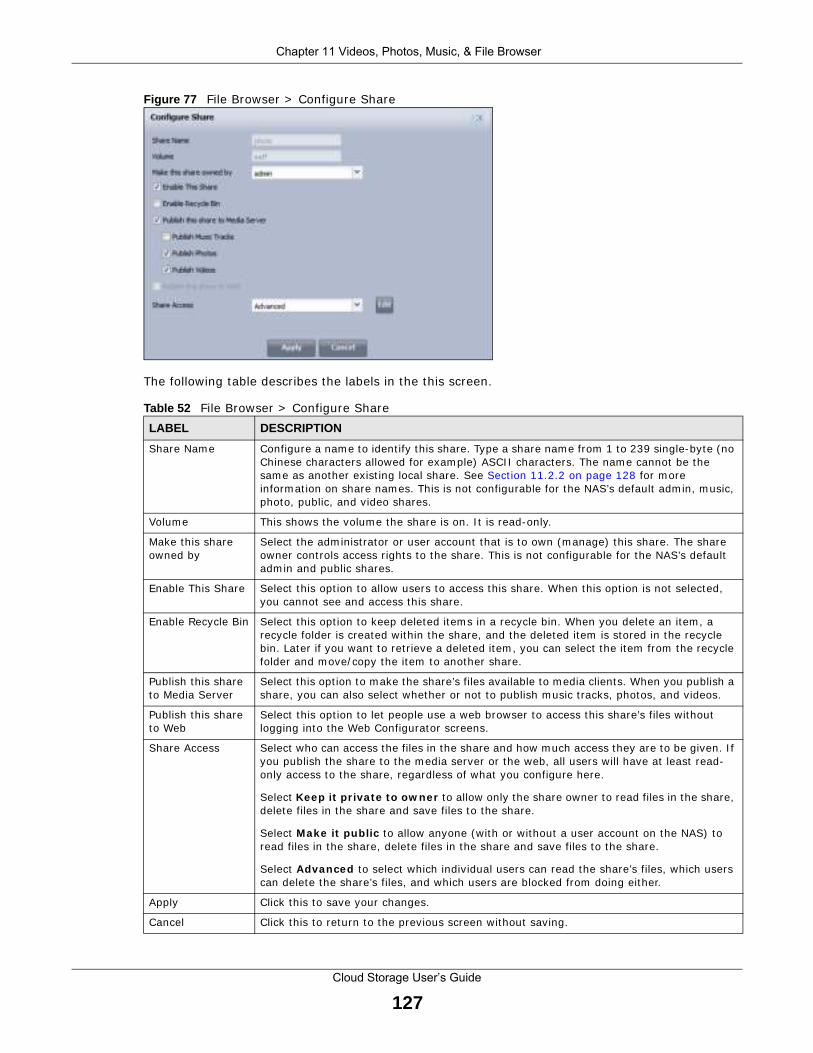
Chapter 11 Videos, Photos, Music, & File Browser
Cloud Storage User’s Guide
127
Figure 77 File Browser > Configure Share
The following table describes the labels in the this screen.
Table 52 File Browser > Configure Share
LABEL DESCRIPTION
Share Nam e Configure a nam e to ident ify this share. Type a share nam e from 1 to 239 single-byte (no Chinese characters allowed for exam ple) ASCI I characters. The nam e cannot be the sam e as another exist ing local share. See Sect ion 11.2.2 on page 128 for m ore inform at ion on share nam es. This is not configurable for the NAS’s default adm in, m usic, photo, public, and video shares.
Volum e This shows the volume the share is on. I t is read-only.
Make this share owned by
Select the adm inist rator or user account that is to own (m anage) this share. The share owner cont rols access r ights to the share. This is not configurable for the NAS’s default adm in and public shares.
Enable This Share Select this opt ion to allow users to access this share. When this opt ion is not selected, you cannot see and access this share.
Enable Recycle Bin Select this opt ion to keep deleted item s in a recycle bin. When you delete an item , a recycle folder is created within the share, and the deleted item is stored in the recycle bin. Later if you want to ret r ieve a deleted item , you can select the item from the recycle folder and m ove/ copy the item to another share.
Publish this share to Media Server
Select this opt ion to make the share’s files available to m edia clients. When you publish a share, you can also select whether or not to publish m usic t racks, photos, and videos.
Publish this share to Web
Select this opt ion to let people use a web browser to access this share’s files without logging into the Web Configurator screens.
Share Access Select who can access the files in the share and how m uch access they are to be given. I f you publish the share to the m edia server or the web, all users will have at least read-only access to the share, regardless of what you configure here.
Select Keep it pr iva te to ow ner to allow only the share owner to read files in the share, delete files in the share and save files to the share.
Select Make it public to allow anyone (with or without a user account on the NAS) to read files in the share, delete files in the share and save files to the share.
Select Advanced to select which individual users can read the share’s files, which users can delete the share’s files, and which users are blocked from doing either.
Apply Click this to save your changes.
Cancel Click this to return to the previous screen without saving.
Chapter 11 Videos, Photos, Music, & File Browser
Cloud Storage User’s Guide
128
11.2.2 Share and Folder Names
The nam e can only contain the following characters:
• Alphanumeric (A-z, 0-9) and Unicode.
The NAS allows FTP access to shares, folders or files with nam es encoded in the UTF-8 (8-bit UCS/ Unicode Transformat ion Form at ) format . So your FTP client m ust support UTF-8 in order to access shares, folders or files on the NAS with Unicode nam es.
• Spaces
• _ [ underscores]
• . [ periods]
• - [ dashes]
Other lim itat ions include:
• All leading and t railing spaces are removed automat ically.
• Mult iple spaces within names are converted to a single space.
• Share nam es m ust be unique ( they cannot be the sam e as other share nam es) .
• The NAS creates autom at ic volum e nam es for external (USB) disk volum es. These are a type of share, so the share nam e you configure cannot conflict with the external (USB) disk volum e names. “ExtVol1” or “ExtVol2” are examples of external (USB) disk volume nam es.
• Folder nam es m ust be unique ( they cannot be the sam e as other folder nam es) .
• The m inimum character length of a nam e is one character, that is a name cannot be blank.
• The m axim um character length of share nam e is 239 characters.
• Unicode is supported for share nam es, although your FTP client must support UTF-8. Full support should be available in all Windows versions after Windows 2000.
11.3 Photo
Click the Photo icon on the Desktop to open the photo folder in a new tab. Double-click the photo folder to view photos in the shares that publish photos. The following figures show the files as thum bnail and list views of files.

Chapter 11 Videos, Photos, Music, & File Browser
Cloud Storage User’s Guide
129
Figure 78 Photo (Thum bnail)
Figure 79 Photo (List )
A
C
B
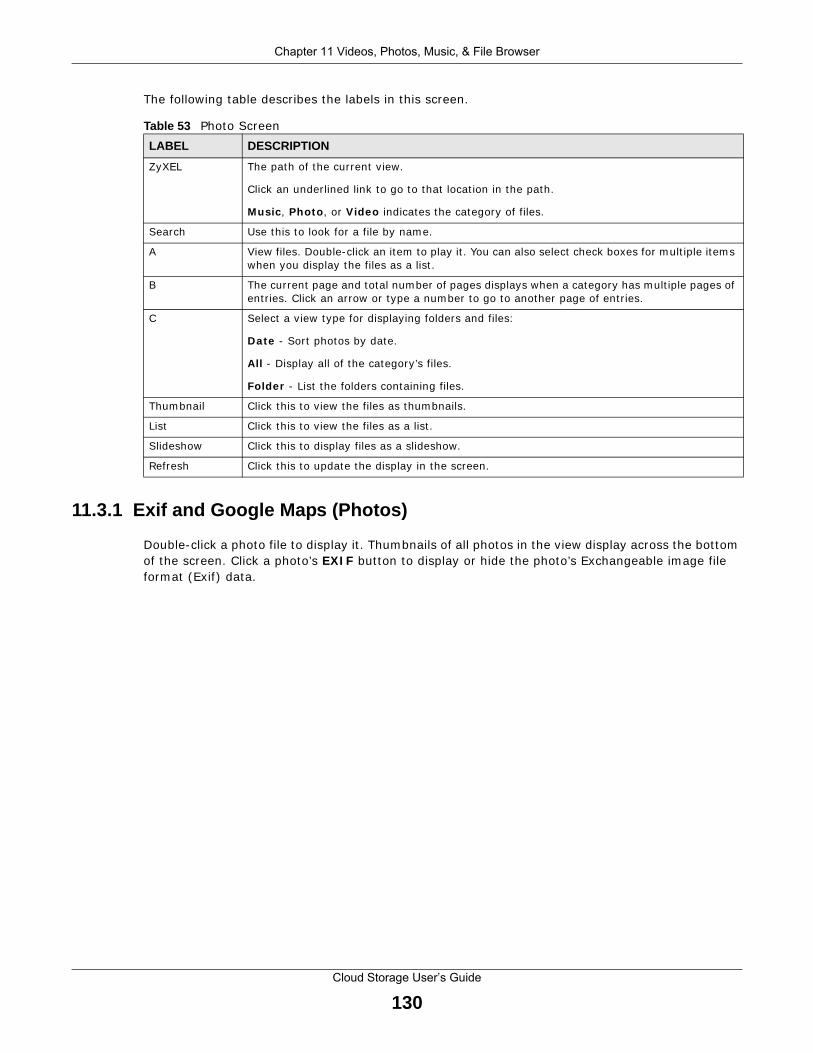
Chapter 11 Videos, Photos, Music, & File Browser
Cloud Storage User’s Guide
130
The following table describes the labels in this screen.
11.3.1 Exif and Google Maps (Photos)
Double-click a photo file to display it . Thum bnails of all photos in the view display across the bot tom of the screen. Click a photo’s EXI F but ton to display or hide the photo’s Exchangeable im age file form at (Exif ) data.
Table 53 Photo Screen
LABEL DESCRIPTION
ZyXEL The path of the current view.
Click an underlined link to go to that locat ion in the path.
Music , Photo , or Video indicates the category of files.
Search Use this to look for a file by nam e.
A View files. Double-click an item to play it . You can also select check boxes for m ult iple item s when you display the files as a list .
B The current page and total num ber of pages displays when a category has m ult iple pages of ent r ies. Click an arrow or type a num ber to go to another page of ent r ies.
C Select a view type for displaying folders and files:
Date - Sort photos by date.
All - Display all of the category’s files.
Folder - List the folders containing files.
Thum bnail Click this to view the files as thum bnails.
List Click this to view the files as a list .
Slideshow Click this to display files as a slideshow.
Refresh Click this to update the display in the screen.

Chapter 11 Videos, Photos, Music, & File Browser
Cloud Storage User’s Guide
131
Figure 80 Exif I nform at ion
I f a photo’s Exif data includes GPS locat ion data, click the lat itude or longitude link to display the locat ion in Google Maps. Click Clear to delete the m arkers of other photos and only display the current photo’s m arker.
Figure 81 Google Maps
11.3.2 Slideshow (Photos)
I n a Photo m enu click the SlideShow but ton to display the m enu’s files as a slideshow. Move your cursor over the slideshow’s screen to display full screen, previous, pause, and next but tons for cont rolling the slideshow.

Chapter 11 Videos, Photos, Music, & File Browser
Cloud Storage User’s Guide
132
Note: Your browser m ust have the Flash Player plug- in installed to view slideshows.
Figure 82 Slideshow
11.4 Music
Click the Music icon on the Desktop to open the music folder in a new tab. Double-click the music folder to view and play m usic files in the shares that publish photos. The following figures show thum bnail and list views of files.

Chapter 11 Videos, Photos, Music, & File Browser
Cloud Storage User’s Guide
133
Figure 83 Music (Thum bnail)
Figure 84 Music (List )
A
C
A
B

Chapter 11 Videos, Photos, Music, & File Browser
Cloud Storage User’s Guide
134
This table describes common labels in the Playzone media server screens. Not every item displays in every screen.
11.4.1 Now Playing (Music)
A Now Playing link displays when a song is playing. Click it to display a panel like the following. This screen displays the nam e of the current song and it ’s play progress and lets you cont rol the playback.
Figure 85 Now Playing
11.5 Video
Click the Video icon on the Desktop to open the video folder in a new tab. Double-click the video folder to view and play video files in the shares that publish videos. The following figures show the thum bnail and list views of files.
Table 54 Music Screen
LABEL DESCRIPTION
ZyXEL The path of the current view.
Click an underlined link to go to that locat ion in the path.
Music , Photo , or Video indicates the category of files.
Search Use this to look for a file by nam e.
A View files. Double-click an item to play it . You can also select check boxes for m ult iple item s when you display the files as a list .
B The current page and total num ber of pages displays when a category has m ult iple pages of ent r ies. Click an arrow or type a num ber to go to another page of ent r ies.
C Select a view type for displaying folders and files:
Art ist - Sort m usic by art ist .
All - Display all of the category’s files.
Folder - List the folders containing music files.
Current Playlist - Show the playing and queued songs.
Thum bnail Click this to view the files as thum bnails.
List Click this to view the files as a list .
Play Click this to play the current ly selected file. You can also double-click a file to play it .
Add to Current Playlist
Click this to add the selected music file to the current ly playing playlist .
Refresh Click this to update the display in the screen.
Now Playing This link is available when a song is playing. Click it to see details about the song that is current ly playing.

Chapter 11 Videos, Photos, Music, & File Browser
Cloud Storage User’s Guide
135
Figure 86 Video (Thumbnail)
Figure 87 Video (List )
A
C
B
A
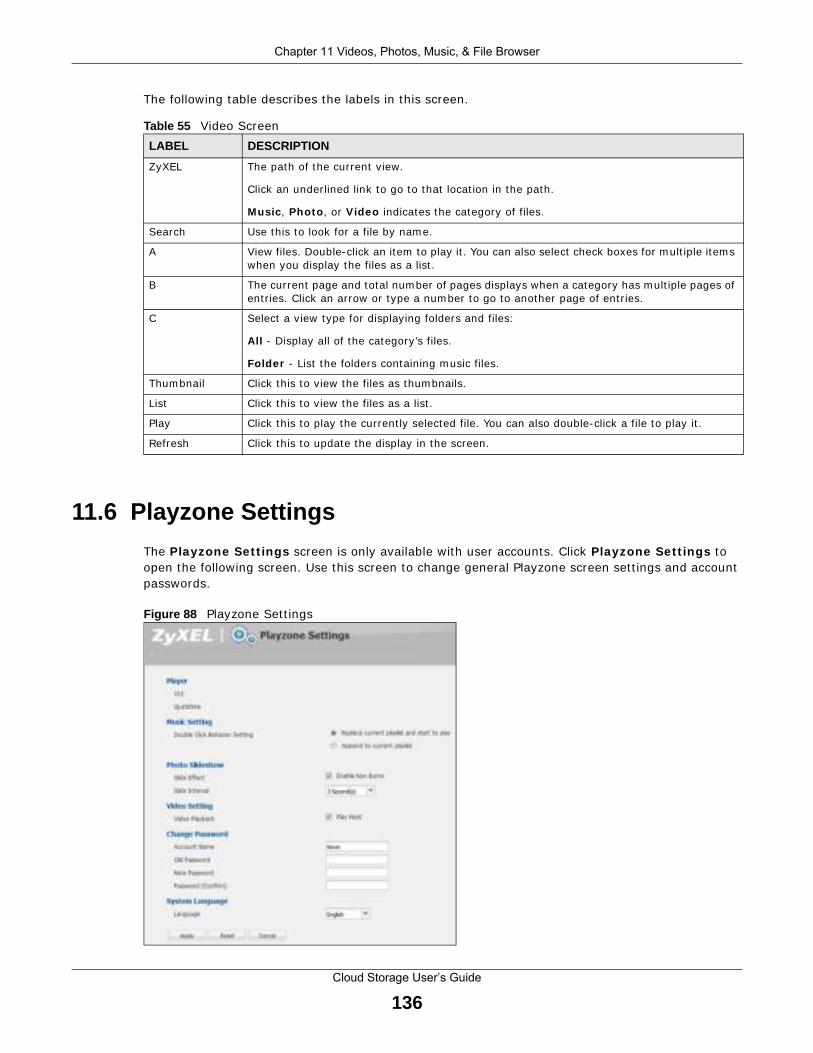
Chapter 11 Videos, Photos, Music, & File Browser
Cloud Storage User’s Guide
136
The following table describes the labels in this screen.
11.6 Playzone Settings
The Playzone Set t ings screen is only available with user accounts. Click Playzone Set t ings to open the following screen. Use this screen to change general Playzone screen set t ings and account passwords.
Figure 88 Playzone Set t ings
Table 55 Video Screen
LABEL DESCRIPTION
ZyXEL The path of the current view.
Click an underlined link to go to that locat ion in the path.
Music , Photo , or Video indicates the category of files.
Search Use this to look for a file by nam e.
A View files. Double-click an item to play it . You can also select check boxes for m ult iple item s when you display the files as a list .
B The current page and total num ber of pages displays when a category has m ult iple pages of ent r ies. Click an arrow or type a num ber to go to another page of ent r ies.
C Select a view type for displaying folders and files:
All - Display all of the category’s files.
Folder - List the folders containing music files.
Thum bnail Click this to view the files as thum bnails.
List Click this to view the files as a list .
Play Click this to play the current ly selected file. You can also double-click a file to play it .
Refresh Click this to update the display in the screen.

Chapter 11 Videos, Photos, Music, & File Browser
Cloud Storage User’s Guide
137
The following table describes the labels in this screen.
Table 56 Playzone Set t ings
LABEL DESCRIPTION
VLC This field displays you already have VLC player installed.
Quickt im e This field displays you already have Quickt im e installed.
Double Click Behavior Set t ing
Select Replace current playli st and star t to play to have double clicking a song cause the NAS to imm ediately stop any current ly playing song and start playing the double-clicked song.
Select Append to current playlist to have double clicking a song add a song to the end of the current playlist .
Slide Effect Enable the Ken Burns effect to have the NAS autom at ically pan and zoom photos in slideshows. Disable it to display photos in slideshows norm ally.
Slide I nterval Select how long to display each image in a slideshow before changing to the next .
Video Playback Select Play Next to play the rest of the video files in a folder. So for exam ple, a folder has video files 1~ 10 and you play video 3. When video 3 finishes the device cont inues playing the rest of the videos in the folder (4~ 10) . I t does not loop back and play videos 1 and 2.
Account Nam e Type the user name of the account for which you want to change the password.
Old Password Type the user ’s current password.
New Password Create a new password for the user. You can type from one to 14 single-byte (no Chinese characters allowed for example) ASCI I characters.
Password (Confirm ) You m ust type the exact sam e password that you just typed in the above field.
Language Select the web configurator language from the drop-down list box.
Apply Click this to save your changes.
Reset Click this to refresh the screen.
Cancel Click this to exit the screen without saving your changes.
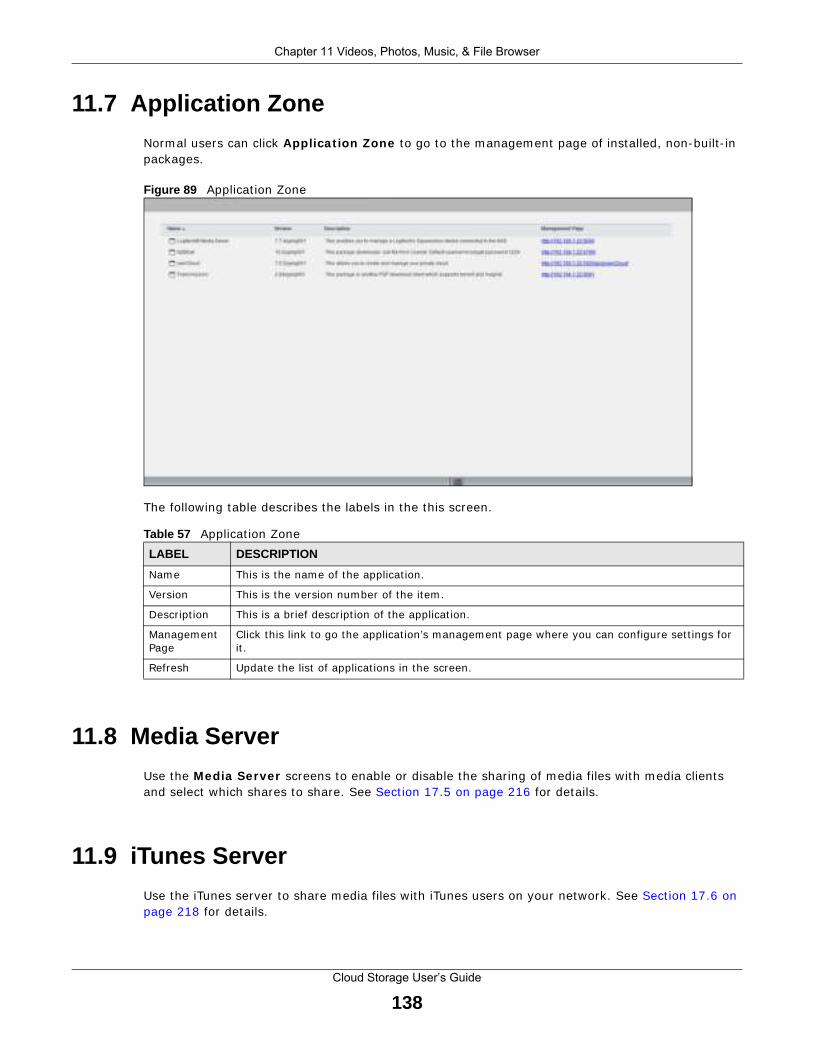
Chapter 11 Videos, Photos, Music, & File Browser
Cloud Storage User’s Guide
138
11.7 Application Zone
Norm al users can click Applicat ion Zone to go to the managem ent page of installed, non-built - in packages.
Figure 89 Applicat ion Zone
The following table describes the labels in the this screen.
11.8 Media Server
Use the Media Server screens to enable or disable the sharing of m edia files with m edia clients and select which shares to share. See Sect ion 17.5 on page 216 for details.
11.9 iTunes Server
Use the iTunes server to share media files with iTunes users on your network. See Sect ion 17.6 on page 218 for details.
Table 57 Applicat ion Zone
LABEL DESCRIPTION
Nam e This is the nam e of the applicat ion.
Version This is the version number of the item .
Descript ion This is a br ief descript ion of the applicat ion.
Managem ent Page
Click this link to go the applicat ion’s managem ent page where you can configure set t ings for it .
Refresh Update the list of applicat ions in the screen.

Cloud Storage User’s Guide
139
CHAPTER 12
Administrator
12.1 Overview
This chapter describes how to access the adm inist rator screens and provides an overview of its screens.
12.2 Administrator Screens
The Desktop screen displays an Adm inist ra tor icon when you log in with an adm inist rator account . Click it to open the administ rator configurat ion screens in a new tab. The Status screen displays first . See Chapter 15 on page 203 for more inform at ion about the Status screen.
Figure 90 Status
12
3
4
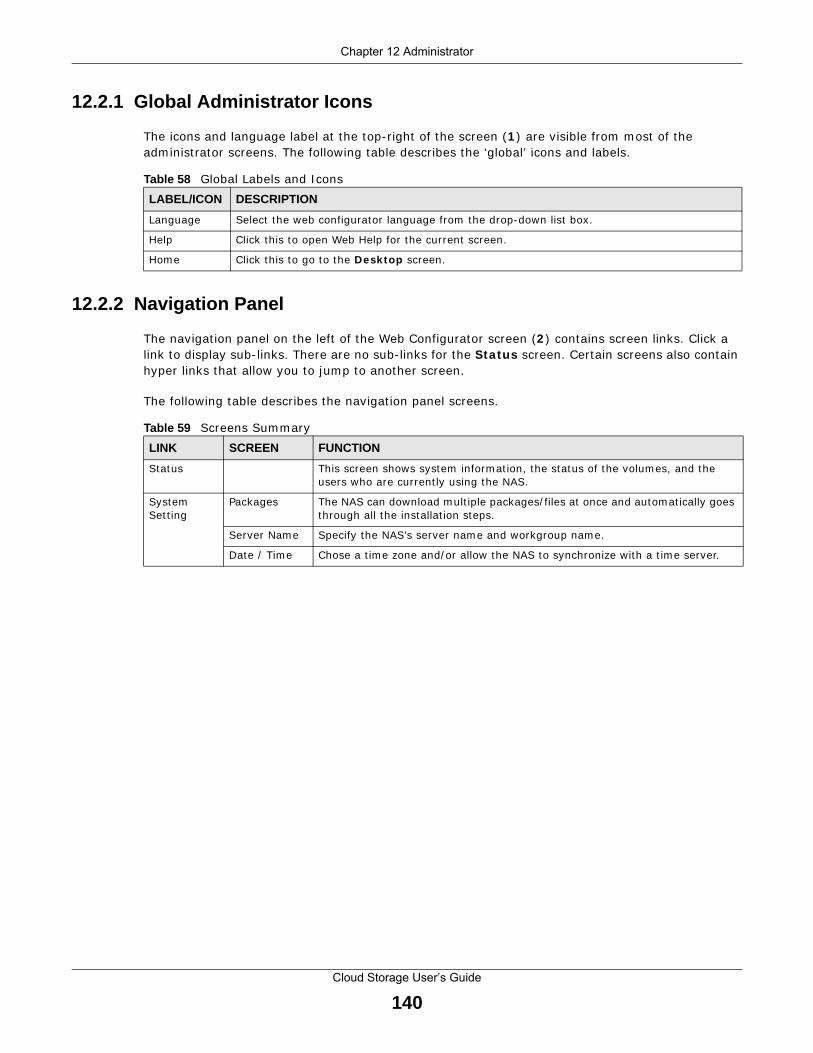
Chapter 12 Administrator
Cloud Storage User’s Guide
140
12.2.1 Global Administrator Icons
The icons and language label at the top- r ight of the screen (1 ) are visible from most of the adm inist rator screens. The following table describes the ‘global’ icons and labels.
12.2.2 Navigation Panel
The navigat ion panel on the left of the Web Configurator screen (2 ) contains screen links. Click a link to display sub- links. There are no sub- links for the Sta tus screen. Certain screens also contain hyper links that allow you to jum p to another screen.
The following table describes the navigat ion panel screens.
Table 58 Global Labels and I cons
LABEL/ICON DESCRIPTION
Language Select the web configurator language from the drop-down list box.
Help Click this to open Web Help for the current screen.
Hom e Click this to go to the Desktop screen.
Table 59 Screens Sum m ary
LINK SCREEN FUNCTION
Status This screen shows system inform at ion, the status of the volumes, and the users who are current ly using the NAS.
System Set t ing
Packages The NAS can download m ult iple packages/ files at once and autom at ically goes through all the installat ion steps.
Server Nam e Specify the NAS’s server nam e and workgroup nam e.
Date / Time Chose a t im e zone and/ or allow the NAS to synchronize with a t im e server.

Chapter 12 Administrator
Cloud Storage User’s Guide
141
Applicat ions FTP Server Enable FTP file t ransfer to/ from the NAS, set the number of FTP connect ions allowed, an FTP idle t im eout , and the character set .
Media Server Enable or disable the sharing of m edia files and select which shares to share.
iTunes Server Use the iTunes server to share m edia files with iTunes users on your network.
Download Service
Have the NAS handle large file downloads.
Web Publishing
Let people use a web browser to access files in shares without logging into the Web Configurator.
Print Server View and m anage the NAS’s list of pr inters and pr int jobs.
Copy/ Sync But ton
Copy or synchronize files between a USB device and the NAS.
Auto Upload - Flickr/ YouTube
Upload files in selected shares to your Flickr and/ or YouTube accounts.
Auto Upload - FTP Uploadr
Upload files in selected shares to FTP servers.
Dropbox Use your Dropbox account to easily m ove files to your NAS and have the NAS download * .torrent files.
Tim e Machine Use Tim e Machine in OS X to use your NAS as a backup volum e.
Mem opal Back up files from the NAS to your Mem opal account .
GoogleDriveClient
Use GoogleDriveClient to synchronize local user folders on the NAS with Google Drive cloud storage accounts.
Syslog Server Enable the syslog server and select the categories to include in the log report .
TFTP Server Configure the NAS to accept log files from TFTP clients.
pyLoad Configure the NAS to use pyLoad to manage your downloads, including those from one-click host ing sites.
Sharing Users View, create and edit adm inist rator and user accounts to let people use the NAS.
Groups View, create and edit groups. Groups allow you to organize users into specific groups. You can create shares accessible only by the group m em bers.
Shares View, create and edit shares. Shares are shared folders to which you can allow specific users read/ write access r ights.
WebDAV Allow rem ote users to use client program s that support WebDAV to edit and m anage files stored on the NAS
Maintenance Power Configure power saving set t ings for the NAS and have the NAS turn itself off and on or reboot according to the schedules you configure.
Log View the NAS’s logs and configure how you want to receive the log reports.
Configurat ion Back up and/ or restore the NAS configurat ion file.
SSL Configure HTTPS and the NAS’s SSL cert ificate.
Shutdown Restart the NAS or shut it down.
Unpair myZyXELcloud
Rem ove the pair ing between the NAS and the myZyXELcloud account .
Protect Backup Create and custom ize backup jobs.
Restore Restore previous backups m ade with the NAS.
Network NFS I nstall the NFS package to display this screen where you can configure NFS (Network File System ) file-sharing.
Table 59 Screens Sum m ary (cont inued)
LINK SCREEN FUNCTION

Chapter 12 Administrator
Cloud Storage User’s Guide
142
12.2.3 Main Window
The m ain window ( 3 ) shows the screen you select in the navigat ion panel. I t is discussed in the rest of this docum ent .
12.2.4 Status Messages
The Message text box at the bot tom of the screen ( 4 ) displays status messages as you configure the NAS.
12.2.5 Common Administrator Screen Icons
The following table explains som e icons that appear in several adm inist rator configurat ion screens.
12.2.6 Session Example (Windows)
Open Windows Explorer and type two back slashes followed by the NAS nam e or I P address. I nit ially you can only read and write to the Public , Video , Music , and Photo folders unt il you create other shares on the NAS. This session is then displayed as shown in the following figure.
Table 60 Comm on Adm inist rator Screen I cons
ICON DESCRIPTION
Edit
Click this to go to a screen where you can change the configurat ion set t ings of an ent ry.
Delete
Click this to delete an ent ry from the list .
Edit
Click this to jump to related item ’s configurat ion screen.
Refresh
Click this to refresh the data for the field or value with which it is associated.
User
See the chapter on user accounts for detailed inform at ion on variants of this icon.
Share
See the chapter on shares for detailed inform at ion on variants of this icon.
Healthy
This represents a healthy volum e.
Dow n
This represents a down volum e.
Scan Disk
Click this to scan a hard disk for file system errors.
Note: It is recommended to scan the volume every three months or 32 reboots.
Eject
Click this before you rem ove an external hard dr ive so that you do not lose data that is being t ransferred to or from that hard dr ive.
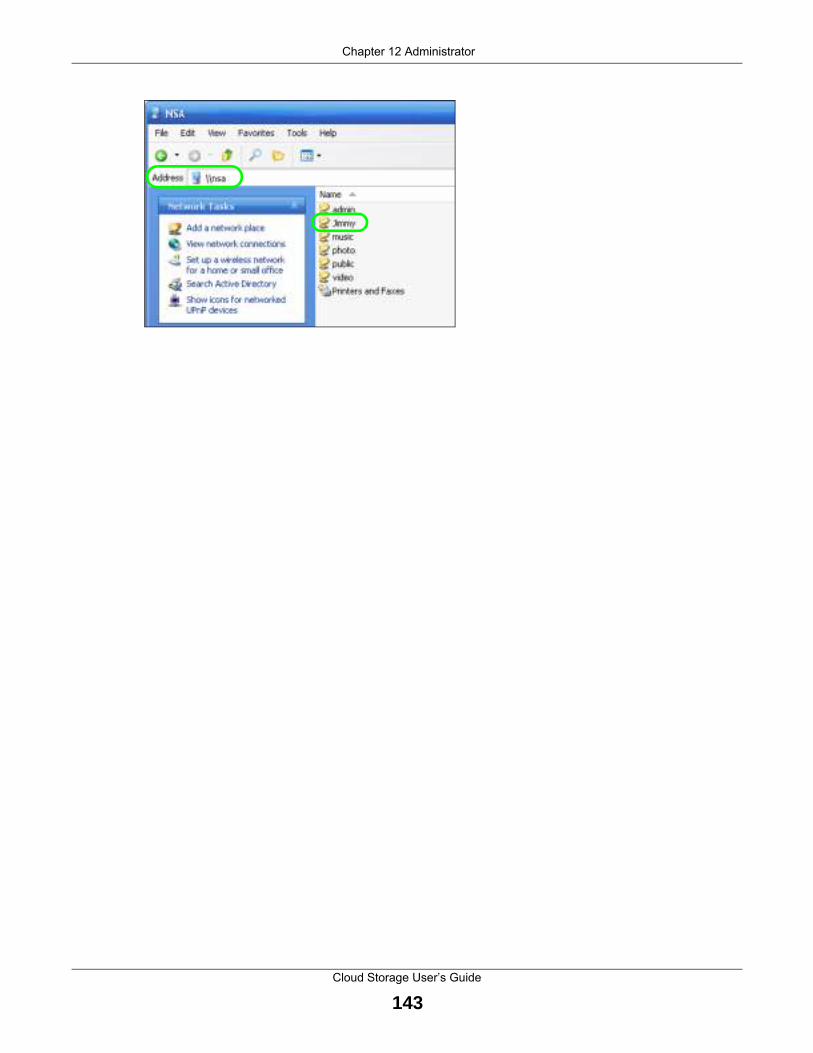
Chapter 12 Administrator
Cloud Storage User’s Guide
143
Session Example (Windows)

Cloud Storage User’s Guide
144
CHAPTER 13
Managing Packages
13.1 About Packages
Packages enhance the funct ions of your NAS. Your NAS supports various packages that let you do m ore. Your NAS com es with som e packages pre- installed. The Packages screen also includes a list of packages to add.
Note: Check what packages do before you install them . Only install packages you actually plan to use.
Note: Get support for each package through its individual vendor.
13.2 Managing Packages
I n the adm inist rator screens, click System Set t ing > Packages to install, rem ove, or upgrade packages. See Sect ion 16.4 on page 207 for details.
Figure 91 System Set t ing > Packages

Chapter 13 Managing Packages
Cloud Storage User’s Guide
145
13.3 Available Packages
Use packages to add the following applicat ions to the NAS.
• Use the NFS screen (Sect ion 18.3 on page 247) to configure the Network File System (NFS) set t ings of your NAS.
• Use the TFTP Server screen (Sect ion 18.4 on page 250) to configure the NAS to accept log files from TFTP clients.
• Use the pyLoad screen (Sect ion 18.5 on page 251) to use pyLoad manage your downloads including those from one-click host ing sites.
• Use ow nCloud (Sect ion 18.6 on page 251) to store, synchronize, and share files, photos, calendars, and m ore with com puters and m obile devices using an ownCloud client .
• Use Mem opal (Sect ion 18.3 on page 247) to back up files on the NAS to your Mem opal online backup and storage account .
• Use the GoogleDr iveClient screens (Sect ion 18.8 on page 256) to synchronize local NAS shares or folders and Google Drive accounts.
Access the following applicat ions’ configurat ion screens through the Package Managem ent screen. Refer to the applicat ions’ own docum entat ion for further inform at ion.
• Gallery - This web-based applicat ion allows your NAS to host pictures. You can upload im ages in your local com puter or shares to this applicat ion. Use the Gallery adm inist rator account (default username adm in, password 1234) to log into the Gallery console. There you can create accounts for other users.
• Use Logitech® Media Server (Sect ion 17.5.2 on page 218) to manage a Logitech Squeezebox device connected to the NAS.
• The NZBGet news grabber helps download files from UseNet .
• PHP- MySQL- phpMyAdm in can be used to m anage MySQL through the web. Enter 'root ' as the username and '1234' as the password to log in. This includes MySQL, PHP, and phpMyAdmin.
• Transm ission - This Bit Torrent client supports adding tasks through torrent files and m agnet links.
• W ordPress - This allows you to create and manage a blog. Use the WordPress adm inist rator account (default usernam e adm in, password 1234) to log in. You can then create accounts for other users.
• m yZyXELcloud- Agent - Use this to go to mycloud.zyxel.com to set up a free DDNS hostname for the NAS so you can connect to it easily from the I nternet .

Cloud Storage User’s Guide
146
CHAPTER 14
Tutorials
14.1 Overview
This chapter provides tutor ials that show how to use the NAS.
• Windows 7 Network, see page 146
• Windows 7 Network Map, see page 150
• Playing Media Files in Windows 7, see page 152
• Windows 7 Devices and Printers, see page 152
• File Sharing Tutorials, see page 155
• Download Service Tutorial, see page 162
• Copy and Flickr Auto Upload Tutorial, see page 173
• FTP Uploadr Tutorial, see page 174
• Web Configurator ’s Security Sessions, see page 177
• Using FTPES to Connect to the NAS, see page 188
• Using a Mac to Access the NAS, see page 189
• How to Use the BackupPlanner, see page 191
14.2 Windows 7 Network
To see your NAS in a Windows 7 hom e or work network:
1 Click Star t > Cont rol Panel. Set View by to Category and click Netw ork and I nternet .
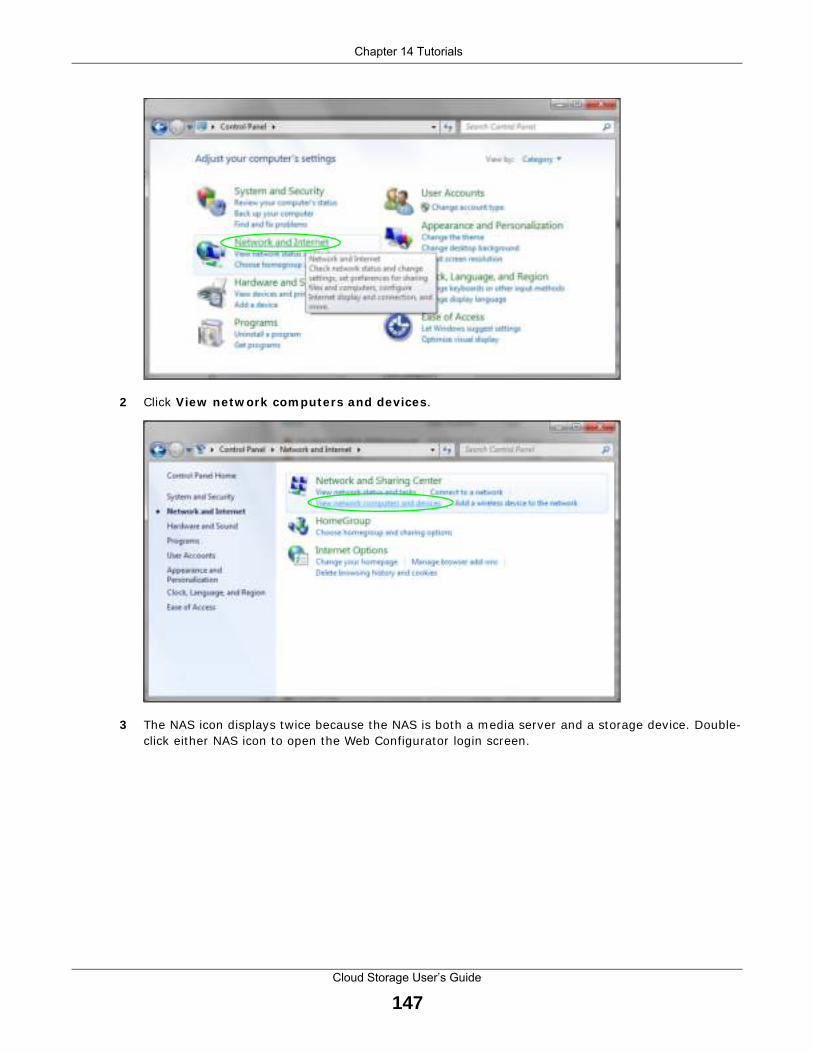
Chapter 14 Tutorials
Cloud Storage User’s Guide
147
2 Click View netw ork com puters and devices .
3 The NAS icon displays twice because the NAS is both a m edia server and a storage device. Double-click either NAS icon to open the Web Configurator login screen.

Chapter 14 Tutorials
Cloud Storage User’s Guide
148
14.2.1 If the NAS Icon Does Not DisplayThe network containing the NAS m ust be set as a home or work network in order for the NAS icons to display. I f the network containing the NAS displays as “Public” :
1 Click Netw ork and Shar ing Center and then the network’s link (circled in the figure) .
2 Use the Set Netw ork Locat ion screen to set the network’s locat ion to hom e or work.
EXAMPLE
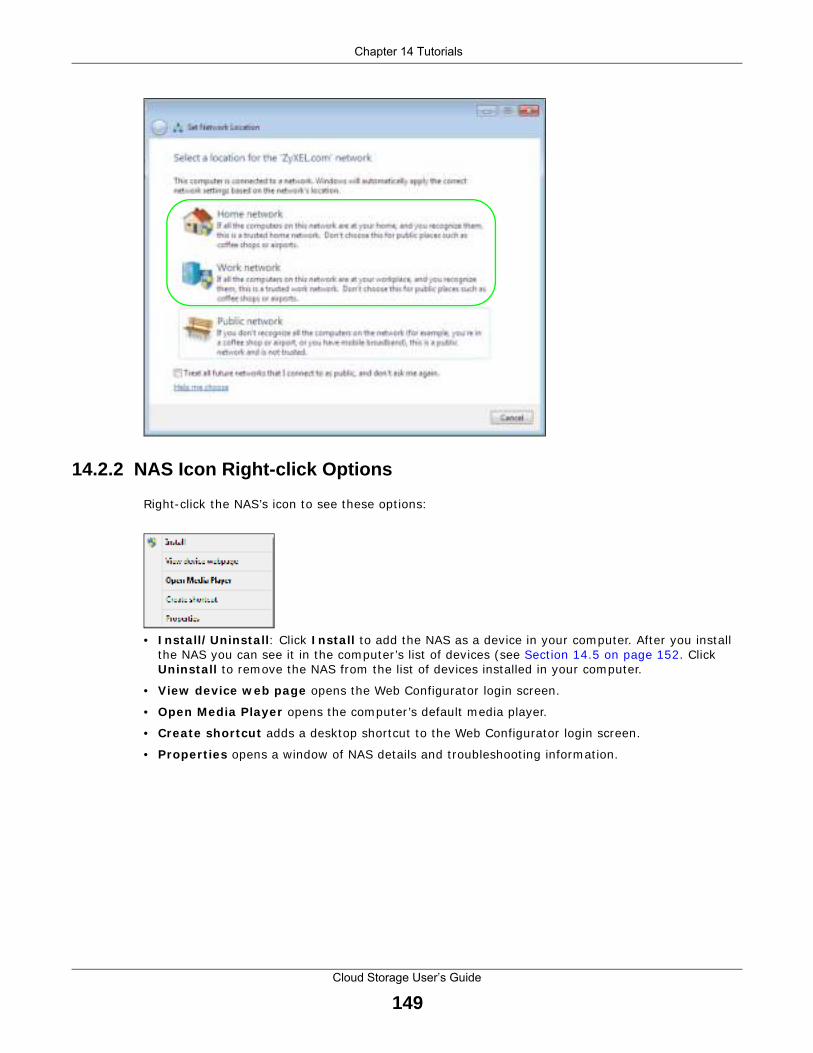
Chapter 14 Tutorials
Cloud Storage User’s Guide
149
14.2.2 NAS Icon Right-click Options
Right-click the NAS’s icon to see these opt ions:
• I nsta ll/ Uninsta ll : Click I nsta ll to add the NAS as a device in your com puter. After you install the NAS you can see it in the com puter ’s list of devices (see Sect ion 14.5 on page 152. Click Uninsta ll to rem ove the NAS from the list of devices installed in your com puter.
• View device w eb page opens the Web Configurator login screen.
• Open Media Player opens the computer ’s default media player.
• Create shor tcut adds a desktop shortcut to the Web Configurator login screen.
• Propert ies opens a window of NAS details and t roubleshoot ing inform at ion.

Chapter 14 Tutorials
Cloud Storage User’s Guide
150
• Manufacturer ident ifies the com pany that produced the NAS.
• Model ident ifies the NAS model.
• Model number ident ifies the NAS m odel num ber.
• Device w ebpage shows the I P address for accessing the Web Configurator.
• Ser ia l num ber is unavailable because the NAS does not have one.
• MAC address is the NAS’s unique physical hardware address (MAC) . You need the MAC address to register the product at myZyXEL.com . Custom er support m ay also request it for t roubleshoot ing purposes.
• Unique ident if ier is a unique UPnP I D that the NAS generated.
• I P address is the NAS’s I P address. I t is also the I P address for accessing the Web Configurator.
14.3 Windows 7 Network Map
To see your NAS in a Windows 7 hom e or work network map:
1 Click Star t > Cont rol Panel > View netw ork sta tus and tas ks (or Netw ork and Shar ing Center if you view the Cont rol Panel by icons) .
EXAMPLE
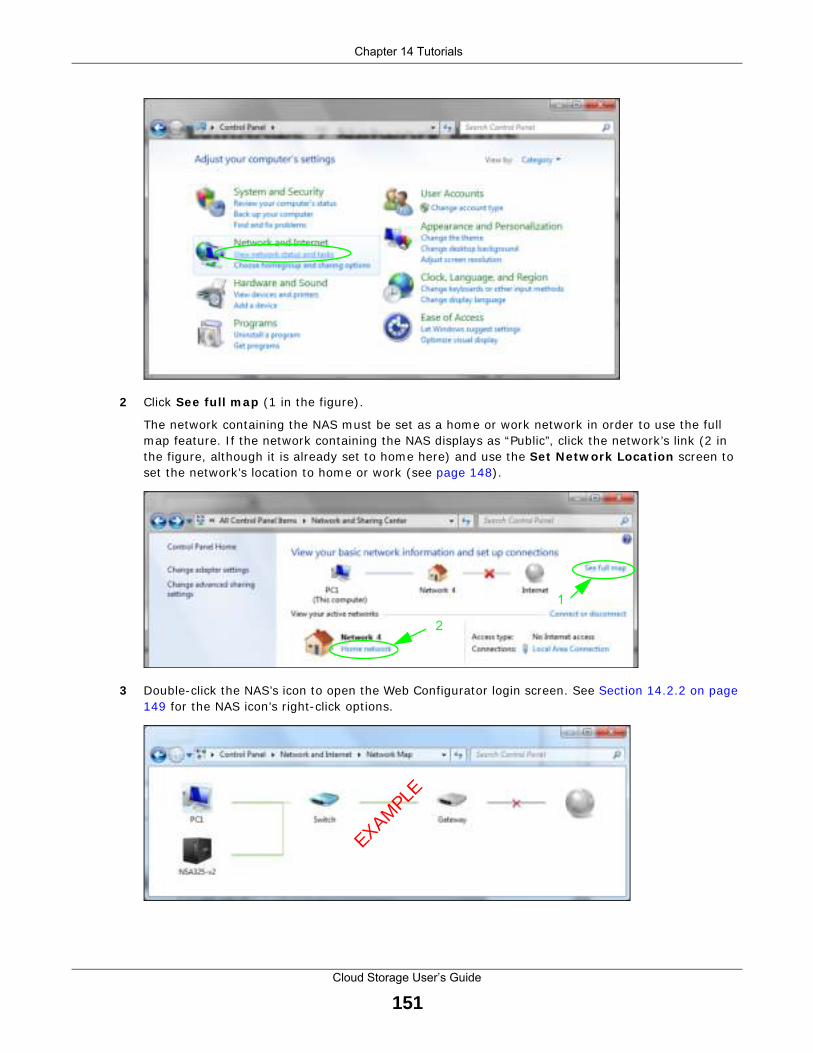
Chapter 14 Tutorials
Cloud Storage User’s Guide
151
2 Click See full m ap (1 in the figure) .
The network containing the NAS m ust be set as a home or work network in order to use the full m ap feature. I f the network containing the NAS displays as “Public”, click the network’s link (2 in the figure, although it is already set to hom e here) and use the Set Netw ork Locat ion screen to set the network’s locat ion to hom e or work (see page 148) .
3 Double-click the NAS’s icon to open the Web Configurator login screen. See Sect ion 14.2.2 on page 149 for the NAS icon’s r ight-click opt ions.
2
1
EXAMPLE

Chapter 14 Tutorials
Cloud Storage User’s Guide
152
14.4 Playing Media Files in Windows 7
I n Windows 7, the NAS autom at ically displays as a library in Windows Media Player.
Figure 92 NAS in Windows Media Player
14.5 Windows 7 Devices and Printers
After you use the NAS’s network icon’s install opt ion you can m anage the NAS from the Windows 7 Devices and Pr inters folder.
Click Star t > Cont rol Panel > Hardw are and Sound > Devices and Pr inters . Select the NAS icon to display inform at ion about the NAS. Double-click the NAS icon to open a propert ies window (see page 149) . Right-click the icon to display these opt ions:
EXAMPLE
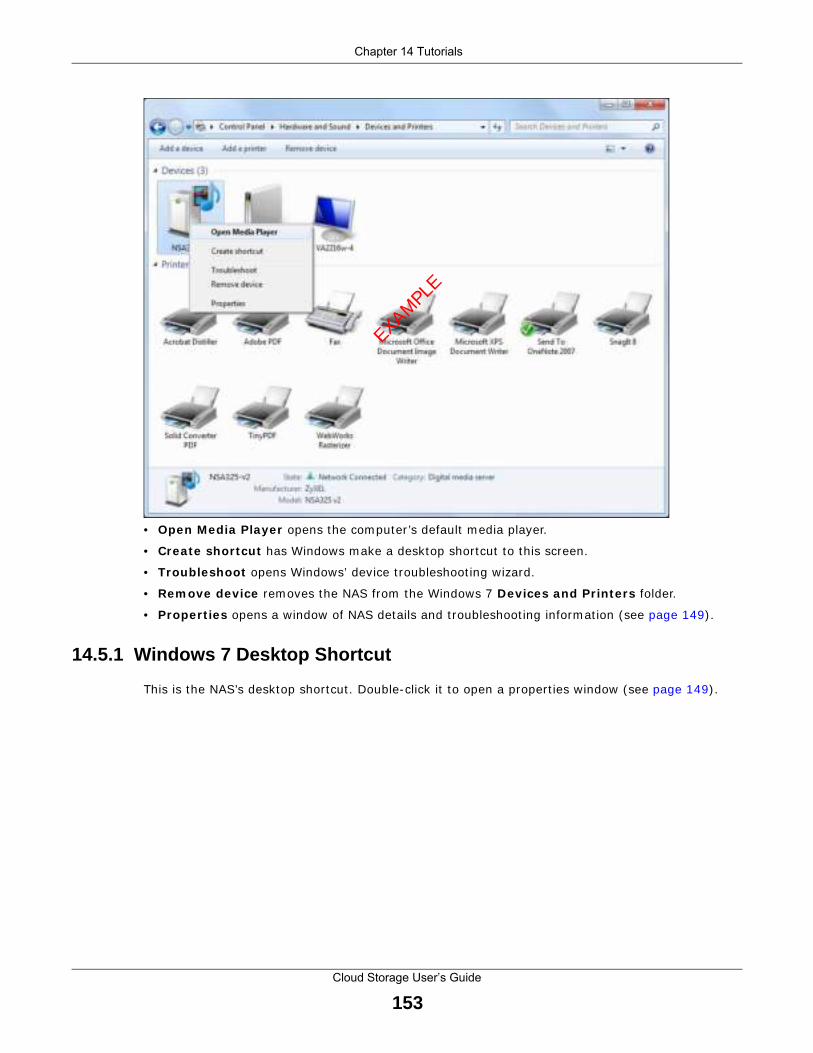
Chapter 14 Tutorials
Cloud Storage User’s Guide
153
• Open Media Player opens the computer ’s default media player.
• Create shor tcut has Windows m ake a desktop shortcut to this screen.
• Troubleshoot opens Windows’ device t roubleshoot ing wizard.
• Rem ove device removes the NAS from the Windows 7 Devices and Pr inters folder.
• Propert ies opens a window of NAS details and t roubleshoot ing inform at ion (see page 149) .
14.5.1 Windows 7 Desktop Shortcut
This is the NAS’s desktop shortcut . Double-click it to open a propert ies window (see page 149) .
EXAMPLE
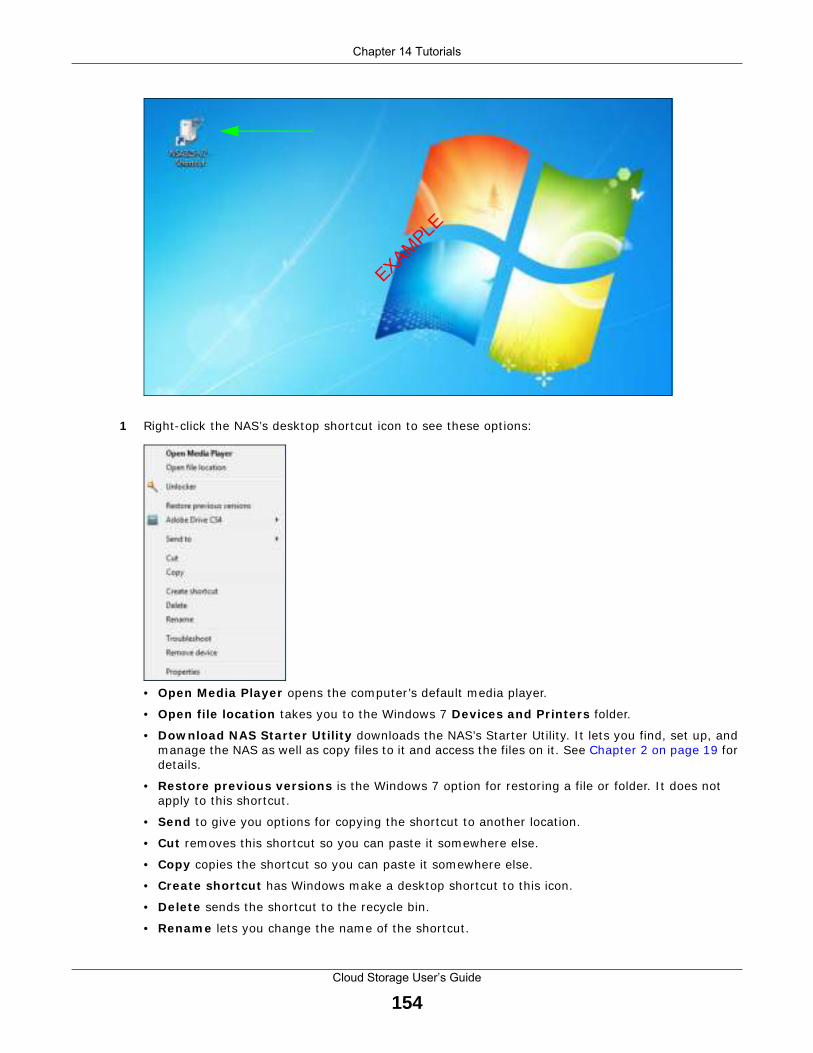
Chapter 14 Tutorials
Cloud Storage User’s Guide
154
1 Right-click the NAS’s desktop shortcut icon to see these opt ions:
• Open Media Player opens the computer ’s default media player.
• Open f ile locat ion takes you to the Windows 7 Devices and Pr inters folder.
• Dow nload NAS Star ter Ut ilit y downloads the NAS’s Starter Ut ility. I t lets you find, set up, and manage the NAS as well as copy files to it and access the files on it . See Chapter 2 on page 19 for details.
• Restore previous versions is the Windows 7 opt ion for restor ing a file or folder. I t does not apply to this shortcut .
• Send to give you opt ions for copying the shortcut to another locat ion.
• Cut rem oves this shortcut so you can paste it som ewhere else.
• Copy copies the shortcut so you can paste it som ewhere else.
• Create shor tcut has Windows m ake a desktop shortcut to this icon.
• Delete sends the shortcut to the recycle bin.
• Renam e lets you change the nam e of the shortcut .
EXAMPLE

Chapter 14 Tutorials
Cloud Storage User’s Guide
155
• Troubleshoot opens Windows’ device t roubleshoot ing wizard.
• Rem ove device removes the NAS from the Windows 7 Devices and Pr inters folder.
• Propert ies opens a window of details about the shortcut .
14.6 File Sharing Tutorials
The following sect ions cover using the NAS for file sharing. This chapter assum es you have already followed the Quick Start Guide inst ruct ions to perform init ial setup and configurat ion (so you have a working volume) . See the rest of this User ’s Guide for details on configuring the NAS’s various screens.
14.6.1 Creating a User Account
Jim my wants to create accounts for his sons Bob and Kevin. This is how he would do it .
1 Go to the advanced administ rat ion screens.
2 Click Shar ing > Users to open the Users screen. Then click Add User .
3 Configure the screen as follows and write down the usernam e and password to give to Bob. I f the usernam e and password are the sam e as Bob’s Windows login, Bob will not need to enter a usernam e and password when he logs into his share from his com puter. Set the Account Type to User so Bob doesn’t get to configure the whole NAS. Click Apply to create the account .

Chapter 14 Tutorials
Cloud Storage User’s Guide
156
4 The account now displays in the Users screen.
Now that Jim my has created Bob’s account , he can go through the steps again to create another account for Kevin. After both accounts are created, he can go to Sect ion 14.6.2 on page 156 to create shares for Bob and Kevin.
14.6.2 Creating a Share
Suppose Jim my has already created separate accounts for his sons Bob and Kevin. Now Jim m y wants to create a share for each son. He also wants to m ake sure that each son can only access his own share ( to keep them from delet ing each other ’s files) . This is how he would do it .
1 I n the NAS’s adm inist rat ion web configurator screens, click Shares > Add Share . Click Add Share to create a new share.
2 Specify a name for the share and select which volum e it should be on. Configure the screen as follows. Then click Edit .

Chapter 14 Tutorials
Cloud Storage User’s Guide
157
3 Configure the screen as follows to give Bob full access r ight to the share. Then click Apply to create the share.
Now that Jim my has created Bob’s share, he can go through the steps again to create another share for Kevin.
14.6.3 Creating a Group
After creat ing user accounts for Bob and Kevin, Jimmy wants to create a group for his sons and another one for the parents. Jim my can assign access r ights to his sons’ group for certain shares such as a cartoons share and allow only the parents’ group to access the scary m ovie share. This is how he would create the group.
1 I n the NAS’s adm inist rat ion web configurator screen, click Groups > Add Group .
2 Specify a name for the group. Select the user(s) you want to add to the group from the Available User( s) list and click Add Selected User( s) . Configure the screen as follows. Then click Apply to create the group.

Chapter 14 Tutorials
Cloud Storage User’s Guide
158
Now that Jim my has created a group for Bob and Kevin, he can go through the steps again to create another group for the parents. Then he can see the rest of the tutor ials for how to use the groups in assigning access r ights to shares.
14.6.4 Accessing a Shar e From Windows Explorer
I f you m ap a NAS share (where data is stored) to a Windows network dr ive, you can use Windows Explorer to t ransfer files to and from the NAS as if it was another folder on your com puter. Here he m aps Jim my’s share to Jim my’s com puter.
1 Start Windows Explorer and go to the NAS’s server name. The default is ‘nas’ followed by the num ber of your model ( ‘nas5 4 0 ’ for example) .
2 Click Tools > Map Netw ork Dr ive .
3 Select the network dr ive that you want to m ap the NAS to from the Drive list box. This exam ple uses I . Then browse to and select the share on the NAS. Click Finish .
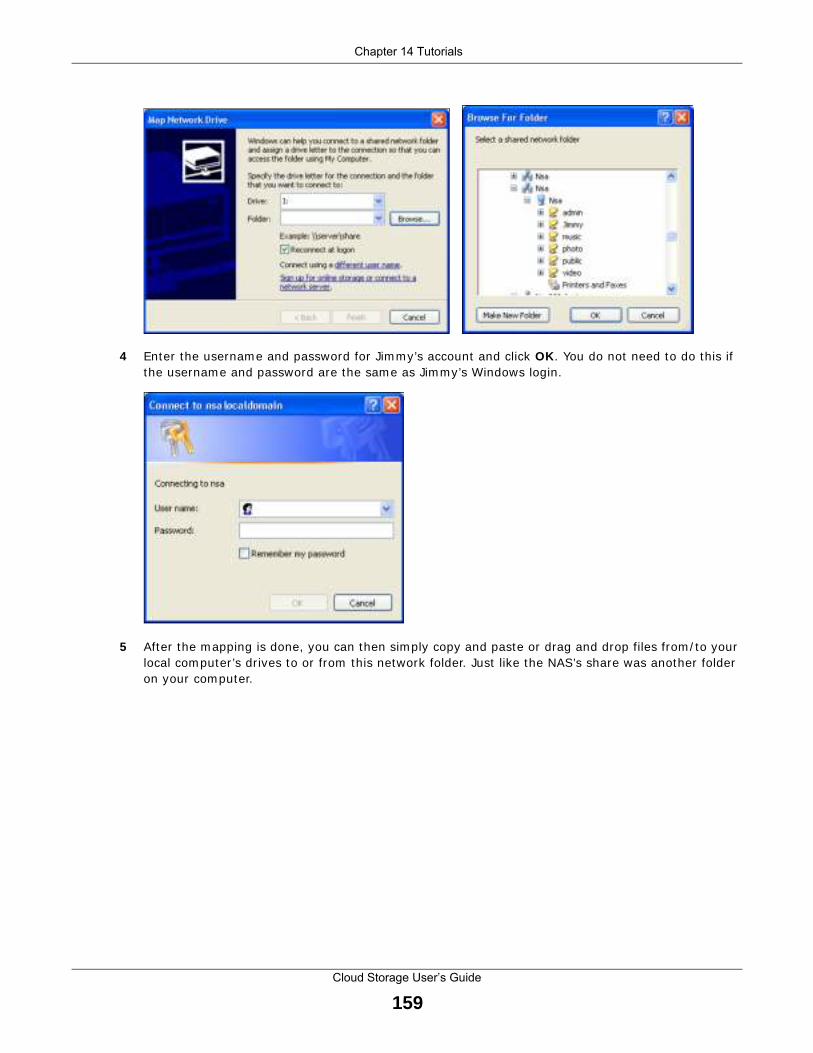
Chapter 14 Tutorials
Cloud Storage User’s Guide
159
4 Enter the usernam e and password for Jim my’s account and click OK . You do not need to do this if the usernam e and password are the sam e as Jim my’s Windows login.
5 After the m apping is done, you can then simply copy and paste or drag and drop files from / to your local com puter ’s dr ives to or from this network folder. Just like the NAS’s share was another folder on your computer.

Chapter 14 Tutorials
Cloud Storage User’s Guide
160
Now that Bob has m apped Jim my’s share to Jim my’s com puter, he can go through the steps again to m ap Kevin’s share to Kevin’s com puter.
14.6.5 Accessing a Share Using FTP
You can also use FTP to access the NAS. Suppose Jim my is tem porarily using a different com puter and wants to access his share without mapping it to the com puter. This is how he would do it .
1 Open the FTP client (Windows Explorer is used here) and type “ ftp: / / username@server” where “usernam e” is the account ’s usernam e and “server” is the NAS’s I P address or server nam e.
2 Enter your password and click Login .
EXAMPLE
EXAMPLE
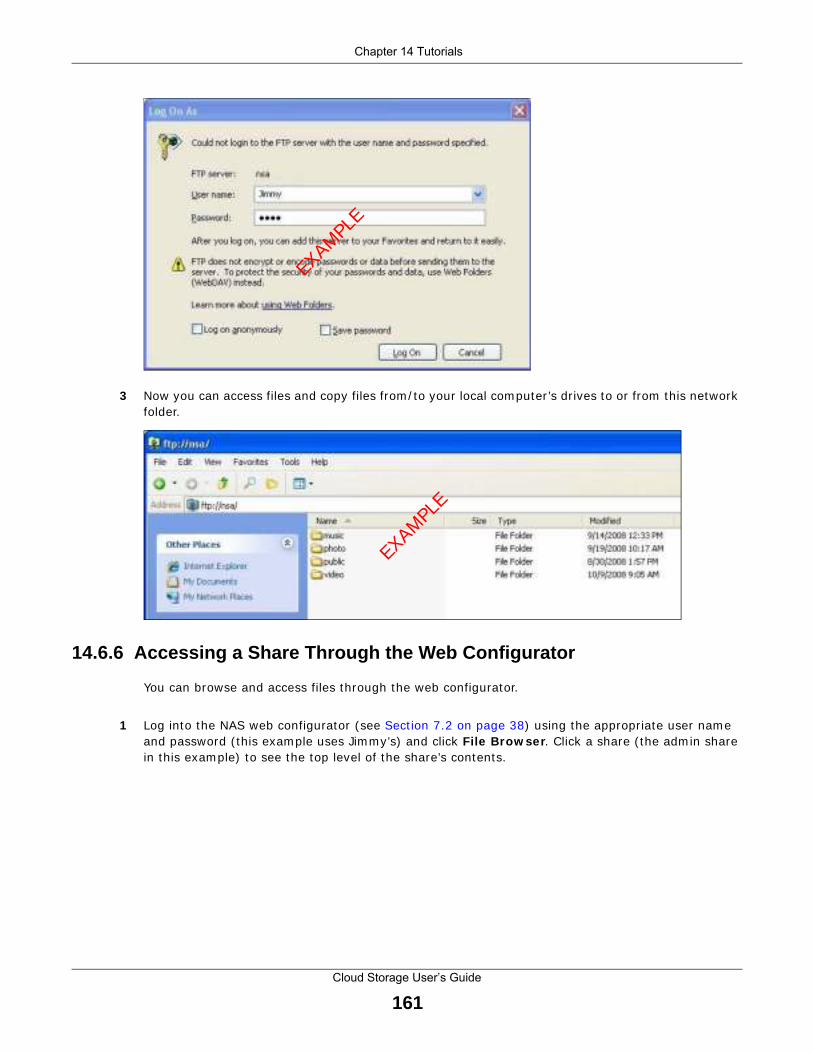
Chapter 14 Tutorials
Cloud Storage User’s Guide
161
3 Now you can access files and copy files from / to your local com puter ’s dr ives to or from this network folder.
14.6.6 Accessing a Share Through the Web Configurator
You can browse and access files through the web configurator.
1 Log into the NAS web configurator (see Sect ion 7.2 on page 38) using the appropriate user name and password ( this example uses Jimmy’s) and click File Brow ser . Click a share ( the adm in share in this example) to see the top level of the share’s contents.
EXAMPLE
EXAMPLE

Chapter 14 Tutorials
Cloud Storage User’s Guide
162
2 Click a folder ’s file nam e to browse the folder. You can open files or copy them to your com puter. You can also create new folders and upload addit ional files to the share.
3 Click the logout icon when your are done.
14.7 Download Service Tutorial
This tutor ial covers using the NAS to download a file from the I nternet . Use this same procedure for P2P downloads as well as regular HTTP (web) and FTP downloads. See Sect ion 17.11.2 on page 235 for m ore on the download service.
14.7.1 Copying/Pasting a Download Link
1 Open your I nternet browser ( this exam ple uses I nternet Explorer) .
2 Find a download link for the file you want . I n this example, www.zyxel.com has a Server 1 link for downloading a datasheet for ZyXEL’s NSA325 v2.
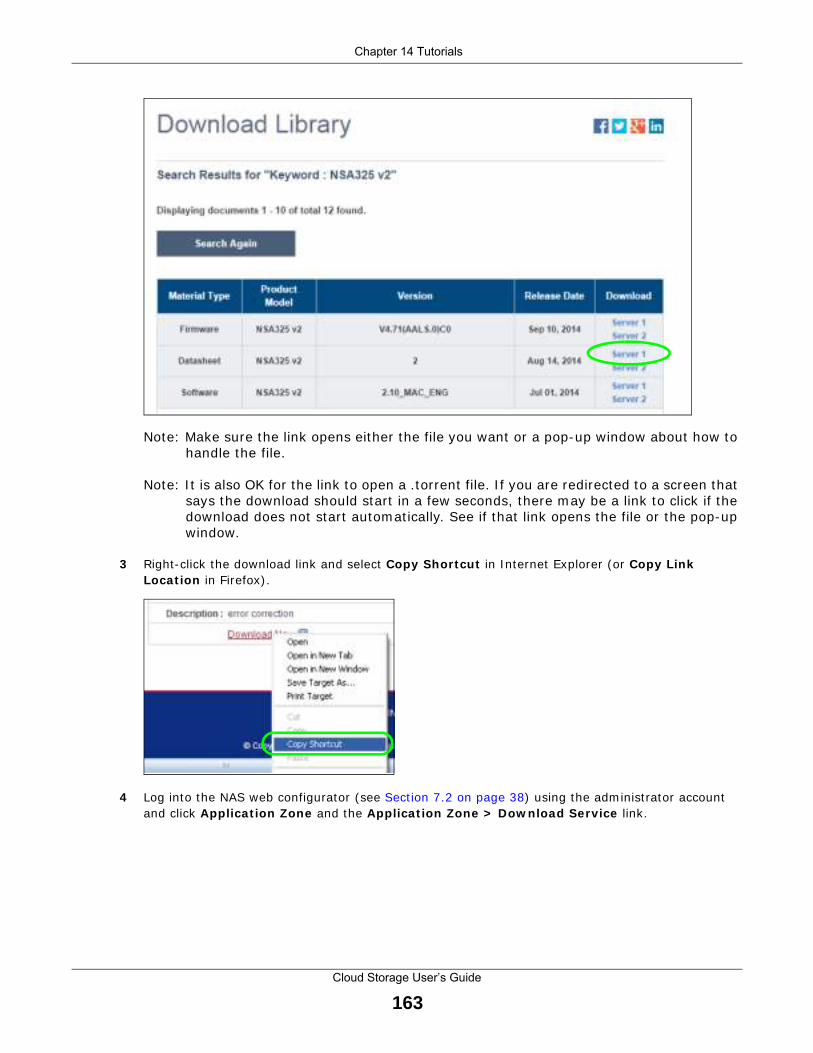
Chapter 14 Tutorials
Cloud Storage User’s Guide
163
Note: Make sure the link opens either the file you want or a pop-up window about how to handle the file.
Note: I t is also OK for the link to open a .torrent file. I f you are redirected to a screen that says the download should start in a few seconds, there m ay be a link to click if the download does not start autom at ically. See if that link opens the file or the pop-up window.
3 Right-click the download link and select Copy Shortcut in I nternet Explorer (or Copy Link Locat ion in Firefox) .
4 Log into the NAS web configurator (see Sect ion 7.2 on page 38) using the adm inist rator account and click Applicat ion Zone and the Applicat ion Zone > Dow nload Service link.
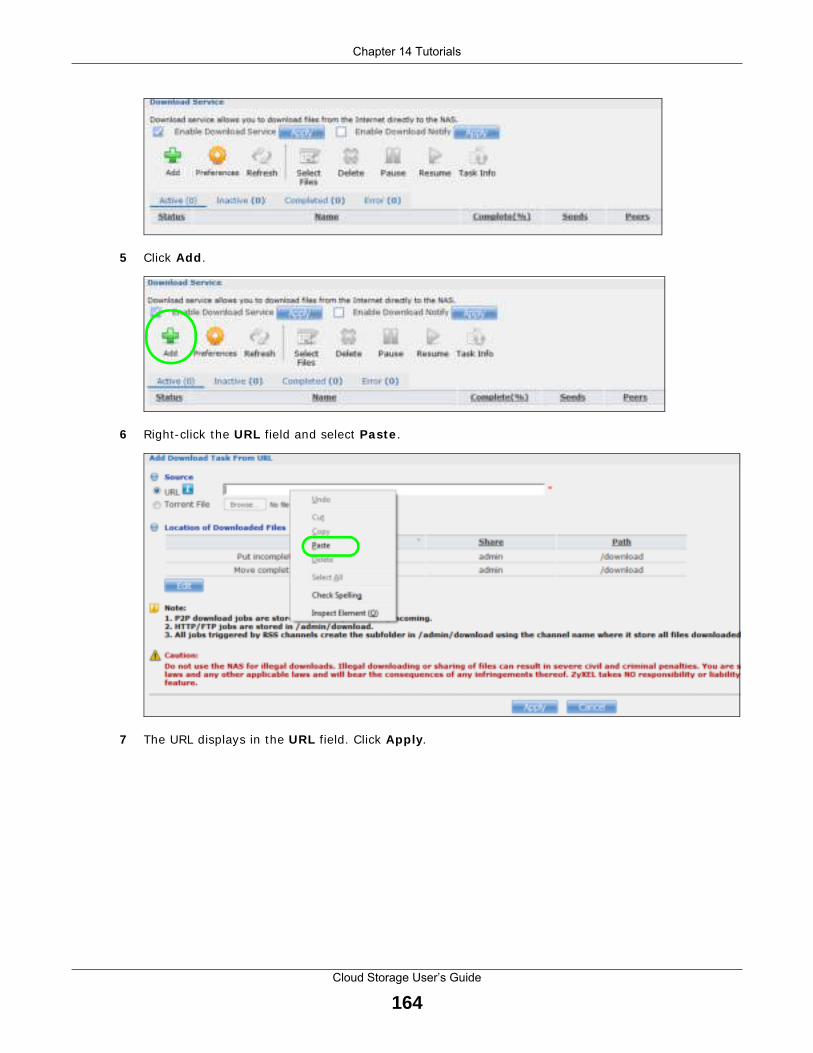
Chapter 14 Tutorials
Cloud Storage User’s Guide
164
5 Click Add .
6 Right-click the URL field and select Paste .
7 The URL displays in the URL field. Click Apply .

Chapter 14 Tutorials
Cloud Storage User’s Guide
165
8 After a few m oments, the download task appears in the Dow nload Service screen’s Act ive tab.
The download appears in the Com pleted tab when it is done. By default the NAS stores all downloads in the adm in share’s dow nload folder. See Sect ion 14.6.4 on page 158, Sect ion 14.6.5 on page 160, or Sect ion 14.6.6 on page 161 for how to access a share.
14.7.2 Configuring the Do wnload Service Preferences
Once you added a list of download tasks to the NAS (see Sect ion 14.7.1 on page 162) , you can have the NAS download files during a specific t im e period of the day. You can also configure the P2P download set t ings to cont rol bandwidth and opt im ize download efficiency.
Say you have the NAS turned on all the t im e, but you only want the NAS download files at night . Here is how you use the download period cont rol feature to set the t im e range.
1 Click Applicat ions > Dow nload Service > Preferences to open the General Set t ings screen.
2 Select Enable Dow nload Per iod Cont rol and use the arrows to adjust the t im e period from 23: 30 to 09: 00. Click Apply to save your changes. The NAS only downloads files within this 9.5-hour period every day.
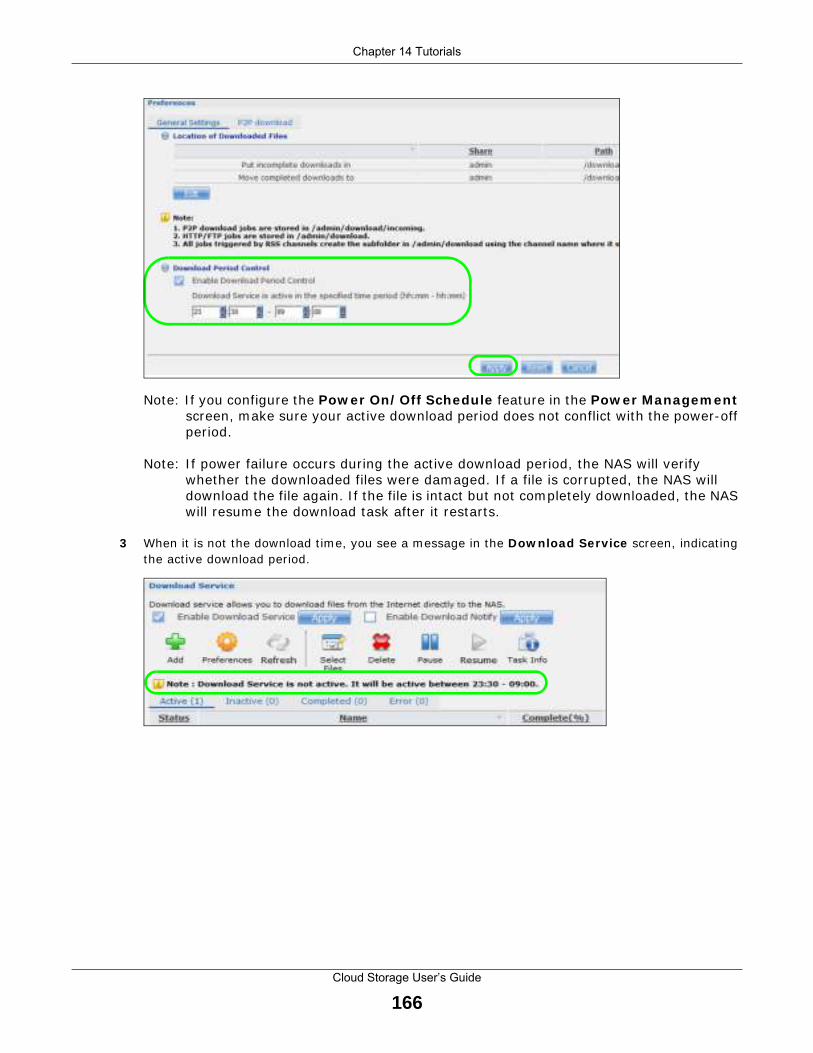
Chapter 14 Tutorials
Cloud Storage User’s Guide
166
Note: I f you configure the Pow er On/ Off Schedule feature in the Pow er Managem ent screen, m ake sure your act ive download period does not conflict with the power-off per iod.
Note: I f power failure occurs during the act ive download period, the NAS will verify whether the downloaded files were dam aged. I f a file is corrupted, the NAS will download the file again. I f the file is intact but not com pletely downloaded, the NAS will resum e the download task after it restarts.
3 When it is not the download t im e, you see a m essage in the Dow nload Service screen, indicat ing the act ive download period.

Chapter 14 Tutorials
Cloud Storage User’s Guide
167
Click Applicat ions > Dow nload Service > Preferences > P2 P dow nload to open the following screen. Enter the inform at ion below and then click Apply .
Here is a list of P2P download set t ings you want to configure for your NAS:
• Lim it the m axim um upload rate to 20 KB/ s.
Enter this value in the Max. upload rate field.
• Act ively download three torrent files but only upload one at a t im e.
Enter 3 in the Maxim um Num ber of Act ive Torrents f ield and enter 1 in the Maxim um Num ber of Seeding Jobs field.
• Keep sharing unt il the NAS has shared equal or greater am ount of the downloaded files.
Select the check box and enter 100 in the Upload/ Dow nload Rat io field.
• Scroll down and click Edit I P Filter . Use an online I P filter table from ht tp: / / www.bluetack.co.uk/config/ level1.gz for example to protect P2P downloads.
Enter the URL in the Update I P Filt er from the I nternet Every W eek field.

Chapter 14 Tutorials
Cloud Storage User’s Guide
168
14.7.3 Using Download Service Notification
Use an RSS feed reader on your com puter to keep t rack of files the NAS has downloaded. The following exam ples show how to subscribe to the NAS’s download service not ificat ions. See Sect ion 17.11.3 on page 236 for m ore on download service not ificat ions.
Some RSS readers may not support the NAS’s download service not ificat ions. For exam ple, Google Reader cannot support this feature if the NAS has a pr ivate I P address.
Note: I t is recom m ended to subscr ibe to the download service not ificat ions using the built - in reader in I nternet Explorer 7 or higher, or Firefox.
You have to act ivate this feature in the Dow nload Service screen. Click Applicat ions > Dow nload Service to open the following screen. Select Enable Dow nload Not ify and click Apply .
Internet Explorer 7 Example
1 After you act ivate download service not ificat ion, click the RSS feed icon.
2 The following screen displays. Select Subscr ibe to th is feed .
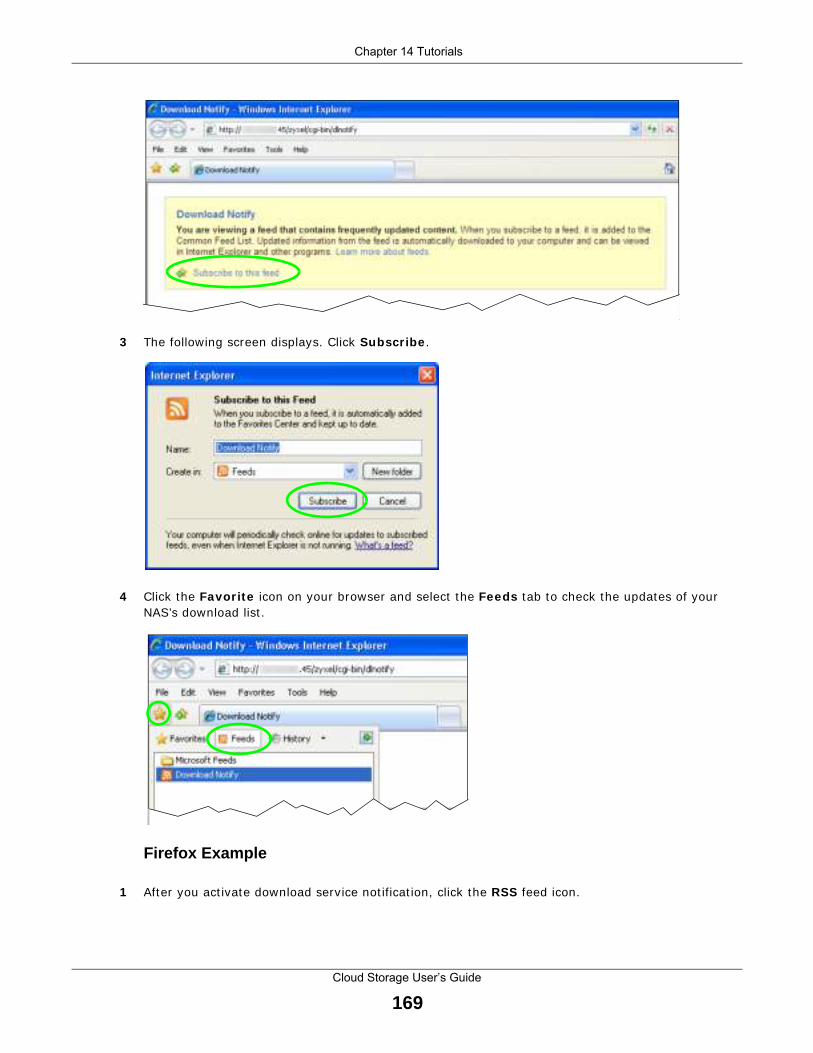
Chapter 14 Tutorials
Cloud Storage User’s Guide
169
3 The following screen displays. Click Subscr ibe .
4 Click the Favor ite icon on your browser and select the Feeds tab to check the updates of your NAS’s download list .
Firefox Example
1 After you act ivate download service not ificat ion, click the RSS feed icon.

Chapter 14 Tutorials
Cloud Storage User’s Guide
170
2 The following screen displays. Select Live Bookm arks from the drop-down list and click Subscr ibe Now .
3 The following screen displays. Select Bookm arks Menu and click Add .
4 From the Firefox’s Bookm arks Menu , select Dow nload Not ify to check the updates of your NAS’s download list .

Chapter 14 Tutorials
Cloud Storage User’s Guide
171
14.8 Printer Server Tutorial
Do the following to have the NAS let com puters on your network share a printer. See www.zyxel.com for a list of com pat ible pr inters.
1 Make sure the NAS is on and the SYS light is on steady (not blinking) .
2 Use a USB cable to connect the printer ’s USB port to one of the NAS’s USB ports. Make sure the printer is also connected to an appropriate power source.
3 Turn on the pr inter.
4 The NAS detects the printer after a few m om ents.
5 On your com puter, open your CI FS file sharing program (Windows Explorer for exam ple) and browse to the NAS. Double-click the printer ’s icon.
6 I f you get a warning screen, click the opt ion that lets you cont inue (Yes in this exam ple) .
NAS

Chapter 14 Tutorials
Cloud Storage User’s Guide
172
7 I f your com puter does not already have the printer ’s dr iver installed, you will need to install it . I n this exam ple, click OK .
8 Use the wizard screens to install the pr inter dr iver on the com puter. You may need to get the file from the printer ’s CD or the printer manufacturer ’s website ( the driver is not installed on the NAS) .
Note: You m ust install the pr inter dr iver on each com puter that will use the pr inter.
After the driver installat ion finishes, the computer is ready to use the pr inter. Select the printer in an applicat ion to use it to pr int . Browse to the NAS using a CI FS program ( like Windows Explorer) and double-click the printer ’s icon to open the printer ’s queue of pr int jobs.
Note: Repeat steps 5 to 8 on your other com puters so they can also use the pr inter.

Chapter 14 Tutorials
Cloud Storage User’s Guide
173
14.9 Copy and Flickr Auto Upload Tutorial
Amy received som e photos taken during her best fr iend’s wedding and saved the files on a USB disk. She wants to save a copy of the photos in the NAS and upload the photos to her Flickr account .
Amy has to act ivate the NAS’s auto upload feature. See Sect ion 19.4 on page 262 for m ore details on set t ing up a Flickr account for auto upload. I n this example Amy select the NAS’s photo share for auto upload.
This is how Amy would t ransfer the files from her USB disk to the NAS.
1 Click Applicat ions > Copy/ Sync But ton in the navigat ion panel to open the screen.
2 Configure the copy set t ings as shown and click Apply .
3 Press and release the COPY/ SYNC but ton on the NAS’s front panel to start copying files.
4 The copied files can be found in a new folder in the photo share. The name of this folder is the date (yyyy-mm -dd) and t im e (hh-m m-ss) when the folder is created.

Chapter 14 Tutorials
Cloud Storage User’s Guide
174
5 The NAS also autom at ically uploads the copied files to Flickr.r
14.10 FTP Uploadr Tutorial
FTP Uploadr can autom at ically upload files saved on the NAS to a rem ote FTP server. Amy wants to share files on her NAS with Susan. They each have an NAS at hom e, so Susan has to set her NAS as an FTP server for Amy to automat ically send files using FTP Uploadr.
l
To set the NAS as an FTP server, click Applicat ions > FTP to open the FTP screen. Select Enable FTP and click Apply.
Amy’s NAS Susan’s NAS

Chapter 14 Tutorials
Cloud Storage User’s Guide
175
Susan also has to create a user account and share on her NAS for Amy to upload files. The share is used for files uploaded from Amy’s NAS. Am y will then use the following inform at ion to configure FTP Uploadr on her NAS.
This is how Amy would set up the NAS’s FTP Uploadr.
1 Click Applicat ions > Auto Upload > FTP Uploadr to open the FTP Uploadr screen. Select Enable FTP Uploadr and click Apply to turn on FTP Uploadr.
2 Click Add Server .
3 Enter the inform at ion as describe in Table 61 on page 175. Click Apply to add the server.
Table 61 FTP Uploadr Tutorial: FTP Server I nform at ionFTP Dom ain Nam e or I P Address exam ple2.com
FTP User Nam e Amy
FTP Password xxxxx
Share (Remote Path) Amy

Chapter 14 Tutorials
Cloud Storage User’s Guide
176
4 I n the FTP Uploadr screen, click Preferences to configure the auto upload set t ings.
5 Am y wants to share video files with Susan. I n the Preferences screen, click the Add but ton and select video from the Shares drop-down list box, enter a forward slash in the Path field and click Apply to add the share to the Folder W atch List .t
6 Amy also set the Bandw idth Lim it to 20 KB/ s so that the upload doesn’t slow down her I nternet connect ion.
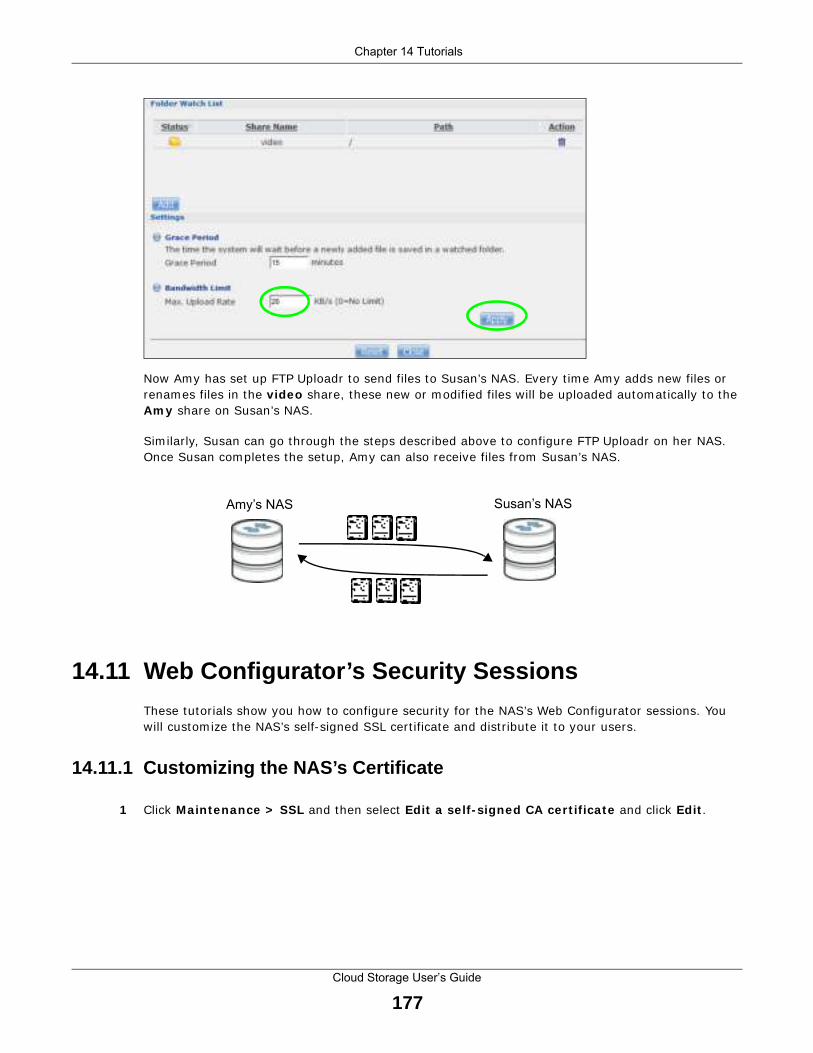
Chapter 14 Tutorials
Cloud Storage User’s Guide
177
Now Amy has set up FTP Uploadr to send files to Susan’s NAS. Every t ime Amy adds new files or renam es files in the video share, these new or m odified files will be uploaded autom at ically to the Am y share on Susan’s NAS.
Sim ilar ly, Susan can go through the steps described above to configure FTP Uploadr on her NAS. Once Susan com pletes the setup, Amy can also receive files from Susan’s NAS.
14.11 Web Configurator’s Security Sessions
These tutor ials show you how to configure security for the NAS’s Web Configurator sessions. You will custom ize the NAS’s self-signed SSL cert ificate and dist r ibute it to your users.
14.11.1 Customizing the NAS’s Certificate
1 Click Maintenance > SSL and then select Edit a self- signed CA cer t if icate and click Edit .
Amy’s NAS Susan’s NAS
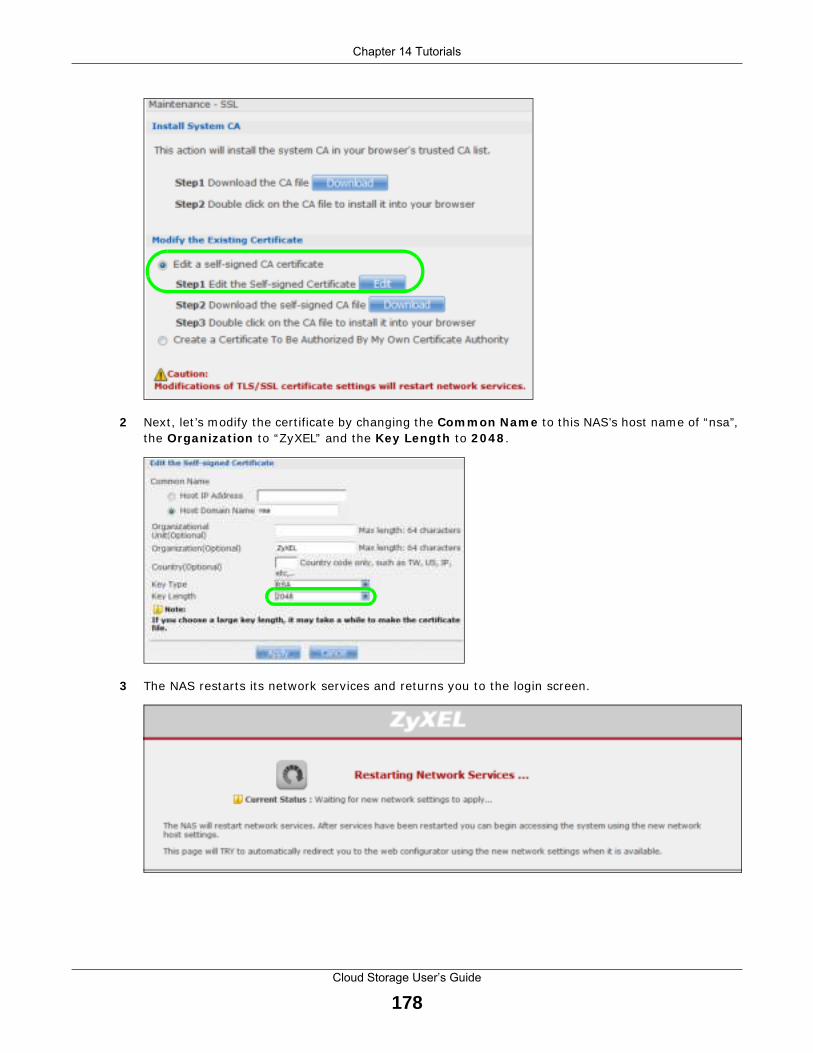
Chapter 14 Tutorials
Cloud Storage User’s Guide
178
2 Next , let ’s m odify the cert ificate by changing the Com m on Nam e to this NAS’s host nam e of “nsa”, the Organizat ion to “ZyXEL” and the Key Length to 2 0 4 8 .
3 The NAS restarts its network services and returns you to the login screen.
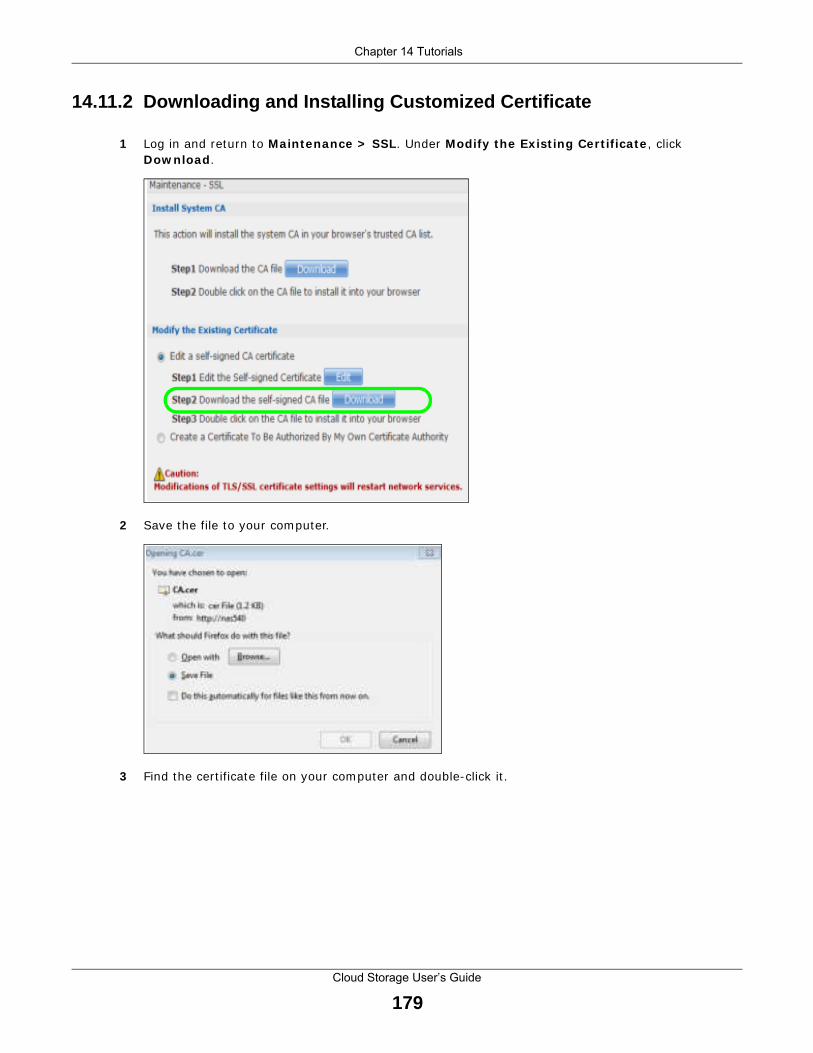
Chapter 14 Tutorials
Cloud Storage User’s Guide
179
14.11.2 Downloading and Insta lling Customized Certificate
1 Log in and return to Maintenance > SSL . Under Modify the Ex ist ing Cert if icate , click Dow nload .
2 Save the file to your computer.
3 Find the cert ificate file on your com puter and double-click it .
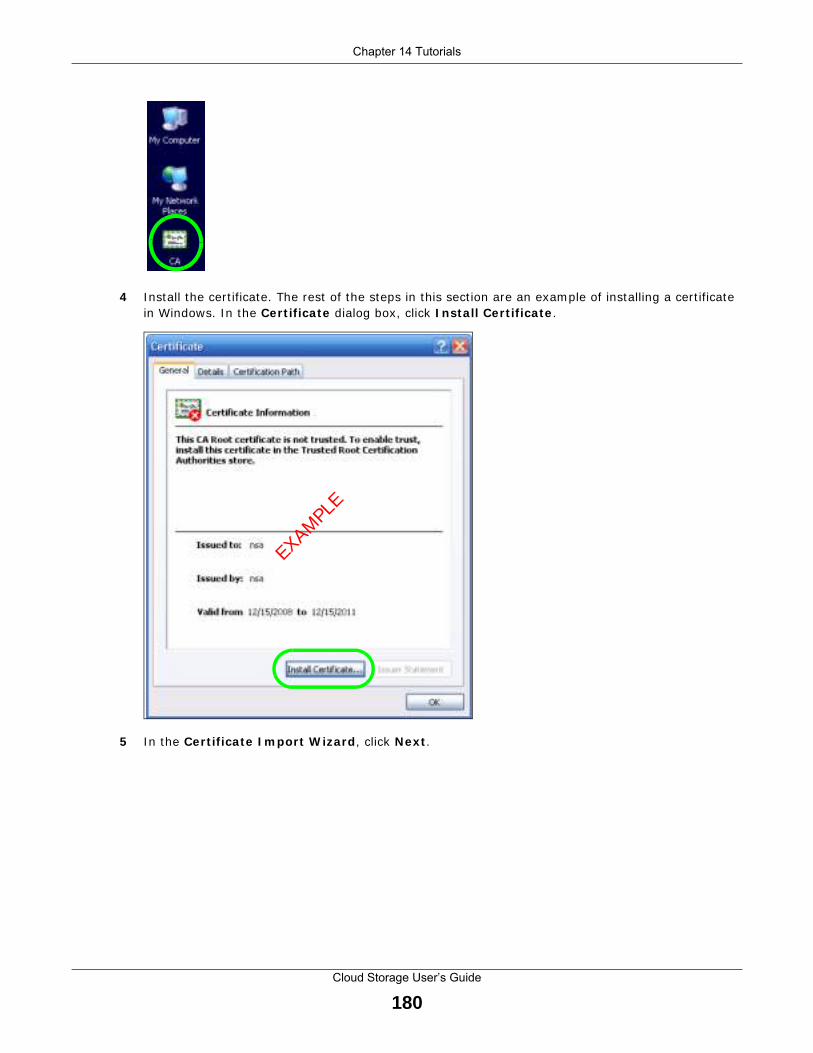
Chapter 14 Tutorials
Cloud Storage User’s Guide
180
4 I nstall the cert ificate. The rest of the steps in this sect ion are an example of installing a cert ificate in Windows. I n the Cert if icate dialog box, click I nsta ll Cer t if icate .
5 I n the Cert if icate I m port W izard , click Next .
EXAMPLE

Chapter 14 Tutorials
Cloud Storage User’s Guide
181
6 Leave Autom at ica lly se lect cer t if icate stor e based on the type of cer t if icate selected and click Next .
7 I n the Com plet ing the Cert if icate I m port W izard screen, click Finish .
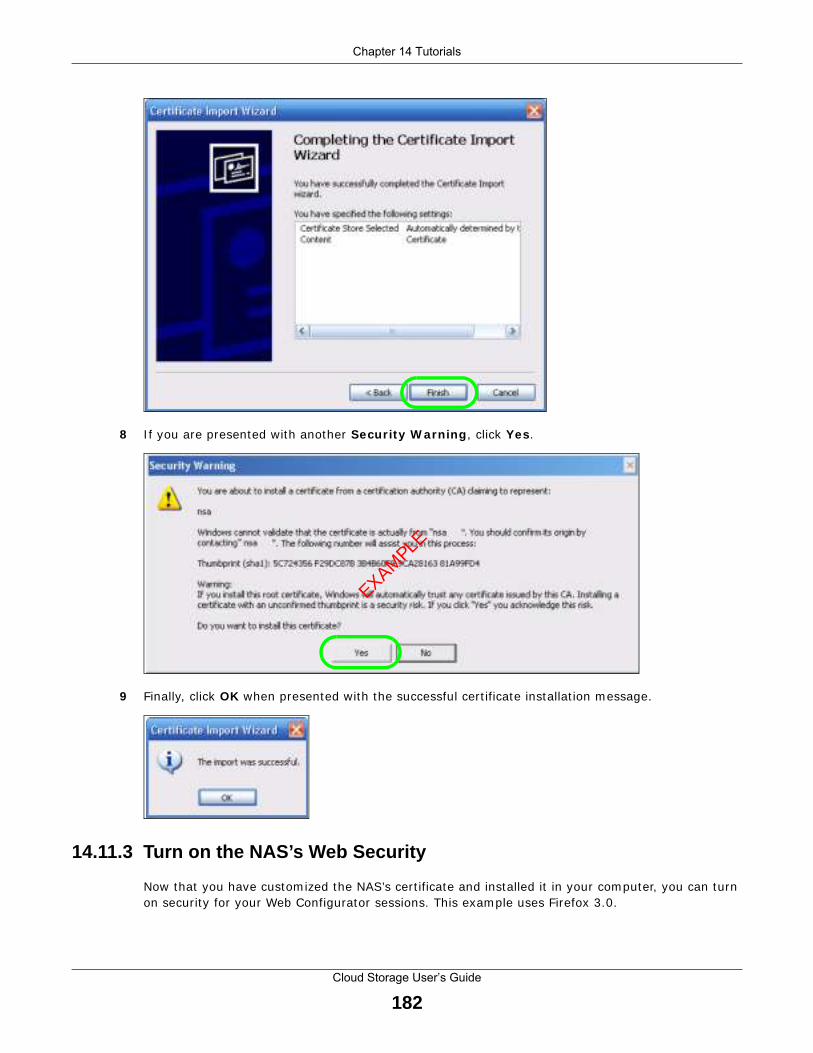
Chapter 14 Tutorials
Cloud Storage User’s Guide
182
8 I f you are presented with another Secur ity W arning , click Yes .
9 Finally, click OK when presented with the successful cert ificate installat ion m essage.
14.11.3 Turn on the NAS’s Web Security
Now that you have custom ized the NAS’s cert ificate and installed it in your com puter, you can turn on security for your Web Configurator sessions. This exam ple uses Firefox 3.0.
EXAMPLE
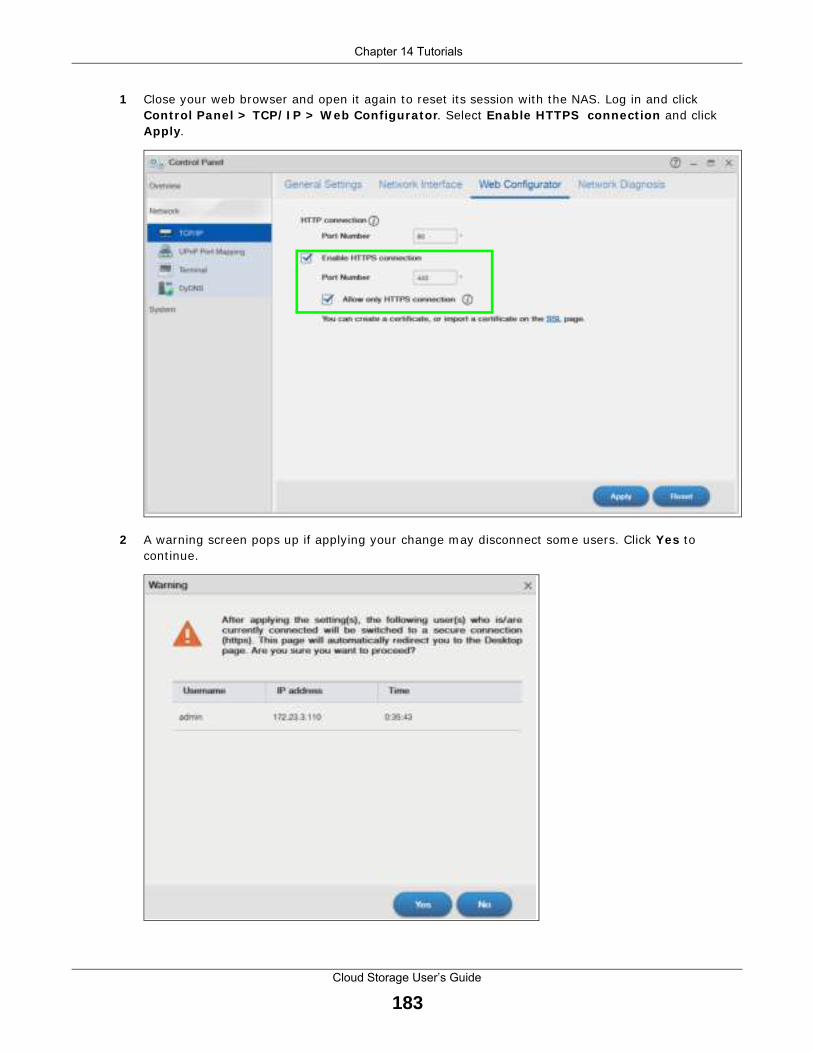
Chapter 14 Tutorials
Cloud Storage User’s Guide
183
1 Close your web browser and open it again to reset its session with the NAS. Log in and click Cont rol Panel > TCP/ I P > W eb Configurator . Select Enable HTTPS connect ion and click Apply .
2 A warning screen pops up if applying your change m ay disconnect som e users. Click Yes to cont inue.

Chapter 14 Tutorials
Cloud Storage User’s Guide
184
3 The NAS logs you out and automat ically redirects your form erly non-secure (HTTP) connect ion to a secure (HTTPS) connect ion. Your browser m ay give you a warning about the device’s public key cert ificate. Add an except ion to allow your browser to bypass the warning.
4 Click Add Except ion .
5 Click Get Cert if icate .
EXAMPLE
EXAMPLE

Chapter 14 Tutorials
Cloud Storage User’s Guide
185
6 Before you add an except ion, verify that the device to which you are t rying to connect is providing the correct cert ificate. Click View .

Chapter 14 Tutorials
Cloud Storage User’s Guide
186
7 The SHA1 fingerprint must match the NAS’s cert ificate you downloaded from the NAS to your com puter. (Double-click the NAS’s cert ificate file and then click Deta ils and look at the Thum bpr int ) . Click Close .

Chapter 14 Tutorials
Cloud Storage User’s Guide
187
8 I f the cert ificate fingerprints match, click Confirm Secur it y Except ion , otherwise click Cancel .
EXAMPLE
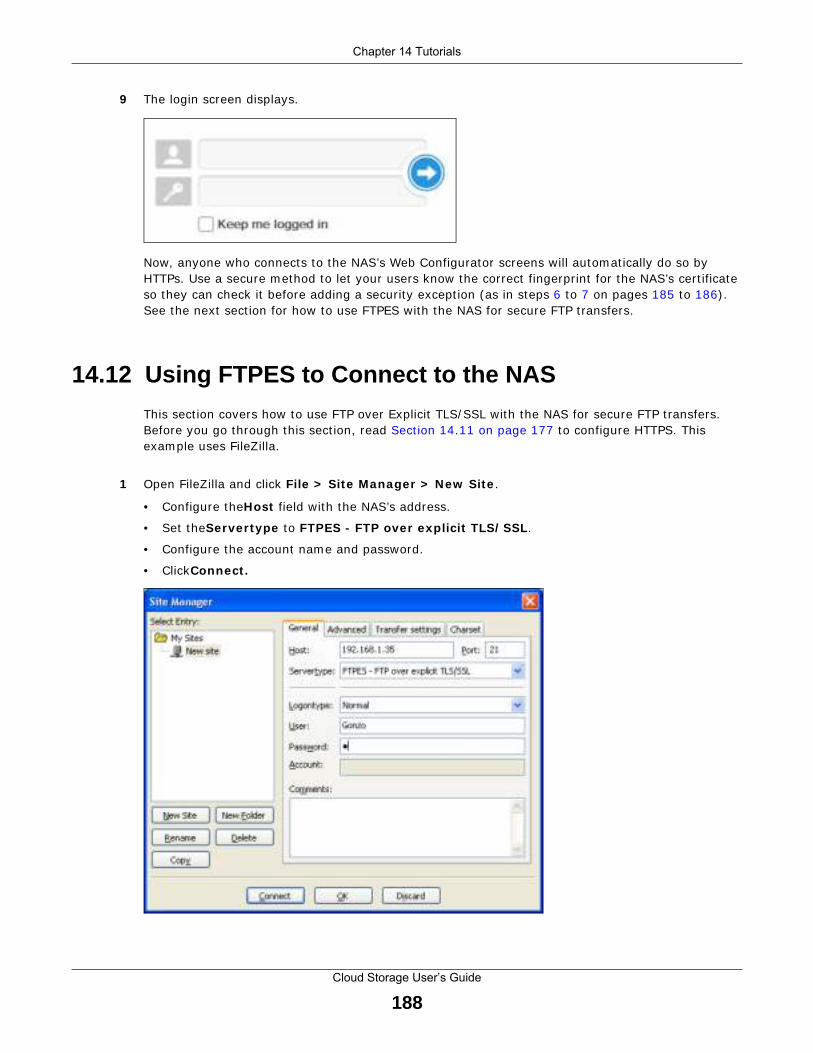
Chapter 14 Tutorials
Cloud Storage User’s Guide
188
9 The login screen displays.
Now, anyone who connects to the NAS’s Web Configurator screens will autom at ically do so by HTTPs. Use a secure method to let your users know the correct fingerprint for the NAS’s cert ificate so they can check it before adding a security except ion (as in steps 6 to 7 on pages 185 to 186) . See the next sect ion for how to use FTPES with the NAS for secure FTP t ransfers.
14.12 Using FTPES to Connect to the NAS
This sect ion covers how to use FTP over Explicit TLS/ SSL with the NAS for secure FTP t ransfers. Before you go through this sect ion, read Sect ion 14.11 on page 177 to configure HTTPS. This exam ple uses FileZilla.
1 Open FileZilla and click File > Site Manager > New Site .
• Configure the Host field with the NAS’s address.
• Set the Server type to FTPES - FTP over explicit TLS/ SSL .
• Configure the account nam e and password.
• Click Connect .
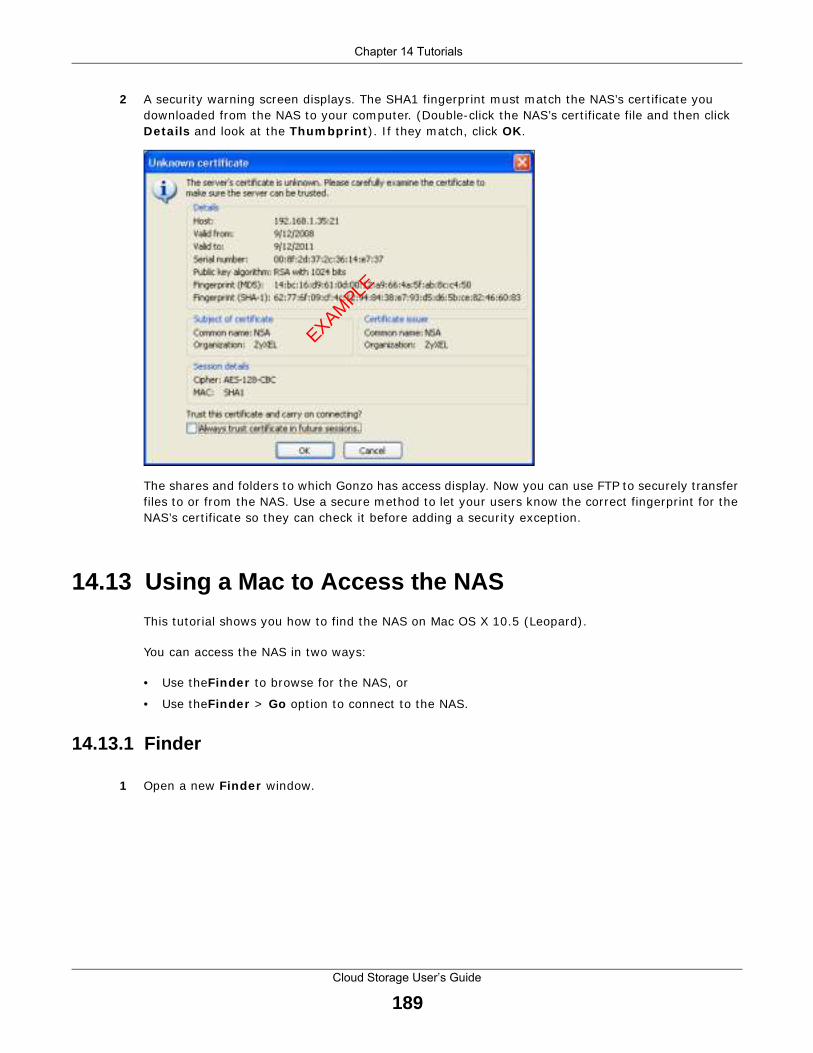
Chapter 14 Tutorials
Cloud Storage User’s Guide
189
2 A security warning screen displays. The SHA1 fingerprint m ust m atch the NAS’s cert ificate you downloaded from the NAS to your com puter. (Double-click the NAS’s cert ificate file and then click Deta ils and look at the Thum bpr int ) . I f they m atch, click OK .
The shares and folders to which Gonzo has access display. Now you can use FTP to securely t ransfer files to or from the NAS. Use a secure m ethod to let your users know the correct fingerprint for the NAS’s cert ificate so they can check it before adding a security except ion.
14.13 Using a Mac to Access the NAS
This tutorial shows you how to find the NAS on Mac OS X 10.5 (Leopard) .
You can access the NAS in two ways:
• Use the Finder to browse for the NAS, or
• Use the Finder > Go opt ion to connect to the NAS.
14.13.1 Finder
1 Open a new Finder window.
EXAMPLE

Chapter 14 Tutorials
Cloud Storage User’s Guide
190
2 Select All under the SHARED sidebar. Look for the NAS from the Netw ork list .
3 Expand the NAS to display the shares you m ay access.
EXAMPLE
EXAMPLE
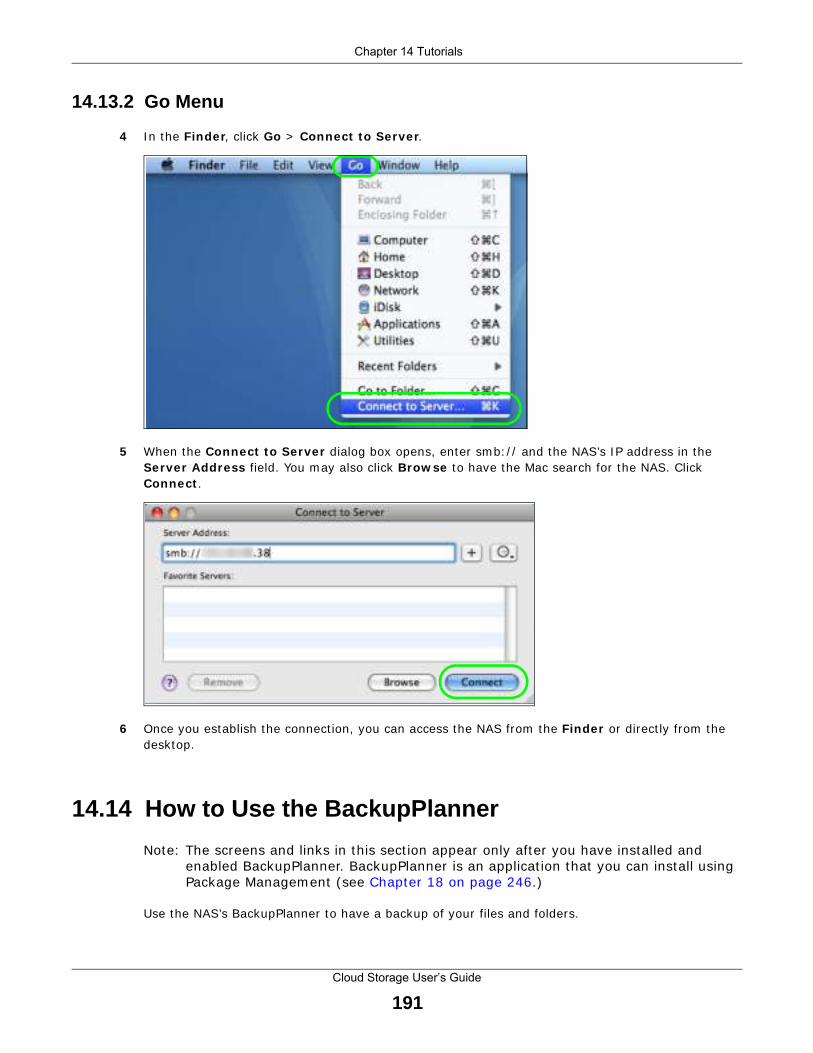
Chapter 14 Tutorials
Cloud Storage User’s Guide
191
14.13.2 Go Menu
4 I n the Finder , click Go > Connect to Server .
5 When the Connect to Server dialog box opens, enter sm b: / / and the NAS’s I P address in the Server Address field. You m ay also click Brow se to have the Mac search for the NAS. Click Connect .
6 Once you establish the connect ion, you can access the NAS from the Finder or direct ly from the desktop.
14.14 How to Use the BackupPlanner
Note: The screens and links in this sect ion appear only after you have installed and enabled BackupPlanner. BackupPlanner is an applicat ion that you can install using Package Managem ent (see Chapter 18 on page 246.)
Use the NAS’s BackupPlanner to have a backup of your files and folders.

Chapter 14 Tutorials
Cloud Storage User’s Guide
192
Schedule backups for t im es when the network is not busy ( like at night or on weekends) . For exam ple, you m ight do daily backups of im portant individual files or folders and a weekly general archive. You can save backups to another locat ion so your files can survive even if the original RAI D or NAS fails.
14.14.1 Creating an Archive Backup
To backup the NAS every week to a rem ote NAS:
1 Click Protect > Backup > Add Job .
Figure 93 Protect > Backup
2 I dent ify the backup job and select Archive .
New files are often added to the shares that you need to back up and exist ing files are not frequent ly changed so select I ncrem enta l . The NAS does a full backup first and later only copies source files that are new and/ or m odified since the last backup. This example sets the NAS to do another full backup after every four increm ental backups.
Figure 94 Protect > Backup > Add Job: Step 1

Chapter 14 Tutorials
Cloud Storage User’s Guide
193
3 Select the volum e1 check box to select all the folders and files.
Select Rem ote and enter the other NAS’s address, usernam e, password, and share nam e.
I f you want to m ake sure the rem ote NAS is reachable, click Test Connect ion .
Figure 95 Protect > Backup > Add Job: Step 2
4 I n this exam ple, the target NAS is on the LAN so leave the com pression off.
Security is already configured on the target NAS so you can leave the encrypt ion off, too.
Have the NAS keep 3 backups.
Figure 96 Protect > Backup > Add Job: Step 3
5 Set the frequency to W eekly . Schedule the backup for 5: 00 every Saturday morning.
Protect > Backup > Add Job: Step 4
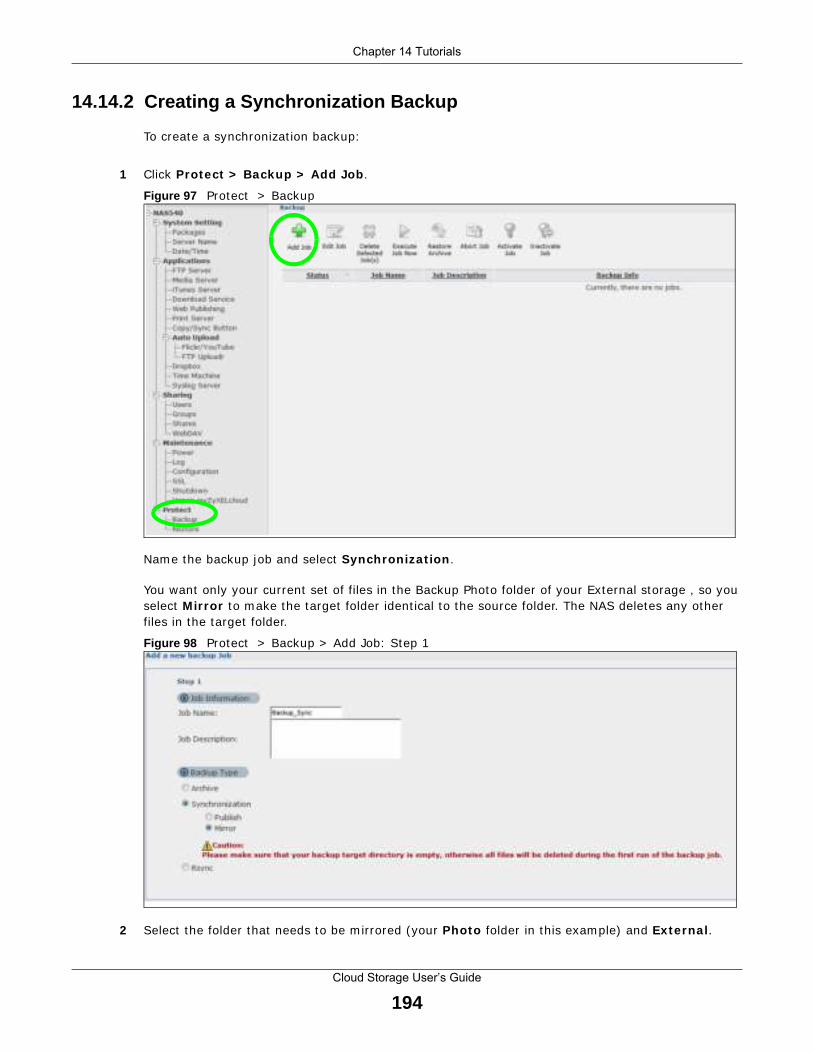
Chapter 14 Tutorials
Cloud Storage User’s Guide
194
14.14.2 Creating a Synchronization Backup
To create a synchronizat ion backup:
1 Click Protect > Backup > Add Job .
Figure 97 Protect > Backup
Name the backup job and select Synchronizat ion .
You want only your current set of files in the Backup Photo folder of your External storage , so you select Mirror to m ake the target folder ident ical to the source folder. The NAS deletes any other files in the target folder.
Figure 98 Protect > Backup > Add Job: Step 1
2 Select the folder that needs to be m irrored (your Photo folder in this exam ple) and External .

Chapter 14 Tutorials
Cloud Storage User’s Guide
195
• Select the dest inat ion on the External (Backup Photo in this exam ple) .
• Click Next .
Figure 99 Protect > Backup > Add Job: Step 2
3 Click OK in the warning dialog box.
Figure 100 Protect > Backup > Add Job: Step 3
4 For this example, assume not many files need to be backed up so leave the com pression off.
• Turn on the encrypt ion to protect these sensit ive files during the t ransfer. The final files stored on the rem ote NAS will be unencrypted (usable) .
• Rest r ict the bandwidth usage to 256 KB/ s to stop the archives from using all of your network connect ion’s available bandwidth.
• You don’t have to configure a purge policy for a synchronizat ion backup.
• Click Next .

Chapter 14 Tutorials
Cloud Storage User’s Guide
196
Figure 101 Protect > Backup > Add Job: Step 3
5 Schedule the backup to occur every m orning at 3: 00 and click Done .
Figure 102 Protect > Backup > Add Job: Step 4
You do not need to use a special restore process to use the files a synchronizat ion backup creates. The copy of files that the NAS creates on the other NAS’s Backups share can be used direct ly by anyone with access to that share.
14.14.3 Restoring Archiv ed Files by Backup Job
I f you have backup jobs for which the NAS has already perform ed backups, you can restore the files based on the backup job. Do the following:
1 Click Protect > Backup screen, select a backup job and click Restore Archive .
Figure 103 Protect > Backup
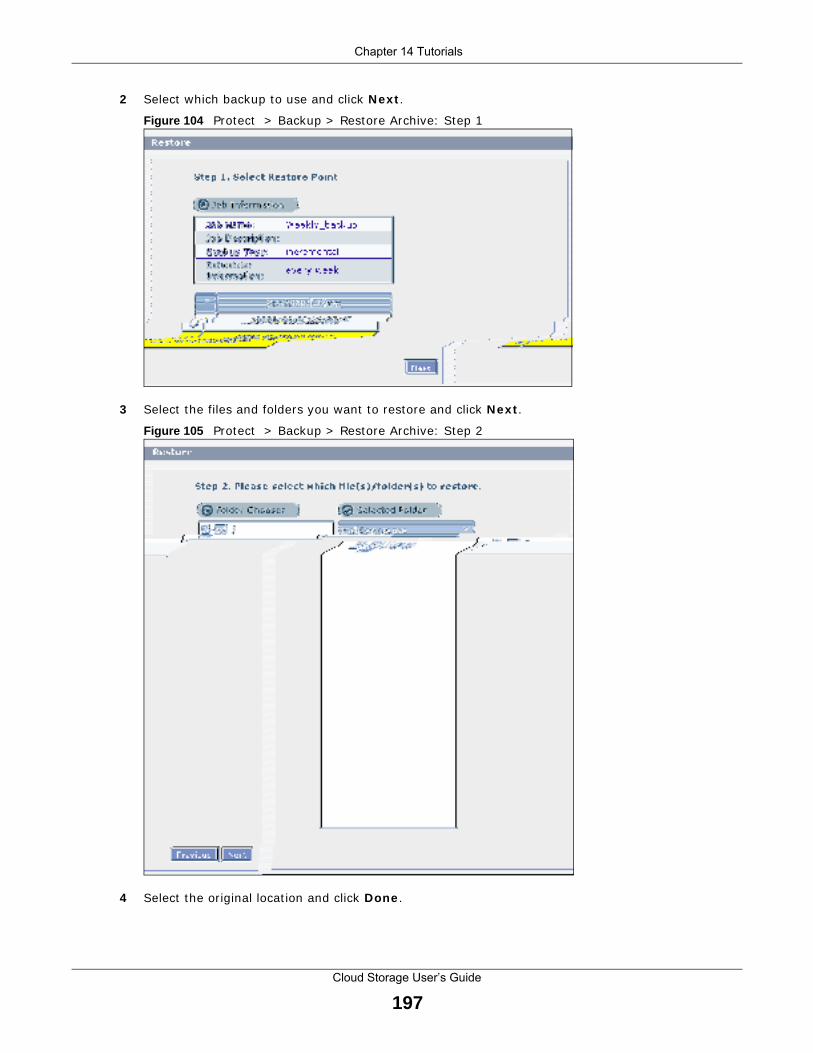
Chapter 14 Tutorials
Cloud Storage User’s Guide
197
2 Select which backup to use and click Next .
Figure 104 Protect > Backup > Restore Archive: Step 1
3 Select the files and folders you want to restore and click Next .
Figure 105 Protect > Backup > Restore Archive: Step 2
4 Select the or iginal locat ion and click Done .

Chapter 14 Tutorials
Cloud Storage User’s Guide
198
Figure 106 Protect > Backup > Restore Archive: Step 3
5 The NAS restores the files into the share. When it finishes you can access the files.
Figure 107 Protect > Backup > Restore Archive: Progress
14.14.4 Restoring by Backup Files
I f you deleted an archive backup job or the NAS or the RAI D array containing the backup job failed you cannot restore archived files by the backup job. I n this example, the NAS’s RAI D array failed. You’ve replaced the hard drives and re-configured the RAI D. To restore by backup files:
1 Click Protect > Restore . Specify where the archive files are located. I n this example, enter “192.168.3.2” as the I P address, “adm in” as the account name, “1234” as the password, and “Backups” as the share nam e. Click Test Connect ion . Click Next .
Figure 108 Protect > Restore: Step 1
EXAMPLE

Chapter 14 Tutorials
Cloud Storage User’s Guide
199
2 Select the backup job and backup t ime and click Next .
Figure 109 Protect > Restore: Step 2
3 Select everything in the share except the recycle folder. Click Next .
Figure 110 Protect > Restore: Step 3
4 Browse to the folder where you want to put the files. Click Done .

Chapter 14 Tutorials
Cloud Storage User’s Guide
200
Figure 111 Protect > Restore: Step 4
5 The NAS restores the files and you can use them again.

201
PART IITechnical Reference

202
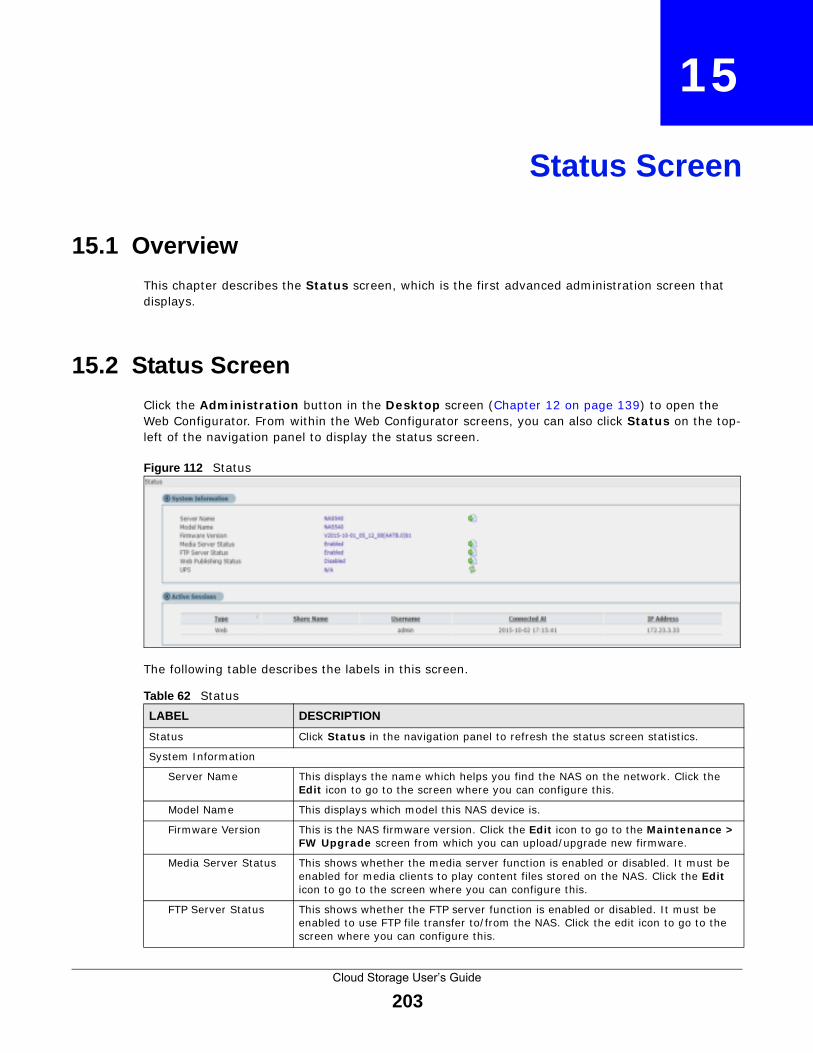
Cloud Storage User’s Guide
203
CHAPTER 15
Status Screen
15.1 Overview
This chapter describes the Status screen, which is the first advanced administ rat ion screen that displays.
15.2 Status Screen
Click the Adm inist ra t ion but ton in the Desktop screen (Chapter 12 on page 139) to open the Web Configurator. From within the Web Configurator screens, you can also click Status on the top-left of the navigat ion panel to display the status screen.
Figure 112 Status
The following table describes the labels in this screen.
Table 62 Status
LABEL DESCRIPTION
Status Click Status in the navigat ion panel to refresh the status screen stat ist ics.
System I nform at ion
Server Name This displays the name which helps you find the NAS on the network. Click the Edit icon to go to the screen where you can configure this.
Model Nam e This displays which model this NAS device is.
Firm ware Version This is the NAS firmware version. Click the Edit icon to go to the Maintenance > FW Upgrade screen from which you can upload/ upgrade new firm ware.
Media Server Status This shows whether the m edia server funct ion is enabled or disabled. I t m ust be enabled for m edia clients to play content files stored on the NAS. Click the Edit icon to go to the screen where you can configure this.
FTP Server Status This shows whether the FTP server funct ion is enabled or disabled. I t m ust be enabled to use FTP file t ransfer to/ from the NAS. Click the edit icon to go to the screen where you can configure this.

Chapter 15 Status Screen
Cloud Storage User’s Guide
204
Web Publishing Status This shows whether the Web server funct ion is enabled or disabled. I t m ust be enabled to use HTTP to access shares on the NAS. Click the Edit icon to go to the screen where you can configure this.
UPS This shows the Uninterrupt ible Power Supply (UPS) capacity. Click the Edit icon to go to the screen where you can configure this.
Act ive Sessions This shows how many users are current ly connected to the NAS.
Type This shows whether it ’s a Windows/ CI FS, web (web configurator) , or FTP connect ion to the NAS.
Share Nam e This displays the shared folder name on the NAS that the user is connected to for CI FS sessions and is blank for FTP and web sessions.
Usernam e This displays the name of the user connected to the NAS if one is defined. ANONYMOUS FTP displays if a usernam e is not defined for the user ’s connect ion.
Connected At This displays the date and t im e the user last connected to the NAS in year, m onth, day, hour, m inute, second form at .
I P Address This displays the I P address of the com puter connected to the NAS.
Table 62 Status (cont inued)
LABEL DESCRIPTION

Cloud Storage User’s Guide
205
CHAPTER 16
System Setting
16.1 Overview
This chapter gives an overview of the various features included in the system set t ing screens. Upgrade the NAS firmware. Use package management to add m ore useful applicat ions in your NAS. I dent ify your NAS on the network and set the t im e that the NAS follows for its scheduled tasks/ logs.
16.2 What You Can Do• Use the Packages screens (Sect ion 16.4 on page 207) to upload new firmware and download
and install applicat ions from the web.
• Use the Server Nam e screen (Sect ion 16.5 on page 209) to specify the NAS’s server and workgroup nam es.
• Use the Date/ Tim e screen (Sect ion 16.6 on page 210) to set up date/ t im e and choose a t ime zone for the NAS.
16.3 What You Need to Know
Package Management
This feature enables you to install and use the following applicat ions.
• Gallery - This web-based applicat ion allows your NAS to host pictures. You can upload im ages in your local com puter or shares to this applicat ion. Use the Gallery adm inist rator account (default username adm in, password 1234) to log into the Gallery console. There you can create accounts for other users.
• NFS - NFS (Network File System ) is a file-sharing protocol m ost com m only im plem ented on Unix- like systems.
• NZBGet - This news grabber helps download files from UseNet .
• PHP- MySQL- phpMyAdm in - This tool can be used to m anage MySQL through the web. Enter 'root ' as the username and '1234' as the password to log in. This includes MySQL, PHP, and phpMyAdmin.
• Logitech® Media Server - This enables you to m anage a Logitech's Squeezebox device connected to the NAS.
• TFTP - Use this to configure the NAS to accept log files from TFTP clients.
• Transm ission - This Bit Torrent client supports adding tasks through torrent files and m agnet links.

Chapter 16 System Setting
Cloud Storage User’s Guide
206
• W ordPress - This allows you to create and manage a blog. Use the WordPress adm inist rator account (default usernam e adm in, password 1234) to log in. You can then create accounts for other users.
• pyLoad - Use this to have the NAS m anage your downloads including those from one-click host ing sites. One-click host ing sites allow I nternet users to easily upload files to the one-click host 's server so others can download them .
• Mem opal - Use this to back up files on the NAS to your Mem opal online backup and storage account .
• ow nCloud - Use this to store, synchronize, and share files, photos, calendars, and m ore with com puters and m obile devices.
• m yZyXELcloud- Agent - Use this to go to mycloud.zyxel.com to set up a free DDNS hostname for the NAS so you can connect to it easily from the I nternet .
The following applicat ions com e with their own configurat ion screens and docum entat ion:
• Gallery
• NZBGet
• PHP-MySQL-phpMyAdm in
• Logitech® Media Server
• Transm ission
• WordPress
• myZyXELcloud-Agent
• ownCould
Windows/CIFS
Com m on I nternet File System (CI FS) is a standard protocol supported by m ost operat ing system s in order to share files across the network.
• CI FS is included by default in Windows operat ing system s.
• You can use Sam ba with Linux to use CI FS.
• CI FS t ransfers use security.
Time Lag
Tim e lag occurs when the t ime on the NAS falls behind the t ime on the t ime server. This m ay happen if:
• the t ime server is no longer reachable
• if the NAS is shut down often ( the NAS internal bat tery keeps t ime when the NAS is shut down and this m ay cause possible variance)
• power surges occur.
The NAS gives no warning if t ime lag occurs. You should resynchronize the t im e after a power surge or after you have shut down the NAS several t imes.
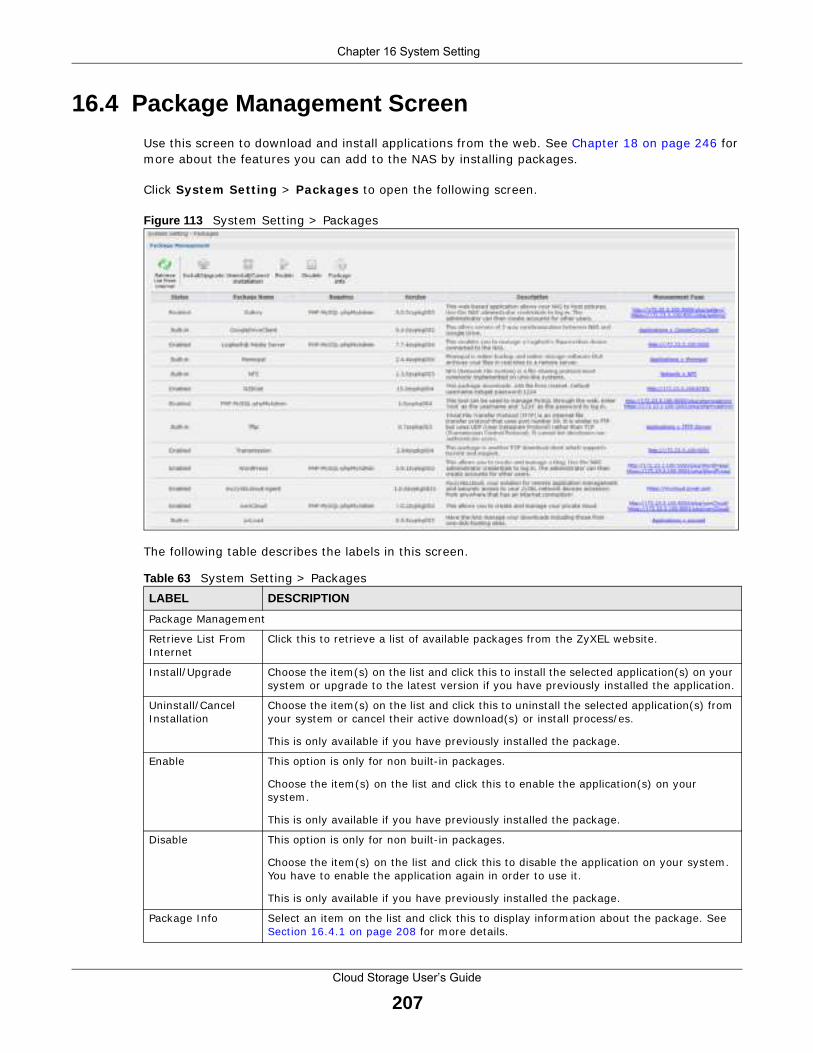
Chapter 16 System Setting
Cloud Storage User’s Guide
207
16.4 Package Management Screen
Use this screen to download and install applicat ions from the web. See Chapter 18 on page 246 for m ore about the features you can add to the NAS by installing packages.
Click System Set t ing > Packages to open the following screen.
Figure 113 System Set t ing > Packages
The following table describes the labels in this screen.
Table 63 System Set t ing > Packages
LABEL DESCRIPTION
Package Managem ent
Ret r ieve List From I nternet
Click this to ret r ieve a list of available packages from the ZyXEL website.
I nstall/ Upgrade Choose the item(s) on the list and click this to install the selected applicat ion(s) on your system or upgrade to the latest version if you have previously installed the applicat ion.
Uninstall/ Cancel I nstallat ion
Choose the item(s) on the list and click this to uninstall the selected applicat ion(s) from your system or cancel their act ive download(s) or install process/ es.
This is only available if you have previously installed the package.
Enable This opt ion is only for non built - in packages.
Choose the item (s) on the list and click this to enable the applicat ion(s) on your system .
This is only available if you have previously installed the package.
Disable This opt ion is only for non built - in packages.
Choose the item (s) on the list and click this to disable the applicat ion on your system . You have to enable the applicat ion again in order to use it .
This is only available if you have previously installed the package.
Package I nfo Select an item on the list and click this to display inform at ion about the package. See Sect ion 16.4.1 on page 208 for m ore details.

Chapter 16 System Setting
Cloud Storage User’s Guide
208
Note: Once you install an applicat ion and enable it , addit ional links show up in the navigat ion panel. This applies to NFS, TFTP Server , pyLoad , and Mem opal . Access the Gallery , NZBGet , PHP- MySQL- phpMyAdm in , Logitech® Media Server , Transm ission , W ordPress , Ow nCloud , and m yZyXELcloud- Agent applicat ions’ web configurators through the Package Managem ent screen.
16.4.1 Displaying the Package Information
Select an item on the list and click Package I nfo . Use this screen to check detailed inform at ion about the applicat ion.
Figure 114 System Set t ing > Packages > Package I nfo
Status This is the current status of the applicat ion. I t shows:
• Not I nsta lled - This displays for applicat ions that have not been installed by the NAS.
• I nsta lling ( % ) - This displays when the applicat ion is being installed. I t also shows the percent of the package already installed.
• Built - in - This displays for applicat ions installed by the NAS that you can configure in the NAS Web Configurator.
• Enabled - This displays for applicat ions installed and enabled by the NAS that have their own web configurators.
• Disabled - This displays for applicat ions installed and disabled by the NAS that have their own web configurators.
• Unknow n - I t is possible to get this status if the web locat ion for the applicat ion is unavailable.
Package Nam e This is the name of the applicat ion.
Requires This shows the other packages required in order to run this applicat ion.
Note: A package would be disabled/enabled simultaneously if its prerequisite package(s)
has been disabled/enabled. For example, when you enable WordPress, this also
enables PHP-MySQL-phpMyAdmin automatically. However when you enable
PHP-MySQL-phpMyAdmin, this does not automatically enable WordPress.
Version This is the version num ber of the item .
The icon indicates that the applicat ion has a newer version available. Move your mouse over this icon to see the latest version num ber. Choose this item and click I nsta ll/ Upgrade .
Descript ion This shows a br ief descript ion of the applicat ion.
Managem ent Page
This shows the locat ion of the screens or web configurator where you can m anage the applicat ion (after the package has been installed on the system ) .
Table 63 System Set t ing > Packages
LABEL DESCRIPTION

Chapter 16 System Setting
Cloud Storage User’s Guide
209
The following table describes the labels in this screen.
16.5 Server Name Screen
Click System Set t ing > Server Nam e to open the following screen. Use this screen to configure your CI FS set t ings. I n this screen you can set your server nam e and specify if your NAS is a part of a workgroup.
Note: CI FS cannot be disabled on the NAS.
Figure 115 System Set t ing > Server Name
Table 64 System Set t ing > Packages > Package I nfo
LABEL DESCRIPTION
Status This is the current status of the applicat ion. I t shows:
• Not I nsta lled - This displays for applicat ions that have not been installed by the NAS.• I nsta lling ( % ) - This displays when the applicat ion is being installed. I t also shows
the percent of the package already installed.• Built - in - This displays for applicat ions installed by the NAS that you can configure in
the NAS Web Configurator.• Enabled - This displays for applicat ions installed and enabled by the NAS that have
their own web configurators.• Disabled - This displays for applicat ions installed and disabled by the NAS that have
their own web configurators.
Nam e This is the nam e of the applicat ion.
Size This is the size of the applicat ion at init ial download.
Needed Space This is the needed space to com plete the installat ion of the applicat ion.
Version This is the version num ber of the applicat ion.
Requires This shows other package/ s required to run this applicat ion.
Required By This shows which other packages require this applicat ion in order to be usable.
Managem ent Page This shows the locat ion of the screens, console or web configurator where you can m anage the applicat ion (after the package has been installed on the system) .
Source This shows the locat ion of the installed files of the applicat ion.
Descript ion This shows a brief descript ion of the item .
Close Click this to close the screen.
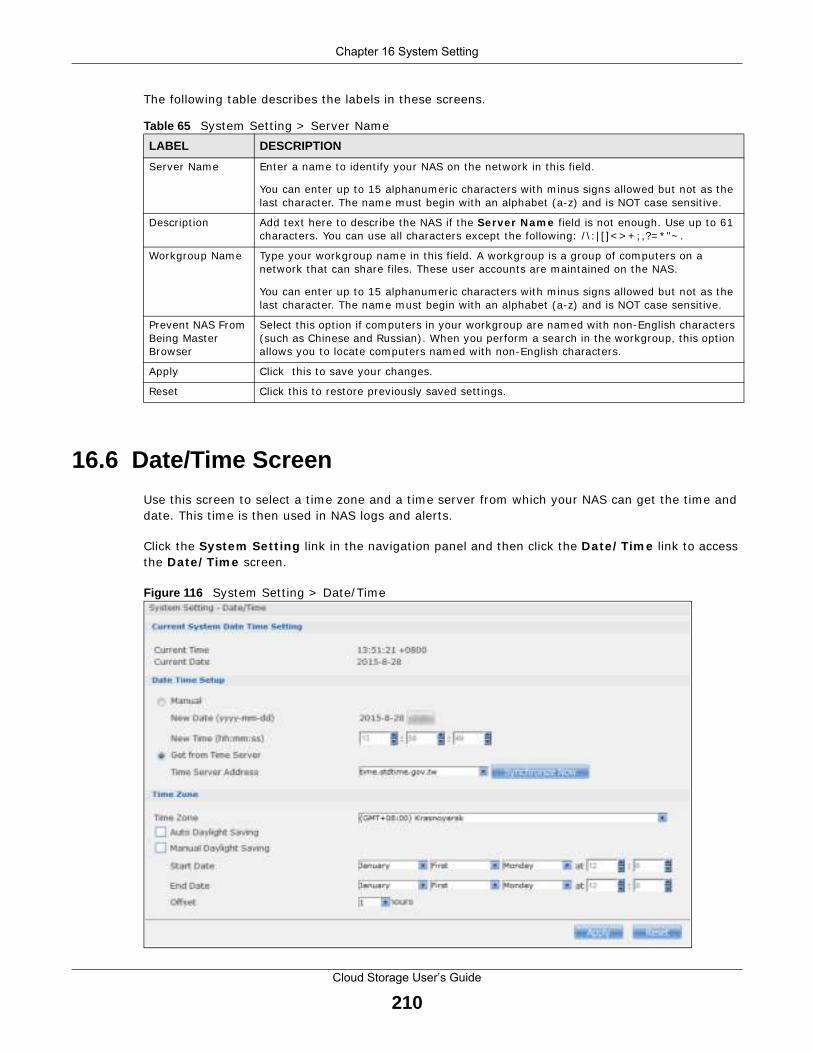
Chapter 16 System Setting
Cloud Storage User’s Guide
210
The following table describes the labels in these screens.
16.6 Date/Time Screen
Use this screen to select a t im e zone and a t im e server from which your NAS can get the t im e and date. This t ime is then used in NAS logs and alerts.
Click the System Set t ing link in the navigat ion panel and then click the Date/ Tim e link to access the Date/ Tim e screen.
Figure 116 System Set t ing > Date/ Time
Table 65 System Set t ing > Server Name
LABEL DESCRIPTION
Server Nam e Enter a nam e to ident ify your NAS on the network in this field.
You can enter up to 15 alphanumeric characters with m inus signs allowed but not as the last character. The nam e m ust begin with an alphabet (a-z) and is NOT case sensit ive.
Descript ion Add text here to describe the NAS if the Server Nam e f ield is not enough. Use up to 61 characters. You can use all characters except the following: / \ : | [ ] < > + ; ,?= * "~ .
Workgroup Nam e Type your workgroup nam e in this field. A workgroup is a group of com puters on a network that can share files. These user accounts are m aintained on the NAS.
You can enter up to 15 alphanumeric characters with m inus signs allowed but not as the last character. The nam e m ust begin with an alphabet (a-z) and is NOT case sensit ive.
Prevent NAS From Being Master Browser
Select this opt ion if computers in your workgroup are nam ed with non-English characters (such as Chinese and Russian) . When you perform a search in the workgroup, this opt ion allows you to locate computers nam ed with non-English characters.
Apply Click this to save your changes.
Reset Click this to restore previously saved set t ings.

Chapter 16 System Setting
Cloud Storage User’s Guide
211
The following table describes the labels in this screen.
Table 66 System Set t ing > Date/ Tim e
LABEL DESCRIPTION
Current System Date Tim e Set t ing
Current Tim e This field displays the t im e used by your NAS for it s logs and alerts.
Current Date This field displays the date used by your NAS for it s logs and alerts.
Date Time Setup
Manual Select this radio but ton to enter the t im e and date manually.
When you enter the t ime set t ings m anually, the NAS uses the new set t ing once you click Apply .
Note: If you enter time settings manually, they revert to their defaults when power is lost.
New Date (yyyy-m m -dd)
This field displays the last updated date from the t im e server or the last date configured m anually.When you set Tim e and Date Setup to Manual , enter the new date in this field and then click Apply .
New Tim e (hh: m m : ss)
This field displays the last updated t im e from the t im e server or the last t im e configured m anually.When you set Tim e and Date Setup to Manual , enter the new t im e in this field and then click Apply .
Get from Tim e Server
Select this check box to have the NAS get the t im e and date from the t im e server you select in the Tim e Server Address f ield.
Tim e Server Address
Select a t im e server from the drop-down list box or select Specify m y ow n t im e server and enter the t im e server you wish to use in the field below. Check with your I SP/ network adm inist rator if you are unsure of this inform at ion.
Synchronize Now
Click this for the NAS to ret r ieve the correct t ime from the configured t im e server r ight away.
Tim e Zone
Tim e Zone Choose the t im e zone of your locat ion. This will set the t ime difference between your t ime zone and Greenwich Mean Tim e (GMT) .
Manual Daylight Saving
Daylight saving is a period from late spr ing to fall when m any count r ies set their clocks ahead of norm al local t im e by one hour to give m ore dayt im e light in the evening.
Select this opt ion to m anually enter Daylight Saving Tim e set t ings. Clear this opt ion to have the NAS autom at ically ret r ieve Daylight Saving Tim e set t ings from the I nternet . The NAS will download a new daylight saving resource file from the I nternet every m onth.
Start Date Configure the day and t im e when Daylight Saving Tim e starts if you selected Enable Daylight Saving . The hour f ield uses the 24 hour form at . Here are a couple of exam ples:
Daylight Saving Tim e starts in m ost parts of the United States on the second Sunday of March. Each t im e zone in the United States starts using Daylight Saving Time at 2 A.M. local t im e. So in the United States you would use March, Second , Sunday , at 2 : 0 0 .
Daylight Saving Tim e starts in the European Union on the last Sunday of March. All of the t im e zones in the European Union start using Daylight Saving Time at the sam e mom ent (1 A.M. GMT or UTC) . So in the European Union you would select March , Last , Sunday . The t im e you specify depends on your t im e zone. I n Germ any for instance, you would type 2 because Germ any's t im e zone is one hour ahead of GMT or UTC (GMT+ 1) .
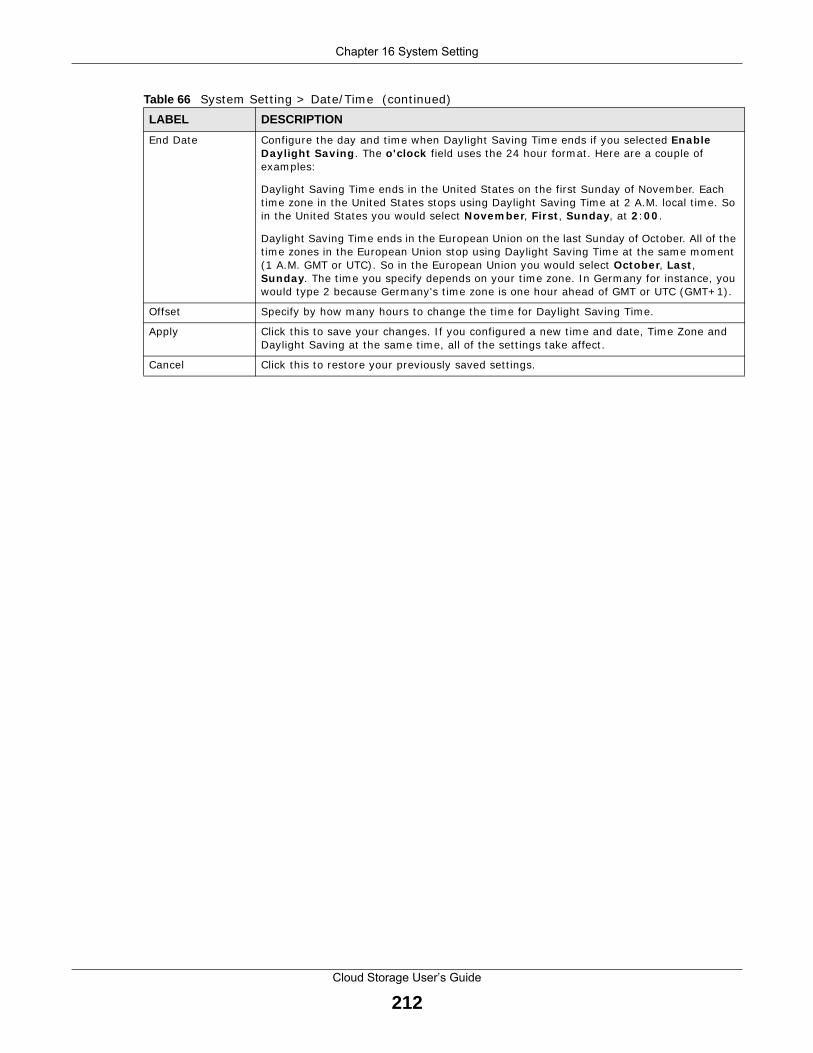
Chapter 16 System Setting
Cloud Storage User’s Guide
212
End Date Configure the day and t im e when Daylight Saving Time ends if you selected Enable Daylight Saving . The o'clock f ield uses the 24 hour form at . Here are a couple of exam ples:
Daylight Saving Time ends in the United States on the first Sunday of Novem ber. Each t im e zone in the United States stops using Daylight Saving Time at 2 A.M. local t ime. So in the United States you would select Novem ber , First , Sunday , at 2 : 0 0 .
Daylight Saving Time ends in the European Union on the last Sunday of October. All of the t im e zones in the European Union stop using Daylight Saving Tim e at the sam e m om ent (1 A.M. GMT or UTC) . So in the European Union you would select October , Last , Sunday . The t im e you specify depends on your t im e zone. I n Germ any for instance, you would type 2 because Germ any's t im e zone is one hour ahead of GMT or UTC (GMT+ 1) .
Offset Specify by how m any hours to change the t im e for Daylight Saving Tim e.
Apply Click this to save your changes. I f you configured a new t im e and date, Tim e Zone and Daylight Saving at the sam e t im e, all of the set t ings take affect .
Cancel Click this to restore your previously saved set t ings.
Table 66 System Set t ing > Date/ Tim e (cont inued)
LABEL DESCRIPTION

Cloud Storage User’s Guide
213
CHAPTER 17
Applications
17.1 Overview
This chapter discusses the features in the Applicat ion screens. The NAS contains various applicat ions for file sharing and downloading.
17.2 What You Can Do• Use the FTP Server screen (Sect ion 17.4 on page 215) to configure set t ings for FTP file t ransfers
to/ from the NAS.
• Use the Media Server screens (Sect ion 17.5 on page 216) to share files with m edia clients.
• Use the iTunes Server screens (Sect ion 17.6 on page 218) to share files with iTunes users on your network.
• Use the Dow nload Service screen (Sect ion 17.7 on page 219) to download files from the I nternet .
• Use the W eb Publishing screen (Sect ion 17.8 on page 230) to publish shares for people to access files using a web browser.
• Use the Print Server screen (Sect ion 17.9 on page 231) to share a printer.
• Use the Copy/ Sync But ton screen (Sect ion 17.10 on page 232) to t ransfer files between a USB device and the NAS.
• Use the Auto Upload screens (Chapter 19 on page 262) to upload files in selected shares to your Flickr and/ or YouTube accounts.
• Use the Syslog Server screen (Sect ion 17.12 on page 243) to configure the NAS to accept syslog logs from syslog clients.
• Use the Dropbox screen (Chapter 20 on page 274) to log the NAS into your Dropbox account .
• Use the Tim e Machine screen (Chapter 21 on page 278) to turn Tim e Machine support on or off, and designate the share for Tim e Machine backups.
17.3 What You Need to Know
FTP
File Transfer Protocol (FTP) is a file t ransfer service that operates on the I nternet . A system running the FTP server accepts com m ands from a system running an FTP client . FTP is not a secure protocol. Your file t ransfers could be subject to snooping.

Chapter 17 Applications
Cloud Storage User’s Guide
214
FTPES (File Transfer Protoc ol over Expl icit TLS/SSL)
File Transfer Protocol over Explicit TLS/ SSL (FTPES) is a file t ransfer service that uses either TLS (Transport Layer Security) or SSL (Secure Sockets Layer) for secure t ransfers across the I nternet . I t requests for a m utual method of encrypt ion from the FTP server for its file t ransfer sessions. Your FTP client must be set to use FTPES as in the following exam ple.
Figure 117 FTP Client Exam ple
Media Server
The m edia server feature lets anyone on your network play video, music, and photos from the NAS (without having to copy them to another com puter) . The NAS can funct ion as a DLNA-com pliant media server and/ or an iTunes server. The NAS st reams files to DLNA-compliant media clients or computers using iTunes. The Digital Living Network Alliance (DLNA) is a group of personal com puter and elect ronics com panies that works to m ake products com pat ible in a hom e network.
iTunes Server
The NAS iTunes server feature lets you use Apple’s iTunes software on a com puter to play m usic and video files stored on the NAS. You can download iTunes from www.apple.com .
Download Service
The NAS’s download service downloads files from the I nternet direct ly to the NAS. You do not have to download to your com puter and then copy to the NAS. This can free up your computer ’s system resources.
The NAS can download using these protocols.
• HTTP: The standard protocol for web pages.
• FTP: A standard I nternet file t ransfer service.
• P2P download: Peer- to-peer files sharing protocol.

Chapter 17 Applications
Cloud Storage User’s Guide
215
Web Publishing
Web publishing lets you “publish” shares (containing folders and files) on the NAS so people can access the files using a web browser without having to log into the Web Configurator. This way you can share files with others without them having to know and enter a usernam e and password.
For exam ple, if you want to share photos in a Fam ilyPhotos share, you could “web publish” it and others could use a web browser to access the photos at ht tp: / / my-NAS’s-I P-Address/ MyWeb/FamilyPhotos.
RSS
RSS (Really Sim ple Syndicat ion) is a form at for delivering frequent ly updated digital content . A channel uses a feed to deliver its contents ( item s) . Subscribe the NAS to a feed to be able to download the contents.
17.4 FTP Server Screen
Use FTP or FTPES (FTP over Explicit TTL/ SSL) to upload files to the NAS and download files from the NAS. Click Applicat ions > FTP Server to open the following screen.
Figure 118 Applicat ions > FTP Server

Chapter 17 Applications
Cloud Storage User’s Guide
216
The following table describes the labels in this screen.
17.5 Media Server Screens
The media server applicat ion allows you to share media files with media clients.
Table 67 Applicat ions > FTP Server
LABEL DESCRIPTION
FTP
Enable FTP You can use FTP to send files to the NAS or get files from the NAS. Select this check box to allow users to connect to the NAS via FTP; otherwise clear the check box.
Connect ion Lim it Enter the m axim um number of concurrent FTP connect ions allowed on the NAS in this field. See your screen for your m odel’s connect ion lim it .
I dle Tim eout Enter the length of t im e that an FTP connect ion can be idle before t im ing out . The t imeout lim it is 300 m inutes.
Port Num ber This is the port num ber used by the NAS for FTP t raffic.
Enable Anonym ous FTP Access
Select this check box to allow any user to log into the NAS using ‘FTP’ or ‘anonym ous’ as a usernam e and no password. Any other nam e is considered a usernam e, so m ust be valid and have a corresponding correct password.
Custom ize the port range for data t ransfer
Select this check box to assign a port range for FTP clients to use when downloading files from the NAS using passive m ode.
The connect ion lim it is rest r icted to half of the port num bers within the range if this value is smaller than the one configured in the Connect ion Lim it f ield. For exam ple, you specified a port range from 1024 to 1029 and configured 10 in the Connect ion Lim it field. The FTP connect ion lim it will only be 3 (6 ports in the range divided by 2) because it is the sm aller value.
Start ing Port Enter the first port num ber in the range. Choose from 1024 to 65535.
Ending Port Enter the last port number in the range. Choose from 1024 to 65535.
Download/ Upload Rate For All Users ( include adm in)
Select this if you want to lim it the download/ upload bandwidth for all users who are logged into the NAS, including the adm inist rator.
• Max. Dow nload Rate - Enter the download speed ( in kilobytes/ s) that the NAS allows for users who are logged into the NAS.
• Max. Upload Rate - Enter the upload speed ( in kilobytes/ s) that the NAS allows for users who are logged into the NAS.
Download/ Upload Rate For Anonym ous Users
Select this if you want to lim it the download/ upload bandwidth for users who log into the NAS using ‘FTP’ or ‘anonym ous’ as a usernam e and no password.
• Max. Dow nload Rate - Enter the download speed ( in kilobytes/ s) that the NAS allows for users who are logged into the NAS.
• Max. Upload Rate - Enter the upload speed ( in kilobytes/ s) that the NAS allows for users who are logged into the NAS.
Character Set The NAS uses UTF-8 (8-bit UCS/ Unicode Transform at ion Form at ) form at for FTP by default . I f the NAS’s folders, or file nam es do not display correct ly in your FTP client , select the appropriate language encoding here.
This set t ing applies to all FTP client connect ions to the NAS. I t does not affect your Windows/ CI FS connect ions ( it will not correct the character display in Windows Explorer) .
Apply Click this to save your changes.
Reset Click this to restore your previously saved set t ings.

Chapter 17 Applications
Cloud Storage User’s Guide
217
Click Applicat ions > Media Server to open the following screen. Use this screen to view the m edia server ’s status and rebuild the m edia server database.
Figure 119 Applicat ions > Media Server > Media Server
The following table describes the labels in this screen.
17.5.1 Media Server Share Publish Screen
Click Applicat ions > Media Se rver > Share Publish to open the following screen. Use this screen to select shares to publish (share with m edia clients like a m edia player or iTunes) .
Figure 120 Applicat ions > Media Server > Share Publish
The following table describes the labels in this screen.
Table 68 Applicat ions > Media Server > Media Server
LABEL DESCRIPTION
Enable Twonky Media Server
Select this to have the NAS share the m edia files in the shares selected in the Share Publish tab. Clear it to stop the NAS from sharing m edia files through the Playzone screens or m edia players.
Click the hyper link to open the Twonky m edia server configurat ion screens to check m edia server status or m odify m edia server set t ings. See the help center in the Twonky screens for details.
Apply Click this to save your changes.
Reset Click this to restore your previously saved set t ings.
Table 69 Applicat ions > Media Server > Share Publish
LABEL DESCRIPTION
Publish Select this to have the media server share a share’s m edia files with media clients.
Share Nam e This colum n lists nam es of shares on the NAS.
Publish Music Tracks Select this to give media clients access to the share’s music files.
Publish Photos Select this to give media clients access to the share’s photo files.
Publish Videos Select this to give m edia clients access to the share’s video files.

Chapter 17 Applications
Cloud Storage User’s Guide
218
17.5.2 Media Server Logit ech® Media Server Screen
Logitech® Media Server enables you to manage a Logitech Squeezebox device connected to the NAS.
Click Applicat ions > Media Server > Logitech® Media Server to open the following screen. This screen is available when the Logitech® Media Server applicat ion is installed using Package Management (see Sect ion 17.5.2 on page 218) . Use this screen to turn the Logitech® Media Server applicat ion on or off.
Figure 121 Applicat ions > Media Server > Logitech® Media Server
The following table describes the labels in this screen.
17.6 iTunes Server Screen
Click Applicat ions > iTunes Server to open the following screen. Use this screen to turn the iTunes server on or off.
Figure 122 Applicat ions > iTunes Server
Apply Click this to save your changes.
Reset Click this to restore your previously saved set t ings.
Table 69 Applicat ions > Media Server > Share Publish
LABEL DESCRIPTION
Table 70 Applicat ions > Media Server > Logitech® Media Server
LABEL DESCRIPTION
Enable Logitech® Media Server
Check this to enable Logitech® Media Server .
Click the hyper link to open the Logitech m edia server screens where you can play files and change set t ings See the help center in the Logitech m edia server screens for details.
Apply Click this to save your changes.
Reset Click this to restore your previously saved set t ings.
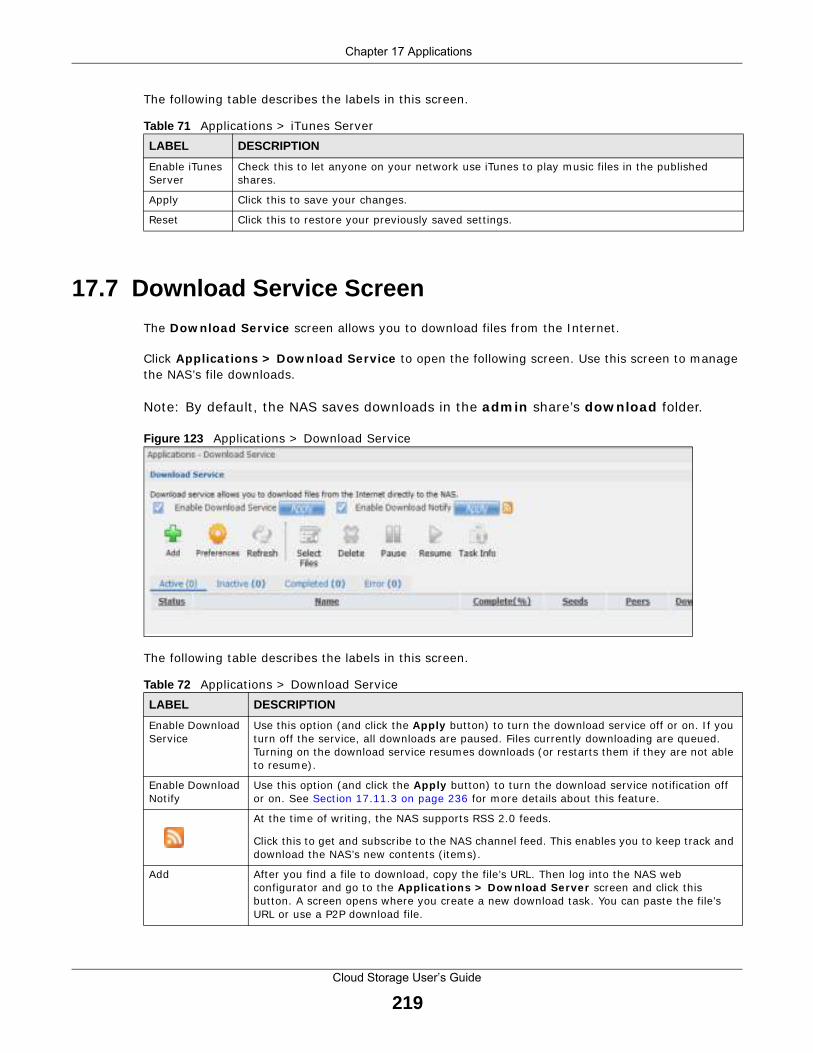
Chapter 17 Applications
Cloud Storage User’s Guide
219
The following table describes the labels in this screen.
17.7 Download Service Screen
The Dow nload Service screen allows you to download files from the I nternet .
Click Applicat ions > Dow nload Service to open the following screen. Use this screen to manage the NAS’s file downloads.
Note: By default , the NAS saves downloads in the adm in share’s dow nload folder.
Figure 123 Applicat ions > Download Service
The following table describes the labels in this screen.
Table 71 Applicat ions > iTunes Server
LABEL DESCRIPTION
Enable iTunes Server
Check this to let anyone on your network use iTunes to play m usic files in the published shares.
Apply Click this to save your changes.
Reset Click this to restore your previously saved set t ings.
Table 72 Applicat ions > Download Service
LABEL DESCRIPTION
Enable Download Service
Use this opt ion (and click the Apply but ton) to turn the download service off or on. I f you turn off the service, all downloads are paused. Files current ly downloading are queued. Turning on the download service resum es downloads (or restarts them if they are not able to resum e) .
Enable Download Not ify
Use this opt ion (and click the Apply but ton) to turn the download service not ificat ion off or on. See Sect ion 17.11.3 on page 236 for m ore details about this feature.
At the t im e of writ ing, the NAS supports RSS 2.0 feeds.
Click this to get and subscribe to the NAS channel feed. This enables you to keep t rack and download the NAS’s new contents ( item s) .
Add After you find a file to download, copy the file’s URL. Then log into the NAS web configurator and go to the Applica t ions > Dow nload Server screen and click this but ton. A screen opens where you create a new download task. You can paste the file’s URL or use a P2P download file.

Chapter 17 Applications
Cloud Storage User’s Guide
220
Preferences Click this to open a screen where you can set the default locat ion for saving downloads and configure your P2P download set t ings.
Refresh Click this to update the inform at ion displayed on the screen.
Select Files A single P2P download torrent file is often for m ult iple files. I f you do not need all of the files the torrent file specifies, click this to select which files to download.
Delete To delete download tasks (or m anually clear out completed download tasks) , select a download task and click this to rem ove it from the list . A pop-up screen asks you to confirm . Click Apply to delete or Cancel to quit . When you delete a download task, you are given the opt ion to delete the associated files. Select ing this opt ion deletes a downloaded file and in the case of a P2P download task, also deletes the related .torrent file.
Use your keyboard’s [ SHI FT] key to select a range of download tasks. Use the [ CTRL] key and click individual download tasks to select mult iple individual download tasks.
Pause Select a downloading item and click this to temporar ily stop the download. Paused downloads appear in the Dow nload Service screen’s I nact ive tab .
Use your keyboard’s [ SHI FT] key to select a range of download tasks. Use the [ CTRL] key and click individual download tasks to select mult iple individual download tasks.
Resum e Select a paused item and click this to cont inue downloading the file.
Select a com pleted item and click this to re-seed a P2P file or download a file again. I f you want to re-seed a P2P task, keep the P2P file and the completed file in their or iginal locat ions.
Task I nfo Select an item on the list and click this to display inform at ion about the download task. See Sect ion 17.7.6 on page 229 for m ore details.
The table lists your downloads. Click a colum n’s heading to sort the ent r ies by that cr iter ia.
Act ive Click this to see the list of files the NAS is current ly downloading or sharing with other P2P users. The NAS handles a m axim um of 10 act ive tasks at a t im e (or fewer depending on how m uch of the NAS’s system m em ory is available) . I f you add m ore, they appear in the I nact ive tab.
P2P downloads m ay appear in the I nact ive tab for a while before showing in the Dow nloading tab. The NAS autom at ically moves com pleted tasks to the Com pleted tab.
I nact ive Click this to see the list of files that are queued (wait ing in line) for the NAS to download or the downloads that have been m anually paused.
Com pleted Click this to see the list of files that the NAS has finished downloading.
The Locat ion colum n shows where a downloaded file is saved on the NAS. Click on the locat ion link to open the share browser and access the file.
Error Click this to see the list of files that the NAS was not able to download. The NAS automat ically ret r ies unsuccessful download at tem pts. The download displays in the error tab when the re-at tem pts are also unsuccessful and the NAS stops t rying to download the file. To t ry the download again, use the Add but ton to create a new download task.
Table 72 Applicat ions > Download Service (cont inued)
LABEL DESCRIPTION
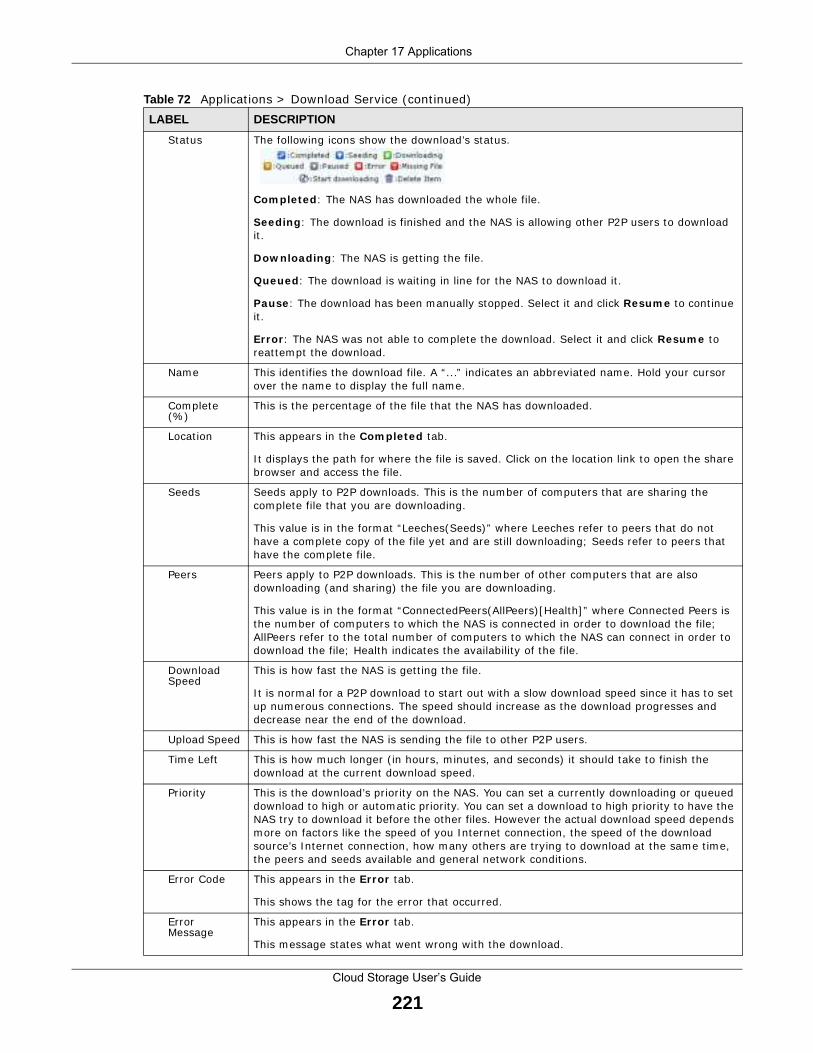
Chapter 17 Applications
Cloud Storage User’s Guide
221
Status The following icons show the download’s status.
Com pleted : The NAS has downloaded the whole file.
Seeding : The download is finished and the NAS is allowing other P2P users to download it .
Dow nloading : The NAS is get t ing the file.
Queued : The download is wait ing in line for the NAS to download it .
Pause : The download has been m anually stopped. Select it and click Resum e to cont inue it .
Error : The NAS was not able to com plete the download. Select it and click Resum e to reat tem pt the download.
Nam e This ident ifies the download file. A “ .. .” indicates an abbreviated nam e. Hold your cursor over the name to display the full nam e.
Com plete (% )
This is the percentage of the file that the NAS has downloaded.
Locat ion This appears in the Com pleted tab.
I t displays the path for where the file is saved. Click on the locat ion link to open the share browser and access the file.
Seeds Seeds apply to P2P downloads. This is the num ber of com puters that are sharing the com plete file that you are downloading.
This value is in the form at “Leeches(Seeds) ” where Leeches refer to peers that do not have a com plete copy of the file yet and are st ill downloading; Seeds refer to peers that have the com plete file.
Peers Peers apply to P2P downloads. This is the num ber of other com puters that are also downloading (and sharing) the file you are downloading.
This value is in the form at “ConnectedPeers(AllPeers) [ Health] ” where Connected Peers is the num ber of com puters to which the NAS is connected in order to download the file; AllPeers refer to the total num ber of com puters to which the NAS can connect in order to download the file; Health indicates the availability of the file.
Download Speed
This is how fast the NAS is get t ing the file.
I t is norm al for a P2P download to start out with a slow download speed since it has to set up num erous connect ions. The speed should increase as the download progresses and decrease near the end of the download.
Upload Speed This is how fast the NAS is sending the file to other P2P users.
Tim e Left This is how m uch longer ( in hours, m inutes, and seconds) it should take to finish the download at the current download speed.
Prior ity This is the download’s pr ior ity on the NAS. You can set a current ly downloading or queued download to high or autom at ic pr ior ity. You can set a download to high prior ity to have the NAS t ry to download it before the other files. However the actual download speed depends m ore on factors like the speed of you I nternet connect ion, the speed of the download source’s I nternet connect ion, how m any others are t ry ing to download at the sam e t im e, the peers and seeds available and general network condit ions.
Error Code This appears in the Error tab.
This shows the tag for the error that occurred.
Error Message
This appears in the Error tab.
This m essage states what went wrong with the download.
Table 72 Applicat ions > Download Service (cont inued)
LABEL DESCRIPTION

Chapter 17 Applications
Cloud Storage User’s Guide
222
17.7.1 Adding a Download Task
Click Applicat ions > Dow nload Service > Add to open the following screen. Use this screen to specify a file for the NAS to download. Sect ion 14.7 on page 162 provides a tutor ial on adding a download task.
Figure 124 Applicat ions > Download Service > Add
The following table describes the labels in this screen.
Table 73 Applicat ions > Download Service > Add
LABEL DESCRIPTION
Source
URL Paste the URL or m agnet link of the file you want to download into this field. The URL can be for an HTTP, FTP, or P2P download. A m agnet link is for a P2P download.
For a P2P download using a m agnet link the NAS autom at ically downloads the file related to the m agnet link.
For a P2P download using a .torrent file, you can copy and paste the URL of the .torrent file. The NAS will automat ically download the .torrent file and use it . You do not have to m anually download the .torrent file or save it to your com puter.
Note: Make sure the link opens either the file you want or a pop-up window about how to
handle the file.
I t is also OK for the link to open a .torrent file. I f you are redirected to a screen that says the download should start in a few seconds, there m ay be a link to click if the download does not start autom at ically. See if that link opens the file or the pop-up window.
Torrent File A “ torrent ” file has inform at ion the NAS uses to do a P2P download. A torrent file uses a .torrent extension. I f you already have a torrent file saved on your com puter, select the Torrent File opt ion and specify it s path or click Brow se and look for it s locat ion.
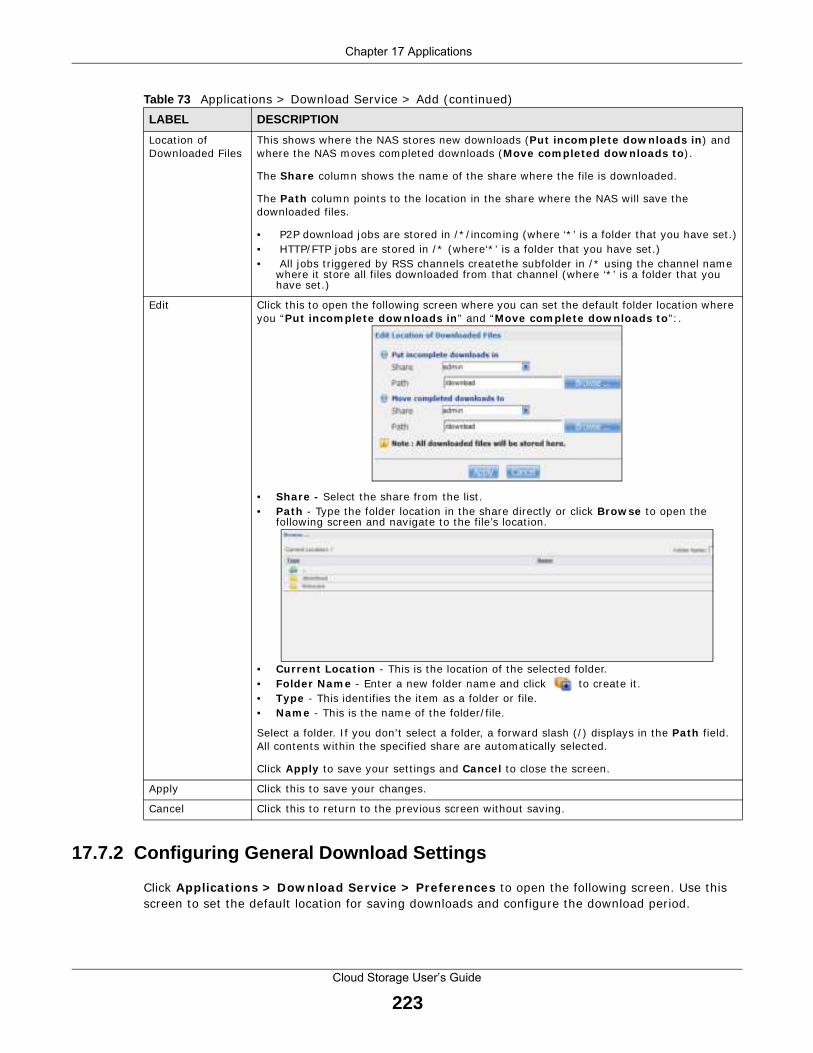
Chapter 17 Applications
Cloud Storage User’s Guide
223
17.7.2 Configuring Ge neral Download Settings
Click Applicat ions > Dow nload Service > Preferences to open the following screen. Use this screen to set the default locat ion for saving downloads and configure the download period.
Locat ion of Downloaded Files
This shows where the NAS stores new downloads (Put incom plete dow nloads in ) and where the NAS m oves com pleted downloads (Move com pleted dow nloads to ) .
The Share colum n shows the nam e of the share where the file is downloaded.
The Path column points to the locat ion in the share where the NAS will save the downloaded files.
• P2P download jobs are stored in / * / incom ing (where ‘* ’ is a folder that you have set .)• HTTP/ FTP jobs are stored in / * (where ‘* ’ is a folder that you have set .)• All jobs t r iggered by RSS channels create the subfolder in / * using the channel nam e
where it store all files downloaded from that channel (where ‘* ’ is a folder that you have set .)
Edit Click this to open the following screen where you can set the default folder locat ion where you “Put incom plete dow nloads in ” and “Move com plete dow nloads to ” : .
• Share - Select the share from the list .• Path - Type the folder locat ion in the share direct ly or click Brow se to open the
following screen and navigate to the file’s locat ion.
• Current Locat ion - This is the locat ion of the selected folder.• Folder Nam e - Enter a new folder nam e and click to create it .• Type - This ident ifies the item as a folder or file.• Nam e - This is the nam e of the folder/ file.
Select a folder. I f you don’t select a folder, a forward slash ( / ) displays in the Path f ield. All contents within the specified share are automat ically selected.
Click Apply to save your set t ings and Cancel to close the screen.
Apply Click this to save your changes.
Cancel Click this to return to the previous screen without saving.
Table 73 Applicat ions > Download Service > Add (cont inued)
LABEL DESCRIPTION

Chapter 17 Applications
Cloud Storage User’s Guide
224
Figure 125 Applicat ions > Download Service > Preferences > General Set t ings
The following table describes the labels in this screen.
Table 74 Applicat ions > Download Service > Preferences > General Set t ings
LABEL DESCRIPTION
Locat ion of Downloaded Files
This shows where the NAS stores new downloads (Put incom plete dow nloads in ) and where the NAS moves com pleted downloads (Move com pleted dow nloads to ) .
The Share colum n shows the nam e of the share where the file is downloaded.
The Path colum n points to the locat ion in the share where the NAS will save the downloaded files.
• P2P download jobs are stored in / * / incom ing (where ‘* ’ is a folder that you have set .)• HTTP/ FTP jobs are stored in / * (where ‘* ’ is a folder that you have set .)• All j obs t r iggered by RSS channels create the subfolder in / * using the channel nam e
where it store all files downloaded from that channel (where ‘* ’ is a folder that you have set .)
Edit Click this to open the following screen where you can set the default folder locat ion where you “Put incom plete dow nloads in ” and “Move com plete dow nloads to ” : .
• Share - Select the share from the list .• Path - Type the folder locat ion in the share direct ly or click Brow se to open the
following screen and navigate to the file’s locat ion.

Chapter 17 Applications
Cloud Storage User’s Guide
225
17.7.3 Configuring th e P2P Download Settings
Click Applicat ions > Dow nload Service > Preferences > P2 P dow nload to open the following screen. Use this screen to configure P2P download set t ings.
• Current Locat ion - This is the locat ion of the selected folder.• Folder Nam e - Enter a new folder nam e and click to create it .• Type - This ident ifies the item as a file or folder.• Nam e - This is the nam e of the folder/ file.
Select a folder. I f you don’t select a folder, a forward slash ( / ) displays in the Path f ield. All contents within the specified share are autom at ically selected.
Click Apply to save your set t ings and Cancel to close the screen.
Download Period Cont rol
This feature sets the NAS to download files only within a specified t im e period.
Enable Download Period Cont rol
Use the check box to turn the download period cont rol on or off.
Download Service is act ive in the t im e period (hh: m m - hh: mm )
Specify the t im e period for the NAS to download files.
Note: If you also configured the Power On/Off Schedule feature in the Power Management screen, make sure your active download period does not conflict with
the power-off period.
Apply Click this to save your changes.
Reset Click this to restore your previously saved set t ings.
Cancel Click this to return to the previous screen without saving.
Table 74 Applicat ions > Download Service > Preferences > General Set t ings (cont inued)
LABEL DESCRIPTION
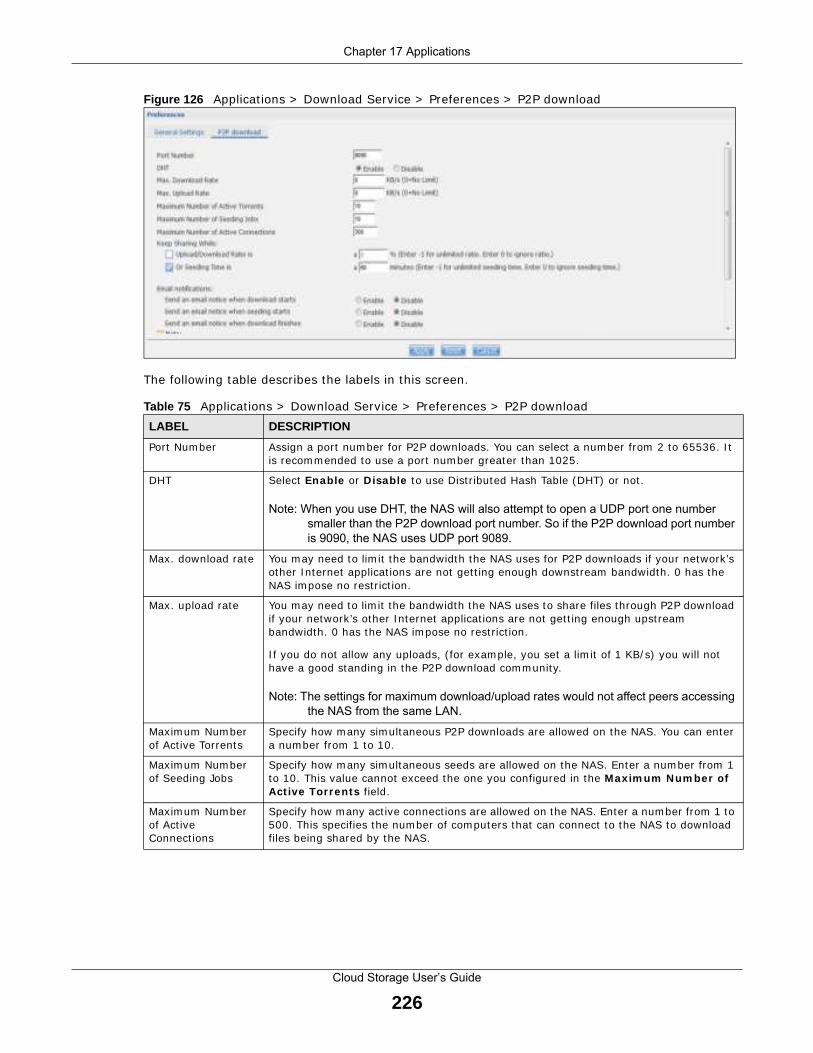
Chapter 17 Applications
Cloud Storage User’s Guide
226
Figure 126 Applicat ions > Download Service > Preferences > P2P download
The following table describes the labels in this screen.
Table 75 Applicat ions > Download Service > Preferences > P2P download
LABEL DESCRIPTION
Port Num ber Assign a port num ber for P2P downloads. You can select a number from 2 to 65536. I t is recom mended to use a port num ber greater than 1025.
DHT Select Enable or Disable to use Dist r ibuted Hash Table (DHT) or not .
Note: When you use DHT, the NAS will also attempt to open a UDP port one number
smaller than the P2P download port number. So if the P2P download port number
is 9090, the NAS uses UDP port 9089.
Max. download rate You m ay need to lim it the bandwidth the NAS uses for P2P downloads if your network’s other I nternet applicat ions are not get t ing enough downst ream bandwidth. 0 has the NAS im pose no rest r ict ion.
Max. upload rate You may need to lim it the bandwidth the NAS uses to share files through P2P download if your network’s other I nternet applicat ions are not get t ing enough upst ream bandwidth. 0 has the NAS im pose no rest r ict ion.
I f you do not allow any uploads, ( for exam ple, you set a lim it of 1 KB/ s) you will not have a good standing in the P2P download com m unity.
Note: The settings for maximum download/upload rates would not affect peers accessing
the NAS from the same LAN.
Maxim um Num ber of Act ive Torrents
Specify how m any sim ultaneous P2P downloads are allowed on the NAS. You can enter a num ber from 1 to 10.
Maxim um Num ber of Seeding Jobs
Specify how m any sim ultaneous seeds are allowed on the NAS. Enter a num ber from 1 to 10. This value cannot exceed the one you configured in the Maxim um Num ber of Act ive Torrents f ield.
Maxim um Num ber of Act ive Connect ions
Specify how many act ive connect ions are allowed on the NAS. Enter a num ber from 1 to 500. This specifies the num ber of com puters that can connect to the NAS to download files being shared by the NAS.

Chapter 17 Applications
Cloud Storage User’s Guide
227
17.7.4 Edit IP Filter
Use this screen to enable or disable I P filter ing for P2P downloads. I P filtering blocks I P addresses known to share fake files. You can either get an I P filter table from a website or use your own table.
Click Edit I P Filt er in the Applica t ions > Dow nload Service > Preferences > P2 P dow nload screen.
Figure 127 Applicat ions > Download Service > Preferences > P2P download > Edit I P Filter
Keep Sharing While With P2P download, the NAS starts sharing a file while you are downloading it . Set how long to cont inue sharing a file after the NAS finishes the download.
Select Upload/ Dow nload Rat io to keep sharing a file unt il the NAS has uploaded a specific percent com pared to the download.
Select Seeding Tim e to keep sharing a file for a specific num ber of m inutes after the download finishes.
Cont inuing to share a file helps other P2P download users finish downloading it . Sharing out at least as m uch as you download helps keep you in good standing in the P2P download comm unity.
Enter -1 to share a file indefinitely. Leave both check boxes blank to have the NAS stop sharing the file as soon as the download finishes.
I f you select both opt ions, the NAS keeps sharing a file unt il both condit ions exceed the values you configure. For exam ple, you entered 150% in the Upload/ Dow nload Rat io field and 120 m inutes in the Seeding Tim e f ield. The NAS keeps sharing a file unt il it has shared 1.5 t im es the size of the file and has passed 120 m inutes.
Email not ificat ions Select whether or not to send em ails to the em ail address configured for em ailing log reports (see Sect ion 26.4.2 on page 308) when the NAS starts downloading the file, seeding the file, and/ or finishes downloading the file.
Edit I P Filter Click this to enable or disable I P filtering for P2P downloads.
Refer to Sect ion 17.7.4 on page 227 for inform at ion about the fields in this screen.
Apply Click this to save your changes.
Reset Click this to restore your previously saved set t ings.
Cancel Click this to return to the previous screen without saving.
Table 75 Applicat ions > Download Service > Preferences > P2P download (cont inued)
LABEL DESCRIPTION
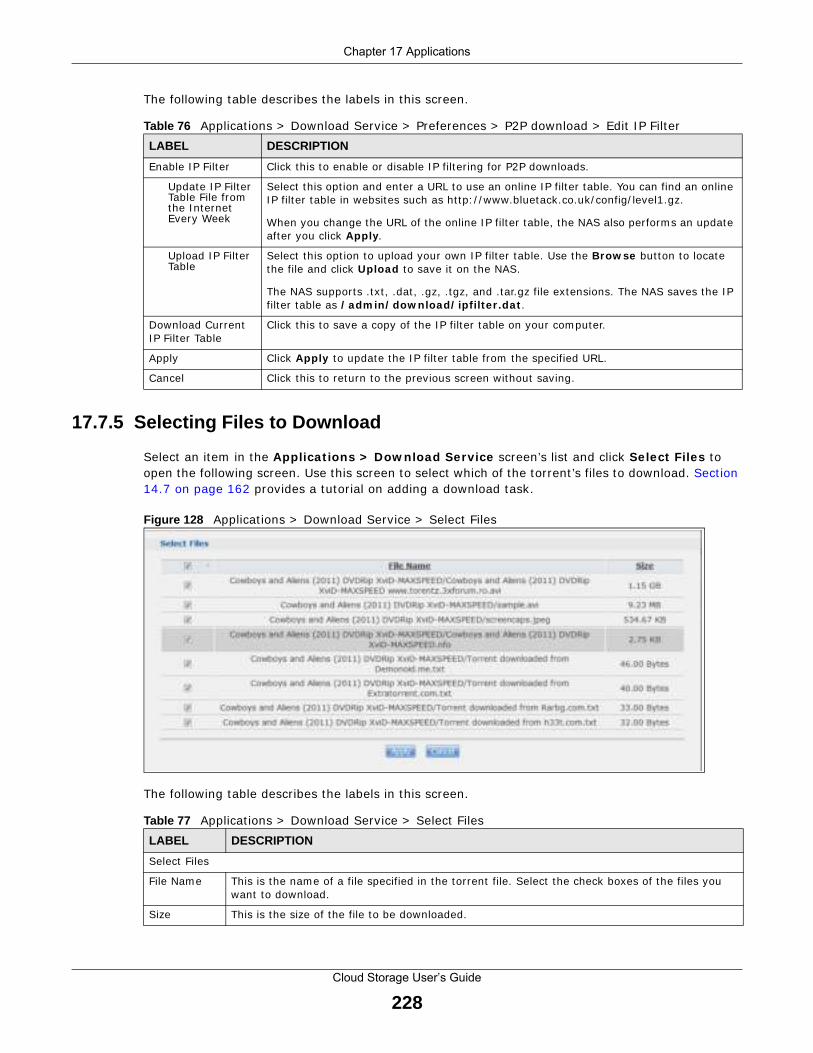
Chapter 17 Applications
Cloud Storage User’s Guide
228
The following table describes the labels in this screen.
17.7.5 Selecting Files to Download
Select an item in the Applicat ions > Dow nload Service screen’s list and click Select Files to open the following screen. Use this screen to select which of the torrent ’s files to download. Sect ion 14.7 on page 162 provides a tutor ial on adding a download task.
Figure 128 Applicat ions > Download Service > Select Files
The following table describes the labels in this screen.
Table 76 Applicat ions > Download Service > Preferences > P2P download > Edit I P Filter
LABEL DESCRIPTION
Enable I P Filter Click this to enable or disable I P filter ing for P2P downloads.
Update I P Filter Table File from the I nternet Every Week
Select this opt ion and enter a URL to use an online I P filter table. You can find an online I P filter table in websites such as ht tp: / / www.bluetack.co.uk/ config/ level1.gz.
When you change the URL of the online I P filter table, the NAS also perform s an update after you click Apply .
Upload I P Filter Table
Select this opt ion to upload your own I P filter table. Use the Brow se but ton to locate the file and click Upload to save it on the NAS.
The NAS supports .t xt , .dat , .gz, . tgz, and .tar.gz file extensions. The NAS saves the I P filter table as / adm in/ dow nload/ ipf ilter .dat .
Download Current I P Filter Table
Click this to save a copy of the I P filter table on your com puter.
Apply Click Apply to update the I P filter table from the specified URL.
Cancel Click this to return to the previous screen without saving.
Table 77 Applicat ions > Download Service > Select Files
LABEL DESCRIPTION
Select Files
File Nam e This is the name of a file specified in the torrent file. Select the check boxes of the files you want to download.
Size This is the size of the file to be downloaded.

Chapter 17 Applications
Cloud Storage User’s Guide
229
17.7.6 Displaying the Task Information
Select an item on the list and click Task I nfo . Use this screen to check detailed informat ion about the task.
Figure 129 Applicat ions > Download Service > Task I nfo
The following table describes the labels in this screen.
Apply Click this to save your changes.
Cancel Click this to return to the previous screen without saving.
Table 77 Applicat ions > Download Service > Select Files (cont inued)
LABEL DESCRIPTION
Table 78 Applicat ions > Download Service > Task I nfo
LABEL DESCRIPTION
Status This is the current status of the task.
Nam e This is the nam e of the task.
Size This is the size of the file to be downloaded.
Uploaded/Downloaded Rat io
This is the rat io of total uploaded data to downloaded data.
Com plete(% ) This field displays how m uch has been downloaded to the NAS.
Seeds This is the number of computers that are sharing the com plete file that you are downloading.
Peers This is the num ber of other com puters that are also downloading (and sharing) the file you are downloading.
Download Speed This field displays how fast the NAS downloads the file.
Upload Speed This field displays how fast the NAS uploads the file.

Chapter 17 Applications
Cloud Storage User’s Guide
230
17.8 Web Publishing Screen
Use this screen to turn web publishing on or off and select shares to publish. Click Applica t ions > W eb Publishing to open the following screen.
Figure 130 Applicat ions > Web Publishing
The following table describes the labels in this screen.
Health This field displays how m any full copies of the file are available for this task. The NAS can download a file with a higher health value m ore efficient ly. I f the health value is less than 1 (0.65 for exam ple) , there is no full copy of the file, and the NAS m ay not be able to com plete downloading the file.
Tim e Left This is the t im e rem aining to com plete the task.
Prior ity Use this field to set the pr ior ity for downloading the task.
Select Auto to have the NAS autom at ically determ ine the task’s prior ity.
Select High to have the NAS download this file before the other files.
Com m ent Enter a descript ion for this task. Click Apply to save the descript ion.
Start Tim e This field displays when the NAS started to download files.
Com pleted on This field displays when the file was successfully downloaded to the NAS.
I nfo-Hash This inform at ion is used to ver ify the torrent file.
Tracker This field displays the t racker that NAS is current ly connected to. A t racker is a server used for finding peers sharing the file.
Close Click this to close the screen.
Table 78 Applicat ions > Download Service > Task I nfo (cont inued)
LABEL DESCRIPTION
Table 79 Applicat ions > Web Publishing
LABEL DESCRIPTION
Web Publishing
Disable / Enable Web Publishing
Turn on web publishing to let people access files in the published shares using a web browser, without having to log into the Web Configurator.

Chapter 17 Applications
Cloud Storage User’s Guide
231
Note: I f you installed php- MySQL- phpMyAdm in through the Package Managem ent screen (Sect ion 18.6 on page 251) and enable it , you can use PHP and MySQL in your published web page.
17.9 Print Server Screen
Use the Print Server screen to view and m anage the NAS’s list of pr inters and print jobs.
Click Applicat ions > Pr int Server to open the following screen.
Figure 131 Applicat ions > Print Server
The following table describes the labels in this screen.
Support HTTPS Select this to allow users to use web browser security for connect ions to the web-published shares. I n order to use secured connect ions users m ust use “ht tps: / / ” in the NAS’s web address and install the NAS’s public key cert ificate.
Port Num ber Specify a port num ber for accessing the published share websites hosted on the NAS. I f you enter a num ber other than 80, m ake sure you include it when telling others how to access the web-published share. For example, say you specified port 8080, the NAS’s I P address is 192.168.1.23, and the nam e of the web-published share is Fam ilyPhotos. You would have to enter “ht tp: / / 192.168.1.23: 8080/ MyWeb/ Fam ilyPhotos/ ” in your browser ’s address bar to access the share’s web page.
Unpublished Shares This list box displays the shares that the NAS does not publish for web browser access.
Publish Selected Share(s)
Select shares in the Unpublished Shares box and click this to let people access files in the published shares using a web browser, without logging into the Web Configurator. Use the [ SHI FT] key to select a range of ent r ies. Hold down the [ CTRL] key to select m ult iple individual ent r ies.
Published Shares This list box displays the shares people can access using a web browser, without logging into the Web Configurator.
Unpublish Selected Share(s)
Select shares in the Published Shares box and click this to not let people access using a web browser without logging into the Web Configurator. Use the [ SHI FT] key to select a range of ent r ies. Hold down the [ CTRL] key to select m ult iple individual ent r ies.
Apply Click this to save your changes.
Reset Click this to restore your previously saved set t ings.
Table 79 Applicat ions > Web Publishing (cont inued)
LABEL DESCRIPTION
Table 80 Applicat ions > Print Server
LABEL DESCRIPTION
Refresh Click this to update the list of pr inters and pr int jobs.
The table lists pr inters and their queued print jobs. Click a colum n’s heading to sort the ent r ies by that cr iter ia.
Status This fields shows whether the printer is connected and turned on (on- line ) or not (off- line ) .
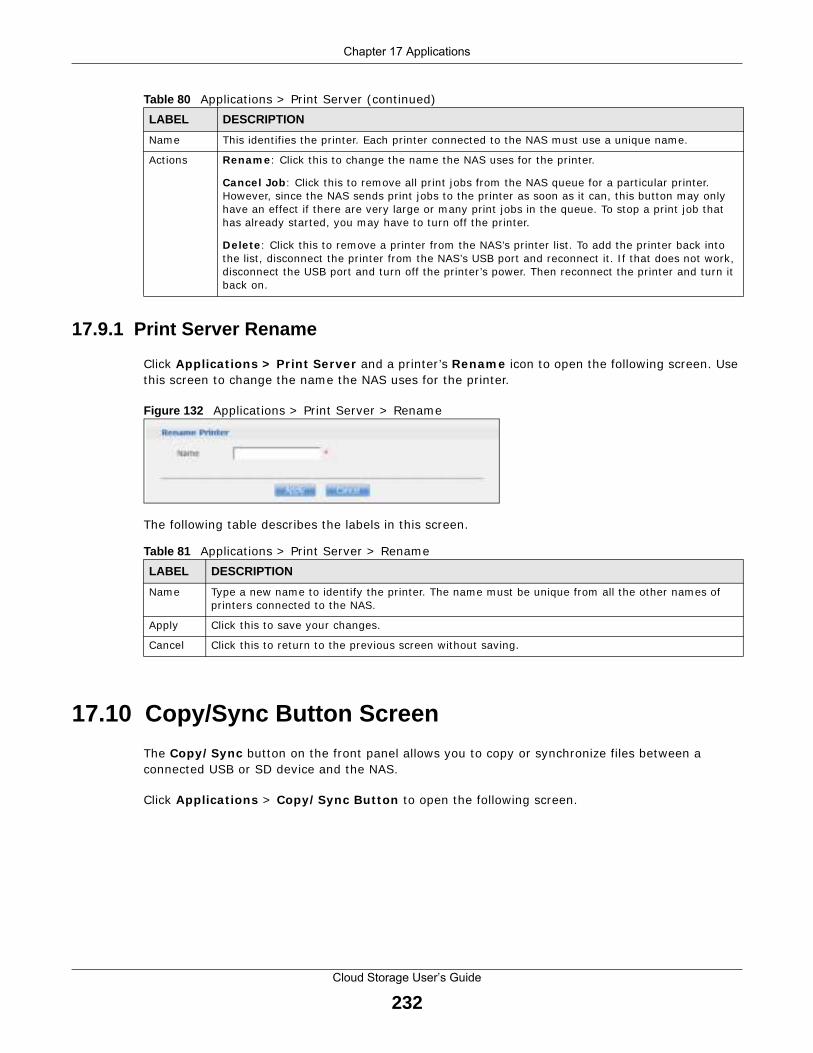
Chapter 17 Applications
Cloud Storage User’s Guide
232
17.9.1 Print Server Rename
Click Applicat ions > Pr int Server and a printer ’s Renam e icon to open the following screen. Use this screen to change the nam e the NAS uses for the printer.
Figure 132 Applicat ions > Print Server > Renam e
The following table describes the labels in this screen.
17.10 Copy/Sync Button Screen
The Copy/ Sync but ton on the front panel allows you to copy or synchronize files between a connected USB or SD device and the NAS.
Click Applicat ions > Copy/ Sync But ton to open the following screen.
Nam e This ident if ies the printer. Each pr inter connected to the NAS m ust use a unique nam e.
Act ions Renam e : Click this to change the name the NAS uses for the pr inter.
Cancel Job : Click this to remove all pr int j obs from the NAS queue for a part icular pr inter. However, since the NAS sends pr int j obs to the pr inter as soon as it can, this but ton may only have an effect if there are very large or m any print jobs in the queue. To stop a pr int job that has already started, you m ay have to turn off the pr inter.
Delete : Click this to rem ove a pr inter from the NAS’s pr inter list . To add the pr inter back into the list , disconnect the pr inter from the NAS’s USB port and reconnect it . I f that does not work, disconnect the USB port and turn off the pr inter ’s power. Then reconnect the pr inter and turn it back on.
Table 80 Applicat ions > Print Server (cont inued)
LABEL DESCRIPTION
Table 81 Applicat ions > Print Server > Renam e
LABEL DESCRIPTION
Nam e Type a new nam e to ident ify the printer. The nam e m ust be unique from all the other nam es of pr inters connected to the NAS.
Apply Click this to save your changes.
Cancel Click this to return to the previous screen without saving.
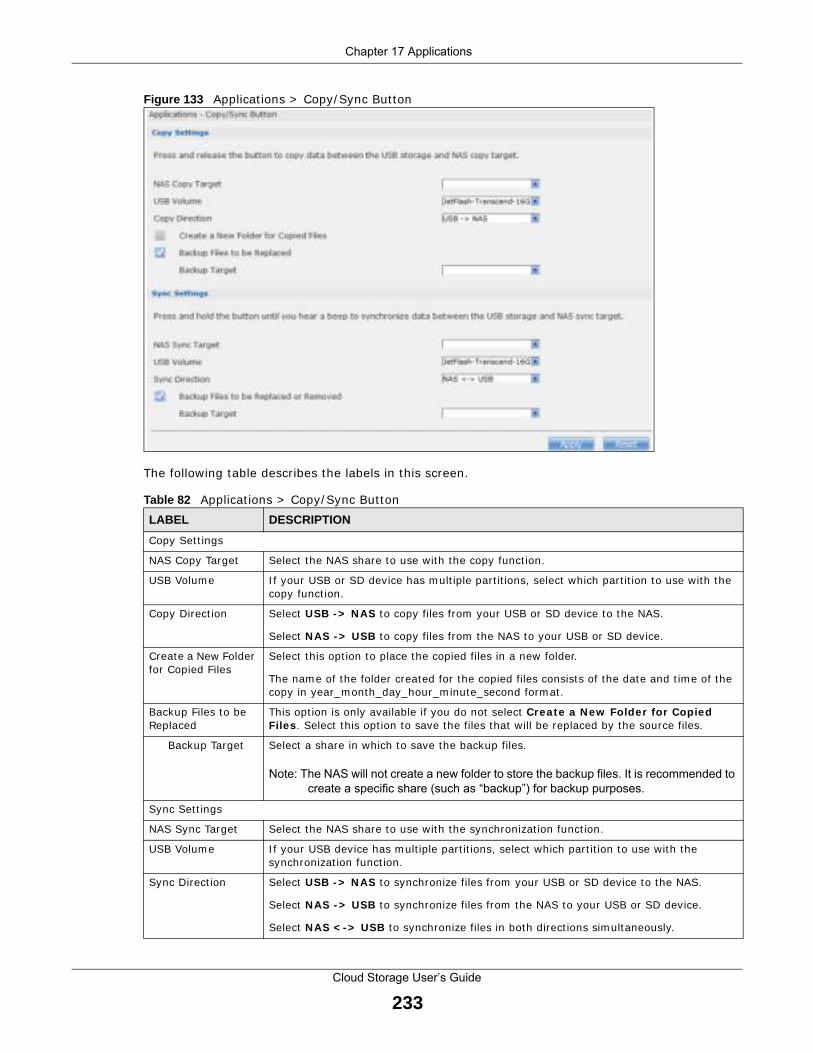
Chapter 17 Applications
Cloud Storage User’s Guide
233
Figure 133 Applicat ions > Copy/ Sync But ton
The following table describes the labels in this screen.
Table 82 Applicat ions > Copy/ Sync But ton
LABEL DESCRIPTION
Copy Set t ings
NAS Copy Target Select the NAS share to use with the copy funct ion.
USB Volum e I f your USB or SD device has m ult iple part it ions, select which part it ion to use with the copy funct ion.
Copy Direct ion Select USB - > NAS to copy files from your USB or SD device to the NAS.
Select NAS - > USB to copy files from the NAS to your USB or SD device.
Create a New Folder for Copied Files
Select this opt ion to place the copied files in a new folder.
The nam e of the folder created for the copied files consists of the date and t im e of the copy in year_month_day_hour_m inute_second form at .
Backup Files to be Replaced
This opt ion is only available if you do not select Create a New Folder for Copied Files . Select this opt ion to save the files that will be replaced by the source files.
Backup Target Select a share in which to save the backup files.
Note: The NAS will not create a new folder to store the backup files. It is recommended to
create a specific share (such as “backup”) for backup purposes.
Sync Set t ings
NAS Sync Target Select the NAS share to use with the synchronizat ion funct ion.
USB Volum e I f your USB device has m ult iple part it ions, select which part it ion to use with the synchronizat ion funct ion.
Sync Direct ion Select USB - > NAS to synchronize files from your USB or SD device to the NAS.
Select NAS - > USB to synchronize files from the NAS to your USB or SD device.
Select NAS < - > USB to synchronize files in both direct ions sim ultaneously.

Chapter 17 Applications
Cloud Storage User’s Guide
234
17.11 Technical Reference
This sect ion provides technical background inform at ion on the topics discussed in this chapter.
17.11.1 Sharing Media Files on Your Network
The m edia server feature lets anyone on your network play video, music, and photos from the NAS (without having to copy them to another com puter) . The NAS can funct ion as a DLNA-com pliant media server and/ or an iTunes server. The NAS st reams files to DLNA-compliant media clients or computers using iTunes. The Digital Living Network Alliance (DLNA) is a group of personal com puter and elect ronics com panies that works to m ake products com pat ible in a hom e network.
• Publish shares to let others play the contained m edia files.
• The media server is a convenient way to share files you download.
• Hardware-based media players can also play the files. See page 354 for the supported mult imedia file formats.
Note: Anyone on your network can play the m edia files in the published shares. No user nam e and password or other form of security is used. The m edia server is enabled by default with the video, photo, and m usic shares published.
Songs from the iTunes Store
After using iTunes on your com puter to download songs from Apple’s iTunes Store, you can copy them to the NAS. Many of these songs have DRM (Digital Rights Managem ent ) . At the t im e of writ ing, you can use your Apple account I D and password to authorize up to a total of five com puters to play the files. To authorize a com puter, open iTunes and click Store > Author ize Com puter .
A link for the NAS in iTunes under SHARED . Click it to display the NAS’s published media files as shown next .
Backup Files to be Replaced or Rem oved
Select this opt ion to save the files that will be replaced by the source files.
Backup Target Select a share in which to save the backup files.
Note: The NAS will not create a new folder to store the backup files. It is recommended to
create a specific share (such as “backup”) for backup purposes.
Apply Click this to save your changes.
The configurat ion file is saved on the USB device.
Reset Click this to restore your previously saved set t ings.
Table 82 Applicat ions > Copy/ Sync But ton (cont inued)
LABEL DESCRIPTION
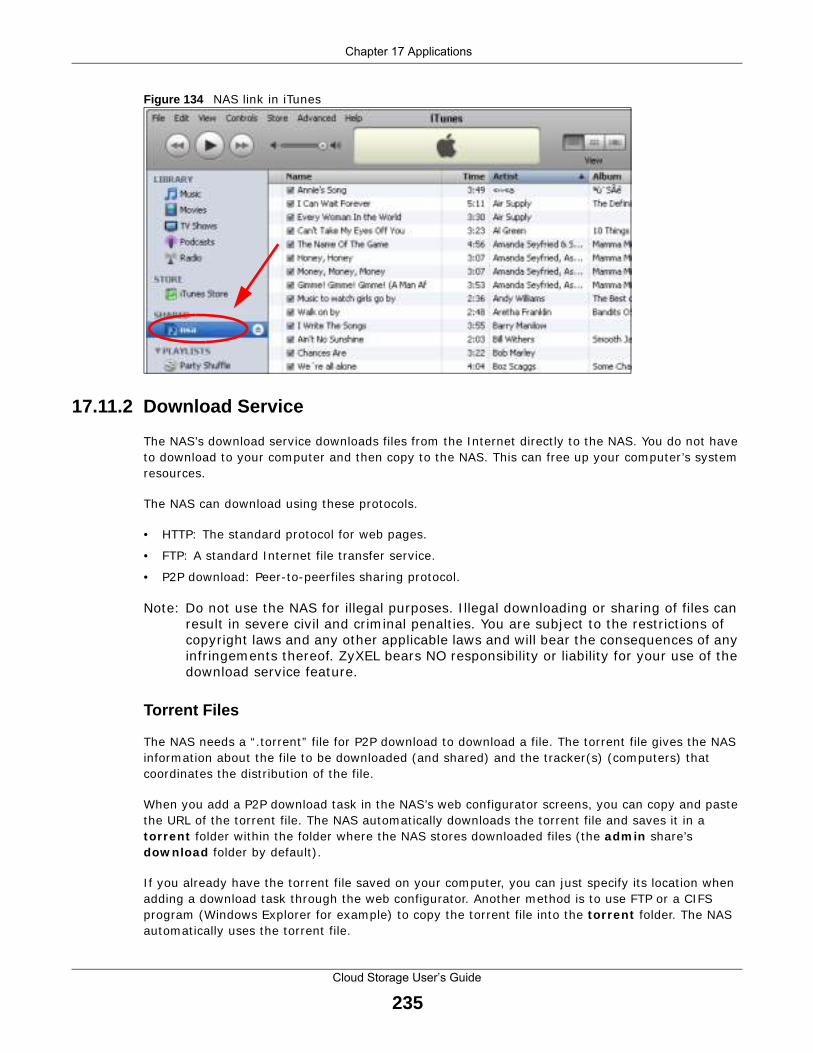
Chapter 17 Applications
Cloud Storage User’s Guide
235
Figure 134 NAS link in iTunes
17.11.2 Download Service
The NAS’s download service downloads files from the I nternet direct ly to the NAS. You do not have to download to your com puter and then copy to the NAS. This can free up your computer ’s system resources.
The NAS can download using these protocols.
• HTTP: The standard protocol for web pages.
• FTP: A standard I nternet file t ransfer service.
• P2P download: Peer- to-peer files sharing protocol.
Note: Do not use the NAS for illegal purposes. I llegal downloading or sharing of files can result in severe civil and cr im inal penalt ies. You are subject to the rest r ict ions of copyright laws and any other applicable laws and will bear the consequences of any infr ingem ents thereof. ZyXEL bears NO responsibility or liability for your use of the download service feature.
Torrent Files
The NAS needs a “ .torrent ” file for P2P download to download a file. The torrent file gives the NAS inform at ion about the file to be downloaded (and shared) and the t racker(s) (com puters) that coordinates the dist r ibut ion of the file.
When you add a P2P download task in the NAS’s web configurator screens, you can copy and paste the URL of the torrent file. The NAS automat ically downloads the torrent file and saves it in a torrent folder within the folder where the NAS stores downloaded files ( the adm in share’s dow nload folder by default ) .
I f you already have the torrent file saved on your com puter, you can just specify its locat ion when adding a download task through the web configurator. Another m ethod is to use FTP or a CI FS program (Windows Explorer for example) to copy the torrent file into the torrent folder. The NAS automat ically uses the torrent file.

Chapter 17 Applications
Cloud Storage User’s Guide
236
After your P2P download and sharing are finished, you can go to the incom ing folder within the dest inat ion share or folder and delete the .torrent file if you need to free up hard disk space.
17.11.3 Download Service Notification
Use the download service not ificat ion to keep t rack of downloaded files on the NAS. You can subscribe to the NAS’s download list on your com puter. When the NAS finishes downloading new files, your RSS reader displays the inform at ion and links for the files. You can also download the files from the RSS reader to your computer.
See Sect ion 14.7.3 on page 168 for a tutor ial about using the download service not ificat ion.
I n the Dow nload Service screen, select Enable Dow nload Not ify and click Apply . An RSS feed icon appears. Click the icon to subscribe to the NAS’s download list .
Note: The download service not ificat ion only keeps t rack of files downloaded via P2P download.
Figure 135 Download Service Not ificat ion
17.11.4 P2P Download Security
When you download using P2P, you reveal your I P address. This increases the r isk of hacking at tacks, which can be protected against by a good firewall.
Use a Hardware-based Firewall
Place a hardware-based firewall between your network and the I nternet (a software-based firewall on your com puter would just protect the computer itself, not the NAS since your com puter is not between your NAS and the I nternet ) .

Chapter 17 Applications
Cloud Storage User’s Guide
237
Figure 136 Firewall
I deally your firewall should have the following:
• Stateful packet inspect ion to cont rol access between the I nternet and your network and protect your NAS (and com puters) from hacking at tacks.
• I DP ( I nt rusion Detect ion and Prevent ion) to detect m alicious packets within norm al network t raffic and take imm ediate act ion against them.
• Ant i-virus to check files you download for com puter viruses.
P2P Download and Your Firewall
The ant i-virus feature on a firewall probably cannot check P2P downloads for viruses, so use ant i-virus software on your com puter to scan the NAS for viruses.
When you download using P2P download, many other P2P download users are also t rying to download the file from you. The firewall slows this down because by default , it only allows t raffic from the I nternet in response to a request that or iginated on the LAN ( it lets you get files from the I nternet and blocks those on the I nternet from get t ing files from you) .
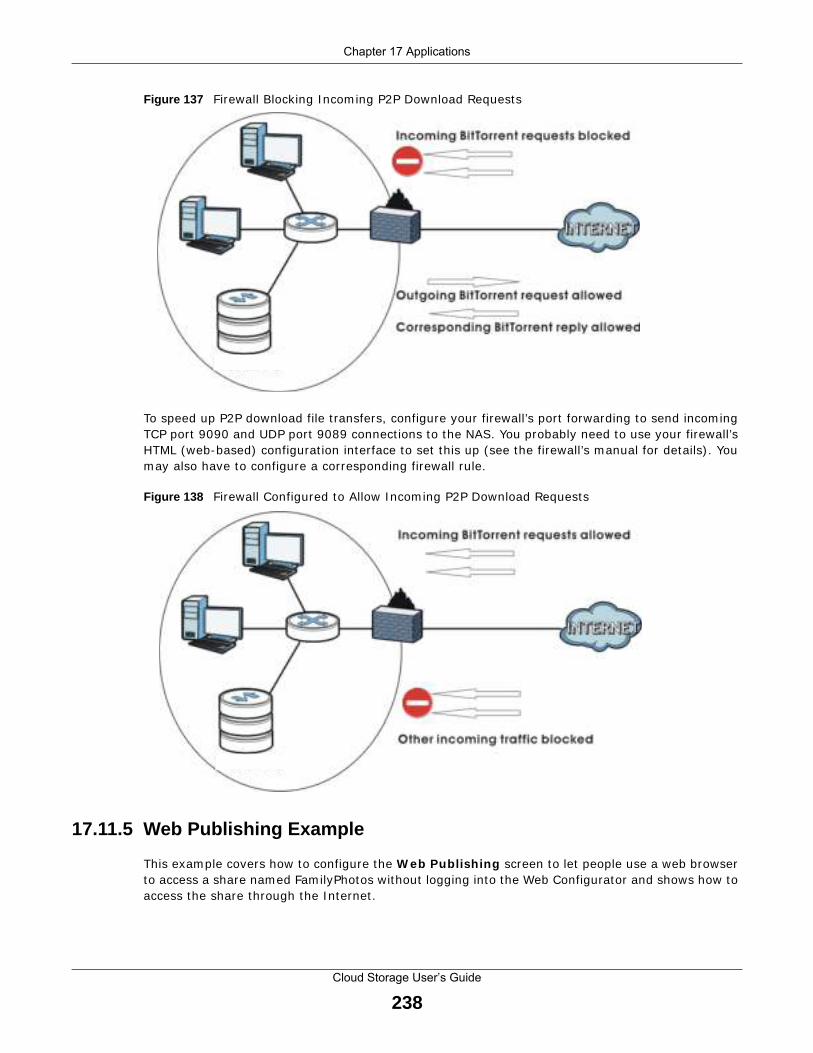
Chapter 17 Applications
Cloud Storage User’s Guide
238
Figure 137 Firewall Blocking I ncom ing P2P Download Requests
To speed up P2P download file t ransfers, configure your firewall’s port forwarding to send incom ing TCP port 9090 and UDP port 9089 connect ions to the NAS. You probably need to use your firewall’s HTML (web-based) configurat ion interface to set this up (see the firewall’s manual for details) . You m ay also have to configure a corresponding firewall rule.
Figure 138 Firewall Configured to Allow I ncom ing P2P Download Requests
17.11.5 Web Publishing Example
This example covers how to configure the W eb Publishing screen to let people use a web browser to access a share named Fam ilyPhotos without logging into the Web Configurator and shows how to access the share through the I nternet .

Chapter 17 Applications
Cloud Storage User’s Guide
239
1 Click Applicat ions > W eb Publishing and configure the screen as shown (enable the web publishing and move Fam ilyPhotos over to Published Shares ) and click Apply.
Figure 139 Applicat ions > Web Publishing (Exam ple)
2 Now open your web browser and type in the address of the NAS’s Fam ilyPhotos web page. I n this example, the NAS’s I P address is 192.168.1.33, and the nam e of the web-published share is FamilyPhotos. So you would enter “ht tp: / / 192.168.1.33/ MyWeb/ Fam ilyPhotos/ ” in your browser ’s address bar. Then press [ ENTER] or click Go . A screen displays list ing the share’s files.
Figure 140 Browsing to an NAS Share Exam ple
• Click a file’s link to open the file.
• Right-click a file’s link and select Save Target As.. ( in I nternet Explorer) to save a copy of the file.
• Click a label in the heading row to sort the files by that cr iter ia.
• To custom ize how the page looks and works, create an index.htm l or index.htm file and store it in the share.

Chapter 17 Applications
Cloud Storage User’s Guide
240
17.11.6 Web Publishing
Web publishing lets you “publish” shares (containing folders and files) on the NAS so people can access the files using a web browser without having to log into the Web Configurator. This way you can share files with others without them having to know and enter a user name and password.
For exam ple, if you want to share photos in a Fam ilyPhotos share, you could “web publish” it and others could use a web browser to access the photos at ht tp: / / my-NAS’s-I P-Address/ MyWeb/FamilyPhotos.
Note: The NAS does not use any security for the files in the published folders. I t is not recom m ended to publish shares if you do not have the NAS behind a good hardware-based firewall. See page 236 for m ore on firewalls.
Addit ionally, you can use HTML edit ing software (not included) to create an index.htm l or index.htm file to define and custom ize how your website works and looks.
Accessing Web-published Sh ares from the Internet
You need to use a public address to access the NAS’s web-published shares from the I nternet . I f your NAS uses a pr ivate I P address, you m ay need to use the public I P address of your I nternet gateway and configure NAT or port forwarding on your I nternet gateway and possibly firewall rules in order to let people access the NAS’s web-published shares from the I nternet .
Web Publishing Port Number
I f the web-published shares use a port number other than 80 ( the norm al port for web t raffic) , users must include it after the NAS’s I P address in order to access the NAS’s web-published shares. For example, say you specified port 8080, the NAS’s I P address is 192.168.1.23, and the name of the web-published share is Fam ilyPhotos. You would have to enter “ht tp: / / 192.168.1.23: 8080/MyWeb/ Fam ilyPhotos/ ” in your browser ’s address bar to access the share’s web page.
The NAS’s web configurator uses port 80. To m ake the web configurator m ore secure, you can have the web-published shares use another port number. Then you can configure one set of firewall rules and NAT or port forwarding set t ings on your I nternet gateway specifically for allowing access to the web-published shares and another separate set of rules for accessing the NAS’s web configurator.
17.11.7 Printer Sharing
The NAS can act as a print server. A print server lets m ult iple com puters share a printer. Connect a pr inter to the NAS’s USB port to let m ult iple com puters on your network use it . See www.zyxel.com for a list of com pat ible pr inters.

Chapter 17 Applications
Cloud Storage User’s Guide
241
Figure 141 Printer Sharing
17.11.8 Copying Files
You can copy files from a USB device to the NAS or from the NAS to a USB device. Simply press and release the COPY/ SYNC but ton to start copying files. See Sect ion 17.10 on page 232 for details about configuring the copy set t ings.
The following figure illust rates how copying files works when you copy files from a USB device to the NAS. The sam e concept applies when you copy files from the NAS to a USB device.
Figure 142 Copying Files Example
Both storage devices contain file A.
A C
Before Copy
After Copy
USBNAS
A B
C
USBNAS
A B A B

Chapter 17 Applications
Cloud Storage User’s Guide
242
• A copy of files A and B from the USB device is t ransferred to the NAS.
• File A from the USB device replaces file A on the NAS.
17.11.9 Synchronizing Files
Synchronizat ion m akes the contents on the target device ident ical to the ones on the source device. You can synchronize files from a USB device to the NAS or from the NAS to a USB device. I n addit ion, you m ay also synchronize files in both direct ions sim ultaneously.
Press and hold the COPY/ SYNC but ton unt il you hear a beep to synchronize files. See Sect ion 17.10 on page 232 for details about configuring the synchronizat ion set t ings.
USB -> NAS or USB <- NAS
When you synchronize files in one direct ion, contents on the source device replace the files on the target device.
The following figure illust rates how synchronizat ion works when you synchronize files from a USB device to the NAS. The sam e concept applies when you synchronize files from the NAS to a USB device.
Figure 143 Synchronizing Files Example 1
Both storage devices contain A.
• A copy of files A and B from the USB device is t ransferred to the NAS.
• File A from the USB device replaces file A on the NAS.
• File C on the NAS is deleted.
A C
Before Sync
After Sync
USBNAS
A B
USBNAS
A B A B

Chapter 17 Applications
Cloud Storage User’s Guide
243
USB <-> NAS
When you synchronize files in both direct ions simultaneously, both storage devices t ransfer unique files to one another. Files with the sam e file nam e are synchronized according to their m odificat ion date/ t ime. The difference in modificat ion t im e between the two files has to be greater than five m inutes. More recent ly m odified files overwrite the older ones during synchronizat ion.
The following figure illust rates how synchronizat ion works when you synchronize files in both direct ions sim ultaneously.
Figure 144 Synchronizing Files Example 2
A on the USB device and B on the NAS are modified more recent ly.
• File A from the USB device replaces file A on the NAS.
• File B from the NAS replaces file B on the USB device.
• A copy of file C from the USB device is t ransferred to the NAS.
• A copy of file D from the NAS is t ransferred to the USB device.
17.12 Syslog Server Screen
Use this screen to configure the NAS to accept syslog logs from syslog clients such as ZyXEL’s G-4100 v2.
Note: You m ay need to configure any firewalls between the NAS and the syslog clients in order to let the syslog t raffic go to the NAS.
A B
Before Sync
After Sync
USBNAS
A B
USBNAS
C D
BA B C DD C
(new)
A(new)
(new)
(new)(new) (new)

Chapter 17 Applications
Cloud Storage User’s Guide
244
Click Applicat ions > Syslog Server to open the following screen.
Figure 145 Applicat ions > Syslog Server
The following table describes the labels in this screen.
Table 83 Applicat ions > Syslog Server
LABEL DESCRIPTION
Enable Syslog Server
Select this to have the NAS accept syslog logs from syslog clients. Clear it to stop the NAS from accept ing syslog logs from syslog clients.
Log Locat ion Click View Files to browse to where you want to store the syslog logs on the NAS.
Shares Select the share in which to store the syslog logs.
Path Use this if you want to further specify a folder within the share. This field displays the share folder ’s path. Type the locat ion of the folder using forward slashes as branch separators or use Brow se to find or create a folder on the NAS.
After you click Apply in the Syslog Server screen the NAS creates a folder for the current m onth’s logs. The folder ’s nam e uses the year and m onth in YYYYMM form at .
Purge Policy Select Enable Purge Policy and set a num ber of months in the Log Dele t ion I nterva l f ield that displays to have the NAS delete the syslog m essages after keeping them for the specified period of t im e.
Regardless of how you set the purge policy, to save hard disk space the NAS archives the syslog logs in a .tgz file on the second day of each m onth and deletes the or iginal folder and syslog files. The NAS creates a new folder for the syslog logs it receives after that . You can use a zip program such as 7-zip to open the archives.

Chapter 17 Applications
Cloud Storage User’s Guide
245
Log Form at Select the form at you want to use for recording the received logs.
The Exam ple item below the drop-down list boxes displays how the selected custom form at looks. For exam ple, if you select Full Date , the individual log ent r ies would display with something like 2009 May 13 17: 15: 51 in front of them .
Apply Click this to save your changes.
Reset Click this to restore the screen’s last-saved set t ings.
Table 83 Applicat ions > Syslog Server (cont inued)
LABEL DESCRIPTION

Cloud Storage User’s Guide
246
CHAPTER 18
Packages
18.1 Overview
This chapter describes screens for features you can add to the NAS by installing packages. See Sect ion 16.4 on page 207 for how to m anage packages.
18.2 What You Can Do• Use the NFS screen (Sect ion 18.3 on page 247) to configure the Network File System (NFS)
set t ings of your NAS.
• Use the TFTP Server screen (Sect ion 18.4 on page 250) to configure the NAS to accept log files from TFTP clients.
• Use the pyLoad screen (Sect ion 18.5 on page 251) to configure the NAS so you can have it m anage your downloads including those from one-click host ing sites.
• Use ow nCloud (Sect ion 18.6 on page 251) to store, synchronize, and share files, photos, calendars, and m ore with com puters and m obile devices using an ownCloud client .
• Use Mem opal (Sect ion 18.7 on page 254) to back up files on the NAS to your Mem opal online backup and storage account .
• Use the GoogleDr iveClient screens (Sect ion 18.8 on page 256) to synchronize local NAS shares or folders and Google Drive accounts.
Access the following applicat ions’ configurat ion screens through the Package Managem ent screen. Refer to the applicat ions’ own docum entat ion for further inform at ion.
• Gallery - This web-based applicat ion allows your NAS to host pictures. You can upload im ages in your local com puter or shares to this applicat ion. Use the Gallery adm inist rator account (default username adm in, password 1234) to log into the Gallery console. There you can create accounts for other users.
• Use Logitech® Media Server (Sect ion 17.5.2 on page 218) to manage a Logitech Squeezebox device connected to the NAS.
• The NZBGet news grabber helps download files from UseNet .
• PHP- MySQL- phpMyAdm in can be used to m anage MySQL through the web. Enter 'root ' as the username and '1234' as the password to log in. This includes MySQL, PHP, and phpMyAdmin.
• Transm ission - This Bit Torrent client supports adding tasks through torrent files and m agnet links.
• W ordPress - This allows you to create and manage a blog. Use the WordPress adm inist rator account (default usernam e adm in, password 1234) to log in. You can then create accounts for other users.
• m yZyXELcloud- Agent - Use this to go to mycloud.zyxel.com to set up a free DDNS hostname for the NAS so you can connect to it easily from the I nternet .
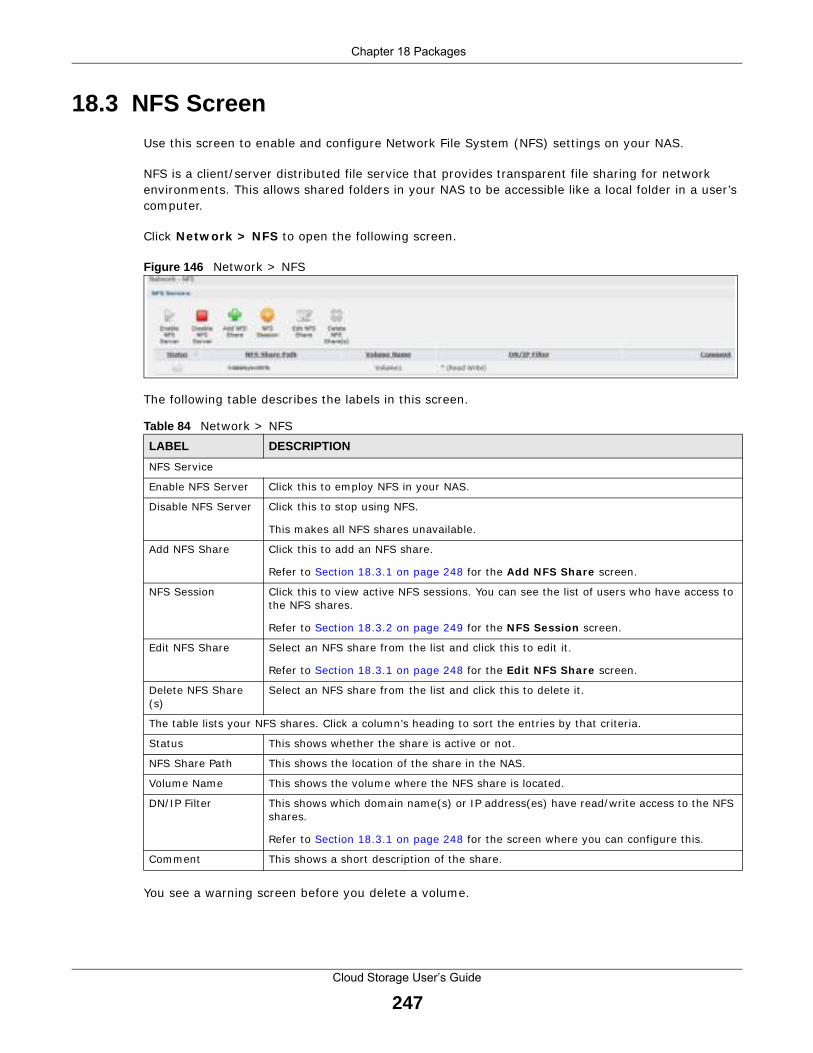
Chapter 18 Packages
Cloud Storage User’s Guide
247
18.3 NFS Screen
Use this screen to enable and configure Network File System (NFS) set t ings on your NAS.
NFS is a client / server dist r ibuted file service that provides t ransparent file sharing for network environm ents. This allows shared folders in your NAS to be accessible like a local folder in a user ’s computer.
Click Netw ork > NFS to open the following screen.
Figure 146 Network > NFS
The following table describes the labels in this screen.
You see a warning screen before you delete a volume.
Table 84 Network > NFS
LABEL DESCRIPTION
NFS Service
Enable NFS Server Click this to em ploy NFS in your NAS.
Disable NFS Server Click this to stop using NFS.
This m akes all NFS shares unavailable.
Add NFS Share Click this to add an NFS share.
Refer to Sect ion 18.3.1 on page 248 for the Add NFS Share screen.
NFS Session Click this to view act ive NFS sessions. You can see the list of users who have access to the NFS shares.
Refer to Sect ion 18.3.2 on page 249 for the NFS Session screen.
Edit NFS Share Select an NFS share from the list and click this to edit it .
Refer to Sect ion 18.3.1 on page 248 for the Edit NFS Share screen.
Delete NFS Share (s)
Select an NFS share from the list and click this to delete it .
The table lists your NFS shares. Click a column’s heading to sort the ent r ies by that cr iter ia.
Status This shows whether the share is act ive or not .
NFS Share Path This shows the locat ion of the share in the NAS.
Volum e Name This shows the volume where the NFS share is located.
DN/ I P Filter This shows which dom ain name(s) or I P address(es) have read/ write access to the NFS shares.
Refer to Sect ion 18.3.1 on page 248 for the screen where you can configure this.
Com m ent This shows a short descript ion of the share.

Chapter 18 Packages
Cloud Storage User’s Guide
248
Figure 147 Delete an NFS Share
18.3.1 Add/Edit NFS Share
Use this screen to add or edit an NFS share.
Note: Som e at t r ibutes of the NFS share cannot be edited.
Click Add or Edit in the Netw ork > NFS screen to open the following:
Figure 148 Network > NFS: Add/ Edit
The following table describes the labels in this screen.
Table 85 Network > NFS: Add/ Edit
LABEL DESCRIPTION
Volum e Name Select the volume where the folder you want to add as an NFS share is located.
NFS Share Nam e Enter the nam e you want to give to the NFS share.
Full Path This shows the locat ion of the NFS share in the NAS.
The NFS server assigns this path to the share folder you input .
Com m ent Enter a short descr ipt ion for the share.
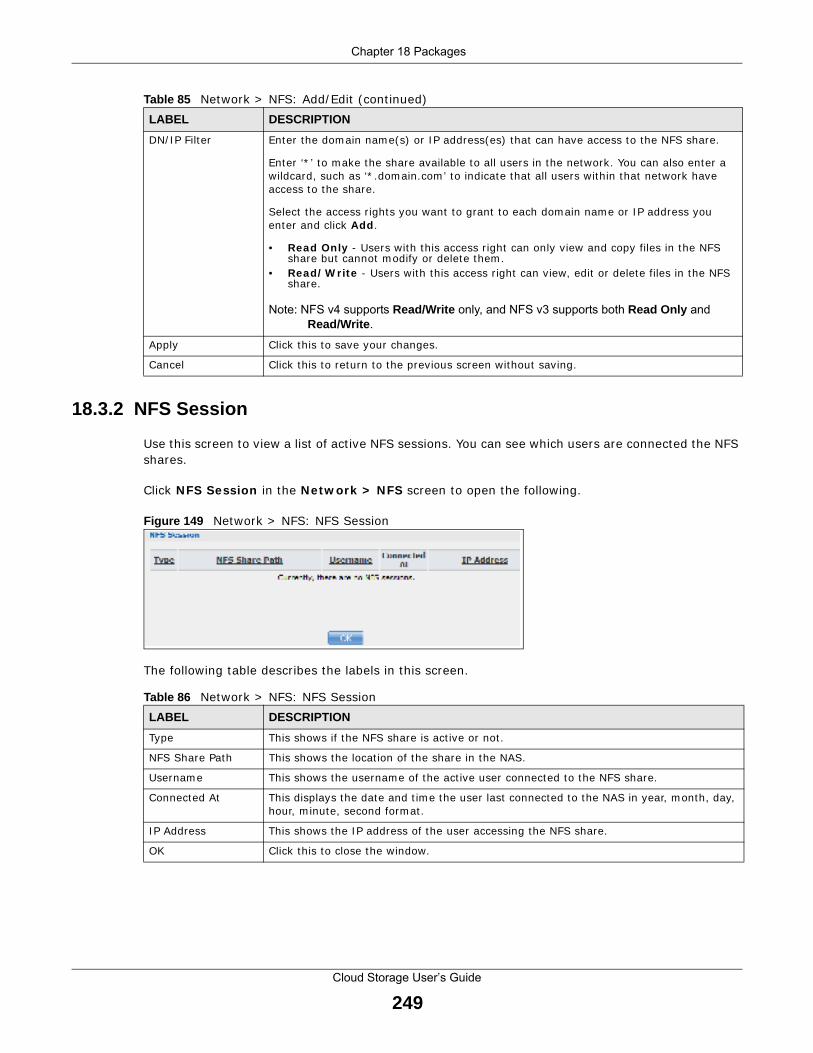
Chapter 18 Packages
Cloud Storage User’s Guide
249
18.3.2 NFS Session
Use this screen to view a list of act ive NFS sessions. You can see which users are connected the NFS shares.
Click NFS Session in the Netw ork > NFS screen to open the following.
Figure 149 Network > NFS: NFS Session
The following table describes the labels in this screen.
DN/ I P Filter Enter the dom ain nam e(s) or I P address(es) that can have access to the NFS share.
Enter ‘* ’ to make the share available to all users in the network. You can also enter a wildcard, such as ‘* .dom ain.com ’ to indicate that all users within that network have access to the share.
Select the access r ights you want to grant to each dom ain nam e or I P address you enter and click Add .
• Read Only - Users with this access r ight can only view and copy files in the NFS share but cannot m odify or delete them .
• Read/ W rite - Users with this access r ight can view, edit or delete files in the NFS share.
Note: NFS v4 supports Read/Write only, and NFS v3 supports both Read Only and
Read/Write .
Apply Click this to save your changes.
Cancel Click this to return to the previous screen without saving.
Table 85 Network > NFS: Add/ Edit (cont inued)
LABEL DESCRIPTION
Table 86 Network > NFS: NFS Session
LABEL DESCRIPTION
Type This shows if the NFS share is act ive or not .
NFS Share Path This shows the locat ion of the share in the NAS.
Usernam e This shows the username of the act ive user connected to the NFS share.
Connected At This displays the date and t im e the user last connected to the NAS in year, m onth, day, hour, m inute, second form at .
I P Address This shows the I P address of the user accessing the NFS share.
OK Click this to close the window.
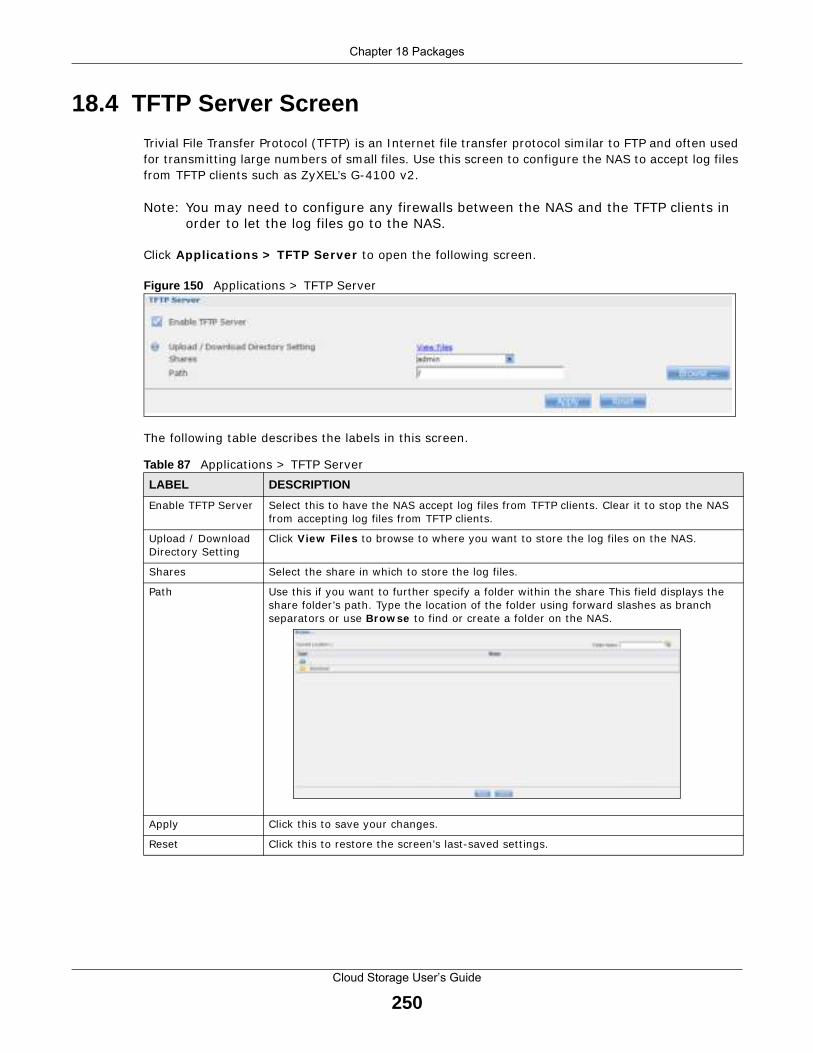
Chapter 18 Packages
Cloud Storage User’s Guide
250
18.4 TFTP Server Screen
Trivial File Transfer Protocol (TFTP) is an I nternet file t ransfer protocol sim ilar to FTP and often used for t ransm it t ing large num bers of small files. Use this screen to configure the NAS to accept log files from TFTP clients such as ZyXEL’s G-4100 v2.
Note: You m ay need to configure any firewalls between the NAS and the TFTP clients in order to let the log files go to the NAS.
Click Applicat ions > TFTP Server to open the following screen.
Figure 150 Applicat ions > TFTP Server
The following table describes the labels in this screen.
Table 87 Applicat ions > TFTP Server
LABEL DESCRIPTION
Enable TFTP Server Select this to have the NAS accept log files from TFTP clients. Clear it to stop the NAS from accept ing log files from TFTP clients.
Upload / Download Directory Set t ing
Click View Files to browse to where you want to store the log files on the NAS.
Shares Select the share in which to store the log files.
Path Use this if you want to further specify a folder within the share This field displays the share folder ’s path. Type the locat ion of the folder using forward slashes as branch separators or use Brow se to find or create a folder on the NAS.
Apply Click this to save your changes.
Reset Click this to restore the screen’s last-saved set t ings.
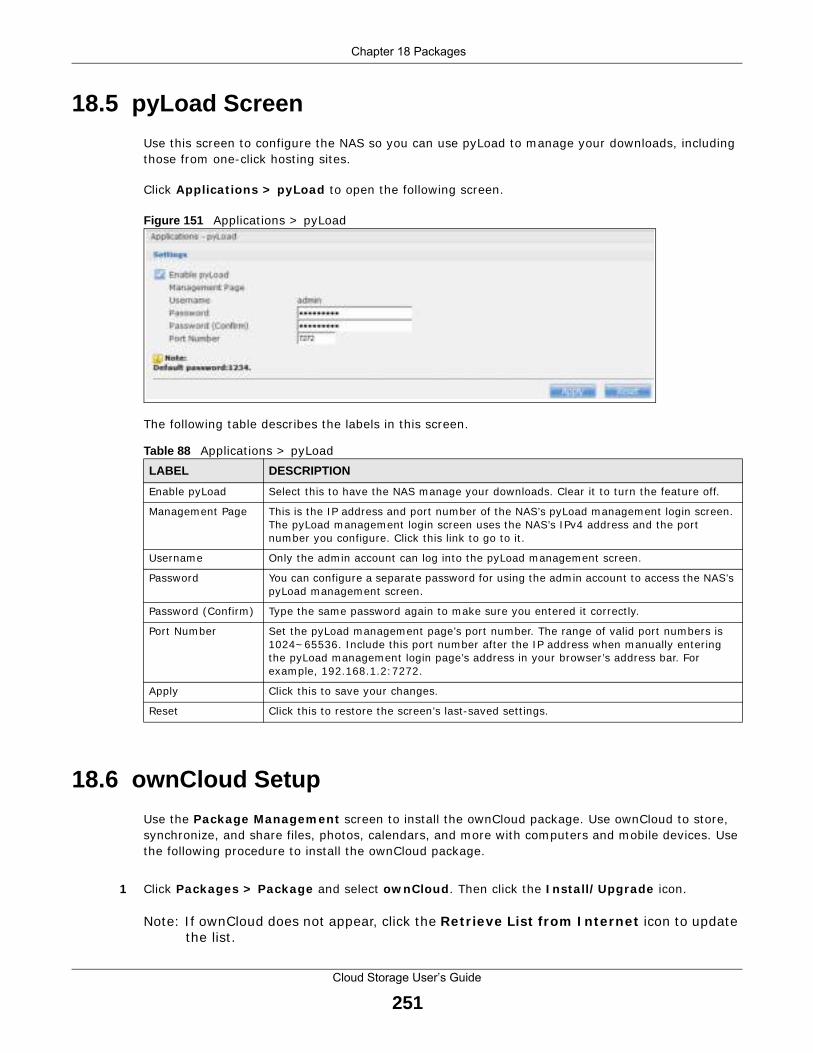
Chapter 18 Packages
Cloud Storage User’s Guide
251
18.5 pyLoad Screen
Use this screen to configure the NAS so you can use pyLoad to m anage your downloads, including those from one-click host ing sites.
Click Applicat ions > pyLoad to open the following screen.
Figure 151 Applicat ions > pyLoad
The following table describes the labels in this screen.
18.6 ownCloud Setup
Use the Package Managem ent screen to install the ownCloud package. Use ownCloud to store, synchronize, and share files, photos, calendars, and more with computers and mobile devices. Use the following procedure to install the ownCloud package.
1 Click Packages > Package and select ow nCloud . Then click the I nsta ll/ Upgrade icon.
Note: I f ownCloud does not appear, click the Ret r ieve List from I nternet icon to update the list .
Table 88 Applicat ions > pyLoad
LABEL DESCRIPTION
Enable pyLoad Select this to have the NAS m anage your downloads. Clear it to turn the feature off.
Managem ent Page This is the I P address and port num ber of the NAS’s pyLoad m anagem ent login screen. The pyLoad m anagem ent login screen uses the NAS’s I Pv4 address and the port num ber you configure. Click this link to go to it .
Usernam e Only the adm in account can log into the pyLoad m anagement screen.
Password You can configure a separate password for using the adm in account to access the NAS’s pyLoad m anagem ent screen.
Password (Confirm ) Type the same password again to m ake sure you entered it correct ly.
Port Num ber Set the pyLoad m anagem ent page’s port number. The range of valid port num bers is 1024~ 65536. I nclude this port number after the I P address when m anually enter ing the pyLoad m anagem ent login page’s address in your browser ’s address bar. For exam ple, 192.168.1.2: 7272.
Apply Click this to save your changes.
Reset Click this to restore the screen’s last-saved set t ings.

Chapter 18 Packages
Cloud Storage User’s Guide
252
2 The following confirm at ion screen appears. Select the volum e in which to install ownCloud and store ownCloud data and click Apply . The NAS m ust have a connect ion to the I nternet to download the package.
3 The installat ion progress appears in the ownCloud row.
4 A link appears in the Managem ent Page colum n after installat ion finishes. Click this link.

Chapter 18 Packages
Cloud Storage User’s Guide
253
5 The ownCloud login screen appears. Create an administ rator user nam e and password and click Finish Setup .
6 The main ownCloud screen displays. Use this web interface to manage files on the NAS ownCloud server. Click your user nam e in the upper- r ight corner to see the help for more inform at ion on using ownCloud.
Note: Get ownCloud desktop clients from owncloud.org and ownCloud m obile apps from Google Play or the Apple App Store.
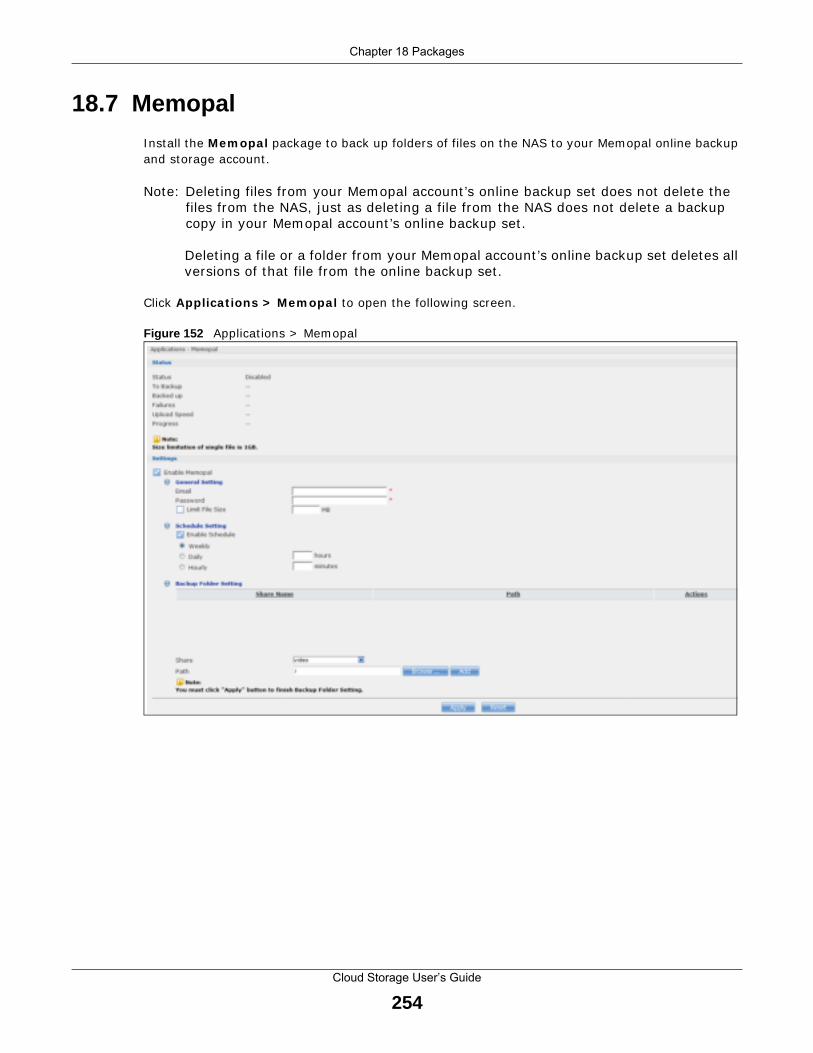
Chapter 18 Packages
Cloud Storage User’s Guide
254
18.7 Memopal
I nstall the Mem opal package to back up folders of files on the NAS to your Memopal online backup and storage account .
Note: Delet ing files from your Mem opal account ’s online backup set does not delete the files from the NAS, just as delet ing a file from the NAS does not delete a backup copy in your Mem opal account ’s online backup set .
Delet ing a file or a folder from your Mem opal account ’s online backup set deletes all versions of that file from the online backup set .
Click Applicat ions > Mem opal to open the following screen.
Figure 152 Applicat ions > Memopal

Chapter 18 Packages
Cloud Storage User’s Guide
255
The following table describes the labels in this screen.
Table 89 Applicat ions > Mem opal
LABEL DESCRIPTION
Status This shows the status of the Mem opal applicat ion’s interact ion with the Mem opal server.
Disabled : The NAS Mem opal applicat ion is turned off.
Start ing : The backup job is init ializing and the NAS is get t ing ready to back up.
Running : The backup job is execut ing.
Stopped : The backup job is stopped. This m ay be due to a network error, rem ote server error, or other issue.
Com pleted : The backup job finished.
To Backup The num ber of files rem aining to back up.
Backed up The num ber of files backed up already.
Failures The num ber of files the NAS failed to back up to the Mem opal server.
Upload Speed This is how fast in Bytes per second the NAS is backing up to the Mem opal server.
Progress This shows the percentage of the files already backed up from the total files to be backed up.
Restart Backup Re-scan all f iles and perform a backup.
Ret ry Failures Only re-scan and back up files the NAS failed to back up.
Backup Report Display back up record details.
Enable Memopal Select this to back up files to your Mem opal account . The rest of the configurat ion fields display.
Email Enter the em ail address you use for your Mem opal account .
Password Enter the password for your Mem opal account .
Lim it File Size Select this and enter a num ber of MegaBytes if you want to rest r ict the size of files the NAS uploads to the Mem opal account . You have to enter your password again if you select this.
Enable Schedule Select this to set when the Mem opal backups occur. You have to enter your password again if you select this. Clear this to have the NAS back up files in the selected folders to your Mem opal account in real- t ime whenever you add or m odify the files.
Weekly Select this to perform a Mem opal backup on a weekly basis. The NAS perform s the backup job every Sunday at 2: 00 AM and cont inues unt il the job finishes.
Daily Select this to perform a Mem opal backup every day. The NAS perform s the backup job every day at 2: 00 AM. Use hours to specify for up to how m any hours the NAS can perform a Mem opal backup. Enter 0 in hours to have the NAS cont inue the backup job unt il it f inishes (no t im e lim it ) .
Hourly Select this to perform a Mem opal backup every hour. Use m inutes to specify for up to how m any m inutes the NAS can perform a Mem opal backup. Enter 0 in m inutes to have the NAS cont inue the backup job unt il it finishes (no t im e lim it ) .
Share Nam e This is the nam e of the share containing a folder the NAS Mem opal applicat ion backs up to the Memopal server.
Path This field displays the share folder ’s path.
Act ions Click the Delete icon to rem ove the folder from the list of folders the NAS Memopal applicat ion backs up to the Mem opal server.
Share Select the share containing the folder to back up to the Mem opal server.

Chapter 18 Packages
Cloud Storage User’s Guide
256
18.8 GoogleDriveClient
Use GoogleDriveClient to synchronize local NAS user folders and Google Drive cloud storage accounts. This two-way synchronizat ion m eans changes in the Google Drive account appear in the local sync folder and changes in the local sync folder appear in the Google Drive account .
Note: Do not store your only copy of a docum ent in Google Drive or the local sync folder.
• Modifying or delet ing a file or folder at either end modifies or deletes it at the other end.
• Moving a file out of the local sync folder or Google Drive deletes it at the other end.
• Use the Protect screens instead of Google Drive for backups (see Chapter 27 on page 321) .
• You can link mult iple NAS user accounts to Google accounts.
• You can link an individual NAS user account to m ult iple Google accounts.
• You can only link each individual Google account to one NAS user account .
• This feature does not current ly download Google Docum ents.
18.8.1 Account Setting Screen
Use the Account Set t ing screen to synchronize local NAS shares or folders and Google Drive accounts.
Click Applicat ions > GoogleDr iveClient to open the following screen.
Path I dent ify the folder to back up to the Mem opal server.
Use Brow se to find or create a folder on the NAS or type the locat ion of the folder using forward slashes as branch separators.
Click Add to add the folder to the list of folders the NAS Memopal applicat ion backs up to the Memopal server.
Apply Click this to save your changes.
Reset Click this to restore the screen’s last-saved set t ings.
Table 89 Applicat ions > Mem opal (cont inued)
LABEL DESCRIPTION

Chapter 18 Packages
Cloud Storage User’s Guide
257
Figure 153 Applicat ions > GoogleDriveClient > Account Set t ing
The following table describes the labels in this screen.
Table 90 Applicat ions > GoogleDriveClient > Account Set t ing
LABEL DESCRIPTION
Linked Account Select a Google account linked to an NAS user account .
Click Add to open a screen where you can link an NAS user account and a Google account .
Click Delete to remove the NAS’s link to the selected Google account . You m ust disable the Google Drive feature for the account before you can do this. A screen pops up to let you decide what to do with the data in the NAS’s linked local sync folder.
Click Yes to delete all data in the local sync folder. Click No to rem ove the link to the selected Google account but keep the data in the local sync folder. Click Cancel to do nothing (keep the account link and data) .
Binding User The NAS user account linked to the selected Google account .

Chapter 18 Packages
Cloud Storage User’s Guide
258
18.8.2 Account Setting Add Screen
Use the Account Set t ing Add screen to link an NAS user account and a Google account . Click Applicat ions > GoogleDr iveClient > Add to open the following screen.
Note: The user has to log into the Google account on the sam e com puter to allow the NAS to link to it .
Figure 154 Applicat ions > GoogleDriveClient > Account Set t ing > Add
Status The current status of the GoogleDrive feature for the selected Google account .
• Disabled - The GoogleDrive feature is turned off. During this state you can use the other sect ions of this screen to add or delete linked accounts or enable Google Drive.
• Enabled - W ait ing - The GoogleDrive feature is configured, enabled, and wait ing to perform the next Google Drive update. During this state you can use the other sect ions of this screen to add or delete linked accounts or disable Google Drive.
• Enabled - Synchronizing - The GoogleDrive feature is synchronizing the local sync folder and the Google account . During this state you can use the other sect ions of this screen to add linked accounts during this state.
Local Sync Folder The NAS folder or share the NAS synchronizes with the linked Google account .
Capacity The Google account ’s used, available, and total online Google Drive storage space.
Enable GoogleDrive Select this to have the NAS periodically synchronize the selected linked account ’s local sync folder and Google Drive storage. You can enable synchronizing with Google Drive for individual accounts and disable it for other accounts.
Clear this opt ion to disable synchronizing the selected linked account ’s local sync folder and Google Drive storage.
Apply Click this to save your changes.
Table 90 Applicat ions > GoogleDriveClient > Account Set t ing (cont inued)
LABEL DESCRIPTION
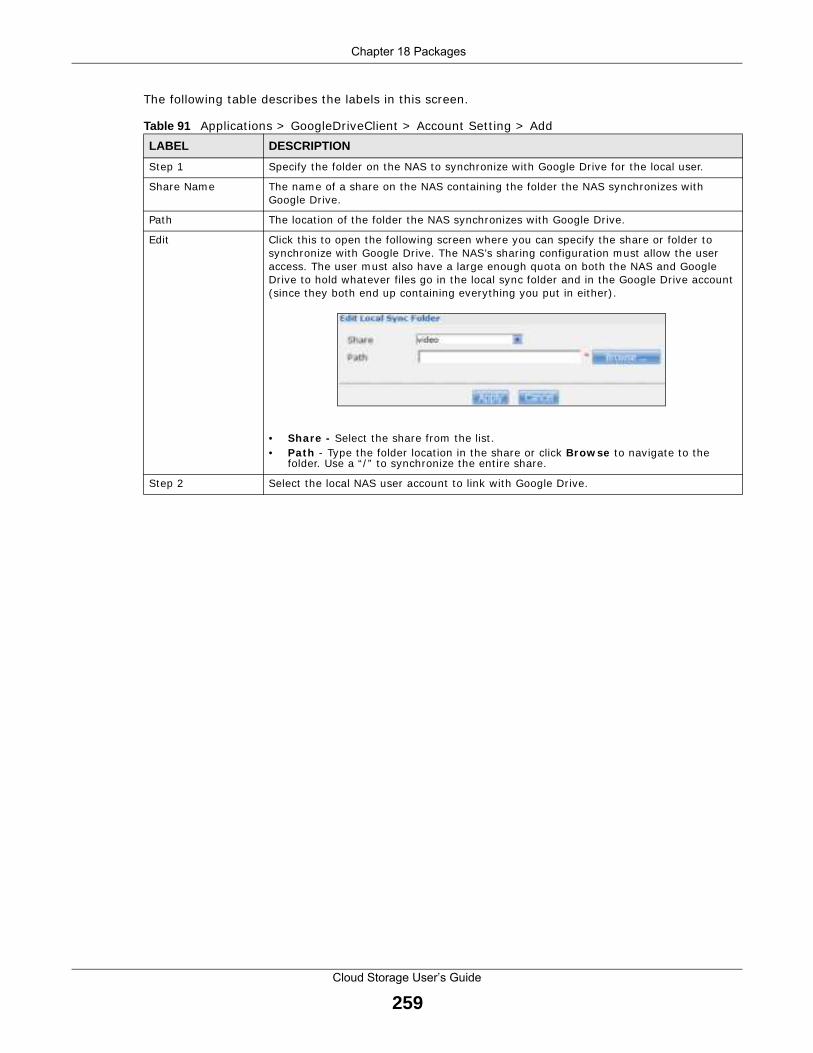
Chapter 18 Packages
Cloud Storage User’s Guide
259
The following table describes the labels in this screen.
Table 91 Applicat ions > GoogleDriveClient > Account Set t ing > Add
LABEL DESCRIPTION
Step 1 Specify the folder on the NAS to synchronize with Google Drive for the local user.
Share Nam e The nam e of a share on the NAS containing the folder the NAS synchronizes with Google Drive.
Path The locat ion of the folder the NAS synchronizes with Google Drive.
Edit Click this to open the following screen where you can specify the share or folder to synchronize with Google Drive. The NAS’s sharing configurat ion must allow the user access. The user m ust also have a large enough quota on both the NAS and Google Drive to hold whatever files go in the local sync folder and in the Google Drive account (since they both end up containing everything you put in either) .
• Share - Select the share from the list .• Path - Type the folder locat ion in the share or click Brow se to navigate to the
folder. Use a “ / ” to synchronize the ent ire share.
Step 2 Select the local NAS user account to link with Google Drive.
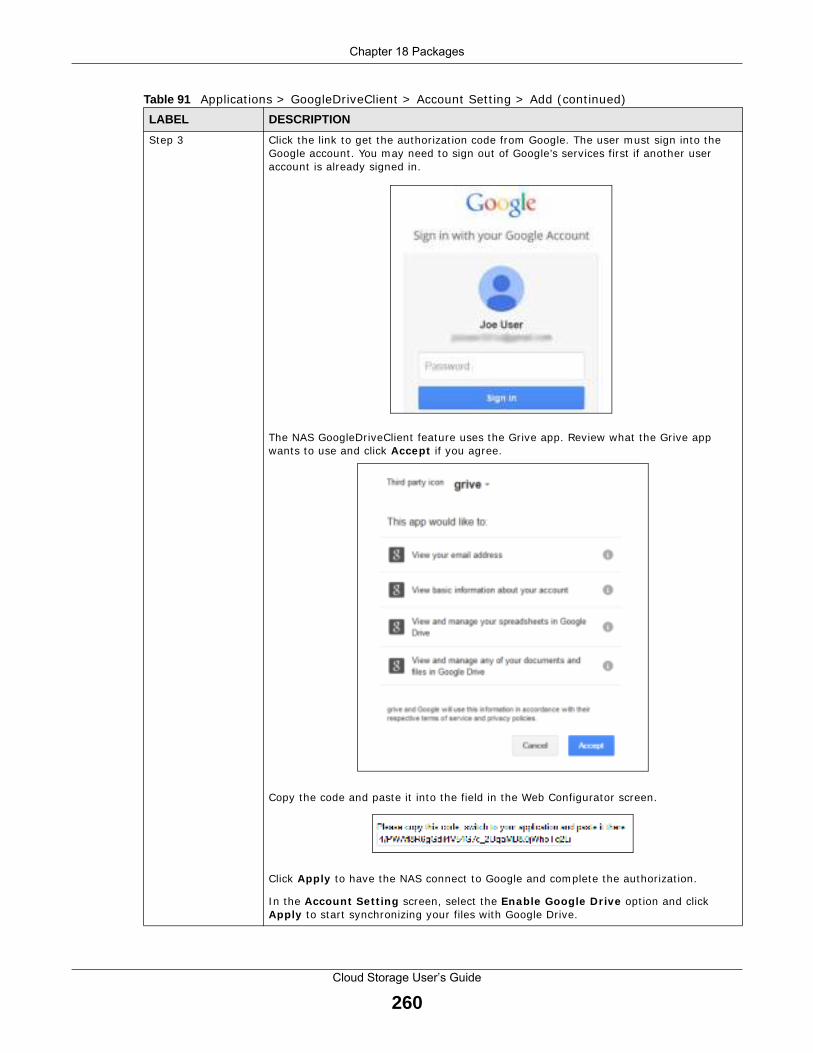
Chapter 18 Packages
Cloud Storage User’s Guide
260
Step 3 Click the link to get the author izat ion code from Google. The user m ust sign into the Google account . You may need to sign out of Google’s services first if another user account is already signed in.
The NAS GoogleDriveClient feature uses the Grive app. Review what the Grive app wants to use and click Accept if you agree.
Copy the code and paste it into the field in the Web Configurator screen.
Click Apply to have the NAS connect to Google and com plete the authorizat ion.
I n the Account Set t ing screen, select the Enable Google Dr ive opt ion and click Apply to start synchronizing your files with Google Drive.
Table 91 Applicat ions > GoogleDriveClient > Account Set t ing > Add (cont inued)
LABEL DESCRIPTION

Chapter 18 Packages
Cloud Storage User’s Guide
261
18.8.3 Update Period Screen
Use the Update Per iod screen to set how often the NAS synchronizes with Google Drive. The NAS init iates the connect ions, thus you do not have to configure rules on a firewall located in front of the NAS to allow access.
Click Applicat ions > GoogleDr iveClient > Update Per iod to open the following screen.
Figure 155 Applicat ions > GoogleDriveClient > Update Period
The following table describes the labels in this screen.
Apply Click this to save your changes and com plete the authorizat ion.
Cancel Click this to return to the previous screen without saving.
Table 91 Applicat ions > GoogleDriveClient > Account Set t ing > Add (cont inued)
LABEL DESCRIPTION
Table 92 Applicat ions > GoogleDriveClient > Update Period
LABEL DESCRIPTION
Update Period Specify how frequent ly the NAS synchronizes the local sync folders and the linked Google Drive accounts. The range is 1 to 4320 m inutes (3 days) .
Apply Click this to save your changes.

Cloud Storage User’s Guide
262
CHAPTER 19
Auto Upload
19.1 Overview
This chapter discusses the features in the Auto Upload screens.
The auto upload feature uploads m edia files stored in the NAS to the Flickr and/ or YouTube sharing websites. Besides web publishing and media server, auto upload is another convenient way to share media files with your fr iends and fam ily. You can link the NAS to your Flickr and/ or YouTube account and select shares for the NAS to upload. The NAS uploads the media files stored in the specified shares to your Flickr and/ or YouTube account . When you add new files to the specified shares, the NAS also automat ically uploads the new files to your Flickr and/ or YouTube account .
19.2 What You Can Do• Use the Flickr / YouTube screen (Sect ion 19.4 on page 262) to upload photos and videos to your
Flickr and YouTube accounts.
• Use the FTP Uploadr screen (Sect ion 19.5 on page 270) to upload files to FTP servers.
19.3 What You Need to Know
FTP
File Transfer Protocol (FTP) is a file t ransfer service that operates on the I nternet . A system running the FTP server accepts com m ands from a system running an FTP client . FTP is not a secure protocol. Your file t ransfers could be subject to snooping.
FTPES (File Transfer Protoc ol over Expl icit TLS/SSL)
File Transfer Protocol over Explicit TLS/ SSL (FTPES) is a file t ransfer service that uses TLS (Transport Layer Security) or Secure Socket Layer (SSL) for secure t ransfers across the I nternet .
19.4 Flickr/YouTube Screen
Use this screen to upload photos and videos to your Flickr and YouTube accounts.
Click Applicat ions > Auto Upload > Flickr / YouTube to open the following screen.

Chapter 19 Auto Upload
Cloud Storage User’s Guide
263
Figure 156 Applicat ions > Auto Upload > Flickr/ YouTube
The following table describes the labels in this screen.
19.4.1 Configuring the Flickr Settings
I n the Applica t ions > Auto Up load > Flickr / YouTube screen, select Flickr from the list and then click the Config but ton.
The following screen displays if you have not authorized the NAS to use a Flickr account . Click OK to cont inue the authorizat ion process.
Figure 157 Linking NAS to Flickr
The web browser opens the Yahoo! Flickr login page. Enter your Yahoo account ’s inform at ion and click Sign I n .
Table 93 Applicat ions > Auto Upload > Flickr/ YouTube
LABEL DESCRIPTION
Flickr/ YouTube
Disable/ Enable Select a service from the list and click this to turn the service on or off.
I f you disable the service and add m ore files to the watch folder(s) , the NAS will not auto upload these files. However, the NAS st ill uploads any files added before you turned off the service.
Pause/ Resum e Select a service from the list and click this to pause or resum e the auto upload feature.
Config Select a service from the list and click this to m anage the service’s set t ings.
Status This field displays the service’s status.
The service m ay be Enabled , Disabled , Uploading or Paused .
Service Nam e This field displays the nam e of a sharing website to which the NAS can autom at ically upload files.
Account I nform at ion
This field displays the usernam e and related inform at ion of the account to use with the auto upload feature.
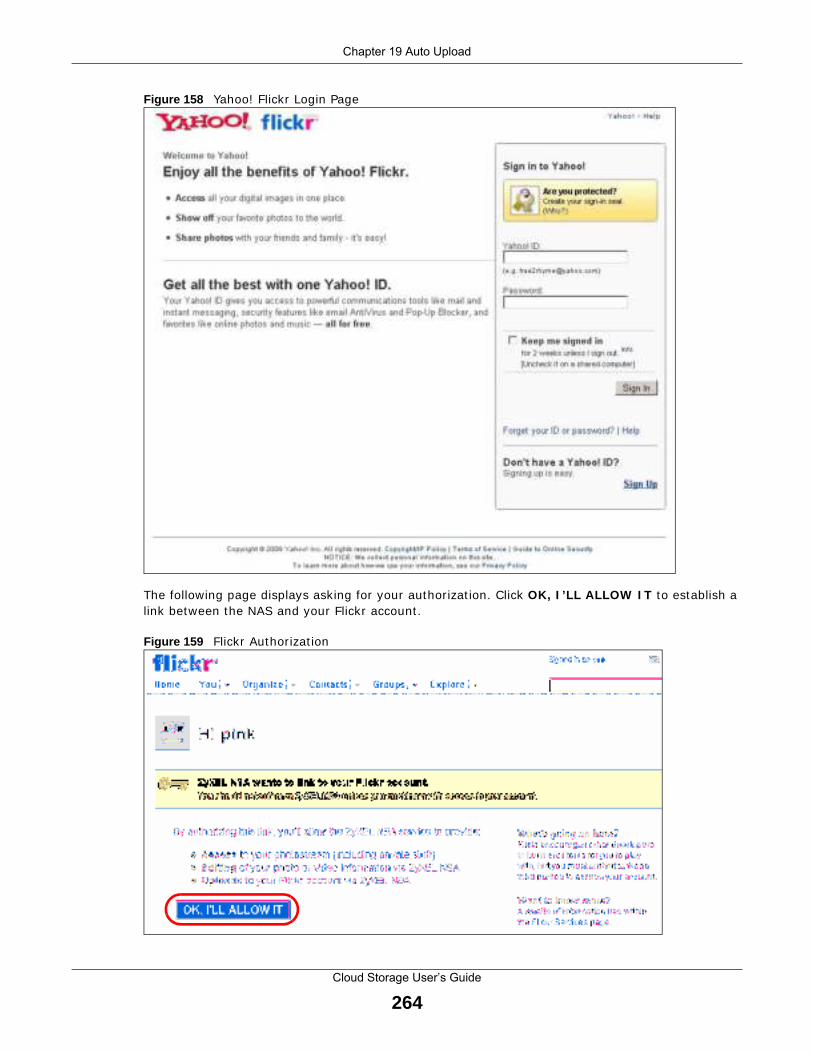
Chapter 19 Auto Upload
Cloud Storage User’s Guide
264
Figure 158 Yahoo! Flickr Login Page
The following page displays asking for your authorizat ion. Click OK, I ’LL ALLOW I T to establish a link between the NAS and your Flickr account .
Figure 159 Flickr Authorizat ion
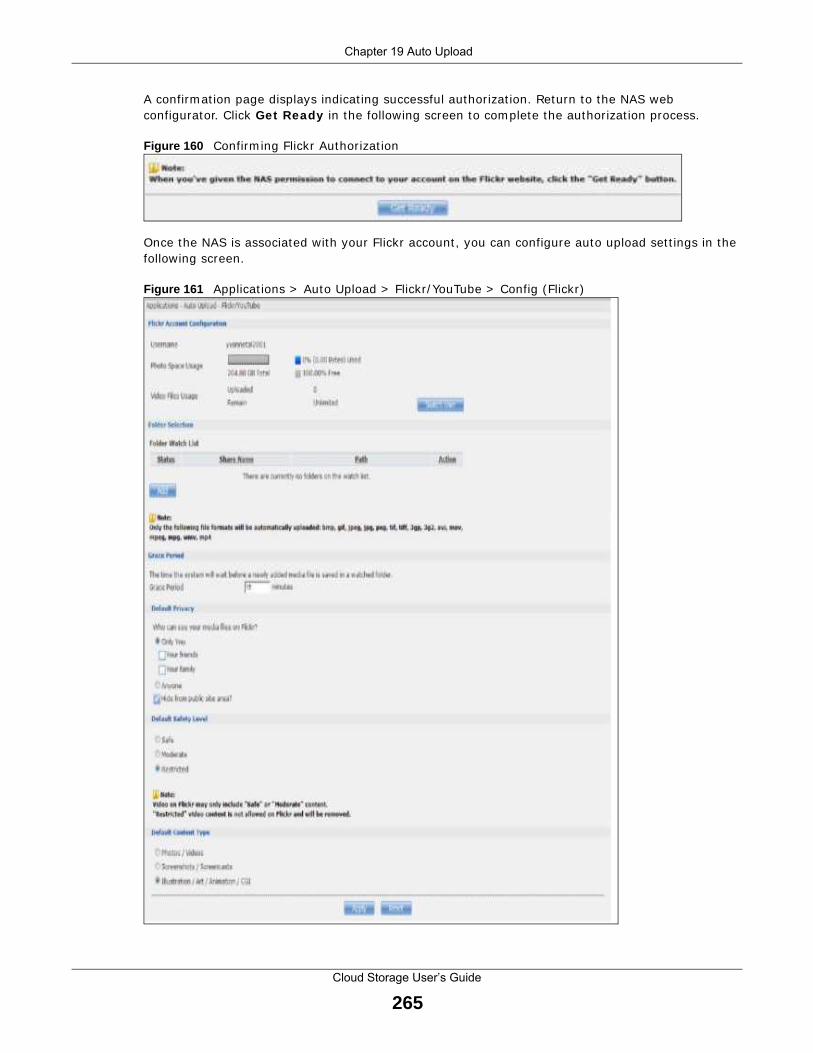
Chapter 19 Auto Upload
Cloud Storage User’s Guide
265
A confirm at ion page displays indicat ing successful authorizat ion. Return to the NAS web configurator. Click Get Ready in the following screen to com plete the authorizat ion process.
Figure 160 Confirm ing Flickr Authorizat ion
Once the NAS is associated with your Flickr account , you can configure auto upload set t ings in the following screen.
Figure 161 Applicat ions > Auto Upload > Flickr/ YouTube > Config (Flickr)
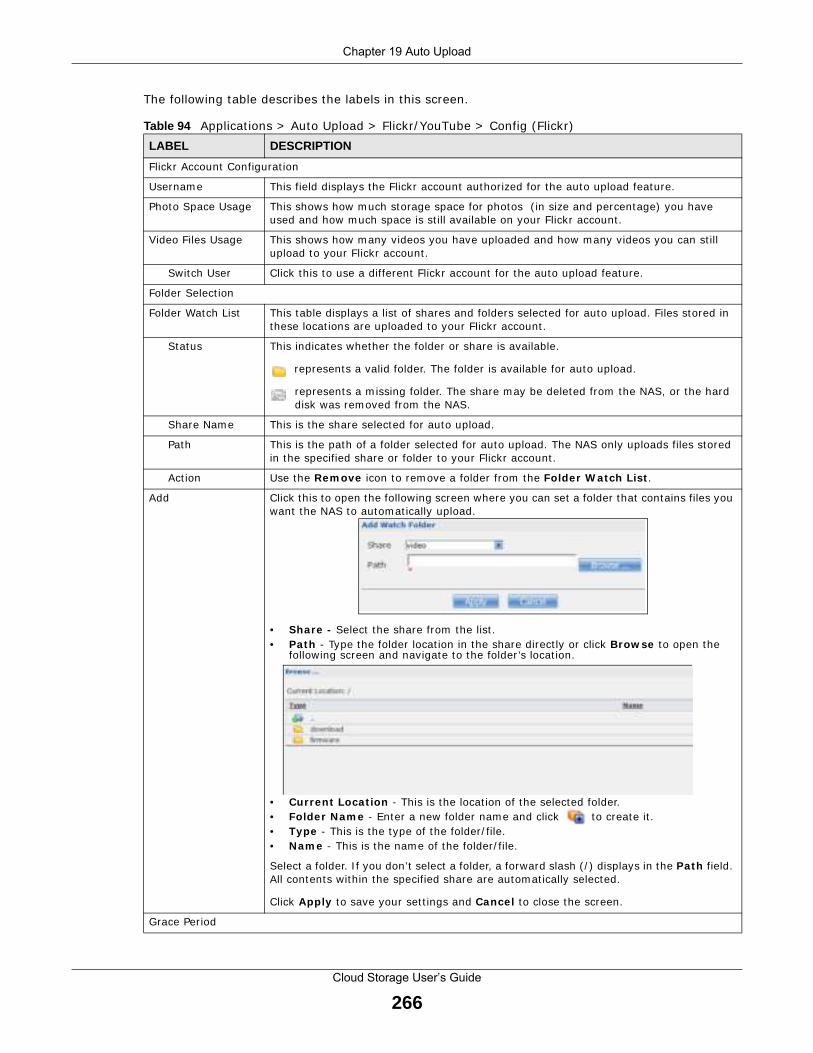
Chapter 19 Auto Upload
Cloud Storage User’s Guide
266
The following table describes the labels in this screen.
Table 94 Applicat ions > Auto Upload > Flickr/ YouTube > Config (Flickr)
LABEL DESCRIPTION
Flickr Account Configurat ion
Usernam e This field displays the Flickr account authorized for the auto upload feature.
Photo Space Usage This shows how m uch storage space for photos ( in size and percentage) you have used and how m uch space is st ill available on your Flickr account .
Video Files Usage This shows how m any videos you have uploaded and how m any videos you can st ill upload to your Flickr account .
Switch User Click this to use a different Flickr account for the auto upload feature.
Folder Select ion
Folder Watch List This table displays a list of shares and folders selected for auto upload. Files stored in these locat ions are uploaded to your Flickr account .
Status This indicates whether the folder or share is available.
represents a valid folder. The folder is available for auto upload.
represents a m issing folder. The share m ay be deleted from the NAS, or the hard disk was rem oved from the NAS.
Share Nam e This is the share selected for auto upload.
Path This is the path of a folder selected for auto upload. The NAS only uploads files stored in the specified share or folder to your Flickr account .
Act ion Use the Rem ove icon to rem ove a folder from the Folder W atch List .
Add Click this to open the following screen where you can set a folder that contains files you want the NAS to automat ically upload.
• Share - Select the share from the list .• Path - Type the folder locat ion in the share direct ly or click Brow se to open the
following screen and navigate to the folder ’s locat ion.
• Current Locat ion - This is the locat ion of the selected folder.• Folder Nam e - Enter a new folder nam e and click to create it .• Type - This is the type of the folder/ file.• Nam e - This is the nam e of the folder/ file.
Select a folder. I f you don’t select a folder, a forward slash ( / ) displays in the Path f ield. All contents within the specified share are automat ically selected.
Click Apply to save your set t ings and Cancel to close the screen.
Grace Period

Chapter 19 Auto Upload
Cloud Storage User’s Guide
267
19.4.2 Configuring the YouTube Settings
I n the Applica t ions > Auto Upload > Flickr / YouTube screen, select YouTube from the list and then click the Config but ton.
Note: Your YouTube account m ust be associated with a Google account .
Get a Google account and use it to log into YouTube. You can then m erge the exist ing YouTube account to your Google account .
I f you have not authorized a YouTube account on the NAS, the following screen displays. Enter your Google account ’s e-m ail address and password in the fields and click OK to authorize the service.
Figure 162 YouTube Account Set t ings
Grace Period N m inutes
Specify how long the NAS should wait when you add a new file for auto upload. For exam ple, if you set the grace period to 5 m inutes, the NAS uploads a new file after it has been in a watched folder for 5 m inutes. You can choose from a range of 1 to 10080 m inutes (up to one week) .
Default Pr ivacy
Who can see your m edia files on Flickr?
Determ ine who has the r ight to see files uploaded to your Flickr account .
Select Only You if you do not want anyone else to see your files. You may also rest r ict the access to Your fr iends and/ or Your fam ily . You can set up a fr iend/ fam ily list in your Flickr account .
Select Anyone to allow everyone to see your files.
Hide from public site area
Check this opt ion to prevent others from finding your files when they perform a search in the Flickr website.
Default Safety Level Assign a safety level to your files.
Select Safe if the contents of your files are suitable for the general public.
Select Moderate if the contents of your files m ay be offensive to som e people.
Select Rest r icted if the contents of your files are not suitable for certain people, such as children or your colleagues.
Default Content Type
Select a content type for your files. You can choose Photo/ Video , Screenshots/Screencasts , or I llust ra t ion/ Ar t / Anim at ion/ CGI .
Apply Click this to save your changes.
Reset Click this to restore previously saved set t ings.
Table 94 Applicat ions > Auto Upload > Flickr/ YouTube > Config (Flickr) ( cont inued)
LABEL DESCRIPTION

Chapter 19 Auto Upload
Cloud Storage User’s Guide
268
Once the NAS is associated with your YouTube account , you can configure auto upload set t ings in the following screen.
Figure 163 Applicat ions > Auto Upload > Flickr/ YouTube > Config (YouTube)
The following table describes the labels in this screen.
Table 95 Applicat ions > Auto Upload > Config (YouTube)
LABEL DESCRIPTION
YouTube Account Configurat ion
Usernam e This field displays the Youtube account authorized for the auto upload feature.
Switch User Click this to use a different YouTube account for the auto upload feature.
Folder Select ion
Folder Watch List This table displays a list of shares and folders selected for auto upload. Files stored in these locat ions are uploaded to your YouTube account .

Chapter 19 Auto Upload
Cloud Storage User’s Guide
269
Status This field indicates whether the share or folder is available.
represents a valid folder. The folder is available for auto upload.
represents a m issing folder. The share may be deleted from the NAS, or the hard disk was rem oved from the NAS.
Share Nam e This field displays the share selected for auto upload.
Path This field displays the path of a folder selected for auto upload. The NAS only uploads the files stored in the specified share or folder to your YouTube account .
Act ion Use the Rem ove icon to delete a folder from the Folder W atch List .
Add Click this to open the following screen where you can set a folder that contains files you want the NAS to autom at ically upload.
• Share - Select the share from the list .• Path - Type the folder locat ion in the share direct ly or click Brow se to open the
following screen and navigate to the folder ’s locat ion.
• Current Locat ion - This is the locat ion of the selected folder.• Folder Nam e - Enter a new folder nam e and click to create it .• Type - This is the type of the folder/ file.• Nam e - This is the nam e of the folder/ file.
Select a folder. I f you don’t select a folder, a forward slash ( / ) displays in the Path field. All contents within the specified share are automat ically selected.
Click Apply to save your set t ings and Cancel to close the screen.
Grace Period
Grace Period N m inutes
Specify how long the NAS should wait when you add a new file for auto upload. For exam ple, if you set the grace period to 5 m inutes, the NAS uploads a new file after it has been in a watched folder for 5 m inutes. You can choose from a range of 1 to 10080 m inutes (up to one week) .
Video Category Select the category that best describes the m edia files you want to upload.
Default Pr ivacy
Who can see your m edia files on YouTube?
Determ ine who has the r ight to see files uploaded to your YouTube account .
Select Only You if you do not want anyone else to see your files.
Select Anyone to allow everyone to see your files.
Apply Click this to save your changes.
Reset Click this to restore your previously stored set t ings.
Table 95 Applicat ions > Auto Upload > Config (YouTube) (cont inued)
LABEL DESCRIPTION
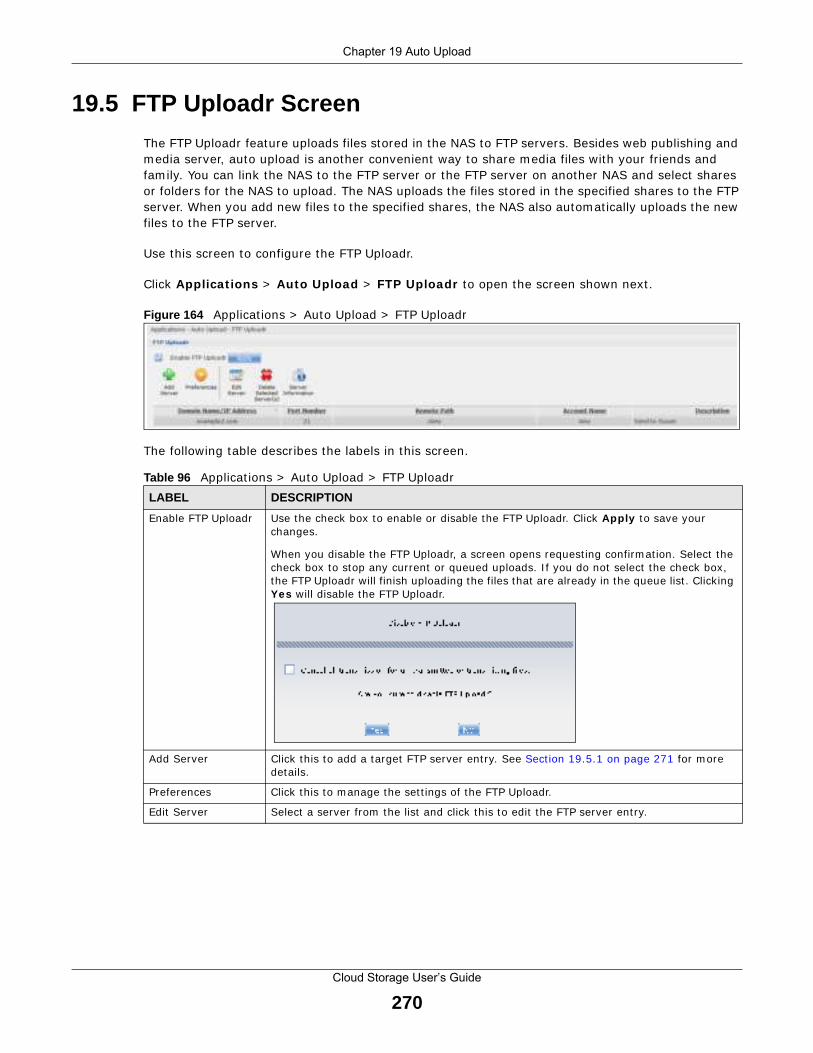
Chapter 19 Auto Upload
Cloud Storage User’s Guide
270
19.5 FTP Uploadr Screen
The FTP Uploadr feature uploads files stored in the NAS to FTP servers. Besides web publishing and media server, auto upload is another convenient way to share m edia files with your fr iends and fam ily. You can link the NAS to the FTP server or the FTP server on another NAS and select shares or folders for the NAS to upload. The NAS uploads the files stored in the specified shares to the FTP server. When you add new files to the specified shares, the NAS also autom at ically uploads the new files to the FTP server.
Use this screen to configure the FTP Uploadr.
Click Applicat ions > Auto Upload > FTP Uploadr to open the screen shown next .
Figure 164 Applicat ions > Auto Upload > FTP Uploadr
The following table describes the labels in this screen.
Table 96 Applicat ions > Auto Upload > FTP Uploadr
LABEL DESCRIPTION
Enable FTP Uploadr Use the check box to enable or disable the FTP Uploadr. Click Apply to save your changes.
When you disable the FTP Uploadr, a screen opens request ing confirm at ion. Select the check box to stop any current or queued uploads. I f you do not select the check box, the FTP Uploadr will f inish uploading the files that are already in the queue list . Clicking Yes will disable the FTP Uploadr.
Add Server Click this to add a target FTP server ent ry. See Sect ion 19.5.1 on page 271 for m ore details.
Preferences Click this to m anage the set t ings of the FTP Uploadr.
Edit Server Select a server from the list and click this to edit the FTP server ent ry.

Chapter 19 Auto Upload
Cloud Storage User’s Guide
271
19.5.1 Adding or Edit ing an FTP Server Entry
Use this screen to add or edit an FTP server ent ry for auto upload.
I n the FTP Uploadr screen, click the Add Server or Edit Server but ton to open the following screen.
Figure 165 Applicat ions > Auto Upload > FTP Uploadr > Add or Edit a Server
The following table describes the labels in this screen.
Delete Selected Server(s)
Select a server from the list and click this to rem ove the FTP server ent ry.
Server I nform at ion Select a server from the list and click this to display the status and set t ings about the FTP server.
Dom ain Nam e/ I P Address
This is the dom ain nam e or I P address of the FTP server.
Port Num ber This is the port num ber used by the FTP server.
Rem ote Path The NAS autom at ically uploads files to this locat ion of the FTP server.
Account Nam e This is the login account for the FTP server.
Descript ion This is the inform at ion related to the FTP server.
Table 96 Applicat ions > Auto Upload > FTP Uploadr (cont inued)
LABEL DESCRIPTION
Table 97 Applicat ions > Auto Upload > FTP Uploadr > Add or Edit a Server
LABEL DESCRIPTION
Dom ain Nam e/ I P Address
Enter the dom ain nam e or I P address of the FTP server.
Account Nam e Enter the account name used to access the FTP server.

Chapter 19 Auto Upload
Cloud Storage User’s Guide
272
19.5.2 FTP Uploadr Preferences Screen
Use this screen to configure the general set t ings for the FTP Uploadr.
I n the FTP Uploadr screen, click the Preferences icon to open the following screen.
Figure 166 Applicat ions > Auto Upload > FTP Uploadr > Preferences
The following table describes the labels in this screen.
Password Enter the password associated with the account name.
Port Num ber Enter the port num ber for the FTP server.
Rem ote Path Enter the path of the FTP server where the NAS autom at ically uploads files.
Descript ion Enter addit ional inform at ion about this FTP server.
Test Connect ion Click this to test your set t ings and check whether you can use the set t ings to connect to the FTP server.
Apply Click this to save your changes.
Cancel Click this to return to the previous screen without saving.
Table 97 Applicat ions > Auto Upload > FTP Uploadr > Add or Edit a Server (cont inued)
LABEL DESCRIPTION
Table 98 Applicat ions > Auto Upload > FTP Uploadr > Preferences
LABEL DESCRIPTION
Folder Watch List
Status This field indicates whether the share or folder is available.
represents a valid folder. The folder is available for auto upload.
represents a m issing folder. The share may be deleted from the NAS, or the hard disk was rem oved from the NAS.
Share Nam e This is the share selected for auto upload.
Path This is the path of a folder selected for auto upload. The NAS only uploads files stored in the specified share or folder to your FTP server.
Act ion Use the Rem ove icon to delete a folder from the Folder W atch List .

Chapter 19 Auto Upload
Cloud Storage User’s Guide
273
Add Click this to open the following screen where you can set a folder that contains files you want the NAS to autom at ically upload.
• Share - Select the share from the list .• Path - Type the folder locat ion in the share direct ly or click Brow se to open the
following screen and navigate to the folder ’s locat ion.
• Current Locat ion - This is the locat ion of the selected folder.• Folder Nam e - Enter a new folder nam e and click to create it .• Type - This is the type of the folder/ file.• Nam e - This is the nam e of the folder/ file.
Select a folder. I f you don’t select a folder, a forward slash ( / ) displays in the Path f ield. All contents within the specified share are autom at ically selected.
Click Apply to save your set t ings and Cancel to close the screen.
Set t ings
Grace Period Specify how long the NAS should wait when you add a new file for auto upload. For exam ple, if you set the grace period to 5 m inutes, the NAS uploads a new file after it has been in a watched folder for 5 m inutes. You can choose from a range of 1 to 10080 m inutes (up to one week) .
Bandwidth Lim it Enter the m axim um upload rate for auto upload. You can choose from a range of 0 to 100,000 KB/ s. Enter 0 if you do not want to set any lim it .
Use this to leave bandwidth on your network connect ion for other t raffic, especially if your I nternet connect ion has rest r icted upload speed.
Apply Click this to save your changes in this sect ion.
Reset Click this to restore previously saved set t ings.
Close Click this to return to the previous screen without saving.
Table 98 Applicat ions > Auto Upload > FTP Uploadr > Preferences (cont inued)
LABEL DESCRIPTION
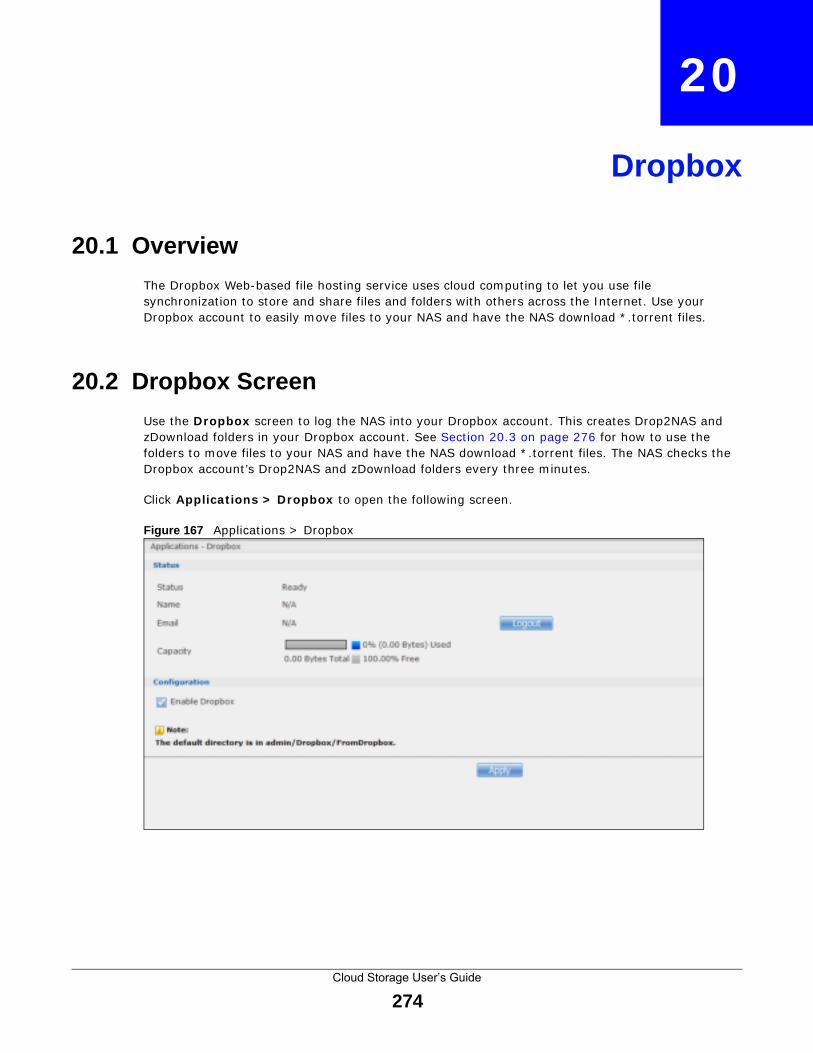
Cloud Storage User’s Guide
274
CHAPTER 20
Dropbox
20.1 Overview
The Dropbox Web-based file host ing service uses cloud com put ing to let you use file synchronizat ion to store and share files and folders with others across the I nternet . Use your Dropbox account to easily m ove files to your NAS and have the NAS download * .torrent files.
20.2 Dropbox Screen
Use the Dropbox screen to log the NAS into your Dropbox account . This creates Drop2NAS and zDownload folders in your Dropbox account . See Sect ion 20.3 on page 276 for how to use the folders to move files to your NAS and have the NAS download * .torrent files. The NAS checks the Dropbox account ’s Drop2NAS and zDownload folders every three m inutes.
Click Applicat ions > Dropbox to open the following screen.
Figure 167 Applicat ions > Dropbox

Chapter 20 Dropbox
Cloud Storage User’s Guide
275
The following table describes the labels in this screen.
Table 99 Applicat ions > Dropbox
LABEL DESCRIPTION
Status This shows the status of the NAS Dropbox applicat ion’s interact ion with the Dropbox server.
Disable : The NAS Dropbox applicat ion is turned off.
Ready : The NAS Dropbox applicat ion has authent icated with the Dropbox server and is ready to use.
Authent ica t ing w ith Dropbox. Please w ait . : The NAS Dropbox applicat ion is logging into the Dropbox server.
Failed to negot ia te link w ith Drop box. Please cont act your vendor . : The NAS cannot find the Dropbox server at the norm al address.
Receiving f ile / folder from Dropbox tunnel. : The NAS is get t ing a file from your Dropbox account .
Dropbox account has been a l ready used on other NAS. : One Dropbox account can only work with one NAS at a t ime. Log the other NAS out of your Dropbox account to be able to use the account with this NAS.
Nam e This is the owner of the Dropbox account the NAS is configured to use.
Em ail This is the e-m ail address of the owner of the Dropbox account the NAS is configured to use.
Logout This displays after the NAS connects to Dropbox. Click Logout to stop syncing your files with Dropbox and have the NAS log out from your Dropbox account . Use this to be able to use the NAS with another Dropbox account . I f you only want to stop syncing your files with Dropbox, you can just clear the Enable Dropbox opt ion and click Apply .
Capacity This shows how much total storage space is available on the NAS to use for Dropbox as well as the am ounts already in use and st ill available.
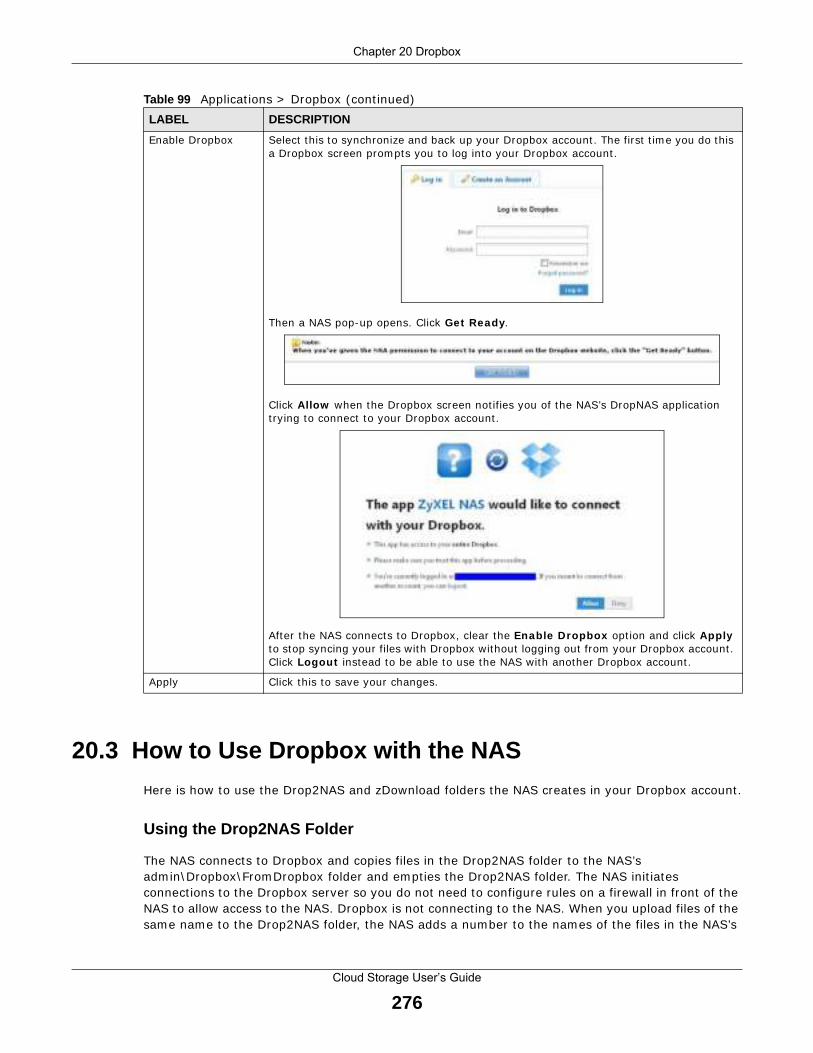
Chapter 20 Dropbox
Cloud Storage User’s Guide
276
20.3 How to Use Dropbox with the NAS
Here is how to use the Drop2NAS and zDownload folders the NAS creates in your Dropbox account .
Using the Drop2NAS Folder
The NAS connects to Dropbox and copies files in the Drop2NAS folder to the NAS’s adm in\ Dropbox\ From Dropbox folder and em pt ies the Drop2NAS folder. The NAS init iates connect ions to the Dropbox server so you do not need to configure rules on a firewall in front of the NAS to allow access to the NAS. Dropbox is not connect ing to the NAS. When you upload files of the sam e name to the Drop2NAS folder, the NAS adds a number to the nam es of the files in the NAS’s
Enable Dropbox Select this to synchronize and back up your Dropbox account . The first t im e you do this a Dropbox screen prom pts you to log into your Dropbox account .
Then a NAS pop-up opens. Click Get Ready .
Click Allow when the Dropbox screen not if ies you of the NAS’s DropNAS applicat ion t ry ing to connect to your Dropbox account .
After the NAS connects to Dropbox, clear the Enable Dropbox opt ion and click Apply to stop syncing your files with Dropbox without logging out from your Dropbox account . Click Logout instead to be able to use the NAS with another Dropbox account .
Apply Click this to save your changes.
Table 99 Applicat ions > Dropbox (cont inued)
LABEL DESCRIPTION

Chapter 20 Dropbox
Cloud Storage User’s Guide
277
adm in\ Dropbox\ From Dropbox folder in the format of “ filenam e(n) .extension”. Here is an exam ple of the Drop2NAS folder.
Note: Do not delete the NAStoken file as it is needed for your NAS to work with the Dropbox account .
Figure 168 Dropbox\ Drop2NAS
Using the zDownload Folder
The NAS copies * .torrent files in the zDownload folder to the NAS’s adm in\ download\ torrents folder and autom at ically starts downloading them. The NAS adds a suffix to the name of each torrent file in the Dropbox account ’s zDownload folder and keeps updat ing it to show the job’s state (downloading, queued, paused, canceled, uploading, finished, error, or ret rying) . The NAS does not take any act ion for folders nor other types of files in the zDownload folder. Here is an example of torrent files in the zDownload folder.
Figure 169 Dropbox\ zDownload

Cloud Storage User’s Guide
278
CHAPTER 21
Using Time Machine with the NAS
21.1 Overview
Tim e Machine is a backup system provided by Mac OS X. I t automat ically backs up everything on your Mac, including pictures, m usic, videos, docum ents, applicat ions, and set t ings. This chapter helps you to enable Tim e Machine in OS X to use your NAS as a backup volum e.
21.2 Time Machine Screen
Use the Tim e Machine screen to turn Tim e Machine support on or off, and designate the share for Tim e Machine backups.
Click Applicat ions > Tim e Machine to open the following screen.
Figure 170 Applicat ions > Tim e Machine
The following table describes the labels in this screen.
21.3 Using Time Machine
After enabling Tim e Machine on the NSA, follow the steps below to set up Tim e Machine on your Mac to use your NAS for backup.
Table 100 Applicat ions > Tim e Machine
LABEL DESCRIPTION
Enable Time Machine
Select this to allow Macs to use Tim e Machine to back up to the NAS. Clear it to turn off Tim e Machine support .
Share Select the share the NAS uses to store Tim e Machine backups.
Apply Click this to save your changes.
Reset Click this to restore the screen’s last-saved set t ings.
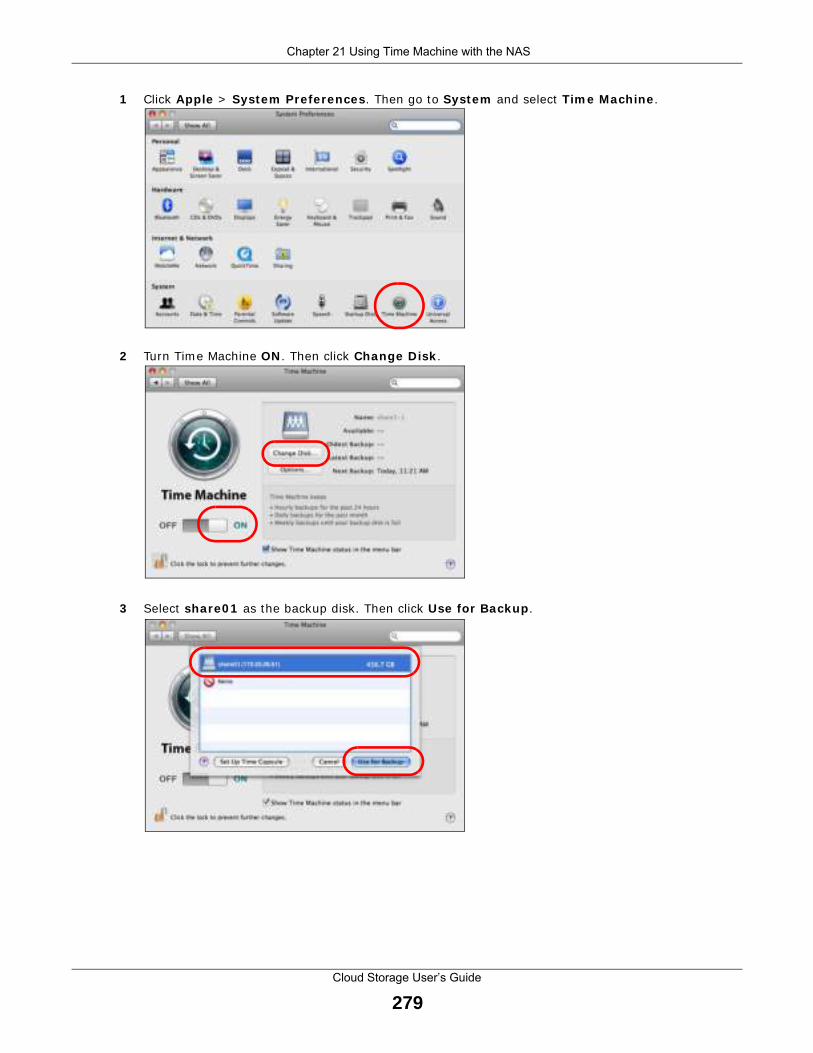
Chapter 21 Using Time Machine with the NAS
Cloud Storage User’s Guide
279
1 Click Apple > System Preferences . Then go to System and select Tim e Machine .
2 Turn Tim e Machine ON . Then click Change Disk .
3 Select share0 1 as the backup disk. Then click Use for Backup .
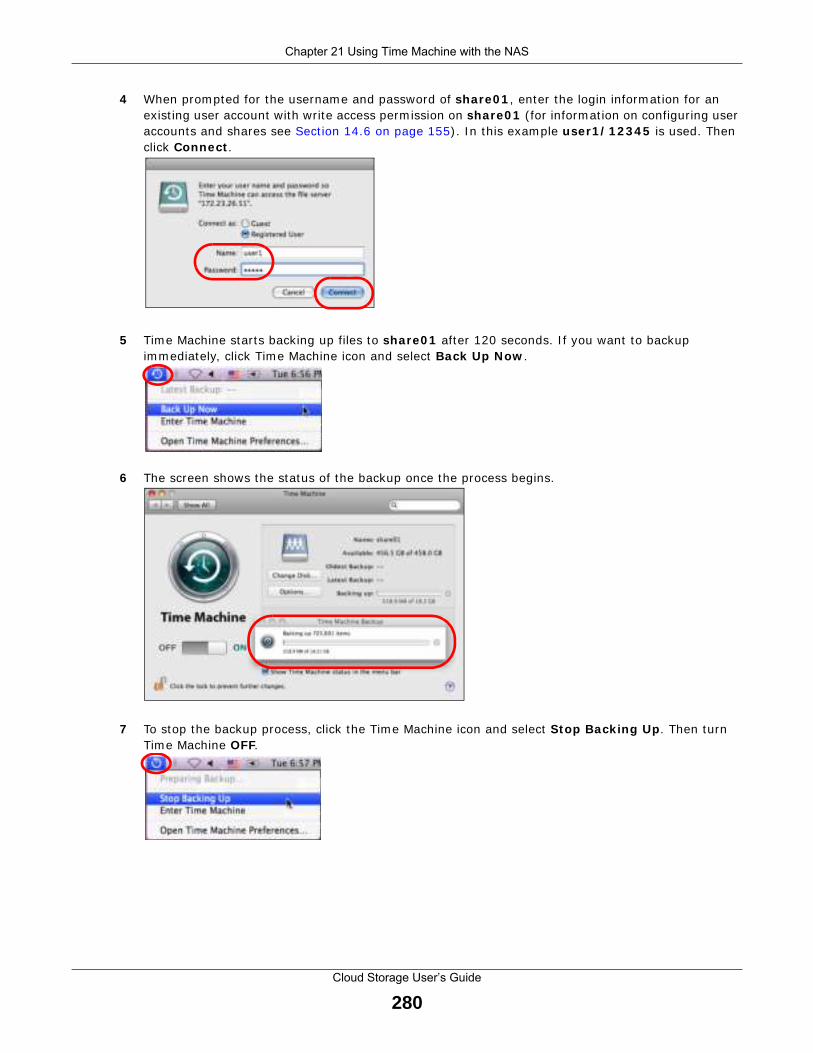
Chapter 21 Using Time Machine with the NAS
Cloud Storage User’s Guide
280
4 When prompted for the username and password of share0 1 , enter the login inform at ion for an exist ing user account with write access perm ission on share0 1 ( for inform at ion on configuring user accounts and shares see Sect ion 14.6 on page 155) . I n this exam ple user1 / 1 2 3 4 5 is used. Then click Connect .
5 Tim e Machine starts backing up files to share0 1 after 120 seconds. I f you want to backup immediately, click Time Machine icon and select Back Up Now .
6 The screen shows the status of the backup once the process begins.
7 To stop the backup process, click the Tim e Machine icon and select Stop Back ing Up . Then turn Tim e Machine OFF.

Cloud Storage User’s Guide
281
CHAPTER 22
Users
22.1 Overview
This chapter int roduces the Users screens of the NAS. Use the Users screens to create and m anage adm inist rator and user accounts.
Adm inist rators can:
• Configure and m anage the NAS.
• Create volum es, shares, and user accounts.
• Assign individual users specific access r ights for specific shares.
Users are people who have access r ights to the NAS and can store files there for later ret r ieval. A user can:
• Manage shares that he owns.
• Change his own password.
• Access the contents of other shares to which he is given access r ights.
22.2 What You Can Do• Use the m ain Users screen (Sect ion 22.3 on page 281) to display a list of user accounts created
on the NAS.
• Use the Add User screen (Sect ion 22.3.2 on page 283) to create new user accounts.
• Use the Edit User screen (Sect ion 22.3.2 on page 283) to edit the propert ies of an exist ing account .
• Use the User I nfo screen (Sect ion 22.4 on page 285) to display the am ount of volume space used by a selected account and the account ’s m em bership in any groups.
22.3 Users Screen
Click Shar ing > Users to display the screen shown next .
Use this screen to create and m anage accounts for users who can store files on the NAS.

Chapter 22 Users
Cloud Storage User’s Guide
282
Figure 171 Sharing > Users
The following table describes the labels in this screen.
Table 101 Sharing > Users
LABEL DESCRIPTION
Add User Click this to open a screen where you can configure a new user account .
Refer to Sect ion 22.3.2 on page 283 to see the screen.
Search Click this to display a search field. Type in the nam e of an account and then click Search to look up the account you specified. Click Clear to close the search funct ion.
Edit User Select an account and click this to open a screen where you can edit the propert ies of the account .
Refer to Sect ion 22.3.2 on page 283 to see the screen.
Delete Selected Users
Select an account and click this to open a screen where you can delete the user account .
User I nfo Select an account and click this to open a screen displaying the am ount of storage space used by the account . You can also check the account ’s m em bership in any groups.
Refer to Sect ion 22.4 on page 285 to see the screen.
Display Number Click the drop-down m enu to set how m any accounts you want to display in one screen.
Go to Page Click the drop-down m enu to display and access m ore user accounts.

Chapter 22 Users
Cloud Storage User’s Guide
283
22.3.1 User Icons
The following table describes the user icons.
22.3.2 Adding or Editing an Account
Use this screen to create or edit a NAS user account with NAS access password.
Click the Add User but ton in the Users screen to open the following screens. Click the Edit User but ton in the screen shown previously to edit an exist ing account .
Figure 172 Sharing > Users > Add or Edit a User: General Set t ings
Figure 173 Sharing > Users > Add or Edit a User: Quota (per volum e)
User Type This field displays whether the account is an adm inist rator account or a user account .
Usernam e This field displays the usernam e of each account .
Table 101 Sharing > Users (cont inued)
LABEL DESCRIPTION
Table 102 User I cons
ICON DESCRIPTION
The blue icon is for an adm inist rator account .
The green icon is for a user account .

Chapter 22 Users
Cloud Storage User’s Guide
284
Figure 174 Sharing > Users > Add or Edit a User: General Set t ings
The following table describes the labels in these screens.
22.3.3 Usernames
Enter a usernam e from one to 32 characters. The first character m ust be alphabet ical (case insensit ive, [ A-Z a-z] ) ; num eric characters are not allowed as the first character.
The usernam e can only contain the following characters:
Table 103 Users > Add or Edit a User
LABEL DESCRIPTION
General Set t ings Click this to configure the user ’s user name and password.
Usernam e Type a nam e from 1 to 32 single-byte (no Chinese characters allowed for exam ple) ASCI I characters. See Sect ion 22.3.3 on page 284 for m ore details on usernam es.
New Password Create a password associated with this user. You can type from one to 14 single-byte (no Chinese characters allowed for exam ple) ASCI I characters.
Password (Confirm ) You m ust type the exact same password that you just typed in the above field.
Account Type Select Adm inist ra tor to give the account full configurat ion and m anagem ent access to the NAS.
Select User to give the account basic access r ights to the NAS and allow the user to m anage his own shares, change his own password, and access the contents of other shares to which he is given access r ights.
Quota (per volum e) Click this to configure which volum e the user can use and the allowed storage space.
Volum e Name Select the volum e in which you want the user ’s files to be stored.
Quota (per volum e) Enter how much space ( in m egabytes) you want to allow for the user to store files.
Group Membership Click this to configure to which groups on the NAS the user belongs.
Available Group(s) This field lists the groups created on the NAS to which the selected account does not belong.
Group Mem bership This field lists the groups that the selected account belongs to.
Add Selected Group(s)
Select a group from the Available Groups list and click this to add the account to that group.
Rem ove Selected Group(s)
Select a group from the Group Mem bership list and click this to rem ove the account from that group.
Apply Click this to save your changes.
Cancel Click this to return to the previous screen without saving.
Chapter 22 Users
Cloud Storage User’s Guide
285
• Alphanumeric A-z 0-9. Unicode usernames are supported with CI FS logins, but not FTP or web configurator logins.
• Spaces
• _ [ underscores]
• . [ periods]
• - [ dashes]
Other lim itat ions on usernam es are:
• All leading and t railing spaces are removed automat ically.
• Mult iple spaces within names are converted to a single space.
• Usernames are case insensit ive. The username cannot be the same (no mat ter the let ter case) as an exist ing user. For example, if a user exists with the nam e 'BOB', you cannot create a user nam ed 'bob'. I f you enter a user 'bob' but use 'BOB' when connect ing via CI FS or FTP, it will use the account set t ings used for 'bob'.
• The username cannot be the same as a system username such as ANONYMOUS- FTP nor be the sam e as an exist ing user. Other reserved usernam es that are not allowed are:
• bin
• daem on
• ftp
• anonymous- ftp
• anonymous
• nobody
• root
• pc-guest
• adm in
• password
22.4 Displaying User Info
Use this screen to display a user ’s informat ion.
I n the Users screen, select an account and click User I nfo to open the following screen.

Chapter 22 Users
Cloud Storage User’s Guide
286
Figure 175 Sharing > Users > User I nfo
The following table describes the labels in this screen.
Table 104 Sharing > Users > User I nfo
LABEL DESCRIPTION
Usernam e This field displays the selected usernam e.
Space Usage Click this to display the amount of volum e space used by the selected account .
Group List Click this to display the selected user ’s group m embership.
Volum e Name This field displays the volume(s) created on the NAS.
Used Space This field displays how m uch storage space the selected account is current ly using. This only applies for files that the user saved onto the NAS while logged in with that usernam e.
Group Nam e This shows when you click the Group List tab.
This displays the list of groups to which the selected user belongs.
OK Click this to close the current screen.
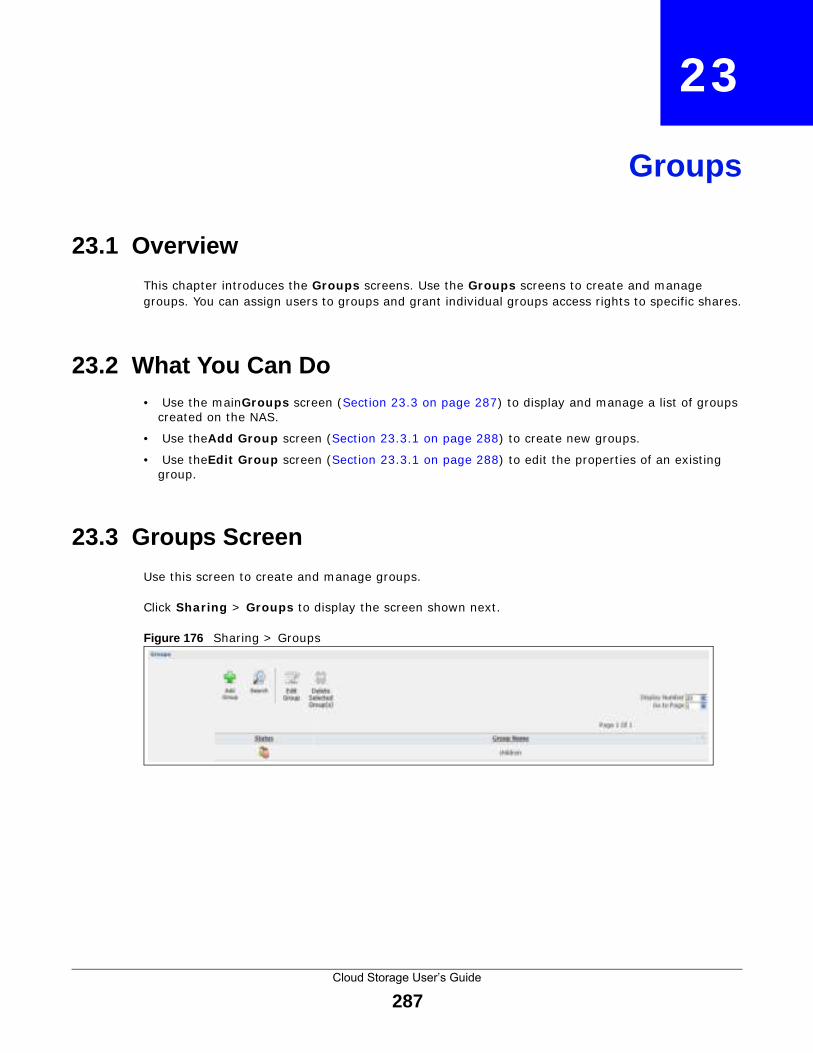
Cloud Storage User’s Guide
287
CHAPTER 23
Groups
23.1 Overview
This chapter int roduces the Groups screens. Use the Groups screens to create and manage groups. You can assign users to groups and grant individual groups access r ights to specific shares.
23.2 What You Can Do• Use the m ain Groups screen (Sect ion 23.3 on page 287) to display and manage a list of groups
created on the NAS.
• Use the Add Group screen (Sect ion 23.3.1 on page 288) to create new groups.
• Use the Edit Group screen (Sect ion 23.3.1 on page 288) to edit the propert ies of an exist ing group.
23.3 Groups Screen
Use this screen to create and m anage groups.
Click Shar ing > Groups to display the screen shown next .
Figure 176 Sharing > Groups

Chapter 23 Groups
Cloud Storage User’s Guide
288
The following table describes the labels in this screen.
23.3.1 Adding or Editing a Group
Use this screen to create or edit a NAS group.
Click the Add Group but ton in the Groups screen to open the following screen. Click the Edit Group but ton in the screen shown previously to edit an exist ing group.
Table 105 Sharing > Groups
LABEL DESCRIPTION
Add Group Click this to open a screen where you can configure a new group.
Search Click this to display a search field. Type the nam e of a group and then click Search to look up the group you specified. Click Clear to close the search funct ion.
Edit Group Select a group and click this to open a screen where you can edit the propert ies of the selected group.
Delete Selected Group(s) Select a group and click this to open a screen where you can delete the group.
Display Num ber Click the drop-down m enu to set how many groups you want to display in one screen.
Go to Page Click the drop-down m enu to select a page num ber. Jum p to a different page to display and access m ore groups.
Status This field displays the group icon.
Group Nam e This field displays the group nam es created on the NAS.

Chapter 23 Groups
Cloud Storage User’s Guide
289
Figure 177 Sharing > Groups > Add or Edit a Group
The following table describes the labels in this screen.
23.3.2 Group Names
Enter a group nam e from 1 to 32 characters. The first character m ust be alphabet ical (case insensit ive, [ A-Z a-z] ) ; num eric characters are not allowed as the first character.
The group nam e can only contain the following characters:
• Alphanumeric A-z 0-9. Unicode usernames are supported with CI FS logins, but not FTP or web configurator logins.
• Spaces
• _ [ underscores]
• . [ periods]
• - [ dashes]
Other lim itat ions on group nam es are:
• All leading and t railing spaces are removed automat ically.
• Mult iple spaces within names are converted to a single space.
Table 106 Sharing > Groups > Add or Edit a Group
LABEL DESCRIPTION
Group Nam e Type a nam e from 1 to 32 single-byte (no Chinese characters allowed for exam ple) ASCI I characters. See Sect ion 23.3.2 on page 289 for m ore details on group nam es.
Group Membership Use this field to assign group m em bership to individual users.
Available User(s) This field lists the user accounts created on the NAS that are not m embers of the current group.
Group Mem bership This field lists the user accounts added to the group.
Add Selected User(s) Select a user account from the Available Users list and click this to add the account to the group.
Rem ove Selected User(s)
Select a user account from the Group Mem bership list and click this to rem ove the account from the group.
Apply Click this to save your changes.
Cancel Click this to return to the previous screen without saving.

Chapter 23 Groups
Cloud Storage User’s Guide
290
• Group names are case insensit ive. The group name cannot be the same (no mat ter the let ter case) as an exist ing group. For example, if a group exists with the nam e 'FAMI LY', you cannot create a group nam ed 'fam ily '.
• The group nam e cannot be the sam e as a system group nam e such as EVERYONE nor be the sam e as an exist ing group. Other reserved groups nam es that are not allowed are:
• nobody
• root
• everyone

Cloud Storage User’s Guide
291
CHAPTER 24
Shares
24.1 Overview
A share is a set of access perm issions m apped to a specific folder on a volum e. I t is equivalent to the Windows concept of a shared folder. You can m ap a share to a network dr ive for easy and fam iliar file t ransfer for Windows users.
24.2 What You Can Do• Use the Shares screen (Sect ion 24.3 on page 291) to navigate a list of shares created on the
NAS.
• Use the Add Shares screen (Sect ion 24.3.1 on page 293) to create addit ional shares on the NAS.
• Use the Recycle Bin screen (Sect ion 24.4 on page 295) to configure and clean up the recycle bins.
• Use the Edit Share screen (Sect ion 24.3.1 on page 293) to edit a share’s propert ies.
• Use the Share Brow ser screen (Sect ion 24.5 on page 296) to navigate, add and edit the contents in a share.
24.3 Shares Screen
Click Shar ing > Shares in the navigat ion panel to open the following screen. This screen lists all shares created on the NAS.
Figure 178 Sharing > Shares

Chapter 24 Shares
Cloud Storage User’s Guide
292
The following table describes the labels in this screen.
Table 107 Sharing > Shares
LABEL DESCRIPTION
Add Share Click this to create a new share.
Recycle Bin Click this to configure recycle bins.
Edit Share Select a share and click this to edit the share.
Delete Share Select a share and click this to rem ove or rest r ict access to the share.
Share Browser Select a share and click this to browse the share’s contents.
Status This field displays the share icons.
represents a Built - in share on a volum e on the internal hard dr ives.
represents a Predefined or User- Created share on a volum e on the internal hard dr ives.
represents an Auto or User- Created share on a volum e on the external (USB) devices.
represents a disabled share that no user can access.
represents a m issing share. The NAS cannot find the hard disk associated with the share ( the disk m ay be rem oved from the NAS for exam ple) . You m ay install the disk back to the NAS to recover the share, or you m ay delete the share from the NAS.
Share Type This field displays Built - in for the adm in share. I f you delete the volume containing this share, the NAS autom at ically creates an adm in share in the next volum e by alphabet ical order.
This field displays Predefined for default shares. Default shares, including music, video, and photo, always exist as long as there is a volum e. I f you delete the volume containing these default shares, the NAS autom at ically creates these shares in the next volum e by alphabet ical order.
This field displays User- created for shares that an adm inist rator has created. You can delete these shares.
This field displays Auto for shares that are autom at ically created on an external (USB) device when a user plugs in the device.
Share Nam e This field displays the share’s nam es.
Share Path This field displays the share’s file path, for exam ple, volum e1/ m usic.

Chapter 24 Shares
Cloud Storage User’s Guide
293
24.3.1 Adding or Editing Share
Click Add Share to create a new share. I n the Shares screen, select a share and click Edit Share to open the following screen. Use this screen to create or edit a share.
Figure 179 Shares > Add Share (or Edit Share)
The following table describes the labels in this screen.
Share Owner This is the nam e of the user account to which this share belongs.
Perm ission Type This field displays the access perm ission of a share.
Everyone on the network can access a Public share.
Only the share owner can access a Private share.
An Advanced share allows you to assign specific access r ights ( read-only for exam ple) to individual users/ groups.
Table 107 Sharing > Shares (cont inued)
LABEL DESCRIPTION
Table 108 Shares > Add Share (or Edit Share)
LABEL DESCRIPTION
Share Nam e Type a share nam e from 1 to 239 single-byte (no Chinese characters allowed for exam ple) ASCI I characters. The nam e cannot be the sam e as another exist ing share. See Sect ion 11.2.2 on page 128 for m ore inform at ion on share nam es.
Volum e You should have already created volum es (a single accessible storage area with a single file system ) on the NAS. Select the one that contains the folder that you want to share out .
You cannot m odify this when edit ing a share.
Make this share owned by
Select the adm inist rator or user account that can own (m anage) this share. The share owner cont rols access r ights to the share.
Enable this share Click this to allow access to this share.
Enable Recycle Bin
Click this to act ivate the recycle bin. When you delete a file from this share, a recycle folder is created to store the deleted item .
Publish this share to Media Server
This opt ion is available only when you enable the Media Server (Sect ion 17.5 on page 216) .
Select this opt ion to have the NAS m ake m edia files in this share available to m edia clients and through the Playzone screens. When you publish a share, you can also select whether or not to publish m usic t racks, photos, and videos. The m edia clients do not have to use a password to play the shares you publish.

Chapter 24 Shares
Cloud Storage User’s Guide
294
24.3.2 Configuring Advanced Share Access
I n the Shar ing > Shares > Add Share or Edit Share screen, select Advanced from the Share Access drop-down list . Click Edit to open the following screen. Use this screen to configure share access r ights for individual users and groups.
Figure 180 Sharing > Shares > Add Share (or Edit Share) > Advanced
Publish this share to Web
This opt ion is available when you enable the W eb Publish (Sect ion 17.8 on page 230) .
Select this opt ion to let people use a web browser to access this share’s files without logging into the Web Configurator.
Share Access Assign access r ights ( full, read only or deny) to users or groups. I f you publish the share to the m edia server or the web, all users will have at least read-only access to the share, regardless of what you configure here.
Keep it pr iva te to ow ner means only the share owner (selected above) can access the share.
Make it Public m eans every user ( including people who do not have accounts on the NAS) can access the share.
Advanced allows you to assign specific access r ights ( full, read only or deny) to individual users/ groups.
Edit This but ton is available only when you select Advanced share access. Click this to configure advanced share access r ights.
Apply Click this to save your changes.
Cancel Click this to return to the previous screen without saving.
Table 108 Shares > Add Share (or Edit Share) (cont inued)
LABEL DESCRIPTION

Chapter 24 Shares
Cloud Storage User’s Guide
295
The following table describes the labels in this screen.
24.3.3 Public and ANON YMOUS Share Access Rights
I f you m ake a share public, users do not need to log in.
With ANONYMOUS FTP, you m ust enter either 'anonym ous' or 'ftp' as the usernam e. Any other name is considered a username, so must be valid and have a corresponding correct password.
24.4 Recycle Bin C onfiguration Screen
Use this screen to periodically clean up items in all recycle bins.
24.4.1 Recycle Bins
Recycle bins in the NAS help users recover accidentally deleted files or folders in the shares. When you delete an item, a recycle folder is created within the share to hold the deleted item .
Every share can have its own recycle folder. You m ust enable the recycle-bin funct ion to recycle deleted item s. You can configure this set t ing when you add or edit a share. See Sect ion 24.4.2 on page 296 for details on act ivat ing the recycle bin in a share.
Later if you want to ret r ieve a deleted item , you can locate the item in the recycle folder. You m ay m ove or copy the deleted item to another share.
Table 109 Sharing > Shares > Add Share (or Edit Share) > Advanced
LABEL DESCRIPTION
Available Users/ Groups This field lists the users/ groups to which you can assign access r ights.
Authority Use this field to assign access r ights to users/ groups.
Full Cont rol gives users/ groups full access ( read, write and execute) to all files contained within this share.
Read- Only gives users/ groups read-only access ( they cannot m odify nor execute) to all files contained within this share.
Deny blocks access (users/ groups cannot read, m odify, nor execute) to all f iles contained within this share.
Am ong all access r ights, Deny has the highest pr ior ity. For exam ple, User A belongs to Group 1. You assign User A full access r ights to the Music share but deny access r ights to Group 1. Then User A cannot access the Music share.
Note: If you deny access to all users, no-one can use the share, not even the
administrator.
Click an arrow but ton to m ove users/ groups between the left and r ight fields. Use the arrow but tons to assign access r ights to users/ groups.
Apply Click this to save your changes.
Cancel Click this to return to the previous screen without saving.

Chapter 24 Shares
Cloud Storage User’s Guide
296
24.4.2 Configuring Recycle Bins
I n the Shar ing > Shares screen, click Recycle Bin to open the following screen.
Figure 181 Sharing > Shares > Recycle Bin
The following table describes the labels in this screen.
24.5 Share Browser Screen
Use this screen to create folders, upload files, and edit files within the share.
Figure 182 Sharing > Shares > Share Browser
Table 110 Sharing > Shares > Recycle Bin
LABEL DESCRIPTION
Clean Recycle Bin every N days
Specify how often you want to clear the contents in all recycle bins. The specified days correspond to how long a file has been stored in a recycle bin. For exam ple, if you set the interval to be 3 days, recycle bins will clean up items deleted or not accessed for 3 days.
Note: Cleaning up recycle bins permanently removes the files from the NAS.
Empty All Recycle Bins Now
Click this to im mediately rem ove contents from all recycle bins.
Apply Click this to save your changes.
Cancel Click this to return to the previous screen without saving.
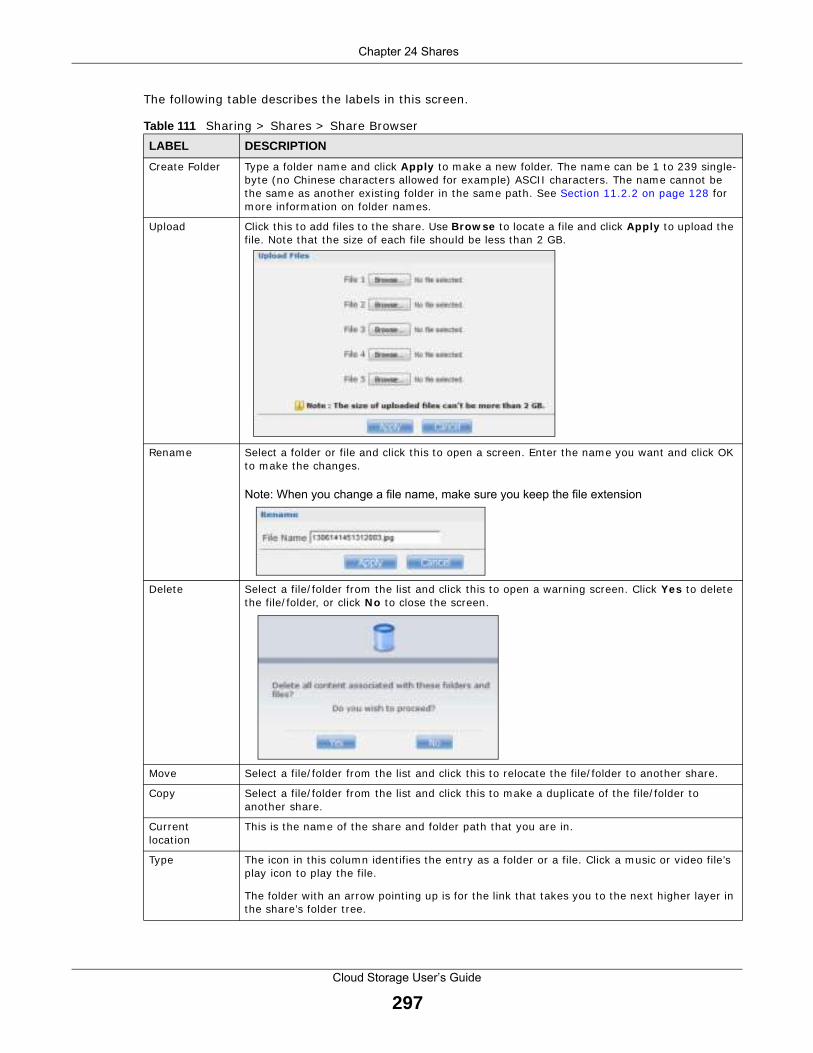
Chapter 24 Shares
Cloud Storage User’s Guide
297
The following table describes the labels in this screen.
Table 111 Sharing > Shares > Share Browser
LABEL DESCRIPTION
Create Folder Type a folder nam e and click Apply to m ake a new folder. The nam e can be 1 to 239 single-byte (no Chinese characters allowed for example) ASCI I characters. The nam e cannot be the sam e as another exist ing folder in the sam e path. See Sect ion 11.2.2 on page 128 for m ore inform at ion on folder nam es.
Upload Click this to add files to the share. Use Brow se to locate a file and click Apply to upload the file. Note that the size of each file should be less than 2 GB.
Rename Select a folder or file and click this to open a screen. Enter the nam e you want and click OK to make the changes.
Note: When you change a file name, make sure you keep the file extension
Delete Select a file/ folder from the list and click this to open a warning screen. Click Yes to delete the file/ folder, or click No to close the screen.
Move Select a file/ folder from the list and click this to relocate the file/ folder to another share.
Copy Select a file/ folder from the list and click this to m ake a duplicate of the file/ folder to another share.
Current locat ion
This is the nam e of the share and folder path that you are in.
Type The icon in this colum n ident ifies the ent ry as a folder or a file. Click a m usic or video file’s play icon to play the file.
The folder with an arrow point ing up is for the link that takes you to the next higher layer in the share’s folder t ree.

Chapter 24 Shares
Cloud Storage User’s Guide
298
24.5.1 Moving or Copying Files
Use this screen to m ove or copy files to another share.
I n the Share Brow ser screen, select a file or folder and click Move or Copy to open the following screen.
Figure 183 Sharing > Shares > Share Browser > Move (or Copy)
The following table describes the labels in this screen.
Nam e This sect ion lists the share’s exist ing folders or files. Click to the r ight of the file/ folder nam e to select the file/ folder. You can also click the folder ’s nam e to navigate to a sub- folder within the folder.
Size This field displays size of the file.
Modified Date This field displays a file’s latest m odificat ion date.
Close Click this to close the screen.
Table 111 Sharing > Shares > Share Browser (cont inued)
LABEL DESCRIPTION
Table 112 Sharing > Shares > Share Browser > Move (or Copy)
LABEL DESCRIPTION
Shares Select the dest inat ion share from the drop-down list .
Path This field displays the share folder ’s path. You can use Brow se to find or create a folder on the NAS or type the locat ion of the folder using forward slashes as branch separators.
Browse Click this to open the following screen and navigate to the locat ion of the file/ folder.
• Current Locat ion - This is the locat ion of the selected folder.• Folder Nam e - Enter a new folder nam e and click to create it .• Type - This ident ifies the item as a folder or file.• Nam e - This is the nam e of the folder/ file.
Select a folder. I f you don’t select a folder, a forward slash ( / ) displays in the Path f ield. All contents within the specified share are automat ically selected.
Click Apply to save your set t ings and Cancel to close the screen.

Chapter 24 Shares
Cloud Storage User’s Guide
299
Yes Click this to move or copy the file/ folder to the designated share.
Close Click this to return to the Share Brow ser screen.
Table 112 Sharing > Shares > Share Browser > Move (or Copy) (cont inued)
LABEL DESCRIPTION

Cloud Storage User’s Guide
300
CHAPTER 25
WebDAV
25.1 Overview
The WebDAV HTTP extension lets users edit and manage files stored on remote servers. The NAS’s WebDAV service allows client program s that support WebDAV, such as NetDrive and BitKinex on Windows, Mac OS Finder, and Linux file browsers rem otely edit and m anage files stored on the NAS.
25.2 WebDAV Screen
Use the W ebDAV screen to allow rem ote users to use client program s that support WebDAV to edit and manage files stored on the NAS.
Click Shar ing > W ebDAV to open the following screen.
Figure 184 Sharing > WebDAV
The following table describes the labels in this screen.
Table 113 Sharing > WebDAV
LABEL DESCRIPTION
Enable WebDAV (ht tp/ Ht tps)
Select this to allow rem ote users to work with files stored on the NAS. Edit the access priv ileges in Shar ing > Shares .
Ht tps is for secure WebDAV connect ions to the NAS.
Exam ple When you enable WebDAV the screen displays an exam ple of the URL users would use to use WebDAV to connect to the NAS where “sharenam e” represents a share that the user can access. Use HTTPS for secure WebDAV connect ions to the NAS.
Enable anonym ous WebDAV
Select this to allow rem ote users to use WebDAV to access all shares on the NAS without a login nam e or password.
Apply Click this to save your changes.
Reset Click this to discard any unsaved changes and restore previously saved set t ings.

Chapter 25 WebDAV
Cloud Storage User’s Guide
301
25.3 How to Use NetDrive with the NAS
Here is an exam ple of how to use the NetDrive WebDAV client with the NAS.
1 Download and install NetDrive.
2 Click Add Dr ive and use the URL for WebDAV connect ions to the NAS to add a dr ive ent ry for accessing the NAS.
Figure 185 NetDrive Exam ple
3 Name the drive and specify the URL of the share to access. Select SSL if the NAS forces HTTPs use. Specify your user nam e and password for accessing the share on the NAS.
Figure 186 NetDrive Add Drive

Cloud Storage User’s Guide
302
CHAPTER 26
Maintenance Screens
26.1 Overview
This chapter discusses the Maintenance screens. The Maintenance screens allow you to m anage system configurat ions.
26.2 What You Can Do• Use the Pow er screen (Sect ion 26.3 on page 302) to configure power set t ings for the NAS,
including power saving, UPS, power on/ off after power failure, power on/ off schedule, and Wake on LAN.
• Use the Log screen (Sect ion 26.4 on page 306) to check the system ’s logs.
• Use the Configurat ion screen (Sect ion 26.5 on page 310) to backup or restore the NAS configurat ion file.
• Use the SSL screen (Sect ion 26.6 on page 311) to configure HTTPS and the NAS’s SSL cert ificate.
• Use the Shutdow n screen (Sect ion 26.7 on page 313) to restart or shut down your NAS.
• Use the Unpair m yZyXELcloud screen (Sect ion 26.8 on page 314) to rem ove the pair ing between the NAS and the myZyXELcloud account .
26.3 Power Screen
Use this screen to m anage power set t ings for the NAS.
Click Maintenance > Pow er to display the following screen.

Chapter 26 Maintenance Screens
Cloud Storage User’s Guide
303
Figure 187 Maintenance > Power
The following table describes the labels in this screen.
Table 114 Maintenance > Power
LABEL DESCRIPTION
Power Managem ent
Turn off hard disk(s)
Enter the num ber of m inutes to wait when the NAS is idle before spinning the hard disks down to sleep (hibernat ion) . The default t im e is 15 m inutes.
Enable Sleeping HDD LED Blinking
Select this to have the HDD LED blink slowly when the hard disk is sleeping (hibernat ing) . Clear this to have the HDD LED stay on when the hard disk is sleeping.
Minim um UPS Capacity
Minim um UPS Capacity
When you use an APC Uninterrupt ible Power Supply (UPS) with a USB connect ion to the NAS, the NAS shuts itself down if the APC UPS’s bat tery charge gets down to the percentage you specify in this field. This allows the NAS to shut down properly and avoid data loss caused by a power failure when the UPS stops supplying power.
A set t ing around 50% is recom m ended. A set t ing close to 100% is not recom m ended since it would cause the NAS to shut down whenever the UPS is charging. A set t ing close to 0 is also not recom m ended since the UPS would not have enough power to allow the NAS to shutdown properly.
Power On After Power Failure
Select an opt ion to set whether or not the NAS restarts when the power is restored after a power failure.
Note:
Keep Form er Status
Select this opt ion to have the NAS autom at ically restart only if it was operat ing when the power failed. The NAS rem ains off if it was already off when the power failed.
Always Power On
Select this opt ion to keep the NAS operat ing as m uch of the t im e as possible. The NAS restarts autom at ically even if it was turned off when the power failed.
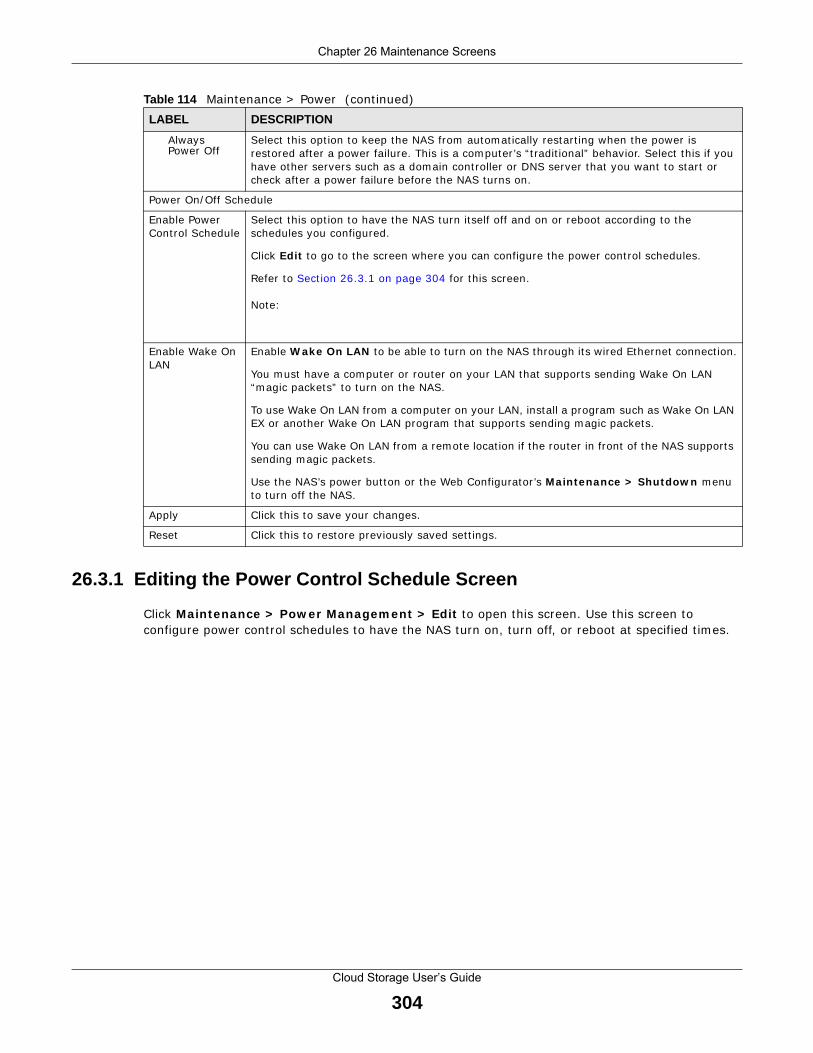
Chapter 26 Maintenance Screens
Cloud Storage User’s Guide
304
26.3.1 Editing the Power Control Schedule Screen
Click Maintenance > Pow er Managem ent > Edit to open this screen. Use this screen to configure power cont rol schedules to have the NAS turn on, turn off, or reboot at specified t im es.
Always Power Off
Select this opt ion to keep the NAS from autom at ically restart ing when the power is restored after a power failure. This is a com puter ’s “ t radit ional” behavior. Select this if you have other servers such as a dom ain cont roller or DNS server that you want to start or check after a power failure before the NAS turns on.
Power On/ Off Schedule
Enable Power Cont rol Schedule
Select this opt ion to have the NAS turn itself off and on or reboot according to the schedules you configured.
Click Edit to go to the screen where you can configure the power cont rol schedules.
Refer to Sect ion 26.3.1 on page 304 for this screen.
Note:
Enable Wake On LAN
Enable W ake On LAN to be able to turn on the NAS through its wired Ethernet connect ion.
You m ust have a com puter or router on your LAN that supports sending Wake On LAN “m agic packets” to turn on the NAS.
To use Wake On LAN from a computer on your LAN, install a program such as Wake On LAN EX or another Wake On LAN program that supports sending m agic packets.
You can use Wake On LAN from a rem ote locat ion if the router in front of the NAS supports sending m agic packets.
Use the NAS’s power but ton or the Web Configurator ’s Maintenance > Shutdow n m enu to turn off the NAS.
Apply Click this to save your changes.
Reset Click this to restore previously saved set t ings.
Table 114 Maintenance > Power (cont inued)
LABEL DESCRIPTION

Chapter 26 Maintenance Screens
Cloud Storage User’s Guide
305
Figure 188 Maintenance > Power Managem ent > Edit
The following table describes the labels in this screen.
Table 115 Maintenance > Power Management > Edit
LABEL DESCRIPTION
Power Cont rol Schedule List
This table lists the power on, power off, and reboot schedules. For exam ple, you could have one schedule to turn the NAS on every m orning, at 8: 00, another schedule to turn it off every evening at 18: 00, and a third schedule to have it reboot every Fr iday at 14: 00.
Click a colum n’s heading cell to sort the schedules by that colum n’s cr iter ia. Click the heading cell again to reverse the sort order.
Type This field displays whether the power cont rol schedule has the NAS turn on, turn off, or reboot .
Frequency This field shows how often (m onthly, weekly, or daily) the NAS is to apply this power cont rol schedule.
Execute Tim e This field shows when the NAS is to use this power cont rol schedule (when the NAS is to turn on, turn off, or reboot ) .
Act ions Click the Delete icon to rem ove a power cont rol schedule from the list .
Add Power Cont rol Schedule
Use this part of the screen to configure power on, power off, and reboot t im es.
Type Select whether this power cont rol schedule has the NAS turn on, turn off, or reboot .
Frequency Select whether the NAS is to apply this power cont rol schedule ent ry on a monthly, weekly, or daily basis.
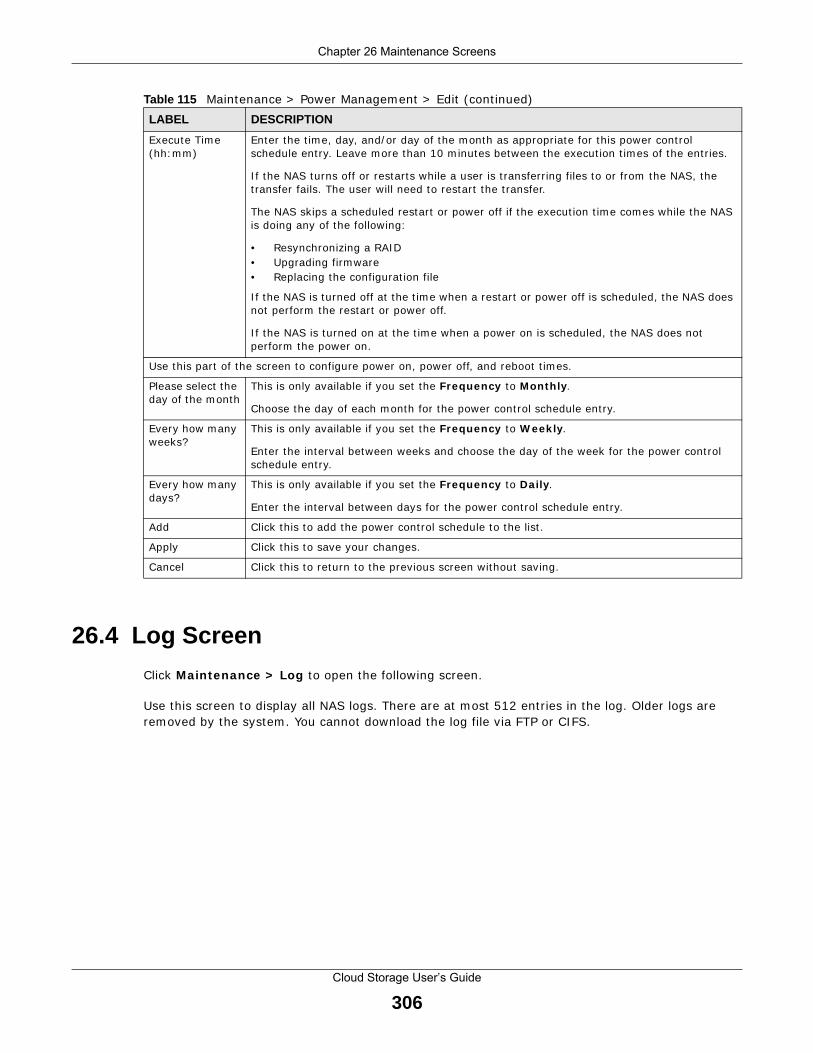
Chapter 26 Maintenance Screens
Cloud Storage User’s Guide
306
26.4 Log Screen
Click Maintenance > Log to open the following screen.
Use this screen to display all NAS logs. There are at most 512 ent r ies in the log. Older logs are rem oved by the system. You cannot download the log file via FTP or CI FS.
Execute Time (hh: m m )
Enter the t im e, day, and/ or day of the m onth as appropriate for this power cont rol schedule ent ry. Leave more than 10 m inutes between the execut ion t imes of the ent r ies.
I f the NAS turns off or restarts while a user is t ransferr ing files to or from the NAS, the t ransfer fails. The user will need to restart the t ransfer.
The NAS skips a scheduled restart or power off if the execut ion t ime comes while the NAS is doing any of the following:
• Resynchronizing a RAI D• Upgrading firmware• Replacing the configurat ion file
I f the NAS is turned off at the t im e when a restart or power off is scheduled, the NAS does not perform the restart or power off.
I f the NAS is turned on at the t im e when a power on is scheduled, the NAS does not perform the power on.
Use this part of the screen to configure power on, power off, and reboot t im es.
Please select the day of the m onth
This is only available if you set the Frequency to Monthly .
Choose the day of each m onth for the power cont rol schedule ent ry.
Every how many weeks?
This is only available if you set the Frequency to W eek ly .
Enter the interval between weeks and choose the day of the week for the power cont rol schedule ent ry.
Every how many days?
This is only available if you set the Frequency to Daily .
Enter the interval between days for the power cont rol schedule ent ry.
Add Click this to add the power cont rol schedule to the list .
Apply Click this to save your changes.
Cancel Click this to return to the previous screen without saving.
Table 115 Maintenance > Power Management > Edit (cont inued)
LABEL DESCRIPTION
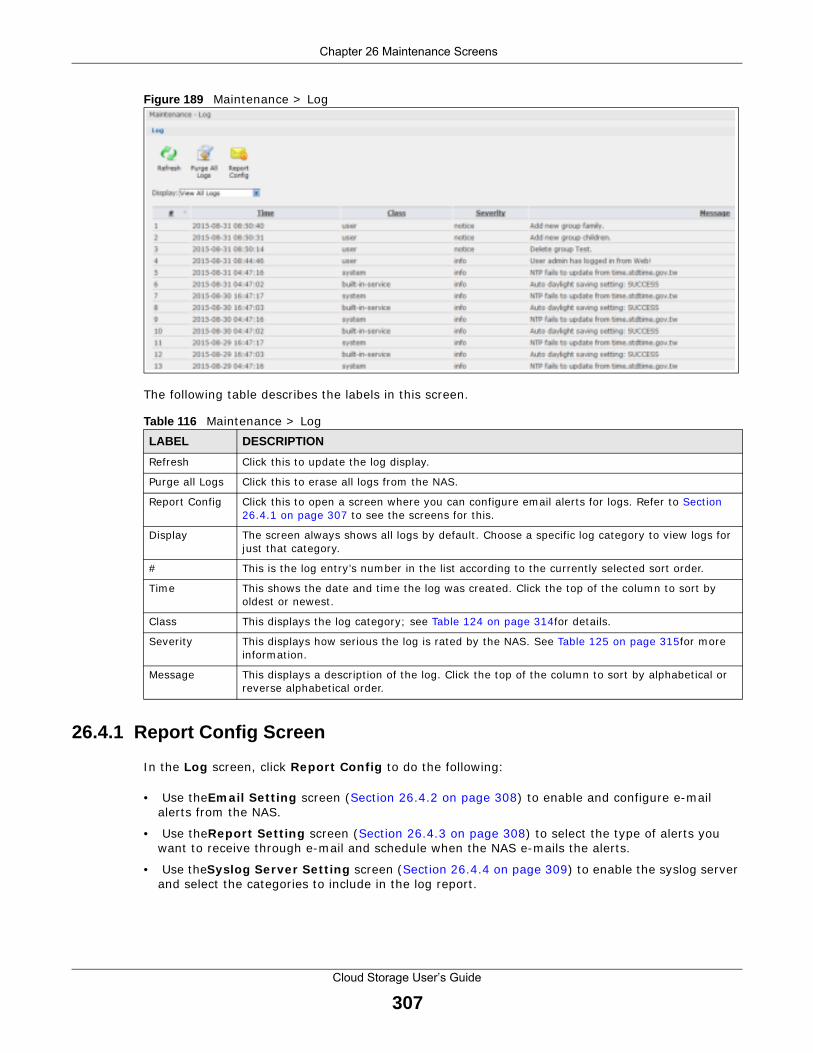
Chapter 26 Maintenance Screens
Cloud Storage User’s Guide
307
Figure 189 Maintenance > Log
The following table describes the labels in this screen.
26.4.1 Report Config Screen
I n the Log screen, click Report Config to do the following:
• Use the Em ail Set t ing screen (Sect ion 26.4.2 on page 308) to enable and configure e-m ail alerts from the NAS.
• Use the Report Set t ing screen (Sect ion 26.4.3 on page 308) to select the type of alerts you want to receive through e-m ail and schedule when the NAS e-m ails the alerts.
• Use the Syslog Server Set t ing screen (Sect ion 26.4.4 on page 309) to enable the syslog server and select the categories to include in the log report .
Table 116 Maintenance > Log
LABEL DESCRIPTION
Refresh Click this to update the log display.
Purge all Logs Click this to erase all logs from the NAS.
Report Config Click this to open a screen where you can configure em ail alerts for logs. Refer to Sect ion 26.4.1 on page 307 to see the screens for this.
Display The screen always shows all logs by default . Choose a specific log category to view logs for just that category.
# This is the log ent ry’s num ber in the list according to the current ly selected sort order.
Tim e This shows the date and t im e the log was created. Click the top of the colum n to sort by oldest or newest .
Class This displays the log category; see Table 124 on page 314for details.
Severity This displays how serious the log is rated by the NAS. See Table 125 on page 315for m ore inform at ion.
Message This displays a descript ion of the log. Click the top of the colum n to sort by alphabet ical or reverse alphabet ical order.

Chapter 26 Maintenance Screens
Cloud Storage User’s Guide
308
26.4.2 Email Setting
You can enable and configure e-m ail alerts from the NAS. I n the Report Config screen, click the Em ail Set t ing tab to open the following screen.
Figure 190 Maintenance > Log > Report Config: Em ail Set t ing
The following table describes the labels in this screen.
26.4.3 Report Setting
You can have the NAS em ail you alerts and reports. I n the Report Config screen, click the Repor t Set t ing tab to open the following screen.
Table 117 Maintenance > Log > Report Config: Email Set t ing
LABEL DESCRIPTION
Enable Log Em ail Click this to have the NAS e-m ail log alerts to your e-m ail account .
Email To Enter the e-mail address where you want to receive the log alerts.
Em ail From Enter the e-m ail address the NAS uses in the From field of the e-m ail header for its log alerts.
Em ail Server Enter the e-m ail server address the NAS uses to send e-m ail alerts,
Em ail Form at Select the e-m ail form at you want the NAS to use in its e-m ail alerts.
Use SMTP Authent icat ion
Click this if the e-mail server you want the NAS to use for it s e-m ail alerts requires a usernam e and password.
User Enter the usernam e for the e-m ail server.
Password Enter the password for the e-m ail server.
Password (Confirm )
Re-enter the password to confirm it .
After apply set t ings, send a test em ail
Click this to have the NAS send a test e-m ail to the set t ings you have entered.
Apply Click this to save your changes.
Cancel Click this to return to the previous screen without saving.

Chapter 26 Maintenance Screens
Cloud Storage User’s Guide
309
Figure 191 Maintenance > Log > Report Config: Report Set t ing
The following table describes the labels in this screen.
26.4.4 Syslog Server Setting
You can enable the syslog server and select the categories to include in the log report . I n the Report Config screen, click the Syslog Server Set t ing tab to open the following screen.
Table 118 Maintenance > Log > Report Config: Report Set t ing
LABEL DESCRIPTION
Email Alert Select the Enable Em ail Log check box to have the NAS send an alert em ail to the configured em ail address whenever the NAS generates a cr it ical severity log.
Report Tim e Select how often (W eek ly , Daily or Hour ly ) , the day of the week ( for weekly reports) , and the t im e (hour: m inutes) the NAS sends a report em ail.
Enable Em ail Log
Select the check box to have the NAS em ail reports of all logs the NAS generates to the configured em ail address.
Apply Click this to save your changes.
Cancel Click this to return to the previous screen without saving.

Chapter 26 Maintenance Screens
Cloud Storage User’s Guide
310
Figure 192 Maintenance > Log > Report Config: Syslog Server Set t ing
The following table describes the labels in this screen.
26.5 Configuration Screen
Click Maintenance > Configurat ion to open the following screen. Use this screen to backup or restore the NAS configurat ion set t ings.
Figure 193 Maintenance > Configurat ion
Table 119 Maintenance > Log > Report Config: Syslog Server Set t ing
LABEL DESCRIPTION
Enable Syslog Server
Check this to enable syslog server.
Server Address Enter the syslog server address you want the NAS to use for it s log alerts.
I n the table below, check the type of log alerts you want to receive in your e-m ail. Select All Log to include all types of log alerts.
Apply Click this to save your changes.
Cancel Click this to return to the previous screen without saving.

Chapter 26 Maintenance Screens
Cloud Storage User’s Guide
311
The following table describes the labels in this screen.
26.6 SSL Certification
Click Maintenance > SSL to open this screen, where you can turn on HTTPS, create a public key cert ificate, or upload a public key cert ificate that was issued by a known cert ificate authority.
Figure 194 Maintenance > SSL
Table 120 Maintenance > Configurat ion
LABEL DESCRIPTION
Backup Current Configurat ion Set t ings
Backup Click this to save the current configurat ion of the NAS to your computer. A pop-up screen appears asking you to confirm . Click OK to cont inue or Cancel to quit .
Restore Configurat ion When you restore a file configurat ion, the NAS checks the volum es/ share paths on the NAS and the configurat ion file.
I f the volum e exists but the share path is m issing in the NAS, the NAS automat ically creates this share path.
I f the volum e does not exist on the NAS, the Status of the share will show “m issing share icon” in Shares screen (see Table 107 on page 292) .
Browse Click this to locate a previously-saved configurat ion file.
Restore Click this to load the previously-saved configurat ion file to the NAS. This replaces your current NAS configurat ion set t ings with the set t ings in the previously-saved configurat ion file.
A pop-up screen appears asking you to confirm . Click OK to cont inue or Cancel to quit .

Chapter 26 Maintenance Screens
Cloud Storage User’s Guide
312
The following table describes the labels in this screen.
26.6.1 Modifying or Creating a Certificate
When you select the Edit a self- signed CA cer t if icate opt ion, then click the Edit but ton, a screen opens to allow you to m ake adjustm ents to the NAS’s public key cert ificate.
The screen is also the same for the Create a cer t if icate author ized by other CA opt ion.
Figure 195 Maintenance > SSL > Create or Edit a Cert ificate
Table 121 Maintenance > SSL
LABEL DESCRIPTION
I nstall System Default CA Click Dow nload but ton to save a copy of the NAS’s public key cert ificate to your local computer. This is useful for installing the cert ificate without having to connect to the NAS, or for sending by em ail to other users for them to install pr ior to logging into the NAS for the first t im e. After saving the cert if icate to your com puter, double-click it to install it .
Note: Each web browser handles certificate installation differently.
Modify the Exist ing Cert ificate
Select Edit a self- signed CA cer t if ica te , then follow the on-screen inst ruct ions for creat ing a public key cert if icate signed by the NAS as the local cert if icate authority.
Note: Use certificates created and signed by the NAS if the device is not open to
external access.
Select Create a cer t if ica te au thor ized by other CA , then follow the on-screen inst ruct ions to install a cert if icate that has been authorized by a third-party cert ificate authority.
Note: Use this method if the device is open to external access, such as allowing
users to connect through the Internet using FTP over TLS or HTTPs.

Chapter 26 Maintenance Screens
Cloud Storage User’s Guide
313
The following table describes the labels in this screen.
26.7 Shutdown Screen
Use this screen to turn off the NAS or perform a software restart . A software restart is faster than turning the NAS off and then turning it on again. Before shut t ing down or restart ing, check the System Status > Act ive Sessions screen to m ake sure that no one is logged into the NAS or t ransferr ing files to or from the NAS.
Click Maintenance > Shutdow n to open the following screen.
Figure 196 Maintenance > Shutdown
The following table describes the labels in this screen.
When you click the Restar t but ton a pop-up screen will appear asking you to confirm . Click OK to cont inue or Cancel to quit the restart .
Table 122 Maintenance > SSL > Create or Edit a Cert ificate
LABEL DESCRIPTION
Com m on Name This nam e describes the cert if icate’s or igin, either in the form of an I P address or a dom ain nam e.
Host I P Address Select this opt ion and enter the NAS’s I P address if you want to use this for the com m on nam e.
Host Dom ain Nam e Select this opt ion and enter the NAS’s dom ain nam e if you want to use this for the com m on nam e
Organizat ional Unit (Opt ional)
Enter this name of the organizat ional unit which owns or m aintains the NAS. This is an opt ional field.
Organizat ion (Opt ional) Enter this name of the organizat ion or company which owns or m aintains the NAS. This is an opt ional field.
Count ry (Opt ional) Enter this name of the count ry in which the NAS is located. This is an opt ional field.
Key Type Select the cert if icate’s key type, either RSA or DSA . RSA is a public-key encrypt ion and digital signature algorithm , while DSA is only a digital signature algorithm .
Key Length Select the encrypt ion key length. The longer the key, the bet ter the encrypt ion security. The only drawback to having a long key is that the file encrypted with it swells in size as well.
Apply Click this to save your changes.
Cancel Click this to discard changes and close the window.
Table 123 Maintenance > Shutdown
LABEL DESCRIPTION
Restart Click this to have the device perform a software restart .
Shutdown Click this to shut down the system and restart it again later.

Chapter 26 Maintenance Screens
Cloud Storage User’s Guide
314
Figure 197 Maintenance > Shutdown > Confirm Restart
When you click the Shutdow n but ton a pop-up screen will appear asking you to confirm . Click OK to cont inue or Cancel to quit the shutdown.
Figure 198 Maintenance > Shutdown > Confirm Shutdown
26.8 Unpair myZyXELcloud ScreenFigure 199 Use this screen to rem ove the pair ing between the NAS and the myZyXELcloud account
if you want to pair the NAS with a different myZyXELcloud account . You have to pair the NAS and your myZyXELcloud account before perform ing the unpair. Click Maintenance > Unpair m yZyXELcloud to open the following screen, and click Unpair .
26.9 Technical Reference
This sect ion provides technical background inform at ion on the topics discussed in this chapter.
26.9.1 Log Classes
The following table shows inform at ion on log classes.
Table 124 Log Classes
LOG CATEGORY DESCRIPTION
Users This log class shows inform at ion on user access to the NAS.
Shares This log class shows inform at ion on shares being created or deleted.
Services This log class shows inform at ion on the operat ion of the NAS’s built - in services.
System This log class shows all other system related m essages.
Network This log class shows inform at ion on network configurat ion, set t ing changes and so on.
Storage This log class shows inform at ion on the NAS’s internal and external storage act iv it ies.
Backup This log class shows inform at ion on all backup- related act ivit ies.
Auto Upload This log class shows inform at ion on autom at ic uploads done by the NAS.

Chapter 26 Maintenance Screens
Cloud Storage User’s Guide
315
26.9.2 Log Severity Levels
The following table shows informat ion on log severity levels. Levels range from 0 to 6 with 0 being the most severe level log and 6 being an informat ional log only. Log levels are not displayed in the logs and are for your reference only.
26.9.3 Log Messages
Here are some exam ple log m essages.
Table 125 Log Severity Levels
LEVEL DESCRIPTION
0 Em ergency
1 Alert
2 Crit ical
3 Error
4 Warning
5 Not ice
6 I nfo
Table 126 Log Messages
CLASS SEVERITY MESSAGE
Auto upload I NFO % s is queued.
Auto upload I NFO % s uploaded (Flickr or YouTube Upload) .
Auto upload WARNI NG error uploading "% s" (% s) : % s
Auto upload I NFO % s will not be uploaded to % s for there is already a duplicate file.
Auto upload I NFO Failed to upload % s to % s (FTP Upload) : % s
Auto upload I NFO Successfully upload % s to % s (FTP Upload)
Copy/ Sync But ton ERROR [ USB % s] Backup Folder Does Not Exist .
Copy/ Sync But ton ERROR [ USB % s] Target Folder Does Not Exist .
Copy/ Sync But ton ERROR [ USB Sync] Failed at % s: I t is a Folder in I nternal Volum e. But I t is not a Folder in USB.
Copy/ Sync But ton ERROR [ USB Sync] Failed at % s: I t is a Folder in USB. But I t is not a Folder in I nternal Volum e.
Copy/ Sync But ton ERROR [ USB Sync] Failed at File % s.
Copy/ Sync But ton ERROR [ USB Sync] Sync Failed at Folder % s.
Copy/ Sync But ton ERROR Modify COPY/ SYNC But ton Configurat ion: % s
Copy/ Sync But ton ERROR Please Change Your Folder Nam e. I nvalid Path: % s
Copy/ Sync But ton I NFO [ USB Sync] Copying % s from I nternal Volum e to Backup Folder.
Copy/ Sync But ton I NFO [ USB Sync] Copying % s from I nternal Volum e to USB.
Copy/ Sync But ton I NFO [ USB Sync] Copying % s from USB to Backup Folder.
Copy/ Sync But ton I NFO [ USB Sync] Copying % s from USB to I nternal Volume.
Copy/ Sync But ton I NFO [ USB Sync] Delet ing % s from I nternal Volum e.
Copy/ Sync But ton I NFO [ USB Sync] Delet ing % s from USB.
Copy/ Sync But ton I NFO [ USB Sync] Delet ing % s from USB Recursively.

Chapter 26 Maintenance Screens
Cloud Storage User’s Guide
316
Copy/ Sync But ton I NFO [ USB Sync] Finished. Elapsed Tim e % s Seconds.
Copy/ Sync But ton I NFO [ USB Sync] Moving % s from I nternal Volum e to Backup Folder.
Copy/ Sync But ton I NFO [ USB Sync] Moving % s from USB to Backup Folder
Copy/ Sync But ton I NFO [ USB Sync] Skip % s: File not Exist
Copy/ Sync But ton I NFO [ USB Sync] Skip % s: Not a Regular File.
Copy/ Sync But ton I NFO [ USB Sync] Start Pre-Processing: Generat ing File Lists.
Copy/ Sync But ton NOTI CE [ USB Sync] Start Copying Files.
Download Service ERROR Download service cannot find a volume
Download Service ERROR Download service failed to find ipfilter.dat
Download Service I NFO Download service add a URL download job % s
Download Service I NFO Download service delete % s by user
Download Service I NFO Download service download % s error (0x% 08x)
Download Service I NFO Download service download % s finished in % s
Download Service I NFO Download service found a new torrent file % s
Download Service I NFO Download service init ialized
Download Service I NFO Download service pause % s by user
Download Service I NFO Download service set % s to % s pr ior ity by user
Download Service I NFO Download service set default download locat ion to % s
Download Service I NFO Download service set m ax P2P download rate to % d KB/ s by user
Download Service I NFO Download service set m ax P2P upload rate to % d KB/ s by user
Download Service I NFO Download service set m ax download slot to % d
Download Service I NFO Download service set seeding t im e to % d m inutes
Download Service I NFO Download service set TCP port to % d and UDP port to % d
Download Service I NFO Download service set torrent monitor locat ion to % s
Download Service I NFO Download service start to download % s
Download Service I NFO Download service stopped
Download Service I NFO Download service suspend % s because of no data incom e detected or to lim it m ax download slot
Download Service I NFO Download service add com m ent % s to % s by user
Download Service I NFO Download service set m in upload/ download rat io to % d%
Download Service I NFO Download service set m ax seed slot to % d
Download Service I NFO Download service start loading ipfilter.dat
Download Service I NFO Download service clear all ipfilter rules
Download Service I NFO Download service blocked peer rem oved from peer list
Download Service I NFO Download service disconnected blocked peer
Download Service I NFO Download service incom ing connect ion blocked by I P filter
Download Service I NFO Download service peer from t racker blocked by I P filter
Download Service I NFO Download service abort loading ipfilter.dat
Download Service I NFO Download service will update ipfilter.dat from % s after % d day(s)
Download Service I NFO Download service added % d rules from ipfilter.dat
Download Service I NFO Download service detected invalid ip range % s in ipfilter.dat
Table 126 Log Messages (cont inued)
CLASS SEVERITY MESSAGE

Chapter 26 Maintenance Screens
Cloud Storage User’s Guide
317
Download Service WARNI NG Download service default locat ion does not exist . Load default
Download Service WARNI NG Download service default torrent locat ion does not exist . Load default
Groups NOTI CE Add new group % s.
Groups NOTI CE Delete group % s.
Network I NFO DyDNS: Start Success
Network I NFO DyDNS: Stop Success
Network NOTI CE % s is act ive because of changing Port Group. Enable DHCP client .
Network NOTI CE % s is inact ive because of changing Port Group. Disable DHCP client .
Network NOTI CE % s MTU > (% s MTU - 8) , % s m ay not work correct ly.
Network NOTI CE (% s MTU - 8) < % s MTU, % s m ay not work correct ly.
Network NOTI CE Add interface % s.
Network NOTI CE Because % s link down. Default route will not apply unt il % s link up.
Network NOTI CE Because base interface % s will be disabled. I nterface % s is disabled now., base_ud_iface
Network NOTI CE Network Config set t ing is changed
Network NOTI CE I nterface % s was disabled.
Network NOTI CE I nterface % s was enabled.
Network NOTI CE Port Group on % s is changed. Renew DHCP client .
Network NOTI CE Account pppoe was changed
Network NOTI CE Add account pppoe
Network NOTI CE ADD interface ppp0
Network NOTI CE I nterface ppp0 will reapply because Device-Ha becom e act ive status.
Network NOTI CE I nterface ppp0 will reapply because Device-Ha is not running.
Network NOTI CE Network port is disabled
Network NOTI CE Network port is enabled
Network ERROR DyDNS: Start Error
Network ERROR DyDNS: Stop Error
Services I NFO HTTP managem ent port has changed to % s
Services I NFO Clock t im ezone is set to GMT% s
Services I NFO Clock t im ezone is set to default
Services I NFO Clock daylight saving is enabled
Services I NFO Clock daylight saving is disabled
Services I NFO Clock has disable daylight saving
Services I NFO MyClock has enable daylight saving
Services I NFO MyClock has set t im ezone to % s
Services I NFO MyClock has set t im ezone to default
Services I NFO The date and t im e are updated from NTP server.
Services I NFO The date and t im e are updated m anually.
Services I NFO The t im e is updated m anually.
Services NOTI CE FTP server stops
Services NOTI CE FTP server starts
Table 126 Log Messages (cont inued)
CLASS SEVERITY MESSAGE
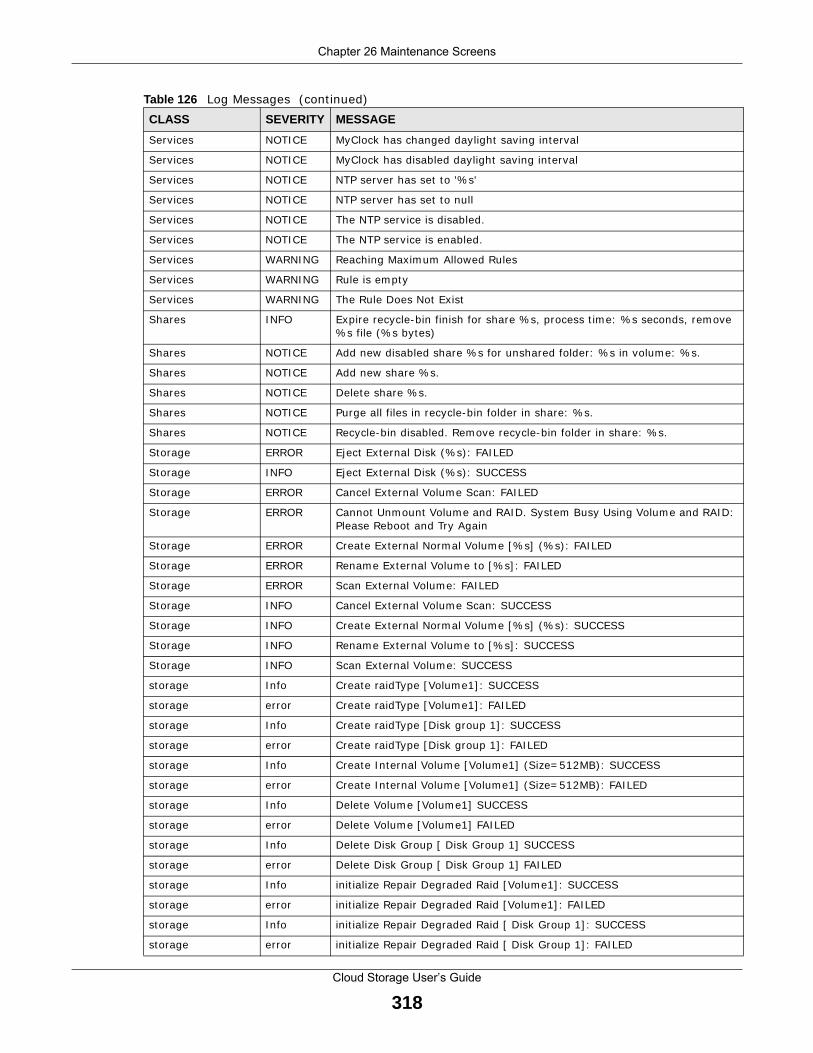
Chapter 26 Maintenance Screens
Cloud Storage User’s Guide
318
Services NOTI CE MyClock has changed daylight saving interval
Services NOTI CE MyClock has disabled daylight saving interval
Services NOTI CE NTP server has set to '% s'
Services NOTI CE NTP server has set to null
Services NOTI CE The NTP service is disabled.
Services NOTI CE The NTP service is enabled.
Services WARNI NG Reaching Maxim um Allowed Rules
Services WARNI NG Rule is em pty
Services WARNI NG The Rule Does Not Exist
Shares I NFO Expire recycle-bin finish for share % s, process t im e: % s seconds, rem ove % s file (% s bytes)
Shares NOTI CE Add new disabled share % s for unshared folder: % s in volum e: % s.
Shares NOTI CE Add new share % s.
Shares NOTI CE Delete share % s.
Shares NOTI CE Purge all f iles in recycle-bin folder in share: % s.
Shares NOTI CE Recycle-bin disabled. Rem ove recycle-bin folder in share: % s.
Storage ERROR Eject External Disk (% s) : FAI LED
Storage I NFO Eject External Disk (% s) : SUCCESS
Storage ERROR Cancel External Volum e Scan: FAI LED
Storage ERROR Cannot Unm ount Volum e and RAI D. System Busy Using Volum e and RAI D: Please Reboot and Try Again
Storage ERROR Create External Norm al Volum e [ % s] (% s) : FAI LED
Storage ERROR Renam e External Volum e to [ % s] : FAI LED
Storage ERROR Scan External Volum e: FAI LED
Storage I NFO Cancel External Volum e Scan: SUCCESS
Storage I NFO Create External Norm al Volum e [ % s] (% s) : SUCCESS
Storage I NFO Renam e External Volum e to [ % s] : SUCCESS
Storage I NFO Scan External Volum e: SUCCESS
storage I nfo Create raidType [ Volum e1] : SUCCESS
storage error Create raidType [ Volum e1] : FAI LED
storage I nfo Create raidType [ Disk group 1] : SUCCESS
storage error Create raidType [ Disk group 1] : FAI LED
storage I nfo Create I nternal Volum e [ Volum e1] (Size= 512MB) : SUCCESS
storage error Create I nternal Volum e [ Volum e1] (Size= 512MB) : FAI LED
storage I nfo Delete Volum e [ Volum e1] SUCCESS
storage error Delete Volum e [ Volum e1] FAI LED
storage I nfo Delete Disk Group [ Disk Group 1] SUCCESS
storage error Delete Disk Group [ Disk Group 1] FAI LED
storage I nfo init ialize Repair Degraded Raid [ Volume1] : SUCCESS
storage error init ialize Repair Degraded Raid [ Volume1] : FAI LED
storage I nfo init ialize Repair Degraded Raid [ Disk Group 1] : SUCCESS
storage error init ialize Repair Degraded Raid [ Disk Group 1] : FAI LED
Table 126 Log Messages (cont inued)
CLASS SEVERITY MESSAGE

Chapter 26 Maintenance Screens
Cloud Storage User’s Guide
319
storage I nfo Add disk1 to Volum e1: SUCCESS
storage error Add disk1 to Volum e1: FAI LED
storage I nfo Add disk1 to Disk Group 1: SUCCESS
storage error Add disk1 to Disk Group 1: FAI LED
storage I nfo Change Volum e1 Raid type to raid5: SUCCESS
storage error Change Volum e1 Raid type to raid5: FAI LED
storage I nfo Change Disk Group 1 Raid type to raid5: SUCCESS
storage error Change Disk Group 1 Raid type to raid5: FAI LED
storage I nfo Add Hot-Spare disk1 to Raid [ Volum e1] : SUCCESS
storage error Add Hot-Spare disk1 to Raid [ Volum e1] : FAI LED
storage I nfo Add Hot-Spare disk1 to Raid [ Disk Group 1] : SUCCESS
storage error Add Hot-Spare disk1 to Raid [ Disk Group 1] : FAI LED
storage I nfo Rem ove Hot-Spare disk1 from Raid [ Volum e1 ] : FAI LED
storage error Rem ove Hot-Spare disk1 from Raid [ Volum e1 ] : SUCCESS
storage I nfo Rem ove Hot-Spare disk1 from Raid [ Disk Group1 ] : FAI LED
storage error Rem ove Hot-Spare disk1 from Raid [ Disk Group1 ] : SUCCESS
storage I nfo Expand Volum e [ Volum e1] : SUCCESS
storage error Expand Volum e [ Volum e1] : FAI LED
storage I nfo Expand Disk Group [ Disk Group 1] SUCCESS
storage error Expand Disk Group [ Disk Group 1] FAI LED
System I NFO NTP update failed
System I NFO NTP updates successfully from % s
System I NFO NTP fails to update from % s
System I NFO Device is rebooted by adm inist rator!
System I NFO Device is shutdown by adm inist rator!
System NOTI CE DNS server is changed.
System NOTI CE Hostnam e is cleared.
System NOTI CE Hostnam e is set to '% s'.
System NOTI CE System descript ion is changed.
System NOTI CE System descript ion is em pty now.
System NOTI CE DNS server set t ing is changed
System NOTI CE DNS server address is changed to be given from DHCP server
System NOTI CE DNS server address is changed to be assigned by user
System NOTI CE Nam e server is changed.
USB NOTI CE An external APC UPS device is plugged/ unplugged.
USB NOTI CE An external Mass Storage device is plugged/ unplugged.
USB NOTI CE An external Printer device is plugged/ unplugged.
USB NOTI CE An external USB hub device is plugged/ unplugged.
Users ALERT Failed % s login at tempt ( incorrect password or inexistent usernam e)
Users ALERT Failed % s login at tempt ( incorrect password or inexistent usernam e)
Users I NFO User % s has logged in from % s!
Table 126 Log Messages (cont inued)
CLASS SEVERITY MESSAGE

Chapter 26 Maintenance Screens
Cloud Storage User’s Guide
320
Users I NFO User % s has logged out from % s!
Users I NFO User % s from % s has been logged out ( re-auth t im eout ) !
Users I NFO User % s from % s has been logged out ( lease t im eout ) !
Users NOTI CE Add new user % s by % s from % s.
Users NOTI CE User % s password has been changed.
Users NOTI CE Delete user % s by % s from % s.
Users NOTI CE The user % s from % s has at tem pted to change the user % s password but old password verificat ion fail.
Users NOTI CE User % s on % u.% u.% u.% u has been denied access from % s
Users NOTI CE User % s password has been changed by % s from % s.
Backup/ Restore ERROR When query rem ote target [ % s] : % s
Backup/ Restore I NFO Backup job [ % s] successfully
Backup/ Restore ERROR When backup [ % s] : % s
Backup/ Restore ERROR When backup [ % s] , error happens: % s
Backup/ Restore I NFO Start to restore backup job [ % s] .
Backup/ Restore I NFO Restore backup job [ % s] successfully.
Backup/ Restore ERROR Restore backup job [ % s] failed: % s
Backup/ Restore I NFO Start to restore backup job [ % s] from [ % s] .
Backup/ Restore I NFO Restore from [ % s] successfully.
Backup/ Restore ERROR Restore from [ % s] failed: % s
Backup/ Restore ERROR When restore [ % s] : % s
Backup/ Restore ERROR When restore job [ % s] , error happens: % s
Power Managem ent I NFO Job [ % s] is t r iggered by schedule
Power Managem ent I NFO Job [ % s] is t r iggered by user
Power Managem ent ERROR Job [ % s] is resulted as failed
Power Managem ent I NFO Job [ % s] is finished successfully
Power Managem ent I NFO Job [ % s] is pending because other job is running
Power Managem ent I NFO Job [ % s] is canceled by user
Power Managem ent I NFO Restore job [ % s] is t r iggered by user
Power Managem ent I NFO [ Power On] schedule is t r iggered.
Power Managem ent I NFO [ Power Off ] schedule is t r iggered.
Power Managem ent I NFO [ Reboot ] schedule is t r iggered.
Table 126 Log Messages (cont inued)
CLASS SEVERITY MESSAGE

Cloud Storage User’s Guide
321
CHAPTER 27
Protect
27.1 Overview
This chapter int roduces different ways of protect ing data on the NAS and covers the Protect screens.
27.2 What You Can Do• Use the Backup screens (Sect ion 27.3 on page 321) to create and custom ize backup jobs.
• Use the Restore screens (Sect ion 27.4 on page 332) to restore previous backups m ade with the NAS.
27.3 Backup Screens
Use this screen to create and custom ize scheduled backup jobs for your files.
You can have several backup jobs for specific folders and t ime periods.
Click Protect > Backup to open the following screen.
Table 127 Overview of Protect ion Methods
SITUATION ACTION
Unexpected NAS behavior after configurat ion changes
Back up the NAS configurat ion file before you m ake m ajor configurat ion changes. See Sect ion 27.5 on page 336.
Need to t ransfer data from your com puter to the NAS after volum e(s) have been created
Backup your data to a computer or other storage devices.
Data infected by virus Use ant i-virus software on your com puter to scan files before saving them onto the NAS. Although this m ay be slow so you m ay want to schedule it to occur while no one is using the NAS.
Use a firewall with ant i-virus capability on your network.
Hard drive m alfunct ion. Use RAI D. See Sect ion 8.6 on page 98 for m ore inform at ion on RAI D.
NAS m alfunct ion
Network down
Natural disaster such as a fire or earthquake occurs where your NAS is located
Back up data to another NAS or external USB hard dr ive. See Sect ion 14.14 on page 191 for an exam ple of how to back up the NAS to another NAS.

Chapter 27 Protect
Cloud Storage User’s Guide
322
Figure 200 Protect > Backup
The following table describes the labels in this screen.
27.3.1 Backup: Step 1
Use this screen to specify the job inform at ion and back up type.
Click Add Job in the Protect > Backup screen to open the following:
Table 128 Protect > Backup
LABEL DESCRIPTION
Backup
Add Job Click this to create and custom ize a backup job.
Edit Job Select a backup job in the list and click this to m ake som e changes to it .
Delete Selected Job(s)
Select a backup job in the list and click this to delete it .
Execute Job Now Select a backup job in the list and click this to run the backup job im m ediately.
Restore Archive Select a backup job in the list and click this to restore the file(s) included in that backup job to the NAS.
This applies to Archive backups only. Refer to Sect ion 27.3.8 on page 330 to see the screens.
Abort Job Select a backup job in the list and click this to stop the process if the backup job is current ly act ive.
Act ivate Job Enable the selected backup job.
I nact ivate Job Disable the selected backup job.
Status This shows the current state of the backup job.
• W ait ing m eans the backup job is not act ive but is scheduled to run at som e t im e.• Running indicates that the NAS is current ly doing the backup job. When the backup
job is running, you can also see a progress bar.
Job Nam e This ident ifies the backup job.
Job Descript ion This is a short descript ion of the backup job.
Backup I nfo This lists down the backup job details: type, source and target . Refer to Sect ion 27.3.1 on page 322 and Sect ion 27.3.2 on page 323.
Scheduler I nfo This shows the backup schedule, including the frequency, the t im e it was last run in (and whether or not it succeeded) , and when it is scheduled to run again. The t im es use yyyy-m m-dd hh: m m: ss form at .
Refer to Sect ion 27.3.4 on page 326.

Chapter 27 Protect
Cloud Storage User’s Guide
323
Figure 201 Protect > Backup: Step 1
The following table describes the labels in this screen.
27.3.2 Backup: Step 2
Use this screen to specify where the files you want to backup are located and set where you want the backup to be stored.
Table 129 Protect > Backup: Step 1
LABEL DESCRIPTION
Job I nform at ion
Job Name Enter a nam e to ident ify the backup job.
Job Descript ion Enter a short descript ion (up to 100 keyboard characters) for the backup job.
Backup Type Choose the backup type the NAS im plem ents for the backup job.
Archive - This is a backup of the source folder in an archive form at . Once you backup your files in the target folder, you cannot access the files individually unless you have the ext ract ing tool used by the NAS. I f there are exist ing files in the target folder pr ior to the NAS’s backup job, the files rem ain undisturbed. You can also choose between the following types of archive:
• Full - The NAS does a fresh backup each t ime. This provides the most protect ion but also requires the m ost storage space.
• I ncrem enta l - The NAS backs up new or m odified files from the source folder since the last backup. The first backup is a full backup. You can also do a full backup after several increm ental backups. Enter how many increm ental backups the NAS runs before it perform s a full backup of the source folder. You m ust keep the latest full backup to be able to restore the files later.
Synchronizat ion - This does a backup of individual files. I f you use this type, you cannot use the Restore feature of the NAS. You can also choose between the following types of synchronizat ion:
• Mirror - The NAS deletes all data in the target folder before running the backup. I t m akes the target folder ident ical to the source folder.
• Publish - The NAS does a backup of individual files to the target folder without overwrit ing exist ing files in that folder. I t m akes a copy of the source files.
Rsync - This synchronizes individual files to another device that supports rsync. Rsync is open source and provides increm ental file t ransfers. I t only sends the differences in the files through the connect ion so it br ings the rem ote files into sync very quickly.
• The NAS deletes all data in the target folder before running the backup. I t m akes the target folder ident ical to the source folder.
• I f you use this type, you cannot use the Restore feature of the NAS.
Next Click this to go to the next step.
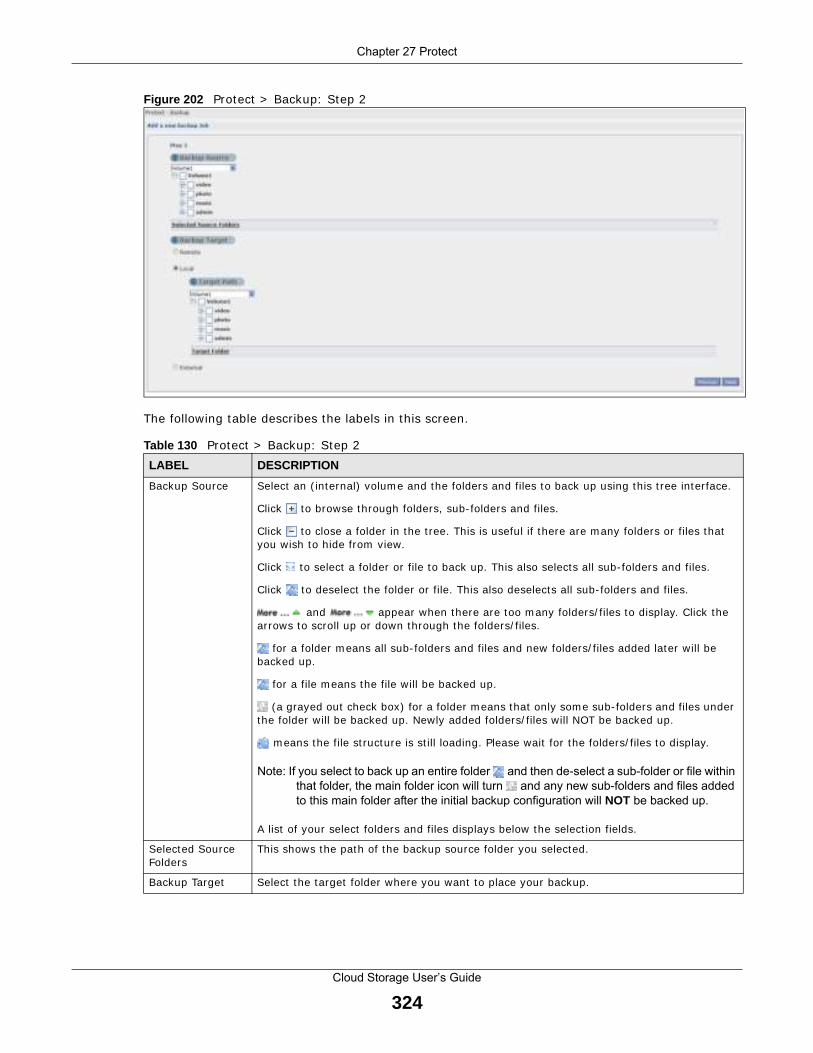
Chapter 27 Protect
Cloud Storage User’s Guide
324
Figure 202 Protect > Backup: Step 2
The following table describes the labels in this screen.
Table 130 Protect > Backup: Step 2
LABEL DESCRIPTION
Backup Source Select an ( internal) volum e and the folders and files to back up using this t ree interface.
Click to browse through folders, sub- folders and files.
Click to close a folder in the t ree. This is useful if there are m any folders or files that you wish to hide from view.
Click to select a folder or file to back up. This also selects all sub- folders and files.
Click to deselect the folder or file. This also deselects all sub- folders and files.
and appear when there are too m any folders/ files to display. Click the arrows to scroll up or down through the folders/ files.
for a folder m eans all sub- folders and files and new folders/ files added later will be backed up.
for a file m eans the file will be backed up.
(a grayed out check box) for a folder m eans that only som e sub- folders and files under the folder will be backed up. Newly added folders/ files will NOT be backed up.
m eans the file st ructure is st ill loading. Please wait for the folders/ files to display.
Note: If you select to back up an entire folder and then de-select a sub-folder or file within
that folder, the main folder icon will turn and any new sub-folders and files added
to this main folder after the initial backup configuration will NOT be backed up.
A list of your select folders and files displays below the select ion fields.
Selected Source Folders
This shows the path of the backup source folder you selected.
Backup Target Select the target folder where you want to place your backup.

Chapter 27 Protect
Cloud Storage User’s Guide
325
27.3.3 Backup: Step 3
Use this screen to specify com pression, encrypt ion and purge policies for the backup job. This step is only available if you are doing an archive backup or a synchronizat ion backup to a rem ote target .
Rem ote Select this to back up to another device.
For Archives:
The rem ote device can be another NAS in the network. Fill in the following fields in order to be able to access it .
• Remote NAS Address• Usernam e• Password• Share Nam e
Click Test Connect ion to see if your NAS can com municate with the remote device.
For Synchronizat ion:
The rem ote device m ust be another NAS com pat ible with the NAS’s synchronizat ion feature. Fill in the following fields in order to be able to access it .
• Remote NAS Address• Usernam e (always “adm in” )• Remote Adm in’s Password
Click Show target content to connect to the rem ote NAS so you can select the target share for the backup.
For Rsync:
The rem ote device m ust be a NAS that supports rsync or a com puter running the rsync ut ility. Fill in the following fields in order to be able to access it .
• Remote NAS Address• Usernam e (always “adm in” )• Remote Adm in’s Password
Click Show target content to connect to the rem ote NAS or com puter so you can select the target folder for the backup.
Local Select this if you want to place your backup in another volum e in the NAS. Select the folder where you want to place the backup.
External Select this if you have a USB hard disk connected to the NAS that you want to use for your backup. Select the folder where you want to place the backup.
Previous Click this to go back to the previous screen.
Next Click this to go to the next screen.
Table 130 Protect > Backup: Step 2 (cont inued)
LABEL DESCRIPTION

Chapter 27 Protect
Cloud Storage User’s Guide
326
Figure 203 Protect > Backup: Step 3
The following table describes the labels in this screen.
27.3.4 Backup: Step 4
Click this to specify the schedule for the backup job. The backup job automat ically runs according to the schedule that you set in this screen.
Table 131 Protect > Backup: Step 3
LABEL DESCRIPTION
Com pression Select Yes if you want NAS to com press the files for your backup. Otherwise, choose No .
I n an Archive backup, com pression is a m ethod of packing com put ing files in a way that saves hard disk space.
For a Synchronizat ion backup ( to a rem ote target ) , the source data will be com pressed before the t ransm ission to reduce the t ransm ission t ime. I t is used in slow networks only.
Encrypt ion Select Yes if you want NAS to encrypt the files for your backup. Otherwise, choose No .
I n an Archive backup, this m eans using a password to secure files.
For a Synchronizat ion backup ( to a rem ote target ) , this m eans securing the file t ransfer session. However the final file stored on the rem ote NAS is unencrypted. This takes a long t im e. Make sure you really need this feature before enabling it .
Bandwidth Rest r ict the bandwidth of synchronizat ion backups to help stop them from using all of your network connect ion’s available bandwidth. This is m ore im portant when backing up to a rem ote NAS or com puter through the I nternet .
Purge Policy The NAS maintains the files that have been included in your backups. However to save hard disk space, you can choose to delete files that have been included in previous backups.
• Select Keep All Old Backup f iles to store all f iles that have been included in previous backups.
• I f you want to store a certain num ber of backup files, select Keep Only the last n backup f iles ( 1 - 3 0 ) . Enter a value (n) from 1 to 30 to specify how m any backups the NAS stores. All backup files older than the last one are deleted. You will not be able to recover files that existed (only) in those previous backups. Select this if backup space is lim ited and recovery of old files is not im portant .
• I f you want to store all backups for a certain t ime period, select Keep Backups for n day( s) ( 1 - 3 6 5 0 ) . Enter a value (n) from 1 to 3650 to specify how m any days the NAS stores all backup files. After this day has expired, all backup files will be deleted.
Previous Click this to go back to the previous screen.
Next Click this to go to the next screen.

Chapter 27 Protect
Cloud Storage User’s Guide
327
Figure 204 Protect > Backup: Step 4
The following table describes the labels in this screen.
27.3.5 Edit Job Screen
Use this screen to edit an exist ing backup job. Some at t r ibutes of the backup job cannot be changed, such as the nam e, backup type, source folder and so on.
Table 132 Protect > Backup: Step 4
LABEL DESCRIPTION
Scheduler
Backup Frequency Select from Hour ly , Daily , W eek ly and Monthly backup intervals. The screen changes depending on the item you select .
Every how many hours?
This is only available if you selected Hour ly as your backup frequency.
Select every how many hours the NAS perform s the backup job.
On which m inute of the hour?
This is only available if you selected Hour ly as your backup frequency.
Select the m inute ( from 0 to 59) in an hour when the NAS perform s the backup job.
Start Tim e (hh: m m )
This is available if you selected Daily, W eek ly or Monthly as your backup frequency.
Select the t im e in hour: m inute form at when you want the NAS to perform the backup job.
Every how many days?
This is only available if you selected Daily as your backup frequency.
Enter the interval between days when the NAS perform s the backup job.
Every how many weeks?
This is only available if you selected W eekly as your backup frequency.
Enter the interval between weeks when NAS perform s the backup job.
Step 1: Please select the m onth(s) of a year
This is only available if you selected Monthly as your backup frequency.
Select the m onth(s) when you want the NAS to perform the backup job.
Step 2: Please select the day of the month
This is only available if you selected Monthly as your backup frequency.
Select the day in a m onth when you want the NAS to perform the backup job.
Previous Click this to go back to the previous screen.
Done Click this to close the screen.
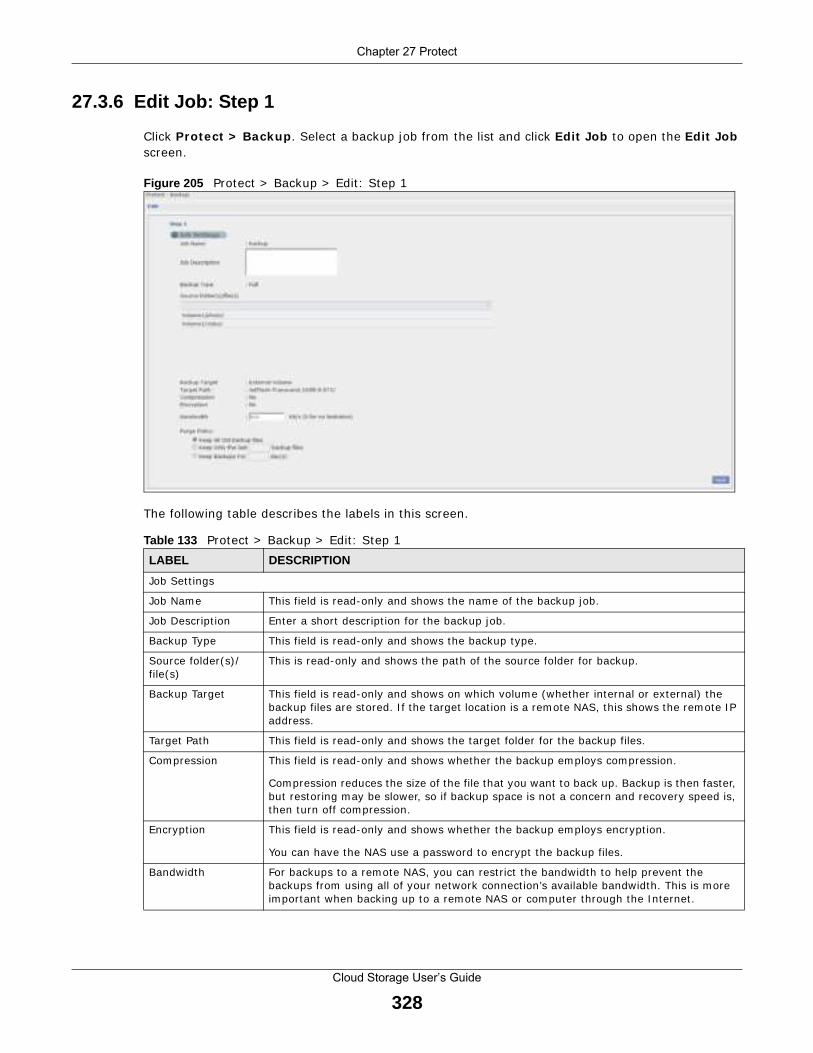
Chapter 27 Protect
Cloud Storage User’s Guide
328
27.3.6 Edit Job: Step 1
Click Protect > Backup . Select a backup job from the list and click Edit Job to open the Edit Job screen.
Figure 205 Protect > Backup > Edit : Step 1
The following table describes the labels in this screen.
Table 133 Protect > Backup > Edit : Step 1
LABEL DESCRIPTION
Job Set t ings
Job Name This field is read-only and shows the nam e of the backup job.
Job Descript ion Enter a short descript ion for the backup job.
Backup Type This field is read-only and shows the backup type.
Source folder(s) /file(s)
This is read-only and shows the path of the source folder for backup.
Backup Target This field is read-only and shows on which volum e (whether internal or external) the backup files are stored. I f the target locat ion is a rem ote NAS, this shows the rem ote I P address.
Target Path This field is read-only and shows the target folder for the backup files.
Com pression This field is read-only and shows whether the backup em ploys com pression.
Com pression reduces the size of the file that you want to back up. Backup is then faster, but restor ing m ay be slower, so if backup space is not a concern and recovery speed is, then turn off com pression.
Encrypt ion This field is read-only and shows whether the backup em ploys encrypt ion.
You can have the NAS use a password to encrypt the backup files.
Bandwidth For backups to a rem ote NAS, you can rest r ict the bandwidth to help prevent the backups from using all of your network connect ion’s available bandwidth. This is more im portant when backing up to a rem ote NAS or com puter through the I nternet .

Chapter 27 Protect
Cloud Storage User’s Guide
329
27.3.7 Edit Job: Step 2
Use this screen to edit the schedule for the backup job.
Figure 206 Protect > Backup > Edit : Step 2
The following table describes the labels in this screen.
Purge Policy The NAS maintains the files that have been included in your backups. However to save hard disk space, you can choose to delete files that have been included in previous backups.
• Select Keep All Old Backup f iles to store all files that have been included in previous backups.
• I f you want to store a certain num ber of backup files, select Keep Only the last n backup f iles ( 1 - 3 0 ) . Enter a value (n) from 1 to 30 to specify how m any backups the NAS stores. All backup files older than the last one are deleted. You will not be able to recover files that existed (only) in those previous backups. Select this if backup space is lim ited and recovery of old files is not im portant .
• I f you want to store all backups for a certain t ime period, select Keep Backups for n day( s) ( 1 - 3 6 5 0 ) . Enter a value (n) from 1 to 3650 to specify how m any days the NAS stores all backup files. After this day has expired, all backup files will be deleted.
Next Click this to go to the next screen.
Table 133 Protect > Backup > Edit : Step 1 (cont inued)
LABEL DESCRIPTION
Table 134 Protect > Backup > Edit : Step 2
LABEL DESCRIPTION
Scheduler Set t ings
Backup Frequency Edit this by select ing from Hour ly , Daily , W eek ly and Monthly backup intervals. The screen changes depending on the item you select .
Every how many hours?
This is only available if you selected Hour ly as your backup frequency.
Select every how m any hours the NAS perform s the backup job.
On which m inute of the hour?
This is only available if you selected Hour ly as your backup frequency.
Select the m inute ( from 0 to 59) in an hour when the NAS perform s the backup job.
Start Tim e (hh: m m) This is available if you selected Daily, W eekly or Monthly as your backup frequency.
Select the t im e in hour: m inute form at when you want the NAS to perform the backup job.
Every how many days?
This is only available if you selected Daily as your backup frequency.
Enter the interval between days when the NAS perform s the backup job.

Chapter 27 Protect
Cloud Storage User’s Guide
330
27.3.8 Restore Archive Screen
Use this screen to restore previous backups made with the NAS.
27.3.9 Restore Archive: Step 1
Click Protect > Backup screen (Sect ion 27.3 on page 321) . You can restore a previous backup job by select ing a backup job from the list and clicking Restore Archive.
Figure 207 Protect > Backup > Restore Archive: Step 1
The following table describes the labels in this screen.
Every how many weeks?
This is only available if you selected W eek ly as your backup frequency.
Enter the interval between weeks when NAS perform s the backup job.
Step 1: Please select the m onth(s) of a year
This is only available if you selected Monthly as your backup frequency.
Select the m onth(s) when you want the NAS to perform the backup job.
Step 2: Please select the day of the m onth
This is only available if you selected Monthly as your backup frequency.
Select the day in a month when you want the NAS to perform the backup job.
Previous Click this to go back to the previous screen.
Done Click this to close the screen.
Table 134 Protect > Backup > Edit : Step 2 (cont inued)
LABEL DESCRIPTION
Table 135 Protect > Backup > Restore Archive: Step 1
LABEL DESCRIPTION
Step 1. Select Restore Source
Select a previous archive backup that you want to restore to the NAS.
Job I nform at ion
Job Name This is the nam e to ident ify the backup job.
Job Descript ion This is a short descript ion (up to 100 keyboard characters) for the backup job.
Backup Type This is the type of backup im plemented for the backup job.
Scheduler I nform at ion
This field displays the backup’s frequency.
Restored Tim e Select a previous backup in the list that you want to restore to your NAS.
Next Click this to go to the next screen.

Chapter 27 Protect
Cloud Storage User’s Guide
331
27.3.10 Restore Archive: Step 2Use this screen to select the folder where the archive you want to restore is located.
Figure 208 Protect > Backup > Restore Archive: Step 2
The following table describes the labels in this screen.
27.3.11 Restore Archive: Step 3
Use this screen to select the locat ion in the NAS where you want to restore your backup.
Figure 209 Protect > Backup > Restore Archive: Step 3
Table 136 Protect > Backup > Restore Archive: Step 2
LABEL DESCRIPTION
Step 2. Please select which file(s) / folder(s) to restore.
Folder Chooser Select the folder where the backup you want to restore is located.
Selected Folder This shows the path of the folder you selected.
Previous Click this to go back to the previous screen.
Next Click this to go to the next screen.

Chapter 27 Protect
Cloud Storage User’s Guide
332
The following table describes the labels in this screen.
27.4 Restore Screen
Use this screen to restore previous backups made with the NAS, including archives and folders from internal, external or rem ote NASs to the NAS.
27.4.1 Restore: Step 1
You can access this screen by clicking Protect > Restore .
Table 137 Protect > Backup > Restore Archive: Step 3
LABEL DESCRIPTION
Step 3. Set a restore target and start restor ing
Original Locat ion Select this to restore the files to their or iginal locat ion in the NAS.
Other Locat ion Click this to select a folder where you want to place the restored files. Click Brow se to open the following screen.
• Volum e - Select a volum e from the list .• Current Locat ion - This is the locat ion of the selected folder.• Type - This ident ifies the item as a file or folder.• Nam e - This is the nam e of the folder/ file.
Click Apply to save your set t ings and Cancel to close the screen.
Previous Click this to go back to the previous screen.
Done Click this to run the restore process and go back to the Backup screen.

Chapter 27 Protect
Cloud Storage User’s Guide
333
Figure 210 Protect > Restore: Step 1
The following table describes the labels in this screen.
Table 138 Protect > Restore: Step 1
LABEL DESCRIPTION
Step 1. Select Restore Source
Select a previous archive backup that you want to restore to the NAS.
Select Rem ote NAS if the file is in another NAS in the network that you used for your backup. Fill in the fields below when you choose this opt ion.
Select I nterna l or Ex terna l Volum e if you want to use another volum e in the NAS or an at tached USB hard disk for your backup. Click Brow se to select the backup file.
I P Address Enter the address of the NAS you want to use.
User Enter the usernam e you use to access the NAS.
Password Enter the password of your NAS account .
Share Nam e Enter the nam e of the share you want to use.
Test Connect ion Click this to test your connect ion to the rem ote NAS that you have specified in the fields above.
Browse Click this to select where the previous backup that you want to restore is located.
• Volum e - Select a volum e from the list .• Current Locat ion - This is the locat ion of the selected folder.• Type - This ident ifies the item as a file or folder.• Nam e - This is the nam e of the folder/ file.
Click Apply to save your set t ings and Cancel to close the screen.
Next Click this to go to the next screen.

Chapter 27 Protect
Cloud Storage User’s Guide
334
27.4.2 Restore: Step 2Select a previous archive backup that you want to restore to the NAS.
Figure 211 Protect > Restore: Step 2
The following table describes the labels in this screen.
27.4.3 Restore: Step 3
Use this screen to select the folder where the archive you want to restore is located.
Table 139 Protect > Restore: Step 2
LABEL DESCRIPTION
Step 2. Select Restore Point
I f you selected Rem ote NAS for the backup you want to restore, you can see a list of all the backups you perform ed in the Job Nam e table.
I f you selected I nterna l or Externa l Volum e for the backup you want to restore, you can see a list of restore t im es for the backups you perform ed in the Restored Tim e table.
Job Nam e Select a previous backup job in the list that you want to restore to your NAS. Once you choose a job nam e, all available restore t im es for that backup job shows in the Restored Tim e table.
Restored Tim e Select a previous backup job in the list that you want to restore to your NAS.
Previous Click this to go back to the previous screen.
Next Click this to go to the next screen.
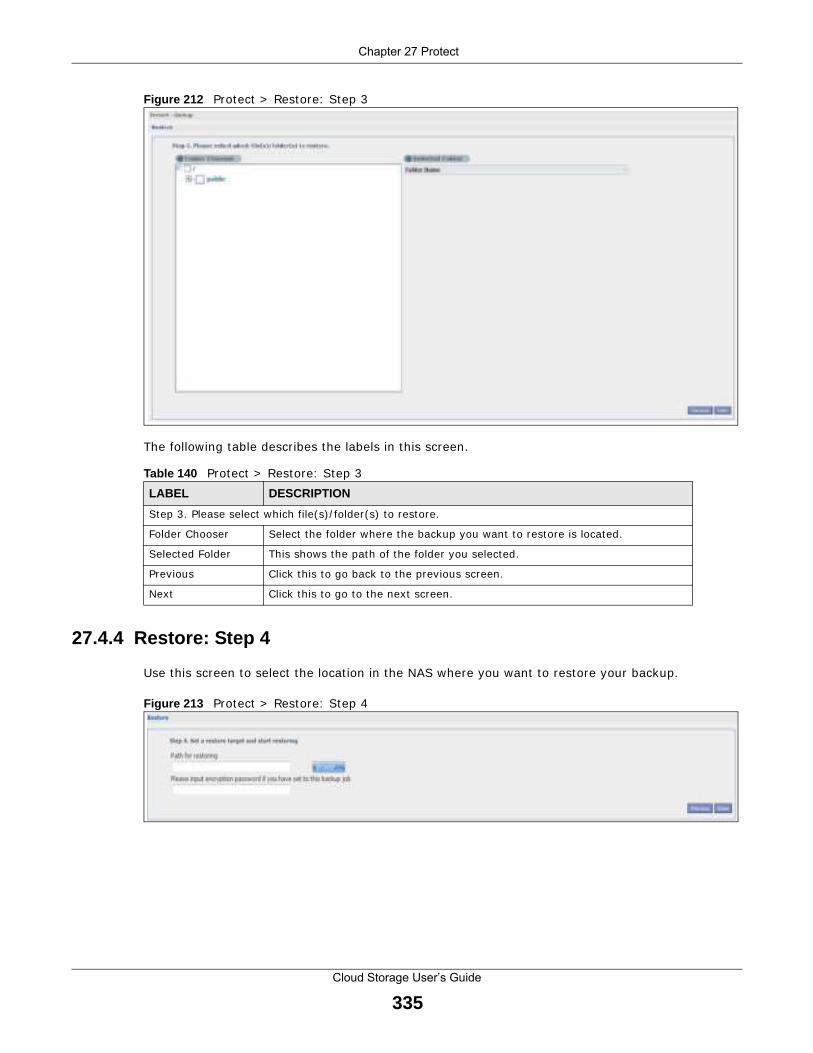
Chapter 27 Protect
Cloud Storage User’s Guide
335
Figure 212 Protect > Restore: Step 3
The following table describes the labels in this screen.
27.4.4 Restore: Step 4
Use this screen to select the locat ion in the NAS where you want to restore your backup.
Figure 213 Protect > Restore: Step 4
Table 140 Protect > Restore: Step 3
LABEL DESCRIPTION
Step 3. Please select which file(s) / folder(s) to restore.
Folder Chooser Select the folder where the backup you want to restore is located.
Selected Folder This shows the path of the folder you selected.
Previous Click this to go back to the previous screen.
Next Click this to go to the next screen.

Chapter 27 Protect
Cloud Storage User’s Guide
336
The following table describes the labels in this screen.
27.5 Configuration File Backup and Restoration
Use the Maintenance > Configurat ion m enus to create a file of your NAS configurat ions such as passwords, shares and volum es created, network set t ings and so on. I f you’re going to do some m ajor configurat ion changes, then it is advisable to create a configurat ion backup file. I f things go wrong after you make the configurat ion changes, you can always go back to the previous configurat ion by restor ing an earlier configurat ion file.
I f you forgot the NAS password, then use the RESET but ton (see Sect ion 1.7 on page 17) to return the NAS to the factory default configurat ion.
Note: Configurat ion File Backup and Restorat ion does not affect data (your files and folders) , volum es on the NAS.
Table 141 Protect > Restore: Step 4
LABEL DESCRIPTION
Step 3. Set a restore target and start restor ing
Browse Click this to select a folder where you want to place the restored files.
• Volum e - Select a volum e from the list .• Current Locat ion - This is the locat ion of the selected folder.• Type - This ident if ies the item as a file or folder.• Nam e - This is the nam e of the folder/ file.
Click Apply to save your set t ings and Cancel to close the screen.
Previous Click this to go back to the previous screen.
Done Click this to run the restore process and go back to the Backup screen.

Cloud Storage User’s Guide
337
CHAPTER 28
Troubleshooting
28.1 Troubleshooting Overview
This chapter offers som e suggest ions to solve problem s you m ight encounter. The potent ial problems are divided into the following categories.
• Power, Hardware, Connect ions, and LEDs
• NAS Starter Ut ility
• NAS Login and Access
• I Cannot Access The NAS
• Users Cannot Access the NAS
• External USB Drives
• Storage
• Firmware
• File Transfer
• Networking
• Some Features’ Screens Do Not Display
• Media Server Funct ions
• Download Service Funct ions
• Web Publishing
• Auto Upload
• Package Managem ent
• Backups
• Google Drive
28.2 Power, Hardware, Connections, and LEDs
The NAS PW R LED does not turn on (no LEDs are on) .
• Make sure the NAS is turned on.
• Make sure you are using the power adaptor or cord included with the NAS.
• Make sure the power adaptor or cord is connected to the NAS and plugged in to an appropriate power source. Make sure the power source is turned on.

Chapter 28 Troubleshooting
Cloud Storage User’s Guide
338
• Turn the NAS off and on.
• I f the problem cont inues, contact the vendor.
An HDD LED is off.
The HDD LED is off when the NAS cannot detect a hard drive in the drive bay. Replace or install a hard drive. See I nstalling or replacing a hard disk.
An HDD LED is red.
Red means that the NAS detected an error on the hard drive ( like a bad sector for example) . The NAS autom at ically t r ies to recover a bad sector, but the LED stays red unt il the NAS restarts. Even if the hard drive st ill funct ions, it is recom m ended that you replace it since errors are a sign that the hard drive m ay fail soon. See I nstalling or replacing a hard disk.
I nstalling or replacing a hard disk.
Do not remove or install a hard disk while the NAS is turned on. The NAS must be turned off before you re move or install the hard disk.
1 Turn the NAS off, rem ove the front panel and m ake sure:
• there is a SATA I or SATA I I (3.0 Gbit / s) com pat ible hard disk installed.
• the hard disk is installed correct ly in the disk bay. Push the disk back into the NAS disk bay unt il the hard disk is fit ted snugly inside the NAS (see the NAS Quick Start Guide) .
• the hard disk could be faulty. Try a different hard drive or test the original hard disk in a different NAS or com puter.
2 I f you had to replace the drive, turn on the NAS and go to the Storage screen.
• I f you have a RAI D I volume click the Repair icon next to the new drive.
• I f you are using RAI D 0 you will need to recreate the whole volum e. All of your data is lost .
• I f you are using a single-disk JBOD volume, you need to create a new volume on the new drive.
• I f you are using a two-disk JBOD volum e, you need to create a whole new volum e on both drives.
The LAN LED (by the LAN port ) is off.
Chapter 28 Troubleshooting
Cloud Storage User’s Guide
339
• Make sure the Ethernet cable is connected properly to the NAS and connected to another (Ethernet ) device. Make sure the other device is turned on. I f it ’s connected direct ly to a com puter, m ake sure that the com puter network card is working (ping 127.0.0.1 on the com puter) .
• Use another Ethernet cable. I f you’re connect ing to a Gigabit Ethernet , make sure you’re using an 8-wire Ethernet cable.
• I f the problem cont inues, contact the vendor.
See Table 1 on page 15 for a descript ion of NAS LEDs.
The NAS turns off or reboots by itself.
Check the Pow er Managem ent screen. This is where you configure power set t ings for the NAS, including power saving, UPS, power on/ off during power failure and power on/ off schedule. The NAS m ay be set to turn off under certain condit ions.
A power failure occurred while the NAS was downloading files.
• I f power failure occurs during the act ive download period, the NAS will verify whether the downloaded files were damaged.
• I f a file is corrupted, the NAS will download the file again.
• I f the file is intact but not completely downloaded, the NAS will resum e the download task after it restarts.
28.3 NAS Starter Utility
The NAS Starter Ut ility cannot discover my NAS.
• Close the NAS Starter Ut ilit y and reopen it .
• Check your hardware connect ions and m ake sure they are set up correct ly.
• Only one instance of the NAS Starter Ut ility can run on your computer. Make sure you close any duplicate windows for this applicat ion.
• Wait for the SYS LED to stop blinking before clicking Discover .
• Confirm that the com puter running the NAS Starter Ut ility has a network connect ion. See the sect ion on the NAS’s LAN connect ion for related inform at ion.
• The com puter running the NAS Starter Ut ility can only discover NASs in the sam e subnet . NASs connected to the sam e switch or router as your NAS Starter Ut ility com puter are usually in the sam e subnet unless the router is doing subnet t ing or the switch is im plem ent ing VLAN.
Chapter 28 Troubleshooting
Cloud Storage User’s Guide
340
The NAS Starter Ut ility discovered m y NAS but the status is always unreachable, even though I can access it .
You m ay need to add the NAS Starter Ut ility to your software firewall’s allow list or lower your software firewall or ant i-virus scanner ’s security level. Alternat ively you m ay have to configure your software firewall or other security software to allow UDP port 50127 t raffic from the NAS. I f there is a hardware firewall between you and the NAS, configure it to allow UDP port 50127 t raffic from the NAS.
I have at least two NASs in my network, how do I ident ify which one I want to configure in the NAS Starter Ut ilit y screens.
I f you have several NASs connected to your com puter/ network, give each a unique nam e. You m ay have to disconnect all but one and use the NAS Starter Ut ility to renam e it . Then connect another NAS and renam e it and cont inue to connect and rename the NASs one-by-one unt il they are all connected and each has a unique nam e.
Alternat ively, if you have a DHCP server on your network and you can access it ’s list of assigned I P addresses, you could see which I P address belongs to which NAS. You can check the MAC address of your NAS by checking the at tached st icker in the device housing.
28.4 NAS Login and Access
I forgot the server nam e of the NAS.
• The default server nam e is ‘NAS’ followed by the number of your m odel ( ‘NAS5 4 0 ’ for example) .
• Use the NAS Starter Ut ility to discover your NAS. I f you have adm in privileges, you can direct ly change the I P address of the NAS using the NAS Starter Ut ility.
• I f the server nam e has changed and you don’t have the NAS Starter Ut ilit y, see Sect ion 1.7 on page 17 to use the RESET but ton to return to the default set t ing.
I cannot get to the NAS login screen.
• Use the NAS Starter Ut ility to discover your NAS. I f you have adm in privileges, you can direct ly change the I P address of the NAS using the NAS Starter Ut ility.
• Make sure you have used the NAS Starter Ut ility to init ialize your NAS.
• I f you used the RESET but ton, the NAS m ay have a new I P address. Close and reopen the NAS Starter Ut ility to discover the NAS.
• Make sure the NAS is turned on.

Chapter 28 Troubleshooting
Cloud Storage User’s Guide
341
• I f you are t rying to login direct ly by typing the server nam e into your web browser ’s address field, make sure you are using the correct server name as the web site address.
• The default server name is ‘NAS’ followed by the number of your model ( ‘NAS5 4 0 ’ for example) . I f you have changed the server name, use the new one.
• I f the server name has been changed and you do not know the new server name, see the t roubleshoot ing suggest ions for I forgot the server nam e of the NAS.
• I f it st ill doesn’t work, t ry using the NAS Starter Ut ility.
• Check the hardware connect ions, and make sure the LEDs are behaving as expected. See the Quick Start Guide and Table 1 on page 15.
• By default , the NAS gets an I P address autom at ically. The NAS assigns itself an I P address if no device assigns one. I f your com puter is also set to get an I P address autom at ically, the computer and the NAS can both assign them selves I P addresses and com m unicate. See Sect ion 10.4 on page 107 if you need to configure the NAS with a stat ic I P address.
• I f you are connect ing to the NAS by its I P address, make sure you use the correct one. I f the NAS has a wired Ethernet connect ion and a wireless connect ion through an at tached USB wireless dongle, the NAS has a different I P address for each connect ion. To connect through the wired Ethernet connect ion, use the wired Ethernet connect ion’s I P address. To connect through the wireless connect ion, use the wireless connect ion’s I P address.
• Make sure your com puter ’s I P address is in the same subnet as the NAS’s I P address. You can use the NAS Starter Ut ility to find the NAS’s I P address. Skip this if you know that there are routers between your com puter and the NAS.
• Ping the NAS from your computer. Make sure your com puter ’s Ethernet adapter is installed and funct ioning properly. I n a (Windows) com puter, click Star t , (All) Program s , Accessor ies and then Com m and Prom pt . I n the Com m and Prom pt window, type “ping” followed by the NAS’s I P address (use the NAS Starter Ut ility to find the NAS’s I P address if you don’t know it ) and then press [ ENTER] .
• Make sure you are using I nternet Explorer 6.0 (and later) or Firefox 1.07 (and later) .
• Make sure your I nternet browser does not block pop-up windows and has JavaScript and Java enabled. With I nternet Explorer 6, you may also have to enable script ing of safe Act iveX cont rols. See Sect ion 28.4.1 on page 341.
I forgot the password.
• The default password is 1 2 3 4 .
• I f you have changed the password and forgot ten it , you will have to reset the NAS.
28.4.1 Enabling Scriptin g of Safe ActiveX Controls
I f pages of the web configurator do not display properly in I nternet Explorer, check that scr ipt ing of safe Act iveX cont rols is enabled.
1 I n I nternet Explorer, click Tools , I nternet Opt ions and then the Secur ity tab.
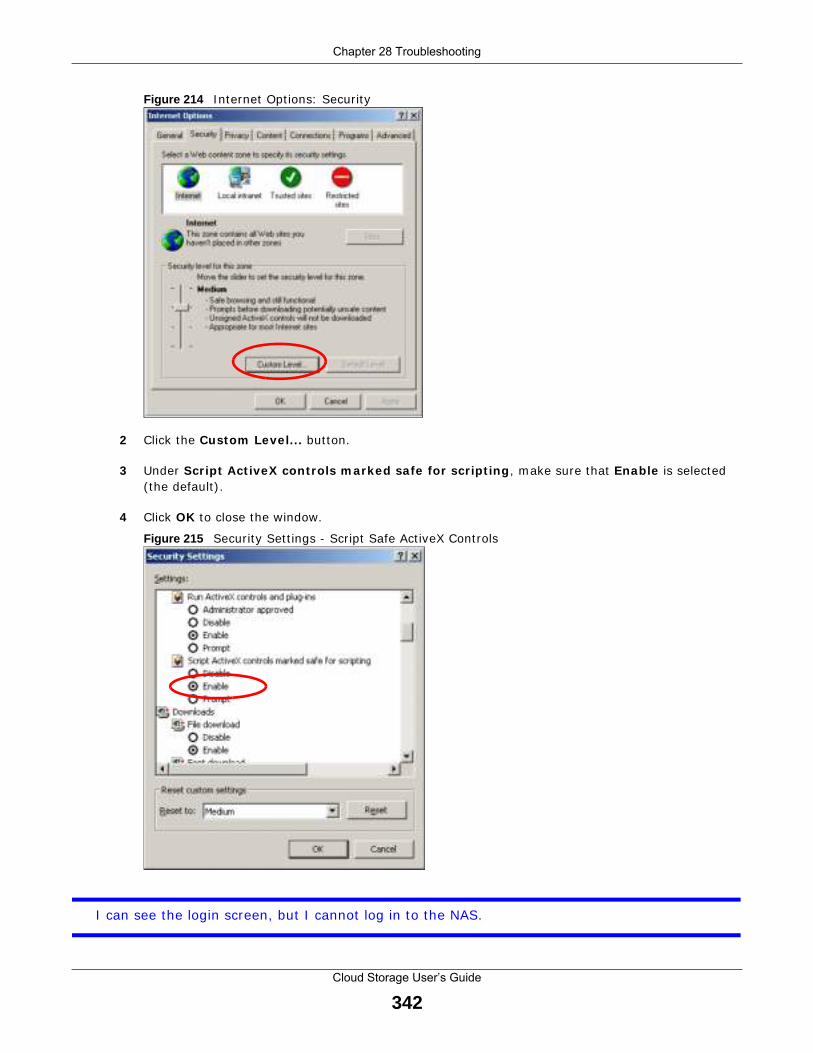
Chapter 28 Troubleshooting
Cloud Storage User’s Guide
342
Figure 214 I nternet Opt ions: Security
2 Click the Custom Level... but ton.
3 Under Scr ipt Act iveX cont rols m arked safe for scr ipt ing , m ake sure that Enable is selected ( the default ) .
4 Click OK to close the window.
Figure 215 Security Set t ings - Script Safe Act iveX Cont rols
I can see the login screen, but I cannot log in to the NAS.
Chapter 28 Troubleshooting
Cloud Storage User’s Guide
343
• Make sure you have entered the usernam e and password correct ly. The default usernam e is adm in , and the default password is 1 2 3 4 . These fields are case-sensit ive, so m ake sure [ Caps Lock] is not on.
• Turn the NAS off and on.
• I f this does not work, see Sect ion 1.7 on page 17 to reset the device.
I cannot see the m ult i- language web configurator screens while using I nternet Explorer.
Use Sect ion 28.4.1 on page 341 to enable the script ing of safe Act iveX cont rols.
The Web Configurator logs out by it self.
The web configurator management session automat ically t im es out if it is left idle for 15 m inutes. Sim ply log back into the NAS if this happens to you.
28.5 I Cannot Access The NAS
I cannot access a share.
• Check that the NAS is turned on and connected to the network. Try to ping the NAS or use the NAS Starter Ut ility to discover it .
• Make sure you have used the NAS Starter Ut ility to init ialize your NAS. See Chapter 2 on page 19 for m ore inform at ion.
• Check that you entered your login name and password correct ly.
• Check that the share exists and check its access set t ings.
• Check if the shared folder is a subfolder of another (parent ) share. Check that the parent share’s access r ights do not conflict with the subfolder share. I t is recom m ended that you do not create subfolder shares.
• Check if there are any exist ing mapped network drives to the NAS. You may need to disconnect exist ing m apped network dr ives as a new m apped network dr ive connect ion m ay use (different ) previously-saved login informat ion. To do this, open Windows Explorer and click Tools > Disconnect Mapped Netw ork Dr ives .
• Check that the volume in which the share resides, exists and is not down or degraded. I f it is down or degraded, see Sect ion 28.2 on page 337.
• Make sure you have the client for Microsoft networks installed and enabled in your network connect ion’s propert ies.
• I n Windows XP or 2000, click Star t > Set t ings > Cont rol Panel > Netw ork Connect i ons (Netw ork and Dia l- up Connect ions in Windows 2000/ NT) > Local Area Connect ion > Proper t ies .

Chapter 28 Troubleshooting
Cloud Storage User’s Guide
344
• Check that Client for Microsoft Netw orks is in the list of com ponents and has its check box selected.
28.6 Users Cannot Access the NAS
A local user cannot access a share
• Check that the NAS is turned on and connected to the network. The local user should t ry to ping the NAS or use the NAS Starter Ut ility to discover it .
• The local user should check that he entered his login nam e and password correct ly.
• Check if the share exists and has the correct access set t ings for this user.
• Check the Access Cont rol List (ACL) of read/ write perm issions associated with specific files and/or folders. Account names added to the list are linked to the files and folders that they are allowed to access, along with what kinds of act ions they are allowed to perform with those files and folders (delete, move, rename, and so on) .
• The user ’s com puter m ay already be connected to another of the NAS’s shares using a different user name and/ or password. This can happen without the user realizing it if the user ’s com puter automat ically connects to a share at logon. Right-click any other connected shares and click Disconnect . Then re-at tempt to connect to the desired share.
• Check if the share has an ANONYMOUS or EVERYONE access r ight . I f the user is already logged into a share using her username and password, she will NOT be able to access a share that has ANONYMOUS FTP only access r ights (as these require ‘no login’) . I n this case she should log out and t ry to access the share again without logging in. See Sect ion 17.4 on page 215 for m ore details.
• Check if the shared folder is a subfolder of another (parent ) share. Check that the parent share’s access r ights do not conflict with the subfolder share. I t is recom m ended that you do not create subfolder shares.
• Check if the user belongs to a group with conflicting access r ights. DENY always takes precedence. I f you allow a user FULL access to a share but set his group to DENY, then he will NOT be able to access the share.
• The local user should check if there are any exist ing m apped network dr ives to the NAS. He m ay need to disconnect exist ing CI FS connect ions as new CI FS connect ion m ay use previously-saved login informat ion that may be different to NAS login.
• Check that the array in which the share resides, exists and is not down or degraded. I f the array is down or degraded, see Sect ion 28.2 on page 337.
• I f the user is using DFS links, then he can only access the NAS using CI FS and not FTP.
• Check that the share has not been disabled.
I cannot im port dom ain user or user group inform at ion even though test ing of the connect ion to the dom ain cont roller is OK.

Chapter 28 Troubleshooting
Cloud Storage User’s Guide
345
• Check the NAS’s DNS set t ing. The DNS server the NAS is using must be able to resolve the dom ain cont roller ’s address. I f the dom ain cont roller uses a pr ivate I P address, the NAS needs to use a private DNS server. I f the domain cont roller uses a public I P address, the NAS needs to use a public DNS server.
• Leave the domain and re- join it .
A dom ain user can’t access a share.
I n addit ion to the checks listed previously for local users, check that the dom ain cont roller is turned on and connected to the network.
A user can access a share but cannot access individual folders or files within the share.
• Check the Access Cont rol List (ACL) of read/ write perm issions associated with the share’s specific files and/ or folders. Account names added to the list are linked to the files and folders that they are allowed to access, along with what kinds of act ions they are allowed to perform with those files and folders (delete, move, rename, and so on) .
28.7 External USB Drives
The COPY LED is red.
Copying files to or from a USB device or SD card failed. The USB device or SD card m ay not be compat ible with the NAS. Try to save the files onto a computer and then from the com puter to the NAS ( through the network connect ion) .
28.8 Storage
Migrat ing from RAI D 1 to RAI D 5 did not expand the storage capacity.
The NAS normally expands the storage capacity by itself after rebuilding the RAI D but m ay not if the NAS rebooted during the RAI D re-build.
After the re-build finishes, go to the Storage screens and select the volum e or disk group and click Manage and use Expand the volum e w ith unallocated disk space .

Chapter 28 Troubleshooting
Cloud Storage User’s Guide
346
Replacing sm aller disks in a RAI D 1, RAI D 5, or RAI D 6 with larger capacity hard disks did not expand the storage capacity.
The NAS normally expands the storage capacity by itself after rebuilding the RAI D but m ay not if the NAS rebooted during the RAI D re-build.
After the re-build finishes, go to the Storage screens and select the volum e or disk group and click Manage and use Expand the volum e w ith unallocated disk space .
28.9 Firmware
I want to know the firm ware version on the NAS.
Go to the Status screen. The Firm w are field shows you the current firmware version running.
28.10 File Transfer
I want to t ransfer my file(s) from my local com puter or storage device to the NAS.
• After you init ialize your hard disk, you can direct ly access the folders in your NAS and t ransfer files in the sam e way you t ransfer files in your local com puter:
1 On your Windows com puter, click Start > Run or open a web browser.
2 Enter \ \ nas followed by the number of your model (5 4 0 for exam ple) or the Server Nam e you assigned the NAS. This shows you the folders in the NAS.
3 Use drag-and-drop or copy-and-paste to t ransfer files over to your NAS.
• Use the COPY/ SYNC but ton to t ransfer files from an external (USB) storage device to the NAS.
I want to t ransfer my file(s) from the NAS to my local com puter or storage device.
• After you init ialize your hard disk, you can direct ly access the folders in your NAS and t ransfer files in the sam e way you t ransfer files in your local com puter:
1 On your Windows com puter, click Start > Run or open a web browser.

Chapter 28 Troubleshooting
Cloud Storage User’s Guide
347
2 Enter \ \ nas followed by the number of your model (5 4 0 for exam ple) or the Server Nam e you assigned the NAS. This shows you the folders in the NAS.
3 Use drag-and-drop or copy-and-paste to t ransfer files from your NAS to your local com puter ’s folder or your storage device.
• You can download the files from your NAS. Just click on the file(s) in the Share Brow sing screen (Sect ion 11.2 on page 124) . Your com puter will prom pt you for the locat ion where you want to save the file.
28.11 Networking
I want to cont rol who can access my folder(s) / file(s) .
• I f you are an adm inist rator, you can configure a user ’s access r ights. Use the Shares screen (Sect ion 24.3 on page 291) to do this.
• I f you enabled W eb Publishing for a folder, anyone on your network can play the m edia files in the published shares. No user name and password or other form of security is used. The m edia server is enabled by default with the video, photo, and music shares published.
One of the com puters in my network cannot use the pr inter I connected to the NAS.
• You m ust install the printer dr iver on each com puter that will use the printer.
• Check Sect ion 28.4 on page 340 and check for related connect ivity issues.
28.12 Some Features’ Screens Do Not Display
Many NAS features require a valid internal volum e.
Features like the print server, download service, FTP and Windows/ CI FS access will not work without a valid internal volum e. Make sure you have a volume on an internal disk and that the volum e is in the healthy state.
• I nstall an internal disk if one is not installed yet or has failed. See the Quick Start Guide for how to install an internal disk.
• Create a new volum e if you do not have one on the internal disk yet .
• Make sure the volum e on the installed internal disk is in a healthy state.

Chapter 28 Troubleshooting
Cloud Storage User’s Guide
348
I cannot use som e applicat ions in the Web Configurator.
• The firm ware installed in your NAS includes the features m ent ioned in Sect ion 10.8 on page 122. This does not include the applicat ions you can install using the Package Managem ent screen.
• You can use the Package Managem ent screen (Chapter 18 on page 246) to install m ore applicat ions from a web locat ion (specified in the firmware) to your NAS.
• I f you have installed the applicat ion and can see the applicat ion’s configurat ion screen but st ill cannot use it , check that you have Enabled the applicat ion.
28.13 Media Server Functions
I set the m edia server funct ion to publish a folder, but som e of the files in the folder do not display in the list on the m edia client .
Files with form ats that are not supported on the media server may not display in the list . See page 354 for the file form ats that the m edia server supports.
I published a folder with the m edia server funct ion, but the m edia client does not play som e of the files (or does not play them properly) .
1 Files with form ats that are not supported on the media server may not display in the list . See page 354 for the file form ats that the m edia server supports.
2 I f you are using m edia client software, you m ay need to install codecs on your com puter. Since the m edia client software uses your com puter ’s installed codecs, files do not play if the required codec is not installed on your com puter.
3 The m edia client m ay not support the file’s form at .
iTunes does not display the nam es of all the m usic files I j ust put on the NAS.
1 Make sure the files are a format supported by iTunes. See page 354.
2 Go to Applica t ions > Media Server . Make sure the share containing the m usic files is published and the iTunes server opt ion is enabled.
3 I f an iTunes client is connected, the NAS’s iTunes server funct ion scans the published m edia server folders for files every three m inutes. Leave iTunes connected to the NAS for three m inutes. Then use the NAS’s eject but ton (as shown next ) to disconnect .
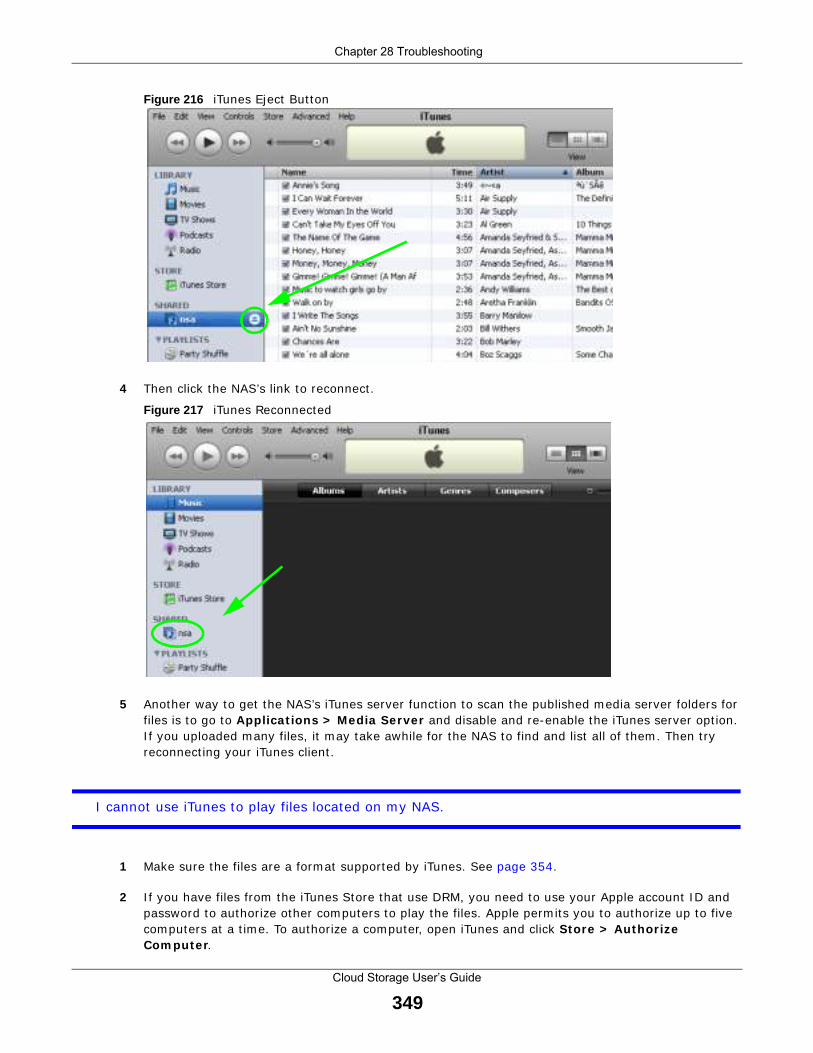
Chapter 28 Troubleshooting
Cloud Storage User’s Guide
349
Figure 216 iTunes Eject But ton
4 Then click the NAS’s link to reconnect .
Figure 217 iTunes Reconnected
5 Another way to get the NAS’s iTunes server funct ion to scan the published m edia server folders for files is to go to Applicat ions > Media Server and disable and re-enable the iTunes server opt ion. I f you uploaded many files, it may take awhile for the NAS to find and list all of them . Then t ry reconnect ing your iTunes client .
I cannot use iTunes to play files located on my NAS.
1 Make sure the files are a format supported by iTunes. See page 354.
2 I f you have files from the iTunes Store that use DRM, you need to use your Apple account I D and password to authorize other com puters to play the files. Apple perm its you to authorize up to five com puters at a t im e. To authorize a computer, open iTunes and click Store > Author ize Com puter .

Chapter 28 Troubleshooting
Cloud Storage User’s Guide
350
3 I f you are connect ing through a NAT router, m ake sure that TCP port 3689 and UDP port 5353 are open for t raffic on both the server and the client and all points in between (especially the NAT router) . I f your router includes a firewall, m ake sure it also allows TCP port 3689 and UDP port 5353 t raffic.
28.14 Download Service Functions
The download list item s are m issing after I rem oved a hard dr ive.
The NAS’s download list is stored on the system volum e. I f you have two JBOD volumes, it is possible to remove one and st ill use the other. However if you rem ove the system volum e, you m ay lose the download list . With two JBOD volum es, the hard disk that was installed first is usually the system volume.
I cannot find the download files.
By default , the Dow nload Service feature stores downloaded files as follows:
• P2P download jobs are stored in / * / incom ing (where ‘* ’ is a folder that you have set .)
• HTTP/ FTP jobs are stored in / * (where ‘* ’ is a folder that you have set .)
• All jobs t r iggered by RSS channels create the subfolder in / * using the channel name where it store all files downloaded from that channel (where ‘* ’ is a folder that you have set .)
Check your Preferences in the Dow nload Service (Sect ion 17.7 on page 219) screens to know or configure where downloaded files are stored.
28.15 Web Publishing
A web-published share cannot be accessed by web browser from the I nternet .
• Make sure the person t rying to access the share is using the correct web address (and port number if the NAS’s web publishing feature is not using port 80) . See page 240 for details.
• Make sure the publishing feature is turned on and the share is in the list of published shares.
• Make sure the person t rying to access the share is using I nternet Explorer 6.0 (and later) or Firefox 1.07 (and later) .
• You need to use a public address to access the NAS’s web-published shares from the I nternet . I f your NAS uses a private I P address, use the public I P address of your I nternet gateway ( firewall) and configure NAT or port forwarding on your I nternet gateway and possibly firewall rules in order to let people access the NAS’s web-published shares from the I nternet .

Chapter 28 Troubleshooting
Cloud Storage User’s Guide
351
• Make sure the firewall’s public I P address is static or that the firewall uses a Dynam ic Dom ain Nam e (DDNS) .
• Web publishing uses TCP protocol and the port num ber you specify. Make sure there is not another service using TCP protocol with the sam e port num ber.
• I f Firefox access to the share does not work, check that you did not set the Web publishing feature to use one of the following ports. (Firefox blocks these ports by default .)
• Make sure your I SP allows you to run a server and is not blocking the port number of the NAS’s web publishing feature.
28.16 Auto Upload
The NAS does not autom at ically upload files to Flickr or YouTube.
1 Make sure the NAS is connected to the I nternet . See Sect ion 10.4 on page 107 for details about test ing network connect ions.
2 Click Maintenance > Log to check the NAS’s log for a m essage about the file.
2a I f the log m essage displays “no such file or directory”, the file m ay have been rem oved from the NAS. Make sure the file st ill exists in the watch folder.
Table 142 Ports Blocked By Default in Firefox
PORT SERVICE PORT SERVICE PORT SERVICE
1 tcpm ux 95 supdup 513 login
7 echo 101 host r iame 514 shell
9 discard 102 iso- tsap 515 printer
11 systat 103 gppitnp 526 tem po
13 dayt ime 104 acr-nem a 530 courier
15 netstat 109 POP2 531 chat
17 qotd 110 POP3 532 netnews
19 chargen 111 sunrpc 540 uucp
20 ftp data 113 auth 556 rem otefs
21 ftp cont rol 115 sftp 563 NNTP+ SSL
22 ssh 117 uucp-path 587 subm ission
23 telnet 119 NNTP 601 syslog
25 sm tp 123 NTP 636 LDAP+ SSL
37 t ime 135 loc-srv epm ap 993 I MAP+ SSL
42 nam e 139 netbios 995 POP3+ SSL
43 nicnam e 143 I MAP2 2049 nfs
53 domain 179 BGP 4045 lockd
77 priv- r j s 389 LDAP 6000 X11
79 finger 465 SMTP+ SSL
87 t tylink 512 print exec

Chapter 28 Troubleshooting
Cloud Storage User’s Guide
352
2b I f the log m essage displays “ filenam e is queued”, the file may st ill be wait ing for auto upload. Check the grace period set t ing in the service’s Configurat ion screen. You can set a sm aller grace period to shorten the queue t ime.
2c I f you cannot find any log messages about the file:
• Make sure the Folder W atch List includes the folder containing the file. You can upload the file to the watch folder again.
• Make sure the file’s form at is supported by Flickr or YouTube. You can find the supported file extensions in the Folder W atch List .
2d I f the log m essage displays “not authorized yet ”, check if you can enter the NAS’s Configurat ion screen for the service. I f you changed the password of your Flickr or YouTube account , you cannot access the service’s Configurat ion screen, and the NAS cannot auto upload files. Make sure you also update the account informat ion in the NAS.
3 Make sure the file size does not exceed the lim it im posed by the service. At the t im e of writ ing, Flickr rest r icts the file size to 10 MB, and YouTube rest r icts the file size to 100 MB.
4 Make sure you did not exceed the service’s upload quota. Flickr and YouTube have different policies about how much you can upload within a certain period, for example, 100 MB/ week.
5 The NAS may have tem porarily failed to connect to the service. You can upload the file to the watch folder again.
28.17 Package Management
The NAS won’t install the package(s) I selected in the Package Managem ent screen.
• The web locat ion of the package may be undergoing maintenance. Try again at a later t ime. Upgrade the firmware of the NAS.
• I f a new firm ware is available, do an upgrade and t ry installing the package(s) again.
I want to know how my hard disk is perform ing.
Use S.M.A.R.T. (Self Monitor ing, Analysis, and Report ing Technology) to m onitor hard disks. I t detects and reports the reliability of hard disks using standard indicators, enabling adm inist rators to ant icipate possible disk failures.
28.18 Backups
I cannot m ake a backup.
Chapter 28 Troubleshooting
Cloud Storage User’s Guide
353
• Check that enough space is available on the external disk. I f there isn’t you m ay need to purge older backups or delete other files on the backup USB disk or NAS.
• I f you are using the Backup screen (Sect ion 27.3 on page 321) :
• You can look at the Backup screen’s Last Run Result display.
• I f you’re backing up to another NAS or a computer, check that it allows the NAS to write files to it . For a synchronizat ion backup, the target m ust be another NAS or another com pat ible model.
• Check that the NAS is not perform ing another backup job. Scheduler queues backups when a different backup is already going on at the t im e a backup is scheduled.
The backup does not run at the t im e configured.
• Check that the correct t im e is configured on the NAS.
• Check that the NAS is able to access the t im e server from which it gets the t im e; see Sect ion 16.6 on page 210.
28.19 Google Drive
Google Drive stopped syncing.
1 Make sure the NAS is connected to the I nternet . See Sect ion 10.4 on page 107 for details about test ing network connect ions.
2 Check if you have exceeded the Google Drive account ’s storage quota. You m ay need to:
• Delete unneeded files.
• Empty the Google Drive t rash bin. Note, this perm anent ly deletes everything in the bin, even if Google m oved it there without telling you (because you moved a file out of the local sync folder for exam ple) .
• Upgrade the account ’s capacity
3 Click Maintenance > Log to check the NAS’s log messages. I f a log message says you have exceeded your storage quota on the NAS:
• Delete unneeded files.
• Clean out the recycle bin (see Sect ion 24.4.2 on page 296) .
• I ncrease the user ’s quota on the volume containing the local sync folder (see Sect ion 22.3.2 on page 283) .
4 Check for any logs about removal of the user account . When you rem ove a user ’s NAS account , the NAS also rem oves the link to the user ’s Google account . However the NAS keeps the data in the local sync folder. Reconfigure a user account and link it to the Google account to let the user use Google Drive again.

Cloud Storage User’s Guide
354
A PPENDIX A
Product Specifications
See also Chapter 1 on page 14 for a general overview of the key features.
Supported Media Server Content Formats
The following describes the details about the files that the NAS m edia server can publish.
• Audio: LPCM (not supported as a file format ) , MP3, WMA, M4A, M4B, MP4, 3GP, WAV, OGG, FLAC, AAC, MP2, AC3, MPA, MP1, AI F, ASF, FLV, DSD
• I mages: JPEG, PNG, TI F, TI FF, BMP, GI F
• Video: WMV, MPEG2, MP1, MPG, SPTS, MP4, AVI , VOB, DivX, 3GP, VDR, MPE, DVR-MS, Xvid, M1V, M4V, MOV, MPV, MKV, OGG, FLV, MTS
Note: Not all published file types can be viewed by all client applicat ions.
Supported iTunes Server Content Formats
At the t im e of writ ing, the NAS supports iTunes publishing audio files of the following form ats: m p3, m4a, m4p, wav, and mp4.
Cloud Storage User’s Guide
355
A PPENDIX B
Customer Support
I n the event of problem s that cannot be solved by using this manual, you should contact your vendor. I f you cannot contact your vendor, then contact a ZyXEL office for the region in which you bought the device.
See ht tp: / / www.zyxel.com/ hom epage.shtm l and also
ht tp: / / www.zyxel.com/ about_zyxel/ zyxel_worldwide.shtm l for the latest inform at ion.
Please have the following inform at ion ready when you contact an office.
Required Information• Product m odel and serial num ber.
• Warranty I nform at ion.
• Date that you received your device.
• Brief descript ion of the problem and the steps you took to solve it .
Corporate Headquart ers (Worldwide)
Taiwan• ZyXEL Com m unicat ions Corporat ion
• ht tp: / / www.zyxel.com
Asia
China• ZyXEL Com m unicat ions (Shanghai) Corp.
ZyXEL Com m unicat ions (Beij ing) Corp.
ZyXEL Com m unicat ions (Tianj in) Corp.
• ht tp: / / www.zyxel.cn
India• ZyXEL Technology I ndia Pvt Ltd
• ht tp: / / www.zyxel. in
Kazakhstan• ZyXEL Kazakhstan

Appendix B Customer Support
Cloud Storage User’s Guide
356
• ht tp: / / www.zyxel.kz
Korea• ZyXEL Korea Corp.
• ht tp: / / www.zyxel.kr
Malaysia• ZyXEL Malaysia Sdn Bhd.
• ht tp: / / www.zyxel.com.my
Pakistan• ZyXEL Pakistan (Pvt .) Ltd.
• ht tp: / / www.zyxel.com.pk
Philippines• ZyXEL Philippines
• ht tp: / / www.zyxel.com.ph
Singapore• ZyXEL Singapore Pte Ltd.
• ht tp: / / www.zyxel.com.sg
Taiwan• ZyXEL Com m unicat ions Corporat ion
• ht tp: / / www.zyxel.com/ tw/ zh/
Thailand• ZyXEL Thailand Co., Ltd
• ht tp: / / www.zyxel.co.th
Vietnam• ZyXEL Com m unicat ions Corporat ion-Vietnam Office
• ht tp: / / www.zyxel.com/ vn/ vi
Europe
Austria• ZyXEL Deutschland Gm bH
• ht tp: / / www.zyxel.de
Appendix B Customer Support
Cloud Storage User’s Guide
357
Belarus• ZyXEL BY
• ht tp: / / www.zyxel.by
Belgium• ZyXEL Com m unicat ions B.V.
• ht tp: / / www.zyxel.com/ be/ nl/
• ht tp: / / www.zyxel.com/ be/ fr /
Bulgaria• ZyXEL България
• ht tp: / / www.zyxel.com/ bg/ bg/
Czech Republic• ZyXEL Com m unicat ions Czech s.r.o
• ht tp: / / www.zyxel.cz
Denmark• ZyXEL Com m unicat ions A/ S
• ht tp: / / www.zyxel.dk
Estonia• ZyXEL Estonia
• ht tp: / / www.zyxel.com/ ee/ et /
Finland• ZyXEL Com m unicat ions
• ht tp: / / www.zyxel.fi
France• ZyXEL France
• ht tp: / / www.zyxel.fr
Germany• ZyXEL Deutschland Gm bH
• ht tp: / / www.zyxel.de
Hungary• ZyXEL Hungary & SEE
• ht tp: / / www.zyxel.hu

Appendix B Customer Support
Cloud Storage User’s Guide
358
Italy• ZyXEL Com m unicat ions I taly
• ht tp: / / www.zyxel. it /
Latvia• ZyXEL Latvia
• ht tp: / / www.zyxel.com/ lv/ lv/ hom epage.shtm l
Lithuania• ZyXEL Lithuania
• ht tp: / / www.zyxel.com/ lt / lt / homepage.shtm l
Netherlands• ZyXEL Benelux
• ht tp: / / www.zyxel.nl
Norway• ZyXEL Com m unicat ions
• ht tp: / / www.zyxel.no
Poland• ZyXEL Com m unicat ions Poland
• ht tp: / / www.zyxel.pl
Romania• ZyXEL Rom ania
• ht tp: / / www.zyxel.com/ ro/ ro
Russia• ZyXEL Russia
• ht tp: / / www.zyxel.ru
Slovakia• ZyXEL Com m unicat ions Czech s.r.o. organizacna zlozka
• ht tp: / / www.zyxel.sk
Spain• ZyXEL Com m unicat ions ES Ltd
• ht tp: / / www.zyxel.es
Sweden• ZyXEL Com m unicat ions
Appendix B Customer Support
Cloud Storage User’s Guide
359
• ht tp: / / www.zyxel.se
Switzerland• Studerus AG
• ht tp: / / www.zyxel.ch/
Turkey• ZyXEL Turkey A.S.
• ht tp: / / www.zyxel.com.t r
UK• ZyXEL Com m unicat ions UK Ltd.
• ht tp: / / www.zyxel.co.uk
Ukraine• ZyXEL Ukraine
• ht tp: / / www.ua.zyxel.com
Latin America
Argentina• ZyXEL Com m unicat ion Corporat ion
• ht tp: / / www.zyxel.com/ ec/ es/
Brazil• ZyXEL Com m unicat ions Brasil Ltda.
• ht tps: / / www.zyxel.com/ br/ pt /
Ecuador• ZyXEL Com m unicat ion Corporat ion
• ht tp: / / www.zyxel.com/ ec/ es/
Middle East
Israel• ZyXEL Com m unicat ion Corporat ion
• ht tp: / / il.zyxel.com / hom epage.shtm l
Middle East• ZyXEL Com m unicat ion Corporat ion

Appendix B Customer Support
Cloud Storage User’s Guide
360
• ht tp: / / www.zyxel.com/ me/ en/
North America
USA• ZyXEL Com m unicat ions, I nc. - North Am erica Headquarters
• ht tp: / / www.zyxel.com/ us/ en/
Oceania
Australia• ZyXEL Com m unicat ions Corporat ion
• ht tp: / / www.zyxel.com/ au/ en/
Africa
South Africa• Nology (Pty) Ltd.
• ht tp: / / www.zyxel.co.za
Cloud Storage User’s Guide
361
A PPENDIX C
Legal Information
CopyrightCopyright © 2015 by ZyXEL Com m unicat ions Corporat ion.
The contents of this publicat ion m ay not be reproduced in any part or as a whole, t ranscribed, stored in a ret r ieval system , t ranslated into any language, or t ransm it ted in any form or by any m eans, elect ronic, m echanical, m agnet ic, opt ical, chem ical, photocopying, m anual, or otherwise, without the pr ior writ ten perm ission of ZyXEL Com m unicat ions Corporat ion.
Published by ZyXEL Communicat ions Corporat ion. All r ights reserved.
DisclaimerZyXEL does not assum e any liability ar ising out of the applicat ion or use of any products, or software described herein. Neither does it convey any license under it s patent r ights nor the patent r ights of others. ZyXEL further reserves the r ight to m ake changes in any products described herein without not ice. This publicat ion is subject to change without not ice.
Regulatory Notice and Statement
UNITED STATES of AMERICA
The following inform at ion applies if you use the product within USA area.
FCC EMC Statement• The device com plies with Part 15 of FCC rules. Operat ion is subject to the following two condit ions:
(1) This device m ay not cause harm ful interference, and
(2) this device must accept any interference received, including inter ference that m ay cause undesired operat ion.
• Changes or m odificat ions not expressly approved by the party responsible for com pliance could void the user ’s authority to operate the equipment .
• This product has been tested and com plies with the specif icat ions for a Class B digital device, pursuant to Part 15 of the FCC Rules. These lim its are designed to provide reasonable protect ion against harm ful interference in a resident ial installat ion. This equipm ent generates, uses, and can radiate radio frequency energy and, if not installed and used according to the inst ruct ions, m ay cause harm ful interference to radio com m unicat ions. However, there is no guarantee that interference will not occur in a part icular installat ion.
• I f this equipment does cause harm ful interference to radio or television recept ion, which is found by turning the equipm ent off and on, the user is encouraged to t ry to correct the inter ference by one or m ore of the following measures:
• Reorient or relocate the receiving antenna
• I ncrease the separat ion between the equipment or devices
• Connect the equipm ent to an out let other than the receiver ’s
• Consult a dealer or an experienced radio/ TV technician for assistance
CANADA The following inform at ion applies if you use the product within Canada area
Industry Canada ICES statementCAN I CES-3 (B) / NMB-3(B)
Appendix C Legal Information
Cloud Storage User’s Guide
362
EUROPEAN UNION
The following inform at ion applies if you use the product within the European Union.
List of national codes
Safety Warnings• DO NOT use this product near water, for exam ple, in a wet basem ent or near a swim m ing pool.
• DO NOT expose your device to dampness, dust or corrosive liquids.
• DO NOT store things on the device.
• DO NOT install, use, or service this device dur ing a thunderstorm . There is a rem ote r isk of elect r ic shock from lightning.
• Connect ONLY suitable accessories to the device.
• DO NOT open the device or unit . Opening or rem oving covers can expose you to dangerous high voltage points or other r isks. ONLY qualified service personnel should service or disassem ble this device. Please contact your vendor for further inform at ion.
• Make sure to connect the cables to the correct ports.
• Place connect ing cables carefully so that no one will step on them or stum ble over them.
• Always disconnect all cables from this device before servicing or disassembling.
• DO NOT rem ove the plug and connect it to a power out let by itself; always at tach the plug to the power adaptor first before connect ing it to a power out let .
• DO NOT allow anything to rest on the power adaptor or cord and do NOT place the product where anyone can walk on the power adaptor or cord.
• Please use the provided or designated connect ion cables/ power cables/ adaptors. Connect it to the r ight supply voltage ( for exam ple, 110V AC in North Am erica or 230V AC in Europe) . I f the power adaptor or cord is damaged, it m ight cause elect rocut ion. Remove it from the device and the power source, repair ing the power adapter or cord is prohibited. Contact your local vendor to order a new one.
• DO NOT use the device outside, and m ake sure all the connect ions are indoors. There is a rem ote r isk of elect r ic shock from lightning.
• CAUTI ON: Risk of explosion if bat tery is replaced by an incorrect type, dispose of used bat ter ies according to the inst ruct ion. Dispose them at the applicable collect ion point for the recycling of elect r ical and elect ronic devices. For detailed informat ion about recycling of this product , please contact your local city office, your household waste disposal service or the store where you purchased the product .
• DO NOT obst ruct the device vent ilat ion slots, as insufficient air flow m ay harm your device.
The following warning statem ents apply, where the disconnect device is not incorporated in the device or where the plug on the power supply cord is intended to serve as the disconnect device,
• For permanent ly connected devices, a readily accessible disconnect device shall be incorporated external to the device;• For pluggable devices, the socket-out let shall be installed near the device and shall be easily accessible.
COUNTRY ISO 3166 2 LETTER CODE COUNTRY ISO 3166 2 LETTER CODE
Austr ia AT Liechtenstein LI
Belgium BE Lithuania LT
Bulgaria BG Luxem bourg LU
Croat ia HR Malta MT
Cyprus CY Netherlands NL
Czech Republic CZ Norway NO
Denm ark DK Poland PL
Estonia EE Portugal PT
Finland FI Rom ania RO
France FR Serbia RS
Germ any DE Slovakia SK
Greece GR Slovenia SI
Hungary HU Spain ES
I celand IS Switzerland CH
I reland IE Sweden SE
I taly IT Turkey TR
Latvia LV United Kingdom GB

Appendix C Legal Information
Cloud Storage User’s Guide
363
Environment Statement
ErP (Energy-related Products) ZyXEL products put on the EU market in compliance with the requirem ent of the European Parliament and the Council published
Direct ive 2009/ 125/ EC establishing a fram ework for the set t ing of ecodesign requirem ents for energy- related products ( recast ) , so called
as "ErP Direct ive (Energy- related Products direct ive) as well as ecodesign requirem ent laid down in applicable im plem ent ing m easures, power consum pt ion has sat isfied regulat ion requirem ents which are:
Network standby power consum pt ion < 12W, and/ or
Off mode power consum pt ion < 0.5W, and/ or
Standby mode power consum pt ion < 0.5W.
Wireless set t ing, please refer to "Wireless" chapter for more detail.
European Union - Disposal and Recycling InformationThe sym bol below m eans that according to local regulat ions your product and/ or its bat tery shall be disposed of separately from domest ic waste. I f this product is end of life, take it to a recycling stat ion designated by local authorit ies. At the t im e of disposal, the separate collect ion of your product and/ or it s bat tery will help save natural resources and ensure that the environm ent is sustainable development .
Die folgende Sym bol bedeutet , dass I hr Produkt und/ oder seine Bat ter ie gem äß den ört lichen Best im m ungen get rennt vom Hausm üll entsorgt werden muss. Wenden Sie sich an eine Recyclingstat ion, wenn dieses Produkt das Ende seiner Lebensdauer erreicht hat . Zum Zeitpunkt der Entsorgung wird die get rennte Sammlung von Produkt und/ oder seiner Bat terie dazu beit ragen, natürliche Ressourcen zu sparen und die Umwelt und die menschliche Gesundheit zu schützen.
El símbolo de abajo indica que según las regulaciones locales, su producto y/ o su batería deberán depositarse como basura separada de la domést ica. Cuando este producto alcance el final de su vida út il, llévelo a un punto limpio. Cuando llegue el momento de desechar el producto, la recogida por separado éste y/ o su batería ayudará a salvar los recursos naturales y a proteger la salud hum ana y m edioam biental.
Le symbole ci-dessous signif ie que selon les réglementat ions locales vot re produit et / ou sa bat ter ie doivent êt re élim inés séparément des ordures ménagères. Lorsque ce produit at teint sa fin de vie, amenez- le à un cent re de recyclage. Au m om ent de la m ise au rebut , la collecte séparée de vot re produit et / ou de sa bat ter ie aidera à économ iser les ressources naturelles et protéger l'environnem ent et la santé hum aine.
I l simbolo sot to significa che secondo i regolam ent i locali il vost ro prodot to e/ o bat ter ia deve essere sm alt ito separatamente dai r ifiut i domest ici. Quando questo prodot to raggiunge la fine della vita di servizio portar lo a una stazione di r iciclaggio. Al mom ento dello smalt imento, la raccolta separata del vost ro prodot to e/ o della sua bat ter ia aiuta a r isparm iare r isorse naturali e a proteggere l'am biente e la salute um ana.
Sym bolen innebär at t enligt lokal lagst iftning ska produkten och/ eller dess bat ter i kastas separat från hushållsavfallet . När den här produkten når slutet av sin livslängd ska du ta den t ill en återvinningsstat ion. Vid t iden för kasseringen bidrar du t ill en bät t re m ilj ö och mänsklig hälsa genom at t göra dig av m ed den på et t återvinningsställe.

Appendix C Legal Information
Cloud Storage User’s Guide
364
Environmental Product Declaration

Appendix C Legal Information
Cloud Storage User’s Guide
365
灣
安 警告
為了您的安 請先閱讀以 警告及指示 :
• 請勿將 產品接近水 火焰或放置在高溫的環境• 避免設備接觸任何液體 - 勿讓設備接觸水 雨水 高濕 水腐蝕性的液體或其他水份• 灰塵及 物 - 勿接觸灰塵 物 沙土 食物或其他不合適的材料• 雷雨天氣時 不要安裝 使用或維修 設備 有遭受電擊的風險• 勿重摔或撞擊設備 並勿使用不 確的電源變壓器• 若接 不 確的電源變壓器會有爆炸的風險• 請勿隨意更換產品 的電• 如果更換不 確之電 型式 會有爆炸的風險 請依製造商說明書處理使用過之電• 請將廢電 丟棄在適當的電器或電子設備回收處• 請勿將設備解體• 請勿阻礙設備的散熱孔 空氣對流不足將會造成設備損害• 請插在 確的電壓供給插 (如 :北美 / 灣電壓 110V AC 歐洲是 230V AC)• 假若電源變壓器或電源變壓器的纜線損壞 請從插 拔除 若您還繼續插電使用 會有觸電死亡的風險• 請勿試圖修理電源變壓器或電源變壓器的纜線 若有毀損 請直接聯絡您購買的店家 購買一個新的電源變壓器• 請勿將 設備安裝於室外 設備僅適合放置於室• 請勿隨一般垃圾丟棄• 請參閱產品背貼 的設備額定功率• 請參考產品型錄或是彩盒 的作業溫• 產品沒有斷電裝置或者採用電源線的插頭視為斷電裝置的一部 以 警語將適用 :
對永久連接之設備 在設備外部須安裝 觸及之斷電裝置;
對插接式之設備 插 必須接近安裝之地點而且是易於觸及的
Viewing Certifications Go to ht tp: / / www.zyxel.com to view this product ’s docum entat ion and cert ificat ions.
ZyXEL Limited Warranty ZyXEL warrants to the original end user (purchaser) that this product is free from any defects in m aterial or workm anship for a specific period ( the Warranty Period) from the date of purchase. The Warranty Period varies by region. Check with your vendor and/ or the author ized ZyXEL local dist r ibutor for details about the Warranty Period of this product . During the warranty per iod, and upon proof of purchase, should the product have indicat ions of failure due to faulty workm anship and/ or m aterials, ZyXEL will, at it s discret ion, repair or replace the defect ive products or com ponents without charge for either parts or labor, and to whatever extent it shall deem necessary to restore the product or com ponents to proper operat ing condit ion. Any replacement will consist of a new or re-manufactured funct ionally equivalent product of equal or higher value, and will be solely at the discret ion of ZyXEL. This warranty shall not apply if the product has been m odified, m isused, tampered with, damaged by an act of God, or subjected to abnorm al working condit ions.
NoteRepair or replacem ent , as provided under this warranty, is the exclusive rem edy of the purchaser. This warranty is in lieu of all other warrant ies, express or im plied, including any im plied warranty of merchantability or fitness for a part icular use or purpose. ZyXEL shall in no event be held liable for indirect or consequent ial damages of any kind to the purchaser.
To obtain the services of this warranty, contact your vendor. You m ay also refer to the warranty policy for the region in which you bought the device at ht tp: / / www.zyxel.com / web/ support_warranty_info.php.
Registration Register your product online to receive e-mail not ices of firmware upgrades and inform at ion at www.zyxel.com for global products, or at www.us.zyxel.com for North Am erican products.
Open Source Licenses This product contains in part som e free software dist r ibuted under GPL license terms and/ or GPL like licenses. Open source licenses are provided with the f irm ware package. You can download the latest firm ware at www.zyxel.com . To obtain the source code covered under those Licenses, please contact [email protected] to get it .

Index
Cloud Storage User’s Guide
366
Index
A
access r ights 127Flickr 267shares 294, 295YouTube 269
act ivat iondownload service 219Flickr/ YouTube 263FTP 216FTP Uploadr 270recycle bins 127, 293web publishing 230
adding channels 219
Amazon Fire TV 30
ANONYMOUS FTP 344
anonymous FTP access 216
Apple TV 30
applicat ions 213, 262adding channels 219auto upload
Flickr/ YouTube 262FTP Uploadr 270
COPY/ SYNC but ton 232configurat ion 232exam ple 241synchronizat ion 242
download service 214, 235act ivat ion 219adding a task 222, 228configurat ion 219not ificat ions 236P2P download 222, 235preferences 223protect ion 236, 237status 221URL 222
FTP 213, 215, 262act ivat ion 216anonym ous access 216passive m ode t ransfer 216
media server 214, 216configurat ion 217
iTunes server 214, 234print server 240
configurat ion 231nam e 232
web publishing 215, 230, 240act ivat ion 230exam ple 238port number 240
archive 192
authorizat ionFlickr 263, 264YouTube 267
auto upload
Flickr/ YouTube 262act ivat ion 263authorizat ion 263, 267configurat ion 266, 267
FTP Uploadr 270act ivat ion 270bandwidth lim it 273configurat ion 272server ent ry 271
grace period 267, 269, 273
B
backup 191, 192, 254, 256archive 192synchronizat ion tutor ial 194tutor ial 194
backup files
restoring files by 34, 198
backup job
restoring files by 196
backup set t ings 310
bandwidth lim it 273
Index
Cloud Storage User’s Guide
367
C
cert ificate 312edit ing 312tutor ial 177verifying 186
cert ificat ions 362viewing 365
Chrom ecast 30
CI FS 206
cloud 251
cloud storage 254, 256
collaborat ion 256
configurat ion
COPY/ SYNC but ton 232download service 219Flickr 266FTP Uploadr 272print server 231recycle bins 296YouTube 267, 268
contact inform at ion 355
cont rol panel 106
COPY/ SYNC but ton 17, 232configurat ion 232exam ple 241synchronizat ion 242
copying contents 298
copyright 361
CPU
temperature 104usage 104
creat ing
groups 288, 289shares 292, 293users 282, 283
customer support 355
D
date 210
desktop 41
disclaimer 361
discovery 20
disk
S.M.A.R.T. at t r ibutes 79
displaying user inform at ion 285
DLNA 214, 234
DNS 106, 108
docum entat ion
related 2
Domain Name System, see DNS
domain usert roubleshoot ing 345t roubleshoot ing share access 345
download period cont rol 225
download service 214, 235act ivat ion 219adding a task 222, 228configurat ion 219download period cont rol 225not ificat ions 236
act ivat ion 219P2P download
I P filter ing 227protect ion 236, 237re-seeding 220set t ings 225torrent files 222, 235
preferences 223status 221URL, download service 222
downloading files 126
Dropbox 274
duplexing 98
E
Exchangeable image file form at , see Exif
Exif 130
explicit TLS/ SSL 188
F
fan speed 104
filet roubleshoot ing access 345
file browser
configure share 126

Index
Cloud Storage User’s Guide
368
file synchronizat ion 256
File Transfer Protocol over Explicit TLS, see FTPES
File Transfer Protocol over TLS, see FTPS
filesdownloading 126uploading 126
FileZilla 188
FindMe 19
fingerprint 186
firmware, upgrading 122
Flickr 262access r ights 267act ivat ion 263authorizat ion 263, 264grace period 267safety level 267
foldert roubleshoot ing access 345
folder creat ion 125
FTP 188, 213, 215, 262act ivat ion 216anonym ous access 216over TLS 188passive m ode t ransfer 216
FTP Uploadr 270act ivat ion 270bandwidth lim it 273configurat ion 272grace period 273server ent ry 271
FTPES 214
FTPES - FTP over explicit TLS/ SSL 188
FTPS 188, 262
G
global icons 140
GMT 24, 211
Google Chrom ecast 30
Google Drive 256
Google Maps 131
GPS 131
grace period 267, 269, 273
groups 287
adding 288, 289edit ing 289m em bership 284, 289nam es 289searching 288
Guide
Quick Start 2
H
hot spare 102
HTTPS 182, 300, 311
I
icons 140, 142global 140users 283
I P address 106
I P filter ing 227
iSCSI 81
iSCSI target 86
iTunes server 214, 218, 234
J
JBOD 98
K
Ken Burns 137
L
lag, t ime 206
language 137
lat itude 131
login 38
Logitech® Media Server 218

Index
Cloud Storage User’s Guide
369
logs 306
longitude 131
LUN 82
M
m aintenance 302backup set t ings 310logs 306power managem ent 302
failure 303resum e 303schedule 304UPS 303
reset 310restoring set t ings 310shutdown 313upgrading firmware 122
m aster browser 210
media server 214, 216configurat ion 217iTunes server 214, 218, 234Logitech® Media Server 218rebuild database 216share publish 217status 216
m em bership 284groups 284, 289
Memopal 254
m irror ing 98
m oving contents 298
myZyXELCloud 26
N
naming
server 209shares 128workgroup 210
NAS Starter Ut ility 19
navigat ion panel 140
network 106DNS 106, 108I P address 106
PPPoE 107, 111, 119TCP/ I P 107
not ificat ions
download service
act ivat ion 219
not ificat ions, download service 236
O
one-way incremental backup 254
online backup 254
online support inform at ion 2
other docum entat ion 2
ownCloud 251
P
P2P download
I P filter ing 227protect ion 236, 237re-seeding 220set t ings 225torrent files 222, 235
health 230info-hash 230t rackers 230
parity 98
passive m ode t ransfer 216
personal cloud 251
Play Next 137
port m apping 113
power but ton 16
power management 302failure 303resum e 303schedule 304UPS 303
PPPoE 107, 111, 119
preferences, download service 223
print server 240configurat ion 231nam e 232
private cloud 251

Index
Cloud Storage User’s Guide
370
protect 192backup 191backup tutor ial 194
protect ion, download service 236, 237
public key cert ificate 312edit ing 312
publishing shares 217
Q
Quick Start Guide 2
R
RAI D
background inform at ion 98data protect ion 102RAI D 0 99RAI D 10 101RAI D 5 101RAI D 5 spare 102
rebuild m edia server database 216
recycle bins 295act ivat ion 127, 293configurat ion 292, 296
related documentat ion 2
rem ote access 26
reset 17, 310
restor ingby backup files tutor ial 34, 198by backup job tutorial 196files 196
restoring set t ings 310
Roku 3 30
RSS 215download service not ificat ions 236
S
S.M.A.R.T.
at t r ibutes 79
safety level, Flickr 267
schedule, power managem ent 304
scheduling, download service 225
secure connect ions 182
serverSyslog 243TFTP 250
server ent ry, FTP Uploadr 271
server nam e 209
setup
COPY/ SYNC but ton 232download service 219Flickr 266FTP Uploadr 272media server 217P2P download 225print server 231YouTube 267, 268
shareconfigurat ion 126t roubleshoot ing local user access 344
share publishing 217
shares 124, 291access r ights 127, 294, 295adding 292, 293copying contents 298downloading files 126edit ing 293folder creat ion 125m oving contents 298nam es 128recycle bins 292, 295
act ivat ion 293configurat ion 296
share browser 292, 296status 292types 292uploading files 126, 297
shutdown 313
smart TVs 30
SSL 188, 311cert ificate 312
edit ing 312tutor ial 177
status 139, 203download service 221shares 292volum e 97
status center 103
Index
Cloud Storage User’s Guide
371
storage 47status 97volum es 95
st ream ing 30
st r iping 98
support inform at ion 2
synchronizat ion 232, 242, 256configurat ion 232direct ions 233single direct ion 242tutor ial 194two direct ions 243
Syslog server 243
systemdate/ t ime 210login 38m aster browser 210reset 17server nam e 209set t ings 205status 203t im e lag 206workgroup nam e 210
T
target 86
TCP/ I P 107
temperature
CPU 104
TFTP server 250
thum bprint 186
t im e 210lag 206server 211zone 24, 211
Tim e Machine 278
TLS 188, 214, 262
torrent files 222, 235health 230info-hash 230t rackers 230
Transport Layer Security, see TLS
troubleshoot ing
dom ain user 345
dom ain user share access 345file access 345folder access 345forgot password 340, 341LED indicators 337
LAN 339local user share access 344login 343m edia files 348NAS Starter Ut ility 339overview 337user share access 343web configurator access 341
two-way synchronizat ion 256
U
Universal Plug and Play. See UPnP.
upgrading firmware 122
uploading files 126, 297
UPnP 113port m apping 113
UPS 303
URL 222
User Name 121
usernam es 284
users 281adding an account 282, 283displaying inform at ion 282, 285edit ing an account 283group membership 284, 289icons 283search 282usernam es 284
V
video category, YouTube 269
video playback 137
volum e
RAI D 1 99
volum es 95status 97

Index
Cloud Storage User’s Guide
372
W
warranty 365note 365
web configurator 38login 38navigat ion panel 140status 139
web publishing 215, 230, 240act ivat ion 230exam ple 238port number 240t roubleshoot ing 350
web security 182
workgroup nam e 210
Y
YouTube 262access r ights 269act ivat ion 263authorizat ion 267configurat ion 267, 268grace period 269video category 269
Z
zCloud 30
ZyXEL Drive 26