CK-12 Geometry - Basic, Teacher's Edition
426
-
Upload
khangminh22 -
Category
Documents
-
view
1 -
download
0
Transcript of CK-12 Geometry - Basic, Teacher's Edition


CK-12 Geometry - Basic,Teacher’s Edition
Lori JordanKate Dirga
Say Thanks to the AuthorsClick http://www.ck12.org/saythanks
(No sign in required)
www.ck12.org
To access a customizable version of this book, as well as otherinteractive content, visit www.ck12.org
CK-12 Foundation is a non-profit organization with a mission toreduce the cost of textbook materials for the K-12 market bothin the U.S. and worldwide. Using an open-content, web-basedcollaborative model termed the FlexBook®, CK-12 intends topioneer the generation and distribution of high-quality educationalcontent that will serve both as core text as well as provide anadaptive environment for learning, powered through the FlexBookPlatform®.
Copyright © 2014 CK-12 Foundation, www.ck12.org
The names “CK-12” and “CK12” and associated logos and theterms “FlexBook®” and “FlexBook Platform®” (collectively“CK-12 Marks”) are trademarks and service marks of CK-12Foundation and are protected by federal, state, and internationallaws.
Any form of reproduction of this book in any format or medium,in whole or in sections must include the referral attribution linkhttp://www.ck12.org/saythanks (placed in a visible location) inaddition to the following terms.
Except as otherwise noted, all CK-12 Content (including CK-12Curriculum Material) is made available to Users in accordancewith the Creative Commons Attribution-Non-Commercial 3.0Unported (CC BY-NC 3.0) License (http://creativecommons.org/licenses/by-nc/3.0/), as amended and updated by Creative Com-mons from time to time (the “CC License”), which is incorporatedherein by this reference.
Complete terms can be found at http://www.ck12.org/terms.
Printed: August 21, 2014
AUTHORSLori JordanKate Dirga
iii

Contents www.ck12.org
Contents
1 Basic Geometry TE - Teaching Tips 11.1 Basics of Geometry . . . . . . . . . . . . . . . . . . . . . . . . . . . . . . . . . . . . . . . . . 21.2 Reasoning and Proof . . . . . . . . . . . . . . . . . . . . . . . . . . . . . . . . . . . . . . . . 81.3 Parallel and Perpendicular Lines . . . . . . . . . . . . . . . . . . . . . . . . . . . . . . . . . . 131.4 Triangles and Congruence . . . . . . . . . . . . . . . . . . . . . . . . . . . . . . . . . . . . . . 211.5 Relationships with Triangles . . . . . . . . . . . . . . . . . . . . . . . . . . . . . . . . . . . . 271.6 Polygons and Quadrilaterals . . . . . . . . . . . . . . . . . . . . . . . . . . . . . . . . . . . . . 331.7 Similarity . . . . . . . . . . . . . . . . . . . . . . . . . . . . . . . . . . . . . . . . . . . . . . 391.8 Right Triangle Trigonometry . . . . . . . . . . . . . . . . . . . . . . . . . . . . . . . . . . . . 461.9 Circles . . . . . . . . . . . . . . . . . . . . . . . . . . . . . . . . . . . . . . . . . . . . . . . . 521.10 Perimeter and Area . . . . . . . . . . . . . . . . . . . . . . . . . . . . . . . . . . . . . . . . . 601.11 Surface Area and Volume . . . . . . . . . . . . . . . . . . . . . . . . . . . . . . . . . . . . . . 651.12 Rigid Transformations . . . . . . . . . . . . . . . . . . . . . . . . . . . . . . . . . . . . . . . . 72
2 Basic Geometry TE - Common Errors 782.1 Basics of Geometry . . . . . . . . . . . . . . . . . . . . . . . . . . . . . . . . . . . . . . . . . 792.2 Reasoning and Proof . . . . . . . . . . . . . . . . . . . . . . . . . . . . . . . . . . . . . . . . 842.3 Parallel and Perpendicular Lines . . . . . . . . . . . . . . . . . . . . . . . . . . . . . . . . . . 912.4 Triangles and Congruence . . . . . . . . . . . . . . . . . . . . . . . . . . . . . . . . . . . . . . 982.5 Relationships with Triangles . . . . . . . . . . . . . . . . . . . . . . . . . . . . . . . . . . . . 1032.6 Polygons and Quadrilaterals . . . . . . . . . . . . . . . . . . . . . . . . . . . . . . . . . . . . . 1092.7 Similarity . . . . . . . . . . . . . . . . . . . . . . . . . . . . . . . . . . . . . . . . . . . . . . 1152.8 Right Triangle Trigonometry . . . . . . . . . . . . . . . . . . . . . . . . . . . . . . . . . . . . 1212.9 Circles . . . . . . . . . . . . . . . . . . . . . . . . . . . . . . . . . . . . . . . . . . . . . . . . 1272.10 Perimeter and Area . . . . . . . . . . . . . . . . . . . . . . . . . . . . . . . . . . . . . . . . . 1332.11 Surface Area and Volume . . . . . . . . . . . . . . . . . . . . . . . . . . . . . . . . . . . . . . 1372.12 Rigid Transformations . . . . . . . . . . . . . . . . . . . . . . . . . . . . . . . . . . . . . . . . 145
3 Basic Geometry TE - Enrichment 1483.1 Basics of Geometry . . . . . . . . . . . . . . . . . . . . . . . . . . . . . . . . . . . . . . . . . 1493.2 Reasoning and Proof . . . . . . . . . . . . . . . . . . . . . . . . . . . . . . . . . . . . . . . . 1583.3 Parallel and Perpendicular Lines . . . . . . . . . . . . . . . . . . . . . . . . . . . . . . . . . . 1643.4 Triangles and Congruence . . . . . . . . . . . . . . . . . . . . . . . . . . . . . . . . . . . . . . 1763.5 Relationships with Triangles . . . . . . . . . . . . . . . . . . . . . . . . . . . . . . . . . . . . 1843.6 Polygons and Quadrilaterals . . . . . . . . . . . . . . . . . . . . . . . . . . . . . . . . . . . . . 1973.7 Similarity . . . . . . . . . . . . . . . . . . . . . . . . . . . . . . . . . . . . . . . . . . . . . . 2073.8 Right Triangle Trigonometry . . . . . . . . . . . . . . . . . . . . . . . . . . . . . . . . . . . . 2173.9 Circles . . . . . . . . . . . . . . . . . . . . . . . . . . . . . . . . . . . . . . . . . . . . . . . . 2263.10 Perimeter and Area . . . . . . . . . . . . . . . . . . . . . . . . . . . . . . . . . . . . . . . . . 2393.11 Surface Area and Volume . . . . . . . . . . . . . . . . . . . . . . . . . . . . . . . . . . . . . . 2493.12 Rigid Transformations . . . . . . . . . . . . . . . . . . . . . . . . . . . . . . . . . . . . . . . . 261
iv
www.ck12.org Contents
4 Basic Geometry TE - Differentiated Instruction 2704.1 Basics of Geometry . . . . . . . . . . . . . . . . . . . . . . . . . . . . . . . . . . . . . . . . . 2714.2 Reasoning and Proof . . . . . . . . . . . . . . . . . . . . . . . . . . . . . . . . . . . . . . . . 2774.3 Parallel and Perpendicular Lines . . . . . . . . . . . . . . . . . . . . . . . . . . . . . . . . . . 2824.4 Triangles and Congruence . . . . . . . . . . . . . . . . . . . . . . . . . . . . . . . . . . . . . . 2924.5 Relationships with Triangles . . . . . . . . . . . . . . . . . . . . . . . . . . . . . . . . . . . . 2984.6 Polygons and Quadrilaterals . . . . . . . . . . . . . . . . . . . . . . . . . . . . . . . . . . . . . 3044.7 Similarity . . . . . . . . . . . . . . . . . . . . . . . . . . . . . . . . . . . . . . . . . . . . . . 3114.8 Right Triangle Trigonometry . . . . . . . . . . . . . . . . . . . . . . . . . . . . . . . . . . . . 3174.9 Circles . . . . . . . . . . . . . . . . . . . . . . . . . . . . . . . . . . . . . . . . . . . . . . . . 3244.10 Perimeter and Area . . . . . . . . . . . . . . . . . . . . . . . . . . . . . . . . . . . . . . . . . 3334.11 Surface Area and Volume . . . . . . . . . . . . . . . . . . . . . . . . . . . . . . . . . . . . . . 3394.12 Rigid Transformations . . . . . . . . . . . . . . . . . . . . . . . . . . . . . . . . . . . . . . . . 347
5 Basic Geometry TE - Problem Solving 3535.1 Basics of Geometry . . . . . . . . . . . . . . . . . . . . . . . . . . . . . . . . . . . . . . . . . 3545.2 Reasoning and Proof . . . . . . . . . . . . . . . . . . . . . . . . . . . . . . . . . . . . . . . . 3595.3 Parallel and Perpendicular Lines . . . . . . . . . . . . . . . . . . . . . . . . . . . . . . . . . . 3645.4 Triangles and Congruence . . . . . . . . . . . . . . . . . . . . . . . . . . . . . . . . . . . . . . 3705.5 Relationships with Triangles . . . . . . . . . . . . . . . . . . . . . . . . . . . . . . . . . . . . 3745.6 Polygons and Quadrilaterals . . . . . . . . . . . . . . . . . . . . . . . . . . . . . . . . . . . . . 3805.7 Similarity . . . . . . . . . . . . . . . . . . . . . . . . . . . . . . . . . . . . . . . . . . . . . . 3865.8 Right Triangle Trigonometry . . . . . . . . . . . . . . . . . . . . . . . . . . . . . . . . . . . . 3915.9 Circles . . . . . . . . . . . . . . . . . . . . . . . . . . . . . . . . . . . . . . . . . . . . . . . . 3975.10 Perimeter and Area . . . . . . . . . . . . . . . . . . . . . . . . . . . . . . . . . . . . . . . . . 4055.11 Surface Area and Volume . . . . . . . . . . . . . . . . . . . . . . . . . . . . . . . . . . . . . . 4105.12 Rigid Transformations . . . . . . . . . . . . . . . . . . . . . . . . . . . . . . . . . . . . . . . . 416
v

www.ck12.org Chapter 1. Basic Geometry TE - Teaching Tips
CHAPTER 1 Basic Geometry TE -Teaching Tips
Chapter Outline1.1 BASICS OF GEOMETRY
1.2 REASONING AND PROOF
1.3 PARALLEL AND PERPENDICULAR LINES
1.4 TRIANGLES AND CONGRUENCE
1.5 RELATIONSHIPS WITH TRIANGLES
1.6 POLYGONS AND QUADRILATERALS
1.7 SIMILARITY
1.8 RIGHT TRIANGLE TRIGONOMETRY
1.9 CIRCLES
1.10 PERIMETER AND AREA
1.11 SURFACE AREA AND VOLUME
1.12 RIGID TRANSFORMATIONS
1

1.1. Basics of Geometry www.ck12.org
1.1 Basics of Geometry
Author’s Note
This component of the Teacher’s Edition for the Basic Geometry FlexBook® textbook is designed to help teacher’slesson plan. Suggestions for block planning, daily supplemental activities, and study skills tips are also included. Itis recommended to hand out the Study Guides (at the end of each chapter and print-ready) at the beginning of eachchapter and fill it out as the chapter progresses.
The Review Queue at the beginning of each section in the FlexBook® textbook is designed to be a warm-up for thebeginning of each lesson and is intended to be done at the beginning of the period. Answers are at the end of eachsection.
The Know What? at the beginning of each section in the FlexBook® textbook is designed as a discussion point forthe beginning of a lesson and then answered at the conclusion of the lesson. It can be added to homework or doneas an end-of-the-lesson “quiz” to assess how students are progressing.
Throughout the text there are investigations pertaining to theorems or concepts within a lesson. These investigationsmay be constructions or detailed drawings that are designed to steer students towards discovering a theorem orconcept on their own. This is a hands-on approach to learning the material and usually received well by low-levelstudents. It provides them an opportunity to gain ownership of the material without being told to accept somethingas truth. These investigations may use: a ruler (or straightedge), compass, protractor, pencil/pen, colored pencils,construction paper, patty paper, or scissors. They can be done as a teacher-led activity, as a group, in pairs, or as anindividual activity. If you decide to make an investigation teacher-led, have the students follow along, answer thequestions in the text, and then draw their own conclusions. In a block period setting, these activities could be doneas a group (because activities seem to take longer when students work in groups) with each group member owninga particular role. One or two students can do the investigation, one can record the group’s conclusions, and one canreport back to the class.
At the beginning of the Review Questions, there is a bulleted list with the examples that are similar to which reviewquestions. Encourage students to use this list to and then reference the examples to help them with their homework.
In the Pacing sections for each chapter, consider each “Day” a traditional 50-minute period. For block scheduling,group two days together.
Pacing
TABLE 1.1:
Day 1 Day 2 Day 3 Day 4 Day 5Points, Lines, andPlanes
Continue Points,Lines, and PlanesInvestigation 1-1
Segments and Dis-tance
Quiz 1Start Angles andMeasurement
Finish Angles andMeasurementInvestigation 1-2Investigation 1-3
Day 6 Day 7 Day 8 Day 9 Day 10Midpoints and Bi-sectorsInvestigation 1-4Investigation 1-5
Quiz 2Start Angle Pairs
Finish Angle PairsInvestigation 1-6
ClassifyingPolygons
Quiz 3Start Review ofChapter 1
Day 11 Day 12 Day 13
2

www.ck12.org Chapter 1. Basic Geometry TE - Teaching Tips
TABLE 1.1: (continued)
Day 1 Day 2 Day 3 Day 4 Day 5Continue Review Chapter 1 Test Continue testing (if
needed)Start Chapter 2
Points, Lines, and Planes
Goal
This lesson introduces students to the basic principles of geometry. Students will become familiar with the termspoints, lines, and planes and how these terms are used to define other geometric vocabulary. Students will also beexpected to correctly draw and label geometric figures.
Study Skills Tip
Geometry is very vocabulary-intensive, unlike Algebra. Devote 5-10 minutes of each class period to thoroughlydefining and describing vocabulary. Use the Study Guides at the end of each chapter to assist you with this.Also make sure that students know how to correctly label diagrams. You can use personal whiteboards to per-form quick vocabulary checks. Or, visit Discovery School’s puzzle maker to make word searches and crosswords(http://puzzlemaker.discoveryeducation.com/
Real World Connection
Have a class discussion to identify real-life examples of points, lines, planes in the classroom, as well as sets ofcollinear and coplanar. For example, points could be chairs, lines could be the intersection of the ceiling and wall,and the floor is a plane. If your chairs are four-legged, this is a fantastic example of why 3 points determine aplane, not four. Four legged chairs tend to wobble, while 3-legged stools remain stable. During this discussion, havestudents fill out the following table:
TABLE 1.2:
Dimensions Description Geometry Representation Real-Life Example(s)Zero n/aOne LengthTwo Length and widthThree Length, width, and height
Students may have difficulty distinguishing the difference between a postulate and a theorem. Use real-worldexamples like “my eyes are blue,” for a postulate. That cannot be proven true, but we know that it is by looking (fillin your eye color). A theorem would be something like, “If the refrigerator is not working, then it is unplugged.”We can go through steps to prove (or disprove) that the fridge is unplugged. Students may conclude other reasonsthat would make the fridge not work (it could be broken, the fan could have gone out, it is old, etc), making this astatement that needs to be proven and cannot be accepted as true.
Segments and Distance
Goal
Students should be familiar with using rulers to measure distances. This lesson incorporates geometric postulates
3

1.1. Basics of Geometry www.ck12.org
and properties to measurement, such as the Segment Addition Property. There is also an algebraic tie-in, finding thedistance of vertical and horizontal lines on the coordinate plane.
Notation Note
Double (and triple) check that students understand the difference between the labeling of a line segment, AB, and itsdistance, AB. Even though the alternative notation, mAB, is introduced in this section, this text primarily uses AB.
Relevant Review
Students may need to review how to plot points and count the squares for the horizontal and vertical distancesbetween two points. It might also be helpful add a few algebraic equations to the Review Queue. Problems involvingthe Segment Addition Postulate can be similar to solving an algebraic equation (Example 9).
Real World Connection
To review the concept of measurement, use an enlarged map of your community. Label several things on your mapimportant to students –high school, grocery store, movie theatre, etc. Have students practice finding the distancesbetween landmarks “as the crow flies” and using different street routes to determine the shortest distance betweenthe two.
Teaching Strategy
The Segment Addition Postulate can seem simple to students at first. Start with basic examples, like Examples 5 and6 and then progress to more complicated examples, like 7 and 8. Finally, introduce problems like Example 9. Formore examples, see the Differentiated Instruction component. With the Segment Addition Postulate, you can startto introduce the concept of a proof. Use Example 7 and have students write out an explanation of their drawing. Tellstudents to use language such that the person reading their explanation knows nothing about math.
Angles and Measurement
Goal
This lesson introduces students to angles and how to use a protractor to measure them. Then, we will apply theAngle Addition Postulate in the same way as the Segment Addition Postulate.
Notation Note
Beginning geometry students may get confused regarding the ray notation. Draw rays in different directions sostudents become comfortable with the concept that ray notation always has the non-arrow end over the endpoint(regardless of the direction the ray points). Reinforce that
−→AB and
←−BA represent the same ray.
Real World Connection
Have students Think-Pair-Share their answers to the opening question, “Can you think of real-life examples of rays?”Then, open up the discussion to the whole class.
Teaching Strategies
Using a classroom sized protractor will allow students to check to make sure their drawings are the same as yours.An overhead projector or digital imager is also a great way to demonstrate the proper way to use a protractor.
In this section, we only tell students that they can use three letters (and always three letters) to label and angle. InChapter 2 we introduce the shortcut. We did not want the confusion that so commonly occurs where students willname any angle by only its vertex.
Stress the similarities between the Segment Addition Property and Angle Addition Property. Students will discoverthat many geometrical theorems and properties are quite similar.
Have students take a piece of paper and fold it at any angle of their choosing from the corner of the paper. Open
4

www.ck12.org Chapter 1. Basic Geometry TE - Teaching Tips
the fold and refold the paper at a different angle, forming two “rays” and three angles. Show how the angle additionproperty can be used by asking students to measure their created angles and finding the sum. You can also use thisopportunity to explain how angles can also be labeled as numbers, m6 1+m6 2+m6 3 = 90◦
Student may need additional practice drawing and copying angles. This is the first time they have used a compass(in this course). Encourage students to play with the compass and show them how to use it to draw a circle and arcs.Once they are familiar with the compass (after 5-10 minutes), then go into Investigation 1-3. In addition to copyinga 50◦ angle, it might be helpful to walk students through copying a 90◦ angle and an obtuse angle.
Midpoints and Bisectors
Goal
The lesson introduces students to the concept of congruency, midpoints, and bisectors. The difference betweencongruence and equality will also be stressed. Students will use algebra to write equivalence statements and solvefor unknown variables.
Teaching Strategies
This is a great lesson for students to create a “dictionary” of all the notations learned thus far. In addition to theStudy Guide, the dictionary provides an invaluable reference before assessments.
When teaching the Midpoint Postulate, reiterate to students that this really is the arithmetic average of the endpoints,incorporating algebra and statistics into the lesson. Explain the average between two numbers, is the sum divided by2. The midpoint of two points is the exact same idea.
Ask students to define “bisector” on their own, before discussing a perpendicular bisector (Example 4). Hopefullystudents will construct multiple bisectors. This will help students visualize that there are an infinite amount ofbisectors, and lead them to the fact there is only one perpendicular bisector and the Perpendicular Bisector Postulate.
With Investigations 1-4 and 1-5, students may need to repeat the construction a few times. Copy a handout withseveral line segments and different angle measures and have them practice the construction on their own or in pairs.
In this lesson and the previous lesson, we have introduced how to make drawings. Encourage students to redraw anypictures that are in the homework so they can mark congruent segments and angles. Also, let students know that itis ok to mark on quizzes and tests (depending on your preference).
Angle Pairs
Goal
5

1.1. Basics of Geometry www.ck12.org
This lesson introduces students to common angle pairs, the Linear Angle Postulate and the Vertical Angles Theorem.
Teaching Strategies
Students can get complementary and supplementary confused. A way to help them remember:
• C in Complementary also stands for Corner (in a right angle)
• S in Supplementary also stands for Straight (in a straight angle)
To illustrate the concept of the Linear Pair Postulate, offer several examples of linear pairs. Have students measureeach angle and find the sum of the linear pair. Students should discover any linear pair is supplementary. Also explainthat a linear pair must be adjacent. Discuss the difference between adjacent supplementary angles (a linear pair) andnon-adjacent supplementary angles (same side interior angles, consecutive angles, or two angles in a drawing thatare not next to each other).
To further illustrate the idea of vertical angles, repeatInvestigation 1-6 with two different intersecting lines. Also,encourage students two draw their intersecting lines at different angles than yours. This way, they will see that nomatter the angle measures the vertical angles are always equal and the linear pairs are always supplementary. Drawthis investigation on a piece of white paper and have students use the whole page. Then, when they are done, havethem exchange papers with the students around them to reinforce that the angle measures do not matter.
• V in Vertical angles also stands for V in Vertex. Vertical angles do not have to be “vertical” (one on top of theother). Students might get the definitions confused.
In this section there are a lot of Algebra tie-ins (Example 5, Review Questions 17-25). Students might need additionalexamples showing linear pairs and vertical angles with algebraic expression representations.
Additional Example: Find the value of y.
Solution: Because these are vertical angles, set the two expressions equal to each other.
(14y−42)◦ = (11y+6)◦
3y = 48◦
y = 16◦
6

www.ck12.org Chapter 1. Basic Geometry TE - Teaching Tips
Classifying Polygons
Goal
In this lesson, we will explore the different types of triangles and polygons. Students will learn how to classifytriangles by their sides and angles, as well as classify polygons by the number of sides. The definitions of convexand concave polygons will also be explored.
Teaching Strategy
Divide students into pairs. Give each pair three raw pieces of spaghetti. Instruct one partner to break one pieceof spaghetti into three pieces and attempt to construct a triangle using these segments. Students will reach theconclusion that the sum of two segments must always be larger than the third if a triangle is to be formed. TheTriangle Inequality Theorem is introduced in Chapter 4.
Next, have students create right, obtuse, acute, scalene, isosceles, and equilateral triangles with their pieces ofspaghetti. Show them that if the spaghetti pieces’ endpoints are not touching, the polygon is not closed, and thereforenot a polygon. You can use pieces of spaghetti on an overhead projector.
To show the difference between line segments and curves, introduce cooked spaghetti. The flexibility of the spaghettidemonstrates to students that segments must be straight in order to provide rigidity and follow the definitions ofpolygons.
After playing with the spaghetti, brainstorm the qualities of polygons and write them on the board (or overhead) anddevelop a definition. From here, you can compare and contrast convex and concave polygons. Use a Venn diagramto show the properties that overlap and those that are different.
Review
At the end of this chapter there is a Symbol Toolbox with all the labels and ways to mark drawings. Have studentsmake flash cards with the symbols and markings on one side, and what they represent on the other. Students mayalso want to make flash cards for the definitions for the other words in the (and future) chapters.
In addition to the Study Guide, it might be helpful to go over the constructions from this chapter. You might wantto have a Construction Toolbox, where students have one example of each construction they have learned. Theseconstruction pages can supplement the Study Guide and should be added to from chapter to chapter. As an addedincentive, you might want to grade students’ Study Guides at the end of the chapter. Another option could be toallow students to use their Study Guide on tests and/or allow it to be extra credit. These options can change fromtest to test or at the teacher’s discretion.
7
1.2. Reasoning and Proof www.ck12.org
1.2 Reasoning and Proof
Pacing
TABLE 1.3:
Day 1 Day 2 Day 3 Day 4 Day 5Inductive Reasoning Conditional
StatementsContinueConditionalStatementsStart DeductiveReasoning
Quiz 1Finish DeductiveReasoning
Algebraic and Con-gruence Properties
Day 6 Day 7 Day 8 Day 9 Day 10Quiz 2Start Proofs aboutAngle Pairs andSegments
Finish Proofs aboutAngle Pairs andSegments
Quiz 3Review for Chapter2 Test
More Review Chapter 2 Test(May need to con-tinue testing on Day11)
Inductive Reasoning
Goal
This lesson introduces students to inductive reasoning, which applies to algebraic patterns and integrates algebrawith geometry.
Teaching Strategies
After the Review Queue do a Round Robin with difference sequences. Call on one student to say a number, call on asecond student to say another number. The third student needs to distinguish the pattern and say the correct number.The fourth, fifth, sixth, etc. students need to say the correct numbers that follow the pattern. Start over wheneveryou feel is appropriate and repeat. To make the patterns more challenging, you can interject at the third spot (tointroduce geometric sequences, Fibonacci, and squared patterns).
Now, take one of the sequences that was created by the class and ask students to try to find the rule. Ask students torecognize the pattern and write the generalization in words.
Additional Example: Find the next three terms of the sequence 14, 10, 15, 11, 16, 12, ...
Solution: Students can look at this sequence in two different ways. One is to subtract 4 and then add 5. Anotherway is to take the odd terms as one sequence (14, 15, 16, ...) and then the even terms as another sequence (10, 11,12, ...). Either way, the next three terms will be 17, 13, and 18.
Know What? Suggestion
When going over this Know What? (the locker problem) draw lockers on the front board (as many that will fit). Havestudents come up to the board and mark x’s to close the appropriate doors, as if they are acting out the problem. Thiswill help students see the pattern.
Real Life Connection
Apply the idea of counterexample to real life situations. Begin by devising a statement, such as, “If the sun isshining, then you can wear shorts.” While this is true for warm weather states such as Florida and California, for
8

www.ck12.org Chapter 1. Basic Geometry TE - Teaching Tips
those living in the Midwest or Northern states, it is quite common to be sunny and 12◦F . Have students create theirown statements and encourage other students to find counterexamples.
Conditional Statements
Goal
This lesson introduces conditional statements. Students will gain an understanding of how converses, inverses, andcontrapositives are formed from a conditional.
Teaching Strategies
The first portion of this lesson may be best taught using direct instruction and visual aids. Design phrases you canlaminate, such as “you are sixteen” and “you can drive.” Adhere magnets to the back of the phrases (to stick to thewhite board), or you can use a SMART board. Begin by writing the words “IF” and “THEN,” giving ample space toplace your phrases. When discussing each type of conditional, show students how each is constructed by rearrangingyour phrases, yet leaving the words “IF” and “THEN” intact.
Have students create a chart listing the type of statement, its symbolic form and an example. This allows studentsanquick reference sheet when trying to decipher between converse, conditional, contrapositive, and inverse. Thechart can be added to the Study Guide or place in class notes.
TABLE 1.4:
Symbolic Form Example True or False?Conditional Statement p→ qConverseInverseContrapositive Logically equivalent to
original.
Spend time reviewing the definition of a counterexample (from the previous section). A counterexample is a quickway to disprove the converse and inverse. Explain to students that the same counterexample should work for boththe converse and inverse (if they are false, see Examples 2, 3, and 7).
Use the same setup as the opening activity when discussing biconditionals. Begin with a definition, such as Example4. Set up your magnetic phrases in if and only if form, then illustrate to students how the biconditional can beseparated into its conditional and converse.
Deductive Reasoning
Goal
This lesson introduces deductive reasoning. Different than inductive reasoning, deductive reasoning begins with ageneralized statement, and assuming the hypothesis is true, specific examples are deduced.
Teaching Strategies
Start this lesson by writing the Know What? on the board (or copy it onto a transparency). Have the students readeach door (either out loud or to themselves) and try to reason which door the peasant should pick. This discussioncan lend itself to the definitions of logic and deductive reasoning.
Students may or may not realize that they do deductive reasoning every day. Explain that solving an equation is an
9

1.2. Reasoning and Proof www.ck12.org
example of deductive reasoning. Try to brainstorm, as a class, other examples of deductive reasoning and inductivereasoning.
The best way for students to understand the Laws of Detachment, Contrapositive, and Syllogism is to do lots ofpractice. Make sure to include problems that do not have a logical conclusion. Like in Examples 7 and 8, it mightbe helpful for students to put the statements in symbolic form. This will make it easier for them to find the logicalconclusion.
Additional Example: Is the following argument logical? Why or why not?
Any student that likes math must have a logical mind.
Lily is logical.
Conclusion: Lily likes math.
Solution: Change this argument into symbols.
p→ qq∴ p
If we were to combine the last statement of the argument and the conclusion, it would be q→ p or the inverse. Weknow that the inverse is not logically equivalent to the original statement, so this is not a logical (or valid) argument.
Algebraic and Congruence Properties
Goal
Students should have some familiarity with these properties. Here we can extend algebraic properties to geometriclogic and congruence.
Teaching Strategy
Use personal whiteboards to do a spot check. Write down examples of each property (4+ a = a+ 4, for example)either on the board or overhead. Then have students “race” to see who writes the correct answer on their whiteboardthe fastest. If you do not want to make it a competition, just have students show you the answer quickly, 2-3 seconds,and then put their whiteboard down to erase. This could also be done as a competition in groups.
Stress to students that the properties of congruence can only be used with a∼= symbol and properties of equality withan = sign. Remind students of the difference between congruence and equality that was discussed in Chapter 1.
Have students expand on the properties mentioned in this lesson. Students may come up with the multiplyingfractions property, reciprocals, or cross-multiplication.
Prove Move
This lesson introduces proofs. In this text, we will primarily use two-column proofs. Because of the nature of thistext, all homework questions and assessment relating to proofs will be fill-in-the-blank. Feel free to explain theconcept of a paragraph proof and flow-chart proof, if you feel it would help your students.
Proofs can be very difficult for students to understand. They might ask “why” they have to give a reason for everystep. Explain that not everyone reading their proof understands math as well as they or you do. Also, apply proofs(and logical arguments) to the real world. Lawyers use logical arguments all the time. Tell them it might help themthey are trying to rationalize something with their parents; a new video game, longer curfew, etc. If they have alogical, fluid “proof” to present to their parents, the parents may be more apt to agree and give them what they areasking for.
Example 4 in the text outlines the basic steps of how to start and complete a proof. Encourage students to draw their
10
www.ck12.org Chapter 1. Basic Geometry TE - Teaching Tips
own diagrams and mark on them. The bullet list after this example should be gone over several times and addressedas you present Example 5.
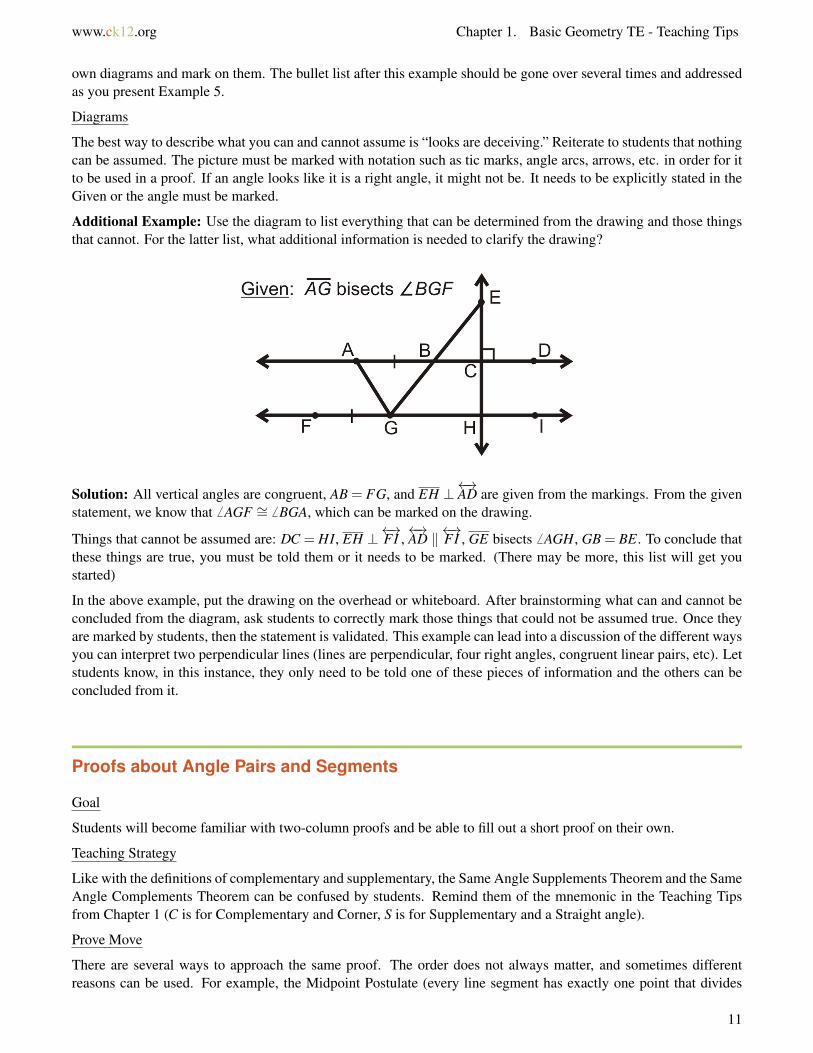
Diagrams
The best way to describe what you can and cannot assume is “looks are deceiving.” Reiterate to students that nothingcan be assumed. The picture must be marked with notation such as tic marks, angle arcs, arrows, etc. in order for itto be used in a proof. If an angle looks like it is a right angle, it might not be. It needs to be explicitly stated in theGiven or the angle must be marked.
Additional Example: Use the diagram to list everything that can be determined from the drawing and those thingsthat cannot. For the latter list, what additional information is needed to clarify the drawing?
Solution: All vertical angles are congruent, AB = FG, and EH ⊥←→AD are given from the markings. From the givenstatement, we know that 6 AGF ∼= 6 BGA, which can be marked on the drawing.
Things that cannot be assumed are: DC = HI, EH ⊥←→FI ,←→AD ‖ ←→FI , GE bisects 6 AGH, GB = BE. To conclude that
these things are true, you must be told them or it needs to be marked. (There may be more, this list will get youstarted)
In the above example, put the drawing on the overhead or whiteboard. After brainstorming what can and cannot beconcluded from the diagram, ask students to correctly mark those things that could not be assumed true. Once theyare marked by students, then the statement is validated. This example can lead into a discussion of the different waysyou can interpret two perpendicular lines (lines are perpendicular, four right angles, congruent linear pairs, etc). Letstudents know, in this instance, they only need to be told one of these pieces of information and the others can beconcluded from it.
Proofs about Angle Pairs and Segments
Goal
Students will become familiar with two-column proofs and be able to fill out a short proof on their own.
Teaching Strategy
Like with the definitions of complementary and supplementary, the Same Angle Supplements Theorem and the SameAngle Complements Theorem can be confused by students. Remind them of the mnemonic in the Teaching Tipsfrom Chapter 1 (C is for Complementary and Corner, S is for Supplementary and a Straight angle).
Prove Move
There are several ways to approach the same proof. The order does not always matter, and sometimes differentreasons can be used. For example, the Midpoint Postulate (every line segment has exactly one point that divides
11

1.2. Reasoning and Proof www.ck12.org
it equally in half) and the Definition of a Midpoint (a point that splits a line segment equally in half) can be usedinterchangeably.
Students may also get stuck on the reasons. Encourage students to not worry about getting the name quite right.If they can’t remember the name of a proof, tell them to write it all out. Depending on your preference, you canalso let students use abbreviations for names of theorems as well. For example, the Vertical Angles Theorem can beshortened to the VA Thm. Establish these abbreviations for the entire class so there is no confusion.
In the Proof of the Vertical Angles Theorem, steps 2-4 might seem redundant to students. Explain that they need tocompletely explain everything they know about linear pairs.
Additional Example: Complete the proof by matching each statement with its corresponding reason.
Solution: The order of the reasons is E, D, G, F, B, A, D
12

www.ck12.org Chapter 1. Basic Geometry TE - Teaching Tips
1.3 Parallel and Perpendicular Lines
Pacing
TABLE 1.5:
Day 1 Day 2 Day 3 Day 4 Day 5Lines and AnglesInvestigation 3-1Investigation 3-2
Finish Lines andAnglesInvestigation 3-3Start Properties ofParallel Lines
Finish Properties ofParallel LinesInvestigation 3-4
Quiz 1Start Proving LinesParallel
Finish ProvingLines ParallelInvestigation 3-5
Day 6 Day 7 Day 8 Day 9 Day 10Properties of Per-pendicular Lines
Quiz 2Start Parallel andPerpendicular Linesin the CoordinatePlane
Finish Parallel andPerpendicular Linesin the CoordinatePlane
The Distance For-mula
Quiz 3Start Review ofChapter 3
Day 11 Day 12 Day 13Review Chapter 3 Chapter 3 Test Finish testing (if
needed)Start Chapter 4
Lines and Angles
Goal
Students will be introduced to parallel, perpendicular, and skew lines in this lesson. Transversals and the anglesformed by such are also introduced.
Teaching Strategies
To introduce skew lines, use two pencils and hold them in the air, like skew lines. This will help students visualizethat skew lines are in different planes. Use Example 1 as a jumping off point and find more parallel, skew, andperpendicular lines, other than those listed in the solution.
Investigation 3-1 is a useful tool to help students visualize the Parallel Line Postulate. You can decide whether youwant to do this activity individually or teacher-led. If you decide to make it a teacher-led demonstration, considerusing the overhead and folding a transparency rather than patty paper.
Explore the similarities and differences between the Parallel Line Postulate and the Perpendicular Line Postulate.You can use a Venn diagram to aid in this discussion.
Investigations 3-2 and 3-3 demonstrate the Perpendicular Line Postulate. Guide students through these constructionsusing a whiteboard compass. If you do not have access to a whiteboard compass, tie a piece of string around yourmarker and use your finger as the pointer. Make the string at least 8 inches long. If you have access to an LCD screenor computer in the classroom, the website listed in these investigations (www.mathisfun.com) has a great animationof these constructions.
When introducing the different angle pairs, discuss other ways that students can identify the relationships. For
13

1.3. Parallel and Perpendicular Lines www.ck12.org
example, corresponding angles are in the “same place” on lines l and m. Draw a large diagram, like the ones to theleft, and find all the linear pairs, vertical angles, corresponding angles, alternate interior angles, alternate exteriorangles, and same side interior angles. Use two different pictures to show the different orientations and that the linesdo not have to be parallel to have these angle relationships. Explain that vertical angles and linear pairs only use twolines; however these new angle relationships require three lines to be defined. Use Examples 4 and 5. You can alsoexpand on Example 5 and ask:
d) What is a same side interior angle to 6 6? (6 7)
e) What is a corresponding angle to 6 8? (6 6)
f) What is an alternate exterior angle to 6 8? (6 1)
Students might wonder why there is no same side exterior relationship. You can explain that it does exist (6 1 and 6 4in the second picture), but not explicitly defined.
Real Life Connection
Discuss examples of parallel, skew, and perpendicular lines and planes in the real world. Examples could be: a tabletop and the floor (parallel planes), the legs of the table and the table top or floor (perpendicular planes), or the cablesin the Brooklyn Bridge (skew lines).
14

www.ck12.org Chapter 1. Basic Geometry TE - Teaching Tips
Properties of Parallel Lines
Goal
In this section we will extend the notion of transversals and parallel lines to illustrate the corresponding anglespostulate and the alternate interior angles postulate. Additional theorems and postulates are proven in this lesson.
Teaching Strategies
If you discuss the Know What? at the beginning of the lesson, students will only know how to find angle measuresthat are vertical or a linear pair with 6 FT S and 6 SQV . Revisit this at the end of the lesson and use the new-foundpostulates and theorems to find corresponding angles, alternate interior angles, alternate exterior angles, and sameside interior angles. You could also test that the angles in ∆FST add up to 180◦.
Discuss Example 1 as a refresher on where the corresponding angles are and now, if the lines are parallel, whichangles are congruent. Then, guide students through Investigation 3-4. If you prefer, you can do the investigationbefore introducing the Corresponding Angles Postulate and Example 1, so that students can discover this postulateon their own.
When introducing the alternate interior angles, alternate exterior angles, and same side angles use the results that thestudents found in Investigation 3-4. Let them draw their own conclusions about all the angles and angle measures.They already know the names of the relationships, so then ask students if any other relationships that they learned inthe previous lesson are equal. This will allow you to explain the Alternate Interior Angles Theorem and AlternateExterior Angles Theorem.
For the Same Side Interior Theorem, ask students which angles are same side interior and then ask what therelationship is. Students should notice that the two angles add up to 180◦.
Students may notice that there are other angles that are supplementary or congruent. Encourage students to makethese observations even though there are no explicit theorems.
Reinforce to students that these theorems do not apply to parallel lines. Demonstrate this by drawing two non-parallel lines and a transversal. Measure all angles. Students will see the alternate interior angles, correspondingangles, and alternate interior angles are not congruent, nor are the consecutive interior angles supplementary.
Proving Lines Parallel
Goal
The converse of the previous lesson’s theorems and postulates are provided in this lesson. Students are encouragedto read through this lesson and follow along with the proofs.
Vocabulary
Let students rewrite theorems, postulates, and properties symbolically and using pictures. The converses and theParallel Lines Property in this section are written in this way to help students understand them better. Continue touse this strategy throughout the text.
Teaching Strategies
Review the concept of a converse from Chapter 2. Then, introduce the converse of the Corresponding AnglesPostulate and ask students if they think it is true. Investigation 3-5 is one way to show students that converse ofthe Corresponding Angle Postulate must be true. Remind students that Postulates do not need to be proven true.However, it is always nice to show students why.
Decide if you would like Investigation 3-5 to be student driven or teacher-led. As a teacher-led investigation, this
15

1.3. Parallel and Perpendicular Lines www.ck12.org
activity will show students that the converse of the Corresponding Angles Postulate is true. As a student drivenactivity, encourage students to work in pairs. Before starting, demonstrate how to copy an angle (Investigation 2-2)and then allow students to work through the investigation. Expect it to take 15 minutes.
Investigation 3-5 can also be redone such that students copy the angle and place it in the location of the alternateinterior or alternate exterior angle location.
Additional Example: Put the reasons for the proof in the correct order.
Solution: The correct order is C, F or H, G, A, F or H, B, D, E.
Properties of Perpendicular Lines
Goal
This section further explains the properties of perpendicular lines and how they affect transversals.
Perpendicular Lines Investigation
On the whiteboard, draw a linear pair such that the shared side is perpendicular to the non-adjacent sides (seepicture). Ask students what the angle measure of each angle is and what they add up to. Once students arrive at thecorrect conclusion, reiterate that a congruent linear pairs is the same as a linear pair formed by perpendicular linesand the angles will always be 90◦.
Second, extend−→BD to make a line and add a parallel line to
←→AC (see picture). Now, discuss the effects of a
perpendicular transversal. Steer this discussion towards Theorems 3-1 and 3-2 and see if the converses of eitherof these theorems are true. Again, reiterate that all eight angles in this picture will be 90◦.
16

www.ck12.org Chapter 1. Basic Geometry TE - Teaching Tips
Prove Move
In a proof involving perpendicular lines, the following three steps must be included to say that the angles are 90◦.
• Two lines are perpendicular (usually the given)• The angles formed are right angles (definition of perpendicular lines)• The angles formed are 90◦ (definition of right angles)
To say that two right angles are congruent, the following steps must be included:
• Two lines are perpendicular (usually the given)• The angles formed are right angles (definition of perpendicular lines)• The right angles are congruent/equal (all right angles are congruent or congruent linear pairs)
This can seem repetitive to students because many of them will feel that it should be inferred that if two lines areperpendicular, then all the angles will be equal/right/90◦. This is not the case. Explain that they are writing a proofto someone who knows nothing about math or the definitions of perpendicular lines or right angles. They cannotassume that it is the math teacher that is reading each proof. See Example 3 in this section as an example of thesesteps.
Additional Example: Algebra Connection Solve for x.
Solution: The three angles add up to 180◦, or (5x−6)◦ and (4x+15)◦ add up to 90◦.
(5x−6)◦+(4x+15)◦ = 90◦
9x+9◦ = 90◦
9x = 81◦
x = 9◦
Parallel and Perpendicular Lines in the Coordinate Plane
Goal
17

1.3. Parallel and Perpendicular Lines www.ck12.org
Students should feel comfortable with slopes and lines. Use this lesson as a review of key concepts needed todetermine parallel and perpendicular lines in the coordinate plane. Then, we will apply the concepts learned in thischapter to the coordinate plane.
Real Life Connection
Ask students to brainstorm the many different interpretations of the word slope. Apply these to real world situationssuch as the slope of a mountain, or the part of a continent draining into a particular ocean (Alaska’s North Slope), theslope of a wheelchair ramp, etc. Discuss synonyms for slope: grade, slant, incline. Then, have students brainstormfurther. Relate this back to the Know What? for this section. Explain how the slope and the grade are related. Forexample, in the Know What? the slope of the California Incline is 3
25 (see FlexBook® textbook). The grade of thisincline is a percentage, so 3
25 ·100% = 12%.
Relevant Review
Before discussing standard form for a linear equation, make sure students can clear fractions.
Additional Example: Solve the following equations for x.
a) 56 x = 30
b) 23 x+3 = 9
c) 76 x+ 1
4 = 12
Solution: Multiply each number by what the lowest common denominator would be.
a) 6 ·(5
6 x = 30)
5x = 180x = 36
b) 3 ·(2
3 x+3 = 9)
2x+9 = 272x = 18x = 9
c) 12 ·(1
3 x+ 14 = 3
2
)4x+3 = 184x = 15x = 3.75
Of course, there are other ways to approach these problems, but this method of clearing fractions will help studentschange slope-intercept form into standard form. Show students these alternate ways of solving these problems andlet them decide which is easier. Then, apply both to changing a slope-intercept equation into standard form.
Additional Example: Change y = 34 x− 1
2 into standard form using two different methods.
Solution: Method #1: Clear fractions
4 ·(
y =34
x− 12
)4y = 3x−2
−3x+4y =−2
or 3x−4y = 2
Method #2: Find a common denominator
18

www.ck12.org Chapter 1. Basic Geometry TE - Teaching Tips
44
y =34
x− 24
−34
x+44
y =−24
−3x+4y =−2
3x−4y = 2
Students generally want to avoid fractions, so Method #1 should seem for desirable to them.
Teaching Strategies
When discussing the rise over run triangles, begin making the right triangle connection to students, demonstratingthat every rise/run triangle will form a 90◦ angle. When students are asked to find the distance between two points,they can use the Pythagorean Theorem.
Have students trace the top and bottom edges of a ruler onto a coordinate plane (use graph paper). Ask studentsto determine the equations for each line and compare the results. Students should notice that, if done correctly, theslopes will be equal. Recall that this is an easy way to draw parallel lines (Investigation 3-4).
The Distance Formula
Goal
Students are introduced to the Distance Formula and its applications.
Teaching Strategies
Students should be familiar with the Pythagorean Theorem and possibly even the Distance Formula from previousclasses. A quick review of the Pythagorean Theorem might be helpful. The reason neither are derived at this time isbecause we have not yet introduced triangles or the properties of right triangles, which is in Chapter 9. At this point,students can accept both formulas as true and they will be proven later.
Even though the Distance Formula is written d =√
(x2− x1)2 +(y2− y1)2, where (x1,y1) is the first point and(x2,y2) is the second point the order does not matter as long as the same point’s coordinate is first. So, if stu-
dents prefer, they can use d =√
(x1− x2)2 +(y1− y2)2. Using Example 1, show students that they can use d =√(x1− x2)2 +(y1− y2)2 and the answer will be the same.
d =√(4− (−10))2 +(−2−3)2 =
√142 +(−5)2 =
√196+25 =
√221
Finding the distance between two parallel lines can be quite complicated for some students because there are somany steps to remember. For this text, we have simplified this subsection to only use lines with a slope of 1 or -1.Reinforce the steps used to find the distance between two parallel lines from Example 5.
Additional Example: Find the shortest distance between y = x+4 and y = x−4.
19
1.3. Parallel and Perpendicular Lines www.ck12.org
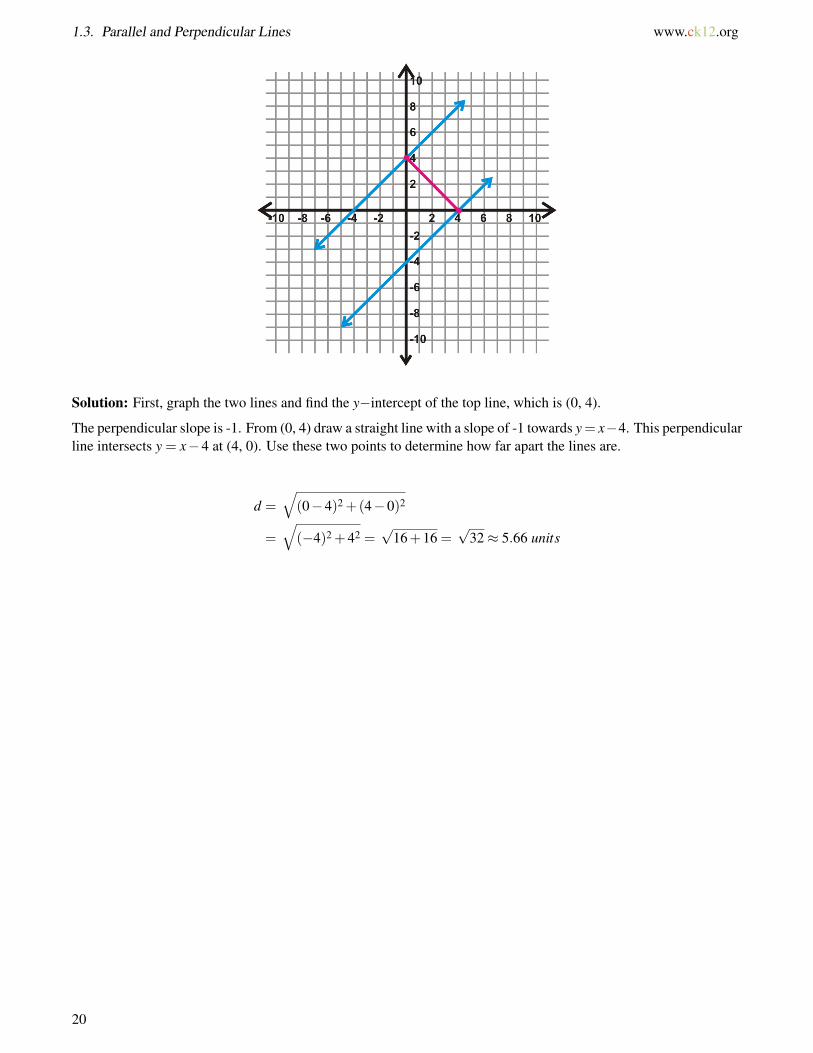
Solution: First, graph the two lines and find the y−intercept of the top line, which is (0, 4).
The perpendicular slope is -1. From (0, 4) draw a straight line with a slope of -1 towards y= x−4. This perpendicularline intersects y = x−4 at (4, 0). Use these two points to determine how far apart the lines are.
d =√(0−4)2 +(4−0)2
=√
(−4)2 +42 =√
16+16 =√
32≈ 5.66 units
20

www.ck12.org Chapter 1. Basic Geometry TE - Teaching Tips
1.4 Triangles and Congruence
Pacing
TABLE 1.6:
Day 1 Day 2 Day 3 Day 4 Day 5Triangle SumsInvestigation 4-1
Congruent Figures Quiz 1Start Triangle Con-gruence using SSSand SAS
Finish TriangleCongruence usingSSS and SASInvestigation 4-2Investigation 4-3
TriangleCongruence usingASA, AAS, and HLInvestigation 4-4
Day 6 Day 7 Day 8 Day 9 Day 10More Triangle Con-gruence using ASA,AAS, and HL
Quiz 2 Isosceles and Equi-lateral TrianglesInvestigation 4-5Investigation 4-6
Quiz 3 Review Chapter 4
Day 11 Day 12Finish Review ofChapter 4
Chapter 4 Test
Triangle Sums
Goal
First, this lesson reviews the types of triangles. The Triangle Sum Theorem will be introduced and proven followedby the Exterior Angle Theorem.
Notation Note
A new symbol, ∆, is introduced to label a triangle. The order of the vertices do not matter for a triangle (unlike whenlabeling an angle). Usually the vertices are written in alphabetical order.
Teaching Strategies
To review finding angle measures, give them the six triangles at the beginning of the section and have them use theirprotractors to measure all the angles. Then, discuss their results. Students should notice that all the angles add up to180◦, all the angles in an equilateral triangle are 60◦, and two of the angles in an isosceles triangle are equal.
21

1.4. Triangles and Congruence www.ck12.org
Investigation 4-1 is a version of a proof of the Triangle Sum Theorem. One approach to this investigation is todemonstrate for the students. You can do the activity on the overhead and have students discover the sum of all theangles. You may need to remind students that a straight angle is 180◦. You could also have the students perform thisinvestigation in pairs. After completing this investigation, go over the traditional proof in the text. Ask students howthe traditional proof is similar to the investigation. This will make the traditional proof easier to understand.
Guide students through Example 5 before showing them the answer. Once all the exterior angles are found, askstudents to find their sum. This will lead into the Exterior Angle Sum Theorem. Students might need a littleclarification with this theorem. Explain that each set of exterior angles add up to 360◦. This theorem will beaddressed again in Chapter 6.
The Exterior Angle Theorem can be hard for students to remember. Present it like a shortcut. If students forget theshortcut, they can still use the Triangle Sum Theorem and the Linear Pair Postulate. See Examples 7 and 8.
Congruent Figures
Goal
The goal of this lesson is to prepare students for the five triangle congruency theorems and the definition of congruenttriangles.
Notation Note
Revisit congruence notation from earlier lessons. This is the first time students will apply congruence to a shape.Remind them that figures are congruent and measurements are equal. So, two triangles can be congruent and themeasurements of their sides would be equal. Stress the importance of labeling each congruency statement such thatthe congruent vertices match.
Stress the tic mark notation in relation to the congruency statement. Simply because the letters used are in alphabet-ical order does not necessarily mean they will line up this way in a congruency statement. Students must follow thetic marks around the figure when writing congruency statements.
Teaching Strategies
When writing congruence statements, have students put the first triangle’s vertices in alphabetical order. Then, matchup the second triangle’s vertices so that the congruent angles are lined up. Remember that it is very common to useletters in alphabetical order, however they might not always line up so that the congruent triangles vertices will be inalphabetical order. For example, ∆ABC might not be congruent to ∆DEF , but it could be ∆ABC ∼= ∆FDE.
Rather than needing to know all three pairs of angles and sides are congruent, the Third Angle Theorem eliminatesone set of angles. Now, students need to know that two sets of angles and three sets of sides are congruent to showthat two triangles are congruent. Ask students if they think there are any other shortcuts to finding out if two triangles
22

www.ck12.org Chapter 1. Basic Geometry TE - Teaching Tips
are congruent. Can they show that two triangles are congruent using 4 pieces of information? 3 pieces? This couldbe a discussion for the end of the lesson and lead into the next.
Prove Move
In this lesson, we introduce CPCTC (corresponding parts of congruent triangles are congruent). Even though this isnot a theorem, it will be used in proving that parts of triangles are congruent. CPCTC can only be used after twotriangles are stated and proven congruent in a proof.
The Reflexive Property of Congruence is commonly used in proofs to say that a shared side or angle is congruent toitself. We will discuss this more in the next section.
Triangle Congruence using SSS and SAS
Goal
This lesson introduces students to the formal concept of triangle congruency through the SSS and SAS CongruenceTheorems.
Teaching Strategies
When introducing SSS Congruence Postulate let students do Investigation 4-2 individually. Walk through theclassroom and assist students with the steps. Once they reach Step 5, ask if they can make another triangle withthese three measurements. Every student should have a 3-4-5 right triangle and have them show each other theirconstructions. Have students rotate and flip their triangles, but demonstrate that they still have the same shape.
You can also use the Distance Formula to show that two triangles are congruent using SSS (Examples 5 and 6). InExample 5 the two triangles are congruent. Show students that they are in different places, flipped and rotated. Putthis example on a transparency and cut out ∆ABC. Then, place it over ∆DEF so that they are lined up. This alsoshows that the two triangles are congruent.
To introduce the SAS Congruence Theorem, you can either let students do Investigation 4-3 individually or in pairs.Like with the previous investigation, as students to compare their triangles to the triangles drawn by other studentsin the class. Again, they will see that all the triangles have the same shape and are congruent.
The concept of an included angle can be confusing for some students. Draw triangles to show students the difference.See picture.
Reinforce that the angle must be between the two sides to be a valid congruence theorem. The way the letters arewritten, SAS, also should remind students that the angle is between the two sides. SSA (or ASS) implies that theangle is not between the two sides.
Students may ask if SSA is a valid congruence theorem; it is not. There is an explanation of this in the next section.Also, students will realize that SSA and ASS are the same thing. You can address this however you seem fit. Someteachers approach it straight on while others may choose to avoid it and refer to this combination as SSA only.
23

1.4. Triangles and Congruence www.ck12.org
Prove Move
When using SSS and SAS in a proof, students must present each piece as a step. For SSS, there needs to be threesteps, one for each set of congruent sides. For SAS, there needs to be two steps for the two sets of congruent sidesand one step for the included angles. Then, students can list the congruence statement and reason.
The Reflexive Property of Congruence can be used in triangle proofs. If two triangles share a side or an angle, theReflexive Property is the reason this piece is congruent to itself. Students might feel as though this is an unnecessarystep, but just remind them that they must right all three sets of congruent sides/angles in order to state that twotriangles are congruent.
Triangle Congruence using ASA, AAS, and HL
Goal
Students will learn the ASA, AAS and HL Congruence Theorems and how to complete proofs using all five of thecongruence theorems.
Teaching Strategies
Investigation 4-4 should be done individually and then students can compare their triangles with the students aroundthem. Like with Investigations 4-2 and 4-3, students should realize that no other triangle can be drawn. Rotation andreflection do not change the shape of the triangle (Chapter 12).
ASA and AAS can be hard for students to distinguish between. Draw the two theorems side by side and compare.See picture.
Here we introduce the concept of an included side. The definition of an included side is very similar to that of anincluded angle. Ask students to compare the differences and similarities.
The proof of the AAS Congruence Theorem may help students better understand the difference between it and ASA.Explain that because of the Third Angle Theorem, AAS is also a congruence theorem. Example 3 shows which sidesor angles are needed to show that the same two triangles are congruent using SAS, ASA, and AAS. Go over thisexample thoroughly with students.
Hypotenuse-Leg (HL) is the only congruence theorem that is triangle-specific. This theorem can only be used withright triangles. So, in order to use this congruence theorem in a proof, the student must know that the two trianglesare right triangles (or be able to show it in the proof).
AAA and SSA are introduced at the end of the section as the other possible side-angle relationships that we have yetto explore. Neither of these relationships can prove that two triangles are congruent, but it is useful to show studentswhy they do not work. AAA shows that two triangles are similar, as in Chapter 7 and SSA can actually create twodifferent triangles.
Have students copy the Recap Chart into their notes. This chart will be a very helpful study guide for the chaptertest.
24

www.ck12.org Chapter 1. Basic Geometry TE - Teaching Tips
Example 7 is the only example that touches on CPCTC, even though there are proofs that use it in the homework.Explain to students that they can only use CPCTC after they have proven two triangles are congruent.
This is a very challenging lesson for students. If you feel as though not everyone is grasping the concept of proofsor all the different triangle congruence theorems, slow down and go back over this lesson.
Additional Example: Put the reasons to the proof below in the correct order.
Solution: The correct order is B, D, C, G, F, A, E
Isosceles and Equilateral Triangles
Goal
This lesson illustrates the special properties that arise from isosceles and equilateral triangles.
Teaching Strategies
Investigation 4-5 can be done individually or teacher-led. As a teacher-led activity, this investigation should be doneas a group discovery. You should ask questions of the students to keep them engaged while you are performing theconstruction (on the overhead or whiteboard). Then use a protractor to measure the angles. Or, you could have astudent come up and measure the angles. Ask them to generalize this construction into the Base Angles Theorem.
This investigation also leads into the Isosceles Triangle Theorem. Have students duplicate ∆DEF (just beforeExample 1) in their notes. They should write down all markings and all corresponding congruence statements(for angles and sides) and any perpendicular statements. Stress that this theorem is only true at the vertex angle.
Investigation 4-6 can also be done individually or teacher-led. This investigation allows students to come to theirown conclusion about equilateral triangles. They should discover that an equilateral triangle is also an equiangulartriangle in Step 4.
Additional Example: Algebra Connection Solve for x and y.
25

1.4. Triangles and Congruence www.ck12.org
Solution: It does not matter which variable you solve for first.
(6y−7)◦ = 65◦ (4x+2)◦+65◦+65◦ = 180◦
6y = 72◦ 4x+132◦ = 180◦
y = 12◦ 4x = 48◦
x = 12◦
26

www.ck12.org Chapter 1. Basic Geometry TE - Teaching Tips
1.5 Relationships with Triangles
Pacing
TABLE 1.7:
Day 1 Day 2 Day 3 Day 4 Day 5Midsegments Start Perpendicular
Bisectors and AngleBisectors in Trian-glesInvestigation 5-1Investigation 5-2
Finish Perpendicu-lar Bisectors andAngle Bisectors inTrianglesInvestigation 5-3Investigation 5-4
Quiz 1Start Medians andAltitudes in Trian-glesInvestigation 5-5
Finish Medians andAltitudes in Trian-glesInvestigation 5-6
Day 6 Day 7 Day 8 Day 9 Day 10Inequalities in Tri-angles
Quiz 2?Start Extension:Indirect Proof
?Finish Extension:Indirect Proof
?Quiz 3 Review Chapter 5
Day 11 Day 12 Day 13Review Chapter 5 Chapter 5 Test Finish Chapter 5
Test (if needed)Start Chapter 6
Midsegments
Goal
This lesson introduces students to midsegments and the properties they hold.
Vocabulary.
This lesson begins a chapter that is full of vocabulary and new types of line segments. As a new line segment islearned, have students write each one with its definition and a picture in a self-made table. By the end of this chapter,students should have: midsegment, perpendicular bisector, angle bisector, median, and altitude. You can also havestudents draw these line segments in acute, right and obtuse triangles. Make sure to include the appropriate labelingand congruence statements for each line segment within each triangle as well.
Notation Note
Review with students the difference between a line segment, NM and its distance NM. These notations will be usedfrequently in this chapter.
Teaching Strategies
Stress the properties of midsegments to students and make sure they understand the definition of a midsegmentbefore moving on to the next section. Each segment in a triangle is very similar, so students tend to get them mixedup. A midsegment is unique because it connects two midpoints.
Examples 3-5 investigate the properties of a midsegment in the coordinate plane. Give students these exampleswithout the solutions and have them work in pairs to arrive at the Midsegment Theorem on their own. At thecompletion of Example 5, ask students if they notice any similarities between the slopes of NM and QO and thelengths of NM and QO. Explain that their findings are the Midpoint Theorem.
27

1.5. Relationships with Triangles www.ck12.org
Discuss that a midsegment is both parallel and half the length of the third side. Stress to students that if a line isparallel to a side in a triangle that does not make it a midsegment. The parallel line must also connect the midpoints,pass through the midpoints, or cut the sides it passes through in half. Go over all of these different ways to statewhat a midpoint and midsegment are.
If you have access to an LCD display screen (in the classroom) or a computer lab, use the website http://www.mathopenref.com/trianglemidsegment.html (in the FlexBook® textbook) to play with midsegments within a triangle. It isa great resource to help students to better understand the Midsegment Theorem.
Additional Example: B,D,F , and H are midpoints of ∆ACG and ∆CGE. BH = 10 Find CG and DF .
Solution: BH is the midsegment of ∆ACG that is parallel to CG. DF is the midsegment of ∆CGE that is parallel toCG. Therefore, BH = DF = 10 and CG = 2 ·10 = 20.
Perpendicular Bisectors and Angle Bisectors in Triangles
Goal
Students will apply perpendicular bisectors and angle bisectors to triangles and investigate their properties.
Teaching Strategies
Review the constructions of a perpendicular bisector and angle bisector (Review Queue #1 and #2). When goingover #3a ask students if the line that bisects the line segment is a perpendicular bisector (it is not, it is just a segmentbisector). Explain that the markings must look like the ones in #4 to be a perpendicular bisector.
Investigation 5-1 guides students through the properties of a perpendicular bisector before placing it in a triangle.Show students that ∆ACB is an isosceles triangle (in the description of the Perpendicular Bisector Theorem) whichreinforces the fact that C is equidistant from the endpoints of AB. Explain the difference between the PerpendicularBisector Theorem and its converse. You can also have the students put the theorems into a biconditional statement.
Investigation 5-2 places the perpendicular bisectors in a triangle. This activity should be done individually, whileyou show students what to do. You will need to circle around the classroom to make sure students understand step2. Then, students should be able to do step 3 on their own. Do step 4 as a class to make sure that every studentunderstands that the circle drawn will pass through every vertex of the triangle.
Here, two new words are introduced: circumscribe and inscribe. If students have hard time remembering theirdefinitions use their Latin roots. Circum = around and In = inside or interior. Scribe = draw or write.
The angle bisectors are also first introduced with one angle. Investigation 5-3 explores the property of one angle bi-sector and its relationship to the sides of the angle. This activity should be teacher-led while students are encouragedto follow along. In step 2, the folded line does not have to be a perpendicular bisector, but just a perpendicular linethrough D.
After Investigation 5-3 compare the properties of an angle bisector and a perpendicular bisector. Draw them next to
28

www.ck12.org Chapter 1. Basic Geometry TE - Teaching Tips
each other with markings and draw a Venn diagram with the similarities and differences. If this lesson takes morethan one day, this could be a good warm-up.
After analyzing the pictures, lead students towards the conclusion that B is equidistant from the endpoints of AC (inpicture 1) and B is equidistant from the sides of 6 ADC. Then, to translate a perpendicular bisector into a triangle, thepoint where they all intersect would be equidistant from the endpoints of all the line segments, which are the verticesof the triangle. The point of intersection of the angle bisectors would be equidistant from all the sides of the angleswhich are also the sides of the triangle.
Just like with Investigation 5-2, lead students through this activity. Make sure every student understands how to foldthe patty paper to create an angle bisector (step 2). Once they make all the angle bisectors, do step 4 together toensure that every student understands that the circle will pass through the sides of the circle.
Students can get the properties of perpendicular bisectors and angle bisectors within triangles confused. One way tohelp students remember which is which show them that the point of intersection of the perpendicular bisectors canoutside the triangle so the circle would go around the outside the circle (circumscribe). The point of intersection ofthe angle bisectors is always inside the triangle so the circle will always be inside the triangles (inscribed).
The points of concurrency of the perpendicular bisectors, angle bisectors and altitudes were intentionally left out ofthe Basic Geometry FlexBook® textbook to avoid confusion and to encourage students to focus on the theorems andproperties of these lines. The Enrichment chapter discusses the names of these points of concurrency if you wouldlike to include them in your curriculum.
Medians and Altitudes in Triangles
Goal
Students will be introduced to medians and their point of intersection, the centroid. They will explore the propertiesof a centroid as well as learn how to construct an altitude.
Teaching Strategies
The median is now the third segment that passes through at least one midpoint. Make sure students understand thedifference between a median, midsegment and a perpendicular bisector. Also, students may get the angle bisectorconfused with a median because sometimes it “looks like” (a fatal flaw in geometry) the angle bisector will passthrough the opposite side’s midpoint. Students can never assume from a picture that the angle bisector and a medianare the same. Discuss the cases when they are the same, this may alleviate some confusion. When a triangle is anisosceles triangle, the line segments are all the same when drawn from the vertex. Also when a triangle is equilateral,the line segments are all the same regardless of which vertex they are drawn from. The following picture might betterillustrate this point:
29

1.5. Relationships with Triangles www.ck12.org
Points F and D are the midpoints of the sides they are on.
FD is a midsegment
ED is a perpendicular bisector
BG is an angle bisector
BD is a median
BH is an altitude
With Investigation 5-6, encourage students to construct more than one altitude on the given obtuse triangle. Whilewe did not explore the point of intersection for the altitudes, there is one. Have students arrive at this conclusionon their own, while constructing the other altitudes in ∆ABC. While students are performing the constructions,encourage them to turn their paper around so that the side they are making the altitude perpendicular to is horizontal.This will make the process easier.
At the end of this lesson, compare all of the line segments within triangles. Use the table below. The answers arefilled in, but draw on the board without answers and generate the answers as a class. You can also use the pictureabove to help students determine the properties of the line segments.
TABLE 1.8:
Pass through themidpoint(s)?
Pass through a ver-tex?
Perpendicular? Properties of thepoint of intersec-tion
Midsegment Yes, two. No No No point of intersec-tion
Angle Bisector No Yes No Equidistant from thesides of a triangle;inscribed circle.
PerpendicularBisector
Yes No Yes Equidistant from thevertices of a trian-gle; circumscribedcircle.
Median Yes Yes No The centroid; the“center of gravity”of a triangle. Alsoit splits the mediansinto 2
3 −13 pieces.
Altitude No Yes Yes None
Check and recheck that students understand these five line segments before moving on. It is very common forstudents to get the definitions and properties confused.
30

www.ck12.org Chapter 1. Basic Geometry TE - Teaching Tips
Inequalities in Triangles
Goal
The purpose of this lesson is to familiarize students with the angle inequality theorems and the Triangle InequalityTheorem and the SAS and SSS Inequality Theorems.
Teaching Strategies
Students have probably figured out the Triangle Inequality Theorem but not actually put it into words. Ask the classif they can make a triangle out of the lengths 3 in, 5 in, and 9 in. You can give each student a few pieces of dryspaghetti and have them break the pieces so that they are the lengths above and then attempt to make a physicalmodel. They will discover that it is impossible. Then, tell the class to break off 1 in of the 9 in piece and try again.Again, this will not work. Finally, tell them to break off another 1
2 -inch and try a third time. This time it will work.Analyze each set of numbers. You could also have students do this a fourth time and make the longest piece either 6or 7 inches. They will still be able to make a triangle.
3, 5, 9→ No triangle
3, 5, 8→ No triangle
3, 5, 7.5→ Yes!
3, 5, 6→ Yes!
Guide students towards the Triangle Inequality Theorem. Example 4 explores the possible range of the third side,given two sides. Explain to students that this third side can be the shortest side, the longest side or somewherein-between. We have no idea, so we have to propose a range of lengths that the third side could be. Have studentsshout out possible lengths of the third side and place them in a table. Then, show them the way to write the lengthsas a compound inequality.
Example 4 leads students into the SAS Inequality Theorem, which compares two triangles where two sides are thesame length and the included angles are different measurements. We know, from Chapter 4, that if the includedangles are congruent, then the triangles would be congruent, but in this case, we know that one is bigger than theother. Logically, it follows that the triangle with the bigger included angle will have the longer opposite side. This isa very wordy theorem; it might help to explain using the symbols and picture in the text. This theorem is also calledthe Hinge Theorem.
The SSS Inequality Theorem is the converse of the SAS Inequality Theorem. Now we know that two sides arecongruent and the third sides are not. It follows that the angle opposite the longer side is going to be larger than thesame angle in the other triangle. Example 6 is a good example of how this theorem works. You can also reverse thequestion and ask: If m 6 1 > m6 2, what can we say about XY and XZ?
Extension: Indirect Proof
Goal
Students should be able to understand how an indirect proof is organized and executed.
Teaching Strategy
An indirect proof is a powerful reasoning tool that students might find useful outside of mathematics. Ask studentswhat professions they think would use indirect proofs (also called proof by contradiction). Examples are lawyers(disproving innocence/guilt), doctors (disproving diagnosis), crime scene investigators (collecting evidence andtrying to prove or disprove).
31

1.5. Relationships with Triangles www.ck12.org
Additional Example: Prove√
15 6= 4.
Solution: Assume√
15 = 4
Squaring both sides, we get 15 = 16.
But 15 6= 16, therefore,√
15 6= 4.
32

www.ck12.org Chapter 1. Basic Geometry TE - Teaching Tips
1.6 Polygons and Quadrilaterals
Pacing
TABLE 1.9:
Day 1 Day 2 Day 3 Day 4 Day 5Angles in PolygonsInvestigation 6-1Investigation 6-2
Properties of Paral-lelogramsInvestigation 6-3
Quiz 1Start ProvingQuadrilaterals areParallelograms
Finish ProvingQuadrilaterals areParallelograms
Rectangles, Rhom-buses, and SquaresInvestigation 6-4Investigation 6-5
Day 6 Day 7 Day 8 Day 9 Day 10Quiz 2Start Trapezoids andKites
Finish Trapezoidsand KitesInvestigation 6-6
Quiz 3Start Review ofChapter 6
Finish Review ofChapter 6
Chapter 6 Test
Angles in Polygons
Goal
Students will use the Triangle Sum Theorem to derive the Polygonal Sum Theorem by dividing a convex polygoninto triangles. Students will also be reintroduced to the Exterior Angle Sum Theorem, but now it will be applied toany polygon.
Teaching Strategies
Using the Know What? at the beginning of this lesson, discuss where someone might see polygons in nature andthe real world. Determine if any of these polygons are regular polygons or not. Students might need a review of thedefinition of a regular polygon.
Investigation 6-1 is intended to be a student-driven activity while the teacher monitors and leads or answers questions.Students should know what a quadrilateral, pentagon, and hexagon are from Chapter 1; however they may need alittle review. Diagonals were also addressed in Chapter 1. Make sure that students only draw the diagonals in step 2from one vertex so that none of the triangles overlap. In step 3 it might be helpful to write out the last column as alist, including the triangle; 180◦,360◦,540◦,720◦. Then, ask students what the next number in the pattern should be.Continue this for a few more terms and then generalize into the Polygon Sum Formula.
Students might think that the Polygon Sum Formula and the Equiangular Polygon Formula are two different formulasfor them to memorize. This is not the case. Tell students that they need to memorize the Polygon Sum Formula andthen the Equiangular Polygon Formula simply divides the Polygon Sum Formula by the number of angles in thepolygon. Stress to students that the Equiangular Polygon Formula can be used on equiangular polygons as well asregular polygons.
To introduce exterior angles for polygons, draw a triangle with its exterior angles. Students should remember thateach set of exterior angles of a triangle add up to 360◦. Then, show students the exterior angles for a square. Eachexterior angle is 90◦, so their sum would be 360◦ as well. Now, have students complete Investigation 6-2 in pairs.
The first question in the review questions is a table with angle sums and individual angles in a regular n-gon.Complete this table at the end of the lesson so that students see the relationship between all the angles and theirsums. If you would like, add a final column labeled “Each exterior angle in a regular n-gon.” Students can either use
33

1.6. Polygons and Quadrilaterals www.ck12.org
linear pairs with column 4 or divide 360◦ by the number of sides.
Properties of Parallelograms
Goal
The purpose of this lesson is to familiarize students with properties special to parallelograms.
Notation Note
The notation for any quadrilateral or is the list of vertices, usually clockwise, such as ABCD (quadrilateral) orLMNOP (pentagon). Students can start at any vertex they would like. The only requirement is that the vertices arelisted such that they are next to each other in the picture. Quadrilateral ABCD could be:
Notice that the first vertex listed and the last vertex listed are next to each other.
Teaching Strategies
Investigation 6-3 enables students to discover the properties of parallelograms on their own. Encourage students tolabel the vertices of the parallelogram (ABCD, for example) and then they can write equality/congruence statementsfor the angles and sides. Once they have all the equality/congruence statements written (step 3), have students writedown all their conclusions and see if they can generate the parallelogram theorems on their own.
Students might wonder if there is a difference between consecutive angles and same side interior angles. Discuss thiswith your students. One could argue they are the same. Another could argue they are different because consecutiverefers to two angles that are next to each other in a polygon. Same side interior angles refer to two angles that areformed by parallel lines and one transversal.
Encourage students to make as many connections as possible. For example, students have learned parallel linesare equidistant from each other. Make this connection to a parallelogram. If students drawn in the diagonals of aparallelogram; review that alternate interior angles are congruent.
In Example 3, we place the parallelogram in a coordinate plane. In this chapter we will show that certain quadri-laterals are parallelograms (and rhombuses, squares, and rectangles) when they are in the coordinate plane. Inthis section we introduce one method. Because the diagonals of a parallelogram bisect each other, their point ofintersection should be the midpoint of each. Therefore, the midpoint of each diagonal will be the same point.
Proving Quadrilaterals are Parallelograms
Goal
Students will use triangle congruence postulates and theorems to prove quadrilaterals are parallelograms. Studentswill also determine if a quadrilateral is a parallelogram when placed in the coordinate plane.
Teaching Strategies
There are two main ways to prove that a quadrilateral is a parallelogram: formal proof and using the coordinateplane. If students are given a formal proof, they must prove that the two halves of a parallelogram (split by one of
34

www.ck12.org Chapter 1. Basic Geometry TE - Teaching Tips
the diagonals) are congruent and then use of the converses used in this lesson. They will also have to use CPCTCsomehow.
If students are doing a problem with a quadrilateral in the coordinate plane, then they must use the distanceformula, slope formula, or midpoint formula. The distance formula would lend itself to the Opposite Sides TheoremConverse, and finding the slopes of all four sides is the definition of a parallelogram and the midpoint formula is theParallelogram Diagonals Theorem Converse. Discuss all these options with students before allowing them to startclass work or homework.
As a way to introduce the proof of the Opposite Sides Theorem Converse and the proof of Theorem 6-10 (Example1), you can copy these theorems and then cut up the statements and reasons and put them in an envelope. Given anenvelope to either pairs or groups of students and have them match up the statements with the corresponding reasonsand put them in the correct order. On one side of the envelope, put the Given and Prove as well as the picture. Thistechnique can be done for any proof.
Rectangles, Rhombuses and Squares
Goal
This lesson introduces rectangles, rhombuses, and squares. These are more specific types of parallelograms.
Teaching Strategies
Make sure students understand that everything that falls within a rhombus possess the same characteristics andproperties of a parallelogram. A rectangle also has all the properties of a parallelogram as well as its properties. Asquare has all the properties of a rhombus, rectangle and parallelogram. Squares do not have any of its own uniqueproperties.
Investigation 6-4 shows us that the diagonals of a rectangle are congruent. So, if the diagonals of a parallelogramare congruent, then the parallelogram is a rectangle. Investigation 6-5 explores the properties of the diagonals of arhombus. Here, the diagonals are perpendicular and they bisect each angle in the rhombus. Note that students donot need to show both to be a rhombus. However, if they decide to use Theorem 6-16, they do need to show thatthe diagonals bisect all four angles of the rhombus. Therefore, it is much easier for students to use Theorem 6-15(showing that the diagonals are perpendicular) to show a parallelogram is a rhombus.
Because there are no theorems regarding squares, make sure you go over Example 4 thoroughly. This is the onlyplace we discuss all the properties of squares. Stress that a square holds all the properties of a parallelogram,rectangle, and rhombus. Ask students if they think it has any of its own properties. A square is a specific version ofa rhombus, so the angles are bisected. Because a square is also a rectangle, the angles are all 90◦, so the bisectedangles are all 45◦. In addition to the properties listed in Example 4, show students other ways to write some ofthese properties. For example, a rectangle has four congruent angles. Students can also write this as the sides are allperpendicular to each other.
At this point, students might have the different types of parallelograms confused. There are a lot of differentproperties and students might have them all mixed up in their heads. One way to help is to draw a hierarchydiagram with QUADRILATERALS at the top and then two arrows. One points to PARALLELOGRAMS and theother points to OTHER TYPES. Then, ask students if they can determine how rectangles, squares, and rhombusesfit into this diagram. The final diagram should look like:
35

1.6. Polygons and Quadrilaterals www.ck12.org
Students can add to this diagram in the next lesson.
The steps after Example 5 are very helpful for students to determine if a parallelogram is a rectangle, rhombus orsquare. Here is an additional example, using these steps.
Additional Example: The vertices of WXY Z are below. Determine the type of quadrilateral it is.
Solution: Let’s follow the steps.
1. The quadrilateral is graphed.
2. Do the diagonals bisect each other?
mid pointWY =
(−8+2
2,3−7
2
)= (−3,−2)
mid pointXZ =
(0−6
2,1−5
2
)= (−3,−2)
The diagonals bisect each other. This is a parallelogram.
3. Are the diagonals equal?
36
www.ck12.org Chapter 1. Basic Geometry TE - Teaching Tips
WY =√
(−8−2)2 +(3− (−7))2 =√
102 +102 =√
200
XZ =√(0− (−6))2 +(1− (−5))2 =
√62 +62 =
√72
The diagonals are not equal. This is not a rectangle.
4. At this step, we know this figure is a rhombus. It cannot be a square because the diagonals are not equal, fromstep 3. So, to prove that it is a rhombus, we can either show that all the sides are equal or that the diagonals areperpendicular. It is easier to find the slopes of the diagonals than do the distance formula four times.
mWY =3− (−7)−8−2
=10−10
=−1 mXZ =1− (−5)0− (−6)
=66= 1
The diagonals are perpendicular, so this reaffirms our earlier conclusion that WXY Z is a rhombus.
Trapezoids and Kites
Goal
This lesson introduces students to the special properties of kites, trapezoids, and isosceles trapezoids.
Teaching Strategies
After going over the definition of a trapezoid, discuss the difference between a trapezoid and a parallelogram.Students need to realize that a trapezoid has exactly one pair of parallel sides. It is not like the definition of anisosceles triangle (at least two congruent angles). Therefore, a parallelogram is not a trapezoid.
For a trapezoid to be isosceles, the non-parallel sides must be congruent. Describe an isosceles trapezoid as cuttingoff the top of an isosceles triangle. Therefore, Theorem 6-17 is a form of the Base Angles Theorem for isoscelestriangles. Isosceles trapezoids also have congruent diagonals, like a rectangle. Ask students if isosceles trapezoidsare rectangles. This is a great example of two different quadrilaterals that have the same property. Of course,rectangles are not isosceles trapezoids because rectangles have four congruent angles and two sets of parallel sides.
Just like triangles, a trapezoid also has a midsegment. Trapezoids only have one midsegment because it connects thenon-parallel sides. For this reason, the midsegment is also parallel with the parallel sides. Stress that the length ofthe midsegment is the average of the lengths of the parallel sides. You could also say that the midsegment is halfwaybetween the parallel sides, so its length is halfway between the lengths of the parallel sides.
Kites are very similar to rhombuses, but a rhombus is not a kite. The definition of a kite says “a quadrilateral withtwo sets of adjacent congruent sides.” All sides are congruent in a rhombus. Because a kite has two sets of congruentadjacent sides, it has some properties of rhombuses. Go over the similarities and differences between kites andrhombuses. At the end of this lesson, complete the hierarchy diagram that was started in the previous lesson.
37

1.6. Polygons and Quadrilaterals www.ck12.org
Review Game
Have your students create flashcards with quadrilateral names on one side and important information or propertieson the reverse. Have various types of quadrilaterals, both abstract and real world, ready to show students. Oncestudents believe they have classified the quadrilateral, they are to hold up the appropriate name. Have students dothis in pairs and keep score. You can give the winners bonus points on the test, candy, or a homework pass.
38

www.ck12.org Chapter 1. Basic Geometry TE - Teaching Tips
1.7 Similarity
Pacing
TABLE 1.10:
Day 1 Day 2 Day 3 Day 4 Day 5Ratios & Propor-tions
Similar Polygons Quiz 1Start Similarity byAA
Finish Similarity byAAInvestigation 7-1
Similarity by SSSand SASInvestigation 7-2
Day 6 Day 7 Day 8 Day 9 Day 10Finish Similarity bySSS and SASInvestigation 7-3
Quiz 2Start Proportional-ity Relationships
FinishProportionalityRelationships
Similarity Transfor-mations
Quiz 3∗ Extension: Self-Similarity
Day 11 Day 12 Day 13 Day 14 Day 15∗Finish Extension:Self-SimilarityStart Review ofChapter 7
∗ Extension QuizMore Review ofChapter 7
Finish Review ofChapter 7
Chapter 7 Test Start Chapter 8
∗ Without the Extension lesson, this chapter will take 12-13 days.
Ratios and Proportions
Goal
The purpose of this lesson is to reinforce the algebraic concept of ratios and proportions. Proportions are necessarywhen discussing similarity of geometric objects.
Teaching Strategies
The Know What? for this lesson is a little different than the ones in in previous lessons. Have students takethis activity one step further and apply the concept of a scale drawing to their own room. Students can draw scalerepresentations of their rooms (or even their whole house) and the furniture for an alternative assessment or a chapterproject.
Ratios can be written three different ways. This text primarily uses fractions or the colon notation. Remind studentsthat a ratio has no units and can be reduced just like a fraction. With rates, to contrast to with ratios, there are units.Rates are also fractions. Have students compare the similarities and differences between ratios and rates. Ask themto brainstorm types of ratios and rates.
Proportions are two ratios that are set equal to each other. The most common way to solve a proportion is cross-multiplication. Show students the proof of the Cross-Multiplication Theorem in the FlexBook® textbook. This proofmakes the denominators the same, so that the numerators can be set equal to each other. Students can go throughthis whole process each time or they can use cross-multiplication, which can be considered a shortcut.
All of the corollaries in this lesson are considered the same as ab = c
d because when cross-multiplied you would endup with ad = bc. Therefore, the placement of the a,b,c, and d is important. When in doubt about if two proportionsare the same, always have students cross-multiply.
39
1.7. Similarity www.ck12.org
Corollaries 7-4 and 7-5 are a little different from the previous three. To show that these proportions are true, it mightbe helpful for students to see the proofs. Each corollary is proven true when the last step is ad = bc because this isthe same as the cross-multiplication of a
b = cd .
Proof of Corollary 7-4
a+bb
=c+d
dd(a+b) = b(c+d)
ad +bd = bc+bd
ad = bc
Proof of Corollary 7-5
a−bb
=c−d
dd(a−b) = b(c−d)
ad−bd = bc−bd
ad = bc
Brainstorm other possible reconfigurations of ab = c
d with students to see if there are any other possible “corollaries.”Have students cross-multiply their “true” proportions to check to see if they are valid.
Similar Polygons
Goal
This lesson connects the properties of proportions to similar polygons. An introduction to scale factors is alsopresented within this lesson.
Teaching Strategies
To see if students understand the definition of similar polygons, have students come up to the front board and drawpictures of two similar polygons or two non-similar polygons. You could also do this several times, before you givestudents the formal definition, and then students can generate one as a class.
After doing Examples 1 and 2, brainstorm with the class as to which specific types of triangles, quadrilaterals orpolygons are always similar. For example, the text cites equilateral triangles and squares. This leads to the fact thatall regular polygons are similar. Explore why just equilateral (rhombuses) or equiangular (rectangles) polygons arenot always similar.
Students might wonder which value goes on top when finding the scale factor. Remind students that the scale factoris a ratio. In Example 4, it says “∆ABC to ∆XY Z.” This is a ratio too. So, the side of ∆ABC should go in thenumerator and the sides of ∆XY Z should go in the denominator. The triangle or figure listed first in the written-outratio goes in the numerator and the figure listed second goes in the denominator.
In Example 5 we show that the scale factor could be 23 or 3
2 . It is useful for students to know that either can technicallybe the scale factor. The important thing is that they know when to use which fraction. Ask students which fraction islarger. Then explain that to find the sides of the larger rectangle we would multiply the sides of the smaller triangleby the larger ratio. To find the sides of the smaller rectangle, we would multiply the sides of the larger rectangle bythe smaller ratio.
40

www.ck12.org Chapter 1. Basic Geometry TE - Teaching Tips
Similarity by AA
Goal
The purpose of this lesson is to enable students to see the relationship between triangle similarity and proportions.Here we discuss the AA Similarity Postulate and show how it can prove that two triangles are similar.
Teaching Strategies
Investigation 7-1 is designed to be teacher-led while the student also does the activity and follows along. Studentscan work individually or in pairs. One option is to have half the students make the triangle with a 3 inch side, like instep 1, and the other half make a triangle with a 4 inch side, like in step 3. Then, have each pair of students comparetheir two different triangles and complete step 4 together.
Students can find the corresponding sides in two similar triangles by identifying the congruent angles in the twotriangles. Then, the sides that are opposite the congruent angles are corresponding. Students can also place the twolargest sides together as corresponding, the shortest sides are corresponding and the middle sides are corresponding.You must be careful with this option, however. Students can only use this method when they know that the trianglesare similar.
Another option for indirect measurement (other than Example 5) utilizes the Law of Reflection. It states that theangle at which a ray of light (ray of incidence) approaches a mirror will be the same angle in which the light bouncesoff (ray of reflection). This method is the basis of reflecting points in real world applications such as billiards andminiature golf. See the additional example below.
Additional Example: You want to shoot the red ball into the corner pocket, as shown below. How far must the cueball travel in order to do this?
Solution: The answer is the total amount traveled by the cue ball, which is 36+ x. First we need to find x. Set up aproportion using similar triangles.
48x
=3236
32x = 1728
x = 54 in
The cue ball must travel 54+36 = 100 inches to sink the red ball.
41

1.7. Similarity www.ck12.org
Similarity by SSS and SAS
Goal
The purpose of this lesson is to extend the SSS and SAS Congruence Theorems to include similarity.
Teaching Strategies
After completing the Review Queue, introduce the lesson by asking students, “How can triangles be congruent andsimilar simultaneously?” Have a discussion with students about the answer to this question, including how we canprove that triangles are congruent or similar. This will lead into Investigation 7-2.
Investigation 7-2 uses the construction from Chapter 4 for SSS Congruence. Here, students will construct two similar3-4-5 triangles and then determine if they actually are similar. Have students work in pairs for this activity andcirculate to answer questions. Students might need a review of Investigation 4-2 before beginning this investigation.You can show students the provided link in the FlexBook® textbook as a review of this construction.
One could say that that SSS Congruence Theorem is a more specific version of the SSS Similarity Theorem. Discussthis point with your students.
As with the previous lesson, make sure students understand which sides are corresponding. If students do not matchup corresponding sides, they may get the wrong answer to a homework problem or on a test. Review the pointsdiscussed in the previous lesson about how to match up corresponding sides.
Like with Investigation 7-2, you can split the class in half and have one half draw the triangle in step 1 and the otherhalf draw the triangle in step 2 for Investigation 7-3. Then, have students from each half, pair up with someone fromthe other half and they can do steps 3 and 4 together.
Proportionality Relationships
Goal
In this lesson, students will learn about proportionality relationships when two parallel lines are split by twotransversals.
Teaching Strategies
Example 1 can be done as a mini-investigation before Investigation 7-4. Discuss the properties of a midsegment andhow it splits the two sides that it intersects. Find the ratio of the split sides (1:1) and the ratio of the similar triangles(1:2). Point out that these two ratios are always different.
Investigation 7-4 should be teacher-led and student can follow along, writing down any important information intheir notes. They can sketch your drawings and write down your measurements from steps 3 and 6.
To make the proof of Triangle Proportionality Theorem easier to understand, you can utilize the technique presentedearlier in this text where you would copy the entire proof, cut out the statements and reasons (separately) and placeit in an envelope. Then, students (in pairs or groups) can put the proof in the correct order.
Before introducing Theorem 7-7, show students an example, like Example 4. See if they can figure out the answer.In actuality, Example 4 really is not any different from the examples within triangles, just that the transversals donot intersect. Rather than being sides of triangles, now these lines are the transversals passing through parallel lines.Show students several different orientations (like Example 5), so they not confused by the homework problems.
Proportions with Angle Bisectors can be a little tricky for some students. Tell them to set up the proportion like thepicture below:
42

www.ck12.org Chapter 1. Basic Geometry TE - Teaching Tips
Notice that this set-up is different from the proportion given in Theorem 7-8. Using the letters from the theorem, theproportion would be BC
AB = CDAD , which is corollary 7-1.
Encourage students to use this set-up if they are having difficulties with the proportion given in the text.
Similarity Transformations
Goal
Dilations produce similar figures. This lesson introduces the algorithm to produce similar figures using measure-ments and a scale factor.
Teaching Strategies
To help students with this lesson’s Know What? show them pictures of different types of perspective drawings. Hereare three very different examples to discuss.
An easy way to remember enlargements versus reductions is a rhyme. Have your students repeat the rhyme, “Areduction is a proper fraction.” Improper fractions are mixed numbers, and greater than 1, thus creating enlargements.Other texts might use other words for enlargements and reductions. Brainstorm with students synonyms for thesewords. Possibilities are: stretch and shrink or expansion or contraction.
Dilations can also be clarified using a photograph. School pictures are great examples of dilations. Suppose a typicalphotograph is 4×6. An 8×10 enlargement does not alter the appearance. This is also true for shrinking photos fora 2×3. Using a base picture, bring in several enlargements and reductions to further illustrate this concept.
In Examples 1 and 2, a point is dilated. Recall that a point has no dimension, so it cannot be enlarged or reduced.Therefore, the distance from the center of the dilation is stretched and shrunk. Point out to students that the originaldistance is 6 units and the distance from P to Q′ is three times 6 units, or 18 units.
Anytime a figure is dilated, the distance from the center of the dilation is also stretched or shrunk according to thescale factor. The dilated point will always be collinear with the original point as well. Even though the terminologyimage and preimage (the original image) are not introduced until Chapter 12, feel free to introduce it now.
43

1.7. Similarity www.ck12.org
Extension: Self-Similarity
Goal
This lesson introduces students to popular fractals. Fractals possess self-similarity and maintain the properties ofsimilarity.
Teaching Strategies
This optional lesson is a great mathematical connection to art and nature. Show students examples of fractals in artand graphic design. See the examples below. The last picture is a type of broccoli called romanesco broccoli. Youcan sometimes find it in specialty grocery stores.
Mathematician Benoit Mandelbrot derived the term “fractal” from the Latin word frangere, meaning to fragment.A fractal is a geometric figure in which its branches are smaller versions of the “parent” figure. Most fractalsare explained using higher level mathematics; however, students can create their own fractal patterns easily. TheMandelbrot set is illustrated in the middle picture above.
Additional Example: Follow these instructions to create a cauliflower fractal.
1. Hold your paper in landscape format.2. Draw a horizontal segment AB, such that AB = 8 in, in the center of the paper.3. Find and mark C, the midpoint of AB.4. Find the midpoint from A to C. This is 1
4 AB.5. Use this quarter-length to be the length of DC. Draw DC such that it is perpendicular to AB at C.6. Draw lines AD and BD forming ∆ADB.7. Repeat steps 3-6 for AD and BD8. Continue to repeat this process for the legs of each new smaller triangle.
Final image:
The surface of this fractal (as you continue with smaller and smaller triangles) looks like the outside of a head ofcauliflower.
44

1.8. Right Triangle Trigonometry www.ck12.org
1.8 Right Triangle Trigonometry
Pacing
TABLE 1.11:
Day 1 Day 2 Day 3 Day 4 Day 5The PythagoreanTheoremInvestigation 8-1
The PythagoreanTheorem Converse
Quiz 1Start Similar RightTriangles
Finish Similar RightTriangles
Special Right Trian-glesInvestigation 8-2
Day 6 Day 7 Day 8 Day 9 Day 10Finish Special RightTrianglesInvestigation 8-3
Quiz 2Start Tangent, Sine,and Cosine Ratios
Finish Tangent,Sine, and CosineRatios
Solving Right Trian-gles
Finish Solving RightTriangles
Day 11 Day 12 Day 13Quiz 3Start Review ofChapter 8
Review Chapter 8 Chapter 8 Test Start Chapter 9
Be sure to take your time with this chapter. Remember that the Pacing Guide is merely a suggestion. Students canget caught up with vocabulary and theorems in this lesson.
The Pythagorean Theorem
Goal
This lesson introduces the Pythagorean Theorem. It has several applications which we will explore throughout thischapter.
Relevant Review
Thoroughly review the Simplifying and Reducing Radicals subsection in this lesson. In this and subsequent lessons,answers will be given in simplest radical form. Make sure students know how to add, subtract, multiply, divide, andreduce radicals before moving on. Present anything under the radical like a variable. Students know they cannot add2x+5y. Therefore, they cannot combine 2
√3+5
√2. This should make it easier for students to understand.
Teaching Strategies
Investigation 8-1 provides one proof of the Pythagorean Theorem. First, lead students through steps 1-3, then havethem finish step 4 individually while you circle around to answer questions. Once students are done with thisinvestigation, either take students to the computer lab or if you have an LCD screen, go to the site in the FlexBook®textbook to see two additional proofs of the Pythagorean Theorem. Both of these proofs are animated and provideanother viewpoint.
There are several applications of the Pythagorean Theorem. Students need to be familiar with as many as possible.Go over each example to make sure students understand the range of questions that can be asked. Each of theexamples, even though worded differently, are completed the same way. The directions for a given problem canbe one place where students can have confusion. Going over the different types of directions for the same type ofproblem can be very helpful.
46

www.ck12.org Chapter 1. Basic Geometry TE - Teaching Tips
Finally the Distance Formula is proven in this lesson. Students might already have an idea of how it works. Explainthat it is a variation on the Pythagorean Theorem, especially the before we solve for d, when the equation looks liked2 = (x1− x2)
2 +(y1− y2)2. Notice in this section, the Distance Formula looks different than it did when it was
introduced in Chapter 3. Recall that order does not matter, as long as the corresponding x or y value is first (x1 andy1 are first or x2 and y2 are first).
Converse of the Pythagorean Theorem
Goal
This lesson applies the converse of Pythagorean’s Theorem to determine whether triangles are right, acute, or obtuse.
Relevant Review
Make sure students are comfortable squaring and simplifying radical numbers.
Teaching Strategies
The Converse of the Pythagorean Theorem basically says if the sides of a triangle do not satisfy the PythagoreanTheorem, then the triangle is not a right triangle. Theorems 8-3 and 8-4 extend this concept to determine if thenon-right triangle is acute or obtuse. To help students remember which is which, tell them to think opposite. Whena2 + b2 > c2 (a2 + b2 is greater than c2) the triangle is acute (all angles are less than 90◦). When a2 + b2 < c2
(a2 + b2 is less than c2) the triangle is obtuse (one angle is greater than 90◦). Also, when in doubt, have themdraw the triangle, as best they can, to scale. Then, they can see what the triangle should be and they can do thePythagorean Theorem to confirm or deny.
Remind students that the Triangle Inequality Theorem still holds. So, if they are given lengths like 5, 7, and 15,they need to be able to recognize that these lengths do not make a triangle at all. 5+ 7 > 15, so no triangle can beformed. If students do not see this, they will be doing unnecessary work, not to mention think that the triangle isobtuse. Review the Triangle Inequality Theorem as you are going through the examples in the text. No one likes todo extra work, if they do not have to.
Additional Example: Do the following lengths form a triangle? If so, is it acute, right, or obtuse?
a) 10, 15, 20
b) 7, 14, 21
c) 8√
2,4√
6,4√
14
Solution: First, check all the lengths to see if they make a triangle. b) does not, 7+14 = 21, so those lengths cannotmake a triangle. Let’s see what type of triangles a) and c) are.
a)
102 +152 = 202
100+225 < 400
obtuse triangle
c)
(8√
2)2 +(4√
6)2 = (4√
14)2
64 ·2+16 ·6 = 16 ·14
128+96 = 224
right triangle
47

1.8. Right Triangle Trigonometry www.ck12.org
Additional Example: Find an integer such that 9, 12, ____ represent an acute or obtuse triangle.
Solution: 9, 12, 15 would be a right triangle (this is a multiple of the Pythagorean triple, 3-4-5). So 8, 9, 10, 11, 12,13, or 14 would work. If the integer is less than 8, then the triangle would be obtuse, with 12 as the longest side.
For an obtuse triangle, the third side could be less than 8, but greater than 3(9+ 3 = 12). And, it could also begreater than 15, but less than 21(9+12 = 21). So, the possibilities are 4, 5, 6, 7, 16, 17, 18, 19, or 20.
Using Similar Right Triangles
Goal
Students will review similar triangles, primarily right triangles. Then, the concept of the geometric mean is intro-duced and applied to right triangles.
Relevant Review
Review similar triangles and their properties briefly before introducing Theorem 8-5. The two triangles formed bythe altitude from the right angle in a right triangle are similar to the larger right triangle by AA (see Example 1).Show students how the three triangles fit together and which angles are congruent to each other and which sides areproportional (Examples 1 and 2).
Also, remind students that answers should be in simplest radical form. You may need to add a few simplifying andreducing radical questions in the Review Queue.
Teaching Strategies
Example 3 introduces the geometric mean as it applies to right triangles. You can choose to use this example beforediscussing the geometric mean or after it, after Example 7. It might be easier for students to see the geometric inits literal, algebraic form (without being applied to triangles) and practice it that way for a few examples, and thenapply it to a right triangle.
In Examples 5 and 6, it might be helpful to show students the corresponding proportions for the geometric mean,24x = x
36 and 18x = x
54 . Students will like the short cut, x =√
ab, but they should be shown the proportion first. Theproportion directly relates to its application to right triangles.
Examples 3 and 7 apply the geometric mean to the right triangle. The set-up of these proportions, using similartriangles, is the same as the geometric mean. So, students can always use similar triangles, rather than memorize thegeometric mean.
So often in math, there are two or even three ways to solve one problem. In Example 8, there are two ways presentedto solve for y. Encourage students to try the geometric mean, but they can also use the Pythagorean Theorem. Showstudents both methods and then brainstorm why one method could be preferred over the other. Students should beallowed to use which ever method they feel more comfortable with.
Special Right Triangles
Goal
The purpose of this lesson is to encourage the use of ratios to find values of the sides of special right triangles. Thesetriangles are extremely useful in trigonometry.
Relevant Review
Special right triangle ratios are extended ratios. Here is an additional Review Queue question:
48

www.ck12.org Chapter 1. Basic Geometry TE - Teaching Tips
Additional Review Queue: The sides of a triangle are in the extended ratio 3:7:9. If the shortest side is 21, find thelength of the other two sides.
Solution: We will rewrite the ratio as 3x : 7x : 9x. So, 3x = 21, which means x = 7. Therefore, the other two sidesare 7 ·7 = 49 and 9 ·7 = 63.
Teaching Strategies
Students should complete Investigation 8-2 independently. Lead students through step 1, but then allow them tocomplete the Pythagorean Theorem in steps 2 and 3 on their own. Ask students if they see a pattern among thehypotenuses. Then, go over how to solve an isosceles triangle given various sides and with various square roots.They should know how to solve an isosceles right triangle when the legs are not whole numbers. To find the legs,always divide the hypotenuse by
√2 and then simplify the radical. (Students might also notice there is a pattern
here too. The leg will be the hypotenuse divided by 2 and multiplied by√
2. For example, if the hypotenuse is 20,the legs will be 20÷ 2 ·
√2 = 10
√2. This is a little short cut.) To find the hypotenuse, multiply the leg by
√2.
Students may need to simplify the square root. Also, the diagonal of a square will always split the square into two45-45-90 triangles. Make sure students notice this connection.
With 30-60-90 triangles, students must make the connection that it is half an equilateral triangle. In Investigation8-3, lead students through steps 1-3, then allow the students complete steps 4 and 5 on their own. Students will havea hard time remembering this extended ratio. Some students will think that x
√3 should be the hypotenuse because
3 is bigger than 2. However, explain that√
3≈ 1.73, which is smaller than 2, so 2x will always be the longest side,which is the hypotenuse. To solve 30-60-90 triangles, students will need to find the shortest leg, if they are not givenit. If they are given the hypotenuse, divide by 2, then they can multiply by
√3 to get the longer leg. If they are given
the longer leg, they will need to divide by√
3 (or use the shortcut as applied to the 45-45-90 triangle above, use 3and√
3 where appropriate) to get the shorter leg, then multiply that by 2.
Students will also get these two ratios confused. One way to help them remember is for a 45-45-90 triangle thereare 2 45◦ angles, so the hypotenuse is x
√2. For a 30-60-90 triangle all the angles are divisible by 3, so the
√3 is in
the radical for this ratio.
The best way for students to become comfortable with these ratios is to have them do lots of problems. Students canalso make flashcards for these ratios. If students have trouble remembering these special shortcuts, encourage themto use Pythagorean’s Theorem and simplify the answer. The resulting answer will equal the shortcut.
Tangent, Sine and Cosine
Goal
This lesson introduces the trigonometric functions; sine, cosine and tangent.
Teaching Strategies
Before introducing the trig ratios, make sure students understand what adjacent and opposite mean and which anglesthey are in reference to. c will always be the hypotenuse, but a and b can be either opposite or adjacent, dependingon which acute angle we are using. At this point, do not overwhelm students with the fact that the trig functions canbe applied to any angle; focus on acute angles in triangles.
Encourage students to make flash cards for the sine, cosine and tangent ratios and to use the pneumonic SOH-CAH-TOA (in FlexBook® textbook). Both of these things will help students internalize the ratios.
In the types of problems in this lesson, it will be very common that two of the three sides are given and studentswill need to use the Pythagorean Theorem to find the third side. This should always be done first, and then they canapply the ratios. Students will also need to reduce ratios and simplify any radicals. Show students several differentorientations of the triangles (rotated, flipped, etc) so they are familiar with where an angle is and which sides areadjacent and opposite.
49

1.8. Right Triangle Trigonometry www.ck12.org
Have each student check to ensure their calculator is set to degrees (DEG), not radians (RAD). Having a calculatorin radians will provide incorrect answers. When checking homework at the beginning of the class period, check themode of students’ calculators as well.
When introducing how to find the sides of a right triangle, using the trig ratios, draw the triangle from Example 5on the board with only one variable, a. This will isolate a and students should be able to see that the cosine ratiowill solve for a. Use the arrow to help illustrate that a is adjacent to 22◦ and 30 is the hypotenuse. After a is found,redraw the triangle so b is the only variable. Now, b is isolated and students will be able to recognize that the sineratio will solve for it. Again, use arrows, if needed.
Stress to students that they should only use information that they are given in the problem. Using “solved for”information will not give them the most accurate answer or it could be completely wrong (if the “solved for” answerused is incorrect).
To help illustrate the angles of elevation and depression, see the picture below.
Show this to students and ask what the angle of elevation from the cow to the goat is. Then, ask what the angleof depression from the sheep down to the cow is. Students should notice it is the same measurement and alternateinterior angles. Fill in the angle of depression/elevations with any measurement.
50

www.ck12.org Chapter 1. Basic Geometry TE - Teaching Tips
Inverse Trigonometric Ratios
Goal
In the previous lesson, students used the special trigonometric values to determine approximate angle measurements.This lesson enables students to “cancel” a trigonometric function by applying its inverse to accurately find an anglemeasurement.
Relevant Review
Begin by listing several mathematical operations on the board in one column. In a second column, title it “Inverse.”Be sure students understand what an inverse means (an inverse cancels an operation, leaving the original valueundisturbed).
TABLE 1.12:
Operation Inverse ExampleAdditionMultiplicationSquaringSineCosineTangent
The first four are typically easy for students (Subtraction, square root, multiplication, and addition). You may haveto lead students a little more on the last two (inverse tangent and inverse sine). Students may say, “Un-tangent it.”Use the correct terminology here, but also use their wording, if at all possible. Students will be able to cancel thetrigonometric function using the inverse of that function, even though they may use incorrect terminology.
Go over Example 1 thoroughly. Make sure every student understands how to input inverse trig functions into theircalculator. Remind students that the set-up for inverse problems is the same as those from the previous lesson.However, instead of being given an angle measure, we leave it as a variable. Students need to solve for the angleand then put everything into the calculator at the same time. Get them in this habit so they will produce the mostaccurate answers. For example:
Yes : sin−1(
23
)No : sin−1(0.666)
Example 5 is a special right triangle. Students will probably go through the motions and not notice that they can usethe ratios learned in the Special Right Triangles lesson. Either way, students will still arrive at the correct answer,but point out to them to not go blindly into each question. Read a problem, re-read, and then decide how to answer.
Like the last lesson, real-life situations are a major application. At the end of this lesson, create a word problem as aclass. Use the names of students or find the height of a local building. Make the problem personal. Then, add it tothe test as an extra question or a bonus.
51

1.9. Circles www.ck12.org
1.9 Circles
Pacing
TABLE 1.13:
Day 1 Day 2 Day 3 Day 4 Day 5Parts of Circles &Tangent LinesInvestigation 9-1
Finish Parts ofCircles & TangentLinesStart Properties ofArcs
Finish Properties ofArcs
Quiz 1Start Properties ofChords
Finish Properties ofChordsInvestigation 9-2Investigation 9-3
Day 6 Day 7 Day 8 Day 9 Day 10Inscribed AnglesInvestigation 9-4
Finish Inscribed An-glesInvestigation 9-5
Quiz 2Start Angles fromChords, Secants,and TangentsInvestigation 9-6
Finish Angles fromChords, Secants andTangentsInvestigation 9-7Investigation 9-8
Segments from Se-cants and Tangents
Day 11 Day 12 Day 13 Day 14 Day 15Quiz 3∗Start Extension:Equations of Circles
∗Finish Extension:Equations of Circles
Review for Chapter9 Test
Chapter 9 Test Start Chapter 10
Parts of Circles & Tangent Lines
Goal
This lesson introduces circles and several parts of circles. Then, we will explore the properties of tangent lines.
Notation Note
� is the symbol for a circle. A circle is labeled using this symbol and its center. Some textbooks place a dot in thecenter, some do not. Do not confuse this symbol with an uppercase©.
Teaching Strategies
There is a lot of vocabulary in this chapter. Encourage students to make flash cards for each word and the theorems.Give students index cards at the end of each class period so they can make flash cards in the last 5-10 minutes of allthe terms they learned.
Discuss with students where one could find tangent circles, tangent lines, concentric circles, and intersecting circlesin real life. Concentric circles can also be formed when raindrops hit a body of water, such as a lake or puddle.An example of intersecting circles can be a Venn diagram. Common external tangent lines could be the gears of abicycle.
Investigation 9-1 can be done as a teacher-led activity or individually. For step 2, it can be difficult for studentsto draw a perfectly tangent line at point B. You may need to circulate to ensure they each student has the correctdrawing, to ensure that they get the correct measurement of 6 ABC. After measuring 6 ABC, ask students if they thinkthis will happen at angle drawn to the point of tangency. Feel free to repeat this investigation with a larger or smallercircle so students can see two different cases. Lead them towards the Tangent to a Circle Theorem.
52

www.ck12.org Chapter 1. Basic Geometry TE - Teaching Tips
In this lesson and chapter, students will need to apply the Pythagorean Theorem. Having a tangent line and a radiusthat meet at the same point will always produce a 90◦ angle. Therefore, students will need to recall all the informationthey learned in the last chapter (special right triangles, Pythagorean Theorem and its converse, and the trig ratios).Review these points, if needed, and proceed with Example 4.
Example 6 is an important example because it uses the converse of the Pythagorean Theorem to show that B is not apoint of tangency. Make sure students understand this point. In Example 7, students will need to draw an additionalline, EB. Encourage students to draw in additional lines if ever needed.
If students wonder the reasoning behind Theorem 9-2, draw in radii AD and AB and segment AC. You can givestudents this additional example.
Additional Example: Put the reasons for the proof of Theorem 9-2 in the correct order.
Solution: B,E,D,F,C, and A.
Properties of Arcs
Goal
This lesson introduces arcs, central angles, their properties and how to measure them.
Notation Note
Use a curved line above the endpoints of the arc to label it. Some arcs, such as major arcs, require three letters tolabel it. Explain to students that they must use three letters for some arcs to distinguish between the two differentarcs that have the same endpoints. If only two letters are used to label an arc, it is assumed that the arc is less than180◦.
Teaching Strategies
When introducing arcs, discuss with students where they might see arcs and degrees in real life. Examples arepizza crust, pie crust, a basketball hoop (the rim), among others. An arc could be a piece of pizza crust or piecrust. Some students might be familiar with skateboarding or snowboarding. A 360◦ jump is one rotation, a 540◦ isone-and-a-half rotations, and a 720◦ is two full rotations.
Make sure that students are comfortable with finding arc measures using central angles. This is the beginning of arcmeasures and corresponding angles in circles, so having a solid foundation is important. In Example 3, there are morecongruent arcs than the ones that are listed. See if students can find other possibilities: DAE ∼= DBE ∼= ADB∼= AEB(all semicircles), ADE ∼= DAB, and DBA ∼= EDB This would also be a good time to discuss different ways to labelthe same major arc. For example, ADE from above could also have been labeled ABE.
53

1.9. Circles www.ck12.org
The Arc Addition Postulate should be familiar to students; it is very similar to the Segment Addition Postulate andthe Angle Addition Postulate. Rather than adding segments or angles, we are now adding arcs. This is a very usefulpostulate when trying to find all the arcs in a circle.
Properties of Chords
Goal
Students will find the lengths and learn the properties of chords in a circle.
Notation Note
There is no explicit way to mark that two arcs are congruent in a picture. Students will have to infer from otherinformation if two arcs are congruent or not. Ways that they can tell are: if corresponding chords are congruent or ifthe central angles are congruent.
Teaching Strategies
Make sure students understand all the possible ways to interpret Theorem 9-3. First, if the chords are congruent, thenthe arcs are congruent. Second, the converse is also true (you may need to review “if and only if” and biconditionalstatements). Finally, you can also say that if the central angles are congruent, then the arcs are congruent AND thechords are congruent. The converse of this statement is also true.
In Investigation 9-2, the construction tells us that a diameter bisects a chord. From this, students should also see thatthe diameter is perpendicular. Therefore, the perpendicular bisector of a chord is also a diameter (Theorem 9-4).Stress to students that other chords can be perpendicular to a chord and other chords can bisect a chord, but only thediameter is both. Remind students that every line segment has exactly one perpendicular bisector. Also, studentsshould understand that not every diameter drawn that intersects a given chord will be its perpendicular bisector. Thisinvestigation is best done as a teacher-led activity.
Like Theorem 9-3, make sure students understand all the possible ways to interpret Theorems 9-4 and 9-5. Becareful, though. Write the converse of Theorem 9-4; if a line is a diameter, then it is also the perpendicular bisectorof a chord. At first glance, students might think this is a true statement. Show students a counterexample or havea student come up and draw one (see Example 3). However, the converse of Theorem 9-5 is true; if the diameterbisects a chord and its corresponding arc, then the diameter is also perpendicular to the chord. When applying thesetheorems to a diagram, two of the following three things must be marked: chord is bisected, diameter passes throughthe center (to ensure that this chord is actually a diameter), or diameter is perpendicular to the chord. If two of theseare marked, then it can be inferred that the third is also true.
Investigation 9-3 and Theorem 9-6 apply Theorems 9-3, 9-4, and 9-5 to two congruent chords in the same circle (orcongruent circles). If you want, you can continue Investigation 9-3 on the same circle from Investigation 9-2. Drawa second chord that is the same length as BC (from Investigation 9-2) somewhere else in the circle. You can repeatstep 2 from Investigation 9-2, rather than using step 2 from Investigation 9-3 as well. Both steps will produce thesame result.
Review with students the definition of equidistant and why the shortest distance between a point and a line is theperpendicular line between them. In order for two chords to be congruent, using Theorem 9-6, the segments from thecenter to the chords must be marked congruent and perpendicular. Ask students if they notice any other propertiesof these segments. Students should notice that these segments are part of a diameter and that they also bisect eachchord.
Finally, you can show students the following picture and see if they can find all the congruent chords, segments andarcs. Tell them that BE ∼= IF . This diagram applies all the theorems learned in this lesson.
54
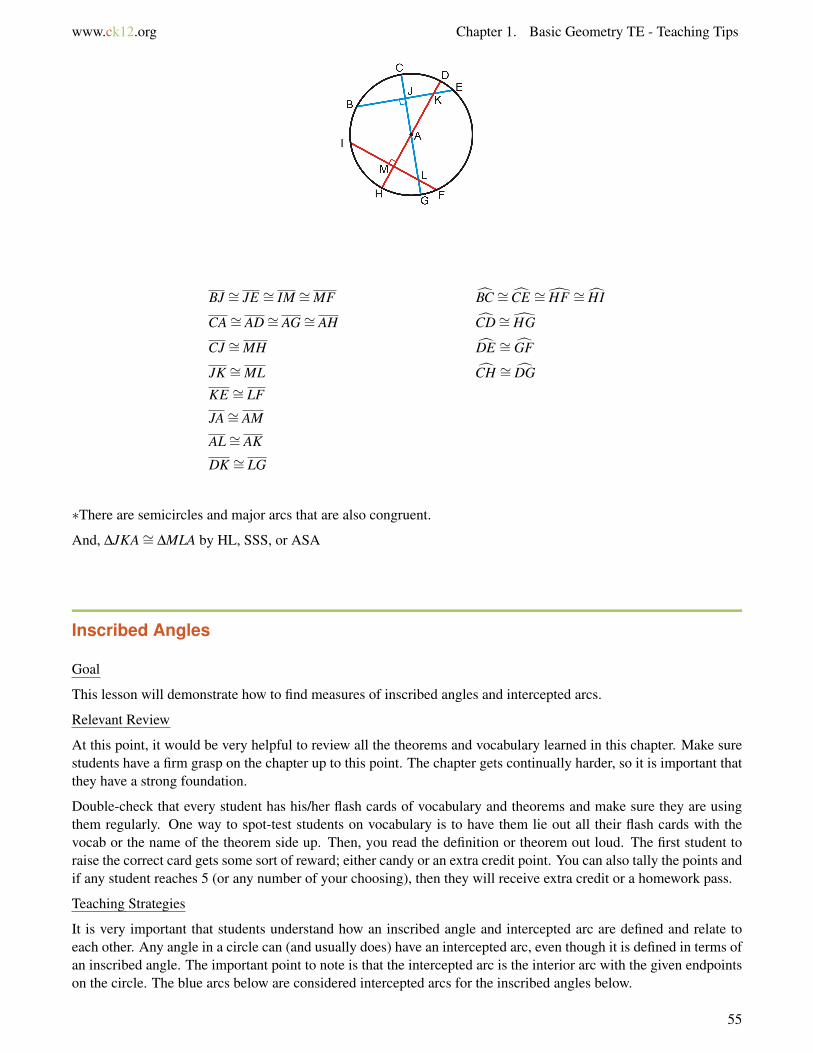
www.ck12.org Chapter 1. Basic Geometry TE - Teaching Tips
BJ ∼= JE ∼= IM ∼= MF BC ∼= CE ∼= HF ∼= HI
CA∼= AD∼= AG∼= AH CD∼= HG
CJ ∼= MH DE ∼= GF
JK ∼= ML CH ∼= DG
KE ∼= LF
JA∼= AM
AL∼= AK
DK ∼= LG
∗There are semicircles and major arcs that are also congruent.
And, ∆JKA∼= ∆MLA by HL, SSS, or ASA
Inscribed Angles
Goal
This lesson will demonstrate how to find measures of inscribed angles and intercepted arcs.
Relevant Review
At this point, it would be very helpful to review all the theorems and vocabulary learned in this chapter. Make surestudents have a firm grasp on the chapter up to this point. The chapter gets continually harder, so it is important thatthey have a strong foundation.
Double-check that every student has his/her flash cards of vocabulary and theorems and make sure they are usingthem regularly. One way to spot-test students on vocabulary is to have them lie out all their flash cards with thevocab or the name of the theorem side up. Then, you read the definition or theorem out loud. The first student toraise the correct card gets some sort of reward; either candy or an extra credit point. You can also tally the points andif any student reaches 5 (or any number of your choosing), then they will receive extra credit or a homework pass.
Teaching Strategies
It is very important that students understand how an inscribed angle and intercepted arc are defined and relate toeach other. Any angle in a circle can (and usually does) have an intercepted arc, even though it is defined in terms ofan inscribed angle. The important point to note is that the intercepted arc is the interior arc with the given endpointson the circle. The blue arcs below are considered intercepted arcs for the inscribed angles below.
55
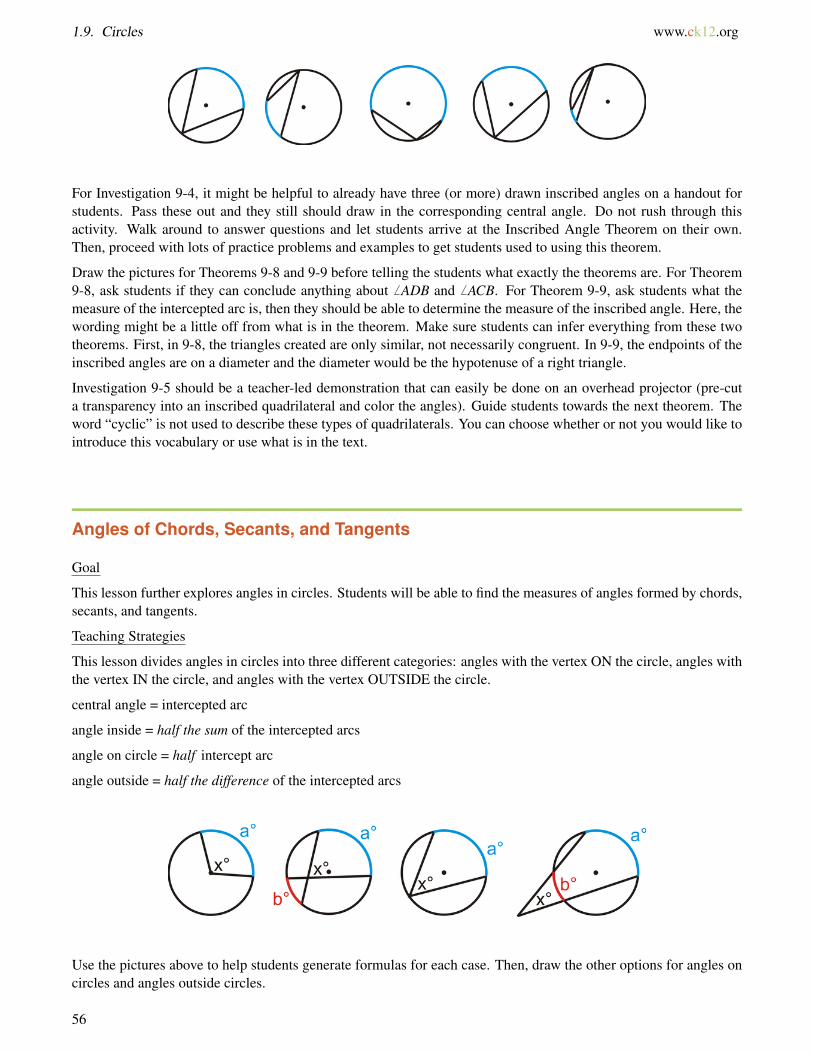
1.9. Circles www.ck12.org
For Investigation 9-4, it might be helpful to already have three (or more) drawn inscribed angles on a handout forstudents. Pass these out and they still should draw in the corresponding central angle. Do not rush through thisactivity. Walk around to answer questions and let students arrive at the Inscribed Angle Theorem on their own.Then, proceed with lots of practice problems and examples to get students used to using this theorem.
Draw the pictures for Theorems 9-8 and 9-9 before telling the students what exactly the theorems are. For Theorem9-8, ask students if they can conclude anything about 6 ADB and 6 ACB. For Theorem 9-9, ask students what themeasure of the intercepted arc is, then they should be able to determine the measure of the inscribed angle. Here, thewording might be a little off from what is in the theorem. Make sure students can infer everything from these twotheorems. First, in 9-8, the triangles created are only similar, not necessarily congruent. In 9-9, the endpoints of theinscribed angles are on a diameter and the diameter would be the hypotenuse of a right triangle.
Investigation 9-5 should be a teacher-led demonstration that can easily be done on an overhead projector (pre-cuta transparency into an inscribed quadrilateral and color the angles). Guide students towards the next theorem. Theword “cyclic” is not used to describe these types of quadrilaterals. You can choose whether or not you would like tointroduce this vocabulary or use what is in the text.
Angles of Chords, Secants, and Tangents
Goal
This lesson further explores angles in circles. Students will be able to find the measures of angles formed by chords,secants, and tangents.
Teaching Strategies
This lesson divides angles in circles into three different categories: angles with the vertex ON the circle, angles withthe vertex IN the circle, and angles with the vertex OUTSIDE the circle.
central angle = intercepted arc
angle inside = half the sum of the intercepted arcs
angle on circle = half intercept arc
angle outside = half the difference of the intercepted arcs
Use the pictures above to help students generate formulas for each case. Then, draw the other options for angles oncircles and angles outside circles.
56

www.ck12.org Chapter 1. Basic Geometry TE - Teaching Tips
Example 2 shows students that Theorem 9-8 (from the previous lesson) works for any angle where the vertex is onthe circle.
Investigations 9-6, 9-7, and 9-8 can all be teacher-led investigations where students follow along and the classdiscovers the formulas together. Allow students to guess the possibilities for the formulas, even if they are wrong.Developing the correct formula will give students ownership over the material and it will help them retain theinformation.
Make sure you do plenty of practice problems in class to ensure that students are using the correct formula in theappropriate place. Give students a handout with several problems. You can choose to put the formulas on the board,let them use notes, or use nothing at all. Include problems from the previous lesson(s) as well.
Segments of Chords, Secants, and Tangents
Goal
This goal of this lesson is to explain the formulas for determining segment lengths formed by intersecting secantsand tangents.
Relevant Review
Students might need a little algebraic review with solving quadratic equations. Problems involving tangents andsecants can become a factoring problem or use the quadratic formula. Students might also need a review of squareroots and simplifying square roots.
Teaching Strategies
Get students organized with all the information from this lesson and the previous two lessons. Have students drawand complete the following table.
TABLE 1.14:
Picture Angle Formula Segment Formulax◦ = a◦ Sides of angle are radii. No formula
57

1.9. Circles www.ck12.org
TABLE 1.14: (continued)
Picture Angle Formula Segment Formulax◦ = 1
2(a◦+b◦) pq = sr
x◦ = 12 a◦ Sides are chords. No formula.
x◦ = 12 a◦ One side is a chord, other is a ray.
No formula.
x◦ = 12(a◦−b◦) s(s+ p) = q(q+ r)
x◦ = 12(a◦−b◦) s2 = q(q+ r)
x◦ = 12(a◦−b◦) s = q
58

www.ck12.org Chapter 1. Basic Geometry TE - Teaching Tips
Extension: Writing and Graphing the Equations of Circles
Show students how a point can be on a circle, using the Pythagorean Theorem. For example, if the equation of acircle is x2 + y2 = 25, is (3, -4) on the circle? Yes. If students plug in 3 for x and -4 for y, they will see that thePythagorean Theorem holds true. Conversely, if we tested (-6, 2), we would find that it is not on the circle because36+4 6= 25.
In Example 3, students might have problems finding the diameter. Remind them that the diameter is the longestchord in a circle. Students would need to count the squares vertically and horizontally to see where the longestsegment would be (within the circle).
59

1.10. Perimeter and Area www.ck12.org
1.10 Perimeter and Area
Pacing
TABLE 1.15:
Day 1 Day 2 Day 3 Day 4 Day 5Triangles and Par-allelograms
Trapezoids,Rhombi, andKites
More Trapezoids,Rhombi, and KitesStart Area of SimilarPolygons
Finish Area of Simi-lar Polygons
Quiz 1Start Circumferenceand Arc Length
Day 6 Day 7 Day 8 Day 9 Day 10FinishCircumferenceand Arc LengthInvestigation 10-1
Area of Circles andSectors
Quiz 2Start Review ofChapter 10
Review of Chapter10
Chapter 10 Test
Triangles and Parallelograms
Goal
This lesson introduces students to the area and perimeter formulas for triangles, parallelograms and rectangles.
Relevant Review
Most of this lesson should be review for students. They have learned about area and perimeter of triangles andrectangles in a previous math class (Math 6, Pre-Algebra, or equivalent).
Notation Note
In this chapter, students need to use square units. If no specific units are given, students can write units2 or u2.
Teaching Strategies
If students are having a hard time with the formulas for area and perimeter of a rectangle, place Example 3 on apiece of graph paper or transparency. Then, students can could the squares for the area and perimeter and you cangenerate the formula together.
If you count all the squares, there are 36 squares in the area, or square centimeters (red numbers). Counting aroundthe rectangle (blue numbers), we see there are 26 squares. Therefore, the perimeter of this square is 26 cm.
60

www.ck12.org Chapter 1. Basic Geometry TE - Teaching Tips
This technique will also work for squares.
An important note, each problem will have some sort of units. Remind students that the shapes might not always bedrawn to scale.
Example 5 is a counterexample for the converse of the Congruent Areas Postulate. Therefore, the converse is false.An additional counterexample would to have them draw all the possible rectangles with an area of 20 in2. Use graphpaper so students will see that each rectangle has 20 squares. Possible answers are: 20×1,10×2, and 5×4.
The Area Addition Postulate encourages students to separate a figure into smaller shapes. Always divide the largershape into smaller shapes that students know how to find the area of.
To show students the area of a parallelogram, cut out the picture (or draw a similar picture to cut out) of the parallel-ogram and then cut the side off and move it over so that the parallelogram is transformed into a rectangle. Explain tostudents that the line that you cut is the height of the parallelogram, which is not a side of the parallelogram. Then,cut this parallelogram along a diagonal to create a triangle. Here, students will see that the area of a triangle is halfthe area of a parallelogram. You may need to rotate the halves (triangles) so that they overlap perfectly. This willshow the students that the triangles are congruent and each is exactly half of the parallelogram.
Create another set of flashcards for the area formulas in this chapter. These flashcards should be double-sided. Theblank side should be a sketch of the figure and its name. The flip side should have the formula for its area and theformula for its perimeter. Students should create flashcards as the chapter progresses.
Trapezoids, Rhombi, and Kites
Goal
This lesson further expands upon area formulas to include trapezoids, rhombi, and kites.
Relevant Review
Students might need a quick review of the definitions of trapezoids, rhombi, and kites. Go over their properties(especially that the diagonals of rhombi and kites are perpendicular) and theorems. Students may know the areaformula of a trapezoid from a previous math class.
Review the Pythagorean Theorem and special right triangles. There are several examples and review questions thatwill use these properties. If students do not remember the special right triangle ratios, they can use the PythagoreanTheorem.
Teaching Strategies
Use the same technique discussed in the previous lesson for the area of a parallelogram and triangle. Cut outtwo congruent trapezoids and demonstrate the explanation at the beginning of the lesson explaining the area of atrapezoid. Going over this with students (rather than just giving them a handout or reading it) will enable them tounderstand the formula better. These activities are done best on an overhead projector.
Conveniently, the area formula of the rhombus and kite are the same. Again, you can cut out a rhombus and kite, thencut them on the diagonals and piece each together to form a rectangle. Generate the formula with students. Anotherway to write the formula of a rhombus is to say that it has 4 congruent triangles, with area 1
2
(12 d1)(1
2 d2)= 1
8 d1d2.Multiplying this by 4, we get 4
8 d1d2 = 12 d1d2. This process is not as easily done with a kite because one of the
diagonals is not bisected.
Additional Example: Find two different rhombi that have an area of 48 units2.
Solution: The diagonals are used to find the area, so when solving this problem, we are going to be finding thediagonals’ lengths. 1
2 d1d2 = 48, so d1d2 = 96. This means that the product of the diagonals is double the area.
The diagonals can be: 1 and 96, 2 and 48, 3 and 32, 4 and 24, 6 and 16, 8 and 12.
61

1.10. Perimeter and Area www.ck12.org
As an extension, you can students draw the rhombi. The diagonals bisect each other, so have the diagonals cut eachother in half and then connect the endpoints of the diagonals to form the rhombus. Three examples are below.
Areas of Similar Polygons
Goal
Students will learn about the relationship between the scale factor of similar polygons and their areas. Studentsshould also be able to apply area ratios to solving problems.
Relevant Review
Review the properties of similar shapes, primarily triangles and quadrilaterals, from Chapter 7. Remind studentsthat the perimeter, sides, diagonals, etc. have the same ratio as the scale factor. The Review Queue reviews similarsquares. As an additional question, ask students to find the perimeter of both squares and then reduce the ratio(smaller square = 40, larger square = 100, ratio is 2:5, the same as the ratio of the sides). Ask students why theythink the ratio of the sides is the same as the ratio of the perimeters.
Teaching Strategies
Examples 1 and 2 lead students towards the Area of Similar Polygons Theorem. As an additional example (beforeintroducing the Area of Similar Polygons Theorem), ask students to find the area of two more similar shapes. Havingstudents repeat problems like Example 2, they should see a pattern and arrive at the theorem on their own.
Additional Example: Two similar triangles are below. Find their areas and the ratio of the areas. How does theratio of the areas relate to the scale factor?
Solution: Each half of the isosceles triangles are 3-4-5 triangles. The smaller triangle has a height of 3 and the largertriangle has a height of 9 (because 12 is 3 time 4, so this triangle is three time larger than the smaller triangle). Theareas are: Alarger ∆ = 1
2 ·24 ·9 = 108 and Asmaller ∆ = 12 ·8 ·3 = 12. The ratio of the area is 12
108 = 19 . The ratios of the
scale factor and areas relate by squaring the scale factor, 19 =
(13
)2.
Circumference and Arc Length
Goal
62

www.ck12.org Chapter 1. Basic Geometry TE - Teaching Tips
The purpose of this lesson is to review the circumference formula and then derive a formula for arc length.
Relevant Review
The Review Queue is a necessary review of circles. Students need to be able to apply central angles, find interceptedarcs and inscribed angles. They also need to know that there are 360◦ in a circle.
Teaching Strategies
Students may already know the formula for circumference, but probably do not remember where π comes from.Investigation 10-1 is a useful activity so that students can see how π was developed and why it is necessary to findthe circumference and area of circles. You can decide to make this investigation teacher-led or allow students towork in pairs or groups. From this investigation, we see that the circumference is dependent upon π.
When introducing arc length, first have students find the circumference of a circle with radius of 6(12π). Then,see what the length of the arc of a semicircle (6π). Students should make the connection that the arc length of thesemicircle will be half of the circumference. Then ask students what the arc length of half of the semicircle is (3π).Ask what the corresponding angle measure for this arc length would be (90◦). See if students can reduce 90
360 and ifthey make the correlation that the measure of this arc is a quarter of the total circumference, just like 90◦ is a quarterof 360◦. Using this same circle, see if students can find the arc length of a 30◦ portion of the circle
(3π
3 = π). Then,
as students what portion of the total circumference π is. π is 112 of 12π, just like 30◦ is 1
12 of 360◦. This should leadstudents towards the Arc Length Formula.
Students may wonder why it is necessary to leave answer in exact value, in terms of π, instead of approximate(multiplying by 3.14). This is usually a teacher preference. By using the approximate value for π, the answerautomatically has a rounding error. Rounding the decimal too short will cause a much larger error than using thedecimal to the hundred-thousandths place. Whatever your preference, be sure to explain both methods to yourstudents. The review questions request that answers be left in terms of π, but this can be easily changed, dependingon your decision.
Area of Circles and Sectors
Goal
This lesson reviews the formula for the area of a circle and introduces the formula for the area of a sector andsegment of a circle.
Teaching Strategies
If you have access to an LCD display or a computer lab, show students the animation of the area of a circle formula(link is in the FlexBook® textbook).
The formula for the area of a sector is very similar to the formula for arc length. Ask students to compare the twoformulas. Stress to students that the angle fraction in the sector formula is the same as it is for the arc length formula.Therefore, students do not need to memorize a new formula; they just need to remember the angle fraction for both.
To find the area of the shaded regions (like Example 8), students will need to add or subtract areas of circles, triangles,rectangles, or squares in order to find the correct area. Encourage students to identify the shapes in these types ofproblems before they begin to solve it. At the end of this lesson, quickly go over problems 23-25, so that studentsknow how to solve the problems that evening. Remind students to use the examples in the lesson to help them withhomework problems.
Finding the area of a segment can be quite challenging for students. This text keeps the angles fairly simple, usingspecial right triangle ratios. Depending on your level of student, you may decide to omit this portion of this lesson.If so, skip Example 9 and review questions 26-31.
Additional Example: Find the area of the blue shaded region below.
63

1.10. Perimeter and Area www.ck12.org
Solution: The triangle that is inscribed in the circle is a 45-45-90 triangle and its hypotenuse is on the diameter ofthe circle. Therefore, the hypotenuse is 24
√2 and the radius is 12
√2. The area of the shaded region is the area of
the circle minus the area of the triangle.
A⊙ = π(12√
2)2 = π ·144 ·2 = 288π
A∆ =12·24 ·24 = 288
The area of the shaded region is 288π−288≈ 616.78 units2
64
www.ck12.org Chapter 1. Basic Geometry TE - Teaching Tips
1.11 Surface Area and Volume
Pacing
TABLE 1.16:
Day 1 Day 2 Day 3 Day 4 Day 5Exploring Solids Surface Area of
Prisms & CylindersFinish Surface Areaof Prisms & Cylin-ders
Quiz 1Start Surface Areaof Pyramids andCones
Finish Surface Areaof Pyramids andCones
Day 6 Day 7 Day 8 Day 9 Day 10Volume of Prisms &Cylinders
Quiz 2Start Volume ofPyramids & Cones
Finish Volume ofPyramids & ConesInvestigation 11-1
Surface Area andVolume of Spheres
Quiz 3∗Start Extension:Exploring SimilarSolids
Day 11 Day 12 Day 13 Day 14 Day 15∗Finish Extension:Exploring SimilarSolids
∗ Extension QuizStart Review ofChapter 11
Review of Chapter11
Chapter 11 Test Start Chapter 12
Exploring Solids
Goal
The purpose of this lesson is to introduce students to three-dimensional figures. Polyhedral figures are presented inthis lesson and common terms such as edge, vertex, and face are explained, as well as how to name polyhedra.
Relevant Review
Students should know the definition of a regular polygon and how to find the area of various triangles and quadrilat-erals.
Teaching Strategies
Like with previous chapters, it might be helpful for students to make flash cards of the vocabulary and theoremslearned.
Discuss with students where they would see polyhedra, prisms, pyramids, cylinders, and cones in real life. Tellstudents to visualize themselves in a grocery store; there are several examples of these solids there. Examples couldbe: soup can (cylinder), Toblerone chocolate bar (triangular prism), oranges (sphere), or waffle cones (cone). Writedown the items students come up with and draw a representation.
After going over Example 1 and putting the faces, vertices, and edges into a table, see if students can come up withEuler’s Theorem on their own. Students might wonder why they need to know Euler’s Theorem, when they can justcount the number of vertices, edges, and faces. One application could be when the prism has so many sides that itbecomes difficult to count the edges (E is always the largest of F,V, and E in the formula). Other applications areExamples 3 and 4, when you are not given a picture in the problem.
One way to “view” a three-dimensional solid is to use cross-sections. You might need to use physical models to helpstudents understand this concept. For example, you could mold Play-doh into a cylinder or cube and “cut” them
65

1.11. Surface Area and Volume www.ck12.org
in different ways to show the different cross-sections. A cylinder can have a circle, oval (or portion of an oval), orrectangle as a cross-section.
Another way to “view a three-dimensional solid is to use a net. A net takes all the faces of a solid and lies them outflat and adjoining. Students need to be careful with nets. There can be several answers for one solid and dependingon how the faces are laid out, the net might not even work. Be sure to show students nets that do not work. Theactivity in the link, http://illuminations.nctm.org/activitydetail.aspx?ID=84 , gives students 20 possible nets of a cubeand they need to find the 11 that work.
Surface Area of Prisms and Cylinders
Goal
Students will learn how to find the surface area of prisms and cylinders.
Relevant Review
Students should know how to find a net of a three-dimensional solid. They will also need to be able to find the areaof triangles and quadrilaterals.
Teaching Strategies
The surface area can be difficult for students to visualize. Make sure they have a firm grasp on how to find nets ofa three-dimension figure. Students need to find all the lengths and heights of the faces of a prism before finding thetotal surface area. For example, in Example 2, students need to find the length of the hypotenuse of the base becauseit is also the length of a rectangle.
Additional Example: Find the surface area of the trapezoidal prism. The bases are isosceles trapezoids.
Solution: First find the length of the legs of the isosceles trapezoid bases.
Here is the net for this prism.
66

www.ck12.org Chapter 1. Basic Geometry TE - Teaching Tips
Surface Area:
Trapezoids A =12(35+19)15 = 405
Rectangles A = 17 ·40 = 680
A = 35 ·40 = 1400
A = 19 ·40 = 760
Total = 405+405+680+680+1400+760
= 4330 units2
The surface area of a cylinder can be difficult for students to visualize. As the FlexBook® textbook suggests, takethe label off of a soup can so that it opens up to a rectangle. Then, students will see that the width of the rectangle isthe circumference of the circular base.
Surface Area of Pyramids and Cones
Goal
Students will learn the formulas for the surface area of a regular pyramid and cone.
Relevant Review
Students should review nets and the formula for the area of triangles and quadrilaterals. Students should also be ableto apply the Pythagorean Theorem, Pythagorean triples, and special right triangle ratios.
Teaching Strategies
The slant height is a new term that applies to the lateral faces. It is only used to find the surface area of pyramids andcones. Students may need to use the actual height to find the slant height through the Pythagorean Theorem. Helpstudents develop a formula for finding the slant height for different types of pyramids and cones. In this lesson, wewill find the surface area of equilateral triangle based pyramids, square based pyramids, and right cones.
The most difficult of the three is the equilateral based pyramid. For the review questions in this section, the slantheight for these pyramids is given. However, students will still need to find the altitude of the base in order to find
67

1.11. Surface Area and Volume www.ck12.org
the area. Or, if students remember, they can use the formula, A = s2√
34 for the area of any equilateral triangle, where
s is the length of the sides.
Since students only need to worry about two types of pyramids (for surface area), then you could generate morespecific surface area formulas for each one. They are:
Equilateral triangle based pyramid : SA = B+12
nbl =s2√
34
+12(3)sl =
s2√
34
+32
sl
Square based pyramid : SA = B+12
nbl = s2 +12(4)sl = s2 +2sl
Where s is the edge length and l is the slant height. Once students know the basic surface area, derive these with theclass for n = 3 and n = 4.
Compared to the pyramid, the surface area of a cone is relatively simple. Students will always be given two of thethree pieces of information needed; h,r, or l (in the picture above). If the problem does not give l, the slant height,then students will have to use the Pythagorean Theorem to solve for it.
Volume of Prisms and Cylinders
Goal
Students will learn how to find the volume of prisms and cylinders. They will also discover that the volume of anoblique prism or cylinder is the same as a right prism or cylinder with the same height.
Relevant Review
Students will still need to know how to find the area of triangles and quadrilaterals so they can properly apply thevolume formulas in this lesson. Also, review with students how to “cube” and “cube root” a number. Lastly, reviewthe definitions of prisms and cylinders, so students are clear about which faces are bases. This will be very helpfulwhen using the volume formulas.
Teaching Strategies
Begin with a discussion of volume. Students might get volume, mass, and density confused. Volume is simply theamount of physical space a three-dimension takes up. Think of two different objects that have the same shape; a12-pound bowling ball and a plastic empty sphere of the same size. Both of these solids have the same volume, butvery different masses or densities. Therefore, an empty solid has the same volume as a full solid of the same size.
Volume is measured in cubic units, or units3. This is because the formula for volume always comes back to length×width×height. Each of these have a unit associated with them. So, the answer would be unit×unit×unit = units3.
Example 1 explores the concept of placing cubes (of whatever unit) into a prism to find its volume. Students cancount all these cubes and find that there are 60 within the prism. Another option would be to show students what thearea of each face is and then multiply that by the relative height. This will demonstrate that the order of multiplicationdoes not matter.
68

www.ck12.org Chapter 1. Basic Geometry TE - Teaching Tips
V = (3×5)×4 = 15×4 = 60
V = (3×4)×5 = 12×5 = 60
V = (5×4)×3 = 20×3 = 60
Regardless of the order, the formula for the volume of a rectangular prism will be length×width×height. It doesnot matter which face is the base for a rectangular prism.
Students will take the words “base” and “height” literally. However, in the formula for volume, the “height” mightnot always be the vertical length. As in Example 3, the apparent height of the solid is only the height of the base.The “height” in the formula is actually 7 ft, which looks like the length of the base. Students will think that the baseof this tent is the rectangle on the bottom. However, we know that the bases are actually the triangles at the front andback of the tent. Be very careful when discussing the formula for volume and the definition of a prism. Review withstudents that the “bases” are the two congruent parallel faces. Before starting on a volume problem, students shouldexamine the solid so they know which faces are the bases.
As with the case of an oblique prism, the sides are all parallelograms, however the bases will still be parallel.Students should know that the height of an oblique prism is not going to be an edge (like it is in a right prism), but avertical length that is outside the solid. Review with students that the base of a cylinder is a circle.
Volume of Pyramids and Cones
Goal
In this lesson, students will discover that the volume of a prism is one-third the volume of a prism with the samebase. This property also applies to cones. Then, they will find the volume of composite solids.
Relevant Review
Make sure students are comfortable finding the volume of prisms and cylinders from the previous lesson.
Teaching Strategies
Investigation 11-1 should be a teacher-led activity. You should pre-make the open nets of a cube and pyramid andthen demonstrate that filling the pyramid three times will completely fill the cube.
If you decide to allow students to do the investigation, be prepared for it to take 20-30 minutes. You should makethe nets with students in case they have questions. Have students complete this activity in pairs and each student inthe pair can make one net.
In this lesson, students should be able to find the volume of any triangle or quadrilateral based pyramid and any typeof cone. If students are ever given the slant height, they will need to solve for the overall height of the pyramid orcone. If a cone is not a right cone, it will not have a slant height and students will need to be given the height inorder to find the volume.
Like with surface area of pyramids, you can generate more specific formulas for the volume of an equilateral trianglebased pyramid and a square based pyramid. They would be:
Equilateral triangle based pyramid : V =13
Bh =13
(s2√
34
)h =
s2h√
312
Square based pyramid : V =13
Bh =13
s2h
69
1.11. Surface Area and Volume www.ck12.org
s and h are the base edge length and the height. You can also generate formulas for the volume of a rectangular basedpyramid and a right triangle based pyramid.
Problems 3 and 6 will be quite difficult for students to complete (in the Review Questions). This is because the basesare equilateral triangles and they are given the slant height. If you desire, you can change the values given as the slant
height to be the height of the pyramids. If you do this, the answers will be 256√
33 and 240
√3, respectively. Students
will still need to find the area of the equilateral triangle bases(
s2√
34
). If you do not alter the problems, students
will have to find the height of the pyramids, using the slant height. This will be a difficult process, because studentswill have to recall the properties of the centroid (the point where the vertical height hits the base). Therefore, thedistance from the bottom of the slant height to the centroid will be one-third the length of the entire altitude. (Seethe picture in the teaching tips for Surface Area of Pyramids and Cones.)
Surface Area and Volume of Spheres
Goal
Students will learn how to find the surface area and volume of spheres and hemispheres.
Relevant Review
Make sure students are comfortable with the formulas for circumference and area of a circle. Also, students willapply the formulas for the surface area and volume of cylinders and cones to composite solids.
Teaching Strategies
Ask students where they have seen spheres and hemispheres in real life. Discuss the parts of a sphere that are thesame as a circle and those parts that are different. Be sure to show students the animated derivations of the surfacearea and volume by Russell Knightley.
http://www.rkm.com.au/ANIMATIONS/animation-Sphere-Surface-Area-Derivation.html
http://www.rkm.com.au/ANIMATIONS/animation-Sphere-Volume-Derivation.html
When finding the surface area or volume of composite solids discuss with students what the parts are before startingeach problem This will make it easier for students to complete the problem. Also, make sure they understand whento not include the top or bottom of cylinders or hemispheres in the total surface area (see Example 5).
Extension: Exploring Similar Solids
Goal
Students will understand the relationship between similar solids, their surface areas, and their volumes.
Relevant Review
The areas of similar polygons should be reviewed before starting this extension. Students should know that thesquare of the scale factor is the ratio of the areas of two similar shapes.
Teaching Strategies
Help students make the connection between the ratios of the areas of two similar shapes is the same as the ratio ofthe surface areas of two similar solids. Both are area, so both ratios will be the square of the scale factor. Followingthis pattern, ask students if they have an idea as to what the ratio of the volumes of two similar solids would be.
Additional Example: The two square based pyramids below are similar. Find the surface area and volume of both
70

www.ck12.org Chapter 1. Basic Geometry TE - Teaching Tips
solids.
Solution: The scale factor is 812 =
23 . The slant height of the smaller pyramid is l =
√42 +82 =
√16+64=
√80=
4√
5. Using the scale factor, the slant height of the larger pyramid is 32 ·4√
5 = 6√
5.
SAsmaller = 82 +4(
12·8 ·4
√5)= 64+64
√5 Vsmaller =
13(82)8 =
5123
SAlarger = 122 +4(
12·12 ·6
√5)= 144+144
√5 Vsmaller =
13(122)12 = 576
Encourage students to find the ratios of the surface areas and volumes above to reinforce what was learned in thislesson.
71

1.12. Rigid Transformations www.ck12.org
1.12 Rigid Transformations
Pacing
TABLE 1.17:
Day 1 Day 2 Day 3 Day 4 Day 5Exploring Symmetry Translations Reflections Quiz 1
Start RotationsInvestigation 12-1
Finish Rotations
Day 6 Day 7 Day 8 Day 9 Day 10Compositions ofTransformationsInvestigation 12-2
Quiz 2∗ Extension: Tessel-lating Polygons
∗ Extension QuizStart Review ofChapter 12
Finish Review ofChapter 12
Chapter 12 Test
Exploring Symmetry
Goal
This lesson introduces line symmetry and rotational symmetry.
Teaching Strategies
The Know What? for this lesson provides a good starting point for a discussion about symmetry in nature. Afterdefining line symmetry and rotational symmetry, discuss how both are found in nature and the real world. Then, goover the symmetry in the starfish.
Have your students write the alphabet in uppercase letters. Using one colored pencil, show which letters possesshorizontal or vertical symmetry by drawing in the line. For example, B,E, and K have a line of horizontal symmetry.Using a second color, draw in the vertical lines of symmetry. Have a contest to determine who can write the longestword possessing one type of symmetry. For example, MAXIMUM is a word where all the letters have verticalsymmetry. KICKBOXED has a horizontal line of symmetry. You could even do words like TOT. The entire wordhas vertical symmetry.
When discussing rotational symmetry, some textbooks may refer to the rotations as n- fold rotational symmetry. Thissimply means that the n is the number of times the figure can rotate onto itself. For example, a regular pentagon has5-fold rotation symmetry, because it can be rotated 5 times of 108◦ before returning to its original position.
Translations
Goal
The purpose of this lesson is to introduce the concept of translations in the coordinate plane.
Relevant Review
Students should be comfortable with the distance formula and finding the slope between two points.
Teaching Strategies
72

www.ck12.org Chapter 1. Basic Geometry TE - Teaching Tips
All the transformations in this chapter are rigid transformations or isometries. Students need to know that thesetransformations never change the size or shape of the preimage and, therefore, will always create congruent images.
A “translation rule” is not property defined in this lesson. A translation rule is the amount an image is translated(or moved) from the preimage. A rule can only be applied when the translation is in the coordinate plane. Thehorizontal movement is added or subtracted from x and the vertical movement is added or subtracted from y. Thehorizontal and vertical change will always be the same for every point in a figure. For example, if the translationrule is (x,y)→ (x+1,y−2) for a triangle, each vertex of the triangle will be moved to the right one unit and downtwo units.
Additional Example:
a) If ∆ABC is the preimage, find the translation rule for image ∆XY Z.
b) If ∆XY Z is the preimage, find the translation rule for image ∆ABC.
Solution:
a) From A to X , the triangle is translated to the left 8 units and down 5 units. (x,y)→ (x−8,y−5).
b) From X to A, the triangle is translated to the right 8 units and up 5 units. (x,y)→ (x+8,y+5).
Reflections
Goal
Students will reflect a figure over a given line and find the rules for reflections over vertical and horizontal lines inthe coordinate plane.
Teaching Strategies
Using patty paper (or tracing paper), have students draw a small scalene triangle ∆ABC on the right side of the paper.Fold the paper so that ∆ABC is covered and then trace it. Unfold the patty paper and label the vertices as A′,B′, andC′, the images of A,B, and C. Darken the fold line; this is the line of reflection. Use a ruler to draw AA′. Mark
73
1.12. Rigid Transformations www.ck12.org
the intersection of the reflecting line and AA′ point M. Find AM and A′M. Ask students what they notice about thedistances and how the line AA′ intersects the line of reflection.
Students might have a hard time visualizing where a reflection should be placed. Tell students to use the activitydescribed above to help them. They can fold their graph paper on the appropriate line (the y−axis, for example) andthen trace the figure on the other side. Until they get used to using the rules, this can be one way for students toapply a reflection.
One way to help students remember the rules for reflections over vertical or horizontal is that the other coordinateis changed. For a reflection over the x−axis (or horizontal line), the x−value will stay the same and the y−valuewill change. For a reflection over the y−axis (or vertical line), the y−value will stay the same and the x−value willchange. The new coordinates of an image depend on how far away the preimage points are. If a point is 5 units tothe left of a line of reflection, then the image will be 5 units to the right of the line of reflection.
The only diagonal lines that we will reflect over in this chapter are y = x and y =−x. Again, encourage students tofold their graph paper when starting rotations over these lines and completing homework or class work problems.
Rotations
Goal
In this lesson, students will learn about general rotations and in the coordinate plane. By the end of the lesson,students should be able to apply the rules of rotation for 90◦,180◦, and 270◦, as well as draw a rotation (using aprotractor) of any degree.
Relevant Review
Make sure students remember how to draw and measure an angle, using a protractor. Practice this before startingInvestigation 12-1.
Teaching Strategies
Investigation 12-1 should be done individually by each student. The teacher can also lead the students in the activity,on the overhead projector, if desired. Students need to be comfortable rotating a figure around a fixed point. Everystudent will need a protractor for this activity. After completing the investigation, have students repeat it with anotherfigure of their choosing. Encourage students to pick a figure that has straight sides, such as a quadrilateral or theletters H,T, or E.
Unless otherwise stated, rotations are always done in a counterclockwise direction. Tell students this is because thequadrants are numbered in a counterclockwise direction. In the coordinate plane, the origin is always the center ofrotation.
After going over the rules for the rotations of 90◦,180◦, and 270◦, compare the rules learned in the previous lesson tothese (reflections over the x and y axis and y = x and y =−x). At this point, students know seven different reflectionand rotation rules that are all very similar.
Reflection over x−axis: (x,y)→ (x,−y)
Reflection over y−axis: (x,y)→ (−x,y)
Reflection over y = x: (x,y)→ (y,x)
Reflection over y =−x: (x,y)→ (−y,−x)
Rotation of 90◦: (x,y)→ (−y,x)
Rotation of 180◦: (x,y)→ (−x,−y)
Rotation of 270◦: (x,y)→ (y,−x)
74

www.ck12.org Chapter 1. Basic Geometry TE - Teaching Tips
All of these rules are different, but very similar. It is encouraged that students make flash cards for this rules to helpthem memorize each one. Ask students which ones have the x and y values switched and why they think that is.Also, see if they can make a correlation between the reflections over the x and y axis and the rotation of 180◦. Thesethree are the only rules where there is just a sign change. As it will be seen in the next chapter, a rotation of 180◦ is acomposition of the double reflection over the axes. Students might be able to notice this by looking at the rules now.The reflection over the x−axis has a negative y and the reflection over the y−axis has a negative x. In the rotation of180◦, both x and y are negative.
Composition of Transformations
Goal
This lesson introduces students to the concept of composition. Composition is the process of applying two (or more)operations to an object. In this lesson, we will only apply two transformations to an object and then determine whatone transformation this double-translation is the same as.
Teaching Strategies
Students can get easily confused when applying compositions. They may attempt to perform the composition fromleft to right, as in reading a sentence. Point out to the students they must begin with the object and, according tothe order of operations, should perform the operation occurring within the parentheses first. A glide reflection is theonly composition where order does not matter.
Have students do Example 6 and see if they can come up with the Reflection over the Axes Theorem on their own.You may need to do an additional example so students see the pattern.
Additional Example: Reflect ∆XY Z over the y−axis and the x−axis. Find the coordinates of ∆X ′′Y ′′Z′′ and the onetransformation this double reflection is the same is.
Solution: The coordinates of ∆XY Z and ∆X ′′Y ′′Z′′ are:
75

1.12. Rigid Transformations www.ck12.org
X(3,5)→ X ′′(−3,−5)
Y (6,9)→ Y ′′(−6,−9)
Z(10,7)→ Z′′(−10,−7)
From these coordinates, we see that a double reflection over the x and y axes is the same as a rotation of 180◦.
Investigation 12-2 should be a teacher-led activity. You can either have students perform the investigation along withyou or you can just do the activity and have student write down the necessary information.
Extension: Tessellating Polygons
Goal
This lesson defines tessellations and shows students how to create a tessellation from regular polygons.
Relevant Review
Review with students the definition of a regular polygon and how many degrees are in a quadrilateral, pentagon,hexagon, octagon, etc.
Teaching Strategies
Take students to the computer lab and let them play with the Tessellation Artist, from the website given in theFlexBook® textbook (http://www.mathisfun.com/geometry/tessellation-artist.html
Students may wonder if shapes other than regular polygons tessellate. You can show them the example below andthen see if they can tessellate any quadrilateral. When tessellating this quadrilateral, make sure that every studenthas a different quadrilateral. When everyone is done, have the students hold up their tessellations or share them witheach other.
Additional Example: Tessellate the quadrilateral below.
76

www.ck12.org Chapter 1. Basic Geometry TE - Teaching Tips
Solution: To tessellate any image you will need to reflect and rotate the image so that the sides all fit together. First,start by matching up the each side with itself around the quadrilateral.
Now, continue to fill in around the figures with either the original or the rotation.
This is the final tessellation. You can continue to tessellate this shape forever.
77

www.ck12.org
CHAPTER 2 Basic Geometry TE -Common Errors
Chapter Outline2.1 BASICS OF GEOMETRY
2.2 REASONING AND PROOF
2.3 PARALLEL AND PERPENDICULAR LINES
2.4 TRIANGLES AND CONGRUENCE
2.5 RELATIONSHIPS WITH TRIANGLES
2.6 POLYGONS AND QUADRILATERALS
2.7 SIMILARITY
2.8 RIGHT TRIANGLE TRIGONOMETRY
2.9 CIRCLES
2.10 PERIMETER AND AREA
2.11 SURFACE AREA AND VOLUME
2.12 RIGID TRANSFORMATIONS
78

www.ck12.org Chapter 2. Basic Geometry TE - Common Errors
2.1 Basics of Geometry
Points, Lines and Planes
Naming Lines - Students often want to use all the labeled points on a line in its name, especially if there are exactlythree points labeled. Tell them they get to pick two, any two, to use in the name. This means there are often manypossible correct names for a single line.
Practice Exercise: How many different names can be written for a line that has four labeled points?
Answer: 12, Students can get to this answer by listing all the combinations of two letters. Recommend that theymake the list in an orderly way so they do not leave out any possibilities. This exercise is good practice for countingtechniques learned in probability.
Naming Rays - There is so much freedom in naming lines that students often struggle with the precise way in whichrays must be named. It is helpful to think of the name of a ray as a starting point and direction. There is onlyone possible starting point, but often several points that can indicate direction. Any point on the ray other than theendpoint can be the second point in the name. The “ray” symbol drawn above the two points should be drawn suchthat the endpoint is over the endpoint of the ray and the arrow is over the second point which indicates the direction.
Example: The ray to the right could be named−→AB or
−→AC
There is only one point B - English is an ambiguous language. Two people can have the same name; one word canhave two separate meanings. Math is also a language, but is different from other languages in that there can be noambiguity. In a particular figure there can be only one point B. A point marks a location and a diagram is like a map.If you have multiple streets with the same name, it is impossible to distinguish between them and find a particularaddress. Students also need to be reminded that points should always be labeled with capitol letters.
Coplanar Points - Students are often confused by the phrase “three non-collinear points” are necessary to define aplane. They think that none of the points can be on the same line but in reality there is a line through any two points.It must be made clear that the phrase “three non-collinear points” implies that all three of the points are not on thesame line but that any two of them may be collinear.
Intersections - Visualizing geometric figures and their intersections can be very difficult for students. Sometimes ithelps to use a pencil and paper to illustrate the difference between a line intersecting a plane and a line in a plane.Objects in the room or parts of the building can be used to visualize two planes intersecting in a line (a wall andthe ceiling) or three planes intersecting in a point (two walls and the floor). Many high school students still strugglewith visualizing these abstract concepts, the more they can be realized in everyday objects, the better students willunderstand them.
Segments and Distance
Using a Ruler - Many Geometry students need to be taught how to use a ruler. The problems stems from students
79

2.1. Basics of Geometry www.ck12.org
not truly understanding fractions and decimals. This is a good practical application and an important life skill.Measuring in centimeters will be learned quickly. Give a brief explanation of how centimeters and millimeters aremarked on the ruler. Since a millimeter is a tenth of a centimeter, both fractions and decimals of centimeters areeasily written. Students need to practice using a ruler and recognizing centimeters, millimeters and inches. It is verycommon for students to measure incorrectly, particularly when using inches because they have difficulty interpretingthe fractional divisions of inches on a ruler. Some may need to be shown how an inch is divided using the marks for12 ,
14 ,
18 and 1
16 . These fractions often need to be added and reduced to get a measurement in inches.
Another difficulty students encounter is inaccurate measuring because they used the edge of the ruler rather thanthe mark at zero. Example 1 in the textbook illustrates the correct way to line up the ruler with a segment and thediagram which follows this example shows how to read the partial inches and centimeters on the ruler.
Number or Object - The measure of a segment is a number that can be added, subtracted and combined arithmeti-cally with other numbers. The segment itself is an object to which postulates and theorems can be applied. Usingthe correct notation may not seem important to the students, but is a good habit that will work to their benefit as theyprogress in their study of mathematics. For example, in calculus whether a variable represents a scalar or a vectoris critical. To be sure students can differentiate between the two concepts, emphasize the notation for the measureof AB - Students really struggle with the difference in meaning of AB,mAB and AB. The first one, AB, refers to theobject, the segment with endpoints A and B. The latter two expressions refer to the length of the segment and/or thedistance from A to B and may be used interchangeably.
Segment Addition - Students should be encouraged to always make a sketch of the segment with particular end-points and the point between them. Having this concrete diagram will help them avoid setting up an incorrectequation. The process of going from a description to a picture also helps them review their vocabulary. One commonmistake with these problems is that once students have been presented with the example in which the point on thesegment is the midpoint they sometimes think that the point on the segment in all subsequent examples is also amidpoint. It is important to help them read the questions carefully and note terms such as “in the middle” whichindicates a midpoint and “in between” which does not indicate a midpoint.
Review the Coordinate Plane and Horizontal and Vertical Distance - Some students will have forgotten how tograph an ordered pair on the coordinate plane, or will get the words vertical and horizontal confused. A reminderthat the x−coordinate is first, and measures horizontal distance from the origin, and that the y−coordinate is secondand measures vertical distance from the origin will be helpful. The coordinates are listed in alphabetical order. Whencounting these distances on the coordinate plane students occasionally will count the starting point as one and thusend up with a length that is one unit more than the actual distance. Comparing this to when they are playing a boardgame and counting off squares as they move their token (you don’t count the square you start on as one), or countinglaps as they run around the track (you don’t count one until you’ve completed the first lap) may give them a coupleof real world example to which they can relate an otherwise abstract concept.
Angles and Measurement
Naming Angles with Three Points - Naming and identifying angles named with three points is often challengingfor students when they first learn it. The middle letter of the angle name, the vertex of the angle, is the most importantpoint. Instruct the students to start by identifying this point and working from there. Remind students that an angleis made up of two rays and that the three points used to identify the angle come directly from these two rays. Withpractice students will become adept at seeing and naming different angles in a complex picture. Review of thisconcept is also important. Every few months give the students a problem that requires using this important skill. Itcan be difficult for students to learn all of the different notations and labeling practices, especially in the beginning,but practicing these skills will help build a strong foundation for students in geometry. It is crucial that they canread, correctly interpret and correctly communicate in this language in order to be successful in this course.
Using a Protractor - Students need to be shown how to line up the vertex and side of the angle correctly with the
80

www.ck12.org Chapter 2. Basic Geometry TE - Common Errors
protractors available for their use. Not all protractors are the same and students often struggle with this procedure,particularly if the protractor the teacher is using is different from theirs. It is worth taking the time to check witheach student to make sure they know how to use their own protractor. The two sets of numbers on a protractorare convenient for measuring angles oriented in many different directions, but often lead to errors on the part ofthe students. There is a simple way for students to check their work when measuring an angle with a protractor.Visual inspection of an angle usually can be used to tell if an angle is acute or obtuse. After the measurement istaken, students should notice if their answer matches with the classification. In fact, encouraging students to alwaysconsider whether their answers are reasonable is a good practice to encourage. Students don’t think to do this andoften make a small error in calculation that leads to an answer that is clearly wrong. They can help themselves bemore accurate in their work if they learn to embrace this habit.
Marking Segments and Angles - Students need to be able to interpret these markings and use them to communicatewhich angles and segments are congruent and which are not in their own diagrams. It is imperative to practice theseskills with students to avoid confusion later in the course.
Midpoints and Bisectors
Congruent or Equal - Frequently students interchange the words congruent and equal. Stress that equal is a wordthat describes two numbers, and congruent is a word that describes two geometric objects. Equality of measure isoften one of the conditions for congruence. If the students have been correctly using the naming conventions fora segment and its measure and an angle and its measure in previous lessons they will be less likely to confuse thewords congruent and equal now.
The Number of Tick Marks or Arcs Does Not Give Relative Length - A common misconception is that a pair ofsegments marked with one tick, are longer than a pair of segments marked with two ticks in the same figure. Clarifythat the number of ticks just groups the segments; it does not give any relationship in measure between the groups.An analogous problem occurs for angles.
Midpoint or Bisector - Midpoint is a location, a noun, and bisect is an action, a verb. One geometric object canbisect another by passing through its midpoint. This link to English grammar often helps students differentiatebetween these similar terms.
Intersects vs. Bisects - Many students replace the word intersects with bisects. Remind the students that if a segmentor angle is bisected it is intersected, and it is know that the intersection takes place at the exact middle.
Orientation Does Not Affect Congruence - The only stipulation for segments or angles to be congruent is that theyhave the same measure. How they are twisted or turned on the page does not matter. This becomes more importantwhen considering congruent polygons later, so it is worth making a point of now.
Labeling a Bisector or Midpoint - Creating a well-labeled picture is an important step in solving many Geometryproblems. How to label a midpoint or a bisector is not obvious to many students. It is often best to explicitly explainthat in these situations, one marks the congruent segments or angles created by the bisector.
Midpoint Formula - Students often have a hard time remembering this formula. It helps to make the connectionbetween a midpoint and the “averages” of the x and y coordinates. Students frequently use subtraction rather thanaddition in this formula and connecting the formula to finding an average helps them to remember that it should beaddition. It is also important to remind students that the result is a point, a pair of coordinates and thus it should bewritten this way.
81

2.1. Basics of Geometry www.ck12.org
Angle Pairs
Complementary or Supplementary - The quantity of vocabulary in Geometry is frequently challenging for stu-dents. It is common for students to interchange the words complementary and supplementary. There are severalways to help students remember which is which. One is to tell students that it is always right to compliment someoneand thus complementary angles add up to 90 degrees or could form a right angle. Another way to remember thatcomplementary angles add up to 90 degrees is to connect the first letter of the word complementary to the first letterof the term corner-typically a corner of a piece of paper is a 90 degree angle. It is also important to present studentswith examples of each of these pairs of these angles that are separate and adjacent. It is very easy for students to getin the habit of expecting these pairs of angles to occur one way or the other.
Linear Pair and Supplementary - All linear pairs have supplementary angles, but not all supplementary anglesform linear pairs. Linear pairs are always adjacent pairs of supplementary angles but not all pairs of supplementaryangles are adjacent. Understanding how Geometry terms are related helps students remember them. Linear pairs area subset of pairs of supplementary angles.
Angles formed by Two Intersecting Lines - Students frequently have to determine the measures of the four anglesformed by intersecting lines. They can check their results quickly when they realize that there will always be twosets of congruent angles, and that angles that are not congruent must be supplementary. They can also check that allfour angles measures have a sum of 360 degrees.
Write on the Picture - In a complex picture that contains many angle measures which need to be found, studentsshould write angle measures on the figure as they find them. Once they know an angle they can use it to find otherangles. When students don’t write each angle measure on the diagram they often overlook a relationship betweenangles that helps them find another measure. It is easy for them to think that they should only find the measures of theangles which are asked for in the problem, when in fact it may be helpful or even necessary to find other, unmarked,angles in the process. This may require them to draw or trace the picture on their paper. It is worth taking the timeto do this. The act of drawing the picture will help them gain a deeper understanding of the angle relationships.
Proofs - The word proof strikes fear into the heart of many Geometry students. It is important to define what amathematical proof is, and let the students know what is expected of them regarding each proof.
Definition: A mathematical proof is a mathematical argument that begins with a truth and proceeds by logical stepsto a conclusion which then must be true.
The students’ responsibilities regarding each proof depend on the proof, the ability level of the students, and wherein the course the proof occurs. Some options are (1) The student should understand the logical progression of thesteps in the proof. (2) The student should be able to reproduce the proof. (3) The student should be able to createproofs using similar arguments.
Classifying Polygons
Vocabulary Overload - Students frequently interchange the words isosceles and scalene. This would be a good timeto make flashcards. Each flashcard should have the definition in words and a marked and labeled figure. Just makingthe flashcards will help the students organize the material in their brains. The flashcards can also be arranged andgrouped physically to help students remember the words and how they are related. For example, have the studentsseparate out all the flashcards that describe angles. The cards could also be arranged in a tree diagram to showsubsets, for instance equilateral would go under isosceles, and all the triangle words would go under the trianglecard.
Angle or Triangle - Both angles and triangles can be named with three letters. The symbol in front of the lettersdetermines which object is being referred to. Remind the students that the language of Geometry is extremely precise
82

www.ck12.org Chapter 2. Basic Geometry TE - Common Errors
and little changes can make a big difference.
Acute Triangles need all Three - A student may see one acute angle in a triangle and immediately classify it as anacute triangle. Remind the students that unlike the classifications of right and obtuse, for a triangle to be acute allthree angles must be acute.
Equilateral Subset of Isosceles - In many instances one term is a subset of another term. A Venn diagram is agood way to illustrate this relationship. Having the students practice with this simple instance of subsets will make iteasier for the students to understand the more complex situation when classifying quadrilaterals. It is also importantto point out that these subsets are determined by properties exhibited in a figure. In this case, and Equilateral trianglepossesses all of the characteristics or properties of an isosceles triangle plus additional properties which make it asubset of the Isosceles triangle category.
Additional Exercises:
1. Draw and mark an isosceles right and an isosceles obtuse triangle.
Answer: The congruent sides of the triangles must be the sides of the right or obtuse angle.
This exercise lays the groundwork for studying the relationship between the sides and angles of a triangle in laterchapters. It is important that students take the time to use a straightedge and mark the picture. Using and reading thetick marks correctly helps the students think more clearly about the concepts.
Vocab, Vocab, Vocab - If the students do not know the vocabulary well, they will have no chance at leaning theconcepts and doing the exercises. Remind them that the first step is to memorize the vocabulary. This will takeconsiderable effort and time. The student edition gives a good mnemonic device, “caving in” for remembering theword concave. Ask the students to create tricks to memorize other words and have them share their ideas.
Side or Diagonal - A side of a polygon is formed by a segment connecting consecutive vertices, and a diagonalconnects nonconsecutive vertices. This distinction is important when student are working out the pattern betweenthe number of sides and the number of vertices of a polygon. It is also worth noting that all diagonals in a convexpolygon are inside the figure and at least one diagonal in a concave polygon lies outside the polygon. This is anadditional method to distinguish between concave and convex polygons.
Squaring in the Distance Formula - After subtracting in the distance formula, students will need to square theresult. This result is often a negative number. Remind them that the square of a negative number is a positivenumber. After the squaring step there should be no negatives or subtraction. If they have a negative in the squareroot, they have made a mistake.
83

2.2. Reasoning and Proof www.ck12.org
2.2 Reasoning and Proof
Inductive Reasoning
Process of Inductive Reasoning - Students often struggle with the concept of inductive reasoning. It is importantto emphasize the three steps of the process: making observations, recognizing a pattern and forming a conjecture.Use real life examples, such as the following:
On Monday the principal decided to play classical music in the cafeteria during lunch. He measured the volume ofnoise in during lunch and determined it was 80 decibels. On Tuesday he played no music and the volume was 90decibels. On Wednesday he played pop music and the volume was 85 decibels. The principal repeated this pattern ofalternating classical music, no music and pop music a couple more times and noticed similar results. He concludesthat classical music reduces the volume of noise in the cafeteria the most during lunch.
This example is very much like a science experiment, which are also typically examples of inductive reasoning.Finding a pattern in a sequence of numbers or figures and continuing the pattern is also inductive reasoning. Havingstudents come up with their own examples of inductive reasoning- either made up examples or examples based ontheir actually experiences) often helps them to really internalize the concept.
The nth Term - Students enjoy using inductive reasoning to find missing terms in a pattern. They are good atfinding the next term, or the tenth term, but have trouble finding a generic term or rule for the number sequence. Ifthe sequence is linear (the difference between terms is constant), they can use methods they learned in Algebra forwriting the equation of a line.
Sample: Find a rule for the nth term in the following sequence: 13, 9, 5, 1,...
Sometimes making an input/output table helps students see that the term numbers are the x values and the terms arethe y values.
x 1 2 3 4 . . . n
y 13 9 5 1 . . .
Since this sequence is arithmetic (each term is found by adding or subtracting the same value, or common difference,from the previous term), these points lie on a line. From the table, students can identify two points on the line suchas (1, 13) and (2, 9). It may be helpful to do an example where students work in a group and each student in thegroup chooses a different pair of points. Then they can find the slope between the points and write the equation ofthe line. Each student should come up with the same equation regardless of which pair of points was chosen. In thiscase the equation of the line is y =−4x+17 and the rule is −4n+17.
True Means Always True - In mathematics a statement is said to be true if it is always true, no exceptions.Sometimes students will think that a statement only has to hold once, or a few times to be considered true. Explainto them that just one counterexample makes a statement false, even if there are a thousand cases where the statementholds. Truth is a hard criterion to meet, proving a statement false is much less burdensome.
Sequences - A list of numbers is called a sequence. If the students are doing well with the number of vocabularywords in the class, the term sequence can be introduced.
84

www.ck12.org Chapter 2. Basic Geometry TE - Common Errors
Conditional Statements
The Advantages and Disadvantages of Non-Math Examples - When first working with conditional statements,using examples outside of mathematics can be very helpful for the students. Statements about the students’ dailylives can be easily broken down into parts and evaluated for veracity. This gives the students a chance to work withthe logic, without having to use any mathematical knowledge. The problem is that there is almost always some crazyexception or grey area that students will love to point out. This is a good time to remind students of how much moreprecise math is compared to our daily language. Ask the students to look for the idea of what you are saying in thenon-math examples, and use their powerful minds to critically evaluate the math examples that will follow. One wayto help students avoid confusion is to use Euler (pronounced “Oiler”) diagrams to show the relationship between thehypothesis and the conclusion. Here is an example based on the conditional statement, “If today is Saturday, then Iwill go to the park.”
Figure 1: In this example, the hypothesis is, “today is Saturday.” The hypothesis is written in the inner circle. Theconclusion, “I will go to the park,” is written in the outer circle. This diagram is interpreted like a Venn Diagram- ifthe statement in the inner circle is true, then the statement in the outer circle is also true.
Figure 2: It may help to make an “x” in the inner circle as shown in the figure and say, “You are here, where thisstatement is true. Does this indicate that you are also inside the circle where it is true that you will go to the park?”
Figure 3: This figure shows an x in the outer circle. Now students should understand that just because you are insidethe circle of “going to the park”, that doesn’t not necessary require that you are in the circle of, “it is Saturday.” Itcould be Saturday, but it doesn’t have to be Saturday.
85

2.2. Reasoning and Proof www.ck12.org
Figure 4: This final figure illustrates the scenario in which we do not go to the park. If the X is outside of the outercircle, then it is outside the “it is Saturday” circle.
Converse and Contrapositive - The most important variations of a conditional statement are the converse and thecontrapositive. Unfortunately, these two sound similar, and students often confuse them. Emphasize the converseand contrapositive in this lesson. Ask the students to compare and contrast them. It is helpful to use the diagramsabove to verify the validity of these statements. The Contrapositive can be shown to be true using the last diagram.The statement would be, “If I do not go to the park, then today is not Saturday.” The converse can be shown to beinconclusive using figure 3. The converse statement is, “It I go to the park, then today is Saturday”. Is this true? Thecorrect answer is no, it is not necessarily true.
Converse and Biconditional - The converse of a true statement is not necessarily true! The important conceptof implication is prevalent in Geometry and all of mathematics. It takes some time for students to completelyunderstand the direction of the implication. Daily life examples where the converse is obviously not true is a goodplace to start and making the Euler diagrams should help as well. A good question for students would be, “Whatwould the Euler diagram look like if the converse is true?” They should come to the conclusion that the two circleswould completely overlap. In other words there would be one circle with two statements inside as in the examplebelow of the conditional statement, “If an angle is a right angle, then its measure is 90◦.
Both of these statements are equivalent because the definition of a right angle is, “an angle which measures 90◦.In fact, all definitions can be written as true biconditional statements. The students will spend considerable timedeciding what theorems have true converses (are bicondtional) in subsequent lessons.
Practice, Practice, Practice - Students are going to need a lot of practice working with conditional statements. Itis fun to have the students write and share conditional statements that meet certain conditions. For example, havethem write a statement that is true, but that has an inverse that is false. There will be some creative, funny answersthat will help all the members of the class remember the material. Encourage students who are struggling to drawthe Euler diagram for each conditional statement to help interpret whether or not the other statements are true.
Deductive Reasoning
Inductive or Deductive Reasoning - Students frequently struggle with the uses of inductive and deductive reason-ing. It is harder for them to see the strengths and weaknesses of each type of thinking, and understand how inductive
86

www.ck12.org Chapter 2. Basic Geometry TE - Common Errors
and deductive reasoning work together to form conclusions. Use situations that the students are familiar with whereeither inductive or deductive reasoning is being used to familiarize them with the different types of logic. The sideby side comparison of the two types of thinking will cement the students’ understanding of the concepts. It wouldalso be beneficial to have the students write their own examples. Some examples follow.
Is inductive or deductive reasoning being used in the following paragraph? Why did you come to this conclusion?
1. The rules of Checkers state that a piece will be crowned when it reaches the last row of the opponent’s side of theboard. Susan jumped Tony’s piece and landed in the last row, so Tony put a crown on her piece.
Answer: This is an example of detachment, a form of deductive reasoning. The conclusion follows from an agreedupon rule.
2. For the last three days a boy has walked by Ana’s house at 5 pm with a cute puppy. Today Ana decides to takeher little sister outside at 5 pm to show her the dog.
Answer: Ana used inductive reasoning. She is assuming that the pattern she observed will continue.
3. Paul finds the nth term rule for the arithmetic sequence: 5, 9, 13, 17,... to be 4n+ 1. He then uses this rule todetermine that the 100th term is 401.
Answer: This example uses both forms of reasoning. First, Paul uses inductive reasoning to determine the nth termrule. He then uses deductive reasoning when he uses the rule to find the 100th term.
A good rule of thumb for establishing which type of reasoning is being used is to think about what part of the processis occurring. If you are coming up with a conjecture or hypothesis, then it is more likely inductive reasoning. Ifyou are using a known rule, formula or type of argument then it is most likely deductive reasoning. As shown inthe previous example, the two work together to form and then prove conjectures or “guesses” about the observedpatterns.
Valid Arguments - Students need lots of practice recognizing the valid arguments. The Euler diagrams in theprevious section can be used here as well to show that the Law of the Contrapositive and the Law of Detachment arevalid. By adding a third circle, the Law of Syllogism can also be illustrated in an Euler diagram.
Converse/Inverse Errors - Students often make the following false conclusions in logical reasoning:
Converse Error: If it rains, then I will bring my umbrella. I bring my umbrella. Therefore, it is raining.
Inverse Error: If it rains, then I will bring my umbrella. It does not rain. Therefore, I do not bring my umbrella.
In these examples, the conclusion is made by assuming that the converse or inverse of the statement is true. Welearned in the previous section that they are not necessarily true. This is a good opportunity to review these statementsand revisit the Euler diagrams for them again as well.
Algebraic and Congruence Properties
Commutative or Associate - Students sometimes have trouble distinguishing between the commutative and asso-ciative properties. It may help to put these properties into words. The associative property is about the order inwhich multiple operations are done. The commutative is about the first and second operand having different rolesin the operation. In subtraction the first operand is the starting amount and the second is the amount of change.Often student will just look for parenthesis; if the statement has parenthesis they will choose associate, and they willusually be correct. Expose them to an exercise like the one below to help break them of this habit.
What property of addition is demonstrated in each of the following statements?
a. (x+ y)+ z = z+(x+ y)
b. (x+ y)+ z = x+(y+ z)
87

2.2. Reasoning and Proof www.ck12.org
Answer: For example a, it is the commutative property that ensures these two quantities are equal. On the left-handside of the equation the first operand is the sum of x and y, and on the right-hand side of the equation the sum if xand y is the second operand. In example b, the parentheses are grouping different variables so this is an example ofthe associative property.
Sometimes it helps students to come up with an expression to remember which is which. One example is: Yourgroup of friends is the people you associate with. This indicates that the associative property refers to a change ingrouping. For commutative, think of the word commute-you move from one place to another such as going fromhome to work. When the variables change position in the expression then it is the commutative property.
Transitive or Substitution - The transitive property is actually a special case of the substitution property. Thetransitive property has the additional requirement that the first statement ends with the same number or object withwhich the second statement begins. Acknowledging this to the students helps avoid confusion, and will help themsee how the properties fit together. The following statement is true due to the substitution property of equality. Howcan the statement be changed so that the transitive property of equality would also ensure the statement’s validity?
If ab = cd, and ab = f , then cd = f .
Answer: The equality ab = cd can be changed to cd = ab due to the symmetric property of equality. Then thestatement would read:
If cd = ab, and ab = f , then cd = f .
This is justified by the transitive property of equality.
Keeping It All Straight - At this point in the class the students have been introduced to an incredible amount ofmaterial that they will need to use in proofs. Laying out a logic argument in proof form is, at first, a hard task.Searching their memories for terms at the same time makes it near impossible for many students. A notebook thatserves as a “tool cabinet” full of the definitions, properties, postulates, and later theorems that they will need, willfree the students’ minds to concentrate on the logic of the proof. After the students have gained some experience,they will no longer need to refer to their notebook. The act of making the book itself will help the students collectand organize the material in their heads. It is their collection; every time they learn something new, they can add toit.
All Those Symbols - In the back of many math books there is a page that lists all of the symbols and their meanings.The use of symbols is not always consistent between texts and instructors. Students should know this in case theyrefer to other materials. It is a good idea for students to keep a page in their notebooks where they list symbols, andtheir agreed upon meanings, as they learn them in class. Some of the symbols they should know at this point in arethe ones for equal, congruent, angle, triangle, perpendicular, and parallel.
Don’t Assume Congruence! - When looking at a figure students have a hard time adjusting to the idea that even iftwo segments or angles look congruent they cannot be assumed to be congruent unless they are marked. A triangleis not isosceles unless at least two of the sides are marked congruent, no matter how much it looks like an isoscelestriangle. Maybe one side is a millimeter longer, but the picture is too small to show the difference. Congruent meansexactly the same. It is helpful to remind the students that they are learning a new, extremely precise language. Ingeometry congruence must be communicated with the proper marks if it is known to exist.
Communicate with Figures - A good way to have the students practice communicating by drawing and markingfigures is with a small group activity. One person in a group of two or three draws and marks a figure, and then theother members of the group tell the artist what if anything is congruent, perpendicular, parallel, intersecting, and soon. They take turns drawing and interpreting. Have them use as much vocabulary as possible in their descriptions ofthe figures.
Two-Column Proofs
Diagram and Plan - Students frequently want to skip over the diagramming and planning stage of writing a proof.They think it is a waste of time because it is not part of the end result. Diagramming and marking the giveninformation enables the writer of the proof to think and plan. It is analogous to making an outline before writing an
88

www.ck12.org Chapter 2. Basic Geometry TE - Common Errors
essay. It is possible that the student will be able to muddle through without a diagram, but in the end it will probablyhave taken longer, and the proof will not be written as clearly or beautifully as it could have been if a diagramand some thinking time had been used. Inform students that as proofs get more complicated, mathematicians pridethemselves in writing simple, clear, and elegant proofs. They want to make an argument that is undeniably true.
Teacher Encouragement - When talking about proofs and demonstrating the writing of proofs in class, take timeto make a well-drawn, well-marked diagram. After the diagram is complete, pause, pretend like you are consideringthe situation, and ask students for ideas of how they would go about writing this proof.
Assign exercises where students only have to draw and mark a diagram. Use a proof that is beyond their ability atthis point in the class and just make the diagram the assignment.
When grading proofs, use a rubric that assigns a certain number of points to the diagram. The diagram should bealmost as important as the proof itself.
Refer students to the tips for proof writing that appear between Examples 4 and 5 of this section in the text. Theyshould keep going back to those tips periodically until they become second nature.
Start with “Given”, but don’t end with “Prove” - After a student divides the statement to be proved into a givenand prove statements he or she will enjoy writing the givens into the proof. It is like a free start. Sometimes they get alittle carried away with this and when they get to the end of the proof write “prove” for the last reason. Remind themthat the last step has to have a definition, postulate, property, or theorem to show why it follows from the previoussteps. Perhaps reminding them the “prove” is a command statement, not a reason will help them remember that it isjust part of the question.
Scaffolding - Proofs are challenging for many students. Many students have a hard time reading proofs. They arejust not used to this kind of writing; it is very specialized, like a poem. One strategy for making students accustomto the form of the proof is to give them incomplete proofs and have them fill in the missing statements and reason.There should be a progression where each proof has less already written in, and before they know it, they will bewriting proofs by themselves.
Number or Geometric Object - The difference between equality of numbers and congruence of geometric objectswas addressed earlier in the class. Before starting this lesson, a short review of this distinction to remind studentsis worthwhile. If the difference between equality and congruence is not clear in students’ heads, the proofs in thissection will seem pointless to them.
Theorems - The concept of a theorem and how it differs from a postulate has been briefly addressed several timesin the course, but this is the first time theorems have been the focus of the section. Now would be a good time forstudents to start a theorem section in their notebook. As they prove, or read a proof of each theorem it can be addedto the notebook to be used in other proofs.
Proofs about Angle Pairs and Segments
Mark-Up That Picture - Angles are sometimes hard to see in a complex picture because they are not really writtenon the page; they are the amount of rotation between two rays that are directly written on the page. It is helpfulfor students to copy diagram onto their papers and mark all the angles of interest. They can use highlighters anddifferent colored pens and pencils. Each pair of vertical angles or linear pairs can be marked in a different color.Using colors is fun, and gives the students the opportunity to really analyze the angle relationships.
Add New Information to the Diagram - It is common in geometry to have multiple questions about the samediagram. The questions build on each other leading the student though a difficult exercise. As new information isfound it should be added to the diagram so that it is readily available to use in answering the next question.
Try a Numerical Example - Sometimes students have trouble understanding a theorem because they get lost in allthe symbols and abstraction. When this happens, advise the students to assign a plausible number to the measures of
89

2.2. Reasoning and Proof www.ck12.org
the angles in question and work from there to understand the relationships. Make sure the student understands thatthis does not prove anything. When numbers are assigned, they are looking at an example, using inductive reasoningto get a better understanding of the situation. The abstract reasoning of deductive reasoning must be used to write aproof.
Inductive vs. Deductive Again - The last six sections have given the students a good amount of practice drawingdiagrams, using deductive reasoning, and writing proofs, skills which are closely related. Before moving on tochapter three, take some time to review the first two sections of this chapter. It is quite possible that students haveforgotten all about inductive reasoning. Now that they have had practice with deductive reasoning they can compareit to inductive reasoning and gain a deeper understanding of both. They should understand that inductive reasoningoften helps a mathematician decide what should be attempted to be proved, and deductive reasoning proves it.
Review - The second section of chapter two contains information about conditional statements that will be used inthe more complex proofs in later chapters. Continue to review these variations of the conditional statement in verbaland symbolic form so that students do not forget them.
90

www.ck12.org Chapter 2. Basic Geometry TE - Common Errors
2.3 Parallel and Perpendicular Lines
Lines and Angles
Marking the Diagram - Sometimes students confuse the marks for parallel and congruent. When introducing themto the arrows that represent parallel lines, review the ticks that represent congruent segments. Seeing the two at thesame time helps avoid confusion. Also, explaining that the arrows show that the lines or segments are going in thesame direction or have the same slope may help them understand why arrows are used and thus help them remember.
When given the information that two lines or segments are perpendicular, students don’t always immediately seehow to mark the diagram accordingly. They need to use the definition of perpendicular and mark one of the rightangles created by the lines with a box.
Students also struggle with marking angle bisectors and midpoints (or segments bisectors). Just like the perpendic-ular lines, they aren’t marking the object directly. They need to mark the results, which are congruent angles orcongruent segments in these cases.
Symbol Update - Students should be keeping a list of symbols and how they will be used in this class in theirnotebooks. Remind them to update this page with the symbols for parallel, ‖, and perpendicular, ⊥.
Construction - The parallel and perpendicular line postulates are used in construction. Constructing parallel andperpendicular lines with a compass and straightedge is a good way to give students kinesthetic experience with theseconcepts. Construction can also be done with computer software. To construct a parallel or perpendicular line thestudent will select the line they want the new line to be parallel or perpendicular to, and the point they want the newline to pass through, and chose construct. The way the programs have the students select the line and then the pointreinforces the postulates.
Parallel vs Skew Lines - Students often struggle with the difference between these two scenarios. It is difficult forthem to picture the skew lines in three dimensions and even harder for them to draw them. Use concrete examplesof skew and perpendicular lines (objects in the classroom) to help them visualize the difference. Also, reinforce therequirement for the lines to be coplanar in the definition of parallel lines. If it is not specifically stated that the linesare coplanar, then the lines may be skew.
Naming the Angle Pairs Formed when a Transversal Intersects Two Lines - Students often struggle withmemorizing the names of the angle pairs. It helps to go through the names and explain how the names trulydescribe the angle pairs. Using colored pencils or highlighters to indicate the space in the interior of the parallellines and the space in the exterior of the parallel lines helps distinguish between alternate exterior and alternateinterior. Discussing what alternate vs same side means will help distinguish between these pair of interior angles.Corresponding angles are in the same location with respect to the transversal and the line. Using words like above orbelow and to the right or left helps students locate the pairs of corresponding angles, particularly in situations wherethe lines are not parallel and the angles don’t “match”.
Properties of Parallel Lines
The Parallel Hypothesis - So far seven different pairs of angles that may be supplementary or congruent have beenintroduced. All seven of these pairs are used in the situation where two lines are being crossed by a transversal
91

2.3. Parallel and Perpendicular Lines www.ck12.org
forming eight angles. Some of these pairs require the two lines to be parallel and some do not. Students sometimesget confused about when they need parallel lines to apply a postulate or theorem, and if a specific pair is congruentor supplementary. A chart like the one below will help them sort it out.
TABLE 2.1:
Type of Angle Pair RelationshipDo Not Require Parallel Lines Linear Pairs
Vertical AnglesSupplementaryCongruent
Parallel Lines Required Corresponding AnglesAlternate Interior AnglesAlternate Exterior AnglesConsecutive Interior AnglesConsecutive Exterior Angles
CongruentCongruentCongruentSupplementarySupplementary
Encourage students who are really struggling to use common sense when deciding whether a pair of angles issupplementary or congruent. When parallel lines are intersected by a transversal, any pair of two angles will beeither congruent or supplementary. For students at this level, it is advisable to make these drawings accurate (i.e.make the lines look parallel if they are parallel) so that students can practice using common sense. If the angles lookcongruent, they are congruent and if one is clearly obtuse and the other is clearly acute, then they are supplementary.This goes against the idea that it is not advisable to encourage students to rely on the appearance of a diagram butfor very low level students, this can really help them. In addition, practicing common sense will help them in thereal world and in application problems.
Patty Paper Activity - When two lines are intersected by a transversal eight angles are formed in two sets of four.When the lines are parallel, the two sets of four angles are exactly the same. To help students see this relationship,have them darken a set of parallel lines on their binder paper a few inches apart (or they can use the two sides ofa ruler to make the parallel lines) and draw a transversal through the parallel lines. Next, they should trace one setof four angles on some thin paper (tracing paper or patty paper). When they slide the set of four angles along thetransversal they will coincide with the other set of four angles. Have them try the same thing with a set of linesthat are not parallel. This will help students find missing angle measures quickly and remember when they cantransfer numbers down the transversal. It does not help them learn the names of the different pairs of angles whichis important for communicating with others about mathematical concepts and for writing proofs.
Proving Lines Parallel
When to Use the Converse - It takes some experience before most students truly understand the difference betweena statement and its converse. They will be able to write and recognize the converse of a statement, but then will havea hard time deciding which one applies in a specific situation. Tell them when you know the lines are parallel andare looking for angles, you are using the original statements; when you are trying to decide if the lines are parallelor not, you are using the converse.
Proofs of Converse Theorems - The textbook includes a proof of the Converse of the Alternate Interior AnglesTheorem. It would be helpful to prove each of the other theorems to help students see when the converse theoremsare used.
Example Proof of the Converse of the Alternate Exterior Angle Theorem:
92

www.ck12.org Chapter 2. Basic Geometry TE - Common Errors
Given: 6 1∼= 6 8
Prove: l ‖ m
TABLE 2.2:
Statements Reasons1. 6 1∼= 6 8 1. Given2. 6 1∼= 6 4 2. Vertical Angles Theorem3. 6 4∼= 6 8 3. Transitive Property of Angle Congruence4. l ‖ m 4. Converse of the Corresponding Angles Postulate
The Converse of the Alternate Interior Angle Theorem could also be proved using the Converse of the AlternateExterior Angle Theorem. This would demonstrate to the students that once a theorem has been proved, it can beused in the proof of other theorems. This demonstrates the building block nature of math. Here is one way to do thisusing the same diagram from above.
Given: 6 1∼= 6 8
Prove: l ‖ m
TABLE 2.3:
Statements Reasons1. 6 1∼= 6 8 1. Given2. 6 1∼= 6 4 2. Vertical Angles Theorem3. 6 5∼= 6 8 3. Vertical Angles Theorem4. 6 4∼= 6 5 4. Substitution Property of Angle Congruence5. l ‖ m 5. Converse of the Alternate Interior Angles Theorem
Proving the theorem in several ways gives students a chance to practice with the concepts and their proof writingskills. Similar proofs can be assigned for the other theorems in this section.
Properties of Perpendicular Lines
Complementary, Supplementary, or Congruent - When finding angle measures, students generally need to decidebetween three possible relationships: complementary, supplementary, and congruent. A good way for them topractice with these and review their equation solving skills, is to assign variable expressions to angle measures,state the relationship of the angles, and have the students use this information to write an equation that when solvedwill lead to a numerical measurement for the angle. Encourage students to take the time to write out and solve theequation neatly. This process helps them avoid errors. Many times students will find the value of x, and then stopwithout plugging in the value to the expression for the angle measures. Have the students find the actual angles
93

2.3. Parallel and Perpendicular Lines www.ck12.org
measures by plugging their x value in to verify that their final answers are angle measures that have the desiredrelationship.
Interpreting “Word” Questions – Students often have difficulty translating the words in a statement into analgebraic equation. Here are a couple examples that might help students interpret verbal questions that are notaccompanied by a diagram.
Example 1: Two vertical angles have measures (2x−30)◦ and (x+60)◦. Find the measures of the two angles.
Students may wish to make a diagram of vertical angles, then label them with these measures before setting up theequation: 2x−30 = x+60. Once they solve for x, students need to plug this value into both expressions to get themeasures of the two angles.
Remind students that these angles should have equal measures. Model for students the process of checking youranswers for reasonableness by asking them if the values make sense and how they know. At first they may havetrouble answering these questions but if you consistently model this process, it may become second nature to themas well and help them to identify and correct mistakes as they solve problems throughout the course.
Example 2: The outer rays of two adjacent angle with measures (4x+10)◦ and (5x−10)◦ are perpendicular. Findthe measures of each angle.
This example contains a lot of information that students will need to sort out. In this case a diagram is especiallyuseful. Break down the information with students and help them diagram the angles to discover that the sum of thetwo angles must be 90◦. Here is the equation and value of x:
4x+10+5x−10 = 90
x = 10
Using this value of x, the two angles are 50◦ and 40◦, respectively. Do these measures make sense? How do youknow? Practice asking and answering these questions yourself so you can help students answer them correctly.
Example 3: The angles of a linear pair have measures (3x+45)◦ and (2x+35)◦. Find the measure of each angle.
Example 4: Perpendicular lines form an angle with measure (8x+10)◦. What is the value of x?
Again, help students interpret the given information to make a diagram and set up an equation to solve. Then remindstudents to plug in their x value to find the actual angle measures. Finally, prompt students to check their work forreasonableness and accuracy.
Answers:
Example 3: x = 20◦ and the angles are 105◦ and 75◦.
Example 4: x = 10◦
Proof Tip - In a proof, students must first state which lines are perpendicular and why, then they can say that all fourangles formed by those perpendicular lines are right angles, then right angles are congruent, etc. Students are aptto just jump to the final conclusion because the lines are perpendicular. In a complete proof, these middle steps areimportant to show understanding of the thought process. Refer to the proof in question 26 of the review problemsfor an example.
Parallel and Perpendicular Lines in the Coordinate Plane
Order of Subtraction - When calculating the slope of a line using two points it is important to keep straight whichpoint was made point one and which one was point two. It does not matter how these labels are assigned, but theorder of subtraction has to stay the same in the numerator and the denominator of the slope ratio. If students switch
94

www.ck12.org Chapter 2. Basic Geometry TE - Common Errors
the order they will get the opposite of the correct answer. If they have a graph of the line, ask them to compare thesign of the slope to the direction of the line. Is the line increasing or decreasing? Does that match the slope? Thiswill give them another opportunity to practice checking their results for reasonableness.
Another strategy to help students with this is to have them write the points vertically and subtract as shown in thediagram below:
−3−54−(−2) =
−86 = −4
3
Graphing Lines with Integer Slopes - The slope of a line is the ratio of two numbers. When students are asked tograph a line with an integer slope they often fail to realize what and where the second number is. Frequently theywill make the “run” of the line zero and graph a vertical line. It is helpful to have them write the slope as a ratio overone before they do any graphing. They may only need to do this a few times on paper before they are able to graphthe lines correctly.
Zero or Undefined - Students need to make these associations:
Zero in numerator –slope is zero –line is horizontal
Zero in denominator –slope is undefended –line is vertical
Students frequently switch these around. Try to connect these concepts to their experiences. For example explainthat when they are walking on a flat surface, they are not going up or down so the slope is zero. Ask them if they canwalk up a vertical wall, hopefully they will say, “No.” Then you can explain that the slope of this wall is undefined.After the relationships are explained in class, remind them frequently, maybe have a poster up in the room thatshows lines with a positive slope, negative slope, zero slope (horizontal) and undefined slope (vertical). You couldalso write the relationship on a corner of the board that does not get erased.
Students also struggle with realizing that a line perpendicular to a horizontal line is vertical and vice versa. Whenthey look at these equations, the slope is not evident and so they don’t know what to do. Practice lots of exampleswith horizontal and vertical lines.
Use Graph Paper - Making a connection between the numbers that describe a line and the line itself is an importantskill. Requiring that the students use graph paper encourages them to make nice, thoughtful graphs, and helps themmake this connection.
The y−axis is Vertical - When using the slope-intercept form to graph a line or write an equation, it is commonfor students to use the x−intercept instead of the y−intercept. Remind them that they want to use the vertical axis,y−intercept, to begin the graph. Requiring that the y−intercept be written as a point, say (0, 3) instead of just 3,helps to alleviate this problem.
Where’s the Slope - Students are quickly able to identify the slope as the coefficient of the x−variable when a lineis in slope-intercept form. Unfortunately they sometimes extend this to standard form. Remind the students that ifthe equation of a line is in standard form, or any other form, they must first algebraically convert it to slope-interceptform before they can easily read off the slope. It is wise to do several examples which require changing the equationfrom standard form into slope-intercept form.
Why Use Standard Form - The slope-intercept form of the line holds so much valuable information about the graphof a line that students probably won’t understand why any other form would ever be used. Mention to them thatstandard form is convenient when solving systems and putting equations into matrices, things they will be doing intheir second year of algebra, to motivate them to learn and remember the standard form.
Organizing Work in Multi-Step Problems - Part of the struggle with these problems is that students get lost in theprocess. They get wrapped up in a particular step and forget where they are going. It may be helpful to have studentswrite out the steps they will need to follow in the beginning so that they will have a road map to follow. They can
95

2.3. Parallel and Perpendicular Lines www.ck12.org
even leave some space between each step to go back and fill in with their work. Here is an example of this:
Find the equation of the line that is perpendicular to the line passing through the points (5, 7) and (12, 3) and passesthrough the second point.
1) Find the slope between the given two points.
m =3−712−5
=−47
2) Find the opposite reciprocal (perpendicular) slope.
⊥ m =74
3) Use the perpendicular slope and the given point (12, 3) to find the y−intercept.
3 =74(12)+b
3 = 21+b
−18 = b
4) Write the new equation.
y =74
x−18
Many students forget that at the end they need to write an equation with variables x and y. They don’t quiteunderstand that this is an equation that relates all possible pairs of x and y coordinates. Explain to them that theyneed to use the given pair to determine what the y−intercept is, but not in the final equation.
The Distance Formula
The Perpendicular Distance - In theory, measuring along a perpendicular line makes sense to the students, but inpractice, when lining up the ruler or deciding which points to put in the distance formula, there are many distractions.Students can evaluate their decision by taking a second look to see if the path they chose was the shortest onepossible. This is another opportunity to practice checking their work for reasonableness.
Where to Measure? - Now that the students know to measure along a line that is perpendicular to both parallellines, they might wonder where along the lines to measure. When working on a coordinate plane it is best to startwith a point that has integer coordinates, just to keep the problem simple and accurate. They will get the samedistance no matter where they measure though. You may wish to share the alternate definition of parallel lines: Twolines that are a constant distance apart.
Order of Operations - Students might want to cancel the squares with the square root in the distance formula, eventhough they cannot. See example below:
√(x1− x2)
2 +(y1− y2)2 6= (x1− x2)+(y1− y2)
96

www.ck12.org Chapter 2. Basic Geometry TE - Common Errors
Remind students that the square root is like parenthesis. The operations contained inside the square root must beperformed before the square root can be taken. Give students lots of opportunity to practice finding the distancebetween two points to practice this formula.
97

2.4. Triangles and Congruence www.ck12.org
2.4 Triangles and Congruence
Triangle Sums
Interior vs. Exterior Angles - Students frequently have trouble keeping interior and exterior angles straight. Theymay fail to identify to which category a specific angle belongs and include an exterior angle in a sum with twointerior. They also sometimes use the wrong total, 360◦, verses 180◦. Encourage the students to draw the figureon their papers and color code it. They can highlight or use a specific color of pencil to label all the exterior anglemeasures and another color for the interior angle measures. Then it is easy to do some checks on their work. Eachinterior/exterior adjacent (linear) pair should have a sum of 180◦, all of the interior angles should add to 180◦, andthe measures of the exterior angles total 360◦.
Find All the Angles You Can - When a student is asked to find a specific angle in a complex figure and they donot immediately see how they can do it, they can become stuck, and not see how to proceed. A good strategy is tofind any angle they can and write the measures in the diagram, even if it is not the one they are after. Finding otherangles keeps their brains active and working, they practice using angle relationships, and the new information willoften help they find the target angle. Students often miss possible connections when they don’t write down all of theangles as they find them. It is important that students know that many exercises are not designed to do in one step.
Congruent Angles in a Triangle - In later sections students will study different ways of determining if two or moreangles in a triangle are congruent, and will then have to use this information to find missing angles in a triangle. Tostart them on this process it is good to have them work with triangles in which two angles are stated to be congruent.A few example problems follow:
Example 1: An acute triangle has two congruent angles each measuring 70◦. What is the measure of the third angle?
Encourage students to make a triangle diagram and label two angles 70◦. This helps review making and markingdiagrams and gives them a concrete visual to work with. Next, students should set up an equation showing that thetwo given angles plus the third, unknown angle, will add up to 180◦. Finally, students should solve and find that thethird angle is 40◦.
Example 2: An obtuse triangle has two congruent angles. One angle of the triangle measures 130◦. What are themeasures of the other two angles?
Again, drawing a diagram will help students organize their thoughts. They will recognize that the obtuse anglecannot be one of the congruent angles. They should arrive at the conclusion that each of the congruent angles shouldbe 25◦.
Congruent Figures
Rotation Difficulties - When congruent triangles are shown with different orientations, many students find it difficultto rotate the figures in their head to align corresponding sides and angles. Remind them that the angles and sidesmarked congruent are the corresponding pairs of angles and sides. Have students practice listing the correspondingpairs of congruent sides and angles. Another recommendation is to redraw the figures on paper so that they havethe same orientation. It may be necessary for students to physically rotate the paper at first. After students have hadsome time to practice this skill, most will be able to skip this step.
98

www.ck12.org Chapter 2. Basic Geometry TE - Common Errors
Stress the Definition - The definition of congruent triangles requires six congruencies, three pairs of angles andthree pairs of sides. If students understand what a large requirement this is, they will be more motivated to developthe congruence shortcuts in subsequent lessons.
The Language of Math - Many students fail to see that math is a language, a form of communication, which isextremely dense. Just a few symbols hold great amounts of information. The congruence statements for example,not only tell the reader which triangles are congruent, but which parts of the triangle correspond. When put in termsof communication students have an easier time understanding why they must put the corresponding vertices in thesame order when writing the congruence statement.
Third Angle Theorem by Proof - In the text an example is given to demonstrate the Third Angle Theorem, thisis inductive reasoning. A deeper understanding of the theorem, and different types of reasoning, can be gained byusing deductive reasoning to write a proof. It will also reinforce the idea that theorems must be proved, and showshow inductive and deductive reasoning work together. Use review question 23 as a template for a proof of the ThirdAngle Theorem.
Triangle Congruence Using SSS and SAS
One Triangle or Two - In previous chapters, students learned to classify a single triangle by its sides. Now studentsare comparing two triangles by looking for corresponding pairs of congruent sides. Evaluating the same triangle inboth of these ways helps the students remember the difference, and is a good way to review previous material. Forinstance, students could be asked to draw a pair of isosceles triangles that are not congruent, and a pair of scalenetriangles that can be shown to be congruent with the SSS postulate.
Congruent Segments - This is a good time to remind students that overlapping (shared) segments will be congruent.Also, remind students that when they are given a midpoint, they can mark the two halves of the segment congruent.Practice this with them and illustrate marking the diagram appropriately.
Correct Congruence Statements - Determining which vertices of congruent triangles correspond is more difficultwhen no congruent angles are marked. Once the students have determined that the triangles are in fact congruentusing the SSS Congruence postulate, it is advisable for them to mark congruent angles before writing the congruencestatement. Corresponding congruent angles are found by matching up side markings. The angle made by the sidesmarked with one and two tick marks corresponds to the angle made by the corresponding sides in the other triangle,and so on.
The Included Angle - Students often have a hard time differentiating between SAS and SSA. It helps to havestudents practice identifying the angle included between two particular sides in a triangle. This should be practicedusing a diagram and using the name of the triangle. This will help students identify which triangle congruencetheorem is being used are help them identify correct pairs of corresponding triangle parts.
Example: What is the included angle between sides AB and BC in ∆ABC?
Answer: The included angle is 6 B. Note that it is the point that is an endpoint in both segments.
Tricky Problems - When looking to see which triangle congruence theorem is being used, students are liable toonly look at one of the triangles and make a mistake as shown in the example below. This is problem #3 from thereview questions for this section in the textbook.
99
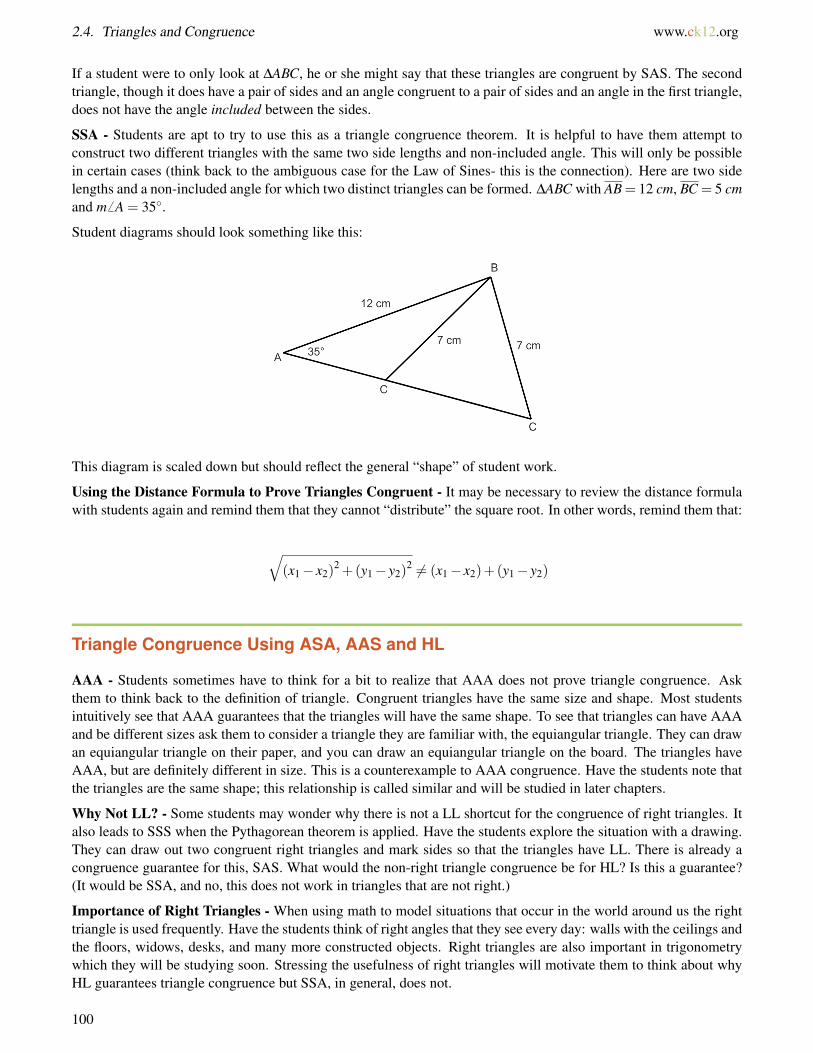
2.4. Triangles and Congruence www.ck12.org
If a student were to only look at ∆ABC, he or she might say that these triangles are congruent by SAS. The secondtriangle, though it does have a pair of sides and an angle congruent to a pair of sides and an angle in the first triangle,does not have the angle included between the sides.
SSA - Students are apt to try to use this as a triangle congruence theorem. It is helpful to have them attempt toconstruct two different triangles with the same two side lengths and non-included angle. This will only be possiblein certain cases (think back to the ambiguous case for the Law of Sines- this is the connection). Here are two sidelengths and a non-included angle for which two distinct triangles can be formed. ∆ABC with AB= 12 cm, BC = 5 cmand m6 A = 35◦.
Student diagrams should look something like this:
This diagram is scaled down but should reflect the general “shape” of student work.
Using the Distance Formula to Prove Triangles Congruent - It may be necessary to review the distance formulawith students again and remind them that they cannot “distribute” the square root. In other words, remind them that:
√(x1− x2)
2 +(y1− y2)2 6= (x1− x2)+(y1− y2)
Triangle Congruence Using ASA, AAS and HL
AAA - Students sometimes have to think for a bit to realize that AAA does not prove triangle congruence. Askthem to think back to the definition of triangle. Congruent triangles have the same size and shape. Most studentsintuitively see that AAA guarantees that the triangles will have the same shape. To see that triangles can have AAAand be different sizes ask them to consider a triangle they are familiar with, the equiangular triangle. They can drawan equiangular triangle on their paper, and you can draw an equiangular triangle on the board. The triangles haveAAA, but are definitely different in size. This is a counterexample to AAA congruence. Have the students note thatthe triangles are the same shape; this relationship is called similar and will be studied in later chapters.
Why Not LL? - Some students may wonder why there is not a LL shortcut for the congruence of right triangles. Italso leads to SSS when the Pythagorean theorem is applied. Have the students explore the situation with a drawing.They can draw out two congruent right triangles and mark sides so that the triangles have LL. There is already acongruence guarantee for this, SAS. What would the non-right triangle congruence be for HL? Is this a guarantee?(It would be SSA, and no, this does not work in triangles that are not right.)
Importance of Right Triangles - When using math to model situations that occur in the world around us the righttriangle is used frequently. Have the students think of right angles that they see every day: walls with the ceilings andthe floors, widows, desks, and many more constructed objects. Right triangles are also important in trigonometrywhich they will be studying soon. Stressing the usefulness of right triangles will motivate them to think about whyHL guarantees triangle congruence but SSA, in general, does not.
100

www.ck12.org Chapter 2. Basic Geometry TE - Common Errors
Congruent Angle/Segment Pairs - It is important to review what pairs of angles will be congruent in diagrams.Students may forget that they can mark vertical angles and shared (overlapping) angles congruent. They may alsoneed a reminder that if segments are parallel, then alternate interior angles will be congruent. Remind them as wellthat shared sides can be marked congruent.
Marking the Diagram - Once again, students should be encouraged to mark all given information and all deducedcongruencies in their diagrams. Seeing the markings will help them determine which triangle congruence theoremis being utilized.
An Important Distinction - At first students may not see why it is important to identify whether ASA or AASis the correct tool to use for a specific set of triangles. They both lead to congruent triangles, right? Sometimeseither can be used to prove triangles are congruent, but this will not always be the case, as they will see in the nextlesson. Sometimes the configuration of the corresponding congruent sides and angles in the triangles determinesif the triangles can be proved to be congruent or not. Knowing this will motivate students to study the differencebetween ASA and AAS. This is a good time to practice identifying the “included” side between two angles. Thiswill help students see when a side is included and when it is not.
AAS or SAA - Sometimes students try to list the congruent sides and angles in a circle as they move around thetriangle. This could result in AAS or SAA when there are two pairs of congruent angles and one pair of congruentsides that is not between the angles. They know AAS proves congruence and want to know if SAA does as well.When this occurs it is best to redirect their thinking process. With two sets of angles and one set of sides thereare only two possibilities, the side is between the angles or it is another side. When it is between the angles wehave ASA, if it is either of the other two sides we use SAA. This same situation occurs with SSA, but is even moreimportant since SSA is not a test for congruence. A good way for the students to remember this is that when theorder of SSA is reversed it makes an inappropriate word. This word should not be used in class or in proofs, even ifit is spelled backwards.
Patterns and Structure - All of the shortcuts to triangle congruence require three pieces of information. Reinforcethis concept with students are you complete proofs. Students often wonder why we need to include statements suchas BC ∼= BC when it is so obvious to them that it is the same segment and that it has to be congruent to itself. Itis important to the structure of the proof that we include exactly which segment and/or angle pairs we are using inorder to conclude the triangles are congruent by a particular triangle congruence theorem.
Isosceles and Equilateral Triangles
The Useful Definition of Congruent Triangles - The arguments used in the proof of the Base Angle Theorem applywhat the students have learned about triangles and congruent figures in this chapter, and what they learned aboutreasoning and implication in the second chapter. It is a lot of information to bring together and students may need toreview before they can fully understand the proof.
This is a good point to summarize what the students have learned in this chapter about congruent triangles anddemonstrate how it can be put to use. To understand this proof, students need to remember that the definition ofcongruent triangles requires three pairs of congruent sides and three pairs of congruent angles, but realize that not allsix pieces of information need to be verified before it is certain that the triangles are congruent. There are shortcuts.The proof of the Base Angle Theorem uses one of these shortcuts and jumps to congruence which implies that thebase angles, a pair of corresponding angles of congruent triangles, are congruent.
To a student new to geometry this argument is not as straightforward as it may seem to an instructor experienced inmathematical proofs. Plan to take some time explaining this important proof.
A Proved Theorem Can Be Used - Now that the students have the proof of the Base Angle Theorem they can useit as opportunities present themselves. They should be on the lookout for isosceles triangles in the proofs of othertheorems, in complex figures, and in all other situations. When they spot them, they need to immediately apply the
101

2.4. Triangles and Congruence www.ck12.org
Base Angle Theorem and mark those base angles congruent. This is true for the converse as well. When they spot atriangle with congruent angles, they should mark the appropriate sides congruent. Students sometimes do not realizewhat a powerful tool this theorem is and that they will be using it extensively throughout this class, and in mathclasses they will take in the future.
The Process of Writing a Proof - When students first start examining pairs of triangles to determine congruence itis difficult for them to sort out all the sides and angles.
The first step is for them to copy the figure onto their paper. It is helpful to color code the sides and angles,congruent sides marked in one color and the congruent angles in another. Some congruent parts will not be markedin the original figure that is given to the students in the text. For example, there could be an overlapping side that iscongruent to itself, due to the reflexive property; mark it as well. Then they should do a final check to ensure thatthe congruent parts do correspond.
The next step is for them to count how many pairs of congruent corresponding sides and how many pairs of congruentcorresponding angles there are. With this information they can eliminate some possibilities from the list of wayto prove triangles congruent. If there is no right angle they can eliminate HL, or if they only have one set ofcorresponding congruent angles, they can eliminate both ASA and AAS.
If at this point there is still more than one possibility, they are going to need to decide if an angle is between twosides or if a side is between two angles. Remind them that both ASA and AAS can be used to guarantee trianglecongruence, and that SAS works, but that SSA cannot be used to prove two triangles are congruent.
If all postulates and theorems have been eliminated, then it is not possible to determine if the triangles are congruent.
102

www.ck12.org Chapter 2. Basic Geometry TE - Common Errors
2.5 Relationships with Triangles
Midsegments
Don’t Forget the 12 – In this section there are two types of relationships that the students need to keep in mind when
writing equations with variable expressions. The first involves the midpoint. When the expressions represent the twoparts of a segment separated by the midpoint they just have to set the expressions equal to each other. The secondis when comparing the length of a side of the triangle with the midsegment parallel to it. In this case they need tomultiply the expression representing the side of the triangle by 1
2 , and then set it equal to the expression representingthe midsegment. They may forget the 1
2 or forget to use parenthesis and distribute. Remind them that they need tomultiply the entire expression by 1
2 , not just the first term. Similarly, they may mess up the distribution going theother way. When given the midsegment, they must multiply the whole expression by 2 to get the third side of thetriangle.
Midpoint Formula, Distance Formula and Slope Formula - You may need to review these formulas again.Remind students that the Midpoint Formula produces a point. Also, remind students that the slopes of parallellines are the same.
Parallel - Students may forget that a midsegment is also parallel to the third side of a triangle. They are apt to focusmost on the length relationship since it is used most in the problem sets.
Perpendicular Bisectors and Angle Bisectors in Triangles
Construction Frustrations - Using a compass and straightedge to make clean, accurate constructions takes a bitof practice. Some students will pick up the skill quickly and others will struggle. Practice, practice, practice. Helpthe students individually to make nice arcs. A few minutes of practicing just making circles will help them to getmore comfortable and accurate with the compass. They will know right away if they are changing the size of thearc mid circle because the “ends” will not meet up. What is nice about doing construction in the classroom is that itis often the students that typically struggle with mathematics, the more artistically minded students, that excel andlearn from constructing figures.
Here are some other tips for good construction: (1) Hold the compass at an angle to the paper rather than perpen-dicularly. Suggest that students try not to press down very hard- a light arc is sufficient and will be easier to make.(2) Try rotating the paper while holding the compass steady. (3) Work on a stack of a few papers so that the needleof the compass can really dig into the paper and will not slip. (4) Suggest that students hold the compass by the“circle” or vertex where the two radii meet- often students will try to hold the compass by the needle and pencil andthey grip it so tightly that they change the angle in mid arc.
Perpendicular Bisector Quirks - There are two key ways in which the perpendicular bisector of a triangle isdifferent from the other segments in the triangle that the students will learn about in subsequent sections. Sincethey are learning about the perpendicular bisector first these differences do not become apparent until the end of thechapter.
The perpendicular bisector of the side of a triangle does not have to pass through a vertex. Have the students explorein what situations the perpendicular bisector does pass through the vertex. They should discover that this is true forequilateral triangles and for the vertex angle of isosceles triangles.
103

2.5. Relationships with Triangles www.ck12.org
The point of concurrency of the three perpendiculars of a triangle, the circumcenter, can be located outside thetriangle. This is true for obtuse triangles. The circumcenter will be on the hypotenuse of a right triangle. This is alsotrue for the orthocenter, the point of concurrency of the altitudes.
Circumcenter and Perpendicular Bisector Relationship - Stress the relationship between the points on a per-pendicular bisector and the center of a circle. Remind students that the definition of the center of a circle is thepoint equidistant from every point on the circle. Remind students that every point on a perpendicular bisector isequidistant from the endpoints of a segment. Make the connection that this means that the point of concurrency ofthe perpendicular bisectors is equidistant from all three vertices of the triangle. This means that the vertices all layon a circle with the center at this point of concurrency- the circumcenter.
Same Construction for Midpoint and Perpendicular Bisector - The Perpendicular Bisector Theorem is used toconstruct the perpendicular bisector of a segment and to find the midpoint of a segment. When finding the midpoint,the students should make the arcs, one from each endpoint with the same compass setting, to find two equidistantpoints, but instead of drawing in the perpendicular bisector, they can just line up their ruler and mark the midpoint.This will keep the drawing from getting overcrowded and confusing.
Incenter and Angle Bisector Relationship - Stress the relationship between the incenter and the angle bisectors ofa triangle. Again, discuss the definition of the center of a circle. Also, remind students that all the points on an anglebisector are equidistant from the sides of the angles. In this case, the point of concurrency of the angle bisectors willbe equidistant from the three sides of the triangle. Remind students that the distance measured from a point to a line(or segment in this case) is measured along a perpendicular segment. You may wish to demonstrate constructing theperpendiculars from the incenter to each of the sides. This segment is the radius of the inscribed circle. Students maynot be able to do this accurately themselves but doing this in a demonstration for them may help make the conceptstick.
Adaptation - For practical purposes, you may wish to skip having students construct the perpendiculars to determinethe correct compass setting for the inscribed circle. In this case, have students to place the center of the compass atthe incenter, choose one side, and adjust the compass setting until the compass brushes by that side of the triangle,without passing through it. The word tangent does not have to be introduced at this point if the students already haveenough vocabulary to learn. When the incenter is correctly placed, the compass should also hit the other two sidesof the triangle once, creating the inscribed circle.
Check with a Third - When constructing the point of concurrency of the perpendicular bisectors or angle bisectorsof a triangle, it is strictly necessary to construct only two of the three segments. The theorems proved in the textsensure that all three segments meet in one point. It is advisable to construct the third segment as a check of accuracy.Sometimes the compass will slip a bit while the student is doing the construction. If the three segments form a littletriangle, instead of meeting at a single point, the student will know that their drawing is not accurate and can go backand check their marks.
Special Triangles - In some special triangles, these segments overlap. The following examples may be used to havestudents explore these cases.
Example 1: Construct an equilateral triangle. Now construct the perpendicular bisector of one of the sides. Constructthe angle bisector from the angle opposite of the side with the perpendicular bisector. What do you notice about thesetwo segments? Will this be true of a scalene triangle? Consider what would happen if you found the circumcenterand the incenter. Where would they be located?
Answer: The segments should coincide on the equilateral triangle, but not on the scalene triangle. The incenter andthe circumcenter will be located in the same place. You could extend this to an isosceles triangle to show that theangle bisector of the vertex angle overlaps with the perpendicular bisector of the base.
Example 2: Construct an equilateral triangle. Now construct one of the angle bisectors. This will create two righttriangles. Label the measures of the angles of the right triangles. With your compass compare the lengths of theshorter leg to the hypotenuse of either right triangle. What do you notice?
Answer: The hypotenuse should be twice the length of the shorter leg. You may wish to refer back to this example
104

www.ck12.org Chapter 2. Basic Geometry TE - Common Errors
in the next lesson to show that the angle bisector is the same segment as the median in an equilateral triangle.
Medians and Altitudes in Triangles
Vocabulary Overload - So far this chapter has introduced to a large number of vocabulary words, and there willbe more to come. This is a good time to stop and review the new words before the students become overwhelmed.Have them make flashcards, or play a vocabulary game in class.
Label the Picture - When using the Concurrency of Medians Theorem to find the measure of segments, it is helpfulfor the students to copy the figure onto their paper and write the given measures by the appropriate segments. Whenthey see the number in place, it allows them to concentrate on the relationships between the lengths since they nolonger have to work on remembering the specific numbers.
Median or Perpendicular Bisector - Students sometimes confuse the median and the perpendicular bisector sincethey both involve the midpoint of a side of the triangle. The difference is that the perpendicular bisector must beperpendicular to the side of the triangle, and the median must end at the opposite vertex. Show lots of examplesof the two of these on the same triangle so students have a visual memory of the difference. Discuss with students(or have them explore and then discuss) that these segments will be the same for each vertex and opposite side inequilateral triangles and for the median drawn from the vertex angle of an isosceles triangle and the perpendicularbisector of the base.
Applications - Students are much more willing to spend time and effort learning about topics when they know oftheir applications. Questions like the ones below improve student motivation.
In the following situations would it be best to find the circumcenter, incenter, or centroid?
Example 1: The drama club is building a triangular stage. They have supports on all three corners and want to putone in the middle of the triangle.
Answer: Centroid, because it is the center of mass or the balancing point of the triangle
Example 2: A designer wants to fit the largest circular sink possible into a triangular countertop.
Answer: Incenter, because it is equidistant from the sides of the triangle.
Extending the Side - Many students have trouble knowing when and how to extend the sides of a triangle whendrawing in an altitude. First, this only needs to be done with obtuse triangles when drawing the altitude that intersectsthe vertex of one of the acute angles. It is the sides of the triangle that form the obtuse angle that need to be extended.The students should rotate their paper so that the vertex of the acute angle they want to start an altitude from is abovethe other two, and the segment opposite of this vertex is horizontal. Now they just need to extend the horizontal sideuntil it passes underneath the raised vertex.
The Altitude and Distance - The distance between a point and a line is defined to be the shortest segment withone endpoint on the point and the other on the line. It has been shown that the shortest segment is the one that isperpendicular to the line. So, the altitude is the segment along which the distance between a vertex and the oppositeside is measured. Seeing this connection will help students remember and understand why the length of the altitudeis the height of a triangle when calculating the triangle’s area using the formula A = 1
2 bh.
Orthocenter - Students need to connect this term to something to help them remember that it is the point ofconcurrency of the altitudes in a triangle. They are likely unfamiliar with the term orthogonal - which meansperpendicular. Telling them this may help them connect the term orthocenter to the altitudes (or perpendicularsegments from vertices to the opposite side in triangles).
Explorations - When students discover a property or relationship themselves it will be much more meaningful.They will have an easier time remembering the fact because they remember the process that resulted in it. They willalso have a better understanding of why it is true now that they have experience with the situation. Unfortunately,
105

2.5. Relationships with Triangles www.ck12.org
students sometimes become frustrated with explorations. They may not understand the instruction, or they may notbe carefully enough and the results are unclear. Some of the difficulties can be alleviated by having the studentswork in groups. They can work together to understand the directions and interpret the results. Students strong in onearea, like construction, can take on that part of the task and help the others with their technique.
Some guidelines for successful group work.
• Groups of three work best.• The instructor should choose the groups before class.• Students should work with new groups as often as possible.• Desks or tables should be arranged so that the members of the group are physically facing each other.• The first task of the group is to assign jobs: person one reads the directions, person two performs the
construction, person three records the results. Students should regularly trade tasks.• Teachers need to circulate and provide additional assistance so that groups do not get frustrated or go off task.
Inequalities in Triangles
The Opposite Side/Angle - At first it may be difficult for students to recognize what side is opposite a given angleor what angle is opposite a given side. If it is not obvious to them from the picture, obtuse, scalene triangles can beconfusing, they should use the names. For ∆ABC, the letters are divided up by the opposite relationship, the anglewith vertex A is opposite the side with endpoints B and C. Being able to determine these relationships without afigure is important when studying trigonometry.
Small, Medium, and Large - When working with the relationship between the sides and angles of a triangle,students will summarize the theorem to “largest side is opposite largest angle”. They sometimes forget that thiscomparison only works within one triangle. There can be a small obtuse triangle in the same figure as a large acutetriangle. Just because the obtuse angle is the largest in the figure, does not mean the side opposite of it is the longestamong all the segments in the figure, just that it is the longest in that obtuse triangle. If the triangles are connected orinformation is given about the sides of both triangles, a comparison between triangles could be made. See exercise#29 in the text.
Add the Two Smallest - The triangle inequality says that the sum of the lengths of any two sides of a triangle isgreater than the length of the third side. In practice it is enough to check that the sum of the lengths of the smallertwo sides is larger than the length of the longest side. When given the three sides lengths for a triangle, studentswho do not fully understand the theorem will add the first two numbers instead of the smallest two. When writingexercises it is easy to always put the numbers in ascending order without thinking much about it. Have the studentstry to draw a picture of the triangle. After making a few sketches they will understand what they are doing, insteadof just blindly following a pattern.
Range of Possible Lengths - Students are so used to finding a single “answer” to a problem that they often strugglewith the idea that the third side of a triangle could take on multiple possible lengths and how to figure out this rangeof values. A shortcut is that the length of the third side is always between the difference and sum of the two knowlengths. Students also do not immediately understand why the inequality shows values that the third side cannotassume. For example in a triangle with known sides, 5 and 8, the range of possible values for the third side is3 < x < 13. They may question why it isn’t 4 < x < 12 since the third side cannot be 3 or 13. Remind them that thesides don’t have to have whole number lengths.
SSS and SAS Use Color - When the figures have two triangles instead of just one, they become more complex. Thestudents may need some help sorting out the shapes. A good way for them to begin this process is to draw the figureon their paper and use highlighters to color code the information.
Both of the theorems presented in this section require two pairs of congruent sides. The first step is for student tohighlight these four sides in a common color, let’s say yellow. Once they have identified the two pairs of congruent
106

www.ck12.org Chapter 2. Basic Geometry TE - Common Errors
sides, they know the hypothesis of the theorem has been filled and they can apply the conclusion.
The conclusions of these theorems involve the third side and the angle between the two congruent sides. These partsof the triangles can be highlighted in a different color, let’s say pink.
Now the students need to determine if they need to use the SAS Inequality theorem or the SSS inequality theorem.If they know one of the pink angles is bigger than the other, than they will use the SAS Inequality theorem and writean inequality involving the pink sides. If they know that one of the pink sides is bigger than the other, they will applythe SSS Inequality theorem, and write an inequality involving the two pink angles.
Having a step-by-step process is good scaffolding for students as they begin working with new types of problems.After the students have gained some experience, they will no longer need to go through all the steps.
Solving Inequalities - Students learned to solve inequalities in algebra, but a short review may be in order. Solvinginequalities involves the same process as solving equations except the equal sign is replaced with an inequality, andthere is the added rule that if both sides of the inequality are multiplied or divided by a negative number the directionof the inequality changes. Students frequently want to change the direction of the inequality when it is not required.They might mistakenly change the inequality if they subtract from both sides, or if result of multiplication or divisionis a negative even if the number used to change the inequality was not negative. In geometry it is most common tobe working with all positive numbers, but depending on how the students apply the Properties of Inequalities, theymay create some negative values.
Extension: Indirect Proof
Why Learn Indirect Proof - For a statement to be mathematically true it must always be true, no exceptions. Thisfrequently makes it easier to prove that a statement is false than to prove it is true. Indirect proof gives mathematicianthe choice between proving a statement true or proving a statement false and can therefore greatly simplify someproofs. Letting the students know that indirect proof can be a potential shortcut will motivate them to learn to usethis type of logic.
Indirect Proof - Students will not really understand the method of indirect proof the first time they see it. Letthem know that this is just the first introduction, and that in subsequent lessons they will be given more examplesand opportunities to learn this new method of proof. If students think they are supposed to understand somethingperfectly the first time they see it, and they don’t, they will become frustrated with themselves and mathematics. Letthem know that the brain needs time and multiple exposures to master these challenging concepts.
Review the Contrapositive - Proving a statement using indirect proof is equivalent to proving the contrapositive ofthe statement. If students are having trouble setting up indirect proofs, or even if they are not, it is a good idea tohave them review conditional statements and the contrapositive. The first step to writing an indirect proof, can be tohave them write out the contrapositive of the statement they want to prove. This will reduce confusion about whatstatement to start with, and what statement concludes the proof.
Does This Really Prove Anything? - Even after students have become adept with the mechanics of indirect proof,they may not be convinced that what they are doing really proves the original statement. This is the same as asking ifthe contrapositive is equivalent to the original statement. Using examples outside the field of mathematics can helpstudents concentrate on the logic.
Start with the equivalence of the contrapositive. Does statement (1) have the same meaning as statement (2)?
1. If you attend St. Peter Academy, you must wear a blue uniform.2. If you don’t wear a blue uniform, you don’t attend St. Peter Academy.
Let the students discuss the logic, and have them create and share their own examples.
If a good class discussion ensues, and the students provide many statements on a single topic, it may be possible to
107

2.5. Relationships with Triangles www.ck12.org
write some indirect proofs of statements not concerned with mathematics. This could be a good bonus assignmentor project that when presented to the class will make the logic of indirect proof clearer for other students.
108

www.ck12.org Chapter 2. Basic Geometry TE - Common Errors
2.6 Polygons and Quadrilaterals
Angles in Polygons
All Those Polygons - Although they have probably been taught it before, not all students will remember the namesof the different polygons. There are not very many opportunities in life to use the word heptagon. Add these wordsto their vocabulary list.
This is most likely the first time they have been introduced to a polygon with a variable number of sides, an n−gon.This notation can be used when referring to a polygon that does not have a special name in common use, like a19-gon. It can also be used when the number of sides of the polygon is unknown.
Clockwise or Counterclockwise But Not Both - At this point in the class, student are usually good at recognizingvertical angles. They will understand that the exterior angles made by extending the sides of the polygon in a clock-wise rotation are congruent, at each vertex, to the exterior angle formed by extending the sides counterclockwise.What they will sometimes do is include both of these angles when using the Exterior Angle Sum theorem. Reinforcethat the number of exterior angles is the same as the number of interior angles and sides, one at each vertex.
Interior or Exterior - Interior and exterior angles come in linear pairs. If one of these angles is known at a particularvertex, it is simple to find the other. When finding missing angles in a polygon, students need to decide from thebeginning if they are going to use the interior or exterior sum. Most likely, if the majority of the known anglemeasures are from interior angles they will use the interior sum. They need to convert the exterior angle measuresto interior angle measures before including them in the sum. If there are more exterior angle measures given, theycan convert the interior angle measures and use the sum of 360◦. It is important that they make a clear choice. Theymay mix the two types of angles in one summation if they are not careful.
Do a Double Check - Students often do not take the time to think about their answers. Going over the arithmeticand logic is one way to check work, but it is common to not recognize the error the second time either. A betterstrategy is to use other relationships to do the checking. In this lesson if the exterior sum was used, the work can bechecked with the interior sum.
What’s the Interior Sum of a Nonagon Again? - If students do not remember the interior sum for a specificpolygon, and do not remember the formula, they can always convert to the exterior angle measures using the linearpair relationship. The sum of the exterior angles is always 360◦. This strategy will work just as well as using theinterior sum. Remind the students to be creative. When taking a test, they may not know an answer directly, butmany times they can figure out the answer in an alternative way.
It is important to practice lots of problems like the following examples and to help student devise strategies to solvethem.
Example 1: What is the measure of each interior angle of a regular n−gon if the sum of the interior angles is 1080◦?
Answer: 135◦ First the number of sides needs to be found, so set the sum equal to (n− 2)180◦ and solve to findn = 8. Now the total of 1080◦ needs to be divided into 8 congruent angles: 1080◦
8 = 135◦.
Example 2: If three angles in a pentagon have measures 115◦,100◦ and 125◦ what are the measures of the tworemaining angles if they are congruent to each other?
Answer: 100◦ First we must determine the sum of the 5 angles in a pentagon: (5− 2)180◦ = 540◦. Next, subtractthe three known angles from the sum: 540◦−115◦−100◦−125◦ = 200◦. Finally, divide the remaining measure by2 to get 100◦.
109

2.6. Polygons and Quadrilaterals www.ck12.org
Example 3: If the measure of one interior angle in a regular polygon is 168◦, how many sides does it have?
Answer: 30 The easiest way to solve this problem is to use the exterior angle sum. If the interior angle measure is168◦, then the measure of each exterior angle is the supplement of this, or 12◦. Now simply divide the exterior sum,360◦ by 12◦ to get 30, the number of sides.
Sketchpad Alternatives - Many students become particularly engaged in a topic when they are able to investigate itwhile playing around with the computer. Here are a couple of ways to use Geometers’ Sketchpad in the classroomas an alternative or supplement to direct instruction.
Angle Sum Conjecture –Have student make different convex polygons and measure the sum of their interior angles.
1. The students should observe that for each type of polygon, no matter how many were drawn, they all havethe same interior angle sum. They also like to see that if they change the shape of the convex polygon (bydragging a vertex- making sure it stays convex) that the sum remains the same.
2. The students should drag a vertex of each polygon toward the center to create a concave polygon, and noticeif the sum stays the same. (It won’t.)
3. Put the sums in order on the board: 180◦,360◦,540◦, . . . Ask the students to find the pattern in this sequenceof numbers. Lead them to discovering the Angle Sum formula, (n−2)180◦ from the pattern.
Exterior Angle Sum Conjecture –Have student make different convex polygons and measure the sum of their exteriorangles. Using Sketchpad to extend the sides of the polygon helps students gain an understanding of where the exteriorangle is in relation to the polygon.
1. Students should observe that the sum is always 360◦, regardless of the number of sides. Doing this forpolygons with different numbers of sides will help them see why the exterior angle sum remains the same.
2. Students can again drag the vertex of a polygon and see that although the angles may change, the sum doesnot.
Properties of Parallelograms
Tree Diagram - Most students will need practice working with the classification of quadrilaterals before theycompletely understand and remember all of the relationships. The Venn diagram is an important mathematicaltool and should definitely be used to display the relationships among the different types of quadrilaterals. A treediagram will also make an informative visual. Using both methods will reinforce the students’ understanding ofquadrilaterals, and their ability to make good diagrams.
Parallel Line Properties - In Chapter Three: Parallel and Perpendicular Lines, the students learn about the rela-tionships between the measures of the angles formed by parallel lines and a transversal. Many of the quadrilateralsstudied in this section have parallel sides. The students can apply what they learned in chapter three to the quadri-laterals in this chapter. They may have trouble seeing the relationships because instead of lines the quadrilateralsare made of segments. Recommend that the students draw the figures on their papers and extend the sides of thequadrilaterals so they can see all four angles made by the intersection of the lines. These angles will be useful whenlooking for specific information about the quadrilateral.
Show Clear, Organized Work - When using the distance or slope formula to verify information about a quadrilateralon the coordinate plane, students will often do messy scratch work as if they are the only ones that will need to readit. In this situation, the work is a major part of the answer. They need to communicate their thoughts on the situation.They should write as if they are trying to convince the reader that they are correct. As students progress in theirstudy of mathematics, this is more often the case than the need for a single numerical answer. They should startdeveloping good habits now.
110

www.ck12.org Chapter 2. Basic Geometry TE - Common Errors
Symmetry - Most students have already studied symmetry at some point in their education. A review here maybe in order. When studying quadrilaterals, symmetry is a good property to consider. Symmetry is also importantwhen discussing the graphs of key functions that the students will be studying in the next few years. It will serve thestudents well to be adept in recognizing different types of symmetry.
Proving Quadrilaterals are Parallelograms
Proofs Using Congruent Triangles - The majority of the proofs in this section use congruent triangles. Thequadrilateral of interest is somehow divided into triangles that can be proved congruent with the theorems andpostulates of the previous chapters. Once the triangles are known to be congruent, the definition of congruenttriangles ensures that certain parts of the quadrilateral are also congruent. Students should be made aware of thispattern if they are having difficulty writing or understanding the proofs of the properties of various quadrilaterals. Ifthey are still struggling they should spend some time reviewing Chapter Four: Triangles and Congruence.
The Diagonals of Parallelograms - The properties concerning the sides and angles of parallelograms are fairlyintuitive, and students pick them up quickly. More emphasis should be placed on what is known, and not knownabout the diagonals. Students frequently try to use the incorrect fact that the diagonally of a parallelogram arecongruent. Rectangles are the focus of an upcoming lesson, but demonstrating to students that the diagonals of aquadrilateral are only congruent in the special case where all the angles of the parallelogram are congruent. Fora general parallelogram, the diagonals bisect each other. This can be shown nicely using a sketch in Geometer’sSketchpad.
Proof Practice - The proofs in this section may seem a bit repetitive, but students will benefit from practicing theseproofs since they review important concepts learned earlier in the course. To avoid loosing the students’ attention,find different ways of presenting the proofs. One idea is to divide the students into groups, and have each groupdemonstrate a different proof to the class.
Parallel or Congruent - When looking at a marked figure students will sometimes see the arrows that designateparallel segments and take that the segments to be congruent. This could be due to the misreading of the marks, ormistakenly thinking parallel always implies congruence. Warn students not to make this error. The last method ofproof in this section which utilizes that one pair of sides are both congruent and parallel, along with an example ofa trapezoid where the parallel sides are not congruent, will help students remember the difference.
Below are some additional examples to be shown in class.
Example 1: Quadrilateral ABCD is a parallelogram. AB = 2x+5, BC = x−3 and DC = 3x−10. Find the measuresof all four sides of the quadrilateral.
Answer: AB =CD = 35 and BC = AD = 12.
Encourage students to draw and label a diagram for problems such as these. Remind them that the name of a polygonlists the vertices in a circular order. This will help ensure that they match up correct pairs of congruent sides. Set thecongruent sides equal to each other and solve for x.
2x+5 = 3x−10
x = 15
Example 2: JACK is a parallelogram. m6 A = (10x− 60)◦ and m6 C = (2x+ 45)◦. Find the measures of all fourangles.
Answer: m 6 C = m6 J = 77.5◦ and m6 A = m6 K = 102.5◦
Again, encourage students to sketch and label a diagram so they can see that 6 A and 6 C are consecutive angles in
111

2.6. Polygons and Quadrilaterals www.ck12.org
the parallelogram and therefore supplementary. Now, they can set the sum of the expressions for the measures ofthese two angles equal to 180◦ and solve for x.
10x−60+2x+45 = 180◦
x = 1614
Example 3: KAT E is a parallelogram with a perimeter of 40 cm. KA = 3x+ 8 and AT = x+ 4. Find the length ofeach side.
Answer: KA = ET = 14 cm and AT = KE = 6 cm
After sketching a diagram, students should recognize that KA and AT are adjacent sides and therefore not necessarilycongruent. Remind them that they were given the perimeter and help them figure out that they need to add two timeseach of the given side length expressions and set this sum equal to the perimeter of the parallelogram as shownbelow.
2(3x+8)+2(x+4) = 40
x = 2
Example 4: SAMY is a parallelogram with diagonals intersecting at point X . SX = x+5,XM = 2x−7 and AX = 12x.Find the length of each diagonal.
Answer: SM = 34 cm and AY = 288 cm
Students should use the fact that diagonals bisect each other in a parallelogram to solve this one. By setting the twoparts of diagonal SM each to each other they can find x and then solve for the lengths of the diagonals.
x+5 = 2x−7
x = 12
Example 5: JEDI is a parallelogram. m6 J = 2x+60 and m6 D = 3x+45. Find the measures of the four angles ofthe parallelogram. Does this parallelogram have a more specific categorization?
Answer: All four angles measure 90◦. JEDI is a rectangle.
The angles given here are opposite angles. By setting them equal we can solve for x and find the angle measures.
2x+60 = 3x+45
x = 15
Rectangles, Rhombuses and Squares
The Power of the Square - Students should know by the classification of quadrilaterals that all the theorems forparallelograms, rectangles, and rhombuses, also apply to squares. It is a good idea to talk about this in class thoughin case they have not put it together on their own. These theorems and the definition of a square can be combined tofrom some interesting exercises.
112

www.ck12.org Chapter 2. Basic Geometry TE - Common Errors
A Venn diagram can be used to show the relationships between the figures and their properties. This is also anexcellent opportunity to review some logic and practice making conditional statements and checking their validitybased on the Venn diagram. For example: If the quadrilateral is a square, then it is a parallelogram. This statementis true, but its converse is false.
Information Overload - Quite a few theorems are presented in this chapter. Remembering them all and whichquadrilaterals they apply to can be a challenge for students. If they are unsure, and cannot check reference material,a test case can be drawn. For example: Do the diagonals of a parallelogram bisect the interior angles of thatparallelogram? First they need to draw a parallelogram that clearly does not fit into any subcategory. It should belong and skinny, so no rhombi properties are mistakenly attributed to it. It should also be well slanted over, so asnot to be mistaken for a rectangle. Now they can draw in the diagonals. It will be obvious that the diagonals are notbisecting the interior angles. They could also try to recreate the proof, but that will probably be more time consumingand it requires a bit of skill.
Also, students need to be reminded that they must show that the quadrilateral is a parallelogram before it can bedetermined that it is one of the special parallelograms. For example, just because the diagonals of the quadrilateralare congruent, it is not sufficient information to conclude the quadrilateral is a rectangle- it could be an isoscelestrapezoid. If students can also show that one of the properties of parallelograms is true for the quadrilateral as well,such as opposite sides are parallel, then they can correctly conclude that the quadrilateral is a rectangle.
Example 1: SQUR is a square and X is the point where the diagonals meet. QX = 3x− 9 and SX = 2x. Find thelength of both diagonals.
Answer: SU = QR = 36.
Since the diagonals in a square are equal and bisect each other, we can set 3x−9 = 2x and solve to get x = 9. ThenQX = 18 and both diagonals are 36.
Example 2: DAV E is a rhombus with diagonals that intersect at point X . DX = 3 cm and AX = 4 cm. How long iseach side of the rhombus?
Answer: DA = AV =V E = ED = 5 cm
The diagonals of a rhombus are perpendicular bisectors of each other so DX and AX are the legs of a right triangle.The hypotenuse of this right triangle is a side of the rhombus and is 5 cm by Pythagorean Theorem.
Trapezoids and Kites
Average for the Median - Students who have trouble memorizing formulas may be intimidated by the formula forthe length of the median of a trapezoid. Inform them that they already know this formula; it is just the average. Theapplication of the formula makes since, the location of the median is directly between the two bases, and the lengthof the median is exactly between the lengths of the bases. They will have no problem finding values involving themedian.
Where Are We? - It is easy for students to forget how what they are learning today relates to the chapter and tothe class. Use the Venn diagram of the classification of quadrilaterals to orient them in the chapter. They are nolonger learning about parallelograms, but have moved over to the separate trapezoid area. When student are able toorganize their new knowledge, they are better able to retain and apply it.
Does it have to be Isosceles? - Students may have trouble remembering which theorems in this section apply onlyto isosceles trapezoids. Note that base angle, and diagonal congruence apply only to isosceles trapezoids, but therelationship of the length of the median to the bases is the same for all trapezoids.
Example 1: T RAP is a trapezoid. The median has length 4 cm, and one of the bases has length 7 cm. What is thelength of the other base?
113

2.6. Polygons and Quadrilaterals www.ck12.org
Answer: 1 cm
There are two ways to approach this problem. One is to compare differences –seven is three more than four, so theother base must be three less than four. The second way is to set up and solve an equation as shown below.
4 =7+ x
2x = 1
Example 2: WXY Z is a trapezoid. The length of one base is twice the length of the other base, and the median is 9cm. How long is each base?
Answer: The bases are 6 cm and 12 cm.
This problem can be solved by allowing one base to be x and the other base to be 2x. Then solve the followingequation:
x+2x2
= 9
x = 6
Only One Congruent Set - It is important to note that in a kite, only one set of interior angles are congruent, andonly one of the diagonals is bisected. Sometimes students struggle with identifying where these properties hold. Itis the nonvertex angles that are congruent, and the diagonal connecting the nonvertex angles that is bisected. Thesingle line of symmetry of a kite shows both these relationships. Remind students to think of this line of symmetryand what it tells them about congruent pairs of angles and segments.
Break it Up - When working with a kite, it is sometimes easier to think of it as two isosceles triangles, or four righttriangles, instead of one quadrilateral.
At this point in the class, students have had extensive experience working with isosceles triangles, and can easilyapply the Base Angle theorem to see that the nonvertex angles of the kite are congruent. They have also seenthat the diagonal segment between the vertex angles creates many symmetries in the triangle. If students think ofthe symmetries in the triangle, it will make sense to them that the vertex angles are bisected and that the diagonalconnecting the nonvertex angles is bisected.
They can also think of a kite as four right triangles. This will help them remember that the diagonals are perpendic-ular, and remind them that the Pythagorean Theorem can be used to find missing segment measures. Noticing thatthe right triangles are in two congruent sets will help them identify congruent segments and angles.
Example 1: KIT E is a kite with KE ∼= KI. Prove that ∆KSE ∼= ∆KSI.
Answer:
TABLE 2.4:
Statement ReasonKE ∼= KI GivenES∼= SI Kite Diagonal Theorem6 KSE and 6 KSI are right angles Definition of Perpendicular6 KSE ∼= 6 KSI Right Angle Theorem∆KSE ∼= ∆KSI HL
114

www.ck12.org Chapter 2. Basic Geometry TE - Common Errors
2.7 Similarity
Ratios and Proportions
Keep it in Order - When writing a ratio, the order of the numbers is important. When the ratio is written in fractionform the amount mentioned first goes in the numerator, and the second number goes in the denominator. Remindthe students it is important to keep the values straight to avoid confusion or misunderstandings. For example, if theyare looking at a college and see that the male to female ratio is 11 to 12, it is important to know which one comesfirst to interpret the ratio correctly.
To Reduce or Not to Reduce - When a ratio is written in fraction form it can be reduced like any other fraction.This will often make the arithmetic simpler and is frequently required by instructors for fractions in general. Butwhen reducing a ratio, useful information can be lost. If the ratio of girls to boys in a classroom is16 to 14, it may bebest to use the fraction 16
14 because it gives the total number of students in the class where the reduced ratio 87 does
not.
Consistent Proportions - A proportion can be correctly written in many ways. As long as the student sets up theratios in a consistent, orderly fashion, they will most likely have written a correct proportion. There should be acommon tie between the two numerators, the two denominators, the numbers in the first ratio, and the numbers inthe second ratio. They should think about what the numbers represent, and not just use them in the order given inthe exercise, although the numbers are often given in the correct order.
Example: Victor got a new hybrid. He went 525 gallons on the first five gallons that came with the car. He just put12 gallons in the tank. How far can he expect to go on that amount of gas?
Answer: 255 = x
12 , so x = 12∗255 and Victor can expect to go 1,260 miles.
Note: Students may be tempted to put the 12 in the numerator of the second ratio because it was the third numbergiven in the exercise, but it should go in the denominator with the other amount of gas.
The Fraction Bar is a Grouping Symbol - Students know that parenthesis are a grouping symbol and that theyneed to distribute when multiplying a number with a sum or difference. A fraction bar is a more subtle groupingsymbol that students frequently overlook, causing them to forget to distribute. To help them remember have themput parenthesis around sums and differences in proportions before they cross-multiply.
Example: x+35 = x−8
7 becomes (x+3)5 = (x−8)
7
Everybody Loves to Cross-Multiply - There is something satisfying about cross-multiplying and students are proneto overusing this method. Remind them that cross-multiplication can only be used in proportions, when two ratiosare equal to each other. It is not appropriate to cross-multiply when two fractions are being added, subtracted,multiplied or divided. It might be helpful to do some example of these to illustrate the difference and discuss thedifference between “cross multiplication” and “multiplying across.”
Examples: Cross multiply here: 34 = 10
x or x+17 = 8
x
Don’t cross multiply here: 34 +
10x or x+1
7 ÷8x
Only Cancel Common Factors - When reducing a fraction or putting a ratio in simplest terms, students often try tocancel over an addition or subtraction sign. This problem occurs most frequently when students work with fractionsthat contain variable expressions. To combat this error, go back to numerical examples. Students will see that whatthey are doing does not make sense when the variables are removed. Then go back to example with variables.
115

2.7. Similarity www.ck12.org
Hopefully the students will be able to carry over the concept.
Examples: Can be reduced: 3·25·2 = 3
5 and 3(x−4)3·2 = (x−4)
2
Can’t be reduced: 3+25+2 6=
35 and (x−4)
4 6= x−1
Similar Polygons
A Common Vocabulary Error - Students frequently interchange the words proportional and similar. Remind themthat proportional describes a relationship between numbers, and similar describes a relationship between figures.You can relate this difference in definition back to the difference between the terms equal and congruent.
Compare and Contrast Similar with Congruent - If your students have already learned about congruent figures,now would be a good time to review. The definitions of congruent and similar are very close. Ask the students ifthey can identify the difference; it’s only one word. You can also point out that congruent is a subset of similar likesquare is a subset of rectangle, or mother is a subset of women. Understanding the differences between congruentand similar will be important in upcoming lessons when proving triangles similar.
Use that Similarity Statement - In some figures, which sides of similar polygons correspond is obvious, but whenthe polygons are almost congruent, or oriented differently, the figure can be misleading. Students usually begin byusing the figure and then forget to use the similarity statement when necessary. Remind them about this informationas they start working on more complicated problems. The similarity statement is particularly useful for studentsthat have a hard time with visual-spatial processing. It is a good idea to do several examples in which students are“forced” to use the similarity statement to align the correct sides and angles to get them in the habit of using thesimilarity statement rather than their “eyes.”
Who’s in the Numerator - When writing a proportion students sometimes carelessly switch which polygon’smeasurements are in the numerator. To help students avoid this pitfall, I tell the students to choose right fromthe beginning and BE CONSISTENT throughout the problem. When it comes to writing proportions if the studentsfocus on being orderly and consistent, they will usually come up with a correct setup.
Bigger or Smaller - After completing a problem it is always a good idea to take a minute to decide if the answermakes sense. This is hard to get students to do. When using a scale factor, a good way to check that the correct ratiowas used is to notice if the number got bigger or smaller. Is that what we expected to happen?
Update the List of Symbols - In previous lessons it has been recommended that students create a reference pagein their note books that contains a list of all the symbols and how they are being used in this class. Studentsshould add the symbol for similar to the list, and take few minutes to compare it to the symbols they already know.Sometimes students will read the similarity symbol as “approximately equal”. It is standard to use two wavy linesfor approximately equal and one wavy line for similar, but this is not always the case.
Similarity by AA
Definition of Similar Triangles vs. AA Shortcut - Let the students know what a deal they are getting with theAA Triangle Similarity Postulate. The definition of similar polygons requires that all three corresponding pairs ofangles be congruent, and that all three pairs of corresponding sides are proportional. This is a significant amount ofinformation to verify, especially when writing a proof. The AA postulate is a significant shortcut; only two piece ofinformation need to be verified and all the rest comes for free. When students see how much this reduces the work,they will be motivated to understand the proof and will enjoy using the postulate. Everybody likes to use a trickyshortcut. A fun activity to explore this concept would be to have students create a triangle with three given anglemeasures. Then, in pairs, compare the lengths of corresponding sides to discover that they are indeed similar. Then
116

www.ck12.org Chapter 2. Basic Geometry TE - Common Errors
ask students if they really needed to be told the third angle measure? This process should help them remember AASimilarity and help reinforce the idea that AA does not ensure congruent triangles.
Get Some Sun - It is always a good idea to create some variety in the class. It will keep students’ minds active.Although it is time consuming, get some yard sticks and take the students outside to measure a tree or a flagpoleusing their shadows and similar triangles. Have them evaluate their accuracy. They will have to measure carefullyif they are to get a reasonable numbers. This will give them some practice using a ruler and converting units. Theexperience will also help them put what they are learning about similar triangles into their long term memory.
Trigonometry - Let the students know that the next chapter is all about trigonometry, and that the AA TriangleSimilarity Postulate is what make trigonometry possible. Mentioning what is to come will start to prepare theirminds and make learning the material in the next chapter that much easier. Here are some problems that involvesimilar right triangles to accustom the students to this new branch of mathematics.
Example 1: ∆ABC is a right triangle with right angle C and ∆ABC∼ ∆XY Z. Which angle in ∆XY Z is the right angle?
Answer: 6 Z
Example 2: ∆CAT ∼ ∆DOG with right angle at A. If CA = 5 cm, CT = 13 cm and DO = 15 cm, what is the lengthof OG?
Answer: 36 cm
There is more than one step required to solve this problem. Students must use the Pythagorean theorem and thedefinition of similar polygons. First, the ratio between the figures is determined by CA
DO = 515 = 1
3 . Next, we need thelength of AT since it corresponds to OG. Using the Pythagorean Theorem gives us AT = 12 cm. Now we can set upthe proportion 1
3 = 12x and solve it to get x = 36.
Similarity by SSS and SAS
The S of a Triangle Similarity Postulate - At this point in the class, students have shown that a significant numberof triangles are congruent. They have learned the process well. When teaching them to show that triangles aresimilar, it is helpful to build on what they have learned. The similarity postulates have S’s and A’s just like thecongruence postulates and theorems. The A’s are treated exactly the same in similarity postulates as they were incongruence theorems. Each A in a similarity shortcut stands for one pair of congruent corresponding angles in thetriangles.
The S’s represent a different requirement in similarity postulates than they did in congruence postulates and theo-rems. Congruent triangles have congruent sides, but similar triangles have proportional sides. Each S in a similaritypostulate represents a ratio of corresponding sides. Once the ratios (two for SAS and three for SSS) are written,equality of the ratios must be verified. If the ratios are equal, the sides in question are proportional, and the postulatecan be applied.
It is sometimes hard for student to adjust to this new side requirement. They have done so much work with congruenttriangles that it is easy for them to slip back into congruent mode. Warn them not to fall into the old way of thinking.
Triangle Congruence Postulates and Theorems Triangle Similarity Postulates
S → congruent sides S → proportional sides
SSS AA
SAS SSS
ASA SAS
AAS
HL
117

2.7. Similarity www.ck12.org
Only Three Similarity Postulates - Students will sometimes try to use ASA, or other congruence theorems to showthat two triangles are similar. Bring it to their attention that there are only three postulates for similarity, and thatthey do not all have the same side and angle combinations as congruence postulates or theorems. It may help themto show them that the Congruence Postulates ASA and AAS are both “represented” by the Similarity Postulate AA.
Proportionality Relationships
Similar Triangles Formed by an Interior Parallel Segment - Students frequently are presented with a triangle thatcontains a segment that is parallel to one side of the triangle and intersects the other two sides. This segment createsa smaller triangle in the tip of the original triangle. There are two ways to consider this situation. The two trianglescan be considered separately, or the Triangle Proportionality Theorem can be applied.
(1) Consider the two triangles separately.
The original triangle and the smaller triangle created by the parallel segment are similar as seen in the proof of theTriangle Proportionality theorem. One way students can tackle this situation is to draw the triangles separately anduse proportions to solve for missing sides. The strength of this method is that it can be used for all three sides of thetriangles. Students need to be careful when labeling the sides of the larger triangle; often the lengths will be labeledas two separate segments and the students will have to add to get the total length.
(2) Use the Triangle Proportionality theorem.
When using this theorem it is much easier to setup the proportions, but there is the limitation that the theorem cannotbe used to find the lengths of the parallel segments.
Ideally, students will be able to identify the situations where each method is the most efficient, and apply it. Thismay not happen until the students have had some experience with these types of problems. It is best to have studentsuse method (1) at first, then after they have worked a few exercises on their own, they can use (2) as a shortcut in theappropriate situations.
Make sure to do many examples where students need to use the similar triangles to solve for one of the parallelsegments. Combining this requirement in the same problem where the shortcut can be utilized is especially helpfulfor them to begin recognizing the difference.
Example: ∆ABC has point E on AB and F on BC such that EF || AC. Given AE = 5 cm,EB = 3 cm,BF = 4 cm andAC = 10 cm, find EF and FC.
Answer: 38 = EF
10 ,EF = 3 34 cm
35 = 4
FC or 38 = 4
FC+4 ,FC = 6 23 cm
Encourage students to draw a diagram and label it with the given lengths. Next, they may wish to draw the twosimilar triangles separately to better visualize which parts correspond.
Proportions with Angle Bisectors - Students have a hard time with this one because the two triangles formed bythe angle bisector are not similar. Students need to see lots of examples to get this one straight. Remind them thatthis proportion is true only when the segment is an angle bisector- it is not necessarily true for altitudes or mediansin the triangle.
Similarity Transformations
Apostrophe vs Prime - When a geometric figure is transformed (by translation, rotation, dilation, etc.) the image isdenoted using the “prime” marking. For example, if ∆ABC is transformed, the image is denoted by ∆A′B′C′.
118

www.ck12.org Chapter 2. Basic Geometry TE - Common Errors
Scale Factor Compared to Segment and Area Ratios - When a polygon is dilated using scale factor, k, the ratioof the image of the segment to the original segment is k. This is true for the sides of the polygon, all the specialsegments of triangles studied in chapter five, and the perimeter of the polygon. The relationship holds for any linearmeasurement. Area is not a linear measurement and has a different scale factor. The ratio of the area of the imageto the area of the original polygons is k2. Students frequently forget to square the scale factor when working withthe ratios of a figure and its image. This concept will be explored further in Chapter 10: Perimeter and Area, but theidea can be introduced here.
Example: ∆ABC has coordinates A(1,13),B(6,1) and C(1,1). Complete the following:
1. Graph ∆ABC.2. Use the distance formula to find the length of each side of ∆ABC.3. Calculate the perimeter of ∆ABC.4. Calculate the area of ∆ABC.5. ∆A′B′C′ is the image of ∆ABC under a dilation centered at the origin with scale factor 3. Graph ∆A′B′C′.6. Calculate the perimeter of ∆ABC.7. Calculate the area of ∆A′B′C′.8. Compare ∆A′B′C′ to ∆ABC. What is the ratio of each set of corresponding side lengths, the perimeters and the
areas? What do you notice when these ratios are compared to the scale factor?
Answers:
1. Graph2. AC = 12,BC = 5,AB = 133. 304. 305. Graph6. AC = 36,BC = 15,AB = 39, perimeter = 907. 2708. The ratios of the side lengths and the perimeter are 3:1, the same ratio as the scale factor. The ratio of the areas
is 9:1, the square of the scale factor.
Extension: Self-Similarity
More Complex Fractals – Students need to begin learning about fractals with the simple examples given in the text.Once they have taken some time to work with, and understand the self-similar relationship, it is amazing to see howcomplex and beautiful fractals can become. Numerous examples of exquisite fractals can be found on-line. If youare lucky enough to have access to computers and a projector, have the students search for fractals and choose theirfavorite to share with the class. Student will begin to realize the importance of what there are learning when they seewhat a huge ocean they are dipping their toe into.
Applications - Many students need to know how a subject is useful before they are motivated to spend time andenergy learning about it. Throughout the text there have been references to modeling and how mathematical conceptsoften need to be adjusted to fit the world around us. Fractals are used to model many aspects of nature including treebranches, shells, and the coast line. Knowing of the applications of fractals motivates students. If time permits givea more in-depth explanation, or use this topic to assign research projects.
Video Time - Self-similarity and fractals make up an extremely complex visual topic. There are many videos incommon use that can give a much more exciting and attention grabbing explanation than most teachers can deliverwhile standing in front of the classroom. These videos are not hard to come by, and they give an excellent explanationof the material. It is a nice change of pace for the students, and make help them develop some genuine interest in thesubject of mathematics.
119
2.7. Similarity www.ck12.org
Create Your Own Fractal - Having the students create their own fractal outside of class is a fun, creative project.This gives the more artistically minded students an opportunity to shine in the class, and the products make beautifulwall decorations. Here are some guidelines for the assignment.
1. The fractal should fill the top half of a piece of 8 12 ×11 inch plain white paper turned vertically. To give them
more space, provide them with legal size paper. Be aware that each student will probably require more thanone piece before they create their final product.
2. The fractal should be boldly colored to accentuate the self-similarity.3. The students should be encouraged to be creative and original in their design.4. The bottom half of the paper will have a paragraph explaining the self-similarity in the fractal. They should
explain why their design is a fractal.5. Create a rubric to give to the students at the time the project is assigned so that they will feel like they are
being graded fairly. It is hard to evaluate artwork in a way that everyone feels is objective.
120

www.ck12.org Chapter 2. Basic Geometry TE - Common Errors
2.8 Right Triangle Trigonometry
The Pythagorean Theorem
Reducing Radicals - Students may or may not have spent much time reducing radicals in previous math courses.You may need to review how to do this and how to perform operations with radicals. Students may need to see morethan one way to reduce radicals. The most common is to take out the greatest factor which is a perfect square, butthis can be difficult for many students with weak mental math skills. Another method is to make a factor tree andfind the prime factorization of the number and identify doubles that can be taken out. There is not necessarily a“best” way, it is more important to figure out which way your students can best reduce radicals correctly.
Method 1:√
72 =√
36×2 = 6√
2
Method 2:√
72 =√
9×8 =√
3×3×2×2×2 = 3×2√
2 = 6√
2
The following are some examples that will help students review the basic properties of radicals and practice reducingradicals.
Example 1:√
112
Answer:√
16×7 = 4√
7
Students may not recognize right away that 16 is a factor of 112. This problem can also be solved by completelyfactoring 112 (method 2).
Example 2: 4√
192
Answer: 4√
64×3 = 4×8√
3 = 32√
3
Example 3: 2√
5+√
45
Answer: 2√
5+3√
5 = 5√
5
Review with students that in order to add or subtract radicals, the radical must be identical. Sometimes they canmeet this condition by simplifying one or both terms and sometimes they just won’t be able to add them together.
Example 4:√
6×√
18
Answer:√
108 =√
36×3 = 6√
3
Students may have forgotten that radicals can be multiplied or divided to form a new radical which they may thenbe able to reduce.
Example 5:(√
11)2
Answer: 11
Review the definition of a square root with students to help them understand this one. The square root and the squarecancel each other out - they are inverse operations.
Skipping Around - Not all texts present material in the same order, and many instructors have a preferred way todevelop concepts that is not always the same as the one used in the text. The Pythagorean theorem is frequentlymoved from place to place. You should follow the link given in the text to see additional proofs of the PythagoreanTheorem. Proofs are hard for most students to understand. It is important to choose one that the students canfeel good about. Don’t limit the possibilities to these two, research other methods, and pick the one that is most
121
2.8. Right Triangle Trigonometry www.ck12.org
appropriate for your class. Or better yet, pick the best two or three. Different proofs will appeal to different students.
The Height Must be Measured Along a Segment That is Perpendicular to the Base - When given an isoscelestriangle where the altitude is not explicitly shown, student will frequently try to use the length of one of the sides ofthe triangle for the height. Tell them that they must find the length of the altitude that is perpendicular to the segmentthat’s length is being used for the base in the formula A = 1
2 bh. Sometimes they do not know what to do, and arejust trying something, which is, in a way, admirable. The more common explanation though is that they forget. Thestudents have been using this formula for years, they think they know this material, so they just plug and chug, notrealizing that the given information has changed. Remind the students that now that they are in Geometry class,there is an extra step. The new challenge is to find the height, and then they can do the easy part and plug it into theformula.
Derive the Distance Formula - After doing an example with numbers to show how the distance formula is basicallyjust the Pythagorean theorem, use variables to derive the distance formula. Most students will understand the proofif they have seen a number example first. Point out to the students that the number example was inductive reasoning,and that the proof was deductive reasoning. Taking the time to do this is a good review of logic and algebra as wellas great proof practice.
Squaring a Negative - One of the most common errors students make when using the distance formula is that theyuse their calculator incorrectly when squaring negative numbers. Remind students that when they square a negativenumber, the result is positive. Describe the difference between −82 and (−8)2 and review the correct of order ofoperations. You may also want to stress the connection between the distance formula and the Pythagorean theoremand encourage them to think of the difference between the x’s and y’s as lengths and therefore they can just use theabsolute value of the difference (i.e. ignore the negative).
Converse of the Pythagorean Theorem
Acute and Obtuse Triangles - Many students have trouble remembering that the inequality with the greater thanis true when the triangle is acute, and that the equation with the less than is true for obtuse triangles. It seemsbackwards to them. One way to present this relationship is to compare the longest side and the angle opposite ofit. In a right triangle, the equation has an equal sign; the hypotenuse is the perfect size. When the longest side ofthe triangle is shorter than what it would be in a right triangle, the angle opposite that side is also smaller, and thetriangle is acute. When the longest side of the triangle is longer than what is would be in a right triangle, the angleopposite that side is also larger, and the triangle is obtuse.
Is It Really a Triangle? - I have found that once students start using the Pythagorean theorem to determine whetherlengths form a right, acute or obtuse triangle that they forget completely that the sum of two sides must be greaterthan the remaining side in order for a triangle to exist at all. The following example illustrates this misunderstanding.You may want to put it on the board and ask your students what kind of triangle is formed.
Example: What kind of triangle is formed by lengths 3, 4, 7?
Answer: None! There is no triangle at all. 3+4 = 7.
If students used the Pythagorean theorem and didn’t check to make sure there was a triangle at all then they wouldhave said that the triangle is obtuse. This in incorrect.
Using Similar Right Triangles
Separate the Three Triangles - The altitude from the right angle of a triangle divides the triangle into two smallerright triangles that are similar to each other, and to the original triangle. All the relationships among the segments
122

www.ck12.org Chapter 2. Basic Geometry TE - Common Errors
in this figure are based on the similarity of the three triangles. Many students have trouble rotating shapes in theirminds, or seeing individual polygons when they are overlapping. It is helpful for these students to draw the trianglesseparately and oriented in the same direction. After going through the process of turning and redrawing the trianglesa few times, they will remember how the triangles fit together, and this step will no longer be necessary.
Color-Coded Flashcards - It is difficult to describe in words which segments to use in the geometric mean to findthe desired segment. Labeling the figure with variables and using a formula is the standard method. The relationshipis easier to remember if the labeling of the triangles is kept the same every time the figure is drawn. The studentsneed to remember the location of the segments relative to each other. Making color-coded pictures or flashcards willbe helpful. For each relationship the figure should be drawn on both sides of the card. The segment whose measureis to be found should be highlighted in one color on the front, and on the back, the two segments that need to be usedin the geometric mean should be highlighted with two different colors. Using two colors on the back is importantbecause the segments often overlap. Making these cards will be helpful even if the students never use them. Thosethat have trouble remembering the relationship will use these cards frequently as a reference.
Add a Step and Find the Areas - The exercises in this section have the students find the base or height of triangles.They have all the information that they need to also calculate the areas of these triangles. Students need practice withmulti-step problems. Having them find the area will help them think through a more complex problem, and givethem practice laying out organized work for calculations that are more complex. Chose to extend the assignment ornot based on how well the students are doing with the material, and how much time there is to work on this section.
Special Right Triangles
Memorize These Ratios - There are some prevalent relationships and formulas in mathematics that need to becommitted to long term memory, and the ratios made by the sides of these two special right triangles are definitelyamong them. Students will use these relationships not only in the rest of this class, but also in trigonometry, and inother future math classes. Students are expected to know these relationships, so the sooner they learn to use themand commit them to memory, the better off they will be.
Two is Greater Than the Square Root of Three - One way that students can remember the ratios of the sides ofthese special right triangles, is to use the fact that in a triangle, the longest side is opposite the largest angle, andthe shortest side is opposite the smallest angle. At this point in the class, students know that the hypotenuse is thelongest side in a right triangle. What sometimes confuses them is that in the 30-60-90 triangle, the ratio of the sidesis 1 : 2 :
√3, and if they do not really think about it, they sometimes put the
√3 as the hypotenuse because it might
seem bigger than 2. Using the opposite relationship is a good method to use when working with these triangles. Justbring to the students’ attention that 2 >
√3.
How Do I Find the Short Leg Again? - While students may quickly memorize the two special right triangle ratios,they may have trouble applying the ratios to find the unknown sides. One way to help students with this process isto have them write the ratios with a variable. For example the 30-60-90 triangle ratio would be x : 2x : x
√3. Next,
have them identify which side they are given and use the appropriate part of the ratio to determine x and the otherside.
Example 1: Find the other two sides in a 30-60-90 triangle given that the hypotenuse is 8.
Answer: First set 2x = 8 and solve to get x = 4 which is the short leg. The long leg is then 4√
3.
Example 2: Find the length of a leg in an isosceles right triangle with hypotenuse 3.
Answer: The ratio for an isosceles right triangle or 45-45-90 triangle is x : x : x√
2. Since we are given the hypotenusehere, x
√2 = 3. Now we must solve for x as shown below.
123

2.8. Right Triangle Trigonometry www.ck12.org
x√
2√2
=3√2
x =3√2×√
2√2=
3√
22
Rationalizing the Denominator - Sometimes student will not recognize that 1√2
and√
22 are equivalent. Most
likely, they learned how to rationalize denominators in algebra, but it is nice to do a short review before using thesetypes of ratios in special right triangles.
Derive with Variables - The beginning of the last chapter offers students a good amount of experience with ratios.If they did well on those sections, it would benefit them to see the derivation of the ratios done with variableexpressions. It would give them practice with a rigorous derivation, review and apply the algebra they have learned,and help them see how the triangles can change in size.
Exact vs. Decimal Approximation - Many students do not realize that when they enter√
2 into a calculator andget 1.414213562, that this decimal is only an approximation of
√2. They also do not realize that when arithmetic
is done with an approximation, that the error usually grown. If 3.2 is rounded to 3, the error is only 0.2, but if thethree is now multiplied by five, the result is 15, instead of the 16 it would have been if original the original numberhad not been rounded. The error has grown to 1.0. Most students find it more difficult to do operations with radicalexpressions than to put the numbers into their calculator. Making them aware of error magnification will motivatethem to learn how to do operations with radicals. In the last step, it may be nice to have a decimal approximation sothat the number can be easily compared with other numbers. It is always good to have an exact form for the answerso that the person using your work can round the number to the desired degree of accuracy.
Tangent, Sine and Cosine
Trig Thinking - Students sometimes have a difficult time understanding trigonometry when they are first introducedto this new branch of mathematics. It is quite a different way of thinking when compared to algebra or even geometry.Let them know that as they begin their study of trigonometry in the next few sections the calculations won’t bedifficult, the challenge will be to understand what is being asked. Sometimes students have trouble because theythink it must be more difficult than it appears to be. Most students find they like trigonometry once they get the feelof it.
Ratios for a Right Angle - Students will sometimes try to take the sine, cosine or tangent of the right angle in aright triangle. They should soon see that something is amiss since the opposite leg is the hypotenuse. Let themknow that there are other methods of finding the tangent of angles 90◦ or more. The triangle based definitions of thetrigonometric functions that the students are learning in this chapter only apply to angles in the interval 0◦<m< 90◦.
The Ratios of an Angle - The sine, cosine, and tangent are ratios that are associated with a specific angle. Emphasizethat there is a pairing between an acute angle measure, and a ratio of side lengths. Sine, cosine, and tangentis best described as functions. If the students’ grasp of functions is such that introducing the concept will onlyconfuse matters, the one-to-one correspondence between acute angle and ratio can be taught without getting intothe full function definition. When students understand this, they will have an easier time using the notation andunderstanding that the sine, cosine, and tangent for a specific angle are the same, no matter what right triangle it isbeing used because all right triangles with that angle will be similar.
Use Similar Triangles - Many students have trouble understanding that the sine, cosine, and tangent of a specificangle measure do not depend on the size of the right triangle used to take the ratio. Take some time to go back andexplain why this is true using what the students know about similar triangle. It will be a great review and application.
124

www.ck12.org Chapter 2. Basic Geometry TE - Common Errors
Remind the students that if the right triangles have one set of congruent acute angles, then they are similar by the AATriangle Similarly Postulate. Once the triangles are known to be similar it follows that their sides are proportional. Itmay be a good activity to have students make right triangles with a particular acute angle measure and compare theratios of the sides. They should see that no matter how big or small they made their triangle, they get the same ratiosas their classmates. You could also refer to the special right triangles to make this connection. Explaining that thenames sine, cosine and tangent were given to these ratios and the values were recorded in tables by angle measuremay help them understand the idea a little better. You may even want to show them a trig table of values and explainthat their calculator is simply looking up a value in a table when they type in the trig function and a particular anglemeasure.
Here is a Sketchpad activity that may further enhance student understanding:
1. Students can construct similar right triangles using dilation from the transformation menu.2. After choosing a specific angle they should measure the corresponding angle in all the triangles. Each of these
measurements should be equal.3. The legs of all the right triangles can be measured.4. Then the tangents can be calculated.5. Student should observe that all of ratios are the same.
Trig Errors are Hard to Catch - The math of trigonometry is, at this point, not difficult. Not much computationis necessary to chose two numbers and put them in a ratio. What students need to be aware of is how easy it is tomake a little mistake and not realize that there is an error. When solving an equation the answer can be substitutedback into the original equation to be checked. The sine and cosine for acute angles do not have a wide range. It isextremely easy to mistakenly use the sine instead of the cosine in an application and the difference often is smallenough to seem reasonable, but still definitely wrong. Ask the student to focus on accuracy as they work with thesenew concepts. Remind them to be slow and careful.
SOHCAHTOA - This pneumonic device has been around for a while because it helps students keep the ratiosstraight. Another way to write it that makes it even more clear is: S O
H C AH T O
A .
Something to Consider - Ask the students to combine their knowledge of side-angle relationships in a triangle withthe definition of sine. How does the length of the hypotenuse compare to the lengths of the legs of a right triangle?What does that mean about the types of numbers that can be sine ratios? With leading questions like these studentsshould be able to see that the sine and cosine ratios for an acute angle will always be less than one. This type ofanalysis will prepare them for future math classes and increase their analytical thinking skills. It will also be a goodreview of previous material and help them check there work when they first start writing sine and cosine ratios.
Two-Step Problems - Having the students write sine, cosine, and tangent ratios as part of two-step problems willhelp them connect the new material that they have learned to other geometry they know. They will remember itlonger, and be better able to see where it can be applied.
Example: ∆ABC is a right triangle with the right angle at vertex C. AC = 3 cm,BC = 4 cm. What is the sine of 6 A?
Answer: AB = 5 cm by the Pythagorean theorem, therefore sinA = 45 .
Note: The sine of an angle does not have units. The units will cancel out in the ratio.
Inverse Trigonometric Ratios
Regular or Arc - Students will sometimes be confused about when to use the regular trigonometric function andwhen to use the inverse. They understand to concepts, but do not want to go through the entire thought process eachtime they must make the decision. I give them this short rule of thumb to help them remember: When looking for aratio or side length, use regular and when looking for an angle use arc. They can associate “angle” and “arc” in theirminds. Use the alliteration.
125

2.8. Right Triangle Trigonometry www.ck12.org
It may also help to explain that the inverse or “arc” trigonometric function does the reverse of the original. Each ofthe original three trig functions essentially go to a table, look up an angle measure and find the corresponding ratio.The “arc” functions will look up the ratio in the table and give back the corresponding angle measure. Understandingwhat it is that the calculator does when they use these functions may help reinforce student understanding.
Which Trig Ratio - A common mistake students make when using the inverse trigonometric functions to find anglesin right triangles is to use the wrong function. They may use arcsine instead of arccosine for example. There is aprocess that students can use to reduce the number of these kinds of errors.
1. First, the students should mark the angle whose measure is to be found. With the angle in question highlighted,it is easier for the students to see the relationship the sides have to that angle. It is fun for the students to usecolored pencils, pens, or highlighters.
2. Next, the students should look at the sides with known side measures and determine their relationship to theangle. They can make notes on the triangle, labeling the hypotenuse, the adjacent leg and the opposite let. Ifthey are having trouble with this I have them look for the hypotenuse first and always highlight it green, thenthey can decide between opposite and adjacent for the remaining two sides.
3. Now, they need to look at the two sides they have chosen, and decide if they need to use sine, cosine, ortangent.
126

www.ck12.org Chapter 2. Basic Geometry TE - Common Errors
2.9 Circles
Parts of Circles & Tangent Lines
Circle Vocabulary - This section has quite a few vocabulary words. Some the students will already know, likeradius, and some, like secant, will be new. Encourage the students to make flashcards or a vocabulary list. Theyshould know the word definition and have pictures drawn and labeled. It is also important for students to know therelationships between the words. The radius is half the length of the diameter and the diameter is the longest chardin a circle. Make knowing the vocabulary a specific assignment, otherwise many students will forget to take the timeto learn the vocabulary well.
Circle or Disk - The phrase “a point on the circle” is commonly used. This will confuses the students that do notrealize that the circle is the set of points exactly some set distance from the center, and not the points less than thatdistance. What is happening is that they are confusing the definition of a disk and a circle. Emphasize to the studentsthat a circle is one dimensional; it only contains the points on the edge. Another option is to give them the definitionof a disc along with that of a circle, so that they can compare and contrast the two definitions.
Inscribed or Circumscribed - An inscribed circle can also be described as a circumscribed polygon. The differentways that these vocabulary words can be used can make learning the relationships complicated. As a guide, tell thestudents that the object inscribed is on the inside. Starting with that, they can work out the rest. For practice, ask thestudents to draw different figures that are described in words, like a circumscribed hexagon, or a circle inscribed inan octagon.
All the Radii of a Circle Are Congruent - It may seem obvious, but frequently students forget to use the fact thatall the radii of a circle are congruent. This follows directly from the definition of a circle. Remind students to usethis fact when setting up equations and assigning variables to different radii in the same circle.
Tangency - Initially students get very confused by the different tangencies. There is a lot here that they need todigest. Keep reviewing the differences between internally and externally tangent circles and tangent lines that areinternal and external so that students have a chance to practice identifying the differences.
Congruent Tangents - In this section the Tangent Segment Theorems is proved and applied. Remind student thatthis is only true for tangents and does not extend to secants. Sometimes student will see a secant enter a circle andthink the distance from the exterior point to where the secant intersects the circle is the same as a tangent or anothersecant from that same point.
Hidden Tangent Segments - Sometimes it is difficult for students to recognize tangent segments because they areimbedded in a more complex figure, or the tangent segment is extended in some way. A common situation wherethis occurs is when there is an inscribed circle. Tell the students to be on the lookout for tangent segments. Theyshould look at segments individually and as part of the whole.
Using the Pythagorean Theorem to Find Side Measurers in Right Triangles - Using the Pythagorean Theorem tofind the measures of sides in a right triangle is a common practice in this section. Students should be on the lookoutfor right triangles formed by a radius and tangent segment. Later in this chapter they will also find right trianglesformed by radii (and diameters) and chords that they bisect. Recognizing these perpendicular segments and the righttriangles they form will help students solve problems.
127
2.9. Circles www.ck12.org
Properties of Arcs
Naming Major Arcs and Semicircles - When naming and reading the names of major arcs and semicircles, thethree letter system is sometimes confusing for students. When naming an angle with three letters, the first place tolook is to the middle letter, the vertex. It is just the opposite for a three letter arc name. First, the students shouldlocate the endpoints of the arc at the ends of the name. For a major arc they have two arcs to choose from. The majorarc uses three letters and is the long way around. Any of the other points on the major arc can be used to designatethat the long path is being taken. A semicircle divides the circle into two congruent arcs. A third letter is needed todesignate which half of the circle is being named.
Look For Diameters - When working exercises that call for students to find the measures of arcs by adding andsubtracting arc and angle measures in a circle, students often forget that a diameter divides the circle in half, or intotwo 180 degree arcs. Remind the students to be on the lookout for diameters when finding arc measures.
Sum is 360◦ - Remind students that the entire arc (all the way around the circle) is 360◦. This may seem obvious tosome students, but others don’t pick up on this right away and need reminding.
Central Angles - Students may grasp the idea immediately that central angles are equal in measure to the arc theyintercept, but they often forget this property as they add additional angle theorems for circles. There are so manydifferent angles that can be formed in circles and this is just the first to be explored. It is imperative that studentsfocus on the fact that central angles have a vertex at the center of the circle (not on the circle or in the circle).Keep saying this every time you talk about a central angle so that students really internalize this definition. If theycontinually go back to where the vertex is located they will be better able to distinguish between the different typesof angles formed by segments in, on and around a circle.
Properties of Chords
Update the Theorem List - Students should be keeping a notebook full of all the theorems they have learned ingeometry class. The outlines of keywords, definitions and theorems provided at the beginning go each chapter isan excellent basis for this. These theorems are like tools that can be used to work exercises and write proofs. Thissection has quite a few different theorems about the relationships or chords and angles that need to be includedin their notebook. Each entry should have the name of the theorem, the written statement of the theorem, and apicture to illustrate the relationship. Not only will this be good reference material, making the notebook will helpthe students to remember the material.
Tips and Suggestions - There are a few strategies that students should keep in mind when working on the exercisesin this section.
1. Draw in segments to create right triangles, central angles, and any other useful geometric objects.2. Remember to split the length of the chord in half if only half of it is used in a right triangle. Don’t just use
the numbers that are given. The theorems must be applied to get the correct number, and multiple steps willusually be necessary.
3. Use trigonometry of right triangles to find the angles and segment lengths needed to complete the exercise.4. Don’t forget that all radii are congruent. If you have the length of one radius, you have them all, including the
ones you add to the figure.5. Employ the Pythagorean theorem and any other tool you have from previous lessons that might be useful.
128

www.ck12.org Chapter 2. Basic Geometry TE - Common Errors
Inscribed Angles
Inscribed Angle or Central Angle - When students spot an arc/angle pair to use in solving a complex circle exercise,the first step is to identify the angle as a central angle, an inscribed angle, or possibly neither. If necessary, they cantrace the sides of the angle back from the arc to see where the vertex is located. If the vertex is at the center of thecircle, it is a central angle, and the measure of the arc and the angle are equal. If the vertex is on the circle, it is aninscribed angle, and the students must remember to double the angle measure to get the arc measure (or divide thearc measure by 2 to get the angle measure). A good mnemonic device is to think of the arc of an inscribed anglebeing farther away from the vertex than the arc of a central angle. Therefore the measure of the arc will be larger. Ifthe vertex is at neither the exact center or on the circle, no arc/angle relationship can be determined with only onearc.
What to Look For - Students can be overwhelmed by the number of different relationships that need to be used tosolve circle exercises. Sometimes they can just get paralyzed and not know where to start. In small groups, or as aclass, have them create a list of possible tools that are commonly used in these types of situations.
Does the figure contain?
1. A triangle with a sum of 180◦.2. A convex quadrilateral with a sum of 360◦.3. A right triangle formed with a tangent and radius4. An isosceles triangle formed with two radii5. A diameter creating a semicircle6. Arcs covering the entire circle7. Central or Inscribed angles8. Congruent tangents9. A right angle inscribed in a semicircle
10. Perpendicular segments (radius and tangent, radius and chord that is bisected)11. Similar triangle with proportional sides12. Congruent triangles with congruent corresponding parts
Any New Information is Good - If students can not immediately see how to find the measure they are after, advisethem to find any measure they can. This keeps their mind active and working. Frequently, they will be able to usethe new information to find other measures, and will eventually work their way around to the desired answer. Thismight not be the most efficient method, but the students’ technique will improve with practice.
Angles of Chords, Secants, and Tangents
Where’s the Vertex? - When determining the relationships between angles and arcs in a circle the location of thevertex of the angle is the determining factor. There are four possibilities.
1. The vertex of the angle is at the center of the circle, it is a central angle, and the arc and angle have the samemeasure.
2. The vertex of the angle is on the circle. The angle could be made by two cords, an inscribed angle, or by achord and a tangent. In either situation, the measure of the arc is twice that of the angle.
3. The vertex of the angle is inside the circle, but not at the center. In this case two arcs are necessary, and theangle measure is the average of the measures of the arcs cut off by the chords that form the vertical angles.
4. The vertex of the angle is outside the circle. Then the two intersected arcs have to be subtracted and thedifference divided by two. Note the similarity to an average.
129
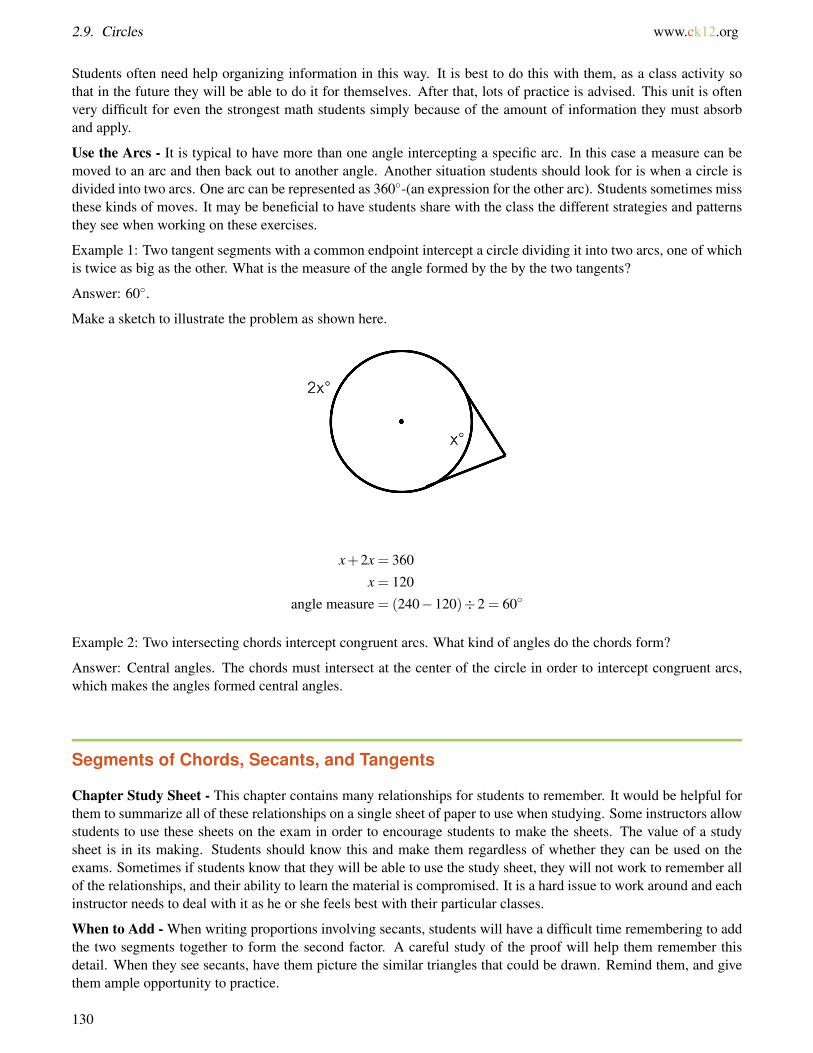
2.9. Circles www.ck12.org
Students often need help organizing information in this way. It is best to do this with them, as a class activity sothat in the future they will be able to do it for themselves. After that, lots of practice is advised. This unit is oftenvery difficult for even the strongest math students simply because of the amount of information they must absorband apply.
Use the Arcs - It is typical to have more than one angle intercepting a specific arc. In this case a measure can bemoved to an arc and then back out to another angle. Another situation students should look for is when a circle isdivided into two arcs. One arc can be represented as 360◦-(an expression for the other arc). Students sometimes missthese kinds of moves. It may be beneficial to have students share with the class the different strategies and patternsthey see when working on these exercises.
Example 1: Two tangent segments with a common endpoint intercept a circle dividing it into two arcs, one of whichis twice as big as the other. What is the measure of the angle formed by the by the two tangents?
Answer: 60◦.
Make a sketch to illustrate the problem as shown here.
x+2x = 360
x = 120
angle measure = (240−120)÷2 = 60◦
Example 2: Two intersecting chords intercept congruent arcs. What kind of angles do the chords form?
Answer: Central angles. The chords must intersect at the center of the circle in order to intercept congruent arcs,which makes the angles formed central angles.
Segments of Chords, Secants, and Tangents
Chapter Study Sheet - This chapter contains many relationships for students to remember. It would be helpful forthem to summarize all of these relationships on a single sheet of paper to use when studying. Some instructors allowstudents to use these sheets on the exam in order to encourage students to make the sheets. The value of a studysheet is in its making. Students should know this and make them regardless of whether they can be used on theexams. Sometimes if students know that they will be able to use the study sheet, they will not work to remember allof the relationships, and their ability to learn the material is compromised. It is a hard issue to work around and eachinstructor needs to deal with it as he or she feels best with their particular classes.
When to Add - When writing proportions involving secants, students will have a difficult time remembering to addthe two segments together to form the second factor. A careful study of the proof will help them remember thisdetail. When they see secants, have them picture the similar triangles that could be drawn. Remind them, and givethem ample opportunity to practice.
130

www.ck12.org Chapter 2. Basic Geometry TE - Common Errors
Go Through the Proportions - Take the time, if you can, to go through the process of proving these relationshipsbetween the lengths of secants, chords and tangents using similar triangles. It is not necessary for students tomemorize these proofs, but sometimes they have an easier time remembering the properties if they understand theirorigins.
Have Them Subtract - One way to give students more practice with the lengths of secants in circles is to give themexercises where the entire length of the secant is given, and they have to setup an expression using subtraction to usein the proportion.
Example 1: A secant and a tangent segment have a common exterior endpoint. The secant has a total length of 12cm and the tangent has length 7 cm. What is the measure of both segments of the secant?
Answer: The secant is composed of two segments with approximate lengths 4.1 cm and 7.9 cm.
Let one segment of the secant be x, so the other can be represented by 20− x.
72 = (12− x)×12
x≈ 7.9
Example 2: Two secant segments have a common endpoint outside of a circle. One has interior and exterior segmentsof lengths 10 ft and 12 ft respectively and the other has a total measure of18 ft. What is the measure of the twosegments composing the other secant?
Answer: The secant is composed of two segments with lengths 3 13 f t and 14 2
3 f t.
12(10+12) = (18− x)×18
x = 313
Practice, Practice, Practice - Perhaps the most effective method to get students to internalize the concepts in thischapter is to provide extensive practice. There is just so much information that students are going to have a hardtime remembering it all unless they practice it repeatedly. Mixed up the different concepts in a practice assignmentso that they get in the habit of switching gears repeatedly and seeing different types of problems on the same page.Too often, students will just assume that all the problems in a particular assignment should be solve the same wayand they don’t stop to think about how each problem might be different from the previous one. Mixing problems upwill help them practice this important skill.
Extension: Writing and Graphing the Equations of Circles
Square the Radius - When working with the equation of a circle, students frequently forget that the radius is squaredin the equation, especially when the radius is an irrational number. Explaining the equation of the circle in terms ofthe Pythagorean theorem will help the students remember and understand how to graph this conic section.
Remembering the Equation - Refer back to the definition of a circle- set of all point in the plane equidistant froma given point. This implies that the equation requires this “given” point, or center, and the distance, or radius, of thecircle. Show students that the formula is derived by taking a point on the circle, (x,y), the center, (h,k), and settingthe distance between them equal to the radius as shown below.
√(x−h)2 +(y− k)2 = r
131

2.9. Circles www.ck12.org
Now, square both sides to get the equation: (x−h)2 +(y− k)2 = r2
The more students know and understand about the origins of particular equations and properties, the more likely theyare to remember them in the future. Going through this process also helps students realize that all these equationsare not just “made up”, they have roots in concepts they may already know and understand.
Completing the Square - Completing the square to put the equation of a conic section in standard form is a nicelittle math trick. It exemplifies the kinds of moves mathematicians use to manipulate expressions and equations.Students find it difficult to do especially when fractions are involved and they have trouble retaining the process formore than a few days. Give them many opportunities to practice.
132

www.ck12.org Chapter 2. Basic Geometry TE - Common Errors
2.10 Perimeter and Area
Triangles and Parallelograms
The Importance of Units - Students will give answers that do not include the proper units, unless it is requiredby the instructor. When stating an area, square units should be included, and when referring to a length, linearunits should be used. Using proper units helps reinforce the basic concepts. With these first simple area problemsincluding the units seems like a small detail, but as the students move to more complex situations combining length,area, and volume, units can be a helpful guide. In physics and chemistry dimensional analysis is an important tool.
The Power of Labeling - When doing an exercise where a figure needs to be broken into polynomials with knownarea formulas, it is important for the student to draw on and label the figure well. Each polygon, so far onlyparallelograms and triangles, should have their base and height labeled and the individual area should be in thecenter of each. By solving these exercises in a neat, orderly way student will avoid errors like using the wrongvalues in the formulas, overlapping polygons, or leaving out some of the total area.
Subtracting Areas - Another way of finding the area of a figure that is not a standard polygon is to calculate alarger known area and then subtracting off the areas of polygons that are not included in the target area. This canoften result in fewer calculations than adding areas. Different minds work in different ways, and this method mightappeal to some students. It is nice to give them as many options as possible so they feel they have the freedom to becreative.
The Height Must Be Perpendicular to the Base - Students will frequently take the numbers from a polygon andplug them into the area formula without really thinking about what the numbers represent. In geometry there willfrequently be more steps. The students will have to use what they have learned to find the correct base and heightand then use those numbers in an area formula. Remind students that they already know how to use a formula; manyexercises in this class will require more conceptual work.
Write Out the Formula - When using an area formula, it is a good idea to have students first write out the formulathey are using, substitute numbers in the next step, and then solve the resulting equation. Writing the formula helpsthem memorize it and also reduces error when substituting and solving. It is especially important when the areais given and the student is solving for a length measurement in the polygon. Students will be able to do thesecalculations in their heads for parallelograms, and maybe triangles as well, but it is important to start good habits forthe more complex polygons to come.
Trapezoids, Rhombi, and Kites
It’s Arts and Crafts Time - Student have trouble remembering how to derive the area formulas. At this level itis required that they understand the nature of the formulas and why the formulas work so they can modify andapply them in less straightforward situations. An activity where student follow the explanation by illustrating it withshapes that they cut out and manipulate is much more powerful than just listening and taking notes. It will engagethe students, keep their attention, and make them remember the lesson longer. Here are examples of how studentscan do this for each figure in this section.
Trapezoid - This procedure models the description in the text. Actually have students physically cut out the figuresand do this will deepen understanding. Afterwards, the pictures in the lesson in the text will have much more
133
2.10. Perimeter and Area www.ck12.org
meaning to them as they will have a more concrete understanding of what is going on.
1. Have student use the parallel lines on binder paper to draw a trapezoid. They should draw in the height andlabel it h. They should also label the two bases b1 and b2.
2. Now they can trace and cut out a second congruent trapezoid and label it as they did the first.3. The two trapezoids can be arranged into a parallelogram and glued down to another piece of paper.4. Identify the base and height of the parallelogram in terms of the trapezoid variables. Then substitute these
expressions into the area formula of a parallelogram to derive the area formula for a trapezoid.5. Remember that two congruent trapezoids were used in the parallelogram, and the formula should only find the
area of one trapezoid.
Kite - This particular method is different than the description in the text. You can choose to do this either way, butit helps to improve understanding sometimes to show different methods to achieve the same results. Some studentsmay have an easier time grasping the concept one way or the other.
1. Have the students draw a kite. They should start by making perpendicular diagonals, one of which is bisectingthe other. Then they can connect the vertices to form a kite.
2. Now they can draw in the rectangle around the kite.3. Identify the base and height of the parallelogram in terms of d1 and d2, and then substitute into the parallelo-
gram area formula to derive the kite area formula.4. Now have the students cut off the four triangles that are not part of the kite and arrange them over the congruent
triangle in the kite to demonstrate that the area of the kite is half the area of the rectangle.
Rhombus - You could allow students to decide which way they would rather do this one or just let them come upwith their own method. The more they can do this on their own, the more they have gleaned from this activity.
Also, the area of a rhombus can be found using either the kite or parallelogram area formulas. Use this as anopportunity to review subsets and what they mean in terms of applying formulas and theorems.
Area of Similar Polygons
Reducing Fractions - It is helpful in this section to have ratios in reduced form. Once students start square-rootingratios (in fraction form), however, they may start messing up their reductions. For example, they may start thinkingthat 4
9 reduces to 23 . Just be aware of this common error and point out the difference to students as needed.
Adjust the Scale Factor - It is difficult for students to remember to square and cube the scale factor when writingproportions involving area and volume. Writing and solving a proportion is a skill they know well and have usedfrequently. Once the process is started, it is hard to remember to add that extra step of checking and adjusting thescale factor in the middle of the process. Here are some ways to reinforce this step in the students’ minds.
1. Inform students that this material is frequently used on the SAT and other standardized tests in some of themore difficult problems.
2. Play with graph paper. Have students draw similar shape on graph paper. They can estimate the area bycounting squares, and then compare the ratio of the areas to the ratio of the side lengths. Creating the shapeson graph paper will give the students a good visual impression of the areas.
3. Write out steps, or have the students write out the process they will use to tackle these problems. (1) Write aratio comparing the two polygons. (2) Identify the type of ratio: linear, area, or volume. (3) Adjust the ratiousing powers or roots to get the desired ratio. (4) Write and solve a proportion.
4. Mix-up the exercises so that students will have to square the ratio in one problem and not in the next. Keepthem on the lookout. Make them analyze the situation instead of falling into a habit.
134

www.ck12.org Chapter 2. Basic Geometry TE - Common Errors
Example 1: The ratio of the lengths of the sides of two squares is 2:3. What is the ratio of their areas?
Answer: 4:9, The ratio of areas is the ratio of the lengths squared.
Example 2: The area of a small triangle is 15 cm2, and it has a height of 5 cm. A larger similar triangle has an areaof 60 cm2. What is the corresponding height of the larger triangle?
Answer: 10 cm
The area ratio is 15:60 or 1:4. The length ratio is then the square root of this, or 1:2. Now set up a proportion tosolve for the height of the smaller triangle.
12=
5x
Example 3: The ratio of the lengths of two similar rectangles is 4:5. The larger rectangle has a width of 45 cm. Whatis the width of the smaller rectangle?
Answer: 36 cm.
In this problem, we did not have to adjust the ratio since we are given a ratio of lengths and a length is what we aretrying to find. Just set up the proportion and solve.
45=
x45
Example 4: The ratio of the areas of two regular pentagons is 25:64. What is the ratio of their corresponding sides?
Answer: 5:8
This time students have to square root the area ratio to find the ratio of the lengths of the sides.
Circumference and Arc Length
Pi is an Irrational Number - Many students can give the definition of an irrational number. They know that anirrational number has an infinite decimal that has no pattern, but they have not really internalized what this means.Infinity is a difficult concept. A fun way to help the students develop this concept is to have a pi contest. The studentscan chose to compete by memorizing digits of pi. They can be given points, possible extra credit, for ever ten digitsor so, and the winner gets a pie of their choice. The students can also research records for memorizing digits of pi.The competition can be done on March 14th, pi day. When the contest is introduced, there is always a student whoasks “How many points do I get if I memorize it all?” It is a fun way to reinforce the concept of irrational numbersand generate a little excitement in math class.
There Are Two Values That Describe an Arc - The measure of an arc describes how curved the arc is, and thelength describes the size of the arc. Whenever possible, have the students give both values with units so that theywill remember that there are two different numerical descriptions of an arc. Often student will give the measure ofan arc when asked to calculate its length.
Arc Length Fractions - Fractions are a difficult concept for many students even when they have come as far asgeometry. For many of them putting the arc measure over 360 does not obviously give the part of the circumferenceincluded in the arc. It is best to start with easy fractions. Use a semi-circle and show how 180
360 reduces to 12 , then a
ninety degree arc, and then a 120◦ arc. After some practice with fractions they can easily visualize, the students willbe able to work with any arc measure as a fraction of 360 degrees.
135

2.10. Perimeter and Area www.ck12.org
Exact or Approximate - When dealing with the circumference of a circle there are often two ways to express theanswer. The students can give exact answers, such as 2π cm or the decimal approximation 6.28 cm. Explain thestrengths and weaknesses of both types of answers. It is hard to visualize 13π ft, but that is the only way to accuratelyexpress the circumference of a circle with diameter 13 ft. The decimal approximations 41, 40.8, 40.84, etc, can becalculated to any degree of accuracy, are easy to understand in terms of length, but are always slightly wrong. Letthe students know if they should give one, the other, or both forms of the answer.
Areas of Circles and Sectors
Reinforce - This section on area of a circle and the area of a sector is analogous to the previous section aboutcircumference of a circle and arc length. This gives students another chance to go back over the arguments andlogic to better understand, remember, and apply them. Focus on the same key points and methods in this section,and compare it to the previous section. Mix-up exercises so students will see the similarities and learn each morethoroughly.
Don’t Forget the Units - Remind students that when they calculate an area the units are squared. When an answercontains the pi symbol, students are more likely to leave off the units. In the answer 7π cm2, the π is part of thenumber and the cm2 are units of area.
Draw a Picture - When applying geometry to the world around us, it is helpful to draw, label, and work with apicture. Visually organized information is a powerful tool. Remind students to take the time for this step whencalculating the areas of the irregular shapes that surround us.
Example 1: What is the area between two concentric circles with radii 5 cm and 12 cm?
(Hint: Don’t subtract the radii.)
Answer: 144π−25π = 119πcm2
Example 2: The area of a sector of a circle with radius 6 cm, is 12π cm2. What is the measure of the central anglethat defines the sector?
Answer: 12π = x360 ∗π∗62,x = 120◦. The central angle measures 120◦.
Example 3: A square with side length 5√
2 cm is inscribed in a circle. What is the area of the region between thesquare and the circle?
Answer: approx. 28.5 cm2
First find the diagonal of the square using special right triangles: 5√
2∗√
2 = 5∗2 = 10.
This makes the radius of the circle 5 cm. Now we can find the area of the circle and subtract the area of the squareas shown below.
52 ∗π−(
5√
2)2
25π−50≈ 28.5cm2
136

www.ck12.org Chapter 2. Basic Geometry TE - Common Errors
2.11 Surface Area and Volume
Exploring Solids
Polygon or Polyhedron - A polyhedron is defined using polygons, so in the beginning students will understand thedifference. After some time has passed though, students tend to get these similar sounding words confused. Remindthem that polygons are two-dimensional and polyhedrons are three-dimensional. The extra letters in polyhedronrepresents it spreading out into three-dimensions.
The Limitations of Two Dimensions - It is difficult for students to see the two-dimensional representations ofthree-dimensional figures provided in books and on computer screens. A set of geometric solids is easily obtainedthrough teacher supply companies, and are extremely helpful for students as they familiarize themselves with three-dimensional figures. When first counting faces, edges, and vertices most students need to hold the solid in theirhands, turn it around, and see how it is put together. After they have some experience with these objects, studentswill be better able to read the figures drawn in the text to represent three-dimensional objects.
Assemble Solids - A valuable exercise for students as they learn about polyhedrons is to make their own. Studentscan cut out polygons from light cardboard and assemble them into polyhedrons. Patterns are readily available. Thishands-on experience with how three-dimensional shapes are put together will help them develop the visualizationskills required to count faces, edges, and vertices of polyhedrons described to them.
Computer Representations - When shopping on-line it is possible to “grab” and turn merchandise so that they canbe seen from different perspectives. The same can be done with polyhedrons. With a little poking around studentscan find sites that will let them virtually manipulate a three-dimensional shape. This is another possible option todevelop the students’ ability to visualize the solids they will be working with for the remainder of this chapter.
Using the Contrapositive - If students have already learned about conditional statements, point out to them thatExample 4 in this section makes use of the contrapositive. Euler’s formula states that if a solid is a polyhedron, thenV +F = E+2. The contrapositive is that if V +F 6= E+2, then the solid is not a polyhedron. Students need periodicreview of important concepts in order to transfer them to their long-term memory. For more review of conditionalstatements, see the second chapter of this text.
Each Representation Has Its Use - Each of the methods for making two-dimensional representations of three-dimensional figures was developed for a specific reason and different representations are most appropriate dependingon what aspect of the geometric solid is of interest.
Perspective –used in art, and when one wants to make the representation look realistic
Isometric View –used when finding volume
Orthographic View –used when finding surface area
Cross Section –used when finding volume and the study of conic sections (circles, ellipses, parabolas, and hyperbo-las) is based on the cross sections of a cone
Nets –used when finding surface area or assembling solids
Ask the students to think of other uses for these representations.
When students know and fully understand the options, they will be able to choose the best tool for each task theyundertake.
Isometric Dot Paper - If students are having trouble making isometric drawings, they might benefit from the use
137

2.11. Surface Area and Volume www.ck12.org
of isometric dot paper. The spacing of the dots allows students to make consistent lengths and angles on theirpolyhedrons. After some practice with the dot paper, they should be able to make decent drawings on any paper. Agood drawing will be helpful when calculating volumes and surface areas.
Practice - Most students will need to make quite a few drawings before the result is good enough to be helpfulwhen making calculations. The process of making these representations provides the student with an opportunity tocontemplate three-dimensional polyhedrons. The better their concept of these solids, the easier it will be for them tocalculate surface areas and volumes in the sections to come.
Additional Exercises:
1. In the next week look around you for polyhedrons. Some example may be a cereal box or a door stop. Make atwo-dimensional representation of the object. Choose four objects and use a different method of representation foreach.
These can make nice decorations for classroom walls and the assignment makes students look for way to apply whatthey will learn in this chapter about surface area and volume.
Surface Area of Prisms and Cylinders
The Proper Units - Students will frequently use volume units when reporting a surface area. Because the numberdescribes a three-dimensional figure, the use of cubic units seems appropriate. This shows a lack of understandingof what exactly it is that they are calculating. Provide students with some familiar applications of surface area likewrapping a present or painting a room, to improve their understanding of the concept. Insist on the use of correctunits so the student will have to consider what exactly is being calculated in each exercise.
Review Area Formulas - Calculating the surface area and volume of polyhedrons requires the students to find theareas of different polygons. Before starting the new material, take some time to review the area formulas for thepolygons that will be used in the lesson. When students are comfortable with the basic area calculations, they canfocus their attention on the new skill of working with three-dimensional solids.
A Prism Does Will Not Always Be Sitting On Its Base - When identifying prisms, calculating volumes, or usingthe perimeter method for calculating surface area, it is necessary to locate the bases. Students sometimes havetrouble with this when the polyhedron in question is not sitting on its base. Remind students that the mathematicaldefinition of the bases of a prism is two parallel congruent polygons, not the common language definition of a base,which is something an object sits on. Once students think they have identified the bases, they can check that anycross-section taken parallel to the bases is congruent to the bases. Thinking about the cross-sections will also helpthem understand why the volume formula works later in this chapter.
Understand the Formula - Many times students think it is enough to remember and know how to apply a formula.They do not see why it is necessary to understand how and why it works. The benefit of fully understanding whatthe formula is doing is versatility. Substituting and simplifying works wonderfully for standard cylinders, but whatif the surface area of a composite solid needs to be found?
Example 1: Find the surface area of the composite solid shown below.
138

www.ck12.org Chapter 2. Basic Geometry TE - Common Errors
Answer: 426 u2
There are a number of ways to “divide” up this figure into numerous rectagular pieces to find the surface area. Oneway is to find the areas of the rectangular “steps” and add those to the rectangles formed on the sides of the figureby drawing vertical lines.
2(4×12)+2(3×12)+2(4×12)+2{(4×11)+(3×7)+(4×4)}= 426 u2
Make and Take Apart a Cylinder - Students have a difficult time understanding that the length of the rectanglethat composes the lateral area of a cylinder has length equal to the circumference of the circular base. First, reviewthe definition of circumference with the students. A good way to help students visualize this is a soup can label.When the label is removed and placed flat on a table, it is a rectangle. Another way to describe the circumferenceis to talk about an ant walking around the circle. Next, let them play with some paper cylinders. Have them cut outcircular bases, and then fit a rectangle to the circles to make the lateral surface. After some time spent trying to tapethe rectangle to the circle, they will understand that the length of the rectangle matches up with the outside of thecircle, and therefore, must be the same as the circumference of the circle.
Surface Area of Pyramids and Cones
Prism or Pyramid - Some students have trouble deciding if a solid is a prism or a pyramid. Most try to make thedetermination by looking for the bases. This is especially tricky if the figure is not sitting on its base. Another methodfor differentiating between these solids is to look at the lateral faces. If there are a large number of parallelograms,the figure is probably a prism. If there are more triangles, the figure is most likely a pyramid. Once the student haslocated the lateral faces, then they can make a more detailed inspection of the base or bases.
Height, Slant Height, or Edge - A pyramid contains a number of segments with endpoints at the vertex of thepyramid. There is the altitude which is located inside right pyramids, the slant height of the pyramid is the height ofthe triangular lateral faces, and there are lateral edges, where two lateral faces intersect. Students frequently get thesesegments confused. To improve their understanding, give them the opportunity to explore with three-dimensionalpyramids. Have the students build pyramids out of paper or light cardboard. The slant height of the pyramid shouldbe highlighted along each lateral face in one color, and the edges where the lateral faces come together in anothercolor. A string can be hung from the vertex to represent the altitude of the pyramid. The lengths of all of thesesegments should be carefully measured and compared. They should make detailed observations before and after thepyramid is assembled. Once the students have gained some familiarity with pyramids and these different segments,it will make intuitive sense to them to use the height when calculating volume, and the slant height for surface area.
Example 1: A square pyramid is placed on top of a cube. The cube has side length 3 cm. The slant height of thetriangular lateral faces of the pyramid is 2 cm. What is the surface area of this composite solid?
139

2.11. Surface Area and Volume www.ck12.org
Answer: 57 cm2
Five faces of the cubic base are visible and therefore part of the surface area. Their total area is: 5×3×3 = 45 cm2.The surface area of the pyramid is just the lateral surface area because the base is not visible. This lateral surfacearea is calculated by multiplying the perimeter of the base by the slant height of the pyramid and then multiplyingby one half as shown: 1
2 ×4×3×2 = 12 cm2. Adding these two areas together yields the answer shown above.
Example 2: Calculate the surface area of the composite figure shown below.
Answer: 226.19 u2
The surface area of this figure is the surface area of the cylinder minus the area of the “top” base plus the lateralsurface area of the cone. The area of the “top” of the base and the “base” of the cone are not visible and thereforenot part of the total surface area of the composite solid. Students are prone to just find the surface areas of the twofigures and add them together. This will result in an answer that includes the areas of these two circular bases.
π32 +2(3)π(8)+π(3)(5)≈ 226.19 u2
Volume of Prisms and Cylinders
The Volume Base - In the past, when students used formulas, they just needed to identify the correct number tosubstitute in for each variable. Calculating a volume requires more steps. To find the correct value to substitute intothe B in the formula V = Bh, usually requires an additional calculation with an area formula. Students will oftenforget this step, and use the length of the base of the polygon that is the base of the prism for the B. Emphasizethe difference between b, the linear measurement of the length of a side of a polygon, and B, the area of the two-dimensional polygon that is the base of the prism. Students can use dimensional analysis to check their work.Volume is measured in cubic units, so three linear measurements, or a linear unit and a squared unit must be fed intothe formula.
Example 1: The volume of a 4 in tall coffee cup is approximately 50 in3. What is the radius of the base of the cup?
Answer: The cup has a radius of approximately 2 inches.
Since we know the volume we can use the volume formula with the given height and solve for the radius as shownbelow:
50 = πr2(4)
3.97887 . . .≈ r2
r ≈ 2
140

www.ck12.org Chapter 2. Basic Geometry TE - Common Errors
Example 2: A prism has a base with area 15 cm2 and a height of 10 cm. What is the volume of the prism?
Answer: V = 15×10 = 150 cm3
Example 3: A triangular prism has a height of 7 cm. Its base is an equilateral triangle with side length 4 cm. Whatis the volume of the prism?
Answer: V = Bh = 12(4)(2
√3)(7) = 28
√3≈ 48.5 cm3
Given that the sides of the equilateral triangle are 4, then the altitude (height) of the triangle is 2√
3. So, the area ofthe base is 1
2(4)(2√
3). Then we can multiply this by the height, 7.
Example 4: The volume of a cube is 27 cm3. What is the cube’s surface area?
Answer: 36 cm2
This is a two step problem. First, students should find the length of one edge of the cube by finding the cubed rootof 27. This is 3. Next, find the area of one square face (32 = 9) and multiply it by 6 because there are 6 faces.
Volume of Pyramids and Cones
Don’t Forget the 13 –The most common mistake students make when calculating the volume of a pyramid is to
forget to divide by three. They also might mistakenly divide by three when trying to find the volume of a prism. Thefirst step students should take when beginning a volume calculation, is to make the decision if the solid is a prism ora pyramid. Once they have chosen, they should immediately write down the correct volume formula.
Prism or Pyramid - Some students have trouble deciding if a solid is a prism or a pyramid. Most try to make thedetermination by looking for the bases. This is especially tricky if the figure is not sitting on its base. Another methodfor differentiating between these solids is to look at the lateral faces. If there are a large number of parallelograms,the figure is probably a prism. If there are more triangles, the figure is most likely a pyramid. Once the student haslocated the lateral faces, then they can make a more detailed inspection of the base or bases.
Mix’em Up - Students have just learned to calculate the surface area and volume of prisms, cylinders, and cones.Most students do quite well when focused on one type of solid. They remember the formulas and how to apply them.It is a bit more difficult when students have to choose between the formulas for all four solids. Take a review dayhere. Have the students work in small groups during class on a worksheet or group quiz that has a mixture of volumeand surface area exercises for these four solids. The extra day will greatly help to solidify the material learned in thelast few lessons.
Example 1: A square pyramid is placed on top of a cube. The cube has side length 4 cm. The height of the pyramidis 6 cm. What is the volume of this composite solid?
Answer: 96 cm3
The volumes of the cube and square pyramid should be calculated separately and then added together to get the totalvolume of the composite solid.
Example 2: Calculate the volume of the composite figure shown below.
141

2.11. Surface Area and Volume www.ck12.org
Answer: 263.89 u2
The volume of this composite solid can be calculated by finding the volumes of the cylinder and the cone and addingthem together. The Pythagorean theorem (or recognition of a Pythagorean Triple) will be used to determine theheight (4) of the cone.
π32(8)+13
π(32)(4)≈ 263.89 u2
Surface Area and Volume of Spheres
Expand on Circles - Students learned about circles earlier in the course. Review and expand on this knowledge asthey learn about spheres. Ask the students what they know about circles. Being able to demonstrate their knowledgewill build their confidence and activate their minds. Now, modify the definitions that the students have provided tofit the three-dimensional sphere. Students will learn the new material quickly and will remember it because it is nowintegrated with their knowledge of circles.
Explore Cross-Sections - One of the goals of this chapter is to develop the students’ ability to think about three-dimensional objects. Most students will need a significant amount of practice before becoming competent at thisskill. Take some time and ask the students to think about what the cross-sections of a sphere and a plane will looklike. Explore trends. What happens to the cross-section as the plane moves farther away from the center of thecircle? A cross-section that passes through the center of the sphere makes the largest possible circle, or the greatcircle of the sphere.
Cylinder to Sphere - It would be a good exercise for students to take the formula for the surface area of a cylinderand derive the formula for the surface area of a sphere. It is just a matter of switching a few variables, but it wouldbe a good exercise for them. During the lesson, ask them to do it in their notes, wait a few minutes and then do it onthe board or ask one of them to put their work on the board. It should look something like this:
Acylinder = bases+ lateral area
Acylinder = 2πr2 +2πrh
Now, replace h with r to get:
142
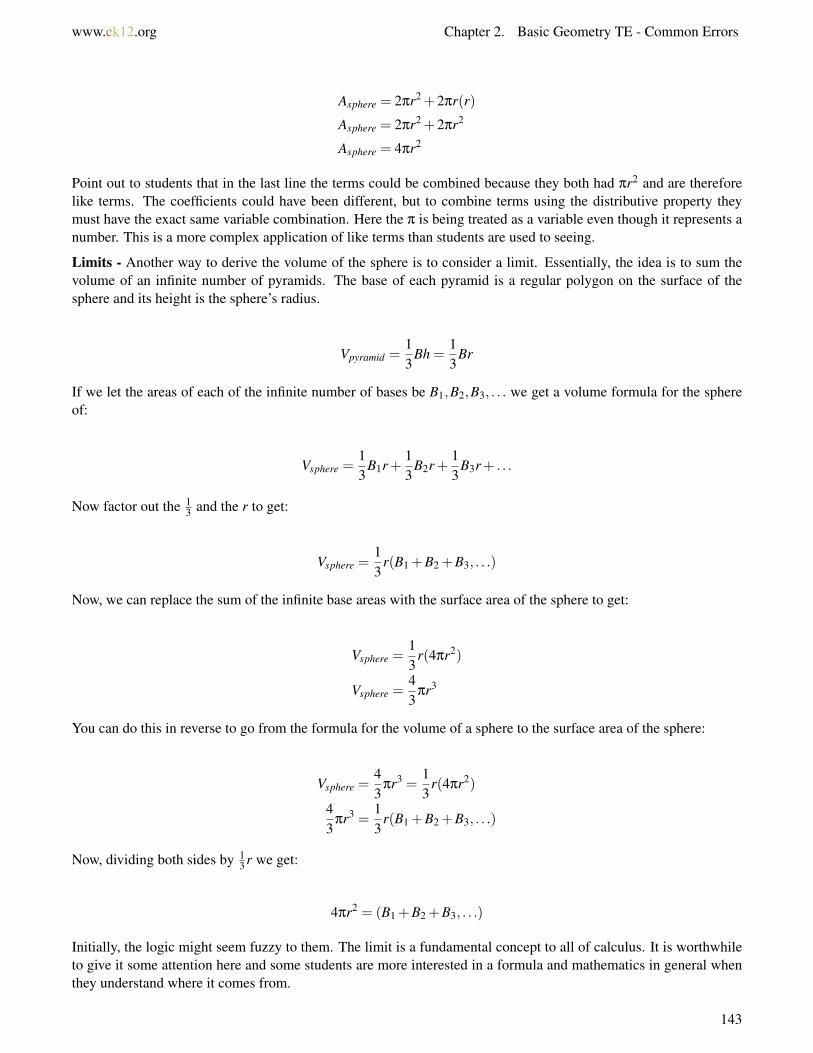
www.ck12.org Chapter 2. Basic Geometry TE - Common Errors
Asphere = 2πr2 +2πr(r)
Asphere = 2πr2 +2πr2
Asphere = 4πr2
Point out to students that in the last line the terms could be combined because they both had πr2 and are thereforelike terms. The coefficients could have been different, but to combine terms using the distributive property theymust have the exact same variable combination. Here the π is being treated as a variable even though it represents anumber. This is a more complex application of like terms than students are used to seeing.
Limits - Another way to derive the volume of the sphere is to consider a limit. Essentially, the idea is to sum thevolume of an infinite number of pyramids. The base of each pyramid is a regular polygon on the surface of thesphere and its height is the sphere’s radius.
Vpyramid =13
Bh =13
Br
If we let the areas of each of the infinite number of bases be B1,B2,B3, . . . we get a volume formula for the sphereof:
Vsphere =13
B1r+13
B2r+13
B3r+ . . .
Now factor out the 13 and the r to get:
Vsphere =13
r(B1 +B2 +B3, . . .)
Now, we can replace the sum of the infinite base areas with the surface area of the sphere to get:
Vsphere =13
r(4πr2)
Vsphere =43
πr3
You can do this in reverse to go from the formula for the volume of a sphere to the surface area of the sphere:
Vsphere =43
πr3 =13
r(4πr2)
43
πr3 =13
r(B1 +B2 +B3, . . .)
Now, dividing both sides by 13 r we get:
4πr2 = (B1 +B2 +B3, . . .)
Initially, the logic might seem fuzzy to them. The limit is a fundamental concept to all of calculus. It is worthwhileto give it some attention here and some students are more interested in a formula and mathematics in general whenthey understand where it comes from.
143
2.11. Surface Area and Volume www.ck12.org
Extension: Exploring Similar Solids
Surface Area is Squared - Surface area is a two-dimensional measurement taken of a three-dimensional object.Students are often distracted by the solid and use cubed units when calculating surface area or mistakenly cube theratio of linear measurements of similar solids when trying to find the ratio of the surface areas. Remind them, andgive them many opportunities to practice with exercises where surface area and volume are both used.
Don’t Forget to Adjust the Ratio - There are three distinct ratios that describe the relationship between similarsolids. When the different ratios and their uses are the subject of the lesson, students usually remember to use thecorrect ratio for the given situation. In a few weeks when it comes to the chapter test or on the final at the end ofthe year, students will frequently forget that the area ratio is different from the volume ratio and the linear ratio.They enjoy writing proportions and when they recognize that a proportion will be used, they get right to it withoutanalyzing the ratios. One way to remind them is to have them use units when writing proportions. The units onboth sides of the equal sign have to match before they can cross-multiply. Give them opportunities to consider therelationship between the different ratios with questions like the one below.
Example 1: If a fully reduced ratio is raised to a power, will the resulting ratio be fully reduced? Explain yourreasoning.
Answer: Yes, two numbers make a fully reduced ratio if they have no common factors. Raising a number to a powerincreases the exponent of each factor already present, but does not introduce new factors. Therefore, the resultingtwo numbers will still not have any common factors.
These concepts frequently appear on the SAT. It will serve the students well to practice them from time to time tokeep the knowledge fresh.
Example 2: The ratio of the surface areas of two cubes is 25:49. What is the ratio of their volumes?
Answer: In order to find the ratio of the volumes, we need to square root the ratio of the areas and then cube theresulting ratio:
(√25)3
:(√
49)3
53 : 73
125 : 343
144
www.ck12.org Chapter 2. Basic Geometry TE - Common Errors
2.12 Rigid Transformations
Exploring Symmetry
360◦ Doesn’t Count - When looking for rotational symmetries students will often list 360◦ rotational symmetry.When a figure is rotated 360◦ the result is not congruent to the original figure, it is the original figure itself. Thisdoes not fit the definition of rotational symmetry. This misconception can cause error when counting the numbers ofsymmetries a figure has or deciding if a figure has symmetry or not. Another important note here is that sometimesrotational symmetry is referred to as point symmetry. The center “point” of the figure is the center of rotation in afigure with rotational symmetry. Students might be thrown by this new term which might appear on a standardizedtest if it isn’t introduced here.
Review Quadrilateral Classifications - Earlier in the course students learned to classify quadrilaterals. Now wouldbe a good time to break out that Venn diagram. Students will have trouble understanding that some parallelogramshave line symmetry if they do not remember that squares and rectangles are types of parallelograms. As the coursedraws to an end, reviewing helps students retain what they have learned past the final. It is possible to redefinethe classes of quadrilaterals based on symmetry. This pursuit will make the student use and combine knowledge indifferent ways making what they have learned more flexible and useful. You may also want to look at the symmetryof regular polygons.
Applications - Symmetry has numerous applications both in and outside of mathematics. Knowing some of the usesfor symmetry will motivate student, especially those who are not inspired by pure mathematics, to spend their timeand energy learning this material.
Biology –Most higher level animals have bilateral symmetry, starfish and flowers often have 72◦ rotational symmetry.Naturally formed nonliving structures like honeycomb and crystals have 60◦ rotational symmetry. These patternsare fascinating and can be used for classification and study.
Trigonometry –Many identities of trigonometry are based on the symmetry of a circle. In the next few years ofmathematics the students will see how to simplify extremely complex expressions using these identities.
Advertising –Many company logos make use of symmetry. Ask the students to bring in examples of logos with par-ticular types of symmetry and create a class collection. Analyze the trends. Are certain products more appropriatelyrepresented by logos that contain a specific type of symmetry? Does the symmetry make the logo more pleasing tothe eye or more easily remembered?
Functions –A function can be classified as even or odd based on the symmetry of its graph. Even functions havesymmetry around the y−axis, and odd functions have 180◦ rotational symmetry about the origin. Once a function isclassified as even or odd, properties and theorems can be applied to it.
Draw - Have students be creative and create their own logos or designs with specific types of symmetry. Using theseconcepts in many ways will build a deeper understanding and the ability to apply the new knowledge in differentsituations.
Translations
Translation or Transformation - The words translation and transformation look and sound quite similar to students
145

2.12. Rigid Transformations www.ck12.org
at first. Emphasis their relationship: A translation is just one of the many transformations the students will be learningabout in this chapter.
Image vs Pre-image - Students often get these two terms mixed up. Help students focus on the prefix, “pre” whichmeans “before”. The pre-image is the image before a transformation is performed.
Mapping Notation - An ordered pair is use to represent a location on the coordinate plane, and mapping notationindicates how a point is “moved” to create an image of a point. Give students ample opportunity to practice readingand writing with this notation.
The Power of Good Notation - There is a lot going on in these exercises. There are the points that make thepreimage, the corresponding points of the image, and the mapping notation used to describe the translation. Goodnotation is the key to keeping all of this straight. The points of the image should be labeled with capital letters, andthe prime marks should be used on the points of the image. In this way it is easy to see where each point has gone.This will be even more important when working with more complex transformations in later sections. Start goodhabits now.
Use Graph Paper and a Ruler - When making graphs of these translations by hand, insist that the students usegraph paper and a ruler. If students try to graph on lined paper, the result is frequently messy and inaccurate. It isbeneficial for students to see that the pre-image and image are congruent to reinforce the knowledge that a translationis an isometry. It is also important that students take pride in producing quality work. They will learn so much morewhen they take the time to do an assignment well, instead of just rushing through the work.
Translations of Sketchpad - Geometers’ Sketchpad uses vectors to translate figures. The program will display thepre-image, vector, and image at the same time. Students can type in the vector and can also drag points on the screento see how the image moves when the vector is changed. It is a quick and engaging way to explore the relationships.If the students have access to Sketchpad and there is a little class time available, it is a worthwhile activity. You willneed to explain how students can write vector from mapping notation in the program.
Reflections
Rules for Reflections in the Coordinate Plane - Students are likely to have a hard time memorizing these rules.Encourage students to just reflect one point at a time until they notice a pattern. When reflecting over the y−axis,the x changes sign and when reflecting over the x−axis, the y changes sign. Reviewing the quadrants and where xand y are positive/negative may also help. They will then see how the signs change as they cross the particular axes.
Will the Pre-Image and Image Match Up? - Encourage students to visualize whether or not the image and pre-image will “match up” if they fold over the line of reflection. This caheck at the end of the process may help studentsavoid making careless errors.
Reflections over y = x - This particular reflection is very important for students to be able to recognize for futuremath courses. The inverse of a function is a reflection of the original function over this line. Understanding theconnection between the process of creating this reflection (switching x and y values) and finding an inverse functionlater in more advanced algebra courses (students will switch the variables in the equation) will help students gain adeeper understanding of both concepts.
Rotations
Clockwise vs Counterclockwise Rotations - Students sometimes have difficulty keeping these two straight. It isalso counter-intuitive to them that a counterclockwise angle is considered positive and a clockwise angle is negative.This text uses all positive angles and indicates clockwise vs counterclockwise but if you decide to use Geometer’s
146

www.ck12.org Chapter 2. Basic Geometry TE - Common Errors
Sketchpad (or other computer programs) to do some additional activities, you will need to explain this concept tostudents.
Rotating in the Coordinate Plane - There are mapping rules given in the text for the different rotations in thecoordinate plane. Sometimes, however, it is helpful to have students attempt to “visualize” these on the coordinateplane. Often students forget the “rules” and cannot complete the assignment or problem on a quiz or test. It may behelpful to do some examples using patty paper. Students can draw a triangle or quadrilateral on the coordinate plane,then trace the figure and the axes onto the patty paper. Now they can rotate the patty paper 90, 180 and 270 degreesusing the axes as a reference to see how the figure (and the coordinates of its vertices) change. This technique isparticularly beneficial for visual and kinesthetic learners.
Composition of Transformations
Glide Reflections - Students sometimes struggle with the concept that order doesn’t matter here. It is helpful to havestudents do a problem such as the example below to experience this.
Example: ∆ABC has vertices (2, -3), (5, 3) and (6, 0). Translate this figure 5 units left and reflect it over the liney =−2. What are the coordinates of the final image? Now try doing the reflection before the translation. What arethe coordinates of the final image?
Answer: The coordinates of the resulting images for both orders is (-3, -1), (0, -7), (1, -4).
Reflections over Parallel Lines - Students may initially struggle with the relationship between this double reflectionand the resulting equivalent translation. Have students practice this on the coordinate plane where distances betweenthe vertices of the pre-image and image can be easily calculated to verify the relationship.
Reflections over both Axes - Patty paper can be used again here to help students see that this double reflectionis actually a rotation of 180◦ about the origin. Students can also compare the rules for reflections to the rules forrotations to see that the combination of the two reflections results in the rule for the rotation.
Extension: Tessellating Polygons
Review Interior Angles Measures for Polygons - Earlier in the course students learned how to calculate the sum ofthe measures of interior angles of a convex polygon, and how to divide by the number of angles to find the measuresof the interior angle of regular polygons. Now would be a good time to review this lesson. The students will needthis knowledge to see which regular polygons will tessellate and the final is fast approaching.
Move Them Around - When learning about regular and semi-regular tessellation it is helpful for students to havea set of regular triangles, squares, pentagons, hexagons, and octagons that they can slide around and fit together.These shapes can be bought from a mathematics education supply company or made with paper. Exploring therelationships in this way gives the students a fuller understanding of the concepts.
Use On-Line Resources - A quick search on tessellations will produce many beautiful, artistic examples like thework of M. C. Escher and cultural examples like Moorish tiling. This bit of research will inspire students and showthem how applicable this knowledge is to many areas.
Tessellation Project - A good long-term project is to have the students create their own tessellations. This is anartistic endeavor that will appeal to students that typically struggle with mathematics, and the tessellations makenice decorations for the classroom.
147

www.ck12.org
CHAPTER 3 Basic Geometry TE -Enrichment
Chapter Outline3.1 BASICS OF GEOMETRY
3.2 REASONING AND PROOF
3.3 PARALLEL AND PERPENDICULAR LINES
3.4 TRIANGLES AND CONGRUENCE
3.5 RELATIONSHIPS WITH TRIANGLES
3.6 POLYGONS AND QUADRILATERALS
3.7 SIMILARITY
3.8 RIGHT TRIANGLE TRIGONOMETRY
3.9 CIRCLES
3.10 PERIMETER AND AREA
3.11 SURFACE AREA AND VOLUME
3.12 RIGID TRANSFORMATIONS
Introduction
This FlexBook® resource is designed to supplement the Basic Geometry FlexBook® textbook with enriching andextension activities. Mostly, the activities will cross into art, technology, architecture, and history. By definition,enrichment means to “enrich” or enhance something. The activities or problems included will enrich the lessonand add to the lesson without adding too much of a challenge. There will also be “challenging” problems thatbe separately identified. Like with the other FlexBook® resources, the activities and problems in this text aresuggestions and designed to supplement a lesson. Pick and choose activities as you see fit.
In addition to the supplemental activities in this FlexBook® resource, see the Texas Instruments Geometry FlexBook®textbook. This book has activities that supplement some sections and are designed to utilize a graphing calculator.See http://www.ck12.org/flexbook/book/3783/ for the Teacher’s Edition and http://www.ck12.org/flexbook/book/3766/ for the Students’ Edition.
148

www.ck12.org Chapter 3. Basic Geometry TE - Enrichment
3.1 Basics of Geometry
Points, Lines, and Planes
Connections to Art
Tangrams are a fun way to introduce Geometry to any student. If you have tangrams, let students play with them,make designs or animals. If you do not have access to tangrams, take them to the computer lab to do online tangrams:http://pbskids.org/cyberchase/games/area/tangram.html
Point of points of intersection, lines, triangles, quadrilaterals, and planes to students as they play. You could eventake picture of students creations and put them up in your classroom.
(To purchase, see: http://www.amazon.com/Learning-Advantage-Tangrams-Classroom-Set/dp/B000XURP14/ref=sr_-1_20?s=toys-and-gamesie=UTF8qid=1305226538sr=1-20
Connections to Map Reading
A practical application of points, lines, and planes are maps. Show students a map of a state and see if they candetermine what represents a city (point), a highway (line), and the state itself (plane).
149

3.1. Basics of Geometry www.ck12.org
Taking this a step further, ask students what points (cities) are collinear (on the same highway) and which arecoplanar (all the cities). Have a discussion as to what sort of representation would be “space.” Students should seethat it would be a globe.
Challenge
1. Three planes intersect in three different ways. Draw all three.
2. One line can divide a plane into two regions. Two lines can divide a plane into four regions. Three lines thatintersect at a point can divide a plane into six regions, but you can get more regions if the lines do not all intersectat the same point. If you have six lines, what is the maximum number of regions into which you can divide a plane?BONUS: What if you used n lines? What is the maximum number of regions into which you can divide the plane?
Answers
1. See the pictures below. Notice that we did not include options where all the planes were parallel (no intersection)or when one plane intersected the other two (two planes parallel).
2. For six lines, the maximum number of regions is 22. You can decide if you would like students to generate apattern or draw pictures for 1-6 lines (the pattern is: 2, 4, 7, 11, 16, 22, 29, ...). For n lines, there will be 1
2 n2+ 12 n+1
regions.
150

www.ck12.org Chapter 3. Basic Geometry TE - Enrichment
Segments and Distance
Extension
Using the Know What? as a guide, have students measure their own “head” width and length. Then, have them findtheir height in heads. Students can also find: the length from the wrist to the elbow, the length from the top of theneck to the hip, and the width from shoulder to shoulder, and hip height. Some of these are given in the picture inthe text, but have students verify the measurements for their own bodies. Taking it one step further, you could havestudents create a scale drawing of him/her based on the head measurements.
Connections to History
Describe the advantages of using the metric system to measure length over the English system. Use the examples ofthe two rulers (one in inches and one in centimeters) to aid in your description.
Research the origins of ancient measurement units such as the cubit. Research the origins of the units of measure weuse today such as: foot, inch, mile, meter. Why are standard units important? Student answers should include thatthe cubit was the first recorded unit of measure and it was integral to the building of the Egyptian pyramids.
Research the facial proportions that da Vinci used to create his Vitruvian man. Write a summary of your findings.Student answers should comment on the “ideal” proportions found in the human face and how these correspond toour perception of beauty.
Challenge
1. Draw four points, A,B,C, and D such that AB = BC = AC = AD = BD.
(HINT: A,B,C and D should NOT be collinear)
2. AB∼= BC and AC ∼=CD. If AD = 20, find the length of all the segments in the diagram.
Answers
1. Here is one possible answer.
2. AC =CD = 10,AB = BC = 5,BD = 15
Angles and Measurement
Connections to Astronomy
151

3.1. Basics of Geometry www.ck12.org
Give students pictures of the Big Dipper and Orion (below). For homework, ask students to observer the night skyand try to find these two constellations. Have them make note of any other constellations. To see a full list ofconstellations, visit http://en.wikipedia.org/wiki/List_of_constellations . Ask the students to find 2-3 constellationson line or in a book and to bring the hard copy of a picture of the constellation to class.
The next day, in class, begin a whole discussion about the angles in the constellations and the distance between stars.Ancient astronomers used to measure the degrees between stars using their hands. Here are the approximations:
• Extend your little finger; its width is approximately 1 degree.• Extend your three middle fingers; this is about 5 degrees.• A clenched fist (thumb to little finger) is about 10 degrees.• From the tip of the little finger to the tip of the thumb, an extended hand with fingers and thumb splayed is
about 20 degrees.
Now, for homework, have students see if they can find the angle measures between the stars in each constellationthey found the night before. Remind students that these hand measurements are approximations. They only workbecause the stars are so far away.
Challenge
1. You are measuring 6 ABC with a protractor. When you line up−→BC with the 10◦ mark,
−→AB lines up with the
90◦ mark. Then you move the protractor so that−→BC lines up with the 25◦ mark. What mark should
−→AB line up
with?2. Why do you think the degree measure of a straight line is 180, the degree measure of a right angle is 90, etc?
In other words, answer the question, “Why is the straight line exactly 180◦ and not some other number ofdegrees?”
Answers
1. It should line up with 115◦.
152

www.ck12.org Chapter 3. Basic Geometry TE - Enrichment
2. Answers will vary. Students should comment about the necessity to have a number of degrees in a line that isdivisible by 30, 45, 60 and 90 degrees because these degree measures are prevalent in the study of geometricalfigures. Basically, setting the measure of a straight line equal to 180◦ allows us to have more whole numberdegree measures in common geometrical figures.
Midpoints and Bisectors
Connections to Construction
This is a picture of a wooden frame for a home. Notice that←→BD bisects the sides of the roof (6 ABC) and the other
support beams ( 6 FDG and 6 EDH). It is also perpendicular to EH. Ask students why it is important why←→BD bisects
these angles. What would happen if←→BD did not perfectly bisect these angles? There are also several congruent
segments. Ask students to find these. Then, as a classwork (individually or in pairs) assignment, have studentsanswer the following questions.
1. If m 6 ABC = 150◦, find m6 ABD.
2. If m 6 BDF = 80◦, find m6 FDG.
3. What is m6 EFD?
4. List an example of an acute, obtuse, right and straight angle.
Answers
1. m6 ABD = 75◦
2. m6 FDG = 160◦
3. m6 EFD = 10◦
4. Acute angles: 6 ABD, 6 DBC, 6 BDF, 6 BDG, 6 FDE, 6 GDH
Obtuse angles: 6 ABC, 6 FDG, 6 EDG, 6 HDF
Right angles: 6 BDE, 6 BDH
Straight angle: 6 EDH
Challenge
1. Construct a 90◦ angle using the constructions learned in this section.
2. Using #1, construct a 45◦ angle.
3. Using #1, construct a square (all sides are equal and all angles are 90◦).
Answers
1. Construct a perpendicular bisector to create two 90◦ angles.
153

3.1. Basics of Geometry www.ck12.org
2. Bisect one of the angles in #1 to create a 45◦ angle.
3. The square is a little harder. Students will need to start with #1 and repeat this once more. Then, they can markthe distance between two created 90◦ angles and repeat these on the created lines (the green and purple arc marks).
154

www.ck12.org Chapter 3. Basic Geometry TE - Enrichment
Angle Pairs
Connections to Map Reading
Use the image of a street map of Manhattan or Washington DC (www.mapquest.com). Print a copy of this mapfor students to work with during the activity. There are several different examples of complementary angles,supplementary angles, linear pairs, and vertical angles.Have the students work in pairs with a highlighter, coloredpencils or markers and identify examples of each of the types of angles in the map. Ask the students to make a list ofthe intersections (by street name) on paper and how each angle fits the description. You could also enlarge the mapand have students use a protractor to measure the angles. Students can either share the findings as a whole class, asa discussion, or in small groups. An extension could be to have students repeat this activity for the city they live in.
Extension
Ask students if they think three angles can form a linear pair. Can three angles be supplementary? Complementary?By the definition, only two angles can form a linear pair, be supplementary or complementary. However, explain tostudents that this does not mean that three angles cannot add up to 180◦ (such as in a triangle) or 90◦.
Challenge
1. Find the value of x and y. You may need to factor or use the square root.
155

3.1. Basics of Geometry www.ck12.org
2. What is a congruent linear pair?
Answers
1. x = 11◦,y = 7◦
2. A congruent linear pair would be two 90◦ angles. Congruent linear pairs are created by perpendicular lines.
Classifying Polygons
Connections to Art
To prepare, you will need an assortment of one or more of the following items: gumdrops, marshmallows, toothpicks,tinkertoys, or kynex. Be sure that the students understand the different types of triangles and have an example ofeach type before beginning. Then have them create an example of each type triangles using the materials provided.The gumdrops or marshmallows would be the vertices and the toothpicks would be the sides, for example. Letstudents play for a while. You could also extend this activity to polygons (squares and other regular polygons arepretty easy to create). Finally, you could have students create geometric designs using the materials.
Connections to Architecture
Either in class or as a homework assignment, have students search for “polygon architecture” on the internet. Tellstudents to click “images” on the search engine and have them print out 2-3 images to share with the class. Encouragestudents to print out pictures of buildings, tile designs, interiors, windows, or playground equipment.
As a class, brainstorm the different types of polygons used in architecture (write these on the board and how they areused) and why certain polygons are used over others. As a homework assignment, students can go home and writedown all the polygons they find their home.
Extension
You can introduce students to the concept of an equilateral polygon and an equiangular polygon. Only in the case ofa triangle are equilateral and equiangular the same shape. Also, equilateral polygons can be concave (see hexagonbelow), but equiangular polygons cannot. After drawing examples of equilateral and equiangular quadrilaterals,pentagons, and hexagons, show students regular polygons (when sides and angles are congruent). Encourage toguess the definitions of these new terms and ask for volunteers to come up to draw different polygons. Here are afew examples.
156

www.ck12.org Chapter 3. Basic Geometry TE - Enrichment
Challenge
1. Can an equiangular polygon be concave? Why or why not?2. Find the pattern for the number of diagonals drawn from one vertex. Determine how many diagonals can be
drawn from one vertex of an n-gon.3. Find the pattern for the total number of diagonals in a polygon. Determine how many diagonals are in an
n-gon.
Answers
1. An equiangular polygon cannot be concave because all the angles must be the same measure. In a concavepolygon, one angle will be larger than 180◦.
2. The number of diagonals at one vertex increases by one. For an n-gon, the equation would be n−3.3. For the total number of diagonals, the pattern is: 0, 2, 5, 9, 14, 20, 27, ... Here, you add one more than what
was previously added. If there are n vertices and n− 3 diagonals from each vertex, then start with n(n− 3)as the equation for the total number of diagonals. However, if you plug in n = 5 (or any other number),the answer would be double the correct answer (this is because n(n− 3) counts all of the diagonals twice).Therefore, you need to divide by two. The equation is n(n−3)
2 .
157

3.2. Reasoning and Proof www.ck12.org
3.2 Reasoning and Proof
Inductive Reasoning
Connections to Music
This will need to be prepared ahead of time. Prepare several different examples of repetitive music, such as rap,classical, folk songs, or children’s songs. Make sure that the songs have a refrain (chorus) or a clear consistentpattern.Examples are: Old MacDonald, Puff the Magic Dragon, Let’s Dance (Lady Gaga), excerpts from theNutcracker (the Russian Dance, Dance of the Reed Flutes, Arabian Dance, Waltz of the Flowers), or Gotta Feeling(Black Eyed Peas). For students to really “hear” the repetition, it might be easiest to start with songs that do not havelyrics.
Play the songs in class and have students develop a rule for each selection. You may have to play the songs 3-5 timesbefore students recognize a pattern. Then, brainstorm a list of possible pattern rules, decide on one and write it onthe board. See if students can come up with a counterexample to the rule. After doing one or two examples togetheras a class, split students into groups and have them listen to remaining selections. Once all the groups are finished,have them share their rules and see if the other groups can find any counterexamples.
As an extension to this activity, you could survey the class to see if any student has an interest in DJ-ing. If onedoes (and has the appropriate equipment), allow he/she to bring in the necessary equipment and have them give ademonstration on how to mix and dj. Have the class find patterns in their sampling and/or mixing. If no student hasthe necessary equipment, see if your music department, mass media, or theater classes do.
Connections to Nature
In the computer lab, allow students to search for “nature patterns” in the “images” tab on the search engine. Havestudents print out 2-3 pictures of plants, fruit, or trees that they feel show a pattern. Give them time to come up withan appropriate rule for each picture. Then, pair up students and have them exchange their pictures with their partner.See if the partner can find any counterexamples.
Challenge
1. Find the next three terms in the sequence and describe the rule.
a) 1, 1, 2, 3, 5, 8, 13, ...
b) 3, 7, 12, 18, 25, ...
2. Plot the points (1, 3), (2, 8), and (3, 13). What do you notice? Can you use algebra to find the rule that maps xonto y?
Answers
1. a) 21, 34, 55 Each term is made up of the sum of the two numbers before it. This is called a Fibonacci sequence.
b) 33, 42, 52 To find each term, add one more than what was added to the previous term. In other words, we added4, 5, 6, 7, ... each time.∗As an added challenge, have students find the equation for part b. The equation would be n(n+5)
2 . A hint would beto tell students to double every term and see if they can find that pattern, then divide by 2.
2. The three points form a line. The equation of this line is y = 5x−2. Any set of points that are collinear will followa pattern where the rule is the equation of the line.
158

www.ck12.org Chapter 3. Basic Geometry TE - Enrichment
Conditional Statements
Connections to Literature
Give students a copy of the poem “The Road Not Taken” by Robert Frost. Read the poem with the class and discussthe meaning of the poem and the thoughts behind it.Then have the students rewrite the poem in all conditionalstatements. When finished, ask the students if the meaning of the poem has changed and how conditional statementscan impact the different statements. You can have students work in pairs or in groups. Also, decide if you wantstudents to read their new poems aloud to the class.
Connections to Cinema
In the Know What? is a cartoon by Rube Goldberg. You can show students the “Breakfast Machine” scene from PeeWee’s Big Adventure (1985). This scene is an acted out series of conditional statements. Have students attempt towrite the series of if-then statements that complete the breakfast machine.
Challenge
1. Rewrite your Know What? answer as a series of conditional statements.
Answers
1. A→ B: If the man raises his spoon, then it pulls a string.
B→C: If the string is pulled, then it tugs back a spoon.
C→ D: If the spoon is tugged back, then it throws a cracker into the air.
D→ E: If the cracker is tossed into the air, the bird will eat it.
E→ F : If the bird eats the cracker, then it turns the pedestal.
F → G: If the bird turns the pedestal, then the water tips over.
G→ H: If the water tips over, it goes into the bucket.
H→ I: If the water goes into the bucket, then it pulls down the string.
I→ J: If the bucket pulls down the string, then the string opens the box.
J→ K: If the box is opened, then a fire lights the rocket.
K→ L: If the rocket is lit, then the hook pulls a string.
L→M: If the hook pulls the string, then the man’s face is wiped with the napkin.
Deductive Reasoning
Extension
Draw five different parallelograms on the board. Tell students the definition of a parallelogram. Then, have eachstudent make 2-3 conjectures about the angles or sides. Allow students to share their conjectures with the class. Asa class, try to find counterexamples or see if the conjectures are true. Then, see if the conjectures hold for otherparallelograms.
Extension
After going over the Laws of Detachment, Contrapositive and Syllogism, students might question why there are noLaw of Converse or Law of Inverse. These two statements lead to the Converse Error and the Inverse Error. Example4 would be an example of the Converse Error. You can also extend the use of symbols. See if students can find the
159

3.2. Reasoning and Proof www.ck12.org
conclusion (if there is one) for each of the following:
v→ g d→ e x→ y v→ g
v→ h r→ d y→ z h→ v
∴ ∴ ∴ ∴
None r→ d x→ z h→ g
Logic Challenge
Logic Puzzles are a great way to use the Law of Syllogism and Contrapositive. Below is an example. Have studentsread the hints and see if they can figure out who left work on what day, what their favorite “vice” is and how theycommute. Students should place an “X” where they know something is not a possibility. If something is true, theycan either put an “O” in the square or color the square in. These are great activities for students to do after a test orfor extra credit. If you need more logic puzzles, go to www.logic-puzzles.org.
Answers
Feb 3rd → Davis→ pizza→ 10-speed
Feb 15th→ Alexa→ nachos→ scooter
Apr 7th→ Noe→ chocolate→ Segway
Sept 1st →McKenna→ ice cream→ skateboard
160

www.ck12.org Chapter 3. Basic Geometry TE - Enrichment
Algebraic and Congruence Properties
Connections to Scales
Bring in several different scales for students to work with.Then, prepare an assortment of items for students to workwith. For example, apples, bananas, bags of flour, bags of rice, oranges, etc. You can use non-food items too. Fromhere, have students work in groups and come up with collections of items that demonstrate equality. For example,apples and oranges: How many apples “equal” how many oranges (in weight)? Have one member of the group bethe recorder and list of the items that equal other items.Then ask students to use the properties from the chapter andwrite a reflexive statement, a symmetric statement and a transitive statement about two of their equal statements.Allow time for the students to share their work.
Extension
In this lesson, we introduce the two-column proof. If students feel confident with the concept, you can take awaythe fill-in-the-blank option that is presented throughout this text. See the Differentiated Instruction chapter formodifications and alternate proof options.
Challenge
1. Write a two-column proof.
Given: AC bisects 6 DAB
Prove: m6 BAC = 45◦
2. Draw a picture and write a two-column proof.
Given: 6 1 and 6 2 form a linear pair and m6 1 = m6 2.
Prove: 6 1 is a right angle
Answers
1.
TABLE 3.1:
Statement Reason1. 6 DAB is a right angle Given2. m6 DAB = 90◦ Definition of a right angle3. AC bisects 6 DAB Given4. m6 DAC = m6 BAC Definition of an angle bisector5. m6 DAB = m 6 DAC+m6 BAC Angle Addition Postulate6. m6 DAB = m 6 BAC+m6 BAC Substitution PoE7. m6 DAB = 2m6 BAC Combine like terms8. 90◦ = 2m6 BAC Substitution PoE9. 45◦ = m6 BAC Division PoE
161

3.2. Reasoning and Proof www.ck12.org
2.
TABLE 3.2:
Statement Reason1. 6 1 and 6 2 form a linear pair m6 1 = m6 2 Given2. 6 1 and 6 2 are supplementary Linear Pair Postulate3. m6 1+m 6 2 = 180◦ Definition of Supplementary4. m 6 1+m 6 1 = 180◦ Substitution5. 2m6 1 = 180◦ Simplify6. m 6 1 = 90◦ Division PoE7. 6 1 is a right angle Definition of a right angle
Proofs about Angle Pairs and Segments
Connections to Cooking
In this activity, the students are going to need to prove the following statement: “You must have eggs to make achocolate cake.”
Assign half of the class the job of proving that this is a true statement. Assign the other half of the class the job ofdisproving the statement. Allow students to research on the internet for recipes. Recipes that would disprove thisstatement would be dairy-free or vegan cakes. Students will need at least three sources (websites, cookbooks, orother) to support their ability to prove or disprove. Then, they will need to come up with an argument (this can bedone in groups or pairs) to persuade the rest of the class as to why a chocolate cake is better with or without eggs(depending on which they were assigned). Once the groups have shared their proofs with the class, allow time todebate as a whole on which was the best proof.
Challenge
1. Find the measure of the lettered angles in the picture below. Hint: Recall the sum of the three angles in a triangleis 180◦.
162

www.ck12.org Chapter 3. Basic Geometry TE - Enrichment
Answers
1. a = 25◦, b = 75◦, c = 105◦, d = 90◦, e = 50◦, f = 40◦, g = 25◦, h = 130◦, j = 155◦, k = 130◦
163

3.3. Parallel and Perpendicular Lines www.ck12.org
3.3 Parallel and Perpendicular Lines
Lines and Angles
Connections to Architecture
Discuss the lines and angles in the picture of Westminster Abbey. Show students how perpendicular lines are a majorfeature in the structure. What would happen if the lines were not perpendicular? Ask students how geometry playsa role in architecture.
You can extend this activity by taking students to the computer lab and having them find another building withparallel, perpendicular, and/or skew lines. Have them print out the picture and explain how the architecture of thebuilding they chose relates to geometry.
Connections to Art
This drawing is an example of lines and angles in art. Have students discuss the different lines and angles in thisdrawing. Then, use this image as a springboard for students to create their own drawing.
Students will need white paper, colored pencils, markers or crayons, and rulers. Stress that the artwork should besimple and prominently display intersecting lines. Allow for some time in class to create their art and then displayin the classroom.
If students need additional help getting started, show them http://fineartamerica.com/profiles/todd-hoover.html ,specifically “Coming Together” and “Coming Apart” by Todd Hoover.
164

www.ck12.org Chapter 3. Basic Geometry TE - Enrichment
Algebra Extension
Give students the series of problems below to begin to explore the concepts of parallel and perpendicular lines in thecoordinate plane.
1. Write the equations of two lines parallel to y = 3.2. Write the equations of two lines perpendicular to y = 5.3. What is the relationship between the two lines you found for number 27?4. Plot the points A(2,−5),B(−3,1),C(0,4),D(−5,10). Draw the lines
←→AB and
←→CD. What are the slopes of
these lines? What is the geometric relationship between these lines?5. Plot the points A(2,1),B(7,−2),C(2,−2),D(5,3). Draw the lines
←→AB and
←→CD. What are the slopes of these
lines? What is the geometric relationship between these lines?6. Based on what you discovered in numbers 4 and 5, can you make a conjecture about the slopes of parallel and
perpendicular lines?
Answers
1. Any two equations in the form y = b, where b is a constant.2. Any two equations in the form x = b, where b is a constant.3. These two lines are parallel to each other.4. slope of
←→AB equals slope of
←→CD =−6
5 ; these lines are parallel5. slope of
←→AB =−5
3 , slope of←→CD = 3
5 ; these lines are perpendicular6. It appears that the slopes of parallel lines are the same and the slopes of perpendicular lines are opposite
reciprocals.
Properties of Parallel Lines
Connections to Map Reading
Give each student a copy of the Tube map of London below. They will be using the map to find an example of eachof the postulates/theorems:
1. Corresponding Angles Postulate2. Alternate Interior Angles Theorem
165

3.3. Parallel and Perpendicular Lines www.ck12.org
3. Alternative Exterior Angles Theorem4. Same Side Interior Angles Theorem
Students will need to prove that each of their examplesis accurate. Students may need to use a protractor. Studentsmay also want to work in pairs.
As an extension, have students research other subway lines, such as the “L” in Chicago, the Metro in WashingtonDC and the Subway in New York City.
Know What? Extension
When looking at the street map of Washington DC, point out to students that all the “state” streets are transversalsthroughout the city. Ask students why they think these streets do not follow the grid layout. (Lettered streets runeast to west, numbered streets run north to south.)
Algebra Challenge
Find the values of x and y.
1.
2.
Answers
166

www.ck12.org Chapter 3. Basic Geometry TE - Enrichment
1. x = 15◦,y = 21◦
2. x = 37◦,y = 28◦
Proof Challenge
Use the picture to the right to complete each proof.
1. Given: l ‖ m,s ‖ t
Prove: 6 4∼= 6 10
2. Given: l ‖ m,s ‖ t
Prove: 6 2∼= 6 15
3. Given: l ‖ m,s ‖ t
Prove: 6 4 and 6 9 are supplementary
Answers
1.
TABLE 3.3:
Statement Reason1. l ‖ m,s ‖ t Given2. 6 4∼= 6 12 Corresponding Angles Postulate3. 6 12∼= 6 10 Corresponding Angles Postulate4. 6 4∼= 6 10 Transitive PoC
2.
TABLE 3.4:
Statement Reason1. l ‖ m,s ‖ t Given2. 6 2∼= 6 13 Alternate Exterior Angles Theorem3. 6 13∼= 6 15 Corresponding Angles Postulate4. 6 2∼= 6 15 Transitive PoC
3.
167

3.3. Parallel and Perpendicular Lines www.ck12.org
TABLE 3.5:
Statement Reason1. l ‖ m,s ‖ t Given2. 6 6∼= 6 9 Alternate Interior Angles Theorem3. 6 4∼= 6 7 Vertical Angles Theorem4. 6 6 and 6 7 are supplementary Same Side Interior Angles5. 6 9 an 6 4 are supplementary Same Angle Supplements Theorem
Proving Lines Parallel
Construction Extension
Extend Investigation 3-5 to the Converses of the Alternate Interior Angles Theorem and the Alternate ExteriorAngles Theorem. You can decide to do this as a student or teacher-led activity. The major difference will be that inStep 3, the copied angle will be in a different location. Ask students how they can extend this investigation to theConverse of the Same Side Interior Angle Theorem.
Construction Challenge
Draw a straight line. Construct a line perpendicular to this line through a point on the line. Now, construct aperpendicular line to this new line. What can you conclude about the original line and this final line? How couldyou prove this conjecture?
Answers
Construction, the first and last lines are parallel. You might conjecture that two lines perpendicular to the same lineare parallel to each other. You could prove this using any of the converse theorems learned in this section because allfour angles formed where the transversal intersects the two parallel lines are right angles. Thus, Alternate InteriorAngles, Alternate Exterior Angles and Corresponding Angles are all congruent and the Same Side Interior Anglesare supplementary.
Connections to Map Reading
The following link is a map of the mall in Washington DC: http://www.destination360.com/north-america/us/washington-dc/images/smithsonian-institution-map.jpg (found on http://www.destination360.com/north-america/us/washington-dc/smithsonian-institution
There are several different examples of parallel lines and transversals in this map. Have students to write a seriesof directions to take someone on a tour of the mall. They must go to the American History Museum, the NationalArchives, the Newseum, the West National Gallery of Art, and the Air and Space Museum. Students can pick theorder in which they go to these sites. Working in pairs, their job is to write down directions with the shortest path.Then, they need to determine if there is another set of directions that is close to (or the same length) as their originaldirections. When finished, have the students swap directions with a neighboring group and check to be sure that thedirections work.
Properties of Perpendicular Lines
Connections to Gymnastics
Gymnasts use the parallel bars and the uneven bars in routines. Ask students if they see any perpendicular transver-sals for these pieces of equipment. Extend this discussion to other gymnastic equipment (pommel horse, rings,balance beam, vault). How would the events be different if this equipment was not parallel to the ground?
168

www.ck12.org Chapter 3. Basic Geometry TE - Enrichment
Judges also score gymnasts on their ability to get their body perfectly vertical and legs perpendicular or vertical. Arethere any perpendicular transversals or parallel lines between the gymnast and the equipment or the ground?
Challenge
Find x and y. Remember that the angles in a triangle add up to 180◦.
Answers
x = 49◦,y = 111◦
Parallel and Perpendicular Lines in the Coordinate Plane
Connections to Road Construction
Typically, the slope of a steep road, also called a grade, is measured in a percentage. If a road has a grade of 5%,which means in 100 horizontal feet the road will rise vertically 5 feet.
This would be a slope triangle for this particular piece of road. The slope would be 5100 = 1
20 . Present students withthe following problem: The Grapevine on Highway 5 rises from 400 feet to 4144 feet over 6 miles. What is thegrade of this road? (This is for the southbound side)
Answer
First, convert 6 miles to feet, 6×5280 = 31,680 f t. Now, write a ratio and then turn that into a percent. 4144−40031680 =
374431680 ≈ 0.118×100% = 11.8% grade. In general, if a grade is over 10% it is considered steep.
169

3.3. Parallel and Perpendicular Lines www.ck12.org
As an extension, students can find the grade of the California Incline in the Know What? at the beginning of thislesson. (11.6%)
More Connections to Construction
Slope, also called grade or pitch, is a very important part in roof design, wheelchair ramp design, and skateboardramp design. Have students research any or all of these online to see why slope is important to these items.
Challenge
1. A line passes through (5, -2) and (-4, 1). Find the equations of the lines that are perpendicular to this one,through each point. How do these two lines relate to each other?
Answer
1. The equation of the line is y =−13 x− 1
3 . The perpendicular line through (5, -2) is y = 3x−17 and through (-4,1) is y = 3x+13. These two lines are parallel to each other.
The Distance Formula
Extension: Shortest Distance between a Point and a Line
We know that the shortest distance between two points is a straight line. This distance can be calculated by usingthe distance formula. Let’s extend this concept to the shortest distance between a point and a line.
Just by looking at a few line segments from A to line l, we can tell that the shortest distance between a point and aline is the perpendicular line between them. Therefore, AD is the shortest distance between A and line l.
Example: Determine the shortest distance between the point (1, 5) and the line y = 13 x−2.
170

www.ck12.org Chapter 3. Basic Geometry TE - Enrichment
Solution: First, graph the line and point. Second determine the equation of the perpendicular line. The oppositesign and reciprocal of 1
3 is -3, so that is the slope. We know the line must go through the given point, (1, 5), so usethat to find the y−intercept.
y =−3x+b
5 =−3(1)+b The equation of the line is y =−3x+8.
8 = b
Next, we need to find the point of intersection of these two lines. By graphing them on the same axes, we can seethat the point of intersection is (3, -1), the green point.
171
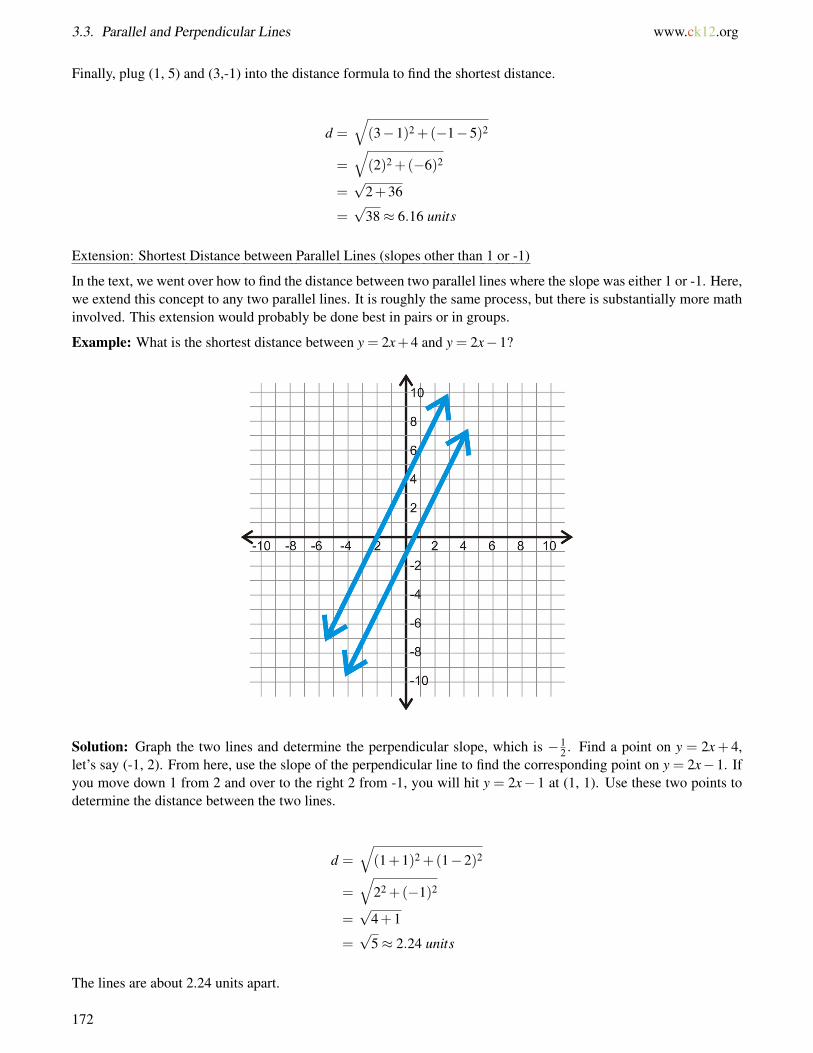
3.3. Parallel and Perpendicular Lines www.ck12.org
Finally, plug (1, 5) and (3,-1) into the distance formula to find the shortest distance.
d =√
(3−1)2 +(−1−5)2
=√
(2)2 +(−6)2
=√
2+36
=√
38≈ 6.16 units
Extension: Shortest Distance between Parallel Lines (slopes other than 1 or -1)
In the text, we went over how to find the distance between two parallel lines where the slope was either 1 or -1. Here,we extend this concept to any two parallel lines. It is roughly the same process, but there is substantially more mathinvolved. This extension would probably be done best in pairs or in groups.
Example: What is the shortest distance between y = 2x+4 and y = 2x−1?
Solution: Graph the two lines and determine the perpendicular slope, which is −12 . Find a point on y = 2x+ 4,
let’s say (-1, 2). From here, use the slope of the perpendicular line to find the corresponding point on y = 2x−1. Ifyou move down 1 from 2 and over to the right 2 from -1, you will hit y = 2x− 1 at (1, 1). Use these two points todetermine the distance between the two lines.
d =√(1+1)2 +(1−2)2
=√
22 +(−1)2
=√
4+1
=√
5≈ 2.24 units
The lines are about 2.24 units apart.
172
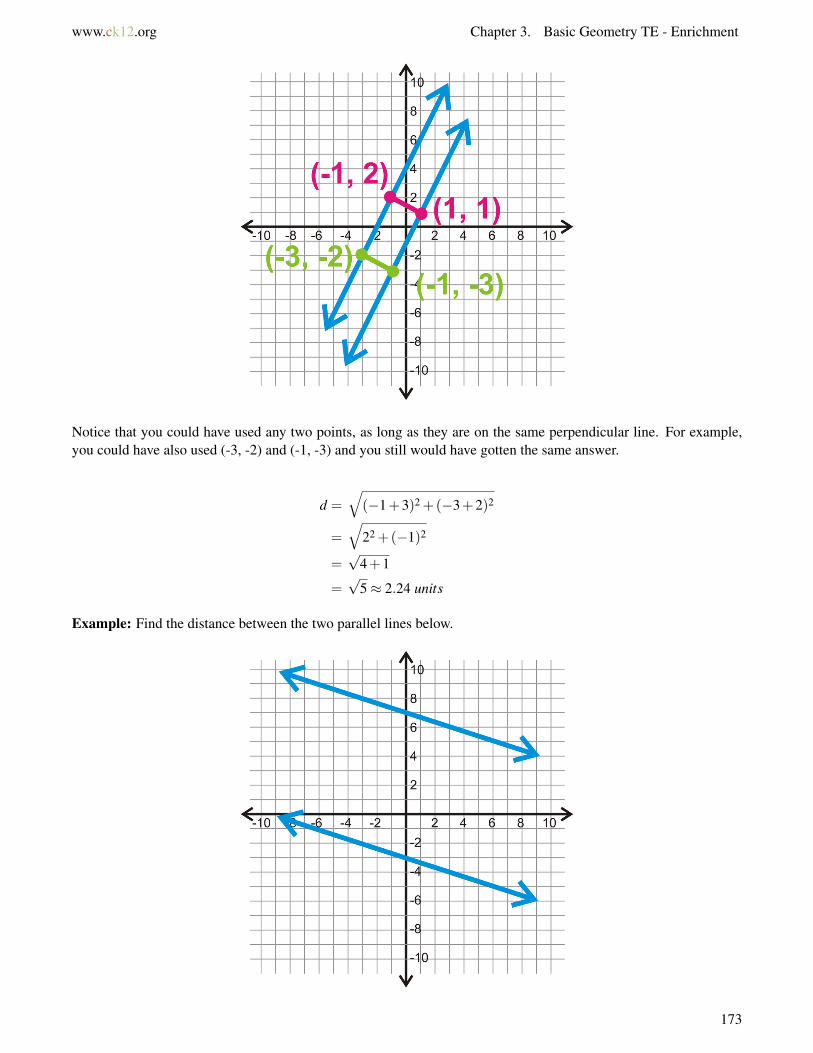
www.ck12.org Chapter 3. Basic Geometry TE - Enrichment
Notice that you could have used any two points, as long as they are on the same perpendicular line. For example,you could have also used (-3, -2) and (-1, -3) and you still would have gotten the same answer.
d =√(−1+3)2 +(−3+2)2
=√
22 +(−1)2
=√
4+1
=√
5≈ 2.24 units
Example: Find the distance between the two parallel lines below.
173

3.3. Parallel and Perpendicular Lines www.ck12.org
Solution: First you need to find the slope of the two lines. Because they are parallel, they are the same slope, so ifyou find the slope of one, you have the slope of both.
Start at the y−intercept of the top line, 7. From there, you would go down 1 and over 3 to reach the line again.Therefore the slope is −1
3 and the perpendicular slope would be 3.
Next, find two points on the lines. Let’s use the y−intercept of the bottom line, (0, -3). Then, rise 3 and go over 1until your reach the second line. Doing this three times, you would hit the top line at (3, 6). Use these two points inthe distance formula to find how far apart the lines are.
d =√
(0−3)2 +(−3−6)2
=√
(−3)2 +(−9)2
=√
9+81
=√
90≈ 9.49 units
Extension Problems
Determine the shortest distance between the given line and point. Round your answers to the nearest hundredth.
1. y = 13 x+4; (5,−1)
2. y = 2x−4; (−7,−3)
3. y =−4x+1; (4,2)
4. y =−23 x−8; (7,9)
Determine the shortest distance between the each pair of parallel lines. Round your answer to the nearest hundredth.
5. y =−13 x+2,y =−1
3 x−8
6. y = 4x+9,y = 4x−8
7. y = 12 x,y = 1
2 x−5
174

www.ck12.org Chapter 3. Basic Geometry TE - Enrichment
Answers
1. 6.32 units
2. 6.71 units
3. 12 units
4. 7 units
5. 9.49 units
6. 4.12 units
7. 4.47 units
175
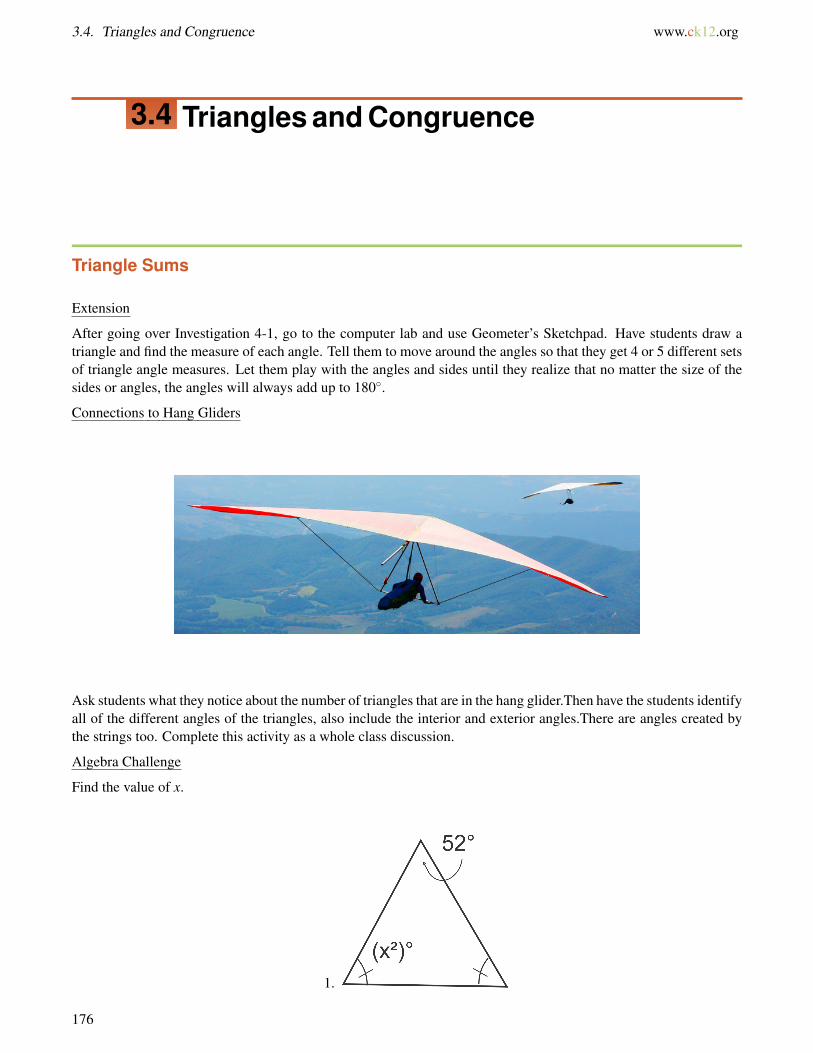
3.4. Triangles and Congruence www.ck12.org
3.4 Triangles and Congruence
Triangle Sums
Extension
After going over Investigation 4-1, go to the computer lab and use Geometer’s Sketchpad. Have students draw atriangle and find the measure of each angle. Tell them to move around the angles so that they get 4 or 5 different setsof triangle angle measures. Let them play with the angles and sides until they realize that no matter the size of thesides or angles, the angles will always add up to 180◦.
Connections to Hang Gliders
Ask students what they notice about the number of triangles that are in the hang glider.Then have the students identifyall of the different angles of the triangles, also include the interior and exterior angles.There are angles created bythe strings too. Complete this activity as a whole class discussion.
Algebra Challenge
Find the value of x.
1.
176

www.ck12.org Chapter 3. Basic Geometry TE - Enrichment
2.
3.
4.
Answers
1. x =±8◦
2. x = 17◦
3. x = 11◦
4. x = 7◦
Congruent Figures
Connections to Bridge Construction
For this activity, the students are going to use popsicle sticks or toothpicks to build a truss bridge. Begin by showingstudents some truss bridge designs.
177

3.4. Triangles and Congruence www.ck12.org
Working in pairs, students should draw a design first and get it approved.Then they can move on to the constructionpiece of the project.When finished, have students explain the importance of congruent triangles in building a solidbridge.
As an extension, have students research “triangles in bridges” online. Then they can explore one or two differenttypes bridge designs.Ask the students to write congruence statements explaining the congruence of the triangles inthe different bridge designs.
Challenge
1. Draw a 50◦ angle using a protractor. Make one side of the 50◦ angle 3 inches and the other side of the angle 2inches long. Draw the line segment that connects the end of these two sides, completing the triangle.
a) Measure the third side of this triangle. What is the length (in inches)?
b) Use a protractor to measure the other two angles.
c) Can you draw a different triangle with the original information? If so, draw it. If not, why do you think this is?
2. Draw a 40◦ angle using a protractor. Make one side horizontal and 6 cm long. At the endpoint, draw a 70◦ angle(6 cm side has the two angles at each endpoint). Extend the other sides of both angles until they intersect to form atriangle.
a) What is the measure of the third angle? What type of triangle is this?
b) What is the measure of the other two sides?
c) Can you draw a different triangle with the original information? If so, draw it. If not, why do you think this is?
Answers
1. a) The triangle to the left is to scale; 2.3 in
b) Using a protractor one angle is 42◦ and the other is 88◦.
c) No, only one triangle can be drawn. These three pieces of information are enough to draw one triangle becausethe two sides are fixed. There is no way to manipulate these sides to make the third side a different measurement.
2. a) The third angle is 70◦ because 40◦+70◦ = 110◦ and 180◦−110◦ = 70◦. Two angles are equal so the triangleis isosceles.
b) Using a ruler the other two sides are 6 cm and 4.1 cm
c) No, only one triangle can be drawn. These three pieces of information are enough to draw one triangle becausethe one side is fixed, as are the two angles. The other sides of the angles can only intersect in one way.
178

www.ck12.org Chapter 3. Basic Geometry TE - Enrichment
Triangle Congruence Using SSS and SAS
Investigation Extension
For Investigation 4-2, you could have students repeat Steps 1-5, starting with the 4 in. side and then starting with the3 in. side. Then, compare these two triangles to the original made (starting with the 5 in. side). See if students thinkthe triangles are congruent. Then discuss this “shortcut” (SSS Congruence Postulate) with students.
This extension can be repeated with Investigation 4-3. Have students start with the 2 in. side and draw the 5 in. aftercreating the 45◦ angle (switch Steps 1 and 3). Have the same discussion you did above to determine if students feelthat SAS is a congruence shortcut.
Extension: SAS in the Coordinate Plane
Using the SAS Congruence Postulate in the coordinate plane is a bit more challenging than SSS. First, it is verydifficult to measure the angles based on the slope of the sides and/or the distance formula. Therefore, we must limitusing SAS in the coordinate plane to right triangles. The measure of the right angle can determined if we know thetwo sides are perpendicular.
Extension Example: Determine if the two triangles are congruent by SAS. If so, write the congruence statement.
Solution: First, we need to determine which angle can be “measured.” It looks like 6 B and 6 E are the right angles,so let’s see if the sides are perpendicular.
mAB =2−6
−7− (−6)=−4−1
= 4 mBC =6−4−6−2
=2−8
=−14
mEF =−6− (−7)
7−3=
14
mDE =2− (−6)
5−7=
8−2
=−4
This shows that AB⊥ BC and EF ⊥ DE and thus m6 B = m6 E = 90◦. Now, we need to use the distance formula tosee if the two sides around the right angles are equal.
179

3.4. Triangles and Congruence www.ck12.org
AB =√
(−7− (−6))2 +(2−6)2 =√(−1)2 +(−4)2 =
√1+16 =
√17
BC =√
(−6−2)2 +(6−4)2 =√
(−8)2 +22 =√
64+4 =√
68 = 2√
17
EF =√
(7−3)2 +(−6− (−7))2 =√
42 +(−1)2 =√
16+1 =√
17
DE =√
(5−7)2 +(2− (−6))2 =√(−2)2 +82 =
√4+64 =
√68 = 2
√17
From this, we see that AB = EF and BC = DE. So, by SAS ∆ABC ∼= ∆FED.
Challenge
1. See if the two triangles are congruent by SAS.
∆ABC : A(−9,−6),B(−7,0),C(2,−3) ∆DEF : D(0,2),E(−6,4),F(2,8)
Answer
1. The two triangles are not congruent. Both have a right angle, but one set of legs is not congruent.
Triangle Congruence Using ASA, AAS, and HL
Construction Extension
By now, students will have noticed that there is no ASS or SSA congruence theorem. Give students the angle andthe two side lengths below. Have them create two different ∆ABCs from these givens. This should show studentsthat for some cases of SSA there will be two triangles created which is why it cannot be a congruence theorem.
Point out to students the vertex labeling above. Remind them that the angle is not included. The two triangles thatare created are below.
Have a class discussion as to why this is possible. Students need to realize that the length of AC will vary because ofthe length of BC. Using a compass will best demonstrate this.
180

www.ck12.org Chapter 3. Basic Geometry TE - Enrichment
When students perform this construction, it will be easiest for them to draw the two triangles together, like the onesto the left. Then, when students measure the fixed length of BC, they will see that it will cross AC in two places.
Algebra Challenge
1. Find the values of x and y. Is ∆ABC ∼= ∆DOG?
Answers
Yes, ∆ABC ∼= ∆DOG by ASA. Therefore, by CPCTC, AC = DG and BC = OG. Set each side equal to each otherand factor.
x2−5 = 5x+19 2y2 +4y−13 = 11y+2
x2−5x−24 = 0 2y2−7y−15 = 0
(x−8)(x+3) = 0 (2y+3)(y−5) = 0
x = 8,−3 x =−32,5
Because length is never negative, students should eliminate the negative answers.
Isosceles and Equilateral Triangles
Proof Extension
Have students prove the Base Angles Theorem for equilateral triangles. This is Equilateral Triangle Theorem in thetext.
Given: ∆ABC is equilateral
Prove: ∆ABC is equiangular
181

3.4. Triangles and Congruence www.ck12.org
TABLE 3.6:
Statement Reason1. ∆ABC is equilateral Given2. ∆ABC is isosceles All equilateral triangles are isosceles3. AB∼= BC,AB∼= AC Definition of equilateral triangle4. 6 C ∼= 6 A, 6 C ∼= 6 B Base Angle Theorem5. 6 A∼= 6 B Transitive Property6. ∆ABC is equiangular Definition of equiangular
Connections to Construction
For this Construction Connection, we will analyze geodesic domes. Use Epcot Center as an example.
Here, students will see that the Epcot Center is made up entirely of equilateral triangles. All geodesic domes aredomes made up of equilateral triangles of the same size. Have students make their own geodesic dome either onpaper or using Geometer’s Sketchpad. Once they decide on the size of the triangle, the rest is just a series of repetitionand rotation of the equilateral triangle.
As an extension or in-class project, have students turn their designs into a 3-D model using cardboard. You candecide if you want students to make the entire dome or half a dome. Make sure the for the equilateral triangles areall the same size.
Construction Challenge
182

www.ck12.org Chapter 3. Basic Geometry TE - Enrichment
1. Using the construction of an equilateral triangle (investigation 4-6), construct a 30◦ angle.
Hint: recall how to bisect an angle from investigation 1-4.
2. Use the construction of a 60◦ angle to construct a 120◦ angle. Is there any other way to construct a 120◦ angle?
Answers
1. Bisect a 60◦ angle as shown.
2. Construct a 60◦ angle, then extendone side.
The adjacent angle is 120◦.
In investigations 3-2 and 3-3 you learned how to construct perpendiculars (i.e. 90◦ angles). You could make a 90◦
angle and copy your 30◦ onto it to make 120◦. See investigation 1-2 for a review of copying an angle.
183

3.5. Relationships with Triangles www.ck12.org
3.5 Relationships with Triangles
Midsegments
Coordinate Plane Extension
Another type of problem that was not covered in this lesson is how to find the vertices of a triangle, given themidpoints. Here is an example.
Extension Example: If the midpoints of the sides of a triangle are A(1,5),B(4,−2), and C(−5,1), find the verticesof the triangle.
Solution: The easiest way to solve this problem is to graph the midpoints and then apply what we know from theMidpoint Theorem.
Now, find the slopes between the three midpoints.
slope AB =5+21−4
=−73
slope BC =−2−14+5
=−39
=−13
slope AC =5−11+5
=46=
23
Using the slope between two of the points, plot that slope triangle on either side of the third point and extend theline. Repeat this process for all three midpoints.
184

www.ck12.org Chapter 3. Basic Geometry TE - Enrichment
The green lines in the graph to the left represent the slope triangles of each midsegment. For example, we took theslope between A and B and mapped it on either side of point C. The three dotted lines represent the sides of thetriangle. Where they intersect are the vertices of the triangle (the blue points), which are (-8, 8), (10, 2) and (-2, 6).
This process can also be done algebraically. Use the slopes and the appropriate midpoint to find the equation of theside. Then, you would have to find the points of intersection for each pair of sides.
Extension Example: Find the equation of the side with midpoint B from the previous example.
Solution: If B is the midpoint of the side, then we need to use the slope from AC, which is 23 . Plug in what we know
to the equation of a line to solve for the y−intercept.
y = mx+b
−2 =23(4)+b
−2 =83+b
−143
= b
The equation of the line is y = 23 x− 14
3 .
Challenge
Given the midpoints of the sides of a triangle, find the vertices of the triangle.
1. (-2, 1), (0, -1) and (-2, -3)
2. (1, 4), (4, 1) and (2, 1)
3. Find the equations of the sides of the triangle from #2.
∆CAT has vertices C(x1,y1),A(x2,y2) and T (x3,y3).
4. Find the midpoints of sides CA and CT . Label them L and M respectively.
185

3.5. Relationships with Triangles www.ck12.org
5. Find the slopes of LM and AT .
6. Find the lengths of LM and AT .
7. What have you just proven algebraically?
Answers
1. (0, 3), (0, -5) and (-4, -1)
2. (-1, 4), (3, 4) and (5, -2)
3. y = 4,y = 3x−5,y =−x+3
4. L( x1+x2
2 , y1+y22
),M( x1+x3
2 , y1+y32
)5. slope of LM =
y1+y32 − y1+y2
2x1+x3
2 − x1+x22
= y1+y3−y1−y2x1+x3−x1−x2
= y3−y2x3−x2
= slope of AT
6. length of LM
=
√(x1 + x3
2− x1 + x2
2
)2
+
(y1 + y3
2− y1 + y2
2
)2
=
√(x3− x2
2
)2
+
(y3− y2
2
)2
=
√14(x3− x2)2 +
14(y3− y2)2
=12
√(x3− x2)2 +(y3− y2)2 =
12
AT
7. We have just proven algebraically that the midsegment (or segment which connects midpoints of sides in atriangle) is parallel to and half the length of the third side.
Perpendicular Bisectors and Angle Bisectors in Triangles
Circumcenter Extension
In this lesson, the point of intersection, also called the point of concurrency (when more than two lines intersectat the same spot), for the perpendicular bisectors was never defined. This point is called the circumcenter and hasa couple of unique properties. First, as was touched on in this text, the circumcenter is the center of a circle thatcircumscribes the triangle. What this means is that the circumcenter is equidistant to the vertices of the triangle. Youcan also show students this alternative construction to find the circumcenter, using a compass and straightedge.
Investigation 5-2b: Constructing the Perpendicular Bisectors of the Sides of a Triangle
Tools Needed: paper, pencil, compass, ruler
1. Draw a scalene triangle.
2. Construct the perpendicular bisector (Investigation 1-3) for all three sides.
The three perpendicular bisectors all intersect at the same point, called the circumcenter.
186

www.ck12.org Chapter 3. Basic Geometry TE - Enrichment
Students do not need to construct all three perpendicular bisectors here. Only two are needed to find the point ofintersection.
3. Erase the arc marks to leave only the perpendicular bisectors. Put the pointer of your compass on the circumcenter.Open the compass so that the pencil is on one of the vertices. Draw a circle.
The circumcenter is the center of a circle that passes through all the vertices of the triangle. We say that this circlecircumscribes the triangle and is equidistant to the vertices.
Angle Bisector Extension
In this lesson, the point of concurrency for the angle bisectors was never defined. This point is called the incenterand has a couple of unique properties. First, as was touched on in this text, the incenter is the center of a circle thatinscribes the triangle. What this means is that the incenter is equidistant to the sides of the triangle. You can alsoshow students this alternative construction to find the incenter, using a compass and straightedge.
Investigation 5-4b: Constructing Angle Bisectors in Triangles
Tools Needed: compass, ruler, pencil, paper
1. Draw a scalene triangle. Construct the angle bisector of each angle. Use Investigation 1-4 and #1 from the ReviewQueue to help you.
2. Erase the arc marks and the angle bisectors after the incenter. Draw or construct the perpendicular lines to eachside, through the incenter.
187

3.5. Relationships with Triangles www.ck12.org
3. Erase the arc marks from #2 and the perpendicular lines beyond the sides of the triangle. Place the pointer of thecompass on the incenter. Open the compass to intersect one of the three perpendicular lines drawn in #2. Draw acircle.
Extension Problems
What are points A and B?
1. J,E, and G are midpoints and KA = AD = AH.
2. The blue lines are congruent. The green lines are angle bisectors.
3. Both sets of lines are congruent. The green lines are also perpendicular to the sides
188

www.ck12.org Chapter 3. Basic Geometry TE - Enrichment
Determine if the following descriptions refer to the incenter or circumcenter of the triangle.
4. A lighthouse on a triangular island is equidistant to the three coastlines.
5. A hospital is equidistant to three cities.
6. A circular walking path passes through three historical landmarks.
7. A circular walking path connects three other straight paths.
Answers
1. A is the incenter because KA = AD = AH, which means that it is equidistant to the sides. B is the circumcenterbecause JB,BE, and BG are the perpendicular bisectors to the sides.
2. A is the incenter because it is on the angle bisectors. B is the circumcenter because it is equidistant to the vertices.
3. A is the circumcenter because it is equidistant to the vertices. B is the incenter because it is equidistant to thesides.
4. Incenter
5. Circumcenter
6. Circumcenter
7. Incenter
Medians and Altitudes in Triangles
Coordinate Plane Extension
Students can find the equation of a median in the coordinate plane. To do this, first they need to find the midpoint ofthe opposite side. Then, using this midpoint and the opposite vertex, they can find the slope and the equation of themedian. This process can be repeated for all the medians in a triangle. Then, students can use these equations anduse them to find the centroid. The centroid can be found algebraically by solving a system of equation (medians)using substitution or elimination (also called the linear combination method).
Extension Example: Find the equation of the median from B to the midpoint of AC for the triangle in the x− yplane below.
189

3.5. Relationships with Triangles www.ck12.org
Solution: To find the equation of the median, first we need to find the midpoint of AC, using the Midpoint Formula.
(−6+6
2,−4+(−4)
2
)=
(02,−82
)= (0,−4)
Now, we have two points that make a line, B and the midpoint. Find the slope and y−intercept.
m =−4−4
0− (−2)=−82
=−4
y =−4x+b
−4 =−4(0)+b
−4 = b
The equation of the median is y =−4x−4
Extension Example: Using the picture above, find the equation of the median from A to the midpoint of BC. Then,find the centroid of ∆ABC.
Solution: First, find the midpoint of BC.
(−2+6
2,4−4
2
)=
(42,02
)= (2,0)
Now, find the slope and the y−intercept.
m =−4−0−6−2
=−4−8
=12
y =12
x+b
0 =12(2)+b
−1 = b
190

www.ck12.org Chapter 3. Basic Geometry TE - Enrichment
The equation of this median is y = 12 x−1. To find the centroid, set this equation and the equation from the previous
example equal to each other and solve.
−4x−4 =12
x−1
−92
x = 3
x = 3 ·−29=−2
3→ y =−4
(−2
3
)−4 =
83− 12
3=−4
3
The centroid is(−2
3 ,−43
).
Equilateral Triangle Extension
The circumcenter, incenter, centroid, and orthocenter are the same point for equilateral triangle. To verify this, youcan have students construct an equilateral triangle and an angle bisector from one vertex, a median from anothervertex, and the altitude from the last vertex. All these lines should intersect at the same point. For an equilateraltriangle, the point of concurrency is just called the center. Napoleon’s Theorem uses the centers of equilateraltriangles to create more equilateral triangles.
Napoleon’s Theorem: If equilateral triangles are constructed on the sides of any triangle, then the centers of thoseequilateral triangles will form an equilateral triangle.
Extension Example: Trace the triangle below. Then, create equilateral triangles on each side of the triangle. Next,find the center of each equilateral triangle and connect the three centers. What type of triangle is created?
Solution: First, construct the three equilateral triangles with each side. Then, draw the medians or altitudes (or anglebisectors or perpendicular bisectors) to find the center of each equilateral triangle. Finally, connect the three centers.Measure the length of each side of the triangle created. This triangle is equilateral.
191

3.5. Relationships with Triangles www.ck12.org
Challenge
Write a two-column proof.
1. Given: ∆ABC ∼= ∆DEF
AP and DO are altitudes
Prove: AP∼= DO
Use ∆ABC with A(−2,9),B(6,1) and C(−4,−7) for questions 21-26.
2. Find the midpoint of AB and label it M.
3. Write the equation of←→CM.
4. Find the midpoint of BC and label it N.
5. Write the equation of←→AN.
6. Find the intersection of←→CM and
←→AN.
7. What is this point called?
Answers
TABLE 3.7:
Statement Reason1. ∆ABC ∼= ∆DEF,AP and DO are altitudes Given2. AB∼= DE CPCTC3. 6 P and 6 O are right angles Definition of an altitude4. 6 P∼= 6 O All right angles are congruent5. 6 ABC ∼= 6 DEF CPCTC6. 6 ABC and 6 ABP are a linear pair6 DEF and 6 DEO are a linear pair
Definition of a linear pair
7. 6 ABC and 6 ABP are supplementary6 DEF and 6 DEO are supplementary
Linear Pair Postulate
8. 6 ABP∼= 6 DEO Congruent Supplements Theorem9. ∆APB∼= ∆DOE AAS10. AP∼= DO CPCTC
2. M(2,5)
3. y = 2x+1
4. N(1,−3)
5. y =−4x+1
6. (0,1)
192
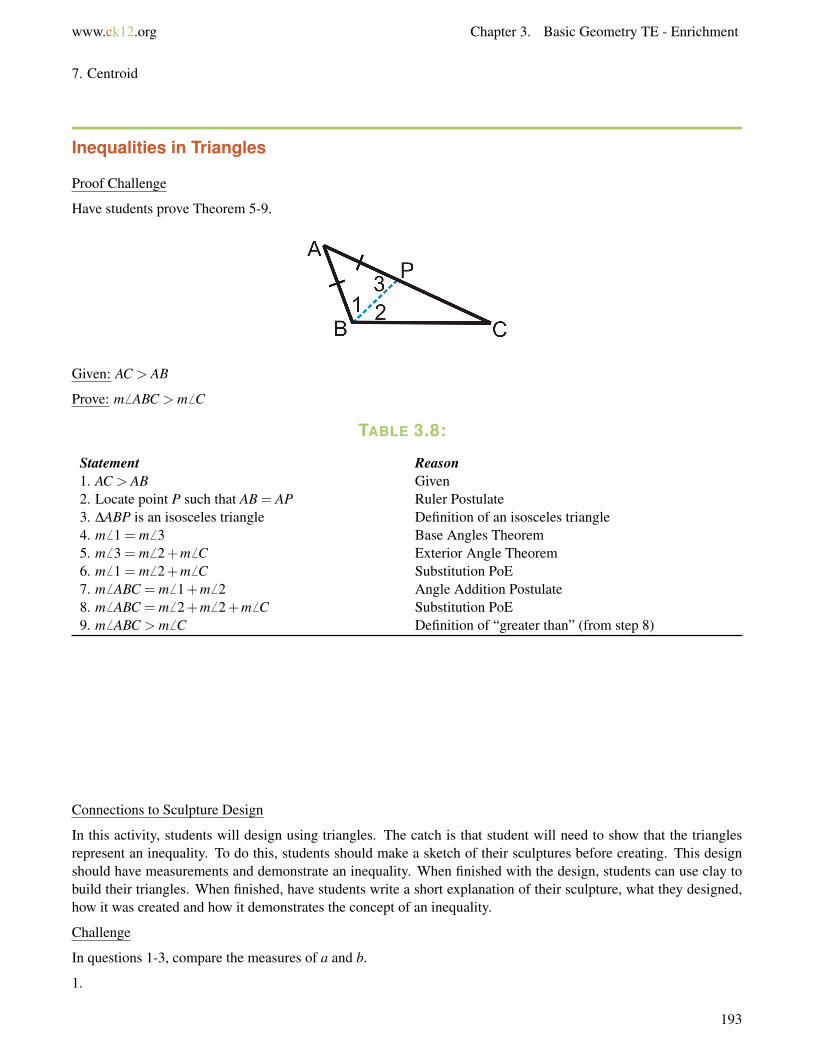
www.ck12.org Chapter 3. Basic Geometry TE - Enrichment
7. Centroid
Inequalities in Triangles
Proof Challenge
Have students prove Theorem 5-9.
Given: AC > AB
Prove: m6 ABC > m6 C
TABLE 3.8:
Statement Reason1. AC > AB Given2. Locate point P such that AB = AP Ruler Postulate3. ∆ABP is an isosceles triangle Definition of an isosceles triangle4. m 6 1 = m6 3 Base Angles Theorem5. m6 3 = m6 2+m6 C Exterior Angle Theorem6. m6 1 = m6 2+m6 C Substitution PoE7. m6 ABC = m6 1+m6 2 Angle Addition Postulate8. m6 ABC = m6 2+m6 2+m 6 C Substitution PoE9. m6 ABC > m6 C Definition of “greater than” (from step 8)
Connections to Sculpture Design
In this activity, students will design using triangles. The catch is that student will need to show that the trianglesrepresent an inequality. To do this, students should make a sketch of their sculptures before creating. This designshould have measurements and demonstrate an inequality. When finished with the design, students can use clay tobuild their triangles. When finished, have students write a short explanation of their sculpture, what they designed,how it was created and how it demonstrates the concept of an inequality.
Challenge
In questions 1-3, compare the measures of a and b.
1.
193

3.5. Relationships with Triangles www.ck12.org
2.
3.
In questions 4 and 5, list the measures of the sides in order from least to greatest
4.
5.
194

www.ck12.org Chapter 3. Basic Geometry TE - Enrichment
In questions 6 and 7 determine the range of possible values for x.
6.
7.
Answers
1. a = b
2. a > b
3. a < b
4. d < a < e < c < b
5. a = b < d < e < c
6. x < 18
7. x > 3
Extension: Indirect Proof
Connections to Sports
Students will have the “job” of being a sports announcer at a basketball game, reporting on the actions of the game.However, students can only report findings using if-then statements. They will need to prepare a short broadcast andthen present it with a peer to the class. This is meant to be a fun short assignment to help students to see how to useif then statements in real life. Let students have time to present to the class. See if the drama department has propsor costumes that can be borrowed for the class period.
Challenge
195

3.5. Relationships with Triangles www.ck12.org
Prove the following statements indirectly.
1. If a collection of nickels and dimes is worth 85 cents, then there must be an odd number of nickels.2. Hugo is taking a true/false test in his Geometry class. There are five questions on the quiz. The teacher gives
her students the following clues: The last answer on the quiz is not the same as the fourth answer. The thirdanswer is true. If the fourth answer is true, then the one before it is false. Use an indirect proof to prove thatthe last answer on the quiz is true.
3. On a test of 15 questions, Charlie claims that his friend Suzie must have gotten at least 10 questions right.Another friend, Larry, does not agree and suggests that Suzie could not have gotten that many correct. Rebeccaclaims that Suzie certainly got at least one question correct. If only one of these statements is true, how manyquestions did Suzie get right?
Hints
1. If we assume that we have an even number of nickels, then the value of the coin collection must be a multipleof ten and we have a contradiction.
2. Assume that the last answer on the quiz is false. This implies that the fourth answer is true. If the fourthanswer is true, then the one before it (the third answer) is false. However, this contradicts the fact that the thirdanswer is true.
3. None. To prove this by contradiction, select each statement as the “true” statement and you will see that atleast one of the other statements will also be true. If Charlie is right, then Rebecca is also right. If Larry isright, then Rebecca is right. If Rebecca is right, then Larry is right.
196
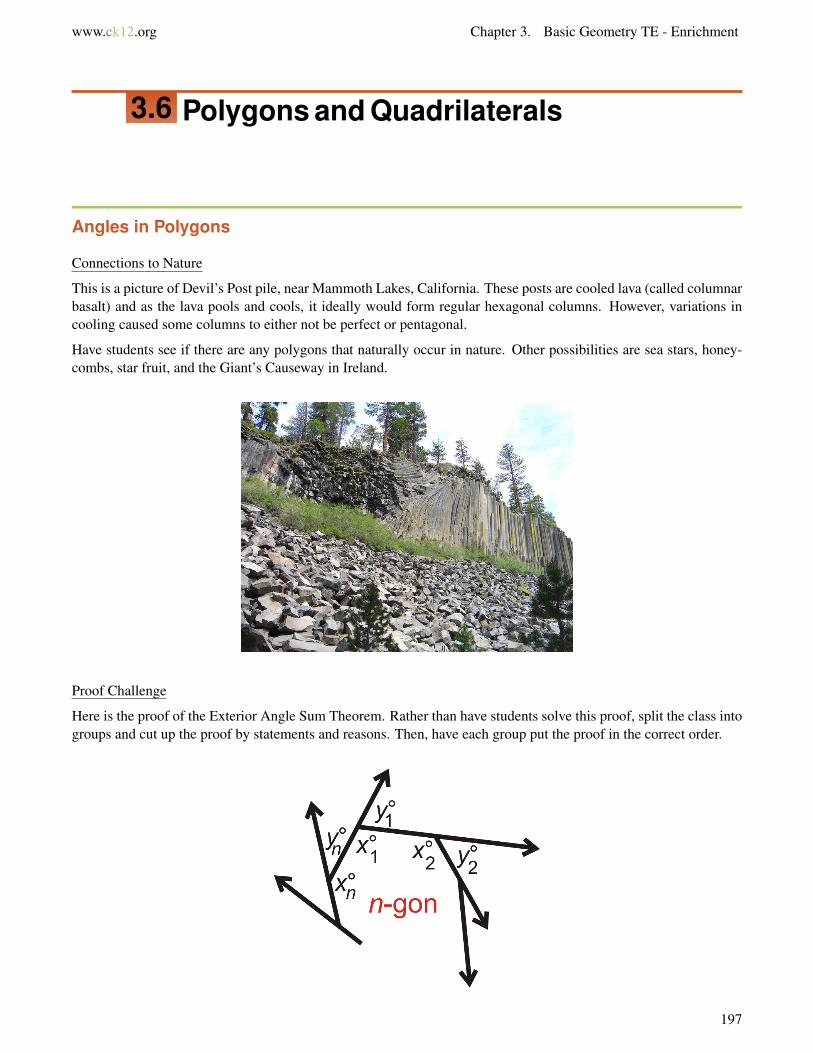
www.ck12.org Chapter 3. Basic Geometry TE - Enrichment
3.6 Polygons and Quadrilaterals
Angles in Polygons
Connections to Nature
This is a picture of Devil’s Post pile, near Mammoth Lakes, California. These posts are cooled lava (called columnarbasalt) and as the lava pools and cools, it ideally would form regular hexagonal columns. However, variations incooling caused some columns to either not be perfect or pentagonal.
Have students see if there are any polygons that naturally occur in nature. Other possibilities are sea stars, honey-combs, star fruit, and the Giant’s Causeway in Ireland.
Proof Challenge
Here is the proof of the Exterior Angle Sum Theorem. Rather than have students solve this proof, split the class intogroups and cut up the proof by statements and reasons. Then, have each group put the proof in the correct order.
197

3.6. Polygons and Quadrilaterals www.ck12.org
Given: Any n−gon with n sides, n interior angles and n exterior angles.
Prove: n exterior angles add up to 360◦
NOTE: The interior angles are x1,x2, ...xn.
The exterior angles are y1,y2, ...yn.
TABLE 3.9:
Statement Reason1. Any n−gon with n sides, n interior angles and nexterior angles.
Given
2. xn◦ and yn
◦ are a linear pair Definition of a linear pair3. xn
◦ and yn◦ are supplementary Linear Pair Postulate
4. xn◦+ yn
◦ = 180◦ Definition of supplementary angles5. (x1
◦+x2◦+ ...+xn
◦)+(y1◦+y2
◦+ ...+yn◦)= 180◦n Sum of all interior and exterior angles in an n−gon
6. (n−2)180◦ = (x1◦+ x2
◦+ ...+ xn◦) Polygon Sum Formula
7. 180◦n = (n−2)180◦+(y1◦+ y2
◦+ . . .+ yn◦) Substitution PoE
8. 180◦n = 180◦n−360◦+(y1◦+ y2
◦+ . . .+ yn◦) Distributive PoE
9. 360◦ = (y1◦+ y2
◦+ . . .+ yn◦) Subtraction PoE
Challenge
1. Each interior angle forms a linear pair with an exterior angle. In a regular polygon you can use two differentformulas to find the measure of each exterior angle. One way is 360◦
n and the other is 180◦− (n−2)180◦
n (180◦ minusEquiangular Polygon Formula). Use algebra to show these two expressions are equivalent.
2. Find the measures of the lettered angles below given that m ‖ n.
Answers
1.
180◦− (n−2)180◦
n=
360◦
n180◦n−180◦n+360
n=
360◦
n360◦
n=
360◦
n
2. a = 120◦,b = 60◦,c = 48◦,d = 60◦,e = 48◦, f = 84◦,g = 120◦,h = 108◦, j = 96◦
198

www.ck12.org Chapter 3. Basic Geometry TE - Enrichment
Properties of Parallelograms
Connections to Architecture
• Contemporary Dwelling House• Sloping Roof House in Belgium• Recycled Wood Cottage in Chile• Plastic Roof House
These homes are on www.trendir.com/house-design/. Either print these images and distribute them to students orhave them use computers to look at the images.All of the homes here are constructed using many different parallel-ograms.Ask the students to select one of the houses and work with it to identify the elements of the parallelogramsin the designs.Students should look for the relationship between the opposite sides of a parallelogram, the oppositeangles and the consecutive angles. Then,students can design their own home using parallelograms. Make sure thatall the elements of the exterior of the house; walls, windows, doors, are all parallelograms. Discuss with studentsthe different types of parallelograms. Graph paper may be helpful for this activity.
Challenge
Plot the points E(−1,3),F(3,4),G(5,−1),H(1,−2) and use parallelogram EFGH for problems 1-4.
1. Find the coordinates of the point at which the diagonals intersect. How did you do this?2. Find the slopes of all four sides. What do you notice?3. Use the distance formula to find the lengths of all four sides. What do you notice?4. Make a conjecture about how you might determine whether a quadrilateral in the coordinate is a parallelogram.
Answers
1. (2, 1), Find the midpoint of one of the diagonals since the midpoints are the same for both2. slope of EF = slope of GH = 1
4 ; slope of EH = slope of FG = −52 ; Slopes of opposite sides are the same,
therefore opposite sides are parallel.3. EF = HG =
√17;FG = EH =
√29; lengths of opposite sides are the same (congruent).
4. A quadrilateral in the coordinate plane can be show to be a parallelogram by showing any one of the threeproperties of parallelograms shown in questions 1-3.
Proving Quadrilaterals are Parallelograms
Coordinate Plane Challenge
Suppose that A(−2,3),B(3,3) and C(1,−3) are three of four vertices of a parallelogram.
199

3.6. Polygons and Quadrilaterals www.ck12.org
1. Depending on where you choose to put point D, the name of the parallelogram you draw will change. Sketch apicture to show all possible parallelograms. How many can you draw?
2. If you know the parallelogram is named ABDC, what is the slope of side parallel to AC?
3. Again, assuming the parallelogram is named ABDC, what is the length of BD?
4. Find the points of intersection of the diagonals of the three parallelograms formed. Label them X in parallelogramABCD, Y in parallelogram ADBC and Z in parallelogram ABDC.
5. Connect the points X ,Y and Z to form a triangle. What do you notice about this triangle?
Answers
1. See graph below; 3 parallelograms can be drawn. The coordinates of D could be (0, 9), (6, -3), and (-4, -3). Thus,the parallelograms created are ADBC,ABDC, and ABCD.
2. mAC = 3−(−3)−2−1 = 6
−3 =−2
3. d =√
(3−6)2 +(3− (−3)2) =√
9+36 = 3√
5
4. See graph; the intersections of the diagonals are (0.5, 3), (2, 0), and (-0.5, 0). They form the yellow triangle in thecenter of the graph.
5. The triangle is formed by the midsegments of the triangle formed when the parallelograms overlap. Fourcongruent triangles are formed within this center triangle, which is also congruent to the three outer triangles.
200
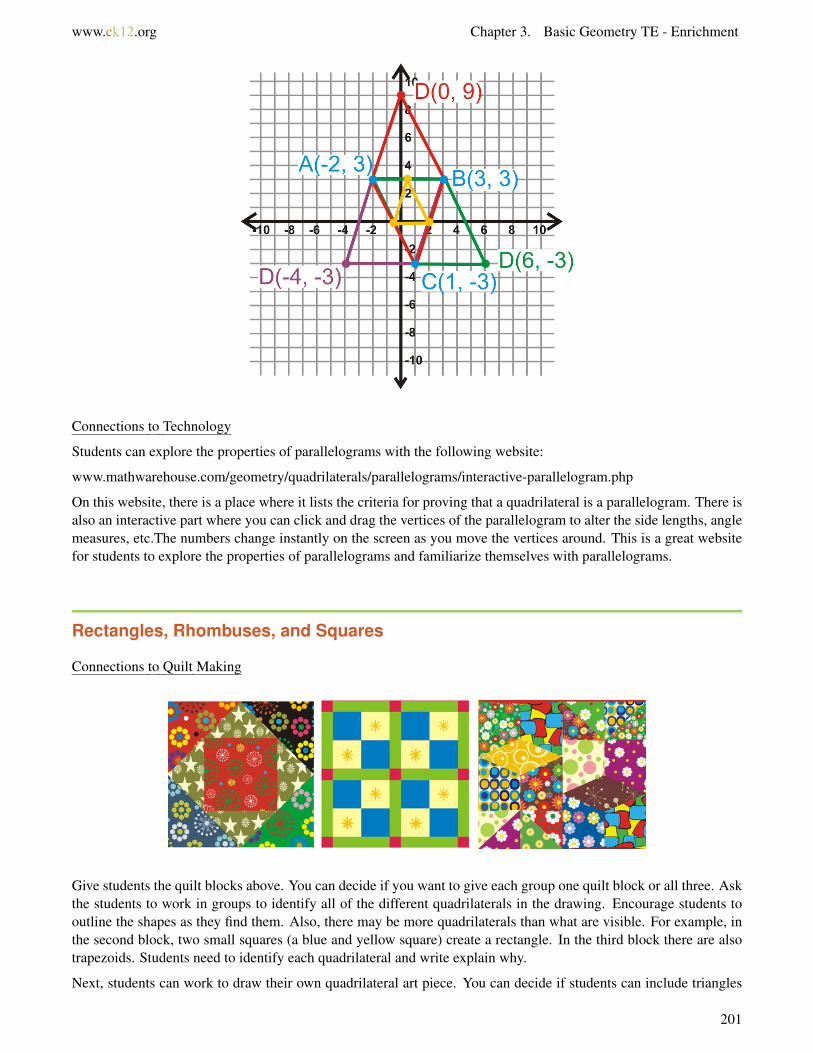
www.ck12.org Chapter 3. Basic Geometry TE - Enrichment
Connections to Technology
Students can explore the properties of parallelograms with the following website:
www.mathwarehouse.com/geometry/quadrilaterals/parallelograms/interactive-parallelogram.php
On this website, there is a place where it lists the criteria for proving that a quadrilateral is a parallelogram. There isalso an interactive part where you can click and drag the vertices of the parallelogram to alter the side lengths, anglemeasures, etc.The numbers change instantly on the screen as you move the vertices around. This is a great websitefor students to explore the properties of parallelograms and familiarize themselves with parallelograms.
Rectangles, Rhombuses, and Squares
Connections to Quilt Making
Give students the quilt blocks above. You can decide if you want to give each group one quilt block or all three. Askthe students to work in groups to identify all of the different quadrilaterals in the drawing. Encourage students tooutline the shapes as they find them. Also, there may be more quadrilaterals than what are visible. For example, inthe second block, two small squares (a blue and yellow square) create a rectangle. In the third block there are alsotrapezoids. Students need to identify each quadrilateral and write explain why.
Next, students can work to draw their own quadrilateral art piece. You can decide if students can include triangles
201

3.6. Polygons and Quadrilaterals www.ck12.org
or not. Students should try to include as many different quadrilaterals as they can. Once they have completed thedesign, have the students write a brief description of their work identifying each quadrilateral in the design.
Coordinate Plane Challenge
The points Q(−1,1),U(7,1),A(1,7) and D(−1,5) are the vertices of quadrilateral QUAD. Plot the points on graphpaper to complete problems 27-30.
1. Find the midpoints of sides QU ,UA,AD and DQ. Label them W,X ,Y and Z respectively.
2. Connect the midpoints to form quadrilateral WXY Z. What does this quadrilateral appear to be?
3. Use slopes to verify your answer to problem 29.
4. Use midpoints to verify your answer to problem 29.
5. This phenomenon occurs in all quadrilaterals. Describe how you might prove this fact. (Hint: each side ofquadrilateral WXY Z is a midsegment in a triangle formed by two sides of the parallelogram and a diagonal.)
Answers
1. See graph; W (3,1),X(4,4),Y (0,6),Z(−1,3)
2. It is a parallelogram.
3. slope of WX = slope of Y Z = 3; slope of XY = slope of ZW =−12 opposite sides parallel
4. midpoint of diagonal YW is (1.5, 3.5); midpoint of diagonal XZ is (1.5, 3.5); midpoints bisect each other
5. Each side of the parallelogram is parallel to the diagonal. For example, XY ‖ DU ‖ ZW , so opposite sides areparallel. They are also half the length of the diagonal so opposite sides are congruent. Either proves that WXY Z is aparallelogram.
Challenge
This is a proof of a specific case of the investigation above.
1. Given: ABCD is a rectangle
202

www.ck12.org Chapter 3. Basic Geometry TE - Enrichment
W,X ,Y and Z are midpoints of BC,AB,AD, and CD respectively
Prove: quadrilateral WXY Z is a rhombus
TABLE 3.10:
Statements Reasons1. ABCD is a rectangle 1. Given1. BW ∼=WC ,_____ , _____ ,_____ 2. Definition of a midpoint3. BD = AC 3.4. XY is a midsegment in ∆ABD_______________,_______________,_______________
4. Definition of a midsegment in a triangle
5. XY = 12 BD =WZ and ______________ 5. Midsegment in a triangle is half the length of the
parallel side.6. 1
2 BD = 12 AC 6.
7. XY =WZ = Y Z = XW 7.8. WXY Z is a rhombus 8.
2. Explain why a quadrilateral formed by the segments connecting the midpoints of the sides in a rhombus is alwaysa rectangle.
3. Explain why a quadrilateral formed by the segments connecting the midpoints of the sides in a square is always asquare.
For problems 4-6, find the value of each variable in the figures.
4.
5.
6.
203

3.6. Polygons and Quadrilaterals www.ck12.org
Answers
1.
TABLE 3.11:
Statements Reasons1. ABCD is a rectangle 1. Given2. BW ∼=WC,AY ∼= Y D,BX ∼= XA,CZ ∼= ZD 2. Definition of a midpoint3. BD = AC 3. Diagonals are congruent in a rectangle4. XY is a midsegment in ∆ABDZY is a midsegment in ∆ACDXW is a midsegment in ∆ABCWZ is a midsegment in ∆BCD
4. Definition of a midsegment in a triangle
5. XY = 12 BD =WZ and XW = 1
2 AC = Y Z 5. Midsegment in a triangle is half the length of theparallel side.
6. 12 BD = 1
2 AC 6. Division POE7. XY =WZ = Y Z = XW 7. Substitution8. WXY Z is a rhombus 8. Definition of a rhombus
2. Answers may vary. The quadrilateral inscribed in the rhombus will always be a rectangle because the diagonalsof a rhombus are perpendicular and the opposite sides of the inscribed quadrilateral will be parallel to the diagonalsand thus perpendicular to one another.
3. Answers may vary. First, the square is a rhombus, the inscribed quadrilateral will be a rectangle (see problem28). Second, the diagonals of the square are congruent so the sides of the inscribed quadrilateral will be congruent(see problem 27). Since the sides of the inscribed quadrilateral are perpendicular and congruent the parallelogram isa square.
4. x = 10,w = 53◦,y = 37◦,z = 37◦
5. x = 45◦,y = 90◦,z = 2√
2
6. x = y = 13,w = z = 25◦
Trapezoids and Kites
Connections to Kite Design
In this activity, students can design their own kites. They can look at the different kinds of kites that are possibleby looking at the Wikipedia website, www.en.wikipedia.org/wiki/Kite. In the kite construction, it is very importantthat the diagonals are perpendicular. Students can also use the dimensions in the Know What? for this lesson to helpthem get started. However, they do not have to use these dimensions. Allow students to be creative with their design.
Proof Challenge
Here is the proof to the Convers of Theorem 6-17.
204

www.ck12.org Chapter 3. Basic Geometry TE - Enrichment
Given: Trapezoid ZOID and parallelogram ZOIM 6 D∼= 6 I
Prove: ZD∼= OI
TABLE 3.12:
Statement Reason1. Trapezoid ZOID and parallelogram ZOIM, 6 D∼= 6 I Given2. ZM ∼= OI Opposite Sides Theorem3. 6 I ∼= 6 ZMD Corresponding Angles Postulate4. 6 D∼= 6 ZMD Transitive PoC5. ZM ∼= ZD Base Angles Converse6. ZD∼= OI Transitive PoC
Example 3 Extension
Extend the idea of Example 3 to general points. Then, this example will show that the diagonals for any isoscelestrapezoid are congruent.
Example 3 Extension: Show TA = RP.
Solution: This is an example of a coordinate proof. Here, we will use the distance formula to show that TA = RP,but with letters instead of numbers for the coordinates.
TA =√
(x−d)2 +(0− y)2 RP =√
(x−d−0)2 +(y−0)2
=√
(x−d)2 +(−y)2 =√(x−d)2 + y2
=√
(x−d)2 + y2
Notice that we end up with the same thing for both diagonals. This means that the diagonals are equal and we haveproved the Isosceles Trapezoid Diagonals Theorem.
205

3.6. Polygons and Quadrilaterals www.ck12.org
Challenge
Determine what type of quadrilateral ABCD is. ABCD could be any quadrilateral that we have learned in this chapter.If it is none of these, write none.
1. A(−2,2),B(0,1),C(2,2),D(1,5)2. A(−7,4),B(−4,4),C(0,0),D(0,−3)3. A(3,3),B(5,−1),C(7,0),D(5,4)4. A(−4,4),B(−1,2),C(2,4),D(−1,6)
Answers
1. none2. isosceles trapezoid3. rectangle4. rhombus
206

www.ck12.org Chapter 3. Basic Geometry TE - Enrichment
3.7 Similarity
Ratios and Proportions
Connections to History
The “golden ratio”, labeled φ (Greek letter phi), is when two numbers, a and b are in the ratio a+ba = a
b = φ. There
is one solution for this ratio, φ = 1+√
52 = 1.6180339887... Since the Renaissance, artists and architects have used
this proportion, believing that it is aesthetically pleasing. For example, many of the proportions in the Parthenon arein the golden ratio. As a mini research project, you could have students research the golden ratio and find it in art,architecture, nature, or music. Websites that might help students are:
www.intmath.com/Numbers/mathOfBeauty.php
• This site analyzes the mathematics in beauty and nature.
www.mcs.surrey.ac.uk/Personal/R.Knott/Fibonacci/fibInArt.html
• This website has a ton of different links for students to explore when looking at how ratios play into differenttopics.
Challenge
1. Explain why a+bb = c+d
d is a valid proportion. HINT: Cross-multiply.2. Explain why a−b
b = c−dd is a valid proportion. HINT: Cross-multiply.
3. A recipe for crispy rice treats calls for 6 cups of rice cereal and 40 large marshmallows. You want to makea larger batch of goodies and have 9 cups of rice cereal. How many large marshmallows do you need?However, you only have the miniature marshmallows at your house. You find a list of substitution quantitieson the internet that suggests 10 large marshmallows are equivalent to 1 cup miniatures. How many cups ofminiatures do you need?
Answers
1.a+b
b=
c+dd
d(a+b) = b(c+d)
ad +bd = bc+bd
ad = bc
2.a−b
b=
c−dd
d(a−b) = b(c−d)
ad−bd = bc−bd
ad = bc
3. 60 marshmallows; 6 cups miniatures
207

3.7. Similarity www.ck12.org
Similar Polygons
Connections to Sports
In sports, there can be several versions of a court or playing surface for men, women, or different versions of thesame game. In tennis, the court is 78 feet by 36 feet (no, 78 : 36 6= 9 : 5). In table tennis, the table is 9 feet by 5feet. Are these two rectangles similar? Have students research and compare other sporting venues in this way. Someexamples are:
• WNBA court vs. NBA court vs. College (men or women) court vs. international play (students can alsocompare the size of the keys and the three-point line)
• Softball infield vs. baseball infield• Arena football field vs. NFL football field• Curling triangle vs. shuffleboard triangle
Challenge
1. ∆ABC ∼ ∆DEF
Solve for x and y.
2. QUAD∼ KENT
Find the perimeter of QUAD.
3. ∆CAT ∼ ∆DOG
Solve for x and y.
208

www.ck12.org Chapter 3. Basic Geometry TE - Enrichment
4. PENTA∼ FIV ER
Solve for x.
5. ∆MNO∼ ∆XNY
Solve for a and b.
6. Trapezoids HAV E ∼ KNOT
Solve for x and y.
7. Two similar octagons have a scale factor of 911 . If the perimeter of the smaller octagon is 99 meters, what is the
perimeter of the larger octagon?
209

3.7. Similarity www.ck12.org
8. Two right triangles are similar. The legs of one of the triangles are 5 and 12. The second right triangle has ahypotenuse of length 39. What is the scale factor between the two triangles?
9. What is the area of the smaller triangle in problem 30? What is the area of the larger triangle in problem 30?What is the ratio of the areas? How does it compare to the ratio of the lengths (or scale factor)? Recall that the areaof a triangle is A = 1
2 bh.
Answers
1. x = 12,y = 15
2. 31
3. x = 20,y = 7
4. x≈ 14.6
5. a≈ 7.4,b = 9.6
6. X = 6,y = 10.5
7. 121
8. 1:3
9. 30u2,270u2,1 : 9, this is the ratio of the lengths squared or(1
3
)2.
Similarity by AA
Connections to History and Pyramids
One of the first ancient Greek philosophers, Thales, is credited with also being one of the first mathematicians. Hewas one of the first people to truly understand similar triangles and indirect measurement. The story goes that hemeasured the height of the pyramids by their shadows at the moment when his own shadow was equal to his height.We know that a right triangle with two equal legs is a 45-degree right triangle, all of which are similar (by AA). Thelength of the pyramid’s shadow measured from the center of the pyramid at that moment must have been equal toits height. Students can continue to research Thales using the website www.phoenicia.org/thales.html. Make sure tofully discuss Thales’ logic and though process before moving on to the next part of this activity.
Have students investigate pyramids like Thales did. Using sugar cubes, have students create a scale model of anancient pyramid. After completing the model, use a darkened room and a flashlight to find the shadow of thepyramid. Then, see if students can find a way to test and prove Thales’ logic. Allow time for students to share theirwork when finished.
Challenge
1. Janet wants to measure the height of her apartment building. She places a pocket mirror on the ground 20 ftfrom the building and steps backwards until she can see the top of the build in the mirror. She is 18 in fromthe mirror and her eyes are 5 ft 3 in above the ground. The angle formed by her line of sight and the groundis congruent to the angle formed by the reflection of the building and the ground. You may wish to draw adiagram to illustrate this problem. How tall is the building?
2. Sebastian is curious to know how tall the announcer’s box is on his school’s football field. On a sunny day hemeasures the shadow of the box to be 45 ft and his own shadow is 9 ft. Sebastian is 5 ft 10 in tall. Find theheight of the box.
3. Juanita wonders how tall the mast of a ship she spots in the harbor is. The deck of the ship is the same heightas the pier on which she is standing. The shadow of the mast is on the pier and she measures it to be 18 ftlong. Juanita is 5 ft 4 in tall and her shadow is 4 ft long. How tall is the ship’s mast?
210

www.ck12.org Chapter 3. Basic Geometry TE - Enrichment
4. Use shadows or a mirror to measure the height of an object in your yard or on the school grounds. Draw apicture to illustrate your method.
Answers
1. 70 ft2. 29 ft 2 in3. 24 ft4. Answers will vary.
Similarity by SSS and SAS
Connections to Bridge Construction
Similar triangles are used in bridge construction. Have students look at a picture of the Golden Gate Bridge. Askthem why they think the support of the bridge and the columns are created from triangles. To help students arriveat the correct answer, give them strips of construction paper (all the same length) and brads. In groups, have eachstudent create an equilateral polygon: triangle, rhombus, pentagon, and hexagon. Then, let them determine why atriangle is the best of those polygons to use as the support for a bridge (a triangle will not change shape when puttogether, unlike the other 3, which will move around).
Therefore, no matter the shape, a triangle is the sturdiest of the polygons. This is because for any three points thereis exactly one plane.
Coordinate Plane Challenge
For questions 1-3, use ∆ABC with A(−3,0),B(−1.5,3) and C(0,0) and ∆DEF with D(0,2),E(1,4) and F(2,2).
1. Find AB,BC,AC,DE,EF and DF .
2. Use these values to find the following proportions: ABDE ,
BCEF and AC
DF .
3. Are these triangles similar? Justify your answer.
211

3.7. Similarity www.ck12.org
For questions 4-7, use ∆CAR with C(−3,3),A(−3,−1) and R(0,−1) and ∆LOT with L(5,−2),O(5,6) and T (−1,6).
4. Find the slopes of CA,AR,LO and OT .
5. What are the measures of 6 A and 6 O? Explain.
6. Find LO,OT,CA and AR. Use these values to write the ratios LO : CA and OT : AR
7. Are the triangles similar? Justify your answer.
Answers
1. AB = BC =√
11.25,AC = 3,DE = EF =√
5,DF = 2
2. ABDE = BC
EF = ACDF = 3
2
3. Yes, ∆ABC ∼ ∆DEF by SSS similarity.
4. slope of CA = slope of LO = undefined (vertical); slope of AR = slope of OT = 0 (horizontal).
5. 90◦, vertical and horizontal lines are perpendicular.
6. TO = 6,OL = 8,CA = 4 and AR = 3; LO : CA = OT : AR = 2 : 1
7. Yes, by SAS similarity.
Proportionality Relationships
Construction Extension
This construction will guide students through constructing a line segment that is divided into four equal parts.
1. Draw a line segment that is about 3 inches long. Label the endpoints A and B. Draw−→AC, such that C is above AB.
2. Using any length, place the pointer on A and make and arc intersecting−→AC. Without changing the width of
the compass, repeat this measurement on−→AC three more times. Label the intersections D,E,F , and G. From our
construction, AD = DE = EF = FG.
3. Draw GB. You are going to draw a series of parallel lines to GB. Copy 6 AGB (Investigation 1-3) on D,E, and F .Where the second side of the angles intersect AB, should all be equidistant, creating four congruent segments.
Proof Challenge
Write the proof of Theorem 7-8.
212

www.ck12.org Chapter 3. Basic Geometry TE - Enrichment
Given: ∆BAD with−→AC is the angle bisector of 6 BAD Auxiliary lines
−→AX and
−→XD, such that X ,A,B are collinear and
−→AC ‖ −→XD.
Prove: BCCD = BA
AD
Answer
TABLE 3.13:
Statement Reason1.−→AC is the angle bisector of 6 BAD X ,A,B are collinear
and−→AC ‖ −→XD
Given
2. 6 BAC ∼= 6 CAD Definition of an angle bisector3. 6 X ∼= 6 BAC Corresponding Angles Postulate4. 6 CAD∼= 6 ADX Alternate Interior Angles Theorem5. 6 X ∼= 6 ADX Transitive PoC6. ∆XAD is isosceles Base Angles Converse7. AX ∼= AD Definition of an Isosceles Triangle8. AX = AD Congruent segments are also equal9. BA
AX = BCCD Theorem 7-7
10. BAAD = BC
CD Substitution PoE
Challenge
Find the values of the variables below.
1.
2.
213

3.7. Similarity www.ck12.org
Find the unknown lengths.
3.
4.
Answers
1. a = 1.8,b = 73
2. x = 5,y = 7
3. 32 b or 1.5b
4. 165 a or 3.2a
Similarity Transformations
Connections to Art
In this activity students are going to take any polygon that they would like to and create an art piece that showsthe dilations of the polygon.The first polygon should be red so that you can tell which polygon is being trans-formed.Students should create dilations that are smaller and larger. Students can be creative and decide what thescale factors will be. It might be easier for students to do this art piece on a coordinate plane. Students need to makeat least three dilations of the original figure.
Extension
As an extension to the Know What? in this lesson, students can also create two-point perspective drawings. Acomputer program, such as Geometer’s Sketchpad, can be very helpful for activity.
214

www.ck12.org Chapter 3. Basic Geometry TE - Enrichment
Construction Challenge
We can use a compass and straight edge to construct a dilation as well. Copy the diagram below.
1. Set your compass to be CG and use this setting to mark off a point 3 times as far from C as G is. Label this pointG′. Repeat this process for CO and CD to find O′ and D′.
2. Connect G′,O′ and D′ to make ∆D′O′G′. Find the ratios, D′O′DO , O′G′
OG and G′D′GD .
3. What is the scale factor of this dilation?
4. Describe how you would dilate the figure by a scale factor of 4.
5. Describe how you would dilate the figure by a scale factor of 12 .
Answers
1.
2. D′O′DO = 3, O′G′
OG = 3 and G′D′GD = 3.
3. 3
4. To dilate the original figure by a scale factor of 4 make one additional tick mark with your compass.
5. To dilate the original figure by a scale factor of 12 , construct the perpendicular bisectors of CD,CO and CG. The
midpoints created by the perpendicular bisectors would be D′,O′, and G′ respectively.
Extension: Self-Similarity
Connections to Art and Music
Have students do an internet search for fractals. Let students pick one aspect of art, music, nature, or another topicthat interests them and how fractals can be related to it. Have students do a short write-up on what they find out.
215

3.7. Similarity www.ck12.org
Challenge
Have students research how the golden ratio and fractals relate to each other.
216

www.ck12.org Chapter 3. Basic Geometry TE - Enrichment
3.8 Right Triangle Trigonometry
The Pythagorean Theorem
Connections to History
Pythagoras was a Greek philosopher and mathematician. He is credited with discovering the Pythagorean Theorem.Students can see his Wikipedia page, http://en.wikipedia.org/wiki/Pythagoras and write a mini-project about his lifeand accomplishments.
Proof of the Pythagorean Theorem
This proof is “more formal” than the one in the text. Here, we will use letters, a,b, and c to represent the sides ofthe right triangle. In this particular proof, we will take four right triangles, with legs a and b and hypotenuse c andmake the areas equal.
Agreen square = c2
Agreen square = 4(
12
ab)+(b−a)2
= 2ab+b2−2ab+a2
= b2 +a2
Pythagorean Proof Challenge
This first proof below is similar to the one above. Use the picture below to answer the following questions.
1. Find the area of the square with sides (a+b).
217

3.8. Right Triangle Trigonometry www.ck12.org
2. Find the sum of the areas of the square with sides c and the right triangles with legs a and b.
3. The areas found in the previous two problems should be the same value. Set the expressions equal to each otherand simplify to get the Pythagorean Theorem.
Major General James A. Garfield (and former President of the U.S) is credited with deriving this next proof of thePythagorean Theorem using a trapezoid.
4. Find the area of the trapezoid using the trapezoid area formula: A = 12(b1 +b2)h
5. Find the sum of the areas of the three right triangles in the diagram.
6. The areas found in the previous two problems should be the same value. Set the expressions equal to each otherand simplify to get the Pythagorean Theorem.
Answers
1. a2 +2ab+b2
2. c2 +4(1
2
)ab = c2 +2ab
3. a2 +2ab+b2 = c2 +2ab, which simplifies to a2 +b2 = c2
4. 12(a+b)(a+b) = 1
2(a2 +2ab+b2)
5. 2(1
2
)ab+ 1
2 c = ab+ 12 c
6. 12(a
2 +2ab+b2) = ab+ 12 c⇒ a2 +2ab+b2 = 2ab+ c2, which simplifies to a2 +b2 = c2
Converse of the Pythagorean Theorem
Proof Challenge
Prove Theorem 8-3.
Given: In ∆ABC,a2 +b2 > c2, where c is the longest side.
In ∆LMN, 6 N is a right angle.
Prove: ∆ABC is an acute triangle.
(all angles are less than 90◦)
Answer
218

www.ck12.org Chapter 3. Basic Geometry TE - Enrichment
TABLE 3.14:
Statement Reason1. In ∆ABC,a2 + b2 > c2, and c is the longest side. In∆LMN, 6 N is a right angle.
Given
2. a2 +b2 = h2 Pythagorean Theorem3. c2 < h2 Transitive PoE4. c < h Take the square root of both sides5. 6 C is the largest angle in ∆ABC. The largest angle is opposite the longest side.6. m6 N = 90◦ Definition of a right angle7. m6 C < m6 N SSS Inequality Theorem8. m6 C < 90◦ Transitive PoE9. 6 C is an acute angle. Definition of an acute angle10. ∆ABC is an acute triangle. If the largest angle is less than 90◦, then all the angles
are less than 90◦.
Prove Theorem 8-4.
Given: In ∆ABC,a2 +b2 < c2, where c is the longest side.
In ∆LMN, 6 N is a right angle.
Prove: ∆ABC is an obtuse triangle.
(one angle is greater than 90◦)
Answer
TABLE 3.15:
Statement Reason1. In ∆ABC,a2 + b2 < c2, and c is the longest side. In∆LMN, 6 N is a right angle.
Given
2. a2 +b2 = h2 Pythagorean Theorem3. c2 > h2 Transitive PoE4. c > h Take the square root of both sides5. 6 C is the largest angle in ∆ABC. The largest angle is opposite the longest side.6. m6 N = 90◦ Definition of a right angle7. m6 C > m6 N SSS Inequality Theorem8. m6 C > 90◦ Transitive PoE9. 6 C is an obtuse angle. Definition of an obtuse angle.10. ∆ABC is an obtuse triangle. Definition of an obtuse triangle.
Coordinate Plane Challenge
Given AB, with A(3,3) and B(2,−3) determine whether the given point, C, makes an acute, right or obtuse triangle.
1. C(3,−3)
219

3.8. Right Triangle Trigonometry www.ck12.org
2. C(4,−1)
3. C(5,−2)
Given AB, with A(−2,5) and B(1,−3) find at least two possible points, C, such that ∆ABC is
4. right, with right 6 C.
5. acute, with acute 6 C.
6. obtuse, with obtuse 6 C.
Answers
1. right
2. obtuse
3. acute
4. (1, 5), (-2, -3)
5. Answers will vary, possibilities are (-3, -3) or (-4, 3)
6. Answers will vary, possibilities are (1, 4), (-1, 3), or (4, 3).
Using Similar Right Triangles
Geometric Mean Extension
The true definition of the geometric mean is: the nth root of a product of n numbers. For use with triangles welimited this to the second root of the product of two numbers. Using the expanded definition, students can find thegeometric and arithmetic mean of any set of numbers and compare the answers.
Extension Example: Find the geometric and arithmetic mean of the set of numbers below.
4, 6, 8, 9, 11, 15, 18, 25, 26
Solution: Arithmetic mean: 4+6+8+9+11+15+18+25+269 = 122
9 = 13.5
Geometric mean: 9√4×6×8×9×11×15×18×25×26 = 9√
3,335,904,000≈ 11.43
With this expanded definition, the geometric mean can be applied to population growth. It is a better approximationof the mean for exponential growth and proportional growth. In business, the geometric mean of growth rates isknown as thecompound annual growth rate (CAGR). It is commonly used with percentages to see how much apopulation has grown or decreased.
Extension Example: The population of a town is shown from 1980, 1990, 2000 and 2010: 6324, 8571, 9867,12,108. What is the average rate of growth over the thirty years?
Solution: This is an example where we would use the geometric mean. The percentage increase from year to yearis: 35.5%, 15.1% and 22.7%. Therefore, the amount of increase is 1.355, 1.151 and 1.227. Use these numbers in thegeometric mean. 3√1.355×1.151×1.227 = 1.241. The average rate of growth over the four years is 24.2%.
Students may wonder why we use this mean in this situation over the arithmetic mean. The arithmetic mean for thisdata set is 35.5+15.1+22.7
3 = 24.43%. Using the starting population, the population would increase by 6324×0.2443 =1545 people each year. The final population in 2010 would be 12,504. Using the geometric mean in this way, theincrease would be 6324× 0.241 = 1524 people. The final population in 2010 would be 12,420, which is closer tothe actual final population.
The geometric mean was also used to find the aspect ratio for HDTVs (16:9). This ratio was determined by theSociety of Motion Picture and Television Engineers (SMPTE) by finding the geometric ratio between the widescreen
220

www.ck12.org Chapter 3. Basic Geometry TE - Enrichment
format movies are shot in (2.35:1) and standard TV (4:3).
√2.35× 4
3= 1.77 This ratio, 1.777:1 is best approximated
by 16:9.
Extension with Geometric Sequences
A geometric sequence is a sequence of numbers in which each successive term is determined by multiplying theprevious term by the common ratio. An example is the sequence 1, 3, 9, 27, ... Here each term is multiplied by 3 toget the next term in the sequence. Another way to look at this sequence is to compare the ratios of the consecutiveterms.
1. Find the ratio of the 2nd to 1st terms and the ratio of the 3rd to 2nd terms. What do you notice? Is this true for thenext set (4th to 3rd terms)? Use 1, 3, 9, 27, ... from above.
2. Given the sequence 4, 8, 16, ..., if we equate the ratios of the consecutive terms we get: 84 = 16
8 . This means that8 is the ___________________ of 4 and 16. We can generalize this to say that every term in a geometric sequenceis the ___________________ of the previous and subsequent terms.
Use what you discovered in problem 2 to find the middle term in the following geometric sequences.
3. 5, ____, 20
4. 4, ____, 100
5. 2, , 12
Answers
1. ratios are 31 and 9
3 , which both reduce to the common ratio 3. Yes, this is true for the next pair of terms since 279
also reduces to 3.
2. geometric mean; geometric mean
3. 10
4. 20
5. 1
Another Proof of the Pythagorean Theorem
We can use what we have learned in this section in another proof of the Pythagorean Theorem. Use the diagram tofill in the blanks in the proof below.
TABLE 3.16:
Statement Reason1. e
a = ?d+e and d
b = b? Theorem 8-7
2. a2 = e(d + e) and b2 = d(d + e) ?3. a2 +b2 =? Combine equations from #2.4. ? Distributive Property5. c = d + e ?6. ? Substitution PoE
221

3.8. Right Triangle Trigonometry www.ck12.org
Answer
TABLE 3.17:
Statement Reason1. e
a = ad+e and d
b = bd+e Theorem 8-7
2. a2 = e(d + e) and b2 = d(d + e) Cross-Multiplication Property3. a2 +b2 = e(d + e)+d(d + e) Combine equations from #2.4. a2 +b2 = (e+d)(d + e) Distributive Property5. c = d + e Segment Addition Postulate6. a2 +b2 = c2 Substitution PoE
Special Right Triangles
Know What? Extension/Connection to Baseball
In this Know What? for this lesson, students found the distance from 1st to 3rd base for a baseball diamond. Usingthe special right triangle ratios, we found that the distance is 90
√2 ≈ 127.27922... As an extension, have students
research what value Major League Baseball actually uses as the distance from 1st to 3rd base. The distance cannotbe an irrational number because the decimal repeats. Students should find that the regulation distance is 127 feet,3 3
8 inches. Then, have them compare the amounts as decimals to see what the discrepancy is. Discuss why MLBuses this distance and not 90
√2 feet. 127 f t.3 3
8 in.= 127 f t.3.375 in.= 127.28125 f t. Students can also see if thisgeneralization holds true for softball infields.
Challenge
Use the special right triangle ratios to find the length of x.
1.
2.
3. An equilateral triangle is an isosceles triangle. If all the sides of an equilateral triangle are s, find the area,A = 1
2 bh, using special right triangles. Leave your answer in simplest radical form.
222

www.ck12.org Chapter 3. Basic Geometry TE - Enrichment
4. What is the height of an equilateral triangle with sides of length 3 in?
5. What is the area of an equilateral triangle with sides of length 5 ft?
6. A regular hexagon has sides of length 3 in. What is the area of the hexagon? (Hint: the hexagon is made up a 6equilateral triangles.)
7. The area of an equilateral triangle is 36√
3. What is the length of a side?
8. Four isosceles triangles are formed when both diagonals are drawn in a square. If the length of each side in thesquare is s, what are the lengths of the legs of the isosceles triangles?
Answers
1. 12√
2+20+4√
6≈ 46.77
2. 16+6√
3≈ 26.39
3. A = 12 · s ·
√3
2 s =√
34 s2
4. 3√
32 in
5. 25√
34 f t2
6. 27√
32 in2
7. 12
8. s√
32
Tangent, Sine and Cosine
Connections to Land Surveying
This activity involves allowing the class going outside and creating a clinometer.
Making a Clinometer
Tools Needed: straw, paper copies of a protractor, string (about 6 inches), washer, tape
1. Tie the washer to the string at one end and then to the straw at the other end. The string should be at the center ofthe straw.
2. Tape the straight edge of the protractor to the straw so that its center lines up with where the string is tied to thestraw.
223
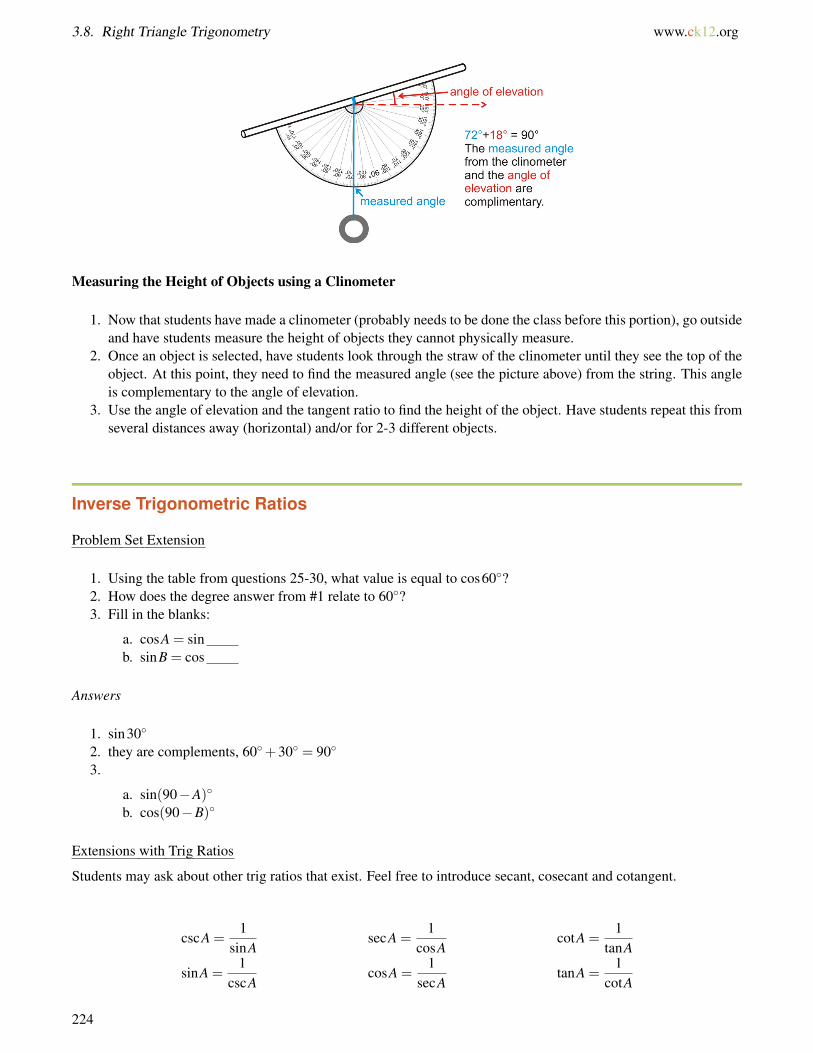
3.8. Right Triangle Trigonometry www.ck12.org
Measuring the Height of Objects using a Clinometer
1. Now that students have made a clinometer (probably needs to be done the class before this portion), go outsideand have students measure the height of objects they cannot physically measure.
2. Once an object is selected, have students look through the straw of the clinometer until they see the top of theobject. At this point, they need to find the measured angle (see the picture above) from the string. This angleis complementary to the angle of elevation.
3. Use the angle of elevation and the tangent ratio to find the height of the object. Have students repeat this fromseveral distances away (horizontal) and/or for 2-3 different objects.
Inverse Trigonometric Ratios
Problem Set Extension
1. Using the table from questions 25-30, what value is equal to cos60◦?2. How does the degree answer from #1 relate to 60◦?3. Fill in the blanks:
a. cosA = sinb. sinB = cos
Answers
1. sin30◦
2. they are complements, 60◦+30◦ = 90◦
3. .
a. sin(90−A)◦
b. cos(90−B)◦
Extensions with Trig Ratios
Students may ask about other trig ratios that exist. Feel free to introduce secant, cosecant and cotangent.
cscA =1
sinAsecA =
1cosA
cotA =1
tanA
sinA =1
cscAcosA =
1secA
tanA =1
cotA
224

www.ck12.org Chapter 3. Basic Geometry TE - Enrichment
Have students apply these ratios to the values in the table from questions 25-30. To enter these values into acalculator, they will need to use the fractions above.
Another extension would be to explore the trig identities sin2 A+ cos2 A = 1 and tanA = sinAcosA .
1. Find sin2 30◦+ cos2 30◦.
2. Find sin2 80◦+ cos2 80◦.
3.
Let’s explore why this works. Using the triangle, find:
a) sinA
b) cosA
c) sin2 A
d) cos2 A
4. Find sin2 A+ cos2 A
5. Use the Pythagorean Theorem to simplify.
6. Find sin30◦cos30◦
7. Find tan30◦.
8. Let’s explore why this works. Again, use the triangle from #3. Using the ratios you found in parts a and b, findsinAcosA and simplify.
Answers
1. 0.25+0.75 = 1
2. 0.9698+0.0302 = 1
3. a) ac
b) bc
c) a2
c2
d) b2
c2
4. a2
c2 +b2
c2 = a2+b2
c2
5. From the Pythagorean Theorem, a2 +b2 = c2, so a2
c2 +b2
c2 = a2+b2
c2 = c2
c2 = 1.
6. 0.50.866 ≈ 0.5774
7. 0.5774
8. sinAcosA =
acbc= a
c ÷bc = a
c ×cb = a
b For this triangle, tanA = ab therefore tanA = sinA
cosA .
225

3.9. Circles www.ck12.org
3.9 Circles
Parts of Circles and Tangent Lines
Connections to Nature
Use these figures as an introductory activity to circles. Discuss how circles exist in nature and mechanics. See ifstudents can come up with other examples. Then, after going over the parts of circles, see if students can identify thedifferent parts of circles within these images. As an extension, have students go to the computer lab, find an imageonline and print it out. Then, they should identify all the parts of the circle that they can find. You can have a littlecompetition to see which student has the image with the most parts of a circle in it.
Connections to Technology
The following website, www.cut-the-knot.org/Curriculum/Geometry/TangentTwoCirclesI.shtml, is a great exampleof tangent circles and lines. In working with this website, students manipulate the center or edge of one of thecircles.When they do this, they will alter the diagram of the two circles and their tangents.
Proof Challenge
Write a proof for Theorem 9-2.
Given: AB and CB with points of tangency at A and C.
AD and DC are radii.
Prove: AB∼=CB
Answer
226

www.ck12.org Chapter 3. Basic Geometry TE - Enrichment
TABLE 3.18:
Statement Reason1. AB and CB with points of tangency at A and C. ADand DC are radii.
Given
2. AD∼= DC All radii are congruent.3. DA⊥ AB and DC ⊥CB Tangent to a Circle Theorem4. m6 BAD = 90◦ and m6 BCD = 90◦ Definition of perpendicular lines5. Draw BD. Connecting two existing points6. ∆ADB and ∆DCB are right triangles Definition of right triangles (Step 4)7. DB∼= DB Reflexive PoC8. ∆ABD∼= ∆CBD HL9. AB∼=CB CPCTC
Challenge
1. Circles tangent at T are centered at M and N. ST is tangent to both circles at T . Find the radius of the smallercircle if SN ⊥ SM,SM = 22,T N = 25 and m6 SNT = 40◦.
2. Four circles are arranged inside an equilateral triangle as shown. If the triangle has sides equal to 16 cm, what isthe radius of the bigger circle? What are the radii of the smaller circles?
HINT: Use 30-60-90 triangles.
Answers
1. 9.23
2. 8√
33 ; 8
√3
9
227
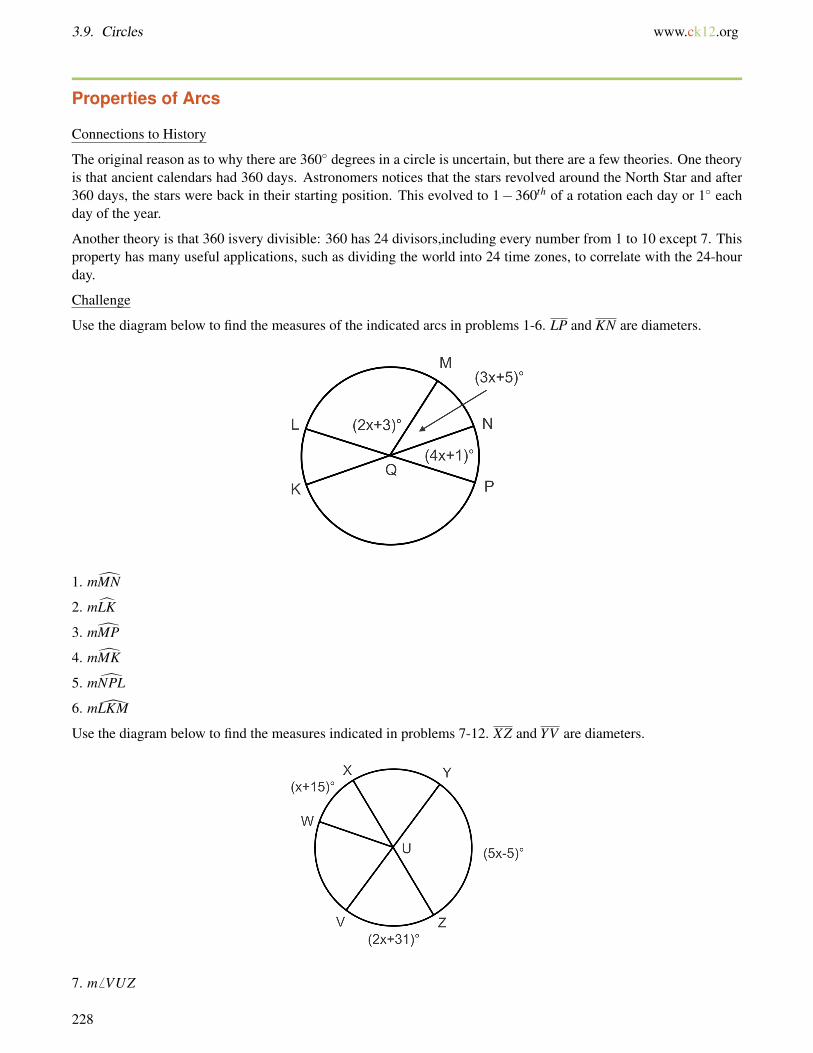
3.9. Circles www.ck12.org
Properties of Arcs
Connections to History
The original reason as to why there are 360◦ degrees in a circle is uncertain, but there are a few theories. One theoryis that ancient calendars had 360 days. Astronomers notices that the stars revolved around the North Star and after360 days, the stars were back in their starting position. This evolved to 1−360th of a rotation each day or 1◦ eachday of the year.
Another theory is that 360 isvery divisible: 360 has 24 divisors,including every number from 1 to 10 except 7. Thisproperty has many useful applications, such as dividing the world into 24 time zones, to correlate with the 24-hourday.
Challenge
Use the diagram below to find the measures of the indicated arcs in problems 1-6. LP and KN are diameters.
1. mMN
2. mLK
3. mMP
4. mMK
5. mNPL
6. mLKM
Use the diagram below to find the measures indicated in problems 7-12. XZ and YV are diameters.
7. m6 VUZ
228

www.ck12.org Chapter 3. Basic Geometry TE - Enrichment
8. m6 YUZ
9. m6 WUV
10. m6 XUV
11. mYWZ
12. mWY Z
Answers
1. 62◦
2. 77◦
3. 139◦
4. 118◦
5. 257◦
6. 319◦
7. 75◦
8. 105◦
9. 68◦
10. 105◦
11. 255◦
12. 217◦
Properties of Chords
Construction Challenge
Trace the arc below onto your paper then follow the steps to locate the center using a compass and straightedge.
a. Use your straightedge to make a chord in the arc.
b. Use your compass and straightedge to construct the perpendicular bisector of this chord.
c. Repeat steps a and b so that you have two chords and their perpendicular bisectors.
d. What is the significance of the point where the perpendicular bisectors intersect?
e. Verify your answer to part d by using the point and your compass to draw the rest of the circle.
Answer
This construction is not done to scale and your chords might be in different places but it should give you an idea ofwhat the construction should look like.
229

3.9. Circles www.ck12.org
Coordinate Plane Challenge
Let’s repeat what we did in the Construction Challenge above using coordinate geometry.
Given the points A(−3,5),B(5,5) and C(4,−2) on the circle (an arc could be drawn through these points from Ato C). The following steps will walk you through the process to find the equation of the perpendicular bisector of achord, and use two of these perpendicular bisectors to locate the center of the circle.
1. Let’s first find the perpendicular bisector of chord AB.
a. Since the perpendicular bisector passes through the midpoint of a segment, find the midpoint between Aand B.
b. Now the perpendicular line must have a slope that is the opposite reciprocal of the slope of←→AB. Find the
slope of←→AB and then its opposite reciprocal.
c. Finally, you can write the equation of the perpendicular bisector of AB using the point you found in parta and the slope you found in part b.
2. Repeat steps a-c for chord BC.3. Now that we have the two perpendicular bisectors of the chord we can use algebra to find their intersection.
Solve the system of linear equations to find the center of the circle.4. Find the radius of the circle by finding the distance from the center (point found in part e) to any of the three
given points on the circle.
Answers
1. for AB:
a. (1, 5)b. m = 0,⊥ m is undefinedc. x = 1
2. for BC:
a.(9
2 ,32
)b. m = 7,⊥ m =−1
7c. y =−1
7 x+ 157
3. Point of intersection (center of the circle) is (1, 2).4. radius is 5 units
230

www.ck12.org Chapter 3. Basic Geometry TE - Enrichment
Inscribed Angles
Proof Challenge
Use the diagram below to write a proof of Theorem 9-8.
Answer
TABLE 3.19:
Statement Reason1. 6 ACB and 6 ADB intercept AB 1. Given2. m6 ACB = 1
2 mAB 2. Inscribed Angle Theoremm6 ADB = 1
2 mAB3. m6 ACB = m 6 ADB 3. Transitive Property4. 6 ACB∼= 6 ADB 4. Definition of Congruence
Challenge
1. Find x and y in the picture below.
Use the diagram below to find the measures of the indicated angles and arcs in problems 2-7.
231

3.9. Circles www.ck12.org
2. m6 EBO
3. m6 EOB
4. mBC
5. m6 ABO
6. m6 A
7. m6 EDC
8. Suppose that AB is a diameter of a circle centered at O, and C is any other point on the circle. Draw the linethrough O that is parallel to AC, and let D be the point where it meets BC. Prove that D is the midpoint of BC.
Answers
1. x = 134◦,y = 120◦
2. 55◦
3. 70◦
4. 110◦
5. 90◦
6. 20◦
7. 90◦
8. Since AC ‖ ←→OD,m6 CAB = m 6 DOB by Corresponding Angles Postulate. Also, m 6 DOB = mDB and m 6 CAB =12 mCB, so mDB = 1
2 mCB. This makes D the midpoint of CB.
Angles of Chords, Secants, and Tangents
Connections to Architecture
Either in this lesson or as a review activity, you can have students do an internet search on circles in architecture.
232

www.ck12.org Chapter 3. Basic Geometry TE - Enrichment
Have students select three different images that best illustrate the content of the chapter. They can either pick anentire circle, parts of a circle, or use a theorem to help them interpret the buildings they choose. Each student shouldwrite a paragraph explaining how each building illustrates the concept(s) they decided to highlight. Also encouragestudents to explain why the circular architecture is important for the particular building they chose.
This particular building is a bullfighting ring in Malaga, Spain. Sporting arenas are usually a very good representationof circular seating.
Algebra Challenge
Solve for the variable(s).
1.
2.
233

3.9. Circles www.ck12.org
3.
4.
5.
6.
Answers
1. x = 75◦
2. x = 45◦
3. x = 35◦,y = 35◦
4. x = 60◦
5. x = 10◦
6. x = 3◦
234

www.ck12.org Chapter 3. Basic Geometry TE - Enrichment
Segments of Chords, Secants, and Tangents
Connections to Technology
Go to the website http://mathbits.com/mathbits/gsp/CircleSegments.htm and download the Geometer’s Sketchpadfile MBcirclesegments.gsp. Use this file as a demonstration or go to the computer lab and have students investigatethe circle segments on their own. This is a great tool to help students see the relationship between the segments andhelp them develop a formula.
Proof Challenge
Prove Theorem 9-16.
Given: Secant AC and tangent CD.
Prove: z2 = y(y+ x)
HINT: Show ∆ACD∼ ∆DCB.
Answer
TABLE 3.20:
Statement Reason1. Secant AC and tangent CD. Given2. 6 C ∼= 6 C Reflexive PoC3. 6 CAD∼= 6 BDC Theorem 9-84. ∆ACD∼ ∆DCB AA Similarity Postulate5. z
y =x+y
z Corresponding parts of similar triangles are propor-tional
6. z2 = y(y+ x) Cross multiplication
Challenge
For problems 1-8, solve for x.
1.
235

www.ck12.org Chapter 3. Basic Geometry TE - Enrichment
6.
7.
8. Find x and y.
Answers
1. x = 7
2. x = 3
237

3.9. Circles www.ck12.org
3. x = 3
4. x = 6
5. x = 2
6. x = 8
7. x = 2
8. x = 12,y = 3
Extension: Writing and Graphing the Equations of Circles
Coordinate Plane Challenge
Let’s find the equation of a circle using three points on the circle. Do you remember how we found the center andradius of a circle given three points on the circle in the Properties of Chords Enrichment? We used the fact that theperpendicular bisector of any chord in the circle will pass through the center. By finding the perpendicular bisectorsof two different chords and their intersection we can find the center of the circle. Then we can use the distanceformula with the center and a point on the circle to find the radius. Finally, we will write the equation.
Given the points A(−12,−21),B(2,27) and C(19,10) on the circle (an arc could be drawn through these points fromA to C), follow the steps below.
a. Since the perpendicular bisector passes through the midpoint of a segment we must first find the midpoint betweenA and B.
b. Now the perpendicular line must have a slope that is the opposite reciprocal of the slope of←→AB. Find the slope of←→
AB and then its opposite reciprocal.
c. Finally, you can write the equation of the perpendicular bisector of AB using the point you found in part a and theslope you found in part b.
d. Repeat steps a-c for chord BC.
e. Now that we have the two perpendicular bisectors of the chord we can find their intersection. Solve the system oflinear equations to find the center of the circle.
f. Find the radius of the circle by finding the distance from the center (point found in part e) to any of the three givenpoints on the circle.
g. Now, use the center and radius to write the equation of the circle.
Find the equations of the circles which contain three points.
1. A(−2,5),B(5,6) and C(6,−1)2. A(−11,−14),B(5,16) and C(12,9)
Answers
a-d. ⊥ bisector of AB is y =− 724 x+ 37
24 ,⊥ bisector of BC is y = x+8
e. center of circle (-5, 3)
f. radius 25
g. (x+5)2 +(y−3)2 = 625
1. (x−2)2 +(y−2)2 = 252. (x+3)2 +(y−1)2 = 289
238

www.ck12.org Chapter 3. Basic Geometry TE - Enrichment
3.10 Perimeter and Area
Triangles and Parallelograms
Extension: Heron’s Formula
Another way to find the area of a triangle is to use Heron’s Formula. This formula states that the area can berepresented by the formula A =
√s(s−a)(s−b)(s− c) where a,b, and c are the sides of a triangle and s is the
semiperimeter, s = a+b+c2 . This formula is useful because you do not need the altitude to find the area. To derive this
formula, you would need to use the Law of Cosines.
Extension Example: Find the area of a triangle with sides 6, 9, and 11.
Solution: First find the semiperimeter, s = 6+9+112 = 26
2 = 13. Now, plug everything into Heron’s Formula.
A =√
13(13−6)(13−9)(13−11) =√
13 ·7 ·4 ·2 =√
728 = 2√
182≈ 26.98 u2
Sample Problems
Find the area of a triangle with the given side lengths. Round answers to the nearest hundredth.
1. 5, 10, 62. 20, 16, 223. 9, 14, 194. 31, 32, 33
Answers
All units below are square units.
1. 11.402. 154.113. 56.874. 442.54
Challenge
Find the dimensions of the rectangles with the given information.
1. A rectangle with a perimeter of 20 units and an area of 24 units2.
2. A rectangle with a perimeter of 72 units and an area of 288 units2.
For problems 3 and 4 find the height and area of the equilateral triangle with the given perimeter.
3. Perimeter 18 units.
4. Perimeter 30 units.
Answers
1. 6×4
239

3.10. Perimeter and Area www.ck12.org
2. 12×24
3. h = 3√
3,A = 9√
3
4. h = 5√
3,A = 25√
3
Trapezoids, Rhombi, and Kites
Proof Challenge
Using the pictures below, prove the area formulas for a trapezoid, rhombus, and kite.
1. Use the isosceles trapezoid to show that the area of this trapezoid can also be written as the sum of the area ofthe two triangles plus the rectangle in the middle. Write the formula and then reduce it to equal 1
2 h(b1 + b2) orh2(b1 +b2).
2. Use this picture of a rhombus to show that the area of a rhombus is equal to the sum of the areas of the fourcongruent triangles. Write a formula and reduce it to equal 1
2 d1d2.
3. Use this picture of a kite to show that the area of a kite is equal to the sum of the areas of the two pairs of congruenttriangles. Recall that d1 is bisected by d2. Write a formula and reduce it to equal 1
2 d1d2.
Answers
240

www.ck12.org Chapter 3. Basic Geometry TE - Enrichment
1.
2+2∆s
h(b1)+2(
12·h · b2−b1
2
)hb1 +
h(b2−b1)
22hb1 +hb2−hb1
2hb1 +hb2
2=
h2(b1 +b2)
2.
4∆s
4 · 12
(12
d1 ·12
d2
)48
d1 ·d2
12
d1d2
3.
2∆s+2∆s
2(
12· 1
2d1 · x
)+2(
12· 1
2d1(d2− x)
)12
d1 · x+12
d1d2−12
d1x
12
d1d2
Challenge
For problems 1-3, determine what kind of quadrilateral ABCD is and find its area.
1. A(−2,3),B(2,3),C(4,−3),D(−2,−1)
2. A(0,1),B(2,6),C(8,6),D(13,1)
3. A(−2,2),B(5,6),C(6,−2),D(−1,−6)
4. Given that the lengths of the diagonals of a kite are in the ratio 4:7 and the area of the kite is 56 square units, findthe lengths of the diagonals.
5. Given that the lengths of the diagonals of a rhombus are in the ratio 3:4 and the area of the rhombus is 54 squareunits, find the lengths of the diagonals.
6. In the figure to the right, ABCD is a square. AP = PB = BQ and DC = 20 f t.
241

3.10. Perimeter and Area www.ck12.org
a. What is the area of PBQD?
b. What is the area of ABCD?
c. What fractional part of the area of ABCD is PBQD?
Answers
1. kite, 24 units2
2. Trapezoid, 47.5 units2
3. rhombus, 12√
5 units2
4. 8, 14
5. 9, 12
6. a) 200 f t2
b) 400 f t2
c) 12
Areas of Similar Polygons
Recall that a regular polygon is a polygon with congruent sides and angles. Regular polygons are the only polygonsthat have a consistent formula for area and perimeter.
Extension: Perimeter of Regular Polygons
Recall that the perimeter of a square is 4 times the length of a side because each side is congruent. We can extendthis concept to any regular polygon.
Perimeter of a Regular Polygon: If the length of a side is s and there are n sides in a regular polygon, then theperimeter is P = ns.
Extension Example: What is the perimeter of a regular octagon with 4 inch sides?
Solution: If each side is 4 inches and there are 8 sides, that means the perimeter is 8(4 in) = 32 inches.
242

www.ck12.org Chapter 3. Basic Geometry TE - Enrichment
Extension: Area of Regular Polygons
In order to find the area of a regular polygon, we need to define some new terminology. All regular polygons can beinscribed in a circle, which means regular polygons have a center and radius. Also like a circle, a regular polygonhas a central angle. However, the central angle is the angle formed by two radii drawn to consecutive vertices of thepolygon. In the picture, the central angle is 6 BAD. Also, notice that ∆BAD is an isosceles triangle. Every regularpolygon with n sides is formed by n isosceles triangles. In a regular hexagon, the triangles are equilateral. Theheight of these isosceles triangles is called the apothem. By the Isosceles Triangle Theorem, the apothem is theperpendicular bisector of the side of the regular polygon. The apothem is also the height, or altitude of the isoscelestriangle.
From this information and the picture above, we can derive a formula for the area of a regular polygon.
The area of each triangle is: A∆ = 12 bh = 1
2 sa, where s is the length of a side and a is the apothem.
If there are n sides in the regular polygon, then it is made up of n congruent triangles.
A = nA∆ = n(
12
sa)=
12
nsa
In this formula we can also substitute the perimeter formula, P = ns, for n and s.
A =12
nsa =12
Pa
Area of a Regular Polygon: If there are n sides with length s in a regular polygon and a is the apothem, thenA = 1
2 asn or A = 12 aP, where P is the perimeter.
Extension Example: Find the area of the regular polygon with radius 4.
243

3.10. Perimeter and Area www.ck12.org
Solution: In this problem we need to find the apothem and the length of the side before we can find the area of theentire polygon. Each central angle for a regular pentagon is 360◦
5 = 72◦. So, half of that, to make a right triangle withthe apothem, is 36◦. We need to use sine and cosine.
sin36◦ =.5n4
cos36◦ =a4
4sin36◦ =12
n 4cos36◦ = a
8sin36◦ = n a≈ 3.24
n≈ 4.7
Using these two pieces of information, we can now find the area. A = 12(3.24)(5)(4.7)≈ 38.07 units2.
Extension Example: The area of a regular hexagon is 54√
3 and the perimeter is 36. Find the length of the sidesand the apothem.
Solution: Plug in what you know into both the area and the perimeter formulas to solve for the length of a side andthe apothem.
P = sn A =12
aP
36 = 6s 54√
3 =12
a(36)
s = 6 54√
3 = 18a
3√
3 = a
Extension Problems
Find the area and perimeter of each of the following regular polygons. Round your answer to the nearest hundredth.
1.
2.
244

www.ck12.org Chapter 3. Basic Geometry TE - Enrichment
3.
4.
5.
6.7. If the perimeter of a regular decagon is 65, what is the length of each side?8. A regular polygon has a perimeter of 132 and the sides are 11 units long. How many sides does the polygon
have?9. The area of a regular pentagon is 440.44 in2 and the perimeter is 80 in. Find the length of the apothem of the
pentagon.10. The area of a regular octagon is 695.3 cm2 and the sides are 12 cm. What is the length of the apothem?
Answers
1.
A = 384√
3
P = 96
2.
A = 8√
2
P = 6.12
3.
A = 68.26
A = 72
4.
A = 688.19
P = 100
245
3.10. Perimeter and Area www.ck12.org
5.
A = 73.47
P = 15.45
6.
A = 68.26
P = 63
7. 6.58. 129. a = 11.01
10. a = 14.49
Circumference and Arc Length
Pi Extension
Pi is a fascinating number to students. Have a competition in class to see who can memorize the most digits of π.Students can go to the website in the text to see more digits.
March 14th can also be considered “Pi Day” because it is 3-14. You can celebrate this however you want, fromhaving students bring in different kinds of pie to doing a project about π. See the Problem Solving chapter forproject ideas.
Connections to Playtime
Hula Hoops are a great example of circumference. Have students measure with a string (much like Investigation10-1) the outline of the hula hoop and then lie of out straight to find its length. Using the formula for circumference,find the circumference in this way too. Have students compare their measured answers to the circumference. Seeif students can count how many times they can spin the hula hoop around their body and then determine thatmeasurement. For example, the average hula hoop has a circumference of 40π in. ≈ 125.66 in. If a student wasto spin the hoop 15 times around themselves, that would be a total length of 1884.96 in. or 157 ft.
Challenge
1. Mario’s Pizza Palace offers a stuffed crust pizza in three sizes (diameter length) for the indicated prices:
The Little Cheese, 8 in, $7.00
The Big Cheese, 10 in, $9.00
The Cheese Monster, 12 in, $12.00
What is the crust (in) to price ($) ratio for each of these pizzas? Michael thinks the cheesy crust is the best part ofthe pizza and wants to get the most crust for his money. Which pizza should he buy?
2. Jay is decorating a cake for a friend’s birthday. They want to put gumdrops around the edge of the cake which hasa 12 in diameter. Each gumdrop is has a diameter of 1.25 cm. To the nearest gumdrop, how many will they need?
3. A spedometer in a car measures the distance travelled by counting the rotations of the tires. The number ofrotations required to travel one tenth of a mile in a particular vehicle is approximately 9.34. To the nearest inch, findthe diameter of the wheel. (1 mile = 5280 feet)
4. Bob wants to put new weather stripping around a semicircular window above his door. The base of the window(diameter) is 36 inches. How much weather stripping does he need?
246

www.ck12.org Chapter 3. Basic Geometry TE - Enrichment
5. Each car on a Ferris wheel travels 942.5 ft during the 10 rotations of each ride. How high is each car at the highestpoint of each rotation?
Answers
1. The Little Cheese, 3.59:1; The Big Cheese, 3.49:1; The Cheese Monster, 3.14:1; Michael should buy The LittleCheese
2. 31 gumdrops
3. 18 in
4. 93 in
5. 30 ft
Area of Circles and Sectors
Challenge
Find the area of the shaded region. Round your answer to the nearest hundredth.
1. The quadrilateral is a square.
2.
3.
4.
247

3.10. Perimeter and Area www.ck12.org
5.
6. The area of a sector of a circle is 54π and its arc length is 6π. Find the radius of the circle.
7. The area of a sector of a circle is 2304π and its arc length is 32π. Find the central angle of the sector.
Answers
1. 292.25
2. 13.73
3. 21.21
4. 98.17
5. 24.65
6. 18 units
7. 40◦
248

www.ck12.org Chapter 3. Basic Geometry TE - Enrichment
3.11 Surface Area and Volume
Exploring Solids
Extension: Geometric Probability
We are going to connect the Platonic Solids to probability. A six sided die is the shape of a cube. The probability ofany one side landing face up is 1/6 because each of the six faces is congruent to each other. We can also relate theother Platonic Solids to probability in this way, however, keep in mind that they have a different number of faces,and therefore different odds.
1. A cube-shaped die has sides numbered 1 through 6. Determine the probability of:
a. Rolling an even number.b. Rolling a factor of 6.c. Rolling a prime number.
2. What shape would we make a die with 12 faces? If we number these faces 1 to 12, and each face has the samelikelihood of landing face up, what is the probability of rolling a multiple of three?
3. I have a die that is a regular octahedron. Each face is labeled with a consecutive prime number starting with2. What is the largest prime number on my die?
4. Rebecca wants to design a new die. She wants it to have one red face. The other faces will be yellow, blue orgreen. How many faces should her die have and how many of each color does it need so that: the probability ofrolling yellow is eight times the probability of rolling red, the probability of rolling green is half the probabilityof rolling yellow and the probability of rolling blue is seven times the probability of rolling red?
Answers
1. a. 1/2b. 2/3c. 2/3
2. regular dodecahedron, 1/33. 194. 1 red face, 8 yellow faces, 7 blue faces and 4 green faces
Extension: Isometric Views
Isometric views of a solid is similar to perspective drawing. Typically, isometric views are drawn on special dotpaper that looks like this:
249

3.11. Surface Area and Volume www.ck12.org
We usually draw figures that can be made from cubes on isometric paper. Students can experiment with the dotpaper and draw different views of stairs or prisms.
To have students draw something in an isometric view, you will need to give them the map plan, which is theoverhead view.
Extension Example: Draw the isometric view of the map plan below.
Solution: When drawing an isometric view, the front is drawn to the left. The drawing would look something likethis:
Extension Problems
Draw the isometric views of the following map plans.
250

www.ck12.org Chapter 3. Basic Geometry TE - Enrichment
1.
2.
Answers
1.
2.
Surface Area of Prisms and Cylinders
Extension: Finding the Surface Area of a Regular Polygon Prism
Regular polygon prisms have the same strategy towards finding the surface area as any other prism. The catch hereis to remember how to find the area of the regular pentagon. See the Chapter 10 Enrichment for a recap on how todo this.
Extension Example: Find the surface area of the regular pentagonal prism.
251

3.11. Surface Area and Volume www.ck12.org
Solution: For this prism, each lateral face has an area of 160 units2. Then, find the area of the regular pentagonalbases. Recall that the area of a regular polygon is 1
2 asn. s = 8 and n = 5, so we need to find a, the apothem.
tan36◦ =4a
a =4
tan36◦≈ 5.51
SA = 5(160)+2(
12·5.51 ·8 ·5
)= 1020.4
Extension Problems
Find the surface area of the following prisms. All polygons are regular, unless otherwise specified.
1.
2.
Answers
1. 1719.62 cm2
252
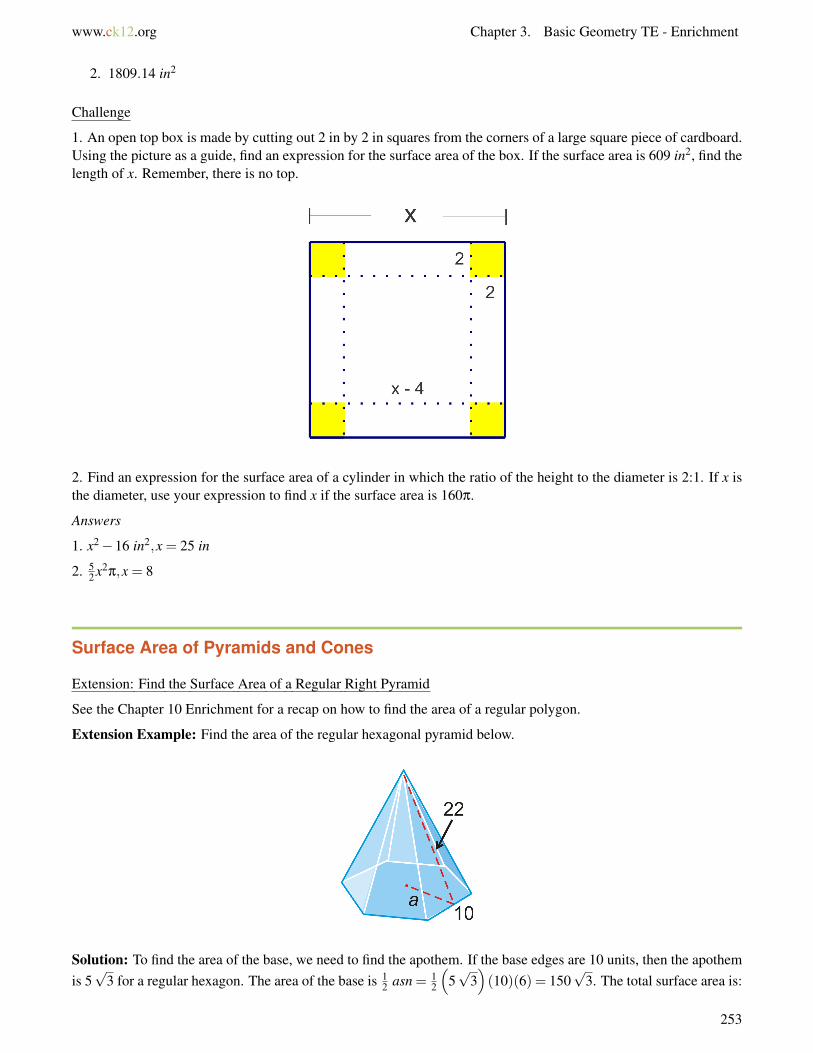
www.ck12.org Chapter 3. Basic Geometry TE - Enrichment
2. 1809.14 in2
Challenge
1. An open top box is made by cutting out 2 in by 2 in squares from the corners of a large square piece of cardboard.Using the picture as a guide, find an expression for the surface area of the box. If the surface area is 609 in2, find thelength of x. Remember, there is no top.
2. Find an expression for the surface area of a cylinder in which the ratio of the height to the diameter is 2:1. If x isthe diameter, use your expression to find x if the surface area is 160π.
Answers
1. x2−16 in2,x = 25 in
2. 52 x2π,x = 8
Surface Area of Pyramids and Cones
Extension: Find the Surface Area of a Regular Right Pyramid
See the Chapter 10 Enrichment for a recap on how to find the area of a regular polygon.
Extension Example: Find the area of the regular hexagonal pyramid below.
Solution: To find the area of the base, we need to find the apothem. If the base edges are 10 units, then the apothemis 5√
3 for a regular hexagon. The area of the base is 12 asn = 1
2
(5√
3)(10)(6) = 150
√3. The total surface area is:
253

3.11. Surface Area and Volume www.ck12.org
SA = 150√
3+12(6)(10)(22)
= 150√
3+660≈ 919.81 units2
Extension Problems
Find the surface area of the regular right pyramids. Round answers to the nearest hundredth.
1.
2.
Answers
1. 750.44 in2
2. 41.57 in2
Challenge
For questions 1-4, consider the sector of a circle with radius 25 cm and arc length 14π.
1. What is the central angle of this sector?
2. If this sector is rolled into a cone, what are the radius and area of the base of the cone?
3. What is the height of this cone?
4. What is the total surface are of the cone?
For questions 5-7, consider a square with diagonal length 10√
2 in.
5. What is the length of a side of the square?
6. If this square is the base of a right pyramid with height 12, what is the slant height of the pyramid?
7. What is the surface area of the pyramid?
Answers
1. 100.8◦
2. 7
3. 24
4. 175π
5. 10 in
6. 13 in
7. 360 in2
254

www.ck12.org Chapter 3. Basic Geometry TE - Enrichment
Volume of Prisms and Cylinders
Extension: Volume of Regular Prisms
Extension Example: Find the volume of the regular hexagonal prism below.
Solution: Recall that a regular hexagon is divided up into six equilateral triangles. The height of one of thosetriangles would be the apothem. If each side is 6, then half of that is 3 and half of an equilateral triangle is a30-60-90 triangle. Therefore, the apothem is going to be 3
√3. The area of the base is:
B =12
(3√
3)(6)(6) = 54
√3 units2
And the volume will be:
V = Bh =(
54√
3)(15) = 810
√3 units3
Extension Problems
Find the volume of the following prisms. All polygons are regular, unless otherwise specified.
1.
2.
Answers
1. 5196.21 in3
2. 5581.69 in3
Challenge
255

3.11. Surface Area and Volume www.ck12.org
1. The volume of a cylinder with height to radius ratio of 4:1 is 108π cm3. Find the radius and height of thecylinder.
2. The length of a side of the base of a hexagonal prism is 8 cm and its volume is 1056√
3 cm3. Find the heightof the prism.
3. A cylinder fits tightly inside a rectangular prism with dimensions in the ratio 5:5:7 and volume 1400 in3. Findthe volume of the space inside the prism that is not contained in the cylinder.
Answers
1. r = 3 cm,h = 12 cm2. 11 cm3. 300.44 in3
Volume of Pyramids and Cones
Connections to Construction
Teepees are cones. Native Americans would construct teepees as living spaces. Have students construct a teepee (onpaper) that is tall enough for them to stand up inside of. Should their height be the height of the cone? Point out tostudents that the height of the teepee should be more than their own height. If not, students would only be able tostand in the center of the teepee.
Extension: Find the Volume of a Regular Right Pyramid
Extension Example: Find the volume of the regular hexagonal pyramid below.
256

www.ck12.org Chapter 3. Basic Geometry TE - Enrichment
Solution: To find the area of the base, we need to find the apothem. If the base edges are 16 units, then the apothemis 8√
3 for a regular hexagon. The area of the base is 12 asn = 1
2
(8√
3)(16)(6) = 384
√3. The total volume is:
V =13
Bh =13·384
√3 ·28
= 3584√
3≈ 6207.67 units3
Extension Problems
Find the surface area of the regular right pyramids. Round answers to the nearest hundredth.
1.
2.
Answers
1. 1080√
3≈ 1870.61 in3
2. 6400√
3≈ 11,085.13 in3
Challenge
1. The ratio of the height to radius in a cone is 3:2. If the volume is 108π m3, find the height and radius of thecone.
2. The ratio of the height to the radius in a cone is 4:3. If the volume is 2592π f t3, find the height and radius ofthe cone.
3. Derive a generalized formula for the volume of a regular hexagonal pyramid. Write the apothem in terms ofthe length of a side.
Answers
1. h = 9 m,r = 6 m2. h = 24 f t.,r = 18 f t.
3. n = 6,B = 12 asn,a =
√3
2 s→V = 13 Bh = 1
3
(12 ·√
32 s · s ·6
)h =
√3
2 s2h
Surface Area and Volume of Spheres
Connections to Sports
257

3.11. Surface Area and Volume www.ck12.org
One way to find the formula for the surface area of a sphere is to look at a baseball. We can best approximate thecover of the baseball by 4 circles. The area of a circle is πr2, so the surface area of a sphere is 4πr2. While the coversof a baseball are not four perfect circles, they are stretched and skewed.
To take this investigation further, have students work in pairs or groups and given each group a baseball. First, theyneed to measure the circumference around the great circle and record this number. Then, let them take the baseballapart on the seams and lay the covering flat. Give the students graph paper and have them trace the covering piecesonto the paper. The two pieces of the covering should be congruent, so students really only need to trace one piece.Let students count the squares that are within the traced outline to approximate the surface area. Don’t forget tomultiply this number by two (depending on the graph paper, students may also need to divide by 16 because thereare usually 4 squares per inch or 16 squares per square inch). Now, have students find the actual surface area ofa baseball. Using the measurement of the great circle from the beginning of the activity, students need to find thesurface area. Students should round their answer to the nearest hundredth and compare with what they found earlier.
Extension: Derivation of the Volume of a Sphere
A sphere can be thought of as a regular polyhedron with an infinite number of congruentregular polygon faces. Asn, the number of faces increases to an infinite number, the figure approaches becoming a sphere.So a sphere canbe thought of as a polyhedron with an infinite number faces. Each of those faces is the base of a pyramid whosevertex is located at the center of the sphere. Each of the pyramids that make up the sphere would be congruent to thepyramid shown. The volume of this pyramid is given by V = 1
3 Bh.
To find the volume of the sphere, you need to add up the volumes of an infinite number of infinitely small pyramids.
V (all pyramids) =V1 +V2 +V3 + · · ·+Vn
=13(B1h+B2h+B3h+ · · ·+Bnh)
=13
h(B1 +B2 +B3 + · · ·+Bn)
258
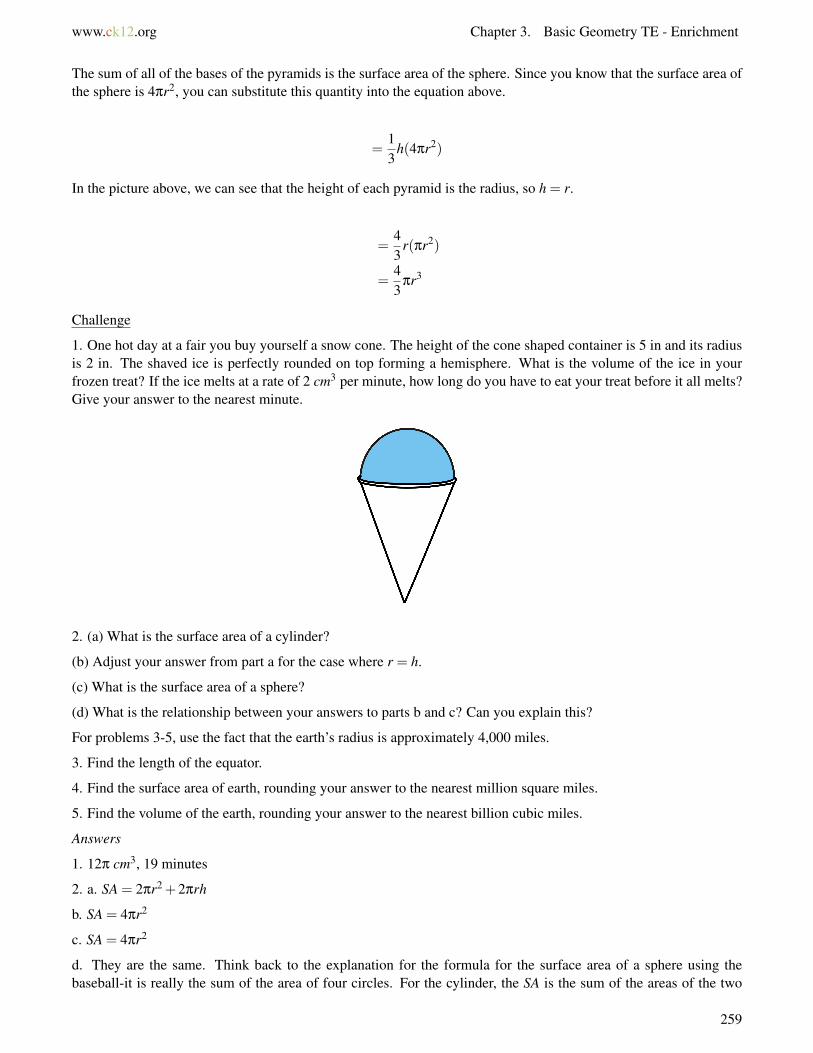
www.ck12.org Chapter 3. Basic Geometry TE - Enrichment
The sum of all of the bases of the pyramids is the surface area of the sphere. Since you know that the surface area ofthe sphere is 4πr2, you can substitute this quantity into the equation above.
=13
h(4πr2)
In the picture above, we can see that the height of each pyramid is the radius, so h = r.
=43
r(πr2)
=43
πr3
Challenge
1. One hot day at a fair you buy yourself a snow cone. The height of the cone shaped container is 5 in and its radiusis 2 in. The shaved ice is perfectly rounded on top forming a hemisphere. What is the volume of the ice in yourfrozen treat? If the ice melts at a rate of 2 cm3 per minute, how long do you have to eat your treat before it all melts?Give your answer to the nearest minute.
2. (a) What is the surface area of a cylinder?
(b) Adjust your answer from part a for the case where r = h.
(c) What is the surface area of a sphere?
(d) What is the relationship between your answers to parts b and c? Can you explain this?
For problems 3-5, use the fact that the earth’s radius is approximately 4,000 miles.
3. Find the length of the equator.
4. Find the surface area of earth, rounding your answer to the nearest million square miles.
5. Find the volume of the earth, rounding your answer to the nearest billion cubic miles.
Answers
1. 12π cm3, 19 minutes
2. a. SA = 2πr2 +2πrh
b. SA = 4πr2
c. SA = 4πr2
d. They are the same. Think back to the explanation for the formula for the surface area of a sphere using thebaseball-it is really the sum of the area of four circles. For the cylinder, the SA is the sum of the areas of the two
259

3.11. Surface Area and Volume www.ck12.org
circular bases and the lateral area. The lateral area is 2πrh, when we replace h with r this part of the formula becomesthe area of two more circles. That makes the total surface area of the cylinder equal to the area of four circles, justlike the sphere.
3. 25,132.74 miles
4. 201 million square miles
5. 268 billion cubic miles
Extension: Exploring Similar Solids
Connections to Art
A kaleidocycle is a chain of rotating tetrahedra that connect to form a ring. To investigate this further, see the website:www.mathematische-basteleien.de/kaleidocycles.htm. This website provides pictures and directions of how to makedifferent kaleidocycles and is a great way for students to see how similar solids can be combines together. Someof the solids are congruent and some are similar. Become familiar with some of the patterns and designs beforeassigning this to the students.
Give students instructions, by printing or providing websites and let them go to work. Students need to select twodifferent kaleidocycles to create or design their own unique ones. This activity might be best done in pairs.
Connections to Science
Animal A and animal B are similar (meaning the size and shape of their bones and bodies are similar) and thestrength of their respective bones are proportional to the cross sectional area of their bones. Answer the followingquestions given that the ratio of the height of animal A to the height of animal B is 3:5. You may assume the lengthsof their bones are in the same ratio.
1. Find the ratio of the strengths of the bones. How much stronger are the bones in animal B?2. If their weights are proportional to their volumes, find the ratio of their weights.3. Which animal has a skeleton more capable of supporting its own weight? Explain.
Answers
1. 9:25, about 2.78 times as strong2. 27:1253. Animal A, Animal B’s weight is about 4.63 times the weight of animal A but his bones are only 2.78 times as
strong.
260

www.ck12.org Chapter 3. Basic Geometry TE - Enrichment
3.12 Rigid Transformations
Exploring Symmetry
Connections to Art
Let students search through magazines for a picture of an object that they feel comfortable drawing and has reflec-tional symmetry. Once they find a picture they like (students can also bring in a picture as long as it is ok to cutit), have students cut the picture on the line of symmetry. Then, tape one half on a blank piece of paper and havestudents draw the symmetrical half without referring to the part they cut off. As an extension, students can do thiswith a picture of their face.
Connections to Science
Identical twins are mirror images of each other. If you know of any students that are twins at your school, ask if theywould come in to demonstrate. The left side of one twin’s face will be the exact mirror image of the other twin’sright side and vice versa. If there are no twins at your school, find pictures of twins online, copy the images andcut their faces vertically along the line of symmetry. Then switch the sides of the faces and see if they are actuallymirror images.
Extension: Point Symmetry
When an object is symmetric about a point, we say that it has point symmetry. Point symmetry is the same as havingexactly 180◦ rotational symmetry. Most playing cards have point symmetry. Have students look through a deck ofcards to see if they can determine how many cards have point symmetry. The odd numbered cards do not have pointsymmetry. See if students can determine why not.
Challenge
1. Can an object have point symmetry and reflectional symmetry? If so, draw an example.2. Point symmetry in the coordinate plane is called origin symmetry, which means that an object is symmetrical
about (0, 0). A line segment has endpoint (4, 2). What must the other endpoint be so that the line segment hasorigin symmetry?
Answers
1. Yes, it is possible. A square has point and reflectional symmetry.
261
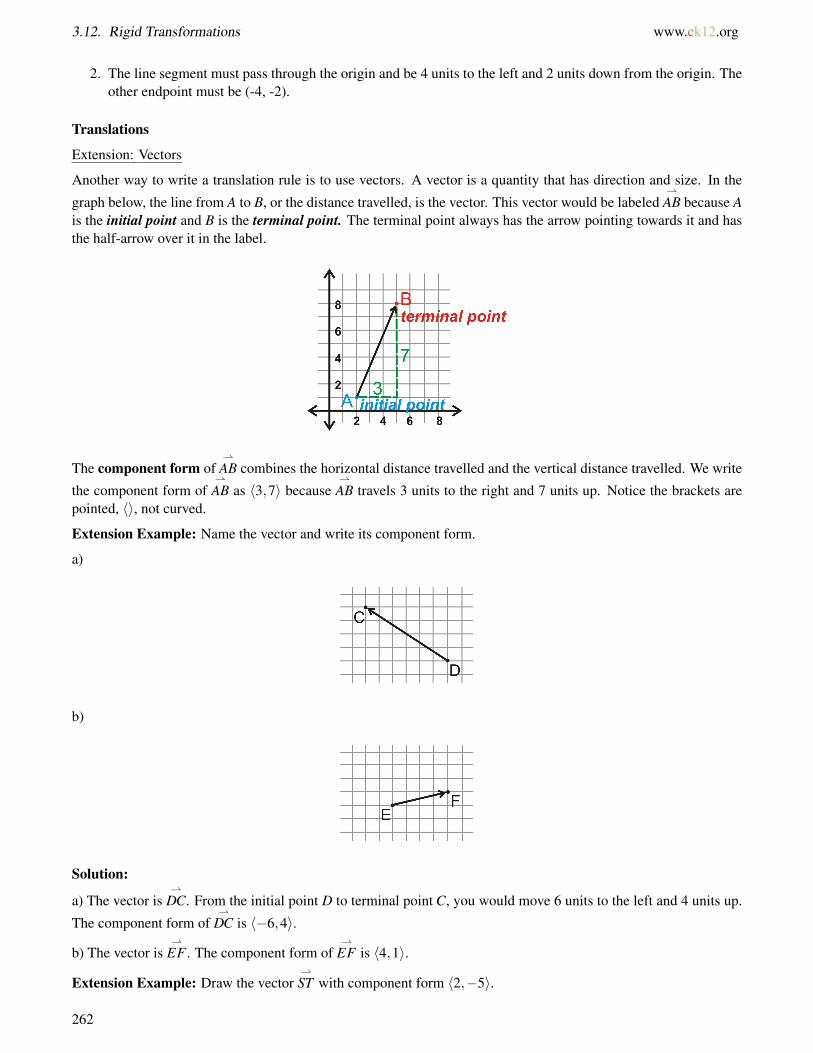
3.12. Rigid Transformations www.ck12.org
2. The line segment must pass through the origin and be 4 units to the left and 2 units down from the origin. Theother endpoint must be (-4, -2).
Translations
Extension: Vectors
Another way to write a translation rule is to use vectors. A vector is a quantity that has direction and size. In the
graph below, the line from A to B, or the distance travelled, is the vector. This vector would be labeled⇀AB because A
is the initial point and B is the terminal point. The terminal point always has the arrow pointing towards it and hasthe half-arrow over it in the label.
The component form of⇀AB combines the horizontal distance travelled and the vertical distance travelled. We write
the component form of⇀AB as 〈3,7〉 because
⇀AB travels 3 units to the right and 7 units up. Notice the brackets are
pointed, 〈〉, not curved.
Extension Example: Name the vector and write its component form.
a)
b)
Solution:
a) The vector is⇀
DC. From the initial point D to terminal point C, you would move 6 units to the left and 4 units up.
The component form of⇀
DC is 〈−6,4〉.
b) The vector is⇀
EF . The component form of⇀
EF is 〈4,1〉.
Extension Example: Draw the vector⇀ST with component form 〈2,−5〉.
262

www.ck12.org Chapter 3. Basic Geometry TE - Enrichment
Solution: The graph to the left is the vector⇀ST . From the initial point S it moves down 5 units and to the right 2
units.
Extension Problems
For questions 1-3, name each vector and find its component form.
1.
2.
3.
For questions 4-6, plot and correctly label each vector.
4.⇀AB = 〈4,−3〉
5.⇀
CD = 〈−6,8〉
6.⇀
FE = 〈−2,0〉
7. The coordinates of ∆DEF are D(4,−2),E(7,−4) and F(5,3). Translate ∆DEF using the vector 〈5,11〉 and findthe coordinates of ∆D′E ′F ′.
263

3.12. Rigid Transformations www.ck12.org
For problems 8 and 9, write the translation rule as a translation vector.
8. (x,y)→ (x−3,y+8)
9. (x,y)→ (x+9,y−12)
For problems 10 and 11, write the translation vector as a translation rule.
10. 〈−7,2〉
11. 〈11,25〉
Answers
1.⇀
GH = 〈6,3〉
2.⇀KJ = 〈−2,4〉
3.⇀
LM = 〈3,−1〉
4.
5.
6.
7. D′(9,−9),E ′(12,7),F ′(10,14)
8. 〈−3,8〉
9. 〈9,−12〉
10. (x,y)→ (x−7,y+2)
11. (x,y)→ (x+11,y+25)
Reflections
Connections to Mirrors
Give each student a small mirror. Have them place the mirror in front of their writing hand and hold it with the otherhand. Then, see if they can write their name so that it can be read in the mirror. Students should look only at their
264

www.ck12.org Chapter 3. Basic Geometry TE - Enrichment
hand in the mirror. Once they are done, students can then look at their actual handwriting. How does this version oftheir name look different than normal?
Coordinate Plane Challenge
The vertices of ∆GHI are G(1,1),H(5,1), and I(5,4). Use this information to answer questions 1-7.
1. Plot ∆GHI on the coordinate plane.
2. Reflect ∆GHI over the x−axis. Find the coordinates of ∆G′H ′I′.
3. Reflect ∆G′H ′I′ over the y−axis. Find the coordinates of ∆G′′H ′′I′′.
4. What one transformation would be the same as this double reflection?
5. Following the steps to reflect a triangle using a compass and straightedge.
a. Make a triangle on a piece of paper. Label the vertices A,B and C.
b. Make a line next to your triangle (this will be your line of reflection).
c. Construct perpendiculars from each vertex of your triangle through the line of reflection.
d. Use your compass to mark off points on the other side of the line that are the same distance from the line as theoriginal A,B and C. Label the points A′,B′ and C′.
e. Connect the new points to make the image ∆A′B′C′.
6. Describe the relationship between the line of reflection and the segments connecting the pre-image and imagepoints.
7. Repeat the steps from #5 with a line of reflection that passes through the triangle.
Answers
1-3.
4. A rotation of 180◦.
5.
265

3.12. Rigid Transformations www.ck12.org
6. Perpendicular Bisector
7.
Rotations
Connections to Playtime
Several carnival and amusement park rides use rotation. For example, the Tea Cups and Disneyland rotate aroundthe floor of the ride and individually. Other examples could be a Ferris wheel or the Yo-Yo (the rotating swing), Havestudents search online for rotating amusement park rides. Then, they should focus on 2 or 3 rides. Students shouldturn in a short paragraph for each ride that consists of the point of rotation, how the ride fits into the mathematicaldefinition, and a description of the ride. Students need to include a picture of the ride with their paragraph.
Construction Challenge
1. Draw two lines that intersect, m and n, and ∆ABC. Reflect ∆ABC over line m to make ∆A′B′C′. Reflect ∆A′B′C′
over line n to get ∆A′′B′′C′′. Make sure ∆ABC does not intersect either line.
2. Draw segments from the intersection point of lines m and n to A and A′′. Measure the angle between thesesegments. This is the angle of rotation between ∆ABC and ∆A′′B′′C′′.
3. Measure the angle between lines m and n. Make sure it is the angle which contains ∆A′B′C′ in the interior of theangle.
4. What is the relationship between the angle of rotation and the angle between the two lines of reflection?
Answers
1-3.
266

www.ck12.org Chapter 3. Basic Geometry TE - Enrichment
4. Angle of rotation is double the angle between the lines.
Composition of Transformations
Extension: More Double Reflections
Through the following examples, we determine what single rotation is double reflections in the coordinate plane.
Extension Example: Reflect the square over y = x, followed by a reflection over the x−axis.
Solution: First, reflect the square over y = x. The answer is the red square in the graph to the right.
Second, reflect the red square over the x−axis. The answer is the green square below.
267

3.12. Rigid Transformations www.ck12.org
Extension Example: Determine the one rotation that is the same as the double reflection from the previous Example.
Solution: First, we need to figure out what the angle of intersection is between y= x and the x−axis. y= x is halfwaybetween the two axes, which are perpendicular, so is 45◦ from the x−axis. Therefore, the angle of rotation is 90◦
clockwise or 270◦ counterclockwise. The correct answer is 270◦ counterclockwise because we always measureangle of rotation in the coordinate plane in a counterclockwise direction. From the diagram, we could have also saidthe two lines are 135◦ apart, which is supplementary to 45◦.
Therefore, a reflection over y = x followed by a reflection over the x−axis is the same as a rotation of 270◦
counterclockwise.
Extension Problems
1. What one rotation is the same as a reflection over the y−axis, followed by a reflection over y =−x?2. What one rotation is the same as a reflection over the x−axis, followed by a reflection over y = x?3. What one rotation is the same as a reflection over y = x, followed by a reflection over y =−x?
Answers
1. 90◦ counterclockwise2. 90◦ counterclockwise3. 180◦ rotation
Extension: Tessellating Polygons
Connections to Nature
In this activity, students will create a piece of art based on a honeycomb. They can use any shape that will tessellateas they saw with the honeycomb. The key is that the honeycomb, according to a Wikipedia definition, is a space
268
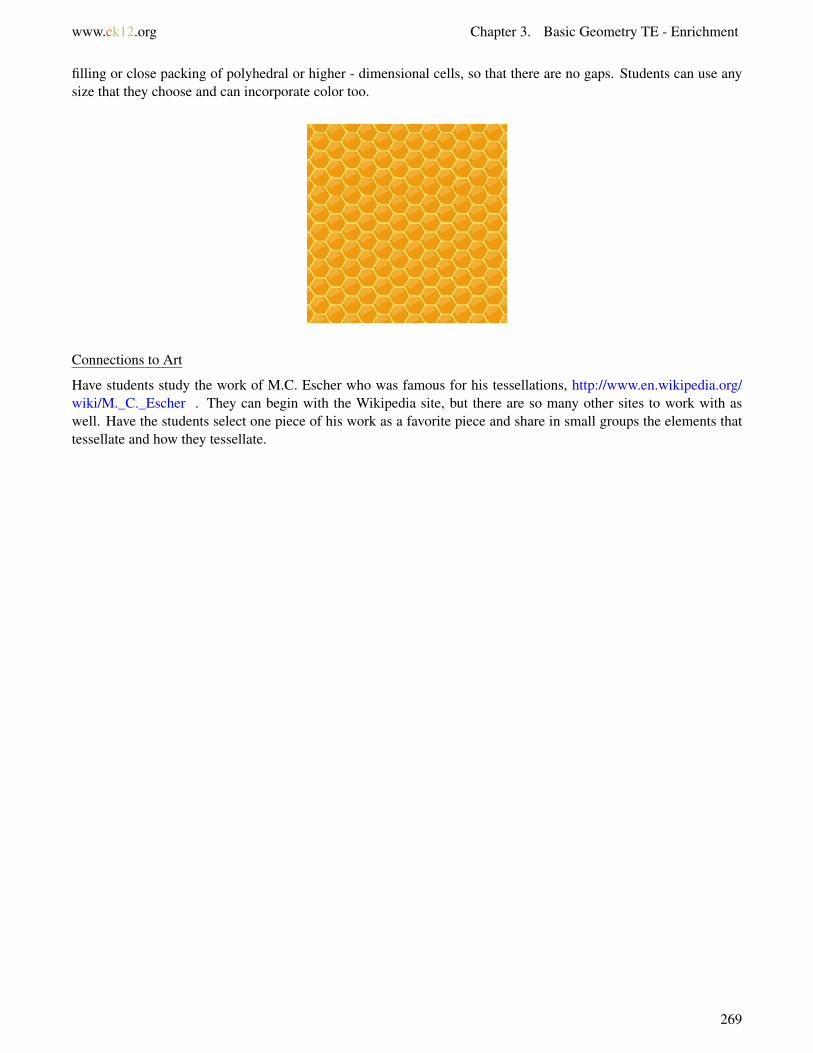
www.ck12.org Chapter 3. Basic Geometry TE - Enrichment
filling or close packing of polyhedral or higher - dimensional cells, so that there are no gaps. Students can use anysize that they choose and can incorporate color too.
Connections to Art
Have students study the work of M.C. Escher who was famous for his tessellations, http://www.en.wikipedia.org/wiki/M._C._Escher . They can begin with the Wikipedia site, but there are so many other sites to work with aswell. Have the students select one piece of his work as a favorite piece and share in small groups the elements thattessellate and how they tessellate.
269

www.ck12.org
CHAPTER 4 Basic Geometry TE -Differentiated Instruction
Chapter Outline4.1 BASICS OF GEOMETRY
4.2 REASONING AND PROOF
4.3 PARALLEL AND PERPENDICULAR LINES
4.4 TRIANGLES AND CONGRUENCE
4.5 RELATIONSHIPS WITH TRIANGLES
4.6 POLYGONS AND QUADRILATERALS
4.7 SIMILARITY
4.8 RIGHT TRIANGLE TRIGONOMETRY
4.9 CIRCLES
4.10 PERIMETER AND AREA
4.11 SURFACE AREA AND VOLUME
4.12 RIGID TRANSFORMATIONS
Introduction
In this Teacher’s Edition, we will help the educator adapt our Basic Geometry FlexBook® textbook for all learners.Differentiated Instruction involves providing students with different avenues to acquiring content, involving pro-cessing, constructing, and making sense of ideas. This text develops teaching materials so that all students within aclassroom can learn effectively, regardless of differences in ability.
Each lesson is split up by the type of learner: visual, kinesthetic, or auditory. Not every lesson will have a suggestionfor every type of learner. There are also modifications for the English language learner (ELL) and the learningdisabled student.
Several students who claim they do not like math really enjoy creative writing. Every couple of lessons there is analternate journal entry that can be used as a warm-up. These journey entries are somewhat math related, but reallydraw on the creativity of the student. Have students keep these entries in with their Review Queues and collect allwarm-ups at the end of each chapter.
The low-achieving or basic level student needs all the incentives you are willing to give in your classroom. Onesuggestion is to grade everything. Give students a participation grade, worth 5-10% of their total grade. Havea checklist of student names and for each day give them points based on completing notes, the Review Queue,investigations, and certain class work. Each day is worth 2 points; 2 = they did everything, 1 = did half, 0 = didnothing. Even though it does not seem like a lot, the points will add up. This is a great incentive for the basic level orEL student who has a hard time understanding math, but are good kids who want to try. Then, occasionally collectclass work and give a separate grade for these assignments. You can also collect the Review Queues and journalentries at the end of each chapter and give students a grade or extra credit toward the test.
Collaborative learning can be a very rewarding experience for basic students as well. Allow your class room to be“flexible.” At the beginning of class and during note-taking, organize the desks in rows. Then, when students aredoing group work, allow them to rotate their desks into groups of four. Change seats every 1-2 chapters. On the firstday of new groups, have students practice going from rows to groups and back to make the process more efficient.
270

www.ck12.org Chapter 4. Basic Geometry TE - Differentiated Instruction
Groups can be picked a number of different ways. Three suggestions are: one student from each grade achievement:1 A, 1-2 B/C, 1-2 D/F, the students may pick their own groups (this should be used sparingly and as a reward forstudents), or picked totally at random by a grade program or Excel. However you pick the groups, the grading shouldbe uniform. One way to grade group work is to staple all the work together and grade one student’s work out of eachpacket; the second paper in each group, for example. Another option would be to grade everyone’s paper and the“group grade” would be the average of the member’s scores. Both methods will encourage students to double-checkeveryone’s work and make sure that everyone has the same answers, so that everyone gets the best grade. Explainthese repercussions to the class. You can decide if you would like to tell the class which grading method you aregoing to use before they begin working or after you have collected the assignment.
Testing can also be a cause of high anxiety for all levels of students. This text will present alternative assessmentsas a final chapter. There are options for group testing, projects, alternative set-ups for quizzes and tests, as well asalternative grading rubrics.
271

4.1. Basics of Geometry www.ck12.org
4.1 Basics of Geometry
Points, Lines and Planes
Journal Entry
If math were an animal, what would it be? Explain your answer in 1-2 sentences and draw a picture.
These journal entries are intended to make math more approachable and (hopefully) fun. You can decide whether ornot to have students share with the class upon completion. This is a fun activity for any student at the beginning ofa school year. Give students construction paper and markers to illustrate their animal. Some examples to get themgoing: A spider because it is scary, a worm because it wriggles around in my brain, a unicorn because it is mythical,and a butterfly because while it is beautiful it is also complex (these are all actual student responses as seen by theauthor).
Visual Learners
One way to assist visual learners with this lesson is to use the actual objects mentioned in the lesson. This will assiststudents with special needs in making a connection with the material.
When discussing the postulates, use physical models to demonstrate what each one says. For example, with Postulate1-2, draw three dots on a piece of paper. Then, for Postulate 1-3, connect two of those points to form a line. ForPostulate 1-5, use two pieces of paper (possibly cutting one so they slide together) to show that they intersect to forma line.
Kinesthetic Learners
Allow move time so that students can walk around the classroom identifying points, lines and planes in theirsurroundings. Request that students make a list of the things that they find. After a few minutes, come back togetherand write the examples students find on the whiteboard.
The Know What? for this lesson discusses wooden blocks. If possible, it might be helpful for students to use blocksand identify the geometric terms learned in this lesson. You could also have students use their prior knowledge byasking them which other geometric terms they know and then finding the appropriate block.
Collaborative Learning
Have students work in pairs or small groups to discuss their findings from the “walk around” activity. This engagesstudents who need to talk about their work to gain a better understanding of a concept.
Special Needs/Modifications
Be sure that all of the vocabulary and postulates are written on a board or overhead as they are presented anddiscussed. Request that students copy this information into a notebook. Reading the terms, hearing them discussed,seeing them written again and writing the words themselves assists students in retaining information. At the end ofthe lesson, make sure each student has all the vocabulary and postulates written in their notes. They should have thedefinitions and a picture for each term. Give students either participation points or a small class work grade for theirnotes as an added incentive so that each student writes notes. If you do not want to check notes every day, you couldalso collect them at the end of each chapter and look through the work while students are taking the test.
272

www.ck12.org Chapter 4. Basic Geometry TE - Differentiated Instruction
Segments and Distance
Visual/Auditory Learners
An alternative way to introduce the Segment Addition Postulate is to draw a line segment with a point on the line onthe white board or overhead projector.
Then, set AB = 5 and BC = 15. Ask students what the value of AC is. Once a student says the correct answer, askthem how they came up with that answer. Then, ask students if they can write an algebraic equation for the linesegment without numbers. This should lead students towards the Segment Addition Postulate.
Kinesthetic Learners
As an extension for Examples 1 and 2, have students work in pairs. One member in the pair draws a line segmentthat s/he has measured to find the distance. The other member also draws a line segment that he/she has measured.Then they switch drawings. Student A must figure out the length of student B’s line segment, and student B mustfigure out the length of student A’s line segment. Repeat this with both inches and centimeters. You could even havestudents measure the same segment in both units and compare.
After Examples 10 and 11, hand out grid paper. Ask students to draw a coordinate plane and provide given distanceson the board/overhead. Then allow the student time to draw a line segment with this distance. Provide a time forsharing/feedback from the exercise.
Modifications
Write all vocabulary and names of postulates on the board as it is brought up in the lesson. Leave this list on theboard throughout the lesson so that students can reference and become comfortable with the new vocabulary.
Be sure that students are given plenty of time to think through their work and be sure that all students have finishedexamples before going over the answers. Sometimes, special needs students require more time to complete tasksand will stop working if the answers to a particular question are given before they have finished.
Observe students as they work in groups. Make a note of student that may need extra help and set aside a timeto check in with each one. To help you with this task, create an observation checklist of things to watch for whenstudents are working in a group or individually. This should be done throughout the year.
Angles and Measurement
All Learners
After Example 1, have students work in small groups. Assign one group rays and the other group angles. Usingrulers, the students need to design a series of either rays or angles. You can use index cards for this activity. Thenhave the groups switch cards. The angle group needs to name all of the rays that the other group has drawn. The raygroup needs to name all of the angles that the angle group has drawn. Then the groups exchange answers and checkeach other’s work. This involves peer discussion and tutoring.
Kinesthetic Learners
The angle formed at a person’s elbow is a useful physical model of angles. Have the students put their arm straightout, illustrating a straight angle. Then have the student gradually turn their arm up (or down) gradually to demonstrate
273

4.1. Basics of Geometry www.ck12.org
how the degree changes. Use several students as examples to show that the length of the forearm and bicep do notchange the angle measurement.
After completing Example 7, provide students with drawings of several different angles so that they can practicemeasuring more angles. Make sure to have several types of angles. After finding all the measurements, havestudents classify each angle as acute, right, obtuse, or straight.
With the investigations in this lesson, let students play with the protractor and compass. Most students have seenthese tools, but never used them. After going over Investigation 1-2, tell students to draw 3-4 angles on the back ofthe handout from above. Then, after going over Investigation 1-3, have students copy these 3-4 angles. Once theseangles are copied by students, walk around and give them a participation grade and answer questions.
Auditory Learners
For Investigations 1-2 and 1-3, explain each step as you complete it. Answer questions as you go over this activity.These investigations may take a little longer than you expect to complete, but if you do not take the time to answerquestions now, students will have even more questions the next time they need to do either of these tasks.
Special Needs/Modifications
Leave the terms on the board from the previous class and add the new terms from this lesson. As the chapterprogresses, continue to add new terms. At the end of the chapter, students should double-check that they have all thedefinitions and theorems that are on the board.
Rather than giving students a large class work assignment, break it up. Have students do a few problems afterInvestigation 1-2, come back and then do a few more after Investigation 1-3, then a few more after going over theAngle Addition Postulate.
Midpoints and Bisectors
Journal Entry
What does it mean to bisect something? Can you think of any examples in real life? Write 2-3 sentences.
Visual Learners/ELL
We can differentiate this lesson by organizing the content into a table. This should be done as part of a classdiscussion, not ahead of time and then presented. Creating the chart is meant to be interactive. Since this lessonworks with line segments and angles, we can use these as the two columns of our table. Here is a sample of a tableand how to organize it for the students.
TABLE 4.1:
Line Segments AnglesCongruent(draw a picture with labels and markings)
Congruent(draw a picture with labels and markings)
Equality(write congruence statement vs. equality)
Equality(write congruence statement vs. equality)
Segment Midpoint (add to picture above) Angle Bisector (add to picture above)Segment Midpoint Postulate Angle Bisector Postulate
Be sure to explain each concept and how they are different and similar depending on whether you are working withline segments or angles. For the Segment Midpoint and Angle Bisector Postulates, write each out symbolically.The Segment Midpoint Postulate can be written, “For AB there is one point M, such that AM = MB.” Use the samelabels that were used in the picture you drew. Especially for EL Students, use as little language as possible. Rely on
274

www.ck12.org Chapter 4. Basic Geometry TE - Differentiated Instruction
the symbols to get the concept across. As an alternate method to solve Example 3, you can use the slope (triangle)between B and M to and duplicate it on the other side of M to find A.
Example 3, Alternate Solving Method: Either plot M and B or find the horizontal distance and vertical distancebetween the two points. Using the picture, from B to M, we move to the left 4 and up 5. Therefore, we wouldrepeat those distances from M to find A. This means we would need to subtract 4 from the x−value and add 5 to they−value of M.
(3−4,−1+5) = A(−1,4)
Notice that we get the same answer with this alternate method. Encourage students to use which ever method theyare most comfortable with for these types of problems. You might only want to show this method to students thatare having difficulty with the method used in the text, to avoid confusion.
Be sure to show students the animations listed in the text of the constructions of Investigations 1-4 and 1-5. Both ofthese animations are very helpful for visual learners and it is recommended that you show them to the class at leasttwice after going over the investigations. The more students can see each construction (and any construction), themore comfortable they will be with using these tools.
Kinesthetic Learner
When introducing the Midpoint Formula, tell students the order of the coordinates does not matter. They can decidewhich point they would like to put first. To demonstrate this, redo Example 2 with the second point first.
Example 2, Alternate Solving Method:
(−5+9
2,14−2
2
)=
(42,122
)= (2,6)
You could also have half the class do the example (before showing them the answer) using the first point first andthe other half can do the example using the second point first in the Midpoint Formula.
Auditory Learner
Before Example 4, discuss the students’ journal entries from the beginning of class. This will help them to understandthe definition of a segment bisector and perpendicular bisector.
275

4.1. Basics of Geometry www.ck12.org
Angle Pairs
Visual Leaner
When introducing the concept of a linear pair, ask students what a straight angle is and if they remember howmany degrees it has. Draw one on the board. Then, draw a ray from the vertex of this right angle and explain thatthis straight angle is now a linear pair. This will help students visualize the definition and that the two angles aresupplementary.
Before doing Example 5, you may need to do a few easier examples first, so students can get used to seeing linearpairs and the relationship.
Additional Example: Find m 6 DBC.
Solution: 6 ABD and 6 DBC are a linear pair, so they are supplementary. Set up an equation.
m6 DBC+128◦ = 180◦
m6 DBC = 52◦
You may need to do several examples like the one above before students have fully internalized the concept.
Visual/Kinesthetic/EL Leaners
After going over all the material in the lesson, have students create a Venn diagram that compares the different anglerelationships in this lesson. Have students work in groups and pass out a blank diagram. Do two separate diagrams;one for complementary vs. supplementary and a second for linear pair vs. vertical angles. Remind students that thethings that are the same go in the overlapping portion of the two circles.
Once they are done, draw two large Venn diagrams on the board and have a “reporter” from each group tell youwhat they came up with. The successive groups only need to add what is not on the board. Decide whether you wantstudents to copy these into their notes.
Modifications
As with any of the investigations, you can decide how to use them in your classroom. Suggestions are: have thestudents do them individually or in groups (as you walk around and answer questions), you do them and studentscan follow along by also doing the activity or by taking notes, or you can demonstrate the investigation while thestudents observe.
To help students, you can take a picture of the above Venn diagrams and either put it on your website (if you haveone), or make copies and pass them out in the following class.
276

www.ck12.org Chapter 4. Basic Geometry TE - Differentiated Instruction
Classifying Polygons
Auditory/Kinesthetic Leaner
After defining the different classifications of triangles, ask students the following questions:
1. Can a scalene triangle be
a. right?b. acute?c. obtuse?
2. Can an isosceles triangle be
a. right?b. acutec. obtuse?
3. Can an equilateral triangle be
a. right?b. acutec. obtuse?
Ask students to draw a picture of the possible combinations and an explanation as to why certain combinations willnot work. Discuss the answers as a class.
Visual/Auditory Learner
An alternative definition to a concave polygon is: A polygon where at least one diagonal crosses outside the figure.Explain this definition by drawing a picture.
Both figures above are hexagons, but the one on the right has three diagonals that cross outside the figure (in red).That makes this hexagon concave, and the one on the left is convex. Notice that both hexagons will still have thesame number of diagonals.
Kinesthetic Learner/Collaborative Learning
First, tell students to draw either four concave polygons or four convex polygons and they cannot tell anyone elsewhat they have chosen (this should be done individually). When finished, the students form groups and exchangepapers. The must show, by drawing lines, whether the figures they have been given are concave or convex.
Modifications
Provide students with diagrams of a triangle, quadrilateral, pentagon, and other polygons. Have the vertices labeledand sides labeled. Be sure that students understand where to find the interior angles because they will need to do thisto classify triangles. Help students draw in diagonals for the larger polygons. You can also copy the table in the textand give that to students as an aid (under the Classifying Polygons sub-header).
Continue to write all vocabulary words on the board. It is up to you to leave the words up during the test or not.
277

4.2. Reasoning and Proof www.ck12.org
4.2 Reasoning and Proof
Inductive Reasoning
Visual/Kinesthetic Learners
Have students work in pairs. Each student draws a visual pattern (Examples 1-3) and exchanges papers with theirpartner. Have each student write down the next two steps and explain the rule of the pattern on a separate piece ofpaper. Then, have each pair exchange with another pair of students and repeat. Each student should look at threeunique patterns this way. This process can be repeated with number patterns as well. When writing out the rule forthe number pattern, encourage students to try and find the equation.
Auditory Learner
When going over a counterexample, use a few statements that students might be familiar with. See if they can figureout an example that would make the statement false.
• All integers are positive or negative (zero would be the counterexample).• I only use my calculator in math class (let students be creative with these counterexamples; paying bills could
be one possibility).• A number that is divisible by 3 is also divisible by 9 (6, 12, 15, etc. are counterexamples).• If a number is divisible by 2 and 3, it is also divisible by 12. (6 and 18 are counterexamples).
Read these statements aloud to students and see if they can come up with the counterexamples. The first statementonly has one counterexample, but the other three have infinitely many. See if students can come up with severalcounterexamples for these.
Modifications
Continue to write vocabulary on the board throughout this chapter. Erase the vocabulary from the first chapter.
Give students a 100×100 grid for the locker problem (Know What?) so they can fill it out and find the pattern.
Give students a handout with the false statements above (for finding the counterexample). Then, they can write down1-2 counterexamples and turn in the handout as a class work assignment. You can also put several visual and numberpatterns on this handout such that students can find the next 2-3 terms and describe the rule.
Conditional Statements
Journal Entry
How do you use inductive reasoning in your day-to-day life? Give and explain 2-3 examples.
When students are finished with their journal entries have a discussion about their answers and reasoning.
Kinesthetic/Auditory Learners
Working in pairs, have each student create a conditional statement that is not math related. It can be silly, but shouldbe a true statement. Have the partners switch papers and then they must write down the converse, inverse, and
278

www.ck12.org Chapter 4. Basic Geometry TE - Differentiated Instruction
contrapositive. Then, let students determine which of these three statements are true. Do this activity after Example4.
ELL Students
Encourage ELL students to use the symbolic notation when writing the converse, inverse, and contrapositive. This isa very language-intensive chapter and anytime students can use symbols will help them to understand the conceptsbetter. For example, you could introduce the symbolic notation at the beginning of the lesson and then students canset the hypotheses and conclusions equal to p and q. Encourage students to find p and q, then they can write “Ifp, then q.” Then, when the converse, inverse, and contrapositive are introduced, students will have an easier timetranslating the original statement.
There are also words that mean the same thing as “if” in conditional statements, such as “when.” Tell students that“if = when.” Also, whatever is after the “if” is the hypothesis, even when “if” is in the middle of the statement (seeStatement 2). “If and only if” can also be replaced with “iff.” All students might like this shortcut so they do nothave to write as much.
Visual Learner
Students might get caught up in the symbolic notation of statements. Explain to students they can write the statementstwo different ways. Encourage students to use whichever representation they are most comfortable with.
Original Statement: If p, then q. p→ q
Converse: If q, then p. q→ p
Inverse: If not p, then not q. ∼ p→∼ q
Contrapositive: If not q, then not p. ∼ q→∼ p
Biconditional: p if and only if q. p↔ q
Modifications
This is a difficult lesson for special needs students to understand because the language and symbols are so verbal.Many students with language based learning disabilities will find this challenging. You could alter these definitionsand provide an example (in words not symbols) for each term. For example:
Converse:
Switch the hypothesis and the conclusion of the conditional statement.
Inverse:
Add “nots” to the hypothesis and conclusion to negate the original statement.
Contrapositive:
Add “nots” to the hypothesis and conclusion to negate the converse.
Switch the hypothesis and conclusion and negate both parts.
Biconditional Statement:
Combine the conditional statement and its converse together.
Deductive Reasoning
Visual/Auditory Learners
Write the “Door A” and “Door B” statements on the board (from the Know What?). Show this to students at thebeginning of the lesson and let the students read each statement for a few minutes. Then, have one student read each
279

4.2. Reasoning and Proof www.ck12.org
door aloud and have a discussion as to why they think the tiger is behind which door. This is a great introductoryactivity that allows students to use deductive reasoning. Students need to figure out which statement is true.
Ask students what it means to be “logical.” See if they can generate a definition on their own that is close to the onein the text. In this lesson, we introduce the concept of a “logical argument.” Arguments can be sound, or logical, butnot necessarily true. This will confuse students. Here are similar examples of a logical argument and an illogicalone. Present each to your students and see if they can determine which one is which.
Additional Example: Of the two arguments below, one is logical and the other is illogical. See if you can determinewhich one is which.
I f it is f oggy in San Francisco, then you cannot see the Golden Gate Bridge.
I can′t see the Bridge. T here f ore, it is f oggy in San Francisco.
I f it is f oggy in San Francisco, then you cannot see the Golden Gate Bridge.
I can see the Bridge. T here f ore, it is not f oggy in San Francisco.
Solution: Use the symbol notation to determine what type of logic or statement is being used.
I f p, then ∼ q. I f p, then ∼ q.
∼ q. T here f ore, p. q. T here f ore, ∼ p.
The first statement’s (blue) conclusion is in the form ∼ q→ p, which is the converse of the original statement. Weknow that the converse is false, so this is not a logical conclusion. The second statement’s (red) conclusion is in theform q→∼ p. Here, p and q are switch and they are also both negated, which means this is the contrapositive. Weknow that the contrapositive is the logical equivalent of the original statement, so this is a logical conclusion.
Be careful to explain that even though the red conclusion is logical, it might not be true because the original statementmight not be true. Of course, if it is foggy around the Golden Gate Bridge, we probably would not be able to seeit. However, it could be foggy in a different neighborhood or you could be driving on the Bridge. In both of thesecases, our original statement is false. See if students can determine other cases when the original statement could befalse.
As with the previous two lessons in this chapter, this lesson is also very verbal. Some students might have troublewith difference between inductive and deductive reasoning. First, inductive reasoning does not have all these Lawsof logic (Detachment, Contrapositive, and Syllogism). So, if students see these types of statements, they shouldknow that the logic is deductive. Secondly, stress that inductive reasoning uses patterns. So, any number pattern,shape pattern, or patterns in nature or observation will be inductive reasoning.
Modifications
Students might want alternative definitions to the Laws of logic.
Law of Detachment:
Assume a given statement is true. If you are told the hypothesis of this statement, then you can conclude that theconclusion must be true.
Law of Contrapositive:
Assume a given statement is true. If you are told the negated conclusion of this statement, then you can concludethat the negated hypothesis must be true.
Law of Syllogism:
You are given at least two true conditional statements that tie together such that the conclusion of the first is thehypothesis of the second. If you are told the hypothesis of the first statement, you can conclude that the conclusionof the last statement must be true.
280

www.ck12.org Chapter 4. Basic Geometry TE - Differentiated Instruction
Algebraic and Congruence Properties
Visual Learners
Review the definition of equality and write all the Properties of Equality on one half of the board. Then, write thestatements of congruence on the other half of the board. Show students how to combine these two together visually.Use different colored chalk or pens (on a whiteboard) to illustrate how combining these statements together can helpto prove the given statement. Practice this with a few examples. Encourage class participation. Example 5 uses bothcongruence and equality.
Kinesthetic Learners/Collaborative Learning
There are 12 properties of equality and congruence. After going over these properties, divide students into 12 groupsand assign each a property. Give each group a large, poster-sized piece of paper and markers. On their paper, theyneed to clearly state the property and draw and give two examples using line segments, angles or algebra. Let themuse the examples in the text to get started. At the end of the activity, allow groups to quickly present their propertyto the class. Place these posters around the room. You can decide if you would like to leave them up for the test ornot.
Modifications
If you have many special needs students in the class, you may want to break up this lesson over two days.
Day One: Review properties and statements of congruence. Review basics of geometry.
Day Two: Show students how to use the two and introduce the two-column proof.
Here are some steps for combining and using properties of equality vs. congruence.
1. Look at whether you are working with line segments or angles. This will help you choose a property ofcongruence. If the statement is an equation of equality, students will use an equality property.
2. Choose a property that explains the given statement.3. Students might wonder how to go “back and forth” between equality and congruence. Reasons for this could
be “If the angles are congruent/equal, then they are equal/congruent” or the definition of equality/congruence.
When introducing proof, go very slowly. Students with special needs will have a very difficult time with proofs. Beprepared to go over Examples 4 and 5 at least two times each. Either give each student a print-out of the steps forproofs in the text or discuss them in the notes. Encourage students to have this list out while they are preformingclass work or homework problems. As an added modification, all the proofs in this text are fill-in-the-blank. A fewextra examples in the Teaching Tips chapter are placing the Reasons in the correct order.
Proofs about Angle Pairs and Segments
Visual Learners
In this lesson we introduce the shortcut to labeling angles. The reason being, we did not want students to get confusedand only use one letter in the wrong instances. You can decide if you want to introduce this shortcut at all. However,it is recommended that students know this option because it is commonly used in standardized testing.
Encourage students to use symbols or abbreviations where ever possible when doing proofs. Agree upon theseabbreviations and/or symbols as a class to avoid confusion.
Kinesthetic Learner
To illustrate the Same Angle Supplements (or Complements) Theorem, make several angles of various measures on
281

4.2. Reasoning and Proof www.ck12.org
construction paper or overhead transparencies and give one to each student. Make sure to make a few of your anglesequal, some supplementary and some complementary. Draw a straight angle (or right angle) on the front board oroverhead and place an angle (100◦, for example) on this vertex. Then, have students come up to the board and placetheir angle on the vertex of the straight angle. Continue in this manner until a supplement is found (for example,if the angle is 100◦, the supplement is 80◦). Once the supplement is found, remove it and place it somewhere elseon the board. A second supplement (another 80◦ angle) should also be in a student’s possession. At this point askstudents to see if they have a congruent angle to this angle. This student will come up and place their angle on theboard. Then, ask students to draw a conclusion about the two supplemental angles. Repeat this activity with a rightangle and complements.
Angles to give to students (draw these on transparencies or construction paper, with or without measurements):
40◦ 140◦ 130◦ 50◦
40◦ 140◦ 120◦ 60◦
20◦ 110◦ 10◦ 80◦
20◦ 110◦ 30◦ 150◦
45◦ 135◦ 45◦ 135◦
160◦ 170◦ 125◦ 90◦
Angles to draw on the board: 50◦,70◦,45◦ Draw these in a right angle for complements.
40◦,70◦,135◦ Draw these in a straight angle for supplements.
Take the proof of #1 in the Review Questions and remove all the statements and reasons so that it is blank. Writeeach statement and reason on a separate piece of paper and give each student one (see the Solution Key). There willbe 10 statements and 10 reasons. Do not tell students which one they have. Write the blank proof, with given, prove,and diagram on the board. Starting with the Given statement, have students place their statements or reasons on theboard in the correct order. Encourage students to work together and have an open discussion about what goes next.This activity can be done for any proof.
An alternative to the previous proof activity is to give groups of students an envelope with all the statements andreasons (all written on separate pieces of paper) for a proof. Write the Given, Prove, and diagram on the front of theenvelope. Then, have groups work together to put the statements and reasons in the correct order. Once groups aredone, they can switch envelopes until every group has done all the proofs.
Modifications
Show students how to draw a diagram to illustrate a given statement. A picture often helps special needs students.If no picture is given, always encourage students to draw their own.
Review the basic definitions of right angles, supplementary angles, complementary angles, and vertical angles anddraw an example of each on the board/overhead. Also review that a postulate or property does not need to be proven,but a theorem does.
Explain to students how to move from the basic definition of each angle relationship to the theorem.
Write each of the theorems on the board/overhead and request that students copy this information in their notebooks.
Be sure that the students have a current list of postulates, properties and vocabulary where they can access it easily.
When grading proofs, be lenient on the reasoning at first. If students describe the theorem or property, that shouldbe ok. Also, with proofs involving right angles, students might have a difficult time identifying which theorem ordefinition is the correct reason.
282

www.ck12.org Chapter 4. Basic Geometry TE - Differentiated Instruction
4.3 Parallel and Perpendicular Lines
Lines and Angles
Visual Learners/ELL
Continue to write the vocabulary on the board. In this chapter there are new symbols and labels for parallel andperpendicular lines. Make sure to include these in your definitions. You could also write a chart, like the one belowfor these definitions.
TABLE 4.2:
Word Definition Label Mark it in a PictureParallel Two lines that are in the
same plane and never in-tersect.
←→AB||←→CD
Perpendicular Two lines that intersect toform a 90◦ angle.
←→AB ⊥←→CD
You can have students continue this chart for definitions for the rest of the chapter.
Visual/Kinesthetic Learners
Have students walk around the room (or school) and make a list of the places where they see parallel, perpendicularand skew lines. They should draw pictures of the location. If students have access to a digital camera, they couldalso take pictures of the real-life examples. Students could work in pairs on this activity.
Investigations 3-1, 3-2, and 3-3 are excellent visual representations of the Parallel Line and Perpendicular LinePostulates. If you do not have access to patty paper, wax paper works very well. Just make sure to precut squaresfor each student. Encourage students to draw a line that has a different orientation than their neighbor. When theyare done with each investigation, have students compare their drawings to the people around them.
When working with transversals, use color to indicate the different angles in a diagram. Use color for definitionstoo. This will help students to keep things clear and organized.
Modifications
Decide if you want the investigations to be individual, pair, or teacher-led activities. To help students, you couldgive them a handout with Step 1 already completed (the point and line drawn for them) for each investigation.
Before defining transversals, review the meaning of the following words: adjacent, vertical, interior, exterior,corresponding and consecutive. Draw pictures to aid in the discussion of transversals.
You could also give students a chart for the different types of angles formed by lines and transversals. Leave the lastthree columns blank and fill out as a class. For the last column, have students generate their own definitions for each
283

4.3. Parallel and Perpendicular Lines www.ck12.org
angle relationship.
TABLE 4.3:
Name of Relationship Picture Number of LinesNeeded
Relationship in Words(Definition)
Vertical Angles
Linear Pair
Corresponding Angles
Alternate Interior Angles
Alternate Exterior Angles
Same Side Interior Angles
284

www.ck12.org Chapter 4. Basic Geometry TE - Differentiated Instruction
Properties of Parallel Lines
Journal Entry
Where do you see parallel lines in real life? Why do you think they are important to day-to-day activities or certainjobs?
Collaborative Learning/Auditory Learners
Divide students into groups of four. Assign each of the four students a different topic-Corresponding AnglesPostulate, Alternate Interior Angles Theorem, Alternate Exterior Angles Theorem, Consecutive Interior AnglesTheorem.
Let the students know that their assignment is to prepare a lesson and teach the other students in the group abouttheir topic. They can use their notes, a diagram, real life examples, a poem, a song, whatever they would like tomake the topic clear. The other students in the groups will let the “teacher” know what he/she did well and also offersuggestions to improve the presentation. You can decide whether or not the peers should grade each “teacher” oryou do. If you have the students grade each other, give them a clear rubric with 3-5 criteria and a grade of 1-5 foreach. Then, have the students add up the criterion for a final score.
Visual Learners
For the Algebra Connection examples (Examples 5 and 7), students might need more explanation than what is given.To help students, add in the following red steps.
(4x−10)◦ = 58◦
+10◦+10◦
4x = 68◦
4 4
x = 17◦
(3y+53)◦ = (7y−55)◦
−3y+55◦−3y+55◦
108◦ = 4y
4 4
27◦ = y
Example 11 introduces a fourth line so that there are two sets of parallel lines. It might be helpful for students if youput this example on the overhead projector. Place a second transparency over the example and trace one angle, 6 2for example, and move it over all the angles that it is congruent to. You could repeat this with 6 1 for the other anglesas well.
Throughout this lesson, it might be helpful to show students different sets of parallel lines cut by transversals so thatstudents become familiar with several different orientations. As a warm-up activity, you could place two or threedifferent versions on the board and ask students to find different angle pairs.
285

4.3. Parallel and Perpendicular Lines www.ck12.org
Modifications
Review the angles formed by a transversal from the previous lesson.
For Investigation 3-4, give students Steps 1 and 2 on a handout, already draw for them. You can ask them if the linesare parallel, how do they know, and then find all the angle measures. This will shorten the investigation, as well aseliminate a lot of questions about how to correctly draw the lines.
Proving Lines Parallel
Auditory/Visual Learner
As a part of going over the Review Queue, ensure that students remember what a converse is and how to determineif it is true or not.
Visual/Kinesthetic Learner
Draw two different pictures of the board/overhead, one with parallel lines cut by a transversal, and a second wherethe lines are not parallel. Do not mark the first set of lines parallel. Then, fill in sets of corresponding angles. For thefirst set of lines, tell students that the corresponding angles are congruent. Then, see if they can arrive at the correctconclusion. For the second set of lines, ask students if they think the corresponding angles are congruent. Whenthey arrive at the correct answer, then ask if they feel those lines are parallel. This will lead to the Converse of theCorresponding Angles Postulate.
This activity can be repeated for the other angle relationships.
286

www.ck12.org Chapter 4. Basic Geometry TE - Differentiated Instruction
Modifications
Review what a conditional statement is and how to write the converse of a conditional statement.
Practice writing converse statements from conditional statements by using real life examples.
Investigation 3-5 is a very powerful construction, but can also be quite challenging for students. You might want tomake this a teacher-led investigation to ease students. Another option is to give students the picture of completedSteps 1 and 2. Then, they just have to copy the angle at A onto point B.
To make proofs easier for students, you can give them a Statements/Reasons bank, where all the correct answers arein a box, along with some extras. This way they can pick which answers they want to go and at what step. This isa nice option to help students start working with proofs. Eventually, the goal would be to have students complete aproof without the aid of a bank.
Allow students to shorten the names of theorems and properties to make it easier for them to write. You could alsogive students a complete list of all the theorems, postulates, and properties for each chapter. You can decide if youwant to let students use the list for tests or quizzes.
Review the Transitive Property before introducing the Parallel Lines Property.
Properties of Perpendicular Lines
Auditory/Kinesthetic Learners
Before defining and going over what congruent linear pairs are, ask students if they can figure out what they are bythe name alone. Have an open discussion and allow students to come up to the board to draw pictures. At the end ofthis discussion, fill in any holes that students might have missed.
When discussing perpendicular transversals, have students refer to Review Queue #1. See if students can come upwith Theorems 3-1 and 3-2 on their own as part of a class discussion.
Visual Learners
It might be difficult for students to infer the conclusions of Example s 5-7 without a little help. For Example 5,remind students that the two angles, 55◦ and 35◦, make up the vertical angle with 6 1. Therefore, because they addup to 90◦,m6 1 must be 90◦ as well. You could make a similar argument with Example 6. Example 7 is the converseof Examples 5 and 6. Students need to determine if l and m are perpendicular. In this example, you could encouragestudents to find all the other angle measures. If they find that the three other angles are 90◦ (and they should), thenthey should realize that l and m are perpendicular.
Modifications
Review the following vocabulary prior to beginning the lesson: congruent, perpendicular, complementary, supple-mentary, vertical angles, adjacent angles, and linear pair.
Give students a handout with all the pictures and directions for each example. This will give students an instantplace to write notes. Then, you can go over the examples as a class and students can fill in the solutions and add anyother important information. You can decide to give students a grade for their notes, whether it be for participationor class work.
Parallel and Perpendicular Lines in the Coordinate Plane
Visual/Kinesthetic Learners
287

4.3. Parallel and Perpendicular Lines www.ck12.org
After Example 4, students may need additional review of finding the equation of a line. You can use Examples 1 and2. Once students have found the slopes between the points, they can also find the equations of the lines.
Example 1 Continuation: Find the equation of the line between (2, 2) and (4, 6).
Solution: We found that the slope was 2. Plug this into the equation of a line, y = mx+b, for m. Use either point forx and y in the equation. You could have half the class choose the first point and the other half use the second point.Then, reconvene and compare to make sure everyone got the correct answer.
Point (2, 2)
y = 2x+b
2 = 2(2)+b
2 = 4+b
−2 = b
Point (4, 6)
y = 2x+b
6 = 2(4)+b
6 = 8+b
−2 = b
Using either point, we see that the y−intercept is 2. The equation of the line is y = 2x−2.
Example 2 Continuation: Find the equation of the line between (-8, 3) and (2, -2).
Solution: We found that the slope was −12 . Again, have students use both points and compare.
Point (-8, 3)
y =−12
x+b
3 =−12(−8)+b
3 = 4+b
−1 = b
Point (2, -2)
y =−12
x+b
−2 =−12(2)+b
−2 =−1+b
−1 = b
Using either point, we see that the y−intercept is -1. The equation of the line is y =−12 x−1.
288

www.ck12.org Chapter 4. Basic Geometry TE - Differentiated Instruction
Visual Learners
Another approach to Examples 1-4, would be to plot the points on the board or overhead (on a grid/graph of somekind) before going over the equation for slope. Have students draw horizontal and vertical lines from the points tocreate a slope triangle. Here are Examples 1 and 2 with this alternative approach.
Example 1, Alternative Approach: What is the slope of the line through (2, 2) and (4, 6)?
Solution: Draw a slope triangle between the two points. Then, count the length of the horizontal and vertical sides.
After counting the sides, make a fraction. We say “rise over run,” so the “rise” or the y−distance will be in thenumerator and the “run” will be in the denominator.
m =42=
21= 2
Example 2, Alternative Approach: Find the slope between (-8, 3) and (2, -2).
Solution: Draw a slope triangle between the two points. Then, count the length of the horizontal and vertical sides.
After counting the sides, make a fraction. We say “rise over run,” so the “rise” or the y−distance will be in thenumerator and the “run” will be in the denominator.
m =−510
=−12
When counting the sides, start at the first point. And, always reduce all fractions.
When you get to Example 3, students will see that there is no vertical leg (or y−direction) and cannot create a slopetriangle. Because we cannot rise, this is a horizontal line and will only pass through the y−axis, making the equation
289

4.3. Parallel and Perpendicular Lines www.ck12.org
y = b. The opposite occurs with Example 4. There will be no run, so the line will only pass through the x−axis,making the equation x = b.
With Example 5, you can encourage students to graph the line and plot (9, -5) on a piece of graph paper. Then, theycan use the slope from the line, start at (9, -5) and create the slope triangle (fall 1, run 3). Doing this, we find that asecond point on the line is (12, -6). You can also show students that they can go backwards by rising 1 and runningin the negative direction 3. This would give them a point of (6, -4). Have students connect these points (see picture).Where this line passes through the y−axis will be the y−intercept. After going over this approach, show studentsthe algebraic approach.
If you applied this graphical approach to Example 7, the graph would look like the one to the right. Notice thatstudents would have to draw a very large y−axis in order to find the y−intercept in this way.
290
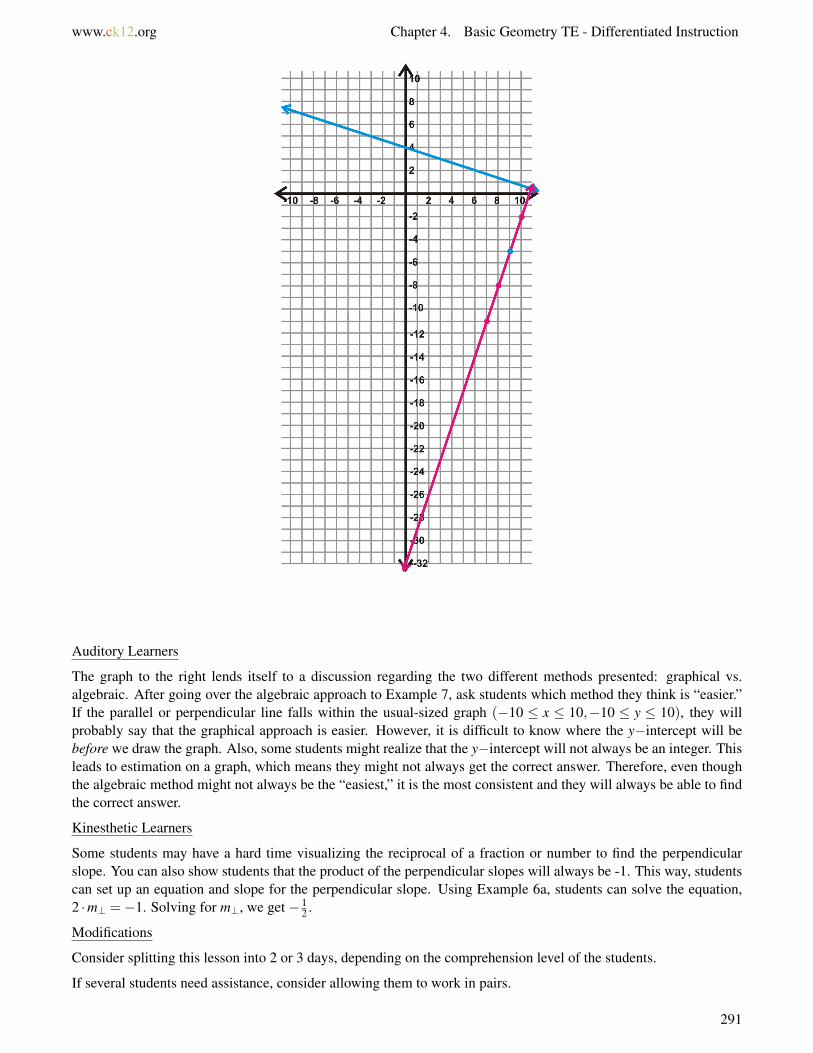
www.ck12.org Chapter 4. Basic Geometry TE - Differentiated Instruction
Auditory Learners
The graph to the right lends itself to a discussion regarding the two different methods presented: graphical vs.algebraic. After going over the algebraic approach to Example 7, ask students which method they think is “easier.”If the parallel or perpendicular line falls within the usual-sized graph (−10 ≤ x ≤ 10,−10 ≤ y ≤ 10), they willprobably say that the graphical approach is easier. However, it is difficult to know where the y−intercept will bebefore we draw the graph. Also, some students might realize that the y−intercept will not always be an integer. Thisleads to estimation on a graph, which means they might not always get the correct answer. Therefore, even thoughthe algebraic method might not always be the “easiest,” it is the most consistent and they will always be able to findthe correct answer.
Kinesthetic Learners
Some students may have a hard time visualizing the reciprocal of a fraction or number to find the perpendicularslope. You can also show students that the product of the perpendicular slopes will always be -1. This way, studentscan set up an equation and slope for the perpendicular slope. Using Example 6a, students can solve the equation,2 ·m⊥ =−1. Solving for m⊥, we get −1
2 .
Modifications
Consider splitting this lesson into 2 or 3 days, depending on the comprehension level of the students.
If several students need assistance, consider allowing them to work in pairs.
291

4.3. Parallel and Perpendicular Lines www.ck12.org
The Distance Formula
Visual Learners
Rather than just plugging in the points to the Distance Formula, students can use the slope triangle and the PythagoreanTheorem (which they have probably seen in a previous math class). Here is an alternate solution to Example 1.
Example 1 Alternate Approach: Find the distance between (4, -2) and (-10, 3).
Solution: Draw the slope triangle and find the lengths of the horizontal and vertical sides.
The hypotenuse of the right triangle is the length between the two points. Using the Pythagorean Theorem, we have:
52 +142 = c2
25+196 = c2
221 = c2
√221 = c
Explain to students that this approach is the Distance Formula. This technique can also be applied to Example 2.
Visual/Kinesthetic Learners
For Examples 5 and 6, students might get confused by Step 3. Rather than count down from the y−intercept, draw aperpendicular line (using a ruler) from the y−intercept. Then, find this point of intersection. Continue with Step 4.
Modifications
The subsection titled “Shortest Distance between Parallel Lines with m = 1 or -1” can be skipped if you feel yourstudents are struggling with the content of this section. This subsection is not a part of many states’ standards. Makesure to double-check your state’s standards before omitting this subsection.
292
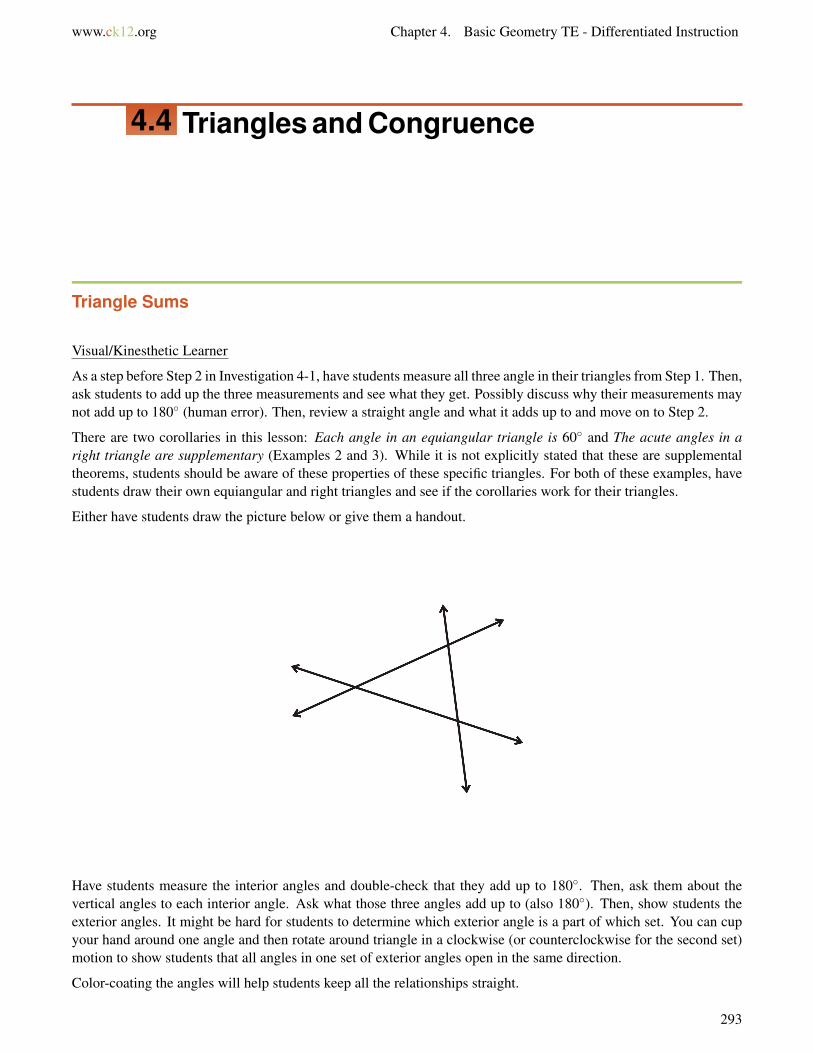
www.ck12.org Chapter 4. Basic Geometry TE - Differentiated Instruction
4.4 Triangles and Congruence
Triangle Sums
Visual/Kinesthetic Learner
As a step before Step 2 in Investigation 4-1, have students measure all three angle in their triangles from Step 1. Then,ask students to add up the three measurements and see what they get. Possibly discuss why their measurements maynot add up to 180◦ (human error). Then, review a straight angle and what it adds up to and move on to Step 2.
There are two corollaries in this lesson: Each angle in an equiangular triangle is 60◦ and The acute angles in aright triangle are supplementary (Examples 2 and 3). While it is not explicitly stated that these are supplementaltheorems, students should be aware of these properties of these specific triangles. For both of these examples, havestudents draw their own equiangular and right triangles and see if the corollaries work for their triangles.
Either have students draw the picture below or give them a handout.
Have students measure the interior angles and double-check that they add up to 180◦. Then, ask them about thevertical angles to each interior angle. Ask what those three angles add up to (also 180◦). Then, show students theexterior angles. It might be hard for students to determine which exterior angle is a part of which set. You can cupyour hand around one angle and then rotate around triangle in a clockwise (or counterclockwise for the second set)motion to show students that all angles in one set of exterior angles open in the same direction.
Color-coating the angles will help students keep all the relationships straight.
293

4.4. Triangles and Congruence www.ck12.org
Modifications
Give students a handout for Step 1 for Investigation 4-1.
Show the additional steps for Examples 9 and 10. Additional steps are in red.
Example 9
(8x−1)◦+(3x+9)◦+(3x+4)◦ = 180◦
(8x+3x+3x)◦+(−1+9+4)◦ = 180◦
(14x+12)◦ = 180◦
−12◦ −12◦
14x = 168◦
14 14
x = 12◦
Example 10
(4x+2)◦+(2x−9)◦ = (5x+13)◦
(4x+2x)◦+(2−9)◦ = (5x+13)◦
(6x−7)◦ = (5x+13)◦
−5x+7◦ −5x+7◦
x = 20◦
Congruent Figures
Visual Learners
294

www.ck12.org Chapter 4. Basic Geometry TE - Differentiated Instruction
Review what it is to be congruent vs. equal. Show students two congruent line segments, congruent angles and thenintroduce two congruent triangles. In this lesson, we do not introduce any shortcuts so that students can get used tothe fact that there are six sets of congruent pieces that make up two congruent triangles.
Copy the triangles from the definition of Congruent Triangles onto an overhead transparency. Cut the triangles outto visually show students that the two triangles are congruent. This can also be repeated with the triangles fromExample 1.
Additional Example: Draw ∆CAT ∼= ∆DOG (after Example 3).
Solution: These two triangles can be drawn in several different ways. Here is one possible answer. Students needto make sure that the corresponding sides and angles match up when labeled. The use of color is very helpful forstudents to visualize corresponding angles.
Kinesthetic Learners
Before introducing the Third Angle Theorem, have students draw two different congruent triangles (or, to modifythis, give them a handout with two congruent triangles on it, without any markings). Ask students to measure twoangles in the first triangle. Using the Triangle Sum Theorem, have students find the measure of the third angle.Then, have students measure two angles in the second triangle. Before finding the measure of the third angle, see ifthe students can infer what the measure of the third angle will be. This can lead to a discussion of the Third AngleTheorem.
Modifications
Allow students to have a list of the theorems, postulates, and properties that will be useful for this chapter andtriangle proofs.
Give students handouts of triangles or other figures any time the directions say to “draw” something. This will beeasier on you and ensure accuracy when students are doing self-discovery. To take this a step further, you can alsogive students handout for each day’s notes. You can list the important theorems and vocabulary. Then, as you goover the notes, students fill in the information.
Triangle Congruence using SSS and SAS
Auditory/Visual Learners
Use the Know What? as a discussion point to see if the two triangles are congruent. Ask students what they think.Have students volunteer to represent the fridge, sink and stove in each house and place them the appropriate distancesapart to represent each kitchen. Rotate the second kitchen in the picture (the neighbor’s kitchen) so that the 3 ft. and2.5 ft. sides match up with the first kitchen. Then, ask students if the two kitchens are congruent. Students shouldsee that they are not. As an extension, ask students if they feel the angle between the 3 ft. and 2.5 ft. sides in eachtriangle are congruent or not. (These angles are not congruent because the opposite sides are not congruent.)
Visual/Kinesthetic Learners
Rather than using a traditional two-column proof, students can use a paragraph proof or a flow chart proof.
295

4.4. Triangles and Congruence www.ck12.org
Example 2, Alternate Approach: Write a paragraph proof to show that the two triangles are congruent.
Given: AB∼= DE
C is the midpoint of AE and DB.
Prove: ∆ACB∼= ∆ECD
Solution: A paragraph proof is a written out version of a two-column proof.
We are given that AB∼= DE and C is the midpoint of AE and BD. From the definition of a midpoint, we can concludethat AC ∼=CE and DC ∼=CB. By the SSS Postulate, we can conclude that ∆ACB∼= ∆ECD.
Example 2, Alternate Approach: Write a paragraph proof to show that the two triangles are congruent.
Given: AB∼= DE
C is the midpoint of AE and DB.
Prove: ∆ACB∼= ∆ECD
Solution: A flow chart proof is a more visual representation of a two-column proof. Start with one given and alloweach step to “flow” from one to the next. Each reason is written below the statement.
After Example 6 you can do the following activity as an additional example.
1. Each student draws a triangle on the coordinate grid and the passes his/her paper to the right.2. The next student takes the triangle and uses the distance formula to figure out the lengths of each side of the
triangle. Then he/she passes the paper to the right.
296

www.ck12.org Chapter 4. Basic Geometry TE - Differentiated Instruction
3. The next student takes the measurements and draws a triangle congruent to the first triangle somewhere on thecoordinate grid. Then he/she passes the paper to the right. Using slope triangles might also be helpful here.
4. The final student checks the work of all of the others.
Modifications
Give students a handout with a 5 in. line segment drawn on it for Step 1 of Investigations 4-2 and 4-3. You will haveto give students one handout for each investigation. On this handout, you can also put 4 in. and 3 in. segments forstudents to use as a guide for the other steps.
For both of these investigations, you can also do either as a teacher lead activity and encourage students to followalong.
Make sure to review the Distance Formula before Example 5.
Triangle Congruence using ASA, AAS, and HL
Visual Learners
When going over the Review Queue, students might have a hard time visualizing the congruent triangles. Considerseparating the two triangles to show that DB∼= DB by the Reflexive Property.
Point out to students that when the triangles are separated, DB is repeated. Explain that students must use theReflexive Property in this instance. You could even take it one step further and say that anytime a side or angle isrepeated in both triangles, the reason will always be the Reflexive Property.
You can also use this separation technique for Example 2 and 5. Here is the picture for Example 2.
Auditory Learner
After going over ASA and AAS, do Example 5. After completing Example 5, ask students if they think they couldhave completed this proof using ASA. Complete the alternate proof as a class. The only difference is that therewould be an added step using the Third Angle Theorem and then the reason why the two triangles are congruentwould be ASA. Discuss why this is also an acceptable proof for Example 5.
Modifications
Give students a handout with a 5 in. line segment drawn on it for Step 1 of Investigations 4-4. You could also makethis a teacher-led investigation and encourage students to follow along.
297

4.4. Triangles and Congruence www.ck12.org
Give students a copy of the Recap Table for their notes.
At this point, students should be familiar with proofs, but probably not proficient. They should be able to fill outStep 1 (the Given), but may have a hard time coming up with the reasons. If you sense students struggling, give thema word bank for each problem in the Review Questions. For example, with #27, the word bank could be: Definitionof a midpoint, Definition of perpendicular lines, Definition of right angles, SAS, CPCTC, 6 STW ∼= 6 UTV . At first,only give students the necessary answers. In the next section, try expanding the word bank to include possibilitiesthat will not be used.
Isosceles and Equilateral Triangles
Auditory/Visual Learners
Prior to teaching the lesson, ask students to recall information about isosceles and equilateral triangles. Ask them tomake a list of the characteristics of each in their notebooks. When finished, use a class discussion to generate a listof characteristics for both isosceles and equilateral triangles on the board.
Visual/Kinesthetic Learners
After going over the parts of an isosceles triangle, either have students draw an isosceles triangle in their notes orgive them a handout of one. Then, as a class, have students construct the angle bisector of the vertex angle. Askstudents what they know about this triangle (including congruent legs and base angles) so far. Mark these on thetriangle. Then, have students find any other properties of the angle bisector. Ask students to measure the lengths ofthe two segments that the angle bisector splits the base into (they should be equal). Then, measure the angles at thatpoint of intersection (should be 90◦). From this, students should realize that the angle bisector of the vertex angleis also the perpendicular bisector of the base. You are leading students to the Isosceles Triangle Theorem. Once thetheorem has been stated, ask is if students think the converse is also true (yes). Also, ask if they think this is validat any other angle in the isosceles triangle. As a modification, you can do this as a teacher-led activity and havestudents write down the important information in their notes.
After students do Investigation 4-6, have them draw perpendicular bisectors for each side in the triangle. Ask themif the Isosceles Triangle Theorem applies to equilateral triangles. Students should see that it does and that it appliesto every angle in an equilateral triangle.
Modifications
You can give students a handout with a 3 in segment drawn 6 in down the page for Investigation 4-5 and then havethem refer back to Investigation 4-2 (SSS Construction). You can also do this investigation as a teacher-led activitywhile students follow along.
Give students pictures/handout of an isosceles triangle and an equilateral triangle. They can label each triangle withtheir parts (leg, base angles, etc).
As with Investigation 4-5, you can give students a handout with a 2 in. segment, instead of having them draw Step1. Also, this investigation can be teacher-led.
Show the additional algebraic steps for Examples 4 and 5.
298

www.ck12.org Chapter 4. Basic Geometry TE - Differentiated Instruction
4.5 Relationships with Triangles
Midsegments
Visual/Kinesthetic Learner
Give each student a blank piece of paper, ruler and compass. Instruct each student to construct a 3-4-5 right triangleusing Investigation 4-2. After the triangle is constructed, have them each find the midpoint of each side. Once allthe midpoints are marked, students should connect two midpoints to create a midsegment. Have students measurethe midsegment and the side that it does not intersect. See if students can arrive at the Midsegment Theorem. Then,have them create the other midsegments to see if the same holds true for all the midsegments in a triangle.
Kinesthetic Learner
Have students complete Examples 3-5 by finding the slopes of all the sides, midsegments, and all the lengths. Onlydo this if you feel that students are still struggling with the properties of a midsegment and/or if students need reviewon slope and the distance formula.
Slope of NL = 3−5−8−4 = −2
−12 = 16
NL =
√(−8−4)2 +(3−5)2
=√
144+4 =√
148 = 2√
37
Slope of LM = 5−(−7)4−(−2) =
126 = 2
LM =
√(4− (−2))2 +(5− (−7))2
=√
36+144 =√
180 = 6√
5
Slope of PO = −2−(−1)−5−1 = −1
−6 = 16
PO =
√(−5−1)2 +(−2− (−1))2
=√
36+1 =√
37
Slope of QP = −2−4−5−(−2) =
−6−3 = 2
QP =
√(−5− (−2))2 +(−2−4)2
=√
9+36 =√
45 = 3√
5
Visual Learner/ELL
299

4.5. Relationships with Triangles www.ck12.org
This chapter has a lot of new vocabulary and parts of triangles. Have students make a graphic organizer to help themwith the organization. You can either have students draw their own chart or give them a blank one to fill out as thechapter progresses.
300
www.ck12.org Chapter 4. Basic Geometry TE - Differentiated Instruction
TABLE 4.4:
Name Picture (withmarkings)
Properties Pass through theopposite vertex?
Passes throughthe midpoint?
Do they inter-sect?
MidsegmentPerpendicularBisectorAngle BisectorMedianAltitude
Modifications
Give students handouts of the 3-4-5 right triangle for the activity above. Students can also benefit from copies of thechart above, possibly with triangles drawn in the “Picture” column.
Provide students with graph paper for any notes involving coordinate geometry and homework.
Perpendicular Bisectors and Angle Bisectors in Triangles
Visual/Kinesthetic Learners
After doing Investigation 5-2, give students two more pieces of patty paper. Have them repeat this investigationwith an obtuse triangle and a right triangle. If done correctly, the circumcenter for the obtuse triangle will be on theoutside of the triangle. The circumcenter for the right triangle will be on the hypotenuse.
If students need an additional construction of perpendicular bisectors or angle bisectors in triangles, see the Enrich-ment chapter. There are traditional straightedge and compass constructions there.
Auditory/Visual Learners
After going over Investigation 5-4, see if students can reason if point of intersection of the angle bisectors (theincenter) is ever outside of the triangle. Ask them if they could inscribe a circle if the point was outside the circle.The answer here is no. In order to inscribe any circle in a polygon, the center of the circle must be inside the polygon.Therefore, the incenter must always be inside the triangle. You can also do Investigation 5-4 with obtuse and righttriangles to show that this is the case.
Visual Learner/ELL
Don’t forget to add perpendicular and angle bisector to the chart created in the previous section.
Modifications
Review how to construct the perpendicular bisector and angle bisector. Then, show how these can be placed into atriangle. If you or students prefer, you can do the patty paper construction for the perpendicular bisector or anglebisector. For both of these patty paper constructions, you would only use Step 2 of Investigations 5-2 and 5-4.However, in Step 1, only draw a line segment for the perpendicular bisector patty paper construction. For the anglebisector, only draw one angle.
We intentionally left out the terms points of concurrency, circumcenter, and incenter to avoid confusion for students.If you feel your students can handle this, see the Enrichment chapter.
Allow students to do flowchart proofs for the fill in the blank proofs in the review questions.
301

4.5. Relationships with Triangles www.ck12.org
Medians and Altitudes in Triangles
Journal Entry
Where have you heard the words median and altitude? Think of any setting, including math, where you have heardthese words.
Auditory Learners
Begin class with a discussion of the journal entry. Most students should remember that the median of a set ofnumbers in the “middle number.” Students may also know the term median from freeway driving. In this case, themedian is the middle divider between the two directions of traffic. In both cases, median refers to the middle. Stressthis point with students.
As for the altitude, hopefully students come up with the height of a plane when it’s flying, or the height of a mountain.Remind students that, when measuring altitude, the height is always measured from sea level. Here, altitude refersto height. When defining these terms in triangles, hopefully this prior knowledge will help them connect to thedefinitions.
Visual Learners
Students may need an additional example for the properties of a median.
Additional Example: If F is the centroid, find DF,FC, and AF .
Solution: When it comes to these types of problems, sometimes students forget common sense. Remind them thatthe shorter piece of the centroid is a third of the whole and the longer piece is two-thirds of the whole. This meansthat DF = 15 · 1
3 = 5 and FC = 15 · 23 = 10.
Notice from these two measurements that DF is half of FC. Therefore, FE will be half of AF , making AF = 16.
Kinesthetic Learners
Students may need to repeat Investigation 5-6 with a right triangle and an acute triangle. They may also wonder if thealtitudes intersect at one point like all the other lines in triangles. Explore this as an extension of Investigation 5-6.After constructing one altitude, construct the other two to see if they all intersect at the same point. (This extensionmight be easier to do with an acute triangle.) Of course, they do all intersect at the same point, called the orthocenter.Unlike the other points of concurrency, the orthocenter does not really have any useful properties. However, like thecircumcenter, the orthocenter can lie outside of a triangle.
302

www.ck12.org Chapter 4. Basic Geometry TE - Differentiated Instruction
TABLE 4.5:
Acute Triangle Right Triangle Obtuse Triangle
The orthocenter is inside the trian-gle.
The legs of the triangle are two ofthe altitudes. The orthocenter is thevertex of the right angle.
The orthocenter is outside the trian-gle.
Modifications
Students should have the chart started in the first lesson of this chapter completed. This will be an excellent studyguide for the chapter test.
Give students copies of triangles for the investigations in this lesson. It might make the investigations go smoother.
Assess students’ knowledge by walking around and asking questions. This can be a very difficult chapter for students.Blank papers and looks can indicate that they may be struggling.
Inequalities in Triangles
Visual/Auditory Learners
Give students graph paper and have them construct a 12, 6, 7 triangle using Investigation 4-2. Let them use eachsquare as a unit. Always have students start with the longest side as the horizontal side. Then, using a protractor,have students measure each angle and list them from least to greatest. At this point, have a discussion about thecorrelation between the sides and the angles. Poke students towards Theorem 5-9 and its converse.
Repeat the above mini-investigation with lengths 4, 5, 6 and 5, 12, 13. After they are confident that these all maketriangles, repeat one last time with lengths 4, 8, 11 and 3, 2, 5. What happens? Discuss why these lengths do notmake triangles. Have them look back at all the lengths to see why some worked and some do not. If students arestruggling, have them look at the sums of the lengths. Let students arrive at the Triangle Inequality Theorem. Then,go over Example 3.
Kinesthetic Learners
Another approach to the above investigation is to use dry spaghetti. Let students break off the correct lengths and seeif they can create triangles. This approach also works well for problems like Example 4. You can also demonstratethis using the spaghetti on the overhead. The use of dry spaghetti is also helpful with the SAS and SSS InequalityTheorems.
Additional Example: Find the length of the third side of a triangle if the other two sides are 4 and 5.
Solution: Using the spaghetti, break off lengths of 4 (inches or centimeters) and 5. Let students play with thespaghetti until they arrive at the correct answer. It might help them to trace triangles onto a piece of paper and thenthey can measure the third side. Students should make the “extremes” of the possibilities, 4, 5, 1.1 (a very narrowand tall acute triangle) and 4, 5, 8.9 (a long, flat obtuse triangle) with their spaghetti. 1 < third side < 9.
Modifications
303

4.5. Relationships with Triangles www.ck12.org
Give students a list of the theorems covered in this lesson. You can make these fill-in-the-blank so that students haveto follow along. Leave spaces in the handout for examples.
Review the congruent triangle theorems. Students may get them confused with the inequality theorems in this lesson.If that is the case, the SAS Inequality Theorem is also called the Hinge Theorem and the SSS Inequality Theorem isits converse.
Extension: Indirect Proof
All Learners
Incorporate a real-life example into this lesson. Have students come up with an if-then statement and then see if theycan prove it indirectly. Here is an example.
If-then statement: If it is foggy in San Francisco, then you can’t see the Golden Gate Bridge.
Assume the opposite of the conclusion: I can see the Golden Gate Bridge.
Find a contradiction: Let students reason at this point. If we can see the Golden Gate Bridge, then it is sunny, whichmeans, it cannot be foggy. This is our contradiction.
Our original statement must be true.
Modifications
Pick and choose the parts of this extension that you want to use. Double check your state’s standards to see if it isincluded. If not, the best approach may be to skip this extension. Do a quick assessment of your students to see ifthey can handle this extension. You could take a poll, decide based on their quiz scores, or based on their ability toanswer your in-class questions.
304

www.ck12.org Chapter 4. Basic Geometry TE - Differentiated Instruction
4.6 Polygons and Quadrilaterals
Angles in Polygons
Visual/Kinesthetic Learners
Rather than tell students to draw the diagonals from one vertex (in Investigation 6-1), give students a blank octagonand have them divide it into triangle. They can divide octagon however they want. Once they have it split up intotriangles, have students count the triangles and multiply the answer by 180◦. Of course, their answers will probablynot be 1080◦. Everywhere students have intersecting lines inside the octagon, students need to subtract 360◦. Forexample,
8 triangles = 8×180◦ = 1440◦.
There is one place where all the sides intersect, so subtract 360◦.
1440◦−360◦ = 1080◦
You can repeat this process for any polygon.
Additional Example: Algebra Connection Find the measure of x and each angle in the hexagon.
Solution: From the Polygon Sum Theorem a hexagon adds up to 720◦. Set up an equation.
305

4.6. Polygons and Quadrilaterals www.ck12.org
6x+10◦+10x−10◦+8x−10◦+9x−5◦+9x−5◦+7x+5◦ = 720◦
49x−15◦ = 720◦
49x = 735◦
x = 15◦
The angles are: 100◦,140◦,110◦,130◦,130◦, and 110◦
Visual Learners
External angles can also be represented by a shutter on a camera lens. Notice how the shutter closes and as it does itapproaches a point. There are 360◦ around a point. If you have an older camera (or the art department might), witha shutter, it could be very helpful for students to visualize this concept. You could also show students the openingcredits of a James Bond movie. This has the same visual effect.
Modifications
Review the definitions of diagonals, convex, concave, and regular polygons.
Make Investigation 6-1 teacher-led. Give students a handout with polygons and the chart from Step 3 so they canfollow along.
Make Investigation 6-2 teacher-led. Demonstrate this investigation on the overhead and have students follow along.
Properties of Parallelograms
Kinesthetic Learners
Have students work in pairs. Give each pair of students four strips of paper, where two are the same length andthe other two are a different length. Have students fasten the four strips together (with brads or fasteners) so thecongruent strips are opposite each other. This is a parallelogram. Have students measure the angles. Then, havestudents trace a parallelogram onto a piece of paper, draw in the diagonals and measure them.
With this activity, review with students the properties of parallel lines and transversals. While students will discoversome new properties of parallelograms, the properties of parallel lines will still apply.
Visual Learners/ELL
Make a bullet list of the properties of a parallelogram. It should be:
• Opposite sides are parallel• Opposite sides are congruent• Opposite angles are congruent• Consecutive angles are supplementary
306

www.ck12.org Chapter 4. Basic Geometry TE - Differentiated Instruction
• Diagonals bisect each other
If it helps students, include a picture with each bullet point. Make these notes short and concise. Then, students canadd to them for each type of quadrilateral.
Show students a flowchart proof of the Opposite Sides Theorem in the text.
Modifications
Review how to find the midpoint in the coordinate plane.
Give students a handout with a parallelogram on in for Investigation 6-3. Students can then start at Step 3.
Proving Quadrilaterals are Parallelograms
Collaborative Learning
Give each group a theorem from this lesson. Show students the proof of the Opposite Sides Converse that is inthe text as an example. Then, assign each group a theorem to prove: Opposite Angles Converse, ParallelogramDiagonals Converse, or Theorem 6-10 (some groups will overlap). Then, give each group a poster-piece of paperand have them write the proofs of their theorems on the paper. Walk around to help students and answer questions.If there is time, allow groups to present their proofs to the class. Answers to the other proofs are Example 1 and #23and #24 in the review questions.
The converse of the Consecutive Angles Theorem is also true, but not commonly used as a reason as to why aquadrilateral is a parallelogram. In general, it is very tedious to show that the 4 sets of consecutive angles aresupplementary, which makes it hard to use in a proof. If students are feeling up to a challenge, you can have themprove this converse.
Visual/Kinesthetic Leaners
Show that the parallelogram in Example 4 can be a parallelogram by using a different theorem. Students need toknow that the theorem they choose does not matter. In the example, Theorem 6-10 was used. In coordinate geometry,it is challenging to show that two angles are congruent (unless they are 90◦), so we will only use the definition of aparallelogram, Opposite Sides Converse, the Parallelogram Diagonals Converse, and Theorem 6-10.
Example 4, Alternate Solutions: Is the quadrilateral ABCD a parallelogram?
307

4.6. Polygons and Quadrilaterals www.ck12.org
Solution 1: Let’s use the definition of a parallelogram.
Find the slopes.
Slope AB = 5−3−1−3 = 2
−4 =−12
Slope AD = 5−(−2)−1−2 =−7
3
Slope CD = −2+42−6 = 2
−4 =−12
Slope BC = 3−(−4)3−6 =−7
3
Opposite sides are parallel, ABCD is a parallelogram.
Solution 2: Let’s use the Opposite Sides Converse.
AB =
√(−1−3)2 +(5−3)2
=
√(−4)2 +22
=√
16+4
=√
20 = 2√
5
CD =
√(2−6)2 +(−2+4)2
=
√(−4)2 +22
=√
16+4
=√
20 = 2√
5
AD =
√(−1−2)2 +(5− (−2))2
=
√(−3)2 +72
=√
9+49
=√
58
308

www.ck12.org Chapter 4. Basic Geometry TE - Differentiated Instruction
BC =
√(3−6)2 +(3+4)2
=
√(−3)2 +72
=√
9+49
=√
58
Opposite sides are equal, ABCD is a parallelogram.
Solution 3: Let’s use the Parallelogram Diagonals Converse.
Midpoint of AC =(−1+6
2 , 5−42
)=(5
2 ,12
)Midpoint of BD =
(3+22 , 3−2
2
)=(5
2 ,12
)The midpoints of the diagonals are the same, which means that they bisect each other. Therefore, ABCD is aparallelogram.
From all these solutions, we see that there are four different ways to show that a quadrilateral is a parallelogram.Students should be able to choose any solution they want. You could discuss as a class, which methods students likeand why.
Modifications
Leave a list of characteristics of a parallelogram on the board for students to reference.
Thoroughly review how to complete a proof and the properties of parallel lines.
Give students graph paper to assist with the coordinate geometry examples.
Rectangles, Rhombuses and Squares
Visual Learners/ELL
Break down the properties of rectangles, rhombuses, and squares in bullet lists, like we did in the Properties ofParallelogram lesson.
Rectangles
• has all the properties of parallelograms
– opposite sides are parallel– opposite sides are ∼=– opposite angles are ∼=– consecutive angles are supplementary– diagonals bisect each other
• all angles are ∼= (90◦)• diagonals are ∼=
Rhombuses
• has all the properties of parallelograms
– opposite sides are parallel– opposite sides are ∼=
309

4.6. Polygons and Quadrilaterals www.ck12.org
– opposite angles are ∼=– consecutive angles are supplementary– diagonals bisect each other
• all sides are ∼=• diagonals are ⊥• diagonals bisect each angle
Squares
• has all the properties of parallelograms
– opposite sides are parallel– opposite sides are ∼=– opposite angles are ∼=– consecutive angles are supplementary– diagonals bisect each other
• has all the properties of rectangles
– all angles are ∼= (90◦)– diagonals are ∼=
• has all the properties of rhombuses
– all sides ∼=– diagonals are ⊥– diagonals bisect each angle
Have students add these lists to their list from the Properties of a Parallelogram lesson.
Modifications
For Investigations 6-4 and 6-5, consider giving students a handout of a pre-drawn rectangle and rhombus. If you dothis, students can start at Step 3 for 6-4 and Step 4 for 6-5.
Give students a handout of the notes and/or the above chart. Students may also need a copy of the guidelines fordetermining if a quadrilateral is a special parallelogram (after Example 5). Students can use other ways to showthat a figure is a special parallelogram that are not listed here. Discuss with students the other options. For exampleanother algorithm could be:
1. Graph all four points on graph paper.
2. Find the lengths of all four sides.
All sides ∼=: Square or Rhombus, go to #3
Opposite sides ∼=: Parallelogram or Rectangle, go to #3.
No sides ∼=: Quadrilateral (done)
3. Find lengths of diagonals.
Diagonals ∼=: If the shape was a square or rhombus, we now know that it is a square (done).
If the shape was a parallelogram or a rectangle, we now know that it is a rectangle (done).
No ∼= diagonals: If the shape was a square or rhombus, we now know that it is a rhombus (done).
If the shape was a parallelogram or rectangle, we now know that it is a parallelogram (done).
This algorithm does not take trapezoids or kites into account. Make sure if students use this algorithm they areaware of this.
310

www.ck12.org Chapter 4. Basic Geometry TE - Differentiated Instruction
Trapezoids and Kites
Visual Learners/ELL
Break down the properties of isosceles trapezoids, trapezoids, and kites in bullet lists, like we did for parallelograms,rectangles, rhombuses, and squares.
Trapezoids
• one pair of parallel sides
Isosceles Trapezoids
• one pair of parallel sides• non-parallel sides are ∼=• base angles are ∼=• diagonals are ∼=
Kites
• two sets of adjacent sides are ∼=• non-vertex angles are ∼=• diagonals are ⊥• the diagonal through the vertex angles bisects them
Add these lists to the ones students have created from the previous sections. Students should have all sevendescriptions on one sheet of paper. This can serve as a study guide or a “cheat sheet” for the test.
All Learners/Collaborative Learning
In groups, give each group a different set of four points. Here suggestions for each type of quadrilateral:
(-8, 2), (-4, -3), (-3, -1), (-7, -2)→ Square
(6, -1), (10, -7), (7, -9), (3, -3)→ Rectangle
(-2, 7), (3, 5), (5, -1), (-1, 1)→ Rhombus
(-7, 4), (-2, 6), (-1, -1), (-6, -3)→ Parallelogram
(4, 8), (8, 9), (9, 5), (2, -1)→ Kite
(3, 2), (5, -5), (3, -7), (-4, 5)→ Isosceles Trapezoid
(-3, 7), (7, 5), (6, 1), (1, 2)→ Trapezoid
Once each group has a set of four points (do not give them the type of quadrilateral), give the groups markers andgraph poster paper. Let students work on their own to determine what type of shape they have. As a part of theirposter, students need to explain their steps. Let students use their bullet lists as well as the algorithm from theprevious lesson. Students will need to change this algorithm if they decide to use it.
If time allows, have students present their shapes and process to the rest of the class. Then, they can see the differentways each group used to find the type of quadrilateral they had.
Modifications
Write all notes on the board/overhead. Request that students copy this information in their notebooks. You may alsowant to give students handouts and/or fill-in-the-blank notes.
In Investigation 6-6, give students graph paper and/or the trapezoid already drawn.
311

4.7. Similarity www.ck12.org
4.7 Similarity
Ratios and Proportions
Visual Learners
With Example 1, show students the other representations of the ratio of girls to boys. The ratio can also be written1418 and 14 to 18. It is easiest for students to see that this ratio reduces when it is written as a fraction.
Visual/Kinesthetic Learners
Show students how and why cross-multiplication works. We can solve Example 7a in a different way that is morelike what they were used to from Algebra I.
Example 7a, Alternate Method: Solve the proportion.
a) 45 = x
30
Solution: We need to get x by itself, so multiply both sides by 30.
x = 30 · 45=
301· 4
5=
1205
= 24
You can also let students do cross - canceling, but sometime kids can get cross - canceling and cross-multiplicationconfused. Be careful.
Collaborative Learning
Divide the students into five groups, one for each corollary of the Cross-Multiplication Theorem. After teaching thelesson and going through the material, assign each group one of the corollary theorems. Then put an example of twosimilar triangles (with measurements) on the board or overhead (see below).
Ask each group to use the example on the board to create an example that illustrates their corollary theorem.Basically, they will replace the letters in the proportions in each corollary with the correct sides/lengths from thesimilar triangles on the board. Allow time for the students to work and then have each group present their exampleto the class. When finished, encourage the other students to ask questions to see how well the students in the groupcan answer them. The way students answer each other’s questions is a great way to assess understanding.
Modifications
Review how to reduce and multiply fractions.
As you have been doing with previous chapters, continue to write and leave vocabulary and theorems on the boardfor the duration of the chapter.
312

www.ck12.org Chapter 4. Basic Geometry TE - Differentiated Instruction
Let students shorten up the corollaries so that they are only the proportions. An example could be:
If ab = c
d , then
1. ac = b
d2. d
b = ca
3. ba = d
c4. a+b
b = c+dd
5. a−bb = c−d
d
Similar Polygons
All Learners
Let students walk around the school grounds to find examples of similar polygons. Allow students to work in pairsor groups of three. If they have phones or digital cameras, encourage students to take a picture of their similarpolygons. If not, they need to draw a picture of the item and where it is located. After students find 2-3 differentexamples, regroup in the classroom. Go over the students’ findings as a class discussion. Students need to explainwhy their polygons are similar. Award bonus points to students that found similar pentagons or hexagons (or larger).
Kinesthetic Learners/Collaborative Learning
Ask students to draw a polygon and label the lengths of the sides of their polygon. Have students exchange polygonswith someone else. Students may exchange more than once just be sure that everyone has a different polygon thanthe one that they started with. Students need to complete the following with this new polygon.
1. Draw a similar polygon to the one that you have been given.2. Write proportions to demonstrate that the side lengths are similar.3. Determine the scale factor.4. Determine the ratio of the perimeters.
When finished, divide into small groups to share their findings. Use peers to correct any errors in the work of eachindividual.
Visual/Auditory Learners
Between Examples 2 and 3, students are told that all equilateral triangles and square are similar. But, why? Drawpictures of several equilateral triangles on the board. Then, ask students what the scale factor is for different pairs ofequilateral triangles. Students will notice that if the sides of one triangle is a and the sides of another is b, then thescale factor is a : b. You can repeat this explanation with squares and any regular polygon.
Modifications
Write all assignment directions on the board or pass out a handout, so that students can refer back to what is neededfor each step.
Develop a list with students about what ratios are the same as the scale factor.
• ratio of the sides• ratio of the perimeters• ratio of the diagonals, medians, altitudes, and midsegments.
Students can use any of these to find the scale factor, as well.
313

4.7. Similarity www.ck12.org
Similarity by AA
Visual Learners
In Examples 1-4, the triangles are not oriented in the same way, making it harder for students to visualize if thetriangles are similar. If students are having a hard time with this, encourage them to use a piece of patty paper andtrace one triangle. Then they can rotate or flip it so that they line up. If two triangles are similar, the correspondingangles should overlap perfectly. Students can do this with the patty paper, over the other triangle.
Visual/Kinesthetic Learners
On a sunny day, take your class outside to perform their own indirect measurement problems. Let students work inpairs. They need to compare their heights to the height of an object they cannot measure, such as a flagpole, the goalposts on the football field, a tall tree or the school building. Students need to make sure that they can easily measurethe shadow of whatever object they decide to measure. They will need to record their height (make students do thishere, to ensure accuracy), their shadow and the shadow of the object. Once they have these measurements, headback to the classroom to finish the calculations.
Modifications
For Investigation 7-1, give students a handout with the triangles from Step 1-3. Then, have students measure theangles and sides of these two triangles to see if they are similar.
Encourage students to draw in any markings on triangles. Students need to be able to show that two angles arecongruent in two triangles to verify they are similar.
Explain to students that the AA Similarity Postulate could also be the AAA Similarity Postulate. However, becauseof the Third Angle Theorem, we only need to show that two angles are congruent. It is inferred that the third set iscongruent because of this theorem.
Similarity by SSS and SAS
Visual/Kinesthetic Learner
Using Geometer’s Sketchpad, explore triangles with proportional side lengths. Draw two triangles, ∆ABC and∆MNP, with each side length of ∆MNP being k times the length of the corresponding side of ∆ABC.
Measure the angles of both triangles and side lengths. Record the results in a chart like the one below. Repeat steps1-3 for each value of k in the chart. Keep ∆ABC the same throughout the exploration.
Triangle Data
TABLE 4.6:
AB BC AC m6 A m6 B m6 CMeasurementsfor ∆ABC
MN NP MP m6 M m6 N m6 Pk = 2k = 1
3k = 5
Now, have students analyze their data. Have students complete the following ratios: ABMN ,
BCNP ,
ACMP and AB
BC ,MNNP ,
BCAC ,
NPMP ,
ABAC ,
MNMP .
Do they notice anything? Are the triangles similar?
314

www.ck12.org Chapter 4. Basic Geometry TE - Differentiated Instruction
Kinesthetic/Auditory Learners
Have students work with in pairs. Partner 1 needs to construct a 6-8-10 triangle and Partner 2 needs to construct a9-12-15 triangle. They can refer back to Investigation 4-2 to help them with this. Students will need a ruler, compassand protractor. After constructing, students should compare their triangles. Discuss how the triangles are differentand the same. Are they similar?
From what we are given, the students should notice that the side lengths are proportional. We found that the anglesare congruent, which means that the triangles are similar, by the AA Similarity Postulate. Discuss with students ifthe triangles are similar (yes, they are). In this case, students were given three side lengths that turned out to beproportional. This leads us to the SSS Similarity Postulate. This is a variation of Investigation 7-2.
Modifications
Write the directions for the technology activity or the variation of Investigation 7-2 on the board so students canfollow along.
The first five review questions are vocabulary. As a class, go over these questions as a quick review at the end of thelesson. From this, students will also have five of their homework questions completed.
Proportionality Relationships
Kinesthetic Learners/Collaborative Learning
In groups of 3-5, give each student the same triangle, plus one extra (students may want this extra triangle later in theinvestigation, do not let them cut this one). Then, each student needs to draw a line on their triangle that is parallelto one side. It does not matter where it is, but make sure that every group member puts the line in a different placeor parallel to different sides. Cut the triangle on this line.
Before this activity, students know that xx+w = y
y+z from similar triangles. Now, we will investigate if xw = y
z . Haveeach student measure w,x,y, and z and the write these lengths in this ratio. Once everyone in the group is done, allowtime for the group to compare their ratios. Students should see that the proportion x
x+w = yy+z still holds and x
w = yz
is a new, valid proportion. However, stress that these two proportions are not equal to each other. Students shouldsee this, considering they are using numbers and will arrive at different scale factors for each proportion.
This activity can be repeated with Theorem 7-8 (the angle bisector theorem). However, have students cut the triangleon the angle bisector and measure the sides below to show that b
c = ad .
315

4.7. Similarity www.ck12.org
Visual Learners
Another name for Theorem 7-7 is the Notebook Paper Theorem. To demonstrate this for students, you couldhave them draw two transversals on their lined paper. Then, the notebook paper lines divide the two transversalsproportionally.
Another way to write the proportion in Theorem 7-8, bc = a
d , (using the triangle above) is ba = c
d or ab = d
c . Studentsmight like these two options better than the one that is in the theorem because they group together the two sides thatare on the same side of the triangle together in each ratio.
Modifications
Students will get confused and think that the parallel sides in the Triangle Proportionality Theorem are in the sameratio as the sides that were cut by the parallel line. In actuality, the parallel sides are in the same ratio as the similartriangles. Go over that these ratios are not the same. It is helpful to insert numbers into an example problem so thatstudents see that you do not end up with the same thing.
ad=
be6= c
f→ Triangle Proportionality Theorem
aa+d
=b
b+ e=
cf→ Similar Triangle Ratios
Insert a = 6,b = 8,c = 6,d = 3,e = 4, f = 9 as an example for students to help them with these proportions.
Similarity Transformations
Visual/Kinesthetic Learners
Let students work in pairs. After going over the material from this lesson, have students create a scale drawing of theclassroom. You can either have students do their drawing on poster paper or an 8×11 piece of paper. They need to
316

www.ck12.org Chapter 4. Basic Geometry TE - Differentiated Instruction
pick an appropriate scale factor, depending on the size of their paper. If a classroom is 25 ft. by 30 ft., then studentscould make the scale 1
10 if they are using poster paper or 140 for an 8×11 in. piece.
After they have scaled down the room, have scale down the student desks, your desk, and chalkboards or whiteboards,cabinets, or tables. Then, let students be creative and redesign the layout of their desks. Once all your classes havefinished this part of the assignment, allow classes to vote on their favorite and then redo the classroom in that manner.
Visual/Auditory Learners
When going over Example 7, encourage students to draw rays from the origin to A′,B′, and C′. What do they notice?Discuss why the image and preimage are collinear with the origin. Do they think this will always happen? ReferenceExample 6 if needed.
Modifications
Students have not yet seen reflections, rotations or translations. You may want to go over these ideas quickly to helpstudents understand the concept of a transformation and dilation.
To tie into problems 25-34, you may need to expand on Example 8, to show the distances from the origin to eachvertex of the image and preimage. Here we will find OA,OA′,AA′,OB,OB′ and BB′ for Example 7.
OA =√(2−0)2 +(1−0)2 =
√5 OB =
√(5−0)2 +(1−0)2 =
√26
OA′ =√(6−0)2 +(3−0)2 =
√45 = 3
√5 OB′ =
√(15−0)2 +(3−0)2 =
√234 = 3
√26
AA′ =√
(2−6)2 +(1−3)2 =√
20 = 2√
5 BB′ =√
(5−15)2 +(1−3)2 =√
104 = 2√
26
Now, compare the ratios. The ratios of OA : OA′ and OB : OB′ are still the same as the scale factor. However, theratio of OA : AA′ and OB : BB′ is 1 : 2. You may want to discuss with your students as to why this is.
Extension: Self-Similarity
Kinesthetic Learners
Go to the website, http://fractalfoundation.org/resources/fractal-software/ , to download free fractal-creating soft-ware. Go to the Help tab→ Tutorials→ An introduction to fractals→ Whole story. This will show students howto generate several different fractals and define them. Then, let students play with the software to generate fractals,Fractals tab→ Formulae or Formulae 2.
Modifications
Fractals may or may not be a part of your state’s standards for Geometry. Please double check to ensure that you arenot covering unnecessary material. Depending on the time, you may not want to go over this extension.
Write the steps for each fractal on the board/overhead or hand out directions. Leave these up as students work on theexamples in the text. Encourage students to color in the Sierpinksi Triangle and other fractals.
317
4.8. Right Triangle Trigonometry www.ck12.org
4.8 Right Triangle Trigonometry
The Pythagorean Theorem
Visual Learners
When going over the Pythagorean Theorem, encourage students to draw a right triangle at first (if there is nonegiven). This way, students will avoid confusion with the appropriate sides. Remind students that the hypotenuse isalways the longest side in a right triangle. So, it should be the length that is by itself, c, when being squared in thePythagorean Theorem.
Visual/Kinesthetic Learners
Students may wonder where a Pythagorean Triple comes from. Euclid developed a formula to generate PythagoreanTriples: a = m2−n2,b = 2mn, and c = m2+n2. Show students this where m = 2 and n = 1 to see what they come upwith. Then, have students generate 2-3 triples on their own. The only restriction is that m > n, so a is not negative.
Kinesthetic Learners
Students may need an additional example where the three numbers given do not form a Pythagorean Triple. Do thisexample after Example 8.
Additional Example: Is 12, 19, 25 a Pythagorean Triple?
Solution: 122 +192 = 144+361 = 505 6= 252. 252 = 625, so this is not a Pythagorean Triple. However, from ourprior knowledge of triangles, it does still create a triangle.
Visual Learners
To avoid confusion, show students the proof of the Distance Formula with numbers for (x1,y1) and (x2,y2). Gothrough the entire proof, as it is, with (-5, 6) and (3, 2). Showing students the vertical and horizontal distance is animportant part of understanding where the Distance Formula comes from.
Modifications
Review the concept of a perfect square.
Decide if you want students to memorize the Pythagorean Theorem and the Distance Formula. Other options areleaving them on the board for the chapter or allow students to use a formula sheet.
In Investigation 8-1, you may want to give students pre-cut squares that are 3 in, 4 in, and 5 in. Students can thenstart with Step 2. You can also do this investigation as a teacher-led activity and students can follow along whileyou fit the areas together. This is one way the green (4 in) and blue (3 in) squares fit into the red square. There areseveral possibilities. If done as individually by students, encourage them to be creative with how they cut up theirsquares.
318

www.ck12.org Chapter 4. Basic Geometry TE - Differentiated Instruction
Converse of the Pythagorean Theorem
Visual/Kinesthetic Learners
Have three students pretend to be a right triangle on the coordinate plane. Have students A and B be the hypotenuseand give them a tape measure to find the distance between them. Then, ask student C where the perfect spot forthem to stand would be so that they complete the right triangle. At this point, transfer the tape measure to find ACand BC. Then, as a class, use the Pythagorean Theorem to see how close they got to being a right triangle. They canalso determine if the triangle created was an acute or obtuse triangle using the converse. Repeat this process withseveral different students and placements, including Pythagorean Triples. Encourage students to move their desks tothe edge of the classroom so students have more room to move.
Visual/Auditory Learners
Write the following three triangles and the variations of the Pythagorean Theorem on the board. Have studentsdiscuss why these theorems are true.
It might help to insert lengths for a,b, and c. Use the following numbers:
acute triangle: 20,21,25 (202 +212 > 252)
right triangle: 20,21,29 (202 +212 = 292)
obtuse triangle: 20,21,35 (202 +212 < 352)
If you have access to a computer lab and Geometer’s Sketchpad, this activity can be easily done using technology.Draw a triangle in Geometer’s Sketchpad; label the vertices A,B, and C. Then, have students move around B so thatthey can see when the triangle is acute, right, and obtuse.
Modifications
Review the definition of a converse statement.
319

4.8. Right Triangle Trigonometry www.ck12.org
Decide if you would like students to memorize Theorems 8-3 and 8-4, add them to their formula sheets, or writethem on the board.
Using Similar Right Triangles
Visual/Kinesthetic Learners
When initially going over Theorem 8-5, have students draw two 6-8-10 right triangle. Then, they need to cut outboth triangles. Label the triangles like the one below. To make this activity go a little smoother, you may want tohand out pre-cut 6-8-10 triangles.
With one triangle, students need to find the altitude from the right angle and cut this triangle on the altitude. Studentsshould now have three similar triangles.
Ask them to prove the triangles are similar by the AA Similarity Postulate. Next, have students measure the lengthsof all the sides of all three sides. Students should generate the following proportions: BC
AC = ACDC (short legs to longer
legs), BCAB = AB
DB (short legs to hypotenuses), and DCAD = AD
DB (long legs to hypotenuses). Point out to students that allof these proportions repeat one value. This is a property of the geometric mean. Therefore, AC is the geometricmean of BC and DC,AB is the geometric mean of BC and BD, and AD is the geometric mean of CD and BD. Seeif students can find any other geometric means among the three triangles. Also, stress that this only happens withsimilar right triangles.
Modifications
Review similarity and how to draw/find the altitude of a triangle.
Students may have a lot of trouble visualizing which sides match up with others in the similar right triangles.Encourage them to draw out the triangles, like in the examples in the text. If this is not enough, give studentstriangles that they can cut (like the activity above, the triangles do not have to be to scale) on the altitude. Theyshould write the vertex labels and lengths along the legs and hypotenuses before cutting.
Special Right Triangles
Journal Entry
What makes a triangle “special”? What would be your definition of a special right triangle?
320

www.ck12.org Chapter 4. Basic Geometry TE - Differentiated Instruction
Visual/Kinesthetic Learners
See if students can generate a shortcut for rationalizing the denominator. In Example 2b, the leg of the 45-45-90right triangle is 8
√2 and the hypotenuse is 16. Help students notice the pattern that the leg would be the hypotenuse
divided by 2 with a√
2 multiplied by (or next to) it. The same will work for any time students need to rationalizethe denominator. For example:
a) 18√3= 18
3
√3 = 6
√3
b) 26√2= 26
2
√2 = 13
√2
c) 10√6= 10
6
√6 = 5
√6
3
d) 30
2√
5= 15
5
√5 = 3
√5
Kinesthetic Learners
Before Investigation 8-2, give each student the table below.
TABLE 4.7:
a b c a2 +b2 c2
4 4√
26 6
10 10√
25√
2 5√
23√
6 6√
3
Have students fill out the table and then see if they notice any patterns. All of the lengths above correspond toisosceles right triangles. Once students see the patterns, start Investigation 8-2.
Before Investigation 8-3, have students fill out the following table and find the patterns. Here, all the lengthswill correspond to 30-60-90 triangles. Once students are comfortable with the patterns in this table, move on toInvestigation 8-3.
TABLE 4.8:
a b c a2 +b2 c2
4 86 6
√3
10√
3 205√
3 153√
6 6√
6
Modifications
In Investigation 8-2, give students a copy of the triangle described in Step 1. Then, start with Step 2. Go over Step 3together.
In Investigation 8-3, give students a copy of the equilateral triangle described in Step 1 with an altitude. Then, startwith Step 3 and go over steps 4 and 5 as a class.
As a homework assignment, students need to bring in calculators for the next lesson/class period.
321
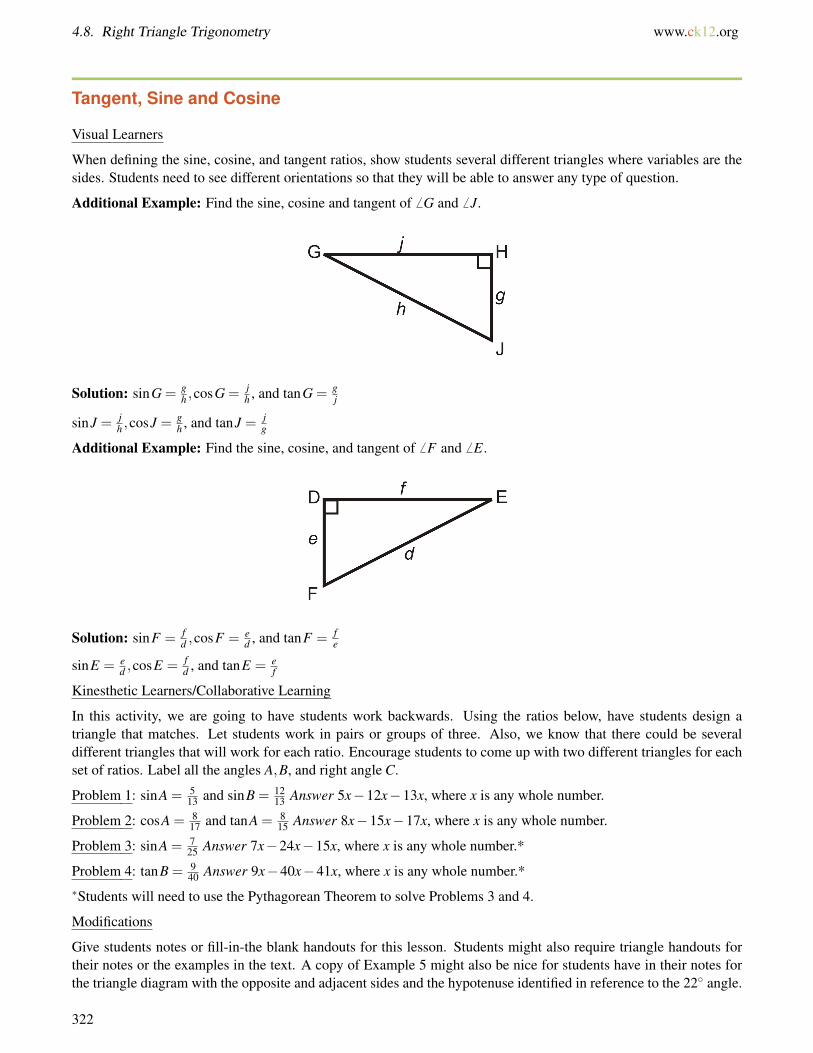
4.8. Right Triangle Trigonometry www.ck12.org
Tangent, Sine and Cosine
Visual Learners
When defining the sine, cosine, and tangent ratios, show students several different triangles where variables are thesides. Students need to see different orientations so that they will be able to answer any type of question.
Additional Example: Find the sine, cosine and tangent of 6 G and 6 J.
Solution: sinG = gh ,cosG = j
h , and tanG = gj
sinJ = jh ,cosJ = g
h , and tanJ = jg
Additional Example: Find the sine, cosine, and tangent of 6 F and 6 E.
Solution: sinF = fd ,cosF = e
d , and tanF = fe
sinE = ed ,cosE = f
d , and tanE = ef
Kinesthetic Learners/Collaborative Learning
In this activity, we are going to have students work backwards. Using the ratios below, have students design atriangle that matches. Let students work in pairs or groups of three. Also, we know that there could be severaldifferent triangles that will work for each ratio. Encourage students to come up with two different triangles for eachset of ratios. Label all the angles A,B, and right angle C.
Problem 1: sinA = 513 and sinB = 12
13 Answer 5x−12x−13x, where x is any whole number.
Problem 2: cosA = 817 and tanA = 8
15 Answer 8x−15x−17x, where x is any whole number.
Problem 3: sinA = 725 Answer 7x−24x−15x, where x is any whole number.*
Problem 4: tanB = 940 Answer 9x−40x−41x, where x is any whole number.*
∗Students will need to use the Pythagorean Theorem to solve Problems 3 and 4.
Modifications
Give students notes or fill-in-the blank handouts for this lesson. Students might also require triangle handouts fortheir notes or the examples in the text. A copy of Example 5 might also be nice for students have in their notes forthe triangle diagram with the opposite and adjacent sides and the hypotenuse identified in reference to the 22◦ angle.
322

www.ck12.org Chapter 4. Basic Geometry TE - Differentiated Instruction
Make sure every student has a scientific calculator to work with to find the trig ratios. As students walk into classor while checking homework, check their calculators to make sure they are in the correct mode. Also show studentsthe buttons that will be used today.
Inverse Trigonometric Ratios
Visual Learners
After doing the Review Queue, go back over questions 1 and find the other angle in the triangle, which is 54◦. Then,look at the complete triangles and set up a sine, cosine, and tangent ratios.
From the previous lesson, students know that sin36◦ = 4.117 . Use algebra to ask students how they would get 36◦ by
itself? Students might shout out “divide by sine”. They are on the right track, but there is a new way to “undo” thetrig functions. Show students the sin−1 notation.
sin−1(sin36◦) = sin−1(
4.117
)36◦ = sin−1
(4.11
7
)
The sin and sin−1 cancel each other out and 36◦ is isolated.
36◦ = sin−1(
4.117
)
We have now introduced the inverse trig functions to students. Ask students to fill in the blanks. Write the problemsbelow on the board.
36◦ = cos−1(
??
)36◦ = tan−1
(??
)54◦ = sin−1
(??
)54◦ = cos−1
(??
)54◦ = tan−1
(??
)
Then, go over the traditional definition in the text.
Visual Learners/Kinesthetic Learners
323

4.8. Right Triangle Trigonometry www.ck12.org
In Example 4, we used 62◦ to find AB and BC. Students might notice that it is more challenging to solve for thesesides when they are in the denominator of the fraction
(sin62◦ = 25
AB
). Encourage students to find the third angle
measure before finding the lengths of the sides.
Example 4, Alternate Solution: Solve the right triangle.
Solution: First, find the third angle using the Triangle Sum Theorem. 180◦−90◦−62◦ = 28◦.
AB : Use cosine.
cos28◦ =25AB
AB =25
cos28◦
AB≈ 28.31
BC : Use tangent.
tan28◦ =BC25
BC = 25 · tan28◦
BC ≈ 13.30
Notice that when students use 28◦ to find BC, it is in the numerator of the tangent ratio. This equation might beeasier for students to solve than tan62◦ = 25
BC . If students are given two angles, encourage them to explore the trigratios using both acute angles.
Modifications
Give students a copy of the Review Queue for this lesson.
When checking homework, double-check students’ calculators to make sure they are in the correct mode. At thistime, show students where the inverse trig buttons are.
324

www.ck12.org Chapter 4. Basic Geometry TE - Differentiated Instruction
4.9 Circles
Parts of Circles and Tangent Lines
Visual Learners/ELL
Allow students to define the circle terms by using pictures rather than words. Here are a few examples:
If students are making flash cards, they should put the name on one side of the card and the picture on the other.There are lots of pictures in the text for the other definitions.
Kinesthetic Learners
See if you can find physical examples of common internally and externally tangent lines. An easy example couldbe gears. The science department might have something or you could probably buy them at a bike shop. The bikeshop might have scrap parts or broken parts that you could purchase at a discount. Thread the gears using both theinternally tangent lines and externally tangent lines. After showing students both options, ask why they think bikegears do not have common internal tangents.
Modifications
Leave formulas and theorems on the board throughout the chapter. You could also give students a blank formulasheet and fill it out as the chapter progresses. Decide if you want students to memorize the formulas in this chapteror allow them to use some sort of cheat sheet on quizzes and tests.
This is a long lesson with a lot of vocabulary and new concepts. Allow 2-3 class periods to thoroughly go over thematerial. In addition to a blank formula sheet, you might also want to give students a blank vocabulary sheet for thechapter.
Give students 3×5 cards at the beginning of each lesson for flash cards. Allow for time so that students can maketheir flash cards in class.
Properties of Arcs
Visual/Kinesthetic Learners
In addition to a circle having 360◦, this is also the number of degrees around a point. The picture in the text illustratesthis point quite well, using the straight angle as part of the reason as to why there are 360◦ in a circle. Make surestudents understand this picture and use it to explain the degree measure of a semicircle.
325

4.9. Circles www.ck12.org
ELL Students
Semi = half, minor = little or small, and major = big or large. These quick definitions of these terms will help studentdecipher the vocabulary in this lesson. Also, in Spanish, menor translates to less. Therefore, a minor arc could alsobe likened to un arco menor.
Semicircle = half circle, minor arc = small(er) arc, major arc = large(er) arc
Visual Learners
Show students that the arcs in Example 2 will add up to 360◦ when added together. This is a good way for studentsto check their work.
mEF +mFB+mBC+mCD+mDE = 120◦+60◦+52◦+90◦+38◦ = 360◦
Ask students to draw pictures of congruent arcs that were not shown in Example 4. Remind students that in orderfor arcs to be congruent, they either need to be drawn in congruent circles or in the same circles. They must alsohave the same central angle measure. Here is an example of congruent arcs that was not shown in the text.
Auditory Learners
Before going over the Arc Addition Postulate, ask students how they would find mDB from Example 2. Encouragestudents to come up to the board and explain how they would find the answer and shout out how to find the answer.Students will jump to the Arc Addition Postulate without even realizing it. When someone says, “add mDC andmCB,” or “add 90◦ and 52◦,” ask the students why? Why can this be done? We have not done it yet, so why can wedo it now? Part of the explanation could be that there are Segment and Angle Addition Postulates, so it would onlymake sense that there is an Arc Addition Postulate. Students might also say, that the angles add up to 142◦, so thecorresponding arc should too.
Modifications
Like in the previous lesson, let students use pictures to define the terms.
Properties of Chords
Visual/Kinesthetic Learners
As a class investigation, derive Theorem 9-3 together. First, draw a circle. If you do not have a board compass, tie astring around a piece of chalk or whiteboard marker. Then, at the other end, use your finger as the pointer. Once yourcircle is drawn, use two rulers as congruent chords. Either draw congruent chords on the circle or place the rulers inthe circle. Then, ask students if they notice anything about the corresponding arcs. Draw in the central angles andask if students can conclude anything about them. Allow students to shout out their thoughts. Together, discuss andformulate Theorem 9-3. Then, use this same diagram to go over Example 1 in the text.
326

www.ck12.org Chapter 4. Basic Geometry TE - Differentiated Instruction
When discussing Theorems 9-4 and 9-5, students need to be careful when looking at diagrams. This is a goodopportunity to remind students that nothing can be assumed; they must be told information in statements or fromlabeling. To use these theorems, one chord must clearly pass through the center and be labeled (or written)perpendicular to the other chord, like in Example 2.
For additional practice with congruent chords, have students measure the arcs in Step 3 of Investigation 9-3. Studentsshould draw in the corresponding central angles and measure them. As a quick review of Theorem 9-3, these centralangles should be congruent.
Visual/Kinesthetic Learners
At the conclusion of this lesson, have students draw the follow picture and label everything they have learned fromthis lesson.
Given: E is the center, EF ⊥ AB, and EG⊥CD
Students can conclude: AB ∼= CD, F and G are the midpoints of AB and EG,AE,EC,ED and EB are all radii andcongruent, ∆AEB∼= ∆CEB,∆AEB and ∆CEB are isosceles triangles, AB∼= CD.
Modifications
For Investigation 9-2, give students a handout with Steps 1 and 2 completed. Start at Step 3. You could also makethis investigation teacher-led and just have students follow along.
For Investigation 9-3, give students a handout with Step 1 completed and then start at Step 2. Again, this investigationcould be teacher-led.
Go over the definition of equidistant and how it relates to circles and chords.
Inscribed Angles
Kinesthetic Learners/Collaborative Learning
After going over the Inscribed Angle Theorem and Examples 1 and 2, give students a handout with the extra practicebelow. Solve for x◦ and y◦.
327

4.9. Circles www.ck12.org
Answers
1. x = 55◦
2. x = 80◦,y = 100◦
3. x = y = 60◦
4. x = 160◦,y = 65◦
5. x = 90◦,y = 70◦
6. x = 50◦,y = 100◦
7. x = 170◦
8. x = 180◦,y = 90◦
9. x = 40◦,y = 20◦,z = 40◦
After students complete the problems, have them look back at #5 and #8 to see if they can come up with Theorem9-9. Repeat this with #3 and #6 and Theorem 9-8. This activity would be done well in pairs.
With #9, see if students can find all the arc measures and all the angles in the inscribe quadrilateral. Then, seeif students can come up with Theorem 9-10. If they are having problems making the connections, move on toInvestigation 9-5.
Modifications
For Investigation 9-4, give students several different circles (5-7) with inscribed angles and the corresponding centralangle. Then, have students start with Step 3. This investigation is best done by the students, individually, to generatetheir own meaning for the relationship between the inscribed angle, intercepted arc and central angle.
Investigation 9-5 can be a little challenging for some students. This investigation might be best done as a teacher-ledinvestigation on the overhead. If you decide to make this a student activity, consider passing out handouts with Steps
328

www.ck12.org Chapter 4. Basic Geometry TE - Differentiated Instruction
1 and 2 completed.
Angles from Chords, Secants, and Tangents
Visual Learners
For Investigation 9-6, it might help students to draw in the insribed angle, 6 CFB. This picture shows that 6 CFB ∼=6 ECB because they intercept the same arc. Therefore, any angle with its vertex on the circle will be half the measureof the intercepted arc.
After going over all the formulas, either give students the following picture or have them draw it in their notes withthe corresponding formulas.
The formulas progress CB+EF2 , CB
2 , CB−EF2 as the angle moves from the inside to the outside of the circle. Putting the
circles and formulas in this order might help students understand and remember them.
Kinesthetic Learners
Students will need lots of practice with these new formulas. Consider giving them the following problems as extrapractice.
329

4.9. Circles www.ck12.org
Answers
1. x = 85◦
2. x = 100◦
3. x = 45◦
4. x = 110◦
5. x = 200◦
6. x = 60◦
Modifications
Investigations 9-7 and 9-8 might be a little challenging for students. One modification for these would be to omitthem and give students the formulas and several examples. Students might get confused by all the angles in theinvestigations and not make the proper connections. Another modification for these investigations would be to makethem teacher-led.
Segments from Chords, Secants, and Tangents
Kinesthetic Learners
Here are a series of investigations for the theorems presented in this lesson.
Investigation 1: Ratios from Chords
Tools Needed: picture in step 1 (below), colored pencils, pencil
1. Give students the following picture.
330

www.ck12.org Chapter 4. Basic Geometry TE - Differentiated Instruction
2. Have students connect the two sets of endpoints to create two triangles. Have a discussion as to why the twotriangles are similar (AA Similarity Postulate). Encourage them to use color to identify the corresponding sides.
3. Have students generate a proportion with a,b,c, and d. Students should come up with ac = d
b or ad = c
b .
4. Lastly, they need to cross-multiply. Then, they will arrive at Theorem 9-14, ab = cd.
Investigation 2: Ratios from Secants
Tools Needed: picture in step 1 (below), colored pencils, pencil
1. Give students the following picture.
2. Draw two chords that intersect inside the circle, to form two triangles. Have a discussion as to why the twotriangles are similar (both triangles share the angle outside the circle). Have students use color to identify thecorresponding sides. You could also have students extract the triangles so that it is easier for them to see which sidesline up.
3. Have students set up a proportion using a,b,c, and d. Students should come up with ac = c+d
a+b or ac+d = c
a+b .
331

4.9. Circles www.ck12.org
4. Lastly, cross-multiply. Students will arrive at Theorem 9-15, a(a+b) = c(c+d).
Investigation 3: Ratios from a Secant and a Tangent
Tools Needed: picture in step 1 (below), colored pencils, pencil
1. Give students the following picture.
2. Draw two chords from the point of tangency of a so that two triangles are formed. However, we are not going touse the two triangles that are most obviously visible. We are going to use the overall, large triangle and the smalltriangle that is partially outside of the circle (see below). Discuss with students why these two triangles are similar.Have students use color to identify the corresponding sides. You could also have students extract the triangles sothat it is easier for them to see which sides line up.
3. Have students set up a proportion using a,b, and c. Students should come up with ba = a
b+c .
4. Lastly, cross-multiply. Students will arrive at Theorem 9-16, a2 = b(b+ c).
Extension: Writing and Graphing the Equations of Circles
Kinesthetic Learners
In Geometer’s Sketchpad, open a new sketch and go to Graph→ Show Grid. Then select the circle tool to draw acircle. Then, go to Measure → Equation. The equation of the circle should appear in the upper left-hand corner.Move around the center and the point on the circle to see how the equation changes.
Modifications
Consider only showing students the equation of a circle when it is centered at the origin. Students will see thismaterial in Algebra II.
332

www.ck12.org Chapter 4. Basic Geometry TE - Differentiated Instruction
Print out this extension and go over everything as a class. Students can write down notes in the margins.
333

4.10. Perimeter and Area www.ck12.org
4.10 Perimeter and Area
Triangles and Parallelograms
Visual/Kinesthetic Learners
For students that are having difficulty with the area formulas, give them graph paper and let students draw the shapeson the graph paper. This way, students can count the squares to find the area.
Give students a piece of graph paper for Example 5. Have students draw all the different rectangles with an area of36 cm2. Then, compare the perimeters of these rectangles.
Use the examples below so that students are familiar with all placements of the altitude.
Additional Example: Find the altitude of the triangle, if the area is 64 units2.
Solution: Plug in what you know to the area formula.
64 =12·16 ·a
64 = 8a
a = 8
Additional Example: Find the area of the triangle below.
Solution: This is a right triangle so the height and base are on either side of the right angle. Even though 25 doesnot look like the height, if we rotate the triangle it would be.
A =12·25 ·16 = 800 units2
Kinesthetic Learners/Collaborative Learning
334

www.ck12.org Chapter 4. Basic Geometry TE - Differentiated Instruction
To complete this activity, you will need to prepare enough figures for one-half of the students in the class. The otherhalf of the class will get the area measurements of the figures given to the other half. Pass out all the figures andmeasurements. Some students will receive drawings and some will receive measurements. The students will needto figure out the measure of their figure and find the person in the room who has the correct area measurement fortheir figure. The activity is complete when both persons are sure that they have been matched up correctly. This is anoisy activity, but the students will have a lot of fun doing it. It also has a lot of movement in it which is excellentfor kinesthetic learners.
Collect all the papers and then repeat this activity. Be sure that those who received drawings get area measurementsand those who had measurements receive drawings.
Modifications
Write down the formulas for this chapter on the board. You need to decide if you would like to leave these formulason the board for quizzes and tests.
Trapezoids, Rhombi, and Kites
Kinesthetic Learners/Collaborative Learning
Repeat the activity described in the previous lesson for trapezoids, rhombuses, and kites (matching figures with theirarea). This would also be an excellent review game for the end of the chapter.
Visual/Kinesthetic Learners
Another approach to the area of a trapezoid is to complete the trapezoid to make it a rectangle.
Area of the rectangle: A = hb2
Area of the triangles: A = 12 h(b2 − b1)
Area of the trapezoid:
A = hb2−12
h(b2 − b1)
= hb2−12
hb2 +12
hb1
=12
hb2 +12
hb1
=12
h(b1 +b2)
You can use this same approach to finding the area of a kite.
335

4.10. Perimeter and Area www.ck12.org
Area of the rectangle: A = d1d2
Area of outer triangles: A = 2 · 12
(12 d2)(1
2 d1)= 1
2 d1d2
Area of kite: A = d1d2− 12 d1d2 = 1
2 d1d2
For the rhombus, all the interior triangles are congruent. The area for one triangle is: A = 12
(12 d1)(1
2 d2)= 1
8 d1d2.Multiplying this by 4 we get: 1
2 d1d2.
For these investigations, give students the picture of the trapezoid and kite and see if the students can figure out thearea of the rectangle by themselves. Finding the area of the outer triangles might be more complicated. Tell themthey will need to move the two triangles, for the trapezoid, next to each other so that the heights are back-to-back.Then, it will be easier for them to see that the base length of the triangle is b2 − b1. This idea can be repeated withthe outer triangles for a kite.
After students work on this individually for a few minutes, let them work with the person sitting next to them. Aftera few more minutes, come together as a class and have a discussion as to what the areas are and finish the areaproblems as a class. This entire process could also be done with the area derivations that are in the text. Decidewhich approach your students would be most receptive to.
Modifications
Review how to find the area of a triangle, rectangle, and parallelogram. Keep these formulas on the board, alongwith the new ones introduced in this section.
For problems in the coordinate plane (Example 5), give students graph paper and/or a copy of the problem. Then,allow students to draw on the paper to find the diagonals or lengths. Remind students that things are not alwaysdrawn to scale.
Areas of Similar Polygons
All Learners/Collaborative Learning
One of the best ways for the students to understand scale drawings is to complete one. Using the guidelines fromthe Know What? in this lesson, break the students off into pairs and have them create the scale drawing of theirhand. Allow students to use chart paper, rulers, tape measures, colored pencils and to create their own scale for thediagram. After students have finished drawing their enlarged hands, have them do a scale drawing of a comic strip,something in a magazine, or picture.
Visual/Kinesthetic Learners
For Example 1, give students a piece of graph paper and have them draw the two rectangles, to scale, on the paper.Then, cut out the smaller rectangle and see how many times it will fit into the larger rectangle. Students will needthree copies of the smaller rectangle.
336
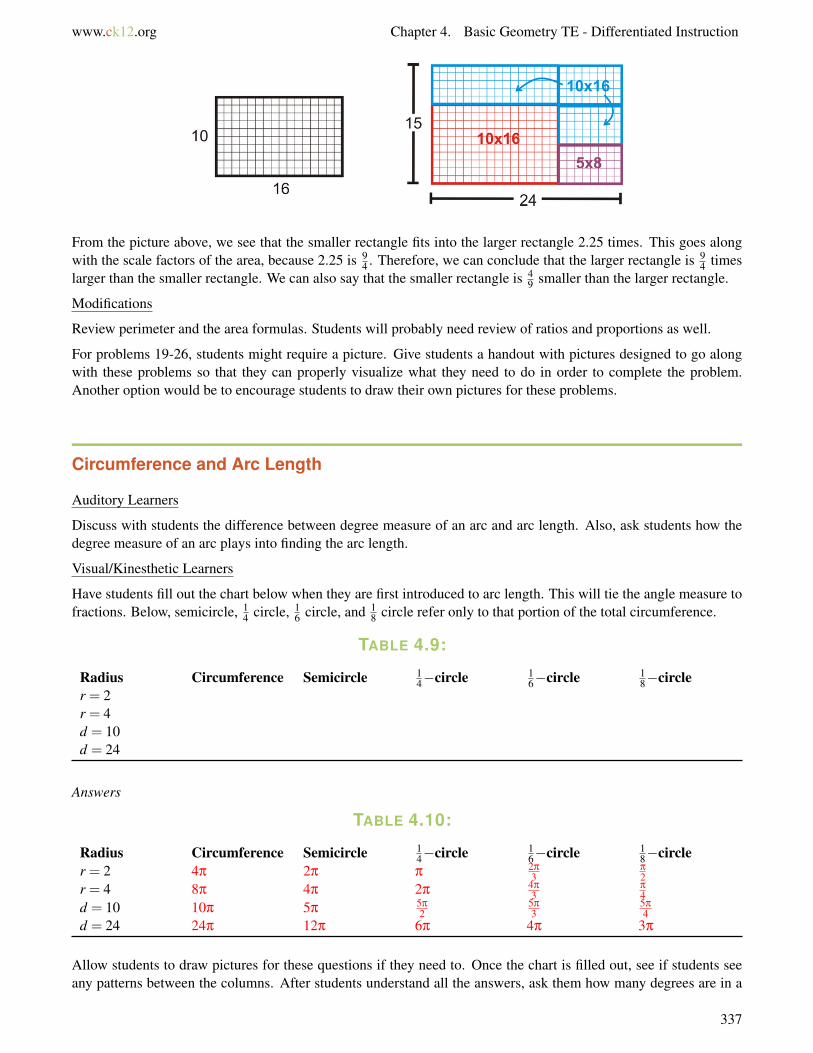
www.ck12.org Chapter 4. Basic Geometry TE - Differentiated Instruction
From the picture above, we see that the smaller rectangle fits into the larger rectangle 2.25 times. This goes alongwith the scale factors of the area, because 2.25 is 9
4 . Therefore, we can conclude that the larger rectangle is 94 times
larger than the smaller rectangle. We can also say that the smaller rectangle is 49 smaller than the larger rectangle.
Modifications
Review perimeter and the area formulas. Students will probably need review of ratios and proportions as well.
For problems 19-26, students might require a picture. Give students a handout with pictures designed to go alongwith these problems so that they can properly visualize what they need to do in order to complete the problem.Another option would be to encourage students to draw their own pictures for these problems.
Circumference and Arc Length
Auditory Learners
Discuss with students the difference between degree measure of an arc and arc length. Also, ask students how thedegree measure of an arc plays into finding the arc length.
Visual/Kinesthetic Learners
Have students fill out the chart below when they are first introduced to arc length. This will tie the angle measure tofractions. Below, semicircle, 1
4 circle, 16 circle, and 1
8 circle refer only to that portion of the total circumference.
TABLE 4.9:
Radius Circumference Semicircle 14−circle 1
6−circle 18−circle
r = 2r = 4d = 10d = 24
Answers
TABLE 4.10:
Radius Circumference Semicircle 14−circle 1
6−circle 18−circle
r = 2 4π 2π π2π
3π
2r = 4 8π 4π 2π
4π
3π
4d = 10 10π 5π
5π
25π
35π
4d = 24 24π 12π 6π 4π 3π
Allow students to draw pictures for these questions if they need to. Once the chart is filled out, see if students seeany patterns between the columns. After students understand all the answers, ask them how many degrees are in a
337

4.10. Perimeter and Area www.ck12.org
semicircle, 14−circle, 1
6−circle, and 18−circle. Then, show them the formula for arc length and plug in the radius or
diameter and show how we will arrive at the exact same answer.
Modifications
Do a quick review at the beginning of the period about the parts of circles, primarily radii, diameters, central angles,inscribed angles, and intercepted arcs. Rather than just telling students all the information that they need to know,brainstorm the information as a group. Write down what students come up with.
Students might already be familiar with pi, but might not know where it comes from. Investigation 10-1 can be auseful investigation if this is the case. If students are comfortable with pi, feel free to skip the investigation or saveit for the end of the lesson if there is time.
For students that are struggling with the idea of pi, have them treat it as a variable.
Area of Circles and Sectors
Auditory Learners
Besides pizza (in the Know What?), discuss with students where they might see sectors in real life.
Visual/Kinesthetic Learners
Have students fill out the chart below when they are first introduced to sectors. This will tie the angle measure tofractions. Below, semicircle, 1
4 circle, 16 circle, and 1
8 circle refer only to that portion of the total area.
TABLE 4.11:
Radius Area Semicircle 14−circle 1
6−circle 18−circle
r = 2r = 4d = 10d = 24
Answers
TABLE 4.12:
Radius Area Semicircle 14−circle 1
6−circle 18−circle
r = 2 4π 2π π2π
3π
2r = 4 16π 8π 4π
4π
3 2π
d = 10 25π25π
225π
425π
625π
8d = 24 144π 72π 36π 24π 18π
Allow students to draw pictures for these questions if they need to. Once the chart is filled out, see if students seeany patterns between the columns. After students understand all the answers, ask them how many degrees are in asemicircle, 1
4−circle, 16−circle, and 1
8−circle. Then, show them the formula for a sector and plug in the radius ordiameter and show how we will arrive at the exact same answer.
All Learners
Discuss with students how to solve the complex area problems in the examples and the review questions. It mightnot be so obvious to students which formulas to use. For example, with Example 8, students will need to subtractthe area of the square from the area of the circle. Do this at the end of the lesson; it will avoid confusion on theirhomework.
338

www.ck12.org Chapter 4. Basic Geometry TE - Differentiated Instruction
#23: Area of square minus area of circle.
#24: Area of larger circle minus area of smaller circle.
#25: Area of square minus the area of the four circles.
Modifications
The subsection about segments can be challenging for some students. Depending on your state’s standards, you canchoose to omit this section or not. Another option would be to present this example instead of or before the one inthe book.
Additional Example: Find the area of the segment below.
Solution: First, what portion of the circle would the sector be? Because the angle is 90◦, the sector would be 14 of the
circle. The area of the sector is A = 14 π82 = 16π. Then, we need to find the area of the triangle. A = 1
2 ·8 ·8 = 32.Finally, to find the sector, we need to subtract the area of the triangle from the area of the sector to find the bluesegment.
A = 16π−32≈ 18.27 units2
339

4.11. Surface Area and Volume www.ck12.org
4.11 Surface Area and Volume
Exploring Solids
Visual/Kinesthetic Learners
Bring in physical representations of prisms and pyramids. Split the students into groups and have them identifyall the faces, edges, and vertices for each of these items. Then, have them verify Euler’s Theorem. Possibilitiesfor solids could be: a shoe box, Toblerone chocolate bar (probably the container only), an actual triangular prism(for refracting light), or cracker/cereal box. For things other than prisms, look into purchasing a set of the woodengeometric solids. Die are also a great representation of the Platonic Solids. Have groups rotate the objects every5-10 minutes until every group has seen all the solids.
Show students the following website: http://www.mathsnet.net/geometry/solid/nets.html . This website providesanimations of the nets of a cube, tetrahedron, octahedron, dodecahedron, and an icosahedron. The website http://www.korthalsaltes.com/ has several examples of nets that are print-ready. Having students fold nets is a great way forthem to become familiar with solids.
Kinesthetic Learners
Have students work in groups of two or three. Students will need graph paper, plain paper, rulers, tape and coloredpencils. Either assign a solid or let students choose a solid to work with. You can provide students with a model ofa solid if you have them. Then students are going to create three different things: 1-3 cross-sections of the solid, anet for the solid, and an actual model of the solid using the net. You can decide if you would like groups to do morethan one solid as well or mini-presentations to the class.
Visual Learners
Students might have a hard time with cross-sections. Use the visual models mentioned about to help students seehow cross-sections can change in the same solid. For example, with a rectangular box (prism), use a piece of paperto represent the cross section. See how many different cross sections students can come up with. For a rectangularprism, there should be at least three different rectangles as cross-sections. Then, move on to the triangular prism,which should have two different triangles and two different trapezoids as cross-sections.
Modifications
Give students pictures of all the polyhedra discussed in this lesson. If there is time, use Euler’s Theorem on a few ofthese polyhedra so students are more familiar with the theorem. In addition, consider giving students a vocabularysheet so that they can fill in necessary words for throughout the chapter.
The only Platonic Solid that students are probably familiar with is the cube. They are all interesting solids, but otherthan just showing them to students, we don’t do much with them. Don’t dwell on these solids when presenting themto students.
Have nets pre-cut for students to use.
Surface Area of Prisms and Cylinders
Visual Learners
340

www.ck12.org Chapter 4. Basic Geometry TE - Differentiated Instruction
When showing students the difference between lateral faces and bases of prisms, use a physical model. Also, makesure that you show students a prism lying down, so that the solid is not standing on one of the bases. Students needto see that, no matter the orientation, the lateral faces will always be the rectangles. This can be a common error forstudents when it comes to finding the volume of prisms.
Visual/Kinesthetic Learners/Collaborative Learning
When introducing surface area and lateral surface area; use nets. You have two options here: give students papercopies of nets or physical models so that they can make their own net. Either way, once students have cut out thenet, they will need to use their knowledge of area from the previous chapter to find the total surface area. Repeat thisprocess with several solids. Students can work in groups of 3-4 for this activity.
Visual Learners
When introducing cylinders, find physical models that you can bring into the classroom. Canned food, soda cans,or a Quaker Oats container are all great examples of cylinders. Have each student bring in a soup can or other foodcan (beans, vegetables) to class. Then, take off the label to show them that the lateral area of a right cylinder is arectangle. After this investigation, donate the cans of food to a local food bank. You should offer some sort of extracredit if you decide to do this. And, make sure to put the labels back on.
Kinesthetic Learners/Collaborative Learning
Give each group one of the physical models mentioned above. Have them find the circumference of the bases, theheight, and the total surface area. Students may need rulers or string to measure their cylinders. Have students usethe string to measure the circumference of their cylinder. Once they have wrapped the string around the cylinder,they will need to lie it flat and then measure the distance with a ruler. To compare, have students find the surface areausing the formula in the text and using a “string” measurement of the circumference. For the “string” measurementof the circumference, students will need to reorganize the formula for surface area of a cylinder. If C = 2πr, thenthe formula becomes SA =Cr+Ch.
Modifications
Review the area formulas at the beginning of the period. You may want to put any necessary area formulas on theboard for reference.
Divide this lesson into two class periods or two mini-lessons. If doing this within the same class period, give studentsa break after going over the surface area of a prism. After 5 minutes, resume with the surface area of a cylinder andthe rest of the lesson.
Make sure students understand the difference between a right prism and an oblique prism. You may need to usephysical models for this. Also, it is important that students understand the difference between lateral area and totalsurface area.
Surface Area of Pyramids and Cones
Auditory/Visual Learners
Discuss the difference between a slant height and the height of a pyramid. When using a net, the slant height will nolonger be slanted, but flat. In the picture below, l is the slant height.
341

4.11. Surface Area and Volume www.ck12.org
Collaborative Learning
After going over the parts of a pyramid and finding the slant height, break students into groups. Give each group adifferent pyramid: triangular based, rectangular based, or square based. (There are no regular polygon bases, otherthan triangles and squares, in this chapter.) Have groups create a net for their pyramid and then find the surface area.
Visual/Kinesthetic Learners
Find snow cone paper cones (online or a party store) and give each student one. Go over the different parts of acone. Then, have them cut the cone along the slant height and force the cone flat. This will become their net. At thispoint, have students figure out the formula for the surface area. We know that the base is a circle, so that portion isπr2. The “flat” cone will be harder to find.
Notice that the circumference of the base is the same as the red arc of the flattened piece. We will have to use ratiosto find the area of the flattened piece. First, this piece is a sector of a circle with radius l. Let’s set up a ratio.
2πr2πl
=portion o f circum f erence f or conecircum f erence o f circle with r = l
=rl
This is the portion of the whole circle. So, if we multiply the area of the circle by our ratio, we will have the area ofthe sector/flattened piece of the cone.
rl
(πl2) = πrl
Adding this to the base circle, we get the total surface area of a cone: πr2 +πrl.
This derivation might be a little challenging for some students. Decide how much of it you would like to cover inclass.
Modification
342

www.ck12.org Chapter 4. Basic Geometry TE - Differentiated Instruction
Even though there is a formula for the surface area of a pyramid, students do not need to memorize it. It mightbe easier for students to visualize (or draw) the net of the pyramid and then use the formulas for the area of aparallelogram and triangle that they are already familiar with.
Write the formulas learned in this lesson on the board.
Volume of Prisms and Cylinders
Visual/Kinesthetic Learners/Collaborative Learning
Use the physical models of prisms and cylinders from the previous two lessons. Have students split into groups andfind the volume of one of these solids. Students may need to measure the height and the dimensions of the base.After groups have found the volume of one solid, have them switch so that every group has the opportunity to seeall the solids.
Visual Learners
To demonstrate Cavalieri’s Principle, show students a stack of books, like the one in the text. Then, slowly slide thebooks so that the pile is leaning. Try to use books that are all the same size, like textbooks. Explain to students thatno matter how the pile is arranged, it will always have the same volume. You could even have students come up torearrange the books.
Collaborative Learning
At the end of the lesson, have students work in groups of two or three to compare a cylinder and square based prismwith the same dimensions. Give students the following picture.
The last prism has diagonals of 8 inches. Ask students which one of these solids has the greatest volume. Then, havestudents find the volumes and compare.
Vcylinder = π42 ·10 = 160π≈ 502.65 in3
Vprism1 = 8 ·8 ·10 = 640 in3
Vprism2 = 4√
2 ·4√
2 ·10 = 320 in3
The first prism has the largest volume, followed by the cylinder, then the last prism. If the bases were all drawntogether, the largest square would be on the outside, the circle would be inscribed in it and then the base of the otherprism would be inscribed in the circle.
If you would like to extend this problem, have students make to scale nets of the three solids and see if they can fitthem together like the picture to the right.
343

4.11. Surface Area and Volume www.ck12.org
Modifications
Review finding the area and circumference of a circle.
Write out the formulas for volume of prisms and cylinders on the board. Encourage students to focus memorizingthe second formula for a prism, V = Bh. This way, when they are introduced to the volume of a prism in the nextlesson, the only thing they have to add is the 1
3 to the formula. Also, if students thing “area of the base times theheight,” they will remember that they have to find the area of the base, no matter what the base is.
Write out the steps for finding the volume of composite solids.
1. Break each composite solid into its smaller solid parts.2. Select the correct formula for either surface area or volume based on the problem.3. Find the volume of each smaller solid.4. Add or subtract the results of the volume based on the question.
Volume of Pyramids and Cones
Visual/Kinesthetic Learners/Collaborative Learning
Use the physical models of pyramids and cones from the previous lessons. Have students split into groups and findthe volume of one of these solids. Students may need to measure the height and the dimensions of the base. Aftergroups have found the volume of one solid, have them switch so that every group has the opportunity to see all thesolids.
Collaborative Learning
At the end of the lesson, have students work in groups of two or three to compare a equilateral triangle basedpyramid, a square based pyramid, and a cone with the same dimensions. Give students the following picture.
Ask students which one of these solids has the greatest volume. Then, have students find the volumes and compare.
344

www.ck12.org Chapter 4. Basic Geometry TE - Differentiated Instruction
Vcone =13
π42 ·8 ≈ 134.04 in3
Vsquare pyramid =13
8 ·8 ·8 ≈ 170.67 in3
Vequilateral 4 pyramid =13
(12·8 ·4
√3)·8 ≈ 73.81 in3
The square pyramid has the largest volume, followed by the cone, then the equilateral triangle pyramid. If thebases were all drawn together, the square would be on the outside, the circle would be inscribed in it and then theequilateral triangle.
If you would like to extend this problem, have students make to scale nets of the three solids and see if they can fitthem together like the picture to the right.
Modification
Investigation 11-1 can be a little messy but a very valuable activity. You may want to have students work in pairs.You can extend this investigation to the volume of cylinders and cones. Give students a snow cone cup and then havethem design a net of a cylinder around that.
Go back over the list for finding the volume of composite solids that was generated in the last lesson. Leave all theformulas for area and volume on the board for students to reference. Decide whether you want to leave them on theboard for test and quizzes.
Surface Area and Volume of Spheres
Visual Learners
Begin by showing students some spheres of different sizes. You could use a baseball, a globe or a basketball.
Visual/Kinesthetic Learners
Often the measurement of a ball is given according to the diameter. Use a 14-inch basketball, for example, to show:the center, radius, diameter, a chord, secant line, tangent line, the surface area and volume.
After the students have worked with the surface area and volume formulas, give groups the physical models that youbrought to class. Have them find the surface area and volume of these solids.
Kinesthetic Learners/Collaborative Learning
You will need some Styrofoam balls and aluminum foil for this activity. Students should work in pairs. Give eachpair a ball. Have them measure the circumference and use that to find the radius. Then, give each pair a piece ofaluminum foil. Students need to form the aluminum foil around the ball without overlap and as little wrinkles as
345

4.11. Surface Area and Volume www.ck12.org
possible. Once it is perfectly covered, students need to carefully remove the aluminum foil and lay it flat. This isequivalent to the surface area of the Styrofoam ball. See if students can cut the aluminum foil into a rectangle withdimensions of 2πr by 2r. This way, the area of the rectangle would be 4πr2, just like the formula for the surface areaof the sphere.
Modifications
You may need to review circles with your students. Do this by comparing what is the same and different betweenthe parts of circle and the parts of spheres.
Give students a handout for their notes and/or examples in the text.
Extension: Exploring Similar Solids
Visual/Kinesthetic Learners/Collaborative Learning
Give students the two nets of the rectangular prisms below.
Have students cut out the nets (you can enlarge or shrink these, the larger net is twice as large as the smaller net)and put them together. They should measure the lengths of the sides and find the scale factor and the surface area ofeach solid. Then, have students find the volume of each solid and compare the volumes.
You could also have students build similar solids using Legos or other type of building block. Just use the unit sizedbuilding blocks.
346

www.ck12.org Chapter 4. Basic Geometry TE - Differentiated Instruction
Modifications
Decide how much of this lesson you would like to cover. This is an extension, so check with your state’s standardsto see how much of the lesson is necessary.
347

4.12. Rigid Transformations www.ck12.org
4.12 Rigid Transformations
Exploring Symmetry
Visual Learners/Collaborative Learning
Ask each group to come up with an example to explain line symmetry and rotational symmetry. When finished, haveeach group share their images. Then move on to the next part of the activity. Ask each group to draw half of animage that has line symmetry and rotational symmetry. Students can use objects in the room to help them brainstormwhich image to draw for each. Then they are going to pass their papers to a group near them. The next group mustfinish the drawings according to each description. When finished, allow time for sharing.
Kinesthetic Learners
Let students get out of the classroom and walk around the school grounds. Have students search for examples ofreflectional and rotational symmetry in nature, construction, or just around the school. Students should either takepictures of their examples or draw pictures.
Visual/Kinesthetic Learners
Give students handouts with 3-4 pictures of figures with rotational symmetry. Let students cut out the images andphysically have them rotate the images to determine the number of lines of rotational symmetry. To be consistentwith the text, only use images where the center of the object is also the center of rotation. Here are a few picturesthat you can use.
Lines of Rotation: 8, 10, 3, 7
Angle of Rotation between each Line: 45◦,36◦,120◦,51.43◦
Modifications
Give students lots of pictures of examples of line and rotational symmetry. The best way for students to understandsymmetry is through examples and real-life.
Make a notes handout for this lesson and the entire chapter. Have students fill in vocabulary and examples.
Write down important information on the board. Leave it up for the duration of the chapter.
Translations
Auditory Learners/ELL
Have students generate synonyms for translation. Possibilities are move and shift.
348

www.ck12.org Chapter 4. Basic Geometry TE - Differentiated Instruction
Kinesthetic Learners/Collaborative Learning
Turn this lesson into a discovery. Give students the following set of questions/directions and graph paper. Thesequestions are from the examples in the text. This presentation of material is an alternative to what is in the text andnot to be done in conjunction.
1. Plot the points S(1,2),Q(4,1),R(5,4) and E(2,5) on graph paper. Connect the points to form a square.2. Now, move each point to units to the left and three units up. What are the new coordinates? Label them
S′,Q′,R′, and E ′.3. Plot the new points from #2 on the same set of axes as #1. What do you notice?4. A translation rule is written (x,y)→ (x±a,y±b), where a and b are the amount the figure moved. What is
the translation rule for questions 1-3?5. Draw a new set of axes. Plot A(3,−1),B(7,−5) and C(−2,−2).6. Move each point to the left 4 units and up 5 units. What are the coordinates of A′,B′, and C′?7. Plot A′,B′, and C′. Write the translation rule.8. Draw a new set of axes. Plot T (−3,3),R(2,6), I(−2,8). Connect these to form a triangle.9. Plot T ′(3,−1),R′(8,2), and I′(4,4) on the same set of axes. Do these two triangles look congruent?
10. Find T R,RI,T I,T ′R′,R′I′, and T ′I′ using the Distance Formula. Now are these two triangles congruent?11. What is the translation (movement) from T to T ′? R to R′? I to I′? Are they all the same? If so, then we can
write a translation rule of this triangle. Write it.
Answers
1-3. See graph. The two squares are congruent.
4. The translation rule is (x,y)→ (x−2,y+3)
5-7. The translation rule is (x,y)→ (x−4,y+5)
349

4.12. Rigid Transformations www.ck12.org
8. See graph.
9. See graph. Yes, these triangles seem congruent.
10.
T R =
√(−3−2)2 +(3−6)2 =
√34
T ′R′ =√(3−8)2 +(−1−2)2 =
√34
RI =√(2− (−2))2 +(6−8)2 =
√20
R′I′ =√(8−4)2 +(2−4)2 =
√20
T I =√
(−3− (−2))2 +(3−8)2 =√
26
T ′I′ =√(3−4)2 +(−1−4)2 =
√26
The triangles are congruent by SSS.
11. The movement from each to its prime is down 4 and to the right 6. Because all the translations are the same thisis considered a translation. The rule is (x,y)→ (x+6,y−4).
Modifications
The alternative lesson presentation above could be considered a modification. Give students a print-out of the 11questions. Decide if you would like student to work in pairs or individually. Students will also need rulers and graphpaper.
Reflections
Visual/Kinesthetic Learners
Use the patty paper construction below to create reflections.
Tools Needed: Patty paper, pencil, ruler
1. Draw a picture on the left side of the patty paper.2. Draw a line of reflection to the right of your image.3. Fold the paper on the line of reflection.4. Trace your original image on the other side of the line of reflection.5. Open the paper to view your transformation.
350

www.ck12.org Chapter 4. Basic Geometry TE - Differentiated Instruction
This construction can be done with the x−axis and y−axis by drawing a set of axes on the patty paper. Students canalso do double reflections on patty paper by repeating the steps above a second time. Depending on the thickness ofthe graph paper that you use, it could be folded and the images traced to perform reflections on the coordinate plane.
Modifications
Let students do examples and homework problems on tracing paper.
Print out the homework problems for students to take home. Then, they can do the reflections on this handout byfolding the paper on the lines of reflection.
Rotations
Visual/Kinesthetic Learners
To prepare this activity, you will need to prepare some small squares on 3×5 cards. Draw several (enough for a classset) squares and pass them out to your students. Have them cut out the squares and decorate them. Now, studentswill need graph paper. Have them draw a large set of axes that takes up the entire paper. Then have each studentdraw their square somewhere on the paper. They can draw the square wherever and with any orientation.
At this point, you tell each student to rotate their square 90◦ counterclockwise. If they need to, they can use theircut-out square to help with the rotation. After the rotation is complete, have them exchange papers with a neighbor.Make sure everyone has a new paper. Then, have students rotate this new square 180◦. If you would like, you canhave students exchange one more time. This time, see if students can figure out the correct rotation needed to placethe image back on the original square.
Modifications
For investigation 12-1, give students a cut-out of 4ABC to work with. Then, on a plain piece of paper, have themdraw a center of rotation, R, and trace4ABC on the paper. They can continue with the investigation. At Step 4, havestudents use the cut-out and rotate it the 100◦ so that B′ lines up with the angle drawn in Step 3. When students likethe placement of the cut-out triangle, have them trace it to create4A′B′C′.
Composition of Transformations
Visual/Kinesthetic Learners/Collaborative Learning
Students need to work in pairs for this “game.” Give each pair a plain piece of paper and have them fold it into16 congruent squares (three vertical folds, three horizontal folds). Make the START square and the END square atopposite vertices of the square (see picture below). Place a triangle in the START square. Then, students will reflectthe triangle over the folds. Students will alternate turns. The student whose reflection lands in the END square wins.Students will need to use strategy for this game. Students can only reflect over the horizontal and vertical lines.
351

4.12. Rigid Transformations www.ck12.org
Variations on this game: make more squares (32 or 64), reflect over the points of intersection of the folded lines,rotations of 90◦,180◦ or 270◦ around the closest point of intersection, and combining rotations and reflections.
Modifications
Decide if the Reflections over Parallel Lines Theorem and the Reflection over Intersecting Lines Theorem are toochallenging for your students. You might want to show your students these theorems through an example, but notrequire them to memorize the properties.
Make Investigation 12-2 a teacher-led investigation. Give students a copy of the finished Example 7 and then startthe investigation at Step 2.
Extension: Tessellating Polygons
Collaborative Learning
Do this activity after going over the definition and a few examples of tessellations. Students will work in groups.You will need to give each group an example of a regular polygon. Give each group their polygon and tell themthat they will need to prove whether each one tessellates or not. Students need to demonstrate that it has no gaps,no overlapping shapes, that the entire plane is covered in all directions. Allow students time for this exploration andthen have students share their work. From the lesson they will discover that only equilateral triangles, squares andregular hexagons tessellate.
Visual/Kinesthetic Learners
Have students create a tessellation with regular octagons and squares. There will have to be two regular octagonsand one square around each point. Encourage them to add color and design.
Modifications
Write the steps of how to tessellate a polygon on the board.
352

www.ck12.org Chapter 4. Basic Geometry TE - Differentiated Instruction
Decide if you want to cover this extension in your class. Reference your state’s standards to see if it required part ofGeometry.
353

www.ck12.org
CHAPTER 5 Basic Geometry TE -Problem Solving
Chapter Outline5.1 BASICS OF GEOMETRY
5.2 REASONING AND PROOF
5.3 PARALLEL AND PERPENDICULAR LINES
5.4 TRIANGLES AND CONGRUENCE
5.5 RELATIONSHIPS WITH TRIANGLES
5.6 POLYGONS AND QUADRILATERALS
5.7 SIMILARITY
5.8 RIGHT TRIANGLE TRIGONOMETRY
5.9 CIRCLES
5.10 PERIMETER AND AREA
5.11 SURFACE AREA AND VOLUME
5.12 RIGID TRANSFORMATIONS
Problem Solving in Geometry
Problem solving and applications are particularly challenging for many students. Let the students know that this isdifficult for most people and that with time they will get better at it. They are probably going to struggle, have toreread the information several times, and may be confused for a while. It is all part of the process. This section willgive them strategies to work through the difficulties without giving up.
Highlight Important Information - It is nice when students can actually mark up the text of the exercise, butfrequently this is not the case. As they read the paragraph have the students take notes or organize the informationinto a chart or diagram. Otherwise the students can just get lost in all the words. Translating from English to math isoften the hardest part.
The Last Sentence - When the students are faced with a sizable paragraph of information the most importantsentence, the one that asks the question, is usually at the end. Advise the students to read the last sentence first, thenas they read the rest of the paragraph they will see how the information they are being given is important.
Does This Make Sense? - It is so hard to get the students to ask themselves this question at the end of a wordproblem or application. I think they are so happy to have an answer they do not want to know if it is wrong. Asyou examples in class, model the process of checking the validity of the answer. Give examples of obviously wronganswers-like a hypotenuse that turns out to be shorter than a leg in a right triangle or angles in a triangle that don’tadd up to 180 degrees. Many students really don’t know how to determine whether their answer is reasonable.Keep reminding them and giving examples. Sometimes it is possible to not accept work with an obviously wronganswer. The paper can be returned to the student so they can look for their mistake. This is a good argument for theimportance of showing clear, organized work.
Naming Quadrilaterals - When naming a quadrilateral the letter representing the vertices will be listed in aclockwise or counterclockwise rotation starting from any vertex. Students are accustomed to reading from leftto right and will sometimes continue this pattern when naming a quadrilateral.
354

www.ck12.org Chapter 5. Basic Geometry TE - Problem Solving
The Pythagorean Theorem - Most students have learned to use the Pythagorean Theorem before Geometry classand will want to use it instead of the distance formula. They are closely related; the distance formula is derivedfrom the Pythagorean Theorem as will be explained in another chapter. If they are allowed to use the PythagoreanTheorem remind them that it can only be used for right triangles, and that the length of the longest side of the righttriangle, the hypotenuse, must be substituted into the c variable if it is known. If the hypotenuse is the side of thetriangle being found, the c stays a variable, and the other two side lengths are substituted for a and b.
355

5.1. Basics of Geometry www.ck12.org
5.1 Basics of Geometry
Points, Lines and Planes
Project-Global Architecture
The objective of this activity is for students to recognize the postulates connected with points, lines and planes inreal life architecture.
Students should find and use pictures of at least two different structures from at least two different countries toidentify an example of each of the following postulates:
• Line Postulate - There is exactly one line through any two points.• Plane Postulate - There is exactly one plane that contains any three non-collinear points.• Postulate - A line connecting points in a plane also lies in the plane.• Postulate - the intersection of two distinct lines will be a single point.• Postulate - the intersection of two planes is a line.
Students can either print the pictures, use computer displays or slides.
Students should be encouraged to use mathematical language as they describe and write about each example of apostulate.
Students may also wish to draw sketches or draw and label points or lines on printouts of the pictures.
Some students may require assistance in locating appropriate structures to analyze and in identifying the postulates.It may be helpful for teachers to use a sample structure and analyze it as a class. The level of assistance given whilestudents complete their work is entirely up to the individual teacher.
Basic Assessment:
This rubric contains the objectives that students should meet or exceed. Teachers are encouraged to adapt this tomeet the needs of their students and assign their own point values.
Mathematical Process - Students should correctly identify points, lines and planes in both of their chosen piecesof architecture. All five postulates should be illustrated using their choices with at least three identifiable in eachbuilding.
Mathematical Communication - Students should use the terms points, lines, planes, segments, etc. correctly in theirdiscourse and all notations should also be appropriate and correct.
Presentation and General Communication - Students should demonstrate an appropriate level of writing skill.Complete sentences and clearly communicated thoughts are essential.
Meeting the Requirements - Students should analyze two different buildings from two different countries. Theprinted photographs should be clear enough for them to identify the postulates.
Going Above and Beyond - Some students are bound to do more than is expected and here are some ways in whichthey may achieve this and perhaps earn bonus points.
• Finding all five postulates in each structure.• Analyzing a third structure.• Word processing their work and/or creating additional diagrams to illustrate their work.
356

www.ck12.org Chapter 5. Basic Geometry TE - Problem Solving
Segments and Distance
Project-My Town
The objectives of this project are for students practice measuring distances using different tools, to understand andapply the ruler postulate and segments addition postulate to measurement and to use endpoints to identify distanceson a coordinate grid.
Students are assigned the task of using measurement to design their own town.
Students will need rulers, pencils, colored pencils and chart paper.
Each town needs to have the following buildings in it: a post office, a police station, a bank, a park, a school andsome houses. The students can expand this list if they choose.
Each town map needs a scale to determine the distances from one building to another building. This scale could beexpanded to include standard and metric measurement.
Each students needs to develop a key that shows the measurements from one building to another.
Distances must be actual distances measured with rulers and matched to scale. This could be expanded to includeboth standard and metric measurement.
After the design has been completed, the students need to write a series of directions and distances for someone totravel around their town between the various buildings and locations. The distances should be clear enough for anyother student to follow.
Students pair up with a peer to check and make sure that student directions/measurements are accurate.
Finally, allow students time to share their designs in small groups or with the entire class.
Adapting the Project
Teachers may wish to allow students to work in pairs if the students expand the town appropriately and/or expandtheir work to include both metric and standard measurements.
Teachers may choose to award bonus points for extra effort including more locations, more detailed drawing orinclusion of both standard and metric units.
Basic Assessment:
Observe students as they work on this assignment and provide assistance as needed to make sure that students arecorrectly measuring distances using the grid or a ruler.
Teachers should create a rubric where each piece of the assignment is worth points. Exactly how many points eachcomponent should be worth is left up to individual teachers. The following is a list of possible components:
• Scale• Accurate measurements• Clear and correct directions• Inclusion of all essential buildings
Angles and Measurement
Activity-Angle Hunt
The objectives of this activity are for students to understand and identify rays, to understand and classify angles andto understand and apply the protractor and angle addition postulates.
357

5.1. Basics of Geometry www.ck12.org
Print copies of the figure below for students to use in this activity.
Students will need rulers, colored pencils or markers and protractors.
First, students take the drawing and find ten different angles. They should name each angle with three letters.
Next, they make a list of each of the ten angles and classify each.
Then, they apply the protractor postulate to measure each of the ten angles.
Finally, they apply the angle addition postulate and create four different combinations of angles to calculate totalmeasures.
When finished, pair up students and have them check each other’s work.
Each student needs to provide their peer partner with verbal and written feedback.
Then allow students time to share feedback in small groups.
Basic Assessment:
Teachers should create a rubric to grade each students work. Key components of the project that should be includedin the rubric are:
• Were ten angles labeled and identified?• Were the angles correctly classified?• Are the measurements of each angle accurate?• Did students successfully use the angle addition postulate?• How well did students provide feedback to their peers?
Midpoints and Bisectors
The objectives of this project are to understand and identify congruent line segments, identify the midpoint andbisector of line segments, understand and identify congruent angles and to understand and apply the Angle BisectorPostulate.
Activity-Revolving Door Design
Students are going to be assigned the task of designing their own revolving door.
Show students the Wikipedia site. http://en.wikipedia.org/wiki/Revolving_door
Discuss the importance of revolving doors and the design used. Point out that the diagram of the revolving door has
358

www.ck12.org Chapter 5. Basic Geometry TE - Problem Solving
four wings to it and four congruent angles. Discuss with students the measures of the angles, bisectors and midpointsin the diagram on the site.
Students will design a revolving door with at least six wings in it.
Students will need compasses, rulers, protractors, pencils, and paper.
They can choose to add more wings, but the revolving door needs to have at least six in it.
Here are the specifics of the assignment:
• Design a revolving door with at least six wings.• Each angle must be congruent.• Label each angle measure using a protractor.• Identify line segments that are bisected.• Identify the midpoint of each line segment.• Label each part of the revolving door and demonstrate congruency.
Basic Assessment:
Assess student work by thinking about each of the following points.
• Were the students successful in executing a design that matches the specifics of the assignment?• Are the angles of the wings congruent?• Are the angle measures labeled?• Are all midpoints and bisectors identified?• Is it clear that students understand the concepts discussed in the lesson?
Angle Pairs
Activity-Visualize It
The objectives of this activity are for students to understand and identify complementary and supplementary angles,understand and utilize the Linear Pair Postulate and to understand and identify Vertical Angles.
Students are going to go on a search for different types of angle pairs. This can be done in the classroom, but itwould be best to expand it to the entire school or outside.
If possible, allow the use of digital cameras. If this is not possible, students can draw sketches of the places wherethey locate each type of angle pairs.
They will need rulers, pencils, chart paper, clip boards.
Students need to locate three examples of each of the following:
• Complementary Angles• Supplementary Angles• Vertical Angles
Students must write a description of each example pair and explain why it is a complimentary, supplementary orvertical angle pair.
Print and display student work. If possible, display the pictures with “hidden” descriptions so that other studentsin the class can circulate the room and test their knowledge trying to identify the pairs and checking their answers.Another idea is to have students create booklets with the pictures and “lift the flap” answers like a children’s book.
Basic Assessment:
359

5.1. Basics of Geometry www.ck12.org
Have students work in groups to assess each other’s work. Request that students read each description of the anglepair to be sure that it describes each angle pair in mathematical terms.
You want to see that students are using measurements such as 90◦ for complementary angles, and that they aredemonstrating that vertical angles are congruent.
Students should have three appropriate examples of each type of angle pair in their project.
Students should be clearly expressing themselves in their written explanations and using appropriate mathematicalterminology.
Classifying Polygons
The objective of this activity is to practice identifying and classifying the various types of polygons such as convexand concave, classifying polygons by the number of sides they have and identifying and classifying the particulartypes of triangles based on their angles and side lengths.
Activity-Polygon Sort
This activity requires students to sort polygons in multiple ways. To prepare this activity, you will need to createor copy different polygons. You want an assortment of polygons and non-polygons, convex polygons, concavepolygons, triangles (acute, obtuse, right, scalene, isosceles and equilateral) and regular polygons (i.e. quadrilaterals,hexagons, etc.).
There are a number of things you can now do with these figures. Here is one idea:
Make categories on the boards and have students tape up or use magnets to place the figures appropriately. Possiblesorting ideas:
• Polygons vs non-polygons• Concave vs convex• Classification based on number of sides-use the names• Triangle sort (put up the categories of triangles based on angles and sides). This will be a good one to have
students discuss since some triangles may fit in multiple categories. This could lead into creating a tree orVenn diagram of triangles.
Basic Assessment:
This activity is really more of the formative variety. This will allow you to determine whether or not your studentsunderstand the basics of polygons and help you refine their understanding. With that in mind, you should do thefollowing during the activity:
Assess student understanding by checking each “sorting exercise”
Also ask different student for feedback about why they “sorted” their polygons the way that they did.
Allow time for feedback and student questions.
360

www.ck12.org Chapter 5. Basic Geometry TE - Problem Solving
5.2 Reasoning and Proof
Inductive Reasoning
Activity-Pascal’s Triangle
The objective of this activity is to recognize patterns and number patterns, extend and generalize patterns and writea counterexample to a pattern rule.
Students will be using a diagram of Pascal’s Triangle like the one below for this activity
1
1 1
1 2 1
1 3 3 1
1 4 6 4 1
1 5 10 10 5 1
1 6 15 20 15 6 1
You may also wish to look at other diagrams such as the one on the website: http://en.wikipedia.org/wiki/Pascal%27s_triangle
Students are going to practice their inductive reasoning skills an make conjectures about patterns they see in Pascal’sTriangle.
Students should work in small groups and may wish to use color on the triangle to identify different patterns. Allowstudents time to really explore the patterns in the triangle.
Students should eventually develop a rule for the triangle.
Once students have found the rule, they need to do the following:
1. Write the rule in complete sentences as if they are writing directions for someone to construct the triangle.2. Write out the next two rows in the triangle.3. Demonstrate two ways that you know your rule is accurate. Students may do this by recreating the diagram
and using colored pencils or markers to mark the diagram.4. Conjecture two other patterns in the triangle.5. Share your results with the class.
Teachers may extend this project by having students do some research on Pascal and the other patterns/propertiesof the triangle. The website given above is a great place to start but encourage students to look further and practicetheir research skills by going to other websites as well.
Basic Assessment:
It is helpful to do some research on Pascal’s Triangle and the many patterns within it before assigning this project.Students may initially struggle to find a pattern. They may not have done anything quite like this before and may
361
5.2. Reasoning and Proof www.ck12.org
have a hard time understanding how to approach the problem. Try not to help them too much, but encouraging themto look at “sums” or “rows” may give them a hint. Throughout the activity check in with the groups to make surethey are on the right track.
Teachers should create a rubric where each piece of the assignment is worth points. Exactly how many points eachcomponent should be worth is left up to individual teachers. The following is a list of possible components:
• Correct rule found and communicated clearly.• Next two rows of the triangle were found correctly.• Two demonstrations verifying the rule were completed.• Two additional patterns found and clearly described.• Presentation.
Conditional Statements
The objective of this activity is to recognize if-then statements; identify the hypothesis and conclusion of an if-thenstatement; write the converse, inverse and contrapositive of an if-then statement and to understand a biconditionalstatement.
Activity-Advertisements
Students are going to use newspapers, magazines and online advertisements for this problem solving activity.
Begin the activity by talking about how advertisers use conditional statements to lure people into purchasing theirproducts. For example, a phone company will often offer a free phone for a cell phone plan. Provide severalexamples of advertisements with conditional statements. Ideally, some are explicitly if-then statements and somemust be re-written as such.
Tell students that their assignment is to use newspapers, magazines and the internet to find one such conditionaladvertisement.
Then they are to take that advertisement and create a display using it to show the converse, inverse, contrapositiveand biconditional statement of the advertisement.
Students can decorate and design their display.
Allow time for students to share their work when finished and display them in the classroom.
Basic Assessment:
You may wish to have students bring in several advertisements and help them select the best one. Some studentsmay have trouble picking out the conditional statement and you want to be sure they have selected something usablebefore they continue.
Teachers should create a rubric where each piece of the assignment is worth points. Exactly how many points eachcomponent should be worth is left up to individual teachers. The following is a list of possible components:
• Students have selected a conditional statement in an advertisement.• Correct statements written.• Creativity in display and presentation.
362

www.ck12.org Chapter 5. Basic Geometry TE - Problem Solving
Deductive Reasoning
The objective of this activity is to recognize and apply some basic rules of logic, including the Law of Detachment,the Law of the Contrapositive and the Law of Syllogism.
Activity-Logic Puzzles
Students will use the following series of statements in this activity.
If we don’t get sand in the car, then we are not sandy.
If we go to the beach, then we build a sandcastle.
If we aren’t sandy, then we didn’t build a sandcastle.
If it is summer, then we go to the beach.
If we get sand in the car, then Mom will be mad.
It is summer.
Students will use the Law of the Contrapositive and rearrange the statements in order to use the Law of Syllogismand the Law of Detachment to make a conclusion.
Students will then write their own logic puzzle:
• In groups, students will create a series of at least 4 statements that can be linked using the Law of Syllogism• At least one statement should be written as a contrapositive and then the statements should be mixed up.• Students should identify the initial hypothesis and state that it is true.• Each group will present their puzzle by either writing it on the board, on poster paper or creating a slide for a
Powerpoint presentation for the other groups to solve.
Basic Assessment:
It is a good idea to find other examples of logic puzzles such as the ones written by Lewis Carroll, the author ofAlice in Wonderland. A lesson and many examples can be found online at: http://www.math.hawaii.edu/~hile/math100/logice.htm It may help students to do a few of these as a class before assigning this activity.
Students may need help identifying which statements need to be rewritten as a contrapositive and may need someguidance. Try to let them puzzle it out a while but if they need help a hint is to suggest that students start with thestatement, “It is summer” and then follow the statements, changing them to a contrapositive as needed.
Teachers should create a rubric where each piece of the assignment is worth points. Exactly how many points eachcomponent should be worth is left up to individual teachers. The following is a list of possible components:
• Did all students participate in the process?• Were students able to reorder the given statements and reach the correct conclusion?• Did each student contribute at least one conditional statement to the group’s puzzle?• Did students create a solvable puzzle that contained at least four statements and one contrapositive?• Did groups make a reasonable attempt to solve their classmates’ puzzles?
Algebraic and Congruence Properties
The objective of this activity is to identify and apply properties of equality and congruence and use these propertiesto solve problems.
363
5.2. Reasoning and Proof www.ck12.org
Activity-Match It Up
Students are going to create a matching game that they can then play in small groups.
Each small group needs to create a pair for each of the properties. One card will have the name of the property on it,and the match will be a numerical example, and or a geometric example.
Students should write out an actual example of the property and not just variables as they did in class. An exampleis a card that has: if x = 7, then x+5 = 12 and a second card with: Addition Property of Equality.
Students will use index or small cards, pens, rulers, etc.
After the cards have all been created, have one group exchange with another group and play that team’s game.
When finished, ask the teams to give each other feedback on the examples used.
Here are the properties to use:
• Reflexive Property• Symmetric Property• Transitive Property• Substitution Property• Distributive Property• Addition Property of Equality• Subtraction Property of Equality• Multiplication Property of Equality• Division Property of Equality• Reflexive Property of Congruence with segments and angles• Symmetric Property of Congruence with segments and angles• Transitive Property of Congruence with segments and angles
Basic Assessment:
This activity has two parts. During the first part, it is very important to watch carefully to make sure that groupscreate workable examples for their games cards. During the second part, it is important to observe whether or notstudents can recognize the properties and make correct matches. They may also find their classmates’ errors. Allowtime for students to provide feedback and corrections to their peers.
Proofs about Angle Pairs and Segments
The objective of this activity is to create, mark and interpret diagrams that represent the postulates learned thus farin the course.
Activity-Name That Postulate!
This is a game. The students will create the game cards and then a “Jeopardy” kind of game can be played in thelarge class or in small groups.
Students are assigned the task of creating an index card with a diagram that represents each postulate.
Students should use diagrams and also standard marks for segments and angles in their examples.
There are twelve postulates, so if there are twenty-four students in the class, each postulate would be represented bytwo different diagrams. You need to assign the students the postulates to make sure all are made and to avoid toomany repeats.
Allow time for the students to create their diagrams and then use peers to check each other’s work for accuracy.
364

www.ck12.org Chapter 5. Basic Geometry TE - Problem Solving
When finished, collect the cards and play the game with the students.
The postulates to be represented are:
• Postulate 1-1• Postulate 1-2• Postulate 1-3• Postulate 1-4• Postulate 1-5• Ruler Postulate• Segment Addition Postulate• Protractor Postulate• Angle Addition Postulate• Right Angle Theorem• Same Angle Supplements Theorem• Same Angle Complements Theorem
Remind students that they should have all of these with examples in their notes to reference.
Basic Assessment:
Assessment is made easier with this activity because the students will be playing the game. You will be able to seewho understands the postulates and who doesn’t. Having students check each other’s work before playing the gamewill provide additional opportunity for students to review the material and will help to catch any errors. You canhelp add any corrections when playing the game and looking at each game card. This activity allows opportunity forformative assessment. A rubric could be created to assign points for the cards created, but the real objective here isto insure understanding of marking and interpreting diagrams and recognizing the postulates.
365

5.3. Parallel and Perpendicular Lines www.ck12.org
5.3 Parallel and Perpendicular Lines
Lines and Angles
Activity-School Map
The objectives of this project are to practice identifying parallel lines, skew lines, and perpendicular lines, to use theParallel and Perpendicular Line Postulates and to identify angles made by transversals.
Students are going to use parallel lines, perpendicular lines and skew lines to create a map of the school.
You can begin this lesson by looking at a fire exit map of the school or another building to give them a concreteexample of what it is that they will be creating.
The students are going to work in groups of three to create a map of the school.
Students will need chart paper, rulers, yard sticks, colored pencils.
Take students on a walk around the school to begin taking notes for their design.
Notes: If your school is very large, you can either challenge students with the whole school or select a floor todesign. This could create a complete school map in the end with groups putting their “floors” together. Also, if youhave access to a device that can be used to actually measure the distances in the building, students could practicecreating a “scaled” map by actually measuring the lengths of the hallways. Even a pedometer could be used to dothis.
Have students draw and design their map.
When finished with the map, students must identify two sets of parallel lines and two sets of perpendicular lines.
Extension-you can extend this activity even further by asking the students to identify an example of the Parallel LinePostulate and an example of the Perpendicular Line Postulate on their map. You may wish to have them discuss whythere would be no skew lines on their two-dimensional map, even though there may well be hallways in the buildingthat are skew.
Allow time at the end for the students to share their work.
Create a class display of student maps.
Basic Assessment:
Teachers should create a rubric where each piece of the assignment is worth points. Exactly how many points eachcomponent should be worth is left up to individual teachers. The following is a list of possible components:
• Do the students have a good understanding of parallel lines?• Of perpendicular lines?• Of skew lines?• Are students able to identify an example of each postulate?• Is the map neatly drawn using a straightedge?• Is the map an accurate representation of the building (or portion thereof)?• Were the lengths scaled correctly (this only applies if you have them actually measure distances?)
366

www.ck12.org Chapter 5. Basic Geometry TE - Problem Solving
Properties of Parallel Lines
Activity-Airport Map
The objective of this activity is to identify and use properties of corresponding, alternate interior, alternate exteriorand consecutive interior angles formed when two lines are intersected by a transversal.
For this problem solving activity, students are going to use an aerial map of Logan International Airport in Boston,Massachusetts. Use the following link to get the map:
http://en.wikipedia.org/wiki/File:KBOS_Aerial_NGS.jpg
Students need to use the picture to draw their own version of the map. You may wish to project the image in theclassroom for them to “copy.”
Then using color, they need to identify the following:
In red, two parallel lines and a non-perpendicular transversal.
In blue-two corresponding angles
In green-two alternate interior angles
In orange-two alternate exterior angles
In purple-two consecutive interior angles
When finished, you can extend this by having the students use a protractor to determine angle measures.
Allow time for students to share their work.
Basic Assessment:
Teachers should begin assessing this activity while students are working on it by observing and assisting throughoutthe process. This is an excellent opportunity to assess understanding and help students correct themselves. Pointsmay be awarded for following directions and completing the assignment correctly. The following questions mayhelp you decide how to award points.
• Is the diagram complete and labeled correctly?• Was the student able to present his/her work to the class?
Proving Lines Parallel
Activity-Forest Tower
The objectives of this activity are to use the Converse of the Corresponding, Alternate Interior, Alternate Exteriorand Consecutive Interior Angles Theorems.
Students are going to design a tower to be used in National Park by a Forest Ranger. You may wish to begin thisactivity by showing pictures of forest towers found on the internet and explaining the uses of forest towers. Forexample, Forest Rangers use towers to spot forest fires and observe various animals in the park. The following is alink to a picture of one such lookout tower:
http://en.wikipedia.org/wiki/File:Unity_Ranger_Station_lookout_tower.jpg
The students are going to need to design the tower so that the four posts of the tower which support the platform areparallel and are connected or braced by transversals.
They will need to demonstrate how the angles of the transversal prove that the tower poles are parallel.
367

5.3. Parallel and Perpendicular Lines www.ck12.org
You must use what you have learned about angles to design the tower and prove that the poles are parallel.
Students will need protractors, rulers, chart paper and pencils.
All angles must be labeled and measured.
• Look at Figure 03.03.01 to get an idea of a possible example.
When finished, allow students time to share their work.
Basic Assessment:
Teachers should create a rubric where each piece of the assignment is worth points. Exactly how many points eachcomponent should be worth is left up to individual teachers. The following is a list of possible components:
• Did the student create a platform atop four parallel poles with transversals connecting the posts for support?• Is the diagram completely and correctly labeled?• Are the angle measures correct?• Were the students able to demonstrate that the poles are parallel?• Overall presentation-both the diagram and the verbal presentation to their classmates.
Properties of Perpendicular Lines
The objectives of this activity are to identify congruent linear pairs of angles, indentify the angles formed byperpendicular intersecting lines and to identify complementary adjacent angles.
Activity-Rug Angles
In this problem solving activity, students are going to identify the angles formed by perpendicular lines. Showstudents the sample activity rug design found at the website:
http://www.homedecorators.com/detail.php?parentid=26996&aid=bzrt
Ask students to use this figure as an example to create and draw their own rug design.
They can use color and different sizes of polygons on the rug. The big point is to be sure that they are usingperpendicular lines on the rug.
In the design, the students need to include the following:
• two linear pairs• two sets of perpendicular intersecting angles• one set of complementary adjacent angles
These rugs can be designed on chart paper or graph paper-you can leave it up to the students on the size of the rug.
Allow time for the students to share their work when finished.
Basic Assessment:
Teachers should create a rubric where each piece of the assignment is worth points. Exactly how many points eachcomponent should be worth is left up to individual teachers. The following is a list of possible components:
• Are there two linear pairs?• Are there two sets of perpendicular intersecting angles?• Is there one set of complementary adjacent angles?• Are all of the perpendicular lines accurate (truly perpendicular)?
368

www.ck12.org Chapter 5. Basic Geometry TE - Problem Solving
• Is there anything missing in the design?• Is the design visually appealing?
Parallel and Perpendicular Lines in the Coordinate Plane
Activity 1-Wheelchair Ramps
The objective of this activity is to use the concept of slope in a real world application problem.
Students are going to use what they have learned about slope to design a wheelchair ramp.
A wheelchair ramp must have a maximum slope of 112 f t. Discuss with students why this is true and refer to the
website: www.newdisability.com/wheelchairramp.htm before beginning the problem below:
A new home has a front door that is 3 12 f t off of the ground. A wheelchair ramp needs to have a slope of 1
12 f t.Based on this fact and on the height of the door, design a wheelchair ramp that will work for this new home. Showall of your work in your diagram.
How far away from the house will the ramp begin? What could you do to meet the maximum slop requirements ifthe sidewalk is not far enough away from the door to start the ramp there? In other words, there isn’t enough spacefor a straight ramp to the door?
Allow time for the students to work on this dilemma.
Then tell students that every unit on a coordinate grid represents one foot. Ask them to draw their wheelchair rampon coordinate grid.
When finished, allow time for students to share their work.
An extension to this activity would be to find a wheel chair ramp in the school and determine its slope. Students willhave to work together to figure out a way to measure the ramp slope.
Basic Assessment:
The main purpose of this activity is to help students connect what they are learning in the classroom to what theysee in the world. Before the activity is completed students should have demonstrated the following:
• Students show that they can use what they have learned about slope to determine the rise and run of the ramp.• Students will demonstrate an understanding of how the slope of a line impacts the rise and run of the line.• Is the rise and run of the ramp accurate-it should be 42 feet?• Is this drawn accurately?• Is it graphed correctly on the coordinate grid?• Allow time for students to share their work and offer feedback and correction when necessary.
Activity 2-The Park Path
The objectives of this activity are to identify and write equations in slope-intercept form, identify equations ofparallel lines, identify equations of perpendicular lines and to identify and write equations in standard form.
Students are going to be designing a path for a park using Parallel and Perpendicular Lines as described in theproblem below.
You are on a team that is designing paths through a local park. The team has cleared some of the brush and hascreated one path through the park. Here is the path graphed on the coordinate grid. Note the locations of attractionsand facilities in the park. Students cannot make their lines go through existing buildings, playground equipment orinto the pond.
It is recommended that the diagram below is reproduced for students to work with directly. They may wish to usecolored pencils or markers to show their new paths.
369

5.3. Parallel and Perpendicular Lines www.ck12.org
The equation for this path is y =−32 x+2.
The team needs to draw in two more paths. The first one will be parallel to this one, and the next one will beperpendicular to this one. The objective is to have these two additional paths connect the original path to theattractions.
Use what you have learned to draw these three paths on a coordinate grid. Use your problem solving skills to namethe equation of each line. Be sure to write your equations in slope-intercept form.
Students should present their plans to the class and be ready to explain why they chose to put their paths in particularplaces.
Basic Assessment:
There is more than one correct solution to this problem. Students should be able to justify their particular plans.
Teachers should create a rubric where each piece of the assignment is worth points. Exactly how many points eachcomponent should be worth is left up to individual teachers. The following is a list of possible components:
• Is there a correct equation for a line perpendicular to the original line?• Is there a correct equation for a line parallel to the original line?• Have students managed to connect the three attractions using the three paths?• How well have students solved the problem? In other words, how well did they place their lines to allow for
easy access by path to each of the attractions?
The Distance Formula
Activity-Park Distances
The objective of this activity is to use the distance formula to find distances in the coordinate plane.
Students will revisit the park from the last activity and calculate the distances between the attractions if the paths areconstructed as shown on the map below.
370

www.ck12.org Chapter 5. Basic Geometry TE - Problem Solving
Students should calculate the distances between the attractions based on the map above. Each unit on the gridrepresents 10 ft. Find the following distances:
• Refreshments to Playground• Playground to Pond• Pond to refreshments
Once students have calculated these distances an extension would be to discuss the two possible ways to link theattractions in the park as seen in these two activities. Which way might be better? Why? Is there a third way to makethe paths such that they are even more practical (i.e. distance visitor must travel between attractions is minimized?)This discussion could take many tracks from here to discuss traffic flow patterns encouraged by path constructionand benefits and drawbacks of minimizing distance between attractions.
Basic Assessment:
Teachers should create a rubric where each piece of the assignment is worth points. Exactly how many points eachcomponent should be worth is left up to individual teachers. The following is a list of possible components:
• Were the distances calculated correctly?• Did the student participate meaningfully in the discussion?
371

5.4. Triangles and Congruence www.ck12.org
5.4 Triangles and Congruence
Triangle Sums
Activity-Triangle Sums
The objective of this activity is to practice identifying interior and exterior angles in a triangle and applying theTriangle Sum Theorem. Students will also practice justifying each conclusion they make and practice logicalreasoning develop skills required for writing proofs.
Provide students with a copy of the figure below
Students are going to work in pairs with this figure.
Part one-students need to figure out the angle measures for each of the missing angles.
Part two-students are going to write down the theorem that helped them to figure out the measure of each angle.
• For example: a = 30◦, by Triangle Sum Theorem.
Allow time for the students to explain their work in small groups.
Next, have each group make its own triangle angle puzzle. Each group’s puzzle must require use of each of thefollowing (you may wish to add additional requirements):
• Triangle Sum Theorem• Exterior/Interior Angle pair (linear pair)• Vertical Angles
Basic Assessment:
Teachers should create a rubric where each piece of the assignment is worth points. Exactly how many points eachcomponent should be worth is left up to individual teachers. The following is a list of possible components:
• Is the student’s work accurate?• Can the student talk about why each theorem is appropriate for each angle measure?• Does the group’s new puzzle contain the specified angle pairs?• Is the new puzzle solvable?
372

www.ck12.org Chapter 5. Basic Geometry TE - Problem Solving
Congruent Figures
Activity-Congruent Triangles Game
The objectives of this game are to demonstrate student understanding of congruence in triangles, congruence state-ments, the Third Angles Theorem and to explore properties of triangle congruence.
This game involves a bit of prep by the teacher. You first need to create sets of three cards such that each studentwill get one card of a set. Students will be using these cards to figure out which other two students in the class are intheir set. Here is a sample set of three cards:
• Card 1- a congruent triangle• Card 2- it’s matching triangle• Card 3- a congruence statement about the two triangles.
∆ABC ∼= ∆LMN
Create enough cards so that each student receives one. Be sure that your triangles have tic marks on them.
Add some challenge by using repeated letters in the diagrams and congruence statements. Students will need to payclose attention to the order of the angles in the congruence statement to find the correct matches.
Then shuffle and hand out the cards.
Students need to move around the room and find their matches. Each group should have three students in each groupwhen finished.
This is a fun activity that has a lot of movement in it. You can reshuffle and do multiple rounds if desired.
Basic Assessment:
This is a great formative assessment activity. You will see very quickly which students understand and which studentsare struggling. By the end all groups should be correct. Listen to student conversation as they work, are the studentstalking about properties of congruence? Allow time for the students to share the strategies that they used to find eachother.
Triangle Congruence using SSS and SAS
Activity-Triangle Measurement
The objective of this activity is to the distance formula to analyze triangles on a coordinate grid and apply the SSSpostulate of triangle congruence.
373

5.4. Triangles and Congruence www.ck12.org
Students are going to use the distance formula to analyze triangles on a coordinate grid and solve the followingproblem.
You wish to design a triangular garden in your yard. Your neighbor wants an identical triangle garden in her yardtoo. You are going to use the same dimensions to build your neighbor a garden. To plan your work, plot your gardenout using a coordinate grid. Here are the coordinates for your triangular garden.
(-3,7),(-1,5),(-4,1)
If you use these dimensions, and move the plot five units to the left and three units down, what will the coordinatesof your neighbor’s garden be?
Students can work on this problem in pairs or individually.
Have the students draw out the coordinate grid with the two triangles on them.
Allow time for the students to share their work when finished.
Extension-students can transfer these triangles to measurement. For example, they could use 1 foot for every oneunit on the coordinate grid.
Basic Assessment:
Teachers should create a rubric where each piece of the assignment is worth points. Exactly how many points eachcomponent should be worth is left up to individual teachers. The following is a list of possible components:
• Correctly plotted triangles• Correctly calculated lengths of the segments• Did students explain how their calculations prove that the two triangles will be congruent?
Triangle Congruence using ASA, AAS and HL
Activity-Double Triangles
The objectives of this activity are to understand and apply the SSS, SAS, ASA, AAS and HL Congruence Postulates.Students will also practice writing two-column proofs in this activity.
For this activity, create single triangles with certain pieces of information indicated. For example one triangle mighthave all three side lengths indicated. Another triangle would have two sides and the included angle measure given.A third might be a right triangle. There should be enough triangles created for each group of four students to havetwo triangles to work with. All five of the congruence theorems should be represented in the selection of triangles.
Each group of four will choose two of the triangles that have been drawn to work with. The students in the groupneed to use the given information to draw two triangles that are congruent to the selected triangles. They shouldmark their triangles with the information they used to create the congruent triangles (i.e. SSS, SAS, AAS, ASA orHL) Each group will now have two pairs of Congruent Triangles.
Now change the groups into new teams of two pairs of students. Each pair on the team selects one set of CongruentTriangles with which to work. You may wish to select the teams or allow students to choose partners. You may alsowish to decide with pairs get which triangles.
Now, the pairs on each team quiz each other. Each pair needs to prove that their triangles are congruent. The otherpair can question and challenge any claims that the teammates use to justify congruency.
When the team has successfully proven that their triangles are congruent, the team can write a two-column proofwith their statements and reasons in it. Each team will have two proofs to complete.
Basic Assessment:
374

www.ck12.org Chapter 5. Basic Geometry TE - Problem Solving
This can be a formative assessment without a rubric or grade. You may also wish to give a grade for the finalproducts-the triangles and the proofs. The following components should give an idea of how to develop rubric forthis activity:
• Were the groups able to make congruent triangles?• Did the teams work together to figure out their proofs?• Are the proofs accurate?
Isosceles and Equilateral Triangles
Activity-Triangle Proofs
The objective of this activity is to prove the Converse of the Base Angles Theorem. Students will be using a varietyof theorems in the process and develop their proof skills as well.
Provide students with the Base Angles Theorem: If two sides of a triangle are congruent, then the angles oppositethe congruent sides are congruent. Have students write out the converse of this statement.
Next, assign students the task of proving that this converse is true.
The students need to draw a diagram involving isosceles triangles to demonstrate this theorem.
Then, they need to write a two-column proof for the Converse of the Base Angles Theorem. The given informationis that the two base angles are congruent. Students must now work through the proof to show that the triangle isisosceles. (They may need the hint to add the altitude from the vertex angle of their isosceles triangle.)
When finished, the students are going to present their work in small groups. Allow time for the students in othergroups to provide feedback. Each group may have done this a little differently. This is a great way to show studentsthat there is often more than one way to prove something.
Basic Assessment:
Groups may need assistance with this activity. Try to help steer the groups in the right direction without giving awaythe steps of the proof.
Teachers should create a rubric where each piece of the assignment is worth points. Exactly how many points eachcomponent should be worth is left up to individual teachers. The following is a list of possible components:
• Did the group make an appropriate diagram?• Does the proof have the correct statements and reasons?• Are the group members able to explain their thought process and reasoning in words?
375

5.5. Relationships with Triangles www.ck12.org
5.5 Relationships with Triangles
Midsegments
Activity-Race Day Route
The objective of this activity is to practice using the midpoint and distance formulas and to apply the MidsegmentTheorem to a real world situation.
Students will need colored pencils and rulers for this activity.
Sally, Nick and Luis are helping out at water stations along a race route for a local fundraising race. The race istaking place in a local park. The race route is shown on the coordinate grid below. Racers will begin at A, turn at Band C and finish back at A. Reproduce the image below for students to use.
Use the distance formula to determine the perimeter of the triangle. This perimeter is the length of the race. If eachunit on the grid represents 200 m, find the length of the race to the nearest 0.5 km.
Now, there are to be three water stations, X ,Y and Z, on the race route. X will be equidistant from points A and B,Yshould be equidistant from points B and C and Z will be equidistant from points A and C. Find the coordinates ofpoints X ,Y and Z. Show all your work and label these points on your diagram.
Sally and Luis are at point X . Nick is at point Z. All of the runners have passed Sally and Luis and they are closingup their station. They need to take their extra cups to Nick at point Z. Sally and Luis need to get to Nick but musteither go to point A or point Y first to pick up additional cups. Sally thinks that is faster if they go to Y and then to Z.Luis disagrees and proposes that they go to A and then to Z. Mark these routes on your diagram in different colors.
Sally and Luis decide to split up and each take their own route. Who travels farther? Support your answer withalgebraic calculations.
376

www.ck12.org Chapter 5. Basic Geometry TE - Problem Solving
Now, prove your answer to the last question using the Midsegment Theorem. You may do a two-column proof or aparagraph proof.
Basic Assessment:
Students should determine that the same distance will be travelled by both Sally and Luis. They should use thedistance formula to show this algebraically. They will prove this using the Midsegment Theorem. There are manypossible proofs.
Teachers should create a rubric where each piece of the assignment is worth points. Exactly how many points eachcomponent should be worth is left up to individual teachers. The following is a list of possible components:
• Correct race length determined in the correct units (7.5 km)• Points X ,Y and Z found using the midpoint formula. (-4, 2.5), (-1, 6.5) and (2, 0), respectively.• Correct distance travelled by Sally and Luis-they should be the same (2.4 km)• Proof is complete (example proof below).
In order to prove that Sally and Luis travelled the same distance, we need to prove that XY +Y Z = AX +AZ. Wewill start with the fact that X ,Y and Z are midpoints of the sides of the triangle.
TABLE 5.1:
Statements Reasons1. X ,Y and Z are midpoints of AB,BC and CA respec-tively
1. Given
2. XY and Y Z are midsegments 2. Definition of Triangle Midsegment3. AX = XB and AZ = ZC 3. Definition of Midpoint4. AB = AX +XB and AC = AZ +ZC 4. Segment Addition Postulate5. AB = AX +AX and AC = AZ +AZ 5. Substitution6. AB = 2AX and AC = 2AZ 6. Distributive Property7. AX = 1
2 AB and AZ = 12 AC 7. Division Property of Equality
8. XY = 12 AC and Y Z = 1
2 AB 8. Triangle Midsegment Theorem9. XY +Y Z = 1
2 AB+ 12 AC 9. Substitution
10. XY +Y Z = AX +AZ 10. Substitution
Perpendicular Bisectors and Angle Bisectors in Triangles
Activity-The Garden Dilemma
The objectives of this lesson are to practice using algebra skills (midpoints, slope, equations of lines, solving systems)and construction tools and connecting them to the practice of finding the centers of circumscribed and inscribedtriangles in a real world problem solving activity.
This project may be difficult for some students with weak algebra skills and they may need significant assistancein completing the work correctly. Allow time to help students work through this problem and help them as needed.This problem may also be adapted to solve using only patty paper constructions rather than algebra.
The environmental club at Triangle High School wants to make a triangular shaped garden in one of the courtyards.The club begins by plotting the desired triangular garden shape on a grid as shown below.
Students will need two copies of the diagram below (one for each part of the activity), a straightedge, patty paperand a compass.
377

5.5. Relationships with Triangles www.ck12.org
Part 1 – The club needs to figure out where to place a single sprinkler that sprays water in a circle such that it willwater the entire garden. Use algebra skills to locate this point.
Note to teacher - Students should make the connection that this point is the intersection of the perpendicular bisectorsof the triangle. You may wish to discuss this problem as a class and come up with a list of steps that students willfollow to locate this point. Essentially, they will need to find the intersection of the equations of two perpendicularbisectors in the triangles. Then find the intersection of these lines.
Part 2 – The club wants to make a path leading from each side of the garden to a bench in the “center” of the garden.Each path should be the same length. Find and mark the desired location of the bench and where the paths willoriginate on each side of the triangle. Draw the paths on your diagram.
Note to teacher –Students should recognize that this point would be the intersection of the angle bisectors ofthe triangle. They may need help constructing the two perpendicular bisectors required to locate this point anddetermining where on each side of the of the triangle the path with originate. You may wish to have them trace thetriangle onto patty paper and reference the investigation 5-4: Constructing Angle Bisectors in Triangles. Once theyhave drawn the angle bisectors on the patty paper, then they can lay the patty paper on top or the original triangleand locate the point where they intersect on the grid.
Extensions - (1) Figure out the cost of the pavers for the paths students will put in leading from each edge of thegarden to the bench. (2) Determine the radius of the water spray necessary to water the garden.
Basic Assessment:
Again, students may need significant help with this activity, particularly with the algebra. You may wish to haveeach group submit one final piece of work. This will allow students to work together, and compare answers. Thiswill also help students who struggle with accuracy using patty paper or the construction tools. This is particularlyuseful if you group the students such that each group has at least on strong algebra student and one who is good atmaking accurate constructions.
Teachers should create a rubric where each piece of the assignment is worth points. Exactly how many points eachcomponent should be worth is left up to individual teachers. The following is a list of possible components:
Part 1
• Are all steps included and accurate in the algebra?
378

www.ck12.org Chapter 5. Basic Geometry TE - Problem Solving
• Is the center of a circumscribed circle (the point of intersection of the perpendicular bisectors in the correctlocation?
The midpoint of LM is (1, 2). The slope of LM is −34 , so the slope of the line perpendicular to LM is 4
3 . Thereforethe perpendicular bisector of LM is y = 4
3 x+ 23 .
The midpoint of MN is (2, -5). The slope of MN is 17 , so the slope of the line perpendicular to MN is -7. Therefore
the perpendicular bisector of MN is y =−7x+9.
Now the point of intersection can be found by solving a system. Since both equations are equal to y we can conclude:43 x+ 2
3 = −7x+ 9. Solving this equation gives us x = 1 and then y = 2. (Note that this is the midpoint of thehypotenuse since the triangle is a right triangle. Students may have used the third perpendicular bisector instead ofone of these but they should still arrive at the same solution.)
Part 2
• Are all necessary markings visible for the construction of the angle bisectors?• Is the point of intersection of the angle bisectors in the correct location?• Did students correctly identify the points on the sides of the triangle where the paths will originate?
The center of the inscribed circle should be at approximately (-1.5, -1.5). The points or origination of the paths(where the inscribed circle touch the triangle) should be approximately (1, 2), (-5.5, 2), (-1, -5.5). Keep in mind thatthese are approximations and that students may have slightly different answers so allow a little room for variance.
Medians and Altitudes in Triangles
Project-Hanging Triangles
The objectives of this project are to use medians in triangles to locate the centroid and use this point in a practicalapplication as the center of gravity (or balancing point) of the triangle.
Begin by referring back to the Know What problem in this section. The hanging triangle problem described there isexactly what students will do in this project. You may wish to talk out the process before setting students to workon making their triangles and find the circumcenters. Your discussion might help them avoid problems later-such as,if they cut out their triangles before finding the centroid then they will have trouble constructing the perpendicularbisectors of the sides to find the midpoints. It might help if you make a sample ahead of time as well because thenyou may discover other issues that hinder progress and then you can help students avoid them as well.
Students will need several pieces of cardstock in a variety of colors, a piece of string, scissors, a straightedge and acompass.
Students will make at least four different triangles and locate their centroids.
Next, students will punch a hole in the triangle at the centroid and thread the string through the hole. Students maytie a knot in the string to keep the triangle in place. Students will continue this process until they have all four (ormore) triangles strung on the string.
The triangles should remain relatively parallel to the floor when this is done accurately. These mobiles can then behung in the classroom.
Basic Assessment:
This can be a really fun project, particularly for students with an interest or talent in art. Some students may needsignificant assistance with the mechanics of the constructions.
Teachers should create a rubric where each piece of the assignment is worth points. Exactly how many points eachcomponent should be worth is left up to individual teachers. The following is a list of possible components:
379

5.5. Relationships with Triangles www.ck12.org
• Did the student make at least four triangles?• Did the student use correct construction techniques to locate the centroids of the triangles?• Do the triangles remain horizontal to the floor when the mobile is suspended? You may wish to allow some
room for error here.
Inequalities in Triangles
Activities-Prove the Theorem and Name that Inequality
The objectives of this activity are to determine relationships among the angles and sides of triangles, to apply theTriangle Inequality Theorem and to apply the SSS and SAS Triangle Inequality Theorems.
Part 1 –Name that Theorem
In this problem, students need to use the information given to draw a diagram and prove the theorem. Students aregoing to prove the theorem that states that the angle opposite the longest side of a triangle with unequal sides willhave the greatest measure.
In ∆ABC with AB < BC, the measure of angle A is 80◦. The measure of angle C is 40◦, and the measure of angle Bis 60◦.
Sketch a diagram of this triangle. Given the theorem on side lengths and angle measures, can this be a true statement?Why or why not?
Provide students time to work on this problem. Students need to provide a diagram, a written explanation and averbal explanation to explain their thinking.
When finished, allow students time to present their work to the class.
Part 2 –Name that Inequality
This problem solving activity is a game. The preparation for this game is to prepare two Congruent Triangles foreach group to work with. These triangles should have measurements indicated on them.
Students will work in groups of four-two teams of two. Each pair is a team that plays against each other.
When the students play, their goal is to “stump” the other team. The play begins like this, one team comes up witha problem for the other team to solve. For example, “If I lengthen side AB what else changes in the triangle?” or “Ifthe measure of 6 B is decreased then what else changes in the triangle?”
Then the other team has to answer the question. If they answer it correctly, the team receives a point. If not, theother team gets a point.
Then they repeat the process by switching team positions. Both teams play until time is up.
Students need to be encouraged to use the SAS Triangle Inequality Theorem and the SSS Triangle InequalityTheorem as well as the converse Theorems.
Students can create as many different types of questions as they would like. Students can be very creative in theirapproach to writing questions.
Basic Assessment:
Teachers may wish to create a rubric where each piece of the assignment is worth points. Exactly how many pointseach component should be worth is left up to individual teachers. The following is a list of possible components:
Part 1: Students should have a correctly marked sketch and some variation of the following explanation.
The statement is true because the length of BC is longer than the length of AB. The angle opposite BC is the greatestof the three angles in the triangle. It measures 80◦. Therefore, the theorem is accurate and proven through this
380

www.ck12.org Chapter 5. Basic Geometry TE - Problem Solving
statement.
Part 2: Students may need help getting started with this one. They may need a little assistance coming up with thefirst few questions until they get the hang of it.
Walk around as students play and assist students when necessary. Offer suggestions and challenge students to createdifficult questions. Notice which students are having difficulty with the assignment and then offer assistance andcoaching.
Extension: Indirect Proof
Activity-Write Your Own Proof
The objective of this activity is to develop an indirect proof.
Assign students the task of creating a situation for which an indirect proof can be used to prove a conjecture. Thesecould be algebraic, geometric or just situational. Below are two examples you may wish to share with the classbefore they begin working on their own.
Here is one possible example for an algebraic problem.
Marcy is selling candy bars for the school band. She starts out selling five bars. But in the end, she sells three timesas many as her friend John does. The band teacher congratulates her on selling over forty candy bars. If John soldless than 12 bars, prove that Marcy did not sell more than forty bars.
We can use algebra skills to prove this one. Let x represent the number of candy bars Marcy sells. First we start byassuming that Marcy did sell more than 40 bars or that x > 40. Now, let the number of candy bars that John sells berepresented by y. Since John sells less than 12 bars, y < 12. Now, we know that Marcy sells three times as manycandy bars as John, so x = 3y. Now, 3y < 36 since y < 12. So x < 36 by substitution. This contradicts the statementthat x > 40, so what we assumed is false and Marcy did not sell more than 40 candy bars.
Here is one possible example for situational problem.
Teresa is younger than Leslie and Kathryn is younger than Teresa. Prove that Leslie is older than Kathryn.
First, we assume the opposite of what we are trying to prove is true. In this case, we assume that Leslie is not olderthan Kathryn. If Leslie is not older than Kathryn, then Leslie is younger than Teresa. This contradicts the fact thatTeresa is younger than Leslie. Therefore, what we assumed is false and Leslie must be older than Kathryn.
Here is one example for a geometric problem.
Two angles form a linear pair. If the first angle is acute, then the second angle must be obtuse.
Assume that the second angle is not obtuse. This means that m6 2 ≤ 90◦. If the angles form a linear pair thenm6 1+m6 2 = 180◦. If m6 2 ≤ 90◦, then by subtraction, m6 1 ≥ 90◦. This contradicts the fact that the first angle isacute. Therefore, what we assumed is false and the second angle must be obtuse.
Basic Assessment:
Teachers may wish to create a rubric where each piece of the assignment is worth points. Exactly how many pointseach component should be worth is left up to individual teachers. The following is a list of possible components:
• Do students begin their proof by assuming the opposite of what they are trying to prove?• Do students use valid forms of reasoning to reach a contradiction?• Students should then deny the assumption and determine that what they are trying to prove is actually true.• Originality
381
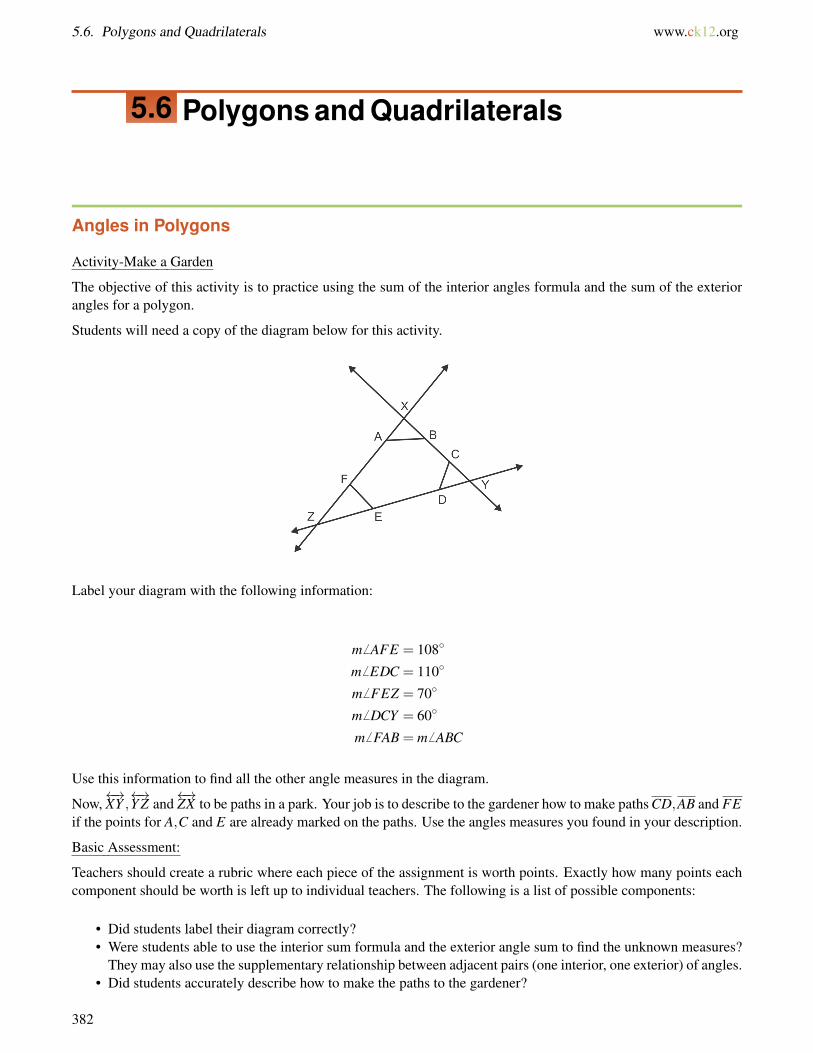
5.6. Polygons and Quadrilaterals www.ck12.org
5.6 Polygons and Quadrilaterals
Angles in Polygons
Activity-Make a Garden
The objective of this activity is to practice using the sum of the interior angles formula and the sum of the exteriorangles for a polygon.
Students will need a copy of the diagram below for this activity.
Label your diagram with the following information:
m6 AFE = 108◦
m6 EDC = 110◦
m6 FEZ = 70◦
m6 DCY = 60◦
m6 FAB = m6 ABC
Use this information to find all the other angle measures in the diagram.
Now,←→XY ,←→Y Z and
←→ZX to be paths in a park. Your job is to describe to the gardener how to make paths CD,AB and FE
if the points for A,C and E are already marked on the paths. Use the angles measures you found in your description.
Basic Assessment:
Teachers should create a rubric where each piece of the assignment is worth points. Exactly how many points eachcomponent should be worth is left up to individual teachers. The following is a list of possible components:
• Did students label their diagram correctly?• Were students able to use the interior sum formula and the exterior angle sum to find the unknown measures?
They may also use the supplementary relationship between adjacent pairs (one interior, one exterior) of angles.• Did students accurately describe how to make the paths to the gardener?
382

www.ck12.org Chapter 5. Basic Geometry TE - Problem Solving
Angles measures should be:
m6 FED = 110◦
m6 CDY = 70◦
m 6 BCD = 120◦
m6 FAB = m6 ABC = 136◦
m6 XAB = m6 XBA = 44◦
m 6 ZFE = 72◦
Directions should read something like this. Standing at point C and looking toward point Y , turn 60◦ clockwise tomake path CD. Standing at point A and looking towards point F , turn 136◦ to make path AB. Standing at point Eand looking towards point Z, turn 70◦ clockwise to make path EF .
Properties of Parallelograms
Activity-Show the Properties
The objective of this activity is two-fold. First, students will be reviewing and verifying the properties of parallelo-grams. Second, they will be practicing algebra skills and using a protractor to do so.
Students will need graph paper (large graph paper that can be posted in the room is ideal), protractor, ruler andcolored pencils.
Give the students the coordinates of the vertices of the parallelogram T HOM, with T (−2,4),H(4,7),O(2,0),M(−4,−3).
Note to teacher: You may wish to make up additional sets of vertices so that each student/group has a differentparallelogram. In doing so, you could make some of them special parallelograms that could be revisited later in thechapter to identify other special properties of those figures.
Instruct students to plot these points on their graph. Once the parallelogram is graphed, students should verify thateach of the following properties is true using algebra or a protractor (no rulers except to be used as straightedges).Students should mark their parallelogram with the information they find using a different color for each property.
• Opposite angles congruent (protractor)• Consecutive angles supplementary (addition)• Opposite sides congruent (distance formula)• Opposite sides parallel (slope formula)• Diagonals bisect each other (midpoint formula)
Allow students to share their work with one another –especially if each student/group had a different parallelogramwith which to work.
Basic Assessment:
Students may need significant assistance using the formulas and perhaps a review of the formulas beforehand. Usethis opportunity to observe student work and verify that all students are able to use the formulas correctly and showthat the properties are true for their parallelogram.
Teachers should create a rubric where each piece of the assignment is worth points. Exactly how many points eachcomponent should be worth is left up to individual teachers. The following is a list of possible components:
• Angle measures correct: 132◦ and 48◦ (allow for slight variance)
383

5.6. Polygons and Quadrilaterals www.ck12.org
• Opposite side lengths correct:√
53 and 3√
5• Side slopes correct: 7
2 and 12
• Midpoints correct: (0, 2)
Proving Quadrilaterals are Parallelograms
Activity-Is it really a Parallelogram?
The objective of this activity is to prove a quadrilateral is a parallelogram given opposite sides are congruent, oppositeangles are congruent, the diagonals bisect each other or that one pair of opposite sides are both congruent and parallel.
For this activity, students will work in pairs. One student in the pair will need to cut two strips of paper that are thesame length and two strips that aren’t. The other student of the pair will cut two sets of congruent strips.
Then have the students attach the four strips of paper together at the ends with fasteners. This will form a quadrilat-eral. Explain to the students that some quadrilaterals are parallelograms and some aren’t. Then divide the studentsinto groups.
Students need to come up with ways to demonstrate the following points using their moveable figures. These pointswill help students to see how to prove that a quadrilateral is a parallelogram or that the shape that they have createdis NOT a parallelogram.
Use a ruler to compare opposite sides.
Use a protractor to compare opposite angles.
Add pairs of adjacent angles to see if the Supplement Theorem applies.
Show how the number of degrees in a quadrilateral is the same as a parallelogram by using the Triangle SumTheorem.
When students are finished working in pairs, give them time for each group to demonstrate one property to the restof the class.
Ask students to write what they have learned in their notebooks.
Basic Assessment:
Check student work for accuracy as they are working. Listening to them explain their reasoning to their partner isoften a great way to identify misunderstandings. Offer feedback during their discussions in their pairs and duringtheir presentations as necessary.
Rectangles, Rhombuses and Squares
Activity-Can you prove it?
The objective of this activity is to have students use algebra skills to check whether properties of rhombuses,rectangles and squares can be shown to exist in quadrilaterals plotted in the coordinate plane. In this process studentswill identify the relationships between diagonals in rectangles and rhombuses.
To prepare this activity, you will need to choose sets of four vertices that can be connected to form a quadrilateral.Some should form rhombuses, some should be rectangles and some should be close to one of these figures but neithera rhombus nor a rectangle.
The students are going to need to figure out if the figure is a rectangle or a rhombus or does it just look like one.Students will be using the principles that they learned in the text to determine whether the figure is really a rectangle
384

www.ck12.org Chapter 5. Basic Geometry TE - Problem Solving
or a rhombus. Students can work in pairs or small groups on this activity.
In a rectangle, the students should:
1. Use the distance formula to prove that the diagonals are or are not congruent.2. Use the slope formula to prove that the diagonals are or are not perpendicular.3. Decide whether their figure is a rhombus, a rectangle or a square.
Allow time for the students to investigate and prepare to prove what their figure is or is not.
Then allow time for each group to present their discovery.
Basic Assessment:
This activity could be used as either a formative or summative assessment. If you choose to do this as a formativeassessment, then it is recommended to check on students as they work, provide assistance as needed and note whetheror not students seem to comprehend what it is that they are doing. If you choose to do this activity as a summativeassessment (graded for accuracy), then it is recommended that you do a couple examples with the whole class, reviewthe formulas needed and review the properties before assigning the task. One idea would be to do the activity as aformative assessment individually and then have pairs work on a second figure for a grade. If the work is assessed,the following list of key components will help to determine a score.
• Was the correct length of each diagonal found?• Was the correct slope of each diagonal found?• Did the student make the correct conclusion regarding the lengths of the diagonals?• Did the student make the right conclusion regarding the angle at which the diagonals intersect?• Was the student able to assimilate this information and correctly categorize the figure?• Was the student able to clearly and correctly communicate his/her process and findings to the class?
Trapezoids and Kites
Activity-Trapezoidal Shelters?
The objective of this activity is to use the properties of an isosceles trapezoid to prove that a quadrilateral is anisosceles trapezoid. Students will be using the properties of the base angles the diagonals.
Veronica, Nick and Santi are on a camping trip. They are sitting outside of the sheltered picnic area and wonderingwhether or not the shelter structure (roof and support beams) form an isosceles trapezoid.
Between them they have a roll of string and a piece of chalk to work with. (You may wish to allow their charactersto have other common camping supplies-i.e. pocket knife, compass, etc. This may result in even more creativeproblem solving ideas.
They know that the roof line is parallel to the ground, thus ensuring that the figure outlined is a trapezoid.
In pairs, have students think about and describe a way to show:
1. The diagonals are congruent2. The base angles are congruent
Students should draw a picture of the situation on large paper and illustrate their strategy to measure the diagonalsand the angles.
When pairs are finished, allow time for sharing.
Basic Assessment:
385

5.6. Polygons and Quadrilaterals www.ck12.org
Students may have a hard time with this problem at first because they don’t know where to start. Try to point themin the right direction by asking questions rather than telling them one way to solve the problem. This is a great wayto get kids to think outside the box and be creative about problem solving.
Teachers should create a rubric where each piece of the assignment is worth points. Exactly how many points eachcomponent should be worth is left up to individual teachers. The following is a list of possible components:
• Were students able to prove that the diagonals are congruent? One possible way to do this would be to use thestring. One end can be held at the base of one of the supports and the other at the opposite vertex. Mark thelength of the string required to stretch this distance and check to see if it is the same as the length required toconnect the other pair of opposite vertices.
• Were students able to determine whether the base angles are congruent? Students could use the string andthe chalk to “construct” congruent angles. If the string is tied around the chalk and the string is anchored tothe point where the support meets the ground, students can mark points on the support and ground that areequidistant from the intersection (just like they use a compass to mark points on the sides of an angle that areequidistant from the vertex). Making sure that they are using the same amount of string, they should makemarks on the other support post and ground (the second base angle). Now, they can use the string to checkwhether or not the distance between each pair of marks is the same. If it is, then the angles are congruent.
• Students may come up with other solutions. Use your discretion.• Did students illustrate the problem and their solution?• Were students able to communicate their solution to the class?
Activity-Quad Design
The objective of this activity is to have students create, identify and classify quadrilaterals as parallelograms,rectangles, rhombuses, squares, kites and trapezoids.
This is a creative design activity. The students are going to need colored pencils, crayons, markers, rulers, largeblank sheets of paper.
The task is to create a design that has at least one of each of the seven figures in it. Students need to create a colorkey to identify the seven figures in the design. They can include any other shapes/color that they would like, as longas the seven figures are in the design.
Here are the figures that must be in the design:
Parallelogram
Rhombus
Rectangle
Square
Kite
Trapezoid
Isosceles trapezoid
Allow students significant time to work on this activity. Students should be encouraged to be creative in this activity.
When they finish, have students share their work with the rest of the class and then display the artwork.
Basic Assessment:
Teachers should create a rubric where each piece of the assignment is worth points. Exactly how many points eachcomponent should be worth is left up to individual teachers. The following is a list of possible components:
• Are all seven figures represented?
386

www.ck12.org Chapter 5. Basic Geometry TE - Problem Solving
• Are the figures drawn accurately? How “exact” you require them to be is up to you, but students should beusing rulers, protractors and compasses as needed to make their figures accurate.
• How creative is the picture? This one is rather subjective so you may want to allow “bonus” points here forexceptional work rather than to deduct points for less original/artistic work.
387

5.7. Similarity www.ck12.org
5.7 Similarity
Ratios and Proportions
Activity-Ratio/Proportion Relay
The objective of this lesson is for students to practice identifying and writing ratios and proportions. Students willalso be using the properties of proportions in this activity.
Since this lesson is mostly review, use this fun game to review the concepts in the lesson.
To prepare, bring in a bunch of assorted items from home. Make these random household items, but have more thanone of each type of items. For example: three hairbrushes or five apples.
Students will play this game in teams of four. For the directions, they will be referred to as players 1, 2, 3 and 4. Theactivity is timed and will be played in five timed segments. To start, lay out the items on a table in the front of theroom. Each team member needs to do their individual portion of the game individually, there should be no coachingfrom teammates.
Segment 1 (20 seconds): Player 1 from each team will come to the table and write down as many proportions as theycan. For example: hairbrushes to apples is 3 to 5.
Segment 2 (20 seconds): Player 2 from each team will come to the table and write down as many proportions as theycan.
Segment 3 (20 seconds): Player 3 from each team will come to the table and write down as many proportions as theycan.
Segment 4 (2 minutes): Player 4 will write down as many correct proportions as he/she can from the ratios players1, 2 and 3 wrote down. For example if there were six books and ten forks on the table then player 4 could write:35 = 6
10 . This is a correct proportion.
Stop at this point to check their proportions and assign points to each group for each correct proportion-two pointsper correct proportion.
Segment 5 (2 minutes): All players on the team will take whatever remaining correct proportions they have andrearrange the proportion using the Corollaries of the Cross-Multiplication Theorem.
Now check their work. Award 1 point for each correct rearrangement. Tally the points and announce the winner.
This game can be played multiple times with the same groups or new groups. You may wish to adjust the timesaccording to student ability in subsequent rounds. Students should enjoy this one.
Basic Assessment:
You may wish to assign participation points for this game. You could give the winning team bonus points.
Similar Polygons
The objective of this activity is for students to recognize similar polygons, identify corresponding angles and sidesof similar polygons from a statement of similarity and to calculate and apply scale factors.
388
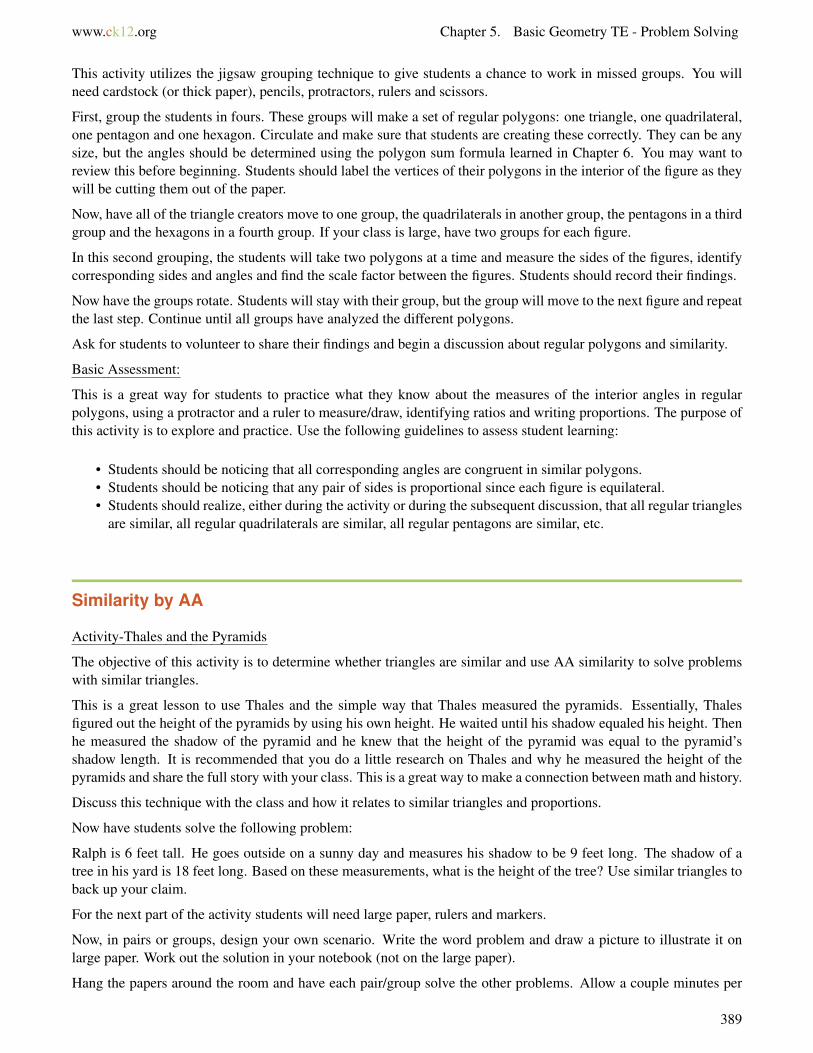
www.ck12.org Chapter 5. Basic Geometry TE - Problem Solving
This activity utilizes the jigsaw grouping technique to give students a chance to work in missed groups. You willneed cardstock (or thick paper), pencils, protractors, rulers and scissors.
First, group the students in fours. These groups will make a set of regular polygons: one triangle, one quadrilateral,one pentagon and one hexagon. Circulate and make sure that students are creating these correctly. They can be anysize, but the angles should be determined using the polygon sum formula learned in Chapter 6. You may want toreview this before beginning. Students should label the vertices of their polygons in the interior of the figure as theywill be cutting them out of the paper.
Now, have all of the triangle creators move to one group, the quadrilaterals in another group, the pentagons in a thirdgroup and the hexagons in a fourth group. If your class is large, have two groups for each figure.
In this second grouping, the students will take two polygons at a time and measure the sides of the figures, identifycorresponding sides and angles and find the scale factor between the figures. Students should record their findings.
Now have the groups rotate. Students will stay with their group, but the group will move to the next figure and repeatthe last step. Continue until all groups have analyzed the different polygons.
Ask for students to volunteer to share their findings and begin a discussion about regular polygons and similarity.
Basic Assessment:
This is a great way for students to practice what they know about the measures of the interior angles in regularpolygons, using a protractor and a ruler to measure/draw, identifying ratios and writing proportions. The purpose ofthis activity is to explore and practice. Use the following guidelines to assess student learning:
• Students should be noticing that all corresponding angles are congruent in similar polygons.• Students should be noticing that any pair of sides is proportional since each figure is equilateral.• Students should realize, either during the activity or during the subsequent discussion, that all regular triangles
are similar, all regular quadrilaterals are similar, all regular pentagons are similar, etc.
Similarity by AA
Activity-Thales and the Pyramids
The objective of this activity is to determine whether triangles are similar and use AA similarity to solve problemswith similar triangles.
This is a great lesson to use Thales and the simple way that Thales measured the pyramids. Essentially, Thalesfigured out the height of the pyramids by using his own height. He waited until his shadow equaled his height. Thenhe measured the shadow of the pyramid and he knew that the height of the pyramid was equal to the pyramid’sshadow length. It is recommended that you do a little research on Thales and why he measured the height of thepyramids and share the full story with your class. This is a great way to make a connection between math and history.
Discuss this technique with the class and how it relates to similar triangles and proportions.
Now have students solve the following problem:
Ralph is 6 feet tall. He goes outside on a sunny day and measures his shadow to be 9 feet long. The shadow of atree in his yard is 18 feet long. Based on these measurements, what is the height of the tree? Use similar triangles toback up your claim.
For the next part of the activity students will need large paper, rulers and markers.
Now, in pairs or groups, design your own scenario. Write the word problem and draw a picture to illustrate it onlarge paper. Work out the solution in your notebook (not on the large paper).
Hang the papers around the room and have each pair/group solve the other problems. Allow a couple minutes per
389

5.7. Similarity www.ck12.org
problem and then have them rotate to the next one. Once all groups have has a chance to solve all the other groups’problems, have the creators share their solutions.
Basic Assessment:
Students may need help designing the problems. Encourage creativity. You will be able to check their problems asthe other groups go around the room completing them.
Teachers should create a rubric where each piece of the assignment is worth points. Exactly how many points eachcomponent should be worth is left up to individual teachers. The following is a list of possible components:
• Were students are to solve the Ralph problem? Did they use clear and correct reasoning to determine/showthat the triangles are similar? They should have identified that the shadow and the object meet at a right angleand that the angle of the sun is the same in both triangles, therefore, the triangles are similar by AA similarity.Now, the proportion 6
9 = x18 can be solved to determine that the height of the tree is 12 feet.
• Did students create a solvable problem? Hopefully they all will do so-you may need to check up on them asthey work to make sure this happens.
• Did each group solve their own problem correctly?• Did all groups attempt to solve all of the other problems? You could have them turn in these solutions and
check them for a part of the assessment.
Similarity by SSS and SAS
Activity-Triangle Jeopardy
The objective of this activity is use SSS and SAS to determine whether triangles are similar and apply SSS and SASto solve problems about similar triangles.
To play this game, divide students into small groups. To prepare this game, use a set of index cards and write oneof the ways to prove similarity among triangles on each card. You should have cards that say SSS, SAS, and AA.Make sure that you have several of each card and then mix them up.
Each student in the group takes a turn. The student selects a card. Then he/she must come up with an example thatillustrates the way to prove similar triangles.
Each team (note that this is not each team member, but each group) can have 1 helpful hint-that is from you, and 1lifeline from their group.
If the student completes the challenge correctly, the team receives a point.
You can play this game for quite a while.
Some variations can include scale factor or diagrams on the board and then the group needs to show how the trianglesare similar.
Basic Assessment:
This should be a fun game for the class to play. Assessment comes through the process of the game. Each studentwill be working individually so you will be able to determine their level of understanding quite readily. Providecoaching/feedback when necessary through “helpful hints”.
Proportionality Relationships
Activity-Midsegment Match-up
390

www.ck12.org Chapter 5. Basic Geometry TE - Problem Solving
The objective of this activity is to identify proportional segments when two sides of a triangle are cut by a segmentparallel to the third side.
To prepare this activity, you will need to draw a bunch of triangles and cut them along the midsegment line.
Then pass out one part of a triangle to each student.
Students need to measure the lengths of the sides of their part of the triangle.
Then, they need to find the student who has their match. Students will walk around the room and find a match fortheir triangle. When finished, all of the triangles should be complete.
Once students have found a match, or think that they have, they need to write proportions to justify their thinking.Each pair of students will then sit down and write the appropriate proportions for their triangle. These proportionsshould include the ratios of the sides of the corresponding triangles as well as the proportions know to be true basedon the proportionality theorem.
Allow time for the students to share their work when finished.
After students have finished, you can collect the triangle pieces and repeat the process.
Basic Assessment:
Observe students as they walk around finding the match for their triangle part. Notice if students are using mea-surements or not. If not, remind students to look for the proportionality in the measurements of each section of thetriangle. Be sure to listen as students share their work. Are they able to articulate why the triangles are similar? Isthe match that they selected an accurate match? Offer feedback/correction as needed. Did students write the correctproportionality statements? Did students match up correct corresponding sides of the similar triangles and use theproportionality theorem correctly?
You may wish to have students record their work (i.e. the proportions) on a sheet of paper that you can collect at theend to assess. I recommend that you label the triangles and calculate the correct measurements and write the correctproportions ahead of time to facilitate grading. You may want to label each part of each triangle differently (maybeuse a letter for the “top” and a number for the “bottom” and record them as pairs so that students can’t use yourlabeling to determine the matches. For example one triangle might consist of parts A and 6. As long as you recordthe “pair” you’ll know how they go together.
Similarity Transformations
Activity-Cartoon Dilation
The objective of this activity is to draw a dilation of a given figure. Students will practice plotting the image of apoint when given the center of dilation and a scale factor. Students will also recognize the significance of the scalefactor of a dilation.
Have students select a favorite cartoon character and bring in a small picture of it (the picture should be no biggerthat about 2.5 square inches.
Students will use dilation techniques to enlarge their picture by a scale factor of 3.
Using a notebook size piece of graph paper, create axes that intersect as close to the center of the page as possible.
Now, students should center their picture under the origin. Ideally, they will be able to see their picture through thegraph paper (they may need to darken the outline of their character to make this happen.)
Now, students will identify key points on the outline of their character to dilate. They will find the coordinate ofthese points and dilate them using a scale factor of 3. For example if the top of the character’s hat is at point (1, 4)originally, then the image would be at (3, 12). If the center of the characters nose is at (0, 0), then the image is at (0,0) also.
391
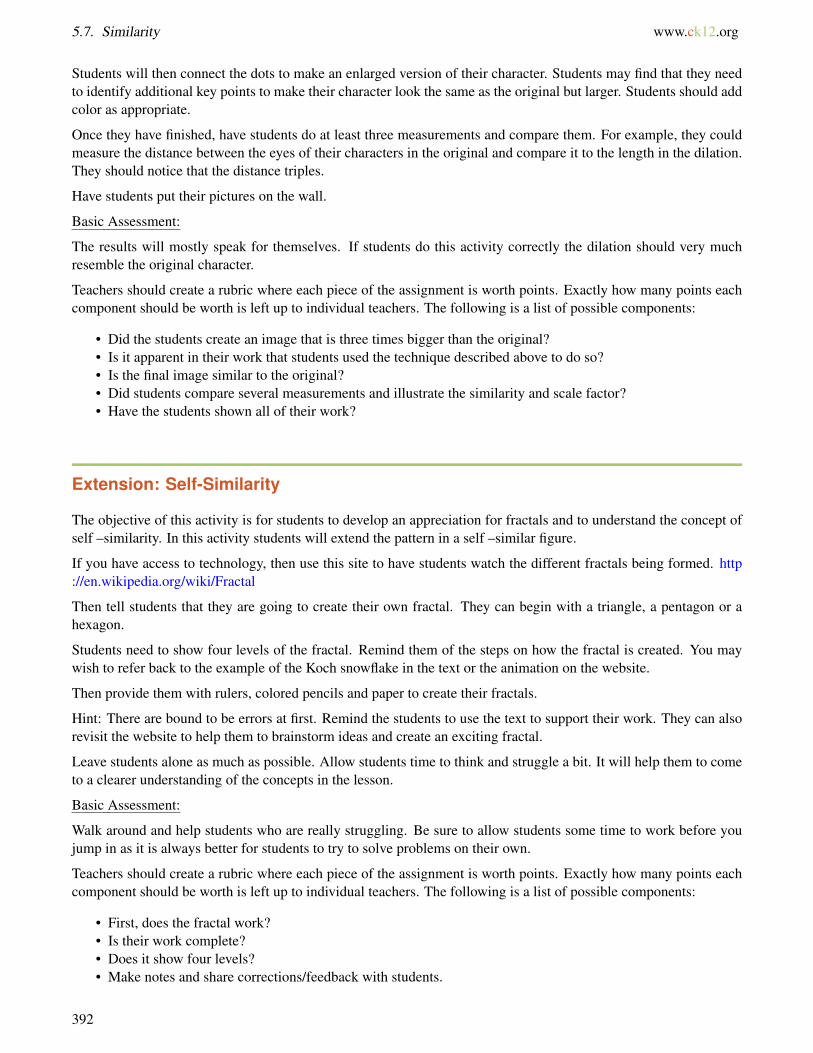
5.7. Similarity www.ck12.org
Students will then connect the dots to make an enlarged version of their character. Students may find that they needto identify additional key points to make their character look the same as the original but larger. Students should addcolor as appropriate.
Once they have finished, have students do at least three measurements and compare them. For example, they couldmeasure the distance between the eyes of their characters in the original and compare it to the length in the dilation.They should notice that the distance triples.
Have students put their pictures on the wall.
Basic Assessment:
The results will mostly speak for themselves. If students do this activity correctly the dilation should very muchresemble the original character.
Teachers should create a rubric where each piece of the assignment is worth points. Exactly how many points eachcomponent should be worth is left up to individual teachers. The following is a list of possible components:
• Did the students create an image that is three times bigger than the original?• Is it apparent in their work that students used the technique described above to do so?• Is the final image similar to the original?• Did students compare several measurements and illustrate the similarity and scale factor?• Have the students shown all of their work?
Extension: Self-Similarity
The objective of this activity is for students to develop an appreciation for fractals and to understand the concept ofself –similarity. In this activity students will extend the pattern in a self –similar figure.
If you have access to technology, then use this site to have students watch the different fractals being formed. http://en.wikipedia.org/wiki/Fractal
Then tell students that they are going to create their own fractal. They can begin with a triangle, a pentagon or ahexagon.
Students need to show four levels of the fractal. Remind them of the steps on how the fractal is created. You maywish to refer back to the example of the Koch snowflake in the text or the animation on the website.
Then provide them with rulers, colored pencils and paper to create their fractals.
Hint: There are bound to be errors at first. Remind the students to use the text to support their work. They can alsorevisit the website to help them to brainstorm ideas and create an exciting fractal.
Leave students alone as much as possible. Allow students time to think and struggle a bit. It will help them to cometo a clearer understanding of the concepts in the lesson.
Basic Assessment:
Walk around and help students who are really struggling. Be sure to allow students some time to work before youjump in as it is always better for students to try to solve problems on their own.
Teachers should create a rubric where each piece of the assignment is worth points. Exactly how many points eachcomponent should be worth is left up to individual teachers. The following is a list of possible components:
• First, does the fractal work?• Is their work complete?• Does it show four levels?• Make notes and share corrections/feedback with students.
392

www.ck12.org Chapter 5. Basic Geometry TE - Problem Solving
5.8 Right Triangle Trigonometry
The Pythagorean Theorem
Activity-The TV Dilemma
The objectives of this activity are for students to employ problem solving skills and the Pythagorean Theorem in areal world context.
Michael’s father wants to buy as big a TV as he can fit in the 5 ft wide, 4 ft high wall space he has in their basement.Most TV’s are made with dimensions in a 16:9 (length to height) ratio, as described in the You Know What? in thissection of the text.
Students will need calculators, writing utensils and paper for this problem.
Determine the diagonal length of the largest TV that will fit in their basement. Round to the nearest (appropriate)inch. Be careful that if you round up, your TV will still “fit” in the allotted space.
Be prepared to share an explanation of your thought process and work performed to attain your answer.
Have students share their work with each other and provide feedback.
Basic Assessment:
Students may need some guidance getting started with this one because “step by step” directions are not provided.This is a chance for students to really think about a situational problem and come up with their own method to solveit.
Teachers should create a rubric where each piece of the assignment is worth points. Exactly how many points eachcomponent should be worth is left up to individual teachers. The following is a list of possible components:
• Did students choose an appropriate method to solve the problem?• Does a TV with their determined diagonal length fit in the allotted space?• Were students able to describe their process and work to their peers?• Did students round their final answer appropriately?
Here is a solution. You may allow for other answers to be acceptable as long as they do not exceed this value, areclose to this value and students can explain why they choose their specific length. For example, students may startby saying that the horizontal length is 59” to be certain that it fits inside 5 ft. Use your discretion here to decide whatis sensible.
Since the horizontal length cannot exceed 5 ft (60”), I chose to let the horizontal length of the TV equal 60”. Usingthe ratio 16:9 for the length to height of the TV, I solved to find the height of 33.75”. Now, using PythagoreanTheorem, I can find the diagonal length of 68”. I rounded down to 68” (the actual value was 68.8”) because I’vealready set the horizontal length equal to the maximum space. If I were to round up to 69”, then the horizontal lengthwould exceed the allotted space. So, the largest possible TV to fit in the allotted space would have a diagonal lengthof 68”.
393

5.8. Right Triangle Trigonometry www.ck12.org
Converse of the Pythagorean Theorem
Activity-Figure Those Triangles!
The objective of this activity is to understand and use the converse of the Pythagorean Theorem to identify right,acute and obtuse angles from side measures. Students will also use the Pythagorean Triples and their multiples inthis activity.
This is a game that has the students use number cards to figure out whether triangles are right triangles, acutetriangles or obtuse triangles.
To prepare for this game, use index cards and write one number on each card. Number the cards 2-25. Each groupwill need a set of cards to play the game.
Divide the students into groups of three to four students.
Students are going to use the number cards to create as many different types of triangles as they can in each of threerounds. At the end of each round, count how many correct combinations each team has made and award points.
Round 1: Right triangles. Students are given a short period of time to use the number cards to create as manydifferent combinations of numbers that will equal right triangles. For example, using 3 - 4 - 5, the students will havea right triangle because 32 +42 = 52. Students work together to write out as many as possible using the numbers 2 -25. Each card may only be used once.
Round 2: Acute triangles. Remind students that a2 +b2 > c2.
Round 3: Obtuse triangles. Remind students that a2 +b2 < c2.
Finally have students share their combinations.
Winning teams can be determined based on the number of points accumulated in each round.
Basic Assessment:
You should walk around the room while students play the game and offer assistance as needed. At the end of eachround have each group share their combinations and check each other’s work as you check it too.
You may wish to assign a grade for the work students do in this game. Perhaps you expect each group to come upwith at least 3 combinations in each round and they may earn bonus points for additional combinations. You shoulddetermine what the minimum number of combinations expected in each round is based on the ability of your class.It should be a number that most (or even all) groups can achieve so that they don’t get frustrated.
Using Similar Right Triangles
Activity-The Model Train Problem
The objective of this activity is to practice identifying the similar triangles formed when an altitude is drawn fromthe right angle to the hypotenuse of the right triangle. Students will also practice finding the geometric mean in orderto solve for specified lengths in these similar triangles.
You are trying to build a support for a mountain range on your model train platform. You want one side of themountain to have a greater slope than the other side. You supports underneath the mountain surface look like this:
394

www.ck12.org Chapter 5. Basic Geometry TE - Problem Solving
Provide students with a copy of this diagram to reference and write on as they complete the problem.
In the diagram, B represents the peak of the mountain range which should be 6 in above the platform. The supports,AB and BC, meet at a right angle at B. D represents a point directly below point B on the platform (i.e. BD and ACare perpendicular). Label this information in your diagram.
Now, determine the following:
How far from point D is point A?
How long is support AB?
How long is support BC?
Basic Assessment:
Circulate and provide assistance while students are working on this problem. Students are likely to struggle withsetting up the appropriate proportions and/or geometric means. Encourage the students to draw the three trianglesseparately and oriented the same way to make it easier for them to identify corresponding sides. Students may alsorecognize that they can use the Pythagorean Theorem instead of proportions for some parts of this problem you candecide whether or not to allow this.
Teachers should create a rubric where each piece of the assignment is worth points. Exactly how many points eachcomponent should be worth is left up to individual teachers. The following is a list of possible components:
• Measure of AD correct? 18 in• Measure of AB correct? approx. 18.97 in• Measure of BC correct? approx. 6.32 in• Are answers supported by clear and correct working?
For example, the first part should look like this:
26=
6AD
AD = 18
The second two parts could be solved using proportions or the Pythagorean Theorem.
Special Right Triangles
Activity-Triangle Tiling
395

5.8. Right Triangle Trigonometry www.ck12.org
The objective of this activity is to get students thinking about and using the ratios of the sides in isosceles righttriangles and 30-60-90 right triangles. Students will also see how these triangles appear in familiar polygons.
For this activity, you will need to cut out a bunch of squares and equilateral triangles of different sizes and colors.There should be enough for each student to get one of each figure to work with.
Tell students that they need to measure their square and figure out the length of the diagonal of each square. Thenthey must show that the ratio of the diagonal to the length of a side is approximately
√2 : 1. The measurements and
the calculations should be shown on the back of the square.
Next, students will find the altitude of their equilateral triangle. They may do this a number of different ways (drawthe angle bisector, the perpendicular bisector of one side, etc). Students should measure the sides of the triangleand verify that the altitude bisects the base of the triangle. Next, tell students that they need to figure out the lengthof the altitude of each triangle. Then they must show that the ratio of the altitude to the length of half of the baseis approximately
√3 : 1. The measurements and the calculations should be shown on the back of the equilateral
triangle.
Once all calculations have been made and ratios have been verified, students will create a tiling design on a wall inthe classroom with their figures.
Have students elect a design team (2 students who will map out the design). You can have them cut some of thesquares and triangles into the special right triangles and keep some of them squares and equilateral triangles formore variety in the design. You may also wish to allow students to cut out additional figures (squares, equilateraltriangles, isosceles right triangles and 30-60-90 right triangles) in appropriate colors to complete their design idea.You may wish to have students make their design on the floor first where they can change things before they attachthe final design to the wall.
Basic Assessment:
You will need to check each student’s work and calculations before they begin making the tiling design. Awardpoints for correct measurement and calculations.
Tangent, Sine and Cosine
Activity-Ladder Tangents
The objective of this activity is to have students identify the different parts of right triangles and use an appropriatetrigonometric ratio to solve a real world problem.
Students will use what they have learned about trigonometric ratios to solve the following problem.
A building is 25 ft tall. Victor and his roofing company are going to replace the roof on the building. Victor requiresthat the angle that the ladder makes with the ground does not exceed 70◦ for safety reasons. Use this informationand the diagram to answer the following questions.
396

www.ck12.org Chapter 5. Basic Geometry TE - Problem Solving
Label the hypotenuse of the right triangle.
Which trig function can be used to determine the minimum length of a ladder needed to reach the top of the building?
Set up an equation using this ratio to find the length of the ladder.
How far from the bases of the building should Victor place the base of the ladder?
At what angle will the ladder meet the building?
Basic Assessment:
Walk around as the students are working. Notice which students are having difficulty and offer support. Allowstudents time to share their work when finished.
Teachers should create a rubric where each piece of the assignment is worth points. Exactly how many points eachcomponent should be worth is left up to individual teachers. The following is a list of possible components:
• Did students correctly identify the hypotenuse of the right triangle in the diagram?• Students should use the sine ratio to find the length of the ladder as shown:
sin70◦ =25x
x =25
sin70◦
The ladder needs to be at least 26.6 ft long.
• Students should use either the tangent or cosine ratios or the Pythagorean Theorem to find the distance fromthe building that the ladder should be placed. This distance is approx 9.09 ft.
• The angle at which the ladder meets the building is 20◦.
Inverse Trigonometric Ratios
Activity-Write Your Own Word Problem
The objective of this activity is to practice using the inverse trigonometric functions and gain experience writing andinterpreting word problems. Students usually struggle the most with translating word problems into mathematicalequations. Having students write their own problems helps them to better understand the terminology used in writingthese problems.
397

5.8. Right Triangle Trigonometry www.ck12.org
Students will work in pairs to write two trigonometric word problems. One problem will require that a trigonometricfunction be used in order to solve for the length of a side in a right triangle. The second problem will require the useof one of the inverse trigonometric functions to find an acute angle in a right triangle. You may wish to discuss thefollowing with students before hand:
• Angle of elevation• Angle of depression• What minimal information is required to find a side in a right triangle using trigonometry?• What minimal information is required to find an acute angle in a right triangle using inverse trigonometric
functions?
Students should write out the word problems on poster paper and include a diagram of the situation. Each pairshould have a worked out solution to their problem on notebook paper.
Have student pairs put up their problems around the room. You may wish to check their work to make sure it issensible first, or let other groups determine this as they attempt to solve it in the next step.
Now, each pair will circulate around the room and solve the problems of each of the other pairs. (If you have a largeclass, you may wish to have students work in groups of three or only solve some of the other groups’ problems tosave time).
Have students share their solutions so that the other groups can check their work. Provide feedback and assistanceas needed.
Basic Assessment:
Teachers should create a rubric where each piece of the assignment is worth points. Exactly how many points eachcomponent should be worth is left up to individual teachers. The following is a list of possible components:
• Did each pair create and solve two problems correctly?• Did each pair correctly solve the other pairs’ problems?• Did pairs provide constructive feedback to other students whose problems had design flaws?
398
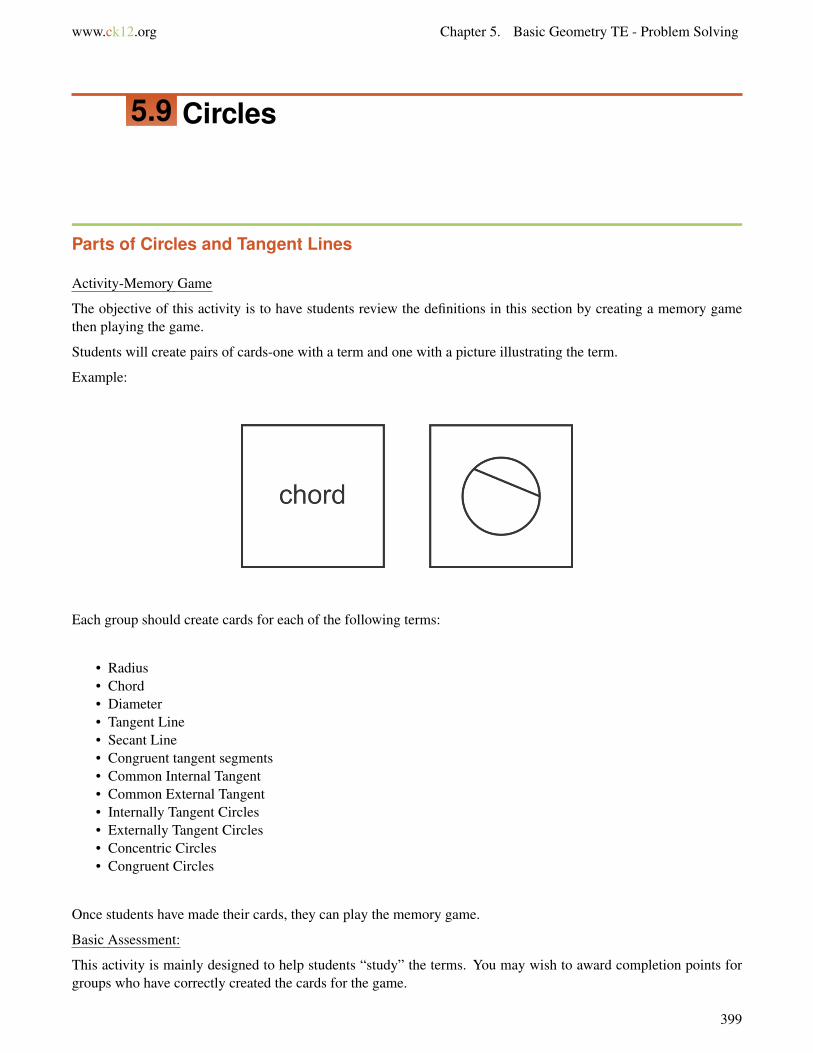
www.ck12.org Chapter 5. Basic Geometry TE - Problem Solving
5.9 Circles
Parts of Circles and Tangent Lines
Activity-Memory Game
The objective of this activity is to have students review the definitions in this section by creating a memory gamethen playing the game.
Students will create pairs of cards-one with a term and one with a picture illustrating the term.
Example:
Each group should create cards for each of the following terms:
• Radius• Chord• Diameter• Tangent Line• Secant Line• Congruent tangent segments• Common Internal Tangent• Common External Tangent• Internally Tangent Circles• Externally Tangent Circles• Concentric Circles• Congruent Circles
Once students have made their cards, they can play the memory game.
Basic Assessment:
This activity is mainly designed to help students “study” the terms. You may wish to award completion points forgroups who have correctly created the cards for the game.
399

5.9. Circles www.ck12.org
Properties of Arcs
Activity-How Much Pie do I get?
The objective of this activity is for students to integrate what they know about arc measures and central angles withratios, proportions and algebra skills.
Veronica is going to divide up an apple pie that she made amongst her siblings. Each child gets a portion of the piebased on his/her age. For example, if Veronica is 10 years old and her oldest brother, Frank, is 15 years old, then theratio of the arc measure of her piece of pie to that of his will be 10:15 or 2:3.
Veronica has three other siblings as well as the older brother. They are Chad, 8, Sally, 7, and Mikey, 5.
Use what you know about circle arcs and proportions to determine what the central angle measure of each child’sslice of the pie should be.
Use a compass to make a circle and a protractor to create a template for the slicing. You should label each slice ofpie in the diagram with the corresponding child’s name.
Be prepared to share your method and solution to the problem with the class.
Basic Assessment:
Teachers should create a rubric where each piece of the assignment is worth points. Exactly how many points eachcomponent should be worth is left up to individual teachers. The following is a list of possible components:
• Did students set up a correct equation based on the information given to find the angle measures?• Did students find the correct measures?• Is the diagram correctly drawn to scale?
Solution: Students should come up with the equation:
5x+7x+8x+10x+15x = 360◦
45x = 360◦
x = 8◦
Now we can substitute to find that the following central angles for each of the children and make the diagram below.The radius of the circle can be anything, but the arcs and central angles should be the same.
400

www.ck12.org Chapter 5. Basic Geometry TE - Problem Solving
Properties of Chords
Activity-Find the Center
The objective of this activity is to integrate what students know about chords, radii and diameters of a circle to locatethe center of a circle given an arc.
Before beginning this activity it is a good idea to review Investigation 1-4 in the textbook on constructing a Perpen-dicular Bisector of a segment.
Students have learned in this section that the perpendicular from a the center of a circle to a chord will bisect thechord. Now they will use the converse: If a segment is a perpendicular bisector of a chord, then it passes through thecenter of the circle.
A group of students find a treasure map that was supposedly made by a pirate. The treasure is located on the circularpath through the three rocks shown on the map. It is 100◦ counterclockwise from the rock furthest to the West. Useconstruction tools and a protractor to complete the circular path and mark to stop on the map where the treasurecould be found. The rocks are denoted by points A,B and C. Each student will need a copy of the map below.
Basic Assessment:
Teachers should make their own solution on the same size paper as what the students are using. Then make an“overhead” slide of the solution so that it is easy to lay it on top of the students’ work and check for accuracy. Thesolution below shows all required markings and the location of the treasure. Students may make a different pair ofchords by connecting different pairs of rocks.
Teachers should create a rubric where each piece of the assignment is worth points. Exactly how many points eachcomponent should be worth is left up to individual teachers. The following is a list of possible components:
• Did students create two chords using the rocks as the endpoints?• Did students use a perpendicular bisector construction to locate the center of the circle?• Did students correctly construct the rest of the circle?• Did students correctly locate the buried treasure on the map?
Solution:
401

5.9. Circles www.ck12.org
Inscribed Angles
Activity-Find the Inscribed Angles
The objective of this activity is to find the measures of inscribed angles and the arcs they intersect.
For this activity, students are going to work in small groups to write a problem. Each problem must have a circlewith a triangle or a quadrilateral inscribed in it.
Students are going to use a protractor to measure the angles of the inscribed angles.
Students are assigned the task of writing a word problem for another student to solve.
Students must include a diagram and have an answer key to check student work.
Allow time for students to write their problems.
If students are having difficulty, have them brainstorm things with circles and other things in them-like a circus ringwith a stand in it, an amphitheater, a circular pond with walkways crossing it, etc.
When students are finished, have them switch papers with another group and solve each others’ problem.
Allow time for students to share when finished.
There is a learning curve for this and don’t be surprised if some of the initial attempts at writing a problem aremissing essential components. If this is the case, have the students try again to rewrite the problem.
Be sure that diagrams are accurate-this will make a huge difference.
Basic Assessment:
Walk around and observe students as they work. If students are having difficulty, offer suggestions to help themthink up a scenario that makes sense. Help students to understand how to solve the problems. Help students to besure that the problems that they are writing are complete. Offer suggestions/feedback as needed.
Teachers should create a rubric where each piece of the assignment is worth points. Exactly how many points eachcomponent should be worth is left up to individual teachers. The following is a list of possible components:
• Did students come up with a viable scenario for their word problem?• Did students create an accurate diagram?• Did students correctly measure the inscribed angles?
402

www.ck12.org Chapter 5. Basic Geometry TE - Problem Solving
• Did students complete a correct solution to the problem?• Perhaps additional points can be awarded for creativity.
Angles of Chords, Secants, and Tangents
The objective of this activity is to have students visualize the different angles formed by chords, radii, secants andtangents and how their measures relate to the intercepted arcs.
Students will need white paper, colored paper, a compass, a straightedge and a protractor for this activity.
Students will start by creating a large circle using a compass on a piece of paper. Now students will mark off twopoints on the circle, A and B. Now students will complete the following steps, using different colors for each angle.
• Construct a central angle that intercepts AB.• Construct an inscribed angle that intercepts AB.• Construct intersecting chords in the circle such that one endpoint of one chord is point A and one endpoint of
the other chord is point B.• Construct secant segments with a common endpoint outside the circle and the other endpoints on A and B.• Construct a tangent line to the circle at point B. Make an angle with the vertex at this point of tangency and
the one side AB and the other side on the tangent line.
Now students should measure all angles created in their diagram and set up equations using the properties they havelearned in this chapter to verify their findings.
Basic Assessment:
You may find it helpful to do an example with the class before having them complete this task individually.Walkaround as students work and offer assistance as needed. If students are having difficulty, remind them to refer backto the text. Collect student work when finished, and assess student understanding based on the accuracy of studentwork. Offer feedback and correction as needed.
Here is a sample solution:
Central angle is 110◦
Inscribed angle is 12 (110◦) = 55◦
Angle formed by chords is 12 (48◦+110◦) = 79◦
Angle formed by secants is 12 (110◦−40◦) = 35◦
Inscribed angle formed by tangent and chord is 12 (110◦) = 55◦
403

5.9. Circles www.ck12.org
Segments of Chords, Secants, and Tangents
Activity-Discover the Properties
The objective of this activity is to practice identifying similar triangles and to discover the formulas for the lengthsof segments associated with circles.
Give students a copy of the circles below.
The solid line segments represent the chords and secants in the diagram. The dashed lines represent the third side ofa triangle formed by these segments. Use the diagrams to answer the following questions:
1. Identify all congruent angles in each circle. What do these congruent angles tell us about the triangles?2. Write a similarity statement for the triangles formed by the intersecting chords.3. Use the corresponding sides of the triangles to write a proportion which shows the relationship between
AE,EC,BE, and ED.4. Given that AE = 3,EC = 8 and BE = 4, find ED.5. Write a similarity statement for the triangles formed by the secant segments in the second circle.6. Use the corresponding sides of the triangle to write a proportion which shows the relationship between
XY,XV,XZ and XW .7. Given that YV = 10,XY = 6 and XW = 12, find XZ.
Students may need some coaching with this one, but in completing this activity they will be reviewing a number ofconcepts and seeing these properties in a slightly different manner.
Basic Assessment:
Teachers should create a rubric where each piece of the assignment is worth points. Exactly how many points eachcomponent should be worth is left up to individual teachers. The following is a list of possible components:
• Were students able to correctly identify the congruent pairs of angles in each diagram?• Were students able to conclude which triangles were similar?• Do their similarity statements have the correct corresponding sides?• Are their proportions correct?• Did students find the correct values for ED(6) and XZ(8)?
Solution:
First diagram: 6 DAE ∼= 6 CBE, 6 ADE ∼= 6 BCE, 6 DEA∼= 6 CEB,∆AED∼ ∆BEC, AEBE = ED
EC ,3x = 4
8
Second diagram: 6 X ∼= 6 X , 6 YWZ ∼= 6 ZVY, 6 XZV ∼= 6 XYW,∆XYW ∼ ∆XZV, XVXW = XZ
XY ,1612 = x
6
404

www.ck12.org Chapter 5. Basic Geometry TE - Problem Solving
Extension: Writing and Graphing the Equations of Circles
Activity-Find the Center of the Circle
The objective of this lesson is to practice using the definition of a circle to write an equation of a circle and to reviewproperties of circles.
Students will need a piece of graph paper, a straightedge and a compass for this activity.
The points (-3, 6), (9, -2) and (9, 6) are the vertices of a right triangle. Plot this triangle on the coordinate plane.Find the equation of the circle circumscribed about this triangle.
To do this, first identify where the center of the circle should be located. Think about what you know about righttriangles inscribed in a circle.
Next, find the radius of the circle. Use the distance formula to do this.
Write the equation of the circle. Use your compass to make the circle on the coordinate plane.
Basic Assessment:
Students may struggle with getting started on this problem. Once they realize that the hypotenuse of the right trianglemust be the circle’s diameter, the rest will follow. The center of the circle is the midpoint of the diameter and theradius is the distance from this point to any vertex of the triangle. You may wish to remind students about what theylearned earlier in the course about the center of the circle and how it is the point where the perpendicular bisectorsof the sides of the triangle intersect.
Teachers should create a rubric where each piece of the assignment is worth points. Exactly how many points eachcomponent should be worth is left up to individual teachers. The following is a list of possible components:
• Did students plot the points correctly and draw the right triangle?• Did students correctly identify the center of the circle?• Were students able to use the distance formula correctly to find the radius?• Do students have the correct equation of the circle?
Here is a completed graph and equation.
405

5.9. Circles www.ck12.org
r =√
(9−3)2 +(−2−2)2 =√
36+16
=√
52 = 2√
13
Equation of the circle is:
(x−3)2 +(y−2)2 = 52
406

www.ck12.org Chapter 5. Basic Geometry TE - Problem Solving
5.10 Perimeter and Area
Triangles and Parallelograms
Activity-Flooring Dilemma
The objective of this activity is to practice dividing up an irregular region into known polygonal units to find totalarea. This activity also involves a real world problem solving element.
Ralph is working for a flooring company for the summer. He is assigned the task of figuring out the area of astrangely shaped room at the library. Here is a diagram of the room that Ralph needs to measure.
Help Ralph find the total area of the floor that needs to be covered. Provide students with the diagram below and thequestions that follow.
Fill in missing measurements as needed based on the given information in the diagram. You may assume that anglesthat appear to be right angles are right angles and that segments that appear to be parallel are parallel.
Next, divide your diagram into rectangles and triangles and find the areas of these parts.
Now, find the total area of the floor.
If the cost of the flooring material is $5.95 per square foot, how much will the material cost?
Basic Assessment:
Circulate and assist students as needed to complete this assignment. You may wish to have them work in pairs.
Teachers should create a rubric where each piece of the assignment is worth points. Exactly how many points eachcomponent should be worth is left up to individual teachers. The following is a list of possible components:
• Did students divide up the area into triangles and rectangles?
407
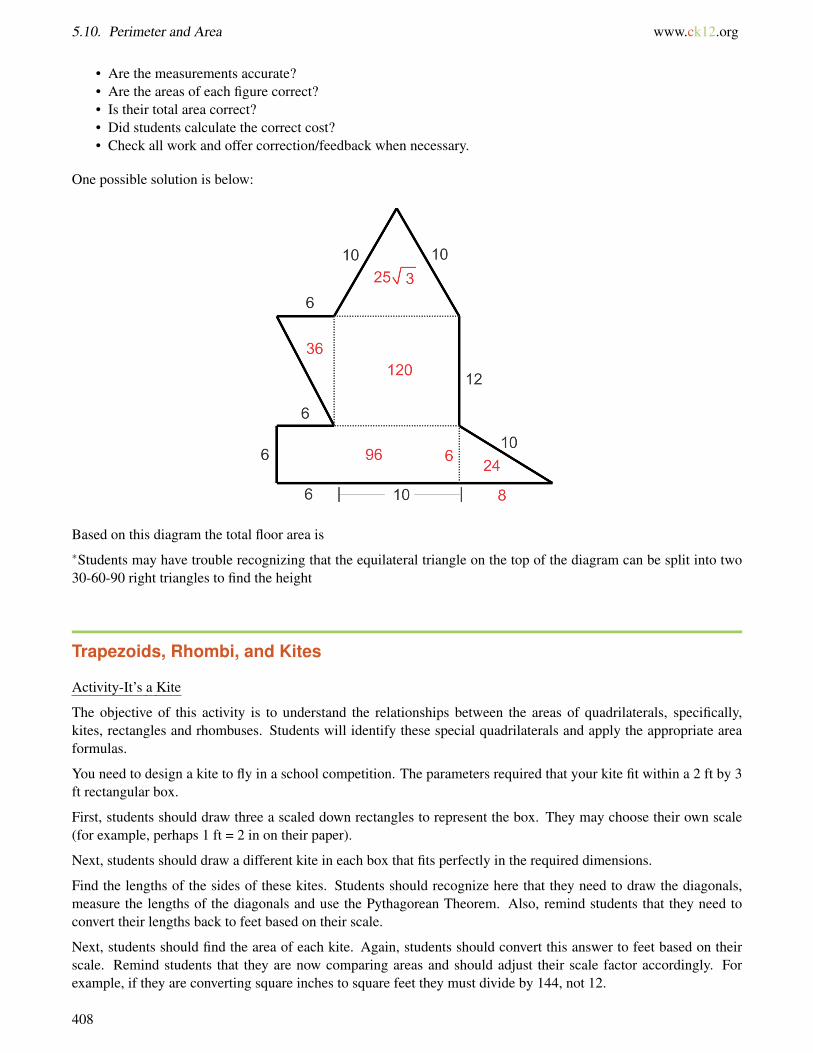
5.10. Perimeter and Area www.ck12.org
• Are the measurements accurate?• Are the areas of each figure correct?• Is their total area correct?• Did students calculate the correct cost?• Check all work and offer correction/feedback when necessary.
One possible solution is below:
Based on this diagram the total floor area is∗Students may have trouble recognizing that the equilateral triangle on the top of the diagram can be split into two30-60-90 right triangles to find the height
Trapezoids, Rhombi, and Kites
Activity-It’s a Kite
The objective of this activity is to understand the relationships between the areas of quadrilaterals, specifically,kites, rectangles and rhombuses. Students will identify these special quadrilaterals and apply the appropriate areaformulas.
You need to design a kite to fly in a school competition. The parameters required that your kite fit within a 2 ft by 3ft rectangular box.
First, students should draw three a scaled down rectangles to represent the box. They may choose their own scale(for example, perhaps 1 ft = 2 in on their paper).
Next, students should draw a different kite in each box that fits perfectly in the required dimensions.
Find the lengths of the sides of these kites. Students should recognize here that they need to draw the diagonals,measure the lengths of the diagonals and use the Pythagorean Theorem. Also, remind students that they need toconvert their lengths back to feet based on their scale.
Next, students should find the area of each kite. Again, students should convert this answer to feet based on theirscale. Remind students that they are now comparing areas and should adjust their scale factor accordingly. Forexample, if they are converting square inches to square feet they must divide by 144, not 12.
408

www.ck12.org Chapter 5. Basic Geometry TE - Problem Solving
Do you notice anything about the areas of your kites?
What is the ratio of the areas of the kites to the area of the rectangle?
Can you explain this phenomenon?
Share your findings with the class.
Basic Assessment:
Circulate and assist students as needed to complete this assignment. You may wish to have them work in pairs.
Teachers should create a rubric where each piece of the assignment is worth points. Exactly how many points eachcomponent should be worth is left up to individual teachers. The following is a list of possible components:
• Did students create three correctly scaled rectangles and draw three different kites in the rectangles?• Did students correctly find the side lengths? These answers will vary.• Did students determine that the area of all of the kites is 3 f t2?• Did students determine that the ratio of the areas of the kites to that of the rectangles is 1:2?• Were students able to communicate that the diagonal lengths would be the same as the lengths of the sides and
since the formula for area of a kite is 12 d1d2, the area of the kite will be half the area of the rectangle?
Area of Similar Polygons
Activity-Paint It!
The objective of this activity is to have students understand the relationship between the scale factor of similarpolygons and their areas and to use this relationship to solve a problem.
A scale drawing of a barn is shown below. Students will find the total surface area of the barn in centimeters andthen convert this area to meters based on the given scale. Now, the roof needs to be painted white and the faces ofthe barn need to be painted red. If one can of paint will cover 50 square meters, how many cans of each color paintare required to complete the task?
Basic Assessment:
Circulate and assist students as needed to complete this assignment. You may wish to have them work in pairs.
Teachers should create a rubric where each piece of the assignment is worth points. Exactly how many points eachcomponent should be worth is left up to individual teachers. The following is a list of possible components:
• Did students find the correct area in the diagram?
409

5.10. Perimeter and Area www.ck12.org
• Did students correctly convert this area to meters?• Did students determine the correct number of cans of paint?
Solution: The total surface area of the barn is: 1530 cm2(roof)+240 cm2(triangles)+1200 cm2(front and back)+1800 cm2(sides) = 4770 cm2.
Convert this to meters-the length ratio would be 2 : 1 (2 cm = 1 m), so the area ratio is 4 : 1 (4 cm2 = 1 m2). So, thetotal surface area in square meters is 1192.5m2.
Now, we can separate the roof surface to get 382.5 m2, which will require 8 cans of white paint. The rest of the barnis 810 m2, which will require 17 cans of red paint.
Circumference and Arc Length
Activity-The Fish Pond Border
The objective of this activity is to practice calculating circumference and arc length of a circle.
A local park has a very large fish pond. The park authority has decided to create bridges over the pond in such a waythat there will be three paths to a point in the center of the pond.
The circumference of the pond will be divided as shown in the diagram.
What is the arc measure of each section of shoreline?
If the diameter of the pond is 50 ft, how many feet of bridge will be constructed?
How long is each section of shoreline?
Basic Assessment:
Teachers should create a rubric where each piece of the assignment is worth points. Exactly how many points eachcomponent should be worth is left up to individual teachers. The following is a list of possible components:
• Did students find the correct arc measures?• Did students find the correct total length of bridge?• Did students find the correct lengths of shoreline?
Solution: The arc measures are 135◦,135◦ and 90◦. There will be a total of 150 ft of bridge pathways. The sectionsof the shoreline are: two sections of 135
360 100π≈ 117.8 f t and one piece of 90360 100π≈ 78.5 f t.
410

www.ck12.org Chapter 5. Basic Geometry TE - Problem Solving
Area of Circles and Sectors
Activity-Circle Segments
The objective of this activity is to calculate the area of a circle, a sector and to use the area of a triangle to find thearea of a circle segment.
Use your knowledge of various area formulas to determine the area of the large square, the circle and the smallsquare in the diagram below.
Next, shade one of the four pieces of the circle that extends beyond the small square.
Find the area of this shaded region.
Basic Assessment:
Teachers should create a rubric where each piece of the assignment is worth points. Exactly how many points eachcomponent should be worth is left up to individual teachers. The following is a list of possible components:
• Did students calculate the correct area of the large square? (100u2)• Did students calculate the correct area of the circle? (25πu2)
• Did students calculate the correct area of the small square?(
5√
2)2
= 50u2
• Did students calculate the correct circle segment area? 14(25π−50)u2
411

5.11. Surface Area and Volume www.ck12.org
5.11 Surface Area and Volume
Exploring Solids
Activity-Solids
The objectives of this lesson are for students to identify and draw isometric, orthographic, cross-sectional and netrepresentations of polyhedra.
Part 1: Give students a geometric solid to work with. For this figure, students are going to create four differentthings.
1. Create an orthographic projection of their solid.2. Create a cross-section of the solid.3. Create a net for the solid.4. Use the net to create an actual model of the solid.
Part 2: Students are going to use the net that they created to design a mobile of solids.
For this, students can create the same solid in different sizes, or they can create nets for different solids. Perhapsthey can “trade” nets with their classmates two. Each student should create a minimum of 5 solids from nets fortheir mobile.
Encourage students to use color and creativity in their mobile.
Students can connect all of the created solids together with string and wooden dowels.
Have materials on hand for students to complete their mobiles when finished.
You can create a great display of mobiles and hang them all around the classroom.
Basic Assessment:
Some students really struggle with the idea of a net and how it works. For many, looking at a two-dimensionalrepresentation of a three-dimensional figure is daunting. They struggle with visualizing how the parts can be foldedto configure a three-dimensional solid. Teachers are encouraged to help students in their creation of their nets toinsure that they will work.
Teachers should create a rubric where each piece of the assignment is worth points. Exactly how many points eachcomponent should be worth is left up to individual teachers. The following is a list of possible components:
• Are the nets created correctly?• Did the student use different sized versions of the same solid or different solids?• Is the mobile finished? Are there at least five solids?• Did the student use color and creativity in his/her design?• Some students struggle with making projects like this look nice. You may wish to assign bonus points for
particularly well done mobiles as a way to reward those who excel at artistic endeavors without penalizingthose who do not.
412

www.ck12.org Chapter 5. Basic Geometry TE - Problem Solving
Surface Area of Prisms and Cylinders
Activity-Prism Match
The objectives of this activity are to practice measuring, finding the surface area of prisms and use deductivereasoning skills to solve a problem.
Part 1: This activity requires some preparation. You will need a bunch of boxes. You could collect them over timeyourself or have each student in the class bring in a box for this activity.
Next, give a box to each student. Have them figure out the surface area of their box. Some students may need helpwith this. You will want to label each box with a letter for the game. It is a good idea to make sure that each surfacearea is correct before beginning the next part. Write each area on an index card. It is advisable to label each indexcard with a number and keep a “key” with the correct matches and names of the students who calculated each area.This way, if one of the surface area calculations is incorrect, you can determine which figure it was supposed to befor and even who calculated it. Mix up the numbers and letters, however, so that students know that box A does notgo with measure 1, etc.
Part 2: Place all of the boxes around the classroom.
To complete the activity, each of the students is given a ruler/tape measure and an index card with a surface area onit.
Students will need to take notes as they work-remind them to do this. Also encourage students to think of strategiesbefore beginning the task. Does a large box have a large surface area or a small surface area?
Then the students need to figure out which box has their correct surface area. This will take some time. Don’t rushthe students, but encourage them to work together.
Once they have found their box, the students need to create a diagram of it. Label the edges of the figure with thelengths they found and show the calculations of the surface area. This final page should be submitted for a grade.
Allow time for the students to share their work when finished.
Basic Assessment:
Teachers should create a rubric where each piece of the assignment is worth points. Exactly how many points eachcomponent should be worth is left up to individual teachers. The following is a list of possible components:
• Did each student calculate a correct surface area in part 1?• Did the students match up the correct prism with their measurements?• Is the diagram labeled accurately?• Is the surface area calculation clear and correct?
Surface Area of Pyramids and Cones
Activity-Create Your Own Pyramid
The objectives of this activity are to identify pyramids, find the surface area of a pyramid using a net or formula andto find the volume of a pyramid. Students will also explore the relationship between the surface areas and volumesof similar solids.
For this activity, the students are going to design their own pyramids.
Part 1: Students should decide what polygon to use for the base of their pyramid. Students should consider how bigthey want their final pyramid to be (i.e. determine their scale factor) and draw scale diagram of the pyramid.
413

5.11. Surface Area and Volume www.ck12.org
Now, students should use their diagram to calculate the surface area and volume of their pyramid.
Part 2: Students will construct a net (in actual size) and cut it out to construct the pyramid.
Students should use the actual lengths of the edges to determine the surface area and volume of their constructedpyramid.
Compare the surface areas and volumes of the diagram to the actual pyramid. DO you notice anything?
Basic Assessment:
Teachers should create a rubric where each piece of the assignment is worth points. Exactly how many points eachcomponent should be worth is left up to individual teachers. The following is a list of possible components:
• Check student work for accuracy.• The design should be drawn to scale-so the design should not be the same size as the model.• Listen during presentations for student understanding.• Can the student explain what they did and why they did it?• Are the surface area measurements/calculations accurate?• Are the volume measurements/calculations accurate?• Did the student recognize that the ratio of the areas is the scale factor squared?• Did the student recognize that the ratio of the volumes is the scale factor cubed?• Offer correction/feedback as needed.
Volume of Prisms and Cylinders
Activity-Maximum Volume
The objective of this activity is to have students practice using the formulas for surface area and volume and explorethe concept of a maximum volume for a given surface area.
For this activity students will be determining the dimensions of the can or box with “maximum” volume given thesurface area.
Students should work in pairs or groups of three for this activity. The surface area is 294u2.
Half of the pairs/groups should be given the premise that they are making a can and that the surface area of the cancannot exceed 294u2. The can is a cylinder.
Half of the pairs/groups should be given the premise that they are making a box and that the surface area of the boxcannot exceed 294u2. The box is a rectangular prism.
Students should experiment with several different dimensions in their pairs/groups and try to determine what thedimensions are of the can or box of maximum volume.
Have pairs/groups share their results and discuss them as a class.
They may not actually come up with a perfect solution and that is okay. You can open a discussion about how moreadvanced mathematical techniques (i.e. calculus) provide tools for finding the best solution to this problem. Youmay wish to discuss the practical applications of such a problem (i.e. minimizing packaging materials for a productto save costs and waste.)
Basic Assessment:
Teachers should create a rubric where each piece of the assignment is worth points. Exactly how many points eachcomponent should be worth is left up to individual teachers. The following is a list of possible components:
• Did students develop several possible figures within the surface area limitation?
414

www.ck12.org Chapter 5. Basic Geometry TE - Problem Solving
• Were students able to discuss the results with the class?• Were they able to generalize their results?
Volume of Pyramids and Cones
Activity-Find the Figure with the Greatest Volume
The objectives of this activity are to evaluate and compare volumes of a cone and pyramids.
First ask students to find the volumes of a cone and a square pyramid. The cone has a diameter of 6 in and a heightof 10 in. The square pyramid has a base with diagonal of length 6 in and a height of 10 in.
Which has the greater volume? Can you explain why?
What if the side lengths of the square base are 6 in? Which has the greater volume in this case?
Draw the bases of the three figures in a single diagram. (This should look like a square inscribed in a circle inscribedin a larger square.)
Discuss the relationship between the volumes of the two square pyramids.
Basic Assessment:
Teachers should create a rubric where each piece of the assignment is worth points. Exactly how many points eachcomponent should be worth is left up to individual teachers. The following is a list of possible components:
• Did students find the correct volumes for the cone and the smaller square pyramid?• Did students discover that the cone has a larger volume and explain why this is so?• Did students find the correct volume of the larger square pyramid?• Did students make a correct drawing?• Did students recognize the relationship between the two square pyramids?
Solution:
The small square pyramid has a volume of 13
(6√2
)2
(10) = 60 in3
The cone has a volume of 13(3)
2π(10)≈ 94.25 in3
The cone has the larger volume because the area of its base is greater than that of the small square pyramid. Theonly difference between the two figures is the areas of the bases.
The larger square pyramid has a volume of 13(6)
2(10) = 120 in2
The area of the base of the larger square pyramid is twice that of the smaller square pyramid. Therefore its volumewill be twice as large too. The length of the sides in the two squares differ by a factor of
√2, when the area of the
base is found, this factor is squared to get a factor of 2.
Surface Area and Volume of Spheres
Activity-Measuring Spheres
The objective of this activity is to practice finding the surface area and volume of spheres.
Bring in a bunch of different size balls. The students will need string, measuring tape, rulers, paper and pencils tocomplete this assignment.
415

5.11. Surface Area and Volume www.ck12.org
Students may complete this assignment in pairs or groups of three. Each group will select a ball to work with.
Using their tools, students need to figure out the surface area and the volume of this first ball. Students shouldsummarize in a few sentences the process they used to determine the surface area and volume of their ball.
Then they select another ball and figure out the surface area and the volume for the second ball.
Then students need to draw a diagram comparing the two (radii, surface areas and volumes) and write about anyconclusions that they can determine about the two balls.
Allow time for students to share their work when finished.
Basic Assessment:
Teachers should create a rubric where each piece of the assignment is worth points. Exactly how many points eachcomponent should be worth is left up to individual teachers. The following is a list of possible components:
• Did students find the correct surface area and volume for each sphere?• Is their description of their process clear and correct?• Were their findings about the two spheres correct? did they recognize that the spheres are similar and that in
fact all spheres are similar?• Did students recognize the correct relationships between the radii, surface area and volumes? They should
recognize here that the ratio of the surface areas is the ratio of the radii squared and the ratio of the volumes isthe ratio of the radii cubed.
• Listen for student understanding during the presentations.
Extension: Exploring Similar Solids
Activity-Cone Sizing
The objectives of the lesson are to calculate the volume of a composite solid and to compare volume and surfacearea of similar solids.
The “Cherry on Top” ice cream shop wants to make a giant ice cream cone to put on top of its roof so that drivers onthe nearby interstate will see the shop. The larger-than-life cone needs to be 22 ft tall from the bottom of the pointedcone to the top of the hemispherical ice cream scoop on top.
The sugar cone base of the ice cream cones that the shop sells have a height of 4 inches and radius of 1.5 inches.The ice cream scoop is spherical and fits perfectly on top of the cone with no overlap (in other words, its radius isalso 1.5 inches.)
What are the volume and surface area of the ice cream cone sold in the shop in terms of π and rounded to the nearesthundredth?
What is the scale factor between the actual cone and the giant cone?
What are the dimensions of the giant cone?
What are the volume and surface area of the giant ice cream cone? Can you find this using a proportion rather thanthe formulas? How?
Basic Assessment:
Teachers should create a rubric where each piece of the assignment is worth points. Exactly how many points eachcomponent should be worth is left up to individual teachers. The following is a list of possible components:
• Did students find the correct surface area and volume of the actual cone?• Did students find the correct dimensions of the giant cone?
416

www.ck12.org Chapter 5. Basic Geometry TE - Problem Solving
• Were students able to find the correct surface area and volume of the giant cone in the correct units?• Did students use the scale factor to find the surface area and volume of the giant cone?
Solution:
The volume of the actual cone is 13(1.5)
2π(4)+ 12
(43
)π(1.5)3 = 21
4 π≈ 16.49 in3.
The surface area of the actual cone is π(1.5)√
1.52 +42 + 12 4π(1.5)2 = 10.91π≈ 34.27 in2
The scale factor between the small cone with height from tip of the cone to the top of the ice cream scoop of 5.5 into the giant cone with height of 22 ft is 1:48
Using the ratio of 1.5:4 as the ratio of the radius to the height of the cone, and the fact that the radius plus the heightof the giant cone is 22 (here units don’t matter), we can set up the proportion:
1.54
=x
22− x4x = 33−1.5x
5.5x = 33
x = 6
This means that the radius of the giant cone (and the hemispherical scoop of ice cream) is 6 ft. The height of thecone is thus 16 ft.
We can use the scale factor to find the volume and surface area of the giant cone.
The scale factor of the lengths is 1:48, so the ratio of areas is 1:2304. The surface of the giant cone is thus78,958.08 in2. Let’s convert this measure from square inches to square feet by dividing by 144 (as there are144 square inches in a square foot-students may need an explanation of this). The surface are of the giant coneis 548.32 f t2.
The ratio of the volumes will be 1:110592. The volume of the giant cone will be 1,823,662.08 in3. Now let’s convertthis measure to feet by dividing by 123 to get 1,055.36 f t3.
417

5.12. Rigid Transformations www.ck12.org
5.12 Rigid Transformations
Exploring Symmetry
Activity-Magazine Symmetry Hunt
The objective of this activity is to have students begin to recognize and classify different types of symmetry in theworld around them.
For this activity, students are going to hunt through magazines of example of symmetry. You will need to prepareand bring a stack of magazines to class. Architecture and nature magazines will be very helpful.
They are going to create a collage of the pictures that they find. Students will need paper, glue, scissors, a ruler anda pencil.
When the students select a given picture, they need to cut it out and attach it to the collage. Then they draw in thelines of symmetry or indicate the rotational symmetry.
Students do this until their collage is complete.
Then have the students write a paragraph explaining their collage-any themes and the types of symmetry found inthe collage.
Allow time for students to share their work when finished.
Basic Assessment:
Teachers should create a rubric where each piece of the assignment is worth points. Exactly how many points eachcomponent should be worth is left up to individual teachers. The following is a list of possible components:
• Observe students as they work and help them classify the symmetries as necessary.• Read student descriptions of their collages for accuracy.• Were students able to correctly identify all symmetries in each figure used in their collage?• Did students develop a theme in their work? (This may or may not be a requirement for full points.)
Translations
Activity-Find the Pre-Image
The objective of this activity is to practice making and identifying translations and writing mapping notations forthese translations in the coordinate plane.
For this activity, the students will be creating a game. Divide students onto teams of two.
The first step is for students to design translations on a coordinate grid. They will need to create a pre-image andfour different translations of this pre-image in the coordinate plane.
Then have them write the mapping notations for each translation on a separate index card.
To help students keep their index cards organized have them put letters on their figures in the coordinate plane andnumbers on the index cards and record a “code” which matches the correct image with its mapping notation. (There
418

www.ck12.org Chapter 5. Basic Geometry TE - Problem Solving
will not be a card for the pre-image)
Now, each team joins another team.
Student pairs will need to identify the pre-image created by the other team and correctly match each translated figurewith the correct mapping notation. This will require some guess and check work.
Basic Assessment:
Teachers should create a rubric where each piece of the assignment is worth points. Exactly how many points eachcomponent should be worth is left up to individual teachers. The following is a list of possible components:
• Are the mapping notations correct?• Were student pairs able to correctly deduce which figure must be the pre-image?• Were student pairs able to correctly match the mapping notations with the correct translated figure?• Offer correction/feedback when necessary.
Reflections
Activity-Reflection in the Coordinate Plane
The objective of this activity is to practice making a reflection in the coordinate plane and verify that it is an isometry.
First, the students will need graph paper, rulers and colored pencils for this activity.
Tell students to begin by drawing a quadrilateral on a coordinate grid. They can use color if they wish to.
Then tell them that they will be drawing a reflection of this quadrilateral over the line y = x. Students should drawthis line on the coordinate plane and reflect the vertices of their quadrilateral over it.
Then the students draw in the new quadrilateral on the coordinate grid.
Now, students should calculate the lengths of the sides of their pre-image quadrilateral and their image after thereflection. Students should verify that the lengths of the corresponding pairs of sides are the same.
Finally, have students exchange papers and complete a peer check. Each person needs to check the other person’swork.
Allow time for the students to share their reflections in small groups when finished.
Basic Assessment:
Teachers should create a rubric where each piece of the assignment is worth points. Exactly how many points eachcomponent should be worth is left up to individual teachers. The following is a list of possible components:
• Were students able to create the correct translation of their quadrilateral?• Did students correctly calculate the lengths of the sides of both figures?• Did students find that the lengths of the corresponding pairs of sides are the same?• Did students thoroughly check each other’s work and offer constructive feedback as necessary?
Rotations
Activity-Rotating Triangles
The objective of this activity is to rotate a triangle using a compass, ruler and protractor and verify that it is anisometry.
419

5.12. Rigid Transformations www.ck12.org
Students should start by constructing a triangle on white paper and marking a center for their rotation.
Next students will use their tools to rotate their triangle. They may choose how many degrees to rotate their triangle.You may wish to encourage students to rotate their triangles far enough to prevent overlap of the pre-image andimage. For some students having overlapping figures will make the subsequent steps more difficult.
For each vertex of the pre-image, students will need to create a segment connecting this point to their center ofrotation. Next, students will draw a ray x◦ away from this segment. Now students can use their compass to mark apoint equidistant from the center as the vertex on the pre-image on this new ray. This is the image of the vertex.
Repeat the process above for the other two vertices and then connect the vertices to make the image triangle. Be sureto correctly label the vertices of the image.
Now students must verify that the image is congruent to the pre-image to show that rotations are an isometry.Students may do this using any of the triangle congruence theorems learned in this course.
Basic Assessment:
Students may need significant assistance with the rotation of the first vertex. You may wish to do an example withthem before beginning this activity.
Teachers should create a rubric where each piece of the assignment is worth points. Exactly how many points eachcomponent should be worth is left up to individual teachers. The following is a list of possible components:
• Did students correctly/accurately rotate their triangle?• Were students able to prove that their image is congruent to their pre-image?• Did students correctly apply a triangle congruence theorem?
Composition of Transformations
Activity-Glide Reflections
The objective of this activity is to have students create a design using a glide reflection.
To begin this activity it may be helpful to refer back to the foot prints in the lesson. These are an example of a glidereflection “design”.
Students will need pencils, colored pencils or markers, scissors, cardstock or cardboard and large white paper tocomplete this activity.
Students are going to create a glide reflection design of their own. They may choose to use a geometric figure orother shape of their choosing in this project.
In order to insure the congruence of the images in the design, students should cut out a template of their figure fromcardstock or cardboard that they will trace.
Once students have created their template, they will need to draw their line of reflection on their paper. Now studentswill trace their template, glide it (a particular distance that will be repeated) and reflect it over the line multiple timesto create their design.
Student’s final work should have at least six of the figures. Students should color in their design to make itaesthetically pleasing. Students should turn in their template with their final work.
Basic Assessment:
Circulate and help students throughout this process. Some will have an easier time with this than others.
Teachers should create a rubric where each piece of the assignment is worth points. Exactly how many points eachcomponent should be worth is left up to individual teachers. The following is a list of possible components:
420

www.ck12.org Chapter 5. Basic Geometry TE - Problem Solving
• Students’ work should be accurate-all figures congruent and evenly spaced.• You may wish to award extra points for outstanding work.
Extension: Tessellating Polygons
Activity-Designing Tessellations
The objective of this activity is to further develop student understanding of tessellation, whether or not a particularregular polygon with tessellate and to design an original tessellation.
For this lesson, the students are going to design a tessellation that uses two different polygons. Students first need toidentify which polygons will tessellate and which won’t.
Each student will need colored pencils, rulers, paper, cardstock, and large paper.
Explain to the students that they will be graded on their work for accuracy, neatness and aesthetic appeal.
Each student needs to create a “sample” pattern to demonstrate that the tessellation that they have proposed doeswork.
Students need to have a peer check their work. Students need to have an instructor check their work. When thepattern has been approved, students may begin work on their final design.
This process will help students to problem solve and eliminate redoing work.
Allow time for the students to present their work when finished.
Basic Assessment:
Teachers should create a rubric where each piece of the assignment is worth points. Exactly how many points eachcomponent should be worth is left up to individual teachers. The following is a list of possible components:
• Does the pattern tessellate?• Did the student use two polygons?• Is the student’s work neat and accurate?• You may wish to award extra points for exceptional work.
421