Circus clown dance i e ltr
11
(Moving) Clowns on stilts line dance : Assembly Instructions © Canon Inc. © Hideharu Naitoh & unity design http://www.canon.com/c-park/en/ *When you pull on the lever at right, the long-legged clowns begin to dance, with all three clowns lifting their long legs and the puppy ducking its head. Assembly Instructions Mountain fold(dotted line) Make a mountain fold. Valley fold(dashed and dotted line) Make a valley fold. Scissors line(solid line) Cut along the line. Cut in line(solid line) Cut along the line. Glue spot(Red dot) Glue parts with the same number together. Glue spot(Green dot) Glue within the same part. Glue spot(Blue dot) Glue to the rear of the other part. Glue The glue spot(colored dot) shows where to apply the glue. Tools and materials Assembly tip Caution Scissors, set square, glue(We recommend stick glue), pencil, used ballpoint pen, toothpicks, tweezers, (useful for handling small parts) Before gluing, crease the paper along mountain fold and valley fold lines and make sure rounded sections are nice and stiff. Glue, scissors and other tools may be dangerous to young children so be sure to keep them out of the reach of young children. View of completed model Assembly Instructions : Eleven US letter sheets (No. 1 to No. 11) *Hint: Trace along the folds with a ruler and an exhausted pen (no ink) to get a sharper, easier fold. * Build the model by carefully reading the Assembly Instructions , in the parts sheet page order. Before starting assembly : Writing the number of each section on its back side before cutting out the sections is highly recommended. (* This way, you can be sure which section is which even after cutting out the sections.) Indicates where sections should be glued together. Indicates where to insert sections. Do not glue the sections together. Cut along the line. Use care here. Round bar : Use to give parts a curved surface. Tweezers : Useful in working with fine parts. Caution: This circus clown dance model uses three pieces of thread. Please use strong thread such as silk thread (three pieces 30 cm each in length). Caution: Do not assemble the parts into a box shape yet at this stage. Turn the parts upside down and glue them in place as shown in the illustration.
-
Upload
independent -
Category
Documents
-
view
1 -
download
0
Transcript of Circus clown dance i e ltr

(Moving) Clowns on stilts line dance : Assembly Instructions © Canon Inc. © Hideharu Naitoh & unity design
http://www.canon.com/c-park/en/
*When you pull on the lever at right, the long-legged clowns begin to dance, with all three clowns lifting their long legs and the puppy ducking its head.
Assembly Instructions
Mountain fold(dotted line)Make a mountain fold.
Valley fold(dashed and dotted line)Make a valley fold.
Scissors line(solid line)Cut along the line.
Cut in line(solid line)Cut along the line.
Glue spot(Red dot)Glue parts with the same number together.
Glue spot(Green dot)Glue within the same part.
Glue spot(Blue dot)Glue to the rear of the other part.
GlueThe glue spot(colored dot)shows where to apply the glue.
Tools and materials
Assembly tip
Caution
Scissors, set square, glue(We recommend stick glue), pencil, usedballpoint pen, toothpicks, tweezers, (useful for handling small parts)
Before gluing, crease the paper along mountain fold and valley fold lines and make sure rounded sections are nice and stiff.
Glue, scissors and other tools may be dangerous to young children so be sure to keep them out of the reach of young children.
View of completed model
Assembly Instructions : Eleven US letter sheets (No. 1 to No. 11)
*Hint: Trace along the folds with a ruler and an exhausted pen (no ink) to get a sharper, easier fold.
* Build the model by carefully reading the Assembly Instructions , in the parts sheet page order.
Before starting assembly : Writing the number of each section on its back side before cutting out the sections is highly recommended.(* This way, you can be sure which section is which even after cutting out the sections.)
Indicates where sections should be glued together.
Indicates where to insert sections. Do not glue the sections together.
Cut along the line.
Use care here.
Round bar : Use to give parts a curved surface.
Tweezers : Useful in working with fine parts.
Caution: This circus clown dance model uses three pieces of thread. Please use strong thread such as silk thread (three pieces 30 cm each in length).
Caution: Do not assemble the parts into a box shape yet at this stage.
Turn the parts upside down and glue them in place as shown in the illustration.

(Moving) Clowns on stilts line dance : Assembly Instructions © Canon Inc. © Hideharu Naitoh & unity design
It's easier to form a cylinder using a round bar or similar object.

(Moving) Clowns on stilts line dance : Assembly Instructions © Canon Inc. © Hideharu Naitoh & unity design
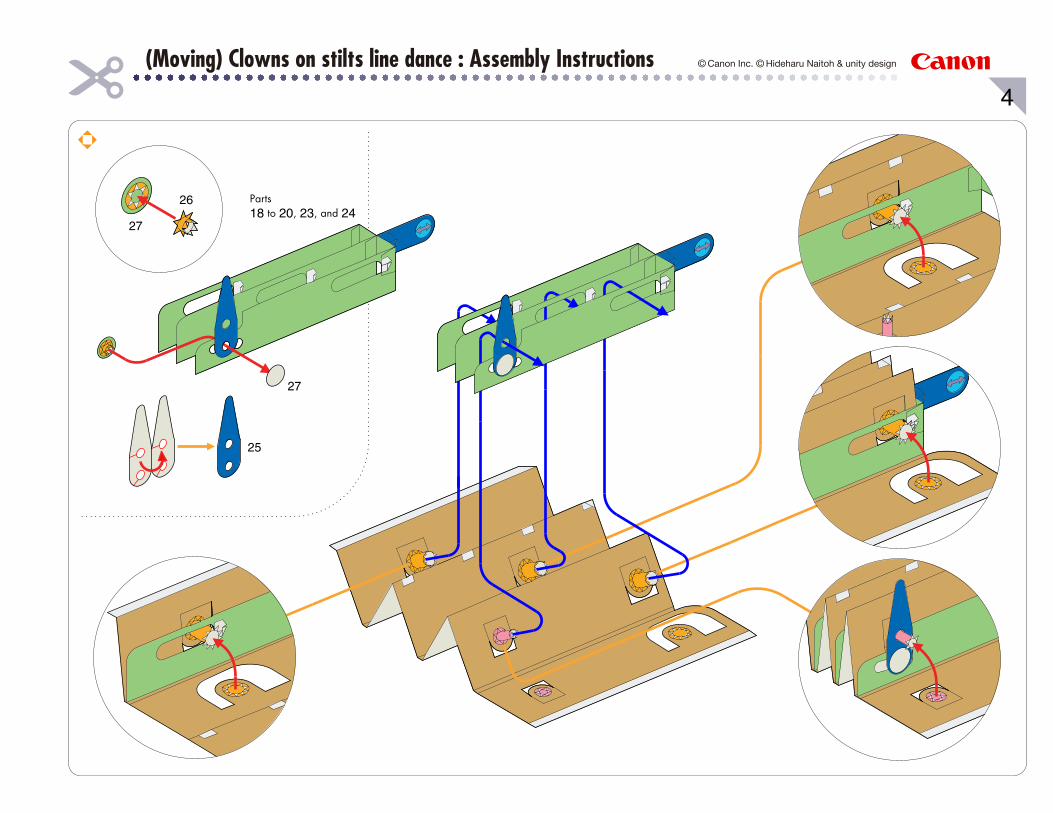
Pull the openings in parts 18, 19, and 20 shown above slightly forward.
Insert the glue spots to be glued on parts 19 and 20 and glue them in place.
(Moving) Clowns on stilts line dance : Assembly Instructions © Canon Inc. © Hideharu Naitoh & unity design
Parts 18 to 20, 23, and 24

(Moving) Clowns on stilts line dance : Assembly Instructions © Canon Inc. © Hideharu Naitoh & unity design
Pull and push the lever at right to check the movement of part 25 at left.
These steps are easier if you use an empty box or similar item as a base and assemble the parts upside down.
(Moving) Clowns on stilts line dance : Assembly Instructions © Canon Inc. © Hideharu Naitoh & unity design
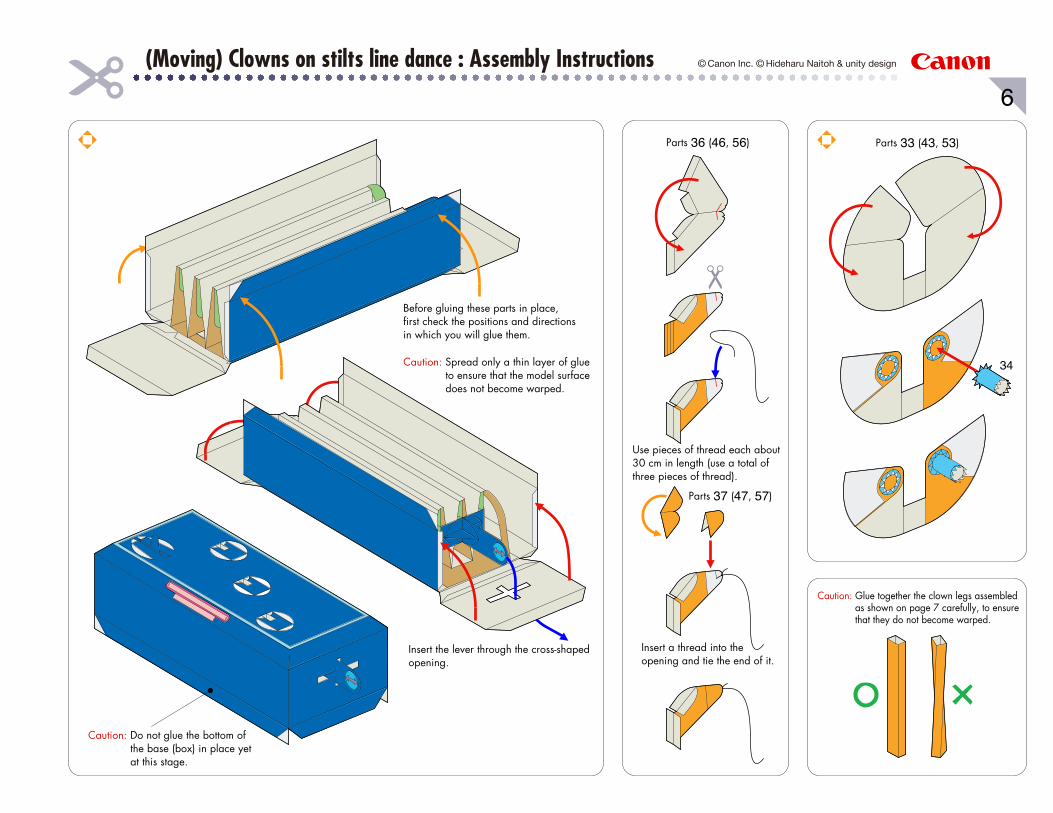
Before gluing these parts in place, first check the positions and directions in which you will glue them.
Caution: Spread only a thin layer of glue to ensure that the model surface does not become warped.
Caution: Do not glue the bottom of the base (box) in place yet at this stage.
Insert the lever through the cross-shaped opening.
Parts 36 (46, 56)
Use pieces of thread each about 30 cm in length (use a total of three pieces of thread).
Parts 33 (43, 53)
Parts 37 (47, 57)
Insert a thread into the opening and tie the end of it.
Caution: Glue together the clown legs assembled as shown on page 7 carefully, to ensure that they do not become warped.

(Moving) Clowns on stilts line dance : Assembly Instructions © Canon Inc. © Hideharu Naitoh & unity design
Parts 28, 31, and 32Parts 29 and 31
Parts 36 and 37 Parts 33 and 34
Parts 30 and 38

(Moving) Clowns on stilts line dance : Assembly Instructions © Canon Inc. © Hideharu Naitoh & unity design
First glue the glue spots on part 30 (42, 52).
Place the left and right legs together in position, leaving no gap between them, and glue them to part 34 (the cylindrical axle).
Run the thread through the left leg, so that it sticks out from the bottom.
Pull the thread to check the movement of the clown's leg.
Assemble the other two clowns in the same way you assembled the clown in orange.

(Moving) Clowns on stilts line dance : Assembly Instructions © Canon Inc. © Hideharu Naitoh & unity design
Fold the fold line ( ) on the puppy forward and backward five or six times, so that it will move easily.
Glue parts 63 and 64 in place, aligned with the tip of the puppy's nose on the reverse side of part 60.
Parts 60, 63, and 64
Use your finger to check the movement of the puppy's head.
Caution: Push the puppy's upper body forward touches the surface of the base (box) and then glue the upper body to the puppy's legs in this position.

After running the thread for each clown through the opening in the base, glue the clown to the base.
Caution: Do not glue the bottom in place yet.
When gluing the puppy in place, first glue the rear glue spot in place and then the left and right spots, one at a time.
(1) Push the lever in as far as it will go.
(2) Pull the thread gently beneath the cylinder (axle) and then insert it into the opening.
(4) Glue part 21 in place to fix the thread firmly in position.
(3) Wrap the thread around the opening once, then adjust the length of thread by pulling on the lever to see how the leg moves.
(Moving) Clowns on stilts line dance : Assembly Instructions © Canon Inc. © Hideharu Naitoh & unity design
About 5 mm
The right leg should rise from a position in which the left and right heels are together to about 5 mm beyond the tip of the puppy's cap.
Ensure the legs of all three clowns rise to the same height.

(Moving) Clowns on stilts line dance : Assembly Instructions © Canon Inc. © Hideharu Naitoh & unity design
Glue the bottom of the base (box) in place and then glue the star-shaped batons in place.
Finished!