Entry Level Certificate in Hospitality and Catering (Entry 3)
Upload
khangminh22Category
view
1download
0
Page 1 of 50
07.14.2014
CHARGE ENTRY
Application Reference Guide
Project Access Training

Page 2 of 50
07.14.2014
Copyright © 2014 North Shore Long Island Jewish Health System. All rights reserved.
This documentation is confidential, proprietary to NSLIJ, is protected by copyright laws in the US and
abroad, and is licensed for use by NSLIJ and its customers only in strict accordance with the license
agreement governing its use.
Any reports or other figures that appear in this manual are merely illustrative and do not contain
names of or data on real people. Any similarity in names of people, living or dead, or in data is strictly
coincidental and is expressly disclaimed.
The information contained in this manual is subject to change. Revisions and updates will occur from
time to time to document changes and/or additions. The date of the last revision to the course
material is noted on the documentation.
The documentation is delivered "as is", with all faults, and NSLIJ does not warrant, and shall have no
liability for, its correctness or completeness or for its fitness for a particular purpose.
If this was obtained without attending the accompanying training, the Customer acknowledges that no
telephone or other support or assistance will be provided by NSLIJ Health System personnel.

Page 3 of 50
07.14.2014
Table of Contents Enter Charges ...................................................................................................................................................... 4
Updating Charges ................................................................................................................................................ 7
Error Alerts - Incorrect Diagnosis ........................................................................................................................ 9
Missing Certificate Number .............................................................................................................................. 10
Missing Referring Physician .............................................................................................................................. 12
Create Stand Alone Encounter(s) ...................................................................................................................... 13
Delete Diagnosis................................................................................................................................................ 15
TES Real Time Edit on the Transaction Level .................................................................................................... 16
TES Edits ............................................................................................................................................................ 17
Enter National Drug Code(s) - (NDC) ................................................................................................................. 20
Enter a Last Menstrual Period (LMP) ................................................................................................................ 21
Delete Transaction(s) ........................................................................................................................................ 22
Print Batch Proof(s) ........................................................................................................................................... 25
Add Insurance(s) ............................................................................................................................................... 27
Initiate and View Insurance Eligibility ............................................................................................................... 30
Verifying Insurance Eligibility ............................................................................................................................ 34
Adding Authorization(s) and Referral(s) ....................................................................................................... 35
Foreign Encounter(s) ..................................................................................................................................... 38
TES Inquiry .................................................................................................................................................... 40
Add Insurance(s) in GE Centricity Business ....................................................................................................... 43
Update Insurance(s) in GECB ............................................................................................................................ 46
Initiating and Viewing Eligibility in GECB .......................................................................................................... 48

Page 4 of 50
07.14.2014
Enter Charges 1. Select Front Desk on the Vertical Tool Bar.
2. Select TES Charge Entry on the Horizontal Tool Bar.
3. In the Batch field, type “G”, Press Tab to generate a new batch.
4.
Note: If a batch has already been created, the batch number will display.
5. In the Description field, enter a batch description, Press Tab and click OK.
6. Search for patient in the Patient field, Press Tab.
7. Highlight your patient on the Patient Selection screen and click OK.

Page 5 of 50
07.14.2014
8. Select the appointment for which to enter charges and press OK.
9. On the TES Encounter/Transaction Entry-Main screen press Tab at the Encounter field.
10. Tab or click to get to the Diagnosis field.

Page 6 of 50
07.14.2014
11. Enter Diagnosis code(s) or use lookup options to find the codes. Press Tab or click to get to the next
diagnosis field.
12. Tab or click to the Procedure code field and enter Procedure code(s) or use the lookup options to find
the Procedure code(s).
13. Tab through the fields until you reach the second Procedure field. If a second procedure is added, Tab
through all the fields until you reach the third Procedure field. Click OK to file the charges.
14. Type the next patients name to continue entering charges.

Page 7 of 50
07.14.2014
Updating Charges 1. Follow steps 1-8 of Enter Charges
2. When selecting the appointment, a dialogue box will display asking to use the invoice header
information, click Yes
3. On the TES Encounter/Transaction Entry-Main screen, delete the “G” in the Encounter field and
replace with “?” and press Tab.

Page 8 of 50
07.14.2014
4. Select the encounter you want to edit and click OK.
5. The TES Encounter/Transaction Entry-Main screen displays
6. Update Diagnosis/Procedure fields
7. Click OK to re-file charges
Page 9 of 50
07.14.2014
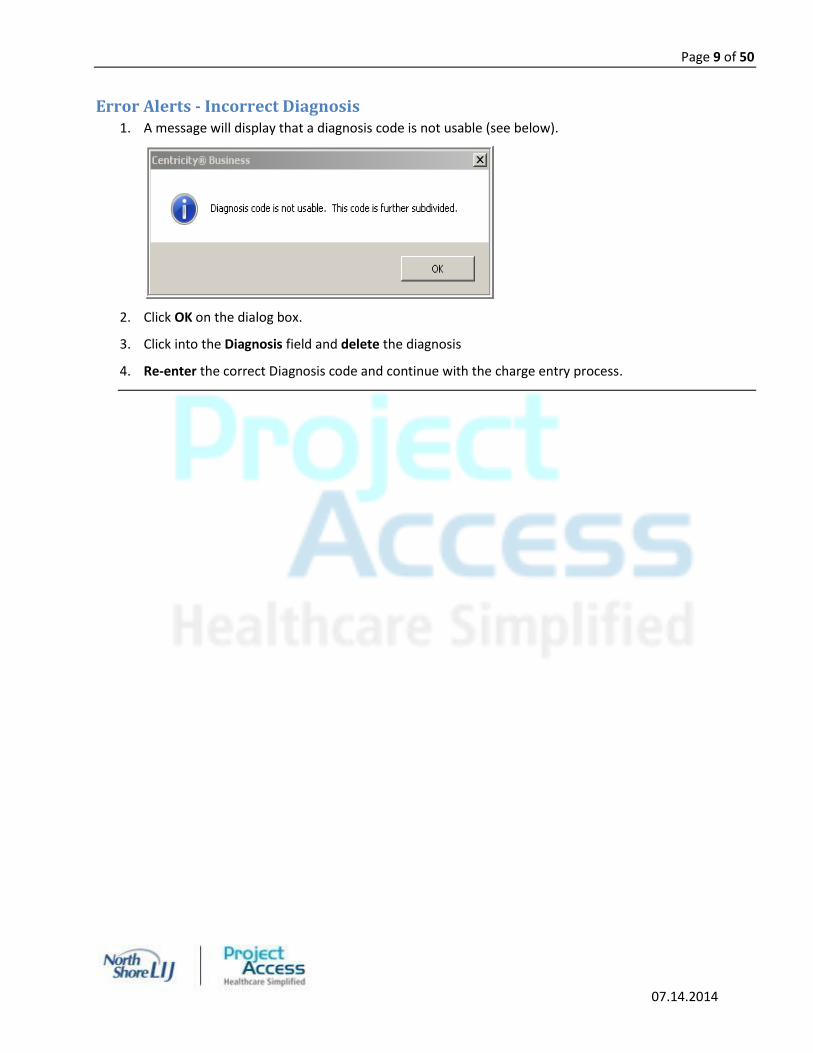
Error Alerts - Incorrect Diagnosis 1. A message will display that a diagnosis code is not usable (see below).
2. Click OK on the dialog box.
3. Click into the Diagnosis field and delete the diagnosis
4. Re-enter the correct Diagnosis code and continue with the charge entry process.

Page 10 of 50
07.14.2014
Missing Certificate Number 1. A TES Edit displays on the Edit Selector Header: VM-MISSING CERTIFICATE NUMBER.
2. Click on the Display Edit Condition hyperlink.
3. Click OK to file the charges.
4. Toggle to Soarian Financials to enter the missing certificate number.
5. Once logged on to Soarian Financials, use the Revise Encounter Details task to review and update the
encounter.
6. Once in the patients account, click on PT Insurance tab to update insurance and enter the missing
policy number in the Policy # field.
Note: As best practice, it is important to verify eligibility when updating insurance.

Page 11 of 50
07.14.2014
7. To check for insurance verification: Go to Manage List > Initiate eligibility request.
8. Review the response by clicking Manage List > View eligibility response.
9. Select the Verified for encounter checkbox and type a comment in the free text box below.
10. Click Done in the lower right hand corner until you return to the Soarian Financials Home Page.
11. Toggle to GECB to re-file the charges.
12. Select Front Desk on the Vertical Tool Bar.
13. Select TES Charge Entry on the Horizontal Tool Bar.
14. Select the appropriate batch and click OK.
15. Search for patient in the Patient field and press Tab.
16. Select your patient on the Patient Selection screen and click OK.
17. Select the appointment and click OK.
18. Replace the “G” in the encounter field with a “?” and Press Tab.
19. Select the encounter to be corrected and click OK.
20. Click OK to re-file the charges.

Page 12 of 50
07.14.2014
Missing Referring Physician 1. A TES Edit displays on the Edit Selector Header: CE-MISSING RERERRING PHYSICIAN
2. Click on the Display Edit Condition hyperlink to read a description of the edit.
3. Click Cancel until the TES Encounter/Transaction Entry-Main screen displays.
4. Click into the RefProv: field.
5. Enter the referring provider’s name into the field and Press Tab
6. Select the appropriate referring provider from the list and click OK.
7. Click OK to re-file the charges.

Page 13 of 50
07.14.2014
Create Stand Alone Encounter(s) 1. Toggle to Soarian Financials and click on the Check Patient In task.
2. Search for and Select the patient.
3. Select an Encounter Location and Encounter Provider from the drop-down menu fields
4. Click OK.
5. Click Add New Encounter.
6. The Check In Summary page displays.

Page 14 of 50
07.14.2014
7. Enter the mandatory data to complete the check in process.
8. Toggle to GECB to enter charges.
9. Select Front Desk on the Vertical Tool Bar.
10. Select TES Charge Entry on the Horizontal Tool Bar.
11. TES Batch screen displays. Enter “G” to generate a new batch or press OK to continue working in the
open batch.
12. Search for the patient at TES Encounter/Transaction Entry Batch-Main screen.
13. Select patient and click OK.
14. The Patient Appointment list displays, click Cancel.
Note: For Stand Alone Encounters, select the Visit List instead of the Appointment List as there is no
appointment created when a Stand Alone Encounter is created in Soarian Financials.
15. The Patient Visit List displays. Select the Visit/Encounter for which to enter charges.
16. Click OK.
17. Enter charges for the encounter.
18. Click OK to file the charges.

Page 15 of 50
07.14.2014
Delete Diagnosis 1. Select Front Desk on the Vertical Tool Bar.
2. Select TES Charge Entry on the Horizontal Tool Bar.
3. Select the appropriate batch and click OK.
4. Select Patient.
5. Select the Appointment linked to the TES Encounter you wish to edit and click OK.
6. A dialog box stating the appointment has an invoice attached to it will display. Click Yes.
7. In the Encounter field, delete the “G” and replace with “?” and Press Tab.
8. Select the encounter you want to edit and click OK.
9. Click in the Diagnosis field you want to delete. Delete the diagnosis and Press Tab.
10. Click Yes in the dialog box.
11. Click OK to re-file the charges.

Page 16 of 50
07.14.2014
TES Real Time Edit on the Transaction Level 1. After the TES encounter is filed, a message will display that the charge(s) has an edit(s).
2. The Edit Selector Header screen displays. Click the Display Edit Condition hyperlink or press
D for more information.
3. If the information is available to correct the edit, edit the encounter immediately by clicking Cancel on
the Edit Selector Header screen.
4. You will be returned to the TES Charge Entry screen.
5. Resolve the edit in GECB on the transaction level and re-file the charges.
Note: If the edit is not resolved on the transaction level, the TES Encounter will fall to an ETM worklist. Until
the edit is corrected, TES will suspend the charge and the charge will not be extracted to BAR.

Page 17 of 50
07.14.2014
TES Edits 1. Select TES in the VTB
2. Select TES Edits in the HTB
Note: If a patient has already been selected, the patient name will display. There are other lookup options such
as Encounter, Transaction, Workfile, and Batch.
3. Press Tab.
4. The TES Encounter/Transaction Editing screen displays.

Page 18 of 50
07.14.2014
5. Select the encounter on which to perform an edit.
6. Select Edit Trans from the available actions by pressing Single Letter Action Code C or clicking on the
Edit Trans hyperlink.
Note: To view the edit, select Display Edits from the available actions by pressing Single Letter Action Code Q or
clicking on the Display Edits hyperlink

Page 19 of 50
07.14.2014
7. The TES Encounter/Transaction Editing – Transaction Details screen displays
8. Click the Page button and switch the page to Main
9. Correct the charge and re-file by clicking OK
Page 20 of 50
07.14.2014
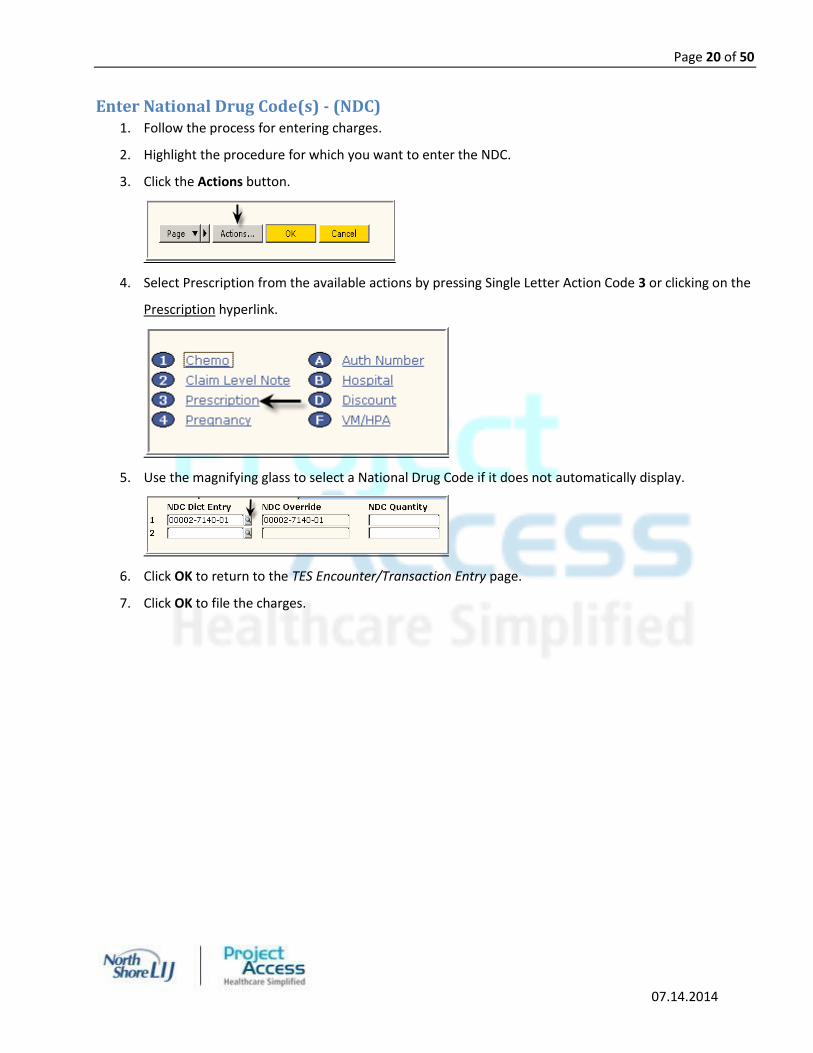
Enter National Drug Code(s) - (NDC) 1. Follow the process for entering charges.
2. Highlight the procedure for which you want to enter the NDC.
3. Click the Actions button.
4. Select Prescription from the available actions by pressing Single Letter Action Code 3 or clicking on the
Prescription hyperlink.
5. Use the magnifying glass to select a National Drug Code if it does not automatically display.
6. Click OK to return to the TES Encounter/Transaction Entry page.
7. Click OK to file the charges.

Page 21 of 50
07.14.2014
Enter a Last Menstrual Period (LMP) 1. Follow the process for entering charges.
2. Highlight the procedure for which you want to enter the LMP.
3. Click the Actions button.
4. Select Pregnancy from the available actions by pressing Single Letter Action Code 4 or clicking on the
Pregnancy hyperlink.
5. Enter the appropriate information relating to the LMP
6. Click OK
7. Click OK to file the charges

Page 22 of 50
07.14.2014
Delete Transaction(s) 1. Click Front Desk on the Vertical Tool Bar.
2. Select TES Charge Entry from the Horizontal Toolbar
3. In the Batch field, type in the batch number, or click the magnifying glass.
4. Click the Actions button.
5. Click Delete Transactions or press D on your keyboard.

Page 23 of 50
07.14.2014
6. From the TES Encounter/Transaction Editing screen choose the appropriate encounter.
7. Click Display Transactions or press Z on your keyboard.
8. Select the appropriate transaction and click Delete Transactions or press X on your keyboard.

Page 24 of 50
07.14.2014
9. Choose the appropriate Reason for Deletion.
10. Enter a free text comment as needed.
11. Click OK.

Page 25 of 50
07.14.2014
Print Batch Proof(s) 1. Click TES on the Vertical Tool Bar.
2. Click TES Charge Entry on the Horizontal Tool Bar.
3. In the Batch field, type in the batch number, or click the magnifying glass.
4. Click the Actions button.
5. Single Letter Action Codes display at the bottom of the screen.

Page 26 of 50
07.14.2014
6. Click the Print Batch Proof hyperlink or press L on your keyboard.
7. The Encounter/Trans Entry screen displays.
8. Select the device to print to.
9. Click OK.

Page 27 of 50
07.14.2014
Add Insurance(s) 1. On the Soarian Homepage, click Revise Encounter Details.
2. The Encounter Details page displays.
3. Click the Insurance tab.
4. On the Insurance page, click Manage List > Create a New Policy

Page 28 of 50
07.14.2014
6. After selecting Create a new policy a dialog box will display. The dialog box defaults to the Payer/Plan Quick Pick radio button.

Page 29 of 50
07.14.2014
7. After selecting a plan, the Insurance page displays. On the Basics tab, value the Policy Number and Subscriber fields.
Note: Although these fields are not hard coded, many practices have a policy about scheduling without a policy number. Please refer to your office Policies and Procedures for further clarification.
8. Once all applicable insurance data is valued, the insurance eligibility verification process can take place.

Page 30 of 50
07.14.2014
Initiate and View Insurance Eligibility 1. Select Revise Encounter Details
2. Search for and Select the patient
3. Click Insurance
4. Click Manage List > Initiate eligibility request.

Page 31 of 50
07.14.2014
5. The Initiate Eligibility Request dialog box displays. Select the Policy, Encounter Provider and the Service Type.
6. Click Submit.
7. The Insurance page displays.
The icon will change to reflect the submitted eligibility request.

Page 32 of 50
07.14.2014
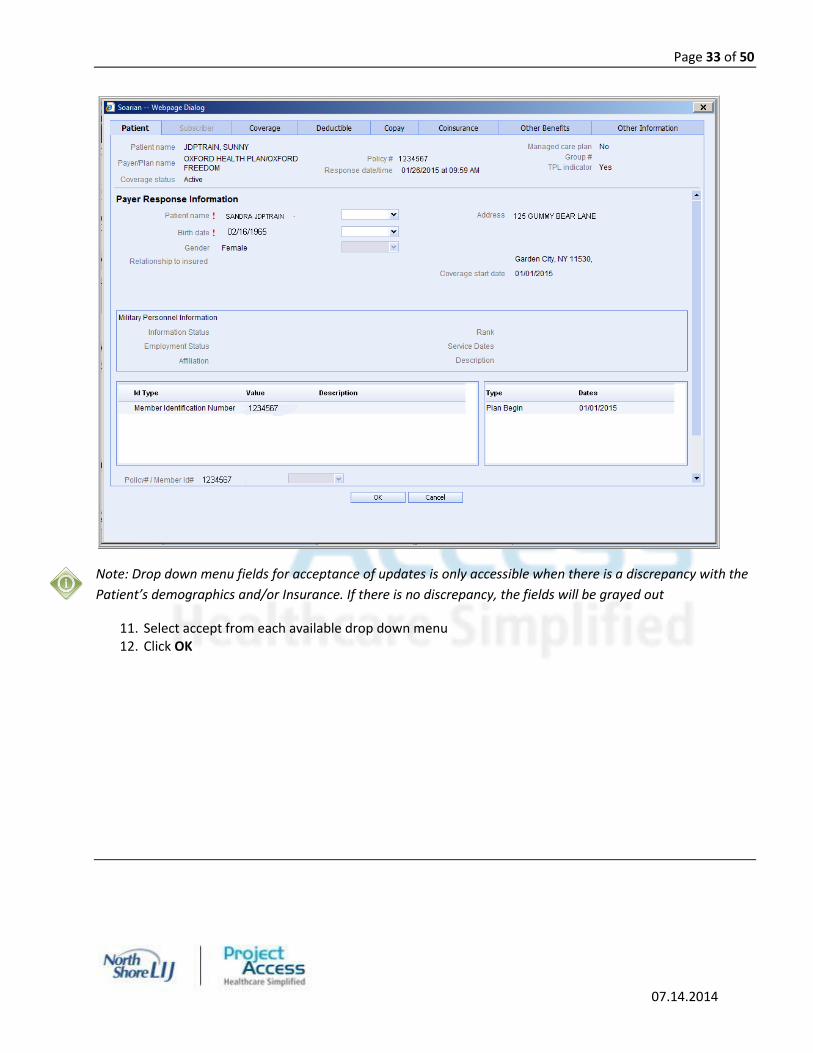
8. To view the response, click Manage List > View eligibility response.
9. The response dialog box displays.
10. To view more information about the response, click View Full Response
Page 33 of 50
07.14.2014
Note: Drop down menu fields for acceptance of updates is only accessible when there is a discrepancy with the
Patient’s demographics and/or Insurance. If there is no discrepancy, the fields will be grayed out
11. Select accept from each available drop down menu 12. Click OK

Page 34 of 50
07.14.2014
Verifying Insurance Eligibility 1. On the Insurance page, to verify that insurance eligibility has been initiated and viewed, value the
Verified for Encounter checkbox and enter in the appropriate comment in the free text comment field.

Page 35 of 50
07.14.2014
Adding Authorization(s) and Referral(s)
1. On the Soarian Homepage select Revise Encounter Details.
2. Search for and Select the patient
3. The Encounter Details page displays.
4. Click the Insurance tab.
5. On the Insurance page, click Auths/Referrals tab.

Page 36 of 50
07.14.2014
6. Enter all applicable information; use the drop-down arrows where available.
Note: the Allocate to this encounter checkbox is valued by default, as well as the Auto Count
checkbox.

Page 37 of 50
07.14.2014
7. Scroll down to complete all applicable fields.
8. Click Add.
9. The Authorization or Referral displays in the collection area.
Note: To search for additional authorization(s) or referral(s), click the Find Additional button under the collection area.

Page 38 of 50
07.14.2014
Foreign Encounter(s)
1. Select Front Desk on the Vertical Tool Bar.
2. Select TES Charge Entry on the Horizontal Tool Bar.
3. In the Batch field, type “G”, Press Tab to generate a new batch.
Note: If a batch has already been created, the batch number will display.
4. In the Description field, enter a batch description, Press Tab and click OK.
5. Search for patient in the Patient field, Press Tab.
6. Select your patient on the Patient Selection screen and click OK.
7. The Patient Appointment list displays, click Cancel.
Note: For Foreign Encounters, select the Visit List instead of the Appointment List as there is no appointment
created when a Foreign Encounter is created at a specific facility.

Page 39 of 50
07.14.2014
8. The Patient Visit List displays. Select the Visit/Encounter for which to enter charges.
Note: For Foreign Encounters, the Alt Visit Number will start with the letters of the facility that the
encounter is coming from; it will not start with SF as the visit is not coming from Soarian Financials.
9. Click OK.
10. Enter charges for the encounter.
11. Click OK to file the charges.
Page 40 of 50
07.14.2014
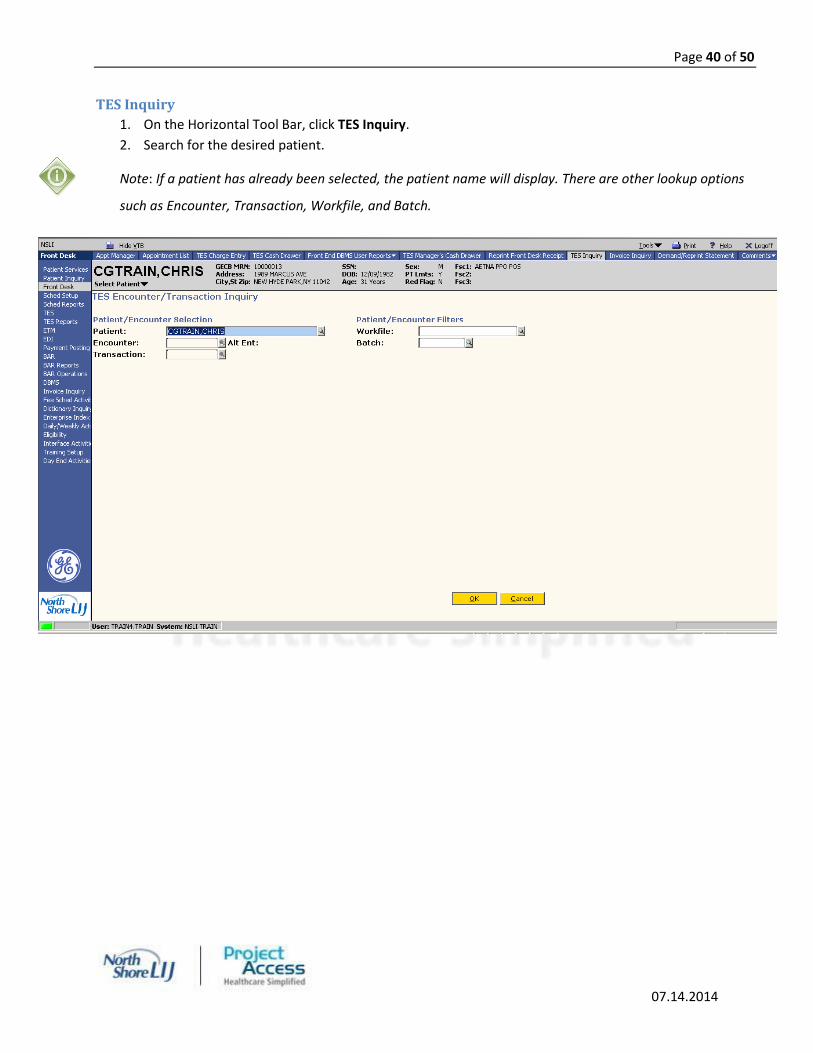
TES Inquiry
1. On the Horizontal Tool Bar, click TES Inquiry.
2. Search for the desired patient.
Note: If a patient has already been selected, the patient name will display. There are other lookup options
such as Encounter, Transaction, Workfile, and Batch.
Page 41 of 50
07.14.2014
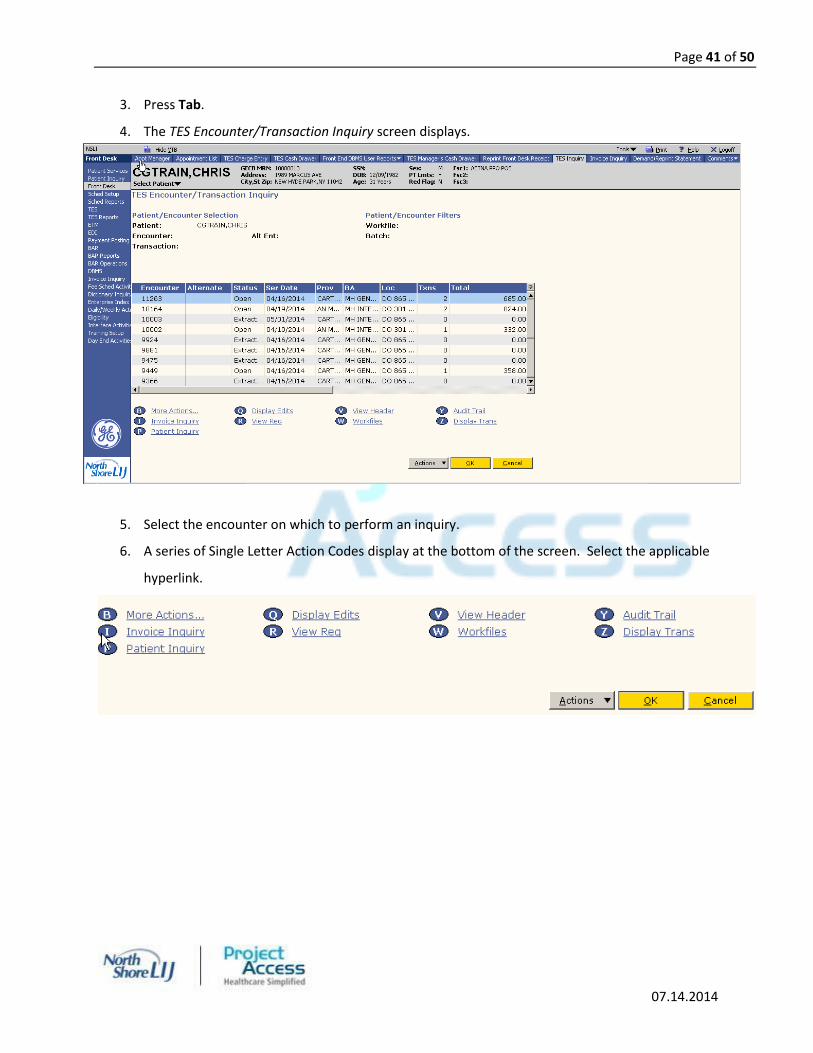
3. Press Tab.
4. The TES Encounter/Transaction Inquiry screen displays.
5. Select the encounter on which to perform an inquiry.
6. A series of Single Letter Action Codes display at the bottom of the screen. Select the applicable
hyperlink.

Page 42 of 50
07.14.2014
7. Once all inquiries are complete, click OK or Cancel until you see the screen that displays Activity
Complete.

Page 43 of 50
07.14.2014
Add Insurance(s) in GE Centricity Business 1. Select Patient Services on the Vertical Toolbar.
2. Search for and select your patient.
3. Click Visit List on the lower right hand side of the screen.
4. Select the appropriate visit.
5. Enter “IV” in the Action Code field and press TAB.

Page 44 of 50
07.14.2014
6. From the Visit Insurance screen click Add Plan.
7. In the FSC field type the desired plan.
8. Click Add FSC.
9. From the collection area on top mark the checkbox of the appropriate plan.
10. Click Add Plan.
11. Click OK.
Page 45 of 50
07.14.2014
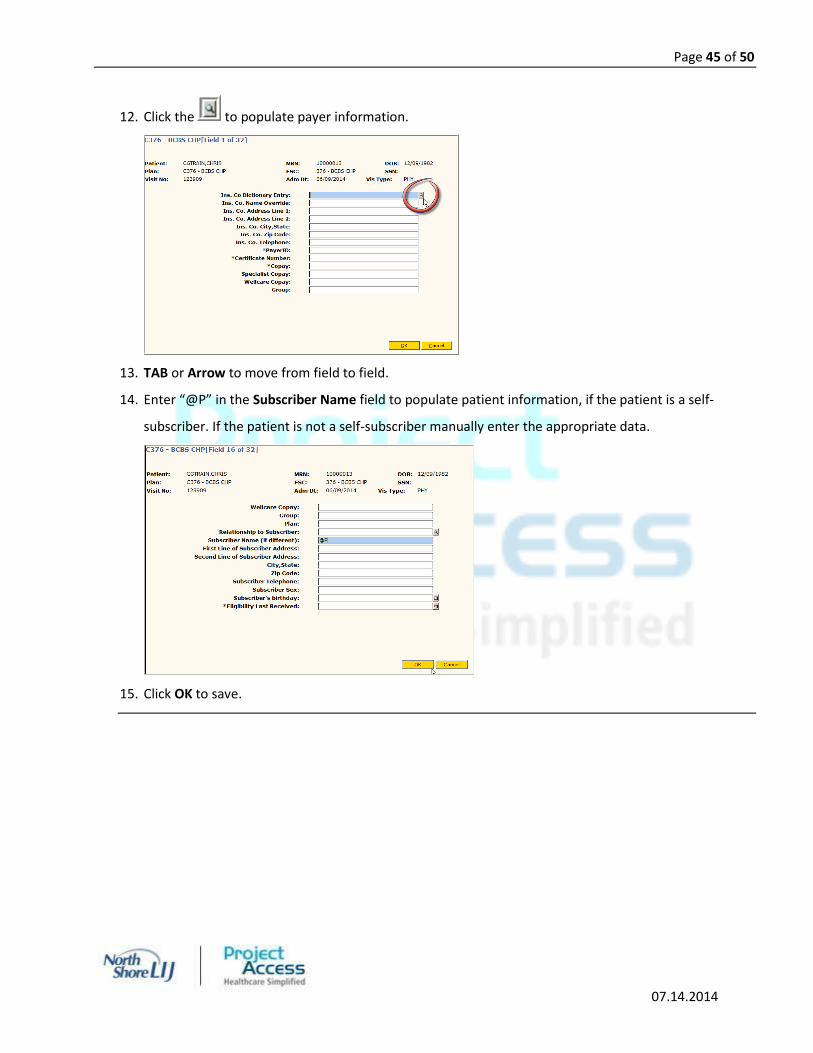
12. Click the to populate payer information.
13. TAB or Arrow to move from field to field.
14. Enter “@P” in the Subscriber Name field to populate patient information, if the patient is a self-
subscriber. If the patient is not a self-subscriber manually enter the appropriate data.
15. Click OK to save.

Page 46 of 50
07.14.2014
Update Insurance(s) in GECB 1. Select Patient Services on the Vertical Toolbar.
2. Search for and select your patient.
3. Click Visit List on the lower right hand side of the screen.
4. Select the appropriate visit.
5. Enter “IV” in the Action Code field and press TAB.

Page 47 of 50
07.14.2014
6. From the Visit Insurance screen select the desired plan then click Plan Detail > Follow-ups/Edit.
7. Make any necessary updates and click OK.

Page 48 of 50
07.14.2014
Initiating and Viewing Eligibility in GECB 1. Select Patient Services on the Vertical Toolbar
2. Search for and select your patient
3. Click Visit List on the lower right hand side of the screen
4. Select the appropriate Visit
Insurance Eligibility should only be run through GECB for Foreign Encounters. Foreign Encounters can be identified using the Alt Visit #. The prefix at the beginning of the Alt Visit # identifies where the visit interfaced from.

Page 49 of 50
07.14.2014
5. Enter “EQ” in the Action Code field and press TAB or click OK
6. Select the appropriate plans and click OK

Page 50 of 50
07.14.2014
7. To view the Eligibility Results from the Visit List enter “EL” and press TAB or click OK
8. From the Eligibility Request List screen, choose the appropriate action from the lower left hand side of the screen
Copyright © 2022 FDOKUMEN