Camper 785 / RV 785 / RV 700 Owner's manual
74
CAMPER 785 / RV 785 / RV 700 Owner’s manual
-
Upload
khangminh22 -
Category
Documents
-
view
0 -
download
0
Transcript of Camper 785 / RV 785 / RV 700 Owner's manual
CAMPER 785 / RV 785 / RV 700 Owner’s manual

© 2019 Garmin Ltd. or its subsidiariesAll rights reserved. Under the copyright laws, this manual may not be copied, in whole or in part, without the written consent of Garmin. Garmin reserves the right to change or improve its products and to make changes in the content of this manual without obligation to notify any person or organisation of such changes or improvements. Go to www.garmin.com for current updates and additional information concerning the use of this product.Garmin® and the Garmin logo are trademarks of Garmin Ltd. or its subsidiaries, registered in the USA and other countries. These trademarks may not be used without the express permission of Garmin.Garmin Drive™, Garmin Express™ and myTrends™ are trademarks of Garmin Ltd. or its subsidiaries. These trademarks may not be used without the express permission of Garmin.ACSI™ is a trademark of Auto Camper Service International Holding B.V. Android™ is a trademark of Google Inc. Apple®, iPhone® and Mac® are trademarks of Apple Inc, registered in the U.S. and other countries. The Bluetooth® word mark and logos are owned by the Bluetooth SIG, Inc., and any use of such word mark or logo by Garmin is under licence. Foursquare® is a trademark of Foursquare Labs, Inc. in the U.S. and in other countries. HISTORY® and the H logo are trademarks of A+E Networks and are protected in the United States and other countries around the globe. All Rights Reserved. Used with Permission. microSD® and the microSDHC logo are trademarks of SD-3C, LLC. PlanRV™ is the trademark of TruckDown Info International, Inc. TripAdvisor® is a registered trademark of TripAdvisor LLC. Wi‑Fi® is a registered mark of Wi-Fi Alliance Corporation. Windows® is a registered trademark of Microsoft Corporation in the United States and other countries.

Table of contentsGetting started................................. 1
Garmin® Overview.................................. 2Mounting and powering the Garmin device in your vehicle............................. 3Turning the device on or off................... 4Acquiring GPS signals............................ 4Home Screen...........................................5
Opening an App................................... 5Adding Shortcuts to the Home Screen.................................................. 5Viewing Notifications......................... 5Status bar icons.................................. 6
Using the Touchscreen...........................6Adjusting the screen brightness............ 6
Vehicle Profiles................................6Adding a vehicle profile.......................... 7Car Profile................................................7Switching the Vehicle Profile................. 7Editing a vehicle profile.......................... 7
Adding Propane Tanks....................... 8
Dash Cam........................................ 8Aligning the camera................................ 8Dash Cam Controls................................. 8
Dash Cam Recording.......................... 8Saving a Dash Cam Recording........... 9Turning audio recording on or off...... 9
Using the Dash Cam Gallery...................9Dash Cam Videos on Your Computer.................................................9Viewing Videos on Your Smartphone.. 10
Deleting a Video Using Your Smartphone....................................... 10Trimming and Exporting a Video..... 10
Replacing the Dash Cam Memory Card....................................................... 10
Formatting the Dash Cam Memory Card................................................... 11
Driver awareness features and alerts............................................. 11
Enabling or Disabling Driver Alerts...... 12Red light and speed cameras.............. 12Advanced Driver Assistance System.. 12
Forward collision warning system... 12Lane departure warning system...... 13
Warning and alert symbols.................. 14Restriction warnings......................... 15Road condition warnings..................15Alerts................................................. 16
Finding and saving locations.......... 16Finding a location using the search bar.......................................................... 17Finding an address............................... 17Location Search Results...................... 18
Changing the search area................ 19Location Search Results on the Map.................................................... 19Changing the Search Area Using the Map.................................................... 20
Points of Interest.................................. 20Finding a location by category......... 20Finding Campsites............................ 20Finding Motor Home services.......... 21Finding National Parks..................... 21Finding HISTORY points of interest...............................................21Foursquare........................................ 22TripAdvisor........................................ 22Navigating to points of interest within a venue.............................................. 23
Search tools.......................................... 23Finding a junction..............................23Finding a location using coordinates....................................... 23
Parking.................................................. 23Finding Parking Near Your Current Location............................................. 24Finding Parking Near a Specified Location............................................. 24Understanding Parking Colours and Symbols............................................. 24
Viewing history..................................... 24Clearing the list of recently found places................................................ 24
Viewing current location information.. 24Finding emergency services and fuel..................................................... 24Getting directions to your current location.............................................. 25
Adding a shortcut................................. 25
Table of contents i

Removing a shortcut.........................25Saving Locations.................................. 25
Saving a location...............................25Saving your current location............ 25Editing a Saved Location.................. 25Assigning Categories to a Saved Location............................................. 26Deleting a favourite location............ 26
Following a route............................26Routes................................................... 26Starting a route..................................... 26
Starting a route by using the map....27Going home....................................... 27
Your route on the map.......................... 28Active lane guidance........................ 28Viewing turns and directions........... 29Viewing the Entire Route on the Map.................................................... 29
Arriving at your destination.................. 29Parking Near Your Destination.........29
Changing Your Active Route................ 30Adding a location to your route........30Shaping your route............................ 30Taking a detour................................. 30Changing the route calculation mode.................................................. 30
Stopping the route................................ 31Using Suggested Routes...................... 31Avoiding Delays, Tolls and Areas........ 31
Avoiding traffic delays on your route...................................................31Avoiding toll roads............................ 31Avoiding toll stickers........................ 31Avoiding road features..................... 32Avoiding environmental zones.........32Custom Avoidances......................... 32
Navigating off road............................... 33
Using the Map................................ 33Map Tools............................................. 33
Viewing a map tool........................... 34Up ahead............................................... 34
Viewing upcoming locations............ 34Customising the up ahead categories..........................................34
Towns Ahead........................................ 34
Viewing Upcoming Towns and Exit Services............................................. 34
Trip information.................................... 35Viewing Customised Trip Information on the Map........................................ 35Viewing the trip information page... 35Viewing the trip log........................... 35Resetting trip information................ 35
Viewing upcoming traffic..................... 36Viewing traffic on the map............... 36Searching for traffic incidents......... 36
Customising the map........................... 36Customising the map layers............ 36Changing the map data field............ 36Changing the map perspective........ 36
Live services, traffic and smartphone features......................................... 37
Pairing with Your Smartphone............. 37Enabling or Disabling Bluetooth Features.............................................37Pairing Additional Bluetooth Devices.............................................. 38
Smart Notifications.............................. 38Receiving notifications..................... 38Viewing the list of notifications....... 39
Hands-free calling.................................39Placing a call..................................... 39Receiving a call................................. 39Using in-call options......................... 40Saving a Phone Number as a Preset................................................ 40
Disconnecting a Bluetooth device....... 40Deleting a paired Bluetooth device...... 40
Traffic............................................ 41Receiving traffic data using your smartphone........................................... 41Receiving traffic data using a traffic receiver.................................................. 41Enabling traffic......................................41
Voice Command.............................42Setting the wake-up phrase................. 42Activating voice command.................. 42Voice Command tips............................ 42
ii Table of contents

Starting a route using voice command.............................................. 43Muting Instructions.............................. 43
Using the apps............................... 43Viewing the Owner's Manual on Your Device........................................... 43Viewing the Weather Forecast............. 43
Viewing weather near a different town................................................... 44Viewing the weather radar............... 44Viewing weather alerts..................... 44Checking road conditions................ 44
Logging service history........................ 44Adding service categories................ 44Deleting service categories.............. 45Renaming service categories........... 45Deleting service records................... 45Editing a service record.................... 45
Trip planner........................................... 45Planning a trip................................... 45Editing and reordering locations in a trip...................................................... 46Discovering Attractions Along Your Trip..................................................... 46Changing routing options for a trip...................................................... 46Navigating to a favourite trip........... 46Editing and saving your active route...................................................46
photoLive traffic cameras.................... 47Viewing and Saving photoLive Traffic Cameras............................................ 47Viewing photoLive Traffic Cameras on the Map..............................................47Saving a traffic camera.................... 47
Viewing Previous Routes and Destinations.......................................... 47
Settings......................................... 48Navigation settings...............................48
Map and vehicle settings................. 48Route Preference Settings............... 48Driver Assistance Settings............... 49Traffic Settings................................. 49
Dash Cam Settings............................... 49Enabling Bluetooth wireless technology.............................................49
Connecting to a Wireless Network...... 49Display settings.................................... 50Sound and Notification Settings.......... 50
Adjusting Sound and Notification Volume.............................................. 50
Enabling or Disabling Location Services................................................. 50Setting the Text Language................... 50Date and time settings......................... 50Device settings..................................... 51Restoring settings.................................51Resetting Data and Settings................ 51
Device information......................... 51Viewing E-label Regulatory and Compliance Information...................... 51Specifications....................................... 52Charging the Device............................. 52
Device maintenance....................... 52Garmin Support Centre.........................52Map and Software Updates................. 52
Updating Maps and Software Using a Wi‑Fi Network.................................... 53Updating Maps and Software with Garmin Express................................. 54
Device Care........................................... 55Cleaning the camera lens................. 55Cleaning the outer casing.................55Cleaning the Touchscreen............... 55Avoiding theft.................................... 55
Restarting the Device........................... 56Removing the Device, Mount and Suction Cup........................................... 56
Removing the Mount from the Suction Cup..................................................... 56Removing the Suction Cup from the Windscreen....................................... 56
Appendix........................................56Backup Cameras.................................. 56
Connecting a Wired Backup Camera.............................................. 56Pairing a BC™ 35 Backup Camera with a Garmin Navigation Device............. 57Viewing the Backup Camera............ 57
Connecting to a Wireless Display........ 57Data management................................ 58
Table of contents iii

About memory cards........................ 58Installing a memory card for maps and data.............................................58Connecting the Device to Your Computer........................................... 58Transferring data from your computer........................................... 58
Power cables........................................ 59Charging the Device.......................... 59Changing the Fuse in the Vehicle Power Cable...................................... 59
Installing the Motorhome Charging Station Accessory.................................60Removing the Device, Mount and Suction Cup........................................... 61
Removing the Device from the Mount................................................ 61Removing the Mount from the Suction Cup..................................................... 61Removing the Suction Cup from the Windscreen....................................... 61
Purchasing additional maps................ 61Purchasing accessories....................... 61
Troubleshooting.............................61The suction cup will not stay on my windscreen............................................ 61The mount does not hold my device in place while I drive................................. 62My device is not acquiring satellite signals................................................... 62The device does not charge in my vehicle................................................... 62My battery does not stay charged for very long................................................ 62My video recordings are blurry............ 62My memory card has degraded and needs to be replaced............................ 63My video recordings are choppy or incomplete............................................ 63My device does not connect to my phone..................................................... 63Some smartphone features do not work....................................................... 64
Index..............................................65
iv Table of contents

Getting started WARNING
See the Important Safety and Product Information guide in the product box for product warnings and other important information.
• Install the camera memory card (Replacing the Dash Cam Memory Card, page 10).• Update the maps and software on your device (Map and Software Updates, page 52).• Mount the device in your vehicle and connect it to power (Mounting and powering the Garmin device in your
vehicle, page 3).• Align the dash camera (Aligning the camera, page 8).• Acquire GPS signals (Acquiring GPS signals, page 4).• Adjust the volume (Garmin® Overview, page 2) and display brightness (Adjusting the screen brightness,
page 6).• Set up a vehicle profile for your camper (Adding a vehicle profile, page 7).• Navigate to your destination (Starting a route, page 26).
Getting started 1

Garmin® Overview
Microphone for hands-free calling
Microphone for dash camera recording
Volume control
Camera
power key
Micro USB power and data port
Map and data memory card slot
3.5mm audio jack
Magnetic mount interface with 14 pin connector
Speaker
2 Getting started

Dash cam memory card below access panel (Replacing the Dash Cam Memory Card, page 10)
Mounting and powering the Garmin device in your vehicle WARNING
This product contains a lithium-ion battery. To prevent the possibility of personal injury or product damage caused by battery exposure to extreme heat, store the device out of direct sunlight.Both the device and its mount contain magnets. Under certain circumstances, magnets may cause interference with some internal medical devices, including pacemakers and insulin pumps. Keep the device and its mount away from such medical devices.
NOTICEBoth the device and its mount contain magnets. Under certain circumstances, magnets may cause damage to some electronic devices, including hard drives in laptop computers. Use caution when the device or its mount is near electronic devices.
Before you use your device on battery power, you should charge it.1 Plug the vehicle power cable into the mini-USB port on the mount.
2 Press the mount onto the suction cup until it snaps into place.NOTE: the mount and suction cup may already be assembled in the package.The Garmin logo on the mount should face right-side up. It is easiest to connect the mount and suction cup when the hinged arm on the suction cup is closed. The mount and suction cup fit tightly, and you may need to press hard to connect them.
3 Press the suction cup to the windscreen, and flip the lever back toward the windscreen.4 Place the back of the device onto the magnetic mount.5 Select an option:
• If your power cable has a vehicle power plug, plug it into a power outlet in your vehicle.• If your power cable has bare wire connectors, follow the wiring diagram included with your cable to
connect the cable to vehicle power.
Getting started 3
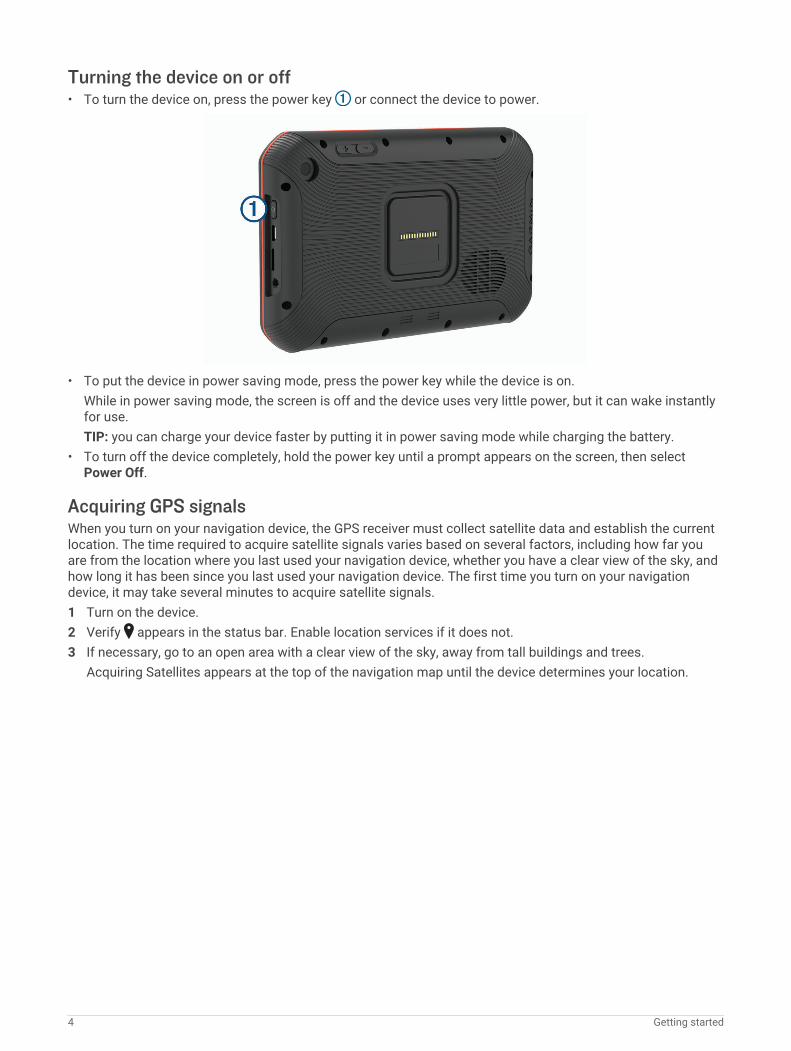
Turning the device on or off• To turn the device on, press the power key or connect the device to power.
• To put the device in power saving mode, press the power key while the device is on.While in power saving mode, the screen is off and the device uses very little power, but it can wake instantly for use.TIP: you can charge your device faster by putting it in power saving mode while charging the battery.
• To turn off the device completely, hold the power key until a prompt appears on the screen, then select Power Off.
Acquiring GPS signalsWhen you turn on your navigation device, the GPS receiver must collect satellite data and establish the current location. The time required to acquire satellite signals varies based on several factors, including how far you are from the location where you last used your navigation device, whether you have a clear view of the sky, and how long it has been since you last used your navigation device. The first time you turn on your navigation device, it may take several minutes to acquire satellite signals.1 Turn on the device.2 Verify appears in the status bar. Enable location services if it does not.3 If necessary, go to an open area with a clear view of the sky, away from tall buildings and trees.
Acquiring Satellites appears at the top of the navigation map until the device determines your location.
4 Getting started

Home ScreenNOTE: the home screen layout may vary if it has been customised.
Swipe down to view notifications.Swipe down twice to quickly change settings and backlight brightness.
Hold to customise the wallpaper or add widgets to the home screen.
Select to open the app drawer. The app drawer contains shortcuts to all the apps installed on your device.
Opening an AppThe home screen contains shortcuts for frequently used apps. The app drawer contains all the apps installed on your device, organised into two tabs. The Navigation tab contains Garmin apps which are useful for navigation, dispatching and hours of service recording. The Tools tab contains apps useful for communication and other tasks.
Select an option to open an app:• Select an app shortcut from the home screen.• Select , select a tab and select an app.
Adding Shortcuts to the Home Screen1 Select .2 Select an app tab to view additional applications.3 Hold an application, and drag it to a location on the home screen.
Viewing Notifications1 Swipe down from the top of the screen.
The list of notifications appears.2 Select an option:
• To launch the action or app mentioned in the notification, select the notification.• To dismiss a notification, swipe the notification to the right.
Getting started 5

Status bar iconsThe status bar is located at the top of the main menu. The status bar icons display information about features on the device.
Location services is enabled.
Bluetooth® technology is enabled.
Connected to a Bluetooth device.
Connected to a Wi‑Fi® network (Connecting to a Wireless Network, page 49).
Active vehicle profile. Swipe down twice and select to view the vehicle profile settings.
Battery charge level.
Using the Touchscreen• Tap the screen to select an item.• Drag or swipe your finger across the screen to pan or scroll.• Pinch two fingers together to zoom out.• Spread two fingers apart to zoom in.
Adjusting the screen brightnessThe device uses an ambient light sensor to automatically adjust the screen brightness to your vehicle conditions. You can also adjust the brightness manually using either the notification panel or the settings menu.1 Select an option:
• Swipe down twice from the top of the screen to expand the quick settings in the notification panel.• Select Settings > Display > Brightness Level.
2 Use the slider bar to adjust the brightness.
Vehicle Profiles WARNING
Entering your vehicle profile characteristics does not guarantee that your vehicle's characteristics will be accounted for in all route suggestions or that you will receive the warning icons in all cases. Limitations may exist in the map data such that your device cannot account for these restrictions or road conditions in all cases. Always defer to all posted road signs and road conditions when making driving decisions.
Routing and navigation are calculated differently based on your vehicle profile. The activated vehicle profile is indicated by an icon in the status bar. The navigation and map settings on your device can be customised separately for each vehicle type.When you activate a camper vehicle profile, the device avoids including restricted or impassable areas in routes based on the dimensions, weight and other characteristics you entered for your vehicle.
6 Vehicle Profiles

Adding a vehicle profileYou should add a vehicle profile for each camper to be used with your device.1 Select Vehicle.2 Select your vehicle type:
• To add a motorhome with a permanently attached camper, select Motorhome.• To add a motorhome pulling a trailer, select Motorhome with Trailer.• To add a camper pulled behind a passenger vehicle, select Vehicle with Trailer.
3 If necessary, select your trailer type:• To add a camper pulled using a standard hitch, select Caravan.• To add a camper pulled using a fifth-wheel hitch, select Fifth Wheel.
NOTE: this trailer type is not available in all areas.• To add a boat trailer pulled using a standard hitch, select Boat Trailer.• To add a trailer pulled using a standard hitch, select Caravan.
4 Follow the on-screen instructions to enter the vehicle characteristics.After you add a vehicle profile, you can edit the profile to enter additional detailed information (Editing a vehicle profile, page 7).
Car ProfileThe car profile is a preloaded vehicle profile intended for use in an automobile without a trailer. While using the car profile, the device calculates standard automobile routes, and routing for large vehicles is not available. Some features and settings specific to large vehicles are not available while using the car profile.
Switching the Vehicle ProfileYou can manually switch to another vehicle profile at any time.1 Select an option:
• Select Vehicle.• Swipe down twice from the top of the screen and select the vehicle profile icon, such as or .
2 Select a vehicle profile.The vehicle profile information appears, including measurements and weight.
3 Select Select.
Editing a vehicle profileYou can change basic vehicle profile information or add detailed information to a vehicle profile, such as maximum speed.1 Select Vehicle.2 Select the vehicle profile to edit.3 Select an option:
• To edit the vehicle profile information, select , and select a field to edit.• To rename a vehicle profile, select > > Rename Profile.• To delete the vehicle profile, select > > Delete.
Vehicle Profiles 7

Adding Propane TanksNOTE: this feature is not available on all product models.When you add your propane tanks to your vehicle profile, the device avoids routing through areas with propane tank restrictions that may affect your route. The device also alerts you when you approach areas that require you to shut off your propane tanks.1 From the vehicle profile, select > Propane Tanks > Add Tank.2 Enter the weight of the propane tank and select Save.
Dash CamAligning the camera
WARNINGDo not attempt to align the camera whilst driving.
You should align the dash camera each time you mount or reposition the device.1 Select Dash Cam.2 Tilt the device to align the camera.
The crosshairs should point straight ahead, and the horizon line should be centred between the top and bottom of the screen.TIP: if the suction cup appears in the dash cam field of view, you should move the hinged arm toward the suction cup.
Dash Cam ControlsNOTICE
Some jurisdictions regulate or prohibit use of this device. It is your responsibility to know and comply with applicable laws and rights to privacy in jurisdictions where you plan to use this device.
You can control the dash cam using either the dash cam app or the notification panel.Select > Dash Cam, or swipe down from the top of the screen.
Select to save a dash cam recording.
Select to stop dash cam recording.
Select to start dash cam recording.
Select to enable audio recording.
Select to disable audio recording.
Dash Cam Recording• While the dash cam is recording, it records continuously, overwriting the oldest, non-saved video.• You can start and stop dash cam recording using the dash cam controls (Dash Cam Controls, page 8).• If you enable the Auto Record option (Dash Cam Settings, page 49), the dash cam starts recording
automatically when the device receives power through the powered mount. This is most useful when the mount is connected to an ignition-switched power source.
• When the device is removed from the mount or the mount loses power, the dash cam stops recording automatically after a 15-second delay.
8 Dash Cam

Saving a Dash Cam RecordingYou can save a portion of the recorded video to prevent it from being overwritten by new video.1 While the dash cam is recording, select > Dash Cam > .
The device saves the video footage before, during, and after you select .2 Select again to extend the saved recording time (optional).
A message indicates the amount of video footage to be saved.The memory card has limited storage. After you save a video recording, you should transfer the recording to your computer or other external storage location for permanent storage (Dash Cam Videos on Your Computer, page 9).
Turning audio recording on or offNOTICE
Some jurisdictions may regulate or prohibit recording audio with this device. It is your responsibility to know and comply with applicable laws and rights to privacy in jurisdictions where you plan to use this device.
The device can record audio using the integrated microphone whilst recording video. You can turn audio recording on or off at any time.1 Select > Dash Cam.2 Select or .
Using the Dash Cam GalleryYou can use the dash cam gallery to view recorded dash cam video, delete unneeded videos, and save a clip from the unsaved video footage.NOTE: the device stops recording video while you view videos.1 Select > Dash Cam Gallery > OK.2 Select a saved video, or select Unsaved.
The video starts playing automatically.3 Select an option:
• To save a clip of unsaved video footage, use the slider to select the video segment to save, and select .The device saves the segment of video between the orange pointers on the slider.
• To delete a video, select .
Dash Cam Videos on Your ComputerVideos are stored in MP4 format in the DCIM folder on the camera memory card. You can view and transfer videos by connecting the memory card or the device to your computer (Connecting the Device to Your Computer, page 58).The videos are sorted into several folders.100EVENT: contains videos saved automatically when the device detected an incident.101SAVED: contains videos saved manually by the user.104UNSVD: contains unsaved video footage. The device overwrites the oldest unsaved video when the storage
space for unsaved video is full.
Dash Cam 9
Viewing Videos on Your SmartphoneBefore you can view videos on your smartphone, you must pair your Garmin device with the Garmin Drive™ app (Pairing with Your Smartphone, page 37).NOTE: the device stops recording and alerts are disabled while viewing videos.1 From the Garmin Drive app on your smartphone, select Review Footage.2 Select an option:
• To view a video you saved, select a file from the Saved Footage category.• To view recent video footage that has not been saved, select a video from the Temporary Footage
category.
Deleting a Video Using Your Smartphone1 When you are viewing the list of saved videos on your smartphone, select Select.2 Select one or more files.3 Select .
Trimming and Exporting a VideoYou can trim the length of your video to remove unnecessary footage before exporting it.1 From the Garmin Drive app, select Review Footage.2 Select a video.3 Drag the handles on the video progress bar left or right to trim the video length.4 Select Export.
NOTE: you must keep the app in the foreground when exporting a video.The app exports the trimmed video to your smartphone.
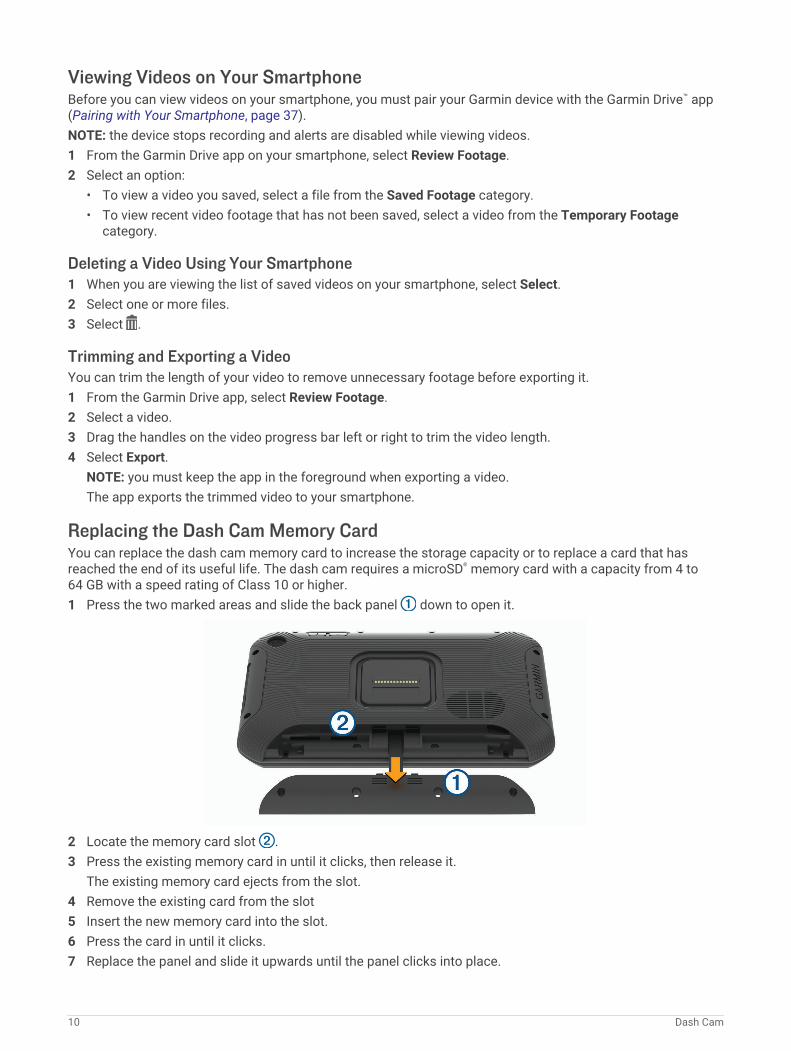
Replacing the Dash Cam Memory CardYou can replace the dash cam memory card to increase the storage capacity or to replace a card that has reached the end of its useful life. The dash cam requires a microSD® memory card with a capacity from 4 to 64 GB with a speed rating of Class 10 or higher.1 Press the two marked areas and slide the back panel down to open it.
2 Locate the memory card slot .3 Press the existing memory card in until it clicks, then release it.
The existing memory card ejects from the slot.4 Remove the existing card from the slot5 Insert the new memory card into the slot.6 Press the card in until it clicks.7 Replace the panel and slide it upwards until the panel clicks into place.
10 Dash Cam

Formatting the Dash Cam Memory CardThe dash cam requires a memory card formatted using the FAT32 file system. You can use the device to format your card using this file system.You should format your memory card at least once every 6 months to help extend the useful life of the memory card. You must also format a brand new memory card if it is not formatted using the FAT32 file system.NOTE: formatting the memory card deletes all data on the card.1 Select > Navigation > Dash Cam Gallery.2 Select > Format memory card.
Driver awareness features and alerts CAUTION
The driver alerts and speed limit features are for information only. They do not replace your responsibility to abide by all posted speed limit signs and to use safe driving judgement at all times. Garmin is not responsible for any traffic fines or citations that you receive for failing to follow all applicable traffic laws and signs.
Your device provides features that can help encourage safer driving and increase efficiency, even when you are driving in a familiar area. The device plays an audible tone or message and displays information for each alert. You can enable or disable the audible tone for some types of driver alerts. Not all alerts are available in all areas.Schools: the device plays a tone and displays the speed limit (if available) for an upcoming school or school
zone.Speed limit exceeded: the device plays a tone and displays a red border on the speed limit icon when you
exceed the posted speed limit for the current road.Speed limit change: the device plays a tone and displays the upcoming speed limit so you can be prepared to
adjust your speed.Level crossing: the device plays a tone to indicate an upcoming level crossing.Animal crossing: the device plays a tone to indicate an upcoming animal crossing area.Bends: the device plays a tone to indicate a curve in the road.Slower traffic: the device plays a tone to indicate slower traffic when you approach slower traffic at a higher
speed. Your device must be receiving traffic information to use this feature (Traffic, page 41).Risk of grounding: the device plays a tone and displays a message when you approach a road where your
vehicle could become grounded.Lateral wind: the device plays a tone and displays a message when you approach a road where there is risk of
lateral wind.Narrow road: the device plays a tone and displays a message when you approach a road that may be too
narrow for your vehicle.Steep hill: the device plays a tone and displays a message when you approach a steep hill.County and country borders: the device plays a tone and displays a message when you approach the border of
a county or country.Shut off propane: the device plays a tone and displays a message when you approach an area where propane
should be turned off.Forward collision warning: the device alerts you when it detects that you are not maintaining a safe distance
between your vehicle and the vehicle in front of you (Forward collision warning system, page 12).Lane departure warning: the device alerts you when it detects you may be crossing a lane boundary
unintentionally (Lane departure warning system, page 13).
Driver awareness features and alerts 11

Enabling or Disabling Driver AlertsYou can enable or disable several types of driver alerts.1 Select Settings > Navigation > Driver Assistance > Driver Alerts.2 Select or clear the tick box next to each alert.
Red light and speed camerasNOTICE
Garmin is not responsible for the accuracy of or the consequences of using a red light or speed camera database.
NOTE: this feature is not available for all regions or product models.Information about red light and speed camera locations is available in some areas for some product models. The device alerts you when you approach a reported speed or red light camera.• In some areas, your device can receive live red light and speed camera data while connected to a
smartphone running the Garmin Drive app.• You can use the Garmin Express™ software (garmin.com/express) to update the camera database stored on
your device. You should update your device frequently to receive the most up-to-date camera information.
Advanced Driver Assistance SystemYour device includes an advanced driver assistance system (ADAS), which uses the integrated dash camera to provide warnings and alerts about your driving environment.You can enable or disable each of the advanced driver assistance features in the Driver Assistance settings (Driver Assistance Settings, page 49).
Forward collision warning system WARNING
The forward collision warning system (FCWS) feature is for information only and does not replace your responsibility to observe all road and driving conditions, abide by all traffic regulations, and use safe driving judgement at all times. The FCWS relies on the camera to provide a warning of upcoming vehicles and, as a result, may have limited functionality in low visibility conditions. For more information, go to garmin.com/warnings.
NOTE: this feature is not available in all areas or for all product models.The FCWS feature alerts you when the device detects that you are not maintaining a safe distance between your vehicle and the vehicle in front of you. The device determines your vehicle speed using GPS, and it calculates an estimated safe following distance based on your speed. The FCWS activates automatically when your vehicle speed exceeds 48 km/hr (30 mph).When the device detects that you are too close to the vehicle ahead of you, the device plays an audible alert, and a warning appears on the screen.
12 Driver awareness features and alerts
Forward collision warning system performance tipsSeveral factors affect the performance of the forward collision warning system (FCWS). Some conditions may prevent the FCWS feature from detecting a vehicle ahead of you.• The FCWS feature activates only when your vehicle speed exceeds 50 km/h (30 mph).• The FCWS feature may not detect a vehicle ahead of you when the camera's view of the vehicle is obscured
by rain, fog, snow, sun or headlight glare, or darkness.• The FCWS feature may not function properly if the camera is incorrectly aligned (Aligning the camera,
page 8).• The FCWS feature may not detect vehicles greater than 40 m (130 ft.) away or closer than 5 m (16 ft.).• The FCWS feature may not function properly if the camera placement settings do not correctly indicate your
vehicle height or the placement of your device in the vehicle (Aligning the camera, page 8).
Lane departure warning system WARNING
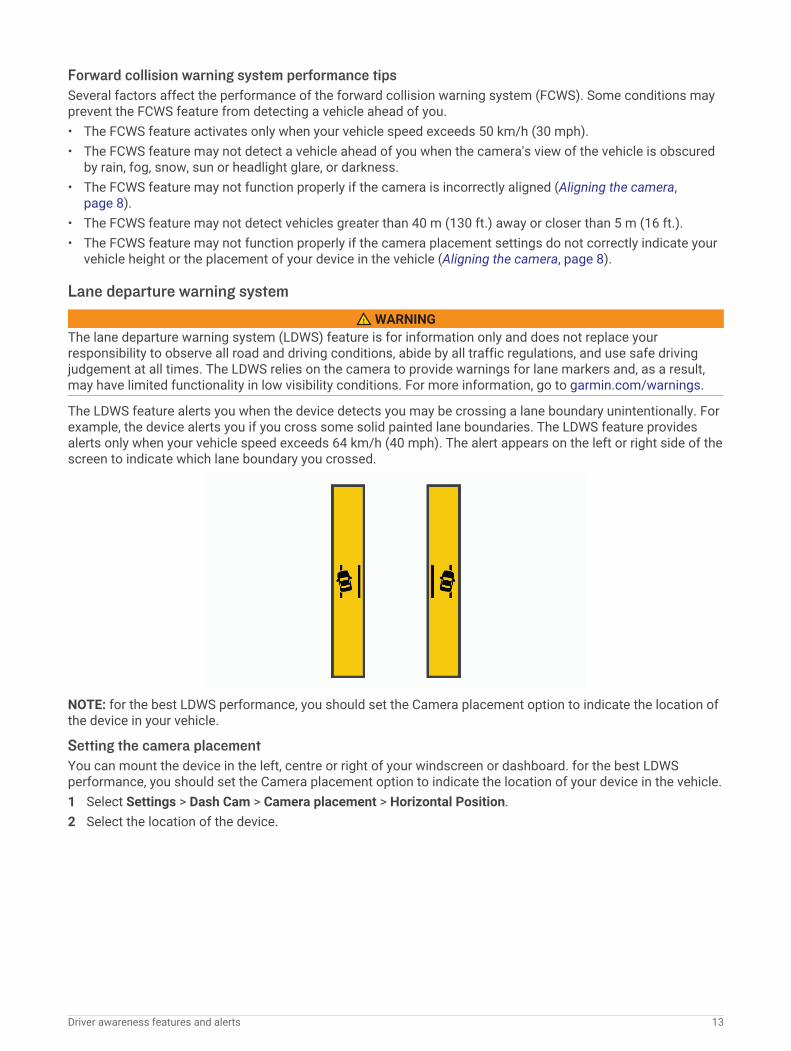
The lane departure warning system (LDWS) feature is for information only and does not replace your responsibility to observe all road and driving conditions, abide by all traffic regulations, and use safe driving judgement at all times. The LDWS relies on the camera to provide warnings for lane markers and, as a result, may have limited functionality in low visibility conditions. For more information, go to garmin.com/warnings.
The LDWS feature alerts you when the device detects you may be crossing a lane boundary unintentionally. For example, the device alerts you if you cross some solid painted lane boundaries. The LDWS feature provides alerts only when your vehicle speed exceeds 64 km/h (40 mph). The alert appears on the left or right side of the screen to indicate which lane boundary you crossed.
NOTE: for the best LDWS performance, you should set the Camera placement option to indicate the location of the device in your vehicle.
Setting the camera placementYou can mount the device in the left, centre or right of your windscreen or dashboard. for the best LDWS performance, you should set the Camera placement option to indicate the location of your device in the vehicle.1 Select Settings > Dash Cam > Camera placement > Horizontal Position.2 Select the location of the device.
Driver awareness features and alerts 13

Lane departure warning performance tipsSeveral factors affect the performance of the lane departure warning system (LDWS). Some conditions may prevent the LDWS feature from detecting lane departures.• The LDWS feature provides alerts only when your vehicle speed exceeds 65 km/h (40 mph).• The LDWS feature may not function properly if the camera is incorrectly aligned.• The LDWS feature may not function properly if the camera placement settings do not correctly indicate your
vehicle height or the placement of your device in the vehicle (Aligning the camera, page 8).• The LDWS feature requires a clear, continuous view of the lane divider lines.
◦ Lane departures may not be detected when divider lines are obscured by rain, fog, snow, extreme shadows, sun or headlight glare, road construction, or any other visual obstruction.
◦ Lane departures may not be detected if lane divider lines are misaligned, missing or heavily worn.• The LDWS feature may not detect lane departures on extremely wide, narrow or winding roads.
Warning and alert symbols WARNING
Entering your vehicle profile characteristics does not guarantee that your vehicle's characteristics will be accounted for in all route suggestions or that you will receive the warning icons in all cases. Limitations may exist in the map data such that your device cannot account for these restrictions or road conditions in all cases. Always defer to all posted road signs and road conditions when making driving decisions.
Warning and alert symbols may appear on the map or in route directions to alert you to potential hazards and road conditions.
14 Driver awareness features and alerts

Restriction warnings
Height
Weight
Length
Width
Trailer height
Trailer weight
Trailer length
Trailer width
No boat trailers allowed
No campers allowed
No trailers allowed
No propane
No left turn
No right turn
No U-turn
Road condition warnings
Risk of grounding
Lateral wind
Narrow road
Sharp curve
Steep down hill
Tree overhang
Driver awareness features and alerts 15

Alerts
Weighbridge
Road not verified for motorhomes
Finding and saving locationsThe maps loaded in your device contain locations, such as restaurants, hotels, vehicle services, and detailed street information. The Where To? menu helps you find your destination by providing several methods to browse, search, and save this information.From the main menu, select Where To?.• To quickly search all locations on your device, select Enter Search (Finding a location using the search bar,
page 17).• To find an address, select Address (Finding an address, page 17).• To browse or search pre-loaded points of interest by category, select Categories (Finding a location by
category, page 20).• To search near a different town or area, select next to the current search area (Changing the search area,
page 19).• To view and edit your saved locations, select Favourites (Saving Locations, page 25).• To view locations you have recently selected from the search results, select History (Viewing history,
page 24).• To search for motorhome parks and campsites, select All Campsites(Finding Campsites, page 20).• To browse, search and check in to Foursquare® points of interest, select Foursquare (Searching Foursquare
points of interest, page 22).• To browse and search TripAdvisor® points of interest and reviews, select TripAdvisor (TripAdvisor,
page 22).• To browse and search HISTORY® points of interest, photos and information, select History® (Finding
HISTORY points of interest, page 21).• To find national parks and explore park maps, select National Parks (Finding National Parks, page 21).• To navigate to specific geographic coordinates, select Coordinates (Finding a location using coordinates,
page 23).
16 Finding and saving locations

Finding a location using the search barYou can use the search bar to search for locations by entering a category, brand name, address or town name.1 Select Where To?.2 Select Enter Search in the search bar.3 Enter all or part of the search term.
Suggested search terms appear below the search bar.4 Select an option:
• To search for a type of business, enter a category name (for example, "cinemas").• To search for a business name, enter all or part of the name.• To search for an address near you, enter the house number and street name.• To search for an address in another town, enter the house number, street name, town and county.• To search for a town, enter the town and county.• To search for coordinates, enter latitude and longitude coordinates.
5 Select an option:• To search using a suggested search term, select the term.• To search using the text you entered, select .
6 If necessary, select a location.
Finding an addressNOTE: the order of the steps may change depending on the map data loaded on your device.1 Select Where To?.2 If necessary, select to search near a different town or area.3 Select Address.4 Follow the on-screen instructions to enter address information.5 Select the address.
Finding and saving locations 17

Location Search ResultsBy default, the location search results appear in a list, with the nearest location at the top. You can scroll down to view more results.
Select a location to view the option menu.
Select to view detailed information about the selected location.
Select to find parking areas near the location.
Select to view alternate routes to the locations.
Go! Select to start navigating to the location using the recommended route.
Select to view the search results on the map.
18 Finding and saving locations

Changing the search areaBy default, the device searches for locations near your current location. You can also search other areas, such as near your destination, near another city, or along your active route.1 Select Where To?.2 Select next to the current search area .
3 Select a search area.4 If necessary, follow the on-screen instructions to select a specific location.The selected search area appears next to . When you search for a location using any of the options in the Where To? menu, the device suggests locations near this area first.
Location Search Results on the MapYou can view the results of a location search on the map instead of in a list.From the location search results, select . The nearest location appears at the centre of the map, and basic information about the selected location appears at the bottom of the map.
Drag the map to view additional search results.
Additional search results. Select to view another location.
Selected location summary. Select to view detailed information about the selected location.
Go! Select to start navigating to the location using the recommended route.
Select to view the search results in a list.
Finding and saving locations 19
Changing the Search Area Using the Map1 Select View Map.2 Select anywhere on the map.3 Drag the map to the new search area.4 Select Search Here.
Points of InterestA point of interest is a place that you may find useful or interesting. Points of interest are organised by category and can include popular travel destinations such as petrol stations, restaurants, hotels, and entertainment venues.
Finding a location by category1 Select Where To?.2 Select a category or select Categories.3 If necessary, select a subcategory.4 Select a location.
Searching within a categoryAfter you have performed a search for a point of interest, certain categories may display a Quick Search list that displays the last four destinations you selected.1 Select Where To? > Categories.2 Select a category.3 Select an option:
• Select a destination from the quick search list on the right side of the screen.The quick search list provides a list of recently found locations in the selected category.
• Select a subcategory, if necessary, and select a destination.
Finding CampsitesSelect Where To? > All Campsites.
Finding Campsites with AmenitiesYou can search for motorhome parks and campsites based on the amenities available.1 Select Where To?.2 Select a motorhome parks and campsites search provider, such as PlanRV™ Parks, The Caravan and
Motorhome Club, or ACSI™.NOTE: all search providers are not available on all product models.
3 If necessary, select Filter by Amenities, select one or more amenities and select Save.4 Select a location.
Finding iOverlander™ points of interestNOTICE
You are responsible for understanding and complying with any applicable regulations associated with campsites and points of interest.
Your device includes iOverlander points of interest, which allow you to find points of interest useful for overlanding, such as campsites, repair services and accommodation.1 Select Where To? > iOverlander.2 Select a category.3 Select a location.
20 Finding and saving locations

Finding Ultimate Campgrounds points of interestNOTE: this feature is not available in all areas.Your device includes Ultimate Campgrounds points of interest, which allow you to find public campsites near your location.1 Select Where To? > Ultimate Public Campgrounds.2 If necessary, select Search Filters, select one or more search filters and select Search.3 Select a location.
Finding Motor Home servicesNOTE: this feature is not available in all areas.You can find nearby locations that offer repair, towing and other services for Motor Homes.
Select Where To? > PlanRV™ Services.
Finding National ParksDevice models that include maps for North America or the United States also include detailed information for national parks in the United States. You can navigate to a national park or to a location within a national park.1 Select Where To? > National Parks.
A list of national parks appears, with the nearest park at the top.2 Select Enter Search, and enter all or part of the park name to narrow the results (optional).3 Select a national park.
A list of categories for locations of features and amenities within the park appears below the park name.4 Select an option:
• To start navigating to the park, select Go!.• To view more park information or explore the park features and amenities, select .• To quickly find a location within the park, select a category from the list below the park name and select a
location.
Exploring National Park Features and AmenitiesOn North American product models, you can explore detailed information about the features and amenities available inside a national park and navigate to specific locations in the park. For example, you can find campgrounds, landmarks, visitor centres and popular attractions.1 From the location search results, select a national park and select .2 Select Explore this Park.
A list of categories for park features and amenities appears.3 Select a category.4 Select a location and select Go!.
Finding HISTORY points of interestNOTE: this feature is not available on all product models or for all map regions.Your device includes HISTORY points of interest, which allow you to find and learn about historically significant locations and attractions, such as historic buildings, monuments, museums and notable locations of historic events.1 Select Where To? > History®.2 Select a category.3 Select a location.4 Select to view a photo and a short summary of the location's history.
Finding and saving locations 21

FoursquareFoursquare is a location-based social network. Your device includes millions of pre-loaded Foursquare points of interest, which are indicated by the Foursquare logo in your location search results.You can connect to your Foursquare account using the Garmin Drive app on your compatible smartphone. This allows you to view Foursquare location details, check in to a location and search for points of interest in the online Foursquare database.
Connecting to your Foursquare accountBefore you can use this feature, your device must be connected to a supported phone running the Garmin Drive app (Live services, traffic and smartphone features, page 37).1 On your smartphone, open the Garmin Drive app.2 Select > Foursquare > Login.3 Enter your Foursquare login information.
Searching Foursquare points of interestYou can search for Foursquare points of interest loaded on your device. While your device is connected to your Foursquare account using the Garmin Drive app, the search provides the most up-to-date results from the online Foursquare database and customised results from your Foursquare user account (Connecting to your Foursquare account, page 22).
Select Where To? > Foursquare.
Viewing Foursquare location detailsBefore you can use this feature, your device must be connected to your Foursquare account using the Garmin Drive app (Connecting to your Foursquare account, page 22).You can view detailed Foursquare location information, such as user ratings, restaurant pricing information, and hours of operation.1 From the location search results, select a Foursquare point of interest.2 Select .
Checking in with FoursquareBefore you can use this feature, your device must be connected to your Foursquare account using the Garmin Drive app (Connecting to your Foursquare account, page 22).1 Select Where To? > Foursquare > Check In.2 Select a point of interest.3 Select > Check In.
TripAdvisorYour device includes TripAdvisor points of interest and ratings. TripAdvisor ratings appear automatically in the search results list for applicable points of interest. You can also search for nearby TripAdvisor points of interest and sort by distance or popularity.
Finding TripAdvisor points of interest1 Select Where To? > TripAdvisor.2 Select a category.
A list of nearby TripAdvisor points of interest for the category appears.3 Select Sort Results to sort the search results by distance or popularity (optional).
22 Finding and saving locations

Navigating to points of interest within a venueNOTE: this feature may not be available in all areas or for all product models.You can create a route to a point of interest (POI) within a larger venue, such as a store in a shopping centre or a specific terminal in an airport.1 Select Where To? > Enter Search.2 Select an option:
• To search for the venue, enter the name or address of the venue, select , and go to step 3.• To search for the POI, enter the name of the POI, select , and go to step 5.
3 Select the venue.A list of categories appears below the venue, such as restaurants, car hire, or terminals.
4 Select a category.5 Select the POI, and select Go!.The device creates a route to the parking area or venue entrance closest to the POI. When you arrive at the destination, a chequered flag indicates the recommended parking area. A labelled point indicates the location of the POI within the venue.
Exploring a venueNOTE: this feature may not be available in all areas or for all product models.You can view a list of all points of interest located within each venue.1 Select a venue.2 Select > Explore this Venue.
Search toolsSearch tools allow you to search for specific types of locations by responding to on-screen prompts.
Finding a junctionYou can search for a junction between two streets, motorways, or other roads.1 Select Where To? > Junctions.2 Follow the on-screen instructions to enter street information.3 Select the junction.
Finding a location using coordinatesYou can find a location using latitude and longitude coordinates.1 Select Where To? > Coordinates.2 If necessary, select and change the coordinate format or datum.3 Enter the latitude and longitude coordinates.4 Select View on Map.
ParkingYour Garmin device includes detailed parking data, which can help you find nearby parking based on the likelihood of available parking spots, type of parking area, price, or accepted payment methods.NOTE: detailed parking data is not available in all areas or for all parking locations.
Finding and saving locations 23

Finding Parking Near Your Current Location1 Select Where To? > Parking.2 Select Filter Parking, and select one or more categories to filter parking by availability, type, price, or
payment methods (optional).NOTE: detailed parking data is not available in all areas or for all parking locations.
3 Select a parking location.4 Select Go!.
Finding Parking Near a Specified Location1 Search for a location.2 From the location search results, select a location.3 Select .
A list of parking areas near the selected location appears.4 Select Filter Parking, and select one or more categories to filter parking by availability, type, price, or
payment methods (optional).NOTE: detailed parking data is not available in all areas or for all parking locations.
5 Select a parking location.6 Select Go!.
Understanding Parking Colours and SymbolsParking locations that include detailed parking data are colour-coded to show the likelihood of finding parking. Symbols indicate the type of parking available (street or car park), relative pricing information and payment type.You can view the legend for these colours and symbols on the device.
From the parking search results, select .
Viewing historyYour device stores a history of the last 50 locations you have found.
Select Where To? > History.
Clearing the list of recently found placesSelect Where To? > History > > Clear > Yes.
Viewing current location informationYou can use the Where Am I? page to view information about your current location. This feature is helpful if you need to tell emergency personnel your location.
From the map, select the vehicle.
Finding emergency services and fuelYou can use the Where Am I? page to find the nearest hospitals, police stations, and fuel stations.1 From the map, select the vehicle.2 Select Hospitals, Police Station, Petrol Stations or Roadside Assist..
NOTE: some service categories are not available in all areas.A list of locations for the selected service appears, with the nearest locations at the top.
3 Select a location.4 Select an option:
• To navigate to the location, select Go!.• To view the phone number and other location details, select .
24 Finding and saving locations

Getting directions to your current locationIf you need to tell another person how to get to your current location, your device can give you a list of directions.1 From the map, select the vehicle.2 Select > Directions to Me.3 Select a starting location.4 Select Select.
Adding a shortcutYou can add shortcuts to the Where To? menu. A shortcut can point to a location, a category, or a search tool.The Where To? menu can contain up to 36 shortcut icons.1 Select Where To? > Personalise.2 Select an item.
Removing a shortcut1 Select Where To? > > Remove Shortcut(s).2 Select a shortcut to remove.3 Select the shortcut again to confirm.4 Select Done.
Saving Locations
Saving a location1 Search for a location (Finding a location by category, page 20).2 From the search results, select a location.3 Select > Save.4 Enter a name and select Done.
Saving your current location1 From the map, select the vehicle icon.2 Select Save.3 Enter a name and select Done.4 Select OK.
Editing a Saved Location1 Select Where To? > Favourites.2 If necessary, select a category.3 Select a location.4 Select .5 Select > Edit.6 Select an option:
• Select Name.• Select Phone Number.• Select Categories to assign categories to the saved location.• Select Change Map Symbol to change the symbol used to mark the saved location on a map.
7 Edit the information.8 Select Done.
Finding and saving locations 25

Assigning Categories to a Saved LocationYou can add custom categories to organise your saved locations.NOTE: categories appear in the saved locations menu after you have saved more than 12 locations.1 Select Where To? > Favourites.2 Select a location.3 Select .4 Select > Edit > Categories.5 Enter one or more category names, separate by commas.6 If necessary, select a suggested category.7 Select Done.
Deleting a favourite locationNOTE: deleted locations cannot be recovered.1 Select Where To? > Favourites.2 Select > Delete Favourite(s).3 Select the box next to the saved locations to delete and select Delete.
Following a routeRoutesA route is a path from your current location to one or more destinations.• The device calculates a recommended route to your destination based on the preferences you set, including
the route calculation mode (Changing the route calculation mode, page 30) and avoidances (Avoiding Delays, Tolls and Areas, page 31).
• The device can automatically avoid roads that are not appropriate for the active vehicle profile.• You can start navigating to your destination quickly using the recommended route, or you can select an
alternative route (Starting a route, page 26).• If there are specific roads you need to use or avoid, you can customise the route (Shaping your route,
page 30).• You can add multiple destinations to a route (Adding a location to your route, page 30).
Starting a route1 Select Where To?, and search for a location (Finding and saving locations, page 16).2 Select a location.3 Select an option:
• To start navigating using the recommended route, select Go!.• To choose an alternative route, select and select a route.
Alternative routes appear to the right of the map.• To edit the course of the route, select > Edit Route and add shaping points to the route (Shaping your
route, page 30).The device calculates a route to the location and guides you using voice prompts and information on the map (Your route on the map, page 28). A preview of the major roads in your route appears at the edge of the map for several seconds.If you need to stop at additional destinations, you can add the locations to your route (Adding a location to your route, page 30).
26 Following a route

Starting a route by using the mapYou can start a route by selecting a location from the map.1 Select View Map.2 Drag and zoom the map to display the area to search.3 If necessary, select to filter the displayed points of interest by category.
Location markers ( or a blue dot) appear on the map.4 Select an option:
• Select a location marker.• Select a point, such as a street, junction or address location.
5 Select Go!.
Going homeThe first time you start a route home, the device prompts you to enter your home location.1 Select Where To? > Go Home.2 If necessary, enter your home location.
Editing your home location1 Select Where To? > > Set Home Location.2 Enter your home location.
Following a route 27

Your route on the mapAs you travel, the device guides you to your destination using voice prompts and information on the map. Instructions for your next turn or exit, or other actions appear across the top of the map.
Next action in the route. Indicates the next turn, exit, or other action and the lane in which you should travel, if available.
Distance to the next action.
Name of the street or exit associated with the next action.
Route highlighted on the map.
Next action in the route. Arrows on the map indicate the location of upcoming actions.
Vehicle speed.
Name of the road on which you are travelling.
Estimated arrival time.TIP: you can touch this field to change the information it shows (Changing the map data field, page 36).
Map tools. Provides tools to show you more information about your route and surroundings.
Active lane guidanceAs you approach some turns, exits, or interchanges in your route, a detailed simulation of the road appears beside the map, if available. A coloured line indicates the proper lane for the turn.
28 Following a route

Viewing turns and directionsWhile navigating a route, you can view next turns, lane changes, or other directions for your route.1 From the map, select an option:
• To view next turns and directions as you navigate, select > Turns.The map tool displays the next several turns or directions beside the map. The list updates automatically as you navigate the route.
• To view the complete list of turns and directions for the entire route, select the text bar at the top of the map.
2 Select a turn or direction (optional).Detailed information appears. An image of the junction may appear for junctions on major roads, if available.
Viewing the Entire Route on the Map1 While navigating a route, select anywhere on the map.2 Select .
Arriving at your destinationWhen you approach your destination, the device provides information to help you complete your route.• indicates the location of your destination on the map, and a voice prompt announces you are approaching
your destination.• When you approach some destinations, the device automatically prompts you to search for parking. You can
select Yes to find nearby parking areas (Parking Near Your Destination, page 29).• When you stop at your destination, the device automatically ends the route. If the device does not detect
your arrival automatically, you can select Stop to end your route.
Parking Near Your DestinationYour device can help you find a parking spot near your destination. When you approach some destinations, the device automatically prompts you to search for parking.1 Select an option:
• When the device prompts you, select Yes to search for nearby parking.• If the device does not prompt you, select Where To? > Categories > Parking, and select > My
Destination.2 Select Filter Parking, and select one or more categories to filter parking by availability, type, price, or
payment methods (optional).NOTE: detailed parking data is not available in all areas or for all parking locations.
3 Select a parking location, and select Go! > Add As Next Stop.The device guides you to the parking area.
Following a route 29

Changing Your Active Route
Adding a location to your routeBefore you can add a location to your route, you must be navigating a route (Starting a route, page 26).You can add locations to the middle or end of your route. For example, you can add a petrol station as the next destination in your route.TIP: to create complex routes with multiple destinations or scheduled stops, you can use the trip planner to plan, schedule, and save a trip (Planning a trip, page 45).1 From the map, select > Where To?.2 Search for a location (Finding and saving locations, page 16).3 Select a location.4 Select Go!.5 Select an option:
• To add the location as the next destination in your route, select Add As Next Stop.• To add the location to the end of your route, select Add As Last Stop.• To add the location and edit the order of destinations in your route, select Add to Active Route.
The device re-calculates the route to include the added location and guides you to the destinations in order.
Shaping your routeBefore you can shape your route, you must start a route (Starting a route, page 26).You can manually shape your route to change its course. This allows you to direct the route to use a certain road or go through a certain area without adding a destination to the route.1 Touch anywhere on the map.2 Select .
The device enters route shaping mode.3 Select a location on the map.
TIP: you can select to zoom in on the map and select a more precise location.The device recalculates the route to travel through the selected location.
4 If necessary, select an option:• To add more shaping points to the route, select additional locations on the map.• To remove a shaping point, select .
5 When you are finished shaping the route, select Go!.
Taking a detourYou can take a detour for a specified distance along your route or detour around specific roads. This is useful if you encounter construction zones, closed roads or poor road conditions.1 From the map, select > Change Route.2 Select an option:
• To re-route for a specific distance, select Detour by Distance.• To detour around a specific road on the route, select Detour by Road.
Changing the route calculation mode1 Select Settings > Navigation > Route preferences > Calculation Mode.2 Select an option:
• Select Faster Time to calculate routes that are faster to drive, but can be longer in distance.• Select Off Road to calculate point-to-point routes (without roads).• Select Shorter Distance to calculate routes that are shorter in distance, but can take more time to drive.
30 Following a route

Stopping the route• From the map, select > Stop.• From the home screen, select Stop.
Using Suggested RoutesBefore you can use this feature, you must save at least one location and enable the travel history feature (Device settings, page 51).Using the myTrends™ feature, your device predicts your destination based on your travel history, the day of the week and the time of day. After you have driven to a favourite location several times, the location may appear in the navigation bar on the map, along with the estimated time of travel and traffic information.
Select the navigation bar to view a suggested route to the location.
Avoiding Delays, Tolls and Areas
Avoiding traffic delays on your routeBefore you can avoid traffic delays, you must be receiving traffic information (Receiving traffic data using your smartphone, page 41).By default, the device optimises your route to avoid traffic delays automatically. If you have disabled this option in the traffic settings (Traffic Settings, page 49), you can view and avoid traffic delays manually.1 While navigating a route, select > Traffic.2 Select Alternative Route, if available.3 Select Go!.
Avoiding toll roadsYour device can avoid routing you through areas that require tolls, such as toll roads, toll bridges, or congestion areas. The device may still include a toll area in your route if no other reasonable routes are available.1 Select Settings > Navigation > Route preferences.2 Select an option:
NOTE: the menu changes based on your area and the map data on your device.• Select Toll Roads.• Select Tolls and Fees > Toll Roads.
3 Select an option:• To be asked each time before routing through a toll area, select Always Ask.• To always avoid tolls, select Avoid.• To always allow tolls, select Allow.
4 Select Save.
Avoiding toll stickersIf the map data on your device contains detailed toll sticker information, you can avoid or allow roads that require toll stickers for each country.NOTE: this feature is not available in all areas.1 Select Settings > Navigation > Route preferences > Tolls and Fees > Toll Stickers.2 Select a country.3 Select an option:
• To be asked each time before routing through an area that requires toll stickers, select Always Ask.• To always avoid roads that require toll stickers, select Avoid.• To always allow roads that require toll stickers, select Allow.
4 Select Save.
Following a route 31

Avoiding road features1 Select Settings > Navigation > Route preferences > Avoidances.2 Select the road features to avoid on your routes, and select OK.
Avoiding environmental zonesYour device can avoid areas with environmental or emissions restrictions that may apply to your vehicle. This option applies to the vehicle type in the active vehicle profile.1 Select Settings > Navigation > Route preferences > Environmental Zones.2 Select an option:
• To be asked each time before routing through an environmental zone, select Always Ask.• To always avoid environmental zones, select Avoid.• To always allow environmental zones, select Allow.
3 Select Save.
Custom AvoidancesCustom avoidances allow you to select specific areas or sections of road to avoid. When the device calculates a route, it avoids these areas and roads unless no other reasonable route is available.
Avoiding a road1 Select Settings > Navigation > Route preferences > Custom Avoidances.2 If necessary, select Add Avoidance.3 Select Add Avoid Road.4 Select the starting point of the section of road to avoid and select Next.5 Select the ending point of the road section and select Next.6 Select Done.
Avoiding an area1 Select Settings > Navigation > Route preferences > Custom Avoidances.2 If necessary, select Add Avoidance.3 Select Add Avoid Area.4 Select the upper left corner of the area to avoid and select Next.5 Select the lower right corner of the area to avoid and select Next.
The selected area is shaded on the map.6 Select Done.
Disabling a custom avoidanceYou can disable a custom avoidance without deleting it.1 Select Settings > Navigation > Route preferences > Custom Avoidances.2 Select a created avoidance.3 Select > Disable.
Deleting custom avoidances1 Select Settings > Navigation > Route preferences > Custom Avoidances.2 Select an option:
• To delete all custom avoidances, select .• To delete one custom avoidance, select the avoidance and select > Delete.
32 Following a route

Navigating off roadIf you are not following roadways as you navigate, you can use Off Road mode.
Select Settings > Navigation > Route preferences > Calculation Mode > Off Road > Save.The device ignores roads and calculates routes using straight lines between destinations.
Using the MapYou can use the map to navigate a route (Your route on the map, page 28) or to view a map of your surroundings when no route is active.1 Select View Map.2 Touch anywhere on the map.3 Select an option:
• Drag the map to pan left, right, up, or down.• To zoom in or out, select or .• To switch between North Up and 3-D views, select .• To filter the displayed points of interest by category, select .• To start a route, select a location on the map, and select Go! (Starting a route by using the map, page 27).
Map ToolsMap tools provide quick access to information and device functions while you view the map. When you activate a map tool, it appears in a panel at the edge of the map.Stop: stops navigation of the active route.Camera: provides dash cam controls and displays forward collision and lane departure alerts. Also allows you
to access the dash cam viewfinder and the driver assistance settings.Change Route: allows you to re-route or skip locations in your route (Changing Your Active Route, page 30).Mute: mutes the master volume.Towns Ahead: shows upcoming towns and services along your active route or along a highway (Towns Ahead,
page 34).Up Ahead: shows upcoming locations along the route or the road on which you are travelling (Up ahead,
page 34).Elevation: displays elevation changes ahead.Traffic: displays traffic conditions along your route or in your area (Viewing upcoming traffic, page 36). This
feature is not available in all areas or for all device models.Trip Data: displays customisable trip data, such as speed or mileage (Viewing Customised Trip Information on
the Map, page 35).Turns: displays a list of upcoming turns in your route (Viewing turns and directions, page 29).Phone: displays a list of recent phone calls from your connected phone, and displays in-call options while a
phone call is active (Using in-call options, page 40).Weather: displays weather conditions for your area.photoLive: displays live traffic cameras from your photoLive subscription (photoLive traffic cameras, page 47).Report Camera: allows you to report a speed or red light camera. This tool is available only when you have
speed or red light camera data on your device and you have an active connection to the Garmin Drive app (Live services, traffic and smartphone features, page 37).
Using the Map 33
Viewing a map tool1 From the map, select .2 Select a map tool.
The map tool appears in a panel at the edge of the map.3 When you have finished using the map tool, select .
Up aheadThe Up Ahead tool provides information about upcoming locations along your route or the road on which you are travelling. You can view upcoming points of interest by category, such as restaurants, fuel stations or roadside services.You can customise three categories to show in the Up Ahead tool.
Viewing upcoming locations1 From the map, select > Up Ahead.
While you are travelling, the map tool shows the next location along your road or route in each of the three categories. While you are not travelling, the map tool shows the three category names.
2 Select an option:• If the map tool shows categories, select a category to view a list of nearby locations in that category.• If the map tool shows upcoming locations, select a location to view location details or start a route to the
location.
Customising the up ahead categoriesYou can change the location categories that appear in the Up Ahead tool.1 From the map, select > Up Ahead.2 Select a category.3 Select .4 Select an option:
• To move a category up or down in the list, select and drag the arrow next to the category name.• To change a category, select the category.• To create a custom category, select a category, select Custom Search, and enter the name of a business
or category.5 Select Save.
Towns AheadWhile you are travelling on a highway or navigating a route that includes a highway, the Towns Ahead tool provides information about upcoming towns along the highway. For each town, the map tool shows the distance to the highway exit and the services available, similar to the information on highway road signs.
Viewing Upcoming Towns and Exit Services1 From the map, select > Towns Ahead.
While you are travelling along a highway or an active route, the map tool shows information about upcoming towns and exits.
2 Select a town.The device shows a list of points of interest located at the selected town exit, such as fuel stations, lodging or restaurants.
3 Select a location, and select Go! to start navigating.
34 Using the Map
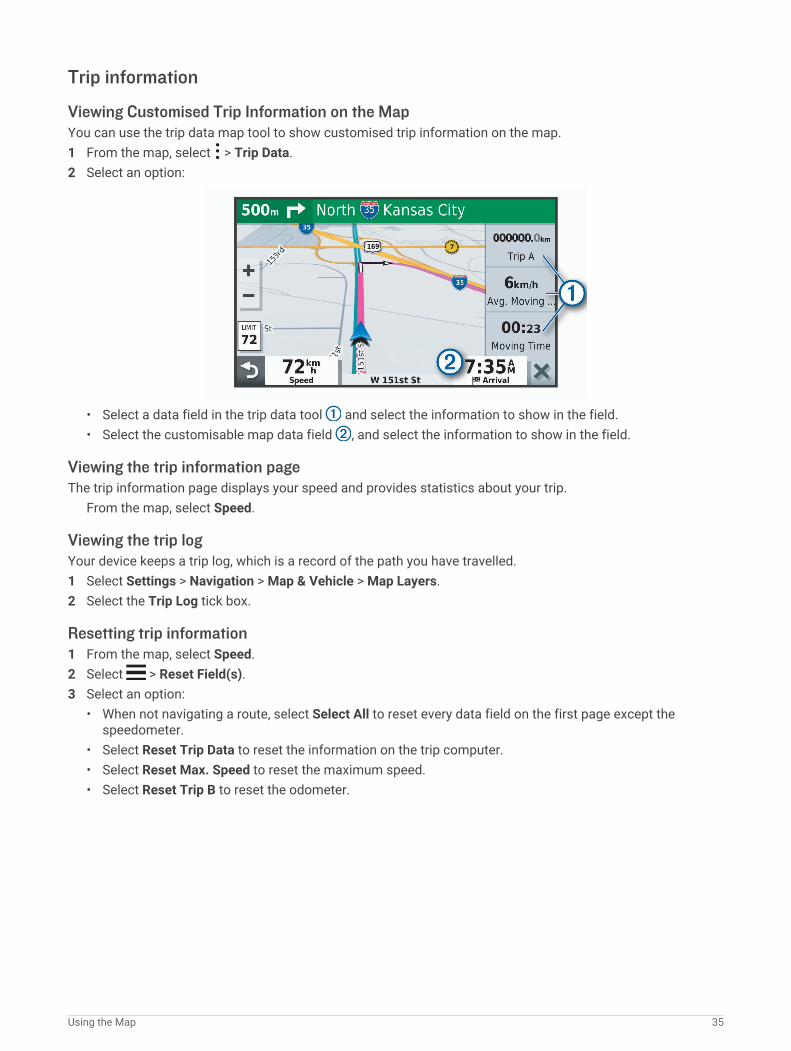
Trip information
Viewing Customised Trip Information on the MapYou can use the trip data map tool to show customised trip information on the map.1 From the map, select > Trip Data.2 Select an option:
• Select a data field in the trip data tool and select the information to show in the field.• Select the customisable map data field , and select the information to show in the field.
Viewing the trip information pageThe trip information page displays your speed and provides statistics about your trip.
From the map, select Speed.
Viewing the trip logYour device keeps a trip log, which is a record of the path you have travelled.1 Select Settings > Navigation > Map & Vehicle > Map Layers.2 Select the Trip Log tick box.
Resetting trip information1 From the map, select Speed.2 Select > Reset Field(s).3 Select an option:
• When not navigating a route, select Select All to reset every data field on the first page except the speedometer.
• Select Reset Trip Data to reset the information on the trip computer.• Select Reset Max. Speed to reset the maximum speed.• Select Reset Trip B to reset the odometer.
Using the Map 35

Viewing upcoming trafficNOTICE
Garmin is not responsible for the accuracy or timeliness of the traffic information.
Before you can use this feature, your device must be receiving traffic data (Traffic, page 41).You can view traffic incidents coming up along your route or along the road on which you are travelling.1 While navigating a route, select > Traffic.
The nearest upcoming traffic incident appears in a panel on the right side of the map.2 Select the traffic incident to view additional details.
Viewing traffic on the mapThe traffic map shows colour-coded traffic flow and delays on nearby roads.1 From the main menu, select > Navigation > Traffic.2 If necessary, select > Legend to view the legend for the traffic map.
Searching for traffic incidents1 From the main menu, select > Navigation > Traffic.2 Select > Incidents.3 Select an item in the list.4 If there is more than one incident, use the arrows to view additional incidents.
Customising the map
Customising the map layersYou can customise which data appears on the map, such as icons for points of interest and road conditions.1 Select Settings > Navigation > Map & Vehicle > Map Layers.2 Select the tick box next to each layer you want to show on the map.
Changing the map data field1 From the map, select a data field.
NOTE: you cannot customise Speed.2 Select a type of data to display.
Changing the map perspective1 Select Settings > Navigation > Map & Vehicle > Driving Map View.2 Select an option:
• Select Track Up to display the map in two dimensions (2-D), with your direction of travel at the top.• Select North Up to display the map in 2-D with North at the top.• Select 3-D to display the map in three dimensions.
36 Using the Map

Live services, traffic and smartphone featuresThe Garmin Drive app allows your device to receive smart notifications and live information, such as live traffic data and weather information.Live traffic data: sends real-time traffic data to your device, such as traffic incidents and delays, construction
zones and road closings (Traffic, page 41).Weather information: sends real-time weather forecasts, road conditions and weather radar to your device
(Viewing the Weather Forecast, page 43).Smart Notifications: displays phone notifications and messages on your device. This feature is not available
for all languages.Hands-Free calling: allows you to make and receive phone calls using your device, and allows you to use the
device as a hands-free speaker phone. If the selected language supports the voice command feature, you can place calls using voice commands.
Send locations to device: allows you to send locations from your smartphone to your navigation device.Foursquare check in: allows you to check in to Foursquare locations using your navigation device (Checking in
with Foursquare, page 22).
Pairing with Your SmartphoneYou can pair your Garmin device with your smartphone and the Garmin Drive app to enable additional features and access live information (Live services, traffic and smartphone features, page 37) .1 From the app store on your smartphone, install the Garmin Drive app.2 Turn on your Garmin device and place the device and your smartphone within 3 m (10 ft.) of each other.3 On your phone, open the Garmin Drive app.4 Follow the on-screen instructions to sign in to a Garmin account and complete the pairing and setup
process.The main app dashboard appears. After the devices are paired, they connect automatically when they are turned on and within range.
Enabling or Disabling Bluetooth FeaturesYou can enable or disable hands-free calling and Garmin Drive features for your paired smartphone.1 Select Settings > Bluetooth.2 Select next to your phone name.3 In the Use for section, select an option:
• To enable a connection to the Garmin Drive app, select Garmin Drive.• To enable hands-free calling features, select Hands-Free.
4 Select OK.
Showing or hiding app notifications (Android™)You can use the Garmin Drive app to customise which types of smartphone notifications appear on your Garmin device.1 On your phone, open the Garmin Drive app.2 Select > Smart Notifications.
A list of your smartphone apps appears.3 Select the toggle switch next to an app to enable or disable notifications for the app.
Showing or hiding notification categories for your Apple® deviceIf you are connected to an Apple device, you can filter the notifications shown on your Garmin device by showing or hiding categories.1 Select > Navigation > Smart Notifications > .2 Select the check box next to each notification to show.
Live services, traffic and smartphone features 37

Pairing Additional Bluetooth Devices1 Place your headset or phone and your Bluetooth device within 33 ft. (10 m) of each other.2 On your device, enable Bluetooth wireless technology.3 On your headset or phone, enable Bluetooth wireless technology and make it visible to other Bluetooth
devices.4 On your device, select Settings > Bluetooth.
A list of nearby Bluetooth devices appears.5 Select your headset or phone from the list.6 Select Pair.
Smart NotificationsWhile your device is connected to the Garmin Drive app, you can view notifications from your smartphone on your Garmin device, such as text messages, incoming calls, and calendar appointments.
Receiving notifications WARNING
Do not read or reply to notifications while driving. If you do so, you could become distracted by the display, which could lead to an accident causing serious personal injury or death.
Before you can use this feature, your device must be connected to a supported phone running the Garmin Drive app (Live services, traffic and smartphone features, page 37).From most pages, a pop-up appears when the device receives a notification from your smartphone. If the device is moving, you must verify you are a passenger and not the driver before you can view notifications.NOTE: if you are viewing the map, notifications appear in a map tool.• To ignore a notification, select OK.
The pop-up closes, but the notification remains active on your phone.• To view a notification, select View.• To listen to the notification, select View > Play.
The device reads the notification using text-to-speech technology. This feature is not available for all languages.
• To perform additional actions, such as dismissing the notification from your phone, select View, and select an option.NOTE: additional actions are available for only some notification types and must be supported by the app generating the notification.
38 Live services, traffic and smartphone features

Receiving notifications while viewing the map
WARNINGDo not read or reply to notifications while driving. If you do so, you could become distracted by the display, which could lead to an accident causing serious personal injury or death.
Before you can use this feature, your device must be connected to a supported phone running the Garmin Drive app (Live services, traffic and smartphone features, page 37).When you are viewing the map, new notifications appear in a map tool at the edge of the screen. If the device is moving, you must verify you are a passenger and not the driver before you can view notifications.• To ignore a notification, select or wait for popup to expire.
The pop-up closes, but the notification remains active on your phone.• To view a notification, select the notification text.• To listen to the notification, select Play Message.
The device reads the notification using text-to-speech technology. This feature is not available for all languages.
• To listen to the notification using a voice command, say Play Message.NOTE: this option is available only when the selected language supports the voice command feature and appears in the map tool.
• To perform additional actions, such as dismissing the notification from your phone, select View, and select an option.NOTE: additional actions are available for only some notification types and must be supported by the app generating the notification.
Viewing the list of notificationsYou can view a list of all active notifications.1 Select > Navigation > Smart Notifications.
The list of notifications appears. Unread notifications appear black, and previously read notifications appear grey.
2 Select an option:• To view a notification, select the notification description.• To listen to a notification, select .
The device reads the notification using text-to-speech technology. This feature is not available for all languages.
Hands-free callingNOTE: while most phones and headsets are supported and can be used, it cannot be guaranteed that a particular phone or headset can be used. All features may not be available for your phone.Using Bluetooth wireless technology, your device can connect to your mobile phone and wireless headset or helmet to become a hands-free device. To determine whether your mobile device with Bluetooth technology is compatible with your device, go to www.garmin.com/bluetooth.
Placing a call1 Select .2 Select an option:
• To dial a number, select , enter the phone number and select .• To call a recently dialled or received phone number, select and select a number.• To call a contact from your phone book, select and select a contact.
Receiving a callWhen you receive a call, select Answer or Dismiss.
Live services, traffic and smartphone features 39
Using in-call optionsIn-call options appear when you answer a call. Some options may not be compatible with your phone.TIP: if you close the in-call options page, you can open it again by selecting from the main menu.• To set up a conference call, select .• To transfer audio to your phone, select .
TIP: you can use this feature if you want to disconnect the Bluetooth connection and remain on the call, or if you need privacy.
• To use the dial pad, select .TIP: you can use this feature to use automated systems, such as voice mail.
• To mute the microphone, select .• To hang up, select .
Saving a Phone Number as a PresetYou can save up to three contacts as presets on the dial pad. This allows you to quickly call your home phone number, family members, or frequently called contacts.1 Select > .2 Hold a preset number, such as Preset 1.3 Select a contact.
Disconnecting a Bluetooth deviceYou can temporarily disconnect a Bluetooth device without deleting it from the paired devices list. The Bluetooth device can connect to your Garmin device automatically in the future.1 Select Settings > Bluetooth.2 Select the device to disconnect.
Deleting a paired Bluetooth deviceYou can delete a paired Bluetooth device to prevent it from automatically connecting to your Garmin device in the future. Deleting a paired smartphone also deletes all synced phonebook contacts and call history from your Garmin device.1 Select Settings > Bluetooth.2 Next to the Bluetooth device name, select > Forget.
40 Live services, traffic and smartphone features
TrafficNOTICE
Garmin is not responsible for the accuracy or timeliness of the traffic information.
Your device can provide information about traffic on the road ahead or on your route. You can set your device to avoid traffic when calculating routes, and to find a new route to your destination if a large traffic delay occurs on your active route (Traffic Settings, page 49). The traffic map allows you to browse the map for traffic delays in your area.To provide traffic information, your device must be receiving traffic data.• Product models ending with MT can receive traffic data from an over-the-air broadcast signal using the built-
in traffic receiver and the included vehicle power cable (Receiving traffic data using a traffic receiver, page 41).
• All product models can receive subscription-free traffic data using the Garmin Drive app (Receiving traffic data using your smartphone, page 41).
• All product models can receive traffic data using an over-the-air traffic receiver cable accessory (Receiving traffic data using a traffic receiver, page 41). Go to your product page at garmin.com to find and purchase a compatible traffic receiver cable accessory.
Traffic data is not available in all areas. For information about traffic coverage areas, go to garmin.com/traffic.
Receiving traffic data using your smartphoneYour device can receive subscription-free traffic data while connected to a smartphone running the Garmin Drive app.1 Connect your device to the Garmin Drive app (Live services, traffic and smartphone features, page 37).2 On your Garmin device, select Settings > Navigation > Traffic and verify the Traffic check box is selected.
Receiving traffic data using a traffic receiverNOTICE
Heated (metallised) windscreens could degrade the performance of the traffic receiver.
A traffic receiver receives traffic data from an over-the-air broadcast signal, where available. To receive over-the-air traffic data, the device must be connected to vehicle power using a traffic-compatible power cable. A traffic receiver is included with some product models (Traffic, page 41). If your product model does not include a traffic receiver, you can go to your product page at garmin.com to find and purchase a compatible traffic receiver cable accessory.Traffic data is not available in all areas. For information about traffic coverage areas, go to garmin.com/traffic.
Connect the device to vehicle power using the traffic-compatible power cable (Mounting and powering the Garmin device in your vehicle, page 3).If your product model includes traffic data, the vehicle power cable included with your device is traffic-compatible. If you purchased a traffic receiver cable as an accessory, you should use the accessory cable to connect the device to vehicle power.
When you are within a traffic coverage area, your device can display traffic information and help you avoid traffic delays.
Enabling trafficYou can enable or disable traffic data.1 Select Settings > Navigation > Traffic.2 Select the Traffic tick box.
Traffic 41

Voice CommandNOTE: voice command is not available for all languages and regions, and may not be available on all models.NOTE: Voice Activated Navigation may not achieve desired performance when in a noisy environment.Voice command allows you to use your device by saying words and commands. The voice command menu provides voice prompts and a list of available commands.
Setting the wake-up phraseThe wake-up phrase is a word or phrase you can say to activate voice command. The default wake-up phrase is OK Garmin.TIP: you can reduce the chance of accidental voice command activation by using a strong wake-up phrase.1 Select > Voice Command > > Wake-Up Phrase.2 Enter a new wake-up phrase.
The device indicates the strength of the wake-up phrase as you enter the phrase.3 Select Done.
Activating voice command1 Say OK Garmin.
The voice command menu appears.
2 Say a command from the menu.3 Respond to the voice prompts to complete the search or action.
Voice Command tips• Speak in a normal voice directed at the device.• Reduce background noise, such as voices or the radio, to increase the accuracy of the voice recognition.• Say commands as they appear on the screen.• Respond to voice prompts from the device as needed.• Increase the length of your wake-up phrase to reduce the chance of accidental voice command activation.• Listen for two tones to confirm when the device enters and exits voice command.
42 Voice Command

Starting a route using voice commandYou can say the names of popular, well known locations.1 Say OK Garmin.2 Say Find Place.3 Listen for the voice prompt and speak the name of a location.
The device displays a list of search results.
4 Say the line number of the location you want.The device displays the location on the map.
5 Say Navigate.
Muting InstructionsYou can disable the voice prompts for voice command without muting the device.1 Select > Navigation > Voice Command > .2 Select Mute Instructions > Enabled.
Using the appsViewing the Owner's Manual on Your DeviceYou can view the complete owner's manual on the device screen in many languages.1 Select > Owner's Manual.
The owner's manual appears in the same language as the software text (Setting the Text Language, page 50).
2 Select to search the owner's manual (optional).
Viewing the Weather ForecastNOTICE
Garmin is not responsible for the accuracy or timeliness of the weather data.
Before you can use this feature, your device must be receiving weather data. You can connect your device to the Garmin Drive app to receive weather data (Live services, traffic and smartphone features, page 37).
1 Select > Weather.The device shows the current weather conditions and a forecast for the next several days.
2 Select a day.The detailed forecast for that day appears.
Using the apps 43

Viewing weather near a different town1 Select > Weather > Current Location.2 Select an option:
• To view weather for a favourite town, select a town in the list.• To add a favourite town, select Add Town, and enter a town name.
Viewing the weather radarBefore you can use this feature, your device must be connected to a supported phone running the Garmin Drive app (Live services, traffic and smartphone features, page 37).1 Select > Weather Radar.2 Select to animate the radar map.
Viewing weather alertsBefore you can use this feature, your device must be connected to a supported phone running the Garmin Drive app (Live services, traffic and smartphone features, page 37).NOTE: this feature is not available in all areas.While you are travelling with your device, weather alerts may appear on the map. You can also view a map of weather alerts near your current location or near a selected town.1 Select > Weather.2 If necessary, select a town.3 Select > Weather Alerts.
Checking road conditionsBefore you can use this feature, your device must be connected to a supported phone running the Garmin Drive app (Live services, traffic and smartphone features, page 37).You can view weather-related road conditions for the roads in your area, on your route or in another town.1 Select > Weather.2 If necessary, select a town.3 Select > Road Conditions.
Logging service historyYou can log the date and odometer reading when service or maintenance is performed on your vehicle. The device provides several service categories, and you can add custom categories (Adding service categories, page 44).1 Select > Service History.2 Select a service category.3 Select Add Record.4 Enter the odometer reading, and select Next.5 Enter a comment (optional).6 Select Done.
Adding service categories1 Select > Service History.2 Select > Add Category.3 Enter a category name, and select Done.
44 Using the apps

Deleting service categoriesWhen you delete a service category, all service records in the category are also deleted.1 Select > Service History.2 Select > Delete Categories.3 Select the service categories to delete.4 Select Delete.
Renaming service categories1 Select > Service History.2 Select the category to be renamed.3 Select > Rename Category.4 Enter a name and select Done.
Deleting service records1 Select > Service History.2 Select a service category.3 Select > Delete Records.4 Select the service records to be deleted.5 Select Delete.
Editing a service recordYou can edit the comment, odometer reading and date of a service record.1 Select > Service History.2 Select a category.3 Select a field.4 Enter the new information, and select Done.
Trip plannerYou can use the trip planner to create and save a trip, which you can navigate later. This can be useful for planning a delivery route, a vacation, or a road trip. You can edit a saved trip to further customise it, including reordering locations, optimising the order of stops, adding suggested attractions and adding shaping points.You can also use the trip planner to edit and save your active route.
Planning a tripA trip can include many locations, and it must include at least a starting point and a destination. The starting point is the location from which you plan to start your trip. If you start navigating the trip from a different location, the device gives you the option to route to your starting point first. For a round trip, the starting location and final destination can be the same.1 Select > Trip Planner > New Trip.2 Select Select Start Location.3 Choose a location for your starting point, and select Select.4 Select Select Destination.5 Choose a location for a destination, and select Select.6 Select Add Location to add more locations (optional).7 After you have added all the necessary locations, select Next > Save.8 Enter a name and select Done.
Using the apps 45

Editing and reordering locations in a trip1 Select > Trip Planner > Saved Trips.2 Select a saved trip.3 Select a location.4 Select an option:
• To move the location up or down, select , and drag the location to a new position in the trip.• To add a new location after the selected location, select .• To remove the location, select .
Optimising the order of stops in a tripThe device can automatically optimise the order of stops in your trip to create a shorter, more efficient route. The starting location and final destination are not changed when you optimise the order.
While editing a trip, select > Optimise Order.
Discovering Attractions Along Your TripThe device can suggest interesting or popular attractions to add to your trip.1 While editing a trip, select > Suggest Attractions.2 Select an attraction to view more information.3 Select Select to add the attraction to your trip.
Changing routing options for a tripYou can customise how the device calculates the route when you start your trip.1 Select > Trip Planner > Saved Trips.2 Select a saved trip.3 Select the vehicle profile icon, and select the vehicle you plan to use while navigating the trip (optional).4 Select .5 Select an option:
• To add shaping points to your trip, select Shape Route, and follow the on-screen instructions (Shaping your route, page 30).
• To change the calculation mode for the trip, select Route Preference (Changing the route calculation mode, page 30).
Navigating to a favourite tripBefore you can start navigating a saved trip, the active vehicle profile on the device must match the selected vehicle profile for the trip (Changing routing options for a trip, page 46). If it does not match, the device prompts you to change the vehicle profile before you can start the trip (Switching the Vehicle Profile, page 7).1 Select > Trip Planner > Saved Trips.2 Select a saved trip.3 Select Go!.4 Select the first location to navigate to, and select Start.
The device calculates a route from your current location to the selected location, and then it guides you to the remaining trip destinations in order.
Editing and saving your active routeIf a route is active, you can use the trip planner to edit and save your route as a trip.1 Select > Trip Planner > Saved Trips > My Active Route.2 Edit your route using any of the trip planner features.
The route recalculates each time you make a change.3 Select Save to save your route as a trip, which you can navigate again later (optional).
46 Using the apps
photoLive traffic camerasBefore you can use this feature, your device must be connected to the Garmin Drive app (Live services, traffic and smartphone features, page 37).photoLive traffic cameras provide live images of traffic conditions on major roads and junctions.The photoLive service is not available in all areas.
Viewing and Saving photoLive Traffic CamerasYou can view live images from nearby traffic cameras. You can also save traffic cameras for areas you travel frequently.1 Select > photoLive.2 Select Touch to Add3 Select a road.4 Select a traffic camera location.
A preview of the live image from the camera appears next to a map of the camera's location. You can select the image preview to view the full-sized image.
5 Select Save to save the camera (optional).A thumbnail image preview of the camera is added to the main screen of the photoLive app.
Viewing photoLive Traffic Cameras on the MapThe photoLive map tool shows traffic cameras from the road ahead of you.1 From the map, select > photoLive.
The device shows the live image from the nearest traffic camera on the road ahead, along with the distance to the camera. When you pass the camera, the device loads the live image of the next camera on the road.
2 If no cameras are found for the road, select Find Cameras to view or save nearby traffic cameras (optional).
Saving a traffic camera1 Select > photoLive.2 Select Touch to Add.3 Select a road.4 Select a junction.5 Select Save.
Viewing Previous Routes and DestinationsBefore you can use this feature, you must enable the travel history feature (Device settings, page 51).You can view your previous routes and places where you have stopped on the map.
Select > Where I've Been.
Using the apps 47

SettingsNavigation settingsSelect Settings > Navigation.Vehicle Profile: sets the vehicle profile for each vehicle with which you will use your device.Map & Vehicle: sets the map detail level and the vehicle icon to display on your device.Route preferences: Sets the route preferences when navigating.Driver Assistance: sets driver assistance alerts.Traffic: sets the traffic details the device uses. You can set your device to avoid traffic when calculating routes
and to find a new route to your destination if a traffic delay occurs (Avoiding traffic delays on your route, page 31).
Units: sets the unit of measure used for distances.
Map and vehicle settingsSelect Settings > Navigation > Map & Vehicle.Vehicle: sets the vehicle icon that represents your position on the map.Driving Map View: sets the perspective on the map.Map Detail: sets the level of detail on the map. More detail may cause the map to be drawn more slowly.Map Theme: changes the colour of the map data.Map Layers: sets the data that appears on the map page (Customising the map layers, page 36).Auto Zoom: automatically selects the zoom level for optimal use of your map. When disabled, you must zoom
in or out manually.myMaps: sets which installed maps the device uses.
Enabling mapsYou can enable map products installed on your device.TIP: to purchase additional map products, go to http://buy.garmin.com.1 Select Settings > Navigation > Map & Vehicle > myMaps.2 Select a map.
Route Preference SettingsSelect Settings > Navigation > Route preferences.Route Preview: shows a preview of the major roads in your route when you start navigation.Calculation Mode: sets the route calculation method.Avoidances: sets road features to avoid on a route.Custom Avoidances: allows you to avoid specific roads or areas.Environmental Zones: sets the avoidance preferences for areas with environmental or emissions restrictions
that may apply to your vehicle.Restricted Mode: disables all functions that require significant operator attention.Voice Language: sets the language for navigation voice prompts.Travel History: allows the device to record information for the myTrends, Where I've Been and Trip Log
features.Clear Travel History: clears your travel history for the myTrends, Where I've Been, and Trip Log features.
48 Settings

Driver Assistance SettingsSelect Settings > Navigation > Driver Assistance.Driver Alerts: allows you to enable or disable alerts for upcoming zones or road conditions (Driver awareness
features and alerts, page 11).Proximity Alerts: alerts you when you approach speed cameras or red light cameras.
Traffic SettingsFrom the main menu, select Settings > Navigation > Traffic.Traffic: enables traffic.Current Provider: sets the traffic provider to use for traffic data. The Auto option selects the best available
traffic data automatically.Subscriptions: lists the current traffic subscriptions.Optimise Route: enables the device to use optimised alternative routes automatically or upon request (Avoiding
traffic delays on your route, page 31).Traffic Alerts: sets the traffic delay severity for which the device displays a traffic alert.
Dash Cam SettingsSelect Settings > Dash Cam.Camera placement: allows you to set the vehicle height and camera position, and align the dash cam (Aligning
the camera, page 8).Auto Record: enables the dash camera to start recording video automatically when you turn on the device.Driver Assistance Alert Tones: enables the device to play a tone when a forward collision warning or lane
departure warning is triggered.Forward collision warning: allows you to enable and set the sensitivity of the forward collision warning
(Forward collision warning system, page 12). A higher sensitivity alerts you sooner than a lower sensitivity.Lane Departure Warning: enables an alert when the device detects you may be crossing a lane boundary
unintentionally (Lane departure warning system, page 13).Video Resolution: sets the resolution and quality for dash cam recordings.Unsaved Footage: determines when the device deletes unsaved video footage. When the Delete When Full
option is selected, the device deletes the oldest unsaved video when the memory card storage is full. When the Promptly Delete option is selected, the device continually deletes unsaved video more than three minutes old and deletes all unsaved video each time it is powered off. This is useful to help protect data privacy. While the Promptly Delete option is selected, you cannot record Travelapse™ videos or view unsaved video in the gallery.
Record Audio: enables or disables audio recording while you are recording with the dash cam.Data Overlay: includes date, time, location, and speed information in the recorded video.Record After Power Loss: continues recording video up to a selected time period after external power is lost.
Enabling Bluetooth wireless technologySelect Settings > Bluetooth.
Connecting to a Wireless Network1 Select Settings > Wi-Fi.2 If necessary, select the toggle switch to turn on wireless network technology.3 Select a wireless network.4 If necessary, enter the encryption key.The device connects to the wireless network. The device remembers the network information and connects automatically when you return to this location in the future.
Settings 49

Display settingsSelect Settings > Display.Brightness Level: sets the display brightness level on your device.Theme: allows you to select day or night colour mode. If you select the Automatic option, the device
automatically switches to day or night colours based on the time of day.Wallpaper: sets the wallpaper background on your device.Sleep: allows you to set the amount of idle time before your device enters sleep mode while using battery
power.Daydream: enables or disables the daydream screen saver.Font size: increases or decreases the font size on your device.Cast: enables you to show the contents of the device screen on a compatible external display wirelessly.
Sound and Notification SettingsSelect Settings > Sound & notification.Volume Sliders: set the volume levels for navigation, media, calls, alarms, and notification alerts.Do not disturb: sets the rules for the automatic do-not-disturb feature. This feature allows you to disable
audible alerts during specific times or events.Default notification ringtone: sets the default notification ringtone sound on your device.
Adjusting Sound and Notification Volume1 Select Settings > Sound & notification.2 Use the slider bars to adjust the sound and notification volume.
Enabling or Disabling Location ServicesThe location services feature must be enabled for your device to find your location, calculate routes and provide navigational assistance. You can disable location services to plan a route when GPS signals are not available. When location services are disabled, the device enables a GPS simulator to calculate and simulate routes.TIP: disabling location services can help save battery power.1 Select Settings > Location.2 Select the toggle switch to enable or disable location services.NOTE: for most uses, you should not change the Mode setting from the default option of Device only. The device includes a high-performance GPS antenna that provides the most accurate location data while navigating.
Setting the Text LanguageYou can select the language for text in the device software.1 Select Settings > Language & input > Language.2 Select a language.
Date and time settingsSelect Settings > Date & Time.Automatic date & time: automatically sets the time based on information from the connected network.Set date: sets the month, day, and year on your device.Set time: sets the time on your device.Select time zone: sets the time zone on your device.Use 24-hour format: enables or disables the 24-hour time format.
50 Settings
Device settingsSelect Settings > About device.System updates: allows you to update map and device software.Status: displays the battery status and network information.Legal Information: allows you to view the end-user licence agreement (EULA) and software licence information.Regulatory: displays e-label regulatory and compliance information.Garmin device information: displays hardware and software version information.
Restoring settingsYou can restore a category of settings to the factory default values.1 Select Settings.2 Select a settings category.3 Select > Restore.
Resetting Data and SettingsThe device offers several options for deleting your user data and resetting all settings to the factory default values.1 Select Settings.2 Select an option:
• To clear your travel history, select Navigation > Route preferences > Clear Travel History.This option deletes all records of the places you have travelled. It does not delete favourite locations, accounts, apps or installed maps.
• To reset all navigation settings to the factory default values, select Navigation > > Restore.This option does not delete any user data.
• To remove all saved wireless networks and paired devices, select Device Reset > Network settings reset.This option does not delete any other user data.
• To delete all user data and reset all settings to the factory default values, select Device Reset > Factory Data Reset.This option deletes your travel history, apps, accounts, settings, saved networks, paired devices and all other user data. Installed maps are not deleted. User files in the Garmin folder may not be deleted.
Device informationViewing E-label Regulatory and Compliance Information1 From the settings menu, swipe to the bottom of the menu.2 Select About device > Regulatory.
Device information 51

SpecificationsOperating temperature range From -10° to 55°C (from 14° to 131°F)
Charging temperature range (vehicle power) From 0° to 45°C (from 32° to 113°F)
Power input type Vehicle power using an optional accessory. AC power using an optional accessory for home or office use only.
Battery type Rechargeable lithium-ion
Input Maximum DC 5 V, 2 A
Wireless frequencies 2.4 GHz @ 19.5 dBm nominal
Charging the DeviceNOTE: this Class III product shall be powered by an LPS power supply.You can charge the battery in the device using any of these methods.• Install the device in the mount, and connect the mount to vehicle power.• Connect the device to an optional power adapter accessory, such as a wall power adapter.
You can purchase an approved Garmin AC-DC adapter suitable for home or office use from a Garmin dealer or www.garmin.com. The device may charge slowly when connected to a third-party adapter.
Device maintenanceGarmin Support CentreGo to support.garmin.com for help and information, such as product manuals, frequently asked questions, videos and customer support.
Map and Software UpdatesFor the best navigation experience, you should keep the maps and software on your device up to date.Map updates provide the newest available changes to roads and locations in the maps used by your device. Keeping maps up to date helps your device find recently added locations and calculate more accurate routes. Map updates are large and may take several hours to complete.Software updates provide changes and improvements to the device features and operation. Software updates are small and take a few minutes to complete.You can update your device using two methods.• You can connect the device to a Wi‑Fi network to update directly on the device (recommended). This option
allows you to update your device conveniently without connecting it to a computer.• You can connect the device to a computer and update it using the Garmin Express application (garmin.com
/express).
52 Device maintenance

Updating Maps and Software Using a Wi‑Fi NetworkNOTICE
Map and software updates may require the device to download large files. Regular data limits or charges from your internet service provider apply. Contact your internet service provider for more information about data limits or charges.
You can update the maps and software by connecting your device to a Wi‑Fi network that provides access to the internet. This allows you to keep your device up to date without connecting it to a computer.1 Using the included USB cable, connect the device to external power.
NOTE: a USB power adapter is not included. Go to the product page on garmin.com to purchase a power adapter accessory.
2 Connect the device to a Wi‑Fi network (Connecting to a Wireless Network, page 49).While connected to a Wi‑Fi network, the device checks for available updates automatically and displays a notification when an update is available.
3 Select an option:• When an update notification appears, swipe down from the top of the screen, and select An update is
available..• To manually check for updates, select Settings > About device > System updates.The device displays available map and software updates. When an update is available, Update Available appears below Map or Software.
4 Select an option:• To install all available updates, select Download.• To install only map updates, select Map.• To install only software updates, select Software.
5 If necessary, read the licence agreements, and select Accept All to accept the agreements.NOTE: if you do not agree with the licence terms, you can select Reject. This stops the update process. You cannot install updates until you accept the licence agreements.
6 Keep the device connected to external power and within range of the Wi‑Fi network until the update process is complete.
TIP: if a map update is interrupted or cancelled before it completes, your device may be missing map data. To repair missing map data, you must update the maps again.
Device maintenance 53

Updating Maps and Software with Garmin ExpressYou can use the Garmin Express application to download and install the latest map and software updates for your device.1 If you do not have the Garmin Express application installed on your computer, go to garmin.com/express
and follow the on-screen instructions to install it (Installing Garmin Express, page 55).2 Open the Garmin Express application.3 Connect your device to your computer using a micro-USB cable.
The small end of the cable connects to the micro-USB port on your Garmin device and the large end connects to an available USB port on your computer.
4 When your Garmin device prompts you to enter file transfer mode, select Yes.5 In the Garmin Express application, click Add a Device.
The Garmin Express application searches for your device and displays the device name and serial number.6 Click Add Device and follow the on-screen instructions to add your device to the Garmin Express
application.When setup is complete, the Garmin Express application displays the updates available for your device.
7 Select an option:• To install all available updates, click Install All.• To install a specific update, click View Details and click Install next to the update you want.The Garmin Express application downloads and installs the updates onto your device. Map updates are very large and this process may take a long time on slower internet connections.NOTE: if a map update is too large for the internal storage of the device, the software may prompt you to install a microSD card in your device to add storage space (Installing a memory card for maps and data, page 58).
8 Follow the on-screen instructions during the update process to finish installing updates.For example, during the update process, the Garmin Express application may instruct you to disconnect and reconnect your device.
54 Device maintenance

Installing Garmin ExpressThe Garmin Express application is available for Windows® and Mac® computers.1 On your computer, go to garmin.com/express.2 Select an option:
• To view the system requirements and verify the Garmin Express application is compatible with your computer, select System Requirements.
• To install on a Windows computer, select Download for Windows.• To install on a Mac computer, select Download for Mac.
3 Open the downloaded file, and follow the on-screen instructions to complete the installation.
Device CareNOTICE
Avoid dropping your device.Do not store the device where prolonged exposure to extreme temperatures can occur, as it can cause permanent damage.Never use a hard or sharp object to operate the touchscreen as this may result in damage.Do not expose the device to water.
Cleaning the camera lensNOTICE
Avoid chemical cleaners and solvents that can damage plastic components.
You should clean the camera lens regularly to improve the quality of recorded video.1 Wipe the lens with a non-scratch lens cloth, optionally dampened with isopropyl alcohol.2 Allow the lens to air dry.
Cleaning the outer casingNOTICE
Avoid chemical cleaners and solvents that can damage plastic components.
1 Clean the outer casing of the device (not the touchscreen) using a cloth dampened with a mild detergent solution.
2 Wipe the device dry.
Cleaning the Touchscreen1 Use a soft, clean, lint-free cloth.2 If necessary, lightly dampen the cloth with water.3 If using a dampened cloth, turn off the device and disconnect the device from the power.4 Gently wipe the screen with the cloth.
Avoiding theft• Remove the device and mount from sight when not in use.• Remove the residue left on the windscreen by the suction cup.• Do not keep your unit in the glove compartment.• Register your device using the Garmin Express software (garmin.com/express).
Device maintenance 55

Restarting the DeviceYou can restart your device if it stops functioning.
Hold the power key for 12 seconds.
Removing the Device, Mount and Suction Cup
Removing the Mount from the Suction Cup1 Turn the device mount to the right or left.2 Apply pressure until the socket on the mount releases the ball on the suction cup.
Removing the Suction Cup from the Windscreen1 Flip the lever on the suction cup towards you.2 Pull the tab on the suction cup towards you.
AppendixBackup CamerasYour device can display the video feed from one or more connected backup cameras.
Connecting a Wired Backup CameraThe device mount includes a 3.5 mm composite video input jack. You can connect a wired backup camera and view the output on the device screen.
Plug the camera video cable into the video input jack on the mount.
56 Appendix

Pairing a BC™ 35 Backup Camera with a Garmin Navigation DeviceYou must enable the Wi‑Fi setting on your Garmin navigation device before you can connect to a camera.The BC 35 wireless backup camera is compatible with some Garmin navigation devices with Android. Go to garmin.com/bc35 for more information about device compatibility.You can pair up to four BC 35 wireless backup cameras with your compatible Garmin navigation device.1 Update your navigation device to the latest software.
Your device may not support the BC 35 camera without the latest software. For more information about updating, see the owner's manual for your navigation device.
2 Turn on the Garmin navigation device, and bring it within 3 m (10 ft.) of the camera.3 Select > Rear View.4 Select an option:
• If this is the first camera you are connecting to the navigation device, select Add New Camera.• If this is an additional camera you are connecting to the navigation device, select > Choose Camera >
Add New Camera.5 Follow the on-screen instructions.
NOTE: the pairing code or password is located on the transmitter or the camera.After you complete the pairing process with a camera for the first time, it connects automatically to the Garmin navigation device.
Viewing the Backup CameraYour device shows video from the connected backup camera in different ways, depending on how the camera is connected to power.1 Select an option to show video:
• If the camera is connected to a reverse lamp (recommended), place the vehicle into reverse.The device automatically shows video from the backup camera.
• If the camera is connected to a steady power source, select > Rear View to manually view the camera.2 Select an option to resume normal device operation:
• If the camera is connected to a reverse lamp (recommended), take the vehicle out of reverse.The device automatically resumes normal operation.
• If the transmitter is connected to a steady power source, select to manually hide the camera.
Switching CamerasWhen multiple backup cameras are transmitting to your device, you can switch between the views from the cameras.1 Select > Rear View.2 Select > Choose Camera.3 Select a camera.
The video feed from the camera appears, and the camera name appears at the top of the screen.
Connecting to a Wireless DisplayYou can show the contents of the device screen on a compatible external display wirelessly.1 Bring your device near the wireless display.2 Select Settings > Display > Cast.3 Select a wireless display.4 If necessary, enter the PIN.
Appendix 57

Data managementYou can store files on your device. The device has a memory card slot for additional data storage.NOTE: the device is compatible with Windows 7 and newer, and Mac OS 10.4 and newer. Mac computers may require additional third-party software to read and write files on Android devices.
About memory cardsYou can purchase memory cards from an electronics supplier, or purchase pre-loaded Garmin mapping software (www.garmin.com). Memory cards can be used to store files such as maps and custom POIs.
Installing a memory card for maps and dataYou can install a memory card to increase the storage space for maps and other data on your device. You can purchase memory cards from an electronics supplier, or go to www.garmin.com/maps to purchase a memory card with pre-loaded Garmin mapping software. The device supports microSD memory cards from 4 to 256 GB.1 Locate the map and data memory card slot on your device (Garmin® Overview, page 2).2 Insert a memory card into the slot.3 Press it in until it clicks.
Connecting the Device to Your ComputerYou can connect the device to your computer using a USB cable.1 Plug the small end of the USB cable into the port on the device.2 Plug the larger end of the USB cable into a port on your computer.3 When your Garmin device prompts you to enter file transfer mode, select Yes.Depending on your computer operating system, the device appears as either a portable device, a removable drive, or a removable volume.
Transferring data from your computer1 Connect the device to your computer (Connecting the Device to Your Computer, page 58).
Depending on your computer operating system, the device appears as either a portable device, a removable drive, or a removable volume.
2 On your computer, open the file browser.3 Select a file.4 Select Edit > Copy.5 Browse to a folder on the device.
NOTE: for a removable drive or volume, you should not place files in the Garmin folder.6 Select Edit > Paste.
Disconnecting the USB cableIf your device is connected to your computer as a removable drive or volume, you must safely disconnect your device from your computer to avoid data loss. If your device is connected to your Windows computer as a portable device, it is not necessary to safely disconnect the device.1 Complete an action:
• For Windows computers, select the Safely Remove Hardware icon in the system tray and select your device.
• For Apple computers, select the device, and select File > Eject.2 Disconnect the cable from your computer.
58 Appendix

Power cablesYour device can be powered in various ways.• Vehicle power cable• USB cable• AC adapter (optional accessory)
Charging the DeviceNOTE: this Class III product shall be powered by an LPS power supply.You can charge the battery in the device using any of these methods.• Install the device in the mount, and connect the mount to vehicle power.• Connect the device to an optional power adapter accessory, such as a wall power adapter.
You can purchase an approved Garmin AC-DC adapter suitable for home or office use from a Garmin dealer or www.garmin.com. The device may charge slowly when connected to a third-party adapter.
Changing the Fuse in the Vehicle Power CableNOTICE
When replacing the fuse, do not lose any of the small pieces and make sure they are put back in the proper position. The vehicle power cable does not work unless it is assembled correctly.
If your device does not charge in your vehicle, you may need to replace the fuse located at the tip of the vehicle adapter.1 Rotate the end piece anti-clockwise to unlock it.
TIP: you may need to use a coin to remove the end piece.2 Remove the end piece, the silver tip and the fuse .3 Insert a new fast-blow fuse that has the same current, such as 1 A or 2 A.4 Place the silver tip in the end piece.5 Push in the end piece and rotate it clockwise to lock it back into the vehicle power cable .
Appendix 59

Installing the Motorhome Charging Station AccessoryNOTICE
Failure to heed these installation requirements could result in damage to the product or vehicle.• You must choose a suitable mounting location for the charging station before drilling holes in the vehicle
wall.• You must verify the mounting surface allows the mount to be securely connected and the mounting screws
will not interfere with wiring or features in the wall.• You must use proper mounting screws for your vehicle's wall material. The included screws are intended for
installation on wood or fibreglass walls. Before installing the screws, you must verify the screws are the correct length and will not damage the exterior walls or any other components.
To install the motorhome charging station accessory, you need a Philips screwdriver and a drill with a 1.5 mm (1/16 in.) drill bit.The motorhome charging station accessory provides a permanent, wall-mounted charging station for your device. This allows you to use and charge the device in the living area of your motorhome.1 Place the mount against the wall, and use the six screw holes to mark the pilot hole locations.2 Remove the mount from the surface.3 Using a 1.5 mm (1/16 in.) drill bit appropriate for the wall material, drill a pilot hole in each of the six
locations you marked.
NOTICEDo not drill through the mount. This could result in damage to the mount or wall.
4 Line up the screw holes on the wall mount with the pilot holes, and secure the mount to the wall using six screws.
5 Press the socket in the device mount onto the ball of the wall mount until it snaps into place.
6 Route the bare-wire connectors to the motorhome battery or a 12-V power source.7 Connect the black wire to the negative (-) terminal of the battery, and connect the red wire to the positive (+)
terminal of the battery.
60 Appendix

8 Connect the mini-USB end of the power cable to the powered device mount.9 Place the navigation device onto the device mount.
Removing the Device, Mount and Suction Cup
Removing the Device from the Mount1 Grip the device by the top and bottom.2 Pull the bottom edge of the device towards you until it releases from the magnet.
Pulling the device straight towards you may cause the mount to release from the suction cup.
Removing the Mount from the Suction Cup1 Turn the device mount to the right or left.2 Apply pressure until the socket on the mount releases the ball on the suction cup.
Removing the Suction Cup from the Windscreen1 Flip the lever on the suction cup towards you.2 Pull the tab on the suction cup towards you.
Purchasing additional maps1 Go to your device product page at (www.garmin.com).2 Click the Maps tab.3 Follow the on-screen instructions.
Purchasing accessories• Optional accessories are available at garmin.com or from your Garmin dealer.
TroubleshootingThe suction cup will not stay on my windscreen1 Clean the suction cup and windscreen with surgical spirit.2 Dry with a clean, dry cloth.3 Mount the suction cup (Mounting and powering the Garmin device in your vehicle, page 3).
Troubleshooting 61

The mount does not hold my device in place while I driveFor the best results, you should keep the vehicle mount clean and position the device close to the suction cup.If the device shifts position while you are driving, you should complete these actions.• Remove the powered mount from the suction cup arm, and wipe the ball and socket with a cloth.
Dust and other debris may reduce the friction in the ball and socket joint and allow the joint to shift while you are driving.
• Rotate the hinged arm toward the suction cup as far as your windshield angle allows.Positioning the device closer to the windshield reduces the effect of jarring and vibration from the road.
My device is not acquiring satellite signals• Verify the location services feature is enabled.• Take your device out of car parks and away from tall buildings and trees.• Remain stationary for several minutes.
The device does not charge in my vehicle• Check the fuse in the vehicle power cable (Changing the Fuse in the Vehicle Power Cable, page 59).• Verify that the vehicle is turned on and is supplying power to the power outlet.• Verify that the interior temperature of the vehicle is within the charging temperature range indicated in the
specifications.• In the vehicle fuse box, verify that the fuse for the vehicle power outlet is not broken.
My battery does not stay charged for very long• Decrease the screen brightness (Display settings, page 50).• Shorten the display timeout (Display settings, page 50).• Decrease the volume (Garmin® Overview, page 2).• Turn off the Wi-Fi radio when it is not in use (Connecting to a Wireless Network, page 49).• Put the device in power saving mode when not in use (Turning the device on or off, page 4).• Keep your device away from extreme temperatures.• Do not leave your device in direct sunlight.
My video recordings are blurry• Clean the camera lens (Cleaning the camera lens, page 55).• Clean the windscreen in front of the camera.• Verify the area of the windscreen in front of the camera is cleared by the windscreen wipers, and move the
device, if necessary.
62 Troubleshooting

My memory card has degraded and needs to be replacedAll microSD memory cards wear out after they are overwritten a large number of times. Periodically formatting the card can extend the useful life and improve performance. Because the dash camera records continuously, you may need to replace the memory card periodically (Replacing the Dash Cam Memory Card, page 10). Your device detects memory card errors automatically and alerts you when it is time to format or replace your memory card.You can take these actions to help extend the useful life of the memory card.• Format the memory card at least once every six months (Formatting the Dash Cam Memory Card, page 11).• If the device displays a memory card error alert, first try formatting the memory card (Formatting the Dash
Cam Memory Card, page 11) and then, if necessary, replace the memory card (Replacing the Dash Cam Memory Card, page 10).
• Turn off the device when your vehicle is not in use.If your device is not connected to an ignition-switched vehicle power outlet, you should turn off the device when your vehicle is not in use to prevent the dash camera from recording unneeded footage.
• Transfer saved video footage to a computer.The memory card lasts longer when more free space is available on the card.
• Use a memory card with a higher storage capacity.Because higher-capacity memory cards are overwritten less frequently, they usually last longer.
• Use a high-quality memory card with a speed rating of class 10 or higher.• Purchase your replacement memory card from a high-quality manufacturer and a reputable vendor.
My video recordings are choppy or incomplete• For the best camera and video results, use a high-quality memory card with a speed rating of class 10 or
higher.A slower memory card may not record video quickly enough.
• If you are viewing videos on your smartphone using a wireless connection to the camera, try viewing them in another location with less wireless interference, or try transferring videos to the smartphone (Trimming and Exporting a Video, page 10).
• Transfer important recordings to a computer or smartphone, and format the memory card (Formatting the Dash Cam Memory Card, page 11).
• If the device displays a memory card error alert, first try formatting the memory card (Formatting the Dash Cam Memory Card, page 11) and then, if necessary, replace the memory card (Replacing the Dash Cam Memory Card, page 10).
• Update your device to the latest software (Map and Software Updates, page 52).
My device does not connect to my phone• Select Settings > Bluetooth.
The Bluetooth option must be enabled.• Enable Bluetooth wireless technology on your phone and bring your phone within 10 m (33 ft.) of the device.• Verify your phone is compatible.
Go to www.garmin.com/bluetooth for more information.• Complete the pairing process again.
To repeat the pairing process, you must unpair your phone and device (Deleting a paired Bluetooth device, page 40) and complete the pairing process (Live services, traffic and smartphone features, page 37).
Troubleshooting 63

Some smartphone features do not workIf you have paired your phone, but some smartphone features do not work, you can take these actions to resolve the issue.• In the app store on your smartphone, update the Garmin Drive app to the most recent version.• Verify that the feature you want to use is enabled on your device or smartphone (Enabling or Disabling
Bluetooth Features, page 37).
64 Troubleshooting

IndexSymbols2-D map view 363-D map view 36
Aaccessories 61active lane guidance 28addresses, finding 17advanced driver assistance system
(ADAS) 13, 14advanced driving assistance system
(ADAS) 12alarm volume 50alerts 11, 12
audio 49proximity points 49
answering calls 39apps 5audio, proximity points 49avoidances 32
area 32deleting 32disabling 32road 32road features 32tolls 31
Bbackup camera 56, 57. See camerasbattery
charging 3, 52, 59, 60, 62maximising 62problems 62
Bluetooth technology 37, 39, 63deleting a paired device 40disconnecting a device 40enabling 49pairing a phone 37
brightness 6
Ccables, power 59calls 39, 40
answering 39camera, pairing 57cameras 57
backup 57dash cam 8, 49red light 12speed 12switching 57
camper, profiles 6–8changing the search area 19charging your device 3, 52, 59, 62cleaning, device 55, 62cleaning the device 55cleaning the touchscreen 55computer, connecting 58coordinates 23current location 24
Ddash cam 49, 63
aligning 8playing video 9recording audio 8, 9recording video 8
deletingall user data 51paired Bluetooth device 40service categories 45service records 45trips 46
destinations 47. See locationsarriving 29
detours 30device care 55directions 29disconnecting, Bluetooth device 40display settings 50driver alerts 11, 12driving directions 29
Eediting, favourite trips 46emergency services 24EULAs 51Exit Services 34
Ffavourite locations 46
deleting 26files, transferring 58finding locations. 16, 18–22 See also
locationsaddresses 17categories 20coordinates 23junctions 23towns 34
finding services 21forward collision warning system (FCWS)
11–13Foursquare 22fuel, stations 24fuse, changing 59
GGarmin Connect 37Garmin Express 55
updating software 54going home 27GPS 4
simulator 50
Hhands-free phone calls 37Headset, pairing 38history 24home
editing location 27going 27
home screen 5customising 5
Iicons, status bar 6ID number 51
Jjunctions, finding 23
Llane departure warning system (LDWS) 11,
13, 14language 50latitude and longitude 23location 24location services 50locations 17, 47
current 24, 25recently found 24saving 25searching for 16, 23simulated 50
Locationscurrent 25venues 23
Mmap layers, customising 36
map view2-D 363-D 36
maps 20, 27, 33, 48data field 28, 35, 36detail level 48layers 36purchasing 61symbols 28theme 48tools 33, 34updating 52–54viewing routes 28, 29
media volume 50memory card 2, 9, 10, 58, 63
formatting 11installing 58
microSD card 2, 58, 63installing 10
mount, removing 56, 61mounting the device 60, 62
automobile 3removing from mount 61suction cup 3, 56, 61
muting, audio 43myTrends, routes 31
Nnational parks 21navigation 23, 28, 29
off-road 33settings 48
next turn 28notification volume 50notifications 5, 37–39
Ooff-road navigation 33owner's manual 43
Ppairing
deleting a paired device 40disconnecting 40Headset 38phone 37, 63
parking 18, 19, 23, 24, 29phone 64
pairing 37, 38, 63phone calls 39, 40
answering 39, 40dialling 40muting 40
photoLive 47points of interest (POI) 20–22
HISTORY 21venues 23
Points of interest (POI) 23Points of Interest (POI) 22power cables 52, 59
changing the fuse 59vehicle 3
power key 2, 4product support 43profiles, camper 6–8
QQuick Search 20
Rred light cameras 12removing mount 56, 61resetting
device 56trip data 35
resetting the device 51restoring settings 51
Index 65

restrictions, vehicle 6road conditions, weather 44route summary 29routes 26
adding a point 30, 46calculation 30calculation mode 46myTrends 31shaping 30starting 18, 19, 26, 27stopping 31suggested 31viewing on the map 28, 29
Ssatellite signals, acquiring 4, 50saved locations
categories 26editing 25
saving, current location 25screen, brightness 6search bar 17service history
categories 44, 45deleting 45editing 45records 44, 45
settings 48–51shaping a route 30shortcuts
adding 5, 25deleting 25
simulated locations 50sleep mode 4smartphone features 37
connecting 37Smartphone Link 37software
updating 52–54version 51, 56
sound 50specifications 52speech recognition 42speed cameras 12suction cup 56, 61
Ttheft, avoiding 55time settings 50tolls, avoiding 31tools, maps 33, 34touchscreen 6traffic 36, 41, 49
alternative route 31cameras 47incidents 36map 36receiver 41searching for delays 36
traffic cameras, view 47travel history 51trip information
resetting 35view 35
trip log, view 35trip planner 45, 46
editing a trip 46shaping points 46
TripAdvisor 22troubleshooting 61–64
Uunit ID 51up ahead 34
customising 34updating
maps 52–54
software 52–54USB, disconnecting 58
Vvehicle power cable 3vehicle profile
camper 6–8car 7
venues 23video 9
deleting 10playing 9, 10quality 62, 63recording 8, 9saving 9, 10
voice command 42activating 42navigating with 43tips for using 42wake-up phrase 42
volume 50
Wwarning icons 14–16weather 43
radar 44road conditions 44
Where Am I? 24, 25Wi-Fi, connecting 49, 57Wi‑Fi 53wireless camera. See cameras
Yyour current location 25
66 Index


support.garmin.com
GUID-260D9C3C-8A96-42DD-8D3B-6F6B7C616338 v5August 2021