Brilliant Bezeled Necklace
92
- Stitch a Clever 3-in- 1 Design Bracelet Necklace Wrap HOW TO MAKE A Mosaic Tile Necklace p. 56 BEAD THIS ZIGZAG CUFF Use Crescents LIKE NEVER BEFORE p. 42 We’ll Show You How p. 20 CREATE THIS Brilliant Bezeled Necklace ® Parade of Daisies p. 38 ALL NEW Fast & Fabulous STRINGING SECTION 6 EASY STEPS TO A VINTAGE-INSPIRED BRACELET p. 48 p. 67
-
Upload
khangminh22 -
Category
Documents
-
view
1 -
download
0
Transcript of Brilliant Bezeled Necklace

-
Stitch a Clever 3-in-1 Design
Bracelet Necklace Wrap
HOW TO MAKE A
Mosaic Tile Necklace p. 56
BEAD THIS ZIGZAG CUFF
Use Crescents LIKE NEVER BEFORE p. 42
We’ll Show You How p. 20
CREATE THIS
Brilliant BezeledNecklace
®®®®®
Parade of Daisies
p. 38
ALLNEW
Fast & FabulousSTRINGING SECTION
6 EASY STEPS TO A VINTAGE-INSPIRED BRACELET p. 48
p. 67


Manufacturer, Distributor, Wholesaler
The LatestSpring Fling
CaliTMIntroducing
3-Hole Czech Glass
EXCLUSIVEJohn Bead
Available in 50+ Colors3x8mm
CaliTM bead & necklace designed by Patty McCourt
John Bead CorporationBeads, Crystals, Components & Carnival
Tel: (416)757-3287 | Toll Free: 1(888)755-9055 | E-mail: [email protected] | www.johnbead.com

Saturn Connectionsby Carole Ohl
page 12
Designer of the Year Projects
20 MOUNTAIN LILY CUFFAgnieszka Watts
Stitch this fun and stylish zigzag cuff
24 ANCIENT PORTALS Kassie Shaw
Crescent beads create the swirl in these fascinating earrings
28 INTERCHANGEABLE HERRINGBONE BRACELETSMelissa Grakowsky Shippee
You can combine these segmented bracelets in infinite ways
Features
6 20TH ANNIVERSARY CELEBRATION: Stories that Inspire
16 QUICK-START GUIDE to Seed Beads & Seed Beading
Departments 4 Passing Through 8 Cool Stuff 11 Stitch Tips 33 Bead Artist: Cristie Prince 85 Techniques 85 Stitch Index 88 Bead Buzz
contents
XX 52
42
20
24
APRIL/MAY 2017 VOLUME 20 NUMBER 3
Projects
12 SIMPLY SEEDS: SATURN CONNECTIONSCarole Ohl
34 EBOOK EXCERPT: QUEEN OFDIAMONDS BRACELETCristie Prince
36 POPPY DELIGHT EARRINGSSuz Klumb
38 PARADE OF DAISIESAlice Haron
42 SERPENTINE CUFFMarie New
45 PIP PETAL PENDANTKim West
48 VICTORIAN ROSE CORSAGEDanielle Clarke
52 LACY CABLES BRACELETBarbara Falkowitz
56 CRYSTAL RAIN NECKLACEAnnette Holbert
60 CLEMATIS VINE BRACELETJacqui Higgins
2 WWW.INTERWEAVE.COM
On the CoverParade of Daisies by Alice Haron page 38
KITSAVAILABLE

For Stitch Index, see page 85.
28
56
45
36
71
74
48
73
67
BEADWORK APRIL/MAY 2017 3
Project RatingOur three-level project rating system is found on the opening page of each project.
£¡¡BEGINNER LEVELQuick and easy
££¡INTERMEDIATE LEVELModerate time commitment
£££ADVANCED LEVELLonger time commitment
Fast & Fabulous Projects
67 WEATHERED HUESCody Westfall
68 FANTASTICAL FRIDAAnne Potter
69 NESTLEDRejetta Sellers
70 GRAY GARDENAnne Perry
71 SPRING TAPESTRYErin Prais-Hintz
72 SUMMER MARIGOLDAndria McKee
73 LOVE MORELorelei Eurto
74 MADAGASCAN SUNSETKristina Hahn Eleniak

Attention Contributors! Always dreamed of se ng your designs in print?
Visit www.interweave.com/beading for our updated Contributor Guidelines,
including details on how to submit your beadwoven designs (which are
accepted on a continual basis), as well as when and how to submit your
easier strung designs for the Fast & Fabulous section.
Bead Fest Santa Fe returns March 23–26, offering a variety of hands-on
workshops and wares from over 100 vendors!
What’s Cookin’ in the Beadwork Office?
ei
i i
You’ll want to snatch up
one of the stylish Saturn
Connections bracelet kits
before they’re gone! Find the
kit at www.interweave.com
and instructions for making
the bracelet on page 12.
4 WWW.INTERWEAVE.COM
passing through
The beauty of spring is that it brings with it a sense of renewal.
Think of spring cleaning and how that age-old practice makes
your home seem fresh and new. Here at Beadwork, we’re
excited to kick off spring with a few added bonuses. For start-
ers, we’ve increased the page count to give you more content
and value. And while we’re still providing the same number of
intermediate and advanced projects, we’ve added more con-
tent suitable to those who may just be starting out, or that may appeal to experi-
enced beaders looking for a quick project.
We’re also bringing back the popular Fast & Fabulous section of easy, stylish proj-
ects (page 67). In these pages, you’ll find bracelet, necklace, and earring inspiration
featuring spring themes and palettes. In fact, the entire issue is chock-full of delicious,
colorful designs—perfect for freshening up your spring wardrobe. Take the Pip Petal
Pendant by Kim West, with its matte Lucite cabochon center and delightful Pip bead
petals (page 45). Or the Poppy Delight Earrings, in which Suz Klumb used circular
brick stitch to embellish leather flowers with brightly colored seed beads (page 36).
And Jacqui Higgins’s Clematis Vine Bracelet, which showcases SuperDuo components
that resemble the delicate petals of the clematis flower (page 60).
Another recent change we’re excited about is our upgraded cover paper to a higher-
quality matte stock, which we feel better reflects the gorgeous content inside.
Although Beadwork’s quality and approach haven’t changed, we’re also eager to wel-
com e new beaders. So during this season of beginning, I hope the projects in this issue
inspire you to try something new, whether it’s a new technique, unfamiliar materials,
or introducing a friend to the wonderful world of beadweaving! And I hope you’ll find
even more to love with the additional content we’ve thoughtfully curated for you!
Cheers!
Debbie Blair
Editor, Beadwork magazine
The Season of Beginning
Follow Beadwork on Facebook: facebook.com/BeadingDailyonFB
#BeadworkMagazine
EDITORIAL
EDITOR Debbie Blair
MANAGING EDITOR Lavon Peters
PROJEC T EDITOR Megan Lenhausen
ASSISTANT EDITOR Andrea Hoyt
COPY EDITOR Nancy Arndt
MARKETING & ADVERTISING
ADVERTISING MANAGER Marilyn C. [email protected], (877) 613-4613
ADVERTISING & CL ASSIFIED MANAGER Stephanie [email protected], (877) 613-4630
AD TR AFFICKER Cari Ullom
MARKETING MANAGER Hollie Kuhlmann
CREATIVE SERVICES
CREATIVE DIREC TOR Debbie Long
SENIOR DESIGNER Connie Poole
ILLUSTRATOR Bonnie Brooks
PHOTOGRAPHY George Boe, Ann Swanson
FOUNDER Linda Ligon
DIREC TOR OF CONTENT STR ATEGY Stephen Koenig
DIREC TOR OF MARKETING Peter Discoe
F+W MEDIA, INC.CHIEF E XECUTIVE OFFICER Thomas F.X. Beusse
CHIEF FINANCIAL OFFICER Debra Delman
CHIEF OPER ATING OFFICER Joe Seibert
CHIEF CONTENT OFFICER Steve Madden
CHIEF TECHNOLOGY OFFICER Joe Romello
SVP, GENER AL MANAGER F+W CR AF TS GROUP John Bolton
SVP, GENER AL MANAGER F+W OUTDOORS & SMALL BUSINESS GROUP Ray Chelstowski
VP, MANUFAC TURING & LOGISTICS Phil Graham
NEWSSTAND SALES Scott T. Hill, [email protected]
Designs in this issue of Beadwork® are for inspiration and personal use only. Beadwork
does not recommend, approve, or endorse any of the advertisers, products, services, or
views advertised in Beadwork. Nor does Beadwork evaluate the advertisers’ claims in
any way. You should, therefore, use your own judgment in evaluating the advertisers,
products, services, and views advertised in Beadwork. Exact reproduction for commercial
purposes is contrary to the spirit of good craftsmanship.
Beadwork (ISSN 1528-5634) is published bimonthly by Interweave, a division of F+W Media,
Inc., 4868 Innovation Dr., Fort Collins, CO 80525-5576. (866) 949-1646. USPS #018-351.
Periodicals postage paid at Fort Collins, CO 80525, and additional mailing offices. © 2017
F+W Media, Inc. All rights reserved. Reproduction in whole or in part is prohibited, except by
permission of the publisher. Subscription rate is $29.95/one year in the U.S., $34.95/one year
(U.S. funds) in Canada, and $39.95 (U.S. funds) in other countries (surface delivery). Printed
in the U.S.A. POSTMASTER: Please send address changes to Beadwork, PO Box 433289, Palm
Coast, FL 32143.
Retailers: If you are interested in carrying this magazine in your store, please contact us:
Toll Free (800) 289-0963. Email [email protected].
For Beadwork SUBSCRIPTION questions or concerns, contact us:Email address: [email protected]
U.S. Customer Service: (800) 849-8753
Intl. Customer Service: (386) 246-0105
U.S. Mail: PO Box 433289, Palm Coast, FL 32143
www.interweave.com

PRECIOSA Traditional Czech BeadsTM
PRECIOSA ORNELA, a.s. | Zásada 317, 468 25 Czech RepublicP +420 488 117 711, F +420 483 312 292, E [email protected]
preciosa-ornela.com
traditional-czech-beads.com
TO DISCOVER MORE ABOUTPRECIOSA Traditional Czech BeadsTM
VISIT
MANUFACTURERPRECIOSA ORNELACzech Republic
DISTRIBUTORS OF PRECIOSA Traditional Czech BeadsTM
AGENTS FOR USA AND CANADA
Bead & Trim, Inc. | 212-725-9845 | traditional-czech-beads.comJablonex Canada Inc. | 416-675-1326 | [email protected]
Traditional Czech Beads
PRECIOSA HillTM
John Bead Corp., Ltd. | 888-755-9055 | www.johnbead.comShipwreck Beads | 800-950-4232 | www.shipwreckbeads.comJohn F. Allen & Son, Inc. | 800-334-9971 | www.jfallen.com
Beadsmith / Helby Import | 732-969-5300 | www.beadsmith.comFrabels Inc. | 514-842-8561 | www.frabels.comHar-Man Importing Co. | 1-800-232-3769 | www.harmanbeads.com
Art NO.: 151 01 375SIZE: 8 mm
PRECIOSA HillTM

6 WWW.INTERWEAVE.COM
When I was six years old, my par-ents ran a seafood restaurant where my older sisters worked as
waitresses. Every night after work they would count their tip money, and I would be sad that I didn’t make any money to count. So, my mother taught me how to make neck-laces using metallic thread, beads, and a sim-ple chain stitch. My father, Carl “Pee Wee” Wilson, made a display for my necklaces in the restaurant, and I sold them to customers for $1 each. That way , at the end of each night, I would have money to count, too.
Once I was old enough to waitress, making and selling my necklaces became a thing of the past. But when my mother passed away in 1999, I started searching for something to fill the void. Beads became the answer, and
the meditative process was what helped me through my loss.
My sisters en-couraged me to go to the Bead Expo in Charleston,
South Carolina, where I took a workshop on bead embroidery. They also supported me on a trip to Pennsylvania to take a class with Sherry Serafini.
To celebrate the
twentieth anniver-
sary of Beadwork
magazine, we’re
publishing inspira-
tional stories from
you, our readers!
We would love to
hear how beading
has changed your
life, how you’ve
used beading to
change someone
else’s life, or any
other inspirational
story related to
beading. Find the
first inspirational
stories of this series
in the December
2016/January 2017
and February/
March 2017 issues
of Beadwork.
Send your story
(300 words or less)
to beadwork@
interweave.com.
We will publish one
story in each of the
next four issues of
Beadwork. If your
story is selected,
we will notify you
by email and will
ask for photos of
you, your beading
projects, your work-
space, etc.
Beadwork Magazine: Inspiring Beaders
for 20 Years!
Thirty-eight years after I sold my necklaces in my parents’ restaurant, Sherry Serafini, the queen of bead embroidery, came to my hometown of Madison, North Carolina. She taught workshops in the same building that used to be my parents’ restaurant so many years ago!
I think my mother, Beatrice Taylor Wilson, is my guardian angel. Ever since her passing, she has opened doors for me and guided me on a path to pursue a life without her.
After my first class with her, Sherry Serafini has come back numerous times to teach workshops for my friends and me in the same building. She has become a close friend and a guiding light on my journey with bead embroidery.
Since I began beading again, I have won blue ribbons in local competitions for my beaded designs. My husband, Billy, recently built me a fully furnished jewelry studio where I hope to teach classes one day. I now have a designated space to continue on my journey with beads.
Tammy with Sherry Serafini
Below: Tammy’s studio
CO
UR
TESY
OF
TAM
MY
LAW
SON
CO
UR
TESY
OF
TAM
MY
LAW
SON
tammy lawson: GUIDING LIGHT

BEAD STORES�–�Register as a reseller: 888-683-BEAD [2323] • www.CzechBeads.com • [email protected]
Artbeads www.Artbeads.comAura Crystals www.AuraCrystals.comBaubles & Beads www.BaublesAndBeads.comBeadaholique www.Beadaholique.com
Bead & Glass Boutique www.BeadAndGlass.comBead Unique www.BeadUniqueAZ.comBello Modo www.BelloModo.comBeyond Beadery www.BeyondBeadery.com
Bobby Bead www.BobbyBead.comDesign & Adorn Beading Studio www.DesignAndAdorn.comEclectica www.EclecticaBeads.comEureka Crystal Beads www.EurekaCrystalBeads.com
ASK YOUR LOCAL BEAD STORE FOR STARMAN BEADS OR ORDER FROM:
6.5mm CzechMates® 2-Hole Cabochon
3/5mm Prong™
2/10mm CzechMates® 3-Hole Beam™
Protect Me Bracelet by Iulia Postica
Introducing 3 New Shapes:CzechMates® 3-Hole Beam™CzechMates® 2-Hole CabochonStarman 1-Hole Prong
Fusion Beads www.FusionBeads.comJust Bead It www.JustBeadItConcord.comLima Beads www.LimaBeads.comMidwest Bead & Supply www.MidwestBeads.com
Potomac Bead Company www.PotomacBeads.comRed Panda Beads www.RedPandaBeads.com
Queen of the Night Bracelet by Miyuki Oitate
Cypress Leaf Bracelet by Jacqui Higgins
Cabochon Bracelet by Kim Leahy
Fireworks Pendantby Kathy Simonds
Sunflower Earrings by Olga Haserodt
Denali Cuff by Carole Ohl
New TrendSetter classes featuring the latest beads manufactured by Starman. Available through your local bead store.
AUTHORIZED DISTRIBUTORS

cool stuff ANDREA HOYT
4
5
78
2 3
6
8 WWW.INTERWEAVE.COM
1. Inspired by America’s national parks, such as Redwood, Denali, and Shenandoah, the high-relief charms of the Nature Collection by Nunn Design feature plant and animal imagery, organic shapes, and an antiqued finish. They are available in copper, gold, and silver at www.nunndesign.com (wholesale only) or check your favorite bead retailer.2. The new 3×5mm fire-polished donuts from The BeadSmith feature a lovely faceted texture and twenty
rich colors and finishes, including red dark travertine and green turquoise dark travertine, shown here. Visit www.beadsmith .com (wholesale only) or check your favorite bead retailer.3. Inspired by the colors of vintage California fruit-crate advertisements, the beads of the Pacifica collection by Starman are available in a variety of shapes. With soft, glowing colors, the new 14mm cushion rounds are beautiful in both beadwoven and
strung designs. Visit www.czechbeads.com (wholesale only) or check your favorite bead retailer.4. Give your beadwork the look of metal—without the weight—with the new fire-polished micro spacers from the The BeadSmith. These spacers are 2×3mm and come in eight metallic colors and finishes. Use them alongside metallic Silky beads, which are now available in 5mm. Visit www.beadsmith.com or check your favorite bead retailer.
5. Use classic stitches and basic materials to create wearable but elegant beaded jewelry for any occasion in Eve Leder’s Casual Bead Elegance, Stitch by Stitch (Kalmbach). Organized by stitch, this project-focused book will take you from simple to more complex technique applications, making it a great resource for beaders of all levels. Available at your favorite bead or book store.
THE STAFF OF BEADWORK INVITES YOU TO SEND YOUR NEW BEADWORKING PRODUCTS FOR CONSIDERATION IN COOL STUFF.
1

HANDPICKED FAVORITES IN THE
9
10
BEADWORK APRIL/MAY 2017 9
6. It’s not hard to be charmed by the Dahlia beads from Nirvana Beads. They’re a perfect 14mm in diameter and are available in an array of pretty colors and finishes, such as Picasso, silver, gold, turquoise, and mercury glass. They’re great for stringing but can also be used as a button or in bead embroidery. Find them in twenty-six colors at www.nirvanabeads.com (wholesale only) or check your favorite bead retailer.
7. Unlike a small tube of mixed beads, the new seed bead palettes from Fusion Beads can be used to create an entire project from start to finish, with beads to spare. A palette includes ten 5-gram bags of size 8º or 11º seed beads in expertly coordi-nated colors. Find the “Bouquet” palette pictured here, as well as fifty-six others, at www.fusionbeads.com.
8. The bronze kumihimo clasps by Kim Fox Jewelry Design are so striking and unique that they can easily double as a focal. Held together by strong rare-earth magnets, they are exceptionally secure with a pleasing heft. Visit www.phxfox.com.9. Available as two-sided charms, links, or chains, the new checker-board cubic zirconia crystals from Halstead offer expansive design possibilities. Find them in amethyst,
black, citrine, red, and clear at www.halsteadbead.com.10. With mixes such as Sapphire Ice, Cleopatra Gold, and Black Tie, the new Swarovski crystal and pearl designer blends are so pretty that you’ll be tempted to leave them in their tubes. Find them in 3mm, 4mm, and 6mm sizes at www.artbeads.com.
PLEASE SEND ALL SUBMISSIONS TO [email protected] AND INCLUDE COMPLETE PRODUCT INFORMATION.
www.interweave.com
We are pleased to introduce our new YouTube video series,
BeadWise At BeadWise we’ll be demonstrating quick and clever
bead hacks, tips, and tricks. Tune in to our first installment to learn how to create an earring holder or display out of a picture frame in just a few simple
steps—and keep checking back to see what other beady tricks we have up our sleeve at
www.interweave.com/beadwise.
In Global Style Jewelry, Anne Potter traverses the globe in search of jewelry inspiration. Follow along and create a colorful tile bracelet inspired by the mosaics of Gaudí or hand-dyed Incan-style beads for a stunning neckpiece. With detailed step-by-step instructions and clear photos, this book will let you explore diverse jewelry-making techniques such as stringing, beadweaving, wirework, macramé, metal stamping, and chain maille. Make this book your ticket to a world of jewelry adventure! Find it at www.interweave.com.

10 WWW.INTERWEAVE.COM
Ranger and ICE Resin® are pleased to announce exciting new additions to the ICE Resin® brand including German Glass Glitter Shards, Leather Cord, Luminous Layers, Tissue Paper, Resin Squeegee and more. ICE Resin® offers a variety of products for jewelry and mixed media applications. To see the entire line of ICE Resin® products, projects, videos, tips & techniques, visit www.rangerink.com.

BEADWORK APRIL/MAY 2017 11SEE P. 94 FOR HELPFUL TECHNIQUE INFORMATION. SEE P. 4 FOR PROJECT-LEVEL INFORMATION.
Take a look at these two right-angle-weave samples. They’re made using the same beads, the same thread, and the same stitch configuration. So, why do they look so different? The answer is simple: thread tension. Here, Beadwork’s founding editor Jean Cox shares a few basic techniques to help you get your thread tension right.
Thread TensionJean Cox
stitch tipsLESSONS IN BEADWEAVING
s. ad,
y look Here, basic
ght.
A WORD ABOUT WAXNo matter what type of thread you use, wax it before you use it. I like to use good old-fashioned beeswax, even on my FireLine. The stickier the wax, the more it helps hold your thread in place. (Note that thread conditioner works, too, but its primary benefit is to make threads slick and demagnetized and to keep them from fraying. These are all wonderful and important attributes but not necessarily ideal for helping to increase the thread tension.)
USING THE TAILMy favorite technique for maintaining thread tension is working with the tail thread. I wrap it around the pinkie of my nondominant hand—the hand that’s not stitching—so that after each stitch I can pull the beadwork away from the needle with my dominant hand. I often also wrap the working thread around the fingers of my dominant hand to get extra torque while I’m pulling. This ensures that all the threads are tight, providing surprisingly strong tension.
Thread NotesYou might not think so at first, but
your tension can differ from thread to
thread. A parallel-fiber nylon thread
such as Nymo will relax a bit once it’s
stitched, so pull it to stretch it out
before you get started. A braided
beading thread such as FireLine
doesn’t require pre-stretching.
DOUBLED THREADCutting an extra long length of thread and pulling the needle to the center so you can work with doubled thread is another way to ensure good thread tension. You’ll fill the bead holes more quickly, which gives your work more structural support. When you use dou-bled thread, make sure the project doesn’t re-quire multiple thread passes through beads too small to accommodate them.
REINFORCING THREAD PATHSPassing through the beads after they’ve been stitched in place is a great way to reinforce your beadwork and firm up the tension. Because the beads are already placed, it’s easier to pull your thread tight without having to hold onto newly placed beads. And, as with doubled thread, fill-ing the bead holes with more thread passes adds body to your work.
Tension BeadsYou’ll sometimes see instructions that start
with the advice “Add a tension bead.” A
tension bead is any bead that you string on the
end of your thread to keep newly added beads
from falling off. In my opinion, this is actually
misnamed; although temporarily anchoring a
bead at the start is a great way to stop beads
from slipping off (the alternative name for this
is a stop bead or stopper bead), it absolutely
does not provide tension to your beadwork.

12 WWW.INTERWEAVE.COM SEE P. 85 FOR HELPFUL TECHNIQUE INFORMATION. SEE P. 3 FOR PROJECT-LEVEL INFORMATION.
Create components that are out of this world using herringbone and ladder stitches, then form seamless connections for an intriguing bracelet design.
1) COMPONENTS. Use circular herringbone stitch and ladder stitch to make the components:Round 1: Use 2' of thread to string 16B, leav-
ing a 4" tail. Pass through the beads twice to form a circle and exit through the first B strung (Fig. 1, green thread).
Center: String 1D; pass back through the eighth through first beads strung in Round 1 (Fig. 1, blue thread). Pass through the D; pass through the ninth through six-teenth beads strung in Round 1. Pass through the first 2B of Round 1 (Fig. 1, red thread).
Round 2: String 2B and pass through the next 4B of Round 1 to form a herringbone stitch; repeat three times. Note: For this and subse-quent rounds, step up through the first bead added in the current round (Fig. 2, blue thread).
Saturn ConnectionsCarole Ohl
TECHNIQUEScircular herringbone stitchladder stitch
PROJECT LEVEL ££¡
MATERIALS0.5 g light smoky pewter galvanized
size 15° seed beads (A)5 g light smoky pewter galvanized size
11° seed beads (B)2 g matte metallic blue slate AB size 11°
cylinder beads (C)9 polychrome orchid aqua 6mm
pressed-glass rounds (D)1 silver 16×10mm 2-strand tube claspSmoke 4 lb FireLine braided beading
thread
TOOLSScissorsSize 11 or 12 beading needle
FINISHED SIZE7"
simply seedsSPOTLIGHT ON SEED BEADS
Round 3: String 2B and pass down through the next B of the previous round to form a herringbone stitch, then string 4C and pass up through the following B of the previous round; repeat three times (Fig. 2, red thread).
Round 4: String 2B and pass down through the next B of the previous round to form a herringbone stitch, then string 6C and pass up through the following B of the previous round; repeat three times (Fig. 3, green thread).
Round 5: String 2B and pass down through the next B of the previous round to form a herringbone stitch, then weave through beads to pass up through the following B of the previous round; repeat three times. Weave through beads to exit from the near-est 5C of Round 4 (Fig. 3, blue thread).
Main ColorwayColorway
Fig. 1: Stitching Round 1 and adding the center of a component
KITS ARE NOW
AVAILABLE FOR THIS PROJECT AT
www.interweave.com

BEADWORK APRIL/MAY 2017 13SEE P. 85 FOR HELPFUL TECHNIQUE INFORMATION. SEE P. 3 FOR PROJECT-LEVEL INFORMATION.
Link: String 4B; pass through the last 4C exited and the 4B just added (Fig. 3, red thread). Pass through the last 4C exited and the 4B just added to reinforce. Secure the threads and trim. Set aside.
Repeat this entire step eight times for a total of 9 components.
2) ASSEMBLY. Use ladder stitch to connect the components:Top Connection: Add a stop bead to 6' of
new thread, leaving a 16" tail. With the com-ponent’s link to the right, pass up through the top 5C at the left side of 1 component. Note: The center 6mm round will be raised on one side of each component, creating the front; when connecting the components, take care that each component is faceup. Weave through beads to exit up through
artist’s tips ❯ Use only galvanized round seed
beads. Different finishes can affect
the size of seed beads, which
might result in an uneven look.
❯ Knots aren’t required in this
project. Numerous thread
reinforcements keep the beads in
place and provide the structure
needed for the turnarounds.
❯ Using tight tension is
recommended.
the top B of Round 5 at the herringbone-stitched corner above the link (Fig. 4, pink thread). *Align 1 new component next to the previous component, with the new component’s link to the right. String 3B; pass down through the mirror B of the new component and weave through beads to exit up through the B of the new component next to the last B exited (Fig. 4, orange thread). String 1A; pass down through the mirror B of the first com-ponent and weave through beads to exit down through the top B at the end of the herringbone-stitched corner below the first component’s link (Fig. 4, purple thread).
Bottom Connection: String 1A; pass up through the mirror B of the new compo-nent and weave through beads to exit down through the B of the new component
next to the last B exited (Fig. 4, green thread). String 3B; pass up through the mir-ror B of the first component and weave through beads to exit down through the 4B of the first component’s link (Fig. 4, blue thread).
Center Connection: Pass up through the center 4C of the nearest edge in the new component. Pass through the last 4B exited on the previous component and the last 4C exited on the new component. Weave through beads to exit up through the top B of Round 5 at the herringbone-stitched cor-ner above the new component’s link (Fig. 4, red thread).
Repeat from * seven times to connect the re-maining components, but after the last repeat, weave through beads of the last component added to exit up through the 4B of its link.
Fig. 2: Working Rounds 2 and 3 of a component
Fig. 3: Finishing Rounds 4 and 5 and the link of a component
Fig. 4: Connecting the components

14 WWW.INTERWEAVE.COM SEE P. 85 FOR HELPFUL TECHNIQUE INFORMATION. SEE P. 3 FOR PROJECT-LEVEL INFORMATION.
Saturn Connections
3) CLASP 1. String one loop of one half of the clasp and pass back through the last 4B exited (Fig. 5, blue thread); repeat, stringing the second loop of the same half of the clasp (Fig. 5, red thread). Repeat the thread path of this step twice. Secure and trim the working thread.
4) CLASP 2. Remove the stop bead. Add a needle to the tail thread. String 4B and pass through the last 4C exited and the 4B just added; repeat the thread path to reinforce. Repeat Step 3, using the second half of the clasp and taking care that the halves are posi-tioned to close properly. ●
CAROLE OHL has been a beader, teacher, and beadweaving designer since 2003. She also served as a Starman TrendSetter in 2015–2017. She owns a bead store in Kettering, Ohio, called Bead Stash that serves to inspire and preserve the community’s love of beading. Contact Carole at [email protected] and find her tutorials at www.openseed.etsy.com.
RESOURCES Check your favorite bead retailer or contact: Seed beads, Delica cylinder beads, and thread: Charlene’s Beads, (760) 530-9436, www.cbbeads.com. Pressed-glass rounds: Aura Crystals, (888) 213-9484, www.auracrystals.com.
Fig. 5: Attaching the clasp
Alternate Colorway Materials
AMBER0.5 g pewter galvanized size 15° seed
beads (A)5 g pewter galvanized size 11° seed
beads (B)2 g dark amber sparkling size 11°
cylinder beads (C)9 rose gold topaz luster opaque 6mm
pressed-glass rounds (D)1 antiqued brass 16×10mm 2-strand
tube claspSmoke 4 lb FireLine braided beading
thread
MULTICOLOR0.5 g metallic dark bronze size 15° seed
beads (A)5 g metallic dark bronze size 11° seed
beads (B)0.5 g turquoise AB size 11° cylinder
beads (C; use for 2 components)0.5 g lilac AB size 11° cylinder beads
(C; use for 2 components)0.5 g metallic rhubarb luster
size 11° cylinder beads (C; use for 2 components)
0.5 g mallard luster size 11° cylinder beads (C; use for 2 components)
8 bronze clay oxidized 6mm pressed-glass rounds (D)
1 antiqued brass 13mm toggle claspSmoke 4 lb FireLine braided beading
thread

FREE Pattern Downloads

16 WWW.INTERWEAVE.COM
Tammy Honaman
quick-start guideTO SEED BEADS
& SEED BEADING
New to seed beading and not sure where to start? Pick out some beads and get your creative juices flowing!
We asked Tammy Honaman, web producer for the Interweave
Bead and Jewelry groups, founding editor of Step-by-Step Beads,
and bead artist extraordinaire, to introduce us to the
basics. If you’re a seasoned pro, consider this
a refresher or share it with a friend!

BEADWORK APRIL/MAY 2017 17
seed beads Seed beads have been around for ages, originally used as a commodity in trading for other goods and services. These tiny pieces of glass are available in colors beyond the spectrum, thanks to finishes and layering techniques, and in sizes and shapes unheard of until recently, thanks to manufacturers push-ing boundaries and developing new beadmaking techniques.
Seed beads used in beadweaving and jewelry making are manufactured primar-ily in glass factories in the Czech Republic and Japan. Each bead has its own unique properties, and each manufacturer has a niche. Beads are sold in tubes and con-tainers, as hanks, and in bags.
differences among manufacturersCzech seed beads are typically donut-shaped and more irregular than Japa-nese seed beads. This difference, an attribute we use to our advantage, makes Czech seed beads perfect for use in freeform work, stringing projects, and anywhere a more organic feel will work. Czech beads are sold by the hank.
Czech Charlotte beads are also donut-shaped with a facet cut onto the surface of the bead (just one facet), of-fering a little sparkle as the facet catches the light.
Japanese seed beads are generally more uniform in shape, the “donut” be-ing larger, more square, and taller than in Czech seed beads. These beads are cut to be precise, but from time to time you do need to cull misshapen beads.
Japanese seed beads can also be found in a cylindrical shape called cyl-inder beads. These beads look almost square from the side, they have a larger hole end to end, and their precise cut means you will rarely have to cull mis-shapen beads.
Cylinder beads are beautiful in wo-ven designs, creating a smooth finish (almost fabric-like), as well as yielding a lighter-weight piece because the walls of these beads are much thinner than in traditionally shaped seed beads.
seed bead siz ingSeed beads are sold by size; the larger the bead, the lower the number. Each manufacturer and each type of bead uses a different metric for measuring, so this area can be a bit tricky. For
example, a size 11° Delica does not equal a size 11° seed bead. And a Czech size 11° is not necessarily the same size as a Japanese size 11°. They are close, but if you are looking to create a pattern using a specific size and manufacturer, and want the design to be exactly the same, be sure to buy beads in the specified size and by the same company whenever possible.
shaped seed beadsIt’s fun to work other shaped beads into a design, and it’s fun to see how exchanging a seed bead for a triangle or a hex bead completely changes the look of a finished design. (Triangle and hex beads are sized the same as seed beads, so this is an easy swap and a good example of a simple substitution.)
Here’s an overview of a few of the other shapes available to us today.
CUBES—these look like mosaic tiles when worked into a woven design; commonly available in 1.5mm, 3mm, and 4mm sizes.
BUGLES—long tubes of glass available in a variety of lengths; these work well in beaded strands, as fringe, and stitched to fabric or leather. Bugles typically have sharp edges, so either string a round seed bead on either end of a bugle bead to protect the thread or use a stronger stringing material, such as FireLine or WildFire thread.
Cylinder beads
Czech beads
Cubes
Czech and Charlotte
Japanese and cylinders

18 WWW.INTERWEAVE.COM
FRINGE OR DROP—teardrops or raindrop-shaped beads with a lateral hole at the top; when strung, the larger “drop” portion of the beads hang below the thread.
TWO-HOLE “SEED” BEADS—the latest in-clude BiBo, SuperDuo, MiniDuo, Twins, and Rullas. These beads, Tic-Tac–like in shape, have unique holes, one on each end drilled front to back, not lengthwise from end to end. These beads can be woven into place like regular seed beads yet create an entirely different look.
TWO-HOLE TILE-SHAPED—called Czech-Mates Tile or Tila depending on manu-facturer, with slight differences between the two and with the two holes running parallel to each other, top to bottom.
TWO-HOLE HALF TILE—called Czech-Mates Brick or half-Tila depending on manufacturer. Essentially half of a Tile or Tila.
DROPS—new and updated versions of the drop and fringe beads. Names include magatama, long magatama, rizo, mini dagger, and thorns. Varied in size but each has one hole at the top running across the smaller end, not through the length of the bead.
Note: For an in-depth guide on more shaped beads, see the “Expanded Guide to Shaped Beads” in Quick + Easy Beadwork 2016.
fi nishesSeed beads are available in every color imaginable. Finishes added to these colors create an even greater color pal-ette. Here’s the rundown of words used to describe seed bead colors and their finishes.
OPAQUE—bold solid color.
TRANSPARENT—see-through colors of glass; offering a more subtle approach to color but hardly boring!
SILVER-LINED—a flashy silver lining to a transparent color bead.
COLOR-LINED—a colored lining to a trans-parent color bead. Talk about combina-tions that turn your palette on end!
METALLIC—an opaque bead with a reflective surface, often in metal colors such as gold, silver, bronze, etc. This finish is added differently by each manufacturer, and in some cases, the “effect” wears with use.
METAL—seed beads made from metal. More expensive and a heavier finished weight when used in a design, but what a great feeling to wear a peyote-woven cuff made from metal seed beads.
MATTE FINISH—soft, etched look, non-reflective; a finish applied to an opaque or transparent color.
IRIS AND AURORA BOREALIS (AB)—a finish added to the beads creating an oil slick–like appearance.
STRIPES—made using a caning process in which different colors are stacked together before pulling and cutting the tubes into beads. Striped beads look like Old World–trading beads.
toolsNo matter our craft, we must have our tools! The essentials include:
NEEDLES—beading needles are unlike any other needle, sewing or otherwise. The needle, aside from the point, is the same width the entire length, even at the eye. This makes it possible to thread the needle with your stringing mate-rial and still be able to pass the needle through the bead. Brilliant!
There are several sizes available, as well as different lengths and quality. The lower the number, the thicker the needle. I tend to use size 10 needles for general beading of size 11° and 8° beads and size 12 needles when working with size 15° seed beads. If your pattern has you weaving several passes of thread through a seed bead, chang-ing to a thinner needle will help you to be able to keep stitching.
Iris and Aurora Borealis
Opaque
Transparent
quick-start guide

BEADWORK APRIL/MAY 2017 19
THREAD—most patterns will offer you the best suggestion on which thread to use for the beads in the design. This advice is usually offered based on trial and error.
Common thread suggestions include:NYLON—a very strong, durable thread, great for most beading projects. Each brand of nylon thread uses letters to indicate size, i.e., Nymo size D (the thickest) or Nymo OO (the finest). Re-gardless of brand, this type of thread is available in a wide array of colors.
BRAIDED BEADING THREAD—originally used for fishing, these threads are great for designs requiring stronger thread. These threads are strong yet supple and don’t change the drape of your design by much.
POLYETHYLENE—a very strong cord yet also fine and very suitable for weav-ing seed beads; especially good when weaving beads with sharp edges such as crystals and bugle beads. Use wire cutters, a thread burner, or Fiskars chil-dren’s scissors to cut this cording. ELASTIC—a fun alternative stringing ma-terial that can be finished with a knot for a quick and easy stretchy bracelet.
GOOD SHARP SCISSORS—having a good pair of scissors on hand for cutting nylon or silk thread is a must. Good scissors have a fine point needed for cutting the thread close to your beadwork as well as for cutting the end of thread without fraying, so you can thread on a needle and have a clean finished design.
Keep cutters or a thread burner on hand, too, so when working with Fire-Line or other heavier beading material you can cut the material cleanly as well as save the blades of your good scissors.
BEADING MAT—many materials can serve you well when it comes to keeping your beads in place on your work surface. You can simply use a hand towel, a piece of Velux blanket, or a beading mat found at your local bead store. The needle will not “stick” into the fabric, as it’s dense and foam-like, and the beads will sit high on the surface rather than sink down as they would on softer material.
wax es and conditionersLike our hair, some threads just behave better when waxed or conditioned. Tra-ditionally, beeswax is used to coat the threads, making them less susceptible to fraying, tangling, and knotting. Mi-crocrystalline wax, a synthetic beeswax, is what I prefer over beeswax, because it’s not as sticky and doesn’t require softening as beeswax sometimes needs.
Thread Heaven, a silicone-based conditioner, works the opposite of both waxes. It causes the thread to repel, nearly eliminating tangles; it also creates a nice gliding effect.
basic stitchesWith the beads, tools, and supplies covered, let’s get to some basic stitches so you can get to weaving!
For an illustrated how-to, check out the Techniques starting on page 85.
BRICK STITCH creates a staggered bead pattern, such as in traditional brick laying.
FRINGE is a great way to add flair to the edge of beadwork, clothing, and even home décor and accessories. Use a drop bead as the last bead in each row for even greater impact!
HERRINGBONE STITCH creates a beautiful weave in which the beads lie in a slight V-shaped pattern.
LADDER STITCH is a good foundation row for many stitches.
NETTING is often worked off the edge of a beaded trim or other foundation or can be used to quickly cover objects.
PEYOTE STITCH creates a similar pattern to brick stitch but begins, and is stitched, differently.
RIGHT-ANGLE WEAVE, also known as RAW, results in an almost fabric-like piece of beadwork and can be woven with either one needle or two.
SQUARE STITCH is a simple stitch that’s wonderful for adding embellishments to formed metal shapes and for edging other beadwork. ●
as

20 WWW.INTERWEAVE.COM SEE P. 85 FOR HELPFUL TECHNIQUE INFORMATION. SEE P. 3 FOR PROJECT-LEVEL INFORMATION.
Mountain Lily Cuff AGNIESZKA WATTS
designerof the year
2017
Main Colorway
OPTIONCREATE A CUFF WITH MORE
THAN ONE FLOWER.

BEADWORK APRIL/MAY 2017 21SEE P. 85 FOR HELPFUL TECHNIQUE INFORMATION. SEE P. 3 FOR PROJECT-LEVEL INFORMATION.
1) INSIDE CUFF. Use tubular diagonal pey-ote stitch to form the inner layer of the cuff:Rounds 1 and 2: Use 5' of FireLine thread to
string {3C, 15D, and 15E} eight times, leav-ing a 4" tail. Use the working and tail threads to tie a square knot to form a loose circle, and pass through the first C strung (Fig. 1, green thread). Note: When tying the knot, leave a 3-bead-wide gap in the thread; the next 2 rounds will be easier to stitch and the beadwork will tighten as you work and close the gap.
Round 3: String 2C; skip the nearest C of the previous rounds and pass down through the next C to form a herringbone stitch. Work 7 peyote stitches with 1D in each stitch. Skip the next 1D/1E and pass up through the following E. Work 7 peyote stitches with 1E in each stitch. Repeat from the beginning of this round seven times. Note: Step up for this and subsequent rounds by passing through the first bead added in the current round unless other-wise noted (Fig. 1, blue thread). Take care that the beadwork isn’t twisted.
Round 4: String 2C; pass down through the next C of the previous round to form a herringbone stitch. Work 7 peyote stitches with 1D in each stitch. Pass up through the nearest E of the previous round. Work 7 peyote stitches with 1E in each stitch. Repeat from the beginning of this round seven times (Fig. 1, red thread).
Use tubular diagonal peyote stitch and herringbone stitch to form two multicolored zigzag cuffs, then connect them and attach a three-dimensional flower made with the same techniques.
TECHNIQUEStubular herringbone stitchtubular diagonal peyote stitchfringeright-angle weave variation
PROJECT LEVEL £££
MATERIALS0.5 g orange semi-glazed size 15° seed
beads (A)0.5 g gold-lined crystal size 15° seed
beads (B)4 g metallic olive opaque size 11°
cylinder beads (C)7 g matte metallic gold iris size 11°
cylinder beads (D)7 g metallic light bronze size 11°
cylinder beads (E)7 g zest (lime) galvanized Duracoat
size 11° cylinder beads (F)7 g matte metallic olive gold size 11°
cylinder beads (G)16 California gold-rush 2mm fire-polished
rounds (H)22 24k gold-plated 2mm fire-polished
rounds (J)1 polychrome olive mauve 8mm pressed-
glass roundSmoke 4 lb FireLine braided beading
threadContrasting color sewing thread
TOOLSScissorsSize 10 beading needle
FINISHED SIZE 7 ¼ " (inside circumference)
Rounds 5 and 6: Repeat Round 4 twice.Round 7: String 2C; pass down through the
next C of the previous round to form a her-ringbone stitch (Fig. 2, orange thread). Work 7 peyote stitches with 1D in each stitch. Pass down through the nearest cor-ner 5D of the previous rounds to exit from the nearest D of Round 1 (Fig. 2, purple thread). String 1H and 1B; pass back through the H to form a fringe and pass up through the nearest corner 6E of the previous rounds to exit from the nearest E of Round 6 (Fig. 2, green thread). Work 7 peyote stitches with 1E in each stitch (Fig. 2, blue thread). Repeat from the beginning of this round seven times (Fig. 2, red thread).
Rounds 8–12: Repeat Round 4 five times.Rounds 13–22: Repeat Round 4 ten times,
using E for D and D for E.Round 23: String 1C, 1H, and 1B; pass back
through the H to form a fringe. String 1C; pass down through the next C of the previ-ous round to form a herringbone stitch (Fig. 3, purple thread). Work 7 peyote stitches with 1E in each stitch. Pass up through the nearest D of the previous round (Fig. 3, green thread). Work 7 pey-ote stitches with 1D in each stitch (Fig. 3, blue thread). Repeat from the beginning of this round seven times (Fig. 3, red thread). Secure the threads and trim. Set aside.
Fig. 1: Stitching Rounds 1–4 of the inside cuff
Fig. 2: Forming Round 7 of the inside cuff
Fig. 3: Working Round 23 of the inside cuff

22 WWW.INTERWEAVE.COM SEE P. 85 FOR HELPFUL TECHNIQUE INFORMATION. SEE P. 3 FOR PROJECT-LEVEL INFORMATION.
4) CUFF CONNECTION. Note: The follow-ing stitch will form the permanent cuff con-nection. Use 2' of FireLine thread to connect the outside cuff to the inside cuff by weaving through beads of both cuffs around the cir-cumference of the beadwork. Secure the threads and trim. Remove the temporary threads from Step 3. Set aside.
5) FLOWER. Use tubular diagonal peyote stitch and right-angle weave to stitch a flower:Rounds 1 and 2: Note: The flower is worked
in the same manner as the cuffs. Use 5' of FireLine thread to string {3C, 13G, and 13F} six times, leaving a 4" tail. Use the working and tail threads to tie a square knot to form a loose circle and pass through the first C strung. Note: When tying the knot, leave a 3-bead-wide gap in the thread; the beadwork will tighten with each subse-quent round and close the gap.
Round 3: String 2C; skip the nearest C of the previous rounds and pass down through the next C to form a herringbone stitch. Work 6 peyote stitches with 1G in each stitch. Skip the next 1G/1F and pass up through the following F. Work 6 peyote stitches with 1F in each stitch. Repeat from the beginning of this round five times. Note: Step up for this and subsequent rounds by passing through the first bead added in the current round unless other-wise noted. Take care that the beadwork isn’t twisted.
designerof the year
2017
artist’s tips ❯ Use a regular sewing needle to add
the temporary connection stitches in
Step 3. Sewing needles are stronger
and will be able to push through the
cuff layers more easily.
❯ This bracelet fits over a medium-
sized hand and wrist. Each set of
3 beads/15 beads/15 beads added in
Rounds 1 and 2 of the cuffs adds
about 1". To shorten the bracelet,
string 3 beads/13 beads/13 beads in
Rounds 1 and 2; each set will add ¾".
Fig. 4: Adding temporary connection stitches
2) OUTSIDE CUFF. Use tubular diagonal peyote stitch to form the outer layer of the cuff:Rounds 1–7: Repeat Step 1, Rounds 1–7
using G for D, F for E, and J for H.Rounds 8–12: Repeat Step 1, Round 4 five
times using G for D and F for E.Round 13: Repeat Step 1, Round 23 using G
for E, F for D, and J for H. Secure the threads and trim.
3) TEMPORARY CONNECTION. Note:The following stitches will keep the bead-work aligned when forming the permanent cuff connection and will be removed after Step 4. Flip the outside cuff upside down and slide it over the inside cuff so that the herringbone-stitched corners are aligned and the points of the cuffs alternate accord-ing to Fig. 4. Taking care that the outside cuff is centered at the middle of the inside cuff,
use short pieces of sewing thread to add loose temporary stitches around the circumference of the
beadwork that connect the cuffs (Fig. 4).
ing to Fig. 4. Tis centered at
useto aarou
bead(Fig.
OPTIONMAKE A BRACELET WITH
ONLY ONE CUFF LAYER BY
OMITTING STEPS 2–4.
OPTIONYOU CAN MODIFY THE LOOK AND SIZE OF
THE FLOWER BY ADJUSTING THE NUMBER OF
REPEATS IN ROUNDS 1 AND 2. TRY REPEATING
THE SEQUENCE FIVE, SEVEN, OR EIGHT TIMES
FOR A FLOWER WITH FEWER OR MORE PETALS.

BEADWORK APRIL/MAY 2017 23SEE P. 85 FOR HELPFUL TECHNIQUE INFORMATION. SEE P. 3 FOR PROJECT-LEVEL INFORMATION.
Round 4: String 2C; pass down through the next C of the previous round to form a herringbone stitch. Work 6 peyote stitches with 1G in each stitch. Pass up through the nearest F of the previous round. Work 6 peyote stitches with 1F in each stitch. Repeat from the beginning of this round five times.
Rounds 5 and 6: Repeat Flower, Round 4 twice.
Round 7: String 2C; pass down through the next C of the previous round to form a herringbone stitch. Work 6 peyote stitches with 1G in each stitch. Pass down through the nearest corner 5G of the previous rounds to exit from the nearest G of Round 1. String 1J and 1B; pass back through the J and pass up through the nearest corner 6F of the previous rounds to exit from the nearest F of Round 6. Work 6 peyote stitches with 1F in each stitch. Repeat from the beginning of this round five times.
Rounds 8–13: Repeat Flower, Round 4 six times. Pass down through the second C added in Flower, Round 13 (See the tur-quoise start dot in Fig. 5).
Seams: String 1A; pass up through the near-est C of the previous round at the next herringbone-stitched corner. String 1A; pass down through the last C exited and pass through the first A just added (Fig. 5, turquoise thread). *Pass down through the nearest F of the previous round. String 1A; pass up through the next G of the pre-vious round, pass through the nearest A of this seam, pass down through the last F exited in the previous round, and pass through the A just added (Fig. 5, purple thread). Pass down through the near
of the previous round. String 1A; pass up through the next F of the previous round, pass through the nearest A of this seam, pass down through the last G exited in the previous round, and pass through the A just added (Fig. 5, green thread). Repeat from * twice (Fig. 5, blue thread). Weave through beads to exit down through the second C added in the previous round at the next herringbone-stitched corner (Fig. 5, red thread). Repeat from the beginning of this seam five times, making sure the beadwork folds in the same direc-tion each time to create a flower.
Center: Push the center of the flower toward the back so that the ends with J face up and out and the seams are set back. Stitch the 8mm round to the center of the flower by passing through opposite beads at the center hole of the flower. Reinforce the stitch multiple times to rein-force. Exit the working thread toward the back of the flower.
6) FLOWER CONNECTION. Stitch the cen-ter of the flower to the center of the cuff by weaving back and forth through beads of the flower and the outside and inside cuffs. Reinforce the connection. Secure the threads and trim. ●
AGNIESZKA WATTS is a jewelry designer and teacher. She resides in Lemont, Illinois, but also spends time living in her home country, Poland. She became an Illinois Artisan in 2014, and she is an associate instructor for Art Clay World in Oak Lawn, Illinois. Agnieszka is a member of the 2014–2017 Starman TrendSetters team. Contact her at [email protected] and visit her website, www.agnesse.weebly.com, and Etsy shop, www.agnesseartistry1.etsy.com.
RESOURCES Check your favorite bead retailer or contact: Seed beads, Delica cylinder beads, and thread: Beyond Beadery, (800) 840-5548, www.beyondbeadery.com. Fire-polished rounds and pressed-glass round: Agnesse Artistry 1, www.agnesseartistry1.etsy.com.
artist’s tips ❯ The circumference of the cuffs
will be larger when you first start
stitching than it will be when
you finish. As you work each
subsequent round, the cuffs will
tighten to the finished size.
❯ If you’re unsure whether this
bracelet will fit, stitch a small
sample. Use size 11º cylinder
beads to string five repeats of
3 beads/15 beads/15 beads; then
work seven rounds of peyote
stitch. Measure the space of each
repeat to make sure your tension
is the same as the sample. Fig. 5: Forming the seams of the flower
Back of brooch
cuffs
t start
en
h
s will
his
all
er
of
then
e
f each
nsion
T .
F
est G
ds at the cennforce the stitch multipl
rce. Exit the working thread toward ack of the flower. Fi
Agnesse Artis.etsy.com.
f
OPTIONTO MAKE A BROOCH, ATTACH A PIN TO
THE BACK OF A FLOWER; YOU CAN USE
TUBULAR HERRINGBONE STITCH TO
MAKE A STEM. FOR A PENDANT, ADD
A SMALL LOOP TO THE END OF ONE
CORNER OF A FLOWER AND ATTACH
A BAIL USING JUMP RINGS.

24 WWW.INTERWEAVE.COM SEE P. 85 FOR HELPFUL TECHNIQUE INFORMATION. SEE P. 3 FOR PROJECT-LEVEL INFORMATION.
Ancient Portals KASSIE SHAW
designerof the year
2017
Main Colorway

BEADWORK APRIL/MAY 2017 25SEE P. 85 FOR HELPFUL TECHNIQUE INFORMATION. SEE P. 3 FOR PROJECT-LEVEL INFORMATION.
1) EARRING. Use netting, picots, and right-angle weave to bezel and embellish a rivoli:Round 1: Lay 7D horizontally on your work
surface with each bead’s inside curve fac-ing down. Working counterclockwise, use 4' of thread to string 3B and 1D (right hole); repeat six times, leaving a 6" tail. Use the working and tail threads to tie a knot and pass through the first 3B strung (Fig. 1, blue thread).
Round 2: String 2B; pass through the second (inside) hole of the nearest D. Skip the next 2B of the previous round and pass through the following B. Repeat from the begin-ning of this round six times. Pass through the first 2B of this round (Fig. 1, red thread). Pull the thread snug to tighten the beadwork.
Round 3: String 2C and pass through the second B of the next 2B in the previous round; repeat six times (Fig. 2, blue thread). Note: Take care that the thread and the C pass under the D of Round 1. Repeat the thread path of this round to reinforce, tightening the beads into a ring. Pass through the nearest D (inside hole) and pass down through the following 3B, exiting toward the back of the beadwork (Fig. 2, red thread). Flip the beadwork over. Insert 1 rivoli facedown into the beadwork so the front of the rivoli touches Round 3.
Round 4: String 2C and pass back through the first B of the next 3B in Round 1 to exit toward the center of the beadwork; repeat six times (Fig. 3; back of beadwork shown). Note: Take care that the thread and the C pass under the D of Round 1.
Swirling bezels of crescent beads, netting, picots, and right-angle weave draw the eye to sparkling crystal rivolis that look like an entrancing gateway into the past.
TECHNIQUEStubular and circular nettingpicotright-angle weave
PROJECT LEVEL ££¡
MATERIALS1 g purple permanent-finish size 15°
Japanese seed beads (A)2 g silver-lined light gray size 11°
Japanese seed beads (B)2 g nickel size 11° Japanese seed beads (C)14 metallic blue saturated 10×3mm
2-hole crescent beads (D)2 foil-back tanzanite 12mm crystal rivolis24 blue iris 2mm fire-polished rounds (E)2 silver 22-gauge 4mm jump rings2 silver 22×20mm ear wires13" of silver-plated 1.3mm curb chainPurple One-G nylon beading thread
TOOLSScissorsSize 12 sharp (short) beading needle
FINISHED SIZE3"
Round 5: String 9A and pass down through the nearest 5B of Rounds 1 and 2, then pass through the next 2C of Round 4 and pass back through the following B of Round 1 to exit toward the center of the beadwork (Fig. 4; back of beadwork shown); repeat six times. Pass through the first 5A of this round. Note: You’ll now begin working clockwise.
Round 6: String 4B and pass through the fifth A of the next 9A set in the previous round; repeat six times. Pass through the first 4B of this round (Fig. 5, blue thread;back of beadwork shown).
Round 7: String 2C and pass through the next 4B of the previous round; repeat six times. Pass through the first C of this round (Fig. 5, red thread). Flip the beadwork faceup. Note: You’ll now begin working counterclockwise.
Fig. 1: Stitching Rounds 1 and 2
Fig. 2: Working Round 3
Fig. 3: Forming Round 4
Fig. 4: Adding Round 5
Fig. 5: Stitching Rounds 6 and 7

26 WWW.INTERWEAVE.COM SEE P. 85 FOR HELPFUL TECHNIQUE INFORMATION. SEE P. 3 FOR PROJECT-LEVEL INFORMATION.
Round 10, Section 1: Note: Always pass through the outside C of the nearest picot or right-angle-weave unit unless otherwise noted. String 1A and pass through the nearest C, then string 1E and pass through the next C; repeat (Fig. 8, turquoise thread). String 1A; pass through the near-est C (Fig. 8, pink thread).
Round 10, Section 2: String 1E and one 2" piece of chain; pass through the nearest C. String 1A; pass through the nearest C (Fig. 8, orange thread).
Round 10, Section 3: Repeat Round 10, Section 2 using the 2 ½ " piece of chain (Fig. 8, purple thread).
Round 10, Section 4: String 1E and the remaining 2" piece of chain; pass through the nearest C. String 1E and pass through the nearest C; repeat (Fig. 8, green thread).
Round 10, Section 5: String the last link of the first piece of chain in this round, taking care that the chain isn’t twisted, and 1E; pass through the nearest C. String 1A; pass through the nearest C (Fig. 8, blue thread).
Round 8: String 4C; pass through the first C just added to form a picot, the nearest C of the previous round, the next 4B of Round 6, and the following C of the previ-ous round (Fig. 6, blue thread). Repeat from the beginning of this round six times. Pass through the first 2C of this round (Fig. 6, red thread).
Round 9: String 3C, then pass through the last C exited and the first 2C just added (Fig. 7, purple thread); repeat (Fig. 7, green thread). String 1C; pass through the nearest C of the next picot in Round 8. String 1C; pass through the last C exited, the first C just added, and the next 3C of the nearest picot (Fig. 7, blue thread). Repeat from the beginning of this round four times (Fig. 7, red thread). Note: You’ll now begin working clockwise. Rotate the beadwork clockwise so the thread exits at the right.
Round 10, Prepare: Cut two 2" pieces of chain and one 2 ½ " piece of chain. Set aside.
designerof the year
2017
artist’s tips ❯ Toho seed beads are recommended for
this project. Other brands might not work
properly because of size differences.
❯ If your jump ring is too thick to fit
through the seed bead in Step 2, make a
loop of 5 or 7 size 15º seed beads instead.
Then attach the ear wire to the loop
instead of using a jump ring.
❯ To create simpler earrings or a pendant,
leave off the chain.
Fig. 7: Forming Round 9
Fig. 6: Working Round 8
Alternate Colorway Materials
BRONZE/COPPER1 g African sunset gold luster size 15°
Japanese seed beads (A)2 g silver-lined milky light jonquil size 11°
Japanese seed beads (B)2 g bronze size 11° Japanese seed
beads (C)14 metallic gold suede 10×3mm 2-hole
crescent beads (D)2 foil-back volcano 12mm crystal rivolis24 matte copper 2mm fire-polished
rounds (E)2 copper 22-gauge 4mm jump rings2 copper 22×20mm ear wires13" of copper 1.3mm curb chainDark brown One-G nylon beading thread
RUBY/GOLD1 g mauve permanent-finish size 15°
Japanese seed beads (A)2 g silver-lined light brown size 11°
Japanese seed beads (B)2 g gold permanent-finish size 11°
Japanese seed beads (C)14 bronze iris 10×3mm 2-hole crescent
beads (D)2 foil-back chili pepper 12mm crystal
rivolis24 ruby iris luster 2mm fire-polished
rounds (E)2 gold 22-gauge 4mm jump rings2 gold 22×20mm ear wires13" of gold-plated 1.3mm curb chainSand ash One-G nylon beading thread
SEE P. 85 FOR H
St(F
Ro
pare: Cut t one 2 ½" piece of cha
Back of earring

BEADWORK APRIL/MAY 2017 27SEE P. 85 FOR HELPFUL TECHNIQUE INFORMATION. SEE P. 3 FOR PROJECT-LEVEL INFORMATION.
Round 10, Sections 6 and 7: Repeat Round 10, Section 5 twice, stringing each subsequent piece of chain (Fig. 8, red thread).
Round 10, Section 8: String 1E and pass through the nearest C, then string 1A and pass through the next C; repeat. Note: On the last repeat, you’ll pass through the out-side C of the picot (Fig. 8, yellow thread). Secure the threads and trim.
2) EAR WIRE. Use 1 jump ring to attach 1 ear wire to the center C of the picot in Round 8 that isn’t connected to right-angle-weave units. Note: Take care that the front of the ear wire faces the same direction as the front of the rivoli.
Fig. 8: Adding Round 10
3) Repeat Steps 1 and 2 for a second earring, this time working clockwise in Round 1 and stringing the left hole of the D so the ear-rings swirl in the opposite direction. All subsequent rounds will be worked in the opposite direction as well. ●
KASSIE SHAW is a bead artist from western North Carolina. She has been designing and making jewelry and beaded art since 2005. Her video workshops on right-angle-weave variations and more, plus her book, Beadweaving Beyond the Basics, can be found at www.interweave.com. See Kassie’s patterns and finished work at www.beadingbutterfly.com.
RESOURCES Check your favorite bead retailer or contact: Toho seed beads, crescent beads, Swarovski crystal rivolis, fi re-polished rounds, ear wires, and thread: Bead-Therapy, (423) 509-1907, www.bead-therapy.com. Chain: Yadana Beads, www.yadanabeads.etsy.com. Jump rings: Unkamen Supplies, www.unkamensupplies.com.

28 WWW.INTERWEAVE.COM SEE P. 85 FOR HELPFUL TECHNIQUE INFORMATION. SEE P. 3 FOR PROJECT-LEVEL INFORMATION.
Interchangeable Herringbone Bracelets
designerof the year
2017
Main Colorway

BEADWORK APRIL/MAY 2017 29SEE P. 85 FOR HELPFUL TECHNIQUE INFORMATION. SEE P. 3 FOR PROJECT-LEVEL INFORMATION. Y
BRACELET1) ROPE. Use herringbone stitch to form the rope:Rounds 1 and 2: Use 3' of thread to string
8A, leaving an 18" tail. Pass through all the beads again to form a circle and exit from the first A strung (Fig. 1, blue thread).
Round 3: String 2A and pass through the nearest A, then skip the next 2A and pass through the following A; repeat. Note: For this and subsequent rounds, step up by passing through the first bead added in the current round unless otherwise noted (Fig. 1, red thread). Manipulate the bead-work into 2 columns by pulling the work-ing and tail threads in opposite directions.
Round 4: String 2A and pass down through the next A of the previous round, then pass up through the following A of the previous round; repeat (Fig. 2).
Rounds 5–15: Repeat Rope, Round 4 of the bracelet eleven times.
Round 16: String {1A, 1B, 1D, 1C, 1D, 1B, and 1A} twice, then pass down through the next A of the previous round and pass up through the following A; repeat. Step up through the first 1A/1B/1D/1C/1D/1B/1A added (Fig. 3, blue thread; only previous round of the rope shown for clarity).
Round 17: String 2A, then pass down through the next A of the previous round and pass up through the mirror A of the previous round; repeat (Fig. 3, red thread).
Stitch a segmented tubular herringbone bracelet of dainty seed beads, Demi Round seed beads, and fire-polished rounds finished with a hidden magnetic closure, then bead an extender and turn the bracelet into a wrap or a necklace.
MELISSA GRAKOWSKY SHIPPEE
TECHNIQUEStubular herringbone stitchright-angle weave variation
PROJECT LEVEL ££¡
MATERIALS4 g matte metallic carnival size 15°
Japanese seed beads (A)0.5 g dark antique bronze gold luster
size 11° Demi Round seed beads (B)1 g dark antique bronze gold luster size 8°
Demi Round seed beads (C)40 metallic green turquoise Picasso 3mm
fire-polished rounds (D)2 silver-plated 4×10mm magnetic claspsBrown One-G nylon beading thread
TOOLSScissorsSize 12 beading needle
FINISHED SIZE 63⁄8" (bracelet); 123⁄8" (extender)
Rounds 18–30: Repeat Rope, Round 4 of the bracelet thirteen times.
Rounds 31 –75: Repeat Rope, Rounds 16–30 of the bracelet three times.
Rounds 76–81: Repeat Rope, Rounds 16 and 17 of the bracelet . Repeat Rope, Round 4 of the bracelet four times.
2) CLASP. Create a hidden closure for the bracelet:Round 1: String 2A and pass down through
the next A of the previous round, then string 1A and pass up through the follow-ing A; repeat. Step up through the first A of this round, then pass down through the second A of this round (Fig. 4; only Round 81 of the rope shown for clarity).
Clasp: String one half of the clasp. Pass down through the fourth A added in Round 81 of the rope and pass up through the first A added in Round 81 of the rope (Fig. 5, blue thread; only Round 81 of the rope and Round 1 of the clasp shown for clar-ity). Pass through the same half of the clasp. Pass down through the third A added in Round 81 of the rope and pass up through the second A added in Round 81 of the rope (Fig. 5, red thread). Weave through beads to reinforce the clasp multiple times. Exit from the first A added in Round 1 of the clasp (see the pur-ple start dot in Fig. 6).
Fig. 1: Stitching Rope,Rounds 1 –3 of thebracelet
Fig. 4: Adding Clasp, Round 1 of the bracelet
Fig. 2: Forming Rope, Round 4 of the bracelet
Fig. 5: Attaching the clasp to thebracelet
Fig. 3: Working Rope,Rounds 16 and 17 of the bracelet
OPTION FOR A DRESSIER LOOK, USE
3MM PEARLS OR CRYSTAL
BICONES OR ROUNDS FOR
THE FIRE-POLISHED ROUNDS.
30 WWW.INTERWEAVE.COM SEE P. 85 FOR HELPFUL TECHNIQUE INFORMATION. SEE P. 3 FOR PROJECT-LEVEL INFORMATION.
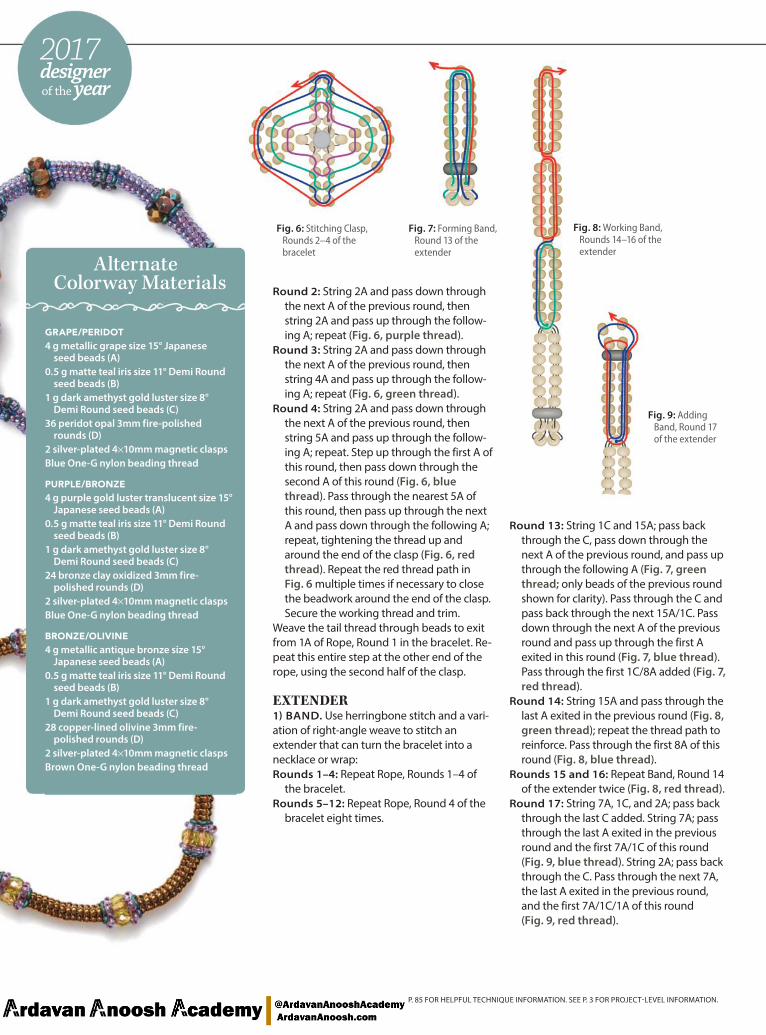
Round 13: String 1C and 15A; pass back through the C, pass down through the next A of the previous round, and pass up through the following A (Fig. 7, green thread; only beads of the previous round shown for clarity). Pass through the C and pass back through the next 15A/1C. Pass down through the next A of the previous round and pass up through the first A exited in this round (Fig. 7, blue thread). Pass through the first 1C/8A added (Fig. 7, red thread).
Round 14: String 15A and pass through the last A exited in the previous round (Fig. 8, green thread); repeat the thread path to reinforce. Pass through the first 8A of this round (Fig. 8, blue thread).
Rounds 15 and 16: Repeat Band, Round 14 of the extender twice (Fig. 8, red thread).
Round 17: String 7A, 1C, and 2A; pass back through the last C added. String 7A; pass through the last A exited in the previous round and the first 7A/1C of this round (Fig. 9, blue thread). String 2A; pass back through the C. Pass through the next 7A, the last A exited in the previous round, and the first 7A/1C/1A of this round (Fig. 9, red thread).
Round 2: String 2A and pass down through the next A of the previous round, then string 2A and pass up through the follow-ing A; repeat (Fig. 6, purple thread).
Round 3: String 2A and pass down through the next A of the previous round, then string 4A and pass up through the follow-ing A; repeat (Fig. 6, green thread).
Round 4: String 2A and pass down through the next A of the previous round, then string 5A and pass up through the follow-ing A; repeat. Step up through the first A of this round, then pass down through the second A of this round (Fig. 6, blue thread). Pass through the nearest 5A of this round, then pass up through the next A and pass down through the following A; repeat, tightening the thread up and around the end of the clasp (Fig. 6, red thread). Repeat the red thread path in Fig. 6 multiple times if necessary to close the beadwork around the end of the clasp. Secure the working thread and trim.
Weave the tail thread through beads to exit from 1A of Rope, Round 1 in the bracelet. Re-peat this entire step at the other end of the rope, using the second half of the clasp.
EXTENDER1) BAND. Use herringbone stitch and a vari-ation of right-angle weave to stitch an extender that can turn the bracelet into a necklace or wrap:Rounds 1 –4: Repeat Rope, Rounds 1–4 of
the bracelet.Rounds 5 –12: Repeat Rope, Round 4 of the
bracelet eight times.
designerof the year
2017
Fig. 7: Forming Band,Round 13 of theextender
Fig. 8: Working Band, Rounds 14 –16 of the extender
Fig. 6: Stitching Clasp, Rounds 2–4 of the bracelet
Fig. 9: Adding Band, Round 17of the extender
Alternate Colorway Materials
GRAPE/PERIDOT4 g metallic grape size 15° Japanese
seed beads (A)0.5 g matte teal iris size 11° Demi Round
seed beads (B)1 g dark amethyst gold luster size 8°
Demi Round seed beads (C)36 peridot opal 3mm fire-polished
rounds (D)2 silver-plated 4×10mm magnetic claspsBlue One-G nylon beading thread
PURPLE/BRO NZE4 g purple gold luster translucent size 15°
Japanese seed beads (A)0.5 g matte teal iris size 11° Demi Round
seed beads (B)1 g dark amethyst gold luster size 8°
Demi Round seed beads (C)24 bronze clay oxidized 3mm fire-
polished rounds (D)2 silver-plated 4×10mm magnetic claspsBlue One-G nylon beading thread
BRONZE/OLIVINE4 g metallic antique bronze size 15°
Japanese seed beads (A)0.5 g matte teal iris size 11° Demi Round
seed beads (B)1 g dark amethyst gold luster size 8°
Demi Round seed beads (C)28 copper-lined olivine 3mm fire-
polished rounds (D)2 silver-plated 4×10mm magnetic claspsBrown One-G nylon beading thread
BEADWORK APRIL/MAY 2017 31SEE P. 85 FOR HELPFUL TECHNIQUE INFORMATION. SEE P. 3 FOR PROJECT-LEVEL INFORMATION.
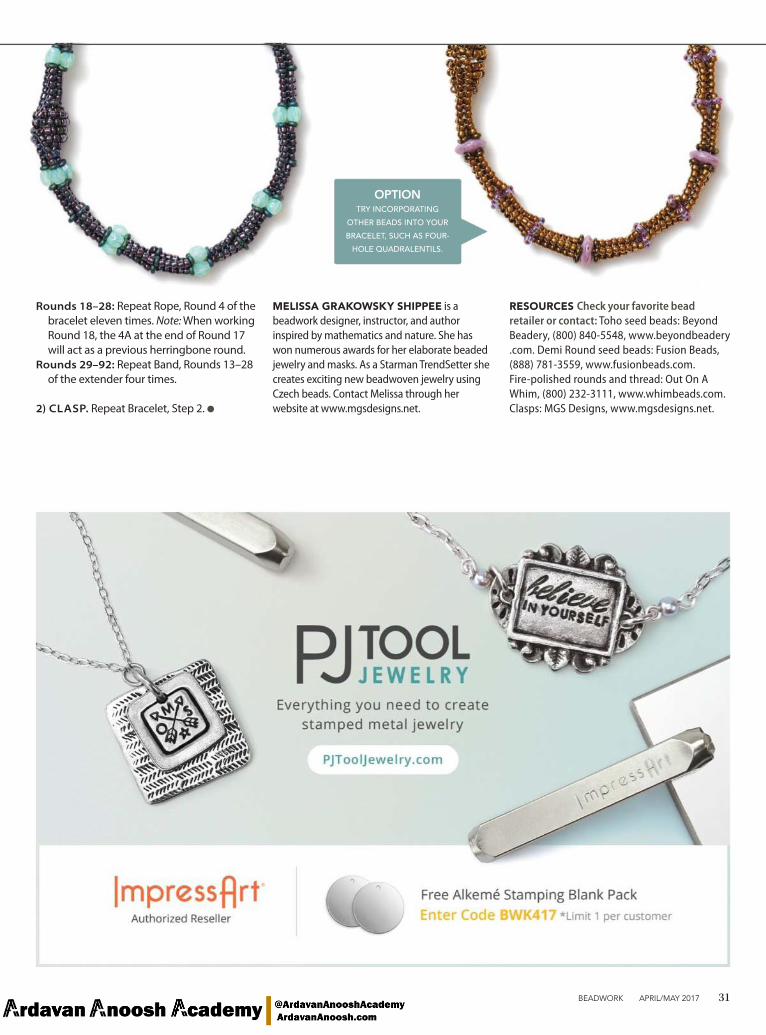
Rounds 18–28: Repeat Rope, Round 4 of the bracelet eleven times. Note: When working Round 18, the 4A at the end of Round 17 will act as a previous herringbone round.
Rounds 29–92: Repeat Band, Rounds 13–28 of the extender four times.
2) CLASP. Repeat Bracelet, Step 2. ●
MELISSA GRAKOWSKY SHIPPEE is a beadwork designer, instructor, and author inspired by mathematics and nature. She has won numerous awards for her elaborate beaded jewelry and masks. As a Starman TrendSetter she creates exciting new beadwoven jewelry using Czech beads. Contact Melissa through her website at www.mgsdesigns.net.
OPTIONTRY INCORPORATING
OTHER BEADS INTO YOUR
BRACELET, SUCH AS FOUR-
HOLE QUADRALENTILS.
RESOURCES Check your favorite bead retailer or contact: Toho seed beads: Beyond Beadery, (800) 840-5548, www.beyondbeadery.com. Demi Round seed beads: Fusion Beads, (888) 781-3559, www.fusionbeads.com. Fire-polished rounds and thread: Out On A Whim, (800) 232-3111, www.whimbeads.com. Clasps: MGS Designs, www.mgsdesigns.net.
32 WWW.INTERWEAVE.COM
~ Free Stringing Designs! ~
Download yourFREE eBook today:
Check our these
stringing designs,
pick one or make
them all!
Eye on Midnightby Sharon Borsavage
Sorbet in Augustby Michelle Mach
Trés
turq
uois
eby
Mar
lene
Ble
ssin
g
GET YOUR FREE PROJECTS AT:
www.Interweave.com
5 FREEBeadingProjects
toLearn How to Bead
2017
[email protected]. 845.352.9735
www.iBExpos.com
14 Years of Quality BeadShows in the Northeast
The Innovative Beads& Jewelry Expo
One Bead Event for All –Beginner & Advanced Beaders
Designers, Jewelry MakersCraft Lovers & Gift Seekers
J

BEADWORK APRIL/MAY 2017 33
Cristie Prince’s beadwork is unlike any you’ve seen before.
Her designs have the feel of fine jewelry that could be passed
down from one generation to the next. We recently interviewed
Cristie about her style and the designs in her latest eBook,
Bead Royale: Elegance in Beadweaving.
Cristie Prince
bead artist
Q: How did you get started beading?A: I grew up in a family of makers, so I’ve always valued handmade over mass produced. And I love to learn new skills, so my interests have taken me on a long and winding creative journey. I’ve done sewing, macramé, counted cross-stitch, stained glass, and lampwork-ing—to name a few—but jewelry making has been in my life the longest. I remember stringing seed beads on elastic thread as early as kindergarten, making chokers as gifts for my classmates.
In the late 1990s, I was doing stained glass but looking for something to do that was easy to cart around and work on while I waited for my kids at their sports practices. A friend showed me a peyote-stitched amulet bag, and I was amazed that beads, when woven together, could create a glass “fabric.” I’ve been bead obsessed ever since! Beadweaving is the per-fect activity for me, since I love jewelry, it’s por-table, and it fulfills my need to create.
Q: Do you sketch your designs ahead of time, or do you just pick up needle and thread, then surround yourself with beads and see what happens?A: I rarely sketch. I’m more of an experimenter. When I attempt to bead what I’ve visualized, the beads don’t always stitch together the way I had in mind. When that happens, I experi-ment with other sizes and shapes. Sometimes, the end result isn’t at all what I was going for, but often I like it better than what I’d originally been trying to create. And then other times, I stubbornly hold on to the vision in my head until I either come up with a solution or a new bead shape comes along to help make that image a reality.
Q: When creating an intricate new design, how many times do you stop and restart before you figure out the pattern and are sat-isfied with the result?A: It depends. Sometimes, when I see a piece of fine jewelry, I’ll automatically visualize some component or shape from the design already beaded with certain beads. Other times, I just try new shapes in unconventional ways to see what happens. Often, I’ll come up with a component but not have a clear idea of how to use it, and I’ll revisit it at a later date. This was the case with the star-shaped com-ponent with a pearl in the center that became the Corona Necklace.
Q: How do you achieve the look of heirloom-quality fine jewelry while using materials all beaders have access to and techniques we can all master?A: Beaders today are so lucky to have such a vast variety of beads, pearls, crystals, and com-ponents to work with. Many of these materials have the feel of the materials that were used to create the treasures of the past.
Q: Do you have a favorite tip to share? A: Sure! For better tension control when bead-weaving, tighten the thread after each stitch in the same direction as the stitch was made. Often, without realizing it, beaders will make a stitch and then, when pulling the thread through the beads, they pull away from the direction they’ve stitched, which pulls on the bead holding the most recent stitch and results in loose tension. ●
For more of Cristie’s designs, visit her website: www.glassyjewels.com.
FOR A BONUS PROJECT
from Cristie, see her Queen of
Diamonds Bracelet on page 34
(excerpted from Bead Royale:
Elegance in Beadweaving, which is
available at www.interweave.com).
BY TAMMY HONAMAN AND LAVON PETERS

34 WWW.INTERWEAVE.COM SEE P. 85 FOR HELPFUL TECHNIQUE INFORMATION. SEE P. 3 FOR PROJECT-LEVEL INFORMATION.
Queen of Diamonds Bracelet CRISTIE PRINCE
Need a quick and easy beading fix? Look no further than this sweet and sparkly bracelet featuring chaton monteés, O beads, and Infinity beads.
Main Colorway
beginnerfriendly!
Bead Royale
Elegance in Beadweaving
by Cristie Prince
In her latest eBook, Bead Royale: Elegance in Beadweaving, Cristie Prince outdoes herself with ten projects that are truly fit for royalty. These designs, with their rich materials and impeccable workmanship, are easily mistaken for high-end fine jewelry. Stitch a variety of regal necklaces, bracelets, and earrings in this eBook, including the stunning but simple Queen of Diamonds Bracelet featured in this exclusive preview. Bead Royale is available from www.interweave.com. To learn more about Cristie, see page 33.

BEADWORK APRIL/MAY 2017 35SEE P. 85 FOR HELPFUL TECHNIQUE INFORMATION. SEE P. 3 FOR PROJECT-LEVEL INFORMATION.
TECHNIQUEright-angle weave variation
PROJECT LEVEL £¡¡
MATERIALS1 g silver size 15° seed beads (A)2 g nickel-plated size 11° metal seed beads (B)2 g nickel-plated size 8° metal seed beads (C)88 silver 3.8×1mm O beads (D)12 silver 3×6mm Infinity beads (E)11 clear 4mm chaton monteés with 4 holes (F)1 silver 10×24mm silver fold-over clasp with
rhinestone inlayCrystal 6 lb FireLine braided beading thread
TOOLSScissorsSize 12 beading needle
FINISHED SIZE7¼"
1) COMPONENT 1. Work the first segment of the bracelet:Ring: Use 3' of thread to string {1E, 1A, 1D,
1B, 1D, 1C, 1D, 1B, 1D, and 1A} twice, leav-ing an 8" tail. Pass through the first (inner) hole of the first E strung and the next 1A/1D/1B (Fig. 1).
Center: String 1F through the top 2 holes; pass through the nearest 1B/1D/1A/1E (inner hole)/1A/1D/1B of the ring. Pass through the bottom 2 holes of the F, then pass through the next 1B/1D/1A/1E (inner hole)/1A/1D/1B (Fig. 2, blue thread). Repeat this thread path to reinforce, then weave through beads to exit from the sec-ond E (inner hole) of the ring (Fig. 2, red thread). Note: It’s best at this point to hold the chaton monteé down inside the ring of beads and tug gently on the thread to lock the chaton monteé inside the circle and keep it flush with the top of the beads.
Link: String 1B; pass through the second (outer) hole of the last E exited. String 1B; pass through the inner hole of the E, the first B strung, and the outer hole of the E (Fig. 3).
2) COMPONENTS 2–11. Repeat Component 1 ten times, using the last E exited in the previous component as the first E of the new component.
3) CLASP. String 2A, the first then second holes of one half of the clasp, and 2A; pass through the last E (outer hole) exited, the nearest B, the same E (inner hole), and the next B (Fig. 4, blue thread). String 1A; pass back through the next 2A/clasp (both holes)/2A just added. String 1A; pass through the nearest 1B/1E (inner hole) (Fig. 4, red thread). Repeat the thread path to reinforce; secure the working thread and trim. Use the tail thread to repeat Step 1, Link, at the other end of the bracelet. Repeat this entire step, using the second half of the clasp and taking care that the clasp is positioned to close properly. ●
CRISTIE PRINCE creates beaded jewelry that captures the look and feel of heirloom fine jewelry pieces. Her work has been published internationally, and she teaches beadweaving classes across the United States. To see more of Cristie’s work, visit www.glassyjewels.com.
RESOURCES Check your favorite bead retailer or contact: Infi nity beads and clasp: Glassy Jewels, www.glassyjewels.com. O beads: The BeadSmith (wholesale only), www.beadsmith.com. Metal seed beads, glass seed beads, and beading thread: Beyond Beadery, www.beyondbeadery.com. 4mm chaton monteés: Dreamtime Creations, www.dreamtimecreations.com. Kits also available at Glassy Jewels, www.glassyjewels.com.
Fig. 4: Attaching the clasp
Fig. 3: Stitching the link of Component 1
Fig. 2: Adding the center of Component 1
Fig. 1: Forming the ring of Component 1
editors’ tipAfter stringing all the beads in Step 1,
Ring, use the working and tail threads
to tie a knot before passing through
the next 1E/1A/1D/1B.

36 WWW.INTERWEAVE.COM SEE P. 85 FOR HELPFUL TECHNIQUE INFORMATION. SEE P. 3 FOR PROJECT-LEVEL INFORMATION.
Use circular brick stitch to embellish the edges of vibrant leather flowers, then add a ring of seed beads to the centers and adorn with smaller leather flowers for an easy pair of earrings.
Poppy Delight Earrings SUZ KLUMB
Fig. 1: Working Round 1
Fig. 2: Adding Round 2
artist’s tipYou can reinforce the
bead of Round 1 at each
corner of the flower by
weaving through beads
to attach it to the nearest
2 holes in the flower.
1) EARRING. Use circular brick stitch to add seed bead edges around a leather-flower component:Round 1: Use 4' of thread to string 1A; loop
the thread around the edge of one 25mm leather flower and pass back through the A just strung, leaving a 4" tail. Use the working and tail threads to tie a knot, securing the A on the outside edge of the leather flower (Fig. 1, purple thread). String 1A and loop the thread around the edge of the flower, then pass back through the last A strung so that it sits snug against the previous A at the outside edge of the flower (Fig. 1, green thread); repeat around the edge of the flower (Fig. 1, blue thread). Pass down through the first A of this round, loop around the edge of the flower, and pass up through the first A of this round (Fig. 1, red thread).
Round 2: String 2A; pass under the nearest thread of the previous round and pass back through the second A just added (Fig. 2, purple thread). String 1A, pass under the next thread of the previous round, and pass back through the A just added (Fig. 2, green thread); repeat around the edge of the flower (Fig. 2,
beginnerfriendly!

BEADWORK APRIL/MAY 2017 37SEE P. 85 FOR HELPFUL TECHNIQUE INFORMATION. SEE P. 3 FOR PROJECT-LEVEL INFORMATION.
TECHNIQUEcircular brick stitch
PROJECT LEVEL £¡¡
MATERIALS2 g tutti-berry mix size 11° seed beads (A)2 gunmetal 4mm jump rings4 gunmetal 7mm jump rings1 pair of gunmetal 9×12mm ear wires2 orange 12mm leather flowers2 turquoise 25mm leather flowersSmoke 6 lb FireLine braided beading thread
TOOLSScissorsSize 10 beading needle2 pairs of chain- or flat-nose pliers
FINISHED SIZE2 1⁄8"
blue thread). Note: Because this round requires more beads than the previous round, you’ll sometimes need to form an increase by passing under the same thread between 2 beads of the previous round. Pass down through the first A of this round, pass under the nearest thread of the previous round, and pass up through the first A of this round (Fig. 2, red thread). Secure the threads and trim.
Center: Use 24" of new thread to string 1A, leaving a 4" tail. Pass up through the cen-ter hole in the flower from back to front. String 1A; pass down through the center hole in the flower from front to back. Use the working and tail threads to tie a knot. Pass through the first A added in the cen-ter, pass up through the center hole in the flower, and pass through the second A added (Fig. 3, purple thread). String 3A and pass through the last A exited (Fig. 3, green thread); repeat (Fig. 3,
blue thread). Pass through the 6A just added and the last A exited to form the beads into a snug ring (Fig. 3, red thread). Pass down through the nearest hole in the flower, pass through the A at the back of the flower, pass up through the opposite hole in the flower, and pass through the nearest A in the ring (Fig. 4, green thread); repeat twice (Fig. 4, blue then red threads) to secure the ring of 6A to the flower. If necessary, pass through the ring of 6A again to snug the beads. Secure the threads and trim.
2) FINISH. Use one 7mm jump ring to attach one 12mm flower to one hole in the 25mm flower, taking care that the front of the flowers face the same direction. Use one 7mm jump ring to attach one 4mm jump ring to the 12mm flower. Attach 1 ear wire to the 4mm jump ring.
3) Repeat Steps 1 and 2 for a second earring. ●
SUZ KLUMB is a bead artist who is drawn to color, textiles, and textures. She loves the business side of creating, and in 2015 she became the owner of Glass Garden Beads, a bead shop based in Faribault, Minnesota. Suz enjoys working in a creative environment, catering to craft enthusiasts, encouraging others to create, and expanding her business’s bead kit line.
RESOURCES Check your favorite bead retailer or contact: Seed beads: Glass Garden Beads, (507) 645-0301, www.glassgardenbeads.com. Jump rings, ear wires, and thread: Fusion Beads, (888) 781-3559, www.fusionbeads.com. Leather fl owers: Lilly Pilly Designs, (303) 543-8673, www.lillypillydesigns.com.
Fig. 3: Starting the center
Fig. 4: Finishing the center

38 WWW.INTERWEAVE.COM SEE P. 85 FOR HELPFUL TECHNIQUE INFORMATION. SEE P. 3 FOR PROJECT-LEVEL INFORMATION.
Bezel large rounds with tubular right-angle weave and peyote stitch, then use circular herringbone stitch to form daisy-like petals.
Parade of Daisies ALICE HARON ON THE
COVER

BEADWORK APRIL/MAY 2017 39SEE P. 85 FOR HELPFUL TECHNIQUE INFORMATION. SEE P. 3 FOR PROJECT-LEVEL INFORMATION.
TECHNIQUEStubular right-angle weavetubular peyote stitchcircular herringbone stitchright-angle weave variation
PROJECT LEVEL ££¡
MATERIALS1 g bright gold size 15° seed beads (A)1 g silver-lined blue size 15° seed beads (B)1 g matte aluminum galvanized permanent-
finish size 15° seed beads (C)1 g rust-lined crystal gold luster size 15°
seed beads (D)1 g matte starlight galvanized permanent-
finish size 15° seed beads (E)1 g rust-lined crystal gold luster size 11°
seed beads (F)1 g turquoise luster size 11° seed beads (G)3 g silver-lined light amethyst size 11° seed
beads (H)24 Aztec gold 6mm 2-hole DiscDuos (J)2 turquoise 8mm faceted rounds (K)37 turquoise 3mm crystal pearl rounds (L)46 turquoise 4mm crystal pearl rounds (M)13 bright gold 5mm crystal pearl rounds (N)1 dyed jade 8mm crystal pearl round (O)2 turquoise 8mm crystal pearl rounds (P)1 bright gold 11mm toggle claspSmoke 6 lb FireLine braided beading thread
TOOLSScissorsSize 11 beading needle
FINISHED SIZE18 ½ "
1) COMPONENTS. Use tubular right-angle weave, tubular peyote stitch, and circular herringbone stitch to form the components:Base Strip: Use 3' of thread to string 1B, 1A,
1B, and 1A, leaving a 4" tail; pass through the first 1B/1A/1B of this unit (Fig. 1, green thread). String 1A, 1B, and 1A and pass through the last B exited in the previous unit and the first 1A/1B of this unit (Fig. 1, blue thread); repeat ten times for a total of 12 units (Fig. 1, red thread).
Base Ring: String 1A; pass up through the first B of the first right-angle-weave unit. String 1A; pass down through the last B exited in the previous unit, pass through the first A just added, and pass up through the first B of the first unit (Fig. 2; beadwork shown flat for clarity).
Center: String 1K; pass down through the opposite B of the base ring (Fig. 3, blue thread). Pass back through the K and pass up through the last B exited. Repeat the thread path of this center to reinforce. Pass through the A at the top of the first base unit (Fig. 3, red thread).
Round 1: String 1C and pass through the top A of the nearest base unit; repeat twelve times. Note: For this and subsequent rounds, step up by passing through the first bead added in the current round unless otherwise noted (Fig. 4, purple thread; beadwork shown flat and K removed for clarity).
Round 2: Work 13 peyote stitches with 1F in each stitch (Fig. 4, green thread).
Round 3: Work 13 peyote stitches with 1G in each stitch (Fig. 4, blue thread). Weave through beads to exit from 1A at the bot-tom of 1 base unit (Fig. 4, red thread). Note: Rounds 1–3 fold down toward the bottom edge of the base; the base forms the inside edge of the bezel.
Round 4: String 1C and pass through the bottom A of the nearest base unit; repeat twelve times (Fig. 5, green thread;beadwork shown flat and K removed for clarity).
Round 5: Work 13 peyote stitches with 1F in each stitch (Fig. 5, blue thread). Weave through beads of Rounds 3 and 5 to zip the beadwork and connect the rounds, exiting from 1G of Round 3 (Fig. 5, red thread).
Fig. 1: Stitching the base strip of the component
Fig. 4: Working Rounds 1–3 of the component
Fig. 2: Forming the base ring of the component
Fig. 5: Stitching Rounds 4 and 5 of the component
Fig. 3: Adding the center of the component

40 WWW.INTERWEAVE.COM SEE P. 85 FOR HELPFUL TECHNIQUE INFORMATION. SEE P. 3 FOR PROJECT-LEVEL INFORMATION.
petals at the bottom of the component between the connection and the strap. In this and the following units, take care that the 3mm pearls are at the inside of the strap in order to achieve proper curvature in the necklace. String 1M, 1J, and 1L; pass through the nearest F of Round 9. Pass back through the last 1L/1J (first hole) added. Pass through the second hole of the J (Fig. 8, brown thread).
Unit 2: String 1L, 1J, and 1M; pass through the last J (second hole) exited and the first 1L/1J (first then second holes) of this unit (Fig. 8, pink thread).
Units 3–10: Repeat Unit 2 eight times (Fig. 8, orange thread).
Unit 11: String 1M, 1N, and 1M; pass through the last J (second hole) exited and the 1M/1N just added (Fig. 8, purple thread).
Unit 12: String 1M, 1N, and 1M; pass through the last N exited and the 1M/1N just added (Fig. 8, green thread).
Unit 13–17: Repeat Unit 12 five times (Fig. 8, blue thread).
Clasp: String 3E and the ring half of the clasp; pass back through the 3E just added and the last N exited. String 3E and pass through the ring half of the clasp; pass back through the 3E just added and the last N exited (Fig. 8, red thread). Repeat the thread path of this clasp to reinforce. Secure the working thread and trim.
2) STRAP CENTER. Use the working thread of 1 component to string 1L, 1J, and 1L; pass through the nearest F of Round 9. Pass back through the last 1L/1J (first hole) added. Pass through the second hole of the J (Fig. 7, blue thread). String 1L; pass through 1F of Round 9 on 1 new component. Pass back through the last L added and the J (second hole). String 1L; pass through the nearest F of Round 9 on the new component. Pass back through the last L added and the J (second hole) (Fig. 7, red thread). Secure and trim the working thread.Repeat this entire step three times to con-nect the remaining components to the pre-vious components, using the working thread of each new component; don’t trim the working thread of the last component. Note:Take care to leave 4 herringbone-stitched petals at the top of each component and 5 herringbone-stitched petals at the bottom of each component between each connec-tion in order to achieve proper curvature in the necklace. Arrange the color sequence of the components as desired.
3) STRAP 1. Use a variation of right-angle weave to stitch the first strap:Unit 1: Weave the working thread of 1 end
component through beads so that it exits from 1F of Round 9 opposite the previous connection. Note: Take care to leave 4 herringbone-stitched petals at the top of the component and 5 herringbone-stitched
Round 6: String 2H and pass through the last G exited, the nearest F of Round 2, and the next G of Round 3; repeat twelve times. Note: For this and subsequent rounds, step up by passing through the first bead added in the current round (Fig. 6, purple thread). Note: You’ll now begin working clockwise.
Round 7: String 2H and pass down through the next H of the previous round and pass up through the following H to form a her-ringbone stitch; repeat twelve times (Fig. 6, green thread).
Round 8: Repeat Round 7 (Fig. 6, blue thread).
Round 9: String 1H, 1F, and 1H and pass down through the next H of the previous round, then string 1D and pass up through the following H of the previous round; repeat twelve times. Exit from the first F of this round (Fig. 6, red thread). Secure and trim the tail thread but don’t trim the working thread. Set the component aside.
Repeat this entire step. Repeat this entire step using O for K. Repeat this entire step twice using P for K.
Parade of Daisies
Fig. 7: Assembling the strap center
Fig. 6: Forming Rounds 6–9 of the component
artist’s tips ❯ You can use beige nylon thread
for Steps 2–4 if you don’t want
the thread to show.
❯ Use medium and even tension.

BEADWORK APRIL/MAY 2017 41SEE P. 85 FOR HELPFUL TECHNIQUE INFORMATION. SEE P. 3 FOR PROJECT-LEVEL INFORMATION.
Fig. 8: Working the first strap
Fig. 9: Attaching the clasp to the second strap
.
4) STRAP 2. Use a variation of right-angle weave to stitch the second strap:Units 1–16: Starting on the other end of the
strap center, repeat Step 3, Units 1–16.Clasp: String 5E, 1L, 2E, and the toggle half of
the clasp (Fig. 9, green thread); pass back through the last 2E/1L/2E added (Fig. 9, blue thread). String 3E; pass through the last N exited (Fig. 9, red thread). Repeat the thread path of this clasp to reinforce. Secure the thread and trim. ●
ALICE HARON lives in Chicago, Illinois, with her husband and their cat. She specializes in creating wearable jewelry designs, and she teaches beading classes at the Chicago Jewelry School. Contact Alice at [email protected].
RESOURCES Check your favorite bead retailer or contact: Seed beads, faceted rounds, and thread: Studio Beads, (847) 607-8702, www.studiobeads.com. DiscDuos: Potomac Bead Company, (717) 263-2323, www.potomacbeads.com. Swarovski crystal pearl rounds: Bodacious Beads, (847) 699-7959, www.bodaciousbeadschicago.com. Clasp: Chelsea’s beads, (847) 433-3451, www.chelseasbeads.com.
OPTIONYOU CAN USE DISCDUOS FOR
THE ENTIRE LENGTH OF THE
STRAPS INSTEAD OF USING
PEARLS AT THE ENDS.

42 WWW.INTERWEAVE.COM SEE P. 85 FOR HELPFUL TECHNIQUE INFORMATION. SEE P. 3 FOR PROJECT-LEVEL INFORMATION.
Use varying sizes of seed beads to your advantage and create an undulating base of two-hole crescent beads, then embellish alternating curves with picots.
Serpentine Cuff MARIE NEW
Main Colorway

BEADWORK APRIL/MAY 2017 43SEE P. 85 FOR HELPFUL TECHNIQUE INFORMATION. SEE P. 3 FOR PROJECT-LEVEL INFORMATION.
TECHNIQUESstringingpicot
PROJECT LEVEL ££¡
MATERIALS1 g matte plum transparent size 15° Japanese
seed beads (A)1 g higher metallic violet iris size 15° Japanese
seed beads (B)2 g silver-lined lavender opal size 11° Japanese
seed beads (C)6 g magenta-lined black diamond size 6°
Japanese seed beads (D)61 matte metallic lava 10×3mm 2-hole
crescent beads (E)60 metallic pink suede 3mm pressed-glass
melon rounds (F)1 silver 10×14mm 3-strand filigree box claspBlack One-G nylon beading thread
TOOLSScissorsSize 12 beading needle
FINISHED SIZE7 ¼ "
1) BASE. String a simple base:Base Row 1: Position each E vertically on
your work surface with its inside curve fac-ing to the left. Add a stop bead to 4' of thread, leaving a 6" tail. Working from right to left, string {1E (top hole) and 1D} six times, then string {1E (top hole) and 1A} six times (Fig. 1, orange thread); repeat four times (Fig. 1, turquoise thread). String 1E (top hole). Snug the beads of this row up to the stop bead; pass through the second (bottom) hole of the last E added (Fig. 1, yellow thread). Note: You’ll now begin working in the opposite direction.
Base Row 2: String 1D and pass through the next E (bottom hole); repeat five times (Fig. 1, green thread). String 1A and pass through the next E (bottom hole); repeat five times (Fig. 1, blue thread). Repeat from the beginning of this row four times. Snug the beadwork. Pass through the top hole of the last E exited and the nearest D (Fig. 1, red thread). Note: You’ll now begin working in the opposite direction.
2) EMBELLISHMENT. Form picots to add frilly embellishments to the base:Embellishment Row 1: String 1B, 1C, 1F, 1C,
and 1B, then pass through the last D exited and the next 1E (top hole)/1D (Fig. 2, tur-quoise thread); repeat four times (Fig. 2, purple thread). String 1B, 1C, 1F, 1C, and 1B; pass through the last D exited and weave through beads to exit from the next D of the base (Fig. 2, green thread). Repeat from the beginning of this row four times. Weave through beads to exit from the first D of Base Row 2 (Fig. 2, blue thread).
Embellishment Row 2: Repeat Embellishment Row 1, this time exiting from the first B of Embellishment Row 1 (Fig. 2, red thread).
Fig. 1: Stitching the base
Fig. 2: Embellishing the base
Backof braceletBackof bracelet

44 WWW.INTERWEAVE.COM SEE P. 85 FOR HELPFUL TECHNIQUE INFORMATION. SEE P. 3 FOR PROJECT-LEVEL INFORMATION.
the clasp from back to front (Fig. 4, blue thread). String 2A; pass through the end loop of the clasp just strung from front to back. String 2A; pass back through the last E (bottom hole) exited and the near-est B (Fig. 4, red thread).
Repeat this entire step to reinforce Embel-lishment Row 2 and to attach the second half of the clasp to the other end of the bracelet, taking care that the clasp is positioned to close properly. Secure the working thread and trim. Remove the stop bead; secure the tail thread and trim. ●
MARIE NEW is a United Kingdom–based textile teacher, an award-winning beadwork designer, and a Starman TrendSetter. She loves experi-menting with colors and texture. Contact Marie at www.maztexdesigns.co.uk.
RESOURCES Check your favorite bead retailer or contact: Toho seed beads, crescent beads, and thread: Artbeads.com, (866) 715-2323. Melon rounds: Bead Haven, (989) 652-3566, www.beadhaven.com.
3) FINISH. Strengthen the embellishments and attach the clasp:Reinforcement: Pass back through the
nearest 1C/1F/1C of the current row; repeat five times, connecting the embel-lishment beads, but skipping the B (Fig. 3, green thread). Pass through the nearest B and weave through beads to exit from the next B of the current row (Fig. 3, blue thread). Repeat from the beginning of this row four times, exiting from the last E (top hole) of the base (Fig. 3, red thread).
Clasp: String 2A; pass through one end loop of one half of the clasp from front to back. String 2A; pass through the center loop of the clasp from back to front (Fig. 4, purple thread). String 2A; pass through the first loop of the clasp just strung, from front to back. String 2A; pass back through the last E (top hole) exited. Pass back through the last E (bottom hole) exited, away from the beadwork (Fig. 4, green thread). String 2A; pass through the opposite end loop of the clasp from front to back. String 2A; pass through the center loop of
Serpentine Cuff
Fig. 3: Reinforcing the embellishments
Fig. 4: Attaching the clasp
artist’s tipTo tighten the beadwork,
weave through the beads of
Base Row 1 and Base Row 2
at each curved section of the
base for the length of the
bracelet.
Alternate Colorway Materials
BLUE1 g turquoise opaque size 15°
Japanese seed beads (A)1 g metallic Polaris permanent-
finish size 15° Japanese seed beads (B)
2 g aqua-lined light jonquil size 11° Japanese seed beads (C)
5.5 g silver-lined milky dark peridot size 6° Japanese seed beads (D)
61 blue iris 10×3mm 2-hole crescent beads (E)
60 dark milky peridot 3mm pressed-glass melon rounds (F)
1 antiqued brass 10×14mm 3-strand filigree box clasp
Black One-G nylon beading thread
PINK1 g hot pink Ceylon size 15°
Japanese seed beads (A)1 g opaque yellow-lined crystal
size 15° Japanese seed beads (B)2 g fuchsia-lined crystal size 11°
Japanese seed beads (C)5.5 g pink-lined light topaz
size 6° Japanese seed beads (D)
61 turquoise Picasso 10×3mm 2-hole crescent beads (E)
60 Capri blue iris luster 3mm pressed-glass melon rounds (F)
1 brass 10×14mm 3-strand filigree box clasp
White One-G nylon beading thread

BEADWORK APRIL/MAY 2017 45SEE P. 85 FOR HELPFUL TECHNIQUE INFORMATION. SEE P. 3 FOR PROJECT-LEVEL INFORMATION.
Create a pretty bezel for a Lunasoft Lucite cabochon using tubular peyote stitch, seed beads, and Pip beads for an easy, eye-catching pendant.
Pip Petal Pendant KIM WEST
Main Colorway

46 WWW.INTERWEAVE.COM SEE P. 85 FOR HELPFUL TECHNIQUE INFORMATION. SEE P. 3 FOR PROJECT-LEVEL INFORMATION.
Pip Petal Pendant
TECHNIQUEtubular peyote stitch
PROJECT LEVEL ££¡
MATERIALS1 g nickel size 15° seed beads (A)1 g hematite size 11° seed beads (B)2 g lilac Ceylon size 8° seed beads (C)19 crystal silver rainbow 5×7mm Pip beads (D)1 pearl 24mm Lucite cabochon1 gunmetal 4×5mm wireguard1 gunmetal 4×13mm bail1 gunmetal 4×5mm oval jump ringSmoke 6 lb FireLine braided beading thread
TOOLSScissorsSize 10 beading needle2 pairs of chain- or flat-nose pliers
FINISHED SIZE 1 ½ " (1 ½ × 2" with bail)
1) BEZEL. Use tubular peyote stitch to bezel the cabochon:Rounds 1 and 2: Use 3' of thread to string
38C, leaving a 24" tail. Pass through all the beads again to form a tight circle, then pass through the first 2C strung (Fig. 1, green thread).
Round 3: String 1C, skip 1C of the previous rounds, and pass through the next C; repeat eighteen times. Note: Step up for this and subsequent rounds by passing through the first bead added in the current round unless otherwise noted (Fig. 1, blue thread).
Round 4: Work 19 stitches with 1D in each stitch (Fig. 1, red thread). Flip the bead-work over.
Round 5: Work 19 stitches with 1B in each stitch (Fig. 2, green thread; Rounds 1–3 not shown for clarity). Note: You’ll now begin working the front of the pendant.
Round 6: Work 19 stitches with 1C in each stitch (Fig. 2, blue thread). Pull the thread tight. Note: The beadwork will cup once this round is added. If it becomes difficult to pass through the B of Round 5, try angling your needle to get at the hole. Make sure the C of this round sit on top of the D in Round 4.
Round 7: Work 19 stitches with 1B in each stitch (Fig. 2, red thread). Insert the cabo-chon faceup into the beadwork so the front of the cabochon touches Round 7. Note: The C of Rounds 1–3 will sit at the back of the cabochon, and the D of Round 4 will be at the edge.
Round 8: Work 19 stitches with 2A in each stitch. Step up through the first A of this round (Fig. 3, blue thread).
Round 9: String 1A and pass through the next 2A of Round 8; repeat eighteen times (Fig. 3, red thread). Secure the working thread and trim. Flip the beadwork face-down. Note: The next 2 rounds finish the back of the bezel.
Fig. 1: Stitching Rounds 1–4
Fig. 2: Adding Rounds 5–7
Fig. 3: Working Rounds 8 and 9
artist’s tips❯ Depending on the
manufacturer of the seed beads
you use, you may need to adjust
the number of beads strung in
Rounds 1 and 2. Some seed beads
might be wider than the ones
used here, so you’d need to use
fewer in the starting ring. Toho
or Miyuki seed beads are
recommended.
❯ If Rounds 8 and 9 won’t lay flat
against the cabochon, try smaller
beads such as Charlottes.
❯ If Round 11 won’t lay flat
against the cabochon, use A
beads instead of B.
Backof pendant
l
nt
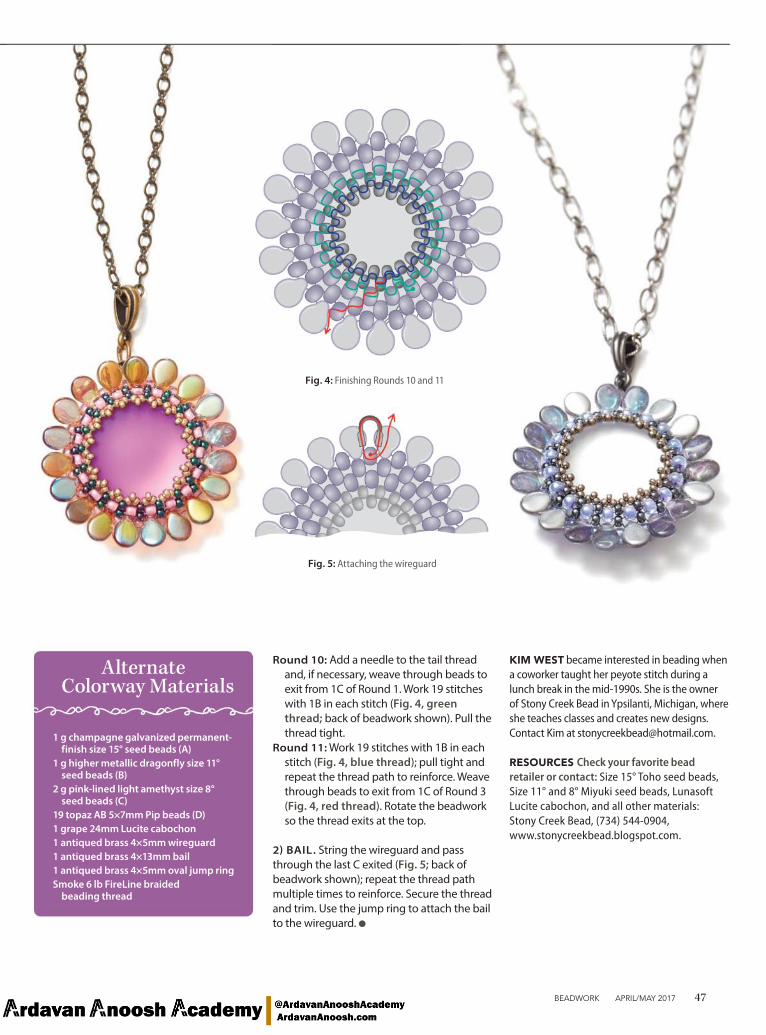
BEADWORK APRIL/MAY 2017 47SEE P. 85 FOR HELPFUL TECHNIQUE INFORMATION. SEE P. 3 FOR PROJECT-LEVEL INFORMATION.
KIM WEST became interested in beading when a coworker taught her peyote stitch during a lunch break in the mid-1990s. She is the owner of Stony Creek Bead in Ypsilanti, Michigan, where she teaches classes and creates new designs. Contact Kim at [email protected].
RESOURCES Check your favorite bead retailer or contact: Size 15° Toho seed beads, Size 11° and 8° Miyuki seed beads, Lunasoft Lucite cabochon, and all other materials: Stony Creek Bead, (734) 544-0904, www.stonycreekbead.blogspot.com.
Round 10: Add a needle to the tail thread and, if necessary, weave through beads to exit from 1C of Round 1. Work 19 stitches with 1B in each stitch (Fig. 4, green thread; back of beadwork shown). Pull the thread tight.
Round 11: Work 19 stitches with 1B in each stitch (Fig. 4, blue thread); pull tight and repeat the thread path to reinforce. Weave through beads to exit from 1C of Round 3 (Fig. 4, red thread). Rotate the beadwork so the thread exits at the top.
2) BAIL. String the wireguard and pass through the last C exited (Fig. 5; back of beadwork shown); repeat the thread path multiple times to reinforce. Secure the thread and trim. Use the jump ring to attach the bail to the wireguard. ●
Fig. 4: Finishing Rounds 10 and 11
Fig. 5: Attaching the wireguard
Alternate Colorway Materials
1 g champagne galvanized permanent-finish size 15° seed beads (A)
1 g higher metallic dragonfly size 11° seed beads (B)
2 g pink-lined light amethyst size 8° seed beads (C)
19 topaz AB 5×7mm Pip beads (D)1 grape 24mm Lucite cabochon1 antiqued brass 4×5mm wireguard1 antiqued brass 4×13mm bail1 antiqued brass 4×5mm oval jump ringSmoke 6 lb FireLine braided
beading thread

1 321817
16
15514
1312 11 10
98
7
65
4
1 32181716
1514
13121110
9 87
654
beginnerfriendly!
48 WWW.INTERWEAVE.COM SEE P. 85 FOR HELPFUL TECHNIQUE INFORMATION. SEE P. 3 FOR PROJECT-LEVEL INFORMATION.
Use backstitch bead embroidery to adorn romantic filigree connectors with fire-polished rounds and a sweet resin rose for a vintage-inspired bracelet.
Victorian Rose Corsage DANIELLE CLARKE
1) FLOWER FILIGREE. Use backstitch bead embroidery to embellish the flower filigree:Ring, First Half: Use 24" of thread to pass up
through Hole 1 of the flower filigree, leav-ing a 4" tail. String 1A; pass down through Hole 3. Use the working and tail threads to tie a square knot. Pass up through Hole 5 (Fig. 1, orange thread). String 2A; pass down through Hole 3. Pass up through Hole 6 (Fig. 1, purple thread). String 2A; pass down through Hole 8. Pass up through Hole 9 (Fig. 1, green thread). String 1A; pass down through Hole 8. Pass up through Hole 9 (Fig. 1, blue thread). Pass back through the 6A just added. Pass down through Hole 1. Tie a half-hitch knot on a previous thread. Pass up through Hole 2. Pass back through the first A of this step (Fig. 1, red thread).
Ring, Second Half: String 1A; pass down through Hole 18. Pass up through Hole 15 (Fig. 2, orange thread). String 2A; pass down through Hole 17. Pass up through Hole 14 (Fig. 2, purple thread). String 2A; pass down through Hole 12. Pass up
Fig. 1: Stitching the first half of the flower filigree’s ring
Fig. 2: Working the second half of the flower filigree’s ring

12 3
45
89
101112
13
16
AB7
6
14
15
1 2 34
5
89
101112
13
16
AB7
6
14
15
12 3 4
5 6
789
1011
13141516
12
Fig. 3: Forming the diamond filigree’s ring
Fig. 4: Adding the first corner of the diamond filigree
Fig. 5: Finishing the second corner and adding the center of the diamond filigree
BEADWORK APRIL/MAY 2017 49SEE P. 85 FOR HELPFUL TECHNIQUE INFORMATION. SEE P. 3 FOR PROJECT-LEVEL INFORMATION.
TECHNIQUEbackstitch bead embroidery
PROJECT LEVEL £¡¡
MATERIALS28 green turquoise luster Picasso 3mm
fire-polished rounds (A)2 champagne luster opaque 4mm fire-
polished rounds (B)1 cream 12mm resin rose3 brass 14mm domed square filigree links2 brass 15×21mm diamond filigree links1 brass 30mm 6-petal flower filigree link12 brass 4mm jump rings1 brass 6mm jump ring1 brass 6×10mm lobster clasp3 ½ " of brass 2mm teardrop chain3 ½ " of gold-plated 3–4×2–3mm wire-
wrapped green rondelle chainDark brown size A Silamide waxed nylon
beading threadClear craft adhesive
TOOLSScissorsSize 7 sewing needleToothpicks2 pairs of chain- or flat-nose pliers
FINISHED SIZE7 ½ "
artist’s tips ❯ Increase or decrease the
finished size of the bracelet
by adjusting the length of
the chains.
❯ To make a matching pair
of earrings, stitch two
diamond filigrees and
attach an ear wire to one
corner of each filigree.
through Hole 9 (Fig. 2, green thread). String 1A; pass down through Hole 11. Pass up through Hole 9 (Fig. 2, blue thread). Pass back through the 6A added in this half (Fig. 2, red thread). Pass through the ring of 12A and pull the thread snug to close any gaps in the thread. Pass down through the nearest hole in the filigree, toward the back. Secure the threads at the back of the fili-gree. Dab the knot with adhesive; let dry. Trim the threads.
Center: Use a toothpick and adhesive to attach the back of the resin rose to the front of the flower filigree, centered within the ring; let dry. Flip the filigree over.
Back: Use a toothpick and adhesive to attach 1 domed filigree to the center of the back of the flower filigree so that the convex surface faces out. Set aside.
2) DIAMOND FILIGREES. Use backstitch bead embroidery to embellish the diamond filigrees:Ring: Use 24" of thread to pass up through
Hole 1 of 1 diamond filigree, leaving a 4" tail. String 1A; pass down through Hole 4. Use the working and tail threads to tie a square knot. Pass up through Hole 7
(Fig. 3, turquoise thread). String 1A; pass down through Hole 5. Pass up through Hole 9 (Fig. 3, orange thread). String 1A; pass down through Hole 7. Pass up through Hole 12 (Fig. 3, purple thread). String 1A; pass down through Hole 9. Pass up through Hole 14 (Fig. 3, green thread). String 1A; pass down through Hole 12. Pass up through Hole 16 (Fig. 3, blue thread). String 1A; pass down through Hole 14. Pass up through Hole 1 and pass through the first 2A added in the ring (Fig. 3, red thread).
First Corner: String 1A; pass down through the hole at Corner A. Pass up through Hole 9. Pass through the third A added in the ring, toward Corner A (Fig. 4, green thread). Pass through the last A added and pass down through Corner A. Pass up through Hole 7 (Fig. 4, blue thread). Pass through the third through fifth beads added in the ring, toward Corner B (Fig. 4, red thread).
Second Corner: String 1A; pass down through the hole at Corner B. Pass up through Hole 1. Pass through the sixth A added in the ring, toward Corner B (Fig. 5, purple thread). Pass through the last A added and pass down through Corner B. Pass up through Hole 13 (Fig. 5, green thread).
Center: String 1B; pass down through Hole 5. Pass up through Hole 13 (Fig. 5, blue thread). Pass through the last B added and pass down through Hole 5 (Fig. 5, red thread). Secure the threads at the back of the filigree. Dab the knot with adhesive; let dry. Trim the threads.
Back: Use a toothpick and adhesive to attach 1 domed filigree to the back of the dia-mond filigree so that the convex surface faces out and the corners and edges of each filigree are aligned. Set aside.
Repeat this entire step to form a second dia-mond filigree.gree.

50 WWW.INTERWEAVE.COM SEE P. 85 FOR HELPFUL TECHNIQUE INFORMATION. SEE P. 3 FOR PROJECT-LEVEL INFORMATION.
DANIELLE CLARKE lives in New Jersey with her husband and their two sons. She works in information technology, and she is a member of the B’sue Boutiques Creative Group. Contact Danielle at www.opalrosebydanielle.etsy.com.
RESOURCES Check your favorite bead retailer or contact: Fire-polished rounds: Eureka Crystal Beads, (401) 603-0983, www.eurekacrystalbeads.com. Diamond links, similar fl ower link, teardrop chain, and similar rondelle chain: Beadaholique, (866) 834-4618, www.beadaholique.com. Resin rose, domed square links, and all other materials: Fire Mountain Gems and Beads, (800) 355-2137, www.fi remountaingems.com.
3) ASSEMBLY. Connect the filigree compo-nents as a focal and attach the chains:Focal: Use one 4mm jump ring to attach
another 4mm jump ring to Corner A on 1 diamond filigree. Use one 4mm jump ring to attach the previous jump ring to the end of 1 petal on the flower filigree. Use one 4mm jump ring to attach another 4mm jump ring to the end of the opposite petal on the flower filigree. Use one 4mm jump ring to attach the previous jump ring to Corner B on the second diamond filigree.
Chains: *Attach one 4mm jump ring to Corner A on the last diamond filigree added. Use one 4mm jump ring to attach one 1 ¾ " piece of teardrop chain and one 1 ¾ " piece of rondelle chain to the previous jump ring. Use one 4mm jump ring to attach the ends of both chains to the lob-ster clasp. Repeat from *, attaching chains to Corner B on the first diamond filigree and using the 6mm jump ring instead of the lobster clasp. ●
Victorian Rose Corsage
HOW TO MAKE
BEADED BEADS
with Cindy Holsclaw
Visit www.interweave.com
Join bead artist Cindy
Holsclaw in this downloadable
on-demand web seminar,
where she shares her
techniques for creating
beautiful beaded beads.
Have you tried Beadwork Web Seminars?

BEADWORK APRIL/MAY 2017 51

52 WWW.INTERWEAVE.COM SEE P. 85 FOR HELPFUL TECHNIQUE INFORMATION. SEE P. 3 FOR PROJECT-LEVEL INFORMATION.
Delicate embellishments made of picots and netting dress up this bracelet’s right-angle-weave base with the look of elegant lace cables.
Lacy Cables Bracelet BARBARA FALKOWITZ
Main Colorway

BEADWORK APRIL/MAY 2017 53SEE P. 85 FOR HELPFUL TECHNIQUE INFORMATION. SEE P. 3 FOR PROJECT-LEVEL INFORMATION.
TECHNIQUESright-angle weave variationpicotnetting
PROJECT LEVEL ££¡
MATERIALS2 g metallic antique bronze size 15° seed
beads (A)1 g silver-lined aqua size 15° seed beads (B)4 g metallic antique bronze size 11° seed
beads (C)7 g turquoise Picasso 4×2mm 2-hole
MiniDuos (D)55 rose gold luster opaque 4mm fire-
polished rounds (E)36 crystal Picasso 3mm pressed-glass
rounds (F)1 antiqued copper 22mm 3-strand box claspSmoke 6 lb FireLine braided beading thread
TOOLSScissorsSize 10 beading needle
FINISHED SIZE6 ¾ "
1) BASE. Use a variation of right-angle weave to stitch the base:Row 1, Unit 1: Use 3' of thread to string {1D
and 1C} four times, leaving a 4" tail. Pass through the beads (same holes of the D) again to form a tight circle; use the work-ing and tail threads to tie a square knot and pass through the first (inside) hole of the first D strung. Pass through the second (outside) hole of the last D exited (Fig. 1, green thread).
Row 1, Unit 2: String {1C and 1D} three times. String 1C; pass through the last D (outside hole) exited in the previous unit and the first 1C, 1D (inside hole), 1C, and 1D (inside then outside holes) of this unit (Fig. 1, blue thread).
Row 1, Units 3–19: Repeat Row 1, Unit 2 seventeen times, exiting toward the bead-work from the first D (inside then outside holes) of Row 1, Unit 19 (Fig. 1, red thread).
Row 2, Unit 1: String {1C and 1D} three times. String 1C; pass through the last D (outside hole) exited in the previous row and the first 1C/1D (inside then outside holes) of this unit (Fig. 2, green thread).
Row 2, Unit 2: String 1C; pass through the D (outside hole) at the bottom of the next unit in the previous row. String {1C and 1D} twice. String 1C; pass through the last D (outside hole) exited in the previous unit of the current row, and weave through beads to exit from the first D (inside then outside holes) of this unit (Fig. 2, blue thread).
Row 2, Units 3–19: Repeat Row 2, Unit 2 seventeen times, exiting away from the beadwork from the second D (inside then outside holes) of Row 2, Unit 19 (Fig. 2, red thread).
Row 3, Unit 1: String {1C and 1D} three times. String 1C; pass through the last D (outside hole) exited in the previous row and weave through beads to exit from the third D (inside then outside holes) of this unit (Fig. 3, green thread).
Row 3, Unit 2: String {1C and 1D} twice. String 1C; pass through the D (outside hole) at the bottom of the next unit in the previous row. String 1C; pass through the last D (outside hole) exited in the previous unit of the current row, and weave through beads to exit from the second D (inside then outside holes) of this unit (Fig. 3, blue thread).
Row 3, Units 3–19: Repeat Row 3, Unit 2 seventeen times, exiting away from the beadwork from the first D (inside hole) of Row 3, Unit 19 (Fig. 3, red thread).
Fig. 1: Stitching Row 1 of the base
Fig. 2: Working Row 2 of the base
Fig. 3: Forming Row 3 of the base
artist’s tipKeep consistent
tension when
stitching the base.
Back of bracelet

54 WWW.INTERWEAVE.COM SEE P. 85 FOR HELPFUL TECHNIQUE INFORMATION. SEE P. 3 FOR PROJECT-LEVEL INFORMATION.
4) EDGE 1, ROW 3. String 1B, 1C, 1F, 1C, and 1B and pass through the second A of the next 3A set in Edge 1, Row 2 (Fig. 5, orange thread); repeat seventeen times. Weave through beads to exit from the second A of the nearest 3A set in Edge 1, Row 1 (Fig. 5, purple thread).
5) EDGE 1, ROW 4. String 1B and 1C and pass back through the nearest F of Edge 1, Row 3, then string 1C and 1B and pass through the second A of the next 3A set in Edge 1, Row 1 (Fig. 5, green thread); repeat seventeen times (Fig. 5, blue thread). Weave through beads to exit from the mirror D (inside hole) at the other edge of the base, away from the beadwork (Fig. 5, red thread).
6) EDGE 2, ROWS 1–4. Repeat Steps 2–5. Weave through beads to exit from one end C of Row 2 in the base (see the blue start dot in Fig. 6).
2) EDGE 1, ROW 1. Use picots and netting to embellish one edge of the base:End 1: String 2A; pass through the last D
(outside hole) exited (Fig. 4, black thread).
Stitch 1: String 3A; pass through the last D (outside hole) exited (Fig. 4, pink thread).
Stitch 2: String 1A, 1E, and 1A; pass through the next edge D (outside hole) (Fig. 4, tur-quoise thread).
Stitches 3–37: Repeat Stitches 1 and 2 seventeen times. Repeat Stitch 1 (Fig. 4, purple thread).
End 2: String 2A; pass back through the nearest C and the next 1D (inside hole), 1C, and 1D (inside hole) (Fig. 4, green thread).
3) EDGE 1, ROW 2. String 3A and pass through the last D (inside hole) exited, then weave through beads to exit from the next D (inside hole) of the current row; repeat seven-teen times (Fig. 4, blue thread). String 3A; pass through the last D (inside hole) exited and the first 2A of the last 3A added (Fig. 4, red thread).
Lacy Cables Bracelet
Fig. 4: Adding Edge 1, Rows 1 and 2
Alternate Colorway Materials
4 g teal purple iris size 15° seed beads (Use for A and B.)
4 g wisteria luster size 11° seed beads (C)7 g turquoise blue bronze Picasso 4×2mm
2-hole MiniDuos (D)49 amethyst opal luster 4mm fire-
polished rounds (E)32 bordeaux pastel 2mm fire-polished
rounds (F)1 silver 22mm 3-strand box claspSmoke 6 lb FireLine braided beading
thread This variation has 17 units in each base row.
FINISHED SIZE6 ¼ "
OPTIONS• USE 2MM FIRE-POLISHED ROUNDS,
2×3MM CRYSTAL RONDELLES, OR 3MM PEARLS
FOR THE 3MM PRESSED-GLASS ROUNDS .
• USE ONE COLOR OF SIZE 15º SEED BEADS
INSTEAD OF TWO.

BEADWORK APRIL/MAY 2017 55SEE P. 85 FOR HELPFUL TECHNIQUE INFORMATION. SEE P. 3 FOR PROJECT-LEVEL INFORMATION.
Fig. 7: Attaching the clasp
Fig. 5: Working Edge 1, Rows 3 and 4 Fig. 6: Stitching the centerline
7) CENTERLINE. String 1A, 1E, and 1A and pass through the diagonal C of the current unit in Row 2 of the base, then weave through beads to exit from the mirror C of the next unit in Row 2 of the base (Fig. 6, blue thread); repeat eighteen times (Fig. 6, red thread). Secure the threads and trim.
8) CLASP. Start 2' of new thread that exits from one end D (outside hole) of Row 1 in the base, away from the beadwork, leaving a 4" tail. *String 3A, the end loop of one half of the clasp, and 3A, then pass through the last D (outside hole) exited; repeat the thread path of the 3A/clasp loop/3A to reinforce. Weave through beads to exit from the next D (outside hole) at the end of the base (Fig. 7, green thread). Repeat from *, stringing the next loop of the same half of the clasp (Fig. 7, blue thread). String 3A, the last loop of the same half of the clasp, and 3A; pass through
the last D (outside hole) exited (Fig. 7, red thread). Secure the threads and trim.Repeat this entire step at the other end of the bracelet, using the second half of the clasp and taking care that the clasp is posi-tioned to close properly. ●
BARBARA FALKOWITZ is a designer, teacher, and former bead store owner. She has been teaching since 2006 and was a BeadworkDesigner of the Year in 2015. Barbara is currently teaching in the Pennsylvania and New Jersey areas and can be contacted at [email protected].
RESOURCES Check your favorite bead retailer or contact: Seed beads, MiniDuos, fi re-polished rounds, pressed-glass rounds, and thread: Fusion Beads, (888) 781-3559, www.fusionbeads.com. Clasp and kits: Diva Beaders, www.divabeaders.etsy.com.

56 WWW.INTERWEAVE.COM SEE P. 85 FOR HELPFUL TECHNIQUE INFORMATION. SEE P. 3 FOR PROJECT-LEVEL INFORMATION.
Inspired by intricate floor tiles, this eye-catching necklace is constructed by suspending a focal of connected components from dainty chain.
Crystal Rain Necklace ANNETTE HOLBERT

BEADWORK APRIL/MAY 2017 57SEE P. 85 FOR HELPFUL TECHNIQUE INFORMATION. SEE P. 3 FOR PROJECT-LEVEL INFORMATION.
TECHNIQUEScircular nettingpicot
PROJECT LEVEL ££¡
MATERIALS1 g silver permanent-finish size 15° seed
beads (A)3 g matte teal iris size 11° seed beads (B)3.5 g matte teal iris size 8° seed beads (C)12 silver 3.4mm Japanese drops (D)20 petrol pastel 6mm 2-hole diamond Silky
beads (E)40 aquamarine 3mm crystal bicones (F)3 Caribbean blue 7×13mm crystal
briolettes (G)1 silver 13×27mm leaf-motif toggle clasp4 silver 4×6mm oval jump rings13 silver 6mm 20-gauge jump rings12" of silver 3×6 / 2×3mm long-and-short
oval chainSmoke 6 lb FireLine braided beading thread
TOOLSScissorsSize 10 or 12 beading needle2 pairs of chain- or flat-nose pliersWire cutters
FINISHED SIZE19 ½ "
1) COMPONENTS. Use circular netting and picots to stitch the components:Round 1: Use 2' of thread to string {3B and
1E} four times, leaving a 4" tail. Note: Take care to string each E so the convex side is faceup. Pass through the beads (first/inside holes of the E) again to form a tight circle; use the working and tail threads to tie a square knot. Pass through the first 2B strung (Fig. 1, orange thread).
Round 2: String 1A, 1F, and 1A, skip the next 1B/1E/1B, and pass through the fol-lowing B; repeat three times. Pass through the first 1A/1F of this round (Fig. 1, blue thread). Pass through the 4F of this round to snug the beads into a ring at the cen-ter. Pass through the next 1A/1B (Fig. 1, red thread).
Round 3: String 1F and 1B, then pass back through the F just added and pass through the last B exited in Round 1 and the next 1B/1E (inside hole)/2B (Fig. 2, purple thread); repeat three times. Pass through the first 1F/1B of this round (Fig. 2, orange thread).
Round 4: String 3B and pass through the second (outside) hole of the next E, then string 3B and pass through the following B of Round 3 (Fig. 2, blue thread); repeat three times. Pass through the first 3B of this round (Fig. 2, red thread).
Round 5: String 5B and pass through the nearest 7B (Fig. 3, purple thread); repeat three times. Pass through the first 3B of this round (Fig. 3, orange thread).
Round 6: String 3C and pass through the last B exited and the next 6B to form a picot (Fig. 3, blue thread); repeat seven times (Fig. 3, red thread). Secure the threads and trim.
Dangle: Use 1 round jump ring to string 1D, 1G, and 1D; attach it to the center C of the 3C set in Round 6 along the bottom flat edge of the component.
Repeat this entire step twice for a total of 3 large-dangle components. Repeat this entire step twice, this time stringing 3D in the dangle instead of 1D/1G/1D for 2 small-dangle components.
Fig. 1: Stitching Rounds 1 and 2
Fig. 2: Working Rounds 3 and 4
Fig. 3: Adding Rounds 5 and 6
ide
le; a
hehe fol-
s through. 1, bluethis round
t the cen-1B (Fig. 1,
en pass back nd pass
n Round 1 andle)/2B (Fig. 2,
hree times. Pass of this round
).ss through the
E then
ng to string 1D,f the
OPTIONPLAY WITH THE NUMBER,
CONNECTION STYLE, AND
LAYOUT OF THE COMPONENTS
IN YOUR NECKLACE.

58 WWW.INTERWEAVE.COM SEE P. 85 FOR HELPFUL TECHNIQUE INFORMATION. SEE P. 3 FOR PROJECT-LEVEL INFORMATION.
ANNETTE HOLBERT has an associate degree in nursing, but she now creates and repairs jewelry and teaches classes on beading, wire, metal, and polymer clay. Annette works and displays her jewelry at A Better Bead and Crafts in Brevard, North Carolina. With the encouragement of her family and friends, she publishes her own jewelry patterns.
RESOURCES Check your favorite bead retailer or contact: Seed beads and Silky beads: Cindy’s Crafts, (423) 926-0050, www.beadlady.biz. Japanese drops: Bead-therapy.com, (423) 509-1907. Swarovski crystal bicones, clasp, jump rings, and chain: A Better Bead and Crafts, (828) 884-5920, www.abetterbead.com. Crystal briolettes: Cherry Tree Beads, (828) 505-2328, www.cherrytreebeads.com.
2) ASSEMBLY. Connect the components and attach the chain:Connect: Use 1 round jump ring to connect
the center C of the top-right picot on 1 large-dangle component to the center C of the top-left picot on 1 small-dangle component, then connect the right-side picot on the large-dangle component to the left-side picot on the small-dangle component in the same manner; repeat three times, connecting each new compo-nent to the last component added and alternating large-dangle and small-dangle components.
Straps: Use 1 oval jump ring to attach one half of the clasp to one 6" piece of chain, then use 1 oval jump ring to attach the other end of the chain to the center C of the top-outside picot on one end compo-nent in the focal; repeat for the other end of the necklace, using the other half of the clasp. ●
Crystal Rain Necklace
d gree
2) ASSEMBLY. Connect the components and attach the chain:Connect: Use 1 round jump ring to connect
C f the top-right picot on
OPTION THE LIGHTWEIGHT COMPONENTS
MAKE GREAT EARRINGS, OR YOU CAN
CONNECT MULTIPLE COMPONENTS
INTO A BRACELET.
Crystal brio(828) 505-2
Alternate Colorway Materials
PURPLE NECKLACE1 g copper permanent-finish size 11°
seed beads (A)3 g purple iris size 11° seed beads (B)4 g purple metal size 8° seed beads (C)There is no D in this colorway.24 Bordeaux pastel 6mm 2-hole
diamond Silky beads (E)48 purple rainbow 3×4mm crystal
rondelles (F)1 Alexandrite blue 10×18mm crystal
briolette (G)1 copper 10×25mm hook-and-eye clasp8 copper 4×6mm oval jump rings1 copper 8mm jump ring10" of antiqued copper 1×2mm oval/3mm
ball link chainSmoke 6 lb FireLine braided beading
thread
DARK BLUE EARRINGS1 g silver permanent-finish size 11° seed
beads (A)2 g dark cobalt transparent size 11° seed
beads (B)2 g jet AB size 8° seed beads (C)There is no D in this colorway.8 jet Azuro 6mm 2-hole diamond Silky
beads (E)16 metallic blue 3mm crystal rondelles (F)2 Alexandrite blue 6×11mm crystal
briolettes (G)1 pair of silver 9×11mm ear wires4 silver 5mm jump ringsSmoke 6 lb FireLine braided beading
thread
TEAL EARRINGS1 g silver permanent-finish size 11° seed
beads (A)2 g matte teal iris size 11° seed beads (B)2 g matte teal iris size 8° seed beads (C)6 silver 3.4mm Japanese drops (D)8 petrol pastel 6mm 2-hole diamond Silky
beads (E)16 aquamarine 3mm crystal bicones (F)There is no G in this colorway.1 pair of silver 9×11mm ear wires4 silver 5mm jump ringsSmoke 6 lb FireLine braided beading
thread
Backof necklace

BEADWORK APRIL/MAY 2017 59
Explore Cubic Right-Angle
Weave with Marcia DeCoster
DESIGNER of the Year SERIES
Fundamentals and Shapingwith MARCIA DeCOSTER
Cubic Right-Angle Weave
Run time: 90 minutes
This DVD is for your private home
viewing only. It is not authorized
for any other use.
This
DVD
is fo
r you
r priv
ate home viewing only. It is
not authorized for any other use. © 2015 F+W Media, Inc. All rights reserved.
with MARCIA DeCOSTER
Cubic Right-Angle WeavePrismatic Right-Angle
Weave and Embellishments
DESIGNER of the Year SERIES
with MARCIA DeCOSTER
Cubic Right-Angle WeavePrismatic Right-Angle
Weave and Embellishments
www.interweave.com
Learn new techniques, refi ne your skills, and expand your repertoire with these must-have DVDs from
Marcia DeCoster. Explore basic ropes and shapes in Cubic Right-Angle Weave:
Fundamentals and Shaping.
Then, embellish your new creations and master the art of creating right-angle weave with more
than four sides in Cubic Right-Angle Weave: Prismatic Right-Angle Weave and Embellishments.
®
www.beadalon.com
Ring Weaver Tool
Bangle Bracelet Weaver Tool
by Kleshna
CHA 2016WINNER
HOT PRODUCT AWARD
CHA 2016CHA 2016NEW!
Create fantastic woven designs quickly!
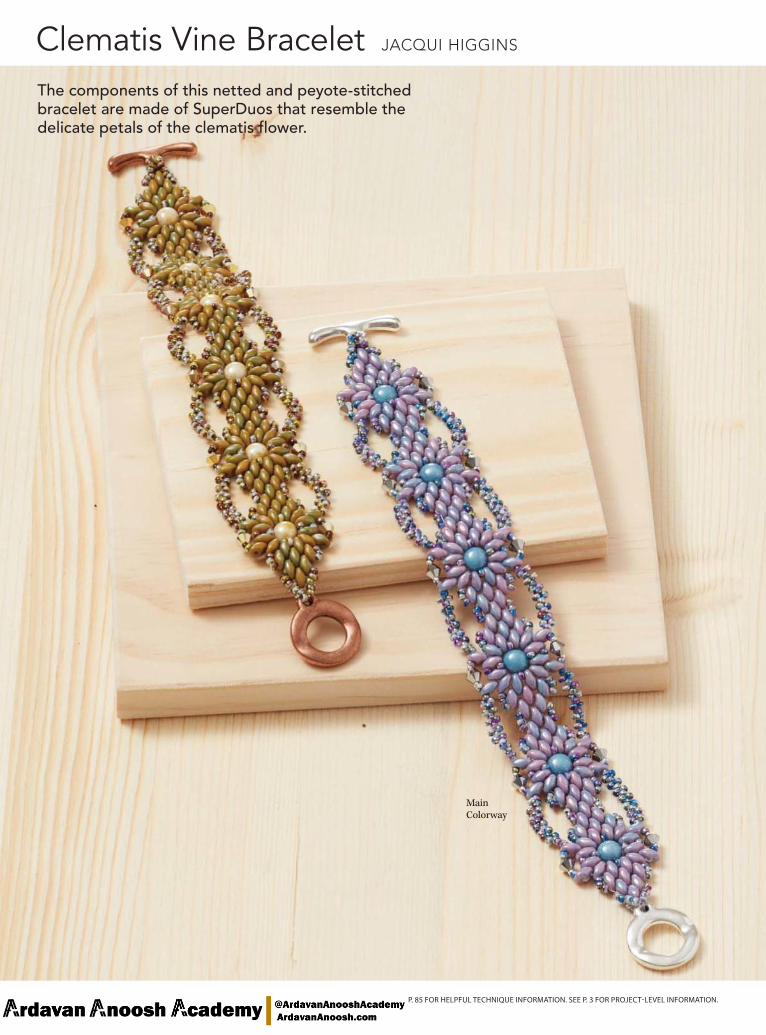
60 WWW.INTERWEAVE.COM SEE P. 85 FOR HELPFUL TECHNIQUE INFORMATION. SEE P. 3 FOR PROJECT-LEVEL INFORMATION.
The components of this netted and peyote-stitched bracelet are made of SuperDuos that resemble the delicate petals of the clematis flower.
Clematis Vine Bracelet JACQUI HIGGINS
Main Colorway

BEADWORK APRIL/MAY 2017 61SEE P. 85 FOR HELPFUL TECHNIQUE INFORMATION. SEE P. 3 FOR PROJECT-LEVEL INFORMATION.
TECHNIQUEScircular and flat nettingpeyote stitch
PROJECT LEVEL ££¡
MATERIALS1 g silver size 15° Japanese seed beads (A)4 g white opaque funky blue size 11°
Japanese seed beads (B)10 g nebula chalk 5×2.5mm 2-hole
SuperDuos (C)6 chalk white baby blue luster 6mm 2-hole
cabochons (D)12 crystal chrome 4mm crystal bicones (E)1 silver-plated 18mm toggle claspCrystal 6 lb FireLine braided beading thread
TOOLSScissorsSize 11 or 12 beading needle
FINISHED SIZE8"
1) COMPONENTS. Use circular netting to create the components:Round 1: Lay 1D on your work surface with
the holes oriented vertically and the round side faceup. Add a stop bead to 3' of thread, leaving a 6" tail. String the D (left hole) and 3C (Fig. 1, green thread); pass back through the D (right hole) (Fig. 1, blue thread). String 3C; pass through the D (left hole) (Fig. 1, red thread).
Round 2: Working counterclockwise, string 3C; pass back through the first (inside) holes of the next 3C and the D (right hole) (Fig. 2, blue thread). String 3C; pass back through the D (right hole) and the next 3C (inside holes) (Fig. 2, red thread).
Round 3: String 1B and pass through the nearest 3C (inside holes) (Fig. 3, green thread); repeat three times (Fig. 3, blue thread). Pass through the second (outside) hole of the last C exited (Fig. 3, red thread). Note: You’ll now begin working clockwise.
Round 4: String 1C and pass through the next C (outside hole); repeat (Fig. 4, orange thread). String 1B; pass through the next C (outside hole) (Fig. 4, purple thread). String 1C and pass through the next C (outside hole); repeat twice (Fig. 4, green thread). Repeat from the beginning of this round (Fig. 4, blue thread). Pass through the first C (inside then outside holes) of this round (Fig. 4, red thread). Note: You’ll now begin work-ing counterclockwise.
End 1: String 1C and pass through the next C (outside hole) of the previous round; repeat (Fig. 5, pink thread). Weave through beads to exit from the last C (inside then outside holes) added, toward the first C just added (Fig. 5, orange thread). String 1C; pass through the next C (outside hole) (Fig. 5, purple thread). Weave through beads, following the green thread path in Fig. 5 to exit from the oppo-site C (outside hole) of Round 4 (Fig. 5, green thread).
End 2: String 1C and pass through the next C (outside hole); repeat (Fig. 5, blue thread). Weave through beads to exit from the last C (inside then outside holes) added, toward the first C just added (Fig. 5, red thread). Remove the stop bead; secure and trim the tail thread but don’t trim the working thread. Set aside.
Repeat this entire step five times for a total of 6 components. Use the working thread of the last component to string 1C; pass through the next C (outside hole) of End 2. Secure and trim the working thread of the last component.
Fig. 1: Working Round 1 of a component
Fig. 4: Stitching Round 4 of a component
Fig. 2: Forming Round 2 of a component
Fig. 5: Finishing the ends of a component
Fig. 3: Adding Round 3 of a component
artist’s tipBefore adding a
two-hole bead to
your work, pretest
each hole to make
sure that neither is
clogged.

62 WWW.INTERWEAVE.COM SEE P. 85 FOR HELPFUL TECHNIQUE INFORMATION. SEE P. 3 FOR PROJECT-LEVEL INFORMATION.
round four times. String 1B, 1A, 1E, 1A, and 1B; pass through the next C (outside hole) of Round 4 (Fig. 8, purple thread). Weave through beads of the end compo-nent to exit from the first C (inside then outside holes) of Round 4 at the bottom of the component, toward the beadwork (Fig. 8, green thread). Repeat from the beginning of this row along the bottom of the components. Weave through beads to exit from the first B of the first 15B set in this row (Fig. 8, blue thread).
Row 3: Work 7 peyote stitches with 1B in each stitch. Weave through beads to exit from the first B of the next 15B set in the previous row (Fig. 8, red thread). Repeat from the beginning of this row nine times to peyote stitch in each set of 15B along the top and bottom of the bracelet. Secure the threads and trim.
3) EDGES. Use netting and peyote stitch to add edges to the bracelet:Row 1: Start 6' of new thread that exits up
through the second (outside) hole of the last C added on the end component in Step 2. Following the blue thread path in Fig. 7, add sets of 3B to the edges of each component and connection point where indicated in the figure (Fig. 7, blue thread). Weave through beads to exit from the nearest C (inside then outside holes) of Round 4 at the top of the end component, toward the beadwork (Fig. 7, red thread).
Row 2: String 1B, 1A, 1E, 1A, and 1B; pass through the next C (outside hole) of Round 4. String 15B; pass through the nearest C (outside hole) of Round 4 at the top of the next component (Fig. 8, orange thread). Repeat from the beginning of this
2) ASSEMBLY. Note: Take care that each component is faceup. Use the working thread of 1 component to string the last C (outside hole) added in End 1 of 1 new com-ponent. Pass through the next C (outside hole) of the first component (Fig. 6, blue thread). Pass through the mirror C (outside hole) of the new component, the last C (inside hole) added in End 1, and the next C (outside hole). Pass through the mirror C (outside hole) of the first component (Fig. 6, red thread). Repeat the thread path of this join to reinforce the connection. Secure and trim the working thread of the first component.Repeat this entire step four times to join the remaining components, taking care that the last component formed in Step 1 is at the end.
Clematis Vine Bracelet
Fig. 7: Stitching Edge, Row 1
Fig. 8: Working Edge, Rows 2 and 3
Fig. 6: Assembling the components
Back of bracelet

BEADWORK APRIL/MAY 2017 63SEE P. 85 FOR HELPFUL TECHNIQUE INFORMATION. SEE P. 3 FOR PROJECT-LEVEL INFORMATION.
Fig. 9: Attaching the clasp
4) CLASP. Start 24" of new thread that exits from 1 set of 3B added in Row 1 of the edges at one end of the bracelet. String 3B, one half of the clasp, and 3B; pass back through the last 3B exited. Weave through beads to exit from the next 3B at this end of the bracelet (Fig. 9, blue thread). String 3B; pass through the same half of the clasp. String 3B; pass back through the last 3B exited. Weave
JACQUI HIGGINS is a member of the Starman TrendSetters team. Her designs have been published in Beadwork and she teaches at bead shops throughout the U.S. and at national events. Contact Jacqui about workshops, patterns, and kits at [email protected].
RESOURCES Check your favorite bead retailer or contact: All materials: Lucy’s Bead Boutique, (848) 232-3690, www.lucysbeadboutique.com.
through beads to exit from the first 3B exited in this clasp (Fig. 9, red thread). Repeat the thread path of this clasp to reinforce. Secure the threads and trim.Repeat this entire step at the other end of the bracelet, using the second half of the clasp. ●
Alternate Colorway Materials
1 g bronze size 15° Japanese seed beads (A)4 g white opaque funky green size 11°
Japanese seed beads (B)10 g matte nebula lemon 5×2.5mm 2-hole
SuperDuos (C)6 chalk white 6mm 2-hole cabochons (D)12 aurum 2XAB 4mm crystal bicones (E)1 bronze 18mm toggle claspSmoke 6 lb FireLine braided beading
thread

Uncode the mystery of stitching fashionable
jewelry using shaped beads
with these project packed
pattern collection eBooks.
Discover your next shaped bead project today at
www.interweave.com
Get started beading with shaped beads today!
PRESENTS
Stitching with Shaped Beads
10 BEADING PROJECTS TO MAKE WITH
BUGLE BEADS
from the editors of
BEADING PROJECTSto make with
TILA BEADS10S T I T C H I N G W I T H S H A P E D B E A D S
10Beaded Projects
to make withSUPERDUOS
& TWINS
Stitching With SHAPED BEADS
presents
DECO DELIGHTDiane Fitzgerald
EMERALD CITY NECKLACE
Smadar Grossman

YOUR RESOURCE FOR BEADS, TEACHERS, PATTERNS, KITS & SUPPLIES
Stitch Learn Create
BEADWORK APRIL/MAY 2017 65
Allene's BeadsPresenting fi ne American and
European Glass Bead Artists.
www.allenesbeads.com
Leslee FruminKits-Classes-Patternswww.lesleefrumin.com
BEAD ME A STORYRubber O-ringsFor chain maille,
leather and more...www.beadmeastory.com
Cindy BeadladyBeads, Findings, Tools, Fast
and Cheap Shipping
GlassyJewels
Kits including
Royals eBook designs
www.glassyjewels.com
Helena Tang-LimThe Manek Lady
Patterns | Kits | Classeswww.manek-manek.com
Twisted Sistah BeadsArt Deco Crowns Bracelet Kit, available in three sumptuous
color ways
www.twistedsistahbeads.comwww.etsy.com/shop/TwistedSistahBeads
WYNWOODS GALLERY & STUDIO
hand cast sterling, bronze & pewter charms, rosary parts
& retail store.
www.wynwoods.com
Beads, stringing materials, fi ndings, tools & supplies.
Classes for beginner to [email protected]
Explorations in Freeform Peyote BeadingAvailable in print & ebook by artist & author Karen Williams
www.etsy.com/shop/[email protected]
Golden Twin ClaspsThe most beautiful clasps in the world.
All of our clasps are made to exacting German standards using lead and nickel-free base metal. We use only neodymium magnets, the strongest in the world. And our crystals are all by Swarovski.
Don’t your designs deserve the best?
www.goldentwinclasps.com
Lanai KinskyExpressions in Color Kit
in 3 colorways25% off select Kits,
use code HAPPYBEADINGwhile supplies last
www.LanaiKinsky.com 503-686-8974
PRISCILLA MARBAN
“Your source for the original and authentic decoupage beads “
www.priscillabeads.com

�et’s �e �riends
MARCH 23-26, 2017 | SANTA FE COMMUNITY CONVENTION CENTER
�orkshops MARCH 23-26
�xpo MARCH 24-26
REGISTER NOW
SantaFe.BeadFest.com
Bead Fest Santa Fe celebrates its highly anticipated return! Experience Bead Fest Santa Fe’s hands-on Workshops
in a variety of techniques, for all skill levels and budgets.
Looking to advance your metalworking skills? Ready to try
your hand at bead weaving? Master these techniques and
more at Bead Fest Santa Fe! And don’t forget to visit the
Expo. It’s a jewelry artist’s paradise, stocked with unique
materials and tools from across the globe.
Workshop seats are filling up fast! Register today, and
start planning your Bead Fest Santa Fe getaway!
Bead Fest BlogCatch the latest Bead Fest news and inspirations on
Bead Fest Blog (blog.beadfest.com). A new post
goes live every Tuesday at 11:00 a.m. EST.

Weathered Hues
Cody Westfall
This delightful beaded necklace features an assortment of glass beads in soft colors
for a stylish accessory that’s perfect for any spring or summer outfi t.
Back by popular demand, this section of fast and
fabulous designs provides eight simple, stylish jewelry
projects guaranteed to add a spring to your
step this season.
BEADWORK APRIL/MAY 2017 67
fast & fabulousEASY-GOING INSPIRATION
(Instructions follow on page 75.)

Fantastical Frida
Anne Potter
Add a pop of color to a mostly chain necklace design by incorporating paper
and raku beads in saturated hues.
68 WWW.INTERWEAVE.COM
Use similar techniques to make a matching bracelet
and earrings.
fast & fabulous

NestledRejetta Sellers
Celebrate springtime by creating a necklace with colorful components
that lend themselves to a fun, sprightly design.
BEADWORK APRIL/MAY 2017 69
Use similar techniques to make a matching
bracelet.
fast & fabulous

Gray Garden Anne Perry
Sweet touches such as the mother-of-pearl clasp and shimmery
pearls give this darling necklace a soft, feminine feel.
70 WWW.INTERWEAVE.COM
Use similar techniques to make matching
earrings.
fast & fabulous

BEADWORK APRIL/MAY 2017 71
Spring TapestryErin Prais-Hintz
This artist used an assortment of lavender English-cut rounds and green agate slices for a beautiful
springtime palette.
fast & fabulous

72 WWW.INTERWEAVE.COM
Summer Marigold Andria McKee
Showcase a standout pendant by combining it with an assortment of gemstones in
corresponding colors for a truly vibrant necklace.
Use similar techniques to make a matching
bracelet and earrings.
fast & fabulous

Love More Lorelei Eurto
Use a mix of glass beads and polymer clay components to string this airy
springtime necklace.
BEADWORK APRIL/MAY 2017 73
Use similar techniques to make a matching
bracelet.
fast & fabulous

74 WWW.INTERWEAVE.COM
Madagascan SunsetKristina Hahn Eleniak
This designer combined soft suede lace and colorful beads to perfectly accent the
striking pendant.
Use similar techniques
to make matching earrings.
fast & fabulous
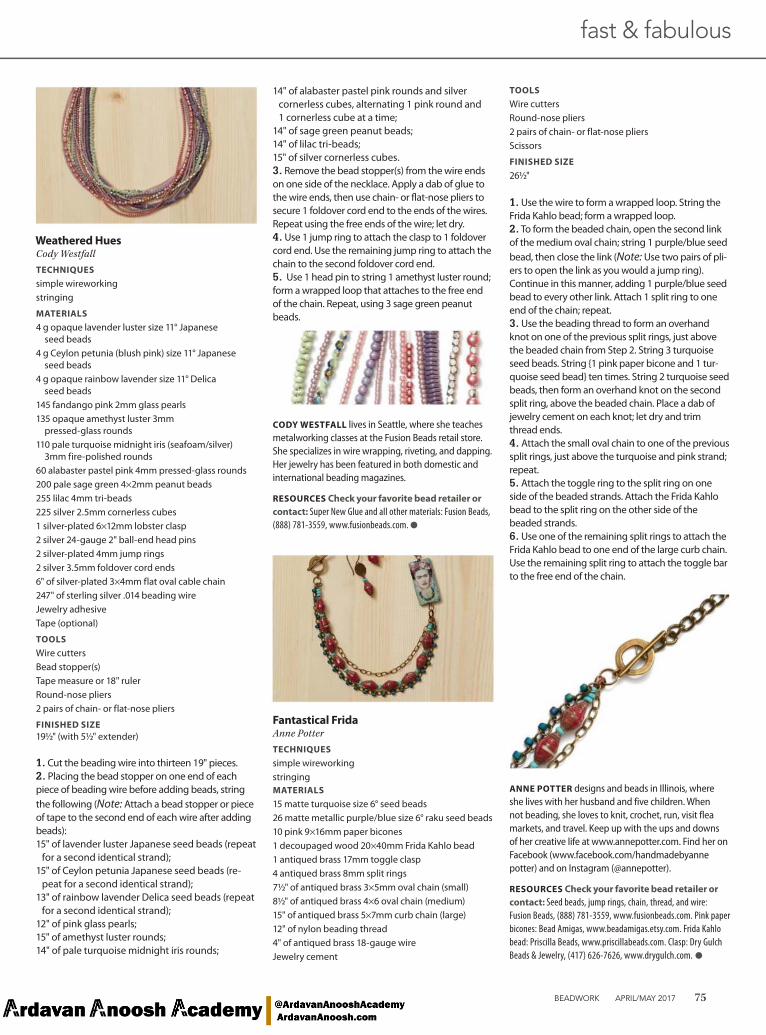
BEADWORK APRIL/MAY 2017 75SEE P. 85 FOR HELPFUL TECHNIQUE INFORMATION.
Weathered HuesCody Westfall
TECHNIQUESsimple wireworkingstringing
MATERIALS4 g opaque lavender luster size 11° Japanese
seed beads4 g Ceylon petunia (blush pink) size 11° Japanese
seed beads4 g opaque rainbow lavender size 11° Delica
seed beads145 fandango pink 2mm glass pearls 135 opaque amethyst luster 3mm
pressed-glass rounds 110 pale turquoise midnight iris (seafoam/silver)
3mm fire-polished rounds60 alabaster pastel pink 4mm pressed-glass rounds200 pale sage green 4×2mm peanut beads255 lilac 4mm tri-beads225 silver 2.5mm cornerless cubes1 silver-plated 6×12mm lobster clasp 2 silver 24-gauge 2" ball-end head pins 2 silver-plated 4mm jump rings 2 silver 3.5mm foldover cord ends6" of silver-plated 3×4mm flat oval cable chain 247" of sterling silver .014 beading wire Jewelry adhesiveTape (optional)
TOOLSWire cuttersBead stopper(s)Tape measure or 18" rulerRound-nose pliers2 pairs of chain- or flat-nose pliers
FINISHED SIZE19½" (with 5½" extender)
1. Cut the beading wire into thirteen 19" pieces.2. Placing the bead stopper on one end of each piece of beading wire before adding beads, string the following (Note: Attach a bead stopper or piece of tape to the second end of each wire after adding beads):15" of lavender luster Japanese seed beads (repeat
for a second identical strand);15" of Ceylon petunia Japanese seed beads (re-
peat for a second identical strand);13" of rainbow lavender Delica seed beads (repeat
for a second identical strand);12" of pink glass pearls;15" of amethyst luster rounds;14" of pale turquoise midnight iris rounds;
14" of alabaster pastel pink rounds and silver cornerless cubes, alternating 1 pink round and 1 cornerless cube at a time;
14" of sage green peanut beads;14" of lilac tri-beads;15" of silver cornerless cubes.3. Remove the bead stopper(s) from the wire ends on one side of the necklace. Apply a dab of glue to the wire ends, then use chain- or flat-nose pliers to secure 1 foldover cord end to the ends of the wires. Repeat using the free ends of the wire; let dry.4. Use 1 jump ring to attach the clasp to 1 foldover cord end. Use the remaining jump ring to attach the chain to the second foldover cord end. 5. Use 1 head pin to string 1 amethyst luster round; form a wrapped loop that attaches to the free end of the chain. Repeat, using 3 sage green peanut beads.
CODY WESTFALL lives in Seattle, where she teaches metalworking classes at the Fusion Beads retail store. She specializes in wire wrapping, riveting, and dapping. Her jewelry has been featured in both domestic and international beading magazines.
RESOURCES Check your favorite bead retailer or contact: Super New Glue and all other materials: Fusion Beads,
(888) 781-3559, www.fusionbeads.com. ●
Fantastical FridaAnne Potter
TECHNIQUESsimple wireworkingstringingMATERIALS15 matte turquoise size 6° seed beads26 matte metallic purple/blue size 6° raku seed beads10 pink 9×16mm paper bicones1 decoupaged wood 20×40mm Frida Kahlo bead1 antiqued brass 17mm toggle clasp4 antiqued brass 8mm split rings7½" of antiqued brass 3×5mm oval chain (small)8½" of antiqued brass 4×6 oval chain (medium)15" of antiqued brass 5×7mm curb chain (large)12" of nylon beading thread4" of antiqued brass 18-gauge wireJewelry cement
TOOLSWire cuttersRound-nose pliers2 pairs of chain- or flat-nose pliersScissors
FINISHED SIZE26½"
1. Use the wire to form a wrapped loop. String the Frida Kahlo bead; form a wrapped loop.2. To form the beaded chain, open the second link of the medium oval chain; string 1 purple/blue seed bead, then close the link (Note: Use two pairs of pli-ers to open the link as you would a jump ring). Continue in this manner, adding 1 purple/blue seed bead to every other link. Attach 1 split ring to one end of the chain; repeat.3. Use the beading thread to form an overhand knot on one of the previous split rings, just above the beaded chain from Step 2. String 3 turquoise seed beads. String {1 pink paper bicone and 1 tur-quoise seed bead} ten times. String 2 turquoise seed beads, then form an overhand knot on the second split ring, above the beaded chain. Place a dab of jewelry cement on each knot; let dry and trim thread ends.4. Attach the small oval chain to one of the previous split rings, just above the turquoise and pink strand; repeat.5. Attach the toggle ring to the split ring on one side of the beaded strands. Attach the Frida Kahlo bead to the split ring on the other side of the beaded strands.6. Use one of the remaining split rings to attach the Frida Kahlo bead to one end of the large curb chain. Use the remaining split ring to attach the toggle bar to the free end of the chain.
ANNE POTTER designs and beads in Illinois, where she lives with her husband and five children. When not beading, she loves to knit, crochet, run, visit flea markets, and travel. Keep up with the ups and downs of her creative life at www.annepotter.com. Find her on Facebook (www.facebook.com/handmadebyannepotter) and on Instagram (@annepotter).
RESOURCES Check your favorite bead retailer or contact: Seed beads, jump rings, chain, thread, and wire:
Fusion Beads, (888) 781-3559, www.fusionbeads.com. Pink paper
bicones: Bead Amigas, www.beadamigas.etsy.com. Frida Kahlo
bead: Priscilla Beads, www.priscillabeads.com. Clasp: Dry Gulch
Beads & Jewelry, (417) 626-7626, www.drygulch.com. ●
fast & fabulous

fast & fabulous
76 WWW.INTERWEAVE.COM SEE P. 85 FOR HELPFUL TECHNIQUE INFORMATION.
NestledRejetta Sellers
TECHNIQUESsimple wireworkingcrimpingstringing
MATERIALS2 metallic purple 4×2mm peanut beads1 oxidized bronze 5mm pressed-glass melon (small)1 oxidized bronze 8mm pressed-glass melon (large)2 purple 12×5mm side-drilled pressed-glass
Gladiola flowers1 mint green 14×6mm pressed-glass flower 1 yellow 14×6mm pressed-glass flower2 green 12×14mm pressed-glass leaves2 gray 8×24mm side-drilled wood ovals4 mint green 13×2mm Greek ceramic discs1 pink 14×17mm ceramic leaf2 magenta 12mm vintage Lucite melons (small)1 magenta 16mm vintage Lucite melon (large)1 iridescent lavender 18×10mm vintage
Lucite rondelle1 mint green 18×20mm vintage Lucite nugget1 enameled 22×35mm copper bird pendant1 brass 8×20mm hook clasp2 brass 24-gauge 2" eye pins 2 etched 7mm brass jump rings (small)1 etched 9mm brass jump ring (large)2 brass 5mm wireguards2 brass 2mm crimp tubes2 brass 3mm crimp covers13½" of copper 5mm double cable chain 8½" of bronze .021 beading wire
TOOLS2 pairs of chain- or flat-nose pliersCrimping pliersWire cutters
FINISHED SIZE20½"
1. Use 1 eye pin to string the mint green pressed-glass flower and form a simple loop; repeat using the yellow pressed-glass flower. Attach the large jump ring to the bird pendant. 2. Use beading wire to string 1 crimp tube, the clasp, and 1 wireguard; pass back through the tube and crimp. Cover the crimp tube with 1 crimp cover. String the large bronze melon, the flower dangles from Step 1, 1 pressed-glass leaf, 1 small Lucite melon, 1 wood oval, 2 ceramic discs, the Lucite ron-delle, the large Lucite melon, the pendant, both
peanut beads, the Lucite nugget, the purple Gladiola flowers, 1 pressed-glass leaf, 1 small Lucite melon, 1 wood oval, 2 ceramic discs, the ceramic leaf, and the small bronze melon. String 1 crimp tube, 1 small jump ring, and 1 wireguard; pass back through the tube. Crimp and cover.3. Attach the chain to the previous small jump ring. Attach the remaining small jump ring to the free end of the chain.
REJETTA SELLERS is a wife and stay-at-home mom of two children. In her free time, she creates jewelry and sculpts rustic animal beads out of polymer clay. Find her work at www.jettabugjewelry.etsy.com.
RESOURCES Check your favorite bead retailer or contact: Similar peanut beads: Jasmine Tea Designs, www
.jasmineteadesigns.etsy.com. Pressed-glass melons, Gladiola
fl owers, and leaves: Vintaj, (888) 592-6272, www.vintaj.com.
Mint green and yellow pressed-glass fl owers: House of Twinkle,
www.houseoftwinkle.etsy.com. Similar wood ovals: Beads and
Honey, www.beadsandhoney.etsy.com. Similar ceramic discs:
Intealectual Destash, www.intealectualdestash.etsy.com. Ceramic
leaf: Gaea, (805) 640-8989, www.gaea.etsy.com. Vintage Lucite
melons and nugget: MK Supplies, www.mksupplies.etsy.com.
Vintage Lucite rondelle: Mimis Beads, www.mimisbeads.etsy
.com. Bird pendant: Artincendi, www.artincendi.etsy.com. Clasp:
AD Adornments, (773) 338-3818, www.adadornments.com. Eye
pins, crimp tubes, crimp covers, and wireguards: Hobby Lobby,
(800) 888-0321, www.hobbylobby.com. All other materials:
Lima Beads, (734) 929-9208, www.limabeads.com. ●
Gray GardenAnne Perry
TECHNIQUEScrimpingstringingsimple wireworking
MATERIALS16 antiqued brass size 11° seed beads140 silver 3×4mm magatama drops17 gray 5×6mm rice pearls12 assorted ivory/gray/pink 5–11×5–12mm pearls
(rice, potato, coin)2 copper 4mm rounds1 copper/silver/pink 40mm stamped aluminum
pendant
1 mother-of-pearl 2-strand 23mm floral box clasp12 copper 24-gauge 2" head pins2 silver 4mm jump rings4 antiqued brass 7mm jump rings1 copper 8mm jump ring2 antiqued brass 2mm crimp tubes2 brass 6×8mm cord ends17" of mauve/gray 6mm silk cord19" of bronze .015 beading wire
TOOLS2 pairs of chain- or flat-nose pliersRound-nose pliersCrimping pliersWire cuttersScissorsJewelry cement
FINISHED SIZE17"
1. Use 1 head pin to string 1 rice/potato/coin pearl; form a wrapped loop. Repeat eleven times for a total of 12 pearl dangles. 2. Attach 1 brass jump ring to the top loop on the box half of the clasp. Use the beading wire to string 1 crimp tube and the previous jump ring; pass back through the crimp tube and crimp. String 70 magatama drops and 1 copper round. String {1 rice pearl and 1 brass seed bead} sixteen times. String 1 rice pearl, 1 copper round, 70 magatama drops, 1 crimp tube, and 1 brass jump ring. Pass back through the crimp tube and crimp. Use 1 silver jump ring to attach the previous brass jump ring to the top loop on the tab half of the clasp.3. Attach the copper jump ring to the pendant. Use the silk cord to string half of the pearl dangles, the pendant, and the remaining pearl dangles. 4. Use 1 brass jump ring to attach 1 cord end to the bottom loop on the box half of the clasp. *Place a dab of jewelry cement into the cord end and insert one end of the silk cord; let dry.** Trim the silk cord so the total length is 16½". Repeat from * to **. 5. Attach 1 brass jump ring to the free cord end. Use 1 silver jump ring to attach the previous jump ring to the bottom loop on the tab half of the clasp.
ANNE PERRY is a professional educator who lives in Southern California. She has been beading in her spare time ever since her best friend cleaned out her craft closet and gave Anne all of her beads.
RESOURCES Check your favorite bead retailer or contact: Magatama drops: Beads and Magic Wishes,
(858) 578-2273. Pearls and E-6000 adhesive: Michaels,
(800) 642-4235, www.michaels.com. Pendant: C-Koop Beads,
(218) 525-7333, www.ckoopbeads.com. Clasp: Fire Mountain
Gems and Beads, (800) 355-2137, www.fi remountaingems.com.
Silk cord and cord ends: Ornamentea, (919) 834-6260,
www.ornamentea.com. All other materials: Beadaholique,
(866) 834-4618, www. beadaholique.com. ●

fast & fabulous
BEADWORK APRIL/MAY 2017 77SEE P. 85 FOR HELPFUL TECHNIQUE INFORMATION.
Spring Tapestry Erin Prais-Hintz
TECHNIQUEScrimpingstringing
MATERIALS 24 purple size 12° seed beads16 amethyst 10mm English-cut faceted-glass rounds10 orange 4mm quartzite rounds26 green 5–8×18–25mm side-drilled agate slices1 purple/green/orange 25mm polymer clay lentil 26 copper 10×3mm filigree bead caps1 copper 8mm magnetic ball clasp2 copper 2mm crimp tubes22" of copper .015 beading wire
TOOLS Crimping pliersWire cutters
FINISHED SIZE18¾"
1. Use beading wire to string 1 crimp tube and one half of the clasp; pass back through the crimp tube and crimp.2. String 3 quartzite rounds, 1 faceted-glass round, and 1 bead cap. String {1 bead cap, 1 faceted-glass round, and 1 bead cap} five times. String 1 bead cap, 1 faceted-glass round, and 1 quartzite round. String {1 agate slice and 1 seed bead} twelve times. String 1 agate slice, 1 quartzite round, 1 faceted-glass round, and 1 bead cap. 3. String the polymer clay lentil. Repeat Step 2, reversing the stringing sequence. Repeat Step 1.
ERIN PRAIS-HINTZ loves to mix patterns, textures, and colors to create one-of-a-kind wearable treasures for her company, Tesori Trovati Jewelry. Her work has been featured in dozens of publications as well as instructional videos and art exhibits. Erin lives in Stevens Point, Wisconsin, with her husband and two children. Find her work at www.tesoritrovati.com.
RESOURCES Check your favorite bead retailer or contact: Similar faceted-glass rounds and bead caps: Lima Beads, (734) 929-9208, www.limabeads.com. Clay lentil: Humblebeads,
(616) 719-1623, www.humblebeads.com. Similar clasp: Golden
Twin Clasps, www.goldentwinclasps.etsy.com. All other materials: Michaels, (800) 642-4235, www.michaels.com. ●
Summer Marigold Andria McKee
TECHNIQUEScrimpingstringing
MATERIALS4 brown 4mm pressed-glass rounds8 turquoise 4×2mm rondelles16 off-white 5–6mm Indonesian irregular
glass rondelles4 crackled matte frosted orange 6mm agate rounds6 faceted 8mm agate rounds (2 yellow, 2 orange,
2 red-orange)2 burnt sienna 8×4mm agate saucers4 crackled blue 8×5mm jasper rondelles2 crackled matte frosted white 10mm agate rounds2 light peach 10mm faceted stone rounds2 brown 12×20mm carved wood or bone rectangles1 carved-and-painted wood 30×55mm floral
teardrop pendant22 assorted copper 3–6mm daisy/round/fluted spacers1 copper 6×9mm lobster clasp1 copper 4mm jump ring1 copper 10mm jump ring2 copper 2mm crimp tubes12¼" of copper 4mm soldered flat cable chain17" of .014 beading wire
TOOLSCrimping pliers2 pairs of chain- or flat-nose pliersWire cutters
FINISHED SIZE26" (with 2 1⁄8" focal)
1. Attach the 10mm jump ring to the top of the pendant. Cut the chain into two 6" pieces. Use the beading wire to string 1 crimp tube and 1 piece of chain; pass back through the crimp tube and crimp.2. String 8 Indonesian glass rondelles, 1 copper spacer, 1 orange 6mm round, 1 copper spacer, 2 tur-quoise rondelles, 1 copper spacer, 1 blue jasper ron-delle, 1 copper spacer, 1 wood rectangle, 1 copper spacer, 1 yellow 8mm round, 1 orange 8mm round, 1 red-orange 8mm round, 1 burnt sienna saucer, 1 copper spacer, 1 white 10mm round, 1 copper spacer, 1 brown 4mm round, 1 peach 10mm round, 1 brown 4mm round, 1 copper spacer, 1 blue jasper rondelle, 1 copper spacer, 1 orange 6mm round, 1 copper spacer, 2 turquoise rondelles, and 1 copper spacer.
3. String the pendant. Repeat Step 2, reversing the stringing sequence. String 1 crimp tube and the remaining piece of chain; pass back through the crimp tube and crimp.4. Use the 4mm jump ring to attach the lobster clasp to the free end of 1 chain.
ANDRIA MCKEE lives in Washington State and has been making jewelry since 2011. She loves designing and creating and especially enjoys incorporating textiles into her pieces. Find more of her work at www.mckeejewelrydesigns.com.
RESOURCES Check your favorite bead retailer or contact: Brown pressed-glass rounds, faceted agate rounds,
copper spacers, and chain: Shipwreck Beads, (800) 950-4232,
www.shipwreckbeads.com. Turquoise rondelles, jasper rondelles,
crackled agate rounds, and wood rectangles: Michaels, (800)
642-4235, www.michaels.com. Indonesian glass rondelles:
Happy Mango Beads, (970) 532-2546, www.happymangobeads
.com. Peach rounds: Craft Warehouse, (503) 589-1377,
www.craftwarehouse.com. Pendant: Summer Wind,
www.summerwindart.etsy.com. All other materials:
Fusion Beads, (888) 781-3559, www.fusionbeads.com. ●
Love MoreLorelei Eurto
TECHNIQUEScrimpingsimple wireworkingstringing
MATERIALS94 opaque gray size 11° seed beads36 ivory 8mm vintage faceted-glass rounds1 speckled blue 10×15mm lampwork egg bead1 gray 15×44mm polymer clay “love more”
feather link 1 beige 40mm polymer clay pendant with bird image
and attached wire bail1 silver 4×3mm rondelle1 antiqued silver 20×30 mm toggle clasp 3 antiqued silver 8mm jump rings2 brass 2mm crimp tubes20" of .019 beading wire
TOOLS2 pairs of chain- or flat-nose pliersCrimping pliersWire cutters

fast & fabulous
78 WWW.INTERWEAVE.COM SEE P. 85 FOR HELPFUL TECHNIQUE INFORMATION.
FINISHED SIZE19" (with 2½" focal)1. Attach 1 jump ring to the toggle bar; set aside.2. Use 1 jump ring to attach the wide end of the feather to the loop on the toggle ring. Use 1 jump ring to attach the polymer clay pendant to the other side of the toggle ring.3. Use the beading wire to string 1 crimp tube, 12 seed beads, and the narrow end of the feather. String 11 seed beads; pass back through the crimp tube and crimp. String {1 faceted-glass round and 2 seed beads} twenty-nine times. String 1 faceted-glass round, the egg bead, and 1 seed bead. String {1 faceted-glass round and 2 seed beads} six times. String the silver rondelle, 1 crimp tube, and the jump ring attached to the toggle bar; pass back through the crimp tube and crimp.
LORELEI EURTO works in her home studio in upstate New York, creating mixed-media art jewelry and jewelry components. You can purchase her work at www.loreleieurtojewelry.etsy.com and www.loreleieurtojewelry.com.
RESOURCES Check your favorite bead retailer or contact: Faceted-glass rounds: Allegory Gallery, (724)
610-3770, www.store.allegorygallery.com. Lampwork egg:
SueBeads, www.suebeads.etsy.com. Pendant and feather link:
SwoonDimples, www.swoondimples.etsy.com. Clasp: Stinky
Dog Beads, www.stinkydogbeads.com. All other materials:
Fusion Beads, (888) 781-3559, www.fusionbeads.com. ●
Madagascan SunsetKristina Hahn Eleniak
TECHNIQUESsimple wireworkingknotting
MATERIALS10 matte pink size 11° seed beads9 matte pink size 6° seed beads1 black 12×8mm lampwork rondelle1 orange 12×8mm lampwork rondelle2 pink 5mm tigereye rounds1 silver-and-glass 28×44mm moth-wing pendant1 Bali-style 7×9mm silver tube2 antiqued 2" brass eye pins3 antiqued copper 3mm jump rings12 antiqued copper 7mm jump rings3 silver 15mm jump rings2 antiqued bronze 12×5mm ribbon crimp ends40" of brown 3mm flat suede lace6½" of black ½ " wide flat leather4" of antiqued bronze 20-gauge wire
TOOLS2 pairs of chain- or flat-nose pliersNeedle-nose pliersRound-nose pliersWire cuttersScissors
FINISHED SIZE27" (adjustable)
1. Use 1 silver jump ring to string four 7mm jump rings, the moth-wing pendant, and four 7mm jump rings; close the silver jump ring. Attach a second sil-ver jump ring to 4 of the previous 7mm jump rings; repeat using the remaining silver jump ring and the remaining 4 previous 7mm jump rings. 2. Use one 4" piece of wire to form a wrapped loop. String 1 tigereye round, the orange lampwork ron-delle, and 1 tigereye round; form a wrapped loop. Use one 3mm jump ring to attach the beaded link just formed to the silver jump ring on the left side of the pendant. Attach one 7mm jump ring to the free end of the beaded link. Cut the suede lace into one 12" piece and one 28" piece. Use the 28" piece to form a lark’s head knot on the previous 7mm jump ring.
3. Use 1 eye pin to string 1 size 6° seed bead, the black lampwork rondelle, and 1 size 6° seed bead; form a simple loop. Use one 3mm jump ring to attach the beaded link just formed to the silver jump ring on the right side of the pendant.4. Use the remaining eye pin to string the remain-ing size 6° seed beads and all of the size 11° seed beads in desired order; form a simple loop. Use one 3mm jump ring to attach the beaded link just formed to the beaded link formed in Step 3. Use one 7mm jump ring to attach the free end of the beaded link just formed to 1 ribbon crimp end.5. Insert one end of the black flat leather into the previous ribbon crimp end, then use needle-nose pliers to squeeze the ribbon end closed, securing the leather; repeat using the remaining crimp end on the free end of the leather. Use one 7mm jump ring to attach another 7mm jump ring to the previ-ous crimp end. 6. Use the 12" piece of suede lace to form a lark’s head knot on the previous 7mm jump ring. Gather all 4 strands of the suede lace and string the silver tube. Form an overhand knot at the end of each strand. Slide the tube to adjust the length of the necklace.
KRISTINA HAHN ELENIAK is a Canadian designer and the creative force and founder of Peacock & Lime. She loves to create pieces that combine craftsmanship, style, and wearability while evoking an emotional response from the wearer. Find her work at www.peacockandlime.com.
RESOURCES Check your favorite bead retailer or contact: Seed beads, tigereye rounds, and silver tube:
Bedrock Supply, (800) 661-3988, www.bedrocksupply.com.
Similar lampwork rondelles: Grace Lampwork Beads, (888)
965-9966, www.gracebeads.com. Pendant: Debra’s Divine
Designs, www.debrasdivinedesigns.com. 3mm jump rings:
Beaducation, (650) 261-1870, www.beaducation.com. 7mm
jump rings: Treasure Stone Beads, (780) 486-7543, www
.treasurestonebeads.com. Silver jump rings and ribbon crimp
ends: Cindy Chan, www.cindychan1.etsy.com. Eye pins and
wire: Vintaj, (888) 592-6272, www.vintaj.com. Suede lace:
Beadaholique, (866) 834-4618, www.beadaholique.com.
Black fl at leather: Tandy Leather, (877) 532-8437,
www.tandyleather.com. ●

BEADWORK APRIL/MAY 2017 79SEE P. 78 FOR HELPFUL TECHNIQUE INFORMATION. SEE P. 4 FOR PROJECT-LEVEL INFORMATION.
K I T S & M O R E S E E D B E A D S S H O W S & E V E N T S
the market PR
EM
IER
CL
ASSIFIE
DS
S U P P L I E S W E B S I T E S TO V I S I T W E B S I T E S TO V I S I T
B E A D S B E A D S B E A D S
beadonitboards.combeadonitboards.comGlass seed beads 11˚ to 24˚
exclusive Czech molded beadsbooks, videos & innovative supplies
Wholesale with credentials
Artists & Teachers:
We have Kits!
B E A D S B E A D S B E A D S
Wood • Stone • Shell Inlaid Beads
Minneapolis, MNMarch 20-21
Livonia, MIMarch 24-25-26
West Springfield, MAApril 21-22
“BRINGING GEM SHOWS TOYOUR PART OF THE COUNTRY”
2017
www.etsy.com/shop/BeadwareILwww.BeadwareIL.com
Beadware ILYour 5 star source forSwarovski® Elements – Chatons & RivolisFancy stones,Pendants andBeadsFeaturingE.H. Ashley & Co.custom coatings

80 BEADWORKMAGAZINE.COM SEE P. 78 FOR HELPFUL TECHNIQUE INFORMATION. SEE P. 4 FOR PROJECT-LEVEL INFORMATION.
BEADS & FINDINGS
A Bit of Stone Beadswww.abosbeads.etsy.com
At A Bit of Stone Beads, you will find a wide selection of gemstone beads for
your jewelry making projects. New beads are added weekly, so please check back often. We strive to offer
competitive prices and fast delivery!
Artbeads.comwww.artbeads.com
(866) 715-2323
Bead World (IL)www.beadworldbeads.com
Shop online! All new Website!(847) 776-2323
Bobby Beadwww.TohoWholesale.com
[email protected](888) 900-2323
TOHO Japanese Seed Beads Wholesale Direct Importer.
No Minimum Orders.
Charm Factorywww.charmfactory.com
(866) 867-5266Custom charms and jewelry tags
Lima Beadswww.limabeads.com
(734) 929-9208Get fresh jewelry components from
around the world at Lima Beads. Huge selection of gemstones, chain,
Czech glass, seed beads, findings, supplies, and more. New additions
every week!
Red Panda Beadswww.redpandabeads.com
Specializing in CzechMates® 2-hole beads. Free shipping on US $25+
orders. See our exclusive Gallery of Color Suggestions for design and
color ideas. 20% off one time coupon: BWAPR17
Starmanwww.starmaninc.com
(888) 683-BEADManufacturing beads since 1948!
Stormcloud Trading(Beadstorm)
www.beadstorm.com
(651) 645-0343
Too Cute Beadswww.toocutebeads.com
KITS & MORE
Jubili Beads & Yarns www.jubilibeadsandyarns.com
(856) 858-7844
SHOWS
Bead Fest Springwww.beadfest.com
Santa Fe, NMMarch 23-26, 2017
Bead Fest Summerwww.beadfest.com
Philadelphia, PAAugust 16-20, 2017
Bead Fest Fallwww.beadfest.com
Tacoma, WAOctober 26-29, 2017
SO ARE YOUR CUSTOMERS!
If you are reading this...
SO ARE YOUR CUSTOMERS!
To advertise in
Beadwork classifieds,
contact:
Stephanie Griess at 970-613-4630
The Beading Connection
the
mar
ket
PR
EM
IER
CL
ASS
IFIE
DS
W E B S I T E S TO V I S I T
Leslee FruminKits and classes in beads, metals and SWAROVSKI Elements
949-456-0718 • www.lesleefrumin.com
Chained Cabochon photo by Robert Diamante
NOWNOWAVAILABLEAVAILABLE
W E B S I T E S TO V I S I T
www.thefreckledpear.com
YOUR AD SHOULD BE HERE!
for more information on Print and Digital Advertising
This is the readership you have been
looking for!Call Marilyn Koponen
877-613-4613or
Stephanie Griess877-613-4630

the market { stop to shop}
AlabamaBead Harbor LLC — Daphne www.facebook.com/BeadHarbor
Huge selection of charms, seed beads (TOHO, Miyuki), Swarovski, firepolished, gemstones, large hole pearls, CzechMates, tools, find-ings and much more. Open Mon-Sat 10-6, Sun 11 4. Free lessons with purchase.27955 Hwy 98, Ste. M (251) 210-6679
ArizonaCreative Destination—Mesa
www.2-old-beadies.com See our beautiful showroom on our website. We specialize in Swarovski crystals, Delica beads, seed beads, interesting lampwork, creative classes—and much, much more! Join us for our monthly Beadathon. We’re worth a visit! 1660 S. Alma School Rd., #108 (480) 755-4367
Bead World Inc.—Phoenix and Scottsdale www.beadworldinc.com
Best selection of quality gemstones, Tierra Cast, seed beads, chain, metals, SS, GF, Swarovski, pearls, leather, jewelry making kits, and more. Classes daily.6068 N. 16th St., Phoenix (602) 240-BEAD8764 E. Shea Blvd., Scottsdale (480) 948-2323
The Bead Garden of Sedona—Sedona www.Sedonabeadgarden.com
Tools and supplies for the bead artist! Northern Arizona’s largest selection of beads, tools, and supplies. We offer classes and private lessons. Mon–Sat 10–5, Closed Sunday.3150 W. State Rte. 89A, Ste. 1 (928) 282-7334
CaliforniaThe Joy of Beading—Arroyo Grande
www.joyofbeading.netLarge selection of Japanese seed beads, Swarovski pearls and crystals, books, Vintaj™, Findings and tools, classes. Closed Sunday & Monday. Tue–Sat 10–5.1054 E. Grand Ave., Ste. A. (805) 489-6544
Just Bead It!—Concordwww.justbeaditconcord.com
Beads to thread, wire and just admire. All for beading to your heart’s desire. Family owned since 2003. Open Mon, Wed, Thu, and Fri 11–7, Sat 11–6, Sun 12–5.2051 Harrison St., Ste. C (925) 682-6493
The Bouncing Bead—La Mesawww.thebouncingbead.com
We are your friendly neighborhood bead store! We have a huge inventory of beads - from seed to fire polish and every-thing in between. Tools, findings, chain, leather, charms, and just about all the supplies you’ll need to create fabulous jewelry. And, we are the Swarovski Flat Back headquarters for San Diego! Check out our class schedule for metal, wire, and beading workshops. Our friendly, knowledgeable staff is here to help you!8876 La Mesa Blvd. (619) 460-2323
Ruby Tuesday Bead Company—Long Beachwww.beadstrands.com
Full-service bead store with an amazing selection of glass and semi-precious beads. Come see our wall of beads. Great prices. Quality beads. Friendly, helpful staff.1766 Clark Ave. (562) 498-2700
A Place to Bead—San Marinowww.aplace2bead.com
A cozy shop in a village setting, carrying a nice selection of beads of all kinds, buttons, findings, supplies, tools, and classes. 2566 Mission St. (626) 219-6633
Beadahs—Santa Monicawww.beadahs.com
Bead inspired in a 2,000 sq. ft. world of rare beads, unique findings and exotic treasures. Just steps from the famous 3rd Street Prome-nade. Open 7 days a week; call for hours.203 Arizona Ave. (310) 395-0033
Bead Dreams—[email protected]
You will love our huge Swarovski selection, stones, pearls, pressed glass, and seed beads of all sizes and varieties. We have a wall of Czech hanks, tubes of Japanese seed beads, as well as all Delicas. Private and group instruction available. On the Miracle Mile, between I–5 and Hwy. 99. Search for us on Google for photos of the shop and directions!2103 Pacific Ave. at Dorris Pl. (209) 464-BEAD
ColoradoSouth Park Pottery & Back Room Beads—
Fairplaywww.backroombeads.com
Bunches of beads—lampwork, raku, Czech, Delica, gemstones, and more. Seven days 9–5. Don’t miss the Fairplay Bead & Fiber Show during the 2nd weekend in August. Vendors wanted!417 Front St. (719) 836-2698
Alley Cat Beads—Northglenn www.alleycatbeads.com
Exciting inventory of gemstones, Czech glass, seed beads, pearls, lampwork, tools, Swarovski crystals, Bali silver, findings, dichroic glass, handmade clay, and one of the largest selections around of dif-ferent pendants/focal beads. We have wonderful bead-stringing and -weaving supplies at great prices, plus we’re adding new items all the time! Classes and parties available.11928 N. Washington (303) 451-1900
Beadsong—Salida10–5 Mon–Sat. Czech glass, gemstones, Bali, seed beads, Delicas, bugles, charms, sterling and gold-filled findings and beads, books, tools, supplies, and much more. Email: [email protected] F St. (719) 530-0110
ConnecticutThistle Beads—Niantic
www.thistlebeads.comTake a trip to the seashore and find all the beads you need! Two-hole heaven, Shibori, Soutache, Toho & Miyuki seed beads, kits and more! Enjoy the new boardwalk and all Niantic has to offer! Find us on Face-book! Mon-Sat 10-6 Thurs 10-8 Sun 11-524 Pennsylvania Ave. (860) 739-6552
FloridaBeaded Envisions—Cape Coral
www.beadedenvisions.comCape Coral’s only Bead Store offers not only an array of beads but a place that’s warm, inviting and nurturing to your creativity. Spend a day with us and enjoy complimentary coffee & soothing music while you browse and shop through our huge selection of Czech glass, Miyuki Seed beads, Delicas, crystals, Semi-Precious Stones, leather, tools, findings, pearls, wire, books as well as unique handcrafted jew-elry & gifts. We offer classes in beading & wire wrapping and host parties. See our website for a list of classes and upcoming events. STORE HOURS: (CLOSED Sun & Mon) TUES, WED & FRI 10am-6pm, THURS & SAT 10am-4pm. During SEASON (November- March) OPEN on MONDAYS 10am-2pm as well as our regular hours.130 Del Prado Blvd. S., Ste.7 (239) 673-6096
Laura’s Beads—Hudsonwww.laurasbeads.com
Laura’s Beads is more than just a bead shop, it is a place to learn, cre-ate, relax and enjoy. With a warm and inviting atmosphere, we’re here to assist you in finding what you need for your latest project. Special-izing in bead-weaving, we offer a range of classes for both beginners and experienced beaders. Best of all, we are stocked with a gorgeous selection of beads, findings, and supplies at great prices.8143 State Rd. 52 (727) 495-0803
Bead & Art—Lighthouse Point (Pompano)www.beadandart.com
South Florida’s friendliest bead store. Tons of semiprecious, pearls, Czech, Swarovski, sterling, tools, supplies. Original lampwork beads. Classes and kits. Check out our website for store location and class schedules.5034 N. Federal Hwy. (954) 418-3390
Beads Etc.—Maitlandwww.beadstoreorlando.com
Beads Etc. is Orlando’s Premier Teaching Center & Full Service Bead Store. Featuring Japanese Seed Beads, Swarovski, Gemstones, Pearls, Thunder Polished Crystals, Fine metals & Mixed Metal Findings and Chain. Lots of Kits and a Special order Catalog.110 N. Orlando Ave. (407) 339-BEAD (2323)
The Bead Strand—Ocalawww.thebeadstrand.com
Come visit Ocala’s hidden treasure at an all new 3000 sq ft location in Market Street. Offering a wide selection of gemstones, Swarovski crystals, seed beads, findings, Czech glass, and lampwork beads. Also newly added is our accessory boutique offering unique gifts and jew-elry. Visit our website to purchase beading kits or for more informa-tion including class schedules.4414 SW College Rd, Ste. 1510 (352) 620-2323
Bead Bar Full Service Bead Store—Orlandowww.beadbar.com
Central Florida’s Favorite Bead Store since 1992. Featuring the area most complete inventory of the latest greatest Seed Beads, Crystals, Gemstones, Pearls, Tools, and Supplies. Rare and unusual beads and baubles and lots more. Retail & wholesale. Friendly Talented Staff of expert Beaders ready to help you.1319 Edgewater Dr. {College Park area} (407) 426-8826
Anderson’s Bead Room—Port Charlottewww.andersonsbeadroom.com
Largest selection of gemstones in Southwest Florida. More Than 3,000 colors of Miyuki seed beads. Over 600 colors of Delicas. Czech glass, Swarovski, bone, shell, tools, sterling silver, copper and gold-filled findings. Tues-Sat 10am-5pm.24600 Sandhill Blvd., Unit 101 (941) 764-6222
Donna’s Beads—Sarasotawww.donnasbeads.com
Are you a beginner or advance bead weaver, come in for inspiration or classes. Great selection of Swarovski crystals/pearls, japanese seed beads, fire polish, preciosa and finds. Great prices and the friendliest gals in town. come in and bead with us.2717 Beneva Rd. (941) 444-7457
BEADS!—Tampawww.eBeads.com
THE LARGEST SEED BEAD COLLECTION IN THE TAMPA BAY AREA! We stock 1,097 Delica colors, Tilas, Half Tilas, Cubes, Magata-mas, Rounds, Berry Beads, and more! Czech glass, SuperDuos, Fire Polish, Tiles, and more! Gemstones, Freshwater Pearls, base metal findings, Swarovski Crystals, and lampwork beads. Classes by local and nationally known artists. Visit our website for hours and class schedule. [email protected] W. Hillsborough Ave., Ste. H (813) 258-3900
Raintree Craft and Design Corp.—TitusvilleComplete bead shop. Large selection of seed beads, gemstones, crys-tals, glass, metal and novelty along with findings, wire and books. Classes and workshops daily. A variety of finished jewelry, gifts and collectibles are available. Sears Town Mall, 3550 S. Washington Ave., Ste. 15 (321) 383-1556
GeorgiaBeadjoux—Braselton
www.beadjoux.comThe Absolute Best Bead Store Northeast of Atlanta! Great products including Swarovski, Czech fire polish, seed beads, all the new bead shapes and sizes, a great selection of clasps and so much more! Check our website for class schedule, national instructor calendar, directions and hours. Shop Online at www.beadjoux.net.6750 HWY 53, Ste. 103 (706) 658-0007
Gone With The Bead—Watkinsville (Athens)www.gonewiththebead.com
Come and see our unique and exciting shop. We have 2,400 sq. ft. featuring artisan beads and focals, Czech beads and buttons, Kumi-himo, vintage beads and stampings, Miyuki, Swarovski, Venetian beads, TierraCast, Wire Lace and Wire Knitz, Hill Tribe Silver, Kazuri, African metal and trade beads, pearls, stone, wood, and horn. See our gallery tour at www.gonewiththebead.com. Please check website for hours.16 N. Main St., Ste. D (Entrance at the back) (706) 769-2012
IdahoPandora’s Baubles and Beads—Idaho Falls
pandorasbaublesandbeads.comThe area’s best and largest selection of high quality gemstones, Ger-man vintage beads, Tibetan, Bali, Thai, and Turkish silver beads and findings, Czech glass, Japanese and Czech seed beads, trade beads and much more. We also specialize in extraordinary pearls, all of which are hand-picked from all over the globe. Classes from beginner to advanced. Monday thru Friday 11:00-5:30 and Saturday 12:00-5:30. Check out our Facebook, Twitter and LinkedIn.440 Park Ave. (208) 529-3696
To be listed in “Stop to Shop” please contact Stephanie Griess at [email protected] or (970) 613-4630
BEADWORK APRIL/MAY 2017 81

the
mar
ket
{sto
p to
shop
}Illinois
City Beads—Chicagowww.citybeadschicago.com
Seed Bead and AIKO Specialists! Huge inventory of vintage Czech glass beads, new shaped beads, Gary Wilson cabochons, pearls and semiprecious stones. Nationally and internationally renowned teach-ers! DISCOUNT PRICES! Open Tuesdays 12-5, Saturdays 11-4 or by appointment. For class schedules and more information, visit our website or call to be added to our mailing list.3928 N. Rockwell St. (312) 316-1910
Studio Beads—Deerfieldwww.studiobeads.com
We carry a great assortment of all sizes of seed beads, freshwater pearls, “BASHA” and other nationally known lampwork beads, semiprecious beads, and finished jewelry from artists across the country. We have a great assortment of vintage purses and jewelry. We offer classes and workshops with nationally recognized teachers. Visit us online for more information. Mon, Tue, Wed, Fri 10–5, Thu 10–8, Sat 10–4.816 Waukegan Rd. (847) 607-8702
bodacious beads, Inc.—Des Plaineswww.bodaciousbeadschicago.com
Best selection & prices. Swarovski™, stone, pearls. Czech glass & 2-hole beads, Japanese, Czech seeds. GF, SS, base metal findings, beads & 250+ chains. Leather, tools, friendly help. Mon -Sat 10-6,Tues til 8.1942 River Rd. (847) 699-7959
Chelsea’s Beads—Highland Parkwww.chelseasbeads.com
Largest bead store on the North Shore. Parties, classes, and everything to make jewelry. Bali, sterling, and gold-filled parts, seed beads, Swarovski crystals, pearls, semiprecious beads, fancy glass beads, tools, and stringing supplies. eBay store. Mon–Fri 10–5:30, Sat 11–5, Sun 12–4. Fax: (847) 681-0681. Email: [email protected] St. Johns Ave. (847) 433-3451
Bead In Hand—Oak Parkwww.beadinhand.com
Friendly and knowledgeable staff, offering seed beads, semi-precious, Czech glass beads and more. Beading supplies, tools, findings and tips. Birthday parties, classes, repairs. Space to “stay and play.” Open 7 days, visit website for hours..145 Harrison St. (708) 848-1761
Bead World—Palatinewww.beadworldbeads.com
Jewelry and gift items from around the world, specializing in ancient and new Indonesian glass beads, (Indonesian glass beads available wholesale) and recycled glass beads. Jewelry repair—books—find-ings—body jewelry—piercings.8 S. Brockway (847) 776-BEAD (2323)
Facets of Isis—Palatinewww.facetsofisis.com
Beautiful selection of Sterling Silver Findings, Swarovski Crystals, Czech Fire Polish, German Vintage & natural Gemstone beads. Bead-Smith authorized dist. Classes, Artist Demos, Trunk Shows.225 N. Northwest Hwy. (847) 705-6614
IndianaThe Beaded Peacock—Winona Lake
www.thebeadedpeacock.comLargest selection of stone beads in N. Indiana. Glass and seed beads, findings and tools, custom jewelry and repair, classes and parties year round. A hidden gem in a cozy lakeside town. Find us on Facebook. Open Mon-Sat 10-6805 East Canal St. (574) 371-2777
MaineCaravan Beads—Portland
www.caravanbeads.comCome see the complete line of Miyuki Delica beads in our retail bead store which doubles as our wholesale showroom. We carry an enor-mous selection of Miyuki seed beads as well as Swarovski crystal, pearls, semi-precious, Czech glass, findings and chain. Weekly classes and free help at our work tables.915 Forest Ave. (207) 761-2503
MarylandAtlantic Gems, Inc.—Silver Spring
www.atlanticgems.comBest pricing on Swarovski Crystal. Factory distributor of Findings/Chains in Sterling Silver, Gold-Filled, & 14K Gold. Plated Chains/Findings in 6 finishes. Miyuki Delicas – 650 colors. Full selection of Semi-Precious Beads, Freshwater and Akoya Pearls, & Tools.8609 Second Ave., #103B (301) 565-8094 (888) 422-GEMS
MassachusettsBead Addiction—Walpole
www.bead-addiction.com2000 sq ft of fabulous beads and beading supplies. We carry many name brands, including Czech glass, Kazuri, Lillypilly, Miyuki, Thun-derpolish crystal, Swarovski, Fuseworks, TierraCast, Artistic wire. Huge tool selection and tons of wire choices. We also offer classes, Ladies Night Out, birthday parties, or any event you can think of. We are open Tue–Sun, closed on Monday. Check our website for hours and directions or call or email us at [email protected]. 2000 Main St. (508) 660-7984
MichiganBead Bohemia—Farmington www.facebook.com/beadbohemia
Low prices *friendly service.* Unique selection. A wide variety of beads and components including semi-precious gems and Czech glass to artist pieces, seed beads, designer brass lines, and more. Ask for your free “Bead Addiction” card! 33321 Grand River Ave. (248) 474-9264
Bead Haven—Frankenmuth www.beadhaven.com
5,000 sq. feet makes us Michigan’s largest bead store! HUGE selection of Czech beads in new shapes. Chain, antique silver & brass stamp-ings. Seed beads, Delicas, Swarovski, & pearls. Kits, patterns, FREE classes, tools, supplies & books. Open 7 days! Second location in CASEVILLE MI! 925 S. Main St., E (989) 652-3566
The Creative Fringe LLC—Grand Haven www.thecreativefringe.com
We’re a full-service bead shop offering an extensive collection of beads, findings, wire, tools, books, lampworking, silver clay, sheet metal and metalsmithing supplies. Cultivate your creative side with classes and parties. Open workstations available. Come to the Fringe! Your creativity awaits you. Open 7 days a week.210 Washington (616) 296-0020
Stony Creek Bead & Gallery—Ypsilanti Twp.
www.stonycreekbead.blogspot.comSupporting the artist inside of you! Huge collection of Seed & Czech Beads. Bali, pearls, and stones. Lampwork & Polymer Clay by MI artists. Classes, kits, books & so much more! I-94 to exit 183. South 1 mile. Closed Sundays and Mondays. Tue–Fri 10–6, Sat 10–5. www.StonyCreekBead.blogspot.com.2060 Whittaker Rd. (734) 544-0904
MinnesotaBobby Bead—Minneapolis
www.bobbybead.comSeveral thousand varieties of TOHO Japanese seed beads including more than 1,000 colors of AIKO Precision Cylinder beads. Wholesale and retail distributor of NEW, high-quality TOHO beading needles and One-G thread. Largest Full-Line Bead Store in Minnesota! [email protected] Hennepin Ave. S. (888) 900-2323
Stormcloud Trading Co. (Beadstorm)—St. Paul
www.beadstorm.com30+ years of experience shows in our vast selection of seed beads, pressed glass, Swarovski crystals, Bali silver, sterling, and gold-filled beads. Shop in-store or online. Mon–Fri 10–6, Sat 10–5. No print catalog.725 Snelling Ave. N. (651) 645-0343
MissouriSpringfield Leather & Touchstone Beads—
Springfieldwww.springfieldleather.com
Come in and explore Springfield’s largest bead store, over 2,500 sq. ft. of high quality findings and an awesome selection of semi-precious bead strands for your unique creations. We have lots of tools for bead-ing, metal stamping, leather crafts and a wide array of seed beads. We offer a variety of classes taught by our resident experts. Lots of classes. Open Mon-Sat 9-6.1463 S. Glenstone (800) 668-8518
Lady Bug Beads—St. Louis www.ladybugbeadsstl.com
Midwest’s favorite bead shop. Over 3000 sq. ft. of beads that focus on Toho and Miyuki Seed Beads, a large selection of Czech Glass and Tierra Cast Pewter. Full selection of Swarovski Crystals and Freshwa-ter Pearls. We are a teaching store. Also check out our Etsy Shop at LadybugbeadsSTL. Mon, Wed, Fri 10–6, Tue and Thu 10–8, Sat 9–4, Sun 12–4.7616 Big Bend Blvd. (314) 644-6140
NevadaBead Jungle—Henderson (Las Vegas area)
www.beadjungle.com Most complete bead shop in the Las Vegas area with the largest vari-ety of beads and findings. Classes, silversmithing, parties, workshops, and volume discounts. Minutes from the Strip. Please visit website for shop hours.1590 W. Horizon Ridge Pkwy., Ste. 160 (702) 432-2323
Bead Haven—Las Vegas www.beadhavenlasvegas.com
Nevada’s most comprehensive bead store, catering to all bead enthu-siasts. Huge selection of findings, pressed glass, seed beads. Full line of Swarovski. Free classes daily. Mon–Sat 10–6. Closed Sun.7575 W. Washington Ave., Ste. 131 (702) 233-2450
New HampshireBead It!—Concord
www.beadit.biz We’ll bend over backwards for you! We search the world for beautiful, unique beads – stone, pearl, glass, sterling, g.f. etc. Interesting clasps. Over 2500 different Japanese seed beads. Classes, parties, and work-tables. Definitely worth the trip! Open Tuesday through Sunday. Our online shop is now open. Wrap yourself in beads...it’s great therapy!146 N. Main St. (603) 223-0146
Ladybead and Rook—Wiltonwww.ladybeadandrook.com
Beautiful, quality beads to inspire your creativity and accentuate your style. Emphasis on European beads: Czech crystals, pressed glass, seed beads, pearls, and semiprecious. Artisan-created jewelry for fine gift giving. Ample parking. Wed–Sat 9–5:30, Sun 11–4. At the River-view Mill Artist Shops.29 Howard St. (603) 654-2805
New JerseyBeads by Blanche—Bergenfield
www.beadsbyblanche.com (Only miles from NYC.) Visit East Coast’s premier bead shop. 3,000+ colors/styles of Japanese seed beads, glass, crystal, semiprecious, lampwork, and more! Classes by local and nationally known artists. Extensive inventory for unlimited possibilities!106 N. Washington Ave. (201) 385-6225
Jubili Beads & Yarns®—Collingswoodwww.jubilibeadsandyarns.com
Everything you need under one roof! Fabulous full-service source for Miyuki & Czech beads, crystals, yarns, supplies. Eight-torch lampworking studio, weaving, knitting, crochet-ing, PMC, & more! Repairs, custom jewelry, and parties. Con-tact us via email at [email protected] Haddon Ave. (856) 858-7844
Sojourner—Lambertvillewww.sojourner.biz
Sojourner stocks freshwater pearls, semiprecious stones, Swarovski crystals, Czech glass and seed beads, sterling beads, Chinese enamel beads, castings, charms, ethnic beads, findings—including our own design sterling silver box clasps bezel set with vintage and semiprecious ele-ments. Open daily 11-6. 26 Bridge St. (609) 397-8849
The Birds and the Beads—Morganvillewww.thebirdsand thebeads.com
Surround yourself in beads! Incredible collection of hand-selected stone, pearl, glass and shell beads. Plus, all the best seed beads, tools, books, findings, and Swarovski crystals. Please call or stop by for further information and our extensive class schedule. 411 Rt. 79 (732) 591-8233
82 BEADWORKMAGAZINE.COM

the market { stop to shop}
Bead Dazzle—Point Pleasantwww.BeadDazzlePoint.com
Ocean County’s largest full service bead store. Huge selec-tion of Swarovski, semi-precious, Czech crystal; largest selection around of seed beads. All the new two-hole beads, Delicas, Charlottes, and much more. Many classes available in all techniques.2319 Bridge Ave. (732) 295-6679
Lucy’s Bead Boutique—Point Pleasantwww.LUCYSBEADBOUTIQUE.com
We offer classes, kits, variety of Miyuki, Toho, Swarovski, Czech, and much more. Also, Bead Club, Sunday Fundays, Open Beading, all in a social, fun atmosphere!3241 Route 88 (848) 232-3690
New YorkBeads World Inc.—New York
www.beadsworldusa.com From Beads to Chains to Glass Sew-On and much more. Beads World is your one-stop shop. Quality selections in the heart of NYC’s fashion district. Mon-Fri 9-7, Sat-Sun 10-5.57 W. 38th St. (between 5th & 6th Avenue) (212) 302-1199
Let’s Bead!—East RochesterYour destination bead shop! 3,200 sq. ft. bright full-service bead store. Wide selection of quality beads, semi-precious stones, Swarovski crystals, kumihimo, chain maille, stringing materials, wire, findings and more! Featuring unique beads and components by local and American artisans. Friendly customer service for beaders of all levels.349 W. Commercial St. (585) 586-6550
North CarolinaChevron Trading Post & Bead Co.—
Ashevillewww.chevronbeads.com
Asheville’s premier full-service bead store of 25+ years. Largest selec-tion of seed beads, Old World Trade Beads and Vintage glass in the SE Region. Huge selection of pearls, gemstones, crystals, Czech, ceramic & natural beads, including all the supplies you need. WireLace® Dis-tributor – Open 7 day a week. Importer/Classes/Parties/Workspace
40 N. Lexington Ave. (Downtown) (828) 236-2323
Ain’t Miss Bead Haven—Mooresvillewww.aintmissbeadhaven.com
Classes, Parties, Design & make your own jewelry-or let us make it 4 you. Mooresville’s best place for beads & jewelry supply. We are just north of Charlotte NC. BYOB Socials (Bring Your Own Beads), Wine & Bead, and Girls Night Out. We offer a large variety of Vintage jewelry and components, Seed beads, Swarovski, Preciosa, Czech, Gemstones, Crys-tals strands, Sterling Silver, Silver & Gold filled, and Ver-meil findings. Hours: Monday– Saturday 10–6; Email: [email protected] N. Main St. (704) 746-9278
OhioBeaded Bliss Designs—Cincinnati (Harrison)
www.followyourbeadedbliss.comThe tri-state’s best bead shop: create your own jewelry from our ever-growing selection of Swarovski crystal, semiprecious, glass, metals, pendants, lampwork, clay beads, books, tools, and much more! Project assistance, classes & parties, too. Always follow your bliss!1151 Stone Dr., Ste. E (513) 202-1706
BEAD PARADISE—Cleveland (Oberlin)www.beadparadise.com
Truly amazing selection! New and vintage glass, gemstones, Swarovski, metal beads and findings. African Trade Beads, ancient , antique and collectible beads in store and online. Just off the Ohio turnpike. Open every day.29 W. College St. (440) 775-2233
Bloomin’ Beads, Etc.—Columbus (Powell)www.BloominBeadsEtc.com
We are a fun bead store with a 2,000 sq. ft. Event Center where we host weekly classes. We have all types of beads and supplies that you will need. Come join us!4040 Presidential Parkway (740) 917-9008
Gahanna Bead Shop—Gahanna www.gahannabeadstudio.com
Oldest bead store in Columbus, uncommon beads at uncommon prices. Huge selection of findings, vintage porcelain, stone, wood, bone, Miyuki, Swarovski, Czech, cords, leather, and more. Exemplary customer service from friendly, knowledgeable staff.1028 N. Hamilton Rd. (614) 933-8948
OklahomaSA Beads—Owasso
www.sabeads.comLooking for the latest in beads? If you’ve seen it in a bead magazine, chances are we have it available for purchase at the store. Classes are t w ice a week w it h t he schedu le posted on our website at www.sabeads.com11230 N. Garnett Rd., Unit A (918) 576-8940
PennsylvaniaButtercup Beads—Audubon
www.buttercupbeads.comLet your creativity blossom in our cozy country setting. Classes, Par-ties, oh-so-pretty sparkly things, and most of all, fun! One-stop shop-ping in an open workshop environment. Artisan/bead-addict owned and operated. 1123 Pawlings Rd. (484) 524-8231
The Bead Garden—Havertown www.thebeadgarden.com
Friendly, full-service bead store for all of your jewelry-making needs. Classes for all levels of experience, including beginners. Birthday par-ties and group outings. Knowledgeable staff that is delighted to help.
2122 Darby Rd. (610) 449-2699
Blue Santa Beads —Mediawww.bluesantabeads.net
An artistic venue that prides itself on a vast selection of beads and findings to encourage your creativity. Customers always come first and always return.1165 W. Baltimore Pike (610) 892-2740
TennesseeBead Therapy—Chattanooga
Finally open now on Tuesdays through Saturdays. Fabulous selection of Japanese seed beads, Swarovski/Preciosa crystals, natural stone beads, glass and freshwater pearls, Czech Firepolish /pressed glass bead and beading supplies. Experienced teachers and great classes! Come see us!! 400 E. Main St. (423) 509-1907
TexasBeads Unlimited Inc.—Dallas
Your one stop bead shop in Dallas: Huge collection of Gemstones, agates, pewter, findings, chain, Chinese crystal, pave beads, rhine-stone findings, wood beads, tools, ceramics and sterling silver jewelry studded with semi-precious gemstones. Spend over $300 or more (wholesale) and receive 50% off on selected items. Call us to be included for weekly sales at the shop. Email: [email protected]. Fax: (214) 749-04462454 Royal Ln. (214) 749-0444
VirginiaSTUDIO BABOO® “A Big Little™ Bead Store”—
Charlottesvillewww.studiobaboo.com
Full service bead store w/a huge selection of Delicas, seed beads, glass, semi-precious, pearls, polymer and more. Friendly, knowledgeable staff. Visit website for class schedule and hours.1933 Commonwealth Dr. (434) 244-2905
Virginia Beadniks—Virginia Beachwww.beadniks.com
Specialty bead store for the discerning eye: unique components, find-ings, bead accessories, gifts and décor. Make & takes, classes, and ladies night. We provide repairs. Open every day. Email us at [email protected] Laskin Rd. (757) 463-5556
WashingtonBeads and Beyond—Bellevue
www.quiltworksnw.com
Now partnered with QuiltWorks Northwest. Full range of seed beads,
charms, sterling, vintage, books, Swarovski, tools, trade beads along
with unique fabrics and patterns for the quilter and sewer. This is
your shop for creative inspiration. Great local and national instruc-
tors. Mon, Wed, Fri, Sat 10–6; Tue, Thu 10–9; Sun 12–5.
121A 107th Ave. NE (425) 453-6005
Wynwoods Gallery & Studio—Port Townsend
www.wynwoods.com
A beautiful and unique bead shop that has everything the beader
could need or want. Also, a line of sterling charms and components
designed by the shop’s owner, Lois. Daily 10–7.
940 Water St. (360) 385-6131
Fusion Beads—Seattlewww.fusionbeads.com
Visit the largest bead store in Seattle! Stop in & take one of over 80
classes taught by local & nationally known instructors. Shop our
extensive line of Swarovski Elements Crystals, Japanese seed beads,
gemstones, glass beads, handmade beads & findings, & so much more.
Our friendly & knowledgeable staff will help get you started! Mon-
Sun 10-6, Tues 10-7
3830 Stone Way N. (206) 782-4595
Wonders of the World Beadshop—Spokanewww.wondersoftheworldinc.com
Best little bead shop in Spokane. Incredible gemstones, crystals,
charms, seed beads, chain, findings, and books for your creative
needs. Friendly staff and great prices. Make us your first stop! In the
historic Flour Mill.
621 W. Mallon, Ste. 412 (509) 325-2867
WisconsinJSM Bead Coop—Sheboygan
www.jsmbeadcoop.com
Sheboygan County’s bead store! Offering a wide variety of beads, find-
ings, tools, books, and more. Workspace, tools, and a friendly, knowl-
edgeable staff available—create right in the store! Classes and special
events. Hours: Closed Sun/Mon; Open Tue/Wed 10-5; Thurs/Fri 10-7;
Sat 10-5
1511 S. 12th St. (920) 208-BEAD (2323)
Madison Bead Company—Madisonwww.madisonbead.com
Madison’s favorite bead store! Our friendly staff focuses on providing
excellent customer service. Beautiful, bright west-side location with
on and off street parking. Great selection of Czech and Japanese seed
beads, gemstones, Czech glass, tons of findings, Vintaj brass, and
more! A wide array of classes for adults and kids ages 5 and up. Mon
11–5, Tue–Fri 11–7, Sat 11–5, Sun 11–3. Closed Sundays in January
and February.
515 S. Midvale Blvd. (608) 274-0104
Prairie Flower Beads—Portagewww.prairieflowerbeads.com
Friendly store that offers classes, birthday/wedding parties, and open
beading. Great selection of seed beads (Czech and Japanese), stone
strands, pearl strands, Czech glass embellishment strands, focal
pieces, Swarovski Crystals and findings. Our staff has combined expe-
rience of 50 years of beading. Magazines, books, tools, cords, leather
cords and lots more. See website for hours.
210 W. Cook St. (608) 742-5900
Meant to Bead—Sun Prairie www.Meant-to-Bead.com
Full-service bead shop. Featuring classes, large selection of beads,
books, tools, etc. Specializing in PMC, semiprecious stone, and lamp-
work and Czech glass beads. Mon–Fri 10–8, Sat 10–5, Sun 12–4.
1264 W. Main St. (608) 837-5900
BEADWORK APRIL/MAY 2017 83

the
mar
ket
{sto
p to
shop
}
Allene’s Beads. . . . . . . . . . . . . . . . . . . . .65Artbeads.com. . . . . . . . . . . . . . . . . . . . .C2Artworks by Cathy J/Filigree & Me 79Bead In Hand, Inc. . . . . . . . . . . . . . . . .65Bead Me A Story . . . . . . . . . . . . . . . . . .65Bead On It Boards. . . . . . . . . . . . . . . . .79Beadaholique . . . . . . . . . . . . . . . . . . . . .10Beadalon/Artistic Wire . . . . . . . . . . . .59Beadcats. . . . . . . . . . . . . . . . . . . . . . . . . .79Beadies Beadwork. . . . . . . . . . . . . . . . .63Beads & Honey . . . . . . . . . . . . . . . . . . .79BeadwareIL. . . . . . . . . . . . . . . . . . . . . . .79Cindy’s Crafts. . . . . . . . . . . . . . . . . . . . .65Crystaletts/Horsman Ltd. . . . . . . . . .15Cynthia Rutledge . . . . . . . . . . . . . . . . .79Fire Mountain Gems . . . . . . . . . . . . . .C4Freckled Pear, The . . . . . . . . . . . . . . . .80Gaea . . . . . . . . . . . . . . . . . . . . . . . . . . . . .65Gem & Lapidary Wholesalers Inc. . .79Glassy Jewels . . . . . . . . . . . . . . . . . . . . .65Golden Twin Clasps . . . . . . . . . . . . . . .65Helby Import/Beadsmith. . . . . . . . . .51Innovative Beads Expo, The . . . . . . .32John Bead Corp. . . . . . . . . . . . . . . . . . . . 1Lanai Kinsky . . . . . . . . . . . . . . . . . . . . .65Leslee Frumin . . . . . . . . . . . . . . . . 65, 80Lillypilly Designs . . . . . . . . . . . . . . . . .79Manek-Manek Beads. . . . . . . . . . . . . .65Marcia Balonis/Baubles by Balonis .65PJ Tool Jewelry . . . . . . . . . . . . . . . .27, 31Potomac Bead Company. . . . . . . . . . .63Preciosa Ornela . . . . . . . . . . . . . . . . . . . . 5Priscilla Marban . . . . . . . . . . . . . . . . . .65Quilt-Pro Systems . . . . . . . . . . . . . . . .79Ranger Industries Inc . . . . . . . . . . . . .10Royalwood, Ltd . . . . . . . . . . . . . . . . . . .79School of Beadwork . . . . . . . . . . . . . . .79Shipwreck Beads, Inc. . . . . . . . . . . . . .10Skunk Hill Studio . . . . . . . . . . . . . . . . .65Soft Flex Co. . . . . . . . . . . . . . . . . . . . . . .51Starman, Inc. . . . . . . . . . . . . . . . . . . . . . . 7Team TOHO. . . . . . . . . . . . . . . . . . . . . .C3Tulip Co., Ltd . . . . . . . . . . . . . . . . . . . . .32Twisted Sistah Beads & Fibers . . . . .65Venetian Bead Shop . . . . . . . . . . . . . . .79Wynwoods Gallery & Studio . . . . . . .65
The advertisers’ index is provided as a reader service. Occasional last minute changes may result in ads appearing on pages other than those listed here. The publisher assumes no liability for omissions or errors.
Stoned & Wired, LLC Studio/Boutique—Wausau
What a lovely addiction!www.stonedandwiredllc.com
Shop Online At: WWW.SHOPTIQUES.COMFacebook: Stoned and Wired Bead ShopInteresting selection of stones, gorgeous pearls, glass, metals & find-ings, Swarovski crystals, seed beads, kumihimo supplies, buttons & more. Unique jewelry designs by Leocadia and local artists. Charm-ing atmosphere. Located in downtown Wausau in the historic Land-mark Building. Classes available. Tues, Thurs: 11-6, Wed, Friday: 11-5. Summer Saturday hours through Sept 11 are 11-3. Starting Sept 12, Saturday hours are 11-5. Closed Sunday and Monday.221 Scott St. (715) 210-3165
CanadaCapilano Rock & Gem—North Vancouver, BC
www.capilanorock.caStone beads, pearls, Swarovski, Czech glass, sterling silver/gold-filled findings and chains. Distributors for Grobet, EuroTool, TierraCast, Soft Flex, Beadalon, Lortone. Wholesale/retail. We are known for our great prices and friendly staff! Close to downtown Vancouver.1406 Pemberton Ave. (604) 987-5311
4 Sirius Beaders—Paris, ONwww.4siriusbeaders.com
Over 400 colors of Miyuki delicas; Miyuki seeds sizes 6 to 15; Swarovski Crystals and Pearls. Superduos, Crescants, Crystals 2mm and up. Large assortment of findings. Fringe & Decorative beads; Wire; Tools; Pattern books; Needles; Nymo thread; Classes. Central to London, Hamilton, Kitchener, Brantford. Call for store hours. See us on Facebook.51 Ball St. (519) 442-7454
CLASSIFIED WORD
SCHOOLS & EDUCATIONWILLIAM HOLLAND LAPIDARY SCHOOL of Arts. PO Box 980, Young Harris, GA 30582. Call for information (706) 379-2126; [email protected]; www.lapidaryschool.org. Week-long classes from April–October.
BEAD SOCIETIES
MichiganGreat Lakes Beadworkers GuildPO Box 1639Royal Oak, MI 48068Web address: www.greatlakesbeadworkersguild.orgSponsors numerous workshops and programs during year BEAD BONANZA SALE with 80 vendors twice annually. Meets 6:30 on 3rd Tuesdays January–November First Presbyterian Church 1669 W. Maple, Birmingham, MI.
New JerseySouth Jersey Bead SocietyP.O. Box 1242Bellmawr, NJ 08099-5242Email: [email protected] address: www.southjerseybeadsociety.orgMeetings are held the first Thursday of the month Septem-ber-June from 6:30 to 9:00 pm. SJBS also offers workshops taught by local and national teachers. For locations and more info see the website.
New MexicoBead Society of New MexicoPO Box 91655Albuquerque NM 87199Email: [email protected]: https://beadsocietyofnewmexico.wildapricot.org/Meetings held 4th Mon. of the month, except Jul. & Dec. Meeting location: 7521 Carmel Ave NW, Albuquerque. Members enjoy monthly activities, classes, discounts, and connecting with bead lovers like you!
TexasDallas Bead SocietyEmail: [email protected] address: www.dallasbeadsociety.org Yahoo Group: http://groups.yahoo.com/group/dallasbeadsociety/Join DBS for camaraderie, learning and sharing the love of beads. Meetings are the first Saturday of the month, subject to holidays. We gather at 10 and have a short meeting at 10:30 followed by a program. Bring your lunch and stay after the program for open beading until 4 Check out our website or Yahoo group for specifics on meeting dates, location and programs. DBS brings in national teachers twice a year and regional teachers more frequently. We can’t wait to meet you.
VirginiaNorthern Virginia Bead SocietyP.O. Box 2258Vienna, VA 22182Email: [email protected] address: www.nvbs.orgMeetings: 1st Thurs. of each month, 7pm-9pm, Sept - June at Vienna Arts Center, 115 Pleasant Street NW, Vienna, VA. We offer workshops; an annual auction; and a year-end member party. Connect on our website!
CanadaToronto Bead SocietySte. 43, 155 Tycos Dr. (mail only)
Toronto, ON, Canada M6B 1W6
Email: [email protected]
Web address: www.torontobeadsociety.org
Meetings 2nd Wednesday 7 p.m., September–June. Ryerson Uni-
versity, 380 Victoria St. (East of Yonge, between College and Dun-
das). Check out website for dates and details of other special events.
BEAD BROWSERwww.beadpassionstudio.comCheck out our selection and great prices! We carry czech beads, fire polish, multi-hole beads, Toho and Miyuki seed beads, metal stamps, charms, findings and much more. Free patterns with purchase. Visit our website for latest news and promotions.
www.jubilibeadsandyarns.comDon’t miss our easy-to-use e-commerce website with ever-expanding inventory! Seed beads coming soon! Check out our beautiful focal beads, vintage treasures, finished jewelry, and mixed media kits. Come back often as we’re growing fast!
www.toocutebeads.comWe carry Swarovski crystal, pendants, pearls, gold-filled beads, chain, sterling silver beads, cultured pearls, Murano glass, artist glass, tools and wire, kits, and much more. Visit our website for class schedule and for our sale of the week.
www.wynwoods.comOriginal cast and hand fabricated charms, findings, resin frames and com-ponents. Unique selection of rosary parts & religious medals. Beads, chain and other found treasures. Plus new Czech two hole beads for your new design work. Whimsical charms all designed by Lois Venarchick. (Wyn-woods Gallery & Bead Studio, Port Townsend, WA)
CLASSES
New JerseyJubili Beads & Yarns®713 Haddon Ave.
Collingswood, NJ 08108
Ph. (856) 858-7844
Email: [email protected]
Website: www.jubilibeadsandyarns.comCrafter’s ecstasy! Great classes in all levels of beaded jewelry mak-ing, bead weaving. Featuring state-of-the-art, 8–torch flame-work studio. Open studio rental available. Mixed-media specialists of-fering classes and supplies in knitting, crocheting, loom weaving, PMC, wirework, and more! Vintage attic now open!
ADVERTISERS’ INDEX
84 BEADWORKMAGAZINE.COM

techniques
BEADWORK APRIL/MAY 2017 85
PASS THROUGH VS PASS BACK THROUGHPass through means to move the needle in the same direction that the beads have been strung. Pass back through means to move the needle in the opposite direction.
FINISHING AND STARTING NEW THREADSTie off the old thread when it’s about 4" long by making an overhand knot around previ-ous threads between beads. Weave through a few beads to hide the knot, and trim the thread close to the work. Start the new thread by tying an overhand knot around previous threads between beads. Weave through several beads to hide the knot and to reach the place to resume beading.
STOP BEADA stop bead (or tension bead) holds your work in place. To make one, string a bead larger than those you are working with, then pass through the bead one or more times, making sure not to split the thread.
STRINGINGStringing is a technique that uses beading wire, needle and thread, or other material to gather beads into a strand.
FRINGEExit from the foundation row of beads or fabric. String a length of beads plus 1 bead. Skipping the last bead, pass back through all the beads just strung to form a fringe leg. Pass back into the foundation row or fabric.
PICOTA picot is a decorative net, most often made with 3 beads, used to embellish a beadwork surface.
BRICK STITCHStitch a foundation row in one- or two-needle ladder stitch. String 2 beads and pass under the closest exposed loop of the foundation row and back through the sec-ond bead. String 1 bead and pass under the next exposed loop and back through the bead just strung; repeat.
To decrease within a row, string 1 bead and skip a loop of thread on the previous row, passing under the second loop and back through the bead.
To increase within a row, work 2 stitches in the same loop on the previous row.
For circular brick stitch, work increases as needed to keep the work flat; at the end of each round, pass through the first and last beads to stitch them together, then string 2 beads to begin the next round.
For tubular brick stitch, join a ladder-stitched foundation row into a ring by pass-ing through the first and last beads of the row, with the holes facing up. *String 1 bead and pass under the closest exposed loop of the foundation ring. Pass back through the same bead and repeat, adding 1 bead at a time. Finish the round by pass-ing down through the first bead and up through the last bead of the current round, then string 2 beads to begin the next round.
LADDER STITCHFor one-needle ladder stitch, string 2 beads and pass through them again. Manipulate the beads so their sides touch. String 1 bead. Pass through the last bead added and the bead just strung. Repeat, adding 1 bead at a time and working in a figure-eight pattern.
HERRINGBONE STITCHForm a foundation row of one- or two-needle even-count ladder stitch and exit up through the final bead. String 2 beads, pass down through next bead in the ladder, and pass up through the following bead; repeat to the end of the row. Step up for the next row by wrapping the thread around previ-ous threads to exit up through the last bead strung. To form the next row, string 2 beads and pass down through the second-to-last bead of the previous row and up through the following bead. Repeat, stringing 2 beads per stitch, passing down then up through 2 beads of the previous row and stepping up as before. The 2-bead stitch will cause the beads to angle in each col-umn, like a herringbone fabric.
Begin tubular herringbone stitch with a foundation ring of one- or two-needle even-count ladder stitch. String 2 beads. Pass down through the next bead and up through the following bead in the ladder. Repeat around the ring. At the end of the round, pass through the first beads of the previous and current rounds to step up to the new round.
PEYOTE STITCHFor one-drop even-count flat peyote stitch, string an even number of beads to create the first two rows. Begin the third row by stringing 1 bead and passing back through the second-to-last bead of the pre-vious row. String another bead and pass back through the fourth-to-last bead of the previous row. Continue adding 1 bead at a time, passing over every other bead of the previous row.
Two-drop peyote stitch is worked the same as one-drop peyote stitch, but with 2 beads at a time instead of 1 bead.
For odd-count flat peyote stitch, string an uneven number of beads to create Rows 1 and 2. String 1 bead, skip the last bead strung, and pass through the next bead. Repeat across the row (this is Row 3). To add the last bead, string 1 bead and knot the tail and working threads, clicking all beads into place. Start the next row (Row 4) by passing back through the last bead added. Continue in peyote stitch, turning as for even-count at the end of this and all even-numbered rows. At the end of all odd-numbered rows, add the last bead, pass under the thread loop at the edge of the previous rows, and pass back through the last bead added.
STITCH INDEXBackstitch bead embroidery 48Brick stitch 36Crimping 69, 70, 71, 72, 73Fringe 20Herringbone stitch 12, 20,
28, 38 Knotting 74Ladder stitch 12Netting 24, 52, 56, 60Peyote stitch 20, 38, 45, 60Picot 24, 42, 52, 56Right-angle weave 20, 24, 28,
34, 38, 52Stringing 42, 67, 68, 69, 70, 71,
72, 73Wireworking 67, 68, 69, 70, 73, 74

86 WWW.INTERWEAVE.COM
techniques (continued)
Begin a midproject peyote-stitch increase by working a stitch with 2 beads in one row. In the next row, work 1 bead in each stitch, splitting the pair of beads in the previous row. For a smooth increase, use very narrow beads for both the two-drop and the one- drop between.
T o make a midproject peyote-stitch decrease, simply pass the thread through 2 beads without adding a bead in the “gap.” In the next row, work a regular one-drop peyote stitch over the decrease. Work with tight tension to avoid holes.
For circular peyote stitch, string 3 beads and knot the tail and working threads to form the first round; pass through the first bead strung. For the second round, string 2 beads and pass through the next bead of the previous round; repeat twice. To step up to the third round, pass through the first bead of the current round. For the third round, string 1 bead and pass through the next bead of the previous round; repeat around, then step up at the end of the round. Continue in this manner, alternating the two previous rounds. It may be neces-sary to adjust the bead count, depending on the relative size of the beads, to keep the circle flat.
For even-count tubular peyote stitch, string an even number of beads and knot the tail and working threads to form the first 2 rounds; pass through the first 2 beads strung. To work Round 3, string 1 bead, skip 1 bead, and pass through the next bead; repeat around until you have added half the number of beads in the first round. Step up through the first bead added in this
round. For the following rounds, string 1 bead and pass through the next bead of the previous round; repeat, stepping up at the end of each round.
BACKSTITCH BEAD EMBROIDERYTie a knot at the end of the thread. Pass up through the foundation from back to front. *String 4 beads and lay them against the foundation. Pass down through the founda-tion next to the last bead added. Pass up through the foundation between the sec-ond and third beads just added, then pass through the third and fourth beads. Repeat from *.
NETTINGString a base row of 13 beads. String 5 beads and pass back through the fifth bead from the end of the base row. String another 5 beads, skip 3 beads of the base row, and pass back through the next bead; repeat to the end of the row. To turn, pass back through the last 3 beads (one leg of the last net). String 5 beads, pass back through the center bead of the next net, and continue.
For circular netting, string {1A and 1B} six times; pass through them again to form a circle for the foundation round and pass through the next 1B. *String 1A, 1B, and 1A; skip 3 beads and pass through the follow-ing bead in the previous round to form a “net.” Repeat from * twice, then step up for the next round by passing through the first 2 beads of the first net. String 2A, 1B, and 2A; pass through the middle bead of the nearest net in the previous round. Repeat twice, then step up for the next round by passing through the first 3 beads of this round. Work each round the same way,
Master the basics. Sharpen your skills.
Learn more must-know techniques from Melinda Barta.
Find these resourcesand more at
www.interweave.com
Mastering Herringbone Stitch
Mastering Peyote Stitch
MORE STITCHES & TIPS!Watch free videos at www.interweave.com to learn valuable beading tips and techniques.
increasing the number of A beads as nec-essary to keep the work flat, and stepping up by passing through the first half of the first net.
For tubular netting, string 1A and 1B six times; pass through them again to form the foundation round. *String 1A, 1B, and 1A; skip 1B and pass through the following 1B in the previous round to form a “net.” Repeat from * twice, then step up for the next round by passing through the first 2 beads of this round. **String 1A, 1B, and 1A; pass through the middle bead of the nearest net in the previous round. Repeat from ** twice, then step up as before. Work each round the same way.
RIGHT-ANGLE WEAVEFor one-needle right-angle weave, string 4 beads and pass through the first 3 beads again to form the first unit. For the rest of the row, string 3 beads and pass through the last bead exited in the previous unit and the first 2 beads just strung; the thread path will resemble a series of figure eights, alternating direction with each unit. To begin the next row, pass through beads to exit from the top bead of the last unit. String 3 beads and pass through the last bead exited and the first bead just strung. *String 2 beads; pass back through the next top bead of the previous row, the last bead exited in the previous unit, and the 2 beads just strung. Pass through the next top bead of the previous row. String 2 beads; pass through the last bead of the previous unit, the top bead just exited, and the first bead just strung. Repeat from * to complete the row, then begin a new row as before.

BEADWORK APRIL/MAY 2017 87
CRIMP BEADS Crimp beads are serrated metal beads. Twisted crimp tubes and crimp beads can be secured by squeezing them flat with chain- or flat-nose pliers.
CRIMP COVERS Crimp covers hide crimp tubes and give a professional finish. To attach, gently hold a crimp cover in the front notch of the crimp-ing pliers. Insert the crimped tube and gently squeeze the pliers, encasing the tube inside the cover.
CRIMP/CORD ENDSCrimp/cord ends consist of a loop attached to a tube. Dab the leather, plastic, ribbon, or other cord with jewelry glue, then place it in the crimp/cord end. If you’re using a crimp end, crimp it as you would a crimp tube.
WIREGUARDSWireguards provide a smooth metal chan-nel to protect the stringing material from chafing against a con-nector. String a crimp tube, then pass up through one half of the guard and down the other half. Pass the guard and wire through the loop of the connector, pass the wire back through the crimp tube, snug the tube up to the guard, then crimp.
OVERHAND KNOTThis is the basic knot for tying off thread. Make a loop with the stringing material. Pass the cord that lies behind the loop over the front cord and through the loop; pull snug.
LARK’S HEAD KNOTLark’s head knots are great for securing stringing material to another piece, such as a ring or a donut. Fold the stringing material in half. Pass the fold through a ring or donut, then pull the ends through the loop created and pull snug.
SQUARE KNOTThis knot is the classic sturdy knot suitable for most stringing materials. Make an over-hand knot, passing the right end over the left end. Make another overhand knot, this time passing the left end over the right end; pull snug.
WIREWORKINGMETAL WIRE comes in many finishes and gauges. The lower the gauge number, the thicker the wire. The hardness or softness of wire is called “temper.” Most wire comes in dead-soft, half-hard, and hard tempers. Unless otherwise noted, wire used in this issue is half-hard—the best temper for making strong loops and other shapes.
JUMP RINGSJump rings con-nect holes and loops. Open a jump ring by grasping each side of its open-ing with a pair of pliers; don’t pull apart. Instead, twist in opposite directions so that you can open and close without dis-torting the shape.
HEAD PINS/EYE PINSHead pins are straight wires with a flat disc, ball, or other shape at one end. Eye pins are straight wires that end in a loop.
WRAPPED-LOOP DANGLESDangles can be strung as they are, attached using jump rings, or linked to other loops. Use a head pin or eye pin to string the bead(s), then form a simple or wrapped loop.
WRAPPED-LOOP LINKSLink a wrapped loop to another loop by passing the wire through the pre-vious loop before wrap-ping the tail down the neck of the wire.
WRAPPED-LOOP BAILSWrapped-loop bails turn side-drilled beads, usually tear-drops, into pen-dants. Center the bead on a 2" or longer piece of wire. Bend both ends of the wire up the sides and across the top of the bead. Bend one end straight up at the center of the bead, then wrap the other wire around it to form a couple of coils. Form a wrapped loop with the straight-up wire, wrapping it back down over the already-formed coils. Trim the excess wire.
CONESUse cones to finish a multistrand piece. Attach each strand of beads to a wrapped loop or an eye pin. Use the wrapped-loop wire or eye pin to string the wide end of a cone, covering the ends of the strands; form a wrapped loop at the tip of the cone that attaches to a clasp.
COILTo make a coil, use one hand to hold the end of your wire against a mandrel (or whatever object you want to coil around). With the other hand, wrap the wire around the mandrel. When finished, slide the coil off the mandrel.
Our editorsalso recommend
Stringing Styleby Jamie Hogsett
Stringing Style 2by Jean Campbell
AVAILABLE ATwww.interweave.com
SPIRALTo start a spiral (or scroll), make a small loop at the end of a wire with round-nose pliers. Enlarge the piece by holding on to the spiral with chain-nose pliers and pushing the wire over the previous spiral with your fingers for as many revolutions as desired.

88 WWW.INTERWEAVE.COM
bead buzz BEAD ALL ABOUT ITAndrea Hoyt
Beads, whether they are flying through the air or embroidered onto an Indian headdress, have been a staple of New Orleans Mardi Gras since the 1890s. Originally made with Czech and Japanese glass, “throw” beads became ubiquitous when parade revelers discovered a cheaper, more lightweight plastic alternative. After a parade, the streets would be filled with plastic bead strands, and children soon learned that they could twist them, like a balloon animal, into small shapes. Thus the Mardi Gras bead dog was born.
The Mardi Gras Bead Dog: A New Icon for an Age-Old Festival
In recent years, the Mardi Gras bead dog has inspired sculptors, jewelry artists, and even a children’s book. The bead dog reigned in 2012 when these colorful tokens of Mardi Gras spirit adorned the streets of New Orleans as part of a public art project called “Paws on Parade,” put on by the Louisiana Society for the Prevention of Cruelty to Animals. Many of the sculptures remain, and a local bakery called Haydel’s continues the tradition by commis-sioning a New Orleans artist to create a new bead dog every year, raffling it off
and donating the proceeds to a local charity. Jewelry artists have gotten in on the fun as well, making cute wear-able dogs out of beads, crystals, and pearls.
It isn’t surprising that beads, with all their color and personality, would become emblematic of such a grand party, and that the bead dog, with its playful and spontaneous origin, would emerge as the new Mardi Gras icon.
Below: The New Orleans Saints Bead Dog
COURTESY OF THE LOUISIANA SPCA
Above: Bead Dog by Artist Nurhan Gokturk
COURTESY OF THE LOUISIANA SPCA

U.S. TOHO BEADS DISTRIBUTORS
www.TOHOBeads.net
Bead Crochet Necklace by Candice Sexton
www.CandiceSexton.com
Starman Beads www.CzechBeads.com 1-888-683-BEAD
Bobby Bead www.BobbyBead.com 1-888-900-BEAD
PermaFinish™TOHO BEADS proudly presents
TOHO PermaFinish (PF) beads provide durability for long-lasting color. Available
in over 60 colors including Silver-Lined, Ceylon, and Galvanized. PermaFinish
Demi Round™ Beads coming soon!
for more info visit http://TeamTOHO.net
America’s Favorite Beading and Jewelry Supply Company®
Go online to see over 120,000 HOT
jewelry-making products and order
a Free catalog today
You supply the creativity,we supply everything else!®
One Fire Mountain Way, DEPT C027 Grants Pass, OR 97526-2373 1-800-355-2137
Fire Mountain Gems and Beads© 2017
Sabrina Milardi, Italywww.facebook.com/sabrina.milardiGrand Prize Honorable Mention Award Winner, 2016 Seed Bead Jewelry- Making Contest
www.firemountaingems.com
Ask about ourPlatinum Partners
Wholesale Program
LowWholesale
Prices


![Halskedjan i silverskatten från Linnaniemi. Vad säger mynten? [The necklace in the treasure from Linnaniemi. What can the coins tell?]. Seminar paper 2009](https://static.fdokumen.com/doc/165x107/632678ac85ee1023db006742/halskedjan-i-silverskatten-fran-linnaniemi-vad-saeger-mynten-the-necklace-in.jpg)