Blackboard Collaborate - University of St. Thomas
69
Page 1 of 69 Contents What Is Blackboard Collaborate Ultra?................................................................................................... 4 How Many Users Can Join a Conference? ............................................................................................... 4 The Ultra Experience and Remote Hosting .............................................................................................. 5 Requirements for Using Collaborate......................................................................................................... 6 Operating System ...................................................................................................................................... 6 Browser ..................................................................................................................................................... 6 Moderators and Presenters................................................................................................................... 6 Participants ........................................................................................................................................... 7 Emptying the Cache .............................................................................................................................. 7 Flash Player ............................................................................................................................................... 7 Hardware Peripherals ................................................................................................................................ 8 Telephone (optional) ................................................................................................................................. 8 Blackboard Integration & Shared Conference Space ............................................................................. 9 Courses and Organizations........................................................................................................................ 9 Scheduling................................................................................................................................................. 9 Recordings ................................................................................................................................................ 9 Room Access .............................................................................................................................................. 11 Instructor Access ..................................................................................................................................... 11 Tools Area............................................................................................................................................... 11 Direct Link on the Course or Organization Menu .................................................................................. 12 Course Link in a Content Area ............................................................................................................... 12 Tool Link in a Content Area ................................................................................................................... 14 Room Management ................................................................................................................................... 17 Joining the Room .................................................................................................................................... 17 Scheduling Sessions ................................................................................................................................ 19 The Collaborate Ultra Menu ................................................................................................................... 21 Blackboard Collaborate
-
Upload
khangminh22 -
Category
Documents
-
view
1 -
download
0
Transcript of Blackboard Collaborate - University of St. Thomas
Page 1 of 69
Contents What Is Blackboard Collaborate Ultra? ................................................................................................... 4
How Many Users Can Join a Conference? ............................................................................................... 4 The Ultra Experience and Remote Hosting .............................................................................................. 5
Requirements for Using Collaborate ......................................................................................................... 6 Operating System ...................................................................................................................................... 6 Browser ..................................................................................................................................................... 6
Moderators and Presenters ................................................................................................................... 6 Participants ........................................................................................................................................... 7 Emptying the Cache .............................................................................................................................. 7
Flash Player ............................................................................................................................................... 7 Hardware Peripherals ................................................................................................................................ 8
Telephone (optional) ................................................................................................................................. 8
Blackboard Integration & Shared Conference Space ............................................................................. 9 Courses and Organizations ........................................................................................................................ 9
Scheduling ................................................................................................................................................. 9 Recordings ................................................................................................................................................ 9
Room Access .............................................................................................................................................. 11 Instructor Access ..................................................................................................................................... 11 Tools Area ............................................................................................................................................... 11
Direct Link on the Course or Organization Menu .................................................................................. 12 Course Link in a Content Area ............................................................................................................... 12
Tool Link in a Content Area ................................................................................................................... 14
Room Management ................................................................................................................................... 17 Joining the Room .................................................................................................................................... 17 Scheduling Sessions ................................................................................................................................ 19 The Collaborate Ultra Menu ................................................................................................................... 21
Blackboard Collaborate
Page 2 of 69
Course Room and Session Options ......................................................................................................... 22 Join session ......................................................................................................................................... 23
Anonymous dial-in .............................................................................................................................. 23 Edit settings ......................................................................................................................................... 24
View reports ........................................................................................................................................ 25 Lock course room ................................................................................................................................ 26 Edit occurrence ................................................................................................................................... 26
Edit recurring session ......................................................................................................................... 26 Copy guest link .................................................................................................................................... 26
Delete session ...................................................................................................................................... 27
The Session Interface ................................................................................................................................ 28 Session Menu .......................................................................................................................................... 29
Start Recording ................................................................................................................................... 29 Use your phone for audio.................................................................................................................... 29
Report an Issue ................................................................................................................................... 30 Blackboard Collaborate Help ............................................................................................................. 30
Learn about the new Collaborate interface ........................................................................................ 30 Interaction Bar Buttons ........................................................................................................................... 31
Settings ................................................................................................................................................ 31
Share Audio ......................................................................................................................................... 31 Share Video ......................................................................................................................................... 32
Raise Hand .......................................................................................................................................... 33 Collaborate Panel .................................................................................................................................... 33
Chat ..................................................................................................................................................... 33
Attendees ............................................................................................................................................. 35 Share Content ...................................................................................................................................... 38
My Settings .......................................................................................................................................... 39 Close Collaborate Panel ..................................................................................................................... 40
Follow the Speaker Mode and Group Mode ........................................................................................... 40
Sharing Content ........................................................................................................................................ 42 Basics of Sharing Content ....................................................................................................................... 42
Switching between Shared Content and Participant Views ................................................................ 42 The View Controls Toolbar ................................................................................................................. 43 Enabling or Disabling Interactivity .................................................................................................... 43
The Stop Sharing Icon ......................................................................................................................... 44 Navigating Back to Share Content ...................................................................................................... 44
Share Blank Whiteboard ......................................................................................................................... 44
Page 3 of 69
Share Application/Screen ........................................................................................................................ 45 Share Files ............................................................................................................................................... 47
Polling ..................................................................................................................................................... 49 Timer ....................................................................................................................................................... 52
Breakout Groups ..................................................................................................................................... 52
Leaving the Room ..................................................................................................................................... 55 Leave Session .......................................................................................................................................... 55
Set as Away ............................................................................................................................................. 56
The Recordings List .................................................................................................................................. 57 Viewing Recordings ................................................................................................................................ 58 Downloading Recordings ........................................................................................................................ 59 Sending Recording Links ........................................................................................................................ 60
Renaming Recordings ............................................................................................................................. 60 Adding a Caption Source ........................................................................................................................ 61
Deleting Recordings ................................................................................................................................ 63
Accessibility ............................................................................................................................................... 64 Closed Captioning ................................................................................................................................... 64 Screen Reader ......................................................................................................................................... 66 Keyboard Shortcuts ................................................................................................................................. 66
Sharing Applications While Viewing the Chat Pane .............................................................................. 67
Quick-Start Sheet for Blackboard Collaborate Ultra............................................................................ 68 Requirements .......................................................................................................................................... 68 Optional Hardware .................................................................................................................................. 68 Navigating to Collaborate Ultra in Blackboard Learn ............................................................................ 68
Scheduling Sessions ................................................................................................................................ 68 Roles ....................................................................................................................................................... 68
Interaction Bar......................................................................................................................................... 69 Other Interface Elements ........................................................................................................................ 69
Session Menu ...................................................................................................................................... 69
Collaborate Panel ............................................................................................................................... 69 Participant Display Modes ................................................................................................................. 69
Miscellaneous Important Facts ............................................................................................................... 69
Page 4 of 69
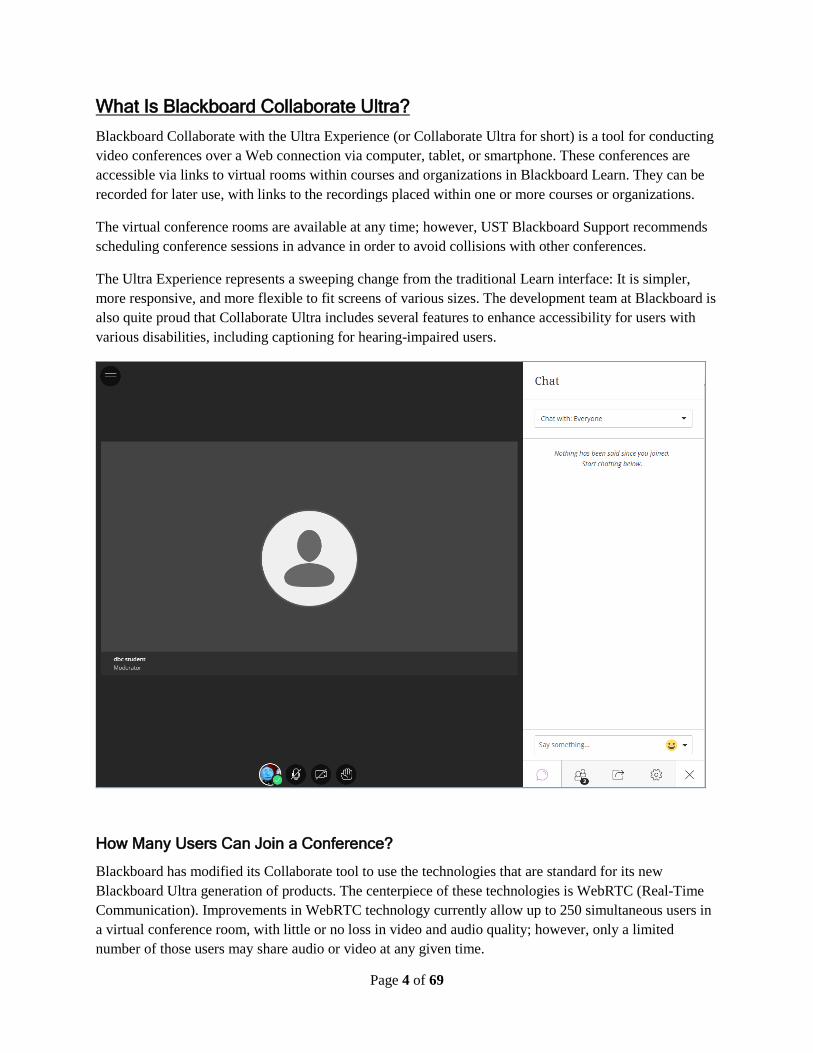
What Is Blackboard Collaborate Ultra? Blackboard Collaborate with the Ultra Experience (or Collaborate Ultra for short) is a tool for conducting video conferences over a Web connection via computer, tablet, or smartphone. These conferences are accessible via links to virtual rooms within courses and organizations in Blackboard Learn. They can be recorded for later use, with links to the recordings placed within one or more courses or organizations.
The virtual conference rooms are available at any time; however, UST Blackboard Support recommends scheduling conference sessions in advance in order to avoid collisions with other conferences.
The Ultra Experience represents a sweeping change from the traditional Learn interface: It is simpler, more responsive, and more flexible to fit screens of various sizes. The development team at Blackboard is also quite proud that Collaborate Ultra includes several features to enhance accessibility for users with various disabilities, including captioning for hearing-impaired users.
How Many Users Can Join a Conference?
Blackboard has modified its Collaborate tool to use the technologies that are standard for its new Blackboard Ultra generation of products. The centerpiece of these technologies is WebRTC (Real-Time Communication). Improvements in WebRTC technology currently allow up to 250 simultaneous users in a virtual conference room, with little or no loss in video and audio quality; however, only a limited number of those users may share audio or video at any given time.
Page 5 of 69
With modifications, a conference can accommodate up to 500 users. If you expect more than 250 in a conference, Blackboard recommends submitting a Large Session Request, which requires a Behind the Blackboard account. The modifications for large sessions include disabling the interactive features for users with the Participant role: sharing audio and video, posting chat messages, drawing on shared content, and breakout groups. Users with the Moderator role may re-enable the chat feature.
The Ultra Experience and Remote Hosting
The primary advantage of the Ultra Experience is that it eliminates dependencies on third-party software engines, including Java. The collaborative tools that were previously integrated with Blackboard Learn depended heavily on Java, which caused problems when users’ systems did not have an up-to-date Java Runtime Engine.
Users with the Blackboard, BbStudent, or Blackboard Instructor mobile app have the Blackboard Learn in the Ultra Experience at their fingertips on most mobile devices, excluding smartphones with Blackberry OS. Collaborate Ultra functionality is integrated with the mobile apps.
Collaborate Ultra conference sessions take place in virtual rooms on a web server at the domain bbcollab.com. Because the service is externally hosted, UST Blackboard Support can do nothing administratively to fix problems with the application. Only Blackboard’s own Technical Support staff can fix such problems. Currently, Blackboard adds bug fixes and feature enhancements on a monthly schedule, with new features added about once per quarter.
Page 6 of 69
Requirements for Using Collaborate To participate in a session of Blackboard Collaborate with both audio and video, users should have equipment and software that meet or exceed certain minimum standards. As the application evolves, the requirements for hardware, operating system, browser and auxiliary programs may change along with it.
Operating System
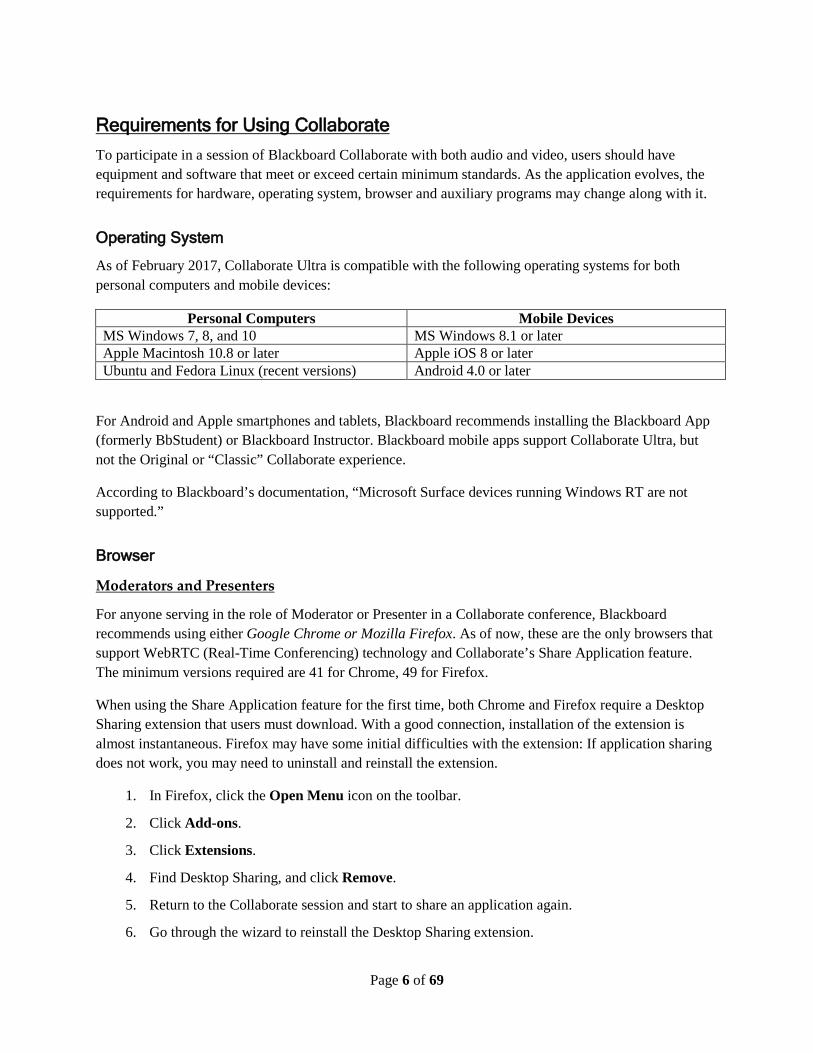
As of February 2017, Collaborate Ultra is compatible with the following operating systems for both personal computers and mobile devices:
Personal Computers Mobile Devices MS Windows 7, 8, and 10 MS Windows 8.1 or later Apple Macintosh 10.8 or later Apple iOS 8 or later Ubuntu and Fedora Linux (recent versions) Android 4.0 or later
For Android and Apple smartphones and tablets, Blackboard recommends installing the Blackboard App (formerly BbStudent) or Blackboard Instructor. Blackboard mobile apps support Collaborate Ultra, but not the Original or “Classic” Collaborate experience.
According to Blackboard’s documentation, “Microsoft Surface devices running Windows RT are not supported.”
Browser
Moderators and Presenters
For anyone serving in the role of Moderator or Presenter in a Collaborate conference, Blackboard recommends using either Google Chrome or Mozilla Firefox. As of now, these are the only browsers that support WebRTC (Real-Time Conferencing) technology and Collaborate’s Share Application feature. The minimum versions required are 41 for Chrome, 49 for Firefox.
When using the Share Application feature for the first time, both Chrome and Firefox require a Desktop Sharing extension that users must download. With a good connection, installation of the extension is almost instantaneous. Firefox may have some initial difficulties with the extension: If application sharing does not work, you may need to uninstall and reinstall the extension.
In Firefox, click the Open Menu icon on the toolbar. 1.
Click Add-ons. 2.
Click Extensions. 3.
Find Desktop Sharing, and click Remove. 4.
Return to the Collaborate session and start to share an application again. 5.
Go through the wizard to reinstall the Desktop Sharing extension. 6.
Page 7 of 69
Participants
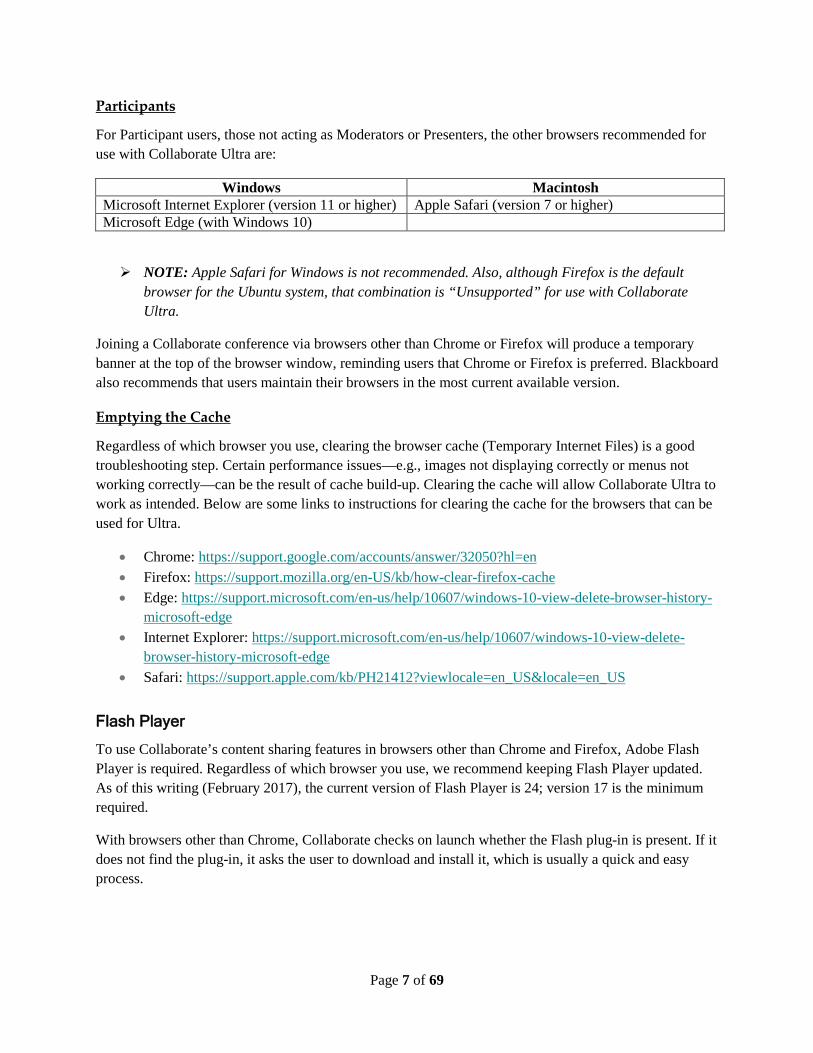
For Participant users, those not acting as Moderators or Presenters, the other browsers recommended for use with Collaborate Ultra are:
Windows Macintosh Microsoft Internet Explorer (version 11 or higher) Apple Safari (version 7 or higher) Microsoft Edge (with Windows 10)
NOTE: Apple Safari for Windows is not recommended. Also, although Firefox is the default browser for the Ubuntu system, that combination is “Unsupported” for use with Collaborate Ultra.
Joining a Collaborate conference via browsers other than Chrome or Firefox will produce a temporary banner at the top of the browser window, reminding users that Chrome or Firefox is preferred. Blackboard also recommends that users maintain their browsers in the most current available version.
Emptying the Cache
Regardless of which browser you use, clearing the browser cache (Temporary Internet Files) is a good troubleshooting step. Certain performance issues—e.g., images not displaying correctly or menus not working correctly—can be the result of cache build-up. Clearing the cache will allow Collaborate Ultra to work as intended. Below are some links to instructions for clearing the cache for the browsers that can be used for Ultra.
• Chrome: https://support.google.com/accounts/answer/32050?hl=en • Firefox: https://support.mozilla.org/en-US/kb/how-clear-firefox-cache • Edge: https://support.microsoft.com/en-us/help/10607/windows-10-view-delete-browser-history-
microsoft-edge • Internet Explorer: https://support.microsoft.com/en-us/help/10607/windows-10-view-delete-
browser-history-microsoft-edge • Safari: https://support.apple.com/kb/PH21412?viewlocale=en_US&locale=en_US
Flash Player
To use Collaborate’s content sharing features in browsers other than Chrome and Firefox, Adobe Flash Player is required. Regardless of which browser you use, we recommend keeping Flash Player updated. As of this writing (February 2017), the current version of Flash Player is 24; version 17 is the minimum required.
With browsers other than Chrome, Collaborate checks on launch whether the Flash plug-in is present. If it does not find the plug-in, it asks the user to download and install it, which is usually a quick and easy process.
https://support.microsoft.com/en-us/help/10607/windows-10-view-delete-browser-history-microsoft-edge
https://support.microsoft.com/en-us/help/10607/windows-10-view-delete-browser-history-microsoft-edge
https://support.microsoft.com/en-us/help/10607/windows-10-view-delete-browser-history-microsoft-edge
Page 8 of 69
Hardware Peripherals
Audio: For moderating or participating in Collaborate sessions, we recommend using a USB headset with a built-in microphone for two-way audio. The microphone mounted on a headset makes it easy to keep the microphone a suitable distance from the user’s mouth.
Video: To provide video, users can make use of a USB webcam. A camera with a resolution width of at least 720 pixels is recommended.
Telephone (optional)
If a user encounters problems connecting to the Internet, is in motion, or is otherwise unable to maintain a network link, the user may participate via telephone instead. As with a typical conference call, a session Moderator can provide the user with a ten-digit phone number; each user receives an eight-digit PIN to join a Collaborate conference, and must retrieve that PIN by joining the conference.
Attendees in a Collaborate conference, even while using a computer or mobile device for video, may also use a telephone in lieu of a microphone for audio. This is useful when a microphone or headset is not available or not working, or if the computer’s audio hardware has stopped working. The Interaction Bar at the bottom of the Collaborate screen displays a telephone icon to indicate that the attendee is using phone audio. Other users will see a telephone icon in the Attendees pane for each user connecting via phone.
Users of the Blackboard App on a smartphone may share audio through their phones. Tablets and laptop computers with built-in microphones may also be used for sharing audio.
Page 9 of 69
Blackboard Integration & Shared Conference Space At the University of St. Thomas, all Collaborate conference spaces will be deployed via Blackboard Learn, through online courses for instructional use or Blackboard Organizations for non-instructional use.
Courses and Organizations
By default, course instructors and organization leaders serve as Moderators for their virtual rooms. Moderators have the power to change other users’ roles. The roles available are Moderator, Presenter, Participant, and Captioner.
Students in courses and participants in organizations assume the Participant role by default. Instructors and leaders may also invite external users as guests and assign them the role of Participant, Presenter, or Moderator. These guests do not need to have UST Blackboard accounts: They may be colleagues at other institutions, other guest lecturers, vendors, or other non-UST personnel.
Scheduling
Blackboard Learn provides the Blackboard Collaborate Ultra page as a tool for managing the Course Room or creating Sessions with definite time frames. A link to a Session is active only between its Start and End times. Multiple Sessions may run simultaneously, which is useful for different groups of students working on group projects. The Course Room is available any time, unless an instructor has disabled the Join room link.
To notify students and other users that the Course Room is reserved for a specific time-frame, we recommend using the Course Calendar or Organization Calendar tool in Blackboard Learn. Before entering the room, students can check the Calendar to make sure that another group is not currently using it. In the event of scheduling conflicts, additional organizations will not be created.
NOTE: Remember that the Blackboard Calendars do not synchronize with Outlook calendars. The only way to add Blackboard Calendar data to your personal calendar, or to share Calendar data with an external user, is via the Get External Calendar Link button at the bottom. The .ics file link that it creates can add data to a user’s Outlook, Macintosh, or Gmail calendar.
Recordings
Moderators may record all or part of a conference for later use by attendees, as well as for individuals who cannot participate in a conference in real time. A moderator may also stop and restart recording at any time during a conference; however, each time recording is started creates a separate MP4 file.
Recordings require anywhere from a few minutes to an hour, depending on the length of the recording, to be processed and posted on the Blackboard Collaborate Ultra page. Each recording posted gets a default name, which Moderators cannot change.
These recordings result in the creation of extremely large files in the MP4 format. Due to limits on server capacity, recordings should never be permanent. When the recordings approach the allotted storage
Page 10 of 69
capacity, the Blackboard Administrators will contact instructors and ask them to delete any recordings no longer needed.
For the same reason, Moderators should consider carefully, in advance, what and when to record. Generally, recording is a good idea when users who need the information cannot attend all or part of the session in real time.
NOTE: Never assume that a recorded session is private. Other Moderators not only have access to them (unless they are deleted from the Blackboard Collaborate page), but also can share links to them with anyone. Also, anyone with whom you share a link can share it with others.
Deleting recordings from the Blackboard Collaborate Ultra page also deletes them from the server. If you have concerns about unauthorized users viewing the recording, you can delete it.
For more detailed information on managing recordings, see the Recordings List section later in this document.
Page 11 of 69
Room Access Each course or organization on UST’s Blackboard system will have exactly one Course Room. The gateway to that room is the Blackboard Collaborate Ultra page. Students can click the Join room link, if it is active, for access to the Course Room, or links to individual sessions. Instructors can use this page to administer the Course Room, create sessions with defined time frames, and manage recordings of conferences.
Instructor Access
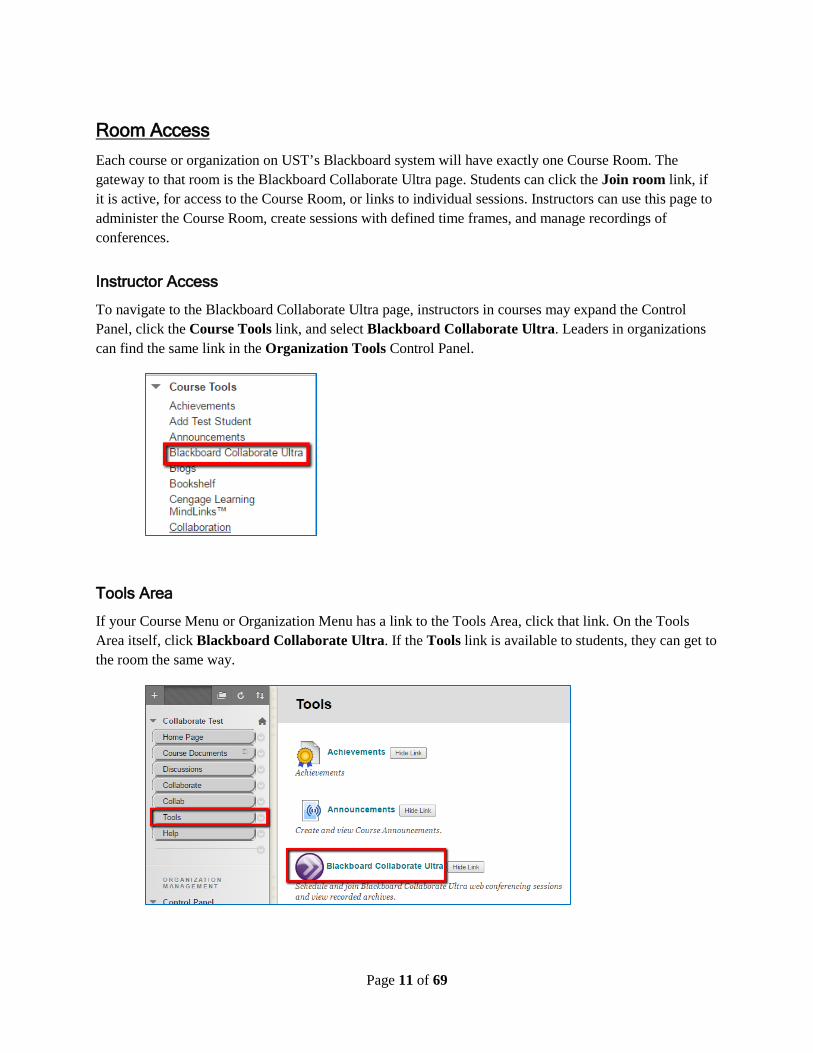
To navigate to the Blackboard Collaborate Ultra page, instructors in courses may expand the Control Panel, click the Course Tools link, and select Blackboard Collaborate Ultra. Leaders in organizations can find the same link in the Organization Tools Control Panel.
Tools Area
If your Course Menu or Organization Menu has a link to the Tools Area, click that link. On the Tools Area itself, click Blackboard Collaborate Ultra. If the Tools link is available to students, they can get to the room the same way.

Page 12 of 69
Direct Link on the Course or Organization Menu
To provide a link for students to the Blackboard Collaborate page on the Course or Organization Menu:
At the top of the Course Menu, point to the Add Menu Item icon (+), and select Tool Link. 1.
Type a Name for the link, such as Blackboard Collaborate. 2.
For the Type, select Blackboard Collaborate Ultra. 3.
Make the link available to students, if that is appropriate, and click Submit. 4.
Drag and drop the link into the most advantageous position on the Course Menu. 5.
Course Link in a Content Area
To add a link to the Blackboard Collaborate page in any content area:
Navigate via a link on the Course or Organization menu to any content area. If you intend to 1.place the link in a folder within that content area, click on the title of the folder as well.

Page 13 of 69
Point to the Build Content button on the Action Bar, and select Course Link. 2.
On the Create Course Link page, click the Browse button. 3.
Page 14 of 69
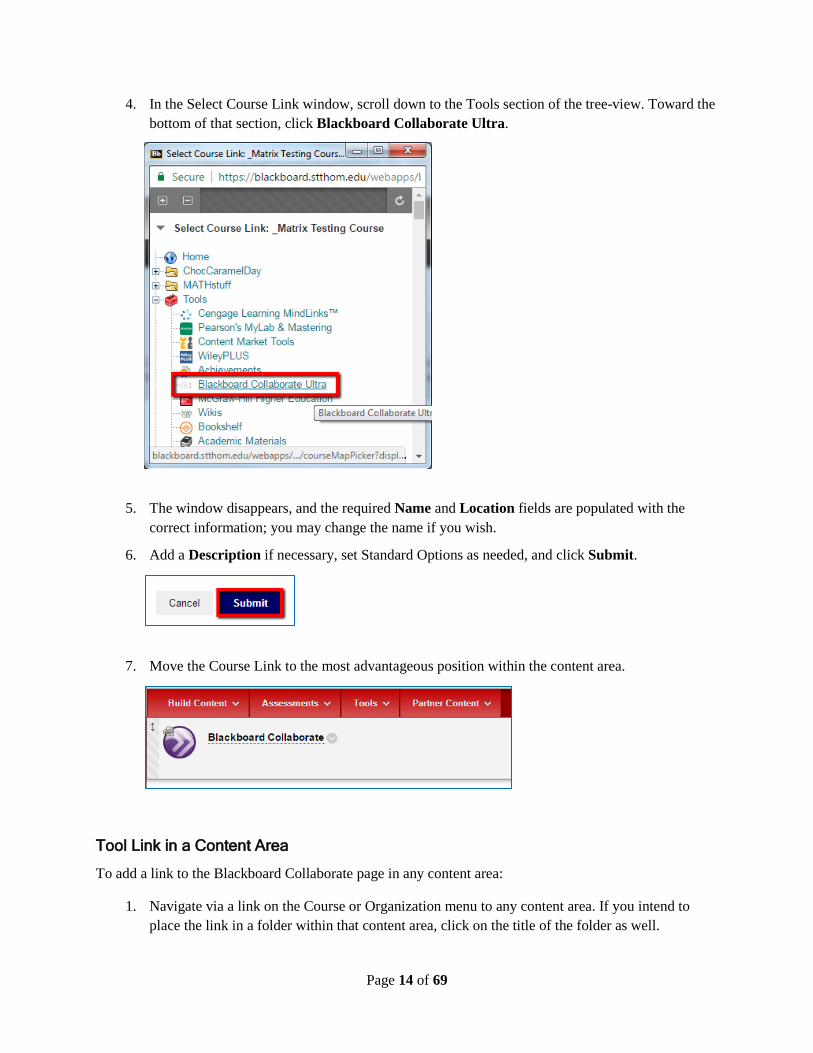
In the Select Course Link window, scroll down to the Tools section of the tree-view. Toward the 4.bottom of that section, click Blackboard Collaborate Ultra.
The window disappears, and the required Name and Location fields are populated with the 5.correct information; you may change the name if you wish.
Add a Description if necessary, set Standard Options as needed, and click Submit. 6.
Move the Course Link to the most advantageous position within the content area. 7.
Tool Link in a Content Area
To add a link to the Blackboard Collaborate page in any content area:
Navigate via a link on the Course or Organization menu to any content area. If you intend to 1.place the link in a folder within that content area, click on the title of the folder as well.
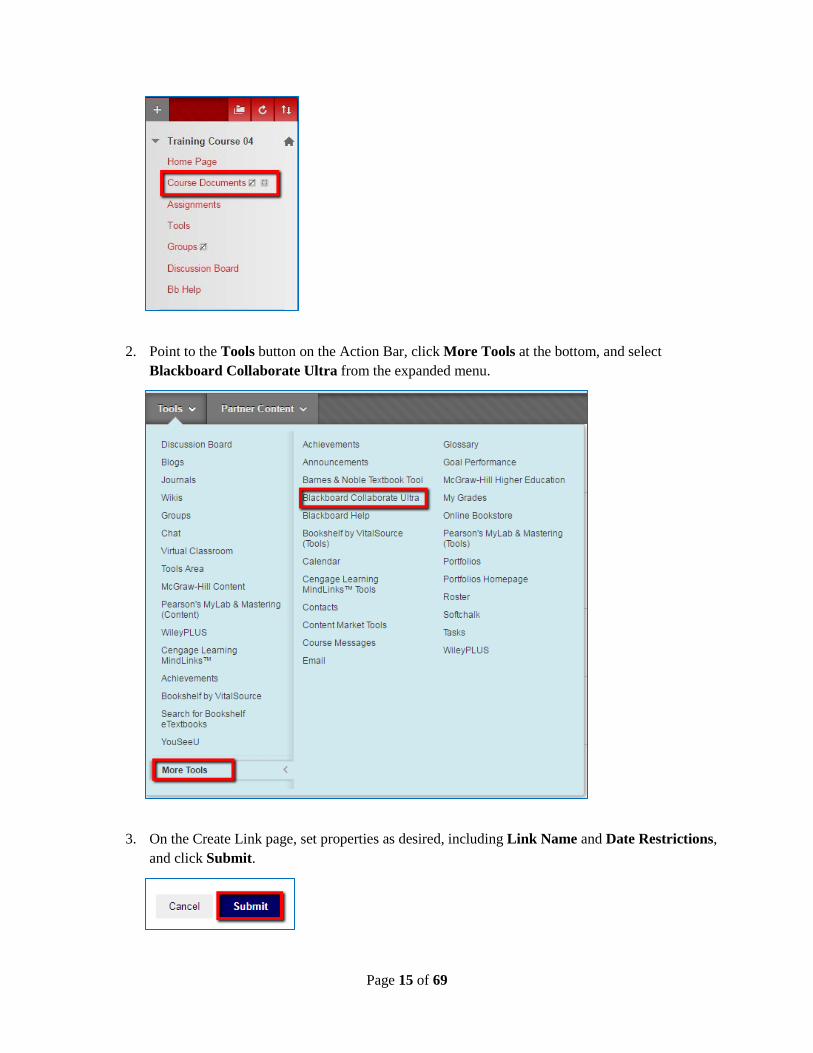
Page 15 of 69
Point to the Tools button on the Action Bar, click More Tools at the bottom, and select 2.Blackboard Collaborate Ultra from the expanded menu.
On the Create Link page, set properties as desired, including Link Name and Date Restrictions, 3.and click Submit.

Page 16 of 69
Move the link to the desired location. 4.

Page 17 of 69
Room Management Even in the Classic Experience of Blackboard Learn, the interface for the Blackboard Collaborate Ultra tool in Blackboard Learn has elements of the Ultra Experience: the “please wait while loading”
animation, the “hamburger” or “pancake” menu icon, the “more options” icon ( ), panes that slide out from the side, etc.
At UST, every course and organization in Blackboard Learn has access to a single conference space called the Course Room. The course can also accommodate multiple Sessions at a time, and each session can make use of the Breakout Groups feature to subdivide itself. Moderators can control access to the Course Room, leave it completely open to students and other attendees, or disable it entirely. Moderators can also re-enable a disabled room.
Joining the Room
To launch the Course Room in a new browser tab, click the Course Room link in the top-left portion of the Blackboard Collaborate Ultra page, and then click Join Course Room on the settings pane that appears. This two-click method of entry generates a fresh, unique link for each user, making it more difficult to share links with unauthorized users.
Alternatively, users may click a link to an active session within its specified time frame, and then click Join session. Individual sessions are entirely separate from each other and from the Course Room.
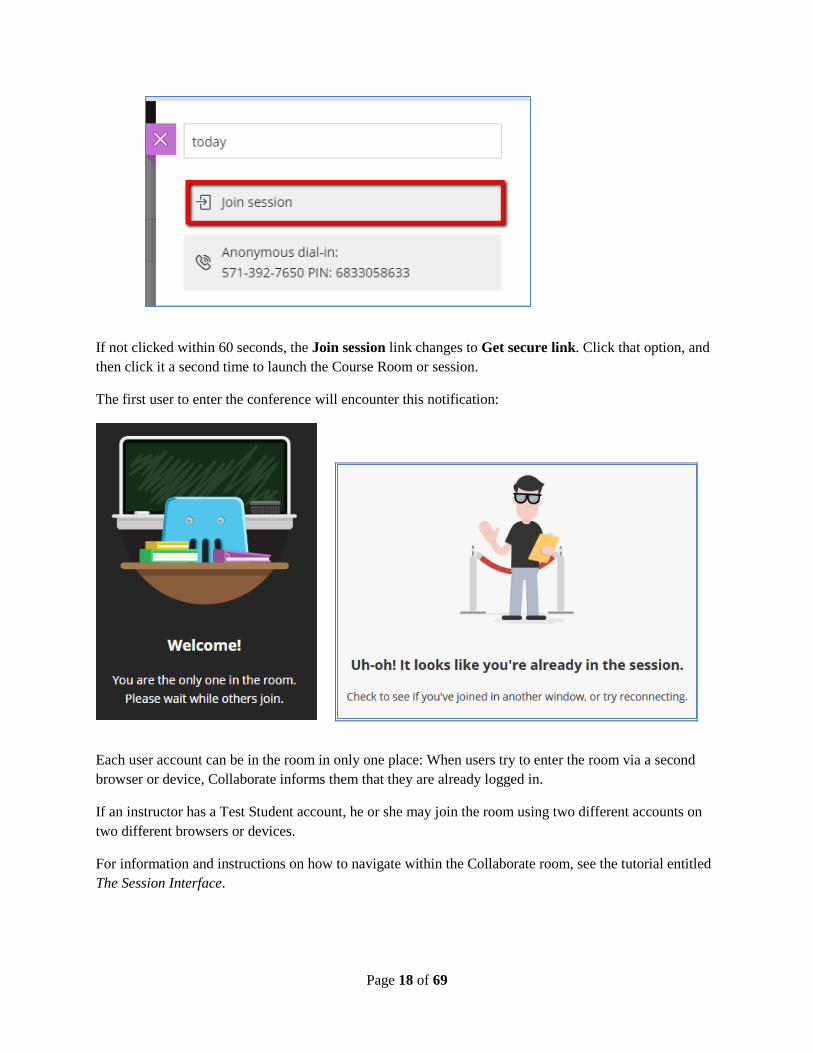
Page 18 of 69
If not clicked within 60 seconds, the Join session link changes to Get secure link. Click that option, and then click it a second time to launch the Course Room or session.
The first user to enter the conference will encounter this notification:
Each user account can be in the room in only one place: When users try to enter the room via a second browser or device, Collaborate informs them that they are already logged in.
If an instructor has a Test Student account, he or she may join the room using two different accounts on two different browsers or devices.
For information and instructions on how to navigate within the Collaborate room, see the tutorial entitled The Session Interface.
Page 19 of 69
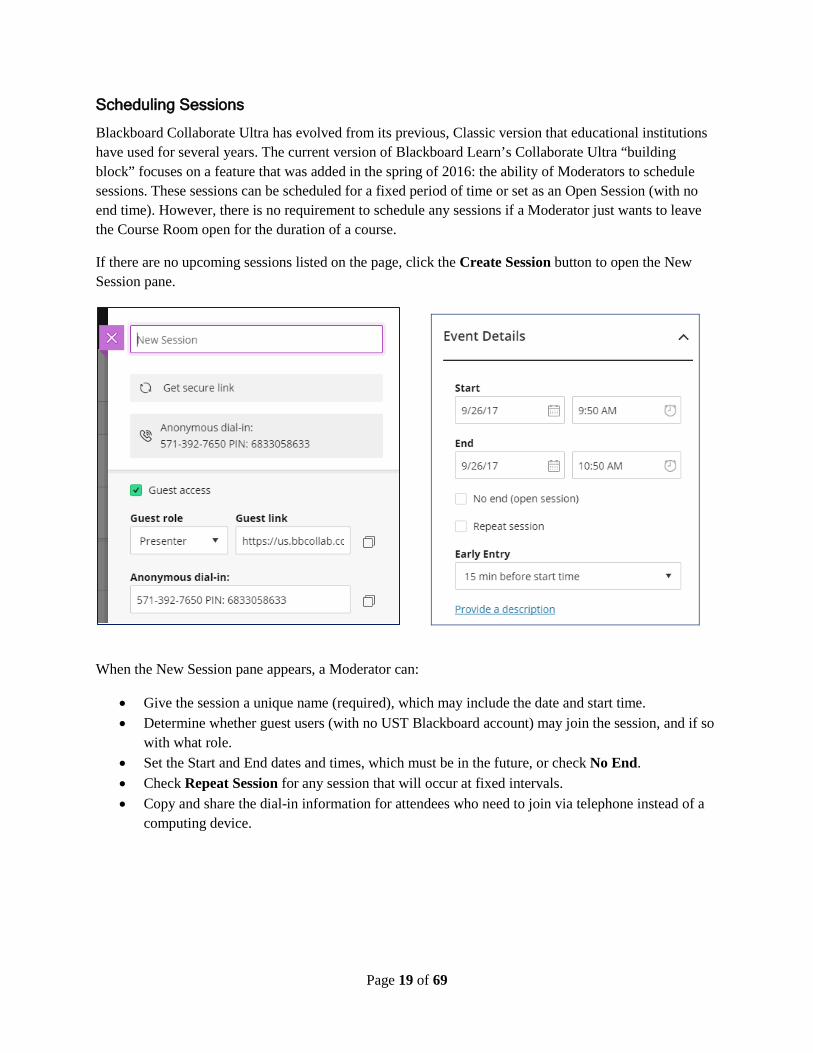
Scheduling Sessions
Blackboard Collaborate Ultra has evolved from its previous, Classic version that educational institutions have used for several years. The current version of Blackboard Learn’s Collaborate Ultra “building block” focuses on a feature that was added in the spring of 2016: the ability of Moderators to schedule sessions. These sessions can be scheduled for a fixed period of time or set as an Open Session (with no end time). However, there is no requirement to schedule any sessions if a Moderator just wants to leave the Course Room open for the duration of a course.
If there are no upcoming sessions listed on the page, click the Create Session button to open the New Session pane.
When the New Session pane appears, a Moderator can:
• Give the session a unique name (required), which may include the date and start time. • Determine whether guest users (with no UST Blackboard account) may join the session, and if so
with what role. • Set the Start and End dates and times, which must be in the future, or check No End. • Check Repeat Session for any session that will occur at fixed intervals. • Copy and share the dial-in information for attendees who need to join via telephone instead of a
computing device.
Page 20 of 69
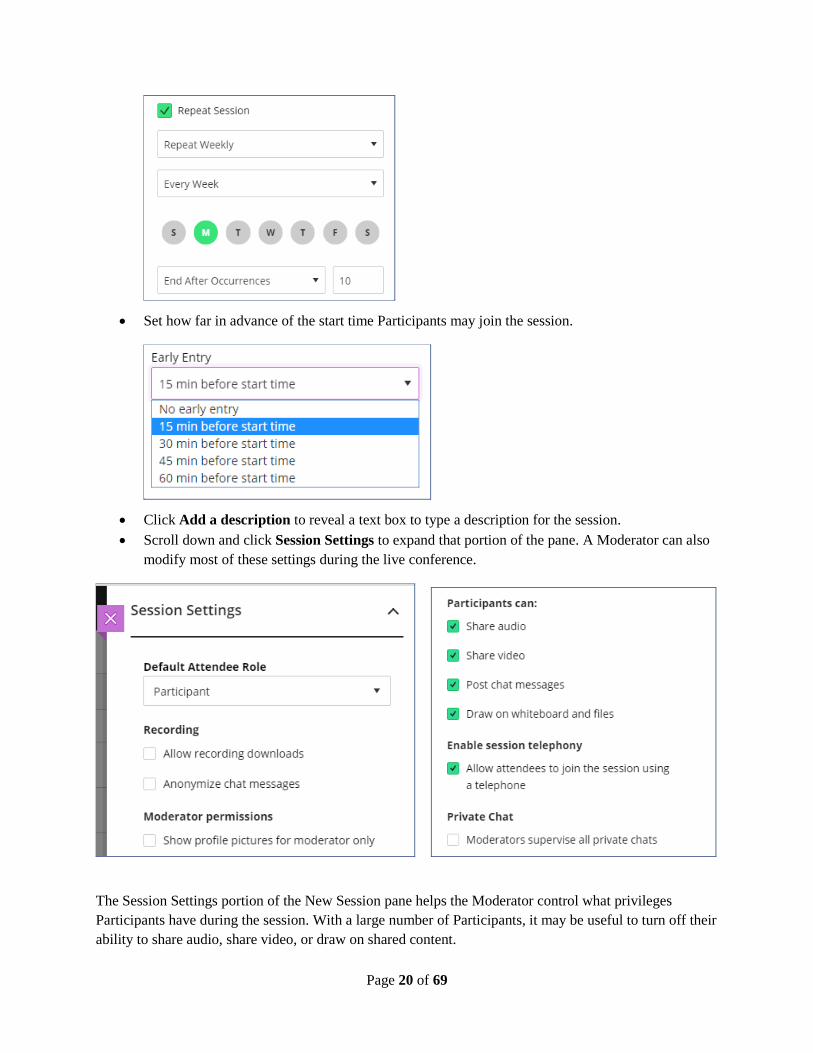
• Set how far in advance of the start time Participants may join the session.
• Click Add a description to reveal a text box to type a description for the session. • Scroll down and click Session Settings to expand that portion of the pane. A Moderator can also
modify most of these settings during the live conference.
The Session Settings portion of the New Session pane helps the Moderator control what privileges Participants have during the session. With a large number of Participants, it may be useful to turn off their ability to share audio, share video, or draw on shared content.

Page 21 of 69
When all the settings are in place, click the Save button to add the session to the current list; otherwise click Cancel or Delete. A few seconds after the beginning of the process, the caption of the Cancel button changes to Delete, because the session itself is automatically saved.
To close the pane without saving any changes, click the X icon in its top-left corner.
Each new occurrence of a session appears in the list on the Blackboard Collaborate Ultra page with its start and end times and a Session Options icon. The menus shown below appear for single and repeated sessions, respectively:
If the list contains more than ten upcoming sessions, navigational links appear below the list.
The Collaborate Ultra Menu
The menu icon at the top-left of the Blackboard Collaborate Ultra page produces a menu with just two commands: Sessions and Recordings. This allows users to switch the list portion of the page between a list of available sessions and recordings. Switching to Recordings hides the join room link and the Create Session icon; it also changes the Session Search icon to a Search Recordings icon and the Show Sessions drop-down to a Show Recordings drop-down.
Page 22 of 69
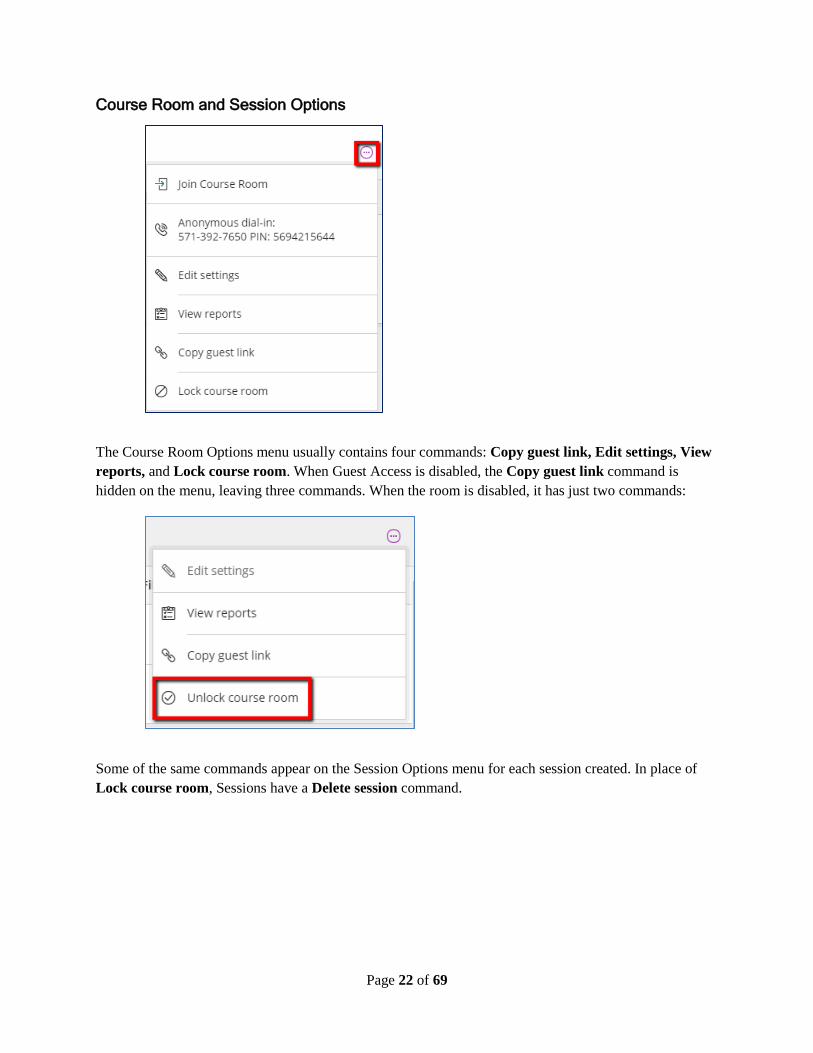
Course Room and Session Options
The Course Room Options menu usually contains four commands: Copy guest link, Edit settings, View reports, and Lock course room. When Guest Access is disabled, the Copy guest link command is hidden on the menu, leaving three commands. When the room is disabled, it has just two commands:
Some of the same commands appear on the Session Options menu for each session created. In place of Lock course room, Sessions have a Delete session command.
Page 23 of 69
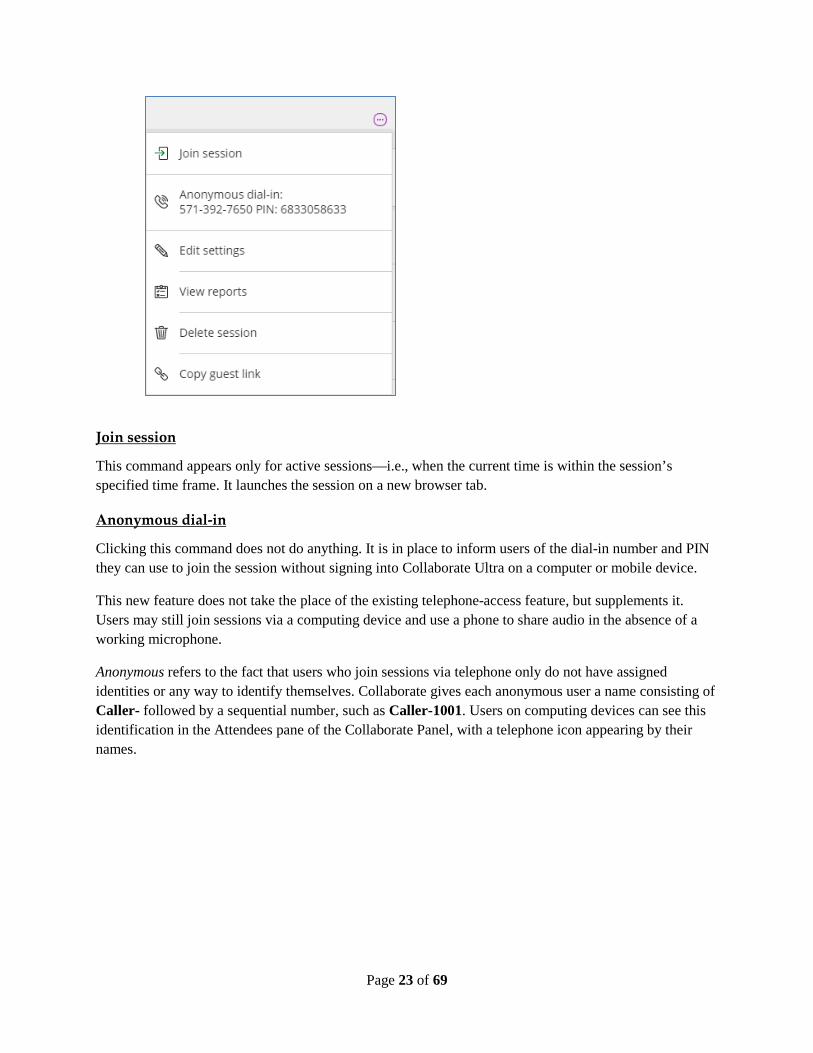
Join session
This command appears only for active sessions—i.e., when the current time is within the session’s specified time frame. It launches the session on a new browser tab.
Anonymous dial-in
Clicking this command does not do anything. It is in place to inform users of the dial-in number and PIN they can use to join the session without signing into Collaborate Ultra on a computer or mobile device.
This new feature does not take the place of the existing telephone-access feature, but supplements it. Users may still join sessions via a computing device and use a phone to share audio in the absence of a working microphone.
Anonymous refers to the fact that users who join sessions via telephone only do not have assigned identities or any way to identify themselves. Collaborate gives each anonymous user a name consisting of Caller- followed by a sequential number, such as Caller-1001. Users on computing devices can see this identification in the Attendees pane of the Collaborate Panel, with a telephone icon appearing by their names.
Page 24 of 69
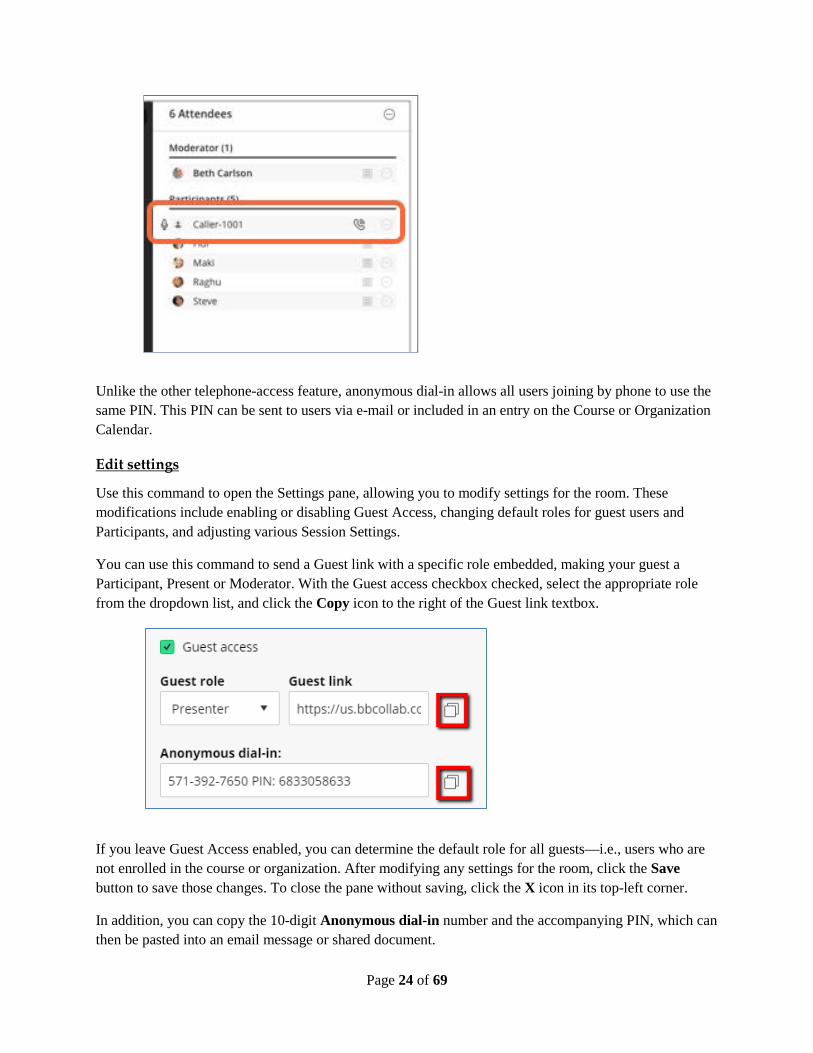
Unlike the other telephone-access feature, anonymous dial-in allows all users joining by phone to use the same PIN. This PIN can be sent to users via e-mail or included in an entry on the Course or Organization Calendar.
Edit settings
Use this command to open the Settings pane, allowing you to modify settings for the room. These modifications include enabling or disabling Guest Access, changing default roles for guest users and Participants, and adjusting various Session Settings.
You can use this command to send a Guest link with a specific role embedded, making your guest a Participant, Present or Moderator. With the Guest access checkbox checked, select the appropriate role from the dropdown list, and click the Copy icon to the right of the Guest link textbox.
If you leave Guest Access enabled, you can determine the default role for all guests—i.e., users who are not enrolled in the course or organization. After modifying any settings for the room, click the Save button to save those changes. To close the pane without saving, click the X icon in its top-left corner.
In addition, you can copy the 10-digit Anonymous dial-in number and the accompanying PIN, which can then be pasted into an email message or shared document.
Page 25 of 69
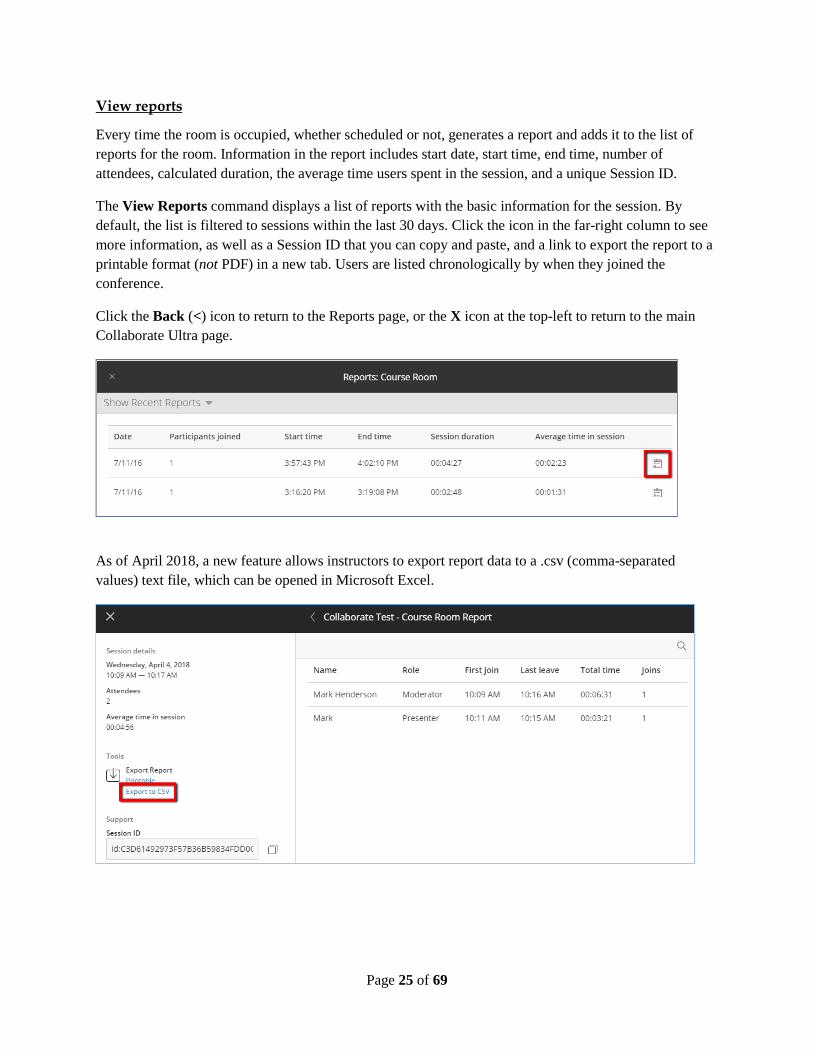
View reports
Every time the room is occupied, whether scheduled or not, generates a report and adds it to the list of reports for the room. Information in the report includes start date, start time, end time, number of attendees, calculated duration, the average time users spent in the session, and a unique Session ID.
The View Reports command displays a list of reports with the basic information for the session. By default, the list is filtered to sessions within the last 30 days. Click the icon in the far-right column to see more information, as well as a Session ID that you can copy and paste, and a link to export the report to a printable format (not PDF) in a new tab. Users are listed chronologically by when they joined the conference.
Click the Back (<) icon to return to the Reports page, or the X icon at the top-left to return to the main Collaborate Ultra page.
As of April 2018, a new feature allows instructors to export report data to a .csv (comma-separated values) text file, which can be opened in Microsoft Excel.

Page 26 of 69
Lock course room
Clicking the Lock course room command immediately hides the Join room link from all users and changes the Course Room’s status to Locked. An instructor may unlock the room by selecting the Unlock course room command that appears on the menu for a disabled room.
Edit occurrence
This command appears on the Session Options menu for recurring sessions only. It opens a limited version of the Settings pane, where the only editable properties are the Start and End dates and times.
Edit recurring session
This command opens the full Settings pane to allow editing of all settings for all occurrences within a series. It also provides a Guest Link for use with any occurrence, as well as a Delete button to delete the entire series.
Copy guest link
The Copy guest link command appears only if Guest Access is enabled in the room’s settings. Clicking this command displays the unique URL for the Course Room and copies that URL to the Clipboard. You can then paste the URL text into an email message or other document to send to guest users. Guests can use the link to enter the room with whatever role has been assigned to them.
NOTE: Guests do not have Blackboard profiles for the conference, so they must type a screen name after launching a conference. As of this writing, including a pound sign (#) anywhere in the screen name produces an error, so advise guests not to use that character in their names.
Page 27 of 69
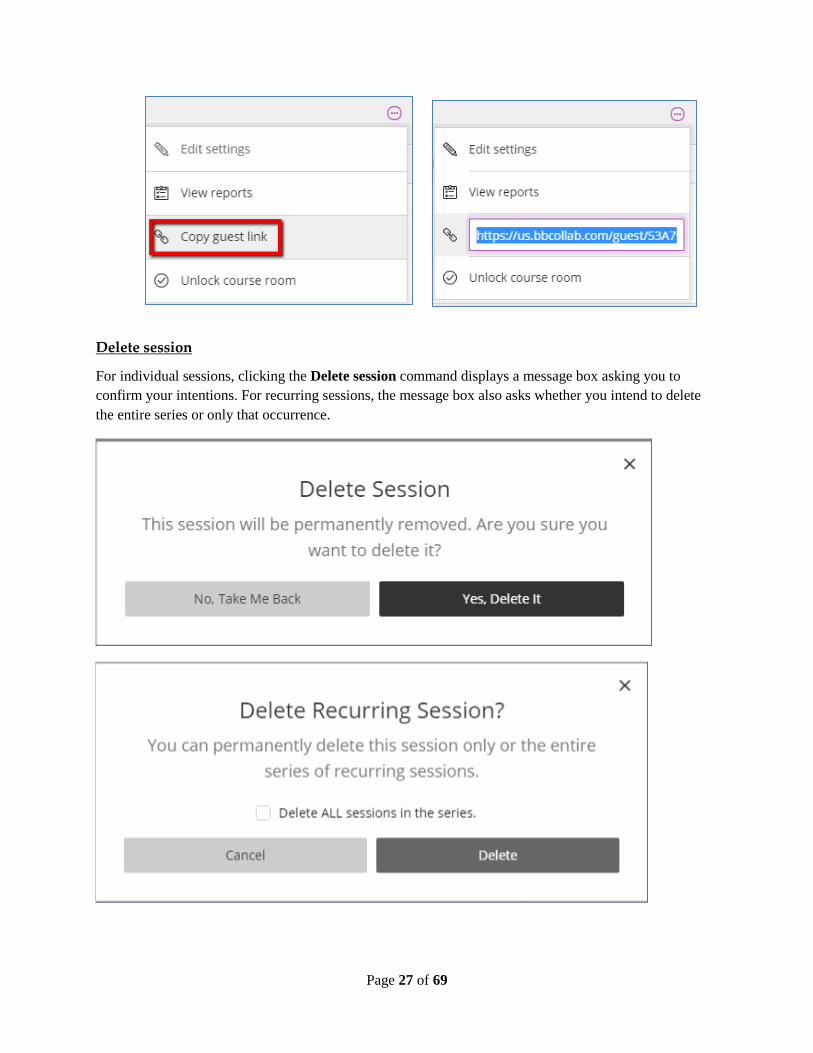
Delete session
For individual sessions, clicking the Delete session command displays a message box asking you to confirm your intentions. For recurring sessions, the message box also asks whether you intend to delete the entire series or only that occurrence.

Page 28 of 69
The Session Interface The visual interface of the virtual room consists of two main areas: The Participants area, which takes up most of the screen space; and the Interaction Bar at the bottom.
A Moderator or Presenter may determine what appears in the display field. It may be boxes displaying the video images or profile pictures of other attendees, an interactive Whiteboard, a file (e.g., a PowerPoint presentation), or a shared application window.
Depending on the browser used, you may be able to change the size of these user interface elements on your screen—and only yours, not those of other attendees.
• Double-clicking in the shared space can toggle it between the 4x3 and 16x9 aspects ratios. • Holding down a Ctrl key (Windows) or Option key (Macintosh) while manipulating the scroll
wheel of a standard mouse zooms the interface in and out, but as they are enlarged, the shared space is diminished.

Page 29 of 69
Session Menu
In the top-left corner of the Collaborate screen, you will find the Session Menu icon. Click it to expand the Session Menu pane. The pane displays the name of the room or session at the top, above a list of five command icons. There is also a Leave Session icon at the very bottom of the pane, which we will discuss later in this document.
Start Recording
This icon begins the recording of the current session. It toggles between Start Recording and Stop Recording. When the recording is stopped, it is processed on the Collaborate server and added to the Recordings list for the room. Processing may take anywhere from one hour to a full day, depending on the length of the recording.
Stopping a recording means that a separate recording is created when it is restarted. Recording also ends when the last moderator leaves the room.
Use your phone for audio
Click this icon to display the 10-digit number to call into the session, as well as the PIN to enter when prompted. The number is not toll-free. Use this option when using a USB microphone is inconvenient or impossible. Each user receives a unique PIN, and no two users may use the same PIN simultaneously.

Page 30 of 69
Report an Issue
This icon opens the Report an Issue pane on the right side of the screen. Fill check or type any useful information about a technical problem with Collaborate, and click the Submit button at the bottom. Collaborate sends the report, with information about the session, to UST’s Blackboard Administrator ([email protected]). The Report an Issue pane can also be opened via the keyboard shortcut Alt+Shift+P in Windows, Option+Shift+P in Macintosh.
Blackboard Collaborate Help
Click this icon to navigate to Blackboard’s Collaborate Help website in a new tab. Depending on your role for the session, you may see the main page for a Moderator, Participant, Presenter, or Captioner.
Learn about the new Collaborate interface
Take a tour of the new design features and functionalities in Collaborate Ultra. The interface received a thorough makeover in July 2016 and several updates since then.

Page 31 of 69
Interaction Bar Buttons
The Interaction Bar consists of icons for Settings, Share Audio, Share Video, and Raise Hand.
Settings
The Settings icon opens the Collaborate Ultra panel to display the Settings pane. (The details of this pane will appear in the Collaborate Panel subsection later in this document.) There is also a checkmark sub-icon that allows you to switch your attendance status between Present and Away, or to provide instant feedback next to your name on the Attendees pane for other users to see. The Feedback icon selected will disappear automatically after 30 seconds.
You can also set your status or feedback icon via the My Settings pane itself. See the subsection on the My Settings Pane for more information.
Share Audio
Keyboard Shortcut: Alt+M (Windows) or Option+M (Macintosh)
Users can control whether their microphones are live for conversations. This button toggles between Share Audio and Mute Audio. It is enabled only if a user has a microphone device plugged into the computer and configured for use. Moderators may wish to ask users to keep their microphones silent until they need them to speak, and to click the Raise Hand icon to be recognized before speaking.

Page 32 of 69
When audio is enabled, the icon also shows the relative volume level of the audio. If speaking into the microphone fills the icon consistently, a user may wish to turn his or her microphone volume down via Audio and Video Settings
To minimize audio traffic in a presentation, Collaborate allows only five users to have their audio active simultaneously.
If users have trouble communicating via microphone, they may be able to troubleshoot the problem:
• Is the headset plugged in? • Is there a mute switch engaged on the headset? • Is the computer’s audio muted or turned low? • Is the user using the audio input device that Collaborate is configured to recognize? • Is there an echo in the headphones? This may result from two or more users in close proximity in
the same physical room; the user’s voice may be coming through two or more microphones.
Share Video
Keyboard Shortcut: Alt+C (Windows) or Option+C (Macintosh)
This button toggles between Share Video and Mute Video. By default, video sharing is turned off. When a user clicks Share Video, Collaborate provides a preview screen to verify that the camera is working.
Page 33 of 69
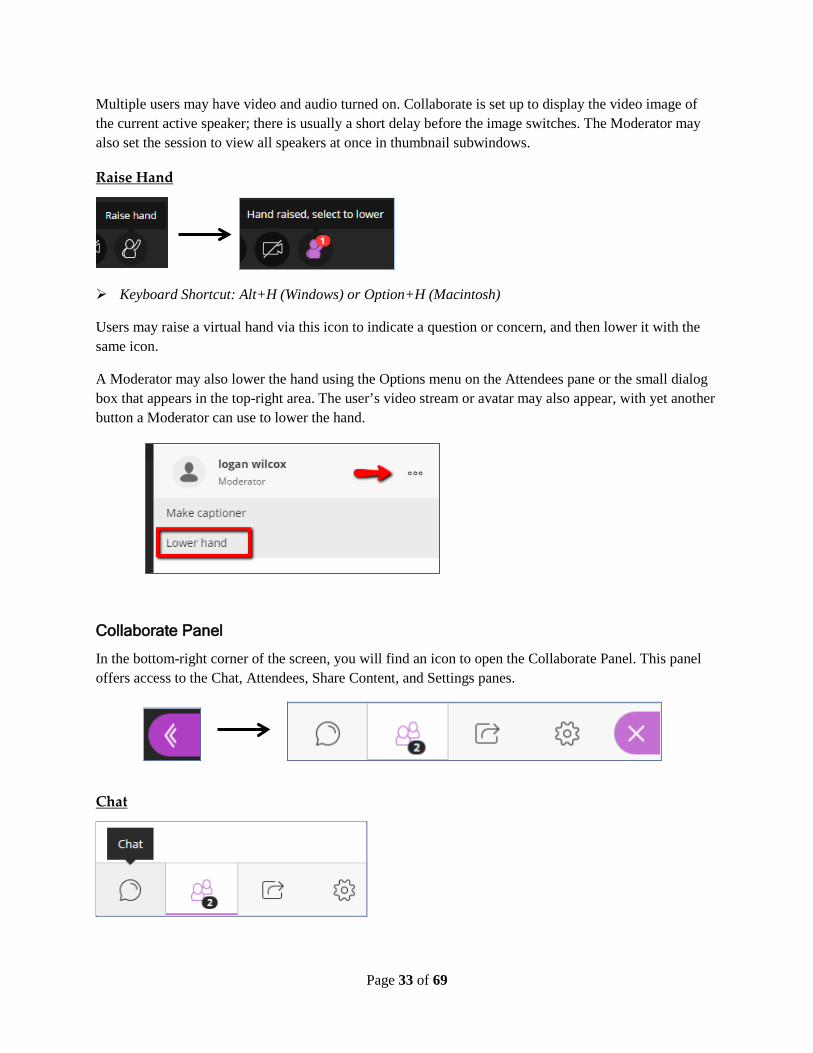
Multiple users may have video and audio turned on. Collaborate is set up to display the video image of the current active speaker; there is usually a short delay before the image switches. The Moderator may also set the session to view all speakers at once in thumbnail subwindows.
Raise Hand
Keyboard Shortcut: Alt+H (Windows) or Option+H (Macintosh)
Users may raise a virtual hand via this icon to indicate a question or concern, and then lower it with the same icon.
A Moderator may also lower the hand using the Options menu on the Attendees pane or the small dialog box that appears in the top-right area. The user’s video stream or avatar may also appear, with yet another button a Moderator can use to lower the hand.
Collaborate Panel
In the bottom-right corner of the screen, you will find an icon to open the Collaborate Panel. This panel offers access to the Chat, Attendees, Share Content, and Settings panes.
Chat

Page 34 of 69
When a user first clicks the Collaborate Panel icon, the Chat pane opens by default, allowing a user to chat with all other users. After switching to a different pane and then closing the panel, the last pane used will appear when the panel is reopened.
As users add text or images to the Chat pane, the contributions accumulate there. However, when a user leaves the session (voluntarily or not) and returns, the Chat pane will appear empty when he or she returns.
Users can type text into the box at the bottom of the pane, and click the menu button display a limited library of emoticons. As with a typical chat application, pressing Enter or Return submits the text. For a wider array of images and emoji, users can keep the Twitter Symbols page open on a separate browser tab and copy the relevant keystrokes from there: http://www.piliapp.com/twitter-symbols.
When users add text in the Chat pane, the other users may receive visual and auditory notification if they do not have their Chat panes open. The small notification window disappears after a few seconds.
A drop-down list on the Chat pane allows users to choose whether their Chat involves all Participants or just the other Moderators. As of July 2017, Collaborate Ultra has a Private Chat feature. If the feature is enabled, users can type a name into the search box at the top of the Chat pane, select the name, and begin a private conversation.
Page 35 of 69
There is also a way to begin a Private Chat via the Attendees pane. On the Settings pane (see below), Moderators have the option of supervising Private Chat; this setting must be established in Session Settings prior to the conference.
The contents of the Chat pane are included in recordings. A scrollable frame displays on the right side of the MP4 Viewer. Otherwise, in order to save a file of the Chat contents from any conference, right-click in the Collaborate Ultra window, and select Save As. (For the contents of the Chat pane for the entire conference, wait until the end.) You can save the window as a .txt or .html file. In Google Chrome, the .html file allows you to scroll through the chat.
As of November 2018, a new feature allows users to see notifications when one or more attendees is typing in the Chat pane. If only one attendee is typing, the notification displays that attendee’s screen name; for more than one, it says “Several people are typing…”
Since the Chat pane can be modified to display messages from all attendees, messages between Moderators only, or individual conversations, the pane indicates text entry by only those attendees involved in the current chat.
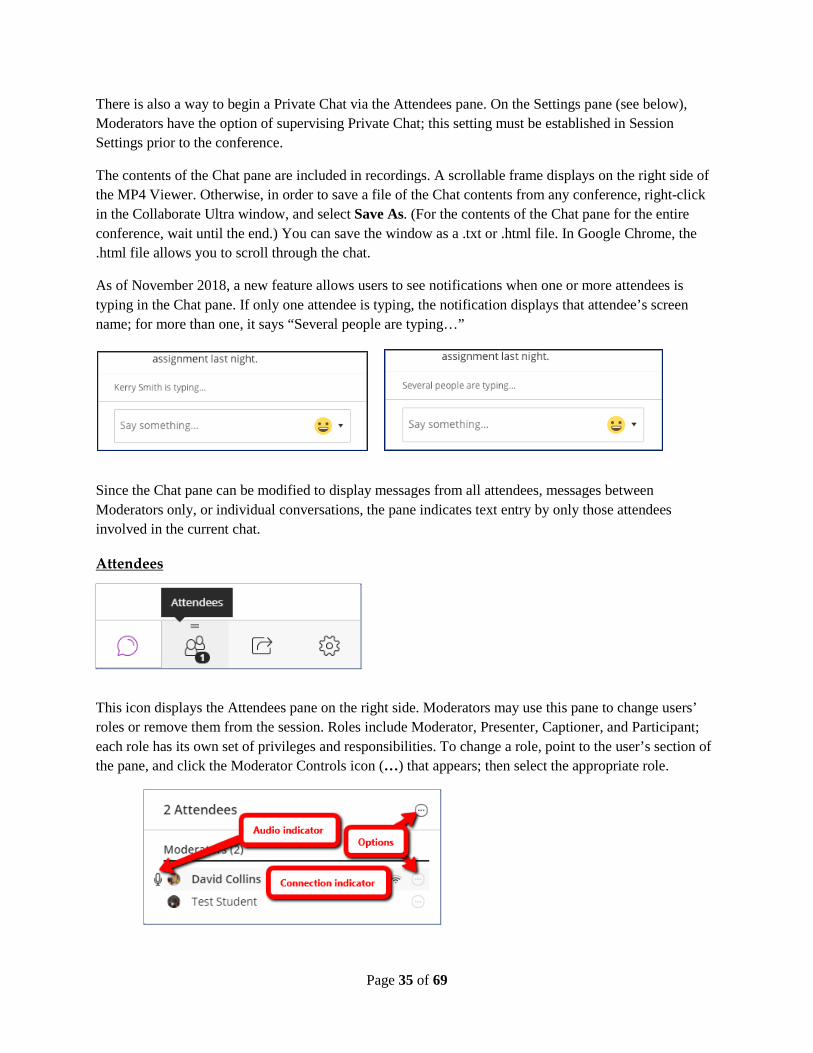
Attendees
This icon displays the Attendees pane on the right side. Moderators may use this pane to change users’ roles or remove them from the session. Roles include Moderator, Presenter, Captioner, and Participant; each role has its own set of privileges and responsibilities. To change a role, point to the user’s section of the pane, and click the Moderator Controls icon (…) that appears; then select the appropriate role.
Page 36 of 69
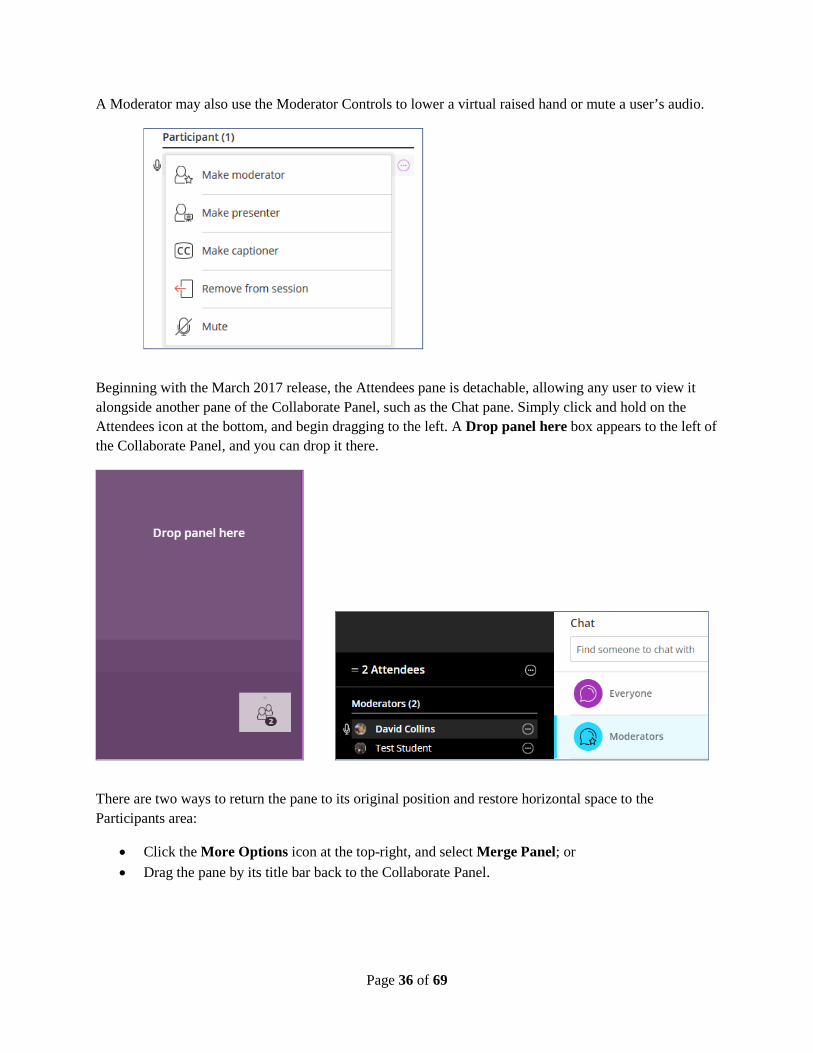
A Moderator may also use the Moderator Controls to lower a virtual raised hand or mute a user’s audio.
Beginning with the March 2017 release, the Attendees pane is detachable, allowing any user to view it alongside another pane of the Collaborate Panel, such as the Chat pane. Simply click and hold on the Attendees icon at the bottom, and begin dragging to the left. A Drop panel here box appears to the left of the Collaborate Panel, and you can drop it there.
There are two ways to return the pane to its original position and restore horizontal space to the Participants area:
• Click the More Options icon at the top-right, and select Merge Panel; or • Drag the pane by its title bar back to the Collaborate Panel.
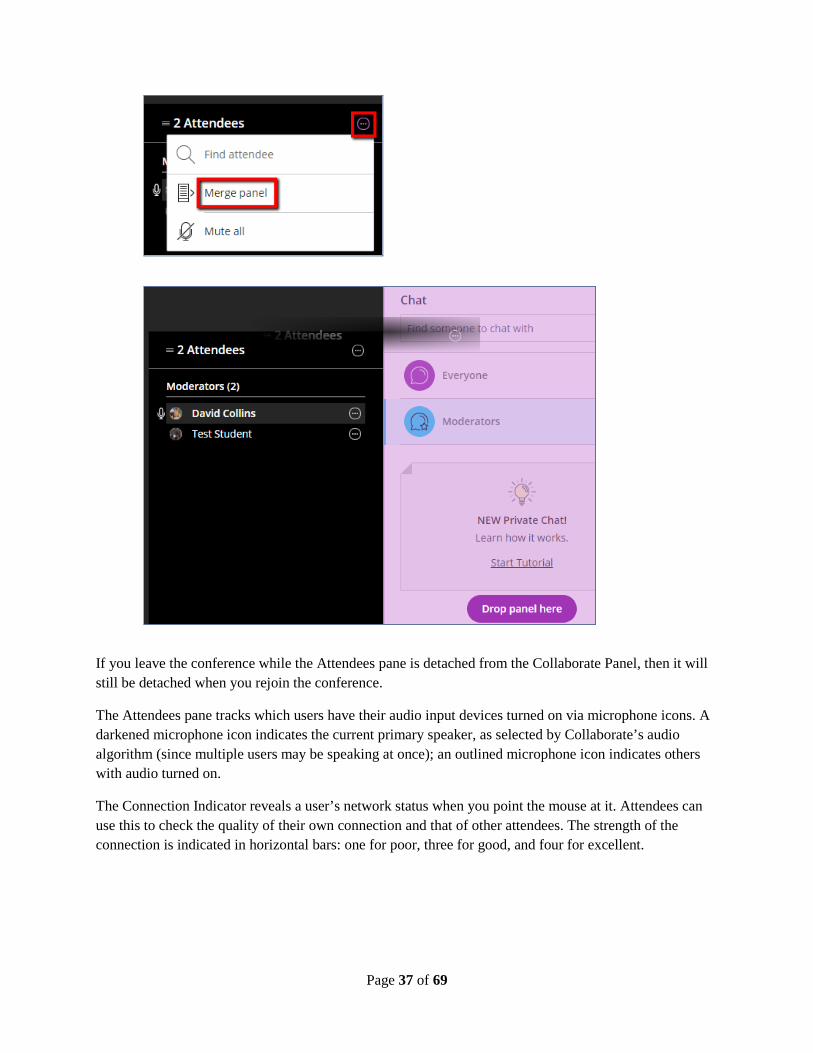
Page 37 of 69
If you leave the conference while the Attendees pane is detached from the Collaborate Panel, then it will still be detached when you rejoin the conference.
The Attendees pane tracks which users have their audio input devices turned on via microphone icons. A darkened microphone icon indicates the current primary speaker, as selected by Collaborate’s audio algorithm (since multiple users may be speaking at once); an outlined microphone icon indicates others with audio turned on.
The Connection Indicator reveals a user’s network status when you point the mouse at it. Attendees can use this to check the quality of their own connection and that of other attendees. The strength of the connection is indicated in horizontal bars: one for poor, three for good, and four for excellent.
Page 38 of 69
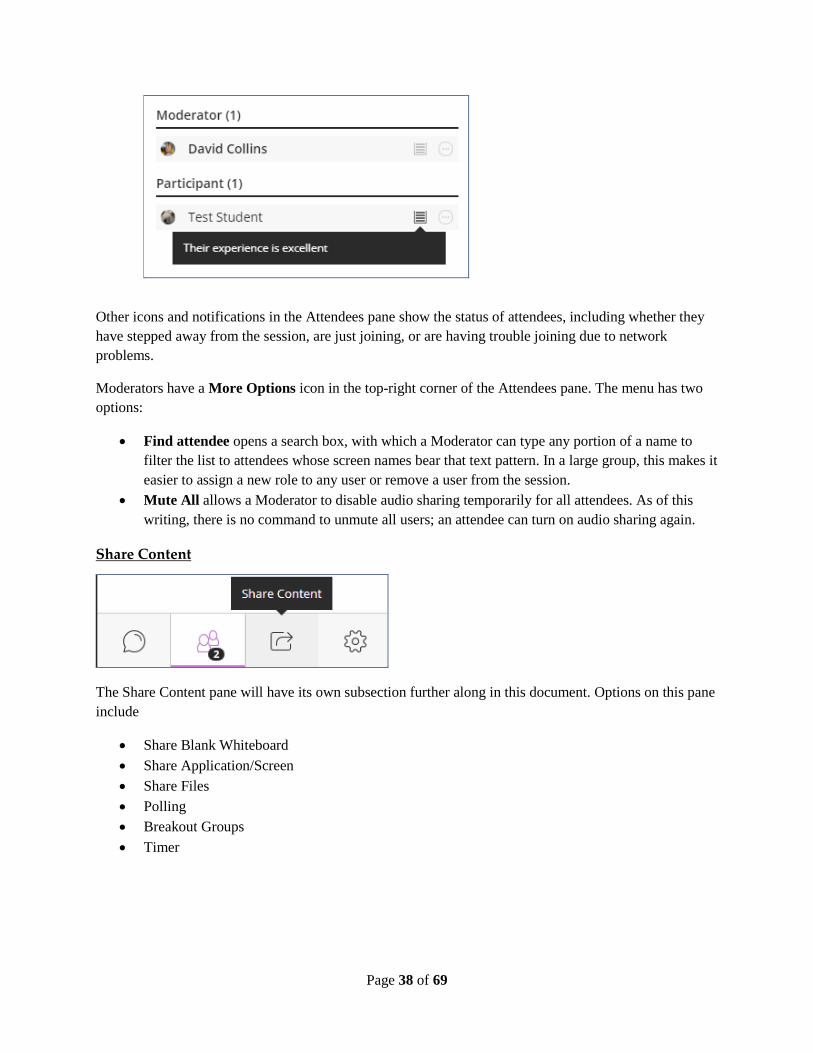
Other icons and notifications in the Attendees pane show the status of attendees, including whether they have stepped away from the session, are just joining, or are having trouble joining due to network problems.
Moderators have a More Options icon in the top-right corner of the Attendees pane. The menu has two options:
• Find attendee opens a search box, with which a Moderator can type any portion of a name to filter the list to attendees whose screen names bear that text pattern. In a large group, this makes it easier to assign a new role to any user or remove a user from the session.
• Mute All allows a Moderator to disable audio sharing temporarily for all attendees. As of this writing, there is no command to unmute all users; an attendee can turn on audio sharing again.
Share Content
The Share Content pane will have its own subsection further along in this document. Options on this pane include
• Share Blank Whiteboard • Share Application/Screen • Share Files • Polling • Breakout Groups • Timer
Page 39 of 69
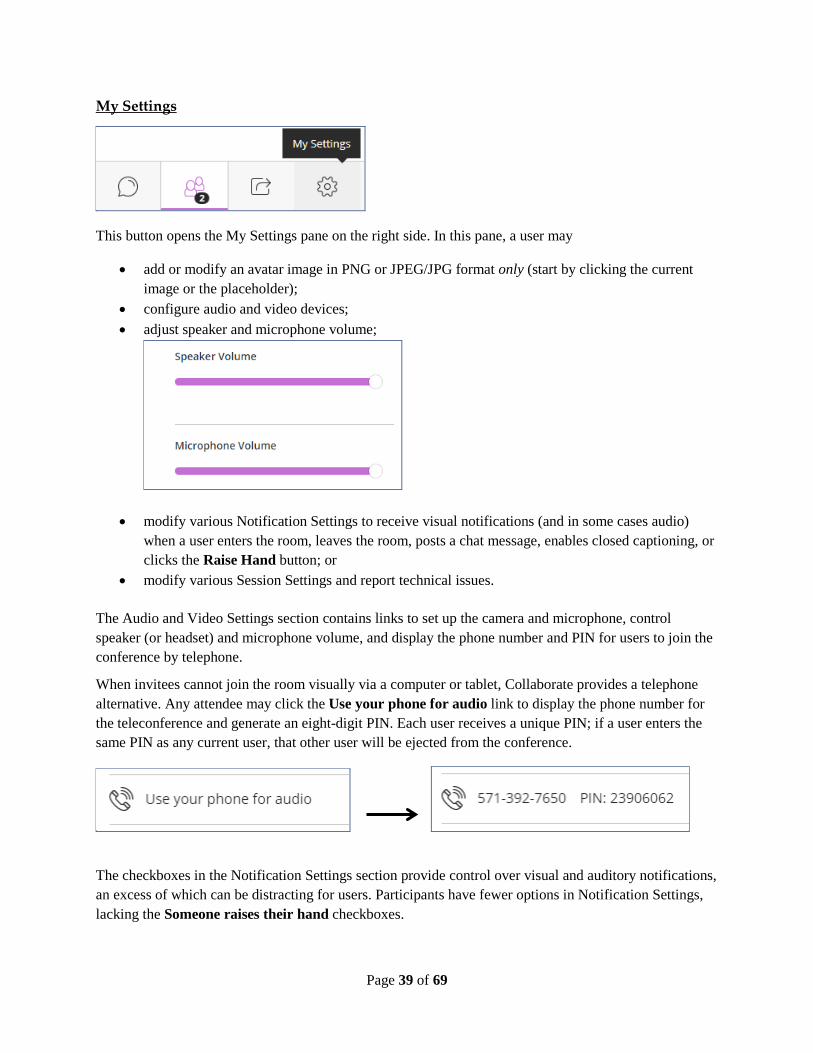
My Settings
This button opens the My Settings pane on the right side. In this pane, a user may
• add or modify an avatar image in PNG or JPEG/JPG format only (start by clicking the current image or the placeholder);
• configure audio and video devices; • adjust speaker and microphone volume;
• modify various Notification Settings to receive visual notifications (and in some cases audio) when a user enters the room, leaves the room, posts a chat message, enables closed captioning, or clicks the Raise Hand button; or
• modify various Session Settings and report technical issues.
The Audio and Video Settings section contains links to set up the camera and microphone, control speaker (or headset) and microphone volume, and display the phone number and PIN for users to join the conference by telephone.
When invitees cannot join the room visually via a computer or tablet, Collaborate provides a telephone alternative. Any attendee may click the Use your phone for audio link to display the phone number for the teleconference and generate an eight-digit PIN. Each user receives a unique PIN; if a user enters the same PIN as any current user, that other user will be ejected from the conference.
The checkboxes in the Notification Settings section provide control over visual and auditory notifications, an excess of which can be distracting for users. Participants have fewer options in Notification Settings, lacking the Someone raises their hand checkboxes.
Page 40 of 69
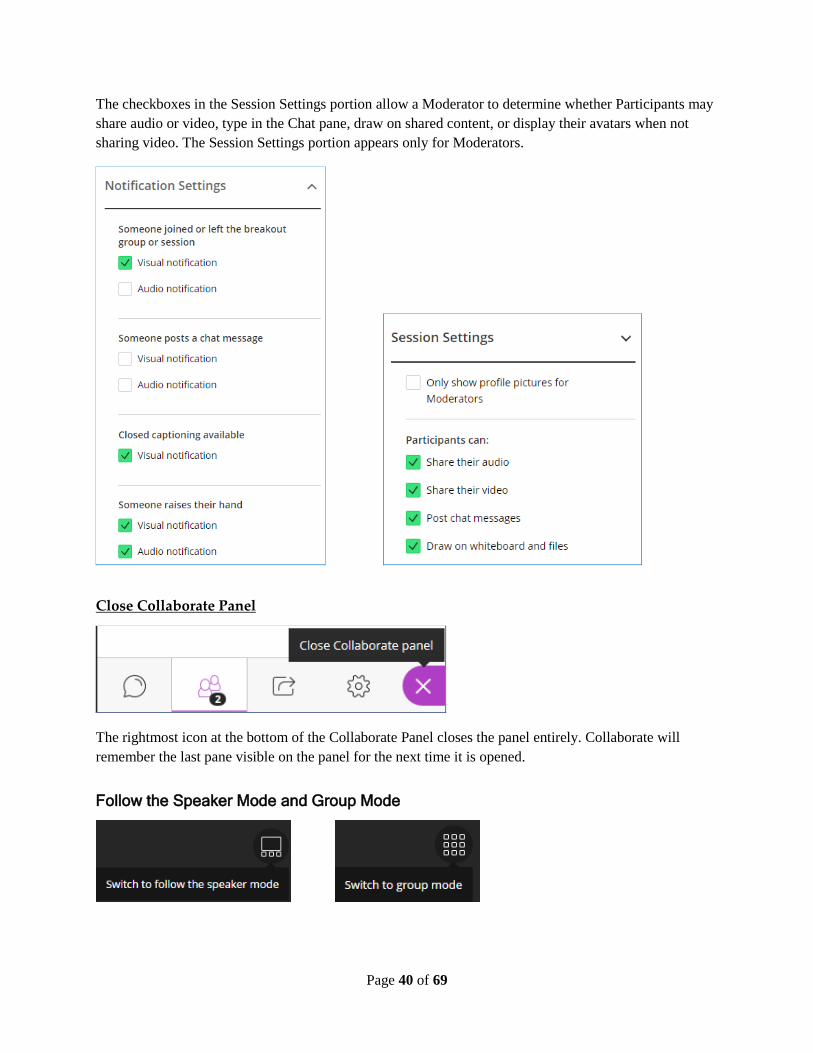
The checkboxes in the Session Settings portion allow a Moderator to determine whether Participants may share audio or video, type in the Chat pane, draw on shared content, or display their avatars when not sharing video. The Session Settings portion appears only for Moderators.
Close Collaborate Panel
The rightmost icon at the bottom of the Collaborate Panel closes the panel entirely. Collaborate will remember the last pane visible on the panel for the next time it is opened.
Follow the Speaker Mode and Group Mode
Page 41 of 69
As users join a session, images of all Participants and Moderators appear tiled in the Collaborate window, either as live video or an avatar. The tiled display is referred to as Group Mode, and it is the default way of viewing the session.
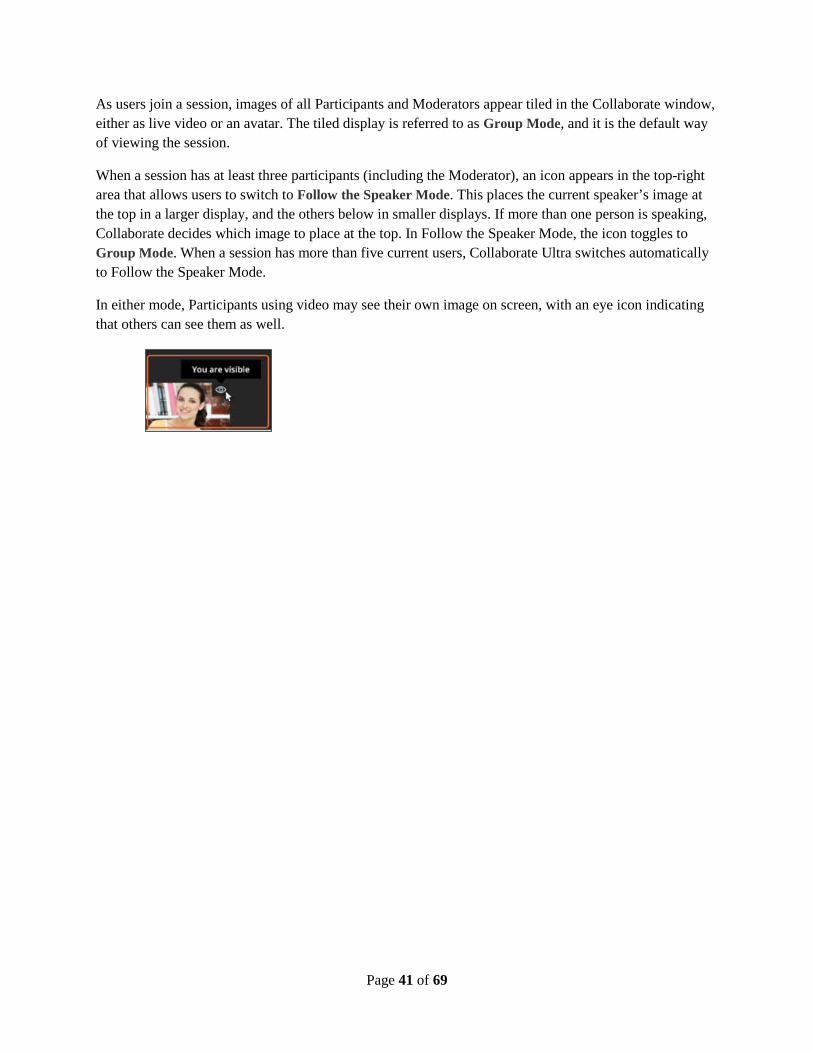
When a session has at least three participants (including the Moderator), an icon appears in the top-right area that allows users to switch to Follow the Speaker Mode. This places the current speaker’s image at the top in a larger display, and the others below in smaller displays. If more than one person is speaking, Collaborate decides which image to place at the top. In Follow the Speaker Mode, the icon toggles to Group Mode. When a session has more than five current users, Collaborate Ultra switches automatically to Follow the Speaker Mode.
In either mode, Participants using video may see their own image on screen, with an eye icon indicating that others can see them as well.

Page 42 of 69
Sharing Content The Share Content pane on the Collaborate Panel provides five links, three of which are actually for sharing content: Whiteboard, Applications, and Files. There is also a link to start a poll and obtain feedback from users, and another to divide the users into Breakout Groups.
Basics of Sharing Content
When a Moderator or Presenter shares content, there are several useful interface elements that they and other users should get to know.
Switching between Shared Content and Participant Views
When a Moderator or Presenter shares a Whiteboard, Application, or File, users may click the thumbnail window in the bottom-right corner to switch between the shared content and the Moderator, Presenter, current speaker, or other user.
Page 43 of 69
The View Controls Toolbar
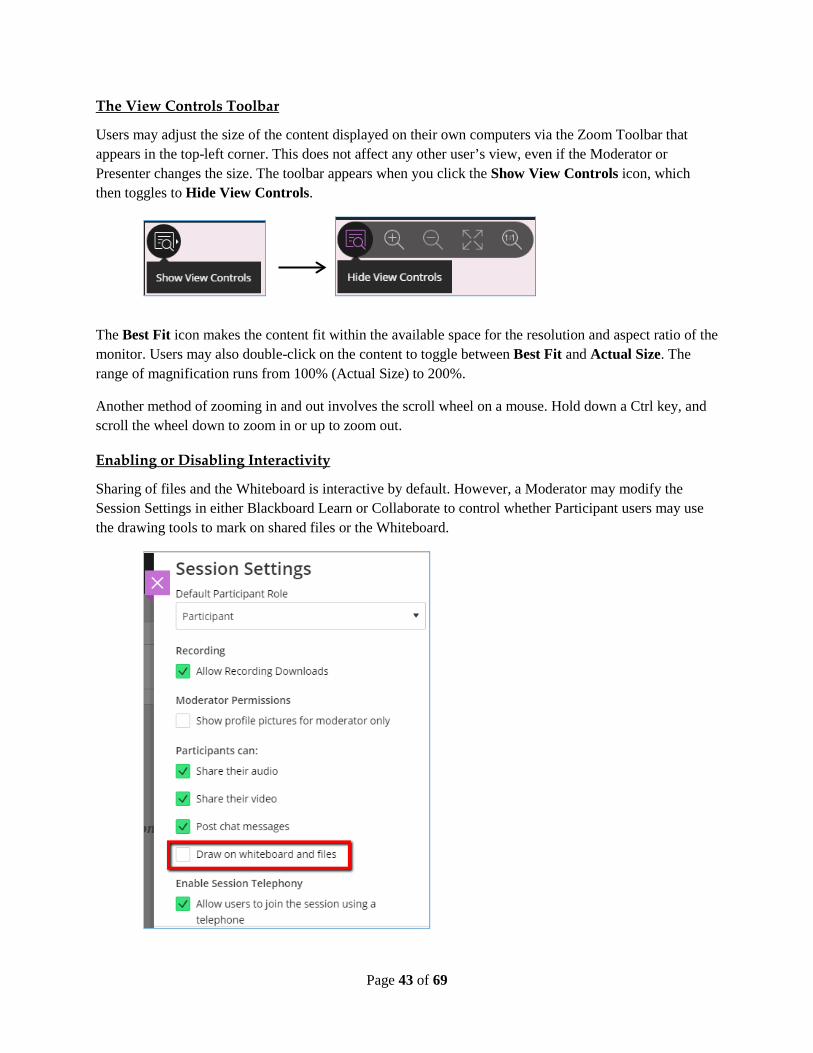
Users may adjust the size of the content displayed on their own computers via the Zoom Toolbar that appears in the top-left corner. This does not affect any other user’s view, even if the Moderator or Presenter changes the size. The toolbar appears when you click the Show View Controls icon, which then toggles to Hide View Controls.
The Best Fit icon makes the content fit within the available space for the resolution and aspect ratio of the monitor. Users may also double-click on the content to toggle between Best Fit and Actual Size. The range of magnification runs from 100% (Actual Size) to 200%.
Another method of zooming in and out involves the scroll wheel on a mouse. Hold down a Ctrl key, and scroll the wheel down to zoom in or up to zoom out.
Enabling or Disabling Interactivity
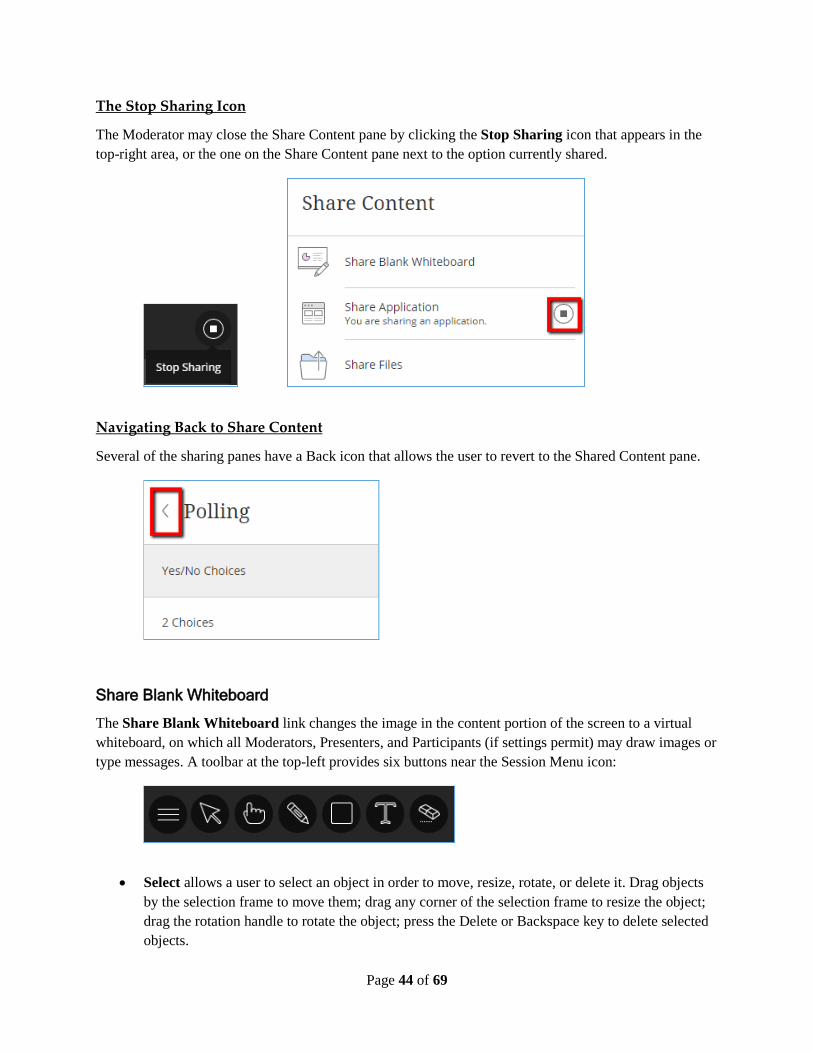
Sharing of files and the Whiteboard is interactive by default. However, a Moderator may modify the Session Settings in either Blackboard Learn or Collaborate to control whether Participant users may use the drawing tools to mark on shared files or the Whiteboard.
Page 44 of 69
The Stop Sharing Icon
The Moderator may close the Share Content pane by clicking the Stop Sharing icon that appears in the top-right area, or the one on the Share Content pane next to the option currently shared.
Navigating Back to Share Content
Several of the sharing panes have a Back icon that allows the user to revert to the Shared Content pane.
Share Blank Whiteboard
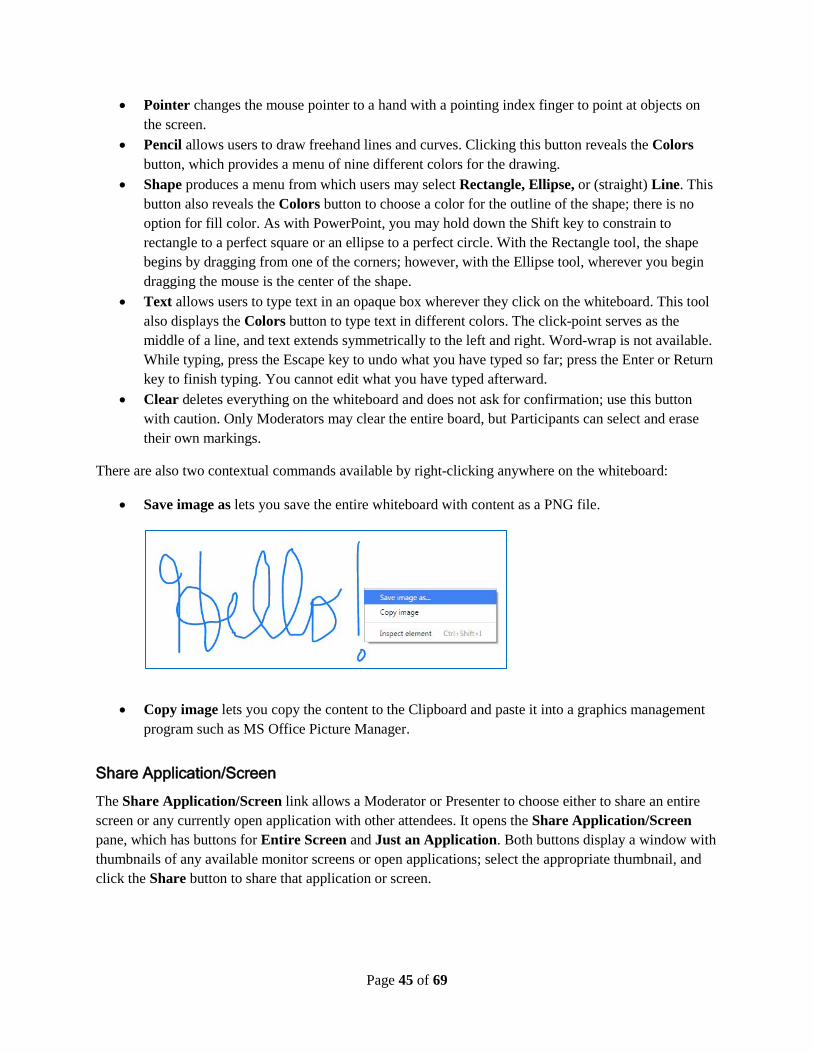
The Share Blank Whiteboard link changes the image in the content portion of the screen to a virtual whiteboard, on which all Moderators, Presenters, and Participants (if settings permit) may draw images or type messages. A toolbar at the top-left provides six buttons near the Session Menu icon:
• Select allows a user to select an object in order to move, resize, rotate, or delete it. Drag objects by the selection frame to move them; drag any corner of the selection frame to resize the object; drag the rotation handle to rotate the object; press the Delete or Backspace key to delete selected objects.
Page 45 of 69
• Pointer changes the mouse pointer to a hand with a pointing index finger to point at objects on the screen.
• Pencil allows users to draw freehand lines and curves. Clicking this button reveals the Colors button, which provides a menu of nine different colors for the drawing.
• Shape produces a menu from which users may select Rectangle, Ellipse, or (straight) Line. This button also reveals the Colors button to choose a color for the outline of the shape; there is no option for fill color. As with PowerPoint, you may hold down the Shift key to constrain to rectangle to a perfect square or an ellipse to a perfect circle. With the Rectangle tool, the shape begins by dragging from one of the corners; however, with the Ellipse tool, wherever you begin dragging the mouse is the center of the shape.
• Text allows users to type text in an opaque box wherever they click on the whiteboard. This tool also displays the Colors button to type text in different colors. The click-point serves as the middle of a line, and text extends symmetrically to the left and right. Word-wrap is not available. While typing, press the Escape key to undo what you have typed so far; press the Enter or Return key to finish typing. You cannot edit what you have typed afterward.
• Clear deletes everything on the whiteboard and does not ask for confirmation; use this button with caution. Only Moderators may clear the entire board, but Participants can select and erase their own markings.
There are also two contextual commands available by right-clicking anywhere on the whiteboard:
• Save image as lets you save the entire whiteboard with content as a PNG file.
• Copy image lets you copy the content to the Clipboard and paste it into a graphics management program such as MS Office Picture Manager.
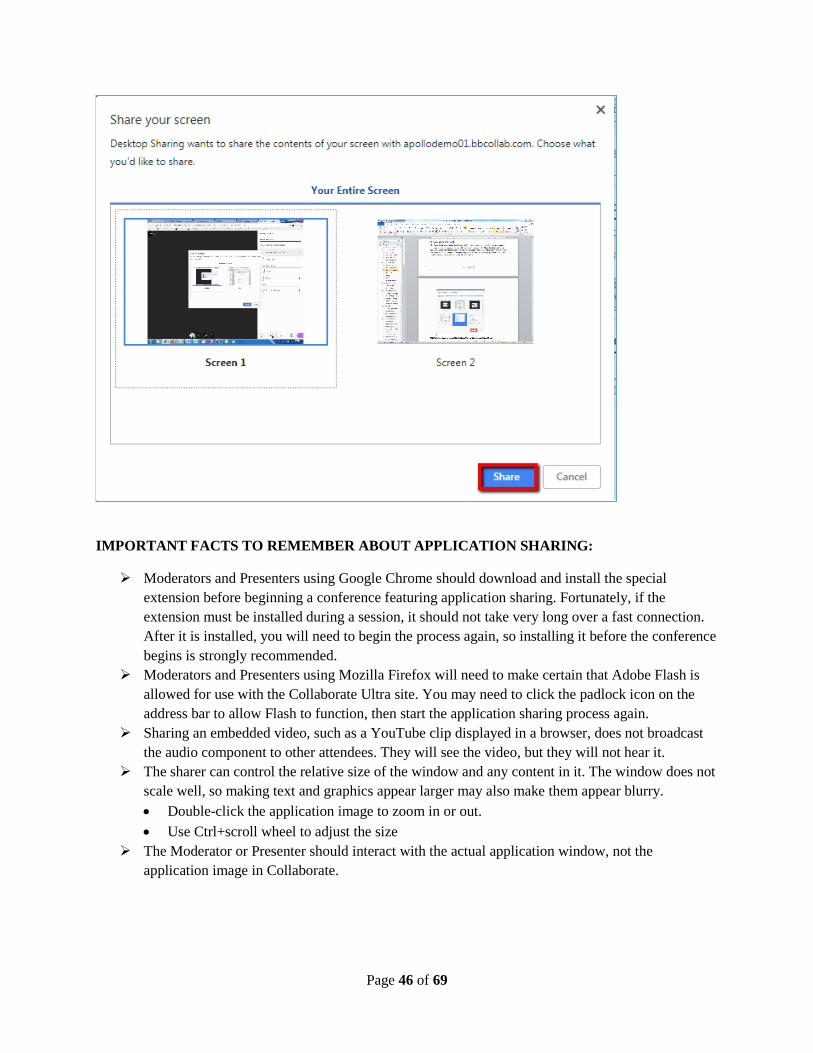
Share Application/Screen
The Share Application/Screen link allows a Moderator or Presenter to choose either to share an entire screen or any currently open application with other attendees. It opens the Share Application/Screen pane, which has buttons for Entire Screen and Just an Application. Both buttons display a window with thumbnails of any available monitor screens or open applications; select the appropriate thumbnail, and click the Share button to share that application or screen.
Page 46 of 69
IMPORTANT FACTS TO REMEMBER ABOUT APPLICATION SHARING:
Moderators and Presenters using Google Chrome should download and install the special extension before beginning a conference featuring application sharing. Fortunately, if the extension must be installed during a session, it should not take very long over a fast connection. After it is installed, you will need to begin the process again, so installing it before the conference begins is strongly recommended.
Moderators and Presenters using Mozilla Firefox will need to make certain that Adobe Flash is allowed for use with the Collaborate Ultra site. You may need to click the padlock icon on the address bar to allow Flash to function, then start the application sharing process again.
Sharing an embedded video, such as a YouTube clip displayed in a browser, does not broadcast the audio component to other attendees. They will see the video, but they will not hear it.
The sharer can control the relative size of the window and any content in it. The window does not scale well, so making text and graphics appear larger may also make them appear blurry. • Double-click the application image to zoom in or out. • Use Ctrl+scroll wheel to adjust the size
The Moderator or Presenter should interact with the actual application window, not the application image in Collaborate.
Page 47 of 69
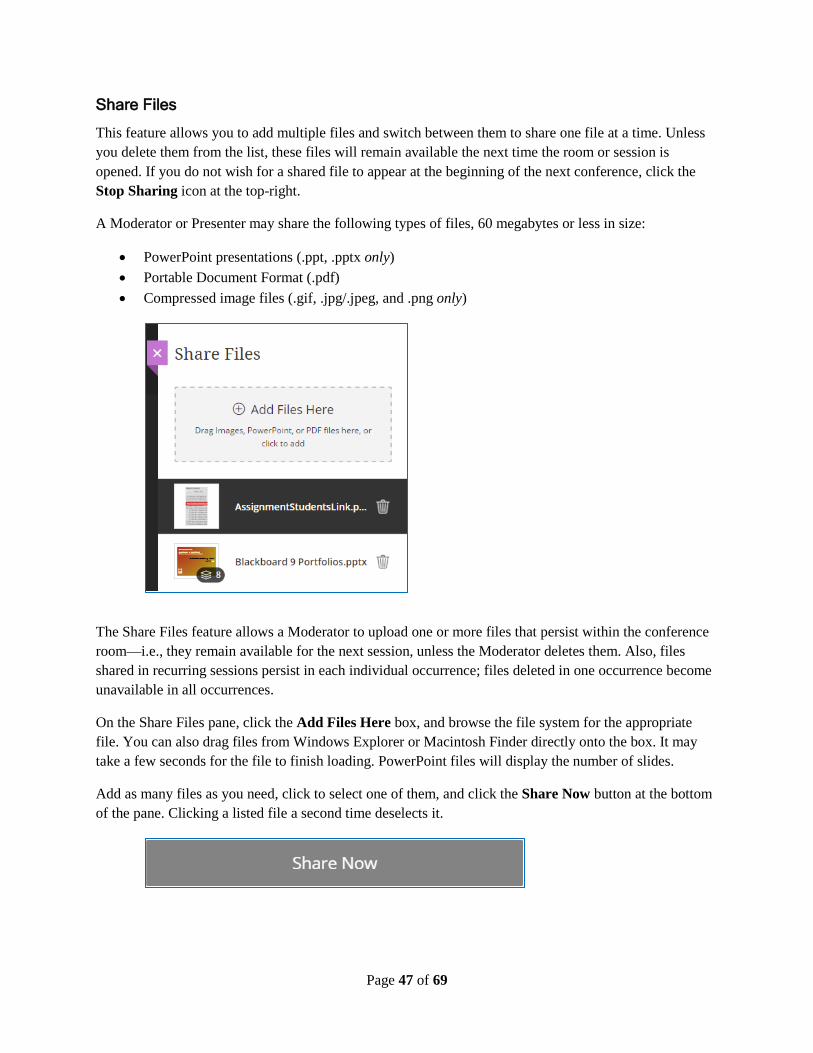
Share Files
This feature allows you to add multiple files and switch between them to share one file at a time. Unless you delete them from the list, these files will remain available the next time the room or session is opened. If you do not wish for a shared file to appear at the beginning of the next conference, click the Stop Sharing icon at the top-right.
A Moderator or Presenter may share the following types of files, 60 megabytes or less in size:
• PowerPoint presentations (.ppt, .pptx only) • Portable Document Format (.pdf) • Compressed image files (.gif, .jpg/.jpeg, and .png only)
The Share Files feature allows a Moderator to upload one or more files that persist within the conference room—i.e., they remain available for the next session, unless the Moderator deletes them. Also, files shared in recurring sessions persist in each individual occurrence; files deleted in one occurrence become unavailable in all occurrences.
On the Share Files pane, click the Add Files Here box, and browse the file system for the appropriate file. You can also drag files from Windows Explorer or Macintosh Finder directly onto the box. It may take a few seconds for the file to finish loading. PowerPoint files will display the number of slides.
Add as many files as you need, click to select one of them, and click the Share Now button at the bottom of the pane. Clicking a listed file a second time deselects it.
Page 48 of 69
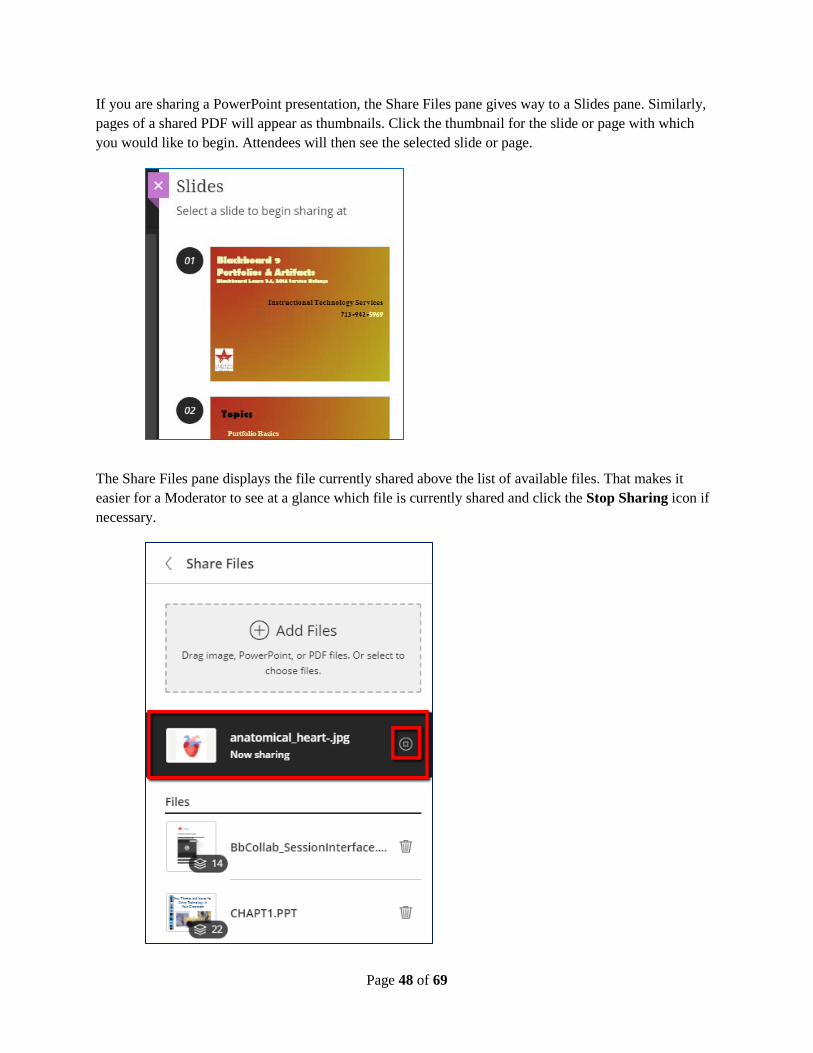
If you are sharing a PowerPoint presentation, the Share Files pane gives way to a Slides pane. Similarly, pages of a shared PDF will appear as thumbnails. Click the thumbnail for the slide or page with which you would like to begin. Attendees will then see the selected slide or page.
The Share Files pane displays the file currently shared above the list of available files. That makes it easier for a Moderator to see at a glance which file is currently shared and click the Stop Sharing icon if necessary.

Page 49 of 69
To share a different file:
1. Click the Share Content icon (+), and select Share Files. 2. Select a different file on the Share Files pane, and click Share Now.
To remove a file from the list of shared files, click the trash can icon for that file. Collaborate does not ask you to confirm your intention; the file disappears from the list immediately.
IMPORTANT FACTS TO REMEMBER ABOUT FILE SHARING:
If you need to share a file that is larger than 60 MB, use the Share Application feature instead. When a Moderator clicks the Stop Sharing button during a PowerPoint presentation, re-sharing
the presentation starts the file back at the first slide. In order to start a presentation in the middle, a best practice is to divide the presentation into two or more files and share them in sequence.
Only basic presentation-type files are sharable in Collaborate, not PowerPoint Shows (.pps, .ppsx); templates (.pot, .potx); or macro-enabled presentations (.pptm).
If you prefer to keep the Collaborate Panel hidden while sharing a presentation, Collaborate Ultra provides navigation arrows to advance to the next or previous slide in a presentation, next or previous page in a PDF. Windows users can press the Alt+Page Down or Alt+Page Up keyboard shortcut to move to the previous or next slide, respectively. Macintosh users can substitute Option for Alt.
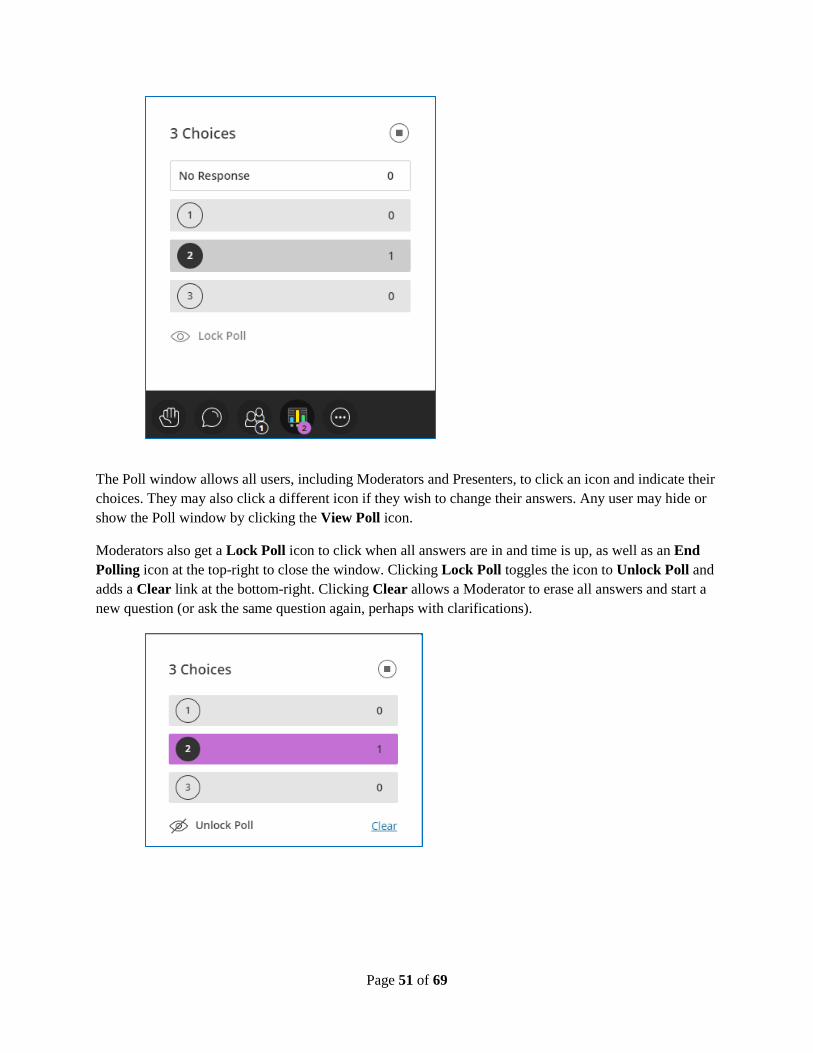
Polling
The Polling feature allows a Moderator to create yes/no or multiple-choice questions for Participants or other attendees to answer. It also tracks the responses in real time. (NOTE: Only Moderators may launch and manage polls.)
The multiple choices that Participants can select are currently limited to numbers, rather than text options. A Moderator may post a question and its answer choices (up to five) on a slide of a shared PowerPoint presentation, or on the whiteboard, then show a polling window for Participants to indicate their answers.

Page 50 of 69
Eventually, the results of the polls may be stored in the session information in Blackboard Learn. For now, however, they are strictly ephemeral.
To give Participants a poll question, start by opening the Share Content pane and selecting Polling in the Secondary Content portion of the pane.
The Share Content pane now becomes the Polling pane. Click the appropriate link: Yes/No, 2, 3, 4, or 5 Choices. Then click the Start button at the bottom of the pane.
The Start button will hide the Polling pane, display the poll window, and add a View Poll icon to the Interaction Bar. During a poll, this icon shows each user the number of the choice that he or she has selected.
Page 51 of 69
The Poll window allows all users, including Moderators and Presenters, to click an icon and indicate their choices. They may also click a different icon if they wish to change their answers. Any user may hide or show the Poll window by clicking the View Poll icon.
Moderators also get a Lock Poll icon to click when all answers are in and time is up, as well as an End Polling icon at the top-right to close the window. Clicking Lock Poll toggles the icon to Unlock Poll and adds a Clear link at the bottom-right. Clicking Clear allows a Moderator to erase all answers and start a new question (or ask the same question again, perhaps with clarifications).

Page 52 of 69
Timer
The Timer is a simple feature that places a small timer in the lower portion of the Participants Area, either for all attendees or for Moderators only. A Moderator can set the timer for any length, counting up or down, with a text description to communicate its purpose. The primary purpose is for timing Breakout Group sessions, but it can also help subdivide a conference into subtopics, among other uses.
Attendees can click the Hide icon on the timer to hide the counting numbers, which can easily distract conferees, and again to show the numbers. The Timer itself does not hide.
Click the Timer option on the Share Content pane to open the Start Timer pane. Numerical values are required in the Minutes and Seconds boxes. A Timer description is optional. The default values for Timer counts and Timer viewable by are Down and Everyone, respectively.
Breakout Groups
To divide a large group of attendees into smaller subgroups, start by clicking the Breakout Groups link in the Interact section of the Share Content pane. Within these subgroups, users granted temporary Presenter privileges may share files, applications, or the Whiteboard. (NOTE: this feature is turned off when a conference has more than 250 attendees.)
Page 53 of 69
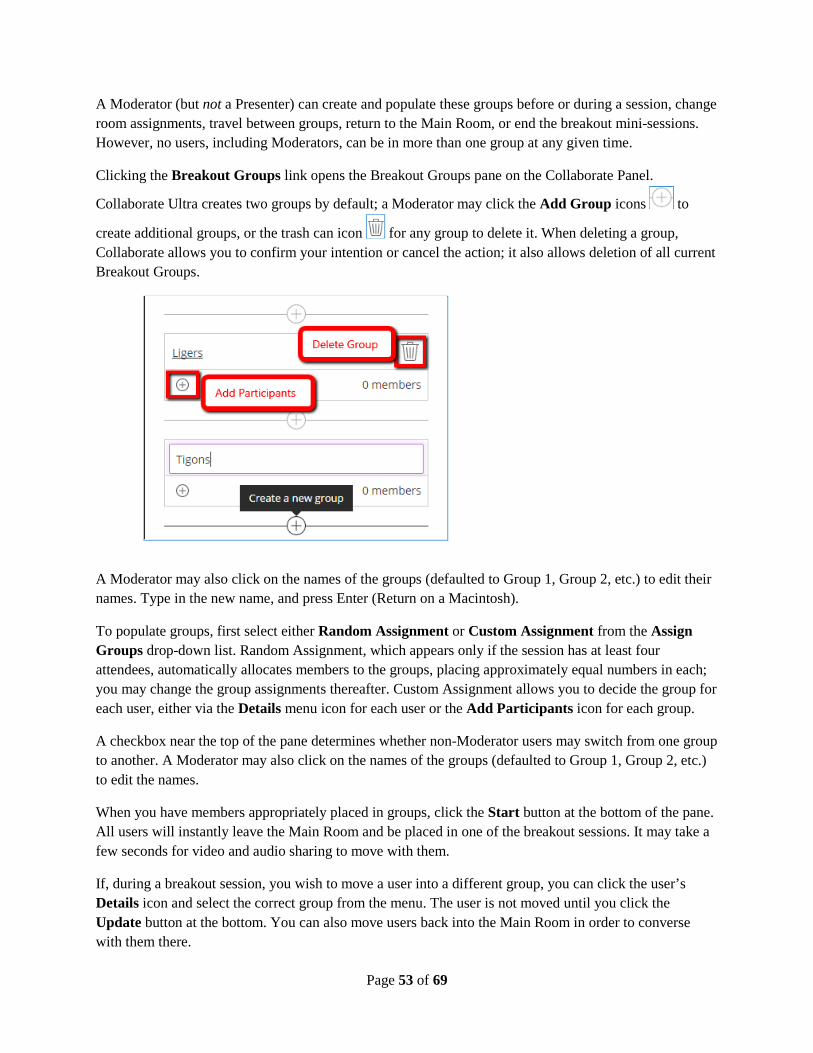
A Moderator (but not a Presenter) can create and populate these groups before or during a session, change room assignments, travel between groups, return to the Main Room, or end the breakout mini-sessions. However, no users, including Moderators, can be in more than one group at any given time.
Clicking the Breakout Groups link opens the Breakout Groups pane on the Collaborate Panel.
Collaborate Ultra creates two groups by default; a Moderator may click the Add Group icons to
create additional groups, or the trash can icon for any group to delete it. When deleting a group, Collaborate allows you to confirm your intention or cancel the action; it also allows deletion of all current Breakout Groups.
A Moderator may also click on the names of the groups (defaulted to Group 1, Group 2, etc.) to edit their names. Type in the new name, and press Enter (Return on a Macintosh).
To populate groups, first select either Random Assignment or Custom Assignment from the Assign Groups drop-down list. Random Assignment, which appears only if the session has at least four attendees, automatically allocates members to the groups, placing approximately equal numbers in each; you may change the group assignments thereafter. Custom Assignment allows you to decide the group for each user, either via the Details menu icon for each user or the Add Participants icon for each group.
A checkbox near the top of the pane determines whether non-Moderator users may switch from one group to another. A Moderator may also click on the names of the groups (defaulted to Group 1, Group 2, etc.) to edit the names.
When you have members appropriately placed in groups, click the Start button at the bottom of the pane. All users will instantly leave the Main Room and be placed in one of the breakout sessions. It may take a few seconds for video and audio sharing to move with them.
If, during a breakout session, you wish to move a user into a different group, you can click the user’s Details icon and select the correct group from the menu. The user is not moved until you click the Update button at the bottom. You can also move users back into the Main Room in order to converse with them there.
Page 54 of 69
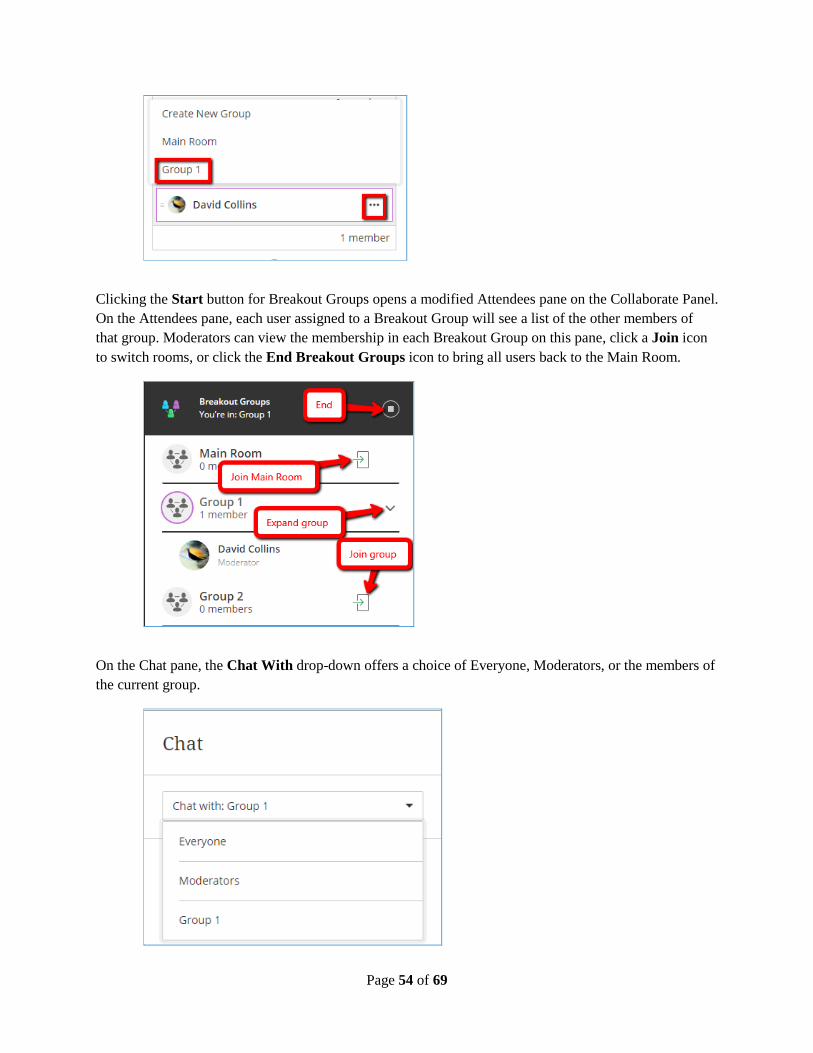
Clicking the Start button for Breakout Groups opens a modified Attendees pane on the Collaborate Panel. On the Attendees pane, each user assigned to a Breakout Group will see a list of the other members of that group. Moderators can view the membership in each Breakout Group on this pane, click a Join icon to switch rooms, or click the End Breakout Groups icon to bring all users back to the Main Room.
On the Chat pane, the Chat With drop-down offers a choice of Everyone, Moderators, or the members of the current group.

Page 55 of 69
Leaving the Room A user may leave a Collaborate conference completely or set status to Away. Use the Leave Session command if you do not intend to return (although you may still rejoin the room). Use the Set as Away command to indicate that you are attending to other business and temporarily not participating.
Leave Session
There are two ways to leave a Collaborate conference completely:
• click the Leave Session icon at the bottom of the Session Menu; or • click the My Settings icon, and select Leave Session on the Feedback Panel.
When you click this icon, a different icon appears in the top-left corner that allows you to return to the session.
The screen will also display a way for attendees to evaluate the quality of the audio and video from the session. Users may either select a rating and click Submit And Exit, or simply click Skip.
You may bypass the evaluation screen entirely by closing the browser window or tab to leave a session. However, this method does not provide a chance to return to the session. Other attendees will receive a notification of your departure.
Page 56 of 69
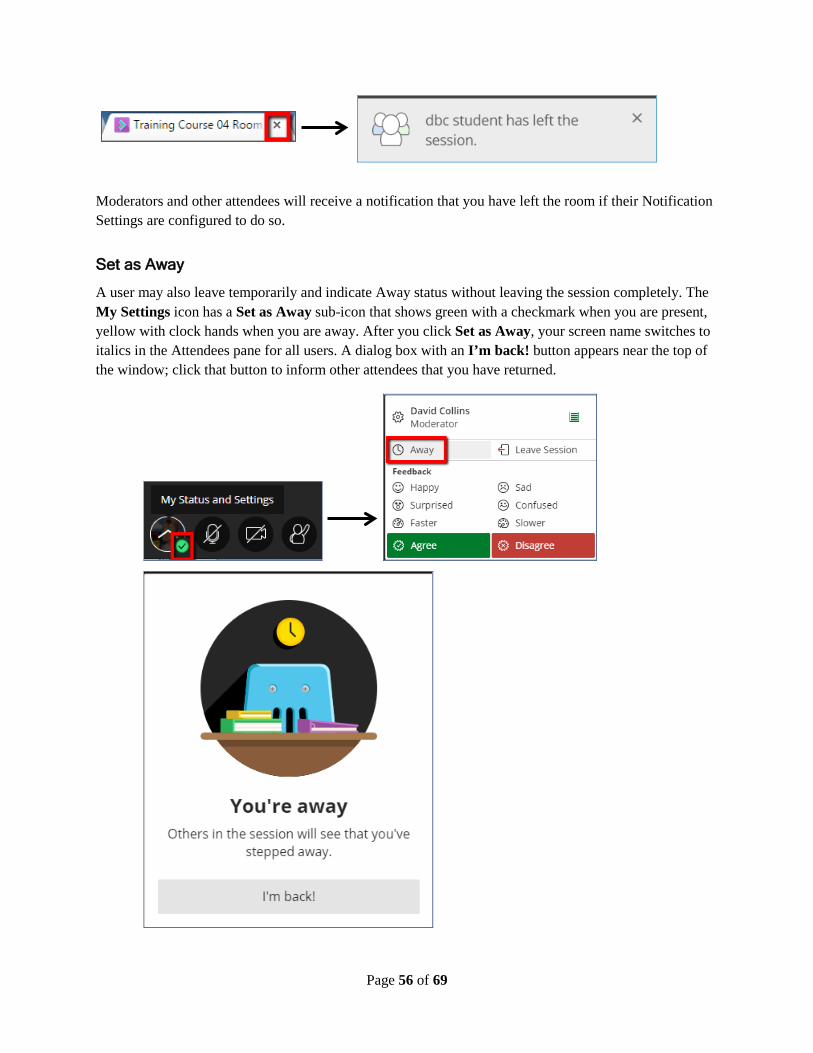
Moderators and other attendees will receive a notification that you have left the room if their Notification Settings are configured to do so.
Set as Away
A user may also leave temporarily and indicate Away status without leaving the session completely. The My Settings icon has a Set as Away sub-icon that shows green with a checkmark when you are present, yellow with clock hands when you are away. After you click Set as Away, your screen name switches to italics in the Attendees pane for all users. A dialog box with an I’m back! button appears near the top of the window; click that button to inform other attendees that you have returned.

Page 57 of 69
The Recordings List If at least one session in the virtual room has been recorded and processed (and not yet deleted), the Blackboard Collaborate page in a course or organization should display a list of available recordings. Collaborate makes a variety of commands available for managing these recordings.
To view the list, click the Menu icon at the top-left of the Blackboard Collaborate Ultra page, and select Recordings.
Because server capacity is limited to 50 gigabytes of recordings for the entire university, most instructors will likely never have enough recordings to require searching or filtering the Recordings list. However, users can click the magnifying glass icon to open a dynamic Search Recordings text box. As you type text into the box, with every keystroke the list filters out recordings whose names do not contain the text. When you have finished searching, click the Done button to hide the box.
Users can also switch the display from Show Recent Recordings (reverse chronological order) to Show Recordings In A Range, where they can specify the dates between which a recording might have been created.
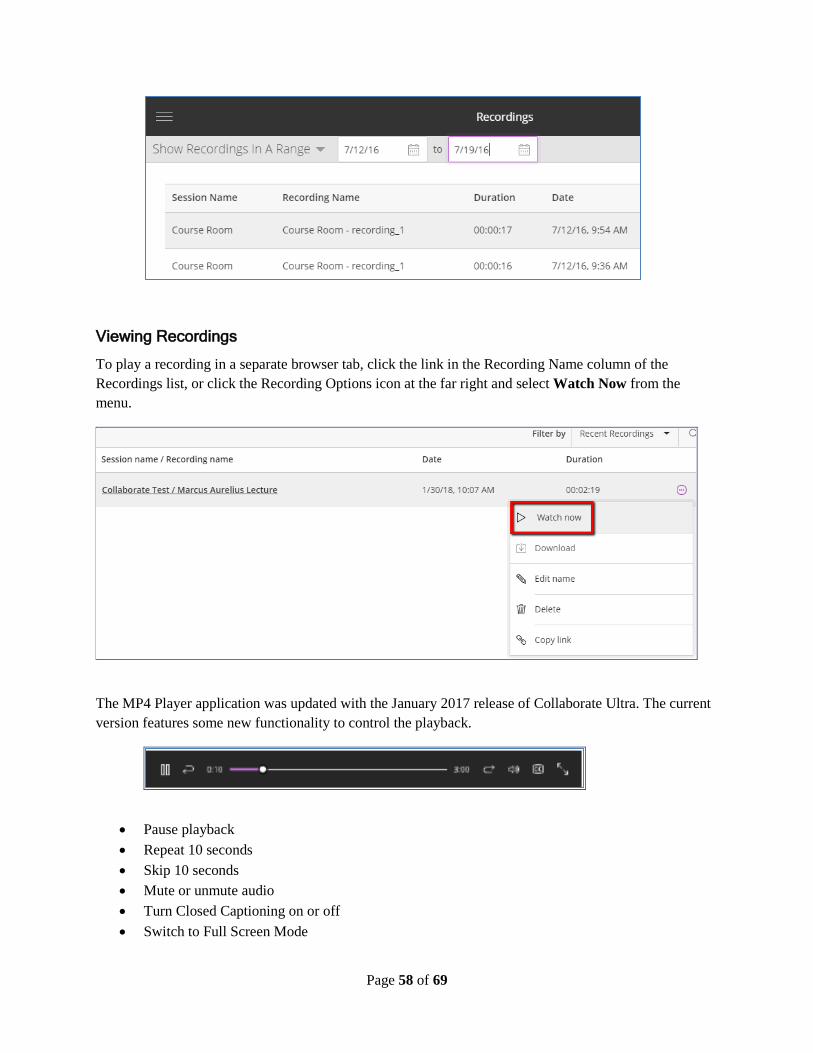
Page 58 of 69
Viewing Recordings
To play a recording in a separate browser tab, click the link in the Recording Name column of the Recordings list, or click the Recording Options icon at the far right and select Watch Now from the menu.
The MP4 Player application was updated with the January 2017 release of Collaborate Ultra. The current version features some new functionality to control the playback.
• Pause playback • Repeat 10 seconds • Skip 10 seconds • Mute or unmute audio • Turn Closed Captioning on or off • Switch to Full Screen Mode
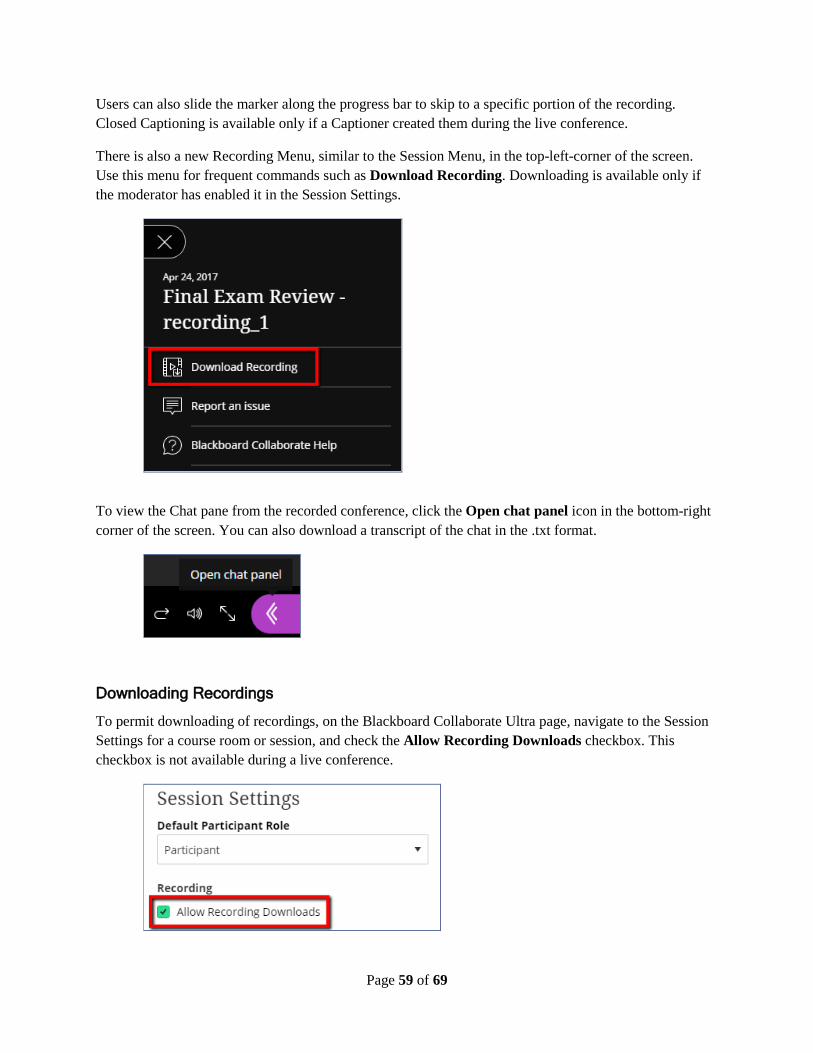
Page 59 of 69
Users can also slide the marker along the progress bar to skip to a specific portion of the recording. Closed Captioning is available only if a Captioner created them during the live conference.
There is also a new Recording Menu, similar to the Session Menu, in the top-left-corner of the screen. Use this menu for frequent commands such as Download Recording. Downloading is available only if the moderator has enabled it in the Session Settings.
To view the Chat pane from the recorded conference, click the Open chat panel icon in the bottom-right corner of the screen. You can also download a transcript of the chat in the .txt format.
Downloading Recordings
To permit downloading of recordings, on the Blackboard Collaborate Ultra page, navigate to the Session Settings for a course room or session, and check the Allow Recording Downloads checkbox. This checkbox is not available during a live conference.

Page 60 of 69
When the recording is processed and added to this list, users may download a copy of the MP4 file in one of two ways:
• On the Blackboard Collaborate Ultra page, click the Options icon, and select Download; or • On the MP4 Viewer, click the menu icon at the top-left, and select Download Recording.
Sending Recording Links
To share a recording with external users (those without a UST Blackboard account), on the Blackboard Collaborate Ultra page, click the Recording Options icon, and select Copy Link. You can then paste the URL for the recording into an email message or shared document.
Renaming Recordings
For the first two years of its existence, Collaborate Ultra gave all recordings generic names, without a way for instructors to modify those names. (Collaborate in the Original Experience did provide that ability.) The default names consisted of the name of the Course Room or session followed by recording_1 or something similar. This led to frequent duplication of names and no small amount of confusion.
As of February 2018, instructors can rename recordings in the Recordings view on the Blackboard Collaborate Ultra page in Learn. To begin the process, if necessary, click the Collaborate Menu and switch from Sessions to Recordings. Then click the Options icon for any recording, and select Edit name.
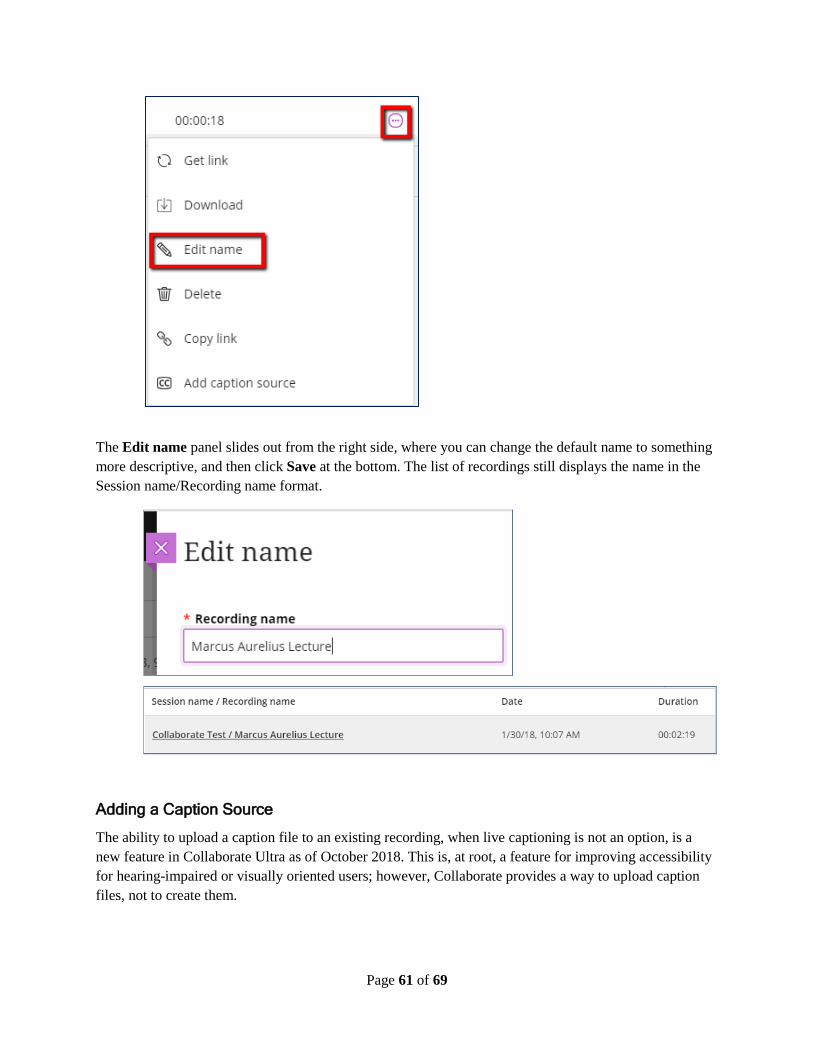
Page 61 of 69
The Edit name panel slides out from the right side, where you can change the default name to something more descriptive, and then click Save at the bottom. The list of recordings still displays the name in the Session name/Recording name format.
Adding a Caption Source
The ability to upload a caption file to an existing recording, when live captioning is not an option, is a new feature in Collaborate Ultra as of October 2018. This is, at root, a feature for improving accessibility for hearing-impaired or visually oriented users; however, Collaborate provides a way to upload caption files, not to create them.

Page 62 of 69
Collaborate recordings support two file formats for displaying captions: WebVTT (.vtt, Web Video Text Tracks) and SRT (.srt, SubRip Subtitle). These files must contain not just a textual transcription, but notations indicating as to the times that blocks of transcription should appear within the recording.
When you have created a caption file (or had one created for you), you can upload it via the Recording Options menu provided for each recording on the Recordings page. Select the Add caption source command from the menu, browse your system to select the file.
The caption file, which is entirely text-based, should upload fairly quickly. The Recordings list updates and displays a CC icon next to the Options icon.
By default, users will see the captions while viewing the recording online or as a download. In the viewer, they can turn off captioning, or adjust the text size, via an icon in the bottom-right corner of the screen.
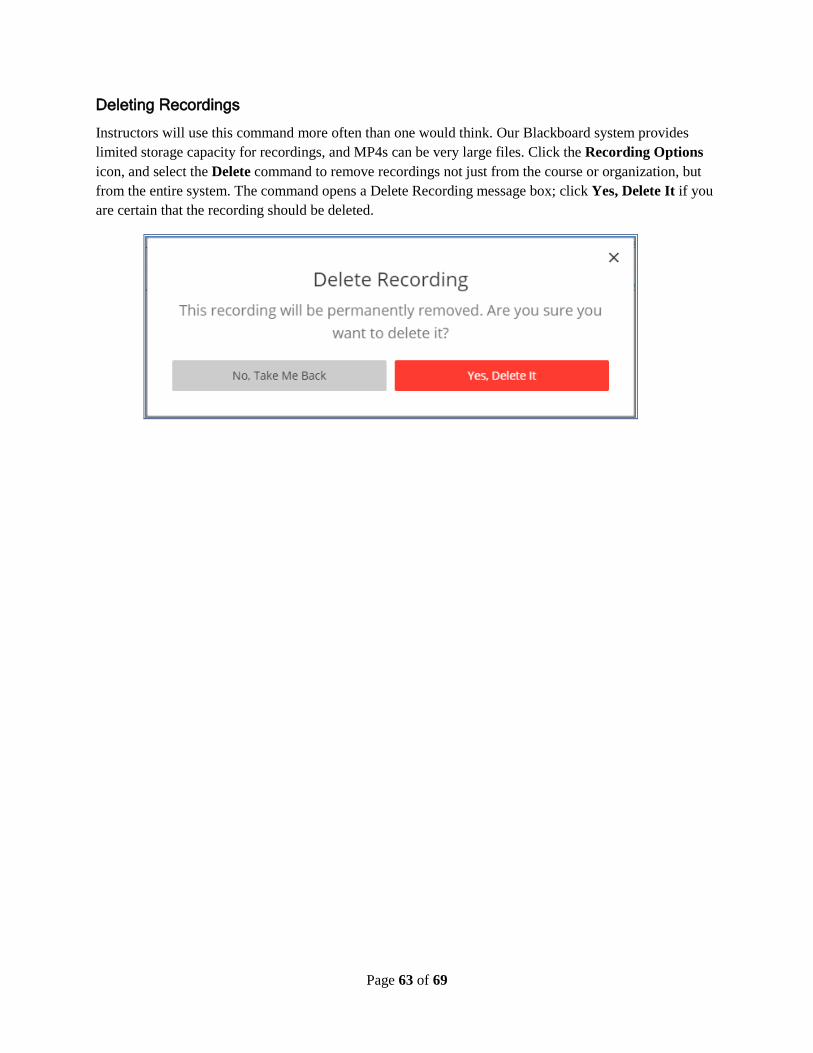
Page 63 of 69
Deleting Recordings
Instructors will use this command more often than one would think. Our Blackboard system provides limited storage capacity for recordings, and MP4s can be very large files. Click the Recording Options icon, and select the Delete command to remove recordings not just from the course or organization, but from the entire system. The command opens a Delete Recording message box; click Yes, Delete It if you are certain that the recording should be deleted.
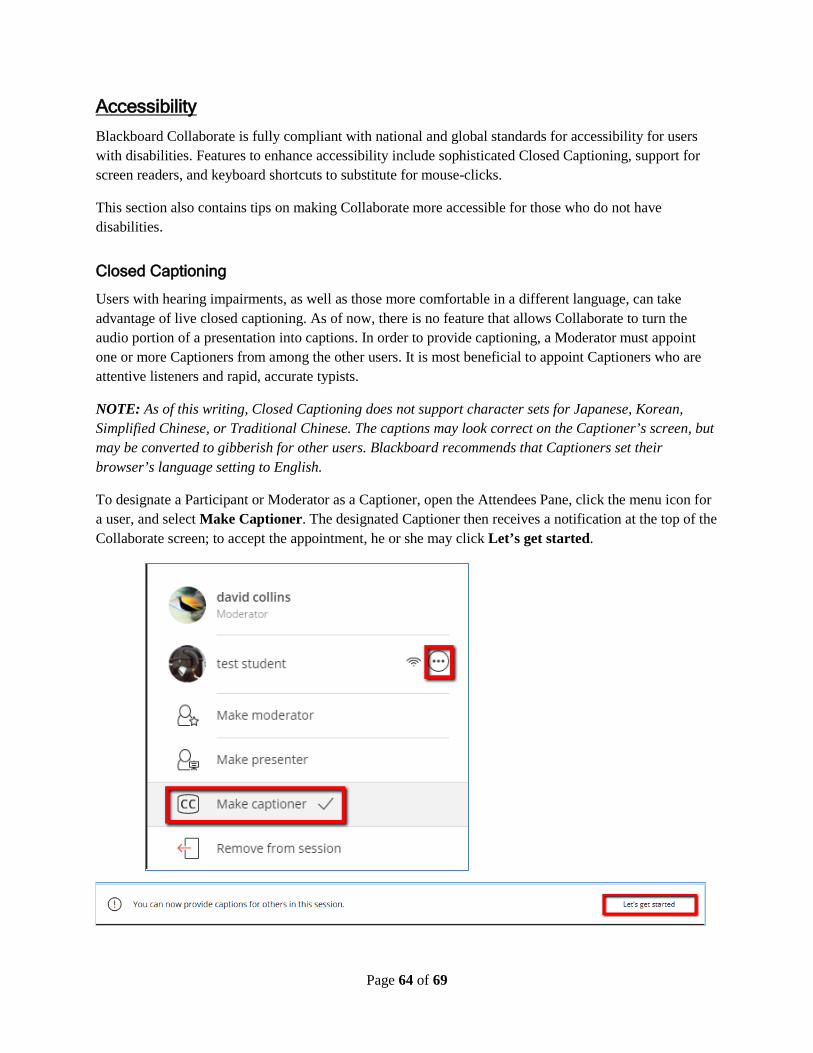
Page 64 of 69
Accessibility Blackboard Collaborate is fully compliant with national and global standards for accessibility for users with disabilities. Features to enhance accessibility include sophisticated Closed Captioning, support for screen readers, and keyboard shortcuts to substitute for mouse-clicks.
This section also contains tips on making Collaborate more accessible for those who do not have disabilities.
Closed Captioning
Users with hearing impairments, as well as those more comfortable in a different language, can take advantage of live closed captioning. As of now, there is no feature that allows Collaborate to turn the audio portion of a presentation into captions. In order to provide captioning, a Moderator must appoint one or more Captioners from among the other users. It is most beneficial to appoint Captioners who are attentive listeners and rapid, accurate typists.
NOTE: As of this writing, Closed Captioning does not support character sets for Japanese, Korean, Simplified Chinese, or Traditional Chinese. The captions may look correct on the Captioner’s screen, but may be converted to gibberish for other users. Blackboard recommends that Captioners set their browser’s language setting to English.
To designate a Participant or Moderator as a Captioner, open the Attendees Pane, click the menu icon for a user, and select Make Captioner. The designated Captioner then receives a notification at the top of the Collaborate screen; to accept the appointment, he or she may click Let’s get started.

Page 65 of 69
In the Moderator’s Attendees Pane, the CC icon appears by the new Captioner’s name. The Captioner receives a text field just above the Interaction Bar for transcribing the conversation. This field allows backspacing over text to fix errors, but does not allow moving the cursor anywhere before the end of the text. Press Enter or Return at the end of a paragraph or to indicate a change of speakers.
A Captioner may also click the pencil icon in the top-left to change the caption title to something other than the default (i.e., the Captioner’s screen name).
Other users who are not designated as Captioners will see the caption in a box just above the Interaction Bar. This box provides a drop-down menu for changing the font size to accommodate users’ visual preferences and capabilities. Small and extra-small text allows a user to see more lines of text in the box; large and extra-large makes the text easier to see for users with limited vision.
A Moderator can also relieve a Captioner of his or her captioning duties via the same steps as making someone a Captioner. However, Captioners do not have a button that allows them to quit the role.
When a Captioner is designated, other users receive a button asking whether they would like to see Closed Captioning. Clicking Yes changes one of the settings to allow the user to turn off Closed Captioning at any time and turn it back on. Users can see the text as it is typed, with only a slight delay.
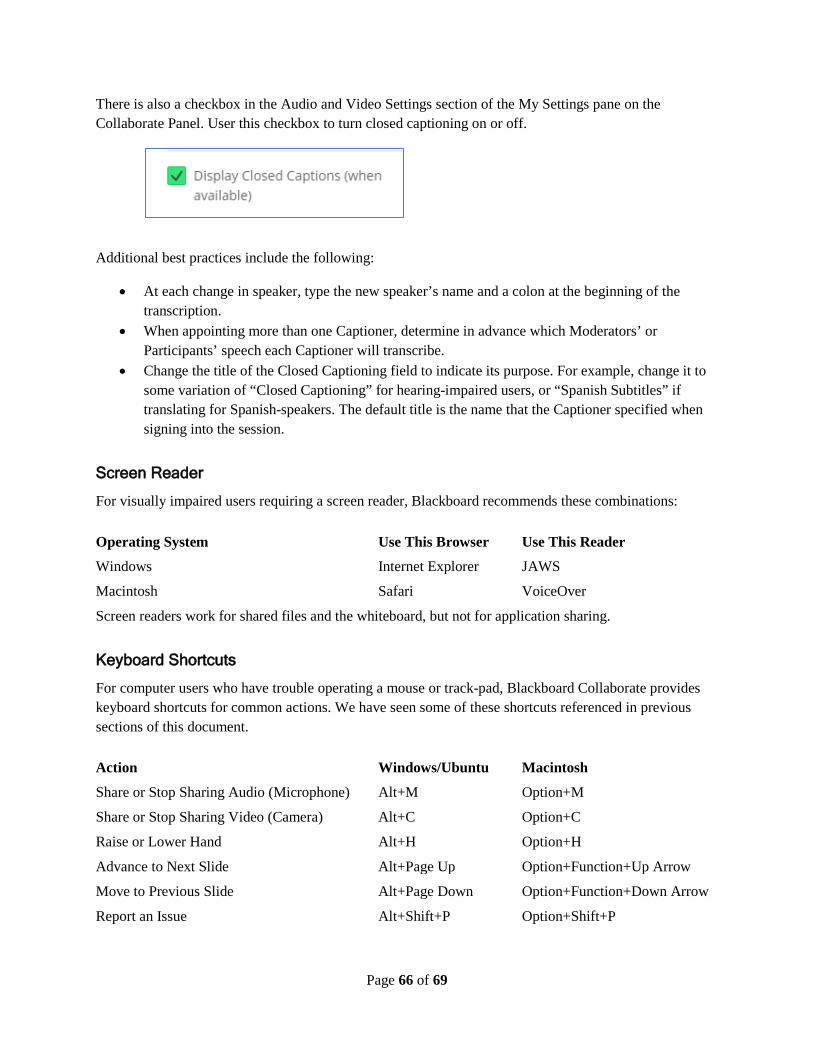
Page 66 of 69
There is also a checkbox in the Audio and Video Settings section of the My Settings pane on the Collaborate Panel. User this checkbox to turn closed captioning on or off.
Additional best practices include the following:
• At each change in speaker, type the new speaker’s name and a colon at the beginning of the transcription.
• When appointing more than one Captioner, determine in advance which Moderators’ or Participants’ speech each Captioner will transcribe.
• Change the title of the Closed Captioning field to indicate its purpose. For example, change it to some variation of “Closed Captioning” for hearing-impaired users, or “Spanish Subtitles” if translating for Spanish-speakers. The default title is the name that the Captioner specified when signing into the session.
Screen Reader
For visually impaired users requiring a screen reader, Blackboard recommends these combinations:
Operating System Use This Browser Use This Reader
Windows Internet Explorer JAWS
Macintosh Safari VoiceOver
Screen readers work for shared files and the whiteboard, but not for application sharing.
Keyboard Shortcuts
For computer users who have trouble operating a mouse or track-pad, Blackboard Collaborate provides keyboard shortcuts for common actions. We have seen some of these shortcuts referenced in previous sections of this document.
Action Windows/Ubuntu Macintosh
Share or Stop Sharing Audio (Microphone) Alt+M Option+M
Share or Stop Sharing Video (Camera) Alt+C Option+C
Raise or Lower Hand Alt+H Option+H
Advance to Next Slide Alt+Page Up Option+Function+Up Arrow
Move to Previous Slide Alt+Page Down Option+Function+Down Arrow
Report an Issue Alt+Shift+P Option+Shift+P
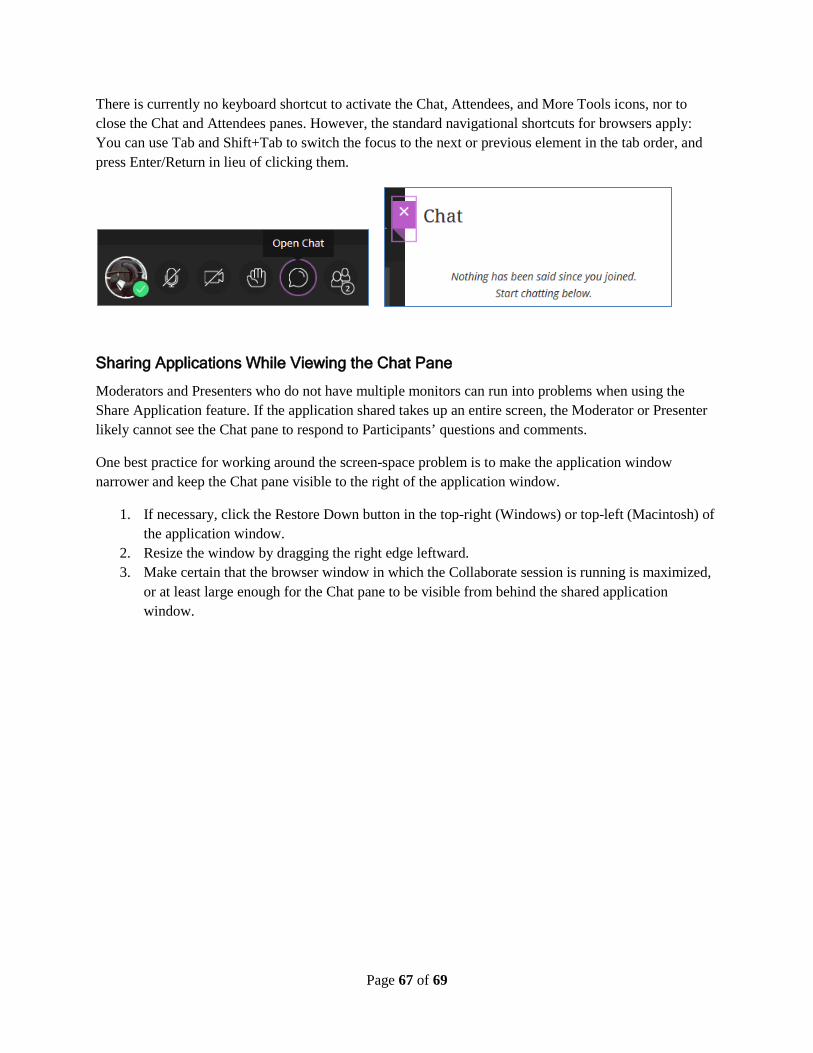
Page 67 of 69
There is currently no keyboard shortcut to activate the Chat, Attendees, and More Tools icons, nor to close the Chat and Attendees panes. However, the standard navigational shortcuts for browsers apply: You can use Tab and Shift+Tab to switch the focus to the next or previous element in the tab order, and press Enter/Return in lieu of clicking them.
Sharing Applications While Viewing the Chat Pane
Moderators and Presenters who do not have multiple monitors can run into problems when using the Share Application feature. If the application shared takes up an entire screen, the Moderator or Presenter likely cannot see the Chat pane to respond to Participants’ questions and comments.
One best practice for working around the screen-space problem is to make the application window narrower and keep the Chat pane visible to the right of the application window.
1. If necessary, click the Restore Down button in the top-right (Windows) or top-left (Macintosh) of the application window.
2. Resize the window by dragging the right edge leftward. 3. Make certain that the browser window in which the Collaborate session is running is maximized,
or at least large enough for the Chat pane to be visible from behind the shared application window.
Page 68 of 69
Quick-Start Sheet for Blackboard Collaborate Ultra
Requirements
• Hardware: A personal computer, tablet, or smartphone; headphones, preferably with an attached microphone; Moderators should use a computer
• System: MS Windows, Apple Macintosh, Apple iOS, or Google Android. • Browser: Google Chrome or Mozilla Firefox for Windows or Macintosh; Chrome for Android;
Apple Safari for Macintosh or iOS. • Plug-ins and Extensions: For the Share Applications feature, download and install Chrome’s
extension or Adobe Flash for Firefox.
Optional Hardware
• A USB webcam • A telephone link (dial-in number and PIN provided for each session)
Navigating to Collaborate Ultra in Blackboard Learn
• Click a Tool Link to the Tools page or Blackboard Collaborate Ultra page added to the Course Menu or Organization Menu.
• On the Blackboard Collaborate Ultra page, click the join room link.
Scheduling Sessions
• On the Blackboard Collaborate Ultra page, click the Create Session icon. • Provide a Name, specify Start and End date and times, set the Early Entry window, determine the
repeat interval, determine session settings, and click Save.
Roles
• Moderator: default role for course instructors/organization leaders in Blackboard Learn; can schedule and record sessions, modify settings for a room or session, share content, assign roles (including Moderator) to users, and remove users if necessary.
• Presenter: often, but not always, a guest user from outside the class; can share files, applications and the Whiteboard.
• Participant: default role for students and teaching assistants in courses, participants and assistants in organizations; can participate in shared applications and whiteboards if a Moderator allows.
• Captioner: a user currently occupying any other role can be designated as a Captioner; can transcribe other users’ speech in a special closed caption box, and users can elect to view closed captioning or not.
Page 69 of 69
Interaction Bar
• Profile picture with Set As Away icon • Share Audio icon (microphone) • Share Video icon (camera) • Raise Hand icon
Other Interface Elements
Session Menu
• Start/Stop Recording: begin and end recording a session viewable from Blackboard Learn. • Use your phone for audio: dial in to a web conference if no audio hardware is available. • Report an issue: send a help request to Blackboard’s technical support team. • Blackboard Collaborate Help: open the Collaborate Ultra help site on a new tab. • Learn about the new Collaborate interface: take an online tour. • Leave Session: exit, with an opportunity to evaluate the audio quality or return to the session.
Collaborate Panel
• Chat pane: type messages to the whole conference or Moderators only. • Attendees pane: check attendees’ network connection, change roles. • Share Content pane (Moderators and Presenters only): Share Blank Whiteboard, Share
Application, Share Files, Polling, Breakout Groups. • My Settings pane: Audio and Video Settings (all users), Notification Settings (all users), Session
Settings (Moderators and Presenters only).
Participant Display Modes
• Group Mode • Follow the Speaker Mode
Miscellaneous Important Facts
• With good network connections, Collaborate sessions can accommodate up to 500 simultaneous users.
• Storage space for recordings is limited to 50 gigabytes (GB) for the entire university. Therefore, instructors should delete recordings immediately that are no longer needed.
• Chrome requires downloading an extension on first use of the Share Application feature. Firefox and other browsers require Adobe Flash Player.
• File types that can be shared using Share Files: o Compressed Graphics (gif, .jpg, .png) o Portable Document (.pdf) o PowerPoint Presentation (.ppt/.pptx)