Atari 2600 Programming for Newbies - Revised Edition
172
Atari 2600 Programming for Newbies by Andrew Davie This is the printed version of the Atari 2600 programming tutorials by Andrew Davie that he originally posted on the AtariAge forums between May 2003 and April 2012 Edited by Dion Olsthoorn – April 2018 AtariAge 2018
-
Upload
khangminh22 -
Category
Documents
-
view
3 -
download
0
Transcript of Atari 2600 Programming for Newbies - Revised Edition

Atari 2600 Programming for Newbies
by Andrew Davie
This is the printed version of the Atari 2600 programming
tutorials by Andrew Davie that he originally posted
on the AtariAge forums between May 2003 and April 2012
Edited by Dion Olsthoorn – April 2018
AtariAge
2018

ii

Table of Contents
Session 1: Start Here ................................................................................ 5
Session 2: Television Display Basics ............................................... 11
Session 3: The TIA and 6502 ............................................................. 17
Session 4: The TIA .................................................................................. 19
Session 5: Memory Architecture ...................................................... 25
Sessions 6 & 7: The TV and our Kernel .......................................... 29
Session 8: Our First Kernel ................................................................. 33
Session 9: 6502 and DASM – Assembling the basics ................ 41
Session 10: Orgasm ............................................................................... 49
Session 11: Colorful colors ................................................................. 55
Session 12: Initialization ..................................................................... 61
Session 13: Playfield Basics ................................................................ 67
Session 14: Playfield Weirdness ....................................................... 77
Session 15: Playfield Continued ....................................................... 79
Session 16: Letting the Assembler Do the Work ........................ 89
Session 17: Asymmetrical Playfields – Part 1 ............................. 97
Session 18: Asymmetrical Playfields – Part 2 ........................... 103
Session 19: Addressing Modes ........................................................ 105
Session 20: Asymmetrical Playfields – Part 3 ........................... 111
Session 21: Sprites ............................................................................... 121
Session 22: Sprites, Horizontal Positioning ............................... 127
Session 23: Moving Sprites Vertically .......................................... 137
Session 24: Some Nice Code ............................................................. 149
Session 25: Advanced Timeslicing................................................. 153
Appendix A: 6502 Opcodes .............................................................. 157


5
Session 1: Start Here
So, you want to program the Atari 2600 and don't know where to
start?
Welcome to the first installment of "000001010 00101000 00000000
1100101" - which at first glance is a rather odd name for a
programming tutorial - but on closer examination is appropriate, as it
is closely involved with what it's like to program the Atari 2600. The
string of 0's and 1's is actually a binary representation of "2600 101".
I'm Andrew Davie, and I've been developing games for various
computers and consoles since the late 1970s. Really! What I plan to
do with this tutorial is introduce you to the arcane world of
programming the '2600, and slowly build up your skill base so that
you can start to develop your own games. We'll take this in slow easy
stages, and I encourage you to ask questions - this will help me pace
the tutorial and introduce subjects of interest.
Developing for the Atari 2600 is much simpler today than it was
when the machine was a force in the marketplace (i.e.: in the 1980s).
We have a helpful online community of dedicated programmers,
readily available documentation, tools, and sample code - and online
forums where we can pose questions and get almost instant feedback
and answers. So don't be scared - with a bit of effort, anyone can do
this!
It is the online community which makes developing for the machine
'fun' - though I use that in the broadest sense of the word. My 'fun'
may be another man's 'torture'. For, programming this machine is
tricky, at best - and not for the faint of heart. But the rewards are great
- making this simple hardware do anything at all is quite an
achievement - and making it do something new and interesting gives
one a warm fuzzy feeling inside.
So, let's get right into it... here's your first installment of "2600 101".
We're going to assume that you know how to program *something*,
but not much more than that. We'll walk through binary arithmetic,
hexadecimal, machine architecture, assemblers, graphics, and
whatever else gets in our way. And we'll probably divert on tangential

6
issues here and there. But hopefully we'll come out of it with a greater
understanding of this little machine, and appreciation for the work of
those brilliant programmers who have developed the classics for this
system.
The Basics
A game on the '2600 comes in the form of a cartridge (or "tape")
which is plugged into the console itself. This cartridge consists of a
circuit board containing a ROM (or EPROM) which is basically just a
silicon chip containing a program and graphics for displaying the
game on your TV set. This program (and graphics) are really just a lot
of numbers stored on the ROM which are interpreted by the CPU (the
processor) inside your '2600 just like a program on any other
computer. What makes the '2600 special is... nothing. It's a computer,
just like any other!
A computer typically consists of a CPU, memory, and some
input/output (I/O) systems. The '2600 has a CPU (a 6507), memory
(RAM for the program's calculations, ROM to hold the program and
graphics), and I/O systems (joystick and paddles for input, and output
to your TV).
The CPU
The CPU of the '2600 is a variant of a processor used in computers
such as the Apple II, the Nintendo NES, the Super Nintendo, and
Atari home computers (and others). It's used in all these machines
because it is cheap to manufacture, it's simple to program, but also
effective - the famous "6502". In this course we will learn how to
program the 6502 microprocessor... but don't panic, we'll take that in
easy stages (and besides, it's not as hard as it looks).
The '2600 actually uses a 6507 microprocessor - but this is really just
a 6502 dressed in sheep's clothing. The 6507 is able to address less
memory than the 6502 but is in all other respects the same. I refer to
the '2600 CPU as a 6502 purely as a matter of convenience.

7
Memory
Memory is severely restricted on the '2600. When the machine was
developed, memory (both ROM and RAM) were very expensive, so
we don't have much of either. In fact, there's only 128 BYTES of
RAM (and we can't even use all of that!) - and typically (depending
on the capabilities of the cartridge we're going to be using for our
final game) only about 4K of ROM. So, then, here's our first
introduction to the 'limitations' of the machine. We may all have great
ideas for '2600 games, but we must keep in mind the limited amount
of RAM and ROM!
Input/Output
Input to the '2600 is through interaction by the users with joystick and
paddle controllers, and various switches and buttons on the console
itself. There are also additional control devices such as keypads - but
we won't delve much into those. Output is invariably through a
television picture (with sound) - i.e.: the game that we see on our TV.
So, there's not really much to it so far - we have a microprocessor
running a program from ROM, using RAM, as required, for the
storage of data - and the output of our program being displayed on a
TV set. What could be simpler?
The Development Process
Developing a game for the '2600 is an iterative process involving
editing source code, assembling the code, and testing the resulting
binary (usually with an emulator). Our first step is to gather together
the tools necessary to perform these tasks.
'Source code' is simply one or more text files (created by the
programmer and/or tools) containing a list of instructions (and
'encoded' graphics) which make up a game. These data are converted
by the assembler into a binary which is the actual data placed on a
ROM in a cartridge, and is run by the '2600 itself.
To edit your source code, you need a text-editor -- and here the choice
is entirely up to you. I use Microsoft Developer Studio myself, as I

8
like its features - but any text editor is fine. Packages integrating the
development process (edit/assemble/test) into your text editor are
available, and this integration makes the process much quicker and
easier (for example, Developer-Studio integration allows a double-
click on an error line reported by the assembler, and the editor will
position you on the very line in the source code causing the error).
To convert your source code into a binary form, we use an
'assembler'. An assembler is a program which converts assembly
language into binary format (and in particular, since the '2600 uses a
6502-variant processor, we need an assembler that knows how to
convert 6502 assembly code into binary). Pretty much all '2600
development these days is done using the excellent cross-platform
(i.e.: versions are available for multiple machines such as Mac, Linux,
Windows, etc.) assembler 'DASM' which was written by Matt Dillon
in about 1988.
DASM is now supported by yours-truly, and is available at
"http://www.atari2600.org/dasm" - it would be a good idea now to go
there and get a copy of DASM, and the associated support-files for
'2600 development. In this course, we will be using DASM
exclusively. We'll learn how to setup and use DASM shortly.
Development of a game in the '80s consisted of creating a binary
image (i.e.: write source code, assemble into binary) and then
physically 'burning' the binary onto an EPROM, putting that EPROM
onto a cartridge and plugging it into a '2600. This was an inherently
slow process (trust me, I did this for NES development!) and it
sometimes took 15 minutes just to see a change!
Nowadays, we are able to see changes to code almost immediately
because of the availability of good emulators. An emulator is a
program which pretends to be another machine/program. For
example, a '2600 emulator is able to 'run' binary ROM images and
display the results just as if you'd actually plugged a cartridge
containing a ROM with that binary into an actual '2600 console.
Today's '2600 emulators are very good indeed.

9
So, instead of actually burning a ROM, we're just going to pretend
we've burned one - and look at the results by running this pretend-
ROM on an emulator. And if there's a problem, we go back and edit
our source code, assemble it to a binary, and run the binary on the
emulator again. That's our iterative development process in action.
There are quite a few '2600 emulators available, but two of note are
• Z26 - available at http://www.whimsey.com/z26/
• Stella - available at http://sourceforge.net/projects/stella/
Stella is your best choice if you're programming on non-Windows
platform. I use Z26 for Windows development, as it is quite fast and
appears to be very accurate. Either of these emulators is fine, and it's
handy to be able to cross-check results on either.
We'll learn how to use these emulators later - but right now let's
continue with the gathering of things we need...
Now that we have an editor, an assembler, and an emulator - the next
important things are documentation and sources for information.
There are many places on the 'net where you can find information for
programming '2600, but perhaps the most important are
• the Stella list - at http://www.biglist.com/lists/stella/
• AtariAge - at http://www.atariage.com/
…and finally, documentation. A copy of the technical specifications
of the '2600 hardware (the Stella Programmer's Guide) is essential...
Stella Programmer's Guide
• text version at http://stella.sourceforge.net/download/stella.txt
• PDF version at http://www.atarihq.com/danb/files/stella.pdf
• printed version at http://tinyurl.com/stella-programmers-guide
10
OK, that's all we need. Here's a summary of what you should have...
• Text editor of your choice
• DASM assembler and '2600 support files
• Emulator (Z26 or Stella)
• Stella Programmer's Guide
• Bookmarks to AtariAge and the #Stella mailing list
That's it for this session. Have a read of the Stella Programmer's
Guide (don't worry about understanding it yet), and try installing your
emulator (and play a few games for 'research' purposes). For the next
session, make sure that your development environment is setup
correctly, and we’ll start to discuss the principles of programming a
'2600 game.

11
Session 2: Television Display Basics
Hopefully you've been through the first part and have your editor,
assembler, emulator and documentation ready to go. What we're
going to look at now is a basic overview of how a television works,
and why this is absolutely necessary pre-requisite knowledge for the
'2600 programmer. We're not going to cover a lot of '2600 specific
stuff this time, but this is most definitely stuff you NEED TO
KNOW!
Television has been around longer than you probably realize. Early
mechanical television pictures were successfully broadcast in the '20s
and '30s (yes, really! - see http://www.tvdawn.com/index.htm). The
mechanical 'scanning' technology utilized in these early television
systems are no doubt the predecessors to the 'scanning' employed in
our modern televisions.
A television doesn't display a continuous moving image. In fact,
television displays static (non-moving) images in rapid succession -
changing between images so quickly that the human eye perceives
any movement as continuous. And even those static images aren't
what they seem - they are really composed of lots of separate lines,
each drawn one after the other by your TV, in rapid succession. So
quick, in fact, that hundreds of them are drawn every image, and
many images are drawn every second. In fact, the actual numbers are
very important, so we'll have a look at those right now.
The Atari 2600 console was released in many different countries
around the world. Not all of these countries use the same television
"system" - in fact there are three variations of TV systems (and there
are three totally different variations of Atari 2600 hardware to support
these systems). These systems are called NTSC, PAL, and SECAM.
NTSC is used for the USA and Japan, PAL for many European
countries, and Australia, and SECAM is used in France, some ex-
French colonies (e.g.: Vietnam), and Russia. SECAM is very similar
to PAL (625/50Hz), but I won't spend much time talking about it, as
Atari SECAM units are incredibly rare, and little if any development
is done for that format anyway. Interestingly, the differences in
requirements for displaying a valid TV image for these systems leads

12
to the incompatibility between cartridges made for NTSC, PAL and
SECAM Atari units. We'll understand why, shortly!
A television signal contains either 60 images per second (on NTSC
systems) or 50 images per second (on PAL systems). This is closely
tied to the frequency of mains AC power in the countries which use
these systems - and this is probably for historical reasons. In any case,
it's important to understand that there are differences. Furthermore,
NTSC images are 525 scanlines deep, and PAL images are 625
scanlines deep. From this, it follows that PAL images have more
detail - but are displayed less frequently - or alternatively, NTSC
images have less detail but are displayed more often. In practice, TV
looks pretty much the same in both systems.
But from the '2600 point of view, the difference in frequency (50Hz
vs. 60Hz) and resolution (625 scanlines vs. 525 scanlines) is
important - very important - because it is the PROGRAMMER who
has to control the data going to the TV. It is not done by the '2600
(!!); the '2600 only generates a signal for a single scanline. This is
completely at odds with how all other consoles work, and what makes
programming the '2600 so much 'fun'. Not only does the programmer
have to worry about game mechanics - but she also has to worry about
what the TV is doing (i.e.: what scanline it is drawing, and when it
needs to start a new image, etc., etc.).
Let's have a look at how a single image is drawn by a TV...
A television is a pretty amazing piece of 1930's technology. It forms
the images we see by shining an electron beam (or 3, for color TVs)
onto a phosphor coating on the front of the picture tube. When the
beam strikes the phosphor, the phosphor starts to glow - and that glow
slowly decreases in brightness until the phosphor is next hit by the
electron beam. The TV 'sweeps' the electron beam across the screen to
form 'scanlines' - at the same time as it sweeps, adjusting the intensity
of the beam, so the phosphor it strikes glow brightly or dimly. When
the beam gets to the end of a scanline, it is turned off, and the
deflection circuitry (which controls the beam) is adjusted so that the
beam will next start a little bit down, and at the start (far left-hand-
side) of the next scanline. And it will then turn on, and sweep left-to-
right to draw the next scanline. When the last scanline is drawn, the

13
electron beam is turned off, and the deflection circuitry is reset so that
the beam's position will next be at the top left of the TV screen - ready
to draw the first scanline of the next frame.
This 'turning-off' and repositioning process - at the end of a scanline,
and at the end of an image - is not instantaneous - it takes a certain
amount of time for the electronics to do this repositioning, and we'll
understand this when we come to talk about the horizontal blank
(when the beam is resetting to the left of the next scanline) and the
vertical blank (when the beam is resetting to the top left scanline on
the screen). I'll leave that for a later session, but when we do come to
it, you'll understand what the TV is doing at these points.
A fairly complex - but nonetheless simple-to-understand analog signal
controls the sweeping of the electron beam across the face of the TV.
First it tells the TV to do the repositioning to the start of the top left
line of the screen, then it includes color and intensity information for
the electron beam as it sweeps across that line, then it tells the TV to
reposition to the start of the next scanline, etc., right down to the last
scanline on the screen. Then it starts again with another reposition to
the start... That's pretty much all we need to know about how that
works.
The Atari 2600 sends the TV the "color and intensity information for
the electron beam as it sweeps across that line", and a signal for the
start of each new line. The '2600 programmer needs to feed the TV
the signal to start the image frame.
A little side-track, here. Although I stated that the vertical resolution
of a TV image is 625 lines (PAL) and 525 lines (NTSC), television
employs another 'trick' called interlacing. Interlacing involves
building up an image out of two separate 'frames' - each frame being
either the odd scanlines, or the even scanlines of that image. Each
frame is displayed every 1/30th of a second (i.e.: at 30HZ) for NTSC,
or every 1/25th of a second (25Hz) for PAL. By offsetting the vertical
position of the start of the first scanline by half a scanline, and due to
the persistence of the phosphor coating on the TV, the eye/brain
combines these frames displaying alternate lines into a single image
of greater vertical resolution than each frame. It's tricky and messy,

14
but a glorious 'hack' solution to the problem of lack of bandwidth in a
TV signal.
The upshot of this is that a single FRAME of a TV image is actually
only half of the vertical resolution of the image. Thus, a NTSC frame
is 525/2 = 262.5 lines deep, and a PAL frame is 625/2 = 312.5 lines
deep. The extra .5 of a line is used to indicate to the TV if a frame is
the first (even lines) or second (odd lines) of an image. An aside:
about a year ago, the #stella community discussed this very aspect of
TV images, and if it would be possible for the Atari to exploit this to
generate a fully interlaced TV frame - and, in fact, it is possible. So
some 25 years after the machine was first released, some clever
programmers discovered how to double the resolution of the graphics.
Back to basics, though. We just worked out that a single frame on a
TV is 262.5 (NTSC) and 312.5 (PAL) lines deep. And that that extra
.5 scanline was used to tell the TV if the frame was odd or even. So
the actual depth of a single frame is 262 (NTSC) and 312 (PAL) lines.
Now, if TV's aren't told that a frame is odd, they don't offset the first
scanline by half a scanline's depth - and so, scanlines on successive
frames are exactly aligned. We have a non-interlaced image,
displayed at 60Hz (NTSC) or 50Hz (PAL). And this is the 'standard'
format of an Atari 2600 frame sent to a TV.
In summary, an Atari 2600 frame consists of 262 scanlines (NTSC) or
312 scanlines (PAL), sent at 60Hz (NTSC) or 50Hz (PAL) frequency.
It is the job of the '2600 programmer to make sure that the correct
number of scanlines are sent to the TV at the right time, with the right
graphics data, and appropriate control signals to indicate the end of
the frame are also included.
One other aspect of the difference between TV standards - and a
consequence of the incremental development of television technology
(first we had black and white, then color was added - but our black
and white TVs could still display a color TV signal - in black and
white) - is that color information is encoded in different places in the
signal for NTSC and PAL (and SECAM) systems. So, even though
the programmer is fully-responsible for controlling the number of
scanlines per frame, and the frequency at which frames are generated,

15
it is the Atari itself which encodes the color information into the TV
signal.
This is the fundamental reason why there are NTSC, PAL, and
SECAM Atari systems - the encoding of the color information for the
TV signal! We get some interesting combinations of Atari and games,
for example...
If we plug a NTSC cartridge into a PAL '2600, then we know that the
NTSC game is generating frames which are 262 lines deep, at 60Hz.
But a PAL TV expects frames 312 lines deep, at 50Hz. So the image
is only 262/312 of the correct depth, and also images are arriving
60/50 times faster than expected. If we were viewing on a NTSC TV,
then the PAL console would be placing the color information for the
TV signal in a completely different place than the TV is expecting -
so we would see our game in black and white.
There are several combinations you can play with - but the essence is
that if you use a different '2600 variant than TV, you will only get
black and white (e.g.: NTSC '2600 with PAL TV or PAL '2600 with
NTSC TV) as the color information is not in at the correct frequency
band of the signal. And if you plug in a different cartridge than TV
(e.g.: NTSC cart with PAL TV or vice-versa) then what you see
depends on the television's capability to synchronize with the signal
being generated - as it is not only the incorrect frequency, but also the
incorrect number of scanlines.
All of this may sound complicated - but really all we need to do is
create a 'kernel' (which is the name for your section of an Atari 2600
program which generates the TV frame) which does the drawing
correctly - and once that's working, we don't really need to worry too
much about the TV - we can abstract that out and just think about
what we want to draw.
Well, I lie, but don't want to scare you off TOO early ;-)
Next session, let's have a look how the processor interacts with
hardware, I/O and memory.

16

17
Session 3: The TIA and 6502
Let's spend this session having a look at how some of the hardware
generates a scanline for the TV. Remember in session 2, we had a
good look at how a TV works, and in particular how a TV frame is
composed of 262 scanlines (NTSC) or 312 scanlines (PAL). It's the
programmer's job to control how many scanlines are sent to the TV,
but it is the '2600 which builds the actual signal comprising the color
and intensity information for any scanline. This color and intensity
information is derived from the internal 'state' of the TIA (Television
Interface Adaptor) chip inside the '2600. The TIA is responsible for
creating the signal for a single scanline for the TV.
The TIA 'draws' the pixels on the screen 'on-the-fly'. Each pixel is one
'clock' of the TIA's processing time, and there are exactly 228 color
clocks of TIA time on each scanline. But a scanline consists of not
only the time it takes to scan the electron beam across the picture
tube, but also the time it takes for the beam to return to the start of the
next line (the horizontal blank, or retrace). Of the 228 color clocks,
160 are used to draw the pixels on the screen (giving us our maximum
horizontal resolution of 160 pixels per line), and 68 are consumed
during the retrace period.
The 6502 clock is derived from the TIA clock through a divide-by-
three. That is, for every single clock of 6502 time, three clocks of TIA
time have passed. Therefore, there are *exactly* 228/3 = 76 cycles of
6502 time per scanline. The 6502 and TIA perform a complex 'in-step'
dance - one cycle of 6502, three cycles of TIA. A side-note: 76 cycles
per line x 262 lines per frame x 60 frames per second = the number of
6502 cycles per second for NTSC (= 1.19MHz, roughly).
So, as our 6502 program is executing its instructions, the TIA is also
sending data for each scanline. Every cycle of 6502 time we know
that the TIA has sent 3 color clocks of information to the TV. If the
TIA was in the first 68 color clocks of the scanline, then it was in the
horizontal retrace period. If it was in color clock 68-227, then it was
drawing pixels on the visible scanline. And so we go, the 6502
program is doing its stuff and at the very same time the TIA doing its
stuff. The magic happens when you start changing the 'state' of the
TIA, because those changes are reflected immediately in the TIA

18
output to the TV! Since the 6502 is 'locked' to the TIA through their
shared timing origin, it is possible for the programmer to know
exactly where on a scanline the TIA is currently drawing (i.e.: what
pixel). And knowing where the TIA 'is at' allows us to change what it
is drawing at particular positions on the scanline. We don't have much
scope for change, but we do have some. And it is this ability that
master '2600 programmers use to achieve all those amazing effects.
Naturally, to achieve this sort of precision timing, programmers have
to know exactly how long the 6502 takes to do each instruction. For
example, a load/store combination takes a minimum of 5 cycles of
6502 time. How many onscreen pixels is that? Remember, 3 color
clocks per 6502 cycle, so that's 3 x 5 = 15 pixels. Essentially, if one
were using the quickest possible load/store combinations to change
the color of, say, the background, then the absolute quickest this could
be done would be every 15 pixels (i.e.: just on 11 times per scanline).
Don't despair! It is not necessary for you to learn how to count 6502
cycles at this stage. Those sort of tricks are for more advanced '2600
programming - and the original design of the TIA hardware made this
unnecessary. It's only when you need to push the hardware (TIA)
beyond its original design, that you will come to appreciate the
benefit inherent in the way that the 6502 and TIA are intricately tied
together.
Next session we'll have a closer look at the TIA and how it
determines what color to use for each pixel of the scanline it is
drawing. In particular, we'll start to look at background, playfield,
sprite, missile and ball graphics.

19
Session 4: The TIA
Last session we were introduced to the link between the 6502 and the
TIA. Specifically, how every cycle of 6502 time corresponds to three
color clocks of TIA time.
The TIA determines the color of each pixel based on its current 'state',
which contains information about the color, position, size and shape
of objects such as background, playfield, sprites (2), missiles (2) and
ball. As soon as the TIA completes a scanline (228 cycles, consisting
of 160 color clocks of pixels, and 68 color clocks of horizontal blank),
it begins drawing the next scanline. Unless there is some change to
the TIA's internal 'state' during a scanline, then each scanline will be
absolutely identical.
Consequently, the absolute simplest way to 'draw' 262 lines for a
NTSC frame is to just WAIT for 262 (lines) x 76 (cycles per line)
6502 cycles. After that time, the TIA will have sent 262 identical lines
to the TV. There are other things that we'd need to do to add
appropriate control signals to the frame, so that the TV would
correctly synch to the frame - but the essential point here is that we
can leave the TIA alone and let it do its stuff. Without our
intervention, once the TIA is started it will keep sending scanlines (all
the same!) to the TV. And all we have to do to draw n scanlines is
wait n x 76 cycles.
It's time to have a little introduction to the 6502.
The CPU of the '2600, the 6502, is an 8-bit processor. Basically this
means that it is designed to work with numbers 8-binary-bits at a
time. An 8-bit binary number has 8 0's or 1's in it, and can represent a
decimal number from 0 to 255. Here's a quick low-down on binary...
In our decimal system, each digit 'position' has an intrinsic value. The
units position (far right) has a value of 1, the tens position has a value
of 10, the hundreds position has a value of one hundred, the thousands
position has a value of 1000, etc. This seems silly and obvious - but
it's also the same as saying the units position has a value of 10^0
(where ^ means to the power of), the tens position has a value of

20
10^1, the hundreds position has a value of 10^2, etc. In fact, it's clear
to see that position number 'n' (counting right to left, from n=0 as the
right-most digit) has a value of 10^n.
That's true of ANY number system, where the 10 is replaced by the
'base'. For example, hexadecimal is just like decimal, except instead
of counting 10 digits (0 to 9) we count 16 digits (0 to 15, commonly
written 0 1 2 3 4 5 6 7 8 9 A B C D E F - thus 'F' is actually a hex
digit with decimal value 15 - which again, is 1 x 10^1 + 5 x 10^0 ). So
in hexadecimal (or hex, for short), the digit positions are 16^n. There's
no difference between hex, decimal, binary, etc., in terms of the
interpretation of a number in that number system. Consider the binary
number 01100101 - this is (reading right to left)... 1 x 2^0 + 0 x 2^1 +
1 x 2^2 + 0 x 2^3 + 0 x 2^4 + 1x2^5 + 1x2^6 + 1x2^7. In decimal, the
value is 101. So, %01100101 = 101 where the % represents a binary
number. Hexadecimal numbers are prefixed with a $.We'll get used to
using binary, decimal and hex interchangeably - after all they are just
different ways of writing the same thing. When I'm talking about
numbers in various bases, I'll include the appropriate prefix when not
base-10.
So now it should be easy to understand WHY an 8-bit binary number
can represent decimal values from 0 to 255 - the largest binary
number with 8 bits would be %11111111 - which is 1 x 2^7 + 1 x 2^6
+ .... + 1 x 2^0.
The 6502 is able to shift 8-bit numbers to and from various locations
in memory (referred to as addresses) - each memory location is
uniquely identified by a memory address, which is just like your
house street address, or your post-box number. The processor is able
to access memory locations and retrieve 8-bit values from, or store 8-
bit values to those locations.
The processor itself has just three 'registers'. These are internal
memory/storage locations. These three registers (named 'A', 'X', and
'Y') are used for manipulating the 8-bit values retrieved from memory
locations and for performing whatever calculations are necessary to
make your program do its thing.

21
What can you do with just three registers? Not much... but a hell of a
lot of not much adds up to something! Just like with the TV frame
generation, a lot of work is left for the programmer. The 6502 cannot
multiply or divide. It can only increment, decrement, add and
subtract, and it can only work with 8-bit numbers! It can load data
from one memory location, do one of those operations on it (if
required) and store the data back to memory (possibly in another
location). And out of that capability comes all the games we've ever
seen on the '2600. Amazing, innit?
At this stage it is probably a good idea for you to start looking for
some books on 6502 programming - because that's the ONLY option
when programming '2600. Due to the severe time, RAM and ROM
constraints, every cycle is precious, every bit is sacred. Only the
human mind is currently capable of writing programs as efficiently as
required for '2600 development.
That was a bit of a diversion - let's get back to the TIA and how the
TIA and 6502 can be used together to draw exactly 262 lines on the
TV. Our first task is simply to 'wait' for 76 cycles, times 262 lines.
The simplest way to just 'wait' on the 6502 is just to execute a 'nop'
instruction. 'nop' stands for no-operation, and it takes exactly two
cycles to execute. So if we had 38 'nop's one after the other, the 6502
would finish executing the last one exactly 76 cycles after it started
the first. And assuming the first 'nop' started at the beginning of the
scanline, then the TIA (which is doing its magic at the same time)
would have just finished the last color clock of the scanline at the
same time as the last nop finished. In other words, the very next
scanline would then start as our 6502 was about to execute the
instruction after the last nop, and the TIA was just about to start the
horizontal retrace period (which, as we have learned, is 68 color
clocks long).
How do we tell the 6502 to execute a 'nop'? Simply typing nop on a
line by itself (with at least one leading space) in the source code is all
we have to do. The assembler will convert this mnemonic into the
actual binary value of the nop instruction.

22
For example...
; sample code
NOP
nop
; end of sample code
The above code shows two nop instructions - the assembler is case-
insensitive. Comments are preceded by semicolons, and occupy the
rest of a line after the “;”. Opcodes (instructions) are mnemonics -
typically 3 letters - and must not start at the beginning of a line! We
can have only one opcode on each line. An assembler would convert
the above code into a binary file containing two bytes - both $EA
(remember, a $ prefix indicates a hexadecimal number) = 234
decimal. When the 6502 retrieves an opcode of $EA, it simply pauses
for 2 cycles, and then executes the next instruction. The code
sequence above would pause the processor for 4 cycles (which is 12
pixels of TIA time, right?!)
But there are better ways to wait 76 cycles! After all, 38 'nop's would
cost us 38 bytes of precious ROM - and if we had to do that 262 times
(without looping), that would be 9432 bytes - more than double the
space we have for our ENTIRE game!
The TIA is so closely tied to the 6502 that it has the ability to stop and
start the 6502 at will. Funnily enough, at the 6502's will! More
correctly, the 6502 has the ability to tell the TIA to stop it (the 6502),
and since the TIA automatically re-starts the 6502 at the beginning of
every scanline, the very next thing the 6502 knows after telling the
TIA to stop the CPU is that the TIA is at the beginning of the very
next scanline. In fact, this is the way to synchronize the TIA and 6502
if you're unsure where you're at - simply halt the CPU through the
TIA, and next thing you know you're synchronized. It's like a time-
warp, or a frozen sleep - you're simply not aware of time passing -
you say 'halt' and then continue on as if no halt has happened. It has,
but the 6502 doesn't know it.
This CPU-halt is achieved by writing any value to a TIA 'register'
called WSYNC. Before we get into reading and writing values to and

23
from 'registers' and 'memory', and what that all means, we'll need to
have a look at the memory architecture of the '2600 - and how the
6502 interacts with memory, including RAM and ROM.
We'll start to explore the memory map (architecture) and the 6502's
interaction with memory and hardware, in our next installment.

24

25
Session 5: Memory Architecture
Let's have a look at the memory architecture of the '2600, and how the
6502 communicates with the TIA and other parts of the '2600
hardware.
The 6502 communicates with the TIA by writing, and sometimes
reading values to/from TIA 'registers'. These registers are 'mapped' to
certain fixed addresses in the 6502's addressing range.
In its simplest form, the 6502 is able to address 65536 (2^16) bytes of
memory, each with a unique address. Each 16-bit address ultimately
directly controls the 'wires' on a 16-bit bus (=pathway) to memory,
selecting the appropriate byte of memory to read/write. However, the
'2600 CPU, the 6507, is only able to directly access 2^13 bytes (8192
bytes) of memory. That is, only 13 of the 16 address lines are actually
connected to physical memory.
This is our first introduction to 'memory mapping' and mirroring.
Given that the 6507 can only access addresses using the low 13 bits of
an address, what happens if bit 14, 15, or 16 of an address is set?
Where does the 6507 go to look for its data? In fact, bits 14, 15, and
16 are totally ignored - only the low 13 bits are used to identify the
address of the byte to read/write. Consider the valid addresses which
can be formed with just 13 bits of data...
from %0000000000000 to %1111111111111
= from $0000 to $1FFF
Note: $0000 is the same as 0 is the same as %000 is the same as
%0000000000. 0 is 0. In the same vein, any number with leading
zeros is the same as that number without zeros. I often see people
writing $02 when they could just write $2, or better yet... 2. Your
assembler doesn't care how numbers are written. It's the value of
numbers that matter. So use the most readable form of numbers,
where it makes sense. Remember, 0 is 0000 is %0 is $000
So we've just written down the minimum and maximum addresses
that can be formed with 13 bits. This gives us our memory 'footprint' -

26
the absolute extremes of memory which can be accessed by the 6507
through a 13-bit address.
This next idea is important, so make sure you understand! All
communication between the CPU and hardware (be it ROM, RAM,
I/O, the TIA, or other) is through reads and/or writes to memory
locations. Read that again.
The consequences of this are that some of that memory range
(between $0 and $1FFF) must contain our RAM, some must contain
our ROM (program), and some must presumably allow us to
communicate with the TIA and whatever other
communication/control systems the machine has. And that's exactly
how it works.
We have just 128 bytes of RAM on the '2600. That RAM 'lives' at
addresses $80 - $FF. It's always there, so any write to location $80
(128 decimal) will actually be to the first byte of RAM. Likewise, any
read from those locations is actually reading from RAM.
So we've just learned that the 6507 addresses memory using 13 bits to
uniquely identify the memory location, and that some areas of that
memory 'range' are devoted to different uses. The area from $80 to
$FF is our 128 bytes of RAM!
Don't worry too much about understanding this yet, but TIA registers
are mapped in the memory addresses 0 to $7F, RIOT (a bit of '2600
hardware we'll look at later) from $280 - $2FF (roughly), and our
program is mapped into address range $1000 to $1FFF (a 4K size).
Note: 1K = 1024 bytes = $400 bytes = %10000000000 bytes.
In essence, then, to change the state of the TIA we just have to write
values to TIA 'registers' which look to the 6507 just like any other
memory location and which 'live' in addresses 0 to $7F. To the 6502
(and I'll revert to that name now we've emphasized that the 6507 only
has 13 address lines as opposed to the 6502's 16 and all other things
are equal) a read or write of a TIA register is just the same as a read or
write to any other area of memory. The difference is, the TIA is
'watching' those locations, and when you write to that memory, you're

27
really changing the TIA 'registers' - and potentially changing what it
draws on a scanline.
So now we know how to communicate with the TIA, and where it
'lives' in our memory footprint. And we know how to communicate
with RAM, and where it 'lives'. Even our program in ROM is really
just another area in our memory 'map' - the program that runs from a
cartridge is accessed by the 6502 just by reading memory locations. In
effect, the cartridge 'plugs-in' to the 6502 memory map. Let's have a
quick look at what we know so far about memory...
Address Range Function
$0000 - $007F TIA registers
$0080 - $00FF RAM
$0200 - $02FF RIOT registers
$1000 - $1FFF ROM
We'll keep it simple for now - though you may be wondering what
'lives' in the gaps in that map, between the bits we know about. The
short answer is 'not much' - so let's not worry about those areas for
now. Just remember that when we're accessing TIA registers, we're
really accessing memory from 0 to $7F, and when we access RAM,
we're accessing memory from $80 to $FF, etc.
Now that we understand HOW the 6502 communicates with the TIA,
one of our next steps will be to start to examine the registers of the
TIA and what happens when you modify them. It won't be long now
before we start to understand how it all works. Stay tuned.

28

29
Sessions 6 & 7: The TV and our Kernel
It’s time to complete our understanding of what constitutes a TV
frame - exactly what has to be sent to the TV to make it display a
picture correctly.
Here's an updated image of the TV timing diagram, taken from the
Stella Programming Guide. Some of the numbers should make sense,
now.
Your understanding of the numbers across the top should be good, but
just to briefly revisit what they mean:
There are 228 TIA color clocks on each scanline. 160 of those are
spent drawing pixels, and 68 of them are the horizontal retrace period
for the TV's scanning of the electron beam back to the start of the next
line. In the diagram we see the horizontal blank (retrace) at the left
side, so our very first color clock for the TIA's first visible pixel on

30
the screen is cycle #68. We should understand this timing fairly well
by now.
What we're going to finalize this session is our understanding of the
numbers down the right hand side - which represent the scanlines sent
to the TV. The diagram shows a valid NTSC TV frame - and thus it
consists of 262 scanlines. A PAL diagram would consist of 312
scanlines - and the inner 'picture' area would increase from 192 lines
to 242 lines.
Let's go from the top. The first thing that the TV needs is a 'reset
signal' to indicate to it that a new frame is starting. This is the 3-
scanline section at the very top of the frame. There are special ways to
trigger the TIA to send this signal, but we're not going to have to
worry too much about understanding that - just about every game
does it exactly the same way - all we need to remember is that the first
thing to send is that reset trigger (called VSYNCH).
TVs are not all made the same. Some cut off more of the picture than
others, some show wider pictures, some show taller pictures, etc. To
'standardize' the picture, the diagram shows the recommended spread
of valid picture lines, surrounded by blank (or 'overscan') lines. In this
case, there are 192 lines of actual picture. We don't *HAVE* to stick
to this - we could steal some of the lines from the vertical blank
section, and some from the overscan section, and increase our picture
section appropriately.
As long as our total number of scanlines adds up to 262 for NTSC
TVs (or 312 for PAL TVs), then the TV will be able to display the
frame. But remember, the further we get 'out of specs' with this
method, the less likely it is that ALL TVs will show the picture
section in its entirety.

31
OK, let's march through the numbers on the right side of the diagram.
• 3 Scanlines devoted to the vertical synchronization
• 37 scanlines of vertical blank time
• 192 (NTSC) or 242 (PAL) lines of actual picture
• 30 scanlines of overscan
Total: 262 scanlines (NTSC) or 312 scanlines (PAL), constituting a
valid TV frame. You send the TV this, and it will be a rock-solid
display.
One interesting aside: if you send a PAL TV an odd number of
scanlines, it will only display in black and white. I don't know the
exact reason for this, but it must be to do with where/when the color
signal is encoded in the TV image, and where the TV looks for it. So
remember, always send an even number of scanlines to a PAL TV.

32
You can send frames with different numbers of scanlines. That is, 262
and 312 are not totally immutable values. But if you do vary these
numbers, it is highly likely that an increasing number of TVs - the
further you deviate from these standards - will simply not be able to
display your image. So, although you can... you shouldn't.
Fortunately, emulators available to us today are able to show us the
actual number of scanlines which are being generated on each frame.
This must have been quite a challenging task for early '2600
programmers - nowadays it’s quite easy to make sure we get it right.
Well, now we have all the knowledge we need about the composition
of a TV frame. Once we know how to make the TIA generate its reset
signal at the top of the frame, and how to wait the correct amount of
time to allow us to correctly generate the right number of scanlines
for those other sections, we will be able to design our first 'kernel' -
the bit that actually 'draws' the frame.
When we have our kernel working, there's not much more to a '2600
game other than moving sprites around, changing colors, etc. :-)

33
Session 8: Our First Kernel
We're going to jump right in, now that we know what a kernel needs
to do. Seen on the next pages is the source code for a working '2600
kernel. It displays the image you see here. Not bad for just a few lines
of code, right? Over the next few sessions we'll learn how to modify
this code, and assemble it - and, of course, what all those strange
words mean.
For now, have a look at the structure of the code on the next pages
and note how closely it relates to the structure of the TV frame
diagram in the earlier sessions. Don't expect to understand everything
- we'll walk through every line soon. For now, all you need to know is
that the "sta WSYNC" is where the 6502 is telling the TIA to halt the
6502 until the start of the next horizontal blank period (which is at the
start of the next scanline, at TIA color clock 0). So each of those lines
is where one complete scanline has been sent to the TV by the TIA.
Have a close look at those lines, and see how there are 3, followed by
37 (vertical blank period), followed by 192 (picture) followed by 30
(overscan) - and how this exactly matches our TV frame diagram
from session 6.

34
Here's the source-code...
processor 6502
include "vcs.h"
include "macro.h"
SEG
ORG $F000
Reset
StartOfFrame
; Start of vertical blank processing lda #0
sta VBLANK
lda #2
sta VSYNC
; 3 scanlines of VSYNCH signal... sta WSYNC
sta WSYNC
sta WSYNC
lda #0
sta VSYNC
; 37 scanlines of vertical blank... sta WSYNC
sta WSYNC
sta WSYNC
sta WSYNC
sta WSYNC
sta WSYNC
sta WSYNC
sta WSYNC
sta WSYNC
sta WSYNC
sta WSYNC
sta WSYNC
sta WSYNC
sta WSYNC
sta WSYNC
sta WSYNC
sta WSYNC
sta WSYNC
sta WSYNC
sta WSYNC
sta WSYNC
sta WSYNC
sta WSYNC
sta WSYNC

35
sta WSYNC
sta WSYNC
sta WSYNC
sta WSYNC
sta WSYNC
sta WSYNC
sta WSYNC
sta WSYNC
sta WSYNC
sta WSYNC
sta WSYNC
sta WSYNC
sta WSYNC
; 192 scanlines of picture...
ldx #0
REPEAT 192; scanlines
inx
stx COLUBK
sta WSYNC
REPEND
lda #%01000010
sta VBLANK ; end of screen - enter blanking
; 30 scanlines of overscan... sta WSYNC
sta WSYNC
sta WSYNC
sta WSYNC
sta WSYNC
sta WSYNC
sta WSYNC
sta WSYNC
sta WSYNC
sta WSYNC
sta WSYNC
sta WSYNC
sta WSYNC
sta WSYNC
sta WSYNC
sta WSYNC
sta WSYNC
sta WSYNC
sta WSYNC
sta WSYNC
sta WSYNC
sta WSYNC
sta WSYNC

36
sta WSYNC
sta WSYNC
sta WSYNC
sta WSYNC
sta WSYNC
sta WSYNC
sta WSYNC
jmp StartOfFrame
ORG $FFFA
.word Reset ; NMI
.word Reset ; RESET
.word Reset ; IRQ
END
Yes, this is a complete kernel. It's not that difficult!
Note that I tried to make the code sample as understandable as
possible. It is certainly not the most efficient code - for it uses too
many bytes of ROM to achieve its effect. But we're learning, and
what's important right now is understanding how things work.
REPEAT/REPEND
You have probably noticed the line “REPEAT 192” halfway down the
kernel code. Before discussing this, let me first explain a little bit
about the assembler - DASM. As you have probably gathered by now,
we make our changes to the source code - which is meant to be a
human-readable form of the program. We feed that source code to the
assembler - and provided the assembler doesn't find any errors in the
format of the code, it will convert the human-readable format into a
binary format which is directly runnable on the '2600 (burn it to an
EPROM, plug the EPROM into a cartridge, and plug the cartridge
into a '2600) or on an emulator (just load the binary into the
emulator).
Consider the following snippet of code...
sta WSYNC
sta WSYNC
sta WSYNC

37
That's 3 scanlines of 6502-halting. DASM has a nice feature where it
can output a listing file which shows both our original source code,
but also the binary numbers it replaces that code with. We'll have a
close look at this feature later (and how to 'drive' DASM) - but those
wishing to look through the DASM documentation should look for
the "-l" switch.
When the above code fragment (from our original kernel) is
assembled, the listing file contains the following...
25 f008 85 02 sta WSYNC
26 f00a 85 02 sta WSYNC
27 f00c 85 02 sta WSYNC
The leftmost number is the line-number in our original source. The
next 4-digit hexadecimal number is the address in ROM of the code.
Don't worry too much about that now - but do notice that each line of
code is taking 2 bytes of ROM. That is, the first line starts at F008 and
the next line starts at F00A (2 bytes different). That's because the "sta
WSYNC" assembles to two bytes - $85 and $02. In fact, there's a 1:1
correspondence here between the mnemonic ("abbreviation") of our
instruction - the human readable form - and the binary - the machine-
readable form. The "sta" instruction (which stands for store-
accumulator) has an opcode of $85. Whenever the 6502 fetches an
instruction from ROM, and that instruction opcode is $85, it will
execute the "store accumulator" instruction.
The above code fragment, then, shows three consecutive "$85 $02"
pairs, corresponding exactly to our three consecutive "sta WSYNC"
pairs. Can you guess the actual address of the TIA WSYNC register?
If you need a clue, load up the "vcs.h" file and see what you can find
in there. It should be clear to you that the assembler has simply
replaced the WSYNC with an actual numerical value. To be exact,
after assembling the file, it has decided that the correct value for
WSYNC is 2 - and replaced all occurrences of WSYNC with the
number 2 in the binary image.

38
OK, so that was pretty straightforward - now let's discuss that
"REPEAT" thingy...
REPEAT 3
sta WSYNC
REPEND
This does do exactly the same thing, as you might have guessed - but
maybe not quite in the way that you think. Let's have a look at the
listing file for this one...
31 f008 REPEAT 3
32 f008 85 02 sta WSYNC
31 f008 REPEND
32 f00a 85 02 sta WSYNC
31 f00a REPEND
32 f00c 85 02 sta WSYNC
33 f00e REPEND
If you look carefully, you can see in the source code at right, we still
have exactly 3 lines of code - the "sta WSYNC" code - and in the
middle, we still have 3 pairs of "$85 $02" bytes in our binary. All that
has changed, really, is that our source code was smaller and easier to
write (especially if we're considering dozens of lines of "sta
WSYNC"s).
DASM is a pretty good assembler - and it is loaded with features
which make writing code easier. One of these features is the “repeat”
construct and it simplifies the writing of code. Wrap any code with
"REPEAT n" (where n is a number > 0), and "REPEND" and the
assembler will automatically duplicate the surrounded code in the
binary n times. Note, we're not saving ROM, we're just having an
easier time writing the code in the first place.
So this highlights, I hope, that it is possible to include things in your
source code which are directions to the assembler - basically a guide
to the assembler about how to interpret the code. REPEAT is one of
those. There are several others, and we will no doubt learn about these
in future sessions.

39
I won't introduce too much more 6502 at this stage - but just be aware
that using the REPEAT structure will indeed simplify the code
visually, but it does not reduce ROM usage. One way (of several) to
do that is to incorporate the "sta WSYNC" into a loop, which iterates
37 times. Here's a teaser...
; 37 scanlines of vertical blank... ldx #0
VerticalBlank sta WSYNC
inx
cpx #37
bne VerticalBlank
Remember, the 6502 has three "registers" named "X", "Y", and "A".
In the code above, we initialize one register to the value 0 through
"ldx #0", then we do the halt "sta WSYNC" which will halt the 6502
until the TIA finishes the current scanline. Then we increment the x-
register "inx" by one, then we compare the x-register with 37 "cpx
#37". This is in essence asking "have we done this 37 times yet". The
final line "bne VerticalBlank" transfers control of the program back to
the line "VerticalBlank" if the comparison returned (in effect) "no".
The actual listing file for that code contains the following...
41 f012 a2 00 ldx #0
42 f014 85 02 VerticalBlank sta WSYNC
43 f016 e8 inx
44 f017 e0 25 cpx #37
45 f019 d0 f9 bne VerticalBlank
If we count the number of bytes in the binary output we can see that
this code takes just 9 bytes of ROM. If we had 37 "sta WSYNC"
instructions, at two bytes each, that's 74 bytes of ROM. Using the
REPEAT structure, as noted, will still take 74 bytes of ROM. So
looping is a much more efficient way to do this sort of thing. There
are even MORE efficient ways, but let's not get ahead of ourselves.
We are a bit ahead of ourselves here, so don't panic. Just remember,
though, that DASM is a tool designed to aid us humans. It is full of
things which make the code more readable (less "ugly") but taking
lines of code out does not necessarily mean our code is more efficient
- or uses less ROM

40
Next session we'll have a look at how to actually assemble this code
using DASM, and how to make modifications so you can play with it
and test it on the emulator to see what effect your changes have.

41
Session 9: 6502 and DASM – Assembling the basics
This session we're going to have a look at the assembler "DASM",
what it does, how it does it, why it does it, and how to get it to do it :-)
The job of an assembler is to convert our source code into a binary
image which can be run by the 6502. This conversion process
ultimately replaces the mnemonics (the words representing the 6502
instructions we use when writing in assembler) and the symbols (the
various names we use for things, such as labels to which we can
branch, and various other things like the names of TIA registers, etc)
with numerical values.
So ultimately, all the assembler needs to do is figure out a numerical
value for all the things which become part of the binary - and place
that value in the appropriate place in the binary.
We've already had a brief introduction to a 6502 instruction - the one
called "nop". This is the no-operation instruction which simply takes
2 cycles to execute. Whenever we enter "nop" into our source code,
the assembler recognizes this as a 6502 instruction and inserts into the
binary the value $EA. This shows that there can be a simple 1:1
relationship between source-code and the binary.
"nop" is a single-byte instruction - all it requires is the opcode, and the
6502 will happily execute it. Some instructions require additional
"parameters" - the "operands". The 6502 microprocessor can use an
additional 1 or 2 bytes of operand data for some instructions, so the
total number of bytes for a 6502 "instruction" can be 1, 2 or 3.
DASM is the assembler used by most (if not all) modern-day '2600
programmers. It is a multi-platform assembler written in 1988 by Matt
Dillon (you should all find his email address and send him a "thank-
you" sometime). It's a great tool.
DASM isn't just capable of assembling 6502 (and variant) code - it
also has inbuilt capability to assemble code for several other
microprocessors. Consequently, one of the very first things that it is
necessary to do in our source code is tell DASM what processor the
source code is written for.

42
processor 6502
This should be just about the first line in any '2600 program you
write. If you don't include it, DASM will probably get confused and
spit out errors. That's simply because it is trying to assemble your
code as if it were written for another processor.
We've just seen how mnemonics (the standard names for instructions)
are converted into numerical values by the assembler. Another job the
assembler does is convert labels and symbols into values. We've
already encountered both of these in our previous sessions, but you
may not be familiar with their names.
Whenever DASM is doing its job assembling, it keeps a list of all the
"words" it encounters in a file in an internal structure called a symbol
table. Think of a symbol as a name for something. Remember the "sta
WSYNC" instruction we used to halt the 6502 and wait for the
scanline to be rendered? The "sta" is the instruction, and "WSYNC" is
a symbol. When it first encounters this symbol, DASM doesn't know
much about it, other than what it's called (ie: "WSYNC"). What
DASM needs to do is work out what the *value* of that symbol is, so
that it can insert that value into the binary file.
When it's assembling, DASM puts all the symbols it finds into its
symbol table - and associated with each of these is a value. If it
doesn't "know" the value, that's OK - DASM will keep assembling the
rest of the file quite happily. At some point, something in the code
might tell DASM what the value for a symbol actually IS - in which
case DASM will put that value in its symbol table alongside the
symbol. So whenever that symbol is used anywhere, DASM now
knows its correct value to put into the binary file.
In fact, it is absolutely necessary for all symbols which go into the
binary file to be given values at some point. DASM can't guess values
- it's up to you, the programmer, to make sure this happens. A symbol
doesn't have to be given a value at any PARTICULAR point in the
code, but it does have to be given a value somewhere in the code.
DASM will make multiple "passes" - basically going through the
code from beginning to end again and again until it manages to
resolve all the symbols to correct values.

43
We've already seen in some sample code how "sta WSYNC" appears
in our binary file as the bytes $85 $02. The first byte $85 is the "sta"
instruction (one variant of many - but let's keep it simple for now) and
it is followed by a single byte giving the address of the location into
which the byte in the "A" register is to be stored. We can see this
address is location 2 in memory. Somehow, DASM has figured out
from the code that the symbol WSYNC has a value of 2, and when it
creates the binary file it replaces all occurrences of the symbol with
the numeric value 2.
How did it get the value 2? Remember, WSYNC is one of the TIA
registers. It appears to the 6502 as a memory location, as the TIA
registers are "mapped" into locations 0 - $7F. The file "vcs.h" defines
(in a roundabout way) the values and names (symbols) for all of the
TIA registers. By including the file "vcs.h" as a part of the assembly
for any source file, we automatically tell DASM the correct numeric
value for all of the TIA register "names".
That's why, at the top of most files, just after the processor statement,
we see...
include "vcs.h"
You don't really need to know much about vcs.h at this stage - but be
aware that a "standardized" version of this file is distributed with the
DASM assembler as the '2600 support files package. I would advise
you to always use the latest and greatest version of this file. Standards
help us all.
So now we know basically what DASM does with symbols - it keeps
an internal list of symbols - and their values, if known. DASM will
keep going through the code and "resolving" the symbols into
numeric values, until it is complete (or it couldn't find ANYTHING to
resolve, in which case it gives an error). Once all symbols have been
resolved, your code has been completely processed by the assembler,
and it creates the binary image/file for you - and assembly is
complete.
To summarize: DASM converts source-code consisting of instructions
(mnemonics) and symbols into a binary form which can be run by the

44
6502. The assembler converts mnemonics into opcodes (numbers),
and symbols into numbers which it calculates the value of during the
assembly process.
DASM is a command-line program - that is, it runs under DOS (or
whatever platform you happen to choose, provided you have a
runnable version for that platform). DASM is provided with full
source-code (it's written in C) so as long as you have a C-compiler
handy, you can port it to just about any platform under the sun.
It does come with a manual - and it's always a good idea to familiarize
yourself with its capabilities. In the interests of getting you up and
running quickly, so you can actually assemble the sample kernel
posted a session or two ago, here's what you need to type on the
command-line...
dasm kernel.asm -lkernel.txt -f3 -v5 -okernel.bin
This is assuming that the file to assemble is named "kernel.asm" (.asm
is a standard prefix for assembler files, but some prefer to use .s - you
can use whatever you want, really, but I always use .asm). Anything
prefixed with a minus-sign ("-") is a "switch" - which tells DASM
something about what it is required to do. The -l switch we discussed
very briefly, and that tells DASM to create a listing file - in this case,
it will write a listing to the file "kernel.txt". The -o switch tells DASM
what file to use for the output binary - in this case, the binary will be
written to "kernel.bin". That file can be loaded into an emulator, or
burned on an EPROM - it is the ROM file, in other words.
The other switches "-f3" and "-v5" control some internals of DASM -
and for now just assume you need these whenever you assemble with
DASM. Remember, if you're curious you can always read the manual!

45
If all goes well, DASM will output something like this...
DASM V2.20.05, Macro Assembler (C)1988-2003
START OF PASS: 1
----------------------------------------------------------------------
SEGMENT NAME INIT PC INIT RPC FINAL PC FINAL RPC
f000 f000
RIOT [u]0280 0280
TIA_REGISTERS_READ [u]0000 0000
TIA_REGISTERS_WRITE [u]0000 0000
INITIAL CODE SEGMENT 0000 ???? 0000 ????
----------------------------------------------------------------------
1 references to unknown symbols.
0 events requiring another assembler pass.
--- Symbol List (sorted by symbol)
AUDC0 0015
AUDC1 0016
AUDF0 0017
AUDF1 0018
AUDV0 0019
AUDV1 001a
COLUBK 0009 (R )
COLUP0 0006
COLUP1 0007
COLUPF 0008
CTRLPF 000a
CXBLPF 0006
CXCLR 002c
CXM0FB 0004
CXM0P 0000
CXM1FB 0005
CXM1P 0001
CXP0FB 0002
CXP1FB 0003
CXPPMM 0007
ENABL 001f
ENAM0 001d
ENAM1 001e
GRP0 001b
GRP1 001c
HMBL 0024
HMCLR 002b
HMM0 0022
HMM1 0023
HMOVE 002a
HMP0 0020
HMP1 0021
INPT0 0008
INPT1 0009
INPT2 000a
INPT3 000b
INPT4 000c
INPT5 000d
INTIM 0284
NUSIZ0 0004
NUSIZ1 0005
Overscan f02c (R )
PF0 000d
PF1 000e

46
PF2 000f
Picture f01d (R )
REFP0 000b
REFP1 000c
RESBL 0014
Reset f000 (R )
RESM0 0012
RESM1 0013
RESMP0 0028
RESMP1 0029
RESP0 0010
RESP1 0011
RSYNC 0003
StartOfFrame f000 (R )
SWACNT 0281
SWBCNT 0283
SWCHA 0280
SWCHB 0282
T1024T 0297
TIA_BASE_ADDRESS 0000 (R )
TIM1T 0294
TIM64T 0296
TIM8T 0295
TIMINT 0285
VBLANK 0001 (R )
VDELBL 0027
VDELP0 0025
VDELP1 0026
VerticalBlank f014 (R )
VSYNC 0000 (R )
WSYNC 0002 (R )
--- End of Symbol List.
Complete.
Here we can actually see the symbol table, and the numeric values
that DASM has assigned to the symbols. If you look at the listing file,
wherever any of these symbols is used, you will see the corresponding
number in the symbol table has been inserted into the binary.
There are lots of symbols there, as the vcs.h file defines just about
everything you'll ever need to do with the TIA. The symbols which
are actually used in your code are marked with a (R ) - indicating
"referenced".
By default I include "vcs.h" and "macro.h" files in all source code.
These are standardized files for '2600 development, and distributed as
official DASM '2600 support files.
MACROs are a sort of text-processing language supported by DASM.
In the same way that the REPEAT keyword allowed us to repeat
blocks of code automatically, MACROs allow us to package common

47
functionality into a single keyword and have the assembler insert (and
tailor) code automatically.
There's nothing in the macro.h file we use, yet... but it is good practice
to include it - as it has some useful content already, and will have
more added from time to time.
As a teaser, consider the SLEEP macro... remember how we wanted
to delay 76 cycles for each scanline, and we used the "sta WSYNC"
capability of the TIA to halt the 6502 till the start of the next
scanline? Or how we used NOP to waste exactly 2 cycles. Use the
sleep macro to delay for any number of cycles you want... e.g.:
SLEEP 25 ; waste 25 cycles.
The SLEEP macro is defined in macro.h, if you want to see how it
does it.
Now you should be able to go and assemble the sample kernel I
provided earlier. Don't be afraid to have a play with things, and see
what happens! Experimenting is a big part of learning.
Soon we'll start playing with some TIA registers and seeing what
happens to our screen when we do that! For now, though, make sure
you are able to assemble and run the first kernel. If you have any
problems, ask for assistance and I'm sure somebody will leap to your
aid.

48

49
Session 10: Orgasm
We've had a brief introduction to DASM, and in particular
mnemonics (6502 instructions, written in human-readable format) and
symbols (other words in our program which are converted by DASM
into a numeric form in the binary).
Now we're going to have a brief look at how DASM uses the symbols
(and in particular the value for symbols it calculates and stores in its
internal symbol table) to build up the binary ROM image.
Each symbol the assembler finds in our source code must be defined
(ie: given an actual value) in at least one place in the code. A value is
given to a symbol when it appears in our code starting in the very first
column of a line. Symbols typically cannot be redefined (given
another value).
In an earlier session we examined how the code "sta WSYNC"
appeared in our binary file as $85 $02 (remember, we examined the
listing file to see what bytes appeared in our binary. At that point, I
indicated that the assembler had determined the value of the symbol
"WSYNC" was 2 (corresponding to the TIA register's memory
address) - through its definition in the standard vcs.h file.
But how does the assembler actually determine the value of a symbol?
The answer is that the symbol must be defined somewhere in the
source code (as opposed to just being referenced). Definition of a
symbol can come in several forms. The most straightforward is to just
assign a value...
WSYNC = 2
or... WSYNC EQU 2
The above examples are equivalent - DASM supports syntax (style)
which has become fairly standard over the years. Some people (me!)
like to use the = symbol, and some like to use EQU.

50
Note that the symbol in question must start in the very first column,
when it is being defined. In both cases, the value 2 is being assigned
to the symbol WSYNC. Wherever DASM encounters the symbol
WSYNC in the code, it knows to use the value 2.
That's fairly straightforward stuff. But symbols can be defined in
terms of other symbols! Also, DASM has a quite capable ability to
understand expressions, so the following is quite valid...
AFTER_WSYNC = WSYNC + 1
In this case, the symbol "AFTER_WSYNC" would have the value 3.
Even if the WSYNC label was defined after the above code, the
assembler would successfully be able to resolve the AFTER_WSYNC
value, as it does multiple passes through the code until symbols are all
resolved.
Symbols can also be given values automatically by the assembler.
Consider our sample kernel where we see the following code near the
start (here we're looking at the listing file, so we can see the address
information DASM outputs)...
5 0000 ???? SEG
6 f000 ORG $F000
7 f000
8 f000 Reset
9 f000
10 f000 StartOfFrame
11 f000
12 f000 ; Start of vertical blank processing 13 f000 a9 00 lda #0
14 f002 85 01 sta VBLANK
"Reset" and "StartOfFrame" are two symbols which are definitions at
this point because they both start at the first column of the lines they
are on. The assembler assigns the current ROM address to these
symbols, as they occur. That is, if we look at these "labels"
(=symbols) in the symbol table, we see...
StartOfFrame f000 (R )
Reset f000 (R )
They both have a value of $F000. This form of symbol (which starts
at the beginning of a line, but is not explicitly assigned a value) is
51
called a label, and refers to a location in the code (or more particularly
an address). How and why did DASM assign the value $F000 to these
two labels, in this case?
As the assembler converts your source code to a binary format, it
keeps an internal counter telling it where in the address space the next
byte is to be placed. This address increments by the appropriate
amount for each bit of data it encounters. For example, if we had a
"nop" (a 1-byte instruction), then the address counter that DASM
maintains would increment by 1 (the length of the nop instruction).
Whenever a label is encountered, the label is given the value of the
current internal address counter at the point in the binary image at
which the label occurs. The label itself does not go into the binary -
but the value of the label refers to the address in the binary
corresponding to the position of the label in the source code.
In the DASM output on the previous page, we can see the address in
column 2 of the output, and it starts at 0 (with ???? after it, indicating
it doesn't actually KNOW the internal counter/address at this point),
and (here's the bit I really want you to understand) it is set to $F000
when we get the "org $F000" line. "Org" stands for origin, and this is
the way we (the programmer) indicate to the assembler the starting
address of next section of code in the binary ROM. Just to complicate
things slightly, it is not the actual offset from the start of the ROM
(for a ROM might, for example, be only 4K but contain code
assembled to live at $F000-$FFFF - as in a 4K cartridge). So it's not
an offset, it's a conceptual address.
These labels are very useful to programmers to give a name to a point
in code, so that that point may be referred to by the label, instead of us
having to know the address. If we look at the end of our sample
kernel, we see...
113 f3ea 4c 00 f0 jmp StartOfFrame
The "jmp" is the mnemonic for the jump instruction, which transfers
flow of control to the address given in the two byte operand. In other
words, it's a GOTO statement. Look carefully at the binary numbers
inserted into the ROM (again, the columns are left to right, line
number, address, byte(s), source code). We see $4C, $00, $f0. The

52
opcode for JMP is $4C - whenever the 6502 fetches this instruction, it
forms a 16-bit address from the next two bytes ($00,$F0) and code
continues from that address. Note that the "StartOfFrame"
symbol/label has a value $F000 in our symbol table.
It's time to understand how 16-bit numbers are formed from two 8-bit
numbers, and how 0, $F0 translates to $F000. The 6502, as noted, can
address 2^16 bytes of memory. This requires 16 bits. The 6502 itself
is only capable of manipulating 8-bit numbers. So 16-bit numbers are
stored as pairs of bytes. Consider any 16-bit address in hexadecimal -
$F000 is convenient enough. The binary value for that is
%1111000000000000. Divide it into two 8-bit sections (i.e.:
equivalent to 2 bytes) and you get %11110000 and %00000000 -
equivalent to $F0 and 0. Note, any two hex digits make up a byte, as
hex digits require 4 bits each (0-15, i.e.: %0000-%1111). So we could
just split any hex address in half to give us two 8-bit bytes. As noted,
6502 manipulates 16-bit addresses through the use of two bytes.
These bytes are generally always stored in ROM in little-endian
format (that is, the lowest significant byte first, followed by the high
byte). So $F000 hex is stored as 0, $F0 (the low byte of $F000
followed by the high byte).
Now the binary of our jmp instruction should make sense. Opcode
($4C), 16-bit address in low/high format ($F000). When this
instruction executes, the program jumps to and continues executing
from address $F000 in ROM. And we can see how DASM has used
its symbol table - and in particular the value it calculated from the
internal address counter when the “StartOfFrame” label was defined -
to "fill in" the correct low/hi value into the binary file itself where the
label was actually referred to.
This is typical of symbol usage. DASM uses its internal symbol table
to give it a value for any symbol it needs. Those values are used to
create the correct numbers for the ROM/binary image.
Let's go back to our magical discovery that the "org" instruction is
just a command to the assembler (it does not appear in the binary) to
let the assembler know the value of the internal address counter at that
point in the code. It is quite legal to have more than one ORG

53
command in our source. In fact, our sample kernel uses this when it
defines the interrupt vectors...
113 f3ea 4c 00 f0 jmp StartOfFrame
114 f3ed
115 fffa ORG $FFFA
116 fffa
117 fffa 00 f0 .word.w Reset; NMI 118 fffc 00 f0 .word.w Reset; RESET 119 fffe 00 f0 .word.w Reset; IRQ
Here we can see that after the jmp instruction, the internal address
counter is at $F3ED, and we have another ORG which sets the
address to $FFFA (the start of the standard 6502 interrupt vector
data). Astute readers will notice the use of the label "Reset" in three
lines, with the binary value $F000 (if the numbers are to be
interpreted as a low/high byte pair) appearing in the ROM image at
address $FFFA, $FFFC, $FFFE. We briefly discussed how the 6502
looks at the address $FFFC to give it the address at which it should
start running code. Here we see that this address points to the label
"Reset". Magic.
It's quite legal to use one symbol as the value for an ORG command.
Here's a short snippet of code which should clarify this...
START = $F800 ; start of code - change this if you want ORG START
HelloWorld
In the above example, the label “HelloWorld” would have a value of
$F800. If the value of START were to change, so would the value of
HelloWorld.
We've seen how the ORG command is used to tell DASM where to
place bits of code (in terms of the address of code in our ROM). This
command can also be used to define our variables in RAM. We
haven't had a play with RAM/variables yet, and it will be a few
sessions before we tackle that - but if you want a sneak peek, have a
look at vcs.h and see how it defines its variables from an origin
defined as "ORG TIA_BASE_ADDRESS". That code is way more
complex than our current level of understanding, but it gives some
idea of the versatility of the assembler.

54
We're almost done with the basic commands inserted into our source
code to assist DASM's building of the binary image. Now you should
understand how symbols are assigned values (either by their explicit
assignation of a value, or by implicit address/location value) - and
how those values - through the assembler's internal symbol table - are
used to put the correct number into the ROM binary image. We also
understand that DASM converts mnemonics (6502 commands in
human-readable form) directly into opcodes. There's not much more
to actual assembly - so we shall soon move on to actual 6502 code,
and playing with the TIA itself.

55
Session 11: Colorful colors
Even our language treats "color" differently - here in Oz we write
"colour" and in the USA they write "color". Likewise, '2600 units in
different countries don't quite speak the same language when it comes
to color.
We have already seen why there are 3 variants of '2600 units - these
variations (PAL, NTSC, SECAM) exist because of the differences in
TV standards in various countries. Specifically, the color information
is encoded in different ways into the analogue TV signal for each
system, and the '2600 hardware is responsible for inserting that color
information in the data sent to the TV.
Not only do these different '2600 systems write the color information
in different ways, they also write totally different colors! What is one
color on a NTSC system is probably NOT the same color on PAL,
and almost certainly not the same color on SECAM! Here's some
wonderful color charts to show the colors used by each of the
systems...
Yes, I realize his book is printed in grayscales, so please go see the
real colors at http://www.qotile.net/minidig/docs/tia_color.html :-)

56
Colors are represented on the '2600 by numbers. How else could it
be? The color to number correspondence is essentially an arbitrary
association - so, for example on a NTSC machine the value $1A is
yellowish, on PAL the same color is grey, and on SECAM it is
aqua(!). If the same color values were used on a game converted
between a NTSC and PAL system, then everything would look very
weird indeed! To read the color charts on the previous page, form a 2-
digit hex number from the Hue (vertical values) and the Lum
(horizontal values) I.e.: hue 2, lum 5 -> $25 value -> brown(ish) on
NTSC and as it happens a very similar brown(ish) on PAL.
We've already played with colors in our first kernel! In the picture
section (the 192 scanlines) we had the following code...
; 192 scanlines of picture...
ldx #0
REPEAT 192; scanlines
inx
stx COLUBK
sta WSYNC
REPEND
We should know by now what that "sta WSYNC" does - and now it's
time to understand the rest of it. Remember the picture that the kernel
shows? A very pretty rainbow effect, with color stripes across the
screen. It's the TIA producing those colors, but it's our kernel telling
the TIA what color to show on each line. And it's done with the "stx
COLUBK" line.
Remember how the TIA maps to memory in locations 0 - $7F, and
that WSYNC is a label representing the memory location of the TIA
register (which happens, of course, to be called WSYNC). In similar
fashion, COLUBK is a label which corresponds to the TIA register of
the same name. This particular register allows us to set the color of
the background that the TIA sends to the TV!
A quick peek at the symbol table shows...
COLUBK 0009 (R )

57
In fact, the very best place to look is in the Stella Programmer's guide
- for here you will be able to see the exact location and usage of this
TIA register. This is a pretty simple one, though - all we do is write a
number representing the color we want (selected from the color charts
linked to, above) and the TIA will display this color as the
background.
Don't forget that it also depends on what system we're running on! If
we're doing a PAL kernel, then we will see a different color than if
we're doing a NTSC or SECAM kernel. The bizarre consequence of
this is that if we change the number of scanlines our kernel generates,
the COLORS of everything also change. That's because (if we are
running on an emulator or plug a ROM into a console) we are
essentially switching between PAL/NTSC/SECAM systems, and as
noted these systems send different color information to the TV! It's
weird, but the bottom line is that when you choose colors, you choose
them for the particular TV standard you are writing your ROM to run
on. If you change to a different TV system, then you will also need to
rework all the colors of all the objects in your game.
Let's go back to our kernel and have a bit of a look at what it's doing
to achieve that rainbow effect. There's remarkably little code in there
for such a pretty effect.
As we've learned, the 6502 has just three "registers". These are named
A, X and Y - and allow us to shift bytes to and from memory - and
perform some simple modifications to these bytes. In particular, the X
and Y registers are known as "index registers", and these have very
little capability (they can be loaded, saved, incremented and
decremented). The accumulator (A) is our workhorse register, and it
is this register used to do just about all the grunt-work like addition,
subtraction, and bit manipulation.
Our simple kernel, though, uses the X register to step a color value
from 0 (at the start), writing the color value to the TIA background
color register (COLUBK), incrementing X by one each scanline. First
(outside the repeat) we have "ldx #0". This instruction moves the
numeric value 0 into the X register. ld is an abbreviation for "load",
and we have lda, ldx, ldy. st is the similar abbreviation for store, and
we have stx sty sta.

58
Inside our repeat structure, we have "stx COLUBK". As noted, this
will copy the current contents of the x register into the memory
location 9 (which is, of course, the TIA register COLUBK). The TIA
will then *immediately* use the value we wrote as the background
color sent to the TV. Next we have an instruction "inx". This
increments the current value of the X register by one. Likewise, we
have an "iny" instruction, which increments the y register. But, alas,
we don't have an "ina" instruction to increment the accumulator (!).
We are also able to decrement (by 1) the x and y registers with "dex"
and "dey".
The operation of our kernel should be pretty obvious, now. The X
register is initialized with 0, and every scanline it is written to the
background color register, and incremented. So the background color
shows, scanline by scanline, the color range that the '2600 is capable
of. In actual fact, you could throw another "inx" in there and see what
happens. Or even change the "inx" to "dex" - what do you think will
happen? As an aside, it was actually possible to blow up one early
home computer by playing around with registers like this (I kid you
not!) - but you can't possibly damage your '2600 (or emulator!) doing
this. Have fun, experiment.
Since we're only doing 192 lines, the X register will increment from 0
to 192 by the time we get to the end of our block of code. But what if
we'd put two "inx" lines in? We'd have incremented the X register by
192 x 2 = 384 times. What would its value be? 384? No - because the
X register is only an 8-bit register, and you would need 9 bits to hold
384 (binary %110000000). When any register overflows - or is
incremented or decremented past its maximum capability, it simply
"wraps around". For example, if our register had %11111111 in it
(255, the maximum 8-bit number) and it was incremented, then it
would simply become %00000000 (which is the low 8-bits of
%100000000). Likewise, decrementing from 0 would leave
%11111111 in the register. This may seem a bit confusing right now,
but when we get used to binary arithmetic, it will seem quite natural.
Hang in there; I'll avoid throwing the need to know this sort of stuff at
you for a while.
Now you've had a little introduction to the COLUBK register, I'd just
like to touch briefly on the difference apparent between the WSYNC

59
register and the COLUBK register. The former (WSYNC) was a
strobe - you could simply "touch" it (by writing any value) and it
would instantly halt the 6502. Didn't matter what value you wrote, the
effect was the same. The latter register (COLUBK) was used to send
an actual VALUE to the TIA (in this case, the value for the color for
the background) - and the value written was very much important. In
fact, this value is stored internally by the TIA and it keeps using the
value it has internally as the background color until it changes.
If you think about the consequences of this, then, the TIA has at least
one internal memory location which is in an unknown (at least by us)
state when the machine first powers on. We'd probably see black -
which happens to be value 0 on all machines), but you never know. I
believe it is wise to initialize the TIA registers to known-states when
your kernel first starts - so there are no surprises on weird machines or
emulators. We have done nothing, so far, to initialize the TIA - or the
6502, for that matter - and I think we'll probably have a brief look at
system startup code in a session real-soon-now.
Until then, have a play with the picture-drawing section, and see what
happens when you write different values to the COLUBK register.
You might even like to change it several times in succession and see
what happens. Here's something to try (with a bit of head scratching,
you should be able to figure all this out by now)...
; 192 scanlines of picture...
ldx #0
ldy #0
REPEAT 192; scanlines
inx
stx COLUBK
nop
nop
nop
dey
sty COLUBK
sta WSYNC
REPEND

60
Try inserting more "nop" lines (what does nop do, again?) - can you
see how the timing of the 6502 and where you do changes to the TIA
is reflected directly onscreen because of the synchronization between
the 6052 and the TIA which is drawing the lines on-the-fly?
Have a good play with this, because once you've cottoned-on to
what's happening here, you will have no problems programming
anything on the '2600.

61
Session 12: Initialization
One of the joys of writing '2600 programs involves the quest for
efficiency - both in processing time used, and in ROM space required
for the code. Every now and then, modern-day '2600 programmers
will become obsessed with some fairly trivial task and try to see how
efficient they can make it.
If you were about to go up on the Space Shuttle, you wouldn't expect
them to just put in the key, turn it on, and take off. You'd like the very
first thing they do is to make sure that all those switches are set to
their correct positions. When our Atari 2600 (which, I might point out
in a tenuous link to the previous sentence, is of the same vintage as
the Space Shuttle) powers-up, we should assume that the 6502, RAM
and TIA (and other systems) are in a fairly unknown state. It is
considered good practice to initialize these systems. Unless you
really, *really* know what you're doing, it can save you problems
later on.
At the end of this session I'll present a highly optimized (and best of
all, totally obscure :-) piece of code which manages to initialize the
6502, all of RAM *and* the TIA using just 8 bytes of code-size.
That's quite amazing, really. But first, we're going to do it the 'long'
way, and learn a little bit more about the 6502 while we're doing it.
We've already been introduced to the three registers of the 6502 - A,
X, and Y. X and Y are known as index registers (we'll see why, very
soon) and A is our accumulator - the register used to do most of the
calculations (addition, subtraction, etc.).
Let's have a look at the process of clearing (writing 0 to) all of our
RAM. Our earlier discussions of the memory architecture of the 6502
showed that the '2600 has just 128 bytes ($80 bytes) of RAM, starting
at address $80. So, our RAM occupies memory from $80 - $FF
inclusive. Since we know how to write to memory (remember the "stx
COLUBK" we used to write a color to the TIA background color
register), it should be apparent that we could do this...

62
lda #0 ; load the value 0 into the accumulator sta $80 ; store accumulator to location $80 sta $81 ; store accumulator to location $81 sta $82 ; store accumulator to location $82 sta $83 ; store accumulator to location $83 sta $84 ; store accumulator to location $84 sta $85 ; store accumulator to location $85
; 119 more lines to store 0 into location $86 - $FC...
sta $FD ; store accumulator to location $FD sta $FE ; store accumulator to location $FE sta $FF ; store accumulator to location $FF
You're right, that's ugly! The code above uses 258 bytes of ROM (2
bytes for each store, and 2 for the initial accumulator load). We can't
possibly afford that - and especially since I've already told you that it's
possible to initialize the 6502 registers, clear RAM, and initialize the
TIA in just 8 bytes total!
The index registers have their name for a reason. They are useful in
exactly the situation above, where we have a series of values we want
to read or write to or from memory. Have a look at this next bit of
code, and we'll walk through what it does...
ldx #0
lda #0
ClearRAM
sta $80,x
inx
cpx #$80
bne ClearRAM
Firstly, this code is nowhere-near efficient, but it does do the same job
as our first attempt and uses only 11 bytes. It achieves this saving by
performing the clear in a loop, writing 0 (the accumulator) to one
RAM location every iteration. The key is the "sta $80,x" line. In this
"addressing mode", the 6502 adds the destination address ($80 in this
example - remember, this is the start of RAM) to the current value of
the X register - giving it a final address - and uses that final address as
the source/destination for the operation.
We have initialized X to 0, and increment it every time through the
loop. The line "cpx #$80" is a comparison, which causes the 6502 to
check the value of X against the number $80 (remember, we have $80

63
bytes of RAM, so this is basically saying "has the loop done 128
($80) iterations yet?". The next line "bne ClearRAM" will transfer
program flow back to the label "ClearRAM" every time that
comparison returns "no". The end result being that the loop will
iterate exactly 128 times, and that the indexing will end up writing to
128 consecutive memory locations starting at $80.
ldx #$80
lda #0
ClearRAM
sta 0,x
inx
bne ClearRAM
Well, that's not a LOT different, but we're now using only 9 bytes to
clear RAM - somehow we've managed to get rid of that comparison!
And how come we're writing to 0,x not $80,x? All will be revealed...
When the 6502 performs operations on registers, it keeps track of
certain properties of the numbers in those registers. In particular, it
has internal flags which indicate if the number it last used was zero or
non-zero, positive or negative, and also various other properties
related to the last calculation it did. We'll get to all of that later. All of
these flags are stored in an 8-bit register called the "flags register".
We don't have easy direct access to this register, but we do have
instructions which base their operation on the flags themselves.
We've already used one of these operations - the "bne ClearRAM" we
used in our earlier version of the code. This instruction, as noted "will
transfer program flow back to the label "ClearRAM" every time that
comparison returns "no". The comparison returns "no" by setting the
zero/non-zero flag in the processor's flags register!
In actuality, this zero/non-zero flag is also set or cleared upon a load
to a register, an increment or decrement of register or memory, and
whenever a calculation is done on the accumulator. Whenever a value
in these circumstances is zero, then the zero flag is set. Whenever the
result is non-zero, the zero flag is cleared. So, we don't even need to
compare for anything being 0 - as long as we have just done one of
the operations mentioned (load, increment, etc) - then we know that
the zero flag (and possibly others) will tell us something about the
number. The 6502 documentation gives extensive information for all

64
instructions about what flags are set/cleared, under what
circumstance.
We briefly discussed how index registers, only holding 8-bit values
"wrap-around" from $FF (%11111111) to 0 when incremented, and
from 0 to $FF when decremented. Our code above is using this "trick"
by incrementing the X-register and using the knowledge that the zero-
flag will always be non-zero after this operation, unless X is 0. And X
will only be 0 if it was previously $FF. Instead of having X be a
"counter" to give 128 iterations, this time we're using it as the actual
address and looping it from $80 (the start of RAM) to $FF (the end of
RAM) + 1. So our store (which, remember, takes the address in the
instruction, adds the value of the X register and uses that as the final
address) is now "sta 0,x". Since X holds the correct address to write
to, we are adding 0 to that :-)
I would highly recommend that you don't worry too much about this
sort of optimization while you're learning. The version with the
comparison is perfectly adequate, safe, and easy to understand. But
sometimes you find that you do need the extra cycles or bytes (the
optimized version, above, is 160 cycles faster - and that's 160x3 color
clocks = 480 color clocks = more than two whole scanlines!! quicker).
So you can see how crucial timing can be - by taking out a single
instruction (the "cpx #$80") in a loop, and rearranging how our loop
counted, we saved more than two scanlines - (very) roughly 1% of the
total processing time available in one frame of a TV picture!
Initializing the TIA is a similar process to initializing the RAM - we
just want to write 0 to all memory locations from 0 to $7F (where the
TIA lives!). This is safe - trust me - and we don't really need to know
what we're writing to at this stage, just that after doing this the TIA
will be nice and happy. We could do this in a second loop, similar to
the first, but how about this...
ldx #0
lda #0
Clear
sta $80,x ; clear a byte of RAM sta 0,x ; clear a byte of TIA register inx
cpx #$80
bne Clear

65
That's a perfectly adequate solution. Easy to read and maintain, and
reasonably quick. We could, however, take advantage of the fact that
RAM and the TIA are consecutive in memory (TIA from 0 - $7F,
immediately followed by RAM $80 - $FF) and do the clear in one
go...
ldx #0
lda #0
Clear
sta 0,x
inx
bne Clear
The above example uses 9 bytes, again, but now clears RAM and TIA
in one 'go' by iterating the index register (which is the effective
address when used in "sta 0,x") from 0 to 0 (i.e.: increments 256 times
and then wraps back to 0 and the loop halts). This is starting to get
into "elegant" territory, something the experienced guys strive for!
Furthermore, after this code has completed, X = 0 and A = 0 - a nice
known state for two of the 3 6502 registers.
That's all I'm going to explain for the initialization at this stage - we
should insert this code just after the "Reset" label and before the
"StartOfFrame" label. This would cause the code to be executed only
on a system reset, not every frame (as, every frame, the code branches
back to the "StartOfFrame" for the beginning of the next frame).
Before we end today's session, though, I thought I'd share the
"magical" 8-byte system clear with you. There's simply no way that I
would expect you to understand this bit of code at the moment - it
pulls every trick in the book - but this should give you some taste of
just how obscure a bit of code CAN be, and how beautifully elegant
clever coding can do amazing things.
The code is on the next page…

66
; CLEARS ALL VARIABLES, STACK ; INIT STACK POINTER ; ALSO CLEARS TIA REGISTERS ; DOES THIS BY "WRAPPING" THE STACK - UNUSUAL
ldx #0
txa
Clear
dex
txs
pha
bne Clear
; 8 BYTES TOTAL FOR CLEARING STACK, MEMORY ; STACK POINTER NOW $FF, A=X==0
After the above, X=A=0, and all of RAM and the TIA has been
initialized to 0, and the stack pointer is initialized to $FF. Amazing!
67
Session 13: Playfield Basics
In the last few sessions, we started to explore the capabilities of the
TIA. We learned that the TIA has "registers" which are mapped to
fixed memory addresses, and that the 6502 can control the TIA by
writing and/or reading these addresses. In particular, we learned that
writing to the WSYNC register halts the 6502 until the TIA starts the
next scanline, and that the COLUBK register is used to set the color
of the background. We also learned that the TIA keeps an internal
copy of the value written to COLUBK.
Today we're going to have a look at playfield graphics, and for the
first time learn how to use RAM. The playfield is quite a complex
beast, so we may be spending the next few sessions exploring its
capabilities.
The '2600 was originally designed to be more or less a sophisticated
programmable PONG-style machine, able to display 2-player games -
but still pretty much PONG in style. These typically took place on a
screen containing not much more than walls, two "players" - usually
just straight lines - and a ball. Despite this, the design of the system
was versatile enough that clever programmers have produced a wide
variety of games.
The playfield is that part of the display which usually shows "walls"
or "backgrounds" (not to be confused with THE background color).
These walls are usually only a single color (for any given scanline),
though games typically change the color over multiple scanlines to
give some very nice effects.
The playfield is also sometimes used to display very large (square,
blocky looking) scores and words.
Just like with COLUBK, the TIA has internal memory where it stores
exactly 20 bits of playfield data, corresponding to just 20 pixels of
playfield. Each one of these pixels can be on (displayed) or off (not
displayed).
The horizontal resolution of the playfield is a very-low 40 pixels,
divided into two halves - both of which display the same 20 bits held

68
in the TIA internal memory. Each half of the playfield may have its
own color (we'll cover this later), but all pixels either half are the
same color. Each playfield pixel is exactly 4 color-clocks wide (160
color clocks / 40 pixels = 4 color clocks per pixel).
The TIA manages to draw a 40 pixel playfield from only 20 bits of
playfield data by duplicating the playfield (the right side of the
playfield displays the same data as the left side). It is possible to
mirror the right side, and it is also possible to create an "asymmetrical
playfield" - where the right and left sides of the playfield are NOT
symmetrical. I'll leave you to figure out how to do that for now - we'll
cover it in a future session. For now, we're just going to learn how to
play with those 20 bits of TIA memory, and see what we can do with
them.
Let's get right into it. Here's some sample code which introduces a
few new TIA registers, and also (for the first time for us) uses a RAM
location to store some temporary information (a variable!). There are
three TIA playfield registers (two holding 8 bits of playfield data, and
one holding the remaining 4 bits) - PF0, PF1, PF2. Today we're going
to focus on just one of these TIA playfield registers, PF1, because it is
the simplest to understand.
; '2600 for Newbies ; Session 13 - Playfield processor 6502
include "vcs.h"
include "macro.h"
;------------------------------------------------------------- PATTERN = $80 ; storage location (1st byte in RAM) TIMETOCHANGE = 20 ; speed of "animation" change as desired ;------------------------------------------------------------- SEG
ORG $F000
Reset
; Clear RAM and all TIA registers ldx #0
lda #0
Clear sta 0,x
inx
bne Clear

69
;------------------------------------------------ ; Once-only initialization...
lda #0
sta PATTERN ; The binary PF 'pattern'
lda #$45
sta COLUPF ; set the playfield color
ldy #0 ; "speed" counter ;------------------------------------------------
StartOfFrame
; Start of new frame ; Start of vertical blank processing lda #0
sta VBLANK
lda #2
sta VSYNC
sta WSYNC
sta WSYNC
sta WSYNC ; 3 scanlines of VSYNC signal
lda #0
sta VSYNC
;------------------------------------------------ ; 37 scanlines of vertical blank... ldx #0
VerticalBlank sta WSYNC
inx
cpx #37
bne VerticalBlank
;------------------------------------------------ ; Handle a change in the pattern once every 20 frames ; and write the pattern to the PF1 register iny ; increment speed count by one cpy #TIMETOCHANGE ; reached our "change point"? bne notyet ; no, so branch past
ldy #0 ; reset speed count
inc PATTERN ; switch to next pattern notyet
lda PATTERN ; use our saved pattern sta PF1 ; as the playfield shape

70
;------------------------------------------------ ; Do 192 scanlines of color-changing (our picture) ldx #0 ; this counts our scanline number Picture stx COLUBK ; change background color ; (rainbow effect) sta WSYNC ; wait till end of scanline inx
cpx #192
bne Picture
;------------------------------------------------ lda #%01000010
sta VBLANK ; end of screen - enter blanking ; 30 scanlines of overscan... ldx #0
Overscan sta WSYNC
inx
cpx #30
bne Overscan
jmp StartOfFrame
;------------------------------------------------------------ ORG $FFFA
InterruptVectors
.word Reset ; NMI .word Reset ; RESET .word Reset ; IRQ END
What you will see is our rainbow-colored background, as before - but
over the top of it we see a strange-pattern of vertical stripe(s). And the
pattern changes. These vertical stripes are our first introduction to
playfield graphics.

71
Have a good look at what this demo does; although it is only writing
to a single playfield register (PF1) which can only hold 8 bits (pixels)
of playfield data, you always see the same stripe(s) on the left side of
the screen, as on the right. This is a result, as noted earlier, of the TIA
displaying its playfield data twice on any scanline - the first 20 bits on
the left side, then repeated for the right side.
Let's walk through the code and have a look at some of the new bits...
PATTERN = $80 ; storage location (1st byte in RAM) TIMETOCHANGE = 20 ; speed of "animation" change as desired
At the beginning of our code we have a couple of equates. Equates are
labels with values assigned to them. We have covered this sort of
label value assignation when we looked at how DASM resolved
symbols when assembling our source code. In this case, we have one
symbol (PATTERN) which in the code is used as a storage location
sta PATTERN
... and the other (TIMETOCHANGE) which is used in the code as a
number for comparison
cpy #TIMETOCHANGE
Remember how we noted that the assembler simply replaced any
symbol it found with the actual value of that symbol. Thus the above
two sections of code are exactly identical to writing "sta $80" and
"cpy #20". But from our point of view, it's much better to read (and
understand) when we use symbols instead of values.
So, at the beginning of our source code (by convention, though you
can pretty much define symbols anywhere), we include a section
giving values to symbols which are used throughout the code. We
have a convenient section we can go back to and "adjust" things later
on.
Here's our very first usage of RAM...
lda #0
sta PATTERN ; The binary PF 'pattern'

72
Remember, DASM replaces that symbol with its value. And we've
defined the value already as $80. So that "sta" is actually a "sta $80",
and if we have a look at our memory map, we see that our RAM is
located at addresses $80 - $FF. So this code will load the accumulator
with the value 0 (that's what that crosshatch means - load a value, not
a load from memory) and then store the accumulator to memory
location $80. We use PATTERN to hold the "shape" of the graphics
we want to see. It's just a byte, consisting of 8 bits. But as we have
seen, the playfield is 20 bits each being on or off, representing a pixel.
By writing to PF1 we are actually modifying just 8 of the TIA
playfield bits. We could also write to PF0 and PF2 - but let's get our
understanding of the basic playfield operation correct, first.
lda #$45
sta COLUPF ; set the playfield color
When we modified the color of the background, we wrote to
COLUBK. As we know, the TIA has its own internal 'state', and we
can modify its state by writing to its registers. Just like COLUBK,
COLUPF is a color register. It is used by the TIA for the color of
playfield pixels (which are visible - i.e. their corresponding bit in the
PF0, PF1, PF2 registers is set).
If you want to know what color $45 is, look it up in the color charts
presented earlier. I just chose a random value, which looks reddish to
me :-)
ldy #0 ; "speed" counter
We should be familiar with the X,Y and A registers by now. This is
loading the value 0 into the y register. Since Y was previously unused
in our kernel, for this example I am using it as a sort of speed throttle.
It is incremented by one every frame, and every time it gets to 20 (or
more precisely, the value of TIMETOCHANGE) then we change the
pattern that is being placed into the PF1 register. We change the speed
at which the pattern changes by changing the value of the
TIMETOCHANGE equate at the top of the file.

73
That speed throttle and pattern change is handled in this section...
; Handle a change in the pattern once every 20 frames ; and write the pattern to the PF1 register iny ; increment speed count by one cpy #TIMETOCHANGE ; reached our "change point"? bne notyet ; no, so branch past ldy #0 ; reset speed count inc PATTERN ; switch to next pattern notyet
lda PATTERN ; use our saved pattern sta PF1 ; as the playfield shape
This is the first time we've seen an instruction like "inc PATTERN" -
the others we have already covered. "inc" is an increment - and it
simply adds 1 to the contents of any memory (mostly RAM) location.
We initialized PATTERN (which lives at $80, remember!) to 0. So
after 20 frames, we will find that the value gets incremented to 1. 20
frames after that, it is incremented to 2.
Now let's go back to our binary number system for a few minutes.
Here's the binary representation of the numbers 0 to 10:
00000000
00000001
00000010
00000011
00000100
00000101
00000110
00000111
00001000
00001001
00001010
Have a real close look at the pattern there, and then run the binary
again and look at the pattern of the stripe. I'm telling you, they're
identical! That is because, of course, we are writing these values to
the PF1 register and where there is a set bit (value of 1) that
corresponds directly to a pixel being displayed on the screen.
See how the PF1 write is outside the 192-line picture loop. We only
ever write the PF1 once per frame (though we could write it every
scanline if we wished). This demonstrates that the TIA has kept the

74
value we write to its register(s) and uses that same value again and
again until it is changed by us.
The rest of the code is identical to our earlier tutorials - so to get our
playfield graphics working, all we've had to do is write a color to the
playfield color register (COLUPF), and then write actual pixel data to
the playfield register(s) PF0, PF1 and PF2. We've only touched PF1
this time - feel free to have a play and see what happens when you
write the others.
You might also like to play with writing values INSIDE the picture
(192-line) loop, and see what happens when you play around with the
registers 'on-the-fly'. In fact, since the TIA retains and redraws the
same thing again and again, to achieve different 'shapes' on the
screen, this is exactly what we have to do - write different values to
PF0, PF1, PF2 not only every scanline, but also change the shapes in
the middle of a scanline!
The diagram below shows the operation of the PF1 register, and
which of the 20 TIA playfield bits it modifies. You can also see the
color-register to color correspondence.

75
Today's session is meant to be an introduction to playfield graphics -
don't worry too much about the missing information, or understanding
exactly what's happening. Try and have a play with the code, do the
exercises - and next session we should have a more comprehensive
treatment of the whole shebang.
Exercises
1. Modify the kernel so that instead of showing a rainbow-color
for the background, it is the playfield which has the rainbow
effect.
2. What happens when you use PF0 or PF2 instead of PF1? It
can get pretty bizarre - we'll explain what's going on in the
next session.
3. Can you change the kernel so it only shows *ONE* copy of
the playfield you write (that is, on the left side you see the
pattern, and on the right side it's blank). Hint: You'll need to
modify PF1 mid-scanline. We'll have a look at these exercises
next session. Don't worry if you can't understand or implement
them - they're pretty tricky.
Subjects we will tackle next time include...
• The other playfield registers (PF0, PF2)
• The super-weird TIA pixel -> screen pixel mapping
• Mirrored playfields
• Two colors playfields
• Asymmetrical playfield

76

77
Session 14: Playfield Weirdness
The diagram below shows the bizarre way that bits in the TIA
playfield registers (PF0, PF2) map to the onscreen pixels in reverse
order. We have already seen how PF1 works - it is shown in this
diagram, too.
This strange backwardness (not to mention inconsistency!) is
probably a result of the fact that it was simpler (cheaper) to design the
hardware to operate in this fashion. Among other things, this layout of
pixels in our TIA registers makes scrolling horizontally a major pain
in the neck!
The bits marked with a cross are not used by the '2600 (including the
low bit in the color registers), and you may write any value to these -
it is ignored.
The diagram shows a shadowy "right-side" - where the 20 pixels of
the left side are duplicated. Be aware that this right-side may also be
mirrored, further complicating things.

78
I'll be delivering this session in stages. If you want to play with some
things then....
1. Confirm that PF0 and PF2 have reverse pixel to bit position
ordering (Hint: using binary for your values will assist you to
see exactly what pixel corresponds to what bit (ie: lda
#%01000000, sta PF0)
2. What happens if you write PF0, PF1 or PF2 in the middle of a
scanline? What would you expect to happen? Can you see any
use for this? (Hint: how do you think an asymmetric playfield
- a different pattern on the left and right of the screen - is
created?)
3. Write some solid shape(s) to PF0, PF1, PF2 (ie: lda
#%01011110, sta PF0, sta PF1, sta PF2) and then play with
changing the playfield color several times during a scanline.
How many color changes (maximum) do you think you can
get on any line? Why is there a limit?
4. How would a game do horizontal scrolling? This is a difficult
question - but I'm trying to get you to think about the
implications of the odd playfield->pixel correspondence, and
the implications for game writing.
5. How would you make a "wall" which was 8 scanlines high,
full screen width, followed by left and right walls just 1
playfield pixel wide each, at extreme left/right edges of the
screen, 176 scanlines high, followed by another horizontal
"wall", full screen width and 8 scanlines high?
Note: this would form a "box" border around the entire
playfield.
There we go, that should keep you busy!

79
Session 15: Playfield Continued
We've had a bit of time to think about the playfield, and hopefully
have a go at some of the exercises. Admittedly I threw you in the deep
end with the last session - so we'll go back a step and walk through
exactly what all this playfield oddity is about. We'll also tackle some
of the exercises to show that there's more than one way to skin a fish.
Last session we learned that the playfield registers PF0 and PF2 are
reversed. Specifically, the order of pixels in the playfield registers
(one bit per pixel, remember!) is backward, compared to the order for
the first playfield register we encountered - PF1. This backward
ordering is rather confusing, but that's just the way it is. Have a close
look at the diagram presented and try and understand exactly the
"playfield register/bit" to "pixel position on the scanline"
correspondence.
There's one new playfield-related capability of the '2600 which I'd
like to introduce now - playfield mirroring. I've already introduced
this to you when I stated that the right hand side of the playfield was a

80
copy of the left hand side (that is, the left 20 pixels come from the 20
playfield bits held in the TIA registers PF0, PF1 and PF2 - and the
right 20 bits are a copy of the same bits). That copy can be displayed
"normally" - or "mirrored". When mirrored, the bits are literally a
mirrored copy of the left side of the playfield.
We're already familiar with two 'types' of TIA register. There's the
strobe-type, where a write of any value to the register causes
something to happen, independent of the value written (an example is
WSYNC, which halts the 6502 until the TIA starts the next scanline).
A second type is the normal register to which we write a byte, and the
TIA uses that byte for some internal purpose (examples of these are
the playfield registers PF0, PF1 and PF2). PF0 was a special-case of
this type, where - though we wrote a byte - only four of the bits were
actually used by the TIA. The remaining bits were discarded/ignored
(have a look at the PF0 register in the diagram on the previous page -
the X for each bit position in bits D0-D3 indicates those bits are not
used).
The third type of register (they're not really 'types' - but I want you to
understand the difference between the way we're writing data to the
TIA) is where we are interested in just the state of a single BIT in a
register. Time to introduce a new TIA register, called CTRLPF. It's
located at address 10 ($A)
CTRLPF This address is used to write into the playfield control register (a logic 1 causes action as described below) D0 = REF (reflect playfield) D1 = SCORE (left half of playfield gets color of player 0, right half gets color of player 1) D2 = PFP (playfield gets priority over players so they can move behind the playfield) D4 & D5 = BALL SIZE D5 D4 Width 0 0 1 clock 0 1 2 clocks 1 0 4 clocks 1 1 8 clocks

81
Wow! This register has a lot of different stuff associated with it! Most
of it is related to playfield display (bits D0, D1, D2) but bits D4 and
D5 control the "BALL SIZE" - we'll worry about those bits later :-)
Bit D0 controls the reflection (mirroring) of our playfield. If this bit is
0, then we have a "normal" non-mirrored playfield, and that's what
we've been seeing so far in our demos. If we set this bit to 1, then the
'2600 will display a reflected playfield (that is, the right-side of the
playfield is a mirror-image of the left-side, instead of a copy). Note
that only a single bit is used to control this feature - if we wrote a byte
with this bit set (i.e. %00000001) to CTRLPF we would also be
setting those other bits to 0 - and we should be very sure this is what
we want. In fact, it's often NOT what we want, so when we are
writing to registers such as this (which contain many bits controlling
different parts of the TIA hardware/display), we should be very
careful to keep all the bits exactly as we need them. Sometimes this is
done with a "shadow" register - a RAM copy of our current register
state, and by first setting or clearing the appropriate bit in the shadow
register, and THEN writing the shadow register to the TIA register.
This is necessary because many/most of the TIA registers are only
writeable - that is, you cannot successfully read their contents and
expect to get the value last written.
Let's have a quick look at those other bits in this register, related to
playfield...
D1 = SCORE. This is interesting. Setting this bit causes the playfield
to have two colors instead of one. The left side of the playfield will be
displayed using the color of sprite 0 (register COLUP0), and the right
side of the playfield will be displayed using the color of sprite 1
(register COLUP1). We won't play with this for now - but keep in
mind that it is possible. Remember, this machine was designed for
PONG-style games, so this sort of effect makes sense in that context.
D2 = PFP. Playfield priority. You may have the playfield appear in
front of, or behind, sprites. If you set this bit, then the playfield will
be displayed in front, and all sprites will appear to go behind the
playfield pixels. If this bit is not set, then all sprites appear to go in
front of the playfield pixels.

82
That's a very quick rundown of this register. We know now that it
controls the playfield mirroring (=reflection), the playfield color
control for left/right halves, the playfield priority (if sprites go in front
of or behind the playfield), and finally it does something with the
"BALL SIZE" which we're not worrying about yet.
I've indicated that it's useful to have a "shadow" copy of the register in
RAM, so that we can easily keep track of the state of this sort of
register. In practice, this is rarely done - as we generally just set the
reflection on or off, the score coloring on or off, the priority on or off,
and the ball size as appropriate... and then forget it. But if, for
example, you were doing a game where you were changing the
priority on the fly (so your sprites went behind SOME bits
background, but not other bits) then you'd need to know what those
other values should be.
In any case, the point of this is to introduce you slowly to more TIA
capabilities, and at the same time build your proficiency with 6502
programming. Here's how we set and clear bits with 6502.
CTRLPF_shadow = $82 ; a RAM location for our shadow register lda #%00000000
sta CTRLPF_shadow ; init our shadow register as required
; lots of code here
lda CTRLPF_shadow
sta CTRLPF ; copy shadow register to TIA register
The above code snippet shows the general form of shadow register
usage. The shadow register is initialized - and at some point later in
the code, we copy it to the TIA register. Now for the fun bit - setting
and clearing individual bits in the shadow register...
; how to set a single bit in a byte lda CTRLPF_shadow ; load the shadow register from RAM ora #%00000001 ; SET bit 0 (D0 = 1) sta CTRLPF_shadow ; save new register value back to RAM
; how to clear a single bit in a byte lda CTRLPF_shadow
and #%11111110 ; keep all bits BUT the one we want to clear sta CTRLPF_shadow

83
OK, that's not too difficult to understand. The two new 6502
instructions we have just used are "ORA", which does a logical-OR
(that is, combines the accumulator with the immediate value bit-by-bit
using a OR operation) - and the "AND", which does a logical-AND
(again, combines the accumulator with the immediate value bit-by-bit
using an AND operation). Now this is getting into pretty basic binary
math - and you should read up on this stuff if you don't already know
- but here are some truth tables for you...
OR operation BIT | 0 1 ----+------------ 0 | 0 1 | 1 | 1 1
AND operation BIT | 0 1 ----+------------ 0 | 0 0 | 1 | 0 1
Basically the above two tables give you the result FOR A SINGLE
BIT POSITION, where you either OR or AND together two bits. For
example, if I "OR" together 1 and 0, the resultant value (bit) is 1.
Likewise, if I "AND" together a 1 and 0, I get a 0. This logical
operation is performed on each bit of the accumulator, with the
corresponding bit of the immediate value as part of the instruction. So
"ora #%00000001" will actually leave the accumulator with the
lowest bit SET. No matter what. Likewise, "and #%11111110" will
leave the accumulator with the lowest bit CLEAR. No matter what.
And in the other bits, their value will remain unchanged. You should
try some values and check this out, because understanding this binary
logical operation on bits is pretty fundamental to '2600 programming.
In the initialization section of your current kernel, add the following
lines...
lda #%00000001
sta CTRLPF

84
That's our playfield reflection in operation - if you're running any sort
of playfield code, you will see that the right-side is now a mirror-
image of the left-side. Now have a think about the exercise I offered
in session 14...
5. How would you make a "wall" which was 8 scanlines
high, full screen width, followed by left and right walls
just 1 pixel wide each, at extreme left/right edges of the
screen, 176 scanlines high, followed by another horizontal
"wall", full screen width and 8 scanlines high? Note: this
would form a "box" border around the entire playfield.
It should be apparent, now, that in this sort of situation we really only
need to worry about the left side of the playfield! If we let the '2600
reflect the right side, we will get a symmetrical copy of the left, and
we'll have our box if only we do the left-side borders. This is a huge
advantage to the programmer, because we suddenly don't have to
write new PF0, PF1, PF2 values each scanline. Remember (and I'll
drum this into you until the very last session!) we only have 76 cycles
per scanline - the less we have to do on any line, the better. At the
very least, rewriting PF0, PF1 and PF2 twice per scanline would cost
30 cycles IF you were being clever. That's almost half the available
time JUST to draw background - and there's still colors, sprites, balls
and missiles to worry about! However, if you just use a reflected
playfield, then we are only looking at single writes to PF0, PF1, PF2,
cutting our playfield update to only 15 cycles per line (eg: lda #value /
sta PF0 / lda #value2 / sta PF1 / lda #value3 / sta PF2).
So, let's get down to it - here's a solution for exercise 5, of session
14...
; '2600 for Newbies ; Session 15 - Playfield Continued ; This kernel draws a simple box around the screen border ; Introduces playfield reflection
processor 6502
include "vcs.h"
include "macro.h"
;------------------------------------------------------ SEG
ORG $F000

85
Reset
; Clear RAM and all TIA registers ldx #0
lda #0
Clear sta 0,x
inx
bne Clear
; Once-only initialization... lda #$45
sta COLUPF ; set the playfield color lda #%00000001
sta CTRLPF ; reflect playfield
StartOfFrame
; Start of new frame ; Start of vertical blank processing lda #0
sta VBLANK
lda #2
sta VSYNC
sta WSYNC
sta WSYNC
sta WSYNC ; 3 scanlines of VSYNC signal
lda #0
sta VSYNC
;------------------------------------------------ ; 37 scanlines of vertical blank... ldx #0
VerticalBlank sta WSYNC
inx
cpx #37
bne VerticalBlank
;------------------------------------------------ ; Do 192 scanlines of color-changing (our picture) ldx #0 ; this counts our scanline number lda #%11111111
sta PF0
sta PF1
sta PF2
; We won't bother rewriting PF0-PF2 every scanline ; of the top 8 lines - they never change!
Top8Lines sta WSYNC
inx
cpx #8 ; are we at line 8? bne Top8Lines ; No, so do another

86
; Now we want 176 lines of "wall" ; Note: 176 (middle) + 8 (top) + 8 (bottom) = 192 lines lda #%00010000
; PF0 is mirrored <--- direction, low 4 bits ignored sta PF0
lda #0
sta PF1
sta PF2
; again, we don't bother writing PF0-PF2 every scanline ; - they never change! MiddleLines sta WSYNC
inx
cpx #184
bne MiddleLines
; Finally, our bottom 8 scanlines - the same as the top 8 ; AGAIN, we aren't going to bother writing ; PF0-PF2 mid scanline! lda #%11111111
sta PF0
sta PF1
sta PF2
Bottom8Lines sta WSYNC
inx
cpx #192
bne Bottom8Lines
;------------------------------------------------ lda #%01000010
sta VBLANK ; end of screen - enter blanking
; 30 scanlines of overscan... ldx #0
Overscan sta WSYNC
inx
cpx #30
bne Overscan
jmp StartOfFrame
;------------------------------------------------- ORG $FFFA
InterruptVectors
.word Reset ; NMI .word Reset ; RESET .word Reset ; IRQ END
This kernel is interesting in that it achieves the box effect by writing
the playfield registers BEFORE the scanline loops to do the
appropriate section. It uses the knowledge that the TIA has an internal
state and will keep displaying whatever it already has in the playfield

87
registers. So, in fact, the actual cost (in cycles) of drawing the "box"
playfield on each scanline is 0 cycles - ie; it's free. We just had that
short initial load before each section (taking a few cycles out of the
very first scanline of each section). This is how you need to think
about '2600 programming - how to remove cycles from your scanlines
- and do the absolute minimal necessary.
That will do for today's session. We've had an introduction to
controlling individual TIA register bits, and seen how to achieve a
reflected playfield at next to no cost. We've had a brief introduction to
the CTRLPF register, and seen how it has a myriad (well, more than
3) uses. Although some of the previous sessions have asked you to
think about tricky subjects like horizontal scrolling, and asymmetrical
playfields - now is not the time to actually discuss these tricky areas.
Those who have been posting their sample solutions are on the right
track. We'll get to those areas in future sessions - so until next time
(when we'll develop our playfield skills a bit more)... ciao!
Exercises:
1. Introduce a RAM shadow of the CTRLPF register, and modify
it differently in each section of the kernel. For example turn
reflection on and off partway through the midsection of the
box, and see what happens.

88
2. Have a play with the SCORE bit in the CTRLPF register, and
in conjunction with that the COLUP0 and COLUP1 color
registers. Note how this SCORE bit changes where the color
for the playfield comes from.

89
Session 16: Letting the Assembler Do the Work
This session we're going to have a brief look at how DASM (our
assembler) builds up the binary ROM file, and how we can use
DASM to help us organize our RAM.
As we've discovered, DASM keeps a list of all symbols and as it is
assembling our code, it assigns values (= numbers, or addresses) to
those symbols. When it is creating the binary ROM image, it replaces
opcodes (=instructions) with appropriate values representing the
opcode, and it replaces symbols with the value of the symbol from its
internal symbol table.
OK, that basic process should be clear by now. When we view our
symbol table (which is output when we use the -v5 switch on our
command-line when assembling a file), we will see that there are
some symbols which are unused (the used ones have (R ) after them,
in the symbol table output). We can see, then, that it is not necessary
for a symbol to actually be in the ROM binary file for it to have a
value. There are several reasons why we'd want to have a symbol with
a value, but not have that symbol "do anything" or relate to anything
in the binary.
For example, we could use a symbol as a switch to tell the compiler
which section of code to compile. A symbol could be used as a value
to tell us how many scanlines to draw... e.g.:
SCANLINES = 312; PAL
;...later
iny
cpy #SCANLINES ; at the end? bne AnotherLine ; do another line
We can even implement a compile-time PAL/NTSC switch
something like this...
PAL = 0
NTSC = 1
SYSTEM = PAL ; change this to PAL or NTSC

90
#if SYSTEM = PAL
; insert PAL-only code here #endif
#if SYSTEM = NTSC
; insert NTSC-only code here #endif
This sort of use of symbols to drive the DASM assembly process can
be quite useful when you want various sections of code to behave
differently - for whatever reason. You might have a test bit of code
which you can conditionally compile by defining a symbol as in the
above example.
Now that we're comfortable with DASM's use of symbols as part of
the compilation process, let's have a look at how we've been
managing our RAM so far...
VARIABLE = $80 ; variable using the 1st byte of RAM VAR2 = $81 ; another variable using the 2nd byte of RAM VAR3 = $82 ;etc
That's perfectly fine - and as we already know, lines like this will add
the symbols to DASM's internal symbol table, and whenever DASM
sees those symbols it will instead use the associated value. Consider
the following example...
VARIABLE = $80 ; variable using 1st TWO bytes of RAM VAR2 = $82 ; another variable must start after ; the 1st var's space
In this case we've created a 2-byte variable starting at the beginning of
RAM. So the second variable has to start at $82 instead of $81 -
because the first variable requires locations $80 and $81. The above
will work fine - but there's no clear correspondence between the
variable declaration (which is really just assigning a number/address
to a symbol) and the amount of space required for the variable.
Furthermore, if we later decided that we really needed 4 bytes
(instead of 2) for VARIABLE, then we'd have to "shift down" all
following variables - that is, VAR2 would have to be changed to $84,
etc.. This is not only extremely annoying and time-consuming, it is a
disaster waiting to happen - because you humans are fallible.
What we really want to do is let DASM manage the calculation of the
91
variable/symbol addresses, and simply say "here's a variable, and it's
this big". And fortunately, we can do that.
First, let's consider "normal code"
ORG $8000
LABEL1 .byte 1,34,12,3
LABEL2 .byte 0
When assembled, DASM will assign $8000 as the value of the
symbol LABEL1, and $8004 as the value of the symbol LABEL2
(that is, it assembles the code, and starting at location $8000 (which is
also the value of LABEL1) we will see 4 bytes (1, 34, 12, 3) and then
another byte (0) which is at $8004 - the value of the symbol LABEL2.
Note, the ".byte" instruction (actually it's called a pseudo-op, as it's an
instruction to the assembler, not an actual 6502 instruction) is just a
way of telling DASM to put particular byte values in the ROM at that
location.
Remember when we wrote "NOP" to insert a no-operation instruction
- which causes the 6502 to execute a 2 cycle delay? When we looked
at the listing file, we saw that the NOP was replaced in the ROM
image by the value $EA. Well, instead of letting DASM work out
what the op-code's value is, we can actually just put that value in
ourselves, using a .byte instruction to DASM. Example...
.byte $EA ; a NOP instruction!
Now, this isn't often done - but there are extremely rare cases where
you might want to do this (typically with extremely obscure and
highly godlike optimizations). We won't worry about that for now.
But it's important to understand that just like DASM - which simply
replaces a list of instructions with their values, we can just as easily
do the same thing and put the values there ourselves.
Now it's easy to see how DASM gets its values for the labels from the
address of the data it is currently assembling - in the earlier example,
we started assembly (the ORG pseudo-op) at $8000, and then DASM
encountered the label LAB1 - which was given the value $8000, etc.

92
We then inserted 4 bytes with the ".byte" pseudo-op. Instead of
".byte" which places specific values into the output binary file, we
could have used the "ds" pseudo-op - which stands for "define space".
For example, the following would give the same two addresses to
LAB1 and LAB2 as the above example, but the data put into the
binary would differ...
ORG $8000
LAB1 ds 4
LAB2 ds 1
Typically, the "ds" pseudo-op will place 0's in the ROM - as many
bytes as specified in the value after the "ds". In the above example,
we'll see 4 0's starting at $8000 followed by another at $8004.
Now let's consider our RAM... which starts at $80. What would we
have if we did something like this...?
ORG $80 ; start of RAM VARIABLE ds 3 ; define 3 bytes of space for ; this variable VAR2 ds 1 ; define 1 byte of space for this one VAR3 ds 2 ; define 2 etc..
Now that's much nicer, isn't it! It won't work, though :-) The problem
is, DASM will quite happily assemble this - and it will correctly
assign values $80 to VARIABLE, $83 to VAR2 and $84 to VAR3 -
but it will ALSO generate a binary ROM image containing data at
locations $80-$85. That's RAM, not ROM - and it most definitely
doesn't belong in a ROM binary. In fact, our ROM would now also be
HUGE - because DASM would figure that it needs to create an image
from location $80 - $FFFF (ie: it will be about 64K, not 4K).
What we need to do is tell DASM that we're really just using this
code-writing-style to calculate the values of the symbols, and not
actually creating binary data for our ROM. And we can do that. Let's
plunge right in...
SEG.U variables
ORG $80
VARIABLE ds 3 ; define 3 bytes of space for variable VAR2 ds 1 ; define 1 byte of space for this one VAR3 ds 2 ; define 2 etc..

93
The addition is the "SEG.U" pseudo-op, followed by a segment name.
This is telling DASM that all the following code (until a next "SEG"
pseudo-op is encountered) is an uninitialized segment. When it
encounters a "segment" defined like this, DASM will not generate
actual binary data in the ROM - but it will still correctly calculate the
address data for the symbols.
Note: It is important to give the segment a name (though this
parameter is optional, you should choose a unique name for each
segment). Naming segments assists the assembler in keeping track of
exactly which parts of your code are initialized and uninitialized.
If you now go back and have a close look at the vcs.h file, you may
begin to understand exactly how the values for all of the TIA registers
are actually defined/calculated. Yes, they're defined as an
uninitialized segment starting at a specific location. Typically this
start-location is 0, and each register is assigned one byte. We keep the
register symbols in the correct order and let DASM work out the
addresses for us. There's a reason for this - to do with bankswitching
cartridge formats - but the general lesson here is that it's nice to let
DASM do the work for us - particularly when defining variables - and
let it worry about the actual addresses of stuff - we just tell it the size.
One final word on the SEG pseudo-op. Though it is not strictly
necessary, all of our code uses it. Without the .U extension, SEG will
create binary data for our ROM. With the .U, SEG just allows DASM
to populate its symbol table with names/values.
So from now on, let's define variables "the proper way". We'll use an
uninitialized segment starting at $80, and give each variable a size
using the "ds" pseudo-op. And don't forget after our variable
definitions to place another "SEG" which will effectively tell DASM
to start generating binary ROM data.

94
Here's an example...
SEG.U vars ; the label "vars" will appear in our ; symbol table's segment list ORG $80 ; start of RAM
Variable ds 1 ; a 1-byte variable
SEG ; end of uninitialized segment - start of ROM binary ORG $F000
; code....
Variable Overlays
This is a good time to mention variable overlays. This is a handy
'trick' you can use to re-use RAM by assigning different usage
(=meaning) to RAM locations based on the premise that some RAM
locations are only needed for some parts of a game, and some for
others. If you have two variables which do not clash in terms of the
area in the code they are used, then there's no real reason why those
variables can't use the same RAM location.
Here's my original post to the stella list on this issue (7/Feb/2001):
##################### start of posting ####################
As I'm trying to optimize RAM usage, I'd been using a general
scratchpad variable ("temp") and using that in the code wherever I
need to. I managed the allocation and meaning of the variables
manually. That is, I might know that "temp+1" is the variable for the
line #, etc., etc. It works, but it is prone to error.
So, I was thinking of a better way, and came up with this...
org $80 ; start of our overlay section temp ds 8 ; general area for variable overlays
; other RAM variable declarations here....
; and now come the 'overlays'... these effectively use ; the 'temp' RAM location, referenced by other names...

95
; overlay section 1 org temp ; <--- this is the bit that is the trick
overlayvar1 ds 1 ; effectively 'temp' overlayvar2 ds 2 ; effectively 'temp+1' overlayvar3 ds 2 ; effectively 'temp+3'
; overlay section 2 org temp ; ANOTHER overlay on the 'temp' variable
linecounter ds 1 ; effectively 'temp' indirect ds 2 ; effectively 'temp+1' ; etc...
; overlay section 3 org temp
sect3var ds 8
; can't add more in this overlay (#3) as it's already ; used all of 'temp's size
This all works fine... as long as you remember that when you are
using variables in overlays, you can't use two different overlays at the
same time. That is, the same routine (or section of code) CANNOT
use variables in overlay section 1 AND overlay section 2. It's not that
much of a restriction, and allows you to use nice variable names
throughout your code.
Just be careful your overlays don't get bigger than the general area
allocated for each section.
The advantages of this system are that you can CLEARLY see what
your variables are, and you only have to change
sizes/declarations/usage in a single place (the RAM overlay
declaration)... not hunt through your code when you decide to change
usage.
#################### end of posting ###################
To summarize, we declare one 'variable' which is a block of RAM
which is used for sharing RAM. This is our overlay section. We then
declare each of our Overlays by setting the origin to the start of the
overlay section and define new variables. This works because the

96
assembler is generating an UNINITIALISED segment for our RAM
variables. What that means is that we're just using the assembler to
assign values to labels (to its symbols), but not actually generating
ROM data. So each overlay section starts in the same spot, and
defines variables (i.e. assigns addresses to labels) starting at that spot.
We essentially share RAM locations for those variables, with other
variables which are also defined the same way.
I've used this technique now for many demos. It can give the effect of
dramatically increasing available RAM. Just have to be careful that
you don't try and use two variables sharing the same location at any
time. With a bit of careful management it comes naturally.
Here's a generic 'shell' with comments I use for overlay RAM
variables...
; This overlay variable is used for the overlay variables. That's OK. ; However, it is positioned at the END of the variables so, if on the ; off chance we're overlapping; stack space and variable, it is LIKELY ; that that won't be a problem, as the temp variables; (especially the ; latter ones) are only used in rare occasions. ; FOR SAFETY, DO NOT USE THIS AREA DIRECTLY (ie: NEVER reference ; 'Overlay' in the code); ADD AN OVERLAY FOR EACH ROUTINE'S USE, SO ; CLASHES CAN BE EASILY CHECKED
Overlay ds 0 ;--> overlay (share) variables (make sure this
; is as big as the biggest overlay subsection)
;--------------------------------------------------------------------- ; OVERLAYS! ; These variables are overlays, and should be managed with care ; That is, variables are ALREADY DEFINED, and we're reusing RAM ; for other purposes ; EACH OF THESE ARE VARIABLES (TEMPORARY) USED BY ONE ROUTINE (AND ; IT'S SUBROUTINES) ; THAT IS, LOCAL VARIABLES. USE 'EM FREELY, THEY COST NOTHING ; TOTAL SPACE USED BY ANY OVERLAY GROUP SHOULD BE <= SIZE OF 'Overlay' ;-------------------------------------------------------------------- org Overlay
; ANIMATION/LOGIC SYSTEM ; place variables here
;-------------------------------------------------------------------- org Overlay
; DRAWING SYSTEM ; place variables here ; etc
Hope that's clear enough.

97
Session 17: Asymmetrical Playfields – Part 1
By now you should be familiar with how the '2600 playfield works. In
summary, there are three playfield registers (PF0, PF1, PF2) and these
hold 20 bits of playfield data. The '2600 displays this data twice on
every scanline, and you can have the second half mirrored, if you
wish. Playfield is a single-color, but each half of the screen may be set
to use the colors of the players (more about those, later!). In short,
though, we have a fairly versatile system just great for PONG-style
games.
Pretty soon, though, programmers started doing much more
sophisticated things with the TIA - and especially with the playfield
registers - than just displaying symmetrical (or mirrored) playfields.
Since writes to TIA immediately change the internal 'state' of the TIA,
and since the TIA and 6502 work in tandem during the display of a
TIA frame, there's no reason why the 6502 can't modify things on-the-
fly in the middle of scanlines. For example, any write to playfield
registers will IMMEDIATELY reflect in changes to the data that the
TIA is sending for a particular scanline. I qualify this slightly by my
non-knowledge if these immediate changes are on a per-pixel basis, or
on a per-byte basis. Something for us all to play with!
In any case, as will probably have become obvious to you by now, it
is possible to display different 'shape' on the left and right of any
scanline. As stated, if we left the TIA alone then it would display the
same (or a mirrored version) data on the left and right halves of the
screen - coming from its 20 pixel playfield data. But if we modify any
of the playfield registers on-the-fly (that is, mid-scanline) then we will
see the results of that modification straight away when the TIA draws
the rest of the scanline.
Let's revisit briefly our understanding of the TIA and frame timing.
Please refer to the earlier sessions where the timing of the TIA and
6502 were covered. In summary, there are exactly 228 color-clocks of
TIA 'time' on any scanline - 160 of those clocks are actual visible
pixels on the screen and 68 of them are the time it takes for the
horizontal retrace to occur.

98
Our 'zero point' of any scanline is the beginning of horizontal retrace.
This is the point at which the TIA re-enables the 6502 if it has been
halted by a WSYNC write. At the beginning of any scanline, then, we
know that we have exactly 68 color clocks (=68/3 = 22.667 cycles)
before the TIA starts 'drawing' the line itself.
You should already be familiar with the horizontal resolution of '2600
playfield - exactly 40 pixels per scanline. I use the term 'pixels'
interchangeably here - to mean a minimum unit of graphic resolution.
For the playfield, there are 40 pixels a line. But the TIA has 160
color-clocks per line, and in fact sprite resolution is also 160 pixels
per line. Another way of looking at this is that each playfield pixel is
4 color-clocks wide, and each sprite pixel is 1 color clock wide (as a
minimum, anyway - this can be adjusted to give double-wide and
quadruple-wide sprites. We'll get to sprites soon, I promise!)
It's quite important to understand the timing of things. Let's delve a bit
more deeply into the synchronization between the 6502 and the TIA,
and have a close look at when/where each pixel of the playfield is
actually being drawn.
As stated above, the first 68 cycles of each scanline are the horizontal
retrace period. So the very first pixel of playfield (which is 4 color-
clocks wide, remember!) starts drawing on TIA cycle 68 (of 228 in
the line). So if we want that pixel to be the right 'shape' (ie: on or off,
as the case may be) then we really have to make sure we have the
right data in the right bit of PF0 before cycle 68.
Likewise, we should really make sure that the second pixel has its
correct data set before cycle 72 (68 + 4 color clocks). In fact, you
should now understand that the 4 playfield pixels at the left of the
scanline occupy TIA color clocks (68-71) (72-75) (76-79) and (80-
83). The very first pixel of PF1, then, starts displaying at clock 84. So
we need to make sure that data for PF1 is written before TIA clock
84. And so it goes, we should make sure that PF2 data is written to
PF2 before the TIA starts displaying PF2 pixels. And that happens on
clock (84 + 8 * 4 = 116)
Finally, we can now see that PF2 will take 32 color clocks (because
it's 8 pixels, at 4 clocks each). As it starts on TIA clock 116, it will

99
end on clock 147. The obvious calculation is 147 (end) - 68 (start) =
80 color clocks. Which nicely corresponds to 20 pixels at 4 color
clocks each. OK, that's straightforward, but you should now follow
exactly the correspondence between TIA color clocks and the start of
display of particular pixels on any scanline.
Now, what happens at color clock 148? The TIA starts displaying the
second half of the playfield for the scanline in question, of course!
Depending on if the playfield is mirrored or not, we will start seeing
data from PF2 (mirrored) or from PF0 (non-mirrored).
Now, and here's the really neat bit - and the whole trick behind
'asymmetric' playfields - we know that if we rewrite the TIA playfield
data AFTER it has been displayed on the left half of the scanline, but
BEFORE it is displayed on the right half of the scanline, then the TIA
will display different data on the left and right side of the screen.
In particular, this method tends to use a non-mirrored playfield. We
noted that PF0 finished displaying its 4 pixels on color clock 83
(inclusive). So from color clock 84 onwards (up to 148, in fact), we
may freely write new data to PF0 and we won't bugger anything
currently being displayed. That's 60 color clocks of time available to
us.
Time to revisit the timing relationship between the 6502 and the TIA.
The TIA has 228 color clocks per scanline, but the 6502 speed is
derived from the TIA clock through a divide-by-three. So the 6502
has only 76 cycles (228/3) per scanline. So if there are 60 color clocks
of time available to change PF0, that corresponds to 60/3 = 20 cycles
of 6502 time. Further conversions between TIA time and 6502 cycles
show us that it must start after TIA cycle 84 (= 84/3) = 6502 cycle 28,
and it must end before TIA cycle 148 (6502 cycle 148/3 = 49.3333).
Aha! How can we have a non-integer cycle? We can't, of course. All
this tells us is that it is IMPOSSIBLE to exactly change data on TIA
color clock 148. We can change TIA data on any divisible-by-three
cycle number, since the 6502 is working in tandem with the TIA but
only gets a look-in every 3 cycles.

100
This inability to exactly time things isn't a problem for us now, as we
have already noted that there are 60 TIA color clocks in which we can
effect our change for PF0.
PF1 and PF2 operate in exactly the same fashion. PF1 is displayed
from clocks 84-115 and on the right-side from clock 164 onwards
(remember the right-side starts at clock 148, PF0 takes 16 color-
clocks (4 pixels at 4 color-clocks each). So to modify PF1 so it
displays different right-side and left-side visuals, we need to modify it
between color clock 116 and 164. That gives us a narrower window of
time in which we can make our modification - just 48 color clocks.
But still, we can do that, right?
Finally, PF2 is displayed from clock 116-147 (let's check, that's 32
color clocks inclusive - 32 = 8 pixels x 4 clocks per pixel. Yep!). And
on the right-side of the scanline, PF2 will display from clock 164 + 32
= 196 to clock 227. 227 - 196 = exactly 32 color clocks. Voila! So the
window of opportunity for PF2, so to speak, is from color clock 148
to 195 inclusive. That's another 48 clocks.
So to summarize the timing for writing the right-hand-side PF register
updates, we can safely modify PF0 from clocks 84 - 147, PF1 from
clocks 116 - 163 inclusive, and PF2 from 148 - 195 inclusive. Note
the overlap on these times. We could safely modify PF1 on (say)
cycle 116, and then modify PF0 on cycle 130, and finally modify PF2
on cycle 190. The point being, it's not the ORDER of the
modifications to the playfield registers than count - it's the TIMING
that counts. As long as we modify the registers in the period when the
TIA isn't drawing them, we won't see glitches on the screen.
Well, now you have all the information you need to generate an
asymmetrical playfield. But there's one thing you need to remember -
once you write data to the TIA, the TIA retains that 'state', or the data
that you last wrote. So if you want an asymmetrical playfield, you not
only have to write the new data for the right-half of the scanline, you
have to write the right data for the left side of the NEXT scanline!
In fact, we already covered that. As long as PF0 is written before
cycle 68 then it will display OK on the left.... etc. So a typical
asymmetrical playfield kernel will be writing 6 playfield writes (two

101
to PF0, two to PF1, two to PF2) on each and every scanline. As you
can imagine, you don't get a lot of change out of just 76 cycles of
6502 time per scanline, when as a minimum a load/store is going to
cost you 5 cycles of time - and in most cases more like 6 or 7. That
can equate to 40 or more cycles of your 76, JUST drawing the
playfield data. Ouch!
Include WSYNC in your CPU cycle calculations
There are 228 ( = 160 visible + 68 not visible ) color clocks on each
scanline. The CPU is active ALL the time, *unless* you write to
WSYNC at which point the CPU is *immediately* halted and doesn't
become active again until the start of the next scanline. Since it takes
3 cycles to actually write WSYNC, a kernel which is using this to
time scanlines only has 73 CPU cycles per line. Why 73? Because if
we look at the color clocks per line, we see 228; but if we look at 3
color clocks for every CPU cycle, we actually have 228/3 = 76 CPU
cycles per line. And if we use 3 of those to do a WSYNC, then we
only have 73 available for other stuff. Voila!
And note, these 76 cycles for the whole line actually encompass the
WHOLE line... 228 color clocks worth. Some of those will be during
the 160 visible onscreen pixels (color clocks). Some will be during
the 68 "horizontal blank" period -- the invisible color clocks. And the
CPU can be halted by a WSYNC at *any* time during the line -- and
it will be turned on at the start of the next line -- no matter how long
away that is.
Rather than give you a code sample this session, I'd like you to grab
the last playfield code and convert it to display an asymmetrical
playfield. Doesn't have to be fancy - just demonstrate a consistent
change between left and right halves of the screen, writing PF0, PF1
and PF2 twice each on each scanline. Once you've mastered this
concept you can truly say you're on the way to programming a '2600
game!

102

103
Session 18: Asymmetrical Playfields – Part 2
The following diagram shows the timing relationship between the
TIA, the 6502, and playfield pixels. Further, it shows the times at
which it is safe to write the playfield registers for both left and right-
sides of the screen.

104
Thomas Jentzsch has pointed out that there is a minimum delay before
a change to a TIA playfield register becomes visible. He suggests ~2
TIA clocks.
When one considers that a 6502 instruction may take anywhere from
2 cycles (=6 TIA color clocks) to 7 cycles, it is apparent that any
particular 6502 instruction "occupies" a fairly wide slice of TIA time
during its execution. All instructions require a fetch of the opcode
(=6502 instruction) from memory, the decoding and execution of that
instruction, and sometimes a write of data back to memory.
These stages of 'execution' of an instruction happen at various times
during the time taken to execute the entire instruction. For example,
the first cycle of the total instruction time might be allocated to
retrieving the opcode from ROM. The second might be allocated to
decoding and executing some of the instruction. Truth be told, I'm not
really sure what happens when - it will differ for each of the
instructions and addressing (=access to memory) modes.
The point is, though, that when we write to the TIA playfield registers
(or any other register for that matter), one may have to make
allowances for the fact that although you may start an instruction on a
particular TIA / 6502 clock cycle, the actual write to the TIA
memory/register will most definitely not happen until 2 or more
cycles later - and that depends on the addressing mode. We will cover
addressing modes later - but basically they deal with ways of
accessing memory (e.g.: directly, indirectly via pointers, via a list
(indexed), etc.).
The timing diagram should be considered to indicate the time at
which TIA playfield registers must be updated by, for correct
playfield data to be displayed.
Another issue altogether - and one I simply don't know the answer to
right now - is *EXACTLY* what happens when you write to a
playfield register when that playfield register is currently being
displayed. I am not sure exactly what timing constraints determine
which pixel is displayed in which situation - the old or the new.
Thomas has also indicated that there are some reports of consoles
behaving differently when you get into this sort of extreme 'pushing
the envelope' timing, too.

105
Session 19: Addressing Modes
Are we having fun, yet?
We're already familiar with a few ways of loading numbers into the
6502's registers, and storing numbers from those registers into RAM
or TIA registers. We'll re-visit those methods we know about, learn
some new ones (not all of the 6502's addressing modes, but enough to
get by with).
This session we're going to have a bit of a look at the various ways
that the 6502 can address memory, and how to write these in source
code.
As you should be aware by now, the 6502 has three registers - A, X
and Y. "A" is our workhorse register, and we use this to do most of
our loading, storing, and calculations. X and Y are index registers,
and we generally use these for looping, and counting operations. They
also allow us to access 'lists' or tables of data in memory.
Let's start with the basics. To load and store actual values to and from
registers, we can use the following...
lda #$80 ; load accumulator with the number $80 (=128 decimal) lda $80 ; load acc. with contents of memory location $80
sta #$80 ; meaningless! DASM will kick a fit. You can't store ; to a number! sta $80 ; store accumulator's contents to memory location $80
ldx #$80 ; load x-register with the number $80
; etc..
All registers can load numbers directly (called 'immediate values').
The above examples show the accumulator being loaded with #$80
(the number 128) and also the X register being loaded with the same
value. You can do this with the Y register, too.
You can't STORE the accumulator to an immediate value. This is a
meaningless concept. It's like me asking you to put a letter in your
three. You may have a post-box numbered "three", but you don't have
a "three".

106
All registers can load and store values to memory addresses by
specifying the location of that address (or, of course, a label which
equates to the location of that address). For example, the following
two sections of code are equivalent...
lda $F000 ; load accumulator with contents of $F000
; or... where = $F000
lda where ; ditto
As noted, the above will work for X and Y registers, too. This form of
addressing (addressing means "how we access memory") is called
'absolute addressing'. Earlier we covered how the 6502 addresses code
over a 16-bit memory range (that is, there are 2^16 distinct addresses
that the 6502 can access, ranging from 0 to $FFFF). To form a 16-bit
address, the 6502 uses pairs of bytes - and these are always stored in
little-endian format (which means that we put the low-byte first, and
the high-byte last). Thus, the address $F023 would be stored in
memory as two bytes in this order... $23, $F0.
Now, when DASM is assembling our code, it converts the mnemonic
we write for an instruction (e.g.: "lda") into an opcode (a number)
which is the 6502's way of understanding what each instruction is
meant to do. We already encountered the mnemonic "nop" which
converted into $EA. Whenever the 6502 encountered an $EA as an
instruction, it performed a 2-cycle delay - i.e.: it 'executed' the NOP.
We've briefly covered how each 6502 instruction may have one or
two additional parameters - that is, there's always an opcode - but
there may be one or two additional bytes following the opcode. These
bytes hold things such as address data, or numeric data. For example,
when we write "lda #$56", DASM will place the bytes $A9, $56 into
the binary. The 6502 retrieves the $A9, recognizes this as a "lda"
instruction, then fetches the next byte $56 and transfers this value into
the accumulator.
To signify absolute addresses, the two bytes of the address are placed
in little-endian format following the opcode. If we write "ldy $F023" -
indicating we wish to load the contents of memory location $F023

107
into the Y register, then DASM will put the bytes $AC, $23, $F0 into
our binary. And the 6502 when executing will retrieve the $AC,
recognize it as a "ldy" instruction which requires a two-byte address -
and then fetches the address from the next two bytes, giving $F023 -
and THEN retrieving the contents of that memory location and
transferring it into the y register.
As you can see, this division of 16-bit addresses into low and high
byte pairs essentially divides the memory map into 256 'pages' of 256
bytes each. The very first page (with the high-byte equal to 0) is
known as 'zero-page', and this is treated a bit differently to the rest of
memory. To optimize the space required for our binary, the 6502
designers decided that they would include a special version of
memory addressing where, if the access was to zero page (and thus
the high byte of the memory address is 0), then you could use a
different opcode for the instruction and only include the low-byte of
the address in the binary. This form of addressing is known as zero-
page addressing.
As with our above example, if we were accessing memory location
$80 (which is the same as $0080 - remember, leading zeroes are
superfluous when writing numbers), then we *COULD* have an
absolute access to this location (with the bytes $AC, $80, $00 -
interpreted in a similar fashion as described above). But DASM is
smart - and it knows that when we are accessing zero-page addresses,
it uses the more efficient (both smaller code-size and faster execution)
form of the instruction, and instead places the following in our
binary... $A4, $80. The 6502 recognizes the opcode $A4 as a "ldy"
instruction (as was the $AC) but in this case only one byte is retrieved
to form the low byte of the address, and the high byte is assumed to
be 0.
Mostly we can rely on DASM to choose the best form of addressing
for us.
So far, we have seen that what we can do with all the registers is
essentially the same. Unfortunately, this is not the case with all the
addressing modes! The 6502 is not 'orthogonal' - and this has some
bearing on our choice of which register to use for which purpose,
when designing our kernel.

108
OK, so now we should know what is meant by "absolute addresses"
and "zero page addresses". Pretty simple, really. Both refer to the
address of memory that the 6502 can theoretically access - and zero
page addresses are those in the range $0000 to $00FF inclusive.
The session discussing Initialization introduced an efficient way of
clearing memory in a loop, using a register to iterate through 256
bytes, and storing 0 to the memory location formed by adding the
contents of the x register to a fixed memory address. These addressing
modes (using the X or Y register to add to a fixed memory address,
giving a final address for access) are known as "Absolute,X" and
"Absolute,Y" and "Zero Page,X" and "Zero Page,Y". It is probably a
good idea now to track down a good 6502 book.
ldx #1
lda $23,x ; load accumulator with contents of ; location 36 (=$24) ldy $23,x ; load Y register with contents of ; location %100100
ldy #2
ldx $23,y ; load X register with contents of location $25 lda $23,y ; load accumulator with contents of location $25
That last line is interesting - an example of the non-orthogonality of
our instruction set. All of the above examples deal with zero-page
addresses (that is, the high byte of the address is 0). Theoretically,
these instructions don't need to include the high-byte in the address
parameters in the binary. However, there is no "zero page,y" load
for the accumulator! There is a zero page,x one, though. It’s a bit
bizarre :-)
So DASM will assemble "ldx $23,y" to a zero page,y instruction - 2
bytes long - but it will assemble "lda $23,y" to an absolute,y
instruction - 3 bytes long. Such is life.
These zero page indexed instructions have a catch - the final address
is always always always a zero page address. So in the following
example...
ldy #1
lda $FF,y

109
Since (as we just discussed) this is an absolute indexed instruction,
the accumulator is loaded with the contents of memory location $100.
However, the following...
ldy #1
ldx $FF,y
Since this will assemble to a zero page indexed instruction, the final
address is always zero-page (the high byte is set to 0 after the index
register is added) - so we will actually be accessing the contents of
memory location 0 (!!). That is, the address is formed by adding the y
register and the address ($FF+1 = $100) and dropping the high-byte.
Something to be very aware of!
Absolute indexed addressing modes are handy for loading values
from data tables in ROM. They allow us to use an index register to
step (for example) the line number in a kernel, and use the same
register to access playfield values from tables. Consider this (mockup)
code...
ldx #0 ; line # Display
lda MyPF0,x ; load a value from the data table "MyPF0" sta PF0
lda MyPF1,x ; use table "MyPF1" sta PF1
lda MyPF2,x ; use table "MyPF2" sta PF2
sta WSYNC
inx
cpx #192
bne Display
; other stuff here jmp StartOfFrame
MyPF0
.byte 1,2,3,4,5,6 ;...etc 192 bytes of data here, ; giving data for PF0 MyPF1
; PF 1 data (should be 192 bytes long) .byte 234,24,1,23,41,2
MyPF2
; PF 2 data (should be 192 bytes long) .byte 64,244,31,73,43,2,0,0

110
The above code fragment uses tables of data in our ROM. These
tables contain the values which should be written to the playfield
registers for each scanline. The x register increments once for each
scanline, and our absolute,x load for each playfield register will load
consecutive values from the appropriate tables.
Then, creating pretty graphics becomes simply a matter of putting the
right values into those tables MyPF0, MyPF1, and MyPF2. This is
where building tools to convert from images to data tables becomes
extremely useful! We'll cover more of this way of doing things when
we complete our sessions on asymmetrical playfields. The plan is to
use a tool to create these data tables, and simplify our kernel by using
data tables to display just about any asymmetrical image we want!
Soon we'll cover the remaining 6502 addressing modes, and also
discuss the 6502's stack.
Exercises
1. Use this method of absolute,x table access to modify or create
a kernel which loads the graphics data from tables. Separate
each playfield register into its own table, as above.
2. Can you extend this system to asymmetrical playfield? Don't
worry, we're going to give a complete asymmetrical playfield
kernel (and tools!) in the next session.
3. How would you incorporate color changes into this system
(i.e. if you wanted clouds on the left, sun on the right)?
4. Each table requires 1 byte of ROM per PF register per
scanline. Can you think of ways to reduce this requirement?
What trade-offs are necessary when reducing the table size?
5. Find a 6502 cycle-timing reference, and try to calculate
exactly how many cycles each instruction in your kernel is
taking. Add-up all the instructions on each line, and work out
just how much time you have left to do "all the other stuff".
Such as sprite drawing!

111
Session 20: Asymmetrical Playfields – Part 3
This session we're going to wrap-up our understanding of playfield
graphics.
It doesn't take long before you get sick of doing data by hand, and
often the time spent in creating tools is repaid many-times-over in the
increase in productivity and capability those tools deliver. Sometimes
a tool is a 'hack' in that it's not professionally produced, it has bugs,
and it isn't user-friendly. But until you've tried creating bitmap
graphics by hand a bit-at-a-time (and I'm sure that some of you have
already done this by now), you won't really appreciate something -
anything! - that can make the process easier. Having prepared you for
the fairly shocking quality of this, I now point you towards the FSB
tool which can be found at https://tinyurl.com/dasm-fsb. FSB stands
for "Full-Screen-Bitmap", and it's the tool I use for generating the
data for those spiffy Interleaved ChronoColour ™ Full-Screen-
Bitmaps. But it's able to be used for monochrome playfields, too.
The tool (Windows-only, sorry - if you're on a non-Windows platform
then you may need to write your own) is run from a DOS command-
line. It takes three graphics files as input (representing the RED,
GREEN, and BLUE components of a color image) and spits-out data
which can be used to display the original data on an Atari 2600. For
now we're not really at the level of drawing color bitmaps - but we'll
get there shortly. First, let's examine how to use FSB to generate data
for simple bitmap displays.
As noted, FSB takes three graphics files as input. Let's simplify
things, and pass the utility only one file. This equates to having
exactly the same data for red, green, and blue components of each
pixel - and hence the image will be black and white (specifically, it
will be two-color). That's the capability of the '2600 playfield display,
remember! It's only through trickery that there ever appear to be more
than two colors on the screen at any time. That trickery being either
time-based or position-based changing of the background and
playfield colors to give the impression of more colors.
Actually, I cheated a bit - if we pass only one file, the utility will
process it, then have a fit when it can't find the others. As I said, it's a

112
bit of a hack. But sometimes, hacking is OK. Sometime, I'll get a
round tuit and fix it up.
Right, let's get right into it. Create yourself a graphic file with a 40 x
192 pixel image, just 2-colors. It doesn't really HAVE to be two
colors for the utility to work, but the utility will only process the
pixels as on or off. It's difficult to create good-looking images in such
low-resolution and odd aspect ratio. Remember, with a graphics
package you're probably drawing with square(ish) pixels, so your 40 x
192 image probably looks narrow and tall. On the '2600 it will be
pretty much full-screen. That is, the pixels are 'stretched' to roughly
8x their width. So, if you like, use your paint program's capabilities to
draw in that aspect ratio. Doesn't matter how you do it, as long as
your final image is just 40 pixels across, 192 deep.
Once you have the image, save it as a .BMP, a .JPG or a .PNG file. I
don't support .GIF as the idea of software patents is abhorrent to me.
Having said that, I actually am the inventor of one particular piece of
patented software (It's true! Look it up - that's exercise 1 for today) so
you just never know when I'm serious or not, do you? Once we have
that image file, we can feed it into the utility...
Navigate to where you've placed the utility .exe file, and type (without
the quotes) "FSB". You'll see something like this...
D:\Atari 2600\Tools>fsb
FSB -- Atari 2600 Color Image Generatorv0.02
Copyright (c)2001 TwoHeaded Software
Contains paintlib code. paintlib is copyright (c) 1996-2000
Ulrich von Zadow
Usage: FSB [-switch] RED_FILE GREEN_FILE BLUE_FILE
Switches...
RED_FILE File with red component of image (2-color)
GREEN_FILE File with green component of image (2-color)
BLUE_FILE File with blue component of image (2-color)
v Toggle verbose output ON/OFF
nNAME set output filename prefix. Defaults to IMAGE
Input files may be .BMP, .JPG, or .PNG format.
Reading File: IMAGE
Unrecognised and/or unsupported file type.

113
If you see that, then the utility is working fine. Ignore the various
error messages - as I said, it's a hack and incomplete. But it does work
well-enough for our purposes. If there's much demand/usage and I'm
embarrassed enough I'll clean it up.
This time, let's pass an image to it... let's assume we saved our file as
test.png in the same directory.
Type (without... you know the drill)... "FSB test.png"
D:\Atari 2600\Tools>fsb test.png
FSB -- Atari 2600 Colour Image Generatorv0.02
Copyright (c)2001 TwoHeaded Software
Contains paintlib code. paintlib is copyright (c) 1996-2000
Ulrich von Zadow
Reading File: test.png
Bitmap size: 40 x 170 pixels
........
........
........
........
........
........
........
........
........
........
>>>lots of stuff cut from here!! <<<
.*..*.*.
.*.*.*.*
..*.*.*.
**.*..*.
...*.*.*
*.*.*.*.
.*..*..*
.*.*.*.*
*.*.*.*.
..*..*..
Reading File: IMAGE
Unrecognised and/or unsupported file type.
You'll see a WHOLE LOT MORE of those lines with dots and
asterisks. This is my debugging visual output of the graphics as the

114
utility is converting the data. Strictly speaking this is not necessary.
But as I said, it's a hack. Increasingly I'm feeling I need to fix this
*sigh*. That's one of the problems with releasing your tools for others
to use. Please IGNORE that last line saying “Unrecognised and/or
unsupported file type.” It's uh... a feature. Anyway, plunging on...
Remember in the previous sessions how we determined that an
asymmetrical playfield was created by writing to playfield registers
PF0, PF1, and PF2, and then with exquisite timing writing again to
those registers before the scanning of the electron-beam across the
scanline got to display them again? In essence, there are 6 bytes of
data for each scanline (two of each of the three playfield registers).
Although 4 bits in playfield 0 aren't used, and there's a potential
saving there of 8 bits total (i.e. one byte per line) we're not going to
delve into that sort of saving here. Let's just accept that the utility will
convert the 40-bit wide image into 'segments' such that we really have
data for PF0, PF1, PF2 for the left side of each scanline, and more
data for those registers for the right side of each scanline.
Some of the examples presented by our astute readers have already
shown formidable asymmetrical playfield solutions - so good, in fact,
that I'm not going to trouble with an 'official' asymmetrical playfield
solution for these tutorials. Take one of the already-presented
solutions and use that.
What I would like to discuss, though, is just how the data for a full-
screen-bitmap should be presented. We can organize our data into 192
scanlines, each having 6 bytes of data - or we could organize it into 6
columns, each having 192 bytes of data. The first method is more
intuitive (to me, anyway) but it is a much more inefficient way to
store our data from the 6502's perspective. In fact, to use the first
method correctly we would need to use an addressing-mode of the
6502 that I haven't introduced yet - so let's just look at how the utility
spits out the data and hopefully as time goes by you will come to trust
my wisdom and perhaps even understand WHY we did it this way ;-)
A hint: When using an index register, you can address 256 bytes from
any given base-address. That is, the index register can range from 0 to
255, and that register is added to the base address when doing
absolute indexed addressing to give you a final address to read from

115
or write-to. Now consider if we had our data organized as 192 lines,
each being 6 bytes long... we could do the following...
ldx #0 ; index to the PF data ldy #0 ; line number
ALine lda PFData,x ; PF0 data sta PF0
lda PFData+1,x ; the next byte of data (assembler ; calculates the +1 when assembling) sta PF1
lda PFData+2,x ; the next sta PF2
; delays here, as appropriate
lda PFData+3,x ; PF0 data, right side sta PF0
lda PFData+4,x ; the next sta PF1
lda PFData+5,x ; the next sta PF2
txa
clc
adc #6
tax ; increment pointer by one line (6 bytes of data)
sta WSYNC ; wait till next line
iny
cpy #192
bne Aline
The above code essentially assumes that the data for the screen is in a
single table consisting of 6 bytes per scanline, and that the scanlines
are stored consecutively. Can you see the problem with this?
It's a bit obscure, but the problem is when we get to scanline #43. At
or about that point, the index register used to access the data will be
42 x 6 (=252) and we come to add 6 to it. So we get 258, right?
Wrong! Remember, our registers are 8-bits only, and so we only get
the low 8-bits of our result - and so 252 + 6 = 2 (think of it in binary:
%11111100 + %00000110 = %100000010 (9 bits) and the low 8 bits
are %00000010 = 2 decimal). So at line 43, instead of accessing data
for line 43 we end up accessing data for line 0 again - but worse yet,
not from the start of the line, but actually two bytes 'in'. Urk! This is a

116
fundamental limitation of absolute indexed addressing - you are
limited to accessing data in a 256-byte area from your base address.
There are addressing-modes which allow you to get around this, but
they're slower - and besides, it's better to reorganize your data rather
than using slow code.
OK, so now let's consider if each of the bytes of the playfield (all 6 of
them) were stored in their own tables. Think of the screen being
organized into 6 columns each of 192 bytes (the depth of the screen).
Since each table is now <256 bytes in size, we can easily access each
one of them using absolute indexed addressing. As an added bonus,
they can all be accessed using just the one index register which can
ALSO double as our line-counter. Like this...
ldx #0 ; line # ALine lda PF0Data,x ; PF0 left sta PF0
lda PF1Data,x ; PF1 left sta PF1
lda PF2Data,x ; PF2 left sta PF2
; delay as appropriate
lda PF3Data,x ; PF0 right sta PF0
lda PF4Data,x ; PF1 right sta PF1
lda PF5Data,x ; PF2 right sta PF2
sta WSYNC
inx
cpx #192
bne Aline
The above code assumes that there are 6 tables (PF0Data - PF5Data)
containing 'strips' or 'columns' of data making up our screen.

117
We COULD have had just a single table with the first 192 bytes being
column 0, the next being column 1, etc., and letting the assembler
calculate the actual address from the base address like this (snippet...)
ldx #0 ; line # ALine lda PFData,x ; column 0 - PF0 left sta PF0
lda PFData+192,x ; column 1 - PF1 left sta PF1
lda PFData+384,x ; column 2 - PF2 left
; delay, etc.
lda PFData+384+192,x ; column 3 - PF0 right
; etc.
What it's important to understand here is that the "+192" etc., is
*NOT* done by the 6502. Remember how our assembler converts
labels to their actual values (using the symbol table)? Likewise it
converts expressions to their actual values - and in this case it will
take the value of 'PFData' and add to it 192, and put the resulting 16-
bit value as the 2-byte address following the lda op-code. Remember,
the 6502 absolute addressing mode is simply given a base address to
which it adds the index register to get a final address from which data
is retrieved (lda) or to which it is stored (sta).
The above example with the manual-offset from the base address (that
is, where +n was added) is functionally identical to the example
where there were 6 separately named tables. In both cases, the data is
assumed to be strips of 192 bytes, each strip being one of the columns
representing the values to put into each of the 6 playfield registers
(given that there are 6 writes to three registers per-line, I think of the
three registers as 6 separate registers).
So that's exactly what FSB does. It creates 6 tables, each representing
a 'strip' of 192 lines of data for a single register. Those tables are
saved to a .asm file with the same prefix as the input file, and contents
like this (abridged)...

118
screen
screen_STRIP_0
.byte 240
.byte 240
.byte 240
.byte 240
;188 more bytes here
screen_STRIP_1
;192 bytes here screen_STRIP_2
;192 bytes here
screen_STRIP_3
;192 bytes here
screen_STRIP_4
;192 bytes here
screen_STRIP_5
;192 bytes here
;end
For space purposes that has been heavily abridged. The file was
produced from a source-file called 'screen.jpg' - as you can see, the
filename prefix has been used to create labels to identify the whole
table ('screen') and also to identify each of the strips
('screen_STRIP_0', etc). So you can use either of the access methods
described above, if you wish. Remember, if this file were assembled,
the values of the symbols 'screen' and 'screen_STRIP_0' would be
identical as they will be at the same address in the binary.
So, we have a DASM-compatible file which contains a text-form
version of the graphics file. How do we include this data into our
source, so that we may display the data as an image? It's pretty easy -
and in fact we've already encountered the method when we included
the 'vcs.h' and 'macro.h' files.
We just use the include dasm pseudo-op.
include "screen.asm" ; or whatever your generated file is
When you use the include pseudo-op, DASM actually inserts the
contents of the file you specify right then and there into that very spot

119
into the source-code it is assembling. So be careful about where you
enter that include pseudo-op. Don't put it in the middle of your kernel-
loop, for example! Put it somewhere at the beginning or end of your
code segment, where it won't be executed as 6502 code. For example,
after the jump at the end of your kernel, which goes back to the start
of the frame.
Exercises
1. Create a circle as a 40 x 192 image and save it as a .JPG,
.PNG or .BMP. Convert it to source-code through FSB to
create source-code data. Can you think of good ways to draw
circles in such an odd screen-size? Hint - make the size of
your image the LAST step in the draw process!
2. Take one of the asymmetric playfield demos from the last
session and convert it to display the data generated in step 1.
3. Set the playfield color to a RED for one frame, then the next
frame set it to a GREEN, and for the third frame set it to a
BLUE. What effect do you see? What color does the circle
appear to be? Why? If you haven't cottoned-on yet, this is
leading towards color-bitmap technology - we may cover that
in a future session. By using different colors over time, we can
trick the eye to seeing a different color than those we actually
use.
4. How can this temporal color change be used to display a range
of colors? This is tricky, so don't worry if you can't understand
it. Hint: don't just change the color each frame! What else can
you change?
5. All our discussions about bitmap graphics have revolved
around the use of asymmetrical (mirrored) playfields. Yet
some (not many!) games use non-mirrored playfields. What
timing problems can you see when using non-mirrored
playfields for bitmap graphics - and why on earth would you
want to do this?

120

121
Session 21: Sprites
It's time to begin our understanding of sprites.
What are sprites? By now, sprites are well-known in the gaming
industry. They are small, independently movable objects which are
drawn by hardware anywhere over the top of playfield graphics. The
Atari 2600 was the first console to introduce general-purpose sprites -
back in the day they were called 'player missile graphics'. It was the
Commodore 64 which introduced the term 'sprites', which we know
and love.
The Atari 2600 has two 'players', two 'missiles' and a 'ball' - all of
these are sprites, and each has various parameters which can be
adjusted by the programmer (position, size, color, shape, etc). We're
going to concentrate, this session, on the 'players' and how they work.
Player graphics have much finer resolution than playfield graphics.
Each player is 8 pixels wide, and each pixel in a player is just a single
TIA color-clock in width. In other words, the pixels in player graphics
are a quarter of the width of the pixels in playfield graphics. The
graphics of each player are controlled by a single 8-bit TIA register.
The register for player 0 (the first player) is GRP0 (standing for
'Graphics, Player 0') and the register for the second player is GRP1.
When you write data to either of these registers you change the
visuals of the relevant player sprite being drawn on the screen.
Just like playfield graphics, the player graphics registers only hold a
single 'line' of data. If you do not modify the data on-the-fly (that is,
changing it every scanline), then the TIA just displays the same data
on every scanline. So kernels using sprite graphics typically modify
these player graphics registers constantly.
Surprisingly, though player sprites can be (effectively) positioned
anywhere on the screen, they do NOT have position registers. Most
more modern machines (Nintendo, C64, etc.) provided an x,y
coordinate which was used to position a sprite on the screen. The
Atari 2600 is a much more primitive beast.

122
The horizontal position of a player sprite is controlled by writing to a
'reset position' register (RESP0 for sprite 0 and RESP1 for sprite 1).
When you write to these registers, you cause the hardware to begin
drawing the relevant sprite... immediately! This is very strange and a
bit hard to get used to at first. To move a sprite horizontally to any x-
position on a scanline, one has to make sure that the RESP0 write
happens just before the position on the scanline at which you want the
sprite to appear. Since the 6502 is running at 1/3 of the clock speed of
the TIA, this makes it incredibly difficult to write to RESP0 at exactly
the right time. For every cycle of 6502 time, three pixels (cycles of
TIA time) pass. So it's only possible to position sprites (through
RESPx writes) with an accuracy of 1 6502 clock period, or in other
words three TIA pixels.
To facilitate fine-positioning of sprites, the TIA has additional
registers which allow the sprite to be adjusted in position by a few
pixels. We are not going to cover that this session - but instead we'll
have a look at how sprite graphics are written, how the course RESPx
registers are used, and how sprite colors are controlled. Fine
positioning of sprites is an art in itself, and many solutions have been
proposed on the [stella] list. We'll get to that in a session or two, but
for now, let's stick with the basics.
The sample kernel from http://atariage.com/forums/topic/32481-
session-21-sprites shows a fully working sprite demo.
There are very few additions from our earlier playfield demos...
lda #$56
sta COLUP0
lda #$67
sta COLUP1
In our initialization (before the main frame loop) the above code is
initializing the colors of the two player sprites. These are random
purplish colors. You may also change the color on-the-fly by
rewriting it every scanline. Remember, though - you only have 76
cycles per scanline - so there's only so much you can cram into a
single line before you run out of 'space'.

123
MiddleLines SLEEP 20
sta RESP0
SLEEP 10
sta RESP1
stx GRP0 ; modify sprite 0 shape stx GRP1
sta WSYNC
inx
cpx #184
bne MiddleLines
The above code sample is the 'guts' of our sprite demo. It doesn't do a
lot of new stuff. You should already be familiar with the SLEEP
macro - it just causes a delay of a certain number of 6502 cycles. The
purpose of the SLEEP macros here is to delay to a position
somewhere in the middle of the scanline - you may play with the
values and see the effect on the positioning of the sprites.
Immediately after each SLEEP, there's a write to RESPx for each of
the player sprites. This causes the TIA to begin drawing the
appropriate player sprite immediately. And what will it draw?
stx GRP0 ; modify sprite 0 shape stx GRP1
Since, in this kernel, the x register is counting the scanline number,
that is also the value written to both of the graphics registers (GRPx)
for the player sprites. So the graphics we see will change on each
scanline, and it will represent a visual image of the scanline counter:

124
That's pretty much all there is to getting sprites up and running. There
are a few interesting things we need to cover in the coming sessions,
including sprite size, sprite repeating, priorities, buffered sprite
drawing, drawing specific images/shapes and lots of other stuff. But
now you have the basics, and you should be able to do some
experimenting with what you see here.
Exercises
1. Modify the kernel so that the color of the sprite is changed
every scanline. How many cycles does this add to your
kernel? How many cycles total is each of your lines taking
now?
Answer: it takes 3 cycles per write to a color register (e.g. stx
COLUP1), but it takes two or more additional cycles if you
want to load a specific color. The variation in time depends on
the addressing mode you use to load the color (e.g. an
immediate value = 2 cycles, but loading indirectly through a
zero page pointer to a memory location, indexed by the y
register, would take 6 cycles!).
lda #34 ; 2 sta COLUP1 ; 3
lda (color),y ; 6 sta COLUP1 ; 3
2. Instead of using the scanline to write the shape of the sprite,
load the shape from a table. Can you think how it would be
possible to draw (say) a Mario-shaped sprite anywhere on the
screen? This is tricky, so we'll devote a session or more to
vertical positioning.
Answer: This really is too tricky to answer here. Future
sessions will cover this problem thoroughly, as its
fundamental to drawing sprites in your game.
3. What happens when you use more than 76 cycles on a line -
how will this code misbehave?

125
Answer: Remember that the TIA and the TV beam are in
synch. The timing is such that precisely 76 cycles of 6502 time,
or 228 cycles of TIA time, correspond to *exactly* one
scanline on the TV. Currently we've been using "sta WSYNC"
to synchronize our kernel to the start of every scanline. This
isn't necessary IF our code makes sure that our kernel lines
take EXACTLY 76 cycles to execute.
But since the above code DOES use "sta WSYNC", a 3 cycle
instruction, we really only have 73 cycles per line available
for other processing. If we exceed these 73 cycles, then that
pushes the "sta WSYNC" past the point at which it's on the
current scanline and onto the point where it's really on the
NEXT scanline. And if it happens on the NEXT scanline, it will
operate as expected (and that, as we know, is by halting the
6502 until the start of the NEXT scanline).
So essentially, if our code exceeds 76 cycles, then each
scanline will actually be two scanlines deep! And instead of
sending, say, 262 scanlines per frame, we'd be sending 524.
Most TVs cannot cope with this and they will, as noted, 'roll'. I
just wanted you to understand WHY.
4. The picture shows sprites over the 'border' areas at top and
bottom, yet the code which draws sprites is only active for the
middle section. Why is this happening? How would you
prevent it?
Answer: A good lesson in how the TIA works. The TIA
registers hold whatever you put into them, until you next put
something in to them. So after our last write to the sprite
registers, the TIA keeps displaying the same shape for sprites,
on each scanline, until we write again. So what we're really
seeing in those border areas is the last write (which is actually
at the bottom of the changing shape area of sprites) repeated
on the bottom, and then on the top again, until we start writing
sprite shapes again.
The solution is to write 0 to GRP0 and GRP1 when we've

126
finished drawing our sprites - and, of course, on initialization
of the system.
5. Move the SLEEP and RESPx code outside the middle loop -
place this code BEFORE the loop. What differences would
you expect to see? Is the result surprising?
Answer: Barring minor timing changes which will cause the
positions to shift slightly, the effect I was trying to show was
that it is not necessary to rewrite the RESPx registers every
scanline. You only need to position your sprites once each,
and they will remain in that position until you reposition them.
By moving the reposition outside the loop, we've freed up
extra cycles in the kernel code for each scanline.
Positioning sprites to any arbitrary horizontal position is quite
complex, and usually takes at least one whole scanline to do in
a generic fashion. This is why games which use multiple
sprites rarely allow those sprites to cross over each other, and
also the reason why you see distinct 'bands' of sprites in other
games - the gaps between the bands is where the horizontal
movement code is doing its stuff.

127
Session 22: Sprites, Horizontal Positioning
The RESPx registers for each of the sprites are strobe registers which
effectively set the x position of each sprite to the point on the scanline
the TIA is displaying when those registers are written to. Put more
simply, as soon as you write to RESP0, sprite 0 begins drawing and it
will keep drawing in that position on every scanline. Same for
RESP1.
This session we're going to have a bit of a play with horizontal
positioning code, and perhaps come to understand why even the
simplest things on the '2600 are still an enjoyable challenge even to
experienced programmers.
As previously noted, it is not possible to just tell the '2600 the x
position at which you want your sprites to display. The x positioning
of the sprites is a consequence of an internal (non-accessible) timer
which triggers sprite display at the same point every scanline. You
can reset the timer by writing to RESP0 for sprite 0 or RESP1 for
sprite 1. And based on where on the scanline you reset the timer, you
effectively reposition the sprite to that position.
The challenge for us this session is to develop code which can
position a sprite to any one of the 160 pixels on the scanline!
Given any pixel position from 0 to 159, how would we go about
'moving' the sprite to that horizontal position? Well, as we now know,
we can't do that. What we can do is wait until the correct pixel
position and then hit a RESPx register. Once we've done that, the
sprite will start drawing immediately. So if we delay until, say, TIA
pixel 80 - and then hit RESP0, then at that point the sprite 0 would
begin display. Likewise, for any pixel position on the scanline, if we
delay to that pixel and then hit RESP0, the sprite 0 will display at the
pixel where we did that.
So how do we delay to a particular pixel? It's not as easy as it sounds!
What we have to do, it turns out, is keep a track of the exact execution
time (cycle count) of instructions being executed by the 6502 and hit
that RESPx register only at the right time. But it gets ugly - because

128
as we know, although there are 228 TIA color clocks on each scanline
(160 of those being visible pixels), these correspond to only 76 cycles
(228/3) of 6502 processing time. Consequently only 160/3 = 53 and
1/3 cycles of 6502 time in the visible part of the scanline. Since each
6502 cycle corresponds to 3 TIA clocks, it would seem that the best
precision with which we could hit RESPx is within 3 pixels. But it
gets uglier still, and we'll soon see why.
The SLEEP macro has been useful to us now, to delay a set number of
6502 cycles. Consider the following code...
sta WSYNC ; wait till start of line SLEEP 40 ; 20 cycle delay sta RESP0 ; reset sprite 0 position
Surely that's a simple and neat way to position the sprite to TIA color-
clock 120? The 120 comes from calculating the 6502 cycle number
(40) x 3 TIA color clocks per 6502 cycle. The answer to the question
is "yes and no". Sure, it's a neat way to hardwire a specific delay to a
specific position. But say you wanted to be able to adjust the position
to an arbitrary spot. We could no longer use this sort of code.
Remember, SLEEP is just a macro. What it does is insert code to
achieve the number of cycles delay you request. The above might
look something more like this...
sta WSYNC
nop ; 2 cycles nop ; +2 nop ; +2 nop ; +2 nop ; +2 nop ; +2 nop ; +2 nop ; +2 nop ; +2 nop ; +2 nop ; +2 nop ; +2 nop ; +2 nop ; +2 nop ; +2 nop ; +2 nop ; +2 nop ; +2 nop ; +2 nop ; +2 sta RESP0

129
We don't really know what the sleep macro inserts, and we don't
really care. It's documented to cause a delay of n cycles, if you pass it
n. That's all we can know about it. If we wanted to change n to n+1
we could do it at compile time, but we couldn't use this sort of code
for realtime changes of the delay. What we want is a bit of code
which will wait a variable bit of time.
And here's where the fun really starts! There are, of course, many
many ways to do this. And part of the fun of horizontal positioning
code is that it's just begging for nifty and elegant solutions to doing
just that. What we're going to do now is just develop a fairly simple,
possibly inefficient, but workable solution.
The essence of our solution will be to use a loop to count down the
delay, and when the loop terminates immediately write the RESPx
register. So the longer the delay, the more our loop iterates. In
principle, it's a fine idea. In practice we soon see the severe
limitations. We should be familiar with simple looping constructs -
we have already used looping to count the scanlines in our kernels, for
example. Here's a simple delay loop which will iterate exactly the
number of times specified in the X register...
; assume X holds a delay loop count SimpleLoop dex
bne SimpleLoop
sta RESP0 ; now reset sprite position
That's as simple a loop as we can get. Each iteration through the loop
the value in the X register is decremented by one, and the loop will
continue until the Z flag is set (which happens when the value of the
last operation performed by the processor returned a zero result - in
this case, the last operation would be the 'dex' instruction). So as you
can see, at just two instructions in size this is a pretty 'tight' loop.
There's not much you can trim out of it and still have a loop! So
what's the problem with using a loop like this in our horizontal
positioning code? Let's have another look at this, but with cycle times
added…
SimpleLoop dex ; 2 bne SimpleLoop ; 3 (2)

130
It has been fairly standard notation for a few years now to indicate
cycle times in the fashion shown above. The number in the comment
(after each semicolon) represents the number of 6502 cycles required
to execute the instruction on that line. In this case, the 'dex' instruction
takes 2 cycles. The 'bne' instruction takes 3 cycles (if the branch is
taken) and 2 cycles if not. Unfortunately, life isn't always that simple.
If the branch from the bne instruction to the actual branch location
crossed over a page (a 256-byte boundary), then the processor takes
another cycle! So we're faced with the situation where, as we add and
remove code to other parts of our program, some of our loops take
longer or shorter amounts of time to execute. No kidding! So when
we come to doing tightly timed loops where timing is critical, we
must also remember to somehow guarantee that this sort of shifting
doesn't happen! That's not our problem today, though - let's assume
that our branches are always within the same page.
So what's wrong with the above? Let's go back to our correspondence
between 6502 cycles and TIA color clocks. We know that each 6502
cycle is 3 TIA color clocks. So a single iteration of the above loop
would take 5 cycles of 6502 time - or a massive 15 TIA color clocks.
No matter what number of iterations of our loop we do, we can only
hit the RESPx register with a finesse of 15 TIA color clocks! Is this a
disaster? No, it's not. In fact, the TIA is specifically designed to cater
for this situation. Before we delve into how, though, let's analyze this
loop a bit more...
Since each iteration of the loop chews 15 TIA color clocks, we must
iterate (x/15) times, where X is the pixel number where we want our
sprite to be positioned. Put another way, we need to know how many
15-pixel chunks to skip in our delay looping before we're at the
correct position to hit RESPx and start sprite display. So when we
come into this code with a desired horizontal position, we'll have to
divide that value by 15 to give us a loop count. What's the divide
instruction? There isn't one, of course!
So how do we divide by 15?
Another of those extremely enjoyable challenges of '2600
programming. Dividing by a power of 2 is easy. The processor
provides shifting instructions which shift all the bits in a byte to the

131
left or to the right. Consider in decimal, if you shifted all digits of a
number to the left by one place, and added a 0 at the end of the
number, you'd have multiplied by 10. Similarly in binary, if you shift
a number left once, and put a 0 on the end, you've multiplied by 2.
Dividing by two is thus shifting to the right one digit position, and
adding a 0 at the 'top' of the number. Typically, multiplication in
particular and sometimes division are achieved by clever combination
of shifting and adding numbers.
But we don't need to do that here. We know that there are only 160
possible positions for the sprite. Why not have a 160 byte table, with
each entry giving the loop counter for the delay loop for each
position? Something like this...
Divide15
.POS SET 0
REPEAT 160
.byte .POS / 15
.POS SET .POS + 1
REPEND
DON'T do things by hand when the assembler can do it for you! What
I've done here is write a little 'program' to control the assembler
generation of a table of data. It has a repeat loop of 160 iterations,
each iteration incrementing a counter by one and putting that counter
value / 15 in the ROM (with the .byte pseudo-op). This code is
equivalent to writing...
Divide15
.byte 0,0,0,0,0,0,0,0,0,0,0,0,0,0,0; 15 entries .byte 1,1,1,1,1,1,1,1,1,1,1,1,1,1,1; 15 entries ; etc... lots more...
Me, I'd prefer the first example - easier to maintain and modify.
In any case, the idea of having a table is to give us a quick and easy
way to divide by 15. To use it, we place our number in an index
register, and then load the divide by 15 result from the table, using the
register to give us the offset into the table. Easier to show than
explain:

132
ldx Xposition
lda Divide15,x ; xPosition / 15 tax
SimpleLoop dex
bne SimpleLoop
sta RESP0 ; start drawing the sprite
It's good, and it's bad. Bad because it can't cope with 'loop 0 times' -
in fact, it will loop 256 times. So let's add one to all the entries in the
table, which will 'fix' this problem. Just change the '.byte .POS / 15' to
'.byte (.POS / 15) + 1'. But I think we're digressing, and what I really
wanted to introduce was the concept of looping to delay for a certain
(variable) time, and then hitting RESPx at the end of the loop. You
can see the problems introduced by this method, though, where we
had to find a way to divide by 15, where we only had 15 color clock
resolution in our positioning. There are other - and arguably better -
ways to do horizontal positioning, but let's not make the better the
enemy of the good. What we're really after right now is a working
solution.
So in theory, our positioning code so far consists of dividing the x
position by 15, looping (skipping 15 color clocks each loop) and then
hitting the RESP0 register to start drawing the sprite. Is this all there
is to it? Yes, in a nutshell. But the devil is in the detail. Let's integrate
what we have so far into a kernel which constantly increments the
desired X position for the sprite, then attempts to set the x position for
the sprite each frame (see the source code and sample binary at
http://atariage.com/forums/topic/32896-session-22-sprites-horizontal-
positioning-part-1).
Now this is very interesting. Clearly our sprite is moving across the
screen as our desired position is incrementing. But it's moving in very
big chunks. We have a bit of optimizing to do before we have a sprite
positioning system capable of pixel-precise horizontal positioning.
But it's a start, and we understand it (I hope!).
There are some observations to make about this code and binary. I've
introduced a little more 6502, which we can examine now...

133
inc SpriteXPosition; increment the desired position by 1 pixel ldx SpriteXPosition
cpx #160 ; has it reached 160? bcc LT160 ; this is equivalent to branch if less than ldx #0 ; otherwise reload with 0 stx SpriteXPosition
LT160
jsr PositionSprite; call the subroutine to position the sprite
This is the bit of code which does the adjustment of the desired
position, loads it to the x register and calls a 'subroutine' to do the
actual positioning code. This is our first introduction to the 'bcc'
instruction, and to the 'jsr' and 'rts' (in the subroutine itself)
instructions. We have previously encountered the Z flag and the use
of flags in the processor's status register to determine if branches are
taken or not. The delay loop uses exactly this. The Z flag isn't the only
flag set or cleared when operations are performed by the processor.
Sometimes the 'carry flag' is also set or cleared. Specifically, when
arithmetic operations such as addition and subtraction, and also when
comparisons are done (which are essentially achieved by doing an
actual addition or subtraction but not storing the result to the register).
In this case, we've compared the x register with the value 160 (cpx
#160). This will clear the carry flag if the x register is LESS than 160,
or set the carry flag if the X register is GREATER than or EQUAL to
160. I've always used the carry flag like this for unsigned
comparisons. In the code above, we're saying 'if the x register is >=
160, then reset it to 0'. All branch instructions cost 3 cycles if taken,
two if not taken, and an additional cycle if the branch taken crosses a
page boundary. Branches can only be made to code within -128 or
+127 bytes from the branch. For longer 'jumps' one can use the 'jmp'
instruction, which is unconditional.
For long conditional branches, use this sort of code...
cpx #160
bcs GT160 ; NOT less than 160 ; (bcs is a GREATER or EQUAL comparison) jmp TooFarForLT ; IS less than 160
GT160
; lots of code
TooFarForLT ; etc

134
But I digress! The 'jsr' instruction mnemonic stands for "Jump
Subroutine". A subroutine is a small section of code somewhere in
your program which can be 'called' to do a task, and then have
program execution continue from where the call was made.
Subroutines are useful to encapsulate often-used code so that it
doesn't need to be repeated multiple times in your ROM. When the
6502 'calls' a subroutine, it keeps a track of where it is calling FROM,
so that when the subroutine returns, it knows where to continue code
execution. This 'return address' is placed on the 6502's 'stack', which
we will learn about very soon now. The stack is really just a bit of our
precious RAM where the 6502 stores these addresses, and sometimes
other values. The 6502 uses as much of our RAM for its stack as it
needs, and each subroutine call we make requires 2 bytes (the return
address) which are freed (no longer used) when the subroutine
returns. If we 'nest' our subroutines, by calling one subroutine from
within another, then each nested level requires an additional 2 bytes
of stack space, and our stack 'grows' and starts taking increasing
amounts of our RAM! So subroutines, though convenient, can also be
costly. They also take a fair number of cycles for the 6502 to do all
that stack manipulation - in fact it takes 6 cycles for the subroutine
call (the 'jsr') and another 6 for the subroutine return (the 'rts'). So it's
not often inside a kernel that we will see subroutine usage!
As noted, the 6502 maintains its stack in our RAM area. It has a
register called the 'stack pointer' which gives it the address of the next
available byte in RAM for it to use. As the 6502 fills up the stack, it
decrements this pointer (thus, the stack 'grows' downwards in RAM).
As the 6502 releases values from the stack, it increments this pointer.
Generally we don't play with the stack pointer, but in case you're
wondering, it can be set to any value only by transferring that value
from the X register via the 'txs' instruction. If you've been following
closely, you have noticed I added a bit to the initialization section!
ldx #$FF
txs ; initialize stack pointer
Without that initialization, the stack pointer could point to anywhere
in RAM (or even to TIA registers) and when we called a subroutine,
the 6502 would attempt to store its return address to wherever the
stack pointer was pointing. Probably with disastrous consequences!

135
Horizontal motion
The only way to get horizontal positioning code that is robust enough
to allow TIA-pixel-precise positioning, is by including the horizontal
motion registers (HMPx, HMMx, HMBL, HMOVE and HMCLR).
(From the Stella Programmer’s Guide)
Horizontal motion allows the programmer to move any of the 5 graphics objects relative to their current horizontal position. Each object has a 4 bit horizontal motion register (HMP0, HMP1, HMM0, HMM1, HMBL) that can be loaded with a value in the range of +7 to -8 (negative values are expressed in two’s complement from). This motion is not executed until the HMOVE register is written to, at which time all motion registers move their respective objects. Objects can be moved repeatedly by simply executing HMOVE. Any object that is not to move must have a 0 in its motion register. With the horizontal positioning command confined to positioning objects at 15 color clock intervals, the motion registers fills in the gaps by moving objects +7 to -8 color clocks. Objects cannot be placed at any color clock position across the screen. All 5 motion registers can be set to zero simultaneously by writing to the horizontal motion clear register (HMCLR).
Please see https://tinyurl.com/stella-sprite-positioning for some
advanced sprite positioning code that uses both RESPx and HMPx
registers to set the exact horizontal position of the two sprites.
Instead of having to work with the odd RESPx timing, we have
abstracted that aspect of the hardware and now reference the sprite
position through a variable in RAM, and our code positions the sprite
to the pixel number indicated by this variable.
Now we've achieved TIA-pixel-precise positioning, we can pretty
much forget about how this works forever more, and use the
horizontal positioning code as a black box. Or perhaps a woodgrain
box might be more appropriate :-)

136

137
Session 23: Moving Sprites Vertically
This session we're going to have a preliminary look at vertical
movement of sprites.
In the previous sessions we have seen that there are two 8-pixel wide
sprites, each represented by a single 8-bit register in the TIA itself.
The TIA displays the contents of the sprite registers at the same
horizontal position on each scanline, corresponding to where on an
earlier scanline the RESP0 or RESP1 register was toggled. We
explored how to use this knowledge to develop some generic
"position at horizontal pixel x" code which greatly simplified the
movement of sprites in a horizontal direction.
Let's now have a look at how to position a sprite vertically.
Our examples so far have shown how sprites appear as a vertical strip
the entire height of the screen. This is due, of course, to the single
byte of sprite data (8 bits = 8 pixels) being duplicated by the TIA (for
each sprite) on each scanline. If we change the data held in the TIA
sprite graphics registers (ie: in GRP0 or GRP1), then the next time the
TIA draws the relevant sprite, we see a change in the shape that the
TIA draws on-screen. We still see 8 pixels, directly under the 8 pixels
of the same sprite on the previous scanline - but if we've changed the
relevant GRPx register then we will see different pixels on (solid) and
different pixels off (transparent).
To achieve vertical movement of "a sprite" - and by this, we mean a
recognizable shape like a balloon, for example - we need to modify
the data that we are writing to the GRPx register. When we're on
scanlines where the shape is not visible, then we should be writing 0
to the GRPx register - and when on scanlines where the shape is
visible, we should be writing the appropriate line of that shape to the
GRPx register. Doing this quickly, and with little RAM or ROM
usage, is the trickiest bit. Conceptually, it's quite simple.
There are several ways to tackle the problem of writing the right line
of the shape on the right line of the screen, and nothing when the
shape isn't on the line we're drawing. Some of them take extra ROM,

138
some require more RAM, and some of them require more cycles per
line.
Most kernels keep one of the registers as a "line counter" for use in
indexing into tables of data for playfield graphics - so that the correct
line of data is placed in the graphics registers for each scanline. The
kernels we've created so far also use this line counter to determine
when we have done sufficient lines in our kernel. For example...
ldx #0 ;2 Kernel lda PF0Table,x ;4 sta PF0 ;3 lda PF1Table,x ;4 sta PF1 ;3 lda PF2Table,x ;4 sta PF2 ;3 sta WSYNC ;3 inx ;2 cpx #192 ;2 bne Kernel ;3(2)
The above code segment shows a loop which iterates the X register
from 0 to 192 while it writes three playfield registers on each of the
scanlines it 'generates'. We've covered all of this in previous sessions.
The numbers after the semicolon (the comment area) indicate the
number of cycles that instruction will take (not taking into account
possible page-boundary crossing, etc). We can see that this simple
symmetrical playfield modification will take at least 31 cycles of our
available 76 cycles just to do the three playfield registers on each
scanline. That leaves only 45 cycles to do sprites, missiles, ball -- and
let's not forget the other three playfield writes if we're doing an
asymmetrical playfield.
Clearly, our scanline loop is extremely starved of cycles, and any
code we put in there must be extremely efficient. The biggest waste in
the code above is the comparison. Remember earlier we indicated that
the 6502 has a flags register, and some of these flags are set/cleared
automatically after certain operations (on loads and arithmetic
operations - including register increments and decrements, the
negative and zero flags are automatically set/cleared). From now on
we're going to use the 'standard' way of looping and instead of
specifically comparing a line count with a desired value (eg: counting

139
up to 192), we'll switch to starting at our top value and decrementing
the line counter and branching UNTIL the counter gets to 0. By using
our knowledge about the automatic flag setting, we are able to remove
the comparison from our loop...
ldx #192 ;2 Kernel lda PF0Table,x ;4 sta PF0 ;3 lda PF1Table,x ;4 sta PF1 ;3 lda PF2Table,x ;4 sta PF2 ;3 sta WSYNC ;3 dex ;2 bne Kernel ;3(2)
The trick here is that the "dex" instruction will set the Z (zero) flag to
1 if the x register is zero after the instruction has executed, and 0 if it
is non-zero. The "bne" instruction stands for "branch if Z is zero" or
more memorably "branch if the result was not equal (to zero)". In
short, the branch will be taken if the x register is non-zero. Thus we
have removed two cycles from our inner scanline loop. But at what
cost? Since the loop is now counting "down" instead of "up", our
tables will now be accessed upside-down (that is, the first scanline
will show data from the bottom of the tables), and our whole playfield
will "flip" upside-down. That's fine - the solution for this is to change
the tables themselves so they are upside-down, too!
All of that was a bit of a diversion - but it's important to understand
how we are accessing our data in an upside-down fashion merely for
the purposes of efficiency - in this case, saving us just 2 cycles per
scanline. But those 2 cycles are some 2.6% of the time we have, and
every little bit counts.
Even with this improvement, we have just 47 cycles left to do
everything else. Let's have a look at what we need to add to this to get
sprites up and running. Assume we are loading our sprite data from a
table, just as with the playfield data. We'd need to add...
lda Sprite0Data,x ;4 sta GRP0 ;3

140
That's 7 cycles, which is OK - but we find that we have an immovable
(we have no ability to change the vertical position) block of sprite
data the whole height of the screen - read from the table 'Sprite0Data'.
This setup would also require that our sprite data table is 192 lines
high.
Let's assume, just for a minute, that Sprite0Data was in RAM. Then
we'd have the ability to use this kernel to do the display and have
another part of our program draw different shapes into that RAM
table (i.e. if we were drawing a Pac-Man sprite, we could have the
first 20 'lines' of the table with 0, then the next 16 lines with the shape
for the Pac-Man sprite, then the remainder with 0). To move this
sprite up or down, we'd simply change where in the RAM table we
were drawing the sprite - and when our kernel came to do the display,
it wouldn't really care where the sprite was, it would just draw the
continuous strip of sprite data from the RAM table, and voila!
Vertically moving sprites.
And this is exactly how the Atari home computers manage vertical
movement of sprites. They, too, have a single register holding the
sprite data - and they, too, modify this register on-the-fly to change
the shape of the sprite that is being shown on each scanline. But the
difference is that the Atari computers have a bit of hardware which
does EXACTLY what our little kernel above does - that is, copy
sprite data from a RAM buffer into the hardware sprite register.
The problem for Atari 2600 kernels is that we simply don't have 192
bytes of RAM to spend on a draw buffer/table for each player sprite.
In fact, we only have 128 bytes RAM total for our entire program! So
it's a nice solution - and certainly one that should be used if you are
programming for some cartridge format with ample RAM - because it
provides extremely quick (7 cycles) drawing of sprites.
But for normal usage, this technique is not possible or practical.
Unfortunately, the available alternatives are costly - in terms of
processing time. The quickest 'generic sprite draw' that I'm aware of at
the moment takes 18 cycles. Given our 47 cycles remaining in the
scanline, 36 of these would be taken up drawing just two sprites - and
that makes asymmetrical playfield, balls and missiles a very

141
problematic task. How can we fit all of these into the remaining 11
cycles of time?
The short answer is: we can't. And this is why many games revert to
what is termed a "2 scanline kernel". Instead of trying to fit ALL of
the updates into a single scanline, the 2 scanline kernel tries to fit all
of the updates into two scanlines - taking advantage of the TIA's
persistent state so that registers which have been modified on one
scanline will remain the same until next modified. A typical two
scanline kernel will modify the playfield (left side), sprite 0, playfield
(right side) on the first scanline, then the playfield (left side), sprite 1,
playfield (right side) on the second scanline - and then repeat the
process.
The upshot of this is that our sprites have a maximum resolution of
two scanlines - that is, we can only modify the shape of a sprite once
every two lines - and in fact each sprite is updated on alternate lines.
There's a bit of hardware (a graphics delay of 1 scanline) to
compensate for this, so that the sprites APPEAR to update on the
same scanline. This interesting hardware capability shows clearly that
the designers of the '2600 were well aware of the time limitations
inherent in trying to update playfield registers, sprites missiles and
ball in a single scanline - and that they designed the hardware
accordingly to mask this problem.
But we're not concerned with two scanline kernels this session. Please
be aware that they are extremely common - and many games extend
this concept to multiple-scanline kernels - where different tasks are
performed in each scanline, and after n scanlines this process repeats
to build up the screen out of 'meta-scanlines'. It's a useful technique to
get around the limitations of cycles per line.
Before we continue, let's have a think about what we want a sprite
draw to do - it's fine to be able to display a sprite shape anywhere on
the screen (we've already touched on the horizontal positioning, and
now we're well on the way to understanding how the vertical
positioning works) - but sprites typically animate. How can we use
the code shown so far to animate our sprites as well?

142
If we used the Atari computer method - presented above - of using a
'strip' of RAM to represent the table from which data is written to the
screen, and modifying the data written to that table, then the problem
is fairly simple - we just write different shapes to the table. But if we
don't HAVE a RAM table, and we're forced to use a ROM table, then
to get different shapes onscreen, we're going to have to use different
tables. We can't modify the contents of tables in ROM! But the code
above has the table hardwired into the code itself. That is...
lda Sprite0Data,x
sta GRP0
The problem here is that the address of the table is hardwired at the
time we write our code - and the assembler will happily predetermine
where this table is in the ROM, and the code will always fetch the
data from the same table. What we really want to do with a sprite
routine is not only fetch the data from a table - but also be able to
change WHICH table we fetch the data from.
And here is an ideal use for a new addressing mode of the 6502.
lda (zp),y
In the above code, 'zp' is a zero page two-byte variable which holds a
memory address. The 6502 takes the contents of that variable (i.e. the
address of our table), adds the y register to it, and then uses the
resulting address as our location from which to load a byte of data. It's
quite an expensive instruction, taking 5 cycles to execute.
But now our code for drawing sprites (in principle) can look like
this...
lda (SpriteTablePtr),y
sta GRP0
The problem this introduces is that the Y register is used for indexing
the data table, whereas we were previously using the X register.
There's no way around this - the addressing mode does not work with
the X register! So let's change our kernel around a bit, and instead of
using the X register to count the scanlines, we'll switch to the Y
register...

143
ldy #192 ;2 Kernel
lda PF0Table,y ;4 sta PF0 ;3 lda PF1Table,y ;4 sta PF1 ;3 lda PF2Table,y ;4 sta PF2 ;3 lda (SpriteTablePtr),y ;5 sta GRP0 ;3
sta WSYNC ;3 dey ;2 bne Kernel ;3(2)
This is a bit better - now (as long as we previously setup the zero page
2-byte variable to point to our table) we are able to display any sprite
shape that we desire, using the one bit of code. Here's what you'd
need to do to setup your variable to point to the sprite shape data...
lda #<Sprite0Data
sta SpriteTablePtr
lda #>SPrite0Data
sta SpriteTablePtr+1
Additionally, the variable should be defined in the RAM segment like
this...
SpriteTablePtr ds 2
Now let's review all of that and make sure we understand exactly
what is happening... We have a zero page variable (2 bytes long)
which holds the address of the sprite table containing the shape we
want to display. Addresses are 16-bits long, and we've already seen
how the 6502 represents 16-bit addresses by a pair of bytes - the low
byte followed by the high byte (little-endian order). So into our sprite
pointer variable, we are writing this byte-pair. The '>' operator tells
the assembler to use the high byte of an address, and the '<' operator
tells the assembler to use the low byte of an address. These are
standard operators, but there's another way to do it...
lda #address&0xFF ; low byte sta var
lda #address/256 ; high byte sta var+1

144
Other ways exist. It doesn't really matter which one you use - the
result is the same. We end up with a zero page variable which
POINTS to the table which is used to give the data for the shape of
the sprite. In fact, the variable points to the very start of the table.
And this is our new problem! As we have earlier seen, if we had a
RAM table, then we could move the sprite up and down by drawing it
into that table and let our kernel display the whole 'strip' of sprite data.
The effect would be that the sprite moved up and down on screen. But
because we don't have that much RAM, we must programmatically
determine on which scanline(s) the sprite data is to be displayed from
the table, and which scanline(s) should contain 0-data for the sprite.
Essentially the process consists of comparing the current line-counter
(the Y register) with the vertical position required for the sprite. If the
counter comparison indicates that the sprite should be visible on the
current scanline, then the data is fetched from the table - else a 0 value
is used for the sprite data. Rather than stepping through the entire
process and deriving the optimum result, we're going to just drop in
the method used by nearly all games these days...
sec ; 2 can often be guaranteed, and omitted tya ; 2 sbc SpriteEnd ; 3 adc #SPRITE_HEIGHT ; 2 bcs .MBDraw3 ; 2(3) nop ; 2 nop ; 2 sec ; 2 bcs .skipMBDraw3 ; 3 .MBDraw3
lda (Sprite),y ; 5 sta GRP0 ; 3 .skipMBDraw3
Now here things start to get a bit complex! What the above code
shows is a sprite draw routine which effectively takes a constant 18
cycles of time to either draw the sprite data from a table (when it's
visible), or skip the draw entirely (when it's not visible).

145
There are a few assumptions here...
1. The last drawn line of a sprite is always 0 - thus subsequent
lines onscreen do not need to be 'cleared' - the persistent state
of the TIA GRP registers will be sufficient to ensure the sprite
is not displayed after the sprite is finished drawing.
2. A variable 'SpriteEnd' is pre-calculated to indicate the starting
line number of the sprite.
3. The sprite is of constant height (here, SPRITE_HEIGHT).
4. The branches in this code are assumed to NOT cross over page
boundaries. If they did, then each would incur an additional
cycle penalty - and the timing for the scanline would be
incorrect.
So, that's a bit much to deal with in one whack - and to be honest you
don't really need to understand the intricacies. Basically the code has
two different sections - one where the sprite data is drawn from the
table, and one where the draw is skipped. Each section is carefully
timed so that after they rejoin at the bottom, they have both taken
EXACTLY the same number of cycles to execute.
Thomas Jentzsch has presented more optimal code, in the form of his
'skipdraw' routine - and frankly, I've not bothered taking the time to
fully understand how it works, either! These sections of code are
pretty much guaranteed to work efficiently and correctly, provided
you setup the variables properly.
;============================================================ ; Thomas Jentzsch’ Skipdraw ;============================================================
;The best way I knew until now was (if y contains linecounter) tya ; 2 ; sec ; 2 <- this can sometimes be avoided sbc SpriteEnd ; 3 adc #SPRITEHEIGHT ; 2 bcx .skipDraw ; 2 = 9-11 cycles ; ...

146
; --------- or ------------
;If you like illegal opcodes, you can use dcp (dec,cmp) here: lda #SPRITEHEIGHT ; 2 dcp SpriteEnd ; 5 initial value has to be adjusted bcx .skipDraw ; 2 = 9 ; ...
;Advantages: ;- state of carry flag doesn't matter anymore (may save 2 ; cycles) ;- a remains constant, could be useful for a 2nd sprite ;- you could use the content of SpriteEnd instead of y for ; accessing sprite data ;- ???
;=========================================================== ;An Example: ; ; skipDraw routine for right player txa ; 2 A-> Current scanline sec ; 2 Set Carry sbc slowP1YCoordFromBottom+1 ; 3 adc #SPRITEHEIGHT+1 ; 2 calc if sprite is drawn bcc skipDrawRight ; 2/3 To skip or not to skip? tay ; 2 lda P1Graphic,y ; 4 continueRight:
sta GRP0
;----- this part outside of kernel
skipDrawRight ; 3 from BCC lda #0 ; 2 beq continueRight ; 3 Return...
;============================================================
Though we have covered a lot of ground today I hope you will
understand the basic principles of vertical sprite movement. In
summary...
1. There is no hardware facility to 'move' sprites either
horizontally or vertically. To achieve horizontal motion, we
need to hit RESPx register at exactly the right horizontal
position in a scanline, at which point the appropriate sprite
will start drawing. To achieve vertical motion, we need to

147
adjust what data we feed to the GRPx registers, so that the
shape we are drawing starts on the appropriate scanline, and
scanlines where it is not visible have 0-data.
2. There are precious few cycles available on scanlines, and
many of these are taken up by playfield drawing and loop
management. Sprite drawing can be done efficiently with large
RAM buffers, but most cartridge configurations don't offer
this luxury.
3. Drawing animated sprites can be done efficiently by using an
indirect zero-page pointer to point to sprite data tables. These
tables can then be used as source for the sprite draw.
4. The sprite draw needs to determine, for each scanline, if the
sprite would be visible on that line - and either take data from
the correct table, or use 0-data.
5. Kernels can be extended to multiple-lines (at the cost of
vertical resolution) to allow all the necessary hardware
updates to be performed.
Exercises
1. Modify your current sprite drawing code to use a zero-page
variable to point to a table of data in your ROM.
2. Create another data table, and use a variable to determine
which of the two data tables to display. You might like to have
it switch between these tables every second, or perhaps use the
joystick button to determine which is displayed. As a hint -
remember, you need to setup the zero page pointer to point to
the table for your sprite draw to use - so all you need to do is
change this pointer, and leave your kernel code alone.
3. The more difficult task is to attempt to integrate the generic
draw (either the code above, or Thomas's code, which should
appear shortly) into your kernel. This is worth doing - and

148
waiting for! - because once you have this installed, you'll have
a totally generic kernel which can draw a sprite at practically
any horizontal and vertical position on the screen and all you
have to do is tell it WHERE to appear - and voila!
That should keep you busy. Enjoy!

149
Session 24: Some Nice Code
In session 22, we learned that to horizontally position a sprite, we
need to trigger the RESPx register at the appropriate position in the
scanline, at which point the sprite will display immediately. To move
to an arbitrary horizontal position, we need to trigger RESPx just
before the TIA is displaying the appropriate color clock. Our solution
has been to use the desired X-position of the sprite as the basis for a
delay loop which starts at the beginning of a scanline, delays until
roughly the correct position, adjusts the HMPx fine-tune horizontal
position register and then 'hits' RESPx to immediately position the
sprite.
Since the minimal time for a single loop iteration is 5 cycles
(involving a register decrement, and a branch), and 5 cycles
corresponds to 15 TIA color-clocks, it follows that our delay-loop
approach can only position RESPx writes with an accuracy of 15 TIA
color-clocks. This is fine, though, as the hardware capability of fine-
positioning sprites by -8 to +7 pixels perfectly allows the correct
position of the sprite to be established.
The approach taken previously has been to effectively divide the
position by 15 (either through a table-lookup, or 'clever' code which
simulated a divide by 15 using a divide by 16 (quick) + adjustment)
and use that value as the iteration counter in a delay loop. This
approach works, and has been fairly standard for a number of years.
This is the approach presented in our earlier tutorial.
A recent posting to the [stella] list of an independent discovery of a
'new' method much improves on this technique. In actual fact, the
technique was already known and documented in the list... but for
various reasons these things don't always become well-known. The
'new' technique of horizontal positioning rolls the divide-by-15 and
the delay loop into a single entity.
sec
.Div15 sbc #15 ; 2 bcs .Div15 ; 3(2)
Now that may not look like much, but it's absolutely brilliant! Every
iteration through the loop, the accumulator is decremented by 15.

150
When the subtraction results in a carry, the accumulator has gone
'past' 0, and our loop ends. Each iteration takes exactly 5 cycles (with
an extra 2 cycles added for the initial 'sec' and one less for the final
branch not taken). The real beauty of the code is that we also, 'for
free', get the correct -8 to +7 adjustment for the fine-tuning of the
position (which with a little bit of fine-tuning can be used for the
HMP0 register)! Read the relevant post on [stella] here...
http://www.biglist.com/lists/stella/archives/200403/msg00260.html
For this brilliant bit of coding, our thanks go to R. Mundschau
; Positions an object horizontally ; Inputs: A = Desired position. ; X = Desired object to be positioned (0-5). ; scanlines: If control comes on or before cycle 73 ; then 1 scanline is consumed. ; If control comes after cycle 73 then 2 scanlines are ; consumed. ; Outputs: X = unchanged ; A = Fine Adjustment value. ; Y = the "remainder" of the division by 15 minus an ; additional 15. ; control is returned on cycle 6 of the next scanline.
PosObject SUBROUTINE
sta WSYNC ; 00 Sync to start of scanline. sec ; 02 Set the carry flag so no ; borrow will be applied ; during the division.
.divideby15 sbc #15 ; 04 Waste the necessary amount ; of time dividing X-pos by 15!
bcs .divideby15
; 06/07 ; 11/16/21/26/31/36/41/46/51/56/61/66
tay
lda fineAdjustTable,y ; 13 -> Consume 5 cycles by ; guaranteeing we cross a ; page boundary sta HMP0,x
sta RESP0,x ; 21/ 26/31/36/41/46/51/56/61/66/71 ; Set the rough position. rts
;----------------------------- ; This table converts the "remainder" of the division by 15

151
; (-1 to -15) to the correct fine adjustment value. ; This table is on a page boundary to guarantee the processor ; will cross a page boundary and waste a cycle in order to be ; at the precise position for a RESP0,x write
ORG $F000
fineAdjustBegin
DC.B %01110000; Left 7 DC.B %01100000; Left 6 DC.B %01010000; Left 5 DC.B %01000000; Left 4 DC.B %00110000; Left 3 DC.B %00100000; Left 2 DC.B %00010000; Left 1 DC.B %00000000; No movement. DC.B %11110000; Right 1 DC.B %11100000; Right 2 DC.B %11010000; Right 3 DC.B %11000000; Right 4 DC.B %10110000; Right 5 DC.B %10100000; Right 6 DC.B %10010000; Right 7
fineAdjustTable EQU fineAdjustBegin - %11110001
; NOTE: %11110001 = -15
One interesting aspect of this code is the access to the table with a
(conceptual) negative index (-1 to -15 inclusive). Negative numbers
are represented in two's complement form, so -1 is %11111111 which
is *exactly* the same as 255 (%11111111). So how can we use
negative numbers as indexes? We can't! All indexing is considered to
be with positive numbers. So if our index was -1, we would actually
index 255 bytes past the beginning of our table. The neat bit of code
at the bottom sets the conceptual start of our table to 241 bytes
BEFORE the start of the actual data so that when we attempt to access
the -15th element of the table, we ACTUALLY end up at the very
first byte of the "fineAdjustBegin" table. Likewise, when accessing
the -1th element, we ACTUALLY access the last element of the table.
It's all very neat!
Finally, since we need to account for every cycle in this code very
carefully (as the horizontal position depends on exactly where we
write the RESP0 value), we need to take into account the possibility
that an extra cycle is being thrown in when we access

152
fineAdjustTable,y and that access crosses a page boundary. By
positioning the table being accessed exactly on a page boundary, the
code guarantees that every access incurs an extra cycle 'penalty' and is
therefore consistent for all cases.
I don't take any credit for this, I just admire it. I consider this a
BRILLIANT bit of coding, so hats-off to R. Mundschau and thanks
for sharing!
Another "BRILLIANT" bit of code, but this time from yours truly, is
the 8-byte system clear. We touched on this earlier in Session 12, but
I thought I'd give a quick run-down on exactly how that code works...
ldx #0
txa
Clear dex
txs
pha
bne Clear
We assume that when this code starts, the system is in a totally
unknown state. Firstly, X and A are set to 0, and we enter the loop.
• The loop begins: X-register is decremented (to 255) and this
value is placed in the stack pointer (now $FF)
• The accumulator(0) is then pushed onto the stack, so
memory/hardware location $FF is set to 0, and the stack
pointer decrements to $FE
• Since the tsx and pha don't affect the flags, the branch will be
based on the decrement of the x register
• If non-zero, then we repeat the loop. 0 will be written to 256
consecutive memory locations starting with $FF and ending
with 0 (inclusive). Loop will terminate after 256 iterations.
• On the final pass through, x would be decremented to 0, and
this placed in the stack pointer. We then push the accumulator
(0) onto the stack (which effectively writes it to memory
(TIA) location 0) and as a consequence the stack pointer dec-
rements (and wraps!) back to $FF
• At the conclusion of the above, X = 0, A = 0, SP = $FF, a
near-perfect init!
That could be the best 8-bytes ever written ;-)

153
Session 25: Advanced Timeslicing
Time is tight. Really tight! The general approach has been to think of
the TV frame as the limiting factor for the capabilities of the machine.
Whatever you can do in "one frame" (i.e., nominally @60Hz on
NTSC or @50Hz on PAL)... that's IT. So in fact you can work out
exactly how much time you have to do stuff. As we've seen in earlier
tutorials, the '2600 programmer has to pump data out to the TIA in
synch with the TV as it's drawing scanlines. You need to feed the TV
scanlines to draw a proper picture. There are 76 cycles per scanline,
and 262 scanlines per standard TV frame (312 for PAL). So 76 * 262
= 19912 cycles per frame. Multiply that by the NTSC frame rate
(actually 59.94Hz) and you get.... 1193525.28 (i.e., there's our
1.19MHz CPU clock speed). It all makes sense.
So, just 262 lines. The visible screen is smaller than that, of course
(usually 192 scanlines of actual graphics)-- so we only need to pump
data to the screen for a smaller number of lines. The rest is black,
nothing to see. Below is a good visual diagram of where the time
goes.

154
So, during those blank lines, the CPU doesn't have to pump data to
the screen. In fact these two major areas of "blackness" (that is, the
vertical blank, and the overscan) account for 37 scanlines (*76 = 2812
cycles) and 30 scanlines (*76 = 2280 cycles). Now that's not exactly
swimming in available CPU capacity but it's better than nothing. So
the general usage of these blank areas has been to whack in "stuff"
that takes a fair bit of time to do.
The problem is, you can't whack in too MUCH stuff. Because when
those 37 scanlines of time have elapsed, you MUST be writing to the
TIA again to make sure the next frame is displaying properly. Same
for the 30 lines of overscan. There's no getting around it; you take too
much time, and you stuff up the timing, and consequently the TV
picture will roll, judder and basically look horrible. The hard and fast
rule has been to simply stay within the limitation, or to reduce the
number of visible scanlines to give more processing time for doing
more complex STUFF. Each scanline of visible data you sacrificed,
you got 76 scanlines of available time to do your stuff. A
compromise.
Fortunately, we have the timer registers. These are single countdown
registers that will regularly decrement a value written to them. I only
use TIM64T -- this one counts 64 cycle blocks. If I write 10 to it, then
I would expect it to reach 0 some 640 cycles later. So, the usage has
been to calculate the amount of time before the screen drawing has to
(re)commence, divide by 64, and put that value in TIM64T. By
reading INTIM and waiting until that reaches 0, you effectively wait
the right number of cycles. You can do your (variable time) "stuff"
and not really care about how long it takes (as long as it doesn't take
TOO long), and after it's finish you enter a tight loop just reading
INTIM and waiting for it to go to 0. When it goes to 0, fire off a
WSYNC and then begin the TV frame drawing once again.
That's how it's BEEN done, but that's not how I did it in Boulder
Dash!
The INTIM register effectively tells you not only if you're out of time,
but also exactly how MUCH time you have remaining (in blocks of
64 cycles if you're using TIM64T). So, if you think about it, you can
actually make decisions about if you should call a subroutine based on
155
this value. For example, say you had a small routine which you know
takes (say) 1000 cycles to run. That's 1000/64 units (= 15.625). So, if
INTIM was reading 16 or greater you KNOW you can call that
subroutine and not run out of time! This gets rather nice. Given a
guaranteed maximum run-time for any subroutine (and you get this by
cycle-counting the subroutine very, very carefully), you can use this
knowledge to determine if/when it's appropriate to call that
subroutine. Furthermore, after you HAVE called the subroutine, you
can repeat the process -- look at INTIM and determine if there's
enough time to run OTHER subroutines.
So the whole concept of '2600 programming basically changes here.
Now we have an asynchronous system, where you have a queue of
"tasks" that you have to do. These tasks in Boulder Dash are generally
creature logic (process a boulder, the amoeba, etc.). Each of these
tasks are cycle-counted so we know exactly how long the worst-case
is. And each of these tasks is only run if there's available time. If not,
then they simply return and in the next chunk of available time, they
will be called again.
So, this is how the timeslicing engine works! Every part of the game
logic is broken down into as small (quick) units of code as
practicable. Rather than have the whole processing for an object in a
single huge and costly block of code, where possible these are broken
down into even smaller "sub-tasks". And those tasks are effectively
placed in a queue which is processed by the task manager. The task
manager is a tight loop which pulls a task off the task stack, vectors to
the appropriate handler for the task, and repeats. The tasks themselves
are responsible for deciding if there's enough time for them to do their
own stuff (i.e., fairly object-oriented in that regard). If a task doesn't
think there's enough time (again, by simply reading INTIM and
comparing with its own timing equate), it simply returns. If it has
enough time to do its stuff, it does so and makes sure that it's no
longer on the task queue. Tasks can even add other tasks to the queue,
for later processing!
The upshot of all this is that a game doesn't have to be able to handle
the very worst case most expensive thing ever in a single frame. The
tasks split across multiple frames, if needed. In other words, there's
now a separation between game logic (running over multiple frames if

156
requried) and the frame display (running exactly at the TV frame
rate). Yes, Virginia, '2600 games can slow down. Now for most
situations this isn't ideal -- but in reality it doesn't really matter. Most
of the gameplay for the '2600 Boulder Dash just never slows down.
But occasionally, very occasionally (say, when an amoeba turns into
200 boulders and they all start falling at the same time) -- well, the
system can handle it. Because although it may only have enough
processing power to handle (say) 20 boulders in a single frame, that's
OK, because the other boulders are effectively stacked and processed
the next frame. And the queue may be really big for a few game
loops, and the game will lag... probably not very noticeably... but
when the queue is empty again, everything is back to running full
speed.
So the above is the secret to making much more complex games than
have heretofore been produced on the machine. You CAN keep the
TV display going full speed (60Hz) while doing processing-intensive
game logic. And you CAN do very, very, very complex game logic
taking absolutely heaps of processing time. The trick, as noted, is to
separate out the two so they are not synchronous -- and to divide the
complex logic into discrete, very quick, sub-components.
Divide and conquer!

157
Appendix A: 6502 Opcodes – from www.6502.org
ADC (ADd with Carry)
Affects Flags: S V Z C MODE SYNTAX HEX LEN TIM Immediate ADC #$44 $69 2 2 Zero Page ADC $44 $65 2 3 Zero Page,X ADC $44,X $75 2 4 Absolute ADC $4400 $6D 3 4 Absolute,X ADC $4400,X $7D 3 4+ Absolute,Y ADC $4400,Y $79 3 4+ Indirect,X ADC ($44,X) $61 2 6 Indirect,Y ADC ($44),Y $71 2 5+ + add 1 cycle if page boundary crossed
ADC results are dependent on the setting of the decimal flag. In decimal mode, addition is carried out on the assumption that the values involved are packed BCD (Binary Coded Decimal). There is no way to add without carry.
AND (bitwise AND with accumulator)
Affects Flags: S Z MODE SYNTAX HEX LEN TIM Immediate AND #$44 $29 2 2 Zero Page AND $44 $25 2 3 Zero Page,X AND $44,X $35 2 4 Absolute AND $4400 $2D 3 4 Absolute,X AND $4400,X $3D 3 4+ Absolute,Y AND $4400,Y $39 3 4+ Indirect,X AND ($44,X) $21 2 6 Indirect,Y AND ($44),Y $31 2 5+ + add 1 cycle if page boundary crossed

158
ASL (Arithmetic Shift Left)
Affects Flags: S Z C MODE SYNTAX HEX LEN TIM Accumulator ASL A $0A 1 2 Zero Page ASL $44 $06 2 5 Zero Page,X ASL $44,X $16 2 6 Absolute ASL $4400 $0E 3 6 Absolute,X ASL $4400,X $1E 3 7
ASL shifts all bits left one position. 0 is shifted into bit 0 and the original bit 7 is shifted into the Carry.
BIT (test BITs)
Affects Flags: N V Z MODE SYNTAX HEX LEN TIM Zero Page BIT $44 $24 2 3 Absolute BIT $4400 $2C 3 4
BIT sets the Z flag as though the value in the address tested were ANDed with the accumulator. The S and V flags are set to match bits 7 and 6 respectively in the value stored at the tested address. BIT is often used to skip one or two following bytes as in: CLOSE1 LDX #$10 If entered here, we .BYTE $2C effectively perform CLOSE2 LDX #$20 a BIT test on $20A2, .BYTE $2C another one on $30A2, CLOSE3 LDX #$30 and end up with the X CLOSEX LDA #12 register still at $10 STA ICCOM,X upon arrival here. Beware: a BIT instruction used in this way as a NOP does have effects: the flags may be modified, and the read of the absolute address, if it happens to access an I/O device, may cause an unwanted action.
Branch Instructions
Affect Flags: none All branches are relative mode and have a length of two bytes. Syntax is "Bxx Displacement" or (better) "Bxx Label". See the notes on the Program Counter for more on displacements. Branches are dependent on the status of the flag bits when the op code is encountered. A branch not taken requires two machine cycles.
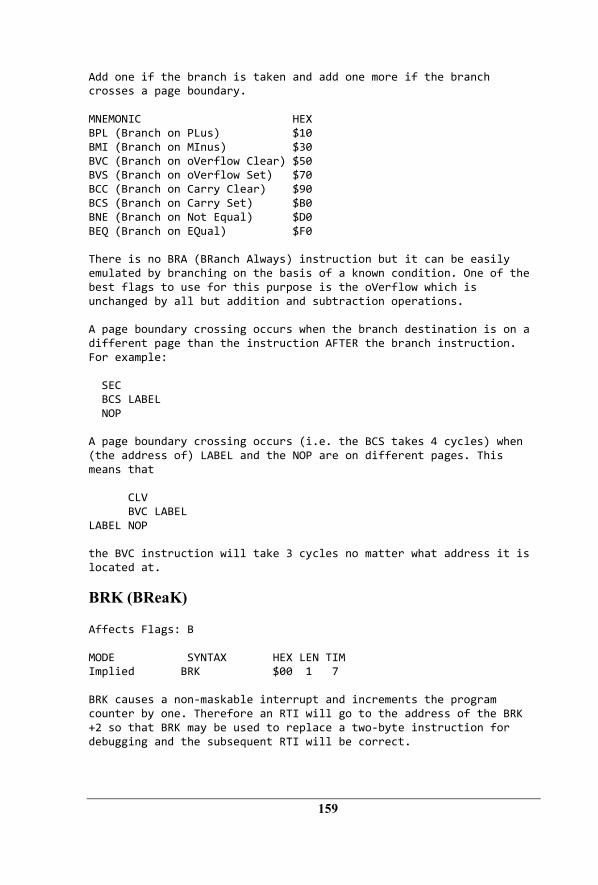
159
Add one if the branch is taken and add one more if the branch crosses a page boundary. MNEMONIC HEX BPL (Branch on PLus) $10 BMI (Branch on MInus) $30 BVC (Branch on oVerflow Clear) $50 BVS (Branch on oVerflow Set) $70 BCC (Branch on Carry Clear) $90 BCS (Branch on Carry Set) $B0 BNE (Branch on Not Equal) $D0 BEQ (Branch on EQual) $F0 There is no BRA (BRanch Always) instruction but it can be easily emulated by branching on the basis of a known condition. One of the best flags to use for this purpose is the oVerflow which is unchanged by all but addition and subtraction operations. A page boundary crossing occurs when the branch destination is on a different page than the instruction AFTER the branch instruction. For example: SEC BCS LABEL NOP A page boundary crossing occurs (i.e. the BCS takes 4 cycles) when (the address of) LABEL and the NOP are on different pages. This means that CLV BVC LABEL LABEL NOP the BVC instruction will take 3 cycles no matter what address it is located at.
BRK (BReaK)
Affects Flags: B MODE SYNTAX HEX LEN TIM Implied BRK $00 1 7 BRK causes a non-maskable interrupt and increments the program counter by one. Therefore an RTI will go to the address of the BRK +2 so that BRK may be used to replace a two-byte instruction for debugging and the subsequent RTI will be correct.

160
CMP (CoMPare accumulator)
Affects Flags: S Z C MODE SYNTAX HEX LEN TIM Immediate CMP #$44 $C9 2 2 Zero Page CMP $44 $C5 2 3 Zero Page,X CMP $44,X $D5 2 4 Absolute CMP $4400 $CD 3 4 Absolute,X CMP $4400,X $DD 3 4+ Absolute,Y CMP $4400,Y $D9 3 4+ Indirect,X CMP ($44,X) $C1 2 6 Indirect,Y CMP ($44),Y $D1 2 5+ + add 1 cycle if page boundary crossed Compare sets flags as if a subtraction had been carried out. If the value in the accumulator is equal or greater than the compared value, the Carry will be set. The equal (Z) and sign (S) flags will be set based on equality or lack thereof and the sign (i.e. A>=$80) of the accumulator.
CPX (ComPare X register)
Affects Flags: S Z C MODE SYNTAX HEX LEN TIM Immediate CPX #$44 $E0 2 2 Zero Page CPX $44 $E4 2 3 Absolute CPX $4400 $EC 3 4 Operation and flag results are identical to equivalent mode accumulator CMP ops.
CPY (ComPare Y register)
Affects Flags: S Z C MODE SYNTAX HEX LEN TIM Immediate CPY #$44 $C0 2 2 Zero Page CPY $44 $C4 2 3 Absolute CPY $4400 $CC 3 4 Operation and flag results are identical to equivalent mode accumulator CMP ops.

161
DEC (DECrement memory)
Affects Flags: S Z MODE SYNTAX HEX LEN TIM Zero Page DEC $44 $C6 2 5 Zero Page,X DEC $44,X $D6 2 6 Absolute DEC $4400 $CE 3 6 Absolute,X DEC $4400,X $DE 3 7
EOR (bitwise Exclusive OR)
Affects Flags: S Z MODE SYNTAX HEX LEN TIM Immediate EOR #$44 $49 2 2 Zero Page EOR $44 $45 2 3 Zero Page,X EOR $44,X $55 2 4 Absolute EOR $4400 $4D 3 4 Absolute,X EOR $4400,X $5D 3 4+ Absolute,Y EOR $4400,Y $59 3 4+ Indirect,X EOR ($44,X) $41 2 6 Indirect,Y EOR ($44),Y $51 2 5+ + add 1 cycle if page boundary crossed
Flag (Processor Status) Instructions
Affect Flags: as noted These instructions are implied mode, have a length of one byte and require two machine cycles. MNEMONIC HEX CLC (CLear Carry) $18 SEC (SEt Carry) $38 CLI (CLear Interrupt) $58 SEI (SEt Interrupt) $78 CLV (CLear oVerflow) $B8 CLD (CLear Decimal) $D8 SED (SEt Decimal) $F8 Notes: The Interrupt flag is used to prevent (SEI) or enable (CLI) maskable interrupts (aka IRQ's). It does not signal the presence or absence of an interrupt condition. The 6502 will set this flag automatically in response to an interrupt and restore it to its prior status on completion of the interrupt service routine. If you want your interrupt service routine to permit other maskable interrupts, you must clear the I flag in your code.

162
The Decimal flag controls how the 6502 adds and subtracts. If set, arithmetic is carried out in packed binary coded decimal. This flag is unchanged by interrupts and is unknown on power-up. The implication is that a CLD should be included in boot or interrupt coding. The Overflow flag is generally misunderstood and therefore under-utilized. After an ADC or SBC instruction, the overflow flag will be set if the twos complement result is less than -128 or greater than +127, and it will cleared otherwise. In twos complement, $80 through $FF represents -128 through -1, and $00 through $7F represents 0 through +127. Thus, after: CLC LDA #$7F ; +127 ADC #$01 ; + +1 the overflow flag is 1 (+127 + +1 = +128), and after: CLC LDA #$81 ; -127 ADC #$FF ; + -1 the overflow flag is 0 (-127 + -1 = -128). The overflow flag is not affected by increments, decrements, shifts and logical operations i.e. only ADC, BIT, CLV, PLP, RTI and SBC affect it. There is no op code to set the overflow but a BIT test on an RTS instruction will do the trick.
INC (INCrement memory)
Affects Flags: S Z MODE SYNTAX HEX LEN TIM Zero Page INC $44 $E6 2 5 Zero Page,X INC $44,X $F6 2 6 Absolute INC $4400 $EE 3 6 Absolute,X INC $4400,X $FE 3 7
JMP (JuMP)
Affects Flags: none MODE SYNTAX HEX LEN TIM Absolute JMP $5597 $4C 3 3 Indirect JMP ($5597) $6C 3 5 JMP transfers program execution to the following address (absolute) or to the location contained in the following address (indirect). Note that there is no carry associated with the indirect jump so:

163
AN INDIRECT JUMP MUST NEVER USE A VECTOR BEGINNING ON THE LAST BYTE OF A PAGE For example if address $3000 contains $40, $30FF contains $80, and $3100 contains $50, the result of JMP ($30FF) will be a transfer of control to $4080 rather than $5080 as you intended i.e. the 6502 took the low byte of the address from $30FF and the high byte from $3000.
JSR (Jump to SubRoutine)
Affects Flags: none MODE SYNTAX HEX LEN TIM Absolute JSR $5597 $20 3 6 JSR pushes the address-1 of the next operation on to the stack before transferring program control to the following address. Subroutines are normally terminated by a RTS op code.
LDA (LoaD Accumulator)
Affects Flags: S Z MODE SYNTAX HEX LEN TIM Immediate LDA #$44 $A9 2 2 Zero Page LDA $44 $A5 2 3 Zero Page,X LDA $44,X $B5 2 4 Absolute LDA $4400 $AD 3 4 Absolute,X LDA $4400,X $BD 3 4+ Absolute,Y LDA $4400,Y $B9 3 4+ Indirect,X LDA ($44,X) $A1 2 6 Indirect,Y LDA ($44),Y $B1 2 5+ + add 1 cycle if page boundary crossed
LDX (LoaD X register)
Affects Flags: S Z MODE SYNTAX HEX LEN TIM Immediate LDX #$44 $A2 2 2 Zero Page LDX $44 $A6 2 3 Zero Page,Y LDX $44,Y $B6 2 4 Absolute LDX $4400 $AE 3 4 Absolute,Y LDX $4400,Y $BE 3 4+ + add 1 cycle if page boundary crossed

164
LDY (LoaD Y register)
Affects Flags: S Z MODE SYNTAX HEX LEN TIM Immediate LDY #$44 $A0 2 2 Zero Page LDY $44 $A4 2 3 Zero Page,X LDY $44,X $B4 2 4 Absolute LDY $4400 $AC 3 4 Absolute,X LDY $4400,X $BC 3 4+ + add 1 cycle if page boundary crossed
LSR (Logical Shift Right)
Affects Flags: S Z C MODE SYNTAX HEX LEN TIM Accumulator LSR A $4A 1 2 Zero Page LSR $44 $46 2 5 Zero Page,X LSR $44,X $56 2 6 Absolute LSR $4400 $4E 3 6 Absolute,X LSR $4400,X $5E 3 7 LSR shifts all bits right one position. 0 is shifted into bit 7 and the original bit 0 is shifted into the Carry.
Wrap-Around
Use caution with indexed zero page operations as they are subject to wrap-around. For example, if the X register holds $FF and you execute LDA $80,X you will not access $017F as you might expect; instead you access $7F i.e. $80-1. This characteristic can be used to advantage but make sure your code is well commented. It is possible, however, to access $017F when X = $FF by using the Absolute,X addressing mode of LDA $80,X. That is, instead of: LDA $80,X ; ZeroPage,X - the resulting object code is: B5 80
which accesses $007F when X=$FF, use: LDA $0080,X ; Absolute,X - the resulting object code is: BD 80 00 which accesses $017F when X = $FF (a at cost of one additional byte and one additional cycle). All of the ZeroPage,X and ZeroPage,Y instructions except STX ZeroPage,Y and STY ZeroPage,X have a corresponding Absolute,X and Absolute,Y instruction. Unfortunately, a lot of 6502 assemblers don't have an easy way to force Absolute addressing, i.e. most will assemble a LDA $0080,X as B5 80. One way

165
to overcome this is to insert the bytes using the .BYTE pseudo-op (on some 6502 assemblers this pseudo-op is called DB or DFB, consult the assembler documentation) as follows: .BYTE $BD,$80,$00 ; LDA $0080,X (absolute,X addressing mode) The comment is optional, but highly recommended for clarity. In cases where you are writing code that will be relocated you must consider wrap-around when assigning dummy values for addresses that will be adjusted. Both zero and the semi-standard $FFFF should be avoided for dummy labels. The use of zero or zero page values will result in assembled code with zero page opcodes when you wanted absolute codes. With $FFFF, the problem is in addresses+1 as you wrap around to page 0.
Program Counter
When the 6502 is ready for the next instruction it increments the program counter before fetching the instruction. Once it has the op code, it increments the program counter by the length of the operand, if any. This must be accounted for when calculating branches or when pushing bytes to create a false return address (i.e. jump table addresses are made up of addresses-1 when it is intended to use an RTS rather than a JMP). The program counter is loaded least significant byte first. Therefore the most significant byte must be pushed first when creating a false return address. When calculating branches a forward branch of 6 skips the following 6 bytes so, effectively the program counter points to the address that is 8 bytes beyond the address of the branch opcode; and a backward branch of $FA (256-6) goes to an address 4 bytes before the branch instruction.
Execution Times
Op code execution times are measured in machine cycles; one machine cycle equals one clock cycle. Many instructions require one extra cycle for execution if a page boundary is crossed; these are indicated by a + following the time values shown.

166
NOP (No OPeration)
Affects Flags: none MODE SYNTAX HEX LEN TIM Implied NOP $EA 1 2 NOP is used to reserve space for future modifications or effectively REM out existing code.
ORA (bitwise OR with Accumulator)
Affects Flags: S Z MODE SYNTAX HEX LEN TIM Immediate ORA #$44 $09 2 2 Zero Page ORA $44 $05 2 3 Zero Page,X ORA $44,X $15 2 4 Absolute ORA $4400 $0D 3 4 Absolute,X ORA $4400,X $1D 3 4+ Absolute,Y ORA $4400,Y $19 3 4+ Indirect,X ORA ($44,X) $01 2 6 Indirect,Y ORA ($44),Y $11 2 5+ + add 1 cycle if page boundary crossed
Register Instructions
Affect Flags: S Z These instructions are implied mode, have a length of one byte and require two machine cycles. MNEMONIC HEX TAX (Transfer A to X) $AA TXA (Transfer X to A) $8A DEX (DEcrement X) $CA INX (INcrement X) $E8 TAY (Transfer A to Y) $A8 TYA (Transfer Y to A) $98 DEY (DEcrement Y) $88 INY (INcrement Y) $C8

167
ROL (ROtate Left)
Affects Flags: S Z C MODE SYNTAX HEX LEN TIM Accumulator ROL A $2A 1 2 Zero Page ROL $44 $26 2 5 Zero Page,X ROL $44,X $36 2 6 Absolute ROL $4400 $2E 3 6 Absolute,X ROL $4400,X $3E 3 7 ROL shifts all bits left one position. The Carry is shifted into bit 0 and the original bit 7 is shifted into the Carry.
ROR (ROtate Right)
Affects Flags: S Z C MODE SYNTAX HEX LEN TIM Accumulator ROR A $6A 1 2 Zero Page ROR $44 $66 2 5 Zero Page,X ROR $44,X $76 2 6 Absolute ROR $4400 $6E 3 6 Absolute,X ROR $4400,X $7E 3 7 ROR shifts all bits right one position. The Carry is shifted into bit 7 and the original bit 0 is shifted into the Carry.
RTI (ReTurn from Interrupt)
Affects Flags: all MODE SYNTAX HEX LEN TIM Implied RTI $40 1 6 RTI retrieves the Processor Status Word (flags) and the Program Counter from the stack in that order (interrupts push the PC first and then the PSW). Note that unlike RTS, the return address on the stack is the actual address rather than the address-1.
RTS (ReTurn from Subroutine)
Affects Flags: none MODE SYNTAX HEX LEN TIM Implied RTS $60 1 6 RTS pulls the top two bytes off the stack (low byte first) and transfers program control to that address+1. It is used, as

168
expected, to exit a subroutine invoked via JSR which pushed the address-1. RTS is frequently used to implement a jump table where addresses-1 are pushed onto the stack and accessed via RTS e.g. to access the second of four routines: LDX #1 JSR EXEC JMP SOMEWHERE LOBYTE .BYTE <ROUTINE0-1,<ROUTINE1-1 .BYTE <ROUTINE2-1,<ROUTINE3-1 HIBYTE .BYTE >ROUTINE0-1,>ROUTINE1-1 .BYTE >ROUTINE2-1,>ROUTINE3-1 EXEC LDA HIBYTE,X PHA LDA LOBYTE,X PHA RTS
SBC (SuBtract with Carry)
Affects Flags: S V Z C MODE SYNTAX HEX LEN TIM Immediate SBC #$44 $E9 2 2 Zero Page SBC $44 $E5 2 3 Zero Page,X SBC $44,X $F5 2 4 Absolute SBC $4400 $ED 3 4 Absolute,X SBC $4400,X $FD 3 4+ Absolute,Y SBC $4400,Y $F9 3 4+ Indirect,X SBC ($44,X) $E1 2 6 Indirect,Y SBC ($44),Y $F1 2 5+ + add 1 cycle if page boundary crossed SBC results are dependent on the setting of the decimal flag. In decimal mode, subtraction is carried out on the assumption that the values involved are packed BCD (Binary Coded Decimal). There is no way to subtract without the carry which works as an inverse borrow. i.e., to subtract you set the carry before the operation. If the carry is cleared by the operation, it indicates a borrow occurred.

169
STA (STore Accumulator)
Affects Flags: none MODE SYNTAX HEX LEN TIM Zero Page STA $44 $85 2 3 Zero Page,X STA $44,X $95 2 4 Absolute STA $4400 $8D 3 4 Absolute,X STA $4400,X $9D 3 5 Absolute,Y STA $4400,Y $99 3 5 Indirect,X STA ($44,X) $81 2 6 Indirect,Y STA ($44),Y $91 2 6
Stack Instructions
These instructions are implied mode, have a length of one byte and require machine cycles as indicated. The "PuLl" operations are known as "POP" on most other microprocessors. With the 6502, the stack is always on page one ($100-$1FF) and works top down. MNEMONIC HEX TIM TXS (Transfer X to Stack ptr) $9A 2 TSX (Transfer Stack ptr to X) $BA 2 PHA (PusH Accumulator) $48 3 PLA (PuLl Accumulator) $68 4 PHP (PusH Processor status) $08 3 PLP (PuLl Processor status) $28 4
STX (STore X register)
Affects Flags: none MODE SYNTAX HEX LEN TIM Zero Page STX $44 $86 2 3 Zero Page,Y STX $44,Y $96 2 4 Absolute STX $4400 $8E 3 4
STY (STore Y register)
Affects Flags: none MODE SYNTAX HEX LEN TIM Zero Page STY $44 $84 2 3 Zero Page,X STY $44,X $94 2 4 Absolute STY $4400 $8C 3 4