APPENDIXES - UCLA
140
Appendix 1A (Preparation of an Agarose Gel) A1A.1 APPENDIXES Appendix 1A Preparation of an Agarose Gel for Gel Electrophoresis Solutions Needed: DNA samples Agarose 1x TAE buffer 10,000x SYBR Safe DNA gel stain (Invitrogen) 50 ng/μL DNA ladder with loading dye (Invitrogen) 6x Loading dye containing xylene cyanol and/or bromophenol blue dyes Materials Needed: Pipettes (P-20) Pipet tips (regular, non-filter tips) 1.5 mL microcentrifuge tubes Microcentrifuge tube rack 250 mL Erlenmeyer flask 25 mL Erlenmeyer flask Saran wrap Scale Microwave 55°C water bath Hot hand protector Gel cast Gel comb Round bubble level Gel box Cables Electrophoresis power supply Plastic container for carrying the gel Gel document system (Bio-Rad) PROCEDURE Note: SYBR Safe gel stain is unstable in UV or bright room light. If possible, keep the gel in the dark by either turning off the lights, covering the gel with a cardboard box or aluminum foil, or run the gel inside of a drawer. Realistically, hours of constant UV or bright room light exposure are required to cause any significant loss of signal.
-
Upload
khangminh22 -
Category
Documents
-
view
3 -
download
0
Transcript of APPENDIXES - UCLA

Appendix 1A (Preparation of an Agarose Gel) A1A.1
APPENDIXES Appendix 1A
Preparation of an Agarose Gel for Gel Electrophoresis Solutions Needed:
Ø DNA samples Ø Agarose Ø 1x TAE buffer Ø 10,000x SYBR Safe DNA gel stain (Invitrogen) Ø 50 ng/µL DNA ladder with loading dye (Invitrogen) Ø 6x Loading dye containing xylene cyanol and/or bromophenol blue dyes Materials Needed:
Ø Pipettes (P-20) Ø Pipet tips (regular, non-filter tips) Ø 1.5 mL microcentrifuge tubes Ø Microcentrifuge tube rack Ø 250 mL Erlenmeyer flask Ø 25 mL Erlenmeyer flask Ø Saran wrap Ø Scale Ø Microwave Ø 55°C water bath Ø Hot hand protector Ø Gel cast Ø Gel comb Ø Round bubble level Ø Gel box Ø Cables Ø Electrophoresis power supply Ø Plastic container for carrying the gel Ø Gel document system (Bio-Rad) PROCEDURE
Note: SYBR Safe gel stain is unstable in UV or bright room light. If possible, keep the gel
in the dark by either turning off the lights, covering the gel with a cardboard box or
aluminum foil, or run the gel inside of a drawer. Realistically, hours of constant UV or
bright room light exposure are required to cause any significant loss of signal.

Appendix 1A (Preparation of an Agarose Gel) A1A.2
1. For a 1% agarose gel, weigh out 1 gram of agarose (powder) into a weigh boat on
the scale in room 4128A2. Note: The percentage of agarose in the gel reflects the
amount of agarose (in grams) in 100 mL of 1x TAE buffer.
Example: If you want to make a 0.7% agarose gel (0.7 g/100 mL, w/v), weigh out 0.7
g of agarose for 100 mL of 1x TAE buffer.
2. Carefully, pour the agarose into a 250 mL Erlenmeyer flask.
3. Measure 100 mL of 1x TAE buffer using a graduated cylinder, and add it to the flask
in step 2.
4. Cover the flask with an inverted 25-mL Erlenmeyer flask or saran wrap. Swirl the
solution to break up any lumps of agarose. Note: The inverted flask will collect
condensation from the steam produced during microwaving in step 6 below.
5. Microwave the solution for 1-2 minute or until the agarose granules have completely
melted and the solution looks clear. Gently swirl the solution every 15 sec during
microwaving to help melt the agarose evenly. Caution: The solution gets very hot.
Use a hot hand protector. Note: Constantly watch over the solution because if it
starts boiling, it might overflow.
6. Cool down the agarose solution for 10 min in a 55ºC water bath. 7. While the agarose solution is cooling, prepare the gel cast with the appropriate comb.
Use the round bubble level to make the gel cast level.
Note: The comb depends on the number of samples to be loaded on the gel. For
example, if there are ≤ 18 samples, then use a 20-tooth comb; but, if there are ≥ 19
samples, then use a 30-tooth comb. Note: Remember that two wells will be for
loading DNA ladder (on left and right sides of loaded samples).
8. After the agarose solution has cooled down, add 10 µL of 10,000x SYBR Safe DNA
gel stain to 100 mL of agarose solution and swirl the flask GENTLY to mix. Note:
Do NOT swirl vigorously to avoid generating bubbles.
9. Pour the agarose/gel stain solution into the gel cast with the appropriate gel comb.
Wait 30 min for the agarose solution to solidify. Note: IMMEDIATELY after pouring
the agarose solution, inspect the agarose solution’s surface for the present of
bubbles. If there are bubbles floating on the surface of the gel solution, use a pipette

Appendix 1A (Preparation of an Agarose Gel) A1A.3
tip to pop them or move them to the sides of the gel before the gel has completely
solidified.
10. Pour ~600 mL of 1x TAE buffer into the gel box.
11. After the agarose has solidified into a gel, take out the comb by gently pulling it side
to side and out of the gel. Put the gel in its cast into the gel box containing the 1x
TAE running buffer.
12. Add 6x loading dye to your samples. Note: Do not use a loading dye that will travel
to the same place as your DNA on the gel because the dye will obscure the DNA
band. Xylene cyanol runs at ~3-4 kb, and bromophenol blue runs at ~400 bp on a 1%
agarose gel.
13. Load 10 µL of 50 ng/µL DNA ladder with loading dye.
14. Load samples and record the identity of the sample in each lane.
15. Add 10 µL of 10,000x SYBR Safe DNA gel stain to the running buffer at the anode
(red) side of the gel box. Pipet up and down to mix. Note: Add 5 µL of 10,000x SYBR
Safe DNA gel stain for a small (50 mL) gel.
16. Put the lid on the gel box and connect the electrodes to the power supply (RED to
RED and BLACK to BLACK).
17. Run the gel at 105 volts for 1-2 hours or until the front dye (bromophenol blue) has
migrated one-half or two-thirds of the gel length.
18. After 1-2 hours of running the gel, turn off the power supply.
19. Remove the lid of the gel box. Put the gel in its gel cast into a small plastic container
and bring the container to room 4128A2. Caution: It is a MUST to put the gel into a
plastic container so that the gel cannot slide off the gel cast, fall on the floor and be
broken into pieces while walking.
20. Take a picture of the gel using the Bio-Rad Gel Document System. Label the picture
using the text program of the Gel Document System. (Your TA will show you how.)
Alternatively: Print out the picture. Tape it to a piece of paper by putting a piece of
white tape at a position immediately above the wells. Label the wells with the sample
names.
21. Print out the picture. Store the labeled picture in your lab notebook.
Appendix 1B (NanoDrop Spectrophotometer) A1B.1
Appendix 1B What is a spectrophotometer?
It is an instrument that measures the amount of molecules absorbing a given wavelength of energy. In this exercise, we measure the amount of DNA molecules in a
given volume in the ultraviolet wavelengths of 200 – 280 nm (nm stands for
nanometer, which is 1 billionth of a meter). The bases of DNA absorb at a wavelength
of 254 nm. The absorbance of DNA molecules over the wavelength range of 220 - 350
nm is represented as a spectrum with a peak at near 260 nm as illustrated by the
NanoDrop spectrophotometer readout below:
DNA concentration
a spectrum of DNA

Appendix 1B (NanoDrop Spectrophotometer) A1B.2
OPERATION OF NANODROP SPECTROPHOTOMETER ND-1000
Note: The NanoDrop is powered by the laptop via the USB port.
1. Open the NanoDrop program by clicking the “ND-1000 v3.7.1” icon on the computer
desktop. Wait for a few seconds for the program to open. You see the NanoDrop
1000 3.7.1 menu panel with user field set to default.
2. To read the concentration of DNA or RNA solutions, click on the “Nucleic Acid”
button on the top left column.
Note: You see the following message: “Ensure sample pedestals are clean and then
load a water sample. After loading water sample, click OK to initialize instrument.”
3. Clean the measurement pedestals as following:
a) Raise the sample arm by holding its end.
Caution: NEVER hold the fiber optic cable when lifting and lowering the sample
arm because the cord is fragile, and it is very expensive to replace it.
b) Blot BOTH the measurement pedestal and the sample arm pedestal with a
piece of Kimwipes slightly wetted with distilled water.
Sample Arm (Handle HERE)
Measurement Pedestal
Magnet Pole
Fiber Optic cable
Appendix 1B (NanoDrop Spectrophotometer) A1B.3
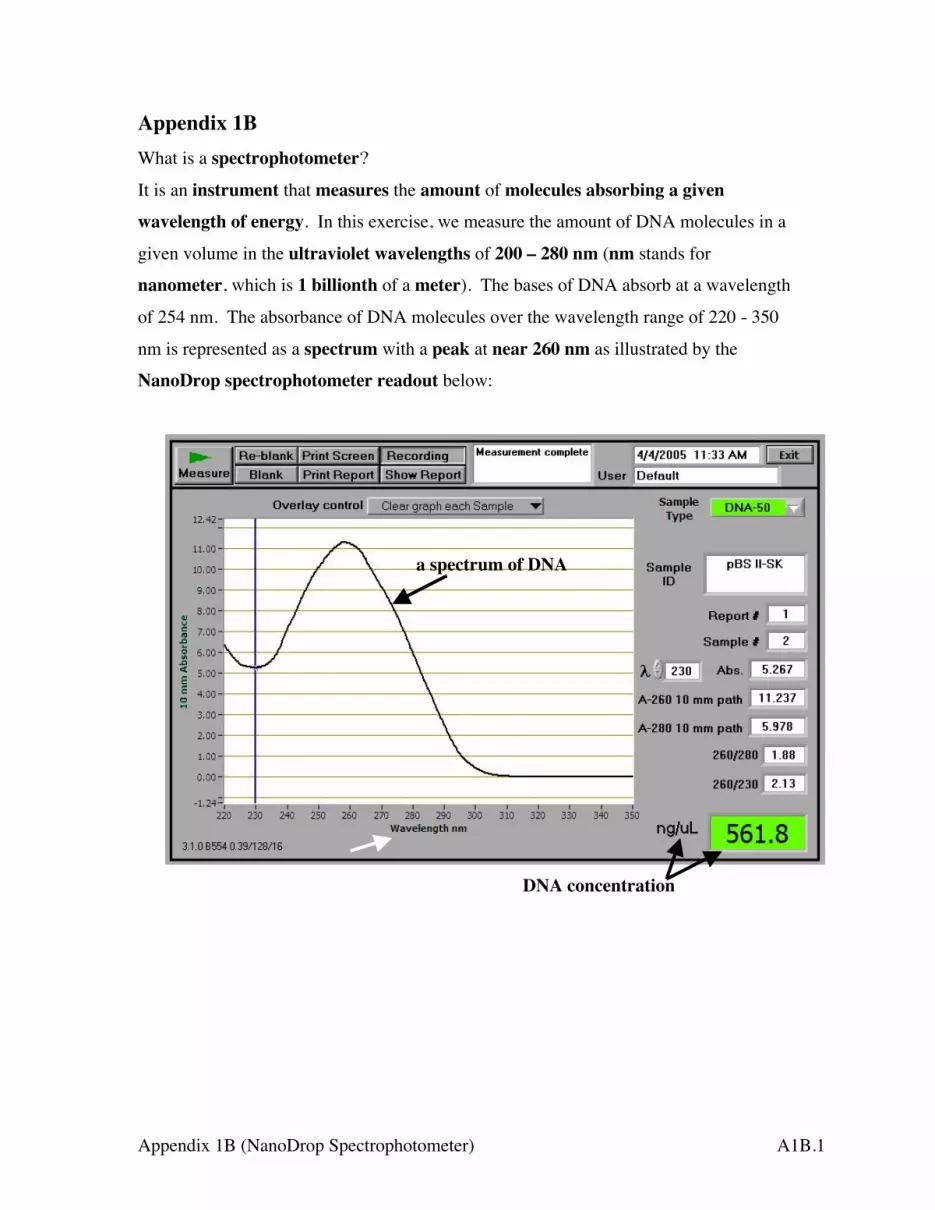
c) Pipet 1.5 - 2 µL of water onto the measurement pedestal.
Note: Even though NanoDrop Inc. claims that the NanoDrop can read as low as 1
µL, the concentration reading is NOT consistent at this volume. Therefore, the
minimal volume for the concentration reading is 1.5 µL.
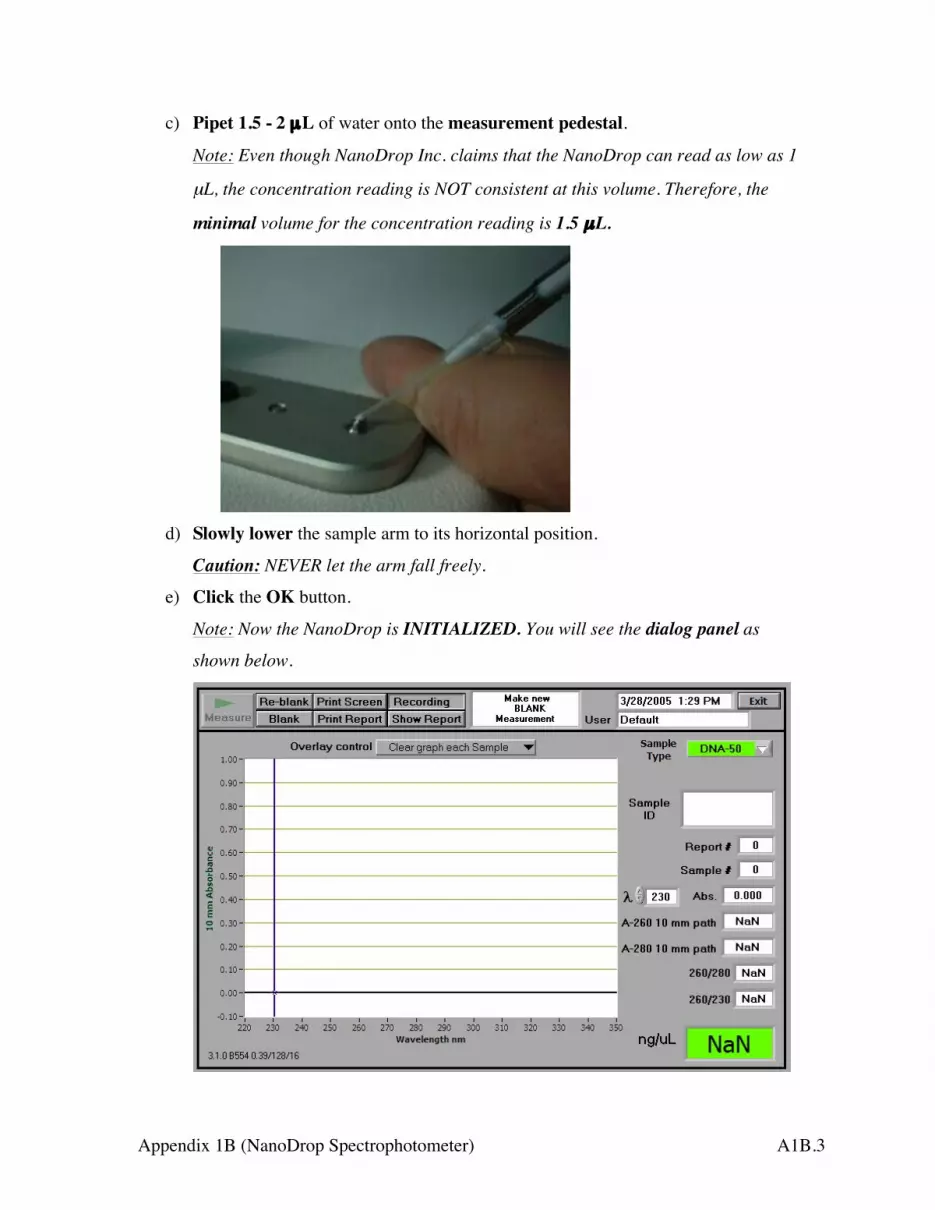
d) Slowly lower the sample arm to its horizontal position.
Caution: NEVER let the arm fall freely.
e) Click the OK button.
Note: Now the NanoDrop is INITIALIZED. You will see the dialog panel as
shown below.
Appendix 1B (NanoDrop Spectrophotometer) A1B.4
f) Raise the sample arm to the vertical position.
g) Wipe off the liquid from BOTH the measurement pedestal and the sample arm pedestal with a piece of Kimwipes.
4. Change SAMPLE TYPE (if necessary) from DNA-50 (default, for DNA) to RNA-40 (for RNA) or ssDNA-33 (for oligonucleotides), depending on your sample.
5. (Optional) Change the OVERLAY CONTROL field from the default setting of
“CLEAR GRAPH EACH SAMPLE” to “CLEAR GRAPH ON NEW REPORT” or
“ACCUMULATE UNTIL CLEAR” or “CLEAR GRAPH NOW.”
6. Make a NEW BLANK measurement.
a) Pipet 1.5 - 2.0 µL of either double-distilled water or TE (depending on whether
your sample solution is in double-distilled water or TE) on the measurement
pedestal.
b) Lower the sample arm to the horizontal position.
c) Click the BLANK button. The blank was made.
d) After the reading is done, raise the sample arm to the vertical position.
e) Blot off the liquid from BOTH the measurement pedestal and the sample arm
pedestal with a piece of Kimwipes.
7. Confirm that the blank was made.
a) Pipet 1.5 - 2.0 µL of either double-distilled water or TE (depending on whether
your sample solution is in double-distilled water or TE) on the measurement
pedestal.
b) Lower the sample arm to the horizontal position.
c) In the SAMPLE ID field, type the identity of the solution that you are measuring
(either TE or ddH2O).
d) Click the MEASURE button.
Note: After the reading is done, a concentration (in ng/µL) and a spectrum of the
absorbance, along with other information, are shown. The reading should be less
than 1 ng/µL. If it is not, make a new blank measurement by repeating step 6.
e) Raise the sample arm to the vertical position.
f) Blot off the liquid from BOTH the measurement pedestal and the sample arm pedestal with a piece of Kimwipes.
Appendix 1B (NanoDrop Spectrophotometer) A1B.5
8. Measure the samples.
a) In the SAMPLE ID field, type the identity of the sample solution.
b) Pipet 1.5 - 2.0 µL of SAMPLE on the measurement pedestal.
c) Lower the sample arm to the horizontal position.
d) Click the MEASURE button to determine concentration of your sample.
e) After the reading is done, a sample concentration (in ng/µL) and a spectrum of
the sample, along with other information, are shown. You can either:
i. Save the window of measured sample.
1. Click on FILE.
2. Choose SAVE WINDOW.
3. Select an existing folder or create a new folder (give a name for the new
folder).
4. Type in a file name in the FILE NAME field.
5. Click the SAVE button to save the file.
ii. Or, print the window by clicking the PRINT SCREEN button.
Note: To print the spectrum of the current sample, you MUST print it before
reading the next sample. Otherwise, you need to repeat reading the sample.
f) Raise the sample arm to the vertical position.
g) Blot off the liquid from BOTH the measurement pedestal and the sample arm pedestal with a piece of Kimwipes.
9. Repeat step 8 for other samples.
10. After reading the last sample, click the PRINT REPORT button to print the
concentrations of all samples.
11. If you are done with the NanoDrop, click the EXIT buttons.
12. Blot BOTH the measurement pedestal and the sample arm pedestal with a piece
of Kimwipes slightly wetted with distilled water.
Appendix 1C (100 bp DNA Ladder) A1C.1
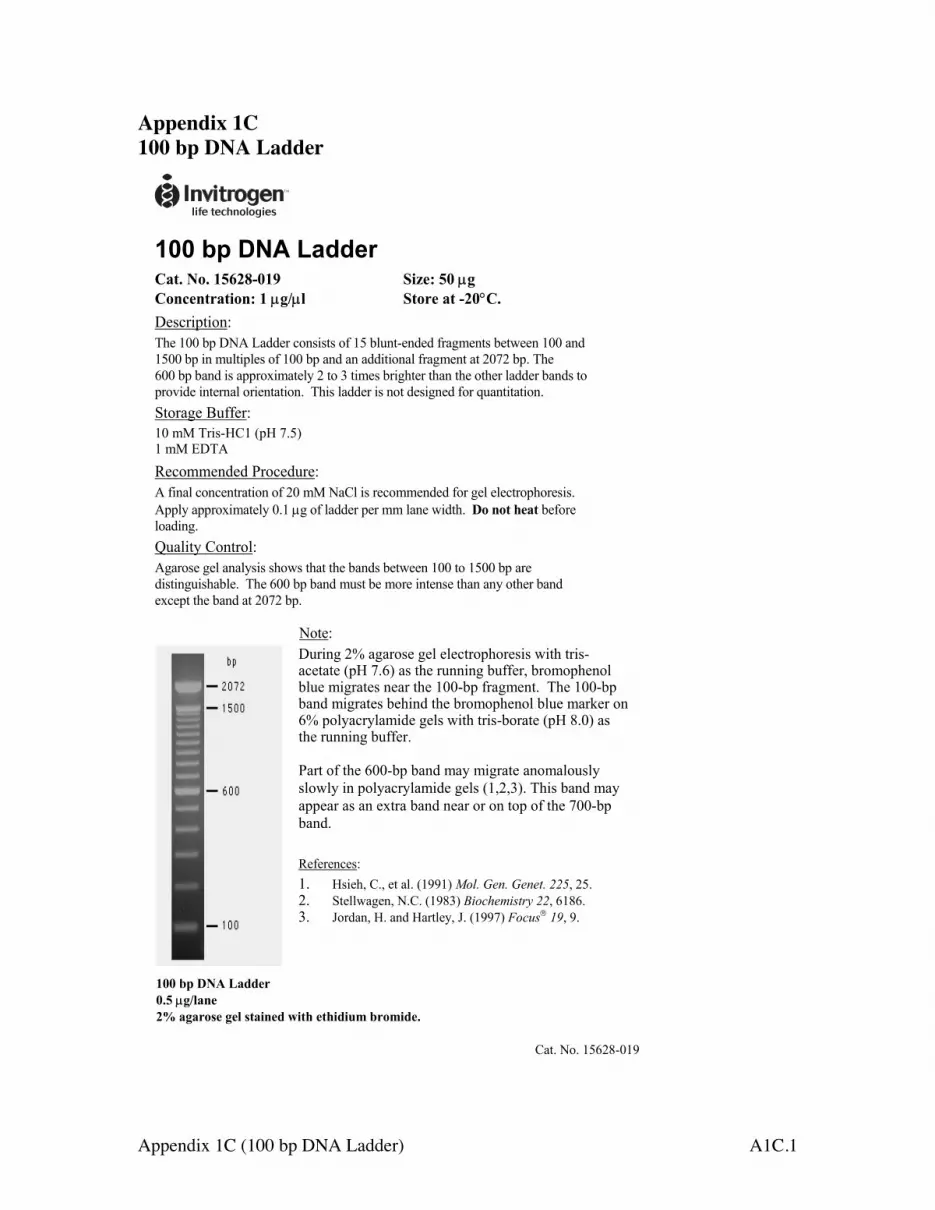
Appendix 1C 100 bp DNA Ladder
!!
!""#$%#&'(#)*++,-#!"#$%&'$%()*+,-.(/% 01234%).% 5%!'6736#8"#1'64%(% 59 :% 0#'83%"#%-+. !$!"#$%&'()'*+,!-.#!/00!1(!"23!4566#&!%*+$'$)$!*7!/8!19:+);#+6#6!7&5<=#+)$!1#)>##+!/00!5+6!/800!1(!'+!=:9)'(9#$!*7!/00!1(!5+6!5+!566')'*+59!7&5<=#+)!5)!?0@?!1(A!-.#!B00!1(!15+6!'$!5((&*C'=5)#9D!?!)*!E!)'=#$!1&'<.)#&!).5+!).#!*).#&!9566#&!15+6$!)*!(&*F'6#!'+)#&+59!*&'#+)5)'*+A!!-.'$!9566#&!'$!+*)!6#$'<+#6!7*&!G:5+)')5)'*+A!H)*&5<#!I:77#&,!/0!=J!-&'$;KL/!M(K!@A8N!/!=J!O"-3
P#%*==#+6#6!Q&*%#6:&#,!3!7'+59!%*+%#+)&5)'*+!*7!?0!=J!25L9!'$!&#%*==#+6#6!7*&!<#9!#9#%)&*(.*&#$'$A!3((9D!5((&*C'=5)#9D!0A/! <!*7!9566#&!(#&!==!95+#!>'6).A!!;'%6'#%<3"#!1#7*&#!9*56'+<A R:59')D!L*+)&*9,!3<5&*$#!<#9!5+59D$'$!$.*>$!).5)!).#!15+6$!1#)>##+!/00!)*!/800!1(!5&#!6'$)'+<:'$.519#A!!-.#!B00!1(!15+6!=:$)!1#!=*&#!'+)#+$#!).5+!5+D!*).#&!15+6!#C%#()!).#!15+6!5)!?0@?!1(A
"*%A!P#FA,!/0?80/!
"#$%!&'()*+,!$%!)$%,'$-*,.)!/('!01-('1,('2!'.%.1'+#!(3024!567"89:;!:(,!/(')$1<3(%,$+!*%.4!"#.!%1/.,2!13)!.//$+1+2!(/!,#$%!&'()*+,!$3!)$1<3(%,$+!('!(,#.'!+0$3$+10!*%.%!#1%!3(,!-..3!.%,1-0$%#.)4!!"#$!%&'()*'+,!-.&/%*#)/!+0#.%!%(*/!1$#2.'%3!'+,,!%(&!4)5*%$#6&)!7&'(89*)&=>!:;<;=;!>??!@AA!BC>>
!"#$%&%'(%)%
*'+$,%-./01#%&2%"#"/'3$%#$4%$4$5+/'67'/$303%80+7%+/039"5$+"+$%:6;%<=>?%"3%+7$%/.1101#%@.(($/A%@/'B'67$1'4%@4.$%B0#/"+$3%1$"/%+7$%CDD9@6%(/"#B$1+=%%E7$%CDD9@6%@"1F%B0#/"+$3%@$701F%+7$%@/'B'67$1'4%@4.$%B"/G$/%'1%>2%6'4H"5/H4"B0F$%#$43%80+7%+/039@'/"+$%:6;%I=D?%"3%+7$%/.1101#%@.(($/=%%!"/+%'(%+7$%>DD9@6%@"1F%B"H%B0#/"+$%"1'B"4'.34H%34'84H%01%6'4H"5/H4"B0F$%#$43%:CA&A)?=%E703%@"1F%B"H%"66$"/%"3%"1%$J+/"%@"1F%1$"/%'/%'1%+'6%'(%+7$%<DD9@6%@"1F=%%K$($/$15$3,%C=% ;30$7A%L=A%$+%"4=%:CMMC?%!"#$%&'($%&'(')$%**+A%&N=%&=% O+$448"#$1A%*=L=%:CMI)?%,-"./'0-1)23%**A%>CI>=%)=% P'/F"1A%;=%"1F%;"/+4$HA%P=%:CMM<?%4".51 %67A%M=%%%%
!""#$%#&'(#)*++,-#"./# 012*3,#45#*0*-67,#0,2#78*93,+#:98;#,8;9+9<=#$-6=9+,.%%%% L"+=%*'=%CN>&I9DCM%
%
Appendix 1D (1 Kb Plus DNA Ladder) A1D.1
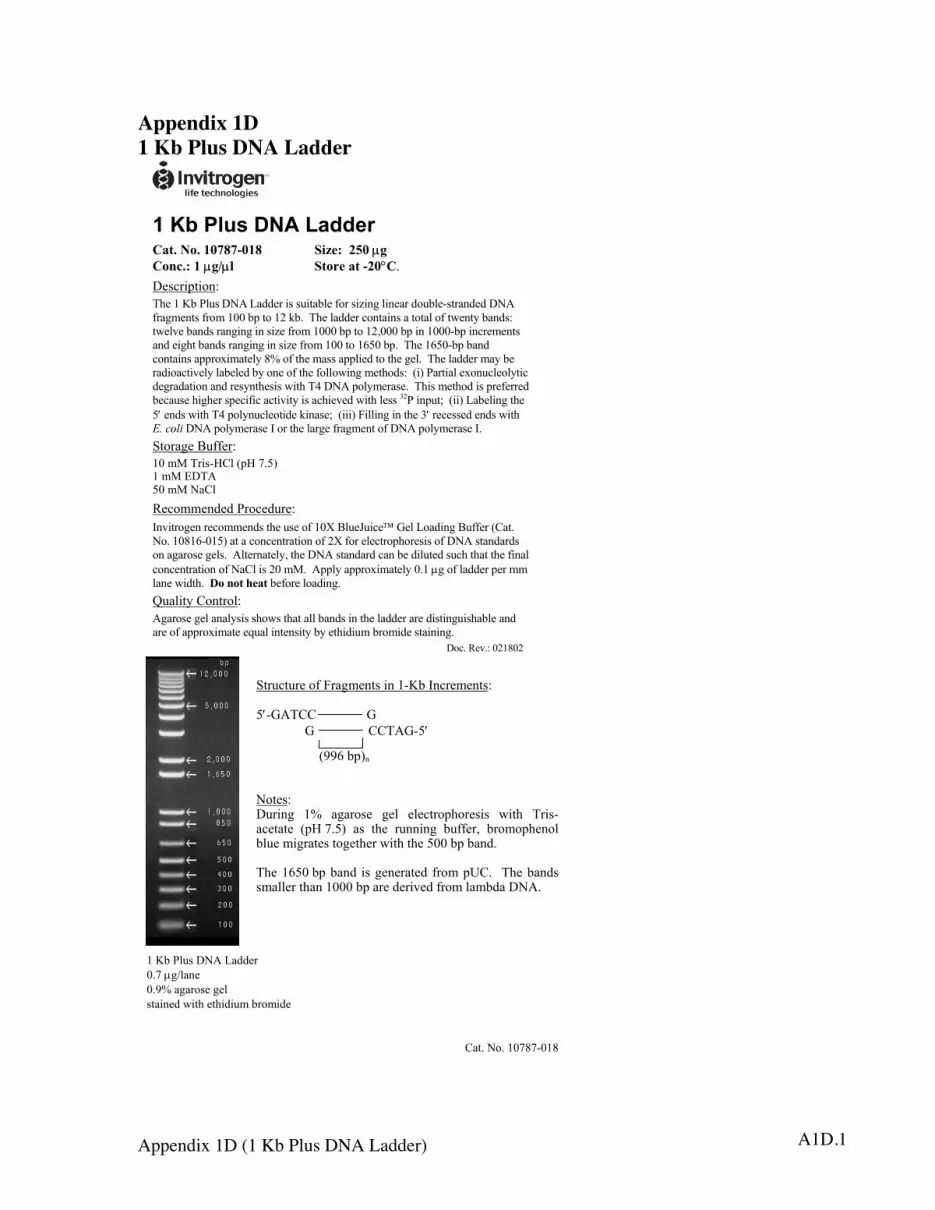
Appendix 1D 1 Kb Plus DNA Ladder
!!
!"#$"%&'(")*+",-../0"!"#$%&'$%()*+*,)(+% -./01%%23)% 4%!'56$1%(% 47 8% -#'90%"#%,2) !"!#$%&'()*(+,-!./$!0!12!345%!#67!89::$'!(%!%5(*924$!;+'!%(<(,=!4(,$9'!:+524$>%*'9,:$:!#67!;'9=?$,*%!;'+?!0@@!2)!*+!0A!B2"!!./$!49::$'!&+,*9(,%!9!*+*94!+;!*C$,*D!29,:%-!*C$4E$!29,:%!'9,=(,=!(,!%(<$!;'+?!0@@@!2)!*+!0AF@@@!2)!(,!0@@@>2)!(,&'$?$,*%!9,:!$(=/*!29,:%!'9,=(,=!(,!%(<$!;'+?!0@@!*+!0GH@!2)"!!./$!0GH@>2)!29,:!&+,*9(,%!9))'+I(?9*$4D!JK!+;!*/$!?9%%!9))4($:!*+!*/$!=$4"!!./$!49::$'!?9D!2$!'9:(+9&*(E$4D!492$4$:!2D!+,$!+;!*/$!;+44+C(,=!?$*/+:%-!!L(M!39'*(94!$I+,5&4$+4D*(&!:$='9:9*(+,!9,:!'$%D,*/$%(%!C(*/!.N!#67!)+4D?$'9%$"!!./(%!?$*/+:!(%!)'$;$''$:!2$&95%$!/(=/$'!%)$&(;(&!9&*(E(*D!(%!9&/($E$:!C(*/!4$%%!OA3!(,)5*P!!L((M!892$4(,=!*/$!H !$,:%!C(*/!.N!)+4D,5&4$+*(:$!B(,9%$P!!L(((M!Q(44(,=!(,!*/$!O !'$&$%%$:!$,:%!C(*/!!"#$%&'!#67!)+4D?$'9%$!R!+'!*/$!49'=$!;'9=?$,*!+;!#67!)+4D?$'9%$!R"!S*+'9=$!T5;;$'-!0@!?U!.'(%>VW4!L)V!X"HM!0!?U!Y#.7!H@!?U!69W4 Z$&+??$,:$:!3'+&$:5'$-!R,E(*'+=$,!'$&+??$,:%!*/$!5%$!+;!0@[!T45$\5(&$ !]$4!8+9:(,=!T5;;$'!LW9*"!6+"!0@J0G>@0HM!9*!9!&+,&$,*'9*(+,!+;!A[!;+'!$4$&*'+)/+'$%(%!+;!#67!%*9,:9':%!+,!9=9'+%$!=$4%"!!74*$',9*$4DF!*/$!#67!%*9,:9':!&9,!2$!:(45*$:!%5&/!*/9*!*/$!;(,94!&+,&$,*'9*(+,!+;!69W4!(%!A@!?U"!!7))4D!9))'+I(?9*$4D!@"0! =!+;!49::$'!)$'!??!49,$!C(:*/"!!:'%5'#%;0"#!2$;+'$!4+9:(,=" ^594(*D!W+,*'+4-!7=9'+%$!=$4!9,94D%(%!%/+C%!*/9*!944!29,:%!(,!*/$!49::$'!9'$!:(%*(,=5(%/924$!9,:!9'$!+;!9))'+I(?9*$!$_594!(,*$,%(*D!2D!$*/(:(5?!2'+?(:$!%*9(,(,="
#+&"!Z$E"-!@A0J@A!
"#$%!&'()*+,!$%!)$%,'$-*,.)!/('!01-('1,('2!'.%.1'+#!(3024!567"89:;!:(,!/(')$1<3(%,$+!*%.4!"#.!%1/.,2!13)!.//$+1+2!(/!,#$%!&'()*+,!$3!)$1<3(%,$+!('!(,#.'!+0$3$+10!*%.%!#1%!3(,!-..3!.%,1-0$%#.)4!!"#$!%&'()*'+,!-.&/%*#)/!+0#.%!%(*/!1$#2.'%3!'+,,!%(&!4)5*%$#6&)!7&'(89*)&=>!:;<;=;!>??!@AA!BC>>
!"#$%&%'(%)%
%*+,-.+-,$%'(%/,"#0$1+2%31%4567%81.,$0$1+29%%: 5;<=>>%%%%%%%%%%%%%%%;%
%%%;%%%%%%%%%%%%%%%%>>=<;5: %
%%%%%%% %?@@A%7BC1%%%D'+$29%E-,31#% 4F% "#",'2$% #$G% $G$.+,'BH',$232% I3+H% =,325".$+"+$% ?BJ%KL:C% "2% +H$% ,-1131#% 7-(($,M% 7,'0'BH$1'G%7G-$%03#,"+$2%+'#$+H$,%I3+H%+H$%:NN%7B%7"1OL%%=H$%4A:N%7B%7"1O% 32%#$1$,"+$O% (,'0%BP>L% %=H$%7"1O2%20"GG$,%+H"1%4NNN%7B%",$%O$,3Q$O%(,'0%G"07O"%ED<L%%
%
%
%
4%67%!G-2%ED<%R"OO$,%%NLK% #SG"1$%NL@F%"#",'2$%#$G%2+"31$O%I3+H%$+H3O3-0%7,'03O$%%
%
>"+L%D'L%4NKTK5N4T%%
Appendix 1E (Ex Taq DNA Polymerase) A1E.1
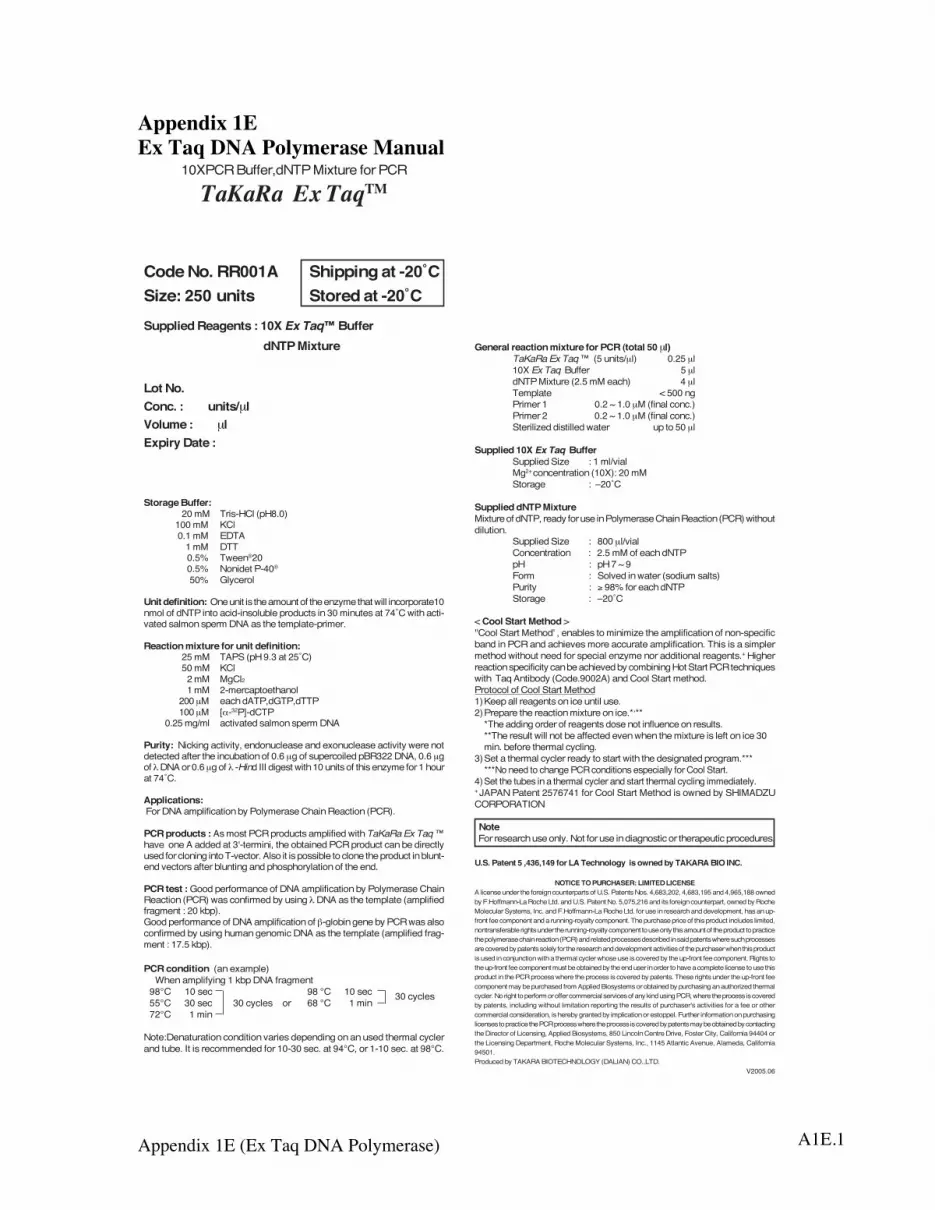
Appendix 1E Ex Taq DNA Polymerase Manual
General reaction mixture for PCR (total 50 µl)TaKaRa Ex Taq ™ (5 units/µl) 0.25 µl10X Ex Taq Buffer 5 µldNTP Mixture (2.5 mM each) 4 µlTemplate < 500 ngPrimer 1 0.2 ~ 1.0 µM (final conc.)Primer 2 0.2 ~ 1.0 µM (final conc.)Sterilized distilled water up to 50 µl
Supplied 10X Ex Taq BufferSupplied Size : 1 ml/vialMg2+ concentration (10X): 20 mMStorage : –20˚C
Supplied dNTP MixtureMixture of dNTP, ready for use in Polymerase Chain Reaction (PCR) withoutdilution.
Supplied Size : 800 µl/vialConcentration : 2.5 mM of each dNTPpH : pH 7 ~ 9Form : Solved in water (sodium salts)Purity : ! 98% for each dNTPStorage : –20˚C
< Cool Start Method >''Cool Start Method' , enables to minimize the amplification of non-specificband in PCR and achieves more accurate amplification. This is a simplermethod without need for special enzyme nor additional reagents.+ Higherreaction specificity can be achieved by combining Hot Start PCR techniqueswith Taq Antibody (Code.9002A) and Cool Start method.Protocol of Cool Start Method1)Keep all reagents on ice until use.2)Prepare the reaction mixture on ice.*,**
*The adding order of reagents dose not influence on results.**The result will not be affected even when the mixture is left on ice 30min. before thermal cycling.
3)Set a thermal cycler ready to start with the designated program.******No need to change PCR conditions especially for Cool Start.
4)Set the tubes in a thermal cycler and start thermal cycling immediately.+ JAPAN Patent 2576741 for Cool Start Method is owned by SHIMADZUCORPORATION
Note For research use only. Not for use in diagnostic or therapeutic procedures.
U.S. Patent 5 ,436,149 for LA Technology is owned by TAKARA BIO INC.
NOTICE TO PURCHASER: LIMITED LICENSEA license under the foreign counterparts of U.S. Patents Nos. 4,683,202, 4,683,195 and 4,965,188 ownedby F.Hoffmann-La Roche Ltd. and U.S. Patent No. 5,075,216 and its foreign counterpart, owned by RocheMolecular Systems, Inc. and F.Hoffmann-La Roche Ltd. for use in research and development, has an up-front fee component and a running-royalty component. The purchase price of this product includes limited,nontransferable rights under the running-royalty component to use only this amount of the product to practicethe polymerase chain reaction (PCR) and related processes described in said patents where such processesare covered by patents solely for the research and development activities of the purchaser when this productis used in conjunction with a thermal cycler whose use is covered by the up-front fee component. Rights tothe up-front fee component must be obtained by the end user in order to have a complete license to use thisproduct in the PCR process where the process is covered by patents. These rights under the up-front feecomponent may be purchased from Applied Biosystems or obtained by purchasing an authorized thermalcycler. No right to perform or offer commercial services of any kind using PCR, where the process is coveredby patents, including without limitation reporting the results of purchaser's activities for a fee or othercommercial consideration, is hereby granted by implication or estoppel. Further information on purchasinglicenses to practice the PCR process where the process is covered by patents may be obtained by contactingthe Director of Licensing, Applied Biosystems, 850 Lincoln Centre Drive, Foster City, California 94404 orthe Licensing Department, Roche Molecular Systems, Inc., 1145 Atlantic Avenue, Alameda, California94501.Produced by TAKARA BIOTECHNOLOGY (DALIAN) CO.,LTD.
V2005.06
Code No. RR001ASize: 250 units
10XPCR Buffer,dNTP Mixture for PCR
TaKaRa Ex TaqTM
Shipping at -20˚CStored at -20˚C
Supplied Reagents : 10X Ex Taq™ Buffer dNTP Mixture
Lot No.Conc. : units/µlVolume : µlExpiry Date :
Storage Buffer:20 mM Tris-HCl (pH8.0)
100 mM KCl0.1 mM EDTA
1 mM DTT0.5% Tween®200.5% Nonidet P-40®
50% Glycerol
Unit definition: One unit is the amount of the enzyme that will incorporate10nmol of dNTP into acid-insoluble products in 30 minutes at 74˚C with acti-vated salmon sperm DNA as the template-primer.
Reaction mixture for unit definition:25 mM TAPS (pH 9.3 at 25˚C)50 mM KCl 2 mM MgCl2 1 mM 2-mercaptoethanol
200 µM each dATP,dGTP,dTTP 100 µM ["-32P]-dCTP 0.25 mg/ml activated salmon sperm DNA
Purity: Nicking activity, endonuclease and exonuclease activity were notdetected after the incubation of 0.6 µg of supercoiled pBR322 DNA, 0.6 µgof # DNA or 0.6 µg of # -Hind III digest with 10 units of this enzyme for 1 hourat 74˚C.
Applications: For DNA amplification by Polymerase Chain Reaction (PCR).
PCR products : As most PCR products amplified with TaKaRa Ex Taq ™have one A added at 3'-termini, the obtained PCR product can be directlyused for cloning into T-vector. Also it is possible to clone the product in blunt-end vectors after blunting and phosphorylation of the end.
PCR test : Good performance of DNA amplification by Polymerase ChainReaction (PCR) was confirmed by using # DNA as the template (amplifiedfragment : 20 kbp).Good performance of DNA amplification of $-globin gene by PCR was alsoconfirmed by using human genomic DNA as the template (amplified frag-ment : 17.5 kbp).
PCR condition (an example)When amplifying 1 kbp DNA fragment
98°C 10 sec 98 °C 10 sec55°C 30 sec 30 cycles or 68 °C 1 min72°C 1 min
Note:Denaturation condition varies depending on an used thermal cyclerand tube. It is recommended for 10-30 sec. at 94°C, or 1-10 sec. at 98°C.
30 cycles

Appendix 1F (QIAquick Spin Handbook) A1F.1
Appendix 1F QIAquick Spin Handbook
QIAquick® Spin Handbook
QIAquick PCR Purification KitFor purification of PCR products, 100 bp to 10 kb
QIAquick Nucleotide Removal KitFor oligonucleotide (17-40mers) and DNA (40 bp to 10 kb) cleanup from enzymatic reactions
QIAquick Gel Extraction KitFor gel extraction or cleanup of DNA (70 bp to 10 kb) from enzymatic reactions
Second Edition December 2005March 2008
Sample & Assay Technologies
1051746_HB 16.04.2008 14:07 Uhr Seite 1

Appendix 1F (QIAquick Spin Handbook) A1F.2
4 QIAquick Spin Handbook 03/2008
Kit Contents
* Buffers PB, PN, and QG contain chaotropic salts which are irritants. Take appropriate laboratory safety measuresand wear gloves when handling.
StorageQIAquick Spin Kits should be stored dry at room temperature (15–25°C). Under theseconditions, QIAquick Spin Kits can be stored for up to 12 months without showing anyreduction in performance and quality. Check buffers for precipitate before use andredissolve at 37°C if necessary. The entire kit can be stored at 2–8°C, but in this casethe buffers should be redissolved before use. Make sure that all buffers and spin columsare at room temperature when used.
QIAquick Nucleotide Removal Kits (50) (250)Catalog no. 28304 28306QIAquick Spin Columns 50 250Buffer PN* 30 ml 140 mlBuffer PE (concentrate) 2 x 6 ml 55 mlBuffer EB 15 ml 55 mlCollection Tubes (2 ml) 100 500Loading Dye 110 µl 550 µlHandbook 1 1
QIAquick Gel Extraction Kits (50) (250)Catalog no. 28704 28706QIAquick Spin Columns 50 250Buffer QG* 2 x 50 ml 2 x 250 mlBuffer PE (concentrate) 2 x 10 ml 2 x 50 mlBuffer EB 15 ml 2 x 15 mlCollection Tubes (2 ml) 50 250Loading Dye 110 µl 550 µlHandbook 1 1
QIAquick PCR Purification Kits (50) (250)Catalog no. 28104 28106QIAquick Spin Columns 50 250Buffer PB* 30 ml 150 mlBuffer PE (concentrate) 2 x 6 ml 55 mlBuffer EB 15 ml 55 mlpH Indicator I 800 µl 800 µlCollection Tubes (2 ml) 50 250Loading Dye 110 µl 550 µlHandbook 1 1
1051746_HB 16.04.2008 14:07 Uhr Seite 4

Appendix 1F (QIAquick Spin Handbook) A1F.3
6 QIAquick Spin Handbook 03/2008
Safety InformationWhen working with chemicals, always wear a suitable lab coat, disposable gloves, andprotective goggles. For more information, please consult the appropriate material safetydata sheets (MSDSs). These are available online in convenient and compact PDF formatat www.qiagen.com/ts/msds.asp where you can find, view, and print the MSDS foreach QIAGEN kit and kit component.
CAUTION: DO NOT add bleach or acidic solutions directly to thesample-preparation waste.
Buffer PB contains guanidine hydrochloride, which can form highly reactive compoundswhen combined with bleach.In case liquid containing this buffer is spilt, clean with suitable laboratory detergent andwater. If the spilt liquid contains potentially infectious agents, clean the affected area firstwith laboratory detergent and water, and then with 1% (v/v) sodium hypochlorite.The following risk and safety phrases apply to the components of the QIAquick system.Buffer PBContains guanidine hydrochloride and isopropanol: harmful, irritant, flammable. Riskand safety phrases*: R10-22-36/38. S23-26-36/37/39-46Buffer PNContains sodium perchlorate and isopropanol: harmful, highly flammable. Risk and safetyphrases*: R11-22. S13-16-23-26-36-46Buffer QGContains guanidine thiocyanate: harmful. Risk and safety phrases*: R20/21/22-32.S13-26-36-4624-hour emergency informationEmergency medical information in English, French, and German can be obtained 24 hours a day from:Poison Information Center Mainz, Germany Tel: +49-6131-19240
* R10: Flammable. R11: Highly Flammable. R22: Harmful if swallowed. R20/21/22: Harmful byinhalation, in contact with skin and if swallowed. R32: Contact with acids liberates very toxic gas.R36/38: Irritating to eyes and skin. S13: Keep away from food, drink and animal feedingstuffs. S16: Explosive when mixed with oxidizing substances. S23: Do not breathe vapour/spray. S26: In case of contact with eyes, rinse immediately with plenty of water and seek medical advice. S36: Wear suitableprotective clothing. S36/37/39: Wear suitable protective clothing, gloves and eye/face protection. S46: If swallowed, seek medical advice immediately and show the container or label.
1051746_HB 16.04.2008 14:07 Uhr Seite 6
Appendix 1F (QIAquick Spin Handbook) A1F.4
QIAquick Spin Handbook 03/2008 7
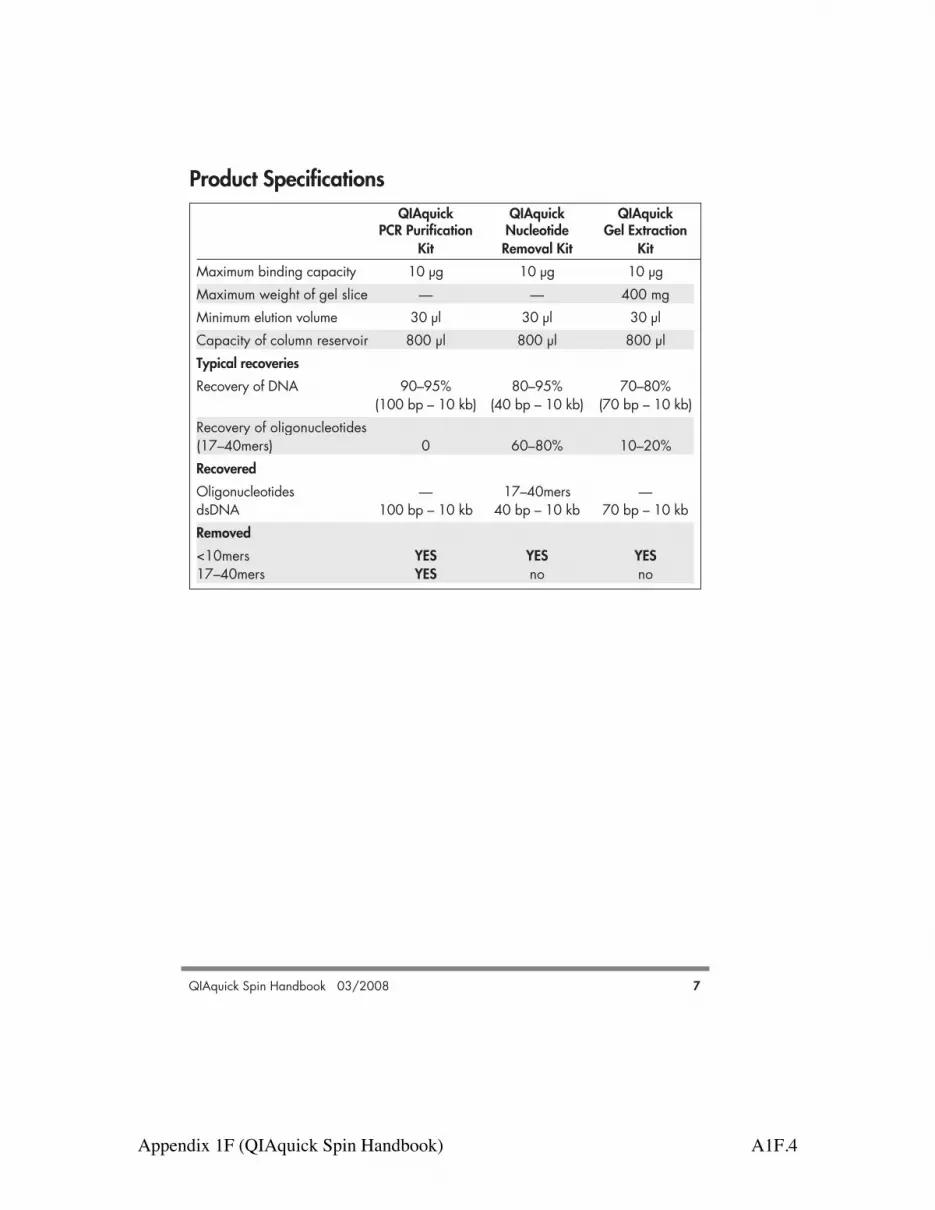
QIAquick QIAquick QIAquickPCR Purification Nucleotide Gel Extraction
Kit Removal Kit KitMaximum binding capacity 10 µg 10 µg 10 µgMaximum weight of gel slice — — 400 mgMinimum elution volume 30 µl 30 µl 30 µlCapacity of column reservoir 800 µl 800 µl 800 µlTypical recoveriesRecovery of DNA 90–95% 80–95% 70–80%
(100 bp – 10 kb) (40 bp – 10 kb) (70 bp – 10 kb)Recovery of oligonucleotides(17–40mers) 0 60–80% 10–20%RecoveredOligonucleotides — 17–40mers —dsDNA 100 bp – 10 kb 40 bp – 10 kb 70 bp – 10 kbRemoved<10mers YES YES YES17–40mers YES no no
Product Specifications
1051746_HB 16.04.2008 14:07 Uhr Seite 7

Appendix 1F (QIAquick Spin Handbook) A1F.5
8 QIAquick Spin Handbook 03/2008
IntroductionThe QIAquick system, designed for rapid DNA cleanup, includes:! QIAquick PCR Purification Kits for direct purification of double- or single-stranded PCR
products (100 bp – 10 kb) from amplification reactions and DNA cleanup from otherenzymatic reactions.
! QIAquick Nucleotide Removal Kits for general cleanup of oligonucleotides andDNA up to 10 kb from enzymatic reactions (e.g., labeling, dephosphorylation,restriction, and tailing).
! QIAquick Gel Extraction Kits for extraction of DNA fragments (70 bp – 10 kb) fromstandard, or low-melt agarose gels in TAE (Tris·acetate/EDTA) or TBE (Tris·borate/EDTA) buffer and DNA cleanup from enzymatic reactions.
QIAquick PCR Kits are also available in multiwell format for preparation of 8 to 96 samples(see page 37 for ordering information).
Enzymatic reaction cleanup using QIAquick KitsThe QIAquick system is suitable for fast cleanup of up to 10 µg of DNA fragments fromenzymatic reactions and agarose gels (Table 1). Enzyme contamination of DNA samplescan interfere with subsequent downstream applications. QIAquick Spin Kits can be usedfor highly efficient removal of a broad spectrum of enzymes widely used in molecular biol-ogy. In addition, QIAGEN offers the MinElute® Reaction Cleanup Kit, which is speciallydesigned for fast and easy DNA cleanup from all enzymatic reactions. Using provenmicrospin technology, the MinElute Reaction Cleanup Kit delivers highly concentrated purifiedDNA by using an elution volume of only 10 µl (see ordering information, page 37).
1051746_HB 16.04.2008 14:07 Uhr Seite 8

Appendix 1F (QIAquick Spin Handbook) A1F.6
QIAquick Spin Handbook 03/2008 9
QIAquick Kits provide high yields of pure nucleic acids, for direct use in applications such as:! Fluorescent and radioactive sequencing ! Ligation and transformation ! Restriction ! Amplification! Labeling ! In vitro transcription! Hybridization ! Microinjection
Table 1. QIAquick DNA Cleanup Guide
From solutions From gels
QIAquickQIAquick PCR Nucleotide QIAquick Gel QIAquick GelPurification Kit Removal Kit Extraction Kit Extraction Kit
Alkaline phosphatase YES YES YES YEScDNA synthesis YES no no YESDNase, YES YES YES YESnuclease digestionKinase:
DNA fragments YES YES YES YESOligonucleotides no YES no no
Ligation YES YES YES YESNick translation YES YES YES YESPCR YES no no YESRandom priming YES YES YES YESRestriction digestion YES YES YES YESTailing:
DNA fragments YES YES YES YESOligonucleotides no YES no no
1051746_HB 16.04.2008 14:07 Uhr Seite 9
Appendix 1F (QIAquick Spin Handbook) A1F.7
10 QIAquick Spin Handbook 03/2008
QIAquick PCRPurification Kit
QIAquick Nucleotide Removal Kit
b 01
b 71
pb 0
7
pb 0
01
bk 0
1
DNA fragment binding size range
QIAquick GelExtraction Kit
b 04
b 04
pb 0
4
Fragments removedFragments recovered
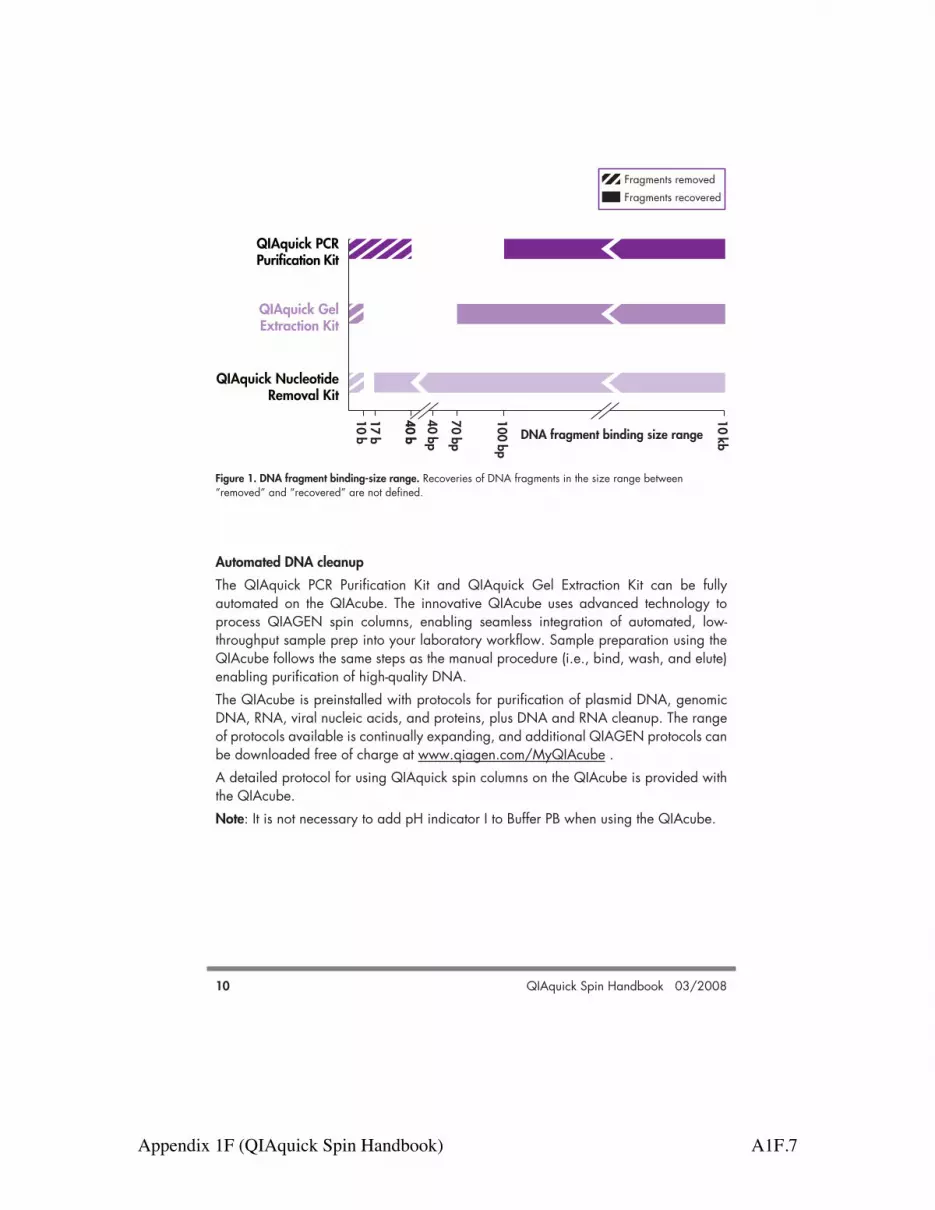
Figure 1. DNA fragment binding-size range. Recoveries of DNA fragments in the size range between“removed” and “recovered” are not defined.
Automated DNA cleanupThe QIAquick PCR Purification Kit and QIAquick Gel Extraction Kit can be fullyautomated on the QIAcube. The innovative QIAcube uses advanced technology toprocess QIAGEN spin columns, enabling seamless integration of automated, low-throughput sample prep into your laboratory workflow. Sample preparation using theQIAcube follows the same steps as the manual procedure (i.e., bind, wash, and elute)enabling purification of high-quality DNA. The QIAcube is preinstalled with protocols for purification of plasmid DNA, genomicDNA, RNA, viral nucleic acids, and proteins, plus DNA and RNA cleanup. The rangeof protocols available is continually expanding, and additional QIAGEN protocols canbe downloaded free of charge at www.qiagen.com/MyQIAcube .A detailed protocol for using QIAquick spin columns on the QIAcube is provided withthe QIAcube.Note: It is not necessary to add pH indicator I to Buffer PB when using the QIAcube.
1051746_HB 16.04.2008 14:07 Uhr Seite 10
Appendix 1F (QIAquick Spin Handbook) A1F.8
QIAquick Spin Handbook 03/2008 11
The QIAquick PrincipleThe QIAquick system combines the convenience of spin-column technology with the selectivebinding properties of a uniquely designed silica membrane. Special buffers provided witheach kit are optimized for efficient recovery of DNA and removal of contaminants in eachspecific application. DNA adsorbs to the silica membrane in the presence of high con-centrations of salt while contaminants pass through the column. Impurities are efficientlywashed away, and the pure DNA is eluted with Tris buffer or water (see page 17).QIAquick spin columns offer 3 handling options — as an alternative to processing the spincolumns in a microcentrifuge, they can now also be used on any commercial vacuum manifoldwith luer connectors (e.g., QIAvac 6S or QIAvac 24 Plus with QIAvac Luer Adapters) orautomated on the QIAcube.
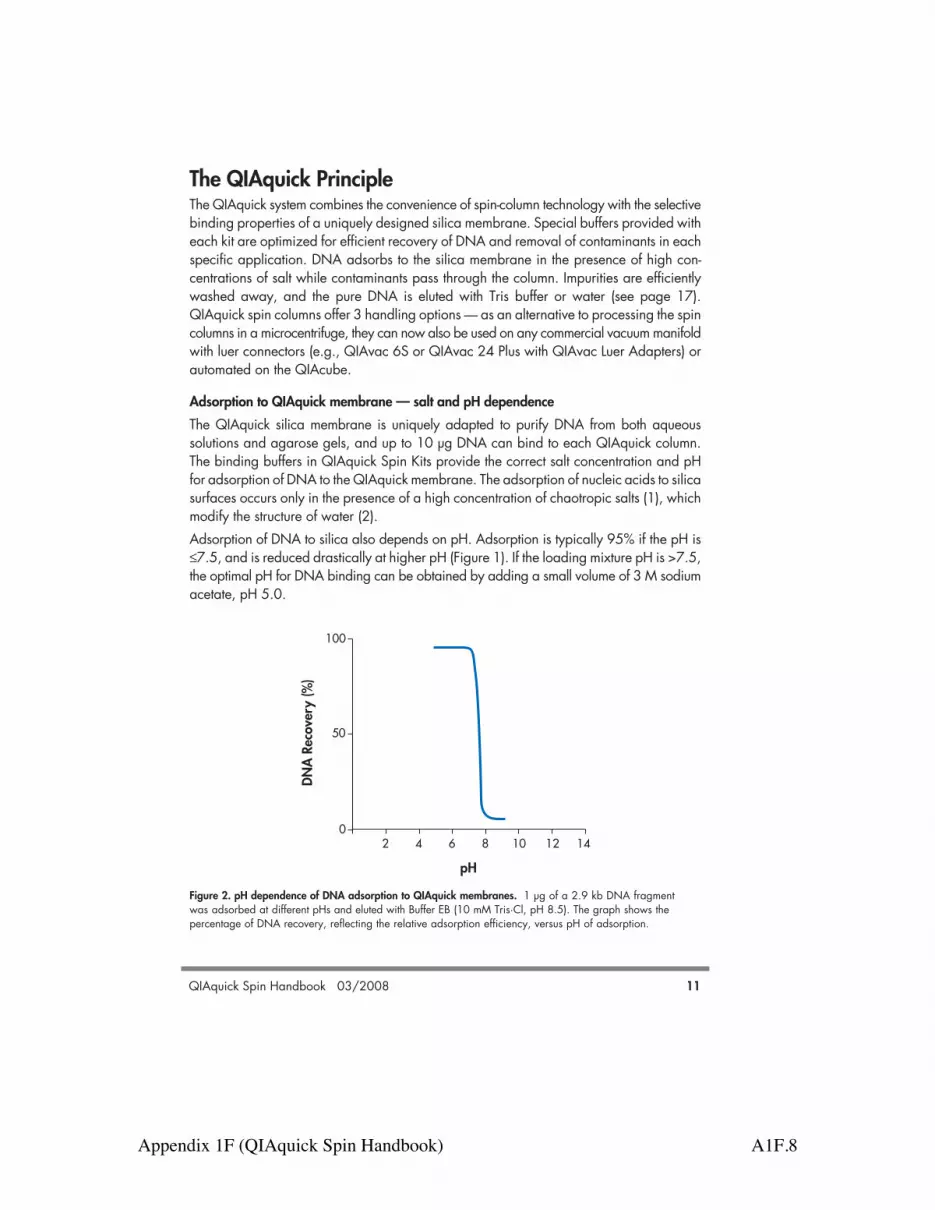
Adsorption to QIAquick membrane — salt and pH dependenceThe QIAquick silica membrane is uniquely adapted to purify DNA from both aqueoussolutions and agarose gels, and up to 10 µg DNA can bind to each QIAquick column.The binding buffers in QIAquick Spin Kits provide the correct salt concentration and pHfor adsorption of DNA to the QIAquick membrane. The adsorption of nucleic acids to silicasurfaces occurs only in the presence of a high concentration of chaotropic salts (1), whichmodify the structure of water (2). Adsorption of DNA to silica also depends on pH. Adsorption is typically 95% if the pH is!7.5, and is reduced drastically at higher pH (Figure 1). If the loading mixture pH is >7.5,the optimal pH for DNA binding can be obtained by adding a small volume of 3 M sodiumacetate, pH 5.0.
)%( yrevoceR A
ND
100
50
02 4 6 8 10 12 14
pH
Figure 2. pH dependence of DNA adsorption to QIAquick membranes. 1 µg of a 2.9 kb DNA fragmentwas adsorbed at different pHs and eluted with Buffer EB (10 mM Tris·Cl, pH 8.5). The graph shows thepercentage of DNA recovery, reflecting the relative adsorption efficiency, versus pH of adsorption.
1051746_HB 16.04.2008 14:07 Uhr Seite 11
Appendix 1F (QIAquick Spin Handbook) A1F.9
12 QIAquick Spin Handbook 03/2008
Optimized binding buffers for every DNA cleanup taskAll QIAquick Spin Kits contain identical QIAquick spin columns but different bindingbuffers optimized for each specific application:! Buffer PB in the QIAquick PCR Purification Kit allows the efficient binding of single-
or double-stranded PCR products as small as 100 bp and the quantitative (99.5%)removal of primers up to 40 nucleotides. This kit can therefore be used to removeoligo-dT primers after cDNA synthesis or to remove unwanted linkers in cloningexperiments.
! Buffer PN in the QIAquick Nucleotide Removal Kit promotes the adsorption of botholigonucleotides !17 bases and DNA fragments up to 10 kb to the membrane.
! Buffer QG in the QIAquick Gel Extraction Kit solubilizes the agarose gel slice andprovides the appropriate conditions for binding of DNA to the silica membrane.
All of these buffers are available separately (see ordering information, page 37).
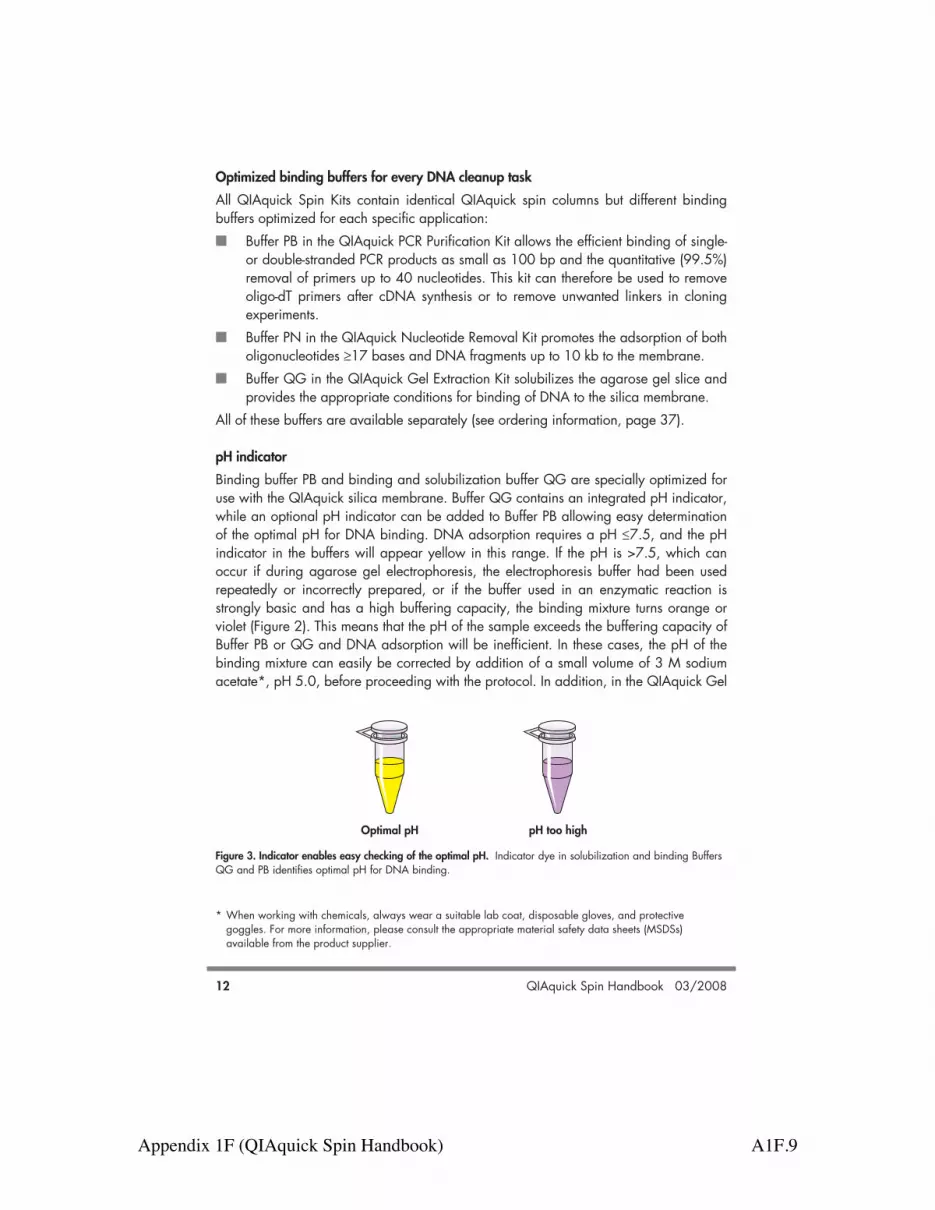
pH indicatorBinding buffer PB and binding and solubilization buffer QG are specially optimized foruse with the QIAquick silica membrane. Buffer QG contains an integrated pH indicator,while an optional pH indicator can be added to Buffer PB allowing easy determinationof the optimal pH for DNA binding. DNA adsorption requires a pH !7.5, and the pHindicator in the buffers will appear yellow in this range. If the pH is >7.5, which canoccur if during agarose gel electrophoresis, the electrophoresis buffer had been usedrepeatedly or incorrectly prepared, or if the buffer used in an enzymatic reaction isstrongly basic and has a high buffering capacity, the binding mixture turns orange orviolet (Figure 2). This means that the pH of the sample exceeds the buffering capacity ofBuffer PB or QG and DNA adsorption will be inefficient. In these cases, the pH of thebinding mixture can easily be corrected by addition of a small volume of 3 M sodiumacetate*, pH 5.0, before proceeding with the protocol. In addition, in the QIAquick Gel
Figure 3. Indicator enables easy checking of the optimal pH. Indicator dye in solubilization and binding BuffersQG and PB identifies optimal pH for DNA binding.
Optimal pH pH too high
* When working with chemicals, always wear a suitable lab coat, disposable gloves, and protectivegoggles. For more information, please consult the appropriate material safety data sheets (MSDSs)available from the product supplier.
1051746_HB 16.04.2008 14:07 Uhr Seite 12

Appendix 1F (QIAquick Spin Handbook) A1F.10
QIAquick Spin Handbook 03/2008 13
Extraction Kit procedure, the color of the binding mixture allows easy visualization of anyunsolubilized agarose, ensuring complete solubilization and maximum yields. Theindicator dye does not interfere with DNA binding and is completely removed during thecleanup procedure. Buffers PB and QG do not contain sodium iodide (NaI). Residual NaImay be difficult to remove from DNA samples, and reduces the efficiency of subsequentenzymatic reactions such as blunt-end ligation.
WashingDuring the DNA adsorption step, unwanted primers and impurities, such as salts,enzymes, unincorporated nucleotides, agarose, dyes, ethidium bromide, oils, anddetergents (e.g., DMSO, Tween® 20) do not bind to the silica membrane but flowthrough the column. Salts are quantitatively washed away by the ethanol-containingBuffer PE. Any residual Buffer PE, which may interfere with subsequent enzymaticreactions, is removed by an additional centrifugation step.
Elution in low-salt solutionsElution efficiency is strongly dependent on the salt concentration and pH of the elutionbuffer. Contrary to adsorption, elution is most efficient under basic conditions and low saltconcentrations. DNA is eluted with 50 or 30 µl of the provided Buffer EB (10 mM Tris·Cl,pH 8.5), or water. The maximum elution efficiency is achieved between pH 7.0 and 8.5.When using water to elute, make sure that the pH is within this range. In addition, DNAmust be stored at –20°C when eluted with water since DNA may degrade in the absenceof a buffering agent. Elution with TE buffer (10 mM Tris·Cl, 1 mM EDTA, pH 8.0) is possible,but not recommended because EDTA may inhibit subsequent enzymatic reactions.
DNA yield and concentrationDNA yield depends on the following three factors: the volume of elution buffer, how thebuffer is applied to the column, and the incubation time of the buffer on the column.100–200 µl of elution buffer completely covers the QIAquick membrane, ensuringmaximum yield, even when not applied directly to the center of the membrane. Elutionwith !50 µl requires the buffer to be added directly to the center of the membrane, and ifelution is done with the minimum recommended volume of 30 µl, an additional 1 minuteincubation is required for optimal yield. DNA will be up to 1.7 times more concentratedif the QIAquick column is incubated for 1 minute with 30 µl of elution buffer, than if it iseluted in 50 µl without incubation (Figure 4, page 14).
1051746_HB 16.04.2008 14:07 Uhr Seite 13
Appendix 1F (QIAquick Spin Handbook) A1F.11
10 20 30 40 50 100 200
20
0
40
60
80
100
)%( yrevoceR
+ incubation
20
0
40
60
80
100
10 20 30 40 50 100 200
)%( yr evoc eR
+ incubation
14 QIAquick Spin Handbook 03/2008
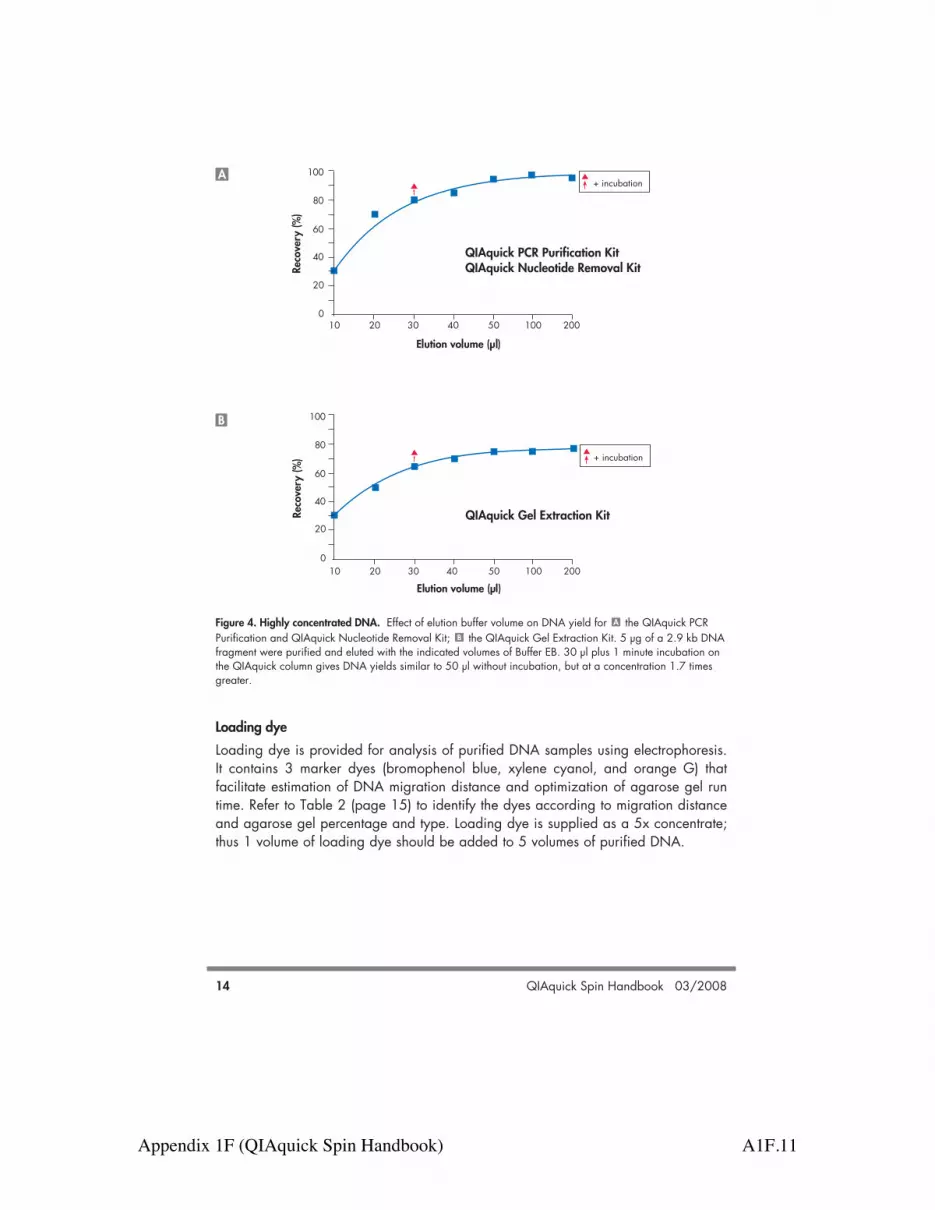
Figure 4. Highly concentrated DNA. Effect of elution buffer volume on DNA yield for the QIAquick PCRPurification and QIAquick Nucleotide Removal Kit; the QIAquick Gel Extraction Kit. 5 µg of a 2.9 kb DNAfragment were purified and eluted with the indicated volumes of Buffer EB. 30 µl plus 1 minute incubation onthe QIAquick column gives DNA yields similar to 50 µl without incubation, but at a concentration 1.7 timesgreater.
B
A
A
B
QIAquick PCR Purification KitQIAquick Nucleotide Removal Kit
QIAquick Gel Extraction Kit
Loading dyeLoading dye is provided for analysis of purified DNA samples using electrophoresis.It contains 3 marker dyes (bromophenol blue, xylene cyanol, and orange G) thatfacilitate estimation of DNA migration distance and optimization of agarose gel runtime. Refer to Table 2 (page 15) to identify the dyes according to migration distanceand agarose gel percentage and type. Loading dye is supplied as a 5x concentrate;thus 1 volume of loading dye should be added to 5 volumes of purified DNA.
1051746_HB 16.04.2008 14:07 Uhr Seite 14

Appendix 1F (QIAquick Spin Handbook) A1F.12
QIAquick Spin Handbook 03/2008 15
Agarose gel analysis of yieldYields of DNA following cleanup can be determined by agarose gel analysis. Table 3 showsthe total yield obtained following extraction of 1 µg or 0.5 µg starting DNA from an agarosegel with a recovery of 80% or 60% using the QIAquick Gel Extraction Kit. The correspondingamount of DNA in a 1 µl aliquot from 50 µl eluate is indicated. Quantities of DNAfragment corresponding to these 1 µl aliquots are shown on the agarose gel in Figure 4.
Starting DNA Recovery Total yield Amount of(50 µl eluate) DNA in 1 µl
1 µg 80% 0.8 µg 16 ng60% 0.6 µg 12 ng
0.5 µg 80% 0.4 µg 8 ng60% 0.3 µg 6 ng
Table 3. Amount of DNA in 1 µl aliquots of a 50 µl eluate following QIAquick purification
M 1 µg 16 ng 12 ng 0.5 µg 8 ng 6 ng
— 2.7 kb Figure 5. High DNA recovery.Quantities of purified 2.7 kb DNAfragment corresponding to 1/50 ofthe DNA obtained followingpurification from 1 µg or 0.5 µgstarting DNA with a recovery of80% or 60% (see Table 1). Sampleswere run on a 1% TAE agarose gel. M: lambda–EcoRI-HindIII markers.
Table 2. Migration Distance of Gel Tracking Dyes
%TAE (TBE) Xylene cyanol Bromophenol blue Orange Gagarose gel (light blue) (dark blue) (orange)0.8 5000 bp (3000 bp) 800 bp (400 bp) 150 bp (<100 bp)1.0 3000 bp (2000 bp) 400 bp (250 bp) <100 bp (<100 bp)1.5 1800 bp (1100 bp) 250 bp (100 bp) <100 bp (<100 bp)2.0 1000 bp (600 bp) 200 bp (<100 bp) <100 bp (<100 bp)2.5 700 bp (400 bp) 100 bp (<50 bp) <50 bp (<50 bp)
1051746_HB 16.04.2008 14:07 Uhr Seite 15

Appendix 1F (QIAquick Spin Handbook) A1F.13
16 QIAquick Spin Handbook 03/2008
Applications using QIAquick purified DNA DNA purified with QIAquick is suitable for any subsequent application, such as restriction,labeling, hybridization, PCR, ligation and transformation, radioactive and fluorescentsequencing, in vitro transcription, or microinjection.
Quantification of DNA fragmentsDNA fragments can be quantified by running a sample alongside standards containing knownquantities of the same-sized DNA fragment. The amount of sample DNA loaded can beestimated by visual comparison of the band intensity with that of the standards (Figure 5).
M 125 ng 100 ng 75 ng 50 ng UFigure 6. Agarose gel analysis. An unknownamount of a 5.5 kb DNA fragment (U) was runalongside known quantities (as indicated in ng)of the same DNA fragment. The unknown samplecontained 75–100 ng DNA, as estimated byvisual comparison with the standards.M: 1 kb DNA ladder.
1051746_HB 16.04.2008 14:07 Uhr Seite 16
Appendix 1F (QIAquick Spin Handbook) A1F.14
QIAquick Spin Handbook 03/2008 17
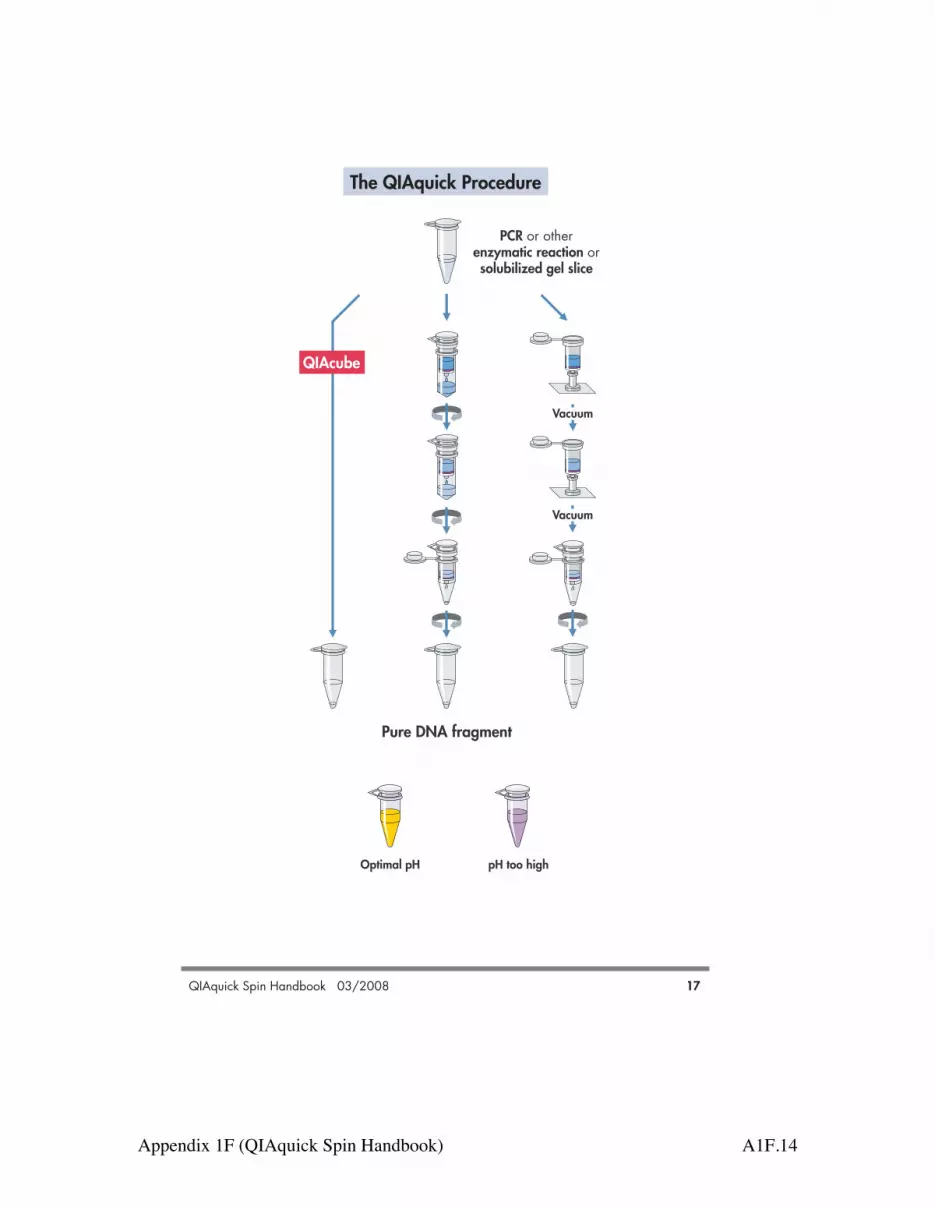
PCR or otherenzymatic reaction orsolubilized gel slice
Pure DNA fragment
Vacuum
Vacuum
QIAcube
Optimal pH pH too high
The QIAquick Procedure
1051746_HB 16.04.2008 14:08 Uhr Seite 17
Appendix 1F (QIAquick Spin Handbook) A1F.15
18 QIAquick Spin Handbook 03/2008
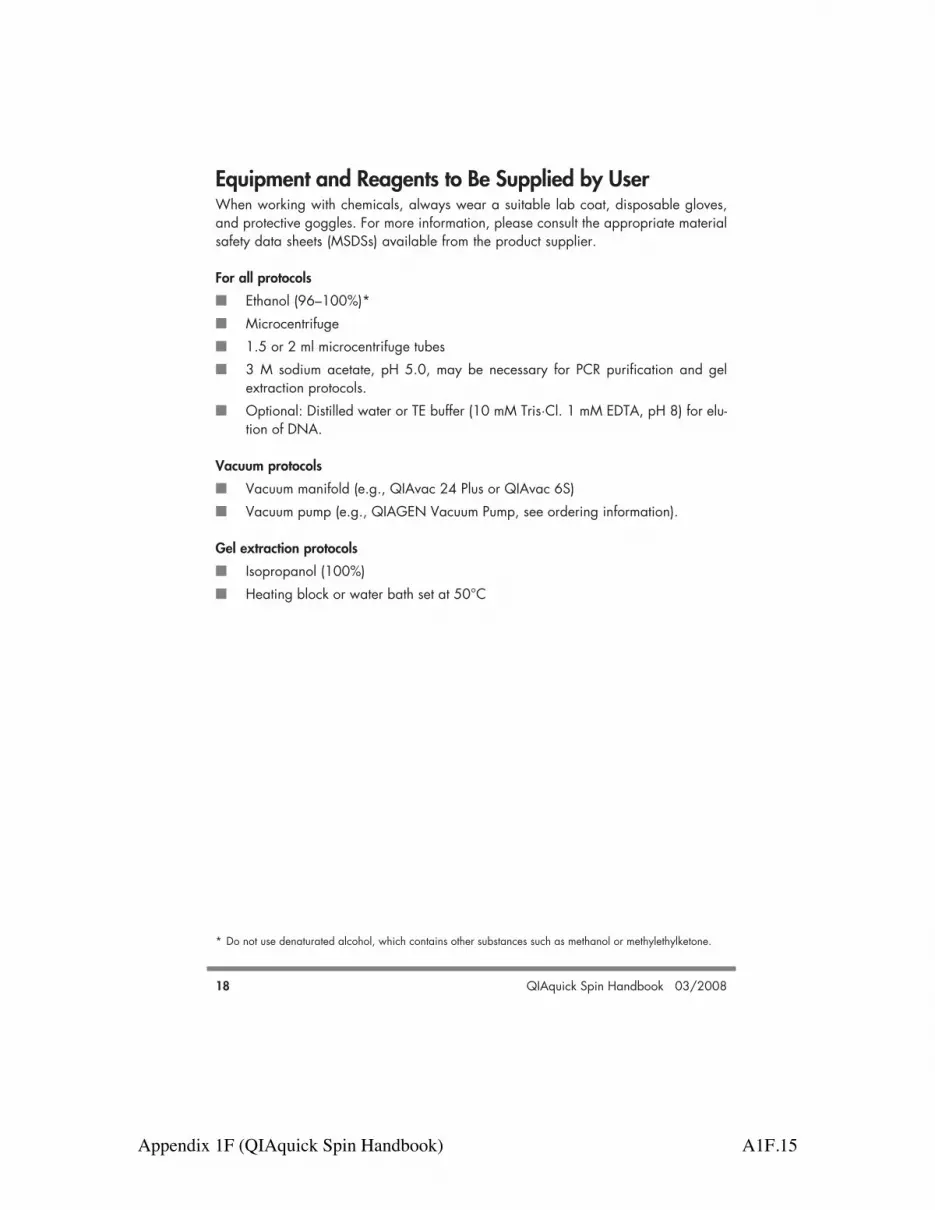
Equipment and Reagents to Be Supplied by UserWhen working with chemicals, always wear a suitable lab coat, disposable gloves,and protective goggles. For more information, please consult the appropriate materialsafety data sheets (MSDSs) available from the product supplier.
For all protocols! Ethanol (96–100%)*! Microcentrifuge! 1.5 or 2 ml microcentrifuge tubes! 3 M sodium acetate, pH 5.0, may be necessary for PCR purification and gel
extraction protocols.! Optional: Distilled water or TE buffer (10 mM Tris·Cl. 1 mM EDTA, pH 8) for elu-
tion of DNA.
Vacuum protocols! Vacuum manifold (e.g., QIAvac 24 Plus or QIAvac 6S)! Vacuum pump (e.g., QIAGEN Vacuum Pump, see ordering information).
Gel extraction protocols! Isopropanol (100%)! Heating block or water bath set at 50°C
* Do not use denaturated alcohol, which contains other substances such as methanol or methylethylketone.
1051746_HB 16.04.2008 14:08 Uhr Seite 18
Appendix 1F (QIAquick Spin Handbook) A1F.16
QIAquick Spin Handbook 03/2008 19
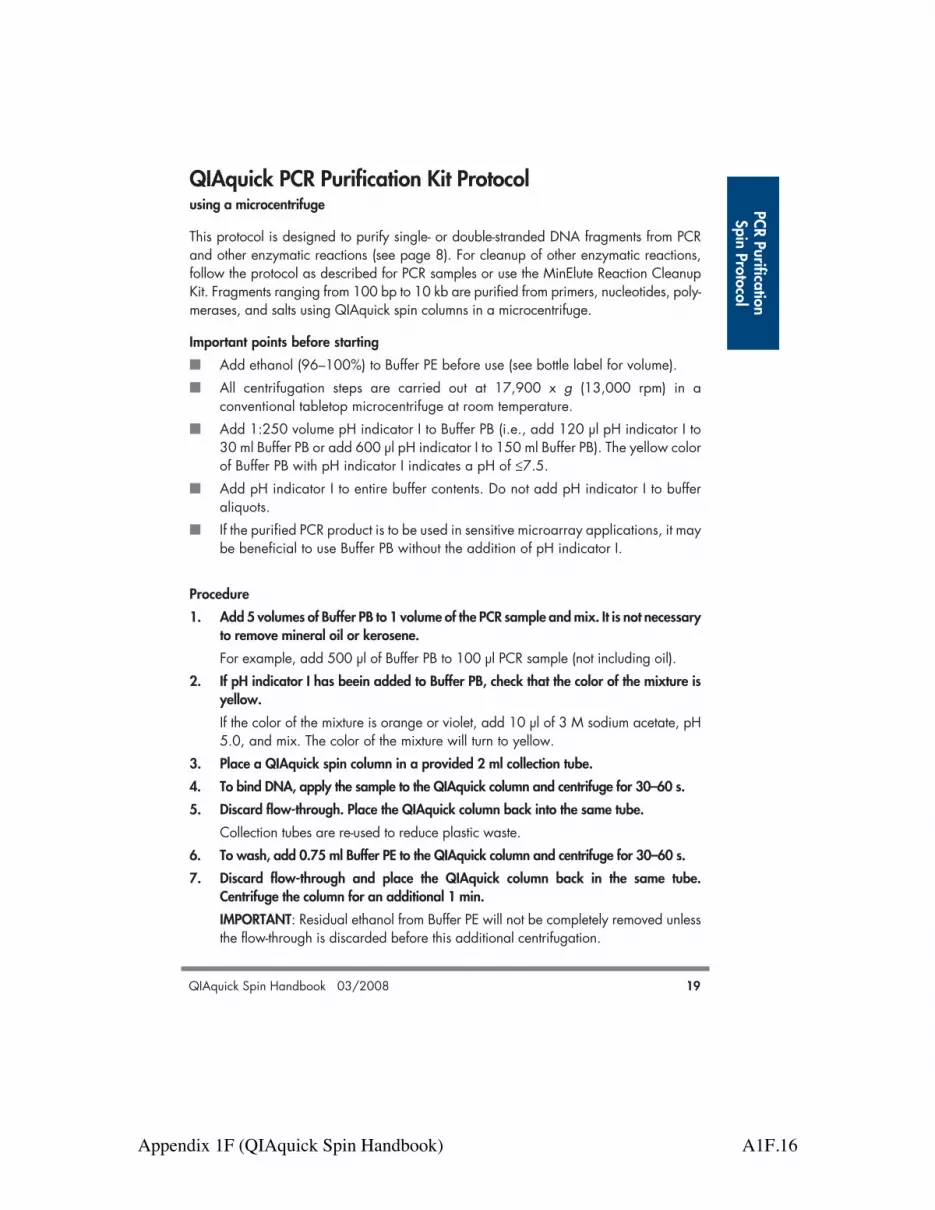
QIAquick PCR Purification Kit Protocolusing a microcentrifuge
This protocol is designed to purify single- or double-stranded DNA fragments from PCRand other enzymatic reactions (see page 8). For cleanup of other enzymatic reactions,follow the protocol as described for PCR samples or use the MinElute Reaction CleanupKit. Fragments ranging from 100 bp to 10 kb are purified from primers, nucleotides, poly-merases, and salts using QIAquick spin columns in a microcentrifuge.
Important points before starting ! Add ethanol (96–100%) to Buffer PE before use (see bottle label for volume).! All centrifugation steps are carried out at 17,900 x g (13,000 rpm) in a
conventional tabletop microcentrifuge at room temperature.! Add 1:250 volume pH indicator I to Buffer PB (i.e., add 120 µl pH indicator I to
30 ml Buffer PB or add 600 µl pH indicator I to 150 ml Buffer PB). The yellow colorof Buffer PB with pH indicator I indicates a pH of !7.5.
! Add pH indicator I to entire buffer contents. Do not add pH indicator I to bufferaliquots.
! If the purified PCR product is to be used in sensitive microarray applications, it maybe beneficial to use Buffer PB without the addition of pH indicator I.
Procedure1. Add 5 volumes of Buffer PB to 1 volume of the PCR sample and mix. It is not necessary
to remove mineral oil or kerosene.For example, add 500 µl of Buffer PB to 100 µl PCR sample (not including oil).
2. If pH indicator I has beein added to Buffer PB, check that the color of the mixture isyellow.If the color of the mixture is orange or violet, add 10 µl of 3 M sodium acetate, pH5.0, and mix. The color of the mixture will turn to yellow.
3. Place a QIAquick spin column in a provided 2 ml collection tube.4. To bind DNA, apply the sample to the QIAquick column and centrifuge for 30–60 s.5. Discard flow-through. Place the QIAquick column back into the same tube.
Collection tubes are re-used to reduce plastic waste.6. To wash, add 0.75 ml Buffer PE to the QIAquick column and centrifuge for 30–60 s.7. Discard flow-through and place the QIAquick column back in the same tube.
Centrifuge the column for an additional 1 min. IMPORTANT: Residual ethanol from Buffer PE will not be completely removed unlessthe flow-through is discarded before this additional centrifugation.
PCR Purification Spin Protocol
1051746_HB 16.04.2008 14:08 Uhr Seite 19

Appendix 1F (QIAquick Spin Handbook) A1F.17
8. Place QIAquick column in a clean 1.5 ml microcentrifuge tube.9. To elute DNA, add 50 µl Buffer EB (10 mM Tris·Cl, pH 8.5) or water (pH 7.0–8.5) to
the center of the QIAquick membrane and centrifuge the column for 1 min. Alternatively,for increased DNA concentration, add 30 µl elution buffer to the center of the QIAquickmembrane, let the column stand for 1 min, and then centrifuge.IMPORTANT: Ensure that the elution buffer is dispensed directly onto the QIAquickmembrane for complete elution of bound DNA. The average eluate volume is 48 µlfrom 50 µl elution buffer volume, and 28 µl from 30 µl elution buffer. Elution efficiency is dependent on pH. The maximum elution efficiency is achievedbetween pH 7.0 and 8.5. When using water, make sure that the pH value is within thisrange, and store DNA at –20°C as DNA may degrade in the absence of a bufferingagent. The purified DNA can also be eluted in TE buffer (10 mM Tris·Cl, 1 mM EDTA, pH8.0), but the EDTA may inhibit subsequent enzymatic reactions.
10. If the purified DNA is to be analyzed on a gel, add 1 volume of Loading Dye to 5 volumes of purified DNA. Mix the solution by pipetting up and down beforeloading the gel. Loading dye contains 3 marker dyes (bromophenol blue, xylene cyanol, andorange G) that facilitate estimation of DNA migration distance and optimizationof agarose gel run time. Refer to Table 2 (page 15) to identify the dyes accordingto migration distance and agarose gel percentage and type.
PCR
Purif
icatio
n Sp
in P
roto
col
20 QIAquick Spin Handbook 03/2008
1051746_HB 16.04.2008 14:08 Uhr Seite 20

Appendix 1F (QIAquick Spin Handbook) A1F.18
QIAquick Spin Handbook 03/2008 25
QIAquick Gel Extraction Kit Protocolusing a microcentrifuge
This protocol is designed to extract and purify DNA of 70 bp to 10 kb from standard orlow-melt agarose gels in TAE or TBE buffer. Up to 400 mg agarose can be processed per spincolumn. This kit can also be used for DNA cleanup from enzymatic reactions (see page 8).For DNA cleanup from enzymatic reactions using this protocol, add 3 volumes of BufferQG and 1 volume of isopropanol to the reaction, mix, and proceed with step 6 of the protocol. Alternatively, use the MinElute Reaction Cleanup Kit.
Important points before starting! The yellow color of Buffer QG indicates a pH !7.5. ! Add ethanol (96–100%) to Buffer PE before use (see bottle label for volume).! All centrifugation steps are carried out at 17,900 x g (13,000 rpm) in a conventional
table-top microcentrifuge at room temperature.
Procedure1. Excise the DNA fragment from the agarose gel with a clean, sharp scalpel.
Minimize the size of the gel slice by removing extra agarose.2. Weigh the gel slice in a colorless tube. Add 3 volumes of Buffer QG to 1 volume of
gel (100 mg ~ 100 µl).For example, add 300 µl of Buffer QG to each 100 mg of gel. For >2% agarosegels, add 6 volumes of Buffer QG. The maximum amount of gel slice per QIAquickcolumn is 400 mg; for gel slices >400 mg use more than one QIAquick column.
3. Incubate at 50°C for 10 min (or until the gel slice has completely dissolved). To helpdissolve gel, mix by vortexing the tube every 2–3 min during the incubation. IMPORTANT: Solubilize agarose completely. For >2% gels, increase incubation time.
4. After the gel slice has dissolved completely, check that the color of the mixture isyellow (similar to Buffer QG without dissolved agarose). If the color of the mixture is orange or violet, add 10 µl of 3 M sodium acetate, pH 5.0, and mix. The color of the mixture will turn to yellow. The adsorption of DNA to the QIAquick membrane is efficient only at pH !7.5. Buffer QG contains a pH indicator which is yellow at pH !7.5 and orange or violet athigher pH, allowing easy determination of the optimal pH for DNA binding.
5. Add 1 gel volume of isopropanol to the sample and mix.For example, if the agarose gel slice is 100 mg, add 100 µl isopropanol. This stepincreases the yield of DNA fragments <500 bp and >4 kb. For DNA fragmentsbetween 500 bp and 4 kb, addition of isopropanol has no effect on yield. Do not centrifuge the sample at this stage.
Gel Extraction
Spin Protocol
1051746_HB 16.04.2008 14:08 Uhr Seite 25

Appendix 1F (QIAquick Spin Handbook) A1F.19
6. Place a QIAquick spin column in a provided 2 ml collection tube.7. To bind DNA, apply the sample to the QIAquick column, and centrifuge for 1 min.
The maximum volume of the column reservoir is 800 µl. For sample volumes of morethan 800 µl, simply load and spin again.
8. Discard flow-through and place QIAquick column back in the same collection tube.Collection tubes are reused to reduce plastic waste.
9. Recommended: Add 0.5 ml of Buffer QG to QIAquick column and centrifuge for 1 min.This step will remove all traces of agarose. It is only required when the DNA willsubsequently be used for direct sequencing, in vitro transcription, or microinjection.
10. To wash, add 0.75 ml of Buffer PE to QIAquick column and centrifuge for 1 min.Note: If the DNA will be used for salt-sensitive applications, such as blunt-end ligationand direct sequencing, let the column stand 2–5 min after addition of Buffer PE,before centrifuging.
11. Discard the flow-through and centrifuge the QIAquick column for an additional 1 minat 17,900 x g (13,000 rpm).IMPORTANT: Residual ethanol from Buffer PE will not be completely removed unlessthe flow-through is discarded before this additional centrifugation.
12. Place QIAquick column into a clean 1.5 ml microcentrifuge tube.13. To elute DNA, add 50 µl of Buffer EB (10 mM Tris·Cl, pH 8.5) or water (pH 7.0–8.5) to the
center of the QIAquick membrane and centrifuge the column for 1 min. Alternatively,for increased DNA concentration, add 30 µl elution buffer to the center of the QIAquickmembrane, let the column stand for 1 min, and then centrifuge for 1 min.IMPORTANT: Ensure that the elution buffer is dispensed directly onto the QIAquickmembrane for complete elution of bound DNA. The average eluate volume is 48 µlfrom 50 µl elution buffer volume, and 28 µl from 30 µl.Elution efficiency is dependent on pH. The maximum elution efficiency is achievedbetween pH 7.0 and 8.5. When using water, make sure that the pH value is withinthis range, and store DNA at –20°C as DNA may degrade in the absence of abuffering agent. The purified DNA can also be eluted in TE (10 mM Tris·Cl, 1 mMEDTA, pH 8.0), but the EDTA may inhibit subsequent enzymatic reactions.
14. If the purified DNA is to be analyzed on a gel, add 1 volume of Loading Dye to 5volumes of purified DNA. Mix the solution by pipetting up and down before loadingthe gel. Loading dye contains 3 marker dyes (bromophenol blue, xylene cyanol, and orangeG) that facilitate estimation of DNA migration distance and optimization of agarosegel run time. Refer to Table 2 (page 15) to identify the dyes according to migrationdistance and agarose gel percentage and type.
Gel
Ext
ract
ion
Spin
Pro
toco
l
26 QIAquick Spin Handbook 03/2008
1051746_HB 16.04.2008 14:08 Uhr Seite 26
Appendix 1F (QIAquick Spin Handbook) A1F.20
30 QIAquick Spin Handbook 03/2008
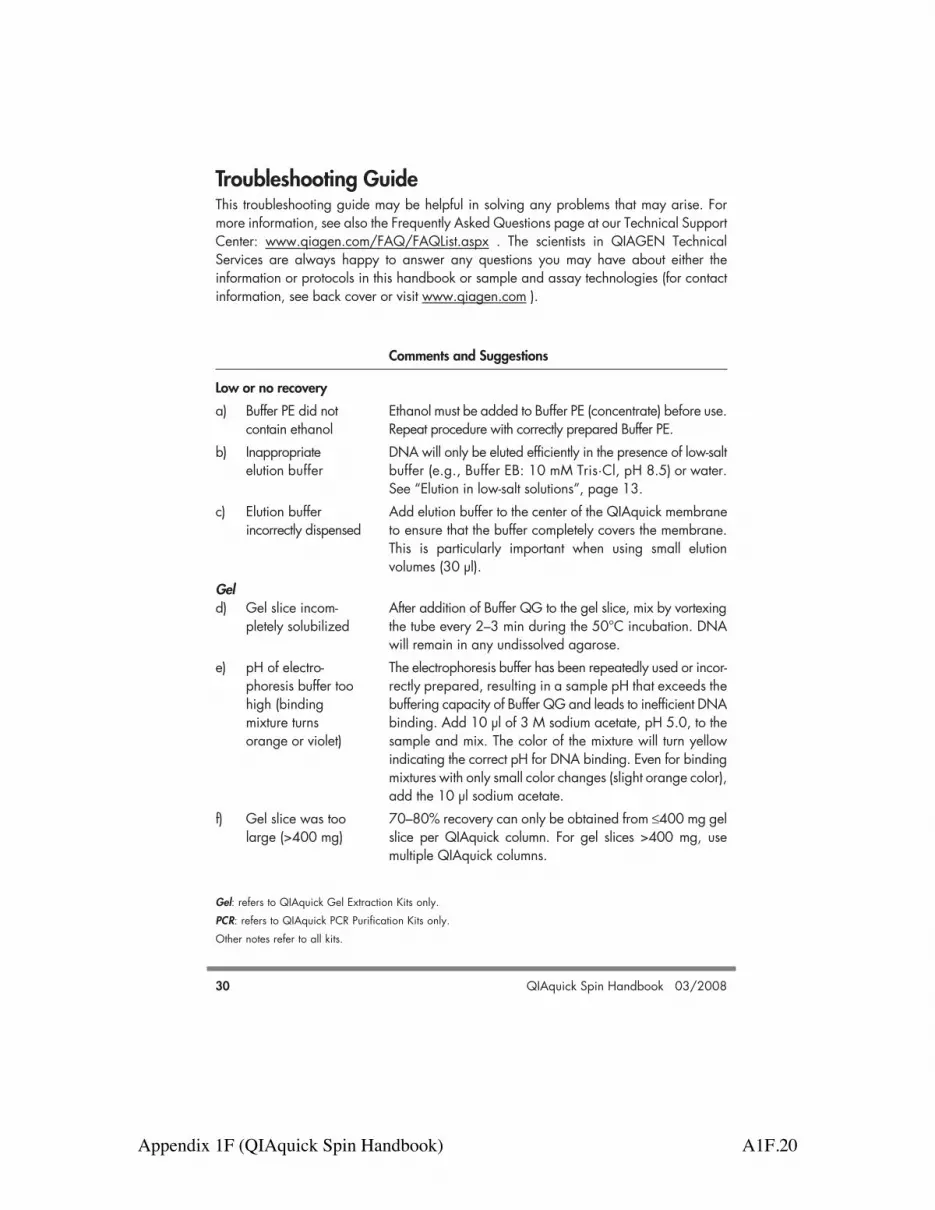
Comments and Suggestions
Low or no recoverya) Buffer PE did not Ethanol must be added to Buffer PE (concentrate) before use.
contain ethanol Repeat procedure with correctly prepared Buffer PE.b) Inappropriate DNA will only be eluted efficiently in the presence of low-salt
elution buffer buffer (e.g., Buffer EB: 10 mM Tris·Cl, pH 8.5) or water.See “Elution in low-salt solutions”, page 13.
c) Elution buffer Add elution buffer to the center of the QIAquick membraneincorrectly dispensed to ensure that the buffer completely covers the membrane.
This is particularly important when using small elutionvolumes (30 µl).
Geld) Gel slice incom- After addition of Buffer QG to the gel slice, mix by vortexing
pletely solubilized the tube every 2–3 min during the 50°C incubation. DNAwill remain in any undissolved agarose.
e) pH of electro- The electrophoresis buffer has been repeatedly used or incor-phoresis buffer too rectly prepared, resulting in a sample pH that exceeds the high (binding buffering capacity of Buffer QG and leads to inefficient DNA mixture turns binding. Add 10 µl of 3 M sodium acetate, pH 5.0, to theorange or violet) sample and mix. The color of the mixture will turn yellow
indicating the correct pH for DNA binding. Even for bindingmixtures with only small color changes (slight orange color),add the 10 µl sodium acetate.
f) Gel slice was too 70–80% recovery can only be obtained from !400 mg gellarge (>400 mg) slice per QIAquick column. For gel slices >400 mg, use
multiple QIAquick columns.
Gel: refers to QIAquick Gel Extraction Kits only.PCR: refers to QIAquick PCR Purification Kits only.Other notes refer to all kits.
Troubleshooting GuideThis troubleshooting guide may be helpful in solving any problems that may arise. Formore information, see also the Frequently Asked Questions page at our Technical SupportCenter: www.qiagen.com/FAQ/FAQList.aspx . The scientists in QIAGEN TechnicalServices are always happy to answer any questions you may have about either theinformation or protocols in this handbook or sample and assay technologies (for contactinformation, see back cover or visit www.qiagen.com ).
1051746_HB 16.04.2008 14:08 Uhr Seite 30

Appendix 1F (QIAquick Spin Handbook) A1F.21
QIAquick Spin Handbook 03/2008 31
Comments and SuggestionsPCRg) Insufficient/no PCR Estimate DNA recovery by running 10% of PCR product
product before and after purification on an agarose gel.
PCR/Gelh) Cloudy and This may be due to salt precipitation, and will disappear upon
gelatinous ap- mixing the sample. Alternatively, the gel slice may not be com-pearance of sample pletely solubilized. In this case, apply the mixture to the mixture after QIAquick column, centrifuge, and then add 0.5 ml Buffer QGaddition of to the column. Let stand for 1 min at room temperature, and isopropanol then centrifuge and continue with the procedure. This
additional wash will solubilize remaining agarose.i) Binding mixture turns The pH in the sample exceeds the buffer capacity of Buffer
orange or violet QG or PB respectively. Add 20 µl of 3 M sodium acetate,pH 5.0, to the sample and mix. The color of the mixturewill turn yellow indicating the correct pH for DNA bind-ing. Even for samples with slight color changes (orangecolor), add 10 µl sodium acetate.
DNA does not perform well (e.g., in ligation reactions)a) Salt concentration Modify the wash step by incubating the column for 5 min at
in eluate too high room temperature after adding 750 µl of Buffer PE, thencentrifuge.
b) Eluate contains Ensure that the wash flow-through is drained from the collectionresidual ethanol tube and that the QIAquick column is then centrifuged at
17,900 x g (13,000 rpm) for an additional 1 min.Gelc) Eluate contami- The gel slice is incompletely solubilized or weighs >400 mg.
nated with agarose Repeat procedure, including the optional Buffer QGcolumn-wash step.
PCRd) Eluate contains Primer-dimers formed are >20 bp and are not completely
primer-dimers removed. After the binding step, wash the QIAquickcolumn with 750 µl of a 35% guanidine hydrochlorideaqueous solution (35 g in 100 ml). Continue with theBuffer PE wash step and the elution step as in the protocol.
1051746_HB 16.04.2008 14:08 Uhr Seite 31

Appendix 1F (QIAquick Spin Handbook) A1F.22
32 QIAquick Spin Handbook 03/2008
Comments and Suggestions
e) Eluate contains Use the eluted DNA to prepare the subsequent enzymaticdenatured ssDNA, reaction but omit the enzyme. To reanneal the ssDNA,which appears as incubate the reaction mixture at 95°C for 2 min, and allowsmaller smeared the tube to cool slowly to room temperature. Add the enzymeband on an ana- and proceed as usual. Alternatively, the DNA can be elutedlytical gel in 10 mM Tris buffer containing 10 mM NaCl. The salt and
buffering agent promote the renaturation of DNA strands.However the salt concentration of the eluate must then beconsidered for subsequent applications.
1051746_HB 16.04.2008 14:08 Uhr Seite 32

Appendix 1F (QIAquick Spin Handbook) A1F.23
36 QIAquick Spin Handbook 03/2008
References1. Vogelstein, B. and Gillespie, D. (1979) Preparative and analytical purification of DNA from agarose.
Proc. Natl. Acad. Sci. USA 76, 615.2. Hamaguchi, K. and Geiduschek, E.P. (1962) The effect of electrolytes on the stability of deoxyribonucle-
ate helix. J. Am. Chem. Soc. 84, 1329.
1051746_HB 16.04.2008 14:08 Uhr Seite 36

Appendix 1G (RNeasy Mini Handbook) A1G.1
Appendix 1G Qiagen RNeasy Plant Mini Kit Handbook
RNeasy® Mini Handbook
RNeasy Mini KitFor purification of total RNA from animal cells, animal tissues, bacteria, and yeast, and for RNAcleanup
RNeasy Protect Mini Kit For immediate stabilization of RNA in harvested animal tissues and subsequent total RNA purification
RNeasy Plant Mini Kit For purification of total RNA from plants and filamentous fungi
Fourth Edition September 2010
W W W . Q I A G E N . C O M

Appendix 1G (RNeasy Mini Handbook) A1G.2
RNeasy Mini Handbook 09/20106
RNeasy Plant Mini Kit (20) (50)Catalog no. 74903 74904Number of preps 20 50RNeasy Mini Spin Columns (pink) 20 50QIAshredder Spin Columns (lilac) 20 50Collection Tubes (1.5 ml) 20 50Collection Tubes (2 ml)* 20 50Buffer RLT*† 18 ml 45 mlBuffer RLC† 18 ml 45 mlBuffer RW1† 18 ml 45 mlBuffer RPE‡ (concentrate) 5 ml 11 mlRNase-Free Water 10 ml 10 mlHandbook 1 1
* Also available separately. See page 74 for ordering information. † Contains a guanidine salt. Not compatible with disinfectants containing bleach. See page 8 for safety
information.‡ Before using for the first time, add 4 volumes of ethanol (96–100%) as indicated on the bottle to obtain a
working solution.
StorageThe RNeasy Mini Kit, RNeasy Protect Mini Kit (including RNAlater RNA StabilizationReagent), and RNeasy Plant Mini Kit should be stored dry at room temperature(15–25°C) and are stable for at least 9 months under these conditions. Storage of RNAlater Reagent at lower temperatures may cause precipitation. Beforeuse, redissolve the precipitate by heating to 37°C with agitation.
Quality ControlIn accordance with QIAGEN’s ISO-certified Quality Management System, each lot ofRNeasy Mini Kit, RNeasy Protect Mini Kit, and RNeasy Plant Mini Kit is tested againstpredetermined specifications to ensure consistent product quality.
Product Use LimitationsThe RNeasy Mini Kit is intended for molecular biology applications. This product is notintended for the diagnosis, prevention, or treatment of a disease.
Appendix 1G (RNeasy Mini Handbook) A1G.3
RNeasy Mini Handbook 09/20108
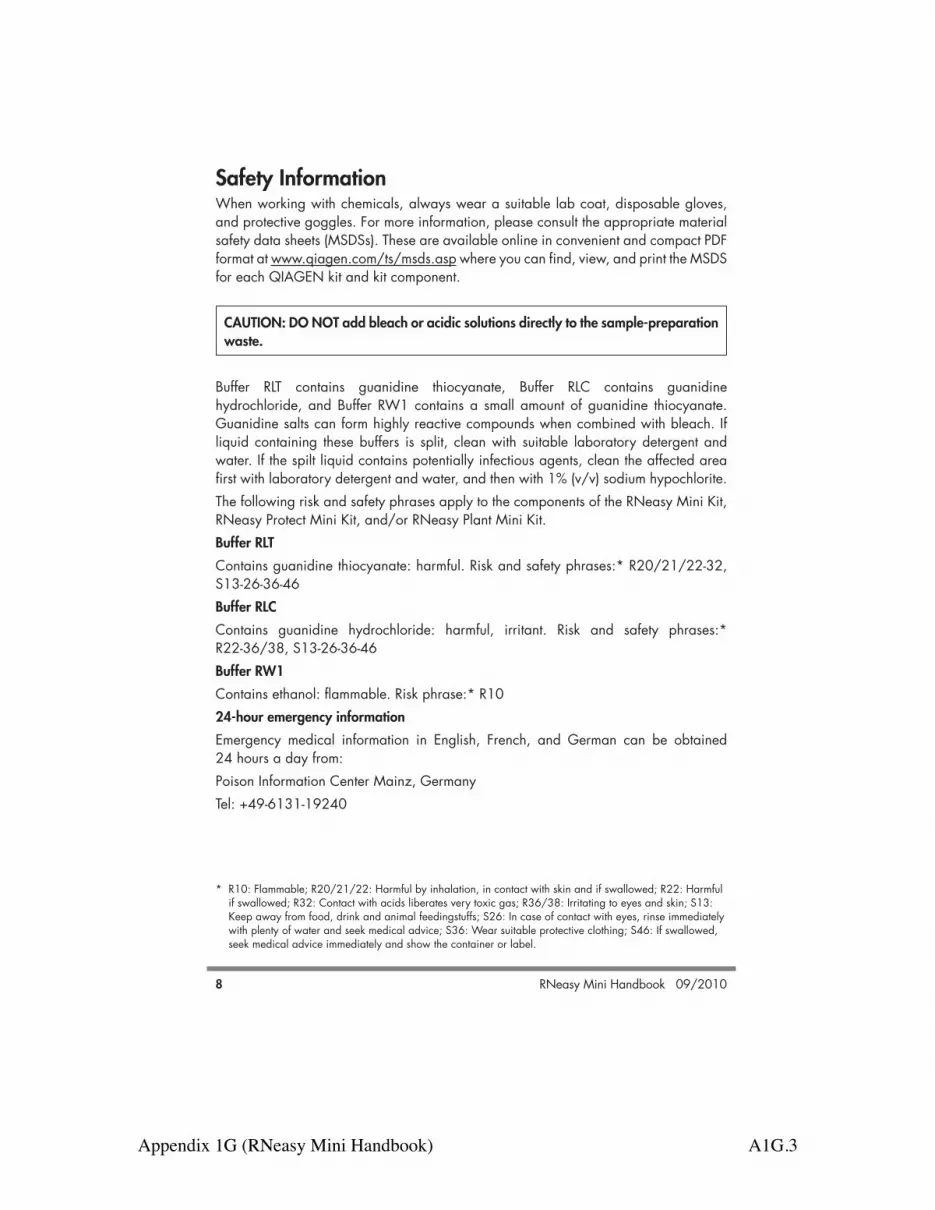
Safety InformationWhen working with chemicals, always wear a suitable lab coat, disposable gloves,and protective goggles. For more information, please consult the appropriate materialsafety data sheets (MSDSs). These are available online in convenient and compact PDFformat at www.qiagen.com/ts/msds.asp where you can find, view, and print the MSDSfor each QIAGEN kit and kit component.
CAUTION: DO NOT add bleach or acidic solutions directly to the sample-preparationwaste.
Buffer RLT contains guanidine thiocyanate, Buffer RLC contains guanidinehydrochloride, and Buffer RW1 contains a small amount of guanidine thiocyanate.Guanidine salts can form highly reactive compounds when combined with bleach. Ifliquid containing these buffers is split, clean with suitable laboratory detergent andwater. If the spilt liquid contains potentially infectious agents, clean the affected areafirst with laboratory detergent and water, and then with 1% (v/v) sodium hypochlorite.The following risk and safety phrases apply to the components of the RNeasy Mini Kit,RNeasy Protect Mini Kit, and/or RNeasy Plant Mini Kit.Buffer RLT Contains guanidine thiocyanate: harmful. Risk and safety phrases:* R20/21/22-32,S13-26-36-46 Buffer RLCContains guanidine hydrochloride: harmful, irritant. Risk and safety phrases:* R22-36/38, S13-26-36-46 Buffer RW1Contains ethanol: flammable. Risk phrase:* R10 24-hour emergency informationEmergency medical information in English, French, and German can be obtained24 hours a day from:Poison Information Center Mainz, GermanyTel: +49-6131-19240
* R10: Flammable; R20/21/22: Harmful by inhalation, in contact with skin and if swallowed; R22: Harmfulif swallowed; R32: Contact with acids liberates very toxic gas; R36/38: Irritating to eyes and skin; S13:Keep away from food, drink and animal feedingstuffs; S26: In case of contact with eyes, rinse immediatelywith plenty of water and seek medical advice; S36: Wear suitable protective clothing; S46: If swallowed,seek medical advice immediately and show the container or label.

Appendix 1G (RNeasy Mini Handbook) A1G.4
RNeasy Mini Handbook 09/2010 9
IntroductionThe RNeasy Mini Handbook provides protocols for use with the following kits:
RNeasy Mini Kit — for purification of total RNA from animal cells, animal tissues,and yeast, and for cleanup of RNA from crude RNA preps and enzymaticreactions (e.g., DNase digestion, proteinase digestion, RNA ligation, and labelingreaction)RNeasy Protect Mini Kit — for immediate stabilization of RNA in harvested animaltissues and subsequent purification of total RNARNeasy Plant Mini Kit — for purification of total RNA from plant cells and tissuesand filamentous fungi
The RNeasy Mini Kit can also be used to purify total RNA from bacteria. In this case,we strongly recommend using the kit in combination with RNAprotect® Bacteria Reagent(available separately), which provides in vivo stabilization of RNA in bacteria to ensurereliable gene expression analysis. Various protocols for stabilizing and purifying RNAfrom different bacteria species are included in the RNAprotect Bacteria ReagentHandbook. The RNeasy Mini Kit and RNAprotect Bacteria Reagent can also bepurchased together as the RNeasy Protect Bacteria Mini Kit. For ordering information, see pages 75–76. It is also possible to use the RNeasy Mini Kit to purifycytoplasmic RNA from animal cells. The protocol can be downloaded at www.qiagen.com/literature/protocols/RNeasyMini.aspx .The RNeasy Kits are designed to purify RNA from small amounts of starting material.They provide a fast and simple method for preparing up to 100 µg total RNA persample. The purified RNA is ready for use in downstream applications such as:
RT-PCR and real-time RT-PCRDifferential display cDNA synthesis Northern, dot, and slot blot analysesPrimer extension Poly A+ RNA selection RNase/S1 nuclease protection Microarrays
The RNeasy Kits allow the parallel processing of multiple samples in less than 30 minutes. Time-consuming and tedious methods, such as CsCl step-gradientultracentrifugation and alcohol precipitation, or methods involving the use of toxicsubstances, such as phenol and/or chloroform, are replaced by the RNeasy procedure.

Appendix 1G (RNeasy Mini Handbook) A1G.5
RNeasy Mini Handbook 09/201010
Principle and procedure RNA purification using RNeasy technologyThe RNeasy procedure represents a well-established technology for RNA purification.This technology combines the selective binding properties of a silica-based membranewith the speed of microspin technology. A specialized high-salt buffer system allows upto 100 µg of RNA longer than 200 bases to bind to the RNeasy silica membrane.Biological samples are first lysed and homogenized in the presence of a highlydenaturing guanidine-thiocyanate–containing buffer, which immediately inactivatesRNases to ensure purification of intact RNA. Ethanol is added to provide appropriatebinding conditions, and the sample is then applied to an RNeasy Mini spin column,where the total RNA binds to the membrane and contaminants are efficiently washedaway. High-quality RNA is then eluted in 30–100 µl water. With the RNeasy procedure, all RNA molecules longer than 200 nucleotides arepurified. The procedure provides an enrichment for mRNA since most RNAs <200nucleotides (such as 5.8S rRNA, 5S rRNA, and tRNAs, which together comprise15–20% of total RNA) are selectively excluded. The size distribution of the purified RNAis comparable to that obtained by centrifugation through a CsCl cushion, where smallRNAs do not sediment efficiently. Protocols for purification of small RNA using RNeasyKits are available at www.qiagen.com/goto/microRNAprotocols .In this handbook, different protocols are provided for different starting materials. Theprotocols differ primarily in the lysis and homogenization of the sample and in theadjustment of the conditions for binding RNA to the RNeasy membrane. Once thesample is bound to the membrane, the protocols are similar (see flowchart, next page).
RNA stabilization using RNAlater technology RNA stabilization is an absolute prerequisite for reliable gene expression analysis.Immediate stabilization of RNA in biological samples is necessary because, directlyafter harvesting the samples, changes in the gene expression pattern occur due tospecific and nonspecific RNA degradation as well as to transcriptional induction. Suchchanges need to be avoided for all reliable quantitative gene expression analyses, suchas microarray analyses, quantitative RT-PCR, such as TaqMan® and LightCycler®
technology, and other nucleic acid-based technologies.
Appendix 1G (RNeasy Mini Handbook) A1G.6
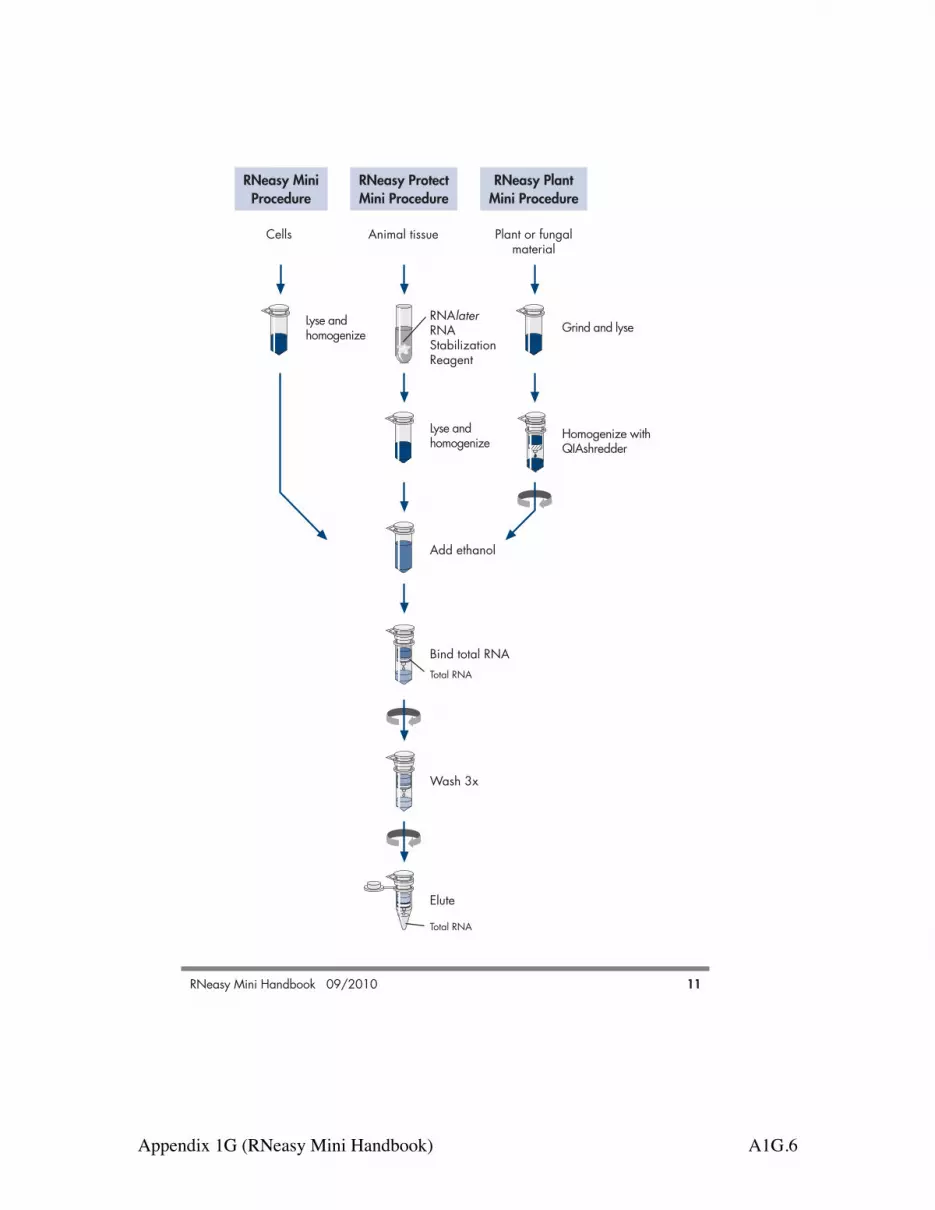
RNeasy Mini Handbook 09/2010 11
RNeasy MiniProcedure
RNeasy ProtectMini Procedure
RNeasy PlantMini Procedure

Appendix 1G (RNeasy Mini Handbook) A1G.7
RNeasy Mini Handbook 09/201012
The RNeasy Protect Mini Kit is supplied with RNAlater RNA Stabilization Reagent,which represents a novel technology for the immediate preservation of the geneexpression pattern in animal tissues, enabling reliable gene expression analysis. Afterharvesting, tissues are immediately submerged in RNAlater RNA Stabilization Reagent,which rapidly permeates the tissues to stabilize and protect cellular RNA in situ. Thereagent preserves RNA for up to 1 day at 37°C, 7 days at 15–25°C, or 4 weeks at2–8°C, allowing transportation, storage, and shipping of samples without ice or dryice. Alternatively, the samples can be archived at –20°C or –80°C. During storage ortransport in RNAlater RNA Stabilization Reagent, even at elevated temperatures (e.g.,room temperature or 37°C), the cellular RNA remains intact and undegraded. RNAlatertechnology allows large numbers of samples to be easily processed and replacesinconvenient, dangerous, and equipment-intensive methods, such as snap-freezing ofsamples in liquid nitrogen, storage at –80°C, cutting and weighing on dry ice, orimmediate processing of harvested samples. Note: RNAlater RNA Stabilization Reagent is not for stabilization of RNA in animalcells, whole blood, plasma, or serum.
Description of protocols Purification of Total RNA from Animal Cells Using Spin TechnologyUp to 1 x 10⁷ cells, depending on the cell line, are disrupted in Buffer RLT andhomogenized. An overview of disruption and homogenization methods is given onpages 20–23. Ethanol is then added to the lysate, creating conditions that promoteselective binding of RNA to the RNeasy membrane. The sample is then applied to theRNeasy Mini spin column. Total RNA binds to the membrane, contaminants areefficiently washed away, and high-quality RNA is eluted in RNase-free water. All bind,wash, and elution steps are performed by centrifugation in a microcentrifuge.
Purification of Total RNA from Animal Cells Using Vacuum/Spin TechnologyUp to 1 x 10⁶ cells, depending on the cell line, are disrupted in Buffer RLT andhomogenized. An overview of disruption and homogenization methods is given onpages 20–23. Ethanol is then added to the lysate, creating conditions that promoteselective binding of RNA to the RNeasy membrane. The sample is then applied to theRNeasy Mini spin column. Total RNA binds to the membrane, contaminants areefficiently washed away, and high-quality RNA is eluted in RNase-free water. The bindand wash steps are performed on a QIAvac 24, QIAvac 24 Plus, or QIAvac 6S vacuummanifold, and the final elution step is performed by centrifugation in a microcentrifuge.

Appendix 1G (RNeasy Mini Handbook) A1G.8
RNeasy Mini Handbook 09/201014
Purification of Total RNA from Plant Cells and Tissues and Filamentous Fungi Up to 100 mg of sample is first ground in liquid nitrogen and then lysed under highlydenaturing conditions. The RNeasy Plant Mini Kit provides a choice of lysis buffers:Buffer RLT and Buffer RLC, which contain guanidine thiocyanate and guanidinehydrochloride, respectively. The higher cell disruption and denaturing properties ofBuffer RLT frequently make it the buffer of choice. However, some tissues, such as milkyendosperm of maize or mycelia of filamentous fungi, solidify in Buffer RLT, making theextraction of RNA impossible. In these cases, Buffer RLC should be used instead. Afterlysis with either buffer, samples are centrifuged through a QIAshredder homogenizer.This simultaneously removes insoluble material and reduces the viscosity of the lysatesby disrupting gelatinous material often formed in plant and fungal lysates. Ethanol isadded to the cleared lysate, creating conditions which promote selective binding ofRNA to the RNeasy membrane. The sample is then applied to the RNeasy Mini spincolumn. Total RNA binds to the membrane, contaminants are efficiently washed away,and high-quality RNA is eluted in RNase-free water.
RNA CleanupThis protocol can be used to purify RNA from enzymatic reactions (e.g., DNasedigestion, RNA labeling) or to desalt RNA samples (up to 100 µg RNA). Buffer RLT andethanol are added to the sample to create conditions that promote selective binding ofRNA to the RNeasy membrane. The sample is then applied to the RNeasy Mini spincolumn. Total RNA binds to the membrane, contaminants are efficiently washed away,and high-quality RNA is eluted in RNase-free water.
Appendix 1G (RNeasy Mini Handbook) A1G.9
RNeasy Mini Handbook 09/2010 15
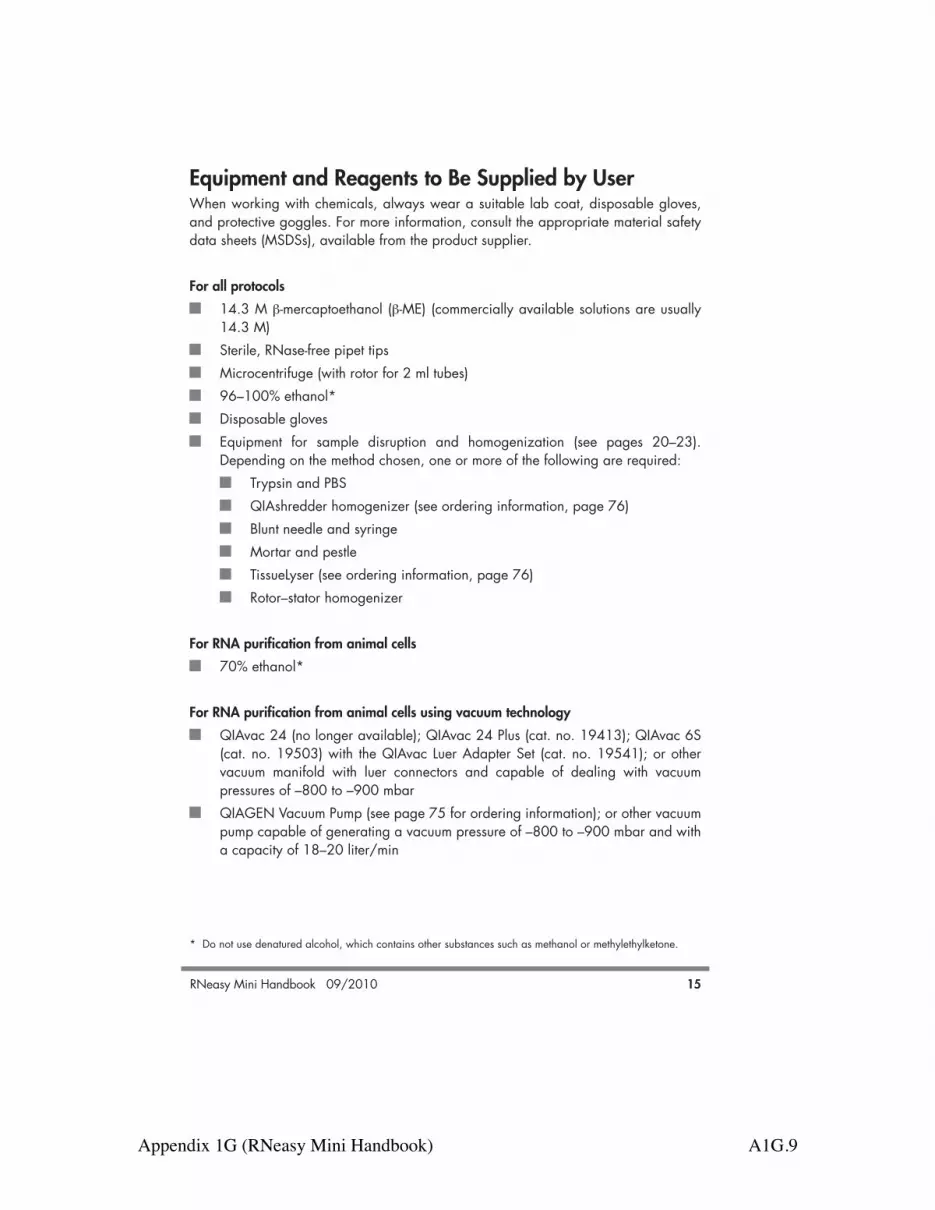
Equipment and Reagents to Be Supplied by UserWhen working with chemicals, always wear a suitable lab coat, disposable gloves,and protective goggles. For more information, consult the appropriate material safetydata sheets (MSDSs), available from the product supplier.
For all protocols14.3 M !-mercaptoethanol (!-ME) (commercially available solutions are usually14.3 M)Sterile, RNase-free pipet tipsMicrocentrifuge (with rotor for 2 ml tubes)96–100% ethanol*Disposable glovesEquipment for sample disruption and homogenization (see pages 20–23).Depending on the method chosen, one or more of the following are required:
Trypsin and PBSQIAshredder homogenizer (see ordering information, page 76)Blunt needle and syringeMortar and pestleTissueLyser (see ordering information, page 76)Rotor–stator homogenizer
For RNA purification from animal cells70% ethanol*
For RNA purification from animal cells using vacuum technologyQIAvac 24 (no longer available); QIAvac 24 Plus (cat. no. 19413); QIAvac 6S(cat. no. 19503) with the QIAvac Luer Adapter Set (cat. no. 19541); or othervacuum manifold with luer connectors and capable of dealing with vacuumpressures of –800 to –900 mbar QIAGEN Vacuum Pump (see page 75 for ordering information); or other vacuumpump capable of generating a vacuum pressure of –800 to –900 mbar and witha capacity of 18–20 liter/min
* Do not use denatured alcohol, which contains other substances such as methanol or methylethylketone.
Appendix 1G (RNeasy Mini Handbook) A1G.10
RNeasy Mini Handbook 09/201016
Note: Use of insufficient vacuum pressure may reduce RNA yield and purity. TheRNeasy procedure requires higher vacuum pressures compared with otherQIAGEN procedures. Most water pumps or house vacuums do not providesufficient vacuum pressure. Optional: Vacuum Regulator (cat. no. 19530) to measure the pressure differencebetween the inside and outside of a vacuum system A vacuum pressure of –800 to –900 mbar should develop when RNeasy Mini spincolumns are used on the vacuum manifold. Vacuum pressures exceeding–900 mbar should be avoided. The vacuum pressure is the pressure differencebetween the inside of the manifold and the atmosphere (standard atmosphericpressure: 1013 mbar or 760 mm Hg) and can be regulated and measured usinga pressure gauge or vacuum regulator. Vacuum recommendations are given innegative units to indicate the required reduction in pressure with respect to theatmosphere. Optional: VacConnectors (cat. no. 19407)These disposable connectors fit between the RNeasy Mini spin columns and theluer extensions on the QIAvac 24 or QIAvac 24 Plus or the QIAvac Luer Adapterson the QIAvac 6S. They prevent direct contact between the RNeasy Mini spincolumns and luer connectors during RNA purification, avoiding any cross-contamination between samples. VacConnectors are discarded after singleuse.
For RNA purification from animal tissues70% ethanol*Optional: Dithiothreitol (DTT)
For RNA purification from yeast using enzymatic lysis70% ethanol*Buffer for enzymatic lysisIn most cases, Buffer Y1 (containing sorbitol, EDTA, !-ME, and lyticase orzymolase) can be used. See the protocol on page 45 for details on preparingBuffer Y1.
For RNA purification from yeast using mechanical disruption70% ethanol*Glass beads, 0.45–0.55 mm diameter
* Do not use denatured alcohol, which contains other substances such as methanol or methylethylketone.

Appendix 1G (RNeasy Mini Handbook) A1G.11
RNeasy Mini Handbook 09/2010 17
Concentrated nitric acid, deionized water, and baking ovenTissueLyser or other bead-mill homogenizer
For RNA purification from plants and fungiLiquid nitrogenMortar and pestle (alternatively, TissueLyser or other bead-mill homogenizer)
Suppliers of equipment for disruption and homogenization*Rotor–stator homogenizers can be purchased from:
BioSpec Products, Inc. ( www.biospec.com ): Tissue-Tearor™ homogenizerCharles Ross & Son Company ( www.mixers.com )IKA ( www.ika.de ): ULTRA-TURRAX® dispersersKINEMATICA AG ( www.kinematica.ch ) or Brinkmann Instruments, Inc. ( www.brinkmann.com ): POLYTRON® laboratory dispersing devicesOmni International, Inc. ( www.omni-inc.com )Silverson ( www.silverson.com )VirTis ( www.virtis.com )
Bead-mill homogenizers and stainless steel and tungsten carbide beads can be pur-chased from:
QIAGEN (TissueLyser system, see page 76 for ordering information) Glass, stainless steel, and tungsten carbide beads can be purchased from:
Retsch ( www.retsch.de )
* This is not a complete list of suppliers and does not include many important vendors of biological supplies.

Appendix 1G (RNeasy Mini Handbook) A1G.12
RNeasy Mini Handbook 09/201018
Important NotesDetermining the amount of starting material It is essential to use the correct amount of starting material in order to obtain optimalRNA yield and purity. The maximum amount that can be used is determined by:
The type of sample and its RNA contentThe volume of Buffer RLT required for efficient lysisThe RNA binding capacity of the RNeasy spin column
When processing samples containing high amounts of RNA, less than the maximumamount of starting material shown in Table 1 should be used, so that the RNA bindingcapacity of the RNeasy spin column is not exceeded. When processing samples containing average or low amounts of RNA, the maximumamount of starting material shown in Table 1 can be used. However, even though theRNA binding capacity of the RNeasy spin column is not reached, the maximum amountof starting material must not be exceeded. Otherwise, lysis will be incomplete andcellular debris may interfere with the binding of RNA to the RNeasy spin columnmembrane, resulting in lower RNA yield and purity. More information on using the correct amount of starting material is given in eachprotocol. Table 2 shows expected RNA yields from various sources.
Table 1. RNeasy Mini Spin Column Specifications
Maximum binding capacity 100 µg RNA Maximum loading volume 700 µlRNA size distribution RNA >200 nucleotidesMinimum elution volume 30 µlMaximum amount of starting material
Animal cells 1 x 10⁷*Animal tissues 30 mg*Yeast 5 x 10⁷*Plant tissues 100 mgFilamentous fungi 100 mg
* For larger sample sizes, RNeasy Kits and RNeasy Protect Kits are available in midi and maxi formats. Fordetails, visit www.qiagen.com/RNA .

Appendix 1G (RNeasy Mini Handbook) A1G.13
RNeasy Mini Handbook 09/2010 19
Note: If the binding capacity of the RNeasy spin column is exceeded, RNA yields willnot be consistent and may be reduced. If lysis of the starting material is incomplete,RNA yields will be lower than expected, even if the binding capacity of the RNeasyspin column is not exceeded.
Table 2. Typical Yields of Total RNA with RNeasy Mini Spin Columns
Source Yield of total RNA* (µg)Cell cultures (1 x 10⁶ cells)
NIH/3T3 10HeLa 15COS-7 35LMH 12Huh 15
Mouse/rat tissues (10 mg)Embryo (13 day) 25Kidney 20–30Liver 40–60Spleen 30–40Thymus 40–50Lung 10–20
Yeast (1 x 10⁷ cells)S. cerevisiae 25
Plants (100 mg leaves)Arabidopsis 35Maize 25Tomato 65Tobacco 60
* Amounts can vary due to factors such as species, developmental stage, and growth conditions. Since theRNeasy procedure enriches for mRNA and other RNA species >200 nucleotides, the total RNA yield doesnot include 5S rRNA, tRNA, and other low-molecular-weight RNAs, which make up 15–20% of totalcellular RNA.

Appendix 1G (RNeasy Mini Handbook) A1G.14
RNeasy Mini Handbook 09/201020
Handling and storing starting material RNA in animal and plant tissues is not protected after harvesting until the sample istreated with RNAlater RNA Stabilization Reagent (animal tissues only), flash-frozen, ordisrupted and homogenized in the presence of RNase-inhibiting or denaturingreagents. Otherwise, unwanted changes in the gene expression profile will occur. It istherefore important that tissue samples are immediately frozen in liquid nitrogen andstored at –70°C, or immediately immersed in RNAlater RNA Stabilization Reagent.The procedures for tissue harvesting and RNA protection should be carried out asquickly as possible. Frozen tissue samples should not be allowed to thaw duringhandling or weighing. After disruption and homogenization in Buffer RLT (lysis buffer),samples can be stored at –70°C for months.Animal and yeast cells can be pelleted and then stored at –70°C until required for RNApurification. However, if performing RNA purification from yeast cells with enzymaticlysis, only freshly harvested samples can be used.
Disrupting and homogenizing starting material Efficient disruption and homogenization of the starting material is an absoluterequirement for all total RNA purification procedures. Disruption and homogenizationare 2 distinct steps:
Disruption: Complete disruption of cell walls and plasma membranes of cells andorganelles is absolutely required to release all the RNA contained in the sample.Different samples require different methods to achieve complete disruption.Incomplete disruption results in significantly reduced RNA yields. Homogenization: Homogenization is necessary to reduce the viscosity of thelysates produced by disruption. Homogenization shears high-molecular-weightgenomic DNA and other high-molecular-weight cellular components to create ahomogeneous lysate. Incomplete homogenization results in inefficient binding ofRNA to the RNeasy spin column membrane and therefore significantly reducedRNA yields.
Some disruption methods simultaneously homogenize the sample, while others requirean additional homogenization step. Table 3 (page 21) gives an overview of differentdisruption and homogenization methods, and is followed by a detailed description ofeach method. This information can be used as a guide to choose the appropriatemethods for your starting material.Note: After storage in RNAlater RNA Stabilization Reagent, tissues become slightlyharder than fresh or thawed tissues. Disruption and homogenization of these tissues,however, is usually not a problem.
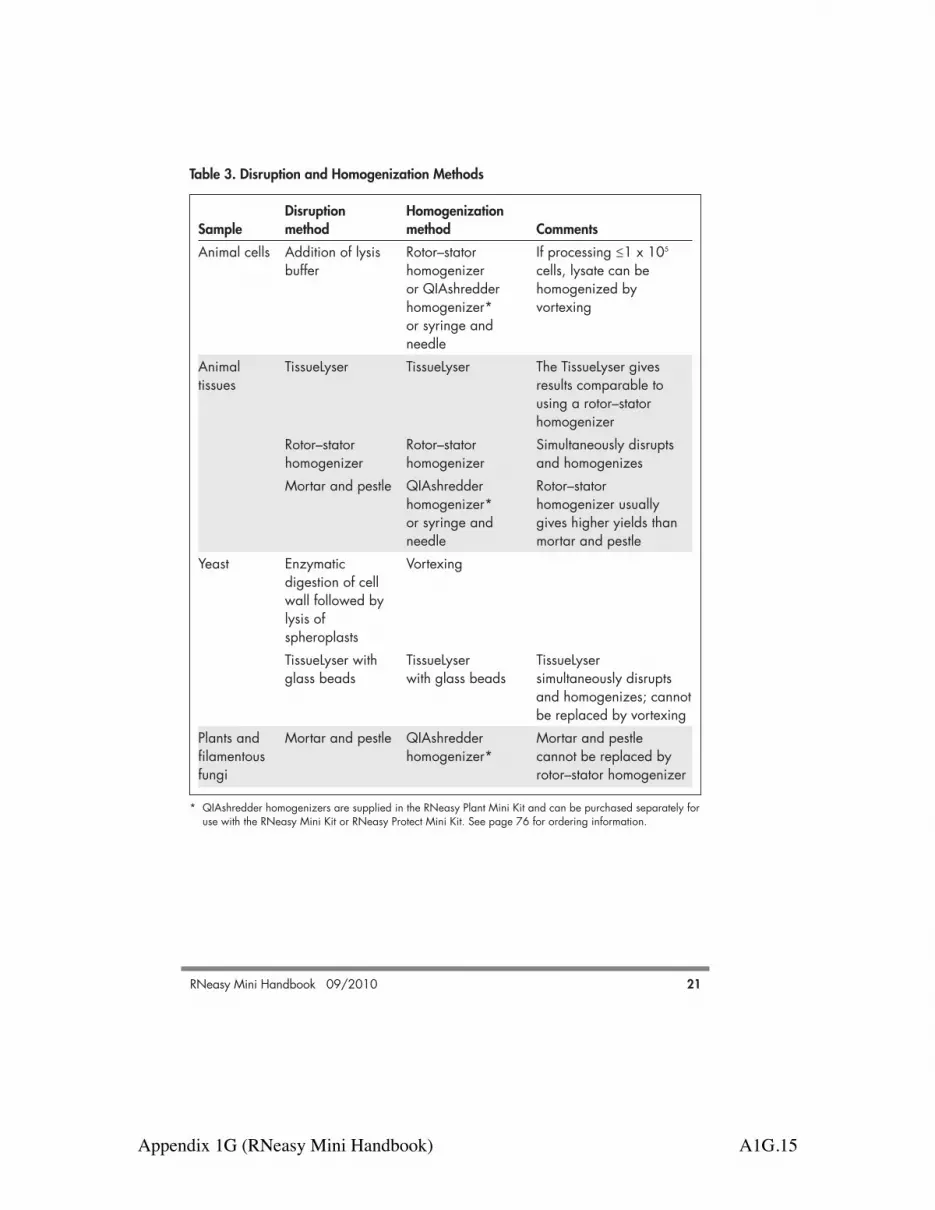
Appendix 1G (RNeasy Mini Handbook) A1G.15
RNeasy Mini Handbook 09/2010 21
Table 3. Disruption and Homogenization Methods
Disruption Homogenization Sample method method CommentsAnimal cells Addition of lysis Rotor–stator If processing !1 x 10⁵
buffer homogenizer cells, lysate can beor QIAshredder homogenized byhomogenizer* vortexingor syringe and needle
Animal TissueLyser TissueLyser The TissueLyser gives tissues results comparable to
using a rotor–statorhomogenizer
Rotor–stator Rotor–stator Simultaneously disruptshomogenizer homogenizer and homogenizesMortar and pestle QIAshredder Rotor–stator
homogenizer* homogenizer usuallyor syringe and gives higher yields thanneedle mortar and pestle
Yeast Enzymatic Vortexingdigestion of cellwall followed bylysis ofspheroplastsTissueLyser with TissueLyser TissueLyserglass beads with glass beads simultaneously disrupts
and homogenizes; cannotbe replaced by vortexing
Plants and Mortar and pestle QIAshredder Mortar and pestlefilamentous homogenizer* cannot be replaced byfungi rotor–stator homogenizer
* QIAshredder homogenizers are supplied in the RNeasy Plant Mini Kit and can be purchased separately foruse with the RNeasy Mini Kit or RNeasy Protect Mini Kit. See page 76 for ordering information.

Appendix 1G (RNeasy Mini Handbook) A1G.16
RNeasy Mini Handbook 09/2010 23
Disruption using a mortar and pestleFor disruption using a mortar and pestle, freeze the animal or plant tissue immediatelyin liquid nitrogen and grind to a fine powder under liquid nitrogen. Transfer thesuspension (tissue powder and liquid nitrogen) into a liquid-nitrogen–cooled,appropriately sized tube and allow the liquid nitrogen to evaporate without allowingthe sample to thaw. Add lysis buffer and continue as quickly as possible with thehomogenization according to one of the 2 methods below. Note: Grinding the sample using a mortar and pestle will disrupt the sample, but willnot homogenize it. Homogenization must be performed afterwards.
Homogenization using QIAshredder homogenizersUsing QIAshredder homogenizers is a fast and efficient way to homogenize cell andtissue lysates without cross-contamination of samples. Up to 700 µl of lysate is loadedonto a QIAshredder spin column placed in a 2 ml collection tube, and spun for 2 minutes at maximum speed in a microcentrifuge. The lysate is homogenized as itpasses through the spin column. QIAshredder spin columns are supplied in the RNeasyPlant Mini Kit and can be purchased separately for use with the RNeasy Mini Kit andRNeasy Protect Mini Kit. See page 76 for ordering information.
Homogenization using a syringe and needleCell and tissue lysates can be homogenized using a syringe and needle. Lysate ispassed through a 20-gauge (0.9 mm) needle attached to a sterile plastic syringe at least5–10 times or until a homogeneous lysate is achieved. Increasing the volume of lysisbuffer may be required to facilitate handling and minimize loss.
Eliminating genomic DNA contaminationGenerally, DNase digestion is not required with RNeasy Kits since RNeasy silica-membrane technology efficiently removes most of the DNA without DNase treatment.However, further DNA removal may be necessary for certain RNA applications that aresensitive to very small amounts of DNA (e.g., TaqMan RT-PCR analysis with a low-abundance target). In these cases, residual DNA can be removed by optional on-column DNase digestion using the RNase-Free DNase Set (see Appendix D, page 69).The DNase is efficiently removed in subsequent wash steps. Alternatively, residual DNAcan be removed by a DNase digestion after RNA purification (see Appendix E,page 71). The DNase digestion can then be cleaned up, if desired, using “Protocol:RNA Cleanup” (page 56). The RNeasy Plus Mini Kit, which is designed for RNA purification from animal cells andtissues, integrates unique gDNA Eliminator spin columns with RNeasy technology.Genomic DNA is effectively removed in a single, rapid centrifugation step, avoidingthe need for DNase digestion. See page 76 for ordering information.

Appendix 1G (RNeasy Mini Handbook) A1G.17
RNeasy Mini Handbook 09/201024
If the purified RNA will be used in real-time, two-step RT-PCR, we recommend using theQuantiTect® Reverse Transcription Kit. The kit provides a fast and convenient procedure,enabling cDNA synthesis and genomic DNA removal in only 20 minutes. For orderinginformation, see page 78.

Appendix 1G (RNeasy Mini Handbook) A1G.18
Plan
ts an
d Fu
ngi
RNeasy Mini Handbook 09/201052
Protocol: Purification of Total RNA from Plant Cells andTissues and Filamentous Fungi This protocol requires the RNeasy Plant Mini Kit.
Determining the correct amount of starting material It is essential to use the correct amount of starting material in order to obtain optimalRNA yield and purity. A maximum amount of 100 mg plant material or 1 x 10⁷ cellscan generally be processed. For most plant materials, the RNA binding capacity of theRNeasy spin column and the lysing capacity of Buffer RLT will not be exceeded by theseamounts. Average RNA yields from various plant materials are given in Table 2 (page 19).If there is no information about the nature of your starting material, we recommendstarting with no more than 50 mg plant material or 3–4 x 10⁶ cells. Depending on RNAyield and purity, it may be possible to use up to 100 mg plant material or up to 1 x 10⁷
cells in subsequent preparations. Do not overload the RNeasy spin column, as this will significantly reduce RNA yield andquality.Counting cells or weighing tissue is the most accurate way to quantitate the amount ofstarting material. As a guide, a 1.5 cm diameter leaf disc weighs 25–75 mg.
Important points before startingIf using the RNeasy Plant Mini Kit for the first time, read “Important Notes”(page 18). If working with RNA for the first time, read Appendix A (page 63). Fresh or frozen tissues can be used. Tissues can be stored at –70°C for severalmonths. Flash-freeze tissues in liquid nitrogen, and immediately transfer to –70°C.Do not allow tissues to thaw during weighing or handling prior to disruption inBuffer RLT. Homogenized tissue lysates from step 4 can also be stored at –70°Cfor several months. Incubate frozen lysates at 37°C in a water bath until completelythawed and salts are dissolved before continuing with step 5. Avoid prolongedincubation, which may compromise RNA integrity.The RNeasy Plant Mini Kit provides a choice of lysis buffers: Buffer RLT and BufferRLC, which contain guanidine thiocyanate and guanidine hydrochloride,respectively. In most cases, Buffer RLT is the lysis buffer of choice due to the greatercell disruption and denaturation properties of guanidine thiocyanate. However,depending on the amount and type of secondary metabolites in some tissues (suchas milky endosperm of maize or mycelia of filamentous fungi), guanidinethiocyanate can cause solidification of the sample, making extraction of RNAimpossible. In these cases, Buffer RLC should be used.
Appendix 1G (RNeasy Mini Handbook) A1G.19
Plants and Fungi
RNeasy Mini Handbook 09/2010 53
Buffer RLT may form a precipitate upon storage. If necessary, redissolve bywarming, and then place at room temperature (15–25°C). Buffer RLT, Buffer RLC, and Buffer RW1 contain a guanidine salt and are thereforenot compatible with disinfecting reagents containing bleach. See page 8 for safetyinformation. Perform all steps of the procedure at room temperature. During the procedure,work quickly. Perform all centrifugation steps at 20–25°C in a standard microcentrifuge. Ensurethat the centrifuge does not cool below 20°C.
Things to do before starting!-Mercaptoethanol (!-ME) must be added to Buffer RLT or Buffer RLC before use.Add 10 µl !-ME per 1 ml Buffer RLT or Buffer RLC. Dispense in a fume hood andwear appropriate protective clothing. Buffer RLT or Buffer RLC containing !-ME canbe stored at room temperature for up to 1 month.Buffer RPE is supplied as a concentrate. Before using for the first time, add 4 volumes of ethanol (96–100%) as indicated on the bottle to obtain a workingsolution. If performing optional on-column DNase digestion, prepare DNase I stock solutionas described in Appendix D (page 69).
Procedure1. Determine the amount of plant material. Do not use more than 100 mg.
Weighing tissue is the most accurate way to determine the amount.2. Immediately place the weighed tissue in liquid nitrogen, and grind thoroughly with
a mortar and pestle. Decant tissue powder and liquid nitrogen into an RNase-free,liquid-nitrogen–cooled, 2 ml microcentrifuge tube (not supplied). Allow the liquidnitrogen to evaporate, but do not allow the tissue to thaw. Proceed immediately tostep 3.RNA in plant tissues is not protected until the tissues are flash-frozen in liquidnitrogen. Frozen tissues should not be allowed to thaw during handling. Therelevant procedures should be carried out as quickly as possible.
3. Add 450 µl Buffer RLT or Buffer RLC (see “Important points before starting”) to amaximum of 100 mg tissue powder. Vortex vigorously.A short 1–3 min incubation at 56°C may help to disrupt the tissue. However, donot incubate samples with a high starch content at elevated temperatures,otherwise swelling of the sample will occur.
Appendix 1G (RNeasy Mini Handbook) A1G.20
Plan
ts an
d Fu
ngi
RNeasy Mini Handbook 09/201054
Note: Ensure that !-ME is added to Buffer RLT or Buffer RLC before use (see “Thingsto do before starting”).
4. Transfer the lysate to a QIAshredder spin column (lilac) placed in a 2 ml collectiontube, and centrifuge for 2 min at full speed. Carefully transfer the supernatant ofthe flow-through to a new microcentrifuge tube (not supplied) without disturbingthe cell-debris pellet in the collection tube. Use only this supernatant in subsequentsteps.It may be necessary to cut off the end of the pipet tip to facilitate pipetting of thelysate into the QIAshredder spin column. Centrifugation through the QIAshredderspin column removes cell debris and simultaneously homogenizes the lysate.While most of the cell debris is retained on the QIAshredder spin column, a verysmall amount of cell debris will pass through and form a pellet in the collectiontube. Be careful not to disturb this pellet when transferring the lysate to the newmicrocentrifuge tube.
5. Add 0.5 volume of ethanol (96–100%) to the cleared lysate, and mix immediatelyby pipetting. Do not centrifuge. Proceed immediately to step 6. Note: The volume of lysate may be less than 450 µl due to loss duringhomogenization.Note: Precipitates may be visible after addition of ethanol. This does not affect theprocedure.
6. Transfer the sample (usually 650 µl), including any precipitate that may haveformed, to an RNeasy spin column (pink) placed in a 2 ml collection tube (supplied).Close the lid gently, and centrifuge for 15 s at !8000 x g (!10,000 rpm). Discardthe flow-through.*Reuse the collection tube in step 7. If the sample volume exceeds 700 µl, centrifuge successive aliquots in the sameRNeasy spin column. Discard the flow-through after each centrifugation.* Optional: If performing optional on-column DNase digestion (see “Eliminatinggenomic DNA contamination”, page 23), follow steps D1–D4 (page 69) afterperforming this step.
7. Add 700 µl Buffer RW1 to the RNeasy spin column. Close the lid gently, andcentrifuge for 15 s at !8000 x g (!10,000 rpm) to wash the spin columnmembrane. Discard the flow-through.*Reuse the collection tube in step 8.
* Flow-through contains Buffer RLT, Buffer RLC, or Buffer RW1 and is therefore not compatible with bleach.See page 8 for safety information.

Appendix 1G (RNeasy Mini Handbook) A1G.21
Plants and Fungi
RNeasy Mini Handbook 09/2010 55
Note: After centrifugation, carefully remove the RNeasy spin column from thecollection tube so that the column does not contact the flow-through. Be sure toempty the collection tube completely.Skip this step if performing optional on-column DNase digestion (page 69).
8. Add 500 µl Buffer RPE to the RNeasy spin column. Close the lid gently, andcentrifuge for 15 s at !8000 x g (!10,000 rpm) to wash the spin columnmembrane. Discard the flow-through.Reuse the collection tube in step 9.Note: Buffer RPE is supplied as a concentrate. Ensure that ethanol is added toBuffer RPE before use (see “Things to do before starting”).
9. Add 500 µl Buffer RPE to the RNeasy spin column. Close the lid gently, andcentrifuge for 2 min at !8000 x g (!10,000 rpm) to wash the spin columnmembrane. The long centrifugation dries the spin column membrane, ensuring that no ethanolis carried over during RNA elution. Residual ethanol may interfere withdownstream reactions. Note: After centrifugation, carefully remove the RNeasy spin column from thecollection tube so that the column does not contact the flow-through. Otherwise,carryover of ethanol will occur.
10. Optional: Place the RNeasy spin column in a new 2 ml collection tube (supplied),and discard the old collection tube with the flow-through. Close the lid gently, andcentrifuge at full speed for 1 min.Perform this step to eliminate any possible carryover of Buffer RPE, or if residualflow-through remains on the outside of the RNeasy spin column after step 9.
11. Place the RNeasy spin column in a new 1.5 ml collection tube (supplied). Add30–50 µl RNase-free water directly to the spin column membrane. Close the lidgently, and centrifuge for 1 min at !8000 x g (!10,000 rpm) to elute the RNA.
12. If the expected RNA yield is >30 µg, repeat step 11 using another 30–50 µl RNase-free water, or using the eluate from step 11 (if high RNA concentration is required).Reuse the collection tube from step 11.If using the eluate from step 11, the RNA yield will be 15–30% less than thatobtained using a second volume of RNase-free water, but the final RNAconcentration will be higher.

Appendix 1G (RNeasy Mini Handbook) A1G.22
RNeasy Mini Handbook 09/201058
Troubleshooting GuideThis troubleshooting guide may be helpful in solving any problems that may arise. Thescientists in QIAGEN Technical Services are always happy to answer any questions youmay have about either the information and protocols in this handbook or molecularbiology applications (see back cover for contact information).
Comments and suggestions
Clogged RNeasy spin columna) Inefficient disruption See “Disrupting and homogenizing starting
and/or homogenization material” (pages 20–23) for details ondisruption and homogenization methods. Increase g-force and centrifugation time ifnecessary. In subsequent preparations, reduce theamount of starting material (see protocols)and/or increase the volume of lysis bufferand the homogenization time. If working with tissues rich in proteins, werecommend using the RNeasy Fibrous TissueMini Kit (see page 76 for orderinginformation).
b) Too much starting material In subsequent preparations, reduce theamount of starting material. It is essential touse the correct amount of starting material(see protocols).
c) Centrifugation before adding Centrifuge the lysate before adding ethanol,ethanol not performed (protocols and use only this supernatant in subsequentfor tissues and mechanical steps (see protocols). Pellets contain cell disruption of yeast) debris that can clog the RNeasy spin
column.d) Centrifugation temperature too low The centrifugation temperature should be
20–25°C. Some centrifuges may cool tobelow 20°C even when set at 20°C. Thiscan cause formation of precipitates that canclog the RNeasy spin column. If thishappens, set the centrifugation temperatureto 25°C. Warm the ethanol-containinglysate to 37°C before transferring it to theRNeasy spin column.
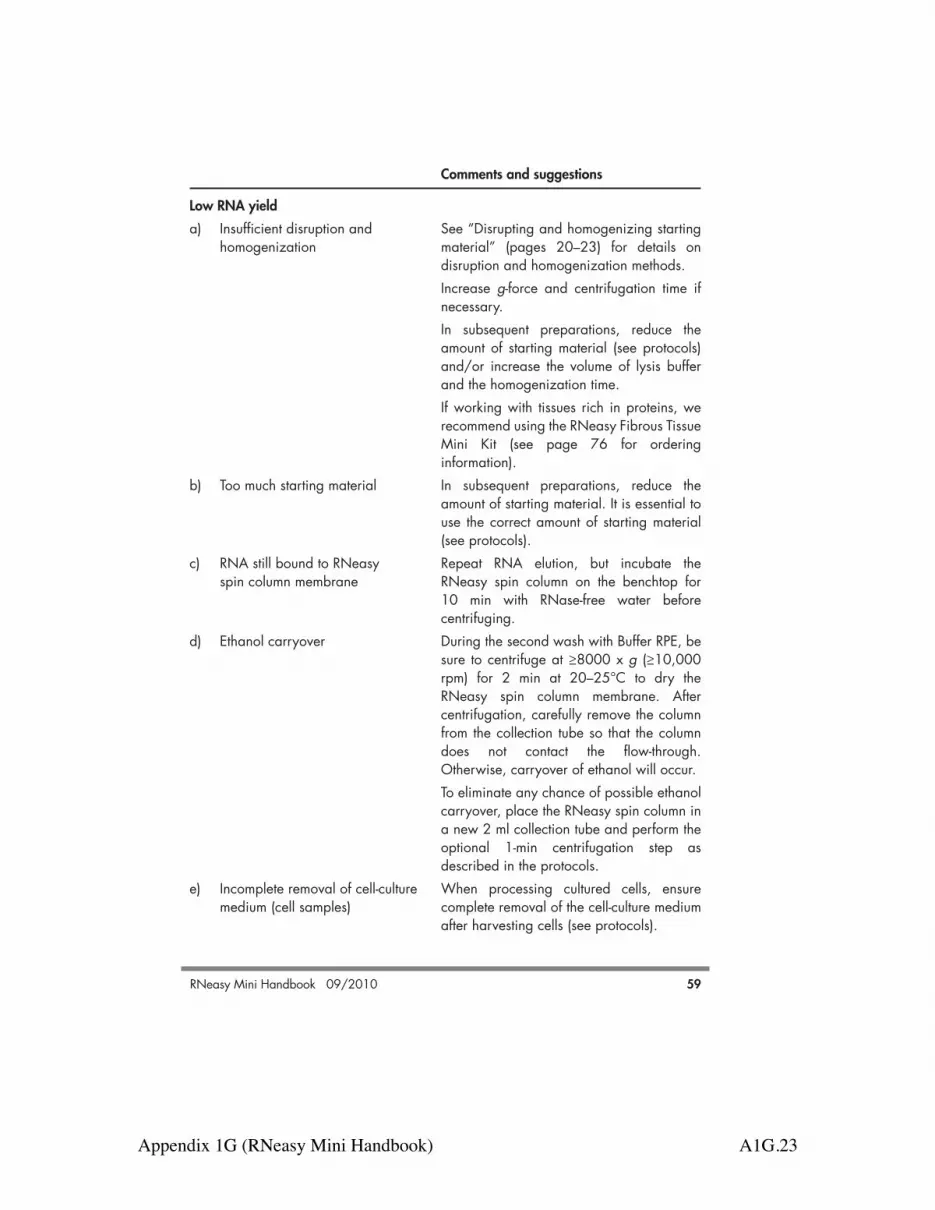
Appendix 1G (RNeasy Mini Handbook) A1G.23
RNeasy Mini Handbook 09/2010 59
Comments and suggestions
Low RNA yielda) Insufficient disruption and See “Disrupting and homogenizing starting
homogenization material” (pages 20–23) for details ondisruption and homogenization methods. Increase g-force and centrifugation time ifnecessary. In subsequent preparations, reduce theamount of starting material (see protocols)and/or increase the volume of lysis bufferand the homogenization time. If working with tissues rich in proteins, werecommend using the RNeasy Fibrous TissueMini Kit (see page 76 for orderinginformation).
b) Too much starting material In subsequent preparations, reduce theamount of starting material. It is essential touse the correct amount of starting material(see protocols).
c) RNA still bound to RNeasy Repeat RNA elution, but incubate thespin column membrane RNeasy spin column on the benchtop for
10 min with RNase-free water beforecentrifuging.
d) Ethanol carryover During the second wash with Buffer RPE, besure to centrifuge at !8000 x g (!10,000rpm) for 2 min at 20–25°C to dry theRNeasy spin column membrane. Aftercentrifugation, carefully remove the columnfrom the collection tube so that the columndoes not contact the flow-through.Otherwise, carryover of ethanol will occur. To eliminate any chance of possible ethanolcarryover, place the RNeasy spin column ina new 2 ml collection tube and perform theoptional 1-min centrifugation step asdescribed in the protocols.
e) Incomplete removal of cell-culture When processing cultured cells, ensure medium (cell samples) complete removal of the cell-culture medium
after harvesting cells (see protocols).

Appendix 1G (RNeasy Mini Handbook) A1G.24
Comments and suggestions
Low A260/A280 valueWater used to dilute RNA for Use 10 mM Tris·Cl, pH 7.5, not RNase-freeA260/A280 measurement water, to dilute the sample before measuring
purity (see Appendix B, page 65).RNA degradeda) Harvested animal tissue not Submerge the tissue in the appropriate
immediately stabilized volume of RNAlater RNA StabilizationReagent immediately after harvesting.
b) Too much animal tissue for Reduce the amount of tissue or increase theproper stabilization amount of RNAlater RNA Stabilization
Reagent used for stabilization (see protocolon page 36).
c) Animal tissue too thick for Cut large samples into slices less than stabilization 0.5 cm thick for stabilization in RNAlater
RNA Stabilization Reagent.d) Frozen animal tissue used for Use only fresh, unfrozen tissue for
stabilization stabilization in RNAlater RNA StabilizationReagent.
e) Storage duration in RNAlater RNAlater stabilized tissue can be stored forRNA Stabilization Reagent up to 1 day at 37°C, up to 7 days atexceeded 15–25°C, or up to 4 weeks at 2–8°C, and
can be archived at –20°C or –80°C.f) Inappropriate handling of Ensure that tissue samples are properly
starting material stabilized and stored in RNAlater RNAStabilization Reagent. For frozen cell pellets or frozen tissuesamples, ensure that they were flash-frozenimmediately in liquid nitrogen and properlystored at –70°C. Perform the RNeasyprocedure quickly, especially the first fewsteps. See Appendix A (page 63), “Handling andstoring starting material” (page 20), and theRNAlater protocol (page 36).
60 RNeasy Mini Handbook 09/2010

Appendix 1G (RNeasy Mini Handbook) A1G.25
Comments and suggestions
g) RNase contamination Although all RNeasy buffers have beentested and are guaranteed RNase-free,RNases can be introduced during use. Becertain not to introduce any RNases duringthe RNeasy procedure or later handling. SeeAppendix A (page 63) for general remarkson handling RNA. Do not put RNA samples into a vacuumdryer that has been used in DNApreparations where RNases may have beenused.
DNA contamination in downstream experimentsa) Optimal procedure not used For animal cells, we recommend purifying
(cell samples) cytoplasmic RNA for applications where theabsence of DNA contamination is critical,since intact nuclei are removed at the start ofthe procedure. The protocol can bedownloaded at www.qiagen.com/literature/protocols/RNeasyMini.aspx .
b) No incubation with Buffer RW1 In subsequent preparations, incubate theRNeasy spin column for 5 min at roomtemperature (15–25°C) after addition ofBuffer RW1 and before centrifuging.
c) No DNase treatment Perform optional on-column DNasedigestion using the RNase-Free DNase Set(see Appendix D, page 69) at the pointindicated in the individual protocols. Alternatively, after the RNeasy procedure,DNase digest the RNA eluate. Afterinactivating the DNase by heat treatment,the RNA can be either used directly in thedownstream application without furthertreatment, or repurified using the RNAcleanup protocol (page 56).
61RNeasy Mini Handbook 09/2010
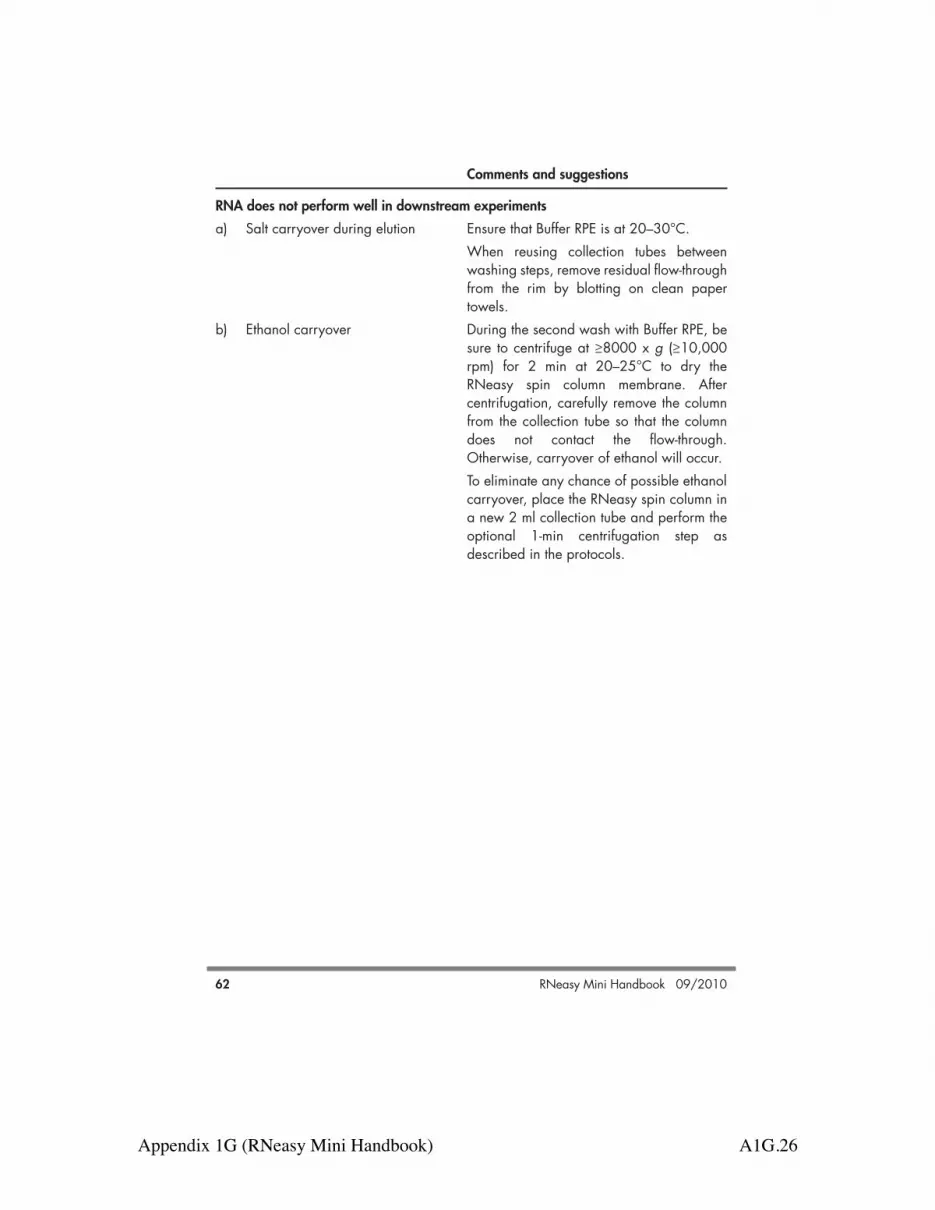
Appendix 1G (RNeasy Mini Handbook) A1G.26
Comments and suggestions
RNA does not perform well in downstream experimentsa) Salt carryover during elution Ensure that Buffer RPE is at 20–30°C.
When reusing collection tubes betweenwashing steps, remove residual flow-throughfrom the rim by blotting on clean papertowels.
b) Ethanol carryover During the second wash with Buffer RPE, besure to centrifuge at !8000 x g (!10,000rpm) for 2 min at 20–25°C to dry theRNeasy spin column membrane. Aftercentrifugation, carefully remove the columnfrom the collection tube so that the columndoes not contact the flow-through.Otherwise, carryover of ethanol will occur. To eliminate any chance of possible ethanolcarryover, place the RNeasy spin column ina new 2 ml collection tube and perform theoptional 1-min centrifugation step asdescribed in the protocols.
62 RNeasy Mini Handbook 09/2010

Appendix 1G (RNeasy Mini Handbook) A1G.27
Appendix A: General Remarks on Handling RNA
Handling RNARibonucleases (RNases) are very stable and active enzymes that generally do notrequire cofactors to function. Since RNases are difficult to inactivate and even minuteamounts are sufficient to destroy RNA, do not use any plasticware or glassware withoutfirst eliminating possible RNase contamination. Great care should be taken to avoidinadvertently introducing RNases into the RNA sample during or after the purificationprocedure. In order to create and maintain an RNase-free environment, the followingprecautions must be taken during pretreatment and use of disposable andnondisposable vessels and solutions while working with RNA.
General handlingProper microbiological, aseptic technique should always be used when working withRNA. Hands and dust particles may carry bacteria and molds and are the most commonsources of RNase contamination. Always wear latex or vinyl gloves while handlingreagents and RNA samples to prevent RNase contamination from the surface of the skinor from dusty laboratory equipment. Change gloves frequently and keep tubes closedwhenever possible. Keep purified RNA on ice when aliquots are pipetted fordownstream applications.
Disposable plasticwareThe use of sterile, disposable polypropylene tubes is recommended throughout theprocedure. These tubes are generally RNase-free and do not require pretreatment toinactivate RNases.
Nondisposable plasticwareNondisposable plasticware should be treated before use to ensure that it is RNase-free.Plasticware should be thoroughly rinsed with 0.1 M NaOH, 1 mM EDTA* followed byRNase-free water (see ”Solutions”, page 64). Alternatively, chloroform-resistantplasticware can be rinsed with chloroform* to inactivate RNases.
* When working with chemicals, always wear a suitable lab coat, disposable gloves, and protectivegoggles. For more information, consult the appropriate material safety data sheets (MSDSs), available fromthe product supplier.
63RNeasy Mini Handbook 09/2010

Appendix 1G (RNeasy Mini Handbook) A1G.28
RNeasy Mini Handbook 09/201064
GlasswareGlassware should be treated before use to ensure that it is RNase-free. Glassware usedfor RNA work should be cleaned with a detergent,* thoroughly rinsed, and oven bakedat 240°C for at least 4 hours (overnight, if more convenient) before use. Autoclavingalone will not fully inactivate many RNases. Alternatively, glassware can be treated withDEPC* (diethyl pyrocarbonate). Fill glassware with 0.1% DEPC (0.1% in water), allowto stand overnight (12 hours) at 37°C, and then autoclave or heat to 100°C for 15 minutes to eliminate residual DEPC.
Electrophoresis tanksElectrophoresis tanks should be cleaned with detergent solution (e.g., 0.5% SDS),*thoroughly rinsed with RNase-free water, and then rinsed with ethanol† and allowed todry.
SolutionsSolutions (water and other solutions) should be treated with 0.1% DEPC. DEPC is astrong, but not absolute, inhibitor of RNases. It is commonly used at a concentration of0.1% to inactivate RNases on glass or plasticware or to create RNase-free solutions andwater. DEPC inactivates RNases by covalent modification. Add 0.1 ml DEPC to 100 mlof the solution to be treated and shake vigorously to bring the DEPC into solution. Letthe solution incubate for 12 hours at 37°C. Autoclave for 15 minutes to remove anytrace of DEPC. DEPC will react with primary amines and cannot be used directly to treatTris* buffers. DEPC is highly unstable in the presence of Tris buffers and decomposesrapidly into ethanol and CO2. When preparing Tris buffers, treat water with DEPC first,and then dissolve Tris to make the appropriate buffer. Trace amounts of DEPC willmodify purine residues in RNA by carbethoxylation. Carbethoxylated RNA is translatedwith very low efficiency in cell-free systems. However, its ability to form DNA:RNA orRNA:RNA hybrids is not seriously affected unless a large fraction of the purine residueshave been modified. Residual DEPC must always be eliminated from solutions or vesselsby autoclaving or heating to 100°C for 15 minutes. Note: RNeasy buffers are guaranteed RNase-free without using DEPC treatment and aretherefore free of any DEPC contamination.
* When working with chemicals, always wear a suitable lab coat, disposable gloves, and protectivegoggles. For more information, consult the appropriate material safety data sheets (MSDSs), available fromthe product supplier.
† Plastics used for some electrophoresis tanks are not resistant to ethanol. Take proper care and check thesupplier’s instructions.

Appendix 1G (RNeasy Mini Handbook) A1G.29
RNeasy Mini Handbook 09/2010 65
Appendix B: Storage, Quantification, andDetermination of Quality of RNA
Storage of RNAPurified RNA may be stored at –20°C or –70°C in RNase-free water. Under theseconditions, no degradation of RNA is detectable after 1 year.
Quantification of RNAThe concentration of RNA should be determined by measuring the absorbance at260 nm (A260) in a spectrophotometer (see “Spectrophotometric quantification of RNA”below). For small amounts of RNA, however, it may be difficult to determine amountsphotometrically. Small amounts of RNA can be accurately quantified using an Agilent®2100 bioanalyzer, quantitative RT-PCR, or fluorometric quantification.
Spectrophotometric quantification of RNATo ensure significance, A260 readings should be greater than 0.15. An absorbance of1 unit at 260 nm corresponds to 44 µg of RNA per ml (A260=1 ! 44 µg/ml). Thisrelation is valid only for measurements at a neutral pH. Therefore, if it is necessary todilute the RNA sample, this should be done in a buffer with neutral pH.* As discussedbelow (see “Purity of RNA”, page 66), the ratio between the absorbance values at 260and 280 nm gives an estimate of RNA purity.When measuring RNA samples, be certain that cuvettes are RNase-free, especially ifthe RNA is to be recovered after spectrophotometry. This can be accomplished bywashing cuvettes with 0.1 M NaOH, 1 mM EDTA,* followed by washing with RNase-free water (see “Solutions”, page 64). Use the buffer in which the RNA is diluted to zerothe spectrophotometer. An example of the calculation involved in RNA quantification isshown below:
Volume of RNA sample = 100 µlDilution = 10 µl of RNA sample + 490 µl of 10 mM Tris·Cl,* pH 7.0 (1/50dilution)Measure absorbance of diluted sample in a 1 ml cuvette (RNase-free)A260 = 0.2Concentration of RNA sample = 44 µg/ml x A260 x dilution factor
= 44 µg/ml x 0.2 x 50= 440 µg/ml
* When working with chemicals, always wear a suitable lab coat, disposable gloves, and protectivegoggles. For more information, consult the appropriate material safety data sheets (MSDSs), available fromthe product supplier.
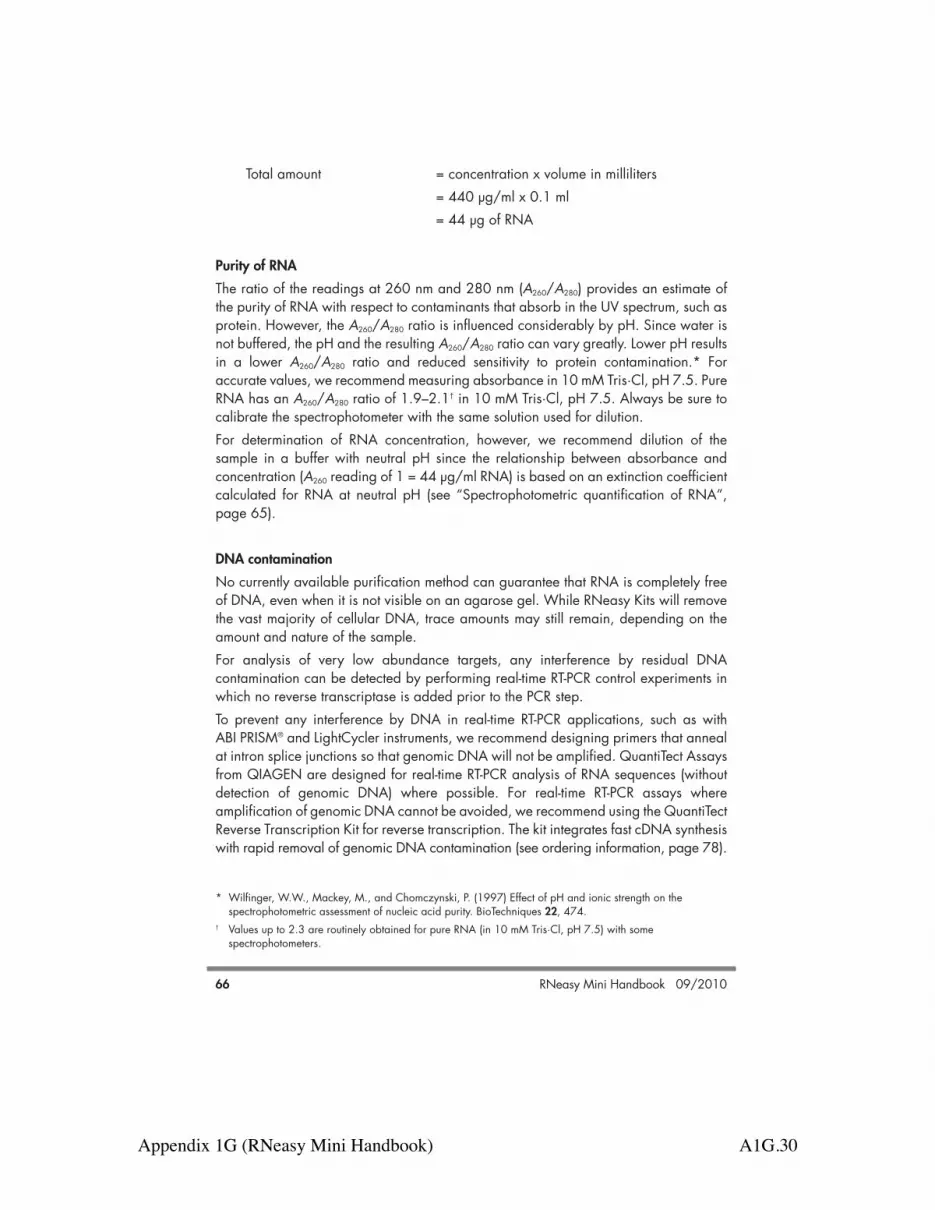
Appendix 1G (RNeasy Mini Handbook) A1G.30
RNeasy Mini Handbook 09/201066
Total amount = concentration x volume in milliliters= 440 µg/ml x 0.1 ml= 44 µg of RNA
Purity of RNAThe ratio of the readings at 260 nm and 280 nm (A260/A280) provides an estimate ofthe purity of RNA with respect to contaminants that absorb in the UV spectrum, such asprotein. However, the A260/A280 ratio is influenced considerably by pH. Since water isnot buffered, the pH and the resulting A260/A280 ratio can vary greatly. Lower pH resultsin a lower A260/A280 ratio and reduced sensitivity to protein contamination.* Foraccurate values, we recommend measuring absorbance in 10 mM Tris·Cl, pH 7.5. PureRNA has an A260/A280 ratio of 1.9–2.1† in 10 mM Tris·Cl, pH 7.5. Always be sure tocalibrate the spectrophotometer with the same solution used for dilution.For determination of RNA concentration, however, we recommend dilution of thesample in a buffer with neutral pH since the relationship between absorbance andconcentration (A260 reading of 1 = 44 µg/ml RNA) is based on an extinction coefficientcalculated for RNA at neutral pH (see “Spectrophotometric quantification of RNA”,page 65).
DNA contaminationNo currently available purification method can guarantee that RNA is completely freeof DNA, even when it is not visible on an agarose gel. While RNeasy Kits will removethe vast majority of cellular DNA, trace amounts may still remain, depending on theamount and nature of the sample. For analysis of very low abundance targets, any interference by residual DNAcontamination can be detected by performing real-time RT-PCR control experiments inwhich no reverse transcriptase is added prior to the PCR step. To prevent any interference by DNA in real-time RT-PCR applications, such as withABI PRISM® and LightCycler instruments, we recommend designing primers that annealat intron splice junctions so that genomic DNA will not be amplified. QuantiTect Assaysfrom QIAGEN are designed for real-time RT-PCR analysis of RNA sequences (withoutdetection of genomic DNA) where possible. For real-time RT-PCR assays whereamplification of genomic DNA cannot be avoided, we recommend using the QuantiTectReverse Transcription Kit for reverse transcription. The kit integrates fast cDNA synthesiswith rapid removal of genomic DNA contamination (see ordering information, page 78).
* Wilfinger, W.W., Mackey, M., and Chomczynski, P. (1997) Effect of pH and ionic strength on thespectrophotometric assessment of nucleic acid purity. BioTechniques 22, 474.
† Values up to 2.3 are routinely obtained for pure RNA (in 10 mM Tris·Cl, pH 7.5) with somespectrophotometers.

Appendix 1G (RNeasy Mini Handbook) A1G.31
RNeasy Mini Handbook 09/2010 67
For other sensitive applications, DNase digestion of the purified RNA with RNase-freeDNase is recommended. A protocol for optional on-column DNase digestion using theRNase-Free DNase Set is provided in Appendix D (page 69). The DNase is efficientlywashed away in subsequent wash steps. Alternatively, after the RNeasy procedure, theRNA eluate can be treated with DNase. The RNA can then be repurified according tothe RNA cleanup protocol (page 56), or after heat inactivation of the DNase, the RNAcan be used directly in downstream applications. The protocol for purification of cytoplasmic RNA from animal cells (available atwww.qiagen.com/literature/protocols/RNeasyMini.aspx ) is particularly advantageousin applications where the absence of DNA contamination is critical, since intact nucleiare removed. Using this protocol, DNase digestion is generally not required: most ofthe DNA is removed with the nuclei, and RNeasy technology efficiently removes nearlyall of the remaining small amounts of DNA without DNase treatment. However, evenfurther DNA removal may be desirable for certain RNA applications that are sensitiveto very small amounts of DNA (e.g., TaqMan RT-PCR analysis with a low-abundancetarget). Using the cytoplasmic RNA protocol with optional DNase digestion results inundetectable levels of DNA, even in sensitive quantitative RT-PCR analyses.
Integrity of RNAThe integrity and size distribution of total RNA purified with RNeasy Kits can be checkedby denaturing agarose gel electrophoresis and ethidium bromide* staining or by usingan Agilent 2100 bioanalyzer. The respective ribosomal RNAs should appear as sharpbands or peaks. The apparent ratio of 28S rRNA to 18S RNA should be approximately2:1. If the ribosomal bands or peaks of a specific sample are not sharp, but appear asa smear towards smaller sized RNAs, it is likely that the sample suffered majordegradation either before or during RNA purification.
Appendix C: Formaldehyde Agarose GelElectrophoresisThe following protocol for formaldehyde agarose (FA) gel electrophoresis is routinelyused at QIAGEN and gives enhanced sensitivity for gel and subsequent analysis (e.g.,northern blotting). A key feature is the concentrated RNA loading buffer that allows alarger volume of RNA sample to be loaded onto the gel than conventional protocols(e.g., Sambrook, J. et al. [1989] Molecular cloning — a laboratory manual. 2nd ed.Cold Spring Harbor, NY: Cold Spring Harbor Laboratory Press).
* When working with chemicals, always wear a suitable lab coat, disposable gloves, and protectivegoggles. For more information, consult the appropriate material safety data sheets (MSDSs), available fromthe product supplier.

Appendix 1G (RNeasy Mini Handbook) A1G.32
!"#$%&'()*(!"#$#%#&'+
++
'),-./+0+122)3+4/$567.78#/2+
9:/)23;+<.)6(+=#6#+>#(+()*'+,*-./'!&-0$'1202'32$' 4%-$5'0#.5'6789:'-0;'67897<'%-0'=*'.$#"*;'-$'"##>'
$*>?*"-$@"*'4ABCDBEF<'G#"'-$'&*-.$'8'>#0$).5'
H#"' >#"*' 20G#">-$2#0I' -;;2$2#0-&' -0;' >#"*' ;*$-2&*;' ?"#$#%#&.I' -0;' .-G*$/'
20G#">-$2#0I'?&*-.*'"*G*"' $#' $)*'!"#$%&'()*)'+$*,-../I'J)2%)'%-0'=*'G#@0;'-$'JJJ5K2-L*05%#>M)-0;=##N.5'
H#"' $*%)02%-&' -..2.$-0%*I' ?&*-.*' %-&&' $#&&OG"**' 99P99ODDO77OQ999I' #"' G20;'
"*L2#0-&'?)#0*'0@>=*".'-$'JJJ5K2-L*05%#>M%#0$-%$5'
:7(/2+?/@7*/+2()*(#68++
! ()*'+,*-./'!&-0$'1202'32$'?"#R2;*.'-'%)#2%*'#G'&/.2.'=@GG*".5'S@GG*"'+T('2.'
$)*'&/.2.'=@GG*"'#G'%)#2%*'=@$'S@GG*"'+T('%-0'%-@.*'.#&2;2G2%-$2#0'#G'.#>*'
.->?&*.I';*?*0;20L'#0'$)*'->#@0$'-0;'$/?*'#G'.*%#0;-"/'>*$-=#&2$*.'20'
$)*'$2..@*5'U0'$)*.*'%-.*.I'S@GG*"'+TF'.)#@&;'=*'@.*;5'
! V;;'*2$)*"'A9' &' O>*"%-?$#*$)-0#&'4 O1W<I'#"'D9' &'D'1';2$)2#$)"*2$#&'
4X((<YI'$#'A'>&'S@GG*"'+T('#"'S@GG*"'+TF'=*G#"*'@.*5'S@GG*".'J2$)'X(('#"' O
1W'%-0'=*'.$#"*;'-$'"##>'$*>?*"-$@"*'G#"'@?'$#'A'>#0$)5'
! V;;'7'R#&@>*.'#G'*$)-0#&'48QCA99Z<'$#'S@GG*"'+!W'G#"'-'J#"N20L'.#&@$2#05'
' Y'()2.'#?$2#0'0#$'20%&@;*;'G#"'?&-0$'$2..@*'20')-0;=##N[')-0;=##N'$#'=*'@?;-$*;5'
'
A5! X2."@?$'-'>-\2>@>'#G'A99'>L'?&-0$'>-$*"2-&'-%%#";20L'$#'.$*?'A-'#"'A=5'
A-5' X2."@?$2#0'J2$)'>#"$-"'-0;'?*.$&*''
U>>*;2-$*&/'?&-%*'$2..@*'20'&2K@2;'02$"#L*05']"20;'$)#"#@L)&/5'X*%-0$'$2..@*'
?#J;*"'-0;'&2K@2;'02$"#L*0'20$#'+,-.*OG"**I'&2K@2;O02$"#L*0C%##&*;I'D'>&'
>2%"#%*0$"2G@L*'$@=*'40#$'.@??&2*;<5'V&&#J'$)*'&2K@2;'02$"#L*0'$#'*R-?#"-$*I'
=@$';#'0#$'-&&#J'$)*'$2..@*'$#'$)-J5'!"#%**;'2>>*;2-$*&/'$#'.$*?'D5'
A=5' X2."@?$2#0'@.20L'$)*'(2..@*T/.*"'UUI'(2..@*T/.*"'T(I'#"'(2..@*+@?$#"^'
H#"';*$-2&*;'20G#">-$2#0'#0';2."@?$2#0'#G'?&-0$'$2..@*.'G#"'?@"2G2%-$2#0'#G'
+,VI'.**'0)%%1#2&%#3'+$*,-../I'0)%%1#2&%#3'20'+$*,-../4'#"'0)%%1#!156.3'+$*,-../5'4()*'!"#$%&'()*)'+$*,-../'J2&&'=*'@?;-$*;'J2$)'$)2.'#?$2#05<'
+
A)6")*3+BCDD+

Appendix 1G (RNeasy Mini Handbook) A1G.33
!
!"#$%&'!(!)**#+!,'-./0&012'*!
!"#$ %&'("')*(+$ ,-.+/0-/1$ -/2"#3*(-"/$ */)$ &#")%.('0&+.-2-.$ )-0.,*-3+#04$ 0++$ (5+$ #+0&+.(-6+$ 789:;<$ =-($5*/)>""=$"#$%0+#$3*/%*,?$
@#*)+3*#=0A$789:;<B4$C<+*0DB4$@-00%+C%&("#B$E789:;<$:#"%&F?$$GHIJKLM$HGNOHGG$$P$OHGG$789:;<4$*,,$#-15(0$#+0+#6+)?$
O?! 9))$LKH$ ,$Q%22+#$CR@$"#$Q%22+#$CRS$("$*$3*T-3%3$"2$GHH$31$(-00%+$&"U)+#?$V"#(+T$6-1"#"%0,D?$
W?! @#*/02+#$(5+$,D0*(+$("$*$78905#+))+#$0&-/$.",%3/$E,-,*.F$&,*.+)$-/$*$O$3,$.",,+.(-"/$(%>+?$S+/(#-2%1+$2"#$O$3-/$*($2%,,$0&++)?$@#*/02+#$(5+$0%&+#/*(*/($"2$(5+$2,"U'(5#"%15$("$*$/+U$3-.#".+/(#-2%1+$(%>+$E/"($0%&&,-+)F$U-(5"%($)-0(%#>-/1$(5+$.+,,')+>#-0$&+,,+(?$
L?! 9))$H?K$6",%3+$"2$+(5*/",$EMIXGHHYF$("$(5+$.,+*#+)$,D0*(+4$*/)$3-T$-33+)-*(+,D$>D$&-&+((-/1?$Z"$/"($.+/(#-2%1+?$[#".++)$-33+)-*(+,D$("$0(+&$K?$
K?! @#*/02+#$(5+$0*3&,+$E%0%*,,D$IKH$ ,F4$U-(5$*/D$&#+.-&-(*(+4$("$*/$C<+*0D$\-/-$0&-/$.",%3/$E&-/=F$-/$*$O$3,$.",,+.(-"/$(%>+$E0%&&,-+)F?$S,"0+$(5+$,-)4$*/)$.+/(#-2%1+$2"#$GK$0$*($ ]HHH$T$!$E GH4HHH$#&3F?$Z-0.*#)$(5+$2,"U'(5#"%15?$
I?! 9))$JHH$ ,$Q%22+#$C^G$("$(5+$C<+*0D$0&-/$.",%3/?$S,"0+$(5+$,-)4$*/)$.+/(#-2%1+$2"#$GK$0$*($ ]HHH$T$!?$Z-0.*#)$(5+$2,"U'(5#"%15?$
J?! 9))$KHH$ ,$Q%22+#$C[;$("$(5+$C<+*0D$0&-/$.",%3/?$S,"0+$(5+$,-)4$*/)$.+/(#-2%1+$2"#$GK$0$*($ ]HHH$T$!?$Z-0.*#)$(5+$2,"U'(5#"%15?$
]?! 9))$KHH$ ,$Q%22+#$C[;$("$(5+$C<+*0D$0&-/$.",%3/?$S,"0+$(5+$,-)4$*/)$.+/(#-2%1+$2"#$O$3-/$*($ ]HHH$T$!?$$
3%420/#&A$[,*.+$(5+$C<+*0D$0&-/$.",%3/$-/$*$/+U$O$3,$.",,+.(-"/$(%>+$E0%&&,-+)F?$S+/(#-2%1+$*($2%,,$0&++)$2"#$G$3-/$("$)#D$(5+$3+3>#*/+?$
M?! [,*.+$(5+$C<+*0D$0&-/$.",%3/$-/$*$/+U$G?K$3,$.",,+.(-"/$(%>+$E0%&&,-+)F?$9))$WHXKH$ ,$C<*0+'2#++$U*(+#$)-#+.(,D$("$(5+$0&-/$.",%3/$3+3>#*/+?$S,"0+$(5+$,-)4$*/)$.+/(#-2%1+$2"#$G$3-/$*($ ]HHH$T$!$("$+,%(+$(5+$C<9?$
GH?! 82$(5+$+T&+.(+)$C<9$D-+,)$-0$_WH$ 14$#+&+*($0(+&$M$%0-/1$*/"(5+#$WHXKH$ ,$"2$C<*0+'2#++$U*(+#?$9,(+#/*(-6+,D4$%0+$(5+$+,%*(+$2#"3$0(+&$M$E-2$5-15$C<9$."/.+/(#*(-"/$-0$#+`%-#+)F?$C+%0+$(5+$.",,+.(-"/$(%>+$2#"3$0(+&$M?$
$
$

Appendix 1H (Turbo DNA-free Kit) A1H.1
Appendix 1H Turbo DNA-free kit
TURBO DNA-free™ Kit
TURBO DNase Treatment and Removal ReagentsPart Number AM1907
A. Product DescriptionAmbion® TURBO DNA-free™ DNase Treatment and RemovalReagents are designed to remove contaminating DNA fromRNA preparations, and to subsequently remove the DNase anddivalent cations from the sample. The included TURBODNase (patent pending) is an engineered version of wild typeDNase I with 350% greater catalytic efficiency. TURBODNase has a markedly higher affinity for DNA than conven-tional DNase I, and is thus more effective in removing tracequantities of DNA contamination. In addition, TURBODNase maintains up to 50! greater activity than DNase I insolutions containing physiological salt concentrations. TheTURBO DNase provided in the kit is overexpressed in an ani-mal-free system, and is then extensively purified in abovine-free process and tested. It is guaranteed to lack any con-taminating RNase activity. The kit also includes an optimizedDNase reaction buffer that contains a small molecule enhancerthat extends the activity of the TURBO DNase enzyme by100-fold or more. Using TURBO DNA-free, contaminatingDNA is digested to levels below the limit of detection by rou-tine PCR (Figure 1). The DNase is then removed rapidly andeasily using a novel method which does not require phe-nol/chloroform extraction, alcohol precipitation, heating, orthe addition of EDTA (see Table 1). TURBO DNA-freetreated RNA is suitable for endpoint or real-time RT-PCR,microarray analysis, RPAs, Northerns, and all other RNA anal-ysis methods.
REVISED 4/2009Inactivation time extended
in step 4 on page 7.
DNA-free.fm Page 1 Tuesday, June 9, 2009 3:00 PM

Appendix 1H (Turbo DNA-free Kit) A1H.2
! A. Product Description
Figure 1. TURBO DNA-free™ Reduces Genomic DNA Contamination by Greater than 5 Million Fold.
Equal amounts of mouse spleen total RNA (purified using Ambion’s RNAqueous® Kit)were either treated with 7.8 U of TURBO DNase in a 130 µL reaction for 20 min at37°C, or were left untreated. The digestions were stopped by adding 22 µL DNase Inacti-vation Reagent. 5 µL (1 µg RNA) was amplified in a one step 25 µL RT-PCR using a Taq-Man® primer probe set for mouse GAPDH. Treated and untreated samples were reversetranscribed with Ambion’s MessageSensor™ RT Kit. RT-minus samples were subjected toPCR to control for DNA contamination. Results are shown using a linear scale so that theamplification plot for the TURBO DNase-treated, RT-minus sample is visible.The fold-removal (5.4 ! 106 fold) of genomic DNA was calculated as follows: The Ct valuefrom the untreated RNA in the RT-minus reaction is the level of gDNA contamination.The fold-removal was determined by subtracting the RT-minus reaction Ct value for thetreated RNA sample, 39.5 (the other duplicate’s signal was undetectable) from the Ct valueof the untreated sample, 17.13, and raising the 17.13 as the exponent with a base of 2.
2.5
2
1.5
1
.5
0
-.510 20 30 40
Del
ta R
n
Cycle Number
TURBO DNA-free treated/RT-minus
TURBO DNA-free treated/RT-PCR
Untreated/RT-minus
Untreated/RT-PCR
Table 1. Treatment of RNA with TURBO DNA-free™ Maintains Target Sensitivity in Real-time RT-PCR
Ct for !-actin (duplicates)
RNA treatment 100 pg RNA 1 pg RNA
none 24.78 / 24.67 31.83 / 31.53
TURBO DNA-free treated 24.50 / 24.62 30.89 /30.88
Ct for CDC-2 (duplicates)
none 28.88 / 28.24 34.41 / 35.50
TURBO DNA-free treated 27.71 / 28.10 34.04 / 33.99
Total RNA from HeLa S3 cells was treated with the TURBO DNA-free™ Kit following thestandard protocol. 5 µL of the treated RNA was then reverse transcribed using Ambion’sMessageSensor RT Kit, and the resulting cDNA was amplified by real-time RT-PCR usingprimer and probe sets for either human !-actin or CDC-2 with TaqMan® detection.
DNA-free.fm Page 2 Tuesday, June 9, 2009 3:00 PM
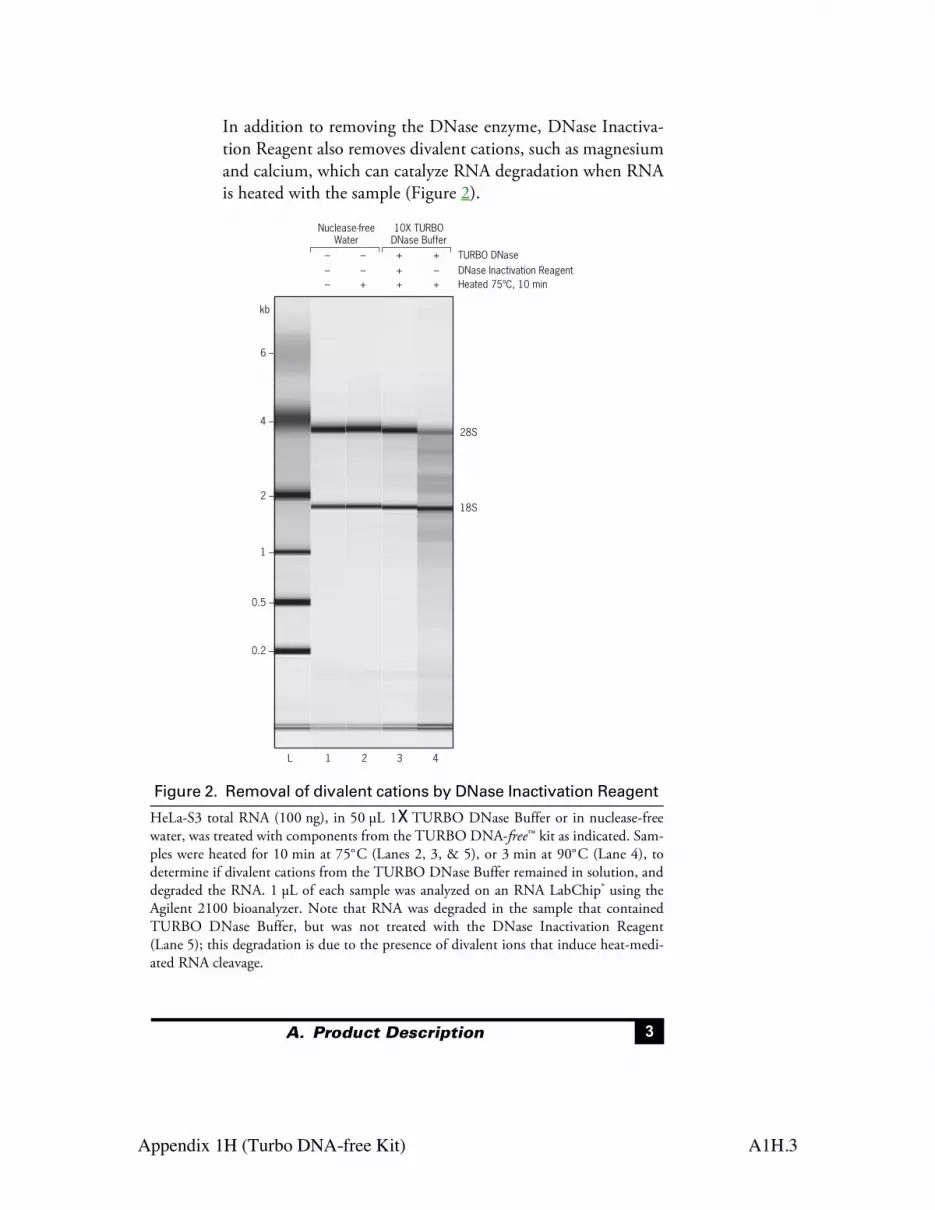
Appendix 1H (Turbo DNA-free Kit) A1H.3
A. Product Description !
In addition to removing the DNase enzyme, DNase Inactiva-tion Reagent also removes divalent cations, such as magnesiumand calcium, which can catalyze RNA degradation when RNAis heated with the sample (Figure 2).
Figure 2. Removal of divalent cations by DNase Inactivation Reagent
HeLa-S3 total RNA (100 ng), in 50 µL 1! TURBO DNase Buffer or in nuclease-freewater, was treated with components from the TURBO DNA-free™ kit as indicated. Sam-ples were heated for 10 min at 75°C (Lanes 2, 3, & 5), or 3 min at 90°C (Lane 4), todetermine if divalent cations from the TURBO DNase Buffer remained in solution, anddegraded the RNA. 1 µL of each sample was analyzed on an RNA LabChip® using theAgilent 2100 bioanalyzer. Note that RNA was degraded in the sample that containedTURBO DNase Buffer, but was not treated with the DNase Inactivation Reagent(Lane 5); this degradation is due to the presence of divalent ions that induce heat-medi-ated RNA cleavage.
Nuclease-free Water
10X TURBO DNase Buffer
TURBO DNase DNase Inactivation ReagentHeated 75ºC, 10 min
28S
kb
6 –
4 –
2 –
1 –
0.5 –
0.2 –
18S
L 1 2 3 4
– – –
– – +
+ + +
+ – +
DNA-free.fm Page 3 Tuesday, June 9, 2009 3:00 PM

Appendix 1H (Turbo DNA-free Kit) A1H.4
! B. Procedure Overview
B. Procedure OverviewFor the detailed procedure, see section E on page 5.
Figure 3. TURBO DNA-free™ Procedure Overview
Incubate
Add DNase Inactivation Reagent
Add DNase Digestion Reagents
Centrifuge and transfer RNA
Incubate and mix
1. Add 0.1 volume 10X TURBO DNase Buffer and 1 µL TURBO DNase to the RNA, and mix gently.
2. Incubate at 37°C for 20–30 min.
3. Add resuspended DNase Inactivation Reagent (typically 0.1 volume) and mix well.
4. Incubate 5 min at room temperature, mixing occasionally.
5. Centrifuge at 10,000 x g for 1.5 min and transfer the RNA to a fresh tube.
DNA-free.fm Page 4 Tuesday, June 9, 2009 3:00 PM
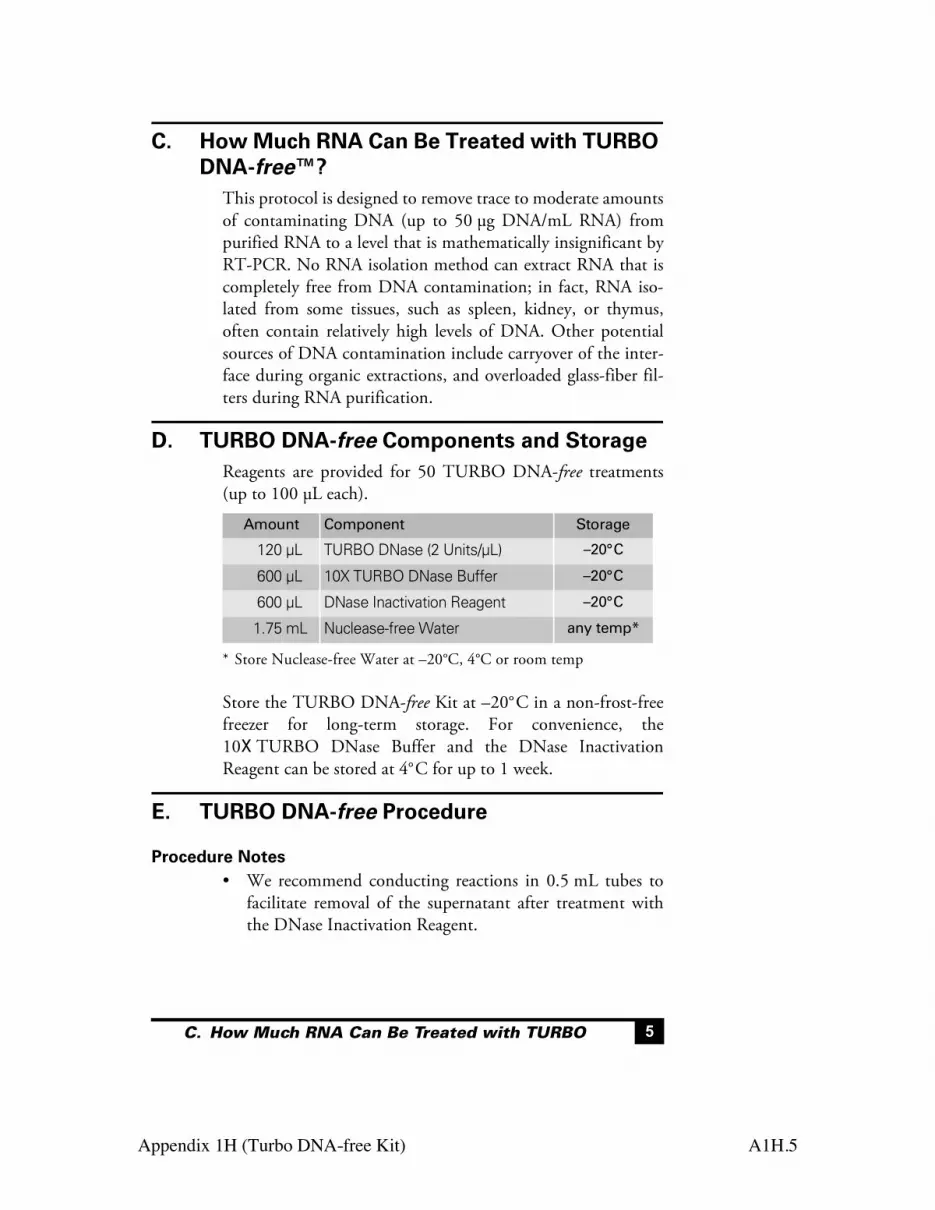
Appendix 1H (Turbo DNA-free Kit) A1H.5
C. How Much RNA Can Be Treated with TURBO !
C. How Much RNA Can Be Treated with TURBO DNA-free™?
This protocol is designed to remove trace to moderate amountsof contaminating DNA (up to 50 µg DNA/mL RNA) frompurified RNA to a level that is mathematically insignificant byRT-PCR. No RNA isolation method can extract RNA that iscompletely free from DNA contamination; in fact, RNA iso-lated from some tissues, such as spleen, kidney, or thymus,often contain relatively high levels of DNA. Other potentialsources of DNA contamination include carryover of the inter-face during organic extractions, and overloaded glass-fiber fil-ters during RNA purification.
D. TURBO DNA-free Components and StorageReagents are provided for 50 TURBO DNA-free treatments(up to 100 µL each).
Store the TURBO DNA-free Kit at –20°C in a non-frost-freefreezer for long-term storage. For convenience, the10! TURBO DNase Buffer and the DNase InactivationReagent can be stored at 4°C for up to 1 week.
E. TURBO DNA-free Procedure
Procedure Notes• We recommend conducting reactions in 0.5 mL tubes to
facilitate removal of the supernatant after treatment withthe DNase Inactivation Reagent.
Amount Component Storage
120 µL TURBO DNase (2 Units/µL) –20°C
600 µL 10X TURBO DNase Buffer –20°C
600 µL DNase Inactivation Reagent –20°C
1.75 mL Nuclease-free Water any temp*
* Store Nuclease-free Water at –20°C, 4°C or room temp
DNA-free.fm Page 5 Tuesday, June 9, 2009 3:00 PM
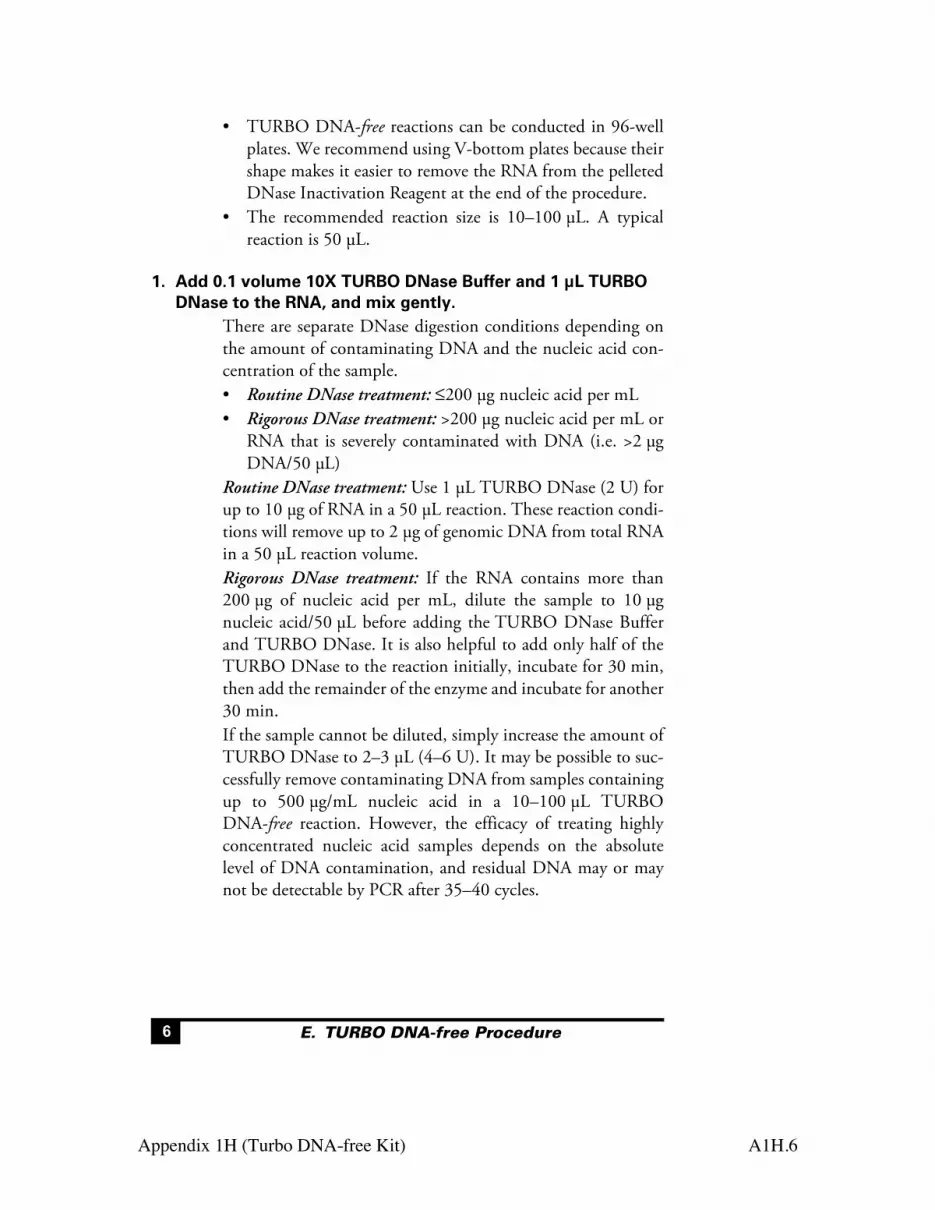
Appendix 1H (Turbo DNA-free Kit) A1H.6
! E. TURBO DNA-free Procedure
• TURBO DNA-free reactions can be conducted in 96-wellplates. We recommend using V-bottom plates because theirshape makes it easier to remove the RNA from the pelletedDNase Inactivation Reagent at the end of the procedure.
• The recommended reaction size is 10–100 µL. A typicalreaction is 50 µL.
1. Add 0.1 volume 10X TURBO DNase Buffer and 1 µL TURBO DNase to the RNA, and mix gently.
There are separate DNase digestion conditions depending onthe amount of contaminating DNA and the nucleic acid con-centration of the sample.• Routine DNase treatment: !200 µg nucleic acid per mL• Rigorous DNase treatment: >200 µg nucleic acid per mL or
RNA that is severely contaminated with DNA (i.e. >2 µgDNA/50 µL)
Routine DNase treatment: Use 1 µL TURBO DNase (2 U) forup to 10 µg of RNA in a 50 µL reaction. These reaction condi-tions will remove up to 2 µg of genomic DNA from total RNAin a 50 µL reaction volume.Rigorous DNase treatment: If the RNA contains more than200 µg of nucleic acid per mL, dilute the sample to 10 µgnucleic acid/50 µL before adding the TURBO DNase Bufferand TURBO DNase. It is also helpful to add only half of theTURBO DNase to the reaction initially, incubate for 30 min,then add the remainder of the enzyme and incubate for another30 min.If the sample cannot be diluted, simply increase the amount ofTURBO DNase to 2–3 µL (4–6 U). It may be possible to suc-cessfully remove contaminating DNA from samples containingup to 500 µg/mL nucleic acid in a 10–100 µL TURBODNA-free reaction. However, the efficacy of treating highlyconcentrated nucleic acid samples depends on the absolutelevel of DNA contamination, and residual DNA may or maynot be detectable by PCR after 35–40 cycles.
DNA-free.fm Page 6 Tuesday, June 9, 2009 3:00 PM

Appendix 1H (Turbo DNA-free Kit) A1H.7
E. TURBO DNA-free Procedure !
2. Incubate at 37°C for 20–30 min.If only half of the TURBO DNase was added in step 1, incu-bate for 30 min, then add the rest of the TURBO DNase andincubate for 30 min more.
3. Add resuspended DNase Inactivation Reagent (typically 0.1 volume) and mix well.
Always resuspend the DNase Inactivation Reagent by flickingor vortexing the tube before dispensing it.• For routine DNase treatment use 2 µL or 0.1 volume DNase
Inactivation Reagent, whichever is greater. For example, ifthe RNA volume is 50 µL, and 1 µL of TURBO DNase wasused in step 1, add 5 µL of DNase Inactivation Reagent.
• For rigorous DNase treatments, where 2–3 µL of TURBODNase was used, add 0.2 volumes of DNase InactivationReagent.
IMPORTANTAlways use at least 2 µL of DNase Inactivation Reagent, even if itis more than 0.1 volume.
NOTEThe DNase Inactivation Reagent may become difficult to pipetteafter multiple uses due to depletion of fluid from the interstitialspaces. If this happens, add a volume of Nuclease-free Water(supplied with the kit) equal to approximately 20–25% of the bedvolume of the remaining DNase Inactivation Reagent, and vor-tex thoroughly to recreate a pipettable slurry.
4. Incubate 5 min at room temperature, mixing occasionally. Flick the tube 2–3 times during the incubation period to redis-perse the DNase Inactivation Reagent.
NOTEIf room temperature cools below 22–26 °C, move the tubes to aheat block or oven to control the temperature. Cold environ-ments can reduce the inactivation of the TURBO DNase, leavingresidual DNase in the RNA sample.
DNA-free.fm Page 7 Tuesday, June 9, 2009 3:00 PM
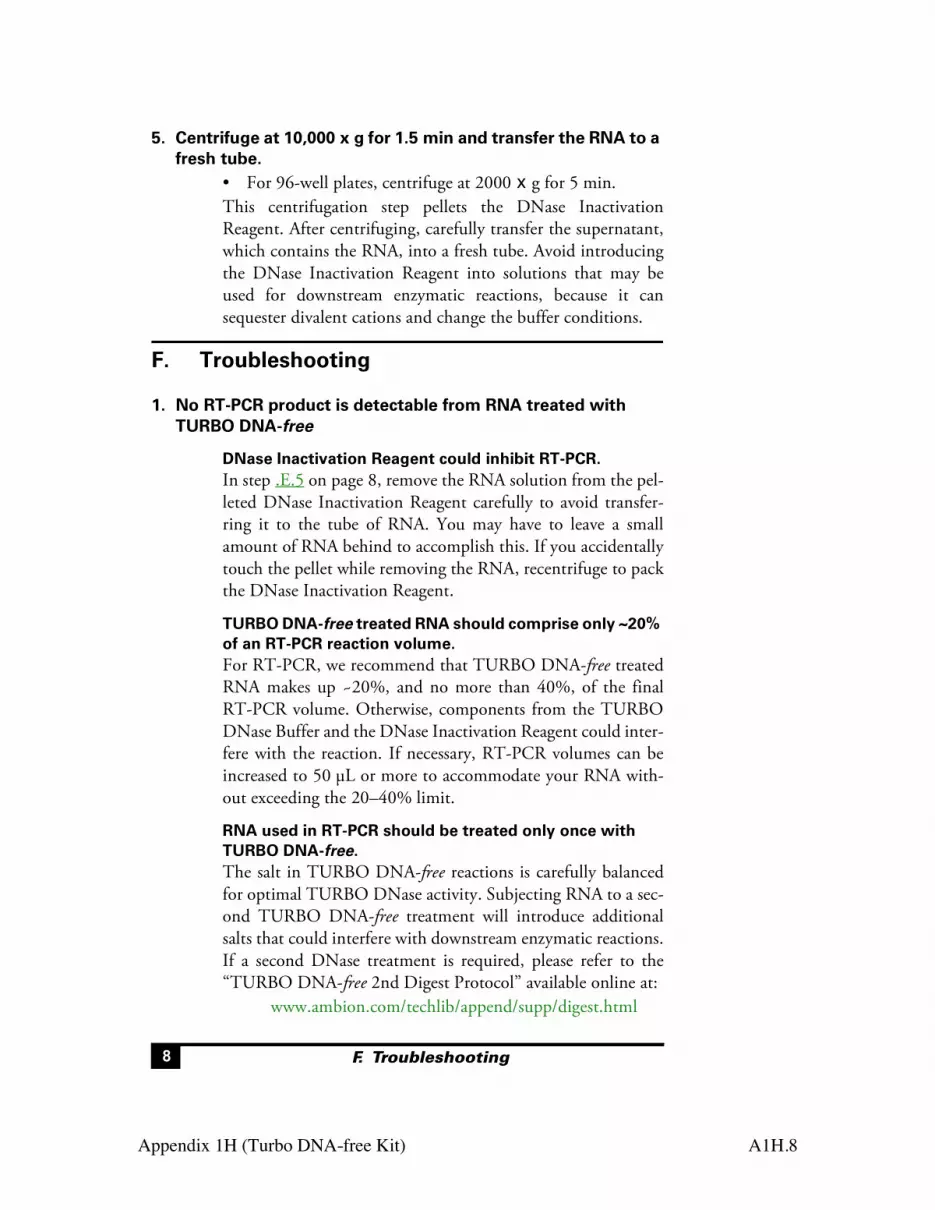
Appendix 1H (Turbo DNA-free Kit) A1H.8
! F. Troubleshooting
5. Centrifuge at 10,000 x g for 1.5 min and transfer the RNA to a fresh tube.
• For 96-well plates, centrifuge at 2000 ! g for 5 min.This centrifugation step pellets the DNase InactivationReagent. After centrifuging, carefully transfer the supernatant,which contains the RNA, into a fresh tube. Avoid introducingthe DNase Inactivation Reagent into solutions that may beused for downstream enzymatic reactions, because it cansequester divalent cations and change the buffer conditions.
F. Troubleshooting
1. No RT-PCR product is detectable from RNA treated with TURBO DNA-free
DNase Inactivation Reagent could inhibit RT-PCR.In step .E.5 on page 8, remove the RNA solution from the pel-leted DNase Inactivation Reagent carefully to avoid transfer-ring it to the tube of RNA. You may have to leave a smallamount of RNA behind to accomplish this. If you accidentallytouch the pellet while removing the RNA, recentrifuge to packthe DNase Inactivation Reagent.
TURBO DNA-free treated RNA should comprise only ~20% of an RT-PCR reaction volume.For RT-PCR, we recommend that TURBO DNA-free treatedRNA makes up ~20%, and no more than 40%, of the finalRT-PCR volume. Otherwise, components from the TURBODNase Buffer and the DNase Inactivation Reagent could inter-fere with the reaction. If necessary, RT-PCR volumes can beincreased to 50 µL or more to accommodate your RNA with-out exceeding the 20–40% limit.
RNA used in RT-PCR should be treated only once with TURBO DNA-free.The salt in TURBO DNA-free reactions is carefully balancedfor optimal TURBO DNase activity. Subjecting RNA to a sec-ond TURBO DNA-free treatment will introduce additionalsalts that could interfere with downstream enzymatic reactions.If a second DNase treatment is required, please refer to the“TURBO DNA-free 2nd Digest Protocol” available online at:
www.ambion.com/techlib/append/supp/digest.html
DNA-free.fm Page 8 Tuesday, June 9, 2009 3:00 PM
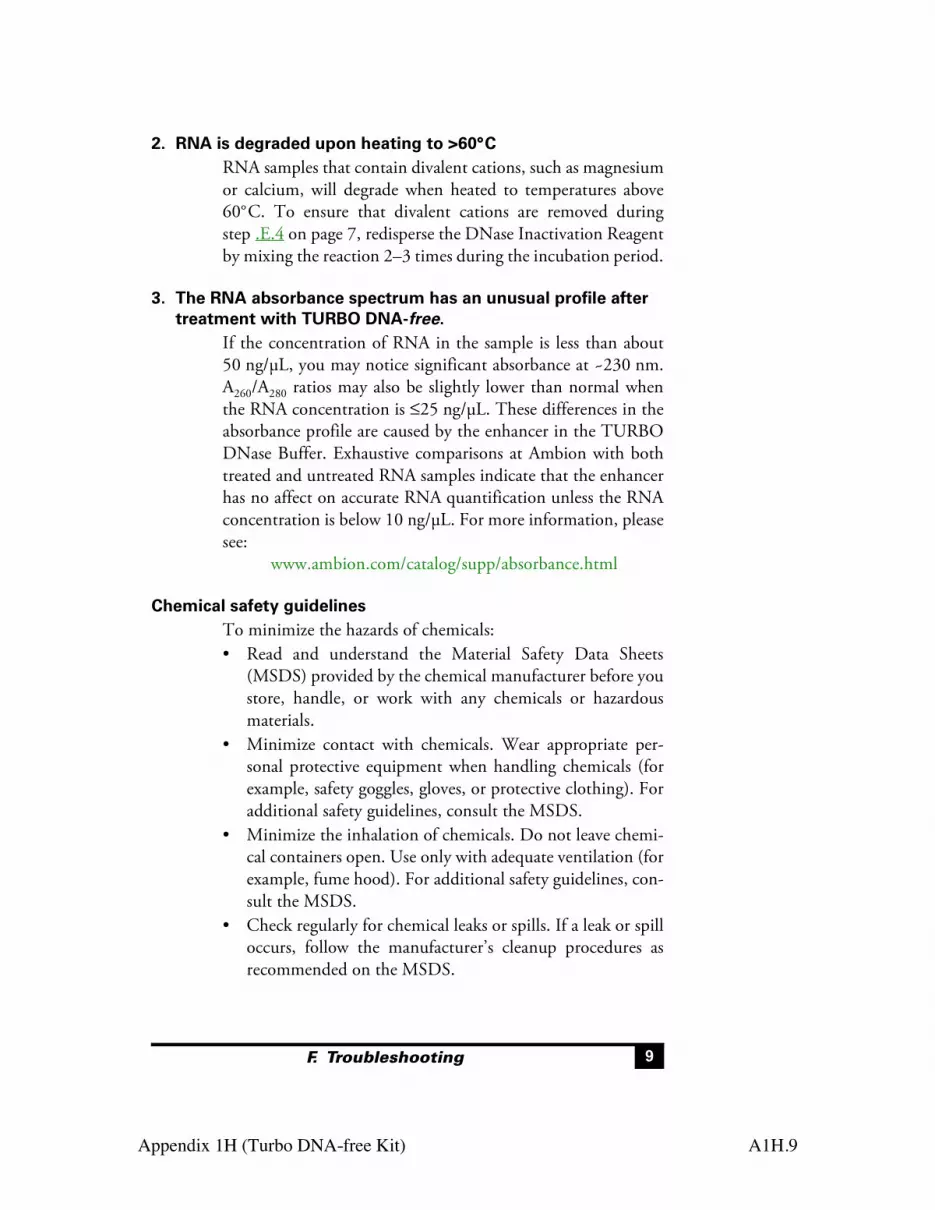
Appendix 1H (Turbo DNA-free Kit) A1H.9
F. Troubleshooting !
2. RNA is degraded upon heating to >60°CRNA samples that contain divalent cations, such as magnesiumor calcium, will degrade when heated to temperatures above60°C. To ensure that divalent cations are removed duringstep .E.4 on page 7, redisperse the DNase Inactivation Reagentby mixing the reaction 2–3 times during the incubation period.
3. The RNA absorbance spectrum has an unusual profile after treatment with TURBO DNA-free.
If the concentration of RNA in the sample is less than about50 ng/µL, you may notice significant absorbance at ~230 nm.A260/A280 ratios may also be slightly lower than normal whenthe RNA concentration is !25 ng/µL. These differences in theabsorbance profile are caused by the enhancer in the TURBODNase Buffer. Exhaustive comparisons at Ambion with bothtreated and untreated RNA samples indicate that the enhancerhas no affect on accurate RNA quantification unless the RNAconcentration is below 10 ng/µL. For more information, pleasesee:
www.ambion.com/catalog/supp/absorbance.html
Chemical safety guidelinesTo minimize the hazards of chemicals:• Read and understand the Material Safety Data Sheets
(MSDS) provided by the chemical manufacturer before youstore, handle, or work with any chemicals or hazardousmaterials.
• Minimize contact with chemicals. Wear appropriate per-sonal protective equipment when handling chemicals (forexample, safety goggles, gloves, or protective clothing). Foradditional safety guidelines, consult the MSDS.
• Minimize the inhalation of chemicals. Do not leave chemi-cal containers open. Use only with adequate ventilation (forexample, fume hood). For additional safety guidelines, con-sult the MSDS.
• Check regularly for chemical leaks or spills. If a leak or spilloccurs, follow the manufacturer’s cleanup procedures asrecommended on the MSDS.
DNA-free.fm Page 9 Tuesday, June 9, 2009 3:00 PM

Appendix 1I (iScript cDNA Synthesis Kit) A1I.1
Appendix 1I iScript cDNA Synthesis
iScript™cDNA Synthesis Kit
25 x 20 µl reactions 170-8890100 x 20 µl reactions 170-8891For Research purposes onlyStore at -20 °C (not frost-free)
iScript cDNA Synthesis kit provides a sensitive and easy-to-use solution for two-step RT-PCR. This kit includes just three tubes - comprehensive of the reagents required forsuccessful RT-PCR.
The iScript reverse transcriptase is RNAse H+, resulting in greater sensitivity than RNAseH- enzymes. iScript is a modified MMLV-derived reverse transcriptase, optimized for reli-able cDNA synthesis over a wide dynamic range of input RNA. The enzyme is providedpre-blended with RNAse inhibitor. The unique blend of oligo (dT) and random hexamerprimers in the iScript Reaction Mix works exceptionally well with a wide variety of targets.This blend is optimized for the production of targets < 1kb in length.
iScript cDNA Synthesis Kit produces excellent results in both real-time and conventionalRT-PCR.
Storage and Stability
Store the iScript™ cDNA Synthesis Kit at -20 °C in a constant temperature freezer. Whenstored under these conditions the kit components are stable for a minimum of one yearafter ship date. Nuclease-free water can be stored at room temperature.
Kit Contents
Reagent Volume
2255 rreeaaccttiioonn kkiitt5x iScript Reaction Mix 100µlNuclease-free water 1.5mliScript Reverse Transcriptase 25µl
110000 rreeaaccttiioonn kkiitt5x iScript Reaction Mix 400µlNuclease-free water 1.5mliScript Reverse Transcriptase 100µl
4106228A.qxd 01/02/2003 1:13 PM Page 1

Appendix 1I (iScript cDNA Synthesis Kit) A1I.2
Reaction Set Up
CCoommppoonneenntt VVoolluummee ppeerr rreeaaccttiioonn
5x iScript Reaction Mix 4µliScript Reverse Transcriptase 1µlNuclease-free water xµlRNA template (100fg to 1µg Total RNA)* xµl
Total Volume 20 µl
Reaction Protocol
Incubate complete reaction mix:5 minutes at 25ºC 30 minutes at 42ºC5 minutes at 85ºCHold at 4ºC (optional)
Reagents and Materials Not Supplied
Reagents for PCR or real-time PCR Such as:iTaq™ DNA polymerase, 170-8870iQ™ Supermix, 170-8860 oriQ™ SYBR® Green Supermix, 170-8880
Pipette tips, aerosol barrier tipsSuch as:the Xcluda® Style B, 211-2006
Nuclease-free tubes Such as:0.2ml Thin-Wall Tubes, 223-9473 or plates, 223-9441
RNA purification kit Such as the:Aurum™ Total RNA Mini Kit, 732-6820 orAurum Total RNA Kit, 2 x 96 well, 732-6800
Recommendations for optimal results using the iScript cDNASynthesis Kit:
The maximum amount of the cDNA reaction that is recommended for downstream PCR is one-tenth of the reaction volume, typically 2µl.
*When using larger amounts of input RNA (>1µg) the reaction should be scaled up e.g. 40µl reactionfor 2µg, 100µl reaction for 5µg to ensure optimum synthesis efficiency.
Practice of the patented polymerase chain reaction (PCR) process requires a license. The iCycler iQ systemincludes a licensed thermal cycler and may be used with PCR licenses available from PE Corporation. Its use withauthorized reagents also provides a limited PCR license in accordance with the label rights accompanying suchreagents. Some applications may require licenses from other parties.
Bio-Rad Laboratories2000 Alfred Nobel Drive, Hercules, CA 94547510-741-1000 4106228 Rev A
4106228A.qxd 01/02/2003 1:13 PM Page 2

Appendix 1J (iProof High-Fidelity DNA Polymerase) A1J.1
Appendix 1J iProof High-Fidelity DNA Polymerase
iProof™ High-Fidelity PCR Kit2 units/µl, 25 µl 50U 172-53302 units/µl, 100 µl 200U 172-5331
For research purposes onlyStore at -20°C
iProof is a high-fidelity DNA polymerase that offers extreme performance for all PCRapplications. Incorporating an exciting new and patented technology, iProof DNApolymerase brings together a novel Pyrococcus-like enzyme with a processivity enhancingdomain. This allows for the generation of long templates with an accuracy and speedpreviously unattainable with a single enzyme. The extreme fidelity of iProof makes it asuperior choice for cloning. The error rate of iProof polymerase is determined to be 4.4 x 10⁻⁷
in iProof HF buffer, which is approximately 50-fold lower than that of Thermus aquaticus,and 6-fold lower than that of Pyrococcus furiosus.
The iProof™ High Fidelity PCR Kit includes lambda DNA control template and primers for1.3 kb and 10 kb positive control amplicons. Sufficient template is included for performing20 x 50 µl or 50 x 20 µl reactions.
Storage and StabilityStore the iProof™ High-Fidelity PCR Kit at -20°C in a constant temperature freezer. Whenstored under these conditions, the polymerase is stable for one year after the ship date.Kit ContentsReagent 50U 200U DescriptioniProof Polymerase 25 µl 100 µl iProof™ High Fidelity DNA
Polymerase, 2 units/µliProof HF Buffer 1.5 ml 3 x 1.5 ml 5X HF Buffer, 7.5 mM MgCl2iProof GC Buffer 1.5 ml 3 x 1.5 ml 5X GC Buffer, 7.5 mM MgCl2dNTP mix 100 µl 100 µl dNTP solution, 10 mM eachMgCl2 1.5 ml 1.5 ml 50 mM MgCl2 solutionControl ltemplate 40 µl 40 µl Control ltemplate, 0.5 ng/µl1.3 kb primers 50 µl 50 µl 4 µM each10 kb primers 50 µl 50 µl 4 µM eachDNA Standard 200 µl 400 µl DNA size standardDMSO 500 µl 500 µl 100% DMSO solution
iProof DNA polymerase is unlike other enzymes. Please read the QuickGuide tomodify your protocol for optimal results.
QuickGuide (See Notes About Cycling Conditions for details)• Use 98°C for denaturation.• Anneal at Tm +3°C (>20nt oligo).• Use 15–30 sec/kb for extension times. Do not exceed 1 min/kb.• Use iProof at 0.5–1.0 U per 50 µl reaction. Do not exceed 2 U/50 µl.• Use 200 µM dNTPs. Do not use dUTP.• iProof produces blunt end DNA products.
Notes About Cycling Conditions
1. DenaturationTemplate denaturation should be performed at 98°C. Due to the high thermostability ofiProof, denaturation temperatures greater than 98°C can be used. A 30 s initialdenaturation time is recommended, but this can be extended to 3 min for difficult DNAtemplates. Subsequent denaturation should be performed for 5–10 s at 98°C.
2. AnnealingWhen using iProof, a general rule is to anneal primers (>20 nt) for 10–30 s at +3°Cabove the primer with the lowest Tm. Primer Tm should be calculated using the nearest-neighbor method as results can vary significantly depending on the method used. Forprimers < 20 nt, use an annealing temperature equal to the primer with the lowest Tm.
3. ExtensionTemplate extension should be performed at 72°C and extension time depends onamplicon length and complexity. For low complexity DNA (e.g. plasmid, lambda, orBAC DNA) use 15 s per kb. For high complexity DNA (e.g. genomic DNA) use 30 s perkb. Do not exceed 1 min per kb for amplicons that are >5 kb.
Related Amplification Products From Bio-Rad LaboratoriesReagents for PCR or Real-Time PCRiProof™ High-Fidelity DNA Polymerase 172-5301iProof HF Master Mix 172-5310iProof GC Master Mix 172-5320iTaq™ DNA Polymerase 170-8870iTaq Supermix With ROX 170-8854iTaq SYBR Green Supermix With ROX 170-8850iQ™ Supermix 170-8860iQ SYBR Green Supermix 170-8880iScript™ cDNA Synthesis Kit 170-8890iScript Select cDNA Synthesis Kit 170-8896iScript One-Step RT-PCR Kit with SYBR Green 170-8892iScript One-Step RT-PCR Kit for Probes 170-8894
For ordering information on larger pack sizes, or to learn more about Bio-Rad amplificationreagents and instruments, visit www.bio-rad.com/amplification/
NOTICE TO PURCHASER: LIMITED LICENSE
Use of this product is covered by one or more of the following US patents and corresponding patent claims outsidethe US: 5,079,352, 5,789,224, 5,618,711, 6,127,155 and claims outside the US corresponding to US Patent No.4,889,818. The purchase of this product includes a limited, non-transferable immunity from suit under the foregoingpatent claims for using only this amount of product for the purchaser’s own internal research. No right under anyother patent claim (such as the patented 5’ Nuclease Process claims in the US Patent Nos. 5,210,015 and5,487,972), no right to perform any patented method, and no right to perform commercial services of any kind,including without limitation reporting the results of purchaser’s activities for a fee or other commercial consideration,is conveyed expressly, by implication, or by estoppel. This product is for research use only. Diagnostic uses underRoche patents require a separate license from Roche. Further information on purchasing licenses may be obtainedby contacting the Director of Licensing, Applied Biosystems, 850 Lincoln Centre Drive, Foster City, California 94404,USA.
iProof, iTaq, iQ, and iScript are trademarks of Bio-Rad Laboratories.
10002300 Rev B
Bio-Rad Laboratories2000 Alfred Nobel Drive, Hercules, CA 94547510-741-1000
Appendix 1J (iProof High-Fidelity DNA Polymerase) A1J.2
iProof™ High-Fidelity PCR Kit2 units/µl, 25 µl 50U 172-53302 units/µl, 100 µl 200U 172-5331
For research purposes onlyStore at -20°C
iProof is a high-fidelity DNA polymerase that offers extreme performance for all PCRapplications. Incorporating an exciting new and patented technology, iProof DNApolymerase brings together a novel Pyrococcus-like enzyme with a processivity enhancingdomain. This allows for the generation of long templates with an accuracy and speedpreviously unattainable with a single enzyme. The extreme fidelity of iProof makes it asuperior choice for cloning. The error rate of iProof polymerase is determined to be 4.4 x 10⁻⁷
in iProof HF buffer, which is approximately 50-fold lower than that of Thermus aquaticus,and 6-fold lower than that of Pyrococcus furiosus.
The iProof™ High Fidelity PCR Kit includes lambda DNA control template and primers for1.3 kb and 10 kb positive control amplicons. Sufficient template is included for performing20 x 50 µl or 50 x 20 µl reactions.
Storage and StabilityStore the iProof™ High-Fidelity PCR Kit at -20°C in a constant temperature freezer. Whenstored under these conditions, the polymerase is stable for one year after the ship date.Kit ContentsReagent 50U 200U DescriptioniProof Polymerase 25 µl 100 µl iProof™ High Fidelity DNA
Polymerase, 2 units/µliProof HF Buffer 1.5 ml 3 x 1.5 ml 5X HF Buffer, 7.5 mM MgCl2iProof GC Buffer 1.5 ml 3 x 1.5 ml 5X GC Buffer, 7.5 mM MgCl2dNTP mix 100 µl 100 µl dNTP solution, 10 mM eachMgCl2 1.5 ml 1.5 ml 50 mM MgCl2 solutionControl ltemplate 40 µl 40 µl Control ltemplate, 0.5 ng/µl1.3 kb primers 50 µl 50 µl 4 µM each10 kb primers 50 µl 50 µl 4 µM eachDNA Standard 200 µl 400 µl DNA size standardDMSO 500 µl 500 µl 100% DMSO solution
iProof DNA polymerase is unlike other enzymes. Please read the QuickGuide tomodify your protocol for optimal results.
QuickGuide (See Notes About Cycling Conditions for details)• Use 98°C for denaturation.• Anneal at Tm +3°C (>20nt oligo).• Use 15–30 sec/kb for extension times. Do not exceed 1 min/kb.• Use iProof at 0.5–1.0 U per 50 µl reaction. Do not exceed 2 U/50 µl.• Use 200 µM dNTPs. Do not use dUTP.• iProof produces blunt end DNA products.
Notes About Cycling Conditions
1. DenaturationTemplate denaturation should be performed at 98°C. Due to the high thermostability ofiProof, denaturation temperatures greater than 98°C can be used. A 30 s initialdenaturation time is recommended, but this can be extended to 3 min for difficult DNAtemplates. Subsequent denaturation should be performed for 5–10 s at 98°C.
2. AnnealingWhen using iProof, a general rule is to anneal primers (>20 nt) for 10–30 s at +3°Cabove the primer with the lowest Tm. Primer Tm should be calculated using the nearest-neighbor method as results can vary significantly depending on the method used. Forprimers < 20 nt, use an annealing temperature equal to the primer with the lowest Tm.
3. ExtensionTemplate extension should be performed at 72°C and extension time depends onamplicon length and complexity. For low complexity DNA (e.g. plasmid, lambda, orBAC DNA) use 15 s per kb. For high complexity DNA (e.g. genomic DNA) use 30 s perkb. Do not exceed 1 min per kb for amplicons that are >5 kb.
Related Amplification Products From Bio-Rad LaboratoriesReagents for PCR or Real-Time PCRiProof™ High-Fidelity DNA Polymerase 172-5301iProof HF Master Mix 172-5310iProof GC Master Mix 172-5320iTaq™ DNA Polymerase 170-8870iTaq Supermix With ROX 170-8854iTaq SYBR Green Supermix With ROX 170-8850iQ™ Supermix 170-8860iQ SYBR Green Supermix 170-8880iScript™ cDNA Synthesis Kit 170-8890iScript Select cDNA Synthesis Kit 170-8896iScript One-Step RT-PCR Kit with SYBR Green 170-8892iScript One-Step RT-PCR Kit for Probes 170-8894
For ordering information on larger pack sizes, or to learn more about Bio-Rad amplificationreagents and instruments, visit www.bio-rad.com/amplification/
NOTICE TO PURCHASER: LIMITED LICENSE
Use of this product is covered by one or more of the following US patents and corresponding patent claims outsidethe US: 5,079,352, 5,789,224, 5,618,711, 6,127,155 and claims outside the US corresponding to US Patent No.4,889,818. The purchase of this product includes a limited, non-transferable immunity from suit under the foregoingpatent claims for using only this amount of product for the purchaser’s own internal research. No right under anyother patent claim (such as the patented 5’ Nuclease Process claims in the US Patent Nos. 5,210,015 and5,487,972), no right to perform any patented method, and no right to perform commercial services of any kind,including without limitation reporting the results of purchaser’s activities for a fee or other commercial consideration,is conveyed expressly, by implication, or by estoppel. This product is for research use only. Diagnostic uses underRoche patents require a separate license from Roche. Further information on purchasing licenses may be obtainedby contacting the Director of Licensing, Applied Biosystems, 850 Lincoln Centre Drive, Foster City, California 94404,USA.
iProof, iTaq, iQ, and iScript are trademarks of Bio-Rad Laboratories.
10002300 Rev B
Bio-Rad Laboratories2000 Alfred Nobel Drive, Hercules, CA 94547510-741-1000

Appendix 1J (iProof High-Fidelity DNA Polymerase) A1J.3
Reaction SetupImportant Note – Please Read Before StartingSpin all tubes before opening to improve recovery. Reactions should be set up on ice. Pipet allcomponents in the order given below. Always add iProof DNA Polymerase last to the reaction asprimer degradation may occur in the absence of dNTPs. It is recommended that you prepare amaster mix for the appropriate number of samples to be amplified.
Typical Reaction SetupVolume for Volume for
Component 50 µl reaction 20 µl reaction Final Conc.
5X iProof HF Buffer* 10 µl 4 µl 1XdNTP mix 1 µl 0.4 µl 200 µM eachPrimer 1** x µl x µl 0.5 µMPrimer 2** x µl x µl 0.5 µMDNA template x µl x µlSterile H20 x µl x µl
iProof DNA Polymerase 0.5 µl 0.2 µl*** 0.02 U/µl
Total Volume 50 µl 20 µl
* For difficult or GC-rich templates, 5X iProof GC Buffer can be used.** Recommended final primer concentration is 0.5 µM; can range between 0.2–1.0 µM.*** Enzyme should be diluted to avoid pipeting errors.
Control Template Reaction SetupVolume for Volume for
Component 50 µl reaction 20 µl reaction Final Conc.
5X iProof HF Buffer 10 µl 4 µl 1XdNTP mix 1 µl 0.4 µl 200 µM eachPrimers * 2.5 µl 1 µl 0.2 µMControl DNA Template 2 µl 0.8 µlSterile H20 34 µl 13.6 µl
iProof DNA Polymerase 0.5 µl 0.2 µl** 0.02 U/µl
Total Volume 50 µl 20 µl
* Either 1.3 kb or 10 kb primers** Enzyme should be diluted to avoid pipetting errors.
Notes About Reaction Components1. iProof DNA Polymerase
The optimal amount of enzyme depends on the amount of template and the length ofthe PCR product. Usually 1 unit of iProof DNA polymerase per 50 µl reaction will givegood results, but optimal amounts could range from 0.5–2 units per 50 µl reactiondepending on amplicon length and difficulty. Do not exceed 2 U/50 µl (0.04 U/µl),especially for amplicons that are > 5kb.
2. BuffersTwo buffers are provided: 5x iProof HF buffer and 5x iProof GC buffer. The error rate ofiProof polymerase in HF buffer (4.4 x 10⁻⁷) is lower than that in GC buffer (9.5 x 10⁻⁷).Therefore, the HF buffer should be used as the default buffer for high fidelity amplification.However, the GC buffer can improve iProof performance on certain difficult or longtemplates, i.e. GC rich templates or those with complex secondary structures. Only useGC buffer when amplification with HF buffer does not provide satisfactory results.
3. Mg2+ and dNTPMg2+ concentration is critical since iProof is a Mg2+-dependent enzyme. ExcessiveMg2+ stabilizes dsDNA, preventing complete denaturation, and can also promoteinaccurate priming. Conversely, insufficient amounts of Mg2+ can lead to low productyield. The optimal Mg2+ concentration also depends on dNTP concentration, thespecific DNA template and the sample buffer composition. The optimal Mg2+
concentration is 0.5 to 1 mM over the total dNTP concentration for standard PCR. Foroptimization, increase or decrease Mg2+ concentration in 0.2 mM increments.Only high quality dNTPs should be used. Use of dUTP or other dUTP-derivatives oranalogs is not recommended. Due to the increased processivity of iProof, there is noadvantage to increasing dNTP amounts. For optimal results, use 200 mM dNTPs.
4. DNA TemplateGeneral guidelines are 1 pg–10 ng of DNA template in a 50 µl reaction for lowcomplexity DNA (e.g. plasmid, lambda, or BAC DNA). For high complexity DNA (e.g.genomic DNA), 50–500 ng of template DNA should be used in a 50 µl reaction.
5. PCR AdditivesThe recommended reaction conditions for GC-rich templates include the addition of3% DMSO which aids in template denaturation. Further optimization of DMSO shouldbe made in 2% increments. In some cases, DMSO may be used to help relaxsupercoiled plasmid DNA. High DMSO concentrations (10%) will require lowering theannealing temperature by 5.5–6.0°C. Other PCR additives such as formamide,glycerol, and betaine are also compatible with iProof.
Cycling ConditionsImportant Note – Please ReadDue to the novel nature of iProof DNA polymerase, optimal reaction conditions may differ fromstandard PCR protocols. iProof works better at elevated denaturation and annealing temperaturesdue to higher salt concentration in the reaction buffer.
Typical Thermal Cycling ProtocolCycle Step Temp. Time Number of Cycles
Initial Denaturation 98°C 30 s 1Denaturation 98°C 5–10 sAnnealing 45–72°C 10–30 s 25–35Extension 72°C 15–30 s / kbFinal Extension 72°C 5–10 min 1Control Template (1.3 kb) Cycling Protocol (2-step)Cycle Step Temp. Time Number of Cycles
Initial Denaturation 98°C 1 min 1Denaturation 98°C 5 sAnnealing/Extension 72°C 20 s 25–35Final Extension 72°C 10 min 1Control Template (10 kb) Cycling Protocol (3-step)*Cycle Step Temp. Time Number of Cycles
Initial Denaturation 98°C 1 min 1Denaturation 98°C 5 sAnnealing 60°C 15 s 25–35Extension 72°C 2 min 30 secFinal Extension 72°C 10 min 1
* Both control template reactions can be run using the 10 kb cycling protocol.

Appendix 1J (iProof High-Fidelity DNA Polymerase) A1J.4
Reaction SetupImportant Note – Please Read Before StartingSpin all tubes before opening to improve recovery. Reactions should be set up on ice. Pipet allcomponents in the order given below. Always add iProof DNA Polymerase last to the reaction asprimer degradation may occur in the absence of dNTPs. It is recommended that you prepare amaster mix for the appropriate number of samples to be amplified.
Typical Reaction SetupVolume for Volume for
Component 50 µl reaction 20 µl reaction Final Conc.
5X iProof HF Buffer* 10 µl 4 µl 1XdNTP mix 1 µl 0.4 µl 200 µM eachPrimer 1** x µl x µl 0.5 µMPrimer 2** x µl x µl 0.5 µMDNA template x µl x µlSterile H20 x µl x µl
iProof DNA Polymerase 0.5 µl 0.2 µl*** 0.02 U/µl
Total Volume 50 µl 20 µl
* For difficult or GC-rich templates, 5X iProof GC Buffer can be used.** Recommended final primer concentration is 0.5 µM; can range between 0.2–1.0 µM.*** Enzyme should be diluted to avoid pipeting errors.
Control Template Reaction SetupVolume for Volume for
Component 50 µl reaction 20 µl reaction Final Conc.
5X iProof HF Buffer 10 µl 4 µl 1XdNTP mix 1 µl 0.4 µl 200 µM eachPrimers * 2.5 µl 1 µl 0.2 µMControl DNA Template 2 µl 0.8 µlSterile H20 34 µl 13.6 µl
iProof DNA Polymerase 0.5 µl 0.2 µl** 0.02 U/µl
Total Volume 50 µl 20 µl
* Either 1.3 kb or 10 kb primers** Enzyme should be diluted to avoid pipetting errors.
Notes About Reaction Components1. iProof DNA Polymerase
The optimal amount of enzyme depends on the amount of template and the length ofthe PCR product. Usually 1 unit of iProof DNA polymerase per 50 µl reaction will givegood results, but optimal amounts could range from 0.5–2 units per 50 µl reactiondepending on amplicon length and difficulty. Do not exceed 2 U/50 µl (0.04 U/µl),especially for amplicons that are > 5kb.
2. BuffersTwo buffers are provided: 5x iProof HF buffer and 5x iProof GC buffer. The error rate ofiProof polymerase in HF buffer (4.4 x 10⁻⁷) is lower than that in GC buffer (9.5 x 10⁻⁷).Therefore, the HF buffer should be used as the default buffer for high fidelity amplification.However, the GC buffer can improve iProof performance on certain difficult or longtemplates, i.e. GC rich templates or those with complex secondary structures. Only useGC buffer when amplification with HF buffer does not provide satisfactory results.
3. Mg2+ and dNTPMg2+ concentration is critical since iProof is a Mg2+-dependent enzyme. ExcessiveMg2+ stabilizes dsDNA, preventing complete denaturation, and can also promoteinaccurate priming. Conversely, insufficient amounts of Mg2+ can lead to low productyield. The optimal Mg2+ concentration also depends on dNTP concentration, thespecific DNA template and the sample buffer composition. The optimal Mg2+
concentration is 0.5 to 1 mM over the total dNTP concentration for standard PCR. Foroptimization, increase or decrease Mg2+ concentration in 0.2 mM increments.Only high quality dNTPs should be used. Use of dUTP or other dUTP-derivatives oranalogs is not recommended. Due to the increased processivity of iProof, there is noadvantage to increasing dNTP amounts. For optimal results, use 200 mM dNTPs.
4. DNA TemplateGeneral guidelines are 1 pg–10 ng of DNA template in a 50 µl reaction for lowcomplexity DNA (e.g. plasmid, lambda, or BAC DNA). For high complexity DNA (e.g.genomic DNA), 50–500 ng of template DNA should be used in a 50 µl reaction.
5. PCR AdditivesThe recommended reaction conditions for GC-rich templates include the addition of3% DMSO which aids in template denaturation. Further optimization of DMSO shouldbe made in 2% increments. In some cases, DMSO may be used to help relaxsupercoiled plasmid DNA. High DMSO concentrations (10%) will require lowering theannealing temperature by 5.5–6.0°C. Other PCR additives such as formamide,glycerol, and betaine are also compatible with iProof.
Cycling ConditionsImportant Note – Please ReadDue to the novel nature of iProof DNA polymerase, optimal reaction conditions may differ fromstandard PCR protocols. iProof works better at elevated denaturation and annealing temperaturesdue to higher salt concentration in the reaction buffer.
Typical Thermal Cycling ProtocolCycle Step Temp. Time Number of Cycles
Initial Denaturation 98°C 30 s 1Denaturation 98°C 5–10 sAnnealing 45–72°C 10–30 s 25–35Extension 72°C 15–30 s / kbFinal Extension 72°C 5–10 min 1Control Template (1.3 kb) Cycling Protocol (2-step)Cycle Step Temp. Time Number of Cycles
Initial Denaturation 98°C 1 min 1Denaturation 98°C 5 sAnnealing/Extension 72°C 20 s 25–35Final Extension 72°C 10 min 1Control Template (10 kb) Cycling Protocol (3-step)*Cycle Step Temp. Time Number of Cycles
Initial Denaturation 98°C 1 min 1Denaturation 98°C 5 sAnnealing 60°C 15 s 25–35Extension 72°C 2 min 30 secFinal Extension 72°C 10 min 1
* Both control template reactions can be run using the 10 kb cycling protocol.
Appendix 1K (pENTR/D-TOPO Cloning Kit Manual) A1K.1
Appendix 1K pENTR/D-TOPO Cloning Instruction Manual
!
!!!!!!!!!!!!!!!!!!!!
!"#$%&'()*+,-)./01'$2324'51./)/6'7)-8'9):+;<)/=-+>'?)*+,-)./01'$2324'51./)/6'.@'A1=/-;+/?'35%'!*.?=,-8')/-.'0/'+/-*B':+,-.*'@.*'-C+'D0-+E0B4'FB8-+<'Catalog nos. K2400-20, K2420-20, K2525-20, K2535-20, K2435-20, and K2635-20
Version G 6 April 2006 !"#$%&%'
A Limited Use Label License covers this product (see Purchaser Notification). By use of this product, you accept the terms and conditions of the Limited Use Label License.
!!

Appendix 1J (pENTR/D-TOPO Cloning Kit Manual) A1K.2
! ! !!!!
!"#$%&'(&)'*+%*+,&!!!!!
Table of Contents ....................................................................................................................................................... iii!TOPO® Cloning Procedure for Experienced Users ................................................................................................ v!Kit Contents and Storage.........................................................................................................................................vii!Accessory Products .................................................................................................................................................... x!
-*+.'/01+2'* 33333333333333333333333333333333333333333333333333333333333333333333333333333333333333333333333333333333333333333333333 4!Overview...................................................................................................................................................................... 1!How Directional TOPO® Cloning Works ................................................................................................................ 3!Experimental Outline ................................................................................................................................................. 4!
5%+6'/,333333333333333333333333333333333333333333333333333333333333333333333333333333333333333333333333333333333333333333333333333333 7!Designing PCR Primers ............................................................................................................................................. 5!Producing Blunt-End PCR Products ...................................................................................................................... 10!Setting Up the TOPO® Cloning Reaction............................................................................................................... 11!Transforming One Shot® Competent E. coli .......................................................................................................... 13!Analyzing Transformants........................................................................................................................................ 16!Guidelines to Perform the LR Recombination Reaction...................................................................................... 18!Guidelines to Perform TEV Cleavage of Recombinant Proteins........................................................................ 20!
!.'0#$%,6''+2*8 33333333333333333333333333333333333333333333333333333333333333333333333333333333333333333333333333333333333333 94!:;;%*/2< 33333333333333333333333333333333333333333333333333333333333333333333333333333333333333333333333333333333333333333333333333 9=!
Performing the Control Reactions .......................................................................................................................... 23!Gel Purifying PCR Products.................................................................................................................................... 26!Map and Features of pENTR™/D-TOPO®............................................................................................................. 28!Map and Features of pENTR™/SD/D-TOPO® ..................................................................................................... 30!Map and Features of pENTR™/TEV/D-TOPO® .................................................................................................. 32!Recipes........................................................................................................................................................................ 34!Technical Service....................................................................................................................................................... 35!Purchaser Notification ............................................................................................................................................. 36!Gateway® Clone Distribution Policy...................................................................................................................... 38!Product Qualification............................................................................................................................................... 39!References .................................................................................................................................................................. 40!
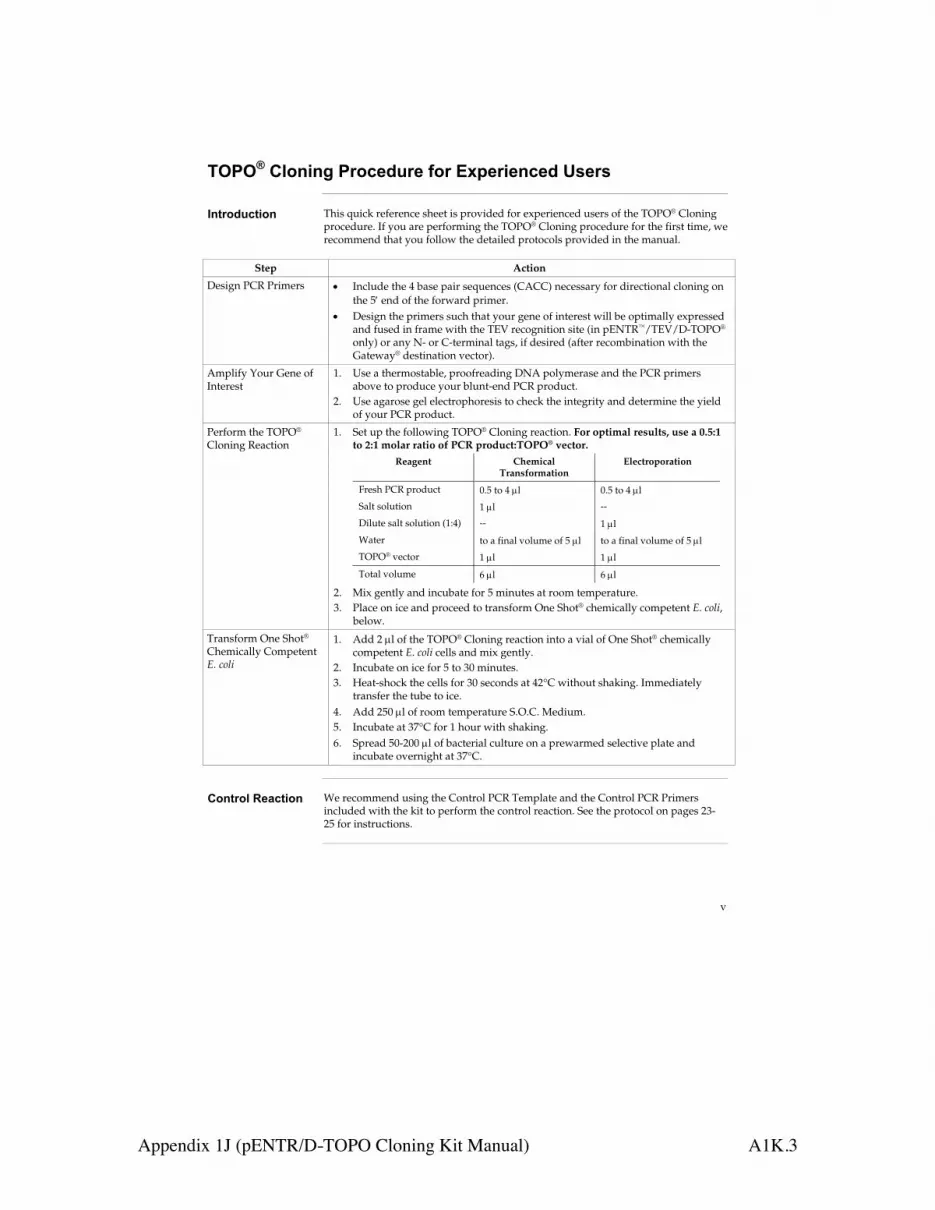
Appendix 1J (pENTR/D-TOPO Cloning Kit Manual) A1K.3
! ! !!
!"#"$%&'()*)+%#,(-./0,.%1(,%234.,*.)-./%56.,6%
7)8,(/0-8*()% This quick reference sheet is provided for experienced users of the TOPO® Cloning procedure. If you are performing the TOPO® Cloning procedure for the first time, we recommend that you follow the detailed protocols provided in the manual.
Step Action
Design PCR Primers Include the 4 base pair sequences (CACC) necessary for directional cloning on the 5 end of the forward primer. Design the primers such that your gene of interest will be optimally expressed and fused in frame with the TEV recognition site (in pENTR™/TEV/D-TOPO® only) or any N- or C-terminal tags, if desired (after recombination with the Gateway® destination vector).
Amplify Your Gene of Interest
1. Use a thermostable, proofreading DNA polymerase and the PCR primers above to produce your blunt-end PCR product.
2. Use agarose gel electrophoresis to check the integrity and determine the yield of your PCR product.
Perform the TOPO® Cloning Reaction
1. Set up the following TOPO® Cloning reaction. For optimal results, use a 0.5:1 to 2:1 molar ratio of PCR product:TOPO® vector.
Reagent Chemical Transformation
Electroporation
Fresh PCR product 0.5 to 4 l 0.5 to 4 l
Salt solution 1 l --
Dilute salt solution (1:4) -- 1 l
Water to a final volume of 5 l to a final volume of 5 l
TOPO® vector 1 l 1 l
Total volume 6 l 6 l
2. Mix gently and incubate for 5 minutes at room temperature. 3. Place on ice and proceed to transform One Shot® chemically competent E. coli,
below.
Transform One Shot® Chemically Competent E. coli
1. Add 2 l of the TOPO® Cloning reaction into a vial of One Shot® chemically competent E. coli cells and mix gently.
2. Incubate on ice for 5 to 30 minutes. 3. Heat-shock the cells for 30 seconds at 42°C without shaking. Immediately
transfer the tube to ice. 4. Add 250 l of room temperature S.O.C. Medium. 5. Incubate at 37°C for 1 hour with shaking. 6. Spread 50-200 l of bacterial culture on a prewarmed selective plate and
incubate overnight at 37°C.
&()8,('%9.:-8*()% We recommend using the Control PCR Template and the Control PCR Primers
included with the kit to perform the control reaction. See the protocol on pages 23-25 for instructions.

Appendix 1J (pENTR/D-TOPO Cloning Kit Manual) A1K.4
! ! !!""
!"#$%&'#('#)$*'+$,#&-*.($
/01()$&2$!"#)$ This manual is supplied with the following kits.
Kit Size Catalog no.
pENTR™/D-TOPO® Cloning Kit with One Shot® TOP10 Chemically Competent E. coli with One Shot® Mach1™-T1R Chemically Competent E. coli
20 reactions 20 reactions
K2400-20 K2435-20
pENTR™/SD/D-TOPO® Cloning Kit with One Shot® TOP10 Chemically Competent E. coli with One Shot® Mach1™-T1R Chemically Competent E. coli
20 reactions 20 reactions
K2420-20 K2635-20
pENTR™/TEV/D-TOPO® Cloning Kit with One Shot® TOP10 Chemically Competent E. coli with One Shot® Mach1™-T1R Chemically Competent E. coli
20 reactions 20 reactions
K2525-20 K2535-20
,3"11"'.4,#&-*.($ Each pENTR™ Directional TOPO® Cloning Kit is shipped on dry ice. Each kit
contains two boxes as described below. Upon receipt, store the boxes as detailed below.
Box Item Storage
1 pENTR™ TOPO® Reagents -20°C
2 One Shot® Chemically Competent E. coli -80°C
continued on next page

Appendix 1J (pENTR/D-TOPO Cloning Kit Manual) A1K.5
! ! !!"""
!"#$%&'#('#)$*'+$,#&-*.(/$0&'#"'1(+$
234567$5898:$6(*.('#)$
The following reagents are supplied with each pENTR™ TOPO® vector (Box 1). Note that the user must supply a thermostable, proofreading polymerase and the appropriate PCR buffer.
Store Box 1 at -20°C.
Item Concentration Amount
pENTR™ TOPO® vector, TOPO®-adapted (pENTR™/D-TOPO® or pENTR™/SD/D-TOPO® or pENTR™/TEV/D-TOPO®)
15-20 ng/ l linearized plasmid DNA in: 50% glycerol 50 mM Tris-HCl, pH 7.4 (at 25°C) 1 mM EDTA 2 mM DTT 0.1% Triton X-100 100 g/ml BSA 30 M bromophenol blue
20 l
dNTP Mix 12.5 mM dATP 12.5 mM dCTP 12.5 mM dGTP 12.5 mM dTTP in water, pH 8
10 l
Salt Solution 1.2 M NaCl 0.06 M MgCl2
50 l
Water --- 1 ml
M13 Forward (-20) Sequencing Primer
0.1 g/ l in TE Buffer, pH 8 20 l
M13 Reverse Sequencing Primer
0.1 g/ l in TE Buffer, pH 8 20 l
Control PCR Primers 0.1 g/ l each in TE Buffer, pH 8 10 l
Control PCR Template 0.1 g/ l in TE Buffer, pH 8 10 l
,(;1('0()$&<$#=($9-">(-)$
The table below provides the sequences of the M13 Forward (-20) and M13 Reverse sequencing primers.
Primer Sequence pMoles Supplied
M13 Forward (-20) 5´-GTAAAACGACGGCCAG-3´ 407
M13 Reverse 5´-CAGGAAACAGCTATGAC-3´ 385
continued on next page

Appendix 1J (pENTR/D-TOPO Cloning Kit Manual) A1K.6
! ! !!"
!"#$%&'#('#)$*'+$,#&-*.(/$0&'#"'1(+$
2'($,3$5(*.('#)$
The following reagents are included with the One Shot® TOP10 or Mach1™-T1R Chemically Competent E. coli kit (Box 2). Transformation efficiency is 1 x 10⁹ cfu/ g plasmid DNA. Store Box 2 at -80°C.
Reagent Composition Amount
S.O.C. Medium (may be stored at room temperature or +4°C)
2% Tryptone 0.5% Yeast Extract 10 mM NaCl 2.5 mM KCl 10 mM MgCl2 10 mM MgSO4 20 mM glucose
6 ml
TOP10 or Mach1™-T1R cells
-- 21 x 50 l
pUC19 Control DNA 10 pg/ l in 5 mM Tris-HCl, 0.5 mM EDTA, pH 8
50 l
6('N($&9$!"#$%&'$,#-*"')$
TOP10: F- mcrA (mrr-hsdRMS-mcrBC) 80lacZ M15 lac 74 recA1 araD139 (ara-leu)7697 galU galK rpsL (StrR) endA1 nupG
Mach1™-T1R: F- 80lacZ M15 lac 74 hsdR(rk-, mk
+) recA1398 endA1 tonA (confers resistance to phage T1)
:'9&-;*#"&'$9&-$<&'=>?,?$%1)#&;(-)$>)"'.$@*03AB=CA5$%(DD)$
The parental strain of Mach1™-T1R E. coli is the non-K-12, wild-type W strain (ATCC #9637, S.A. Waksman). Although the parental strain is generally classified as Biosafety Level 1 (BL-1), we recommend that you consult the safety department of your institution to verify the Biosafety Level.

Appendix 1J (pENTR/D-TOPO Cloning Kit Manual) A1K.7
! ! !!
!""#$$%&'()&%*+",$(
-.,&%*+",/%.( The products listed in this section may be used with the pENTR™ Directional TOPO® Cloning Kits. For more information, refer to www.invitrogen.com or call Technical Service (see page 35).
!**/,/%.01()&%*+",$(
Many of the reagents supplied in the pENTR™ Directional TOPO® Cloning Kits and other reagents suitable for use with the kits are available separately from Invitrogen. Ordering information for these reagents is provided below.
Item Quantity Catalog no.
10 reactions C4040-10 One Shot® TOP10 Chemically Competent E. coli 20 reactions C4040-03
One Shot® TOP10 Electrocompetent E. coli 10 reactions C4040-50
One Shot® Mach1™-T1R Chemically Competent E. coli
20 reactions C8620-03
M13 Forward (-20) Primer 2 g (407 pmoles) N520-02
M13 Reverse Primer 2 g (385 pmoles) N530-02
Kanamycin Sulfate 1 g 11815-016
LB Broth 500 ml 10855-021
LB Agar 500 g 22700-025
PureLink™ HQ Mini Plasmid Purification Kit
100 reactions K2100-01
Gateway® LR Clonase™ II Enzyme Mix 20 reactions 11791-020
100 reactions 11791-100
Gateway® LR Clonase™ Plus Enzyme Mix 20 reactions 12538-013
MultiSite Gateway® Three-Fragment Vector Construction Kit
1 kit 12537-023
AcTEV™ Protease 1,000 units 12575-015
10,000 units 12575-023

Appendix 1J (pENTR/D-TOPO Cloning Kit Manual) A1K.8
! ! !!
!"#$%&'(#)%"*
+,-$,)-.*
!"#$%&'(#)%"* The pENTR™ Directional TOPO® Cloning Kits utilize a highly efficient, 5-minute cloning strategy ("TOPO® Cloning") to directionally clone a blunt-end PCR product into a vector for entry into the Gateway® System or the MultiSite Gateway® System available from Invitrogen. Blunt-end PCR products clone directionally at greater than 90% efficiency, with no ligase, post-PCR procedures, or restriction enzymes required.
A choice of pENTR™ Directional TOPO® vectors is available for optimal expression of your PCR product after recombination with the Gateway® destination vector of interest (see table below).
!Vector Benefit
pENTR™/D-TOPO® For efficient expression of your gene of interest after recombination with a Gateway® destination vector
pENTR™/SD/D-TOPO® Contains a T7 gene 10 translational enhancer and a ribosome binding site (RBS) for optimal expression of native protein after recombination with a prokaryotic Gateway® destination vector Note: Also suitable for efficient expression of your gene of interest in other hosts after recombination with a Gateway® destination vector (e.g. mammalian, insect, yeast)
pENTR™/TEV/D-TOPO®
Contains a Tobacco Etch Virus (TEV) recognition site for efficient TEV protease-dependent cleavage of an N-terminal tag from your recombinant protein after recombination and expression from a Gateway® destination vector
/0-*12#-.234*/-(0"%5%63*
The Gateway® Technology is a universal cloning method that takes advantage of the site-specific recombination properties of bacteriophage lambda (Landy, 1989) to provide a rapid and highly efficient way to move your gene of interest into multiple vector systems. To express your gene of interest using the Gateway® Technology, simply:
1. TOPO® Clone your blunt-end PCR product into one of the pENTR™ TOPO® vectors to generate an entry clone.
2. Generate an expression construct by performing an LR recombination reaction between the entry clone and a Gateway® destination vector of choice.
3. Introduce your expression construct into the appropriate host (e.g. bacterial, mammalian, yeast, insect) and express your recombinant protein.
For more information about the Gateway® Technology, refer to the Gateway® Technology with Clonase™ II manual which is available for downloading from www.invitrogen.com or by contacting Technical Service (see page 35).
continued on next page
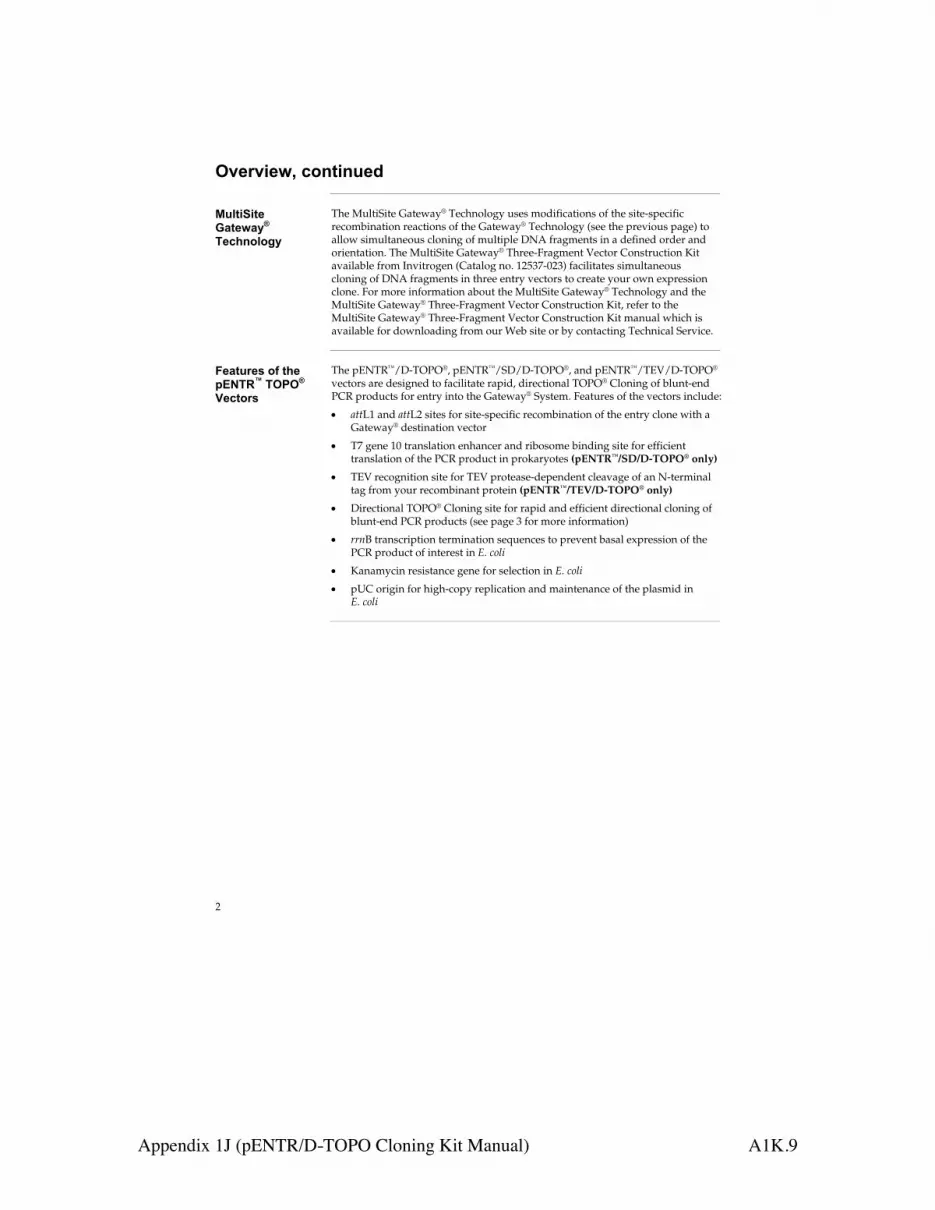
Appendix 1J (pENTR/D-TOPO Cloning Kit Manual) A1K.9
! ! !!
!"#$"%#&'()*+,%+-#.(
/-0,%1%,#(23,#&345(6#)7+*0*84(
The MultiSite Gateway® Technology uses modifications of the site-specific recombination reactions of the Gateway® Technology (see the previous page) to allow simultaneous cloning of multiple DNA fragments in a defined order and orientation. The MultiSite Gateway® Three-Fragment Vector Construction Kit available from Invitrogen (Catalog no. 12537-023) facilitates simultaneous cloning of DNA fragments in three entry vectors to create your own expression clone. For more information about the MultiSite Gateway® Technology and the MultiSite Gateway® Three-Fragment Vector Construction Kit, refer to the MultiSite Gateway® Three-Fragment Vector Construction Kit manual which is available for downloading from our Web site or by contacting Technical Service.
9#3,-$#:(*;(,7#(<=>6?@(6!A!5(B#),*$:(
The pENTR™/D-TOPO®, pENTR™/SD/D-TOPO®, and pENTR™/TEV/D-TOPO® vectors are designed to facilitate rapid, directional TOPO® Cloning of blunt-end PCR products for entry into the Gateway® System. Features of the vectors include:
attL1 and attL2 sites for site-specific recombination of the entry clone with a Gateway® destination vector
T7 gene 10 translation enhancer and ribosome binding site for efficient translation of the PCR product in prokaryotes (pENTR™/SD/D-TOPO® only)
TEV recognition site for TEV protease-dependent cleavage of an N-terminal tag from your recombinant protein (pENTR™/TEV/D-TOPO® only)
Directional TOPO® Cloning site for rapid and efficient directional cloning of blunt-end PCR products (see page 3 for more information)
rrnB transcription termination sequences to prevent basal expression of the PCR product of interest in E. coli
Kanamycin resistance gene for selection in E. coli
pUC origin for high-copy replication and maintenance of the plasmid in E. coli
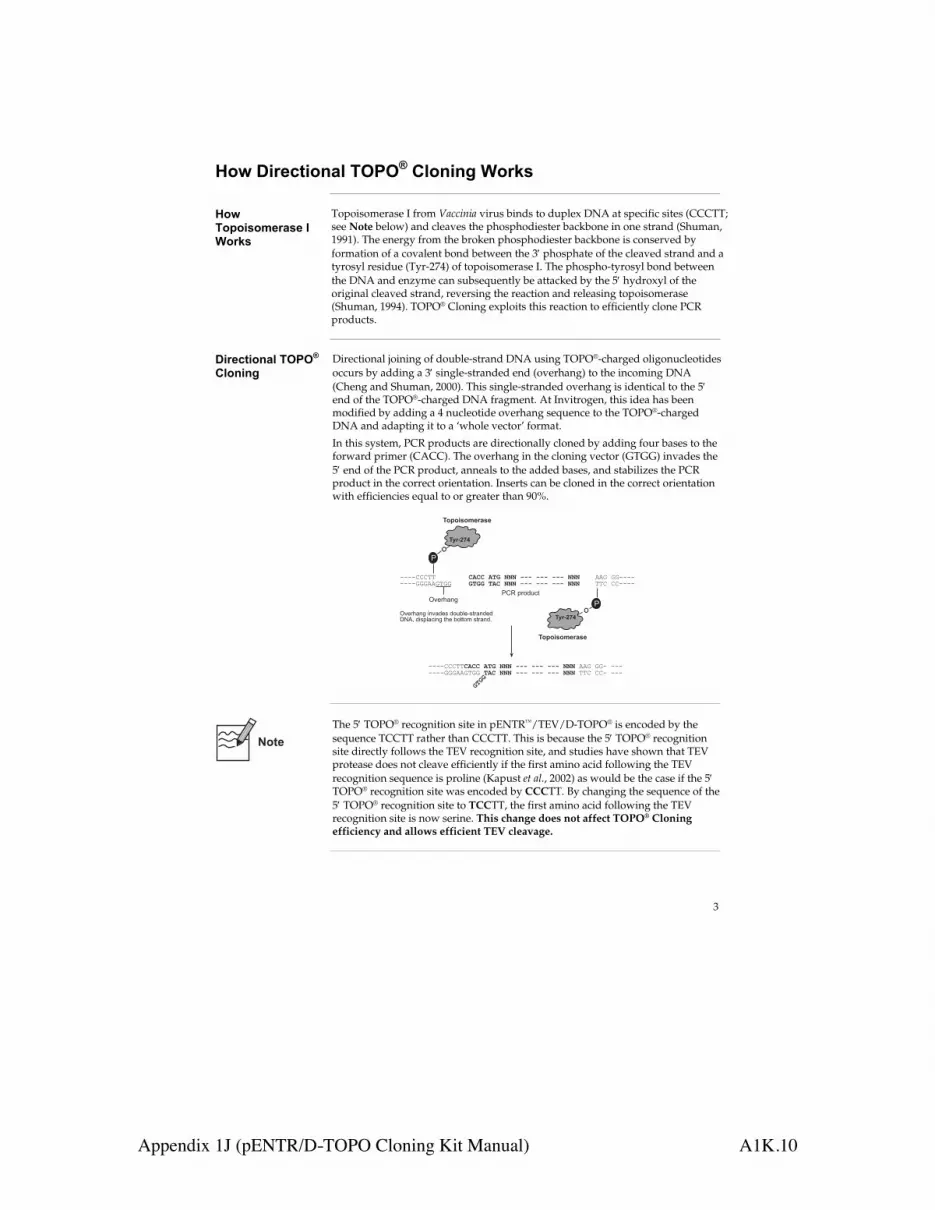
Appendix 1J (pENTR/D-TOPO Cloning Kit Manual) A1K.10
! ! !!
!"#$%&'()*&"+,-$./0/1$2-"+&+3$4"'56$
!"#$."7"&6"8(',6($9$4"'56$
Topoisomerase I from Vaccinia virus binds to duplex DNA at specific sites (CCCTT; see Note below) and cleaves the phosphodiester backbone in one strand (Shuman, 1991). The energy from the broken phosphodiester backbone is conserved by formation of a covalent bond between the 3 phosphate of the cleaved strand and a tyrosyl residue (Tyr-274) of topoisomerase I. The phospho-tyrosyl bond between the DNA and enzyme can subsequently be attacked by the 5 hydroxyl of the original cleaved strand, reversing the reaction and releasing topoisomerase (Shuman, 1994). TOPO® Cloning exploits this reaction to efficiently clone PCR products.
%&'()*&"+,-$./0/1$2-"+&+3$
Directional joining of double-strand DNA using TOPO®-charged oligonucleotides occurs by adding a 3 single-stranded end (overhang) to the incoming DNA (Cheng and Shuman, 2000). This single-stranded overhang is identical to the 5 end of the TOPO®-charged DNA fragment. At Invitrogen, this idea has been modified by adding a 4 nucleotide overhang sequence to the TOPO®-charged DNA and adapting it to a ‘whole vector’ format.
In this system, PCR products are directionally cloned by adding four bases to the forward primer (CACC). The overhang in the cloning vector (GTGG) invades the 5 end of the PCR product, anneals to the added bases, and stabilizes the PCR product in the correct orientation. Inserts can be cloned in the correct orientation with efficiencies equal to or greater than 90%.
!"!!#"$%#&&&#'''#'''#'''#&&&%$%%#$"!#&&&#'''#'''#'''#&&&
!!!!"""##!!!!$$$%%$#$$
%%$&$$!!!!##"&""!!!!
!!!!"""##!"!!#"$%#&&&#'''#'''#'''#&&&&%%$&$$!&!!!!!!!$$$%%$#$$&$"!#&&&#'''#'''#'''#&&&&##"&""!&!!!
!
!"#"$%"&'()%'
!
!*(+,-.(
!"#"$%"&'()%'
!"#$%&'()*+
%$%%
,-.&/012
,-.&/012$31-0(.4$(')56.74+&01(.(89:;$(34%60*312$+/.$5'++'<$4+&01(=
(!*(+,-.
$
The 5 TOPO® recognition site in pENTR™/TEV/D-TOPO® is encoded by the sequence TCCTT rather than CCCTT. This is because the 5 TOPO® recognition site directly follows the TEV recognition site, and studies have shown that TEV protease does not cleave efficiently if the first amino acid following the TEV recognition sequence is proline (Kapust et al., 2002) as would be the case if the 5 TOPO® recognition site was encoded by CCCTT. By changing the sequence of the 5 TOPO® recognition site to TCCTT, the first amino acid following the TEV recognition site is now serine. This change does not affect TOPO® Cloning efficiency and allows efficient TEV cleavage.

Appendix 1J (pENTR/D-TOPO Cloning Kit Manual) A1K.11
! ! !!
!"#$%&'$()*+,-.)+&($,
/+01,23*%), The flow chart below describes the general steps required to produce and clone your blunt-end PCR product.
!"#$%&'()*)+,"$'(-&').//+)'(+0(.&'$.(
!"#$%&'"()*$+'),'(-.+.$+)!"#$%&'),.//%
0./.,+)#$1)#$#/23.),'/'$*.%
4"'15,.)6/5$+7.$1)489)-"'15,+5%*$:)-"'-."/2)1.%*:$.1)489)-"*(."%
!;4;<)8/'$*$:)9.#,+*'$=>*?)+':.+@.")489)-"'15,+)#$1)-AB!9!>)!;4;<)C.,+'"
8@''%.)#)-'%*+*C.)+"#$%&'"(#$+)#$1)*%'/#+.)-/#%(*1)DBE
4"',..1)+')+@.)F9)".,'(6*$#+*'$)".#,+*'$G*+@)#)H#+.G#2<)1.%+*$#+*'$)C.,+'"
D.+."(*$.)%+"#+.:2)&'")489
!

Appendix 1J (pENTR/D-TOPO Cloning Kit Manual) A1K.12
! ! !!
!"#$%&'(
)"'*+,*,+(-./(-0*1"0'(
)"'*+,*,+(2%30(-./(-0*1"0'(
The design of the PCR primers to amplify your gene of interest is critical for expression. Depending on the pENTR™ TOPO® vector you are using, consider the following when designing your PCR primers.
Sequences required to facilitate directional cloning
Sequences required for proper translation initiation of your PCR product
Whether or not you wish your PCR product to be fused in frame with an N- or C-terminal tag after recombination of your entry clone with a Gateway® destination vector
43*&"5*,"'(#%()"'*+,(#$"(6%0780&(-./(-0*1"0(
When designing your forward PCR primer, consider the following points below. Refer to pages 8-9 for diagrams of the TOPO® Cloning site for pENTR™/D-TOPO®, pENTR™/SD/D-TOPO®, and pENTR™/TEV/D-TOPO®.
To enable directional cloning, the forward PCR primer must contain the sequence, CACC, at the 5 end of the primer. The 4 nucleotides, CACC, base pair with the overhang sequence, GTGG, in each pENTR™ TOPO® vector.
If you plan to express your PCR product in mammalian cells as a native or C-terminal fusion-tagged protein (following recombination of the entry clone with a Gateway® destination vector), your sequence of interest should include a Kozak translation initiation sequence with an ATG initiation codon for proper initiation of translation (Kozak, 1987; Kozak, 1991; Kozak, 1990). An example of a Kozak consensus sequence is (G/A)NNATGG. Other sequences are possible, but the G or A at position –3 and the G at position +4 are the most critical for function (shown in bold). The ATG initiation codon is underlined. Note: If your sequence of interest does not contain an initiation codon within the context of a Kozak sequence, design the forward PCR primer to contain a Kozak sequence at the 5 end of the primer (see Example on the next page).
If you plan to express your PCR product in mammalian cells as an N-terminal fusion-tagged protein (following recombination of the entry clone with a Gateway® destination vector), your sequence of interest does not need to contain a Kozak translation initiation sequence. A Kozak sequence is provided by the appropriate destination vector. Note: In this case, internal initiation may occur if your PCR product contains an endogenous Kozak sequence.
If you plan to express your PCR product in prokaryotic cells without an N-terminal fusion tag (following recombination of the entry clone with a Gateway® destination vector), you should TOPO® Clone your PCR product into pENTR™/SD/D-TOPO®. pENTR™/SD/D-TOPO® contains a T7 gene 10 translational enhancer and a ribosome binding site (RBS) to enable efficient translation of the PCR product in E. coli. To ensure optimal spacing for proper translation, design your forward PCR primer so that the ATG initiation codon of your PCR product directly follows the CACC necessary for directional cloning (see Example on the next page).
continued on next page

Appendix 1J (pENTR/D-TOPO Cloning Kit Manual) A1K.13
! ! !!
!"#$%&$&%'()*'(+$,"+#-'./&0$&1"2'
345,67"'/8'9/+:5+2'(+$,"+'!"#$%&'
Below is the DNA sequence of the N-terminus of a theoretical protein and the proposed sequence for your forward PCR primer. The ATG initiation codon is underlined.
DNA sequence: ! "#$%&%%#&$'$&%#$&###
Proposed Forward PCR primer: ! "'&#''&#$%&%%#&$'$&%#$&###
If you design the forward PCR primer as noted above, then:
The ATG initiation codon falls within the context of a Kozak sequence (see boxed sequence), allowing proper translation initiation of the PCR product in mammalian cells.
The ATG initiation codon is properly spaced from the RBS (in pENTR™/SD/D-TOPO® only), allowing proper translation of the PCR product in prokaryotic cells.
' The first three base pairs of the PCR product following the 5 CACC overhang will constitute a functional codon.
;1$2"7$&"#'0/'!"#$%&'0<"'*"="+#"'(+$,"+'
When designing your reverse PCR primer, consider the following points below. Refer to pages 8-9 for diagrams of the TOPO® Cloning site for pENTR™/D-TOPO®, pENTR™/SD/D-TOPO®, and pENTR™/TEV/D-TOPO®.
To ensure that your PCR product clones directionally with high efficiency, the reverse PCR primer MUST NOT be complementary to the overhang sequence GTGG at the 5 end. A one base pair mismatch can reduce the directional cloning efficiency from 90% to 50%, increasing the likelihood of your ORF cloning in the opposite orientation (see Example #1 on the next page). We have not observed evidence of PCR products cloning in the opposite orientation from a two base pair mismatch.
If you wish to fuse your PCR product in frame with a C-terminal tag (following recombination of the entry clone with a Gateway® destination vector), then design the reverse PCR primer to remove the native stop codon in the gene of interest (see Example #2 on the next page).
If you do not wish to fuse your PCR product in frame with a C-terminal tag (following recombination of the entry clone with a Gateway® destination vector), then include the native sequence containing the stop codon in the reverse primer or make sure the stop codon is upstream from the reverse PCR primer binding site (see Example #2 on the next page).
continued on next page

Appendix 1J (pENTR/D-TOPO Cloning Kit Manual) A1K.14
! ! !!
!"#$%&$&%'()*'(+$,"+#-'./&0$&1"2'
345,67"'89'/:'*";"+#"'(+$,"+'!"#$%&'
Below is the sequence of the C-terminus of a theoretical protein. You want to fuse the protein in frame with a C-terminal tag (following recombination of the entry clone with a Gateway® destination vector). The stop codon is underlined.
DNA sequence: !!"#$%"#"!"#%!%#$%"#!%"#!%"#"$"#$!"&' #One solution is to design the reverse PCR primer to start with the codon just up-stream of the stop codon, but the last two codons contain GTGG (underlined below), which is identical to the 4 bp overhang sequence. As a result, the reverse primer will be complementary to the 4 bp overhang sequence, increasing the probability that the PCR product will clone in the opposite orientation. You want to avoid this situation.
DNA sequence: !!"#$%"#"!"#%!%#$%"#!%"#!%"#"$"#$!"&' Proposed Reverse PCR primer sequence: $"#!"%#$"%#$"%#%!%#!!!&(
Another solution is to design the reverse primer so that it hybridizes just down-stream of the stop codon, but still includes the C-terminus of the ORF. Note that you will need to replace the stop codon with a codon for an innocuous amino acid such as glycine, alanine, or lysine.
345,67"'8<'/:'*";"+#"'(+$,"+'!"#$%&'
Below is the sequence for the C-terminus of a theoretical protein. The stop codon is underlined.
)"%"#"$$#!!"#$%"#"!"#%!%#$%"#!%"#!%$#"%!#$!"&' #To fuse the ORF in frame with a C-terminal tag (supplied by the destination vector after recombination), remove the stop codon by starting with nucleotides homologous to the last codon (TGC) and continue upstream. The reverse primer will be:
( &$"%#!"$#%"$#%"!#"$"#%$%#%"!#%$$&' #This will amplify the C-terminus without the stop codon and allow you to join the ORF in frame with a C-terminal tag.
If you don’t want to join the ORF in frame with a C-terminal tag, simply design the reverse primer to include the stop codon.
( &%$!#$"%#!"$#%"$#%"!#"$"#%$%#%"!#%$$&' #
!"#$%&'(&'
Remember that the pENTR™ TOPO® vectors accept blunt-end PCR products.
Do not add 5´ phosphates to your primers for PCR. This will prevent ligation into the pENTR™ TOPO® vectors.
We recommend that you gel-purify your oligonucleotides, especially if they are long (> 30 nucleotides).
continued on next page
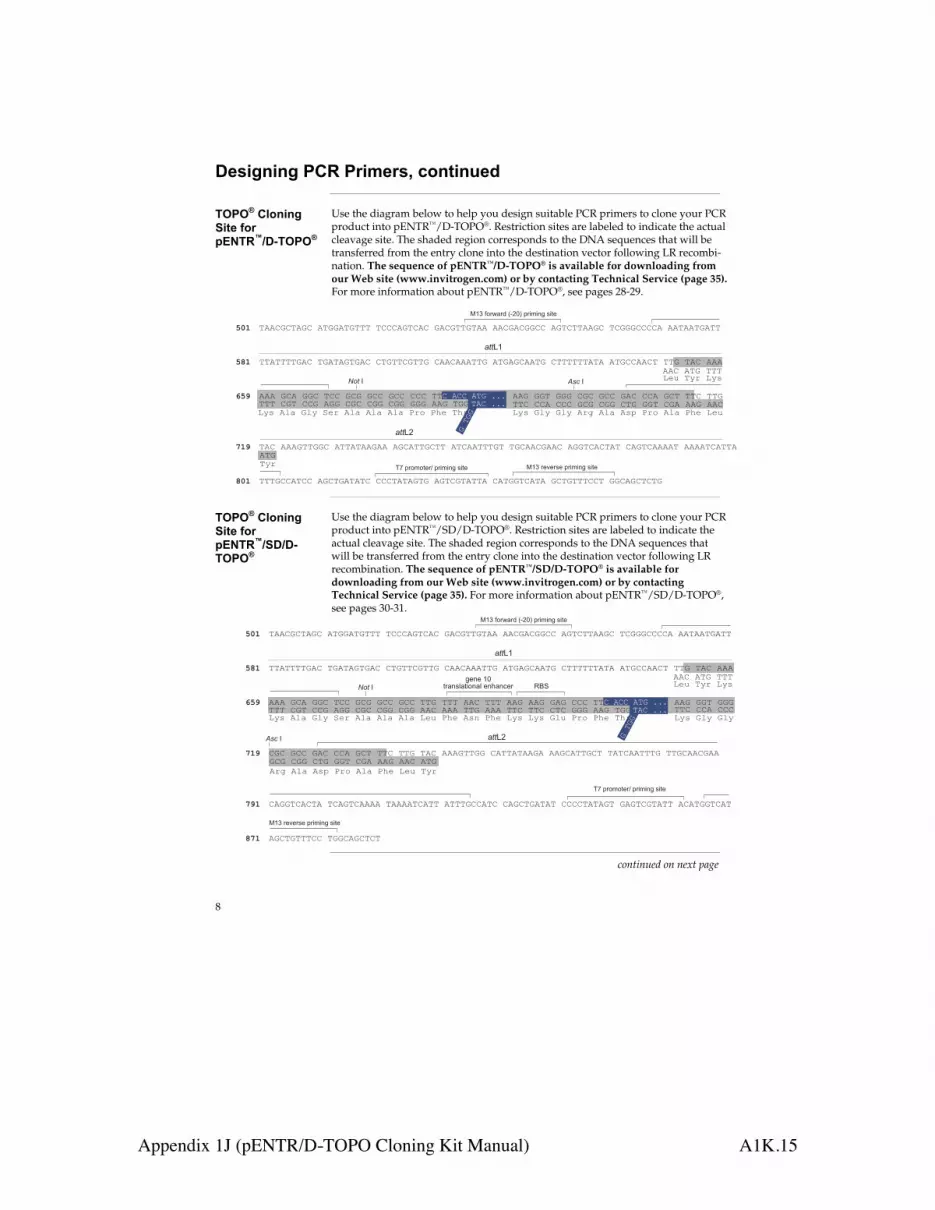
Appendix 1J (pENTR/D-TOPO Cloning Kit Manual) A1K.15
! ! !!
!"#$%&$&%'()*'(+$,"+#-'./&0$&1"2'
34(45')6/&$&%'7$0"'8/+''9:;3*<=!>34(45'
Use the diagram below to help you design suitable PCR primers to clone your PCR product into pENTR™/D-TOPO®. Restriction sites are labeled to indicate the actual cleavage site. The shaded region corresponds to the DNA sequences that will be transferred from the entry clone into the destination vector following LR recombi-nation. The sequence of pENTR™/D-TOPO® is available for downloading from our Web site (www.invitrogen.com) or by contacting Technical Service (page 35). For more information about pENTR™/D-TOPO®, see pages 28-29.
!""#$#!"$#%"!$$"!$!!!%!###"$!#"#%$"#$!!$!""%""#$"#$$##%"$!#!!""$#%!#$$$####"%""!""!$"!!
!!"!!!!$"#%!$"!"$!$"#%#!$!!#$!!$%#""#"""!!$%"!$"$#""!$%#!!!!!!"!"%"!$##""#!%!!$%!"#%"""
"""%$#"%$$#%!##%$#$%$##%$##%###%!!%%%%%%%%%%%%%""$%$$!%$$$%#$#%$##%$"#%##"%$#!%!!#%!!$
!"#%"""$!!$$#%"!!"!""$""%"$#"!!$#!!%"!#""!!!$!%!$#""#$""#%"$$!#"#!"!%#"$!#""""!%""""!#"!!"
!!!$##"!##%"$#!$"!"!#%###!"!"$!$%"$!#$!"!!"%#"!$$!#"!"%$#!$!!!##!%$$#"$#!#!$
!"#
!$#
%!&
'#&
$"#
!!!%#$!%##$%"$$%#$#%#$$%#$$%$$$%""$%!$$
!""!"
!""!#
!"#%&&&#%"##%"!$%&&&
$%!$
$ '()%$*(%$*(%"+,%"*-%").%/+0%"*-%/12%'23!!#%##"%###%$#$%#$$%#!$%$$!%#$"%""$%""#
""#%"!$%!!!
'()%"*-%$*(%42+%"*-%"*-%"*-%/+0%/12%!1+
"!$!(+
'23%!(+%'()#$"%$ &'(%$
%"&'()*+,*-'./#01'2*34356'7389
%"&'*9:9*79'2*34356'7389;<'2*)4)89*='2*34356'7389
!
34(45')6/&$&%'7$0"'8/+'9:;3*<=7!=!>34(45'
Use the diagram below to help you design suitable PCR primers to clone your PCR product into pENTR™/SD/D-TOPO®. Restriction sites are labeled to indicate the actual cleavage site. The shaded region corresponds to the DNA sequences that will be transferred from the entry clone into the destination vector following LR recombination. The sequence of pENTR™/SD/D-TOPO® is available for downloading from our Web site (www.invitrogen.com) or by contacting Technical Service (page 35). For more information about pENTR™/SD/D-TOPO®, see pages 30-31.
!""#$#!"$#%"!$$"!$!!!%!###"$!#"#%$"#$!!$!""%""#$"#$$##%"$!#!!""$#%!#$$$####"%""!""!$"!!
!!"!!!!$"#%!$"!"$!$"#%#!$!!#$!!$%#""#"""!!$%"!$"$#""!$%#!!!!!!"!"%"!$##""#!%!!$%!"#%"""
"""%$#"%$$#%!##%$#$%$##%$##%!!$%!!!%""#%!!!%""$%""$%$"$%###%!!%%%%%%%%%%%%%""$%$$!%$$$
#$#%$##%$"#%##"%$#!%!!#%!!$%!"#%"""$!!$$%#"!!"!""$"%""$#"!!$#!%!"!#""!!!$%!!$#""#$""
#"$$!#"#!"%!#"$!#""""%!""""!#"!!%"!!!$##"!#%#"$#!$"!"!%####!"!"$!%$"$!#$!"!!%"#"!$$!#"!
"$#!$!!!##%!$$#"$#!#!
!"#
!$#
%!&
'#&
'&#
$'#
!!!%#$!%##$%"$$%#$#%#$$%#$$%""#%"""%!!$%"""%!!#%!!#%#!#%$$$%""$%!$$
!""!"
!""!#
!"#%&&&#%"##%"!$%&&&
$%!$
$ '()%$*(%$*(!!#%##"%###
""#%"!$%!!!
'()%"*-%$*(%42+%"*-%"*-%"*-%'23%/12%")5%/12%'()%'()%$*3%/+0%/12%!1+
$#$%#$$%#!$%$$!%#$"%""$%""#%"!$"+,%"*-%").%/+0%"*-%/12%'23%!(+
'23%!(+%'()#$"%$
%"&'()*+,*-'./#01'2*34356'7389
%"&'*9:9*79'2*34356'7389
&'(%$
>?@6959'"0
8*,57A,83)5,A'95B,5C9*
;<'2*)4)89*='2*34356'7389
'
continued on next page
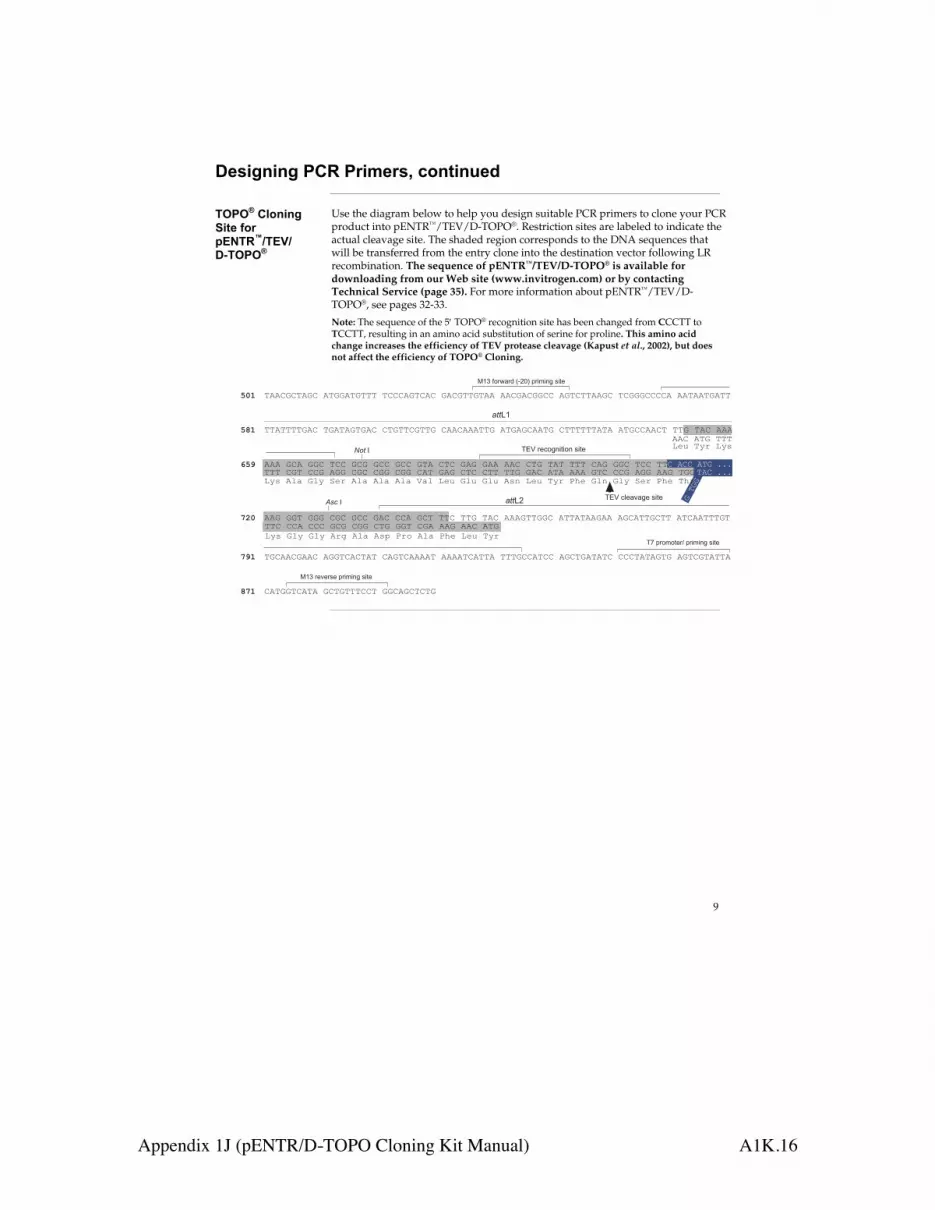
Appendix 1J (pENTR/D-TOPO Cloning Kit Manual) A1K.16
! ! !!
!"#$%&$&%'()*'(+$,"+#-'./&0$&1"2'
34(45')6/&$&%'7$0"'8/+''9:;3*<=3:>='!?34(45'
Use the diagram below to help you design suitable PCR primers to clone your PCR product into pENTR™/TEV/D-TOPO®. Restriction sites are labeled to indicate the actual cleavage site. The shaded region corresponds to the DNA sequences that will be transferred from the entry clone into the destination vector following LR recombination. The sequence of pENTR™/TEV/D-TOPO® is available for downloading from our Web site (www.invitrogen.com) or by contacting Technical Service (page 35). For more information about pENTR™/TEV/D-TOPO®, see pages 32-33. Note: The sequence of the 5 TOPO® recognition site has been changed from CCCTT to TCCTT, resulting in an amino acid substitution of serine for proline. This amino acid change increases the efficiency of TEV protease cleavage (Kapust et al., 2002), but does not affect the efficiency of TOPO® Cloning.
!""#$#!"$#%"!$$"!$!!!%!###"$!#"#%$"#$!!$!""%""#$"#$$##%"$!#!!""$#%!#$$$####"%""!""!$"!!
!!"!!!!$"#%!$"!"$!$"#%#!$!!#$!!$%#""#"""!!$%"!$"$#""!$%#!!!!!!"!"%"!$##""#!%!!$%!"#%"""
"""%$#"%$$#%!##%$#$%$##%$##%$!"%#!#%$"$%$""%""#%#!$%!"!%!!!%#"$%$$#%!##%!!
""$%$$!%$$$%#$#%$##%$"#%##"%$#!%!!#%!!$%!"#%"""$!!$$#%"!!"!""$""%"$#"!!$#!!%"!#""!!!$!
!$#""#$""#%"$$!#"#!"!%#"$!#""""!%""""!#"!!"%!!!$##"!##%"$#!$"!"!#%###!"!"$!$%"$!#$!"!!"
#"!$$!#"!"%$#!$!!!##!%$$#"$#!#!$
!"#
!$#
%!&
'("
'&#
$'#
!!!%#$!%##$%"$$%#$#%#$$%#$$%#"!%$"$%#!#%#!!%!!$%$"#%"!"%"""%$!#%##$%"$$%""$%!$$
!""!"
!""!#
!"#%&&&#%"##%"!$%&&&
$%!$
$
""#%"!$%!!!
'()%"*+%$*(%,-.%"*+%"*+%"*+%/+*%'-0%$*0%$*0%")1%'-0%!(.%23-%$*1%$*(%,-.%23-%!3.
!!#%##"%###%$#$%#$$%#!$%$$!%#$"%""$%""#%"!$'()%$*(%$*(%".4%"*+%")5%2.6%"*+%23-%'-0%!(.
'-0%!(.%'()#$"%$
%"&'()*+,*-'./#01'2*34356'7389
%"&'*9:9*79'2*34356'7389
&'(%$
;<='*9>)65383)5'7389
;<='>?9,:,69'7389
;@'2*)4)89*A'2*34356'7389

Appendix 1J (pENTR/D-TOPO Cloning Kit Manual) A1K.17
! ! !!"
!"#$%&'()*+,%(-./($*!01*!"#$%&-2*
3(-"#$%&-'#(* Once you have decided on a PCR strategy and have synthesized the primers, produce your blunt-end PCR product using any thermostable, proofreading polymerase. Follow the guidelines below to produce your blunt-end PCR product.
45-6"'5,2*7%88,'6$*9:*-;6*<26"*
You will need the following reagents and equipment for PCR. Note: dNTPs (adjusted to pH 8) are provided in the kit.
Thermocycler and thermostable, proofreading polymerase
10X PCR buffer appropriate for your polymerase
DNA template and primers to produce the PCR product
!"#$%&'()*+,%(-./($*!01*!"#$%&-2*
Set up a 25 l or 50 l PCR reaction using the guidelines below.
Follow the instructions and recommendations provided by the manufacturer of your thermostable, proofreading polymerase to produce blunt-end PCR products.
Use the cycling parameters suitable for your primers and template. Make sure to optimize PCR conditions to produce a single, discrete PCR product.
Use a 7 to 30 minute final extension to ensure that all PCR products are completely extended.
After cycling, place the tube on ice or store at –20ºC for up to 2 weeks. Proceed to Checking the PCR Product, below.
0;6&='()*-;6*!01*!"#$%&-*
After you have produced your blunt-end PCR product, use agarose gel electrophoresis to verify the quality and quantity of your PCR product. Check for the following outcomes below.
Be sure you have a single, discrete band of the correct size. If you do not have a single, discrete band, follow the manufacturer’s recommendations to optimize your PCR with the polymerase of your choice. Alternatively, you may gel-purify the desired product (see pages 26-27).
Estimate the concentration of your PCR product. You will use this information when setting up your TOPO® Cloning reaction (see Amount of PCR Product to Use in the TOPO® Cloning Reaction, next page for details).

Appendix 1J (pENTR/D-TOPO Cloning Kit Manual) A1K.18
! ! !!!
!"##$%&'()'#*"'+,-,.'/01%$%&'2"34#$1%'
5%#61784#$1%' Once you have produced the desired blunt-end PCR product, you are ready to TOPO® Clone it into the pENTR™ TOPO® vector and transform the recombinant vector into One Shot® competent E. coli. You should have everything you need set up and ready to use to ensure that you obtain the best possible results. We suggest that you read this section and the section entitled Transforming One Shot® Competent E. coli (pages 13-14) before beginning. If this is the first time you have TOPO® Cloned, perform the control reactions on pages 23-25 in parallel with your samples.
"9:18%#'1;'-/2'-61784#'#1'(<"'$%'#*"'+,-,.'/01%$%&'2"34#$1%'
When performing directional TOPO® Cloning, we have found that the molar ratio of PCR product:TOPO® vector used in the reaction is critical to its success. To obtain the highest TOPO® Cloning efficiency, use a 0.5:1 to 2:1 molar ratio of PCR product:TOPO® vector (see figure below). Note that the TOPO® Cloning efficiency decreases significantly if the ratio of PCR product: TOPO® vector is <0.1:1 or >5:1 (see figure below). These results are generally obtained if too little PCR product is used (i.e. PCR product is too dilute) or if too much PCR product is used in the TOPO® Cloning reaction. If you have quantitated the yield of your PCR product, you may need to adjust the concentration of your PCR product before proceeding to TOPO® Cloning. Tip: For pENTR™ TOPO® vectors, using 1-5 ng of a 1 kb PCR product or 5-10 ng of a 2 kb PCR product in a TOPO® Cloning reaction generally results in a suitable number of colonies.
#$
%#$
!##$
#&! ! !#
!"#$!%&'()*+,-)*&%$./&01%$#1*2&3
#-01*24-$5)*242*6$
.)&0&72-89%-1)*2&73
!continued on next page
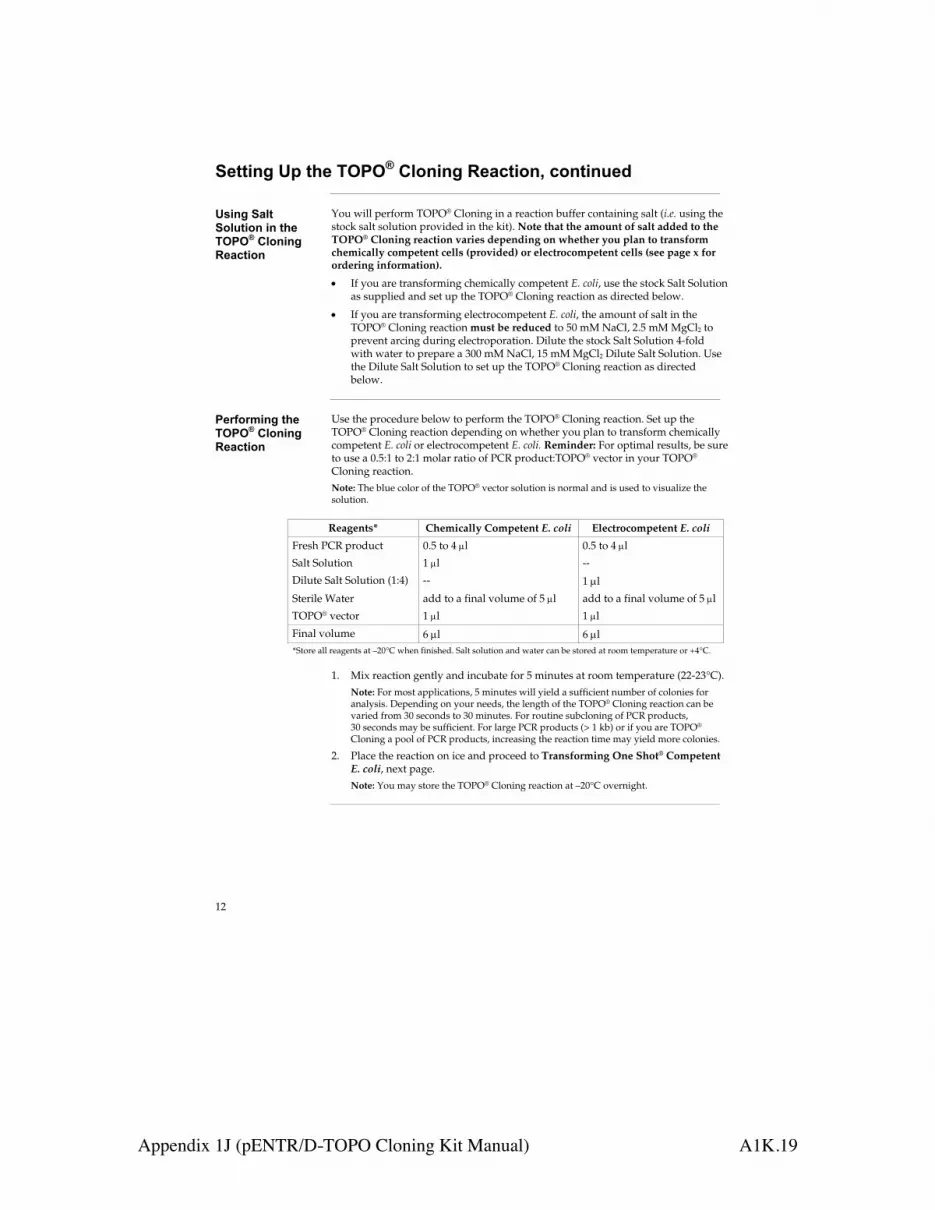
Appendix 1J (pENTR/D-TOPO Cloning Kit Manual) A1K.19
! ! !!"
!"##$%&'()'#*"'+,-,.'/01%$%&'2"34#$1%5'41%#$%6"7'
(8$%&'!30#'!106#$1%'$%'#*"'+,-,.'/01%$%&'2"34#$1%'
You will perform TOPO® Cloning in a reaction buffer containing salt (i.e. using the stock salt solution provided in the kit). Note that the amount of salt added to the TOPO® Cloning reaction varies depending on whether you plan to transform chemically competent cells (provided) or electrocompetent cells (see page x for ordering information).
If you are transforming chemically competent E. coli, use the stock Salt Solution as supplied and set up the TOPO® Cloning reaction as directed below.
If you are transforming electrocompetent E. coli, the amount of salt in the TOPO® Cloning reaction must be reduced to 50 mM NaCl, 2.5 mM MgCl2 to prevent arcing during electroporation. Dilute the stock Salt Solution 4-fold with water to prepare a 300 mM NaCl, 15 mM MgCl2 Dilute Salt Solution. Use the Dilute Salt Solution to set up the TOPO® Cloning reaction as directed below.
-"9:19;$%&'#*"'+,-,.'/01%$%&'2"34#$1%'
Use the procedure below to perform the TOPO® Cloning reaction. Set up the TOPO® Cloning reaction depending on whether you plan to transform chemically competent E. coli or electrocompetent E. coli. Reminder: For optimal results, be sure to use a 0.5:1 to 2:1 molar ratio of PCR product:TOPO® vector in your TOPO® Cloning reaction. Note: The blue color of the TOPO® vector solution is normal and is used to visualize the solution.
!Reagents* Chemically Competent E. coli Electrocompetent E. coli
Fresh PCR product 0.5 to 4 l 0.5 to 4 l
Salt Solution 1 l --
Dilute Salt Solution (1:4) -- 1 l
Sterile Water add to a final volume of 5 l add to a final volume of 5 l
TOPO® vector 1 l 1 l
Final volume 6 l 6 l *Store all reagents at –20°C when finished. Salt solution and water can be stored at room temperature or +4°C.
' 1. Mix reaction gently and incubate for 5 minutes at room temperature (22-23°C).
Note: For most applications, 5 minutes will yield a sufficient number of colonies for analysis. Depending on your needs, the length of the TOPO® Cloning reaction can be varied from 30 seconds to 30 minutes. For routine subcloning of PCR products, 30 seconds may be sufficient. For large PCR products (> 1 kb) or if you are TOPO® Cloning a pool of PCR products, increasing the reaction time may yield more colonies.
2. Place the reaction on ice and proceed to Transforming One Shot® Competent E. coli, next page. Note: You may store the TOPO® Cloning reaction at –20°C overnight.

Appendix 1J (pENTR/D-TOPO Cloning Kit Manual) A1K.20
! ! !!"
!"#$%&'"()$*+,$-+./'01+2'(3-0-$0+!"#$%&'+
4$0"'5670)'$+ Once you have performed the TOPO® Cloning reaction, you will transform your pENTR™ TOPO® construct into competent E. coli. One Shot® TOP10 or Mach1™-T1R Chemically Competent E. coli (Box 2) are included with the kit to facilitate transformation, however, you may also transform electrocompetent cells (see page x for ordering information). Protocols to transform chemically competent or electrocompetent E. coli are provided in this section.
8#0-")#9%+:--5-5+ In addition to general microbiological supplies (i.e. plates, spreaders), you will
need the following reagents and equipment:
TOPO® Cloning reaction (from Step 2, previous page)
One Shot® TOP10 or Mach1™-T1R chemically competent E. coli (supplied with the kit, Box 2)
S. O.C. Medium (supplied with the kit, Box 2)
pUC19 positive control (to verify transformation efficiency, if desired, Box 2)
42°C water bath (or electroporator with cuvettes, optional)
15 ml sterile, snap-cap plastic culture tubes (for electroporation only)
LB plates containing 50 g/ml kanamycin (two for each transformation)
LB plates containing 100 g/ml ampicillin (if transforming pUC19 control)
37°C shaking and non-shaking incubator
+
There is no blue-white screening for the presence of inserts. Most transformants will contain recombinant plasmids with the PCR product of interest cloned in the correct orientation. Sequencing primers are included in the kit to sequence across an insert in the multiple cloning site to confirm orientation and reading frame.
;"-3#")$*+&'"+!"#$%&'"(#0)'$+
For each transformation, you will need one vial of One Shot® competent cells and two selective plates.
Equilibrate a water bath to 42°C (for chemical transformation) or set up your electroporator if you are using electrocompetent E. coli.
Warm the vial of S.O.C. Medium from Box 2 to room temperature.
Warm selective plates at 37°C for 30 minutes.
Thaw on ice one vial of One Shot® cells from Box 2 for each transformation.
continued on next page
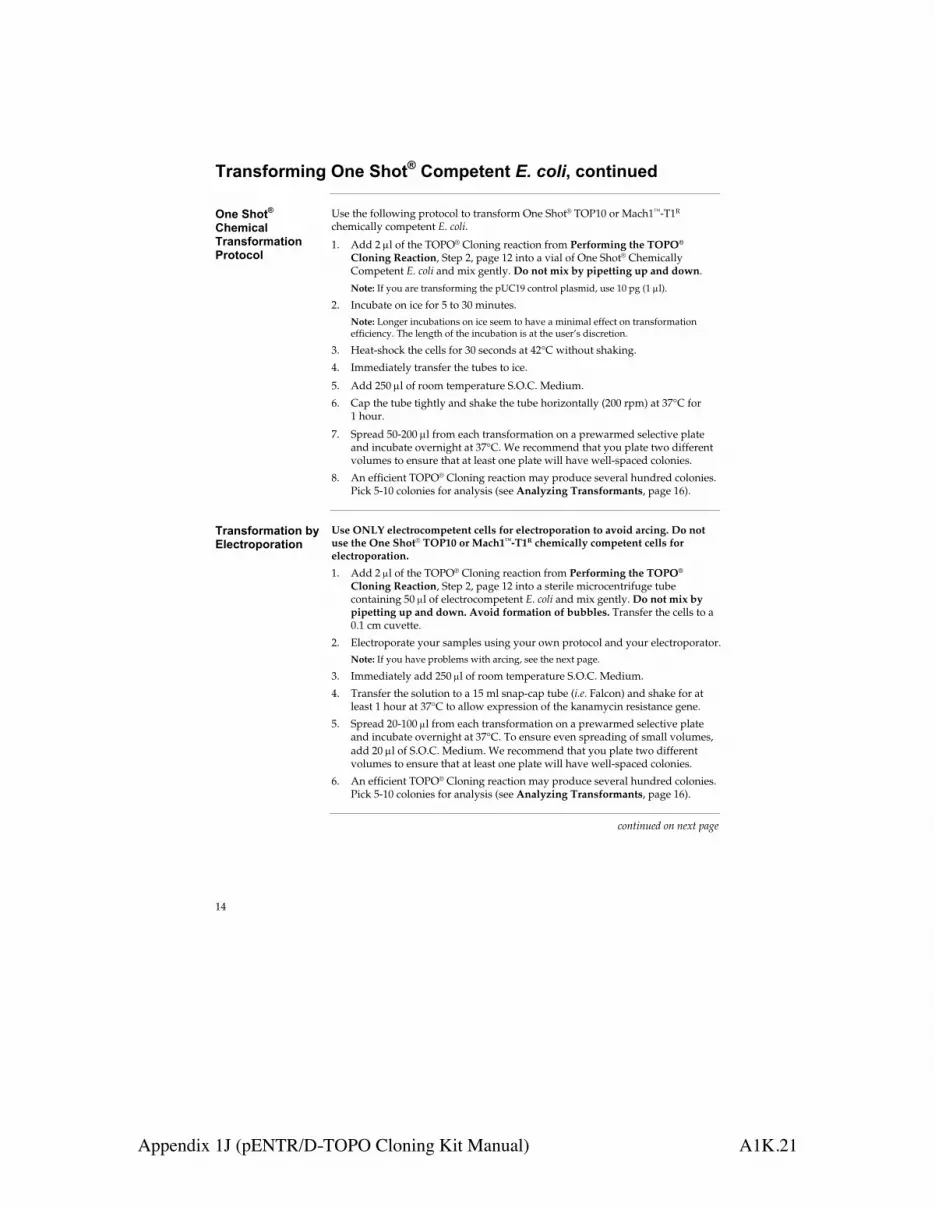
Appendix 1J (pENTR/D-TOPO Cloning Kit Manual) A1K.21
! ! !!"
!"#$%&'"()$*+,$-+./'01+2'(3-0-$0+!"#$%&'4+5'$0)$6-7+
,$-+./'01+2/-()5#8+!"#$%&'"(#0)'$+9"'0'5'8+
Use the following protocol to transform One Shot® TOP10 or Mach1™-T1R chemically competent E. coli.
1. Add 2 l of the TOPO® Cloning reaction from Performing the TOPO® Cloning Reaction, Step 2, page 12 into a vial of One Shot® Chemically Competent E. coli and mix gently. Do not mix by pipetting up and down. Note: If you are transforming the pUC19 control plasmid, use 10 pg (1 l).
2. Incubate on ice for 5 to 30 minutes. Note: Longer incubations on ice seem to have a minimal effect on transformation efficiency. The length of the incubation is at the user’s discretion.
3. Heat-shock the cells for 30 seconds at 42°C without shaking.
4. Immediately transfer the tubes to ice.
5. Add 250 l of room temperature S.O.C. Medium.
6. Cap the tube tightly and shake the tube horizontally (200 rpm) at 37°C for 1 hour.
7. Spread 50-200 l from each transformation on a prewarmed selective plate and incubate overnight at 37°C. We recommend that you plate two different volumes to ensure that at least one plate will have well-spaced colonies.
8. An efficient TOPO® Cloning reaction may produce several hundred colonies. Pick 5-10 colonies for analysis (see Analyzing Transformants, page 16).
!"#$%&'"(#0)'$+:;+<8-50"'3'"#0)'$+
Use ONLY electrocompetent cells for electroporation to avoid arcing. Do not use the One Shot® TOP10 or Mach1™-T1R chemically competent cells for electroporation.
1. Add 2 l of the TOPO® Cloning reaction from Performing the TOPO® Cloning Reaction, Step 2, page 12 into a sterile microcentrifuge tube containing 50 l of electrocompetent E. coli and mix gently. Do not mix by pipetting up and down. Avoid formation of bubbles. Transfer the cells to a 0.1 cm cuvette.
2. Electroporate your samples using your own protocol and your electroporator. Note: If you have problems with arcing, see the next page.
3. Immediately add 250 l of room temperature S.O.C. Medium.
4. Transfer the solution to a 15 ml snap-cap tube (i.e. Falcon) and shake for at least 1 hour at 37°C to allow expression of the kanamycin resistance gene.
5. Spread 20-100 l from each transformation on a prewarmed selective plate and incubate overnight at 37°C. To ensure even spreading of small volumes, add 20 l of S.O.C. Medium. We recommend that you plate two different volumes to ensure that at least one plate will have well-spaced colonies.
6. An efficient TOPO® Cloning reaction may produce several hundred colonies. Pick 5-10 colonies for analysis (see Analyzing Transformants, page 16).
continued on next page

Appendix 1J (pENTR/D-TOPO Cloning Kit Manual) A1K.22
! ! !!"
!"#$%&'"()$*+,$-+./'01+2'(3-0-$0+!"#$%&'4+5'$0)$6-7+
!"#$
%%"&'()*$
&
+
To prevent arcing of your samples during electroporation, the volume of cells should be between 50 and 80 l (0.1 cm cuvettes) or 100 to 200 l (0.2 cm cuvettes).
If you experience arcing during transformation, try one of the following suggestions:
Reduce the voltage normally used to charge your electroporator by 10%
Reduce the pulse length by reducing the load resistance to 100 ohms
Ethanol precipitate the TOPO® Cloning reaction and resuspend in water prior to electroporation

Appendix 1J (pENTR/D-TOPO Cloning Kit Manual) A1K.23
! ! !!"
!"#$%&'"()*+#",-.+/#"0,)
!"#$%&'"()1.,'0'23)4$."3,)
1. Pick 5-10 colonies and culture them overnight in LB or SOB medium containing 50-100 g/ml kanamycin. Note: If you transformed One Shot® Mach1™-T1R competent E. coli, you may inoculate overnight-grown colonies and culture them for only 4 hours in pre-warmed LB medium containing 50 g/ml kanamycin before isolating plasmid DNA. For optimal results, inoculate as much of a single colony as possible.
2. Isolate plasmid DNA using your method of choice. If you need ultra-pure plasmid DNA for automated or manual sequencing, we recommend using Invitrogen’s PureLink™ HQ Mini Plasmid Purification Kit (Catalog no. K2100-01).
3. Analyze the plasmids by restriction analysis or PCR (see below) to confirm the presence and correct orientation of the insert.
!"#$%&'"()*+#",-.+/#"0,)5%)146)
Use the protocol below (or any other suitable protocol) to analyze positive transformants using PCR. For PCR primers, use a combination of the M13 Forward (-20) primer or the M13 Reverse primer and a primer that hybridizes within your insert. You will have to determine the amplification conditions. If you are using this technique for the first time, we recommend performing restriction analysis in parallel. Artifacts may be obtained because of mispriming or contaminating template.
Materials Needed:
PCR Super Mix High Fidelity (Invitrogen, Catalog no. 10790-020)
Appropriate forward and reverse PCR primers (20 M each)
Procedure:
1. For each sample, aliquot 48 l of PCR SuperMix High Fidelity into a 0.5 ml microcentrifuge tube. Add 1 l each of the forward and reverse PCR primer.
2. Pick 5-10 colonies and resuspend them individually in 50 l of the PCR SuperMix containing PCR primers (remember to make a patch plate to preserve the colonies for further analysis).
3. Incubate reaction for 10 minutes at 94°C to lyse cells and inactivate nucleases.
4. Amplify for 20 to 30 cycles.
5. For the final extension, incubate at 72°C for 10 minutes. Store at +4°C.
6. Visualize by agarose gel electrophoresis.
73893":'"() Once you have identified the correct clone(s), you may sequence your construct
to confirm that your gene is cloned in the correct orientation. Use the M13 Forward (-20) and M13 Reverse included to help you sequence your insert (see the diagrams on pages 8-9 for the location of the priming sites in each pENTR™ TOPO® vector). For the complete sequence of each pENTR™ TOPO® vector, see our Web site (www.invitrogen.com) or call Technical Service (see page 35). Note: The M13 Forward (-20) and M13 Reverse primers are available separately from Invitrogen (see page x for ordering information).
continued on next page
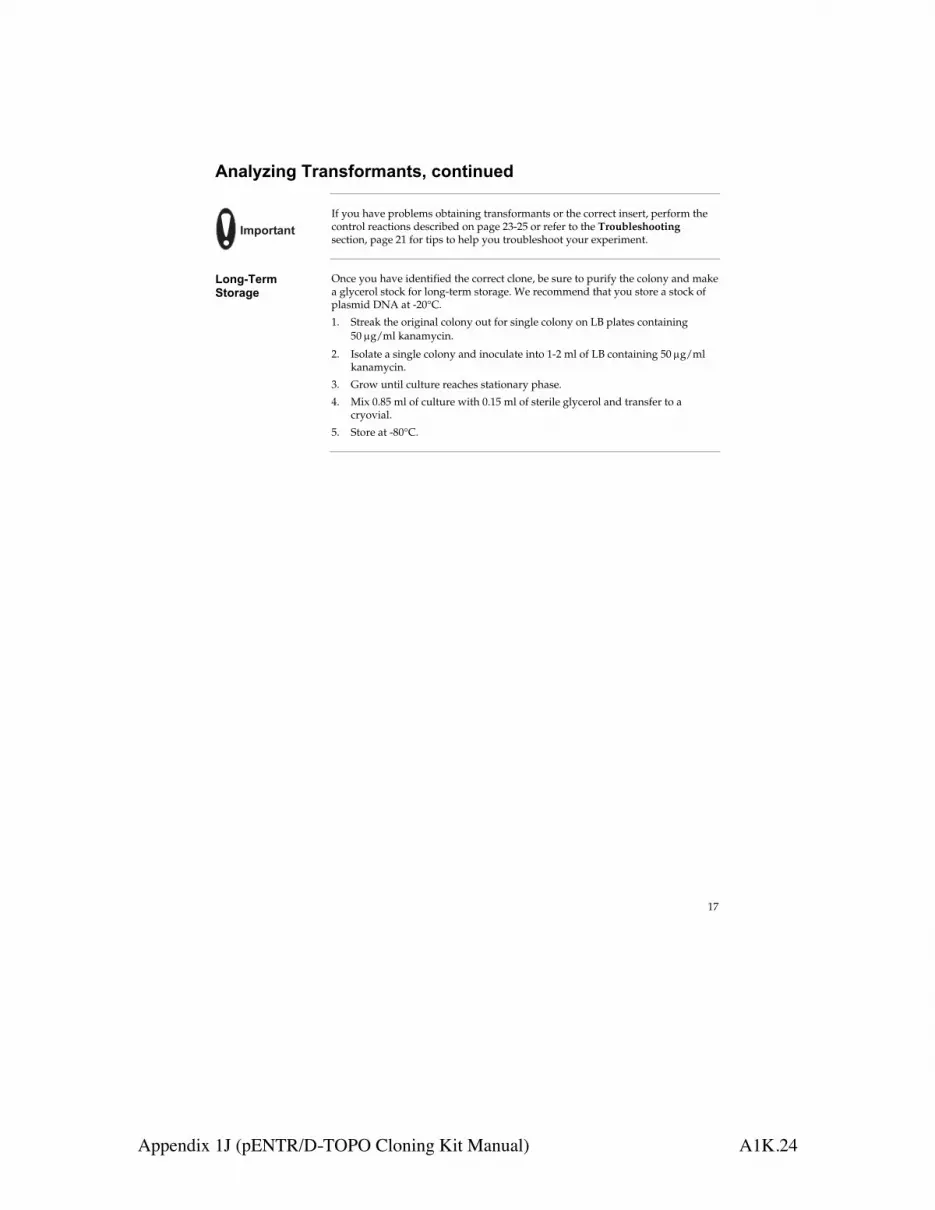
Appendix 1J (pENTR/D-TOPO Cloning Kit Manual) A1K.24
! ! !!"
!"#$%&'"()*+#",-.+/#"0,1)2."0'"345)
!"#$%&'(&)
If you have problems obtaining transformants or the correct insert, perform the control reactions described on page 23-25 or refer to the Troubleshooting section, page 21 for tips to help you troubleshoot your experiment.
6."(7*4+/)80.+#(4)
Once you have identified the correct clone, be sure to purify the colony and make a glycerol stock for long-term storage. We recommend that you store a stock of plasmid DNA at -20°C.
1. Streak the original colony out for single colony on LB plates containing 50 g/ml kanamycin.
2. Isolate a single colony and inoculate into 1-2 ml of LB containing 50 g/ml kanamycin.
3. Grow until culture reaches stationary phase.
4. Mix 0.85 ml of culture with 0.15 ml of sterile glycerol and transfer to a cryovial.
5. Store at -80°C.

Appendix 1J (pENTR/D-TOPO Cloning Kit Manual) A1K.25
! ! !!"
!"#$%&#'%()*+),%-.+-/)*0%)12)2%3+/4#'5*#+')2%53*#+')
6'*-+$"3*#+') Once you have obtained your entry clone, you may:
Perform an LR recombination reaction using Gateway® LR Clonase™ II enzyme mix (see page x for ordering information) to transfer your gene of interest from the entry construct into any Gateway® destination vector of choice to generate an expression clone.
Perform a MultiSite Gateway® LR recombination reaction with 5 and 3 entry clones, the appropriate MultiSite Gateway® destination vector, and LR Clonase™ Plus enzyme mix (see page x for ordering information) to generate an expression clone.
General guidelines are provided below.
!"#$%&'(&!
For most applications, we recommend performing the LR recombination reaction or the MultiSite Gateway® LR recombination reaction using a:
Supercoiled entry clone(s) and
Supercoiled destination vector
!"#$
%%"&'()*$
&
!
To catalyze the LR recombination reaction, we recommend using Gateway® LR Clonase™ II Enzyme Mix (see page x for ordering information). The LR Clonase™ II enzyme mix combines the proprietary enzyme formulation and 5X LR Reaction Buffer previously supplied by Invitrogen as separate components in LR Clonase™ enzyme mix (Catalog no. 11791-019) into an optimized single tube format to allow easier set-up of the LR recombination reaction. Follow the instructions included with the product to perform the LR recombination reaction. Note: You may perform the LR recombination reaction using LR Clonase™ enzyme mix, if desired.
7%(*#'5*#+')8%3*+-()
A large selection of Gateway® destination vectors is available from Invitrogen to facilitate expression of your gene of interest in virtually any protein expression system. For more information about the vectors available, see our Web site (www.invitrogen.com) or call Technical Service (see page 35). Manuals supporting all of the destination vectors are available for downloading from our Web site or by contacting Technical Service.
!"#$%&')9+(*) Once you have performed the LR recombination reaction or the MultiSite
Gateway® LR recombination reaction, you will transform the reaction mixture into competent E. coli and select for expression clones. You may use any recA, endA E. coli strain including OmniMAX™ 2-T1R, TOP10, DH5 ™, or equivalent for transformation. Do not transform the Gateway® or MultiSite Gateway® LR reaction mixture into E. coli strains that contain the F episome (e.g. TOP10F ). These strains contain the ccdA gene and will prevent negative selection with the ccdB gene.
continued on next page

Appendix 1J (pENTR/D-TOPO Cloning Kit Manual) A1K.26
! ! !!"
!"#$%&#'%()*+),%-.+-/)*0%)12)2%3+/4#'5*#+')2%53*#+')
,%-.+-/#'6)*0%)12)2%3+/4#'5*#+')2%53*#+')
To perform the Gateway® LR recombination reaction, you will need:
Purified plasmid DNA of the entry clone containing your gene of interest
A destination vector of choice
LR Clonase™ II enzyme mix (see page x for ordering information)
2 g/ l Proteinase K solution (supplied with the LR Clonase™ II enzyme mix)
TE Buffer, pH 8.0 (10 mM Tris-HCl, pH 8.0, 1 mM EDTA)
Appropriate chemically competent E. coli host and growth media for expression
Appropriate selective plates
For instructions to perform the LR recombination reaction, refer to the Gateway® Technology with Clonase™ II manual or to the manual for the destination vector you are using.
,%-.+-/#'6)*0%)7"&*#8#*%)!5*%95:;)12)2%3+/4#'5*#+')2%53*#+')
Before you can perform the MultiSite Gateway® LR recombination reaction, you will first need to generate 5 and 3 entry clones using Invitrogen’s MultiSite Gateway® Three-Fragment Vector Construction Kit (Catalog no. 12537-023). Once you have generated the 5 and 3 entry clones, you will use the 5 and 3 entry clones, the entry clone containing your gene of interest, and the other reagents supplied in the MultiSite Gateway® Three-Fragment Vector Construction Kit (including LR Clonase™ Plus enzyme mix and the pDEST™R4-R3 destination vector) in a MultiSite Gateway® LR recombination reaction to generate an expression clone.
For instructions to generate 5 and 3 entry clones and to perform the MultiSite Gateway® LR recombination reaction, refer to the MultiSite Gateway® Three-Fragment Vector Construction Kit manual.

Appendix 1J (pENTR/D-TOPO Cloning Kit Manual) A1K.27
! ! !!"
!"#$%&'()##*+,-.
!/0/1.2&#,+,-.3'45*+#,.4,6.!"4,(7#"84*+#,.
The table below lists some potential problems and possible solutions that may help you troubleshoot the TOPO® Cloning and transformation reactions. To help evaluate your results, we recommend that you perform the control reactions (see pages 23-25) in parallel with your samples.
.Problem Reason! Solution
Suboptimal ratio of PCR product:TOPO® vector used in the TOPO® Cloning reaction
Use a 0.5:1 to 2:1 molar ratio of PCR product:TOPO® vector.
Too much PCR product used in the TOPO® Cloning reaction
Dilute the PCR product. Use a 0.5:1 to 2:1 molar ratio
of PCR product:TOPO® vector.
PCR primers contain 5 phosphates
Do not add 5 phosphates to your PCR primers.
Incorrect PCR primer design Make sure that the forward PCR primer contains the sequence, CACC, at the 5 end. Make sure that the reverse PCR primer does not contain the sequence, CACC, at the 5 end.
Used Taq polymerase or a Taq/proofreading polymerase mixture for PCR
Use a proofreading polymerase for PCR.
Large PCR product Use a 0.5:1 to 2:1 molar ratio of PCR product:TOPO® vector. Increase the incubation time of the TOPO® reaction from 5 minutes to 30 minutes. Gel-purify the PCR product to remove primer-dimers and other artifacts.
Few or no colonies obtained from sample reaction and the transformation control gave colonies
PCR reaction contains artifacts (i.e. does not run as a single, discrete band on an agarose gel)
Optimize your PCR using the proofreading polymerase of your choice. Gel-purify your PCR product.
continued on next page
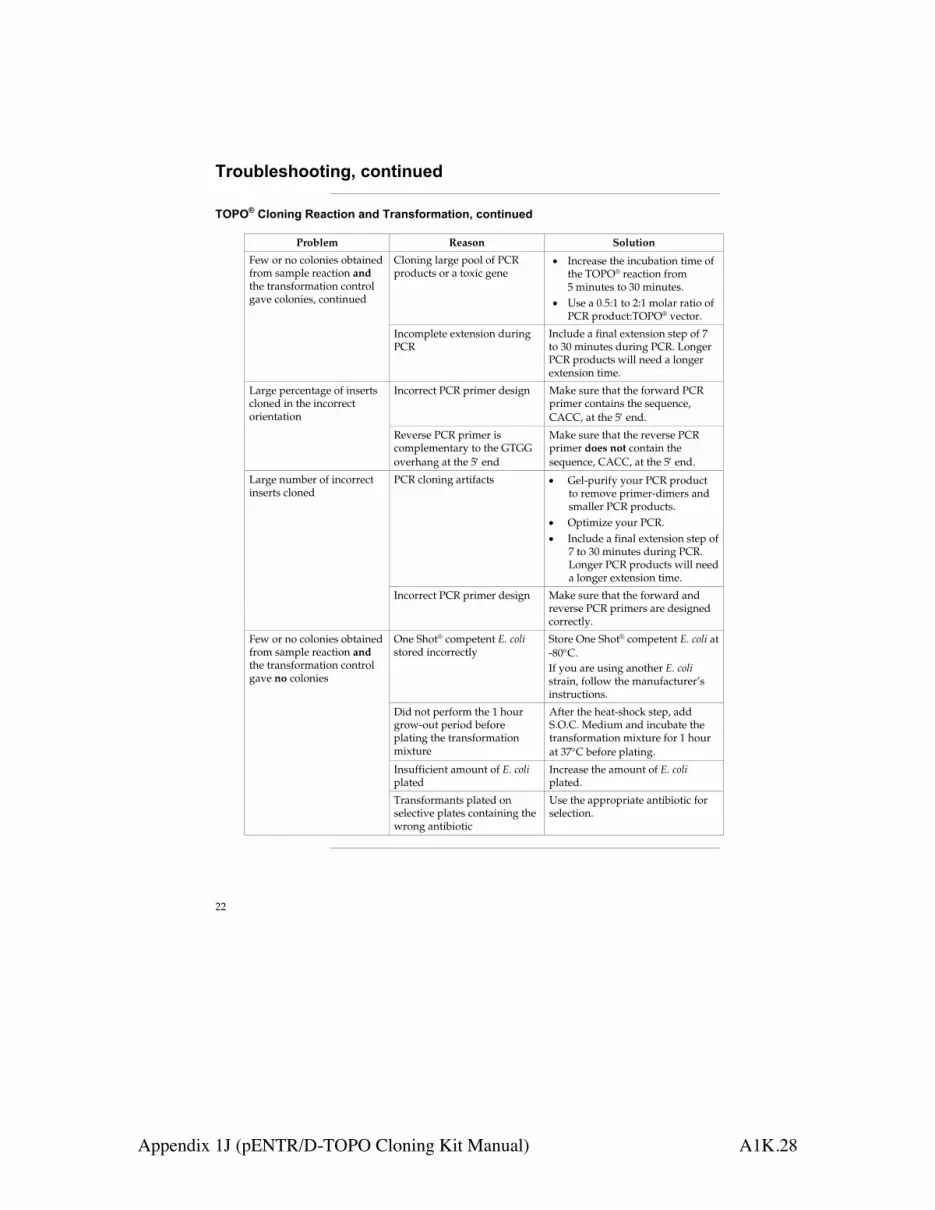
Appendix 1J (pENTR/D-TOPO Cloning Kit Manual) A1K.28
! ! !!!
!"#$%&'()##*+,-./0#,*+,$'1/
!2324/5&#,+,-/6'70*+#,/7,1/!"7,(8#"97*+#,./0#,*+,$'1/
Problem Reason! Solution
Few or no colonies obtained from sample reaction and the transformation control gave colonies, continued
Cloning large pool of PCR products or a toxic gene
Increase the incubation time of the TOPO® reaction from 5 minutes to 30 minutes. Use a 0.5:1 to 2:1 molar ratio of PCR product:TOPO® vector.
Incomplete extension during PCR
Include a final extension step of 7 to 30 minutes during PCR. Longer PCR products will need a longer extension time.
Incorrect PCR primer design Make sure that the forward PCR primer contains the sequence, CACC, at the 5 end.
Large percentage of inserts cloned in the incorrect orientation
Reverse PCR primer is complementary to the GTGG overhang at the 5 end
Make sure that the reverse PCR primer does not contain the sequence, CACC, at the 5 end.
PCR cloning artifacts Gel-purify your PCR product to remove primer-dimers and smaller PCR products. Optimize your PCR. Include a final extension step of 7 to 30 minutes during PCR. Longer PCR products will need a longer extension time.
Large number of incorrect inserts cloned
Incorrect PCR primer design Make sure that the forward and reverse PCR primers are designed correctly.
One Shot® competent E. coli stored incorrectly
Store One Shot® competent E. coli at -80 C. If you are using another E. coli strain, follow the manufacturer’s instructions.
Did not perform the 1 hour grow-out period before plating the transformation mixture
After the heat-shock step, add S.O.C. Medium and incubate the transformation mixture for 1 hour at 37 C before plating.
Insufficient amount of E. coli plated
Increase the amount of E. coli plated.
Few or no colonies obtained from sample reaction and the transformation control gave no colonies
Transformants plated on selective plates containing the wrong antibiotic
Use the appropriate antibiotic for selection.

Appendix 1J (pENTR/D-TOPO Cloning Kit Manual) A1K.29
! ! !!"
!""#$%&'(
)#*+,*-&$.(/0#(1,$/*,2(3#45/&,$6(
7$/*,%85/&,$( We recommend performing the following control TOPO® Cloning reactions the first time you use the kit to help you evaluate your results. Performing the control reactions involves producing a control PCR product using the reagents included in the kit and using this product directly in a TOPO® Cloning reaction.
9#+,*#(:/4*/&$.( For each transformation, prepare two LB plates containing 50 g/ml kanamycin.
)*,%85&$.(/0#(1,$/*,2()13()*,%85/(
Use your thermostable, proofreading polymerase and the appropriate buffer to amplify the control PCR product. Follow the manufacturer’s recommendations for the proofreading polymerase you are using.
1. To produce the 750 bp control PCR product, set up the following 50 l PCR:
Component Amount
Control DNA Template (100 ng) 1 l
10X PCR Buffer (appropriate for enzyme) 5 l
dNTP Mix 0.5 l
Control PCR Primers (0.1 g/ l each) 1 l
Sterile water 41.5 l
Proofreading polymerase (1-2.5 U/ l) 1 l
Total volume 50 l ( 2. Overlay with 70 l (1 drop) of mineral oil, if required.
3. Amplify using the following cycling parameters:
Step Time Temperature Cycles
Initial Denaturation 2 minutes 94°C 1X
Denaturation 1 minute 94°C
Annealing 1 minute 55°C 25X
Extension 1 minute 72°C
Final Extension 7 minutes 72°C 1X ( 4. Remove 10 l from the reaction and analyze by agarose gel electrophoresis.
Make sure that you see a single, discrete 750 bp band.
5. Estimate the concentration of the PCR product, and adjust as necessary such that the amount of PCR product used in the control TOPO® Cloning reaction results in an optimal molar ratio of PCR product:TOPO® vector (i.e. 0.5:1 to 2:1). Proceed to the Control TOPO® Cloning Reactions, next page.
continued on next page

Appendix 1J (pENTR/D-TOPO Cloning Kit Manual) A1K.30
! ! !!"
!"#$%#&'()*+,"*-%(+#%.*/"01+'%(23*1%(+'(4"5*
-%(+#%.*67!78*-.%('()*/"01+'%(2*
Using the control PCR product produced on the previous page and the pENTR™ TOPO® vector, set up two 6 l TOPO® Cloning reactions as described below. If you plan to transform electrocompetent E. coli, use Dilute Salt Solution in place of the Salt Solution.
1. Set up control TOPO® Cloning reactions:
Reagent "Vector Only" "Vector + PCR Insert"
Water 4 l 3 l
Salt Solution 1 l 1 l
Control PCR Product -- 1 l
pENTR™/D-TOPO® vector 1 l 1 l
Total volume 6 l 6 l
2. Incubate at room temperature for 5 minutes and place on ice.
3. Transform 2 l of each reaction into separate vials of One Shot® competent cells using the protocol on page 14.
4. Spread 50-200 l of each transformation mix onto LB plates containing 50 g/ml kanamycin. Be sure to plate two different volumes to ensure that at least one plate has well-spaced colonies.
5. Incubate overnight at 37°C.
continued on next page
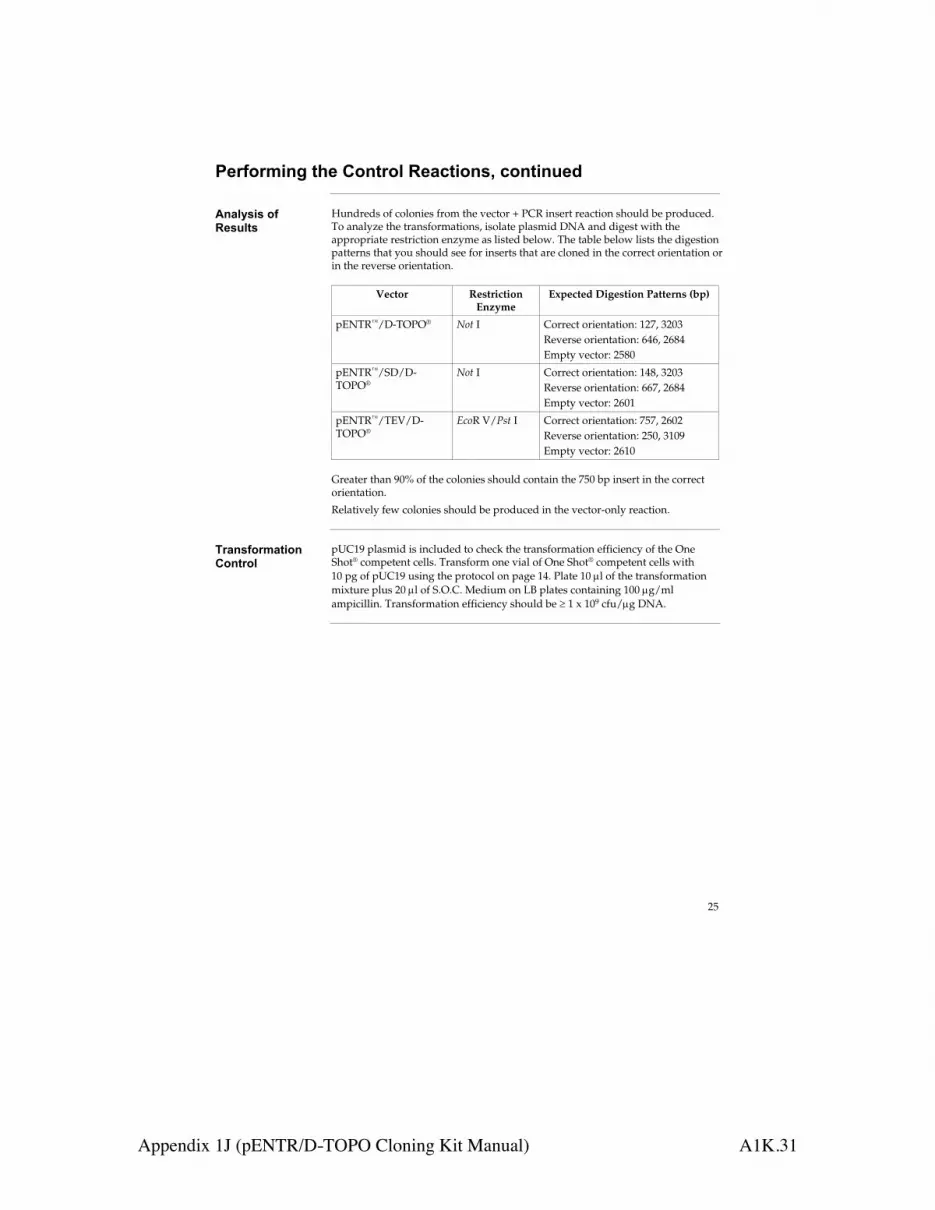
Appendix 1J (pENTR/D-TOPO Cloning Kit Manual) A1K.31
! ! !!"
!"#$%#&'()*+,"*-%(+#%.*/"01+'%(23*1%(+'(4"5*
6(0.72'2*%$*/"24.+2*
Hundreds of colonies from the vector + PCR insert reaction should be produced. To analyze the transformations, isolate plasmid DNA and digest with the appropriate restriction enzyme as listed below. The table below lists the digestion patterns that you should see for inserts that are cloned in the correct orientation or in the reverse orientation.!
Vector Restriction
Enzyme Expected Digestion Patterns (bp)
pENTR™/D-TOPO®! Not I Correct orientation: 127, 3203 Reverse orientation: 646, 2684 Empty vector: 2580
pENTR™/SD/D-TOPO®!
Not I Correct orientation: 148, 3203 Reverse orientation: 667, 2684 Empty vector: 2601
pENTR™/TEV/D-TOPO®
EcoR V/Pst I Correct orientation: 757, 2602 Reverse orientation: 250, 3109 Empty vector: 2610
* Greater than 90% of the colonies should contain the 750 bp insert in the correct
orientation.
Relatively few colonies should be produced in the vector-only reaction.
8#0(2$%#&0+'%(*-%(+#%.*
pUC19 plasmid is included to check the transformation efficiency of the One Shot® competent cells. Transform one vial of One Shot® competent cells with 10 pg of pUC19 using the protocol on page 14. Plate 10 l of the transformation mixture plus 20 l of S.O.C. Medium on LB plates containing 100 g/ml ampicillin. Transformation efficiency should be 1 x 10⁹ cfu/ g DNA.
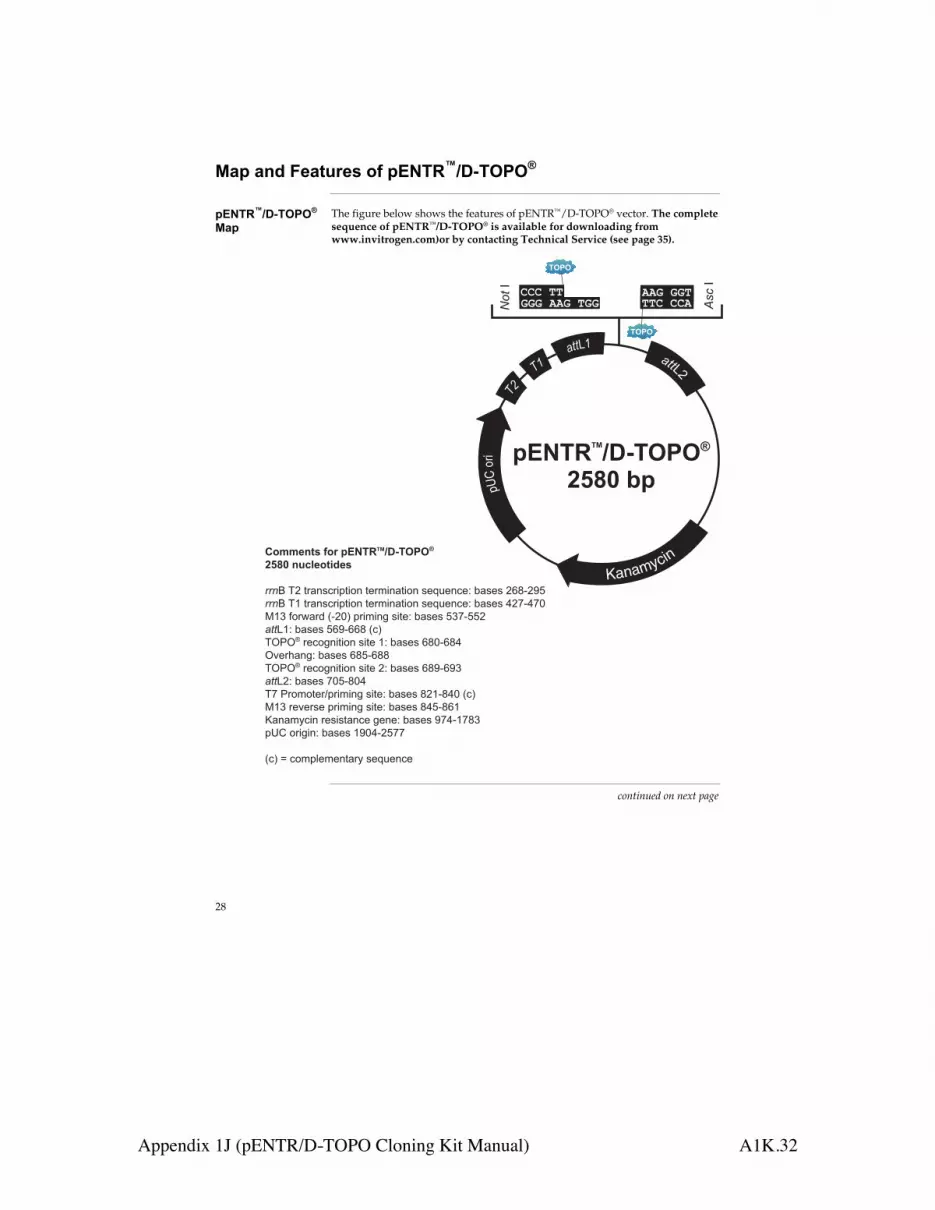
Appendix 1J (pENTR/D-TOPO Cloning Kit Manual) A1K.32
! ! !!"
!"#$"%&$'(")*+(,$-.$#/012345617879$
#/012345617879$!"#$
The figure below shows the features of pENTR™/D-TOPO® vector. The complete sequence of pENTR™/D-TOPO® is available for downloading from www.invitrogen.com)or by contacting Technical Service (see page 35).
!"##$%&'()"*(+,-./.0123.4546
789:(%;<=$"&>?$'
!!"!"#$"%&'()*&+,%+-("%.&/+('%+-(").01.(*.2"3').)"$456$78!!"!"#9"%&'()*&+,%+-("%.&/+('%+-(").01.(*.2"3').)":$;6:;<=9>"?-&@'&A"B6$<C",&+/+(D")+%.2"3').)"8>;688$#$$E92"3').)"8476445"B*C#FGFH"&.*-D(+%+-(")+%."92"3').)"45<645:FI.&J'(D2"3').)"4586455#FGFH"&.*-D(+%+-(")+%."$2"3').)"457647>#$$E$2"3').)";<865<:#;"G&-/-%.&K,&+/+(D")+%.2"3').)"5$965:<"B*C=9>"&.I.&).",&+/+(D")+%.2"3').)"5:86549L'('/M*+("&.)+)%'(*."D.(.2"3').)"7;:69;5>,NO"-&+D+(2"3').)"97<:6$8;;
B*C"P"*-/,Q./.(%'&M").01.(*.
!"#
!"
$%&
!"
!"#"
!!"#""$$$%#%%!
%%%#$$
!"#"
"""#!!"#$""
+,-./.0123.4546
789:(@+
#$$E$
#$%$&'()%
*+,
-.)
#$$E9
%&%'
!
continued on next page

Appendix 1J (pENTR/D-TOPO Cloning Kit Manual) A1K.33
! ! !!"
!"#$"%&$'(")*+(,$-.$#/012345617879:$;-%)<%*(&$
'(")*+(,$-.$$#/012345617879$$
pENTR™/D-TOPO® (2580 bp) contains the following elements. Features have been functionally tested.
Feature Benefit
rrnB T1 and T2 transcription termination sequences
Reduces potential toxicity in E. coli by preventing basal expression of the PCR product.
M13 forward (-20) priming site Allows sequencing of the insert.
attL1 and attL2 sites Bacteriophage -derived recombination sequences that allow recombinational cloning of a gene of interest in the entry construct with a Gateway® destination vector (Landy, 1989).
TOPO® Cloning site (directional) Allows rapid, directional cloning of your PCR product.
T7 promoter/priming site Allows in vitro transcription, and sequencing of the insert.
M13 reverse priming site Allows sequencing of the insert.
Kanamycin resistance gene Allows selection of the plasmid in E. coli.
pUC origin of replication (ori) Allows high-copy replication and maintenance in E. coli.

Appendix 1L (QIAprep Spin Miniprep Handbook) A1L.1
Appendix 1L QIAprep Spin Miniprep Handbook
QIAprep® Miniprep Handbook
For purification of molecular biology grade DNA
PlasmidLarge plasmids (>10 kb)Low-copy plasmids and cosmidsPlasmid DNA prepared by other methods
Second Edition December 2006
W W W . Q I A G E N . C O M

Appendix 1L (QIAprep Spin Miniprep Handbook) A1L.2
Kit ContentsQIAprep Spin Miniprep Kit (50) (250)Catalog no. 27104 27106QIAprep Spin Columns 50 250Buffer P1 20 ml 73 mlBuffer P2 20 ml 73 mlBuffer N3* 30 ml 140 mlBuffer PB* 30 ml 150 mlBuffer PE (concentrate) 2 x 6 ml 55 mlBuffer EB 15 ml 55 mlLyseBlue 20 µl 73 µlRNase A† 200 µl 730 µlCollection Tubes (2 ml) 50 250Handbook 1 1
QIAprep 8 Miniprep Kit (50)Catalog no. 27144QIAprep 8 Strips 50Buffer P1 140 mlBuffer P2 140 mlBuffer N3* 250 mlBuffer PB* 500 mlBuffer PE (concentrate) 2 x 100 mlBuffer EB 2 x 55 mlRNase A‡ 140 µlCollection Microtubes (1.2 ml) 55 x 8Caps for QIAprep Strips 55 x 8Caps for Collection Microtubes 55 x 8Handbook 1
* Buffers N3 and PB contain chaotropic salts which are irritants and not compatible with disinfecting agentscontaining bleach. Take appropriate laboratory safety measures and wear gloves when handling. Seepage 9 for further information.
† Provided as a 10 mg/ml solution.‡ Provided as a 100 mg/ml solution.
4 QIAprep Miniprep Handbook 12/2006

Appendix 1L (QIAprep Spin Miniprep Handbook) A1L.3
QIAprep Miniprep Handbook 12/2006 7
StorageQIAprep Miniprep Kits should be stored dry at room temperature (15–25°C). Kits canbe stored for up to 12 months without showing any reduction in performance and quality.For longer storage these kits can be kept at 2–8°C. If any precipitate forms in the buffersafter storage at 2–8°C it should be redissolved by warming the buffers to 37°C before use. After addition of RNase A and optional LyseBlue reagent, Buffer P1 is stable for 6 months when stored at 2–8°C. RNase A stock solution can be stored for two years atroom temperature.
Quality ControlIn accordance with QIAGEN’s ISO-certified Total Quality Management System, eachlot of QIAprep Miniprep Kit is tested against predetermined specifications to ensure con-sistent product quality.
Product Use LimitationsQIAprep Miniprep Kits are developed, designed, and sold for research purposes only.They are not to be used for human diagnostic or drug purposes or to be administeredto humans unless expressly cleared for that purpose by the Food and Drug Administrationin the USA or the appropriate regulatory authorities in the country of use. All due careand attention should be exercised in the handling of many of the materials describedin this text.The QIAcube, BioRobot 3000, BioRobot 8000 and BioRobot Universal System workstationsare intended for research applications. No claim or representation is intended for theiruse to provide information for the diagnosis, prevention, or treatment of a disease.
Product Warranty and Satisfaction GuaranteeQIAGEN guarantees the performance of all products in the manner described in ourproduct literature. The purchaser must determine the suitability of the product for its particular use. Should any product fail to perform satisfactorily due to any reason otherthan misuse, QIAGEN will replace it free of charge or refund the purchase price. Wereserve the right to change, alter, or modify any product to enhance its performanceand design. If a QIAGEN product does not meet your expectations, simply call yourlocal Technical Service Department. We will credit your account or exchange the product— as you wish. A copy of QIAGEN terms and conditions can be obtained on request, and is alsoprovided on the back of our invoices. If you have questions about product specifica-tions or performance, please call QIAGEN Technical Services or your local distributor(see back cover).
Appendix 1L (QIAprep Spin Miniprep Handbook) A1L.4
QIAprep Miniprep Handbook 12/2006 9
Safety InformationWhen working with chemicals, always wear a suitable lab coat, disposable gloves,and protective goggles. For more information, please consult the appropriate materialsafety data sheets (MSDSs). These are available online in convenient and compact PDFformat at www.qiagen.com/ts/msds.asp where you can find, view, and print the MSDSfor each QIAGEN kit and kit component.
CAUTION: DO NOT add bleach or acidic solutions directly to the sample-preparationwaste.
Buffers N3 and PB contain guanidine hydrochloride, which can form highly reactive compounds when combined with bleach.If liquid containing these buffers is spilt, clean with suitable laboratory detergent andwater. If the spilt liquid contains potentially infectious agents, clean the affected areafirst with laboratory detergent and water, and then with 1% (v/v) sodium hypochlorite.The following risk and safety phrases apply to QIAprep Miniprep Kits.Buffer N3Contains guanidine hydrochloride, acetic acid: harmful, irritant. Risk and safety phrases:*R22-36/38, S13-23-26-36/37/39-46.Buffer P2Contains sodium hydroxide: irritant. Risk and safety phrases:* R36/38, S13-26-36-46.Buffer PBContains guanidine hydrochloride, isopropanol: harmful, flammable, irritant. Risk andsafety phrases:* R10-22-36/38, S13-23-26-36/37/39-46RNase AContains ribonuclease: sensitizer. Risk and safety phrases:* R42/43, S23-24-26-36/37.24-hour emergency informationEmergency medical information in English, French, and German can be obtained 24 hours a day from:Poison Information Center Mainz, GermanyTel: +49-6131-19240
* R10: Flammable; R22: Harmful if swallowed; R36/38: Irritating to eyes and skin; R42/43: May cause sensitization by inhalation and skin contact; S13: Keep away from food, drink, and animal feedingstuffs;S23; Do not breathe spray; S24: Avoid contact with skin; S26: In case of contact with eyes, rinse immediatelywith plenty of water and seek medical advice; S36: Wear suitable protective clothing; S36/37: Wear suitableprotecting clothing and gloves; S36/37/39: Wear suitable protective clothing, gloves and eye/face protection;S46: If swallowed seek medical advice immediately and show the container or label.
Appendix 1L (QIAprep Spin Miniprep Handbook) A1L.5
10 QIAprep Miniprep Handbook 12/2006
IntroductionThe QIAprep Miniprep system provides a fast, simple, and cost-effective plasmidminiprep method for routine molecular biology laboratory applications. QIAprepMiniprep Kits use silica membrane technology to eliminate the cumbersome steps asso-ciated with loose resins or slurries. Plasmid DNA purified with QIAprep Miniprep Kitsis immediately ready for use. Phenol extraction and ethanol precipitation are notrequired, and high-quality plasmid DNA is eluted in a small volume of Tris buffer (includedin each kit) or water. The QIAprep system consists of four products with different handling options to suit every throughput need.
Low throughputThe QIAprep Spin Miniprep Kit is designed for quick and convenient processing of 1–24 samples simultaneously in less than 30 minutes. QIAprep spin columns can beused in a microcentrifuge or on any vacuum manifold with luer connectors (e.g., QIAvac24 Plus, or QIAvac 6S with QIAvac Luer Adapters). The QIAprep Spin Miniprep Kit can be fully automated on the QIAcube. The innovativeQIAcube uses advanced technology to process QIAGEN spin columns, enablingseamless integration of automated, low-throughput sample prep into your laboratoryworkflow. Sample preparation using the QIAcube follows the same steps as the manualprocedure (i.e., lyse, bind, wash, and elute) enabling you to continue using the QIAprepSpin Miniprep Kit for purification of high-quality plasmid DNA.The QIAcube is preinstalled with protocols for purification of plasmid DNA, genomicDNA, RNA, viral nucleic acids, and proteins, plus DNA and RNA cleanup. The rangeof protocols available is continually expanding, and additional QIAGEN protocols canbe downloaded free of charge at www.qiagen.com/MyQIAcube .
Medium throughputFor medium throughput requirements the QIAprep 8 Miniprep Kit and QIAprep 8 TurboMiniprep Kit utilize 8-well strips on QIAvac 6S allowing up to 48 minipreps to be per-formed simultaneously in approximately 40 and 30 minutes respectively. In addition,the QIAprep 8 Turbo BioRobot® Kit enables automated purification of up to 48minipreps in 50 minutes on BioRobot systems.
High throughputThe QIAprep 96 Turbo Miniprep Kit enables up to 96 minipreps to be performed simul-taneously in less than 45 minutes on the QIAvac 96. For automated high-throughputplasmid purification the QIAprep 96 Turbo BioRobot Kit enables up to 96 minipreps tobe processed in 70 minutes.

Appendix 1L (QIAprep Spin Miniprep Handbook) A1L.6
QIAprep Miniprep Handbook 12/2006 11
Applications using QIAprep purified DNA Plasmid DNA prepared using the QIAprep system is suitable for a variety of routine applications including:! Restriction enzyme digestion ! Sequencing! Library screening ! Ligation and transformation! In vitro translation ! Transfection of robust cells
Principle The QIAprep miniprep procedure is based on alkaline lysis of bacterial cells followedby adsorption of DNA onto silica in the presence of high salt (1). The unique silica membrane used in QIAprep Miniprep Kits completely replaces glass or silica slurriesfor plasmid minipreps.
The procedure consists of three basic steps:! Preparation and clearing of a bacterial lysate! Adsorption of DNA onto the QIAprep membrane ! Washing and elution of plasmid DNA All steps are performed without the use of phenol, chloroform, CsCl, ethidium bromide,and without alcohol precipitation.
Preparation and clearing of bacterial lysateThe QIAprep miniprep procedure uses the modified alkaline lysis method of Birnboimand Doly (2). Bacteria are lysed under alkaline conditions, and the lysate is subse-quently neutralized and adjusted to high-salt binding conditions in one step. After lysateclearing, the sample is ready for purification on the QIAprep silica membrane. For moredetails on growth of bacterial cultures and alkaline lysis, please refer to Appendix A onpages 39–42. In the QIAprep Spin and QIAprep 8 miniprep procedures, lysates arecleared by centrifugation, while the QIAprep 8 and 96 Turbo Miniprep kits provide TurboFilter strips or plates for lysate clearing by filtration.
LyseBlue reagent*Use of LyseBlue is optional and is not required to successfully perform plasmid prepa-rations. See “Using LyseBlue reagent” on page 14 for more information.
* LyseBlue reagent is only supplied with QIAprep Spin Miniprep Kits since multiwell or automated formats donot allow visual control of individual samples.
Appendix 1L (QIAprep Spin Miniprep Handbook) A1L.7
12 QIAprep Miniprep Handbook 12/2006
LyseBlue is a color indicator which provides visual identification of optimum buffer mix-ing. This prevents common handling errors that lead to inefficient cell lysis and incom-plete precipitation of SDS, genomic DNA, and cell debris. This makes LyseBlue idealfor use by researchers who have not had much experience with plasmid preparationsas well as experienced scientists who want to be assured of maximum product yield.
DNA adsorption to the QIAprep membraneQIAprep columns, strips, and plates use a silica membrane for selective adsorption ofplasmid DNA in high-salt buffer and elution in low-salt buffer. The optimized buffers inthe lysis procedure, combined with the unique silica membrane, ensure that only DNAwill be adsorbed, while RNA, cellular proteins, and metabolites are not retained on themembrane but are found in the flow-through.
Washing and elution of plasmid DNA Endonucleases are efficiently removed by a brief wash step with Buffer PB. This step isessential when working with endA+ strains such as the JM series, HB101 and its derivatives, or any wild-type strain, to ensure that plasmid DNA is not degraded. TheBuffer PB wash step is also necessary when purifying low-copy plasmids, where large culture volumes are used.Salts are efficiently removed by a brief wash step with Buffer PE. High-quality plasmidDNA is then eluted from the QIAprep column with 50–100 µl of Buffer EB or water. Thepurified DNA is ready for immediate use in a range of applications — no need to precipitate, concentrate, or desalt.Note: Elution efficiency is dependent on pH. The maximum elution efficiency is achievedbetween pH 7.0 and 8.5. When using water for elution, make sure that the pH valueis within this range. Store DNA at –20°C when eluted with water since DNA maydegrade in the absence of a buffering agent.
DNA yieldPlasmid yield with the QIAprep miniprep system varies depending on plasmid copy number per cell (see page 39), the individual insert in a plasmid, factors that affectgrowth of the bacterial culture (see pages 39–42), the elution volume (Figure 1), andthe elution incubation time (Figure 2). A 1.5 ml overnight culture can yield from 5 to 15 µg of plasmid DNA (Table 1, page 14). To obtain the optimum combination of DNAquality, yield, and concentration, we recommend using Luria-Bertani (LB) medium forgrowth of cultures (for composition see page 41), eluting plasmid DNA in a volume of50 µl, and performing a short incubation after addition of the elution buffer.

Appendix 1L (QIAprep Spin Miniprep Handbook) A1L.8
QIAprep Miniprep Handbook 12/2006 13
QIAprep Spin
Figure 1 10 µg pUC18 DNA was purified using the QIAprep Spin protocol and eluted with the indicated vol-umes of Buffer EB. The standard protocol uses 50 µl Buffer EB for elution, since this combines high yield withhigh concentration. However the yield can be increased by increasing the elution volume.
Elution Volume versus DNA Concentration and Recovery
Incubation time (min)
Reco
very
(%)
100
1 2 3 4 5 10 300
20
40
60
80
100 µl50 µl
Figure 2 10 µg pBluescript DNA was purified using the QIAprep Spin Miniprep protocol and eluted after the indicated incubation times with either 50 µl or 100 µl Buffer EB. The graph shows that an incubation time of 1 minute and doubling the elution buffer volume increases yield.
Incubation Time versus DNA Recovery
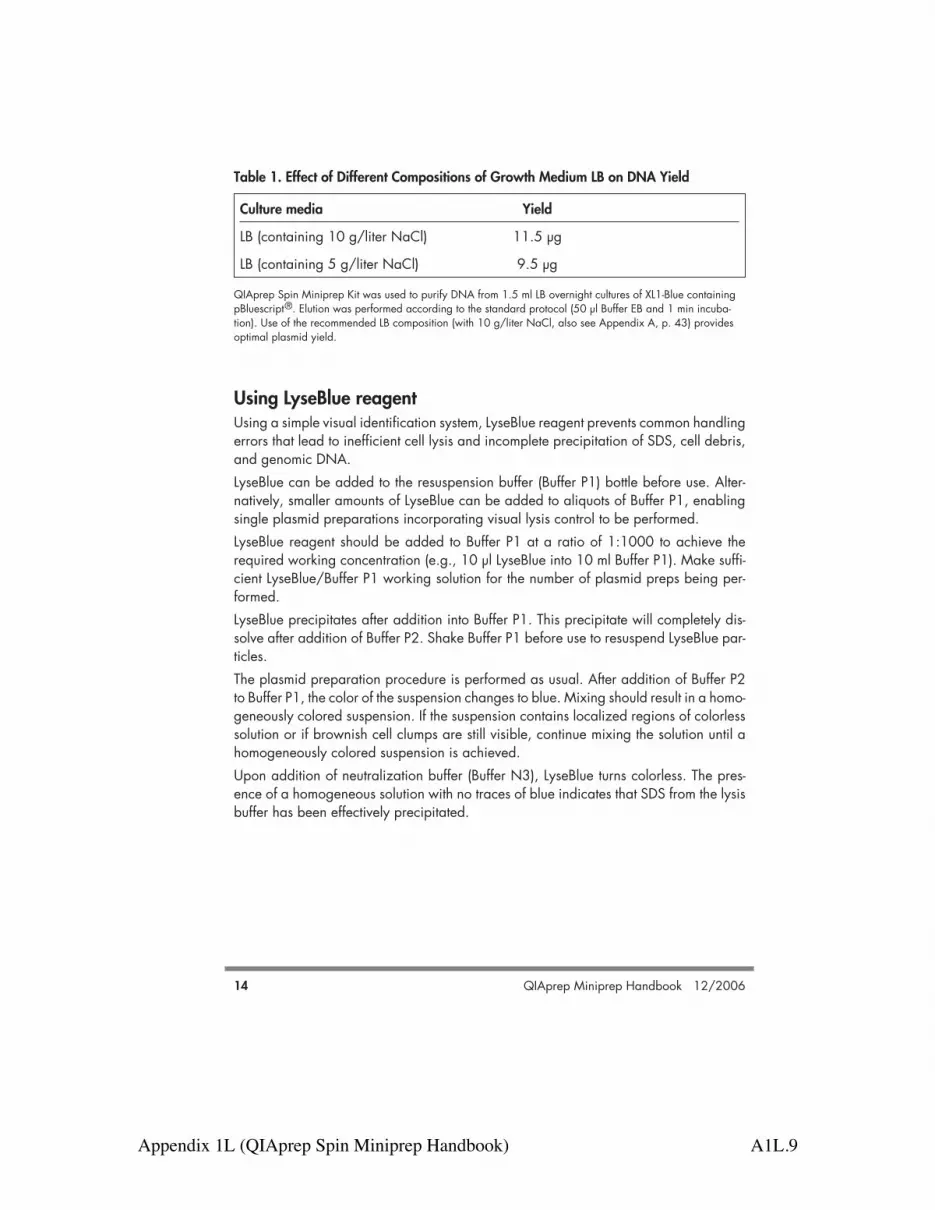
Appendix 1L (QIAprep Spin Miniprep Handbook) A1L.9
Table 1. Effect of Different Compositions of Growth Medium LB on DNA Yield
Culture media Yield
LB (containing 10 g/liter NaCl) 11.5 µg
LB (containing 5 g/liter NaCl) 9.5 µg
QIAprep Spin Miniprep Kit was used to purify DNA from 1.5 ml LB overnight cultures of XL1-Blue containingpBluescript®. Elution was performed according to the standard protocol (50 µl Buffer EB and 1 min incuba-tion). Use of the recommended LB composition (with 10 g/liter NaCl, also see Appendix A, p. 43) providesoptimal plasmid yield.
14 QIAprep Miniprep Handbook 12/2006
Using LyseBlue reagentUsing a simple visual identification system, LyseBlue reagent prevents common handlingerrors that lead to inefficient cell lysis and incomplete precipitation of SDS, cell debris,and genomic DNA.LyseBlue can be added to the resuspension buffer (Buffer P1) bottle before use. Alter-natively, smaller amounts of LyseBlue can be added to aliquots of Buffer P1, enablingsingle plasmid preparations incorporating visual lysis control to be performed.LyseBlue reagent should be added to Buffer P1 at a ratio of 1:1000 to achieve therequired working concentration (e.g., 10 µl LyseBlue into 10 ml Buffer P1). Make suffi-cient LyseBlue/Buffer P1 working solution for the number of plasmid preps being per-formed.LyseBlue precipitates after addition into Buffer P1. This precipitate will completely dis-solve after addition of Buffer P2. Shake Buffer P1 before use to resuspend LyseBlue par-ticles. The plasmid preparation procedure is performed as usual. After addition of Buffer P2to Buffer P1, the color of the suspension changes to blue. Mixing should result in a homo-geneously colored suspension. If the suspension contains localized regions of colorlesssolution or if brownish cell clumps are still visible, continue mixing the solution until ahomogeneously colored suspension is achieved.Upon addition of neutralization buffer (Buffer N3), LyseBlue turns colorless. The pres-ence of a homogeneous solution with no traces of blue indicates that SDS from the lysisbuffer has been effectively precipitated.
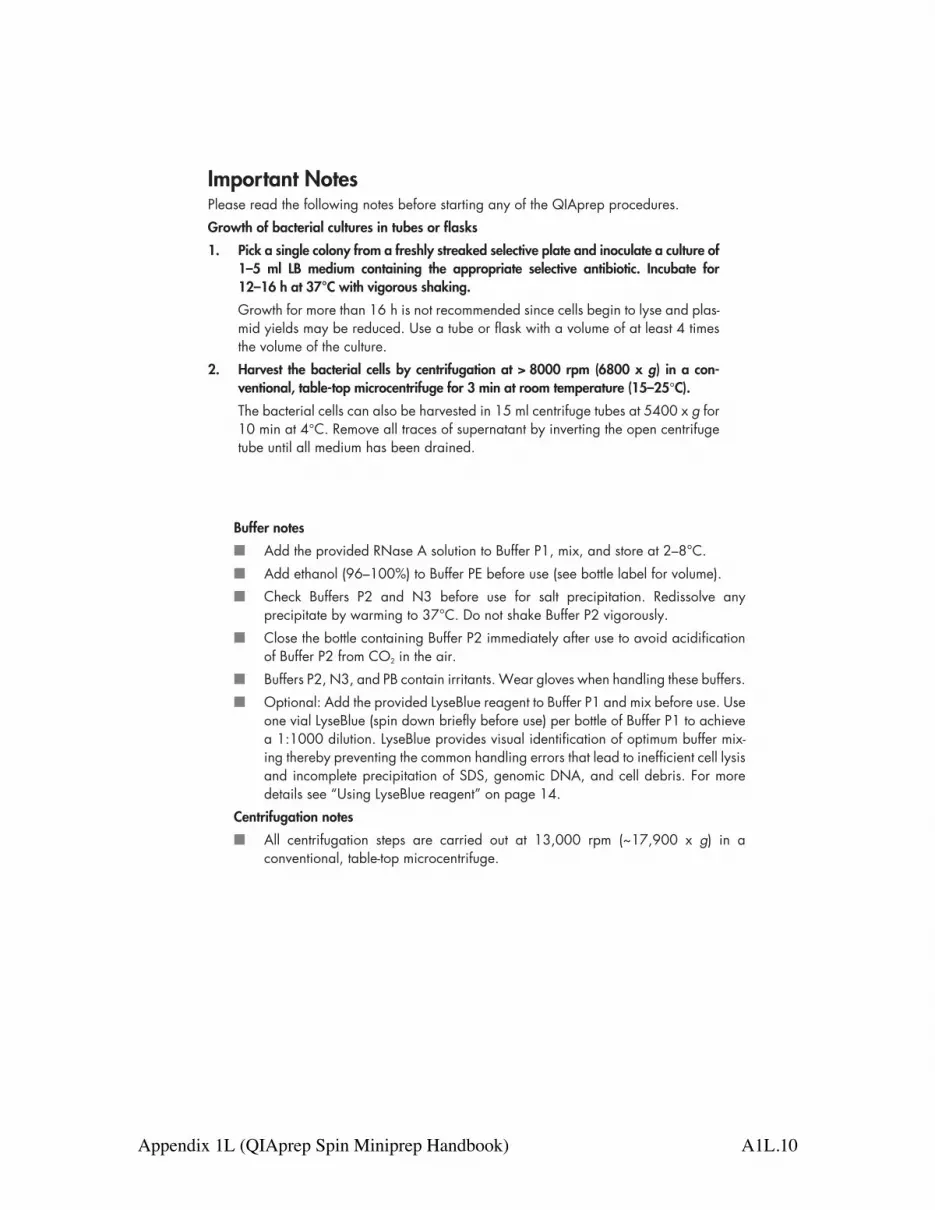
Appendix 1L (QIAprep Spin Miniprep Handbook) A1L.10
QIAprep Miniprep Handbook 12/2006 15
Important Notes Please read the following notes before starting any of the QIAprep procedures.Growth of bacterial cultures in tubes or flasks1. Pick a single colony from a freshly streaked selective plate and inoculate a culture of
1–5 ml LB medium containing the appropriate selective antibiotic. Incubate for 12–16 h at 37°C with vigorous shaking.Growth for more than 16 h is not recommended since cells begin to lyse and plas-mid yields may be reduced. Use a tube or flask with a volume of at least 4 timesthe volume of the culture.
2. Harvest the bacterial cells by centrifugation at > 8000 rpm (6800 x g) in a con-ventional, table-top microcentrifuge for 3 min at room temperature (15–25°C).The bacterial cells can also be harvested in 15 ml centrifuge tubes at 5400 x g for10 min at 4°C. Remove all traces of supernatant by inverting the open centrifugetube until all medium has been drained.
Cell Cultivation in a 96-Well Block for QIAprep Turbo 961. Fill each well of a 96-well flat-bottom block with 1.3 ml of growth medium contain-
ing the appropriate selective agent. Inoculate each well from a single bacterialcolony. Incubate the cultures for 20–24 h at 37°C with vigorous shaking.The wells in the block may be protected against spill-over by covering the blockwith a plastic lid or adhesive tape. AirPore microporous tape sheets promote gasexchange during culturing (see ordering information, page 49). If non-porous tapeis used, pierce 2–3 holes in the tape with a needle above each well for aeration.
2. Harvest the bacterial cells in the block by centrifugation for 5 min at 2100 x g in acentrifuge with a rotor for microtiter plates (e.g., QIAGEN Centrifuge 4K15C, or Heraeus Minifuge® GL), preferably at 4–10°C. The block should be covered withadhesive tape during centrifugation. Remove media by inverting the block.To remove the media, peel off the tape and quickly invert the block over a wastecontainer. Tap the inverted block firmly on a paper towel to remove any remain-ing droplets of medium.WARNING: Ensure that the buckets on the rotor have sufficient clearance to accom-modate the 2 ml flat-bottom blocks before starting the centrifuge.
16 QIAprep Miniprep Handbook 12/2006
Buffer notes! Add the provided RNase A solution to Buffer P1, mix, and store at 2–8°C.! Add ethanol (96–100%) to Buffer PE before use (see bottle label for volume).! Check Buffers P2 and N3 before use for salt precipitation. Redissolve any
precipitate by warming to 37°C. Do not shake Buffer P2 vigorously.! Close the bottle containing Buffer P2 immediately after use to avoid acidification
of Buffer P2 from CO2 in the air.! Buffers P2, N3, and PB contain irritants. Wear gloves when handling these buffers.! Optional: Add the provided LyseBlue reagent to Buffer P1 and mix before use. Use
one vial LyseBlue (spin down briefly before use) per bottle of Buffer P1 to achievea 1:1000 dilution. LyseBlue provides visual identification of optimum buffer mix-ing thereby preventing the common handling errors that lead to inefficient cell lysisand incomplete precipitation of SDS, genomic DNA, and cell debris. For moredetails see “Using LyseBlue reagent” on page 14.
Centrifugation notes! All centrifugation steps are carried out at 13,000 rpm (~17,900 x g) in a
conventional, table-top microcentrifuge.Vacuum notes! Switch off vacuum between steps to ensure that a consistent, even vacuum is
applied during manipulations.! Wear safety glasses when working near a manifold under pressure.! For safety reasons, do not use 96-well plates that have been damaged in any way.! For QIAprep 8, QIAprep 8 Turbo, and QIAprep 96 Turbo miniprep procedures,
the negative pressure (vacuum) should be regulated before beginning the procedure by applying the vacuum to the appropriate number of empty QIAprepmodules (indicated in Table 2) on the QIAvac manifold. The vacuum pressure is the pressure differential between the inside of the manifoldand the atmosphere (standard atmospheric pressure: 1013 millibar or 760 mm Hg)and can be measured using a vacuum regulator (see ordering information, page 48).Vacuum recommendations are given in negative units (Table 2) to indicate therequired reduction in pressure with respect to the atmosphere. Table 3 providespressure conversions to other units.
! Use of a vacuum pressure lower than recommended may reduce DNA yield andpurity.

Appendix 1L (QIAprep Spin Miniprep Handbook) A1L.11
QIAprep Miniprep Handbook 12/2006 17
Table 2. Regulation of Vacuum Pressures for QIAprep Multiwell Procedures
Procedure Vacuum Module used for Vacuum pressure‡
manifold checking pressure* mbar mm HgQIAprep 8 QIAvac 6S QIAprep 8 strip(s)† –100 to –530 –75 to –400QIAprep 8 Turbo QIAvac 6S QIAprep 8 strip(s)† –100 to –530 –75 to –400QIAprep 96 Turbo QIAvac 96 QIAprep 96 plate –40 to –200 –30 to –150
* Pressure should be regulated using empty modules on the manifold. † Regulate the vacuum using the number of 8-well strips that will be used in the purification. ‡ Values apply to empty modules on QIAvac. During the working procedure the vacuum may exceed the
values indicated.
Table 3. Pressure Conversions
To convert from millibars (mbar) to Multiply by:Millimeters of mercury (mm Hg) 0.75Kilopascals (kPa) 0.1Inches of mercury (inch Hg) 0.0295Torrs (Torr) 0.75Atmospheres (atm) 0.000987Pounds per square inch (psi) 0.0145
Elution notes! Ensure that the elution buffer is dispensed directly onto the center of the QIAprep
membrane for optimal elution of DNA. Average eluate volume is 48 µl from an elution-buffer volume of 50 µl (QIAprep spin procedures), and 60 µl from an elution-buffer volume of 100 µl (QIAprep multiwell procedures).
! For increased DNA yield, use a higher elution-buffer volume. For increased DNAconcentration, use a lower elution-buffer volume (see “DNA yield”, pages 13–14).
! If water is used for elution, make sure that its pH is between 7.0 and 8.5. Elution efficiency is dependent on pH and the maximum elution efficiency is achieved within this range. A pH <7.0 can decrease yield.Note: Store DNA at –20°C when eluted with water, as DNA may degrade in theabsence of a buffering agent.
! DNA can also be eluted in TE buffer (10 mM Tris·Cl, 1 mM EDTA, pH 8.0), butthe EDTA may inhibit subsequent enzymatic reactions.
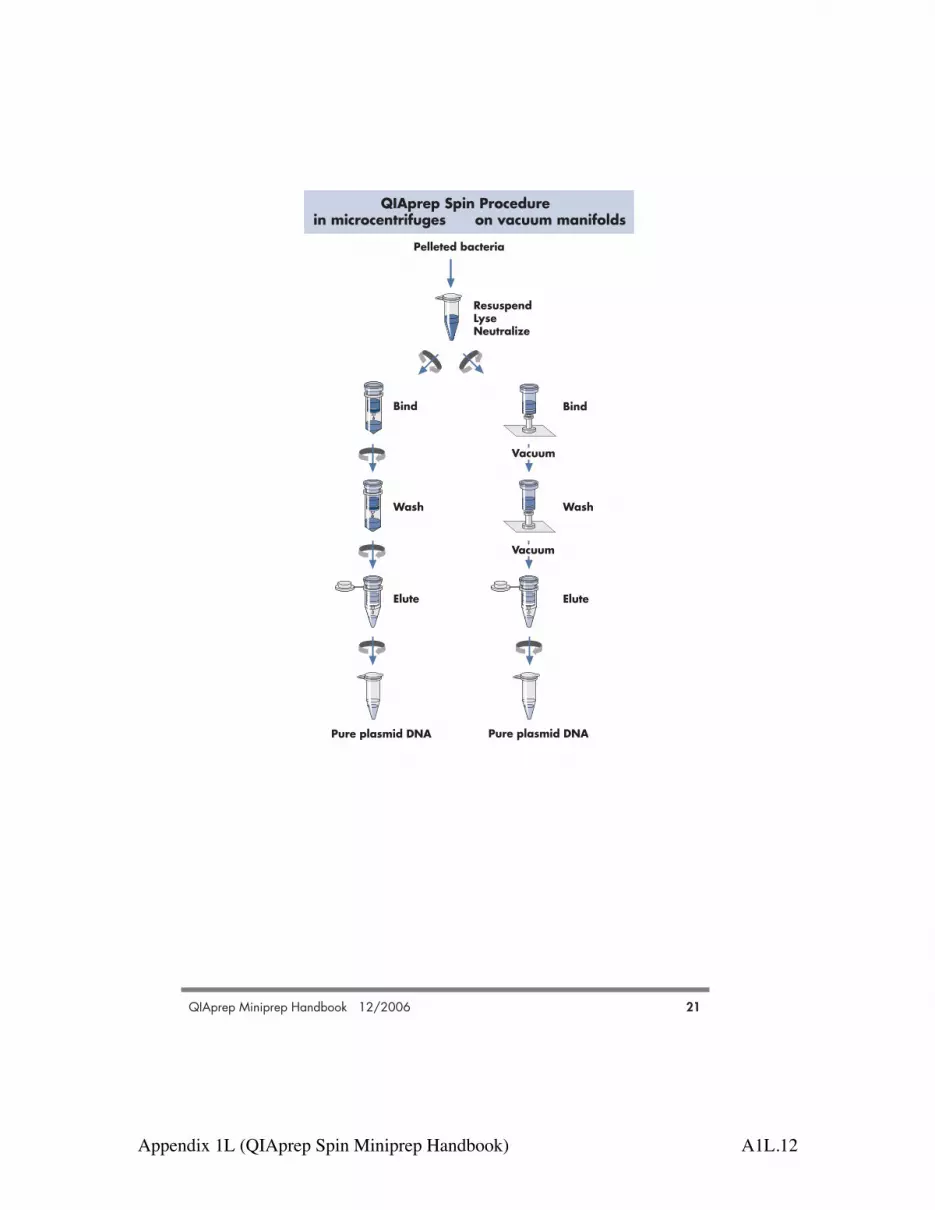
Appendix 1L (QIAprep Spin Miniprep Handbook) A1L.12
QIAprep Miniprep Handbook 12/2006 21
QIAprep Spin Procedurein microcentrifuges on vacuum manifolds
ResuspendLyseNeutralize
Pelleted bacteria
Pure plasmid DNA
Bind
Elute
Bind
Wash
Elute
Pure plasmid DNA
Wash
Vacuum
Vacuum

Appendix 1L (QIAprep Spin Miniprep Handbook) A1L.13
QIA
prep
Spi
n
22 QIAprep Miniprep Handbook 12/2006
Protocol: Plasmid DNA Purification Using the QIAprepSpin Miniprep Kit and a Microcentrifuge This protocol is designed for purification of up to 20 µg of high-copy plasmid DNA from1–5 ml overnight cultures of E. coli in LB (Luria-Bertani) medium. For purification of low-copy plasmids and cosmids, large plasmids (>10 kb), and DNA prepared usingother methods, refer to the recommendations on page 44.
Please read “Important Notes” on pages 15–21 before starting.Note: All protocol steps should be carried out at room temperature.
Procedure1. Resuspend pelleted bacterial cells in 250 µl Buffer P1 and transfer to a micro-
centrifuge tube.Ensure that RNase A has been added to Buffer P1. No cell clumps should be visibleafter resuspension of the pellet.If LyseBlue reagent has been added to Buffer P1, vigorously shake the buffer bot-tle to ensure LyseBlue particles are completely dissolved. The bacteria should beresuspended completely by vortexing or pipetting up and down until no cell clumpsremain.
2. Add 250 µl Buffer P2 and mix thoroughly by inverting the tube 4–6 times.Mix gently by inverting the tube. Do not vortex, as this will result in shearing of genomic DNA. If necessary, continue inverting the tube until the solution becomesviscous and slightly clear. Do not allow the lysis reaction to proceed for more than 5 min.If LyseBlue has been added to Buffer P1 the cell suspension will turn blue after addi-tion of Buffer P2. Mixing should result in a homogeneously colored suspension. Ifthe suspension contains localized colorless regions or if brownish cell clumps arestill visible, continue mixing the solution until a homogeneously colored suspensionis achieved.
3. Add 350 µl Buffer N3 and mix immediately and thoroughly by inverting the tube4–6 times.To avoid localized precipitation, mix the solution thoroughly, immediately afteraddition of Buffer N3. Large culture volumes (e.g. !5 ml) may require inverting upto 10 times. The solution should become cloudy. If LyseBlue reagent has been used, the suspension should be mixed until all traceof blue has gone and the suspension is colorless. A homogeneous colorless sus-pension indicates that the SDS has been effectively precipitated.
4. Centrifuge for 10 min at 13,000 rpm (~17,900 x g) in a table-top microcentrifuge.A compact white pellet will form.
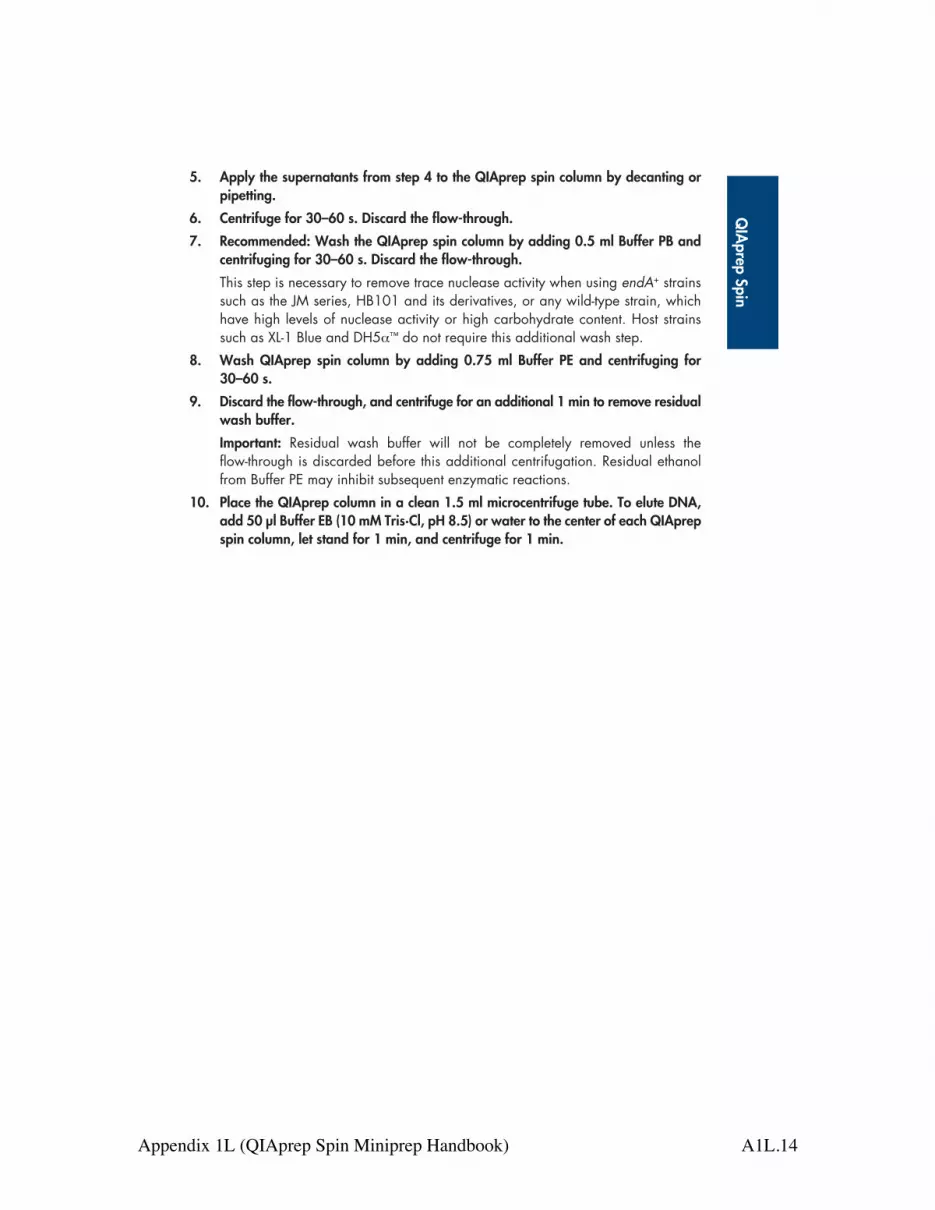
Appendix 1L (QIAprep Spin Miniprep Handbook) A1L.14
QIAprep Spin
QIAprep Miniprep Handbook 12/2006 23
5. Apply the supernatants from step 4 to the QIAprep spin column by decanting or pipetting.
6. Centrifuge for 30–60 s. Discard the flow-through.7. Recommended: Wash the QIAprep spin column by adding 0.5 ml Buffer PB and
centrifuging for 30–60 s. Discard the flow-through.This step is necessary to remove trace nuclease activity when using endA+ strainssuch as the JM series, HB101 and its derivatives, or any wild-type strain, whichhave high levels of nuclease activity or high carbohydrate content. Host strainssuch as XL-1 Blue and DH5!™ do not require this additional wash step.
8. Wash QIAprep spin column by adding 0.75 ml Buffer PE and centrifuging for 30–60 s.
9. Discard the flow-through, and centrifuge for an additional 1 min to remove residualwash buffer.Important: Residual wash buffer will not be completely removed unless the flow-through is discarded before this additional centrifugation. Residual ethanolfrom Buffer PE may inhibit subsequent enzymatic reactions.
10. Place the QIAprep column in a clean 1.5 ml microcentrifuge tube. To elute DNA,add 50 µl Buffer EB (10 mM Tris·Cl, pH 8.5) or water to the center of each QIAprep spin column, let stand for 1 min, and centrifuge for 1 min.
Protocol: Plasmid DNA Purification Using the QIAprepSpin Miniprep Kit and 5 ml Collection TubesThe QIAprep Spin Miniprep procedure can be performed using 5 ml centrifuge tubes(e.g., Greiner, cat. no. 115101 or 115261) as collection tubes to decrease handling.The standard protocol on pages 22–23 should be followed with the following modifications:
Step 4: Place a QIAprep spin column in a 5 ml centrifuge tube instead of a 2 mlcollection tube.
Step 6: Centrifuge at 3000 x g for 1 min using a suitable rotor (e.g., Beckman®
GS-6KR centrifuge at ~4000 rpm). (The flow-through does not need to be discarded.)
Steps 7 For washing steps, centrifugation should be performed at 3000 x g for 1 min.and 8: (The flow-through does not need to be discarded.)Step 9: Transfer the QIAprep spin column to a microcentrifuge tube. Centrifuge at
maximum speed for 1 min. Continue with step 10 of the protocol.

Appendix 1L (QIAprep Spin Miniprep Handbook) A1L.15
36 QIAprep Miniprep Handbook 12/2006
Troubleshooting GuideThis troubleshooting guide may be helpful in solving any problems that may arise. The scientists in QIAGEN Technical Services are always happy to answer any questions youmay have about either the information and protocol(s) in this handbook or molecular biology applications (see back cover for contact information).
Comments and suggestions
Low or no yieldGeneral Low yields may be caused by a number of factors. To
find the source of the problem, analyze fractions savedfrom each step in the procedure on an agarose gel(e.g., Figure 6, page 43). A small amount of the clearedlysate and the entire flow-through can be precipitatedby adding 0.7 volumes isopropanol and centrifuging atmaximum speed (13,000 rpm or ~17,000 x g) for 30 minutes. The entire wash flow-through can be precipitated by adding 0.1 volumes of 3 M sodiumacetate, pH 5.0, and 0.7 volumes of isopropanol.
No DNA in the cleared lysate before loadinga) Plasmid did not Read “Growth of bacterial cultures” (pages 39–41) and
propagate check that the conditions for optimal growth were met.b) Lysate prepared Check storage conditions and age of buffers.
incorrectlyc) Buffer P2 precipitated Redissolve by warming to 37°C.d) Cell resuspension Pelleted cells should be completely resuspended in
incomplete Buffer P1. Do not add Buffer P2 until an even suspen-sion is obtained.
DNA is found in the flow-through of cleared lysatea) QIAprep membrane If rich culture media, such as TB or 2x YT are used,
overloaded culture volumes must be reduced. It may be necessaryto adjust LB culture volume if the plasmid and host strainshow extremely high copy number or growth rates. See“Culture media” on page 41.

Appendix 1L (QIAprep Spin Miniprep Handbook) A1L.16
QIAprep Miniprep Handbook 12/2006 37
Comments and suggestions
b) RNase A digestion Ensure that RNase A is added to Buffer P1 before use.omitted
c) RNase A digestion Reduce culture volume if necessary. If Buffer P1 insufficient containing RNase A is more than 6 months old, add
additional RNase A.
DNA is found in the wash flow-throughEthanol omitted from Repeat procedure with correctly prepared wash bufferwash buffer (Buffer PE).
Little or no DNA in eluatea) Elution buffer incorrect DNA is eluted only in the presence of low-salt buffer
(e.g., Buffer EB [10 mM Tris·Cl, pH 8.5] or water). Elution efficiency is dependent on pH. The maximumefficiency is achieved between pH 7.0 and 8.5. Whenusing water for elution, make sure that the pH value iswithin this range.
b) Elution buffer incorrectly Add elution buffer to the center of the QIAprep dispensed onto membrane to ensure that the buffer completely coversmembrane the surface of the membrane for maximum elution
efficiency.
Low DNA qualityDNA does not perform well in downstream applicationsa) Eluate salt concentration For the QIAprep spin column, modify the wash step by
too high incubating the column for 5 minutes at room temperatureafter adding 0.75 ml of Buffer PE and then centrifuging.For QIAprep 8 preparations and QIAprep 8 and 96Turbo preparations, ensure that two wash steps are carried out prior to elution.
b) Nuclease contamination When using endA+ host strains such as HB101 and itsderivatives, the JM series, or any wild-type strain,ensure that the wash step with Buffer PB is performed.
c) Eluate contains residual Ensure that step 9 in the QIAprep Spin Miniprep protocol ethanol and steps 9 and 10 in the QIAprep 8 Miniprep,
QIAprep 8 Turbo Miniprep, or QIAprep 96 TurboMiniprep protocols are performed.

Appendix 1L (QIAprep Spin Miniprep Handbook) A1L.17
38 QIAprep Miniprep Handbook 12/2006
Comments and suggestions
RNA in the eluatea) RNase A digestion Ensure that RNase A is added to Buffer P1 before use.
omittedb) RNase A digestion Reduce culture volume if necessary. If Buffer P1
insufficient containing RNase A is more than 6 months old, addadditional RNase A.
Genomic DNA in the eluatea) Buffer P2 added The lysate must be handled gently after addition of
incorrectly Buffer P2 to prevent shearing. Reduce culture volume iflysate is too viscous for gentle mixing.
b) Buffer N3 added Upon addition of Buffer N3 in step 3, mix immediatelyincorrectly but gently.
c) Lysis too long Lysis in step 2 must not exceed 5 minutes.d) Culture overgrown Overgrown cultures contain lysed cells and degraded
DNA. Do not grow cultures for longer than 12–16 hours.

Appendix 1L (QIAprep Spin Miniprep Handbook) A1L.18
QIAprep Miniprep Handbook 12/2006 39
Appendix A: Background InformationGrowth of bacterial culturesPlasmids are generally prepared from bacterial cultures grown in the presence of a selective agent such as an antibiotic (3,4). The yield and quality of plasmid DNA maydepend on factors such as plasmid copy number, host strain, inoculation, antibiotic,and type of culture medium.
Plasmid copy numberPlasmids vary widely in their copy number per cell (Table 5), depending on their originof replication (e.g., pMB1, ColE1, or pSC101) which determines whether they areunder relaxed or stringent control; and depending on the size of the plasmid and its associated insert. Some plasmids, such as the pUC series and derivatives, have mutations which allow them to reach very high copy numbers within the bacterial cell.Plasmids based on pBR322 and cosmids are generally present in lower copy numbers.Very large plasmids and cosmids are often maintained at very low copy numbers per cell.
Table 5. Origins of replication and copy numbers of various plasmids (3).
Origin of DNA construct replication Copy number ClassificationPlasmidspUC vectors pMB1* 500–700 high copypBluescript vectors ColE1 300–500 high copypGEM® vectors pMB1* 300–400 high copypTZ vectors pMB1* >1000 high copypBR322 and derivatives pMB1* 15–20 low copypACYC and derivatives p15A 10–12 low copypSC101 and derivatives pSC101 ~5 very low copyCosmidsSuperCos ColE1 10–20 low copypWE15 ColE1 10–20 low copy
* The pMB1 origin of replication is closely related to that of ColE1 and falls in the same incompatibilitygroup. The high-copy-number plasmids listed here contain mutated versions of this origin.
Appendix 1L (QIAprep Spin Miniprep Handbook) A1L.19
40 QIAprep Miniprep Handbook 12/2006
Host strainsMost E. coli strains can be used successfully to isolate plasmid DNA, although the strainused to propagate a plasmid has an effect on the quality of the purified DNA. Hoststrains such as DH1, DH5!, and C600 give high-quality DNA. The slower growingstrain XL1-Blue also yields DNA of very high-quality which works extremely well forsequencing. Strain HB101 and its derivatives, such as TG1 and the JM series, producelarge amounts of carbohydrates, which are released during lysis and can inhibit enzymeactivities if not completely removed (4). In addition, these strains have high levels ofendonuclease activity which can reduce DNA quality. The methylation and growth characteristics of the strain should also be taken into account when selecting a host strain.XL1-Blue and DH5! are highly recommended for reproducible and reliable results.
InoculationBacterial cultures for plasmid preparation should always be grown from a single colonypicked from a freshly streaked selective plate. Subculturing directly from glycerol stocks,agar stabs, and liquid cultures may lead to uneven plasmid yield or loss of the plasmid.Inoculation from plates that have been stored for a long time may also lead to loss ormutation of the plasmid. The desired clone should be streaked from a glycerol stock onto a freshly prepared agarplate containing the appropriate selective agent so that single colonies can be isolated.This procedure should then be repeated to ensure that a single colony of an antibiotic-resistant clone can be picked. A single colony should be inoculated into 1–5 ml ofmedia containing the appropriate selective agent, and grown with vigorous shaking for 12–16 hours. Growth for more than 16 hours is not recommended since cells begin tolyse and plasmid yields may be reduced.
AntibioticsAntibiotic selection should be applied at all stages of growth. Many plasmids in usetoday do not contain the par locus which ensures that the plasmids segregate equallyduring cell division. Daughter cells that do not receive plasmids will replicate muchfaster than plasmid-containing cells in the absence of selective pressure, and can quicklytake over the culture. The stability of the selective agent should also be taken into account. Resistance to ampicillin, for example, is mediated by "-lactamase which is encoded by the plasmid-linked bla gene and which hydrolyzes ampicillin. Levels of ampicillin in the culture medium are thus continually depleted. This phenomenon is clearly demonstrated on ampicillin plates, where “satellite colonies” appear as the ampicillin is hydrolyzed inthe vicinity of a growing colony. Ampicillin is also very sensitive to temperature, andwhen in solution should be stored frozen in single-use aliquots. The recommendationsgiven in Table 6 are based on these considerations.

Appendix 1L (QIAprep Spin Miniprep Handbook) A1L.20
QIAprep Miniprep Handbook 12/2006 41
Table 6. Concentrations of Commonly Used Antibiotics
Stock solutions Working concentrationAntibiotic Concentration Storage (dilution)Ampicillin 50 mg/ml in water –20°C 100 µg/ml (1/500)(sodium salt)Chloramphenicol 34 mg/ml in ethanol –20°C 170 µg/ml (1/200)Kanamycin 10 mg/ml in water –20°C 50 µg/ml (1/200)Streptomycin 10 mg/ml in water –20°C 50 µg/ml (1/200)Tetracycline HCl 5 mg/ml in ethanol –20°C 50 µg/ml (1/100)
Culture mediaLuria-Bertani (LB) broth is the recommended culture medium for use with QIAprep Kits,since richer broths such as TB (Terrific Broth) or 2x YT lead to extremely high cell densities, which can overload the purification system. It should be noted that culturesgrown in TB may yield 2–5 times the number of cells compared to cultures grown in LBbroth. If these media are used, recommended culture volumes must be reduced to matchthe capacity of the QIAprep membrane. If excess culture volume is used, alkaline lysiswill be inefficient, the QIAprep membrane will be overloaded, and the performance ofthe system will be unsatisfactory. Furthermore, the excessive viscosity of the lysate willrequire vigorous mixing, which may result in shearing of bacterial genomic DNA andcontamination of the plasmid DNA. Care must also be taken if strains are used whichgrow unusually fast or to very high cell densities. In such cases, doubling the volumesof Buffers P1, P2, and N3 may be beneficial. It is best to calculate culture cell densityand adjust the volume accordingly. Please note that a number of slightly different LB culture broths, containing differentconcentrations of NaCl, are in common use. Although different LB broths produce similar cell densities after overnight culture, plasmid yields can vary significantly.
Table 7. Recommended composition of Luria Bertani medium
Contents Per literTryptone 10 gYeast extract 5 gNaCl 10 g
Appendix 1L (QIAprep Spin Miniprep Handbook) A1L.21
42 QIAprep Miniprep Handbook 12/2006
Preparation of cell lysatesBacteria are lysed under alkaline conditions. After harvesting and resuspension, the bacterial cells are lysed in NaOH/SDS (Buffer P2) in the presence of RNase A (2, 5).SDS solubilizes the phospholipid and protein components of the cell membrane, leadingto lysis and release of the cell contents while the alkaline conditions denature the chromosomal and plasmid DNAs, as well as proteins. The optimized lysis time allowsmaximum release of plasmid DNA without release of chromosomal DNA, while mini-mizing the exposure of the plasmid to denaturing conditions. Long exposure to alkalineconditions may cause the plasmid to become irreversibly denatured (2). This denaturedform of the plasmid runs faster on agarose gels and is resistant to restriction enzymedigestion. The lysate is neutralized and adjusted to high-salt binding conditions in one step by theaddition of Buffer N3. The high salt concentration causes denatured proteins,chromosomal DNA, cellular debris, and SDS to precipitate, while the smaller plasmidDNA renatures correctly and stays in solution. It is important that the solution isthoroughly and gently mixed to ensure complete precipitation.To prevent contamination of plasmid DNA with chromosomal DNA, vigorous stirringand vortexing must be avoided during lysis. Separation of plasmid from chromosomalDNA is based on coprecipitation of the cell wall-bound chromosomal DNA with insolublecomplexes containing salt, detergent, and protein. Plasmid DNA remains in the clearsupernatant. Vigorous treatment during the lysis procedure will shear the bacterial chromosome, leaving free chromosomal DNA fragments in the supernatant. Since chromosomal fragments are chemically indistinguishable from plasmid DNA under theconditions used, the two species will not be separated on QIAprep membrane and willelute under the same low-salt conditions. Mixing during the lysis procedure must therefore be carried out by slow, gentle inversion of the tube.

Appendix 1L (QIAprep Spin Miniprep Handbook) A1L.22
QIAprep Miniprep Handbook 12/2006 43
Appendix B: Agarose Gel Analysis of Plasmid DNAThe QIAprep Miniprep procedure can be analyzed using agarose gel electrophoresisas shown in Figure 6. Samples can be taken from the cleared lysate and its flow-through, precipitated with isopropanol and resuspended in a minimal volume of TE buffer. In Figure 6 the cleared lysate shows closed circular plasmid DNA and degraded RNase A-resistant RNA. The flow-through contains only degraded RNA and no plasmidDNA is present. The eluted pure plasmid DNA shows no contamination with other nucleic acids.
Agarose Gel Analysis
M C F E M
Figure 6 Agarose gel analysis of the QIAprep Miniprep procedure. C: cleared lysate; F: flow-through; E: eluted plasmid; M: markers.

Appendix 1L (QIAprep Spin Miniprep Handbook) A1L.23
44 QIAprep Miniprep Handbook 12/2006
Appendix C: Special Applications Purification of low-copy plasmids and cosmidsAll QIAprep miniprep protocols in this handbook can be used for preparation of low-copy-number plasmid or cosmids from 1–10 ml overnight E. coli cultures grown in LBmedium.Only two slight modifications to the protocols are required:! The wash step with Buffer PB is required for all strains.! When plasmid or cosmids are >10 kb, pre-heat Buffer EB (or water) to 70°C prior
to eluting DNA from the QIAprep membrane. A 10 ml overnight LB culture typically yields 5–10 µg DNA.
Note: When using 10 ml culture volume, it is recommended to double the volumes ofBuffers P1, P2, and N3 used.
Purification of very large plasmids (>50 kb)Plasmids >50 kb elute less efficiently from silica than smaller plasmids, but do elute efficiently from QIAGEN anion-exchange resin. QIAGEN provides the anion-exchange-based QIAGEN Large-Construct Kit for efficient large-scale purification of ultrapuregenomic DNA-free BAC, PAC, P1, or cosmid DNA. For high-throughput, small-scalepurification of BACs, PACs, and P1s, an optimized alkaline lysis protocol in R.E.A.L.®
Prep 96 Kits yields DNA suitable for sequencing and screening. Call QIAGEN Technical Services or your local distributor for more information on these kits, or seeordering information on page 47.
Purification of plasmid DNA prepared by other methodsPlasmid DNA isolated by other methods can be further purified using QIAprep modulesand any of the QIAprep protocols in this handbook.1. Add 5 volumes of Buffer PB to 1 volume of the DNA solution and mix (e.g., add
500 µl Buffer PB to 100 µl of DNA sample).2. Apply the samples to QIAprep spin columns or to the wells of a QIAprep 8
strip or 96-well plate. Draw the samples through the QIAprep membrane by centrifugation or vacuum, and continue the appropriate protocol at the Buffer PEwash step. The optional wash step with Buffer PB is not necessary.
Appendix 1L (QIAprep Spin Miniprep Handbook) A1L.24
QIAprep Miniprep Handbook 12/2006 45
References1. Vogelstein, B., and Gillespie, D. (1979) Preparative and analytical purification of DNA from agarose.
Proc. Natl. Acad. Sci. USA 76, 615–619.2. Birnboim, H.C., and Doly, J. (1979) A rapid alkaline lysis procedure for screening recombinant plasmid
DNA. Nucleic Acids Res. 7, 1513–1522.3. Sambrook, J. et al., eds. (1989) Molecular cloning: a laboratory manual. 2nd ed., Cold Spring Harbor
Laboratory Press.4. Ausubel, F.M. et al., eds. (1991) Current protocols in molecular biology. Wiley Interscience, New York.5. Birnboim, H.C. (1983) A rapid alkaline extraction method for the isolation of plasmid DNA. Methods
Enzymol. 100, 243–255.

Appendix 1L (QIAprep Spin Miniprep Handbook) A1L.25
Bench Protocol: QIAprep Spin Miniprep Kit Using a Microcentrifuge
This protocol is designed for the purification of up to 20 µg high-copy plasmid DNAfrom 1–5 ml overnight E. coli culture in LB medium. New users and users wanting topurify low-copy plasmids and cosmids, large plasmids (>10 kb), and DNA preparedusing other methods should refer to the detailed protocols provided in the QIAprepMiniprep Handbook, 2nd ed.
Things to do before starting! Add RNase A solution to Buffer P1.! Optional: Add LyseBlue reagent to Buffer P1.! Add ethanol (96–100%) to Buffer PE.! Check Buffers P2 and N3 for salt precipitation and redissolve at 37°C if necessary.
Procedure1. Resuspend pelleted bacterial cells in 250 µl Buffer P1 and transfer to a
microcentrifuge tube.2. Add 250 µl Buffer P2 and mix thoroughly by inverting the tube 4–6 times.
If using LyseBlue reagent, solution turns blue.3. Add 350 µl Buffer N3 and mix immediately and thoroughly by inverting the tube 4–6
times.If using LyseBlue reagent, solution turns colorless.
4. Centrifuge for 10 min at 13,000 rpm (~17,900 x g) in a table-top microcentrifuge.5. Apply the supernatant (from step 4) to the QIAprep spin column by decanting or
pipetting.6. Centrifuge for 30–60 s. Discard the flow-through.7. Recommended: Wash the QIAprep spin column by adding 0.5 ml Buffer PB and
centrifuging for 30–60 s. Discard the flow-through.This step is only required when using endA+ or other bacteria strains with highnuclease activity or carbohydrate content (see QIAprep Miniprep Handbook formore details)
8. Wash QIAprep spin column by adding 0.75 ml Buffer PE and centrifuging for 30–60 s.
9. Discard the flow-through, and centrifuge for an additional 1 min to remove residualwash buffer.
10. To elute DNA, place the QIAprep column in a clean 1.5 ml microcentrifuge tube. Add50 µl Buffer EB or water to the center of each QIAprep spin column, let stand for 1 min, and centrifuge for 1 min.
Plea
se te
ar o
ff he
re