and thank you for choosing Powered by
33
Welcome and thank you for choosing Powered by
-
Upload
khangminh22 -
Category
Documents
-
view
3 -
download
0
Transcript of and thank you for choosing Powered by

Welcome and thank you for choosing
Powered by
© SantillanaUSA Publishing Company Inc.
Table of Contents
Introduction ............................................................................................................................................................................ 3
Get Started ............................................................................................................................................................................... 4
Organize .................................................................................................................................................................................. 6
Organize Your Materials .............................................................................................................................................. 6
Check Out the Español Santillana Materials......................................................................................................... 6
Interactive Practice Workbook Quick-Start Guide ............................................................................................. 9
Add Your Own Materials ........................................................................................................................................... 10
Communicate ...................................................................................................................................................................... 12
Post Updates ................................................................................................................................................................. 12
Post Polls ......................................................................................................................................................................... 13
Send Messages. ............................................................................................................................................................ 14
Assign a Specific Activity .......................................................................................................................................... 15
Add an Assignment .................................................................................................................................................... 16
Assign an Assessment ................................................................................................................................................ 19
Manage .................................................................................................................................................................................. 22
Use the Speaking & Listening Workbook ........................................................................................................... 22
Customize Quizzes and Tests ................................................................................................................................. 23
Grade Assignments and Activities ........................................................................................................................ 25
Grade Quizzes and Tests ........................................................................................................................................... 27
Use the Gradebook ..................................................................................................................................................... 30
Customize the Gradebook ....................................................................................................................................... 31
Use Bulk Editing ........................................................................................................................................................... 32

© SantillanaUSA Publishing Company Inc. 3
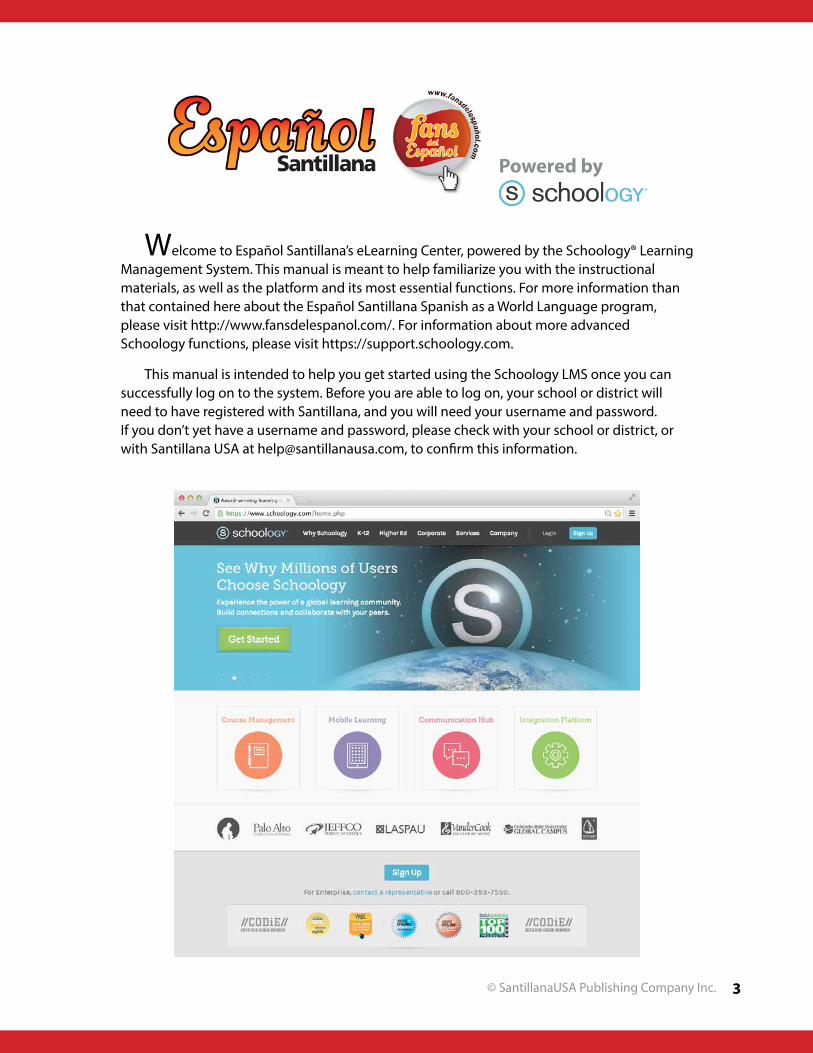
Welcome to Español Santillana’s eLearning Center, powered by the Schoology® Learning Management System. This manual is meant to help familiarize you with the instructional materials, as well as the platform and its most essential functions. For more information than that contained here about the Español Santillana Spanish as a World Language program, please visit http://www.fansdelespanol.com/. For information about more advanced Schoology functions, please visit https://support.schoology.com.
This manual is intended to help you get started using the Schoology LMS once you can successfully log on to the system. Before you are able to log on, your school or district will need to have registered with Santillana, and you will need your username and password. If you don’t yet have a username and password, please check with your school or district, or with Santillana USA at [email protected], to confirm this information.
Powered by
© SantillanaUSA Publishing Company Inc.4
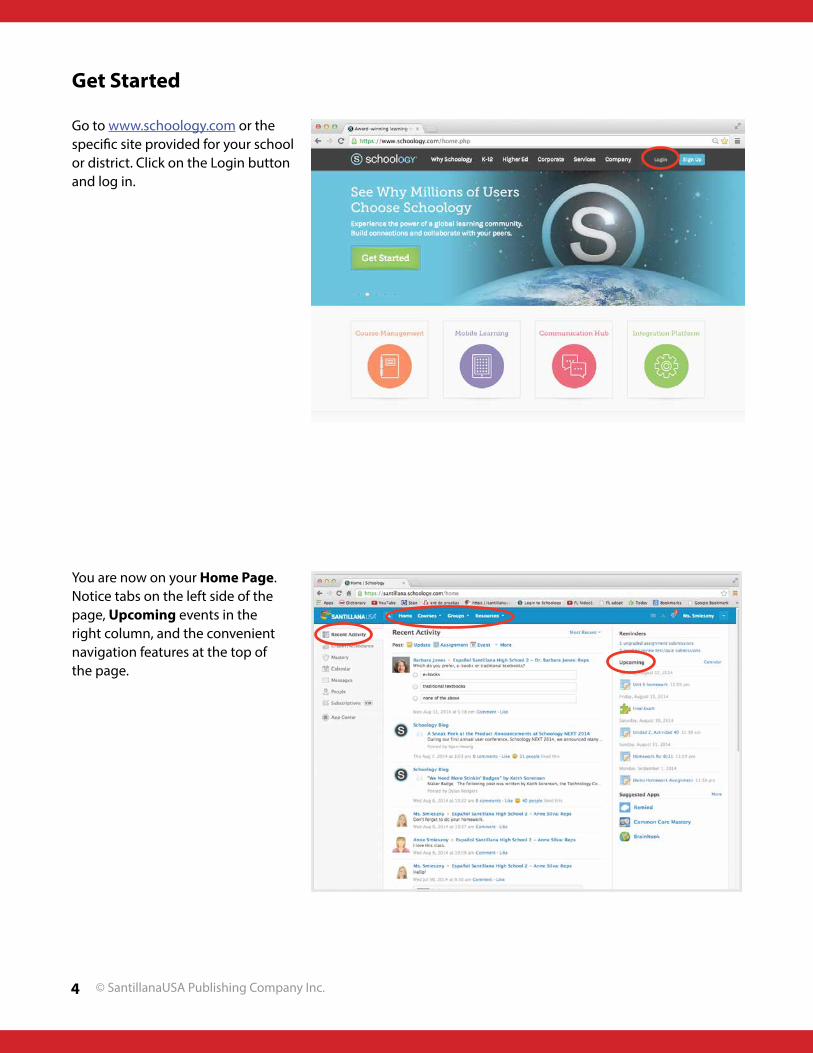
Get Started
Go to www.schoology.com or the specific site provided for your school or district. Click on the Login button and log in.
You are now on your Home Page. Notice tabs on the left side of the page, Upcoming events in the right column, and the convenient navigation features at the top of the page.
© SantillanaUSA Publishing Company Inc. 5
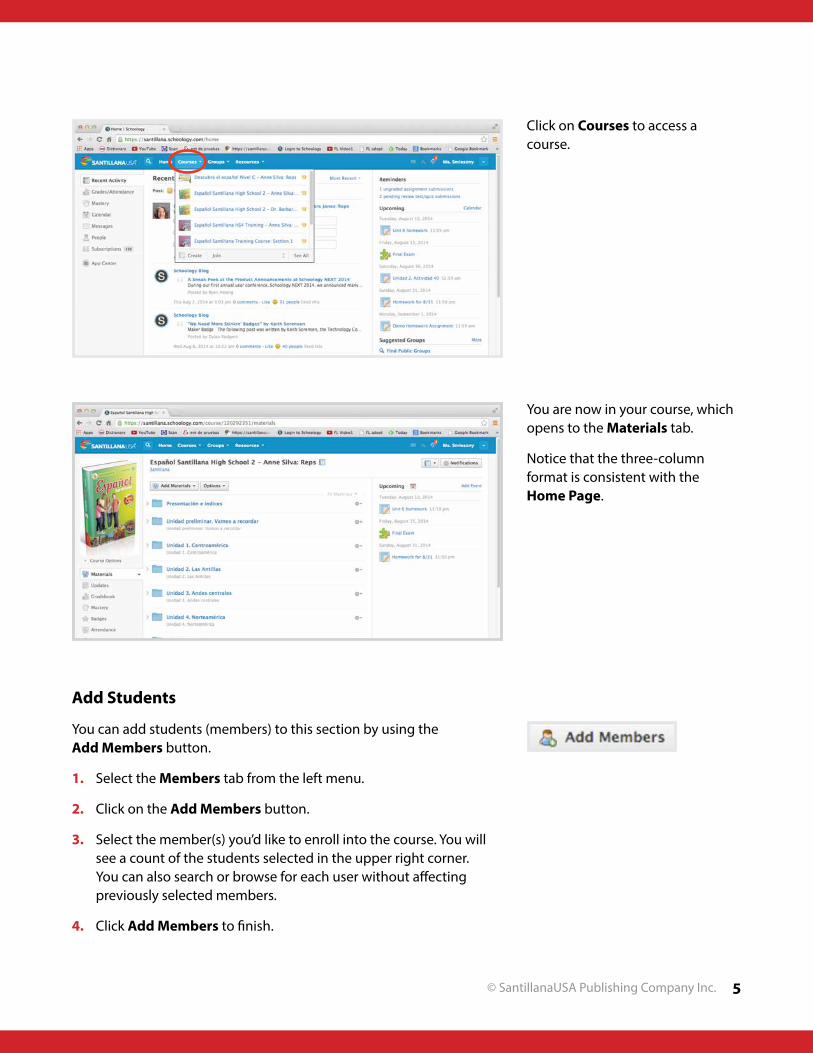
Click on Courses to access a course.
You are now in your course, which opens to the Materials tab.
Notice that the three-column format is consistent with the Home Page.
Add Students
You can add students (members) to this section by using the Add Members button.
1. Select the Members tab from the left menu.
2. Click on the Add Members button.
3. Select the member(s) you’d like to enroll into the course. You will see a count of the students selected in the upper right corner. You can also search or browse for each user without affecting previously selected members.
4. Click Add Members to finish.
© SantillanaUSA Publishing Company Inc.6
Organize
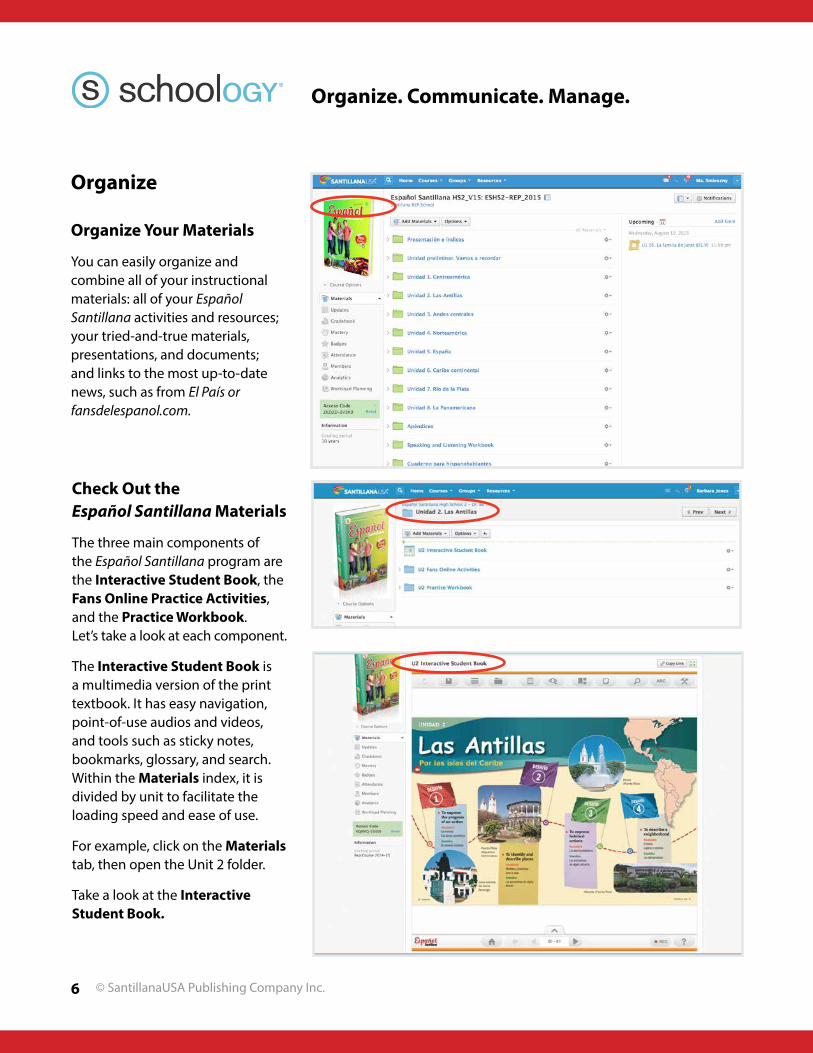
Organize Your Materials
You can easily organize and combine all of your instructional materials: all of your Español Santillana activities and resources; your tried-and-true materials, presentations, and documents; and links to the most up-to-date news, such as from El País or fansdelespanol.com.
Check Out the Español Santillana Materials
The three main components of the Español Santillana program are the Interactive Student Book, the Fans Online Practice Activities, and the Practice Workbook. Let’s take a look at each component.
The Interactive Student Book is a multimedia version of the print textbook. It has easy navigation, point-of-use audios and videos, and tools such as sticky notes, bookmarks, glossary, and search. Within the Materials index, it is divided by unit to facilitate the loading speed and ease of use.
For example, click on the Materials tab, then open the Unit 2 folder.
Take a look at the Interactive Student Book.
Organize. Communicate. Manage.
© SantillanaUSA Publishing Company Inc. 7
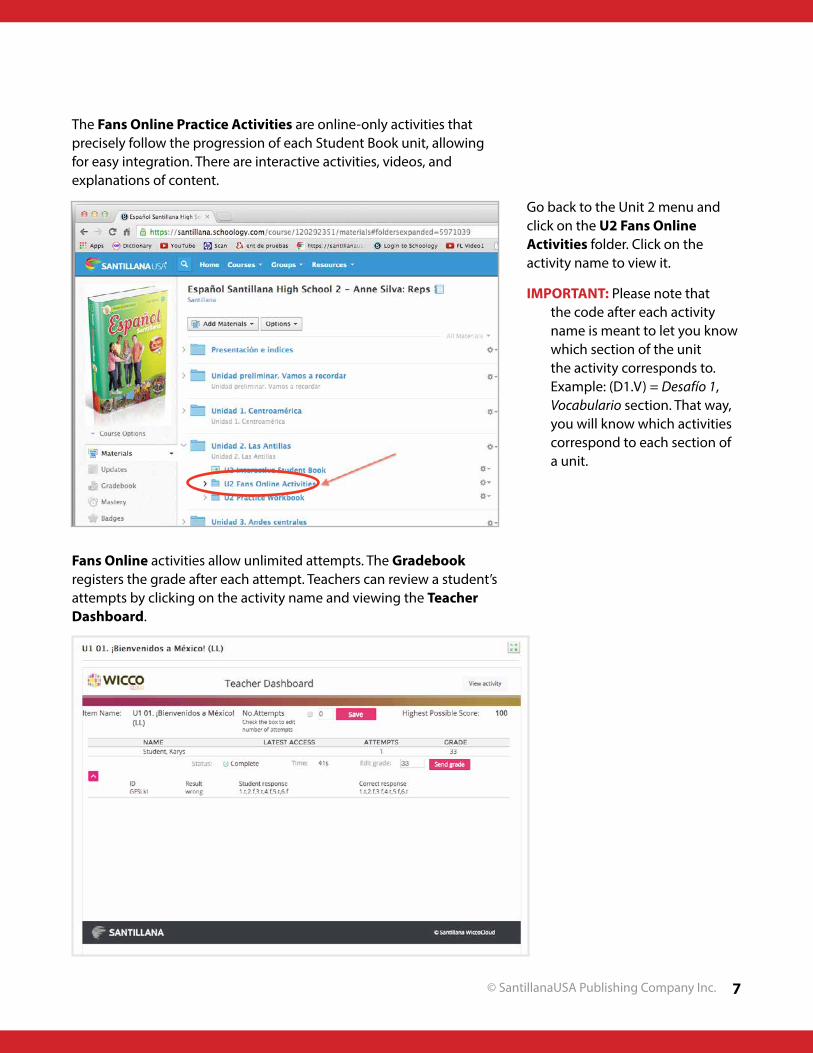
The Fans Online Practice Activities are online-only activities that precisely follow the progression of each Student Book unit, allowing for easy integration. There are interactive activities, videos, and explanations of content.
Fans Online activities allow unlimited attempts. The Gradebook registers the grade after each attempt. Teachers can review a student’s attempts by clicking on the activity name and viewing the Teacher Dashboard.
Go back to the Unit 2 menu and click on the U2 Fans Online Activities folder. Click on the activity name to view it.
IMPORTANT: Please note that the code after each activity name is meant to let you know which section of the unit the activity corresponds to. Example: (D1.V) = Desafío 1, Vocabulario section. That way, you will know which activities correspond to each section of a unit.
© SantillanaUSA Publishing Company Inc.8
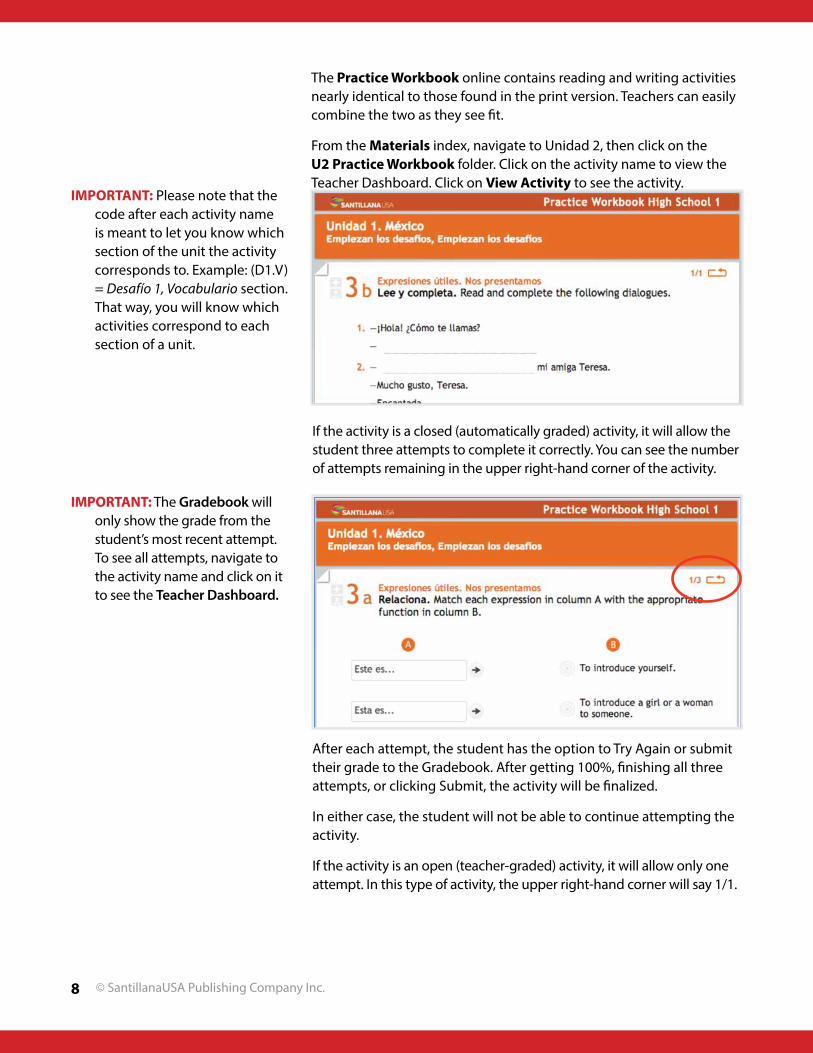
The Practice Workbook online contains reading and writing activities nearly identical to those found in the print version. Teachers can easily combine the two as they see fit.
From the Materials index, navigate to Unidad 2, then click on the U2 Practice Workbook folder. Click on the activity name to view the Teacher Dashboard. Click on View Activity to see the activity.
IMPORTANT: Please note that the code after each activity name is meant to let you know which section of the unit the activity corresponds to. Example: (D1.V) = Desafío 1, Vocabulario section. That way, you will know which activities correspond to each section of a unit.
IMPORTANT: The Gradebook will only show the grade from the student’s most recent attempt. To see all attempts, navigate to the activity name and click on it to see the Teacher Dashboard.
If the activity is a closed (automatically graded) activity, it will allow the student three attempts to complete it correctly. You can see the number of attempts remaining in the upper right-hand corner of the activity.
After each attempt, the student has the option to Try Again or submit their grade to the Gradebook. After getting 100%, finishing all three attempts, or clicking Submit, the activity will be finalized.
In either case, the student will not be able to continue attempting the activity.
If the activity is an open (teacher-graded) activity, it will allow only one attempt. In this type of activity, the upper right-hand corner will say 1/1.
© SantillanaUSA Publishing Company Inc. 9
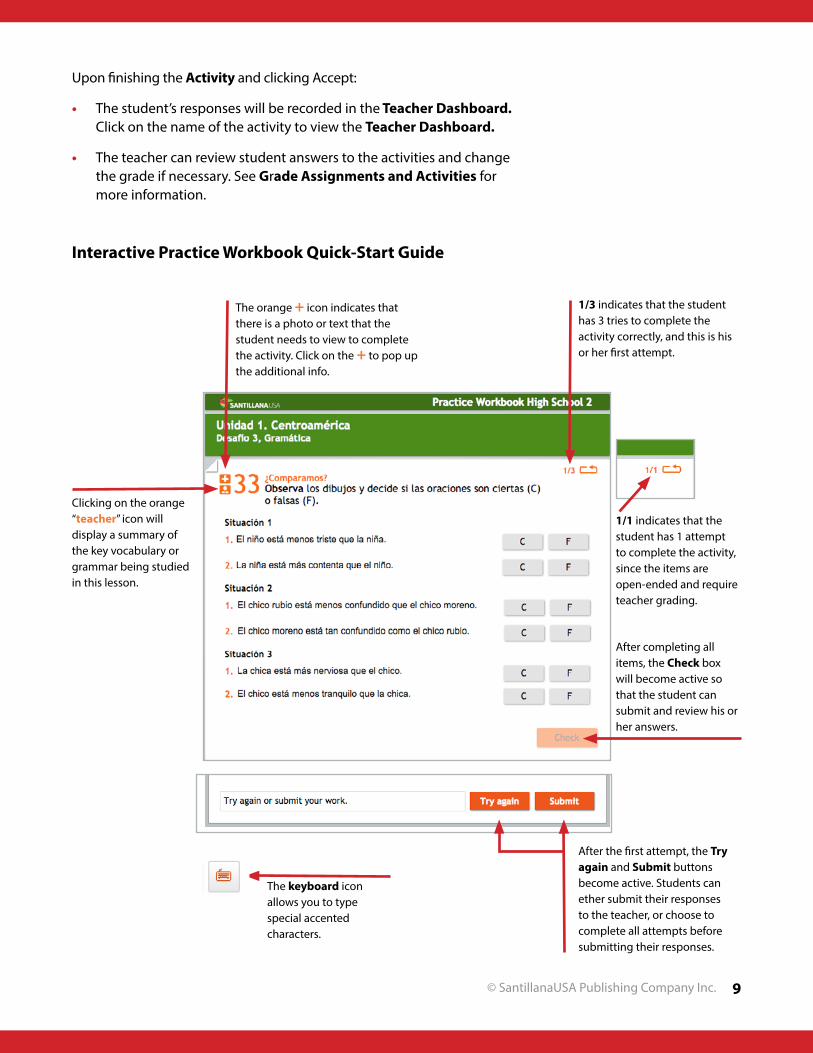
Upon finishing the Activity and clicking Accept:
• The student’s responses will be recorded in the Teacher Dashboard. Click on the name of the activity to view the Teacher Dashboard.
• The teacher can review student answers to the activities and change the grade if necessary. See Grade Assignments and Activities for more information.
Interactive Practice Workbook Quick-Start Guide
The orange + icon indicates that there is a photo or text that the student needs to view to complete the activity. Click on the + to pop up the additional info.
1/3 indicates that the student has 3 tries to complete the activity correctly, and this is his or her first attempt.
Clicking on the orange “teacher” icon will display a summary of the key vocabulary or grammar being studied in this lesson.
1/1 indicates that the student has 1 attempt to complete the activity, since the items are open-ended and require teacher grading.
After the first attempt, the Try again and Submit buttons become active. Students can ether submit their responses to the teacher, or choose to complete all attempts before submitting their responses.
After completing all items, the Check box will become active so that the student can submit and review his or her answers.
The keyboard icon allows you to type special accented characters.
© SantillanaUSA Publishing Company Inc.10
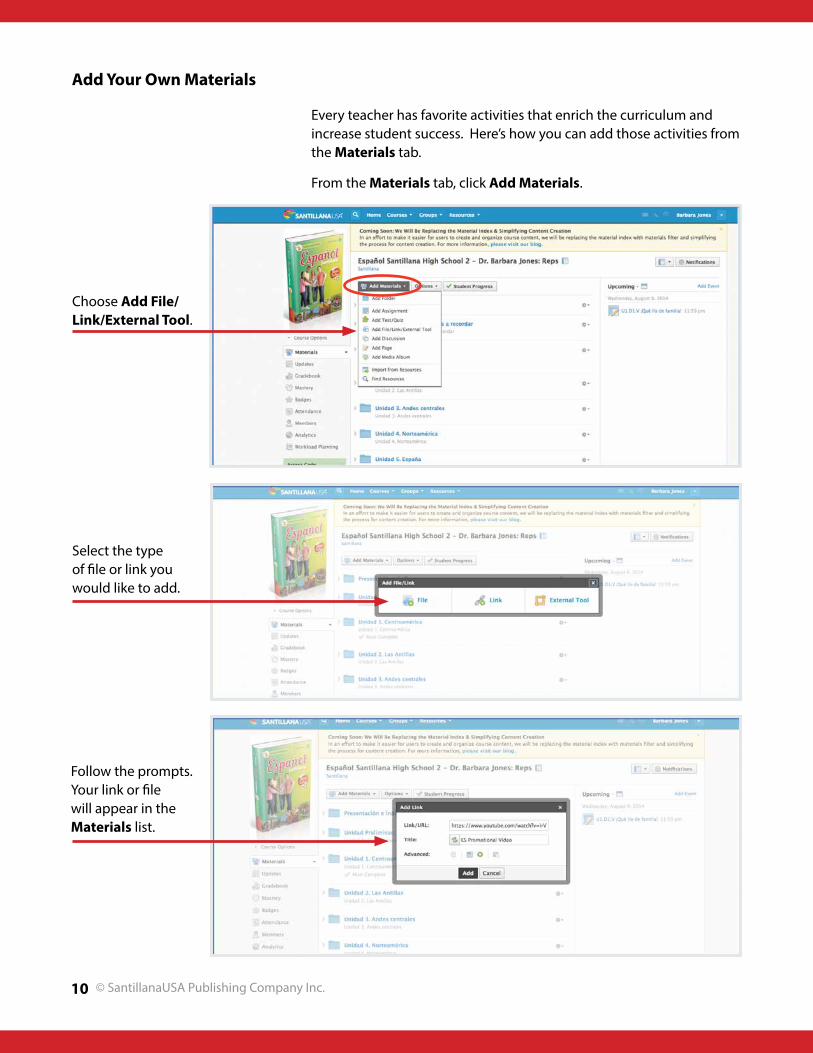
Select the type of file or link you would like to add.
Choose Add File/Link/External Tool.
Follow the prompts. Your link or file will appear in the Materials list.
Add Your Own Materials
Every teacher has favorite activities that enrich the curriculum and increase student success. Here’s how you can add those activities from the Materials tab.
From the Materials tab, click Add Materials.

© SantillanaUSA Publishing Company Inc. 11
Alternatively, you can navigate to the folder in which you’d like to place the new material. Hover over the empty space between items and click on the green + icon.
Then follow the same instructions to add material.
© SantillanaUSA Publishing Company Inc.12
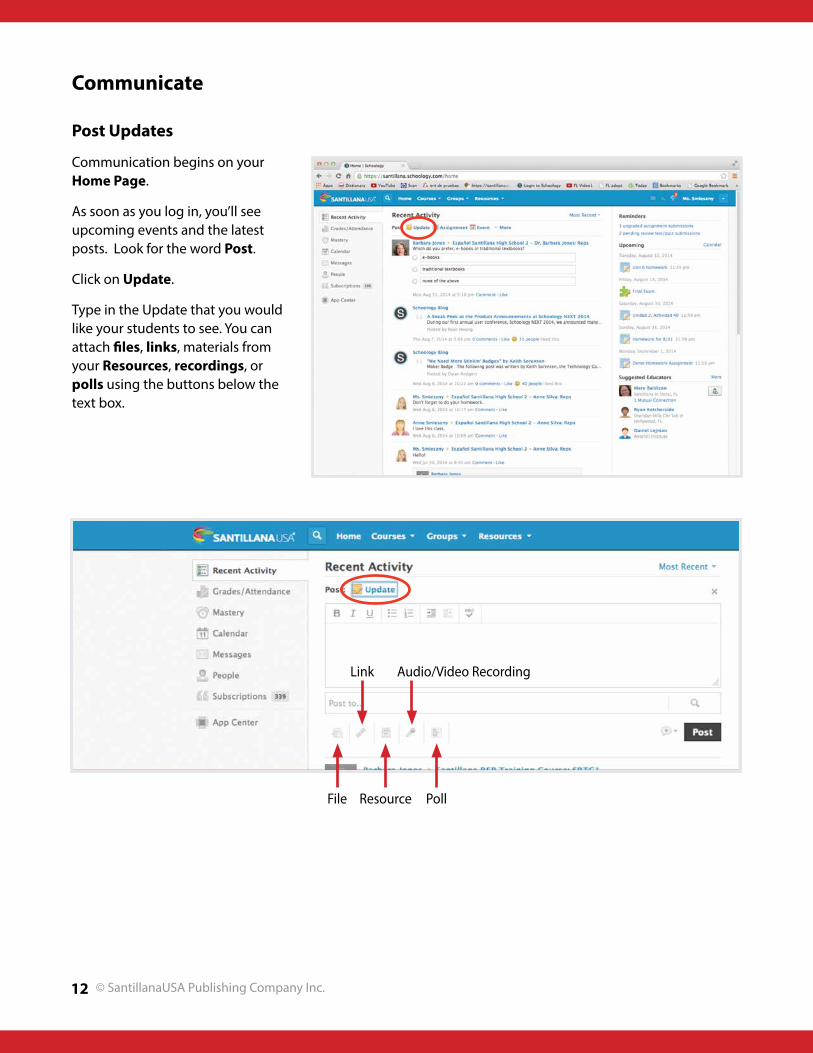
File Resource Poll
Link Audio/Video Recording
Communicate
Post Updates
Communication begins on your Home Page.
As soon as you log in, you’ll see upcoming events and the latest posts. Look for the word Post.
Click on Update.
Type in the Update that you would like your students to see. You can attach files, links, materials from your Resources, recordings, or polls using the buttons below the text box.
© SantillanaUSA Publishing Company Inc. 13
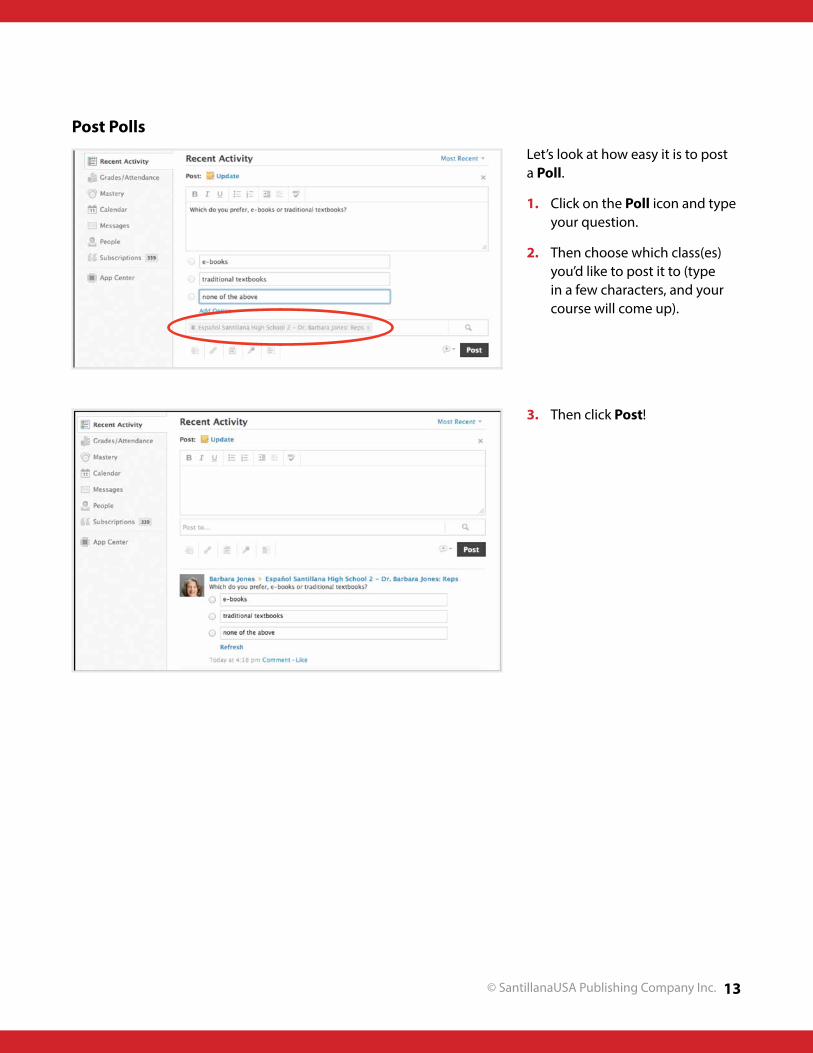
Let’s look at how easy it is to post a Poll.
1. Click on the Poll icon and type your question.
2. Then choose which class(es) you’d like to post it to (type in a few characters, and your course will come up).
3. Then click Post!
Post Polls

© SantillanaUSA Publishing Company Inc.14
Send Messages
You can communicate directly with students from your Home Page.
Just open the Messages tab. Click on + New Message and fill in the fields to compose your message.
© SantillanaUSA Publishing Company Inc. 15
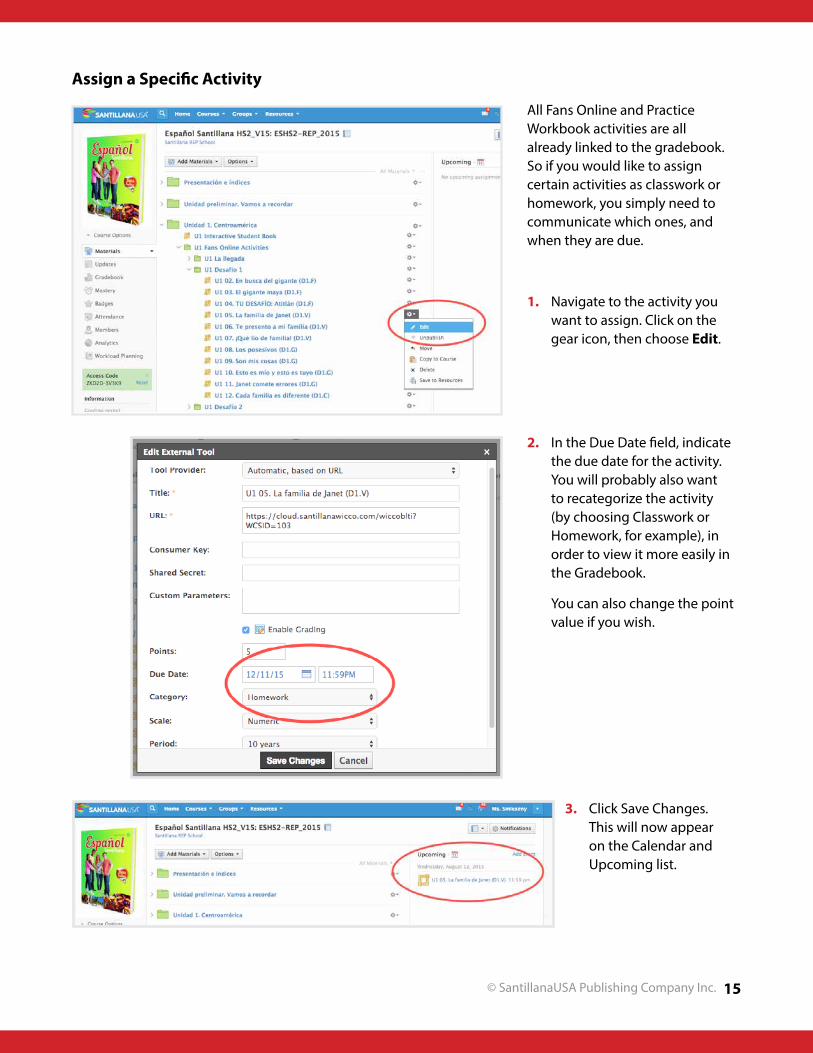
Assign a Specific Activity
All Fans Online and Practice Workbook activities are all already linked to the gradebook. So if you would like to assign certain activities as classwork or homework, you simply need to communicate which ones, and when they are due.
1. Navigate to the activity you want to assign. Click on the gear icon, then choose Edit.
2. In the Due Date field, indicate the due date for the activity. You will probably also want to recategorize the activity (by choosing Classwork or Homework, for example), in order to view it more easily in the Gradebook.
You can also change the point value if you wish.
3. Click Save Changes. This will now appear on the Calendar and Upcoming list.

© SantillanaUSA Publishing Company Inc.16
You can also create a new Assignment.
Add an Assignment in one of these ways:
1. From within any unit or folder, click on the little green + that appears when you hover over empty space. Choose Add Assignment.
Add an Assignment
1a. Alternatively, click on the Calendar icon, then click on the day you want the assignment to be due. (Use this option to assign the same assignment to multiple classes at once.)

© SantillanaUSA Publishing Company Inc. 17
2. Choose Assignment at the top of the window (instead of Event). To assign to multiple classes, type any part of the name of the Course you want to assign it to. Once the class appears, choose it from the list. Each class can have its own due date, as well.
In either case, give the Assignment a name and choose the settings for the assignment. Click Create.

© SantillanaUSA Publishing Company Inc.18
Students will see the Assignment in their list of Upcoming events, as well as in Materials.
For assignments that you have created, students can write their answers directly in the Schoology® platform, record audio or video, or upload documents such as Word or Powerpoint files.
© SantillanaUSA Publishing Company Inc. 19
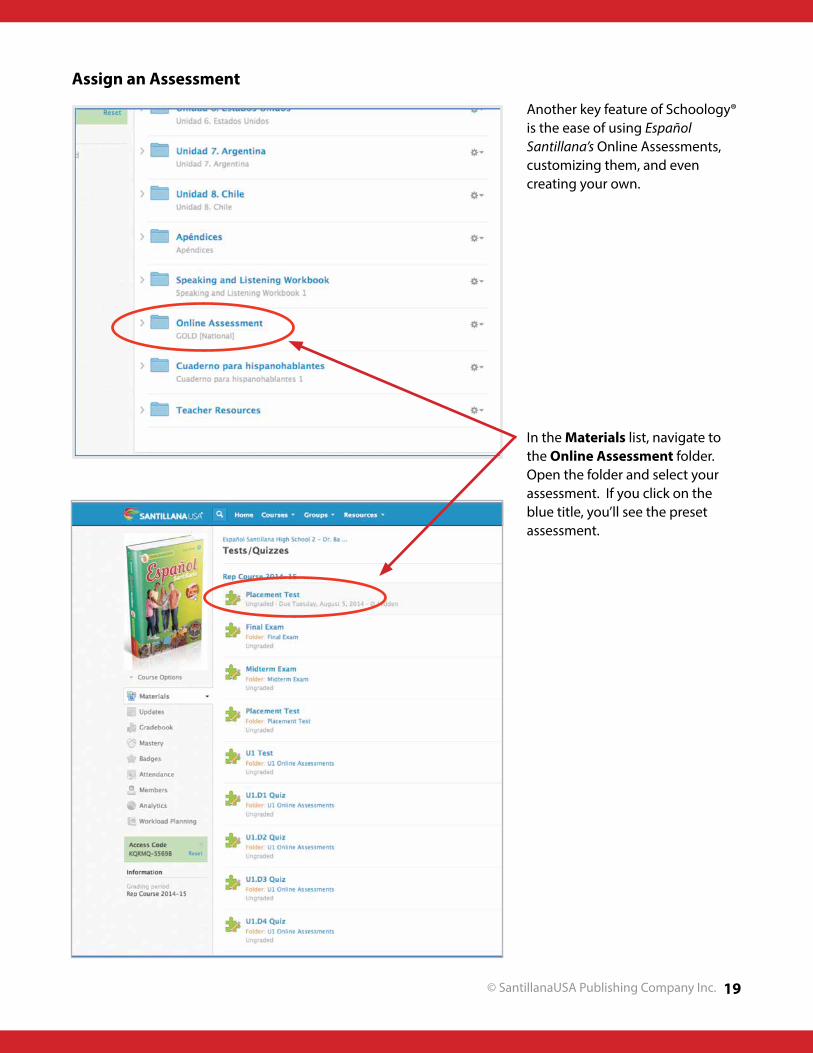
Assign an Assessment
Another key feature of Schoology® is the ease of using Español Santillana’s Online Assessments, customizing them, and even creating your own.
In the Materials list, navigate to the Online Assessment folder. Open the folder and select your assessment. If you click on the blue title, you’ll see the preset assessment.
© SantillanaUSA Publishing Company Inc.20
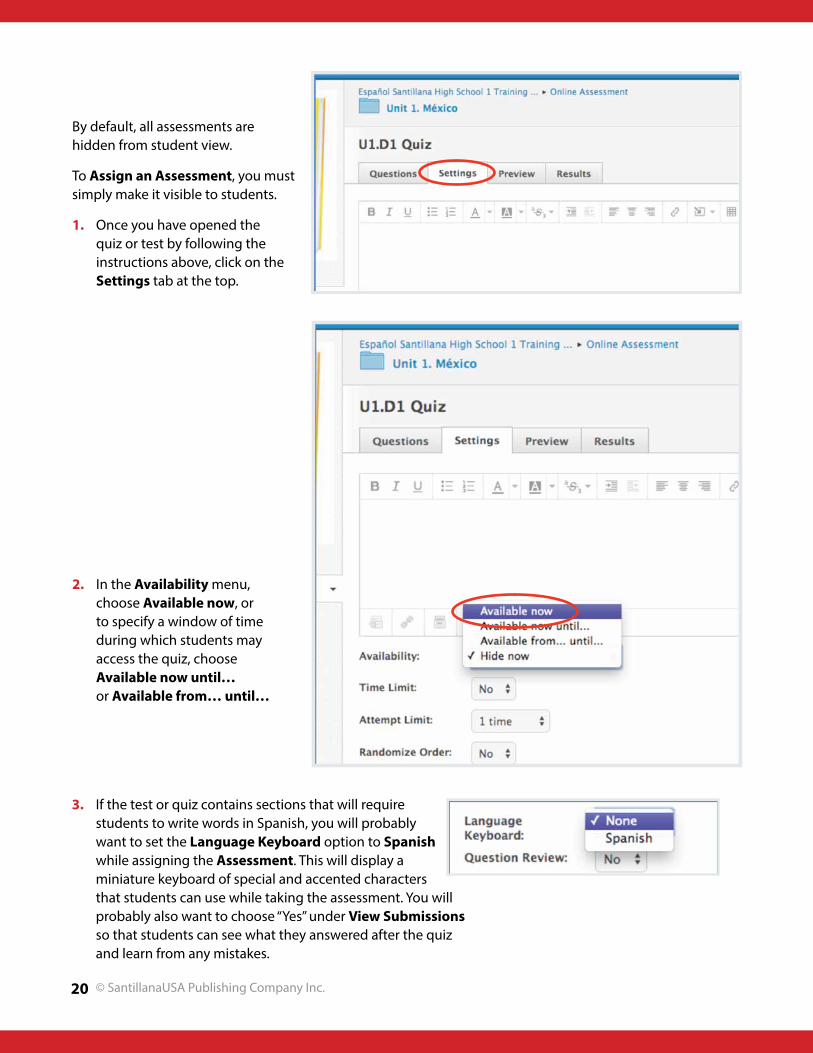
By default, all assessments are hidden from student view.
To Assign an Assessment, you must simply make it visible to students.
1. Once you have opened the quiz or test by following the instructions above, click on the Settings tab at the top.
2. In the Availability menu, choose Available now, or to specify a window of time during which students may access the quiz, choose Available now until… or Available from… until…
3. If the test or quiz contains sections that will require students to write words in Spanish, you will probably want to set the Language Keyboard option to Spanish while assigning the Assessment. This will display a miniature keyboard of special and accented characters that students can use while taking the assessment. You will probably also want to choose “Yes” under View Submissions so that students can see what they answered after the quiz and learn from any mistakes.
© SantillanaUSA Publishing Company Inc. 21
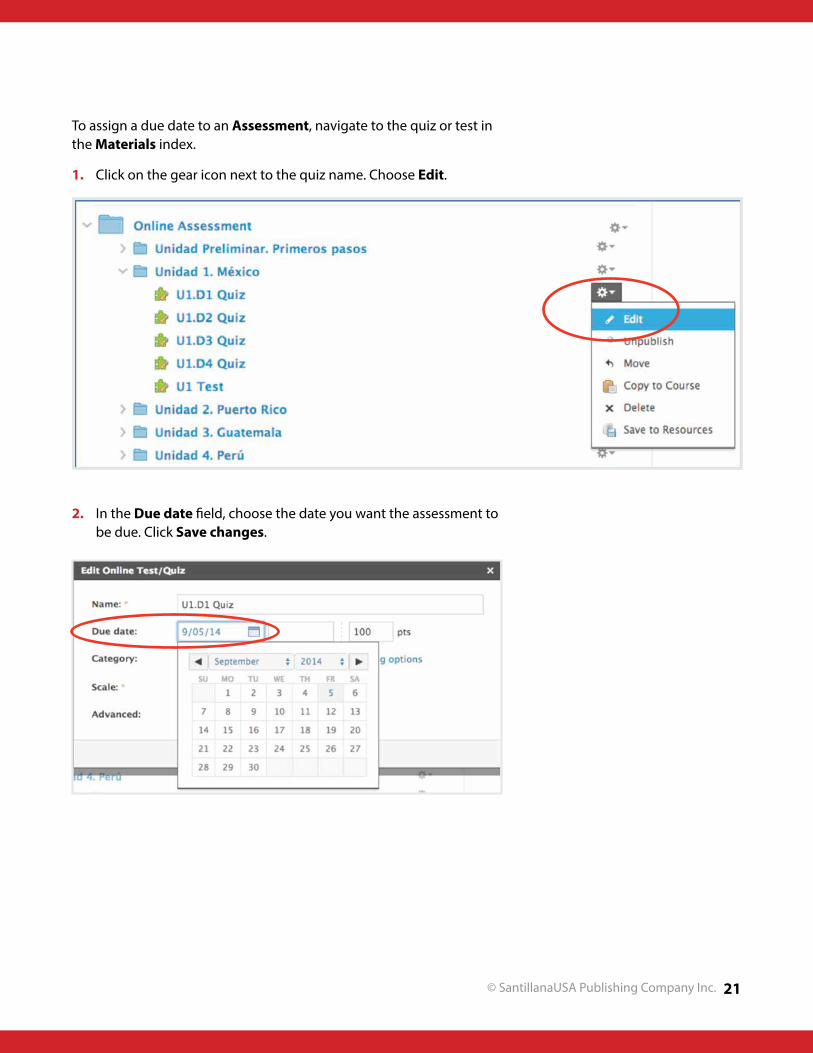
To assign a due date to an Assessment, navigate to the quiz or test in the Materials index.
1. Click on the gear icon next to the quiz name. Choose Edit.
2. In the Due date field, choose the date you want the assessment to be due. Click Save changes.
© SantillanaUSA Publishing Company Inc.22
Manage
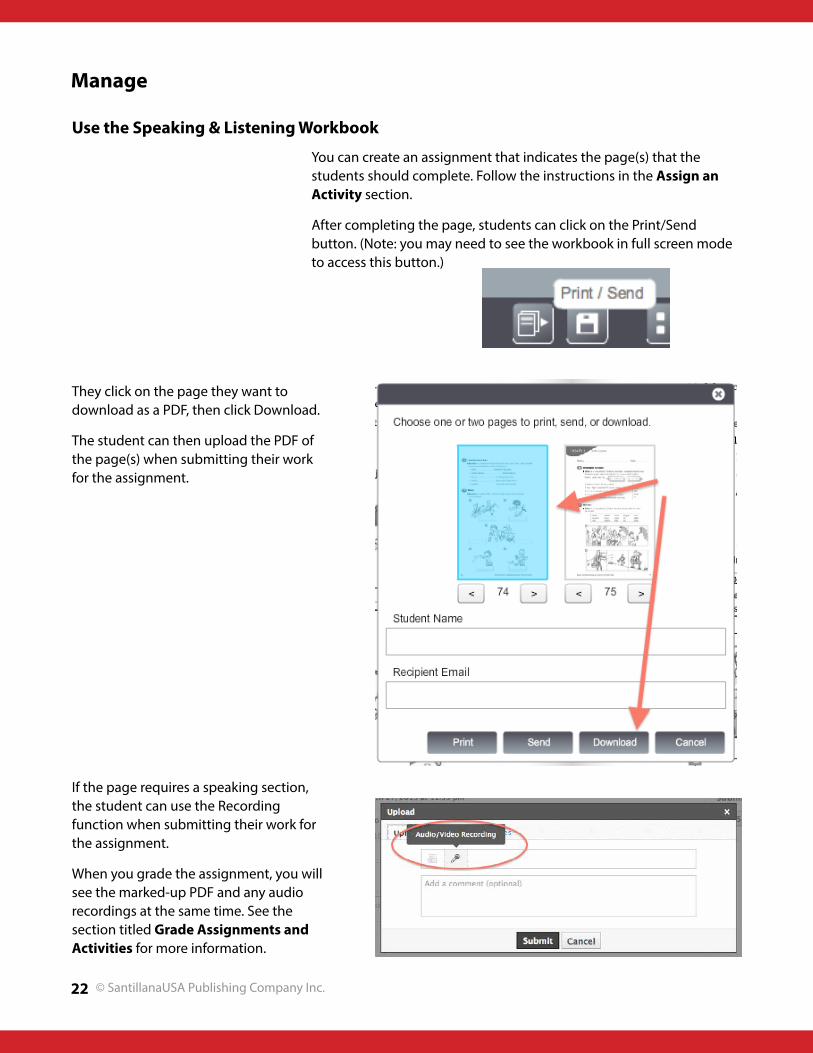
You can create an assignment that indicates the page(s) that the students should complete. Follow the instructions in the Assign an Activity section.
After completing the page, students can click on the Print/Send button. (Note: you may need to see the workbook in full screen mode to access this button.)
They click on the page they want to download as a PDF, then click Download.
The student can then upload the PDF of the page(s) when submitting their work for the assignment.
If the page requires a speaking section, the student can use the Recording function when submitting their work for the assignment.
When you grade the assignment, you will see the marked-up PDF and any audio recordings at the same time. See the section titled Grade Assignments and Activities for more information.
Use the Speaking & Listening Workbook

© SantillanaUSA Publishing Company Inc. 23
The tabs that appear when you open an assessment allow you to customize and edit assessments to suit your students’ needs.
The Questions tab allows you to see the questions contained in the assessment. Underneath this tab, the Add
Question button allows you to add a variety of questions that you create, or add selected questions from your Question Banks.
Settings gives you control over various elements of the testing situation.
The Options button allows you to add questions from this assessment to the Question Bank or reorder the existing quiz questions.
Customize Quizzes and Tests

© SantillanaUSA Publishing Company Inc.24
Preview allows you to look at the test before releasing it to students.
Results lets you see how well students performed on the test. You can view results by student or by question. Click on View Attempts to see a student’s answers.

© SantillanaUSA Publishing Company Inc. 25
Grade Assignments and Activities
You can grade assignments that you have created.
From the main Materials screen, you will see when students make submissions. You can also click on the name of the Assignment in the Upcoming list.
Alternatively, from inside the Gradebook, you will see an icon when students submit their Assignment. Click on the name of the Assignment to see the submissions.
Click on Needs Grading.
© SantillanaUSA Publishing Company Inc.26
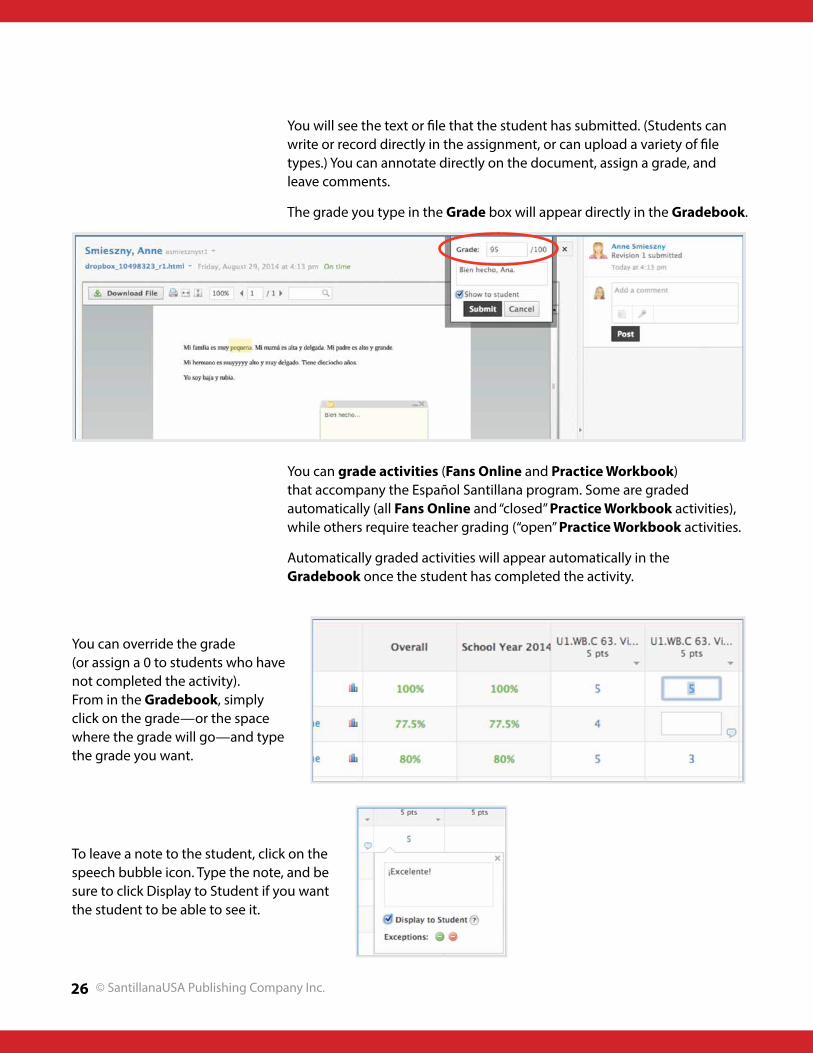
You will see the text or file that the student has submitted. (Students can write or record directly in the assignment, or can upload a variety of file types.) You can annotate directly on the document, assign a grade, and leave comments.
The grade you type in the Grade box will appear directly in the Gradebook.
You can grade activities (Fans Online and Practice Workbook) that accompany the Español Santillana program. Some are graded automatically (all Fans Online and “closed” Practice Workbook activities), while others require teacher grading (“open” Practice Workbook activities.
Automatically graded activities will appear automatically in the Gradebook once the student has completed the activity.
You can override the grade (or assign a 0 to students who have not completed the activity). From in the Gradebook, simply click on the grade—or the space where the grade will go—and type the grade you want.
To leave a note to the student, click on the speech bubble icon. Type the note, and be sure to click Display to Student if you want the student to be able to see it.
© SantillanaUSA Publishing Company Inc. 27
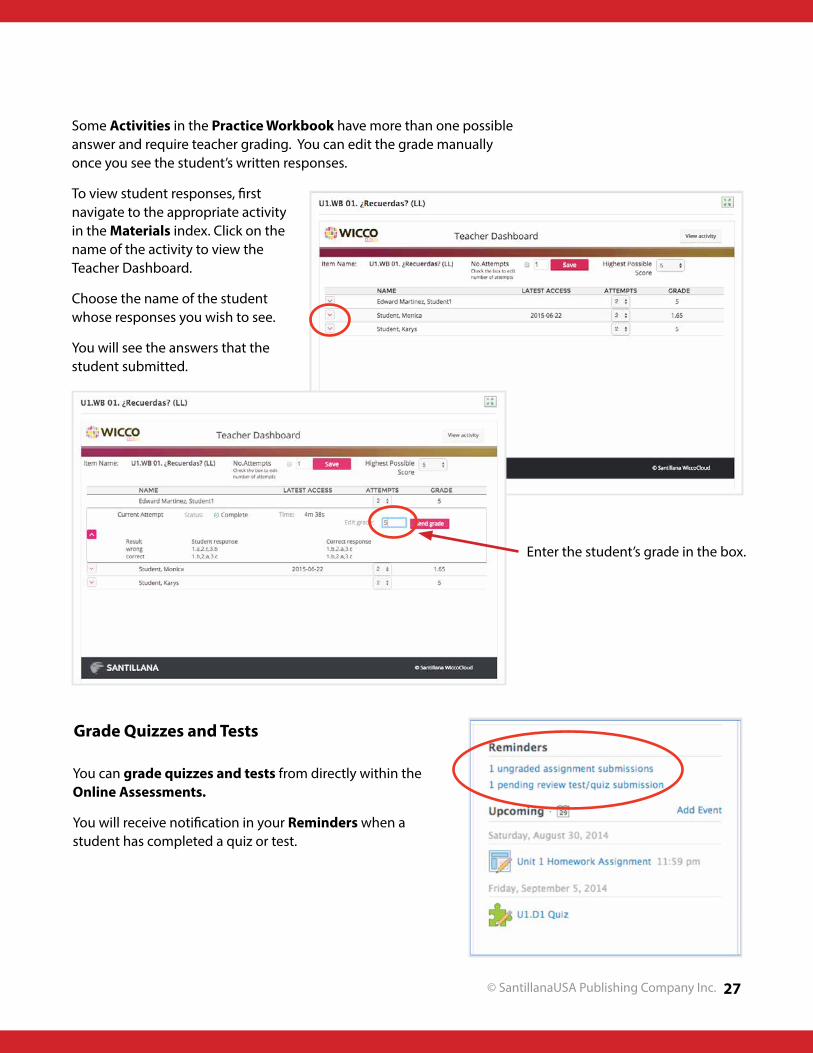
Some Activities in the Practice Workbook have more than one possible answer and require teacher grading. You can edit the grade manually once you see the student’s written responses.
To view student responses, first navigate to the appropriate activity in the Materials index. Click on the name of the activity to view the Teacher Dashboard.
Choose the name of the student whose responses you wish to see.
You will see the answers that the student submitted.
You can grade quizzes and tests from directly within the Online Assessments.
You will receive notification in your Reminders when a student has completed a quiz or test.
Enter the student’s grade in the box.
Grade Quizzes and Tests

© SantillanaUSA Publishing Company Inc.28
To view the student’s work, click on the link in Reminders. Alternatively, from the Materials index, you can navigate directly to the quiz or test, and click on the Results tab at the top. A third option is to click on the name of the quiz in the Gradebook. All three options will bring you to the Results screen:
If there is a section that requires manual grading, you will see an asterisk * instead of a grade along with the words Pending Review in the Final Score column.
You will see the score for automatically graded activities, as well as the acceptable answers for any incorrect responses. You may override this score by clicking on the number, or leave comments for the student by clicking Add Comment.
Click on View Attempts to see the student’s attempts. Then click on the gear icon and choose View/Edit to see the student’s answers to each question on the test.

© SantillanaUSA Publishing Company Inc. 29
You will see an asterisk * for any sections that were not automatically graded.
When grading open-ended or manually graded responses for a whole class, it might be more convenient to use the View by Question option. Using the Results tab, click on View by Question. This will allow you to see all students’ answers at one time for the particular question that needs to be graded.
Click on the asterisk * to add a grade.
Be sure to Save Changes before leaving the screen.

© SantillanaUSA Publishing Company Inc.30
The Gradebook is easy to use. Auto-graded activities will populate immediately, and students can easily submit other assignments. Teachers will be able to grade and comment on those submissions. See the section titled Grade Assignments and Activities for more information.
To view graded assignments more efficiently, click on the All Categories tab and choose the specific category you wish to see.
Use the Gradebook
Student Profiles appear when a teacher clicks on individual student names. This allows teachers to keep track of student work submissions and send messages.

© SantillanaUSA Publishing Company Inc. 31
You can customize the categories for assignments and assign them weights toward the overall grade.
You can add Categories by clicking the + Add button.
You can delete Categories by hovering over the category name and clicking the X icon that appears.
Clicking on the star icon makes that the default category for new assignments.
Assign Weights to Categories
You can assign weights to categories to make certain types of assignments worth more than others. By default, all categories are weighted the same.
Click on the Gradebook tab in the left column.
Click on the Grade Setup tab that appears.
Check the Weight Categories box to turn on weighted grading.
Click on the number in the Weight column to change it.
If you recategorize activities when assigning them, you may wish to assign a value of 0 to all categories other than Classwork, Homework, Quizzes, and Tests. That way, activities completed that were not assigned will not count toward the student’s overall grade.
IMPORTANT: To add or adjust grading periods, please contact Santillana USA Technical Support at [email protected].
Customize the Gradebook

© SantillanaUSA Publishing Company Inc.32
To categorize several Activities at once, you can access the Bulk Edit feature.
Use Bulk Editing
With this feature, you can change the category of an activity, assignment, quiz, or test; set how many points it’s worth; change the grading scale or rubric; and change which grading period it counts in.
Please note that Factor is how many times it counts in the Gradebook. By default, all Factors should be set to 1. If you would like a test or exam to count twice, for example, you would set the Factor to 2.
Click on the Gradebook tab. In the top toolbar, click on the gear icon. Choose Bulk Edit.