AIRCONDITIONER - GSCS CDN B2C Service.
64
P/NO : MFL41549817 TYPE : WALL MOUNTED MODELS : LG GLORY II S09LV S09LP-2 S18LP-2
-
Upload
khangminh22 -
Category
Documents
-
view
1 -
download
0
Transcript of AIRCONDITIONER - GSCS CDN B2C Service.

P/NO : MFL41549817
TYPE : WALL MOUNTED
MODELS :LG GLORY II
S09LV S09LP-2 S18LP-2

2 Room Air Conditioner
Room Air Conditioner Owner’s Manual
TABLE OF CONTENTS FOR YOUR RECORDS Write the model and serial numbers here:
Model #
Serial #
You can find them on a label on the side of each unit.
Dealer's Name
Date Purchased
Staple your receipt to this page in the event you need it to prove date of purchase or for warranty issues.
READ THIS MANUAL Inside you will find many helpful hints on how to use and maintain your air conditioner properly. Just a little preventive care on your part can save you a great deal of time and money over the life of your air conditioner.
You'll find many answers to common problems in the chart of troubleshooting tips. If you review our chart of
Troubleshooting Tips first, you may not need to call for service at all.
PRECAUTION • Contact the authorized service technician for
repair or maintenance of this unit. • Contact the installer for installation of this unit. • The air conditioner is not intended for use by
young children or invalids without supervision. • Young children should be supervised to ensure
that they do not play with the air conditioner. • When the power cord is to be replaced,
replacement work shall be performed by authorized personnel only using only genuine replacement parts.
• Installation work must be performed in accordance with the National Electric Code by qualified and authorized personnel only.
Safety Precautions .........................3
Prior to Operation ..........................9
Introduction ..................................10
Electrical Safety ...........................11
Operating Instructions .................13
Maintenance and Service ............27
Owner's Manual 3
Safety Precautions
Safety PrecautionsTo prevent the injury of the user or other people and property damage, the following instructions must befollowed.
Incorrect operation due to ignoring instruction will cause harm or damage. The seriousness is classifiedby the following indications.
This symbol indicates the possibility of death or serious injury.
This symbol indicates the possibility of injury or damage to properties only.
The meanings of the symbols used in this manual are as shown below.
Be sure not to do.
Be sure to follow the instruction.
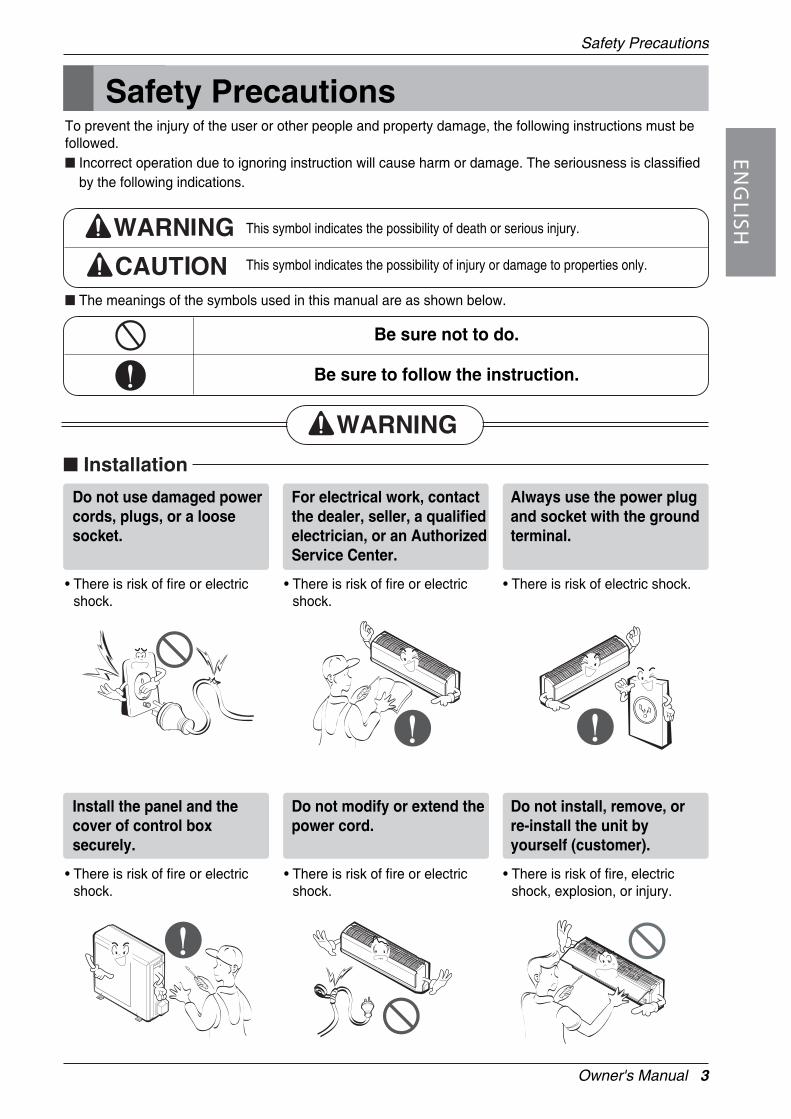
Installation
Do not use damaged powercords, plugs, or a loosesocket.
• There is risk of fire or electricshock.
For electrical work, contactthe dealer, seller, a qualifiedelectrician, or an AuthorizedService Center.
• There is risk of fire or electricshock.
Always use the power plugand socket with the groundterminal.
• There is risk of electric shock.
Install the panel and thecover of control boxsecurely.
• There is risk of fire or electricshock.
Do not modify or extend thepower cord.
• There is risk of fire or electricshock.
Do not install, remove, orre-install the unit byyourself (customer).
• There is risk of fire, electricshock, explosion, or injury.

4 Room Air Conditioner
Safety Precautions
Be cautious whenunpacking and installingthe product.
• Sharp edges could cause injury.Be especially careful of thecase edges and the fins on thecondenser and evaporator.
For installation, alwayscontact the dealer or anAuthorized Service Center.
• There is risk of fire, electricshock, explosion, or injury.
Do not install the producton a defective installationstand.
• It may cause injury, accident, ordamage to the product.
Be sure the installation areadoes not deteriorate withage.
• If the base collapses, the airconditioner could fall with it, causingproperty damage, product failure,and personal injury.
Do not let the air conditionerrun for a long time when thehumidity is very high and adoor or a window is left open.
• Moisture may condense andwet or damage furnishings.
Take care to ensure thatpower cords could not bepulled out or damagedduring operation.
• There is risk of fire or electricalshock.
Do not place anything onthe power cord.
• There is risk of fire or electricshock.
Do not turn theair-conditioner ON or OFFby plugging or unpluggingthe power plug.
• There is risk of fire or electricalshock.
Operation

Owner's Manual 5
Safety Precautions
Use a dedicated outlet forthis appliance.
• There is risk of fire or electricalshock.
Grasp the plug to removethe cord from the outlet. Donot touch it with wet hands.
• There is risk of fire or electricalshock.
Do not place a heater orother appliances near thepower cable.
• There is risk of fire and electricshock.
Do not allow water to runinto electric parts.
• It may cause There is risk offire, failure of the product, orelectric shock.
Do not store or useflammable gas orcombustibles near the airconditioner.
• There is risk of fire or failure ofproduct.
Do not use the product in atightly closed space for along time.
• Oxygen deficiency could occur.
When flammable gas leaks,turn off the gas and open awindow for ventilationbefore turn the product on.DO NOT use the telephoneor turn switches on or off.
• There is risk of explosion or fire.
Unplug the unit if strangesounds, odors, or smokecomes from it.
• There is risk of electrical shockor fire
Stop operation and closethe window in storm orhurricane. If possible,remove the air conditionerfrom the window before thehurricane arrives.
• There is risk of propertydamage, failure of product, orelectric shock.
xaW Thinner

6 Room Air Conditioner
Safety Precautions
Always check for gas(refrigerant) leakage afterinstallation or repair ofproduct.
• Low refrigerant levels maycause failure of product.
Install the drain hose toensure that water is drainedaway properly.
• A bad connection may causewater leakage.
Keep level even wheninstalling the product.
• To avoid vibration or waterleakage.
Installation
90˚
Unplug the appliance beforeperforming cleaning ormaintenance.
• There is risk of electrical shock.
When the product is not beused for a long time,disconnect the power supplyplug or turn off the breaker.
• There is risk of product damageor failure, or unintendedoperation.
Take care to ensure thatnobody could step on or fallonto the outdoor unit.
• This could result in personalinjury and product damage.
Do not open the inlet grill ofthe product duringoperation. (Do not touch theelectrostatic filter, if the unitis so equipped.)
• There is risk of physical injury,electric shock, or productfailure.
When the product is soaked(flooded or submerged),contact an AuthorizedService Center.
• There is risk of fire or eletricshock.
Ventilate the product fromtime to time when operatingit together with a stove, etc.
• There is risk of fire or electricalshock.
Owner's Manual 7
Safety Precautions
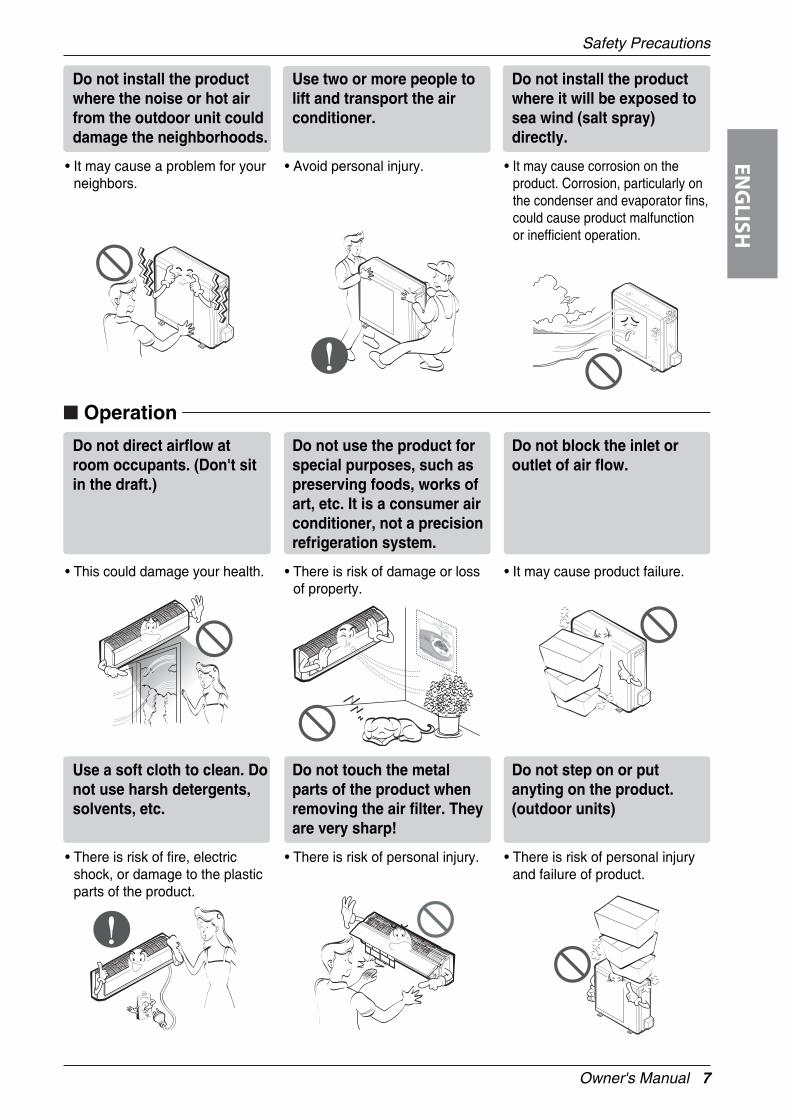
Do not install the productwhere the noise or hot airfrom the outdoor unit coulddamage the neighborhoods.
• It may cause a problem for yourneighbors.
Use two or more people tolift and transport the airconditioner.
• Avoid personal injury.
Do not install the productwhere it will be exposed tosea wind (salt spray)directly.
• It may cause corrosion on theproduct. Corrosion, particularly onthe condenser and evaporator fins,could cause product malfunctionor inefficient operation.
Do not direct airflow atroom occupants. (Don't sitin the draft.)
• This could damage your health.
Do not use the product forspecial purposes, such aspreserving foods, works ofart, etc. It is a consumer airconditioner, not a precisionrefrigeration system.
• There is risk of damage or lossof property.
Do not block the inlet oroutlet of air flow.
• It may cause product failure.
Use a soft cloth to clean. Donot use harsh detergents,solvents, etc.
• There is risk of fire, electricshock, or damage to the plasticparts of the product.
Do not touch the metalparts of the product whenremoving the air filter. Theyare very sharp!
• There is risk of personal injury.
Do not step on or putanyting on the product.(outdoor units)
• There is risk of personal injuryand failure of product.
Operation

8 Room Air Conditioner
Safety Precautions
Do not recharge or disassemble thebatteries. Do not dispose of batteries in afire.
• They may burn or explode.
If the liquid from the batteries gets ontoyour skin or clothes, wash it well with cleanwater. Do not use the remote if the batterieshave leaked.
• The chemicals in batteries could cause burns orother health hazards.
Always insert the filtersecurely. Clean the filterevery two weeks or moreoften if necessary.
• A dirty filter reduces theefficiency of the air conditionerand could cause productmalfunction or damage.
Do not insert hands or otherobjects through the air inletor outlet while the airconditioner is plugged in.
• There are sharp and movingparts that could cause personalinjury.
Do not drink the waterdrained from the unit.
• It is not sanitary and couldcause serious health issues.
Disuse
Use a firm stool or ladder when cleaning ormaintaining the air conditioner.
• Be careful and avoid personal injury.
Replace the all batteries in the remotecontrol with new ones of the same type. Donot mix old and new batteries or differenttypes of batteries.
• There is risk of fire or explosion

Owner's Manual 9
Prior to Operation
Prior to Operation
1. Contact an installation specialist for installation.2. Plug in the power plug properly.3. Use a dedicated circuit.4. Do not use an extension cord.5. Do not start/stop operation by plugging/unplugging the power cord.6. If the cord/plug is damaged, replace it with only an authorized replacement part.
1. Being exposed to direct airflow for a long time may be hazardous to your health. Do not exposeoccupants, pets, or plants to direct airflow for a long time.
2. Due to the possibility of oxygen deficiency, ventilate the room when using the appliance together withstoves or other heating devices.
3. Do not use this air conditioner for non-specified special purpose (e.g. preserving precision devices,food, pets, plants, or art objects). Such use may damage your properties.
1. Do not touch the metal parts of the unit when removing the filter. Injury can occur.2. Do not use water to clean inside the air conditioner. Exposure to water can destroy the insulation,
leading to electric shock.3. When cleaning the unit, first make sure that the power and breaker are turned off. The fan rotates at a
very high speed during operation. There is a possibility of injury if the unit’s power is triggered whilecleaning inner parts of the unit.
For repair and maintenance, contact your authorized service dealer.
Preparing for Operation
Usage
Cleaning and Maintenance
Service

Air Intake Vents
Air Outlet Vents
Air Intake Vents
Air Outlet Vents
Connecting Wires
Connecting Wires
Piping Piping Drain Hose Drain Hose
Base Plate
Base Plate
Front Panel
Air Inlet
Signal Receptor Air Filter
Introduction
This symbol alerts you to the risk of electric shock.
This symbol alerts you to hazards that may cause harm to the air conditioner.
This symbol indicates special notes. NOTICE Features
Symbols used in this Manual
INDOOR
OUTDOOR
10 Room Air Conditioner
Introduction
This appliance should be installed in accordance with national wiring regulations. This guide acts as a guide to help to explain product features.

Electrical SafetyWARNING: This appliance must be properly grounded.
To minimize the risk of electric shock, you must alway plug into a grounded oulet.
WARNING: Do not cut or remove the grounding prong from thepower plug.
WARNING: Attaching the adapter ground terminal to the wallreceptacle cover screw does not ground the appliance unless thecover screw is metal and not insulated, and the wall receptacle isgrounded through the house wiring.
WARNING: If you have any doubt whether the air conditioner isproperly grounded, have the wall receptacle and circuit checked bya qualified electrician.
Preferred method
Ensure proper groundexists before use
Owner's Manual 11
Safety Precautions

12 Room Air Conditioner
Introduction
Temporary Use of an Adapter
We strongly discourage the use of an adapter due to potential safety hazards. For temporaryconnections, use only a UL-listed adapter, available from most local hardware stores. Ensure that thelarge slot in the adapter is aligned with the large slot in the receptacle for a proper polarity connection.To disconnect the power cord from the adapter, use one hand on each to avoid damaging the groundterminal. Avoid frequently unplugging the power cord as this can lead to eventual ground terminaldamage.
WARNING: Never use the appliance with a broken adapter.
We strongly discourage the use of an extension cord due to potential safety hazards. For temporarysituations, use only CSA certified and UL listed 3-wire grounded extension cords, rated 15 A, 125 V.
Temporary Use of an Extension Cord
Temporary method
Adapter Plug
Receptacle Cover
Metal Screw

Operation indicatinglamps
Operating InstructionsHow to insert the Batteries
Storage and Tips for using the Remote Controller
1. Remove the battery cover by pulling it according to the arrow direction.
2. Insert new batteries making sure that the (+) and (-) of battery are installed correctly.
3. Reattach the cover by sliding it back into position.
Use 2 AAA(1.5volt) batteries. Do not use rechargeable batteries.
NOTICE
• The remote controller may be stored by mountingit on a wall.
• To operate the room air conditioner, aim theremote controller at the signal receptor.
Signal ReceptorReceives the signals from the remote control.(Signal receiving sound: two short beeps or one long beep.)
Operation Indication LampsOn/Off : Lights up during the system operation.
Sleep Mode : Lights up during Sleep Mode Auto operation.
Timer : Lights up during Timer operation.
Defrost Mode : Lights up during Defrost Mode or *HotStart operation (Heat pump model only)
: Lights up during outdoor unit operation.(Cooling model only)
OUTDOOR
OUTDOOR UNITOPERATION
: Lights up during outdoor unit operation.(Cooling model only) (Optional)
(Optional)
OUTDOOR UNITOPERATION
* Hot Start operation: Stops the indoor fan in Heating Operation to prevent cold air from blowing out from unit.
Plasma
Plasma and Ion: The function illustrates its dynamic mode by using a multiple lighting system.
Power Display : Indicates the setting temperature and operation mode.
*SUB DISPLAY (OPTIONAL) (Blue: Plasma, Green: Auto clean, Orange: Ion)
Blue Green Orange
Operationmode
Shape ofdisplay
Settingtemperature
Standard Too hot Hot Cold Too coldJet
Cool/HeatTest
operationAutocleanComfortable
Auto operation modeCooling, heating,Dehumidification
Mode
Owner's Manual 13
Safety Precautions EN
GLISH

14 Room Air Conditioner
Introduction
Cooling Operation
Auto Operation or Auto Changeover
Healthy Dehumidification Operation
Heating Operation
• Cooling Model( ), Heat Pump Model( )
Operation Mode
Controls
The controls will look like the following.
Remote Control Operations
1. START/STOP BUTTON Operation starts when this button is pressed and stops when the button is pressed again.
2. OPERATION MODE SELECTION BUTTON Used to select the operation mode.
3. ROOM TEMPERATURE SETTING BUTTONS Used to select the room temperature.
4. INDOOR FAN SPEED SELECTOR Used to select fan speed in four steps low, medium, high and CHAOS.
5. JET COOL Used to start or stop the speed cooling.(speed cooling operates super high fan speed in cooling mode.)
6. CHAOS SWING BUTTON Used to stop or start louver movement and set the desired up/down airflow direction.
7. ON/OFF TIMER BUTTONS Used to set the time of starting and stopping operation. (See page 23)
8. TIME SETTING BUTTONS Used to adjust the time. (See page 23)
9. TIMER SET/CANCEL BUTTON Used to set the timer when the desired time is obtained and to cancel the Timer operation. (See page 23)
10. SLEEP MODE AUTO BUTTON Used to set Sleep Mode Auto operation. (See page 23)
11. AIR CIRCULATION BUTTON Used to circulate the room air without cooling or heating. (See page 24)
12. ROOM TEMPERATURE CHECKING BUTTON Used to check the room temperature.
14. HORIZONTAL AIRFLOW DIRECTIONCONTROL BUTTON (OPTIONAL)Used to set the desired horizontal airflowdirection.
15. RESET BUTTONUsed prior to resetting time.
16. 2nd F ButtonUsed prior to using modes printed in blueat the bottom of buttons. (See page 22)
17. AUTO CLEAN (OPTIONAL)Used to set Auto Clean mode.
ON OFF
CANCEL
AUTO CLEANSET
1
3
5
4
9
10
12
1416
72
813
15
11
6
Flip-up door(opened)
Signal transmitter
1718
13. PLASMA BUTTON(OPTIONAL)Used to start or stop the plasma-purification orplasma + ion generation function (See page 21).
18. LCD/LED LUMINOSITY BUTTON(OPTIONAL)Used to adjust LCD/LED luminosity.

ON
Cooling HealthyDehumidification
AutoChangeover
Heating(Heat pump model only)
To lower the temperature
To raise the temperature
Press the Start/Stop button. The unit will respond with a beep.
Open the door of the remote controller. To select CoolingOperation, press the Operation Mode Selection button. Each time the button is pressed, the operation mode isshifted in the direction of the arrow.
Close the door of the remote controller. Set the temperaturelower than the room temperature. The temperature can beset within a range of 18°C~30°C at intervals of 1°C.
Set the fan speed again with the doorof the remote controller still closed.You can select the fan speed in foursteps-low, medium, high and CHAOS.Each time the button is pressed, thefan speed mode is shifted.
1
2
3
4
Natural wind by the CHAOS logicFor fresher feeling, press the Indoor fan speed selector and set to CHAOS mode. In this mode, the windblows like a natural breeze by automatically changing fan speed according to the CHAOS logic.
Cooling operation
Owner's Manual 15
Safety Precautions

ON
Cooling HealthyDehumidification
Heating(Heat pump model only)
To lower the temperature
To raise the temperature
Press the Start/Stop button. The unit will respond with a beep.
Open the door of the remote controller. To select AutoOperation, press the operation mode selection button. Each time the button is pressed, the operation mode isshifted in the direction of the arrow.
The temperature and fan speed are automatically set by theelectronic controls based on the actual room temperature. Ifyou want to change the set temperature, press the RoomTemperature Setting buttons. The cooler or warmer you feel,the more times (up to two times) you should press the button.The set temperature will be changed automatically.
During Auto Operation
You cannot control the indoor fan speed. It has already been set by the Fuzzy rule.If the system is not operating as desired, manually switch to another mode. The system will notautomatically switch from the cooling mode to the heating mode, or from heating mode to coolingmode, it must be done by manually resetting.During Auto Operation, pressing the chaos swing button makes the horizontal louvers swing up anddown automatically. If you want to stop auto-swing, press the chaos swing button again.
1
2
3
Auto operation (Optional)
16 Room Air Conditioner
Introduction

ON
Cooling HealthyDehumidification
AutoChangeover
Heating(Heat pump model only)
To lower the temperature
To raise the temperature
Auto changeover operation(Optional)
Press the Start/Stop button. The unit will respond with a beep.
Open the door of the remote controller. To select Auto ChangeoverOperation, press the Operation Mode Selection button. Each time the button is pressed, the operation mode is shifted in thedirection of the arrow.
1
2
Close the door of the remote controller. Set the temperaturelower than the room temperature. The temperature can beset within a range of 18°C~30°C at intervals of 1°C.
Set the fan speed again with the doorof the remote controller still closed.You can select the fan speed in foursteps-low, medium, high and CHAOS.Each time the button is pressed, thefan speed mode is shifted.
3
4
During Auto changeover OperationThe air conditioner changes the operation mode automatically to keep indoor temperature. When roomtemperature vary over ±2°C with respect to setting temperature, air conditioner keeps the roomtemperature within ±2°C with respect to setting temperature by auto changeover mode.
Owner's Manual 17
Safety Precautions

ON
Cooling HealthyDehumidification
Heating(Heat pump model only)
AutoChangeover
Press the Start/Stop button.The unit will respond with a beep.
Open the door of the remote controller. To select HealthyDehumidification Operation, press the Operation ModeSelection button. Each time the button is pressed, the operation mode isshifted in the direction of the arrow.
1
2
Set the fan speed again with the doorof the remote controller still closed.You can select the fan speed in foursteps-low, medium, high, or CHAOS.Each time the button is pressed, thefan speed mode is shifted.
3
Natural wind by the CHAOS logicFor fresher feeling, press the Indoor Fan Speed Selector and setto CHAOS mode. In this mode, the wind blows like a naturalbreeze by automatically changing fan speed according to theCHAOS logic.
Healthy dehumidification operation
During Healthy Dehumidification Operation
If you select the dehumidification mode on the operation selection button, the product starts to run thedehumidification function. It automatically sets the room temp. and airflow volume to the best conditionfor dehumidification, based on the sensed current room temp.
In this case, however, the setting temp. is not displayed on the remote controller and you are not able tocontrol the room temp. either.
During the healthy dehumidification function, the airflow volume is automatically set according to theoptimization algorithm responding to the current room temp. status, so that the room condition is kepthealthy and comfortable even in the very humid season.
18 Room Air Conditioner
Introduction

ON
Cooling HealthyDehumidification
Heating(Heat pump model only)
To lower the temperature
To raise the temperature
AutoChangeover
Heating operation (Heat pump model only)
Press the Start/Stop button.The unit will respond with a beep.
Open the door of the remote controller. To select HeatingOperation, press the Operation Mode Selection button. Each time the button is pressed, the operation mode isshifted in the direction of the arrow.
Close the door of the remote controller.Set the temperature higher than the room temperature. The temperature can be set within a range of 16°C~30°C atintervals of 1°C.
Set the fan speed again with the door of theremote controller still closed. You canselect the fan speed in four steps–low,medium, high and CHAOS. Each time thebutton is pressed, the fan speed mode isshifted.
1
2
3
4
Natural wind by the CHAOS logicFor fresher feeling, press the Indoor Fan Speed Selector and set to CHAOS mode. In this mode, thewind blows like a natural breeze by automatically changing fan speed according to the CHAOS logic.
Owner's Manual 19
Safety Precautions

or or
During the JET COOL function at any moment, the A/C starts to blow the cool air at extremelyhigh speed for 30 minutes setting the room temp. automatically to 18°C. It is especially used tocool the room temp. quickly in a hot summer.
In heat pump mode or auto changeover mode, however, the JET COOL function is not available.
In order to return to the normal cooling mode from the JET COOL mode, just press the operationmode selection button, airflow volume selection, temp. setting button or the JET COOL buttonagain.
NOTICE
Press the Start/Stop button. The unit will respond with a beep.
Press the Jet Cool button to operatethe speed cooling mode and the unitwill operate at super high fan speedon cooling mode for 30 minutes.
To cancel the Jet Cool mode, press the Jet Cool button, thefan speed button or the room temperature setting buttonagain and the unit will operate at high fan speed on coolingmode.
1
2
3
Jet cool operation
20 Room Air Conditioner
Introduction

Press the Start/Stop button.The unit will respond with abeep.
1
Open the door of the remotecontroller. Press the PLASMAbutton.Operation will start when the buttonis pressed and stop when the buttonis pressed again.
2
Set the fan speed again with the door of the remotecontroller closed. You can select the fan speed in four steps-low, medium, high or CHAOS. Each time the button is pressed, the fan speed mode is shifted.
Air purifying operation (NEO PLASMA) can be with cooling, Heating or any other operations.
NEO PLASMA Air Purifying Operation onlyIf you press the only PLASMA button, onlyPLASMA purification function operates.Then, fan speed is low. You can select the fanspeed in four steps-low, medium, high orCHAOS.Each time the Indoor Fan Speed Selectorbutton is pressed, the fan speed mode isshifted.
3
NEO PLASMA purification or NEO Plasma + Ion operation(Optional)
If NEO plasma plasma + ion generation function operates normally, blue and orangelight appear at the sub display (Optional)
NOTICEBlue Green Orange
Owner's Manual 21
Safety Precautions EN
GLISH

ON OFF
CANCEL
SETAUTO CLEAN
Press the Start/Stop button. The unit will respond with a beep.
Open the door of the remote controller and press the 2ndFunction button to operate functions printed blue color underbuttons.(Check the indication of 2nd function on the display of theremote controller.)
2nd function disappears in a short time automatically or whenthe button is pressed again.
1
2
3
2nd F operation
For more details, refer to functions next pages.
22 Room Air Conditioner
Introduction

Owner's Manual 23
Safety Precautions
Delay OFF Timer Delay ON Timer Delay OFF and ON Timer Delay ON and OFF Timer
Sleep mode1. Press the Sleep Mode Auto button to set the time you want the unit to stop automatically.
2. The Timer is programmed in one-hour increments by pressing the Sleep Mode Auto button 1 to 7 times. Thesleep mode is available for 1 to 7 times. To alter the time period in steps of 1 hour, press the Sleep ModeButton while aiming at air conditioner.
3. Make sure the Sleep Mode Auto LED lights up.To cancel the Sleep Mode, press the sleep Mode Auto button several times until the star( ) disappears from the operation display.
The Sleep Mode will be operated at slow fan speed (cooling) or medium fan speed (heat pump only) fora comfortable sleep.
In cooling mode or healthy dehumidification mode:The setting temperature will automatically rise by 1°C over the next 30 minutes and by 2°C in 1 hour for a comfortablesleep.
NOTICE
Setting the time1. Time can be set only when you press the Reset button. Having replacing the batteries,
you should press the reset buttons to reset the time. Press the Start/Stop button.
2. Press 2nd F button and check if 2nd F icon is on.
3. Press the Time Setting buttons until the desired time is set.
4. Press the Timer SET button.
Check the indicator for A.M. and P.M.
NOTICE
1. Make sure the time is set correctly on the display of the remote controller.
2. Press 2nd F button.
3. Press the ON/OFF Timer buttons to turn Timer on or off.
4. Press the Time Setting buttons until the desired time is set.
5. To set the selected time, press the Timer setting button aiming the remote controller at the signal receptor.
To cancel the timer settingCheck if 2nd F icon is off.Press the Timer Cancel button aiming the remote controller at the signal receptor.(The timer lamp on the air conditioner and the display will go out.)
Delay start/Pre-set stop
Select one of the following four types of operation.
NOTICEwith the unit running
ON OFF
CANCEL
SET
CANCEL
SET
CANCEL
SET
Additional Features

Fan speed is on low. Fan speed is on medium. Fan speed is on high.CHAOS Air
Vertical Airflow Direction Control
The up/down airflow (Vertical Airflow) can beadjusted by using the remote control.
1. Press the Start/Stop button to start the unit.
2. Press Chaos Swing button and the louvers willswing up and down. Press the Chaos Swingbutton again to set the vertical louver at thedesired airflow direction.
If you press the Chaos Swing button, thehorizontal airflow direction is changedautomatically based on the CHAOS algorithm todistribute the air in the room evenly and at thesame time to make the human body feel mostcomfortable, as if enjoying a natural breeze.Always use the remote control to adjust theup/down airflow direction. Manually moving thevertical airflow direction louver by hand, coulddamage the air conditioner.When the unit is shut off, the up/down airflowdirection louver will close the air outlet vent ofthe system.
NOTICE
Horizontal Airflow Direction Control (Optional)
The left/right(Horizontal Airflow) can be adjusted by using the remote control.Press the Start/Stop button to start the unit.Open the door on the remote control. Press the Horizontal Airflow Directionbutton and the louvers will swing left and right. Press the Horizontal AirflowDirection Control Button again to set the horizontal louver at the desired airflowdirection.
Air circulation mode
Circulates the room air without cooling or heating.
1. Press the Start/Stop button. the unit will respond with a beep.
2. Open the door on the remote control. Press the Air Circulation button. Close the door on the remote control.Now each time that you press the Indoor Fan Speed Selector button, the fan speed is shifted from low toCHAOS and back to low again.
CHAOS Air economizes power consumption and prevents overcooling. The fan speed is automaticallychanged from high to low or vice versa, depending on the ambient temperature.
NOTICE
24 Room Air Conditioner
Introduction

AUTO CLEAN
ON/OFF button
During Auto Clean function, moistures left in indoor units after Cooling Operation or Healthy Dehumidification Operation can be removed. During Auto Clean function, only Start/Stop button, Plasma button and AUTO CLEAN button are available.
NOTICE
Auto clean (Optional)
1. Whenever you press the AUTO CLEAN button, Auto Clean Function will be reserved and cancelled.
2. Auto Clean function works before and after cooling or dehumidification mode. For details, refer to the below points.
3. When the unit is started after the reservation of Auto Clean ,the Cool Start function operates and indoor Fan is started after 20 seconds.
4. When you press Start/Stop button to turn off the unit after the you have reserved Auto Clean function, the air-conditioner circulates the indoor air in the Auto Clean mode with no more Cooling or Dehumidification operation. It lasts for 30 minutes.
5. If you press the AUTO CLEAN button again during the product operation , Auto Clean function will be cancelled.
Operation procedures when the remote control can't be used.The operation will be started if the ON/OFF button is pressed.If you want to stop operation, re-press the button.
Forced operation
Heat pump Model Cooling Model
Room Temp. ≥ 24 ° C 21 ° C ≤ Room Temp. < 24 ° C Room Temp. < 21 ° C
Operating mode Cooling Cooling Healthy Dehumidification Heating
Indoor FAN Speed High High High High
Setting Temperature 22 ° C 22 ° C 23 ° C 24 ° C
Test operation During the TEST OPERATION, the unit operates in cooling mode at high speed fan, regardless of room temperature and resets in 18 minutes. During test operation, if remote controller signal is received, the unit operates as remote controller sets. If you want to use this operation, Press and hold the ON/OFF button for 3~5 seconds, then the buzzer sound 1 "beep". If you want to stop the operation, re-press the button.
If auto cleaner operates normally, green light appears at the sub display (Optional)Blue Green Orange
Owner's Manual 25
Safety Precautions EN
GLISH

HighSpeed
Auto restart
In case the power comes on again after a power failure, Auto Restarting Operation is the function to operateprocedures automatically to the previous operating conditions.So there is no need of activating this function by pressing any key or button.In the initial mode, the fan operates at a low speed and the compressor starts 2.5~3 minutes later.As the compressor starts, the fan speed also resumes its previous setting mode.
Auto restart function has set enable as factory default.But customer can set up by following this instruction.
To be disable function- Press and hold the ON/OFF button for 6 seconds, then the buzzer sound 2 "beep" and the indicator lamp (1)
blinks 4 times.
To be enable function- Press and hold the ON/OFF button for 6 seconds, then the buzzer sound 2 "beep" and the indicator lamp (1)
brights 4 times.
NOTICE
Helpful informationFan speed and cooling capacity.The cooling capacity indicated in the specification is the valuewhen the fan speed is set to high, and the capacity will be lowerat low or medium fan speed.High fan speed is recommended when you wish to cool the roomquickly.
26 Room Air Conditioner
Introduction

Maintenance and Service
Indoor Unit
Before performing any maintenance, turn off the main power to the system.
Grille, Case, and Remote ControlTurn the system off before cleaning. To clean, wipe with a soft, drycloth. Do not use bleach or abrasives.
Supply power must be disconnected before cleaning the indoor unit.
Air filtersThe air filters behind the front grille should be checked andcleaned once in every 2 weeks or more often if neccessary.1. Pull the both sides and remove front panel.2. Pull the filter tab slightly forward to remove the filter.3. Clean the filter with a vacuum cleaner or warm, soapy water.
• If dirt is conspicuous, wash with a solution ofdetergent in lukewarm water.
• If hot water (40°C or more) is used, it may bedeformed.
4. After washing with water, dry well in the shade.5. Re-install the air filter.
NEO PLASMA filter (Optional)The NEO PLASMA filter behind the air filters should bechecked and cleaned once in every 3 months or more often ifnecessary.
1. After removing the air filters, pull slightly forward to removethe NEO PLASMA filter.
2. Clean NEO PLASMA filter with the vacuum cleaner. If it is very dirty, wash it with water.
3. Note the cuts of electric discharge lines.4. Re-install the NEO PLASMA filter to the original position.
TRIPLE DEODORIZER filter (Optional)1. After removing the air filters, pull slightly forward to remove
the TRIPLE DEODORIZER filter.2. Dry in the sunlight for two hours.3. Re-install the TRIPLE DEODORIZER filter to the original
position.
NOTICE
Don't touch this NEO PLASMA Filter within 10 seconds after opening he inlet grille,it may cause an electric shock.Never use any of the followings:• Water hotter than 40°C
Could cause deformation and/or discoloration.• Volatile substances
Could damage the surfaces of the air conditioner.
Vertical louver Horizontal louver
Air filters(behind front panel)
Air outlet ventAir inlet vent
Gasoline
Powder
NEO PLASMAFilter
TRIPLEDEODORIZINGFilter
Owner's Manual 27
Safety Precautions

(Side)
(Rear)
Air intake vents
Air outlet vents
Piping
Drain Hose
(Side)
(Rear)
Air intake vents
Air outlet vents
Piping
Drain Hose
(Side)
(Rear)
Air intake vents
Air outlet vents
Piping Drain Hose
TRIPLE DEODORIZING Filter
3
2
Outdoor Unit
The heat exchanger coils and panel vents of the outdoor unit should be checked regularly. If clogged with dirt or soot, the heat exchanger and panel vents may be professionally steam cleaned.
Dirty or clogged coils will reduce the operating efficiency of the system and cause higher operating costs.
NOTICE
Replacement of purifying filter (Optional) Recomended use period : About 2 years
1. Remove front panel and air filters.
2. Remove air purifying filters.
3. Insert new air purifying filters.
4. Reinsert air filters and close front panel.
Air filter
28 Room Air Conditioner
Introduction

Owner's Manual 29
Safety Precautions
Common Problems and Solutions
Before calling for service
If you have problems with your air conditioner, read the following information and try to solvethe problem. If you cannot find a solution, turn off the air conditioner and contact your dealer.
Air conditioner does not operate1. Ensure that the air conditioner is plugged into a proper outlet.2. Check the fuse or circuit breaker.3. Check whether the voltage is unusually high or low.
Air does not feel cold enough on the cooling setting1. Ensure that the temperature settings are correct.2. Check to see if the air filter is clogged with dust. If so, replace the filter.3. Ensure that the air flow from the outside is not obstructed and that there is a clearance of
over 20" between the back of the air conditioner and the wall or fence behind it. 4. Close all doors and windows and check for any source of heat in the room.
Before calling for service, please review the following list of common problems andsolutions.
The air conditioner is operating normally when:
• You hear a pinging noise. This is caused by water being picked up by the fan on rainy daysor in highly humid conditions. This feature is designed to help remove moisture in the airand improve cooling efficiency.
• You see water dripping from the rear of the unit. Water may be collected in the base pan inhighly humid conditions or on rainy days. This water overflows and drips from the rear ofthe unit.
• You hear the fan running while the compressor is silent. This is a normal operationalfeature.

30 Room Air Conditioner
Introduction
Troubleshooting
The air conditioner may be operating abnormally when:
Problem
The air conditioner isunplugged.
The fuse is blown/circuitbreaker is tripped.
Power failure.
Airflow is restricted.
The air filter is dirty.
The room may have beenhot.
Cold air is escaping.
Cooling coils have iced up.
Airconditionerdoes not start
Airconditionerdoes not coolas it should
• Make sure the air conditioner plug ispushed completely into the outlet.
• Check the house fuse/circuit breakerbox and replace the fuse or reset thebreaker.
• If power failure occurs, turn the modecontrol to Off. When power is restored, wait 3minutes to restart the air conditionerto prevent tripping of the compressoroverload.
• Make sure there are no curtains,blinds, or furniture blocking the front ofthe air conditioner.
• Clean the filter at least every 2 weeks.See the care and Maintenancesection.
• When the air conditioner is first turnedon, you need to allow time for theroom to cool down.
• Check for open furnace floor registersand cold air returns.
• See Air Conditioner Freezing Upbelow.
What To DoPossible Causes
* You can refer to the Energy Star program in detail at www.energystar.gov.

S09LV S09LP-2 S18LP-2

2 Unit Penyejuk Ruangan
Panduan bagi Pemilik Unit Penyejuk Ruangan
DAFTAR ISIUNTUK CATATAN ANDATulislah model dan nomor seri dari unit ini di sini:
Nomor Model #
Nomor Seri #
Anda dapat menemukannya di label di sisi dari setiap unit
Nama Dealer
Tanggal Pembelian
Tempelkan tanda pembelian Anda ke halaman inijika sewaktu-waktu Anda memerlukannya untukmembuktikan tanggal pembelian atau untukkeperluan garansi.
BACALAH PANDUAN INIDi dalamnya Anda akan menjumpai banyak tips yangmembantu tentang bagaimana cara menggunakan dancara merawat unit penyejuk ruangan dengan benar.Cukup dengan tindakan preventif yang sederhana,Anda dapat menghemat banyak waktu dan uangselama Anda menggunakan unit penyejuk ruangan ini.Anda akan menjumpai banyak jawaban atas masalahyang umum dijumpai pada bagan tips pemecahanmasalah. Jika Anda menyempatkan diri membacaterlebih dahulu Bagan Tips Pemecahan Masalah, Andamungkin tidak perlu memanggil petugas servis lagi.
PERHATIAN• Hubungi teknisi servis resmi untuk memperbaiki
dan merawat unit ini.• Hubungi petugas pemasang unit ini.• Unit penyejuk ruangan tidak dimaksudkan untuk
digunakan oleh anak kecil atau orang yang cacattanpa pengawasan.
• Anak-anak harus diawasi untuk memastikanbahwa mereka tidak bermain-main dengan unitpenyejuk ruangan.
• Jika kabel listrik perlu diganti, pekerjaanpenggantian harus dilakukan oleh petugas resmisaja dan dengan menggunakan onderdil asli saja.
• Pekerjaan pemasangan harus dilakukan sesuaidengan Kode Perlistrikan Nasional oleh petugasresmi yang ahli.
Tindakan Pengamanan ..................3
Sebelum Mengoperasikan.............9
Pendahuluan.................................10
Pengamanan Listrik ....................11
Petunjuk Pengoperasian .............13
Pemeliharaan dan Perbaikan ......27

3
PemasanganJangan gunakan kabel,steker, atau stopkontakyang sudah rusak.
• Ada resiko kebakaran atau unitdapat menyetrum.
Tindakan Pengamanan
Tindakan Pengamanan
Untuk mencegah terjadinya luka pada diri pemilik atau orang lain serta tidak terjadi kerusakanbarang-barang, petunjuk berikut ini harus diikuti.
Pengoperasian yang salah akibat mengabaikan petunjuk dapat menyebabkan luka atau kerusakan.Tingkat keseriusannya dapat diklasifikasikan dengan simbol-simbol berikut ini.
AWASPERHATIAN
Simbol ini menunjukkan kemungkinan terjadinya kematian atau luka serius.
Simbol ini menunjukkan kemungkinan terjadinya luka atau kerusakan barang saja.
Makna dari simbol-simbol yang dipakai di panduan ini ditunjukkan di bawah ini.
Jangan lakukan.
Ikuti petunjuknya.
AWAS
Untuk pekerjaan listrik,hubungi dealer, penjual,tukang listrik yang ahli, atauPusat Servis Resmi.
• Ada resiko kebakaran atau unitdapat menyetrum.
Selalu gunakan steker danstopkontak yang sudahdi-ground.
• Ada resiko unit menyetrum.
Panduan bagi Pemilik
Pasanglah panel danpenutup kotak kontroldengan benar.
• Ada resiko kebakaran atau unitdapat menyetrum.
Jangan mengubah ataumemanjangkan sendirikabel listriknya.
• Ada resiko kebakaran atau unitdapat menyetrum.
Jangan memasang, memindahkan,atau memasang ulang unit olehAnda (pemilik) sendiri.
Ada resiko kebakaran, unit dapatmenyetrum, dan dapat terjadi ledakan,serta dapat menimbulkan luka.

4
•
Unit Penyejuk Ruangan
Tindakan Pengamanan
Berhati-hatilah saatmembongkar kemasan danmemasang produk.
Bagian tepi unit yang tajam dapatmenimbulkan luka. Berhati-hatilahkhususnya terhadap bagian tepi dansirip dari kondensor dan evaporator.
Untuk pemasangan unit,hubungi selalu dealer atauPusat Servis Resmi.
Ada resiko kebakaran, unit dapatmenyetrum, dan dapat terjadi ledakan,serta dapat menimbulkan luka.
Jangan memasang produkpada dudukan yang tidakstabil.
• Dapat menyebabkan luka,kecelakaan, atau kerusakanproduk.
Pastikan bahwa daerahpemasangan tidak rusakakibat usia.
Jika dudukannya runtuh, unitpenyejuk ruangan dapat terjatuh sertadapat merusakkan barang-barang,menyebabkan kerusakan unit, ataumenimbulkan luka badan.
Jangan biarkan unit penyejuk ruanganbekerja dalam waktu lama di ruanganyang sangat lembab atau di tempat yangpintu dan jendelanya dibiarkan terbuka.
• Lembab dapat mengkondensasiatau mengembun dan dapatmembasahi atau merusakperabotan.
Berhati-hatilah jangansampai kabel listrik ditarikatau rusak selama unitberoperasi.
• Ada resiko kebakaran atau unitdapat menyetrum.
Jangan menempatkan apapun di atas kabel listrik.
• Ada resiko kebakaran atau unitdapat menyetrum.
Jangan mematikan ataumenghidupkan unit penyejukruangan dengan cara mencolokkanatau mencabut steker.
• Ada resiko kebakaran atau unitdapat menyetrum.
Pengoperasian

Jangan sampai air tumpah ke bagian-bagian yang dialiri listrik.
• IAda risiko kebakaran, kegagalan produk, atau unit dapat menyetrum.
xaW Thinner
Gunakan stopkontak yangkhusus digunakan untukunit ini.
• Ada resiko kebakaran atau unitdapat menyetrum.
Peganglah kepala steker ketikamencabut kabel dari stopkontak.Jangan menyentuhnya dengantangan yang basah.
• Ada resiko kebakaran atau unitdapat menyetrum.
Jangan menempatkanpemanas atau peralatanlistrik lain di dekat kabellistrik.
• Ada resiko kebakaran atau unitdapat menyetrum.
Jangan menyimpan ataumenggunakan gas ataubahan yang mudah terbakardi dekat unit.
• Ada resiko kebakaran atau unitmenjadi rusak.
Jangan menggunakanproduk di tempat yangbenar-benar tertutup rapatdalam waktu yang lama.
• Dapat terjadi penurunan kadaroksigen di udara.
Jika terjadi kebocoran gasyang mudah terbakar,matikan sumber gas danbukalah jendela untukventilasi sebelummenyalakan kembali unit.
• Ada resiko terjadi ledakan ataukebakaran.
Lepaskan steker daristopkontak jika munculsuara, bau, atau asap yangtidak wajar dari unit.
• Ada resiko terjadi kebakaranatau ledakan.
Hentikan pengoperasian dantutup jendela jika terjadi badaiatau angin ribut. Jika mungkin,lepaskan unit penyejukruangan dari tempatnyasebelum angin ribut datang.
Ada resiko kerusakan barang-barang,unit menjadi tidak dapat difungsikan,atau unit dapat menyetrum.
5
Tindakan Pengamanan
Panduan bagi Pemilik

90˚
• • •
• • •
Selalu periksa kebocorangas (pendingin) setelahmemasang ataumemperbaiki unit.
Kadar gas pendingin yangrendah dapat merusakkan unit.
Pasanglah selangpembuangan untukmemastikan bahwa airterbuang dengan benar.
Sambungan yang buruk dapatmenyebabkan kebocoran air.
Usahakan unit tidak miringsaat memasangnya.
Untuk mencegah terjadinyagetaran atau kebocoran air.
PERHATIANPemasangan
Lepaskan steker unitsebelum membersihkannyaatau melakukan tindakanpemeliharaan.
Ada resiko unit menyetrum.
Jika produk akan tidakdigunakan dalam waktuyang lama, putuskan listrikke catu daya atau matikanpemutus sirkuitnya.
Ada resiko unit menjadi rusak,atau mungkin unit akanberoperasi tanpa pengawasan.
Pastikan bahwa tidak adaseorang pun yang dapatmelangkah atau terjatuh keatas unit-luar.
Ini dapat mengakibatkan lukabadan dan unit dapat rusak.
Jangan membuka kisi-kisiudara masuk selama unitberoperasi. Jangan menyentuhfilter elektrostatis, jika unitdilengkapi dengan fasilitas itu.)
Ada resiko dapat menimbulkanluka, unit dapat menyetrum, dandapat terjadi kerusakan unit.
Jika produk terendam(karena banjir atautenggelam), hubungi PusatServis Resmi.
Ada resiko kebakaran atauunit dapat menyetrum.
Berikan ventilasisecukupnya ke produksepanjang waktu jikadioperasikan di ruangantempat memasak dll.
Ada resiko kebakaran atau unitdapat menyetrum.
6 Unit Penyejuk Ruangan
Tindakan Pengamanan

• • •
• • •
• • •
Jangan memasang produk ditempat yang suara atau udarapanas yang keluar dariunit-luar dapat mengganggukehidupan bertetangga.
Ini dapat menimbulkan masalahdengan tetangga Anda.
Gunakan tenaga dua orangatau lebih untukmengangkat danmengangkut unit.
Untuk menghindari luka badan.
Jangan memasang produkdi tempat di mana akanterkena udara laut (cipratanair laut) secara langsung.
Dapat menimbulkan korosipada produk. Korosi, khususnyapada sirip kondensor danevaporator, dapatmenyebabkan produk rusak ataberoperasi secara tidak efisien.
Jangan mengarahkan udarakeluar langsung ke kamaryang dihuni. (Jangan dudukdi aliran udara.)
Ini dapat mengganggukesehatan Anda.
Jangan menggunakan produkuntuk tujuan tertentu, sepertimengawetkan makanan,benda seni dll. Unit ini adalahunit penyejuk ruangan danbukan sistem pendingin.
Ada resiko kerusakan ataukehilangan barang atau nilaiseni dll.
Jangan menghalangi udaramasuk atau keluar.
Ini dapat menyebabkan unitrusak.
Gunakan kain lembut untukmembersihkan. Jangangunakan deterjen yangkeras atau pelarut dll.
Ada resiko kebakaran, unitmenyetrum, atau kerusakanpada benda-benda yang terbuatdari plastik.
Jangan menyentuh bendalogam pada produk ketikamelepaskan filter udara.Bagian itu sangat tajam!
Ada resiko luka badan.
Jangan melangkah ke atasproduk atau menempatkanbenda-benda di atasnya(unit-luar).
Ada resiko luka badan dan unitmenjadi rusak.
Pengoperasian
7
Tindakan Pengamanan
Panduan bagi Pemilik

• •
• • •
• •
Jangan mengecas atau membongkarbaterai. Jangan membuang baterai kedalam nyala api.
Bisa terbakar atau meledak.
Jika cairan dari baterai mengenai kulit ataupakaian, cucilah dengan air bersih. Jangangunakan remote control jika baterai telahbocor.
Bahan kimia pada baterai dapat menyebabkankebakaran atau bahaya kesehatan lainnya.
Pasanglah filter dengankencang. Bersihkan filtersetiap dua minggu sekaliatau lebih sering jika perlu.
Filter yang kotor akanmengurangi efisiensi unitpenyejuk ruangan dan dapatmenyebabkan produk rusakatau tidak dapat bekerja.
Jangan memasukkan tanganatau benda lain melalui lubangudara masuk atau keluar di saatunit penyejuk ruangan bekerja.
Ada benda-benda tajam danbergerak yang dapatmenimbulkan luka badan.
Jangan meminum air yangkeluar dari unit.
Air tidak memenuhi sanitasi dandapat menimbulkan masalahkesehatan yang serius.
Saat tidak Dipakai
Gunakan panjatan atau tangga yang kokohdi saat membersihkan atau merawat unitpenyejuk ruangan.
Berhati-hatilah jangan sampai terluka.
Gantilah semua baterai pada remote controldengan yang baru dari tipe yang sama.Jangan campur baterai lama dan baru ataujenis baterai yang berbeda.
Ada resiko terjadi ledakan atau kebakaran.
8 Unit Penyejuk Ruangan
Tindakan Pengamanan

Sebelum Mengoperasikan
1. Hubungi ahli pemasangan untuk memasang unit.2. Masukkan steker dengan benar.3. Gunakan sirkuit khusus untuk unit.4. Jangan gunakan kabel tambahan.5. Jangan menghidupkan atau mematikan dengan cara mencolokkan atau mencabut kabel listrik.6. Jika kabel atau steker telah rusak, gantilah dengan yang baru dan asli.
1. Terpapar ke aliran udara langsung dalam waktu yang lama dapat membahayakan kesehatan. Janganmengarahkan secara langsung aliran udara ke penghuni, hewan piaraan, atau tanaman untuk waktuyang lama.
2. Mengingat ada kemungkinan terjadi penurunan kadar oksigen, berikan ventilasi ke ruangan ketikamenggunakan unit bersama-sama dengan kompor atau alat pemanas lainnya.
3. Jangan gunakan unit penyejuk ruangan ini untuk tujuan tertentu (misalnya, sebagai alat ukur, atauuntuk mengawetkan makanan dan benda seni, atau untuk mengatur suhu pemeliharaan hewanpiaraan atau tanaman dll.). Pemakaian semacam itu dapat merusak benda-benda atau mengganggukehidupan hewan/tanaman.
1. Jangan menyentuh benda logam pada produk ketika melepaskan filter udara. Dapat menimbulkanluka.
2. Jangan gunakan air untuk membersihkan unit penyejuk ruangan. Jika terkena air insulasi dapatrusak, dan dapat menyebabkan unit menyetrum.
3. Saat membersihkan unit, pertama-tama pastikan bahwa aliran listrik dan pemutus sirkuit telahdimatikan. Dapat menimbulkan luka bada jika aliran listrik dinyalakan lagi ketika unit masihdibersihkan bagian dalamnya.
Untuk perbaikan dan pemeliharaan, hubungi dealer servis resmi.
Sebelum Mengoperasikan
Pemakaian
Pembersihan dan Pemeliharaan
Perawatan
9
Tindakan Pengamanan
Panduan bagi Pemilik

Air Intake Vents
Air Outlet Vents
Air Intake Vents
Air Outlet Vents
Connecting Wires
Connecting Wires
Piping Piping Drain Hose Drain Hose
Base Plate
Base Plate
Front Panel
Air Inlet
Signal Receptor Air Filter
Introduction
This symbol alerts you to the risk of electric shock.
This symbol alerts you to hazards that may cause harm to the air conditioner.
This symbol indicates special notes. NOTICE Features
Symbols used in this Manual
INDOOR
OUTDOOR
10 Room Air Conditioner
Introduction
This appliance should be installed in accordance with national wiring regulations. This guide acts as a guide to help to explain product features.

Pengamanan ListrikAWAS: Alat ini harus diberi ground dengan benar.
Untuk meminimalkan resiko unit menyetrum, Anda harus selalu memasang kawat ground.
AWAS: Jangan memotong atau melepaskan sambungan grounddari kabel listrik.
AWAS: Menyambung terminal ground pada steker adaptor padasekrup penutup stopkontak di dinding tidak akanmenyediakanground bagi unit ini kecuali jika sekrup itu terbuat dari
logam dan tidak diinsulasi, dan stopkontak telah terhubung ke kawatground untuk rumah.
AWAS: Jika Anda ragu-ragu apakah unit penyejuk ruangan telahdiberi ground dengan benar ataukah belum, mintalah petugas listrikyang berpengalaman untuk mengeceknya.
Metode yang disukai
Pastikan ground telah dipasang dengan benar sebelum dipakai
11
Tindakan Pengamanan
Panduan bagi Pemilik

12 Unit Penyejuk Ruangan
Tindakan Pengamanan
Penggunaan Steker Adapter untuk SementaraKami sangat menyarankan untuk tidak menggunakan steker adapter mengingat potensi bahaya yangditimbulkan. Untuk hubungan sementara, gunakan hanya steker adapter yang terdaftar pada UL, yangtersedia di setiap toko alat listrik setempat. Pastikan bahwa slot besar pada steker adapter sesuai denganslot besar pada stopkontak untuk sambungan polaritas yang benar. Untuk memutus aliran listrik daristeker adapter, gunakan satu tangan untuk masing-masing steker yang tergabung untuk mencegahrusaknya terminal ground. Hindari seringnya mencopot dan memasang steker karena ini dapat merusakterminal ground.
AWAS: Jangan gunakan unit dengan steker yang sudah rusak.
Kami sangat menyarankan untuk tidak menggunakan kabel gulung mengingat potensi bahaya yangditimbulkan. Untuk kondisi sementara, gunakan hanya kabel gulung 3-kawat dengan ground yang telahterdaftar pada CSA dan UL, dengan rating 15 A, 125 V.
Penggunaan Kabel Gulung untuk Sementara
Metode sementara
Colokan Steker Adapter
Penutup stopkontak
Sekrup Logam

IND
ON
ESIA
• •
Sleep Mode : Lights up during Sleep Mode Auto operation.
*Operasi Hot Start: Hentikan kipas unit-dalam pada Operasi Pemanasan untuk mencegah keluarnya udara dingin dari unit.
Indikatoroperasi
Bentuktampilan
Mengutursuhu
Standar PanasTerlalupanas
Jet(Dingin, Panas)
Operasi ujiNyaman Dingin Terlalu
dingin
Mode operasi A.IPendinginanPemanasanDehumidifi-
kasi
: Menyala selama pengoperasian unit luar ruang.(cooling model saja)
Unit luar ruangPengoperasian
Pembersihan Otomatis
*Sub Display (opsional) (Biru:Plasma, hijau:auto clean, jingga:ion)
Biru Hijau Jingga
Penerima sinyalMenerima sinyal dari remote control. (Suara penerimaan sinyal: dua 'bip' pendek atau satu 'bip' panjang.)Lampu penunjuk operasi
On/Off : Menyala selama unit beroperasi.
Timer : Menyala selama operasi Timer.
: Fungsi ini melukiskan mode dinamik dengan menggunakan sistem pencahayaan multipel.
Lampu penunjuk operasi
Petunjuk Pengoperasian Cara Memasang Baterai
Penyimpanan dan Tips Menggunakan Remote Control
1. Lepaskan penutup baterai dengan menariknya sesuai dengan arah tanda panah.
2. Masukkan baterai baru dan pastikan bahwa kutub (+) dan ( telah terpasang dengan benar.
3. Pasang kembali penutup dengan menggeser kembali ke posisinya.
Gunakan 2 baterai AAA (1.5 volt). Jangan gunakan baterai isi-ulang.
PERHATIAN
Penyimpanan dan Tips Menggunakan Remote Control Remote control dapat diletakkan di wadahnya di dinding.
Untuk mengoperasikan unit penyejuk ruangan, arahkan remote control ke penerima sinyal.
OUTDOOR
13
Tindakan Pengamanan
Panduan bagi Pemilik
Defrost Mode : Menyala selama Defrost Mode atau HotPengoperasian mulai (heat pump model saja)
: Menyala selama pengoperasian unit luar ruang.(cooling model saja)
Unit luar ruangPengoperasian
Plasma
Plasma dan Ion

14 Unit Penyejuk Ruangan
Tindakan Pengamanan
Kontrol-kontrol
Tutup lipat(terbuka)
Pemancar sinyal
Kontrol-kontrol akan tampak seperti di bawah ini.
Operasi Remote Control
1. TOMBOL “ START/STOP ” Operasi akan mulai bila tombol ini ditekan dan berhenti bila tombol ini ditekan lagi.
2. TOMBOL “ OPERATION MODE SELECTION ” Digunakan untuk memilih mode operasi.
3. TOMBOL “ ROOM TEMPERATURE SETTING ” Digunakan untuk memilih temperatur ruang
4. “ INDOOR FAN SPEED SELECTOR ” Digunakan untuk memilih kecepatan kipas dalam empat tingkat: rendah, sedang, tinggi dan ACAK.
5. “ JET COOL ” Digunakan untuk memulai atau menghentikan speed cooling: (speed cooling mengoperasikan kipas dengan kecepatan super tinggi dalam mode penyejukan.)
6. TOMBOL “ CHAOS SWING ” Digunakan untuk mematikan atau menghidupkan gerakan louver dan mengeset arah aliran udara naik/turun seperti yang dikehendaki.
7. TOMBOL “ ON/OFF TIMER ” Digunakan untuk menyetel waktu dimulainya dan dihentikannya pengoperasian. (Lihat halaman 23)
8. TOMBOL “ TIME SETTING ” Digunakan untuk menyetel waktu.(Lihat halaman 23)
9. TOMBOL “ TIMER SET/CANCEL ” Digunakan untuk menyetel timer ketika waktu yang dikehendaki dicapai dan untuk membatalkan operasi Timer. (Lihat halaman 23)
10. TOMBOL “ SLEEP MODE AUTO ” Digunakan untuk menyetel operasi Sleep Mode Auto (Lihat halaman 23)
11. TOMBOL “ AIR CIRCULATION ” Digunakan untuk mensirkulasikan udara ruangan tanpa penyejukan atau pemanasan. (Lihat halaman 24)
12. TOMBOL "ROOM TEMPERATURE CHECKING ” Digunakan untuk mengecek temperatur ruang
13. NANO PLASMA (opsional)Digunakan untuk memulai atau menghentikanatau fungsi pemurnian plasma + ion generator. (Lihat halaman 21)
14. TOMBOL HORIZONTAL AIRFLOW DIRECTION CONTROL (opsional) Digunakan untuk menyetel arah aliran udara horizontal seperti yang diinginkan.
15. TOMBOL RESET Digunakan untuk menyetel ulang waktu
16. TOMBOL 2nd F Digunakan sebelum menggunakan mode-mode yang dicetak dalam warna biru pada bawah tombol. (Lihat halaman 22)
17. AUTO CLEAN (opsional) Digunakan untuk menyetel mode Auto Clean.
ON OFF
CANCEL
AUTO CLEANSET
1
3
5
4
9
10
12
1416
72
813
15
11
6
1718
18. LCD/LED LUMINOSITY (opsional)Digunakan untuk menyetel kilau LCD/LED.
Operasi Penyejukan
Operasi Otomatis atau Pergantian Otomatis
Operasi Anti Lembab Sehat
Operasi Pemanasan
• Cooling model ( ), Heat pump model ( )
Mode Operasi

ON
1
2
3
4
Untuk menurunkan suhu
Untuk menaikkan suhu
Tekan tombol Start/Stop.Unit akan merespons denganbunyi 'bip'.
Buka pintu dari remote control. Untuk memilih OperasiPendinginan, tekan tombol Pemilihan Mode Operasi. Setiapkali tombol ditekan, mode operasi akan bergeser denganarah sesuai tanda panah.
Tutup pintu dari remote control. Setel suhu lebih rendahdaripada suhu ruangan. Suhu dapat disetel dengan kisaran18°C~30 C pada interval 1°C.
Setel kecepatan kipas dengan pinturemote control tetap tertutup. Andadapat memilih kecepatan kipas dalamempat langkah: lambat, medium,cepat, dan CHAOS.Setiap kali tombol ditekan, modekecepatan kipas akan bergeser.
Angin alami dengan logika CHAOSUntuk mendapatkan suasana yang lebih segar, tekan selektor kecepatan kipas Unit-Dalam dan pilihmode CHAOS. Dengan mode ini, udara akan berembus seperti hembusan udara alami dengan caramengubah kecepatan kipas secara otomatis ke logika CHAOS.
Operasi Pendinginan
Penyejukan Anti Lembab SehatOtomatis Pemanasan(Model pompa panas saja)
15
Tindakan Pengamanan
Panduan bagi Pemilik

ON
1
2
3
Untuk menurunkan suhu
Untuk menaikkan suhu
Tekan tombol Start/Stop.Unit akan merespons denganbunyi 'bip'.
Buka pintu dari remote control. Untuk memilih OperasiOtomatis, tekan tombol Pemilihan Mode Operasi. Setiap kalitombol ditekan, mode operasi akan bergeser dengan arahsesuai tanda panah.
Suhu dan kecepatan kipas akan disetel secara otomatis olehkontrol elektronik berdasarkan suhu ruangan yangsesungguhnya. Jika Anda ingin mengubah suhu yang telahditetapkan, tekan tombol Pengaturan Suhu Ruangan. Semakindingin atau hangat yang ingin Anda rasakan, semakin sering(hingga dua kali) Anda perlu menekan tombol. Suhu yangditetapkan akan berubah-ubah secara otomatis.
Selama Operasi OtomatisAnda tidak dapat mengontrol kecepatan kipas unit-dalam. Kecepatan ini akan ditentukan oleh aturan Fuzzy.Jika sistem tidak beroperasi sebagaimana yang diinginkan, pindahlah secara manual ke mode lain.Sistem tidak dapat berpindah secara otomatis dari mode pendinginan ke mode pemanasan, atausebaliknya, dan ini harus dilakukan secara manual.Selama Operasi Otomatis, penekanan tombol ayunan CHAOS akan membuat bilah horisontal berayunke atas dan ke bawah secara otomatis.
Operasi Otomatis (model Pendinginan saja)
Pendinginan DehumidifikasiSehat
Pemanasan(Model pompa panas saja)
Tindakan Pengamanan
16 Unit Penyejuk Ruangan

ON
1
2
3
4
Penyejukan Anti Lembab SehatPergantianotomatis
Pemanasan(Model pompa
panas saja)
Untuk menurunkan temperatur
Untuk menaikkan temperatur
Operasi Pergantian Otomatis (model pompa panas saja)
Tekan tombol Start/StopUnit akan merespons dengansuara bip.
Buka pintu remote control. Untuk memilih PergantianOtomatis,.tekan tombol Operation Mode Selection. Setiap kali tombol ditekan, mode operasi akan berubahsesuai arah panah.
Tutup pintu remote control. Setel temperaturnya lebih rendahdaripada temperatur ruang Temperatur bisa diset dalamkisaran 18°C-30°C pada interval 1°C.
Setel kecepatan kipas lagi dengan pinturemote control dalam keadaan tertutup. Andadapat memilih kecepatan kipas dalam empattingkat: rendah, medium, tinggi atau ACAK.Setiap kali tombol ditekan, mode kecepatankipas akan berubah.
Selama Operasi Pergantian OtomatisAC akan mengubah mode operasinya secara otomatis untuk mempertahankan temperatur dalam ruang.Ketika temperatur ruang ±2°
°C lebih tinggi daripada seting temperatur, AC akan mempertahankan temperatur
ruang dalam kisaran ±2 C terhadap seting temperatur melalui mode pergantian otomatis.
17
Tindakan Pengamanan
Panduan bagi Pemilik

ON
1
2
3
Penyejukan Anti LembabSehat
Otomatis Pemanasan(Model pompa
panas saja)
Tekan tombol Start/StopUnit akan meresponsdengan suara bip.
Buka pintu remote control. Untuk memilih Operasi AntiLembab Sehat, tekan tombol Operation Mode Selection.Setiap kali tombol ditekan, mode operasi akan berubahsesuai arah panah.
Setel kecepatan kipas sekali lagi dengan pinturemote control masih tertutup.Anda bisa memilih kecepatan kipas dalam empattingkat: rendah, sedang, tinggi dan CHAOS.Setiap kali tombol ditekan, mode kecepatan kipasakan berubah.
Angin alami dengan logika CHAOSUntuk menikmati perasaan yang lebih segar, tekan selektorkecepatan kipas dalam ruang dan setel ke mode CHAOS. Dalammode ini, angin akan bertiup seperti angin alami dengan secaraotomatis mengubah kecepatan kipas sesuai dengan logika CHAOS.
Operasi Anti Lembab Sehat
Selama Operasi Anti Lembab SehatJika Anda memilih mode anti lembab pada tombol pilihan operasi, maka AC akan mulai menjalankanfungsi anti lembab. Fungsi ini secara otomatis akan mengeset temperatur ruang dan volume aliranudara ke kondisi terbaik untuk anti lembab, berdasarkan temperatur ruang terakhir yang dideteksi.
Tetapi dalam hal ini temperatur yang dihasilkan tidak tampak pada remote kontrol dan Anda juga tidakbisa mengontrol temperatur ruang.
Selama fungsi anti lembab sehat ini, volume aliran udara secara otomatis diset menurut algoritmaoptimalisasi yang merespons status temperatur ruang saat itu, sehingga kondisi ruang terjaga sehatdan nyaman meskipun dalam cuaca yang sangat lembab.
18 Unit Penyejuk Ruangan
Tindakan Pengamanan

ON
1
2
3
4
Penyejukan Anti Lembab SehatOtomatis Pemanasan(Model pompa
panas saja)
Untuk menaikkan temperatur
Untuk menurunkan temperatur
Operasi Pemanasan (Heat pump model saja)
Tekan tombol Start/StopUnit akan meresponsdengan suara bip.
Buka pintu remote control. Untuk memilih OperasiPemanasan,.tekan tombol Operation Mode Selection.Setiap kali tombol ditekan, mode operasi akan berubahsesuai arah panah.
Tutup pintu remote control.Setel temperaturnya lebih rendah daripada temperatur ruangTemperatur bisa disetel dalam kisaran 16°C~30°C padainterval 1°C.
Setel kecepatan kipas lagi dengan pinturemote control dalam keadaan tertutup.Anda dapat memilih kecepatan kipas dalamempat tingkat: rendah, medium, tinggi atauACAK. Setiap kali tombol ditekan, modekecepatan kipas akan berubah.
Angin alami dengan logika CHAOSUntuk menikmati perasaan yang lebih segar, tekan selektor kecepatan kipas dalam ruang dan setel kemode CHAOS. Dalam mode ini, angin akan bertiup seperti angin alami dengan secara otomatismengubah kecepatan kipas sesuai dengan logika CHAOS.
19
Tindakan Pengamanan
Panduan bagi Pemilik

atau atau
• Selama fungsi JET COOL sewaktu-waktu AC akan mulai meniupkan udara dingin dengankecepatan yang sangat tinggi selama 30 menit sehingga temperatur ruang secara otomatis akanmenjadi 18°C. Fungsi ini secara khusus digunakan untuk mendinginkan ruangan secara cepat dimusim panas.Dalam mode pompa panas atau mode neuro fuzzy, fungsi JET COOL tidak tersedia.
• Untuk kembali dari mode JET COOL ke mode penyejukan normal, tekan tombol pilihan modeoperasi, pilihan volume aliran udara, tombol pengatur temperatur atau tombol JET COOL lagi.
PERHATIAN
Tekan tombol Start/StopUnit akan merespons dengansuara bip..
Tekan tombol Jet Cool untukmengoperasikan mode penyejukankecepatan dan unit akan beroperasipada kecepatan super tinggi padamode penyejukan selama 30 menit.
Untuk membatalkan mode Jet Cool, tekan tombol Jet Cool,tombol kecepatan kipas atas tombol pengatur temperaturraung sekali lagi dan unit akan beroperasi dengan kecepatankipas tinggi pada mode penyejukan.
1
2
3
Operasi Jet Cool
20 Unit Penyejuk Ruangan
Tindakan Pengamanan

Tekan tombol Start/StopUnit akan merespons dengansuara bip.
1
Buka pintu remote control Tekantombol NEO PLASMAOperasi akan mulai ketika tombol iniditekan dan berhenti ketika tombol iniditekan lagi.
2
Setel kecepatan kipas lagi dengan pintu remotecontrol dalam keadaan tertutup. Anda dapatmemilih kecepatan kipas dalam empat tingkat:rendah, medium, tinggi atau ACAK. Setiap kali tombol ditekan, kecepatan kipasakan berubah.• Operasi pemurnian udara (NEO PLASMA)
dapat dilakukan bersamaan dengan operasipenyejukan (cooling), pemanasan (heating)atau operasi lain.
Operasi pemurnian udara NEO PLASMA sajaApabila Anda menekan tombol NEOPLASMA, hanya fungsi pemurnian NEOPLASMA saja yang beroperasi.Maka, kecepatan kipas rendah. Anda dapatmemilih kecepatan kipas dalam empat tingkat:rendah, medium, tinggi atau ACAK.Setiap kali tombol ( ) ditekan, kecepatankipas akan berubah.
3
Pengoperasian pemurnian NEO PLASMA + Ion operasi(Opsional)
Jika NEO PLASMA + ion generator berfungsi normal, sinar biru & jingga akan menyala pada sub display (opsional)
PERHATIAN
Biru Hijau Jingga
21
Tindakan Pengamanan
Panduan bagi Pemilik
IND
ON
ESIA

ON OFF
CANCEL
SET
ON OFF SET
AUTO CLEAN
Petunjuk Pengoperasian
Tekan tombol Start/Stop.Unit akan merespons denganbunyi 'bip'.
Bukalah pintu dari remote control dan tekan tombol 2nd F(Fungsi ke-2) untuk mengoperasikan fungsi yang tercetakdengan warna biru pada bagian bawah setiap tombol.(Periksa indikasi dari fungsi ke-2 pada layar remote control.)Tombol ini dapat menyetel timer sebagai berikut:
Fungsi ke-2 akan hilang segera secara otomatis atau ketikatombol ditekan sekali lagi.
1
2
3
Operasi 2nd F
Untuk rincian lebih lanjut, bacalah fungsi-fungsi di halaman berikutnya.
22 Unit Penyejuk Ruangan
Tindakan Pengamanan

Delay OFF Timer Delay ON Timer Delay OFF and ON Timer Delay ON and OFF Timer
Mode Sleep1. Tekan tombol Mode Sleep Otomatis untuk menyetel waktu untuk menghentikan kerja unit secara otomatis.
2. Timer diprogram dengan interval 1-jam dengan menekan tombol Mode Sleep Otomatis 1 kali hingga 7 kali.Mode Sleep tersedia untuk 1 kali hingga 7 kali. Untuk mengubah masa waktu dalam langkah-langkah interval1 jam, tekan tombol Mode Sleep dengan mengarahkan remote control ke unit.
3. Pastikan LED dari Model Sleep Otomatis menyala.Untuk membatalkan Mode Sleep, tekan tombol Mode Otomatis beberapa kali hingga tanda bintang ( )menghilang dari layar remote control.
Mode Sleep akan bekerja pada kecepatan kipas yang rendah (pendinginan) atau kecepatankipas yang medium (pompa panas saja) untuk mendapatkan suasana tidur yang nyaman.
Pada Mode Sleep: Fungsi Ayunan Chaos tidak bekerja.Pada mode pendinginan atau mode dehumidifikasi sehat:Suhu akan secara otomatis meningkat dengan 1°C selama 30 menit berikutnya dan dengan 2°C selama 1 jamuntuk mendapatkan suasana tidur yang nyaman.
PERHATIAN
Menyetel waktu1. Waktu hanya dapat disetel jika Anda menekan tombol Reset. Setelah mengganti baterai,
Anda harus menekan tombol reset untuk menyetel waktu. Tekan tombol Start/Stop.2. Tekan tombol 2nd F dan periksalah apakah ikon 2nd F telah menyala.3. Tekan tombol Penyetelan Waktu hingga diperoleh waktu yang diinginkan.4. Tekan tombol SET Timer.
Periksa untuk indikator A.M. dan P.M.PERHATIAN
1. Pastikan waktu telah disetel dengan benar pada layar remote control.2. Tekan tombol 2nd F.3. Tekan tombol Timer ON/OFF untuk menghidupkan atau mematikan Timer.
4. Tekan tombol Penyetelan Waktu hingga diperoleh waktu yang diinginkan.
5. Untuk menyetel waktu yang telah dipilih, tekan tombol Penyetelan Timer sambil mengarahkan remote control ke penerima sinyal.
Membatalkan penyetelan timerPeriksalah apakah ikon 2nd F telah mati.Tekan tombol Batalkan Timer sambil mengarahkan remote control ke penerima sinyal.(Lampu timer pada unit penyejuk ruangan dan pada layar remote control akan mati.)
Start yang Tertunda/Stop yang telah Ditentukan
Pilih salah satu dari empat tipe operasi berikut ini.PERHATIAN with the unit running
ON OFF
CANCEL
SET
CANCEL
SET
CANCEL
SET
Fitur Tambahan
23
Tindakan Pengamanan
Panduan bagi Pemilik

Kecepatan Kipas rendah. Kecepatan Kipas menengah. Fan speed is on high.Udara ACAK (CHAOS)
Kontrol Arah Udara VertikalAliran udara naik/turun (Aliran Udara Vertikal) dapatdiatur dengan menggunakan remote control.
1. Tekan tombol Start/Stop untuk mengoperasikanunit AC.
2. Tekan tombol Chaos Swing dan bilah-bilah akanbergerak naik dan turun. Tekan tombol Chaosswing untuk menyetel bilah vertikal pada arahaliran udara yang diinginkan.
Apabila Anda menekan tombol CHAOS swing,arah aliran udara horizontal diubah secaraotomatis berdasarkan algoritma CHAOS untukmendistribusikan udara di dalam ruangan secaramerata dan pada saat yang sama untuk membuattubuh manusia merasa nyaman, seperti sedangmenikmati sepoi-sepoi angin alami.Selalu gunakan remote control untuk mengaturarah aliran udara naik/turun. Mengubah posisibilah pengatur arah aliran udara vertikal secaramanual dapat merusak AC.Apabila unit AC dimatikan, bilah pengatur arahaliran udara naik/turun akan menutup salurankeluar udara dari unit AC.
PERHATIAN
Kontrol Arah Aliran Udara Horizontal (Tambahan)
Aliran udara kiri/kanan (Horizontal) dapat diatur dengan menggunakan remote control.Tekan tombol Start/Stop untuk mengoperasikan unit.Buka pintu remote control. Tekan tombol Start/Stop untuk Airflow Direction (Arah AliranUdara) dan bilah-bilah akan berayun ke kiri dan ke kanan. Tekan tombol kontrol ArahAliran Udara Horizontal lagi untuk menyetel bilah horizontal pada arah aliran udarayang diinginkan.
Mode sirkulasi udara
Mensirkulasikan udara ruang tanpa mendinginkan atau menghangatkannya.1. Tekan tombol Start/Stop sampai unit AC merespons dengan suara bip.2. Buka pintu remote control. Tekan tombol Air Circulation (Sirkulasi Udara). Tutup pintu remote control.
Setelah itu, setiap kali Anda menekan Selektor Kecepatan Kipas Indoor (Indoor Fan Speed Selector),kecepatan kipas diubah dari rendah ke CHAOS (ACAK) dan kembali ke rendah lagi.
Udara ACAK (CHAOS) menghemat konsumsi listrik dan mencegah penyejukan berlebih.Kecepatan kipas secara otomatis diubah dari tinggi ke rendah atau sebaliknya, bergantungpada temperatur lingkungan.
PERHATIAN
PERHATIAN
PERHATIAN
24 Unit Penyejuk Ruangan
Tindakan Pengamanan

AUTO CLEAN
22 ° C 22 ° C 23 ° C 24 ° C
Pembersihan Otomatis (Tambahan) 1. Kapan pun Anda menekan tombol Auto Clean, Fungsi Auto Clean akan dijadwalkan
dan batalkan. 2. Fungsi Auto Clean bekerja sebelum dan setelah mode penyejukan dan anti lembab.
Untuk keterangan rinci, lihat beberapa poin berikut: 3. Apabila unit AC dinyalakan setelah reservasi (penjadwalan) Auto Clean, maka fungsi
Cool Start akan beroperasi dan Kipas luar ruang dinyalakan. 4. Apabila Anda menekan tombol Start/Stop untuk mematikan unit setelah Anda
menjadwalkan fungsi Auto Clean, maka AC mensirkulasikan udara ruang dalam mode Auto Clean tanpa operasi Cooling atau Dehimidification. Untuk model Cooling saja, sirkulasi udara seperti ini berlangsung selama 30 menit dan untuk model Heat Pump selama 16 menit.
5. Apabila Anda menekan tombol Auto Clean lagi pada saat unit AC bekerja, maka fungsi Auto Clean akan dibatalkan.
During Auto Clean function, moistures left in indoor units after Cooling Operation or HealthyOperation atau Healthy Dehumidification Operation dapat dihilangkan.Selama fungsi Auto Clean, hanya tombol Start/Stop, tombol Plasma dan tombol Auto Cleanyang dapat digunakan.
PERHATIAN
Prosedur pengoperasian unit jika remote control tidak dapat dipakai. Operasi unit akan dimulai jika tombol Power ditekan. Jika Anda ingin menghentikan operasi, tekan sekali lagi tombol Power.
Operasi Paksa
Tombol Power
Model Pompa Panas Suhu Ruang ≥ 24 ° C 21 ° C Suhu Ruang < 24 ° C Suhu Ruang < 21 ° C
Mode operasi Pendinginan Pendinginan Dehumidifikasi Sehat Pemanasan Kecep. Kipas Unit-dalam Tinggi Tinggi Tinggi Tinggi
Penyetelan Suhu
Model Pendinginan ≤
Operasi pengujian Selama OPERASI PENGUJIAN, unit akan bekerja pada mode pendinginan pada kecepatan kipas yang tinggi, tanpa mempedulikan suhu ruangan, dan ini akan di-reset setelah 18 menit. Selama operasi pengujian, jika sinyal remote control diterima, maka unit akan beroperasi sesuai dengan yang ditetapkan pada remote control. Jika Anda ingin menggunakan operasi ini, tekan tombol ON/OFF selama 3!5 detik, dan akan terdengar suara 'bip' satu kali. Jika Anda ingin menghentikan operasi, tekan sekali lagi tombol ini.
25
Tindakan Pengamanan
Panduan bagi Pemilik
IND
ON
ESIA
If auto cleaner operates normally, green light appears at the sub display (Optional)Biru Hijau Jingga

Restart otomatisDalam hal listrik menyala lagi setelah mati, Operasi Restart Otomatis akan berfungsi menjalankan prosedur secaraotomatis ke kondisi operasi yang terakhir.Jadi tidak diperlukan lagi aktivasi fungsi dengan menekan tombol mana pun.Pada mode awal, kipas akan bekerja pada kecepatan rendah dan kompresor bekerja 2.5 hingga 3 menit kemudian.Begitu kompresor bekerja, kecepatan kipas akan kembali ke mode penyetelan sebelumnya.
Informasi pentingKecepatan kipas dan kapasitas pendinginan.Kapasitas pendinginan yang ditunjukkan pada spesifikasimerupakan nilai di mana kecepatan kipas disetel ke tinggi,sedagkan kapasitas akan menurun pada kecepatan kipas lambatatau medium.Kecepatan kipas yang tinggi disarankan jika Anda inginmendinginkan ruangan dengan cepat.
Fungsi restart otomatis telah diaktifkan sebagai default pabrik.Namun pengguna dapat menyetelnya dengan mengikuti petunjuk berikut ini.Menonaktifkan fungsi- Tekan tombol ON/OFF selama 6 detik, dan akan terdengar 'bip 2 kali, dan lampu indikator (1) akan berkedip
4 kali.Mengaktifkan fungsi- Tekan tombol ON/OFF selama 6 detik, dan akan terdengar 'bip 2 kali, dan lampu indikator (1) akan menyala
terang 4 kali.
PERHATIAN
natapeceKiggniT
26 Unit Penyejuk Ruangan
Tindakan Pengamanan

27
Tindakan Pengamanan
Panduan bagi Pemilik
Pemeliharaan dan Perbaikan
Unit-Dalam
Sebelum melakukan kegiatan pemeliharaan apa pun, matikan dahulu sumber listrik utama sistem.
Kisi-kisi, Kotak, dan Remote ControlMatikan sistem sebelum membersihkan unit. Untuk membersihkan, usaplah dengan kain kering yang lembut. Jangan gunakan obat pemutih atau ampelas.
Aliran listrik harus dimatikan sebelum membersihkan unit-dalam.
Filter UdaraFilter udara di belakang kisi-kisi depan harus dicek dan dibersihkan setiap 2 minggu sekali atau lebih jika diperlukan.1. Tarik kedua sisi unit dan lepaskan panel depan. 2. Tarik tab filter sedikit ke depan untuk melepaskan filter.3. Bersihkan filter dengan penyedot debu atau air sabun yang hangat.
• Jika debu sudah mengerak, bersihkan dengan larutan deterjen dengan air hangat.
• Jika digunakan air panas (40°C atau lebih), filter bisa berubah bentuk.
4. Setelah membersihkan dengan air, keringkan di tempat yang teduh.5. Pasang kembali filter udara.
Filter NEO PLASMA (Opsional)Filter NEO PLASMA yang berada di belakang filter udara harus diperiksa dan dibersihkan setiap 3 bulan sekali atau lebih sering lagi, jika diperlukan.
1. Setelah melepaskan filter udara, tarik sedikit untuk melepaskan filter NEO PLASMA.2. Bersihkan filter NEO PLASMA dengan penyedot debu.
Jika filter sangat kotor, cucilah dengan air.3. Perlu diperhatikan adanya kabel-kabel listrik.4. Pasang kembali filter NEO PLASMA ke posisi semula.
Filter TRIPLE DEODORIZER (Opsional)1. Setelah melepaskan filter udara, tarik sedikit untuk melepaskan filter TRIPLE DEODORIZER.2. Keringkan di bawah cahaya matahari selama dua jam.3. Pasang kembali filter TRIPLE DEODORIZER ke posisi semula.
Jangan menyentuh Filter NEO PLASMA dalam 10 detik setelah pembukaan kisi-kisi udara masuk, karena mungkin masih mengandung aliran listrik.Jangan gunakan bahan-bahan berikut:• Air yang lebih panas dari 40°C
Ini dapat menyebabkan filter berubah bentuk atau pudar warnanya.• Bahan mudah menguap
Ini dapat merusak permukaan unit.
Bilah vertikal Bilah horisontal
Filters Udara(Di belakang panel depan )
Ventilasi udarakeluar
Ventilasi udaramasuk
Gasoline
Powder
Filter NEO PLASMA
Filter TRIPLE DEODORIZER
PERHATIAN
PERHATIAN
PERHATIAN
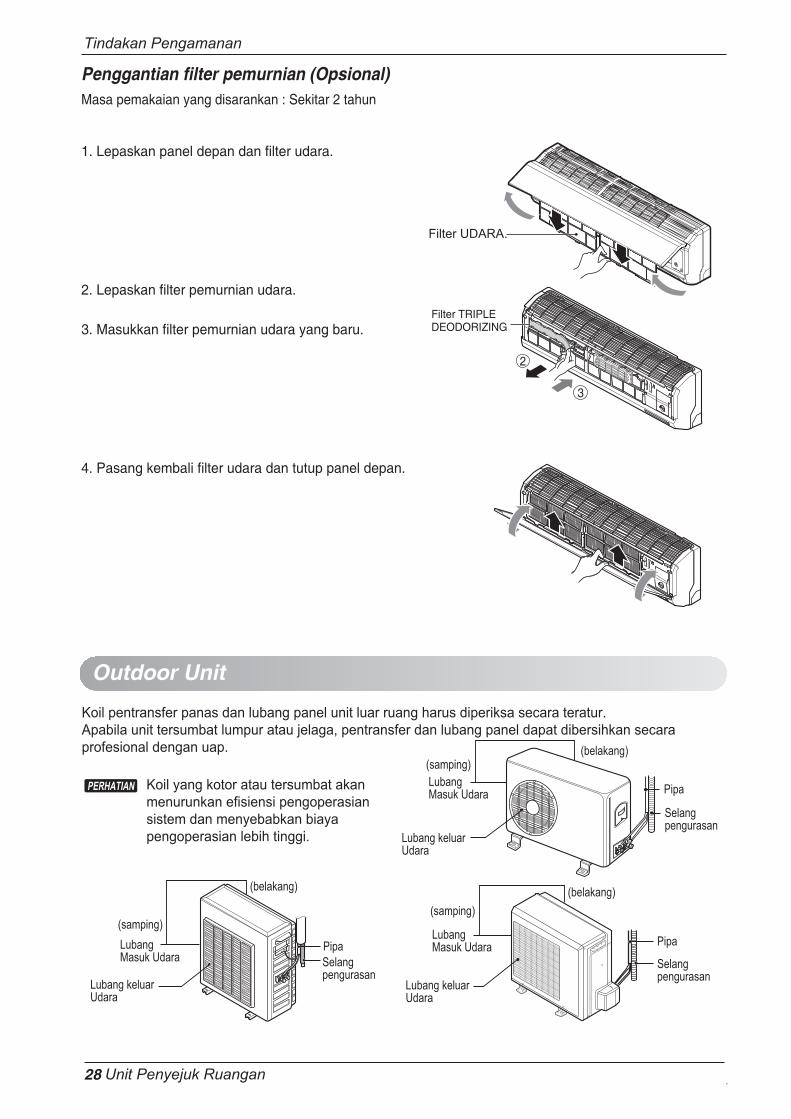
28 Unit Penyejuk Ruangan
Tindakan Pengamanan
Filter TRIPLE DEODORIZING
3
2
Outdoor Unit
Penggantian filter pemurnian (Opsional) Masa pemakaian yang disarankan : Sekitar 2 tahun
1. Lepaskan panel depan dan filter udara.
2. Lepaskan filter pemurnian udara.
3. Masukkan filter pemurnian udara yang baru.
4. Pasang kembali filter udara dan tutup panel depan.
Filter UDARA.
(belakang)
LubangMasuk Udara
Lubang keluarUdara
Pipa
Selangpengurasan
(belakang)
Lubang Masuk Udara
Lubang keluar Udara
Pipa
Selang pengurasan
(samping)
(samping) (samping)
(belakang)
Lubang Masuk Udara
Lubang keluar Udara
Pipa Selang pengurasan
Koil pentransfer panas dan lubang panel unit luar ruang harus diperiksa secara teratur. Apabila unit tersumbat lumpur atau jelaga, pentransfer dan lubang panel dapat dibersihkan secara profesional dengan uap.
Koil yang kotor atau tersumbat akan menurunkan efisiensi pengoperasian sistem dan menyebabkan biaya pengoperasian lebih tinggi.
PERHATIAN

Masalah yang Umum Dijumpai dan Pemecahannya
Sebelum memanggil petugas servisJika Anda menjumpai masalah pada unit penyejuk ruangan, bacalah dahulu informasi di bawah iniuntuk mencoba memecahkan masalah. Jika Anda tidak menemukan jalan pemecahan, matikanunit dan hubungi dealer.
Unit penyejuk ruangan tidak bekerja1. Lihatlah apakah steker untuk unit penyejuk ruangan telah benar-benar masuk ke stopkontak.2. Periksalah sekering atau pemutus sirkuit.3. Periksalah apakah voltase terlalu tinggi atau terlalu rendah.
Udara tidak terasa cukup dinginnya pada penyetelan pendinginan1. Pastikan bahwa suhu telah disetel dengan benar.2. Periksalah apakah filter udara tersumbat oleh kotoran. Jika ya, lepaskan filter.3. Pastikan bahwa udara yang mengalir dari luar tidak terhalang dan ada jarak sekitar 50 cm
antara bagian belakang unit dan dinding yang ada di belakangnya.4. Tutuplah semua pintu dan jendela dan periksalah apakah ada sumber panas di dalam ruangan.
Sebelum memanggil petugas servis, bacalah daftar masalah umum dan upayapemecahannya.
Unit penyejuk ruangan akan bekerja normal jika:
• Anda mendengar suara mendengung. Ini disebabkan oleh air yang diambil oleh kipas padamusim hujan atau pada kondisi sangat lembab. Fitur ini dirancang untuk membantumenghilangkan kelembaban di udara dan meningkatkan efisiensi pendinginan.
• Anda mendengar termostat berbunyi 'klik'. Ini disebabkan oleh siklus kompresor yangbekerja dan berhenti.
• Anda melihat air menetes dari bagian belakang unit. Air mungkin terkumpul di baki di dasarunit ketika kondisinya sangat lembab atau di musim hujan. Air mungkin meluap danmenetes dari bagian belakang unit.
• Anda mendengar kipas berputar ketika kompresor tidak berbunyi. Ini normal.
29
Tindakan Pengamanan
Panduan bagi Pemilik

30 Unit Penyejuk Ruangan
Tindakan Pengamanan
Ruangan terlalu panas.
Udara dingin lolos keluar ruangan.
Koil pendingin tertutup es beku.
•
•
•
•
•
• Jika unit penyejuk ruangan untuk pertama kalinya dinyalakan, Anda memerlukan beberapa waktu untuk memperoleh ruangan yang dingin.
• Periksalah lubang pemanas ruangan dan lubang lepasnya udara dingin.
• Bacalah bagian 'Unit Penyejuk Ruangan Mengalami Pembekuan' di bawah ini.
Pemecahan MasalahUnit penyejuk ruangan akan bekerja tidak normal jika:
Masalah
Unit tidak mendapat aliran listrik.
Sekering putus atau pemutus sirkuit
Listrik mati.
Aliran udara terhalangi.
Filter udaranya kotor.
Unit penyejukruangan tidakbekerja
Unit penyejukruangan tidaksedingin yangdiharapkan
Pastikan steker dari unit penyejuk ruangan telahterpasang dengan benar pada stopkontak.
periksa sekering rumah dan ganti sekering, atauperiksa kotak MCB dan pulihkan aliranlistriknya.
Jika listrik mati, setel kontrol mode ke Off.Jika listrik sudah menyala kembali, tunggu 3menit untuk me-restart unit penyejuk ruanganuntuk mencegah kompresor mengalamikelebihan beban.
Pastikan tidak ada tirai, kerai, atau perabotanyang menghalangi jalan udara di muka unit.
Bersihkan filter sekurang-kurangnya setiap 2minggu sekali. Bacalah bagian 'Perawatan danPemeliharaan'.
What To DoPossible Causes
* Anda dapat melihat di program Energy Star pada www.energystar.gov.

emoM

emoM

emoM

PT. LG ELECTRONICS INDONESIA Kawasan Industri MM2100 Blok G
Cikarang Barat, Bekasi, Jawa Barat 17520INDONESIA