
Access 2010: Part I - Learn Access
109
-
Upload
independent -
Category
Documents
-
view
0 -
download
0
Transcript of Access 2010: Part I - Learn Access


Download free ebooks at bookboon.com
2
Stephen Moffat, The Mouse Training Company
Access 2010 Part I

Download free ebooks at bookboon.com
3
Access 2010: Part I© 2011 Stephen Moffat, The Mouse Training Company & Ventus Publishing ApSISBN 978-87-7681-857-9

Download free ebooks at bookboon.com
Access 2010: Part I
4
Contents
Contents
Section 1 The Basics 9Guide Information 9The Access Screen 11Ribbons Explained 15About Smart Tags 18New Features In Access 2010 20Access and Windows 24Using the Quick Access Toolbar 28
Section 2 Understanding Access 36What is Microsoft Access? 36Using the Getting Started Window 37The File Ribbon 50Help 57The Home Ribbon 58Create Ribbon 63External Data Ribbon 68Viewing Data 73Database Tools Ribbon 76
Stand out from the crowdDesigned for graduates with less than one year of full-time postgraduate work experience, London Business School’s Masters in Management will expand your thinking and provide you with the foundations for a successful career in business.
The programme is developed in consultation with recruiters to provide you with the key skills that top employers demand. Through 11 months of full-time study, you will gain the business knowledge and capabilities to increase your career choices and stand out from the crowd.
Applications are now open for entry in September 2011.
For more information visit www.london.edu/mim/ email [email protected] or call +44 (0)20 7000 7573
Masters in Management
London Business SchoolRegent’s ParkLondon NW1 4SAUnited KingdomTel +44 (0)20 7000 7573Email [email protected]/mim/
Fast-track your career
Ple
ase
clic
k th
e ad
vert

Download free ebooks at bookboon.com
Access 2010: Part I
5
Contents
Using The “database”Tabs 79The Trust Center 80First Steps 89
Section 3 Saving in Access 101Saving in Access 101Using AutoRecover 108
To see Section 4-5 download Access 2010: Part II
Section 4 Tables Part IICreating Tables Part IIPrimary Key Part IIFormat Data and appearance (Design View) Part IIRelationships Part IIControlling Data EntryIn a Table. Part IICreating A Lookup Field Part IIEnter Data In a Table Part IIFormatting A Table in Datasheet view Part IIWorking with records Part IISorting and Finding Data In a table Part IIFiltering data in a table. Part IIUsing Advanced Filter Options Part II
© U
BS
2010
. All
rig
hts
res
erve
d.
www.ubs.com/graduates
Looking for a career where your ideas could really make a difference? UBS’s
Graduate Programme and internships are a chance for you to experience
for yourself what it’s like to be part of a global team that rewards your input
and believes in succeeding together.
Wherever you are in your academic career, make your future a part of ours
by visiting www.ubs.com/graduates.
You’re full of energyand ideas. And that’s just what we are looking for.
Ple
ase
clic
k th
e ad
vert

Download free ebooks at bookboon.com
Access 2010: Part I
6
Contents
Changing Field Data Types Part II
Section 5 Queries Part IICreating Queries Part IIBasic Query use. Part IIFiltering a Query Part IISelect Queries and criteria Part IIUsing Multiple Tables In Queries Part IIBuilding queries on queries Part IIParameter Queries Part IICrosstab Query Part IIAction Queries Part II
To see Section 6-7 download Access 2010: Part III
Section 6 Forms Part IIICreating Forms Part IIICreate form Alternatives Part IIITouring Design View To Modify Your Form Part IIIBuild form in design view Part IIIBind Form to data source Part IIIBasic Field Controls Part IIIFormatting Controls Part III
Ple
ase
clic
k th
e ad
vert

Download free ebooks at bookboon.com
Access 2010: Part I
7
Contents
Form Types Part IIILayout View Part IIIModal and Pop-Up Forms Part IIIAdvanced Features for form and controls Part IIIFormatting Your Forms Part III
Section 7 Reports Part IIIWorking with Reports Part IIICommon Report Tasks Part IIIHeader and Footer Options Part IIICreate report in design view Part IIISubreports Part IIIFormatting Reports Part III
To see Section 8-12 download Access 2010: Part IV
Section 8 Macros Part IVMacro definitions Part IV
Section 9 Printing Part IVPrinting a Database Object Part IV
Section 10 Other advanced Features Part IV
your chance to change the worldHere at Ericsson we have a deep rooted belief that the innovations we make on a daily basis can have a profound effect on making the world a better place for people, business and society. Join us.
In Germany we are especially looking for graduates as Integration Engineers for • Radio Access and IP Networks• IMS and IPTV
We are looking forward to getting your application!To apply and for all current job openings please visit our web page: www.ericsson.com/careers
Ple
ase
clic
k th
e ad
vert

Download free ebooks at bookboon.com
Access 2010: Part I
8
Contents
Web Database Part IVSplit a Database Part IVImport and export data Part IVAdd data collected via e-mails to your database Part IV
Section 11 Getting Help Part IVTo Access Help Part IV
Section 12 Access 2010 Specifications Part IVDiscontinued & modified functionality in 2010 Part IVDatabase specifications for Access 2010 Part IVProject specifications Part IVKeyboard shortcuts for Access Part IV
Maersk.com/Mitas
�e Graduate Programme for Engineers and Geoscientists
Month 16I was a construction
supervisor in the North Sea
advising and helping foremen
solve problems
I was a
hes
Real work International opportunities
�ree work placementsal Internationaor�ree wo
I wanted real responsibili� I joined MITAS because
Ple
ase
clic
k th
e ad
vert

Download free ebooks at bookboon.com
Access 2010: Part I
9
The Basics
Section 1 The BasicsBy The End Of This Section You Will Be Able To Identify
• Title Bar• Ribbons• The Access window• Ask a Question
Guide Information
Introduction
Access 2010 is a powerful Database application that allows users to produce tables, forms, queries and reports within a datbase it can also contain calculations, graphs, pictures and files.. access to web data and sharepoint information is available to be built in to the database an extemely powerful database application.
How To Use This Guide
This manual should be used as a point of reference following attendance of the introductory level Access 2010 training course. It covers all the topics taught and aims to act as a support aid for any tasks carried out by the user after the course.
The manual is divided into sections, each section covering an aspect of the introductory course. The table of contents lists the page numbers of each section and the table of figures indicates the pages containing tables and diagrams.
Objectives
Sections begin with a list of objectives each with its own check box so that you can mark off those topics that you are familiar with following the training.
Instructions
Those who have already used a database before may not need to read explanations on what each command does, but would rather skip straight to the instructions to find out how to do it. Look out for the arrow icon which precedes a list of instructions.
Appendices
The Appendices list the Ribbons mentioned within the manual with a breakdown of their functions and tables of shortcut keys.

Download free ebooks at bookboon.com
Access 2010: Part I
10
The Basics
Keyboard
Keys are referred to throughout the manual in the following way:
ENTER – Denotes the return or enter key, DELETE – denotes the Delete key and so on.
Where a command requires two keys to be pressed, the manual displays this as follows:
CTRL + [P] – this means press the letter “p” while holding down the Control key.
Commands
When a command is referred to in the manual, the following distinctions have been made:
When Ribbon commands are referred to, the manual will refer you to the Ribbon –
E.G. “Choose HOME from the Ribbons and then B for bold”.
When dialogue box options are referred to, the following style has been used for the text –
E.G.“In the PAGE RANGE section of the PRINTdialogue, click the CURRENT PAGE option”
Dialogue box buttons are Emboldened – “Click OK to close the PRINTdialogue and launch the print.”
Notes
Within each section, any items that need further explanation or Points for extra attention devoted to them are denoted by shading. For example:
“Access will not let you close a file that you have not already saved changes to without prompting you to save.”
OR
“Access will not let you close a file that you have not already saved changes to without prompting you to save.”
Tips
At the end of each section there is a page for you to make notes on and a “Useful Information” heading where you will find tips and tricks relating to the topics described within the section.

Download free ebooks at bookboon.com
Access 2010: Part I
11
The Basics
The Access Screen
WINDOW BORDER The box that surrounds the Access screen when it is not maximised is called the window border. When the mouse is over the border, the pointer changes from a single to a double-headed arrow – clicking and dragging with this shape allows the window to be resized.
TITLE BAR The coloured bar that appears at the top of the Access window. The title bar tells you which application you are using and if the document you are in is maximised, it will also contain the name of the document. If the Access window is not maximised, by positioning the mouse over the title bar and clicking and dragging, you can move the Access window to a new location on the screen.
MAXIMISE BUTTON When working in a document, the Access screen contains two windows, an application window and a document window. You can maximise both windows to capitalise on the space you have on-screen. If you would like the window that your Access application is in to fill up the whole screen, click the outermost maximise button. You may find that the document you are in can still be bigger – click the inner maximise button to fill the remaining space within the Access application window.
MINIMISE BUTTON This button is very useful if you need to temporarily switch from Access into another application without closing Access down completely. Click the minimise button to shrink Access to an icon on the task bar; you will then be able to view other icons and applications you may wish to access. When you are finished and ready to continue, click the Access icon from the task bar to resume. The innermost minimise button will minimise the current document window.
RESTORE BUTTON This button only appears when a window is maximised. A maximised window has no border and you cannot see what is behind it. If you want to put the window back inside its border so that you can move and size it, click the restore button.
CLOSE BUTTON This button is used to close a window. If you click the close button for a document window you close the document. The last button will close the Access application.

Download free ebooks at bookboon.com
Access 2010: Part I
12
The Basics
DIALOGUE BOX LAUNCHER this button launches dialogue boxes specific to the part of the ribbon you see them the category will be named such as font, CLIPBOARD, etc
BACKSTAGE VIEW – FILE RIBBON is the start of Access and has many important commands and option. Such as Access settings, opening, saving, printing and closing files. This will be looked into much further later in the manual.
Access Window Components
Access 2010 appears as displayedbelowwhena new database is created..There is a pane on the left to help all objects created within access and on the right the main work window to edit and create those objects such as tables and forms etc.
ӹ To Activate a Button on the ribbonMOUSE
1. Click the left mouse button on the required tool.
Dialogue Box

Download free ebooks at bookboon.com
Access 2010: Part I
13
The Basics
To open a dialogue box use the DIALOGUE BOX LAUNCHER when the dialogue box is open, make a choice from the various options and click OK in the dialogue box. If you wish to change your mind and close the dialogue box with out making a choice then click on CANCEL. The dialogue box will close without any choice being applied. If you would like help while the dialogue box is open then click on the “?” in the top right hand corner this will bring up a help window that will display there levanttopics
Groups
Look at a group type on the ribbon such as font and in the bottom right hand corner of that group you may see a small box with a narrow, clicking this is an other method to callup a dialogue box, this time, directly from the ribbon. Many dialogue boxes may be more familiar if you have used Access before.
Toolbar
There are only two tool bars with in the new version of Office 2010 there is the quick access tool bar seen here next to the File tab, and there is the mini toolbar
Quick Access Toolbar
By default there are only three buttons on the quick access tool bar but these can be edited and other regularly used buttons can be placed there. Using the drop down menu next to the quick access tool bar will allow the customisation of this toolbar adding your most often used commands.
Mini Tool bar
When ever text is selected within Access a small formatting tool bar will appear above the highlighted text it will disappear if the mouse cursor is move away from the tool bar and will reappear when the mouse cursor is moved over the highlighted text again

Download free ebooks at bookboon.com
Access 2010: Part I
14
The Basics
Status Bar
The Status bar, across the bottom of the screen, displays different information at different times. To the left is an indicator, which will display which view you are currently in, to the right are quick options to see which views are available and to change the view you are in E.G. Design
By 2020, wind could provide one-tenth of our planet’s electricity needs. Already today, SKF’s innovative know-how is crucial to running a large proportion of the world’s wind turbines.
Up to 25 % of the generating costs relate to mainte-nance. These can be reduced dramatically thanks to our systems for on-line condition monitoring and automatic lubrication. We help make it more economical to create cleaner, cheaper energy out of thin air.
By sharing our experience, expertise, and creativity, industries can boost performance beyond expectations.
Therefore we need the best employees who can meet this challenge!
The Power of Knowledge Engineering
Brain power
Plug into The Power of Knowledge Engineering.
Visit us at www.skf.com/knowledge
Ple
ase
clic
k th
e ad
vert

Download free ebooks at bookboon.com
Access 2010: Part I
15
The Basics
view, form view or datasheet view..Also information about the status of Access, if anyparticular lock keys are enabled on your keyboard, which view is currently active, and more.
Task Pane
At ask pane is a window that collects commonly used actions in one place. The taskpaneen ables you to quickly createormodify a file, perform a search, or view the clipboard.
It is a Web-style area that you can either, dock along the right or left edge of the window or float any where on the screen. It displays information, commands and controls for choosing options. Like links on a Webpage, the commands on a taskpane are highlighted in blue text, they are underlined when you move the mouse pointer over them, and your unthem with a single click.
At ask pane is displayed automatically when you perform certain tasks, for example when you choose clipart from the INSERT, Ribbon, to insert a picture
Ribbons Explained
One of the biggest changes in Access 2010 is the removal of menus. Instead of having a list of menu commands to choose from (including a number of options that are greyed out and not accessible), Access 2010 features a more intuitive control system of tabs. Each tab contains a certain group of commands relevant only to the tab. The commands are listed in the ribbon.
Consider the HOME ribbon tab that is selected in the diagram above. Beneath the tab is a listing of all commands that are performed most often on the currently selected object, contained in what Microsoft refers to as the ‘ribbon’:

Download free ebooks at bookboon.com
Access 2010: Part I
16
The Basics
The ribbon was designed to allow access to all functionality of a tab at once. Also, the commands in the ribbon are only the commands that are available for use at the time.
We will learn in this lesson how the ribbon works and some of the tools that are available.
About Ribbons
There are two main types of ribbons: general (or command) and contextual. The general ribbons (and corresponding tabs) are always visible when you are viewing a database file in Access:
Command Tabs
Along the top of the window are the command tabs:
In the past, the Office package made use of menus that contained a listing of commands. At their core, the command tabs are essentially the same thing as menus but with a few big changes. For starters, the grouping of commands in tabs is much more intuitive. The commands listed under each tab are also the only commands that are applicable to your current view of the database.
Access 2010 takes this one step further with the addition of contextual tabs. The tab labelled Fields and Table are a subset of the table toolsn and appears only when you have selected a table in Datasheet view. These tabs will contain even more specific commands that can be used on a table being viewed and will only be visible when a table is being viewed.
The command tabs listed here include many of the most common commands you will perform in Access. The Home ribbon contains the majority of the most common tasks including the ability to switch views, formatting, and filtering of data. If you want to make a new database object, click the Create tab and select the object you want to make. The External Data command tab gives you all the flexibility to import and export data to and from your database, computer, and network. The Database Tools tab gives you the ability to manage the data in your database, create macros, and view relationships.
Contextual Tabs
Contextual tabs appear only when a certain type of database object is selected (or brought into context). For example, if you are looking at a table in datasheet view, a contextual tab will appear showing you the commands you can perform on the table while only in datasheet view:

Download free ebooks at bookboon.com
Access 2010: Part I
17
The Basics
When using a command in the ribbon, simply click it with your mouse. The command will be performed, or the appropriate tool or dialogue box will appear to help you perform the task. If you are unsure what a certain command does, point to it, but do not click it.
Tips
After a quick moment a description will appear. This is true for most of the commands:
Are you considering aEuropean business degree?LEARN BUSINESS at university level. We mix cases with cutting edge research working individually or in teams and everyone speaks English. Bring back valuable knowledge and experience to boost your career.
MEET a culture of new foods, music and traditions and a new way of studying business in a safe, clean environment – in the middle of Copenhagen, Denmark.
ENGAGE in extra-curricular activities such as case competitions, sports, etc. – make new friends among cbs’ 18,000 students from more than 80 countries.
See what we look likeand how we work on cbs.dk
Ple
ase
clic
k th
e ad
vert

Download free ebooks at bookboon.com
Access 2010: Part I
18
The Basics
Navigation Pane
On the left side of the Access window is the Navigation Pane. It is always visible on the left side of the screen, but can be expanded ( ) or shrunk ( ) by clicking the double arrows. The Navigation Pane allows quick and easy access to any of the database objects.
Click the pull-down arrow beside the Navigation Pane title ( ) to show a list of all object categories:
Object Tabs
In previous versions of Access, any open database object was opened in its own window and designed to ‘float’ inside the Access Screen. When several database objects were open at once, it was difficult to navigate through all of the windows easily. Access 2010 has solved that problem by using tabs:
Simply click any of the tabs visible on the top to show the database object. Opening many database objects will create left and right facing arrows ( and ); click on the arrow to scroll that direction through the open database objects. If you want to close an object you are no longer using, click the Close button ( ) located beside the tabs.
About Smart Tags
Smart Tags, first introduced in Microsoft Office XP, make it easier for you to complete some of the most common tasks in Access 2010 and provide you with more control over automatic features.
You do not have to complete any additional steps to make the Smart Tags appear or disappear in Access. The Paste Options, AutoCorrect Options and AutoFit smart tags appear automatically to allow you to quickly choose actions and remain in place until you begin another action. For example, when you complete a paste operation, the Paste Options smart tag (below) remains in place alongside your text until you begin typing new text.
A “smart tag” is a type of button in Microsoft Access 2010 that appears after certain actions, such as an automatic text correction or a copy-and-paste, have taken place. The button has a menu of options that help you control the result of the action. For instance, if Access automatically capitalizes the first letter of a word, but you want the word lowercased in this instance, you can click the “undo capitalization” option on the button menu to reverse the action.

Download free ebooks at bookboon.com
Access 2010: Part I
19
The Basics
Access includes several of these smart tag buttons. They function similarly but their look can vary and each has a specific purpose.
Auto correct Options Smart Tag
The AutoCorrect Options Smart Tag appears after an automatic correction or change, such as a lowercased letter that’s changed to a capital or a network path that’s converted to a hyperlink. The Smart Tag shows as a small, blue box when you rest the mouse pointer near text that was changed; it then becomes a button icon which, when you point to it and click it, displays a menu. If you don’t want the correction, use the options on the menu to undo it; turn off this type of correction completely; or connect to the AutoCorrect dialogue box to adjust settings.
Paste Options Smart Tag
The Paste Options Smart Tag gives you greater control and flexibility in choosing the format for a pasted item. The Smart Tag appears just below a pasted item, such as text, a table, or a slide, with options for formatting. For example, if you copy and paste a slide and insert it after a slide that uses a different design template, you can choose to retain the original design for the slide or let the pasted slide assume the design of the slide it now follows.
Autofit Options Smart Tag
The AutoFit Options Smart Tag appears when Access resizes text you’re typing to make it fit the current placeholder. If you don’t want the text to be resized, you can select options on the Smart Tag menu to undo the resizing or to connect to the AutoCorrect dialogue box to turn AutoFit settings off. Also, for single-column layouts, you can change to a two-column layout, start a new slide to accommodate the text, or split the text between two slides.
Automatic Layout Options Smart Tag

Download free ebooks at bookboon.com
Access 2010: Part I
20
The Basics
The Automatic Layout Options Smart Tag appears after you insert an item, such as a picture, diagram, chart, or table, that changes the initial layout of the slide. To accommodate the added item, Access will automatically adjust the slide layout. If you want, use the options to undo the automatic layout or turn it off completely.
New Features In Access 2010
If you are familiar with previous versions of Access, there are a large number of new features and a completely new interface in Access 2010. If you have never used Access before, don’t worry – you will quickly become very familiar with these commands as time goes on!
New Interface Design
Commands hidden in four different menu layers are a thing of the past with Access 2010.). Commands are now organized using a new action tab scheme. Under each tab are the commands relevant to the action described on the tab. This command set is referred to as the ‘ribbon.’ Finally, Access 2010 features contextual tabs showing data that is relevant only to the current object you are working on. We will explore the new interface in more detail later.
www.simcorp.com
MITIGATE RISK REDUCE COST ENABLE GROWTH
The financial industry needs a strong software platformThat’s why we need you
SimCorp is a leading provider of software solutions for the financial industry. We work together to reach a common goal: to help our clients
succeed by providing a strong, scalable IT platform that enables growth, while mitigating risk and reducing cost. At SimCorp, we value
commitment and enable you to make the most of your ambitions and potential.
Are you among the best qualified in finance, economics, IT or mathematics?
Find your next challenge at www.simcorp.com/careers
Ple
ase
clic
k th
e ad
vert

Download free ebooks at bookboon.com
Access 2010: Part I
21
The Basics
New Template Categories
Access 2010 features eleven new templates, each with their own defined tables, forms, reports, queries, and relationships. They are designed to let you start working right away, but are also completely customizable.
More Intuitive Sorting and Filtering
Access 2010 lets you pick from several predefined sorting methods with just a couple of clicks. Access also features a contextual quick sorting method using plain language. For example, if you have a column of numbers, Access can sort them Smallest to Largest. If you have a column of dates, Access can sort them from Oldest to Newest.
New Layout View
When working with forms and reports, Access 2010 features an in-between view called Layout View. It allows you to see a live form or report with real data in it, but also lets you adjust the position of certain elements in your form or report on the fly. You can also define ‘mini layouts’ that allow you to move several controls as a group. Access still features the more in-depth Design view, used to fine tune every aspect of a control.
Enhanced Tooltips
When you hover your mouse above certain command icons, Access 2010 lists the command name, a short description of the command, and an example (if applicable). (Tooltips in previous Office programs listed only the command name.)
Automatic Calendar
When entering information into a Date field, a small icon will appear allowing you to choose a date from a small calendar. This eliminates the need to enter a date as 03/22/2010 – just open the calendar and pick the date!
Rich Text in Memo Fields
If a table makes use of a memo field, data can now be stored as something other than plain text. Using an HTML-based text format, Access lets you automatically add colours, sizes, and formatting to the text in a memo field.
Quickly Create New Objects using the Insert Tab
In previous versions of Access, you had to move and minimize windows to find the Database window, pick the category of database object, and then choose to create a new object. With the Insert tab and ribbon, you can create a form based on a table with only two clicks (versus as many as a dozen clicks in the past).
If you need a new table at any point, simply click Table on the Insert tab and start entering data. Access 2010 even lets you paste data directly from a Microsoft Excel spreadsheet. Data types and formatting will be found and preserved automatically.
Total Row in Datasheet View
Every table in Datasheet view features an automatic Total Row at the bottom. You can find the sum, count, average, maximum, minimum, standard deviation, or variance using the Total Row.

Download free ebooks at bookboon.com
Access 2010: Part I
22
The Basics
Field Templates
In the past, it was potentially a long and tedious task to mould a number data type into a usable field for your organization. Now, you can simply click and drag a predefined field from a list right into your table at any point.
Field List Task Pane
When creating a query in previous versions of Access, each table had to be inserted into Design view in order to use various fields. Now, all fields in all tables are visible in a list. Just drag and drop the ones you need.
Split Forms
A Split Form is new to Access 2010; it combines Datasheet and Form view together as one. The Datasheet view can be placed on the top, bottom, left, or right side of the Form.
Multivalued Fields
A single field can contain multiple values in Access 2010. Imagine you have a product that falls into a few different categories. In previous versions of Access and other database management programs, this would have required a many-to-many relationship to be defined. Access 2010 handles this complicated background relationship with only an extra click when designing a field.
Attachment Data Type
If you want to e-mail a document to a co-worker or some pictures to family members, the files would be sent as an attachment to the e-mail. Access 2010 features a similar attachment data type that can hold documents, charts, sound files, binary files, or any other type of file. Attachments are also automatically compressed when necessary to reduce the overall size of the database file.
Alternating Background Colour
Datasheet view, reports, and long forms now feature the ability to alternate the background colours of each row. Long lists of data become much easier to read!
Navigation Pane
The Navigation Pane is an ever-present feature on the left side of the Access window. It contains a listing of all objects currently contained in the database. The Navigation Pane can also be collapsed to make more room in the window.
Embedded Macros
Though macros go beyond the scope of this manual, macros in Access 2010 are stored inside a database object instead of being a separate object. This makes these macros much safer to use.

Download free ebooks at bookboon.com
Access 2010: Part I
23
The Basics
Newly Designed Help
Office 2010 makes wide use of Office Online, a resource on the Internet to find help on a certain topic. Access 2010 also has different help levels; if you are an end-user rather than a developer who makes database code, you can tailor the help file to search only the more basic topics.
Increased and Enhanced Connectivity
One of the goals of Office 2010 was to create a centralized location where members of your organization can meet and share data over the Internet. Though many of these features are more advanced topics of Access not covered in this manual, Access features a huge variety of SharePoint services. Access lets you:
Collect data from Microsoft Outlook Store and retrieve data on a SharePoint server Integrate with SharePoint Workflow services Retrieve data from linked SharePoint lists Store a SharePoint list offline for use away from your organization Create and save import or export operations if you perform the same online task multiple times
Export Data to PDF or XPS
You can export a form, report, or datasheet as a PDF (Portable Document Format) or XPS (XML Paper Specification) to easily print, post, and e-mail regardless of the computer platform your intended recipient(s) are using.
Ple
ase
clic
k th
e ad
vert

Download free ebooks at bookboon.com
Access 2010: Part I
24
The Basics
New Report View
Report view allows you to browse your report without having to print or preview it. You can also sort and filter records on the fly.
Enhanced Group, Sort, and Total Feature
You can apply new grouping and sorting levels much easier with Access 2010. Grouping is done following a natural sentence structure; you simply fill in the blanks along the way.
Additional Security Features Though many of the security features go beyond the scope of this manual, Access 2010 (and indeed the entire Office 2010 suite) features a number of security enhancements and SharePoint services. This functionality includes: Enhanced security by disabling macros and code only until needed Revision tracking to see who modified what and when Permission setting to restrict data modification Restore deleted data from the SharePoint Recycle Bin in case of accidental deletion Open forms and reports using SharePoint even if Access is not open on your computer Keep track of changes made to memo fields
Access and Windows
The Microsoft Office packages were primarily designed to run in the Microsoft Windows operating system. Further iterations of the Office package have been ported for use in other operating systems, such as the Macintosh operating systems. Because the Office package is designed to run in a particular environment, it is also capable of using some features of the operating system (as well as being limited by some of the operating system’s shortfalls!). In this lesson we will explore the operation of Access 2010 as a whole.
Recovering Access
Despite the best efforts of network administrators, programmers, and home users, there will inevitably come the time where something will go wrong. Viruses, spyware, power outages, and equipment failures can cause havoc if you are unprepared. However, you do have some tools available to use if you get stuck while using Access. Much of the data manipulation done in Access is saved automatically as soon as a particular operation has completed. For example, when you add data to a table, it is saved in the table as soon as the cursor moves to another field.
The other manual operations that can be performed in Access, such as the development of macros, forms and reports, must be saved by the user. However, Access does have a general AutoSave feature that is used every 10 minutes to save any work that has been done.

Download free ebooks at bookboon.com
Access 2010: Part I
25
The Basics
Should Access itself seem unresponsive, there might be a number of causes. If your computer is experiencing heavy network traffic or processor load, some operations regarding Access are placed in a priority queue. With the speed and capability of today’s computers, this delay will likely be minor. Nonetheless, the best first option is to wait for a few moments. If you see no activity, try opening another program on your computer. If the other program does not start, then you computer is likely stuck in a processing loop somewhere.
Task Manager
Pressing CTRL + ALT + DELETE in the Windows 2000/XP environment will open the Task Manager. Check the Applications tab. should you see (Not Responding) beside Access or some other program, highlight the program in the list and click End Task. If you don’t see any unresponsive programs, it may be a background process. Click the Processes tab. Scroll up and down through the list of processes. You see one program with a 99% CPU usage, that process is likely stuck. Highlight the process and click End Task.
If you manage to close Access without having to restart your computer, Access will have saved a backup file in the same folder as the original working file. The backup file will be named filename_Backup.
If worst comes to worst and you cannot shut down Windows or end a process, you must physically power off or restart your computer.

Download free ebooks at bookboon.com
Access 2010: Part I
26
The Basics
Starting Access On Windows Boot
Microsoft Windows contains a special folder in which you can add a program shortcut to have that program start every time Windows starts. Your computer may already have certain programs that start when you computer starts, such as antivirus and instant messaging software.
ӹ To have Access 2010 start when your computer starts.MOUSE
1. Locate the icon you use to start Microsoft Access 2010 normally, such as in the Start Menu. 2. Right click on the icon, point to Send To, and then click Desktop:
3. Once the icon has been created, or if you already have an icon on your desktop, right-click the icon and select CUT:

Download free ebooks at bookboon.com
Access 2010: Part I
27
The Basics
4. Browse to the following folder on your computer:
C:\Documents and Settings\<Your User Name>\Start Menu\Programs\Startup
OR IN VISTA
C:\Users\<Your User Name>\AppData\Roaming\Microsoft\Windows\Start Menu\Programs\Startup
Do you want your Dream Job?
More customers get their dream job by using RedStarResume than any other resume service.
RedStarResume can help you with your job application and CV.
Go to: Redstarresume.com
Use code “BOOKBOON” and save up to $15
(enter the discount code in the “Discount Code Box”)
Ple
ase
clic
k th
e ad
vert

Download free ebooks at bookboon.com
Access 2010: Part I
28
The Basics
5. Paste the icon into the folder:
6. Every time your computer starts, Access will start as well. You can do this for any program on your computer.
But be careful – adding too many programs will significantly lengthen the time needed to boot your computer. Plus, if you want to use your computer for a presentation or something other than the programs in the Startup folder, you must first wait for all of the programs to open before you can close them and free up system resources.
Using the Quick Access Toolbar
In the previous lesson, we introduced the new layout changes to Access 2010. In this section, we will learn a little bit more about each part of the new interface and how it works. This lesson will focus on features and customization options available with the Quick Access toolbar, located in the upper left-hand corner of the screen:

Download free ebooks at bookboon.com
Access 2010: Part I
29
The Basics
About The Default Buttons
Access features three default commands in the Quick Access toolbar:
Save
Saves the most recent changes to the current database file.
Opens the Print dialogue box allowing you to adjust different print settings.
Undo
The Undo command will revert most changes made in Access. For example, if you made a formatting change to a form that you were not happy with, click the Undo button to go back one command.
There is a small pull-down arrow beside the Undo button; click this to see a listing of the last few tasks that were performed. Click any task in the list to undo all commands to that point.
Adding Buttons
As you become more familiar with Access you might find it handy to have another command quickly available for use. Though the command tabs and ribbon significantly reduce the number of clicks it takes to do something, you might want to have a particular command always available. Access allows you to add the command to the Quick Access toolbar.
For example, some of us have difficulty with spelling. Fortunately, many programs (including Access) feature a spell checking feature. In Access 2010, the spell checking feature is located in the Records section of the Home command tab:
ӹ To add this command to the Quick Access toolbar, MOUSE

Download free ebooks at bookboon.com
Access 2010: Part I
30
The Basics
1. Right-click the Spelling command and click ‘ADD TO QUICK ACCESS TOOLBAR:’
2. The command (denoted by the small ‘ABC’ icon) will be placed in the QUICK ACCESS toolbar:
Removing Buttons
If you no longer use a certain command or your Quick Access toolbar is getting a bit too filled with icons, you can remove them easily at any time.
Challenging? Not challenging? Try more
Try this...
www.alloptions.nl/life
Ple
ase
clic
k th
e ad
vert

Download free ebooks at bookboon.com
Access 2010: Part I
31
The Basics
ӹ To remove a buttonMOUSE
3. Right-click on any icon you no longer use and click REMOVE FROM QUICK ACCESS TOOLBAR:
Customizing The Toolbar
As you gain familiarity with Access (and other Office 2010 programs) you have the ability to customize how the Quick Access toolbar looks all at once versus having to add icons one by one. To do this, click the small pull-down arrow ( ) located on the far right of the Quick Access toolbar and click More Commands:
Note that you can click any command listed here to add that command to the toolbar. The commands that are already checked are those on the toolbar; simply click them to remove them.
ӹ To customise the toolbarMOUSE
1. When you click MORE COMMANDS, the Customize dialogue box (found in the Access Options) appears:

Download free ebooks at bookboon.com
Access 2010: Part I
32
The Basics
This window gives you the ability to add any of the functionality from any command tab or contextual tab you like to the Quick Access toolbar.
2. Click the pull-down arrow beside the CHOOSE COMMANDS FROM combo box:

Download free ebooks at bookboon.com
Access 2010: Part I
33
The Basics
3. The first category (File Tab) is all commands accessible via the File Tab. The next seven tabs are the main command tabs, the majority of which are visible when working in Access. (Some command tabs might not be visible at the time, depending on what you are doing with your database.) The third section of options are all of the contextual tabs that appear only when you are working with a specific database object The final section deals with macro commands, other miscellaneous commands, and a listing of every command in Access.
4. Pick a listing from a particular category in order to see the commands it contains. For example, imagine you are going to make heavy use of pictures and diagrams in a database form. To do this, you will need to import each picture one at a time. Therefore, you may find it easier to add the INSERT IMAGE icon to the Quick Access toolbar so it is always accessible.
5. Select the FORM TOOLS - DESIGN option and then scroll down the list of options until you find IMAGE:

Download free ebooks at bookboon.com
Access 2010: Part I
34
The Basics
6. Click the Image icon to highlight it and then click the ADD >>button located in the middle of the window:
7. This will add the Image tool to the Quick Access toolbar list on the right-hand side of the window. By default, the command is inserted at the bottom of the list (under the Undo command).
8. You can change the order of any icons in the list by selecting an item in the Quick Access toolbar list and then clicking the up and down buttons on the right side of the list. Simply click an item in the list you would like to move up or down and then click the corresponding directional button:
9. Items listed top to bottom will be displayed from left to right in the Quick Access Toolbar. To remove an icon from the list, select the icon and click the Remove button in the middle of the window.

Download free ebooks at bookboon.com
Access 2010: Part I
35
The Basics
10. If at any point you want to return the Quick Access toolbar back to its original configuration, click the RESET button:
11. This will remove all icons except for the original three (Save, Print, and Undo).
Ple
ase
clic
k th
e ad
vert

Download free ebooks at bookboon.com
Access 2010: Part I
36
Understanding Access
Section 2 Understanding AccessBY THE END OF THIS SECTION YOU WILL BE ABLE TO
• Plan a database• Create a database file• Understand the terminology.• Understand the tools and ribbons in access• Understand and set basic options• Find your way around a database• Understand access basic security
What is Microsoft Access?
The primary function of Microsoft Office Access 2010 is an information management program. Information is stored in separate lists called tables, and information in one table may relate to information in one or more other tables. These groups of information, when considered together as a whole, become a database.
Access is designed to use the data in these databases to extract the information relevant to your situation. Access can also generate reports (such as quarterly sales by each employee) based on the data contained in the database. The Office 2010 package also features a lot of interconnectivity between the various programs, including a newly designed SharePoint service that lets users in your organization connect and share information using a special data centre via the Internet.

Download free ebooks at bookboon.com
Access 2010: Part I
37
Understanding Access
Consider the following diagram showing an open database:
The new interface design of Access 2010 makes it easy for novice and expert users alike to get working right away. Now that we know a little bit more about the Getting Started page, let’s examine the major pieces of the interface that is visible when a file is opened.
In this diagram, we can see the File Tab and Quick Access toolbar present in the upper left-hand corner. At the bottom of the diagram is the Status bar, telling us that we are currently viewing a table in Datasheet view. Now let’s explore the real power of Access 2010, including the use of tabs and the ribbon.
Using the Getting Started Window
The Getting Started window appears every time you open Access without directly opening a file, or after you close an opened database without actually closing Access. Before you have your own established database(s) you can work on, you will likely visit this page every time you want to create a new database or check out the latest information about Access 2010 using Microsoft Office Online.

Download free ebooks at bookboon.com
Access 2010: Part I
38
Understanding Access
In this section, we will learn about the Access starting screen and the view of a typical working database. We will introduce the views piece by piece in this section of the lesson. There are a large number of updates to learn about, but with time you will wonder how you ever managed without them! If you have ever used Access before, the welcome screen for Microsoft Access 2010 has been completely redesigned. However, the layout is much easier to use, especially if you have never used Access before:
Creating A Database From A Template
When you launch Access 2010, you will see the Getting Started page. From here you can choose from a number of different templates already built into Access. Choose a category in the main part of the screen:
Ple
ase
clic
k th
e ad
vert

Download free ebooks at bookboon.com
Access 2010: Part I
39
Understanding Access
Then choose a template that best suits your needs from the centre of the window:
Once you have chosen a template, choose a save location (default of My Documents) and then click Download/Open (depending on if you are opening from an online or offline template):
The template will open containing a number of pre-built database objects, including tables and relationships between the tables. Start entering data or modify the design of the objects as you see fit.
Using A Template
ӹ To use a template.MOUSE
1. Choose a category in the main window. For our purposes, let’s start off with something basic. Access contains a straightforward Contact database.

Download free ebooks at bookboon.com
Access 2010: Part I
40
Understanding Access
2. Click the Contacts group and you will be navigated to the kinds of contact database that Access can create select the contacts database to prepare to open it:
3. Details about the template will be shown on the right-hand side of the screen, click the Download button to download it from Office Online and open it. When the template opens, close the Access Help window that appears.
4. In the template open the Contacts form which allows you to enter your own contacts one by one into the database. That’s all there is to creating a database from a template! All of the objects are already established; all that is required now is for you to enter your data.

Download free ebooks at bookboon.com
Access 2010: Part I
41
Understanding Access
Creating A Blank Database
Although Access contains a number of templates already built in, However, if you prefer to construct your database from the ground up, doing so is easy with only a few clicks. it is important to understand how to create a database from scratch.
ӹ To create a blank databaseMOUSE
1. Go to the FILE tab if you are already within access and go to new to see the getting started page.2. From the Getting Started page, click BLANK DATABASE From the suggested choices: 3. On the right-hand side of the screen, give the new database a name by typing it into the FILE NAME box.
If you want to create the database in a specific location, click the small folder icon ( ) to the right of the text box. The new file path you select will be shown underneath the FILE NAME text box; Access will by default use the My Documents folder:
4. Finally, click the CREATE button. The new empty database will open with a single empty table contained inside:

Download free ebooks at bookboon.com
Access 2010: Part I
42
Understanding Access
5. Now you know how easy it is to get started with a new database using Access. Later in this manual we will explore the usage of the different objects contained inside, as well as how to properly enter data into a database, or more properly, populate a database.
Stand out from the crowdDesigned for graduates with less than one year of full-time postgraduate work experience, London Business School’s Masters in Management will expand your thinking and provide you with the foundations for a successful career in business.
The programme is developed in consultation with recruiters to provide you with the key skills that top employers demand. Through 11 months of full-time study, you will gain the business knowledge and capabilities to increase your career choices and stand out from the crowd.
Applications are now open for entry in September 2011.
For more information visit www.london.edu/mim/ email [email protected] or call +44 (0)20 7000 7573
Masters in Management
London Business SchoolRegent’s ParkLondon NW1 4SAUnited KingdomTel +44 (0)20 7000 7573Email [email protected]/mim/
Fast-track your career
Ple
ase
clic
k th
e ad
vert

Download free ebooks at bookboon.com
Access 2010: Part I
43
Understanding Access
Using Database Objects
A database object is defined as some individual piece of a database that can be used on its own. We have discussed the major objects: tables, queries, forms, reports, and macros.
The Navigation Pane is used to control and use the objects of an Access 2010 database.
ӹ To view database objectsMOUSE
1. Expand the Navigation Pane ( ) and click the pull-down arrow beside the title to show the full Navigation Pane toolbar.
2. Then, click OBJECT TYPE to display all objects currently in the database: 3. All objects currently in the database are categorized by their object type:

Download free ebooks at bookboon.com
Access 2010: Part I
44
Understanding Access
4. If you want to see the different objects in each category, click to expand that category. Each object contained in each category is listed in alphabetical order:
5. To open an object, simply double-click it. It will open in the main part of the Access window and will have its own identifying tab.
6. Some objects, such as the report, include a time and date stamp right on the object: 7. Access lets you rename or delete objects in your database. However in order to do so, the object must first be
closed.
ӹ To delete or rename an object, MOUSE
1. You can do so by making use of right-clicking. To do this, Point to an object and click the right mouse button. A drop down menu will appear giving you quick access to certain commands:
2. If you click RENAME, simply type a new name for the object, and then press ENTER:

Download free ebooks at bookboon.com
Access 2010: Part I
45
Understanding Access
3. If you need to delete an object, Access warns you that the delete operation cannot be undone: 4. Click ‘Yes’ to delete the selected object.
Setting Navigation Options
Access 2010 also gives you full ability to customize the Navigation Pane.
ӹ To set the navigation options,MOUSE
1. Right click on the title bar of the Navigation Pane and click NAVIGATION OPTIONS: 2. The Navigation Options dialogue box will appear. 3. The following dialogue box is taken from the Northwind Sample database: 4. This dialogue box contains three main parts: a category list, a group list, and a few other options.

Download free ebooks at bookboon.com
Access 2010: Part I
46
Understanding Access
5. The first two options in the Categories list are fixed (Tables and Related Views and Object Type). However, you can create as many custom categories as you like. For example, the Northwind Traders category was added specifically for this database.
© U
BS
2010
. All
rig
hts
res
erve
d.
www.ubs.com/graduates
Looking for a career where your ideas could really make a difference? UBS’s
Graduate Programme and internships are a chance for you to experience
for yourself what it’s like to be part of a global team that rewards your input
and believes in succeeding together.
Wherever you are in your academic career, make your future a part of ours
by visiting www.ubs.com/graduates.
You’re full of energyand ideas. And that’s just what we are looking for.
Ple
ase
clic
k th
e ad
vert

Download free ebooks at bookboon.com
Access 2010: Part I
47
Understanding Access
6. If you highlight the custom category, you have the ability to move it up and down through any custom categories you may have created:
7. Use the DELETE ITEM and RENAME ITEM buttons at the bottom of the categories list to perform the associated action on the selected category. If you ever need to delete a category, the objects that were in the category will not be deleted.
8. On the right-hand side of the Navigation Options dialogue box is a list of groups that are included in a category. For example, the groups contained in the Object Type category we have already used previously in this manual:
9. Highlighting the Northwind Traders category will display all of the custom groups used in the category:
• Note that there is one group that is always present in a custom category: Unassigned Objects.
The options at the bottom of the dialogue box give you a bit more flexibility when it comes to the displaying of objects:

Download free ebooks at bookboon.com
Access 2010: Part I
48
Understanding Access
Show Hidden Objects
If you find your database growing to a level that can be a bit hard to manage, you have the ability to hide certain objects. This means that they simply won’t be shown in the Navigation Pane and can make it easier to find the object you need. Checking this check box will override any Hide command that you give to an object.
Show System Objects
There are some background objects and tables that Access uses when you are using a database. Check this box to display them.
Show Search Bar
If you end up with a very large and complex database, and would rather not hide any objects, you can use the small, simple search bar which will then appear at the top of the Navigation Pane:

Download free ebooks at bookboon.com
Access 2010: Part I
49
Understanding Access
Enter the name of the object you are searching for. As you type, Access will automatically filter the different objects based on the keyword you are inputting.
The search bar does not, however, give you a direct list of results. Instead it filters the relevant names for each group as you type. For example, if you know the object you are looking for includes the word ‘order’, begin typing it into the search bar. Access will show you all of the relevant results:
Lastly, you have the option to open an object from the Navigation Pane using either a single click (like a Web page hyperlink) or double-click (default).

Download free ebooks at bookboon.com
Access 2010: Part I
50
Understanding Access
The File RibbonP
leas
e cl
ick
the
adve
rt

Download free ebooks at bookboon.com
Access 2010: Part I
51
Understanding Access
The File Tab (Backstage) should be pretty familiar to you now. We have learned that you can open and close files, modify the Access program options, and close Access; all by using the File Tab (Backstage). If you have used Access in the past, the File Tab (Backstage) is very similar in functionality to the File menu in previous versions. Or Office menu in office 2007
Let’s take a look at the commands in the File Tab (Backstage).
Open
Opens a dialogue box allowing you to search your computer or network for a file.
Save
Saves any modifications you have made to the current database object.
Save Object As
Allows you to save the currently open object under a different object name within the current database.
Save Database As
Allows you to save the currently open database object under another name. This is useful if you want to perform a major revision or update to a particular object.
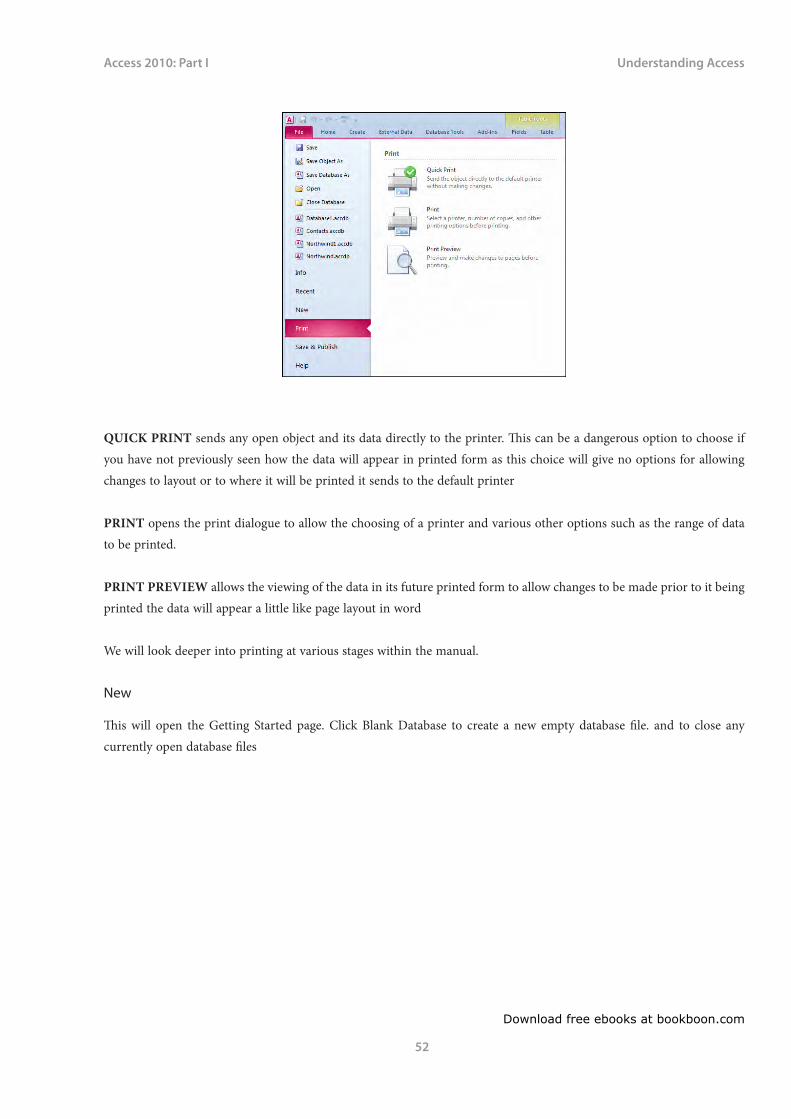
Clicking on the print option in backstage offers three options
Download free ebooks at bookboon.com
Access 2010: Part I
52
Understanding Access
QUICK PRINT sends any open object and its data directly to the printer. This can be a dangerous option to choose if you have not previously seen how the data will appear in printed form as this choice will give no options for allowing changes to layout or to where it will be printed it sends to the default printer
PRINT opens the print dialogue to allow the choosing of a printer and various other options such as the range of data to be printed.
PRINT PREVIEW allows the viewing of the data in its future printed form to allow changes to be made prior to it being printed the data will appear a little like page layout in word
We will look deeper into printing at various stages within the manual.
New
This will open the Getting Started page. Click Blank Database to create a new empty database file. and to close any currently open database files

Download free ebooks at bookboon.com
Access 2010: Part I
53
Understanding Access
Exploring The Access 2010 Getting Started Interface:
Microsoft Office Online (Office.Com)
The centre of the Access window is a special page that extracts content from Microsoft Office Online (a service provided over the Internet). Microsoft Office Online provides quick links to different templates, training material, and other downloads. It also provides links directly to Office Online where you can read about updates to Office 2010 as they become available.
New Blank Database
In the centre of the window is a link to create a new Blank Database. Use this link to make your own database from scratch.
Available Templates
In the main part of the Access window are the accessible Template pane: Access has a number of templates built right into the program. To access those click on the sample templates. The different categories of templates are from office online and will show those templates you can download from the internet, simply click a category to see the available template files.

Download free ebooks at bookboon.com
Access 2010: Part I
54
Understanding Access
your chance to change the worldHere at Ericsson we have a deep rooted belief that the innovations we make on a daily basis can have a profound effect on making the world a better place for people, business and society. Join us.
In Germany we are especially looking for graduates as Integration Engineers for • Radio Access and IP Networks• IMS and IPTV
We are looking forward to getting your application!To apply and for all current job openings please visit our web page: www.ericsson.com/careers
Ple
ase
clic
k th
e ad
vert

Download free ebooks at bookboon.com
Access 2010: Part I
55
Understanding Access
Recent Files
The left-hand side of the window lists any recently opened database files, just like the Old File menu (2003) or office menu (2007: Click one of the database files to open the file.or click on the recent link on the left to show even more of your recently used files. If you want to open a database file stored somewhere else on your computer or on another network, click the More link and browse to the file you want to open, and then click the Open button.
Closing Microsoft Access
When you have finished using Access, click either FILE Tab, EXIT ACCESS or click the program’s close button ( ) in the upper-right hand side of the Access window. If you have any unsaved work still open, Access will allow you to save any changes you have made before the program shuts down.
Save And Publish
Back Up Database
makes a copy of your entire database file for safe keeping.
Sharepoint
Save the database to a sharepoint service location
Save options
There are several options here to save your file in various formats select the option on the right and click the save as button to open the save as dialogue with the various option selected.
Download free ebooks at bookboon.com
Access 2010: Part I
56
Understanding Access
Publish to access services
Allows the publishing to websites using access databases
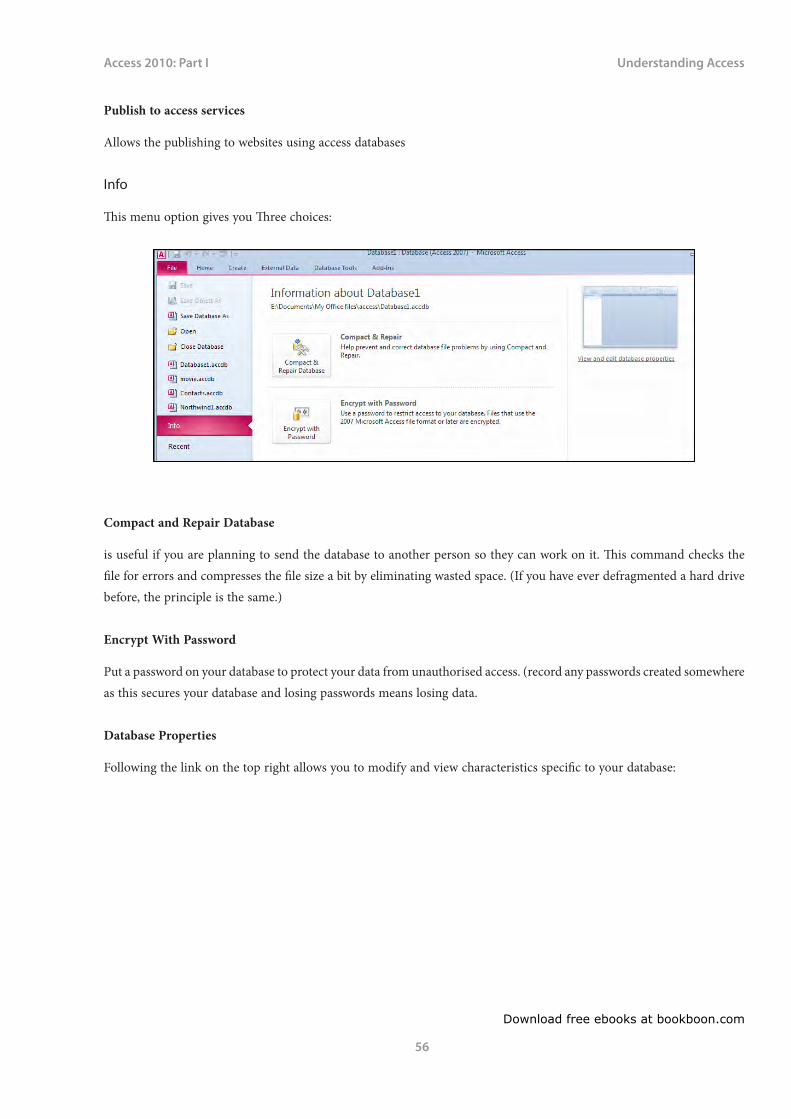
Info
This menu option gives you Three choices:
Compact and Repair Database
is useful if you are planning to send the database to another person so they can work on it. This command checks the file for errors and compresses the file size a bit by eliminating wasted space. (If you have ever defragmented a hard drive before, the principle is the same.)
Encrypt With Password
Put a password on your database to protect your data from unauthorised access. (record any passwords created somewhere as this secures your database and losing passwords means losing data.
Database Properties
Following the link on the top right allows you to modify and view characteristics specific to your database:

Download free ebooks at bookboon.com
Access 2010: Part I
57
Understanding Access
Help
In File Tab
The Help here allows you to check on the status of the access product and check for updates it also gives you another point to connect with the help window as well as using the Help button.

Download free ebooks at bookboon.com
Access 2010: Part I
58
Understanding Access
Help Button
The HELP button, located directly under the title bar, launches the Access help screen:
Click a topic to view help about that particular subject.
Enter a piece of text in the search bar and search for help on that topic.
As we explore more of the features and functionality of Access, we will discover how to use the rest of the interface.
The Home Ribbon
In the following lessons we will explore what commands are included in each command tab and their function. We will start with the HOME command tab and ribbon, which contains most of the commonly used commands for databases and working with data using Access. Remember, this is just an overview; don’t worry if you don’t understand what particular commands do. This is just so you know where to find a command when we begin discussing it.
Views
ӹ To Change viewsMOUSE
Download free ebooks at bookboon.com
Access 2010: Part I
59
Understanding Access
1. Click the VIEWS command to cycle through the different views available for each object. (The type of views available will differ depending on the object that is currently open.)
2. You can also click the small down arrow underneath the word VIEW to see all of the available views:
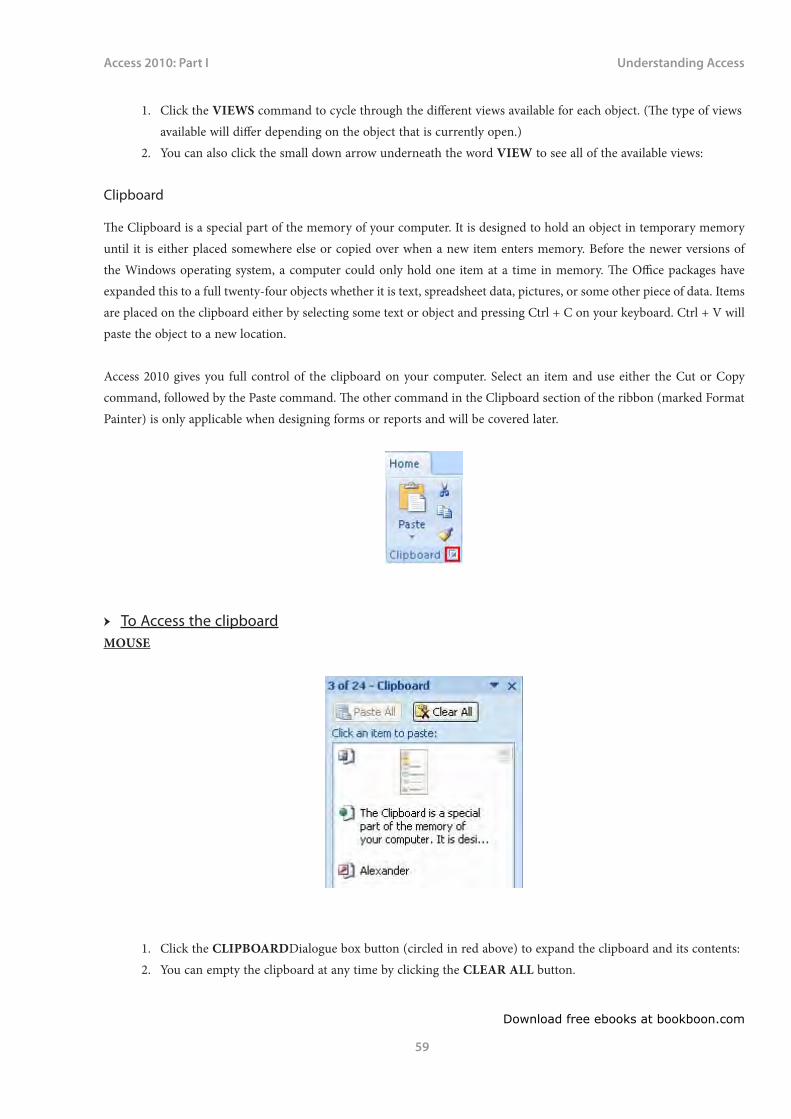
Clipboard
The Clipboard is a special part of the memory of your computer. It is designed to hold an object in temporary memory until it is either placed somewhere else or copied over when a new item enters memory. Before the newer versions of the Windows operating system, a computer could only hold one item at a time in memory. The Office packages have expanded this to a full twenty-four objects whether it is text, spreadsheet data, pictures, or some other piece of data. Items are placed on the clipboard either by selecting some text or object and pressing Ctrl + C on your keyboard. Ctrl + V will paste the object to a new location.
Access 2010 gives you full control of the clipboard on your computer. Select an item and use either the Cut or Copy command, followed by the Paste command. The other command in the Clipboard section of the ribbon (marked Format Painter) is only applicable when designing forms or reports and will be covered later.
ӹ To Access the clipboardMOUSE
1. Click the CLIPBOARDDialogue box button (circled in red above) to expand the clipboard and its contents: 2. You can empty the clipboard at any time by clicking the CLEAR ALL button.

Download free ebooks at bookboon.com
Access 2010: Part I
60
Understanding Access
OR,
1. Delete individual items by right-clicking on an item and selecting DELETE.
Text Formatting
The Font section of the Home ribbon contains all the commands you need to modify how a font looks:
Any of the options that have a small pull-down arrow contain more options than a simple toggle on and off; click the pull-down arrow to see all available options. You can also use the Dialogue box Launcher button in the lower right-hand corner to expand different formatting options for a particular database object.
Text formatting dialogue
This dialogue is for a table (datasheet view object) options may vary dependant on the object and view.
Records
The RECORDS section of the HOME ribbon deals with basic data management:

Download free ebooks at bookboon.com
Access 2010: Part I
61
Understanding Access
The REFRESH ALL command is designed to re-retrieve all the information from the database file. This option becomes particularly useful if your database includes any external data sources (explained later in this manual). If you only want to refresh the data for the current object, click the small pull-down arrow beside the Refresh All command and select Refresh.
Maersk.com/Mitas
�e Graduate Programme for Engineers and Geoscientists
Month 16I was a construction
supervisor in the North Sea
advising and helping foremen
solve problems
I was a
hes
Real work International opportunities
�ree work placementsal Internationaor�ree wo
I wanted real responsibili� I joined MITAS because
Ple
ase
clic
k th
e ad
vert

Download free ebooks at bookboon.com
Access 2010: Part I
62
Understanding Access
The other commands will generate a new record in the object, save any record changes, delete a record, apply a calculation field like sum or average, and check the spelling of the current object.
Clicking the pull-down arrow beside the MORE command will show a small menu of more commands that can be performed on the current object:
We will explore some of these commands later in this manual.
Sort And Filter
The SORT & FILTER section of the Home ribbon will apply some sort of organizational method to a database object:
For example, if you wanted to sort a list of names alphabetically, simply click the column header to select the entire column of names and then click the Sort ASCENDING command. (We will cover how to perform operations on a table of data later in this manual.)
Find
If your database should grow substantially in size some day, finding a particular value by hand quickly becomes impractical. Access features a Find command to track down the value you are looking for:
Simply enter the search criteria you are looking for and Access will search the current database object to retrieve the information you are looking for.
As an addition to the FIND command, Access can also replace certain values based on search criteria. For example, if you misspelled a place name or if someone’s last name has changed, you can use the REPLACE command to find all instances of a value and replace it with something else.

Download free ebooks at bookboon.com
Access 2010: Part I
63
Understanding Access
Use the GO TO command to browse the various records that meet your search criteria. You also have the ability to select an entire row of data containing a ‘found’ value or select the entire object containing the found value(s).
Create Ribbon
We continue in this section with our exploration of the next main ribbon, the Create Ribbon. The Create ribbon is used to make new database objects:
Tables
Tables are the main objects used in databases. (Without tables, and thus without data, you don’t have much of a database!) We learned in Section 1 of this manual that a table contains one or more records (or rows of data) and a record contains one or more fields. So, use this section of the ribbon to create the tables you need in order to store the data for your database. Let’s look at the different options in this section.
Table
This will open a new empty table in Datasheet view. You can directly enter data into the field this way or enter Design view to modify the structure of the table by hand.
Sharepoint Lists
SharePoint Lists are a bit beyond the scope of this manual. Essentially they are tables of data that can be linked to another table stored on a SharePoint server across the room or across the world.

Download free ebooks at bookboon.com
Access 2010: Part I
64
Understanding Access
ӹ To create a sharepoint listMOUSE
1. Use the small pull-down arrow to select a table template from the list of options: 2. You must enter a sharepoint location before using this feature when entered. A new table template opens in
Datasheet view with a number of pre-defined columns. You can start entering data into the table right away.
By 2020, wind could provide one-tenth of our planet’s electricity needs. Already today, SKF’s innovative know-how is crucial to running a large proportion of the world’s wind turbines.
Up to 25 % of the generating costs relate to mainte-nance. These can be reduced dramatically thanks to our systems for on-line condition monitoring and automatic lubrication. We help make it more economical to create cleaner, cheaper energy out of thin air.
By sharing our experience, expertise, and creativity, industries can boost performance beyond expectations.
Therefore we need the best employees who can meet this challenge!
The Power of Knowledge Engineering
Brain power
Plug into The Power of Knowledge Engineering.
Visit us at www.skf.com/knowledge
Ple
ase
clic
k th
e ad
vert

Download free ebooks at bookboon.com
Access 2010: Part I
65
Understanding Access
Table Design
3. Clicking the TABLE DESIGN command opens a new empty table in Design View:
Here you can begin the custom construction of the table as you need it. We will explore more of the functionality of table Design view later in this manual.
Forms
Forms are a way of entering data into a table one record at a time. Forms in Access are comparable to paper forms you would fill out in an office. With a paper form, there is a space for each piece of data required, and once the form is filled out, it will get filed somewhere. The same is true in Access, as you need to have at least one table of data, query, or report in order to make proper use of a form. Use the commands in the Forms section of the Home ribbon to perform different form actions:
Form
Use this command to create a new form based on the last highlighted object in the Navigation Pane. Each field in the object will be made into a new field in the new form. (We will explore the use of forms later in this manual.)
Navigation
This command creates a special kind of form that lets you view more than one record at a time. Multiple item forms are very useful in certain situations.

Download free ebooks at bookboon.com
Access 2010: Part I
66
Understanding Access
Blank Form
Use this command to create a new empty form.
More Forms
This command features more advanced commands relevant to the use of forms, including the Form Wizard, used to help you create a form without having to build it manually:
Form Design
Clicking the Form Design command opens a new empty form in Design view. You can begin constructing a new form right away.
Form Wizard
This is a step by step tool allowing you to create a form quickly using existing table fields and inbulit formatting options
Reports
Reports are primarily used to summarize the data returned by a query. Reports can also be used to create a complete table contents listing suitable for printing.
Report
Clicking the Report button creates a very simple report based on the last highlighted object in the Navigation Pane. We will explore the use of reports later in this manual.
Labels
There is a good chance most of the databases you will use will have some sort of contact table containing names and addresses. Access features the ability to create a mailing list based on the data in a table.
Blank Report
This command opens an empty report.

Download free ebooks at bookboon.com
Access 2010: Part I
67
Understanding Access
Report Wizard
This command will walk you through the steps of creating a report based on another database object. The wizard will walk you through the placement of fields as well as a style and layout that works for you.
Report Design
This command will open a new blank report in Design View where you can start to manually build a form right away.
Queries
The Queries section of the Create ribbon is devoted to the construction of queries
Query Wizard
The Query Wizard will walk you through the steps of making a query without requiring any knowledge of database code like SQL (Structured Query Language). Simply pick the fields you want to display in your query and let Access do the rest.
Query Design
This command will open a new empty query in Design view where you can stipulate with more precision how you want to construct your query.
Macros & Code
Macros are a set of instructions that you can tell Access to perform. For example, if you are performing a fairly large task with many steps frequently in Access, you can design a macro. It works like a script given to a performer; they read the script and deliver the performance the same way each time.

Download free ebooks at bookboon.com
Access 2010: Part I
68
Understanding Access
The modules and visual Basic buttons in this section are designed for database programmers to have Access perform more advanced program functionality.
External Data Ribbon
If you are just starting out with Access, chances are the majority of the databases you will use will be contained on a single machine. You will also likely enter most of the data by hand. This is fine for small databases, but Access gives you the ability to import data from nearly any source and from a wide variety of programs. In this lesson we will learn a little bit more about the External Data ribbon.
Import& Link
The Import& Link section allows you to bring in data from many different sources, including other Microsoft Office programs Or to be able to access the linked table manager to access and manage any tables that may be linked to other databases or Excel files.
Saved Imports
Allows you to retrieve information for a specific source many times. For example, if you extract information from a Microsoft Excel spreadsheet on a regular basis, you can choose to save the import operation so you don’t need to set up the same import over and over again.
Linked Table Manager
This command is used to perform certain operations pertaining to any linked tables in your database.
Excel
The Excel command lets you import data from an Excel file or link to the data contained in a file.
Access
This command lets you import data from another Access file or link to the data contained in a file.

Download free ebooks at bookboon.com
Access 2010: Part I
69
Understanding Access
Text File
If you have a large amount of data that is in an organized structure, you can import that data directly into your database file and have Access format it for you.
XML File
Import the data from an XML (Extensible Mark-Up Language) file directly into a table in your database.
Are you considering aEuropean business degree?LEARN BUSINESS at university level. We mix cases with cutting edge research working individually or in teams and everyone speaks English. Bring back valuable knowledge and experience to boost your career.
MEET a culture of new foods, music and traditions and a new way of studying business in a safe, clean environment – in the middle of Copenhagen, Denmark.
ENGAGE in extra-curricular activities such as case competitions, sports, etc. – make new friends among cbs’ 18,000 students from more than 80 countries.
See what we look likeand how we work on cbs.dk
Ple
ase
clic
k th
e ad
vert

Download free ebooks at bookboon.com
Access 2010: Part I
70
Understanding Access
More
Access 2010 features the ability to import data from other database programs. Click the appropriate file type command to start importing that particular type of file:
SharePoint List
Use this command to import data from a SharePoint list or link to the data contained in the list.
Export
In addition to being able to import data from a number of sources, Access can also export data to several different sources.
Saved Exports
If you frequently export data to a particular location or program, you can save the export operation for later use, thereby eliminating having to set up the export each time.
Excel
Export the data contained in an object to an Excel spreadsheet.
Text File
You can export the data contents from a database object to a plain text file that is usable on virtually any computing platform.
XML File
Xml Files use tagged data and can easily be used on the web or any application that allows the use of XML. XML is supported by a wide range of applications and is the standard data format for transporting or handling data outside of a database.
PDF or XPS
This option enables the contents of a database object to be distributed to others as a PDF or XPS files. This means you can see database objects without having the need for Access to be installed in every location. (This option may not be available if you have not downloaded and installed the PDF add-in from the Microsoft Web site.)

Download free ebooks at bookboon.com
Access 2010: Part I
71
Understanding Access
This allows the sending of the data in a format of your choosing (spreadsheet xml etc) and is a one click solution to exporting your data outside of your organisation.
Access
Export your data or objects to another access database.
Word Merge
Use the merge facility to create mail merge documents utilising the fields and data within the selected table or query.
More
Access 2010 allows you to export to many other file types and locations through the use of the More command:
Word
Access allows you to export the contents of a database object to Rich Text Format (RTF) for use in Microsoft Word and other word processing applications.
SharePoint List
Export the data in a database object to a central SharePoint location.

Download free ebooks at bookboon.com
Access 2010: Part I
72
Understanding Access
Collect Data
One of the more powerful and convenient data collection services is the Collect Data portion of the External Data ribbon. Though the use of these commands is beyond the scope of this manual, their function is certainly worthwhile mentioning.
Create E-Mail
Use this command to send a self-contained form as an attachment in an e-mail. The recipient can enter some data into the form and then e-mail it back to you.
Manage Replies
This command is used to sort and store the incoming e-mail that you had distributed.
www.simcorp.com
MITIGATE RISK REDUCE COST ENABLE GROWTH
The financial industry needs a strong software platformThat’s why we need you
SimCorp is a leading provider of software solutions for the financial industry. We work together to reach a common goal: to help our clients
succeed by providing a strong, scalable IT platform that enables growth, while mitigating risk and reducing cost. At SimCorp, we value
commitment and enable you to make the most of your ambitions and potential.
Are you among the best qualified in finance, economics, IT or mathematics?
Find your next challenge at www.simcorp.com/careers
Ple
ase
clic
k th
e ad
vert

Download free ebooks at bookboon.com
Access 2010: Part I
73
Understanding Access
Viewing Data
We have used Access so far in a simple way, usually opening only one or two objects at a time. In this lesson we will learn a bit more about the different views available in Access as well as some other viewing management options.
Using The View Menus
We have and will make use of the View menu throughout this manual. The View menu is located in The HOME ribbon throughout Access and is different for each object you open.
Table
DATASHEET view displays all data in a table in a columnar view.
PIVOTTABLE AND PIVOTCHART views they allow you to quickly and graphically compare the values in one field with another.
DESIGN view lets you modify the properties of a table to make it contain and display the data you need.
Form

Download free ebooks at bookboon.com
Access 2010: Part I
74
Understanding Access
FORM view lets you view the form in such a way that you can enter data one record at a time into a table.
DATASHEET view is a way of showing you the table that the form references.
LAYOUT view is an intermediate step between Form view and Design view. It lets you adjust the location of objects in a form while still being able to see the data it contains.
DESIGN view lets you modify the look and feel of a form as well as add different controls to perform actions.
Report
REPORT view displays the contents of the report in a manner suitable for printing or presenting.
LAYOUT view is an intermediate step between Report view and Design view. It lets you adjust the location of objects in a report while still being able to see the data it contains.
DESIGN view lets you modify the look and feel of a report as well as add different controls to display data or perform actions.
Query

Download free ebooks at bookboon.com
Access 2010: Part I
75
Understanding Access
DATASHEET view displays the results of a query in a view similar to a table.
PIVOTTABLE AND PIVOTCHART allow you to quickly and graphically compare the values in one field with another.
SQL (STRUCTURED QUERY LANGUAGE) view is a way of viewing and modifying the background ‘code’ used to make a query. SQL editing is beyond the scope of this manual.
DESIGN view lets you add and remove fields from the search as well as add criteria to retrieve more specific results. Many other options we will look into later are available in this view.
Using The View Icons
The VIEW menu has a cousin present in the very bottom right-hand corner of the Access window. For example, viewing a table in Datasheet view will show the following buttons:
Ple
ase
clic
k th
e ad
vert

Download free ebooks at bookboon.com
Access 2010: Part I
76
Understanding Access
These icons are exactly the same as the corresponding items in the View command. The view currently in use is highlighted in orange. If you hover your mouse over an icon to see its description:
ӹ To use the view iconsMOUSE
1. Click any of the icons to switch to that view.
Database Tools Ribbon
The Database Tools ribbon is the last of the four main command ribbons. It contains most of the advanced and background commands used on an established database. We will explore the basics of this ribbon’s functionality in this lesson.
Macro
We defined a macro earlier as a set of instructions you can save to use again and again on a database. A macro can be used to encompass nearly every command in Access, as well as extra functionality defined by a programmer.
Visual Basic
This command launches the Visual Basic editor. This program is used to develop VBA code (Visual Basic for Applications) designed to do background operations in a database.
Run Macro
This command will launch the RUN MACROdialogue box. Choose a macro from the combo box and click OK.

Download free ebooks at bookboon.com
Access 2010: Part I
77
Understanding Access
Relationships
The RELATIONSHIPS section of the ribbon is used to display some of the different characteristics that a database has:
Relationships
Nearly every database that contains multiple tables also includes a relationship between the information contained in the database file. For example, if you work at a department store, each item likely has some department identification number associated with it (1, 2, 3, etc.). In the store database there is another table that lists the corresponding department name with a number (1 = ladies wear, 2 = furniture, 3 = kitchen & bath, etc.). The table of items and the table of departments share a relationship in that the values of one are related to the values of another. We will explore relationships later in this manual.
Object Dependencies
As you develop more relationships in your database and build more forms, reports, and queries, you will develop a large number of dependencies. That is, one object, such as a query, depends on many others in order to fulfil its job. Click this button to view these dependencies.
Analyze
The Analyze section of the ribbon is used to examine how your database is built and how will it will perform. Database performance, as well as the terminology and methodology behind it, is used mainly by database engineers. However, Access makes it easy to perform some optimizations to your data without you needing a PhD in computer science!
Database Documenter
The Database Documenter tool is used to thoroughly list every feature and property of a database object or group of objects.

Download free ebooks at bookboon.com
Access 2010: Part I
78
Understanding Access
Analyze Performance
This command is a special part of Access that can tell you where you may be able to make improvements to the design of your database. For example, if you end up with duplicate tables or a table, the analyzer can find these and suggest some optimizations to increase the performance of your database.
Analyze Table
This command launches the Table Analyzer Wizard. This tool works like the Analyze Performance command, but on a finer scale and one table at a time.
Move Data
The Move Data section of the ribbon is used to perform large scale move and split operations to a database. These commands are beyond the scope of this manual and should only be performed by IT professionals.
Do you want your Dream Job?
More customers get their dream job by using RedStarResume than any other resume service.
RedStarResume can help you with your job application and CV.
Go to: Redstarresume.com
Use code “BOOKBOON” and save up to $15
(enter the discount code in the “Discount Code Box”)
Ple
ase
clic
k th
e ad
vert

Download free ebooks at bookboon.com
Access 2010: Part I
79
Understanding Access
SQL Server
This will move certain objects or an entire database to an external Microsoft SQL Server.
Access Database
In certain corporate situations, it may be useful to split up your database across two or more locations such that the tables are situated in one location and other database objects are in other locations. This command will open a wizard that will help you do just that.
Sharepoint
Move your data to a sharpoint list and creates links to that data.
Add-Ins
An add-in is a special type of third-party program or VBA code that is used to provide extra or specific functionality to the Access interface. If you are familiar with plug-ins used in an Internet browser, the principle is essentially the same.
Tools
The last section of the Database Tools ribbon dealsCompacting and repairing your database to allow the file size to be reduced and the repair of the connectivity within it to allow it to run trouble free.(programming errors cannot be repaired and must be repaired manually.)
Using The “database”Tabs
In previous versions of Access, opening a new database object meant opening a new window. After only a few objects, your screen would be pretty full and finding objects ‘hidden’ under different windows was frustrating. Access 2010 eliminates that clutter. Each database object you open opens a new tab:

Download free ebooks at bookboon.com
Access 2010: Part I
80
Understanding Access
Simply click a tab to view that object.
If you happen to have many objects open at once, arrows will appear on either side of the list of tabs allowing you to scroll back and forth through the opened objects:
Closing Individual Tabs
To close a database object, highlight its name in the list of tabs and then click the close button underneath the ribbon:
The Trust Center
The terms computer security, identity theft, and privacy are being used more and more all the time. There are a few bad apples out there that like to create viruses and spyware for the purpose of disrupting day-to-day business. The Microsoft Windows family of operating systems, as well as a number of third-party developers, work hard every day to keep your private and sensitive data safe. So to does the Office 2010 suite.
In this lesson we will explore some of the measures taken by Access 2010 to keep your computer and yourself from being a victim of an attack or being disrupted while you work.
Warnings You May See when Opening a Database

Download free ebooks at bookboon.com
Access 2010: Part I
81
Understanding Access
In opening a database from a non secure location, we would encounter a warning stating that Access has prevented a file from being opened because of the security settings that have been enabled on your computer:
You might also run into other warnings that state Access cannot perform a certain action because a non-standard operation was encountered or some part of the database file seems to be missing. It is possible that the following warning might appear not because a problem was detected, but because a certain section of the database might not be fully constructed:
These warnings are designed to protect you, not scare you. Should you encounter messages like the ones above, think why it may have occurred. If you received the file from someone else, tell them you have encountered a problem before opening the file. If you are unsure about the file, contact your organization’s IT department for help; they may be able to diagnose your problem and provide a solution. It may even be that your security settings are a bit too high for this application (which is not always a bad thing). We will discuss what to do in situations like this in this lesson.
Enabling Content
If you are sure the file you are opening is safe, or you trust the person it came from, simply click the ENABLE CONTENT button in the bar that appears under the ribbon:

Download free ebooks at bookboon.com
Access 2010: Part I
82
Understanding Access
Doing so will show the Trust In Office dialogue box:
In the picture above, Access gave you a warning because it could not identify who made the file. This does not necessarily mean that it came from an untrustworthy source; perhaps whoever made the file did not bother to apply a digital signature (described in the next section) or security certificate. If you are sure the content is safe, simply click the Enable this content radio button and then click OK. The file will then open normally.
Challenging? Not challenging? Try more
Try this...
www.alloptions.nl/life
Ple
ase
clic
k th
e ad
vert

Download free ebooks at bookboon.com
Access 2010: Part I
83
Understanding Access
About Digital Signatures
Digital signatures serve the same purpose as a written signature or an embossed certificate: they identify who someone or what something is, and no two individual signatures are exactly the same. The same is true with digital signatures. Though the topic of signature application is a bit beyond the scope of this manual, the concept is fairly simple.
If you are part of a corporate network that sends sensitive trade secrets via electronic means, you can apply digital signatures to the files that are created. If you use Access 2010 to organize supplier information, you can safely send information to another individual in your organization. Their computer will hold what is called a digital certificate which is designed to ‘decode’ your signature. If your signature decodes properly, no problem – the other user will then make use of the supplier information. However if your signature does not decode properly, the other user can choose to block content from you (or perhaps someone masquerading as you!).
You can view and modify different aspects of Access’ security via the Microsoft Office Access Trust Centre (described later in this lesson).
About Trusted Locations
Imagine you are an employee of a large company and you send and receive files every day. Access has been warning you that some files may contain a possible security threat because the sender could not be verified. However, you know the sender and know that they can be trusted. Therefore, instead of being warned every time you try to open a file from them (which can quickly become annoying), you can tell Access that files from a certain location can always be trusted.
Trusted locations can include any location on your computer including shared folders, any other computer on your network, a server on your network, or some external data source across town or across the world!
Opening The Trust Center
All of the security features we have mentioned thus far are accessible through the Trust Centre. Let’s quickly explore the different sections and options available in each. To open the Trust Centre.
ӹ To access trust centre settingsMOUSE
1. ClickFILE Tab (Backstage) Access OPTIONS (located above the Exit button): 2. Down the left-hand side of the Access options window is the link to TRUST CENTRE. Click the link, and
then click the TRUST CENTRE SETTINGS button: 3. The Trust Centre window will then appear, giving you different categories of settings:
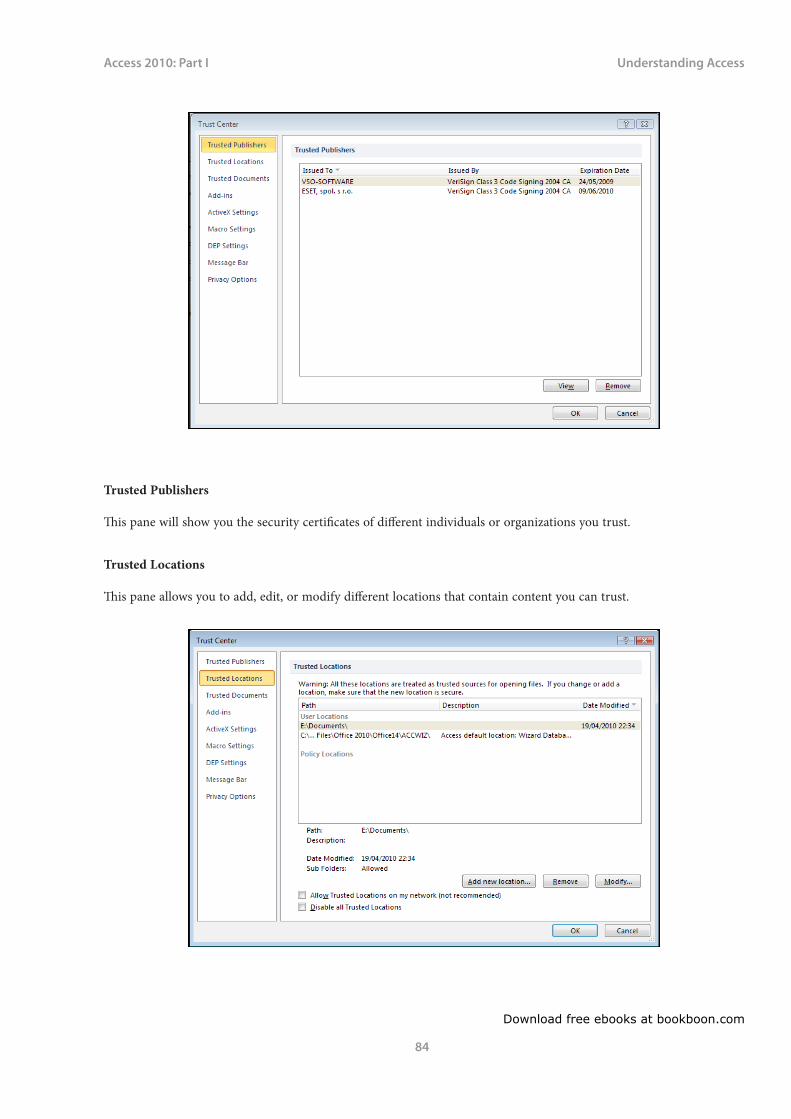
Download free ebooks at bookboon.com
Access 2010: Part I
84
Understanding Access
Trusted Publishers
This pane will show you the security certificates of different individuals or organizations you trust.
Trusted Locations
This pane allows you to add, edit, or modify different locations that contain content you can trust.

Download free ebooks at bookboon.com
Access 2010: Part I
85
Understanding Access
Trusted Documents
This allows you to clear trusted documents, or modify settingsto trust or distrust certain documents.
Add-ins
Add-ins are third party programs or code that are designed to perform a specific task to your database. Add-ins have the potential to cause a lot of trouble and ruin the functionality of a database (such as deleting all of the data) if they contain malicious code. This pane allows you to modify how Access will use any add-ins.
(If you are familiar with a third party plug-in for a web browsing program, such as Adobe Acrobat Reader, the principle is essentially the same.)
ActiveX Settings
Allows you to set the default response in handling files with activeX content (activeX content may contain harmful scripts)

Download free ebooks at bookboon.com
Access 2010: Part I
86
Understanding Access
Macro settings
Macros are a group of commands that can be executed all at once in order to perform some action on your database. But because macros can be constructed with special database code, they too can cause undesirable effects if they are from a bad source. Use this option to modify macro security settings.
Ple
ase
clic
k th
e ad
vert

Download free ebooks at bookboon.com
Access 2010: Part I
87
Understanding Access
Dep Settings
Turn on or off Data Execution Protection which protects your computer from harmful scripts that may run
Message Bar
The Message Bar is set by default to prompt you before opening potentially unsafe content. You can turn the Message Bar on or off using this pane.
Privacy Options
Access (and other programs in the Office suite) can automatically download new content for you, show featured links on Office Online, and provides background access to help diagnose and fix problems. If you would prefer to not see this content, you can modify settings in this pane to disable the content.
You also have the ability to translate certain files based on the languages installed with your operating system, and retrieve reference and research material on the Internet via the Privacy Options pane.
Assigning A Password To Your Database
If you would rather not bother with more advanced security features but still want to have some protection, you can assign a password to encrypt the database. To set a password, a file must first be opened for exclusive use.

Download free ebooks at bookboon.com
Access 2010: Part I
88
Understanding Access
ӹ To set a PasswordMOUSE
1. Close any open databases 2. ClickFILE Tab (Backstage)OPEN:
3. Browse to the database file you wish to open4. Click the small pull-down arrow attached to the OPEN button and click OPEN EXCLUSIVE: 5. Then, open the database file you wish to protect. 6. Click FILE Tab (Backstage) INFO: 7. Click ENCRYPT WITH PASSWORD in the main section of the Window:
8. When the SET DATABASE PASSWORDdialogue box appears, type the password you want to use in the PASSWORD field, then type it again in the VERIFY field:

Download free ebooks at bookboon.com
Access 2010: Part I
89
Understanding Access
9. Once a password is committed to a database file, you must enter the password before Access will open it: 10. Should you need to remove the password, FILE Tab (Backstage) INFOsection again and click REMOVE
DATABASE PASSWORD AND ENCRYPTION:
11. Then, enter the password a final time to confirm the removal of the password.
First Steps
Making a database might seem like a pretty big job, but taking the time to design one properly will save a lot of time down the road. You are exposed to databases everyday use them all the time probably without knowing it. In fact, you are likely in several, yourself!
The easiest method of identifying yourself in day to day life is a simple handshake and saying “Hello, my name is…” But you can’t really shake hands with a computer. Using your name, even your full name, isn’t a very good option either because there may be hundreds of people out there with exactly the same name as you. Therefore, you must be assigned some unique identifier, the most recognizable being your Social Security Number (SSN) or Social Insurance Number (SIN). No one else in the country has the same SSN as you.
This practice holds true for databases, too. Earlier in this manual you may recall seeing the term ‘primary key’. Every row in a table should have at least one field that is unique from every other record. That field is usually a number, and the unique field is referred to as the primary key. It is not imperative to have a primary key, but it makes the design of the database much easier and eliminates the possibility of duplicate data (which does nothing but confuse the issue!) It also allows a database program to (in most cases) search faster and more efficiently. Therefore, it is good practice to have a primary key for every table you make.

Download free ebooks at bookboon.com
Access 2010: Part I
90
Understanding Access
Let’s quickly review what we know about databases: they are made up of tables, and in each table are several records (or rows) of data. Every record is made up of one or more fields, and every record in a table is different from every other record because of the unique primary key. Knowing this, and with the knowledge of the commands we learned so far, we are ready to start making databases!
For the remainder of this manual, let’s pretend that you are Bugs Rabbit, CEO of an upstart animation company, Warner Cousins. You want to use Access 2010 to monitor the expenses made by you and your employees.
Planning A Database
Before you start using Access to create a database, take the time to answer a few questions:
• Why do you need a database? You want to keep track of the expenses made by you and your employees. • Who will be using the database? Any employee of Warner Cousins will have access to this database. • What kind of data would be extracted from the database? Total expenses of the company, total expenses by
each employee, expenses by each category.
Once you have answered these questions, it is time to decide how to design the tables for your database. What fields of data do you need? What data types will the fields need to be? What tables would be important? Which fields will go in which table, and do the placements make sense?
Ple
ase
clic
k th
e ad
vert

Download free ebooks at bookboon.com
Access 2010: Part I
91
Understanding Access
Next comes the planning of relationships between the data. A big list of numbers doesn’t mean much by itself, but when constructed based on other data, it becomes meaningful. And finally, make sure that you talk to everyone who will be using the database will be able to get the data they need. Let’s examine some of the details.
You will obviously need an expense table that contains at least the following: who made the purchase, what did they purchase, how much was it, and when did they purchase it?
The payroll department already has a listing of the people who work for you:
• SIN (or company ID #) • Name • Address • Phone Number • Company Position
The database now should have two tables: an expenses table and an employee table. Now, there needs to be some sort of link between the two tables. You could use the name of each person, but that may become confusing, especially if your company grows into the hundreds. There is another option, however. You can use the SIN (or company ID) of each employee to tie their purchase to their personal information.
In database design, your most powerful tool is not the computer, but rather a piece of paper and a pencil (and a big eraser). Not only can you easily change the information you might need, but you can also visualize the information.
Consider the following diagram, based on the paragraph above:
It might not look like much, but we have a database. It contains fields, records, a primary key for each record in each table, and a relationship between the data. We can see that employee 2 has made two purchases, and employee 1 only one. This might seem silly for an example of this size; why not just say Elmer Funn instead of an employee ID? As mentioned above, this becomes impractical if your organization grows. Imagine that your company has grown to employ thousands of people with hundreds of expenses a day – that becomes a pile of data in a big hurry! You might employ three or four Elmer Funns by now, so using a unique number to identify each employee becomes much more practical.

Download free ebooks at bookboon.com
Access 2010: Part I
92
Understanding Access
Basic Terminology
Let’s take a look at the terminology used in database-speak, starting with the basics. Consider the following diagram:
Let’s Look At Each Piece Of The Database.
Field
A field is the smallest piece of a database; that is, one specific piece of information like a number, a word, a date, a picture, or a reference for some other piece of data. Each column you see in the diagram would all be the same data type; that is, one column of data would all be numbers.
Record
A record is a collection of one or more fields together in a row. (In a real database, you would not count the word ‘Record’ as depicted in the diagram – this is just to help visualize the concept.)
Table
A table is comprised of one or more records. Each table also has a unique name.
Database
A database is comprised of one or more tables. Each database is also given a unique name.
Form
A form is a tool that is used to easily and accurately enter data into a table. A form presents one record of a database at a time to a user, or allows a user to enter data into the database one record at a time.

Download free ebooks at bookboon.com
Access 2010: Part I
93
Understanding Access
Query
A query is just like a question you ask the database. There are two types of queries: select and action. A select query will extract and display data based on criteria you provide. An action query will find all data relevant to your query and perform some sort of operation on it. A query can be performed on one or more tables in a database.
Report
A report presents the data found by a query. A report can be formatted to show summaries, calculations, charts, and more based on the data returned by a query. Access takes the report one step further by letting you organize and format a report into a sleek, professional document suitable for printing, exporting, or e-mailing.
This might seem like a lot to remember, but don’t worry – this terminology will be used heavily throughout this manual and soon it will be second nature!
What Is A Primary Key?
A Primary key consists of one or more fields that uniquely identify each record in a table. An ID number of code often serves as the Primary key because this type of value is always different for each record. Access’s
Stand out from the crowdDesigned for graduates with less than one year of full-time postgraduate work experience, London Business School’s Masters in Management will expand your thinking and provide you with the foundations for a successful career in business.
The programme is developed in consultation with recruiters to provide you with the key skills that top employers demand. Through 11 months of full-time study, you will gain the business knowledge and capabilities to increase your career choices and stand out from the crowd.
Applications are now open for entry in September 2011.
For more information visit www.london.edu/mim/ email [email protected] or call +44 (0)20 7000 7573
Masters in Management
London Business SchoolRegent’s ParkLondon NW1 4SAUnited KingdomTel +44 (0)20 7000 7573Email [email protected]/mim/
Fast-track your career
Ple
ase
clic
k th
e ad
vert

Download free ebooks at bookboon.com
Access 2010: Part I
94
Understanding Access
Primary keys are especially flexible, because you can specify any field, not just the first field in the table. ‘ACCESS’ automatically creates an index for a table’s primary key. A Primary key is similar to a dbase unique index except that ‘ACCESS’ automatically keeps the index on the Primary key current and uses it to search and sort records. You can also create indexes for other fields you search or sort on often.
What Is Unique Index?
For example, suppose you had the personnel records for a large company stored on a database. There are over 50,000 employees within the company and it is necessary for you to find different employees record so that they can be updated. If the records were not indexed, every time you try to find the employee record for ‘Mr Smith’ you will need to read from the beginning of the database until you find ‘Mr Smith’. This operation could take hours to complete.
However, if the records were stored or indexed in alphabetical order then finding the record for ‘Mr. Smith’ would be a great deal easier. What if they are 3 ‘Mr. Smith’? Which record would be the correct one? This highlights the reason why you should try and make your index (primary key) unique, so that every record is different and can be found easily. Staff numbers would be the ideal field to create as an index, because it is unique, no two employees’ numbers are ever the same.
Therefore, if you need to find ‘Mr. Smith’s record and you know his staff number them the record could be located in a matter of seconds rather than hours.
Field Properties & Validation
‘ACCESS’ automatically validates values based on a field data type; for example ‘ACCEESS’ will not allow text in a numeric field. You can set more specific rules for data validation rules.
When Should You Validate Data?
Data should be validated:
• When you want to cut down the amount of errors that can occur in data entry• When you want data to be entered in a specific format only• With fixed length (only xxx amount of characters can be entered)
For example if you were asking someone a question about their date of birth, you could set up a validation rule that only allowed them to enter their data in a specific format i.e. Day/Month/Year, and only allowed them to enter a date which makes them over the age of 18. This will ensure validity of data and cut down the number of errors made.
Setting Field Properties
In the lower portion of the table window, you can set properties for the current field. For example, you can set the size of text or numeric fields. This is also where you define validation rules and default values to assist in the data entry and prevent mistakes in your data.

Download free ebooks at bookboon.com
Access 2010: Part I
95
Understanding Access
The Concept Of Normalisation
Data values should not be stored twice. If they are, it is a waste of space and more importantly, leads to updates only being applied to some of the copies of the value.
Each record is a collection of data items, which have some unique key. In any one record, the data items can only have one value for each key.
If a formal system has a set of repeating entries on one form, then each repeating entry becomes a record in a table.
Some business applications can be implemented using only one table, for example a stock file of a mailing database.
Many other applications use several tables; stock monitoring with records of purchase orders being delivered and despatches being sent out.
The correct system for an internal telephone directory giving departments, employees, rooms and extension numbers needs six tables to cope with such concepts as one room having more than one telephone extensions or two employees sharing the same extension.
End-users require an understanding of these concepts before they can design systems, which are capable of solving a problem. The target of the developer should be that, other people could use system without hours of explanation, or volumes of documentation
THIS IS SELDOM ACHIEVED – usually due to lack of system design.
The data that is to be stored in tables need to be thought about. One factor that needs to be taken into consideration when deciding what tables will be needed is the reality of the system. How many repeating lines mean a new table is needed?
A simple example of this is a list of companies and their telephone numbers. There could be a field for the switch board number, a fax number and an emergency number. This means that we can use one record per company, with three telephone number fields. If one company has fifty external telephone lines then we should NOT allocate fifty field for the numbers in one record; we should start a new table with one field for each telephone number, and another filed to link the telephone number table to the company table. WE do not normally want to repeat the company name in the company name in the telephone number table, as this would be a repetition. If each company has a unique identifier, then this can be stored in the telephone number table.
We have already mentioned that each table normally has a unique key ‘ACCESS’ allows the key to be constructed from two fields such that the combination of values from the two fields is unique. It is NOT compulsory to have a key for a title; the existence of a key serves more that one purpose though.

Download free ebooks at bookboon.com
Access 2010: Part I
96
Understanding Access
Normalisation Techniques
• The steps in Normalising data are:• Convert the source data into a list of attributes;• Put repeating groups of data into separate structures;• Put data that is only dependent on part of the key into separate structures;• Put data that is dependent on other non-key data into separate structures;• Combine structures with identical keys.
The following source document will be used to illustrate the effect of each step.
SALES ORDER RECORD
Order No. Order Date: Order Value Priority Sales Person
Customer No. Customer Name:
Invoice Address: Consignee Address:
Order Details
Product Code Description QTY Price Delivery Data
Delivery Instruction: Special Instruction:
Convert the source data into a list of attributes
(UN-NORMALISED FORM (UNF))
UNF
Order No.
Order DateOrder ValuePrioritySales PersonCustomer No.Customer NameCustomer AddressConsignee AddressInvoice AddressProduct Code

Download free ebooks at bookboon.com
Access 2010: Part I
97
Understanding Access
DescriptionQuantityPriceDelivery DateDelivery InstructionSpecial Instruction
Put repeating groups data into specific structure
(First Normal Form (FNF))
Order No. Order No.
Product CodeOrder ValueOrder Value DescriptionPriority QuantitySales Person PriceCustomer No. Delivery DataCustomer NameInvoice AddressConsignee AddressDelivery AddressDelivery DateDelivery InstructionSpecial Instruction
THIS IS CALLED THE FIRST NORMAL FORM (FNF)
Put fields which are only dependent on part of the key into separate structures (Second Normal Form)
This step is also called ‘removing partial dependencies’.
The description attributes in the extracted group is only dependent on the product code part of the key, not the order No. So that is extracted to a new group. Its primary key is product code. In simple terms this is saying that the description of a product will always be the same, so why not hold it once under the product code, rather that repeat it every time it is ordered.

Download free ebooks at bookboon.com
Access 2010: Part I
98
Understanding Access
There are now three groups of data:
Order No. Order No. Product Code Product CodeOrder Date DescriptionOrder Value Quantity PricePrioritySales PersonCustomer No.Customer NameInvoice AddressConsignee AddressDelivery Address
Special Instruction
The above example assumes that the price is per unit. The analyst would have to check that, this was the correct meaning and not, say price per unit x quantity ordered.Put fields that are dependent on other non-key fields into separate structures.
© U
BS
2010
. All
rig
hts
res
erve
d.
www.ubs.com/graduates
Looking for a career where your ideas could really make a difference? UBS’s
Graduate Programme and internships are a chance for you to experience
for yourself what it’s like to be part of a global team that rewards your input
and believes in succeeding together.
Wherever you are in your academic career, make your future a part of ours
by visiting www.ubs.com/graduates.
You’re full of energyand ideas. And that’s just what we are looking for.
Ple
ase
clic
k th
e ad
vert

Download free ebooks at bookboon.com
Access 2010: Part I
99
Understanding Access
(THIRD NORMAL FORM (TNF)).
This step is known as ‘removing mutual dependencies’.
The fields ‘Customer Address’, and ‘Invoice Address’ are only dependent on the customer number.
They are extracted to a separate group with Customer Number as the primary key.
Customer Number needs to remain in the original data group as a foreign key to provide a link to the extracted data. Again, in simple terms, the reasoning is that if the ‘Customer Address’ and ‘Invoice Address’ will always be the same, hold them only once with the master details of the customer. The foreign key is marked with an ‘*’.
Order No. Order No. Product Code Customer No. Product CodeOrder Date Description Customer NameSales Person Quantity Price Invoice Address*Customer No. Delivery DateConsignee AddressDelivery InstructionSpecial InstructionPriority
Key Values
‘ACCESS’ ensures that no two records in the same table can have the same key. If we use a ‘part number’ to identify a line of stock, then this must be kept unique. If two different lines of stock had the same key, then chaos could be caused.
The key also creates a sequence for the records. However, the user should not try to use values for a key to sequence a report. The data can be presented in different sequence in different printouts without using any keys.
The key also provides quick access to a record, which is important if there are hundreds of records in a file. This feature is used frequently by ‘ACCESS’ when the user is interacting with more than one table at once, via a form, a report or a key.
Choosing A Key
Sometimes the choice of a field for a key is self-evident, as with example such as Employee Details (Payroll number) or stock file (Part Number). If the table is a list of companies, then the choice is not so obvious. If the companies were customers, then a Sales Ledger system would specify an account number for each. If they are a mix of useful contacts such as Bank, Inland Revenue, Software support, Consultant and so on, then there is no obvious key.

Download free ebooks at bookboon.com
Access 2010: Part I
100
Understanding Access
In this situation, an artificial key needs to be created. The old fashioned way to do this was to sue some letters of the company name, a letter to give their relationship to our organisation to our organisation and some geographical reference. This style of solution is now largely discredited, and it is more common to use an artificial numbering system such as A001, A002 and so on. The length of the code should be as short as possible, but providing enough possible values to cope with any predictable number of records.
An alphabetical key provide many more possible values than numeric, but care should be taken to avoid problems such as A 1 not being the same as A1 or A 1.
Sometimes it is desirable to use two fields for a key. If we wish to keep records of daily usage of pool cars, then we could use the combination of the car registration numbers and the date. This would not permit the storage of two records for the same car for the same day though. A system to record quality wines in stock will need to have a list of the wines, and then a second table indicating the number of wines in stock for each year. In this case, the key to the wine table could be vineyard number, and the key to the second table would be the combination of the vineyard number and the year.
It is always possible to create a new field to act a key in one table, and store the other fields as non-key data items.
Ple
ase
clic
k th
e ad
vert

Download free ebooks at bookboon.com
Access 2010: Part I
101
Saving in Access
Section 3 Saving in AccessBY THE END OF THIS SECTION YOU WILL BE ABLE TO
• Save your objects• Save objects as different object types• Save your database as earlier versions • Set file and object properties
Saving in Access
Much of the file management functionality of Access takes place in the background and automatically saves most changes you make to a database. When Access does not save something for you automatically, you will be prompted asking if you want to save the changes to a particular object.
However, Access does give you a bit of flexibility when it comes to saving different objects. We will explore this saving functionality in this lesson.
Using The Save As Options
Access gives you two commands to choose from: Save Object as and Save database as (to save database in another format.)
Let’s look at each of the options.
Save Object As
Most things in Access are saved automatically, but you can perform a manual save of a particular database object. For example, consider the Employees table of the Northwind sample database:

Download free ebooks at bookboon.com
Access 2010: Part I
102
Saving in Access
ӹ To save an objectMOUSE
1. Click FILE Tab (Backstage) - SAVE OBJECT AS:
2. The following SAVE AS dialogue box will appear:
In this example, you have the ability to save the Employees table as another table (which will make a copy), query, form, or report. Give the new object a name and then click the pull-down arrow beside the AS combo box to see the choices. Remember, you can always save a copy of the object as the same type of object (table as table, form as form, etc.).
Object What Objects you can Save As
Tables Table, Query, Form, Report
Queries Query, Form, Report
Forms Form, Report
Reports Report only
3. Once you have saved the new object you can access it in the NAVIGATION PANE: (Seefollowing picture)

Download free ebooks at bookboon.com
Access 2010: Part I
103
Saving in Access
Save Database As
This allows the saving of the database As a copy
ӹ To save a copyMOUSE
1. Click FILE Tab (Backstage) - SAVE DATABSE AS: 2. Access will close all currently open database objects and then open the SAVE AS dialogue box.

Download free ebooks at bookboon.com
Access 2010: Part I
104
Saving in Access
3. Choose a save location and new file name.4. Click SAVE.
your chance to change the worldHere at Ericsson we have a deep rooted belief that the innovations we make on a daily basis can have a profound effect on making the world a better place for people, business and society. Join us.
In Germany we are especially looking for graduates as Integration Engineers for • Radio Access and IP Networks• IMS and IPTV
We are looking forward to getting your application!To apply and for all current job openings please visit our web page: www.ericsson.com/careers
Ple
ase
clic
k th
e ad
vert

Download free ebooks at bookboon.com
Access 2010: Part I
105
Saving in Access
Saving In A Different Format
You may wish to save your database as an earlier format to allow users from earlier versions of access to utilise it. This could prove difficult as many new features within your database are not compatible with earlier versions.
ӹ To save as an earlier versionMOUSE
1. Click the FILE tab and SAVE & PUBLISH2. From the main window make a selection of which format of database you wish to save it as:
Access 2002-2003 File Format
Access 2000 Database
Access 2010 uses a new file structure to save files. The 2010 file format is not directly backwards compatible with previous versions of Access. However, it can be made to save files in any other version of Access if necessary.
3. Click the SAVE AS button to open the SAVE ASdialogue4. Enter a file name and browse to a location5. Click SAVE
Using File Properties
You can view and edit the properties of a file at any time by using the FILE Tab (Backstage).

Download free ebooks at bookboon.com
Access 2010: Part I
106
Saving in Access
ӹ To access and set Database Properties
1. Open a database file 2. ClickFILE Tab - INFO–3. Click the VIEW AND EDIT DATABASE PROPERTIES. Link on the right of the main window4. From the dialogue that appears Click the SUMMARY tab to show the current database properties: 5. Click in any of the fields and enter the information.6. Click OK when you have edited or entered the properties you wish.
Using Object Properties
Each object that you create within your database has its own properties you may wish to enter or edit

Download free ebooks at bookboon.com
Access 2010: Part I
107
Saving in Access
ӹ To set a database objects propertiesMOUSE
1. Select and open an object in the Navigation pane 2. Click the TABLE TOOLS, TABLEContextual tab. (Table object open)
3. Click the TABLE PROPERTIES button in the PROPERTIES group4. Enter or edit any properties you wish to set
OR
1. Right click a Table in the NAVIGATION Pane2. Choose TABLE PROPERTIES3. In the dialogue that appears, Enter a description of the object.

Download free ebooks at bookboon.com
Access 2010: Part I
108
Saving in Access
4. Click OK to close
OR
1. Open a table (any object) in design view.2. On the Contextual design ribbon in the show hide group3. Click on the property sheet button to see the property sheet for the open object on the right hand side4. Set or edit any of the options you wish to.
5. Click the save button on the quick access toolbar to save the property changes.
Using AutoRecover
Access that makes a backup copy of the database you are currently working on. Access, by default, saves the current working file every ten minutes. If your computer encounters a problem and Access has to close, your database will be restored the next time it is opened.

Download free ebooks at bookboon.com
Access 2010: Part I
109
To see Section 4-12 download
Access 2010: Part IIAccess 2010: Part IIIAccess 2010: Part IV