A GUIDE TO YOUR TELSTRA T-HUB® 2 TABLET - Product ...
85
A GUIDE TO YOUR TELSTRA T-HUB ® 2 TABLET
-
Upload
khangminh22 -
Category
Documents
-
view
3 -
download
0
Transcript of A GUIDE TO YOUR TELSTRA T-HUB® 2 TABLET - Product ...
A GUIDETO YOURTELSTRA T-HUB® 2 TABLET
The T-Hub® 2 is a unique combination of phone and tablet, designed specifically for Telstra’s home phone and internet services.
This guide will help you get started as quickly and easily as possible. It’ll help you get connected and show you all kinds of ways to get the most from your T-Hub® 2. You’ll be making calls and browsing the internet in no time. For more information on using your T-Hub® 2 visit telstra.com/thub.
2 3
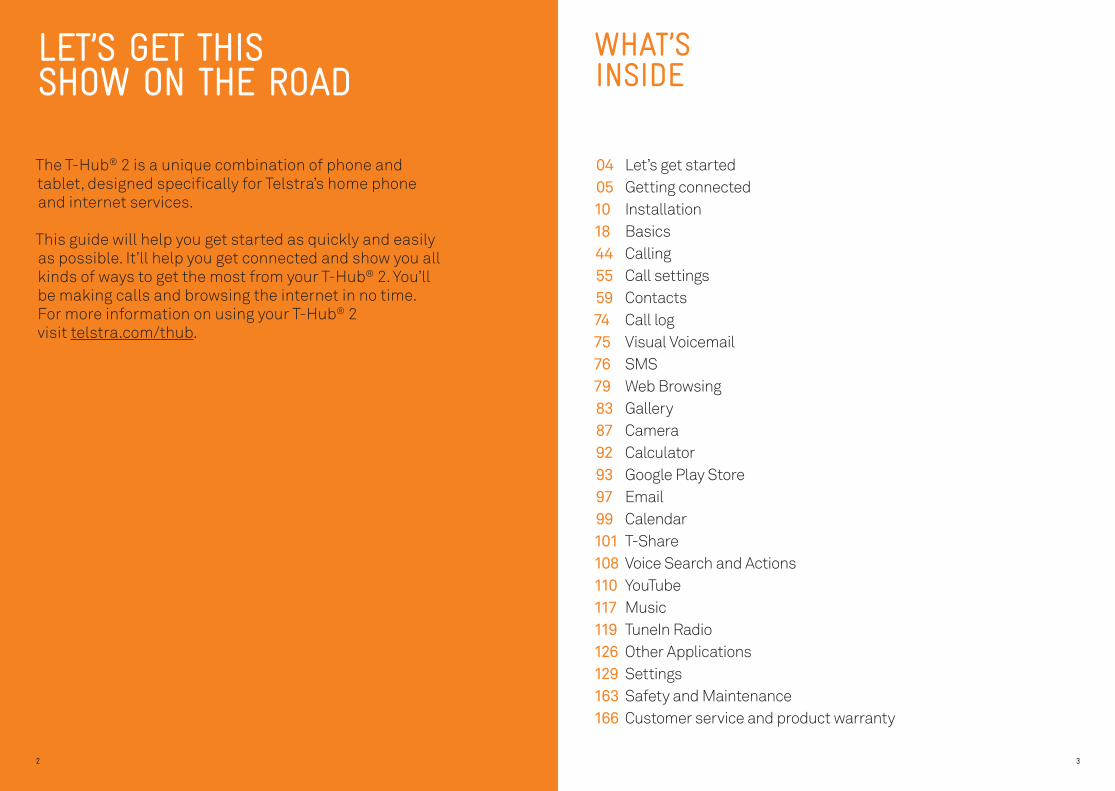
WHAT’SINSIDE
04 Let’s get started 05 Getting connected 10 Installation 18 Basics 44 Calling 55 Call settings 59 Contacts 74 Call log 75 Visual Voicemail 76 SMS 79 Web Browsing 83 Gallery 87 Camera 92 Calculator 93 Google Play Store 97 Email 99 Calendar 101 T-Share 108 Voice Search and Actions 110 YouTube 117 Music 119 TuneIn Radio 126 Other Applications 129 Settings 163 Safety and Maintenance 166 Customer service and product warranty
LET’S GET THIS SHOW ON THE ROAD
4 5
LET’S GET STARTED
GETTING CONNECTED
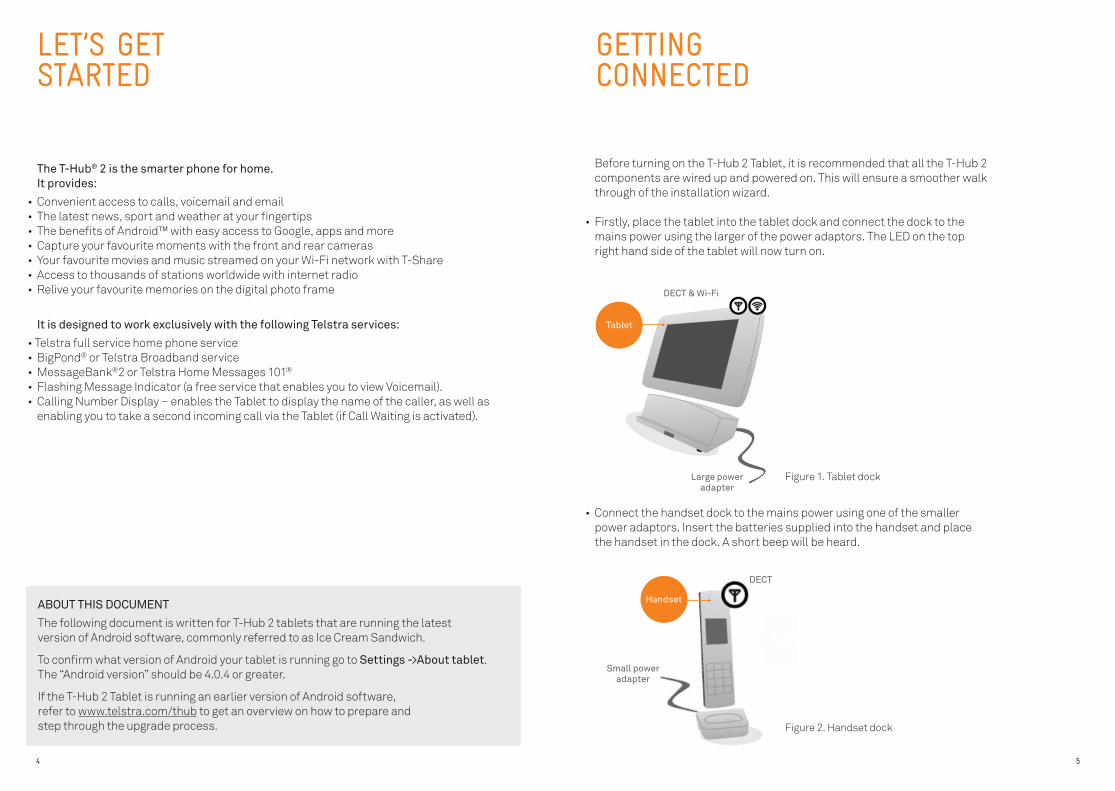
Before turning on the T-Hub 2 Tablet, it is recommended that all the T-Hub 2 components are wired up and powered on. This will ensure a smoother walk through of the installation wizard.
• Firstly, place the tablet into the tablet dock and connect the dock to the mains power using the larger of the power adaptors. The LED on the top right hand side of the tablet will now turn on.
• Connect the handset dock to the mains power using one of the smaller power adaptors. Insert the batteries supplied into the handset and place the handset in the dock. A short beep will be heard.
The T-Hub® 2 is the smarter phone for home. It provides:
• Convenient access to calls, voicemail and email• The latest news, sport and weather at your fingertips• The benefits of Android™ with easy access to Google, apps and more• Capture your favourite moments with the front and rear cameras• Your favourite movies and music streamed on your Wi-Fi network with T-Share• Access to thousands of stations worldwide with internet radio• Relive your favourite memories on the digital photo frame
It is designed to work exclusively with the following Telstra services:
• Telstra full service home phone service• BigPond® or Telstra Broadband service• MessageBank®2 or Telstra Home Messages 101®
• Flashing Message Indicator (a free service that enables you to view Voicemail).• Calling Number Display – enables the Tablet to display the name of the caller, as well as
enabling you to take a second incoming call via the Tablet (if Call Waiting is activated).
ABOUT THIS DOCUMENT
The following document is written for T-Hub 2 tablets that are running the latest version of Android software, commonly referred to as Ice Cream Sandwich.
To confirm what version of Android your tablet is running go to Settings ->About tablet.The “Android version” should be 4.0.4 or greater.
If the T-Hub 2 Tablet is running an earlier version of Android software, refer to www.telstra.com/thub to get an overview on how to prepare and step through the upgrade process.
DECT & Wi-Fi
DECT
Large power adapter
Small power adapter
Tablet
Handset
Figure 1. Tablet dock
Figure 2. Handset dock
6 7
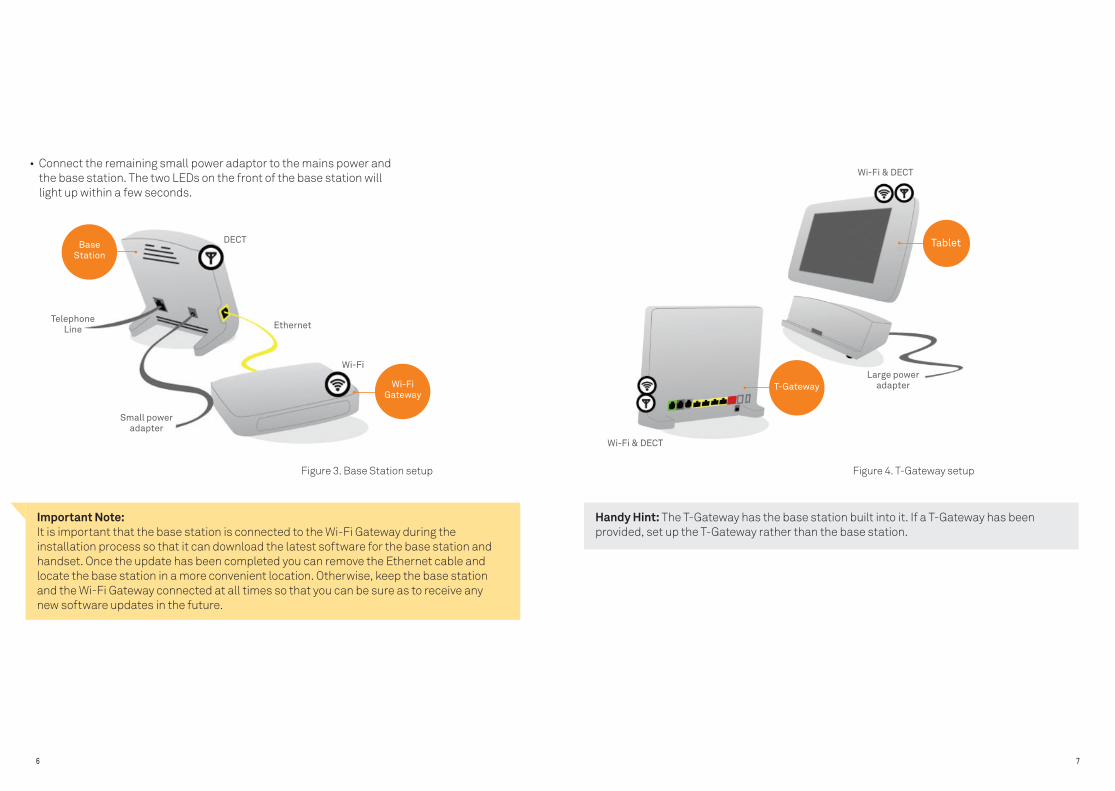
• Connect the remaining small power adaptor to the mains power and the base station. The two LEDs on the front of the base station will light up within a few seconds.
Handy Hint: The T-Gateway has the base station built into it. If a T-Gateway has been provided, set up the T-Gateway rather than the base station.
Important Note:It is important that the base station is connected to the Wi-Fi Gateway during the installation process so that it can download the latest software for the base station and handset. Once the update has been completed you can remove the Ethernet cable and locate the base station in a more convenient location. Otherwise, keep the base station and the Wi-Fi Gateway connected at all times so that you can be sure as to receive any new software updates in the future.
Wi-Fi & DECT
Wi-Fi & DECT
Large power adapter
DECT
Ethernet
Wi-Fi
Telephone Line
Small power adapter
Wi-FiGateway
Base Station
T-Gateway
Tablet
Figure 3. Base Station setup Figure 4. T-Gateway setup
8 9
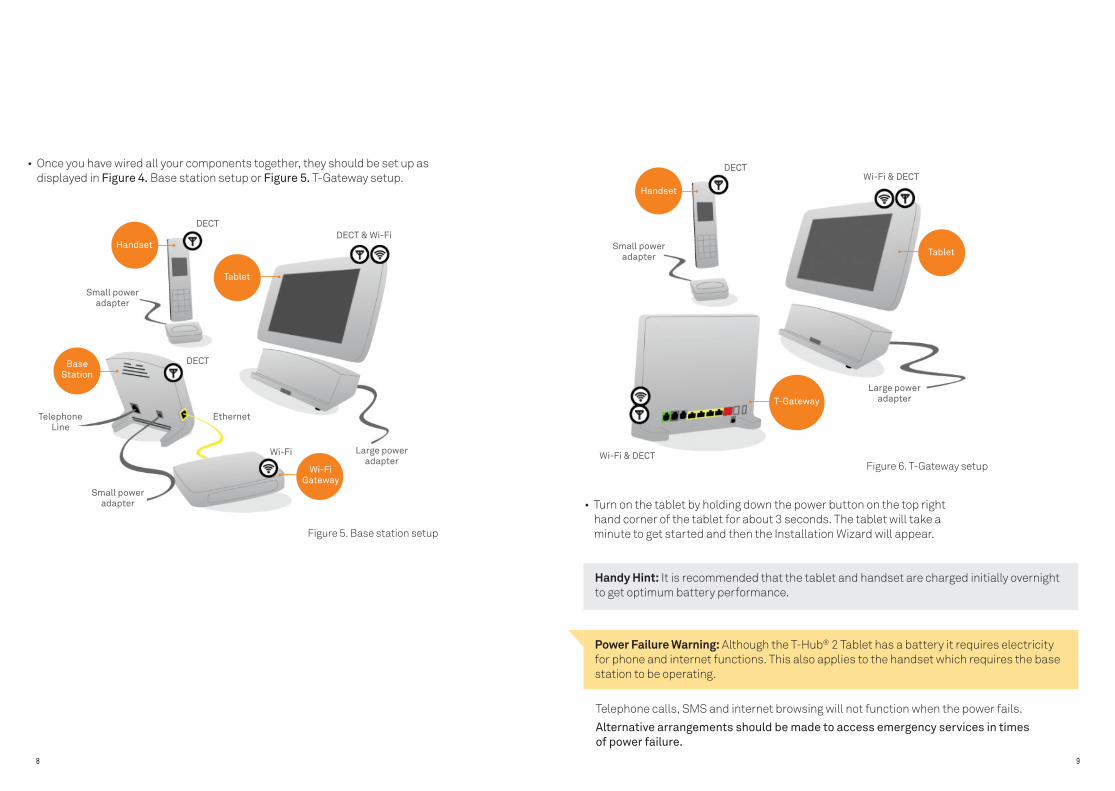
• Once you have wired all your components together, they should be set up as displayed in Figure 4. Base station setup or Figure 5. T-Gateway setup.
Figure 5. Base station setup
Figure 6. T-Gateway setup
• Turn on the tablet by holding down the power button on the top right hand corner of the tablet for about 3 seconds. The tablet will take a minute to get started and then the Installation Wizard will appear.
Telephone calls, SMS and internet browsing will not function when the power fails.
Alternative arrangements should be made to access emergency services in times of power failure.
Power Failure Warning: Although the T-Hub® 2 Tablet has a battery it requires electricity for phone and internet functions. This also applies to the handset which requires the base station to be operating.
Handy Hint: It is recommended that the tablet and handset are charged initially overnight to get optimum battery performance.
DECTWi-Fi & DECT
Wi-Fi & DECT
Small power adapter
Tablet
Wi-FiGateway
DECT
DECT
Wi-Fi
Ethernet
DECT & Wi-Fi
Small power adapter
Telephone Line
Small power adapter
Large power adapter
Large power adapter
Handset
BaseStation
T-Gateway
Tablet
Handset

10 11
INSTALLATION
The installation wizard will assist you in setting up your phone, internet connection and setup Voicemail, SMS, Email, Contacts, Calendar.
From the first page of the installation wizard as shown in Figure 7, check that the T-Hub components are set up correctly. Select the ‘touch for alternative setup’ to view the diagram to display how to connect up a T-Gateway. Touch the [Start] button to setup the T-Hub 2.
Phone setup
On pressing the [Start] button on the previous screen, the tablet will begin to search for all the tablets and handsets registered to the T-Hub 2 Base Station or T-Gateway.
T-HUB 2 SETUPConnect your T-Hub 2 components as shown here.
If you do not have a T-Gateway touch for alternative setup.
Start
Start
T-HUB 2 SETUPConnect your T-Hub 2 components as shown here.
It is important to connect the yellow ethernet cable to your phone base station to get software updates.
If you have a T-Gateway touch for alternative setup diagram.
DECT
Wi-Fi & DECT
Wi-Fi & DECT
Large power adapter
Small power
adapter
DECT
DECT
Wi-Fi
Ethernet
DECT & Wi-Fi
Small power adapter
Telephone Line
Small power adapter
Large power adapter
Handset
Handset
Tablet
Wi-FiGateway
BaseStation
T-Gateway
Tablet
Figure 7. Base Station Installation Wizard
Figure 8. T-Gateway Installation Wizard
Figure 9. Phone setup
12 13
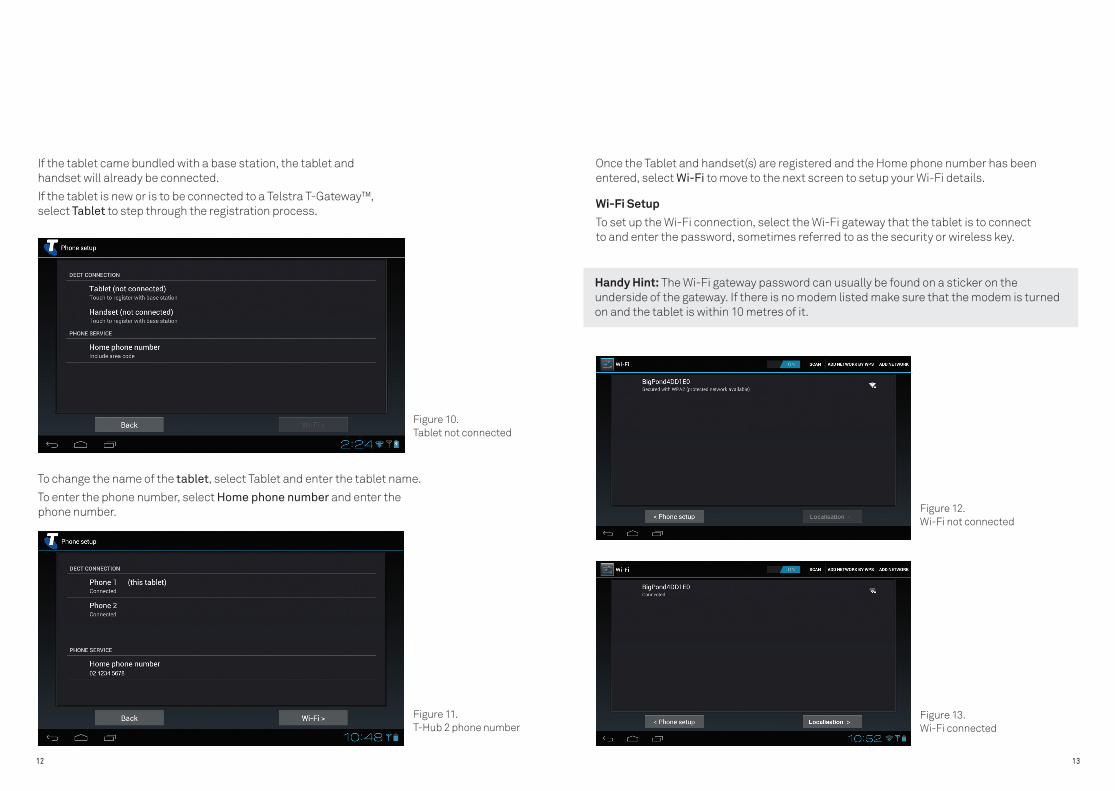
Once the Tablet and handset(s) are registered and the Home phone number has been entered, select Wi-Fi to move to the next screen to setup your Wi-Fi details.
Wi-Fi SetupTo set up the Wi-Fi connection, select the Wi-Fi gateway that the tablet is to connect to and enter the password, sometimes referred to as the security or wireless key.
If the tablet came bundled with a base station, the tablet and handset will already be connected.
If the tablet is new or is to be connected to a Telstra T-Gateway™, select Tablet to step through the registration process.
To change the name of the tablet, select Tablet and enter the tablet name.
To enter the phone number, select Home phone number and enter the phone number.
Handy Hint: The Wi-Fi gateway password can usually be found on a sticker on the underside of the gateway. If there is no modem listed make sure that the modem is turned
on and the tablet is within 10 metres of it.
Figure 10. Tablet not connected
Figure 12. Wi-Fi not connected
Figure 11. T-Hub 2 phone number
Figure 13. Wi-Fi connected
14 15
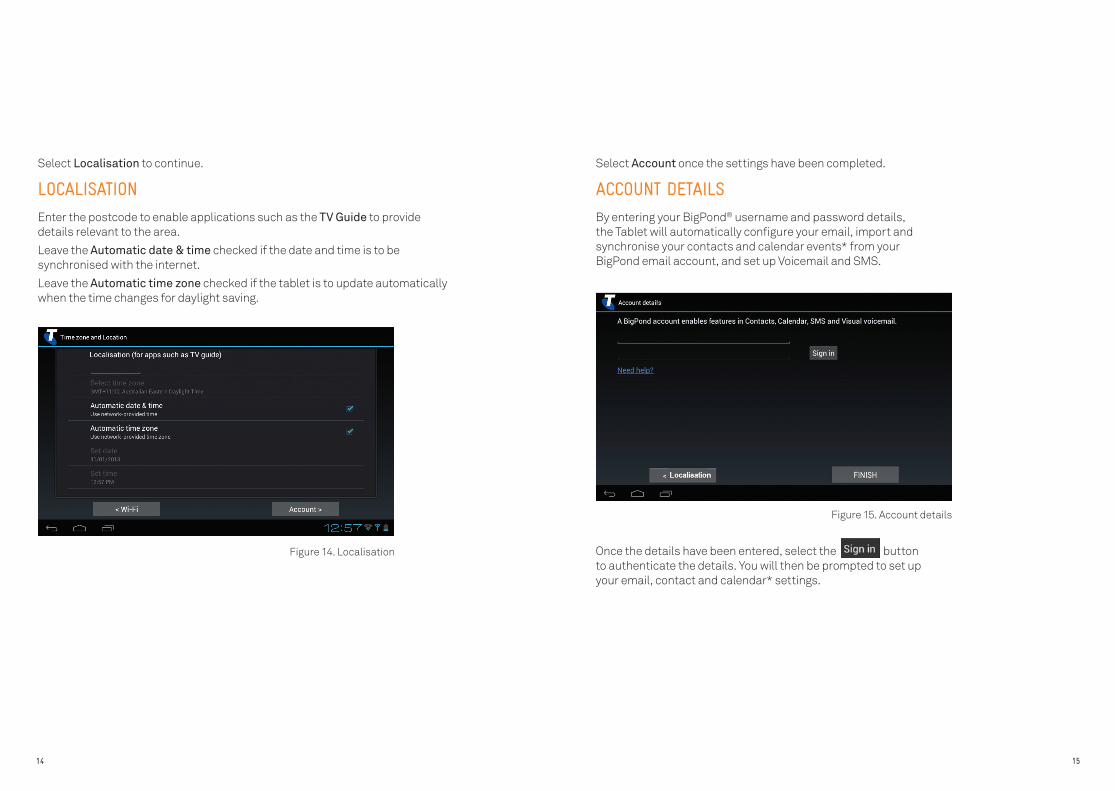
Select Account once the settings have been completed.
ACCOUNT DETAILS
By entering your BigPond® username and password details, the Tablet will automatically configure your email, import and synchronise your contacts and calendar events* from your BigPond email account, and set up Voicemail and SMS.
Select Localisation to continue.
LOCALISATION
Enter the postcode to enable applications such as the TV Guide to provide details relevant to the area.
Leave the Automatic date & time checked if the date and time is to be synchronised with the internet.
Leave the Automatic time zone checked if the tablet is to update automatically when the time changes for daylight saving.
Once the details have been entered, select the button to authenticate the details. You will then be prompted to set up your email, contact and calendar* settings.
Figure 14. Localisation
Figure 15. Account details

16 17
CREATING A GOOGLE ACCOUNT
After completing the Installation Wizard, you are encouraged to set up or create a Google account.
Like a BigPond Email account, the Google Account will enable Google contacts, email and calendar events to be imported and synchronised. Photos will also be automatically backed up and synchronised with the nominated Google account which can be accessed from other devices, e.g. computer, mobile phone.
The Google Account also is also used to expose additional features when using Google Maps, Navigation, Google Play Store, YouTube and many more.
To setup or create a Google account:
Step 1: Select Settings -> Accounts & sync -> ADD ACCOUNT
Step 2: Select Google
Step 3: Enter the user name and password for the Google account or create an account.
Step 4: Enter the purchases information and tap Save. Tap Skip to set up the purchase information later.
Step 5: Deselect the checkbox(es) to turn off the synchronisation for any of the options.
Step 6: Tap Next
Handy Hint: the purchase information enables applications, games, movies and books from Google to be purchased from Play Store.
*Outlook.com users only
Though it is not mandatory for the BigPond details to be entered, by skipping this step, you will not be able to use the Voicemail or SMS application. You can setup these services after installation.
Once the account has been set up, select .
Upon exiting the installation wizard, there will be a number of simple tips and tricks presented on how to use the T-Hub 2 Tablet.
FINISH
Figure 16. Email account settings
18 19
TOUCH & NAVIGATION
The main way to control the features on the T-Hub 2 Tablet is by using your finger to manipulate icons, buttons, menu items, the onscreen keyboard, and other items on the touch screen. You can also change the screen’s orientation.
Touch: To act on items on the screen, such as application and settings icons, totype letters and symbols using the onscreen keyboard, or to press onscreen buttons, you simply touch them with your finger.
Touch & hold: Touch & hold an item on the screen by touching it and not lifting your finger until an action occurs. For example, to open a menu for customising the Home screen, you touch an empty area on the Home screen until the menu opens.
Drag: Touch & hold an item for a moment and then, without lifting your finger, move your finger on the screen until you reach the target position. You drag items on the Home screen to reposition them.
Double-tap: Tap quickly twice on a webpage, map, or other screen to zoom. For example, you double-tap a section of a webpage in the Browser to zoom that section to fit the width of the screen.
Screen Scrolling: Scroll between screens by dragging your finger across the screen, in the direction you wish to scroll. To increase the speed in which you scroll, flick your finger quickly rather than dragging it across the screen.
Scrolling Web Pages or other applications: To scroll web pages or other applications drag your finger up or down.
BASICS
Handy Hint: Some applications may not rotate and are set for either portrait or landscape viewing only.
Pinch Zoom In and Out: Some applications allow you to zoom in and zoom out of web pages, maps and photos. To do this, pinch two fingers together to zoom in. To zoom out reverse the action.
Some apps provide a zoom out/in control instead of pinch to zoom.
Screen orientation: The orientation of the screen can be viewed in either portrait or landscape mode. To change the orientation, simply rotate the device and the screen will rotate too.
If you don’t want the screen orientation to change automatically, then you can turn the feature off in Settings -> Display by un-ticking the Auto-rotate screen setting.
The scrolling will come to a stop on its own, or alternatively touch anywhere on the screen to stop scrolling immediately.
1
2
3
4
20 21
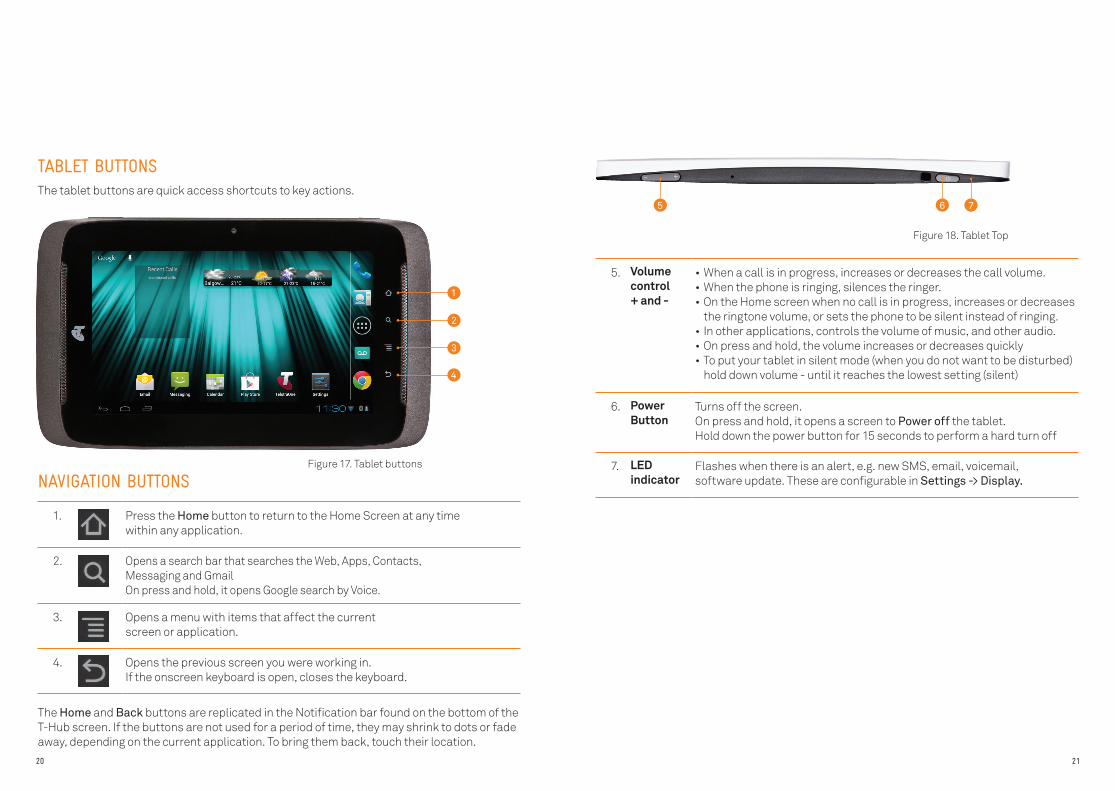
TABLET BUTTONSThe tablet buttons are quick access shortcuts to key actions.
The Home and Back buttons are replicated in the Notification bar found on the bottom of the T-Hub screen. If the buttons are not used for a period of time, they may shrink to dots or fade away, depending on the current application. To bring them back, touch their location.
NAVIGATION BUTTONS
1. Press the Home button to return to the Home Screen at any time within any application.
2. Opens a search bar that searches the Web, Apps, Contacts, Messaging and Gmail On press and hold, it opens Google search by Voice.
3. Opens a menu with items that affect the current screen or application.
4. Opens the previous screen you were working in. If the onscreen keyboard is open, closes the keyboard.
5. • When a call is in progress, increases or decreases the call volume. • When the phone is ringing, silences the ringer. • On the Home screen when no call is in progress, increases or decreases
the ringtone volume, or sets the phone to be silent instead of ringing.• In other applications, controls the volume of music, and other audio.• On press and hold, the volume increases or decreases quickly• To put your tablet in silent mode (when you do not want to be disturbed)
hold down volume - until it reaches the lowest setting (silent)
6. Turns off the screen.On press and hold, it opens a screen to Power off the tablet.Hold down the power button for 15 seconds to perform a hard turn off
7. Flashes when there is an alert, e.g. new SMS, email, voicemail, software update. These are configurable in Settings -> Display.
Power Button
Volume control + and -
LED indicator
5 6 7
Figure 17. Tablet buttons
Figure 18. Tablet Top
22 23
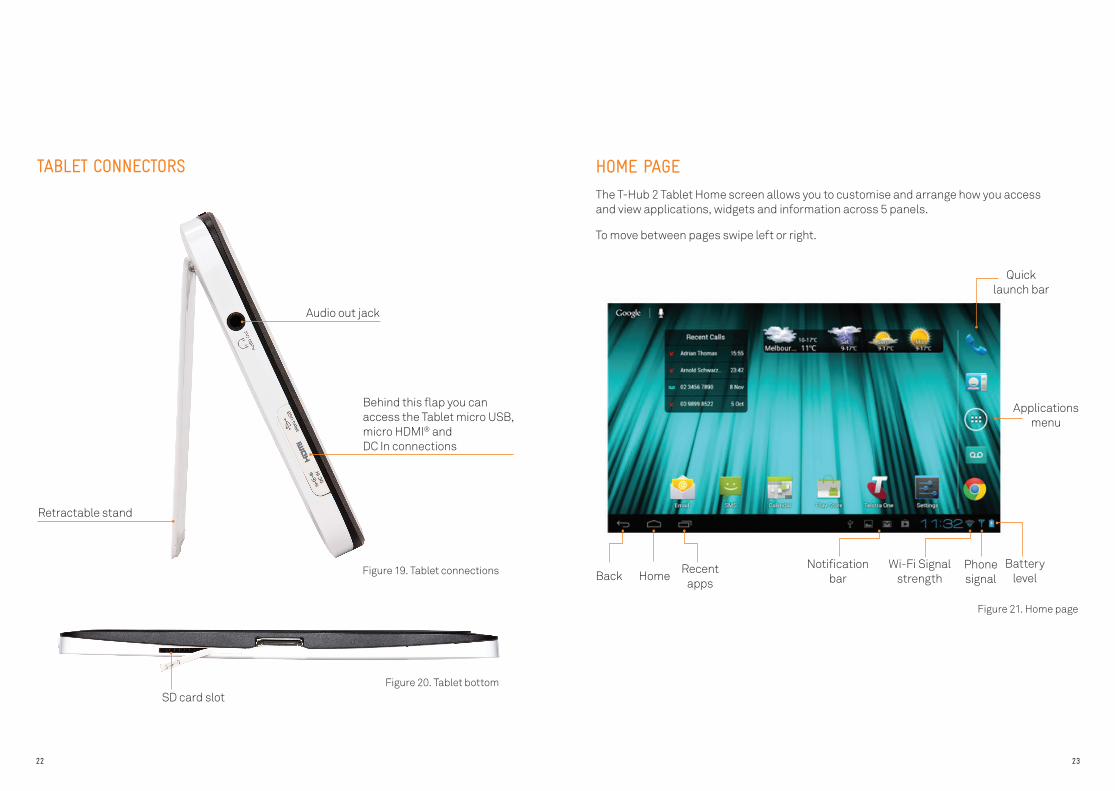
TABLET CONNECTORS HOME PAGE
The T-Hub 2 Tablet Home screen allows you to customise and arrange how you access and view applications, widgets and information across 5 panels.
To move between pages swipe left or right.
Retractable stand
Behind this flap you can access the Tablet micro USB, micro HDMI® and DC In connections
Back Home Recent apps
Notification bar
Wi-Fi Signal strength
Phone signal
Battery level
Applications menu
Quick launch bar
SD card slot
Audio out jack
Figure 19. Tablet connections
Figure 20. Tablet bottom
Figure 21. Home page
24 25
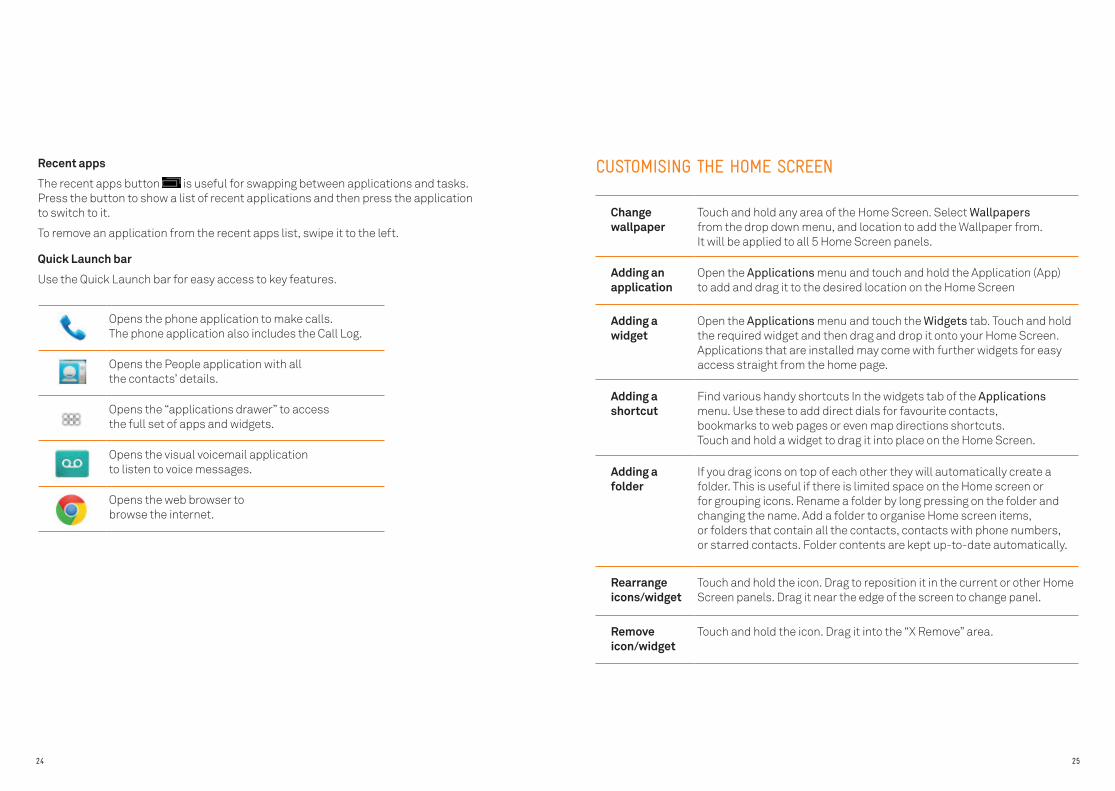
CUSTOMISING THE HOME SCREENRecent apps
The recent apps button is useful for swapping between applications and tasks. Press the button to show a list of recent applications and then press the application to switch to it.
To remove an application from the recent apps list, swipe it to the left.
Quick Launch bar
Use the Quick Launch bar for easy access to key features.
Opens the phone application to make calls. The phone application also includes the Call Log.
Opens the People application with all the contacts’ details.
Opens the “applications drawer” to access the full set of apps and widgets.
Opens the visual voicemail application to listen to voice messages.
Opens the web browser to browse the internet.
Change wallpaper
Touch and hold any area of the Home Screen. Select Wallpapers from the drop down menu, and location to add the Wallpaper from. It will be applied to all 5 Home Screen panels.
Adding an application
Open the Applications menu and touch and hold the Application (App) to add and drag it to the desired location on the Home Screen
Adding a widget
Open the Applications menu and touch the Widgets tab. Touch and hold the required widget and then drag and drop it onto your Home Screen. Applications that are installed may come with further widgets for easy access straight from the home page.
Adding a shortcut
Find various handy shortcuts In the widgets tab of the Applications menu. Use these to add direct dials for favourite contacts, bookmarks to web pages or even map directions shortcuts. Touch and hold a widget to drag it into place on the Home Screen.
Adding a folder
If you drag icons on top of each other they will automatically create a folder. This is useful if there is limited space on the Home screen or for grouping icons. Rename a folder by long pressing on the folder and changing the name. Add a folder to organise Home screen items, or folders that contain all the contacts, contacts with phone numbers, or starred contacts. Folder contents are kept up-to-date automatically.
Rearrange icons/widget
Touch and hold the icon. Drag to reposition it in the current or other Home Screen panels. Drag it near the edge of the screen to change panel.
Remove icon/widget
Touch and hold the icon. Drag it into the “X Remove” area.
26 27
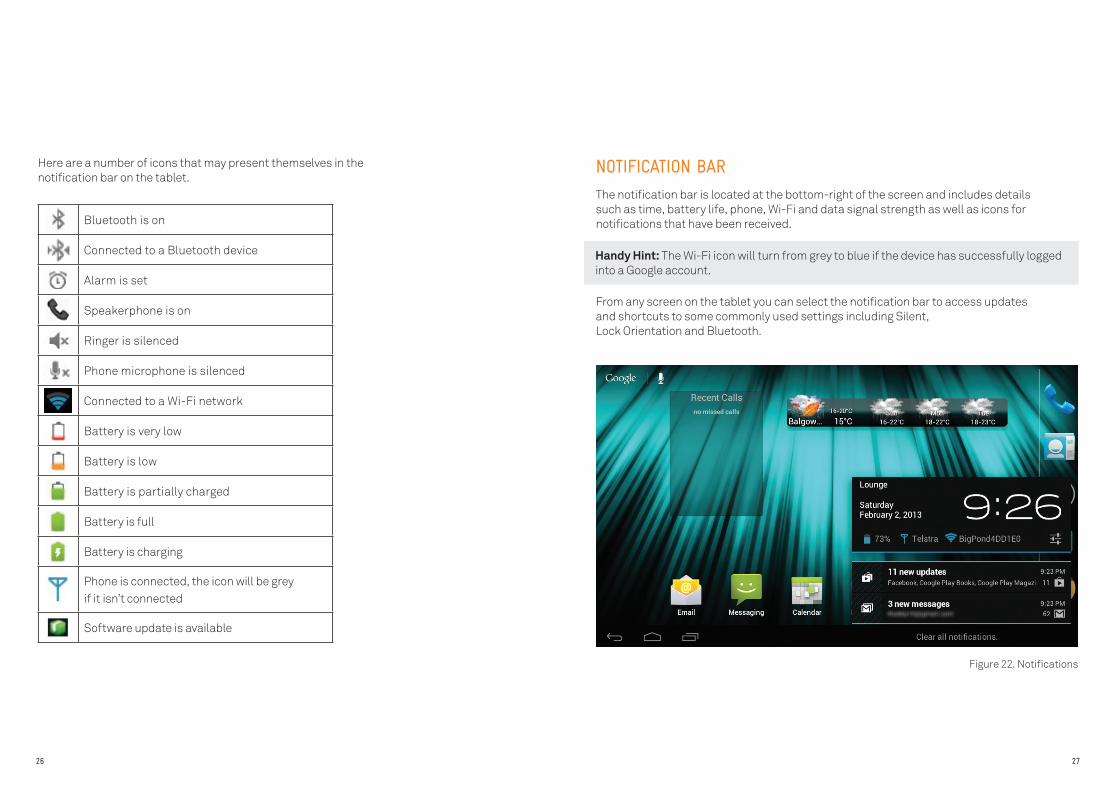
NOTIFICATION BAR
The notification bar is located at the bottom-right of the screen and includes details such as time, battery life, phone, Wi-Fi and data signal strength as well as icons for notifications that have been received.
From any screen on the tablet you can select the notification bar to access updates and shortcuts to some commonly used settings including Silent, Lock Orientation and Bluetooth.
Here are a number of icons that may present themselves in the notification bar on the tablet.
Handy Hint: The Wi-Fi icon will turn from grey to blue if the device has successfully logged into a Google account.
Bluetooth is on
Connected to a Bluetooth device
Alarm is set
Speakerphone is on
Ringer is silenced
Phone microphone is silenced
Connected to a Wi-Fi network
Battery is very low
Battery is low
Battery is partially charged
Battery is full
Battery is charging
Phone is connected, the icon will be grey if it isn’t connected
Software update is available
Figure 22. Notifications
28 29
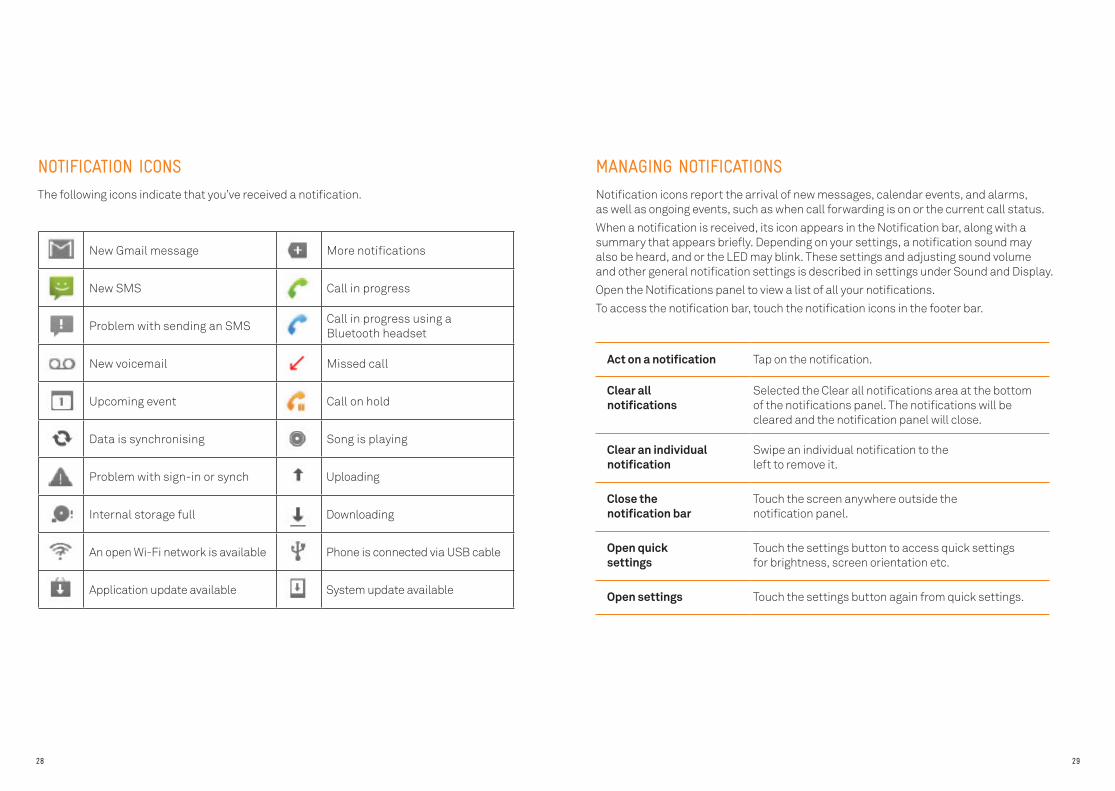
NOTIFICATION ICONS
The following icons indicate that you’ve received a notification.
MANAGING NOTIFICATIONS
Notification icons report the arrival of new messages, calendar events, and alarms, as well as ongoing events, such as when call forwarding is on or the current call status.
When a notification is received, its icon appears in the Notification bar, along with a summary that appears briefly. Depending on your settings, a notification sound may also be heard, and or the LED may blink. These settings and adjusting sound volume and other general notification settings is described in settings under Sound and Display.
Open the Notifications panel to view a list of all your notifications.
To access the notification bar, touch the notification icons in the footer bar.
New Gmail message More notifications
New SMS Call in progress
Problem with sending an SMSCall in progress using a Bluetooth headset
New voicemail Missed call
Upcoming event Call on hold
Data is synchronising Song is playing
Problem with sign-in or synch Uploading
Internal storage full Downloading
An open Wi-Fi network is available Phone is connected via USB cable
Application update available System update available
Act on a notification Tap on the notification.
Clear all notifications
Selected the Clear all notifications area at the bottom of the notifications panel. The notifications will be cleared and the notification panel will close.
Clear an individual notification
Swipe an individual notification to the left to remove it.
Close the notification bar
Touch the screen anywhere outside the notification panel.
Open quick settings
Touch the settings button to access quick settings for brightness, screen orientation etc.
Open settings Touch the settings button again from quick settings.
30 31
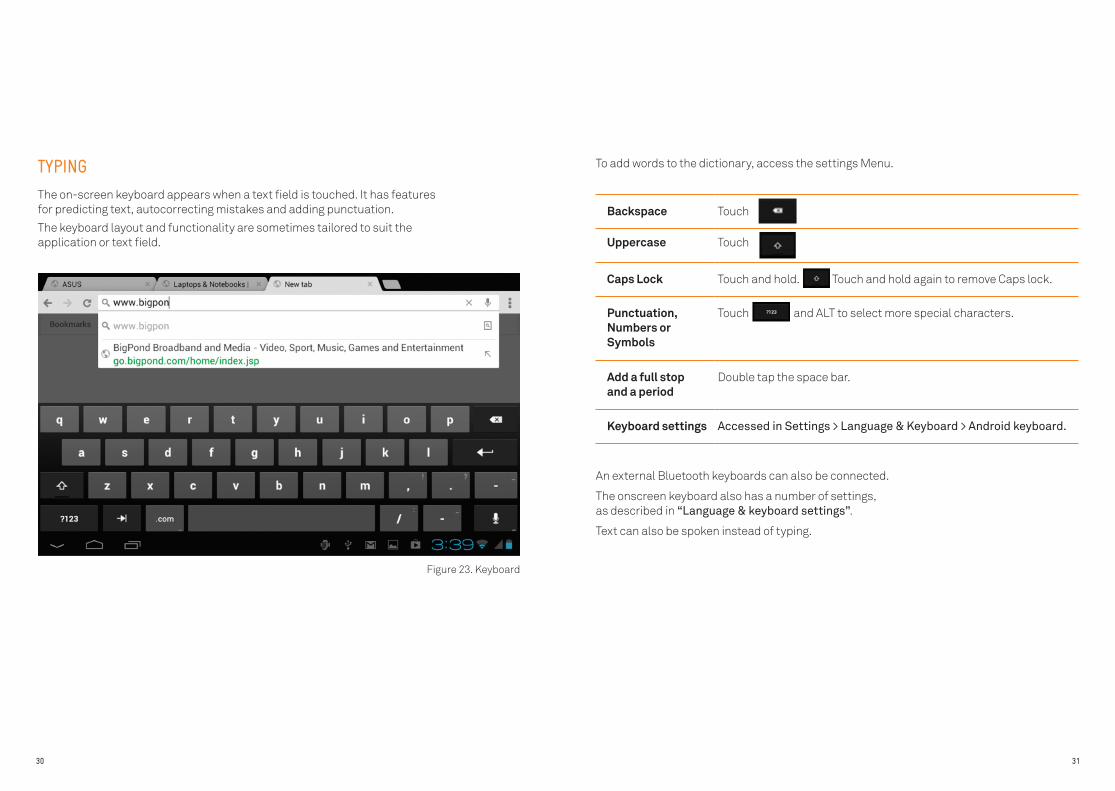
TYPING
The on-screen keyboard appears when a text field is touched. It has features for predicting text, autocorrecting mistakes and adding punctuation.
The keyboard layout and functionality are sometimes tailored to suit the application or text field.
To add words to the dictionary, access the settings Menu.
Backspace Touch
Uppercase Touch
Caps Lock Touch and hold. Touch and hold again to remove Caps lock.
Punctuation, Numbers or Symbols
Touch and ALT to select more special characters.
Add a full stop and a period
Double tap the space bar.
Keyboard settings Accessed in Settings > Language & Keyboard > Android keyboard.
An external Bluetooth keyboards can also be connected.
The onscreen keyboard also has a number of settings, as described in “Language & keyboard settings”.
Text can also be spoken instead of typing.
Figure 23. Keyboard

32 33
ENTERING TEXT BY TYPING
Tip 1: Touch a text field to launch the keyboard.
If a text field where there is already text entered is touched, the insertion point is set where the touch and the insertion point tab appears. Drag the insertion point by its tab to move the insertion point, to pick exactly where the additional text is to be inserted. Select a word or more at a time and copy, cut, and paste text.
Tip 2: Touch the keys on the keyboard to enter text.
What you type appears in the text field and in the strip above the keyboard. A number of suggestions as to what you may be typing will be presented with the word you typed is underlined. The bolded text is the recommended option. You can drag the strip to the left to bring any additional suggestions into view.
Tip 3: Press space to accept the suggested word. If the space key is touched, the suggestion strip offers a series of punctuation marks that can be selected.
If a word is not in the system or user dictionary as it is entered there will be a prompt to touch the word again if you want to add it to the user dictionary.
Words that are added to the dictionary can be viewed, edited, or deleted.
Tip 4: Use the Delete key to erase characters to the left of the cursor.
Tip 5: Whilst typing the Back button changes to this icon to close the keyboard.
Some applications add special keys, e.g. , to the keyboard that make it easier to navigate.
CHANGE THE KEYBOARD LANGUAGE
Use the onscreen keyboard to change the current language.
1. Touch & hold the Space key.
2. Without lifting a finger, move it to the left or right until the language you want appears in the center of the small window above the Space key.
3. Lift the finger. If there are many languages available, repeat these steps to find the language.
ENTERING TEXT BY SPEAKING
Use voice input to enter text by speaking.
TURN ON VOICE INPUT
If the onscreen keyboard does not display a Microphone button , the voice input feature is not turned on or you have it configured to display on the symbols keyboard.
1. From the Home screen select - Settings > Language & input > Google voice typing.
ENTER TEXT BY SPEAKING
Enter text by speaking in most places that text can be entered with the onscreen keyboard.
1. Touch a text field or a location.
2. Touch the Microphone key on the keyboard.
3. When prompted to “Speak now,” speak what you want to enter. Say “comma,” “period,” “question mark,” “exclamation mark,” or “exclamation point” to enter punctuation.
What is said is converted to text and entered in the text field when there is a pause. Press the Delete key to erase the underlined text.
Edit the text that is entered by typing.
ENTER NUMBERS, SYMBOLS, AND OTHER CHARACTERS
To enter a number or symbol, touch & hold one of the top-row keys of the keyboard and then without moving your finger, lift the finger, to enter the number indicated in black on that key. Keys with alternate characters display an ellipsis ( ... ) below the character.
Press the Symbols key to switch to the numbers and symbols keyboard.

34 35
EDITING TEXT
Cut, copy, and paste text within or across applications. Some applications don’t support editing some or all of the text they display; others may offer their own way to select text.
Edit text 1. Touch the text that is to be edited. A cursor will be inserted where the screen is touched
When it first appears, it has a tab that can be used to drag or move it.
SELECT TEXT
Select text that is to be cut, copy, deleted, or replaced.
1. Touch & hold the text or word you want to select.
2. Touch Select all in the menu that opens. The selected text is highlighted.
3. Drag the selection tab to expand or reduce the range of selected text. Unselect the text by touching unselected text in the same or in another text field, or press the Back button.
4. Touch the selected text to open a menu list which gives options to Cut or Copy your selection or, if text has been have previously cut or copied, replace the selected text by pasting. You can also simply enter text by typing or speaking to replace the selection with what you type, or press the Delete key to delete the selected text.
CUT OR COPY TEXT
1. Select the text to cut or copy.
2. Touch the selected text. The selection tabs will give the option to Cut or Copy.
PASTE TEXT
1. Cut or copy the text to paste.
2. Place the cursor in the text field where the text is to be pasted, or select text that is to be replaced by pasting.
3. Paste text that has been copied from one application into a text field in any application.
4. Touch Paste in the menu that opens. The text is inserted at the cursor.
2. Drag the cursor by its tab to the location where you want to edit text. The tab disappears after a few moments. Touch the text again to make the cursor reappear.
3. Edit the text as required.
4. Press the Back button when finished typing to close the keyboard.
Figure 24. Keyboard
36 37
WAKE UP THE PHONE
If the tablet is not used for a while, the screen will dim and then go into the appropriate inactive mode:
1. Screen saver mode when it is in the dock.
2. Black screen to save battery power whilst out of the dock.
To wake it back up, press the Power button on the top right hand side of the tablet.
To adjust the timeout period, from the Home page select Settings->Display and adjust the Screensaver timeout or Sleep settings.
WORKING WITH MENUS
There are two kinds of Android menus: options menus and context menus.
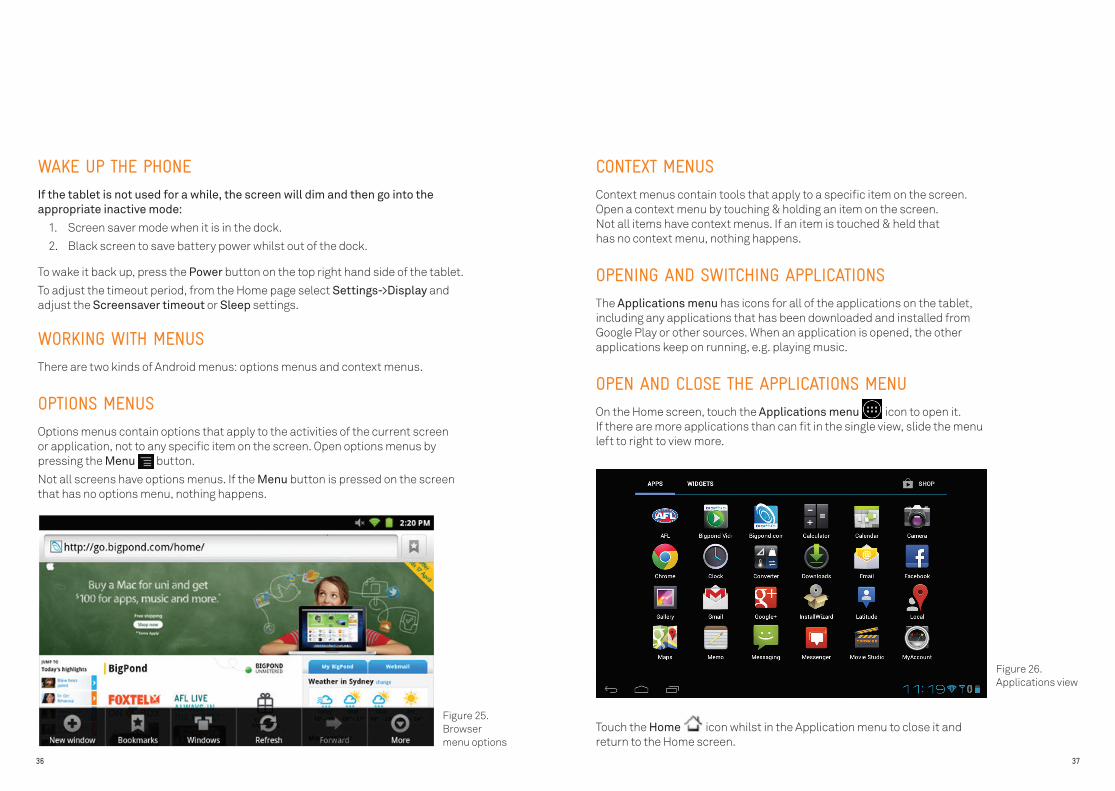
OPTIONS MENUS
Options menus contain options that apply to the activities of the current screen or application, not to any specific item on the screen. Open options menus by pressing the Menu button.
Not all screens have options menus. If the Menu button is pressed on the screen that has no options menu, nothing happens.
CONTEXT MENUS
Context menus contain tools that apply to a specific item on the screen. Open a context menu by touching & holding an item on the screen. Not all items have context menus. If an item is touched & held that has no context menu, nothing happens.
OPENING AND SWITCHING APPLICATIONS
The Applications menu has icons for all of the applications on the tablet, including any applications that has been downloaded and installed from Google Play or other sources. When an application is opened, the other applications keep on running, e.g. playing music.
OPEN AND CLOSE THE APPLICATIONS MENU
On the Home screen, touch the Applications menu icon to open it. If there are more applications than can fit in the single view, slide the menu left to right to view more.
Touch the Home icon whilst in the Application menu to close it and return to the Home screen.
Figure 25. Browser menu options
Figure 26. Applications view
38 39
OPEN AN APPLICATION
• Touch an application’s icon in Application menu.
• Touch an application’s icon whilst on the Home screen.
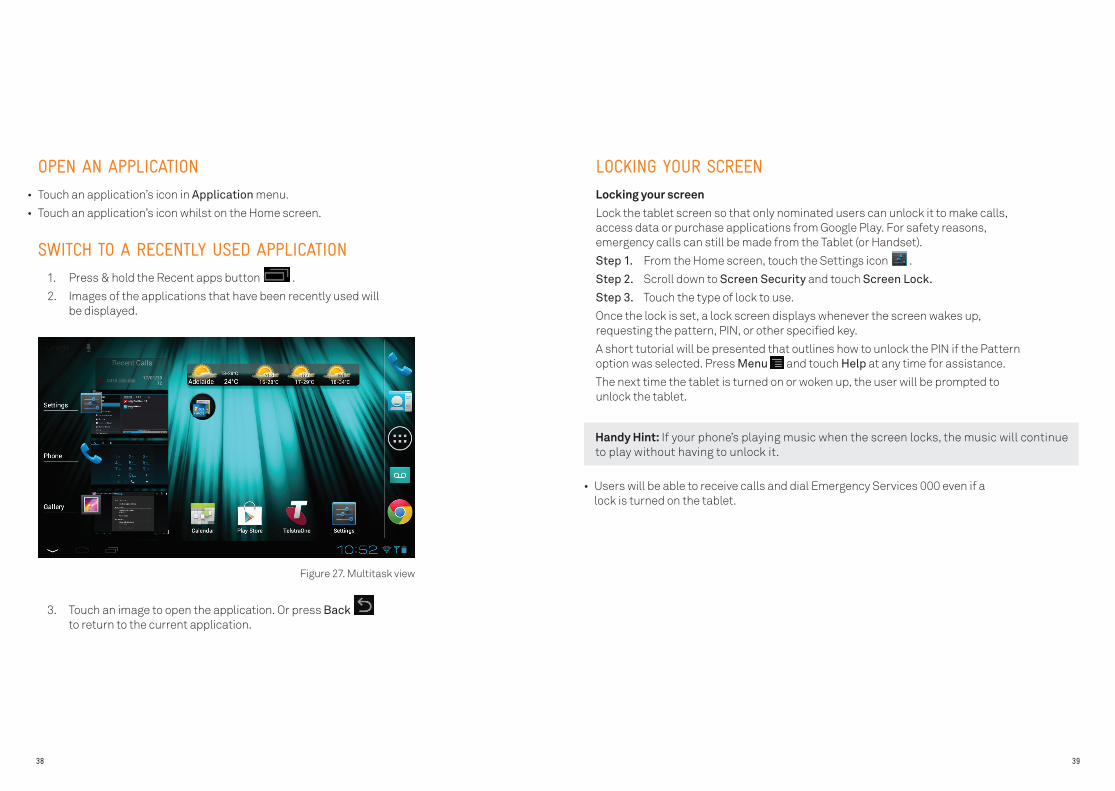
SWITCH TO A RECENTLY USED APPLICATION
1. Press & hold the Recent apps button .
2. Images of the applications that have been recently used will be displayed.
LOCKING YOUR SCREEN
Locking your screenLock the tablet screen so that only nominated users can unlock it to make calls, access data or purchase applications from Google Play. For safety reasons, emergency calls can still be made from the Tablet (or Handset).
Step 1. From the Home screen, touch the Settings icon .
Step 2. Scroll down to Screen Security and touch Screen Lock.
Step 3. Touch the type of lock to use.
Once the lock is set, a lock screen displays whenever the screen wakes up, requesting the pattern, PIN, or other specified key.
A short tutorial will be presented that outlines how to unlock the PIN if the Pattern option was selected. Press Menu and touch Help at any time for assistance.
The next time the tablet is turned on or woken up, the user will be prompted to unlock the tablet.
3. Touch an image to open the application. Or press Back to return to the current application.
Handy Hint: If your phone’s playing music when the screen locks, the music will continue to play without having to unlock it.
• Users will be able to receive calls and dial Emergency Services 000 even if a lock is turned on the tablet.
Figure 27. Multitask view
40 41
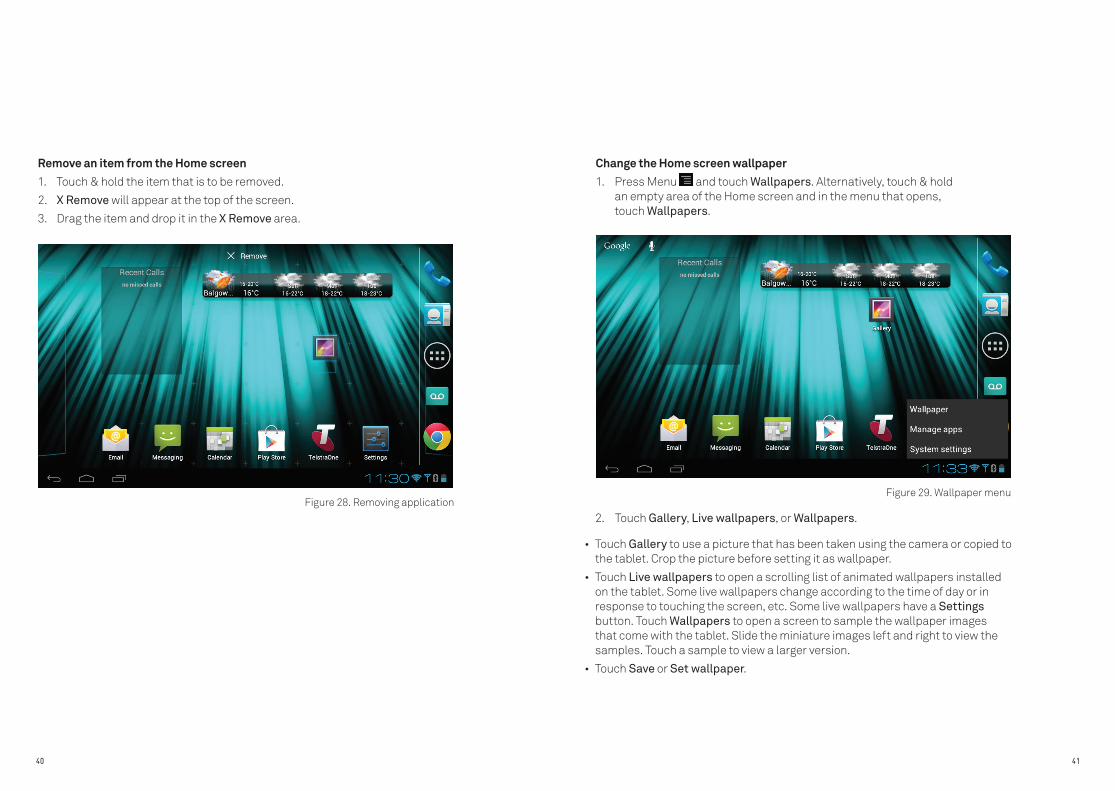
Remove an item from the Home screen1. Touch & hold the item that is to be removed.
2. X Remove will appear at the top of the screen.
3. Drag the item and drop it in the X Remove area.
Change the Home screen wallpaper1. Press Menu and touch Wallpapers. Alternatively, touch & hold
an empty area of the Home screen and in the menu that opens, touch Wallpapers.
2. Touch Gallery, Live wallpapers, or Wallpapers.
• Touch Gallery to use a picture that has been taken using the camera or copied to the tablet. Crop the picture before setting it as wallpaper.
• Touch Live wallpapers to open a scrolling list of animated wallpapers installed on the tablet. Some live wallpapers change according to the time of day or in response to touching the screen, etc. Some live wallpapers have a Settings button. Touch Wallpapers to open a screen to sample the wallpaper images that come with the tablet. Slide the miniature images left and right to view the samples. Touch a sample to view a larger version.
• Touch Save or Set wallpaper.
Figure 28. Removing applicationFigure 29. Wallpaper menu
42 43
Creating a folderCombine several application icons in a folder by dropping one app icon over another on a Home screen.
1. Touch and hold on an icon.
2. Move it over another icon.
3. It will create a folder with the two icons in it.
4. Drag and drop other icons into the folder as required.
Rename a folder1. Touch the folder to open it.
2. Touch & hold the folder window’s title bar.
3. Enter a new name in the dialog that appears.
4. Touch OK.
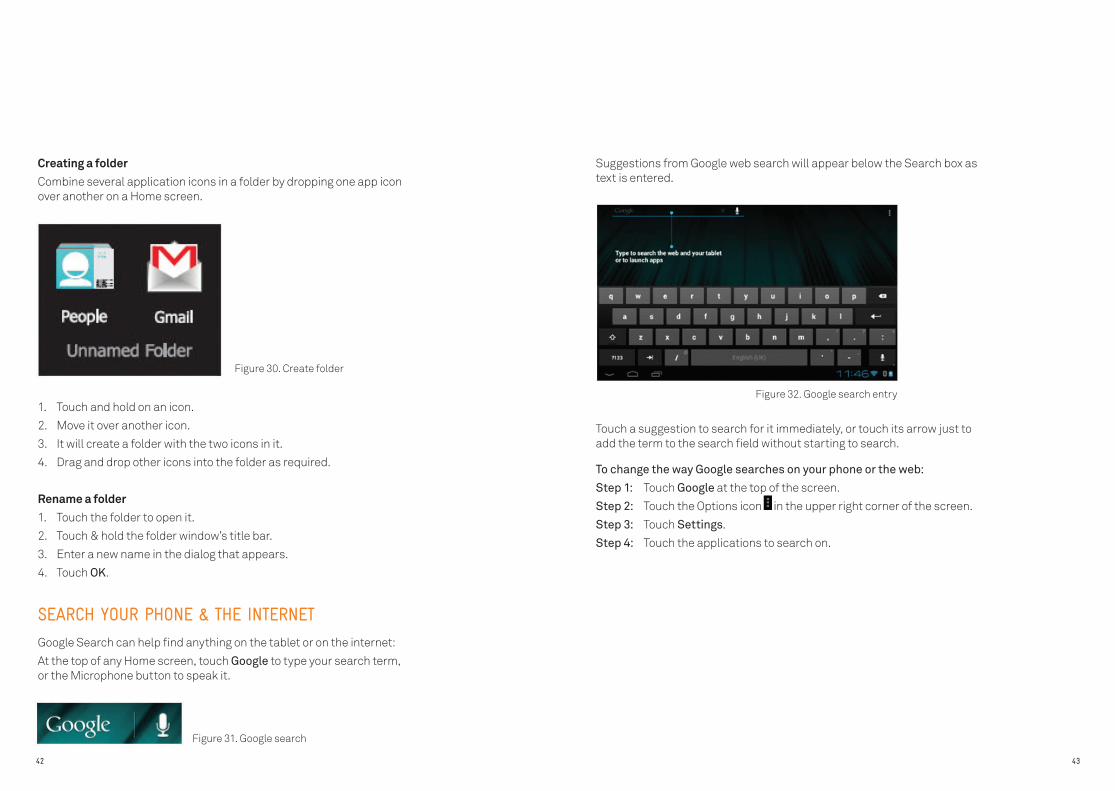
Suggestions from Google web search will appear below the Search box as text is entered.
SEARCH YOUR PHONE & THE INTERNET
Google Search can help find anything on the tablet or on the internet:
At the top of any Home screen, touch Google to type your search term, or the Microphone button to speak it.
Touch a suggestion to search for it immediately, or touch its arrow just to add the term to the search field without starting to search.
To change the way Google searches on your phone or the web:
Step 1: Touch Google at the top of the screen.
Step 2: Touch the Options icon in the upper right corner of the screen.
Step 3: Touch Settings.
Step 4: Touch the applications to search on.
Figure 30. Create folder
Figure 31. Google search
Figure 32. Google search entry
44 45
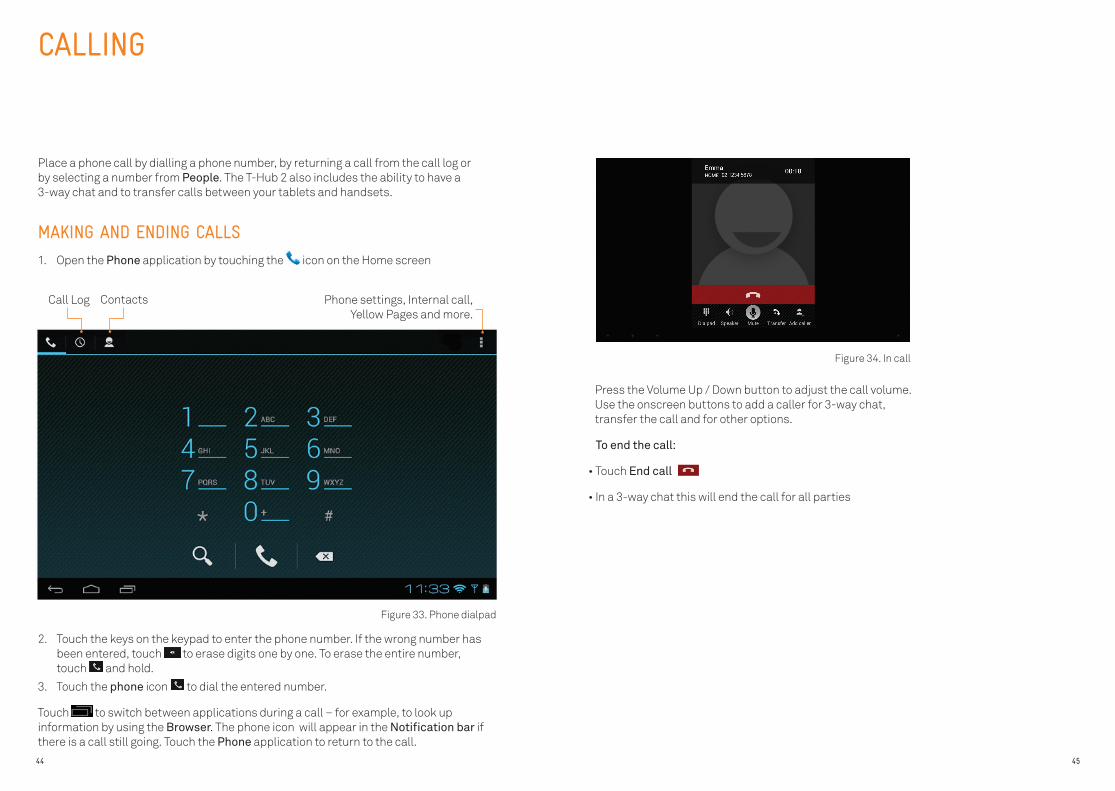
Place a phone call by dialling a phone number, by returning a call from the call log or by selecting a number from People. The T-Hub 2 also includes the ability to have a 3-way chat and to transfer calls between your tablets and handsets.
CALLING
MAKING AND ENDING CALLS
1. Open the Phone application by touching the icon on the Home screen
2. Touch the keys on the keypad to enter the phone number. If the wrong number has been entered, touch to erase digits one by one. To erase the entire number, touch and hold.
3. Touch the phone icon to dial the entered number.
Touch to switch between applications during a call – for example, to look up information by using the Browser. The phone icon will appear in the Notification bar if there is a call still going. Touch the Phone application to return to the call.
Press the Volume Up / Down button to adjust the call volume. Use the onscreen buttons to add a caller for 3-way chat, transfer the call and for other options.
To end the call:
• Touch End call
• In a 3-way chat this will end the call for all parties
Call Log Contacts Phone settings, Internal call, Yellow Pages and more.
Figure 33. Phone dialpad
Figure 34. In call
46 47
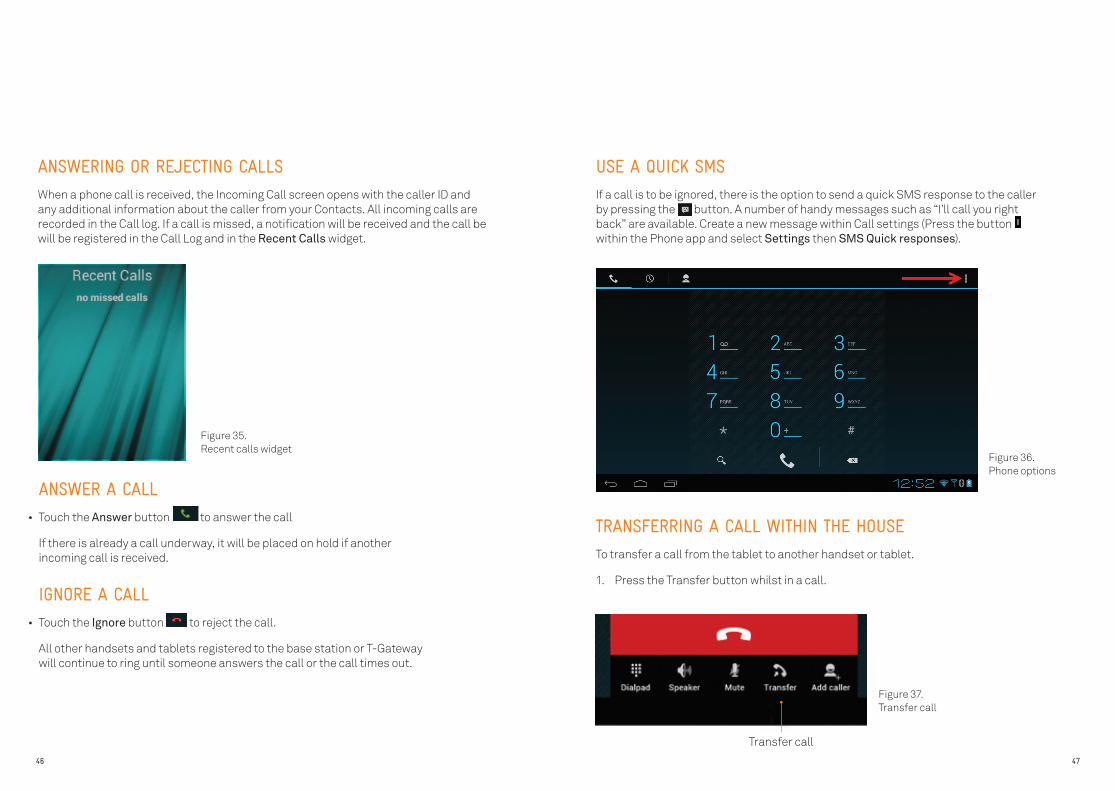
ANSWERING OR REJECTING CALLS
When a phone call is received, the Incoming Call screen opens with the caller ID and any additional information about the caller from your Contacts. All incoming calls are recorded in the Call log. If a call is missed, a notification will be received and the call be will be registered in the Call Log and in the Recent Calls widget.
USE A QUICK SMS
If a call is to be ignored, there is the option to send a quick SMS response to the caller by pressing the button. A number of handy messages such as “I’ll call you right back” are available. Create a new message within Call settings (Press the button within the Phone app and select Settings then SMS Quick responses).
TRANSFERRING A CALL WITHIN THE HOUSE
To transfer a call from the tablet to another handset or tablet.
1. Press the Transfer button whilst in a call.
ANSWER A CALL
• Touch the Answer button to answer the call
If there is already a call underway, it will be placed on hold if another incoming call is received.
IGNORE A CALL
• Touch the Ignore button to reject the call.
All other handsets and tablets registered to the base station or T-Gateway will continue to ring until someone answers the call or the call times out.
Transfer call
Figure 35. Recent calls widget
Figure 36. Phone options
Figure 37. Transfer call
48 49
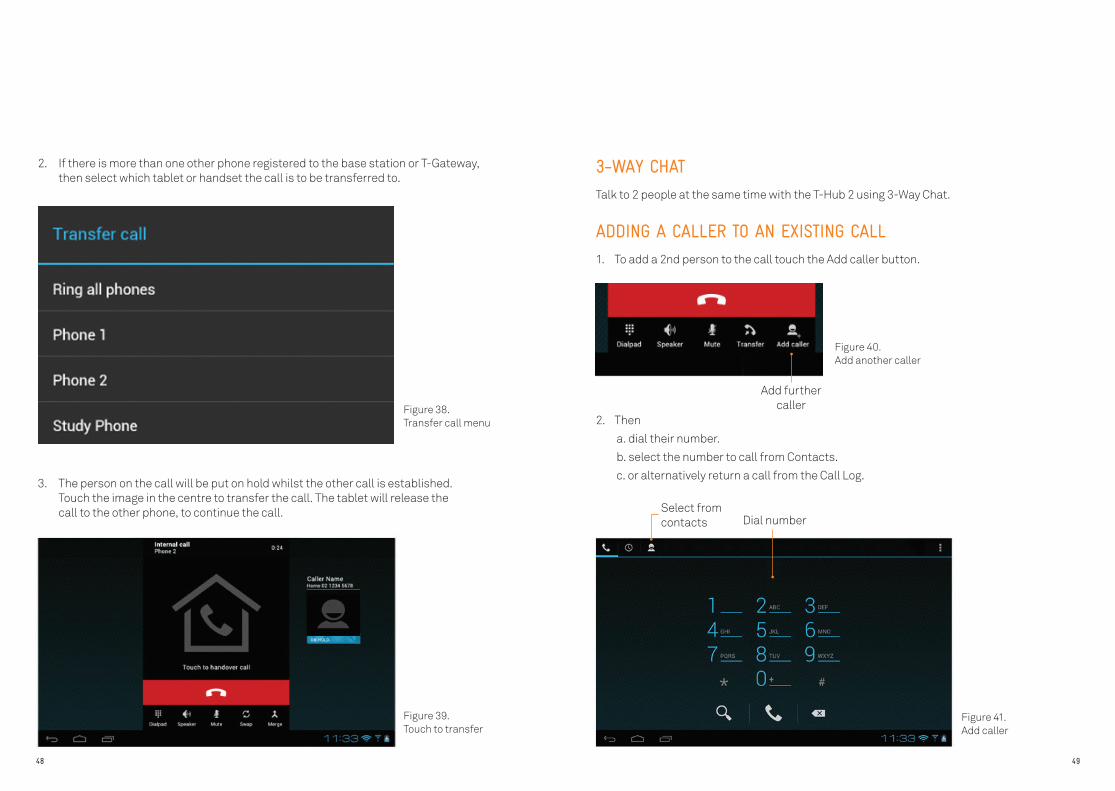
2. If there is more than one other phone registered to the base station or T-Gateway, then select which tablet or handset the call is to be transferred to.
3. The person on the call will be put on hold whilst the other call is established. Touch the image in the centre to transfer the call. The tablet will release the call to the other phone, to continue the call.
3-WAY CHAT
Talk to 2 people at the same time with the T-Hub 2 using 3-Way Chat.
ADDING A CALLER TO AN EXISTING CALL
1. To add a 2nd person to the call touch the Add caller button.
2. Then
a. dial their number.
b. select the number to call from Contacts.
c. or alternatively return a call from the Call Log.
Dial numberSelect from contacts
Add further callerFigure 38.
Transfer call menu
Figure 40. Add another caller
Figure 39. Touch to transfer
Figure 41. Add caller
50 51
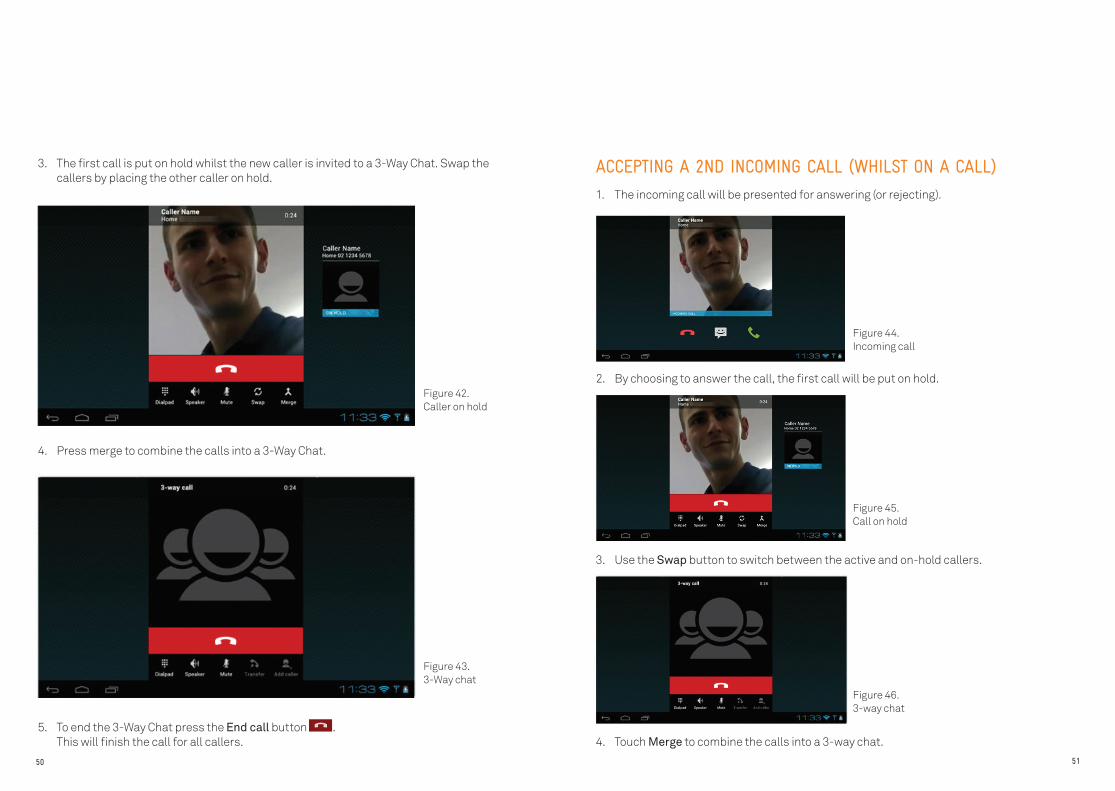
3. The first call is put on hold whilst the new caller is invited to a 3-Way Chat. Swap the callers by placing the other caller on hold.
4. Press merge to combine the calls into a 3-Way Chat.
5. To end the 3-Way Chat press the End call button . This will finish the call for all callers.
ACCEPTING A 2ND INCOMING CALL (WHILST ON A CALL)
1. The incoming call will be presented for answering (or rejecting).
2. By choosing to answer the call, the first call will be put on hold.
3. Use the Swap button to switch between the active and on-hold callers.
4. Touch Merge to combine the calls into a 3-way chat.
Figure 42. Caller on hold
Figure 44. Incoming call
Figure 45. Call on hold
Figure 46. 3-way chat
Figure 43. 3-Way chat
52 53
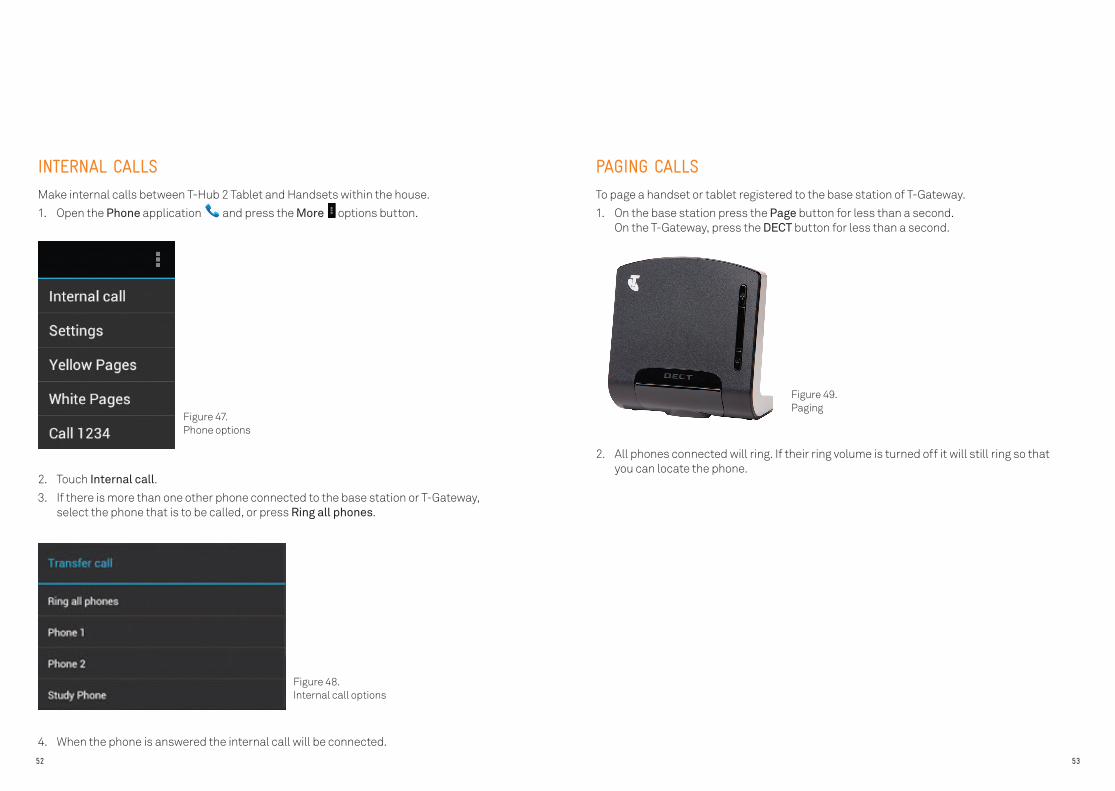
INTERNAL CALLS
Make internal calls between T-Hub 2 Tablet and Handsets within the house.
1. Open the Phone application and press the More options button.
PAGING CALLS
To page a handset or tablet registered to the base station of T-Gateway.
1. On the base station press the Page button for less than a second. On the T-Gateway, press the DECT button for less than a second.
2. All phones connected will ring. If their ring volume is turned off it will still ring so that you can locate the phone.
2. Touch Internal call.
3. If there is more than one other phone connected to the base station or T-Gateway, select the phone that is to be called, or press Ring all phones.
4. When the phone is answered the internal call will be connected.
Figure 47. Phone options
Figure 49. Paging
Figure 48. Internal call options
54 55
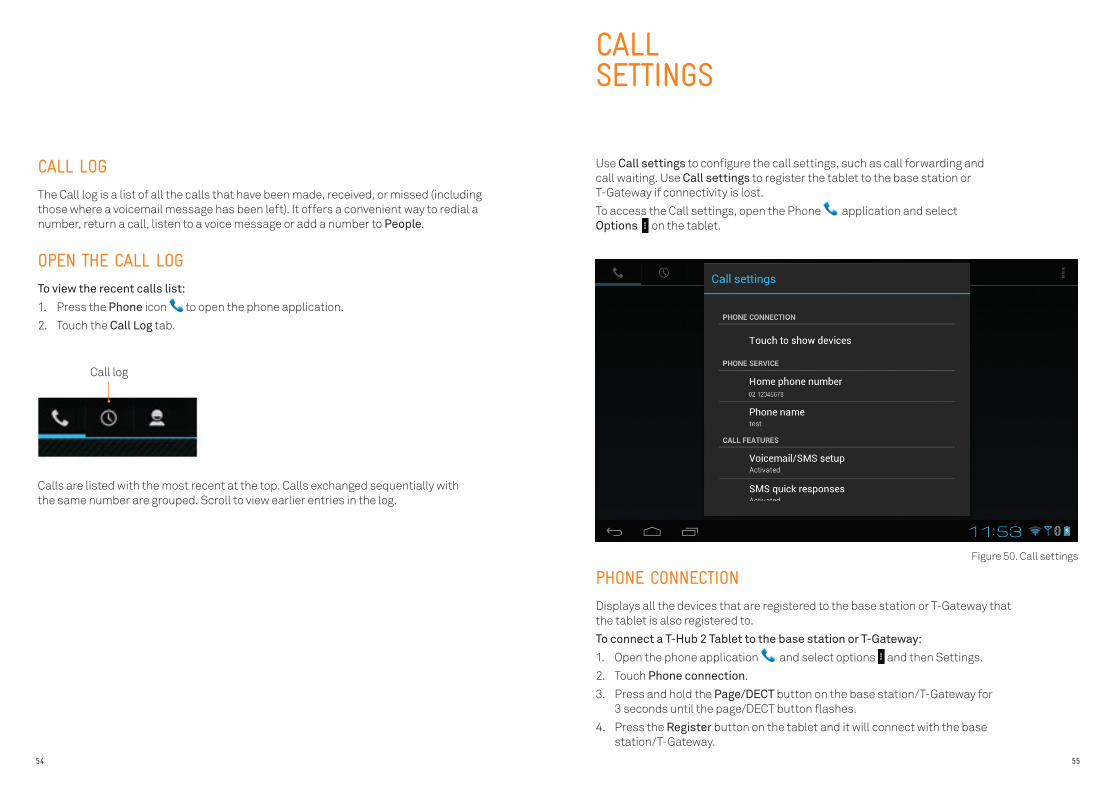
PHONE CONNECTION
Displays all the devices that are registered to the base station or T-Gateway that the tablet is also registered to.
To connect a T-Hub 2 Tablet to the base station or T-Gateway:
1. Open the phone application and select options and then Settings.
2. Touch Phone connection.
3. Press and hold the Page/DECT button on the base station/T-Gateway for 3 seconds until the page/DECT button flashes.
4. Press the Register button on the tablet and it will connect with the base station/T-Gateway.
Use Call settings to configure the call settings, such as call forwarding and call waiting. Use Call settings to register the tablet to the base station or T-Gateway if connectivity is lost.
To access the Call settings, open the Phone application and select Options on the tablet.
Calls are listed with the most recent at the top. Calls exchanged sequentially with the same number are grouped. Scroll to view earlier entries in the log.
CALL SETTINGS
CALL LOG
The Call log is a list of all the calls that have been made, received, or missed (including those where a voicemail message has been left). It offers a convenient way to redial a number, return a call, listen to a voice message or add a number to People.
OPEN THE CALL LOG
To view the recent calls list:
1. Press the Phone icon to open the phone application.
2. Touch the Call Log tab.
Call log
Figure 50. Call settings
56 57
VOICEMAIL SET UP
Voicemail can be set up during the Installation Wizard. Alternatively, Voicemail can be set up by touching the Voicemail application from the Home page. There will be step by step instructions to walk through to setup Voicemail.
Handy Hint 1: Prior to setting up Voicemail, ensure that Telstra Home Message 101 or Messagebank has been setup. These services can be activated by dialling 12 5101 and take up to 3 hours to activate.
Handy Hint 3: SMS will also be setup upon successfully setting up Voicemail.
Handy Hint 2: If the phone number or BigPond username/password that was setup on the tablet changes, it will be necessary to step through the Installation Wizard again to setup Voicemail. The Installation Wizard can be opened by touching Applications and selecting the Install Wizard application.
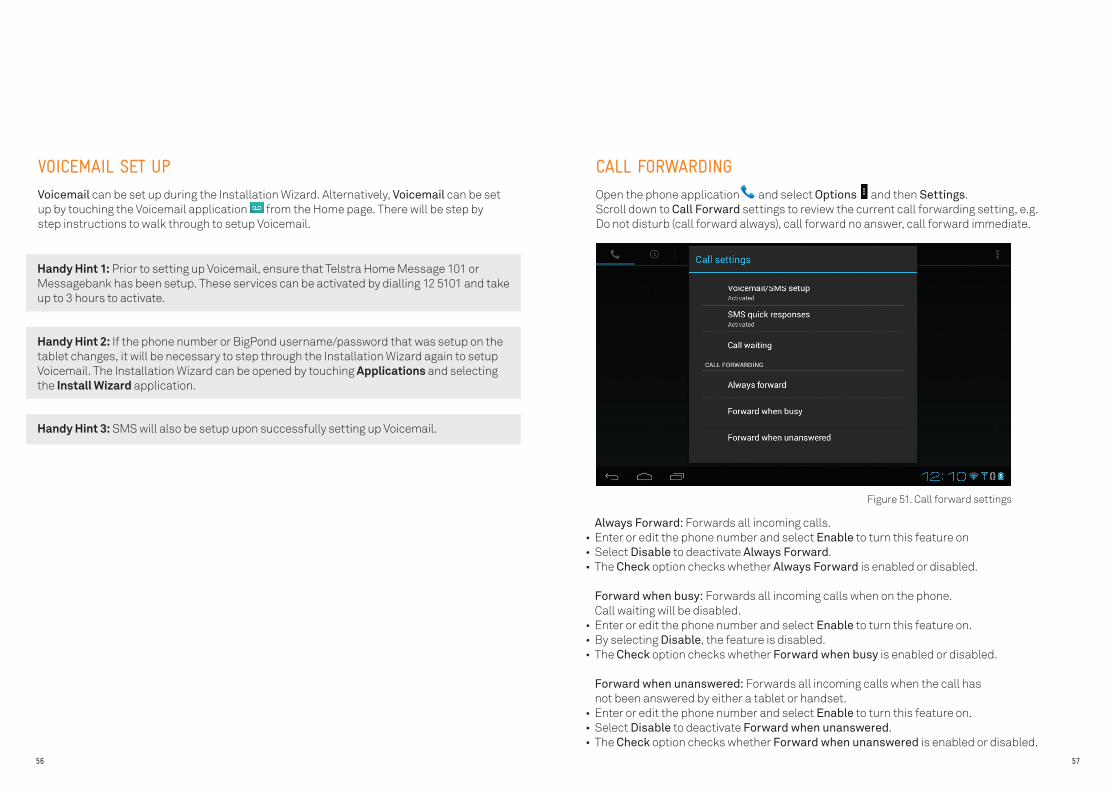
CALL FORWARDING
Open the phone application and select Options and then Settings. Scroll down to Call Forward settings to review the current call forwarding setting, e.g. Do not disturb (call forward always), call forward no answer, call forward immediate.
Always Forward: Forwards all incoming calls. • Enter or edit the phone number and select Enable to turn this feature on • Select Disable to deactivate Always Forward.• The Check option checks whether Always Forward is enabled or disabled.
Forward when busy: Forwards all incoming calls when on the phone. Call waiting will be disabled.
• Enter or edit the phone number and select Enable to turn this feature on. • By selecting Disable, the feature is disabled. • The Check option checks whether Forward when busy is enabled or disabled.
Forward when unanswered: Forwards all incoming calls when the call has not been answered by either a tablet or handset.
• Enter or edit the phone number and select Enable to turn this feature on. • Select Disable to deactivate Forward when unanswered.• The Check option checks whether Forward when unanswered is enabled or disabled.
Figure 51. Call forward settings
58 59
CALL WAITING
Call waiting enables users to take a second call when another call is in progress. To activate the service select Enable call waiting within Call Waiting settings. To de-activate the service select Disable call waiting within Call Waiting settings.
For Call Waiting to work on the T-Hub 2, Caller Number Display must be activated on your service. To check whether this feature has been activated, the phone number of an incoming caller must be visible. To activate this feature, contact Telstra on 13 2200.
CONTACTS
Contacts can be created, edited, deleted from within the People application. Contacts can also be imported/exported from and to mobile devices and other online accounts such as BigPond®, Windows Live, Gmail and Twitter. Finally, contacts can be shared across other T-Hub 2 Tablets and handsets that are registered to the T-Hub 2 Base Station or T-Gateway. This section outlines how to set up contacts so that they can be shared across devices or displayed on a single device.
SHARING CONTACTS
All contacts that are created on the T-Hub 2 Tablet and Handsets registered to the T-Hub 2 Base Station or the Telstra T-Gateway will be shared.
At this time, all contacts that are saved in the BigPond account that was setup during the installation wizard will also be shared across devices.
Any contacts saved in other accounts, including Google and Facebook will not be shared across devices. Note – any BigPond account added to the Tablet after the installation process will not be shared across devices.
BIGPOND CONTACTS
All contacts stored in the BigPond account that was entered during the installation wizard will be downloaded and shared across all handsets and tablets. Each time a change is made to the details of these contact, they will be updated automatically across all devices and online in the BigPond account. If the BigPond account is not set up correctly during the installation wizard, it is recommended that the installation wizard is run again to ensure that the contacts are shared across devices in the future. The installation wizard can be found within the list of Applications drawer on the tablet.
60 61
NON-OUTLOOK.COM BIGPOND® ACCOUNT
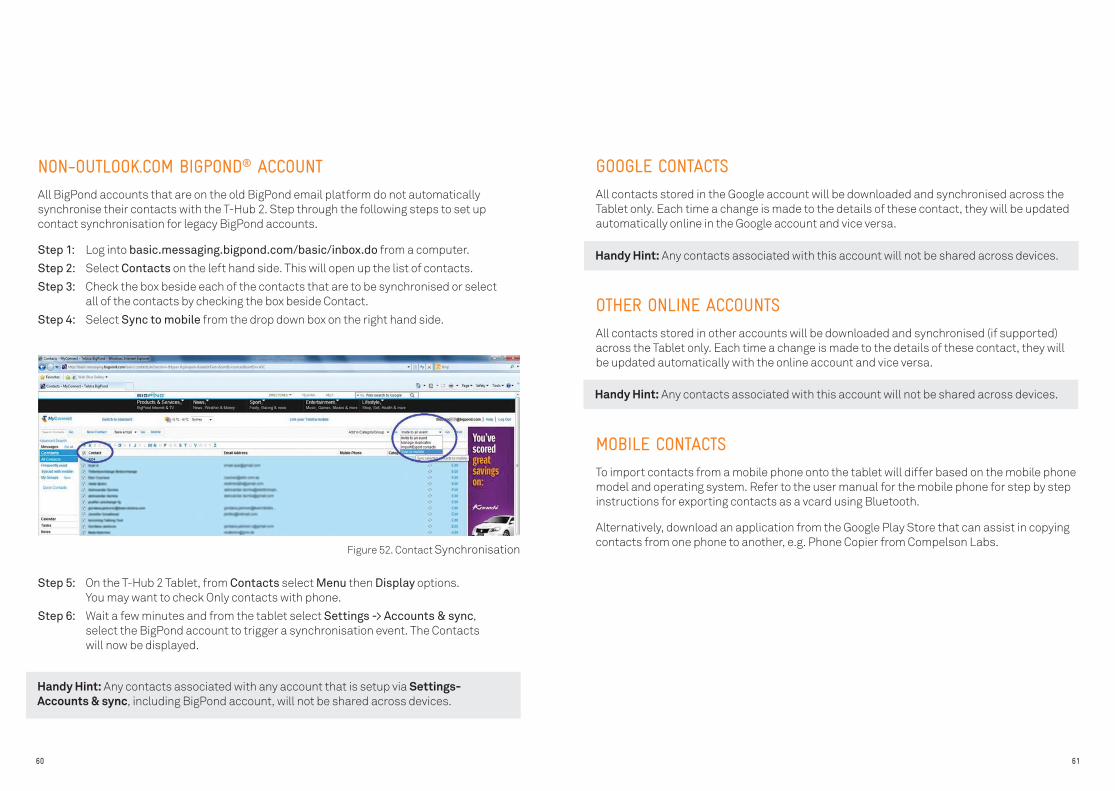
All BigPond accounts that are on the old BigPond email platform do not automatically synchronise their contacts with the T-Hub 2. Step through the following steps to set up contact synchronisation for legacy BigPond accounts.
Step 1: Log into basic.messaging.bigpond.com/basic/inbox.do from a computer.
Step 2: Select Contacts on the left hand side. This will open up the list of contacts.
Step 3: Check the box beside each of the contacts that are to be synchronised or select all of the contacts by checking the box beside Contact.
Step 4: Select Sync to mobile from the drop down box on the right hand side.
Step 5: On the T-Hub 2 Tablet, from Contacts select Menu then Display options. You may want to check Only contacts with phone.
Step 6: Wait a few minutes and from the tablet select Settings -> Accounts & sync, select the BigPond account to trigger a synchronisation event. The Contacts will now be displayed.
Handy Hint: Any contacts associated with any account that is setup via Settings-Accounts & sync, including BigPond account, will not be shared across devices.
Handy Hint: Any contacts associated with this account will not be shared across devices.
Handy Hint: Any contacts associated with this account will not be shared across devices.
GOOGLE CONTACTS
All contacts stored in the Google account will be downloaded and synchronised across the Tablet only. Each time a change is made to the details of these contact, they will be updated automatically online in the Google account and vice versa.
OTHER ONLINE ACCOUNTS
All contacts stored in other accounts will be downloaded and synchronised (if supported) across the Tablet only. Each time a change is made to the details of these contact, they will be updated automatically with the online account and vice versa.
MOBILE CONTACTS
To import contacts from a mobile phone onto the tablet will differ based on the mobile phone model and operating system. Refer to the user manual for the mobile phone for step by step instructions for exporting contacts as a vcard using Bluetooth.
Alternatively, download an application from the Google Play Store that can assist in copying contacts from one phone to another, e.g. Phone Copier from Compelson Labs.
Figure 52. Contact Synchronisation
62 63
ANDROID PHONE
Many Phone manufacturers, e.g. Samsung, HTC, LG, Motorola, Sony and Huawei produce phones that are based on Android. The simplest method to transfer contacts from an Android based mobile phone and the T-Hub 2 is to use Bluetooth.
Prior to transferring contacts from the mobile phone, make sure that Bluetooth is turned on, on the T-Hub 2 Tablet and it is paired to the mobile phone from which the contacts are to be sourced from.
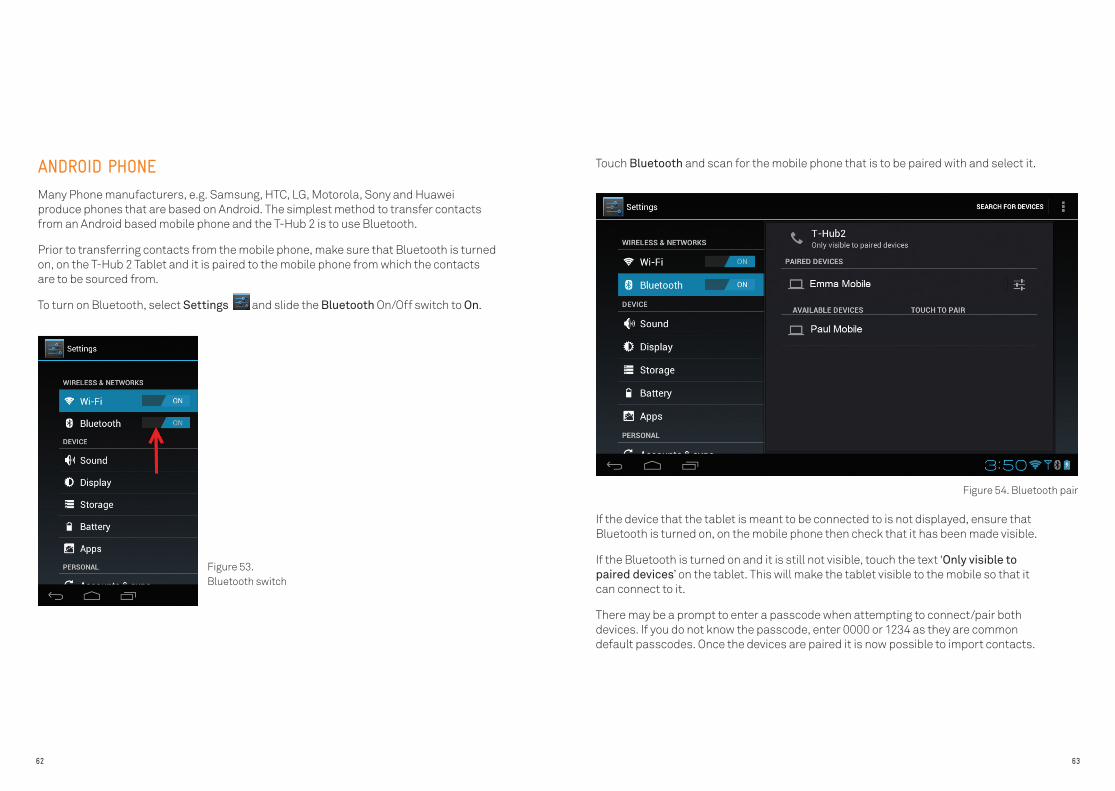
To turn on Bluetooth, select Settings and slide the Bluetooth On/Off switch to On.
Touch Bluetooth and scan for the mobile phone that is to be paired with and select it.
If the device that the tablet is meant to be connected to is not displayed, ensure that Bluetooth is turned on, on the mobile phone then check that it has been made visible.
If the Bluetooth is turned on and it is still not visible, touch the text ‘Only visible to paired devices’ on the tablet. This will make the tablet visible to the mobile so that it can connect to it.
There may be a prompt to enter a passcode when attempting to connect/pair both devices. If you do not know the passcode, enter 0000 or 1234 as they are common default passcodes. Once the devices are paired it is now possible to import contacts.
Figure 53. Bluetooth switch
Figure 54. Bluetooth pair
64 65
Android 2.3.x, 4.0 (Ice Cream Sandwich) and Android 4.1 (JellyBean)
Step 1: On the mobile phone, open Contacts/People.
Step 2: Press Menu and touch Import/Export.
Step 3: Select ‘Share visible contacts’ or ‘Share namecard via’ – depending on the version of Android.
Step 4: If prompted, select the contacts to share. Select Share all if the option is available.
Step 4: Select Bluetooth. Make sure that Bluetooth is turned on your T-Hub 2 tablet.
Step 5: When prompted on the T-Hub 2 tablet, accept the incoming file.
iPhone
There are a number of ways in which the contacts can be copied over to your iPhone.
Import iPhone contacts on the tablet
The following steps will load the iPhone contacts into a Google account. The Google account can then be setup on the T-Hub 2 Tablet.
Step 1: From a computer, open iTunes.
Step 2: Plug the iPhone into the computer with the USB to iPhone cable.
Step 3: Select the iPhone from the iTunes menu, then click “Info.”
Step 4: Click on the “Sync Contacts” box to check it.
Step 5: Click the “Sync Google Contacts” box.
Step 6: Enter the Google username and password. iTunes will export the iPhone contacts to the Gmail account.
Step 7: Go to the tablet and select Settings -> Accounts & sync and select the Google account which the contacts were loaded into. This will trigger the tablet to import the contacts.
Synchronise iPhone contacts with Tablet
The following steps will synchronise the iPhone contacts with a BigPond® account (as long as it has migrated to Outlook.com).
1. On your iPhone, open Settings.
2. Select Mail, Contacts, Calendars.
3. Select Add Account.
4. Select Microsoft Hotmail.
5. Enter the BigPond username and Password and provide a name for the Account.
Synchronise and share iPhone contacts with Tablet
The following steps will synchronise the iPhone contacts into a Google account. The Google account can then be setup on the T-Hub 2 Tablet.
Handy Hint: The contacts will not be shared across devices.
Handy Hint: The contacts will only be shared if the BigPond account set up is the same as the account setup on the tablet during the installation wizard.
Handy Hint: The contacts will not be shared across devices.

66 67
To sync your iPhone to the Tablet
6. On your iPhone, open Settings.7. Select Mail, Contacts, Calendars.8. Select Add Account...9. Select Other.10. Select Add CardDAV Account.11. Fill out your account information in the following fields:
a. Server: Enter “google.com”b. User Name: Enter your full Google Account or Google email address.c. Password: Your Google Account or Google password. d. Description: Enter a description of the account (e.g. Personal Contacts).
12. Select Next at the top of your screen.13. Make sure that the “Contacts” option is turned to ON.
Open the Contacts application on the iPhone, and syncing will automatically begin.
If you have set up iCloud, are syncing contacts from another account, or already have contacts stored on the device, you will need to select a Default Account. This will ensure that any contacts that are created, edited or deleted on your iPhone are also updated in the Google account.
To set up the default account on the iPhone
1. On the iPhone, open the Settings application.
2. Select Mail, Contacts, Calendars and scroll down to the Contacts section. The Default Account option will be displayed if there are more than one account synchronised to the iPhone.
3. Select Default Account.
4. Select the Google contacts account. The account will be labelled with the description given in the Description field.
Existing contacts should be imported into Google contacts.
Troubleshooting steps
If you have any problems, please try these things first:
1. Open the CardDAV account you established at Settings > Mail, Contacts, Calendars under Accounts. Make sure that the Account option is turned to ON.
2. If the Account is ON, then open Advanced Settings below and make sure Use SSL is turned to ON.
3. If you have changed anything, please click Done and the top right of the screen showing your account settings to save those changes.
4. If you’re still experiencing issues syncing your contacts using CardDAV, please login to your Google account on the web. You might be prompted to acknowledge an “Unusual sign-in location”.
68 69
COMPUTER CONTACTS
Contacts can be imported from Outlook and Mac Address Book using vCard files
From Mac Address Book
Step 1: Go to File and choose Export.
Step 2: Choose Export vCard.
Step 3: Sign in to Gmail.
Step 4: Click Gmail at the top-left corner of the Gmail page, then choose Contacts.
Step 5: Click the More actions dropdown menu and select Import....
Step 6: Click the Choose File button and locate the vCard file to upload.
Step 7: Select the file and click the Import button.
Step 8: On the T-Hub 2 Tablet and select Settings -> Accounts & sync and touch the Gmail that was used to import the vCard file. This will download the contacts stored online in the Gmail account on the T-Hub 2 tablet.
From Outlook, Outlook Express, Hotmail and other email providers
Step 1: Export the address book from your other email provider or email client as a CSV file.
Step 2: Sign in to Gmail.
Step 3: Click Gmail at the top-left corner of your Gmail page, then choose Contacts.
Step 4: From the More actions dropdown menu, select Import....
Step 5: Click the Choose File button.
Step 6: Select the file to upload and click the Import button. When it’s done, Gmail will display the number of contacts imported.
Step 7: On the T-Hub 2 Tablet and select Settings -> Accounts & sync and touch the Gmail that was used to import the vCard file. This will download the contacts stored online in the Gmail account on the T-Hub 2 tablet.
Handy Hint: If you receive any error messages during the import, you might need to edit the CSV file.
Handy Hint: The iPhone contacts will only be available on the T-Hub 2 tablet.
Important Note The vCard files that these applications produce might not contain all of the supported contact fields. For example, when Outlook exports to a vCard file, it omits attachments, distribution lists, the “file as” field, and text formatting in the “notes” field. Because Google Contacts doesn’t have a way to know what data was omitted, it is recommended that after import has completed, you search for contacts that might have these properties and manually copy over any important information.
Important Note The CSV files that these applications produce might not contain all of the supported contact fields. For example, when Outlook exports to a CSV file, it omits data including attachments, distribution lists, contact pictures, the “file as” field, the “nickname” field, and text formatting in the “notes” field. Google Contacts doesn’t have a way to know what was omitted, so it is recommended that you manually copy over any important information in these fields after you import your contacts.
70 71
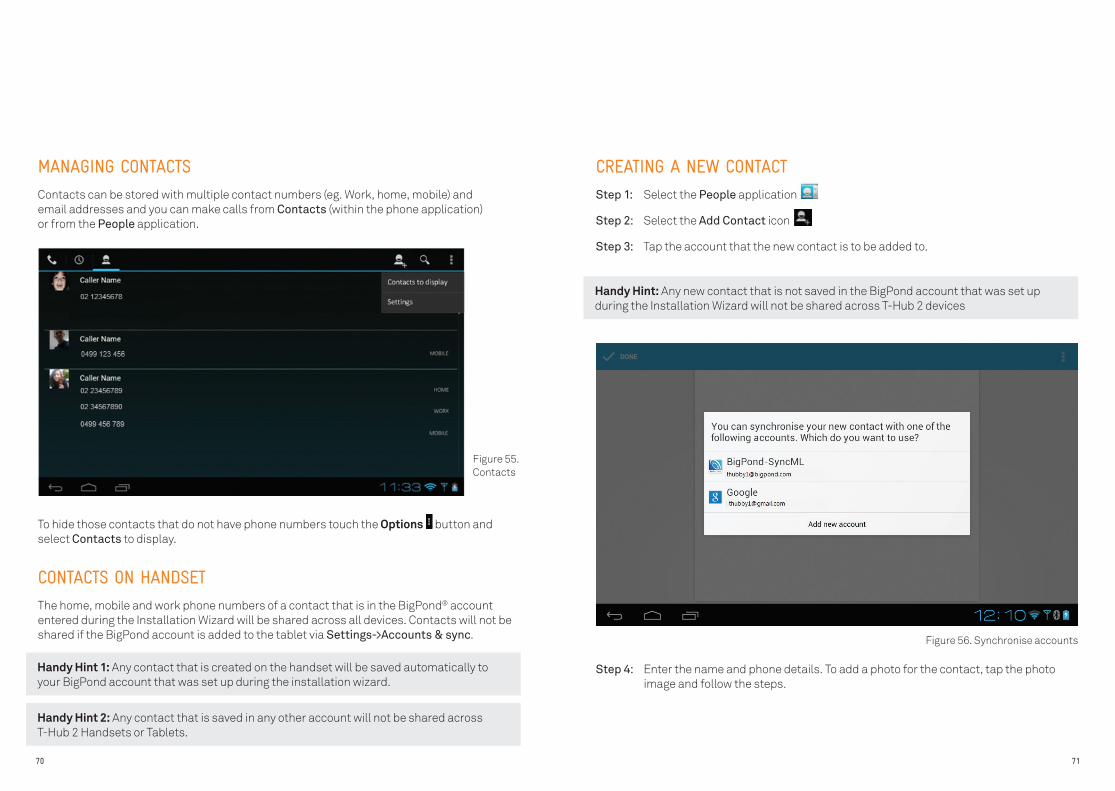
MANAGING CONTACTS
Contacts can be stored with multiple contact numbers (eg. Work, home, mobile) and email addresses and you can make calls from Contacts (within the phone application) or from the People application.
CREATING A NEW CONTACT
Step 1: Select the People application
Step 2: Select the Add Contact icon
Step 3: Tap the account that the new contact is to be added to.
CONTACTS ON HANDSET
The home, mobile and work phone numbers of a contact that is in the BigPond® account entered during the Installation Wizard will be shared across all devices. Contacts will not be shared if the BigPond account is added to the tablet via Settings->Accounts & sync.
To hide those contacts that do not have phone numbers touch the Options button and select Contacts to display.
Handy Hint 1: Any contact that is created on the handset will be saved automatically to your BigPond account that was set up during the installation wizard.
Handy Hint: Any new contact that is not saved in the BigPond account that was set up during the Installation Wizard will not be shared across T-Hub 2 devices
Handy Hint 2: Any contact that is saved in any other account will not be shared across T-Hub 2 Handsets or Tablets.
Step 4: Enter the name and phone details. To add a photo for the contact, tap the photo image and follow the steps.
Figure 55. Contacts
Figure 56. Synchronise accounts

72 73
Step 5: Tap DONE in the top left hand corner of the screen once done.
EDITING CONTACTS
Step 1: Select the People application
Step 2: Tap the contact to edit.
Step 3: Edit information of the contact and tap DONE once finished editing.
CREATING A GROUP
Step 1: Select the People application
Step 2: Select GROUPS on the top left of the screen.
Step 3: Tap the Add Group icon
Step 4: Name the Group and tap DONE.
VIEWING CONTACT BY GROUP
Step 1: Select the People application
Step 2: Select GROUPS on the top left of the screen.
Step 3: Tap the contacts group to view. The list of contacts by the group appears on the right.
RENAMING GROUPS
Step 1: Select the People application
Step 2: Tap GROUP on the top left of the screen.
Step 3: Tap the group to rename and tap
Step 4: Change the group name and tap DONE.
Figure 57. Creating a Contact

74 75
CALL LOG VISUAL VOICEMAIL
The call log is accessed within the Phone application from the tab. Alternatively, touch the Recent Calls widget from the Home page. As with contacts, recent calls are shared across T-Hub.
Voicemails can be accessed in the normal way by long-pressing the number 1 key on the tablet or handset. T-Hub 2 also features Visual Voicemail which lists all of voice messages along with who they are from (unless they have withheld their number). Select the Visual voicemail application by touching from the Home page or within the Phone application.
If a BigPond® account was not entered during the Installation Wizard or the Voicemail setup process was skipped, you will be prompted to set up Voicemail on first time use.
Where a recent call included a voicemail it will be displayed in the call log (as well as in the Voicemail application).
The call log can be cleared by touching Options and touching Clear call log. All recent calls will be removed (including on other T-Hub 2 phones).
Press within the call log to play a message. Unread messages are highlighted in grey. Select the envelope to mark it is as unread.
Figure 58. Recent calls
Figure 59. Call log
Figure 60. Voicemail log
76 77
SMS
The T-Hub 2 tablet can send SMS messages directly to mobiles on the Telstra, Vodafone, 3 and Lycamobile networks within Australia; as well as most Australian fixed numbers with an area code.
It is not possible to send SMS from your T-Hub 2 Tablet to some other numbers including:
• Pivotel mobile numbers.
• Fixed numbers that do not have an area code such as 13, 1300, 180 and 190 numbers.
If a BigPond® account was not entered during the installation wizard or Voicemail was not successfully set up, there will be a prompt to set up SMS on first time use of the SMS application.
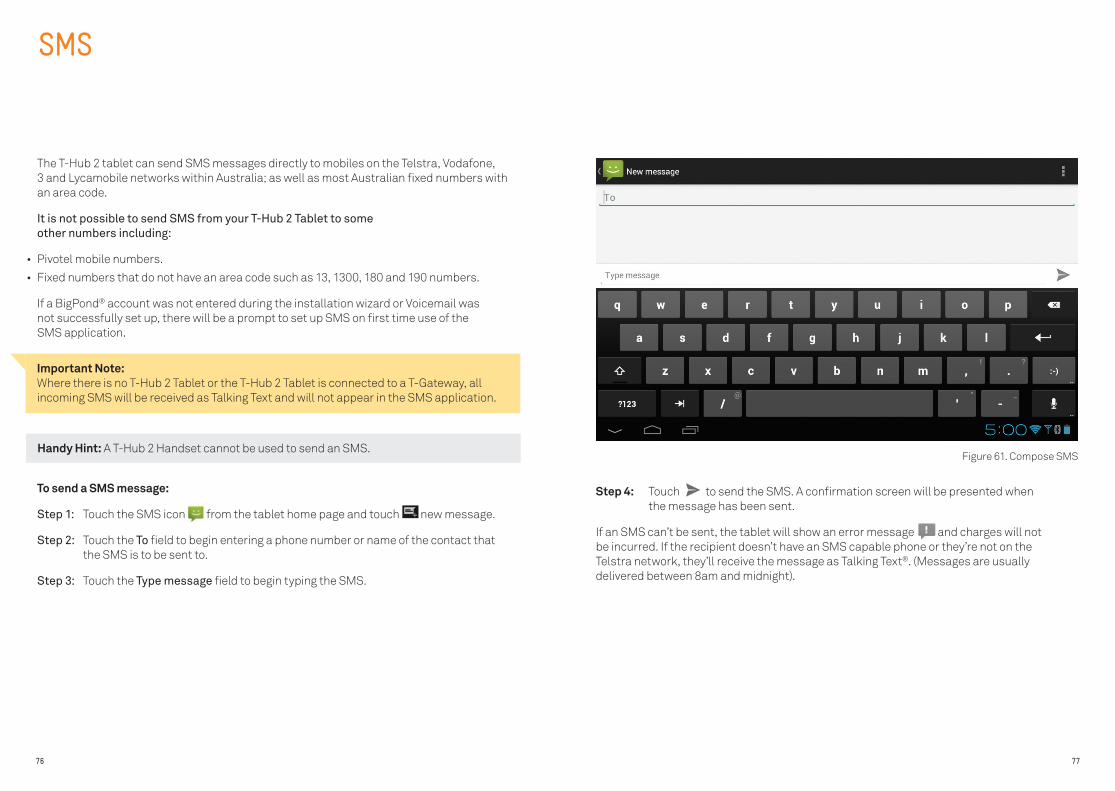
To send a SMS message:
Step 1: Touch the SMS icon from the tablet home page and touch new message.
Step 2: Touch the To field to begin entering a phone number or name of the contact that the SMS is to be sent to.
Step 3: Touch the Type message field to begin typing the SMS.
Handy Hint: A T-Hub 2 Handset cannot be used to send an SMS.
Important Note: Where there is no T-Hub 2 Tablet or the T-Hub 2 Tablet is connected to a T-Gateway, all incoming SMS will be received as Talking Text and will not appear in the SMS application.
Step 4: Touch to send the SMS. A confirmation screen will be presented when the message has been sent.
If an SMS can’t be sent, the tablet will show an error message and charges will not be incurred. If the recipient doesn’t have an SMS capable phone or they’re not on the Telstra network, they’ll receive the message as Talking Text®. (Messages are usually delivered between 8am and midnight).
Figure 61. Compose SMS

78 79
Opening and Responding to a received SMS
When an SMS message is received an SMS Icon will appear in the notification bar . To view the new message, either open the Notification bar and touch the SMS notification to view the message or touch the SMS icon on the Quick Launch Bar and touch the message thread to see the latest received message.
To respond to an SMS, open the message and touch the “Type to compose” box to bring up the keyboard. Once finished typing the message touch Send.
Draft Messages
To draft a message follow the steps to compose the SMS but before touching the Send button press the button to hide the keyboard and then press the Back button on the tablet.
This will save the message as a draft which can be edited or sent at a later time.
Things you should know
If the home phone service has a Silent line, call 019 833 9999 and use the setup menu to enable the telephone number to be sent along with the SMS message.
If there are other SMS-capable phones on the phone line, the SMS may not be received by the T-Hub 2 devices. Refer to the User Guide for the non-T-Hub 2 handset to be stepped through how to change the handsets Terminal Number to something other than 0.
Browsing the Internet with the Chrome browser on the T-Hub 2 is fast and responsive, with the ability to open multiple tabs as well as book mark your favourite pages and add shortcuts to the Home screen.
WEB BROWSING
NAVIGATION
Access a specific webpage
Tap in the address bar, and type in the webpage address using the on screen keyboard.
Stop a webpage from loading
Touch the button next to the address bar. The button is replaced with the Refresh button when the page is fully loaded.
Refresh a webpage Touch the button next to the address bar.
Open the search /URL text box
Chrome’s “omnibox” address bar functions as a search field too. Simply type the search keywords into the address bar and press enter.
Navigate and scroll around a webpage
Drag or swipe side to side or up and down.
Zoom in or out of a webpage
To zoom in, pinch both fingers together on the screen. To zoom out, reverse the gesture.
More options
Mark page as a favourite
Switch tab
Stop loading/Refresh page
“Omnibox”, enter your web address or search keywords
Close tab
New tab
Figure 62. Browser navigation

80 81
Open a link Touch the link on the webpage.
Open a new tab Touch the new tab area in the tabs header.
Open a current tab Touch another tab to switch
Close a tab Touch
To bookmark a page, press the start icon on the right of the address bar.
To open the bookmarks menu, touch the button (alternatively you can use the navigation button) and select Bookmarks. This will also provide you access to your most visited sites and browsing history. If you log into Chrome you can also share bookmarks and history with other devices that you use the Chrome browser on, such as a laptop or mobile phone.
BOOKMARKS AND HISTORY
Bookmark pages for easy access at a later time via the Chrome browser, or by accessing them through the Bookmarks widget. The Bookmarks widget can be found by opening the Applications drawer and selecting Widgets. Select the widget and drag it to one of the tablet home pages.
Mark page as a favourite
Figure 63. Bookmarking a web page
Figure 65. Browser bookmarks
Figure 64. Browser Settings
82 83
Create a bookmark Touch the bookmark button beside the URL text box and then save the bookmark.
Open a bookmark Select from Most Visited and Bookmarks tab and touch the image of the site to be opened.
Manage a bookmark
Touch and hold the bookmark to be opened, edited or removed.
New tab Touch the bookmark button beside the URL text box and then save the bookmark.
New incognito tab
Select from Most Visited and Bookmarks tab and touch the image of the site to be opened.
Bookmarks Touch and hold the bookmark to be opened, edited or removed.
Other devices Login to share browser history between other devices that you use the Chrome browser on.
Find in page… Use this to search for keywords within the content of a web page.
Request desktop site
The T-Hub 2 screen width enables a strong browsing experience on either mobile or desktop sites. Use this to request the desktop site (if applicable).
Settings Access to basic and advanced settings for privacy, accessibility and content.
Help Online help with the Chrome browser.
MORE
To access more features of the browser, touch the button (alternatively use the menu button).
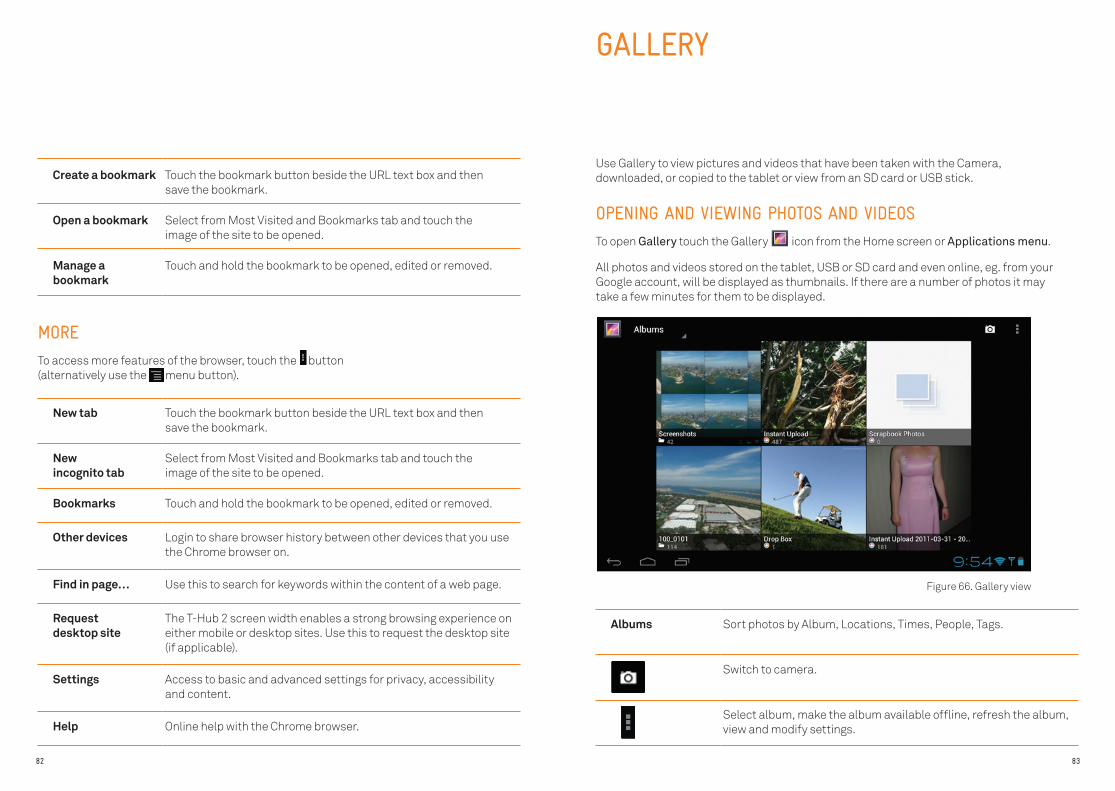
GALLERY
Use Gallery to view pictures and videos that have been taken with the Camera, downloaded, or copied to the tablet or view from an SD card or USB stick.
OPENING AND VIEWING PHOTOS AND VIDEOS
To open Gallery touch the Gallery icon from the Home screen or Applications menu.
All photos and videos stored on the tablet, USB or SD card and even online, eg. from your Google account, will be displayed as thumbnails. If there are a number of photos it may take a few minutes for them to be displayed.
Albums Sort photos by Album, Locations, Times, People, Tags.
Switch to camera.
Select album, make the album available offline, refresh the album, view and modify settings.
Figure 66. Gallery view

84 85
Within Gallery, it is possible to view the photos within an album as a slideshow, edit, crop, set a picture as a contact photo or a wallpaper or view its details by selecting the options icon .
Viewing photos as a slideshow
Select the album of photos that you want to view in a slideshow then select the Play icon .
Editing Photos
Select the photo to edit by touching it then select the Options icon then select Edit.
Modifies the exposure of the photo, including auto-fix.
Add affects to the photo, including Documentary, Film Grain, Fisheye.
Modifies the hues of the photo, including warmth and saturation of the photo. Modify the image to be black and white or have a sepia or negative finish.
Crop an image, fix red eye, add colour to people (tan), straighten an image, rotate, flip and sharpen an image.
Figure 67. Gallery header bar
Figure 68. Gallery options
Figure 69. Edit photo
86 87
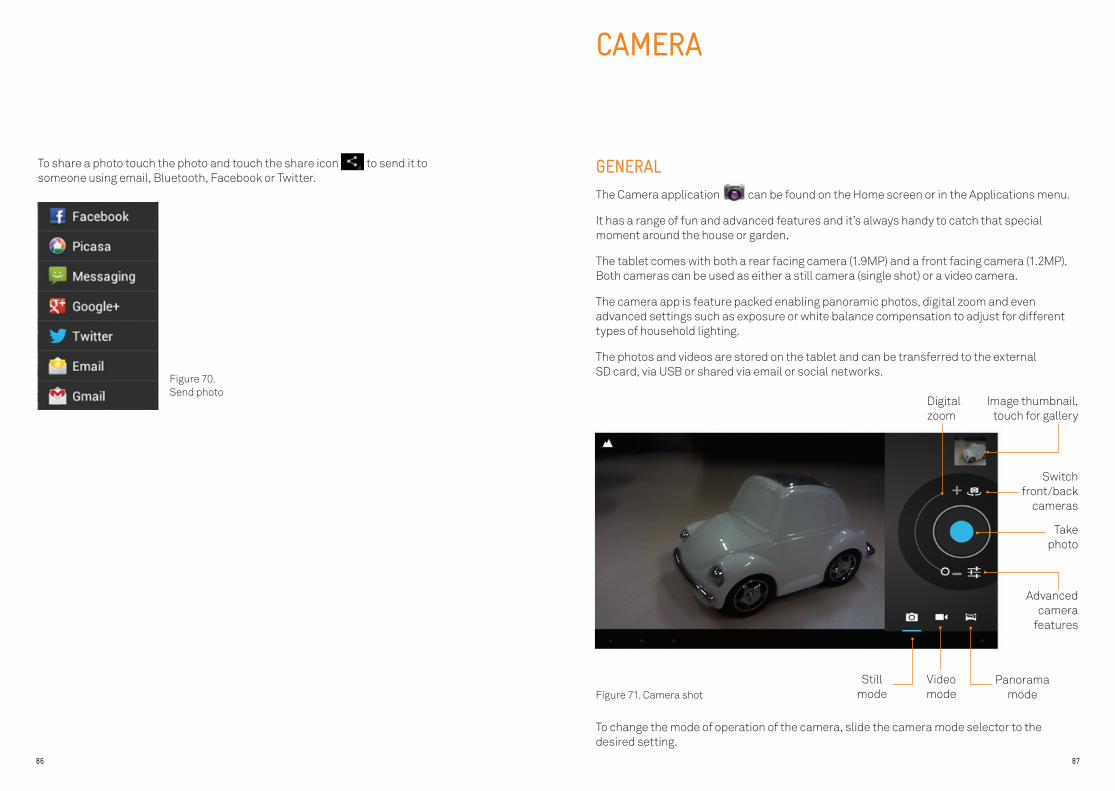
To share a photo touch the photo and touch the share icon to send it to someone using email, Bluetooth, Facebook or Twitter.
CAMERA
GENERAL
The Camera application can be found on the Home screen or in the Applications menu.
It has a range of fun and advanced features and it’s always handy to catch that special moment around the house or garden.
The tablet comes with both a rear facing camera (1.9MP) and a front facing camera (1.2MP). Both cameras can be used as either a still camera (single shot) or a video camera.
The camera app is feature packed enabling panoramic photos, digital zoom and even advanced settings such as exposure or white balance compensation to adjust for different types of household lighting.
The photos and videos are stored on the tablet and can be transferred to the external SD card, via USB or shared via email or social networks.
To change the mode of operation of the camera, slide the camera mode selector to the desired setting.
Digital zoom
Take photo
Advanced camera
features
Image thumbnail, touch for gallery
Switch front/back
cameras
Still mode
Panorama mode
Video mode
Figure 70. Send photo
Figure 71. Camera shot
88 89
STILL CAMERA
When using the still mode camera to take a photo simply select the take photo button (blue for still photos, red for record video and green in panorama mode).
A thumbnail of the photo will appear at the top right hand side of the application. Touch the image to view it in Gallery.
Camera controls
The controls change to provide further settings which are specific to the current camera mode.
The controls change to provide further settings which are specific to the current camera mode.
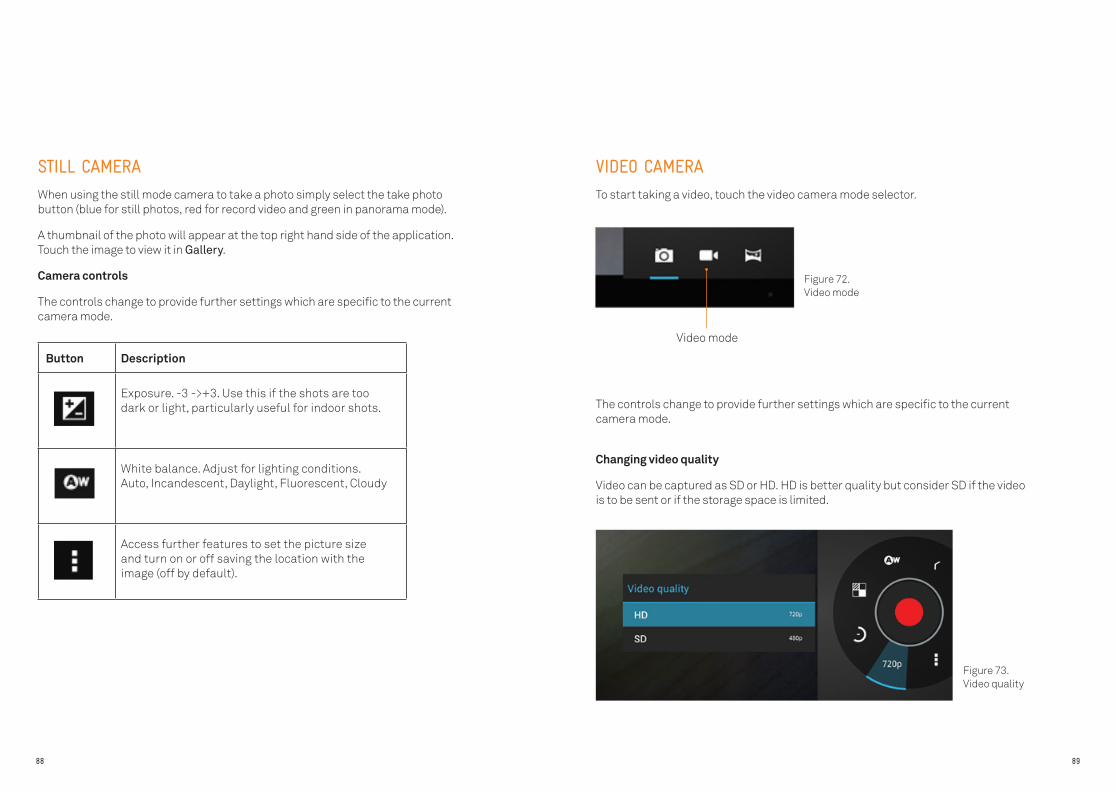
Changing video quality
Video can be captured as SD or HD. HD is better quality but consider SD if the video is to be sent or if the storage space is limited.
VIDEO CAMERA
To start taking a video, touch the video camera mode selector.
Button Description
Exposure. -3 ->+3. Use this if the shots are too dark or light, particularly useful for indoor shots.
White balance. Adjust for lighting conditions. Auto, Incandescent, Daylight, Fluorescent, Cloudy
Access further features to set the picture size and turn on or off saving the location with the image (off by default).
Video mode
Figure 73. Video quality
Figure 72. Video mode
90 91
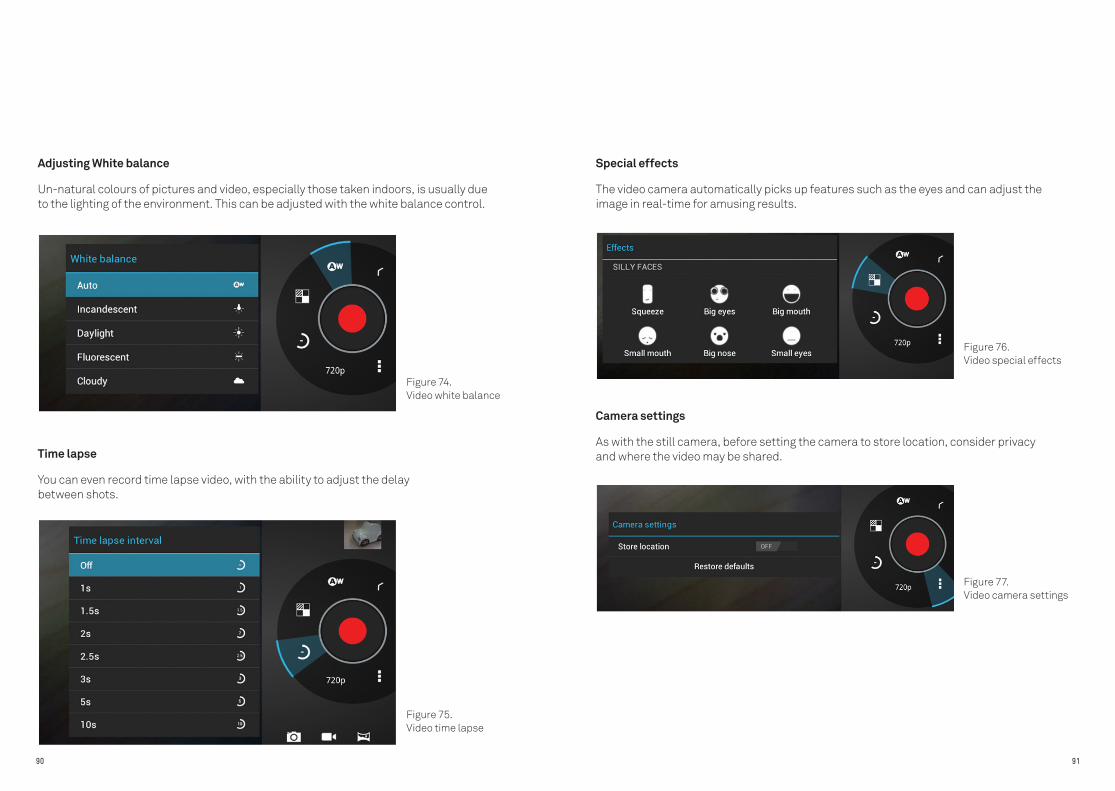
Time lapse
You can even record time lapse video, with the ability to adjust the delay between shots.
Adjusting White balance
Un-natural colours of pictures and video, especially those taken indoors, is usually due to the lighting of the environment. This can be adjusted with the white balance control.
Special effects
The video camera automatically picks up features such as the eyes and can adjust the image in real-time for amusing results.
Camera settings
As with the still camera, before setting the camera to store location, consider privacy and where the video may be shared.
Figure 74. Video white balance
Figure 76. Video special effects
Figure 75. Video time lapse
Figure 77. Video camera settings
92 93
CALCULATOR GOOGLE PLAY STORE
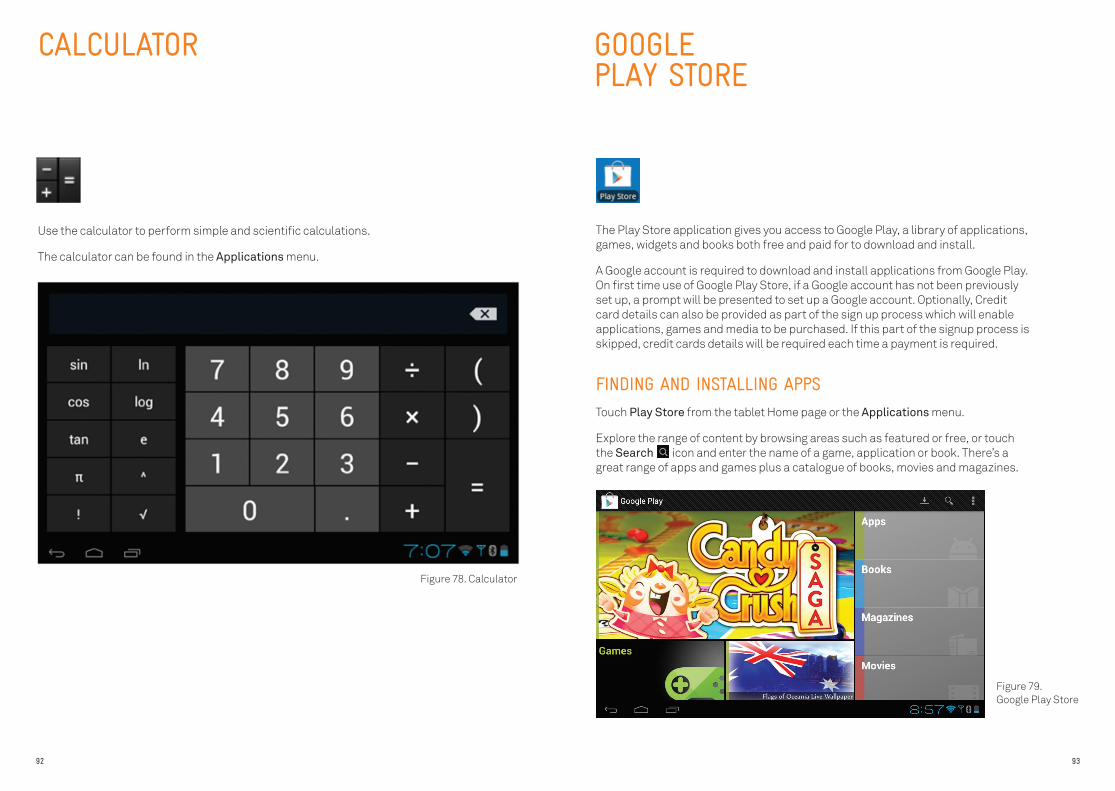
Use the calculator to perform simple and scientific calculations.
The calculator can be found in the Applications menu.
The Play Store application gives you access to Google Play, a library of applications, games, widgets and books both free and paid for to download and install.
A Google account is required to download and install applications from Google Play. On first time use of Google Play Store, if a Google account has not been previously set up, a prompt will be presented to set up a Google account. Optionally, Credit card details can also be provided as part of the sign up process which will enable applications, games and media to be purchased. If this part of the signup process is skipped, credit cards details will be required each time a payment is required.
FINDING AND INSTALLING APPS
Touch Play Store from the tablet Home page or the Applications menu.
Explore the range of content by browsing areas such as featured or free, or touch the Search icon and enter the name of a game, application or book. There’s a great range of apps and games plus a catalogue of books, movies and magazines.
Figure 78. Calculator
Figure 79. Google Play Store

94 95
Select Apps to see the list of Staff Picks, Games and Telstra Featured. Select an application to download it to the tablet. A brief description of the application will be available as well as a rating of the product by other users. It is recommended that the reviews of other users are read prior to installing the application. Also be aware that an application is stored on the tablet and will consume space. Some applications consume more than others.
Download and install the application by touching the Install button.
The tablet will begin the download and install the application. When complete, the application will be put loaded into the Applications menu and may be accessible as a shortcut on one of the tablet home pages.
Handy Hint 1: If a shortcut for the application is not loaded on one of the tablet home pages, find it in the Applications menu, hold it down and drag it onto one of the pages.
Handy Hint 2: It is also possible to manage applications that have been downloaded via a PC by going to play.google.com and logging into the registered Google account.
Handy Hint 3: To uninstall an application, select Apps in Settings and locate the application within the Downloaded tab. Once selected, select Uninstall.
Important Note 2: For those applications where are charge is applied, the Install button will be replaced with the charge of the application.
Important Note 1: Applications requiring GPS hardware cannot be accessed or downloaded from Google Play™ using T-Hub 2.
Figure 80. Play Store applications
Figure 81. Telstra featured apps
Figure 82. T-Cloud installation
96 97
MANAGING APPLICATIONS
By selecting Menu within an application, the option to modify the Settings specific to the application will be presented.
Examples of settings include:
- Whether the application will update automatically when an update is made available.
- Update only when the tablet is connected to a Wi-Fi network.
- Clear history.
Reinstall an application
To reinstall an application that has been deleted, go to play.google.com and log into the registered Google account and select My Android Apps. A list of all the applications that have been downloaded previously will be presented. For those applications that attract a charge, they can be re-installed without making an additional payment.
Request a refund
If the application does not work or it does not meet expectations, there is generally a 15 minute window available to request a refund. The allocated time will be displayed on the screen at time of purchase. The credit card associated with the registered Google account will not be charged once the refund is requested.
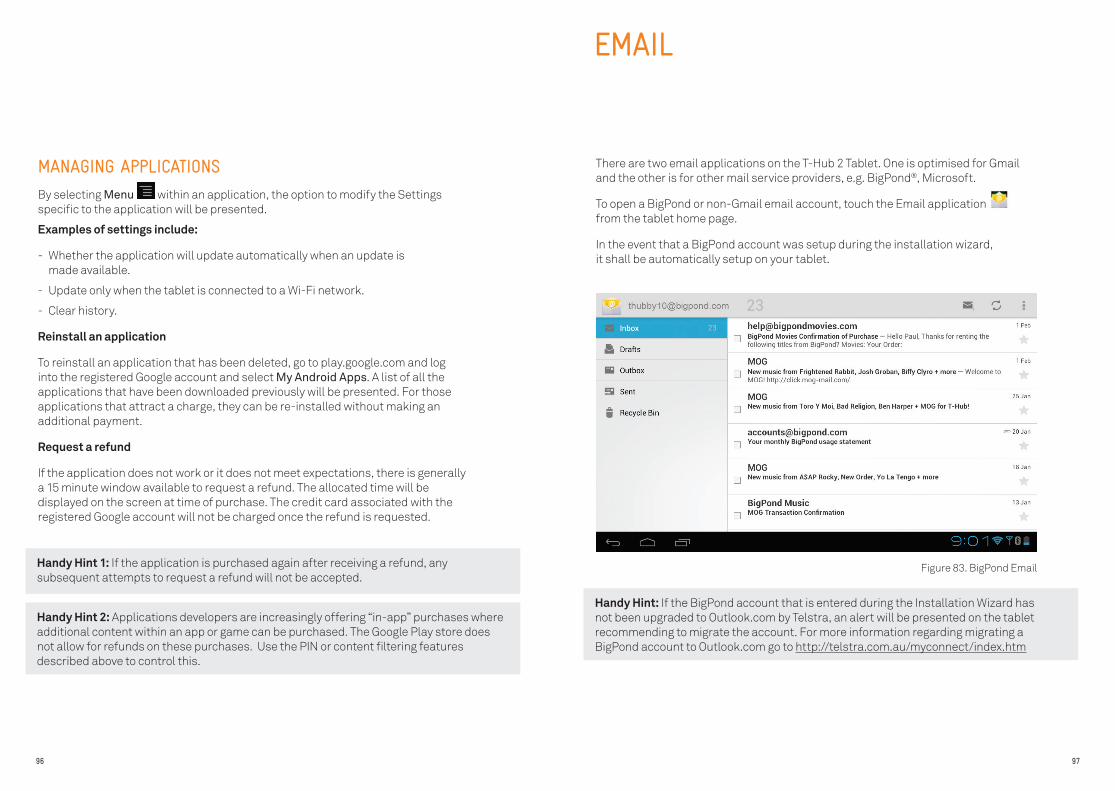
There are two email applications on the T-Hub 2 Tablet. One is optimised for Gmail and the other is for other mail service providers, e.g. BigPond®, Microsoft.
To open a BigPond or non-Gmail email account, touch the Email application from the tablet home page.
In the event that a BigPond account was setup during the installation wizard, it shall be automatically setup on your tablet.
Handy Hint 1: If the application is purchased again after receiving a refund, any subsequent attempts to request a refund will not be accepted.
Handy Hint 2: Applications developers are increasingly offering “in-app” purchases where additional content within an app or game can be purchased. The Google Play store does not allow for refunds on these purchases. Use the PIN or content filtering features described above to control this.
Handy Hint: If the BigPond account that is entered during the Installation Wizard has not been upgraded to Outlook.com by Telstra, an alert will be presented on the tablet recommending to migrate the account. For more information regarding migrating a BigPond account to Outlook.com go to http://telstra.com.au/myconnect/index.htm
Figure 83. BigPond Email

98 99
To open Gmail, touch the Gmail icon from the Apps pages.
The first time either of these email applications are opened, there will be a prompt to enter account details or create an account if they have not been done so already.
From within the Email application:Read email. Touch a message to read it. Unread messages are bold.
Delete Email. Touch the checkbox to delete a message.
Compose Email: Touch the Compose email icon to compose an email.
Refresh: Check for new email by touching the Refresh icon .
Manage email: Check the box beside a message to select it. Then use the icons along the top of the application screen to manage the selected messages.
Change your settings: Touch the Options icon to change your preferences, add an account, or get Help.
Gmail OnlySwipe: left or right to read the previous or next conversation (Gmail only)
Search: Select the Search icon to search for contacts, email messages.
To get back to the Inbox of the Email application, simply touching the top left corner of the tablet screen.
CALENDAR
Create, view, edit and delete events from the Calendar application .
The tablet is designed to pre-populate the Calendar with events from the BigPond® account that was setup during the Installation Wizard.
As events are edited from the tablet or web browser, they are synced automatically. To view the Calendar, touch on the Calendar application on the Home screen. To change the Calendar view, touch the date at the top and choose Day, Week, Month, or Agenda.
Swipe to scroll vertically or horizontally. In the Day or Week views, spread your fingers apart or pinch them together to zoom in or out.
From any of these views,
- Read or edit event details. Touch an event to view its details.
- Manage events and calendars. Touch icons across the top or Menu to search or create events, return to today, or adjust settings.
Handy Hint: Calendar events saved in BigPond accounts that have not yet migrated to Outlook.com will not be imported or synchronised.
Figure 84. Gmail Inbox
Figure 85. Calendar view
100 101
CREATING AN EVENT
To create an event:
Step 1: Open the Calendar application and select the view as either Day, Week or Month. The weekly view is displayed by default.
Step 2: Press and hold the date/time to add an event to.
Step 3: Enter the necessary information, including where the event is, who is attending, set a reminder.
Step 4: Tap DONE which is located in the top right hand corner of the Calendar application.
EDITING EVENTS
To edit an event:
Step 1: Touch the event to edit .
Step 2: Select the edit icon.
Step 3: Edit the relevant details.
Step 4: Tap DONE.
ADDING AN ACCOUNT
To combine the various calendar events of each family member into one view:
Step 1: Select the Options icon.
Step 2: Select Settings.
Step 3: Select Add Account which is located on the top right hand corner of the Calendar application and follow the onscreen instructions.
T-SHARE
T-Share comes pre-installed on the T-Hub 2 Tablet to enable music, video and photos from and via your compatible PC, TV or DVD player to be played on another device, including the tablet. For example, you may want to view a movie that is stored on your compatible Blu-ray player and play it on your tablet.
T-Share works by using a standard called DLNA®. Videos, music and photos can all be controlled and watched/listened to across devices that are DLNA® compatible and are connected on the same home network that the T-Hub 2 Tablet is connected to.
T-SHARE CAN BE USED IN 2 DIFFERENT WAYS:
Controller
When used as a Controller, the T-Share is used to browse the various devices connected to the home network for videos, music and photos. When the file is found, T-Share can be used to push the file to another DLNA® compatible device such as your TV or computer to watch or listen to it there.
Viewer
Enables you to watch a video, listen to music or view photos that are stored on a device connected to the home network on your T-Hub 2 Tablet.
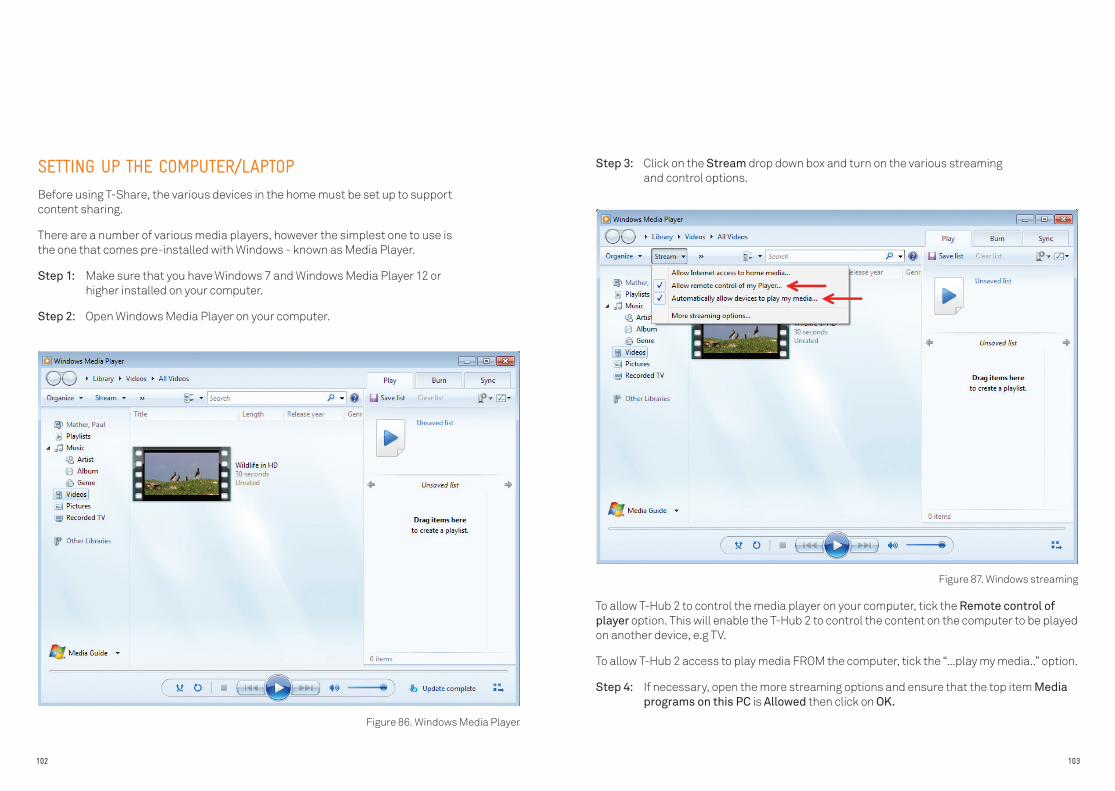
102 103
SETTING UP THE COMPUTER/LAPTOP
Before using T-Share, the various devices in the home must be set up to support content sharing.
There are a number of various media players, however the simplest one to use is the one that comes pre-installed with Windows - known as Media Player.
Step 1: Make sure that you have Windows 7 and Windows Media Player 12 or higher installed on your computer.
Step 2: Open Windows Media Player on your computer.
Step 3: Click on the Stream drop down box and turn on the various streaming and control options.
To allow T-Hub 2 to control the media player on your computer, tick the Remote control of player option. This will enable the T-Hub 2 to control the content on the computer to be played on another device, e.g TV.
To allow T-Hub 2 access to play media FROM the computer, tick the “...play my media..” option.
Step 4: If necessary, open the more streaming options and ensure that the top item Media programs on this PC is Allowed then click on OK.
Figure 86. Windows Media Player
Figure 87. Windows streaming
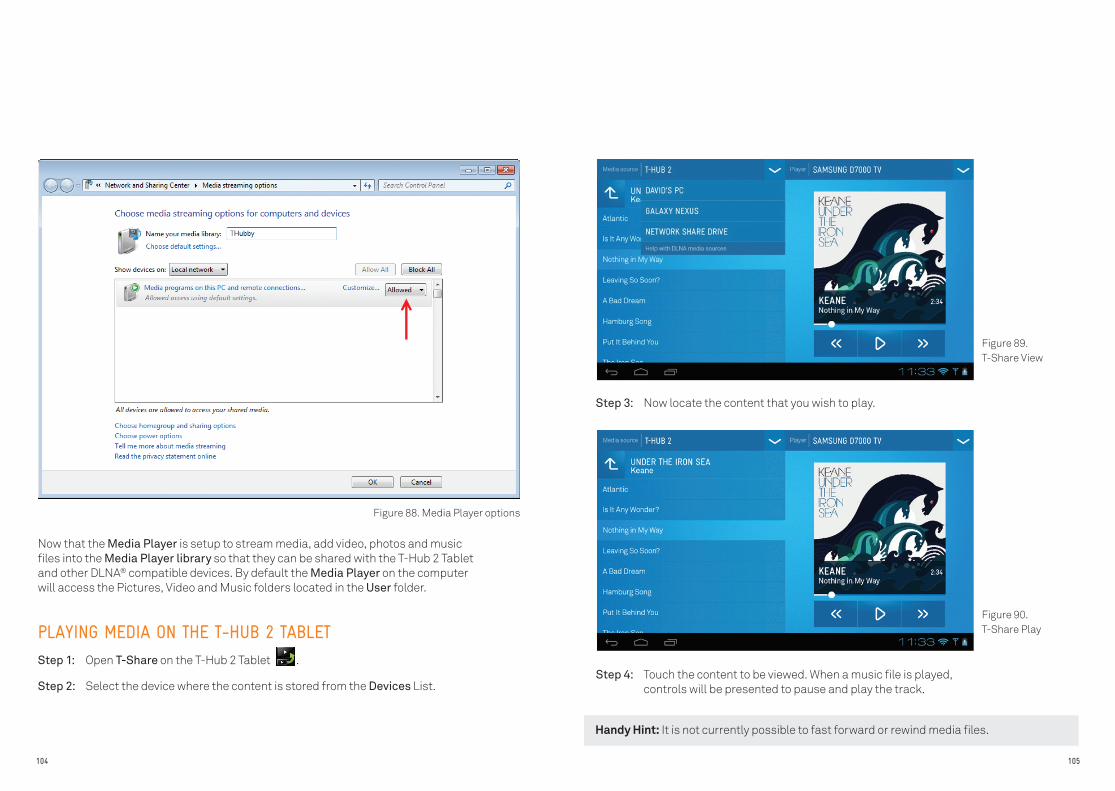
104 105
Now that the Media Player is setup to stream media, add video, photos and music files into the Media Player library so that they can be shared with the T-Hub 2 Tablet and other DLNA® compatible devices. By default the Media Player on the computer will access the Pictures, Video and Music folders located in the User folder.
PLAYING MEDIA ON THE T-HUB 2 TABLET
Step 1: Open T-Share on the T-Hub 2 Tablet .
Step 2: Select the device where the content is stored from the Devices List.
Step 3: Now locate the content that you wish to play.
Step 4: Touch the content to be viewed. When a music file is played, controls will be presented to pause and play the track.
Handy Hint: It is not currently possible to fast forward or rewind media files.
Figure 88. Media Player options
Figure 89. T-Share View
Figure 90. T-Share Play
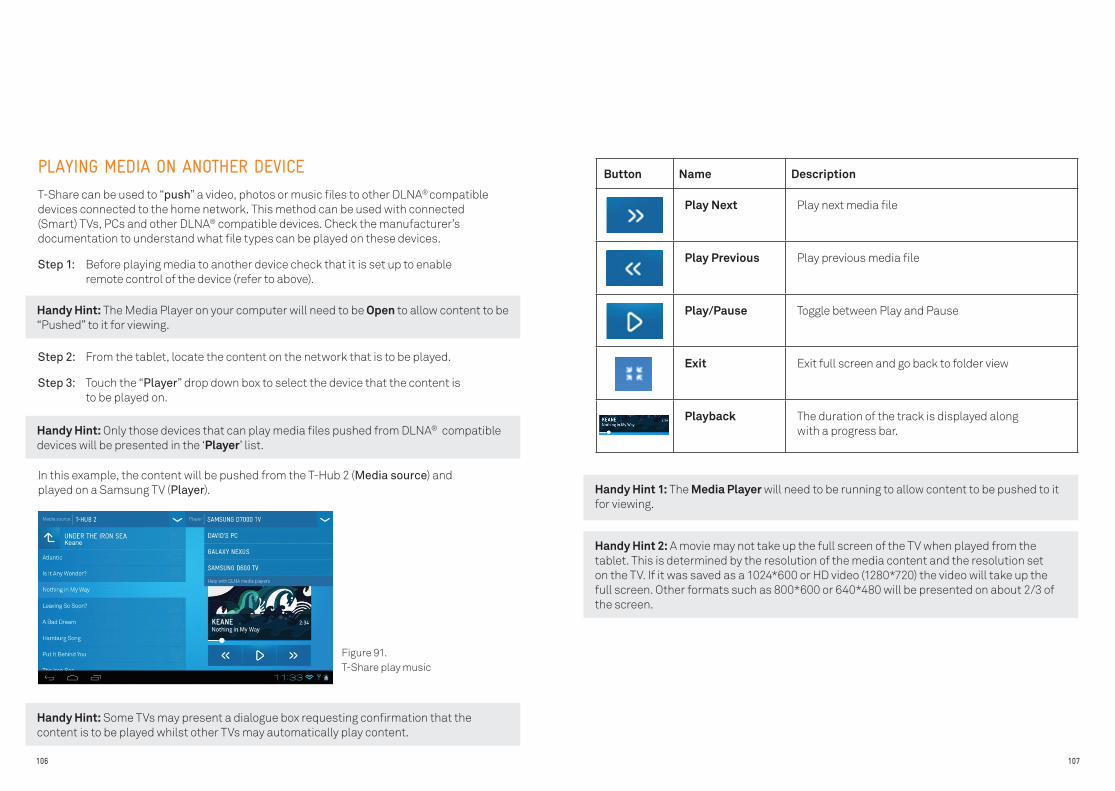
106 107
PLAYING MEDIA ON ANOTHER DEVICE
T-Share can be used to “push” a video, photos or music files to other DLNA® compatible devices connected to the home network. This method can be used with connected (Smart) TVs, PCs and other DLNA® compatible devices. Check the manufacturer’s documentation to understand what file types can be played on these devices.
Step 1: Before playing media to another device check that it is set up to enable remote control of the device (refer to above).
Step 2: From the tablet, locate the content on the network that is to be played.
Step 3: Touch the “Player” drop down box to select the device that the content is to be played on.
®
In this example, the content will be pushed from the T-Hub 2 (Media source) and played on a Samsung TV (Player).
Handy Hint: The Media Player on your computer will need to be Open to allow content to be “Pushed” to it for viewing.
Handy Hint: Only those devices that can play media files pushed from DLNA® compatible devices will be presented in the ‘Player’ list.
Handy Hint: Some TVs may present a dialogue box requesting confirmation that the content is to be played whilst other TVs may automatically play content.
Handy Hint 1: The Media Player will need to be running to allow content to be pushed to it for viewing.
Handy Hint 2: A movie may not take up the full screen of the TV when played from the tablet. This is determined by the resolution of the media content and the resolution set on the TV. If it was saved as a 1024*600 or HD video (1280*720) the video will take up the full screen. Other formats such as 800*600 or 640*480 will be presented on about 2/3 of the screen.
Button Name Description
Play Next Play next media file
Play Previous Play previous media file
Play/Pause Toggle between Play and Pause
Exit Exit full screen and go back to folder view
Playback The duration of the track is displayed along with a progress bar.
Figure 91. T-Share play music
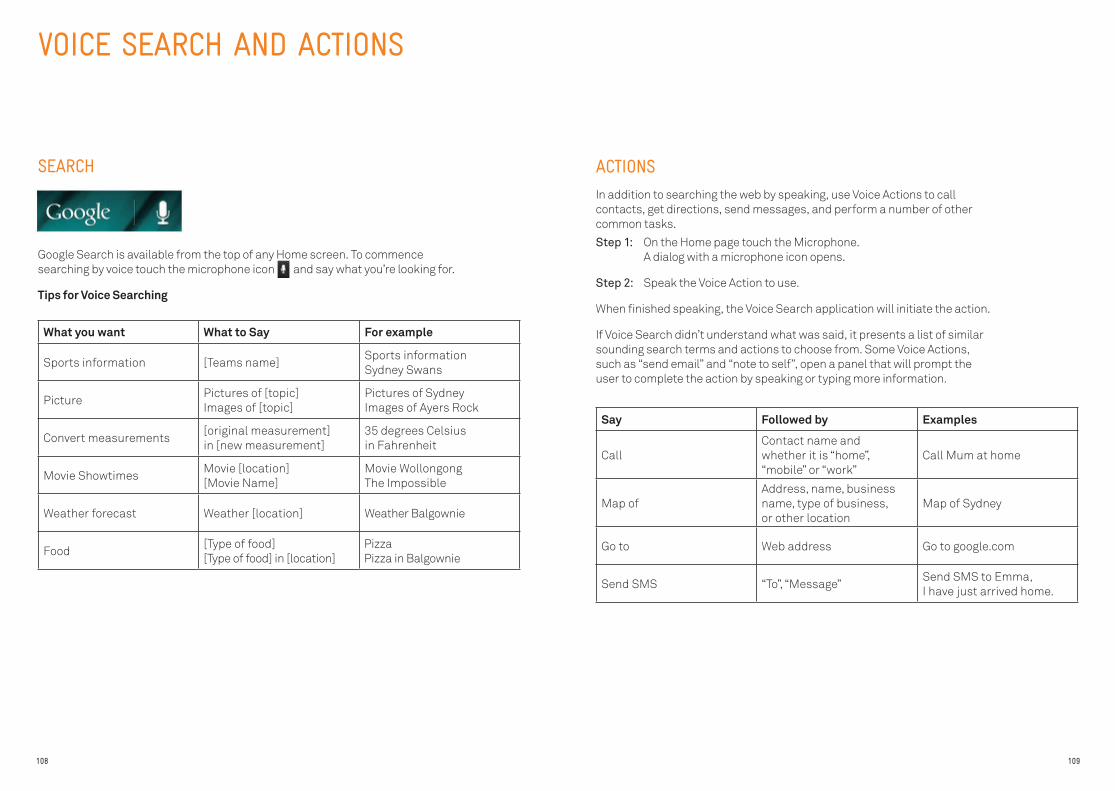
108 109
SEARCH
Google Search is available from the top of any Home screen. To commence searching by voice touch the microphone icon and say what you’re looking for.
Tips for Voice Searching
VOICE SEARCH AND ACTIONS
What you want What to Say For example
Sports information [Teams name]Sports information Sydney Swans
PicturePictures of [topic] Images of [topic]
Pictures of Sydney Images of Ayers Rock
Convert measurements[original measurement] in [new measurement]
35 degrees Celsius in Fahrenheit
Movie ShowtimesMovie [location] [Movie Name]
Movie Wollongong The Impossible
Weather forecast Weather [location] Weather Balgownie
Food[Type of food] [Type of food] in [location]
Pizza Pizza in Balgownie
Say Followed by Examples
CallContact name and whether it is “home”, “mobile” or “work”
Call Mum at home
Map ofAddress, name, business name, type of business, or other location
Map of Sydney
Go to Web address Go to google.com
Send SMS “To”, “Message”Send SMS to Emma, I have just arrived home.
ACTIONS
In addition to searching the web by speaking, use Voice Actions to call contacts, get directions, send messages, and perform a number of other common tasks.
Step 1: On the Home page touch the Microphone. A dialog with a microphone icon opens.
Step 2: Speak the Voice Action to use.
When finished speaking, the Voice Search application will initiate the action.
If Voice Search didn’t understand what was said, it presents a list of similar sounding search terms and actions to choose from. Some Voice Actions, such as “send email” and “note to self”, open a panel that will prompt the user to complete the action by speaking or typing more information.
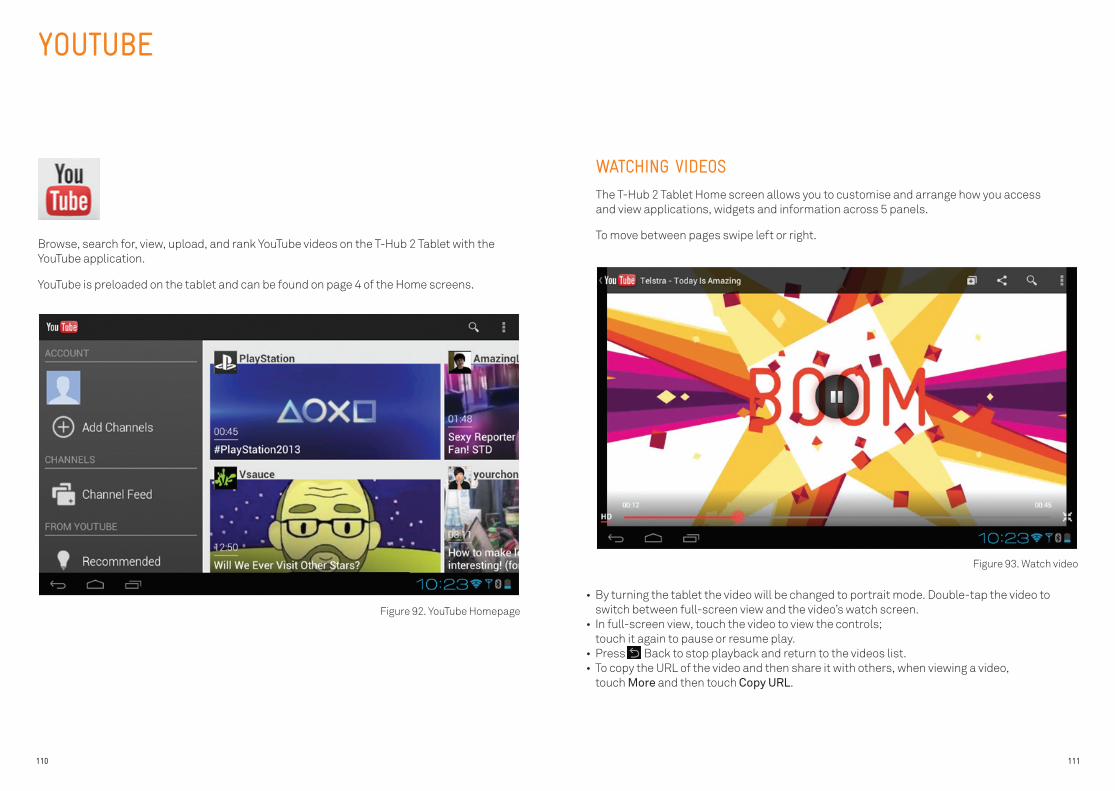
110 111
Browse, search for, view, upload, and rank YouTube videos on the T-Hub 2 Tablet with the YouTube application.
YouTube is preloaded on the tablet and can be found on page 4 of the Home screens.
YOUTUBE
WATCHING VIDEOS
The T-Hub 2 Tablet Home screen allows you to customise and arrange how you access and view applications, widgets and information across 5 panels.
To move between pages swipe left or right.
• By turning the tablet the video will be changed to portrait mode. Double-tap the video to switch between full-screen view and the video’s watch screen.
• In full-screen view, touch the video to view the controls; touch it again to pause or resume play.
• Press Back to stop playback and return to the videos list.• To copy the URL of the video and then share it with others, when viewing a video,
touch More and then touch Copy URL.
Figure 92. YouTube Homepage
Figure 93. Watch video
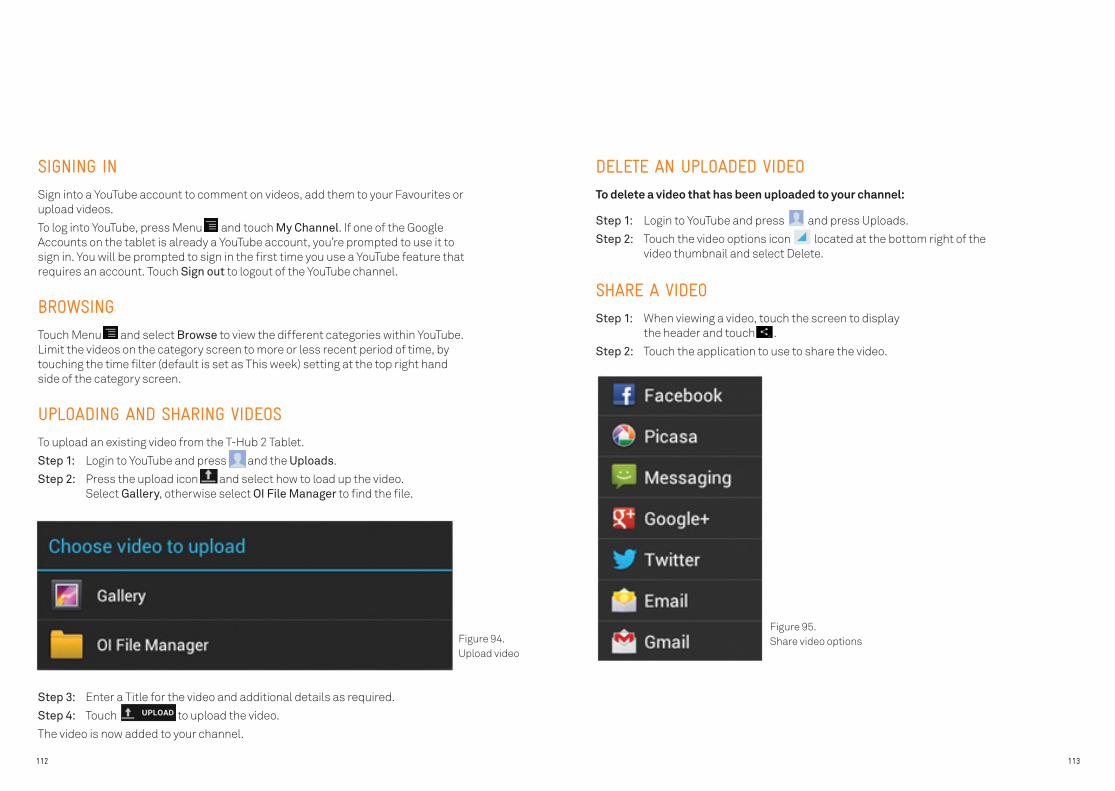
112 113
SIGNING IN
Sign into a YouTube account to comment on videos, add them to your Favourites or upload videos.
To log into YouTube, press Menu and touch My Channel. If one of the Google Accounts on the tablet is already a YouTube account, you’re prompted to use it to sign in. You will be prompted to sign in the first time you use a YouTube feature that requires an account. Touch Sign out to logout of the YouTube channel.
BROWSING
Touch Menu and select Browse to view the different categories within YouTube. Limit the videos on the category screen to more or less recent period of time, by touching the time filter (default is set as This week) setting at the top right hand side of the category screen.
UPLOADING AND SHARING VIDEOS
To upload an existing video from the T-Hub 2 Tablet.
Step 1: Login to YouTube and press and the Uploads.
Step 2: Press the upload icon and select how to load up the video. Select Gallery, otherwise select OI File Manager to find the file.
DELETE AN UPLOADED VIDEO
To delete a video that has been uploaded to your channel:
Step 1: Login to YouTube and press and press Uploads.
Step 2: Touch the video options icon located at the bottom right of the video thumbnail and select Delete.
SHARE A VIDEO
Step 1: When viewing a video, touch the screen to display the header and touch .
Step 2: Touch the application to use to share the video.
Step 3: Enter a Title for the video and additional details as required.
Step 4: Touch to upload the video.
The video is now added to your channel.
Figure 94. Upload video
Figure 95. Share video options
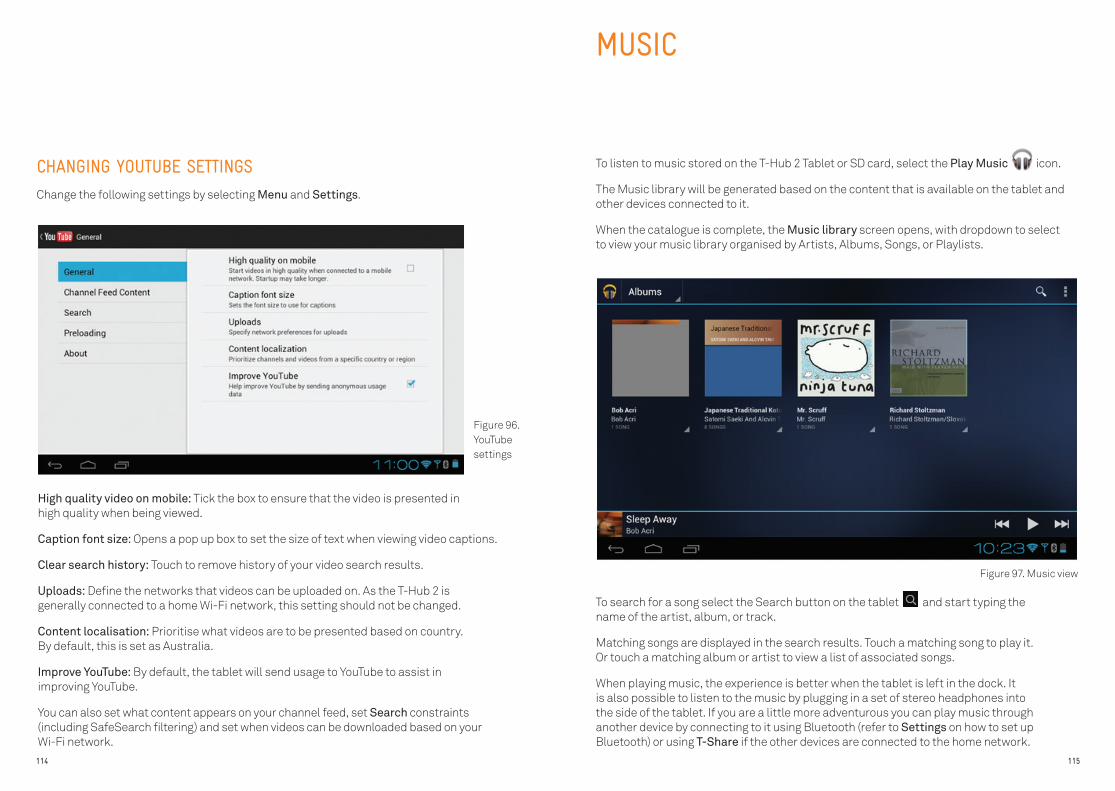
CHANGING YOUTUBE SETTINGS
Change the following settings by selecting Menu and Settings.
High quality video on mobile: Tick the box to ensure that the video is presented in high quality when being viewed.
Caption font size: Opens a pop up box to set the size of text when viewing video captions.
Clear search history: Touch to remove history of your video search results.
Uploads: Define the networks that videos can be uploaded on. As the T-Hub 2 is generally connected to a home Wi-Fi network, this setting should not be changed.
Content localisation: Prioritise what videos are to be presented based on country. By default, this is set as Australia.
Improve YouTube: By default, the tablet will send usage to YouTube to assist in improving YouTube.
You can also set what content appears on your channel feed, set Search constraints (including SafeSearch filtering) and set when videos can be downloaded based on your Wi-Fi network.
MUSIC
To listen to music stored on the T-Hub 2 Tablet or SD card, select the Play Music icon.
The Music library will be generated based on the content that is available on the tablet and other devices connected to it.
When the catalogue is complete, the Music library screen opens, with dropdown to select to view your music library organised by Artists, Albums, Songs, or Playlists.
To search for a song select the Search button on the tablet and start typing the name of the artist, album, or track.
Matching songs are displayed in the search results. Touch a matching song to play it. Or touch a matching album or artist to view a list of associated songs.
When playing music, the experience is better when the tablet is left in the dock. It is also possible to listen to the music by plugging in a set of stereo headphones into the side of the tablet. If you are a little more adventurous you can play music through another device by connecting to it using Bluetooth (refer to Settings on how to set up Bluetooth) or using T-Share if the other devices are connected to the home network.
114 115
Figure 96. YouTube settings
Figure 97. Music view
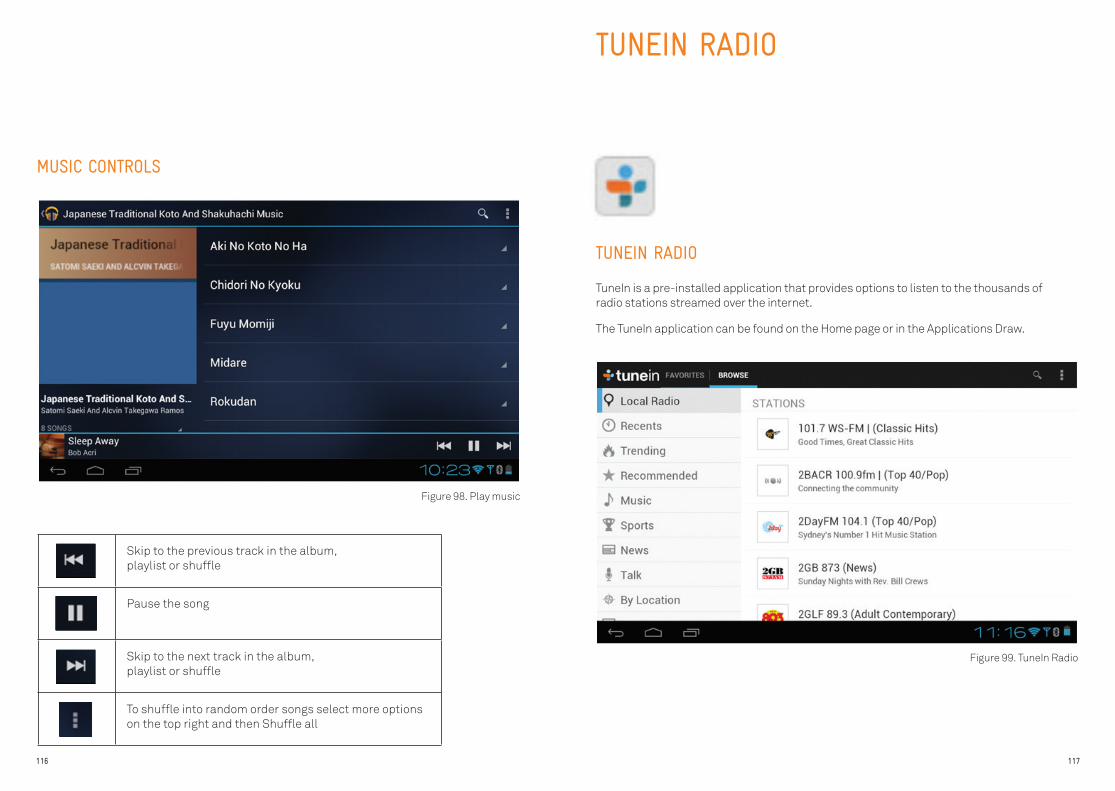
116 117
MUSIC CONTROLS
TUNEIN RADIO
TUNEIN RADIO
TuneIn is a pre-installed application that provides options to listen to the thousands of radio stations streamed over the internet.
The TuneIn application can be found on the Home page or in the Applications Draw.
Skip to the previous track in the album, playlist or shuffle
Pause the song
Skip to the next track in the album, playlist or shuffle
To shuffle into random order songs select more options on the top right and then Shuffle all
Figure 98. Play music
Figure 99. TuneIn Radio
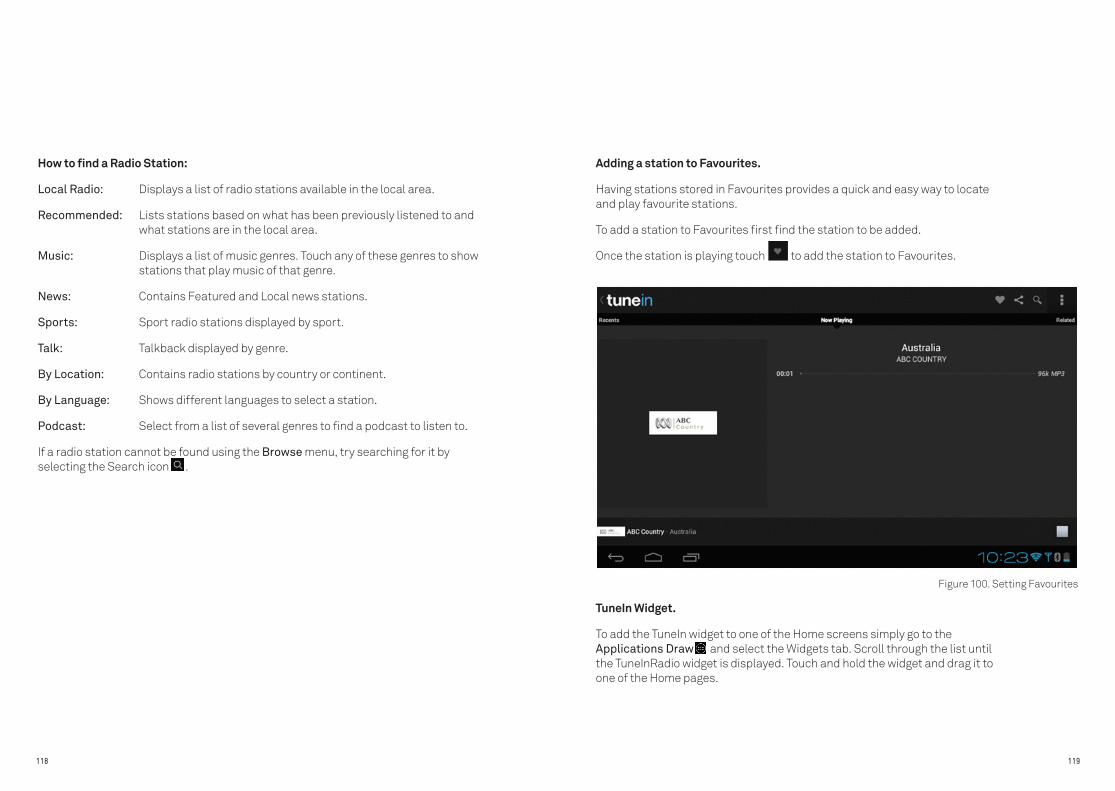
118 119
How to find a Radio Station:
Local Radio: Displays a list of radio stations available in the local area.
Recommended: Lists stations based on what has been previously listened to and what stations are in the local area.
Music: Displays a list of music genres. Touch any of these genres to show stations that play music of that genre.
News: Contains Featured and Local news stations.
Sports: Sport radio stations displayed by sport.
Talk: Talkback displayed by genre.
By Location: Contains radio stations by country or continent.
By Language: Shows different languages to select a station.
Podcast: Select from a list of several genres to find a podcast to listen to.
If a radio station cannot be found using the Browse menu, try searching for it by selecting the Search icon .
Adding a station to Favourites.
Having stations stored in Favourites provides a quick and easy way to locate and play favourite stations.
To add a station to Favourites first find the station to be added.
Once the station is playing touch to add the station to Favourites.
TuneIn Widget.
To add the TuneIn widget to one of the Home screens simply go to the Applications Draw and select the Widgets tab. Scroll through the list until the TuneInRadio widget is displayed. Touch and hold the widget and drag it to one of the Home pages.
Figure 100. Setting Favourites
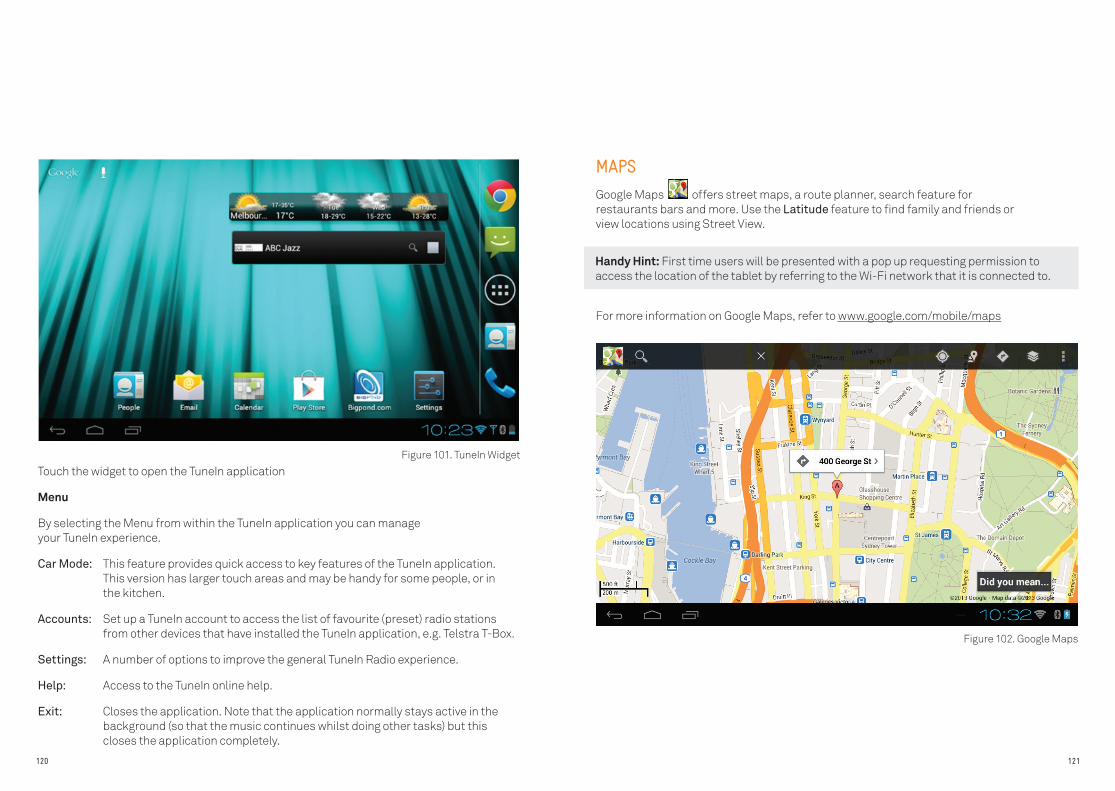
120 121
Touch the widget to open the TuneIn application
Menu
By selecting the Menu from within the TuneIn application you can manage your TuneIn experience.
Car Mode: This feature provides quick access to key features of the TuneIn application. This version has larger touch areas and may be handy for some people, or in the kitchen.
Accounts: Set up a TuneIn account to access the list of favourite (preset) radio stations from other devices that have installed the TuneIn application, e.g. Telstra T-Box.
Settings: A number of options to improve the general TuneIn Radio experience.
Help: Access to the TuneIn online help.
Exit: Closes the application. Note that the application normally stays active in the background (so that the music continues whilst doing other tasks) but this closes the application completely.
MAPS
Google Maps offers street maps, a route planner, search feature for restaurants bars and more. Use the Latitude feature to find family and friends or view locations using Street View.
For more information on Google Maps, refer to www.google.com/mobile/maps
Handy Hint: First time users will be presented with a pop up requesting permission to access the location of the tablet by referring to the Wi-Fi network that it is connected to.
Figure 101. TuneIn Widget
Figure 102. Google Maps
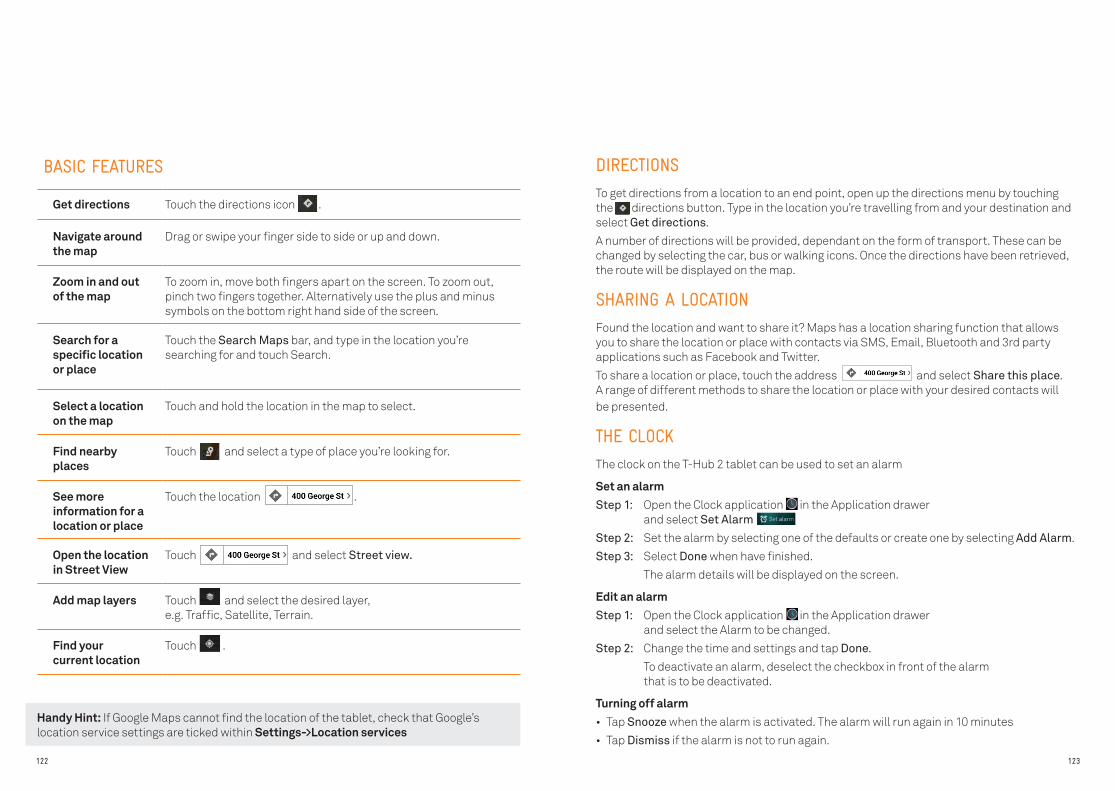
122 123
DIRECTIONS
To get directions from a location to an end point, open up the directions menu by touching the directions button. Type in the location you’re travelling from and your destination and select Get directions.
A number of directions will be provided, dependant on the form of transport. These can be changed by selecting the car, bus or walking icons. Once the directions have been retrieved, the route will be displayed on the map.
SHARING A LOCATION
Found the location and want to share it? Maps has a location sharing function that allows you to share the location or place with contacts via SMS, Email, Bluetooth and 3rd party applications such as Facebook and Twitter.
To share a location or place, touch the address and select Share this place. A range of different methods to share the location or place with your desired contacts will be presented.
THE CLOCK
The clock on the T-Hub 2 tablet can be used to set an alarm
Set an alarmStep 1: Open the Clock application in the Application drawer
and select Set Alarm
Step 2: Set the alarm by selecting one of the defaults or create one by selecting Add Alarm.
Step 3: Select Done when have finished.
The alarm details will be displayed on the screen.
Edit an alarmStep 1: Open the Clock application in the Application drawer
and select the Alarm to be changed.
Step 2: Change the time and settings and tap Done.
To deactivate an alarm, deselect the checkbox in front of the alarm that is to be deactivated.
Turning off alarm• Tap Snooze when the alarm is activated. The alarm will run again in 10 minutes
• Tap Dismiss if the alarm is not to run again.
Get directions Touch the directions icon .
Navigate around the map
Drag or swipe your finger side to side or up and down.
Zoom in and out of the map
To zoom in, move both fingers apart on the screen. To zoom out, pinch two fingers together. Alternatively use the plus and minus symbols on the bottom right hand side of the screen.
Search for a specific location or place
Touch the Search Maps bar, and type in the location you’re searching for and touch Search.
Select a location on the map
Touch and hold the location in the map to select.
Find nearby places
Touch and select a type of place you’re looking for.
See more information for a location or place
Touch the location .
Open the location in Street View
Touch and select Street view.
Add map layers Touch and select the desired layer, e.g. Traffic, Satellite, Terrain.
Find your current location
Touch . .
Handy Hint: If Google Maps cannot find the location of the tablet, check that Google’s location service settings are ticked within Settings->Location services
BASIC FEATURES
124 125
OTHER APPLICATIONS
There are a number of other applications that are pre-loaded on the T-Hub 2 Tablet.
TELSTRA ONE
Telstra One provides quick and easy access to the latest News, Sports and weather from BigPond®.
With multiple widgets and shortcuts to add to the home screen, the best of Telstra, BigPond and Sensis content and services will always be available.
BigPond News – the latest news from BigPond all in one place, to keep you up to date and informed. The BigPond News tab includes Top Stories, National, Entertainment, Odd Spot, Business and more.
BigPond Sport – All the finest domestic and international sports news coverage from BigPond can be found on the BigPond Sports tab, including AFL, NRL, V8, Cricket, Tennis and more.
BigPond Weather – Detailed weather conditions and 3-day forecasts from around Australia, or all cities, towns and suburbs around Australia. The weather tab is fully customisable, add a location or favourite holiday spot by name or postcode. The weather tab includes quick links to key weather related information such as ski reports, surf reports and weather maps.
My Account – quick links to key information including MyAccount and pricing information.
AFL
Quick link to the official AFL website that provides up to date news, game results, match and interview videos.
NRL
Quick link to the official NRL website that provides up to date news, game results, match and interview videos.
PLAY BOOKS
Choose from millions of titles on Google Play including new releases, New York Times best sellers, up-and-coming authors, and free books.
PLAY MAGAZINE
Discover hundreds of bestselling magazines on Google Play. Shop a wide selection of titles, from cooking to technology, travel, fashion, sports, photography, and more.
PLAY MOVIES
Google Play Movies & TV is a collection of movies and TV shows that can be purchased, downloaded and viewed on the tablet.
SOUND RECORDER
Simple to use sound recorder.
STOP WATCH
Simple to use stop watch that you can also use as a timer.
T-BOX REMOTE
Just like the T-Box remote control, the Android application can be used to change channels, control the volume, navigate menu items.
Twitter brings the world to you.
Essential: An organized stream of Tweets that delivers the best content to you.
Instant: All the media, news, events, and information you need.
Personal: Your world, expressed in Tweets and photos.
Search in real time. Follow people you’d like to know. Watch rising trends.
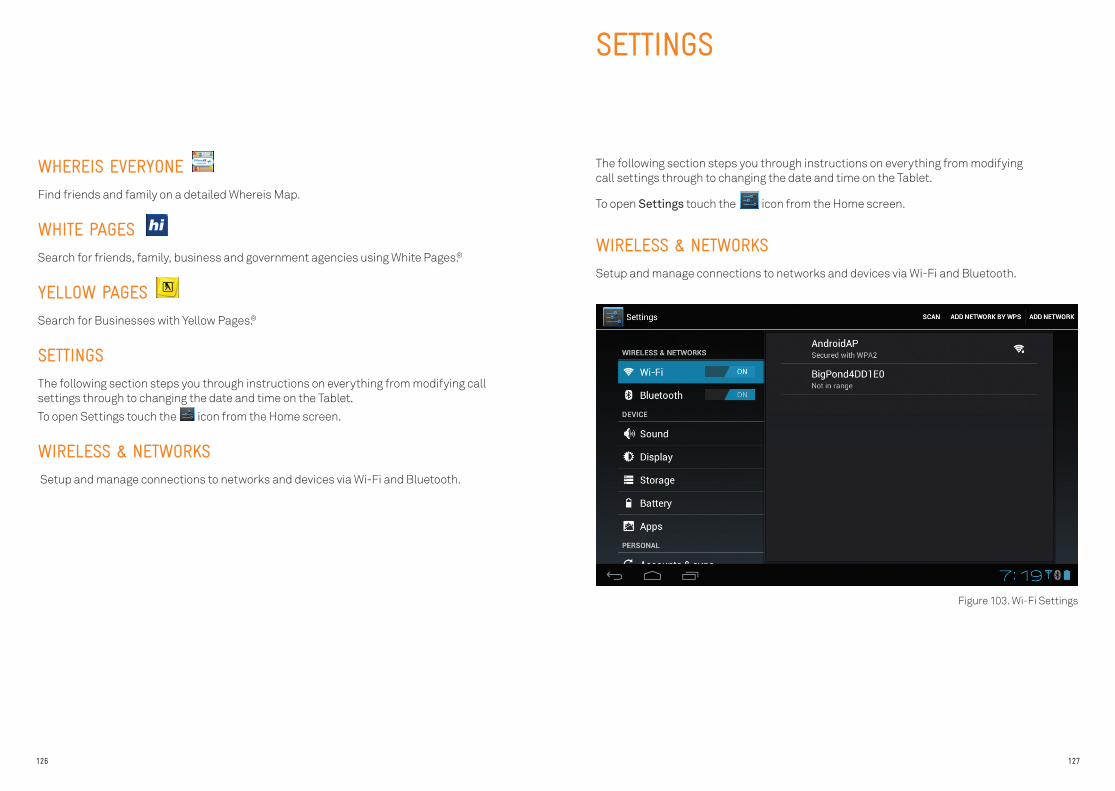
126 127
WHEREIS EVERYONE
Find friends and family on a detailed Whereis Map.
WHITE PAGES
Search for friends, family, business and government agencies using White Pages.®
YELLOW PAGES
Search for Businesses with Yellow Pages.®
SETTINGS
The following section steps you through instructions on everything from modifying call settings through to changing the date and time on the Tablet.
To open Settings touch the icon from the Home screen.
WIRELESS & NETWORKS
Setup and manage connections to networks and devices via Wi-Fi and Bluetooth.
Figure 103. Wi-Fi Settings
128 129
CONNECTING TO WI-FI
To connect to Wi-Fi:
1. Open Settings and then select Wi-Fi on the left.
2. The Wi-Fi should be already on. If it isn’t, move the slider to the On position
3. The tablet will scan for available Wi-Fi networks and displays the names of those it finds. Secured networks are indicated with a Lock icon.
4. If the tablet finds a network that you connected to previously, it connects to it
5. Select the network to connect to on the right.
6. If the network does not display then make sure it is turned on and is within range, then press Scan again to search for nearby networks.
7. Enter the password for the network. The default password is usually on the underside of the modem, or on a card provided at installation. It is not the same as your BigPond password.
8. Touch Connect.
WI-FI SETTINGS
Scan: Refresh the list of networks within range.
Add network: Opens a dialog where a Wi-Fi network can be added by entering its SSID (the name it broadcasts) and security type.
Add (Wi-Fi network) by WPS: Opens a dialog to begin the process of connecting a modem using Wi-Fi Protected Setup (WPS). For compatible Home Network Gateways such as the T-Gateway, this enables connection without a password. Instead of a password the tablet scans for networks and when the WPS button on the T-Gateway or modem is pressed, the tablet will connect to it.
Add Wi-Fi network by WPS PIN: Opens a dialog to connect to a modem using Wi-Fi Protected Setup (WPS) and a PIN.
ADVANCED WI-FI SETTINGS
The Advanced Wi-Fi Settings screen can be accessed by selecting Menu while in the Wi-Fi Settings screen and touch Advanced. Most users will not need to access these settings.
Regulatory Domain: Enables you to set the number of Wi-Fi channels you can use. Default is 11.
TID: Select the TID that you want to use. Default is 0
MAC address: Unique identifier of the tablet.
IP Address: IP address being used by the tablet.
Use Static IP: Enables you to set up your tablet to use a static IP solution. You would have received this information when you were provided your Static IP details from Telstra.
FORGET A WI-FI NETWORK
To stop a tablet remembering a Wi-Fi network:
Step 1: Turn on Wi-Fi if it’s not already on.
Step 2: In the Wi-Fi settings screen, touch & hold the name of the network.
Step 3: Touch Forget network in the dialog that opens.
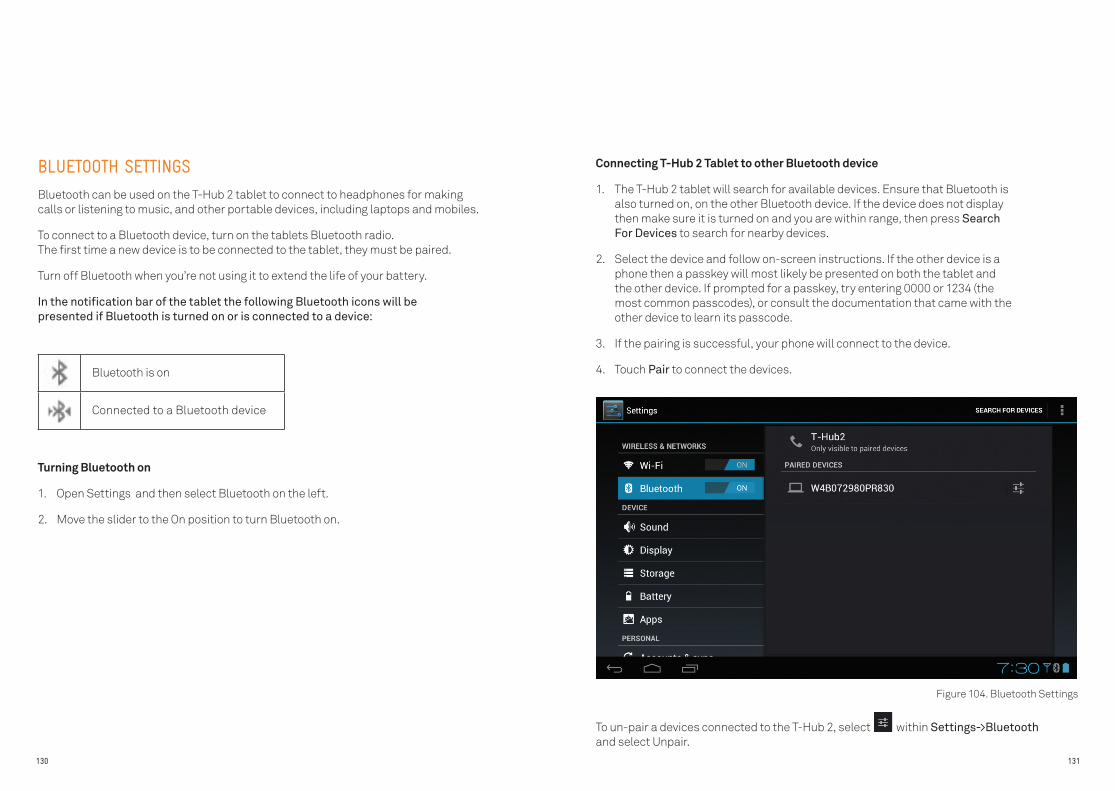
130 131
BLUETOOTH SETTINGS
Bluetooth can be used on the T-Hub 2 tablet to connect to headphones for making calls or listening to music, and other portable devices, including laptops and mobiles.
To connect to a Bluetooth device, turn on the tablets Bluetooth radio. The first time a new device is to be connected to the tablet, they must be paired.
Turn off Bluetooth when you’re not using it to extend the life of your battery.
In the notification bar of the tablet the following Bluetooth icons will be presented if Bluetooth is turned on or is connected to a device:
Bluetooth is on
Connected to a Bluetooth device
Turning Bluetooth on
1. Open Settings and then select Bluetooth on the left.
2. Move the slider to the On position to turn Bluetooth on.
Connecting T-Hub 2 Tablet to other Bluetooth device
1. The T-Hub 2 tablet will search for available devices. Ensure that Bluetooth is also turned on, on the other Bluetooth device. If the device does not display then make sure it is turned on and you are within range, then press Search For Devices to search for nearby devices.
2. Select the device and follow on-screen instructions. If the other device is a phone then a passkey will most likely be presented on both the tablet and the other device. If prompted for a passkey, try entering 0000 or 1234 (the most common passcodes), or consult the documentation that came with the other device to learn its passcode.
3. If the pairing is successful, your phone will connect to the device.
4. Touch Pair to connect the devices.
To un-pair a devices connected to the T-Hub 2, select within Settings->Bluetooth and select Unpair.
Figure 104. Bluetooth Settings
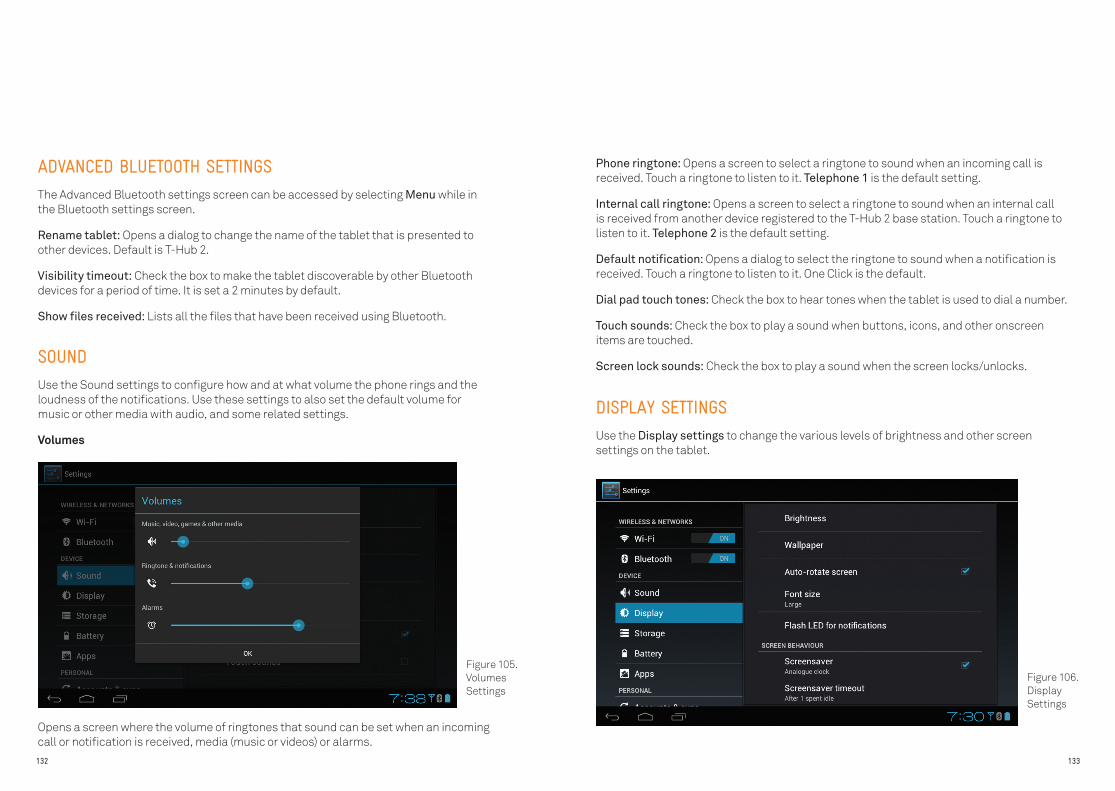
132 133
ADVANCED BLUETOOTH SETTINGS
The Advanced Bluetooth settings screen can be accessed by selecting Menu while in the Bluetooth settings screen.
Rename tablet: Opens a dialog to change the name of the tablet that is presented to other devices. Default is T-Hub 2.
Visibility timeout: Check the box to make the tablet discoverable by other Bluetooth devices for a period of time. It is set a 2 minutes by default.
Show files received: Lists all the files that have been received using Bluetooth.
SOUND
Use the Sound settings to configure how and at what volume the phone rings and the loudness of the notifications. Use these settings to also set the default volume for music or other media with audio, and some related settings.
Volumes
Opens a screen where the volume of ringtones that sound can be set when an incoming call or notification is received, media (music or videos) or alarms.
Phone ringtone: Opens a screen to select a ringtone to sound when an incoming call is received. Touch a ringtone to listen to it. Telephone 1 is the default setting.
Internal call ringtone: Opens a screen to select a ringtone to sound when an internal call is received from another device registered to the T-Hub 2 base station. Touch a ringtone to listen to it. Telephone 2 is the default setting.
Default notification: Opens a dialog to select the ringtone to sound when a notification is received. Touch a ringtone to listen to it. One Click is the default.
Dial pad touch tones: Check the box to hear tones when the tablet is used to dial a number.
Touch sounds: Check the box to play a sound when buttons, icons, and other onscreen items are touched.
Screen lock sounds: Check the box to play a sound when the screen locks/unlocks.
DISPLAY SETTINGS
Use the Display settings to change the various levels of brightness and other screen settings on the tablet.
Figure 105. Volumes Settings
Figure 106. Display Settings
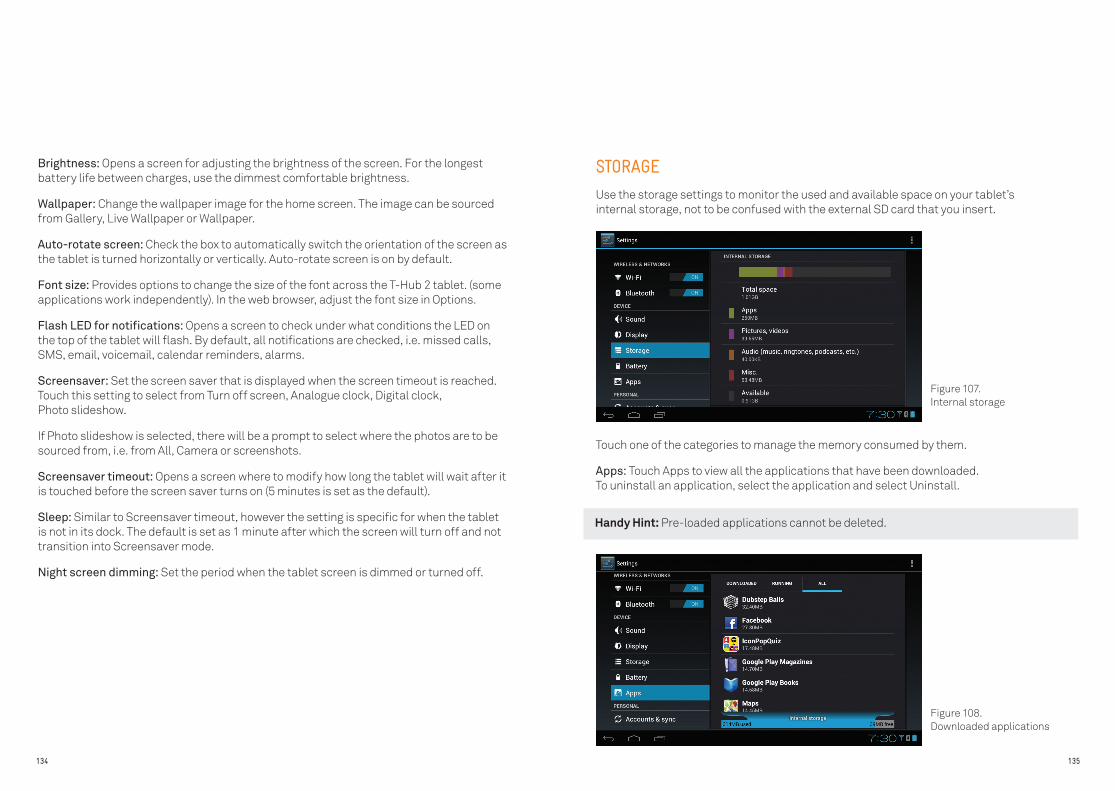
134 135
Brightness: Opens a screen for adjusting the brightness of the screen. For the longest battery life between charges, use the dimmest comfortable brightness.
Wallpaper: Change the wallpaper image for the home screen. The image can be sourced from Gallery, Live Wallpaper or Wallpaper.
Auto-rotate screen: Check the box to automatically switch the orientation of the screen as the tablet is turned horizontally or vertically. Auto-rotate screen is on by default.
Font size: Provides options to change the size of the font across the T-Hub 2 tablet. (some applications work independently). In the web browser, adjust the font size in Options.
Flash LED for notifications: Opens a screen to check under what conditions the LED on the top of the tablet will flash. By default, all notifications are checked, i.e. missed calls, SMS, email, voicemail, calendar reminders, alarms.
Screensaver: Set the screen saver that is displayed when the screen timeout is reached. Touch this setting to select from Turn off screen, Analogue clock, Digital clock, Photo slideshow.
If Photo slideshow is selected, there will be a prompt to select where the photos are to be sourced from, i.e. from All, Camera or screenshots.
Screensaver timeout: Opens a screen where to modify how long the tablet will wait after it is touched before the screen saver turns on (5 minutes is set as the default).
Sleep: Similar to Screensaver timeout, however the setting is specific for when the tablet is not in its dock. The default is set as 1 minute after which the screen will turn off and not transition into Screensaver mode.
Night screen dimming: Set the period when the tablet screen is dimmed or turned off.
STORAGE
Use the storage settings to monitor the used and available space on your tablet’s internal storage, not to be confused with the external SD card that you insert.
Touch one of the categories to manage the memory consumed by them.
Apps: Touch Apps to view all the applications that have been downloaded. To uninstall an application, select the application and select Uninstall.
Handy Hint: Pre-loaded applications cannot be deleted.
Figure 107. Internal storage
Figure 108. Downloaded applications

136 137
Memory Management Over time, the T-Hub 2 Tablet may present a notification indicating that it has been unsuccessful to download or update a game or application due to insufficient storage or memory.
To address this constraint, the T-Hub 2 tablet can be modified so that the 1GB of space allocated specifically for movies, videos and music files can also be used to store application and games that are downloaded.
To enable this feature, a device reset has to be performed on the T-Hub 2 Tablet.
To perform a device reset, go to Settings->Backup and reset and follow the onscreen instructions.
For your reference, before the device reset, the Partition type under About tablet is set as Default.
Handy Hint 1: Performing a devices reset will delete any files and data that is stored on the device. It is recommended that all photos, music files, videos are saved to an SD card prior to performing a device reset. Note –contacts, email and calendar events will be saved if they are synchronised with an online account, e.g. BigPond®, Google. The Wi-Fi, BigPond and phone details will also be saved.
Handy Hint 2: Any applications that have been downloaded and installed from the Google Play Store can be downloaded again by logging into www.play.google.com with the Google account and select the My Android Apps tab. Charges will not be incurred for re-installing applications that were purchased previously.
USB StorageConnect the tablet to a computer with a micro USB cable to transfer music, pictures, and other files between your tablet and the computer.
Connect your tablet to a computer via USBStep 1: Connect the tablet and computer using a micro-USB cable.
Step 2: Open the Notifications panel and touch the Connected as a media device to select other USB options.
The T-Hub 2 drivers will automatically be installed on the computer.
1. When the tablet is connected as USB storage, the screen indicates that device is in use.
2. The tablet’s storage is mounted as a drive on your computer. Files can now be copied back and forth. For more information, see the documentation for your computer.
Handy Hint: USB tethering must be turned off before files can be transferred using USB.
After a device reset the Partition type is now Dynamic.
Figure 109. Default memory Figure 110. Dynamic memory
Figure 111. Managing My Android Apps
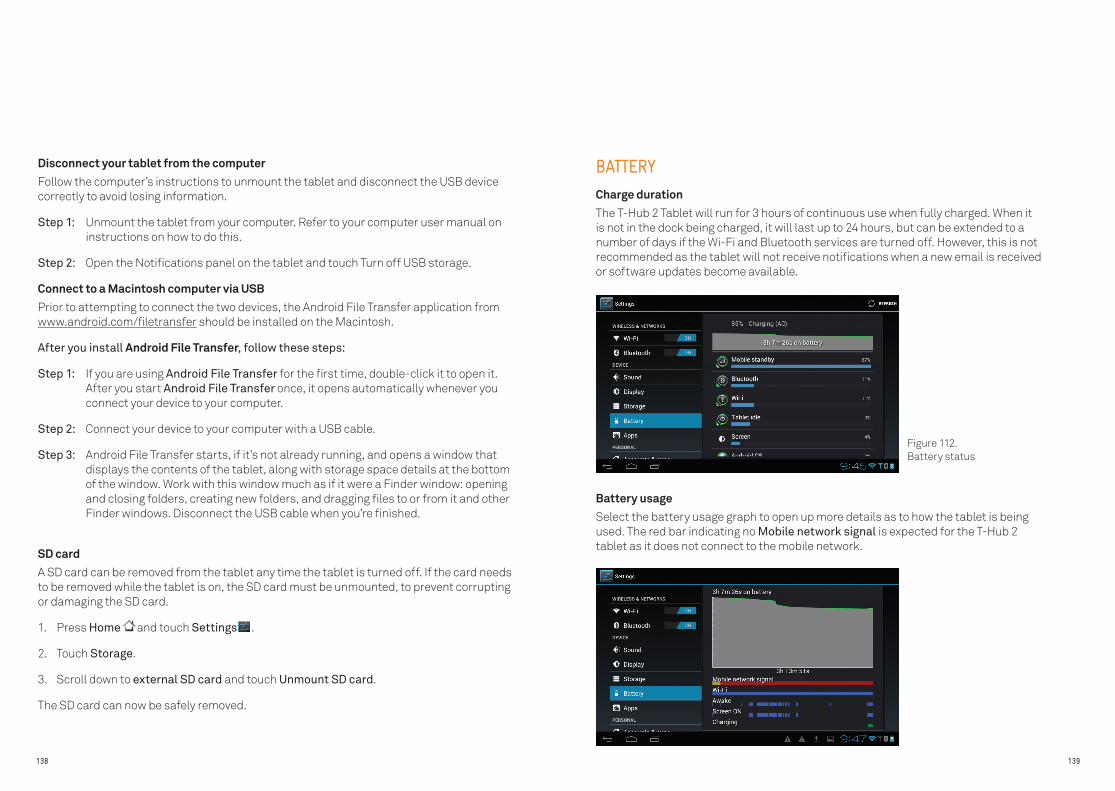
138 139
Disconnect your tablet from the computerFollow the computer’s instructions to unmount the tablet and disconnect the USB device correctly to avoid losing information.
Step 1: Unmount the tablet from your computer. Refer to your computer user manual on instructions on how to do this.
Step 2: Open the Notifications panel on the tablet and touch Turn off USB storage.
Connect to a Macintosh computer via USBPrior to attempting to connect the two devices, the Android File Transfer application from www.android.com/filetransfer should be installed on the Macintosh.
After you install Android File Transfer, follow these steps:
Step 1: If you are using Android File Transfer for the first time, double-click it to open it. After you start Android File Transfer once, it opens automatically whenever you connect your device to your computer.
Step 2: Connect your device to your computer with a USB cable.
Step 3: Android File Transfer starts, if it’s not already running, and opens a window that displays the contents of the tablet, along with storage space details at the bottom of the window. Work with this window much as if it were a Finder window: opening and closing folders, creating new folders, and dragging files to or from it and other Finder windows. Disconnect the USB cable when you’re finished.
SD card A SD card can be removed from the tablet any time the tablet is turned off. If the card needs to be removed while the tablet is on, the SD card must be unmounted, to prevent corrupting or damaging the SD card.
1. Press Home and touch Settings .
2. Touch Storage.
3. Scroll down to external SD card and touch Unmount SD card.
The SD card can now be safely removed.
BATTERY
Charge durationThe T-Hub 2 Tablet will run for 3 hours of continuous use when fully charged. When it is not in the dock being charged, it will last up to 24 hours, but can be extended to a number of days if the Wi-Fi and Bluetooth services are turned off. However, this is not recommended as the tablet will not receive notifications when a new email is received or software updates become available.
Battery usageSelect the battery usage graph to open up more details as to how the tablet is being used. The red bar indicating no Mobile network signal is expected for the T-Hub 2 tablet as it does not connect to the mobile network.
Figure 112. Battery status
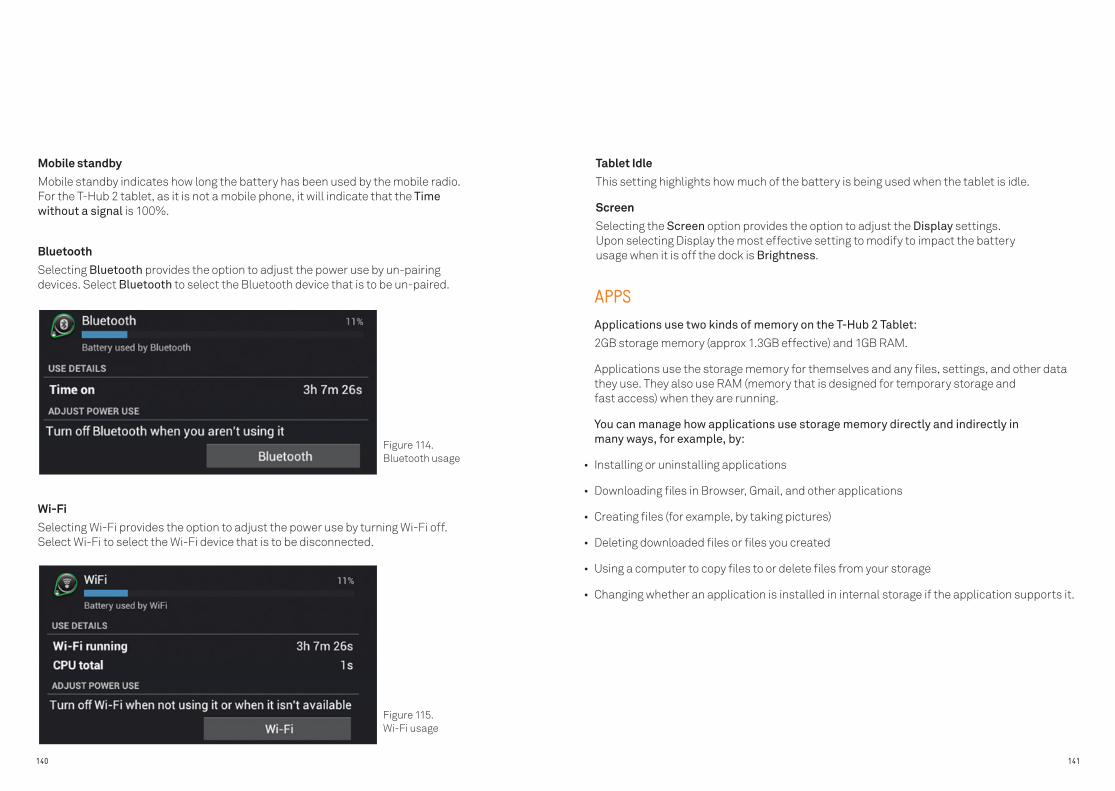
140 141
Mobile standbyMobile standby indicates how long the battery has been used by the mobile radio. For the T-Hub 2 tablet, as it is not a mobile phone, it will indicate that the Time without a signal is 100%.
BluetoothSelecting Bluetooth provides the option to adjust the power use by un-pairing devices. Select Bluetooth to select the Bluetooth device that is to be un-paired.
Wi-Fi Selecting Wi-Fi provides the option to adjust the power use by turning Wi-Fi off. Select Wi-Fi to select the Wi-Fi device that is to be disconnected.
Tablet IdleThis setting highlights how much of the battery is being used when the tablet is idle.
ScreenSelecting the Screen option provides the option to adjust the Display settings. Upon selecting Display the most effective setting to modify to impact the battery usage when it is off the dock is Brightness.
APPS
Applications use two kinds of memory on the T-Hub 2 Tablet:
2GB storage memory (approx 1.3GB effective) and 1GB RAM.
Applications use the storage memory for themselves and any files, settings, and other data they use. They also use RAM (memory that is designed for temporary storage and fast access) when they are running.
You can manage how applications use storage memory directly and indirectly in many ways, for example, by:
• Installing or uninstalling applications
• Downloading files in Browser, Gmail, and other applications
• Creating files (for example, by taking pictures)
• Deleting downloaded files or files you created
• Using a computer to copy files to or delete files from your storage
• Changing whether an application is installed in internal storage if the application supports it.
Figure 114. Bluetooth usage
Figure 115. Wi-Fi usage

142 143
MANAGING APPLICATIONS
• Press Home , press Menu , and touch Manage Apps
OR
• Open the Settings application and touch Apps
The Apps screen has three tabs, with lists of applications. At the bottom of each tab is a graph of the memory used by the items in the list and amount of free memory.
• Touch an application, process, or service in a list to open a screen with details about it and, depending on the item, to change its settings, stop it or uninstall it.
• Touch the Downloaded tab to view the applications that have been downloaded from Google Play or other sources.
• Touch the All tab to view all the applications installed on the tablet. The list includes applications that are bundled with your release of Android and applications downloaded from Google Play or other sources. Note: applications that are preloaded onto the tablet cannot be deleted.
• Touch the Running tab to view the applications and their processes and services that are running or cached.
• When viewing the Downloaded, All, press Menu and touch Sort by size or Sort by name to switch the order of the list.
GET DETAILS ABOUT AN APPLICATION
1. Press Home , press Menu , and touch Manage apps.
2. Touch the application, process or service.
The Application Info screen for each application lists its name and version, along with details about the application. Depending on the application, it may also include buttons for managing the application’s data, forcing the application to stop, and uninstalling the application. Different applications have different kinds of information and controls, but may include:
• Force stop button stops an application that is misbehaving.
• If the application was downloaded from Google Play or another source, use the Uninstall button to remove the application and all of its data and settings from the tablet.
Storage gives details about the amount of storage that an application is using.
• Delete an application’s settings and other data by touching the Clear data button.
• If the application stores data in a temporary area of the tablets memory, the Cache lists how much information is stored, and includes a button for clearing it.
• If an application has been configured to launch certain file types by default, clear that setting by selecting Launch by default.
• Permissions Lists the kinds of information about the tablet and data the application has access to.
Figure 116. All applications
Figure 117. Application information
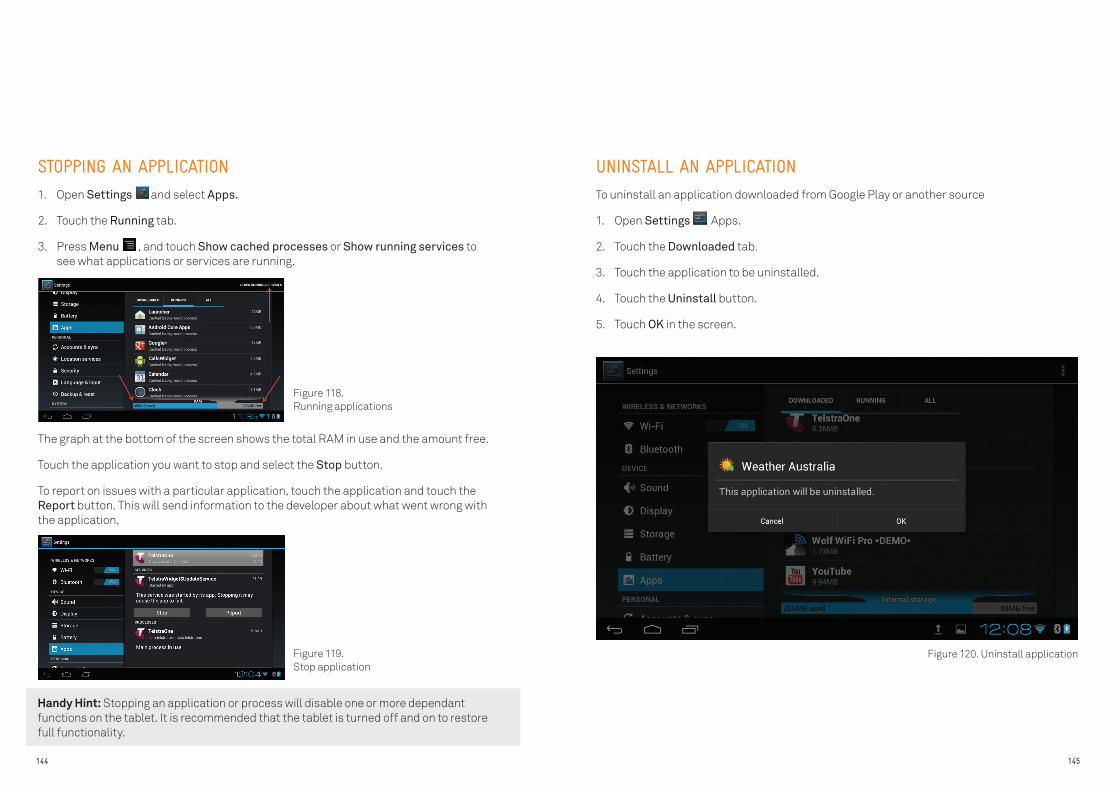
Handy Hint: Stopping an application or process will disable one or more dependant functions on the tablet. It is recommended that the tablet is turned off and on to restore full functionality.
STOPPING AN APPLICATION
1. Open Settings and select Apps.
2. Touch the Running tab.
3. Press Menu , and touch Show cached processes or Show running services to see what applications or services are running.
The graph at the bottom of the screen shows the total RAM in use and the amount free.
Touch the application you want to stop and select the Stop button.
To report on issues with a particular application, touch the application and touch the Report button. This will send information to the developer about what went wrong with the application.
144 145
UNINSTALL AN APPLICATION
To uninstall an application downloaded from Google Play or another source
1. Open Settings Apps.
2. Touch the Downloaded tab.
3. Touch the application to be uninstalled.
4. Touch the Uninstall button.
5. Touch OK in the screen.
Figure 118. Running applications
Figure 119. Stop application
Figure 120. Uninstall application

ACCOUNTS AND SYNC
Use the Accounts & Sync settings to add, remove, and manage online accounts for email, contacts and social networking. Use these settings to control how and whether applications send, receive, and sync data on their own schedules, and whether applications can synchronise data automatically.
Handy Hint: Gmail, Calendar, and other applications may also have their own settings to control how they synchronise data; see the documentation for those applications for details.
146 147
MANAGE ACCOUNTS
The accounts listed are those that you have been set up during the installation process or after installation.
Accounts that have a icon beside it will automatically synchronise account details. In the case of migrated BigPond® accounts (Outlook.com), the contacts and calendar events will be synchronised whilst only the contacts will be synchronised for non-migrated BigPond accounts. If an account has a dimmed synchronisation icon , the account details will not be synchronised.
BigPond accounts
To manage the settings of a BigPond account, select the account within Settings -> Accounts and sync and select Account settings.
Figure 121. Account and Sync
Figure 122. BigPond account
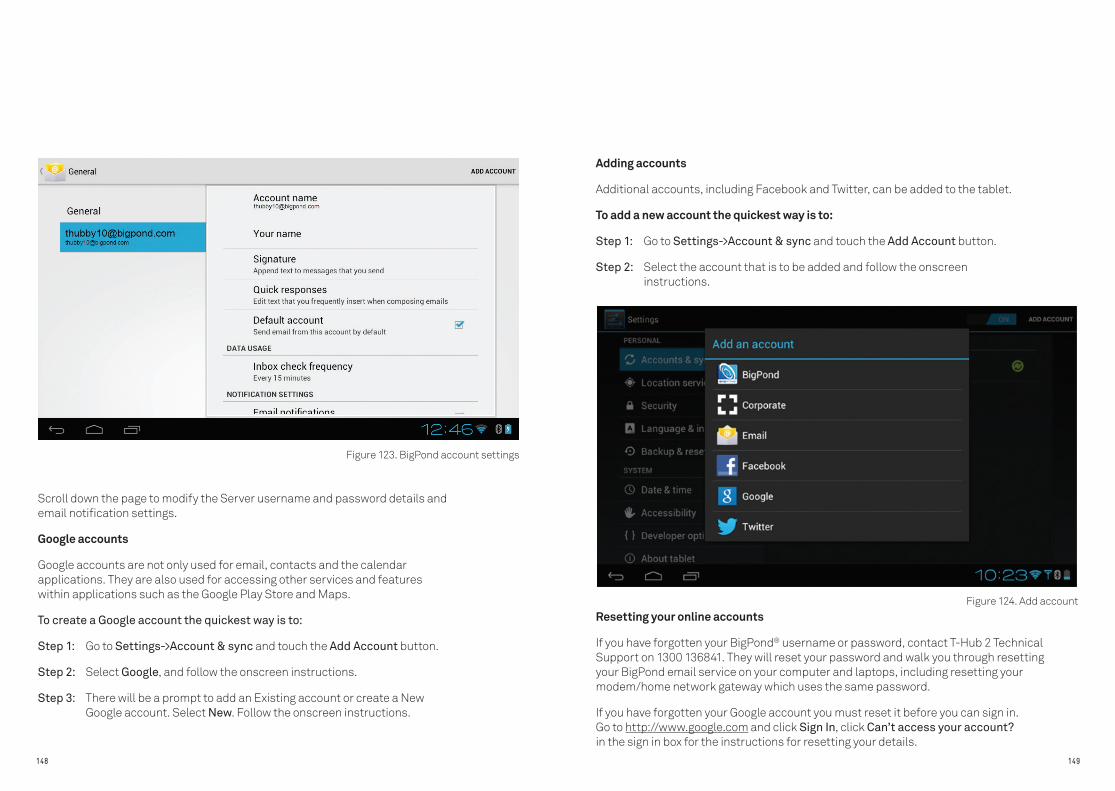
148 149
Scroll down the page to modify the Server username and password details and email notification settings.
Google accounts
Google accounts are not only used for email, contacts and the calendar applications. They are also used for accessing other services and features within applications such as the Google Play Store and Maps.
To create a Google account the quickest way is to:
Step 1: Go to Settings->Account & sync and touch the Add Account button.
Step 2: Select Google, and follow the onscreen instructions.
Step 3: There will be a prompt to add an Existing account or create a New Google account. Select New. Follow the onscreen instructions.
Adding accounts
Additional accounts, including Facebook and Twitter, can be added to the tablet.
To add a new account the quickest way is to:
Step 1: Go to Settings->Account & sync and touch the Add Account button.
Step 2: Select the account that is to be added and follow the onscreen instructions.
Resetting your online accounts
If you have forgotten your BigPond® username or password, contact T-Hub 2 Technical Support on 1300 136841. They will reset your password and walk you through resetting your BigPond email service on your computer and laptops, including resetting your modem/home network gateway which uses the same password.
If you have forgotten your Google account you must reset it before you can sign in. Go to http://www.google.com and click Sign In, click Can’t access your account? in the sign in box for the instructions for resetting your details.
Figure 123. BigPond account settings
Figure 124. Add account
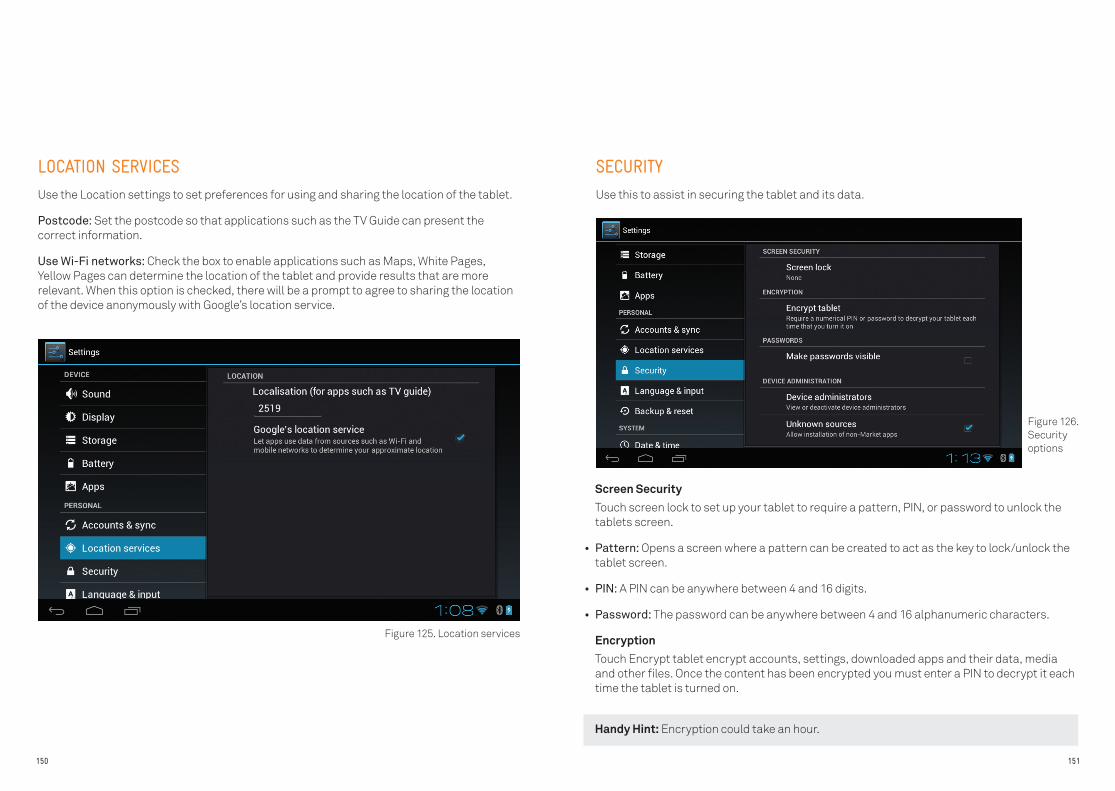
150 151
LOCATION SERVICES
Use the Location settings to set preferences for using and sharing the location of the tablet.
Postcode: Set the postcode so that applications such as the TV Guide can present the correct information.
Use Wi-Fi networks: Check the box to enable applications such as Maps, White Pages, Yellow Pages can determine the location of the tablet and provide results that are more relevant. When this option is checked, there will be a prompt to agree to sharing the location of the device anonymously with Google’s location service.
SECURITY
Use this to assist in securing the tablet and its data.
Screen Security Touch screen lock to set up your tablet to require a pattern, PIN, or password to unlock the
tablets screen.
• Pattern: Opens a screen where a pattern can be created to act as the key to lock/unlock the tablet screen.
• PIN: A PIN can be anywhere between 4 and 16 digits.
• Password: The password can be anywhere between 4 and 16 alphanumeric characters.
Encryption Touch Encrypt tablet encrypt accounts, settings, downloaded apps and their data, media
and other files. Once the content has been encrypted you must enter a PIN to decrypt it each time the tablet is turned on.
Handy Hint: Encryption could take an hour.
Figure 125. Location services
Figure 126. Security options
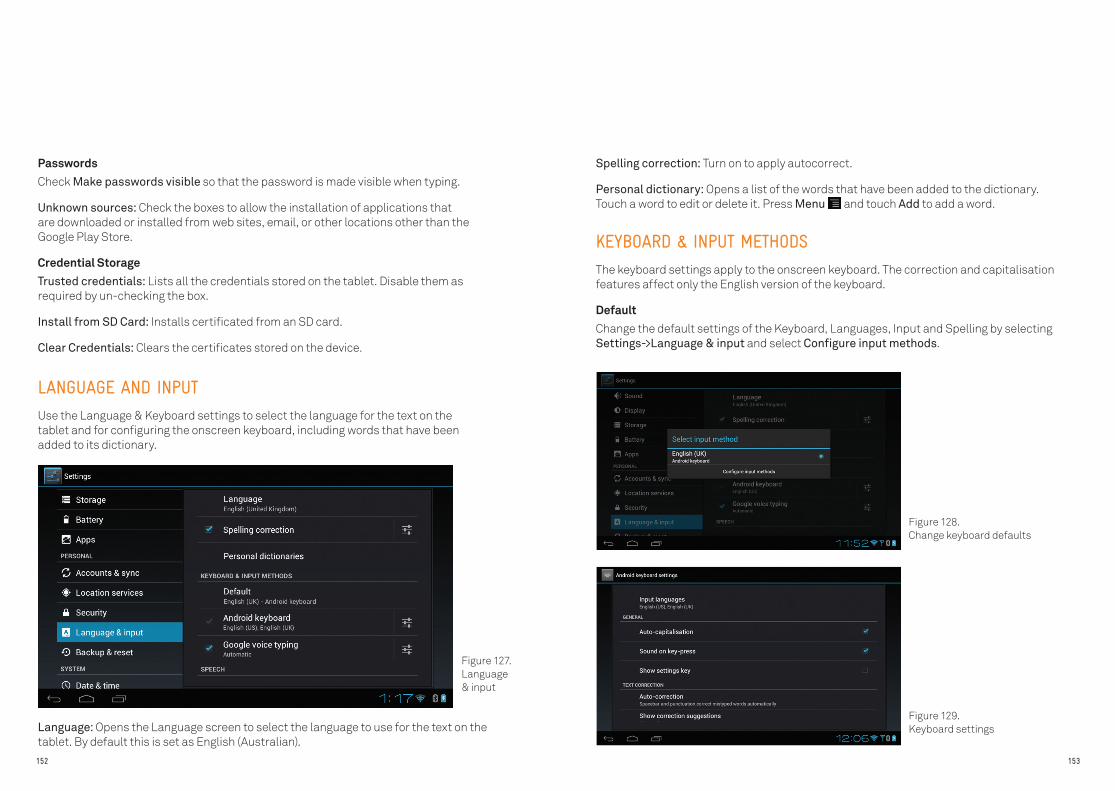
152 153
LANGUAGE AND INPUT
Use the Language & Keyboard settings to select the language for the text on the tablet and for configuring the onscreen keyboard, including words that have been added to its dictionary.
PasswordsCheck Make passwords visible so that the password is made visible when typing.
Unknown sources: Check the boxes to allow the installation of applications that are downloaded or installed from web sites, email, or other locations other than the Google Play Store.
Credential StorageTrusted credentials: Lists all the credentials stored on the tablet. Disable them as required by un-checking the box.
Install from SD Card: Installs certificated from an SD card.
Clear Credentials: Clears the certificates stored on the device.
Language: Opens the Language screen to select the language to use for the text on the tablet. By default this is set as English (Australian).
Spelling correction: Turn on to apply autocorrect.
Personal dictionary: Opens a list of the words that have been added to the dictionary. Touch a word to edit or delete it. Press Menu and touch Add to add a word.
KEYBOARD & INPUT METHODS
The keyboard settings apply to the onscreen keyboard. The correction and capitalisation features affect only the English version of the keyboard.
DefaultChange the default settings of the Keyboard, Languages, Input and Spelling by selecting Settings->Language & input and select Configure input methods.
Figure 127. Language & input
Figure 128. Change keyboard defaults
Figure 129. Keyboard settings
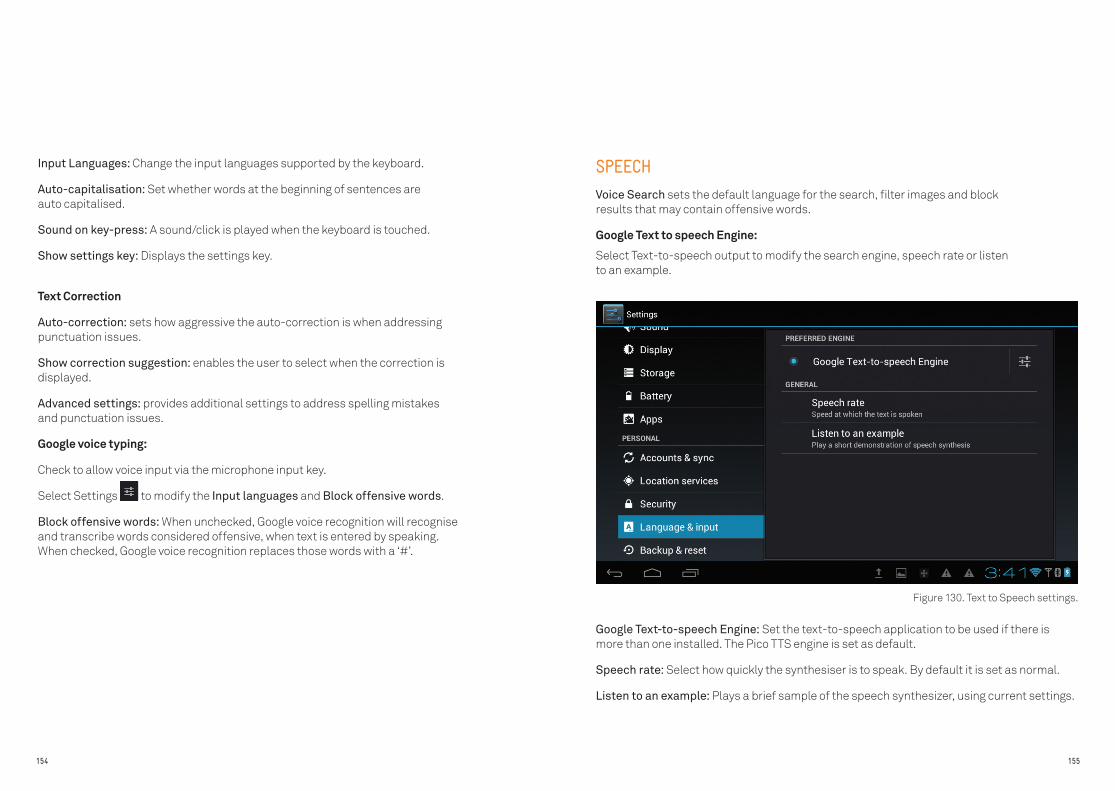
154 155
Input Languages: Change the input languages supported by the keyboard.
Auto-capitalisation: Set whether words at the beginning of sentences are auto capitalised.
Sound on key-press: A sound/click is played when the keyboard is touched.
Show settings key: Displays the settings key.
Text Correction
Auto-correction: sets how aggressive the auto-correction is when addressing punctuation issues.
Show correction suggestion: enables the user to select when the correction is displayed.
Advanced settings: provides additional settings to address spelling mistakes and punctuation issues.
Google voice typing:
Check to allow voice input via the microphone input key.
Select Settings to modify the Input languages and Block offensive words.
Block offensive words: When unchecked, Google voice recognition will recognise and transcribe words considered offensive, when text is entered by speaking. When checked, Google voice recognition replaces those words with a ‘#’.
SPEECH
Voice Search sets the default language for the search, filter images and block results that may contain offensive words.
Google Text to speech Engine:
Select Text-to-speech output to modify the search engine, speech rate or listen to an example.
Google Text-to-speech Engine: Set the text-to-speech application to be used if there is more than one installed. The Pico TTS engine is set as default.
Speech rate: Select how quickly the synthesiser is to speak. By default it is set as normal.
Listen to an example: Plays a brief sample of the speech synthesizer, using current settings.
Figure 130. Text to Speech settings.
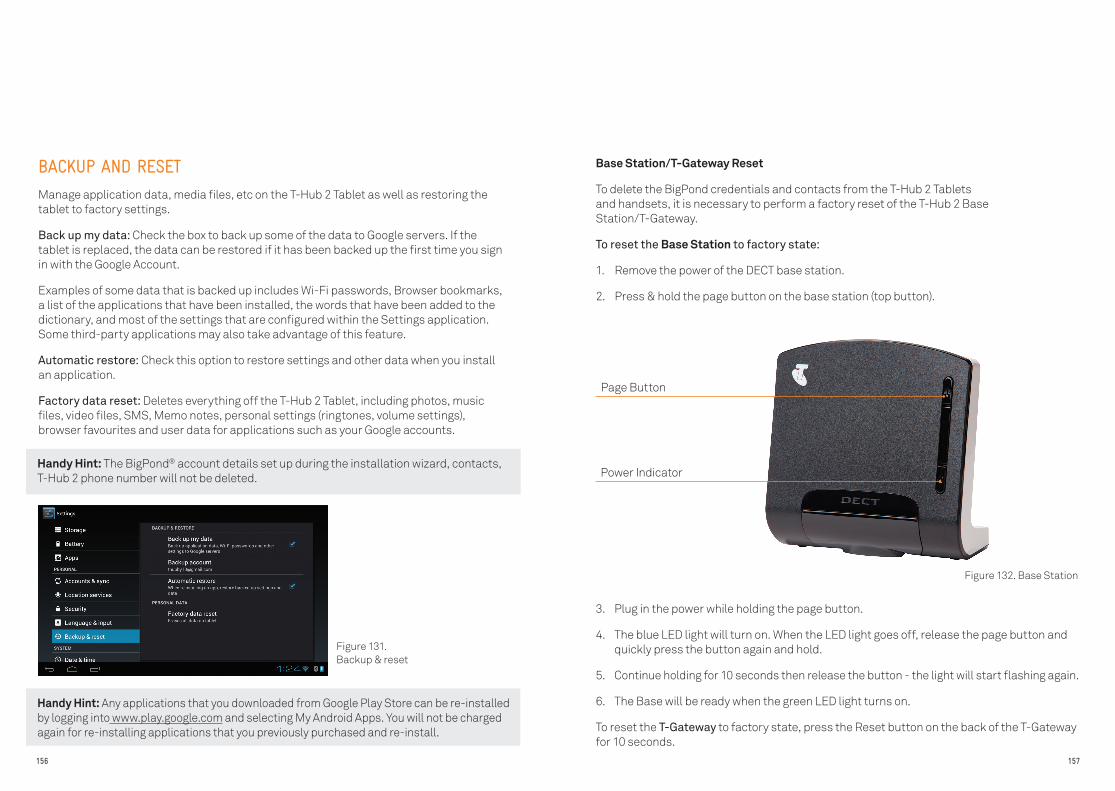
156 157
BACKUP AND RESET
Manage application data, media files, etc on the T-Hub 2 Tablet as well as restoring the tablet to factory settings.
Back up my data: Check the box to back up some of the data to Google servers. If the tablet is replaced, the data can be restored if it has been backed up the first time you sign in with the Google Account.
Examples of some data that is backed up includes Wi-Fi passwords, Browser bookmarks, a list of the applications that have been installed, the words that have been added to the dictionary, and most of the settings that are configured within the Settings application. Some third-party applications may also take advantage of this feature.
Automatic restore: Check this option to restore settings and other data when you install an application.
Factory data reset: Deletes everything off the T-Hub 2 Tablet, including photos, music files, video files, SMS, Memo notes, personal settings (ringtones, volume settings), browser favourites and user data for applications such as your Google accounts.
Handy Hint: Any applications that you downloaded from Google Play Store can be re-installed by logging into www.play.google.com and selecting My Android Apps. You will not be charged again for re-installing applications that you previously purchased and re-install.
Handy Hint: The BigPond® account details set up during the installation wizard, contacts, T-Hub 2 phone number will not be deleted.
Base Station/T-Gateway Reset
To delete the BigPond credentials and contacts from the T-Hub 2 Tablets and handsets, it is necessary to perform a factory reset of the T-Hub 2 Base Station/T-Gateway.
To reset the Base Station to factory state:
1. Remove the power of the DECT base station.
2. Press & hold the page button on the base station (top button).
3. Plug in the power while holding the page button.
4. The blue LED light will turn on. When the LED light goes off, release the page button and quickly press the button again and hold.
5. Continue holding for 10 seconds then release the button - the light will start flashing again.
6. The Base will be ready when the green LED light turns on.
To reset the T-Gateway to factory state, press the Reset button on the back of the T-Gateway for 10 seconds.
Page Button
Power Indicator
Figure 131. Backup & reset
Figure 132. Base Station

158 159
DATE AND TIME
Use Date & Time to set the preferences for how dates are displayed. These settings can also be used to set time and time zone, rather than obtaining the current time from the Telstra network.
Automatic date & time: Uncheck to set the date, time on the phone manually, rather than obtaining the current time from the network (i.e. NTP servers).
If this feature is checked, the Set Date and Set time zone settings are unavailable to be edited.
Set date: If Automatic is unchecked, you will be displayed a screen where you can manually set the tablets date.
Automatic time zone: Set to use automatic time zone handling.
Select time zone: If Automatic is unchecked, the time zone will have to be manually set.
Set time: If Automatic is unchecked, the time will have to be manually set.
Use 24-hour format: Check to display the time using 24-hour time format—for example, 13:00 rather than 1:00pm.
Select date format: Displays a number of options for displaying the date.
Handy Hint: The handset time is derived from the T-Hub 2 Base Station. If the Base Station is not connected to a modem/router using the Ethernet cable, the time on the handset will have to be manually set. Each time the handset is turned off, the time will have to be reset.
ACCESSIBILITY SETTINGS
Configure a number of settings on the T-Hub 2 Tablet to make it more accessible.
SERVICES
TalkBack: When TalkBack is on, entered text will be spoken. Touch Talkback and select On to activate the service. Select Settings to modify additional options such as Speech volume, pitch changes, keyboard echo, sound feedback and volume.
Large text: Check the box to increase the size of text. See also the Font size setting within Display settings and settings local to specific applications such as the Google Chrome browser.
Power button ends call: Check the box to enable the tablet to end a call when the power button is pressed, rather than turning the screen on and off.
Auto-rotate screen: Uncheck to turn off the automatic sensing of portrait or landscape screen.
Speak passwords: Set to off by default.
Touch and hold delay: Set to short by default, touch to increase to your preference.
Figure 133. Date & time
Figure 134. Accessibility

160 161
ABOUT PHONE
About Phone includes information about the tablet and other T-Hub 2 devices.
System updates: Displays the current software version of the tablet. Touch to check for updates. Follow the instructions to download the update if one is available.
Status: Opens the Status screen with information about the battery, phone number and tablet serial number.
Legal information: Opens a screen where you can obtain legal information about the Open Source licenses software loaded on the Tablet as well as Google Legal information.
Model Number: Lists the name of the product, i.e. T-Hub 2.
Android Version: Lists the version of Android, i.e. 4.0.4.
Build number: Provides various details of the tablet hardware and software.
DECT version: Provides various details of the DECT hardware and software.
Partition type: Details the way in which the memory has been partitioned. Default or Dynamic. Dynamic partitioning indicates that there is 1.3GB of effective storage space as opposed to 340MB if it is set to Default. Perform a Device Reset to change the partition type to Dynamic.
T-Hub Devices: Lists all the devices registered to the base station/T-Gateway.
SAFETY AND MAINTENANCE
GENERAL
For the T-Hub 2 Tablet to work, the base station or T-Gateway must be plugged into a mains power socket at all times.
POWER OUTAGES
The T-Hub 2 base station needs electricity to work. You won’t be able to use the tablet to make or receive calls or texts (including to make ‘000’ emergency calls) nor access T-Hub 2 applications that require internet connectivity, during a power cut. For safety’s sake, you should have an alternative means of making calls during a power failure.
LOCATION
• Do not install the tablet in a damp room (like your bathroom), close to a water outlet, or anywhere outside.
• The tablet may not perform as expected in ambient temperatures lower than 15ºC or above 35ºC.
• Do not install the equipment in a dusty environment.
DAMAGE
• Don’t try to remove the tablet covers or try to disassemble the device. The tablet contains electrical circuits which may either give you an electric shock with extremely serious consequences, or be damaged in a way that makes them dangerous. If the device is damaged contact T-Hub Support on 1300 136 841.
• If any liquid or object penetrates any part of the tablet, switch it off immediately, disconnect the power adaptor, then contact T-Hub Support on 1300 136 841.
Figure 135. About tablet
162 163
POWER AND CABLES
• Only use the power adaptors that came with the T-Hub 2. Using any other power adaptors may invalidate the warranty and may damage the equipment.
• Connect the power adaptors to the mains in accordance with the installation instructions.
• When disconnecting any of the power adaptors, make sure the plug is pulled and not the cable. Pulling the cable may cause damage which could cause a fire or electric shock.
• Never touch the mains cable with wet hands.
• The telephone has been designed for use on the Public Switched Telephone Network (PSTN). Only use the supplied telephone cord.
GENERAL TIPS
• Protect your equipment with a surge protection device.
• Avoid using the T-Hub 2 during an electrical storm, as there’s a remote risk of electric shock from lightning.
• During storms it is recommended that the power adaptors and telephone cable are unplugged.
• The radio signals sent between the tablet and the base station may interfere with some hearing aids.
• The tablet and some other electrical equipment (such as TVs, radios, clock/alarms and computers) may interfere with each other so it is recommended that there is at least a 1 metre space between the tablet and other devices.
BATTERY SAFETY
• The tablet may heat up during long calls or when the batteries are being recharged. This is normal.
• If the tablet battery tends to discharge rapidly or is unused for a long period, the lifespan of the battery will decrease and may become hazardous.
• Never try to open the tablet to replace the battery. Contact T-Hub Support on 1300 136841 if there are charging issues with the tablet battery.
HEARING SAFETY
• Protect hearing by only listening at moderate volumes.
CLEANING
• Never use household polish, liquid or aerosol-based cleaners as these will damage the product.
• And never use a dry cloth as this may cause a static shock.
• Simply clean the handset and base with a damp (not wet) cloth, or an anti-static wipe.
164 165
CUSTOMER SERVICE AND PRODUCT WARRANTY
IMPORTANTPlease retain this booklet with your sales receipt as proof of the date of purchase.
Customer ServiceIf you require assistance in operating this product please call Telstra T-Hub Support on 1300 136 841.
Voluntary Product WarrantyIn addition to your Statutory Rights and subject to the conditions in the next paragraph, Telstra also warrants that this product will be free from any defect in materials or workmanship under conditions of normal use for a period of 24 months from date of purchase.
We do not warrant that the product will be free from defects caused by an accident, misuse, abuse, improper installation or operation, vermin infestations, lack of reasonable care, unauthorised modification, loss of parts, tampering or attempted repair by a person not authorised by Telstra; or where the product has been damaged by lightning or a mains power surge.
Where a valid claim is made under this Voluntary Product Warranty, we will, at no cost to you, repair or replace the product within a reasonable time. Subject to your Statutory Rights, if your claim under this Voluntary Product Warranty is not valid, you may be charged a fee under this Voluntary Product Warranty for the service and for any direct costs associated with having the product delivered for service.
To make a claim under this Voluntary Product Warranty, you must provide proof of purchase and call Telstra T-Hub Support on 1300 136 841 to arrange, at our expense, for a prepaid return satchel for you to send the product and all the components from the original purchase. Alternatively, you may return the product and all the components from the original purchase to a Telstra Shop to make a claim under this Voluntary Product Warranty.
The benefits conferred by this Voluntary Product Warranty are in addition to other rights and remedies that are available to you under law, which cannot be excluded. The processes for this Voluntary Product Warranty in no way limit your rights which arise as a result of your Statutory Rights.
This Voluntary Product Warranty is given by:
Telstra Corporation Limited, ABN 33 051 775 556
Business address: 242 Exhibition Street, Melbourne, VIC 3132
Phone number: 1300 368 387
Email address: [email protected]
Please note: These contact details are not product return or service contact details. To make a claim in relation to this Voluntary Product Warranty, please call
Telstra T-Hub Support on 1300 136 841 or visit your place of purchase.
166 167
Apple, iPhone and iTunes are trade marks of Apple Inc., registered in the U.S. and other countries. DLNA is a trade mark of the Digital Living Network Alliance. Google, Android, the Google logo, Picasa, YouTube and Google Play are trade marks of Google Inc. Microsoft, Hotmail, Windows, Windows Live and Windows Media are either registered trade marks or trade marks of the Microsoft Corporation in the United States and other countries. Twitter is a trademark of Twitter, Inc., and is used under license. The spectrum device and ™ are trade marks and ® are registered trade marks of Telstra Corporation Limited, ABN 33 051 775 556.
Statutory Rights
Our goods come with guarantees that cannot be excluded under the Australian Consumer Law. You are entitled to a replacement or refund for a major failure and for compensation for any other reasonably foreseeable loss or damage. You are also entitled to have the goods repaired or replaced if the goods fail to be of acceptable quality and the failure does not amount to a major failure.
For your records
Date of purchase:
_______________________________
Place of purchase:
_______________________________
Serial number:

FOR MORE INFORMATION: CALL 1300 136 841VISIT telstra.com/thubVISIT A TELSTRA STORE