A-CR-CCP-601/PF-001 11-M121.01-1 ROYAL CANADIAN ...
39
A-CR-CCP-601/PF-001 11-M121.01-1 ROYAL CANADIAN SEA CADETS PHASE ONE INSTRUCTIONAL GUIDE SECTION 1 EO M121.01 – TIE KNOTS, BENDS AND HITCHES Total Time: 120 min PREPARATION PRE-LESSON INSTRUCTIONS Resources needed for the delivery of this lesson are listed in the lesson specification located in A-CR-CCP-601/ PG-001, Phase One Qualification Standard and Plan, Chapter 4. Specific uses for said resources are identified throughout the instructional guide within the TP for which they are required. Review the lesson content and become familiar with the material prior to delivering the lesson. Set up six stations with line. Photocopy the cards located at Attachment A. Cut and place a card at each station. PRE-LESSON ASSIGNMENT Nil. APPROACH A demonstration and performance was chosen for TPs 1-3 as it allows the instructor to explain and demonstrate the skill the cadets are expected to acquire while providing an opportunity for the cadets to practice the skill under supervision. An in-class activity was chosen for TP 4 as it is an interactive way to provoke thought and stimulate interest among cadets about tying knots, bends and hitches. INTRODUCTION REVIEW Nil. OBJECTIVES By the end of this lesson the cadet shall have tied and know where to use the reef knot, figure eight, sheet bend, bowline, clove hitch and round turn and two half hitches. IMPORTANCE Knowledge of the effective use of different knots, bends and hitches is one of the foundations of the sea cadet program and will be used in a variety of future training and activities such as rigging sailboats and lifting devices.
-
Upload
khangminh22 -
Category
Documents
-
view
1 -
download
0
Transcript of A-CR-CCP-601/PF-001 11-M121.01-1 ROYAL CANADIAN ...

A-CR-CCP-601/PF-001
11-M121.01-1
ROYAL CANADIAN SEA CADETS
PHASE ONE
INSTRUCTIONAL GUIDE
SECTION 1
EO M121.01 – TIE KNOTS, BENDS AND HITCHES
Total Time: 120 min
PREPARATION
PRE-LESSON INSTRUCTIONS
Resources needed for the delivery of this lesson are listed in the lesson specification located in A-CR-CCP-601/PG-001, Phase One Qualification Standard and Plan, Chapter 4. Specific uses for said resources are identifiedthroughout the instructional guide within the TP for which they are required.
Review the lesson content and become familiar with the material prior to delivering the lesson.
Set up six stations with line.
Photocopy the cards located at Attachment A. Cut and place a card at each station.
PRE-LESSON ASSIGNMENT
Nil.
APPROACH
A demonstration and performance was chosen for TPs 1-3 as it allows the instructor to explain and demonstratethe skill the cadets are expected to acquire while providing an opportunity for the cadets to practice the skillunder supervision.
An in-class activity was chosen for TP 4 as it is an interactive way to provoke thought and stimulate interestamong cadets about tying knots, bends and hitches.
INTRODUCTION
REVIEW
Nil.
OBJECTIVES
By the end of this lesson the cadet shall have tied and know where to use the reef knot, figure eight, sheetbend, bowline, clove hitch and round turn and two half hitches.
IMPORTANCE
Knowledge of the effective use of different knots, bends and hitches is one of the foundations of the sea cadetprogram and will be used in a variety of future training and activities such as rigging sailboats and lifting devices.

A-CR-CCP-601/PF-001
11-M121.01-2
Demonstrate and have the cadets tie the knots, bends and hitches.
The following are some suggestions to make the class more enjoyable for the cadets:
• Use different coloured line to teach the knots.
• Have licorice for the cadets to tie their knots with. Once the knots are completedcorrectly, the cadets can eat the licorice.
• It may be useful to put the accompanying diagrams on overheads for the cadets torefer to.
• Demonstrate all knots in a realistic way; try using simulated sail corners, or use sparsand posts to tie bowlines and hitches to.
• Have senior cadets circulate through the class to check the cadets’ progress.
Bight
A bight is any curved section, slack part, or loop between the ends of a rope, string, or yarn.
Standing end
The standing end is the end of the rope not involved in the knot.
Standing part
Section of line between knot and the standing end.
Working end
The active end of a line used in making the knot.
Working part
Section of line between knot and the working end.
Teaching Point 1 Explain, demonstrate and have the cadets tie a reef andfigure of eight knot.
Time: 20 min Method: Demonstration and Performance
DEFINITION OF KNOTS
A knot is something tied at the end of a line, or using a line itself. It is the term often applied to anything thatis not a bend, splice or hitch.
REEF KNOT
The reef knot is commonly used to tie two lines of equal diameter together, or it can be used to tie off the twoends of a line around an object (eg, parcels, or sails). It got its name from being the knot used to tie up orreduce the reefs or panels of sails.

A-CR-CCP-601/PF-001
11-M121.01-3
An easy way to remember how to tie a reef knot is that the ends must be crossed in oppositedirections each time they are knotted (eg, right over left then left over right, or vice versa).
The knot is made using the following method:
1. Put the left hand working end of the line on top of the right hand working end.
2. Bring the left hand working end of the line under the right hand working end.
3. Put the working end that is now on the right on top of the working end that is now on the left.
4. Bring the working end that is on top over and then under the other working end so that the working endin the left hand comes out of the same space through which it entered the knot.
CFCD 105 Seamanship Rigging and Procedures Manual
Figure 1 Reef Knot
FIGURE OF EIGHT
The figure of eight is a stopper knot, used to tie off the end of a line. It is commonly used to prevent the endsof the sheets of sails from pulling through blocks, eyebolts or fairleads.
The knot is made using the following method:
1. Hold the standing end in one hand, and make a crossing turn with the working end passing under thestanding part of the rope.
2. Bring the working end over the standing part.
3. Tuck the working end up through the loop from behind, forming a figure eight.
4. Pull tight on the working part.
CIC Sea Environmental Training Instructor Guide 2005
Figure 2 Figure of Eight

A-CR-CCP-601/PF-001
11-M121.01-4
CONFIRMATION OF TEACHING POINT 1
QUESTIONS:
Q1. If you are rigging a sailboat, what knot would you use to stop the line from running all the way throughthe fairleads?
Q2. What is a reef knot commonly used for?
ANTICIPATED ANSWERS:
A1. A figure of eight knot.
A2. To tie together two lines of equal diameter.
Teaching Point 2 Explain demonstrate and have the cadets tie a sheet bendand bowline.
Time: 20 min Method: Demonstration and Performance
DEFINITION OF BEND
A bend is used to join together two lines temporarily, and is characterized by making a bend in one of the lines.
SHEET BEND
The sheet bend is one of the simplest and easiest ways of joining together two pieces of line of unequaldiameter; the smaller line is always made fast to the bight of the larger one. It can be used to tie a sailboatto another line.
The bend is made using the following method:
1. Fold an end of the larger line back on itself to form a bight.
2. Bring the working end of the line up to form a loop at the bottom, make the resulting loop the required size.
3. Take the working end of the smaller line around behind both pieces of the first line.
4. Tuck the working end of the smaller line under itself and pull tight.
CIC Sea Environmental Training Instructor Guide 2005
Figure 3 Sheet Bend
BOWLINE
The bowline is the most useful knot for putting a temporary eye in a line; it can also be used as a lifeline arounda person’s waist.

A-CR-CCP-601/PF-001
11-M121.01-5
The knot is made using the following method:
1. With the standing end in one hand, form a small bight with the working end of the line, and lay it overtop of the standing end of the line.
2. Bring the working end of the line up to form a loop at the bottom, and make the resulting loop the requiredsize.
3. Bring the working end up through the bight and around the standing end.
4. Bring the working end down through the bight.
5. Hold the two sides of the loop and the working end in one hand, while the other hand holds the standingend of the line, and pull in opposite directions.
CFCD 105 Seamanship Rigging and Procedures Manual
Figure 4 Bowline
The Royal Canadian Navy encourages every member of a ship’s company to be able to tiea bowline around their waist with their eyes closed, and to be able to do it quickly in the darkor under adverse conditions.
ACTIVITY- BLIND-FOLDED KNOT GUESSING
Time: 10 min
OBJECTIVE
The objective of this activity is to recognize a knot or bend by touch and practice tying knots and bends.
RESOURCES
• Line, one per cadet.
• Piece of fabric, one per cadet.
ACTIVITY LAYOUT
Nil.
ACTIVITY INSTRUCTIONS
1. Blindfold each cadet.
2. Tie one of the knots that have been taught.
3. Pass the knot along to all cadets. Each will have ten seconds to hold the line and try to determine the knot.

A-CR-CCP-601/PF-001
11-M121.01-6
4. Once all cadets have touched the knot, have the cadets tie the knot they think they touched.
5. The cadet that can tie the knot correctly first will then describe its use.
6. Continue until all the knots have been tied.
SAFETY
Nil.
CONFIRMATION OF TEACHING POINT 2
The cadet’s participation in the activity will serve as the confirmation of this TP.
Teaching Point 3 Explain, demonstrate and have the cadets tie a clovehitch and round turn and two half hitches.
Time: 20 min Method: Demonstration and Performance
DEFINITION OF HITCHES
A hitch is tied around or to something, such as a ring, spar or post. They are generally quick to tie and easyto untie.
CLOVE HITCH
The clove hitch can be used to secure a line temporarily to a post or spar, such as securing a small sailboat.
The hitch is made using the following steps:
1. With the running end, make a turn around a spar.
2. To the left of the first turn, make another turn.
3. Pass the running end between the two turns, so that it comes up in the opposite direction from the standingpart.
CFCD 105 Seamanship Rigging and Procedures Manual
Figure 5 Clove Hitch
ROUND TURN AND TWO HALF HITCHES
The round turn and two half hitches is another way to secure a sailboat to a post or ring. It will never jam and canbe untied quickly. The hitches should always be made with the running end of the line going in one direction.

A-CR-CCP-601/PF-001
11-M121.01-7
The knot is made using the following method:
1. Bring the working end of the line around the post or ring two turns, making a full round turn.
2. Take the working end around the standing end, and tuck it behind itself.
3. Bring the working end around the standing end again and tuck to make a second half hitch.
4. Pull tight to finish the knot.
CFCD 105 Seamanship Rigging and Procedures Manual
Figure 6 Round Turn and Two Half Hitches
CONFIRMATION OF TEACHING POINT 3
QUESTIONS:
Q1. What can you use a clove hitch for?
Q2. Can you make the hitches for a round turn and two half hitches in opposite directions?
ANTICIPATED ANSWERS:
A1. You can use it to tie up a small sailboat.
A2. No, they should be made in the same direction.
Teaching Point 4 Practice tying knots, bends and hitches.
Time: 50 min Method: In-Class Activity
ACTIVITY- “CALLING ALL STATIONS”
Time: 50 min
OBJECTIVE
The objective of this activity is to identify and tie knots, bends and hitches.
RESOURCES
• Seamanship cards, located at Attachment A.
• Line, three per station.

A-CR-CCP-601/PF-001
11-M121.01-8
ACTIVITY LAYOUT
Six stations with each station having three pieces of line, and one of the seamanship cards.
ACTIVITY INSTRUCTIONS
1. Divide the cadets into groups, depending upon the size of the class.
2. Have the cadets go to each station and follow the steps on the card to tie the knot, bend or hitch.
3. Once each cadet has tied the knot, bend or hitch, have the cadets move to the next station.
4. Continue until cadets have tied all the knots, bends and hitches.
SAFETY
Nil.
END OF LESSON CONFIRMATION
The cadets’ participation in the activities will serve as the confirmation for this lesson.
CONCLUSION
HOMEWORK/READING/PRACTICE
The cadets should be encouraged to practice the knots, bends and hitches on their own time.
METHOD OF EVALUATION
Nil.
CLOSING STATEMENT
These knots, bends and hitches will be used in a variety of cadet training activities so it is important that thecadets become proficient in them.
INSTRUCTOR NOTES/REMARKS
Nil.
REFERENCES
A1-004 B-GN-181-105/FP-E00 Maddison, G.R., Chief of Maritime Staff (1997). CFCD 105 Fleet SeamanshipRigging and Procedures Manual. Ottawa, ON.
A1-009 A-CR-CCP-004/PT-001 D Cdts (1983). Royal Canadian Sea Cadets Manual Volume 1. Ottawa, ON.
C1-002 ISBN 0-7858-1446-9 Pawson, D. (2001). Pocket Guide to Knots and Splices. Edison, NJ: CharwellBooks, Inc.

A-CR-CCP-601/PF-001Attachment A to EO M121.01
Instructional Guide
11-M121.01A-1
KNOTS, BENDS AND HITCHES CARDS

A-CR-CCP-601/PF-001Attachment A to EO M121.01Instructional Guide
11-M121.01A-2

A-CR-CCP-601/PF-001Attachment A to EO M121.01
Instructional Guide
11-M121.01A-3

A-CR-CCP-601/PF-001Attachment A to EO M121.01Instructional Guide
THIS PAGE INTENTIONALLY LEFT BLANK
11-M121.01A-4

A-CR-CCP-601/PF-001
11-M121.02-1
ROYAL CANADIAN SEA CADETS
PHASE ONE
INSTRUCTIONAL GUIDE
SECTION 2
EO M121.02 – WHIP THE END OF A LINE USING A COMMON WHIPPING
Total Time: 60 min
PREPARATION
PRE-LESSON INSTRUCTIONS
Resources needed for the delivery of this lesson are listed in the lesson specification located in A-CR-CCP-601/PG-001, Phase One Qualification Standard and Plan, Chapter 4. Specific uses for said resources are identifiedthroughout the instructional guide within the TP for which they are required.
Review the lesson content and become familiar with the material prior to delivering the lesson.
PRE-LESSON ASSIGNMENT
Nil.
APPROACH
An interactive lecture method was chosen for TP 1 and TP 2 to introduce the cadets to whipping the end ofa line using a common whipping.
A demonstration and performance was chosen for TP 3 as it allows the instructor to explain and demonstratethe skill the cadets are expected to acquire while providing an opportunity for the cadets to practice the skillunder supervision.
INTRODUCTION
REVIEW
Nil.
OBJECTIVES
By the end of this lesson the cadet shall have whipped the end of a line using a common whipping, and befamiliar with its characteristics.
IMPORTANCE
Knowledge of the common whipping will assist the cadet in future training and is needed to learn more advancedseamanship skills.

A-CR-CCP-601/PF-001
11-M121.02-2
The following are some suggestions to make the class more enjoyable for the cadets:
• Use different coloured line to instruct the whipping.
• It may be useful to put the accompanying diagram on an overhead.
• Try using simulations such as whipping the end of a line from a sail or the line usedto hoist the flag at colours.
• Have senior cadets circulate through the class to check the cadets’ progress.
Bight
A bight is any curved section, slack part, or loop between the ends of a rope, string, or yarn.
Standing end
The standing end is the end of the rope not involved in the knot.
Standing part
Section of line between knot and the standing end.
Working end
The active end of a line used in making the knot.
Working part Section of line between knot and the working end.
Teaching Point 1 List types of whippings.
Time: 5 min Method: Interactive Lecture
TYPES OF WHIPPINGS
Briefly explain that there are other types of whippings, but that this class will focus on the common whippingonly. Other types of whippings include:
• sailmaker’s whipping;
• west country whipping; and
• french whipping.
CONFIRMATION OF TEACHING POINT 1
QUESTION:
Q1. What are some other types of whippings?
ANTICIPATED ANSWER:
A1. Sailmaker’s, west country, and french whipping.

A-CR-CCP-601/PF-001
11-M121.02-3
Teaching Point 2 Describe the purpose of whippings.
Time: 5 min Method: Interactive Lecture
PURPOSE OF WHIPPINGS
A whipping:
• is a binding of fine twine made at the end of a line;
• prevents the line from coming undone, unravelled or frayed; and
• can also be used to mark points along a line.
It may be useful to offer several words that mean essentially the same thing, eg, frayed,unravelled, undone, to give the cadets a choice of words to remember.
CONFIRMATION OF TEACHING POINT 2
QUESTION:
Q1. What is the purpose of a whipping?
ANTICIPATED ANSWER:
A1. It stops a line from coming undone, unravelled or frayed, and can also mark points along a line.
Teaching Point 3 Explain, demonstrate, and have the cadets whip the endof a line using the common whipping.
Time: 40 min Method: Demonstration and Performance
Explain, demonstrate and have the cadets whip the end of a line using the common whipping.Have whippings in various stages of completion, as well as several completed whippings,to show the cadets.
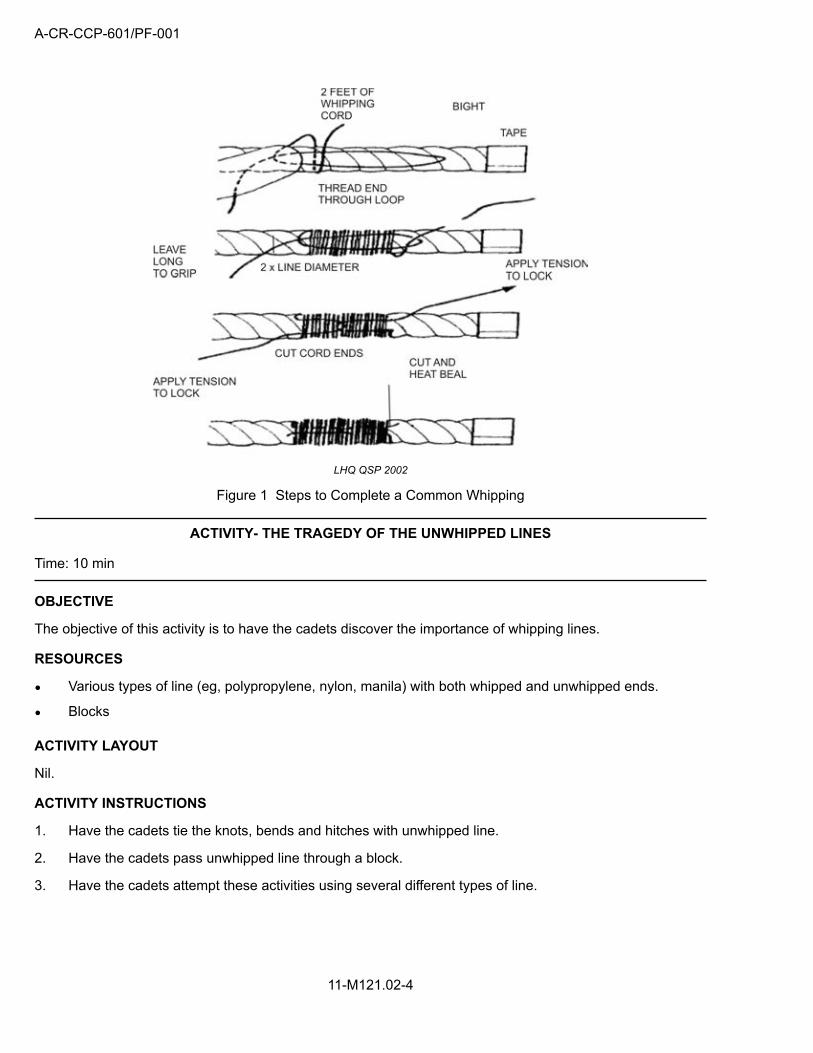
COMMON WHIPPING
The following steps are used for creating a common whipping:
1. Make a bight in the twine, laying it across the line to be whipped.
2. Make tight turns with the twine around the line and over the two ends of the twine that are on top of the line.
3. Tuck the working end of the twine through the bight.
4. Pull the tail so as to trap the working part in the middle of the whipping.
5. Trim the ends of the whipping twine and the line.
A-CR-CCP-601/PF-001
11-M121.02-4
LHQ QSP 2002
Figure 1 Steps to Complete a Common Whipping
ACTIVITY- THE TRAGEDY OF THE UNWHIPPED LINES
Time: 10 min
OBJECTIVE
The objective of this activity is to have the cadets discover the importance of whipping lines.
RESOURCES
• Various types of line (eg, polypropylene, nylon, manila) with both whipped and unwhipped ends.
• Blocks
ACTIVITY LAYOUT
Nil.
ACTIVITY INSTRUCTIONS
1. Have the cadets tie the knots, bends and hitches with unwhipped line.
2. Have the cadets pass unwhipped line through a block.
3. Have the cadets attempt these activities using several different types of line.

A-CR-CCP-601/PF-001
11-M121.02-5
4. Ask the cadets if they noticed any problems.
5. Ensure that cadets are aware that the strands of line will separate (unravel, unlay) with continued useand strands or individual fibres will snag on sharp objects. Also, the safety hazards, including loose fibresbecoming caught in block parts, and unlayed strands reducing the strength of the lines.
SAFETY
Ensure the cadets do not get fingers caught in the blocks when attempting to pass the line through.
END OF LESSON CONFIRMATION
The cadets’ participation in the activities will serve as the confirmation of this lesson.
CONCLUSION
HOMEWORK/READING/PRACTICE
The cadets shall be encouraged to continue practicing the common whipping on their own time to maintaintheir knowledge and skills.
METHOD OF EVALUATION
Nil.
CLOSING STATEMENT
The common whipping will be used in a variety of cadet training activities so it is important that the cadetsbecome proficient with basic whippings.
INSTRUCTOR NOTES/REMARKS
Nil.
REFERENCES
A1-004 B-GN-181-105/FP-E00 Maddison, G.R., Chief of Maritime Staff (1997). CFCD 105 Fleet SeamanshipRigging and Procedures Manual. Ottawa, ON.
C1-002 ISBN 0-7858-1446-9 Pawson, D. (2001). Pocket Guide to Knots and Splices. Edison, NJ: CharwellBooks, Inc.

A-CR-CCP-601/PF-001
THIS PAGE INTENTIONALLY LEFT BLANK
11-M121.02-6

A-CR-CCP-601/PF-001
11-M121.03-1
ROYAL CANADIAN SEA CADETS
PHASE ONE
INSTRUCTIONAL GUIDE
SECTION 3
EO M121.03 – COIL AND HEAVE A LINE
Total Time: 60 min
PREPARATION
PRE-LESSON INSTRUCTIONS
Resources needed for the delivery of this lesson are listed in the lesson specification located in A-CR-CCP-601/PG-001, Phase One Qualification Standard and Plan, Chapter 4. Specific uses for said resources are identifiedthroughout the instructional guide within the TP for which they are required.
Review the lesson content and become familiar with the material prior to delivering the lesson.
PRE-LESSON ASSIGNMENT
Nil.
APPROACH
An interactive lecture was chosen for TP 1 to introduce the cadets to coiling and heaving a line.
A demonstration and performance was chosen for TPs 2 and 3 as it allows the instructor to explain anddemonstrate the skill the cadets are expected to acquire while providing an opportunity for the cadets to practicethe skill under supervision.
INTRODUCTION
REVIEW
Nil.
OBJECTIVES
By the end of this lesson the cadet shall have coiled and heaved a line.
IMPORTANCE
Coiling a line is a traditional way of completing line-handling tasks in the navy, as well as being an importantaspect of maintaining equipment in a good state of repair. Heaving a line is a skill that will be useful in severalsea cadet activities.

A-CR-CCP-601/PF-001
11-M121.03-2
Bight
A bight is any curved section, slack part, or loop between the ends of a rope, string, or yarn.
Standing end
The standing end is the end of the rope not involved in the knot.
Standing part
Section of line between knot and the standing end.
Working end
The active end of a line used in making the knot.
Working part
Section of line between knot and the working end.
Teaching Point 1 Describe the characteristics and uses of a heaving line.
Time: 5 min Method: Interactive Lecture
CHARACTERISTICS AND USES OF A HEAVING LINE
The characteristics and uses of a heaving line include:
• It is a lightweight flexible line, in order to facilitate throwing.
• There must be a heaving knot, or some weighted device, at the end of a heaving line.
• It can be used to start the transfer of equipment or personnel between ships or from a ship to a jetty.
• It is used to throw a line to a jetty or another boat.
CONFIRMATION OF TEACHING POINT 1
QUESTIONS:
Q1. What are the characteristics of a heaving line?
Q2. What are some uses of a heaving line?
Q3. What is the name of the knot used to weight the end of a line?
ANTICIPATED ANSWERS:
A1. Possible answers for this question:
• It is a lightweight line, to facilitate throwing.
• There must be a knot or something weighted at the end of a heaving line.
• It is used to throw a line to a jetty or another boat.
A2. It can be used to throw a line to a jetty or another boat, or transfer equipment or personnel between ships.
A3. A heaving knot.

A-CR-CCP-601/PF-001
11-M121.03-3
Teaching Point 2 Explain, demonstrate and have the cadets coil a line.
Time: 15 min Method: Demonstration and Performance
IMPORTANCE OF COILING A LINE
Demonstrate and have the cadets practice coiling a line.
Explain the importance of coiling a line, to include:
• Proper storage of the line will ensure ease of use for the next person.
• Increases the distance a line can be thrown.
• Allows a line to feed smoothly through a block.
• Allows a line to be tossed cleanly.
• It keeps a line from tangling.
CONFIRMATION OF TEACHING POINT 2
SUGGESTED QUESTION:
Q1. What is the importance of coiling a line?
ANTICIPATED ANSWERS:
A1. Proper storage of the line will ensure ease of use for the next person, it keeps a line from tangling,increases the distance a line can be thrown, allows a line to be tossed cleanly, and allows a line to feedsmoothly through a block.
Teaching Point 3 Explain, demonstrate and have the cadets tie a heavingknot and throw a heaving line.
Time: 30 min Method: Demonstration and Performance
TIE A HEAVING KNOT
Tie a heaving knot using the following steps:
1. Form a bight (a loop) about 1.5 m long at the end of the line.
2. Start wrapping the end of the line around both parts of the bight at about 20 cm from the actual bend ofthe bight, and continue until the running end is all but expended.
3. Pass the end through the small loop that is left and haul on the standing part.

A-CR-CCP-601/PF-001
11-M121.03-4
CFCD 105 Seamanship Rigging and Procedures Manual
Figure 1 Heaving Knot
HEAVING A LINE
Use the following technique to throw a heaving line:
1. The line is first coiled into the hand in bights about three to four feet in circumference.
2. Separate this group of coils in half, keeping the half with the heaving knot in the heaving hand, and allowapproximately five feet of line to hang in the space between the hands.
3. Turn the body sideways to the target, and hold the other hand palm-open facing the target.
4. Heave the weighted end, including the coiled rope, towards the target and allow as much of the rest ofthe line to go out as necessary.
5. Retain the end of the line in the other hand, or secure it to a guardrail.
Royal Canadian Sea Cadets Manual Volume 2, 1983
Figure 2 Throwing a Heaving Line
ACTIVITY - COIL AND HEAVE A LINE
Time: 15 min
OBJECTIVE
The objective of this activity is to have the cadets tie a heaving knot and coil and heave a line towards a target.

A-CR-CCP-601/PF-001
11-M121.03-5
RESOURCES
• Heaving line, one per five cadets.
• Heaving line targets (rings hanging from a ceiling or a circle taped to the deck).
• Diagram of how to properly tie a heaving knot.
ACTIVITY LAYOUT
Layout the activity as per Diagram 3.
Figure 3 Activity Layout
ACTIVITY INSTRUCTIONS
1. Divide the cadets into groups of five.
2. Provide each group with a heaving line, diagram and an area in which to heave towards a target.
3. Have each cadet practice tying a heaving knot.
4. Have each cadet toss the heaving line towards their group’s target focussing on the amount of line in theheaving hand and the power required to toss it.
SAFETY
Ensure a safety zone is put in place around the heaving line targets.
END OF LESSON CONFIRMATION
The cadets’ participation in the activity will serve as the confirmation of this lesson.
CONCLUSION
HOMEWORK/READING/PRACTICE
The cadets should be encouraged to practice coiling and heaving a line on their own time.
METHOD OF EVALUATION
Nil.

A-CR-CCP-601/PF-001
11-M121.03-6
CLOSING STATEMENT
Coiling and heaving a line will be used in a variety of cadet training activities so it is important that the cadetsbecome proficient in these skills.
INSTRUCTOR NOTES/REMARKS
Nil.
REFERENCES
A1-004 B-GN-181-105/FP-E00 Maddison, G.R., Chief of Maritime Staff (1997). CFCD 105 Fleet SeamanshipRigging and Procedures Manual. Ottawa, ON.
C1-002 ISBN 0-7858-1446-9 Pawson, D. (2001). Pocket Guide to Knots and Splices. Edison, NJ: CharwellBooks, Inc.

A-CR-CCP-601/PF-001
11-C121.01-1
ROYAL CANADIAN SEA CADETS
PHASE ONE
INSTRUCTIONAL GUIDE
SECTION 4
EO C121.01 – WHIP THE END OF A LINE USING A WEST COUNTRY WHIPPING
Total Time: 30 min
PREPARATION
PRE-LESSON INSTRUCTIONS
Resources needed for the delivery of this lesson are listed in the lesson specification located in A-CR-CCP-601/PG-001, Phase One Qualification Standard and Plan, Chapter 4. Specific uses for said resources are identifiedthroughout the instructional guide within the TP for which they are required.
Review the lesson content and become familiar with the material prior to delivering the lesson.
Prepare a completed west country whipping to show the cadets.
PRE-LESSON ASSIGNMENT
Nil.
APPROACH
A demonstration and performance was chosen for this lesson as it allows the instructor to explain anddemonstrate the skill the cadets are expected to acquire while providing an opportunity for the cadets to practicethe skill under supervision.
INTRODUCTION
REVIEW
Nil.
OBJECTIVES
By the end of this lesson the cadet shall have whipped the end of a line, using a west country whipping.
IMPORTANCE
Knowledge of the west country whipping will assist the cadet in future training and is needed to learn moreadvanced seamanship skills.

A-CR-CCP-601/PF-001
11-C121.01-2
Teaching Point 1 Explain, demonstrate and have the cadets whip the end ofa line using a west country whipping.
Time: 25 min Method: Demonstration and Performance
WEST COUNTRY WHIPPING
The west country whipping is suitable:
• when a line is in water for a great deal of time, as being in water may cause the whipping to become loose;
• for nylon or polyester line, as this type of line can more easily become undone; and
• to mark points on a line.
Use the following steps to make the whipping:
1. Centre the whipping twine and pass both ends around the line.
2. Each time the ends of the twine pass each other tie an overhand knot.
3. Finish with a reef knot.
Admiralty Manual of Seamanship, Vol 1
Figure 1 Making a West Country Whipping
Show the cadets the completed west country whipping.
ACTIVITY- WHIP THE END OF A LINE
Time: 15 min
OBJECTIVE
The objective of this activity is to have the cadets whip the end of a line using a west country whipping.
A-CR-CCP-601/PF-001
11-C121.01-3
RESOURCES
• Line, one per cadet,
• One metre of whipping twine, one per cadet.
• Samples of the whipping in several stages of completion.
• Samples of the completed whipping.
ACTIVITY LAYOUT
Nil.
ACTIVITY INSTRUCTIONS
1. Provide each cadet with a length of line and whipping twine.
2. Demonstrate each of the steps of the whipping.
3. Have each cadet complete each step after it has been demonstrated.
4. Have each cadet practice the whipping.
SAFETY
Nil.
END OF LESSON CONFIRMATION
The cadets’ participation in the activity will serve as the confirmation of this lesson.
CONCLUSION
HOMEWORK/READING/PRACTICE
Encourage the cadets to continue practicing the whipping on their own time to maintain their knowledge andskills.
METHOD OF EVALUATION
Nil.
CLOSING STATEMENT
The west country whipping can be used in a variety of cadet training activities, so it is beneficial for the cadetsto become proficient in this skill.
INSTRUCTOR NOTES/REMARKS
Nil.
REFERENCES
A1-004 B-GN-181-105/FP-E00 Maddison, G.R., Chief of Maritime Staff (1997). CFCD 105 Fleet SeamanshipRigging and Procedures Manual. Ottawa, ON.

A-CR-CCP-601/PF-001
11-C121.01-4
C1-003 ISBN 11-770973-5 (1972). Admiralty Manual of Seamanship 1964 Volume 1. London, England: HerMajesty's Stationery Office.
C1-002 ISBN 0- 7858-1446-9, Pawson, Des. (2002). Pocket Guide to Knots & Splices. Edison, NJ: Charwell,Books Inc.

A-CR-CCP-601/PF-001
11-C121.02-1
ROYAL CANADIAN SEA CADETS
PHASE ONE
INSTRUCTIONAL GUIDE
SECTION 5
EO C121.02 – WHIP THE END OF A LINE USING A SAILMAKER’S WHIPPING
Total Time: 60 min
PREPARATION
PRE-LESSON INSTRUCTIONS
Resources needed for the delivery of this lesson are listed in the lesson specification located in A-CR-CCP-601/PG-001, Phase One Qualification Standard and Plan, Chapter 4. Specific uses for said resources are identifiedthroughout the instructional guide within the TP for which they are required.
Review the lesson content and become familiar with the material prior to delivering the lesson.
PRE-LESSON ASSIGNMENT
Nil.
APPROACH
A demonstration and performance was chosen for this lesson as it allows the instructor to explain anddemonstrate the skill the cadets are expected to acquire while providing an opportunity for the cadets to practicethe skill under supervision.
INTRODUCTION
REVIEW
Nil.
OBJECTIVES
By the end of this lesson the cadet shall have whipped the end of a line using a sailmaker’s whipping.
IMPORTANCE
Knowledge of the sailmaker’s whipping will give the cadet more versatility when completing advancedseamanship skills.

A-CR-CCP-601/PF-001
11-C121.02-2
Teaching Point 1 Explain, demonstrate and have the cadets whip the end ofa line using a sailmaker’s whipping.
Time: 50 min Method: Demonstration and Performance
SAILMAKER’S WHIPPING
The sailmaker’s whipping is the most secure of the whippings, but can only be made at the end of a three-strand line. By winding the whipping twine around the line, it will not easily come undone.
The following steps are used to make the sailmaker’s whipping:
1. Open or unlay the strands at the end of the line for about two inches.
2. Make a bight about nine inches long in the whipping twine and pass the bight over one strand of theline, letting the bight hang down, and bring the two ends of the twine towards you between the othertwo strands.
3. Ensure that you now have a bight (A) on one side of the line, and the short end (B) and working part ofthe twine (C) on the other side, as shown in Diagram 1.
4. Relay the strands of the line.
5. Whip the line tightly using the working part of the twine (C), moving towards the end of the line, and goingagainst the lay. Put on enough turns so that the whipping is as long as the diameter of the line.
6. Take the slack of the bight (A) and, following the line of the strand (1) as it lies under the whipping, slipthe end of the bight over the end of strand (1) as it emerges from the top of the whipping (see figure); itshould follow the path of the groove in the line.
7. Tighten the bight by pulling firmly on the short end (B). The two parts of the bight will now occupy thegrooves on either side of the strand (1).
8. Take the short end (B) and, following the remaining groove, bring it up outside the whipping and betweenthe strands (1) and (3) as they emerge from the top of the whipping.
9. Take the end of the working part (C) and bring it between strands (1) and (3) from the opposite side ofwhich the short end comes up.
10. Finish the whipping by tying the working part and short end together with a reef knot in the middle of theline and out of sight. Trim the ends to finish the whipping.

A-CR-CCP-601/PF-001
11-C121.02-3
Royal Canadian Sea Cadet Manual, Vol 1, 1983
Figure 1 Making a Sailmaker’s Whipping
Have samples of the completed whipping, as well as examples of the whipping in severalstages of completion to show the cadets.
ACTIVITY- WHIP THE END OF A LINE USING A SAILMAKER’S WHIPPING
Time: 35 min
OBJECTIVE
The objective of this activity is to have the cadets whip the end of a line using a sailmaker’s whipping.
RESOURCES
• Line, one per cadet,
• One metre of whipping twine, one per cadet.
• Samples of the whipping in several stages of completion.
• Samples of the completed whipping.
ACTIVITY LAYOUT
Nil.
ACTIVITY INSTRUCTIONS
1. Provide each cadet with a length of line and whipping twine.
2. Demonstrate each step of the whipping.
3. Have the cadets complete each step after it has been demonstrated.
4. Have the cadets practice the whipping.

A-CR-CCP-601/PF-001
11-C121.02-4
SAFETY
Nil.
END OF LESSON CONFIRMATION
The cadets’ participation in the activity will serve as the confirmation of this lesson.
CONCLUSION
HOMEWORK/READING/PRACTICE
Encourage the cadets to continue practicing the whipping on their own time to maintain their knowledge andskills.
METHOD OF EVALUATION
Nil.
CLOSING STATEMENT
The sailmaker’s whipping can be used in a variety of cadet training activities; therefore it is beneficial for thecadets to become proficient in this skill.
INSTRUCTOR NOTES/REMARKS
Schedule the two periods consecutively.
REFERENCES
A1-004 B-GN-181-105/FP-E00 Maddison, G.R., Chief of Maritime Staff (1997). CFCD 105 Fleet SeamanshipRigging and Procedures Manual. Ottawa, ON.
A1-009 A-CR-CCP-004/PT-001 D Cdts (1983). Royal Canadian Sea Cadets Manual Volume 1. Ottawa, ON.
C1-002 ISBN 0-7858-1446-9 Pawson, D. (2001). Pocket Guide to Knots and Splices. Edison, NJ: CharwellBooks, Inc.

A-CR-CCP-601/PF-001
11-C121.03-1
ROYAL CANADIAN SEA CADETS
PHASE ONE
INSTRUCTIONAL GUIDE
SECTION 6
EO C121.03 – COMPLETE A ROLLING HITCH
Total Time: 30 min
PREPARATION
PRE-LESSON INSTRUCTIONS
Resources needed for the delivery of this lesson are listed in the lesson specification located in A-CR-CCP-601/PG-001, Phase One Qualification Standard and Plan, Chapter 4. Specific uses for said resources are identifiedthroughout the instructional guide within the TP for which they are required.
Review the lesson content and become familiar with the material prior to delivering the lesson.
PRE-LESSON ASSIGNMENT
Nil.
APPROACH
A demonstration and performance was chosen for this lesson as it allows the instructor to explain anddemonstrate the skill the cadets are expected to acquire while providing an opportunity for the cadets to practicethe skill under supervision.
INTRODUCTION
REVIEW
Nil.
OBJECTIVES
By the end of this lesson the cadet shall have tied a rolling hitch.
IMPORTANCE
Knowledge of the rolling hitch will assist the cadet in future training and is needed to learn more advancedseamanship skills.

A-CR-CCP-601/PF-001
11-C121.03-2
Teaching Point 1 Explain, demonstrate and have the cadets complete arolling hitch.
Time: 25 min Method: Demonstration and Performance
ROLLING HITCH
A rolling hitch is used to secure a line to a spar or another rope. Depending on the direction in which the rollinghitch is tied, it is made to pull without slipping in that direction only.
The following steps are used to make the hitch:
1. Wrap a line around a post or spar, take a second turn around and cross over the standing part to trap it.
2. Take another full turn around the post, but on the other side of the standing part.
3. Bring the working part up underneath itself to make a half hitch, and pull tight.
CFCD 105 Seamanship Rigging and Procedures Manual
Figure 1 Rolling Hitch
Have samples of the completed rolling hitch to show the cadets.
END OF LESSON CONFIRMATION
The cadets’ participation in the activity will serve as the confirmation of this lesson.
CONCLUSION
HOMEWORK/READING/PRACTICE
Encourage the cadets to continue practicing the whipping on their own time to maintain their knowledge andskills.
METHOD OF EVALUATION
Nil.

A-CR-CCP-601/PF-001
11-C121.03-3
CLOSING STATEMENT
The rolling hitch can be used in a variety of cadet training activities; therefore it is important that the cadetsbecome proficient with it.
INSTRUCTOR NOTES/REMARKS
Nil.
REFERENCES
C1-002 0-7858-1446-9 Pawson, D. (2001). Pocket Guide to Knots and Splices. Edison, NJ: Charwell Books,Inc.
C1-003 ISBN 11-770973-5 (1972). Admiralty Manual of Seamanship 1964 Volume 1. London, England: HerMajesty's Stationery Office.

A-CR-CCP-601/PF-001
THIS PAGE INTENTIONALLY LEFT BLANK
11-C121.03-4

A-CR-CCP-601/PF-001
11-C121.04-1
ROYAL CANADIAN SEA CADETS
PHASE ONE
INSTRUCTIONAL GUIDE
SECTION 7
EO C121.04 – COMPLETE A MARLING HITCH
Total Time: 30 min
PREPARATION
PRE-LESSON INSTRUCTIONS
Resources needed for the delivery of this lesson are listed in the lesson specification located in A-CR-CCP-601/PG-001, Phase One Qualification Standard and Plan, Chapter 4. Specific uses for said resources are identifiedthroughout the instructional guide within the TP for which they are required.
Review the lesson content and become familiar with the material prior to delivering the lesson.
PRE-LESSON ASSIGNMENT
Nil.
APPROACH
A demonstration and performance was chosen for this lesson as it allows the instructor to explain anddemonstrate the skill the cadets are expected to acquire while providing an opportunity for the cadets to practicethe skill under supervision.
INTRODUCTION
REVIEW
Nil.
OBJECTIVES
By the end of this lesson the cadet shall have completed a marling hitch.
IMPORTANCE
Knowledge of the marling hitch will be beneficial in future training and is needed for more advanced seamanshipskills.
Placing diagrams on overheads will allow the cadets to refer to them during demonstrationand practicing. Demonstrate the hitch on a jetty, post or other spar.
Have senior cadets circulate through the class to assist any cadets having problems.

A-CR-CCP-601/PF-001
11-C121.04-2
Teaching Point 1 Explain, demonstrate and have the cadets complete amarling hitch.
Time: 25 min Method: Demonstration and Performance
PURPOSE OF MARLING HITCH
The marling hitch is used for lashing long bundles such as sails, hammocks and awnings. The end of the lineis passed down through each half hitch, jamming that part up against the bundle.
Use the following steps to make the marling hitch:
1. Wrap the working end around the object to be bundled with a half hitch.
2. Move the working end along the length of the bundle and make another half hitch.
3. Repeat this process until the bundle is lashed as far along as required.
CFCD 105 Seamanship Rigging and Procedures Manual
Figure 1 Marling Hitch
END OF LESSON CONFIRMATION
The cadets’ participation in the activity will serve as the confirmation of this lesson.
CONCLUSION
HOMEWORK/READING/PRACTICE
The cadets shall be encouraged to continue practicing the marling hitch on their own time in order to maintaintheir knowledge and skills.
METHOD OF EVALUATION
Nil.
CLOSING STATEMENT
The marling hitch can be used in a variety of cadet training activities; therefore it is important that the cadetsbecome proficient with it.
INSTRUCTOR NOTES/REMARKS
Nil.

A-CR-CCP-601/PF-001
11-C121.04-3
REFERENCES
A1-004 B-GN-181-105/FP-E00 Maddison, G.R., Chief of Maritime Staff (1997). CFCD 105 Fleet SeamanshipRigging and Procedures Manual. Ottawa, ON.
C1-002 ISBN 0-7858-1446-9 Pawson, D. (2001). Pocket Guide to Knots and Splices. Edison, NJ: CharwellBooks, Inc.
C1-003 ISBN 11-770973-5 (1972). Admiralty Manual of Seamanship 1964 Volume 1. London, England: HerMajesty's Stationery Office.