70-411-R2-Lab05 fdfdsfdsdfs
16
70-411 Administering Windows Server 2012 LAB 5 CONFIGURING FILE SERVER RESOURCE MANAGER THIS LAB CONTAINS THE FOLLOWING EXERCISES AND ACTIVITIES: Exercise 5.1 Installing File Server Resource Manager Exercise 5.2 Configuring Quotas Exercise 5.3 Managing Files with File Screening Exercise 5.4 Using Storage Reports Exercise 5.5 Configuring File Management Tasks Lab Challenge Enabling SMTP for FSRM BEFORE YOU BEGIN The lab environment consists of student workstations connected to a local area network, along with a server
-
Upload
waterfordschools -
Category
Documents
-
view
2 -
download
0
Transcript of 70-411-R2-Lab05 fdfdsfdsdfs

70-411 Administering Windows Server 2012
LAB 5CONFIGURING FILE SERVER RESOURCE MANAGER
THIS LAB CONTAINS THE FOLLOWING EXERCISES AND ACTIVITIES:
Exercise 5.1 Installing File Server Resource Manager
Exercise 5.2 Configuring Quotas
Exercise 5.3 Managing Files with File Screening
Exercise 5.4 Using Storage Reports
Exercise 5.5 Configuring File Management Tasks
Lab Challenge
Enabling SMTP for FSRM
BEFORE YOU BEGIN
The lab environment consists of student workstations connected to a local area network, along with a server

70-411 Administering Windows Server 2012
that functions as the domain controller for a domain called contoso.com. The computers required for this lab arelisted in Table 5-1.
Table 5-1Computers Required for Lab 5
Computer Operating System Computer NameServer (VM 1) Windows Server 2012 R2 RWDC01Server (VM 2) Windows Server 2012 R2 Server01
In addition to the computers, you also require the software listed in Table 5-2 to complete Lab 5.
Table 5-2Software Required for Lab 5
Software LocationADMXMigrator.msi, NMI32_x64.exe, System Center Monitoring Pack for File and Storage Management.msi, and Windows8.1-KB2901549.msu
C:\Software
Lab 5 student worksheet Lab05_worksheet.docx (provided by instructor)
Working with Lab WorksheetsEach lab in this manual requires that you answer questions, take screen shots, and perform other activities that you will document in a worksheet named for the lab, such as Lab05_worksheet.docx. You will find these worksheets on the book companion site. It is recommended that you use a USB flash drive to store your worksheets, so you can submit them to your instructor forreview. As you perform the exercises in each lab, open the appropriate worksheet file using Word, fill in the required information, and save the file to your flash drive.

70-411 Administering Windows Server 2012
After completing this lab, you will be able to:
Install and configure File Server Resource Manager
Use Quotas to manage disk space
Manage files with file screening
Use Storage Reports
Configure File Management Tasks
Estimated lab time: 90 minutes
Exercise 5.1
Installing File Server Resource Manager
Overview In this exercise, you will install File Server Resource Manager (FSRM), which is used in the exercises that follow.
Mindset The File Server Resource Manager is a suite of tools that enables you to control and manage the quantity and type of data stored on a file server. It enables you to define how much data a person can store, define what type of files a user can store on a file server, and generate reports about the file server being used.
Completion time
10 minutes
1. Log in to Server01 using the Contoso\Administrator account and the password Pa$$w0rd.
2. On Server01, at the top of Server Manager, select Manage and click Add Roles and Features to open the Add Roles and Feature Wizard.
3. On the Before you begin page, click Next.
4. Select Role-based or feature-based installation and then click Next.
5. When it asks for your destination server, click Next.

70-411 Administering Windows Server 2012
6. Scroll down, expand File and Storage Services, and expand File and iSCSI Services. Select File Server Resource Manager.
7. When you are asked to add additional features, click Add Features.
8. On the Select server roles page, click Next.
9. On the Select features page, click Next.
10. On the Confirm installation selections page, click Install.
11. When the installation is complete, take a screen shot of the File Server Resource Manager installation by pressing Alt+Prt Scr and then paste it into your Lab05_worksheet file in the page provided by pressing Ctrl+V.
12. Click Close.
End of exercise.

70-411 Administering Windows Server 2012
Exercise 5.2 Configuring QuotasOverview In this exercise, you will use File Server
Resource Manager quotas.
Mindset: When you configure quotas for NTFS, you configure quotas based on user files stored on avolume. FSRM specifies the total space for a volume or folder.
Completion time
10 minutes
1. On Server01, using File Explorer, create a Share4 folder in the C:\ folder.
2. Share the Share4 folder and specify Allow Full Controlfor Everyone.
3. In Server Manager, click Tools > File Server Resource Manager. The File Server Resource Manager console opens.
4. Expand Quota Management and then click Quota Templates. Then right-click Quota Templates and chooseCreate Quota Template. The Create Quota Template dialog box opens.
5. In the Template name text box, type QuotaTemplate1.
6. In the Space limit section, in the Limit text box, type 10 and then specify the unit MB.
7. Select Soft quota, as shown in Figure 5-1.
Question 1
What is the difference between a hard and soft quota?
Hard is not allow user exceed limit but soft allow user to exceed limit.

70-411 Administering Windows Server 2012
Figure 5-1Creating a quota template
8. To add a notification, click the Add button. The Add Threshold dialog box opens.
9. Click the Event Log tab.
10. Select the Send warning to event log check box.
11. Click OK to save your notification threshold and closethe Add Threshold dialog box.
12. Click OK to close the Create Quota Template dialog box.

70-411 Administering Windows Server 2012
13. Click the Quota Templates node and take a screen shot of the Quota Templates pane by pressing Alt+Prt Scr and then paste it into your Lab05_worksheet file in
the page provided by pressing Ctrl+V.
14. Under the Quota Management node, click the Quota Templates node.
15. Right-click the QuotaTemplate1 in the Quota Templates pane and choose Create Quota from Template. The CreateQuota dialog box opens.
16. In the Quota path, type c:\Share4 in the Quota path text box.
17. Click Create.
18. Open File Manager, navigate to the \\RWDC01\software folder, and then copy the following files to the C:\Share4 folder:
ADMXMigrator.msi NM34_x64.exe System Center Monitoring Pack for File and Storage
Management.msi Windows8.1-KB2901549-x64.msu

70-411 Administering Windows Server 2012
19. On Server01, open the Event Viewer and look for an entry in the Application logs showing that the quota has been exceeded.
Question 2
What event ID was used for the quota to be exceeded?
Window power shell
20. Take a screen shot of the Event Viewer window by pressing Alt+Prt Scr and then paste it into your Lab05_worksheet file in the page provided by pressing
Ctrl+V.
21. Close Event Viewer.
End of exercise. Leave the windows open for the next exercise.
Exercise 5.3 Managing Files with File ScreeningOverview In this exercise, you will continue to use
File Server Resource Manager by using File Screening.
Mindset You have a file server that ran out of diskspace. Last week, there was plenty of space andthis week, there is none. While looking at the

70-411 Administering Windows Server 2012
files that are stored, you noticed that a coupleof users have stored movie and musiccollections. File Screening allows you toprevent certain files from being saved to afolder based on the filename extension.
Completion time
20 minutes
1. On Server01, on File Server Resource Manager, expand File Screening Management.
2. Click the File Groups node.
3. Right-click File Groups and choose Create File Group. The Create File Group Properties dialog box opens.
4. In the File group name text box, type FileGroup1.
5. To include video files and add all files with the filename extension ram, type *.ram, and then click Add.
6. Add the following filename extensions:
*.rm
*.avi
*.wmv
*.mpg
7. To add files to exclude, type hello.avi in the Files to exclude text box and click Add. The Create File Group Properties dialog box should look like Figure 5-2.

70-411 Administering Windows Server 2012
Figure 5-2Creating file groups
8. Click OK to close the Create File Group Properties dialog box.
9. Under File Screening Management, click the File Screens node.
10. Right-click File Screens and choose Create File Screen. The Create File Screen dialog box opens.
11. Type C:\Share4 in the File screen path text box.
12. Click Define custom file screen properties and then click Custom Properties. The File Screen Properties onC:\Share4 dialog box opens.
13. With Active screening already selected, select FileGroup1 in the File groups section.
14. To log an event, click the Event Log tab. Then click to select the Send warning to event log check box.
15. Click OK to close the File Screen Properties on C:\Share4 dialog box.
16. Click Create to create a new file screen.
70-411 Administering Windows Server 2012
17. When you are prompted to save the custom properties asa template, click Save the custom file screen without creating a template. Click OK.
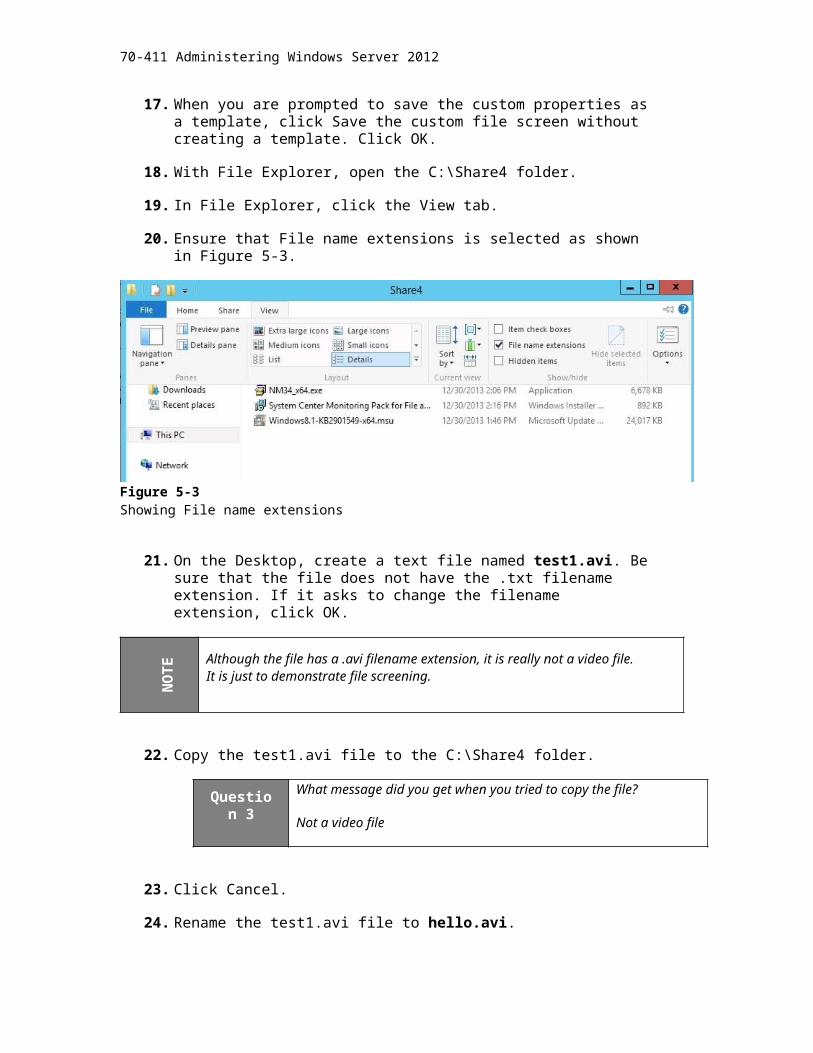
18. With File Explorer, open the C:\Share4 folder.
19. In File Explorer, click the View tab.
20. Ensure that File name extensions is selected as shown in Figure 5-3.
Figure 5-3Showing File name extensions
21. On the Desktop, create a text file named test1.avi. Besure that the file does not have the .txt filename extension. If it asks to change the filename extension, click OK.
NOTE Although the file has a .avi filename extension, it is really not a video file.
It is just to demonstrate file screening.
22. Copy the test1.avi file to the C:\Share4 folder.
Question 3
What message did you get when you tried to copy the file?
Not a video file
23. Click Cancel.
24. Rename the test1.avi file to hello.avi.

70-411 Administering Windows Server 2012
25. Copy the hello.avi file to the C:\Share4 folder.
26. Open the Event Viewer and access the Application logs.
Question 4
What event ID was used for files that were not permitted for file screening? Hardware event
27. Close Event Viewer
28. Close the Share4 folder.
End of exercise. Leave the windows open for the next exercise.
Exercise 5.4 Using Storage ReportsOverview In this exercise, you will execute File Server
Resource Manager storage reports.
Mindset To help you manage storage, you can use FSRM to generate storage reports that show the state of file server volumes and anyone who exceeds the quota or uses files that aren’t allowed.
Completion time
10 minutes
1. On Server01, on File Server Resource Manager, click Storage Reports Management.
2. Right-click Storage Reports Management and choose Generate Reports Now.
3. When the Storage Reports Task Properties dialog box opens, in the Report data section, select Quota Usage.
Question 5
You are starting to run out of space on a volume. Which FSRM report would you use to to determine which files can bearchived? Qutoa
4. Click the Scope tab.
5. Click Add. Then browse to the C:\Share4 and click OK to close the Browse For Folder dialog box.

70-411 Administering Windows Server 2012
6. Click OK to close the Storage Reports Task Properties dialog box.
7. When the Generate Storage Reports dialog box opens, click OK.
8. When a folder opens, double-click the html file. Closemessage box, if needed, and view the Quota Usage Report.
9. Close Internet Explorer.
End of exercise. Leave the windows open for the next exercise.
Exercise 5.5 Configuring File Management TasksOverview In this exercise, you will create file
management tasks that will expire/migrate files in a data folder.
Mindset By using the File Management Tasks node in FSRM,you can c These tasks can automatically move allfiles that match specified criteria to a specified expiration directory. An administratorcan then back up those files and delete them.
Completion time
20 minutes
1. On Server01, using File Explorer, on the C drive, create a C:\FileData folder.
2. In the FileData folder, create a Test1 file with NotePad. Type your name in the text file and then savethe file.
3. Using File Explorer, create a C:\Expire folder.
4. In File Server Resource Manager, click the File Management Tasks node.
5. Right-click the File Management Tasks node and choose Create File Management Task.
6. When the Create File Management Task dialog box opens,on the General tab, in the Task name text box, type Cleanup Old Files.

70-411 Administering Windows Server 2012
7. Click the Scope tab and then click Add.
8. When the Browse For Folder dialog box opens, navigate to and select the C:\FileData folder. Click OK.
9. Click the Action tab.
10. On the Action tab, File Expiration is selected.
11. Click the Browse button.
12. When the Browse For Folder dialog box opens, navigate to and select the C:\Expire folder. Click OK.
13. Click the Condition tab.
14. Select the Days since file was created option. Ensure that 0 days is specified.
15. On the Schedule tab, specify the task to run on Sundays at 8 p.m. Click OK.
16. Right-click the File Management task that you just created and choose Run File Management Tasks Now. Whenthe Run File Management Tasks dialog box opens, selectWait for the task to complete (this can take hours or days) and then click OK. Within a minute, the text file should move from the C:\FileData folder to the C:\Expire folder.
17. Take a screen shot of File Server Resource Manager by pressing Alt+Prt Scr and then paste it into your

70-411 Administering Windows Server 2012
Lab05_worksheet file in the page provided by pressing Ctrl+V.
18. Open the C:\Expire folder and find the test1 file.
19. Close File Server Resource Manager.
End of exercise. Close any open windows.
LAB REVIEW QUESTIONS
Completion time
10 minutes
1. In Exercise 5.2, with File Server Resource Manager, what are quotas assigned to? File screen
2. In Exercise 5.2, if you want to prevent a folder from getting too large, what type of quota should you use? Hard
3. In Exercise 5.2, what methods can you use for notification when a quota is exceeded? Soft
4. In Exercise 5.3, how do you prevent a user from savingunauthorized files? Use File screen
5. In Exercise 5.5, what allows you to get a comprehensive report on how a disk is being used by the users? Use FRSM
Lab Challenge Enabling SMTP for FSRMOverview To complete this challenge, you must
demonstrate how to enable SMTP for FSRM by writing the steps to complete the tasks described in the scenerio.
Mindset You just configured quotas and file screening properly. You now want to be e-mailed when quotas are exceeded and when users save unauthorized files. However, the messages are not being forwarded to the e-mail server. What should you do?

70-411 Administering Windows Server 2012
Completion time
10 minutes
Write out the steps you performed to complete the challenge.
End of lab. You can log off or start a different lab. If you want to restart this lab, you’ll need to click the End Lab button in order for the lab to be reset.