
55hfl5011t_12_dfu_ita.pdf - User Manual - Philips
101
5011 series Manuale dell'utente 32HFL5011T 40HFL5011T 43HFL5011T 49HFL5011T 55HFL5011T
-
Upload
khangminh22 -
Category
Documents
-
view
3 -
download
0
Transcript of 55hfl5011t_12_dfu_ita.pdf - User Manual - Philips

5011 series
Manuale dell'utente32HFL5011T40HFL5011T43HFL5011T49HFL5011T55HFL5011T
Contenuti
1 Panoramica TV 31.1 Connessione Bluetooth 3
2 Configurazione 42.1 Istruzioni di sicurezza 42.2 Supporto TV e montaggio a parete 42.3 Suggerimenti sul posizionamento 42.4 Cavo di alimentazione 42.5 Cavo dell'antenna 5
3 Collegamento del TV Android 63.1 Rete e Internet 6
4 Connetti dispositivi 104.1 Collegamenti 104.2 CAM con Smart Card - CI+ 124.3 Ricevitore - Decoder 134.4 Sistema Home Theatre (HTS) 144.5 Smartphone e tablet 164.6 Lettore dischi Blu-ray 164.7 Lettore DVD 164.8 Cuffie 164.9 Unità flash USB 164.10 Fotocamera 174.11 Videocamera 174.12 Computer 17
5 Accensione e spegnimento 185.1 Accensione, standby o spegnimento 185.2 Luminosità marchio 185.3 Tasti sul televisore 18
6 Telecomando 196.1 Panoramica dei tasti 196.2 Sensore IR 206.3 Batterie 206.4 Pulizia 20
7 Canali 217.1 Visione di canali TV 217.2 Televideo 227.3 TV interattiva 23
8 Guida TV 258.1 Cosa serve? 258.2 Utilizzo della guida TV 25
9 Menu Home 269.1 Info sul Menu Home 269.2 Aprire il menu Home 26
10 Sorgenti 2710.1 Attivazione di un dispositivo 2710.2 Opzioni per un ingresso del TV 2710.3 Nome e tipo di dispositivo 2710.4 Gioco o computer 2810.5 Nuova scansione dei collegamenti 28
11 Applicazioni 2911.1 Informazioni sulle Applicazioni 2911.2 Avvio o interruzione di un'applicazione 29
12 Internet 3012.1 Avvio di Internet 3012.2 Opzioni su Internet 30
13 Video, foto e musica 31
13.1 Da un collegamento USB 3113.2 Riproduzione dei video personali 3113.3 Visualizzazione delle foto personali 3113.4 Riproduzione dei brani musicali personali 32
14 Smartphone e tablet 3314.1 Miracast 3314.2 MHL 34
15 Impostazioni 3515.1 Immagine 3515.2 Suono 3915.3 Consumo energetico, controllo 4315.4 Impostazioni generali 4315.5 Orologio, Regione e lingua 4515.6 Accesso universale 48
16 Installazione canale 5016.1 Installazione via antenna/cavo 50
17 Software 5217.1 Aggiorna software 5217.2 Software open source 5217.3 Dichiarazione licenza open source 5217.4 Open Source License 52
18 Specifiche 8618.1 Informazioni ambientali 8618.2 Assorbimento 8718.3 Sistema operativo 8718.4 Ricezione 8718.5 Tipo di schermo 8718.6 Tipo di schermo 8718.7 Risoluzione video in ingresso 8718.8 Dimensioni e peso 8718.9 Connettività 8818.10 Suono 8818.11 Multimediale 88
19 Guida e supporto 9019.1 Registrazione del televisore 9019.2 Risoluzione dei problemi 9019.3 Guida online 9219.4 Assistenza e riparazione 92
20 Sicurezza e protezione 9320.1 Sicurezza 9320.2 Protezione dello schermo 94
21 Termini di utilizzo 9521.1 Termini di utilizzo - Televisore 9521.2 Termini di utilizzo - Smart TV 95
22 Copyright 9722.1 MHL 9722.2 Ultra HD 9722.3 HDMI 9722.4 Dolby Digital Plus 9722.5 DTS Premium Sound ™ 9722.6 DLNA Certified® 9722.7 Microsoft 9722.8 Wi-Fi Alliance 9822.9 Kensington 9822.10 Altri marchi 98
Indice 99
2

1
Panoramica TV1.1
Connessione BluetoothIl TV è dotato della tecnologia Bluetooth.
È possibile collegare cuffie o altoparlanti wirelessaggiuntivi. Non c'è bisogno di cavi di collegamento, èsufficiente associare il dispositivo al TV.
3
2
Configurazione2.1
Istruzioni di sicurezzaLeggere le istruzioni di sicurezza prima di utilizzare ilTV.
2.2
Supporto TV e montaggio aparete
Supporto TV
Le istruzioni di montaggio del supporto TV sonodisponibili nella guida rapida. È possibile scaricare laguida rapida dal sito Web www.philips.com.
Per cercare la guida rapida da scaricare, immettere ilcodice del TV.
Montaggio a parete
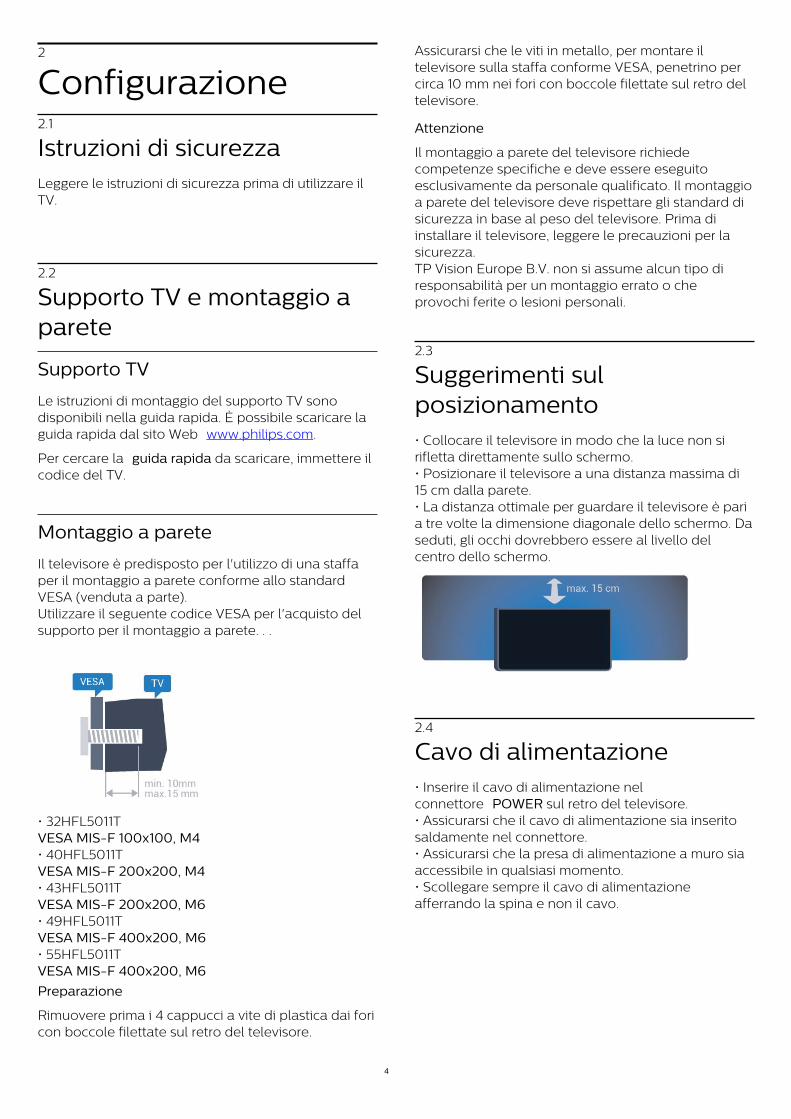
Il televisore è predisposto per l'utilizzo di una staffaper il montaggio a parete conforme allo standardVESA (venduta a parte).Utilizzare il seguente codice VESA per l'acquisto delsupporto per il montaggio a parete. . .
• 32HFL5011TVESA MIS-F 100x100, M4• 40HFL5011TVESA MIS-F 200x200, M4• 43HFL5011TVESA MIS-F 200x200, M6• 49HFL5011TVESA MIS-F 400x200, M6• 55HFL5011TVESA MIS-F 400x200, M6
Preparazione
Rimuovere prima i 4 cappucci a vite di plastica dai foricon boccole filettate sul retro del televisore.
Assicurarsi che le viti in metallo, per montare iltelevisore sulla staffa conforme VESA, penetrino percirca 10 mm nei fori con boccole filettate sul retro deltelevisore.
Attenzione
Il montaggio a parete del televisore richiedecompetenze specifiche e deve essere eseguitoesclusivamente da personale qualificato. Il montaggioa parete del televisore deve rispettare gli standard disicurezza in base al peso del televisore. Prima diinstallare il televisore, leggere le precauzioni per lasicurezza.TP Vision Europe B.V. non si assume alcun tipo diresponsabilità per un montaggio errato o cheprovochi ferite o lesioni personali.
2.3
Suggerimenti sulposizionamento• Collocare il televisore in modo che la luce non sirifletta direttamente sullo schermo.• Posizionare il televisore a una distanza massima di15 cm dalla parete.• La distanza ottimale per guardare il televisore è paria tre volte la dimensione diagonale dello schermo. Daseduti, gli occhi dovrebbero essere al livello delcentro dello schermo.
2.4
Cavo di alimentazione• Inserire il cavo di alimentazione nelconnettore POWER sul retro del televisore.• Assicurarsi che il cavo di alimentazione sia inseritosaldamente nel connettore.• Assicurarsi che la presa di alimentazione a muro siaaccessibile in qualsiasi momento.• Scollegare sempre il cavo di alimentazioneafferrando la spina e non il cavo.
4

Anche se il consumo energetico del televisore nellamodalità standby è molto ridotto, scollegare il cavo dialimentazione se il televisore non viene utilizzato perun lungo periodo di tempo al fine di risparmiareenergia.
2.5
Cavo dell'antennaInserire saldamente la spina dell' antenna nellarelativa presa sul retro del TV.
È possibile collegare la propria antenna oppurecollegarsi a un segnale dell'antenna da un sistema didistribuzione dell'antenna. Utilizzare un cavocoassiale per antenna con connettore IEC (RF) da 75Ohm.
Utilizzare questo collegamento per antenna per isegnali di ingresso DVB-T e DVB-C.
5
3
Collegamento delTV Android3.1
Rete e Internet
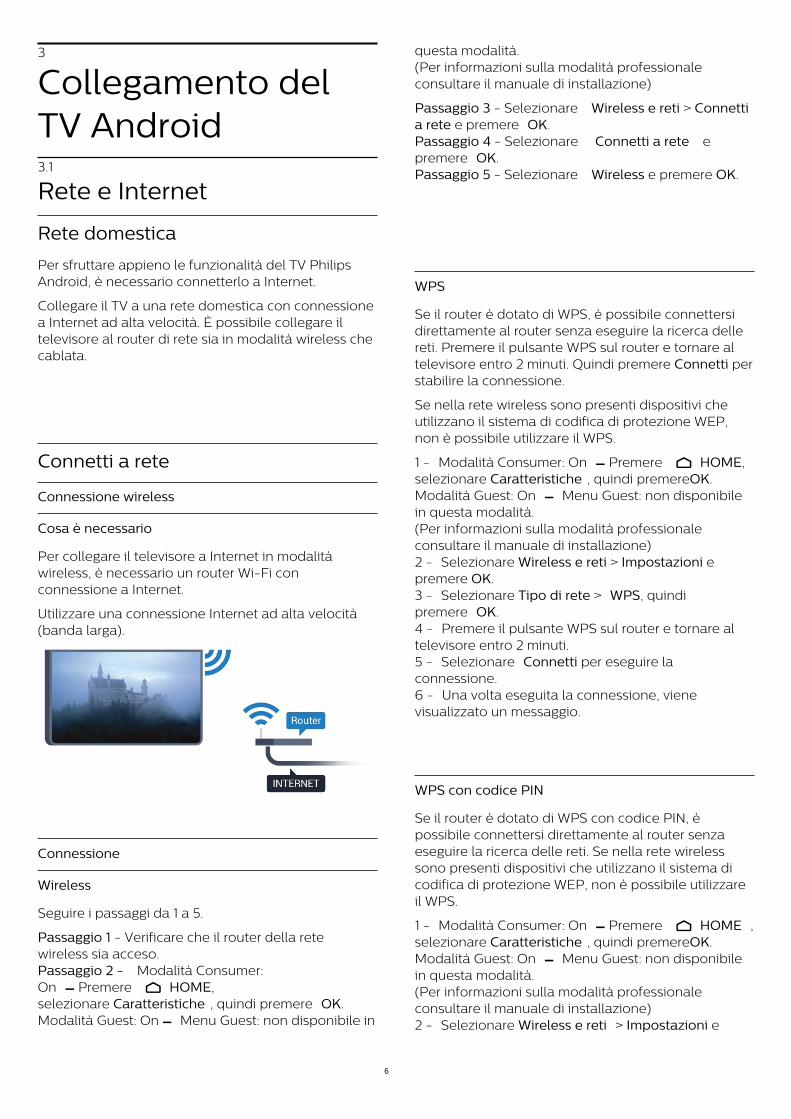
Rete domestica
Per sfruttare appieno le funzionalità del TV PhilipsAndroid, è necessario connetterlo a Internet.
Collegare il TV a una rete domestica con connessionea Internet ad alta velocità. È possibile collegare iltelevisore al router di rete sia in modalità wireless checablata.
Connetti a rete
Connessione wireless
Cosa è necessario
Per collegare il televisore a Internet in modalitàwireless, è necessario un router Wi-Fi conconnessione a Internet.
Utilizzare una connessione Internet ad alta velocità(banda larga).
Connessione
Wireless
Seguire i passaggi da 1 a 5.
Passaggio 1 - Verificare che il router della retewireless sia acceso. Passaggio 2 - Modalità Consumer:On Premere HOME,selezionare Caratteristiche , quindi premere OK.Modalità Guest: On Menu Guest: non disponibile in
questa modalità.(Per informazioni sulla modalità professionaleconsultare il manuale di installazione)
Passaggio 3 - Selezionare Wireless e reti > Connettia rete e premere OK.Passaggio 4 - Selezionare Connetti a rete epremere OK.Passaggio 5 - Selezionare Wireless e premere OK.
WPS
Se il router è dotato di WPS, è possibile connettersidirettamente al router senza eseguire la ricerca dellereti. Premere il pulsante WPS sul router e tornare altelevisore entro 2 minuti. Quindi premere Connetti perstabilire la connessione.
Se nella rete wireless sono presenti dispositivi cheutilizzano il sistema di codifica di protezione WEP,non è possibile utilizzare il WPS.
1 - Modalità Consumer: On Premere HOME,selezionare Caratteristiche , quindi premereOK.Modalità Guest: On Menu Guest: non disponibilein questa modalità.(Per informazioni sulla modalità professionaleconsultare il manuale di installazione)2 - Selezionare Wireless e reti > Impostazioni epremere OK.3 - Selezionare Tipo di rete > WPS, quindipremere OK.4 - Premere il pulsante WPS sul router e tornare altelevisore entro 2 minuti.5 - Selezionare Connetti per eseguire laconnessione. 6 - Una volta eseguita la connessione, vienevisualizzato un messaggio.
WPS con codice PIN
Se il router è dotato di WPS con codice PIN, èpossibile connettersi direttamente al router senzaeseguire la ricerca delle reti. Se nella rete wirelesssono presenti dispositivi che utilizzano il sistema dicodifica di protezione WEP, non è possibile utilizzareil WPS.
1 - Modalità Consumer: On Premere HOME ,selezionare Caratteristiche , quindi premereOK.Modalità Guest: On Menu Guest: non disponibilein questa modalità.(Per informazioni sulla modalità professionaleconsultare il manuale di installazione)2 - Selezionare Wireless e reti > Impostazioni e
6
premere OK.3 - Selezionare Tipo di rete > WPS con codicePIN e premere OK.4 - Scrivere il codice PIN a 8 cifre che viene mostratosullo schermo e inserirlo nel software del router sulPC. Per sapere dove inserire il codice PIN nel softwaredel router, consultare il manuale del router.5 - Selezionare Connetti per eseguire laconnessione.6 - Una volta eseguita la connessione, vienevisualizzato un messaggio.
Problemi
Rete wireless non trovata o distorta • Eventuali forni a microonde, telefoni DECT o altridispositivi Wi-Fi 802.11b/g/n nelle vicinanzepotrebbero disturbare la rete wireless.• Verificare che i firewall della rete consentanol'accesso alla connessione wireless del televisore.• Se la rete wireless non funziona correttamente,provare l'installazione mediante rete cablata.
Internet non funziona • Se il collegamento al router è corretto, verificare laconnessione ad Internet del router stesso.
Il PC e il collegamento a Internet sono lenti • Per informazioni sulla copertura interna, sullavelocità di trasferimento e altri fattori che influisconosulla qualità del segnale, consultare il manuale d'usodel router wireless.• Il router deve disporre di una connessione Internetad alta velocità (banda larga).
DHCP • Se la connessione non riesce, verificarel'impostazione DHCP (Dynamic Host ConfigurationProtocol) del router. DHCP deve essere attivato.
Connessione cablata
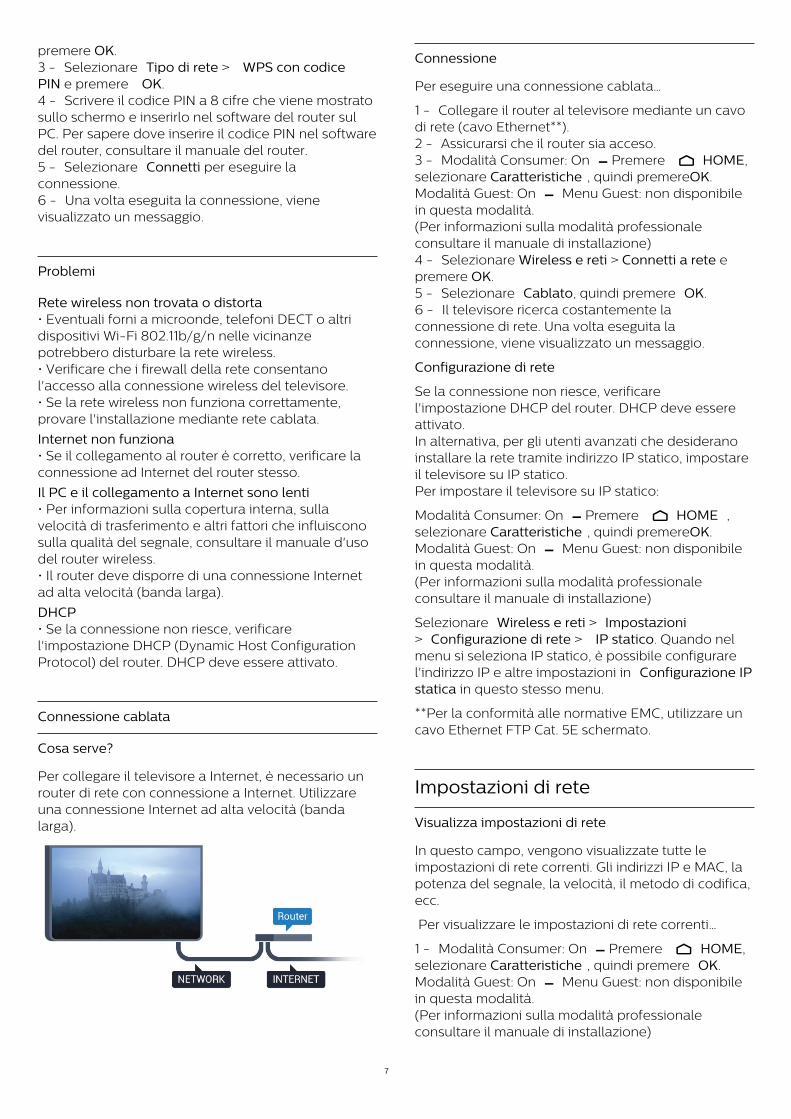
Cosa serve?
Per collegare il televisore a Internet, è necessario unrouter di rete con connessione a Internet. Utilizzareuna connessione Internet ad alta velocità (bandalarga).
Connessione
Per eseguire una connessione cablata…
1 - Collegare il router al televisore mediante un cavodi rete (cavo Ethernet**).2 - Assicurarsi che il router sia acceso.3 - Modalità Consumer: On Premere HOME,selezionare Caratteristiche , quindi premereOK.Modalità Guest: On Menu Guest: non disponibilein questa modalità.(Per informazioni sulla modalità professionaleconsultare il manuale di installazione)4 - Selezionare Wireless e reti > Connetti a rete epremere OK.5 - Selezionare Cablato, quindi premere OK.6 - Il televisore ricerca costantemente laconnessione di rete. Una volta eseguita laconnessione, viene visualizzato un messaggio.
Configurazione di rete
Se la connessione non riesce, verificarel'impostazione DHCP del router. DHCP deve essereattivato.In alternativa, per gli utenti avanzati che desideranoinstallare la rete tramite indirizzo IP statico, impostareil televisore su IP statico.Per impostare il televisore su IP statico:
Modalità Consumer: On Premere HOME ,selezionare Caratteristiche , quindi premereOK.Modalità Guest: On Menu Guest: non disponibilein questa modalità.(Per informazioni sulla modalità professionaleconsultare il manuale di installazione)
Selezionare Wireless e reti > Impostazioni> Configurazione di rete > IP statico. Quando nelmenu si seleziona IP statico, è possibile configurarel'indirizzo IP e altre impostazioni in Configurazione IPstatica in questo stesso menu.
**Per la conformità alle normative EMC, utilizzare uncavo Ethernet FTP Cat. 5E schermato.
Impostazioni di rete
Visualizza impostazioni di rete
In questo campo, vengono visualizzate tutte leimpostazioni di rete correnti. Gli indirizzi IP e MAC, lapotenza del segnale, la velocità, il metodo di codifica,ecc.
Per visualizzare le impostazioni di rete correnti…
1 - Modalità Consumer: On Premere HOME,selezionare Caratteristiche , quindi premere OK.Modalità Guest: On Menu Guest: non disponibilein questa modalità.(Per informazioni sulla modalità professionaleconsultare il manuale di installazione)
7
2 - Selezionare Wireless e reti e premere OK.3 - Selezionare Impostazioni > Visualizzaimpostazioni di rete e premere OK.4 - Premere BACK, ripetutamente se necessario,per chiudere il menu.
Configurazione di rete
In alternativa, per gli utenti avanzati che desideranoinstallare la rete tramite indirizzo IP statico, impostareil televisore su IP statico.
Per impostare il televisore su IP statico…
1 - Modalità Consumer: On Premere HOME,selezionare Caratteristiche , quindi premereOK.Modalità Guest: On Menu Guest: non disponibilein questa modalità.(Per informazioni sulla modalità professionaleconsultare il manuale di installazione)2 - Selezionare Wireless e reti e premere OK.3 - Selezionare Impostazioni > Configurazione direte e premere OK.4 - Selezionare IP statico e premere OK perattivare Configurazione IP statica.5 - Premere BACK per tornare al livelloprecedente. 6 - Selezionare Configurazione IP statica econfigurare la connessione.7 - È possibile impostare il numero per leopzioni Indirizzo IP, Netmask, Gateway, DNS 1o DNS 2.8 - Premere BACK, ripetutamente se necessario,per chiudere il menu.
Accendi in modalità LAN (WoL)
Per attivare il WoL...
1 - Modalità Consumer: On Premere HOME,selezionare Caratteristiche , quindi premereOK.Modalità Guest: On Menu Guest: non disponibilein questa modalità.(Per informazioni sulla modalità professionaleconsultare il manuale di installazione)2 - Selezionare Wireless e reti e premere OK.3 - Selezionare Impostazioni > Wake on LAN(WoL) e premere OK.4 - Selezionare On per abilitare Wake on LAN(WoL).5 - Premere BACK, ripetutamente se necessario,per chiudere il menu.
Accendi in modalità Wi-Fi (WoWLAN)
È possibile accendere questo televisore dallosmartphone o dal tablet se il televisore è in modalitàstandby. L'opzione Wake On Wi-Fi(WoWLAN) deve essere attivata.
Per attivare WoWLAN…
1 - Modalità Consumer: On Premere HOME,selezionare Caratteristiche , quindi premereOK.Modalità Guest: On Menu Guest: non disponibilein questa modalità.(Per informazioni sulla modalità professionaleconsultare il manuale di installazione)2 - Selezionare Wireless e reti e premere OK.3 - Selezionare Impostazioni > Wake on Wi-Fi (WoWLAN) e premere OK.4 - Selezionare On per abilitare Wake on Wi-Fi (WoWLAN) .5 - Premere BACK, ripetutamente se necessario,per chiudere il menu.
Attivazione della connessione Wi-Fi
È possibile attivare o disattivare la connessione Wi-Fisul proprio TV.
Per attivare il Wi-Fi...
1 - Modalità Consumer: On Premere HOME,selezionare Caratteristiche , quindi premereOK.Modalità Guest: On Menu Guest: non disponibilein questa modalità.(Per informazioni sulla modalità professionaleconsultare il manuale di installazione)2 - Selezionare Wireless e reti e premere OK.3 - Selezionare Connetti a rete e premere OK.4 - Selezionare Connetti e premere OK.5 - Selezionare Wireless e premere OK.6 - Premere BACK, ripetutamente se necessario,per chiudere il menu.
Digital Media Renderer - DMR
Se i file multimediali non vengono riprodotti sultelevisore, assicurarsi che Digital Media Renderer siaacceso. Per impostazione predefinita, DMR è acceso.
Per attivare DMR…
1 - Modalità Consumer: On Premere HOME,selezionare Caratteristiche , quindi premereOK.Modalità Guest: On Menu Guest: non disponibilein questa modalità.(Per informazioni sulla modalità professionaleconsultare il manuale di installazione)2 - Selezionare Wireless e reti e premere OK.3 - Selezionare Caratteristiche > PTA epremere OK.4 - Selezionare Digital Media Renderer - DMR e
8
premere OK.5 - Selezionare On e premere OK.6 - Premere BACK, ripetutamente se necessario,per chiudere il menu.
Attivazione di Wi-Fi Miracast
Attivare Wi-Fi Miracast per condividere lo schermodel proprio smartphone, tablet o computer sul TV.
Per attivare Miracast...
1 - Modalità Consumer: On Premere HOME,selezionare Caratteristiche , quindi premereOK.Modalità Guest: On Menu Guest: non disponibilein questa modalità.(Per informazioni sulla modalità professionaleconsultare il manuale di installazione)2 - Selezionare Wireless e reti > Miracast epremere OK.3 - Selezionare Caratteristiche > Wi-Fi Miracast epremere OK.4 - Selezionare Attiva e premere OK.5 - Selezionare Sì e premere OK.6 - Premere BACK, ripetutamente se necessario,per chiudere il menu.
Cancellazione connessione Wi-Fi Miracast
È possibile cancellare l'elenco dei dispositivi collegatie bloccati che vengono utilizzati con Miracast.
Per cancellare le connessioni Miracast...
1 - Modalità Consumer: On Premere HOME,selezionare Caratteristiche , quindi premereOK.Modalità Guest: On Menu Guest: non disponibilein questa modalità.(Per informazioni sulla modalità professionaleconsultare il manuale di installazione)2 - Selezionare Wireless e reti e premere OK.3 - Selezionare Caratteristiche > Wi-Fi Miracast epremere OK.4 - Selezionare Connessioni Wi-Fi Miracast > Cancella tutto e premere OK.5 - Premere BACK, ripetutamente se necessario,per chiudere il menu.
9
4
Connetti dispositivi4.1
Collegamenti
Guida connettività
Collegare sempre un dispositivo al televisore tramitela connessione che offre la migliore qualità possibile.Inoltre, per assicurare un buon trasferimento audio evideo, utilizzare cavi di buona qualità.
Quando viene collegato un dispositivo, il televisore nericonosce immediatamente il tipo e assegna aldispositivo un nome tipo corretto. È possibilemodificare il nome tipo, se necessario. Se per undispositivo è stato impostato il nome tipo corretto, iltelevisore passerà automaticamente alle impostazioniTV ideali quando si seleziona il dispositivo inquestione nel menu Sorgenti.
Per assistenza sul collegamento di più dispositivi altelevisore, consultare la Guida di connettività deltelevisore Philips. La guida offre informazioni sullemodalità di collegamento e sui tipi di cavi dautilizzare.
Visitare il sito Weball'indirizzo www.connectivityguide.philips.com
Porta per antenna
Se si dispone di un decoder (un ricevitore digitale) odi un registratore, collegare i cavi dell'antenna per farpassare il segnale dell'antenna tramite il decoder e/oil registratore prima che raggiunga il televisore. Inquesto modo, l'antenna e il decoder possono inviare ipossibili canali aggiuntivi al registratore per laregistrazione.
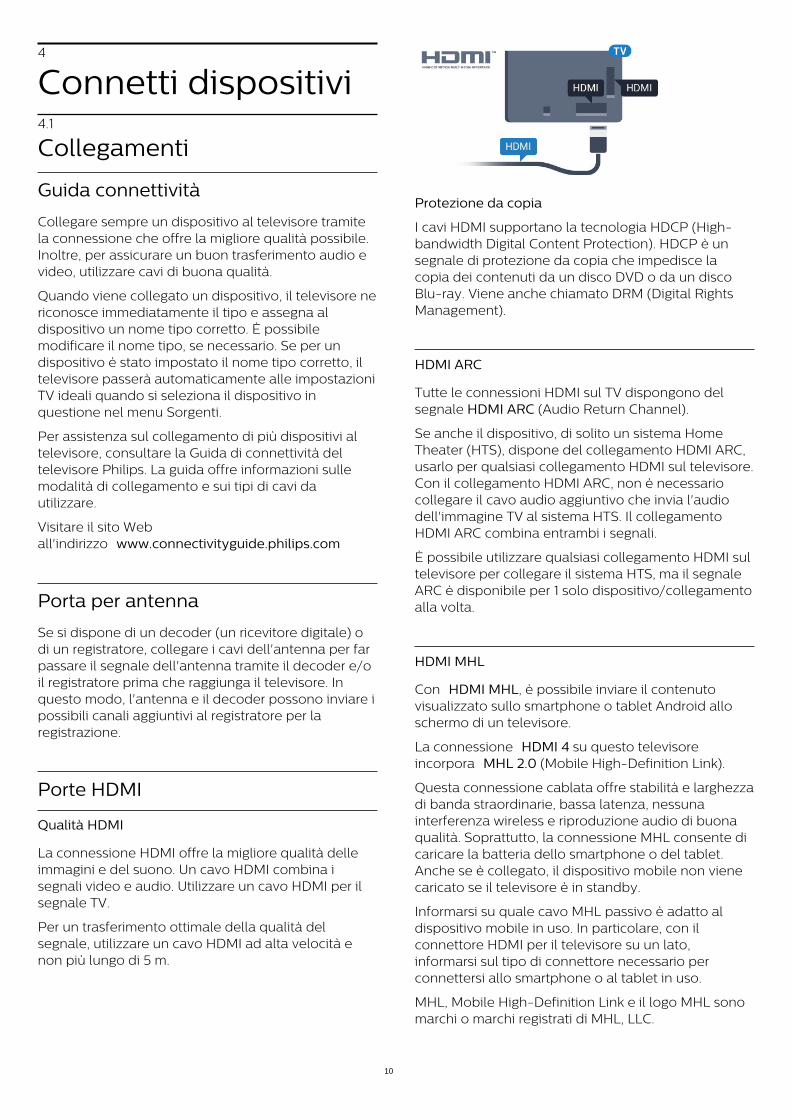
Porte HDMI
Qualità HDMI
La connessione HDMI offre la migliore qualità delleimmagini e del suono. Un cavo HDMI combina isegnali video e audio. Utilizzare un cavo HDMI per ilsegnale TV.
Per un trasferimento ottimale della qualità delsegnale, utilizzare un cavo HDMI ad alta velocità enon più lungo di 5 m.
Protezione da copia
I cavi HDMI supportano la tecnologia HDCP (High-bandwidth Digital Content Protection). HDCP è unsegnale di protezione da copia che impedisce lacopia dei contenuti da un disco DVD o da un discoBlu-ray. Viene anche chiamato DRM (Digital RightsManagement).
HDMI ARC
Tutte le connessioni HDMI sul TV dispongono delsegnale HDMI ARC (Audio Return Channel).
Se anche il dispositivo, di solito un sistema HomeTheater (HTS), dispone del collegamento HDMI ARC,usarlo per qualsiasi collegamento HDMI sul televisore.Con il collegamento HDMI ARC, non è necessariocollegare il cavo audio aggiuntivo che invia l'audiodell'immagine TV al sistema HTS. Il collegamentoHDMI ARC combina entrambi i segnali.
È possibile utilizzare qualsiasi collegamento HDMI sultelevisore per collegare il sistema HTS, ma il segnaleARC è disponibile per 1 solo dispositivo/collegamentoalla volta.
HDMI MHL
Con HDMI MHL, è possibile inviare il contenutovisualizzato sullo smartphone o tablet Android alloschermo di un televisore.
La connessione HDMI 4 su questo televisoreincorpora MHL 2.0 (Mobile High-Definition Link).
Questa connessione cablata offre stabilità e larghezzadi banda straordinarie, bassa latenza, nessunainterferenza wireless e riproduzione audio di buonaqualità. Soprattutto, la connessione MHL consente dicaricare la batteria dello smartphone o del tablet.Anche se è collegato, il dispositivo mobile non vienecaricato se il televisore è in standby.
Informarsi su quale cavo MHL passivo è adatto aldispositivo mobile in uso. In particolare, con ilconnettore HDMI per il televisore su un lato,informarsi sul tipo di connettore necessario perconnettersi allo smartphone o al tablet in uso.
MHL, Mobile High-Definition Link e il logo MHL sonomarchi o marchi registrati di MHL, LLC.
10
HDMI CEC - EasyLink
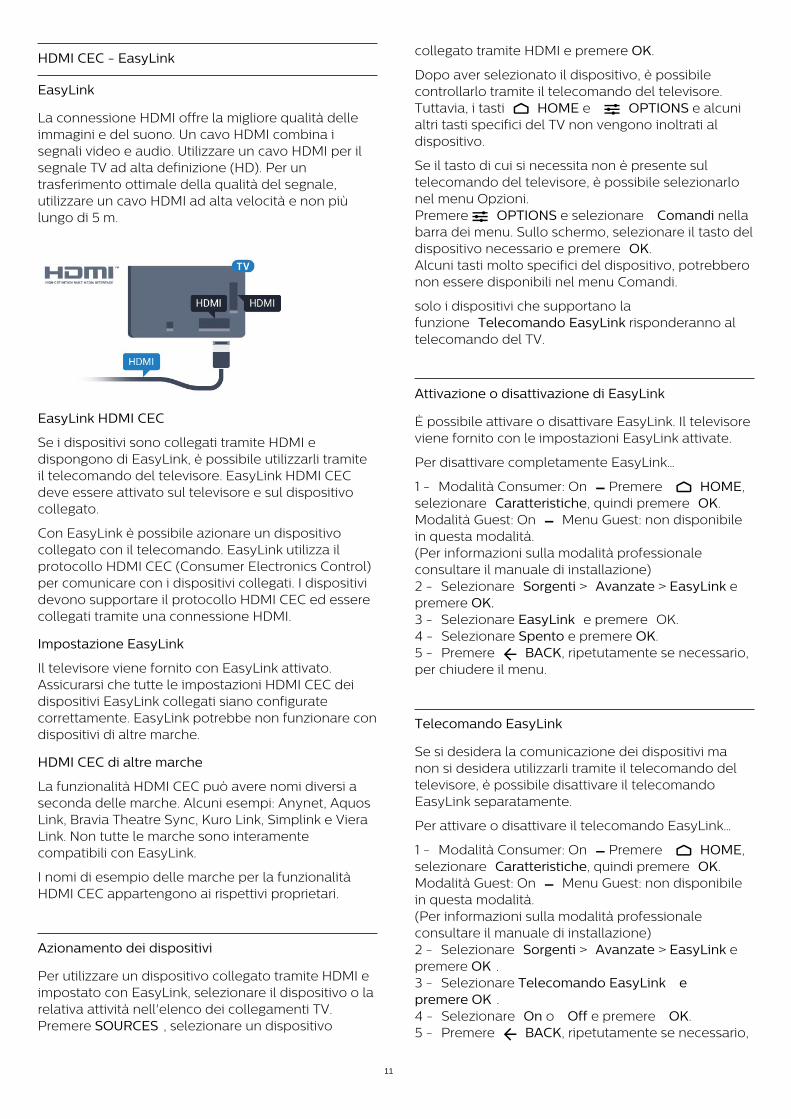
EasyLink
La connessione HDMI offre la migliore qualità delleimmagini e del suono. Un cavo HDMI combina isegnali video e audio. Utilizzare un cavo HDMI per ilsegnale TV ad alta definizione (HD). Per untrasferimento ottimale della qualità del segnale,utilizzare un cavo HDMI ad alta velocità e non piùlungo di 5 m.
EasyLink HDMI CEC
Se i dispositivi sono collegati tramite HDMI edispongono di EasyLink, è possibile utilizzarli tramiteil telecomando del televisore. EasyLink HDMI CECdeve essere attivato sul televisore e sul dispositivocollegato.
Con EasyLink è possibile azionare un dispositivocollegato con il telecomando. EasyLink utilizza ilprotocollo HDMI CEC (Consumer Electronics Control)per comunicare con i dispositivi collegati. I dispositividevono supportare il protocollo HDMI CEC ed esserecollegati tramite una connessione HDMI.
Impostazione EasyLink
Il televisore viene fornito con EasyLink attivato.Assicurarsi che tutte le impostazioni HDMI CEC deidispositivi EasyLink collegati siano configuratecorrettamente. EasyLink potrebbe non funzionare condispositivi di altre marche.
HDMI CEC di altre marche
La funzionalità HDMI CEC può avere nomi diversi aseconda delle marche. Alcuni esempi: Anynet, AquosLink, Bravia Theatre Sync, Kuro Link, Simplink e VieraLink. Non tutte le marche sono interamentecompatibili con EasyLink.
I nomi di esempio delle marche per la funzionalitàHDMI CEC appartengono ai rispettivi proprietari.
Azionamento dei dispositivi
Per utilizzare un dispositivo collegato tramite HDMI eimpostato con EasyLink, selezionare il dispositivo o larelativa attività nell'elenco dei collegamenti TV.Premere SOURCES , selezionare un dispositivo
collegato tramite HDMI e premere OK.
Dopo aver selezionato il dispositivo, è possibilecontrollarlo tramite il telecomando del televisore.Tuttavia, i tasti HOME e OPTIONS e alcunialtri tasti specifici del TV non vengono inoltrati aldispositivo.
Se il tasto di cui si necessita non è presente sultelecomando del televisore, è possibile selezionarlonel menu Opzioni.Premere OPTIONS e selezionare Comandi nellabarra dei menu. Sullo schermo, selezionare il tasto deldispositivo necessario e premere OK.Alcuni tasti molto specifici del dispositivo, potrebberonon essere disponibili nel menu Comandi.
solo i dispositivi che supportano lafunzione Telecomando EasyLink risponderanno altelecomando del TV.
Attivazione o disattivazione di EasyLink
È possibile attivare o disattivare EasyLink. Il televisoreviene fornito con le impostazioni EasyLink attivate.
Per disattivare completamente EasyLink…
1 - Modalità Consumer: On Premere HOME,selezionare Caratteristiche, quindi premere OK. Modalità Guest: On Menu Guest: non disponibilein questa modalità.(Per informazioni sulla modalità professionaleconsultare il manuale di installazione)2 - Selezionare Sorgenti > Avanzate > EasyLink epremere OK.3 - Selezionare EasyLink e premere OK.4 - Selezionare Spento e premere OK.5 - Premere BACK, ripetutamente se necessario,per chiudere il menu.
Telecomando EasyLink
Se si desidera la comunicazione dei dispositivi manon si desidera utilizzarli tramite il telecomando deltelevisore, è possibile disattivare il telecomandoEasyLink separatamente.
Per attivare o disattivare il telecomando EasyLink…
1 - Modalità Consumer: On Premere HOME,selezionare Caratteristiche, quindi premere OK. Modalità Guest: On Menu Guest: non disponibilein questa modalità.(Per informazioni sulla modalità professionaleconsultare il manuale di installazione)2 - Selezionare Sorgenti > Avanzate > EasyLink epremere OK .3 - Selezionare Telecomando EasyLink epremere OK .4 - Selezionare On o Off e premere OK.5 - Premere BACK, ripetutamente se necessario,
11

per chiudere il menu.
DVI-HDMI
Se si utilizza un dispositivo dotato solo delcollegamento DVI, è possibile collegare il dispositivoa una connessione HDMI mediante un adattatore daDVI a HDMI.
È possibile utilizzare un adattatore DVI-HDMI se ildispositivo è dotato solo di un collegamento DVI.Utilizzare un collegamento HDMI e aggiungere uncavo audio L/R (mini-jack da 3,5 mm) all'ingressoaudio per l'audio, sul retro del televisore.
Protezione da copia
I cavi DVI e HDMI supportano HDCP (High-bandwidthDigital Content Protection). HDCP è un segnale diprotezione da copia che impedisce la copia deicontenuti da un disco DVD o da un disco Blu-ray.Viene anche chiamato DRM (Digital RightsManagement).
Component - Y Pb Pr
Component Video - Y Pb Pr è un collegamento di altaqualità.
Il collegamento YPbPr può essere utilizzato persegnali TV ad alta definizione (HD). Oltre ai segnali Y,Pb e Pr, è necessario aggiungere i segnali audio didestra e sinistra per l'audio.
Per il collegamento, far combaciare i colori delconnettore YPbPr (verde, blu, rosso) con gli spinotti.Utilizzare il cavo cinch Audio L/R in dotazione se ildispositivo è dotato anche di audio.
Scart
SCART è un collegamento di buona qualità.
Il collegamento SCART può essere utilizzato per isegnali video CVBS ed RGB ma non per i segnali TVad alta definizione (HD). Il collegamento SCARTcombina segnali video e audio. Il collegamentoSCART supporta anche la riproduzione NTSC.
Audio Out - Ottico
Audio Out - Ottico è un collegamento audio di altaqualità
Questo collegamento ottico può supportare canaliaudio 5.1. Se il dispositivo, di solito un sistema HomeTheater (HTS), non dispone di un collegamento HDMIARC, è possibile collegare questo cavo audio a uncollegamento Audio In - Ottico sul sistema HTS.Questo cavo audio invierà l'audio del televisore alsistema HTS.
È possibile impostare il tipo di segnale uscita audioadatto alle funzionalità audio del sistema HomeTheater in uso.
Se l'audio non corrisponde al video sullo schermo, èpossibile regolare la sincronizzazione audio-video.
12
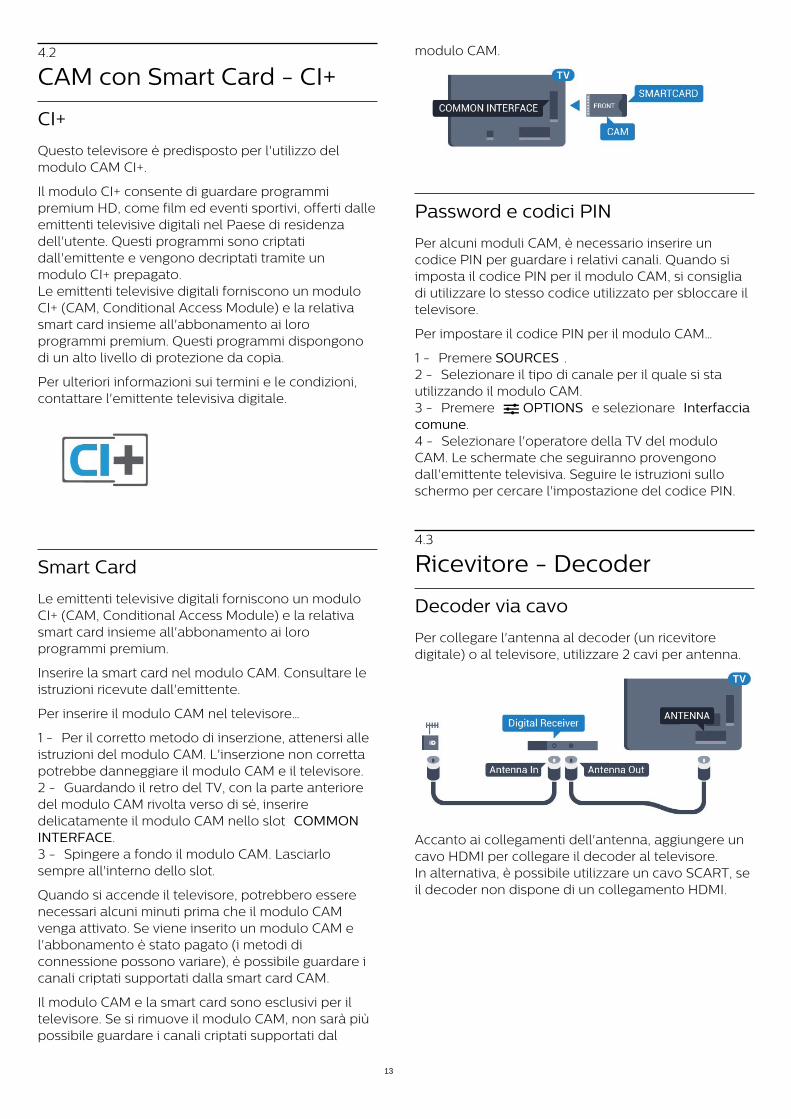
4.2
CAM con Smart Card - CI+
CI+
Questo televisore è predisposto per l'utilizzo delmodulo CAM CI+.
Il modulo CI+ consente di guardare programmipremium HD, come film ed eventi sportivi, offerti dalleemittenti televisive digitali nel Paese di residenzadell'utente. Questi programmi sono criptatidall'emittente e vengono decriptati tramite unmodulo CI+ prepagato.Le emittenti televisive digitali forniscono un moduloCI+ (CAM, Conditional Access Module) e la relativasmart card insieme all'abbonamento ai loroprogrammi premium. Questi programmi dispongonodi un alto livello di protezione da copia.
Per ulteriori informazioni sui termini e le condizioni,contattare l'emittente televisiva digitale.
Smart Card
Le emittenti televisive digitali forniscono un moduloCI+ (CAM, Conditional Access Module) e la relativasmart card insieme all'abbonamento ai loroprogrammi premium.
Inserire la smart card nel modulo CAM. Consultare leistruzioni ricevute dall'emittente.
Per inserire il modulo CAM nel televisore…
1 - Per il corretto metodo di inserzione, attenersi alleistruzioni del modulo CAM. L'inserzione non correttapotrebbe danneggiare il modulo CAM e il televisore.2 - Guardando il retro del TV, con la parte anterioredel modulo CAM rivolta verso di sé, inseriredelicatamente il modulo CAM nello slot COMMONINTERFACE.3 - Spingere a fondo il modulo CAM. Lasciarlosempre all'interno dello slot.
Quando si accende il televisore, potrebbero esserenecessari alcuni minuti prima che il modulo CAMvenga attivato. Se viene inserito un modulo CAM el'abbonamento è stato pagato (i metodi diconnessione possono variare), è possibile guardare icanali criptati supportati dalla smart card CAM.
Il modulo CAM e la smart card sono esclusivi per iltelevisore. Se si rimuove il modulo CAM, non sarà piùpossibile guardare i canali criptati supportati dal
modulo CAM.
Password e codici PIN
Per alcuni moduli CAM, è necessario inserire uncodice PIN per guardare i relativi canali. Quando siimposta il codice PIN per il modulo CAM, si consigliadi utilizzare lo stesso codice utilizzato per sbloccare iltelevisore.
Per impostare il codice PIN per il modulo CAM…
1 - Premere SOURCES .2 - Selezionare il tipo di canale per il quale si stautilizzando il modulo CAM.3 - Premere OPTIONS e selezionare Interfacciacomune.4 - Selezionare l'operatore della TV del moduloCAM. Le schermate che seguiranno provengonodall'emittente televisiva. Seguire le istruzioni sulloschermo per cercare l'impostazione del codice PIN.
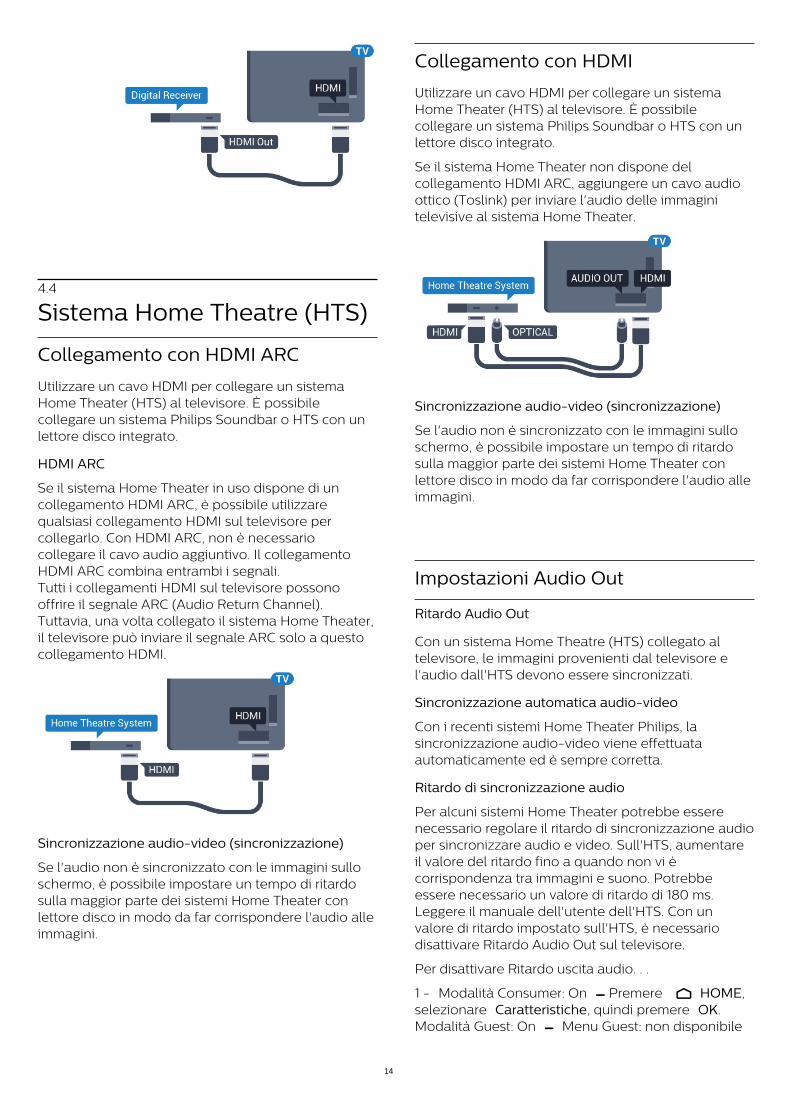
4.3
Ricevitore - Decoder
Decoder via cavo
Per collegare l'antenna al decoder (un ricevitoredigitale) o al televisore, utilizzare 2 cavi per antenna.
Accanto ai collegamenti dell'antenna, aggiungere uncavo HDMI per collegare il decoder al televisore.In alternativa, è possibile utilizzare un cavo SCART, seil decoder non dispone di un collegamento HDMI.
13
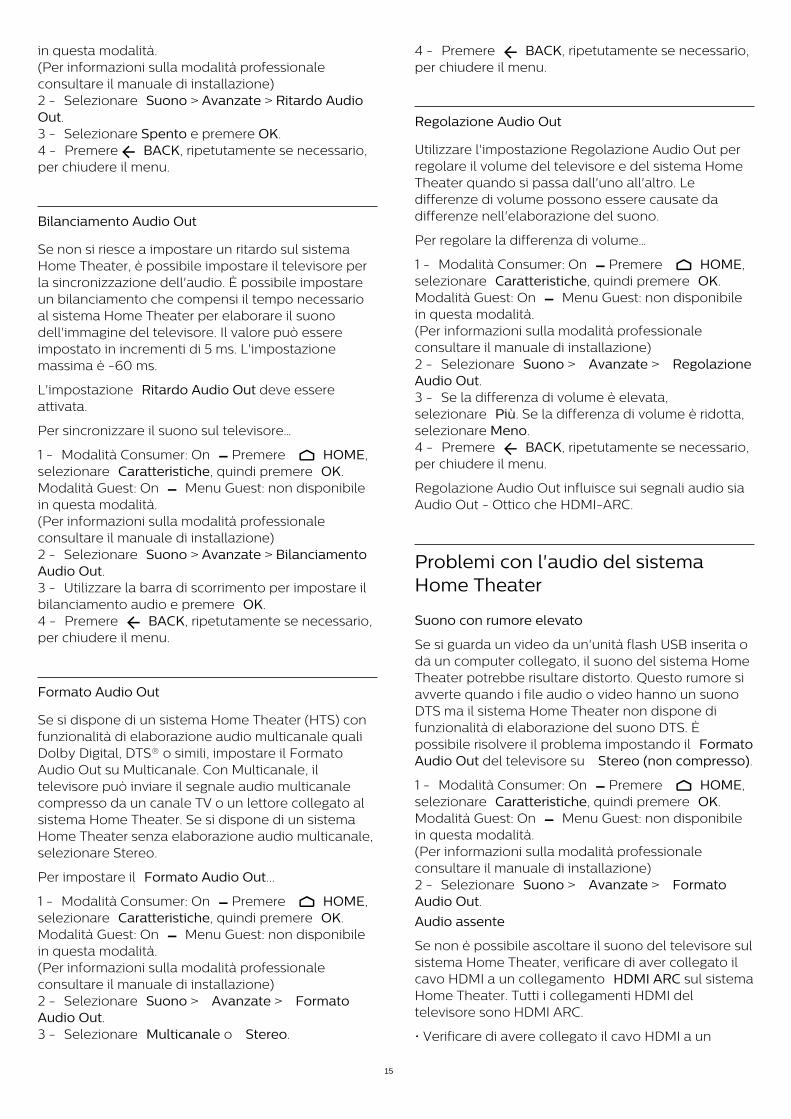
4.4
Sistema Home Theatre (HTS)
Collegamento con HDMI ARC
Utilizzare un cavo HDMI per collegare un sistemaHome Theater (HTS) al televisore. È possibilecollegare un sistema Philips Soundbar o HTS con unlettore disco integrato.
HDMI ARC
Se il sistema Home Theater in uso dispone di uncollegamento HDMI ARC, è possibile utilizzarequalsiasi collegamento HDMI sul televisore percollegarlo. Con HDMI ARC, non è necessariocollegare il cavo audio aggiuntivo. Il collegamentoHDMI ARC combina entrambi i segnali.Tutti i collegamenti HDMI sul televisore possonooffrire il segnale ARC (Audio Return Channel).Tuttavia, una volta collegato il sistema Home Theater,il televisore può inviare il segnale ARC solo a questocollegamento HDMI.
Sincronizzazione audio-video (sincronizzazione)
Se l'audio non è sincronizzato con le immagini sulloschermo, è possibile impostare un tempo di ritardosulla maggior parte dei sistemi Home Theater conlettore disco in modo da far corrispondere l'audio alleimmagini.
Collegamento con HDMI
Utilizzare un cavo HDMI per collegare un sistemaHome Theater (HTS) al televisore. È possibilecollegare un sistema Philips Soundbar o HTS con unlettore disco integrato.
Se il sistema Home Theater non dispone delcollegamento HDMI ARC, aggiungere un cavo audioottico (Toslink) per inviare l'audio delle immaginitelevisive al sistema Home Theater.
Sincronizzazione audio-video (sincronizzazione)
Se l'audio non è sincronizzato con le immagini sulloschermo, è possibile impostare un tempo di ritardosulla maggior parte dei sistemi Home Theater conlettore disco in modo da far corrispondere l'audio alleimmagini.
Impostazioni Audio Out
Ritardo Audio Out
Con un sistema Home Theatre (HTS) collegato altelevisore, le immagini provenienti dal televisore el'audio dall'HTS devono essere sincronizzati.
Sincronizzazione automatica audio-video
Con i recenti sistemi Home Theater Philips, lasincronizzazione audio-video viene effettuataautomaticamente ed è sempre corretta.
Ritardo di sincronizzazione audio
Per alcuni sistemi Home Theater potrebbe esserenecessario regolare il ritardo di sincronizzazione audioper sincronizzare audio e video. Sull'HTS, aumentareil valore del ritardo fino a quando non vi ècorrispondenza tra immagini e suono. Potrebbeessere necessario un valore di ritardo di 180 ms.Leggere il manuale dell'utente dell'HTS. Con unvalore di ritardo impostato sull'HTS, è necessariodisattivare Ritardo Audio Out sul televisore.
Per disattivare Ritardo uscita audio. . .
1 - Modalità Consumer: On Premere HOME,selezionare Caratteristiche, quindi premere OK. Modalità Guest: On Menu Guest: non disponibile
14
in questa modalità.(Per informazioni sulla modalità professionaleconsultare il manuale di installazione)2 - Selezionare Suono > Avanzate > Ritardo AudioOut.3 - Selezionare Spento e premere OK.4 - Premere BACK, ripetutamente se necessario,per chiudere il menu.
Bilanciamento Audio Out
Se non si riesce a impostare un ritardo sul sistemaHome Theater, è possibile impostare il televisore perla sincronizzazione dell'audio. È possibile impostareun bilanciamento che compensi il tempo necessarioal sistema Home Theater per elaborare il suonodell'immagine del televisore. Il valore può essereimpostato in incrementi di 5 ms. L'impostazionemassima è -60 ms.
L'impostazione Ritardo Audio Out deve essereattivata.
Per sincronizzare il suono sul televisore…
1 - Modalità Consumer: On Premere HOME,selezionare Caratteristiche, quindi premere OK. Modalità Guest: On Menu Guest: non disponibilein questa modalità.(Per informazioni sulla modalità professionaleconsultare il manuale di installazione)2 - Selezionare Suono > Avanzate > BilanciamentoAudio Out.3 - Utilizzare la barra di scorrimento per impostare ilbilanciamento audio e premere OK.4 - Premere BACK, ripetutamente se necessario,per chiudere il menu.
Formato Audio Out
Se si dispone di un sistema Home Theater (HTS) confunzionalità di elaborazione audio multicanale qualiDolby Digital, DTS® o simili, impostare il FormatoAudio Out su Multicanale. Con Multicanale, iltelevisore può inviare il segnale audio multicanalecompresso da un canale TV o un lettore collegato alsistema Home Theater. Se si dispone di un sistemaHome Theater senza elaborazione audio multicanale,selezionare Stereo.
Per impostare il Formato Audio Out...
1 - Modalità Consumer: On Premere HOME,selezionare Caratteristiche, quindi premere OK. Modalità Guest: On Menu Guest: non disponibilein questa modalità.(Per informazioni sulla modalità professionaleconsultare il manuale di installazione)2 - Selezionare Suono > Avanzate > FormatoAudio Out.3 - Selezionare Multicanale o Stereo.
4 - Premere BACK, ripetutamente se necessario,per chiudere il menu.
Regolazione Audio Out
Utilizzare l'impostazione Regolazione Audio Out perregolare il volume del televisore e del sistema HomeTheater quando si passa dall'uno all'altro. Ledifferenze di volume possono essere causate dadifferenze nell'elaborazione del suono.
Per regolare la differenza di volume…
1 - Modalità Consumer: On Premere HOME,selezionare Caratteristiche, quindi premere OK. Modalità Guest: On Menu Guest: non disponibilein questa modalità.(Per informazioni sulla modalità professionaleconsultare il manuale di installazione)2 - Selezionare Suono > Avanzate > RegolazioneAudio Out.3 - Se la differenza di volume è elevata,selezionare Più. Se la differenza di volume è ridotta,selezionare Meno.4 - Premere BACK, ripetutamente se necessario,per chiudere il menu.
Regolazione Audio Out influisce sui segnali audio siaAudio Out - Ottico che HDMI-ARC.
Problemi con l'audio del sistemaHome Theater
Suono con rumore elevato
Se si guarda un video da un'unità flash USB inserita oda un computer collegato, il suono del sistema HomeTheater potrebbe risultare distorto. Questo rumore siavverte quando i file audio o video hanno un suonoDTS ma il sistema Home Theater non dispone difunzionalità di elaborazione del suono DTS. Èpossibile risolvere il problema impostando il FormatoAudio Out del televisore su Stereo (non compresso).
1 - Modalità Consumer: On Premere HOME,selezionare Caratteristiche, quindi premere OK. Modalità Guest: On Menu Guest: non disponibilein questa modalità.(Per informazioni sulla modalità professionaleconsultare il manuale di installazione)2 - Selezionare Suono > Avanzate > FormatoAudio Out.
Audio assente
Se non è possibile ascoltare il suono del televisore sulsistema Home Theater, verificare di aver collegato ilcavo HDMI a un collegamento HDMI ARC sul sistemaHome Theater. Tutti i collegamenti HDMI deltelevisore sono HDMI ARC.
• Verificare di avere collegato il cavo HDMI a un
15
collegamento HDMI ARC sul sistema Home Theatre.Tutti i collegamenti HDMI del televisore sono HDMIARC.• Verificare che l'opzione HDMI ARC sul televisore siaimpostata su On.1 - Modalità Consumer: On Premere HOME,selezionare Caratteristiche, quindi premere OK. Modalità Guest: On MenuGuest: Premere HOME ,selezionare Caratteristiche, quindi premere OK.(Per informazioni sulla modalità professionaleconsultare il manuale di installazione)2 - Selezionare Suono > Avanzate > HDMI ARC.
4.5
Smartphone e tabletPer connettere uno smartphone o un tablet altelevisore, è possibile utilizzare una connessionewireless o cablata.
Wireless
Per stabilire una connessione wireless, sullosmartphone o tablet scaricare Philips TV Remote Appdal negozio di app preferito.
Nota: Per utilizzare Philips TV Remote App ènecessario stabilire una connessione al TV. Utilizzarel'opzione in Caratteristiche per creare la connessione.
Cablata
Per stabilire una connessione cablata, utilizzare unaconnessione HDMI 4 MHL sulla parte posteriore deltelevisore.
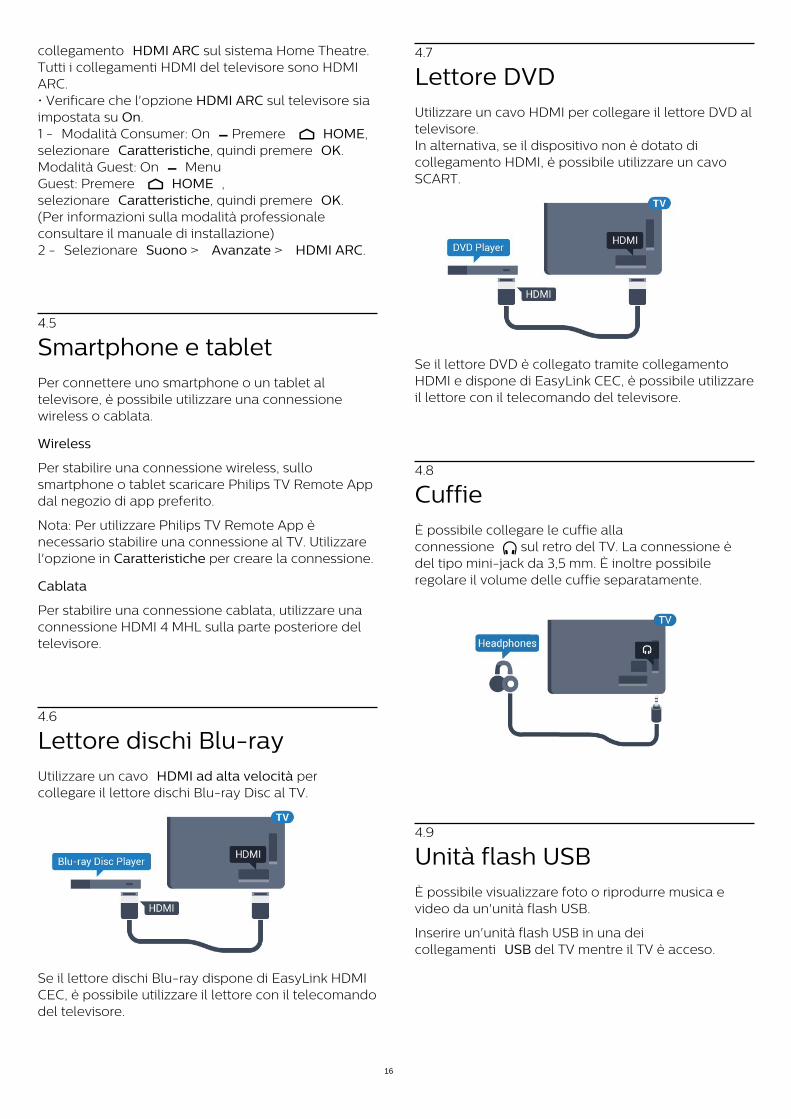
4.6
Lettore dischi Blu-rayUtilizzare un cavo HDMI ad alta velocità percollegare il lettore dischi Blu-ray Disc al TV.
Se il lettore dischi Blu-ray dispone di EasyLink HDMICEC, è possibile utilizzare il lettore con il telecomandodel televisore.
4.7
Lettore DVDUtilizzare un cavo HDMI per collegare il lettore DVD altelevisore.In alternativa, se il dispositivo non è dotato dicollegamento HDMI, è possibile utilizzare un cavoSCART.
Se il lettore DVD è collegato tramite collegamentoHDMI e dispone di EasyLink CEC, è possibile utilizzareil lettore con il telecomando del televisore.
4.8
CuffieÈ possibile collegare le cuffie allaconnessione sul retro del TV. La connessione èdel tipo mini-jack da 3,5 mm. È inoltre possibileregolare il volume delle cuffie separatamente.
4.9
Unità flash USBÈ possibile visualizzare foto o riprodurre musica evideo da un'unità flash USB.
Inserire un'unità flash USB in una deicollegamenti USB del TV mentre il TV è acceso.
16
Il televisore rileva l'unità flash e apre un elenco chene visualizza il contenuto.Se l'elenco dei contenuti non viene visualizzatoautomaticamente, premere SOURCES eselezionare USB.
Per interrompere la visualizzazione dei contenutidell'unità flash USB, premere TV o selezionareun'altra attività.Per scollegare l'unità flash USB, è possibile estrarrel'unità flash in qualsiasi momento.
4.10
FotocameraPer visualizzare le foto memorizzate su unafotocamera digitale, è possibile collegare lafotocamera direttamente al televisore.
Utilizzare uno dei collegamenti USB del TV pereffettuare la connessione. Accendere la fotocameradopo aver effettuato il collegamento.
Se l'elenco dei contenuti non viene visualizzatoautomaticamente, premere SOURCES eselezionare USB.Potrebbe essere necessario impostare la fotocameraper trasferire i contenuti tramite PTP (Picture TransferProtocol). Leggere il manuale dell'utente dellafotocamera digitale.
4.11
Videocamera
HDMI
Per una qualità ottimale, utilizzare un cavo HDMI percollegare la videocamera al televisore.
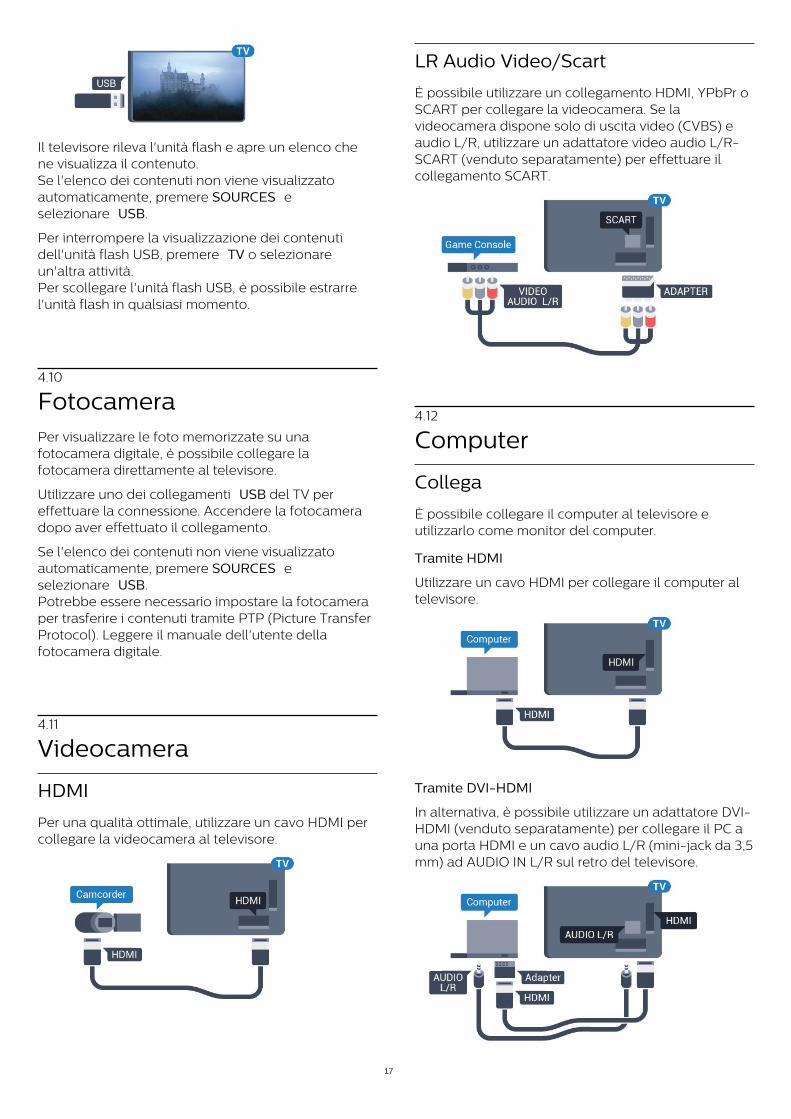
LR Audio Video/Scart
È possibile utilizzare un collegamento HDMI, YPbPr oSCART per collegare la videocamera. Se lavideocamera dispone solo di uscita video (CVBS) eaudio L/R, utilizzare un adattatore video audio L/R-SCART (venduto separatamente) per effettuare ilcollegamento SCART.
4.12
Computer
Collega
È possibile collegare il computer al televisore eutilizzarlo come monitor del computer.
Tramite HDMI
Utilizzare un cavo HDMI per collegare il computer altelevisore.
Tramite DVI-HDMI
In alternativa, è possibile utilizzare un adattatore DVI-HDMI (venduto separatamente) per collegare il PC auna porta HDMI e un cavo audio L/R (mini-jack da 3,5mm) ad AUDIO IN L/R sul retro del televisore.
17
5
Accensione espegnimento5.1
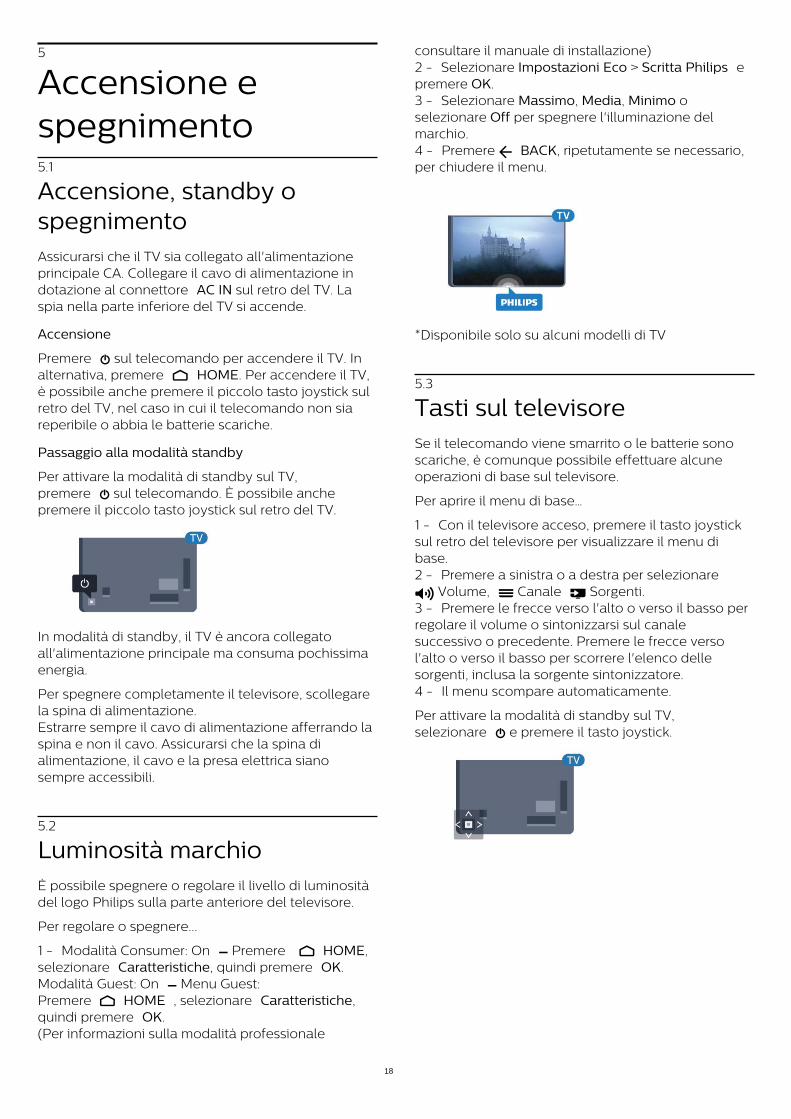
Accensione, standby ospegnimentoAssicurarsi che il TV sia collegato all'alimentazioneprincipale CA. Collegare il cavo di alimentazione indotazione al connettore AC IN sul retro del TV. Laspia nella parte inferiore del TV si accende.
Accensione
Premere sul telecomando per accendere il TV. Inalternativa, premere HOME. Per accendere il TV,è possibile anche premere il piccolo tasto joystick sulretro del TV, nel caso in cui il telecomando non siareperibile o abbia le batterie scariche.
Passaggio alla modalità standby
Per attivare la modalità di standby sul TV,premere sul telecomando. È possibile anchepremere il piccolo tasto joystick sul retro del TV.
In modalità di standby, il TV è ancora collegatoall'alimentazione principale ma consuma pochissimaenergia.
Per spegnere completamente il televisore, scollegarela spina di alimentazione.Estrarre sempre il cavo di alimentazione afferrando laspina e non il cavo. Assicurarsi che la spina dialimentazione, il cavo e la presa elettrica sianosempre accessibili.
5.2
Luminosità marchioÈ possibile spegnere o regolare il livello di luminositàdel logo Philips sulla parte anteriore del televisore.
Per regolare o spegnere...
1 - Modalità Consumer: On Premere HOME,selezionare Caratteristiche, quindi premere OK. Modalità Guest: On Menu Guest:Premere HOME , selezionare Caratteristiche,quindi premere OK.(Per informazioni sulla modalità professionale
consultare il manuale di installazione)2 - Selezionare Impostazioni Eco > Scritta Philips epremere OK.3 - Selezionare Massimo, Media, Minimo oselezionare Off per spegnere l'illuminazione delmarchio.4 - Premere BACK, ripetutamente se necessario,per chiudere il menu.
*Disponibile solo su alcuni modelli di TV
5.3
Tasti sul televisoreSe il telecomando viene smarrito o le batterie sonoscariche, è comunque possibile effettuare alcuneoperazioni di base sul televisore.
Per aprire il menu di base…
1 - Con il televisore acceso, premere il tasto joysticksul retro del televisore per visualizzare il menu dibase.2 - Premere a sinistra o a destra per selezionare Volume, Canale Sorgenti. 3 - Premere le frecce verso l'alto o verso il basso perregolare il volume o sintonizzarsi sul canalesuccessivo o precedente. Premere le frecce versol'alto o verso il basso per scorrere l'elenco dellesorgenti, inclusa la sorgente sintonizzatore.4 - Il menu scompare automaticamente.
Per attivare la modalità di standby sul TV,selezionare e premere il tasto joystick.
18
6
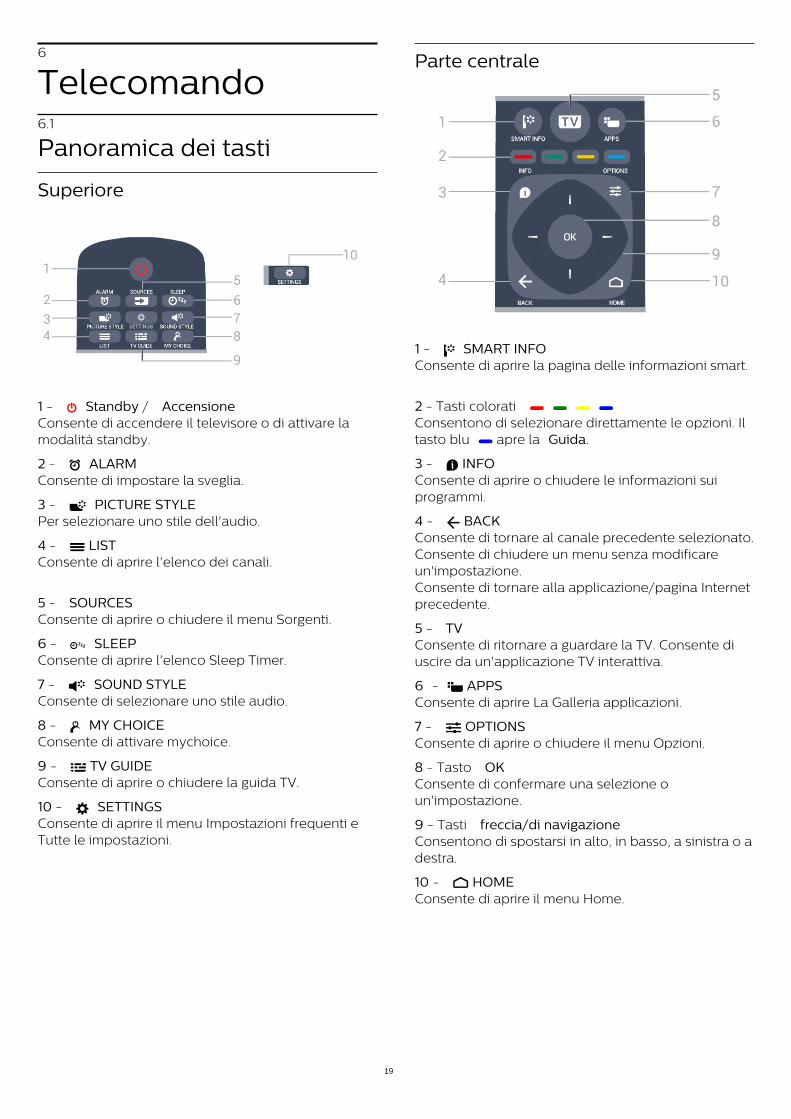
Telecomando6.1
Panoramica dei tasti
Superiore
1 - Standby / AccensioneConsente di accendere il televisore o di attivare lamodalità standby.
2 - ALARMConsente di impostare la sveglia.
3 - PICTURE STYLEPer selezionare uno stile dell'audio.
4 - LISTConsente di aprire l'elenco dei canali.
5 - SOURCESConsente di aprire o chiudere il menu Sorgenti.
6 - SLEEPConsente di aprire l'elenco Sleep Timer.
7 - SOUND STYLEConsente di selezionare uno stile audio.
8 - MY CHOICEConsente di attivare mychoice.
9 - TV GUIDEConsente di aprire o chiudere la guida TV.
10 - SETTINGSConsente di aprire il menu Impostazioni frequenti eTutte le impostazioni.
Parte centrale
1 - SMART INFOConsente di aprire la pagina delle informazioni smart.
2 - Tasti colorati Consentono di selezionare direttamente le opzioni. Iltasto blu apre la Guida.
3 - INFOConsente di aprire o chiudere le informazioni suiprogrammi.
4 - BACKConsente di tornare al canale precedente selezionato.Consente di chiudere un menu senza modificareun'impostazione.Consente di tornare alla applicazione/pagina Internetprecedente.
5 - TVConsente di ritornare a guardare la TV. Consente diuscire da un'applicazione TV interattiva.
6 - APPSConsente di aprire La Galleria applicazioni.
7 - OPTIONSConsente di aprire o chiudere il menu Opzioni.
8 - Tasto OKConsente di confermare una selezione oun'impostazione.
9 - Tasti freccia/di navigazioneConsentono di spostarsi in alto, in basso, a sinistra o adestra.
10 - HOMEConsente di aprire il menu Home.
19

Inferiore
1 - VolumeConsente di regolare il livello del volume.
2 - Tasti numericiConsentono di selezionare direttamente un canale.
3 - SUBTITLEConsente di attivare o disattivare i sottotitoli oppureattivare i sottotitoli con l'audio disattivato.
4 - CLOCKConsente di visualizzare l'orologio.
5 - CanaleConsente di passare al canale successivo oprecedente nell'elenco canali. Consente di aprire lapagina successiva o precedente nel televideo.Consente di avviare il capitolo successivo oprecedente su un disco.
6 - Esclusione dell'audioConsente di disattivare o riattivare l'audio.
7 - TEXTConsente di aprire o chiudere il televideo.
6.2
Sensore IRIl televisore può ricevere i comandi da untelecomando che utilizza raggi infrarossi (IR) perinviare i comandi. Se si utilizza un telecomando diquesto tipo, accertarsi sempre di puntare iltelecomando verso il sensore a infrarossi sul latoanteriore del televisore.
6.3
BatterieSe il televisore non reagisce alla pressione di alcuntasto sul telecomando, le batterie potrebbero essereesaurite.
Per sostituire le batterie, aprire il vano batterie sulretro del telecomando.
1 - Far scorrere il coperchio delle batterie nelladirezione indicata dalla freccia.2 - Sostituire le vecchie batterie con 2 batterie ditipo AAA-R03 da 1,5 V . Assicurarsi che i poli + e -delle batterie siano posizionati correttamente.3 - Riposizionare il coperchio del vano batteriefacendolo scorrere indietro fino a farlo scattare inposizione.
Quando non si utilizza il telecomando per lunghiperiodi, rimuovere le batterie.Smaltire le batterie esaurite attenendosi alle direttivesullo smaltimento dei materiali.
6.4
PuliziaIl telecomando è rivestito di una particolare verniceresistente ai graffi.
Per pulire il telecomando, utilizzare un pannomorbido e umido. Evitare sostanze come alcol,prodotti chimici o detergenti per la pulizia della casasul telecomando.
20
7
Canali7.1
Visione di canali TV
Cambio del canale
Per guardare i canali TV, premere TV. Il televisore sisintonizza sull'ultimo canale TV guardato.
In alternativa, premere HOME per aprire il menuHome, quindi premere per selezionare il canaledesiderato.
Per cambiare canale, premere o . Se siconosce il numero del canale, digitarlo utilizzando itasti numerici. Premere OK dopo aver immesso ilnumero per cambiare canale.
Per tornare al canale sintonizzato in precedenza,premere BACK.
Per passare a un canale da un elenco canali
Mentre si guarda un canale TV, premere LIST peraprire la lista canali.
La lista canali contiene diverse pagine di canali. Pervisualizzare la pagina successiva o precedente,premere o .Per chiudere le liste canali senza cambiare canale,premere di nuovo LIST .
Canali radio
Se sono disponibili trasmissioni digitali, le stazioniradio digitali vengono sintonizzate durantel'installazione. Selezionare un canale radioesattamente come per un canale TV.
Elenco canali
Viste Lista canali
Nell'elenco canali, è possibile trovare tutti i canali TVe radio installati.
Accanto all’elenco canali Tutti, che include tutti icanali installati, è possibile visualizzareseparatamente le stazioni Radio installate o scoprire icanali aggiunti di recente in Nuovo.
Logo canali
In alcuni Paesi, il televisore può mostrare i logo deicanali. Se non si desidera visualizzare i logo, èpossibile disattivarli.Per disattivare la funzione Logo canali . . .
1 - Modalità Consumer: On Premere HOME,selezionare Caratteristiche, quindi premere OK.
Modalità Guest: On Menu Guest: non disponibilenel Menu Guest.(Per informazioni sulla modalità professionaleconsultare il manuale di installazione)2 - Selezionare Canali > Impostazioni canali > Attiva logo canali e premere OK.3 - Selezionare No e premere OK.4 - Premere BACK, ripetutamente se necessario,per chiudere il menu.
Opzioni per i canali
Durante la visione di un canale, in base al tipo dicanale (analogico o digitale) o alle impostazioni TVeseguite, sono disponibili alcune opzioni.
Apertura del menu delle opzioni
Mentre si sta guardando un canale, premere OPTIONS.
Accesso universale
Con la funzione Accesso universale attivata, èpossibile impostare alcune opzioni per persone conhandicap visivi e uditivi.
Selezione video
I canali TV digitali offrono multisegnali video(trasmissione multifeed), molteplici inquadrature oangolazioni della telecamera per lo stesso evento opiù programmi su un solo canale TV. Il televisorevisualizza un messaggio per informare delladisponibilità di tali canali.
Sottotitoli
È possibile attivare o disattivare i sottotitoliselezionando Sottotitoli attivati o Sottotitolidisattivati. Selezionare Automatico per mostrare isottotitoli solo quando l'audio viene disattivatotramite .
Lingua sottotitoli
Per la trasmissione digitale, è possibile selezionareuna lingua dei sottotitoli temporaneamente, se non èdisponibile nessuna delle lingue preferite.
Lingue audio
Per la trasmissione digitale, è possibile selezionareuna lingua audio temporaneamente, se non èdisponibile nessuna delle lingue preferite.
Dual I-II
Questa opzione è disponibile se un segnale audiocontiene due lingue audio, ma una lingua, oentrambe, non dispongono di un'indicazione dellalingua.
21
Interfaccia comune
Se sono disponibili contenuti prepagati da un moduloCAM, è possibile impostare le impostazioni delprovider con questa opzione.
HbbTV su questo canale
È possibile bloccare le pagine HbbTV da un canaleche offre HbbTV.
Stato
Selezionare Stato per visualizzare le informazionitecniche sul canale (analogico o digitale) o su undispositivo collegato.
Condividi
Consente all'utente di condividere la propria attivitàcon altri utenti di social network (ad esempio Twittero tramite e-mail).
* Solo per Smart TV.
Formato immagine
Se vengono visualizzate delle bande nere in alto e inbasso o su entrambi i lati dell'immagine, è possibileregolare il formato dell'immagine in base a unformato che riempia lo schermo.
Per modificare il formato immagine. . .
1 - Modalità Consumer: On Premere HOME,selezionare Caratteristiche, quindi premere OK. Modalità Guest: On Menu Guest:Premere HOME, selezionare Caratteristiche,quindi premere OK. (Per informazioni sulla modalità professionaleconsultare il manuale di installazione)2 - Selezionare Immagine > Formato immagine epremere OK.3 - Selezionare un formato dall'elenco epremere OK.4 - Premere BACK, ripetutamente se necessario,per chiudere il menu.
A seconda dell'immagine sullo schermo, sonodisponibili i seguenti formati. . .
• Riempi schermo• Adatta a schermo• Super Zoom• Espansione filmato 16:9• Schermo largo• Non in scala• 4:3
7.2
Televideo
Pagine del televideo
Per aprire il televideo durante la visione dei canali TV,premere TEXT.Per chiudere il televideo, premere di nuovo TEXT.
Selezione di una pagina del televideo
Per selezionare una pagina . . .
1 - Immettere il numero della pagina desiderata con itasti numerici.2 - Utilizzare i tasti freccia per spostarsi.3 - Per selezionare un argomento con codifica acolori nella parte inferiore dello schermo, premereuno dei tasti colorati.
Sottopagine del televideo
Un numero di pagina del televideo può contenere piùsottopagine. I numeri di sottopagina vengonovisualizzati su una barra accanto al numero di paginaprincipale.Per selezionare una sottopagina, premere o .
Elenco televideo T.O.P.
Alcune emittenti offrono il televideo T.O.P.Per aprire le pagine T.O.P. all'interno del televideo,premere OPTIONS e selezionare PanoramicaTOP
Pagine preferite
Il televisore crea un elenco delle ultime 10 pagine deltelevideo aperte. È possibile riaprirle agevolmentenella colonna Pagine del televideo preferite.
1 - Nel televideo, selezionare la stella nell'angolosuperiore sinistro dello schermo per visualizzare lacolonna delle pagine preferite.2 - Premere (down) or (su) per selezionareun numero di pagina e premere OK per aprire lapagina.È possibile cancellare l'elenco conl'opzione Cancella pagine preferite.
Ricerca nel televideo
È possibile selezionare una parola e cercare neltelevideo tutte le occorrenze di tale parola.
1 - Aprire una pagina del televideo e premere OK.2 - Selezionare una parola o un numero con i tastifreccia.3 - Premere nuovamente OK per passareimmediatamente all'occorrenza successiva dellaparola o del numero.4 - Premere di nuovo OK per passareall'occorrenza successiva.5 - Per interrompere la ricerca, premere (su) finoa quando non è selezionato niente.
Televideo da un dispositivo collegato
22
Anche alcuni dispositivi che ricevono i canali TVoffrono il servizio di televideo.Per aprire il televideo da un dispositivo collegato . . .
1 - Premere SOURCES, selezionare il dispositivo epremere OK.2 - Durante la visione di un canale sul dispositivo,premere OPTIONS , selezionare Mostra i tasti deldispositivo e selezionare il tasto , quindipremere OK. 3 - Premere BACK per nascondere i tasti deldispositivo.4 - Per chiudere il televideo, premere dinuovo BACK.
MHEG (solo Regno Unito)
Alcune emittenti digitali offrono programmi con testodigitale o interattivi trasmessi direttamente sui canalitelevisivi digitali. Questi servizi funzionano come unnormale televideo mediante i tasti numerici, colorati efreccia per selezionare e spostarsi.
Per chiudere MHEG, premere BACK.
Opzioni del televideo
All'interno del televideo, premere OPTIONS perselezionare quanto segue...
• Blocca paginaConsente di interrompere la rotazione automaticadelle sottopagine.• Doppio programma/Schermo interoConsente di visualizzare il canale TV e il televideol'uno accanto all'altro.• Elenco T.O.P.Per aprire le pagine T.O.P.• IngrandisciConsente di ingrandire la pagina del televideo peruna lettura più confortevole.• RivelareConsente di mostrare le informazioni nascoste in unapagina.• Scorri sottopagineConsente di scorrere le sottopagine, se disponibili.• LinguaConsente di visualizzare correttamente i gruppi dicaratteri utilizzati dal televideo.• Televideo 2.5Consente di attivare il Televideo 2.5 per un maggiornumero di colori e una grafica migliore.
Impostazione del televideo
Lingua del televideo
Alcune emittenti televisive digitali offrono diverselingue per il televideo.Per impostare la lingua principale e secondaria deltelevideo . . .
1 - Modalità Consumer: On Premere HOME,selezionare Caratteristiche, quindi premere OK. Modalità Guest: On Menu Guest: non disponibilein questa modalità. (Per informazioni sulla modalità professionaleconsultare il manuale di installazione)2 - Selezionare Regione e lingua e premere OK . 3 - Selezionare Lingue > Lingua televideoprincipale o Lingua televideo secondario epremere OK.4 - Selezionare le preferenze di lingua per iltelevideo.5 - Premere BACK, ripetutamente se necessario,per chiudere il menu.
Televideo 2.5
Se disponibile, il televideo 2.5 offre più colori e unagrafica migliore. Il televideo 2.5 viene attivato comeimpostazione predefinita standard.Per disattivare il televideo 2.5…
1 - Premere TEXT.2 - Con il televideo aperto sullo schermo,premere OPTIONS.3 - Selezionare Televideo 2.5 > Off.4 - Premere (sinistra) più volte, se necessario,per chiudere il menu.
7.3
TV interattiva
Informazioni su iTV
Con la TV interattiva, alcune emittenti digitalicombinano il normale programma TV con pagine diinformazioni o di intrattenimento. In alcune pagine, èpossibile rispondere a un programma o votare,effettuare acquisti online o pagare per un programmavideo-on-demand.
HbbTV, MHEG, . . .
Le emittenti utilizzando diversi sistemi di TVinterattiva: HbbTV (Hybrid Broadcast Broadband TV)o iTV (Interactive TV - MHEG). Il sistema iTV vienetalvolta definito MHEG o tasto rosso. Tuttavia, ciascunsistema presenta caratteristiche distintive.
Per ulteriori informazioni, visitare i siti Web delleemittenti.
23
Cosa serve?
La TV interattiva è disponibile solo sui canali TVdigitali. Per sfruttare appieno i vantaggi della TVinterattiva, il televisore deve disporre di unaconnessione a Internet ad alta velocità (banda larga).
HbbTV
Se un canale TV offre pagine HbbTV, azionare primaHbbTV nelle impostazioni TV per visualizzare lepagine.
1 - Modalità Consumer: On Premere HOME,selezionare Caratteristiche, quindi premere OK. Modalità Guest: On Menu Guest: non disponibilein questa modalità. (Per informazioni sulla modalità professionaleconsultare il manuale di installazione)2 - Selezionare Canali > Impostazioni canali >Attiva Hbb TV e premere OK.3 - Selezionare Sì.4 - Premere BACK, ripetutamente se necessario,per chiudere il menu.
Se non si desidera accedere alle pagine HbbTV su uncanale specifico, è possibile bloccare le pagineHbbTV relative solo a questo canale.
1 - Sintonizzarsi sul canale del quale si desiderabloccare le pagine HbbTV.2 - Premere OPTIONS e fare clic su HbbTV suquesto canale.3 - Selezionare Off.
Utilizzo della TV interattiva
Apertura di pagine iTV
La maggior parte dei canali che offrono HbbTV o iTVinvitano a premere il tasto colorato (rosso) o iltasto OK per aprire il loro programma interattivo.
Navigazione all'interno delle pagine iTV
Per navigare all'interno delle pagine iTV, è possibileutilizzare i tasti colorati, i tasti freccia, i tasti numerici eil tasto BACK.
MHEG (solo Regno Unito)
Per aprire MHEG, premere TEXT. Per chiuderlo,premere BACK.
Chiusura di pagine iTV
Nella maggior parte delle pagine iTV viene indicato iltasto da utilizzare per la chiusura.Per forzare la chiusura di una pagina iTV, passare alcanale TV successivo e premere .
24

8
Guida TV8.1
Cosa serve?Con la guida TV è possibile visualizzare un elenco deiprogrammi TV attuali e nel palinsesto. A secondadella provenienza delle informazioni (dati) della guidaTV, sono visualizzati canali analogici e digitali o solodigitali. Non tutti i canali offrono informazioni sullaguida TV.
Il televisore è in grado di raccogliere le informazionidella guida TV per i canali installati sul televisore. Iltelevisore non è in grado di raccogliere le informazionidella guida TV dai canali visualizzati mediante unricevitore o decoder digitale.
8.2
Utilizzo della guida TV
Apertura della guida TV
Per aprire la guida TV, premere TV GUIDE . Laguida TV mostra i canali del sintonizzatoreselezionato.
Premere di nuovo TV GUIDE per chiudere.
La prima volta che si apre la guida TV, il televisorescorre tutti i canali televisivi alla ricerca delleinformazioni sui programmi. Questa procedurapotrebbe richiedere alcuni minuti. I dati della guida TVvengono memorizzati sul televisore.
Sintonizzazione dei programmi
Dalla guida TV, è possibile sintonizzarsi su unprogramma corrente.
Per passare al programma (canale), selezionare ilprogramma e premere OK.
Visualizzazione dei dettagli del programma
Per richiamare i dettagli del programma selezionato...
1 - Premere INFO.2 - Premere BACK per chiudere.
Modifica giorno
La guida TV consente di visualizzare anche iprogrammi in palinsesto per i giorni successivi (fino aun massimo di 8 giorni).
In alternativa, è possibile premere il tastocolorato Giorno e selezionare il giornodesiderato.
Cerca per genere
Se le informazioni sono disponibili, è possibile cercarei programmi in palinsesto per genere, ad esempiofilm, eventi sportivi, ecc.
Per cercare un file per parola chiave...
1 - Premere TV GUIDE.2 - Premere OPTIONS .3 - Selezionare Cerca per genere e premere OK.4 - Selezionare il genere desiderato e premere OK.Viene visualizzato un elenco con i programmi trovati.5 - È possibile impostare promemoria oprogrammare una registrazione su un programmaselezionato.6 - Premere BACK, ripetutamente se necessario,per chiudere il menu.
25
9
Menu Home9.1
Info sul Menu HomePer sfruttare appieno i vantaggi del TV Android,collegarlo a Internet.
Come su uno smartphone o tablet Android, il menuHome è il centro di questo televisore. Dal menuHome è possibile avviare qualunque applicazione,accedere a un canale televisivo, aprire un sito Web opassare a un dispositivo collegato. A seconda delleimpostazioni del televisore e del Paese, il menuHome può contenere diversi elementi.
Il menu Home è organizzato in righe…
LIST Nella prima riga viene mostrata una selezione dicanali. Selezionare il canale che si desidera
guardare.
Smart InfoQuesta riga consente all'utente di personalizzare leinformazioni dell'hotel visualizzate sul TV.
Applicazioni
La riga Applicazioni elenca tutte le applicazionidisponibili sul TV. In questa riga sono disponibilianche le applicazioni per il TV, come VisioneTV, Sorgenti, Supporti e altre ancora. Leapplicazioni avviate di recente compariranno davantialla riga.
CaratteristicheDa questa riga è possibile aprire una selezione diimpostazioni.
Lingua
In questa riga l'utente può impostare la lingua del TV.
9.2
Aprire il menu HomePer aprire il menu Home e un elemento…
1 - Premere HOME.2 - Selezionare un elemento e premere OK peraprirlo o avviarlo.3 - Premere BACK per chiudere il menu Homesenza avviare nessun elemento.
26
10
Sorgenti10.1
Attivazione di un dispositivoDall'elenco delle sorgenti, è possibile attivarequalsiasi dispositivo collegato. È possibile attivare unsintonizzatore per guardare la TV, aprire i contenuti diun'unità flash USB collegata o visualizzare leregistrazioni effettuate su un hard disk USB collegato.È possibile attivare i dispositivi collegati per guardare irelativi programmi, un ricevitore digitale o un lettoredischi Blu-ray.
Per attivare un dispositivo collegato…
1 - Premere SOURCES per aprire il menu Sorgenti.2 - Selezionare uno degli elementi presentinell'elenco delle sorgenti e premere OK. Il TV mostrail programma o il contenuto del dispositivo.3 - Premere nuovamente SOURCES per chiudere ilmenu.
Riproduzione One Touch
Con il televisore in modalità standby, è possibileattivare un lettore dischi tramite il telecomando deltelevisore.Per attivare sia il lettore dischi che il TV dalla modalitàstandby e avviare immediatamente la riproduzionedel disco, premere (Riproduci) sul telecomandodel televisore. Il dispositivo deve essere collegatocon un cavo HDMI e la funzione HDMI CEC deveessere attivata sia sul televisore che sul dispositivo.
10.2
Opzioni per un ingresso delTVAlcuni dispositivi di ingresso del TV offronoimpostazioni specifiche.
Per impostare le opzioni per un ingresso specifico delTV…
1 - Premere SOURCES.2 - Selezionare l'ingresso del TV nell'elenco epremere OK.3 - Premere OPTIONS . È possibile impostare leopzioni per l'ingresso del TV selezionato in questopunto.4 - Premere nuovamente OPTIONS perchiudere il menu Opzioni.
Opzioni possibili…
Comandi
Con questa opzione, è possibile azionare il dispositivo
collegato con il telecomando del televisore. Ildispositivo deve essere collegato con un cavo HDMI ela funzione HDMI CEC deve essere attivata sia sultelevisore che sul dispositivo.
Informazioni dispositivo
Aprire questa opzione per visualizzare le informazionisul dispositivo collegato.
10.3
Nome e tipo di dispositivoQuando si collega un nuovo dispositivo al TV e il TVrileva il dispositivo, è possibile assegnare un'iconacorrispondente al tipo di dispositivo. Se si collega undispositivo con un cavo HDMI e HDMI CEC, il TV rilevaautomaticamente il tipo di dispositivo e al dispositivoviene assegnata un'icona appropriata.
Il tipo di dispositivo determina infatti gli stili perimmagine e audio, i valori di risoluzione, alcuneimpostazioni specifiche o la posizione nel menuSorgenti. Non occorre tenere conto delle impostazioniideali.
Rinomina o Modifica tipo
È sempre possibile modificare il nome o il tipo di undispositivo collegato. Cercare l'icona a destra delnome del dispositivo, nel menu Sorgenti. Alcunesorgenti di ingresso del TV non consentono lamodifica del nome.
Per modificare il tipo di dispositivo…
1 - Selezionare il dispositivo nel menu Sorgenti.2 - Premere (destra) per selezionare l’icona epremere OK.3 - Premere BACK per nascondere la tastiera suschermo. 4 - Premere (giù) per trovare tutti i tipi didispositivo disponibili. Selezionare il tipo desiderato epremere OK.
5 - Se si desidera reimpostare il tipo del dispositivosul tipo di connettore originale,selezionare Ripristina e premere OK.6 - Selezionare Chiudi e premere OK per chiudereil menu.
Per modificare il nome del dispositivo…
1 - Selezionare il dispositivo nel menu Sorgenti.2 - Premere (destra) per selezionare l'icona epremere OK.3 - Utilizzare la tastiera su schermo per eliminare ilnome corrente e immetterne unonuovo. Premere per confermare.4 - Premere BACK per nascondere la tastiera suschermo.5 - Se si desidera reimpostare il nome del dispositivosul nome del connettore originale,
27
selezionare Ripristina e premere OK.6 - Selezionare Chiudi e premere OK per chiudereil menu.
10.4
Gioco o computerIl tipo di dispositivo determina gli stili di immagine eaudio, i valori di risoluzione e altre specifiche. Nonoccorre tenere conto delle impostazioni ideali.
Per alcuni dispositivi, il tipo corrispondente non èchiaro. Una console di gioco può disporre di unlettore dischi Blu-ray integrato e il tipocorrispondente risulta impostato su Lettore perchéviene utilizzato soprattutto come lettore dischi. Perquesto tipo di dispositivi, è possibile attivaretemporaneamente le impostazioni ideali per il gioco.In alternativa, attivare le impostazioni ideali per uncomputer collegato.
Quando si attiva un dispositivo collegato nel menuSorgenti, è possibile utilizzare esclusivamentel'impostazione Gioco o computer. L'impostazioneGioco o computer viene memorizzata per ildispositivo selezionato.
Per attivare manualmente le impostazioni ideali per ilgioco o il computer…
1 - Modalità Consumer: On Premere HOME,selezionare Caratteristiche, quindi premere OK. Modalità Guest: On Menu Guest: non disponibilein questa modalità.(Per informazioni sulla modalità professionaleconsultare il manuale di installazione)2 - Selezionare Immagine > Avanzate epremere OK.3 - Selezionare Gioco o computer e premere OK.4 - Selezionare Gioco, Computer oppure Off.5 - Premere (sinistra) per tornare indietro di unpassaggio o premere BACK per chiudere il menu.
Ricordarsi di impostare nuovamente questa opzionesu Off al termine del gioco.
10.5
Nuova scansione deicollegamentiÈ possibile eseguire una nuova scansione di tutti icollegamenti TV per aggiornare il menu Sorgenti con idispositivi collegati di recente.
Per eseguire una nuova scansione dei collegamenti…
1 - Premere SOURCES per aprire il menu Sorgenti.
2 - Premere (su) per selezionarel'icona nella parte superiore destra del menuSorgenti.3 - Premere OK per avviare la scansione deicollegamenti. I dispositivi collegati di recenteverranno aggiunti al menu Sorgenti.
28
11
Applicazioni11.1
Informazioni sulleApplicazioniPremendo Applicazioni sul telecomandovengono visualizzate tutte le applicazioni disponibili.Le applicazioni per il TV offrono diverse forme diintrattenimento, che arricchiscono l'esperienza degliospiti dell'hotel. È possibile accedere alle applicazionianche dalla sezione Applicazioni delmenu Applicazioni .
11.2
Avvio o interruzione diun'applicazioneÈ possibile avviare un'applicazione dal menu Home.
Per avviare un'applicazione…
1 - Modalità Consumer: On Premere HOME,selezionare Applicazioni, quindi premere OK. Modalità Guest: On MenuGuest: Premere HOME,selezionare Applicazioni , quindi premere OK. (Per informazioni sulla modalità professionaleconsultare il manuale di installazione)2 - Selezionare l'applicazione desiderata e premere OK.3 - Per interrompere un'applicazione, premere BACK o TV oppure ancora interromperel'applicazione con il pulsante dedicato Esci/Stop.
29
12
Internet12.1
Avvio di InternetÈ possibile navigare in Internet sul TV. È possibilevisualizzare qualsiasi sito Internet, anche se lamaggior parte non è adatta per la visualizzazione suschermo TV.
• Alcuni plug-in (per la visualizzazione delle pagine odei video) non sono disponibili sul televisore.• Non è possibile inviare o scaricare file.• Le pagine Internet vengono visualizzate una allavolta e a schermo intero.
Per avviare il browser per Internet…
1 - Modalità Consumer: On Premere HOME ,selezionare Caratteristiche , quindipremere (destra). Modalità Guest: On MenuGuest: Premere HOME,selezionare Caratteristiche , quindipremere (destra). (Per informazioni sulla modalità professionaleconsultare il manuale di installazione)2 - Selezionare Internet e premere OK.3 - Immettere un indirizzo Internet e selezionare ,quindi premere OK.4 - Per chiudere Internet, premere HOME o TV.
12.2
Opzioni su InternetSono disponibili alcuni extra per Internet.
Per aprire gli extra…
1 - Con il sito Web aperto, premere OPTIONS.2 - Selezionare uno degli elementi e premere OK.3 - Premere BACK, ripetutamente se necessario,per chiudere il menu.
Immetti indirizzo
Consente di immettere un nuovo indirizzo Internet.
Mostra preferiti
Consente di visualizzare le pagine contrassegnatecome preferite.
Ricarica pagina
Consente di caricare nuovamente la pagina Internet.
Ingrandisci pagina
Utilizzare la barra di scorrimento per impostare lapercentuale dello zoom.
Informazioni di sicurezza
Consente di visualizzare il livello di sicurezza dellapagina corrente.
Contrassegna come preferito
Consente di contrassegnare la pagina corrente comepreferita.
Sottotitoli
Consente di selezionare i sottotitoli, se disponibili.
30
13
Video, foto e musica13.1
Da un collegamento USBÈ possibile visualizzare foto o riprodurre musica evideo da un'unità flash USB o un hard disk USBcollegato.
Con il televisore acceso, collegare un'unità flash USBo un hard disk USB ai connettori USB. Il televisorerileva il dispositivo ed elenca i file multimediali.
Se l'elenco dei file non viene visualizzatoautomaticamente…
1 - Premere SOURCES, selezionare USB epremere OK.2 - Selezionare Dispositivi USB epremere (destra) per selezionare il dispositivoUSB richiesto.3 - È possibile scorrere i file nella struttura dellacartella organizzata sull'unità.4 - Per interrompere la riproduzione di video, foto emusica, premere TV.
13.2
Riproduzione dei videopersonali
Riproduzione di video
Le modalità di apertura dell'elenco di file multimedialisul televisore dipendono dal tipo di dispositivo in cuisono memorizzati i file. Vedere i capitoli precedenti.
Per riprodurre un video sul TV…
Selezionare Video , quindi selezionare il nome delfile e premere OK.
• Per andare indietro o avanti veloce,premere o . Premere i tasti diverse volte pervelocizzare fino a 2x, 4x, 8x, 16x, 32x.• Per passare al video successivo in una cartella,premere OK per mettere in pausa eselezionare sullo schermo, quindi premere OK.• Per interrompere la riproduzione video, premere (Interrompi).• Per tornare alla cartella, premere BACK.
Barra di avanzamento
Per visualizzare la barra di avanzamento durante lariproduzione di un video (posizione, durata, titolo,data, ecc.), premere INFO .Premere di nuovo per nascondere le informazioni.
Opzioni video
Durante la riproduzione video,premere OPTIONS per visualizzare le seguentiopzioni…
• Contrassegna come preferito – Impostazione delvideo selezionato come preferito.• Riproduci tutti - Riproduzione di tutti i file videonella cartella.• Riproduci uno – Riproduzione solo di questo video.
• Sottotitoli – Se disponibili, è possibile selezionarele opzioni dei sottotitoli On, Off o Acceso conaudio disattivato.• Lingua audio – Se disponibile, è possibileselezionare una lingua per l'audio.• Casuale – Riproduzione dei file in modalità casuale.• Ripeti – Riproduzione di tutti i video nella cartellauna volta o continuamente.
13.3
Visualizzazione delle fotopersonali
Visualizzazione di foto
Le modalità di apertura dell'elenco di file multimedialisul televisore dipendono dal tipo di dispositivo in cuisono memorizzati i file. Vedere i capitoli precedenti.
Per visualizzare tutte le foto sul TV…
Selezionare Foto , quindi selezionare Tutti epremere OK.
Per visualizzare una foto sul TV…
Selezionare Foto , quindi selezionare il nome delfile e premere OK.
Per avviare una presentazione sul TV…
Se sono presenti più foto in una cartella, è possibileavviare una presentazione.
Per avviare una presentazione…
1 - Selezionare la cartella con le foto.2 - Premere il tasto colorato Presentazione .• Per passare alla foto successiva o precedente,premere (destra - successivo) o (sinistra -precedente).• Per mettere in pausa la presentazione, premere OK.Per riavviarla, premere nuovamente OK.• Per interrompere la presentazione, premere OK,quindi premere BACK.
Info
Per visualizzare le informazioni su una foto(dimensioni, data di creazione, percorso file, ecc.),selezionare una foto e premere INFO .
31

Premere di nuovo per nascondere le informazioni.
Presentazione con musica
È possibile guardare una presentazione delle foto eascoltare contemporaneamente la musica preferita. Ènecessario avviare la riproduzione musicale primadella presentazione delle foto.
Per riprodurre musica con la presentazione…
1 - Selezionare un brano o una cartella contenentebrani e premere OK.2 - Premere INFO per nascondere leinformazioni sul file e la barra di avanzamento.3 - Premere BACK.4 - Ora, utilizzare le frecce di navigazione perselezionare la cartella contenente le foto.5 - Selezionare la cartella contenente le foto epremere Presentazione .6 - Per interrompere la presentazione,premere BACK.
Opzioni per le foto
Con una foto sullo schermo,premere OPTIONS per visualizzare le seguentiopzioni…
• Contrassegna come preferito – Impostazione dellafoto selezionata come preferita.• Presentazione – Visualizzazione delle foto unadopo l'altra.
• Ruota – Rotazione della foto in formato orizzontaleo verticale.• Casuale – Riproduzione dei file in modalità casuale.• Ripeti – Visualizzazione della presentazione unavolta o continuamente.
• Interrompi musica – Interruzione della musicariprodotta in sottofondo.• Velocità presentazione – Impostazione dellavelocità della presentazione.• Transizione presentazione – Impostazione dellostile delle transizioni delle foto.
13.4
Riproduzione dei branimusicali personali
Riproduzione dei brani musicali
Le modalità di apertura dell'elenco di file multimedialisul televisore dipendono dal tipo di dispositivo in cuisono memorizzati i file. Vedere i capitoli precedenti.
Per riprodurre un brano sul TV…
Selezionare Musica , quindi selezionare il nomedel file e premere OK
Se una cartella contiene vari brani, è possibileascoltarli uno dopo l'altro.
• Per mettere in pausa un brano, premere OK.Premere di nuovo OK per continuare.• Per andare indietro o avanti veloce,premere o . Premere i tasti diverse volte pervelocizzare fino a 2x, 4x, 8x, 16x, 32x.• Per passare al brano successivo in una cartella,premere OK per mettere in pausa eselezionare sullo schermo, quindi premere OK.• Per tornare indietro alla cartella, premere BACK;la riproduzione musicale proseguirà.• Per interrompere la riproduzione musicale,premere (Stop).
Barra di avanzamento
Per visualizzare la barra di avanzamento durante lariproduzione di un brano (posizione, durata, titolo,data, ecc.), premere INFO .Premere di nuovo per nascondere le informazioni.
Opzioni per la musica
Opzioni per la riproduzione di musica...
• Contrassegna come preferito - Impostazione delbrano selezionato come preferito.• Riproduci tutti - Riproduzione di tutti i brani nellacartella.• Riproduci uno – Riproduzione solo del branocorrente.
• Casuale – Riproduzione dei file in modalità casuale.
• Ripeti – Riproduzione di tutti i brani nella cartellauna volta o continuamente.
32

14
Smartphone e tablet14.1
Miracast
Informazioni su Wi-Fi Miracast
È possibile visualizzare le foto o riprodurre la musicae i video da un dispositivo mobile sul TV con Wi-FiMiracast™. Il dispositivo mobile e il TV devono trovarsientro il raggio di copertura, il che generalmentesignifica essere collocati nella stessa stanza.
Verificare che il dispositivo mobile sia predisposto perl'utilizzo di Miracast.
Questo TV è un dispositivo Wi-Fi CERTIFIEDMiracast™. Con Miracast™, è possibile guardare econdividere lo schermo del proprio smartphone,tablet o computer sul TV in modalità wireless. Èpossibile riprodurre in streaming video (audio evideo), condividere foto o qualunque altra cosa che sitrova sullo schermo del dispositivo. Non serveconnettere il dispositivo alla rete domestica. Sia iltelevisore che il dispositivo devono essere dispositiviWi-Fi CERTIFIED Miracast™ e Miracast deve essereacceso.
Miracast su questo televisore è soggetto al protocolloHDCP e non può visualizzare contenuti conprotezione da copia inviati da un dispositivo. Larisoluzione video massima supportata è di 720p per2,4 GHz Wi-Fi o 1080p per 5 GHz Wi-Fi.
Per ulteriori informazioni su Wi-Fi CERTIFIEDMiracast™, visitare il sito Web www.wi-fi.org
Wi-Fi®, il logo Wi-Fi CERTIFIED e il logo Wi-Fi sonomarchi registrati della Wi-Fi Alliance. Wi-FiCERTIFIED Miracast™ e Miracast™ sono marchi dellaWi-Fi Alliance.
Condivisione di uno schermo sultelevisore
Per condividere lo schermo del proprio smartphone,tablet o computer sul TV . . .
1 - Accendere il televisore.2 - Modalità Consumer:On Premere HOME > Caratteristiche, quindipremere (destra).3 - Selezionare Miracast e premere OK.4 - Sul dispositivo, aprire un'applicazione quale Wi-Fi Miracast, Wi-Fi Direct™, Intel®Wireless Display* osimile e avviare la ricerca degli altri dispositiviMiracast.5 - Nell'elenco dei dispositivi trovati, selezionare il
televisore e connetterlo.6 - Sul televisore, accettare la richiesta diconnessione al televisore. Se si esegue laconnessione, il televisore mostra lo schermo di undispositivo.7 - Sul dispositivo, selezionare i video, le foto o i fileche si desidera guardare sul televisore.
* Miracast è supportato dalla versione WiDi 3.5 esuccessive.
Interruzione della condivisione
È possibile interrompere la condivisione di unoschermo dal televisore o dal dispositivo portatile.
Dal dispositivo
Con l'applicazione che si utilizza per avviare Miracast,è possibile interrompere la connessione e quindi lavisualizzazione dello schermo di un dispositivo sul TV.Il TV torna all'ultimo programma selezionato.
Dal TV
Per interrompere la visualizzazione dello schermo deldispositivo sul TV, è possibile . . .
• premere TV per guardare una trasmissione TV• premere HOME per avviare un'altra attività sulTV• premere SOURCES per aprire il menu Sorgenti eselezionare un dispositivo connesso.
Blocco di un dispositivo
La prima volta che si riceve una richiesta diconnessione da un dispositivo, è possibile bloccare ildispositivo. Questa richiesta e tutte le richieste futureprovenienti dal dispositivo verranno ignorate.
Per bloccare un dispositivo…
Selezionare Blocca… e premere OK.
Sblocco di tutti i dispositivi
Tutti i dispositivi precedentemente connessi ebloccati vengono memorizzati anche nell'elenco deicollegamenti Wi-Fi Miracast. Se si cancella questoelenco, tutti i dispositivi bloccati verranno sbloccati.
Per sbloccare tutti i dispositivi bloccati…
1 - Modalità Consumer: On Premere HOME,selezionare Caratteristiche , quindi premereOK.Modalità Guest: On Menu Guest: non disponibilein questa modalità.(Per informazioni sulla modalità professionaleconsultare il manuale di installazione)2 - Selezionare Wireless e reti > Caratteristiche epremere OK.3 - Selezionare Wi-Fi Miracast > Connessioni Wi-
33
Fi Miracast e premere OK. L'elenco viene cancellato.4 - Premere BACK, ripetutamente se necessario,per chiudere il menu.Blocco di un dispositivo precedentemente
connesso
Se si desidera bloccare un dispositivoprecedentemente connesso, è necessario cancellareprima l'elenco dei collegamenti Wi-Fi Miracast. Se sicancella l'elenco, è necessario confermare o bloccaredi nuovo la connessione per ogni dispositivo.
Ritardo dello schermo
Il ritardo normale quando si condivide uno schermocon Miracast è di circa 1 secondo. Il ritardo può esserepiù lungo se si utilizzano dispositivi più vecchi conpotenza di elaborazione minore.
14.2
MHLQuesto TV è compatibile con MHL™.
Se anche il dispositivo mobile è compatibile con MHL,è possibile collegare il dispositivo mobile al TV tramiteun cavo MHL. Con il cavo MHL collegato, è possibilecondividere sullo schermo del TV i contenutivisualizzati sul dispositivo mobile.Contemporaneamente, viene ricaricata la batteria deldispositivo mobile. La connessione MHL è ideale perguardare i film o giocare ai videogiochi del dispositivomobile sul TV più a lungo.
Caricamento
Con il cavo MHL collegato, il dispositivo si ricaricamentre il TV è acceso (non in standby).
Cavo MHL
Per il collegamento del dispositivo mobile al TV, ènecessario un cavo MHL passivo (da HDMI a MicroUSB). Per il collegamento del dispositivo mobile,potrebbe essere necessario un adattatore aggiuntivo.Per il collegamento del cavo MHL al TV, utilizzare laconnessione HDMI 4 MHL.
MHL, Mobile High-Definition Link e il logo MHL sonomarchi o marchi registrati di MHL, LLC.
34
15
Impostazioni15.1
Immagine
Stile immagine
Selezione di uno stile
Per facilitare la regolazione delle immagini, èpossibile selezionare un'impostazione predefinita conStile immagine.
1 - Modalità Consumer: On Premere HOME,selezionare Caratteristiche , quindi premereOK. Modalità Guest: On MenuGuest: Premere HOME,selezionare Caratteristiche , quindi premere OK.(Per informazioni sulla modalità professionaleconsultare il manuale di installazione)2 - Selezionare Immagine > Stile immagine epremere OK.3 - Selezionare uno degli stili dall'elenco.4 - Premere BACK, ripetutamente se necessario,per chiudere il menu.
Gli stili disponibili sono…
• Personale: le preferenze per le immagini impostatedurante la prima accensione.• Vivace: ideale per la visione di giorno.• Naturale: impostazioni naturali delle immagini.• Standard: l'impostazione migliore per il risparmioenergetico - Impostazione predefinita• Film: ideale per guardare i film.
• Foto: ideale per la visualizzazione di foto.
• Gioco: ideale per giocare.• Computer: ideale per visualizzare lo schermo di uncomputer
Personalizzare lo stile
Qualsiasi impostazione delle immagini vengamodificata, ad esempio Colore o Contrasto, verràmemorizzata nello Stile immagine selezionato. In talmodo è possibile personalizzare ciascuno stile.Lo stile audio Personale è l'unico che puòmemorizzare le sue impostazioni per ogni singolodispositivo connesso nel menu Sorgenti.
Ripristino di uno stile
Selezionando uno Stile immagine, è possibileregolare le impostazioni di un'immagine in Tutte leimpostazioni > Immagine…
Lo stile selezionato memorizza le modificheapportate. Si consiglia di regolare le impostazionidelle immagini solo per lo stile Personale. Lo stileimmagine Personale può memorizzare le sueimpostazioni per ogni singolo dispositivo collegatonel menu Sorgenti.
Per ripristinare le impostazioni originali dello stile…
1 - Modalità Consumer: On Premere HOME,selezionare Caratteristiche , quindi premereOK.Modalità Guest: On MenuGuest: Premere HOME,selezionare Caratteristiche , quindi premere OK.(Per informazioni sulla modalità professionaleconsultare il manuale di installazione)2 - Selezionare Immagine > Stile immagine, quindiselezionare lo Stile immagine da ripristinare.3 - Premere il tasto colorato Ripristina stile epremere OK. Lo stile viene ripristinato.4 - Premere BACK, ripetutamente se necessario,per chiudere il menu.
Impostazioni delle immagini
Colore
Con Colore, è possibile regolare la saturazione delcolore dell'immagine.
Per regolare il colore…
1 - Modalità Consumer: On Premere HOME,selezionare Caratteristiche , quindi premereOK.Modalità Guest: On MenuGuest: Premere HOME,selezionare Caratteristiche , quindi premere OK.(Per informazioni sulla modalità professionaleconsultare il manuale di installazione)2 - Selezionare Immagine > Colore epremere OK.3 - Regolare il valore tramite (su) o (giù).4 - Premere BACK, ripetutamente se necessario,per chiudere il menu.
Contrasto
Con Contrasto, è possibile regolare il contrastodell'immagine.
Per regolare il contrasto…
1 - Modalità Consumer: On Premere HOME,selezionare Caratteristiche , quindi premereOK.
35

Modalità Guest: On MenuGuest: Premere HOME,selezionare Caratteristiche , quindi premere OK.(Per informazioni sulla modalità professionaleconsultare il manuale di installazione)2 - Selezionare Immagine > Contrasto epremere OK.3 - Regolare il valore tramite (su) o (giù).4 - Premere BACK, ripetutamente se necessario,per chiudere il menu.
Nitidezza
Con Nitidezza, è possibile regolare il contrastodell'immagine.
Per regolare il contrasto…
1 - Modalità Consumer: On Premere HOME,selezionare Caratteristiche , quindi premereOK.Modalità Guest: On MenuGuest: Premere HOME,selezionare Caratteristiche , quindi premere OK.(Per informazioni sulla modalità professionaleconsultare il manuale di installazione)2 - Selezionare Immagine > Nitidezza epremere OK.3 - Regolare il valore tramite (su) o (giù).4 - Premere BACK, ripetutamente se necessario,per chiudere il menu.
Impostazioni avanzate dell'immagine
Gioco o computer
Quando viene collegato un dispositivo, il televisore nericonosce immediatamente il tipo e assegna aldispositivo un nome tipo corretto. È possibilemodificare il nome tipo, se necessario. Se per undispositivo è stato impostato il nome tipo corretto, iltelevisore passerà automaticamente alle impostazioniTV ideali quando si seleziona il dispositivo inquestione nel menu Sorgenti.
Se si dispone di una console di gioco con un lettoredischi Blu-ray integrato, è possibile che il nome tiposia stato impostato su Blu-ray Disc (Disco Blu-ray).Con Gioco o computer è possibile passaremanualmente alle impostazioni ideali per il gioco.Non dimenticare di disattivare l'impostazione Gioco ocomputer per poter guardare nuovamente la TV.
Per selezionare manualmente l'impostazione…
1 - Modalità Consumer: On Premere HOME,selezionare Caratteristiche , quindi premereOK.Modalità Guest: On Menu Guest: non disponibilein questa modalità.(Per informazioni sulla modalità professionaleconsultare il manuale di installazione)
2 - Selezionare Immagine > Avanzate epremere OK.3 - Selezionare Gioco o computer e selezionare iltipo di dispositivo che si desidera utilizzare. Pertornare al TV, selezionare Off.4 - Premere BACK, ripetutamente se necessario,per chiudere il menu.
Impostazioni del colore
Tinta
Con Tinta, è possibile regolare il livello della tintadell'immagine con un livello di dettaglioestremamente definito.
Per regolare la tinta...
1 - Modalità Consumer: On Premere HOME,selezionare Caratteristiche , quindi premereOK.Modalità Guest: On Menu Guest: non disponibilein questa modalità.(Per informazioni sulla modalità professionaleconsultare il manuale di installazione)2 - Selezionare Immagine > Avanzate e premere OK.3 - Selezionare Colore > Tinta e premere OK.4 - Regolare il valore tramite (su) o (giù).5 - Premere BACK, ripetutamente se necessario,per chiudere il menu.
Ottimizzazione dei colori
Con Ottimizzazione dei colori, è possibile ottimizzarel'intensità del colore e i dettagli in colori vivaci.
Per regolare il livello…
1 - Modalità Consumer: On Premere HOME,selezionare Caratteristiche , quindi premereOK.Modalità Guest: On Menu Guest: non disponibilein questa modalità.(Per informazioni sulla modalità professionaleconsultare il manuale di installazione)2 - Selezionare Immagine > Avanzate e premere OK.3 - Selezionare Colore > Ottimizzazione deicolori e premere OK.4 - Selezionare Massimo, Media, Minimo o Off.5 - Premere BACK, ripetutamente se necessario,per chiudere il menu.
Temperatura colore
Con Temperatura del colore, è possibile impostarel'immagine su una temperatura colore predefinita oselezionare Personalizzato per impostareautonomamente una temperatura
36
tramite Temperatura colore personalizzata.Temperatura colore e Temperatura colorepersonalizzata sono impostazioni destinate ad utentiesperti.
Per selezionare un'impostazione predefinita…
1 - Modalità Consumer: On Premere HOME,selezionare Caratteristiche , quindi premere OK.Modalità Guest: On Menu Guest: non disponibilein questa modalità.(Per informazioni sulla modalità professionaleconsultare il manuale di installazione)2 - Selezionare Immagine > Avanzate e premere OK.3 - Selezionare Colore > Temperatura delcolore e premere OK.4 - Selezionare Normale, Caldo o Freddo. Oppurefare clic su Personalizzato se si desiderapersonalizzare autonomamente una temperatura delcolore.5 - Premere BACK, ripetutamente se necessario,per chiudere il menu.
Temperatura colore personalizzata
Con Temperatura colore personalizzata, è possibileimpostare una temperatura del coloreautonomamente. Per impostare una temperatura delcolore personalizzata, selezionare innanzitutto Personalizzato nel menu Temperatura del colore.Temperatura colore personalizzata è un'impostazionedestinata ad utenti esperti.
Consente di impostare una temperatura del colorepersonalizzata…
1 - Modalità Consumer: On Premere HOME,selezionare Caratteristiche , quindi premere OK.Modalità Guest: On Menu Guest: non disponibilein questa modalità.(Per informazioni sulla modalità professionaleconsultare il manuale di installazione)2 - Selezionare Immagine > Avanzate e premere OK.3 - Selezionare Colore > Temperatura del colorepersonalizzata e premere OK.4 - Selezionare una delle opzioni e premere OK. 5 - Premere le frecce (su) o (giù) per regolareil valore. 6 - Premere BACK, ripetutamente se necessario,per chiudere il menu.
Impostazioni di contrasto
Modalità di contrasto
La funzione Modalità contrasto consente diimpostare il livello al quale è possibile ridurre ilconsumo energetico attenuando l'intensità di
illuminazione dello schermo. Scegliere il consumoenergetico ottimale o l'immagine con la miglioreintensità di illuminazione.
Per regolare il livello…
1 - Modalità Consumer: On Premere HOME,selezionare Caratteristiche , quindi premere OK.Modalità Guest: On Menu Guest: non disponibilein questa modalità.(Per informazioni sulla modalità professionaleconsultare il manuale di installazione)2 - Selezionare Immagine > Avanzate e premere OK.3 - Selezionare Contrasto > Modalitàcontrasto e premere OK.4 - Selezionare Off, Standard, Alimentazioneottimale o Immagine ottimale. 5 - Premere BACK, ripetutamente se necessario,per chiudere il menu.
Contrasto dinamico
Con Contrasto dinamico è possibile impostare illivello in base al quale il televisore miglioraautomaticamente i dettagli nelle aree scure,mediamente chiare e chiare dell'immagine.
Per regolare il livello…
1 - Modalità Consumer: On Premere HOME,selezionare Caratteristiche , quindi premere OK.Modalità Guest: On Menu Guest: non disponibilein questa modalità.(Per informazioni sulla modalità professionaleconsultare il manuale di installazione)2 - Selezionare Immagine > Avanzate e premere OK.3 - Selezionare Contrasto > Contrastodinamico e premere OK.4 - Selezionare Off, Minimo, Media o Massimo. 5 - Premere BACK, ripetutamente se necessario,per chiudere il menu.
Perfect Contrast
Con Contrasto perfetto è possibile impostare il livelloin cui il TV migliora automaticamente i dettagli nellearee scure, mediamente illuminate e illuminatedell'immagine.
Per regolare il livello…
1 - Modalità Consumer: On Premere HOME,selezionare Caratteristiche , quindi premere OK.Modalità Guest: On Menu Guest: non disponibilein questa modalità.(Per informazioni sulla modalità professionaleconsultare il manuale di installazione)2 - Selezionare Immagine > Avanzate e
37
premere OK.3 - Selezionare Contrasto > Contrastoperfetto e premere OK.4 - Selezionare Off, Minimo, Media o Massimo. 5 - Premere BACK, ripetutamente se necessario,per chiudere il menu.
Contrasto, Luminosità
Con Luminosità, è possibile impostare il livello diluminosità del segnale dell'immagine. Luminosità èun'impostazione destinata ad utenti esperti. Siconsiglia agli utenti non esperti di regolare laluminosità delle immagini tramitel'impostazione Contrasto.
Per regolare il livello…
1 - Modalità Consumer: On Premere HOME,selezionare Caratteristiche , quindi premere OK.Modalità Guest: On Menu Guest: non disponibilein questa modalità.(Per informazioni sulla modalità professionaleconsultare il manuale di installazione)2 - Selezionare Immagine > Avanzate e premere OK.3- Selezionare Contrasto > Luminosità e premere OK.4 - Premere le frecce (su) o (giù) per regolareil valore. 5 - Premere BACK, ripetutamente se necessario,per chiudere il menu.
Contrasto video
Con Contrasto video, è possibile ridurre la gammadel contrasto video.
Per regolare il livello…
1 - Modalità Consumer: On Premere HOME,selezionare Caratteristiche , quindi premere OK.Modalità Guest: On Menu Guest: non disponibilein questa modalità.(Per informazioni sulla modalità professionaleconsultare il manuale di installazione)2 - Selezionare Immagine > Avanzate e premere OK.3 - Selezionare Contrasto > Contrastovideo e premere OK.4 - Premere le frecce (su) o (giù) per regolareil valore. 5 - Premere BACK, ripetutamente se necessario,per chiudere il menu.
Gamma
Con Gamma, è possibile scegliere un'impostazionenon lineare per la luminanza e il contrasto delleimmagini. Gamma è un'impostazione destinata agliutenti esperti.
Per regolare il livello…
1 - Modalità Consumer: On Premere HOME,selezionare Caratteristiche , quindi premere OK.Modalità Guest: On Menu Guest: non disponibilein questa modalità.(Per informazioni sulla modalità professionaleconsultare il manuale di installazione)2 - Selezionare Immagine > Avanzate e premere OK.3 - Selezionare Contrasto > Gamma e premere OK.4 - Premere le frecce (su) o (giù) per regolareil valore. 5 - Premere BACK, ripetutamente se necessario,per chiudere il menu.
Impostazioni della nitidezza
Super Resolution
Con Super Resolution, è possibile scegliere unanitidezza superiore per linee e contorni.
Per attivare o disattivare la funzione…
1 - Modalità Consumer: On Premere HOME,selezionare Caratteristiche , quindi premere OK.Modalità Guest: On Menu Guest: non disponibilein questa modalità.(Per informazioni sulla modalità professionaleconsultare il manuale di installazione)2 - Selezionare Immagine > Avanzate e premere OK.3 - Selezionare Nitidezza > SuperResolution e premere OK.4 - Selezionare On o Off.5 - Premere BACK, ripetutamente se necessario,per chiudere il menu.
Risoluzione Ultra
Con Ultra Resolution, è possibile scegliere unanitidezza superiore per linee e contorni.
Per attivare o disattivare la funzione…
1 - Modalità Consumer: On Premere HOME,selezionare Caratteristiche , quindi premere OK.Modalità Guest: On Menu Guest: non disponibilein questa modalità.(Per informazioni sulla modalità professionaleconsultare il manuale di installazione)2 - Selezionare Immagine > Avanzate e
38
premere OK.3 - Selezionare Nitidezza > UltraResolution e premere OK.4 - Selezionare On o Off.5 - Premere BACK, ripetutamente se necessario,per chiudere il menu.
Nitidezza, Riduzione del rumore
Con Riduzione rumore è possibile filtrare e ridurre illivello di rumore delle immagini.
Per regolare la riduzione del rumore…
1 - Modalità Consumer: On Premere HOME,selezionare Caratteristiche , quindi premere OK.Modalità Guest: On Menu Guest: non disponibilein questa modalità.(Per informazioni sulla modalità professionaleconsultare il manuale di installazione)2 - Selezionare Immagine > Avanzate e premere OK.3 - Selezionare Nitidezza > Riduzionerumore e premere OK.4 - Selezionare Massimo, Media, Minimo o Off.5 - Premere BACK, ripetutamente se necessario,per chiudere il menu.
Nitidezza, Riduzione artefatti MPEG
Con Riduzione artefatti MPEG, è possibile attenuarele transizioni digitali dell'immagine. Gli artefatti MPEGsono per lo più visibili come piccoli blocchi o bordifrastagliati nelle immagini.
Per ridurre gli artefatti MPEG…
1 - Modalità Consumer: On Premere HOME,selezionare Caratteristiche , quindi premere OK.Modalità Guest: On Menu Guest: non disponibilein questa modalità.(Per informazioni sulla modalità professionaleconsultare il manuale di installazione)2 - Selezionare Immagine > Avanzate e premere OK.3 - Selezionare Nitidezza > Riduzione artefattiMPEG e premere OK.4 - Selezionare Massimo, Media, Minimo o Off.5 - Premere BACK, ripetutamente se necessario,per chiudere il menu.
Impostazioni di movimento
Perfect Natural Motion
Con Perfect Natural Motion, è possibile ridurre ilmovimento a scatti delle immagini, visibile nei film inTV. Perfect Natural Motion rende qualunquemovimento fluido e omogeneo.
Per regolare il movimento a scatti…
1 - Modalità Consumer: On Premere HOME,selezionare Caratteristiche , quindi premere OK.Modalità Guest: On Menu Guest: non disponibilein questa modalità.(Per informazioni sulla modalità professionaleconsultare il manuale di installazione)2 - Selezionare Immagine > Avanzate e premere OK.3 - Selezionare Movimento > Perfect NaturalMotion e premere OK.4 - Selezionare Massimo, Media, Minimo o Off.5 - Premere BACK, ripetutamente se necessario,per chiudere il menu.
Natural Motion
Con Natural Motion, è possibile ridurre il movimentoa scatti delle immagini, visibile nei film in TV. NaturalMotion rende qualunque movimento fluido eomogeneo.
Per regolare il movimento a scatti…
1 - Modalità Consumer: On Premere HOME,selezionare Caratteristiche , quindi premere OK.Modalità Guest: On Menu Guest: non disponibilein questa modalità.(Per informazioni sulla modalità professionaleconsultare il manuale di installazione)2 - Selezionare Immagine > Avanzate e premere OK.3 - Selezionare Movimento > Digital NaturalMotion e premere OK.4 - Selezionare Massimo, Media, Minimo o Off.5 - Premere BACK, ripetutamente se necessario,per chiudere il menu.
Clear LCD
Clear LCD fornisce una maggiore nitidezza delleimmagini in movimento, migliori livelli di nero, unelevato contrasto, immagini senza sfarfallio e un piùampio angolo di visione.
Per attivare o disattivare la funzione…
1 - Modalità Consumer: On Premere HOME,selezionare Caratteristiche , quindi premere OK.Modalità Guest: On Menu Guest: non disponibilein questa modalità.(Per informazioni sulla modalità professionaleconsultare il manuale di installazione)2 - Selezionare Immagine > Avanzate e premere OK.3 - Selezionare Movimento > ClearLCD e premere OK.4 - Selezionare On o Off.5 - Premere BACK, ripetutamente se necessario,per chiudere il menu.
39
15.2
Suono
Stile audio
Selezione di uno stile
Per facilitare la regolazione audio, è possibileselezionare un'impostazione predefinita con Stileaudio.
1 - Modalità Consumer: On Premere HOME,selezionare Caratteristiche , quindi premere OK. Modalità Guest: On MenuGuest: Premere HOME,selezionare Caratteristiche , quindi premere OK.(Per informazioni sulla modalità professionaleconsultare il manuale di installazione)2 - Selezionare Suono > Stile audioe premere OK .3 - Selezionare uno degli stili dall'elenco.4 - Premere BACK, ripetutamente se necessario,per chiudere il menu.
Gli stili disponibili sono…
• Personale: le preferenze per l'audio impostatedurante la prima accensione.• Originale: le impostazioni audio più neutre• Film: ideale per guardare i film.• Musica: ideale per ascoltare la musica.• Gioco: ideale per giocare.
• Notizie: ideale per la lettura di informazioni.
Ripristino di uno stile
Con uno Stile audio selezionato, è possibile regolarele impostazioni audio in Impostazioni > Suono…
Lo stile selezionato memorizza le modificheapportate. Si consiglia di regolare le impostazioniaudio solo per lo stile Personale. Lo stile audioPersonale può memorizzare le sue impostazioni perogni singolo dispositivo collegato nel menu Sorgenti.
Per ripristinare le impostazioni originali dello stile…
1 - Modalità Consumer: On Premere HOME,selezionare Caratteristiche , quindi premere OK.Modalità Guest: On MenuGuest: Premere HOME,selezionare Caratteristiche , quindi premere OK.(Per informazioni sulla modalità professionaleconsultare il manuale di installazione)2 - Selezionare Suono > Stile audio, quindiselezionare lo Stile audio da ripristinare.3 - Premere il tasto colorato Ripristina stile epremere OK. Lo stile viene ripristinato.4 - Premere BACK, ripetutamente se necessario,per chiudere il menu.
Impostazioni audio
Bassi
Con Toni bassi, è possibile regolare il livello dei tonibassi dell'audio.
Per regolare il livello…
1 - Modalità Consumer: On Premere HOME,selezionare Caratteristiche , quindi premere OK.Modalità Guest: On MenuGuest: Premere HOME,selezionare Caratteristiche , quindi premere OK.(Per informazioni sulla modalità professionaleconsultare il manuale di installazione)2 - Selezionare Suono > Toni bassi e premere OK.3 - Regolare il valore tramite (su) o (giù).4 - Premere BACK, ripetutamente se necessario,per chiudere il menu.
Alti
Con Toni alti, è possibile regolare il livello dei toni altidell'audio.
Per regolare il livello…
1 - Modalità Consumer: On Premere HOME,selezionare Caratteristiche , quindi premere OK.Modalità Guest: On MenuGuest: Premere HOME,selezionare Caratteristiche , quindi premere OK.(Per informazioni sulla modalità professionaleconsultare il manuale di installazione)2 - Selezionare Suono > Toni alti e premere OK.3 - Regolare il valore tramite (su) o (giù).4 - Premere BACK, ripetutamente se necessario,per chiudere il menu.
Impostazioni audio avanzate
Modalità surround
Con Modalità surround, è possibile impostarel'effetto audio degli altoparlanti TV.
Per impostare la modalità surround…
1 - Modalità Consumer: On Premere HOME,selezionare Caratteristiche , quindi premere OK.Modalità Guest: On Menu Guest: non disponibilein questa modalità.(Per informazioni sulla modalità professionaleconsultare il manuale di installazione)2 - Selezionare Suono > Avanzate e premere OK.3 - Selezionare Modalità surround e premere OK.4 - Selezionare Stereo o Incredible surround.5 - Premere BACK, ripetutamente se necessario,per chiudere il menu.
40
Regolazione automatica volume
Con Regolazione automatica volume, è possibileimpostare il TV affinché livelli automaticamente ledifferenze di volume improvvise, che in genere siverificano all'inizio della pubblicità o quando si passada un canale all'altro.
Per attivare o disattivare la funzione…
1 - Modalità Consumer: On Premere HOME,selezionare Caratteristiche , quindi premere OK.Modalità Guest: On Menu Guest: non disponibilein questa modalità.(Per informazioni sulla modalità professionaleconsultare il manuale di installazione)2 - Selezionare Suono > Avanzate e premere OK.3 - Selezionare Regolazione automatica volume epremere OK.4 - Selezionare On o Off.5 - Premere BACK, ripetutamente se necessario,per chiudere il menu.
Audio nitido
Con Clear Sound, è possibile migliorare l'audio dellavoce. Si tratta della soluzione ideale per i telegiornali.Questa opzione può essere attivata o disattivata.
Per attivare o disattivare la funzione…
1 - Modalità Consumer: On Premere HOME,selezionare Caratteristiche , quindi premere OK.Modalità Guest: On Menu Guest: non disponibilein questa modalità.(Per informazioni sulla modalità professionaleconsultare il manuale di installazione)2 - Selezionare Suono > Avanzate e premere OK.3 - Selezionare Clear Sound e premere OK.4 - Selezionare On o Off.5 - Premere BACK, ripetutamente se necessario,per chiudere il menu.
Formato Audio Out
1 - Modalità Consumer: On Premere HOME,selezionare Caratteristiche , quindi premere OK.Modalità Guest: On Menu Guest: non disponibilein questa modalità.(Per informazioni sulla modalità professionaleconsultare il manuale di installazione)2 - Selezionare Suono > Avanzate e premere OK.3 - Selezionare Formato Audio Out e premere OK.4 - Selezionare Multicanale o Stereo.5 - Premere BACK, ripetutamente se necessario,per chiudere il menu.
Regolazione Audio Out
1 - Modalità Consumer: On Premere HOME,selezionare Caratteristiche , quindi premere OK.Modalità Guest: On Menu Guest: non disponibilein questa modalità.(Per informazioni sulla modalità professionaleconsultare il manuale di installazione)2 - Selezionare Suono > Avanzate e premere OK.3 - Selezionare Regolazione Audio Out epremere OK.4 - Selezionare Più, Media o Meno.5 - Premere BACK, ripetutamente se necessario,per chiudere il menu.
Ritardo Audio Out
Se si imposta un ritardo di sincronizzazione audio sulsistema Home Theatre, per sincronizzare suono eimmagini è necessario disattivare Ritardo Audio Outsul TV.
Per disattivare Ritardo Audio Out...
1 - Modalità Consumer: On Premere HOME,selezionare Caratteristiche , quindi premere OK.Modalità Guest: On Menu Guest: non disponibilein questa modalità.(Per informazioni sulla modalità professionaleconsultare il manuale di installazione)2 - Selezionare Suono > Avanzate e premere OK.3 - Selezionare Ritardo Audio Out e premere OK.4 - Selezionare Off o On.5 - Premere BACK, ripetutamente se necessario,per chiudere il menu.
Bilanciamento Audio Out
Se non si riesce a impostare un ritardo sul sistemaHome Theatre, è possibile impostare un ritardo sul TVcon Bilanciamento Audio Out.
Per sincronizzare il suono sul televisore…
1 - Modalità Consumer: On Premere HOME,selezionare Caratteristiche , quindi premere OK.Modalità Guest: On Menu Guest: non disponibilein questa modalità.(Per informazioni sulla modalità professionaleconsultare il manuale di installazione)2 - Selezionare Suono > Avanzate e premere OK.3 - Selezionare Bilanciamento Audio Out epremere OK.4 - Utilizzare la barra di scorrimento per impostare ilbilanciamento audio e premere OK.5 - Premere BACK, ripetutamente se necessario,
41
per chiudere il menu.
Altoparlanti
Altoparlanti wireless
Cosa serve?
È possibile collegare un dispositivo wireless conBluetooth® al televisore, ad esempio un altoparlantewireless, un subwoofer, una sound bar o delle cuffie.È possibile collegare anche un gamepad wireless alBluetooth LE.
Per riprodurre l'audio del televisore su un altoparlantewireless, è necessario associarlo al televisore. Èpossibile associare alcuni altoparlanti wireless e unmassimo di 4 dispositivi Bluetooth LE (Low Energy, abasso consumo). Il TV è in grado di riprodurre l'audiosu un solo altoparlante wireless alla volta. Se sicollega un subwoofer, l'audio viene riprodotto sul TVe sul subwoofer. Se si collega una sound bar, l'audioviene riprodotto solo sulla sound bar.
Attenzione - Sincronizzazione audio-video
Molti sistemi di altoparlanti Bluetooth hanno unacosiddetta "latenza" elevata. Una latenza elevatasignifica che l'audio è più lento rispetto al video, il cheprovoca una mancata "sincronizzazione labiale".Prima di acquistare un sistema di altoparlantiBluetooth wireless, informarsi sui modelli più recenti ecercare un dispositivo con classificazione di bassalatenza. Chiedere consiglio al proprio rivenditore.
È possibile collegare una vasta gamma di altoparlantiwireless Philips per riprodurre l'audio del televisore.Per i prodotti audio wireless adatti a questotelevisore, visitare il sito Web Philipsall'indirizzo www.philips.com/tv
Selezione di un altoparlante
Per collegare un altoparlante wireless...
1 - Modalità Consumer: On Premere HOME,selezionare Caratteristiche , quindi premere OK.Modalità Guest: On MenuGuest: Premere HOME,selezionare Caratteristiche , quindi premere OK.(Per informazioni sulla modalità professionaleconsultare il manuale di installazione)2 - Selezionare Suono > Audio Bluetooth epremere OK.3 - Selezionare Connetti e premere OK.4 - Premere BACK, ripetutamente se necessario,per chiudere il menu.
Rimozione di un altoparlante
Per rimuovere un altoparlante wireless...
1 - Modalità Consumer: On Premere HOME,selezionare Caratteristiche , quindi premere OK.Modalità Guest: On MenuGuest: Premere HOME,selezionare Caratteristiche , quindi premere OK.(Per informazioni sulla modalità professionaleconsultare il manuale di installazione)2 - Selezionare Suono > Audio Bluetooth epremere OK.3 - Selezionare Rimuovi e premere OK.4 - Premere BACK, ripetutamente se necessario,per chiudere il menu.
Cuffie wireless
Per collegare dispositivi audio Bluetooth, ad esempiocuffie Bluetooth, assicurarsi che la funzione Bluetoothsia attiva.
Per attivare il Bluetooth…
1 - Modalità Consumer: On Premere HOME,selezionare Caratteristiche , quindi premere OK.Modalità Guest: On MenuGuest: Premere HOME,selezionare Caratteristiche , quindi premere OK.(Per informazioni sulla modalità professionaleconsultare il manuale di installazione)2 - Selezionare Suono e premere OK.3 - Selezionare Audio Bluetooth e premere OK.4 - Selezionare Connetti e premere OK.5 - Premere BACK, ripetutamente se necessario,per chiudere il menu.
Volume subwoofer
Per regolare il volume dell'altoparlante wireless...
1 - Modalità Consumer: On Premere HOME,selezionare Caratteristiche , quindi premere OK.Modalità Guest: On Menu Guest: non disponibilein questa modalità.(Per informazioni sulla modalità professionaleconsultare il manuale di installazione)2 - Selezionare Suono > Audio Bluetooth epremere OK.3 - Selezionare Livello subwoofer e premere OK.4 - Regolare il valore tramite (su) o (giù).5 - Premere BACK, ripetutamente se necessario,per chiudere il menu.
42

Problemi
Connessione persa • Posizionare l'altoparlante wireless a una distanza di5 metri dal TV.• Luoghi con elevata attività wireless (ad esempioappartamenti con molti router wireless) possonocompromettere la qualità del collegamento wireless.Posizionare il router e l'altoparlante wireless il piùvicino possibile al TV.
Discrepanza tra audio e video • Alcuni sistemi di altoparlanti wireless possonopresentare problemi di sincronizzazione audio evideo. Si consiglia di utilizzare prodotti audio wirelessPhilips.
15.3
Consumo energetico,controllo
Spegnimento schermo
Se si ascolta solo musica, è possibile disattivare loschermo TV per risparmiare energia.
Per disattivare solo lo schermo TV…
1 - Modalità Consumer: On Premere HOME,selezionare Caratteristiche , quindi premere OK.Modalità Guest: On MenuGuest: Premere HOME,selezionare Caratteristiche , quindi premere OK.(Per informazioni sulla modalità professionaleconsultare il manuale di installazione)2 - Selezionare Impostazioni Eco > Spegnimentoschermo.3 - Premere BACK, ripetutamente se necessario,per chiudere il menu.
Per riaccendere lo schermo, premere un tastoqualsiasi sul telecomando.
Spegnimento automatico
La funzione di spegnimento automatico consente diimpostare il televisore per il passaggio automaticoalla modalità standby dopo un periodo di tempospecificato.
Per impostare la funzione di sleeptimer. . .
1 - Premere HOME,selezionare Caratteristiche*, quindi premere OK.*Modalità Consumer: On Impostazioni*Modalità Guest: On Menu Guest (Per informazioni sulla modalità professionaleconsultare il manuale di installazione)2 - Selezionare Impostazioni Eco* > Sleep Timer.
*Modalità Consumer:On HOME > Impostazioni Eco*Modalità Guest: On Selezionare Impostazioni Eco> Sleep Timer. (Per informazioni sulla modalità professionaleconsultare il manuale di installazione)La barra di scorrimento consente di impostare iltempo massimo fino a 240 minuti in incrementi di 30minuti. Se l'impostazione è Off, la funzione SleepTimer viene disattivata. È comunque possibilespegnere il televisore prima o reimpostare il tempodurante il conto alla rovescia.3 - Premere BACK, ripetutamente se necessario,per chiudere il menu.
15.4
Impostazioni generali
EasyLink
EasyLink
Per disattivare completamente EasyLink…
1 - Modalità Consumer: On Premere HOME,selezionare Caratteristiche , quindi premere OK.Modalità Guest: On Menu Guest: non disponibilein questa modalità.(Per informazioni sulla modalità professionaleconsultare il manuale di installazione)2 - Selezionare Sorgenti > Avanzate e premere OK.3 - Selezionare EasyLink,premere OK, quindi selezionare ancora unavolta EasyLink.4 - Selezionare Off.5 - Premere BACK, ripetutamente se necessario,per chiudere il menu.
Telecomando EasyLink
Per spegnere il telecomando EasyLink...
1 - Modalità Consumer: On Premere HOME,selezionare Caratteristiche , quindi premere OK.Modalità Guest: On Menu Guest: non disponibilein questa modalità.(Per informazioni sulla modalità professionaleconsultare il manuale di installazione)2 - Selezionare Sorgenti > Avanzate e premere OK.3 - Selezionare EasyLink,premere OK, quindi selezionare ancora unavolta EasyLink.4 - Selezionare Telecomando EasyLink epremere OK.
43
5 - Selezionare Off.6 - Premere BACK, ripetutamente se necessario,per chiudere il menu.
Impostazioni Android
È possibile configurare o visualizzare diverseinformazioni o impostazioni specifiche di Android. Èpossibile individuare l'elenco delle applicazioniinstallate sul TV e lo spazio di archiviazionenecessario. È possibile configurare la tastiera suschermo o consentire alle applicazioni di utilizzare lapropria posizione. Esplorare le diverse impostazioni diAndroid. Per ulteriori informazioni su questeimpostazioni, è possibile accedere al sitoWeb www.support.google.com/androidtv.
Per aprire queste impostazioni…
1 - Modalità Consumer: On Premere HOME,selezionare Caratteristiche , quindi premere OK.Modalità Guest: On Menu Guest: non disponibilein questa modalità.(Per informazioni sulla modalità professionaleconsultare il manuale di installazione)2 - Selezionare Impostazioni Android epremere OK. 3 - Esplorare le diverse impostazioni di Android.4 - Premere BACK, ripetutamente se necessario,per chiudere il menu.
Impostazioni tastiera USB
Per installare la tastiera USB, accendere il TV ecollegare la tastiera a un collegamento USB del TV.Quando il televisore rileva la tastiera per la primavolta, è possibile selezionare il layout della tastiera eprovare la selezione. Se si seleziona un layout dellatastiera con caratteri cirillici o greci, è possibileselezionare un layout secondario con caratteri latini.
Per cambiare layout della tastiera quando ne è giàselezionato uno…
Modalità Consumer: On Non disponibile in questamodalità.Modalità Guest: On Menu Guest: non disponibilein questa modalità.(Per informazioni sulla modalità professionaleconsultare il manuale di installazione)
HbbTV
Se un canale TV offre pagine HbbTV, azionare primaHbbTV nelle impostazioni TV per visualizzare lepagine.
1 - Modalità Consumer: On Premere HOME,selezionare Caratteristiche , quindi premere OK.Modalità Guest: On Menu Guest: non disponibilein questa modalità.(Per informazioni sulla modalità professionaleconsultare il manuale di installazione)2 - Selezionare Canali > Impostazioni canali epremere OK.3 - Selezionare Attiva Hbb TV e premere OK. 4 - Selezionare Sì.5 - Premere BACK, ripetutamente se necessario,per chiudere il menu.
Se non si desidera accedere alle pagine HbbTV su uncanale specifico, è possibile bloccare le pagineHbbTV relative solo a questo canale.
1 - Sintonizzarsi sul canale del quale si desiderabloccare le pagine HbbTV.2 - Premere OPTIONS e HBB TV su questocanale e premere OK.3 - Selezionare Spento e premere OK.
Posizione TV
Alla prima installazione, questa impostazione vieneregolata su Su supporto TV o Sulla parete. Se, nelfrattempo, è stata cambiata la posizione deltelevisore, regolare questa impostazione diconseguenza, per poter ottenere la miglioreriproduzione audio.
1 - Modalità Consumer: On Premere HOME,selezionare Caratteristiche , quindi premere OK.Modalità Guest: On Menu Guest: non disponibilein questa modalità.(Per informazioni sulla modalità professionaleconsultare il manuale di installazione)2 - Selezionare Suono > Posizione TV epremere OK.3 - Selezionare Su supporto TV o Sulla parete.4 - Premere BACK, ripetutamente se necessario,per chiudere il menu.
Logo canali
In alcuni Paesi, il televisore può mostrare i logo deicanali.Se non si desidera visualizzare i logo, è possibiledisattivarli.
Per disattivare i logo…
1 - Modalità Consumer: On Premere HOME,
44
selezionare Caratteristiche , quindi premere OK.Modalità Guest: On Menu Guest: non disponibilein questa modalità.(Per informazioni sulla modalità professionaleconsultare il manuale di installazione)2 - Selezionare Canali > Impostazioni canali epremere OK.3 - Selezionare Attiva logo canali e premere OK. 4 - Selezionare No .5 - Premere BACK, ripetutamente se necessario,per chiudere il menu.
Reinstalla TV
È possibile rieseguire un'installazione completa deltelevisore. Il televisore viene completamentereinstallato.
Per eseguire nuovamente un'installazione completadel televisore…
1 - Modalità Consumer: On Premere HOME,selezionare Caratteristiche , quindi premere OK.Modalità Guest: On Menu Guest: non disponibilein questa modalità.(Per informazioni sulla modalità professionaleconsultare il manuale di installazione)2 - Selezionare Ripristina > Reinstalla TV epremere OK.3 - Seguire le istruzioni visualizzate sullo schermo.L'installazione può richiedere alcuni minuti.
15.5
Orologio, Regione e lingua
Lingua menu
Per modificare la lingua dei menu e dei messaggi deltelevisore…
1 - Modalità Consumer: On Premere HOME,selezionare Caratteristiche , quindi premere OK.Modalità Guest: On Menu Guest: non disponibilein questa modalità.(Per informazioni sulla modalità professionaleconsultare il manuale di installazione)2 - Selezionare Regione e lingua > Lingue > Linguamenu e premere OK.3 - Selezionare Elenco lingue e premere OK.4 - Selezionare la lingua desiderata.5 - Premere BACK, ripetutamente se necessario,per chiudere il menu.
Preferenze per la lingua
impostazioni lingua audio
I canali televisivi digitali possono trasmettereprogrammi in varie lingue. È possibile impostare unalingua audio principale e secondaria preferita. Iltelevisore attiverà l'audio in una di queste lingue, sedisponibile.
Se nessuna delle lingue audio preferite è disponibile,è possibile selezionare un'altra lingua audio tra quelledisponibili.
Per impostare la lingua audio principale esecondaria…
1 - Modalità Consumer: On Premere HOME,selezionare Caratteristiche , quindi premere OK.Modalità Guest: On Menu Guest: non disponibilein questa modalità.(Per informazioni sulla modalità professionaleconsultare il manuale di installazione)2 - Selezionare Regione elingua > Lingue > Lingua audioprincipale o Lingua audio secondaria epremere OK.3 - Selezionare la lingua desiderata.4 - Premere BACK, ripetutamente se necessario,per chiudere il menu.
Per selezionare una lingua audio quando nessunadelle lingue audio preferite è disponibile…
1 - Premere OPTIONS .2 - Selezionare Lingua audio, quindi la lingua audioche si desidera utilizzare temporaneamente.
Sottotitoli
Accensione
Per attivare i sottotitoli premere SUBTITLE.
È possibile impostare le opzioni dei sottotitolisu On, Off o Acceso con audio disattivato.Oppure, per mostrare i sottotitoli durante la visione diun programma trasmesso in una lingua diversa dallapropria, ovvero quella impostata per il TV,selezionare Automatico. Questa impostazionemostrerà i sottotitoli automaticamente anche quandosi disattiva l'audio.
Impostazioni lingua sottotitoli
I canali digitali possono offrire diverse lingue deisottotitoli per un programma. È possibile impostareuna lingua principale e secondaria per i sottotitoli. Iltelevisore mostrerà i sottotitoli in una delle lingueimpostate, se disponibili.
45

Se nessuna delle lingue preferite per i sottotitoli èdisponibile, è possibile selezionare un'altra lingua deisottotitoli tra quelle disponibili.
Per impostare la lingua principale e secondaria deisottotitoli…
1 - Modalità Consumer: On Premere HOME,selezionare Caratteristiche , quindi premere OK.Modalità Guest: On Menu Guest: non disponibilein questa modalità.(Per informazioni sulla modalità professionaleconsultare il manuale di installazione)2 - Selezionare Regione elingua > Lingue > Lingua sottotitoliprincipale o Lingua sottotitoli secondaria epremere OK.3 - Selezionare la lingua desiderata.4 - Premere BACK, ripetutamente se necessario,per chiudere il menu.
Per selezionare una lingua dei sottotitoli quandonessuna delle lingue preferite è disponibile…
1 - Premere OPTIONS .2 - Selezionare Lingua sottotitoli e quindi la linguache si desidera visualizzare temporaneamente.
Sottotitoli dal servizio di televideo
Se ci si sintonizza su un canale analogico, ènecessario rendere disponibili manualmente isottotitoli per ciascun canale.
1 - Sintonizzarsi su un canale e premere TEXT peraprire il televideo.2 - Immettere il numero della pagina dei sottotitoli,solitamente 888.3 - Premere di nuovo TEXT per chiudere iltelevideo.
I sottotitoli attivati premendo On nel menu deisottotitoli durante la visione del canale analogicoverranno visualizzati, se disponibili.
Per verificare se un canale è analogico o digitale,sintonizzarsi sul canale e selezionare Infocanale in OPTIONS.
Lingue televideo
Pagine del televideo
Per aprire il televideo durante la visione dei canali TV,premere TEXT.Per chiudere il televideo, premere di nuovo TEXT.
Selezione di una pagina del televideo
Per selezionare una pagina . . .
1 - Immettere il numero della pagina desiderata con itasti numerici.
2 - Utilizzare i tasti freccia per spostarsi.3 - Per selezionare un argomento con codifica acolori nella parte inferiore dello schermo, premereuno dei tasti colorati.
Sottopagine del televideo
Un numero di pagina del televideo può contenere piùsottopagine. I numeri di sottopagina vengonovisualizzati su una barra accanto al numero di paginaprincipale.Per selezionare una sottopagina, premere o .
Elenco televideo T.O.P.
Alcune emittenti offrono il televideo T.O.P.Per aprire le pagine T.O.P. all'interno del televideo,premere OPTIONS e selezionare PanoramicaTOP
Pagine preferite
Il televisore crea un elenco delle ultime 10 pagine deltelevideo aperte. È possibile riaprirle agevolmentenella colonna Pagine del televideo preferite.
1 - Nel televideo, selezionare la stella nell'angolosuperiore sinistro dello schermo per visualizzare lacolonna delle pagine preferite.2 - Premere (giù) o (su) per selezionare unnumero di pagina e premere OK per aprire lapagina.È possibile cancellare l'elenco conl'opzione Cancella pagine preferite.
Ricerca nel televideo
È possibile selezionare una parola e cercare neltelevideo tutte le occorrenze di tale parola.
1 - Aprire una pagina del televideo e premere OK.2 - Selezionare una parola o un numero con i tastifreccia.3 - Premere nuovamente OK per passareimmediatamente all'occorrenza successiva dellaparola o del numero.4 - Premere di nuovo OK per passareall'occorrenza successiva.5 - Per interrompere la ricerca, premere (su) finoa quando non è selezionato niente.
Televideo da un dispositivo collegato
Anche alcuni dispositivi che ricevono i canali TVoffrono il servizio di televideo.Per aprire il televideo da un dispositivo collegato . . .
1 - Premere SOURCES, selezionare il dispositivo epremere OK.2 - Durante la visione di un canale sul dispositivo,premere OPTIONS , selezionare Mostra i tasti deldispositivo e selezionare il tasto , quindipremere OK.3 - Premere BACK per nascondere i tasti deldispositivo.4 - Per chiudere il televideo, premere dinuovo BACK.
46
MHEG (solo Regno Unito)
Alcune emittenti digitali offrono programmi con testodigitale o interattivi trasmessi direttamente sui canalitelevisivi digitali. Questi servizi funzionano come unnormale televideo mediante i tasti numerici, colorati efreccia per selezionare e spostarsi.
Per chiudere MHEG, premere BACK.
Opzioni del televideo
All'interno del televideo, premere OPTIONS perselezionare quanto segue...
• Blocca paginaConsente di interrompere la rotazione automaticadelle sottopagine.• Doppio programma/Schermo interoConsente di visualizzare il canale TV e il televideol'uno accanto all'altro.• Elenco T.O.P.Per aprire le pagine T.O.P.• IngrandisciConsente di ingrandire la pagina del televideo peruna lettura più confortevole.• RivelareConsente di mostrare le informazioni nascoste in unapagina.• Scorri sottopagineConsente di scorrere le sottopagine, se disponibili.• LinguaConsente di visualizzare correttamente i gruppi dicaratteri utilizzati dal televideo.• Televideo 2.5Consente di attivare il Televideo 2.5 per un maggiornumero di colori e una grafica migliore.
Impostazione del televideo
Lingua del televideo
Alcune emittenti televisive digitali offrono diverselingue per il televideo.Per impostare la lingua principale e secondaria deltelevideo . . .
1 - Modalità Consumer: On Premere HOME,selezionare Caratteristiche , quindi premere OK.Modalità Guest: On Menu Guest: non disponibilein questa modalità.(Per informazioni sulla modalità professionaleconsultare il manuale di installazione)2 - Selezionare Regione elingua > Lingue > Lingua televideoprincipale o Lingua televideo secondario epremere OK.3 - Selezionare le preferenze di lingua per iltelevideo.4 - Premere BACK, ripetutamente se necessario,
per chiudere il menu.
Televideo 2.5
Se disponibile, il televideo 2.5 offre più colori e unagrafica migliore. Il televideo 2.5 viene attivato comeimpostazione predefinita standard.Per disattivare il televideo 2.5…
1 - Premere TEXT.2 - Con il televideo aperto sullo schermo,premere OPTIONS.3 - Selezionare Televideo 2.5 > Off.4 - Premere BACK, ripetutamente se necessario,per chiudere il menu.
Orologio
Data e orario
Automatico
Per conoscere l'ora esatta, premere HOME.Il menu Home visualizza sempre l'ora esatta.
In alcuni paesi le trasmissioni digitali non invianodettagli UTC (Coordinated Universal Time). Lamodifica dell'ora legale, quindi, potrebbe essereignorata e il televisore potrebbe indicare un orariosbagliato.
Quando si registrano i programmi in palinsesto nellaGuida TV, si consiglia di non modificare l'ora e la datamanualmente. In alcuni Paesi,l'impostazione Orologio viene nascosta daglioperatori di rete per evitare che venga impostato unorario errato.
Per reimpostare automaticamente l'orologio del TV...
1 - Modalità Consumer: On Premere HOME,selezionare Caratteristiche , quindi premere OK.Modalità Guest: On Menu Guest: non disponibilein questa modalità.(Per informazioni sulla modalità professionaleconsultare il manuale di installazione)2 - Selezionare Data e orario > Sorgente epremere OK.3 - Selezionare NTP automatico.4 - Premere BACK, ripetutamente se necessario,per chiudere il menu.
Manuale
Per impostare manualmente l'orologio del TV...
1 - Modalità Consumer: On Premere HOME,selezionare Caratteristiche , quindi premere OK.Modalità Guest: On Menu Guest: non disponibilein questa modalità.(Per informazioni sulla modalità professionaleconsultare il manuale di installazione)
47
2 - Selezionare Data e orario > Impostazionemanuale data e ora e premere OK.3 - Selezionare la data e l' orario da regolare.4 - Premere BACK, ripetutamente se necessario,per chiudere il menu.
Fuso orario
Per impostare il fuso orario...
1 - Modalità Consumer: On Premere HOME,selezionare Caratteristiche , quindi premere OK.Modalità Guest: On Menu Guest: non disponibilein questa modalità.(Per informazioni sulla modalità professionaleconsultare il manuale di installazione)2 - Selezionare Data e orario > Impostazioni fusoorario e premere OK.3 - Selezionare Nazione fuso orario o Regione fusoorario e premere OK.4 - Selezionare un fuso orario.5 - Premere BACK, ripetutamente se necessario,per chiudere il menu.
15.6
Accesso universale
Accensione
Se si attiva Accesso universale, il televisore vienepredisposto per l'uso da parte di persone conproblemi di udito o di vista.
Accensione
Se l'opzione Accesso universale non è stata attivatadurante l'installazione, è possibile attivarla dal menu Accesso universale.Per attivare Accessibilità…
1 - Modalità Consumer: On Premere HOME,selezionare Caratteristiche , quindi premere OK.Modalità Guest: On Menu Guest: non disponibilein questa modalità.(Per informazioni sulla modalità professionaleconsultare il manuale di installazione)2 - Selezionare Accessibilità > Accessouniversale e premere OK.3 - Selezionare On e premere OK.4 - Premere BACK, ripetutamente se necessario,per chiudere il menu.
Con Accesso universale attivato, l'opzione Accessouniversale viene aggiunta al menu delle opzioni.
Ipoudenti
Alcuni canali televisivi digitali trasmettono audio esottotitoli speciali adatti a persone con handicapuditivi. Se Non udenti è attivato, il TV passaautomaticamente all'audio e ai sottotitoli speciali, sedisponibili. Prima di attivare la funzione Non udenti, ènecessario attivare Accesso universale.
Per attivare l'opzione Non udenti...
1 - Modalità Consumer: On Premere HOME,selezionare Caratteristiche , quindi premere OK.Modalità Guest: On Menu Guest: non disponibilein questa modalità.(Per informazioni sulla modalità professionaleconsultare il manuale di installazione)2 - Selezionare Accessibilità > Non udenti epremere OK.3 - Selezionare On e premere OK.4 - Premere BACK, ripetutamente se necessario,per chiudere il menu.
Per attivare Non udenti mentre si guarda il TV...
1 - Durante la visione di un canale TV,premere OPTIONS , selezionare Accessouniversale e premere OK.2 - Selezionare Non udenti, quindi On.
Per verificare se è disponibile una lingua audio pernon udenti, premere OPTIONS ,selezionare Lingua audio e cercare una lingua audiocontrassegnata con il simbolo .
Se Accessibilità non viene visualizzato nel menu delleopzioni, attivare Accesso universale nel menuImpostazioni.
Descrizione audio
Accensione
I canali TV digitali possono trasmettere commentiaudio speciali che descrivono ciò che accade sulloschermo. Per poter impostare l'audio e gli effetti per nonvedenti, è necessario attivare prima Descrizioneaudio. Inoltre, prima di attivare la Descrizione audio, ènecessario attivare Accesso universale nel menuImpostazioni.
L'opzione Descrizione audio consente di aggiungereil commento di un narratore all'audio normale.Per attivare i commenti (se disponibili)…
Per attivare Descrizione audio...
1 - Modalità Consumer: On Premere HOME,selezionare Caratteristiche , quindi premere OK.
48
Modalità Guest: On Menu Guest: non disponibilein questa modalità.(Per informazioni sulla modalità professionaleconsultare il manuale di installazione)2 - Selezionare Accessibilità > Descrizione audio epremere OK.3 - Selezionare ancora una volta Descrizione audio.4 - Selezionare On e premere OK.5 - Premere BACK, ripetutamente se necessario,per chiudere il menu.
Per attivare Descrizione audio mentre si guarda laTV...
1 - Durante la visione di un canale TV,premere OPTIONS , selezionare Accessouniversale e premere OK.2 - Selezionare Descrizione audio, quindi On.
È possibile verificare se è disponibile un commentoaudio.Nel menu Opzioni, selezionare Lingua audio ecercare una lingua audio contrassegnata con ilsimbolo .
Altoparlanti/cuffia
Con Altoparlanti/Cuffia, è possibile scegliere dadove si desidera ascoltare i commenti audio. solo dagli altoparlanti del televisore, solo dalle cuffieo da entrambi.
Per impostare Altoparlanti/cuffia…
1 - Modalità Consumer: On Premere HOME,selezionare Caratteristiche , quindi premere OK.Modalità Guest: On Menu Guest: non disponibilein questa modalità.(Per informazioni sulla modalità professionaleconsultare il manuale di installazione)2 - Selezionare Accessibilità > Descrizioneaudio e premere OK.3 - Selezionare Altoparlanti/cuffia e premere OK.4 - Selezionare Altoparlanti, Cuffia o Altoparlanti+ Cuffia e premere OK.5 - Premere BACK, ripetutamente se necessario,per chiudere il menu.
Volume misto
È possibile combinare il volume dell'audio normalecon i commenti audio.
Per combinare il volume…
1 - Modalità Consumer: On Premere HOME,selezionare Caratteristiche , quindi premere OK.Modalità Guest: On Menu Guest: non disponibilein questa modalità.(Per informazioni sulla modalità professionale
consultare il manuale di installazione)2 - Selezionare Accessibilità > Descrizioneaudio e premere OK.3 - Selezionare Volume misto e premere OK.4 - Regolare il valore tramite (su) o (giù).5 - Premere BACK, ripetutamente se necessario,per chiudere il menu.
Se è disponibile una lingua audio con commentiaudio aggiuntivi, è possibile trovare questaimpostazione in OPTIONS > Accessouniversale > Volume misto.
Effetti audio
Alcuni commenti audio possono disporre di effettiaudio aggiuntivi, come quello stereo o dissolvenza.
Per attivare Effetti audio (se disponibile)...
1 - Modalità Consumer: On Premere HOME,selezionare Caratteristiche , quindi premere OK.Modalità Guest: On Menu Guest: non disponibilein questa modalità.(Per informazioni sulla modalità professionaleconsultare il manuale di installazione)2 - Selezionare Accessibilità > Descrizioneaudio e premere OK.3 - Selezionare Effetti audio e premere OK.4 - Selezionare On e premere OK.5 - Premere BACK, ripetutamente se necessario,per chiudere il menu.
Vocale
I commenti audio possono anche disporre disottotitoli per le parole dei discorsi.
Per attivare questo tipo di sottotitoli (se disponibili) . . .
1 - Modalità Consumer: On Premere HOME,selezionare Caratteristiche , quindi premere OK.Modalità Guest: On Menu Guest: non disponibilein questa modalità.(Per informazioni sulla modalità professionaleconsultare il manuale di installazione)2 - Selezionare Accessibilità > Descrizioneaudio e premere OK.3 - Selezionare Voce e premere OK.4 - Selezionare Descrittivo o Sottotitoli epremere OK.5 - Premere BACK, ripetutamente se necessario,per chiudere il menu.
49

16
Installazione canale16.1
Installazione viaantenna/cavo
Aggiorna canali
Aggiornamento automatico canali
Se si ricevono canali digitali, è possibile impostare iltelevisore in modo da aggiornare automaticamentel'elenco.
Una volta al giorno, alle ore 4, il televisore aggiorna icanali e salva quelli nuovi. I nuovi canali vengonomemorizzati nell'elenco canali e sono contrassegnaticon un . I canali senza un segnale vengonorimossi. Per l'aggiornamento automatico dei canali, iltelevisore deve trovarsi in modalità standby. Èpossibile disattivare l'aggiornamento automaticocanali.
Per disattivare l'aggiornamento automatico…
1 - Modalità Consumer: On Non disponibile inquesta modalità.Modalità Guest: On Menu Guest: non disponibilein questa modalità.(Per informazioni sulla modalità professionaleconsultare il manuale di installazione)
Se vengono rilevati nuovi canali o se i canali vengonoaggiornati o rimossi, viene visualizzato un messaggioall'avvio del televisore. Per evitare che questomessaggio compaia dopo ogni aggiornamento deicanali, è possibile disattivarlo.
Per disattivare il messaggio…
1 - Modalità Consumer: On Non disponibile inquesta modalità.Modalità Guest: On Menu Guest: non disponibilein questa modalità.(Per informazioni sulla modalità professionaleconsultare il manuale di installazione)
In alcuni Paesi, l'aggiornamento automatico dei canaliviene eseguito durante la visione di un programma oquando il televisore si trova in modalità standby.
Qualità ricezione
Se si ricevono canali digitali, è possibile verificare laqualità e l'intensità del segnale di un canale. Se sidispone di un'antenna propria, è possibileriposizionarla per provare a migliorare la ricezione.
Per controllare la qualità della ricezione di un canaledigitale…
1 - Modalità Consumer: On Premere HOME,selezionare Caratteristiche , quindi premere OK.Modalità Guest: On Menu Guest: non disponibilein questa modalità.(Per informazioni sulla modalità professionaleconsultare il manuale di installazione)2 - Selezionare Canali > Installazione canali RF epremere OK.3 - Immettere il codice PIN, se necessario.4 - Selezionare Digitale: test ricezione epremere OK.5 - Selezionare DVB-T Ricerca o Ricerca DVB-C epremere OK. Viene mostrata la frequenza digitaledel canale sintonizzato.6 - Selezionare nuovamente Ricerca epremere OK per verificare la qualità del segnale perquesta frequenza. Il risultato del test vienevisualizzato sullo schermo. Per migliorareeventualmente la ricezione, è possibile riposizionarel'antenna o verificare i collegamenti.7 - È inoltre possibile modificare personalmente lafrequenza. Selezionare il numero di frequenza unoalla volta e utilizzare i tasti (su) o (giù) permodificare il valore. Per eseguire nuovamente il testsulla ricezione, selezionare Ricerca e premere OK.8 - Premere BACK, ripetutamente se necessario,per chiudere il menu.
Reinstalla canali
Reinstallazione di tutti i canali
È possibile reinstallare tutti i canali lasciando invariatetutte le altre impostazioni del televisore.
Se è stato impostato un codice PIN, è necessarioimmettere tale codice prima di eseguire lareinstallazione dei canali.
Per reinstallare i canali…
1 - Modalità Consumer: On Premere HOME,selezionare Caratteristiche , quindi premere OK.Modalità Guest: On Menu Guest: non disponibilein questa modalità.(Per informazioni sulla modalità professionaleconsultare il manuale di installazione)2 - Selezionare Canali > Installazione canali RF epremere OK.3 - Immettere il codice PIN, se necessario.4 - Selezionare Cerca canali e premere OK.
50
5 - Selezionare Avvia e premere OK.6 - Selezionare Reinstalla canali,selezionare Avanti e premere OK.7 - Selezionare il Paese in cui ci si trova in quelmomento e premere OK.8 - Selezionare Avanti e premere OK.9 - Selezionare il tipo di installazione desiderato,ossia Antenna (DVB-T) o Cavo (DVB-C), epremere OK.8 - Selezionare Avanti e premere OK.11 - Selezionare il tipo di canali desiderato,ossia Canali digitali e analogici o Solo canalidigitali, e premere OK.8 - Selezionare Avanti e premere OK.13 - Selezionare Avvia e premere OK peraggiornare i canali digitali. L'operazione puòrichiedere alcuni minuti.14 - Premere BACK, ripetutamente senecessario, per chiudere il menu.
Reinstalla TV
È possibile rieseguire un'installazione completa deltelevisore. Il televisore viene completamentereinstallato.
Per eseguire nuovamente un'installazione completadel televisore…
1 - Modalità Consumer: On Premere HOME,selezionare Caratteristiche , quindi premere OK.Modalità Guest: On Menu Guest: non disponibilein questa modalità.(Per informazioni sulla modalità professionaleconsultare il manuale di installazione)2 - Selezionare Ripristina e premere OK.3 - Selezionare Reinstalla TV e premere OK.4 - Immettere il codice PIN, se necessario.5 - Selezionare Sì e premere OK per confermare.6 - Verrà eseguita la reinstallazione completa del TV.Tutte le impostazioni verranno ripristinate e i canaliinstallati verranno sostituiti. L'installazione puòrichiedere alcuni minuti.7 - Premere BACK, ripetutamente se necessario,per chiudere il menu.
Installazione manuale
I canali televisivi analogici possono essere installatimanualmente uno alla volta.
Per installare manualmente i canali analogici…
1 - Modalità Consumer: On Premere HOME,selezionare Caratteristiche , quindi premere OK.Modalità Guest: On Menu Guest: non disponibilein questa modalità.(Per informazioni sulla modalità professionaleconsultare il manuale di installazione)2 - Selezionare Canali > Installazione canali RF e
premere OK.3 - Immettere il codice PIN, se necessario.4 - Selezionare Analogico: installazione manuale epremere OK.
• SistemaPer impostare il sistema TV, selezionare Sistema.Selezionare il Paese o l'area geografica in cui ci sitrova in quel momento e premere OK.
• Cerca canalePer trovare un canale, selezionare Cerca canale epremere OK. È possibile immettere personalmenteuna frequenza per trovare un canale o attivare laricerca automatica di un canale sul TV.Premere (destra) per selezionare Ricerca epremere OK per cercare automaticamente uncanale. Il canale trovato viene visualizzato sulloschermo; se la ricezione non è ottimale, premerenuovamente Ricerca. Se si desidera memorizzare ilcanale, selezionare Compiuto e premere OK.
• MemorizzaUn canale può essere salvato nella posizione correnteo in corrispondenza di un nuovo numero di canale.Selezionare Memorizza canale attivo o Memorizzacome nuovo canale e premere OK. Vienevisualizzato brevemente il nuovo numero di canale.
È possibile effettuare nuovamente questi passaggifinché non sono stati trovati tutti i canali televisivianalogici disponibili.
51

17
Software17.1
Aggiorna software
Aggiornamento da USB
Potrebbe essere necessario aggiornare il software deltelevisore. Utilizzare un computer con connessione aInternet ad alta velocità e un'unità flash USB percaricare il software sul televisore. Utilizzare un'unitàflash USB con 500 MB di spazio libero. Accertarsi chela protezione da scrittura sia disattivata.
Per aggiornare il software del televisore…
1 - Modalità Consumer: On Premere HOME,selezionare Caratteristiche , quindi premere OK.Modalità Guest: On Menu Guest: non disponibilein questa modalità.(Per informazioni sulla modalità professionaleconsultare il manuale di installazione)2 - Selezionare Aggiorna e clona > Aggiornamentodel firmware da USB e premere OK.
Download del software 1 - Inserire l'unità flash USB nel computer.2 - Nell'unità flash USB, individuare ilfile update.htm e fare doppio clic su di esso.3 - Fare clic su Invia ID.4 - Se è disponibile il nuovo software, scaricare il file.zip.5 - Una volta completato il download, decomprimereil file scaricato e copiare il file autorun.upg sull'unitàflash USB. Non salvare il file in una cartella.
Aggiornamento del software del televisore 1 - Inserire nuovamente l'unità flash USB neltelevisore. L'aggiornamento viene avviatoautomaticamente.2 - L'aggiornamento software può richiedere alcuniminuti. Non premere il tasto sul televisore o sultelecomando. Non rimuovere l'unità flash USB.3 - Al termine dell'aggiornamento, il televisore tornaal canale visualizzato in precedenza.
Se durante l'aggiornamento si verifica un'interruzionedi corrente, non scollegare l'unità flash USB daltelevisore. Una volta ripristinata la corrente, iltelevisore proseguirà con l'aggiornamento.
Per evitare un aggiornamento accidentale delsoftware del televisore, eliminare il file autorun.upgdall'unità flash USB.
17.2
Software open sourceQuesto televisore utilizza software open source. TPVision Europe B.V., su richiesta, può consegnare unacopia del codice sorgente completo per i pacchettisoftware open source utilizzati in questo prodotto eprotetti da copyright, per i quali tale offerta è richiestadalle rispettive licenze.
Questa offerta è valida fino a 3 anni a partire dalladata di acquisto del prodotto per chiunque sia inpossesso delle suddette informazioni.Per ottenere il codice sorgente, scrivere in inglese alseguente indirizzo: . .
17.3
Dichiarazione licenza opensourceFile README per il codice sorgente delle parti delsoftware televisivo TP Vision Netherlands B.V.concesse su licenze di tipo open source.
Questo documento descrive la distribuzione delcodice sorgente utilizzato sul software televisivo TPVision Netherlands B.V., che rientra nella Licenzapubblica generica GNU (GPL) o nella Licenzapubblica generica attenuata GNU (LGPL) o inqualsiasi altra licenza open source. Le istruzioni perottenere copie del software possono essere reperitenelle istruzioni per l'uso.
TP Vision Netherlands B.V. NON OFFRE ALCUNAGARANZIA, ESPRESSA O IMPLICITA, INCLUSEGARANZIE DI COMMERCIABILITÀ O IDONEITÀ A UNPARTICOLARE SCOPO, PER CIÒ CHE CONCERNE ILSOFTWARE. TP Vision Netherlands B.V. non offreassistenza per il software. Quanto appena espressonon riguarda le garanzie e i diritti statutari derivantidall'acquisto dei prodotti TP Vision Netherlands B.V. Èapplicabile solo al codice sorgente messo adisposizione.
17.4
Open Source LicenseAndroid (5.1.0)
This TV contains the Android Lollipop Software.Android is a Linux-based operating system designedprimarily for touch screen mobile devices such assmartphones and tablet computers. This software willalso be reused in TPVision Android based TV's. Theoriginal download site for this software is :
52

https://android.googlesource.com/This piece ofsoftware is made available under the terms andconditions of the Apache license version 2, which canbe found below. Android APACHE License Version 2(http://source.android.com/source/licenses.html)
Toolbox (N/A)
The original download site for this software is :https://android.googlesource.com/This piece ofsoftware is made available under the terms andconditions of the Apache license version 2, which canbe found below. Android APACHE License Version 2(http://source.android.com/source/licenses.html)
linux kernel (3.10.27)
This TV contains the Linux Kernel. The originaldownload site for this software is :http://www.kernel.org/.This piece of software is madeavailable under the terms and conditions of the GPLv2 license, which can be found below. Additionally,following exception applies : "NOTE! This copyrightdoes *not* cover user programs that use kernelservices by normal system calls - this is merelyconsidered normal use of the kernel, and does *not*fall under the heading of "derived work". Also notethat the GPL below is copyrighted by the FreeSoftware Foundation, but the instance of code that itrefers to (the linux kernel) is copyrighted by me andothers who actually wrote it. Also note that the onlyvalid version of the GPL as far as the kernel isconcerned is _this_ particular version of the license (iev2, not v2.2 or v3.x or whatever), unless explicitlyotherwise stated. Linus Torvalds"
libcurl (7.21.7)
libcurl is a free and easy-to-use client-side URLtransfer library, supporting DICT, FILE, FTP, FTPS,Gopher, HTTP, HTTPS, IMAP, IMAPS, LDAP, LDAPS,POP3, POP3S, RTMP, RTSP, SCP, SFTP, SMTP,SMTPS, Telnet and TFTP. libcurl supports SSLcertificates, HTTP POST, HTTP PUT, FTP uploading,HTTP form based upload, proxies, cookies,user+password authentication (Basic, Digest, NTLM,Negotiate, Kerberos), file transfer resume, http proxytunneling and more! The original download site forthis software is :http://curl.haxx.se/libcurl/COPYRIGHT ANDPERMISSION NOTICE
Copyright (c) 1996 - 2010, Daniel Stenberg,[email protected] rights reserved. Permission to use,copy, modify, and distribute this software for anypurpose with or without fee is hereby granted,provided that the above copyright notice and thispermission notice appear in all copies. THESOFTWARE IS PROVIDED "AS IS", WITHOUT
WARRANTY OF ANY KIND, EXPRESS ORIMPLIED,INCLUDING BUT NOT LIMITED TO THE WARRANTIESOF MERCHANTABILITY,FITNESS FOR A PARTICULARPURPOSE AND NONINFRINGEMENT OF THIRDPARTY RIGHTS. INNO EVENT SHALL THE AUTHORSOR COPYRIGHT HOLDERS BE LIABLE FOR ANYCLAIM,DAMAGES OR OTHER LIABILITY, WHETHER INAN ACTION OF CONTRACT, TORT OROTHERWISE,ARISING FROM, OUT OF OR IN CONNECTION WITHTHE SOFTWARE OR THE USEOR OTHER DEALINGSIN THE SOFTWARE. Except as contained in thisnotice, the name of a copyright holder shall not beused in advertising or otherwise to promote the sale,use or other dealings in this Software without priorwritten authorization of the copyright holder.
libfreetype (2.4.2)
FreeType is a software development library, availablein source and binary forms, used to render text on tobitmaps and provides support for other font-relatedoperations
The original download site for this software is : https://github.com/julienr/libfreetype-androidFreetypeLicense
libjpeg (8a)
This package contains C software to implement JPEGimage encoding, decoding, and transcoding. Thissoftware is based in part on the work of theIndependent JPEG Group.
The authors make NO WARRANTY or representation,either express or implied, with respect to thissoftware, its quality, accuracy, merchantability, orfitness for a particular purpose. This software isprovided "AS IS", and you, its user, assume the entirerisk as to its quality and accuracy. This software iscopyright (C) 1991-1998, Thomas G. Lane. All RightsReserved except as specified below. Permission ishereby granted to use, copy, modify, and distributethis software (or portions thereof) for any purpose,without fee, subject to these conditions:(1) If any partof the source code for this software is distributed,then this README file must be included, with thiscopyright and no-warranty notice unaltered; and anyadditions, deletions, or changes to the original filesmust be clearly indicated in accompanyingdocumentation.(2) If only executable code isdistributed, then the accompanying documentationmust state that "this software is based in part on thework of the Independent JPEG Group".(3) Permissionfor use of this software is granted only if the useraccepts full responsibility for any undesirableconsequences; the authors accept NO LIABILITY fordamages of any kind. These conditions apply to anysoftware derived from or based on the IJG code, notjust to the unmodified library. If you use our work, you
53
ought to acknowledge us. Permission is NOT grantedfor the use of any IJG author's name or companyname in advertising or publicity relating to thissoftware or products derived from it. This softwaremay be referred to only as "the Independent JPEGGroup's software". We specifically permit andencourage the use of this software as the basis ofcommercial products, provided that all warranty orliability claims are assumed by the product vendor.
libpng (1.4.1)
libpng is the official Portable Network Graphics (PNG)reference library (originally called pnglib). It is aplatform-independent library that contains Cfunctions for handling PNG images. It supports almostall of PNG's features, is extensible. The originaldownload site for this software is :https://github.com/julienr/libpng-androidlibpnglicense
openssl (1.0.1j)
OpenSSL is an open-source implementation of theSSL and TLS protocols. The core library, written in theC programming language, implements the basiccryptographic functions and provides various utilityfunctions. The original download site for this softwareis : http://openssl.org/OpenSSL license
Zlib compression library (1.2.7)
zlib is a general purpose data compression library. Allthe code is thread safe. The data format used by thezlib library is described by RFCs (Request forComments) 1950 to 1952 in the fileshttp://tools.ietf.org/html/rfc1950 (zlib format), rfc1951(deflate format) and rfc1952 (gzip format) Developedby Jean-loup Gailly and Mark Adler(C) 1995-2012Jean-loup Gailly and Mark Adler This software isprovided 'as-is', without any express or impliedwarranty. In no event will the authors be held liablefor any damages arising from the use of this software.Permission is granted to anyone to use this softwarefor any purpose, including commercial applications,and to alter it and redistribute it freely, subject to thefollowing restrictions: 1. The origin of this softwaremust not be misrepresented; you must not claim thatyou wrote the original software. If you use thissoftware in a product, an acknowledgment in theproduct documentation would be appreciated but isnot required. 2. Altered source versions must beplainly marked as such, and must not bemisrepresented as being the original software. 3. Thisnotice may not be removed or altered from anysource distribution. Jean-loup Gailly Mark [email protected] [email protected]
dvbsnoop (1.2)
dvbsnoop is a DVB / MPEG stream analyzer program.For generating CRC32 values required for composingPAT, PMT, EIT sections
The original download site for this software is : https://github.com/a4tunado/dvbsnoop/blob/master/src/misc/crc32.cGPL v2http://dvbsnoop.sourceforge.net/dvbsnoop.html
ezxml (0.8.6)
ezXML is a C library for parsing XML documents.
The original download site for this software is :http://ezxml.sourceforge.net.Copyright 2004, 2005Aaron Voisine. This piece of software is madeavailable under the terms and conditions of the MITlicense, which can be found below.
gSoap (2.7.15)
The gSOAP toolkit is an open source C and C++software development toolkit for SOAP/XML Webservices and generic (non-SOAP) C/C++ XML databindings. Part of the software embedded in thisproduct is gSOAP software. Portions created bygSOAP are Copyright 2001-2009 Robert A. vanEngelen, Genivia inc. All Rights Reserved. THESOFTWARE IN THIS PRODUCT WAS IN PARTPROVIDED BY GENIVIA INC AND ANY EXPRESS ORIMPLIED WARRANTIES, INCLUDING, BUT NOTLIMITED TO, THE IMPLIED WARRANTIES OFMERCHANTABILITY AND FITNESS FOR APARTICULAR PURPOSE ARE DISCLAIMED. IN NOEVENT SHALL THE AUTHOR BE LIABLE FOR ANYDIRECT, INDIRECT, INCIDENTAL, SPECIAL,EXEMPLARY, OR CONSEQUENTIAL DAMAGES(INCLUDING, BUT NOT LIMITED TO, PROCUREMENTOF SUBSTITUTE GOODS OR SERVICES; LOSS OFUSE, DATA, OR PROFITS; OR BUSINESSINTERRUPTION) HOWEVER CAUSED AND ON ANYTHEORY OF LIABILITY, WHETHER IN CONTRACT,STRICT LIABILITY, OR TORT (INCLUDINGNEGLIGENCE OR OTHERWISE) ARISING IN ANY WAYOUT OF THE USE OF THIS SOFTWARE, EVEN IFADVISED OF THE POSSIBILITY OF SUCH DAMAGE.
restlet (2.1.7)
Restlet is a lightweight, comprehensive, open sourceREST framework for the Java platform. Rest let issuitable for both server and client Web applications. Itsupports major Internet transport, data format, andservice description standards like HTTP and HTTPS,SMTP, XML, JSON, Atom, and WADL. The originaldownload site for this software is :http://restlet.orgThis piece of software is madeavailable under the terms and conditions of the
54
Apache License version 2.
Opera Web Browser (SDK 3.5)
This TV contains Opera Browser Software.
dlmalloc (2.7.2)
Opera uses Doug Lea's memory allocator
The original download site for this software is :http://gee.cs.oswego.edu/dl/html/malloc.html
double-conversion
Opera uses double-conversion library by FlorianLoitsch, faster double : string conversions (dtoa andstrtod).The original download site for this software is : http://code.google.com/p/double-conversionCopyright 2006-2011, the V8 projectauthors. All rights reserved. Redistribution and use insource and binary forms, with or without modification,are permitted provided that the following conditionsare met: * Redistributions of source code must retainthe above copyright notice, this list of conditions andthe following disclaimer. * Redistributions in binaryform must reproduce the above copyright notice, thislist of conditions and the following disclaimer in thedocumentation and/or other materials provided withthe distribution. * Neither the name of Google Inc. northe names of its contributors may be used to endorseor promote products derived from this softwarewithout specific prior written permission. THISSOFTWARE IS PROVIDED BY THE COPYRIGHTHOLDERS AND CONTRIBUTORS"AS IS" AND ANYEXPRESS OR IMPLIED WARRANTIES, INCLUDING,BUT NOTLIMITED TO, THE IMPLIED WARRANTIES OFMERCHANTABILITY AND FITNESS FORAPARTICULAR PURPOSE ARE DISCLAIMED. IN NOEVENT SHALL THE COPYRIGHTOWNER ORCONTRIBUTORS BE LIABLE FOR ANY DIRECT,INDIRECT, INCIDENTAL,SPECIAL, EXEMPLARY, ORCONSEQUENTIAL DAMAGES (INCLUDING, BUTNOTLIMITED TO, PROCUREMENT OF SUBSTITUTEGOODS OR SERVICES; LOSS OF USE,DATA, ORPROFITS; OR BUSINESS INTERRUPTION) HOWEVERCAUSED AND ON ANYTHEORY OF LIABILITY,WHETHER IN CONTRACT, STRICT LIABILITY, ORTORT(INCLUDING NEGLIGENCE OR OTHERWISE)ARISING IN ANY WAY OUT OF THE USEOF THISSOFTWARE, EVEN IF ADVISED OF THE POSSIBILITYOF SUCH DAMAGE.
EMX (0.9c)
Opera uses EMX, which is an OS/2 port of the gccsuite. Opera uses modified versions of the sprintf andsscanf methods from this C library.* The emx librariesare not distributed under the GPL. Linking an *
application with the emx libraries does not cause theexecutable * to be covered by the GNU GeneralPublic License. You are allowed * to change and copythe emx library sources if you keep the copyright *message intact. If you improve the emx libraries,please send your * enhancements to the emx author(you should copyright your * enhancements similar tothe existing emx libraries).
freetype (2.4.8)
Opera uses freetype FreeType 2 is a software-fontengine that is designed to be small, efficient, highlycustomizable and portable, while capable ofproducing high-quality output (glyph images).Theoriginal download site for this software is : http://www.freetype.org/freetype2/index.htmlFreetype License
HKSCS (2008)
Opera uses HKSCS: The Government of the HongKong Special Administrative Region HKSCSmappingsThe original download site for this softwareis : http://www.ogcio.gov.hkBefore downloading theSoftware or Document provided on this Web page,you should read the following terms (Terms of Use).By downloading the Software and Document, you aredeemed to agree to these terms.1. The Government ofthe Hong Kong Special Administrative Region(HKSARG) has the right to amend or vary the termsunder this Terms of Use from time to time at its solediscretion.2. By using the Software and Document,you irrevocably agree that the HKSARG may fromtime to time vary this Terms of Use without furthernotice to you and you also irrevocably agree to bebound by the most updated version of the Terms ofUse.3. You have the sole responsibility of obtainingthe most updated version of the Terms of Use whichis available in the "Digital 21" Web site (http://www.ogcio.gov.hk/en/business/tech_promotion/ccli/terms/terms.htm).4. By accepting this Terms of Use, HKSARGshall grant you a non-exclusive license to use theSoftware and Document for any purpose, subject toclause 5 below.5. You are not allowed to make copiesof the Software and Document except it is incidentalto and necessary for the normal use of the Software.You are not allowed to adapt or modify the Softwareand Document or to distribute, sell, rent, or makeavailable to the public the Software and Document,including copies or an adaptation of them.6. TheSoftware and Document are protected by copyright.The licensors of the Government of Hong KongSpecial Administrative Region are the owners of allcopyright works in the Software and Document. Allrights reserved.7. You understand and agree that useof the Software and Document are at your sole risk,that any material and/or data downloaded orotherwise obtained in relation to the Software andDocument is at your discretion and risk and that you
55
will be solely responsible for any damage caused toyour computer system or loss of data or any otherloss that results from the download and use of theSoftware and Document in any manner whatsoever.8.In relation to the Software and Document, HKSARGhereby disclaims all warranties and conditions,including all implied warranties and conditions ofmerchantability, fitness for a particular purpose andnon-infringement.9. HKSARG will not be liable for anydirect, indirect, incidental, special or consequentialloss of any kind resulting from the use of or theinability to use the Software and Document even ifHKSARG has been advised of the possibility of suchloss.10. You agree not to sue HKSARG and agree toindemnify, defend and hold harmless HKSARG, itsofficers and employees from any and all third partyclaims, liability, damages and/or costs (including, butnot limited to, legal fees) arising from your use of theSoftware and Document, your violation of the Termsof Use or infringement of any intellectual property orother right of any person or entity.11. The Terms of Usewill be governed by and construed in accordancewith the laws of Hong Kong.12. Any waiver of anyprovision of the Terms of Use will be effective only ifin writing and signed by HKSARG or itsrepresentative.13. If for any reason a court ofcompetent jurisdiction finds any provision or portionof the Terms of Use to be unenforceable, theremainder of the Terms of Use will continue in fullforce and effect.14. The Terms of Use constitute theentire agreement between the parties with respect tothe subject matter hereof and supersedes andreplaces all prior or contemporaneousunderstandings or agreements, written or oral,regarding such subject matter.15.In addition to thelicence granted in Clause 4, HKSARG hereby grantsyou a non-exclusive limited licence to reproduce anddistribute the Software and Document with thefollowing conditions:(i) not for financial gain unless itis incidental;(ii) reproduction and distribution of theSoftware and Document in complete and unmodifiedform; and(iii) when you distribute the Software andDocument, you agree to attach the Terms of Use anda statement that the latest version of the Terms ofUse is available from the "Office of the GovernmentChief Information Officer" Web site (http://www.ogcio.gov.hk/en/business/tech_promotion/ccli/terms/terms.htm).
IANA (Dec 30 2013)
Opera uses Internet Assigned Numbers Authority:Character encoding tag names and numbers. Theoriginal download site for this software is :https://www.iana.org
ICU (3)
Opera uses ICU : International Components for
Unicode: Mapping table for GB18030The originaldownload site for this software is : http://site.icu-project.org/http://source.icu-project.org/repos/icu/icu/trunk/license.html
MozTW (1.0)
Opera uses MoxTW : MozTW project: Big5-2003mapping tables. The original download site for thissoftware is : https://moztw.orgThis piece of softwareis made available under the terms and conditions ofCCPL
NPAPI (0.27)
Opera uses NPAPI : Netscape 4 Plugin API: npapi.h,npfunctions.h, npruntime.h and nptypes.h. Distributedas part of the Netscape 4 Plugin SDK.The originaldownload site for this software is : wiki.mozilla.orgThispiece of software is made available under the termsand conditions of mozilla licencse as describedbelow.
Unicode (4.0)
Opera uses Unicode : Data from the Unicodecharacter database. The original download site forthis software is : www.unicode.orghttp://www.unicode.org/copyright.html
Webp (0.2.0)
Opera uses Webp : libwebp is a library for decodingimages in the WebP format. Products may use it todecode WebP images. The turbo servers willeventually re-decode images to WebP. The originaldownload site for this software is :https://developers.google.com/speed/webp/?csw=1 https://chromium.googlesource.com/webm/libwebp/Additional IP Rights Grant (Patents)"Thisimplementation" means the copyrightable worksdistributed by Google as part of the WebMProject.Google hereby grants to you a perpetual,worldwide, non-exclusive, no-charge, royalty-free,irrevocable (except as stated in this section)patentlicense to make, have made, use, offer to sell, sell,import, transfer, and otherwise run, modify andpropagate the contents of this implementation ofVP8, where such license applies only to those patentclaims, both currently owned by Google and acquiredin the future, licensable by Google that arenecessarily infringed by this implementation of VP8.This grant does not include claims that would beinfringed only as a consequence of furthermodification of this implementation. If you or youragent or exclusive licensee institute or order or agreeto the institution of patent litigation against any entity(including a cross-claim or counterclaim in a lawsuit)
56
alleging that this implementation of VP8 or any codeincorporated within this implementation of VP8constitutes direct or contributory patent infringement,or inducement of patent infringement, then anypatent rights granted to you under this License for thisimplementation of VP8shall terminate as of the datesuch litigation is filed.
FaceBook SDK (3.0.1)
This TV contains Facebook SDK. The Facebook SDKfor Android is the easiest way to integrate yourAndroid app with Facebook's platform. The SDKprovides support for Login with Facebookauthentication, reading and writing to Facebook APIsand support for UI elements such as pickers anddialogs. The original download site for this software is: https://developer.facebook.com/docs/androidThispiece of software is made available under the termsand conditions of the Apache License version 2.
iptables (1.4.7)
iptables is a user space application program thatallows a system administrator to configure the tablesprovided by the Linux kernel firewall (implemented asdifferent Netfilter modules) and the chains and rules itstores. Different kernel modules and programs arecurrently used for different protocols; iptables appliesto IPv4The original download site for this software is :https://android.googlesource.comThis piece ofsoftware is made available under the terms andconditions of the GPL v2.
libyuv (814)
libyuv is an open source project that includes YUVconversion and scaling functionality. The originaldownload site for this software is :http://code.google.com/p/libyuvThis piece ofsoftware is made available under the terms andconditions BSD.
ffmpeg (2.1.3)
This TV uses FFmpeg. FFmpeg is a complete, cross-platform solution to record, convert and stream audioand video. The original download site for thissoftware is : http://ffmpeg.orgThis piece of software ismade available under the terms and conditions of theGPL v2 license, which can be found below.
u-boot (2011-12)
U-boot is a boot loader for embedded boards basedon ARM, MIPS and other processors, which can beinstalled in a boot ROM and used to initialize and testthe hardware or to download and run application
code
This piece of software is made available under theterms and conditions of the GPL v2 license, which canbe found below.
live555 (0.82)
Live555 provides RTP/RTCP/RTSP client. The originaldownload site for this software is :http://www.live555.comThis piece of software ismade available under the terms and conditions of theLGPL v2.1 license, which can be found below.
Bluetooth Stack (Bluedroid)
This TV uses Bluetooth stack. The original downloadsite for this software is :This piece of software is madeavailable under the terms and conditions of AndroidApache License Version 2.
EXIF (NA)
Exif JPEG header manipulation tool. The originaldownload site for this software is :http://www.sentex.net/~mwandel/jhead/Portions ofthis source code are in the public domain
Copyright (c) 2008, The Android Open Source Project
All rights reserved. Redistribution and use in sourceand binary forms, with or without modification, arepermitted provided that the following conditions aremet: * Redistributions of source code must retain theabove copyright notice, this list of conditions and thefollowing disclaimer. * Redistributions in binary formmust reproduce the above copyright notice, this list ofconditions and the following disclaimer in thedocumentation and/or other materials provided withthe distribution. * Neither the name of The AndroidOpen Source Project nor the names of its contributorsmay be used to endorse or promote products derivedfrom this software without specific prior writtenpermission. THIS SOFTWARE IS PROVIDED BY THECOPYRIGHT HOLDERS AND CONTRIBUTORS"AS IS"AND ANY EXPRESS OR IMPLIED WARRANTIES,INCLUDING, BUT NOTLIMITED TO, THE IMPLIEDWARRANTIES OF MERCHANTABILITY ANDFITNESSFOR A PARTICULAR PURPOSE AREDISCLAIMED. IN NO EVENT SHALL THECOPYRIGHTOWNER OR CONTRIBUTORS BE LIABLE FOR ANYDIRECT, INDIRECT,INCIDENTAL, SPECIAL,EXEMPLARY, OR CONSEQUENTIAL DAMAGES(INCLUDING,BUT NOT LIMITED TO, PROCUREMENTOF SUBSTITUTE GOODS OR SERVICES; LOSSOF USE,DATA, OR PROFITS; OR BUSINESS INTERRUPTION)HOWEVER CAUSEDAND ON ANY THEORY OFLIABILITY, WHETHER IN CONTRACT, STRICTLIABILITY,OR TORT (INCLUDING NEGLIGENCE OROTHERWISE) ARISING IN ANY WAY OUTOF THE USE
57
OF THIS SOFTWARE, EVEN IF ADVISED OF THEPOSSIBILITY OFSUCH DAMAGE.
EXPAT (2.1.0)
EXPAT is a XML Parser. The original download site forthis software is :http://expat.sourceforge.netCopyright (c) 1998, 1999,2000 Thai Open Source Software Center Ltd andClark Cooper
Copyright (c) 2001, 2002, 2003, 2004, 2005, 2006Expat maintainers. Permission is hereby granted, freeof charge, to any person obtaining a copy of thissoftware and associated documentation files (the"Software"), to deal in the Software withoutrestriction, including without limitation the rights touse, copy, modify, merge, publish, distribute,sublicense, and/or sell copies of the Software, and topermit persons to whom the Software is furnished todo so, subject to the following conditions: The abovecopyright notice and this permission notice shall beincluded in all copies or substantial portions of theSoftware. THE SOFTWARE IS PROVIDED "AS IS",WITHOUT WARRANTY OF ANY KIND, EXPRESS ORIMPLIED, INCLUDING BUT NOT LIMITED TO THEWARRANTIES OFMERCHANTABILITY, FITNESS FOR APARTICULAR PURPOSE AND NONINFRINGEMENT.INNO EVENT SHALL THE AUTHORS OR COPYRIGHTHOLDERS BE LIABLE FOR ANYCLAIM, DAMAGES OROTHER LIABILITY, WHETHER IN AN ACTION OFCONTRACT,TORT OR OTHERWISE, ARISING FROM,OUT OF OR IN CONNECTION WITH THESOFTWAREOR THE USE OR OTHER DEALINGS IN THESOFTWARE.
neven face recognition library (NA)
This TV uses neven face recognition library which isused for face recognitionThis piece of software ismade available under the terms and conditions ofAndroid Apache License version 2.
Unicode (4.8.1.1)
This TV uses Unicode which specifies therepresentation of text
The original download site for this software is :http://icu-project.orgICU License - ICU 1.8.1 and later
COPYRIGHT AND PERMISSION NOTICE
Copyright (c) 1995-2008 International BusinessMachines Corporation and others
All rights reserved. Permission is hereby granted, freeof charge, to any person obtaining a copy of thissoftware and associated documentation files (the"Software"), to deal in the Software withoutrestriction, including without limitation the rights to
use, copy, modify, merge, publish, distribute, and/orsell copies of the Software, and to permit persons towhom the Software is furnished to do so, providedthat the above copyright notice(s) and this permissionnotice appear in all copies of the Software and thatboth the above copyright notice(s) and thispermission notice appear in supportingdocumentation. THE SOFTWARE IS PROVIDED "ASIS", WITHOUT WARRANTY OF ANY KIND, EXPRESSOR IMPLIED, INCLUDING BUT NOT LIMITED TO THEWARRANTIES OF MERCHANTABILITY, FITNESS FORA PARTICULAR PURPOSE AND NONINFRINGEMENTOF THIRD PARTY RIGHTS. IN NO EVENT SHALL THECOPYRIGHT HOLDER OR HOLDERS INCLUDED INTHIS NOTICE BE LIABLE FOR ANY CLAIM, OR ANYSPECIAL INDIRECT OR CONSEQUENTIAL DAMAGES,OR ANY DAMAGES WHATSOEVER RESULTINGFROM LOSS OF USE, DATA OR PROFITS, WHETHERIN AN ACTION OF CONTRACT, NEGLIGENCE OROTHER TORTIOUS ACTION, ARISING OUT OF OR INCONNECTION WITH THE USE OR PERFORMANCE OFTHIS SOFTWARE. Except as contained in this notice,the name of a copyright holder shall not be used inadvertising or otherwise to promote the sale, use orother dealings in this Software without prior writtenauthorization of the copyright holder. All trademarksand registered trademarks mentioned herein are theproperty of their respective owners.
IPRoute2 (NA)
IPRoute2 is used for TCP/IP, Networking and Trafficcontrol. The original download site for this software is: http://www.linuxfoundation.org/collaborate/workgroups/networking/iproute2This piece of software ismade available under the terms and conditions ofGPL V2.
mtpd (NA)
mtpd is used for VPN Network. The original downloadsite for this software is :http://libmtp.sourceforge.net/This piece of software ismade available under the terms and conditions ofApache License version 2.0.
MDNS Responder (NA)
MDNS Responder. The Mdns Responder project is acomponent of Bonjour, Apple's ease-of-use IPnetworking initiative. The original download site forthis software is : http://www.opensource.apple.com/tarballs/mDNSResponder/This piece of software ismade available under the terms and conditions ofApache License version 2.0.
NFC (NA)
58
NFC Semiconductor's NFC Library. Near FieldCommunication (NFC) is a set of short-range wirelesstechnologies, typically requiring a distance of 4cm orless to initiate a connection. NFC allows you to sharesmall payloads of data between an NFC tag and anAndroid-powered device, or between two Android-powered devices. This piece of software is madeavailable under the terms and conditions of ApacheLicense version 2.0.
Skia (NA)
Skia is a complete 2D graphic library for drawing Text,Geometries, and Images. The original download sitefor this software is :http://code.google.com/p/skia/Copyright (c) 2011Google Inc. All rights reserved. Redistribution and usein source and binary forms, with or withoutmodification, are permitted provided that thefollowing conditions are met: * Redistributions ofsource code must retain the above copyright notice,this list of conditions and the following disclaimer. *Redistributions in binary form must reproduce theabove copyright notice, this list of conditions and thefollowing disclaimer in the documentation and/orother materials provided with the distribution. *Neither the name of Google Inc. nor the names of itscontributors may be used to endorse or promoteproducts derived from this software without specificprior written permission. THIS SOFTWARE ISPROVIDED BY THE COPYRIGHT HOLDERS ANDCONTRIBUTORS"AS IS" AND ANY EXPRESS ORIMPLIED WARRANTIES, INCLUDING, BUTNOTLIMITED TO, THE IMPLIED WARRANTIES OFMERCHANTABILITY AND FITNESS FORAPARTICULAR PURPOSE ARE DISCLAIMED. IN NOEVENT SHALL THE COPYRIGHTOWNER ORCONTRIBUTORS BE LIABLE FOR ANY DIRECT,INDIRECT, INCIDENTAL,SPECIAL, EXEMPLARY, ORCONSEQUENTIAL DAMAGES (INCLUDING, BUTNOTLIMITED TO, PROCUREMENT OF SUBSTITUTEGOODS OR SERVICES; LOSS OF USE,DATA, ORPROFITS; OR BUSINESS INTERRUPTION) HOWEVERCAUSED AND ON ANYTHEORY OF LIABILITY,WHETHER IN CONTRACT, STRICT LIABILITY, ORTORT(INCLUDING NEGLIGENCE OR OTHERWISE)ARISING IN ANY WAY OUT OF THE USEOF THISSOFTWARE, EVEN IF ADVISED OF THE POSSIBILITYOF SUCH DAMAGE.
Sonic Audio Synthesis library (NA)
The original download site for this software is :http://www.sonivoxmi.com/This piece of software ismade available under the terms and conditions ofApache License version 2.0.
Sqlite (3071100)
The original download site for this software is :www.sqlite.org.This piece of software is madeavailable under the terms and conditions of ApacheLicense version 2.0.
Nuance Speech Recognition engine (NA)
The original download site for this software is :http://www.nuance.com/This piece of software ismade available under the terms and conditions ofApache License version 2.0.
C++Standard Template Library library (5)
This TV uses Implementation of the C++ StandardTemplate Library. The original download site for thissoftware is : http://stlport.sourceforge.netBorisFomitchev grants Licensee a non-exclusive, non-transferable, royalty-free license to use STLport andits documentation without fee. By downloading,using, or copying STLport or any portion thereof,Licensee agrees to abide by the intellectual propertylaws and all other applicable laws of the UnitedStates of America, and to all of the terms andconditions of this Agreement. Licensee shall maintainthe following copyright and permission notices onSTLport sources and its documentation unchanged:Copyright 1999,2000 Boris Fomitchev
This material is provided "as is", with absolutely nowarranty expressed or implied. Any use is at your ownrisk. Permission to use or copy this software for anypurpose is hereby granted without fee, provided theabove notices are retained on all copies. Permissionto modify the code and to distribute modified code isgranted, provided the above notices are retained, anda notice that the code was modified is included withthe above copyright notice. The Licensee maydistribute binaries compiled with STLport (whetheroriginal or modified) without any royalties orrestrictions. The Licensee may distribute original ormodified STLport sources, provided that: Theconditions indicated in the above permission noticeare met; The following copyright notices are retainedwhen present, and conditions provided inaccompanying permission notices are met :Copyright1994 Hewlett-Packard Company Copyright 1996,97Silicon Graphics Computer Systems, Inc. Copyright1997 Moscow Center for SPARC Technology.Permission to use, copy, modify, distribute and sellthis software and its documentation for any purposeis hereby granted without fee, provided that theabove copyright notice appear in all copies and thatboth that copyright notice and this permission noticeappear in supporting documentation. Hewlett-Packard Company makes no representations aboutthe suitability of this software for any purpose. It isprovided "as is" without express or implied warranty.Permission to use, copy, modify, distribute and sellthis software and its documentation for any purpose
59

is hereby granted without fee, provided that theabove copyright notice appear in all copies and thatboth that copyright notice and this permission noticeappear in supporting documentation. Silicon Graphicsmakes no representations about the suitability of thissoftware for any purpose. It is provided "as is" withoutexpress or implied warranty. Permission to use, copy,modify, distribute and sell this software and itsdocumentation for any purpose is hereby grantedwithout fee, provided that the above copyright noticeappear in all copies and that both that copyrightnotice and this permission notice appear insupporting documentation. Moscow Center forSPARC Technology makes no representations aboutthe suitability of this software for any purpose. It isprovided "as is" without express or implied warranty
svox (NA)
The original download site for this software is :http://www.nuance.com/This piece of software ismade available under the terms and conditions ofApache License version 2.0.
tinyalsa (NA)
This TV uses tinyalsa: a small library to interface withALSA in the Linux kernel The original download sitefor this software is :http://github.com/tinyalsaCopyright 2011, TheAndroid Open Source Project Redistribution and usein source and binary forms, with or withoutmodification, are permitted provided that thefollowing conditions are met: * Redistributions ofsource code must retain the above copyright notice,this list of conditions and the following disclaimer. *Redistributions in binary form must reproduce theabove copyright notice, this list of conditions and thefollowing disclaimer in the documentation and/orother materials provided with the distribution. *Neither the name of The Android Open SourceProject nor the names of its contributors may be usedto endorse or promote products derived from thissoftware without specific prior written permission.THIS SOFTWARE IS PROVIDED BY The Android OpenSource Project ``AS IS'' ANDANY EXPRESS ORIMPLIED WARRANTIES, INCLUDING, BUT NOTLIMITED TO, THEIMPLIED WARRANTIES OFMERCHANTABILITY AND FITNESS FOR APARTICULAR PURPOSEARE DISCLAIMED. IN NOEVENT SHALL The Android Open Source Project BELIABLEFOR ANY DIRECT, INDIRECT, INCIDENTAL,SPECIAL, EXEMPLARY, ORCONSEQUENTIALDAMAGES (INCLUDING, BUT NOTLIMITED TO, PROCUREMENT OF SUBSTITUTEGOODS ORSERVICES; LOSS OF USE, DATA, ORPROFITS; OR BUSINESS INTERRUPTION)HOWEVERCAUSED AND ON ANY THEORY OFLIABILITY, WHETHER IN CONTRACT,
STRICTLIABILITY, OR TORT (INCLUDINGNEGLIGENCE OR OTHERWISE) ARISING IN ANYWAYOUT OF THE USE OF THIS SOFTWARE, EVEN IFADVISED OF THE POSSIBILITY OF SUCHDAMAGE.
Vorbis Decompression Library (NA)
This TV uses Tremolo ARM-optimized Ogg Vorbisdecompression library. Vorbis is a general purposeaudio and music encoding format contemporary toMPEG-4's AAC and TwinVQ, the next generationbeyond MPEG audio layer 3The original downloadsite for this software is :http://wss.co.uk/pinknoise/tremoCopyright (c)2002-2008 Xiph.org Foundation Redistribution anduse in source and binary forms, with or withoutmodification, are permitted provided that thefollowing conditions are met:- Redistributions ofsource code must retain the above copyright notice,this list of conditions and the following disclaimer.-Redistributions in binary form must reproduce theabove copy right notice, this list of conditions and thefollowing disclaimer in the documentation and/orother materials provided with the distribution.-Neither the name of the Xiph.org Foundation nor thenames of its contributors may be used to endorse orpromote products derived from this software withoutspecific prior written permission. THIS SOFTWARE ISPROVIDED BY THE COPYRIGHT HOLDERS ANDCONTRIBUTORS``AS IS'' AND ANY EXPRESS ORIMPLIED WARRANTIES, INCLUDING, BUTNOTLIMITED TO, THE IMPLIED WARRANTIES OFMERCHANTABILITY AND FITNESS FORAPARTICULAR PURPOSE ARE DISCLAIMED. IN NOEVENT SHALL THE FOUNDATIONORCONTRIBUTORS BE LIABLE FOR ANY DIRECT,INDIRECT, INCIDENTAL,SPECIAL, EXEMPLARY, ORCONSEQUENTIAL DAMAGES (INCLUDING, BUTNOTLIMITED TO, PROCUREMENT OF SUBSTITUTEGOODS OR SERVICES; LOSS OF USE,DATA, ORPROFITS; OR BUSINESS INTERRUPTION) HOWEVERCAUSED AND ON ANYTHEORY OF LIABILITY,WHETHER IN CONTRACT, STRICT LIABILITY, ORTORT(INCLUDING NEGLIGENCE OR OTHERWISE)ARISING IN ANY WAY OUT OF THE USEOF THISSOFTWARE, EVEN IF ADVISED OF THE POSSIBILITYOF SUCH DAMAGE.
wpa_supplicant_Daemon (v0.8)
Library used by legacy HAL to talk to wpa_supplicantdaemonThe original download site for this software is: http://hostap.epitest.fi/wpa_supplicant/This piece ofsoftware is made available under the terms andconditions of GPL version 2.
gson (2.3)
Gson is a Java library that can be used to convert
60

Java Objects into their JSON representation. It canalso be used to convert a JSON string to anequivalent Java object. Gson can work with arbitraryJava objects including pre-existing objects that youdo not have source-code of. The original downloadsite for this software is :https://code.google.com/p/google-gson/This pieceof software is made available under the terms andconditions of the Apache License 2.0
This software includes an implementation of the AESCipher, licensed by Brian Gladman
The original download site for this software is :http://www.gladman.me.uk/This piece of software islicensed by Brian Gladman
libUpNp (1.2.1)
The original download site for this software is :http://upnp.sourceforge.net/This piece of software ismade available under the terms and conditions of theBSD.
dnsmasq
Dnsmasq is a lightweight, easy to configure DNSforwarder and DHCP server
The original download site for this software is : https://android.googlesource.com/platform/external/dnmasqThis piece of software is made available under theterms and conditions of the GPL v2 license, which canbe found below.
TomCrypt (1.1)
iwedia stack is using tomcrypt for sw decryption
The original download site for this software is : http://manpages.ubuntu.com/manpages/saucy/man3/libtomcrypt.3.htmlThis piece of software is made availableunder the terms and conditions of the DO WHAT THEFUCK YOU WANT TO PUBLIC LICENSE
AsyncHttpclient (1.4.6)
The original download site for this software is :http://loopj.com/android-async-http/This piece ofsoftware is made available under the terms andconditions of the APACHE LICENSE 2.0
Jackson Parser (2.x)
Ipepg client uses Jackson Parser for stringmanipualation. The original download site for thissoftware is : https://github.com/FasterXML/jackson-coreThis piece of software is made available underthe terms and conditions of the APACHE LICENSE 2.0
TP Vision Netherlands B.V. is grateful to the groupsand individuals above for their contributions.
_________________________________
GNU GENERAL PUBLIC LICENSE
Version 2, June 1991
Copyright (C) 1989, 1991 Free Software Foundation,Inc.
51 Franklin Street, Fifth Floor, Boston, MA 02110-1301, USA
Everyone is permitted to copy and distribute verbatimcopies
of this license document, but changing it is notallowed.
Preamble
The licenses for most software are designed to takeaway your freedom to share and change it. Bycontrast, the GNU General Public License is intendedto guarantee your freedom to share and change freesoftware--to make sure the software is free for all itsusers. This General Public License applies to most ofthe Free Software Foundation's software and to anyother program whose authors commit to using it.(Some other Free Software Foundation software iscovered by the GNU Lesser General Public Licenseinstead.) You can apply it to your programs, too.
When we speak of free software, we are referring tofreedom, not price. Our General Public Licenses aredesigned to make sure that you have the freedom todistribute copies of free software (and charge for thisservice if you wish), that you receive source code orcan get it if you want it, that you can change thesoftware or use pieces of it in new free programs; andthat you know you can do these things.
To protect your rights, we need to make restrictionsthat forbid anyone to deny you these rights or to askyou to surrender the rights. These restrictionstranslate to certain responsibilities for you if youdistribute copies of the software, or if you modify it.
For example, if you distribute copies of such aprogram, whether gratis or for a fee, you must givethe recipients all the rights that you have. You mustmake sure that they, too, receive or can get thesource code. And you must show them these termsso they know their rights.
We protect your rights with two steps: (1) copyrightthe software, and (2) offer you this license whichgives you legal permission to copy, distribute and/or
61

modify the software.
Also, for each author's protection and ours, we wantto make certain that everyone understands that thereis no warranty for this free software. If the software ismodified by someone else and passed on, we wantits recipients to know that what they have is not theoriginal, so that any problems introduced by otherswill not reflect on the original authors' reputations.
Finally, any free program is threatened constantly bysoftware patents. We wish to avoid the danger thatredistributors of a free program will individually obtainpatent licenses, in effect making the programproprietary. To prevent this, we have made it clearthat any patent must be licensed for everyone's freeuse or not licensed at all.
The precise terms and conditions for copying,distribution and modification follow.
TERMS AND CONDITIONS FOR COPYING,DISTRIBUTION AND MODIFICATION
Activities other than copying, distribution andmodification are not covered by this License; they areoutside its scope. The act of running the Program isnot restricted, and the output from the Program iscovered only if its contents constitute a work basedon the Program (independent of having been madeby running the Program). Whether that is truedepends on what the Program does.
You may charge a fee for the physical act oftransferring a copy, and you may at your option offerwarranty protection in exchange for a fee.
a) You must cause the modified files to carryprominent notices stating that you changed the filesand the date of any change.
b) You must cause any work that you distribute orpublish, that in whole or in part contains or is derivedfrom the Program or any part thereof, to be licensedas a whole at no charge to all third parties under theterms of this License.
c) If the modified program normally reads commandsinteractively when run, you must cause it, whenstarted running for such interactive use in the mostordinary way, to print or display an announcementincluding an appropriate copyright notice and anotice that there is no warranty (or else, saying thatyou provide a warranty) and that users mayredistribute the program under these conditions, andtelling the user how to view a copy of this License.(Exception: if the Program itself is interactive but doesnot normally print such an announcement, your workbased on the Program is not required to print anannouncement.)
These requirements apply to the modified work as awhole. If identifiable sections of that work are notderived from the Program, and can be reasonablyconsidered independent and separate works in
themselves, then this License, and its terms, do notapply to those sections when you distribute them asseparate works. But when you distribute the samesections as part of a whole which is a work based onthe Program, the distribution of the whole must be onthe terms of this License, whose permissions for otherlicensees extend to the entire whole, and thus toeach and every part regardless of who wrote it.
Thus, it is not the intent of this section to claim rightsor contest your rights to work written entirely by you;rather, the intent is to exercise the right to control thedistribution of derivative or collective works based onthe Program.
In addition, mere aggregation of another work notbased on the Program with the Program (or with awork based on the Program) on a volume of a storageor distribution medium does not bring the other workunder the scope of this License.
a) Accompany it with the complete correspondingmachine-readable source code, which must bedistributed under the terms of Sections 1 and 2 aboveon a medium customarily used for softwareinterchange; or,
b) Accompany it with a written offer, valid for at leastthree years, to give any third party, for a charge nomore than your cost of physically performing sourcedistribution, a complete machine-readable copy ofthe corresponding source code, to be distributedunder the terms of Sections 1 and 2 above on amedium customarily used for software interchange;or,
c) Accompany it with the information you received asto the offer to distribute corresponding source code.(This alternative is allowed only for noncommercialdistribution and only if you received the program inobject code or executable form with such an offer, inaccord with Subsection b above.)
The source code for a work means the preferred formof the work for making modifications to it. For anexecutable work, complete source code means all thesource code for all modules it contains, plus anyassociated interface definition files, plus the scriptsused to control compilation and installation of theexecutable. However, as a special exception, thesource code distributed need not include anythingthat is normally distributed (in either source or binaryform) with the major components (compiler, kernel,and so on) of the operating system on which theexecutable runs, unless that component itselfaccompanies the executable.
If distribution of executable or object code is made byoffering access to copy from a designated place, thenoffering equivalent access to copy the source codefrom the same place counts as distribution of thesource code, even though third parties are notcompelled to copy the source along with the objectcode.
62
If any portion of this section is held invalid orunenforceable under any particular circumstance, thebalance of the section is intended to apply and thesection as a whole is intended to apply in othercircumstances.
It is not the purpose of this section to induce you toinfringe any patents or other property right claims orto contest validity of any such claims; this section hasthe sole purpose of protecting the integrity of the freesoftware distribution system, which is implementedby public license practices. Many people have madegenerous contributions to the wide range of softwaredistributed through that system in reliance onconsistent application of that system; it is up to theauthor/donor to decide if he or she is willing todistribute software through any other system and alicensee cannot impose that choice.
This section is intended to make thoroughly clearwhat is believed to be a consequence of the rest ofthis License.
Each version is given a distinguishing version number.If the Program specifies a version number of thisLicense which applies to it and "any later version",you have the option of following the terms andconditions either of that version or of any later versionpublished by the Free Software Foundation. If theProgram does not specify a version number of thisLicense, you may choose any version ever publishedby the Free Software Foundation.
NO WARRANTY
________________________________
GNU LESSER GENERAL PUBLIC LICENSE
Version 2.1, February 1999
Copyright (C) 1991, 1999 Free Software Foundation,Inc.
51 Franklin Street, Fifth Floor, Boston, MA 02110-1301 USA
Everyone is permitted to copy and distribute verbatimcopies
of this license document, but changing it is notallowed.
[This is the first released version of the Lesser GPL. Italso counts as the successor of the GNU LibraryPublic License, version 2, hence the version number2.1.]
Preamble
The licenses for most software are designed to takeaway your freedom to share and change it. Bycontrast, the GNU General Public Licenses are
intended to guarantee your freedom to share andchange free software--to make sure the software isfree for all its users.
This license, the Lesser General Public License,applies to some specially designated softwarepackages--typically libraries--of the Free SoftwareFoundation and other authors who decide to use it.You can use it too, but we suggest you first thinkcarefully about whether this license or the ordinaryGeneral Public License is the better strategy to use inany particular case, based on the explanations below.
When we speak of free software, we are referring tofreedom of use, not price. Our General PublicLicenses are designed to make sure that you have thefreedom to distribute copies of free software (andcharge for this service if you wish); that you receivesource code or can get it if you want it; that you canchange the software and use pieces of it in new freeprograms; and that you are informed that you can dothese things.
To protect your rights, we need to make restrictionsthat forbid distributors to deny you these rights or toask you to surrender these rights. These restrictionstranslate to certain responsibilities for you if youdistribute copies of the library or if you modify it.
For example, if you distribute copies of the library,whether gratis or for a fee, you must give therecipients all the rights that we gave you. You mustmake sure that they, too, receive or can get thesource code. If you link other code with the library,you must provide complete object files to therecipients, so that they can relink them with the libraryafter making changes to the library and recompiling it.And you must show them these terms so they knowtheir rights.
We protect your rights with a two-step method: (1) wecopyright the library, and (2) we offer you this license,which gives you legal permission to copy, distributeand/or modify the library.
To protect each distributor, we want to make it veryclear that there is no warranty for the free library.Also, if the library is modified by someone else andpassed on, the recipients should know that what theyhave is not the original version, so that the originalauthor's reputation will not be affected by problemsthat might be introduced by others.
Finally, software patents pose a constant threat to theexistence of any free program. We wish to make surethat a company cannot effectively restrict the users ofa free program by obtaining a restrictive license froma patent holder. Therefore, we insist that any patentlicense obtained for a version of the library must beconsistent with the full freedom of use specified inthis license.
Most GNU software, including some libraries, iscovered by the ordinary GNU General Public License.
63

This license, the GNU Lesser General Public License,applies to certain designated libraries, and is quitedifferent from the ordinary General Public License.We use this license for certain libraries in order topermit linking those libraries into non-free programs.
When a program is linked with a library, whetherstatically or using a shared library, the combination ofthe two is legally speaking a combined work, aderivative of the original library. The ordinary GeneralPublic License therefore permits such linking only ifthe entire combination fits its criteria of freedom. TheLesser General Public License permits more laxcriteria for linking other code with the library.
We call this license the "Lesser" General PublicLicense because it does Less to protect the user'sfreedom than the ordinary General Public License. Italso provides other free software developers Less ofan advantage over competing non-free programs.These disadvantages are the reason we use theordinary General Public License for many libraries.However, the Lesser license provides advantages incertain special circumstances.
For example, on rare occasions, there may be aspecial need to encourage the widest possible use ofa certain library, so that it becomes a de-factostandard. To achieve this, non-free programs must beallowed to use the library. A more frequent case isthat a free library does the same job as widely usednon-free libraries. In this case, there is little to gain bylimiting the free library to free software only, so weuse the Lesser General Public License.
In other cases, permission to use a particular library innon-free programs enables a greater number ofpeople to use a large body of free software. Forexample, permission to use the GNU C Library in non-free programs enables many more people to use thewhole GNU operating system, as well as its variant,the GNU/Linux operating system.
Although the Lesser General Public License is Lessprotective of the users' freedom, it does ensure thatthe user of a program that is linked with the Libraryhas the freedom and the wherewithal to run thatprogram using a modified version of the Library.
The precise terms and conditions for copying,distribution and modification follow. Pay closeattention to the difference between a "work based onthe library" and a "work that uses the library". Theformer contains code derived from the library,whereas the latter must be combined with the libraryin order to run.
TERMS AND CONDITIONS FOR COPYING,DISTRIBUTION AND MODIFICATION
A "library" means a collection of software functionsand/or data prepared so as to be conveniently linkedwith application programs (which use some of thosefunctions and data) to form executables.
The "Library", below, refers to any such softwarelibrary or work which has been distributed underthese terms. A "work based on the Library" meanseither the Library or any derivative work undercopyright law: that is to say, a work containing theLibrary or a portion of it, either verbatim or withmodifications and/or translated straightforwardly intoanother language. (Hereinafter, translation is includedwithout limitation in the term "modification".)
"Source code" for a work means the preferred form ofthe work for making modifications to it. For a library,complete source code means all the source code forall modules it contains, plus any associated interfacedefinition files, plus the scripts used to controlcompilation and installation of the library.
Activities other than copying, distribution andmodification are not covered by this License; they areoutside its scope. The act of running a program usingthe Library is not restricted, and output from such aprogram is covered only if its contents constitute awork based on the Library (independent of the use ofthe Library in a tool for writing it). Whether that is truedepends on what the Library does and what theprogram that uses the Library does.
You may charge a fee for the physical act oftransferring a copy, and you may at your option offerwarranty protection in exchange for a fee.
?a) The modified work must itself be a softwarelibrary.
?b) You must cause the files modified to carryprominent notices stating that you changed the filesand the date of any change.
?c) You must cause the whole of the work to belicensed at no charge to all third parties under theterms of this License.
?d) If a facility in the modified Library refers to afunction or a table of data to be supplied by anapplication program that uses the facility, other thanas an argument passed when the facility is invoked,then you must make a good faith effort to ensure that,in the event an application does not supply suchfunction or table, the facility still operates, andperforms whatever part of its purpose remainsmeaningful.
(For example, a function in a library to computesquare roots has a purpose that is entirely well-defined independent of the application. Therefore,Subsection 2d requires that any application-suppliedfunction or table used by this function must beoptional: if the application does not supply it, thesquare root function must still compute square roots.)
These requirements apply to the modified work as awhole. If identifiable sections of that work are notderived from the Library, and can be reasonablyconsidered independent and separate works inthemselves, then this License, and its terms, do not
64
apply to those sections when you distribute them asseparate works. But when you distribute the samesections as part of a whole which is a work based onthe Library, the distribution of the whole must be onthe terms of this License, whose permissions for otherlicensees extend to the entire whole, and thus toeach and every part regardless of who wrote it.
Thus, it is not the intent of this section to claim rightsor contest your rights to work written entirely by you;rather, the intent is to exercise the right to control thedistribution of derivative or collective works based onthe Library.
In addition, mere aggregation of another work notbased on the Library with the Library (or with a workbased on the Library) on a volume of a storage ordistribution medium does not bring the other workunder the scope of this License.
Once this change is made in a given copy, it isirreversible for that copy, so the ordinary GNUGeneral Public License applies to all subsequentcopies and derivative works made from that copy.
This option is useful when you wish to copy part ofthe code of the Library into a program that is not alibrary.
If distribution of object code is made by offeringaccess to copy from a designated place, then offeringequivalent access to copy the source code from thesame place satisfies the requirement to distribute thesource code, even though third parties are notcompelled to copy the source along with the objectcode.
However, linking a "work that uses the Library" withthe Library creates an executable that is a derivativeof the Library (because it contains portions of theLibrary), rather than a "work that uses the library". Theexecutable is therefore covered by this License.Section 6 states terms for distribution of suchexecutables.
When a "work that uses the Library" uses materialfrom a header file that is part of the Library, the objectcode for the work may be a derivative work of theLibrary even though the source code is not. Whetherthis is true is especially significant if the work can belinked without the Library, or if the work is itself alibrary. The threshold for this to be true is notprecisely defined by law.
If such an object file uses only numerical parameters,data structure layouts and accessors, and smallmacros and small inline functions (ten lines or less inlength), then the use of the object file is unrestricted,regardless of whether it is legally a derivative work.(Executables containing this object code plusportions of the Library will still fall under Section 6.)
Otherwise, if the work is a derivative of the Library,you may distribute the object code for the work underthe terms of Section 6. Any executables containing
that work also fall under Section 6, whether or notthey are linked directly with the Library itself.
You must give prominent notice with each copy of thework that the Library is used in it and that the Libraryand its use are covered by this License. You mustsupply a copy of this License. If the work duringexecution displays copyright notices, you mustinclude the copyright notice for the Library amongthem, as well as a reference directing the user to thecopy of this License. Also, you must do one of thesethings:
?a) Accompany the work with the completecorresponding machine-readable source code for theLibrary including whatever changes were used in thework (which must be distributed under Sections 1 and2 above); and, if the work is an executable linked withthe Library, with the complete machine-readable"work that uses the Library", as object code and/orsource code, so that the user can modify the Libraryand then relink to produce a modified executablecontaining the modified Library. (It is understood thatthe user who changes the contents of definitions filesin the Library will not necessarily be able to recompilethe application to use the modified definitions.)
?b) Use a suitable shared library mechanism forlinking with the Library. A suitable mechanism is onethat (1) uses at run time a copy of the library alreadypresent on the user's computer system, rather thancopying library functions into the executable, and (2)will operate properly with a modified version of thelibrary, if the user installs one, as long as the modifiedversion is interface-compatible with the version thatthe work was made with.
?c) Accompany the work with a written offer, valid forat least three years, to give the same user thematerials specified in Subsection 6a, above, for acharge no more than the cost of performing thisdistribution.
?d) If distribution of the work is made by offeringaccess to copy from a designated place, offerequivalent access to copy the above specifiedmaterials from the same place.
?e) Verify that the user has already received a copy ofthese materials or that you have already sent this usera copy.
For an executable, the required form of the "work thatuses the Library" must include any data and utilityprograms needed for reproducing the executablefrom it. However, as a special exception, the materialsto be distributed need not include anything that isnormally distributed (in either source or binary form)with the major components (compiler, kernel, and soon) of the operating system on which the executableruns, unless that component itself accompanies theexecutable.
It may happen that this requirement contradicts the
65
license restrictions of other proprietary libraries thatdo not normally accompany the operating system.Such a contradiction means you cannot use boththem and the Library together in an executable thatyou distribute.
?a) Accompany the combined library with a copy ofthe same work based on the Library, uncombinedwith any other library facilities. This must bedistributed under the terms of the Sections above.
?b) Give prominent notice with the combined libraryof the fact that part of it is a work based on theLibrary, and explaining where to find theaccompanying uncombined form of the same work.
If any portion of this section is held invalid orunenforceable under any particular circumstance, thebalance of the section is intended to apply, and thesection as a whole is intended to apply in othercircumstances.
It is not the purpose of this section to induce you toinfringe any patents or other property right claims orto contest validity of any such claims; this section hasthe sole purpose of protecting the integrity of the freesoftware distribution system which is implemented bypublic license practices. Many people have madegenerous contributions to the wide range of softwaredistributed through that system in reliance onconsistent application of that system; it is up to theauthor/donor to decide if he or she is willing todistribute software through any other system and alicensee cannot impose that choice.
This section is intended to make thoroughly clearwhat is believed to be a consequence of the rest ofthis License.
Each version is given a distinguishing version number.If the Library specifies a version number of thisLicense which applies to it and "any later version",you have the option of following the terms andconditions either of that version or of any later versionpublished by the Free Software Foundation. If theLibrary does not specify a license version number,you may choose any version ever published by theFree Software Foundation.
NO WARRANTY
_______________________________
BSD LICENSE
Redistribution and use in source and binary forms,with or without modification, are permitted providedthat the following conditions are met:
THIS SOFTWARE IS PROVIDED BY THE REGENTSAND CONTRIBUTORS ``AS IS'' AND ANY EXPRESS ORIMPLIED WARRANTIES, INCLUDING, BUT NOTLIMITED TO, THE IMPLIED WARRANTIES OF
MERCHANTABILITY AND FITNESS FOR APARTICULAR PURPOSE ARE DISCLAIMED. IN NOEVENT SHALL THE REGENTS OR CONTRIBUTORS BELIABLE FOR ANY DIRECT, INDIRECT, INCIDENTAL,SPECIAL, EXEMPLARY, OR CONSEQUENTIALDAMAGES (INCLUDING, BUT NOT LIMITED TO,PROCUREMENT OF SUBSTITUTE GOODS ORSERVICES; LOSS OF USE, DATA, OR PROFITS; ORBUSINESS INTERRUPTION) HOWEVER CAUSED ANDON ANY THEORY OF LIABILITY, WHETHER INCONTRACT, STRICT LIABILITY, OR TORT (INCLUDINGNEGLIGENCE OR OTHERWISE) ARISING IN ANY WAYOUT OF THE USE OF THIS SOFTWARE, EVEN IFADVISED OF THE POSSIBILITY OF SUCH DAMAGE.
______________________________
MIT LICENSE
Permission is hereby granted, free of charge, to anyperson obtaining
a copy of this software and associateddocumentation files (the
"Software"), to deal in the Software withoutrestriction, including
without limitation the rights to use, copy, modify,merge, publish,
distribute, sublicense, and/or sell copies of theSoftware, and to
permit persons to whom the Software is furnished todo so, subject to
the following conditions:
The above copyright notice and this permissionnotice shall be included
in all copies or substantial portions of the Software.
THE SOFTWARE IS PROVIDED "AS IS", WITHOUTWARRANTY OF ANY KIND,
EXPRESS OR IMPLIED, INCLUDING BUT NOTLIMITED TO THE WARRANTIES OF
MERCHANTABILITY, FITNESS FOR A PARTICULARPURPOSE AND NONINFRINGEMENT.
IN NO EVENT SHALL THE AUTHORS OR COPYRIGHTHOLDERS BE LIABLE FOR ANY
CLAIM, DAMAGES OR OTHER LIABILITY, WHETHERIN AN ACTION OF CONTRACT,
TORT OR OTHERWISE, ARISING FROM, OUT OF ORIN CONNECTION WITH THE
66

SOFTWARE OR THE USE OR OTHER DEALINGS INTHE SOFTWARE.
_____________________________
ApacheLicense
Version 2.0,January 2004
http://www.apache.org/licenses/
TERMS AND CONDITIONS FOR USE,REPRODUCTION, AND DISTRIBUTION
1. Definitions.
"License" shall mean the terms and conditionsfor use, reproduction,
and distribution as defined by Sections 1through 9 of this document.
"Licensor" shall mean the copyright owner orentity authorized by
the copyright owner that is granting the License.
"Legal Entity" shall mean the union of theacting entity and all
other entities that control, are controlled by, orare under common
control with that entity. For the purposes ofthis definition,
"control" means (i) the power, direct orindirect, to cause the
direction or management of such entity,whether by contract or
otherwise, or (ii) ownership of fifty percent(50%) or more of the
outstanding shares, or (iii) beneficialownership of such entity.
"You" (or "Your") shall mean an individual orLegal Entity
exercising permissions granted by this License.
"Source" form shall mean the preferred formfor making modifications,
including but not limited to software sourcecode, documentation
source, and configuration files.
"Object" form shall mean any form resultingfrom mechanical
transformation or translation of a Source form,including but
not limited to compiled object code,generated documentation,
and conversions to other media types.
"Work" shall mean the work of authorship,whether in Source or
Object form, made available under theLicense, as indicated by a
copyright notice that is included in or attachedto the work
(an example is provided in the Appendixbelow).
"Derivative Works" shall mean any work,whether in Source or Object
form, that is based on (or derived from) theWork and for which the
editorial revisions, annotations, elaborations,or other modifications
represent, as a whole, an original work ofauthorship. For the purposes
of this License, Derivative Works shall notinclude works that remain
separable from, or merely link (or bind byname) to the interfaces of,
the Work and Derivative Works thereof.
"Contribution" shall mean any work ofauthorship, including
the original version of the Work and anymodifications or additions
to that Work or Derivative Works thereof, thatis intentionally
submitted to Licensor for inclusion in the Workby the copyright owner
or by an individual or Legal Entity authorizedto submit on behalf of
the copyright owner. For the purposes of thisdefinition, "submitted"
means any form of electronic, verbal, or
67
written communication sent
to the Licensor or its representatives, includingbut not limited to
communication on electronic mailing lists,source code control systems,
and issue tracking systems that are managedby, or on behalf of, the
Licensor for the purpose of discussing andimproving the Work, but
excluding communication that isconspicuously marked or otherwise
designated in writing by the copyright owneras "Not a Contribution."
"Contributor" shall mean Licensor and anyindividual or Legal Entity
on behalf of whom a Contribution has beenreceived by Licensor and
subsequently incorporated within the Work.
2. Grant of Copyright License. Subject to the termsand conditions of
this License, each Contributor hereby grants toYou a perpetual,
worldwide, non-exclusive, no-charge, royalty-free, irrevocable
copyright license to reproduce, prepareDerivative Works of,
publicly display, publicly perform, sublicense,and distribute the
Work and such Derivative Works in Source orObject form.
3. Grant of Patent License. Subject to the termsand conditions of
this License, each Contributor hereby grants toYou a perpetual,
worldwide, non-exclusive, no-charge, royalty-free, irrevocable
(except as stated in this section) patent licenseto make, have made,
use, offer to sell, sell, import, and otherwisetransfer the Work,
where such license applies only to thosepatent claims licensable
by such Contributor that are necessarilyinfringed by their
Contribution(s) alone or by combination of
their Contribution(s)
with the Work to which such Contribution(s)was submitted. If You
institute patent litigation against any entity(including a
cross-claim or counterclaim in a lawsuit)alleging that the Work
or a Contribution incorporated within the Workconstitutes direct
or contributory patent infringement, then anypatent licenses
granted to You under this License for thatWork shall terminate
as of the date such litigation is filed.
4. Redistribution. You may reproduce anddistribute copies of the
Work or Derivative Works thereof in anymedium, with or without
modifications, and in Source or Object form,provided that You
meet the following conditions:
(a) You must give any other recipients of theWork or
Derivative Works a copy of this License;and
(b) You must cause any modified files to carryprominent notices
stating that You changed the files; and
(c) You must retain, in the Source form of anyDerivative Works
that You distribute, all copyright, patent,trademark, and
attribution notices from the Source formof the Work,
excluding those notices that do notpertain to any part of
the Derivative Works; and
(d) If the Work includes a "NOTICE" text file aspart of its
distribution, then any Derivative Worksthat You distribute must
include a readable copy of the
68

attribution notices contained
within such NOTICE file, excluding thosenotices that do not
pertain to any part of the DerivativeWorks, in at least one
of the following places: within a NOTICEtext file distributed
as part of the Derivative Works; withinthe Source form or
documentation, if provided along withthe Derivative Works; or,
within a display generated by theDerivative Works, if and
wherever such third-party noticesnormally appear. The contents
of the NOTICE file are for informationalpurposes only and
do not modify the License. You may addYour own attribution
notices within Derivative Works that Youdistribute, alongside
or as an addendum to the NOTICE textfrom the Work, provided
that such additional attribution noticescannot be construed
as modifying the License.
You may add Your own copyright statement toYour modifications and
may provide additional or different licenseterms and conditions
for use, reproduction, or distribution of Yourmodifications, or
for any such Derivative Works as a whole,provided Your use,
reproduction, and distribution of the Workotherwise complies with
the conditions stated in this License.
5. Submission of Contributions. Unless Youexplicitly state otherwise,
any Contribution intentionally submitted forinclusion in the Work
by You to the Licensor shall be under theterms and conditions of
this License, without any additional terms orconditions.
Notwithstanding the above, nothing herein
shall supersede or modify
the terms of any separate license agreementyou may have executed
with Licensor regarding such Contributions.
6. Trademarks. This License does not grantpermission to use the trade
names, trademarks, service marks, or productnames of the Licensor,
except as required for reasonable andcustomary use in describing the
origin of the Work and reproducing thecontent of the NOTICE file.
7. Disclaimer of Warranty. Unless required byapplicable law or
agreed to in writing, Licensor provides theWork (and each
Contributor provides its Contributions) on an"AS IS" BASIS,
WITHOUT WARRANTIES OR CONDITIONS OFANY KIND, either express or
implied, including, without limitation, anywarranties or conditions
of TITLE, NON-INFRINGEMENT,MERCHANTABILITY, or FITNESS FOR A
PARTICULAR PURPOSE. You are solelyresponsible for determining the
appropriateness of using or redistributing theWork and assume any
risks associated with Your exercise ofpermissions under this License.
8. Limitation of Liability. In no event and under nolegal theory,
whether in tort (including negligence),contract, or otherwise,
unless required by applicable law (such asdeliberate and grossly
negligent acts) or agreed to in writing, shallany Contributor be
liable to You for damages, including anydirect, indirect, special,
incidental, or consequential damages of anycharacter arising as a
result of this License or out of the use orinability to use the
Work (including but not limited to damages for
69
loss of goodwill,
work stoppage, computer failure ormalfunction, or any and all
other commercial damages or losses), even ifsuch Contributor
has been advised of the possibility of suchdamages.
9. Accepting Warranty or Additional Liability. Whileredistributing
the Work or Derivative Works thereof, You maychoose to offer,
and charge a fee for, acceptance of support,warranty, indemnity,
or other liability obligations and/or rightsconsistent with this
License. However, in accepting suchobligations, You may act only
on Your own behalf and on Your soleresponsibility, not on behalf
of any other Contributor, and only if You agreeto indemnify,
defend, and hold each Contributor harmlessfor any liability
incurred by, or claims asserted against, suchContributor by reason
of your accepting any such warranty oradditional liability.
END OF TERMS AND CONDITIONS
APPENDIX: How to apply the Apache License toyour work.
To apply the Apache License to your work,attach the following
boilerplate notice, with the fields enclosed bybrackets "[]"
replaced with your own identifyinginformation. (Don't include
the brackets!) The text should be enclosed inthe appropriate
comment syntax for the file format. We alsorecommend that a
file or class name and description of purposebe included on the
same "printed page" as the copyright noticefor easier
identification within third-party archives.
Copyright [yyyy] [name of copyright owner]
Licensed under the Apache License, Version 2.0(the "License");
you may not use this file except in compliancewith the License.
You may obtain a copy of the License at
http://www.apache.org/licenses/LICENSE-2.0
Unless required by applicable law or agreed to inwriting, software
distributed under the License is distributed on an"AS IS" BASIS,
WITHOUT WARRANTIES OR CONDITIONS OF ANYKIND, either express or implied.
See the License for the specific languagegoverning permissions and
limitations under the License.
_____________________________
This copy of the libpng notices is provided for yourconvenience. In case of
any discrepancy between this copy and the notices inthe file png.h that is
included in the libpng distribution, the latter shallprevail.
COPYRIGHT NOTICE, DISCLAIMER, and LICENSE:
If you modify libpng you may insert additional noticesimmediately following
this sentence.
This code is released under the libpng license.
libpng versions 1.2.6, August 15, 2004, through 1.4.1,February 25, 2010, are
Copyright (c) 2004, 2006-2007 Glenn Randers-
70

Pehrson, and are
distributed according to the same disclaimer andlicense as libpng-1.2.5
with the following individual added to the list ofContributing Authors
Cosmin Truta
libpng versions 1.0.7, July 1, 2000, through 1.2.5 -October 3, 2002, are
Copyright (c) 2000-2002 Glenn Randers-Pehrson,and are
distributed according to the same disclaimer andlicense as libpng-1.0.6
with the following individuals added to the list ofContributing Authors
Simon-Pierre Cadieux
Eric S. Raymond
Gilles Vollant
and with the following additions to the disclaimer:
There is no warranty against interference with yourenjoyment of the
library or against infringement. There is nowarranty that our
efforts or the library will fulfill any of yourparticular purposes
or needs. This library is provided with all faults,and the entire
risk of satisfactory quality, performance, accuracy,and effort is with
the user.
libpng versions 0.97, January 1998, through 1.0.6,March 20, 2000, are
Copyright (c) 1998, 1999 Glenn Randers-Pehrson, andare
distributed according to the same disclaimer andlicense as libpng-0.96,
with the following individuals added to the list ofContributing Authors:
Tom Lane
Glenn Randers-Pehrson
Willem van Schaik
libpng versions 0.89, June 1996, through 0.96, May1997, are
Copyright (c) 1996, 1997 Andreas Dilger
Distributed according to the same disclaimer andlicense as libpng-0.88,
with the following individuals added to the list ofContributing Authors:
John Bowler
Kevin Bracey
Sam Bushell
Magnus Holmgren
Greg Roelofs
Tom Tanner
libpng versions 0.5, May 1995, through 0.88, January1996, are
Copyright (c) 1995, 1996 Guy Eric Schalnat, Group 42,Inc.
For the purposes of this copyright and license,"Contributing Authors"
is defined as the following set of individuals:
Andreas Dilger
Dave Martindale
Guy Eric Schalnat
Paul Schmidt
Tim Wegner
The PNG Reference Library is supplied "AS IS". TheContributing Authors
and Group 42, Inc. disclaim all warranties, expressedor implied,
including, without limitation, the warranties ofmerchantability and of
fitness for any purpose. The Contributing Authorsand Group 42, Inc.
assume no liability for direct, indirect, incidental,special, exemplary,
or consequential damages, which may result from theuse of the PNG
Reference Library, even if advised of the possibility of
71
such damage.
Permission is hereby granted to use, copy, modify,and distribute this
source code, or portions hereof, for any purpose,without fee, subject
to the following restrictions:
be misrepresented as being the original source.
source or altered source distribution.
The Contributing Authors and Group 42, Inc.specifically permit, without
fee, and encourage the use of this source code as acomponent to
supporting the PNG file format in commercialproducts. If you use this
source code in a product, acknowledgment is notrequired but would be
A "png_get_copyright" function is available, forconvenient use in "about"
boxes and the like:
printf("%s",png_get_copyright(NULL));
Also, the PNG logo (in PNG format, of course) issupplied in the
files "pngbar.png.jpg" and "pngbar.jpg (88x31) and"pngnow.png.jpg" (98x31).
Libpng is OSI Certified Open Source Software. OSICertified Open Source is a
certification mark of the Open Source Initiative.
Glenn Randers-Pehrson
glennrp at users.sourceforge.net
February 25, 2010
_____________________________
This software is based in part on the work of theFreeType Team.
----------------------
The FreeType ProjectLICENSE
----------------------------
2006-Jan-27
Copyright 1996-2002,2006 by
David Turner, Robert Wilhelm, andWerner Lemberg
Introduction
============
The FreeType Project is distributed in severalarchive packages;
some of them may contain, in addition to theFreeType font engine,
various tools and contributions which rely on, or relate to, the
FreeType Project.
This license applies to all files found in such packages, and
which do not fall under their own explicit license. The license
affects thus the FreeType font engine, the test programs,
documentation and makefiles, at the very least.
This license was inspired by the BSD, Artistic, and IJG
(Independent JPEG Group) licenses, which allencourage inclusion
and use of free software in commercial andfreeware products
alike. As a consequence, its main points are that:
72
o We don't promise that this software works.However, we will be
interested in any kind of bug reports. (`as is'distribution)
o You can use this software for whatever you want, in parts or
full form, without having to pay us. (`royalty-free' usage)
o You may not pretend that you wrote thissoftware. If you use
it, or only parts of it, in a program, youmust acknowledge
somewhere in your documentation that you have used the
FreeType code. (`credits')
We specifically permit and encourage the inclusion of this
software, with or without modifications, incommercial products.
We disclaim all warranties covering The FreeType Project and
assume no liability related to The FreeType Project.
Finally, many people asked us for a preferred form for a
credit/disclaimer to use in compliance with thislicense. We thus
encourage you to use the following text:
"""
Portions of this software are copyright ?<year>The FreeType
Project (www.freetype.org). All rights reserved.
"""
Please replace <year> with the value from theFreeType version you
actually use.
Legal Terms
===========
--------------
Throughout this license, the terms `package',`FreeType Project',
and `FreeType archive' refer to the set offiles originally
distributed by the authors (David Turner, Robert Wilhelm, and
Werner Lemberg) as the `FreeType Project', be theynamed as alpha,
beta or final release.
`You' refers to the licensee, or person using theproject, where
`using' is a generic term including compiling theproject's source
code as well as linking it to form a `program' or`executable'.
This program is referred to as `a program using the FreeType
engine'.
This license applies to all files distributed in the original
FreeType Project, including all source code, binaries and
documentation, unless otherwise stated in the file in its
original, unmodified form as distributed in theoriginal archive.
If you are unsure whether or not a particular fileis covered by
this license, you must contact us to verify this.
The FreeType Project is copyright (C) 1996-2000 by David Turner,
Robert Wilhelm, and Werner Lemberg. All rightsreserved except as
specified below.
--------------
THE FREETYPE PROJECT IS PROVIDED `AS IS'WITHOUT WARRANTY OF ANY
KIND, EITHER EXPRESS OR IMPLIED, INCLUDING, BUT NOT LIMITED TO,
73
WARRANTIES OF MERCHANTABILITY AND FITNESS FOR A PARTICULAR
PURPOSE. IN NO EVENT WILL ANY OF THEAUTHORS OR COPYRIGHT HOLDERS
BE LIABLE FOR ANY DAMAGES CAUSED BY THEUSE OR THE INABILITY TO
USE, OF THE FREETYPE PROJECT.
-----------------
This license grants a worldwide, royalty-free, perpetual and
irrevocable right and license to use, execute,perform, compile,
display, copy, create derivative works of, distribute and
sublicense the FreeType Project (in both sourceand object code
forms) and derivative works thereof for any purpose; and to
authorize others to exercise some or all of the rights granted
herein, subject to the following conditions:
o Redistribution of source code must retainthis license file
(`FTL.TXT') unaltered; any additions,deletions or changes to
the original files must be clearly indicated inaccompanying
documentation. The copyright notices of the unaltered,
original files must be preserved in all copies of source
files.
o Redistribution in binary form must provide a disclaimer that
states that the software is based in part ofthe work of the
FreeType Team, in the distribution documentation. We also
encourage you to put an URL to the FreeTypeweb page in your
documentation, though this isn't mandatory.
These conditions apply to any software derived
from or based on
the FreeType Project, not just the unmodifiedfiles. If you use
our work, you must acknowledge us. However,no fee need be paid
to us.
--------------
Neither the FreeType authors and contributorsnor you shall use
the name of the other for commercial, advertising,or promotional
purposes without specific prior written permission.
We suggest, but do not require, that you use oneor more of the
following phrases to refer to this software in yourdocumentation
or advertising materials: `FreeType Project', `FreeType Engine',
`FreeType library', or `FreeType Distribution'.
As you have not signed this license, you are not required to
accept it. However, as the FreeType Project is copyrighted
material, only this license, or another onecontracted with the
authors, grants you the right to use, distribute, and modify it.
Therefore, by using, distributing, or modifying the FreeType
Project, you indicate that you understand andaccept all the terms
of this license.
-----------
There are two mailing lists related to FreeType:
Discusses general use and applications ofFreeType, as well as
future and wanted additions to the library
74
and distribution.
If you are looking for support, start in thislist if you
haven't found anything to help you in thedocumentation.
Discusses bugs, as well as engineinternals, design issues,
specific licenses, porting, etc.
Our home page can be found at
http://www.freetype.org
--- end of FTL.TXT ---
_____________________________
LICENSE ISSUES
==============
The OpenSSL toolkit stays under a dual license, i.e.both the conditions of
the OpenSSL License and the original SSLeaylicense apply to the toolkit.
See below for the actual license texts. Actually bothlicenses are BSD-style
Open Source licenses. In case of any license issuesrelated to OpenSSL
please contact [email protected].
OpenSSL License
---------------
/*
===========================
* Copyright (c) 1998-2011 The OpenSSL Project. Allrights reserved.
*
* Redistribution and use in source and binary forms,
with or without
* modification, are permitted provided that thefollowing conditions
* are met:
*
* 1. Redistributions of source code must retain theabove copyright
* notice, this list of conditions and the followingdisclaimer.
*
* 2. Redistributions in binary form must reproducethe above copyright
* notice, this list of conditions and the followingdisclaimer in
* the documentation and/or other materialsprovided with the
* distribution.
*
* 3. All advertising materials mentioning features oruse of this
* software must display the followingacknowledgment:
* "This product includes software developed bythe OpenSSL Project
* for use in the OpenSSL Toolkit.(http://www.openssl.org/)"
*
* 4. The names "OpenSSL Toolkit" and "OpenSSLProject" must not be used to
* endorse or promote products derived from thissoftware without
* prior written permission. For writtenpermission, please contact
*
* 5. Products derived from this software may not becalled "OpenSSL"
* nor may "OpenSSL" appear in their nameswithout prior written
* permission of the OpenSSL Project.
*
* 6. Redistributions of any form whatsoever mustretain the following
* acknowledgment:
* "This product includes software developed bythe OpenSSL Project
* for use in the OpenSSL Toolkit
75
(http://www.openssl.org/)"
*
* THIS SOFTWARE IS PROVIDED BY THE OpenSSLPROJECT ``AS IS'' AND ANY
* EXPRESSED OR IMPLIED WARRANTIES,INCLUDING, BUT NOT LIMITED TO, THE
* IMPLIED WARRANTIES OF MERCHANTABILITYAND FITNESS FOR A PARTICULAR
* PURPOSE ARE DISCLAIMED. IN NO EVENTSHALL THE OpenSSL PROJECT OR
* ITS CONTRIBUTORS BE LIABLE FOR ANY DIRECT,INDIRECT, INCIDENTAL,
* SPECIAL, EXEMPLARY, OR CONSEQUENTIALDAMAGES (INCLUDING, BUT
* NOT LIMITED TO, PROCUREMENT OFSUBSTITUTE GOODS OR SERVICES;
* LOSS OF USE, DATA, OR PROFITS; OR BUSINESSINTERRUPTION)
* HOWEVER CAUSED AND ON ANY THEORY OFLIABILITY, WHETHER IN CONTRACT,
* STRICT LIABILITY, OR TORT (INCLUDINGNEGLIGENCE OR OTHERWISE)
* ARISING IN ANY WAY OUT OF THE USE OF THISSOFTWARE, EVEN IF ADVISED
* OF THE POSSIBILITY OF SUCH DAMAGE.
*
===========================
*
* This product includes cryptographic softwarewritten by Eric Young
* ([email protected]). This product includessoftware written by Tim
* Hudson ([email protected]).
*
*/
Original SSLeay License
-----------------------
/* Copyright (C) 1995-1998 Eric Young([email protected])
* All rights reserved.
*
* This package is an SSL implementation written
* by Eric Young ([email protected]).
* The implementation was written so as to conform
with Netscapes SSL.
*
* This library is free for commercial and non-commercial use as long as
* the following conditions are aheared to. Thefollowing conditions
* apply to all code found in this distribution, be it theRC4, RSA,
* lhash, DES, etc., code; not just the SSL code. TheSSL documentation
* included with this distribution is covered by thesame copyright terms
* except that the holder is Tim Hudson([email protected]).
*
* Copyright remains Eric Young's, and as such anyCopyright notices in
* the code are not to be removed.
* If this package is used in a product, Eric Youngshould be given attribution
* as the author of the parts of the library used.
* This can be in the form of a textual message atprogram startup or
* in documentation (online or textual) provided withthe package.
*
* Redistribution and use in source and binary forms,with or without
* modification, are permitted provided that thefollowing conditions
* are met:
* 1. Redistributions of source code must retain thecopyright
* notice, this list of conditions and the followingdisclaimer.
* 2. Redistributions in binary form must reproducethe above copyright
* notice, this list of conditions and the followingdisclaimer in the
* documentation and/or other materialsprovided with the distribution.
* 3. All advertising materials mentioning features oruse of this software
* must display the following acknowledgement:
* "This product includes cryptographic softwarewritten by
* Eric Young ([email protected])"
76
* The word 'cryptographic' can be left out if therouines from the library
* being used are not cryptographic related :-).
* 4. If you include any Windows specific code (or aderivative thereof) from
* the apps directory (application code) you mustinclude an acknowledgement:
* "This product includes software written by TimHudson ([email protected])"
*
* THIS SOFTWARE IS PROVIDED BY ERIC YOUNG``AS IS'' AND
* ANY EXPRESS OR IMPLIED WARRANTIES,INCLUDING, BUT NOT LIMITED TO, THE
* IMPLIED WARRANTIES OF MERCHANTABILITYAND FITNESS FOR A PARTICULAR PURPOSE
* ARE DISCLAIMED. IN NO EVENT SHALL THEAUTHOR OR CONTRIBUTORS BE LIABLE
* FOR ANY DIRECT, INDIRECT, INCIDENTAL,SPECIAL, EXEMPLARY, OR CONSEQUENTIAL
* DAMAGES (INCLUDING, BUT NOT LIMITED TO,PROCUREMENT OF SUBSTITUTE GOODS
* OR SERVICES; LOSS OF USE, DATA, OR PROFITS;OR BUSINESS INTERRUPTION)
* HOWEVER CAUSED AND ON ANY THEORY OFLIABILITY, WHETHER IN CONTRACT, STRICT
* LIABILITY, OR TORT (INCLUDING NEGLIGENCE OROTHERWISE) ARISING IN ANY WAY
* OUT OF THE USE OF THIS SOFTWARE, EVEN IFADVISED OF THE POSSIBILITY OF
* SUCH DAMAGE.
*
* The licence and distribution terms for anypublically available version or
* derivative of this code cannot be changed. i.e. thiscode cannot simply be
* copied and put under another distribution licence
* [including the GNU Public Licence.]
*/
_____________________________
MOZILLA PUBLICLICENSE
Version 1.1
---------------
1.0.1. "Commercial Use" means distribution orotherwise making the
Covered Code available to a third party.
1.1. "Contributor" means each entity that createsor contributes to
the creation of Modifications.
1.2. "Contributor Version" means thecombination of the Original
Code, prior Modifications used by a Contributor,and the Modifications
made by that particular Contributor.
1.3. "Covered Code" means the Original Code orModifications or the
combination of the Original Code andModifications, in each case
including portions thereof.
1.4. "Electronic Distribution Mechanism" meansa mechanism generally
accepted in the software developmentcommunity for the electronic
transfer of data.
1.5. "Executable" means Covered Code in anyform other than Source
Code.
1.6. "Initial Developer" means the individual orentity identified
as the Initial Developer in the Source Codenotice required by Exhibit
A.
1.7. "Larger Work" means a work whichcombines Covered Code or
portions thereof with code not governed by theterms of this License.
1.8. "License" means this document.
77

1.8.1. "Licensable" means having the right togrant, to the maximum
extent possible, whether at the time of theinitial grant or
subsequently acquired, any and all of the rightsconveyed herein.
1.9. "Modifications" means any addition to ordeletion from the
substance or structure of either the OriginalCode or any previous
Modifications. When Covered Code is releasedas a series of files, a
Modification is:
A. Any addition to or deletion from thecontents of a file
containing Original Code or previousModifications.
B. Any new file that contains any part ofthe Original Code or
previous Modifications.
1.10. "Original Code" means Source Code ofcomputer software code
which is described in the Source Code noticerequired by Exhibit A as
Original Code, and which, at the time of itsrelease under this
License is not already Covered Code governedby this License.
1.10.1. "Patent Claims" means any patentclaim(s), now owned or
hereafter acquired, including withoutlimitation, method, process,
and apparatus claims, in any patent Licensableby grantor.
1.11. "Source Code" means the preferred form ofthe Covered Code for
making modifications to it, including all modulesit contains, plus
any associated interface definition files, scriptsused to control
compilation and installation of an Executable,or source code
differential comparisons against either theOriginal Code or another
well known, available Covered Code of theContributor's choice. The
Source Code can be in a compressed orarchival form, provided the
appropriate decompression or de-archivingsoftware is widely available
for no charge.
1.12. "You" (or "Your") means an individual or alegal entity
exercising rights under, and complying with allof the terms of, this
License or a future version of this Licenseissued under Section 6.1.
For legal entities, "You" includes any entitywhich controls, is
controlled by, or is under common control withYou. For purposes of
this definition, "control" means (a) the power,direct or indirect,
to cause the direction or management of suchentity, whether by
contract or otherwise, or (b) ownership of morethan fifty percent
(50%) of the outstanding shares or beneficialownership of such
entity.
2.1. The Initial Developer Grant.
The Initial Developer hereby grants You a world-wide, royalty-free,
non-exclusive license, subject to third partyintellectual property
claims:
(a) under intellectual property rights(other than patent or
trademark) Licensable by InitialDeveloper to use, reproduce,
modify, display, perform, sublicense anddistribute the Original
Code (or portions thereof) with orwithout Modifications, and/or
as part of a Larger Work; and
78
(b) under Patents Claims infringed by themaking, using or
selling of Original Code, to make, havemade, use, practice,
sell, and offer for sale, and/or otherwisedispose of the
Original Code (or portions thereof).
(c) the licenses granted in this Section2.1(a) and (b) are
effective on the date Initial Developerfirst distributes
Original Code under the terms of thisLicense.
(d) Notwithstanding Section 2.1(b) above,no patent license is
granted: 1) for code that You delete fromthe Original Code; 2)
separate from the Original Code; or 3)for infringements caused
by: i) the modification of the OriginalCode or ii) the
combination of the Original Code withother software or devices.
2.2. Contributor Grant.
Subject to third party intellectual propertyclaims, each Contributor
hereby grants You a world-wide, royalty-free,non-exclusive license
(a) under intellectual property rights(other than patent or
trademark) Licensable by Contributor, touse, reproduce, modify,
display, perform, sublicense anddistribute the Modifications
created by such Contributor (or portionsthereof) either on an
unmodified basis, with otherModifications, as Covered Code
and/or as part of a Larger Work; and
(b) under Patent Claims infringed by themaking, using, or
selling of Modifications made by thatContributor either alone
and/or in combination with itsContributor Version (or portions
of such combination), to make, use, sell,offer for sale, have
made, and/or otherwise dispose of: 1)Modifications made by that
Contributor (or portions thereof); and 2)the combination of
Modifications made by that Contributorwith its Contributor
Version (or portions of suchcombination).
(c) the licenses granted in Sections 2.2(a)and 2.2(b) are
effective on the date Contributor firstmakes Commercial Use of
the Covered Code.
(d) Notwithstanding Section 2.2(b)above, no patent license is
granted: 1) for any code that Contributorhas deleted from the
Contributor Version; 2) separate fromthe Contributor Version;
3) for infringements caused by: i) thirdparty modifications of
Contributor Version or ii) thecombination of Modifications made
by that Contributor with other software (except as part of the
Contributor Version) or other devices; or4) under Patent Claims
infringed by Covered Code in theabsence of Modifications made by
that Contributor.
3.1. Application of License.
The Modifications which You create or to whichYou contribute are
governed by the terms of this License, includingwithout limitation
Section 2.2. The Source Code version ofCovered Code may be
distributed only under the terms of this Licenseor a future version
of this License released under Section 6.1, and
79
You must include a
copy of this License with every copy of theSource Code You
distribute. You may not offer or impose anyterms on any Source Code
version that alters or restricts the applicableversion of this
License or the recipients' rights hereunder.However, You may include
an additional document offering the additionalrights described in
Section 3.5.
3.2. Availability of Source Code.
Any Modification which You create or to whichYou contribute must be
made available in Source Code form under theterms of this License
either on the same media as an Executableversion or via an accepted
Electronic Distribution Mechanism to anyone towhom you made an
Executable version available; and if madeavailable via Electronic
Distribution Mechanism, must remain availablefor at least twelve (12)
months after the date it initially becameavailable, or at least six
(6) months after a subsequent version of thatparticular Modification
has been made available to such recipients.You are responsible for
ensuring that the Source Code version remainsavailable even if the
Electronic Distribution Mechanism is maintainedby a third party.
3.3. Description of Modifications.
You must cause all Covered Code to which Youcontribute to contain a
file documenting the changes You made tocreate that Covered Code and
the date of any change. You must include aprominent statement that
the Modification is derived, directly or indirectly,from Original
Code provided by the Initial Developer andincluding the name of the
Initial Developer in (a) the Source Code, and (b)in any notice in an
Executable version or related documentation inwhich You describe the
origin or ownership of the Covered Code.
3.4. Intellectual Property Matters
(a) Third Party Claims.
If Contributor has knowledge that alicense under a third party's
intellectual property rights is required toexercise the rights
granted by such Contributor underSections 2.1 or 2.2,
Contributor must include a text file withthe Source Code
distribution titled "LEGAL" whichdescribes the claim and the
party making the claim in sufficient detailthat a recipient will
know whom to contact. If Contributorobtains such knowledge after
the Modification is made available asdescribed in Section 3.2,
Contributor shall promptly modify theLEGAL file in all copies
Contributor makes available thereafterand shall take other steps
(such as notifying appropriate mailinglists or newsgroups)
reasonably calculated to inform thosewho received the Covered
Code that new knowledge has beenobtained.
(b) Contributor APIs.
If Contributor's Modifications include anapplication programming
interface and Contributor has knowledgeof patent licenses which
are reasonably necessary to implementthat API, Contributor must
also include this information in theLEGAL file.
(c) Representations.
Contributor represents that, except asdisclosed pursuant to
80

Section 3.4(a) above, Contributorbelieves that Contributor's
Modifications are Contributor's originalcreation(s) and/or
Contributor has sufficient rights to grantthe rights conveyed by
this License.
3.5. Required Notices.
You must duplicate the notice in Exhibit A ineach file of the Source
Code. If it is not possible to put such notice ina particular Source
Code file due to its structure, then You mustinclude such notice in a
location (such as a relevant directory) where auser would be likely
to look for such a notice. If You created one ormore Modification(s)
You may add your name as a Contributor to thenotice described in
Exhibit A. You must also duplicate this Licensein any documentation
for the Source Code where You describerecipients' rights or ownership
rights relating to Covered Code. You maychoose to offer, and to
charge a fee for, warranty, support, indemnity orliability
obligations to one or more recipients ofCovered Code. However, You
may do so only on Your own behalf, and not onbehalf of the Initial
Developer or any Contributor. You must make itabsolutely clear than
any such warranty, support, indemnity orliability obligation is
offered by You alone, and You hereby agree toindemnify the Initial
Developer and every Contributor for anyliability incurred by the
Initial Developer or such Contributor as a resultof warranty,
support, indemnity or liability terms You offer.
3.6. Distribution of Executable Versions.
You may distribute Covered Code in Executableform only if the
requirements of Section 3.1-3.5 have been metfor that Covered Code,
and if You include a notice stating that theSource Code version of
the Covered Code is available under the termsof this License,
including a description of how and where Youhave fulfilled the
obligations of Section 3.2. The notice must beconspicuously included
in any notice in an Executable version, relateddocumentation or
collateral in which You describe recipients'rights relating to the
Covered Code. You may distribute theExecutable version of Covered
Code or ownership rights under a license ofYour choice, which may
contain terms different from this License,provided that You are in
compliance with the terms of this License andthat the license for the
Executable version does not attempt to limit oralter the recipient's
rights in the Source Code version from the rightsset forth in this
License. If You distribute the Executable versionunder a different
license You must make it absolutely clear thatany terms which differ
from this License are offered by You alone, notby the Initial
Developer or any Contributor. You hereby agreeto indemnify the
Initial Developer and every Contributor for anyliability incurred by
the Initial Developer or such Contributor as aresult of any such
terms You offer.
3.7. Larger Works.
You may create a Larger Work by combiningCovered Code with other code
not governed by the terms of this License anddistribute the Larger
Work as a single product. In such a case, Youmust make sure the
requirements of this License are fulfilled for the
81
Covered Code.
If it is impossible for You to comply with any ofthe terms of this
License with respect to some or all of theCovered Code due to
statute, judicial order, or regulation then Youmust: (a) comply with
the terms of this License to the maximum extentpossible; and (b)
describe the limitations and the code theyaffect. Such description
must be included in the LEGAL file described inSection 3.4 and must
be included with all distributions of the SourceCode. Except to the
extent prohibited by statute or regulation, suchdescription must be
sufficiently detailed for a recipient of ordinaryskill to be able to
understand it.
This License applies to code to which the InitialDeveloper has
attached the notice in Exhibit A and to relatedCovered Code.
6.1. New Versions.
Netscape Communications Corporation("Netscape") may publish revised
and/or new versions of the License from time totime. Each version
will be given a distinguishing version number.
6.2. Effect of New Versions.
Once Covered Code has been published undera particular version of the
License, You may always continue to use itunder the terms of that
version. You may also choose to use suchCovered Code under the terms
of any subsequent version of the Licensepublished by Netscape. No one
other than Netscape has the right to modify the
terms applicable to
Covered Code created under this License.
6.3. Derivative Works.
If You create or use a modified version of thisLicense (which you may
only do in order to apply it to code which is notalready Covered Code
governed by this License), You must (a) renameYour license so that
the phrases "Mozilla", "MOZILLAPL", "MOZPL","Netscape",
"MPL", "NPL" or any confusingly similar phrasedo not appear in your
license (except to note that your license differsfrom this License)
and (b) otherwise make it clear that Yourversion of the license
contains terms which differ from the MozillaPublic License and
Netscape Public License. (Filling in the name ofthe Initial
Developer, Original Code or Contributor in thenotice described in
Exhibit A shall not of themselves be deemed tobe modifications of
this License.)
COVERED CODE IS PROVIDED UNDER THISLICENSE ON AN "AS IS" BASIS,
WITHOUT WARRANTY OF ANY KIND, EITHEREXPRESSED OR IMPLIED, INCLUDING,
WITHOUT LIMITATION, WARRANTIES THATTHE COVERED CODE IS FREE OF
DEFECTS, MERCHANTABLE, FIT FOR APARTICULAR PURPOSE OR NON-INFRINGING.
THE ENTIRE RISK AS TO THE QUALITY ANDPERFORMANCE OF THE COVERED CODE
IS WITH YOU. SHOULD ANY COVERED CODEPROVE DEFECTIVE IN ANY RESPECT,
YOU (NOT THE INITIAL DEVELOPER OR ANYOTHER CONTRIBUTOR) ASSUME THE
COST OF ANY NECESSARY SERVICING, REPAIROR CORRECTION. THIS DISCLAIMER
OF WARRANTY CONSTITUTES AN ESSENTIALPART OF THIS LICENSE. NO USE OF
ANY COVERED CODE IS AUTHORIZED
82

HEREUNDER EXCEPT UNDER THIS DISCLAIMER.
8.1. This License and the rights grantedhereunder will terminate
automatically if You fail to comply with termsherein and fail to cure
such breach within 30 days of becoming awareof the breach. All
sublicenses to the Covered Code which areproperly granted shall
survive any termination of this License.Provisions which, by their
nature, must remain in effect beyond thetermination of this License
shall survive.
8.2. If You initiate litigation by asserting apatent infringement
claim (excluding declatory judgment actions)against Initial Developer
or a Contributor (the Initial Developer orContributor against whom
You file such action is referred to as"Participant") alleging that:
(a) such Participant's Contributor Versiondirectly or indirectly
infringes any patent, then any and all rightsgranted by such
Participant to You under Sections 2.1 and/or 2.2of this License
shall, upon 60 days notice from Participantterminate prospectively,
unless if within 60 days after receipt of noticeYou either: (i)
agree in writing to pay Participant a mutuallyagreeable reasonable
royalty for Your past and future use ofModifications made by such
Participant, or (ii) withdraw Your litigation claimwith respect to
the Contributor Version against suchParticipant. If within 60 days
of notice, a reasonable royalty and paymentarrangement are not
mutually agreed upon in writing by the partiesor the litigation claim
is not withdrawn, the rights granted byParticipant to You under
Sections 2.1 and/or 2.2 automatically terminateat the expiration of
the 60 day notice period specified above.
(b) any software, hardware, or device, otherthan such Participant's
Contributor Version, directly or indirectlyinfringes any patent, then
any rights granted to You by such Participantunder Sections 2.1(b)
and 2.2(b) are revoked effective as of the dateYou first made, used,
sold, distributed, or had made, Modificationsmade by that
Participant.
8.3. If You assert a patent infringement claimagainst Participant
alleging that such Participant's ContributorVersion directly or
indirectly infringes any patent where such claimis resolved (such as
by license or settlement) prior to the initiation ofpatent
infringement litigation, then the reasonablevalue of the licenses
granted by such Participant under Sections 2.1or 2.2 shall be taken
into account in determining the amount orvalue of any payment or
license.
8.4. In the event of termination under Sections8.1 or 8.2 above,
all end user license agreements (excludingdistributors and resellers)
which have been validly granted by You or anydistributor hereunder
prior to termination shall survive termination.
UNDER NO CIRCUMSTANCES AND UNDER NOLEGAL THEORY, WHETHER TORT
(INCLUDING NEGLIGENCE), CONTRACT, OROTHERWISE, SHALL YOU, THE INITIAL
83
DEVELOPER, ANY OTHER CONTRIBUTOR, ORANY DISTRIBUTOR OF COVERED CODE,
OR ANY SUPPLIER OF ANY OF SUCH PARTIES,BE LIABLE TO ANY PERSON FOR
ANY INDIRECT, SPECIAL, INCIDENTAL, ORCONSEQUENTIAL DAMAGES OF ANY
CHARACTER INCLUDING, WITHOUTLIMITATION, DAMAGES FOR LOSS OF GOODWILL,
WORK STOPPAGE, COMPUTER FAILURE ORMALFUNCTION, OR ANY AND ALL OTHER
COMMERCIAL DAMAGES OR LOSSES, EVEN IFSUCH PARTY SHALL HAVE BEEN
INFORMED OF THE POSSIBILITY OF SUCHDAMAGES. THIS LIMITATION OF
LIABILITY SHALL NOT APPLY TO LIABILITY FORDEATH OR PERSONAL INJURY
RESULTING FROM SUCH PARTY'SNEGLIGENCE TO THE EXTENT APPLICABLE LAW
PROHIBITS SUCH LIMITATION. SOMEJURISDICTIONS DO NOT ALLOW THE
EXCLUSION OR LIMITATION OF INCIDENTALOR CONSEQUENTIAL DAMAGES, SO
THIS EXCLUSION AND LIMITATION MAY NOTAPPLY TO YOU.
The Covered Code is a "commercial item," asthat term is defined in
48 C.F.R. 2.101 (Oct. 1995), consisting of"commercial computer
software" and "commercial computer softwaredocumentation," as such
terms are used in 48 C.F.R. 12.212 (Sept. 1995).Consistent with 48
C.F.R. 12.212 and 48 C.F.R. 227.7202-1 through227.7202-4 (June 1995),
all U.S. Government End Users acquire CoveredCode with only those
rights set forth herein.
This License represents the completeagreement concerning subject
matter hereof. If any provision of this License isheld to be
unenforceable, such provision shall bereformed only to the extent
necessary to make it enforceable. This License
shall be governed by
California law provisions (except to the extentapplicable law, if
any, provides otherwise), excluding its conflict-of-law provisions.
With respect to disputes in which at least oneparty is a citizen of,
or an entity chartered or registered to dobusiness in the United
States of America, any litigation relating to thisLicense shall be
subject to the jurisdiction of the Federal Courtsof the Northern
District of California, with venue lying in SantaClara County,
California, with the losing party responsible forcosts, including
without limitation, court costs and reasonableattorneys' fees and
expenses. The application of the United NationsConvention on
Contracts for the International Sale of Goods isexpressly excluded.
Any law or regulation which provides that thelanguage of a contract
shall be construed against the drafter shall notapply to this
License.
As between Initial Developer and theContributors, each party is
responsible for claims and damages arising,directly or indirectly,
out of its utilization of rights under this Licenseand You agree to
work with Initial Developer and Contributors todistribute such
responsibility on an equitable basis. Nothingherein is intended or
shall be deemed to constitute any admission ofliability.
Initial Developer may designate portions of theCovered Code as
"Multiple-Licensed". "Multiple-Licensed"means that the Initial
84
Developer permits you to utilize portions of theCovered Code under
Your choice of the NPL or the alternativelicenses, if any, specified
by the Initial Developer in the file described inExhibit A.
EXHIBIT A -Mozilla Public License.
``The contents of this file are subject to theMozilla Public License
Version 1.1 (the "License"); you may not use thisfile except in
compliance with the License. You may obtain acopy of the License at
http://www.mozilla.org/MPL/
Software distributed under the License isdistributed on an "AS IS"
basis, WITHOUT WARRANTY OF ANY KIND,either express or implied. See the
License for the specific language governingrights and limitations
under the License.
The Original Code is _________.
The Initial Developer of the Original Code is______.
Portions created by _______ are Copyright (C)______. All Rights Reserved.
Contributor(s): __________.
Alternatively, the contents of this file may beused under the terms
of the _____ license (the "[___] License"), inwhich case the
provisions of [______] License are applicableinstead of those
above. If you wish to allow use of your versionof this file only
under the terms of the [____] License and not toallow others to use
your version of this file under the MPL, indicateyour decision by
deleting the provisions above and replace
them with the notice and
other provisions required by the [___] License. If you do not delete
the provisions above, a recipient may use yourversion of this file
under either the MPL or the [___] License."
[NOTE: The text of this Exhibit A may differslightly from the text of
the notices in the Source Code files of theOriginal Code. You should
use the text of this Exhibit A rather than the textfound in the
Original Code Source Code for YourModifications.]
85
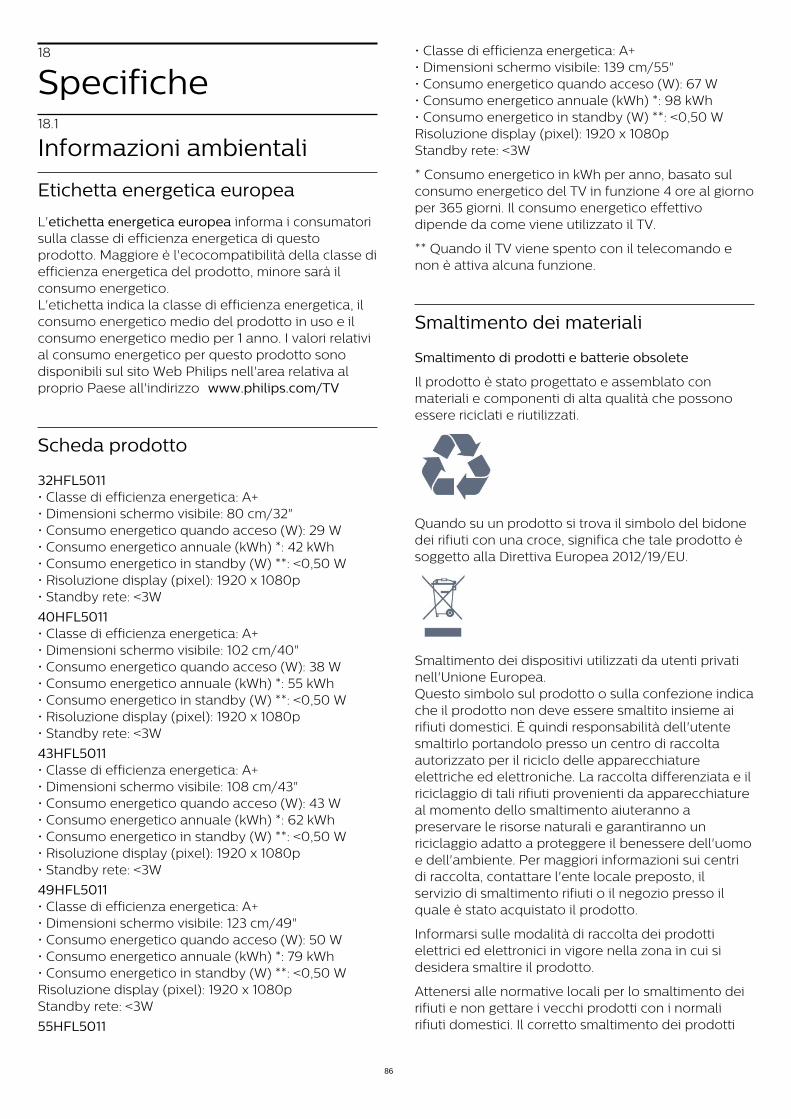
18
Specifiche18.1
Informazioni ambientali
Etichetta energetica europea
L'etichetta energetica europea informa i consumatorisulla classe di efficienza energetica di questoprodotto. Maggiore è l'ecocompatibilità della classe diefficienza energetica del prodotto, minore sarà ilconsumo energetico.L'etichetta indica la classe di efficienza energetica, ilconsumo energetico medio del prodotto in uso e ilconsumo energetico medio per 1 anno. I valori relativial consumo energetico per questo prodotto sonodisponibili sul sito Web Philips nell'area relativa alproprio Paese all'indirizzo www.philips.com/TV
Scheda prodotto
32HFL5011 • Classe di efficienza energetica: A+• Dimensioni schermo visibile: 80 cm/32"• Consumo energetico quando acceso (W): 29 W• Consumo energetico annuale (kWh) *: 42 kWh • Consumo energetico in standby (W) **: <0,50 W• Risoluzione display (pixel): 1920 x 1080p• Standby rete: <3W
40HFL5011 • Classe di efficienza energetica: A+• Dimensioni schermo visibile: 102 cm/40"• Consumo energetico quando acceso (W): 38 W• Consumo energetico annuale (kWh) *: 55 kWh• Consumo energetico in standby (W) **: <0,50 W• Risoluzione display (pixel): 1920 x 1080p• Standby rete: <3W
43HFL5011 • Classe di efficienza energetica: A+• Dimensioni schermo visibile: 108 cm/43"• Consumo energetico quando acceso (W): 43 W• Consumo energetico annuale (kWh) *: 62 kWh• Consumo energetico in standby (W) **: <0,50 W• Risoluzione display (pixel): 1920 x 1080p• Standby rete: <3W
49HFL5011 • Classe di efficienza energetica: A+• Dimensioni schermo visibile: 123 cm/49"• Consumo energetico quando acceso (W): 50 W• Consumo energetico annuale (kWh) *: 79 kWh• Consumo energetico in standby (W) **: <0,50 WRisoluzione display (pixel): 1920 x 1080pStandby rete: <3W
55HFL5011
• Classe di efficienza energetica: A+• Dimensioni schermo visibile: 139 cm/55"• Consumo energetico quando acceso (W): 67 W• Consumo energetico annuale (kWh) *: 98 kWh• Consumo energetico in standby (W) **: <0,50 WRisoluzione display (pixel): 1920 x 1080pStandby rete: <3W
* Consumo energetico in kWh per anno, basato sulconsumo energetico del TV in funzione 4 ore al giornoper 365 giorni. Il consumo energetico effettivodipende da come viene utilizzato il TV.
** Quando il TV viene spento con il telecomando enon è attiva alcuna funzione.
Smaltimento dei materiali
Smaltimento di prodotti e batterie obsolete
Il prodotto è stato progettato e assemblato conmateriali e componenti di alta qualità che possonoessere riciclati e riutilizzati.
Quando su un prodotto si trova il simbolo del bidonedei rifiuti con una croce, significa che tale prodotto èsoggetto alla Direttiva Europea 2012/19/EU.
Smaltimento dei dispositivi utilizzati da utenti privatinell'Unione Europea. Questo simbolo sul prodotto o sulla confezione indicache il prodotto non deve essere smaltito insieme airifiuti domestici. È quindi responsabilità dell'utentesmaltirlo portandolo presso un centro di raccoltaautorizzato per il riciclo delle apparecchiatureelettriche ed elettroniche. La raccolta differenziata e ilriciclaggio di tali rifiuti provenienti da apparecchiatureal momento dello smaltimento aiuteranno apreservare le risorse naturali e garantiranno unriciclaggio adatto a proteggere il benessere dell'uomoe dell'ambiente. Per maggiori informazioni sui centridi raccolta, contattare l'ente locale preposto, ilservizio di smaltimento rifiuti o il negozio presso ilquale è stato acquistato il prodotto.
Informarsi sulle modalità di raccolta dei prodottielettrici ed elettronici in vigore nella zona in cui sidesidera smaltire il prodotto.
Attenersi alle normative locali per lo smaltimento deirifiuti e non gettare i vecchi prodotti con i normalirifiuti domestici. Il corretto smaltimento dei prodotti
86
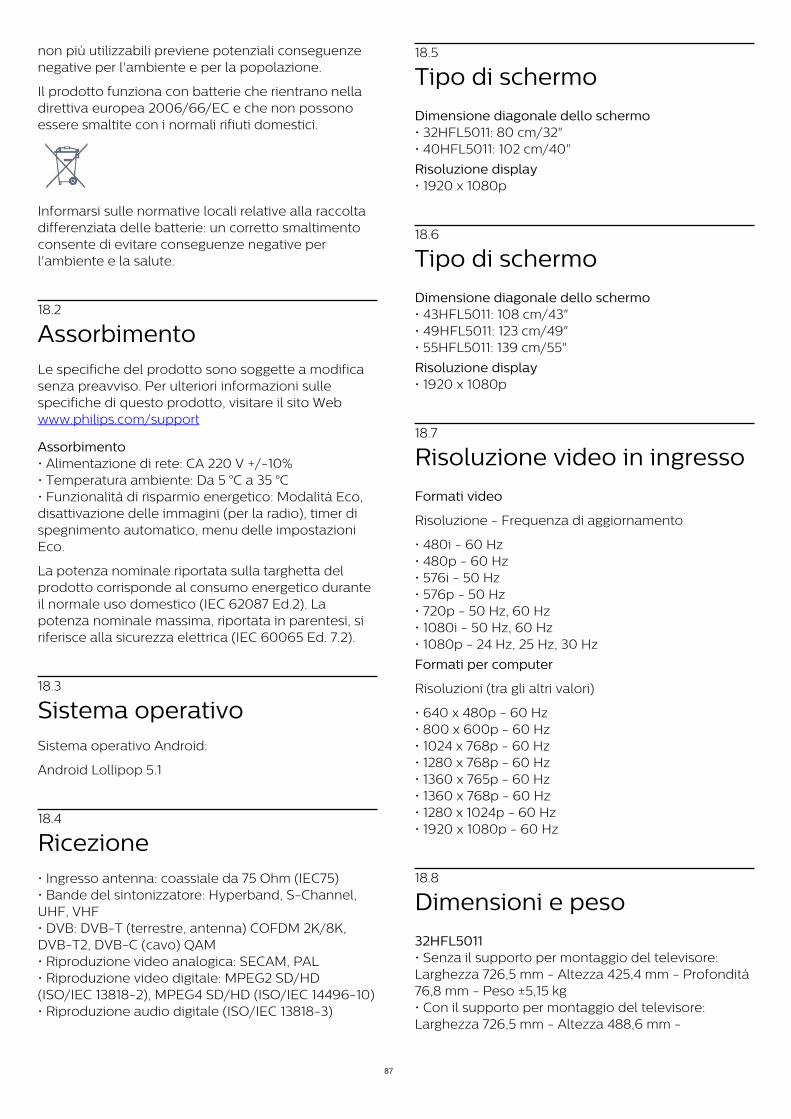
non più utilizzabili previene potenziali conseguenzenegative per l'ambiente e per la popolazione.
Il prodotto funziona con batterie che rientrano nelladirettiva europea 2006/66/EC e che non possonoessere smaltite con i normali rifiuti domestici.
Informarsi sulle normative locali relative alla raccoltadifferenziata delle batterie: un corretto smaltimentoconsente di evitare conseguenze negative perl'ambiente e la salute.
18.2
AssorbimentoLe specifiche del prodotto sono soggette a modificasenza preavviso. Per ulteriori informazioni sullespecifiche di questo prodotto, visitare il sito Web www.philips.com/support
Assorbimento • Alimentazione di rete: CA 220 V +/-10%• Temperatura ambiente: Da 5 °C a 35 °C• Funzionalità di risparmio energetico: Modalità Eco,disattivazione delle immagini (per la radio), timer dispegnimento automatico, menu delle impostazioniEco.
La potenza nominale riportata sulla targhetta delprodotto corrisponde al consumo energetico duranteil normale uso domestico (IEC 62087 Ed.2). Lapotenza nominale massima, riportata in parentesi, siriferisce alla sicurezza elettrica (IEC 60065 Ed. 7.2).
18.3
Sistema operativoSistema operativo Android:
Android Lollipop 5.1
18.4
Ricezione• Ingresso antenna: coassiale da 75 Ohm (IEC75)• Bande del sintonizzatore: Hyperband, S-Channel,UHF, VHF• DVB: DVB-T (terrestre, antenna) COFDM 2K/8K,DVB-T2, DVB-C (cavo) QAM• Riproduzione video analogica: SECAM, PAL• Riproduzione video digitale: MPEG2 SD/HD(ISO/IEC 13818-2), MPEG4 SD/HD (ISO/IEC 14496-10)• Riproduzione audio digitale (ISO/IEC 13818-3)
18.5
Tipo di schermo
Dimensione diagonale dello schermo • 32HFL5011: 80 cm/32"• 40HFL5011: 102 cm/40"
Risoluzione display • 1920 x 1080p
18.6
Tipo di schermo
Dimensione diagonale dello schermo • 43HFL5011: 108 cm/43"• 49HFL5011: 123 cm/49"• 55HFL5011: 139 cm/55"
Risoluzione display • 1920 x 1080p
18.7
Risoluzione video in ingresso
Formati video
Risoluzione - Frequenza di aggiornamento
• 480i - 60 Hz• 480p - 60 Hz• 576i - 50 Hz• 576p - 50 Hz• 720p - 50 Hz, 60 Hz• 1080i - 50 Hz, 60 Hz• 1080p - 24 Hz, 25 Hz, 30 Hz
Formati per computer
Risoluzioni (tra gli altri valori)
• 640 x 480p - 60 Hz• 800 x 600p - 60 Hz• 1024 x 768p - 60 Hz• 1280 x 768p - 60 Hz• 1360 x 765p - 60 Hz• 1360 x 768p - 60 Hz• 1280 x 1024p - 60 Hz• 1920 x 1080p - 60 Hz
18.8
Dimensioni e peso
32HFL5011 • Senza il supporto per montaggio del televisore:Larghezza 726,5 mm - Altezza 425,4 mm - Profondità76,8 mm - Peso ±5,15 kg• Con il supporto per montaggio del televisore:Larghezza 726,5 mm - Altezza 488,6 mm -
87
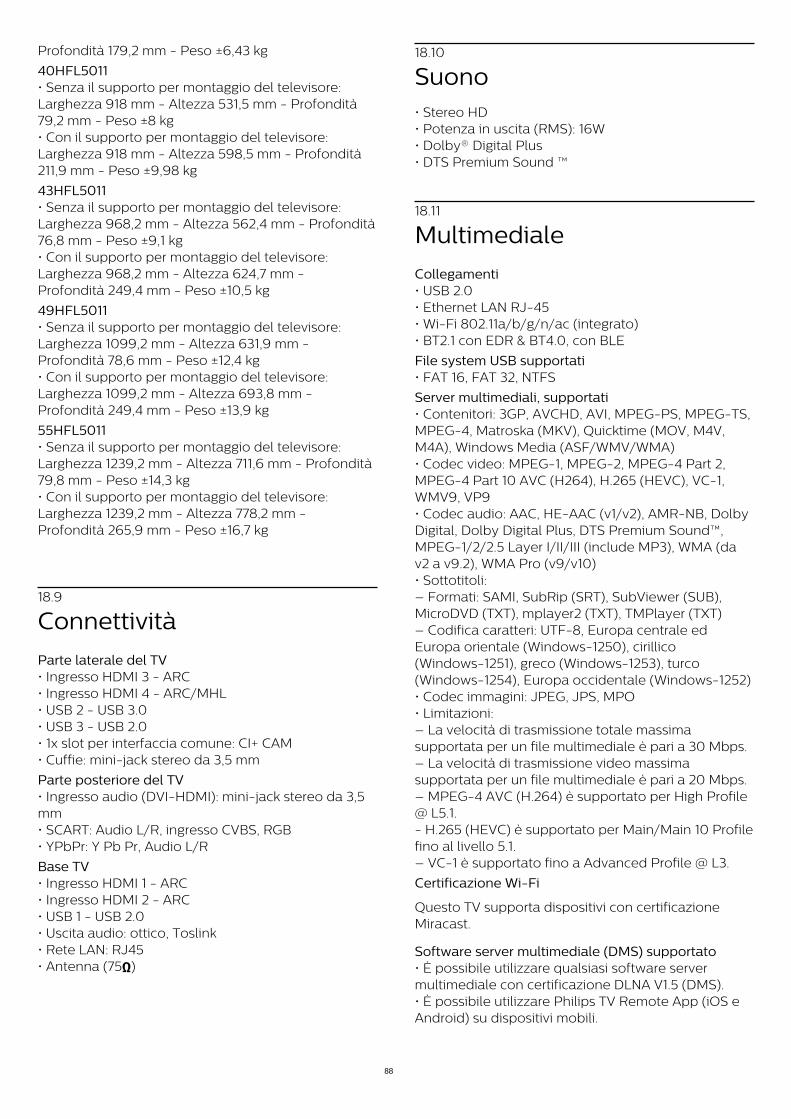
Profondità 179,2 mm - Peso ±6,43 kg
40HFL5011 • Senza il supporto per montaggio del televisore:Larghezza 918 mm - Altezza 531,5 mm - Profondità79,2 mm - Peso ±8 kg• Con il supporto per montaggio del televisore:Larghezza 918 mm - Altezza 598,5 mm - Profondità211,9 mm - Peso ±9,98 kg
43HFL5011 • Senza il supporto per montaggio del televisore:Larghezza 968,2 mm - Altezza 562,4 mm - Profondità76,8 mm - Peso ±9,1 kg• Con il supporto per montaggio del televisore:Larghezza 968,2 mm - Altezza 624,7 mm -Profondità 249,4 mm - Peso ±10,5 kg
49HFL5011 • Senza il supporto per montaggio del televisore:Larghezza 1099,2 mm - Altezza 631,9 mm -Profondità 78,6 mm - Peso ±12,4 kg• Con il supporto per montaggio del televisore:Larghezza 1099,2 mm - Altezza 693,8 mm -Profondità 249,4 mm - Peso ±13,9 kg
55HFL5011 • Senza il supporto per montaggio del televisore:Larghezza 1239,2 mm - Altezza 711,6 mm - Profondità79,8 mm - Peso ±14,3 kg• Con il supporto per montaggio del televisore:Larghezza 1239,2 mm - Altezza 778,2 mm -Profondità 265,9 mm - Peso ±16,7 kg
18.9
Connettività
Parte laterale del TV • Ingresso HDMI 3 - ARC• Ingresso HDMI 4 - ARC/MHL• USB 2 - USB 3.0• USB 3 - USB 2.0 • 1x slot per interfaccia comune: CI+ CAM • Cuffie: mini-jack stereo da 3,5 mm
Parte posteriore del TV • Ingresso audio (DVI-HDMI): mini-jack stereo da 3,5mm• SCART: Audio L/R, ingresso CVBS, RGB• YPbPr: Y Pb Pr, Audio L/R
Base TV • Ingresso HDMI 1 - ARC• Ingresso HDMI 2 - ARC • USB 1 - USB 2.0• Uscita audio: ottico, Toslink• Rete LAN: RJ45• Antenna (75)
18.10
Suono• Stereo HD• Potenza in uscita (RMS): 16W• Dolby® Digital Plus• DTS Premium Sound ™
18.11
Multimediale
Collegamenti • USB 2.0• Ethernet LAN RJ-45• Wi-Fi 802.11a/b/g/n/ac (integrato)• BT2.1 con EDR & BT4.0, con BLE
File system USB supportati • FAT 16, FAT 32, NTFS
Server multimediali, supportati • Contenitori: 3GP, AVCHD, AVI, MPEG-PS, MPEG-TS,MPEG-4, Matroska (MKV), Quicktime (MOV, M4V,M4A), Windows Media (ASF/WMV/WMA)• Codec video: MPEG-1, MPEG-2, MPEG-4 Part 2,MPEG-4 Part 10 AVC (H264), H.265 (HEVC), VC-1,WMV9, VP9• Codec audio: AAC, HE-AAC (v1/v2), AMR-NB, DolbyDigital, Dolby Digital Plus, DTS Premium Sound™,MPEG-1/2/2.5 Layer I/II/III (include MP3), WMA (dav2 a v9.2), WMA Pro (v9/v10)• Sottotitoli:– Formati: SAMI, SubRip (SRT), SubViewer (SUB),MicroDVD (TXT), mplayer2 (TXT), TMPlayer (TXT)– Codifica caratteri: UTF-8, Europa centrale edEuropa orientale (Windows-1250), cirillico(Windows-1251), greco (Windows-1253), turco(Windows-1254), Europa occidentale (Windows-1252)• Codec immagini: JPEG, JPS, MPO• Limitazioni:– La velocità di trasmissione totale massimasupportata per un file multimediale è pari a 30 Mbps.– La velocità di trasmissione video massimasupportata per un file multimediale è pari a 20 Mbps.– MPEG-4 AVC (H.264) è supportato per High Profile@ L5.1.- H.265 (HEVC) è supportato per Main/Main 10 Profilefino al livello 5.1.– VC-1 è supportato fino a Advanced Profile @ L3.
Certificazione Wi-Fi
Questo TV supporta dispositivi con certificazioneMiracast.
Software server multimediale (DMS) supportato • È possibile utilizzare qualsiasi software servermultimediale con certificazione DLNA V1.5 (DMS).• È possibile utilizzare Philips TV Remote App (iOS eAndroid) su dispositivi mobili.
88

Interoperabilità e prestazioni possono variare in basealle funzionalità del dispositivo mobile e del softwarein uso.
Norme ESD
Questo apparecchio soddisfa i criteri di prestazione Bin materia di ESD. Se non è possibile ripristinarel'apparecchio in modalità condivisione file a causa diuna scarica elettrostatica, è richiesto l'intervento daparte dell'utente.
89

19
Guida e supporto19.1
Registrazione del televisoreRegistrare il televisore per approfittare di una serie divantaggi, come assistenza completa (inclusi idownload), accesso privilegiato a informazioni suprodotti nuovi, offerte e sconti esclusivi, possibilità divincere premi e, perfino, di partecipare a sondaggispeciali per i nuovi rilasci.
Visitare il sito Web www.philips.com/welcome
19.2
Risoluzione dei problemi
Accensione e telecomando
Il televisore non si accende • Scollegare il cavo di alimentazione dalla presa.Attendere un minuto e ricollegarlo.• Controllare che il cavo di alimentazione sia collegatosaldamente.
Scricchiolio all'avvio o allo spegnimento
Quando il televisore viene acceso, spento o messo instandby, si sente uno scricchiolio proveniente dallochassis del televisore. Lo scricchiolio che si avverte èprovocato da una normale espansione e contrazionedello chassis del televisore man mano che siraffredda e si riscalda. Ciò non influisce sulleprestazioni.
Il televisore non risponde al telecomando
Il TV richiede del tempo per l'accensione. In questolasso di tempo, il televisore non risponde ai comandidel telecomando o a quelli del televisore. Si tratta diun comportamento normale.Se il televisore continua a non rispondere altelecomando, verificare se il telecomando funzionatramite la fotocamera di un telefono cellulare. Attivarela modalità fotocamera del telefono e puntare iltelecomando verso la lente della fotocamera. Se sipreme qualsiasi pulsante del telecomando e si notauno sfarfallio rosso del sensore nella fotocamera, iltelecomando funziona. In tal caso, occorre controllareil televisore.Se non si nota alcuno sfarfallio, il telecomandopotrebbe essere rotto o le batterie esaurite.Questo metodo di verifica del telecomando non èpossibile con i telecomandi associati in modalitàwireless al televisore.
Il televisore torna in standby dopo aver visualizzato
la schermata di avvio Philips
Quando il televisore è in standby, viene visualizzatauna schermata di avvio Philips, quindi il televisoretorna alla modalità standby. Si tratta di uncomportamento normale. Quando si scollega e siricollega l'alimentazione del televisore, la schermatadi avvio viene visualizzata alla successiva accensione.Per accendere il televisore quando si trova inmodalità standby, premere sul telecomando o sultelevisore.
La spia di standby continua a lampeggiare
Scollegare il cavo di alimentazione dalla presa.Attendere 5 minuti prima di ricollegare il cavo dialimentazione. Se il lampeggiamento si ripete,rivolgersi al centro di assistenza clienti TV Philips.
Canali
Durante l'installazione non sono stati rilevati canali
digitali
Per accertarsi che il televisore supporti DVB-T o DVB-C nel Paese di residenza, vedere le specifichetecniche. Accertarsi che tutti i cavi siano adeguatamentecollegati e che sia selezionata la rete corretta.
I canali precedentemente sintonizzati non sono
visualizzati nell'elenco canali
Controllare che sia stato selezionato l'elenco deicanali corretto.
Immagine
Nessuna immagine/immagine distorta • Assicurarsi che l'antenna sia correttamente collegataal televisore.• Assicurarsi di avere selezionato il dispositivo correttocome sorgente di visualizzazione.• Verificare che il dispositivo esterno o la sorgentesiano collegati correttamente.
Audio senza immagini • Verificare di avere selezionato correttamente leimpostazioni delle immagini.
Ricezione dell'antenna scarsa • Assicurarsi che l'antenna sia correttamente collegataal televisore.• Altoparlanti, dispositivi audio non collegati a terra,lampade al neon, edifici alti e altri oggetti di grandidimensioni possono compromettere la qualità dellaricezione. Se possibile, provare a migliorare la qualitàdella ricezione cambiando l'orientamentodell'antenna o allontanando gli apparecchi daltelevisore.• Se la ricezione su un solo un canale è di scarsaqualità, sintonizzarlo meglio mediante la sintonia fine.
Scarsa qualità dell'immagine da un dispositivo
90
• Verificare che il dispositivo sia collegatocorrettamente.• Verificare di avere selezionato correttamente leimpostazioni delle immagini.Le impostazioni dell'immagine cambiano dopo
qualche tempo
Verificare che Posizione sia impostata su Home. Èpossibile modificare e salvare le impostazioni inquesta modalità.
Viene visualizzato un banner commerciale
Verificare che Posizione sia impostata su Home.
Immagine non adatta allo schermo
Utilizzare un formato immagine diverso.
Il formato immagine continua a cambiare nei vari
canali.
Selezionare un formato immagine non automatico.
Posizione dell'immagine non corretta
I segnali delle immagini di alcuni dispositivi non siadattano correttamente allo schermo. Controllarel'uscita del segnale del dispositivo.
Immagine del computer non stabile
Verificare che sul computer siano selezionate unarisoluzione e una frequenza di aggiornamentosupportate.
Suono
Assenza di audio o audio scarso
Se non viene rilevato alcun segnale audio, il televisoredisattiva automaticamente l'uscita audio; ciò nonindica un malfunzionamento.
• Controllare di avere selezionato le corretteimpostazioni audio.• Assicurarsi che tutti i cavi siano correttamentecollegati.• Assicurarsi di non avere disattivato l'audio né diavere impostato il volume su zero.• Assicurarsi che l'uscita audio TV sia collegataall'ingresso audio del sistema Home Theater. L'audio dovrebbe essere emesso dagli altoparlantiHTS.• Per alcuni dispositivi può essere necessario doverabilitare manualmente l'uscita audio HDMI. Se l'audioHDMI è già abilitato, tuttavia non si sente, provare acambiare il formato dell'audio digitale del dispositivoin PCM (Pulse Code Modulation). Per le istruzioni, fareriferimento alla documentazione in dotazione con ildispositivo.
HDMI e USB
HDMI • Il supporto dello standard HDCP (Protezione deicontenuti digitali a larghezza di banda elevata) puòritardare il tempo impiegato dal televisore pervisualizzare i contenuti trasmessi da un dispositivoHDMI.• Se il televisore non riconosce il dispositivo HDMI enon viene visualizzata alcuna immagine, provare aselezionare un altro dispositivo, quindi tornare suldispositivo desiderato.• Se l'immagine e il suono di un dispositivo collegatotramite HDMI risultano distorti, verificare se siapossibile risolvere il problema utilizzandoun'impostazione HDMI Ultra HD diversa. • Se vi sono interferenze audio intermittenti,assicurarsi che le impostazioni di uscita dal dispositivoHDMI siano corrette.• Se si utilizza un adattatore HDMI-DVI o un cavoHDMI-DVI, assicurarsi di avere collegato un cavoaudio aggiuntivo ad AUDIO IN (solo mini-jack), sedisponibile.
HDMI EasyLink non funziona • Assicurarsi che i dispositivi HDMI siano compatibilicon lo standard HDMI-CEC. Le funzioni EasyLink sipossono utilizzare solo con dispositivi compatibili conHDMI-CEC.
Nessuna icona del volume visualizzata • Quando si collega un dispositivo audio HDMI-CEC esi utilizza il telecomando del televisore per regolare illivello del volume dal dispositivo, talecomportamento è normale.Le foto, i video e i file musicali di un dispositivo USB
non vengono visualizzati • Assicurarsi che il dispositivo di memorizzazione USBsia impostato come conforme alla classe dellamemoria di massa, come descritto nelladocumentazione del dispositivo stesso.• Assicurarsi che il dispositivo di memorizzazione USBsia compatibile con il televisore.• Assicurarsi che i formati dei file audio e delleimmagini siano supportati dal televisore.
Riproduzione discontinua dei file USB • Le prestazioni di trasmissione del dispositivo dimemorizzazione USB possono limitare la velocità ditrasferimento dei dati sul televisore, causando unariproduzione insoddisfacente.
Wi-Fi, Internet e Bluetooth
Rete Wi-Fi non trovata o distorta • Eventuali forni a microonde, telefoni DECT o altridispositivi Wi-Fi 802.11b/g/n nelle vicinanzepotrebbero disturbare la rete wireless.• Verificare che i firewall della rete consentanol'accesso alla connessione wireless del televisore.
91
• Se la rete wireless non funziona correttamente,provare l'installazione mediante rete cablata.
Internet non funziona • Se il collegamento al router è corretto, verificare laconnessione ad Internet del router stesso.
Il PC e il collegamento a Internet sono lenti • Per informazioni sulla copertura interna, sullavelocità di trasferimento e altri fattori che influisconosulla qualità del segnale, consultare il manuale d'usodel router wireless.• Il router deve disporre di una connessione Internetad alta velocità (banda larga).
DHCP • Se la connessione non riesce, verificarel'impostazione DHCP (Dynamic Host ConfigurationProtocol) del router. DHCP deve essere attivato.
Perdita della connessione Bluetooth • Posizionare l'altoparlante wireless a una distanza di5 metri dal TV.• Luoghi con elevata attività wireless (ad esempioappartamenti con molti router wireless) possonocompromettere la qualità del collegamento wireless.Posizionare il router e l'altoparlante wireless il piùvicino possibile al TV.
Sincronizzazione audio e video Bluetooth • Prima di acquistare un altoparlante Bluetoothwireless, informarsi sulla qualità dellasincronizzazione audio-video, comunementechiamata "sincronizzazione labiale". Non tutti idispositivi Bluetooth la eseguono correttamente.Chiedere consiglio al proprio rivenditore.
19.3
Guida onlinePer risolvere eventuali problemi relativi ai televisoriPhilips, consultare l'assistenza online. È possibileselezionare la lingua desiderata e immettere ilnumero di modello del prodotto.
Visitare il sito Web www.philips.com/support.
Sul sito dell'assistenza è possibile trovare il numero ditelefono del servizio di assistenza del proprio Paese,nonché le risposte alle domande più frequenti (FAQ).In alcuni Paesi, è possibile parlare direttamente conuno dei nostri collaboratori o inviare le propriedomande tramite e-mail.È possibile scaricare il nuovo software o manuale TVda consultare sul proprio computer.
19.4
Assistenza e riparazionePer le richieste di assistenza e riparazione, contattareil numero gratuito dell'assistenza clienti del proprioPaese. I nostri tecnici dell'assistenza eseguiranno lenecessarie riparazioni.
Il numero di telefono è riportato nelladocumentazione cartacea in dotazione con iltelevisore.In alternativa, consultare il nostro sitoWeb www.philips.com/support e selezionare ilproprio Paese, se necessario.
Applicazione Assistenza
È inoltre possibile cercare l'applicazione Assistenzanella riga Applicazioni del menu Home.Aprire questa applicazione per trovare il numero ditelefono del servizio di assistenza.
Numero di modello e numero di serie del televisore
All'utente, verrà chiesto di fornire il numero dimodello e di serie del televisore. Questi numeri sonoriportati sull'etichetta dell'imballo o sulla targhetta sulretro/fondo del televisore.
Avviso
Non tentare di riparare da soli il televisore. Ciòpotrebbe causare gravi lesioni e danni irreparabili altelevisore o rendere nulla la garanzia.
92

20
Sicurezza eprotezione20.1
Sicurezza
Importante
Prima di utilizzare il televisore, leggere attentamentetutte le istruzioni di sicurezza. La garanzia non èvalida in caso di danni causati da un utilizzo deltelevisore non conforme alle istruzioni.
Fissare il televisore per evitare checada
Le istruzioni per il montaggio a parete sono disponibilinella guida rapida fornita con il televisore. In caso dismarrimento della guida, scaricarla dal sitoWeb www.philips.com
Per cercare la guida rapida da scaricare, immettere ilcodice del TV.
Rischio di scosse elettriche o diincendio
• Non esporre il televisore a pioggia o acqua. Nonposizionare oggetti contenenti liquidi, come i vasi,vicino al televisore. Nel caso di versamento di liquidi sul o nel televisore,staccare immediatamente la presa di corrente. Per un controllo del televisore prima dell'uso,contattare il centro di assistenza clienti TV Philips.• Non esporre il televisore, il telecomando o lebatterie a calore eccessivo. Non collocarli vicino acandele accese, fiamme vive o altre fonti di calore,inclusa la luce diretta del sole.• Non inserire oggetti nelle fessure di ventilazione o inaltre aperture del televisore.• Non collocare oggetti pesanti sul cavo dialimentazione.• Evitare di esercitare eccessiva pressione sulle spinedi alimentazione. Le spine di alimentazione noninserite correttamente possono causare archi elettricio incendi. Il cavo di alimentazione non deve essereteso quando si gira lo schermo TV.• Per scollegare il televisore dall'alimentazione,staccare la spina del televisore. Estrarre sempre ilcavo di alimentazione afferrando la spina e non ilcavo. Assicurarsi che la spina di alimentazione, il cavoe la presa elettrica siano sempre accessibili.
Rischio di lesioni personali o danni altelevisore
• Per sollevare e trasportare un televisore che pesapiù di 25 kg, sono necessarie due persone.• Se si desidera montare il televisore su un supporto,utilizzare solo il supporto fornito. Fissare con cura ilsupporto al televisore. Collocare il televisore su una superficie piana e lisciain grado di sostenere il peso del televisore e delsupporto.• Se il televisore viene montato su una parete,assicurarsi che il supporto a parete sia in grado disostenere il peso. TP Vision non si assume alcun tipodi responsabilità per un montaggio errato o cheprovochi ferite, lesioni personali o danni.• Alcune parti di questo prodotto sono di vetro.Maneggiare con cura per evitare ferite o danni.
Rischio di danni al televisore
Prima di collegare il televisore alla presa elettrica,assicurarsi che la tensione corrisponda al valoreriportato sul retro del televisore. Non collegare mai iltelevisore alla presa elettrica se la tensione è diversa.
Rischio di lesioni per i bambini
Adottare le seguenti precauzioni per prevenire lacaduta del televisore e conseguenti lesioni ai bambini:
• Non posizionare il TV su una superficie coperta daun panno o altro materiale che possa essere tirato erimosso.• Assicurarsi che non vi siano parti del TV chesporgono dal bordo della superficie di montaggio.• Se si posiziona il televisore su un mobile alto (adesempio, una libreria), innanzitutto fissare il mobile eil televisore alla parete o a un supporto idoneo.• Informare i bambini sui pericoli legati al fatto di saliresui mobili per raggiungere il televisore.
Rischio di ingestione delle batterie
Il telecomando può contenere batterie a bottone chepossono essere facilmente ingerite dai bambini.Tenere le batterie lontano dalla portata dei bambini.
Rischio di surriscaldamento
Non installare il televisore in uno spazio ristretto.Lasciare uno spazio di almeno 10 cm intorno altelevisore per consentirne la ventilazione. Assicurarsiche le prese d'aria del televisore non siano coperteda tende o altri oggetti.
93
Temporali
Scollegare il televisore dalla presa e dall'antennaquando si avvicina un temporale. Durante il temporale, non toccare le parti deltelevisore, il cavo di alimentazione o dell'antenna.
Rischio di danni all'udito
Non utilizzare le cuffie a un volume elevato o perintervalli di tempo prolungati.
Basse temperature
Se il televisore viene trasportato a temperatureinferiori a 5 °C, estrarlo dalla confezione e attendereche raggiunga la temperatura ambiente prima dicollegarlo alla presa elettrica.
Umidità
In rare occasioni, a seconda dell'umidità e dellatemperatura, si può creare una piccola quantità dicondensa all'interno della parte anteriore deltelevisore in vetro. Per evitare una situazione diquesto tipo, non esporre il televisore alla luce direttadel sole, a calore o umidità elevata. L'eventualecondensa scompare spontaneamente dopo alcuneore di funzionamento. La condensa non provoca alcun danno né causamalfunzionamenti del televisore.
20.2
Protezione dello schermo• Non toccare, spingere, strofinare o colpire loschermo con oggetti di qualsiasi tipo.• Prima di pulire lo schermo, scollegare il televisore.• Pulire delicatamente il televisore e la struttura conun panno morbido e umido. Evitare di toccare i LEDAmbilight sul retro del televisore. Non usare sostanzecome alcol, prodotti chimici o detergenti sultelevisore.• Per evitare deformazioni e scolorimenti, asciugaretempestivamente eventuali gocce d'acqua.• Evitare di visualizzare immagini fisse per moltotempo, poiché possono creare una persistenza erimanere visibili anche quando si guarda un'altraimmagine. Le immagini fisse includono menu a video,bande nere, visualizzazioni dell'orario e così via. Se ènecessario utilizzare immagini fisse, ridurre ilcontrasto e la luminosità per evitare danni alloschermo.
94
21
Termini di utilizzo21.1
Termini di utilizzo -Televisore2016 © TP Vision Europe B.V. Tutti i diritti riservati.
Questo prodotto è stato immesso sul mercato da TPVision Europe B.V. o da una delle relative societàaffiliate, denominate d'ora in poi come TP Vision, ilproduttore del prodotto. TP Vision è il garante deltelevisore cui è allegata la presente documentazione.Philips e il logo Philips sono marchi registrati diKoninklijke Philips N.V.
Le specifiche sono soggette a modifica senzapreavviso. I marchi sono di proprietà di KoninklijkePhilips N.V o dei rispettivi proprietari. TP Vision siriserva il diritto di modificare i prodotti in qualsiasimomento, senza l'obbligo di adattare di conseguenzale scorte precedenti.
La documentazione scritta allegata al televisore e ilmanuale disponibile nella memoria del televisore oscaricato dal sito WebPhilips www.philips.com/support sono da ritenersiadeguati per l'utilizzo previsto del sistema.
Le informazioni contenute nel presente manualesono da ritenersi adeguate per l'utilizzo consentitodel sistema. Se il prodotto, o singoli moduli oprocedure, vengono utilizzati per scopi diversi daquelli specificati in questo manuale, è necessariorichiedere conferma della validità e adeguatezzadelle informazioni qui riportate. TP Vision garantisceche il materiale stesso non viola alcun brevettostatunitense. Non sono previste ulteriori garanzie,espresse o implicite. TP Vision non può essereritenuta responsabile di eventuali errori nel contenutodel presente documento, né di possibili problemiderivanti da tale contenuto. Gli errori segnalati aPhilips verranno corretti e pubblicati sul sito Web diassistenza Philips il prima possibile.
Termini di garanzia: Rischio di lesioni, di danni altelevisore o di invalidamento della garanzia.Non tentare di riparare da soli il televisore. Utilizzareesclusivamente il televisore e gli accessori consigliatidal produttore. Il simbolo di attenzione posto sul retrodel televisore indica il rischio di scosse elettriche. Nonrimuovere mai la copertura del televisore. Contattaresempre l'Assistenza Clienti Philips per manutenzioneo riparazione. Il numero di telefono è riportato nelladocumentazione cartacea in dotazione con iltelevisore. In alternativa, consultare il nostro sitoWeb www.philips.com/support e selezionare ilproprio Paese, se necessario. Eventuali operazioniespressamente vietate in questo manuale e
procedure di regolazione o montaggio non consigliateo autorizzate nel presente manuale invalidano lagaranzia.
Caratteristiche dei pixelQuesto prodotto LCD/LED è costituito da un numeroelevato di pixel a colori. Sebbene sia dotato di unapercentuale di pixel attivi al 99,999% (o in quantitàsuperiore), sullo schermo possono comparirecostantemente punti neri o più chiari di luce (di colorerosso, verde o blu). Si tratta di una funzione strutturaledel display (entro determinati standard comuni disettore) e non di un malfunzionamento.
Conformità CECon la presente, TP Vision Europe B.V. dichiara chequesto televisore è conforme ai requisiti essenziali ead altre disposizioni correlate delle Direttive1999/5/CE RTTE), 2004/108/CE (EMC), 2006/95/CE(Bassa tensione), 2009/125/CE (Etichettaturaenergetica) e 2011/65/CE (RoHS).Da giugno 2016 sono valide le seguenti direttive:2014/53/EU (RED), 2009/125/EC (Eco Design),2010/30/EU (etichettatura energetica) e 2011/65/EC(RoHS).
Conformità EMFTP Vision produce e commercializza numerosiprodotti per il mercato consumer che, come tutti gliapparecchi elettronici, possono emettere e riceveresegnali elettromagnetici. Uno dei più importantiprincipi aziendali applicati da TP Vision prevedel'adozione di tutte le misure sanitarie e di sicurezzavolte a rendere i propri prodotti conformi a tutte leregolamentazioni e a tutti gli standard EMF (ElectroMagnetic Field) applicabili alla data di produzionedell'apparecchio.
In base a tale principio, TP Vision sviluppa, produce ecommercializza prodotti che non hanno effettinegativi sulla salute. TP Vision conferma che i propriprodotti, se utilizzati nelle modalità previste, sono daritenersi sicuri in base ai dati scientifici attualmentedisponibili. TP Vision collabora attivamenteall'elaborazione degli standard internazionali EMF edi sicurezza ed è in grado di anticipare evoluzionifuture degli stessi e di implementarle nei propriprodotti.
Türkiye Cumhuriyeti: EEE Yönetmeliğine Uygundur
21.2
Termini di utilizzo - Smart TVÈ possibile visualizzare i termini di utilizzo, ledisposizioni sulla privacy e impostare le impostazionisulla privacy per Smart TV.
Per aprire i termini di utilizzo della pagina Smart TV…
1 - Premere HOME per aprire il menu Home.
95

2 - Selezionare Applicazioni peraprire Applicazioni.3 - Selezionare Assistenza.
96

22
Copyright22.1
MHLMHL, Mobile High-Definition Link e il logo MHL sonomarchi o marchi registrati di MHL, LLC.
22.2
Ultra HDIl logo DIGITALEUROPE UHD Display è un marchiodi DIGITALEUROPE.
22.3
HDMI
HDMI®
I termini HDMI e HDMI High-Definition MultimediaInterface e il logo HDMI sono marchi o marchiregistrati di HDMI Licensing LLC negli Stati Uniti e inaltri Paesi.
22.4
Dolby Digital Plus
Dolby®
Realizzato su licenza di Dolby Laboratories. Dolby e ilsimbolo con la doppia D sono marchi di DolbyLaboratories.
22.5
DTS Premium Sound ™
DTS Premium Sound ™
Per i brevetti DTS, visitare il sitohttp://patents.dts.com. Realizzato su licenza di DTSLicensing Limited. DTS, il simbolo e DTS e il simboloinsieme sono marchi registrati, e DTS 2.0 Channel eun marchio di DTS, Inc. © DTS, Inc. Tutti i dirittiriservati.
22.6
DLNA Certified®(se applicabile)
DLNA®, il logo DLNA e DLNA CERTIFIED® sonomarchi commerciali, marchi di servizi o marchi dicertificazione di Digital Living Network Alliance.
22.7
Microsoft
Windows Media
Windows Media è un marchio registrato o un marchiodi Microsoft Corporation negli Stati Uniti e/o in altriPaesi.
Microsoft PlayReady
I proprietari dei contenuti utilizzano la tecnologia diaccesso ai contenuti Microsoft PlayReady™ perproteggere la rispettiva proprietà intellettuale, inclusi icontenuti protetti da copyright.Il presente dispositivo utilizza la tecnologia
97

PlayReady per l'accesso ai contenuti protetti tramitePlayReady e/o WMDRM. In caso di erroneaapplicazione, da parte del dispositivo, delle limitazionirelative all'utilizzo dei contenuti, i proprietari di talicontenuti potrebbero richiedere a Microsoft la revocadell'autorizzazione all'utilizzo dei contenuti protettitramite PlayReady da parte del dispositivo. La revocanon riguarda i contenuti privi di protezione o icontenuti protetti tramite altre tecnologie di accessoai contenuti. I proprietari dei contenuti potrebberorichiedere all'utente di aggiornare la tecnologiaPlayReady per l'accesso ai propri contenuti. Sel'utente rifiuta di eseguire un aggiornamento, nonpotrà accedere ai contenuti che richiedonol'aggiornamento.
22.8
Wi-Fi Alliance
Wi-Fi®, il logo Wi-Fi CERTIFIED e il logo Wi-Fi sonomarchi registrati della Wi-Fi Alliance.
22.9
Kensington(se applicabile)
Kensington e MicroSaver sono marchi registrati diACCO World Corporation, la cui registrazione è stataaccettata negli Stati Uniti e richiesta in altri Paesi delmondo.
22.10
Altri marchiTutti gli altri marchi registrati e non registrati sono diproprietà dei rispettivi detentori.
98
Indice
AAccensione e spegnimento 18Accesso universale 48Accesso universale, Altoparlanti/cuffia 49Accesso universale, Ipoudenti 48Aggiornamento automatico canali 50Alti 40Altoparlanti wireless, informazioni 42Altoparlanti wireless, selezione 42Altoparlanti, Wireless 42Antenna, Installazione manuale 51Applicazioni 29Assistenza clienti 92Assistenza online 92Assistenza, online 92Audio nitido 41Audio Out - Ottico, suggerimenti 12Audio wireless 42
BBassi 40Bilanciamento Audio Out 15
CCAM, Conditional Access Module 13Canale 21Canale, Aggiornamento automatico canali 50Canale, guida TV 25Canale, Installazione via antenna 50Canale, Installazione via cavo 50Canale, Reinstallazione 50Cancellazione connessione Miracast 9Cavo, Installazione manuale 51Certificazione di ecocompatibilità europea 86CI+ 13Clear LCD 39Collegamento alimentazione 4Collegamento antenna 5Collegamento SCART, suggerimenti 12Collegamento YPbPr, suggerimenti 12Colore 35Colore, Ottimizzazione dei colori 36Colore, temperatura colore personalizzata 37Colore, temperatura del colore 36Colore, tinta 36Commenti audio 48Computer, collegamento 17Consumo energetico, controllo 43Contatta Philips 92Contrasto 35Contrasto retroilluminazione 35Contrasto, Contrasto dinamico 37Contrasto, Contrasto perfetto 37Contrasto, Contrasto video 38Contrasto, Gamma 38Contrasto, modalità di contrasto 37Cuffie, collegamento 16
DDescrizione audio 48DMR, Digital Media Renderer 8
EEasyLink 11EasyLink, attivazione o disattivazione 11EasyLink, telecomando 11
FFile multimediali, da un'unità USB 31Formato Audio Out 15Foto, video e musica 31Fotocamera, collegamento 17
GGamma 38Gioco o computer 28Gioco o computer, impostazioni 36Guida connettività 10Guida TV 25
HHbbTV 24HDMI MHL 10HDMI, ARC 10HDMI, collegamento DVI 12
IImmagine, colore 35Immagine, contrasto retroilluminazione 35Immagine, nitidezza 36Impostazioni Audio Out 14Impostazioni Eco 43Incredible Surround 40Installazione di rete 6Installazione TV 51Ipoudenti 48Ipovedenti 48Istruzioni di sicurezza 93
IiTV 23
LLettore dischi Blu-ray, collegamento 16
Llettore DVD 16
LLingua del televideo, principale 23Lingua del televideo, secondaria 23Logo canali 44Logo Philips, luminosità 18Luminosità, logo Philips 18
MMemoria Internet, cancellazione 7Menu Home 26Messaggio di aggiornamento canale 50MHEG 22Modalità surround 40Movimento, Clear LCD 39Movimento, Natural Motion 39Movimento, Perfect Natural Motion 39
N
99
Natural Motion 39Nitidezza 36Nitidezza, Riduzione artefatti MPEG 39Nitidezza, Riduzione del rumore 39Nitidezza, Super Resolution 38Nitidezza, Ultra Resolution 38Nome rete TV 7Non udenti 48Non vedenti 48
PPerfect Natural Motion 39Posizionamento, distanza di visualizzazione 4Posizionamento, posizionamento del televisore 4Problemi 90Problemi, canali 90Problemi, connessione, HDMI 91Problemi, connessione, Internet 91Problemi, connessione, USB 91Problemi, connessione, Wi-Fi 91Problemi, immagine 90Problemi, suono 91Problemi, telecomando 90Protezione dello schermo 94
QQualità ricezione 50
RRegistra il prodotto 90Regolazione Audio Out 15Regolazione automatica volume 41Reinstalla TV 51Rete cablata 7Rete wireless 6Rete wireless 6Rete, attivazione del Wi-Fi 8Rete, cancellazione connessione Wi-Fi Miracast 9Rete, connessione 6Rete, impostazioni 7Rete, IP statico 8Rete, visualizzazione impostazioni 7Rete, WoWLAN 8Rete, WPS 6Rete, WPS con codice PIN 6Ricezione test 50Riduzione artefatti MPEG 39Riduzione rumore 39Riparazione 92Ritardo Audio Out 14
SScheda prodotto 86Sincronizzazione audio e video 14Sincronizzazione audio-video 14Sistema Home Theater, multicanale 15Sistema Home Theater, regolazione volume 15Sistema Home Theatre, problemi 15Slot per interfaccia standard CI 13Smaltimento dei materiali 86Smaltimento del televisore o delle batterie 86Smart Card, CAM 13Software open source 52Software, Aggiornamento 52Standby 18Stile audio 40Stile immagine 35Su Supporto TV, Posizione TV 44
Sulla parete, Posizione TV 44Suono, Clear Sound 41Suono, modalità surround 40Suono, Regolazione automatica volume 41Suono, Toni alti 40Suono, Toni bassi 40Supporti 31
TTasti sul televisore 18Tasto rosso 23Telecomando e batterie 20Televideo 22Termini di utilizzo 95Testo 22TV interattiva 24
UUnità flash USB, collegamento 16
VVideocamera, collegamento 17
WWi-Fi 6WoWLAN 8
100

Contact information
Belgium/België/Belgique02 7007360
Armenia0-800-01-004
Belarus/Беларусь8 10 800 2000 00 04
Bulgaria/България0 0800 1154426+359 2 4916273
Austria/Österreich0150 2842133
Croatia/Hrvatska0800 222 782
Czech Republic/Českárepublika800 142100
Denmark/Danmark352 587 61
Estonia/Eesti Vabariik800 0044 307
Finland/Suomi09 229 019 08
France01 57324070
Germany0696 640 4383
Greece Cyprus800 92 256
Hungary/Magyarország068 001 85 44(06 1) 700 8151
Republic of Ireland/Poblacht nah Éireann1 601 1161
Northern Ireland/Tuaisceart Éireann1 601 1161
Italy/Italia02 4528 7030
Kazakhstan/Қазақстан8 10 800 1000 00 04
Latvia/Latvija800 03 448
Lithuania/Lietuva880 030 049
Luxembourg/Luxemburg26 84 3000
Netherlands/Nederlands010 4289533
Norway/Norge22 70 82 50
Poland/Polska022 349 1505
Russia/Россия8 (800) 220 0004
Serbia/Srbija11 321 68 40
Slovakia/Slovensko0800 0045 51
Slovenia0800 80 255
Spain/España915 909 335
Sweden/Sverige08 6320 016
Switzerland/Schweiz/Suisse223 102 116
Turkey/Türkiye0 850 222 44 66
Ukraine/Україна0 800 500 480
United Kingdom020 7949 0069
Trademarks are the property of Koninklijke Philips N.V. or their respective owners.2017 © TP Vision Europe B.V. All rights reserved.www.philips.com
This information is correct at the time of print. For updated information, see www.philips.com/support.
Romania/România03 727 66905031 6300042
Greece/Ελλάδα0 0800 4414 4670
Albania/Shqipërisë+355 44806061
Portugal0800 780 902
Kosovo/Kosovës +355 44806061