
22in Recycler® Lawn Mower with SmartStow - Toro
20
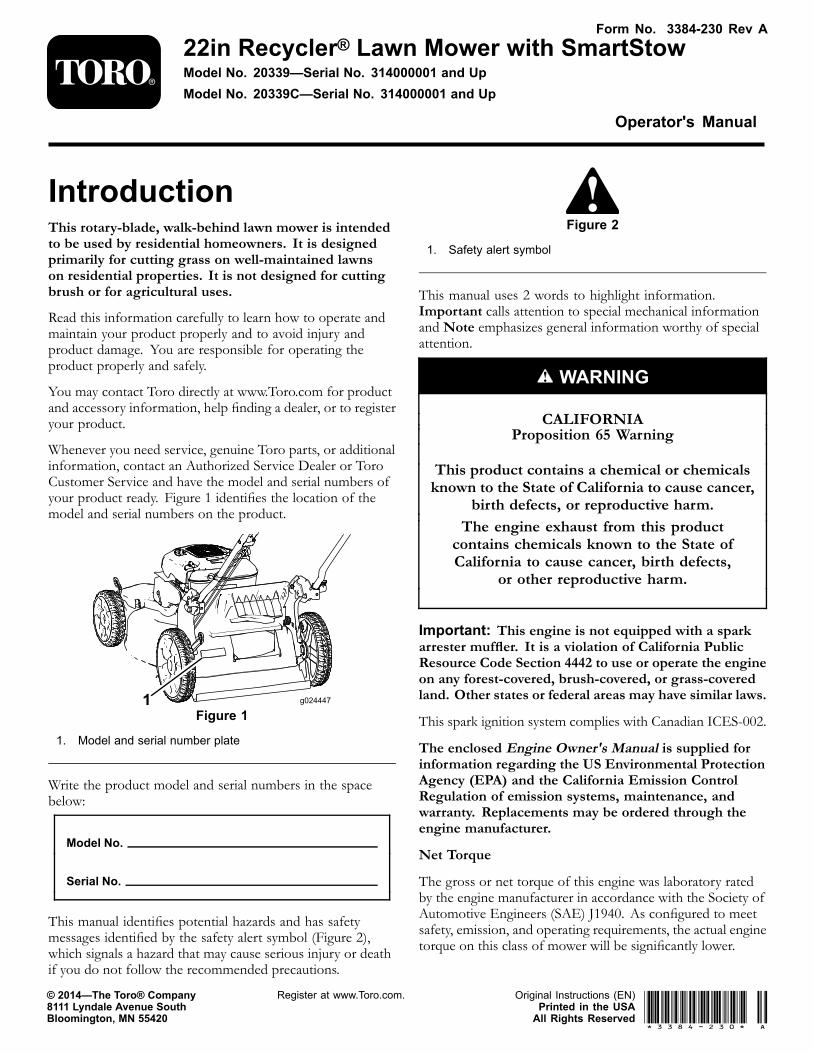
Form No. 3384-230 Rev A 22in Recycler ® Lawn Mower with SmartStow Model No. 20339—Serial No. 314000001 and Up Model No. 20339C—Serial No. 314000001 and Up Operator's Manual Introduction This rotary-blade, walk-behind lawn mower is intended to be used by residential homeowners. It is designed primarily for cutting grass on well-maintained lawns on residential properties. It is not designed for cutting brush or for agricultural uses. Read this information carefully to learn how to operate and maintain your product properly and to avoid injury and product damage. You are responsible for operating the product properly and safely. You may contact Toro directly at www.Toro.com for product and accessory information, help finding a dealer, or to register your product. Whenever you need service, genuine Toro parts, or additional information, contact an Authorized Service Dealer or Toro Customer Service and have the model and serial numbers of your product ready. Figure 1 identifies the location of the model and serial numbers on the product. Figure 1 1. Model and serial number plate Write the product model and serial numbers in the space below: Model No. Serial No. This manual identifies potential hazards and has safety messages identified by the safety alert symbol (Figure 2), which signals a hazard that may cause serious injury or death if you do not follow the recommended precautions. Figure 2 1. Safety alert symbol This manual uses 2 words to highlight information. Important calls attention to special mechanical information and Note emphasizes general information worthy of special attention. WARNING CALIFORNIA Proposition 65 Warning This product contains a chemical or chemicals known to the State of California to cause cancer, birth defects, or reproductive harm. The engine exhaust from this product contains chemicals known to the State of California to cause cancer, birth defects, or other reproductive harm. Important: This engine is not equipped with a spark arrester muffler. It is a violation of California Public Resource Code Section 4442 to use or operate the engine on any forest-covered, brush-covered, or grass-covered land. Other states or federal areas may have similar laws. This spark ignition system complies with Canadian ICES-002. The enclosed Engine Owner's Manual is supplied for information regarding the US Environmental Protection Agency (EPA) and the California Emission Control Regulation of emission systems, maintenance, and warranty. Replacements may be ordered through the engine manufacturer. Net Torque The gross or net torque of this engine was laboratory rated by the engine manufacturer in accordance with the Society of Automotive Engineers (SAE) J1940. As configured to meet safety, emission, and operating requirements, the actual engine torque on this class of mower will be significantly lower. © 2014—The Toro® Company 8111 Lyndale Avenue South Bloomington, MN 55420 Register at www.Toro.com. Original Instructions (EN) Printed in the USA All Rights Reserved *3384-230* A
-
Upload
khangminh22 -
Category
Documents
-
view
5 -
download
0
Transcript of 22in Recycler® Lawn Mower with SmartStow - Toro
Form No. 3384-230 Rev A
22in Recycler® Lawn Mower with SmartStowModel No. 20339—Serial No. 314000001 and UpModel No. 20339C—Serial No. 314000001 and Up
Operator's Manual
IntroductionThis rotary-blade, walk-behind lawn mower is intendedto be used by residential homeowners. It is designedprimarily for cutting grass on well-maintained lawnson residential properties. It is not designed for cuttingbrush or for agricultural uses.
Read this information carefully to learn how to operate andmaintain your product properly and to avoid injury andproduct damage. You are responsible for operating theproduct properly and safely.
You may contact Toro directly at www.Toro.com for productand accessory information, help finding a dealer, or to registeryour product.
Whenever you need service, genuine Toro parts, or additionalinformation, contact an Authorized Service Dealer or ToroCustomer Service and have the model and serial numbers ofyour product ready. Figure 1 identifies the location of themodel and serial numbers on the product.
Figure 1
1. Model and serial number plate
Write the product model and serial numbers in the spacebelow:
Model No.
Serial No.
This manual identifies potential hazards and has safetymessages identified by the safety alert symbol (Figure 2),which signals a hazard that may cause serious injury or deathif you do not follow the recommended precautions.
Figure 2
1. Safety alert symbol
This manual uses 2 words to highlight information.Important calls attention to special mechanical informationand Note emphasizes general information worthy of specialattention.
WARNING
CALIFORNIAProposition 65 Warning
This product contains a chemical or chemicalsknown to the State of California to cause cancer,
birth defects, or reproductive harm.The engine exhaust from this productcontains chemicals known to the State ofCalifornia to cause cancer, birth defects,
or other reproductive harm.
Important: This engine is not equipped with a sparkarrester muffler. It is a violation of California PublicResource Code Section 4442 to use or operate the engineon any forest-covered, brush-covered, or grass-coveredland. Other states or federal areas may have similar laws.
This spark ignition system complies with Canadian ICES-002.
The enclosed Engine Owner's Manual is supplied forinformation regarding the US Environmental ProtectionAgency (EPA) and the California Emission ControlRegulation of emission systems, maintenance, andwarranty. Replacements may be ordered through theengine manufacturer.
Net Torque
The gross or net torque of this engine was laboratory ratedby the engine manufacturer in accordance with the Society ofAutomotive Engineers (SAE) J1940. As configured to meetsafety, emission, and operating requirements, the actual enginetorque on this class of mower will be significantly lower.
© 2014—The Toro® Company8111 Lyndale Avenue SouthBloomington, MN 55420
Register at www.Toro.com. Original Instructions (EN)Printed in the USAAll Rights Reserved *3384-230* A
ContentsIntroduction .................................................................. 1
General Operation .................................................. 2Slope Operation ...................................................... 2Children................................................................. 3Service ................................................................... 3Safety and Instructional Decals ................................. 4
Setup ............................................................................ 51 Unfolding the Handle ............................................ 52 Installing the Recoil-starter Rope in the RopeGuide................................................................. 5
3 Filling the Engine with Oil...................................... 5Product Overview .......................................................... 7Operation ..................................................................... 7
Filling the Fuel Tank ................................................ 7Checking the Engine-oil Level................................... 8Adjusting the Cutting Height .................................... 8Starting the Engine .................................................. 9Using the Self-propel Drive....................................... 9Stopping the Engine ................................................ 9Recycling the Clippings ............................................ 9Bagging the Clippings .............................................10Side-discharging the Clippings..................................10Storing the Machine in the Vertical-stowPosition .............................................................11
Operating Tips ......................................................12Maintenance .................................................................13RecommendedMaintenance Schedule(s) ......................13Preparing for Maintenance.......................................13Replacing the Air Filter............................................13Changing the Engine Oil .........................................14Replacing the Blade ................................................15Cleaning the Machine..............................................15
Storage ........................................................................16Preparing theMachine for Storage ............................16Folding the Handle .................................................16Removing theMachine from Storage.........................17
SafetyThis lawn mower meets or exceeds the CPSC blade safetyrequirements for walk-behind rotary lawn mowers.
Read and understand the contents of this manual beforeyou start the engine.
The safety alert symbol (Figure 2) is used to alert you topotential personal injury hazards. Obey all safety messagesthat follow this symbol to avoid possible injury or death.Improperly using or maintaining this mower could result ininjury or death. To reduce this potential, comply with thefollowing safety instructions.
The following instructions have been adapted from theANSI/OPEI standard B71.1-2012.
This cutting machine is capable of amputating handsand feet and of throwing objects. Failure to observe
the following safety instructions could result in seriousinjury or death.
General Operation• Read, understand, and follow all instructions on the
machine and in the manual(s) before starting.• Do not put hands or feet near or under the machine.
Keep clear of the discharge opening at all times.• Allow only responsible adults, who are familiar with the
instructions, to operate this machine.• Clear the area of objects such as rocks, wire, toys, etc.,
which could be thrown by the blade. Stay behind thehandle when the engine is running.
• Be sure the area is clear of bystanders before operating.Stop machine if anyone enters the area.
• Do not operate machine barefooted or while wearingsandals. Always wear substantial footwear.
• Do not pull machine backward unless absolutelynecessary. Always look down and behind before andwhile moving backward.
• Never direct discharged material toward anyone. Avoiddischarging material against a wall or obstruction.Material may ricochet back toward the operator. Stop theblade when crossing gravel surfaces.
• Do not operate the machine without the entire grasscatcher, discharge guard, rear guard, or other safetyprotective devices in place and working.
• Never leave a running machine unattended.• Stop the engine and wait until the blade comes to a
complete stop before cleaning the machine, removinggrass catcher, or unclogging the discharge guard.
• Operate machine only in daylight or good artificial light.• Do not operate machine while under the influence of
alcohol or drugs.• Never operate the mower in wet grass. Always be sure of
your footing; walk; never run.• Disengage the drive system, if so equipped, before
starting the engine.• If the machine should start to vibrate abnormally, stop
the engine and check for the cause immediately. Vibrationis generally a warning of trouble.
• Always wear eye protection when operating the machine.• Lightning can cause severe injury or death. If you see
lightning or hear thunder in the area, do not operate themachine; seek shelter.
• See the manufacturer's instructions for proper operationand installation of accessories. Use only accessoriesapproved by the manufacturer.
Slope OperationSlopes are a major factor related to slip-and-fall accidents,which can result in severe injury. Operation on all slopes
2
require extra caution. If you feel uneasy on a slope, do notmow it.
• Mow across the face of slopes; never up and down.Exercise extreme caution when changing direction onslopes.
• Watch for holes, ruts, bumps, rocks, or other hiddenobjects. Uneven terrain could cause a slip-and-fallaccident. Tall grass can hide obstacles.
• Do not mow on wet grass or excessively steep slopes.Poor footing could cause a slip-and-fall accident.
• Do not mow near drop-offs, ditches, or embankments.You could lose your footing or balance.
ChildrenTragic accidents can occur if the operator is not alert to thepresence of children. Children are often attracted to themachine and the mowing activity. Never assume that childrenwill remain where you last saw them.
• Keep children out of the mowing area and under thewatchful care of a responsible adult other than theoperator.
• Be alert and turn the mower off if a child enters the area.
• Never allow children to operate the machine.
• Use extra care when approaching blind corners, shrubs,trees, or other objects that may block your view of a child.
Service
Safe Handling of GasolineTo avoid personal injury or property damage, useextreme care in handling gasoline. Gasoline is extremelyflammable and the vapors are explosive.
• Extinguish all cigarettes, cigars, pipes, and other sourcesof ignition.
• Use only an approved gasoline container.
• Never remove the gas cap or add fuel with the enginerunning. Allow the engine to cool before refueling.
• Never refuel the machine indoors.
• Never store the machine or fuel container where there isan open flame, spark, or pilot light, such as on a waterheater or on other appliances.
• Never fill containers inside a vehicle or on a truck ortrailer bed with a plastic liner. Always place containers onthe ground away from your vehicle before filling.
• Remove gas-powered equipment from the truck or trailerand refuel it on the ground. If this is not possible, thenrefuel such equipment with a portable container ratherthan from a gasoline dispenser nozzle.
• Keep the nozzle in contact with the rim of the fuel tankor container opening at all times until fueling is complete.Do not use a nozzle lock-open device.
• If fuel is spilled on clothing, change clothing immediately.
• Never overfill the fuel tank. Replace the gas cap andtighten it securely.
WARNINGExhaust contains carbon monoxide, an odorless,deadly poison that can kill you.
Do not run the engine indoors or in an enclosedarea.
General Service• Never operate the machine in a closed area.
• Keep all nuts and bolts tight to be sure the equipment isin safe working condition.
• Never tamper with safety devices. Check their properoperation regularly. Never do anything to interfere withthe intended function of a safety device or to reduce theprotection provided by a safety device.
• Keep the machine free of grass, leaves, or other debrisbuildup. Clean up oil or fuel spillage and remove anyfuel-soaked debris. Allow the machine to cool beforestoring it.
• If you strike a foreign object, stop and inspect themachine. Repair the machine, if necessary, before startingit.
• Never make any adjustments or repairs with the enginerunning. Disconnect the spark plug wire and groundagainst the engine to prevent unintended starting.
• Check grass catcher components and the dischargeguard frequently, and replace them with manufacturer'srecommended parts, when necessary.
• Mower blades are sharp. Wrap the blade or wear gloves,and use extra caution when servicing them.
• Do not change the engine governor setting or overspeedthe engine.
• Maintain or replace safety and instruction labels, asnecessary.
• To best protect your investment and maintain optimalperformance of your Toro equipment, count on Torogenuine parts. When it comes to reliability, Toro deliversreplacement parts designed to the exact engineeringspecifications of our equipment. For peace of mind, insiston Toro genuine parts.
3
Hauling• Use care when loading or unloading the machine into a
trailer or truck.
• Use full-width ramps for loading the machine into atrailer or truck.
• Tie the machine down securely using straps, chains, cable,or ropes. Both the front and the rear straps should bedirected down and outward from the machine.
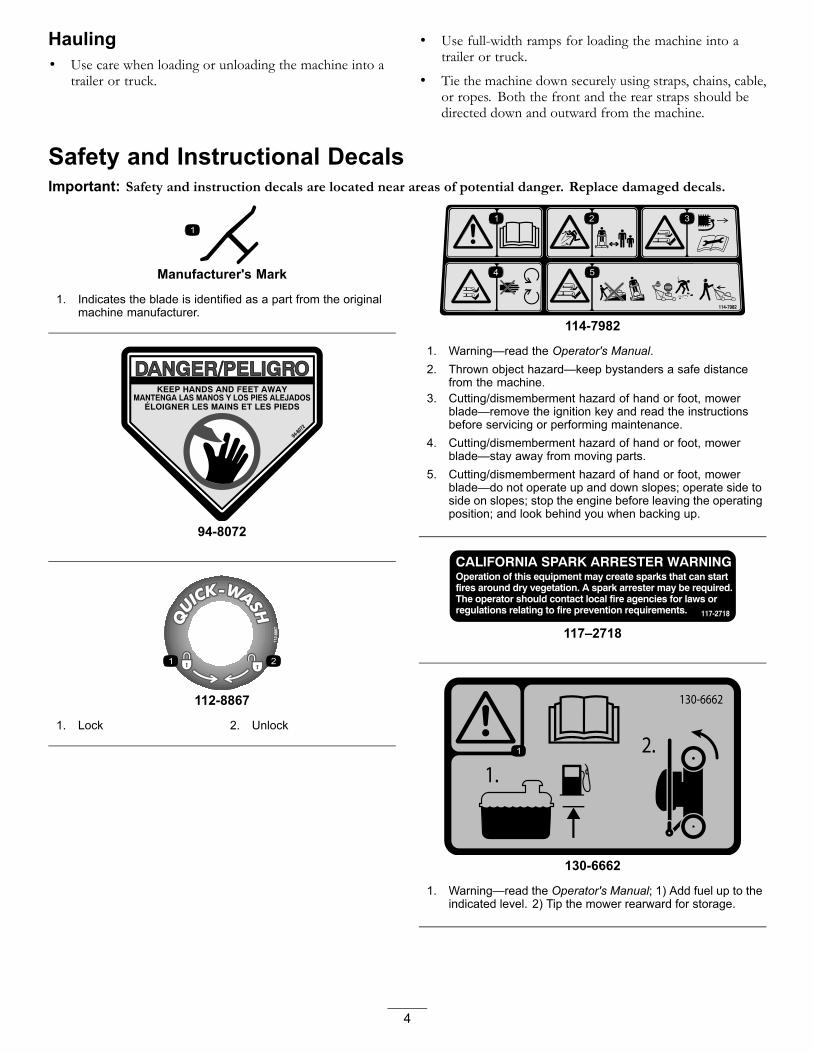
Safety and Instructional DecalsImportant: Safety and instruction decals are located near areas of potential danger. Replace damaged decals.
Manufacturer's Mark
1. Indicates the blade is identified as a part from the originalmachine manufacturer.
94-8072
112-8867
1. Lock 2. Unlock
114-7982
1. Warning—read the Operator's Manual.2. Thrown object hazard—keep bystanders a safe distance
from the machine.3. Cutting/dismemberment hazard of hand or foot, mower
blade—remove the ignition key and read the instructionsbefore servicing or performing maintenance.
4. Cutting/dismemberment hazard of hand or foot, mowerblade—stay away from moving parts.
5. Cutting/dismemberment hazard of hand or foot, mowerblade—do not operate up and down slopes; operate side toside on slopes; stop the engine before leaving the operatingposition; and look behind you when backing up.
117–2718
130-6662
1. Warning—read the Operator's Manual; 1) Add fuel up to theindicated level. 2) Tip the mower rearward for storage.
4
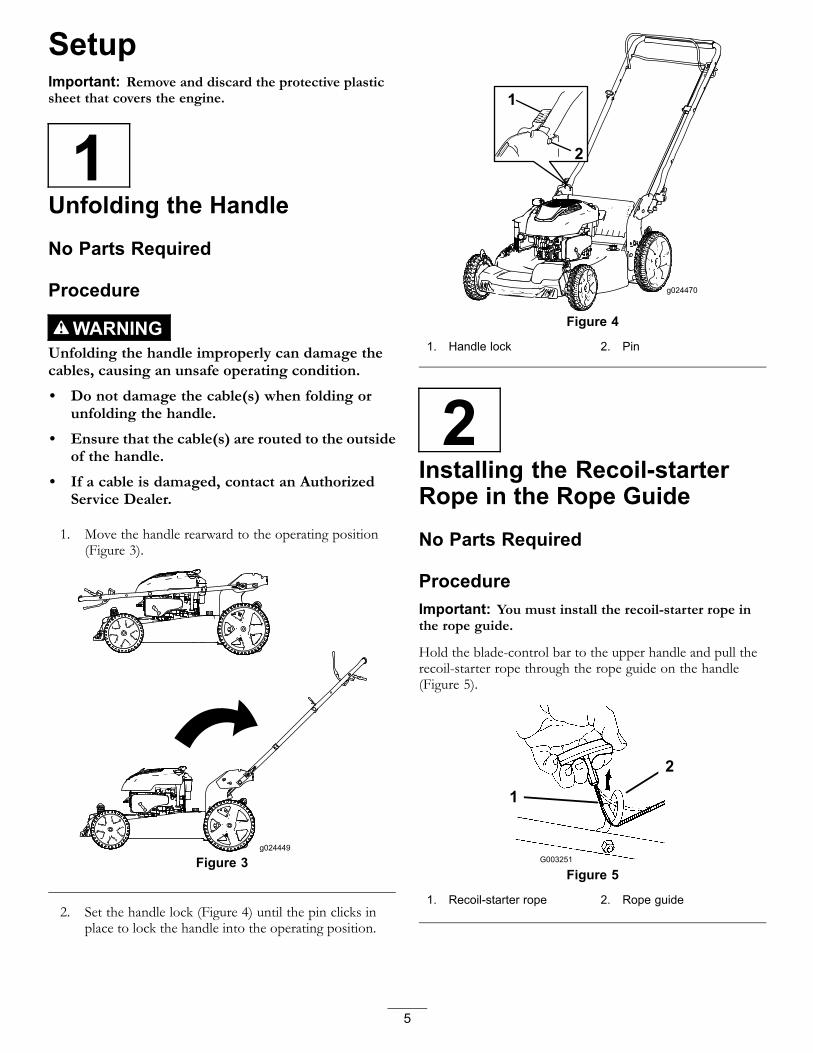
SetupImportant: Remove and discard the protective plasticsheet that covers the engine.
1Unfolding the Handle
No Parts Required
Procedure
WARNINGUnfolding the handle improperly can damage thecables, causing an unsafe operating condition.
• Do not damage the cable(s) when folding orunfolding the handle.
• Ensure that the cable(s) are routed to the outsideof the handle.
• If a cable is damaged, contact an AuthorizedService Dealer.
1. Move the handle rearward to the operating position(Figure 3).
Figure 3
2. Set the handle lock (Figure 4) until the pin clicks inplace to lock the handle into the operating position.
Figure 4
1. Handle lock 2. Pin
2Installing the Recoil-starterRope in the Rope Guide
No Parts Required
ProcedureImportant: You must install the recoil-starter rope inthe rope guide.
Hold the blade-control bar to the upper handle and pull therecoil-starter rope through the rope guide on the handle(Figure 5).
Figure 5
1. Recoil-starter rope 2. Rope guide
5
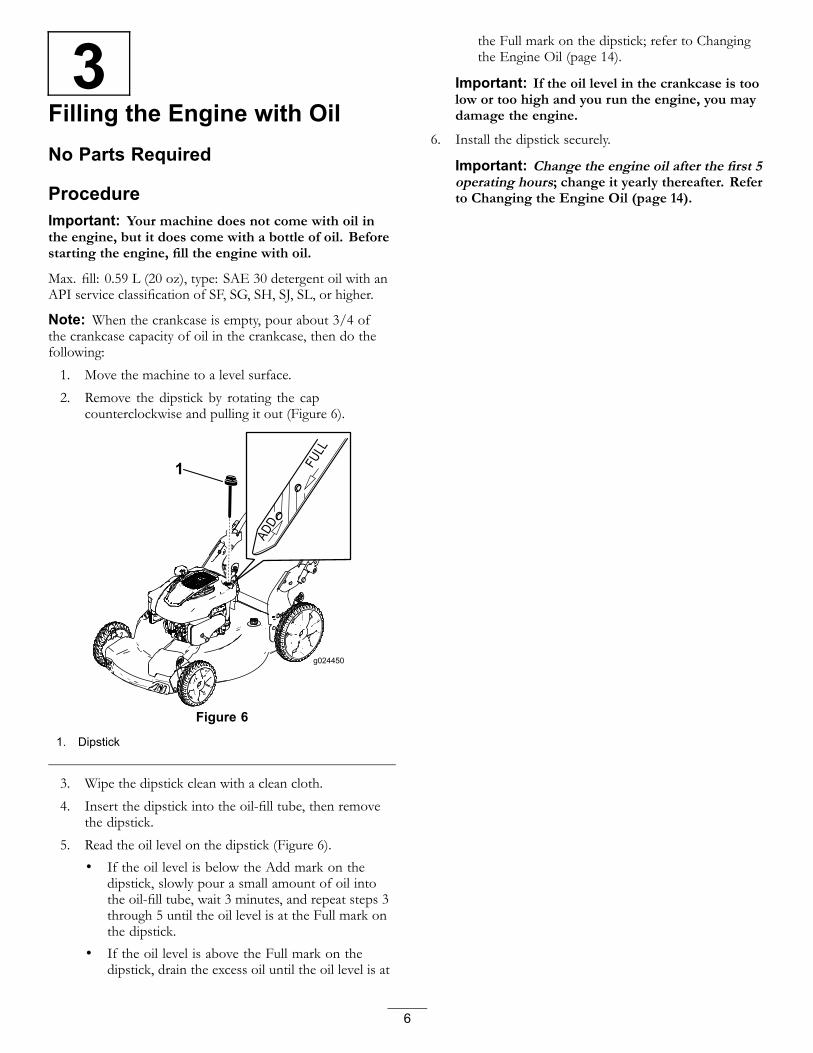
3Filling the Engine with OilNo Parts Required
ProcedureImportant: Your machine does not come with oil inthe engine, but it does come with a bottle of oil. Beforestarting the engine, fill the engine with oil.
Max. fill: 0.59 L (20 oz), type: SAE 30 detergent oil with anAPI service classification of SF, SG, SH, SJ, SL, or higher.
Note: When the crankcase is empty, pour about 3/4 ofthe crankcase capacity of oil in the crankcase, then do thefollowing:
1. Move the machine to a level surface.
2. Remove the dipstick by rotating the capcounterclockwise and pulling it out (Figure 6).
Figure 6
1. Dipstick
3. Wipe the dipstick clean with a clean cloth.
4. Insert the dipstick into the oil-fill tube, then removethe dipstick.
5. Read the oil level on the dipstick (Figure 6).
• If the oil level is below the Add mark on thedipstick, slowly pour a small amount of oil intothe oil-fill tube, wait 3 minutes, and repeat steps 3through 5 until the oil level is at the Full mark onthe dipstick.
• If the oil level is above the Full mark on thedipstick, drain the excess oil until the oil level is at
the Full mark on the dipstick; refer to Changingthe Engine Oil (page 14).
Important: If the oil level in the crankcase is toolow or too high and you run the engine, you maydamage the engine.
6. Install the dipstick securely.
Important: Change the engine oil after the first 5operating hours; change it yearly thereafter. Referto Changing the Engine Oil (page 14).
6

Product Overview
Figure 7
1. Handle 8. Side-discharge deflector2. Self-propel bar 9. Fuel-tank cap3. Blade-control bar 10. Cutting-height lever (4)4. Rear deflector 11. Handle lock (2)5. Oil fill/dipstick 12. Grass bag6. Air filter 13. Recoil-start handle7. Spark plug 14. Side-discharge chute
OperationFilling the Fuel Tank
DANGERGasoline is extremely flammable and explosive. Afire or explosion from gasoline can burn you andothers.• To prevent a static charge from igniting the
gasoline, place the container and/or machinedirectly on the ground before filling, not in avehicle or on an object.
• Fill the tank outdoors when the engine is cold.Wipe up spills.
• Do not handle gasoline when smoking or aroundan open flame or sparks.
• Store gasoline in an approved fuel container, outof the reach of children.
Figure 8
• For best results, use only clean, fresh (less than 30 daysold), unleaded gasoline with an octane rating of 87 orhigher ((R+M)/2 rating method).
• Oxygenated fuel with up to 10% ethanol or 15% MTBEby volume is acceptable.
• Ethanol: Gasoline with up to 10% ethanol (gasohol)or 15% MTBE (methyl tertiary butyl ether) by volumeis acceptable. Ethanol and MTBE are not the same.Gasoline with 15% ethanol (E15) by volume is notapproved for use. Never use gasoline that containsmore than 10% ethanol by volume, such as E15(contains 15% ethanol), E20 (contains 20% ethanol), orE85 (contains up to 85% ethanol). Using unapprovedgasoline may cause performance problems and/or enginedamage which may not be covered under warranty.
• Do not use gasoline containing methanol.
7
• Do not store fuel either in the fuel tank or in fuelcontainers over the winter unless a fuel stabilizer is used.
• Do not add oil to gasoline.
Important: To reduce starting problems, add fuelstabilizer to the fuel, mixing it with gasoline less than30 days old.
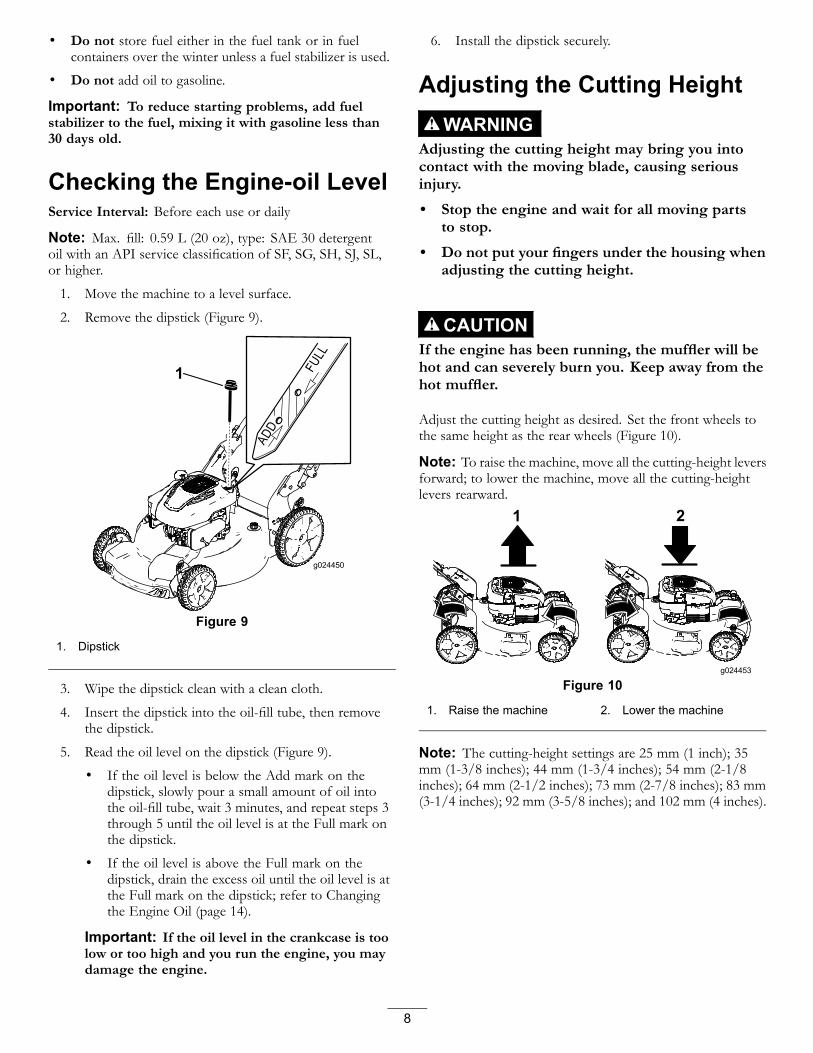
Checking the Engine-oil LevelService Interval: Before each use or daily
Note: Max. fill: 0.59 L (20 oz), type: SAE 30 detergentoil with an API service classification of SF, SG, SH, SJ, SL,or higher.
1. Move the machine to a level surface.
2. Remove the dipstick (Figure 9).
Figure 9
1. Dipstick
3. Wipe the dipstick clean with a clean cloth.
4. Insert the dipstick into the oil-fill tube, then removethe dipstick.
5. Read the oil level on the dipstick (Figure 9).
• If the oil level is below the Add mark on thedipstick, slowly pour a small amount of oil intothe oil-fill tube, wait 3 minutes, and repeat steps 3through 5 until the oil level is at the Full mark onthe dipstick.
• If the oil level is above the Full mark on thedipstick, drain the excess oil until the oil level is atthe Full mark on the dipstick; refer to Changingthe Engine Oil (page 14).
Important: If the oil level in the crankcase is toolow or too high and you run the engine, you maydamage the engine.
6. Install the dipstick securely.
Adjusting the Cutting HeightWARNING
Adjusting the cutting height may bring you intocontact with the moving blade, causing seriousinjury.
• Stop the engine and wait for all moving partsto stop.
• Do not put your fingers under the housing whenadjusting the cutting height.
CAUTIONIf the engine has been running, the muffler will behot and can severely burn you. Keep away from thehot muffler.
Adjust the cutting height as desired. Set the front wheels tothe same height as the rear wheels (Figure 10).
Note: To raise the machine, move all the cutting-height leversforward; to lower the machine, move all the cutting-heightlevers rearward.
Figure 10
1. Raise the machine 2. Lower the machine
Note: The cutting-height settings are 25 mm (1 inch); 35mm (1-3/8 inches); 44 mm (1-3/4 inches); 54 mm (2-1/8inches); 64 mm (2-1/2 inches); 73 mm (2-7/8 inches); 83 mm(3-1/4 inches); 92 mm (3-5/8 inches); and 102 mm (4 inches).
8

Starting the Engine1. Hold the blade-control bar against the handle (Figure
11).
Figure 11
1. Blade-control bar
2. Pull the recoil-start handle (Figure 12) lightly untilyou feel resistance, then pull it sharply, and allow it toreturn to the rope guide on the handle slowly.
Figure 12
Note: If the machine does not start after severalattempts, contact an Authorized Service Dealer.
Using the Self-propel Drive• To engage the self-propel drive: Squeeze the
self-propel-drive bar against the handle and hold it(Figure 13).
Figure 13
1. Self-propel-drive bar
Note: The maximum self-propel-drive speed is fixed.To reduce the speed, increase the space between theself-propel-drive bar and the handle.
• To disengage the self-propel-drive: release theself-propel-drive bar.
Note: The machine comes with freewheeling clutchesthat make it easier to pull the machine rearward. Todisengage the clutches, you may need to push the machineforward about 2.5 cm (1 inch) or more after you releasethe self-propel-drive bar.
Stopping the EngineTo stop the engine, release the blade-control bar.
Important: When you release the blade-control bar,both the engine and blade should stop within 3 seconds.If they do not stop properly, stop using your machineimmediately and contact an Authorized Service Dealer.
Recycling the ClippingsYour machine comes from the factory ready to recycle thegrass and leaf clippings back into the lawn.
If the grass bag is on the machine, remove it; refer toRemoving the Grass Bag (page 10) before recycling theclippings. If the side-discharge chute is on the machine,remove it; refer to Removing the Side-discharge Chute (page10) before recycling the clippings.
9

Bagging the ClippingsUse the grass bag when you want to collect grass and leafclippings from the lawn.
WARNINGA worn grass bag could allow small stones and othersimilar debris to be thrown at you or in the directionof bystanders, resulting in serious personal injuryor death to you or to bystanders.
Check the grass bag frequently. If it is damaged,install a new Toro replacement bag.
If the side-discharge chute is on the machine, remove it;refer to Removing the Side-discharge Chute (page 10) beforebagging the clippings.
WARNINGThe blade is sharp; contacting the blade can resultin serious personal injury.
Stop the engine and wait for all moving parts to stopbefore leaving the operating position.
Installing the Grass Bag1. Raise and hold up the rear deflector (Figure 14).
Figure 14
1. Notches 3. Grass bag pin (2)2. Rear deflector
2. Install the grass bag, ensuring that the pins on the bagrest in the notches on the handle (Figure 14).
3. Lower the rear deflector.
Removing the Grass BagTo remove the bag, reverse the steps above.
Side-discharging the ClippingsUse side discharging for cutting very tall grass.
If the grass bag is on the machine, remove it; refer toRemoving the Grass Bag (page 10).
WARNINGThe blade is sharp; contacting the blade can resultin serious personal injury.
Stop the engine and wait for all moving parts to stopbefore leaving the operating position.
Installing the Side-discharge ChuteLift up the side deflector and install the side-discharge chute(Figure 15).
Figure 15
Removing the Side-discharge ChuteTo remove the side-discharge chute, lift up the side deflector,remove the side-discharge chute, and lower the side-dischargedeflector.
10

Storing the Machine in theVertical-stow PositionDuring the mowing season or in the off-season, you can storeyour machine in the vertical position to minimize storagespace.
DANGERGasoline is extremely flammable and explosive. Afire or explosion from gasoline can burn you andothers.
• Storing the machine in the vertical positionwhen there is too much gasoline in the fuel tankmay cause gasoline to leak from the fuel tank.Gasoline is extremely flammable and explosive.A fire or explosion from gasoline can burn youand others.
• Store the machine in the vertical position onlywhen the level of gasoline in the fuel tank isno higher than what is recommended in thisOperator’s Manual.
• Do not store the machine in a position that isbeyond the vertical (90° ) position; otherwise,gasoline may escape from the fuel tank.
• Do not transport the machine in the vertical-stowposition.
• Do not attempt to start the machine in thevertical-stow position.
• Do not attempt to store any machine with fueland oil in the vertical-stow position that is notdesigned for that purpose.
WARNINGFolding or unfolding the handle improperly candamage the cables, causing an unsafe operatingcondition.
• Do not damage the cables when folding orunfolding the handle.
• If a cable is damaged, contact an AuthorizedService Dealer.
1. Ensure that the level of gasoline in the fuel tank isno higher than what is recommended by the enginemanufacturer; refer to the engine manufacturer’s decalon the engine (Figure 16).
Note: If there is the level of gasoline in the fuel tank istoo high, drain the gasoline from the fuel tank into anapproved fuel container until it is at or below the levelrecommended by the engine manufacturer.
Figure 16
2. Ensure that the cutting-height setting on the machineis 92 mm (3-5/8 inches) or lower; if it is not, lower it;refer to Adjusting the Cutting Height (page 8).
3. Disengage the handle locks (Figure 17).
Figure 17
1. Handle lock engagedposition
2. Handle lock disengagedpositions
4. Fold the handle fully forward (Figure 17).
Important: Route the cables to the outside of thehandle knobs as you fold the handle.
5. Tighten the handle knobs securely by hand.
6. Lift the front of the machine by the handle and moveit into a storage space (Figure 18).
11

Figure 18
Operating TipsGeneral Mowing Tips• Clear the area of sticks, stones, wire, branches, and other
debris that the blade could hit.• Avoid striking solid objects with the blade. Never
deliberately mow over any object.• If the machine strikes an object or starts to vibrate,
immediately stop the engine, disconnect the wire fromthe spark plug, and examine the machine for damage.
• For best performance, install a new blade before thecutting season begins.
• Replace the blade when necessary with a Tororeplacement blade.
Cutting Grass• Cut only about a third of the grass blade at a time. Do not
cut below the 54 mm (2-1/8-inch) setting unless the grassis sparse or it is late fall when grass growth begins to slowdown. Refer to Adjusting the Cutting Height (page 8).
• When cutting grass over 15 cm (6 inches) tall, mow at thehighest cutting-height setting and walk slower; then mowagain at a lower setting for the best lawn appearance. Ifthe grass is too long, the machine may plug and causethe engine to stall.
• Mow only dry grass or leaves. Wet grass and leaves tendto clump on the yard and can cause the machine to plugor the engine to stall.
WARNINGWet grass or leaves can cause serious injury ifyou slip and contact the blade. Mow only in dryconditions.
• Be aware of a potential fire hazard in very dry conditions,follow all local fire warnings, and keep the machine freeof dry grass and leaf debris.
• Alternate the mowing direction. This helps disperse theclippings over the lawn for even fertilization.
• If the finished lawn appearance is unsatisfactory, try oneor more of the following:
– Replace the blade or have it sharpened.
– Walk at a slower pace while mowing.
– Raise the cutting height on your machine.
– Cut the grass more frequently.
– Overlap cutting swaths instead of cutting a full swathwith each pass.
– Set the cutting height on the front wheels one notchlower than the rear wheels. For example, set the frontwheels at 54 mm (2-1/8-inch) and the rear wheelsat 64 mm (2-1/2 inches).
Cutting Leaves• After cutting the lawn, ensure that half of the lawn shows
through the cut leaf cover. You may need to make morethan one pass over the leaves.
• If there are more than 13 cm (5 inches) of leaves on thelawn, set the front cutting height 1 or 2 notches higherthan the rear cutting height.
• Slow down your mowing speed if the machine does notcut the leaves finely enough.
12

MaintenanceNote: Determine the left and right sides of the machine from the normal operating position.
Recommended Maintenance Schedule(s)Maintenance Service
Interval Maintenance Procedure
After the first 5 hours • Change the engine oil.
Before each use or daily• Check the engine-oil level.• Ensure that the engine stops within 3 seconds after releasing the blade-control bar.• Clean grass clippings and dirt from under the machine.
Before storage • Empty the fuel tank before repairs as directed and before annual storage.
Yearly
• Change the engine oil.• Replace the blade or have it sharpened (more frequently if the edge dulls quickly).• Clean the air cooling system; clean it more frequently in dusty operating conditions.Refer to your engine operator's manual.
• Refer to your engine operator's manual for any additional yearly maintenanceprocedures.
Important: Refer to your engine operator's manual for additional maintenance procedures.
Note: Replacement parts are available online at www.Torodealer.com. For engine parts, see an Authorized Toro Dealer.
Preparing for Maintenance1. Stop the engine and wait for all moving parts to stop.
2. Disconnect the spark-plug wire from the spark plug(Figure 19) before performing any maintenanceprocedure.
Figure 19
1. Spark-plug wire
3. After performing the maintenance procedure(s),connect the spark plug wire to the spark plug.
Important: Before tipping the machine to changethe oil or replace the blade, allow the fuel tank torun dry through normal usage. If you must tipthe machine prior to running out of fuel, use ahand fuel pump to remove the fuel. Always tip themachine onto its side, with the dipstick down.
WARNINGTipping the machine may cause the fuel toleak. Gasoline is flammable, explosive andcan cause personal injury.
Run the engine dry or remove the gasolinewith a hand pump; never siphon.
Replacing the Air Filter1. Use a screw driver to open the air-filter cover (Figure
20).
Figure 20
2. Replace the air filter.
3. Install the air-filter cover.
13

Changing the Engine OilService Interval: After the first 5 hours
Yearly
Run the engine a few minutes before changing the oil to warmit. Warm oil flows better and carries more contaminants.
1. Move the machine to a level surface.
2. Refer to Preparing for Maintenance (page 13).
3. Remove the dipstick (Figure 21).
Figure 21
1. Dipstick
4. Tip the machine onto its side with the dipstick down(Figure 22) or set the machine in the vertical-stowposition (Figure 23; refer to Storing the Machine in theVertical-stow Position (page 11)) to drain the used oilout through the oil-fill tube.
Figure 22
Figure 23
5. Return the machine to the operating position.
6. Pour about 3/4 of the crankcase capacity of oil in thecrankcase.
Note: Max. fill: 0.59 L (20 oz), type: SAE 30detergent oil with an API service classification of SF,SG, SH, SJ, SL, or higher.
7. Wait about 3 minutes for the oil to settle in thecrankcase.
8. Wipe the dipstick clean with a clean cloth.
9. Insert the dipstick into the oil-fill tube, then removethe dipstick.
10. Read the oil level on the dipstick (Figure 21).
• If the oil level is below the Add mark on thedipstick, slowly pour a small amount of oil into theoil-fill tube and repeat steps 8 through 10 until theoil level is at the Full mark on the dipstick.
• If the oil level is above the Full mark on thedipstick, drain the excess oil until the oil level is atthe Full mark on the dipstick.
Important: If the oil level in the crankcase is toolow or too high and you run the engine, you maydamage the engine.
11. Install the dipstick securely.
12. Recycle the used oil properly.
14

Replacing the BladeService Interval: Yearly
Important: You will need a torque wrench to install theblade properly. If you do not have a torque wrench orare uncomfortable performing this procedure, contactan Authorized Service Dealer.
Examine the blade whenever you run out of gasoline. If theblade is damaged or cracked, replace it immediately. If theblade edge is dull or nicked, have it sharpened and balanced,or replace it.
WARNINGThe blade is sharp; contacting the blade can resultin serious personal injury.
Wear gloves when servicing the blade.
1. Refer to Preparing for Maintenance (page 13).
2. Tip the machine either onto its side with the dipstickdown.
3. Use a block of wood to hold the blade steady (Figure24).
Figure 24
4. Remove the blade by turning the blade boltcounterclockwise, saving all mounting hardware toinstall the new blade (Figure 24).
5. Install the new blade by turning the blade boltclockwise (Figure 25).
Figure 25
Important: Position the curved ends of the bladeto point toward the machine housing.
6. Use a torque wrench to tighten the blade bolt to82 N-m (60 ft-lb).
Important: A bolt torqued to 82 N-m (60 ft-lb) isvery tight. While holding the blade with a blockof wood, put your weight behind the ratchet orwrench and tighten the bolt securely. This bolt isvery difficult to overtighten.
Cleaning the MachineService Interval: Before each use or daily
WARNINGThe machine may dislodge material from under themachine housing.• Wear eye protection.• Stay in the operating position (behind the
handle) when the engine is running.• Do not allow bystanders in the area.
Cleaning the Machine Using theWashout PortFor best results, clean the machine soon after you havecompleted mowing.1. Lower the machine to its lowest cutting-height setting.
Refer to Adjusting the Cutting Height (page 8).2. Move the machine onto a flat paved surface.
15
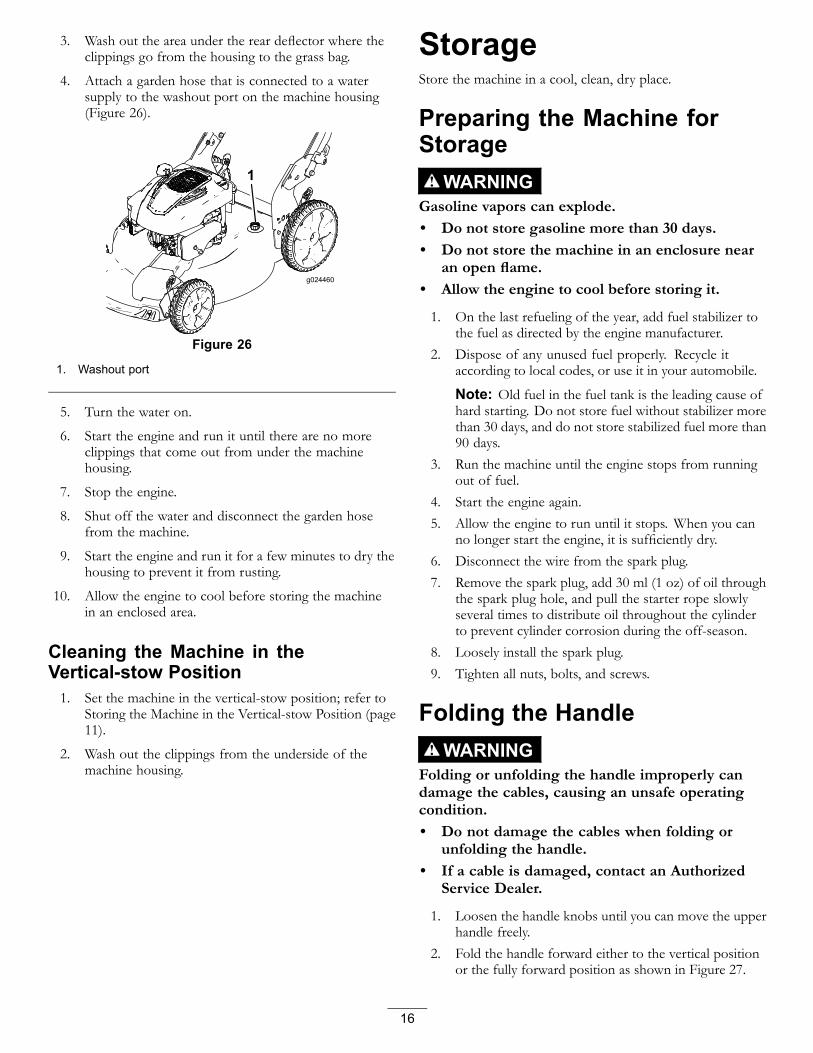
3. Wash out the area under the rear deflector where theclippings go from the housing to the grass bag.
4. Attach a garden hose that is connected to a watersupply to the washout port on the machine housing(Figure 26).
Figure 26
1. Washout port
5. Turn the water on.
6. Start the engine and run it until there are no moreclippings that come out from under the machinehousing.
7. Stop the engine.
8. Shut off the water and disconnect the garden hosefrom the machine.
9. Start the engine and run it for a few minutes to dry thehousing to prevent it from rusting.
10. Allow the engine to cool before storing the machinein an enclosed area.
Cleaning the Machine in theVertical-stow Position1. Set the machine in the vertical-stow position; refer to
Storing the Machine in the Vertical-stow Position (page11).
2. Wash out the clippings from the underside of themachine housing.
StorageStore the machine in a cool, clean, dry place.
Preparing the Machine forStorage
WARNINGGasoline vapors can explode.• Do not store gasoline more than 30 days.• Do not store the machine in an enclosure near
an open flame.• Allow the engine to cool before storing it.
1. On the last refueling of the year, add fuel stabilizer tothe fuel as directed by the engine manufacturer.
2. Dispose of any unused fuel properly. Recycle itaccording to local codes, or use it in your automobile.
Note: Old fuel in the fuel tank is the leading cause ofhard starting. Do not store fuel without stabilizer morethan 30 days, and do not store stabilized fuel more than90 days.
3. Run the machine until the engine stops from runningout of fuel.
4. Start the engine again.5. Allow the engine to run until it stops. When you can
no longer start the engine, it is sufficiently dry.6. Disconnect the wire from the spark plug.7. Remove the spark plug, add 30 ml (1 oz) of oil through
the spark plug hole, and pull the starter rope slowlyseveral times to distribute oil throughout the cylinderto prevent cylinder corrosion during the off-season.
8. Loosely install the spark plug.9. Tighten all nuts, bolts, and screws.
Folding the HandleWARNING
Folding or unfolding the handle improperly candamage the cables, causing an unsafe operatingcondition.• Do not damage the cables when folding or
unfolding the handle.• If a cable is damaged, contact an Authorized
Service Dealer.
1. Loosen the handle knobs until you can move the upperhandle freely.
2. Fold the handle forward either to the vertical positionor the fully forward position as shown in Figure 27.
16
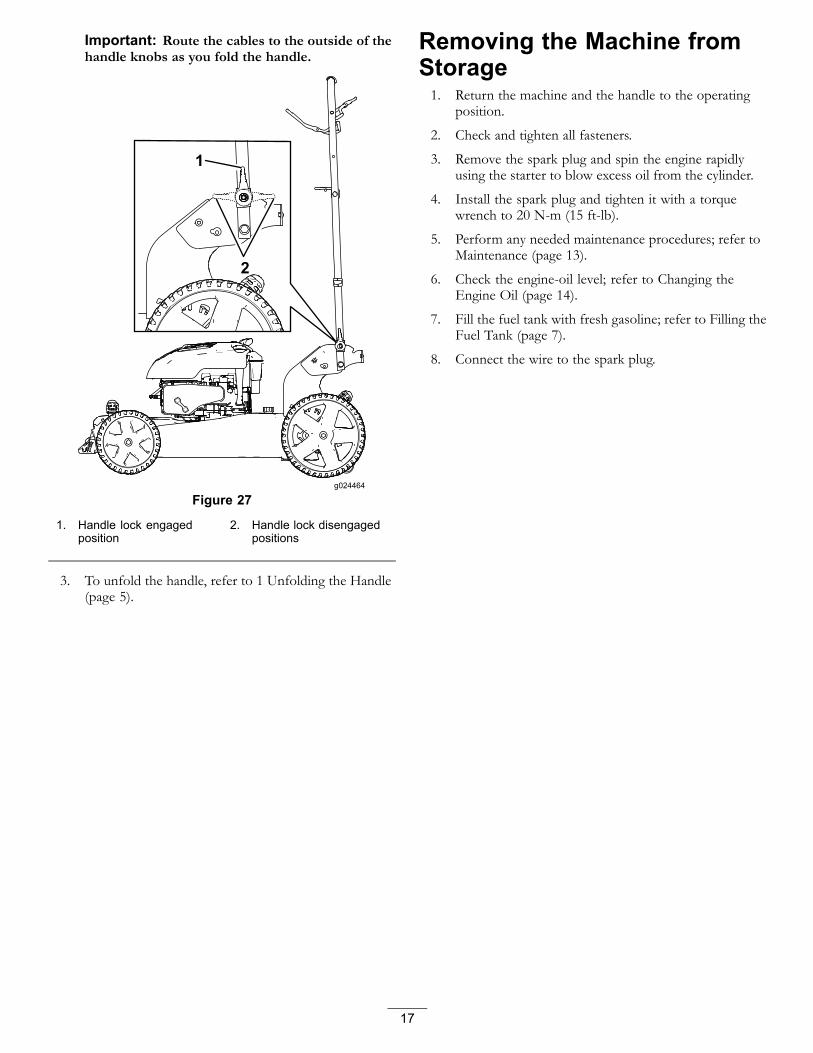
Important: Route the cables to the outside of thehandle knobs as you fold the handle.
Figure 27
1. Handle lock engagedposition
2. Handle lock disengagedpositions
3. To unfold the handle, refer to 1 Unfolding the Handle(page 5).
Removing the Machine fromStorage1. Return the machine and the handle to the operating
position.
2. Check and tighten all fasteners.
3. Remove the spark plug and spin the engine rapidlyusing the starter to blow excess oil from the cylinder.
4. Install the spark plug and tighten it with a torquewrench to 20 N-m (15 ft-lb).
5. Perform any needed maintenance procedures; refer toMaintenance (page 13).
6. Check the engine-oil level; refer to Changing theEngine Oil (page 14).
7. Fill the fuel tank with fresh gasoline; refer to Filling theFuel Tank (page 7).
8. Connect the wire to the spark plug.
17

Notes:
18

Notes:
19
The Toro Total Coverage Guarantee 22 in Recycler®
A 2-Year Full Warranty (45 Day Limited Warranty for Commercial Use) 20 in Mulcher/Bagger
The Toro GTS Starting Guarantee Walk Power MowersA 3-Year Full Warranty (Not Applicable for Commercial Use)
Conditions and Products CoveredThe Toro Company and its affiliate, Toro Warranty Company, pursuant toan agreement between them, jointly promise to repair the Toro Productlisted below if used for residential purposes*; if it is defective in materialsor workmanship or if it stops functioning due to the failure of a component;or if the Toro GTS (Guaranteed to Start) engine will not start on the first orsecond pull, provided the routine maintenance required in the Operator'sManual have been performed.
This warranty covers the cost of parts and labor, but you must paytransportation costs.
The following time periods apply from the date of purchase:
Products Warranty Period22 in Recycler and 20 inMulcher/Bagger and Attachments
2 - year full warranty
GTS (Guaranteed to Start) 3 - year full warrantyEngine 3 - year full warrantyBattery 1 - year full warranty
Limited Warranty for Commercial Use*Gas-powered Toro Products used for commercial, institutional, orrental use, are warranted for 45 days against defects in materials orworkmanship. Components failing due to normal wear are not coveredby this warranty.
The Toro GTS (Guaranteed to Start) Starting Guarantee does not applywhen the product is used commercially*.
Instructions for Obtaining Warranty ServiceIf you think that your Toro Product contains a defect in materials orworkmanship, or if a normal, able-bodied adult can no longer start yourproduct's engine in one or two pulls, follow this procedure:
1. Contact any Authorized Toro Service Dealer to arrange serviceat their dealership. To locate a dealer convenient to you, refer tothe Yellow Pages of your telephone directory (look under “LawnMowers”) or access our web site at www.Toro.com. You may alsocall the numbers listed in item #3 to use the 24-hour Toro Dealerlocator system.
2. Bring the product and your proof of purchase (sales receipt) to theService Dealer. The dealer will diagnose the problem and determineif it is covered under warranty.
3. If for any reason you are dissatisfied with the Service Dealer’sanalysis or with the assistance provided, contact us at:
Customer Care Department, RLC DivisionThe Toro Company8111 Lyndale Avenue SouthBloomington, MN 55420-1196Toll free at 866-214-9807 (U.S. customers)Toll free at 866-214-9808 (Canadian customers)
Owner ResponsibilitiesYou must maintain your Toro Product by following the maintenanceprocedures described in the Operator's Manual. Such routinemaintenance, whether performed by a dealer or by you, is at your expense.
Items and Conditions Not CoveredThere is no other express warranty except for special emission systemcoverage and engine warranty coverage on some products. This expresswarranty does not cover the following:• Cost of regular maintenance service or parts, such as filters, fuel,
lubricants, oil changes, spark plugs, air filters blade sharpeningor worn blades, cable/linkage adjustments, or brake and clutchadjustments
• Components failing due to normal wear• Any product or part which has been altered or misused or neglected
and requires replacement or repair due to accidents or lack of propermaintenance
• Pickup and delivery charges• Repairs or attempted repairs by anyone other than an Authorized
Toro Service Dealer• Repairs necessary due to failure to follow recommended fuel
procedure (consult Operator's Manual for more details)– Removing contaminants from the fuel system is not covered– Use of old fuel (more than one month old) or fuel which contains
more than 10% ethanol or more that 15% MTBE– Failure to drain the fuel system prior to any period of non-use
over one month• Repairs or adjustments to correct starting difficulties due to the
following:– Failure to follow proper maintenance procedures or
recommended fuel procedure– Rotary mower blade striking an object
• Special operational conditions where starting may require more thantwo pulls:– First time starts after extended period of non-use over three
months or seasonal storage– Cool temperature starts such as those found in early spring and
late autumn– Improper starting procedures - if you are having difficulty starting
your unit, please check the Operator's Manual to ensure thatyou are using the correct starting procedures. This can save anunnecessary visit to an Authorized Toro Service Dealer.
General ConditionsAll repairs covered by these warranties must be performed by anAuthorized Toro Service Dealer using Toro-approved replacement parts.Repair by an Authorized Toro Service Dealer is your sole remedy underthis warranty.
Neither The Toro Company nor Toro Warranty Company is liable forindirect, incidental, or consequential damages in connection with theuse of the Toro Products covered by these warranties, including anycost or expense of providing substitute equipment or service duringreasonable periods of malfunction or non-use pending completion ofrepairs under these warranties.
Some states do not allow exclusions of incidental or consequentialdamages, so the above exclusions may not apply to you.
This warranty gives you specific legal rights, and you may also have otherrights which vary from state to state.
Countries Other than the United States or CanadaCustomers who have purchased Toro products exported from the United States or Canada should contact their Toro Distributor (Dealer) to obtainguarantee policies for your country, province, or state. If for any reason you are dissatisfied with your Distributor's service or have difficulty obtainingguarantee information, contact the Toro importer. If all other remedies fail, you may contact us at Toro Warranty Company.
Australian Consumer Law: Australian customers will find details relating to the Australian Consumer Law either inside the box or at your local ToroDealer.
*Residential purposes means use of the product on the same lot as your home. Use at more than one location, or institutional or rental use, is consideredcommercial use, and the commercial use warranty would apply.
374-0254 Rev E