1 Cleaning unwanted files from your computer. This guide is ...
13
1 1 Cleaning unwanted files from your computer. This guide is intended to provide an explanation of the disk de-fragmentation process, with step by step instructions to perform the process. Regular use of your computer can over time, result in reducing the available space on your main storage disc. Files left on your computer, following searches made to commercial web sites also occupy space. The net result is slower performance of your computer. This guide will explain what these files are and how they can be removed, without losing the information that you want to keep, and improve the efficiency of your computer. To find how much information is stored on your computer and how much space is still available; place you cursor on the start button and left click. This will show the following screen. Move the cursor to the black section and left click on ‘computer’.
-
Upload
khangminh22 -
Category
Documents
-
view
4 -
download
0
Transcript of 1 Cleaning unwanted files from your computer. This guide is ...

1
1
Cleaning unwanted files from your computer. This guide is intended to provide an explanation of the disk de-fragmentation process, with step
by step instructions to perform the process. Regular use of your computer can over time, result in reducing the available space on your main storage disc. Files left on your computer, following searches made to commercial web sites also occupy space. The net result is slower performance of your computer. This guide will explain what these files are and how they can be removed, without losing the information that you want to keep, and improve the efficiency of your computer. To find how much information is stored on your computer and how much space is still available;
place you cursor on the start button and left click. This will show the following screen.
Move the cursor to the black section and left click on ‘computer’.
2
2
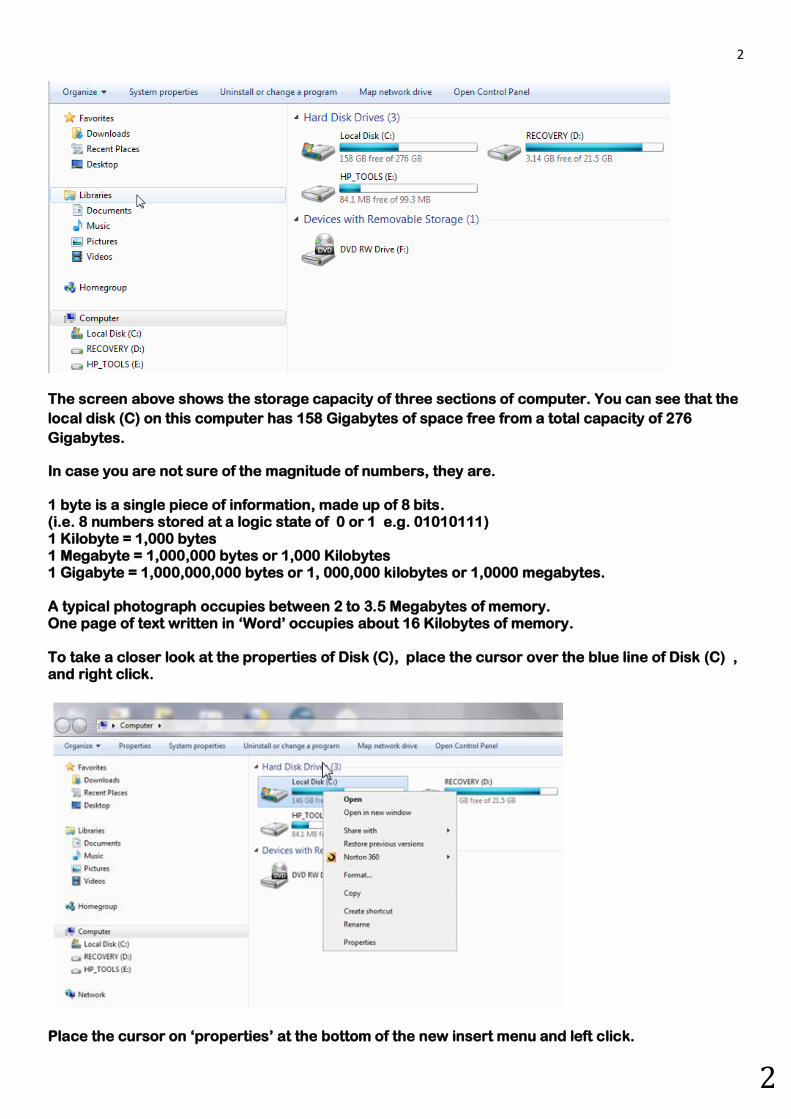
The screen above shows the storage capacity of three sections of computer. You can see that the
local disk (C) on this computer has 158 Gigabytes of space free from a total capacity of 276
Gigabytes.
In case you are not sure of the magnitude of numbers, they are. 1 byte is a single piece of information, made up of 8 bits. (i.e. 8 numbers stored at a logic state of 0 or 1 e.g. 01010111) 1 Kilobyte = 1,000 bytes 1 Megabyte = 1,000,000 bytes or 1,000 Kilobytes 1 Gigabyte = 1,000,000,000 bytes or 1, 000,000 kilobytes or 1,0000 megabytes. A typical photograph occupies between 2 to 3.5 Megabytes of memory. One page of text written in ‘Word’ occupies about 16 Kilobytes of memory. To take a closer look at the properties of Disk (C), place the cursor over the blue line of Disk (C) , and right click.
Place the cursor on ‘properties’ at the bottom of the new insert menu and left click.

3
3
This screen shows the current storage information for disk ‘C’ in the form of a pie graph.
To start some of the clean-up process, left click on ‘Disk Cleanup’
The images above have been captured on the screen, whilst the ‘Disk Cleanup’ process, is calculating how much space will be made free, on completion. At the time of the two screen captures, one was looking at the system error memory dump files and the later one was looking at Service Pack Backup Files. On completion the screen on the following page, will be displayed.
4
4
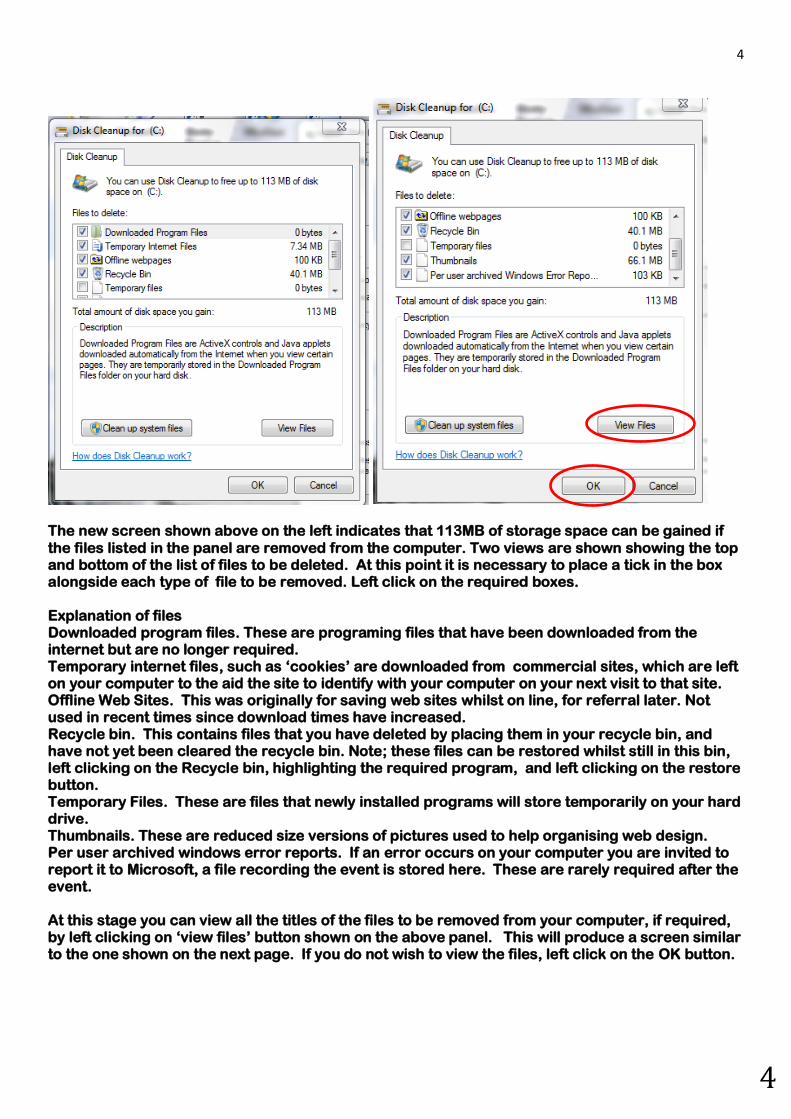
The new screen shown above on the left indicates that 113MB of storage space can be gained if
the files listed in the panel are removed from the computer. Two views are shown showing the top and bottom of the list of files to be deleted. At this point it is necessary to place a tick in the box alongside each type of file to be removed. Left click on the required boxes. Explanation of files Downloaded program files. These are programing files that have been downloaded from the internet but are no longer required. Temporary internet files, such as ‘cookies’ are downloaded from commercial sites, which are left on your computer to the aid the site to identify with your computer on your next visit to that site. Offline Web Sites. This was originally for saving web sites whilst on line, for referral later. Not used in recent times since download times have increased. Recycle bin. This contains files that you have deleted by placing them in your recycle bin, and have not yet been cleared the recycle bin. Note; these files can be restored whilst still in this bin, left clicking on the Recycle bin, highlighting the required program, and left clicking on the restore button. Temporary Files. These are files that newly installed programs will store temporarily on your hard drive. Thumbnails. These are reduced size versions of pictures used to help organising web design. Per user archived windows error reports. If an error occurs on your computer you are invited to report it to Microsoft, a file recording the event is stored here. These are rarely required after the event. At this stage you can view all the titles of the files to be removed from your computer, if required, by left clicking on ‘view files’ button shown on the above panel. This will produce a screen similar to the one shown on the next page. If you do not wish to view the files, left click on the OK button.

5
5
To cancel the above list of files shown in the panel above, left click on the ‘X’ in the top right-hand corner.
To proceed with deleting the files, left click on OK in the panel shown on the left above. This will produce an additional superimposed panel, ‘asking are you sure you want to delete the files?’. Left click on ‘Delete Files’ If you choose to re-inspect these files by following the stages in pages 1 to 3 you will see the image shown on the right above which shows that all the folders now contain 0 bytes. This completes one section of deleting unwanted files. However more usable space can be regained by deleting other files from the computer.

6
6
When you delete a word document or a picture from your computer it is placed in the recycle bin and remains there until you choose to empty your re-cycle bin (either directly by right clicking on
the Recycle Bin, and selecting delete, or by the method described above) However, even if you empty the Recycle Bin, the space occupied by the files remain on your storage disk. This is illustrated in the diagram on the next page. Emptying the recycle bin cancels the indexing reference to the document. The document still occupies the memory space. But cannot be accessed any more.

7
7
Conceptual explanatory model.
Above are three diagrams showing some of the stages in cleaning files from disk(C). The actual process is more complex than is shown above, as many more storage memories are involved than illustrated above. The first set of columns on the left, show the index system, connected to memory locations 1 to 20, which contain, word documents and photographs. The second set of columns show the situation after some documents have been ‘deleted’ (i.e. to your Recycle Bin and the Recycling Bin emptied). This only cancels the index reference connection. The memory locations are still occupied with the data in those locations. The disk is now ‘fragmented’ with sections of occupied memory that cannot be accessed for future use. The third set of columns shows the first pass of the ‘defragmenting’ process which empties the contents of the deleted file locations. (1 -4 and 15-18) The fourth set of columns shows the second defragmenting pass, which moves the photo(s) from memory locations 5-10 and creates an index connection to new locations 1-6. Subsequence defragmentation passes (not illustrated) will move the contents of memory locations 11-14 to 7-10. The word file(s) in locations 19-20 can then be moved to 11- 12. If the disc is very full. This process will take several hours to complete. It advisable to set the process up, and leave the computer to complete the ‘defragmentation’. You can continue to use
your computer whilst this process is in progress.
8
8
Defragmentation
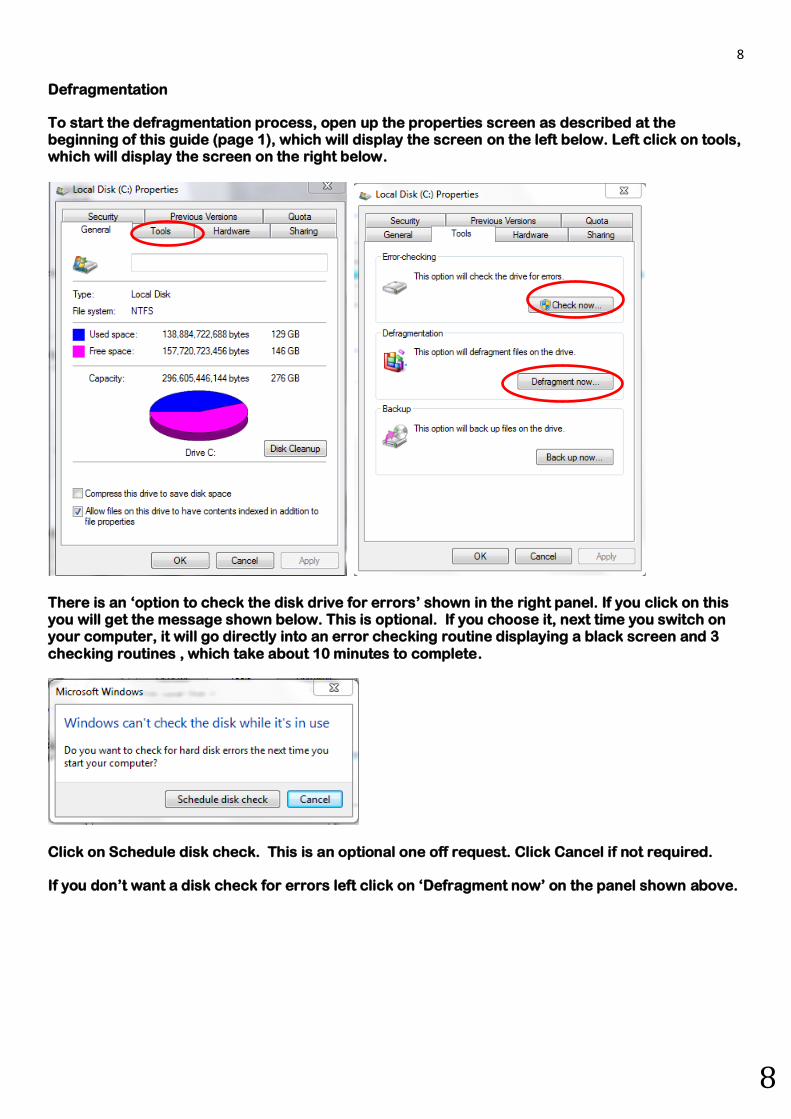
To start the defragmentation process, open up the properties screen as described at the beginning of this guide (page 1), which will display the screen on the left below. Left click on tools, which will display the screen on the right below.
There is an ‘option to check the disk drive for errors’ shown in the right panel. If you click on this you will get the message shown below. This is optional. If you choose it, next time you switch on your computer, it will go directly into an error checking routine displaying a black screen and 3
checking routines , which take about 10 minutes to complete.
Click on Schedule disk check. This is an optional one off request. Click Cancel if not required. If you don’t want a disk check for errors left click on ‘Defragment now’ on the panel shown above.

9
9
Clicking on ‘defragment now’, will display the following panel.
To determine if the disk needs to be defragmented, left click on ‘Analyze disk’. If you are prompted for an administrator password or confirmation, type the password or provide confirmation. Once Windows has finished analyzing the disk, you can see the percentage of fragmentation on the disk in the ‘Last Run’ column. If the number is above 10%, you should defragment the disk. In the panel above for this computer, it shows that C drive is only 8% fragmented. However I am proceeding with the process for the purpose of writing this guide. With (C) disk entry highlighted, left click on ‘Defragment disk’
Confirmation.
Disk Defragmenting might take from several minutes to a few hours to finish, depending on the size and degree of fragmentation on your hard disk. You can still use your computer during the defragmentation process.
.

10
10
The following screen was taken when 51% of disk (C) had been analysed
The following screen was taken during pass 1 when 26% of documents had been relocated.

11
11
The following screen was taken during pass 7 when 1% of disk (C) had been consolidated
The following screen was taken during pass 8 when 46% of disc (C) had been consolidated.

12
12
When the defragmentation is complete. Look at the properties of disk (C, using the procedure describe at the beginning of this guide (page 1).
This will show the following panel.
The above panel now shows that the amount of available free memory on tis computer has increased to 158 Gigabytes, from 146 Gigabytes before defragmentation.
13
13
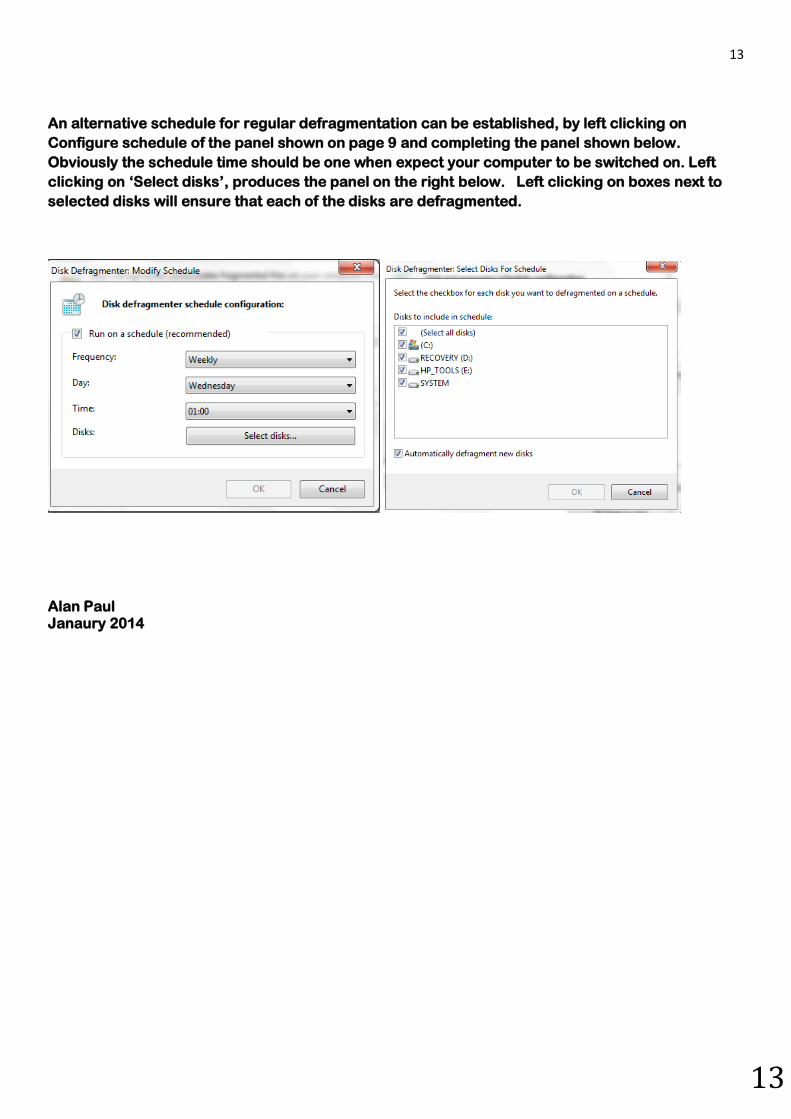
An alternative schedule for regular defragmentation can be established, by left clicking on
Configure schedule of the panel shown on page 9 and completing the panel shown below.
Obviously the schedule time should be one when expect your computer to be switched on. Left
clicking on ‘Select disks’, produces the panel on the right below. Left clicking on boxes next to
selected disks will ensure that each of the disks are defragmented.
Alan Paul Janaury 2014