PEMANTAUAN JARAK JAUH KAMAR BERBASIS RASPBERRY …eprints.itn.ac.id › 4190 › 1 ›...
108
PEMANTAUAN JARAK JAUH KAMAR BERBASIS RASPBERRY PI TERINTEGRASI VIA INTERNET SKRIPSI Disusun Oleh : Brendhadhea Emanuella Desyansari 13.12.509 PROGRAM STUDI TEKNIK ELEKTRO S-1 KONSENTRASI TEKNIK KOMPUTER FAKULTAS TEKNOLOGI INDUSTRI INSTITUT TEKNOLOGI NASIONAL MALANG 2017
Transcript of PEMANTAUAN JARAK JAUH KAMAR BERBASIS RASPBERRY …eprints.itn.ac.id › 4190 › 1 ›...
PEMANTAUAN JARAK JAUH KAMAR BERBASIS
RASPBERRY PI TERINTEGRASI VIA INTERNET
SKRIPSI
Disusun Oleh :
Brendhadhea Emanuella Desyansari
13.12.509
PROGRAM STUDI TEKNIK ELEKTRO S-1
KONSENTRASI TEKNIK KOMPUTER
FAKULTAS TEKNOLOGI INDUSTRI
INSTITUT TEKNOLOGI NASIONAL MALANG
2017


ii
PEMANTAUAN JARAK JAUH KAMAR BERBASIS
RASPBERRY PI TERINTEGRASI VIA INTERNET
Brendhadhea Emanuella Desyansari
1312509
Jurusan Teknik Elektro S-1, Konsentrasi Teknik Komputer
Fakultas Teknologi Industri, Institut Teknologi Nasional Malang
Jln. Raya Karanglo Km 2 Malang
ABSTRAK
Pemantauan kamar dalam laporan ini adalah sebuah sistem kemanan
yang diterapkan pada kamar kos penyewa. Sistem kemanan ini berbasis
Raspberry Pi dan motion detector sebagai pendeteksi gerak yang nantinya akan
mengirim notifikasi pada social media LINE berupa link, webcam untuk
memantau keadaan rumah lewat smartphone atau PC menggunakan koneksi
internet dan buzzer untuk alarm. Dengan alat ini diharapkan penyewa kos dapat
meningkatkan keamanan dan tidak perlu cemas ketika meninggalkan kamar kos
dalam keadaan kosong. Kamera akan memantau semua aktivitas yang terjadi di
sekitar kamar. Raspberry akan mengirimkan hasil gerakan ke Google Drive,
sehingga dapat dipantau dari mana saja dan kapan saja. Kamera dengan sistem
deteksi gerak pada Raspberry Pi dapat secara langsung mengambil gerakan
apabila terdapat gerakan pada ruang lingkup cakupan kamera. Sistem streaming
video dapat menggunakan smartphone atau PC merupakan sistem yang
dirancang untuk melakukan remote monitoring lingkungan secara real-time
dengan menggunakan Raspberry-Pi.
Kata Kunci: CCTV, Monitoring, Raspberry Pi, Webcam,LINE.
Room monitoring in this report is a security system that is applied to tenant rent
rooms. This security system is based on Raspberry Pi and motion detector as a
motion detector that will send notification on LINE social media in the form of
links, webcam to monitor the state of the house via smartphone or PC using
internet connection and buzzer for alarm. With this tool is expected to renters can
improve security and do not have to worry when leaving the boarding room
empty. The camera will monitor all activities that occur around the room.
Raspberry will send the results of movement to Google Drive, so it can be
monitored from anywhere and anytime. Camera with motion detection system on
Raspberry Pi can directly take movement when there is movement on the scope of
camera coverage. Video streaming system can use smartphone or PC is a system
designed to do remote monitoring environment in real-time by using Raspberry-
Pi.
Keywords: CCTV, Monitoring, Raspberry Pi, Webcam, LINE.
iii
KATA PENGANTAR
Puji syukur kepada Tuhan Yang Maha Esa yang telah memberikan berkat dan
anugrah-Nya kepada penulis, sehingga penulis dapat menyelesaikan skripsi
dengan judul “PEMANTAUAN JARAK JAUH KAMAR BERBASIS
RASPBERRY PI TERINTEGRASI VIA INTERNET” dengan
lancar. Skripsi merupakan persyaratan kelulusan Studi di Jurusan Teknik Elektro
S-1 Konsentrasi Teknik Komputer ITN Malang dan untuk mencapai gelar Sarjana
Teknik.
Keberhasilan penyelesaian laporan skripsi ini tidak lepas dari dukungan
dan bantuan berbagai pihak. Untuk itu penyusun menyampaikan terima kasih
kepada :
1. Tuhan Yesus yang telah memberi berkat dan bimbingan kepada penulis.
2. Bapak Dr. Ir. Lalu Mulyadi, MT selaku Rektor Institut Teknologi
Nasional Malang.
3. Bapak Dr. Ir. Yudi Limpraptono, MT selaku Dekan Fakultas Teknologi
Industri Institut Teknologi Nasional Malang
4. Ibu Dr. Irrine Budi Sulistiawati, ST, MT selaku Ketua Jurusan Teknik
Elektro ITN Malang.
5. Bapak Dr. Eng. I Komang Somawirata, ST, MT dan Bapak Ir.
Nurcahyo, MT selaku dosen pembimbing.
6. Kepada teman-teman Elektro 2013 dan juga kakak tingkat dan adik
tingkat yang menyemangati.
7. Kepada kedua orang tua saya yang selalu mendoakan saya sampai
sejauh ini.
Penulis telah berusaha semaksimal mungkin dan menyadari sepenuhnya
akan keterbatasan pengetahuan dalam menyelesaikan laporan ini. Untuk itu
penyusun mengharapkan saran dan kritik yang membangun dari pembaca demi
kesempurnaan laporan ini.
Harapan penulis semoga laporan skripsi ini memberikan manfaat bagi
perkembangan ilmu pengetahuan dan pembaca.
Malang, Agustus 2016
Penulis
iv
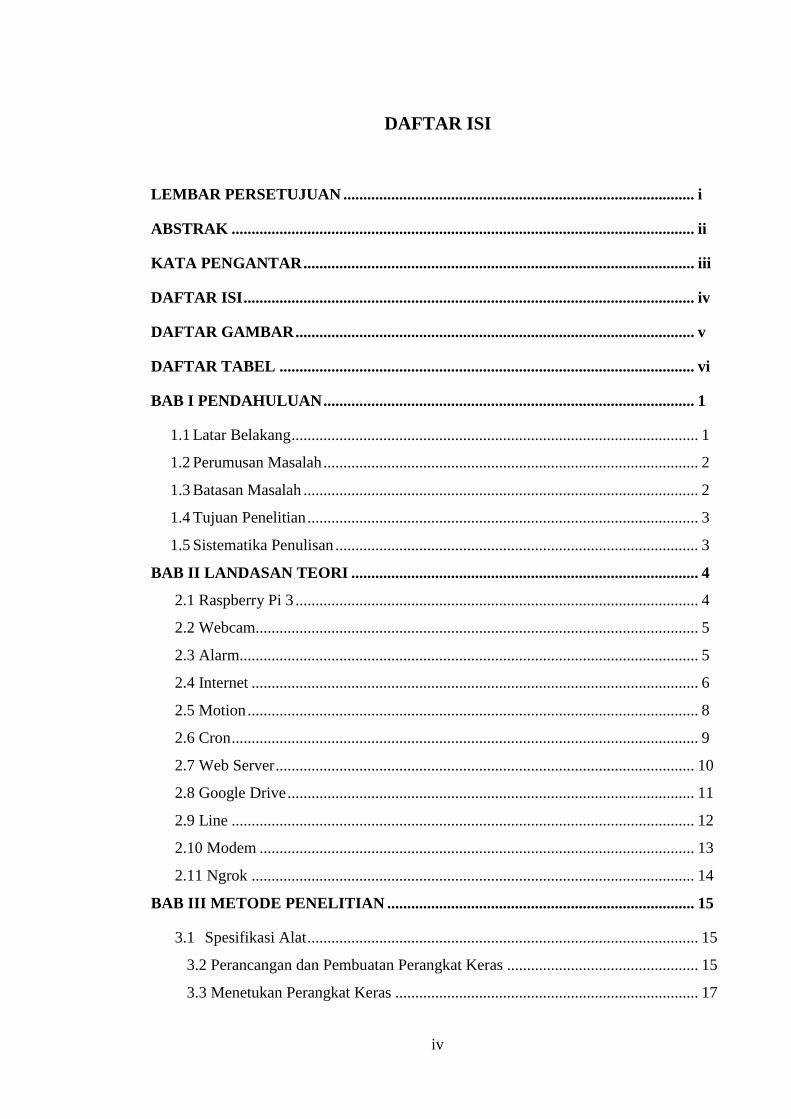
DAFTAR ISI
LEMBAR PERSETUJUAN ........................................................................................ i
ABSTRAK .................................................................................................................... ii
KATA PENGANTAR .................................................................................................. iii
DAFTAR ISI ................................................................................................................. iv
DAFTAR GAMBAR .................................................................................................... v
DAFTAR TABEL ........................................................................................................ vi
BAB I PENDAHULUAN ............................................................................................. 1
1.1 Latar Belakang ...................................................................................................... 1
1.2 Perumusan Masalah .............................................................................................. 2
1.3 Batasan Masalah ................................................................................................... 2
1.4 Tujuan Penelitian .................................................................................................. 3
1.5 Sistematika Penulisan ........................................................................................... 3
BAB II LANDASAN TEORI ....................................................................................... 4
2.1 Raspberry Pi 3 ..................................................................................................... 4
2.2 Webcam............................................................................................................... 5
2.3 Alarm................................................................................................................... 5
2.4 Internet ................................................................................................................ 6
2.5 Motion ................................................................................................................. 8
2.6 Cron ..................................................................................................................... 9
2.7 Web Server ......................................................................................................... 10
2.8 Google Drive ...................................................................................................... 11
2.9 Line .................................................................................................................... 12
2.10 Modem ............................................................................................................. 13
2.11 Ngrok ............................................................................................................... 14
BAB III METODE PENELITIAN ............................................................................. 15
3.1 Spesifikasi Alat .................................................................................................. 15
3.2 Perancangan dan Pembuatan Perangkat Keras ................................................ 15
3.3 Menetukan Perangkat Keras ............................................................................ 17

v
3.4 Perancangan dan Pembuatan Perangkat Lunak................................................ 17
3.5 Konfigurasi Jaringan Internet dan Web server................................................. 18
3.2.1.1 Konfigurasi Pendeteksi Gerakan dan Integrasi dengan LINE ............. 26
3.2.1.2 Konfigurasi Penangkap Gerakan Dan Integrasi System Dengan Google
Drive ..................................................................................................... 38
BAB IV PENGUJIAN .................................................................................................. 31
4.1 Untuk Kerja Perangkat Lunak Pada Server ..................................................... 31
4.1.1 Pengujian Intensitas Cahaya Ruangan. ................................................ 31
4.1.2 Pengujian Waktu Pengiriman Pesan LINE .......................................... 33
4.1.3 Pengujian Besar Data Video ................................................................ 35
4.2 Pengujian Waktu Unggah Video .................................................................... 36
4.3 Untuk Kerja Perangkat Lunak Pada Client ...................................................... 36
4.3.1 Pengujian Fungsional Web Server ....................................................... 46
4.3.2 Pengujian Fungsional Sistem Keseluruhan .......................................... 38
BAB V PENUTUP ........................................................................................................ 39
5.1 Kesimpulan ..................................................................................................... 39
5.2 Saran ............................................................................................................... 39
DAFTAR PUSTAKA ................................................................................................... 40
LAMPIRAN
vi
DAFTAR GAMBAR
Gambar 2.1 Raspberry Pi-3 Model B ............................................................................. 4
Gambar 2.2 Logitech c170 ............................................................................................. 5
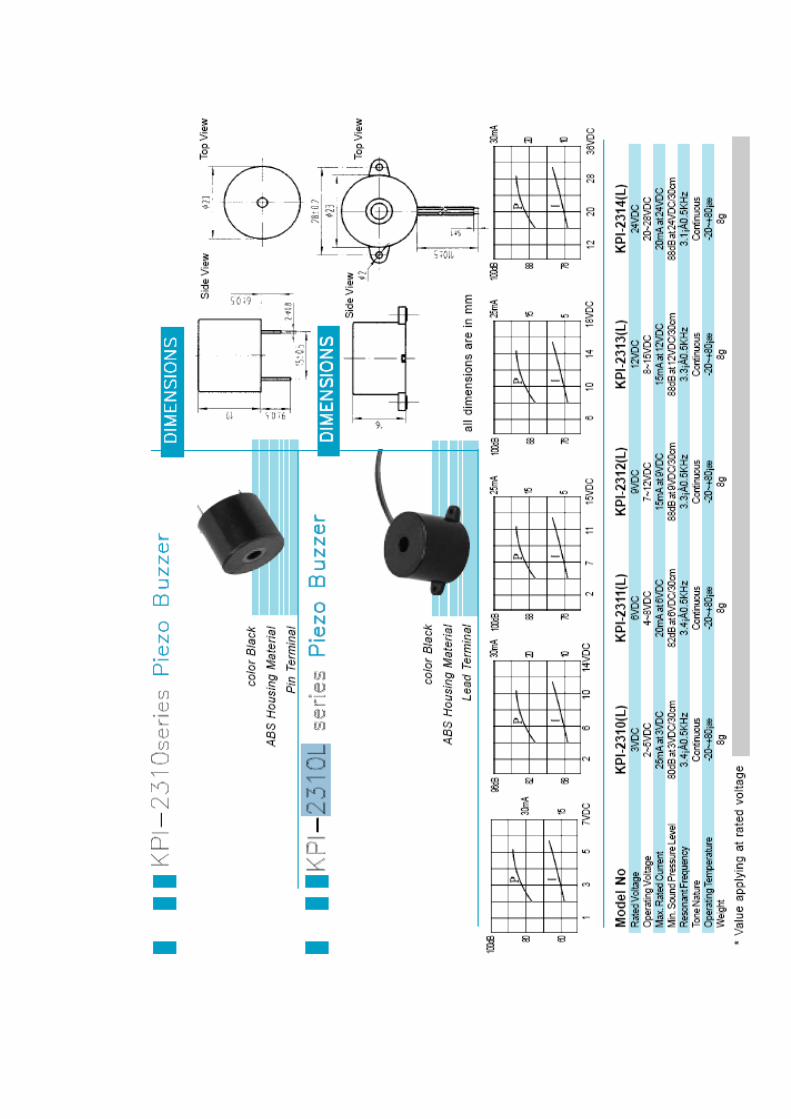
Gambar 2.3 Buzzer......................................................................................................... 6
Gambar 2.4 Modem Mifi ............................................................................................. 13
Gambar 3.1 Rangkaian Raspberry ................................................................................. 16
Gambar 3.2 Blok Diagram Sistem Pemantauan Jarak Jauh ........................................... 18
Gambar 3.3 Diagram Alir Kerja Halaman Web............................................................. 19
Gambar 3.4 Blok Diagram Konfigurasi Pendeteksi Gerakan dengan Integrasi LINE .. 26
Gambar 3.5 Kode Veritifikasi Line ................................................................................ 27
Gambar 3.6 Blok Diagram Penangkap Gerakan Dan Integrasi Dengan Google Drive . 28
Gambar 3.7 File Upload Google Drive .......................................................................... 30
Gambar 4.1 Pengiriman Notifikasi Line ........................................................................ 34
Gambar 4.2 Rekaman Video Selama 5 Detik ................................................................ 35
Gambar 4.3 Detail Video ............................................................................................... 36
Gambar 4.4 Pengujian Web Pada Android .................................................................... 37
vii
DAFTAR TABEL
Tabel 2.1 Struktur Data Header IP ................................................................................. 6
Tabel 3.1 Motion ............................................................................................................ 21
Tabel 4.1 Pengujian intensitas cahaya ruangan.............................................................. 32
Tabel 4.2 Pengujian Waktu Pengiriman Pesan LINE .................................................... 33
Tabel 4.3 Pengujian Besar Data Video .......................................................................... 35
Tabel 4.4 Pengujian Waktu Unggah Video.................................................................... 36
Tabel 4.5 Pengujian Fungsional Web Server ................................................................. 37
Tabel 4.6 Pengujian Fungsional Sistem Keseluruhan .................................................... 38

BAB I
PENDAHULUAN
1.1 Latar Belakang
Tindakan criminal disekitar kita membuat kita resah, terutama siswa atau
mahasiswa yang harus meninggalkan tempat asal mereka untuk menuntut ilmu.
Mereka akan mencari tempat tinggal sementara selama mereka menuntut ilmu,
seperti asrama dan menyewa kos atau rumah jika mampu.
Kadang mereka selalu khawatir akan pencuri yang masuk kamar. Maka
dari itu dengan memanfaatkan teknologi yang sudah mengalami kemajuan pesat,
dapat dimanfaatkan untuk mengambil peran dalam hal menjaga keamanan kamar.
Salah satu teknologi yang cocok untuk mengambil peran tersebut adalah CCTV
(Closed Circuit TeleVision). Selama ini, CCTV dan IP Kamera menggunakan
NVR (Network Video Recorder) sebagai server dan perangkat penyimpanan.
Namun, harga perangkat NVR dan IP Kamera yang cenderung mahal
belum terjangkau, seperti kalangan siswa dan mahasiswa yang pada umunya
masih bergantung pada orang tua mereka.
Berdasarkan masalah diatas maka pada skripsi ini akan dirancang sebuah
kamera pengintai berbasis raspberry yang khusus untuk daerah dengan tingkat
mobilitas rendah. Sistem kamera pengintai Raspberry Pi ini sama dengan system
CCTV dan IP kamera. Dengan menggunakan Raspberry Pi penyewa dapat
memantau kamar dalam jarak jauh tanpa memerlukan IP Publik dan hanya
merekam jika ada pegerakan yang terdeteksi pada kamera, kemudian hasil video
rekaman akan tersimpan pada Google Drive.
Pada saat kamera mendeteksi akan mengirimkan pemberitahuan kepada
penyewa berupa monitoring ke aplikasi sosial media LINE yang berisi link
monitoring. Ditambah lagi sebagai tindakan awal untuk mengatasi tindak
kejahatan jika hasil dari monitoring oleh pengguna didapat hal yang
mencurigakaan, maka sistem akan membunyikan alarm yang dikendalikan dari
jarak jauh.

2
1.2 Perumusan Masala
Berdasarkan latar belakang di atas, maka perumusan masalah dalam
penelitian ini yaitu:
1. Bagaimana merancang dan membuat system yang dapat memantau
kamar kos jarak jauh dengan kamera terkendali Raspberry Pi 2.
2. Bagaimana merancang dan membuat sistem yang dapat mengirim pesan
ke penyewa kos melalui aplikasi sosial media LINE saat mendeteksi
gerakan.
3. Bagaimana merancang dan membuat sistem yang dapat merekam video
secara otomatis saat terjadi gerakan dan menyimpan di Google Drive.
4. Bagaimana merancang dan membuat sistem yang dapat mengendalikan
alarm jarak jauh untuk mendukung proses pemantauan kamar kos.
1.3 Batasan Masalah
Agar penelitian tidak menyimpang dan tetap terarah diperlukan adanya
batasan masalah. Batasan masalah dalam penelitian ini adalah :
1. Membahas konfigurasi dan pemrograman web server pada sistem
2. Membahas konfigurasi dan pemrograman pendeteksi gerakan maupun
integerasi dengan aplikasi media sosial LINE
3. Membahas konfigurasi dan pemrograman penangkap gerakan maupun
integerasi sistem dengan media penyimpanan online Google Drive
4. Membahas perancangan dan pembuatan rangkaian driver alarm pada
system
5. Penyimpanan di SD Card lalu diBack Up ke Google drive seminggu
sekali secara manual.
Dari ruang lingkup diatas, untuk mengfokuskan bahasan yang diteliti maka
hal – hal menjadi batasan masalah pada skripsi ini adalah:
1. Kondisi ruangan tidak gelap.
2. Tidak membahas rangkaian board Raspberry Pi 2.
3. Tidak membahas rangkaian catu daya pada sistem.

3
1.4 Tujuan Penelitian
1. Memberikan info secara realtime tentang keadaan ruangan sehingga
tindakan pencegahan dapat segera dilakukan.
2. memberikan alternatif sistem monitoring ruangan yang hemat dan
praktis.
1.5 Sistematika Penulisan
Dalam pembuatan karya ilmiah ini, terdiri dari lima bab dengan sitematika
penulisan sebagai berikut:
1. BAB I : Pendahuluan
Berisi tentang latar belakang rumusan masalah, tujuan, batasan
masalah, metodologi penelitian, dan sistematika penulisan.
2. BAB II: Landasan Teori
Membahas tentang dasar teori mengenai permasalahan yang
berhubungan dengan penelitian.
3. BAB III: Metode Penelitian
Bab ini membahas tentang perencanaan dan proses pembuatan meliputi
perencanaan, pembuatan alat, cara kerja, dan penggunaan alat.
4. BAB IV: Pengujian
Berisi tentang pembahasan, perbandingan dan analisa alat dari hasil yang
diperoleh pada pengujian.
5. BAB V: Penutup
Berisi tentang semua kesimpulan yang berhubungan dengan penulisan
skripsi, dan saran yang digunakan sebagai pertimbangan dalam
pengembangan program selanjutnya.

BAB II
LANDASAN TEORI
2.1 Raspberry Pi 3
Minat pada perangkat Raspberry Pi sangat luar biasa dan telah jauh melebihi
harapan. Profesional IT, ahli elektronik dan pendatang baru semua bersemangat
untuk „meletakkan‟ tangan mereka pada perangkat kecil ini dan semua orang
setuju, perangkat ini akan menjadi besar dan semakin berkembang (Jaseman dan
Meltwater dalam Majalah MagPi, 2012 : 3).
Gambar 2.1 Raspberry Pi-3 Model B
(Sumber : Raspberry)
Berikut Spesifikasi dari Raspberry Pi 3:
SoC : Broadcom BCM2837
CPU : 4x ARM Cortex-A53, 1.2GHz
GPU : Broadcom VideoCore IV
RAM : 1GB LPDDR2 (900 MHz)
Networking : 10/100 Ethernet, 2.4GHz 802.11n wireless
Bluetooth : Blietooth 4.1 Classic, Bluetooth Low Energy
Storage : microSD
GPIO : 40-pin header, populated
Ports : HDMI, 3.5mm analogue audio-video jack, 4x USB 2.0,
Ethernet, Camera Serial Interface (CSI), Display Serial
Interface (DSI)
Raspberry Pi, sering disingkat dengan nama Raspi, adalah komputer papan
tunggal (single-board circuit; SBC) yang seukuran dengan kartu kredit yang dapat

5
digunakan untuk menjalankan program perkantoran, permainan komputer, dan
sebagai pemutar media hingga video beresousi tinggi.
2.2 WebCam
Webcam atau USB camera adalah perangkat elektronik pengcapture objek
yangdigunakan bersamaan dengan PC atau laptop.” (Aryanto, 2009 : 6). Webcam
juga dapat dipergunakan untuk komunikasi visual sehingga sesama pengguna
dapat saling bertatap muka melalui internet. Kamera Web biasana dilengkapi
dengan software, software ini mengambil gambar-gambar dari kamera digital
secara terus menerus ataupun dalam interval waktu tertentu dan menyiarannya
melalui koneksi internet. Ada beberapa metode penyiaran, metode yang paling
umu adalah perangkat keras mengubah gambar kedalam bentuk beras JPG dan
mengunggahnya ke web server menggunakan File Transfer Protokol (FTP).
Kamera web tipe Logitech Webcam C170 ditunjukan dalam Gambar 2.2.
Gambar 2.2 Logitech c170
(sumber : https//assets.logitech.com/assets/54866/c170-gallery.png)
Frame rate mengindikasikan jumlah gambar sebuah software dapat ambil
dan kirim dalam satu second. Untuk streaming video membutuhkan minimal 15
frame per second (fps) atau idealnya 24 fps. Untuk mendapatkan frame rate yang
tinggi, dibutuhkan koneksi internet yang tinggi kecepatannya.
2.3 Alarm
Buzzer adalah sebuah komponen elektronika yang berfungsi untuk mengubah
getaran listrik menjadi getaran suara. Pada dasarnya prinsip kerja buzzer hampir
sama dengan loud speaker, jadi buzzer juga terdiri dari kumparan yang terpasang
pada diafragma dan kemudian kumparan tersebut dialiri arus sehingga menjadi
elektromagnet, kumparan tadi akan tertarik ke dalam atau keluar, tergantung dari

6
arah arus dan polaritas magnetnya, karena kumparan dipasang pada diafragma
maka setiap gerakan kumparan akan menggerakkan diafragma secara bolak-balik
sehingga membuat udara bergetar yang akan menghasilkan suara.
Gambar 2.3 Buzzer
(sumber Buzzer)
Buzzer biasa digunakan sebagai indikator bahwa proses telah selesai atau
terjadi suatu kesalahan pada sebuah alat (alarm).
2.4 Internet
Internet adalah rangkaian hubungan jaringan komputer yang dapat diakses
secaraumum diseluruh dunia, yang mengirimkan data dalam bentuk paket data
berdasarkan standar Internet Protocol (IP)”. Paket-paket data dalam protokol IP
dikirimkan dalam bentuk datagram.
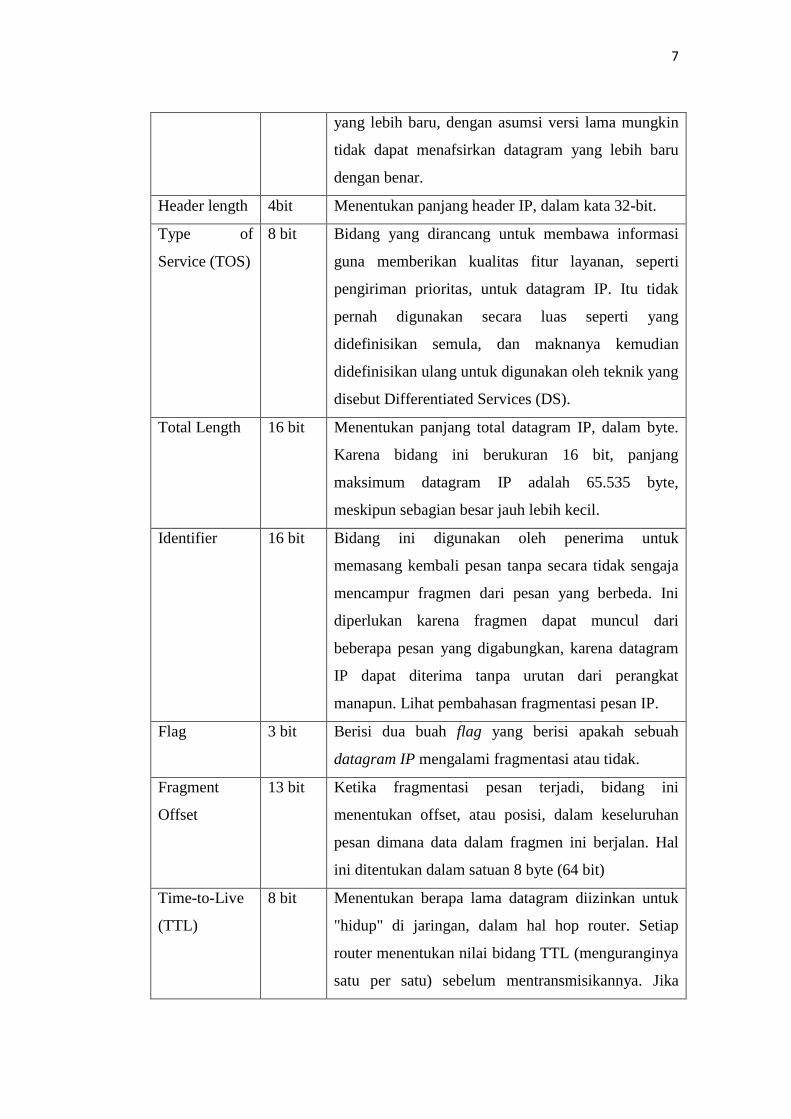
Ukuran heaser IP bervariasi, yakni berukuran 20 hingga 60 byte, dalam
penambahan 4byte. Header IP terdiri atas beberapa field yang diuraikan pada tabel
2.1.
Tabel 2.1 Struktur Data Header IP
Field Panjang Keterangan
Version 4 bit Tujuan dari bidang ini adalah untuk memastikan
kompatibilitas antar perangkat yang mungkin
menjalankan berbagai versi IP. Secara umum,
perangkat yang menjalankan versi lama IP akan
menolak datagram yang dibuat oleh implementasi
7
yang lebih baru, dengan asumsi versi lama mungkin
tidak dapat menafsirkan datagram yang lebih baru
dengan benar.
Header length 4bit Menentukan panjang header IP, dalam kata 32-bit.
Type of
Service (TOS)
8 bit Bidang yang dirancang untuk membawa informasi
guna memberikan kualitas fitur layanan, seperti
pengiriman prioritas, untuk datagram IP. Itu tidak
pernah digunakan secara luas seperti yang
didefinisikan semula, dan maknanya kemudian
didefinisikan ulang untuk digunakan oleh teknik yang
disebut Differentiated Services (DS).
Total Length 16 bit Menentukan panjang total datagram IP, dalam byte.
Karena bidang ini berukuran 16 bit, panjang
maksimum datagram IP adalah 65.535 byte,
meskipun sebagian besar jauh lebih kecil.
Identifier 16 bit Bidang ini digunakan oleh penerima untuk
memasang kembali pesan tanpa secara tidak sengaja
mencampur fragmen dari pesan yang berbeda. Ini
diperlukan karena fragmen dapat muncul dari
beberapa pesan yang digabungkan, karena datagram
IP dapat diterima tanpa urutan dari perangkat
manapun. Lihat pembahasan fragmentasi pesan IP.
Flag 3 bit Berisi dua buah flag yang berisi apakah sebuah
datagram IP mengalami fragmentasi atau tidak.
Fragment
Offset
13 bit Ketika fragmentasi pesan terjadi, bidang ini
menentukan offset, atau posisi, dalam keseluruhan
pesan dimana data dalam fragmen ini berjalan. Hal
ini ditentukan dalam satuan 8 byte (64 bit)
Time-to-Live
(TTL)
8 bit Menentukan berapa lama datagram diizinkan untuk
"hidup" di jaringan, dalam hal hop router. Setiap
router menentukan nilai bidang TTL (menguranginya
satu per satu) sebelum mentransmisikannya. Jika

8
bidang TTL turun menjadi nol, datagram
diasumsikan terlalu lama mengambil rute dan
dibuang.
Protocol 8 bit Digunakan untuk mengidentifikasikan jenis protokol
lapisan yang lebih tinggi yang dikandung oleh
muatan IP. Field ini merupakan tanda eksplisit untuk
protokol klien.
Header
Checksum
16 bit Sebuah checksum dihitung di atas header untuk
memberikan perlindungan dasar terhadap korupsi
dalam transmisi. Pada setiap hop perangkat yang
menerima datagram melakukan perhitungan
checksum yang sama dan pada ketidakcocokan,
membuang datagram sebagai rusak.
Source IP
Address
32 bit Alamat IP 32-bit dari originator datagram. Perhatikan
bahwa meskipun perangkat perantara seperti router
dapat menangani datagram, mereka biasanya tidak
memasukkan alamat mereka ke bidang ini-selalu
perangkat yang awalnya mengirim datagram.
Destination IP
Address
32 bit Alamat IP 32-bit dari penerima datagram yang
dimaksud. Sekali lagi, meskipun perangkat seperti
router mungkin merupakan target antara datagram,
bidang ini selalu untuk tujuan akhir.
2.5 Motion
Motion merupakan suatu aplikasi yang mampu memonitoring sinyalvideo dari
sebuah kamera dan mampu mendeteksi perubahan yang terjadi pada potongan
video. Motion berkerja secara penuh dalam mode text dan tidak memiliki
interface. Motion dikembangkan pertama kali oleh Jeroen Vreeken dan kemudian
dilanjutkan oleh Folkert van Heusden dan Kenneth Lavrsen. Aplikasi Motion
sendiri ditulis menggunakan bahasa C dan memiliki output berupa gambar jpg
ataupun video mpg (Lavrsen, 2006) Motion bekerja dengan membandingkan
intesitas pixel dari gambar baru dengan gambar referensi (gambar lama). Ketika

9
tidak ada perubahan intensitaspixel maka gambar referensi bernilai nol. Jika
terjadi perubahan maka nilai dari gambar referensi akan berbeda. Untuk mencegah
agar tidak terjadi salah deteksi maka dalam pengaturan motion perlu ditentukan
batas perubahan pixel yang diperlukan agar bisa disebut gerakan. Dalam proses
perbandingan iniwarna dalam suatu gambar tidak diperlukan dan hanya diambil
citra hitam putihnya saja.
Aplikasi Motion memiliki fitur antara lain :
1. Deteksi Gerakan
2. Live Streaming webcam
3. Motion Tracking
4. Pengontrolan Treeshold
5. Mengambil Screenshot dalam interval tertentu
2.6 Cron
Cron ini di Linux diimplementasikan dalam bentuk layanan. Pada saat
layanannya aktif maka semua tugas yang telah dijadwalkan akan dikerjakan sesuai
waktunya. Sedangkan atd adalah program penjadwalan tugas yang hanya
dikerjakan hanya satu kali pada waktu tertentu.Pada sistem Linux ada banyak
penjadwalan yang dapat dilakukan, seperti rotasi file log, pembaruan basisdata
untuk program locate, backup, skrip perawatan (misalnya, penghapusan file
temporari). Secara default semua user dapat membuat penjadwalan tugas,karena
layanan cron membedakan penyimpanan untuk tiap user. Di UNIX/Linux
penjadwalan ini disimpan pada file crontab untuk masing-masing user.Pembatasan
terhadap user yang dapat membuat pejadwalan ini dapat dilakukan melalui file
/etc/cron.allow, sedangkan file /etc/cron.deny digunakan untuk memblok user.
Untuk mengkonfigurasikan atau menambahkan daftar program atau script
yang akan dijadwalkan digunakan perintah editing Cron dengan menjalankan
perinth Cron dengan tanda –e seperti berikut: “Crontab –e”
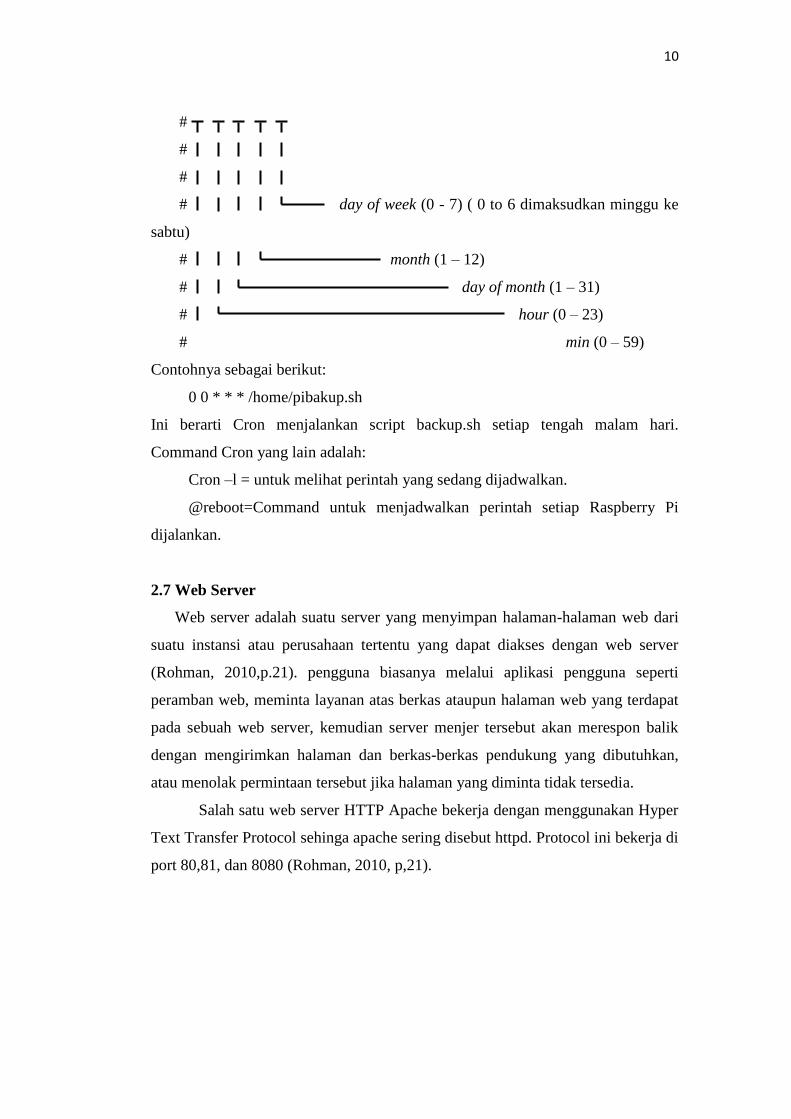
Susunan untuk menambahkan perintah baru di Cron terdapat 6 kompoen
agar Command dapat dieksekusi yaitu: minute, hour, day of month, month of
year, day of week.
# m h dom mon dow Command
10
#
#
#
# day of week (0 - 7) ( 0 to 6 dimaksudkan minggu ke
sabtu)
# month (1 – 12)
# day of month (1 – 31)
# hour (0 – 23)
# min (0 – 59)
Contohnya sebagai berikut:
0 0 * * * /home/pibakup.sh
Ini berarti Cron menjalankan script backup.sh setiap tengah malam hari.
Command Cron yang lain adalah:
Cron –l = untuk melihat perintah yang sedang dijadwalkan.
@reboot=Command untuk menjadwalkan perintah setiap Raspberry Pi
dijalankan.
2.7 Web Server
Web server adalah suatu server yang menyimpan halaman-halaman web dari
suatu instansi atau perusahaan tertentu yang dapat diakses dengan web server
(Rohman, 2010,p.21). pengguna biasanya melalui aplikasi pengguna seperti
peramban web, meminta layanan atas berkas ataupun halaman web yang terdapat
pada sebuah web server, kemudian server menjer tersebut akan merespon balik
dengan mengirimkan halaman dan berkas-berkas pendukung yang dibutuhkan,
atau menolak permintaan tersebut jika halaman yang diminta tidak tersedia.
Salah satu web server HTTP Apache bekerja dengan menggunakan Hyper
Text Transfer Protocol sehinga apache sering disebut httpd. Protocol ini bekerja di
port 80,81, dan 8080 (Rohman, 2010, p,21).

11
2.8 Google Drive
Google Drive adalah layanan penyimpanan online milik Google. Layanan ini
merupakan ekstensi dari Google Docs dan akan mengganti URL docs.google.com
dengan Driver.google.com setelah diaktifkan. Google drive memberikan layanan
penyimpanangratis sebesar 15 GB dan dapat ditambahkan dengan pembayaran
tertentu. Dengan fitur unggulan yang sama seperti Dropbox, yaitu sinkronisasi
data melalui folder khusus didalam desktop atau lebih dikenal dengan Desktop
Sync Clients. Google Drive memberikan kapasitas grastis sebesar 15 GB dan
tentunya fitur-fitur yang terintegrasi dengan layanan Google lainnya seperti:
Gmail, G+ dan Google Search( Google,2017).
GDriver merupakan paket perangkat lunak yang dapat dijalankan disistem
operasi unix. Gdrive berfungsi sebagai perangkat lunak utilitas command untuk
mengakses layanan Google Drive (Prasmussen, 2017). Daftar Command yang
digunakan pada GDrive adalah sebagai berikut:
GDrive [global] list [options] menampilkan daftar file.
GDrive [global] download [options]<fileld> mengunduh file atau
direktori.
GDrive [global] upload [options]<path> mengunggah file atau
direktori.
GDrive [global] upload – [options]<name> mengunggah file dari stdin.
GDrive [global] info[options]<fileld> menampilkan informasi file.
GDrive [global] mkdir [options]<name> membuat direktori.
GDrive [global] delete [options]<fileld> menghapus file atau direktori.
GDrive [global] sync content [options] <fileld> menampilkan isi dari
direktori yang disinkronkan
GDrive [global] sync download [options] <fileld><path> membuat sinkronisasi
Drive ke direktori lokal.
GDrive [global] sync upload [options] <path><fileld> sinkronisasi direktori
lokal ke Drive.
GDrive version menampilkan versi yang
digunakan
GDrive help menampilkan help / bantuan

12
2.9 LINE
LINE adalah sebuah aplikasi pengirim pesan instan gratis yang dapat
digunakan pada sebagai platform seperti telepon cerdas, tablet, dan computer.
LINE difungsikan dengan menggunakan jaringan internet senhingga pengguna
LINE dapat melakukan aktivitas seperti mengirim pesan teks, mengirim gambar,
video, pesan suara, dan lain lain. Kelabihan LINE adalah menyediakan Blocked
List sehingga pengguna dapat memblok user ID atau nomor handphone untuk
tidak masuk dalam kontak LINE pengguna. Merupakan aplikasi lintas platform,
dan banyak sticker-sticker lucu yang dapat mewakili persaan pengguna untuk
digunakan dalam obrolan.
LINE adalah sebuah library Python yang dapat mengakses aplikasi LINE
seperti login, mengirim atau menerima pesan. Dengan LINE dapat digunakan
pada beberapa system operasi seperti Debian. Untuk melakukan login pada
terminal Rasperry Pi lakukan perintah berikut:
>>>from line import LineClient
>>>client = LineClient(“email”,”password”)
Enter PinCode „7390‟ to your mobile phone in 2 minutes
Dari listing Program diatas login dilakukan dengan mengisi Email dan
Password pengguna dan akan melakukan otentikasi pad aplikasi LINE dengan
memasukkan kode pin yang muncul di terminal. Contoh periintah lainnya adalah
sebagai berikut:
Menampilakan daftar kontak teman LINE:
>>>print client.contact
Mengirim pesan teman nomor urut pertama:
>>>friend = client.contact[0]
>>>friend.sendMessage(“hello world”)
Mengirm pesan Gambar:
>>>friend.sendImageWithURL(https://avaatar3.gl.com/u/3346407
?v-3&s=460)
Mengirim sticker:
>>>friend.sendSticker

13
2.10 Modem
Mifi itu adalah servernya wifi, yaitu teknologi yang ada pada suatu
perangkat yang memungkinkan perangkat lain terhubung kepadanya via WIFI
dalam rangka berbagi koneksi internet maupun share data. Seperti Wireless
Access Point ibaratnya. Namun ringkasnya mifi (mobile Wifi) ini menggabungkan
3 fungi sekaligus yakni modem, router dan access point. Sehingga dapat
mengakses sinyal untuk konektivitas internet, meneruskan sinyal untuk
dipancarkan, dan membentuk access point yang dapat diakses oleh perangkat lain
melalui wifi.
Gambar 2.4 Modem Mifi
Disini penulis memakai modem Mifi Huawei E5577. Huawei E5577
sendiri dapat mengakomodasi konektivitas hingga 10 perangkat. Jangkauan
sinyalnya cukup jauh dan penetrasi sinyalnya juga cukup kuat. Tentu saja
jangkauan sinyalnya tidak akan sehebat router WiFi rumahan. Perangkat MiFi ini
juga menggunakan sinyal yang ramah, yaitu 2,4GHz mengingat sinyal tersebut
adalah yang paling banyak digunakan di ponsel dan perangkat lama lainnya.
Menariknya adalah E5577 juga bisa digunakan sebagai WiFi extender. Ia bisa
memperluas dan memperkuat jaringan WiFi yang telah ada, membuatnya tampil
sebagai perangkat yang lebih fleksibel dan multifungsi. Perangkat MiFi ini
ternyata mendukung cukup banyak fitur mulai dari DHCP, hingga MAC filtering.
Sementara fitur keamanannya mulai dari Firewall, IP Filtering, UPnP, hingga
NAT. Pengaturan tersebut tergolong sangat lengkap untuk sebuah perangkat MiFi.

14
2.11 Ngrok
Ngrok adalah proy server reverse yang menciptakan terowongan yang
aman dari endpoint publik untuk layanan web lokal berjalan. Ngrok menangkap
dan menganalisis semua lalu lintas melalui terowongan untuk pemeriksaan
kemudian dan replay. Penggunaan ngrok digunakan untuk penghubung antara
pengakses localhost dengan internet. Menangkap dan menganalisis semua lalu
lintas melalui terowongan pemeriksaan kemudian dan reply. Kegunaan dari ngork
yaitu:
a. Sementara berbagi sebuah website yang hanya berjalan pada mesin
pengembangan.
b. Demoing sebuah aplikasi di hackathon tanpa menyebarkan.
c. Mengembangkan setiap layanan yang mengkonsumsi webhooks (callback
HTTP) dengan memungkinkan Anda untuk memutar ulang permintaan
mereka.
d. Debugging dan memahami layanan web apapun dengan memeriksa lalu
lintas HTTP.
e. Menjalankan layanan jaringan pada mesin yang firewall off dari internet
BAB III
METODE PENELITIAN
Penyusunan skripsi ini berdasar pada masalah yang bersifat splikatif, yaitu
perencanaan dan realisasi alat agar dapat bekerja sesuai dengan yang
direncanakan dengan mengacu pada rumusan masalah. Oleh karena itu
dibutuhkan suatu metode penelitian agar perencanaan dan realisasi alat dapat
dilaakukan.
3.1 Spesifikasi Alat
Sistem yang dibuat menggunakan Raspberri Pi 3 sebagai sebuah server
yang akan bertindak sebagai web server, server pengirim LINE, server
pengunggah ke Google Drive dan akan memberikan perintah ke Buzzer. Aat akan
diletakan pada sebuah ruangan. Ruangan dapat dipantau dari jarak jauh melalui
intrnet yang tersedia pada domain yang telah dikonfugurasi dan diakses melalui
browser yang terinstall di lapop/ smartphone pengguna. Sistem dikonfirmasikan
agar dapat mendeteksi gerakan pada kondisi intensitas ruangan minimal, dan saat
mendeteksi gerakan sistem akan mengirim pesan melalui social media LINE ke
pemilik rumah.
Sistem dikonfigurasikan agar dapat merekam saat terjadi gerakan yang
tertangkap kamera. Kemudian hasil rekaman aka disimpan di MicroSD dan jika
ada video baru maka akan diunggah di Google Drive. Alarm dapat dikendalikan
dari jarak jauh melalui halaman web pada domain yang telah dikonfigurasikan.
Dimana untuk membunyikan alarm diperlukan rangkaian driver.
3.2 2 Perancangan dan Pembuatan Perangkat Keras
Perancangan dan pembuatan perangkat keras pada skripsi iniberupa
perancangan pembuatan system dari penyambungan Raspberry Pi, Kamera, dan
Buzzer.

16
Gambar 3.1 Rangkaian Raspberry
3.2.1 Menentukan Perangkat Keras
1. Raspberry Pi 3
Raspberry Pi 3 adalah generasi ketiga Raspberry Pi. Ini
menggantikan Model 2 Pip Raspberry pada bulan Februari 2016.
Dibandingkan dengan Raspberry Pi 2, ia memiliki:
a. A 1.2GHz 64-bit quad-core ARMv8 CPU
b. 802.11n Wireless LAN
c. Bluetooth 4.1
d. Bluetooth Low Energy (BLE)
Seperti halnya Pi 2, ia juga memiliki:
a. 1GB RAM
b. 4 USB ports
c. 40 GPIO pins
d. Full HDMI port
e. Ethernet port
f. Combined 3.5mm audio jack and composite video
g. Camera interface (CSI)
h. Display interface (DSI)
i. Micro SD card slot (now push-pull rather than push-push)
17
j. VideoCore IV 3D graphics core
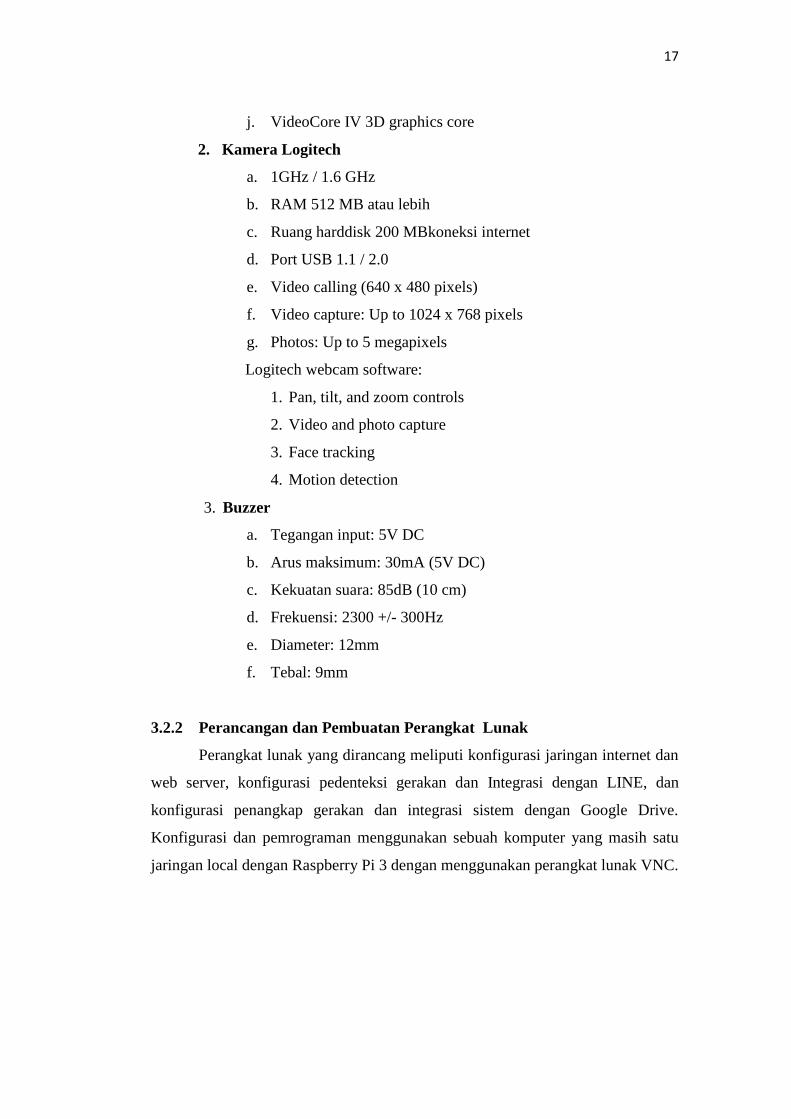
2. Kamera Logitech
a. 1GHz / 1.6 GHz
b. RAM 512 MB atau lebih
c. Ruang harddisk 200 MBkoneksi internet
d. Port USB 1.1 / 2.0
e. Video calling (640 x 480 pixels)
f. Video capture: Up to 1024 x 768 pixels
g. Photos: Up to 5 megapixels
Logitech webcam software:
1. Pan, tilt, and zoom controls
2. Video and photo capture
3. Face tracking
4. Motion detection
3. Buzzer
a. Tegangan input: 5V DC
b. Arus maksimum: 30mA (5V DC)
c. Kekuatan suara: 85dB (10 cm)
d. Frekuensi: 2300 +/- 300Hz
e. Diameter: 12mm
f. Tebal: 9mm
3.2.2 Perancangan dan Pembuatan Perangkat Lunak
Perangkat lunak yang dirancang meliputi konfigurasi jaringan internet dan
web server, konfigurasi pedenteksi gerakan dan Integrasi dengan LINE, dan
konfigurasi penangkap gerakan dan integrasi sistem dengan Google Drive.
Konfigurasi dan pemrograman menggunakan sebuah komputer yang masih satu
jaringan local dengan Raspberry Pi 3 dengan menggunakan perangkat lunak VNC.

18
3.2.2.1 Konfigurasi Jaringan Internet dan Web server
Gambar 3.2 Blok Diagram Sistem Pemantauan Jarak Jauh
Blok diagram pada Gambar 3.2 Menunjukan pengguna menggunakan
smartphone/laptop yang telah terinstall browser mengakses web server dari
internet ke port komputer lokal. Web server digunakan yaitu dengan paket
perangkat lunak APACHE. Web server akan menampilkan halaman streaming
kamera dan halaman akses kendali alarm. Untuk menampilkan streaming kamera
digunakan perangkat lunak Motion.
Perangkat lunak yang digunakan pada sistem memiliki spesifikasi berikut:
1. Sistem Operasi digunakan untuk menjalankan paket perangakat lunak
yang dibutuhkan oleh sistem. Sistem operasi yang digunakan adalah
sistem operasi Debian Jessie.
2. Web server digunakan untuk menampilkan halaman web pemantauan
ruangan halaman kendali alarm pada sistem. Paket perangkat lunak untuk
membangun web server adalah APACHE dan PHP
3. Motion merupkan perangkat unak yang digunakan menganalisishasil
tangkapan gambar kamera apakah terdapat gerakan atau tidak.
4. Python merupakan perangkat lunak yang digunakan untuk mengakses
GPIO pada Raspberry Pi 3.
5. Corn merupakan perangkat lunak yang berfungsi menjalankan perintah
pada Raspberry Pi 3 sesuai waktu yang dijadwalkan.

19
Start
Login.php
Index.php
Username dan
Password bisa?
Apakah alarm akan
dibunyikan?
Alarm Status ON Alarm Status OFF
Logout.php
End
Program memasukkan
username dan
password
Halaman
streaming kamera
dan kontrol alarm
No
Yes
NoYes
Gambar 3.3 Diagram Alir Kerja Halaman Web
Tampilan halaman web menggunakan bahasa pemrograman html dan php
sesuai dengan diagram alir pada gambar 3.3 . Untuk melakukan kontrol alarm dari
jarak jauh maka program php akan memanggil program Python yang dapat
mengakses pin GPIO pada Raspberry Pi.
Konfigurasi perangkat lunak yang akan dilakukan meliputi:

20
1. Konfigurasi Kamera USB
a. Kamera web dihubungkan ke port USB Raspberry Pi 3 seperti
Gambar 3.2.
b. Selanjutnya pada terminal diketikan command berikut:
Terlihat kamera telah terhubung ini menunjukan bahwa Driver
untuk perangkat kamera jenis Logitech C170 telah tersedia pada
sistem operasi yang digunakan.
2. Konfigurasi Motion
a. Dengan mulai menghapus perpustakaan yang mungkin
bertentangan dengan paket yang lebih baru. Ini mungkin atau
mungkin belum ada pada salinan Raspbian.
b. Download dan instal paket berikut dengan memasukkan perintah
berikut ke terminal.
c. Sekarang kita perlu menginstal paket berikut, kita memerlukan ini
sebagai perangkat lunakgerak bergantung pada mereka.
d. Sekarang pastikan kamera terhubung dan jalankan baris berikut:
Dengan paket yang terinstal sekarang kita dapat mengambil versi
terbaru dari perangkat lunak gerak dan menginstalnya. Untuk
melakukan ini jalankan perintah berikut.

21
e. Sekarang kita perlu membuat beberapa suntingan ke file
konfigurasi (motion.conf).
f. Sekarang kita perlu setup daemon, pertama kita perlu mengedit file
motion.
Tabel 3.1 Motion
a. Temukan baris berikut dan ubah menjadi berikut ini:
Setelah Anda selesai cukup simpan dan keluar dengan menekan
ctrl + x lalu y.
22
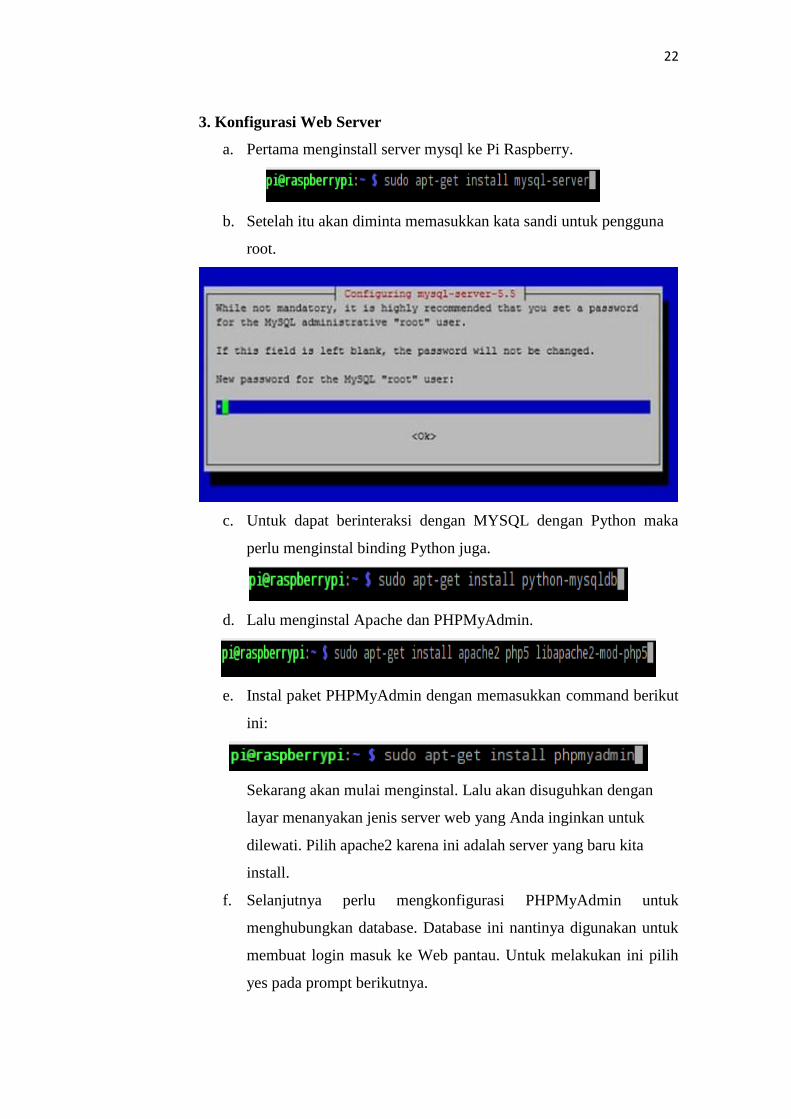
3. Konfigurasi Web Server
a. Pertama menginstall server mysql ke Pi Raspberry.
b. Setelah itu akan diminta memasukkan kata sandi untuk pengguna
root.
c. Untuk dapat berinteraksi dengan MYSQL dengan Python maka
perlu menginstal binding Python juga.
d. Lalu menginstal Apache dan PHPMyAdmin.
e. Instal paket PHPMyAdmin dengan memasukkan command berikut
ini:
Sekarang akan mulai menginstal. Lalu akan disuguhkan dengan
layar menanyakan jenis server web yang Anda inginkan untuk
dilewati. Pilih apache2 karena ini adalah server yang baru kita
install.
f. Selanjutnya perlu mengkonfigurasi PHPMyAdmin untuk
menghubungkan database. Database ini nantinya digunakan untuk
membuat login masuk ke Web pantau. Untuk melakukan ini pilih
yes pada prompt berikutnya.
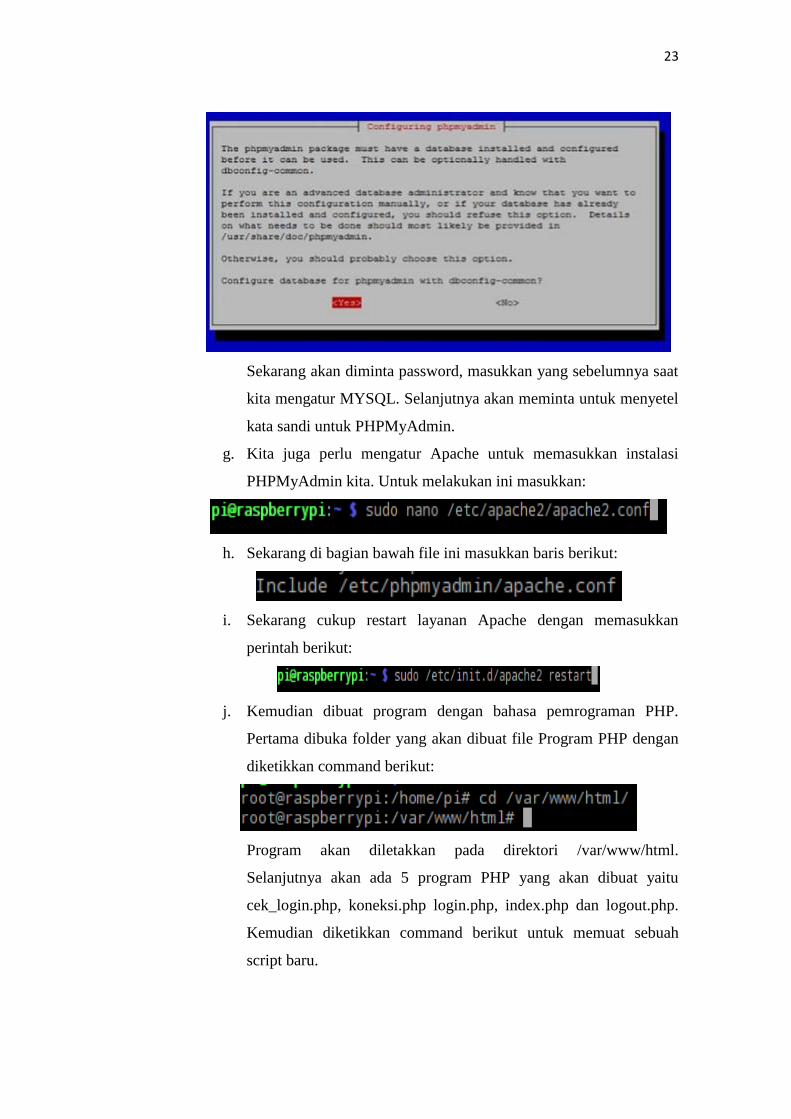
23
Sekarang akan diminta password, masukkan yang sebelumnya saat
kita mengatur MYSQL. Selanjutnya akan meminta untuk menyetel
kata sandi untuk PHPMyAdmin.
g. Kita juga perlu mengatur Apache untuk memasukkan instalasi
PHPMyAdmin kita. Untuk melakukan ini masukkan:
h. Sekarang di bagian bawah file ini masukkan baris berikut:
i. Sekarang cukup restart layanan Apache dengan memasukkan
perintah berikut:
j. Kemudian dibuat program dengan bahasa pemrograman PHP.
Pertama dibuka folder yang akan dibuat file Program PHP dengan
diketikkan command berikut:
Program akan diletakkan pada direktori /var/www/html.
Selanjutnya akan ada 5 program PHP yang akan dibuat yaitu
cek_login.php, koneksi.php login.php, index.php dan logout.php.
Kemudian diketikkan command berikut untuk memuat sebuah
script baru.

24
4. Konfigurasi Buzzer
Library Wiring Pi untuk bekerja dengan pin GPIO dan kemudian
menggunakan library dengan PHP melalui fungsi shell_exec (). Agar
solusi ini berhasil, maka perlu menginstal Wiring Pi pada Raspberry Pi
terlebih dahulu. Library tidak tersedia sebagai paket biner, jadi Anda perlu
mengkompilasi dan menginstalnya dari sumbernya. Mulaidengan
menginstal perangkat lunak Git menggunakan:
Kemudian, kloning Wiring Pi Git repositori dengan menjalankan:
Beralih ke direktori wiringPi yang dihasilkan dan gunakan perintah
./build untuk mengkompilasi dan menginstal Wiring Pi:
5. Konfigurasi Cron
a. Diinstall paket perangkat lunak Cron dengan diketikkan command
berikut:
Paket perangkat lunak Cron akan digunakan pada sistem untuk
menjadwalkan perintah yang harus dieksekusi.

25
6. Konfigurasi Ngrok
Langkah pertama mendownload aplikasi ngrok
Setelah selesai mendownload ngroknya kita unzip dengan
menggunakan perintah :
Setelah itu beri hak akses folder ngrok hasil unzip tadi dengan
menggunakan perintah :
Setelah diberi hak akses langkah selanjutnya adalah pindah folder
ngrok ke dalam folder /usr/local/bin/ dengan menggunakan perintah :
Kemudian kita sambungkan ngrok dengan menggunakan port 80
sebagai penghubung localhost dengan internet dengan menggunakan
perintah:
Dari perintah diatas jika di enter maka akan keluar seperti ini :

26
3.2.2.2 Konfigurasi Pendeteksi Gerakan dan Integrasi dengan LINE
Gambar 3.4 Blok Diagram Konfigurasi Pendeteksi Gerakan dengan Integrasi
LINE
Blok diagram pada gambar menunjukkan bagaimana sistem dapat
mendeteksi gerakan dan mengirim pesan ke pengguna melalui aplikasi media
sosial LINE. LINE merupakan library Python yang digunakan untuk mengakses
login dan menggunakan layanan LINE. LINE yang digunakan pada sistem adalah
LINE versi 0.69. Motion akan mendeteksi jika terjadi gerakan kemudian akan
menjalankan Program Python yang terintegrasi dengan LINE sebagai library
LINE klien. LINE akan mengirim pesan kepada pengguna melalui internet.
Konfigurasi perangkat lunak yang meliputi:
1. Konfigurasi LINE
a. Pertama install Apache Thrift
b. Didownload dan diinstall paket perangkat lunak LINE dengan
diketikkan command berikut:
c. Setelah berhasil mendownload, dibuka folder LINE dengan
diketikkan command berikut:
d. Selanjutnya pada terminal ketikkan command berikut:

27
Terlihat pada terminal menunjukkan sendang menjalankan paket
perangkat lunak Python. Selanjutnya akan dilakukan otentikasi
untuk akun yang akan digunakan menjadi server LINE. Pada
terminal diketikkan script berikut:
Terlihat pada terminal setelah memasukkan email dan password
maka akan muncul PinCode yang harus dimasukkan
e. Pada akun LINE akan terlihat pada gambar 3.5
Gambar 3.5 Kode Veritifikasi LINE

28
Setelah memasukkan pincode pada akun LINE server maka terlihat
pada gambar akun server paket perangkat lunak LINE telah
terveritifikasi.
2. Konfigurasi pada Motion
Pada direktori /etc/motion/motion.conf. Kemudian ditambahkan
pada baris berikut:
Script diatas menunjukkan ketika terjadi gerakan didepan kamera
maka akan mengeksekusi perintah mengirim pesan LINE
3.2.2.3 Konfigurasi Penangkap Gerakan dan Integrasi Sistem Dengan Google
Drive
Gambar 3.6 Blok Diagram Penangkap Gerakan Dan Integrasi Dengan Google
Drive
Blok diagram pada Gambar 3.6 menunjukan bagaimana sistem dapat
mendeteksi gerakan yang ditangkap kamera keudian mengunggahnya ke Google
Drive. GDrive merupakan perangkat lunak yang berfungsi untuk akses login dan
mengunakkan layanan Google Drive sperti upload dan download. GDrive yang
digunakan yaitu jenis akun free dengan kuota penyimpanan 15 GB. Kamera akan
merekam kondisi ruangan kemudian apabila paket perangkat lunak MOTION
akan menganalisa video ghasil tangkapan kamera. Apabila ada gerakan maka
Kamera
Raspberry Pi
Motion Cron
MicroSD Gdrive
Smartphone
Internet Google Drive
29
software MOTION akan merekam dan menyimpan ke SDCARD. GDrive
merupakan paket perangat lunak untuk klien Google Drive. Perintah
pengunggahan video dilakukan setiap seminggu sekali secara manual, dengan
metode sinkronisasi folder online pada Google Drive ke folder lokal hasil
rekaman pada Raspberry Pi maka dengan demikian dapat menghin dari gagal
upload file koneksi internet sedang bermasalah.
Konfigurasi perangkat lunak meliputi:
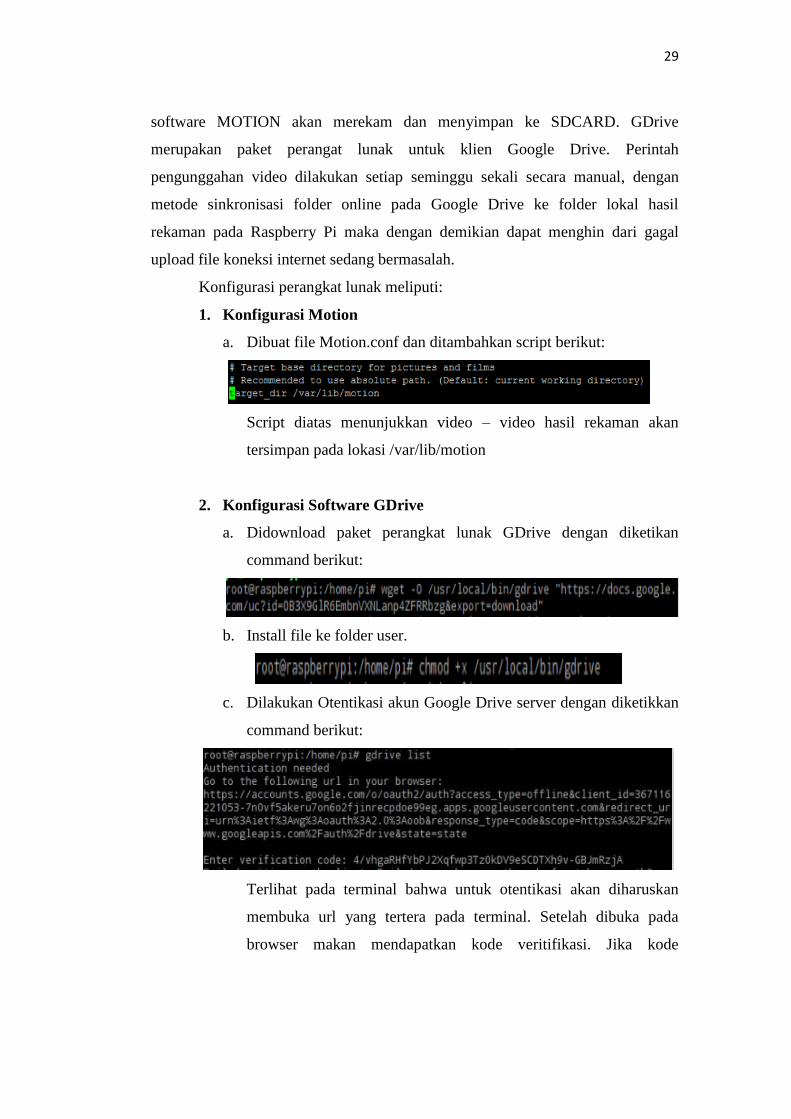
1. Konfigurasi Motion
a. Dibuat file Motion.conf dan ditambahkan script berikut:
Script diatas menunjukkan video – video hasil rekaman akan
tersimpan pada lokasi /var/lib/motion
2. Konfigurasi Software GDrive
a. Didownload paket perangkat lunak GDrive dengan diketikan
command berikut:
b. Install file ke folder user.
c. Dilakukan Otentikasi akun Google Drive server dengan diketikkan
command berikut:
Terlihat pada terminal bahwa untuk otentikasi akan diharuskan
membuka url yang tertera pada terminal. Setelah dibuka pada
browser makan mendapatkan kode veritifikasi. Jika kode

30
veritifikasi berhasil dimasukan maa akun Google Drive server siap
digunakan.
d. Selanjutnya dibuat folder pada akunGoogle Drive, folder ini
nantinya akan digunakan sebagai tempat file yang telah terunggah
atau sebagai folder yang akan disinkronkan dengan folder lokal
Raspberry Pi. Setelah folder dibuat catat id folder yang ditunjukan
pada kotak merah pada gambar 3.7
Gambar 3.7 File Upload Google Drive

31
BAB IV
PENGUJIAN
Pembahasan hasil pengujian dilakukan untuk menganalisis alat yang telah
dirancang dan direalisasikan apakah telah bekerja sesuai perancangan. Pengujian
dilakukan tiap-tiap blok dengan tujuan untuk mengamati apakah tiap blok sistem
sudah sesuai dengan perancangan, baru kemudian dilanjutkan dengan pengujian
secara keseluruhan sistem. Adapun pengujian yang perlu dilakukan sebagai
berikut:
1. Bagian Untuk Kerja Perangkat Lunak Pada Server:
a. Pengujian Intensitas Cahaya Ruangan.
b. Pengujian Waktu Pengiriman Pesan LINE.
c. Pengujian Besar Data Video.
d. Pengujian Waktu Unggah Video.
2. Bagian Untuk Kerja Perangkat Lunak Sisi Client:
a. Pengujian Fungsional Web Server
b. Pengujian Fungsional Sistem Keseluruhan
4.1 Untuk Kerja Perangkat Lunak Pada Server
Pada bagian unjuk kerja perangkat lunak sisi server pengujian yang akan
dilakukan adalah pengujian intensitas cahaya ruangan, pengujian waktu
pengiriman pesan LINE, pengujian besr data video, dan pengujian waktu unggah
video.
4.1.1 Pengujian Intensitas Cahaya Ruangan.
Hasil Pengujian intensitas cahaya ruangan ditunjukkan pada Tabel 4.1

32
Pengujian
Ke-
Intesitas
Cahaya (lux)
Gambar Tangkapan
Kamera
Pengujian ke -
1 2 3
1
0
X
X
X
2
5
V
V
V
3
10
V
V
V
4
20
V
V
V
5
40
V
V
V
Tabel 4.1 Pengujian intensitas cahaya ruangan

33
Keterangan :
x=tidak mendeteksi gerakan
v=mendeteksi gerakan
dari tabel 4 didapatkan saat kondisi intesitas cahaya ruangan sebesar 0 lux
selama 3 kali pengujian obyek bergerak didepan kamera didapatkan hasil motion
tidak dapt mendeteksi gerakan. Pada saat kondisi intensitas cahaya ruangan
sebesar 5 – 80 lux selama 3 kali pengujian obyek bergerak didepan kamera
didapatkan hasil motion mendeteksi adanya gerakan.
4.1.2 Pengujian Waktu Pengiriman Pesan LINE
Hasil pengujian waktu pengiriman pesan LINE ditunjukkan pada tabel 4.2
Pengujian ke - Pengiriman Pesan
LINE Server
Waktu(s)
1 V 3,51
2 V 2,65
3 V 2,48
4 V 2,70
5 V 3,40
Rata-rata 2,95
Error 0%
Tabel 4.2 Pengujian Waktu Pengiriman Pesan LINE
keteragan:
x=tidak terkirim
v=terkirim

34
Gambar 4.1 Pengiriman Notifikasi Line
dari Tabel 4.2 didapatkan rata-rata waktu pengiriman pesan LINE sebesar
2,95 S (sekon). Hasil percobaan menunjukkan error 0% . Maka tingkat
keberhasilan pengiriman pesan LINE saat terjadi gerakan adalah sebesar 100%
35
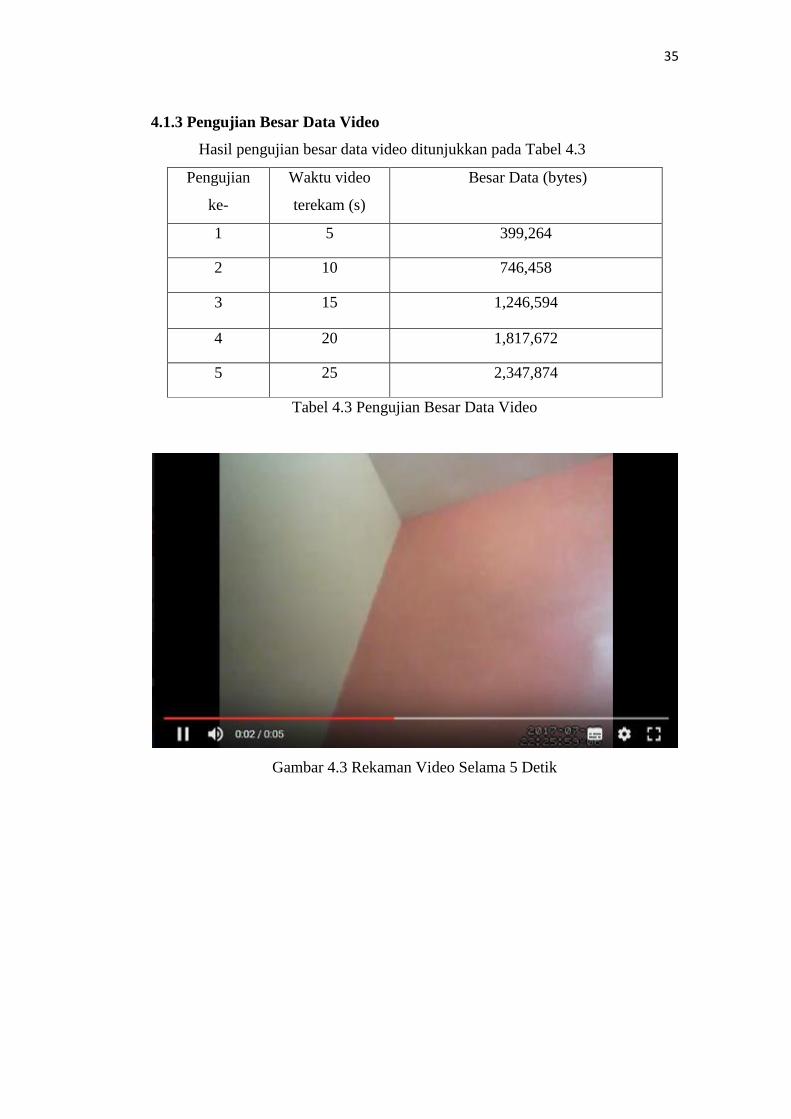
4.1.3 Pengujian Besar Data Video
Hasil pengujian besar data video ditunjukkan pada Tabel 4.3
Pengujian
ke-
Waktu video
terekam (s)
Besar Data (bytes)
1 5 399,264
2 10 746,458
3 15 1,246,594
4 20 1,817,672
5 25 2,347,874
Tabel 4.3 Pengujian Besar Data Video
Gambar 4.3 Rekaman Video Selama 5 Detik

36
Gambar 4.3 Detail Video
dari Tabel 4.3 didapatkan Besar data pada rekaman dapat disimpulkan semakin
lama video, maka akan semakin besar data pada video tersebut. Sebaliknya jika
waktu rekam sedikit maka ukuran data akan kecil.
4.1.4 Pengujian Waktu Unggah Video
Pengujian waktu unggah video ditunjukkan pada Tabel 4.4. Pengunggah
video dilakukan secara manual oleh user/admin.
Pengujian ke - Besar Data (bytes) Waktu Unggah (s)
1 399,264 5,66
2 746,458 9,83
3 1,246,594 5,75
4 1,817,672 7.09
5 2,347,874 8.80
Tabel 4.4 Pengujian Waktu Unggah Video
4.2 Untuk Kerja Perangkat Lunak Pada Client
Pada bagian untuk kerja perangkat lunak sisi client pengujian yang akan
dilakukan adalah pengujian fungsional web server, pengujian fungsional kendali
alarm dan pengujian fungsional sistem keseluruhan.
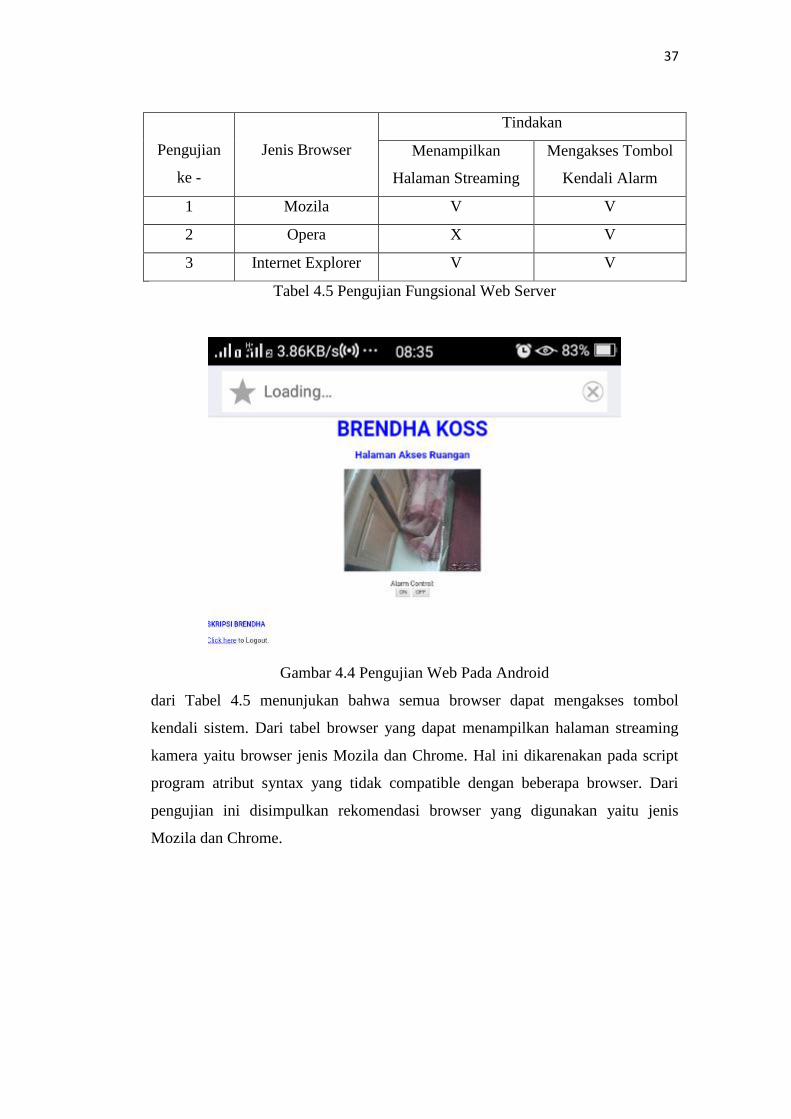
4.2.1 Pengujian Fungsional Web Server
Hasil pengujian fungsional ditunjukkan pada Tabel 4.5
37
Pengujian
ke -
Jenis Browser
Tindakan
Menampilkan
Halaman Streaming
Mengakses Tombol
Kendali Alarm
1 Mozila V V
2 Opera X V
3 Internet Explorer V V
Tabel 4.5 Pengujian Fungsional Web Server
Gambar 4.4 Pengujian Web Pada Android
dari Tabel 4.5 menunjukan bahwa semua browser dapat mengakses tombol
kendali sistem. Dari tabel browser yang dapat menampilkan halaman streaming
kamera yaitu browser jenis Mozila dan Chrome. Hal ini dikarenakan pada script
program atribut syntax yang tidak compatible dengan beberapa browser. Dari
pengujian ini disimpulkan rekomendasi browser yang digunakan yaitu jenis
Mozila dan Chrome.
38
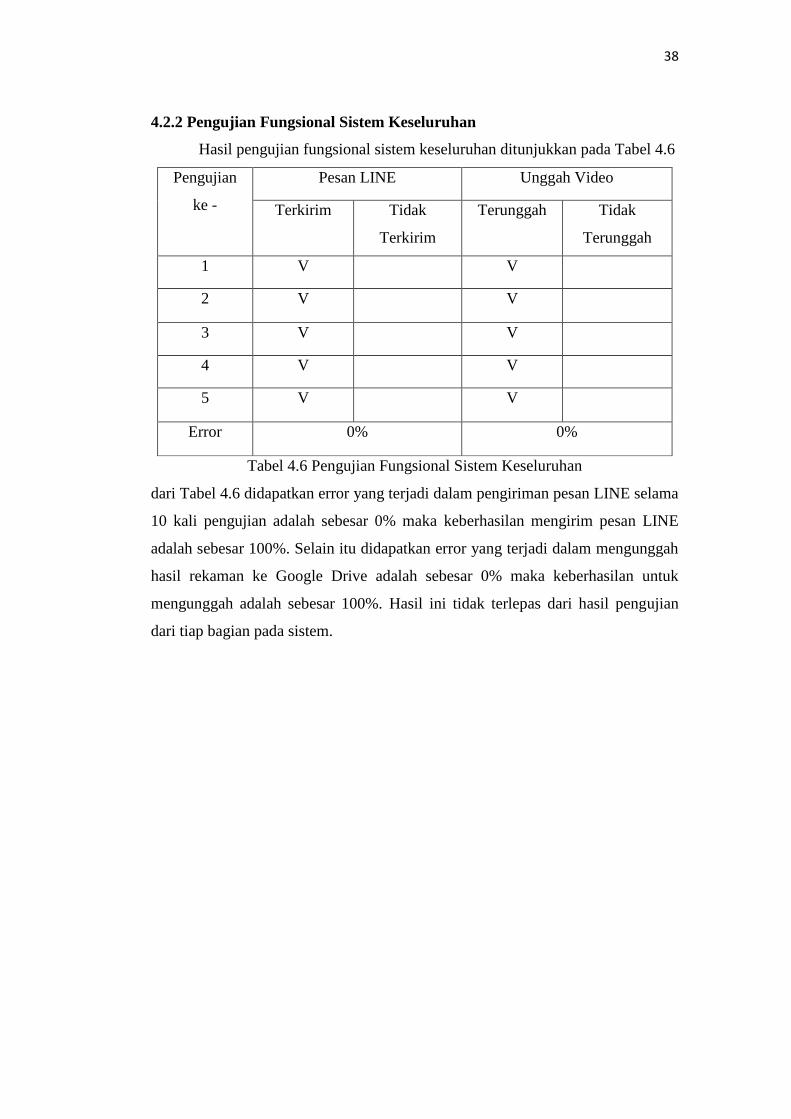
4.2.2 Pengujian Fungsional Sistem Keseluruhan
Hasil pengujian fungsional sistem keseluruhan ditunjukkan pada Tabel 4.6
Pengujian
ke -
Pesan LINE Unggah Video
Terkirim Tidak
Terkirim
Terunggah Tidak
Terunggah
1 V V
2 V V
3 V V
4 V V
5 V V
Error 0% 0%
Tabel 4.6 Pengujian Fungsional Sistem Keseluruhan
dari Tabel 4.6 didapatkan error yang terjadi dalam pengiriman pesan LINE selama
10 kali pengujian adalah sebesar 0% maka keberhasilan mengirim pesan LINE
adalah sebesar 100%. Selain itu didapatkan error yang terjadi dalam mengunggah
hasil rekaman ke Google Drive adalah sebesar 0% maka keberhasilan untuk
mengunggah adalah sebesar 100%. Hasil ini tidak terlepas dari hasil pengujian
dari tiap bagian pada sistem.
BAB V
PENUTUP
5.1 Kesimpulan
Berdasarkan hasil pengujian tiap bagian dan keseluruhan sistem yang telah
dilakukan didapatkan kesimpulan sebagai berikut:
1. Sistem dapat mengirim pesan melalui aplikasi sosial media LINE saat
terjadi gerakan. Gerakan akan ditangakap jika uangan tersebut
mencapai intensitas cahaya 5 lux.
2. Alarm dapat dikendalikan jarak jauh melalui web dan dapat dibuka di
Mozila, Opera Mini dan Internet Explorer.
3. Video pertama kali akan disimpan di micro SD jika ada video baru
maka video lama akan diupload seminggu sekali ke Google Drive
secara manual oleh admin atau user.
4. System tidak dapat mengunggah video secara otomatis pada Google
Drive dikarenakan Cron pada Google Drive permission denied.
5.2 Saran
Saran yang dapat digunakan dalam peningkatan kerja sistem dapat
diuraikan sebagai berikut:
1. Sistem ini dapat ditambahkan fitur jika mati lampu sistem tetap
menyala.
2. Sistem ini dapat ditambahkan camera lebih dari satu supaya bisa
memantau ruangan, rumah, kantor dll.

DAFTAR PUSTAKA
[1] Tarbani, Yarza Aprizal, Perancangan Monitoring Jarak Jauh
Menggunkan Raspberry Pi Dan Webcam Berbasis Internet, STMIK
PalComTech, Palembang. 2014.
[2] Arif Setiawan, Rancang Bangun Sistem Monitoring
Ruanganmenggunakan Webcam Berbasis Openwrt, Universitas Islam
Negri Sunan Kalijaga, Yogyakarta. 2013.
[3] Muhammad Naufal, Kamera Monitoring Untuk Sistem Keamanan
Perairan Dan Pulau Terluar, Universitas Maritim Raja Ali Haji,
Tanjungpinang. 2016.
[4] Rudi Prima Mandala Putra1, Farid Thalib2, Missa Lamsani3, Pengamanan
Ruang Brankas Mengggunakan Kamera Pendeteksigerak Berbasis
Raspberry Pi Dengan Penyimpanan Otomatis Ke Gmail Dan Dropbox,
Universitas Gunadarma, Jawa Barat.( Jurnal Informatika dan Komputer
Volume 21 No. 3, Desember 2016)
[5] Muhammad Andari Ardiansyah, Perancangan Kamera Pemantau
Ruangan Menggunakan Raspberry Pi, Sekolah Tinggi Manajemen
Informatika Dan Komputer Amikom, Yogyakarta. 2014.
[6] Helmi Muhammad Shadiq, Sudjadi, Darjat, Perancangan Kamera
Pengawas Nirkabel Menggunakan Raspberry Pi Model B, Universitas
Diponegoro, Semarang.
[7] Syafarudin Fani, Home Automation Security Camera Menggunakan
Raspberry Pi Dan Android, Politeknik Negeri, Batam.
[8] Fadli Sirait, Sistem Monitoring Keamanan Gedung Berbasis Rasberry Pi,
Universitas Mercu, Buana. (Jurnal Teknologi Elektro, Universitas Mercu
Buana Issn : 2086-9479 Vol. 6 No.1 Januari 2015)
[9] Deddy Prayama dan Arya Aulia, Sistem Monitoring Ruangan Berbasis
Raspberry Pi Dan Motion, Politeknik Negeri Padang Kampus Limau
Manis, Padang. (POLI REKAYASA Volume 10, Nomor 2, Oktober 2015
ISSN : 1858-3709)
41
[10] Ferrianto Gozal, Erwin Surya, Sistem Video Monitoring Pada Smartphone
Berbasis Android Dengan Menggunakan Raspberry-Pi, Universitas
Trisakti, Grogol, Jakarta Barat. ( Digital Information dan System
Conference 2015 Isbn:978-979-1194-11-2 Universitas Kristen Maranatha)
[11] Choirul Anwar, Didik Tristianto, S.Kom, M.Kom. Sistem Keamanan
Rumah Dengan Webcam Berbasis Web Dan Sms Gateway, Universitas
Narotama Surabaya, Indonesia.
[12] PHP on Raspberry Pi. (Online). (http://www.raspberry-pi-
geek.com/Archive/2014/07/PHP-on-Raspberry-Pi) diakses 03 maret 2017.
[13] Alex Nikolaidis, How to make a DIY home alarm system with a raspberry
pi and a webcam. (Online). (https://medium.com/@Cvrsor/how-to-make-
a-diy-home-alarm-system-with-a-raspberry-pi-and-a-webcam-
2d5a2d61da3d) diakses 27 maret 2017.
[14] Steven Johnston, Motion detection using the Raspberry Pi + USB
Webcam, (Online). (http://sjj.azurewebsites.net/?p=701) diakses 27 maret
2017.
[15] Anonim, Upload file to Google Drive, Raspbian, command line. (Online).
(http://www.catonrug.net/2016/01/upload-file-to-google-drive-raspbian-
command-line.html) diakses 06 april 2017.
[16] Pornmongkon Pongsai, [HOW TO] LINE Bot on Raspberry PI with LINE
API Python. (Online). (https://guutong.blogspot.co.id/2015/06/how-to-
line-bot-on-raspberry-pi-with.html) diakses 07 april 2017.
[17] Ismiati Marfuatun, Cara Menggunakan Ngrok Sebagai Penghubung di
Localhost. (Online). (http://ismiatimarfuatun.blogspot.co.id/2016/06/cara-
menggunakan-ngrok-sebagai.html) diakses 30 juni 2017.
[18] Inconshreveable, Introspected tunnels to localhost. (Online).
(https://github.com/inconshreveable/ngrok) diakses 01 juli 2017.
[19] Ngrok. (Online). (https://ngrok.com/docs#subdomain) diakses 10 juli
2017.
[20] Dhamsky, Membuat Motion CCTV USB Webcam Menggunakan
Raspberry Pi 2. (Online).

42
(http://dhamsky.blogspot.co.id/2015/06/membuat-motion-cctv-usb-
webcam.html) diakses 10 juli 2017.

LAMPIRAN


1 Introduction
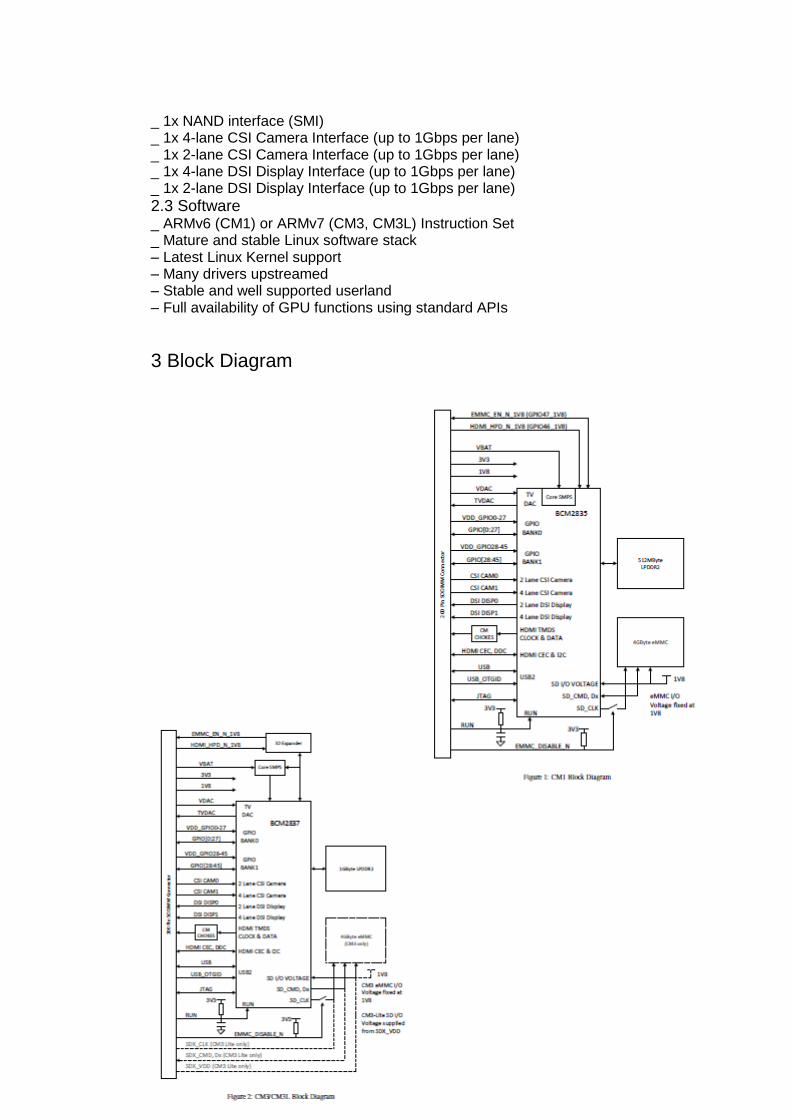
The Raspberry Pi Compute Module (CM1), Compute Module 3 (CM3) and Compute Module 3 Lite (CM3L) are DDR2-SODIMM-mechanically-compatible System on Modules (SoMs) containing processor, memory, eMMC Flash (for CM1 and CM3) and supporting power circuitry. These modules allow a designer to leverage the Raspberry Pi hardware and software stack in their own custom systems and form factors. In addition these module have extra IO interfaces over and above what is available on the Raspberry Pi model A/B boards opening up more options for the designer. The CM1 contains a BCM2835 processor (as used on the original Raspberry Pi and Raspberry Pi B+ models), 512MByte LPDDR2 RAM and 4Gbytes eMMC Flash. The CM3 contains a BCM2837 processor (as used on the Raspberry Pi 3), 1Gbyte LPDDR2 RAM and 4Gbytes eMMC Flash. Finally the CM3L product is the same as CM3 except the eMMC Flash is not fitted, and the SD/eMMC interface pins are available for the user to connect their own SD/eMMC device.
Note that the BCM2837 processor is an evolution of the BCM2835 processor. The only real differences are that the BCM2837 can address more RAM (up to 1Gbyte) and the ARM CPU complex has been upgraded from a single core ARM11 in BCM2835 to a Quad core Cortex A53 with dedicated 512Kbyte L2 cache in BCM2837. All IO interfaces and peripherals stay the same and hence the two chips are largely software and hardware compatible. The pinout of CM1 and CM3 are identical. Apart from the CPU upgrade and increase in RAM the other significant hwardware differences to be aware of are that CM3 has grown from 30mm to 31mm in height, the VBAT supply can now draw significantly more power under heavy CPU load, and the HDMI HPD N 1V8 (GPIO46 1V8 on CM1) and EMMC EN N 1V8 (GPIO47 1V8 on CM1) are now driven from an IO expander rather than the processor. If a designer of a CM1 product has a suitably specified VBAT, can accomodate the extra 1mm module height increase and has followed the design rules with respect to GPIO46 1V8 and GPIO47 1V8 then a CM3 should work fine in a board designed for a CM1.
2 Features 2.1 Hardware _ Low cost _ Low power _ High availability _ High reliability – Tested over millions of Raspberry Pis Produced to date – Module IO pins have 35u hard gold plating
2.2 Peripherals _ 48x GPIO _ 2x I2C _ 2x SPI _ 2x UART _ 2x SD/SDIO _ 1x HDMI 1.3a _ 1x USB2 HOST/OTG _ 1x DPI (Parallel RGB Display)
_ 1x NAND interface (SMI) _ 1x 4-lane CSI Camera Interface (up to 1Gbps per lane) _ 1x 2-lane CSI Camera Interface (up to 1Gbps per lane) _ 1x 4-lane DSI Display Interface (up to 1Gbps per lane) _ 1x 2-lane DSI Display Interface (up to 1Gbps per lane)
2.3 Software _ ARMv6 (CM1) or ARMv7 (CM3, CM3L) Instruction Set _ Mature and stable Linux software stack – Latest Linux Kernel support – Many drivers upstreamed – Stable and well supported userland – Full availability of GPU functions using standard APIs
3 Block Diagram
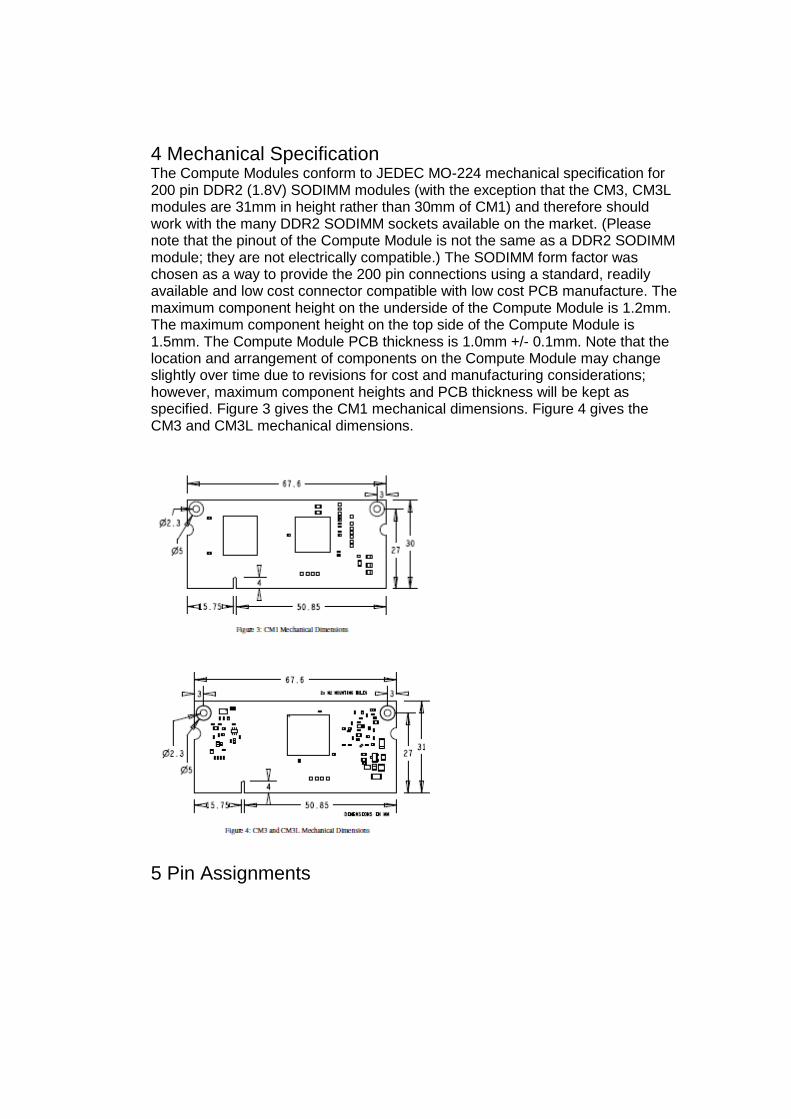
4 Mechanical Specification The Compute Modules conform to JEDEC MO-224 mechanical specification for 200 pin DDR2 (1.8V) SODIMM modules (with the exception that the CM3, CM3L modules are 31mm in height rather than 30mm of CM1) and therefore should work with the many DDR2 SODIMM sockets available on the market. (Please note that the pinout of the Compute Module is not the same as a DDR2 SODIMM module; they are not electrically compatible.) The SODIMM form factor was chosen as a way to provide the 200 pin connections using a standard, readily available and low cost connector compatible with low cost PCB manufacture. The maximum component height on the underside of the Compute Module is 1.2mm. The maximum component height on the top side of the Compute Module is 1.5mm. The Compute Module PCB thickness is 1.0mm +/- 0.1mm. Note that the location and arrangement of components on the Compute Module may change slightly over time due to revisions for cost and manufacturing considerations; however, maximum component heights and PCB thickness will be kept as specified. Figure 3 gives the CM1 mechanical dimensions. Figure 4 gives the CM3 and CM3L mechanical dimensions.
5 Pin Assignments
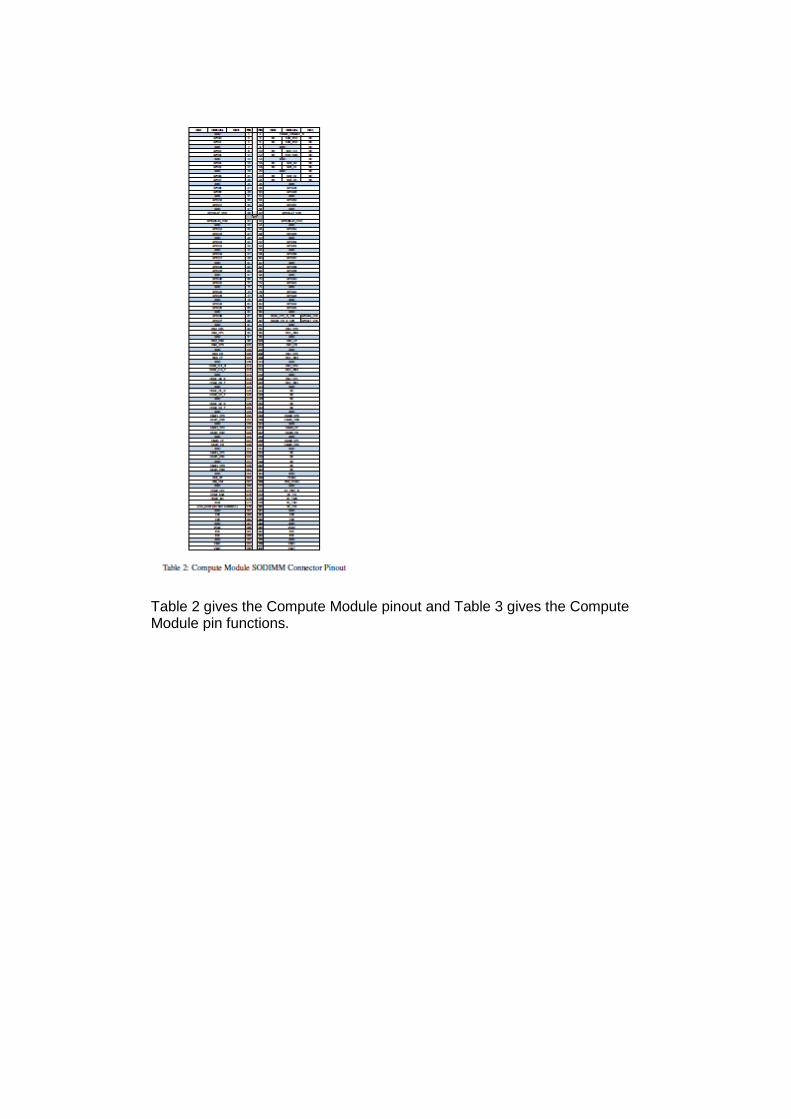
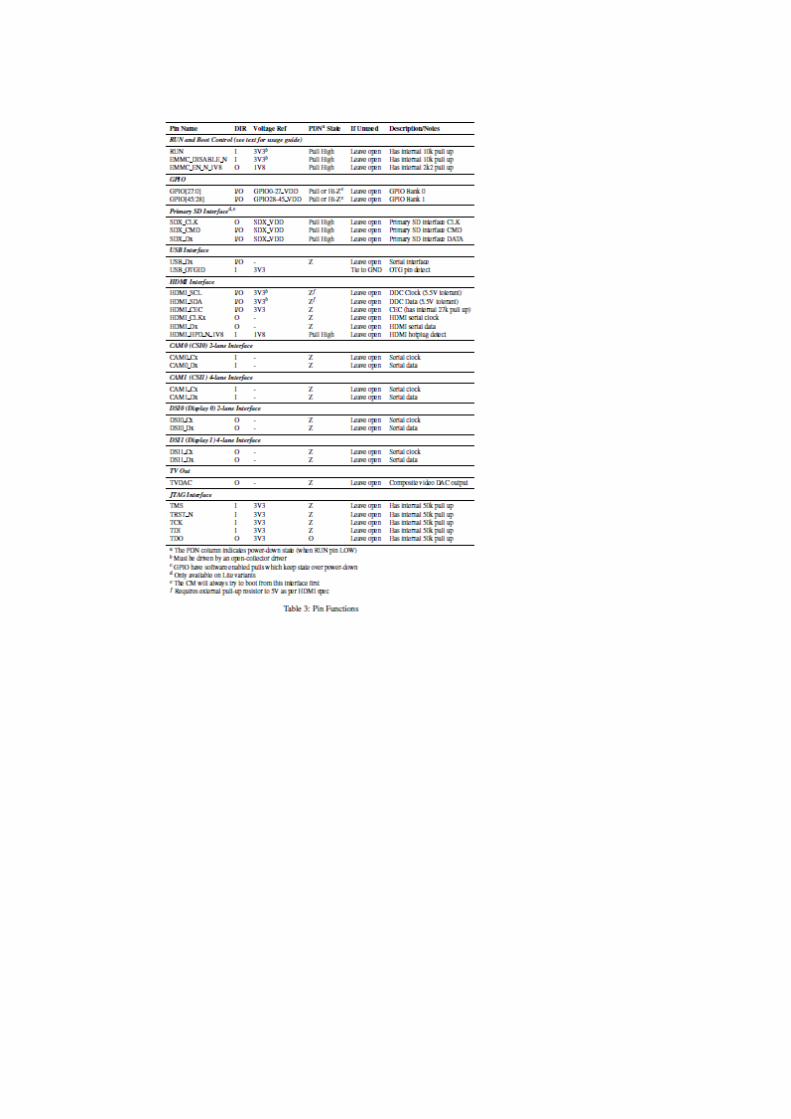
Table 2 gives the Compute Module pinout and Table 3 gives the Compute Module pin functions.

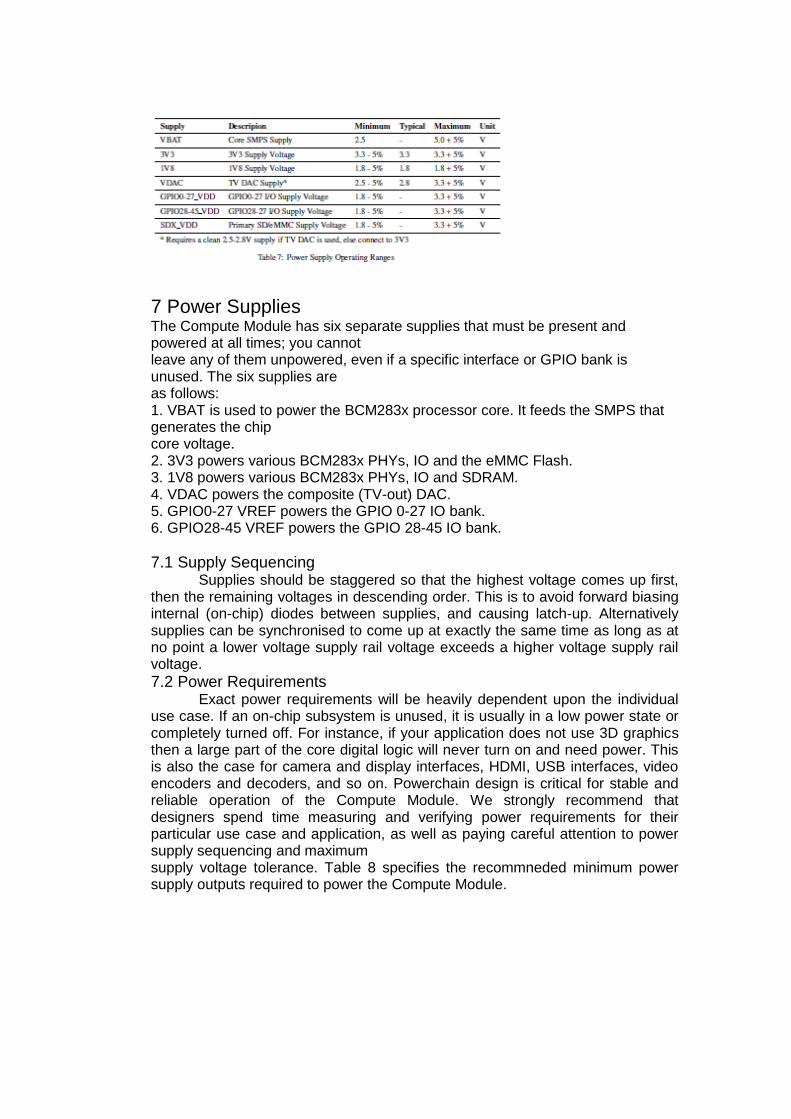
7 Power Supplies The Compute Module has six separate supplies that must be present and powered at all times; you cannot leave any of them unpowered, even if a specific interface or GPIO bank is unused. The six supplies are as follows: 1. VBAT is used to power the BCM283x processor core. It feeds the SMPS that generates the chip core voltage. 2. 3V3 powers various BCM283x PHYs, IO and the eMMC Flash. 3. 1V8 powers various BCM283x PHYs, IO and SDRAM. 4. VDAC powers the composite (TV-out) DAC. 5. GPIO0-27 VREF powers the GPIO 0-27 IO bank. 6. GPIO28-45 VREF powers the GPIO 28-45 IO bank.
7.1 Supply Sequencing Supplies should be staggered so that the highest voltage comes up first,
then the remaining voltages in descending order. This is to avoid forward biasing internal (on-chip) diodes between supplies, and causing latch-up. Alternatively supplies can be synchronised to come up at exactly the same time as long as at no point a lower voltage supply rail voltage exceeds a higher voltage supply rail voltage.
7.2 Power Requirements Exact power requirements will be heavily dependent upon the individual
use case. If an on-chip subsystem is unused, it is usually in a low power state or completely turned off. For instance, if your application does not use 3D graphics then a large part of the core digital logic will never turn on and need power. This is also the case for camera and display interfaces, HDMI, USB interfaces, video encoders and decoders, and so on. Powerchain design is critical for stable and reliable operation of the Compute Module. We strongly recommend that designers spend time measuring and verifying power requirements for their particular use case and application, as well as paying careful attention to power supply sequencing and maximum supply voltage tolerance. Table 8 specifies the recommneded minimum power supply outputs required to power the Compute Module.

8 Booting The 4GB eMMC Flash device on CM3 is directly connected to the primary
BCM2837 SD/eMMC interface. These connections are not accessible on the module pins. On CM3L this SD interface is available on the SDX pins. When initially powered on, or after the RUN pin has been held low and then released, the BCM2837 will try to access the primary SD/eMMC interface. It will then look for a file called bootcode.bin on the primary partition (which must be FAT) to start booting the system. If it cannot access the SD/Emmc device or the boot code cannot be found, it will fall back to waiting for boot code to be written to it over USB; in other words, its USB port is in slave mode waiting to accept boot code from a suitable host. A USB boot tool is available on Github which allows a host PC running Linux to write the BCM2837 boot code over USB to the module. That boot code then runs and provides access to the SD/eMMC as a USB mass storage device, which can then be read and written using the host PC. Note that a Raspberry Pi can be used as the host machine. For those usingWindows a precompiled and packeged tool is available.
For more information see here. The Compute Module has a pin called EMMC DISABLE N which when shorted to GND will disable the SD/eMMC interface (by physically disconnecting the SD CMD pin), forcing BCM2837 to boot from USB. Note that when the eMMC is disabled in this way, it takes a couple of seconds from powering up for the processor to stop attempting to talk to the SD/eMMC device and fall back to booting from USB. Note that once booted over USB, BCM2837 needs to re-enable the SD/eMMC device (by releasing EMMC DISABLE N) to allow access to it as mass storage. It expects to be able to do this by driving the EMMC EN N 1V8 pin LOW, which at boot is initially an input with a pull up to 1V8. If an end user wishes to add the ability to access the SD/eMMC over USB in their product, similar circuitry to that used on the Compute Module IO Board to enable/disable the USB boot and SD/eMMC must be used; that is, EMMC DISABLE N pulled low via MOSFET(s) and released again by MOSFET, with the gate controlled by EMMC EN N 1V8. Ensure you use MOSFETs suitable for switching at 1.8V (i.e. use a device with gate threshold voltage, Vt, suitable for 1.8V switching).
9 Peripherals 9.1 GPIO
BCM283x has in total 54 GPIO lines in 3 separate voltage banks. All GPIO pins have at least two alternative functions within the SoC. When not used for the alternate peripheral function, each GPIO pin may be set as an input (optionally as an interrupt) or an output. The alternate functions are usually peripheral I/Os, and most peripherals appear twice to allow flexibility on the

choice of I/O voltage. On CM1, CM3 and CM3L bank2 is used on the module to connect to the eMMC device and, on CM3 and CM3L, for an on-board I2C bus (to talk to the core SMPS and control the special function pins). On CM3L most of bank 2 is exposed to allow a user to connect their choice of SD card or eMMC device (if required). Bank0 and 1 GPIOs are available for general use. GPIO0 to GPIO27 are bank 0 and GPIO28-45 make up bank1. GPIO0-27 VDD is the power supply for bank0 and GPIO28-45 VDD is the power supply for bank1. SDX VDD is the supply for bank2 on CM3L. These supplies can be in the range 1.8V-3.3V (see Table 7) and are not optional; each bank must be powered, even when none of the GPIOs for that bank are used.
Note that the HDMI HPD N 1V8 andEMMC EN N 1V8 pins (on CM1 these were called GPIO46 1V8 and GPIO47 1V8 respectively) are 1.8V IO and are used for special functions (HDMI hot plug detect and boot control respectively). Please do not use these pins for any other purpose, as the software for the Compute Module will always expect these pins to have these special functions. If they are unused please leave them unconnected. All GPIOs except GPIO28, 29, 44 and 45 have weak in-pad pull-ups or pull-downs enabled when the device is powered on. It is recommended to add off-chip pulls to GPIO28, 29, 44 and 45 to make sure they never float during power on and initial boot.
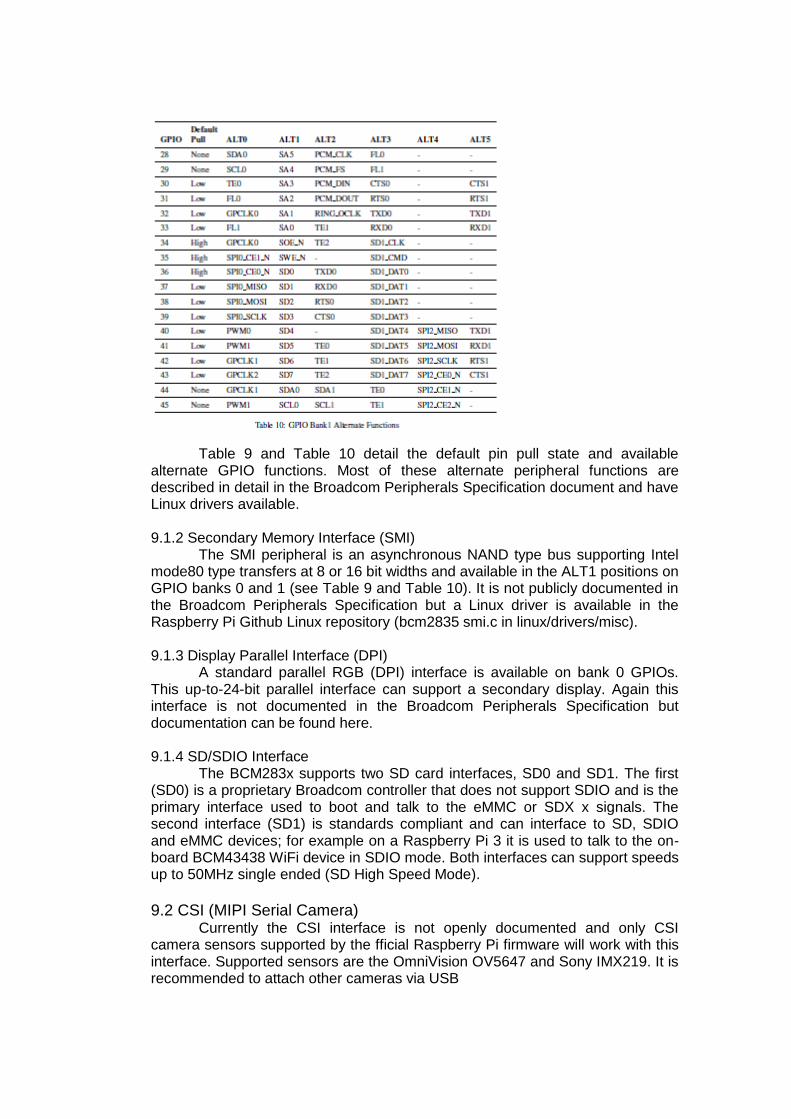
Table 9 and Table 10 detail the default pin pull state and available alternate GPIO functions. Most of these alternate peripheral functions are described in detail in the Broadcom Peripherals Specification document and have Linux drivers available. 9.1.2 Secondary Memory Interface (SMI)
The SMI peripheral is an asynchronous NAND type bus supporting Intel mode80 type transfers at 8 or 16 bit widths and available in the ALT1 positions on GPIO banks 0 and 1 (see Table 9 and Table 10). It is not publicly documented in the Broadcom Peripherals Specification but a Linux driver is available in the Raspberry Pi Github Linux repository (bcm2835 smi.c in linux/drivers/misc). 9.1.3 Display Parallel Interface (DPI)
A standard parallel RGB (DPI) interface is available on bank 0 GPIOs. This up-to-24-bit parallel interface can support a secondary display. Again this interface is not documented in the Broadcom Peripherals Specification but documentation can be found here. 9.1.4 SD/SDIO Interface
The BCM283x supports two SD card interfaces, SD0 and SD1. The first (SD0) is a proprietary Broadcom controller that does not support SDIO and is the primary interface used to boot and talk to the eMMC or SDX x signals. The second interface (SD1) is standards compliant and can interface to SD, SDIO and eMMC devices; for example on a Raspberry Pi 3 it is used to talk to the on-board BCM43438 WiFi device in SDIO mode. Both interfaces can support speeds up to 50MHz single ended (SD High Speed Mode).
9.2 CSI (MIPI Serial Camera)
Currently the CSI interface is not openly documented and only CSI camera sensors supported by the fficial Raspberry Pi firmware will work with this interface. Supported sensors are the OmniVision OV5647 and Sony IMX219. It is recommended to attach other cameras via USB
.
9.3 DSI (MIPI Serial Display) Currently the DSI interface is not openly documented and only DSI
displays supported by the official Raspberry Pi firmware will work with this interface. Displays can also be added via the parallel DPI interface which is available as a GPIO alternate function - see Table 9 and Section 9.1.3
9.4 USB
The BCM283x USB port is On-The-Go (OTG) capable. If using either as a fixed slave or fixed master, please tie the USB OTGID pin to ground. The USB port (Pins USB DP and USB DM) must be routed as 90 ohm differential PCB traces. Note that the port is capable of being used as a true OTG port however there is no official documentation. Some users have had success making this work.
9.5 HDMI
BCM283x supports HDMI V1.3a. It is recommended that users follow a similar arrangement to the Compute Module IO Board circuitry for HDMI output. The HDMI CK P/N (clock) and D0-D2 P/N (data) pins must each be routed as matched length 100 ohm differential PCB traces. It is also important to make sure that each differential pair is closely phase matched. Finally, keep HDMI traces well away from other noise sources and as short as possible. Failure to observe these design rules is likely to result in EMC failure.
9.6 Composite (TV Out) The TVDAC pin can be used to output composite video (PAL or NTSC).
Please route this signal away from noise sources and use a 75 ohm PCB trace. Note that the TV DAC is powered from the VDAC supply which must be a clean supply of 2.5-2.8V. It is recommended users generate this supply from 3V3 using a low noise LDO. If the TVDAC output is not used VDAC can be connected to 3V3, but it must be powered even if the TV-out functionality is unused.
10 Thermals
The BCM283x SoC employs DVFS (Dynamic Voltage and Frequency Scaling) on the core voltage. When the processor is idle (low CPU utilisation), it will reduce the core frequency and voltage to reduce current draw and heat output. When the core utilisation exceeds a certain threshold the core voltage is increased and the core frequency is boosted to the maximum working frerquency. The voltage and frequency are throttled back when the CPU load reduces back to an ’idle’ level OR when the silicon temperature as mesured by the on-chip temperature sensor exceeds 85C (thermal throttling). A designer must pay careful attention to the thermal design of products using the CM3/CM3L so that performance is not artificially curtailed due to the processor thermal throttling, as the Quad ARM complex in the BCM2837 can generate significant heat output.
10.1 Temperature Range
The operating temperature range of the module is set by the lowest maximum and highest minimum of any of the components used. The eMMC and LPDDR2 have the narrowest range, these are rated for -25 to +80 degrees Celsius. Therefore the nominal range for the CM3 and CM3L is -25C to +80C. However, this range is the maximum for the silicon die; therefore, users would

have to take into account the heat generated when in use and make sure this does not cause the temperature to exceed 80 degrees Celsius.
11 Availability
Raspberry Pi guarantee availability of CM1, CM3 and CM3 Lite until at least January 2023.
12 Support
For support please see the hardware documentation section of the Raspberry Pi website and post questions to the Raspberry Pi f

1. Motion
# Motion configuration options
for stand alone PatioCam only.
# (Note: "#-" Indicates that I
commented out the following
command.)
#- Set video input to 8,
keep_alive to on
##############################
##############################
# Daemon
##############################
##############################
# Start in daemon (background)
mode and release terminal
(default: off)
daemon on
# File to store the process
ID, also called pid file.
(default: not defined)
process_id_file
/var/run/motion/motion.pid
##############################
##############################
# Basic Setup Mode
##############################
##############################
# Start in Setup-Mode, daemon
disabled. (default: off)
setup_mode on
# Use a file to save logs
messages, if not defined
stderr and syslog is used.
(default: not defined)
#logfile /tmp/motion.log
logfile /mnt/pipics/motion.log
# Level of log messages [1..9]
(EMR, ALR, CRT, ERR, WRN, NTC,
INF, DBG, ALL). (default: 6 /
NTC)
#- Changed from 2 to 6
log_level 6
# Filter to log messages by
type (COR, STR, ENC, NET, DBL,
EVT, TRK, VID, ALL). (default:
ALL)
log_type all
##############################
#############################
# Capture device options
##############################
##############################
# Videodevice to be used for
capturing (default
/dev/video0)
# for FreeBSD default is
/dev/bktr0
#videodevice /dev/video0
# v4l2_palette allows to
choose preferable palette to
be use by motion
# to capture from those
supported by your videodevice.
(default: 17)
# E.g. if your videodevice
supports both
V4L2_PIX_FMT_SBGGR8 and
# V4L2_PIX_FMT_MJPEG then
motion will by default use
V4L2_PIX_FMT_MJPEG.
# Setting v4l2_palette to 2
forces motion to use
V4L2_PIX_FMT_SBGGR8
# instead.
#
# Values :
# V4L2_PIX_FMT_SN9C10X : 0
'S910'
# V4L2_PIX_FMT_SBGGR16 : 1
'BYR2'
# V4L2_PIX_FMT_SBGGR8 : 2
'BA81'
# V4L2_PIX_FMT_SPCA561 : 3
'S561'
# V4L2_PIX_FMT_SGBRG8 : 4
'GBRG'
# V4L2_PIX_FMT_SGRBG8 : 5
'GRBG'
# V4L2_PIX_FMT_PAC207 : 6
'P207'
# V4L2_PIX_FMT_PJPG : 7
'PJPG'
# V4L2_PIX_FMT_MJPEG : 8
'MJPEG'
# V4L2_PIX_FMT_JPEG : 9
'JPEG'
# V4L2_PIX_FMT_RGB24 : 10
'RGB3'
# V4L2_PIX_FMT_SPCA501 : 11
'S501'
# V4L2_PIX_FMT_SPCA505 : 12
'S505'
# V4L2_PIX_FMT_SPCA508 : 13
'S508'

# V4L2_PIX_FMT_UYVY : 14
'UYVY'
# V4L2_PIX_FMT_YUYV : 15
'YUYV'
# V4L2_PIX_FMT_YUV422P : 16
'422P'
# V4L2_PIX_FMT_YUV420 : 17
'YU12'
#
#- Maybe change this to 9 for
IP cam? But, these options are
supposed to be ignored if ULR
is specified below.
;v4l2_palette 7
# Tuner device to be used for
capturing using tuner as
source (default /dev/tuner0)
# This is ONLY used for
FreeBSD. Leave it commented
out for Linux
;tunerdevice /dev/tuner0
# The video input to be used
(default: -1)
# Should normally be set to 0
or 1 for video/TV cards, and -
1 for USB cameras
#- Was set to -1 for the
PiCam, still shows PiCam when
set to nothing, 0, 8.
#- input 8
# The video norm to use (only
for video capture and TV tuner
cards)
# Values: 0 (PAL), 1 (NTSC), 2
(SECAM), 3 (PAL NC no colour).
Default: 0 (PAL)
norm 0
# The frequency to set the
tuner to (kHz) (only for TV
tuner cards) (default: 0)
frequency 0
# Rotate image this number of
degrees. The rotation affects
all saved images as
# well as movies. Valid
values: 0 (default = no
rotation), 90, 180 and 270.
rotate 180
# Image width (pixels). Valid
range: Camera dependent,
default: 352
#width 1024
width 640
# Image height (pixels). Valid
range: Camera dependent,
default: 288
#height 576
height 480
# Maximum number of frames to
be captured per second.
# Valid range: 2-100. Default:
100 (almost no limit).
framerate 2
# Minimum time in seconds
between capturing picture
frames from the camera.
# Default: 0 = disabled - the
capture rate is given by the
camera framerate.
# This option is used when you
want to capture images at a
rate lower than 2 per second.
minimum_frame_time 0
# Username and password for
network camera (only if
required). Default: not
defined
# Syntax is user:password
; netcam_userpass value
netcam_userpass
Viewer:12345678
# URL to use if you are using
a network camera, size will be
autodetected (incl http://
ftp:// mjpg:// or file:///)
# Must be a URL that returns
single jpeg pictures or a raw
mjpeg stream. Default: Not
defined
;netcam_url
http://127.0.0.1/cgi-
bin/raspicam.sh
#- CasaCam
http://192.168.1.23/jpg/image.
jpg
#- PatioCam
http://192.168.1.30/IMAGE.JPG
netcam_url
http://192.168.1.30/VIDEO.CGI
# The setting for keep-alive
of network socket, should
improve performance on
compatible net cameras.
# off: The historical
implementation using HTTP/1.0,
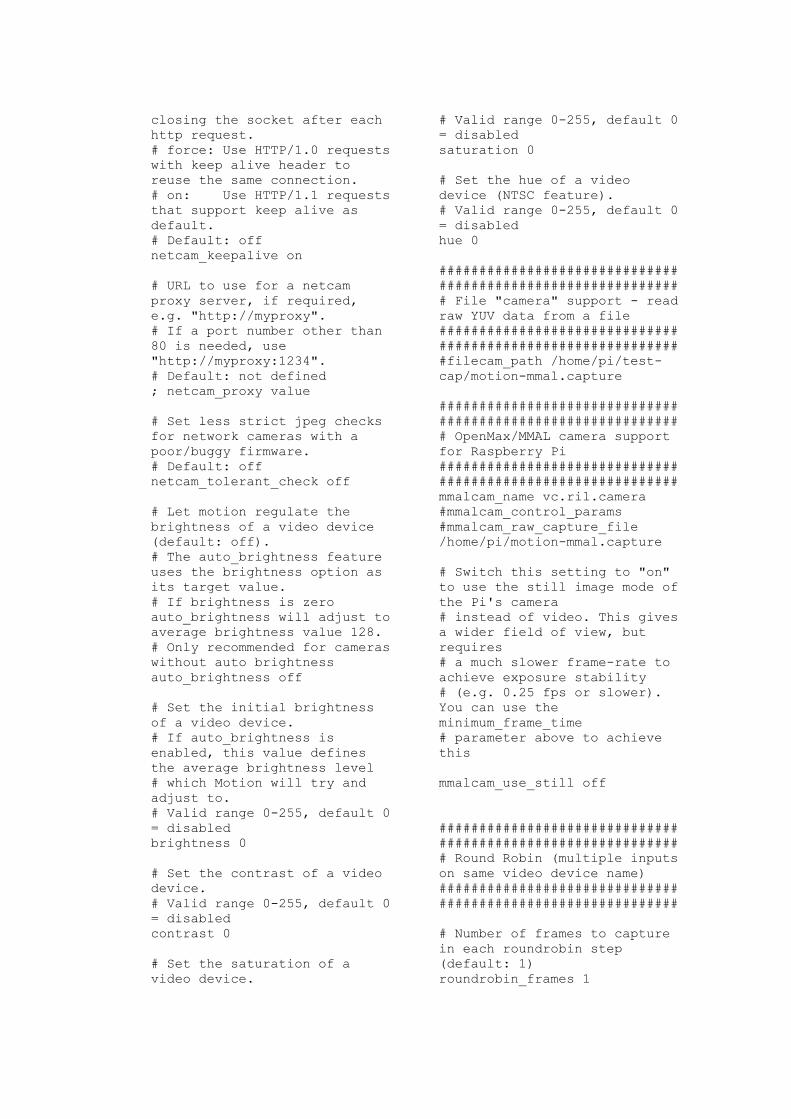
closing the socket after each
http request.
# force: Use HTTP/1.0 requests
with keep alive header to
reuse the same connection.
# on: Use HTTP/1.1 requests
that support keep alive as
default.
# Default: off
netcam_keepalive on
# URL to use for a netcam
proxy server, if required,
e.g. "http://myproxy".
# If a port number other than
80 is needed, use
"http://myproxy:1234".
# Default: not defined
; netcam_proxy value
# Set less strict jpeg checks
for network cameras with a
poor/buggy firmware.
# Default: off
netcam_tolerant_check off
# Let motion regulate the
brightness of a video device
(default: off).
# The auto_brightness feature
uses the brightness option as
its target value.
# If brightness is zero
auto_brightness will adjust to
average brightness value 128.
# Only recommended for cameras
without auto brightness
auto_brightness off
# Set the initial brightness
of a video device.
# If auto_brightness is
enabled, this value defines
the average brightness level
# which Motion will try and
adjust to.
# Valid range 0-255, default 0
= disabled
brightness 0
# Set the contrast of a video
device.
# Valid range 0-255, default 0
= disabled
contrast 0
# Set the saturation of a
video device.
# Valid range 0-255, default 0
= disabled
saturation 0
# Set the hue of a video
device (NTSC feature).
# Valid range 0-255, default 0
= disabled
hue 0
##############################
##############################
# File "camera" support - read
raw YUV data from a file
##############################
##############################
#filecam_path /home/pi/test-
cap/motion-mmal.capture
##############################
##############################
# OpenMax/MMAL camera support
for Raspberry Pi
##############################
##############################
mmalcam_name vc.ril.camera
#mmalcam_control_params
#mmalcam_raw_capture_file
/home/pi/motion-mmal.capture
# Switch this setting to "on"
to use the still image mode of
the Pi's camera
# instead of video. This gives
a wider field of view, but
requires
# a much slower frame-rate to
achieve exposure stability
# (e.g. 0.25 fps or slower).
You can use the
minimum_frame_time
# parameter above to achieve
this
mmalcam_use_still off
##############################
##############################
# Round Robin (multiple inputs
on same video device name)
##############################
##############################
# Number of frames to capture
in each roundrobin step
(default: 1)
roundrobin_frames 1

# Number of frames to skip
before each roundrobin step
(default: 1)
roundrobin_skip 1
# Try to filter out noise
generated by roundrobin
(default: off)
switchfilter off
##############################
##############################
# Motion Detection Settings:
##############################
##############################
# Threshold for number of
changed pixels in an image
that
# triggers motion detection
(default: 1500)
threshold 1500
# Automatically tune the
threshold down if possible
(default: off)
threshold_tune off
# Noise threshold for the
motion detection (default: 32)
noise_level 32
# Automatically tune the noise
threshold (default: on)
noise_tune on
# Despeckle motion image using
(e)rode or (d)ilate or (l)abel
(Default: not defined)
# Recommended value is EedDl.
Any combination (and number
of) of E, e, d, and D is
valid.
# (l)abeling must only be used
once and the 'l' must be the
last letter.
# Comment out to disable
despeckle_filter EedDl
# Detect motion in predefined
areas (1 - 9). Areas are
numbered like that: 1 2 3
# A script (on_area_detected)
is started immediately when
motion is 4 5 6
# detected in one of the given
areas, but only once during an
event. 7 8 9
# One or more areas can be
specified with this option.
Take care: This option
# does NOT restrict detection
to these areas! (Default: not
defined)
; area_detect value
# PGM file to use as a
sensitivity mask.
# Full path name to. (Default:
not defined)
; mask_file value
# Dynamically create a mask
file during operation
(default: 0)
# Adjust speed of mask changes
from 0 (off) to 10 (fast)
smart_mask_speed 0
# Ignore sudden massive light
intensity changes given as a
percentage of the picture
# area that changed intensity.
Valid range: 0 - 100 ,
default: 0 = disabled
lightswitch 0
# Picture frames must contain
motion at least the specified
number of frames
# in a row before they are
detected as true motion. At
the default of 1, all
# motion is detected. Valid
range: 1 to thousands,
recommended 1-5
minimum_motion_frames 1
# Specifies the number of pre-
captured (buffered) pictures
from before motion
# was detected that will be
output at motion detection.
# Recommended range: 0 to 5
(default: 0)
# Do not use large values!
Large values will cause Motion
to skip video frames and
# cause unsmooth movies. To
smooth movies use larger
values of post_capture
instead.
pre_capture 2
# Number of frames to capture
after motion is no longer
detected (default: 0)

post_capture 2
# Event Gap is the seconds of
no motion detection that
triggers the end of an event.
# An event is defined as a
series of motion images taken
within a short timeframe.
# Recommended value is 60
seconds (Default). The value -
1 is allowed and disables
# events causing all Motion to
be written to one single movie
file and no pre_capture.
# If set to 0, motion is
running in gapless mode.
Movies don't have gaps
anymore. An
# event ends right after no
more motion is detected and
post_capture is over.
event_gap 60
# Maximum length in seconds of
an mpeg movie
# When value is exceeded a new
movie file is created.
(Default: 0 = infinite)
# ATTENTION: when you're not
using the motion build from
the tutorial, it might fail
with error 'Unknown config
option "max_mpeg_time"'
# the use this line instead:
# max_movie_time 600
max_mpeg_time 600
# Always save images even if
there was no motion (default:
off)
emulate_motion off
##############################
##############################
# Image File Output
##############################
##############################
# Output 'normal' pictures
when motion is detected
(default: on)
# Valid values: on, off,
first, best, center
# When set to 'first', only
the first picture of an event
is saved.
# Picture with most motion of
an event is saved when set to
'best'.
# Picture with motion nearest
center of picture is saved
when set to 'center'.
# Can be used as preview shot
for the corresponding movie.
output_pictures best
# Output pictures with only
the pixels moving object
(ghost images) (default: off)
output_debug_pictures off
# The quality (in percent) to
be used by the jpeg
compression (default: 75)
quality 75
# Type of output images
# Valid values: jpeg, ppm
(default: jpeg)
picture_type jpeg
##############################
##############################
# FFMPEG related options
# Film (movies) file output,
and deinterlacing of the video
input
# The options movie_filename
and timelapse_filename are
also used
# by the ffmpeg feature
##############################
##############################
# Use ffmpeg to encode movies
in realtime (default: off)
ffmpeg_output_movies on
# Use ffmpeg to make movies
with only the pixels moving
# object (ghost images)
(default: off)
ffmpeg_output_debug_movies off
# Use ffmpeg to encode a
timelapse movie
# Default value 0 = off - else
save frame every Nth second
ffmpeg_timelapse 0
# The file rollover mode of
the timelapse video
# Valid values: hourly, daily
(default), weekly-sunday,
weekly-monday, monthly, manual

ffmpeg_timelapse_mode daily
# Bitrate to be used by the
ffmpeg encoder (default:
400000)
# This option is ignored if
ffmpeg_variable_bitrate is not
0 (disabled)
ffmpeg_bps 500000
# Enables and defines variable
bitrate for the ffmpeg
encoder.
# ffmpeg_bps is ignored if
variable bitrate is enabled.
# Valid values: 0 (default) =
fixed bitrate defined by
ffmpeg_bps,
# or the range 2 - 31 where 2
means best quality and 31 is
worst.
ffmpeg_variable_bitrate 5
# Codec to used by ffmpeg for
the video compression.
# Timelapse mpegs are always
made in mpeg1 format
independent from this option.
# Supported formats are: mpeg1
(ffmpeg-0.4.8 only), mpeg4
(default), and msmpeg4.
# mpeg1 - gives you files with
extension .mpg
# mpeg4 or msmpeg4 - gives you
files with extension .avi
# msmpeg4 is recommended for
use with Windows Media Player
because
# it requires no installation
of codec on the Windows
client.
# swf - gives you a flash film
with extension .swf
# flv - gives you a flash
video with extension .flv
# ffv1 - FF video codec 1 for
Lossless Encoding (
experimental )
# mov - QuickTime ( testing )
# ogg - Ogg/Theora ( testing )
ffmpeg_video_codec msmpeg4
# Use ffmpeg to deinterlace
video. Necessary if you use an
analog camera
# and see horizontal combing
on moving objects in video or
pictures.
# (default: off)
ffmpeg_deinterlace off
##############################
##############################
# SDL Window
##############################
##############################
# Number of motion thread to
show in SDL Window (default: 0
= disabled)
#sdl_threadnr 0
##############################
##############################
# External pipe to video
encoder
# Replacement for FFMPEG
builtin encoder for
ffmpeg_output_movies only.
# The options movie_filename
and timelapse_filename are
also used
# by the ffmpeg feature
##############################
##############################
#
# Bool to enable or disable
extpipe (default: off)
use_extpipe off
# External program (full path
and opts) to pipe raw video to
# Generally, use '-' for
STDIN...
;extpipe mencoder -demuxer
rawvideo -rawvideo
w=320:h=240:i420 -ovc x264 -
x264encopts
bframes=4:frameref=1:subq=1:sc
enecut=-
1:nob_adapt:threads=1:keyint=1
000:8x8dct:vbv_bufsize=4000:cr
f=24:partitions=i8x8,i4x4:vbv_
maxrate=800:no-chroma-me -vf
denoise3d=16:12:48:4,pp=lb -of
avi -o %f.avi - -fps %fps
##############################
##############################
# Snapshots (Traditional
Periodic Webcam File Output)
##############################
##############################

# Make automated snapshot
every N seconds (default: 0 =
disabled)
snapshot_interval 0
##############################
##############################
# Text Display
# %Y = year, %m = month, %d =
date,
# %H = hour, %M = minute, %S =
second, %T = HH:MM:SS,
# %v = event, %q = frame
number, %t = thread (camera)
number,
# %D = changed pixels, %N =
noise level, \n = new line,
# %i and %J = width and height
of motion area,
# %K and %L = X and Y
coordinates of motion center
# %C = value defined by
text_event - do not use with
text_event!
# You can put quotation marks
around the text to allow
# leading spaces
##############################
##############################
# Locate and draw a box around
the moving object.
# Valid values: on, off,
preview (default: off)
# Set to 'preview' will only
draw a box in preview_shot
pictures.
;locate_motion_mode off
# Set the look and style of
the locate box if enabled.
# Valid values: box, redbox,
cross, redcross (default: box)
# Set to 'box' will draw the
traditional box.
# Set to 'redbox' will draw a
red box.
# Set to 'cross' will draw a
little cross to mark center.
# Set to 'redcross' will draw
a little red cross to mark
center.
;locate_motion_style box
# Draws the timestamp using
same options as C function
strftime(3)
# Default: %Y-%m-%d\n%T = date
in ISO format and time in 24
hour clock
# Text is placed in lower
right corner
text_right %d.%m.%Y\n%T
# Draw a user defined text on
the images using same options
as C function strftime(3)
# Default: Not defined = no
text
# Text is placed in lower left
corner
; text_left CAMERA %t
text_left PatioCam
# Draw the number of changed
pixed on the images (default:
off)
# Will normally be set to off
except when you setup and
adjust the motion settings
# Text is placed in upper
right corner
text_changes off
# This option defines the
value of the special event
conversion specifier %C
# You can use any conversion
specifier in this option
except %C. Date and time
# values are from the
timestamp of the first image
in the current event.
# Default: %Y%m%d%H%M%S
# The idea is that %C can be
used filenames and
text_left/right for creating
# a unique identifier for each
event.
text_event %Y%m%d%H%M%S
# Draw characters at twice
normal size on images.
(default: off)
text_double on
# Text to include in a JPEG
EXIF comment
# May be any text, including
conversion specifiers.
# The EXIF timestamp is
included independent of this
text.
;exif_text %i%J/%K%L

##############################
##############################
# Target Directories and
filenames For Images And Films
# For the options snapshot_,
picture_, movie_ and
timelapse_filename
# you can use conversion
specifiers
# %Y = year, %m = month, %d =
date,
# %H = hour, %M = minute, %S =
second,
# %v = event, %q = frame
number, %t = thread (camera)
number,
# %D = changed pixels, %N =
noise level,
# %i and %J = width and height
of motion area,
# %K and %L = X and Y
coordinates of motion center
# %C = value defined by
text_event
# Quotation marks round string
are allowed.
##############################
##############################
# Target base directory for
pictures and films
# Recommended to use absolute
path. (Default: current
working directory)
# target_dir /var/lib/motion
# File path for snapshots
(jpeg or ppm) relative to
target_dir
# Default: %v-%Y%m%d%H%M%S-
snapshot
# Default value is equivalent
to legacy oldlayout option
# For Motion 3.0 compatible
mode choose:
%Y/%m/%d/%H/%M/%S-snapshot
# File extension .jpg or .ppm
is automatically added so do
not include this.
# Note: A symbolic link called
lastsnap.jpg created in the
target_dir will always
# point to the latest
snapshot, unless
snapshot_filename is exactly
'lastsnap'
snapshot_filename %v-
%Y%m%d%H%M%S-snapshot
# File path for motion
triggered images (jpeg or ppm)
relative to target_dir
# Default: %v-%Y%m%d%H%M%S-%q
# Default value is equivalent
to legacy oldlayout option
# For Motion 3.0 compatible
mode choose:
%Y/%m/%d/%H/%M/%S-%q
# File extension .jpg or .ppm
is automatically added so do
not include this
# Set to 'preview' together
with best-preview feature
enables special naming
# convention for preview
shots. See motion guide for
details
picture_filename %v-
%Y%m%d%H%M%S-%q
# File path for motion
triggered ffmpeg films
(movies) relative to
target_dir
# Default: %v-%Y%m%d%H%M%S
# Default value is equivalent
to legacy oldlayout option
# For Motion 3.0 compatible
mode choose: %Y/%m/%d/%H%M%S
# File extension .mpg or .avi
is automatically added so do
not include this
# This option was previously
called ffmpeg_filename
movie_filename %v-%Y%m%d%H%M%S
# File path for timelapse
movies relative to target_dir
# Default: %Y%m%d-timelapse
# Default value is near
equivalent to legacy oldlayout
option
# For Motion 3.0 compatible
mode choose: %Y/%m/%d-
timelapse
# File extension .mpg is
automatically added so do not
include this
timelapse_filename %Y%m%d-
timelapse
##############################
##############################
# Global Network Options
##############################
##############################

# Enable or disable IPV6 for
http control and stream
(default: off )
ipv6_enabled off
##############################
##############################
# Live Stream Server
##############################
##############################
# The mini-http server listens
to this port for requests
(default: 0 = disabled)
stream_port 8080
# Quality of the jpeg (in
percent) images produced
(default: 50)
stream_quality 50
# Output frames at 1 fps when
no motion is detected and
increase to the
# rate given by stream_maxrate
when motion is detected
(default: off)
stream_motion on
# Maximum framerate for stream
streams (default: 1)
stream_maxrate 4
# Restrict stream connections
to localhost only (default:
on)
stream_localhost off
# Limits the number of images
per connection (default: 0 =
unlimited)
# Number can be defined by
multiplying actual stream rate
by desired number of seconds
# Actual stream rate is the
smallest of the numbers
framerate and stream_maxrate
stream_limit 0
# Set the authentication
method (default: 0)
# 0 = disabled
# 1 = Basic authentication
# 2 = MD5 digest (the safer
authentication)
stream_auth_method 0
# Authentication for the
stream. Syntax
username:password
# Default: not defined
(Disabled)
; stream_authentication
username:password
##############################
##############################
# HTTP Based Control
##############################
##############################
# TCP/IP port for the http
server to listen on (default:
0 = disabled)
webcontrol_port 8081
# Restrict control connections
to localhost only (default:
on)
webcontrol_localhost off
# Output for http server,
select off to choose raw text
plain (default: on)
webcontrol_html_output on
# Authentication for the http
based control. Syntax
username:password
# Default: not defined
(Disabled)
; webcontrol_authentication
username:password
##############################
##############################
# Tracking (Pan/Tilt)
##############################
##############################
#
# Type of tracker (0=none
(default), 1=stepper,
2=iomojo, 3=pwc, 4=generic,
5=uvcvideo, 6=servo)
# The generic type enables the
definition of motion center
and motion size to
# be used with the conversion
specifiers for options like
on_motion_detected
track_type 0
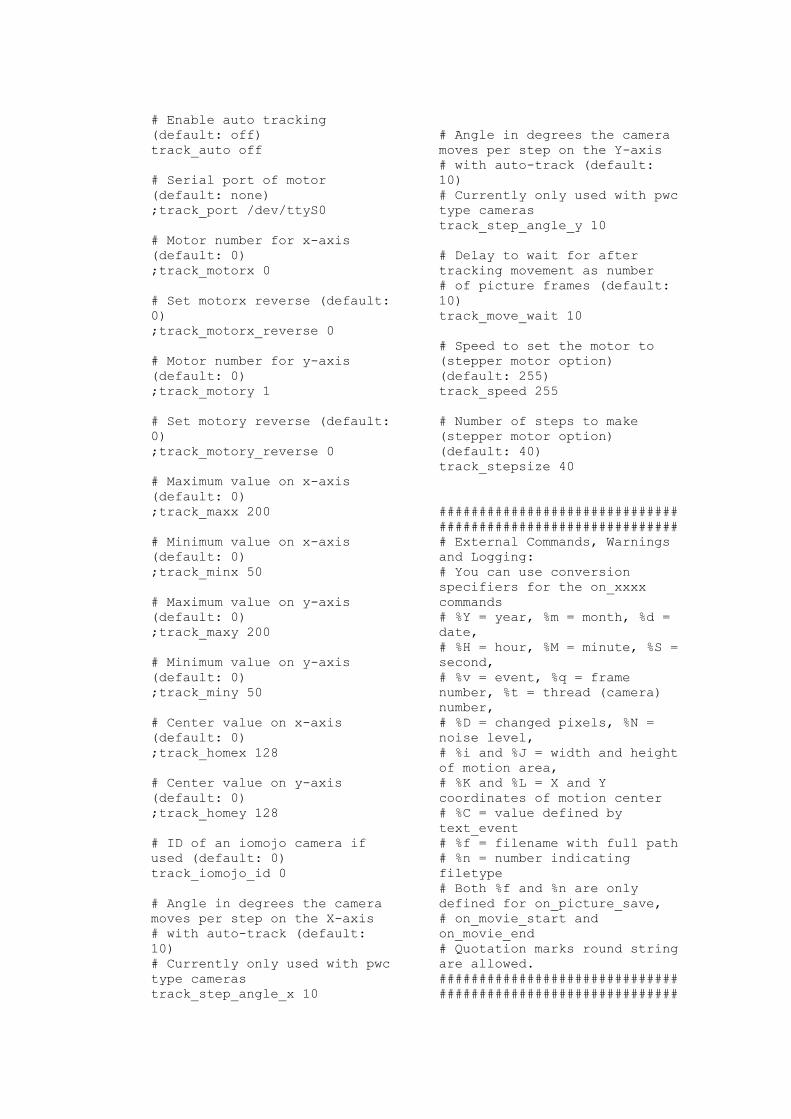
# Enable auto tracking
(default: off)
track_auto off
# Serial port of motor
(default: none)
;track_port /dev/ttyS0
# Motor number for x-axis
(default: 0)
;track_motorx 0
# Set motorx reverse (default:
0)
;track_motorx_reverse 0
# Motor number for y-axis
(default: 0)
;track_motory 1
# Set motory reverse (default:
0)
;track_motory_reverse 0
# Maximum value on x-axis
(default: 0)
;track_maxx 200
# Minimum value on x-axis
(default: 0)
;track_minx 50
# Maximum value on y-axis
(default: 0)
;track_maxy 200
# Minimum value on y-axis
(default: 0)
;track_miny 50
# Center value on x-axis
(default: 0)
;track_homex 128
# Center value on y-axis
(default: 0)
;track_homey 128
# ID of an iomojo camera if
used (default: 0)
track_iomojo_id 0
# Angle in degrees the camera
moves per step on the X-axis
# with auto-track (default:
10)
# Currently only used with pwc
type cameras
track_step_angle_x 10
# Angle in degrees the camera
moves per step on the Y-axis
# with auto-track (default:
10)
# Currently only used with pwc
type cameras
track_step_angle_y 10
# Delay to wait for after
tracking movement as number
# of picture frames (default:
10)
track_move_wait 10
# Speed to set the motor to
(stepper motor option)
(default: 255)
track_speed 255
# Number of steps to make
(stepper motor option)
(default: 40)
track_stepsize 40
##############################
##############################
# External Commands, Warnings
and Logging:
# You can use conversion
specifiers for the on_xxxx
commands
# %Y = year, %m = month, %d =
date,
# %H = hour, %M = minute, %S =
second,
# %v = event, %q = frame
number, %t = thread (camera)
number,
# %D = changed pixels, %N =
noise level,
# %i and %J = width and height
of motion area,
# %K and %L = X and Y
coordinates of motion center
# %C = value defined by
text_event
# %f = filename with full path
# %n = number indicating
filetype
# Both %f and %n are only
defined for on_picture_save,
# on_movie_start and
on_movie_end
# Quotation marks round string
are allowed.
##############################
##############################

# Do not sound beeps when
detecting motion (default: on)
# Note: Motion never beeps
when running in daemon mode.
quiet on
# Command to be executed when
an event starts. (default:
none)
# An event starts at first
motion detected after a period
of no motion defined by
event_gap
; on_event_start value
# Command to be executed when
an event ends after a period
of no motion
# (default: none). The period
of no motion is defined by
option event_gap.
; on_event_end value
# Command to be executed when
a picture (.ppm|.jpg) is saved
(default: none)
# To give the filename as an
argument to a command append
it with %f
; on_picture_save value
# Command to be executed when
a motion frame is detected
(default: none)
; on_motion_detected value
# Command to be executed when
motion in a predefined area is
detected
# Check option 'area_detect'.
(default: none)
; on_area_detected value
# Command to be executed when
a movie file (.mpg|.avi) is
created. (default: none)
# To give the filename as an
argument to a command append
it with %f
; on_movie_start value
# Command to be executed when
a movie file (.mpg|.avi) is
closed. (default: none)
# To give the filename as an
argument to a command append
it with %f
; on_movie_end value
# Command to be executed when
a camera can't be opened or if
it is lost
# NOTE: There is situations
when motion don't detect a
lost camera!
# It depends on the driver,
some drivers dosn't detect a
lost camera at all
# Some hangs the motion
thread. Some even hangs the
PC! (default: none)
; on_camera_lost value
##############################
##############################
#########
# Common Options for database
features.
# Options require database
options to be active also.
##############################
##############################
#########
# Log to the database when
creating motion triggered
picture file (default: on)
; sql_log_picture on
# Log to the database when
creating a snapshot image file
(default: on)
; sql_log_snapshot on
# Log to the database when
creating motion triggered
movie file (default: off)
; sql_log_movie off
# Log to the database when
creating timelapse movies file
(default: off)
; sql_log_timelapse off
# SQL query string that is
sent to the database
# Use same conversion
specifiers has for text
features
# Additional special
conversion specifiers are
# %n = the number representing
the file_type
# %f = filename with full path
# Default value:
# Create tables :
##
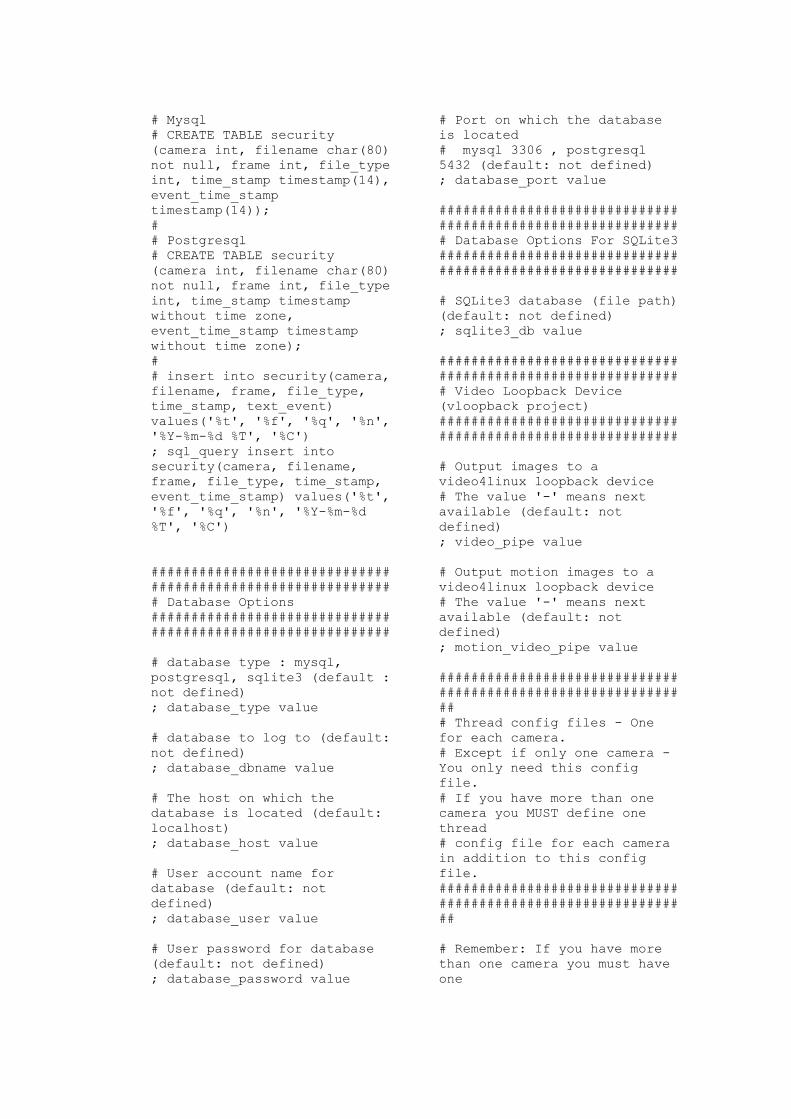
# Mysql
# CREATE TABLE security
(camera int, filename char(80)
not null, frame int, file_type
int, time_stamp timestamp(14),
event_time_stamp
timestamp(14));
#
# Postgresql
# CREATE TABLE security
(camera int, filename char(80)
not null, frame int, file_type
int, time_stamp timestamp
without time zone,
event_time_stamp timestamp
without time zone);
#
# insert into security(camera,
filename, frame, file_type,
time_stamp, text_event)
values('%t', '%f', '%q', '%n',
'%Y-%m-%d %T', '%C')
; sql_query insert into
security(camera, filename,
frame, file_type, time_stamp,
event_time_stamp) values('%t',
'%f', '%q', '%n', '%Y-%m-%d
%T', '%C')
##############################
##############################
# Database Options
##############################
##############################
# database type : mysql,
postgresql, sqlite3 (default :
not defined)
; database_type value
# database to log to (default:
not defined)
; database_dbname value
# The host on which the
database is located (default:
localhost)
; database_host value
# User account name for
database (default: not
defined)
; database_user value
# User password for database
(default: not defined)
; database_password value
# Port on which the database
is located
# mysql 3306 , postgresql
5432 (default: not defined)
; database_port value
##############################
##############################
# Database Options For SQLite3
##############################
##############################
# SQLite3 database (file path)
(default: not defined)
; sqlite3_db value
##############################
##############################
# Video Loopback Device
(vloopback project)
##############################
##############################
# Output images to a
video4linux loopback device
# The value '-' means next
available (default: not
defined)
; video_pipe value
# Output motion images to a
video4linux loopback device
# The value '-' means next
available (default: not
defined)
; motion_video_pipe value
##############################
##############################
##
# Thread config files - One
for each camera.
# Except if only one camera -
You only need this config
file.
# If you have more than one
camera you MUST define one
thread
# config file for each camera
in addition to this config
file.
##############################
##############################
##
# Remember: If you have more
than one camera you must have
one

# thread file for each camera.
E.g. 2 cameras requires 3
files:
# This motion.conf file AND
thread1.conf and thread2.conf.
# Only put the options that
are unique to each camera in
the
# thread config files.
# Something goes wrong when I
uncomment the following line.
# thread /etc/motion-
picam.conf
; thread
/usr/local/etc/thread2.conf
; thread
/usr/local/etc/thread3.conf
; thread
/usr/local/etc/thread4.conf
2. cek_login.php
<?php
$fm_userid =
$_POST['tfusername'];
$fm_password =
$_POST['tfpassword'];
include"koneksi.php";
$sql="SELECT username
, password FROM login
where ( username =
'$fm_userid' AND password =
'$fm_password' )"
or die (" Anda Tidak
Dapat Mengakses Tabel");
if(!$hasil=mysql_query($sql))
{
echo"perintah
salah".mysql_error();
}
$ada_baris =
mysql_num_rows ($hasil);
if ($ada_baris==1)
{
session_start();
$_SESSION['namauser']=$fm_user
id;
header
('location:index.php');
echo"perintah
salah".mysql_error();
}
$ada_baris =
mysql_num_rows ($hasil);
if ($ada_baris==1)
{
session_start();
$_SESSION['namauser']=$fm_user
id;
header
('location:index.php');
exit;
}
else {
echo "
<b> user/password salah !
</b>";
include "login.php";
exit ;
}
?>
3. Login.php
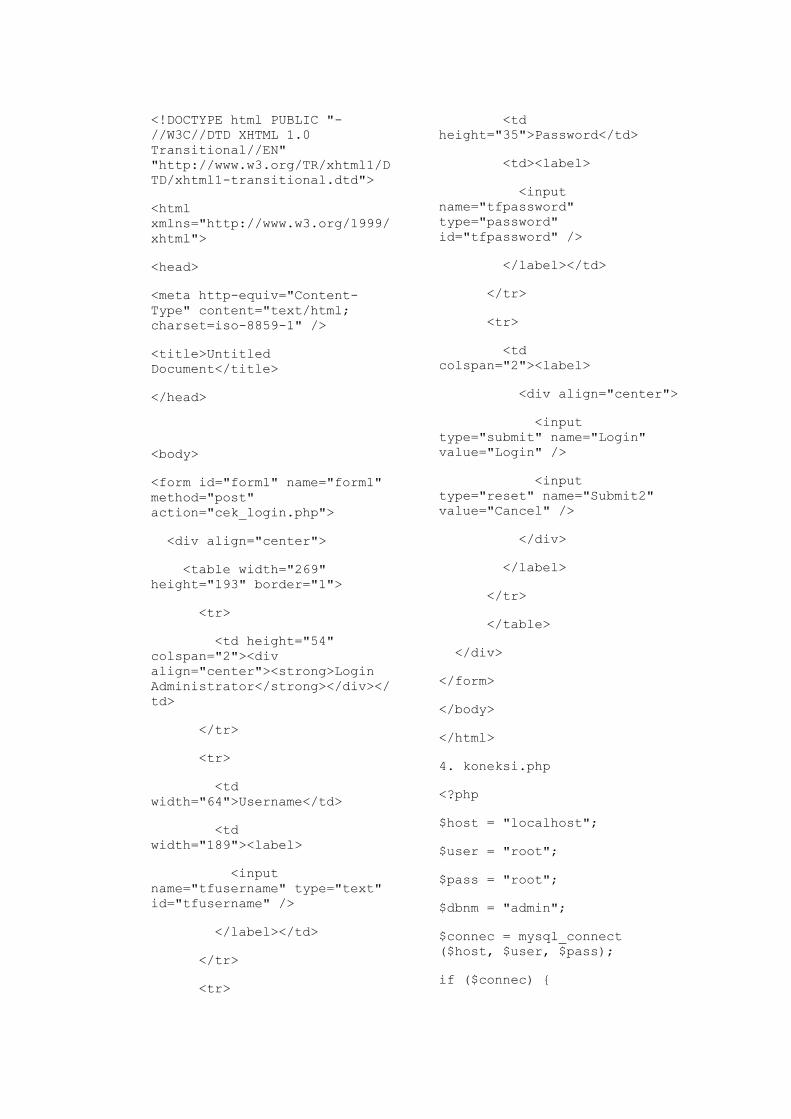
<!DOCTYPE html PUBLIC "-
//W3C//DTD XHTML 1.0
Transitional//EN"
"http://www.w3.org/TR/xhtml1/D
TD/xhtml1-transitional.dtd">
<html
xmlns="http://www.w3.org/1999/
xhtml">
<head>
<meta http-equiv="Content-
Type" content="text/html;
charset=iso-8859-1" />
<title>Untitled
Document</title>
</head>
<body>
<form id="form1" name="form1"
method="post"
action="cek_login.php">
<div align="center">
<table width="269"
height="193" border="1">
<tr>
<td height="54"
colspan="2"><div
align="center"><strong>Login
Administrator</strong></div></
td>
</tr>
<tr>
<td
width="64">Username</td>
<td
width="189"><label>
<input
name="tfusername" type="text"
id="tfusername" />
</label></td>
</tr>
<tr>
<td
height="35">Password</td>
<td><label>
<input
name="tfpassword"
type="password"
id="tfpassword" />
</label></td>
</tr>
<tr>
<td
colspan="2"><label>
<div align="center">
<input
type="submit" name="Login"
value="Login" />
<input
type="reset" name="Submit2"
value="Cancel" />
</div>
</label>
</tr>
</table>
</div>
</form>
</body>
</html>
4. koneksi.php
<?php
$host = "localhost";
$user = "root";
$pass = "root";
$dbnm = "admin";
$connec = mysql_connect
($host, $user, $pass);
if ($connec) {
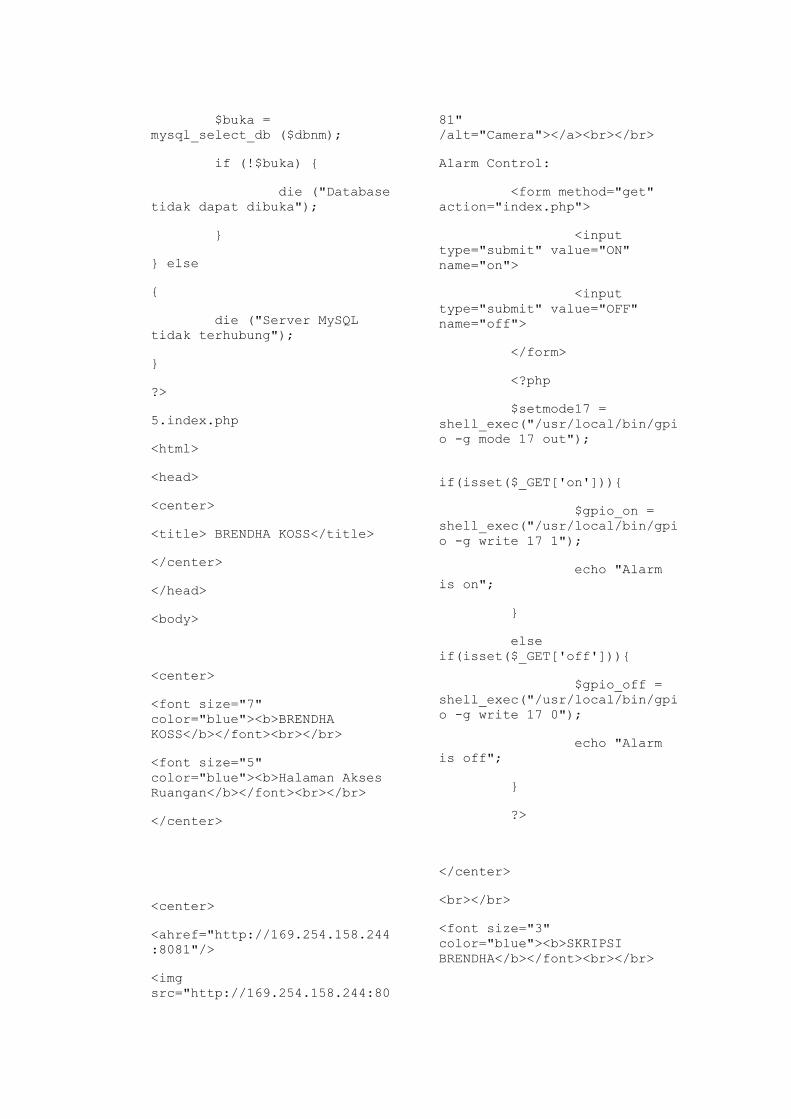
$buka =
mysql_select_db ($dbnm);
if (!$buka) {
die ("Database
tidak dapat dibuka");
}
} else
{
die ("Server MySQL
tidak terhubung");
}
?>
5.index.php
<html>
<head>
<center>
<title> BRENDHA KOSS</title>
</center>
</head>
<body>
<center>
<font size="7"
color="blue"><b>BRENDHA
KOSS</b></font><br></br>
<font size="5"
color="blue"><b>Halaman Akses
Ruangan</b></font><br></br>
</center>
<center>
<ahref="http://169.254.158.244
:8081"/>
<img
src="http://169.254.158.244:80
81"
/alt="Camera"></a><br></br>
Alarm Control:
<form method="get"
action="index.php">
<input
type="submit" value="ON"
name="on">
<input
type="submit" value="OFF"
name="off">
</form>
<?php
$setmode17 =
shell_exec("/usr/local/bin/gpi
o -g mode 17 out");
if(isset($_GET['on'])){
$gpio_on =
shell_exec("/usr/local/bin/gpi
o -g write 17 1");
echo "Alarm
is on";
}
else
if(isset($_GET['off'])){
$gpio_off =
shell_exec("/usr/local/bin/gpi
o -g write 17 0");
echo "Alarm
is off";
}
?>
</center>
<br></br>
<font size="3"
color="blue"><b>SKRIPSI
BRENDHA</b></font><br></br>
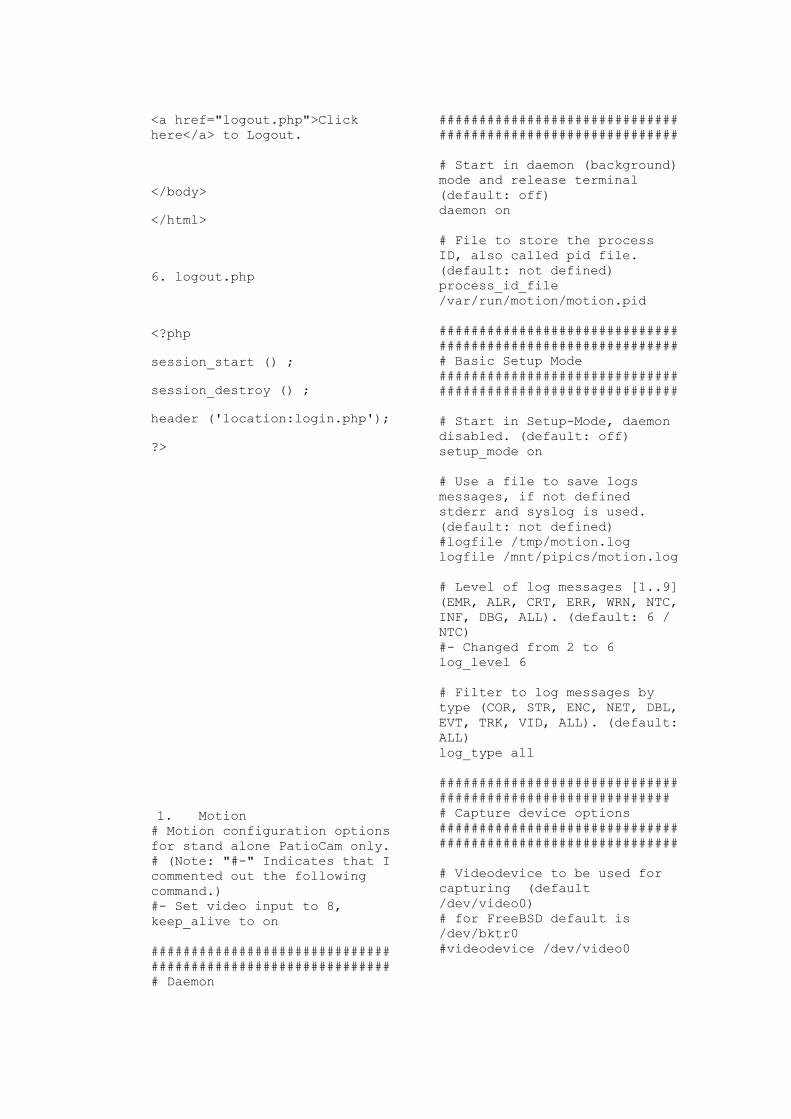
<a href="logout.php">Click
here</a> to Logout.
</body>
</html>
6. logout.php
<?php
session_start () ;
session_destroy () ;
header ('location:login.php');
?>
1. Motion
# Motion configuration options
for stand alone PatioCam only.
# (Note: "#-" Indicates that I
commented out the following
command.)
#- Set video input to 8,
keep_alive to on
##############################
##############################
# Daemon
##############################
##############################
# Start in daemon (background)
mode and release terminal
(default: off)
daemon on
# File to store the process
ID, also called pid file.
(default: not defined)
process_id_file
/var/run/motion/motion.pid
##############################
##############################
# Basic Setup Mode
##############################
##############################
# Start in Setup-Mode, daemon
disabled. (default: off)
setup_mode on
# Use a file to save logs
messages, if not defined
stderr and syslog is used.
(default: not defined)
#logfile /tmp/motion.log
logfile /mnt/pipics/motion.log
# Level of log messages [1..9]
(EMR, ALR, CRT, ERR, WRN, NTC,
INF, DBG, ALL). (default: 6 /
NTC)
#- Changed from 2 to 6
log_level 6
# Filter to log messages by
type (COR, STR, ENC, NET, DBL,
EVT, TRK, VID, ALL). (default:
ALL)
log_type all
##############################
#############################
# Capture device options
##############################
##############################
# Videodevice to be used for
capturing (default
/dev/video0)
# for FreeBSD default is
/dev/bktr0
#videodevice /dev/video0

# v4l2_palette allows to
choose preferable palette to
be use by motion
# to capture from those
supported by your videodevice.
(default: 17)
# E.g. if your videodevice
supports both
V4L2_PIX_FMT_SBGGR8 and
# V4L2_PIX_FMT_MJPEG then
motion will by default use
V4L2_PIX_FMT_MJPEG.
# Setting v4l2_palette to 2
forces motion to use
V4L2_PIX_FMT_SBGGR8
# instead.
#
# Values :
# V4L2_PIX_FMT_SN9C10X : 0
'S910'
# V4L2_PIX_FMT_SBGGR16 : 1
'BYR2'
# V4L2_PIX_FMT_SBGGR8 : 2
'BA81'
# V4L2_PIX_FMT_SPCA561 : 3
'S561'
# V4L2_PIX_FMT_SGBRG8 : 4
'GBRG'
# V4L2_PIX_FMT_SGRBG8 : 5
'GRBG'
# V4L2_PIX_FMT_PAC207 : 6
'P207'
# V4L2_PIX_FMT_PJPG : 7
'PJPG'
# V4L2_PIX_FMT_MJPEG : 8
'MJPEG'
# V4L2_PIX_FMT_JPEG : 9
'JPEG'
# V4L2_PIX_FMT_RGB24 : 10
'RGB3'
# V4L2_PIX_FMT_SPCA501 : 11
'S501'
# V4L2_PIX_FMT_SPCA505 : 12
'S505'
# V4L2_PIX_FMT_SPCA508 : 13
'S508'
# V4L2_PIX_FMT_UYVY : 14
'UYVY'
# V4L2_PIX_FMT_YUYV : 15
'YUYV'
# V4L2_PIX_FMT_YUV422P : 16
'422P'
# V4L2_PIX_FMT_YUV420 : 17
'YU12'
#
#- Maybe change this to 9 for
IP cam? But, these options are
supposed to be ignored if ULR
is specified below.
;v4l2_palette 7
# Tuner device to be used for
capturing using tuner as
source (default /dev/tuner0)
# This is ONLY used for
FreeBSD. Leave it commented
out for Linux
;tunerdevice /dev/tuner0
# The video input to be used
(default: -1)
# Should normally be set to 0
or 1 for video/TV cards, and -
1 for USB cameras
#- Was set to -1 for the
PiCam, still shows PiCam when
set to nothing, 0, 8.
#- input 8
# The video norm to use (only
for video capture and TV tuner
cards)
# Values: 0 (PAL), 1 (NTSC), 2
(SECAM), 3 (PAL NC no colour).
Default: 0 (PAL)
norm 0
# The frequency to set the
tuner to (kHz) (only for TV
tuner cards) (default: 0)
frequency 0
# Rotate image this number of
degrees. The rotation affects
all saved images as
# well as movies. Valid
values: 0 (default = no
rotation), 90, 180 and 270.
rotate 180
# Image width (pixels). Valid
range: Camera dependent,
default: 352
#width 1024
width 640
# Image height (pixels). Valid
range: Camera dependent,
default: 288
#height 576
height 480
# Maximum number of frames to
be captured per second.
# Valid range: 2-100. Default:
100 (almost no limit).
framerate 2

# Minimum time in seconds
between capturing picture
frames from the camera.
# Default: 0 = disabled - the
capture rate is given by the
camera framerate.
# This option is used when you
want to capture images at a
rate lower than 2 per second.
minimum_frame_time 0
# Username and password for
network camera (only if
required). Default: not
defined
# Syntax is user:password
; netcam_userpass value
netcam_userpass
Viewer:12345678
# URL to use if you are using
a network camera, size will be
autodetected (incl http://
ftp:// mjpg:// or file:///)
# Must be a URL that returns
single jpeg pictures or a raw
mjpeg stream. Default: Not
defined
;netcam_url
http://127.0.0.1/cgi-
bin/raspicam.sh
#- CasaCam
http://192.168.1.23/jpg/image.
jpg
#- PatioCam
http://192.168.1.30/IMAGE.JPG
netcam_url
http://192.168.1.30/VIDEO.CGI
# The setting for keep-alive
of network socket, should
improve performance on
compatible net cameras.
# off: The historical
implementation using HTTP/1.0,
closing the socket after each
http request.
# force: Use HTTP/1.0 requests
with keep alive header to
reuse the same connection.
# on: Use HTTP/1.1 requests
that support keep alive as
default.
# Default: off
netcam_keepalive on
# URL to use for a netcam
proxy server, if required,
e.g. "http://myproxy".
# If a port number other than
80 is needed, use
"http://myproxy:1234".
# Default: not defined
; netcam_proxy value
# Set less strict jpeg checks
for network cameras with a
poor/buggy firmware.
# Default: off
netcam_tolerant_check off
# Let motion regulate the
brightness of a video device
(default: off).
# The auto_brightness feature
uses the brightness option as
its target value.
# If brightness is zero
auto_brightness will adjust to
average brightness value 128.
# Only recommended for cameras
without auto brightness
auto_brightness off
# Set the initial brightness
of a video device.
# If auto_brightness is
enabled, this value defines
the average brightness level
# which Motion will try and
adjust to.
# Valid range 0-255, default 0
= disabled
brightness 0
# Set the contrast of a video
device.
# Valid range 0-255, default 0
= disabled
contrast 0
# Set the saturation of a
video device.
# Valid range 0-255, default 0
= disabled
saturation 0
# Set the hue of a video
device (NTSC feature).
# Valid range 0-255, default 0
= disabled
hue 0
##############################
##############################
# File "camera" support - read
raw YUV data from a file
##############################
##############################
#filecam_path /home/pi/test-
cap/motion-mmal.capture
##############################
##############################
# OpenMax/MMAL camera support
for Raspberry Pi
##############################
##############################
mmalcam_name vc.ril.camera
#mmalcam_control_params
#mmalcam_raw_capture_file
/home/pi/motion-mmal.capture
# Switch this setting to "on"
to use the still image mode of
the Pi's camera
# instead of video. This gives
a wider field of view, but
requires
# a much slower frame-rate to
achieve exposure stability
# (e.g. 0.25 fps or slower).
You can use the
minimum_frame_time
# parameter above to achieve
this
mmalcam_use_still off
##############################
##############################
# Round Robin (multiple inputs
on same video device name)
##############################
##############################
# Number of frames to capture
in each roundrobin step
(default: 1)
roundrobin_frames 1
# Number of frames to skip
before each roundrobin step
(default: 1)
roundrobin_skip 1
# Try to filter out noise
generated by roundrobin
(default: off)
switchfilter off
##############################
##############################
# Motion Detection Settings:
##############################
##############################
# Threshold for number of
changed pixels in an image
that
# triggers motion detection
(default: 1500)
threshold 1500
# Automatically tune the
threshold down if possible
(default: off)
threshold_tune off
# Noise threshold for the
motion detection (default: 32)
noise_level 32
# Automatically tune the noise
threshold (default: on)
noise_tune on
# Despeckle motion image using
(e)rode or (d)ilate or (l)abel
(Default: not defined)
# Recommended value is EedDl.
Any combination (and number
of) of E, e, d, and D is
valid.
# (l)abeling must only be used
once and the 'l' must be the
last letter.
# Comment out to disable
despeckle_filter EedDl
# Detect motion in predefined
areas (1 - 9). Areas are
numbered like that: 1 2 3
# A script (on_area_detected)
is started immediately when
motion is 4 5 6
# detected in one of the given
areas, but only once during an
event. 7 8 9
# One or more areas can be
specified with this option.
Take care: This option
# does NOT restrict detection
to these areas! (Default: not
defined)
; area_detect value
# PGM file to use as a
sensitivity mask.
# Full path name to. (Default:
not defined)
; mask_file value

# Dynamically create a mask
file during operation
(default: 0)
# Adjust speed of mask changes
from 0 (off) to 10 (fast)
smart_mask_speed 0
# Ignore sudden massive light
intensity changes given as a
percentage of the picture
# area that changed intensity.
Valid range: 0 - 100 ,
default: 0 = disabled
lightswitch 0
# Picture frames must contain
motion at least the specified
number of frames
# in a row before they are
detected as true motion. At
the default of 1, all
# motion is detected. Valid
range: 1 to thousands,
recommended 1-5
minimum_motion_frames 1
# Specifies the number of pre-
captured (buffered) pictures
from before motion
# was detected that will be
output at motion detection.
# Recommended range: 0 to 5
(default: 0)
# Do not use large values!
Large values will cause Motion
to skip video frames and
# cause unsmooth movies. To
smooth movies use larger
values of post_capture
instead.
pre_capture 2
# Number of frames to capture
after motion is no longer
detected (default: 0)
post_capture 2
# Event Gap is the seconds of
no motion detection that
triggers the end of an event.
# An event is defined as a
series of motion images taken
within a short timeframe.
# Recommended value is 60
seconds (Default). The value -
1 is allowed and disables
# events causing all Motion to
be written to one single movie
file and no pre_capture.
# If set to 0, motion is
running in gapless mode.
Movies don't have gaps
anymore. An
# event ends right after no
more motion is detected and
post_capture is over.
event_gap 60
# Maximum length in seconds of
an mpeg movie
# When value is exceeded a new
movie file is created.
(Default: 0 = infinite)
# ATTENTION: when you're not
using the motion build from
the tutorial, it might fail
with error 'Unknown config
option "max_mpeg_time"'
# the use this line instead:
# max_movie_time 600
max_mpeg_time 600
# Always save images even if
there was no motion (default:
off)
emulate_motion off
##############################
##############################
# Image File Output
##############################
##############################
# Output 'normal' pictures
when motion is detected
(default: on)
# Valid values: on, off,
first, best, center
# When set to 'first', only
the first picture of an event
is saved.
# Picture with most motion of
an event is saved when set to
'best'.
# Picture with motion nearest
center of picture is saved
when set to 'center'.
# Can be used as preview shot
for the corresponding movie.
output_pictures best
# Output pictures with only
the pixels moving object
(ghost images) (default: off)
output_debug_pictures off
# The quality (in percent) to
be used by the jpeg
compression (default: 75)
quality 75
# Type of output images
# Valid values: jpeg, ppm
(default: jpeg)
picture_type jpeg
##############################
##############################
# FFMPEG related options
# Film (movies) file output,
and deinterlacing of the video
input
# The options movie_filename
and timelapse_filename are
also used
# by the ffmpeg feature
##############################
##############################
# Use ffmpeg to encode movies
in realtime (default: off)
ffmpeg_output_movies on
# Use ffmpeg to make movies
with only the pixels moving
# object (ghost images)
(default: off)
ffmpeg_output_debug_movies off
# Use ffmpeg to encode a
timelapse movie
# Default value 0 = off - else
save frame every Nth second
ffmpeg_timelapse 0
# The file rollover mode of
the timelapse video
# Valid values: hourly, daily
(default), weekly-sunday,
weekly-monday, monthly, manual
ffmpeg_timelapse_mode daily
# Bitrate to be used by the
ffmpeg encoder (default:
400000)
# This option is ignored if
ffmpeg_variable_bitrate is not
0 (disabled)
ffmpeg_bps 500000
# Enables and defines variable
bitrate for the ffmpeg
encoder.
# ffmpeg_bps is ignored if
variable bitrate is enabled.
# Valid values: 0 (default) =
fixed bitrate defined by
ffmpeg_bps,
# or the range 2 - 31 where 2
means best quality and 31 is
worst.
ffmpeg_variable_bitrate 5
# Codec to used by ffmpeg for
the video compression.
# Timelapse mpegs are always
made in mpeg1 format
independent from this option.
# Supported formats are: mpeg1
(ffmpeg-0.4.8 only), mpeg4
(default), and msmpeg4.
# mpeg1 - gives you files with
extension .mpg
# mpeg4 or msmpeg4 - gives you
files with extension .avi
# msmpeg4 is recommended for
use with Windows Media Player
because
# it requires no installation
of codec on the Windows
client.
# swf - gives you a flash film
with extension .swf
# flv - gives you a flash
video with extension .flv
# ffv1 - FF video codec 1 for
Lossless Encoding (
experimental )
# mov - QuickTime ( testing )
# ogg - Ogg/Theora ( testing )
ffmpeg_video_codec msmpeg4
# Use ffmpeg to deinterlace
video. Necessary if you use an
analog camera
# and see horizontal combing
on moving objects in video or
pictures.
# (default: off)
ffmpeg_deinterlace off
##############################
##############################
# SDL Window
##############################
##############################
# Number of motion thread to
show in SDL Window (default: 0
= disabled)
#sdl_threadnr 0
##############################
##############################
# External pipe to video
encoder
# Replacement for FFMPEG
builtin encoder for
ffmpeg_output_movies only.
# The options movie_filename
and timelapse_filename are
also used
# by the ffmpeg feature
##############################
##############################
#
# Bool to enable or disable
extpipe (default: off)
use_extpipe off
# External program (full path
and opts) to pipe raw video to
# Generally, use '-' for
STDIN...
;extpipe mencoder -demuxer
rawvideo -rawvideo
w=320:h=240:i420 -ovc x264 -
x264encopts
bframes=4:frameref=1:subq=1:sc
enecut=-
1:nob_adapt:threads=1:keyint=1
000:8x8dct:vbv_bufsize=4000:cr
f=24:partitions=i8x8,i4x4:vbv_
maxrate=800:no-chroma-me -vf
denoise3d=16:12:48:4,pp=lb -of
avi -o %f.avi - -fps %fps
##############################
##############################
# Snapshots (Traditional
Periodic Webcam File Output)
##############################
##############################
# Make automated snapshot
every N seconds (default: 0 =
disabled)
snapshot_interval 0
##############################
##############################
# Text Display
# %Y = year, %m = month, %d =
date,
# %H = hour, %M = minute, %S =
second, %T = HH:MM:SS,
# %v = event, %q = frame
number, %t = thread (camera)
number,
# %D = changed pixels, %N =
noise level, \n = new line,
# %i and %J = width and height
of motion area,
# %K and %L = X and Y
coordinates of motion center
# %C = value defined by
text_event - do not use with
text_event!
# You can put quotation marks
around the text to allow
# leading spaces
##############################
##############################
# Locate and draw a box around
the moving object.
# Valid values: on, off,
preview (default: off)
# Set to 'preview' will only
draw a box in preview_shot
pictures.
;locate_motion_mode off
# Set the look and style of
the locate box if enabled.
# Valid values: box, redbox,
cross, redcross (default: box)
# Set to 'box' will draw the
traditional box.
# Set to 'redbox' will draw a
red box.
# Set to 'cross' will draw a
little cross to mark center.
# Set to 'redcross' will draw
a little red cross to mark
center.
;locate_motion_style box
# Draws the timestamp using
same options as C function
strftime(3)
# Default: %Y-%m-%d\n%T = date
in ISO format and time in 24
hour clock
# Text is placed in lower
right corner
text_right %d.%m.%Y\n%T
# Draw a user defined text on
the images using same options
as C function strftime(3)
# Default: Not defined = no
text
# Text is placed in lower left
corner
; text_left CAMERA %t
text_left PatioCam

# Draw the number of changed
pixed on the images (default:
off)
# Will normally be set to off
except when you setup and
adjust the motion settings
# Text is placed in upper
right corner
text_changes off
# This option defines the
value of the special event
conversion specifier %C
# You can use any conversion
specifier in this option
except %C. Date and time
# values are from the
timestamp of the first image
in the current event.
# Default: %Y%m%d%H%M%S
# The idea is that %C can be
used filenames and
text_left/right for creating
# a unique identifier for each
event.
text_event %Y%m%d%H%M%S
# Draw characters at twice
normal size on images.
(default: off)
text_double on
# Text to include in a JPEG
EXIF comment
# May be any text, including
conversion specifiers.
# The EXIF timestamp is
included independent of this
text.
;exif_text %i%J/%K%L
##############################
##############################
# Target Directories and
filenames For Images And Films
# For the options snapshot_,
picture_, movie_ and
timelapse_filename
# you can use conversion
specifiers
# %Y = year, %m = month, %d =
date,
# %H = hour, %M = minute, %S =
second,
# %v = event, %q = frame
number, %t = thread (camera)
number,
# %D = changed pixels, %N =
noise level,
# %i and %J = width and height
of motion area,
# %K and %L = X and Y
coordinates of motion center
# %C = value defined by
text_event
# Quotation marks round string
are allowed.
##############################
##############################
# Target base directory for
pictures and films
# Recommended to use absolute
path. (Default: current
working directory)
# target_dir /var/lib/motion
# File path for snapshots
(jpeg or ppm) relative to
target_dir
# Default: %v-%Y%m%d%H%M%S-
snapshot
# Default value is equivalent
to legacy oldlayout option
# For Motion 3.0 compatible
mode choose:
%Y/%m/%d/%H/%M/%S-snapshot
# File extension .jpg or .ppm
is automatically added so do
not include this.
# Note: A symbolic link called
lastsnap.jpg created in the
target_dir will always
# point to the latest
snapshot, unless
snapshot_filename is exactly
'lastsnap'
snapshot_filename %v-
%Y%m%d%H%M%S-snapshot
# File path for motion
triggered images (jpeg or ppm)
relative to target_dir
# Default: %v-%Y%m%d%H%M%S-%q
# Default value is equivalent
to legacy oldlayout option
# For Motion 3.0 compatible
mode choose:
%Y/%m/%d/%H/%M/%S-%q
# File extension .jpg or .ppm
is automatically added so do
not include this
# Set to 'preview' together
with best-preview feature
enables special naming
# convention for preview
shots. See motion guide for
details
picture_filename %v-
%Y%m%d%H%M%S-%q
# File path for motion
triggered ffmpeg films
(movies) relative to
target_dir
# Default: %v-%Y%m%d%H%M%S
# Default value is equivalent
to legacy oldlayout option
# For Motion 3.0 compatible
mode choose: %Y/%m/%d/%H%M%S
# File extension .mpg or .avi
is automatically added so do
not include this
# This option was previously
called ffmpeg_filename
movie_filename %v-%Y%m%d%H%M%S
# File path for timelapse
movies relative to target_dir
# Default: %Y%m%d-timelapse
# Default value is near
equivalent to legacy oldlayout
option
# For Motion 3.0 compatible
mode choose: %Y/%m/%d-
timelapse
# File extension .mpg is
automatically added so do not
include this
timelapse_filename %Y%m%d-
timelapse
##############################
##############################
# Global Network Options
##############################
##############################
# Enable or disable IPV6 for
http control and stream
(default: off )
ipv6_enabled off
##############################
##############################
# Live Stream Server
##############################
##############################
# The mini-http server listens
to this port for requests
(default: 0 = disabled)
stream_port 8080
# Quality of the jpeg (in
percent) images produced
(default: 50)
stream_quality 50
# Output frames at 1 fps when
no motion is detected and
increase to the
# rate given by stream_maxrate
when motion is detected
(default: off)
stream_motion on
# Maximum framerate for stream
streams (default: 1)
stream_maxrate 4
# Restrict stream connections
to localhost only (default:
on)
stream_localhost off
# Limits the number of images
per connection (default: 0 =
unlimited)
# Number can be defined by
multiplying actual stream rate
by desired number of seconds
# Actual stream rate is the
smallest of the numbers
framerate and stream_maxrate
stream_limit 0
# Set the authentication
method (default: 0)
# 0 = disabled
# 1 = Basic authentication
# 2 = MD5 digest (the safer
authentication)
stream_auth_method 0
# Authentication for the
stream. Syntax
username:password
# Default: not defined
(Disabled)
; stream_authentication
username:password
##############################
##############################
# HTTP Based Control
##############################
##############################
# TCP/IP port for the http
server to listen on (default:
0 = disabled)
webcontrol_port 8081

# Restrict control connections
to localhost only (default:
on)
webcontrol_localhost off
# Output for http server,
select off to choose raw text
plain (default: on)
webcontrol_html_output on
# Authentication for the http
based control. Syntax
username:password
# Default: not defined
(Disabled)
; webcontrol_authentication
username:password
##############################
##############################
# Tracking (Pan/Tilt)
##############################
##############################
#
# Type of tracker (0=none
(default), 1=stepper,
2=iomojo, 3=pwc, 4=generic,
5=uvcvideo, 6=servo)
# The generic type enables the
definition of motion center
and motion size to
# be used with the conversion
specifiers for options like
on_motion_detected
track_type 0
# Enable auto tracking
(default: off)
track_auto off
# Serial port of motor
(default: none)
;track_port /dev/ttyS0
# Motor number for x-axis
(default: 0)
;track_motorx 0
# Set motorx reverse (default:
0)
;track_motorx_reverse 0
# Motor number for y-axis
(default: 0)
;track_motory 1
# Set motory reverse (default:
0)
;track_motory_reverse 0
# Maximum value on x-axis
(default: 0)
;track_maxx 200
# Minimum value on x-axis
(default: 0)
;track_minx 50
# Maximum value on y-axis
(default: 0)
;track_maxy 200
# Minimum value on y-axis
(default: 0)
;track_miny 50
# Center value on x-axis
(default: 0)
;track_homex 128
# Center value on y-axis
(default: 0)
;track_homey 128
# ID of an iomojo camera if
used (default: 0)
track_iomojo_id 0
# Angle in degrees the camera
moves per step on the X-axis
# with auto-track (default:
10)
# Currently only used with pwc
type cameras
track_step_angle_x 10
# Angle in degrees the camera
moves per step on the Y-axis
# with auto-track (default:
10)
# Currently only used with pwc
type cameras
track_step_angle_y 10
# Delay to wait for after
tracking movement as number
# of picture frames (default:
10)
track_move_wait 10
# Speed to set the motor to
(stepper motor option)
(default: 255)
track_speed 255

# Number of steps to make
(stepper motor option)
(default: 40)
track_stepsize 40
##############################
##############################
# External Commands, Warnings
and Logging:
# You can use conversion
specifiers for the on_xxxx
commands
# %Y = year, %m = month, %d =
date,
# %H = hour, %M = minute, %S =
second,
# %v = event, %q = frame
number, %t = thread (camera)
number,
# %D = changed pixels, %N =
noise level,
# %i and %J = width and height
of motion area,
# %K and %L = X and Y
coordinates of motion center
# %C = value defined by
text_event
# %f = filename with full path
# %n = number indicating
filetype
# Both %f and %n are only
defined for on_picture_save,
# on_movie_start and
on_movie_end
# Quotation marks round string
are allowed.
##############################
##############################
# Do not sound beeps when
detecting motion (default: on)
# Note: Motion never beeps
when running in daemon mode.
quiet on
# Command to be executed when
an event starts. (default:
none)
# An event starts at first
motion detected after a period
of no motion defined by
event_gap
; on_event_start value
# Command to be executed when
an event ends after a period
of no motion
# (default: none). The period
of no motion is defined by
option event_gap.
; on_event_end value
# Command to be executed when
a picture (.ppm|.jpg) is saved
(default: none)
# To give the filename as an
argument to a command append
it with %f
; on_picture_save value
# Command to be executed when
a motion frame is detected
(default: none)
; on_motion_detected value
# Command to be executed when
motion in a predefined area is
detected
# Check option 'area_detect'.
(default: none)
; on_area_detected value
# Command to be executed when
a movie file (.mpg|.avi) is
created. (default: none)
# To give the filename as an
argument to a command append
it with %f
; on_movie_start value
# Command to be executed when
a movie file (.mpg|.avi) is
closed. (default: none)
# To give the filename as an
argument to a command append
it with %f
; on_movie_end value
# Command to be executed when
a camera can't be opened or if
it is lost
# NOTE: There is situations
when motion don't detect a
lost camera!
# It depends on the driver,
some drivers dosn't detect a
lost camera at all
# Some hangs the motion
thread. Some even hangs the
PC! (default: none)
; on_camera_lost value
##############################
##############################
#########

# Common Options for database
features.
# Options require database
options to be active also.
##############################
##############################
#########
# Log to the database when
creating motion triggered
picture file (default: on)
; sql_log_picture on
# Log to the database when
creating a snapshot image file
(default: on)
; sql_log_snapshot on
# Log to the database when
creating motion triggered
movie file (default: off)
; sql_log_movie off
# Log to the database when
creating timelapse movies file
(default: off)
; sql_log_timelapse off
# SQL query string that is
sent to the database
# Use same conversion
specifiers has for text
features
# Additional special
conversion specifiers are
# %n = the number representing
the file_type
# %f = filename with full path
# Default value:
# Create tables :
##
# Mysql
# CREATE TABLE security
(camera int, filename char(80)
not null, frame int, file_type
int, time_stamp timestamp(14),
event_time_stamp
timestamp(14));
#
# Postgresql
# CREATE TABLE security
(camera int, filename char(80)
not null, frame int, file_type
int, time_stamp timestamp
without time zone,
event_time_stamp timestamp
without time zone);
#
# insert into security(camera,
filename, frame, file_type,
time_stamp, text_event)
values('%t', '%f', '%q', '%n',
'%Y-%m-%d %T', '%C')
; sql_query insert into
security(camera, filename,
frame, file_type, time_stamp,
event_time_stamp) values('%t',
'%f', '%q', '%n', '%Y-%m-%d
%T', '%C')
##############################
##############################
# Database Options
##############################
##############################
# database type : mysql,
postgresql, sqlite3 (default :
not defined)
; database_type value
# database to log to (default:
not defined)
; database_dbname value
# The host on which the
database is located (default:
localhost)
; database_host value
# User account name for
database (default: not
defined)
; database_user value
# User password for database
(default: not defined)
; database_password value
# Port on which the database
is located
# mysql 3306 , postgresql
5432 (default: not defined)
; database_port value
##############################
##############################
# Database Options For SQLite3
##############################
##############################
# SQLite3 database (file path)
(default: not defined)
; sqlite3_db value
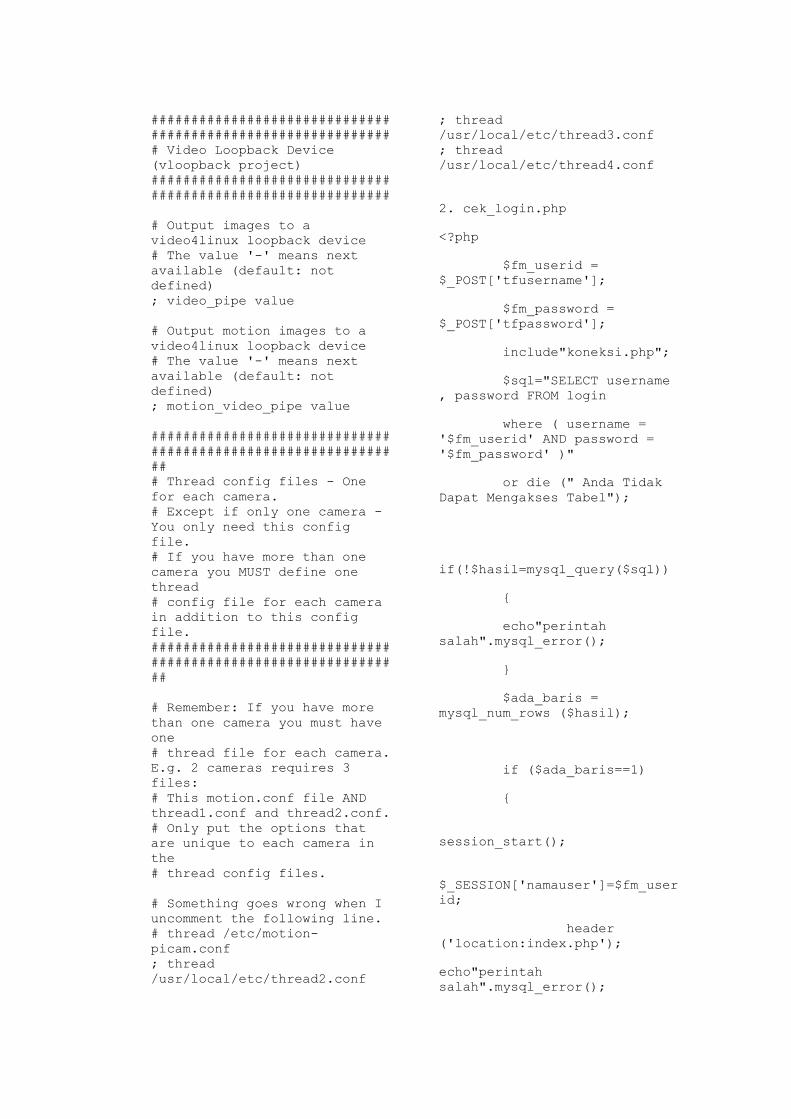
##############################
##############################
# Video Loopback Device
(vloopback project)
##############################
##############################
# Output images to a
video4linux loopback device
# The value '-' means next
available (default: not
defined)
; video_pipe value
# Output motion images to a
video4linux loopback device
# The value '-' means next
available (default: not
defined)
; motion_video_pipe value
##############################
##############################
##
# Thread config files - One
for each camera.
# Except if only one camera -
You only need this config
file.
# If you have more than one
camera you MUST define one
thread
# config file for each camera
in addition to this config
file.
##############################
##############################
##
# Remember: If you have more
than one camera you must have
one
# thread file for each camera.
E.g. 2 cameras requires 3
files:
# This motion.conf file AND
thread1.conf and thread2.conf.
# Only put the options that
are unique to each camera in
the
# thread config files.
# Something goes wrong when I
uncomment the following line.
# thread /etc/motion-
picam.conf
; thread
/usr/local/etc/thread2.conf
; thread
/usr/local/etc/thread3.conf
; thread
/usr/local/etc/thread4.conf
2. cek_login.php
<?php
$fm_userid =
$_POST['tfusername'];
$fm_password =
$_POST['tfpassword'];
include"koneksi.php";
$sql="SELECT username
, password FROM login
where ( username =
'$fm_userid' AND password =
'$fm_password' )"
or die (" Anda Tidak
Dapat Mengakses Tabel");
if(!$hasil=mysql_query($sql))
{
echo"perintah
salah".mysql_error();
}
$ada_baris =
mysql_num_rows ($hasil);
if ($ada_baris==1)
{
session_start();
$_SESSION['namauser']=$fm_user
id;
header
('location:index.php');
echo"perintah
salah".mysql_error();

}
$ada_baris =
mysql_num_rows ($hasil);
if ($ada_baris==1)
{
session_start();
$_SESSION['namauser']=$fm_user
id;
header
('location:index.php');
exit;
}
else {
echo "
<b> user/password salah !
</b>";
include "login.php";
exit ;
}
?>
3. Login.php
<!DOCTYPE html PUBLIC "-
//W3C//DTD XHTML 1.0
Transitional//EN"
"http://www.w3.org/TR/xhtml1/D
TD/xhtml1-transitional.dtd">
<html
xmlns="http://www.w3.org/1999/
xhtml">
<head>
<meta http-equiv="Content-
Type" content="text/html;
charset=iso-8859-1" />
<title>Untitled
Document</title>
</head>
<body>
<form id="form1" name="form1"
method="post"
action="cek_login.php">
<div align="center">
<table width="269"
height="193" border="1">
<tr>
<td height="54"
colspan="2"><div
align="center"><strong>Login
Administrator</strong></div></
td>
</tr>
<tr>
<td
width="64">Username</td>
<td
width="189"><label>
<input
name="tfusername" type="text"
id="tfusername" />
</label></td>
</tr>
<tr>
<td
height="35">Password</td>
<td><label>
<input
name="tfpassword"
type="password"
id="tfpassword" />
</label></td>
</tr>
<tr>
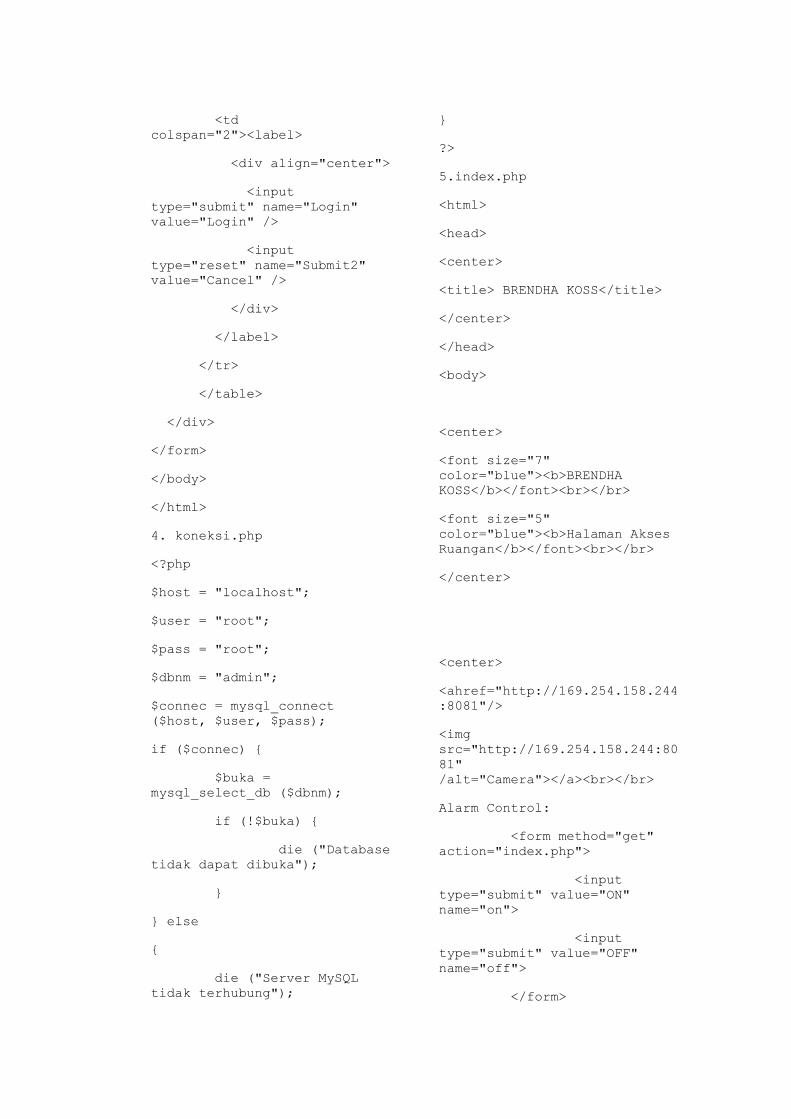
<td
colspan="2"><label>
<div align="center">
<input
type="submit" name="Login"
value="Login" />
<input
type="reset" name="Submit2"
value="Cancel" />
</div>
</label>
</tr>
</table>
</div>
</form>
</body>
</html>
4. koneksi.php
<?php
$host = "localhost";
$user = "root";
$pass = "root";
$dbnm = "admin";
$connec = mysql_connect
($host, $user, $pass);
if ($connec) {
$buka =
mysql_select_db ($dbnm);
if (!$buka) {
die ("Database
tidak dapat dibuka");
}
} else
{
die ("Server MySQL
tidak terhubung");
}
?>
5.index.php
<html>
<head>
<center>
<title> BRENDHA KOSS</title>
</center>
</head>
<body>
<center>
<font size="7"
color="blue"><b>BRENDHA
KOSS</b></font><br></br>
<font size="5"
color="blue"><b>Halaman Akses
Ruangan</b></font><br></br>
</center>
<center>
<ahref="http://169.254.158.244
:8081"/>
<img
src="http://169.254.158.244:80
81"
/alt="Camera"></a><br></br>
Alarm Control:
<form method="get"
action="index.php">
<input
type="submit" value="ON"
name="on">
<input
type="submit" value="OFF"
name="off">
</form>
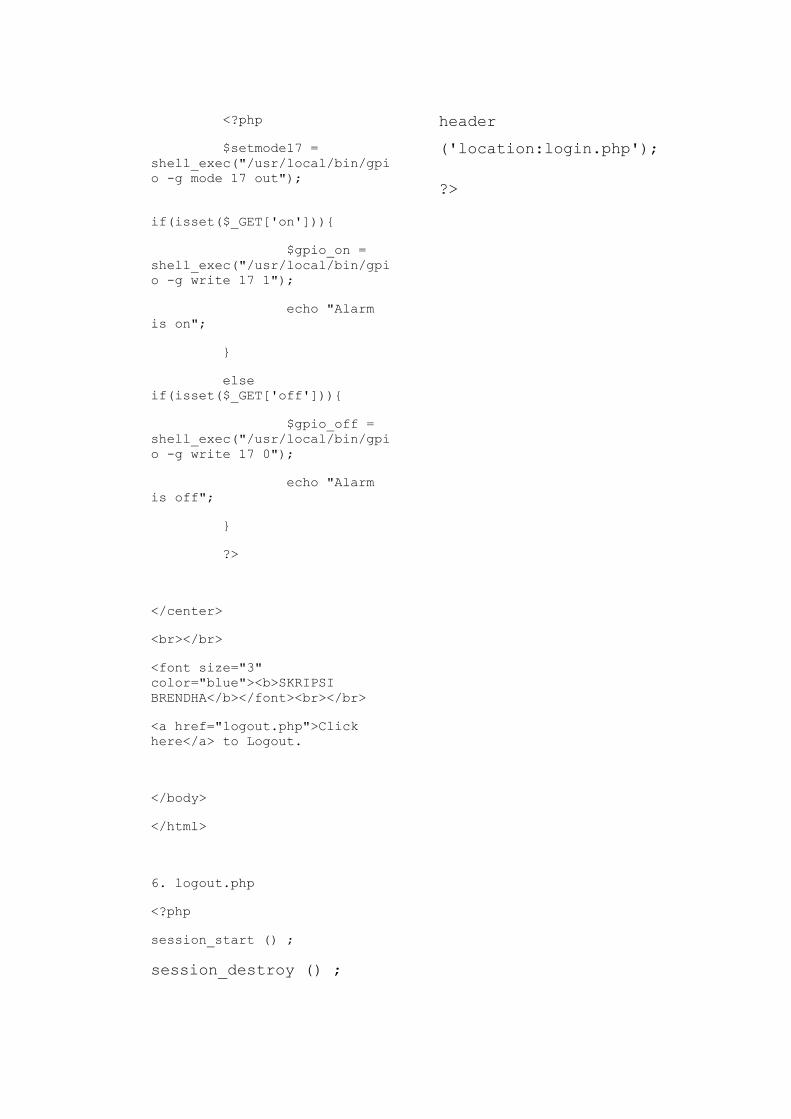
<?php
$setmode17 =
shell_exec("/usr/local/bin/gpi
o -g mode 17 out");
if(isset($_GET['on'])){
$gpio_on =
shell_exec("/usr/local/bin/gpi
o -g write 17 1");
echo "Alarm
is on";
}
else
if(isset($_GET['off'])){
$gpio_off =
shell_exec("/usr/local/bin/gpi
o -g write 17 0");
echo "Alarm
is off";
}
?>
</center>
<br></br>
<font size="3"
color="blue"><b>SKRIPSI
BRENDHA</b></font><br></br>
<a href="logout.php">Click
here</a> to Logout.
</body>
</html>
6. logout.php
<?php
session_start () ;
session_destroy () ;
header
('location:login.php');
?>


![PERANCANGAN SISTEM INVENTARIS TANAH BERBASIS …eprints.uty.ac.id/4190/1/NASKAH PUBLIKASI-Arivatun... · sebagainya [3]. Inventaris berasal dari kata “Latin = inventarium” yang](https://static.fdokumen.com/doc/165x107/607339d45bbb177e107cf093/perancangan-sistem-inventaris-tanah-berbasis-publikasi-arivatun-sebagainya.jpg)