
Hm009 Ing High
78
-
Upload
higherdepths -
Category
Documents
-
view
218 -
download
0
Transcript of Hm009 Ing High

8/13/2019 Hm009 Ing High
http://slidepdf.com/reader/full/hm009-ing-high 1/78

8/13/2019 Hm009 Ing High
http://slidepdf.com/reader/full/hm009-ing-high 2/78
009

8/13/2019 Hm009 Ing High
http://slidepdf.com/reader/full/hm009-ing-high 3/78
8/13/2019 Hm009 Ing High
http://slidepdf.com/reader/full/hm009-ing-high 4/78
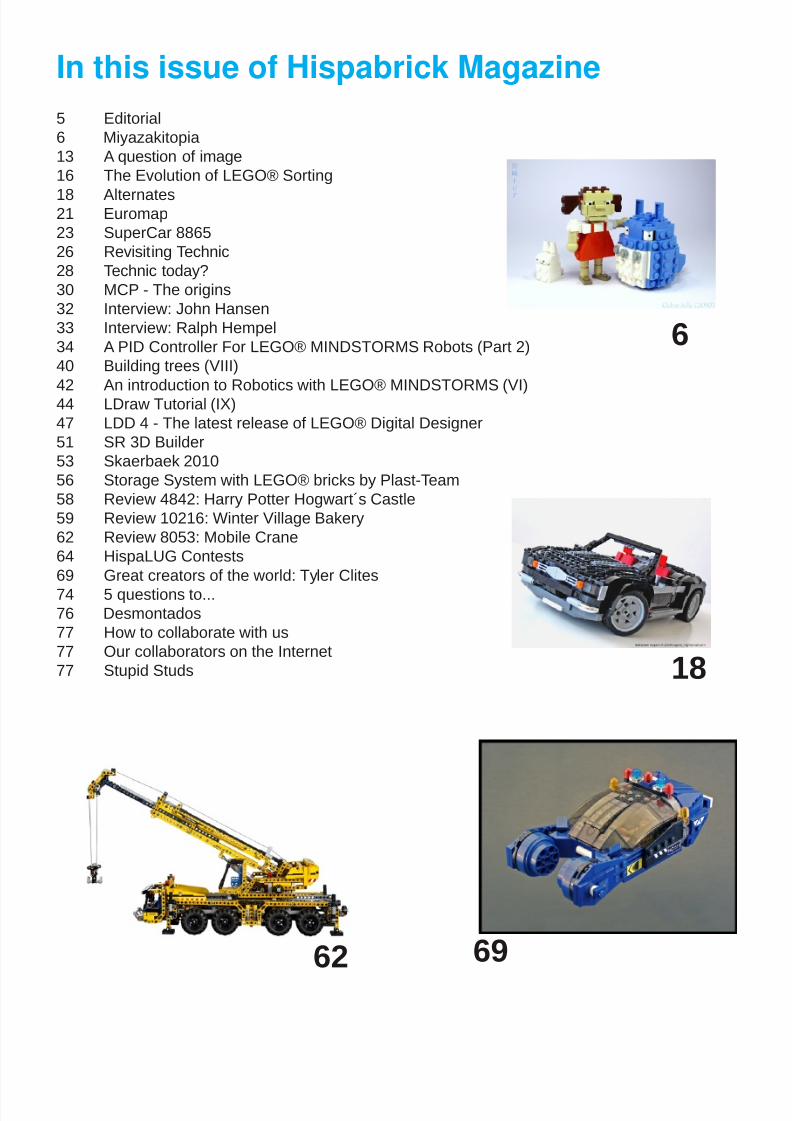
5 Editorial6 Miyazakitopia13 A question of image16 The Evolution of LEGO® Sorting
18 Alternates21 Euromap23 SuperCar 886526 Revisiting Technic28 Technic today?30 MCP - The origins32 Interview: John Hansen33 Interview: Ralph Hempel34 A PID Controller For LEGO® MINDSTORMS Robots (Part 2)40 Building trees (VIII)
42 An introduction to Robotics with LEGO® MINDSTORMS (VI)44 LDraw Tutorial (IX)47 LDD 4 - The latest release of LEGO® Digital Designer51 SR 3D Builder53 Skaerbaek 201056 Storage System with LEGO® bricks by Plast-Team58 Review 4842: Harry Potter Hogwart´s Castle59 Review 10216: Winter Village Bakery62 Review 8053: Mobile Crane64 HispaLUG Contests69 Great creators of the world: Tyler Clites
74 5 questions to...76 Desmontados77 How to collaborate with us77 Our collaborators on the Internet77 Stupid Studs
In this issue of Hispabrick Magazine
6
18
62 69

8/13/2019 Hm009 Ing High
http://slidepdf.com/reader/full/hm009-ing-high 5/78
Editorial
by car_mp
A new issue. It seems incredible that we have reached issue number 009 when few people believed we would go beyond therst issue. As most prominent landmarks I would like to highlight the number of international collaborations that we have in this
issue. Gradually, the magazine goes global, and more importantly, little by little, people begin to know and appreciate our efforts.Perhaps our layout is not as professional it could be, or the quality of articles is not very homogenous... but I assure you that wedo the best this bunch of amateurs can.
The inclusion of Mindstorms and Technic articles have had a good reception from the fans, so we have included materials onthese lines in this new issue. We have also decided to show you two other applications for the design of your models on yourcomputer. After all these issues with the LDraw tutorial we wanted to show you other solutions that are at your disposal.I personally see them as complementary programs. Each has its strengths and weaknesses and if they were more compatible with each other every AFOL would have all three installed on their computers and would use the one best suited to what theyhave in mind.
I’d like to thank all the people who have contacted us at [email protected], both to encourage us or to collaborate with us. I hope that trend continues and more and more people are encouraged to publish their articles with us.
Finally, people who complain about the long time between the issues, the only thing I can recommend is you can readBrickjournal and Railbricks in the meanwhile, two references in our LEGO® world.
See you soon#
5
Kaneda´s bike by

8/13/2019 Hm009 Ing High
http://slidepdf.com/reader/full/hm009-ing-high 6/78
A Plot Is Hatched
2009 was turning out to be a great year for Zombies!
It’s the rst weekend of October, and in Seattle, BrickCon
2009 is in full swing. Several hundred LEGO® fans have spentthe past couple of days frantically (yet meticulously) settingout their unique LEGO creations in this vast hall. And now,thousands of people swarm around us, pressing up against
the barriers to get a close-up look at the fruits of our labor. Andpointing a lot.
My own work is proudly laid out on a table in the very farthestcorner of the auditorium. There probably wouldn’t be muchtrafc down this end, except that I happen to be directlyopposite the BrickArms booth. I watch the 6 foot deep throngof adolescents that surrounds them, a seething organismcomprised entirely of ailing arms and black hoodies, surging
endlessly forwards. The BrickArms guys have had to bracethemselves between the table and the back wall to avoid beingcrushed like bugs. The crowd somehow reminds me of thatdemon from Princess Mononoke…
Andrew Becraft takes time off from the ‘Zombie Apocafest’display to pay me and Lino Martins a visit. This is the secondyear that BrickCon has had a zombie display, and it’s evenbigger than the previous one. And there’s a new zombiemovie playing in theaters as well. Yep, denitely a big year for
zombies.
Andrew knows the kind of stuff that makes Lino and metick, and he has a proposal for us: “I think it’s time to givethe zombies a rest. What if next year’s collaborative theme
was Japan? We could call it something like Big in Japan!People could bring anything they like to do with the Japaneseculture”. Andrew grew up in Japan, and I’m a bit of a Japan-o-phile, so the three of us leap on the idea immediately,brainstorming then and there about giant monsters knockingover skyscrapers, epic samurai battles, and puppy vendingmachines. But at that instant, I know exactly what my
contribution is going to be, even if at the time it seemedcompletely beyond my ability… I was going to build theultimate LEGO tribute to legendary anime director HayaoMiyazaki. It would be big. It would be great. It would be averitable “Miyazaki-topia”!
The Man Behind The Myth
You might never have heard of Hayao Miyazaki, or even
know what “anime” is. Even so, you may still have enjoyedsome of his movies without realizing it. I often meet people who remember seeing My Neighbor Totoro or Nausicaa of theValley of the Winds when they were younger, without knowing
anything about Miyazaki or his later works. In fact, a friendonce asked me “What’s so special about Miyazaki? There area million anime directors in Japan”. The answer is simple…Miyazaki is to Japanese animation, what Alfred Hitchcock wasto American cinema. Except that Hitchcock never actually won
an Oscar, whereas Miyazaki did! His movie Spirited Away wonthe Academy Award for Best Animated Feature in 2002.
Miyazaki’s movies are works of art, taking years of painstaking
hand-drawn animation to complete. They also feature wonderful characters and moving storylines. And if you’ve seenmore than one, you’ll have noticed some recurring themes:child protagonists; strong female characters; breathtakinglandscapes; magical spirits; impossible ying machines. Nature
is an integral part of every Miyazaki movie, and his storylinesoften carry a strong environmentalist message. And there’salways plenty of action to enjoy too, although Miyazaki isn’tafraid to pause things from time to time, and let you just soakin the amazing scenery!
Thanks to the efforts of folks like John Lasseter at Pixar,
Miyazaki’s movies are now far more accessible to Westernaudiences than ever before. His entire body of work is readily
available on DVD, with redubbed soundtracks featuring somestar-studded voice talent. My family enjoys them on a regularbasis, and they occupy a very special place in our hearts.Children seem to nd them particularly spellbinding. When we
rst got Nausicaa of the Valley of the Winds, we watched it 3
times in one weekend!
Mapping It All Out
While recovering from BrickCon, I began to plan the project.The rst step was to draw up a list of the most iconic elements
from each of the 9 movies (characters, creatures, vehicles,
buildings and scenes). But at almost 100 items, the list was way too long! So I whittled it down to the most important 20 orso, limiting myself to just one or two key characters from eachmovie, and focusing less on vehicles, since that was one areathat other people had already covered. For example, I hadseen mini-g scale versions of the Cat Bus, Porco’s plane, and
Flappters, as well as several different sized versions of Howl’sMoving Castle.
I don’t use mini-gs, but prefer to work nearer “miniland” scale
- that’s the scale of the little people you see in Legoland themeparks, or in the display cases at the LEGO store. I actually work at about double that scale, in order to create more lifelikeposes and detailed facial expressions. So I gured I would just
work in that style, but perhaps adding a larger central ‘bust’ ofMiyazaki himself as a centerpiece.
I also wanted to integrate all of the models into some kind
Miyazakitopia
A Tale Of Two Conventions
Text and pictures by Iain Heath
8/13/2019 Hm009 Ing High
http://slidepdf.com/reader/full/hm009-ing-high 7/78
of scene, probably a sweeping natural landscape spanningseveral baseplates. Flight and aircraft are very importantthemes in Miyazaki’s movies, so I also decided that some ofthe models would have to be suspended to look as thoughthey were ying, although at the time I had no idea how I would
accomplish that!
BrickCon 2010 was still almost a year away, which seemed likeplenty of time. But I knew I would have to be aware of my ownlimitations, to ensure I could complete enough pieces to makethe diorama interesting. I don’t have much experience withbuildings, vehicles or scenery, and certainly nothing massive.So I planned to build those elements at “microscale” and placethem at the back, to create the impression that they were faraway.
Why Doesn’t LEGO® Make Furry Bricks?
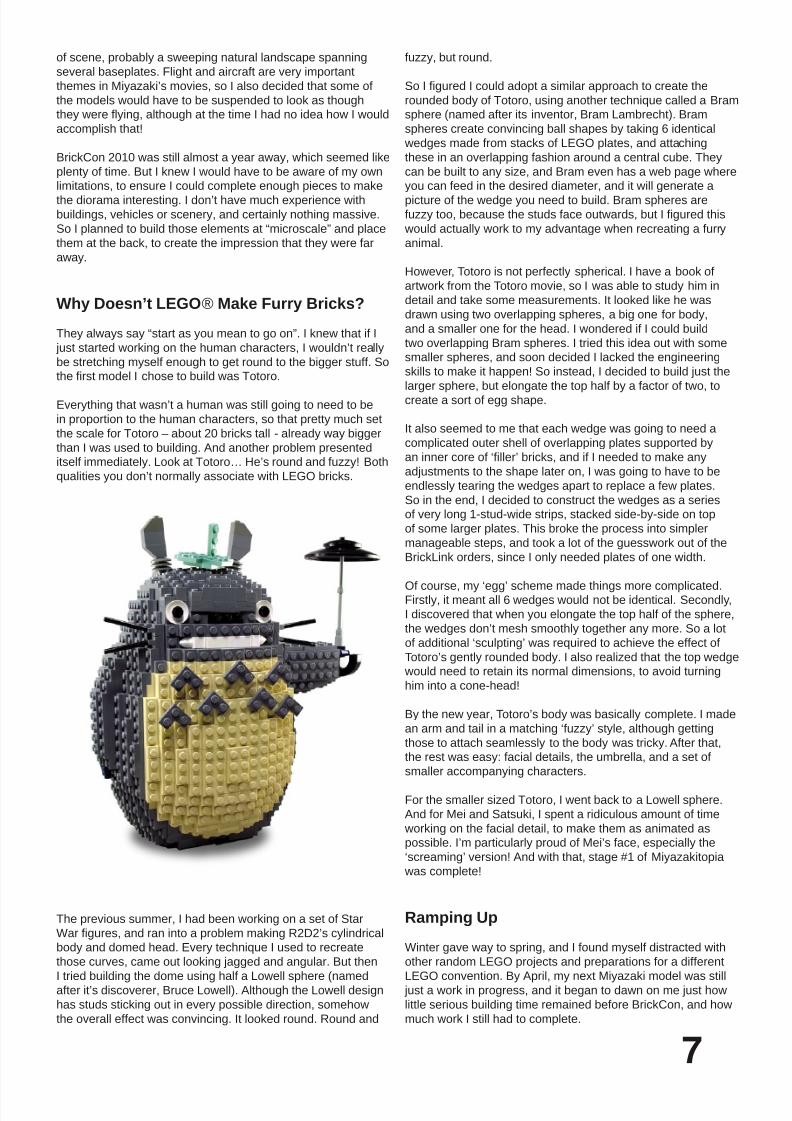
They always say “start as you mean to go on”. I knew that if I just started working on the human characters, I wouldn’t reallybe stretching myself enough to get round to the bigger stuff. Sothe rst model I chose to build was Totoro.
Everything that wasn’t a human was still going to need to bein proportion to the human characters, so that pretty much setthe scale for Totoro – about 20 bricks tall - already way biggerthan I was used to building. And another problem presenteditself immediately. Look at Totoro… He’s round and fuzzy! Bothqualities you don’t normally associate with LEGO bricks.
The previous summer, I had been working on a set of StarWar gures, and ran into a problem making R2D2’s cylindricalbody and domed head. Every technique I used to recreatethose curves, came out looking jagged and angular. But then
I tried building the dome using half a Lowell sphere (namedafter it’s discoverer, Bruce Lowell). Although the Lowell designhas studs sticking out in every possible direction, somehowthe overall effect was convincing. It looked round. Round and
fuzzy, but round.
So I gured I could adopt a similar approach to create the
rounded body of Totoro, using another technique called a Bramsphere (named after its inventor, Bram Lambrecht). Bramspheres create convincing ball shapes by taking 6 identical wedges made from stacks of LEGO plates, and attachingthese in an overlapping fashion around a central cube. Theycan be built to any size, and Bram even has a web page whereyou can feed in the desired diameter, and it will generate a
picture of the wedge you need to build. Bram spheres arefuzzy too, because the studs face outwards, but I gured this
would actually work to my advantage when recreating a furryanimal.
However, Totoro is not perfectly spherical. I have a book ofartwork from the Totoro movie, so I was able to study him indetail and take some measurements. It looked like he wasdrawn using two overlapping spheres, a big one for body,and a smaller one for the head. I wondered if I could buildtwo overlapping Bram spheres. I tried this idea out with somesmaller spheres, and soon decided I lacked the engineeringskills to make it happen! So instead, I decided to build just thelarger sphere, but elongate the top half by a factor of two, tocreate a sort of egg shape.
It also seemed to me that each wedge was going to need acomplicated outer shell of overlapping plates supported byan inner core of ‘ller’ bricks, and if I needed to make any
adjustments to the shape later on, I was going to have to beendlessly tearing the wedges apart to replace a few plates.So in the end, I decided to construct the wedges as a seriesof very long 1-stud-wide strips, stacked side-by-side on topof some larger plates. This broke the process into simplermanageable steps, and took a lot of the guesswork out of theBrickLink orders, since I only needed plates of one width.
Of course, my ‘egg’ scheme made things more complicated.Firstly, it meant all 6 wedges would not be identical. Secondly,I discovered that when you elongate the top half of the sphere,the wedges don’t mesh smoothly together any more. So a lotof additional ‘sculpting’ was required to achieve the effect ofTotoro’s gently rounded body. I also realized that the top wedge would need to retain its normal dimensions, to avoid turninghim into a cone-head!
By the new year, Totoro’s body was basically complete. I madean arm and tail in a matching ‘fuzzy’ style, although gettingthose to attach seamlessly to the body was tricky. After that,the rest was easy: facial details, the umbrella, and a set ofsmaller accompanying characters.
For the smaller sized Totoro, I went back to a Lowell sphere.And for Mei and Satsuki, I spent a ridiculous amount of time working on the facial detail, to make them as animated aspossible. I’m particularly proud of Mei’s face, especially the‘screaming’ version! And with that, stage #1 of Miyazakitopia was complete!
Ramping Up
Winter gave way to spring, and I found myself distracted withother random LEGO projects and preparations for a different
LEGO convention. By April, my next Miyazaki model was still just a work in progress, and it began to dawn on me just howlittle serious building time remained before BrickCon, and howmuch work I still had to complete.
7
8/13/2019 Hm009 Ing High
http://slidepdf.com/reader/full/hm009-ing-high 8/78
It was time to get hard core, and take things up a notch!
Until that time, I had only ever worked on one model at a time,building as ideas or inspiration came to me. I tended to work with just the bricks I already had in my modest collection, andusually recycled old models to create new ones. I was still onlya ‘dabbler’ with BrickLink at this point, being careful to onlyorder exactly the bricks I lacked to complete each model. And
I was still working on the living room oor, with a collection that was only primitively sorted into a dozen gallon-sized Zip-lockbags.
I realized I had to industrialize my building process, if I was tostand a chance of completing this project on time. I prioritizedthe to-do list and built to a strict schedule. I forced myselfto “parallelize”, working on several models at once, movingbetween them as I waited for various overlapping BrickLinkorders to arrive. And I nally set up a proper work space,
clearing out our spare room and bringing in a couple ofcollapsible picnic tables. The nal step was to acquire a large
number of clear plastic containers so that I could organize mygrowing collection of bricks. Having your bricks properly sortedsaves you an enormous amount of time searching for what youneed - or determining if you actually have what you need!
With the addition of an internet radio, I was ready to get downto it. What followed was a summer of many (uncomfortably hot)late night builds. At times it felt more like work than play! Buttowards summer’s end, I had completed almost everything onthe list.
Putting It All Together
Here’s a closer look at the construction behind each of the
various models. You can nd detailed photographs of each oneup on my Flickr photostream…
“Nausicaä on her glider” – This was the second model I
attempted after nishing Totoro. The glider has a very particular
curved design that was hard to emulate. Remember, I hadnever built a vehicle or aircraft before! The rst step was to
decide on a scale. I realized that if I created the pilot at myusual 2X miniland scale, the glider would be really huge. Soagainst my natural instincts, I decided to make Nausicaa tothe miniland ‘standard’. In the past I’ve described the minilandstandard as “horribly deformed”. But this project made merealize that miniland is just another useful weapon in an AFOLs
arsenal. When you only need to create the impression of acharacter, it’s a very handy technique, and I use it quite oftennow! To create the pilot’s wind-blown “hanging on” pose, I hadto build her entirely studs-down, due to a lack of available bricktypes in medium blue.
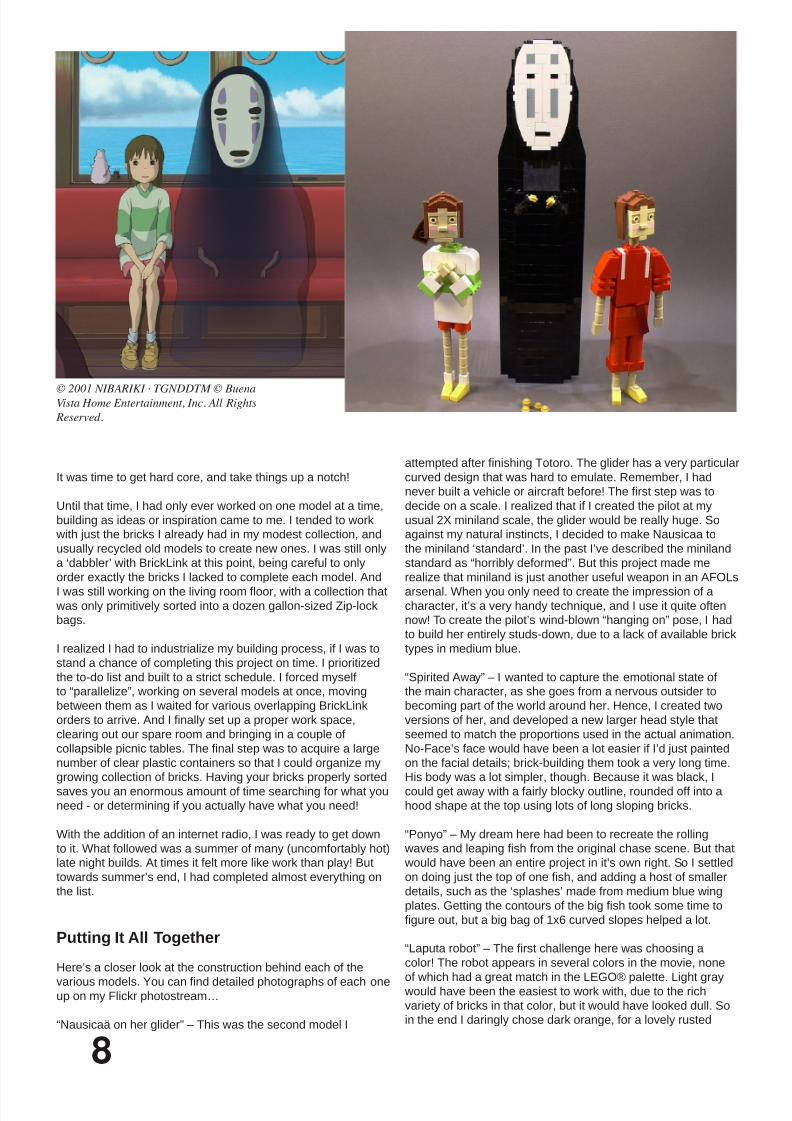
“Spirited Away” – I wanted to capture the emotional state ofthe main character, as she goes from a nervous outsider tobecoming part of the world around her. Hence, I created twoversions of her, and developed a new larger head style thatseemed to match the proportions used in the actual animation.No-Face’s face would have been a lot easier if I’d just paintedon the facial details; brick-building them took a very long time.His body was a lot simpler, though. Because it was black, Icould get away with a fairly blocky outline, rounded off into ahood shape at the top using lots of long sloping bricks.
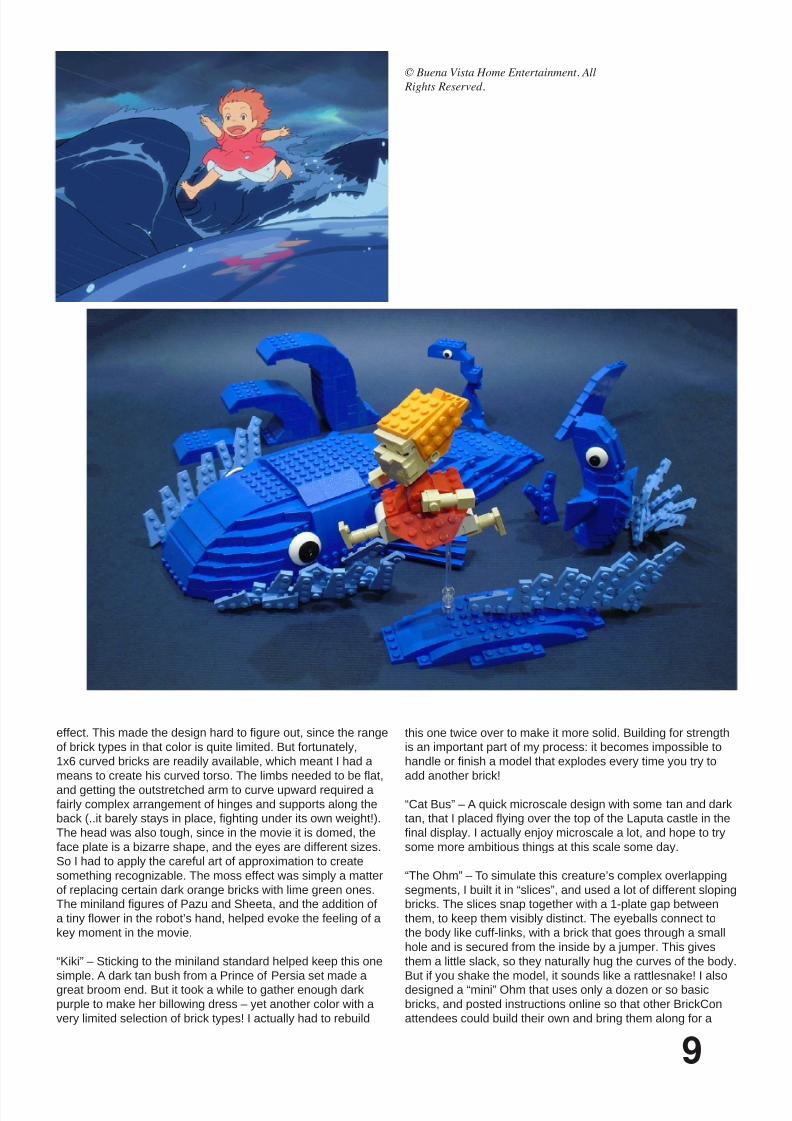
“Ponyo” – My dream here had been to recreate the rolling waves and leaping sh from the original chase scene. But that
would have been an entire project in it’s own right. So I settledon doing just the top of one sh, and adding a host of smaller
details, such as the ‘splashes’ made from medium blue wingplates. Getting the contours of the big sh took some time to
gure out, but a big bag of 1x6 curved slopes helped a lot.
“Laputa robot” – The rst challenge here was choosing a
color! The robot appears in several colors in the movie, none
of which had a great match in the LEGO® palette. Light gray would have been the easiest to work with, due to the richvariety of bricks in that color, but it would have looked dull. Soin the end I daringly chose dark orange, for a lovely rusted
8
© 2001 NIBARIKI · TGNDDTM © BuenaVista Home Entertainment, Inc. All Rights
Reserved.
8/13/2019 Hm009 Ing High
http://slidepdf.com/reader/full/hm009-ing-high 9/78
effect. This made the design hard to gure out, since the range
of brick types in that color is quite limited. But fortunately,1x6 curved bricks are readily available, which meant I had a
means to create his curved torso. The limbs needed to be at,
and getting the outstretched arm to curve upward required afairly complex arrangement of hinges and supports along theback (..it barely stays in place, ghting under its own weight!).
The head was also tough, since in the movie it is domed, theface plate is a bizarre shape, and the eyes are different sizes.So I had to apply the careful art of approximation to create
something recognizable. The moss effect was simply a matterof replacing certain dark orange bricks with lime green ones.The miniland gures of Pazu and Sheeta, and the addition of
a tiny ower in the robot’s hand, helped evoke the feeling of a
key moment in the movie.
“Kiki” – Sticking to the miniland standard helped keep this onesimple. A dark tan bush from a Prince of Persia set made agreat broom end. But it took a while to gather enough darkpurple to make her billowing dress – yet another color with avery limited selection of brick types! I actually had to rebuild
this one twice over to make it more solid. Building for strengthis an important part of my process: it becomes impossible tohandle or nish a model that explodes every time you try to
add another brick!
“Cat Bus” – A quick microscale design with some tan and darktan, that I placed ying over the top of the Laputa castle in the
nal display. I actually enjoy microscale a lot, and hope to try
some more ambitious things at this scale some day.
“The Ohm” – To simulate this creature’s complex overlapping
segments, I built it in “slices”, and used a lot of different slopingbricks. The slices snap together with a 1-plate gap betweenthem, to keep them visibly distinct. The eyeballs connect tothe body like cuff-links, with a brick that goes through a smallhole and is secured from the inside by a jumper. This givesthem a little slack, so they naturally hug the curves of the body.But if you shake the model, it sounds like a rattlesnake! I alsodesigned a “mini” Ohm that uses only a dozen or so basicbricks, and posted instructions online so that other BrickConattendees could build their own and bring them along for a
9
© Buena Vista Home Entertainment. All
Rights Reserved.

8/13/2019 Hm009 Ing High
http://slidepdf.com/reader/full/hm009-ing-high 10/78
special “OhmLUG” display. Brad Krick in particular createdsome hilarious customized versions, including Star Wars™Ohms and Classic Space Ohms!
“Hayao Miyazaki” – I decided to play it safe and create theMiyazaki bust at the same scale as my Sarah Palin bustfrom 2008. I started by deciding how to do the glasses, andthat determined the size of everything else. The hair bang issecured with two hinge bricks that allow it to hang at a realisticangle. Funnily enough, the bust didn’t really look like Miyazaki when I rst completed it. After some time I realized that the
nose was all wrong. As soon as I added those huge ared
nostrils, Mr Miyazaki was suddenly looking back at me fromacross the table!
“Princess Mononoke” – At rst I couldn’t decide what scale
or style to adopt for San, and was actually working on 3prototypes at once, until I decided to go with my ‘traditional’style. Figuring out how to build the war paint into the face tooksome time, as did all the owing garments. In the end I went
for a studs-sideways approach for the body, which I nd makes
it easier to get more detail into clothing. I wanted a dramaticaction pose, and somehow this one just popped into my head.Despite a lot of effort, I couldn’t get her legs to actually attachto the body in those positions, so they are actually free-standing. And as with many of my regular LEGO® gures, the
eyes are painted in with a black sharpie.Ashitaka was fairly simple to do, and wasnished much more quickly. Recreating
the ghostly worms on his arm was kind of
a spur-of-the-moment idea, and since theyhad to be dark purple, there were only alimited number of ways I could do them.
Something Is Missing
At this point I was pretty pleased withthe collection, but it still didn’t seem likeenough to make an impressive, busydiorama. And I still needed to build alandscape to house it all. That was really worrying me. In the end, the bust I createdof The Man Himself was pretty convincing,but not large enough to make a goodcenterpiece. I needed to something witha ‘wow’ factor to bring the other pieces
together. Also, many of the vehicles andbuildings had been at the bottom of thelist, and would probably not make the cutat this point.
Ordinarily, I spend a couple of hours aday scouring the internet for great LEGOcreations by other builders and bloggingabout them. But with all the late nights,the number of posts was w-a-y down.
But looking at other people’s work isalways so inspiring, it convinced me thatI needed to try and step up to the bar thatso many of my favorite builders had set,and try something big (…well, big by mystandards!).
That’s when I decided that the city ofLaputa (from The Castle In The Sky) wasto be the centerpiece.
It seemed like a crazy decision – I’d nevercreated a building before, and now I was going to start bymaking one that ies and has no right angles! As always, the
rst step was to choose a scale. I usually nd it’s important
to zero in on some small but vital detail of your subject, andgure out how you’re gonna do that part, and then multiply
up from there to determine the overall size of the model. Inthis instance, the vital details were the towers and archwaysset into the castle’s outer walls. After much experimentation,
I found a reasonable way to do the walls that could capturethese details, allowing me to begin in earnest.
The dome at the bottom of the castle was clearly going to beanother Bram sphere (well, half a Bram sphere), so buildingthat was just a matter of ordering in the bricks and setting upa “production line” to assemble them. The real problem was
gonna be arranging those ringed outer walls. There neededto be at least 3 rings, of the same basic design but differentdiameters, set atop one another, with grassy lawns in between.Once I had fabricated enough lengths of wall to play around with, I had to gure the exact width for each ring, that would
keep them all in proportion, but also allow me to knit togethera system of lime green wing plates for the lawns. The internalstructure of the walls was also pretty complicated, with thevarious layers resting on top of one another like the layers of a wedding cake. In the end, the tree at the top was a very quick
10
8/13/2019 Hm009 Ing High
http://slidepdf.com/reader/full/hm009-ing-high 11/78
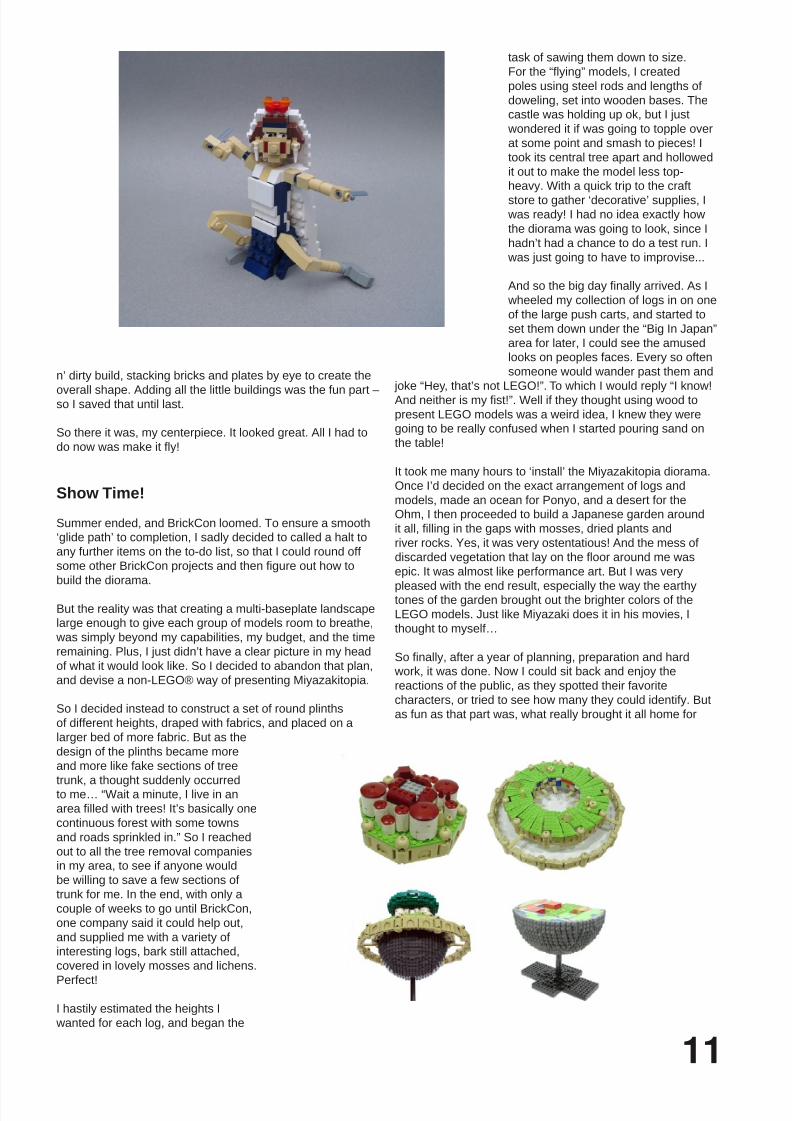
n’ dirty build, stacking bricks and plates by eye to create the
overall shape. Adding all the little buildings was the fun part –so I saved that until last.
So there it was, my centerpiece. It looked great. All I had todo now was make it y!
Show Time!
Summer ended, and BrickCon loomed. To ensure a smooth‘glide path’ to completion, I sadly decided to called a halt toany further items on the to-do list, so that I could round offsome other BrickCon projects and then gure out how to
build the diorama.
But the reality was that creating a multi-baseplate landscapelarge enough to give each group of models room to breathe, was simply beyond my capabilities, my budget, and the timeremaining. Plus, I just didn’t have a clear picture in my headof what it would look like. So I decided to abandon that plan,and devise a non-LEGO® way of presenting Miyazakitopia.
So I decided instead to construct a set of round plinthsof different heights, draped with fabrics, and placed on alarger bed of more fabric. But as thedesign of the plinths became moreand more like fake sections of tree
trunk, a thought suddenly occurredto me… “Wait a minute, I live in anarea lled with trees! It’s basically one
continuous forest with some townsand roads sprinkled in.” So I reachedout to all the tree removal companiesin my area, to see if anyone wouldbe willing to save a few sections oftrunk for me. In the end, with only acouple of weeks to go until BrickCon,one company said it could help out,and supplied me with a variety ofinteresting logs, bark still attached,covered in lovely mosses and lichens.
Perfect!
I hastily estimated the heights I wanted for each log, and began the
task of sawing them down to size.For the “ying” models, I created
poles using steel rods and lengths ofdoweling, set into wooden bases. Thecastle was holding up ok, but I just wondered it if was going to topple overat some point and smash to pieces! Itook its central tree apart and hollowedit out to make the model less top-heavy. With a quick trip to the craft
store to gather ‘decorative’ supplies, I was ready! I had no idea exactly how
the diorama was going to look, since Ihadn’t had a chance to do a test run. I was just going to have to improvise...
And so the big day nally arrived. As I
wheeled my collection of logs in on oneof the large push carts, and started toset them down under the “Big In Japan”area for later, I could see the amusedlooks on peoples faces. Every so oftensomeone would wander past them and
joke “Hey, that’s not LEGO!”. To which I would reply “I know!And neither is my st!”. Well if they thought using wood to
present LEGO models was a weird idea, I knew they weregoing to be really confused when I started pouring sand onthe table!
It took me many hours to ‘install’ the Miyazakitopia diorama.Once I’d decided on the exact arrangement of logs and
models, made an ocean for Ponyo, and a desert for theOhm, I then proceeded to build a Japanese garden aroundit all, lling in the gaps with mosses, dried plants and
river rocks. Yes, it was very ostentatious! And the mess ofdiscarded vegetation that lay on the oor around me was
epic. It was almost like performance art. But I was very
pleased with the end result, especially the way the earthytones of the garden brought out the brighter colors of theLEGO models. Just like Miyazaki does it in his movies, Ithought to myself…
So nally, after a year of planning, preparation and hard work, it was done. Now I could sit back and enjoy thereactions of the public, as they spotted their favoritecharacters, or tried to see how many they could identify. Butas fun as that part was, what really brought it all home for
11
8/13/2019 Hm009 Ing High
http://slidepdf.com/reader/full/hm009-ing-high 12/78
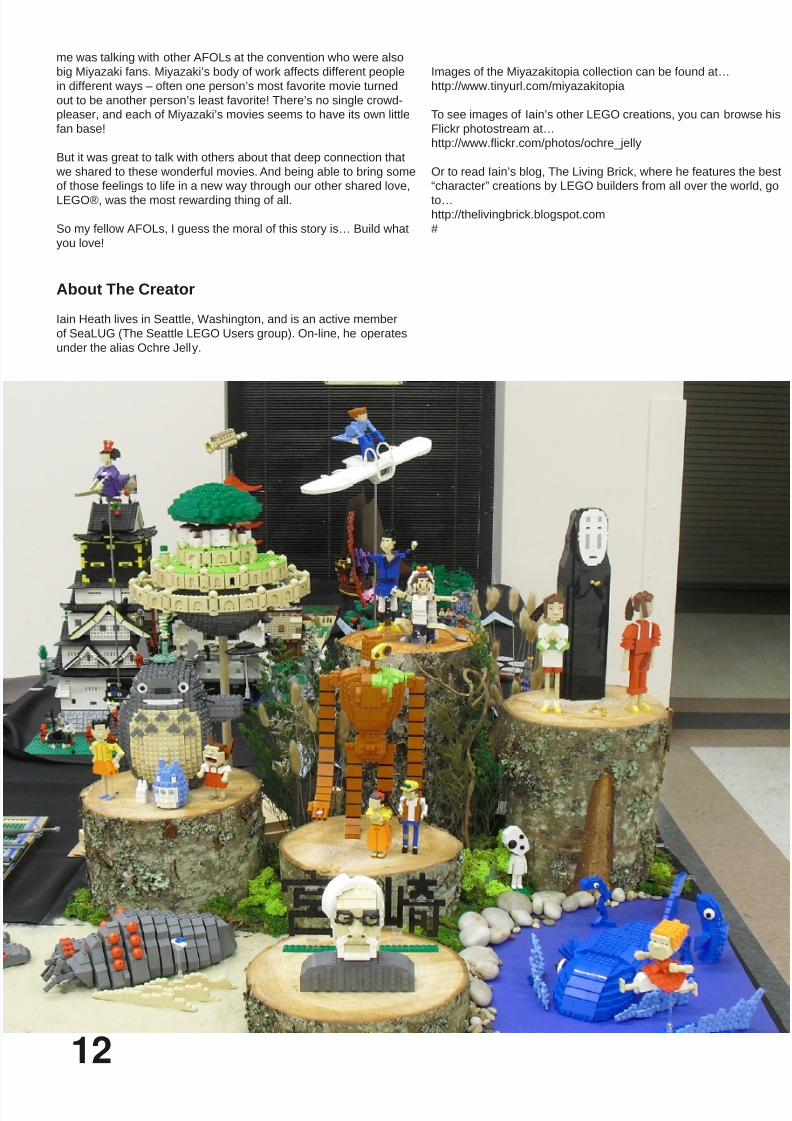
me was talking with other AFOLs at the convention who were alsobig Miyazaki fans. Miyazaki’s body of work affects different peoplein different ways – often one person’s most favorite movie turnedout to be another person’s least favorite! There’s no single crowd-pleaser, and each of Miyazaki’s movies seems to have its own littlefan base!
But it was great to talk with others about that deep connection that we shared to these wonderful movies. And being able to bring someof those feelings to life in a new way through our other shared love,
LEGO®, was the most rewarding thing of all.
So my fellow AFOLs, I guess the moral of this story is… Build whatyou love!
About The Creator
Iain Heath lives in Seattle, Washington, and is an active memberof SeaLUG (The Seattle LEGO Users group). On-line, he operatesunder the alias Ochre Jelly.
Images of the Miyazakitopia collection can be found at…http://www.tinyurl.com/miyazakitopia
To see images of Iain’s other LEGO creations, you can browse hisFlickr photostream at…http://www.ickr.com/photos/ochre_jelly
Or to read Iain’s blog, The Living Brick, where he features the best“character” creations by LEGO builders from all over the world, go
to…http://thelivingbrick.blogspot.com#
12

8/13/2019 Hm009 Ing High
http://slidepdf.com/reader/full/hm009-ing-high 13/78
A question of image
Introducing Stop-Motion
Text and images by Obsoleto
From the beginning of time, the man has tried to portray all that was happening around them either painting on the inside of acave, in a huge canvas or in the Sistine Chapel. Curiosity made man mix chemicals and in 1816 create the rst negative image,
the forerunner of the current picture. But in 1895, man’s obsession for perfection makes him put 24 of these pictures into a singlenegative to create a unique and wonderful second of moving image. That cold morning of December, the rst motion picture was
presented in France.
Much has happened between December 28, 1895 and August 25, 1978, when the rst minig goes on sale.
Much has changed as well since that short lm by the Lumiere brothers to the masterpiece of animation that is Toy Story 3.
And it is when the image and LEGO® sets are combined for the rst time that projects that unite these two arts arise from the
imagination of a few . Those few now are many and active.
THEORY OF THE IMAGE
How many of us have imagined ourselves in the role of the main character in a movie when we saw it at the cinema? The magicof cinema is that their stories, near or far from us, make us forget for a time our surroundings and enter into this world that isbefore our eyes. The rst short lms made with LEGO sets and minigs arise from the need to portray these stories we have
seen the day before in the movies but giving it our personal touch. Those who are dedicated to this start from a simple premise: “Ican not be Spiderman, but I can make a Spider-Man minig y over a LEGO City set”.
And how do you make a Spider-Man minig y over a set of LEGO City? Very simple, with only four steps:
- Spiderman Minig- LEGO City Set- A camera connected to a laptop- Much time and enthusiasm
Is anyone surprised I use a photo camera instead of a video camera? I imagine that at this point where we would be able to make“Avatar”, nobody is surprised ... and that is because if we record this sequence with a video camera, we would be able to see ourngers moving the minig.
Returning to the end of the opening paragraph: “24 photographs made a second of motion”We will be purists, replace “photos” with “frames” and “movement” with “animation”.Good. We already have the set, the minig, camera, laptop and we know that this work will take a lot of time. What’s next?
When I studied Image and Sound, I learned two things in the chapter on American Cinema:- Their lms are industry, not culture
- Their lms are made thinking of the viewer, not the argument.
When recording a short lm with LEGO gures you have to think how you will distribute it (and if not, why invest so much timeand effort...?)A little more theory:- I want my movie to be seen online. I’m going to upload it to Bricklms.com: Select a camera resolution of 640 x 480 pixels and
edit it on the computer at 15 frames per second- I want my movie to be seen in a cinema preceding the second part of Avatar: Select a camera resolution of 1920 x 1080 pixels
and edit on the computer at 24 frames per second- I want my movie to be seen on the Saturday night lm show on Channel 1: Select a camera resolution of 720 x 576 pixels and
edit on the computer at 25 frames per second.
I don´t want to disappoint you, but in the end you’ll wind up showing your “wonderful lm” to your friends on a computer. So
I recommend the rst option: the camera at 640 x 480 (the computer will take less time) and 12 to 15 frames per second
(duplicating frames in the edition)
13

8/13/2019 Hm009 Ing High
http://slidepdf.com/reader/full/hm009-ing-high 14/78
EXPERIENCE IS THE MOTHER OF SCIENCE
If this is your rst experience in making short lms (and you have time...) I would try the same method that is used by scientists:
“trial and error.”Let me explain:
Frame by frame animations recorded with clay, wooden gures, peanuts, minigs, etc ... is called “stop-motion”
“Stop-motion” is based on: Hand in. I move the doll. Hand out. Picture. Hand in. I move the doll. Hand out. Picture. Hand in. Imove the doll. Hand out. Picture ... and so on 25 times to make a second of animation.
My rst short LEGO® lm I did it that way. I recorded three seconds of animation (75 photos), downloaded them to my computer
and joined them with an editing program. Result: the minig is moving in leaps. That was my TRIAL - ERROR.
Analyzing the failures I saw that I have to show more movement of joints than position changesThe work is meticulous, but it works. Only 6 pictures:- Minig with two feet on the ground
- Minig lifts the right foot
- Minig body tilted while low right foot. Left foot back
- Minig stretched with two feet on the ground
- Minig Left foot up- Minig body tilted while low left foot. Right foot back
- Minig stretched with two feet on the ground (such as Picture 1, the loop repeats)
In ¼ second our minig has completed two steps, and therefore in a second it will have taken eight steps (BLOW! Minig IS
RUNNING!)The editing program you’re using is very important. Personally, I bought “Adobe Master Collection CS4” which includes many“must have” tools for those who do this kind of things professionally, including Photoshop (photo editor), Premiere (video editing)and After Effects (video post-production).Yet you can nd very powerful freeware on the Internet.
The trick to not see the minig run is related to how you import the pictures in the video editor. I recommend that each photo last
two frames. So in a second you see 12 photos and the motion is more realistic (only takes 4 steps).
14

8/13/2019 Hm009 Ing High
http://slidepdf.com/reader/full/hm009-ing-high 15/78
MY PERSONAL EXPERIENCE
Since 1992, when I nished my Image and Sound degree, I have been trying to use new technologies for animation. First Istarted with a short lm, then I dared to write a long lm and nally, after many curriculums on paper, I got a job in television.
The use of LEGO® minigs in my short lms came from the need to make a storyboard. The storyboard is the lm in your mind
made shot by shot and drawn in pencil. This tool is essential to then explain to the crew what you intend to do. I am a terrible
artist, so I started to take pictures of my LEGO.
Then one thing led to another (as I’ve already mentioned, I’ve made 75 pictures)...On the other hand, digital photography was in its infancy, so what I did was use my video camera and an analog video capturecard connected to my laptop. Once the photos where on the computer hard drive, I passed them through the photo editor to“eliminate” the cables and impurities arising during the shooting (otherwise it is impossible to make Darth Vader... y)
The worst part of this work is the amount of time you have to take to make a movie with a decent length. So here I propose you write simple stories, without many effects. Making a LEGO version of Star Wars™ is a big temptation, but forces you to doublethe time needed because of the frame-by-frame editing to for example simply draw a lightsaber.
As technology progressed a bit more, it was time to take the next step. So, thanks to models already made with MLCad and a
wonderful plugin called LDRAW2LWS and the program “Lightwave 3D” I was able to convert the “Millennium Falcon Mini (4488) “into a 3D animation in PIXAR style
The world of digital imaging advances in geometric progression and each year there are new tools that revolutionize the cinemascreen. Just when we thought that after “Matrix” everything had been invented, “Avatar” by James Cameron came along in a
spectacular 3D.If, like me, you love the world of image and sound and you are an AFOL, investigate, search, nd the right information and try to
be the rst to make a short “Real 3D Stereo” lm, starring a Minig. Hint: two cameras (right eye, left eye) and a separation of 65
mm between the two lenses.There you have it.#
15

8/13/2019 Hm009 Ing High
http://slidepdf.com/reader/full/hm009-ing-high 16/78
The Evolution of LEGO® Sorting
Here’s a description of an evolution of LEGO collection sorting.It might be yours, at least in parts. It’s certainly been mine.
Text by Remy Evard
I might turn this into an essay some day, but for now it will haveto begin life as a series of unsupported claims. If you have anycomments or additions, toss’em in.
-----------------------------
Let’s assume you start your LEGO® collection like most of usdid: with one set.
1. You don’t sort your LEGO. You just keep them in the box
they came in.
(Then, over time, you get another set, then another, thenanother. And your pile of bricks grows. How do you cope?)
2. You start sorting your LEGO. You sort it by set.
(Your collection grows.)
3. You give up on individual set boxes and toss all your LEGO
in a big storage bin or a LEGO denim bag, or a couple of yourlarge set boxes. You become very familiar with the soundof someone digging through large bricks looking for a 1x1
transparent red plate.
(Your collection grows.)
4. You begin to sort your LEGO by category: normal-lookingbricks in one set box, other pieces in another box.
(And grows.)
5. Ok, you realize you actually have to sort it. You decide tosort the obvious way: by color.
(And grows.)
6. You keep sorting by color, but you get pickier about howyou do it, and you start ltering out by type for the rst time:probably the rst things you sort out by type are minigs and
wheels. You realize you already had baseplates sorted outseparately.
(Let’s just assume at this point that between every paragraph,your keep adding LEGO to your collection.)
7. You cave in and actually get a storage system. Maybe it’s
rubbermaid bins, or piles of blue buckets, or shing tackleboxes, or ziplocks. But now you’ve got a system.
8. You grow weary of digging through all the yellow bricks
looking for that one specialized yellow piece somewhere in 2cubic feet of yellow. But you think of how much work it’s goingto take to split by part and you don’t do it.
9. Sorting becomes difcult enough that you decide, in some
cases, not to break some sets down and put them in your mainpile of LEGO... instead, you store them as a set, becausethat set is so cool just the way it is. (Ok, so this set is from the80s...) The pieces for that set are either in their box, or in a
ziplock or something. Congratulations, you’ve just invented SetArchiving, and now you have two ways you store your LEGO:broken down by parts, and archived by set.
10. You give up and decide to sort your parts by type ratherthan by color. You go get more bins or tackle boxes or
whatever your container of choice is, you dedicate an eveningor a weekend or a month to it, and you split by type.
11. You have now invented your own LEGO categorization
system. You have no doubt separated out bricks, plates, wheels, minigs, slopes, and so on, but you’ve also clumped“things with curves” together, and doors and windshieldstogether. You also have a category called “misc”. Yourcategories, amazingly, don’t look much like the LDrawcategories.
12. You realize you have piles of stuff that don’t t easily intothe categorization system: RCX bricks, train track, those hugeA-shaped pieces, monorial supports, and rubber bands. Youget a different sized drawer system for stuff like that.
13. Your collection is now clearly housed in many differenttypes of containers ranging from buckets to drawers to bins toindividual tackle box components.
14. You begin to develop large piles of LEGO in various statesof being sorted, i.e:
● the sorted stuff
● the stuff you’ve kinda sorted and is ready to be put away
● piles of LEGO you aren’t going to sort because you think
you’ll use it all to build something else anyway
● LEGO sorted some other way than the way you sorted into
drawers to see if this way works better than that way did
● your building projects
16

8/13/2019 Hm009 Ing High
http://slidepdf.com/reader/full/hm009-ing-high 17/78
● your new boxes of LEGO®, some opened, some not
● oh, and let’s not forget your various models and MOCs
15. You begin to develop strong opinions on Plano vs. Stak-Onand Rubbermaid vs. Sterilite.
16. The original categories you made begin to follow this lifecycle:
- They grow too large to t into their container.
- You divide the category into two categories in order to getthem to t into the containers... one for each category. (Now
you have windshields, doors, and windows, each as a differentcategory of pieces, each in their own containers.)
- You store those subcategories together, but as parts of thembecome too numerous or too hard to nd, you split them out.
So your tackle boxes now have a different compartment for
each type of door.
You realize that at this point the endgame is that you will havea different compartment for every type of piece you have.
16.5. Every once in a while, you open a drawer you haven’topened in a while and discover that you’ve been sorting somepiece into two separate places in your drawers. This throwsyour categorization for a loop. How exactly do you categorize
the 1x2 plate with the little robot-looking thing on it? Oh no...
partsref doesn’t have it either, augh!
17. You rearrange your house so that you can t your storage
system into, hopefully, just one room.
18. You give up on the “one compartment for every piece”theory because you can’t keep up with that. Instead, you start
putting some of the similar things into shoebox-sized bins. The way you decide what to compartmentalize and what to putinto bins together is to think about how long it takes to nd an
individual element. It’s ok to dig through a pile of windshieldslooking for the trans yellow blacktron hood. It’s not ok to digthrough a pile of slopes looking for the specialized corner capslope.
18.5. You document your categories so you don’t get lost.
19. You develop a multi-stage sorting system. It may take apiece several hops before it ends up in its nal resting spot, butit’s a bit more efcient to sort this way, and you can do some of
it while watching a video.
20. Bizarrely enough, you actually give up and go back tosorting by color. Only this time, you sort by color after sortingby piece. So you now have a bin for yellow 1x3 plates, and a
bin for black 1x3 plates, and so on.
21. Finally you create an “overow” system of buckets, where,
if the bin of 1x3 yellow plates is full, you just any additional
ones into that overow bucket, along with other plates. (Oneof the rst indicators that you should do this was that you
didn’t have a compartment big enough to hold all your LEGOhorses...)
22. You begin to toss most pieces directly into overow.
23. You now have what, to a stranger, would be a bizarresorting system. You have some parts thrown together in binsby type. You have some parts split out with a separate bin for
each part. You have some parts split out with a separate binfor each color. You even have some parts split out by how oldthey are: red 1x2s from the 60s, red 1x2s from the 70s, newred 1x2s that hold really well, and all the other red 1x2s. And
you have an alphabetized pile of large buckets for the overow
pieces and another one for the 1st stage of sorting.
23.5. That stranger would also think you were certiably
insane. Or at least retentive.
24. You start looking for a new house. One with a largebasement.
25. Vision recognition becomes interesting to you.
26. You begin to long for the day when you could sit at yourdesk and actually reach every piece you owned without gettingup.
27. You decide to keep a special set or two at your desk, awayfrom the huge sorting system, just to play with a few great sets without having to sort them. And then you add another cool set.Pretty soon you’re digging through 3 inches of bricks trying tond that 1x1 transparent red plate and you think about sorting
your bricks...
Of course, somewhere along the way, you probably quit buying just sets, and started to do things like:
- Buy LEGO sets in bulk, to the point where you have 10s to100s of unopened boxes.
- Work on very large construction projects.
- Acquire other people’s collections.
- Run large auctions over the net.
And those bring up entirely new sorting challenges.... but those won’t be written about tonight, at least not by me.
-r’m
Remy Evard / [email protected]
17

8/13/2019 Hm009 Ing High
http://slidepdf.com/reader/full/hm009-ing-high 18/78
8/13/2019 Hm009 Ing High
http://slidepdf.com/reader/full/hm009-ing-high 19/78
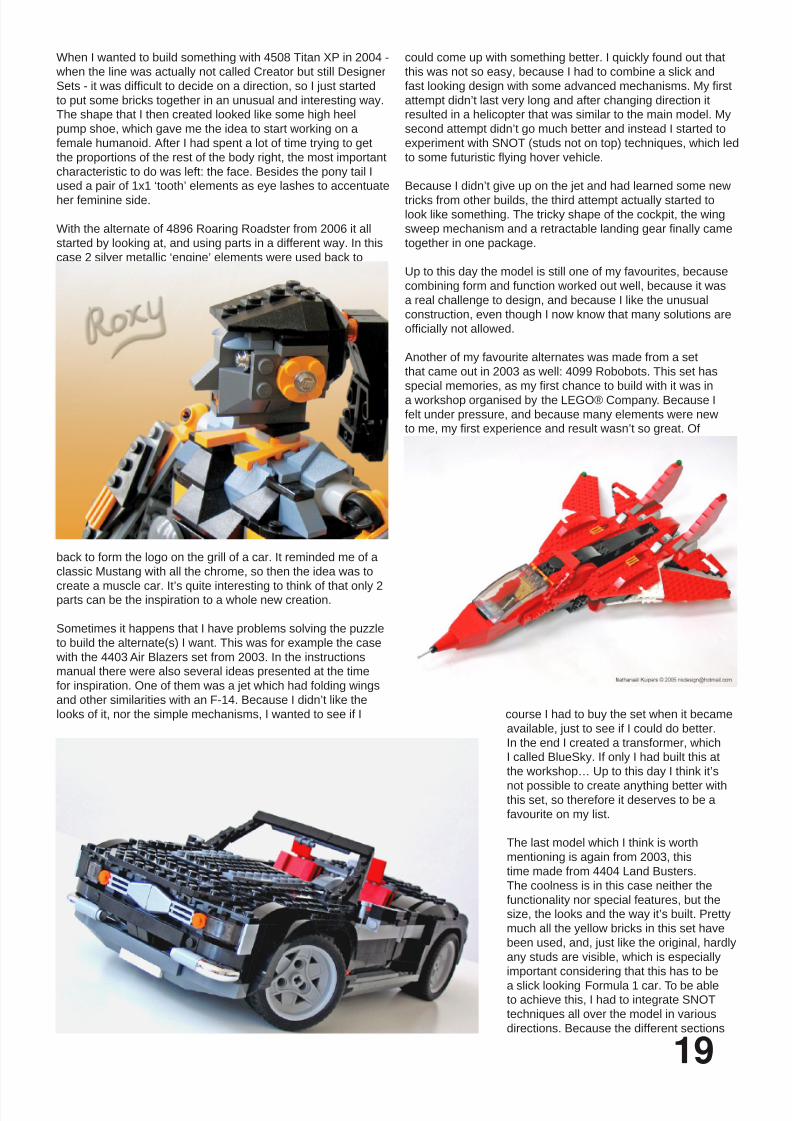
When I wanted to build something with 4508 Titan XP in 2004 - when the line was actually not called Creator but still DesignerSets - it was difcult to decide on a direction, so I just started
to put some bricks together in an unusual and interesting way.The shape that I then created looked like some high heelpump shoe, which gave me the idea to start working on afemale humanoid. After I had spent a lot of time trying to getthe proportions of the rest of the body right, the most importantcharacteristic to do was left: the face. Besides the pony tail Iused a pair of 1x1 ‘tooth’ elements as eye lashes to accentuate
her feminine side.
With the alternate of 4896 Roaring Roadster from 2006 it allstarted by looking at, and using parts in a different way. In thiscase 2 silver metallic ‘engine’ elements were used back to
back to form the logo on the grill of a car. It reminded me of aclassic Mustang with all the chrome, so then the idea was to
create a muscle car. It’s quite interesting to think of that only 2parts can be the inspiration to a whole new creation.
Sometimes it happens that I have problems solving the puzzleto build the alternate(s) I want. This was for example the case
with the 4403 Air Blazers set from 2003. In the instructionsmanual there were also several ideas presented at the timefor inspiration. One of them was a jet which had folding wingsand other similarities with an F-14. Because I didn’t like thelooks of it, nor the simple mechanisms, I wanted to see if I
could come up with something better. I quickly found out thatthis was not so easy, because I had to combine a slick andfast looking design with some advanced mechanisms. My rst
attempt didn’t last very long and after changing direction itresulted in a helicopter that was similar to the main model. Mysecond attempt didn’t go much better and instead I started toexperiment with SNOT (studs not on top) techniques, which led
to some futuristic ying hover vehicle.
Because I didn’t give up on the jet and had learned some new
tricks from other builds, the third attempt actually started tolook like something. The tricky shape of the cockpit, the wingsweep mechanism and a retractable landing gear nally came
together in one package.
Up to this day the model is still one of my favourites, becausecombining form and function worked out well, because it wasa real challenge to design, and because I like the unusualconstruction, even though I now know that many solutions areofcially not allowed.
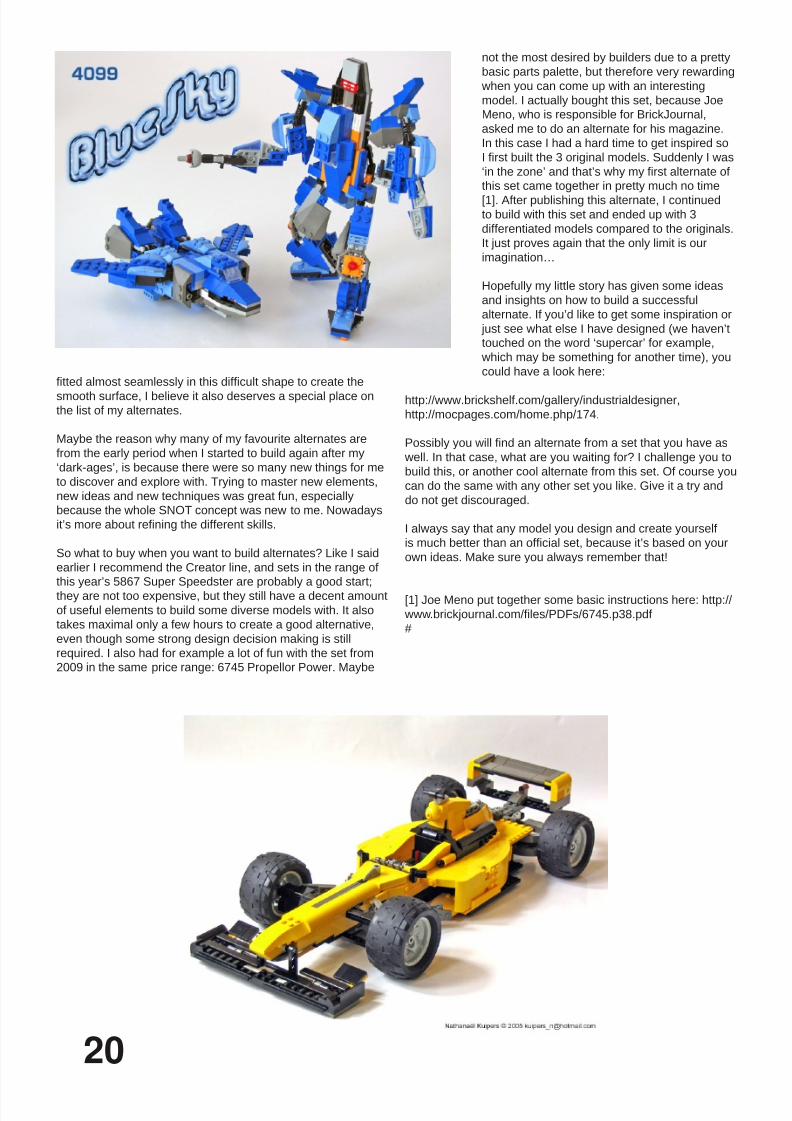
Another of my favourite alternates was made from a setthat came out in 2003 as well: 4099 Robobots. This set hasspecial memories, as my rst chance to build with it was in
a workshop organised by the LEGO® Company. Because Ifelt under pressure, and because many elements were newto me, my rst experience and result wasn’t so great. Of
course I had to buy the set when it becameavailable, just to see if I could do better.In the end I created a transformer, whichI called BlueSky. If only I had built this atthe workshop… Up to this day I think it’s
not possible to create anything better withthis set, so therefore it deserves to be afavourite on my list.
The last model which I think is worthmentioning is again from 2003, thistime made from 4404 Land Busters.The coolness is in this case neither thefunctionality nor special features, but thesize, the looks and the way it’s built. Prettymuch all the yellow bricks in this set havebeen used, and, just like the original, hardlyany studs are visible, which is especiallyimportant considering that this has to be
a slick looking Formula 1 car. To be ableto achieve this, I had to integrate SNOTtechniques all over the model in variousdirections. Because the different sections
19
8/13/2019 Hm009 Ing High
http://slidepdf.com/reader/full/hm009-ing-high 20/78
tted almost seamlessly in this difcult shape to create the
smooth surface, I believe it also deserves a special place onthe list of my alternates.
Maybe the reason why many of my favourite alternates arefrom the early period when I started to build again after my‘dark-ages’, is because there were so many new things for meto discover and explore with. Trying to master new elements,
new ideas and new techniques was great fun, especiallybecause the whole SNOT concept was new to me. Nowadaysit’s more about rening the different skills.
So what to buy when you want to build alternates? Like I saidearlier I recommend the Creator line, and sets in the range ofthis year’s 5867 Super Speedster are probably a good start;they are not too expensive, but they still have a decent amount
of useful elements to build some diverse models with. It alsotakes maximal only a few hours to create a good alternative,
even though some strong design decision making is stillrequired. I also had for example a lot of fun with the set from2009 in the same price range: 6745 Propellor Power. Maybe
not the most desired by builders due to a prettybasic parts palette, but therefore very rewarding when you can come up with an interestingmodel. I actually bought this set, because JoeMeno, who is responsible for BrickJournal,asked me to do an alternate for his magazine.In this case I had a hard time to get inspired soI rst built the 3 original models. Suddenly I was
‘in the zone’ and that’s why my rst alternate ofthis set came together in pretty much no time
[1]. After publishing this alternate, I continuedto build with this set and ended up with 3differentiated models compared to the originals.It just proves again that the only limit is ourimagination…
Hopefully my little story has given some ideasand insights on how to build a successfulalternate. If you’d like to get some inspiration or just see what else I have designed (we haven’ttouched on the word ‘supercar’ for example,
which may be something for another time), youcould have a look here:
http://www.brickshelf.com/gallery/industrialdesigner,http://mocpages.com/home.php/174.
Possibly you will nd an alternate from a set that you have as
well. In that case, what are you waiting for? I challenge you tobuild this, or another cool alternate from this set. Of course youcan do the same with any other set you like. Give it a try anddo not get discouraged.
I always say that any model you design and create yourselfis much better than an ofcial set, because it’s based on your
own ideas. Make sure you always remember that!
[1] Joe Meno put together some basic instructions here: http:// www.brickjournal.com/les/PDFs/6745.p38.pdf
#
20
8/13/2019 Hm009 Ing High
http://slidepdf.com/reader/full/hm009-ing-high 21/78
21
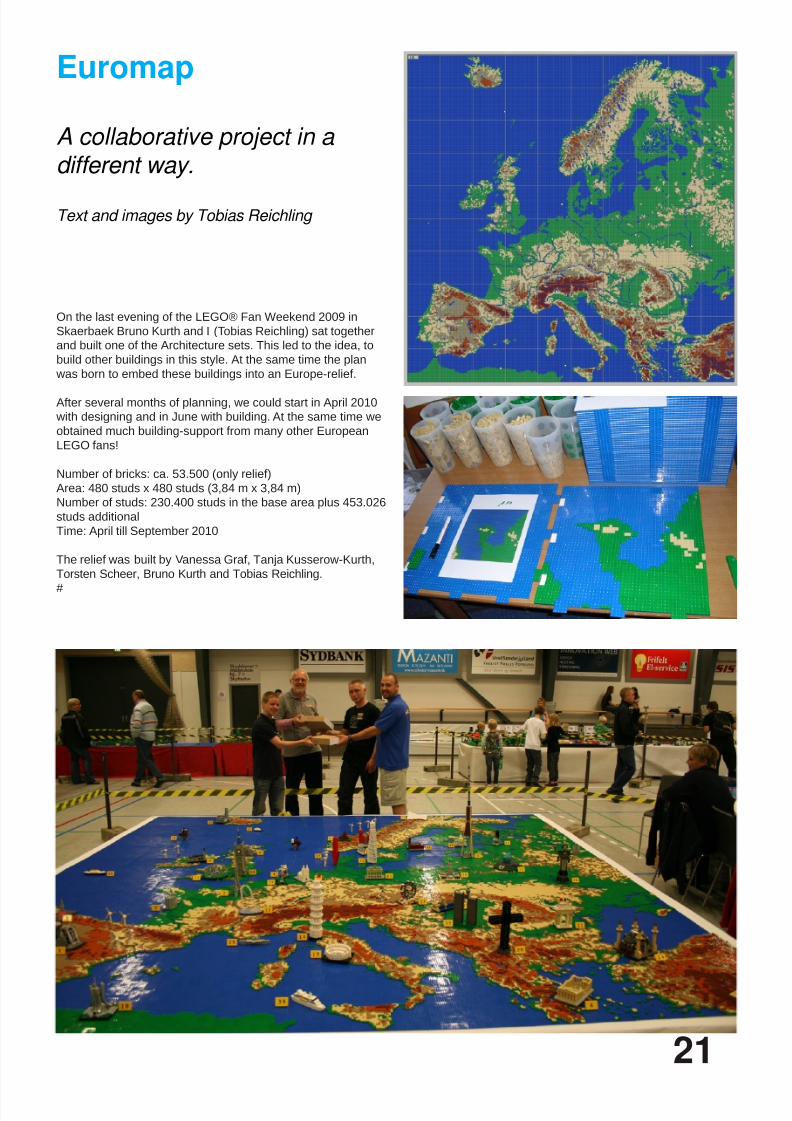
Euromap
A collaborative project in adierent way.
Text and images by Tobias Reichling
On the last evening of the LEGO® Fan Weekend 2009 inSkaerbaek Bruno Kurth and I (Tobias Reichling) sat togetherand built one of the Architecture sets. This led to the idea, tobuild other buildings in this style. At the same time the plan was born to embed these buildings into an Europe-relief.
After several months of planning, we could start in April 2010 with designing and in June with building. At the same time weobtained much building-support from many other EuropeanLEGO fans!
Number of bricks: ca. 53.500 (only relief)Area: 480 studs x 480 studs (3,84 m x 3,84 m)Number of studs: 230.400 studs in the base area plus 453.026studs additionalTime: April till September 2010
The relief was built by Vanessa Graf, Tanja Kusserow-Kurth,Torsten Scheer, Bruno Kurth and Tobias Reichling.
#

8/13/2019 Hm009 Ing High
http://slidepdf.com/reader/full/hm009-ing-high 22/78

8/13/2019 Hm009 Ing High
http://slidepdf.com/reader/full/hm009-ing-high 23/78
23
SuperCar 8865
The eighteightsixveism
Text by arvo
Images from Blackbird´s Technicopedia
It was 1988 when the sexiest, reddest and most technical SET ever designed appeared on the scene.
(Now is when the editors should add that “... the magazine is not responsible for the opinions ... etc, etc ...)
At that time, someone, back in the Denmark, in a cold and white room jumped up from his seat shouting, “I demand mycanonization...my canonization ... !!!”. Although probably the artist responsible of the design was never aware of his achievement.Unless he were an Illuminati, most likely after turning off his computer, he took his ham sandwich and his umbrella and went tohave lunch on his favourite bench (BTW, in 1988, Did computer design exist?, “Did they use an Amiga?, or an ATARI?)
But let that go. Let’s talk about 8865, of what it meant, of what it inherited and of what it introduced, but above all, of what wouldbecome impossible to improve in later models. It ts into the famous series of supercars.
Starting from the outside in, the box was more compact and discreet than its predecessor (SET 8860). Its image, something more
technical with all those dimensions in the background, gave it an air of prototype (we must remember that after 8 years, trends inthe eld of design were very different.) In any case its weight told us that it contained one of the most complete constructions of
that time.
A clear plastic thermoformed tray housed some of the characteristic parts of the model (wheels, gears, technic bricks, etc) andprotected the compartments, made in cardboard, which contained the remaining parts, 892 in total.
A more than worthy evolution of the fabulous 8860, it inherited much of its technical specications but introduced importantinnovations. The rst and most obvious, its striking red fairing, with the folding seats in blue, and Technic Wheels 24 x 43, this
time in white, endowed the model with an exclusive sporty look. On the other hand, the chassis, denser, increased in complexityto be able to host a great amount of detail, as the front suspension and steering compatible with the use of rods (even closerto a real system and becoming a standard from this model), headlights with activation lever (it wasn´t state of the art, but it wasamusing to be able to lift them from a lever, especially effective when dealing with a double lamp model) or V-engine.

8/13/2019 Hm009 Ing High
http://slidepdf.com/reader/full/hm009-ing-high 24/78
24
Its construction is not very complex (instructions has no more than 19 pages, 12 for the main model and 7 pages for the
secondary model), but again it seems perfectly optimized. It uses large Technic bricks and building frameworks to create itsstructure, obtaining a rigid and light scheme where all its parts are fully integrated.
In short, a fun model to build, with a perfect size that makes it manageable without ceasing to be what it truly is ... a big torpedo!
But none of this would result in the masterpiece we believe it is, even now, if we were talking about a handful of good details thatare lost in a mediocre result. No.
This is the real feat. They managed to cram all that technique in a sleek, attractive and inspiring evening dress. The proportions were chosen with care, especially the height of the suspension, ridiculously accurate, the front appears to counterbalance the“excess” in the rear, without altering the prole. No other model gives a cushioned feel like this one does, it is not the number of
shock absorbers, their inclination or distribution, whether or not soft ... the secret seems to lie outside the system: it is the generalsense of delicately supported poise, where each of its four wheels enjoy the right amount of space (while the rear wheels havevertically space, the front wheels, thanks to the inwards alignment of the Technic bricks, have it horizontally ... what genius!)

8/13/2019 Hm009 Ing High
http://slidepdf.com/reader/full/hm009-ing-high 25/78
But, why not repeat this feeling in later models? ... We believe there are several reasons, the famous and criticized“abandonment” of the Technic brick in favour of the lift arm may be one, but not decisive. In our opinion this is a model that“suggests” but there is nothing explicit ... the fairing is so simple that there are more pieces “unseen” than “seen” ... the gaps are
distributed in a very balanced way that let you see all the model without “impregnating” it with a non existent vacuum. To put it
more graphically and brief, the designers were able to stop in time.
The secondary model, a pretty good Jeep, could have been a set in its own right (like almost all secondary models), although
it would have been impossible to stand out next to the this 8865 TEST CAR. Technically it included almost all the details of themain model, except the V engine and the change in rear suspension (much simpler and borrowed from other “minor” models).
Although the design is very successful, this was not the rst time we saw a jeep, so if repeated in a larger size it would have gone
completely unnoticed.
In conclusion we must confess something you will have surely noticed. We can not write about this model without spending moretime on describing the feeling it gives us than on its specications. At the end of the day it is just a LEGO® car that almost drove
us crazy.#
25

8/13/2019 Hm009 Ing High
http://slidepdf.com/reader/full/hm009-ing-high 26/78
26
Although as an engineer perhaps these things should attract me more, I only had two Technic sets before my “dark ages”, thebulldozer (856-1) and truck (8848), both from the pre-liftarm era. In addition to these sets, I also built some of my older brother’ssets in those days, such as the Auto-chassis (8860). I absolutely admired it and its assembly entertained me over the weekends.I found them fun to build and liked to play with their mechanisms, but I found it difcult to create MOCs, probably due to my short
age then. I was able to make vehicles with steering, differential and that sort of things, adapting them from ofcial models I hadbuilt previously, but I could not innovate. I must confess that I have a very special love-hate relationship with this line. Sometimes,models I build normally would require a good Technic skeleton. Or maybe I would like to add some motors and give them somekind of life of their own. At those moments I would like to master this world. But normally they don’t attract my attention. Forgiveme if I offend anyone but in my eyes, Technic is only a cousin of classic LEGO®. And although I have had occasional more orless fortunate dealings with Technic parts in recent years, now, taking advantage of a Technic model that has fallen into my hands(motorbike 8051) I’ve decided to try this line again.
My rst impression is the amount of new parts. Of some of them I could not imagine their use without seeing the instructions. And
then there are the liftarms. There isn´t a single Technic Brick in the entire model ... I must confess that I missed them during theconstruction. Yes, I know the new world of possibilities for liftarms, with its angles, their different thicknesses .... But I feel old tolearn all these tricks.
Besides the typical parts that seem to emerge from the solid unit of existing ones (they look like pin groups fused to form a single
part), others that just look like old parts that have been stretched for some obscure reason, or rubber parts, there are some thathave been the center of the development in recent years. First came the PF (Power Functions) revolution, a world of motorsand infrared lights that have allowed Technic models to take the road without an umbilical cord that joined them to their masters.And the newest, LA (Linear Actuators), they are great for converting a rotary motion into longitudinal. I must say that I soon
Revisiting Technic
A look at today´s Technic through the eyes of an AFOL
“disconnected” from Technic for years
Text by car_mp
Images by LEGO® Systems A/S

8/13/2019 Hm009 Ing High
http://slidepdf.com/reader/full/hm009-ing-high 27/78
surrendered to PF, but the “LA” have left me quite cold. Probably everything is the result of my ignorance, but I think everythingLAs do, could be done by other methods before, maybe not so simple but for me more technically beautiful. You may ask, where did this guy leave Pneumatics?. This line began when I dropped out of LEGO® life and although I know it (my brother is adevotee of it) I must say it is a line that scares me a little. Don´t scream, I will explain myself. I think that Pneumatics functionality
is incredible and it is an important part of technology in real life, which LEGO has recreated quite rightly in my view. However, when motorized, when I see the different compressors that people have designed, circuits, etc, I always expect something will
go ying somewhere. Yes, I know that I am exaggerating, but you knew what this article was about, when you started reading it
anyway, right?.
But let’s continue. When building the model the differences are clear. The build script takes you from the inside of the model out, while leaving many axles and other types of anchors loose, waiting for a later step that will make them acquire sense. It’s hardalso to get used to the parts that do not have a clear position when assembling. Let me explain myself. When you insert, into the
same axle, several parts (liftarms, gears ,...) you nd that the positions are not dened unequivocally as the studs on the bricks.
Many times you have to adjust the position to match the gears properly. You must learn to hold the pieces in places other thanthe usual when applying force to insert parts such as gears onto the axle. Finally I can tell you that it’s easy to forget a part so youhave to go back to it later. Separate parts of each step and make sure you put them all in.
Technic models use panels for aesthetic purposes. Honestly I think it is the best solution for these models. They are lightweightand give more than acceptable results if you’re a little skilled. We shouldn’t abuse of them, the beauty of these models are theircapabilities, and seeing how a cascade of gears moves can be hypnotic.
You can read everything about Liftarms-Technic Bricks in issue number 001 (Spanish only), and about gears in issue number007. Since my times, many new parts have appeared... and in different colors. It might seem a purely aesthetic issue, but no.Often colors speak of their characteristics, as a prime example pins with or without friction. It’s an uncomfortable leson to learn -
the rst time that the wheels of your vehicle don’t spin, you’ll understand.
The best thing you can say about Technic is that it is real as life itself, and you can reproduce almost any mechanism of modernengineering. I will continue with my normal bricks ... for now.#
27

8/13/2019 Hm009 Ing High
http://slidepdf.com/reader/full/hm009-ing-high 28/78
28
The Technic theme appeared for the rst time in 1977, as a “Technical Set”. The term technic would be know later, after
succeeded to the “pro-builder set”. You can nd the complete sets overviews year per year on the Technopedia by Blakbird.Everyone know the technic theme, his gears, his motors his complex linkages... But the most interesting part is what technic
builders make with it.
Technic Creations
The aim of this article is to show you what Technic creation are today.
Machinery and heavy-equipment The heavy equipment such as earth-moving equipment or handling equipment is one of the most active elds for Technic
builders. The reason is that this type of equipment can be easily remote controlled and each functions can be powered bya motor or pneumatic devices (raise a arm, drive a steering...), which enables builders to have a remote controlled vehicle.LEGO® has also released lot of ofcial set in this eld but most of these were manually operated, not designed to be completely
remote controlled. Before the appearance of Power Functions System, the mocs were powered by old wired motors. Most of the
controllers are outside the moc, and the design was reasonably studfull. As a result, the mocs look like model team with a highdenition of details but depend of length of wire and aren’t very powerful.
Technic today?
An overview of building styles in Technic
Text by Nicolas Lespour (Nico71)
Images property of their respective owners
M_longer
Zbiczasty
8/13/2019 Hm009 Ing High
http://slidepdf.com/reader/full/hm009-ing-high 29/78
29
Since 2003, the Power Functions System appeared and especially the InfraRed receiver. The IR receiver allows builders tohave the battery box in the moc, then it was remote controlled with no wires, which is a great breakthrough for the autonomy and
playability. In addition, the new studless parts allow you to build with more complex lighter and smaller constructions. The design was studfull (many details), studless (more affordable) or both (mix up the advantages).
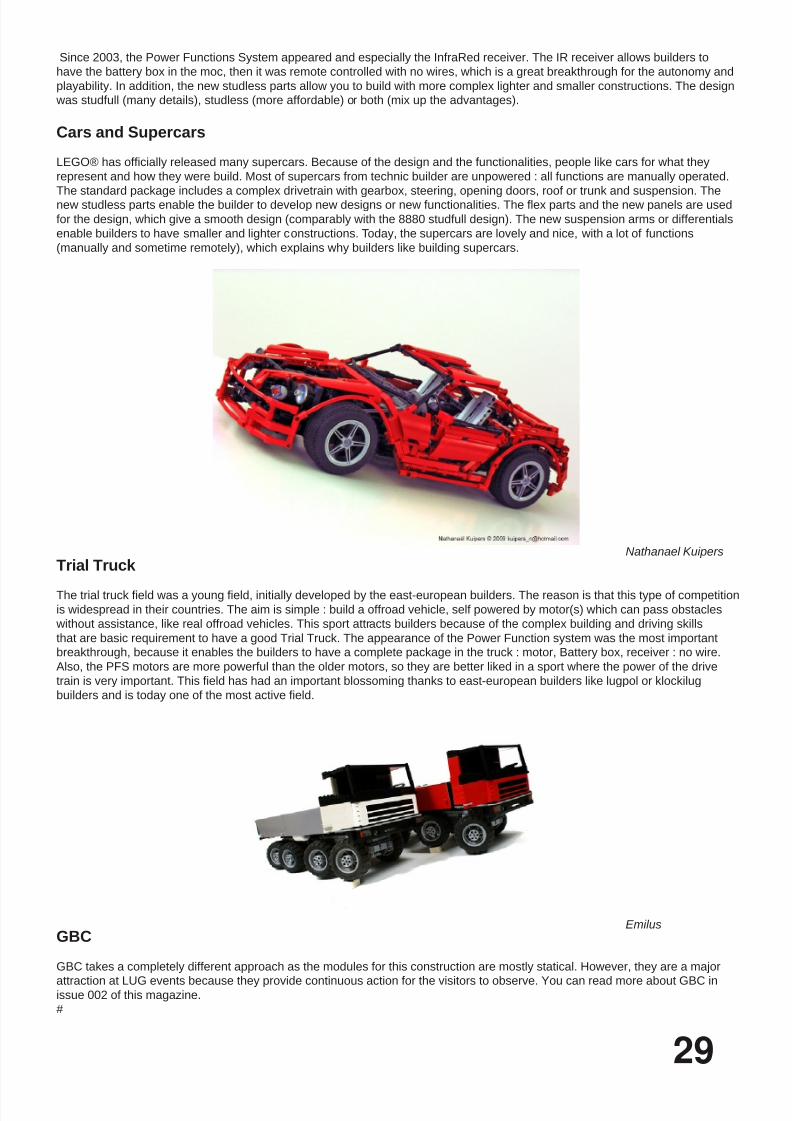
Cars and Supercars
LEGO® has ofcially released many supercars. Because of the design and the functionalities, people like cars for what they
represent and how they were build. Most of supercars from technic builder are unpowered : all functions are manually operated.
The standard package includes a complex drivetrain with gearbox, steering, opening doors, roof or trunk and suspension. Thenew studless parts enable the builder to develop new designs or new functionalities. The ex parts and the new panels are used
for the design, which give a smooth design (comparably with the 8880 studfull design). The new suspension arms or differentialsenable builders to have smaller and lighter constructions. Today, the supercars are lovely and nice, with a lot of functions(manually and sometime remotely), which explains why builders like building supercars.
Trial Truck
The trial truck eld was a young eld, initially developed by the east-european builders. The reason is that this type of competition
is widespread in their countries. The aim is simple : build a offroad vehicle, self powered by motor(s) which can pass obstacles without assistance, like real offroad vehicles. This sport attracts builders because of the complex building and driving skills
that are basic requirement to have a good Trial Truck. The appearance of the Power Function system was the most importantbreakthrough, because it enables the builders to have a complete package in the truck : motor, Battery box, receiver : no wire.
Also, the PFS motors are more powerful than the older motors, so they are better liked in a sport where the power of the drivetrain is very important. This eld has had an important blossoming thanks to east-european builders like lugpol or klockilug
builders and is today one of the most active eld.
GBC GBC takes a completely different approach as the modules for this construction are mostly statical. However, they are a major
attraction at LUG events because they provide continuous action for the visitors to observe. You can read more about GBC inissue 002 of this magazine.#
Emilus
Nathanael Kuipers

8/13/2019 Hm009 Ing High
http://slidepdf.com/reader/full/hm009-ing-high 30/78
30
In the previous edition of Hispabrick Magazine you could read an interview with Kjeld Kirk Kristiansen in which he stated that thevery st time LEGO® turned to the AFOL community for collaboration on the development of a new product was in relation to
LEGO® MINDSTORMS®. The experience turned out to be so positive it was later applied in other product lines.
So how did this all come about? The LEGO MINDSTORMS Robotics Invention Set (the predecessor of the NXT set, includingthe RCX) was launched in 1998 and supported from the MINDSTORMS headquarters in California from 1999 to 2001. After thatsupport for the RCX and RIS software on the retail side was discontinued [1]. In a way MINDSTORMS entered its Dark Ages.
In 2003/2004, The LEGO Company (TLC) was going the trough a difcult time. There was a nancial crisis and many things hadto be rethought. There were however some clear indicators of what direction to follow. Even though support for the RCX haddisappeared and no publicity was made for the set, four years after its release it was selling very well: and the MINDSTORMSproducts accounted for roughly 25% of the annual sales in 1999-2000. An interesting fact was that about half these sales were toadult fans of the product. With this level of success among fans, the product needed and deserved to be revived.
LEGO had learned an interesting lesson when the RCX was released. Only months after the product became available both theRCX and the RIS software had been hacked and information about it was freely available on the internet [2]. Although initiallyLEGO was quite worried about this, after some time it realized this might actually be a good thing and decided to release sometechnical information for the fans. [3]
LEGO also realized there were people out there who knew more about their product than they did them selves, and so it was that when LEGO started developing the new generation of MINDSTORMS they decided to get some input from that AFOL community.The project was of course still secret so they had a good look at the community, made a shortlist of active people with interestingideas and decided to contact 5 of them. Four of these – John Barnes, David Schilling, Ralph Hempel and Steve Hassenplug –
responded to the sparse email they received asking them to sign an NDA[4]without knowing what they were getting into otherthan that LEGO was interested to talk to them. After that they were given access to a special forum which initially didn’t containany information. They soon worked out what they had in common. After a few days, Søren Lund, the director of MINDSTORMS,informed them that a new generation of MINDSTORMS was in the works, but that it was still very early days and they neededtheir input to help with the design. And so the MUP – MINDSTORMS User Panel was born.
The input from the MUP was crucial to the way the nal product looked and worked. The original retail RCX set only featured two
touch sensors and a light sensor. Later on a Rotation sensor, a temperature sensor (only for Education) and the Vision Commandadd-on which included a USB camera were released.
The ultrasound sensor, the ‘hassenpin’ and the battery pack which was released later are all the result of the efforts of the MUP.Steve Hassenplug and David Schilling even travelled to Billund and were invited to revise the set inventory and prototypes for theNXTs circuit boards. Of course the MUP had many more great ideas, but not all of them tted in the idea and budget LEGO had.
[5]
After about half a year the MUP were asked to propose names of other people who could help out in the project and MUP2(informally called the “Muppets”) was started with 14 members who continued to work together with LEGO on what would nally
become the NXT 1.0 set.
In 2006, when the NXT was almost ready for production, LEGO put the word out at CES Las Vegas that it needed 100 betatesters for a new generation MINDSTORMS product. Even though LEGO specically mentioned the product would have a cost
of $150 (in an effort to limit the number of submissions to people with a genuine interest in testing and developing models for theNXT) they received over 9000 applications!
They then sifted through applications to nd people who tted one or more of the criteria for selection – had they written a
book about MINDSTORMS before, did they have specic knowledge on programming or electronics, were they accomplishedbuilders, etc. The MUP were asked to act as moderators on the forum that was set up to collect the feedback from the MDP – theMINDSTORMS Developer Program.
It soon became clear that several additional sub-forums had to be created to cater for all the different areas of interest that theMDP came up with. An example of such an area is the work of Jason Railton did on the NXT’s black and white screen to get it to
display grey values or Andreas Dreier who wound up writing nxtRICedit[6] to allow for animated images on the NXT screen. The
MCP
The origins
Text by Jetro
8/13/2019 Hm009 Ing High
http://slidepdf.com/reader/full/hm009-ing-high 31/78
MDP also came up with a number of inspiring models, custom sensors, alternative programming languages and other interestinguses for the NXT. To compensate them for their efforts and the fact that they had initially paid for a pre-production product theyreceived a complementary NXT 1.0 kit once the product was ready for distribution.
When the MDP came to an end some were happy to move on to other things, but others expressed the desire to somehow be
able to keep in touch and continue in the spirit of what had been started. To cater for this need and because LEGO also valuedthe chance of continued collaboration the MCP – MINDSTORMS Community Program – was created. The program is now in itsfourth cycle since its start in 2006.
Sometimes priorities and personal situations change and some of the people who have been involved from a very early stage
have moved on to other things. LEGO® also discovers new talents and people with a strong community spirit who are invited tonew editions of the MCP. But the general spirit of this collaboration between LEGO and MINDSTORMS AFOLs has not changedand the impact is noticeable both in the product LEGO produces and the community around MINDSTORMS.
I’d like you to meet some of the people who are and/or have been deeply involved in one way or another in the MINDSTORMSAFOL – TLC symbiosis so you can get a rst hand glimpse of history of the MCP.
[1] In 1980 LEGO Education came into existence to cater for the specic needs of educational institutions who wanted to use
LEGO in the classroom. As of 1998 it included LEGO MINDSTORMS for Schools and hardware and software support has been
available through that channel from then on. The FIRST LEGO League (FLL) was started in 1998 (with a rst competition in1999) and the number of teams that participate has continued to increase signicantly from year to year, starting with just under
1000 in 1999 and reaching almost 15000 in 2009. You can learn more about the core values of FLL in the previous edition of
Hispabrick Magazine.
[2] The rst to publish specic information on the internals of the RCX in terms of hardware and communication protocols was
Kekoa Proudfoot. You can still nd the information at http://graphics.stanford.edu/~kekoa/rcx/
[3] LEGO released the SDK or Software Development Kit for the RCX , Scout and Spybotics range in order to provide additional
information about the programming of these elements. It is currently available at http://www.philohome.com/sdk25/sdk25.htm.
It contains documents on the commands the RCX 2.0 rmware accepts, the communications interface between the LEGO USB
tower (for IR communication with the RCX) and the computer and more.
[4] Non Disclosure Agreement – condentiality agreement
[5] It may be interesting to note that although there are many adult users of MINDSTORMS who are taken into account in the
development of the product, there is also another important target group, aged 10-14. Since MINDSTORMS is not only robotics,
but also a toy, this puts heavy constraints on the possibilities and needs in terms of safety, ease of use, etc.
[6] http://ric.dreier-privat.de/Docu/index_eng.htm
#
31

8/13/2019 Hm009 Ing High
http://slidepdf.com/reader/full/hm009-ing-high 32/78
Name: John Hansen
Age: 46Occupation: Software Engineer
Nationality: United States
Website: http://bricxcc.sourceforge.net and http://www.
mindboards.net/
How did you get involved in MINDSTORMS?:
I happened upon the LEGO® TECHNIC Search Sub (http://guide.lugnet.com/set/8250) on clearance at the local ZainyBrainy store back in June of 2000. I posted on lugnet back then(http://news.lugnet.com/loc/us/tn/nas/?n=7):
I’m relatively new to LEGO and Lugnet. For no rational reason
I started dumping cash into LEGO in March of 2000. I found
some clearance items at ZanyBrainy back then. I bought some
stuff from TRU during the BOGO 50% sale. I snagged shuttlesand barcode multi-sets from KayBee Toy Outlet at 100 Oaks
and Factory Stores of America.
Then in August of 2000 Mark Overmars, the author/creatorof RCX Command Center (RcxCC), posted this message on
Lugnet (http://news.lugnet.com/robotics/rcx/nqc/?n=720):
I decided to make the source code available such that others
can do these things. The source code is now available on the
RcxCC home page
http://www.cs.uu.nl/people/markov/lego/rcxcc/index.html
RcxCC was written in Delphi. The program is reasonable wellstructured (I think) but not very well documented. So better be
an experienced Delphi programmer before you start working
on it. Good luck, and please keep me updated about newversions.
Since I was an experienced Delphi programmer I decided that
I would take on the challenge of adding support in RcxCC
to the new RCX 2.0 and the Scout bricks. I downloaded acopy of his source code and started working on replacing thecommunication layer with a Delphi version of the code used inDave Baum’s NQC compiler. I posted on lugnet in April of 2001(http://news.lugnet.com/robotics/rcx/nqc/?n=1052):
I’m working on a revision to Mark Overmars’ fantastic RcxCC program. I’m an experienced Delphi programmer so that’s no
problem. But I’m not all that experienced with NQC or the RCX
generally. I’ve got a the latest version of NQC, a Cybermaster,
an RCX 1.0, the 2.0 beta rmware, the VisionCommandrmware, and a Scout. So I’ll be testing it myself over the next
few days. But I’d like to ask for volunteers to try it out.
John Barnes from HiTechnic was one of the folks I worked a lot with early on, adding a number of features that he requested.Later, Dave Baum asked me to take over the NQC project(http://news.lugnet.com/robotics/rcx/nqc/?n=1560) since I had
worked with him quite a bit while making changes to RcxCC
and eventually renaming it at the request of TLG to BricxCC
(http://news.lugnet.com/robotics/rcx/?n=1448). Bricx is
pronounced Bricks to indicate that the IDE supports more thanone brick and keeps the R, C, and X from the original name.
When The LEGO Group (TLG) began working on the NXTthey got 4 AFOLs together to form the MINDSTORMS UsersPanel. A year later they expanded that group, at which time
I was invited to join because of my work with BricxCC. Ihad worked with Michael Barrett Anderson, a former LEGOemployee, for a number of years while implementing supportfor new programmable bricks released by TLG, such as theSpybot. He was also in the MUP2 group. He and I began working together on a text-based programming language that
would work with the standard NXT rmware. Michael namedthe resulting language NeXT Byte Codes or NBC. It was anassembly language compiler and it was rst used by a group
of programmers within TLG to migrate their LEGO Assemblerprograms that worked with the RCX to new text-based
assembly language programs that worked with the NXT. A bitlater I implemented a C-like programming language on topof the NBC layer which I designed to be very similar to Dave
Baum’s Not Quite C (NQC) for the RCX/Scout/Cybermaster/Sypbot. I called it Not eXactly C since it was a lot closer inmany ways to C than NQC. Since then I have been honoredto participate in each of the subsequent community partnergroups organized by LEGO for the MINDSTORMS productline.
How do you contribute to the MINDSTORMS community?:
My main contribution has been enhancing, extending,and improving the BricxCC IDE to give users of LEGO
MINDSTORMS bricks a wide range of useful tools forprogramming robots. When the NXT arrived on the scene mycontributions included developing the rst and only cross-
platform compiler for text-based programming languagesfor the NXT. It is used on Mac OS X, Linux, FreeBSD, andWindows OSes around the world. While the BricxCC IDE is
still a Windows only tool, most of its tools that support the NXT
Interview:John Hansen
By Hispabrick Magazine
32

8/13/2019 Hm009 Ing High
http://slidepdf.com/reader/full/hm009-ing-high 33/78
33
Name: Ralph HempelAge: 48
Occupation: Electrical Engineer specializing in Embedded
Systems
Nationality: Canadian
Website: www.hempeldesigngroup.com
How did you get involved in MINDSTORMS?
When the RCX came out, I was one of the people who, within
a few weeks of it being released, cracked the rmware code,and then I made one of the rst replacement rmwares –
pbLua. Marcus Noga made the legOS rmware and we were
all invited to the Extreme Mindstorms panel at Mindfest [1].
After that, I kept in touch with Michael Andersen and I keptshowing him updates to the pbForth tools, such as a servodriver, and even a DCC train controller.
He passed this on to Flemming Bundgaard and (I’m guessinghere) when it came time to get the NXT ready for release,LEGO contacted a group of known community leaders thathad individual specialities. John Barnes had the third partysensor development, Steve Hassenplug and Dave Schilling
were builders and robot competitors, and I had lots of rmwareexperience.
So basically, keeping in touch with LEGO insiders over the
years made it possible for the original MUP to participate andgrow into the MCP program. How do you contribute to the MINDSTORMS community?
I have been involved with MINDSTORMS since the early RCXdays when I wrote pbLua which I continue to maintain. In 2006,a few weeks after LEGO released the source code for theNXT rmware I had pbLua working on the NXT. I also created
the pbForth rmware for the NXT, which allows you to write
software that is compiled on the brick itself. In 2007, I helped Chris Anderson (Editor in Chief of Wired) withdecoding raw GPS signals from the Bluetooth port. AlthoughChris went on to use RobotC in his project, my contributionshelped to make the project a reality. I’m a co-author of a chapter in “Lua Programming Gems”available on Amazon...
I also co-authored a book entitled “Extreme MINDSTORMS”,
together with Dave Baum and Luis Villa and I wrote a book onSpybotics, another programmable LEGO brick.
[1] http://www.hempeldesigngroup.com/lego/mindfest/panel.html#
Interview:
Ralph Hempel
By Hispabrick Magazine
are also available in a GUI utility called NeXT Tools on bothMac OSX and Linux. I also have made a number of xes and
enhancements to the LEGO NXT rmware and make it freely
available in binary and source code form as the enhancedNBC/NXC rmware which is 100% compatible with the
standard rmware and can be used when programming with
NXT-G using the LEGO® MINDSTORMS NXT software.
In addition to the tools that I provide to the community, I alsohave participated on blogs and forums, such as on news.lugnet.com, the old nxtasy blog and forum, and, now, the newlycreated MINDBoards website at www.mindboards.net, forums.mindboards.net, and blog.mindboards.net. I try to help peoplelearning about LEGO MINDSTORMS when they either havequestions about one of my tools or programming languages orgenerally about rmware issues or hardware problems.
I also have had the privilege of writing a book aboutprogramming the NXT using Not eXactly C. It’s called “NXTPower Programming, Robotics in C”, published by VariantPress. The 2nd edition was released in September of 2009 andis available for purchase from Amazon.com and other onlinebookstores.#

8/13/2019 Hm009 Ing High
http://slidepdf.com/reader/full/hm009-ing-high 34/78

8/13/2019 Hm009 Ing High
http://slidepdf.com/reader/full/hm009-ing-high 35/78
35
Some subtle issues with the integral
Yep, the integral has more detail. Fortunately they aren’t too painful.
I glossed over a minor issue (OK, it really isn’t minor but we are going to make it so), the time. The integral is really the sum of theerror*(delta time). Delta time (dT) is the time between the last time we checked the sensor and the time of the most recent checkof the sensor;
integral = integral + error*(dT)
So every time we add to integral the thing we should add is the error times the dT. It is fairly easy to have the robot measure thedT. We would just read a timer each time we read the light sensor. If we subtract the last time from the current time we get thetime since the last reading dT. (There are better ways to do this but I’ll skip’m since they are not needed.) But wouldn’t it be nice ifdidn’t have to measure the dT and do the multiplication? Well, what if the dT is always the same? Every time we add to integral we have that same dT term. So we can take that factor of dT out of error*(dT) and just do the summing the way we did before;
integral = integral + error
Only when we want to do another calculation with integral do we actually need to multiply by dT. But wait there’s more...
We can do even more to hide the time term. The integral term in the PI controller equation is Ki*(integral)*dT. But Ki is aparameter that we have to ne tune (just like Kp) so why not just replace the Ki*dT part with a new Ki? The new Ki is differentfrom the original but since we don’t know either one it doesn’t really matter which one we use or what we call it. No matter what
we call it or what it represents we still have to nd the correct value largely by trial and error.
So we have completely removed the time element for the integral term with the restriction that all the times steps, dTs, are thesame (or about the same).
The integral has a memory like an elephant
One last detail should be mentioned about the integral. Usually the integral can only be moved towards zero, where it doesn’tcontribute anything to the controller, by having error values added that are the opposite sign of most of the ones that we havealready collected in integral. For example, if over several cycles through the loop the errors are 1,2,2,3,2,1 that adds up to anintegral of 11. But the error at the last data point is only 1, which is much smaller than the integral at that point. The only way forthe integral to move towards zero is to get a string of negative errors to counter balance the earlier string of positive errors to“wind down” the integral. For example, if the next few errors are -2,-2,-3 then the integral will drop from 11 to 4 and we would still
need more negative errors to get the integral down to zero. In addition, the integral wants the total error to be evenly distributed
between positive and negative errors.
If something happens that pushes our line following robot to the left of the line’s edge the integral term not only wants to getback to the line’s edge it also wants to overshoot the edge to the right by as much as the original disturbance was the left. So theintegral tends to “wind-up” if there are large errors that persist for a while. This can cause problems with controllers that includean integral term. Sometimes this tendency of the integral term to want to overshoot when it tries to correct the error is a bigenough problem that the programmer must do something to the integral term so it won’t cause problems. If integral wind-up isa problem two common solutions are (1) zero the integral, that is set the variable integral equal to zero, every time the error iszero or the error changes sign. (2) “Dampen” the integral by multiplying the accumulated integral by a factor less than one whena new integral is calculated. For example;
integral = (2/3)*integral + error
This reduces the previous integral value by 1/3 each time through the loop. If you think of the integral term as the controllers“memory” then this damping is forcing it to become forgetful of things that happened a “long” time ago.
Pseudo code for the PI controller
To add the integral term to the controller we need to add a new variable for Ki and one for the integral itself. And don’t forget that we are multiplying our Ks by 100 to help with the integer math restrictions.
Kp = 1000 ! REMEMBER we are using Kp*100 so this is really 10 !
Ki = 100 ! REMEMBER we are using Ki*100 so this is really 1 !offset = 45 ! Initialize the variables
Tp = 50
integral = 0 ! the place where we will store our integral
Loop forever
LightValue = read light sensor ! what is the current light reading? error = LightValue - offset ! calculate the error by subtracting the offset integral = integral + error ! our new integral term
Turn = Kp*error + Ki*integral ! the “P term” and the “I term”

8/13/2019 Hm009 Ing High
http://slidepdf.com/reader/full/hm009-ing-high 36/78
Turn = Turn/100 ! REMEMBER to undo the affect of the factor of 100 in Kp !
powerA = Tp + Turn ! the power level for the A motor
powerC = Tp - Turn ! the power level for the C motor MOTOR A direction=forward power=powerA ! actually issue the command in a MOTOR block
MOTOR C direction=forward power=powerC ! actually issue the command in a MOTOR block
end loop forever ! done with this loop, go back to the beginning and do it again.
Adding “D” To The Controller: The Full PID Controller (“D”: what is going to happen
next?)
Our controller now contains a proportional (P) term that tries to correct the current error and an integral (I) term that triesto correct past errors is there a way for the controller to look ahead in time and perhaps try to correct error that hasn’t evenoccurred yet?
Yes, and the solution is another concept from advanced mathematics called the derivative. Ahhh, there’s the “D” in PID. Like theintegral, the derivative can represent some pretty serious mathematics. Fortunately for us, what we need for the PID is fairlysimple.
We can look into the future by assuming that the next change in the error is the same as the last change in the error.
That means the next error is expected to be the current error plus the change in the error between the two preceding sensorsamples. The change in the error between two consecutive points is called the derivative. The derivative is the same as theslope of a line.
That might sound a bit complex to calculate but it really isn’t too bad. A sample set of data will help illustrate how it works. Lets
assume that the current error is 2 and the error before that was 5. What would we predict the next error to be? Well, the change
in error is the derivative which is;
(the current error) - (the previous error)
which for our numbers is 2 - 5 = -3. The current derivative therefore is -3. To use the derivative to predict the next error we would use
(next error) = (the current error) + ( the current derivative)
which for our numbers is 2 + (-3) = -1. So we predict the next error will be -1. In practice we don’t actually go all the way andpredict the next error. Instead we just use the derivative directly in the controller equation.
The D term, like the I term, should actually include a time element, and the “ofcial” D term is;
Kd(derivative)/(dT)
Just as with the proportional and integral terms we have to multiply by a constant. Since this is the constant that goes with thederivative it is called Kd. Notice also that for the derivative term we divide by dT whereas in the integral term we had multipliedby dT. Don’t worry too much about why that is since we are going to do the same kinds of tricks to get rid of the dT from thederivative term as we did for the integral term. The fraction Kd/dT is a constant if dT is the same for every loop. So we canreplace Kd/dT with another Kd. Since this K, like the previous Ks, is unknown and has to be determined by trial and error itdoesn’t matter if it is Kd/dT or just a new value for Kd. We can now write the complete equation for a PID controller:
Turn = Kp*(error) + Ki*(integral) + Kd*(derivative)
It is pretty obvious that “predicting the future” would be a handy thing to be able to do but how exactly does it help? And how
accurate is the prediction?
If the current error is worse than the previous error then the D term tries to correct the error. If he current error is better thanthe previous error then the D term tries to stop the controller from correcting the error. It is the second case that is particularlyuseful. If the error is getting close to zero then we are approaching the point where we want to stop correcting. Since the systemprobably takes a while to respond to changes in the motors’ power we want to start reducing the motor power before the error has actually gone to zero, otherwise we will overshoot. When put that way it might seem that the equation for the D term wouldhave to be more complex than it is, but it isn’t. The only thing you have to worry about is doing the subtraction in the correct order.
The correct order for this type of thing is “current” minus “previous”. So to calculate the derivative we take the current error andsubtract the previous error.
Pseudo code for the PID controller
To add the derivative term to the controller we need to add a new variable for Kd and a variable to remember the last error. And
36

8/13/2019 Hm009 Ing High
http://slidepdf.com/reader/full/hm009-ing-high 37/78
don’t forget that we are multiplying our Ks by 100 to help with the integer math.
Kp = 1000 ! REMEMBER we are using Kp*100 so this is really 10 !Ki = 100 ! REMEMBER we are using Ki*100 so this is really 1 !
Kd = 10000 ! REMEMBER we are using Kd*100 so this is really 100!
offset = 45 ! Initialize the variables
Tp = 50
integral = 0 ! the place where we will store our integral
lastError = 0 ! the place where we will store the last error valuederivative = 0 ! the place where we will store the derivative
Loop forever LightValue = read light sensor ! what is the current light reading?
error = LightValue - offset ! calculate the error by subtracting the offset integral = integral + error ! calculate the integral
derivative = error - lastError ! calculate the derivative
Turn = Kp*error + Ki*integral + Kd*derivative ! the “P term” the “I term” and the “D term”
Turn = Turn/100 ! REMEMBER to undo the affect of the factor of 100 in Kp, Ki and Kd!
powerA = Tp + Turn ! the power level for the A motor
powerC = Tp - Turn ! the power level for the C motor
MOTOR A direction=forward power=PowerA ! actually issue the command in a MOTOR block MOTOR C direction=forward power=PowerC ! same for the other motor but using the other power level
lastError = error ! save the current error so it can be the lastError next time around
end loop forever ! done with loop, go back and do it again.
We now have the pseudo code for our complete PID controller for a line following robot. Now comes what is often the tricky part,“tuning” the PID. Tuning is the process of nding the best, or at least OK, values for Kp, Ki and Kd.
Tuning A PID Controller Without Complex Math (but we still have to do some math)
Very smart people have already gured out how to tune a PID controller. Since I’m not nearly as smart as they are, I’ll use what
they learned. It turns out that measurement of couple of parameters for the system allows you to calculate “pretty good” valuesfor Kp, Ki and Kd. It doesn’t matter much what the exact system is that is being controlled the tuning equations almost always
work pretty well. There are several techniques to calculate the Ks, one of is called the “ Ziegler–Nichols Method ” which is what we will use. A google search will locate many web pages that describe this technique in all it’s gory detail. The version that I’ll use isalmost straight from the Wiki page on PID Controllers (the same treatment is found in many other places). I’ll just make one smallchange by including the loop time (dT) in the calculations shown in the table below.
To tune your PID controller you follow these steps:1. Set the Ki and Kd values to zero, which turns those terms off and makes the controller act like a simple P controller.2. Set the Tp term to a smallish one. For our motors 25 might be a good place to start.3. Set the Kp term to a “reasonable” value. What is “reasonable”? 1. I just take the maximum value we want to send to the motor’s power control (100) and divide by the maximum
useable error value. For our line following robot we’ve assumed the maximum error is 5 so our guess at Kp is 100/5=20. Whenthe error is +5 the motor’s power will swing by 100 units. When the error is zero the motor’s power will sit at the Tp level. 2. Or, just set Kp to 1 (or 100) and see what happens. 3. If you have implemented that the K’s are all entered as 100 times their actual value you have to take that into accounthere. 1 is entered as 100, 20 as 2000, 100 as 10000.4. Run the robot and watch what it does. If it can’t follow the line and wanders off then increase Kp. If it oscillates wildly thendecrease Kp. Keep changing the Kp value until you nd one that follows the line and gives noticeable oscillation but not really
wild ones. We will call this Kp value “Kc” (“critical gain” in the PID literature).5. Using the Kc value as Kp, run the robot along the line and try to determine how fast it is oscillating. This can be tricky butfortunately the measurement doesn’t have to be all that accurate. The oscillation period (Pc) is how long it takes the robot toswing from one side of the line to the other then back to the side where it started. For typical LEGO robots Pc will probably be inthe range of about 0.5 seconds to a second or two.6. You also need to know how fast the robot cycles through it’s control loop. I just set the loop to a xed number of steps (like
10,000) and time how long the robot takes to nish (or have the robot do the timing and display the result.) The time per loop ( dT)is the measured time divided by the number of loops. For a full PID controller, written in NXT-G, without any added buzzes or whistles, the dT will be in the range of 0.015 to 0.020 seconds per loop.7. Use the table below to calculate a set of Kp, Ki, and Kc values. If you just want a P controller then use the line in the tablemarked P to calculate the “correct” Kp (Ki’ and Kd’ are both zero). If you want a PI controller then use the next line. The full PID
controller is the bottom line.8. If you have implemented that the K’s are all entered as 100 times their actual value you don’t have to take that into account inthese calculations. That factor of 100 is already take into account in the Kp = Kc value you determined.9. Run the robot and see how it behaves.
10. Tweak the Kp, Ki and Kd values to get the best performance you can. You can start with fairly big tweaks, say 30% then trysmaller tweaks to get the optimal (or at least acceptable) performance.11. Once you have a good set of K’s try to boost the Tp value, which controls the robot’s straight speed.12. Re-tweak the K’s or perhaps even go back to step 1 and repeat the entire process for the new Tp value.
37

8/13/2019 Hm009 Ing High
http://slidepdf.com/reader/full/hm009-ing-high 38/78
13. Keep repeating until the robot’s behavior is acceptable.
Ziegler–Nichols
method giving K’
values (loop timesconsidered to be
constant and equal
to dT)
Control Type Kp Ki’ Kd’
P 0.50Kc 0 0
PI 0.45Kc 1.2KpdT/ Pc 0
PID 0.60Kc 2KpdT / Pc KpPc / (8dT)
The primes (apostrophes) on the Ki’ and Kd’ are just to remind you that they are calculated assume dT is constant and dT hasbeen rolled into the K values.
I couldn’t nd the equations for the PD controller. If anyone knows what they are please send me an email.
Here are the values I measured for my test robot (the one in the video linked later on). Kc was 300 and when Kp=Kc the robotoscillated at about 0.8 seconds per oscillation so Pc is 0.8. I measured Pc by just counting out loud every time the robot swungfully in a particular direction. I then compared my perception of how fast I was counting with “1-potato -- 2-potato -- 3-potato ...”.That’s hardly “precision engineering” but it works well enough so we’ll call it “practical engineering”. The loop time, dT, is 0.014seconds/loop determined by simply running the program for 10,000 loops and having the NXT display the run time. Using thetable above for a PID controller we get;
Kp = (0.60)(Kc) = (0.60)(300) = 180Ki = 2(Kp)(dT) / (Pc) = 2(180)(0.014) / (0.8) = 6.3 (which is rounded to 6)Kd = (Kp)(Pc) / ((8)(dT)) = (180)(0.8) / ((8)(0.014)) = 1286
After further trial and error tuning the nal values were 220, 7, and 500 for Kp, Ki and Kd respectively. Remember that all of myK’s are entered as 100x their actual value so the actual values are 2.2, 0.07 and 5.
How changes in Kp, Ki, and Kd affect the robots behavior
The table and method described above is a good starting point for optimizing your PID. Sometimes it helps to have a better idea
of what the result will be of increasing (or decreasing) one of the three Ks. The table below is available from many web sites. Thisparticular version is from the Wiki on PID controllers.
Effects of increasingparameters
Parameter Rise time Overshoot Settling time Error at equilibrium
Kp Decrease Increase Small change Decrease
Ki Decrease Increase Increase Eliminate
Kd Indenite (small
decrease or increase)Decrease Decrease None
The “Rise Time” is how fast the robot tries to x an error. In our sample case it is how fast the robot tries to get back to the line
edge after it has drifted off of it. The rise time is mostly controlled by Kp. A larger Kp will make the robot try to get back faster anddecreases the rise time. If Kp is too large the robot will overshoot.
The “Overshoot” is how far past the line edge the robot tends to go as it is responding to an error. For example, if the overshoot
is small then the robot doesn’t swing to the right of the line as it is trying to x being to the left of the line. If the overshoot is large
then the robot swings well past the line edge as it tries to correct an error. Overshoot is largely controlled by the Kd term but isstrongly affected by the Ki and Kp terms. Usually to correct for too much overshoot you will want to increase Kd. Remember ourrst very simple line follower, the one that could do nothing but turn right or left? That line follower has very bad overshoot. Indeed
that is about all it does.
The “settling time” is how long the robot takes to settle back down when it encounters a large change. In our line following casea large change occurs when the robot encounters a turn. As the robot responds to the curve it will correct the error and thenovershoot by some amount. It then needs to correct the overshoot and might overshoot back the other way. It then needs tocorrect the overshoot ... well, you get the idea. As the robot is responding to an error it will tend to oscillate around the desired
position. The “settling time” is how long that oscillation takes to dampen out to zero. The settling time responds strongly to boththe Ki and Kd terms. Bigger Ki gives longer settling times. Bigger Kd gives shorter settling time.
“Error at Equilibrium” is the error remaining as the system operates without being disturbed. For our line follower it would be the
38

8/13/2019 Hm009 Ing High
http://slidepdf.com/reader/full/hm009-ing-high 39/78
offset from the line as the robot follows a long straight line. Often P and PD controllers will end up with this kind of error. It canbe reduced by increasing Kp but that may make the robot oscillate. Including an I term and increasing Ki will often x a P or PD
controller that has a constant error at equilibrium. (This assumes you even care about a small remaining error as the robot followsthe line. It just means it is offset to one side or the other by a small amount.)
How well does it work?
Here’s a short video of a basic LEGO Mindstorms robot following the line on the test mat that comes with the set. The videoquality isn’t very good.
The light sensor is about 1/2” above the mat and offset to one side of the robot’s center line. The Tp (target power) was set at70%. The robot averages about 8 inches per second on this course. The robot is a left hand line follower and is following theinside edge of the oval. The inside edge is a bit harder to follow than the outside edge.
MPEG4 - MP4 (644KB) QuickTime - MOV (972KB)
Overall the line follower appears to work pretty well. If you watch the video closely you’ll see the robot “wag its tail” a bit as itcomes off the corners. That’s the PID oscillating a little. When the robot is running towards the camera you can see the red spoton the mat from the light sensor’s LED. It looks to be tracking the line’s edge pretty well.
The basic PID controller should work for many different control problems, and of course can be used as a P or PI controllerinstead of a PID. You would need to come up with a new denition of the error and the PID would have to be tuned for theparticular task.#
39

8/13/2019 Hm009 Ing High
http://slidepdf.com/reader/full/hm009-ing-high 40/78
Building trees (VIII)
Higher, stronger... and simpler.
Text and pictures by Legotron
The article in this issue is a response to some requests relatingto the construction of larger trees. In particular, there areseveral questions about the possibility of building trees thatare more than 30 bricks high, strong enough not to coma apart
during construction and simple enough to build as many treesas needed to form forests.
With this in mind I started the design phase. The easiest thing was to choose the starting point, for which I chose the tallesttree in the collection, specically the one shown in the second
article in this series [1]. With the idea of building trees with aheight of 35, 40 or more bricks, I used the same techniquedescribed in that article, but it was a fairly complex task, in which the tree suffered continuous breaks, and after mucheffort, it resulted in a 35 bricks high tree which was extremely
fragile.
Since the look of the tree was quite good for the desired result,the only thing I had to do was nd a different technique to buildit. The internal system of bars to strengthen the trunk did notgive the desired result because they are quite short and startand end of each new bar is a critical point where the treestend to break. Therefore, I looked for an alternative that wouldreplace the bars with another more adequate element thatcould be easily used, and the result was the tree of this article.
Parts required The parts list is very simple and requires very few types ofparts. It is mainly based on the list of tree parts of the secondarticle of this series. As usual, we use the naming criteria used
by the Web Bricklink [2]:
For the base:- 1 6x6 green plate.
- Three or four green ower plant stem to decorate the base.
For the trunk:- 30-40 brown 2x2 round bricks.
- 12-15 brown 1x1 round plates.
- A brown 1x1 cone.
- A 3 mm D rigid hose at least 40 bricks in length, of any color.To make the branches:- About 120 green 4x3 plant leaves.
Construction The key part in the construction is the 3mm D rigid hose. Thispiece is going to give the tree the necessary strength and willdetermine the height it can reach. Furthermore, the use of thispiece will simplify the construction process signicantly.
We begin by placing about 15 2x2 round bricks over the 3mm
D rigid hose which form the lower trunk. We place them on the
base and add a couple of 4x3 plant leaves and a pair of 1x1round plates in the free stud son the last brick. These pieces,placed on the bricks, leave enough space in the center to passthe 3mm D rigid hose, so you can keep putting new bricksalong the entire length of the hose. On each group of leavesand 1x1 round plates add a couple of 2x2 round bricks, and
again put a new conguration of sheets and plates, if possible,
in a different conguration from the last one. The space of
two bricks is more than enough to allow proper handling ofthe branches; we can leave even more space to crate parts ofthe tree without branches. This process is repeated until thedesired height. Be careful when tting the following bricks in
order not to force the 3mm D rigid hose. It may bend. Leavefewer leaves and more 1x1 round plate at the bottom and in
the upper stages of the trunk and place stages with four piecesof leaves in the central part of the trunk. Depending on thelength of the 3mm D rigid hose we can build lower or highertrees. Crown the top of the trunk with a 2x2 round brick 2x2
40

8/13/2019 Hm009 Ing High
http://slidepdf.com/reader/full/hm009-ing-high 41/78
and 1x1 cone, over which we will put a couple of 4x3 plant
leaves. This simple process can be done in just 5 minutes, and with this we have completed the structure of the tree. Now you just need to add more 4x3 plant leaves to give it its nal look.
This process can be done in several phases. In a rst phase,
starting from the bottom, you place two leaves forming 120-150 degrees, alternatively, at the end of each leaf, some inthe bottom and others on top of the previous leaves. At eachheight leaves are positioned so they cover the holes in the
lower altitudes. Once this phase is over, have a look at thegeneral appearance of the tree and use the remaining 4x3
plant leaves to give the nal touch. You might want to create
greener areas and others with long branches trying to breakthe symmetry of the tree. Remember that it is desirable that theleaves aren’t too far from the trunk, since handling these hightrees can cause them to fall.
This simple tree, built on a height range of 35 to 40bricks, allows us to make a small forest with a spectacularappearance. Also the same technique can be used foryounger, smaller trees to be placed among the larger ones.
References:[1] Hispabrick Magazine #003[2] Portal selling unofcial LEGO® on the Internet: http://www.bricklink.com#
41

8/13/2019 Hm009 Ing High
http://slidepdf.com/reader/full/hm009-ing-high 42/78
An introduction to Robotics with LEGO®MINDSTORMS (VI)
Programming tools for the NXT
Text and images by Koldo
When LEGO® launched the rst generation of LEGO
MINDSTORMS it was hard to imagine wealth of programmingtools that would become available. A community started togrow on the Internet, developing ideas and tools of their own.When the company realized that offering this communitythe necessary information to develop its full potential, theypublished documentation to develop new programming tools. 8 years later a new MINDSTORMS generation was launched:the NXT. By then the community had become very important
to LEGO, so they enlisted the help of MINDSTORMS usersthrough development programs in which people with a certainlevel of expertise in different aspects related to building and
programming LEGO robots. When the NXT was launched,LEGO published the necessary information to enable others todevelop new programming tools and sensors to be used withthe NXT. There are numerous programming tools available, so there issomething to cater for all needs and interests. You may evendevelop your own tools if you know enough about that. Thisarticle aims to provide a general overview for a newcomer andincludes some recommendations.
Selection criteria There is no doubt that in order to learn something, certainbasic conditions must be met: you need to want to learn it,have the necessary time and be willing to experiment. Practice,
make mistakes and try again. It is the best way to learn. Andsomething that is of great help is being able to share what youdo with others, so the existence of a community is an important
factor. You can learn in your room, in a classroom or university oranywhere else. If we are in charge of the learning process,having good documentation to help us along is another factor
to keep in mind. Not all programming environments have the same learningcurve or require the same level of previous knowledge. NXT-G,for example, requires no previous knowledge and allows you to
create working programs from the very rst moment.
Another important factor, in some cases the most importantone, is the reason why we want to learn to program. Is it ahobby? Will we learn something at school or university? DO we build and program robots to test out solutions to problemsI some cases the choice of programming language will be agiven.
Introduction to robotics I will start out with the group of people between 0 and 99 who
start with LEGO MINDSTORMS without any prior experience.
In many cases these people don’t have anyone to askquestions in their immediate surroundings while others mayresort to parents, siblings etc. But even in the case of someone who can count on some help the starting point may be thesame. Although it is not it’s ofcial name, the original LEGO software
is usually called NXT-G (G for graphic). NXT-G is great toget started. It has been specically designed to start out with
programming and be able to create a program to make a robotmove in les tan 5 minutes. Not a bad start. NXT-G comes with a guide to build and program the ofcial
models and there are many different models and programsavailable on the Internet that can help you in your learningprocess. A great source is NXTprograms [1]. On the other hand, NXT-G provides the programming structureof the traditional programming languages: use of variables,multitasking, conditionals, loops… in other words, it is a goodstart even if you want something different afterwards.
The next step Whether because you have the feeling you have outgrownNXT-G or simply because you want to learn to use a morepowerful tool you may nd yourself wanting to choose a new
programming environment. There is an ever larger selectionof tools and choosing the right one may seem difcult, but it
really isn’t vey much. Unless you have strong professional or
educational reasons, it is convenient to select just one andforget about the rest, at least for a time. Concentrating on asingle language will allow you to reach a better level withoutgetting sidetracked.
42

8/13/2019 Hm009 Ing High
http://slidepdf.com/reader/full/hm009-ing-high 43/78
When choosing one or another, an important factor is theonline community that can help you out when you get stuck,and another one the economical aspect. In this article I willnot mention any commercial programming environments andconcentrate on just two free tools: NXC and LeJOS.
NXC is based on C and enjoys a large tradition among LEGO®MINDSTORMS fans. It has an editor that makes developingprograms for the NXT easier: Bricx Command Centre [2].
There is good documentation and a large community aroundit, and several books have been published on the subject,including one by Daniele Benedettelli [3] and his surprisingprojects As for LeJOS, I have to say I have never used it, even thoughJuan Breña Moral [4], who is a big fan of Java, has often
tried to get me to. Learning LeJOS is learning Java andlearning Java is learning to use a tool used in servers, mobileequipment… It’s an interesting option, although in my case Ihave not yet tried it because I cannot do everything. On the Lrobotikas forum [5] there are people who can help youin your decision to use one or the other.
Advanced users This group contains mostly engineering student, professionalsand similar people who at some time have learned toprogram and in some cases in several different programminglanguages. There is a wide range of option to choose from and the nal
decision depends on the objective and in many cases on thecurriculum or the teaching needs. From LabVIEW (with a free version for students that canbe used with the NXT), to Microsoft Robotics Studio andJava, RobotC, Urbi, Matlab, etc. there is an ample range ofpossibilities that responds to virtually any need.
On the Lrobotikas wiki [6] you can nd information and links forthe different tools mentioned in this article.
[1] http://www.nxtprograms.com/
[2] http://bricxcc.sourceforge.net
[3] http://robotics.benedettelli.com/[4] http://xurl.es/lejos
[5] http://foro.lrobotikas.net[6] http://xurl.es/NXT
#
43

8/13/2019 Hm009 Ing High
http://slidepdf.com/reader/full/hm009-ing-high 44/78
44
LDraw Tutorial (IX)
Anatomy of an LDraw part.
Text and images by Jetro
We all know what our beloved bricks are made of (in caseanyone isn’t sure: ABS), but what are virtual bricks made of?The easy answer would be ‘bytes’, but in this article we’ll learna Little more about the internal structure of LDraw elementsand how they are made.
One of the major strong points of the way James Jessimandesigned what we now know as LDraw is that the system feedsitself. When LDraw was created computers had little powercompared to what we are now used to and it was necessary
to make the most of what was available to ensure everything would work well. Graphical applications require a lot of memoryand processor power and it was therefore necessary to createa system that was both simple and efcient. At the same time,
rendering a single brick may not require a lot of resources,but creations tend to get bigger, and the bigger, the morecomplicated to render.
In CAD (Computer Aided Design) the designer normally has todraw an object line by line. In MLCad we are presented withbricks and other LEGO® elements that have been completelypredesigned, but which are originally also made up of justlines. LDraw does not include the possibility to draw circles orcurves. For this reason a single stud is made up of a 16-agono
that represents the top of the stud and 16 quadrilaterals (orquads) representing the side of the stud. If you look at a 2x4
brick (LDraw reference 3001) you will see it contains 8 ofthese studs. In order to simplify matters and since the stud isa recurring element, it has been converted into a ‘primitive’ orshape that can be recycled and serves as a basis for otherelements. If you turn the brick over you will see three identicaltubes. These are also available as primitives. In this way theyonly need to be drawn once after that you only need to indicatehow many you need for each LEGO element and where theyneed to be placed. This simplies the design process of new
elements enormously. The concept of the recycled studs andcylinders can be further expanded. In addition to studs and
tubes, a brick is made up of boxes, one to describe the outside
shape and one for the inside shape. Combine studs, cylindersand boxes and all you need are four quads to bridge the gapbetween the boxes on the bottom side of the brick.
It sounds simple (and doesn’t need to be much morecomplicated) , but evidently that’s not all parts are quite thateasy to convert to LDraw and the design process needs tofollow some basic rules to ensure the nal quality of the parts.
To learn a little more about this process and what it involves Iconducted a short interview with Alex Taylor, an experienced
LDraw Parts Author:
- Can you describe the process of creating a new part?
It depends heavily on the part - sometimes it’s possible to startout with an existing part and modify it, other times you have to
start from scratch. For patterned parts, including stickers, the
starting point for me is a high-resolution scan of the pattern which can then be ‘drawn’ over with LDraw elements. For aphysical shape I usually start by adding common elements likethe studs and then work from there.
In all cases it’s important to get the dimensions as accurate aspossible, within the limits of the LDraw system, since the parthas to mate with others. Unfortunately, there’s no denitive way

8/13/2019 Hm009 Ing High
http://slidepdf.com/reader/full/hm009-ing-high 45/78
45
to convert from real-world measurements to LDraw units - agood approximation is that one LDraw unit (LDU) is 1/64 of an
inch - so compromises have to be made from time to time.
The next step is then to see what areas of the part can be
represented using LDraw’s library of ‘primitives’ - commonshapes such as boxes, cylinders, cones, studs and so on[1] -
and ‘subparts’ - sections of parts which are intended for reuse.Using these both saves time and keeps the lesize down!
With this done, any remaining areas need to be lled in, and
this process can range from simply adding a couple of trianglesto freehand 3D modelling.
Some examples:
Part 3001, the ubiquitous 2x4 brick, consists of two ve-
sided boxes (one for the outside, one for the inside), four
quadrilaterals (to make up the base), eight studs and three
stud-tubes. This part is almost entirely built from LDrawprimitives, with only the quads needing to be drawn by hand.
47990, a skull brick, uses a small number of primitives (e.g.cylinders, the Technic pins), but the bulk of it was drawn byhand.
3069bpa4.dat, a 1x2 tile with a pattern, uses a subpart(3069s01, the 1x2 tile but without its top surface) and a pattern
painstakingly drawn by hand from a 640dpi scan of the actualpart.
There are a variety of tools available to assist parts authors,ranging from simply generating an array of triangles to
cover a dened area all the way up to taking a ‘pattern’ and warping it to t onto a non-at surface. So far as I know, the
only graphical editor currently available which supports partsauthoring at all is MLCad (although due to bugs in the current
release (v3.3) it is necessary to use v3.2) but even with thesetools there’s still a fair bit of manual work involved! Morerecently it has become possible to perform 3D scans of actualLEGO® bricks - the Fabuland gures which have appeared
recently had their heads created in this manner.
Finally, the LEGO Universe Team have begun releasing 3Ddata to us, so we have a number of parts which would havebeen otherwise extremely difcult to model. A good example of
this is 2543, the Minig Rag Hat.
- On average, how long does it take you to model a part?
Again, it depends on the part :-) Something like 3001 wouldtake just a few minutes to complete, whereas 3069bpa4 tookseveral hours to draw the pattern. On occasion I’ve knockedout half a dozen parts in a single evening; other times I’vespent days working on a single piece.
- What is the most difcult part you have ever modeledand why?
Well...some of the patterned parts I’ve drawn were tedious todo, but I don’t think I’d call them ‘difcult’ :-) I’d say probably
x948 and x949, the blue-era railway points (or ‘switches’ if
you’re American) due to their complex shapes.
- What special techniques and programs did you use tomodel that part?
Sheer bloody hard work! As I recall, I started out by drawingthe basic shapes - the straight rails and similar - and thenspent some time calculating the radii of the curved rails. These
were then divided up into segments to simulate a (reasonably)smooth curve, and a subpart was created which could thenbe replicated around as required. The whole process took acouple of weeks.

8/13/2019 Hm009 Ing High
http://slidepdf.com/reader/full/hm009-ing-high 46/78
- Why isn’t a part immediately available after you model it?
Technically it’s available as soon as it’s uploaded to the LDrawParts Tracker, but it doesn’t become ‘ofcial’ until it appears
in a release of the LDraw Parts Library. Releases happen twoor three times a year on average and the number of parts in arelease varies depending on how much activity there’s beensince the last one.
Once a part goes on the Tracker, it needs to be reviewedby other authors before it can be released. The reviews areto check the part for accuracy (both to the original LEGO®part and to make sure there are no technical errors in themodeling), compliance with the LDraw library standards and toallow other people to make suggestions. A reviewer can either‘certify’ or ‘hold’ the part; a part must have at least two ‘certify’reviews an no ‘holds’ before it can move on to the next stage.
After being reviewer-certied, one of the Parts Tracker
administrators must also certify the part. At this point the partis eligible to go into the next Parts Library release, provided
that it does not make use of any subparts or primitives whichhave not yet been admin-certied. If the part passes all these
hurdles, it will most likely be included in the next release, at
which point it becomes ‘ofcial’.
So long as a part remains on the Tracker, it is considered‘unofcial’. Anyone may download and use these parts in their
models, so long as it is understood that these parts are subjectto change and that changes may result in your model no longerlooking quite right :-)
‘Ofcial’ parts may still be modied, but with some restrictions:
the origin and orientation may not be altered (so as not to‘break’ models which are using the part).
- What are the requirements for someone who’d like tobecome a part author?
None - anyone is welcome to jump in! You do need a login on www.ldraw.org, but once you’ve got that simply drop an emailoff to the admins via the LDraw website[2] to request authoringprivileges on the site. You’re now able to upload your creationsto the Parts Tracker.
Parts authors don’t automatically get ‘reviewer’ status - this isrequested separately, and usually requires that you’ve done abit of authoring rst.
[1] http://www.ldraw.org/library/primref/
[2] http://www.ldraw.org/library/tracker/#
46

8/13/2019 Hm009 Ing High
http://slidepdf.com/reader/full/hm009-ing-high 47/78
47
After trying it out the new LEGO® Digital Designer version 4.0, I had an opportunity to get together with LDD Development TeamManager Claus Matthiesen to talk about some of the new features and about the development of LDD in general.
Johan – Hi Claus, thanks for taking the time for this interview.
Claus – No problem, I’m glad to be of help
Johan - Let me start by say that testing the new LDD 4 has been a great experience. It’s easy to tell that your team has been
working hard to get all the new features in place.
Claus – Yes, we started planning for LDD 4 alreadyin 2009, and have been programming and testing allspring and summer of 2010 to get all the features inplace.
Johan - How many persons are you working withLDD development?
Claus - We are about 10-12 people in the 3D Studiodepartment here in Billund (depending how youcount) focusing on design and development. Then we have sub-contractors, mainly producing digitalbricks, helping us with shaders and physics enginecode. We also have testers in other parts of the world. It is a lot of people, but we work on manyother things apart from LDD; we have, for instance,done a lot of work for LEGO Universe.
Brick outlines and shading
Johan - One of the major new features in LDD 4 has got to be the new brick edge outline. It certainly gives a whole newexperience in using the software. Can you tell me something about the feature?
Claus – Well, one of the key criticisms in earlier version of LDD was that you couldn’t see the brick outlines. This made it difcult
to see the structure of your model, for example how and if bricks overlapped in a wall. And besides, without brick outlines, the
models tended to look too clean and frankly a little uninteresting, with perfectly smooth surfaces. That’s not how LEGO looks. Johan - I notice that also the building guides now have outlines. Claus – Yes, since we had the technology, we decided to add the same brick outlines to the building guide as well.
Johan - How is the brick outlines done technically? Did you need to re-model all bricks and add bevels on the edges?
Claus – No, adding bevels to all bricks would take too much time, and it would yield even more surfaces that have to be renderedin the software. Our goal is to make LDD run on computers that are not state-of-the-art, so we spend a lot of time trying tond algorithms to reduce the stress on the computers 3D system. The solution we ended up with is a novel approach where
we basically use the mark-up we already have on the bricks for which edges should be outlined (we use that in our buildinginstruction renderings that you see in the boxes you can buy in a shop). Using this information, we can use the shader on the
graphics card to generate the precise effect we want when rendering the brick, so the look of the edges may change in future
releases of LDD.
Johan – Speaking about shading, I noticed that you have added improved reections on the bricks themselves. Looks really cool
I must say.
LDD 4 - The latest release of LEGO® DigitalDesigner
An interview with LDD Development Manager Claus Matthiesen
By Johan S. (a.k.a. Superkalle)
LDD 4.0 user interface

8/13/2019 Hm009 Ing High
http://slidepdf.com/reader/full/hm009-ing-high 48/78
Claus – Yes, and apart from looking cool, it also helps the builder understand the spatial relationship between the bricks when heor she is building. This way, neighbouring bricks will cast subtle shadows on each other, which helps the eye decode where theyare in relation to each other. It is based on a technique called SSDO, Screen-Space Directional Occlusion.
Johan – Another thing I noticed regarding brick appearance in LDD is colours – they seem much more saturated compared toLDD 3.
Claus – Yes, already now we can see that this has prompted some discussion. The “old” colours didn’t match the actual brickcolours very well and were mainly chosen because the simple rendering style needed bright colours in order to make the variousparts of your model stand out more. We have wanted to align the colours more with the “real” LEGO® colours for a while, butthis is actually a very tricky subject – for instance, just the way your monitor is set up at home affects the colours a lot, and thatis impossible for us to control. However, the “new” colours are closer to the real LEGO brick colours and align better with thenew rendering pipeline in LDD. You may see the colours change again in future releases, but that will be because we show thecolours differently in the rendering pipeline, not because the brick colours themselves are changed
Flexing the elements
Johan – Another interesting feature is the Flex tool.
Claus – The Flex tool allows you to take an element, like a tube or a string, and ex it so that it looks like it would on a real
model. We tried to make it easy and intuitive to use since many of our users are younger.
Johan – I notice only a few elements can be ex at the moment, like one ex tube, a string and a chain. Will you add exibility to
more items in the future?
Claus – We started with the DbM elements, because DbM is our main “customer” for LDD, but basically we’re going to make anyelement that’s in LDD and bendable in real life exible. We’re looking into how quickly we can do this.
Johan - Being able to bend strings and chains in LDD has been wanted by users for a long time. Do you listen to the LDD fansmuch when you plan new features?
Claus – We sure do. But the fans are actually only a part ofthe LDD user base, which also includes quite a lot of children,many of whom are using DesignByME. We have actuallystarted with the tasks that would benet the most of our entire
user base, mainly to make LDD more accessible and betterintegrated with DesignByMe. This has been a success, and weare now generally turning more towards the issues that havebeen a major concern for the fan base. We have ambitiousplans for LDD 5 and 6, and though I cannot say anythingspecic about them now, they do incorporate many more
issues the fans have brought up than earlier
Even more bricks
Johan – In LDD4 you have added even more bricks. In LDD 3I think there were about 1750 bricks, and now we’re up to over2000. Is this an ongoing trend that you’re adding more bricks?
Without brick outlines and shading With brick outlines and improved shading turned on
48
Flex Tool allows you to bend chains and strings

8/13/2019 Hm009 Ing High
http://slidepdf.com/reader/full/hm009-ing-high 49/78
Claus – Yes. There is a small subset of bricks we can’t release digitally for various reasons, but aside from them, we will continueto add bricks gradually over the coming releases until we have most of the bricks currently used by LEGO® in LDD
Johan – So that means if the brick wanted by fans are not in LDD 4, then they could be added later on?
Claus – Yes, releasing new bricks is much easier than releasing a new LDD version, so they may very well be added later on inan update. But I can’t say anything about which bricks will be added and when.
Johan – Sometimes the users nds problems with a few bricks, mostly in LEGO Universe mode. How focused are you on xing
these?
Claus – This is exactly the reason why the “Universe mode” in LDD isn’t actually public and for the time being unsupported by
us. Brick production takes time just as adding ex to bendable bricks takes time, and we have not yet sufciently developed and
quality assured everything in LDD’s Universe mode to support it to the same level we support the rest of the application. Havingsaid that, we are very happy that people nd the mode useful,
despite is beta-like status, and making it releasable is anongoing process.
Johan – Many fans are asking also for older bricks, bricks thatmay not be used in any of the current sets. Will you add theseto in the future?
Claus – Well, we’re focusing on bricks that are in production right now, but LEGO Universe has needed a number of old bricks which have then been made. If we have good reason we may add other vintage elements, but they are not the rst priority as
such.
Johan – Finally, before we leave this topic about bricks, what are your plans about adding more decorations to the variousbricks? For example there are Castle fans that would love some castle graphics on minigs, horses and shields.
Claus – The main focus now is to continue adding bricks, but decorations are on the agenda for the next releases of LDD.
Finding the bricks
Johan – You’ve added quite a few features regarding brick management that I know many fans will be thrilled about.
Claus – Yes, we realized that for more advanced users it was kind of difcult to know basic stuff, like brick count, so we added
a few goodies. The rst thing we did was add a new status bar at the bottom of the screen. You can now click on a brick in yourmodel and immediately see part number, part name and colour. Also the status bar will give you the count of bricks, both of theentire model, and of the selected bricks. We also added a lter function so you easily nd the bricks you’re looking for. Just type
in the LEGO Part ID or brick name, and it will lter out all matching bricks.
Johan – Well, after trying these features I must say they are somewhat of a blessing. Still, many fans use the BrickLink or Peeronpart names and numbers. Is there support for those in LDD4?
Claus – No, unfortunately not.
Enhanced tools
Johan – You’ve added quite a few other tools too that seems to be aimed at more advanced users, for example the possibility to
enter an angle in the Hinge tool.
Claus – The free degree rotation in Hinge Tool we understood was requested by many users, so we decided to add that.
Johan – And I noticed it accepts both comma and period as delimiter. That’s a nice touch ☺
Claus – Thanks! Another new feature I can mention is the extended Colour palette, which now includes not only the currently
used colours, but also all old LEGO colours.
Johan – I also noticed that old and new colours are mixed. Isn’t there a potential risk that the user will mix these up, and for
example by accident use old grey, when they wanted the new grey? And when they want to order the bricks it won’t be possible
since that brick won’t exist in that colour.
Claus – We have made many changes to the interface in this release. We need to see now how they play out when the
applications is subjected to actual users in the real world. We have received a few comments on the colour palette and it’spossible we can improve it for the next release.
Selecting a brick will display part information
49

8/13/2019 Hm009 Ing High
http://slidepdf.com/reader/full/hm009-ing-high 50/78
Wanted features
Johan – I also noticed the new Invert selection feature
Claus – We added that quite late actually since it was so easyto do. I understand users are also asking for more advancedselection features. We are aware of the requests, and we’ll see what we can do for the future.
Johan – Are there any other fan features you know of?
Claus – I understand better generated building instructions aresomething many are asking for. Regarding this I can say that we are well aware about the limitations of today’s guide, and we’re working on getting it better
Johan – Some LDD users have suggest using groups in themodel to act as a guide for the Building Guide generator.
Claus – Yes, that is one of the things we are considering. Speaking of groups, other things we know fans are asking for is bettergrouping, so that you can click on a brick in a model and see which group it belongs to.
Johan – And, wrapping up the feature section, there are a lot of Technic users out there too. What can you say to them?
Claus – One of the limitations we have today is the physics simulation capabilities of LDD – it doesn’t allow us to make technicalsimulations, rotation of axles and cogs etc. Therefore we haven’t focused on ne tuning the Technic elements in LDD. I can tell
you that this is something we’re looking into.
The future
Johan - What can you tell us in general about the futurefor LDD? So far it has been a tool aimed at supporting theDesignByMe business concept.
Claus – What has happened is that the fundamentalfunctionality of LDD – how to build with bricks, how theyconnect, etc. – has been separated out into an independent
component we call BrickKit. Quite a lot of new projects that arebeing developed not just by us but also by other departments with BrickKit as a component, and by default, when theyrequest a new feature for BrickKit it also goes into LDD. So inthe future you will probably see LDD’s feature set broaden whilethe various modes will be more focused – Mindstorms mode even more integrated into Mindstorms, DesignByMe even moreintegrated into the DesignByMe experience and so on.
Johan - LEGO Universe has a building experience that is fairly similar to LDD with bricks that snap into position. I know many are
wondering if there will there be an import/export from LDD to Universe and vice versa.
Claus – It isn’t planned, but under consideration
Johan – OK, thanks Claus once again for taking the time.
Claus – You’re welcome. It was nice talking to you.#
50
Todo sobre el modo LU y LDD:
http://www.eurobricks.com/forum/index.php?showtopic=40794
Si tienes más dudas el foro de Eurobricks sobre LDD:
http://www.eurobricks.com/forum/index.php?showforum=128
It’s now possible to enter any angle in the Hinge Tool
Extended color palette
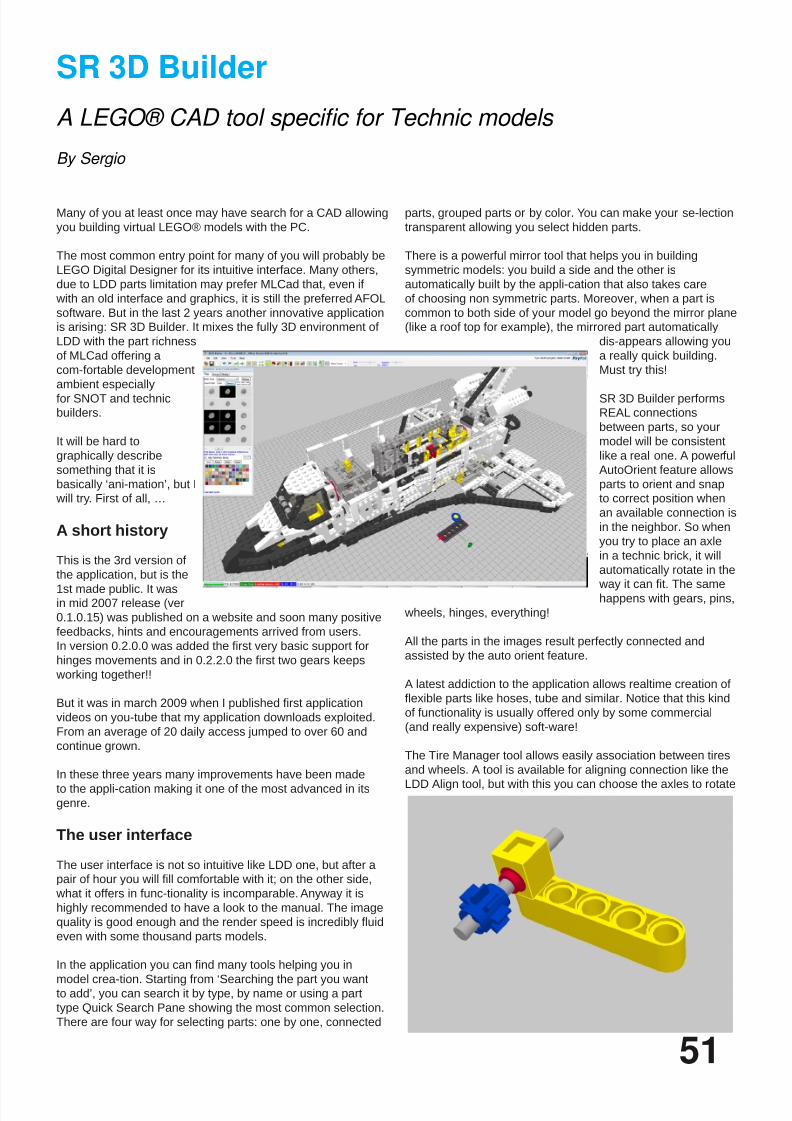
8/13/2019 Hm009 Ing High
http://slidepdf.com/reader/full/hm009-ing-high 51/78
51
Many of you at least once may have search for a CAD allowingyou building virtual LEGO® models with the PC.
The most common entry point for many of you will probably beLEGO Digital Designer for its intuitive interface. Many others,due to LDD parts limitation may prefer MLCad that, even if with an old interface and graphics, it is still the preferred AFOLsoftware. But in the last 2 years another innovative applicationis arising: SR 3D Builder. It mixes the fully 3D environment of
LDD with the part richnessof MLCad offering acom-fortable developmentambient especiallyfor SNOT and technicbuilders.
It will be hard tographically describesomething that it isbasically ‘ani-mation’, but I will try. First of all, …
A short history
This is the 3rd version ofthe application, but is the
1st made public. It wasin mid 2007 release (ver0.1.0.15) was published on a website and soon many positivefeedbacks, hints and encouragements arrived from users.In version 0.2.0.0 was added the rst very basic support for
hinges movements and in 0.2.2.0 the rst two gears keeps
working together!!
But it was in march 2009 when I published rst application
videos on you-tube that my application downloads exploited.
From an average of 20 daily access jumped to over 60 andcontinue grown.
In these three years many improvements have been made
to the appli-cation making it one of the most advanced in itsgenre.
The user interface
The user interface is not so intuitive like LDD one, but after apair of hour you will ll comfortable with it; on the other side,
what it offers in func-tionality is incomparable. Anyway it ishighly recommended to have a look to the manual. The imagequality is good enough and the render speed is incredibly uid
even with some thousand parts models.
In the application you can nd many tools helping you in
model crea-tion. Starting from ‘Searching the part you wantto add’, you can search it by type, by name or using a parttype Quick Search Pane showing the most common selection.There are four way for selecting parts: one by one, connected
parts, grouped parts or by color. You can make your se-lectiontransparent allowing you select hidden parts.
There is a powerful mirror tool that helps you in buildingsymmetric models: you build a side and the other isautomatically built by the appli-cation that also takes careof choosing non symmetric parts. Moreover, when a part iscommon to both side of your model go beyond the mirror plane(like a roof top for example), the mirrored part automatically
dis-appears allowing youa really quick building.Must try this!
SR 3D Builder performsREAL connectionsbetween parts, so yourmodel will be consistentlike a real one. A powerfulAutoOrient feature allowsparts to orient and snapto correct position whenan available connection isin the neighbor. So whenyou try to place an axle
in a technic brick, it willautomatically rotate in the
way it can t. The samehappens with gears, pins, wheels, hinges, everything!
All the parts in the images result perfectly connected andassisted by the auto orient feature.
A latest addiction to the application allows realtime creation ofexible parts like hoses, tube and similar. Notice that this kind
of functionality is usually offered only by some commercial(and really expensive) soft-ware!
The Tire Manager tool allows easily association between tiresand wheels. A tool is available for aligning connection like the
LDD Align tool, but with this you can choose the axles to rotate
SR 3D Builder
A LEGO® CAD tool specic for Technic models
By Sergio
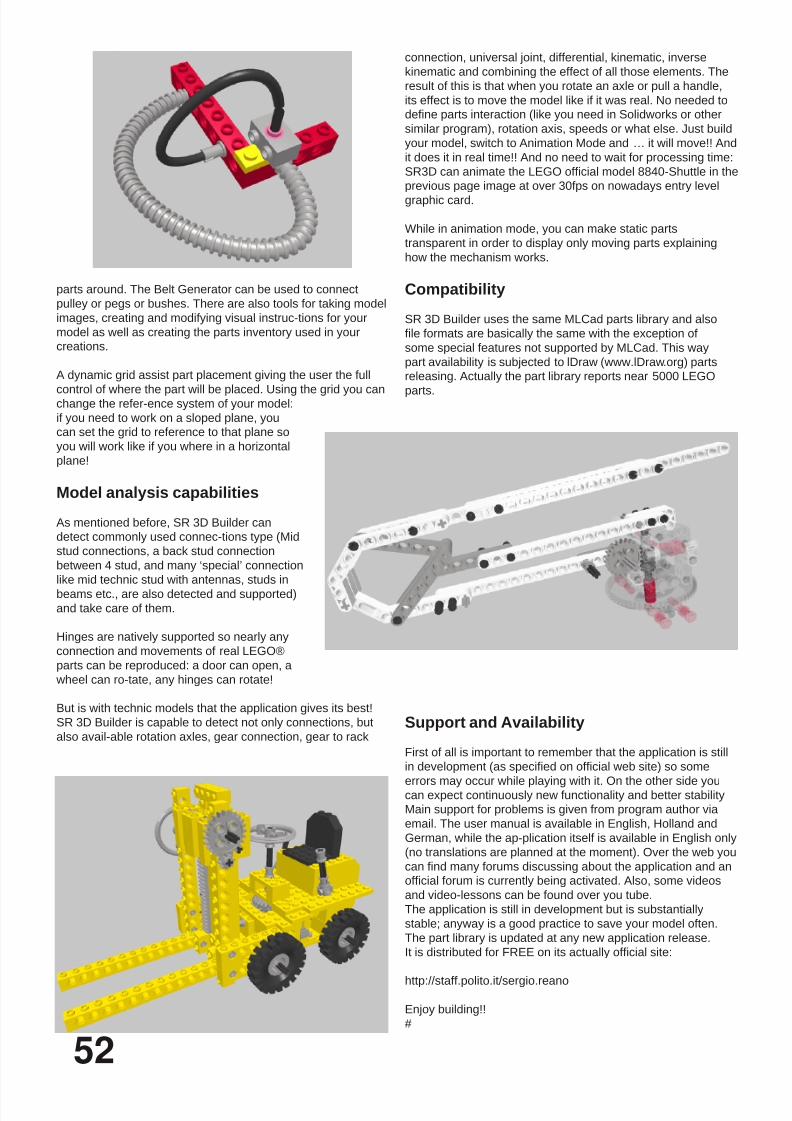
8/13/2019 Hm009 Ing High
http://slidepdf.com/reader/full/hm009-ing-high 52/78
parts around. The Belt Generator can be used to connectpulley or pegs or bushes. There are also tools for taking modelimages, creating and modifying visual instruc-tions for yourmodel as well as creating the parts inventory used in yourcreations.
A dynamic grid assist part placement giving the user the full
control of where the part will be placed. Using the grid you canchange the refer-ence system of your model:if you need to work on a sloped plane, youcan set the grid to reference to that plane soyou will work like if you where in a horizontalplane!
Model analysis capabilities
As mentioned before, SR 3D Builder candetect commonly used connec-tions type (Midstud connections, a back stud connectionbetween 4 stud, and many ‘special’ connectionlike mid technic stud with antennas, studs inbeams etc., are also detected and supported)and take care of them.
Hinges are natively supported so nearly anyconnection and movements of real LEGO®parts can be reproduced: a door can open, a wheel can ro-tate, any hinges can rotate!
But is with technic models that the application gives its best!SR 3D Builder is capable to detect not only connections, butalso avail-able rotation axles, gear connection, gear to rack
connection, universal joint, differential, kinematic, inversekinematic and combining the effect of all those elements. Theresult of this is that when you rotate an axle or pull a handle,
its effect is to move the model like if it was real. No needed todene parts interaction (like you need in Solidworks or other
similar program), rotation axis, speeds or what else. Just build
your model, switch to Animation Mode and … it will move!! Andit does it in real time!! And no need to wait for processing time:SR3D can animate the LEGO ofcial model 8840-Shuttle in theprevious page image at over 30fps on nowadays entry level
graphic card.
While in animation mode, you can make static partstransparent in order to display only moving parts explaining
how the mechanism works.
Compatibility
SR 3D Builder uses the same MLCad parts library and alsole formats are basically the same with the exception of
some special features not supported by MLCad. This waypart availability is subjected to lDraw (www.lDraw.org) partsreleasing. Actually the part library reports near 5000 LEGO
parts.
Support and Availability
First of all is important to remember that the application is stillin development (as specied on ofcial web site) so some
errors may occur while playing with it. On the other side youcan expect continuously new functionality and better stabilityMain support for problems is given from program author viaemail. The user manual is available in English, Holland andGerman, while the ap-plication itself is available in English only(no translations are planned at the moment). Over the web youcan nd many forums discussing about the application and anofcial forum is currently being activated. Also, some videos
and video-lessons can be found over you tube.The application is still in development but is substantiallystable; anyway is a good practice to save your model often.The part library is updated at any new application release.It is distributed for FREE on its actually ofcial site:
http://staff.polito.it/sergio.reano
Enjoy building!!#
52

8/13/2019 Hm009 Ing High
http://slidepdf.com/reader/full/hm009-ing-high 53/78
On September 24, 25 and 26 the Legofan Weekend wascelebrated in Skaerbaek, Denmark. As the name indicates, it isa weekend full of bricks, organised by the Danish AFOL friendsas well as by LEGO® itself. Additionally, this edition was alsolisted as the rst EuroLug event.
Four HispaLUG members had the opportunity to visit the eventin this edition: Satanspoet, Rick83, our Ambassador Lluis andI, Otum. Enough introduction lets get to the part you are all waiting for… The st thing that causes a big impression is the location of
the event: a bungalow park – like the ones where families liketo pass their holidays, virtually taken over by the event, withthe fans sleeping in bungalows for up to six people, which
are located near the pavilions of the exhibition (you read that
well: pavilions!!). We were fortunate to be in one of the nearestbungalows. In addition to the pavilions for the exhibition, there
were a number of rooms for meals, strictly for those attendingthe event, an acclimatized swimming pool with slide and evena bowling alley. As you can see, it was the perfect place for agreat weekend even if you get tired of bricks (¿did I say that?). Most of the participants of the event arrive around noon on
Friday and the afternoon is spent building up – it’s a comingand going of tables and lots of saying hello. As a personalnote, I’d like to add that it was very enriching to meet membersof other LUGs and talk with them as if we had known eachother for years, for the simple fact of sharing the same hobby. During the build-up there is time to walk around the entireexhibition and learn about building-up techniques, or even
guess what is being built up. I will never forget our surprise atseeing a pine tree in milky white. At about 5 in the afternooneverybody stops whatever it is they are doing and goes to thearea prepared by LEGO®. A number of boxes have turnedup… About 20 boxes are placed on the oor and everybody
tries to get a glimpse of what may be inside until suddenly,Hands up!! Five seconds later everybody was on the oor,
pushing and shoving like during sales, trying to get as manyparts as possible. I believe Rick managed to ll three bags and
the rest of us got our fair share too. We may be well behaved,but not stupid, the truth be said. Before the day is over, there is time to have a look at somebricklink shops that are present at the event, and nd
some rare parts and even vintage sets in good conditions.But everything stopped again when we caught sight of a
Skaerbaek 2010
Fanweekend in the land of the brick
By Otum Images by lluis
53
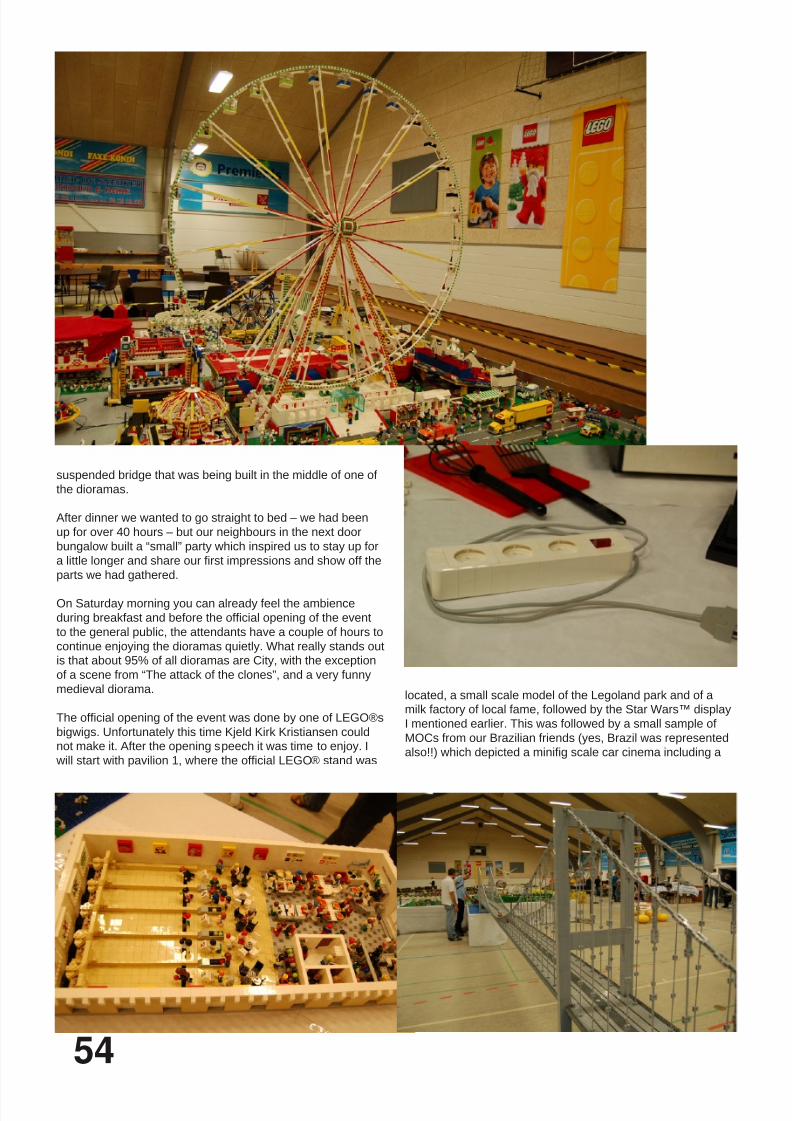
8/13/2019 Hm009 Ing High
http://slidepdf.com/reader/full/hm009-ing-high 54/78
54
suspended bridge that was being built in the middle of one ofthe dioramas. After dinner we wanted to go straight to bed – we had beenup for over 40 hours – but our neighbours in the next door
bungalow built a “small” party which inspired us to stay up fora little longer and share our rst impressions and show off the
parts we had gathered.
On Saturday morning you can already feel the ambienceduring breakfast and before the ofcial opening of the event
to the general public, the attendants have a couple of hours tocontinue enjoying the dioramas quietly. What really stands outis that about 95% of all dioramas are City, with the exception
of a scene from “The attack of the clones”, and a very funnymedieval diorama. The ofcial opening of the event was done by one of LEGO®s
bigwigs. Unfortunately this time Kjeld Kirk Kristiansen couldnot make it. After the opening speech it was time to enjoy. I will start with pavilion 1, where the ofcial LEGO® stand was
located, a small scale model of the Legoland park and of amilk factory of local fame, followed by the Star Wars™ displayI mentioned earlier. This was followed by a small sample ofMOCs from our Brazilian friends (yes, Brazil was representedalso!!) which depicted a minig scale car cinema including a

8/13/2019 Hm009 Ing High
http://slidepdf.com/reader/full/hm009-ing-high 55/78
55
real lm. After that a train diorama with a spectacular statue
and tramways. Right next to the LEGO® shop there was an Octan truck
at three times the size of the set, as well as a collection ofhousehold tools that could almost have been made by theArvo brothers – we even thought the extension lead was real
and someone had left it on the table by mistake. There werealso a number of maxigs of City characters, some of which were motorized, and a Vader. At their feet there was another
collection of trains and tramways together with some scalereproductions of cars. A large MOC represented a bowling alley with lots of activity,then a house on a cliff top. After that one of the, in my opinion,most spectacular dioramas: “the parade”. It consisted of astreet of modular houses and between the houses a paradein the street. The number of minigs that were used for it
was quite incredible. And now we get to what HispaLUGcontributed to the exhibition. We were located right next to our
Norwegian colleagues, who brought some modular houses.We displayed the abducting UFO in a corn eld together with
the characteristic Osborne bull and the “castellers” by Lluis, as well as number 8 of Hispabrick Magazine, with the interview ofKjeld Kirk Kristiansen. On the other side was the EuroLug table where vignettes for the EuroLug contest were displayed. Opposite HispaLUG there was one of the big displays of theevent: a mosaic of Europe full of miniature representationsof typical and famous places, like Big Ben in London, theBrandenburg gate in Berlin or the Kio towers in Madrid (byCarlos Mendez, car-mp, one of our own). Next to that there was a small diorama set in Arabia, where parts from the Princeof Persia sets were very well used. Finally there were was arural diorama, full of trees, with a race and a cyclist who hadsuffered an accident. The last diorama was in the City themeagain, and represented a city with buildings under construction
and a mountain/island. And that was only the rst pavilion! In the second there were
large tables, containing about 15,000 (again, no mistake,15,000!!) red 2x4 bricks so visiting children could participate
in contest to show what they were able to build in a given time with only those bricks. To be completely honest some of us would feel ashamed to show their MOCs after seeing whatthose Danish children were capable of building!! After accepting our defeat as expert LEGO® builders, we had
a look at the diorama that represented an amusement parkand a zoo. There was movement and lights. Words can hardlydescribe how marvellous it was. To relax the eyes there was an
incredibly funny medieval diorama full of gags right after that,followed by a city in Legoland scale, showing a collection ofMOCs of cars from the lms: Ecto I, Herbie, a Delorean, to just
mention a few. Finally, the display that included the hangingbridge. This was a train display with 9V trains controlled byMINDSTORMS®, with a small pirate scene on the coast. Next
to a house that looked like it was haunted. I almost forgetthe last diorama, small, but full of details, completely snowedunder and reproducing a scene from the Chronicles of Narnia.
On Saturday night there were more surprises: the attendantsreceived a free minig from the 2nd collectible series, which
was waiting on their plate at dinner time. During dinner there were several games and afterwards an auction (or should Isay battle xD). Bidding was very aggressive which was hardlysurprising taking into account what was being auctioned: anautographed Tower Bridge, three special edition airplanes fromdifferent airline companies or a Plexiglass box, limited edition
(100 units) that contained a Han Solo minig on one side and a
Indiana Jones minig on the other.
The night ended with a party for all participants in one of thebungalows, including (of course) Danish biscuits. Unfortunately for us, the next morning we had to leave for
the airport after breakfast, but we received a great exampleof Danish hospitality: a six hour delay at the airport in
Copenhagen. J To nish off I’d like to say we had a great time and learned
a lot. That is what you get when you visit events. Two thingsstand out especially: the way the brick unites the community,no matter where you come from and the squirrels, the realstars of Skaerbaek.#
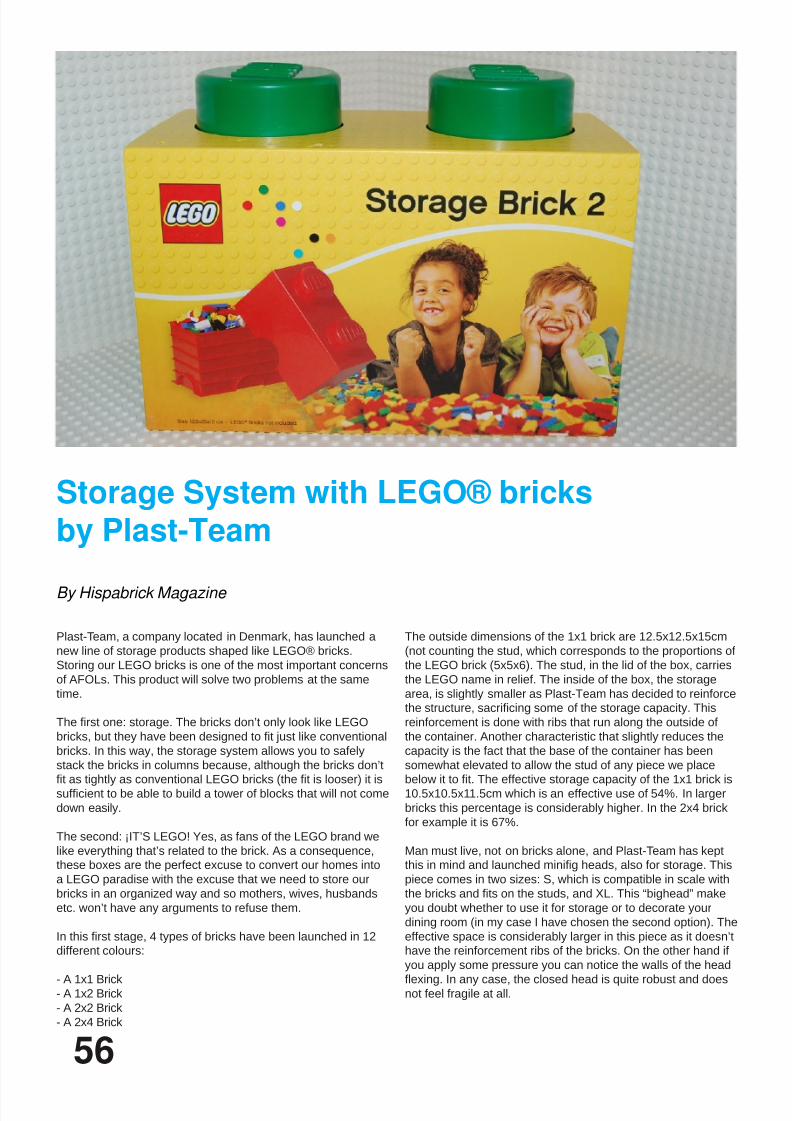
8/13/2019 Hm009 Ing High
http://slidepdf.com/reader/full/hm009-ing-high 56/78
56
Plast-Team, a company located in Denmark, has launched anew line of storage products shaped like LEGO® bricks.Storing our LEGO bricks is one of the most important concernsof AFOLs. This product will solve two problems at the sametime.
The rst one: storage. The bricks don’t only look like LEGO
bricks, but they have been designed to t just like conventional
bricks. In this way, the storage system allows you to safelystack the bricks in columns because, although the bricks don’tt as tightly as conventional LEGO bricks (the t is looser) it is
sufcient to be able to build a tower of blocks that will not come
down easily.
The second: ¡IT’S LEGO! Yes, as fans of the LEGO brand welike everything that’s related to the brick. As a consequence,these boxes are the perfect excuse to convert our homes into
a LEGO paradise with the excuse that we need to store our
bricks in an organized way and so mothers, wives, husbandsetc. won’t have any arguments to refuse them.
In this rst stage, 4 types of bricks have been launched in 12different colours:
- A 1x1 Brick- A 1x2 Brick
- A 2x2 Brick
- A 2x4 Brick
The outside dimensions of the 1x1 brick are 12.5x12.5x15cm
(not counting the stud, which corresponds to the proportions ofthe LEGO brick (5x5x6). The stud, in the lid of the box, carries
the LEGO name in relief. The inside of the box, the storage
area, is slightly smaller as Plast-Team has decided to reinforcethe structure, sacricing some of the storage capacity. This
reinforcement is done with ribs that run along the outside ofthe container. Another characteristic that slightly reduces thecapacity is the fact that the base of the container has beensomewhat elevated to allow the stud of any piece we placebelow it to t. The effective storage capacity of the 1x1 brick is
10.5x10.5x11.5cm which is an effective use of 54%. In larger
bricks this percentage is considerably higher. In the 2x4 brick
for example it is 67%.
Man must live, not on bricks alone, and Plast-Team has keptthis in mind and launched minig heads, also for storage. This
piece comes in two sizes: S, which is compatible in scale withthe bricks and ts on the studs, and XL. This “bighead” make
you doubt whether to use it for storage or to decorate yourdining room (in my case I have chosen the second option). Theeffective space is considerably larger in this piece as it doesn’thave the reinforcement ribs of the bricks. On the other hand ifyou apply some pressure you can notice the walls of the head
exing. In any case, the closed head is quite robust and doesnot feel fragile at all.
Storage System with LEGO® bricksby Plast-Team
By Hispabrick Magazine
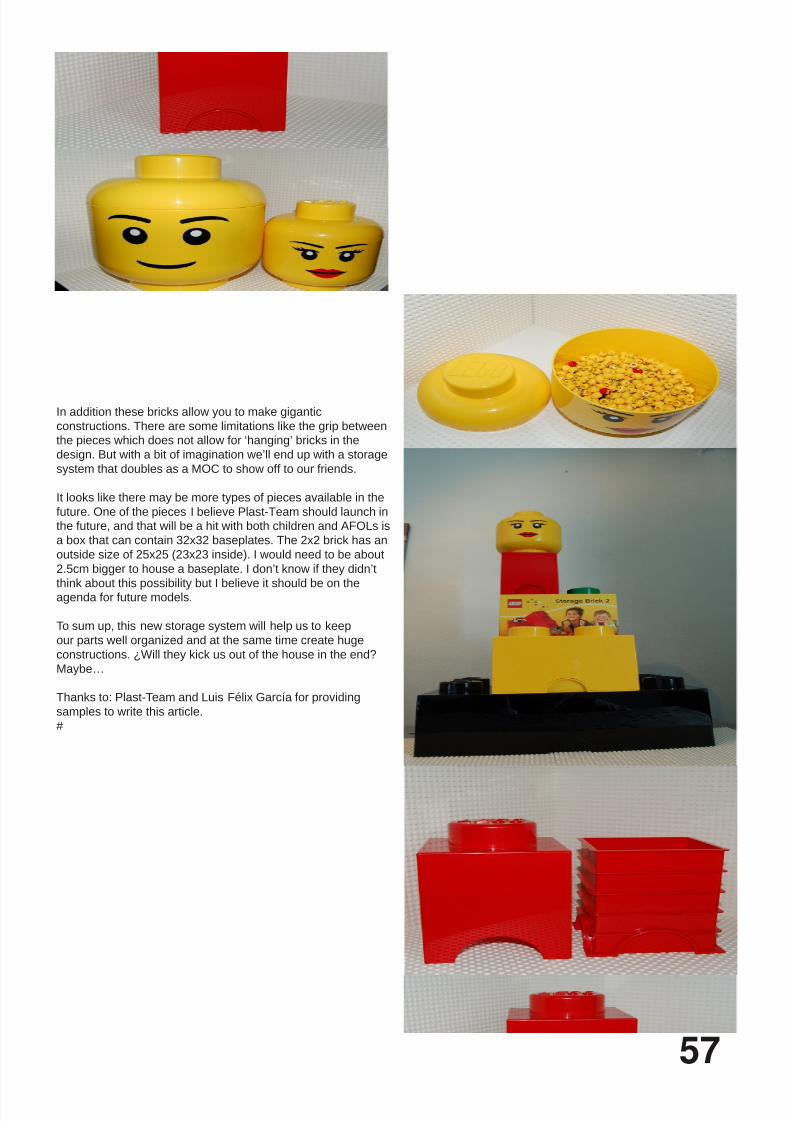
8/13/2019 Hm009 Ing High
http://slidepdf.com/reader/full/hm009-ing-high 57/78
In addition these bricks allow you to make giganticconstructions. There are some limitations like the grip betweenthe pieces which does not allow for ‘hanging’ bricks in thedesign. But with a bit of imagination we’ll end up with a storagesystem that doubles as a MOC to show off to our friends.
It looks like there may be more types of pieces available in thefuture. One of the pieces I believe Plast-Team should launch inthe future, and that will be a hit with both children and AFOLs isa box that can contain 32x32 baseplates. The 2x2 brick has an
outside size of 25x25 (23x23 inside). I would need to be about
2.5cm bigger to house a baseplate. I don’t know if they didn’t
think about this possibility but I believe it should be on theagenda for future models.
To sum up, this new storage system will help us to keepour parts well organized and at the same time create hugeconstructions. ¿Will they kick us out of the house in the end?Maybe…
Thanks to: Plast-Team and Luis Félix García for providing
samples to write this article.#
57

8/13/2019 Hm009 Ing High
http://slidepdf.com/reader/full/hm009-ing-high 58/78
58
Review 4842: HarryPotter Hogwart´sCastle
Harry Potter presentation
Text by lluisgib
Pictures by lluisgib and LEGO® Systems A/S
Set: Hogwart’s CastleSet Number: 4842Parts: 1290Minigures: 10
Recommended price in Spain: € 129.95
Presentation of the line.
Coinciding with the launch of the rst part of the lm
corresponding to the seventh Harry Potter book, called TheDeathly Hallows, a new batch of Harry Potter´s sets has beenreleased in the autumn of 2010.
Six sets have been released (plus a seventh announced as an
exclusive of Shop@Home next January 2011) that will give one
more turn of the screw in this license. There are 5 sets that arereissues of earlier sets, and a new one (4840 - The Burrow).
In this case, we will take a look briey at the fourth edition ofHogwart’s Castle.
I dare say this is the most elaborate edition of the castle, atleast at rst sight. It has been reproduced the exterior of the
castle in considerable detail, and have added modularity, asit consists of 4 modules that t through small buildings withhinges and Brick Modied 1 x 2 with 2 Pins. The interiors have
enough elements to allow the set looks very complete.
Four environments are represented, the most notable intheir details are the dining room and Harry Potter´s room. Allhave many small decorations which makes me think that thisis a rather elaborate reproduction. The set comes with 10
minigures (there is a medieval statue, which for some reasondoesn´t count as minigure ...). Many of them are what one
expects to nd in a Harry Potter set, like Harry himself, Lord
Voldemort, Professor Dumbledore, Professor Snape, ProfessorMcGonagall, Professor Flitwick, Argus Filch and his cat. I stopat the cat because, for the rst time you can nd a yellow cat
with a decorated face in a LEGO® set (previously there haveonly been black or white cats). Also, there are three owls ofdifferent colors, with decorated face and feathers, and youcan also nd some tiles decorated specically for this serie.
In contrast, although this is a licensed set, we did not getrid of the stickers to decorate the exterior walls and interior
elements. There are many accessories such as books, foodand many kinds of animals (other than those mentioned).
Maybe I skipped the top of the dining room windows. They aremade with 1 x 2 x 2 Flat Front windows, but without glass. Incontrast, with some trans colors 1x1 bricks, they have made
two very curious windows.
The 1290 pieces will not disappoint anyone. Neither thehardcore fans who will obtain a revised and improved versionof the castle, nor new arrivals (myself included) who will learna little about this saga enjoyed by millions of children (andadults) throughout the world.
Acknowledgements: to LEGO Iberia for making this setavailable.#
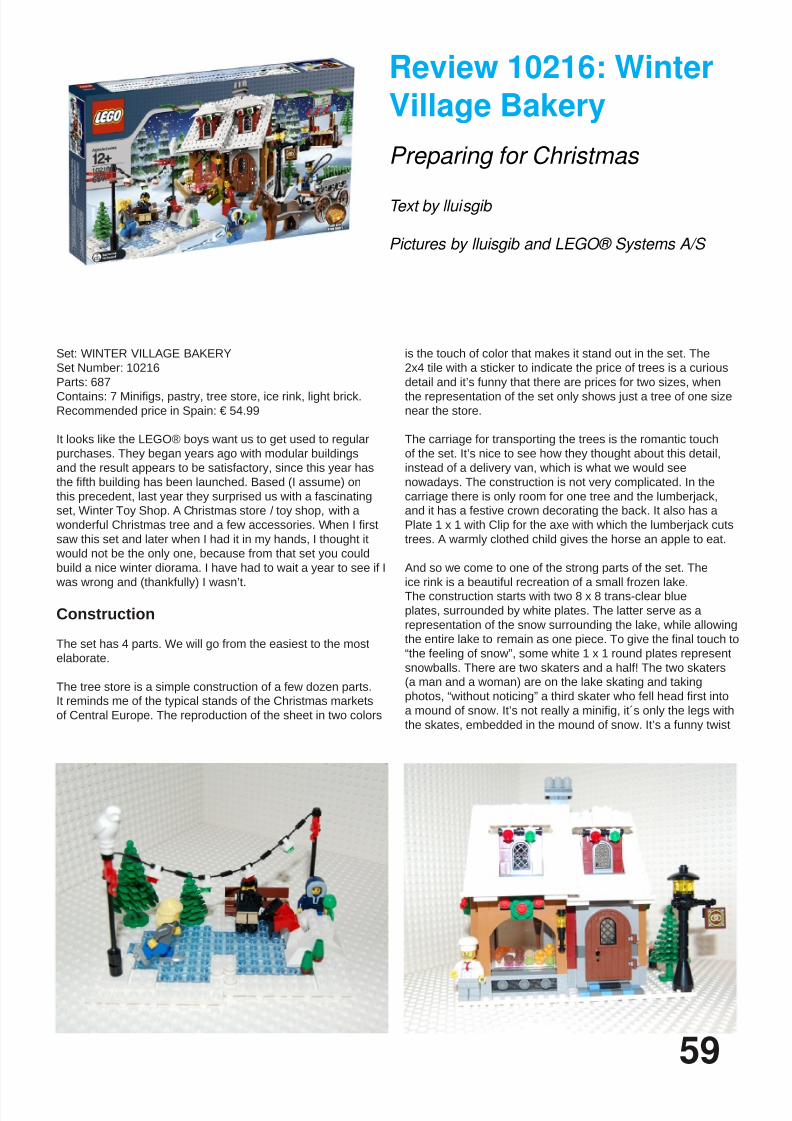
8/13/2019 Hm009 Ing High
http://slidepdf.com/reader/full/hm009-ing-high 59/78
59
Review 10216: WinterVillage Bakery
Preparing for Christmas
Text by lluisgib
Pictures by lluisgib and LEGO® Systems A/S
Set: WINTER VILLAGE BAKERYSet Number: 10216Parts: 687Contains: 7 Minigs, pastry, tree store, ice rink, light brick.Recommended price in Spain: € 54.99
It looks like the LEGO® boys want us to get used to regularpurchases. They began years ago with modular buildingsand the result appears to be satisfactory, since this year hasthe fth building has been launched. Based (I assume) on
this precedent, last year they surprised us with a fascinatingset, Winter Toy Shop. A Christmas store / toy shop, with a wonderful Christmas tree and a few accessories. When I rst
saw this set and later when I had it in my hands, I thought it would not be the only one, because from that set you couldbuild a nice winter diorama. I have had to wait a year to see if I was wrong and (thankfully) I wasn’t.
Construction
The set has 4 parts. We will go from the easiest to the mostelaborate.
The tree store is a simple construction of a few dozen parts.It reminds me of the typical stands of the Christmas marketsof Central Europe. The reproduction of the sheet in two colors
is the touch of color that makes it stand out in the set. The2x4 tile with a sticker to indicate the price of trees is a curious
detail and it’s funny that there are prices for two sizes, when
the representation of the set only shows just a tree of one sizenear the store.
The carriage for transporting the trees is the romantic touchof the set. It’s nice to see how they thought about this detail,instead of a delivery van, which is what we would seenowadays. The construction is not very complicated. In thecarriage there is only room for one tree and the lumberjack,and it has a festive crown decorating the back. It also has aPlate 1 x 1 with Clip for the axe with which the lumberjack cuts
trees. A warmly clothed child gives the horse an apple to eat. And so we come to one of the strong parts of the set. Theice rink is a beautiful recreation of a small frozen lake.The construction starts with two 8 x 8 trans-clear blue
plates, surrounded by white plates. The latter serve as arepresentation of the snow surrounding the lake, while allowingthe entire lake to remain as one piece. To give the nal touch to
“the feeling of snow”, some white 1 x 1 round plates represent
snowballs. There are two skaters and a half! The two skaters(a man and a woman) are on the lake skating and takingphotos, “without noticing” a third skater who fell head rst into
a mound of snow. It’s not really a minig, it´s only the legs with
the skates, embedded in the mound of snow. It’s a funny twist

8/13/2019 Hm009 Ing High
http://slidepdf.com/reader/full/hm009-ing-high 60/78
60
that designers wanted to add. The question that arises is if Imust consider it a minig of the set or not...
The lake is decorated with a bench, and two poles from whichChristmas lights hang, which gives the set a festive touch.Finally, on top of one of the poles there is an owl watching the whole scene.
And we come to “the jewel in the crown.” The oor of thebakery is a mosaic of Medium Stone Gray, Medium Blue and
Brick Yellow. The mosaic design is tailored to what will laterbe placed over it (the counter, the window ....). The building ismade of Dark Light Red with hints of Light Nougat. The frontdoor is medieval house style. This door leads to the counter, where the cash register is, and at the back, a showcase where you nd some boxes of cakes. On the left is a basket
with loaves of bread that have come out of the oven that islocated right behind. Further to the left, there is a windowshowing the different types of candy the shop has to offer,mufns, croissants, meringues ... The showcase becomes
important when the window receives light from light brick thataccompanies the set. This is placed on top of the window, when building the roof of the bakery. Its amber light is very niceand has enough intesity to be able to be seen under any roomambient light.
The roof is made of two parts. Each part is made with a squareof white plates (snow effect) with a hole in the middle, wheretwo small windows are placed, and are topped with smallledges. Behind one of the windows there is a small loft thatserves as a pastry store with a brown storage box. Behind
the other window the light brick that illuminates the window ismounted. Above the windows there are two white awnings witha mound of snow on top of each one. Just below the canopies,there are decorative Christmas lights, the same as those of thefrozen lake. And right in the middle of the building, we can nd
the chimney for the oven of the bakery.
On both sides, there are windows behind Nougat Light arches, just like the front window. Above each of the arches there’sa bit of mistletoe. A lamp with a sign for the bakery is the lastelement that is part of the construction.
Two minigures complete the building. The baker, who carries
a tray of pastries in one hand, and a customer with a box of
pastries she just bought. The client wears a red skirt, instead
of the typical minig legs. It is a nice touch, although I miss
some drawing on the skirt. Being smooth, it seems a bit poorcompared to other details of the set.
The complete set
After nishing setting up the various parts that make up the set,
I can see how well designed it is. A bakery and a Christmastree stand, beside a frozen lake with some skaters. A festive
picture that reminds many of the images we have of theChristmas story. 7 minigures “and half” for a set of this size is
noteworthy. They are also minigures with beautiful and funny
details. The whole set is remarkable. The bakery, with theoven, cakes, light and snow-covered roofs. The lake, with theskaters, the bench and, above all, the skater that is trapped inthe mound of snow. And the carriage, which is complementedby the stand for selling trees, the romantic touch of the set.
It´s hard to nd a fault in the set. The price (€ 54.99) justies
the use of stickers (few) instead of silk prints. The price perpiece is 8cts, which is quite restrained, and taking into accountthat it doesn´t abuse of the smaller pieces.
It is a perfect complement to the Winter Toy Shop. We start tohave material to make a Christmas diorama, and it can give usmany ideas. Now I can only begin to imagine what can be inthe works for the fall of next year. I have many ideas in mind,
but I will not venture a guess. I’ll wait to be surprised (andfascinated) again.
Acknowledgements: LEGO® SYSTEM A / S and Jan Beyer forproviding this set and LEGO Iberia SA, Joachim Schwidtal andRosa Seegelken for providing the ofcial pictures.
#
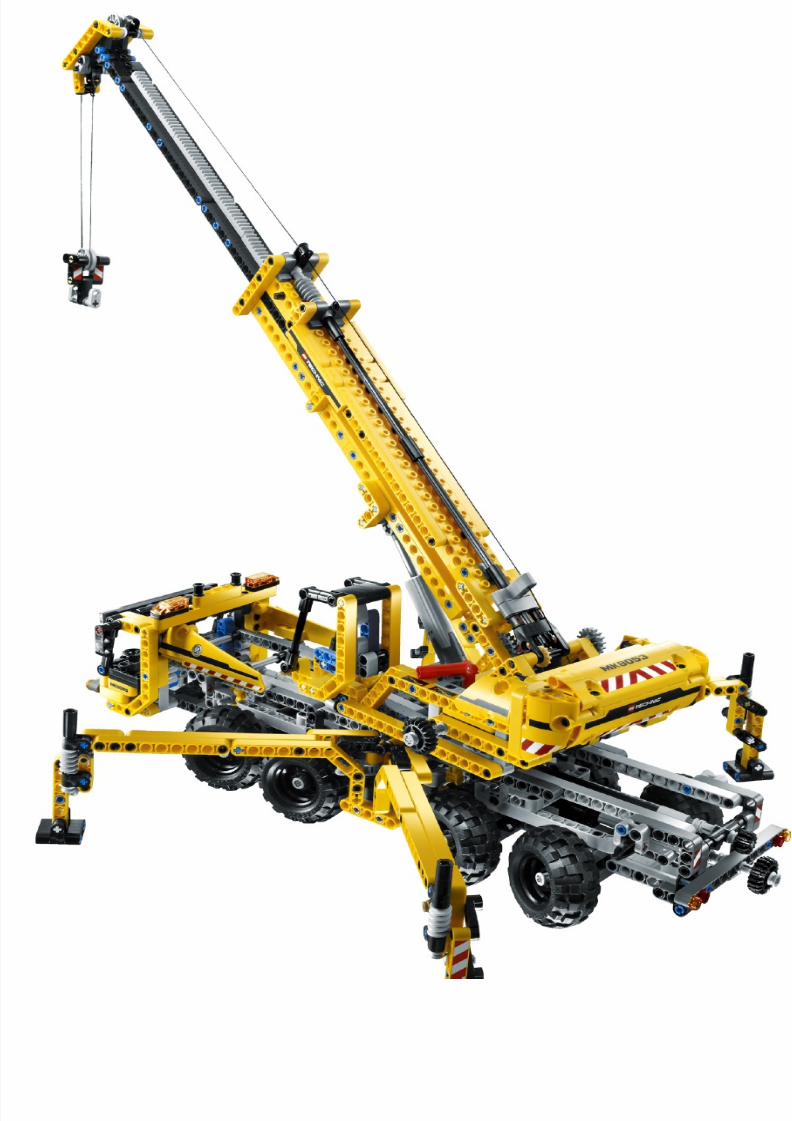
8/13/2019 Hm009 Ing High
http://slidepdf.com/reader/full/hm009-ing-high 61/78

8/13/2019 Hm009 Ing High
http://slidepdf.com/reader/full/hm009-ing-high 62/78
62
Review 8053: MobileCrane
Text by Jetro
Pictures by LEGO® Systems A/S
Set: Mobile Crane
Set number: 8053Parts: 1289Recommended Price in Spain: €100
This year LEGO® presents another mobile crane. Although itis not the rst time we see one in LEGO Technic, it not in any
way a remake as the design presents notable differences withrespect to earlier models. Especially noteworthy in this model(designed by Markuss Kossman, as reected in the license
plate: MK8053) are the stabilizers and the act that it comesprepared for Power Functions. The set has an interestinginventory and a good selection of functions. It does not includePF but does provide instructions for motorizing the crane withthe #8293 add-on set.
Just like we have seen in other models that include a turntable,the building process is divided into two clearly separate parts:the vehicle and the crane.
Of special interest in the vehicle are the stabilizers in Xconguration, which, just like the steering, are controlled from
the back of the model. Although the stabilizers don’t add anyreal stability to the model, they can be individually adjusted in
height to adapt to the terrain the crane is on and this allows
them to be rmly placed on the ground and not suspended inthe air. When the stabilizers are retracted they rest on supportsin the chassis and the opening mechanism is hidden fromview. In this way the stabilizers act as mudguards and give themodel an attractive look.
The vehicle has steering on all axles and the steering
mechanism is constructed so that the central axles turn less
than the front and back ones. They also turn symmetrically sodespite the length of the model it is very easy to steer either onthe road or at a construction site.
The front of the driver’s cabin – with blue seats, a decorativesteering wheel and opening doors – is designed to easily allow
the hook to be attached there.
The crane is made up of an interesting mix of liftarms andTechnic bricks and has an arm in two segments which iselevated by means of a Linear Actuator (LA) and a cable with ahook built out of liftarms.
It is highly recommendable to motorise the crane as turningthe knob to extend the LA can become quite tedious. The
remaining functions are prepared to work at similar speedsso it takes a considerable number of turns to extend the arm
or lower the hook. The two function selectors give access toextending the arm on the one side and to lifting it or lowering
the hook on the other. There is a difference in speed betweenthe extension of the arm and the lowering of the hook (also
in the opposite direction), so it is not altogether comfortableto use both functions at the same time, although the fact thatyou can access more than one function at the same time isinteresting.
The cabin of the crane sports another blue seat, but stands outin that it can tilt backwards to allow the crane driver a betterview of the load.
B-model
Probably the most surprising and at the same time
recommendable aspect of the set is the secondary model,instructions for which are available on the ofcial LEGO
website. The model represents a harbour crane which is veryrealistic and includes a good number of functions. The base

8/13/2019 Hm009 Ing High
http://slidepdf.com/reader/full/hm009-ing-high 63/78
of this harbor crane rests on 8 wheels, allow for the craneto move along the quay. The body of the crane is set onthe traversing beam of this moving base to allow it to movecloser to and further away from the water. This movement iscontrolled by a rack and pinion assembly. Just like the mobilecrane, the rotation of the crane is controlled manually as thereis no mechanism connected to the turntable. From the body ofthe crane, using the function selector you can either extend or
enroll the cable or modify the inclination of the crane.
The cabin of the crane holds a little surprise: the operator’schair is red!
The hook for this crane is identical to the one from the mainmodel, but a new element is attached to allow it to elevatespecial loads. The mechanism is similar to what is used to liftcontainers of trucks or the quay and onto a ship. This addsplayability to the set, especially since the inventory allows fornot one but two frames with tires that can be lifted with thismechanism.
Despite its size, the size of the harbor crane is quite stable,although it cannot lift much weight. The frames with tiresthat are part of this model are close to the maximum weight
it can support. This is due to the fact that the crane has nocounterweight. It would be possible to use the battery boxof the PF add-on set as a counterweight but there are noinstructions for using PF elements with the harbour crane: anice challenge to make the most of your PF elements!#
63
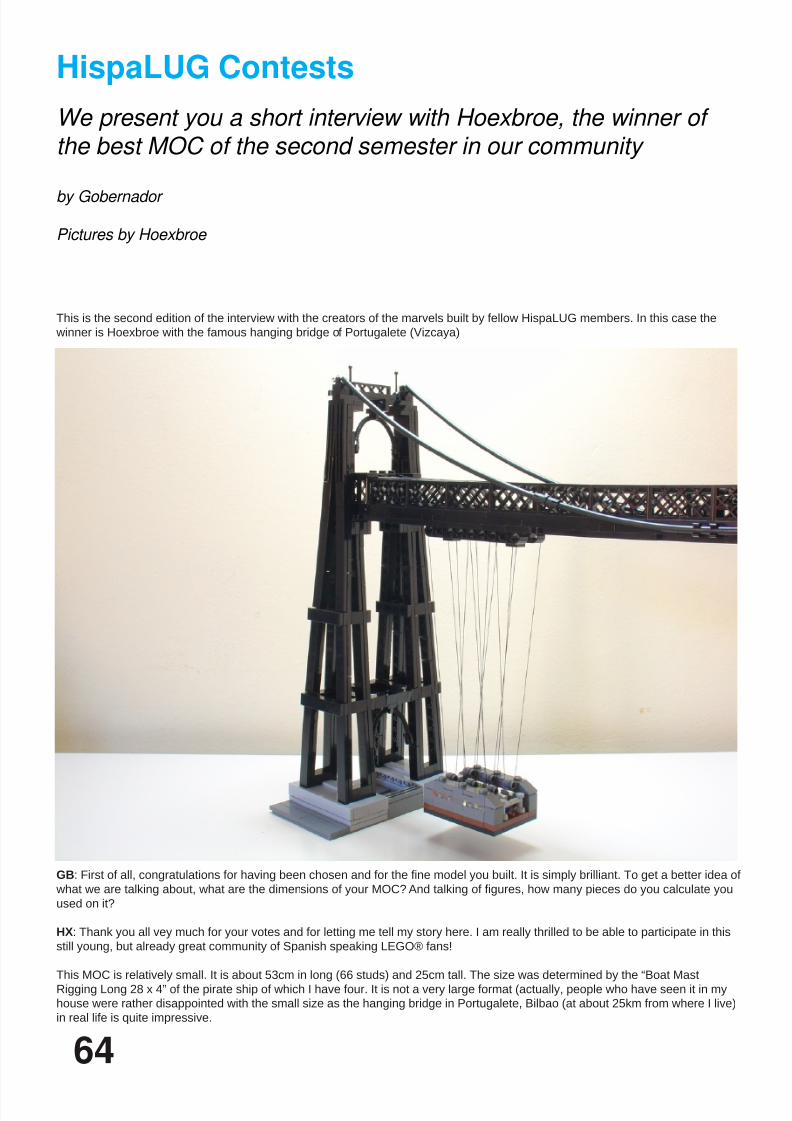
8/13/2019 Hm009 Ing High
http://slidepdf.com/reader/full/hm009-ing-high 64/78
64
HispaLUG Contests
We present you a short interview with Hoexbroe, the winner ofthe best MOC of the second semester in our community
by Gobernador
Pictures by Hoexbroe
This is the second edition of the interview with the creators of the marvels built by fellow HispaLUG members. In this case the winner is Hoexbroe with the famous hanging bridge of Portugalete (Vizcaya)
GB: First of all, congratulations for having been chosen and for the ne model you built. It is simply brilliant. To get a better idea of
what we are talking about, what are the dimensions of your MOC? And talking of gures, how many pieces do you calculate you
used on it?
HX: Thank you all vey much for your votes and for letting me tell my story here. I am really thrilled to be able to participate in thisstill young, but already great community of Spanish speaking LEGO® fans!
This MOC is relatively small. It is about 53cm in long (66 studs) and 25cm tall. The size was determined by the “Boat MastRigging Long 28 x 4” of the pirate ship of which I have four. It is not a very large format (actually, people who have seen it in myhouse were rather disappointed with the small size as the hanging bridge in Portugalete, Bilbao (at about 25km from where I live)in real life is quite impressive.
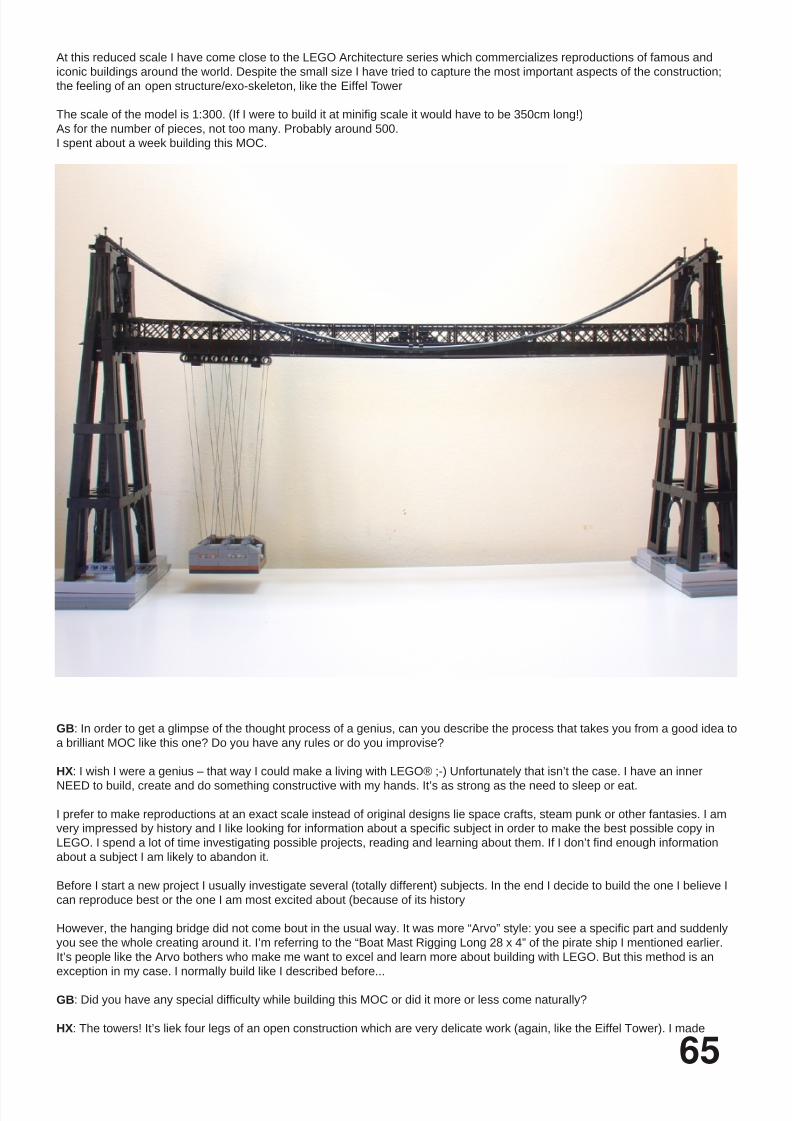
8/13/2019 Hm009 Ing High
http://slidepdf.com/reader/full/hm009-ing-high 65/78
65
At this reduced scale I have come close to the LEGO Architecture series which commercializes reproductions of famous andiconic buildings around the world. Despite the small size I have tried to capture the most important aspects of the construction;the feeling of an open structure/exo-skeleton, like the Eiffel Tower
The scale of the model is 1:300. (If I were to build it at minig scale it would have to be 350cm long!)
As for the number of pieces, not too many. Probably around 500.I spent about a week building this MOC.
GB: In order to get a glimpse of the thought process of a genius, can you describe the process that takes you from a good idea toa brilliant MOC like this one? Do you have any rules or do you improvise?
HX: I wish I were a genius – that way I could make a living with LEGO® ;-) Unfortunately that isn’t the case. I have an inner
NEED to build, create and do something constructive with my hands. It’s as strong as the need to sleep or eat.
I prefer to make reproductions at an exact scale instead of original designs lie space crafts, steam punk or other fantasies. I amvery impressed by history and I like looking for information about a specic subject in order to make the best possible copy in
LEGO. I spend a lot of time investigating possible projects, reading and learning about them. If I don’t nd enough information
about a subject I am likely to abandon it.
Before I start a new project I usually investigate several (totally different) subjects. In the end I decide to build the one I believe Ican reproduce best or the one I am most excited about (because of its history
However, the hanging bridge did not come bout in the usual way. It was more “Arvo” style: you see a specic part and suddenly
you see the whole creating around it. I’m referring to the “Boat Mast Rigging Long 28 x 4” of the pirate ship I mentioned earlier.
It’s people like the Arvo bothers who make me want to excel and learn more about building with LEGO. But this method is an
exception in my case. I normally build like I described before...
GB: Did you have any special difculty while building this MOC or did it more or less come naturally?
HX: The towers! It’s liek four legs of an open construction which are very delicate work (again, like the Eiffel Tower). I made

8/13/2019 Hm009 Ing High
http://slidepdf.com/reader/full/hm009-ing-high 66/78
66
several attempts to build horizontal beams with Technic parts, but the result was too thick and clumsy. After a long struggle Inally found the right style. The diagonal lines have disappeared completely, but the result is more faithful to the prototype.
Using my experience in bending (actually forcing) a series of small parts, I built the curved legs of the towers moving from a
vertical to a diagonal structure. What is new in this case is that I forced the parts into two directions in order to obtain volume in
each leg of the tower. As there is a large succession of parts, the stresses on each one of them are really small and they don’tdamage any parts.
In real life, the bridge is anchored with several metallic cables, but in this case it is rather the bridge that supports the cables,although within the ‘cables’ of this MOC there is an elastic wire that prevents the MOC from collapsing.
GB: Of course we need to ask if this MOC will survive or will shortly be returned to the parts bin and in case it survives, if we willbe able to see it at an AFOL event.
HX: Unfortunately, the MOC no longer exists. Just like none of my MOCs make it beyond a couple of weeks. I really need the
parts. There are always key parts I need to nish build another MOC. For me, the fun with LEGO is in the building process.Not so much in the nished model. What can I do with a nished MOC? Look at it? For how long? In the end I will only see my
mistakes and limitations etc. Enjoying the well built parts has its limitations.
To me it’s the TRIP, not the DESTINATION.
With digital fotos, the internet and forum, any MOC is immortalized and visible to the whole world, which is a big advantage, so I

8/13/2019 Hm009 Ing High
http://slidepdf.com/reader/full/hm009-ing-high 67/78
don’t feel any pain when I disassemble a MOC. That way I can build another better one!
GB: We are used to seeing your great MOCs, some of considerable size, and we are proud to have you on our forum. You haveshown us a marvellous steam boat in the previous issue and you have also built some great tanks to rival with the ones built byLegotron and many other things I cannot now mention. What will be the next thing you’ll surprise us with? And what would you
really like to build but have not yet been able to?
HX: Many thanks for the compliments! ;-)
Size always impresses. I like building big. A large construction gives you more to talk about and see. It can (more easily) include
many details. That is not to say that smaller constructions are worse. Probably it’s the other way round. It is much harder to getto a high level of detail with a small construction. You need more special parts and/or to be more creative with them. In a largeconstruction even small details can often be built with simple bricks..
I love Legotron’s German tanks, but for the moment I don’t want to build at that scale. First of all because there are MANY people who do, even commercially, like for example Daniel Siskind of Brickmania Models. Secondly, because builders like Legotron have
a very specialized LEGO® collection specically for this kind of construction, whereas mine is very much unfocussed; I try to
always be ready for any MOC at any scale!
At the moment I am preparing a rather large MOC: 150cm long, 100cm high, minig scale... for HispaBrick 2010.
All right, it’s another boat. That’s all I will say for now ;-)
And yes, I do have a dream project. I gave it a try at the end of 2009 but had to give up. I have not given up on the dream though.One day I’ll build it, but I will probably need an NXT for i t. That will be another story, for another day...#
67
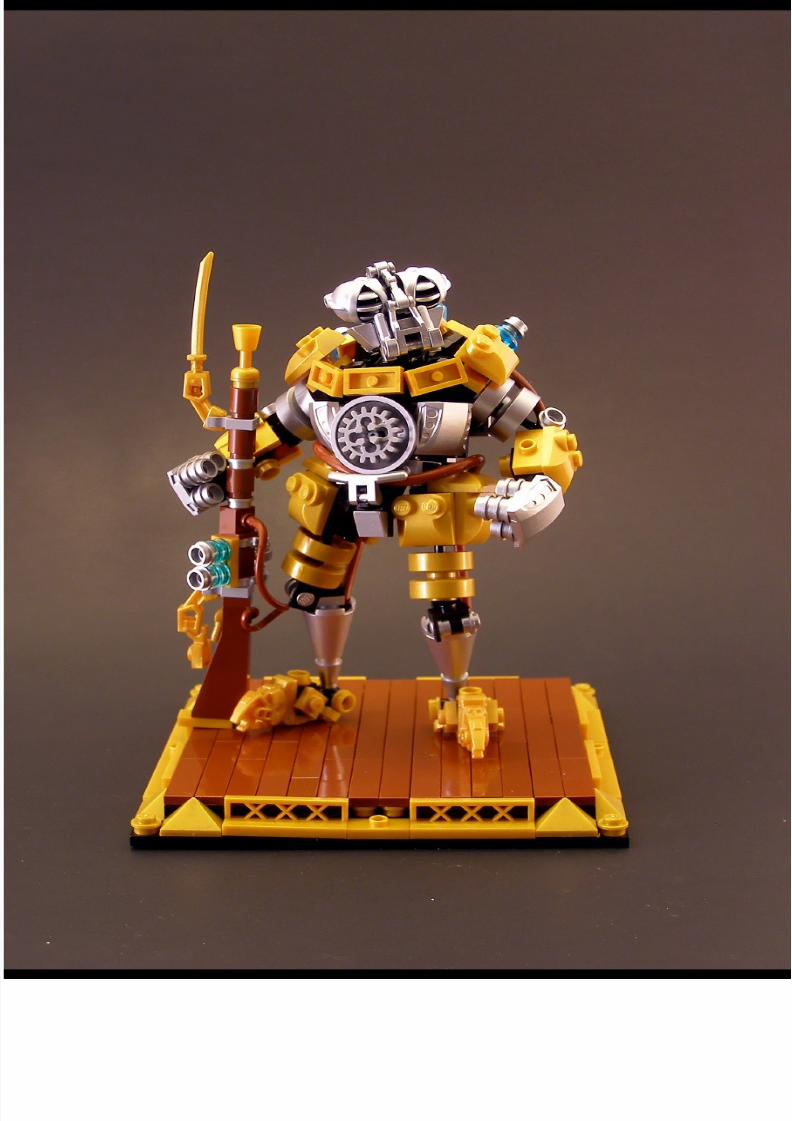
8/13/2019 Hm009 Ing High
http://slidepdf.com/reader/full/hm009-ing-high 68/78

8/13/2019 Hm009 Ing High
http://slidepdf.com/reader/full/hm009-ing-high 69/78
69
Hispabrick Magazine: Name?
Tyler Clites (a.k.a. Legohaulic)
HM: Age?
TC: 23
HM: Nationality?
TC: American
HM: What do you do normally?
TC: Normally I would go to school but since I just graduated
college I’m searching for a job.
HM: When did you rst start building with LEGO®?
TC: When I was in my mother’s womb, okay, not really. I was
two when I got my rst System LEGO set.
HM: Your rst set?
TC: My rst set was a small race car (1517)
HM: And your last set?
TC: 5982 Smash ‘n’ Grab
HM: ¿Your favorite commercial LEGO building theme?
TC: My favorite theme would probably be Star Wars™. I mostlyenjoy it for the parts.
HM: ¿And your favorite non-ofcial building theme?
TC: Steampunk is denitely my favorite non-ofcial theme.
Great creators of the world: Tyler Clites
A fantastic creator known for his quality in details and his talentin all ocial and unocial LEGO® themes.
By Hispabrick Magazine
Pictures by Tyler Clites

8/13/2019 Hm009 Ing High
http://slidepdf.com/reader/full/hm009-ing-high 70/78
70
HM: What is your favorite LEGO® element and why?
TC: It would probably be the 4773 (travis brick) just because ofthe versatility in how it can be used and attached.
HM: Which part would you like LEGO to produce?
TC: There are hundreds of pieces I wish LEGO would makebut right off the top of my head I can think of one in particular.I would love if LEGO would produce a part which is essentiallya “travis brick” but with studs two perpendicular faces and thetop. Essentially this would give the ability to put a “travis brick”in a corner.
HM: How many hours do you spend building with LEGO?
TC: On average I spend anywhere from 5 to 20 hours a weekdepending on how busy I am.
HM: What do your family/friends think about this hobby?
TC: Everyone is very supportive and encouraging. Friendssometimes tease me about still playing with toys but I don’tmind. I know that they really are impressed by what I do.
HM: You have built MOCS from almost all unofcial lines,
Steampunk, Space, Mecha, Postapoc ,..., Is it difcult to
change the theme so frequently? How do you choose thetheme of your next creation?
TC: I have built in pretty much every major unofcial theme. I
like change. I don’t see how some builders can keep buildingin the same theme time after time. If I’m really inspired I mightdo several space ships or sci- mocs in a row but I really enjoy
changing it up on a regular basis. When choosing a theme, Itry not to think of a theme to build in but rather I start buildingsomething and it ends up falling into a theme. For example, I
may want to build a small mech, I start building the legs, therehappens to be some pearl gold piece that catches my eye, Iuse it and it begins to take on a steampunk look.
HM: Do you draw or pre-designs before you start building?
TC: Sometimes I do and sometimes I don’t. Sometimes I’llknow the ‘look’ I want to go for but still need to esh it out in
my head by drawing or sketching ideas. Other times, I just sitdown and start doodling with parts and something evolves fromthere. Still other times, I have an idea so clear in my head that Idon’t need to draw anything, I just build it.
HM: How long does take you to get from the idea to thenished model?
TC: It ultimately depends on the size of the model. However,I have built large models in a short amount of time and somesmall models have taken a very long time. On average there isprobably about 5 to 10 hours of work put into each model.
HM: One of the most famous dioramas in the past months

8/13/2019 Hm009 Ing High
http://slidepdf.com/reader/full/hm009-ing-high 71/78
71
has been your collaboration with Nannan. How did this projectcome about? What was the biggest difculty you found during
your collaboration with another genius of the bricks?
TC: Nannan approached me in January 2010 with the idea ofdoing a collaboration project for Brickworld since neither of ushad anything planned for the event. The biggest difculty was
probably the planning stage and trying to gure out what the
other person’s vision for the display and how we could blendthose visions into a single cohesive display.
HM: You have posted instructions of some of your MOCS onthe net. What has prompted you to put in that extra work that
means creating instructions for the models?
TC: I really want the instructions to be an inspiration to other
builders. Having built MOCs from other builders who havecreated instructions, I loved seeing how other people build andI learned a lot from building their model. Building someoneelses’ MOC is a chance to build in another artist’s style. Iequate it to being able to sit down with the instructions for VanGogh’s Starry Night and paint your own version of his painting.I hope that my instructions can be an inspiration to otherbuilders, both experienced and inexperienced alike. I would
love to see more people making instructions for their MOCs itmay be time consuming, but in my opinion, the reward is worth
it.
HM: If you had to choose one among all your creations, whichone would you choose and why?
TC: My favorite would probably be my rst apoc dio (http://
www.ickr.com/photos/legohaulic/545314787/). It arguably
is what started the Post Apoc theme as well as the irregular/freeform base plate idea. It is my favorite mainly because ofthe composition of it. I love how it almost looks like a differentscene from every angle.
HM: The increase of AFOLs and lines like Star Wars™ createnew possibilities not imagined before by LEGO®. What do youthink about the old school LEGO and the new LEGO?
TC: The ‘new’ LEGO wouldn’t be here without the ‘old’ LEGO.I’m all for whatever is new and different. I like to push theboundaries of what has been done before and progress tothe next level. Some people complain about the ‘new’ LEGO
with all the new parts they aren’t needed. I however, embracethe new parts. They are just providing more possibility for meand other builders to push the envelope on what can be calledLEGO.
On another note, I do feel like LEGO is focusing less oncreativity. With the licensed themes such as Star Wars and
Indiana Jones, kids are being told how to play with their toysrather than just inspiring them to be creative. That’s why it isso important for AFOLs to reach out to kids and help inspire

8/13/2019 Hm009 Ing High
http://slidepdf.com/reader/full/hm009-ing-high 72/78
them to be creative. I miss theold inspirational models on thebacks of LEGO® boxes. The tools/
pieces are there, they just need theinspiration again.
HM: What do you think about theuse of non-ofcial parts (stickers,
modied parts, non-LEGO elements,...)?
TC: A few years ago I would havebeen totally against it. I use to be ahard core purist. I’ve become morelenient in my view of non-LEGOelements after seeing some of theamazing work of Will’s Brickarmsand the amazing models of the lateNate Neilson (nnenn). While I wouldnever modify or paint a piece, Ihave used Brickarms and I’ve cutofcial stickers for a few models. I
try to remain relatively pure in myuse of LEGO just because I like thechallenge of limiting myself to onlyLEGO elements. However, I don’tobject as strongly to non-LEGOelements as I once did.#
72

8/13/2019 Hm009 Ing High
http://slidepdf.com/reader/full/hm009-ing-high 73/78

8/13/2019 Hm009 Ing High
http://slidepdf.com/reader/full/hm009-ing-high 74/78
5 questions to...
Jørgen Vig Knudstorp Chief Executive Ocer, LEGO® A/S
o What was the situation of The LEGO® Company when you arrived?
The LEGO Group was in actual fact a very creative and enthusiastic organisation. However, it was living insulated from therealities facing it. Users were mildly unhappy with the product offering, employees were concerned about the future and scepticalabout the top management’s intentions and strategies, and retailers were very mad at the LEGO Group, which they consideredunable to deliver on their business needs.
I sometimes say that there was too much self condence in LEGO Group, but not enough self-esteem. Self-esteem comes from
knowing who you are and feeling good about yourself, and thus being very true to yourself – being authentic. Self condence
comes from the recognition of others, and when you become too concerned about what other think, you lose yourself. This, Ithink, was the psychological situation of the company. We wanted to be loved and be ‘cool’ as seen by the kids, - so much that we strayed away from our true identity, self and destiny.
From an economic point of view the company was weak due to 10 years of unprotable growth, heavy debt burden and poormanagement. The company was not yet bankrupt, but it wasn’t healthy either.When in 2003, the US dollars sharply declined in value and LEGO Group lost sales in key product areas such as Star Wars™and Harry Potter, the nancial strength was too low to handle the situation, and the company nearly went bankrupt.
o At present TLC is in good health. Could you explain what the key is to this success?
Successful business outcomes are the results of many complex and complementary factors that come together in a carefully
balanced optimization – that constantly shifts as the world the business operates in constantly changes. Thus there is no singlekey to LEGO Group’s success. First and foremost, The LEGO Group is successful again because it has found its way back to where it all started, the core of the LEGO Idea, but it is as if we see that place for the rst time. You could call it ‘forever the same
and yet constantly new’, I believe LEGO City or LEGO Creator is a very good example of this.
Without this strong heritage there was nothing to build a successful business on.
Then on top of that we have built a very strong organisation, people, culture and capabilities that focus on making retailerssuccessful when they sell LEGO Products (so they want to buy ever more, and give us ever more space in their stores,catalogues and web sites), while continue to be driven by the interest and excitement of our users, children of all ages, whether
they are young children or adults.
Today, LEGO Group has a very strong identity but remains humble in listening to and interacting with its users and customers. Itis also an incredibly strong company as seen from a nancial point of view, so our future is very solid and positive.
o Please explain how you as CEO of LEGO view the AFOL community.
I am a LEGO Fan. I love LEGO System, and I think it is one of the greatest inventions of our time. I can take no credit for that;it was someone else’s invention, and I am not involved on a daily basis in our product development, as the owning family of theLEGO Group traditionally has been. But I have the greatest admiration for the LEGO Experience and its potential to bring joy,
pride and essential learning to children of all ages across the globe.
When we had to rediscover our soul and meaning, as per the description above, AFOLs were essential in helping me on that
74

8/13/2019 Hm009 Ing High
http://slidepdf.com/reader/full/hm009-ing-high 75/78
journey. I really enjoyed – and continue to enjoy – meeting with AFOLs because they show the way....they teach me so much,and I feel so at home with their passion for LEGO® Bricks. It’s like loving football and then meeting players in FC Barcelona!
So I have great afnity for the adult community of LEGO Fans, and I am sincerely grateful for the guidance and support they have
offered to me over the years. o In your opinion, what makes the LEGO brick different from any other toy.
Toys are great. They stimulate learning, imagination and creativity. It is when we are playful and curious that we best learn andinvent stuff. Unfortunately, as we go through school that curiosity and playfulness is killed, so much that the favourite kind of play
“role play” is that far away that grown up people have to go to Acting School to learn to be role playing again.
I honestly believe that Play is up there with Food and Love when it comes to child development. It is essential, it is how childrenlearn and develop – become mature grown up’s capable of solving life’s important problems.
So there are many great toys and kinds of play; football is but one great example. However, in this world of Play, I do believe that
LEGO System is very unique and special.
It is special because it nurtures the ability to reason systematically and think creatively – at the same time – and it helps kidsto learn to work collaboratively – and the best part of it, is that they are not even noticing that they are learning these importantthings. They play their way into this learning, without knowing it. So beautiful is nature’s design of human learning that we learnbest when we don’t know it. We call it Playful Learning.
This combination of System and Creativity is unique, especially a system with so many shapes in such a uniquely and consistenthigh quality – there is nothing like it. Something that you can easily assemble and yet easily take apart, without using glue – thereis nothing like. o In general lines, what direction will the company take in the future?
Based on the above insights about the role LEGO Play has in society, I think we have moral imperative to stay in business! It ismore than a business. It is a movement. It is an honor and duty to carry forward.
I think the duty of top management, myself in particular, is to always make sure the business survives – that it is capable ofadapting to constantly shifting circumstances, in order to survive and be successful. This can very often involve very painfulconicts and the implementation of tough decisions. You cannot be everyone’s best friend and you have to nd your own path
and speak with your own voice.
We focus rst and foremost on building our core business around the core themes you know today; bricks, Creator, LEGO Cityand LEGO Star Wars™ as well as LEGO DUPLO and LEGO TECHNIC. We want to continue to evolve the business and we dothat by focusing in on three mid term priorities for the business.
1) Our operations, which we want to continue to reinvent. We will never give up on being very creative in the ways we design,produce, distribute and sell our products.
2) Our People, Culture and Capabilities – we want to develop the LEGO People and our culture to be the best at supporting anddelivering the LEGO Idea, and we want to build the global capabilities to be competitive in every country on the planet.
3) Growth Drivers need to be nurtured and we have found seven, one of which is LEGO Universe which has just been launched with great success.
Thank you very much for the opportunity to speak to you!Jørgen vig.#
75

8/13/2019 Hm009 Ing High
http://slidepdf.com/reader/full/hm009-ing-high 76/78
Desmontados por Arqu medes

8/13/2019 Hm009 Ing High
http://slidepdf.com/reader/full/hm009-ing-high 77/78
77
How to collaborate with usCollaborating with Hispabrick Magazine is very easy, just send an email with your ideas to [email protected] and we will help you to “build” your article.
If your language is not Spanish, don´t worry, we will nd a solution. Contact us now!
¿Do you want to be the rst to know when we publish our magazine? Send us an email to [email protected]
#
Amador y Ramón Alfaro (arvo)Antonio Bellón (LEGOtron)Iain HeathCarlos Méndez (Car_mp)Jesús Delgado (Arqu medes)Jetro de Château (Jetro)
Koldo Olaskoaga (Koldo)Lluis Gibert (Lluisgib)Luis (Vrykolakas) y Ana (W3ird)Nathaniël kuipersNicolas Lespour (Nico71)Tobias Reichling
Stupid Studs por Vrykolakas y W3ird
Our collaborators on the Internet
http://www.brickshelf.com/cgi-bin/gallery.cgi?f=127268http://www.abellon.net/lswimperial/http://www.ickr.com/photos/ochre_jelly
http://www.ickr.com/photos/carmp/
http://debiologoadibujante.blogspot.com/http://www.brickshelf.com/cgi-bin/gallery.cgi?m=linmix
http://Lroboticas.nethttp://www.brickshelf.com/cgi-bin/gallery.cgi?m=lluisgibhttp://www.ickr.com/photos/23033004@N00/
http://www.brickshelf.com/galería/industrialdesignerhttp://www.nico71.fr/http://www.t-reichling.de/en/index.shtml

8/13/2019 Hm009 Ing High
http://slidepdf.com/reader/full/hm009-ing-high 78/78