Getting Started Guidewelcome.hp-ww.com/ctg/Manual/c00862919.pdfSafety Information Always follow...
96
HP Officejet Pro L7300/L7500 Getting Started Guide 使用入门指南 Panduan Untuk Mulai คูมือเริ่มใชงาน
Transcript of Getting Started Guidewelcome.hp-ww.com/ctg/Manual/c00862919.pdfSafety Information Always follow...

HP Officejet Pro L7300/L7500
Getting Started Guide
使用入门指南
Panduan Untuk Mulai
คูมือเร่ิมใชงาน

Copyright Information
© 2007 Copyright Hewlett-Packard Development Company, L.P.
Edition 1, 2/2007
Reproduction, adaptation or translation without prior written permission is prohibited, except as allowed under the copyright laws.
The information contained herein is subject to change without notice.
The only warranties for HP products and services are set forth in the express warranty statements accompanying such products and services. Nothing herein should be construed as constituting an additional warranty. HP shall not be liable for technical or editorial errors or omissions contained herein.
Trademark creditsMicrosoft® and Windows® are U.S. registered trademarks of Microsoft Corporation.

Safety Information
Always follow basic safety precautions when using this product to reduce risk of injury from fire or electric shock.
1. Read and understand all instructions in the documentation that comes with the device.
2. Use only a grounded electrical outlet when connecting this product to a power source. If you do not know whether the outlet is grounded, check with a qualified electrician.
3. When connecting the device to the electrical outlet, use only the power cord provided with the device.
4. If your device supports fax, use the phone cable included with the device.
5. Observe all warnings and instructions marked on the device.
6. Unplug this device from wall outlets before cleaning.
7. Do not install or use this device near water, or when you are wet.
8. Install the product securely on a stable surface.
9. Install the device in a protected location where no one can step on or trip over the line cord, and the line cord cannot be damaged.
10. If the device does not operate normally, see “Maintaining and troubleshooting” in the onscreen user guide on the Starter CD.
11. There are no user-serviceable parts inside. Refer servicing to qualified service personnel.
安全信息
在使用本产品时,一定要遵守基本的安全注意事项以降低火灾或触电的可能性。
1. 请阅读并理解设备随附文档中的所有说明。
2. 将本产品与电源连接时,只能使用接地的电源插座。如果不知道插座
是否接地,请向合格的电工咨询。
3. 将设备连接至电源插座时,请只使用设备附带的电源线。
4. 如果您的设备支持传真,请使用设备随附的电话线。
5. 留意设备上标出的所有警告和说明。
6. 在进行清洁前,先从墙壁插座上拔掉设备的电源插头。
7. 切勿在近水处或身体潮湿的情况下安装或使用本设备。
8. 将产品安放在平稳的桌面上。
9. 请将本设备安装在受到妥善保护的场所,以免有人踩到线路或被线路
绊倒,或者电源线不致受到损坏。
10. 如果设备运行不正常,请参阅 Starter CD 上联机用户指南中的 “维修
与故障排除”。
11. 本设备内部没有用户可维修的部件。请将维修任务交给合格的维修人
员。
Informasi Keselamatan
Perhatikan selalu tindakan pencegahan dasar saat menggunakan produk ini untuk mengurangi risiko cedera karena terbakar atau sengatan listrik.
1. Bacalah dan pahami semua petunjuk dalam dokumentasi yang menyertai perangkat.
2. Gunakan hanya stopkontak listrik yang ditanahkan bila menghubungkan produk ini ke sumber daya. Jika Anda tidak tahu apakah stopkontak ditanahkan atau tidak, tanyakan pada teknisi yang memenuhi syarat.
3. Bila menghubungkan perangkat ke stopkontak listrik, gunakan hanya kabel listrik yang disertakan dengan perangkat.
4. Jika perangkat Anda mendukung faks, gunakan kabel telepon yang disertakan dalam kemasan perangkat.
5. Perhatikan semua tanda peringatan dan petunjuk yang tercantum pada perangkat.
6. Cabut kabel listrik perangkat ini dari stopkontak sebelum membersihkan.
7. Jangan pasang atau gunakan produk ini di dekat air atau saat Anda basah.
8. Pasang produk pada permukaan yang stabil.
9. Pasang perangkat di tempat yang aman agar kabel listrik tidak mudah terinjak dan cepat rusak atau menyebabkan orang lain tersandung.
10. Jika perangkat tidak bekerja secara normal, lihat “Merawat dan memecahkan masalah” dalam panduan pengguna pada layar atau Starter CD.
11. Tidak ada komponen yang dapat diperbaiki pengguna di dalamnya. Serahkan perbaikan kepada tenaga servis yang memenuhi syarat.
ขอมลูดานความปลอดภัย
โปรดปฏิบัติตามขอควรระวังอยางเครงครัด เพื่อหลีกเลีย่งอันตรายจากไฟไหมหรือไฟฟาช็อต
1. โปรดอานและทําความเขาใจคําแนะนําทัง้หมดในเอกสารประกอบที่มา พรอมกับอปุกรณ
2. เมือ่เชือ่มตออปุกรณเขากับแหลงจายไฟ ใหเสียบสายไฟเขากับเตาเสียบ ที่ตอสายดินเทานัน้ หากไมแนใจวาเตาเสียบที่ใชมกีารตอสายดินหรือไม โปรดปรึกษาชางไฟฟาที่มคีวามชํานาญ
3. เมือ่เชือ่มตออปุกรณเขากับเตาเสียบ ใหใชแตสายไฟทีใ่หมาพรอมกับ อุปกรณเทานั้น
4. หากอุปกรณของทานสนับสนนุการทํางานโทรสาร ใหใชสายโทรศัพทที ่ใหมาพรอมกบัอปุกรณ
5. ปฏิบัตติามคําเตอืนและคําแนะนําทั้งหมดทีร่ะบุไวบนอปุกรณ6. กอนทําความสะอาด ตองถอดปลั๊กสายไฟของอุปกรณออกจากเตา
เสียบทุกครั้ง7. หามติดตั้งหรือใชอุปกรณนีใ้กลน้ําหรือขณะตวัเปยก8. ติดตัง้เครื่องอยางมั่นคงบนพื้นทีเ่รียบเสมอกัน9. ติดตัง้อุปกรณในที่ทีเ่หมาะสม เพื่อใหสายไฟไมระเกะระกะ และไมเกิด
ความเสียหาย10. หากอุปกรณทํางานผิดปกติ โปรดดูที ่"การบํารุงรักษาและการแกไข ปญหา"
ในคูมอืผูใชงานบนหนาจอ ซึ่งอยูในแผนซีดเีร่ิมตนการใชงาน11. ไมมชีิ้นสวนใดภายในเครื่องที่ผูใชสามารถซอมแซมเองได โปรดติดตอ
ขอรับบริการจากผูใหบริการทีม่ีความชํานาญ


1
Engl
ish
1 Set up the deviceBefore you begin . . . . . . . . . . . . . . . . . . . . . . 2Set up the device . . . . . . . . . . . . . . . . . . . . . . 2Complete the installation . . . . . . . . . . . . . . . . . 4Finding more information. . . . . . . . . . . . . . . . . 4
2 Identify the device partsFront view . . . . . . . . . . . . . . . . . . . . . . . . . . . 5Back view . . . . . . . . . . . . . . . . . . . . . . . . . . . 6Control panel . . . . . . . . . . . . . . . . . . . . . . . . . 7
3 Set up the fax (optional)Parallel- vs. serial-type phone systems . . . . . . . . 9Dedicated phone line . . . . . . . . . . . . . . . . . . 10Shared phone line . . . . . . . . . . . . . . . . . . . . 10Managing and configuring fax settings . . . . . . 15Set up speed-dial entries . . . . . . . . . . . . . . . . 15Test fax setup . . . . . . . . . . . . . . . . . . . . . . . . 15
4 TroubleshootingSolving installation problems . . . . . . . . . . . . . 16Solving network problems (some models only) . 17Solving fax problems (some models only). . . . . 18Troubleshooting and configuration tools . . . . . 20
Hewlett-Packard limited warranty statement
Contents

1 Set up the device
This section summarizes the setup process for the device.
Before you begin
Prepare the locationMake sure the location where you will place the device meets the following requirements.
• The surface must be sturdy and level.
• Make sure that you leave enough room so that you can gain access to the back of the device and open the flatbed scanner lid.
• Do not place the device in direct sunlight or near chemicals. Make sure that the environment does not experience abrupt changes in temperature or humidity.
Set up the deviceThis section summarizes the steps you follow to set up the device. For more information, see the setup poster that came with the device.
NOTE: Check the package contents and install optional accessories.
Temperature 15° to 35° C (59° to 95° F)
Relative humidity 10% to 80%
1. Remove the tape and packing materials.
NOTE: Be sure to remove the cardboard packing material from the printhead area.
2. Install the control-panel faceplate.3. Install the document feeder tray.4. Install the ink cartridges.
NOTE: All four ink cartridges must be correctly installed for the device to work. Ink from the cartridges is used in the printing process in a number of different ways, including in the initialization process, which prepares the device and cartridges for printing, and in printhead servicing, which keeps print nozzles clear and ink flowing smoothly. In addition, some residual ink is left in the cartridge after it is used. For more information see www.hp.com/go/inkusage.
5. Install the printheads.
CAUTION: Press down firmly on the printheads to ensure proper contact before closing the printhead latch.
6. Connect the power cord and adapter and turn on the device.
NOTE: Set the language and the country/region (if needed), as well as the date and time, on the display.
Set up the device2

Engl
ish
7. When prompted, load paper, and then press the OK button.a. Lift the output tray.b. Insert up to 250 sheets of paper into Tray 1,
print-side down, along the right hand side of the tray. Make sure the stack of paper aligns with the right and back edges of the tray and does not exceed the line marking in the tray.
c. Slide the media guides in the tray to the size that you are loading.
d. Lower the output tray and pull out the extension.
To ensure the best possible print quality, the device initializes and aligns the printheads. This process takes approximately 12 minutes.
8. Install software and connect the device.You can connect the device using one of the following types of connections:• USB• Ethernet network (some models only).• Fax (some models only).For more information about device software and connectivity, see the onscreen user guide on the Starter CD.
a. Insert the Starter CD, click Install (Windows) or Install Software (Mac OS), and then follow the onscreen instructions to complete the software installation.
NOTE: If the CD menu does not start automatically, double-click the setup icon on the Starter CD.
b. Connect the USB cable to the computer, when prompted.
USB
a. Remove the protective cover from the device’s network connector.
b. Connect the network cable to the connector and to an available port on the network hub, switch, or router. If the connector’s Link light does not turn on, try a different port.
CAUTION: Do not plug the network cable into a port labeled WAN, Uplink, or Internet in the hub, switch, or router.
c. Insert the Starter CD, click Install (Windows) or Install Software (Mac OS), and then follow the onscreen instructions to complete the software installation.If the installation program displays more than one instance of the device, print a Network configuration page to select the right device.
NOTE: If the CD menu does not start automatically, double-click the setup icon on the Starter CD.
d. Print the Network configuration page. This page contains information needed for setup. On the control panel, press the Setup button, and then complete one of the following:• If your device has a two-line display, select
Network Setup, select Print Network Settings, and then press OK.
• If your device has a color display, select Network, select View Network Settings, select Print Network Configuration Page, and then press OK.
If you install software using the installation program on the Starter CD, you can configure fax settings after the device software is installed using the Fax Setup Wizard (Windows) or HP Device Manager (Mac OS). For more information about setting up the fax, see “Set up the fax (optional)” on page 9.
Ethernet network
Fax
Set up the device 3

Complete the installation
Verify that the device is set up correctly1. Print a document from an application that you use
frequently.
2. Place the document in the document feeder tray with the print-side facing up and the first page on top.
3. Adjust the width adjusters to the size of the document.
4. Press START COPY Black or START COPY Color. The device makes a copy of the document. If you encounter problems, see “Solving installation problems” on page 16.
5. Remove the document from the ADF output tray.
6. Open the flatbed scanner lid.
7. Place the first page of the document print-side down on the scanner glass with the top-left corner of the document located in the lower-right corner of the glass.
8. Close the flatbed scanner.
9. Press START COPY Black or START COPY Color. The device makes a copy of the document. If you encounter problems, see “Solving installation problems” on page 16.
Verify that the device software is installed correctlyTo verify that the device software has been installed correctly, start the software and complete basic tasks (such as printing a document or sending a scan to your computer).
To open the HP Photosmart software (Windows)1. On the Windows desktop, double-click the
HP Photosmart software icon.
2. If you have more than one HP device installed, select the appropriate tab for your device.
To open the HP Photosmart Studio software (Mac OS)1. Click the HP Photosmart Studio icon in the Dock.
2. Click Device, and then choose a device.
For more information about using the device software, see the online help for the software.
Register the deviceIf you have not already done so, go to www.register.hp.com and register the device.
Finding more informationFor information about using the device and troubleshooting, see the following resources:
• Onscreen user guide and readme file on the Starter CD or at www.hp.com/support
• HP Instant Support and embedded Web server (see the onscreen user guide)
• Product support site at www.hp.com/support
Set up the device4

Engl
ish
2 Identify the device parts
Front view
1 Automatic document feeder (ADF)
2 Scanner glass
3 Control panel
4 Display
5 Output tray
6 Output tray extension
7 Length/width guides
8 Tray 1
9 Front universal serial bus (USB) port
10 Memory card slots
11 Memory device light
12 Document feeder tray
13 Width guides
Printing supplies area
1 Ink cartridge door
2 Ink cartridges
3 Print-carriage access door
4 Printheads
5 Printhead latch
Memory card slots
1 Compact flash (types I and II, solid state only)
2 Secure Digital, MultimediaCard (MMC), Secure MMC
3 xD
4 Memory Stick, Magic Gate Memory Stick, Memory Stick Duo, and Memory Stick Pro
5 Front universal serial bus (USB) port (PictBridge-enabled)
Front view 5

Back view
1 Power input
2 Ethernet network port (HP Officejet Pro L7500)
3 Rear USB port
4 Fax ports (1-LINE and 2-EXT)
5 Rear access panel (HP Officejet Pro L7300)
6 Automatic two-sided printing accessory (duplexer), (HP Officejet Pro L7500)
65
2
3
1
4
Identify the device parts6

Engl
ish
Control panel
NOTE: The control panel layout and features vary depending on the model of the device that you have. Your device might not have all of the buttons and lights described in this section.
1 Speed Dial Speed-dial buttons: Access the first five speed-dial numbers. An entry might be a fax number or a group of fax numbers.
List of speed-dial entries: Identify the speed-dial entries that correspond to the five speed-dial buttons. You can write the entries on the lined paper that is provided, or print lists to insert.
2 SCAN Scan To: Select a scan destination.
START SCAN: Start a scan job and send it to the destination you selected using the Scan Menu button.
3 FAX Menu: Open the menu for the fax function.
Resolution: Adjust the speed and quality of faxes that are sent from the device.
Redial/Pause: Redial the most recently dialed fax number.
Auto Answer: Set the fax function to answer the phone automatically after a specified number of rings.
START FAX Black or START FAX Color: Start the fax, in black and white or in color.
4 KeypadEnter fax numbers, values, or text.
5 DisplayShows status and error messages, mode and setup menus and their options, help information, and ink cartridge levels.
Arrow buttons: Move through menu options or through photos on the color display (if available).
OK: Select a menu, setting, or if the device has a color display, select photos for printing.
6 Other buttonsSetup: Access the menu system for reports, settings, and maintenance.
Cancel: Stop a job, exit a menu, or exit settings.
7 COPY Menu: Open the menu for the copy function.
Reduce/Enlarge: Change the size of the copy.
Collate: Sequence copied output in the exact order it is scanned from the scanner glass or ADF.
Quality: Control the speed and quality of copies. The Quality light illuminates next to the selected copy quality.
START COPY Black or START COPY Color: Start the copy in black and white or in color.
Control panel 7

8 PHOTOMenu: Open the menu for the photo function.
Proof Sheet: Print a proof sheet when a memory card has been inserted in a memory card slot.
PRINT PHOTOS: Start the photo printing job.
9 Power button and lightsPower button: Turn the device on or off. When the
device is off, a minimal amount of power is still supplied to the device. To completely disconnect the power supply to the device, turn the device off, and then unplug the power cord.
When lit, indicates that the device is on. The light blinks while performing a job.
Network status light: Indicate the status of the device on a network.
Attention light: When blinking, the attention light indicates an error has occurred that requires your attention.
Identify the device parts8

Engl
ish
3 Set up the fax (optional)
This chapter provides instructions for setting up the fax in a number of different setup configurations.
• Using a dedicated phone line
• Using a shared phone line
• Managing and configuring the fax
• Configuring the answer mode
• Configuring rings to answer
• Changing the answer ring pattern for distinctive ringing
• Setting the fax header
• Testing the fax setup
For more information about fax features, see the onscreen user guide on the Starter CD.
NOTE: Fax is supported on some models only.
CAUTION: If you do not use the supplied cord to connect from the telephone wall jack to your device, you might not be able to fax successfully.
This special phone cord is different from the phone cords you might already have in your home or office. If the supplied phone cord is too short, see the onscreen user guide on the Starter CD for information.
Parallel- vs. serial-type phone systemsBefore you begin setting up the device for faxing, determine which kind of phone system your country/region uses.
NOTE: The instructions for fax setup differ depending on whether you have a serial- or parallel-type phone system.
If you do not see your country/region listed in the following sections, you probably have a serial-type phone system. If you are unsure which kind of telephone system you have (serial or parallel), check with your telephone company.
Countries/regions with parallel-type phone systemsIn a parallel-type phone system, you are able to connect shared telephone equipment to the phone line by using the “2-EXT” port on the back of the device.
NOTE: If you have a parallel-type phone system, HP recommends you use the 2-wire phone cord supplied with the device to connect it to the telephone wall jack.
Countries/regions with serial-type phone systemsIn a serial-type phone system, the connector type on your shared telephone equipment (modems, phones, and answering machines) does not allow a physical connection to the “2-EXT” port on the device. Instead, all equipment must be connected at the telephone wall jack.
NOTE: In some countries/regions that use serial-type phone systems, the phone cord that came with the device might have an additional wall plug attached to it. This enables you to connect other telecom devices to the wall jack where you plug in the device.
Argentina Australia BrazilCanada Chile ChinaColombia Greece IndiaIndonesia Ireland JapanKorea Latin America MalaysiaMexico Philippines PolandPortugal Russia Saudi ArabiaSingapore Spain TaiwanThailand USA VenezuelaVietnam
Parallel- vs. serial-type phone systems 9
For information on setting up the device for faxing using a serial-type phone system, see the Fax Configuration Web site for your country/region.
Dedicated phone lineUse this section if you plan on using the following type of phone line for the fax:
• Dedicated phone line (no other devices, such as a phone or answering machine, share the line).
• Dedicated phone line without devices sharing the line but with a subscription to a distinctive ring service.
• Private Branch Exchange (PBX) or an Integrated Services Digital Network (ISDN) line. For more information about PBX and ISDN lines, see the onscreen user guide on the Starter CD.
NOTE: You cannot receive faxes automatically if you have a voice mail service at the same phone number you use for fax calls. You must receive faxes manually; this means you must be available to respond in person to incoming fax calls. If you want to receive faxes automatically instead, contact your telephone company to subscribe to a distinctive ring service, or to obtain a separate phone line for faxing.
Set up the device to answer incoming calls manually. Press the Auto Answer button until the light is off.
1. Unplug any telephone devices from the phone jack where you are connecting the device.
2. Connect the phone cord that came with the device between the 1-LINE port on the device and the phone jack.
3. If you subscribe to a distinctive ring service, change the Answer Ring Pattern setting to the pattern that has been assigned to your fax number by the telephone company, for example, double rings or triple rings.
For information on changing this setting, see the onscreen user guide on the Starter CD.
NOTE: Your device is factory-set to answer all ring patterns. If you do not set the correct ring pattern assigned to your fax number by the telephone company, your device might answer both voice calls and fax calls, or it might not answer at all.
Shared phone lineIf the fax is going to share the phone line with other devices, such as a phone, answering machine, computer/computer modem, or caller ID box, or if you have voicemail service included with your line, you must follow these instructions to determine how to set up your fax.
1. Follow the steps for the “Dedicated phone line” on page 10.
2. Plug additional devices into the 2-EXT port on the back of the device.
3. Use the following tables to determine the rest of your fax configuration.
Austria www.hp.com/at/faxconfig
Belgium (Dutch) www.hp.be/nl/faxconfig
Belgium (French) www.hp.be/fr/faxconfig
Denmark www.hp.dk/faxconfig
Finland www.hp.fi/faxconfig
France www.hp.com/fr/faxconfig
Germany www.hp.com/de/faxconfig
Ireland www.hp.com/ie/faxconfig
Italy www.hp.com/it/faxconfig
Norway www.hp.no/faxconfig
Netherlands www.hp.nl/faxconfig
Portugal www.hp.pt/faxconfig
Spain www.hp.es/faxconfig
Sweden www.hp.se/faxconfig
Switzerland (French) www.hp.com/ch/fr/faxconfig
Switzerland (German) www.hp.com/ch/de/faxconfig
United Kingdom www.hp.com/uk/faxconfig
1-LINE
2-EXT
Set up the fax (optional)10

Engl
ish
Use the fax setup tablesUse the fax setup tables to assist you in setting up the fax function on your device. To use the tables, follow these steps:
� Determine how you will use the phone line that your fax machine will be using:
Once you determine how you want to use the phone line, follow these steps:
� In the first row, determine what other devices will share the phone line with the all-in-one (phone, computer, answering machine).
� In the next rows, determine if the phone line has any special services (voicemail or distinctive ring), and, if the phone line will be used with a computer, determine if you have a dial-up or DSL modem.
� The next row provides an example of what your fax setup might look like in terms of how to connect various devices to the all-in-one.
� In the last row of the table are numbers that correspond to the Configuration guideline table on page 13. Use the Configuration guideline table to help you set up your all-in-one so that it operates the most effectively based on the way your all-in-one is set up.
NOTE: You must follow the numbers as they appear in the last row of each fax setup table. Performing the steps out of sequence may result in fax setup problems.
Table 3-1 Voice and Fax
• Voice and Fax (see Table 3-1) • Voice, Fax, and Internet (dial-up) (see Table 3-3)• Fax and Internet (see Table 3-2) • Voice, Fax, and Internet (DSL) (see Table 3-4)
What devices will you connect to the device?
Telephone • Telephone• Answering machine
Does your line have… Distinctive ring service Distinctive ring service
Your fax setup should look like this…
Then follow configuration # 3 1, 9, 2 1, 7 1, 9, 7
Shared phone line 11

Table 3-2 Fax and Internet
Table 3-3 Voice, Fax, and Internet (dial-up)
Table 3-4 Voice, Fax, and Internet (DSL)
What devices will you connect to the device?
• Computer• Modem
Is your line… Dial-up DSL
Your fax setup should look like this…
Then follow configuration # 4, 5, 1, 2, 6 8, 1, 2, 6
Splitter
DSL filter
What devices will you connect to the device?
• Telephone• Computer• Modem
• Telephone• Computer• Modem• Answering machine
Is your line… Dial-up Dial-up
Does your line have… Distinctive ring service Distinctive ring service
Your fax setup should look like this…
Then follow configuration # 4, 10, 5, 3 4, 10, 5, 3, 9 4, 10, 5, 1, 7 4, 10, 5, 1, 9, 7
Splitter Splitter
What devices will you connect to the device?
• Telephone• Computer• Modem
• Telephone• Computer• Modem• Answering machine
Is your line… DSL DSL
Does your line have… Distinctive ring service Distinctive ring service
Your fax setup should look like this…
Then follow configuration # 8, 3 8, 3, 9 8, 1, 7 8, 1, 9, 7
2
3
Splitter
DSL filter
2
3
Splitter
DSL filter
Set up the fax (optional)12

Engl
ish
Configuration guidelineConfiguration # Configuration instructions
1 Set up the device to answer incoming calls automatically. Press the Auto Answer button until the light is on.
2 (Optional) Change the Rings to Answer setting to one ring or two rings.For information on changing this setting, see the onscreen user guide on the Starter CD.
3 Determine how you want the device to answer calls: automatically or manually.• If you set up the device to answer calls automatically, it answers all incoming calls and receives
faxes. Your device will not be able to distinguish between fax and voice calls in this case; if you suspect the call is a voice call, you will need to answer it before the device answers the call.To answer fax calls automatically, press the Auto Answer button until the light is on.
• If you set up the device to answer faxes manually, you must be available to respond in person to incoming fax calls or your device cannot receive faxes.To answer fax calls manually, press the Auto Answer button until the light is off
4(Dial-up modem)
Since your PC modem shares the phone line with your device, you will not be able to use both your PC modem and your device simultaneously. For example, you cannot use your device for faxing if you are using your PC modem to send an e-mail or access the Internet.
5(Dial-up modem)
If your PC modem software is set to receive faxes to your computer automatically, turn off that setting.Caution: If you do not turn off the auto fax receive setting in your PC modem software, your device will not be able to receive faxes.
6 When the phone rings, your device will answer automatically after the number of rings you set in the Rings to Answer setting. Then it will begin emitting fax reception tones to the sending fax machine and receive the fax.
7(Answering machine)
Set your answering machine to answer after four or fewer rings.Change the Rings to Answer setting on your device to six rings.When the phone rings, your answering machine will answer after the number of rings you have set, and then play your recorded greeting. The device monitors the call during this time, “listening” for fax tones. If incoming fax tones are detected, the device will emit fax reception tones and receive the fax; if there are no fax tones, the device stops monitoring the line and your answering machine can record a voice message.
8 DSL lines only: You will need to purchase additional DSL filters for all devices (telephone, computer) that share the DSL phone line.
9(Distinctive ring
service)
Change the Answer Ring Pattern setting to the pattern that has been assigned to your fax number by the telephone company, for example, double rings or triple rings.For information on changing this setting, see the onscreen user guide on the Starter CD.NOTE: Your device is factory-set to answer all ring patterns. If you do not set the correct ring pattern assigned to your fax number by the telephone company, your device might answer both voice calls and fax calls, or it might not answer at all.
Shared phone line 13

10 There are two different ways to set up your device with your computer based on the number of phone ports on your computer. You also need additional phone cords (at least three if your computer has only one phone port and at least two if your computer has two phone ports). Before you begin, check your computer to see if it has one or two phone ports:Computer with one phone portIf your computer has only one phone port, you will need to purchase a parallel splitter (also called a coupler). A parallel splitter has one RJ-11 port on the front and two RJ-11 ports on the back. Do not use a two-line phone splitter, a serial splitter, or a parallel splitter which has two RJ-11 ports on the front and a plug on the back. You can purchase a parallel splitter from an electronics store that carries phone accessories.1. Connect one end of the phone cord that came with the device to the wall jack and the other end to
the 1-LINE port on the device.2. Connect one end of a second phone cord to the 2-EXT port on the device and the other end to the
front of the parallel splitter (the end with the single phone port).3. Connect one end of a third phone cord to the back of the parallel splitter (the end with two phone
ports) and the other end to the computer.4. Connect one end of a fourth phone cord to the last open port on the parallel splitter and the other
end to a telephone or answering machine. If you are connecting both a telephone and answering machine, connect the fourth phone cord to the answering machine, and then use a fifth phone cord to connect the answering machine to the telephone.NOTE: If you do not connect your answering machine in this way, fax tones from a sending fax machine might be recorded on your answering machine, and you might not be able to receive faxes with your device.
Computer with two phone portsIf your computer has two phone ports, complete the following steps to connect the device to the computer:1. Connect one end of the phone cord that came with the device to the wall jack and the other end to
the 1-LINE port on the device.2. Connect one end of a second phone cord to the 2-EXT port on the device and the other end to the
IN port on the computer.3. Connect one end of a third phone cord to the OUT port on the computer and the other end to a
telephone or answering machine. If you are connecting both a telephone and answering machine, connect the third phone cord to the answering machine, and then connect the answering machine to the telephone.NOTE: If you do not connect your answering machine in this way, fax tones from a sending fax machine might be recorded on your answering machine, and you might not be able to receive faxes with your device.
Set up the fax (optional)14
Engl
ish
Managing and configuring fax settingsIf you are connecting the device directly to a computer, install the device software, and then run the Fax Setup Wizard (Windows) or HP Device Manager (Mac OS). You can also launch these tools from Solution Center (Windows) or HP Device Manager (Mac OS) at a later time. Use these tools to set the fax header, country/region, and date and time.
In addition, you can configure the fax settings from the embedded Web server (EWS). For information on the EWS, see page 20.
You can also configure these settings from the control panel. For information on the control panel, see the onscreen user guide on the Starter CD.
Set up speed-dial entriesYou can store fax numbers or groups of fax numbers as speed-dial entries. Speed-dial entries 1 through 5 are associated with the corresponding five speed-dial buttons on the control panel. This lets you dial those numbers quickly by using the control panel.
In addition to using the control panel, you can also set up speed-dial entries using the embedded Web server and the HP Photosmart software. For information, see the onscreen user guide on the Starter CD.
To set up speed-dial entries1. From the control panel, press Setup.
2. Select Speed Dial Setup and do one of the following:
• To add or change an entry: Select Individual Speed Dial or Group Speed Dial and press the arrow keys to move to an unused entry number, or type a number on the keypad. Type the fax number, and then press OK. Include any pauses or other required numbers, such as an area code, an access code for numbers outside a PBX system (usually a 9 or 0), or a long-distance prefix. Type the name using the numeric keypad, and then press OK.
• To delete one entry or all entries: Select Delete Speed Dial and press the arrow keys to move to the speed-dial entry that you want to delete, and then press OK.
Test fax setupYou can test your fax setup to check the status of the device and to make sure it is set up properly for faxing. Perform this test after you have completed setting up the device for faxing. The test does the following:
• Tests the fax hardware
• Verifies the correct type of phone cord is connected to the device
• Checks that the phone cord is plugged into the correct port
• Checks for a dial tone
• Checks for an active phone line
• Tests the status of your phone line connection
The device prints a report with the results of the test. If the test fails, review the report for information on how to fix the problem and rerun the test. For additional troubleshooting information, see “Solving fax problems (some models only)” on page 18.
To test fax setup 1. Set up the device for faxing according to your
particular home or office setup instructions.
2. Make sure the ink cartridges and printheads are installed, and that full-size paper is loaded in the input tray before starting the test.
3. From the control panel, press Setup.
4. Select Tools, and then select Run Fax Test.
The device displays the status of the test on the display and prints a report.
5. Review the report.
• If the test passes and you are still having problems faxing, check the fax settings listed in the report to verify the settings are correct. A blank or incorrect fax setting can cause problems faxing.
• If the test fails, review the report for more information on how to fix any problems found.
Managing and configuring fax settings 15

4 Troubleshooting
This section provides troubleshooting suggestions for some of the most common issues associated with hardware and software installation.
For late-breaking information, see the readme file and release notes on the Starter CD, or visit the product support Web site at www.hp.com/support.
Solving installation problemsThis section provides troubleshooting suggestions for some of the most common issues associated with hardware and software installation.
Hardware installation suggestions
Check the device• Make sure that all packing tape and material have
been removed from outside and inside the device.
• Make sure paper is loaded correctly in the tray, and is not jammed in the device.
• Make sure that no lights are on or blinking except the Power light, which should be on. If the Attention light is blinking, check for messages on the control panel. When the device is first turned on, it takes approximately 45 seconds to warm up.
• Make sure the rear access panel or duplexer is locked into place.
• Make sure that the device can print a Self-test diagnostic page. For more information, see “Self-test diagnostic page” on page 20.
Check the hardware connections• Make sure that any cords and cables that you are
using are in good working order.
• Make sure that the power cord is connected securely to both the device and to a working power outlet.
• Make sure that the phone cord is connected to the 1-LINE port.
Check the printheads and ink cartridges• Make sure that you have removed the orange caps
from the printheads.
• Make sure that all of the printheads and ink cartridges are firmly installed in their correct, color-coded slot. Press down firmly on each one to ensure proper contact. The device cannot work if they are not all installed.
• Make sure that the printhead latch and all covers are closed.
• If the display shows a printhead error message, clean the contacts on the printheads. For more information, see the onscreen user guide on the Starter CD.
Software installation suggestions
Check the computer system• Make sure that your computer is running one of the
supported operating systems. For more information, see the onscreen user guide on the Starter CD.
• Make sure that the computer meets at least the minimum system requirements. For more information, see the onscreen user guide on the Starter CD.
Verify installation preliminaries• Make sure to use the Starter CD that contains the
correct installation software for your operating system.
• Before installing software, make sure that all other programs are closed.
• If the computer does not recognize the path to the CD-ROM drive that you type, make sure that you are specifying the correct drive letter.
• If the computer cannot recognize the Starter CD in the CD-ROM drive, inspect the Starter CD for damage. You can download the device driver from www.hp.com/support.
• In the Windows device manager, make sure that the USB drivers have not been disabled.
Troubleshooting16

Engl
ish
• If you are using a computer running Windows, and the computer cannot detect the device, run the uninstallation utility (util\ccc\uninstall.bat on the Starter CD) to perform a clean uninstallation of the device driver. Restart your computer, and reinstall the device driver.
Solving network problems (some models only)NOTE: After correcting any of the following, run the installation program again.
General network troubleshooting• If you are unable to install the device software,
verify that:
• All cable connections to the computer and the device are secure.
• The network is operational and the network hub is turned on.
• All applications, including virus protection programs, spyware protection programs, and firewalls, are closed or disabled for computers running Windows.
• Make sure the device is installed on the same subnet as the computers that will be using the device.
• If the installation program cannot discover the device, print the Network configuration page (see “To print the Network configuration page” on page 20), and enter the IP address manually in the installation program.
• If you are using a computer running Windows, make sure that the network ports created in the device driver match the device IP address:1) Print the device’s Network configuration page.2) From the Windows desktop, click Start, point to Settings, and then click Printers or Printers and Faxes.
Or
Click Start, click Control Panel, and then double-click Printers.3) Right-click the device icon, click Properties, and then click the Ports tab.
Or
Right-click the device icon, click Run as administrator, click Properties, click Continue, and then click the Ports tab.
4) Select the TCP/IP port for the device, and then click Configure Port. 5) Compare the IP address listed in the dialog box and make sure it matches the IP address listed on the Network configuration page. If the IP addresses are different, change the IP address in the dialog box to match the address on the Network configuration page.6) Click OK twice to save the settings and close the dialog boxes.
Problems connecting to a wired network• If the Link light on the network connector does not
turn on, make sure that all of the “General network troubleshooting” conditions listed above are met.
• Though it is not recommended that you assign the device with a static IP address, you might resolve some installation problems (such as a conflict with a personal firewall) by doing so. For more information, see the onscreen user guide on the Starter CD.
Solving network problems (some models only) 17

Solving fax problems (some models only)If you ran a fax test and the test failed, see the test report for possible solutions. For more detailed information, see the onscreen user guide on the Starter CD.
The device is having problems sending and receiving faxes
Make sure you use the phone cord that came with the device.
Other equipment that uses the same phone line as the device might be in use. Make sure extension phones (phones on the same phone line, but not connected to the device) or other equipment is not in use or off the hook. For example, you cannot use the device for faxing if an extension phone is off the hook or if you are using a computer dial-up modem to send e-mail or access the Internet.
If you are using a phone splitter, the splitter could cause faxing problems. Try connecting the device directly to the telephone wall jack.
Make sure that one end of the phone cord is connected to the telephone wall jack, while the other end to port labeled “1-LINE” on the back of the device.
Try connecting a working phone directly to the telephone wall jack and check for a dial tone –- if you do not hear a dial tone, please contact your telephone company to check the line.
Make sure you connect the device to an analog phone line, or you cannot send or receive faxes. To check if your phone line is digital, connect a regular analog phone to the line and listen for a dial tone. If you do not hear a normal-sounding dial tone, it might be a phone line set up for digital phones. Connect the device to an analog phone line and try sending or receiving a fax.
The phone line connection might be noisy. Phone lines with poor sound quality (noise) can cause faxing problems. Check the sound quality of the phone line by plugging a phone into the telephone wall jack and listening for static or other noise. If you hear noise, turn Error Correction Mode (ECM) off and try faxing again.
If you are using a digital subscriber line (DSL) service, make sure that you have a DSL filter connected. Without the filter, you cannot fax successfully.
If you are using either a private branch exchange (PBX) or an integrated services digital network (ISDN) converter/terminal adapter, make sure the device is connected to the correct port and the terminal adapter is set to the correct switch type for your country/region.
Troubleshooting18

Engl
ish
The device can send faxes, but cannot receive faxes
If you are not using a distinctive ring service, check to make sure that the Distinctive Ring feature on the device is set to All Rings.
If Auto Answer is set to Off, or you have a voice mail service at the same phone number you use for fax calls, you can only receive faxes manually.
If you have a computer dial-up modem on the same phone line with the device, check to make sure that the software that came with your modem is not set to receive faxes automatically.
If you have an answering machine on the same phone line with the device:• Check that the answering machine is working properly.• Make sure your setup looks like the second example in Table 3-1 on page 11.• Make sure the device is set to receive faxes automatically.• Make sure the Rings to Answer setting is set to a greater number of rings than the answering
machine.• Disconnect the answering machine and then try receiving a fax.• Record a message that is approximately 10 seconds in duration. Speak slowly and at a low
volume when recording your message. Leave at least 5 seconds of silence at the end of the voice message.
Other equipment that uses the same phone line might be causing the test to fail. You can disconnect all the other devices and run the test again. If the Dial Tone Detection Test passes, then one or more of the other equipment is causing problems. Try adding them back one at a time and rerunning the test each time until you identify which piece of equipment is causing the problem.
The device cannot send faxes, but can receive faxes
The device might be dialing too fast or too soon. For example, if you need to access an outside line by dialing “9”, try inserting pauses as follows: 9-XXX-XXXX (where XXX-XXXX is the fax number you are sending to). To enter a pause press Redial/Pause, or press the Space (#) button repeatedly, until a dash (-) appears on the display.
The display always shows Phone Off Hook
You are using the wrong phone cord. See the first two issues under “The device is having problems sending and receiving faxes” on page 18.
The device is having problems sending a manual fax
This possible solution applies only in the countries/regions that receive a 2-wire phone cord in the box with the device, including: Argentina, Australia, Brazil, Canada, Chile, China, Colombia, Greece, India, Indonesia, Ireland, Japan, Korea, Latin America, Malaysia, Mexico, Philippines, Poland, Portugal, Russia, Saudi Arabia, Singapore, Spain, Taiwan, Thailand, USA, Venezuela, and Vietnam.
Make sure your setup looks like the first example in Table 3-1 on page 11.
If you are sending a fax manually from your phone that is connected directly to the device, you must use the keypad on the telephone to send the fax.
Fax tones are recorded on my answering machine
See the fourth issue under “The device can send faxes, but cannot receive faxes” on page 19.
The phone cord that came with my device is not long enough
If the phone cord that came with the device is not long enough, you can use a coupler to extend the length. You can purchase a coupler at an electronics store that carries phone accessories. You also need another phone cord, which can be a standard phone cord that you might already have in your home or office.1. Using the phone cord supplied in the box with the device, connect one end to the coupler,
and then connect the other end to the port labeled 1-LINE on the back of the device.2. Connect a second phone cord to the open port on the coupler and to the telephone wall
jack.
Solving fax problems (some models only) 19
Troubleshooting and configuration toolsThe following tools are available for troubleshooting or configuring the device. For more information, see the onscreen user guide on the Starter CD.
Self-test diagnostic pageUse the Self-test diagnostic page to view current device settings, to help troubleshoot device problems, and to verify installation of optional accessories, such as the duplexer. The Self-test diagnostic page also contains a log of recent events. If you need to call HP, print the Self-test diagnostic page before calling.
To print the Self-test diagnostic page1. On the control panel, press the Setup button.
2. Select Print Report, select Self-Test Report, and then press OK.
Network configuration pageIf the device is connected to a network, you can print a Network configuration page to view the network settings for the device. You can use the Network configuration page to help troubleshoot network connectivity problems.
To print the Network configuration page1. On the control panel, press the Setup button.
2. Select Network Setup, select Print Network Settings, and then press OK.
Embedded Web serverA Web server provides an environment in which Web programs can run, in much the same way that an operating system, such as Microsoft® Windows®, provides an environment in which programs can run on your computer. A Web browser, such as Microsoft Internet Explorer, Netscape, Opera, Mozilla Firefox, or Safari can show output from a Web server.
An embedded Web server (EWS) resides on a hardware product (such as a printer) or in the firmware, rather than as software that is loaded on a network server. The advantage of an embedded Web server is that it provides an interface to the product that anyone who has a network-connected computer and a standard Web browser can open and use. No special software needs to be installed or configured.
With the HP Embedded Web Server, you can view product status information, change settings, and manage the product at your computer.
To open the embedded Web serverIn a supported Web browser on your computer, type the IP address that has been assigned to the device. For example, if the IP address is 123.123.123.123, type the following address into the Web browser:
http://123.123.123.123
The IP address for the device is listed on the Network configuration page.
After you open the embedded Web server, you can bookmark it so that you can return to it quickly in the future.
Troubleshooting20
21
Engl
ish
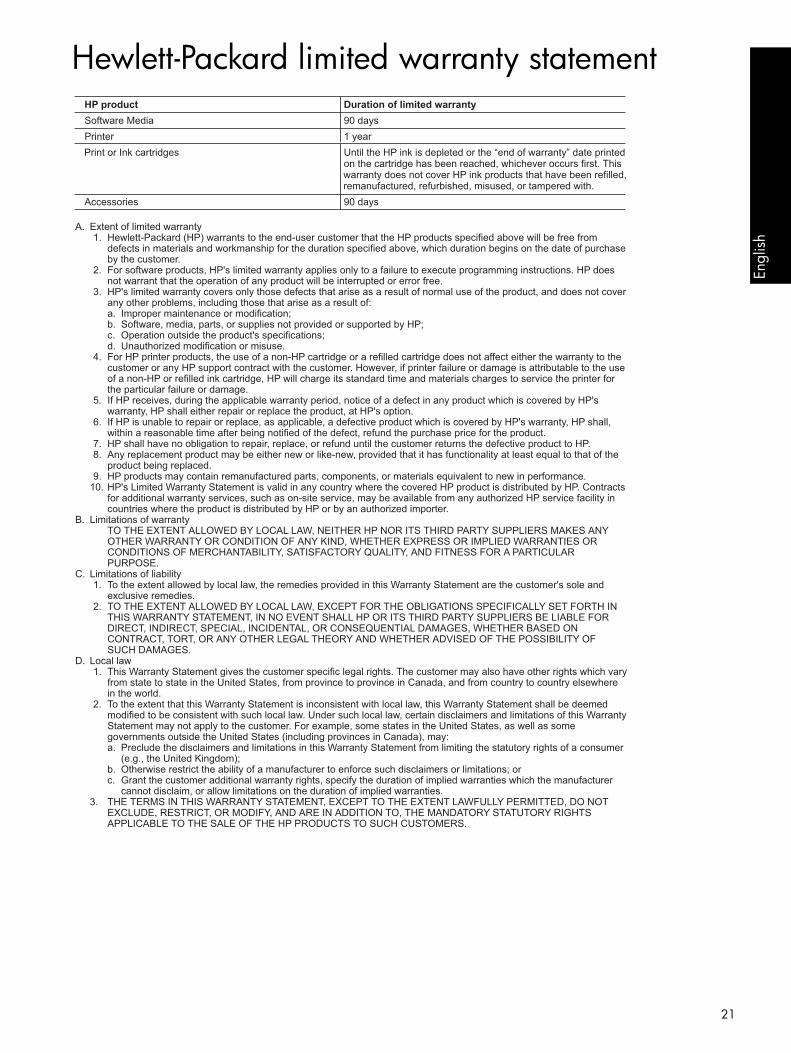
Hewlett-Packard limited warranty statement
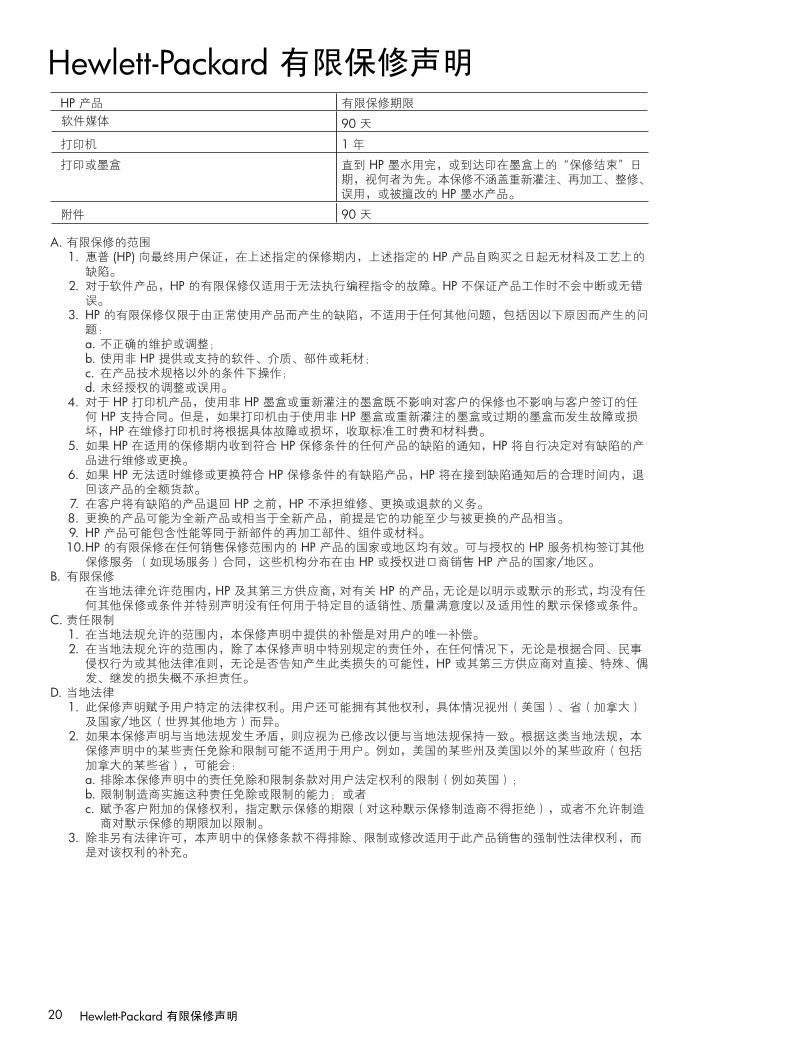
A. Extent of limited warranty 1. Hewlett-Packard (HP) warrants to the end-user customer that the HP products specified above will be free from
defects in materials and workmanship for the duration specified above, which duration begins on the date of purchase by the customer.
2. For software products, HP's limited warranty applies only to a failure to execute programming instructions. HP does not warrant that the operation of any product will be interrupted or error free.
3. HP's limited warranty covers only those defects that arise as a result of normal use of the product, and does not cover any other problems, including those that arise as a result of:
a. Improper maintenance or modification; b. Software, media, parts, or supplies not provided or supported by HP; c. Operation outside the product's specifications; d. Unauthorized modification or misuse. 4. For HP printer products, the use of a non-HP cartridge or a refilled cartridge does not affect either the warranty to the
customer or any HP support contract with the customer. However, if printer failure or damage is attributable to the use of a non-HP or refilled ink cartridge, HP will charge its standard time and materials charges to service the printer for the particular failure or damage.
5. If HP receives, during the applicable warranty period, notice of a defect in any product which is covered by HP's warranty, HP shall either repair or replace the product, at HP's option.
6. If HP is unable to repair or replace, as applicable, a defective product which is covered by HP's warranty, HP shall, within a reasonable time after being notified of the defect, refund the purchase price for the product.
7. HP shall have no obligation to repair, replace, or refund until the customer returns the defective product to HP. 8. Any replacement product may be either new or like-new, provided that it has functionality at least equal to that of the
product being replaced. 9. HP products may contain remanufactured parts, components, or materials equivalent to new in performance. 10. HP's Limited Warranty Statement is valid in any country where the covered HP product is distributed by HP. Contracts
for additional warranty services, such as on-site service, may be available from any authorized HP service facility in countries where the product is distributed by HP or by an authorized importer.
B. Limitations of warrantyTO THE EXTENT ALLOWED BY LOCAL LAW, NEITHER HP NOR ITS THIRD PARTY SUPPLIERS MAKES ANY OTHER WARRANTY OR CONDITION OF ANY KIND, WHETHER EXPRESS OR IMPLIED WARRANTIES OR CONDITIONS OF MERCHANTABILITY, SATISFACTORY QUALITY, AND FITNESS FOR A PARTICULAR PURPOSE.
C. Limitations of liability 1. To the extent allowed by local law, the remedies provided in this Warranty Statement are the customer's sole and
exclusive remedies. 2. TO THE EXTENT ALLOWED BY LOCAL LAW, EXCEPT FOR THE OBLIGATIONS SPECIFICALLY SET FORTH IN
THIS WARRANTY STATEMENT, IN NO EVENT SHALL HP OR ITS THIRD PARTY SUPPLIERS BE LIABLE FOR DIRECT, INDIRECT, SPECIAL, INCIDENTAL, OR CONSEQUENTIAL DAMAGES, WHETHER BASED ON CONTRACT, TORT, OR ANY OTHER LEGAL THEORY AND WHETHER ADVISED OF THE POSSIBILITY OF
SUCH DAMAGES.D. Local law 1. This Warranty Statement gives the customer specific legal rights. The customer may also have other rights which vary
from state to state in the United States, from province to province in Canada, and from country to country elsewhere in the world.
2. To the extent that this Warranty Statement is inconsistent with local law, this Warranty Statement shall be deemed modified to be consistent with such local law. Under such local law, certain disclaimers and limitations of this Warranty Statement may not apply to the customer. For example, some states in the United States, as well as some governments outside the United States (including provinces in Canada), may:
a. Preclude the disclaimers and limitations in this Warranty Statement from limiting the statutory rights of a consumer (e.g., the United Kingdom); b. Otherwise restrict the ability of a manufacturer to enforce such disclaimers or limitations; or c. Grant the customer additional warranty rights, specify the duration of implied warranties which the manufacturer
cannot disclaim, or allow limitations on the duration of implied warranties. 3. THE TERMS IN THIS WARRANTY STATEMENT, EXCEPT TO THE EXTENT LAWFULLY PERMITTED, DO NOT
EXCLUDE, RESTRICT, OR MODIFY, AND ARE IN ADDITION TO, THE MANDATORY STATUTORY RIGHTS APPLICABLE TO THE SALE OF THE HP PRODUCTS TO SUCH CUSTOMERS.
HP product Duration of limited warrantySoftware Media 90 daysPrinter 1 yearPrint or Ink cartridges Until the HP ink is depleted or the “end of warranty” date printed on the cartridge has been reached, whichever occurs first. This
warranty does not cover HP ink products that have been refilled, remanufactured, refurbished, misused, or tampered with.
Accessories 90 days


1
简体中文
1 安装设备安装前须知 . . . . . . . . . . . . . . . . . . . . . . . . . 2安装设备 . . . . . . . . . . . . . . . . . . . . . . . . . . 2完成安装 . . . . . . . . . . . . . . . . . . . . . . . . . . 3查找更多信息 . . . . . . . . . . . . . . . . . . . . . . . 4
2 识别设备部件前视图 . . . . . . . . . . . . . . . . . . . . . . . . . . . . 5后视图 . . . . . . . . . . . . . . . . . . . . . . . . . . . . 6控制面板 . . . . . . . . . . . . . . . . . . . . . . . . . . 7
3 设置传真 (可选)并行电话系统与串行电话系统 . . . . . . . . . . . . 9专用电话线路 . . . . . . . . . . . . . . . . . . . . . . 10共用电话线线路 . . . . . . . . . . . . . . . . . . . . 10管理和配置传真设置 . . . . . . . . . . . . . . . . . . . 15
设置快速拨号条目 . . . . . . . . . . . . . . . . . . . 15测试传真设置 . . . . . . . . . . . . . . . . . . . . . . 15
4 故障排除解决安装问题 . . . . . . . . . . . . . . . . . . . . . . 16解决网络问题(仅限某些型号) . . . . . . . . . 17解决传真问题(仅限某些型号) . . . . . . . . . 18故障排除和配置工具 . . . . . . . . . . . . . . . . . 19
Hewlett-Packard 有限保修声明
目录

1 安装设备
本节简要介绍设备的安装过程。
安装前须知
准备安放位置确保放置设备的位置符合下列要求。
• 安放表面必须稳固而水平。
• 确保留出足够的空间以便可以用手伸入设备后部并打开平板扫描仪盖。
• 不要将设备放在阳光直射处或化学制品的附近。确保环境的温度或湿度不会骤然变化。
安装设备本节简要介绍安装设备的步骤。有关详细信息,
请参阅设备随附的安装海报。
注: 检查包装箱中的物品,并安装可选附件。
温度 15°至 35°C(59°至 95°F)
相对湿度 10% 至 80%
1. 去除胶带和包装材料。
注:务必拆除打印头区域的纸板包装材料。
2. 安装控制面板覆盖板。3. 安装文档进纸器纸盘。4. 安装墨盒。
注:所有四个墨盒都必须正确安装,以便设备能正常工作。在打印过程中,墨盒中的墨
水有多种使用方式,包括在初始化过程为进
行打印准备设备和墨盒,以及在打印头维修
时保持打印喷嘴畅通和墨水流动平稳。
此外,墨盒在使用后会有一些残留墨水。
有关详细信息,请访问 www.hp.com/go/inkusage。
5. 安装打印头。
注意:在闭合打印头闩锁之前,用力按压打印头以确保接触良好。
6. 连接电源线和适配器,然后打开设备。
注:在显示屏上设置语言和国家 /地区(如果需要),以及日期和时间。
7. 出现提示时,装入纸张,然后按“确定”按钮。
a. 提起出纸盘。b. 将最多 250 页纸插入纸盘 1,纸叠的打印面朝下并靠纸盘右侧放置。确保纸叠与纸
盘的右边和后边对齐,并且没有超出纸盘
的标记线。
c. 滑动纸盘的介质导板,以适合装入的介质尺寸。
d. 放下出纸盘并拉出展板。为确保打印质量达到最佳,设备将初始化并
校准打印头。此过程大约需要 12 分钟。
安装设备2
简体中文
完成安装
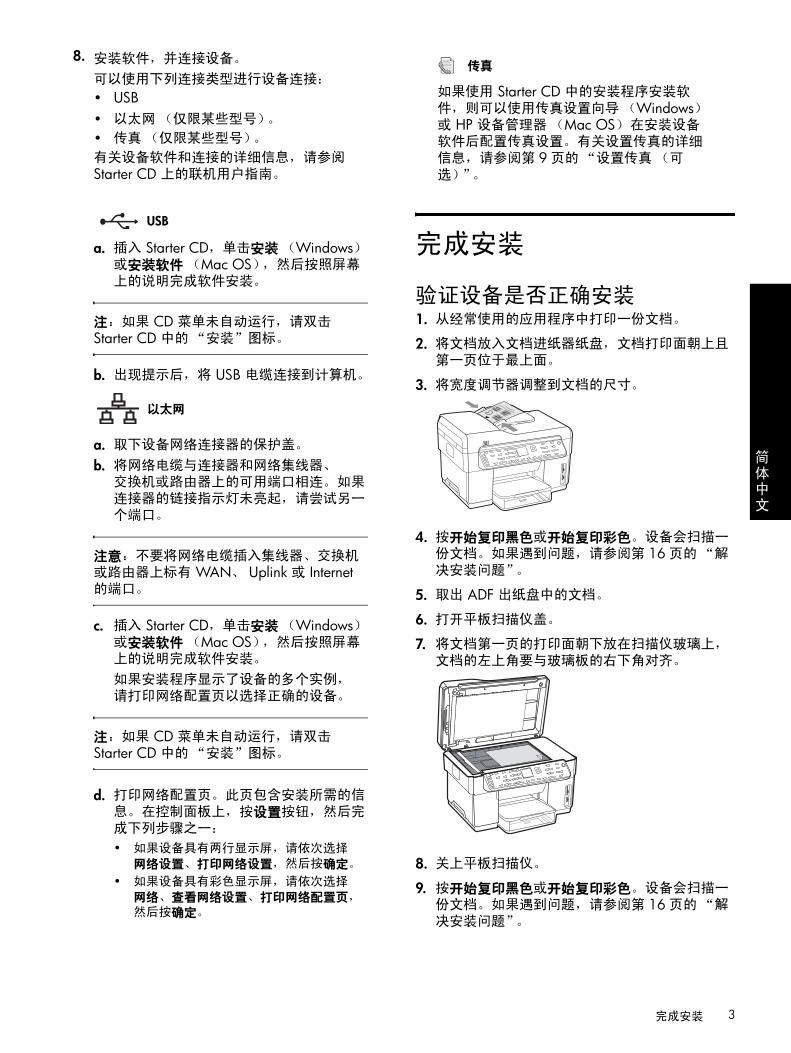
验证设备是否正确安装1. 从经常使用的应用程序中打印一份文档。
2. 将文档放入文档进纸器纸盘,文档打印面朝上且第一页位于最上面。
3. 将宽度调节器调整到文档的尺寸。
4. 按开始复印黑色或开始复印彩色。设备会扫描一份文档。如果遇到问题,请参阅第 16页的“解决安装问题”。
5. 取出 ADF 出纸盘中的文档。
6. 打开平板扫描仪盖。
7. 将文档第一页的打印面朝下放在扫描仪玻璃上,文档的左上角要与玻璃板的右下角对齐。
8. 关上平板扫描仪。
9. 按开始复印黑色或开始复印彩色。设备会扫描一份文档。如果遇到问题,请参阅第 16页的“解决安装问题”。
8. 安装软件,并连接设备。可以使用下列连接类型进行设备连接:
• USB
• 以太网(仅限某些型号)。• 传真(仅限某些型号)。有关设备软件和连接的详细信息,请参阅 Starter CD 上的联机用户指南。
a. 插入 Starter CD,单击安装(Windows) 或安装软件(Mac OS),然后按照屏幕上的说明完成软件安装。
注:如果 CD 菜单未自动运行,请双击 Starter CD 中的“安装”图标。
b. 出现提示后,将 USB 电缆连接到计算机。
a. 取下设备网络连接器的保护盖。b. 将网络电缆与连接器和网络集线器、交换机或路由器上的可用端口相连。如果
连接器的链接指示灯未亮起,请尝试另一
个端口。
注意:不要将网络电缆插入集线器、交换机或路由器上标有 WAN、 Uplink 或 Internet 的端口。
c. 插入 Starter CD,单击安装(Windows) 或安装软件(Mac OS),然后按照屏幕上的说明完成软件安装。
如果安装程序显示了设备的多个实例,
请打印网络配置页以选择正确的设备。
注:如果 CD 菜单未自动运行,请双击 Starter CD 中的“安装”图标。
d. 打印网络配置页。此页包含安装所需的信息。在控制面板上,按设置按钮,然后完成下列步骤之一:
• 如果设备具有两行显示屏,请依次选择网络设置、打印网络设置,然后按确定。
• 如果设备具有彩色显示屏,请依次选择网络、查看网络设置、打印网络配置页,
然后按确定。
USB
以太网
如果使用 Starter CD 中的安装程序安装软件,则可以使用传真设置向导(Windows) 或 HP 设备管理器(Mac OS) 在安装设备软件后配置传真设置。有关设置传真的详细
信息,请参阅第 9页的“设置传真(可选)”。
传真
完成安装 3

验证设备是否正确安装要检查是否已正确安装了设备软件,请启动软件并
完成基本任务(例如打印一份文档或将扫描件发送
到计算机)。
打开 HP Photosmart 软件 (Windows)
1. 在 Windows 桌面上,双击 HP Photosmart 软件图标。
2. 如果您安装了多个 HP 设备,请选择相应的设备标签。
打开 HP Photosmart Studio 软件(Mac OS)
1. 单击 Dock 中的 HP Photosmart Studio 图标。
2. 单击设备,然后选择一个设备。
有关使用设备软件的详细信息,请参阅软件的联机
帮助。
注册设备如果您已完成上述操作,请进入 www.register.hp.com 并注册设备。
查找更多信息有关使用设备和故障排除的信息,请参阅以下资源:
• Starter CD 上的联机用户指南和 Readme 文件或访问 www.hp.com/support
• HP Instant Support 和嵌入式 Web 服务器(请参阅联机用户指南)
• 产品支持网站 www.hp.com/support
安装设备4

简体中文
2 识别设备部件
前视图
1 自动文档进纸器(ADF)
2 扫描仪玻璃板
3 控制面板
4 显示屏
5 出纸盘
6 出纸盘展板
7 长度 /宽度导板
8 纸盘 1
9 正面通用串行总线(USB) 端口
10存储卡插槽
11存储设备指示灯
12文档进纸器
13宽度导板
打印耗材区
1 墨盒门
2 墨盒
3 打印墨盒检修门
4 打印头
5 打印头锁栓
存储卡插槽
1 Compact flash(I 型和 II 型,仅限固态)
2 Secure Digital、MultimediaCard(MMC) 和 Secure MMC
3 xD
4 Memory Stick、Magic Gate Memory Stick、Memory Stick Duo 和 Memory Stick Pro
5 正面通用串行总线(USB) 端口(支持 PictBridge)
前视图 5
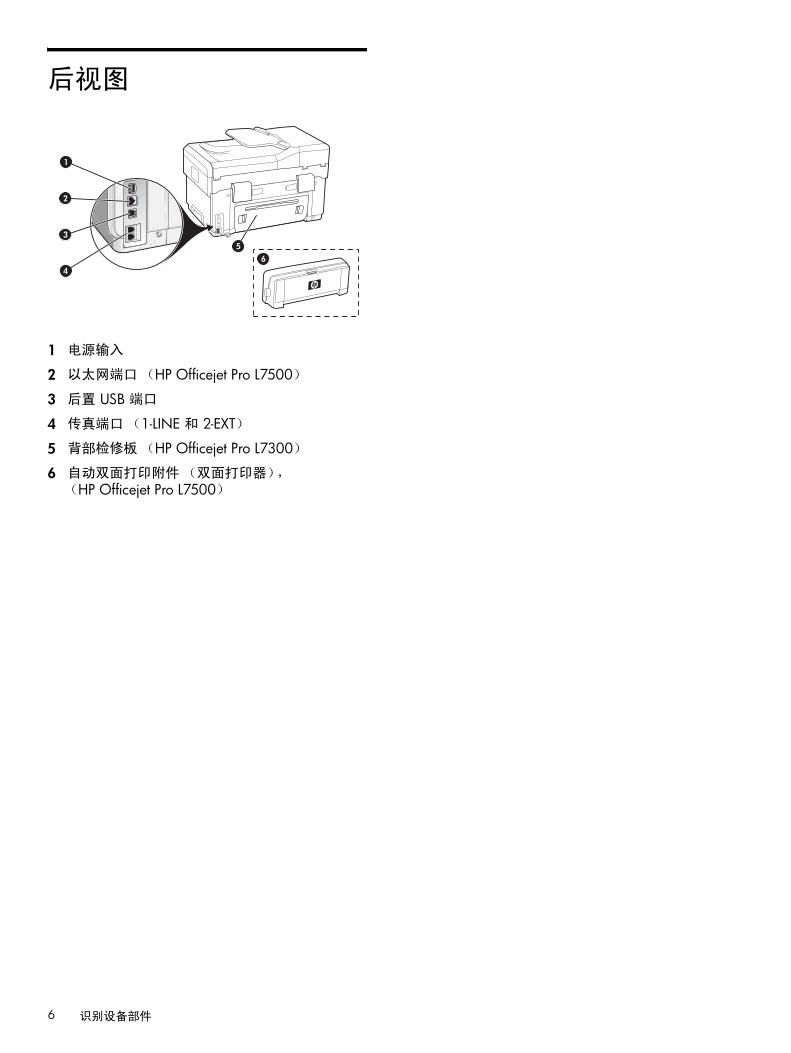
后视图
1 电源输入
2 以太网端口(HP Officejet Pro L7500)
3 后置 USB 端口
4 传真端口(1-LINE 和 2-EXT)
5 背部检修板(HP Officejet Pro L7300)
6 自动双面打印附件(双面打印器),
(HP Officejet Pro L7500)
65
2
3
1
4
识别设备部件6

简体中文
控制面板
注: 视您的设备型号而定,控制面板的布局和功能
会有所不同。您的设备可能不会包含所有本节描述
的按钮和指示灯。
1 快速拨号 快速拨号按钮:访问前 5 个快速拨号码。条目可能是一个传真号码,也可能是一组传真号码。
快速拨号条目列表:识别与 5 个快速拨号按钮对应的快速拨号条目。您可以将条目写在提供的横格纸
上,或打印要插入的列表。
2 扫描 扫描到:选择扫描目的地。
开始扫描:开始扫描作业,并将其发送到用“扫描菜单”按钮选择的目的地。
3 传真 菜单:打开传真功能的菜单。
分辨率:调整设备发送传真的速度和质量。
重拨 /暂停:重拨最近拨过的传真号码。
自动应答:将传真功能设置为在指定的铃声次数后自动应答电话。
开始传真黑色或开始传真彩色:以黑白或彩色模式开始传真。
4 小键盘输入传真号码、数值或文本。
5 显示屏显示状态和错误消息、模式和设置菜单及其选项、
帮助信息以及墨盒剩余量。
箭头按钮:在菜单项之间进行移动,或在彩色显示屏上的照片之间移动(如果可以)。
确定:选择菜单、设置;或者,如果设备具有彩色显示屏,则选择要打印的照片。
6 其他按钮设置:访问报告、设置和维护的菜单系统。
取消:停止作业、退出菜单或退出设置。
7 复印 菜单:打开复印功能的菜单。
缩小 /放大:更改复印的尺寸。
逐份打印:按照从扫描仪玻璃或 ADF 扫描的确切顺序依次复印输出。
质量:控制复印的速度和质量。所选复印质量旁边的质量指示灯亮起。
开始复印黑色或开始复印彩色:以黑白或彩色模式开始复印。
控制面板 7

8 照片菜单:打开照片功能的菜单。
校样页:当将存储卡插入存储卡插槽后打印校样页。
打印照片:开始照片打印作业。
9 电源按钮和指示灯电源按钮:打开或关闭设备。设备关闭后,
电源仍会向设备进行最少量的供电。要完全断开
设备的电源,请关闭设备的电源,然后拔下电源线。
指示灯亮起,则表示设备为开启状态。在执行作业
时该指示灯会闪烁。
网络状态指示灯:指示设备在网络上的状态。
警示灯:警示灯闪烁时,表示有错误发生,需要注意。
识别设备部件8

简体中文
3 设置传真(可选)
本节介绍多种不同配置下的传真设置说明。
• 使用专用电话线路
• 使用共用电话线路
• 管理和配置传真
• 配置应答模式
• 配置应答响铃次数
• 更改特色铃声的应答响铃模式
• 设置传真标题
• 测试传真设置
有关传真功能的详细信息,请参阅 Starter CD 上的联机用户指南。
注: 只有某些型号才支持传真。
注意: 如果不使用随附的电话线来连接墙上的电话插孔
和设备,则可能无法成功地收发传真。
这条特殊的电话线不同于您家里或办公室中已有的电话
线。如果随附的电话线太短,请参阅 Starter CD 上的联机用户指南以获取相关信息。
并行电话系统与串行电话系统在开始设置设备的传真功能之前,请确定您所在的
国家 /地区使用哪种电话系统。
注: 根据您使用的是串行电话系统还是并行电话
系统,传真的设置说明会有所不同。
如果下面的章节中没有列出您所在的国家 /地区,您可能具有串行电话系统。如果您无法确定您的电
话系统是哪一种类型(并行或串行),请向电信公
司确认。
具有并行电话系统的国家 /地区在并行电话系统中,可以通过使用设备背面的
“2-EXT”端口将共享电话设备连接到电话线上。
注: 如果具有并行电话系统, HP 建议您使用设备随附的 2 芯电话线将设备连接到墙上电话插孔。
具有串行电话系统的国家 /地区在串行电话系统中,共享电话设备(调制解调器、
电话机和应答机)上的接头类型不允许物理连接到
设备上的“2-EXT”端口。所有设备都必须连接到墙上电话插孔。
注: 在一些使用串行电话系统的国家 /地区,设备随附的电话线可能额外连有墙上插头。这样,您就
可以将其它电信设备连接到设备所插入的墙上插孔。
阿根廷 澳大利亚 巴西
加拿大 智利 中国
哥伦比亚 希腊 印度
印度尼西亚 爱尔兰 日本
韩国 拉丁美洲 马来西亚
墨西哥 菲律宾 波兰
葡萄牙 俄罗斯 沙特阿拉伯
新加坡 西班牙 台湾
泰国 美国 委内瑞拉
越南
并行电话系统与串行电话系统 9

有关设置该设备以使用串行电话系统收发传真的信
息,请参阅相应国家 /地区的“传真配置”网站。
专用电话线路如果您打算使用以下类型的电话线路进行传真,
请参考本节:
• 专用电话线路(没有其他设备共用电话线,例如电话机或应答机)。
• 专用电话线路,没有其他设备共用电话线,但预订了特色铃声服务。
• 专用分组交换机(PBX)或综合业务数字网(ISDN)线路。有关 PBX 和 ISDN 线路的详细信息,请参阅 Starter CD 上的联机用户指南。
注: 如果语音邮件服务与传真呼叫使用相同的电话
号码,则无法自动接收传真。您必须手动接收传真,
也就是必须亲自应答拨入的传真呼叫。如果要使用
自动接收传真代替手动接收,请联系电话公司订购
特色铃声服务,或者取得一条单独的电话线路供传
真使用。
将设备设置为手动应答拨入的呼叫。按自动应答按钮,直到指示灯熄灭。
1. 从要连接设备的电话插孔上拔下电话设备。
2. 使用设备随附的电话线将设备上的 1-LINE 端口与电话插孔相连。
3. 如果您预订了特色铃声服务,请将“应答响铃模式”设置更改为电话公司为您的传真号码指定的
模式,例如两声或三声铃声。
有关更改此设置的信息,请参阅 Starter CD 上的联机用户指南。
注: 您的设备出厂设置为应答所有响铃模式。如果
未设置成电话公司为您的传真号码指定的正确响铃
模式,设备可能会既应答语音电话,又应答传真电
话,或者根本不应答。
共用电话线线路如果传真与其他设备共用电话线路(例如电话机、
应答机、计算机 /计算机调制解调器或来电显示盒),或线路中包含语音邮件服务,则必须按照这些
说明来确定如何设置传真。
1. 按照第 10页的“专用电话线路”中描述的步骤进行操作。
2. 将其他设备插入设备背面的 2-EXT 端口中。
3. 使用下列各表确定其余的传真配置。
澳大利亚 www.hp.com/at/faxconfig
比利时(荷兰语) www.hp.be/nl/faxconfig
比利时(法语) www.hp.be/fr/faxconfig
丹麦 www.hp.dk/faxconfig
芬兰 www.hp.fi/faxconfig
法国 www.hp.com/fr/faxconfig
德国 www.hp.com/de/faxconfig
爱尔兰 www.hp.com/ie/faxconfig
意大利 www.hp.com/it/faxconfig
挪威 www.hp.no/faxconfig
荷兰 www.hp.nl/faxconfig
葡萄牙 www.hp.pt/faxconfig
西班牙 www.hp.es/faxconfig
瑞典 www.hp.se/faxconfig
瑞士(法语) www.hp.com/ch/fr/faxconfig
瑞士(德语) www.hp.com/ch/de/faxconfig
英国 www.hp.com/uk/faxconfig
1-LINE
2-EXT
设置传真(可选)10

简体中文
使用传真设置表使用传真设置表帮助您在设备上设置传真功能。要使用这些表,请执行下列步骤:
� 确定您将如何使用传真机要使用的电话线:
一旦您确定了希望如何使用电话线,请执行下列步骤:
� 在第一行中,确定其他哪些设备将与一体机(电话机、计算机、应答机)共用电话线。
� 在下面的行中,确定电话线是否具有任何特殊服务(语音邮件或特色铃声)以及电话线是否将用于
计算机,并确定您具有拨号调制解调器还是 DSL 调制解调器。
� 下一行提供了有关根据各设备连接到一体机的方式确定传真设置外观的示例。
� 该表的最后一行是与第 13 页上的配置准则表对应的编号。使用配置准则表可以帮助您设置一体机,
以便其根据一体机的设置方式最高效地运行。
注: 您必须遵循每个传真设置表最后一行中显示的
编号进行操作。不按顺序执行这些步骤可能会导致
传真设置问题。
• 语音和传真(请参阅 Table 3-1) • 语音、传真和 Internet(拨号)(请参阅 Table 3-3)
• 传真和 Internet(请参阅 Table 3-2) • 语音、传真和 Internet(DSL)(请参阅 Table 3-4)
共用电话线线路 11

表 3-1 语音和传真
表 3-2 传真和 Internet
表 3-3 语音、传真和 Internet(拨号)
要将什么设备连接到
设备?
电话 • 电话• 应答机
线路具有… 特色铃声服务 特色铃声服务
您的传真设置应如图
所示…
然后按照配置编号操作3 1, 9, 2 1, 7 1, 9, 7
要将什么设备连接到
设备?• 计算机• 调制解调器
线路为… 拨号 DSL
您的传真设置应如图
所示…
然后按照配置编号操作4, 5, 1, 2, 6 8, 1, 2, 6
分离器
DSL 过滤器
要将什么设备连接到 设备?
• 电话• 计算机• 调制解调器
• 电话• 计算机• 调制解调器• 应答机
线路为… 拨号 拨号
线路具有… 特色铃声服务 特色铃声服务
您的传真设置应如图
所示…
然后按照配置编号
操作4, 10, 5, 3 4, 10, 5, 3, 9 4, 10, 5, 1, 7 4, 10, 5, 1, 9, 7
分离器 分离器
设置传真(可选)12

简体中文
表 3-4 语音、传真和 Internet(DSL)
配置准则
要将什么设备连接到 设备?
• 电话• 计算机• 调制解调器
• 电话• 计算机• 调制解调器• 应答机
线路为… DSL DSL
线路具有… 特色铃声服务 特色铃声服务
您的传真设置应如图
所示…
然后按照配置编号
操作8, 3 8, 3, 9 8, 1, 7 8, 1, 9, 7
2
3
分离器
DSL 过滤器
2
3
分离器
DSL 过滤器
配置号 # 配置说明
1 将设备设置为自动应答拨入的呼叫。按自动应答按钮,直到指示灯亮起。
2 (可选)将“应答响铃次数”设置更改为一次或两次响铃。
有关更改此设置的信息,请参阅 Starter CD 上的联机用户指南。
3 确定设备如何应答呼叫:自动或手动应答。
• 如果将设备设置为自动应答呼叫,它会应答所有拨入的呼叫和并接收传真。在这种情况下,设备无法区分传真和语音呼叫;如果您怀疑来电为语音呼叫,则需要在设备应答此呼叫前自
行应答。
要自动应答传真呼叫,请按自动应答按钮,直到指示灯亮起。
• 如果将设备设置为手动应答传真,则您必须亲自应答传真呼叫,否则设备不能接收传真。要手动应答传真呼叫,请按自动应答按钮,直到指示灯熄灭。
4(拨号调制解调器)
由于您的 PC 调制解调器与设备共用电话线路,因此将无法同时使用 PC 调制解调器和设备。例如,如果正在使用 PC 调制解调器发送电子邮件或访问 Internet,则无法使用设备发送和接收传真。
5(拨号调制解调器)
如果 PC 调制解调器软件设置为自动接收传真到计算机,请关闭此设置。
注意:如果不关闭 PC 调制解调器软件中的自动传真接收设置,则设备将无法接收传真。
6 电话铃响时,在铃声响过 “应答响铃次数”设置中所设的响铃次数后,设备将会自动应答。然后它会将传真接收信号发到发送方的传真机,并开始接收传真。
7(应答机)
将应答机设置为在 4 声铃声或更少铃声后应答。
将设备上的“应答响铃次数”设置更改为 6 声铃声。
电话铃响时,在铃声响过设定的次数后,应答机将进行应答,然后播放所录制的问候音。在此
期间,设备会监控呼叫并“监听”传真信号。如果检测到外来传真的信号,设备将发出传真
接收信号并接收传真;如果没有传真信号,则设备会停止监控线路,此时应答机可记录语音
消息。
8 仅限 DSL 线路:您需要为共用 DSL 电话线的所有设备(电话机、计算机)额外购买 DSL 过滤器。
共用电话线线路 13
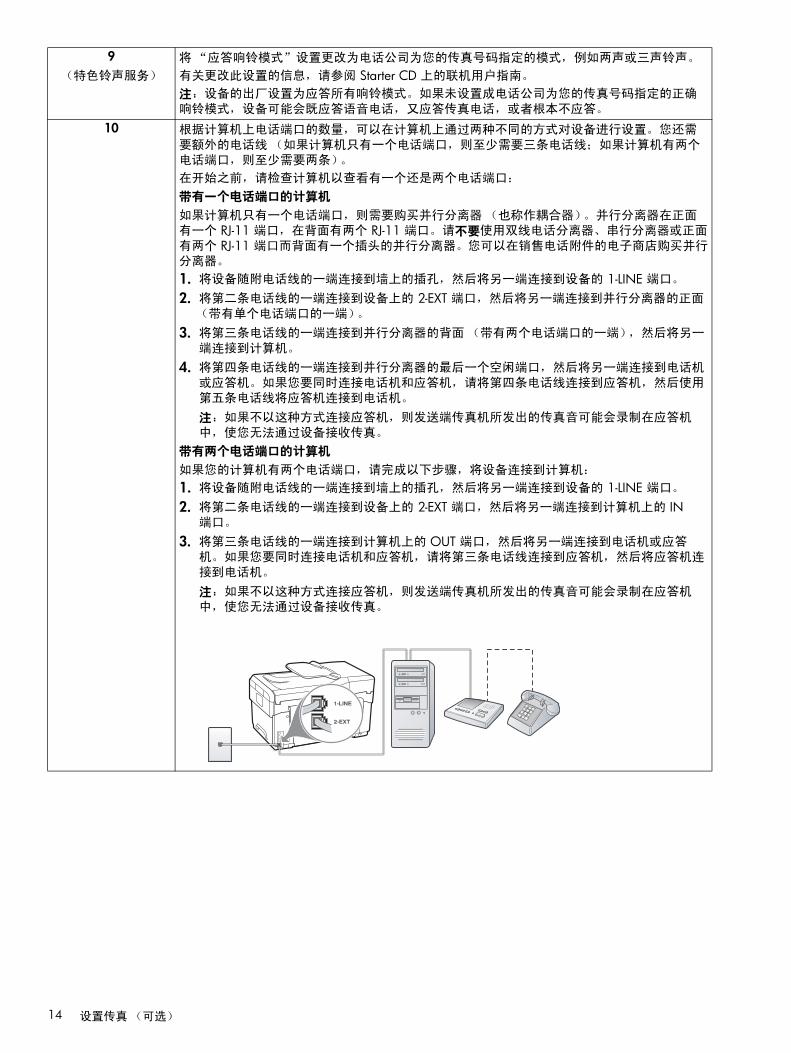
9(特色铃声服务)
将“应答响铃模式”设置更改为电话公司为您的传真号码指定的模式,例如两声或三声铃声。
有关更改此设置的信息,请参阅 Starter CD 上的联机用户指南。
注:设备的出厂设置为应答所有响铃模式。如果未设置成电话公司为您的传真号码指定的正确
响铃模式,设备可能会既应答语音电话,又应答传真电话,或者根本不应答。
10 根据计算机上电话端口的数量,可以在计算机上通过两种不同的方式对设备进行设置。您还需
要额外的电话线(如果计算机只有一个电话端口,则至少需要三条电话线;如果计算机有两个
电话端口,则至少需要两条)。
在开始之前,请检查计算机以查看有一个还是两个电话端口:
带有一个电话端口的计算机
如果计算机只有一个电话端口,则需要购买并行分离器(也称作耦合器)。并行分离器在正面
有一个 RJ-11 端口,在背面有两个 RJ-11 端口。请不要使用双线电话分离器、串行分离器或正面
有两个 RJ-11 端口而背面有一个插头的并行分离器。您可以在销售电话附件的电子商店购买并行
分离器。
1. 将设备随附电话线的一端连接到墙上的插孔,然后将另一端连接到设备的 1-LINE 端口。
2. 将第二条电话线的一端连接到设备上的 2-EXT 端口,然后将另一端连接到并行分离器的正面
(带有单个电话端口的一端)。
3. 将第三条电话线的一端连接到并行分离器的背面(带有两个电话端口的一端),然后将另一
端连接到计算机。
4. 将第四条电话线的一端连接到并行分离器的最后一个空闲端口,然后将另一端连接到电话机
或应答机。如果您要同时连接电话机和应答机,请将第四条电话线连接到应答机,然后使用
第五条电话线将应答机连接到电话机。
注:如果不以这种方式连接应答机,则发送端传真机所发出的传真音可能会录制在应答机
中,使您无法通过设备接收传真。
带有两个电话端口的计算机
如果您的计算机有两个电话端口,请完成以下步骤,将设备连接到计算机:
1. 将设备随附电话线的一端连接到墙上的插孔,然后将另一端连接到设备的 1-LINE 端口。
2. 将第二条电话线的一端连接到设备上的 2-EXT 端口,然后将另一端连接到计算机上的 IN 端口。
3. 将第三条电话线的一端连接到计算机上的 OUT 端口,然后将另一端连接到电话机或应答机。如果您要同时连接电话机和应答机,请将第三条电话线连接到应答机,然后将应答机连
接到电话机。
注:如果不以这种方式连接应答机,则发送端传真机所发出的传真音可能会录制在应答机
中,使您无法通过设备接收传真。
设置传真(可选)14

简体中文
管理和配置传真设置如果要将设备直接连接到计算机,请安装设备软件,
然后运行传真设置向导 (Windows)或 HP 设备管理器 (Mac OS)。您也可以在以后通过解决方案中心(Windows)或 HP 设备管理器 (Mac OS)来启动这些工具。使用这些工具可以设置传真标题、
国家 /地区以及日期和时间。
此外,您还可以从嵌入式 Web 服务器 (EWS)配置传真设置。有关 EWS 的信息,请参阅第 19 页。
也可以从控制面板对这些设置进行配置。有关控制
面板的信息,请参阅 Starter CD 上的联机用户指南。
设置快速拨号条目可以将传真号码或传真号码组存储为快速拨号条目。
快速拨号条目 1 到 5 与控制面板上相应的五个快速拨号按钮相关联。这样,便可以从控制面板快速拨
打这些号码。
除使用控制面板之外,还可以使用嵌入式 Web 服务器和 HP Photosmart 软件设置快速拨号条目。有关信息,请参阅 Starter CD 上的联机用户指南。
设置快速拨号条目1. 从控制面板中,按设置。
2. 选择快速拨号设置并执行以下操作之一:
• 添加或更改条目:选择个人快速拨号或群组快速拨号,然后按箭头键移动到未使用的条目号码,或通过小键盘键入号码。键入传真号码,
然后按确定。传真号码应包括任何暂停符或其它所需号码,如区号、 PBX 系统外号码的接入代码(通常为 9 或 0)或长途电话前缀码。使用数字键盘键入名称,然后按确定。
• 删除一个条目或所有条目:选择删除快速拨号,按箭头键移动到要删除的快速拨号条目,然后按确定。
测试传真设置可以通过测试传真设置来检查设备的状态,以确保
其正确设置了传真功能。在完成对设备的传真设置
后执行此测试。其中包含以下测试:
• 测试传真硬件
• 检查是否将正确类型的电话线连接到设备
• 检查电话线是否插入正确的端口
• 检查拨号音
• 检查电话线路的工作状态
• 测试电话线路连接的状态
设备会打印测试结果的报告。如果测试失败,请通
过查看报告了解如何解决该问题,然后返回该测试。
有关其他故障排除信息,请参阅第 18页的“解决传真问题(仅限某些型号)”。
测试传真设置 1. 根据家庭或办公室设置的特定说明,对设备进行传真设置。
2. 确保安装了墨盒和打印头,并确保在开始测试之前已在进纸盘中放入标准尺寸的纸张。
3. 从控制面板中,按设置。
4. 选择工具,然后选择执行传真测试。
设备会在显示屏上显示测试的状态,并打印一份
报告。
5. 查看报告。
• 如果测试通过,但仍存在传真问题,请检查报告中所列的传真设置,验证设置是否正确。
传真设置为空或不正确都会导致传真问题。
• 如果测试失败,请查看报告以获取更多有关如何解决所发现问题的信息。
管理和配置传真设置 15

4 故障排除
本节对与硬件和软件安装相关的一些最常见问题,
提供了相应的故障排除建议。
有关最新信息,请参阅 Starter CD 上的 readme 文件和发行说明,或访问产品支持网站 www.hp.com/support。
解决安装问题本节对与硬件和软件安装相关的一些最常见问题,
提供了相应的故障排除建议。
硬件安装建议
检查设备• 确保去除了设备内外的所有包装胶带和包装材料。
• 确保将纸张正确装入纸盘,且没有卡在设备中。
• 除“电源”指示灯应亮起外,确保其他指示灯都没有亮起或闪烁。如果警告指示灯闪烁,请检查
控制面板上的消息。首次打开设备时,大约需要 45 秒的预热时间。
• 确保将背部检修板或双面打印器锁定到位。
• 确保设备可打印自检诊断页。有关详细信息,请参阅第 19页的“自检诊断页”。
检查硬件连接• 确保使用的所有线缆工作状况良好。
• 确保电源线与设备和通电插座连接牢固。
• 确保电话线连接到 1-LINE 端口。
检查打印头和墨盒。• 确保去除了打印头上的橙色保护盖。
• 确保所有打印头和墨盒都牢固地安装在相应颜色代码的插槽中。用力按每个打印头和墨盒,确保
接触良好。如果未安装打印头和墨盒,设备将无
法工作。
• 确保打印头锁栓和所有盖板都已合上。
• 如果显示屏显示打印头错误的消息,请清洁打印头触点。有关详细信息,请参阅 Starter CD 上的联机用户指南。
软件安装建议
检查计算机系统• 确保计算机运行的操作系统是受支持的操作系统。有关详细信息,请参阅 Starter CD 上的联机用户指南。
• 确保计算机至少满足最低的系统要求。有关详细信息,请参阅 Starter CD 上的联机用户指南。
检查安装准备事项• 确保使用的 Starter CD 包含适用于操作系统的正确安装软件。
• 在安装软件之前,确保关闭了所有其他程序。
• 键入 CD-ROM 驱动器的路径后,如果计算机识别不出该路径,请检查是否指定了正确的盘符。
• 如果计算机无法识别 CD-ROM 驱动器中的 Starter CD,请检查该 Starter CD 是否损坏。可从 www.hp.com/support 下载设备驱动程序。
• 在 Windows 设备管理器中,确保 USB 驱动器没有禁用。
• 使用运行 Windows 操作系统的计算机时,如果计算机检测不到设备,请运行卸载实用程序
(Starter CD 上的 util\ccc\uninstall.bat),彻底卸载设备驱动程序。重新启动计算机,然后重新
安装设备驱动程序。
故障排除16
简体中文
解决网络问题(仅限某些型号)
注: 纠正下列任一问题后,请再次运行安装程序。
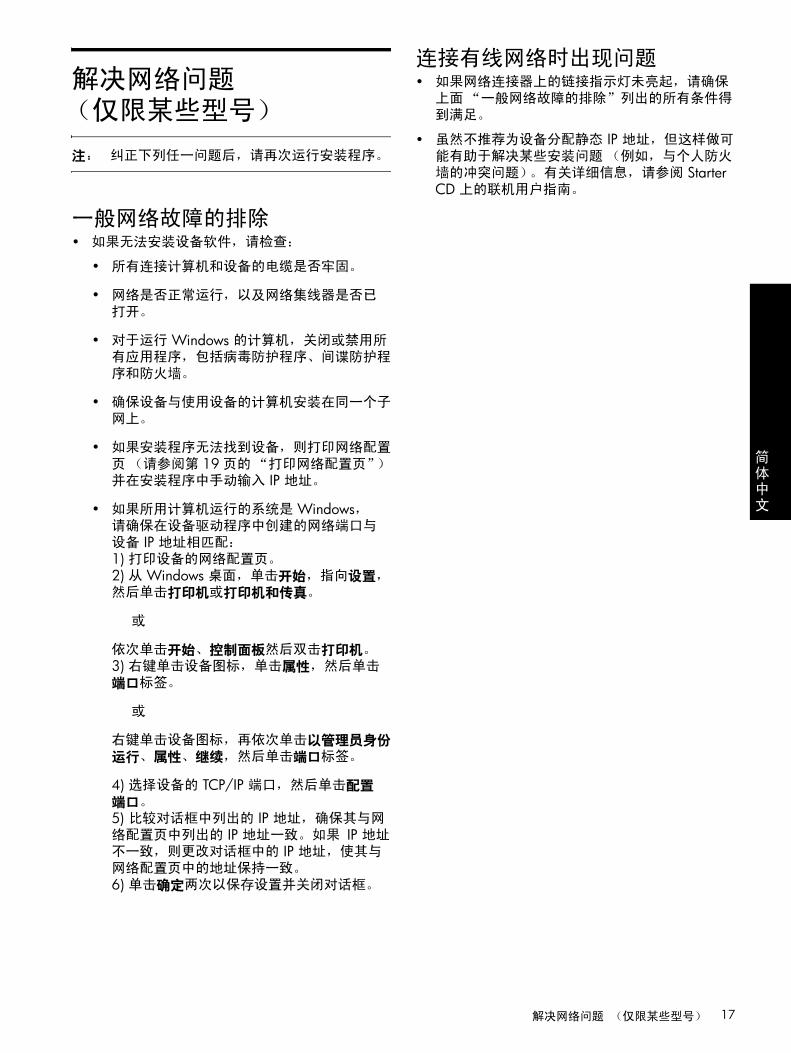
一般网络故障的排除• 如果无法安装设备软件,请检查:
• 所有连接计算机和设备的电缆是否牢固。
• 网络是否正常运行,以及网络集线器是否已打开。
• 对于运行 Windows 的计算机,关闭或禁用所有应用程序,包括病毒防护程序、间谍防护程
序和防火墙。
• 确保设备与使用设备的计算机安装在同一个子网上。
• 如果安装程序无法找到设备,则打印网络配置页(请参阅第 19页的“打印网络配置页”)并在安装程序中手动输入 IP 地址。
• 如果所用计算机运行的系统是 Windows,请确保在设备驱动程序中创建的网络端口与
设备 IP 地址相匹配:1) 打印设备的网络配置页。2) 从 Windows 桌面,单击开始,指向设置,然后单击打印机或打印机和传真。
或
依次单击开始、控制面板然后双击打印机。
3) 右键单击设备图标,单击属性,然后单击端口标签。
或
右键单击设备图标,再依次单击以管理员身份运行、属性、继续,然后单击端口标签。
4) 选择设备的 TCP/IP 端口,然后单击配置端口。 5) 比较对话框中列出的 IP 地址,确保其与网络配置页中列出的 IP 地址一致。如果 IP 地址不一致,则更改对话框中的 IP 地址,使其与网络配置页中的地址保持一致。
6) 单击确定两次以保存设置并关闭对话框。
连接有线网络时出现问题• 如果网络连接器上的链接指示灯未亮起,请确保上面“一般网络故障的排除”列出的所有条件得
到满足。
• 虽然不推荐为设备分配静态 IP 地址,但这样做可能有助于解决某些安装问题(例如,与个人防火
墙的冲突问题)。有关详细信息,请参阅 Starter CD 上的联机用户指南。
解决网络问题 (仅限某些型号) 17

解决传真问题(仅限某些型号)如果运行了传真测试而测试失败,请查看测试报告以了解可能的解决方案。有关更多详细信息,请参阅 Starter CD 上的联机用户指南。
设备在收发传真时出现问题 确保使用设备随附的电话线。
与设备共用一条电话线的其它设备可能正在使用中。确保电话分机(使用同一条电话线
但未与设备连接的电话)或其他设备均未使用或已挂断。例如,如果分机未挂好,或正在
使用计算机拨号调制解调器发送电子邮件或访问 Internet,则无法使用设备收发传真。
如果使用了电话分离器,则该分离器可能会导致传真问题。尝试将设备直接连接到墙上电
话插孔。
确保将电话线的一端连接到墙上电话插孔,将另一端连接到设备背面带有“1-LINE”标记的端口。
尝试将一部可正常工作的电话直接连接到墙上电话插孔中,然后检查拨号音,如果听不到
拨号音,请联系电话公司对线路进行检查。
请确保将设备连接到模拟电话线上,否则您不能收发传真。要检查是否为数字电话线,
请将普通的模拟电话连接到该电话线上,并侦听拨号音。如果您没有听到正常的拨号音,
则该线路可能是设置为用于数字电话的电话线。请将设备连接到模拟电话线上,然后尝试
收发传真。
电话线连接的噪音可能很大。声音质量差(有噪音)的电话线会导致传真出问题。将电
话插入到墙上电话插孔中,并聆听是否有静电噪音或其他噪音,以此来检查电话线的音
质。如果听到噪音,则请关闭纠错模式 (ECM),然后重试收发传真。
如果使用数字用户线 (DSL) 服务,请确保连接了 DSL 过滤器。如果不使用该过滤器,则无法成功地收发传真。
如果您使用的是专用分组交换机 (PBX) 或综合业务数字网络 (ISDN) 转换器 /终端适配器,请确保设备与正确的端口相连并将终端适配器设置为与您所在国家 /地区相匹配的正确交换机类型。
设备可以发送传真,但无法
接收传真
如果没有使用特色铃声服务,请确保设备上的“特色铃声”功能设置为所有铃声。
如果将“自动应答”设置为关闭,或者语音邮件服务与传真呼叫使用相同的电话号码,
则只能手动接收传真。
如果计算机拨号调制解调器与设备共用一条电话线,请检查以确保调制解调器随附的软件
没有设置成自动接收传真。
如果应答机和设备共用一条电话线,请执行以下操作:
• 检查应答机是否正常工作。• 确保您的设置类似于第 12 页上的表 3-1 中的第二个示例。
• 确保已将设备设置为自动接收传真。• 请确保“应答响铃次数”设置所设的次数多于应答机的响铃次数。• 断开应答机的连接,然后再尝试接收传真。• 录制长度大约为 10 秒钟的消息。录制消息时,请以较低音量慢速讲话。在语音消息结束时,请至少停顿 5 秒钟。
共用同一条电话线的其他设备可能会导致测试失败。您可以断开所有其他设备的连接,
然后再次运行测试。如果拨号音检测测试通过,则说明问题是由一个或多个其他设备引起
的。请尝试每次装回一个设备,并且每次都重新执行测试,直到找出导致问题的设备。
故障排除18
简体中文
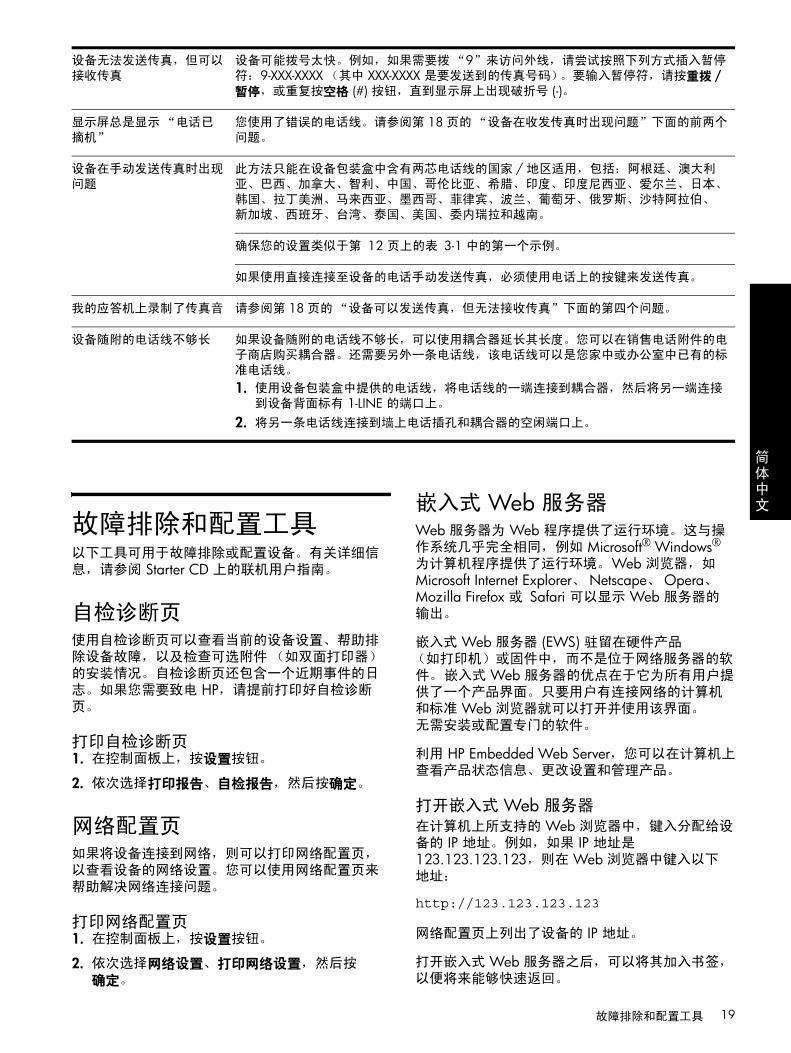
故障排除和配置工具以下工具可用于故障排除或配置设备。有关详细信
息,请参阅 Starter CD 上的联机用户指南。
自检诊断页使用自检诊断页可以查看当前的设备设置、帮助排
除设备故障,以及检查可选附件(如双面打印器)
的安装情况。自检诊断页还包含一个近期事件的日
志。如果您需要致电 HP,请提前打印好自检诊断页。
打印自检诊断页1. 在控制面板上,按设置按钮。
2. 依次选择打印报告、自检报告,然后按确定。
网络配置页如果将设备连接到网络,则可以打印网络配置页,
以查看设备的网络设置。您可以使用网络配置页来
帮助解决网络连接问题。
打印网络配置页1. 在控制面板上,按设置按钮。
2. 依次选择网络设置、打印网络设置,然后按确定。
嵌入式 Web 服务器Web 服务器为 Web 程序提供了运行环境。这与操作系统几乎完全相同,例如 Microsoft® Windows®
为计算机程序提供了运行环境。 Web 浏览器,如 Microsoft Internet Explorer、Netscape、Opera、Mozilla Firefox 或 Safari 可以显示 Web 服务器的输出。
嵌入式 Web 服务器 (EWS) 驻留在硬件产品(如打印机)或固件中,而不是位于网络服务器的软
件。 嵌入式 Web 服务器的优点在于它为所有用户提供了一个产品界面。只要用户有连接网络的计算机
和标准 Web 浏览器就可以打开并使用该界面。 无需安装或配置专门的软件。
利用 HP Embedded Web Server,您可以在计算机上查看产品状态信息、更改设置和管理产品。
打开嵌入式 Web 服务器
在计算机上所支持的 Web 浏览器中,键入分配给设备的 IP 地址。例如,如果 IP 地址是 123.123.123.123,则在 Web 浏览器中键入以下地址:
http://123.123.123.123
网络配置页上列出了设备的 IP 地址。
打开嵌入式 Web 服务器之后,可以将其加入书签,以便将来能够快速返回。
设备无法发送传真,但可以
接收传真
设备可能拨号太快。例如,如果需要拨“9”来访问外线,请尝试按照下列方式插入暂停符:9-XXX-XXXX(其中 XXX-XXXX 是要发送到的传真号码)。要输入暂停符,请按重拨 /暂停,或重复按空格 (#) 按钮,直到显示屏上出现破折号 (-)。
显示屏总是显示“电话已
摘机”
您使用了错误的电话线。请参阅第 18页的“设备在收发传真时出现问题”下面的前两个问题。
设备在手动发送传真时出现
问题
此方法只能在设备包装盒中含有两芯电话线的国家 /地区适用,包括:阿根廷、澳大利亚、巴西、加拿大、智利、中国、哥伦比亚、希腊、印度、印度尼西亚、爱尔兰、日本、
韩国、拉丁美洲、马来西亚、墨西哥、菲律宾、波兰、葡萄牙、俄罗斯、沙特阿拉伯、
新加坡、西班牙、台湾、泰国、美国、委内瑞拉和越南。
确保您的设置类似于第 12 页上的表 3-1 中的第一个示例。
如果使用直接连接至设备的电话手动发送传真,必须使用电话上的按键来发送传真。
我的应答机上录制了传真音 请参阅第 18页的“设备可以发送传真,但无法接收传真”下面的第四个问题。
设备随附的电话线不够长 如果设备随附的电话线不够长,可以使用耦合器延长其长度。您可以在销售电话附件的电
子商店购买耦合器。还需要另外一条电话线,该电话线可以是您家中或办公室中已有的标
准电话线。
1. 使用设备包装盒中提供的电话线,将电话线的一端连接到耦合器,然后将另一端连接到设备背面标有 1-LINE 的端口上。
2. 将另一条电话线连接到墙上电话插孔和耦合器的空闲端口上。
故障排除和配置工具 19
Hewlett-Packard 有限保修声明20
Hewlett-Packard 有限保修声明
1
Bahasa
Indonesi
a
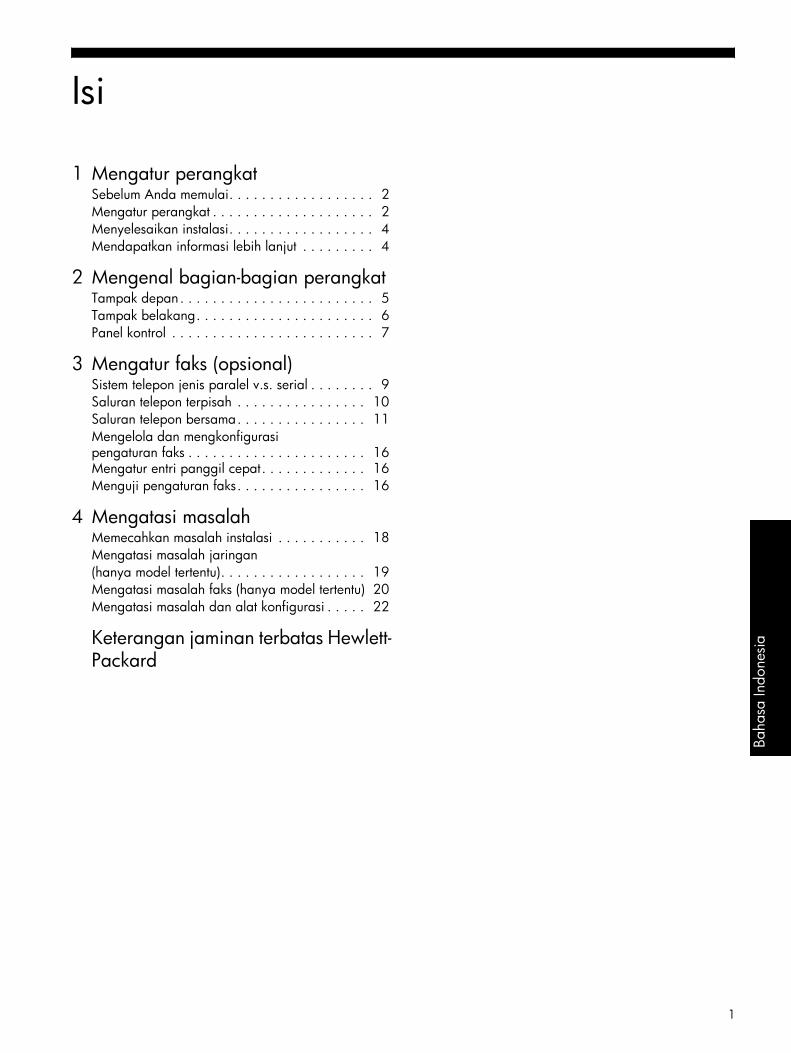
1 Mengatur perangkatSebelum Anda memulai. . . . . . . . . . . . . . . . . . 2Mengatur perangkat . . . . . . . . . . . . . . . . . . . . 2Menyelesaikan instalasi. . . . . . . . . . . . . . . . . . 4Mendapatkan informasi lebih lanjut . . . . . . . . . 4
2 Mengenal bagian-bagian perangkatTampak depan. . . . . . . . . . . . . . . . . . . . . . . . 5Tampak belakang. . . . . . . . . . . . . . . . . . . . . . 6Panel kontrol . . . . . . . . . . . . . . . . . . . . . . . . . 7
3 Mengatur faks (opsional)Sistem telepon jenis paralel v.s. serial . . . . . . . . 9Saluran telepon terpisah . . . . . . . . . . . . . . . . 10Saluran telepon bersama. . . . . . . . . . . . . . . . 11Mengelola dan mengkonfigurasi pengaturan faks . . . . . . . . . . . . . . . . . . . . . . 16Mengatur entri panggil cepat. . . . . . . . . . . . . 16Menguji pengaturan faks. . . . . . . . . . . . . . . . 16
4 Mengatasi masalahMemecahkan masalah instalasi . . . . . . . . . . . 18Mengatasi masalah jaringan (hanya model tertentu). . . . . . . . . . . . . . . . . . 19Mengatasi masalah faks (hanya model tertentu) 20Mengatasi masalah dan alat konfigurasi . . . . . 22
Keterangan jaminan terbatas Hewlett-Packard
Isi

1 Mengatur perangkat
Bagian ini merangkum proses pengaturan awal untuk perangkat.
Sebelum Anda memulai
Persiapkan lokasinyaPastikan lokasi di mana Anda akan menempatkan perangkat memenuhi persyaratan berikut ini.
• Permukaannya harus stabil dan rata.
• Pastikan Anda menyisakan cukup jarak ruang agar dapat mengakses bagian belakang perangkat dan membuka penutup scanner alas datar.
• Jangan letakkan perangkat di tempat yang terkena sinar matahari langsung atau di dekat bahan kimia. Pastikan lingkungan perangkat tidak mengalami perubahan suhu atau kelembaban yang mendadak.
Mengatur perangkatBagian ini merangkum langkah-langkah yang perlu Anda ikuti untuk mengatur perangkat. Untuk informasi lebih lanjut, lihat poster perakitan yang menyertai perangkat.
CATATAN: Periksa isi kemasan dan pasang aksesori opsional.
Suhu 15° s.d 35° C (59° s.d 95° F)
Kelembaban relatif 10% s.d 80%
1. Lepaskan pita dan bahan pengiriman.
CATATAN: Pastikan untuk melepaskan bahan kemasan karton dari daerah kepala cetak.
2. Pasang pelat muka panel kontrol.
3. Pasang baki pemasok dokumen.
4. Pasang kartrid tinta.
CATATAN: Keempat kartrid tinta harus terpasang dengan benar agar perangkat dapat bekerja. Tinta dari kartrid digunakan dalam proses pencetakan dengan berbagai cara, termasuk proses inisialisasi, yang mempersiapkan perangkat dan kartrid untuk mencetak, dan saat menservis kepala cetak, yang menjaga agar ujung semprot tetap bersih dan tinta mengalir dengan lancar. Selain itu, sebagian tinta tertinggal dalam kartrid setelah digunakan. Untuk informasi lebih lanjut kunjungi www.hp.com/go/inkusage.
5. Pasang kepala cetak.
PERHATIAN: Tekan kepala cetak ke bawah dengan kuat untuk memastikan kontak yang baik sebelum menutup penahan kepala cetak.
6. Sambungkan kabel listrik dan adaptor lalu hidupkan perangkat.
CATATAN: Pilih bahasa dan negara/kawasan (bila perlu), serta tanggal dan waktu, pada layar.
Mengatur perangkat2

Bahasa
Indonesi
a
7. Ketika diminta, isikan kertas, lalu tekan tombol OK.
a. Angkat baki keluaran.
b. Masukkan hingga 250 lembar kertas ke dalam Baki 1, dengan sisi cetakan menghadap ke bawah, di sepanjang tepi kanan baki. Pastikan tumpukan kertas tepat menempel tepi kanan dan belakang baki dan tidak melebihi tanda garis pada baki.
c. Geser pemandu media di dalam baki ke ukuran media yang Anda isikan.
d. Turunkan baki keluaran lalu tarik keluar perpanjangan baki.
Untuk memastikan kualitas cetak yang terbaik, perangkat menginisialisasi dan mengatur kelurusan kepala cetak. Proses ini memakan waktu sekitar 12 menit.
8. Instal perangkat lunak dan hubungkan perangkat.
Anda dapat menghubungkan perangkat menggunakan salah satu jenis koneksi berikut:
• USB
• Jaringan Ethernet (hanya model tertentu).
• Faks (hanya model tertentu).
Untuk informasi lebih lanjut tentang perangkat lunak dan konektivitas perangkat, lihat panduan pengguna pada layar pada Starter CD.
a. Masukkan Starter CD, klik Install (Windows) atau Install Software (Mac OS), kemudian ikuti petunjuk pada layar untuk menyelesaikan instalasi perangkat lunak.
CATATAN: Jika menu CD tidak dijalankan secara otomatis, klik ganda ikon setup pada Starter CD.
b. Sambungkan kabel USB ke komputer, ketika diminta.
USB
a. Lepaskan tutup pelindung konektor jaringan perangkat.
b. Sambungkan kabel jaringan ke konektor dan ke port yang tersedia pada hub, switch, atau router jaringan. Jika lampu Link konektor tidak menyala, coba port yang lain.
PERHATIAN: Jangan tancapkan kabel jaringan ke port yang berlabel WAN, Uplink, atau Internet pada hub, switch, atau router.
c. Masukkan Starter CD, klik Install (Windows) atau Install Software (Mac OS), kemudian ikuti petunjuk pada layar untuk menyelesaikan instalasi perangkat lunak.
Jika program instalasi menampilkan lebih dari satu perangkat, cetak Halaman konfigurasi jaringan untuk memilih perangkat yang benar.
CATATAN: Jika menu CD tidak dijalankan secara otomatis, klik ganda ikon setup pada Starter CD.
d. Cetak Halaman konfigurasi jaringan. Halaman ini berisi informasi yang diperlukan untuk pengaturan awal. Di panel kontrol, tekan tombol Setup [Peng. Awal], lalu selesaikan salah satu langkah berikut:
• Jika perangkat Anda dilengkapi dua baris, pilih Network Setup [Peng. Awal Jaringan], pilih Print Network Settings [Cetak Peng. Jaringan], lalu tekan OK.
• Jika perangkat Anda dilengkapi layar berwarna, pilih Network [Jaringan], pilih View Network Settings [Lihat Peng. Jaringan], pilih Print Network Configuration Page [Cetak Hal. Konfigurasi Jaringan], lalu tekan OK.
Jika Anda menginstal perangkat lunak menggunakan program instalasi pada Starter CD, Anda dapat mengkonfigurasi pengaturan faks setelah perangkat lunak perangkat diinstal menggunakan Fax Setup Wizard (Windows) atau HP Device Manager (Mac OS). Untuk informasi lebih lanjut tentang pengaturan awal faks, lihat “Mengatur faks (opsional)” di halaman 9.
Jaringan Ethernet
Fax [Faks]
Mengatur perangkat 3

Menyelesaikan instalasi
Memverifikasi bahwa perangkat telah diatur dengan benar1. Cetak dokumen dari aplikasi yang sering Anda
gunakan.
2. Letakkan dokumen tersebut di dalam baki pemasok dokumen dengan sisi cetakan menghadap ke atas dan halaman pertama di atas.
3. Sesuaikan pengatur lebar dengan ukuran dokumen.
4. Tekan START COPY Black [MULAI SALIN Hitam] atau START COPY Color [MULAI SALIN Berwarna]. perangkat menyalin dokumen tersebut. Jika Anda menemui masalah, lihat “Memecahkan masalah instalasi” di halaman 18.
5. Keluarkan dokumen dari baki keluaran ADF.
6. Buka penutup scanner alas datar.
7. Letakkan halaman pertama dokumen menghadap ke bawah pada kaca scanner dengan sudut kiri atas dokumen tepat pada sudut kanan bawah kaca.
8. Tutup scanner alas datar.
9. Tekan START COPY Black [MULAI SALIN Hitam] atau START COPY Color [MULAI SALIN Berwarna]. perangkat menyalin dokumen tersebut. Jika Anda menemui masalah, lihat “Memecahkan masalah instalasi” di halaman 18.
Memverifikasi bahwa perangkat lunak perangkat telah diinstal dengan benarUntuk memverifikasi bahwa perangkat lunak perangkat telah diinstal dengan benar, jalankan perangkat lunak dan lakukan tugas sederhana (misanya mencetak dokumen atau memindai ke komputer Anda).
Untuk membuka perangkat lunak HP Photosmart (Windows)1. Pada desktop Windows, klik ganda ikon perangkat
lunak HP Photosmart.
2. Jika Anda memiliki lebih dari satu perangkat HP yang diinstal, pilih tab yang sesuai dengan perangkat Anda.
Untuk membuka perangkat lunak HP Photosmart Studio (Mac OS)1. Klik ikon HP Photosmart Studio pada Dock.
2. Klik Device, kemudian pilih salah satu perangkat.
Untuk informasi lebih lanjut tentang menggunakan perangkat lunak perangkat, lihat bantuan online untuk perangkat lunak tersebut.
Mendaftarkan perangkatJika Anda belum melakukannya, kunjungi www.register.hp.com dan daftarkan perangkat Anda.
Mendapatkan informasi lebih lanjutUntuk informasi tentang menggunakan dan mengatasi masalah perangkat, lihat sumber daya berikut:
• Pedoman penggunaan pada layar dan file readme pada Starter CD atau di www.hp.com/support
• HP Instant Support [Dukungan Instan HP] dan server Web terpadu (lihat pedoman penggunaan pada layar)
• Situs dukungan produk yang ada di www.hp.com/support
Mengatur perangkat4

Bahasa
Indonesi
a
2 Mengenal bagian-bagian perangkat
Tampak depan
1 Pemasok dokumen otomatis (ADF)
2 Kaca scanner [pindai]
3 Panel kontrol
4 Layar
5 Baki keluaran
6 Perpanjangan baki keluaran
7 Pemandu panjang/lebar
8 Baki 1
9 Port universal serial bus (USB) depan
10 Slot kartu memori
11 Lampu perangkat memori
12 Baki pemasok dokumen
13 Pemandu lebar
Daerah persediaan cetakan
1 Pintu kartrid tinta
2 Kartrid tinta
3 Pintu akses carriage cetak
4 Kepala cetak
5 Penahan kepala cetak
Slot kartu memori
1 Compact flash (tipe I dan II, hanya solid state)
2 Secure Digital, MultimediaCard (MMC), Secure MMC
3 xD
4 Memory Stick, Magic Gate Memory Stick, Memory Stick Duo, dan Memory Stick Pro
5 Port universal serial bus (USB) depan (kompatibel dengan PictBridge)
Tampak depan 5
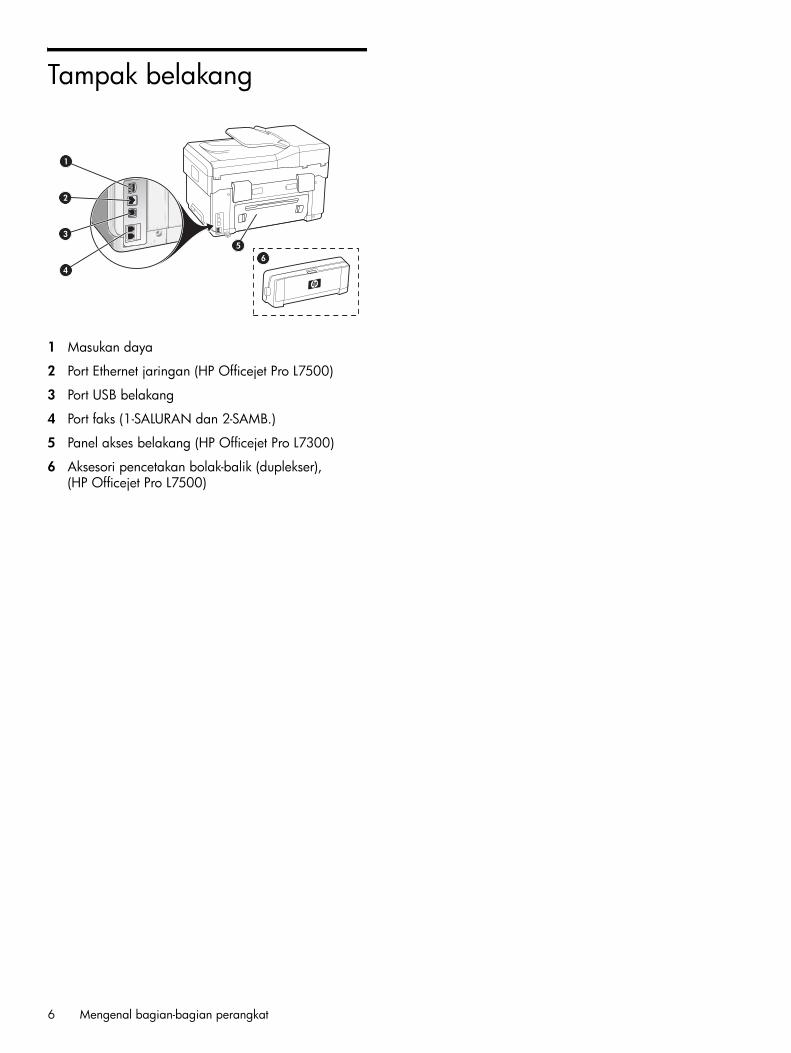
Tampak belakang
1 Masukan daya
2 Port Ethernet jaringan (HP Officejet Pro L7500)
3 Port USB belakang
4 Port faks (1-SALURAN dan 2-SAMB.)
5 Panel akses belakang (HP Officejet Pro L7300)
6 Aksesori pencetakan bolak-balik (duplekser), (HP Officejet Pro L7500)
65
2
3
1
4
Mengenal bagian-bagian perangkat6
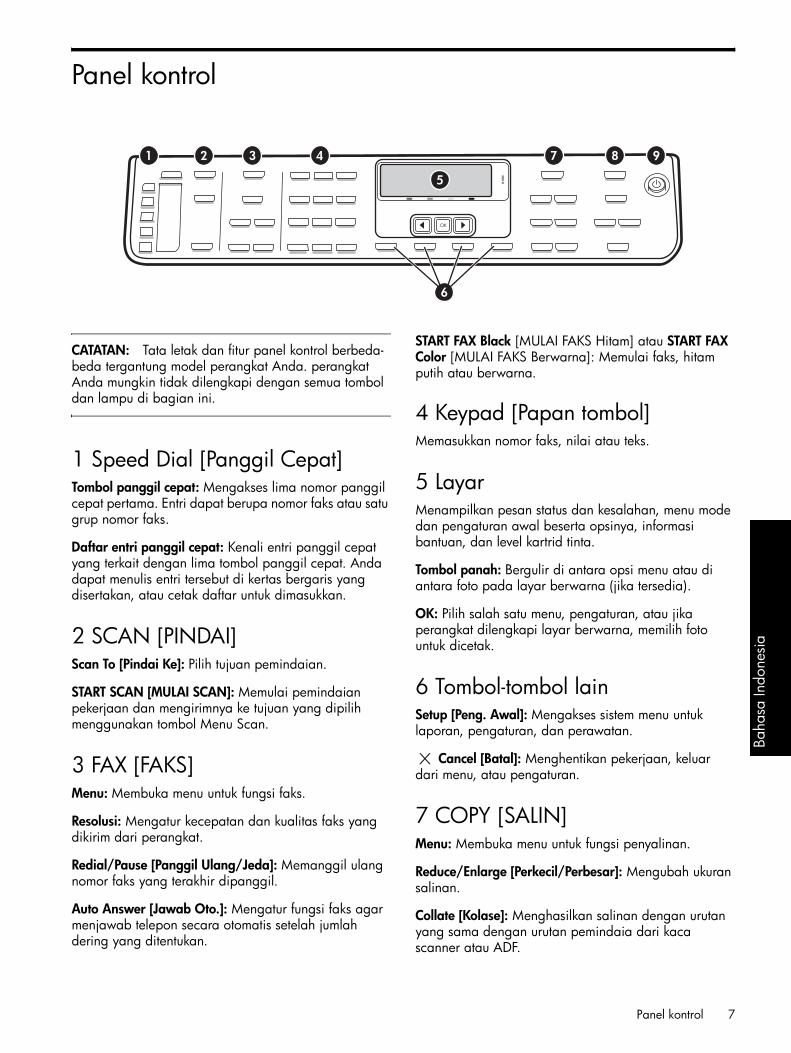
Bahasa
Indonesi
a
Panel kontrol
CATATAN: Tata letak dan fitur panel kontrol berbeda-beda tergantung model perangkat Anda. perangkat Anda mungkin tidak dilengkapi dengan semua tombol dan lampu di bagian ini.
1 Speed Dial [Panggil Cepat] Tombol panggil cepat: Mengakses lima nomor panggil cepat pertama. Entri dapat berupa nomor faks atau satu grup nomor faks.
Daftar entri panggil cepat: Kenali entri panggil cepat yang terkait dengan lima tombol panggil cepat. Anda dapat menulis entri tersebut di kertas bergaris yang disertakan, atau cetak daftar untuk dimasukkan.
2 SCAN [PINDAI] Scan To [Pindai Ke]: Pilih tujuan pemindaian.
START SCAN [MULAI SCAN]: Memulai pemindaian pekerjaan dan mengirimnya ke tujuan yang dipilih menggunakan tombol Menu Scan.
3 FAX [FAKS] Menu: Membuka menu untuk fungsi faks.
Resolusi: Mengatur kecepatan dan kualitas faks yang dikirim dari perangkat.
Redial/Pause [Panggil Ulang/Jeda]: Memanggil ulang nomor faks yang terakhir dipanggil.
Auto Answer [Jawab Oto.]: Mengatur fungsi faks agar menjawab telepon secara otomatis setelah jumlah dering yang ditentukan.
START FAX Black [MULAI FAKS Hitam] atau START FAX Color [MULAI FAKS Berwarna]: Memulai faks, hitam putih atau berwarna.
4 Keypad [Papan tombol]Memasukkan nomor faks, nilai atau teks.
5 LayarMenampilkan pesan status dan kesalahan, menu mode dan pengaturan awal beserta opsinya, informasi bantuan, dan level kartrid tinta.
Tombol panah: Bergulir di antara opsi menu atau di antara foto pada layar berwarna (jika tersedia).
OK: Pilih salah satu menu, pengaturan, atau jika perangkat dilengkapi layar berwarna, memilih foto untuk dicetak.
6 Tombol-tombol lainSetup [Peng. Awal]: Mengakses sistem menu untuk laporan, pengaturan, dan perawatan.
Cancel [Batal]: Menghentikan pekerjaan, keluar dari menu, atau pengaturan.
7 COPY [SALIN] Menu: Membuka menu untuk fungsi penyalinan.
Reduce/Enlarge [Perkecil/Perbesar]: Mengubah ukuran salinan.
Collate [Kolase]: Menghasilkan salinan dengan urutan yang sama dengan urutan pemindaia dari kaca scanner atau ADF.
Panel kontrol 7

Quality [Kualitas]: Mengontrol kecepatan dan kualitas salinan. Lampu Quality [Kualitas] menyala di sampilih kualitas penyalinan yang dipilih.
START COPY Black [MULAI SALIN Hitam] atau START COPY Color [MULAI SALIN Berwarna]: Memulai penyalinan hitam putih atau berwarna.
8 PHOTO [FOTO]Menu: Membuka menu untuk fungsi foto.
Proof Sheet [Lembar Bukti]: Mencetak lembar bukti bila kartu memori telah dimasukkan ke dalam slot kartu memori.
PRINT PHOTOS [CETAK FOTO]: Memulai pekerjaan mencetak foto.
9 Tombol dan lampu dayaTombol Daya: Menghidupkan atau mematikan
perangkat. Bila perangkat mati, perangkat masih menerima sedikit aliran daya listrik. Untuk memutuskan seluruh aliran listrik ke perangkat, matikan perangkat, dan cabut kabel listrik.
Bila menyala, menunjukkan bahwa perangkat hidup. Lampu akan berkedip saat bekerja.
Lampu status jaringan: Menunjukkan status perangkat pada jaringan.
Lampu peringatan: Bila berkedip, lampu indikator menunjukkan adanya kesalahan yang harus Anda perhatikan.
Mengenal bagian-bagian perangkat8

Bahasa
Indonesi
a
3 Mengatur faks (opsional)
Bagian ini berisi petunjuk untuk mengatur faks dalam beberapa konfigurasi pengaturan awal yang berbeda.
• Menggunakan saluran telepon terpisah
• Menggunakan saluran telepon bersana
• Mengelola dan mengkonfigurasi faks
• Mengkonfigurasi mode jawab
• Mengkonfigurasi dering sebelum jawab
• Mengubah pola dering jawab untuk dering berbeda
• Mengatur kepala faks
• Menguji pengaturan faks
Untuk informasi lebih lanjut tentang fitur faks, lihat panduan pengguna pada layar pada Starter CD.
CATATAN: Faks hanya didukung pada beberapa model tertentu.
PERHATIAN: Apabila Anda tidak menggunakan kabel yang disertakan untuk menghubungkan perangkat Anda dengan soket telepon dinding, Anda mungkin tidak akan dapat menggunakan faks dengan baik.
Kabel telepon khusus ini berbeda dengan kabel telepon yang mungkin telah ada di rumah atau kantor Anda. Jika kabel telepon yang disertakan terlalu pendek, lihat panduan pengguna pada layar pada Starter CD untuk memperoleh informasi tersebut.
Sistem telepon jenis paralel v.s. serialSebelum mulai mengatur perangkat untuk faks, pastikan jenis sistem telepon yang digunakan di negara/kawasan Anda.
CATATAN: Petunjuk pemasangan untuk memfaks berbeda-beda tergantung apakah telepon Anda menggunakan sistem serial atau paralel.
Jika Anda tidak menemukan negara/kawasan yang terdaftar di bagian berikut, Anda mungkin menggunakan sistem telepon serial. Apabila Anda tidak yakin dengan jenis sistem telepon yang Anda miliki (serial atau paralel), hubungi perusahaan telepon Anda untuk memastikannya.
Negara/kawasan dengan sistem telepon paralelPada sistem telepon paralel, Anda dapat menghubungkan peralatan telepon bersama ke saluran telepon menggunakan port “2-EXT” [2-SAMB.] di bagian belakang perangkat.
CATATAN: Jika Anda menggunakan sistem telepon paralel, HP menganjurkan untuk menggunakan kabel telepon 2-kawat yang disertakan bersama perangkat untuk menghubungkan ke konektor telepon.
Argentina Australia Brazil
Kanada Cile Cina
Kolombia Yunani India
Indonesia Irlandia Jepang
Korea Amerika Latin Malaysia
Meksiko Filipina Polandia
Portugal Rusia Arab Saudi
Singapura Spanyol Taiwan
Thailand Amerika Serikat Venezuela
Vietnam
Sistem telepon jenis paralel v.s. serial 9

Negara/kawasan dengan sistem telepon serialUntuk sistem telepon serial, jenis konektor pada peralatan telepon bersama (modem, telepon, dan mesin penjawab) tidak memungkinkan sambungan langsung ke port “2-EXT” [2-SAMB] pada perangkat. Namun, semua peralatan harus dihubungkan ke konektor telepon.
CATATAN: Di negara/kawasan tertentu yang menggunakan sistem telepon jenis serial, kabel telepon yang menyertai perangkat mungkin memiliki konektor tambahan yang terpasang pada kabel telepon tersebut. Ini memungkinkan Anda untuk menghubungkan perangkat telekomunikasi lainnya ke konektor di mana Anda menghubungkan perangkat.
Untuk informasi pengaturan awal perangkat untuk faks menggunakan sistem telepon serial, lihat situs Web Fax Configuration [Konfigurasi Faks] untuk negara/kawasan Anda.
Saluran telepon terpisahGunakan bagian ini jika Anda berencana menggunakan jenis saluran telepon berikut untuk faks:
• Saluran telepon terpisah (tanpa perangkat lain, misalnya telepon atau mesin penjawab, menggunakan saluran yang sama).
• Saluran telepon terpisah tanpa perangkat lain menggunakan saluran yang sama tetapi dengan berlangganan layanan dering berbeda.
• Saluran Private Branch Exchange (PBX) atau Integrated Services Digital Network (ISDN). Untuk informasi lebih lanjut tentang saluran PBX dan ISDN, lihat pedoman penggunaan pada layar pada Starter CD.
CATATAN: Anda tidak dapat menerima faks secara otomatis jika Anda memiliki layanan pesan suara pada nomor telepon yang sama dengan yang digunakan untuk panggilan faks. Anda harus menerima faks secara manual; ini berarti Anda harus Anda untuk menjawab panggilan faks masuk. Jika Anda ingin menerima faks secara otomatis, hubungi perusahaan telepon Anda untuk berlangganan layanan dering berbeda, atau dapatkan saluran terpisah untuk faks.
Mengatur perangkat agar menjawab panggilan masuk secara manual. Tekan tombol Auto Answer [Jawab Oto.] sampai lampu mati.
1. Cabut semua perangkat telepon dari soket telepon yang digunakan untuk menghubungkan perangkat.
2. Sambungkan kabel telepon yang menyertai perangkat di antara port 1-LINE [1-SALURAN] pada perangkat dan soket telepon.
Austria www.hp.com/at/faxconfig
Belgia (Belanda) www.hp.be/nl/faxconfig
Belgia (Perancis) www.hp.be/fr/faxconfig
Denmark www.hp.dk/faxconfig
Finlandia www.hp.fi/faxconfig
Perancis www.hp.com/fr/faxconfig
Jerman www.hp.com/de/faxconfig
Irlandia www.hp.com/ie/faxconfig
Italia www.hp.com/it/faxconfig
Norwegia www.hp.no/faxconfig
Belanda www.hp.nl/faxconfig
Portugal www.hp.pt/faxconfig
Spanyol www.hp.es/faxconfig
Swedia www.hp.se/faxconfig
Swiss (Prancis) www.hp.com/ch/fr/faxconfig
Swiss (Jerman) www.hp.com/ch/de/faxconfig
Inggris www.hp.com/uk/faxconfig
1-LINE
Mengatur faks (opsional)10

Bahasa
Indonesi
a
3. Jika Anda berlangganan layanan dering berbeda, ubah pengaturan Pola Dering Jawab ke pola yang telah ditetapkan untuk nomor faks Anda oleh perusahaan telepon, misalnya, dering ganda atau triple.
Untuk informasi tentang mengubah pengaturan ini, lihat pedoman penggunaan pada layar pada Starter CD.
CATATAN: Pengaturan awal perangkat Anda adalah menjawab semua pola dering. Apabila Anda tidak mengatur dengan benar pola dering yang ditetapkan untuk nomor faks Anda oleh perusahaan telepon, perangkat Anda mungkin menjawab panggilan telepon maupun faks atau mungkin tidak menjawab sama sekali.
Saluran telepon bersamaJika faks akan menggunakan saluran telepon bersama perangkat lain, seperti telepon, mesin penjawab, komputer/modem komputer, atau kotak ID penelpon, atau jika saluran Anda dilengkapi layanan pesan suara, Anda harus mengikuti petunjuk berikut ini untuk menentukan cara mengatur faks Anda.
1. Ikuti langkah-langkah untuk “Saluran telepon terpisah” di halaman 10.
2. Tancapkan perangkat tambahan ke port 2-EXT [2-SAMB] di bagian belakang perangkat.
3. Gunakan tabel berikut ini untuk menentukan konfigurasi selengkapnya dari faks Anda.
Menggunakan tabel pengaturan awal faksGunakan tabel pengaturan awal faks untuk membantu Anda mengatur fungsi faks pada perangkat Anda. Untuk menggunakan tabel, ikuti langkah-langkah berikut:
� Tentukan bagaimana Anda akan menggunakan saluran telepon yang akan digunakan oleh mesin faks Anda:
Setelah Anda menentukan bagaimana Anda ingin menggunakan saluran telepon, ikuti langkah-langkah ini:
� Di baris pertama, tentukan perangkat lain apa saja yang akan menggunakan saluran telepon bersama all-in-one (telepon, komputer, mesin penjawab).
� Di baris berikutnya, tentukan apakah saluran telepon dilengkapi layanan khusus (pesan suara atau dering berbeda), dan, jika saluran telepon akan digunakan dengan komputer, tentukan apakah Anda memiliki modem dial-up atau DSL.
� Baris berikutnya memberi contoh bagaimana pengaturan awal faks Anda dalam hal cara menghubungkan berbagai perangkat ke all-in-one.
� Baris terakhir pada tabel berisi nomor yang terkait dengan tabel Pedoman konfigurasi di halaman 14. Gunakan tabel Pedoman konfigurasi untuk membantu Anda mengatur all-in-one agar dapat beroperasi paling efektif berdasarkan pengaturan all-in-one Anda.
CATATAN: Anda harus mengikuti nomor-nomor yang ditampilkan di baris terakhir setiap tabel pengaturan awal faks. Menjalankan langkah-langkah tersebut tidak secara urut dapat mengakibatkan masalah pengaturan awal.
2-EXT
• Suara dan Faks (lihat Tabel 3-1) • Suara, Fax, dan Internet (dial-up) (lihat Tabel 3-3)
• Faks dan Internet (lihat Tabel 3-2) • Suara, Fax, dan Internet (DSL) (lihat Tabel 3-4)
Saluran telepon bersama 11

Tabel 3-1 Suara dan Faks
Tabel 3-2 Faks dan Internet
Perangkat apa saja yang akan dihubungkan ke perangkat?
Telepon • Telepon
• Mesin penjawab
Apakah saluran Anda memiliki…
Layanan dering berbeda Layanan dering berbeda
Pengaturan faks Anda akan tampak seperti ini…
Kemudian ikuti konfigurasi # 3 1, 9, 2 1, 7 1, 9, 7
Perangkat apa saja yang akan dihubungkan ke perangkat?
• Komputer
• Modem
Apakah saluran Anda… Dial-up DSL
Pengaturan faks Anda akan tampak seperti ini…
Kemudian ikuti konfigurasi # 4, 5, 1, 2, 6 8, 1, 2, 6
Pembagi
Filter DSL
Mengatur faks (opsional)12

Bahasa
Indonesi
a
Tabel 3-3 Suara, Fax, dan Internet (dial-up)
Tabel 3-4 Suara, Fax, dan Internet (DSL)
Perangkat apa saja yang akan dihubungkan ke perangkat?
• Telepon
• Komputer
• Modem
• Telepon
• Komputer
• Modem
• Mesin penjawab
Apakah saluran Anda… Dial-up Dial-up
Apakah saluran Anda memiliki…
Layanan dering berbeda Layanan dering berbeda
Pengaturan faks Anda akan tampak seperti ini…
Kemudian ikuti konfigurasi # 4, 10, 5, 3 4, 10, 5, 3, 9 4, 10, 5, 1, 7 4, 10, 5, 1, 9, 7
Pembagi Pembagi
Perangkat apa saja yang akan dihubungkan ke perangkat?
• Telepon
• Komputer
• Modem
• Telepon
• Komputer
• Modem
• Mesin penjawab
Apakah saluran Anda… DSL DSL
Apakah saluran Anda memiliki…
Layanan dering berbeda Layanan dering berbeda
Pengaturan faks Anda akan tampak seperti ini…
Kemudian ikuti konfigurasi # 8, 3 8, 3, 9 8, 1, 7 8, 1, 9, 7
2
3
Pembagi
Filter DSL
2
3
Pembagi
Filter DSL
Saluran telepon bersama 13

Pedoman konfigurasiKonfigurasi # Petunjuk konfigurasi
1 Mengatur perangkat agar menjawab panggilan masuk secara otomatis. Tekan tombol Auto Answer [Jawab Oto.] sampai lampu menyala.
2 (Opsional) Ubah pengaturan Rings to Answer [Dering sebelum Jawab] ke satu atau dua dering.
Untuk informasi tentang mengubah pengaturan ini, lihat pedoman penggunaan pada layar pada Starter CD.
3 Tentukan bagaimana Anda ingin perangkat menjawab panggilan: secara otomatis atau manual.
• Jika Anda mengatur agar perangkat menjawab panggilan secara otomatis, mesin ini akan menjawab semua panggilan masuk dan menerima faks. perangkat Anda tidak dapat membedakan panggilan faks dan suara; bila Anda mengira panggilan tersebut adalah panggilan suara, Anda perlu menjawabnya sebelum perangkat menjawab panggilan tersebut.
Untuk menjawab faks secara otomatis, tekan tombol Auto Answer [Jawab Oto.] sampai lampunya menyala.
• Apabila Anda mengatur perangkat untuk menjawab faks secara manual, Anda harus selalu berada di tempat untuk menjawab panggilan faks atau perangkat Anda tidak dapat menerima faks.
Untuk menjawab faks secara manual, tekan tombol Auto Answer [Jawab Oto.] sampai lampunya mati.
4(Modem dial-up)
Karena modem komputer Anda berbagi saluran telepon dengan perangkat, Anda tidak akan dapat menggunakan modem PC dan perangkat Anda secara bersamaan. Misalnya, Anda tidak dapat menggunakan perangkat untuk faks bila Anda sedang menggunakan modem PC untuk mengirim e-mail atau mengakses Internet.
5(Modem dial-up)
Apabila perangkat lunak modem PC Anda diatur untuk menerima faks ke komputer secara otomatis, nonaktifkan pengaturan tersebut.
Perhatian: Jika Anda tidak mematikan pengaturan penerimaan faks otomatis pada perangkat lunak modem PC, perangkat Anda tidak akan dapat menerima faks.
6 Apabila telepon berdering, perangkat akan menjawab secara otomatis setelah sejumlah dering yang Anda tentukan dalam pengaturan Rings to Answer [Dering sebelum Jawab]. Kemudian mulai mengirim nada terima faks ke mesin faks pengirim dan menerima faks tersebut.
7(Mesin penjawab)
Atur mesin penjawab Anda agar menjawab setelah empat atau lebih sedikit dering.
Ubah pengaturan Rings to Answer [Dering ke Jawab] perangkat Anda ke enam dering.
Apabila telepon berdering, mesin penjawab akan menjawab setelah jumlah dering yang Anda pilih, kemudian memutar rekaman salam Anda. Sementara itu, perangkat memantau panggilan dan "mendengarkan" apakah ada nada faks. Jika terdengar nada faks masuk, perangkat akan mengirimkan nada terima faks lalu menerima faks tersebut; jika tidak ada nada faks, perangkat berhenti memantau saluran dan mesin penjawab Anda dapat merekam pesan suara.
8 Hanya saluran DSL: Anda perlu membeli filder DSL tambahan untuk semua perangkat (telepon, komputer) yang berbagi pakai saluran telepon DSL tersebut.
9(Layanan dering
berbeda)
Ubah pengaturan Answer Ring Pattern [Pola Dering Jawab] ke pola yang telah ditentukan untuk nomor faks Anda oleh peusahaan telepon, misalnya, dering ganda atau triple.
Untuk informasi tentang mengubah pengaturan ini, lihat pedoman penggunaan pada layar pada Starter CD.
CATATAN: Pengaturan awal perangkat Anda adalah menjawab semua pola dering. Apabila Anda tidak mengatur dengan benar pola dering yang ditetapkan untuk nomor faks Anda oleh perusahaan telepon, perangkat Anda mungkin menjawab panggilan telepon maupun faks atau mungkin tidak menjawab sama sekali.
Mengatur faks (opsional)14

Bahasa
Indonesi
a
10 Ada dua cara berbeda dalam memasang perangkat Anda pada komputer berdasarkan jumlah port telepon yang ada pada komputer Anda. Anda juga memerlukan kabel telepon tambahan (setidaknya tiga jika komputer Anda hanya dilengkapi satu port telepon dan setidaknya dua jika komputer Anda dilengkapi dua port telepon).
Sebelum memulai, periksa komputer Anda apakah memiliki satu atau dua port telepon:
Komputer dengan satu port teleponJika komputer Anda hanya memiliki satu port telepon, Anda perlu membeli pembagi paralel (juga disebut coupler). Pembagi saluran paralel memiliki satu port RJ-11 di depan dan dua port RJ-11 di belakang. Jangan gunakan pembagi saluran telepon dua-saluran, pembagi saluran serial, atau pembagi saluran paralel yang memiliki dua port RJ-11 di depan dan satu konektor di belakang. Anda dapat membeli pembagi paralel (coupler) di toko elektronik yang menjual aksesori telepon.
1. Sambungkan salah satu ujung kabel telepon yang menyertai perangkat ke soket dinding dan ujung yang lain ke port 1-LINE [1-SALURAN] pada perangkat.
2. Sambungkan salah satu ujung kabel telepon kedua ke port 2-EXT [2-SAMB] pada perangkat dan ujung yang lain ke pembagi paralel (ujung dengan satu port telepon).
3. Sambungkan salah satu ujung kabel telepon ketiga ke bagian belakang pembagi paralel (ujung dengan dua port telepon) dan ujung yang lain ke komputer.
4. Sambungkan salah satu ujung kabel telepon keempat ke port terakhir yang terbuka pada pembagi paralel dan ujung yang lain ke telepon atau mesin penjawab. Jika Anda menghubungkan telepon dan mesin penjawab, sambungkan kabel telepon keempat ke mesin penjawab, lalu gunakan kabel telepon kelima untuk menghubungkan mesin penjawab ke telepon.
CATATAN: Jika Anda tidak menghubungkan mesin penjawab Anda dengan cara ini, nada faks dari mesin faks pengirim mungkin terekam di dalam mesin penjawab Anda, dan Anda mungkin tidak dapat menerima faks dengan perangkat Anda.
Komputer dengan dua port teleponJika komputer Anda memiliki dua port telepon, selesaikan langkah berikut ini untuk menghubungkan perangkat ke komputer:
1. Sambungkan salah satu ujung kabel telepon yang menyertai perangkat ke soket dinding dan ujung yang lain ke port 1-LINE [1-SALURAN] pada perangkat.
2. Sambungkan salah satu ujung kabel telepon kedua ke port 2-EXT [2-SAMB] pada perangkat dan ujung yang lain ke port IN pada komputer.
3. Sambungkan salah satu ujung kabel telepon ketiga ke port OUT pada komputer dan ujung yang lain ke telepon atau mesin penjawab. Jika Anda menghubungkan telepon dan mesin penjawab, sambungkan kabel telepon ketiga ke mesin penjawab, lalu hubungkan mesin penjawab ke telepon.
CATATAN: Jika Anda tidak menghubungkan mesin penjawab Anda dengan cara ini, nada faks dari mesin faks pengirim mungkin terekam di dalam mesin penjawab Anda, dan Anda mungkin tidak dapat menerima faks dengan perangkat Anda.
Saluran telepon bersama 15

Mengelola dan mengkonfigurasi pengaturan faksJika Anda menghubungkan perangkat langsung ke komputer, instal perangkat lunak perangkat, kemudian jalankan Fax Setup Wizard (Windows) atau HP Device Manager (Mac OS). Anda juga dapat menjalankan alat ini dari Solution Center (Windows) atau HP Device Manager (Mac OS) di lain kali. Gunakan alat-alat ini untuk mengatur kepala faks, negara/kawasan, dan tanggal/waktu.
Di samping itu, Anda dapat mengkonfigurasi pengaturan faks dari server Web terpadu (EWS). Untuk informasi lebih lanjut tentang EWS, lihat halaman 22.
Anda juga dapat mengkonfigurasi pengaturan ini dari panel kontrol. Untuk informasi tentang panel kontrol, lihat pedoman penggunaan pada layar pada Starter CD.
Mengatur entri panggil cepatAnda dapat menyimpan nomor faks atau grup nomor faks sebagai entri panggil cepat. Entri panggil cepat 1 sampai 5 terkait dengan lima tombol panggil cepat yang sama di panel kontrol. Ini memungkinkan Anda menghubungi nomor tersebut dengan cepat menggunakan panel kontrol.
Di samping menggunakan panel kontrol, Anda juga dapat mengatur entri panggilan-cepat menggunakan server Web terpadu dan perangkat lunak HP Photosmart. Untuk memperoleh informasi, lihat pedoman penggunaan pada layar pada Starter CD.
Untuk mengatur entri panggil cepat1. Dari panel kontrol, tekan Setup [Pengaturan Awal].
2. Pilih Speed Dial Setup [Peng. Panggil Cepat] lalu lakukan salah satu berikut ini:
• Untuk menambah atau mengubah entri: Pilih Individual Speed Dial [Panggil Cepat Satu Per Satu] atau Group Speed Dial [Panggil Cepat Grup] lalu tekan tombol panah untuk beralih ke nomor entri yang tidak dipakai, atau ketikkan nomornya pada papan tombol. Ketikkan nomor faks, lalu tekan OK. Masukkan semua jeda atau nomor lain yang diperlukan, seperti kode area, kode akses untuk nomor di luar sistem PBX (biasanya 9 atau 0), atau awalan panggilan jarak jauh. Ketikkan nama menggunakan tombol angka, lalu tekan OK.
• Untuk menghapus salah satu atau semua entri: Pilih Delete Speed Dial [Hapus Panggil Cepat], tekan tombol panah untuk menyorot entri panggil cepat yang akan dihapus, lalu tekan OK.
Menguji pengaturan faksAnda dapat menguji pengaturan faks Anda untuk memeriksa status perangkat dan memastikan sudah dipasang dengan benar untuk mengirim dan menerima faks. Lakukan pengujian berikut ini setelah Anda selesai mengatur perangkat untuk mengirim dan menerima faks. Langkah-langkah pengujian meliputi:
• Menguji perangkat keras faks
• Memverifikasi jenis kabel telepon yang terhubung ke perangkat
• Memeriksa apakah kabel telepon tersambung ke port yang benar
• Memeriksa nada sambung
• Memeriksa saluran telepon yang aktif
• Menguji status koneksi saluran telepon
Perangkat akan mencetak laporan hasil pengujian tersebut. Jika pengujian gagal, kaji laporan untuk mengetahui cara memperbaiki masalah yang ada lalu uji kembali. Untuk informasi mengatasi masalah lebih lanjut, lihat “Saluran telepon terpisah” di halaman 10.
Mengatur faks (opsional)16

Bahasa
Indonesi
a
Untuk menguji pengaturan faks 1. Atur perangkat agar mengirim faks sesuai dengan
petunjuk spesifik pengaturan kantor atau rumah.
2. Pastikan kartrij tinta dan kepala cetak telah terpasang, dan kertas berukuran penush diisikan ke dalam baki masukan sebelum menjalankan pengujian.
3. Dari panel kontrol, tekan Setup [Pengaturan Awal].
4. Pilih Tools [Alat], lalu pilih Run Fax Test [Jalankan Uji Faks].
Perangkat akan menampilkan status pengujian tersebut pada layar dan mencetak laporan.
5. Periksa laporan tersebut.
• Jika lulus uji dan Anda masih menemui masalah dalam mengirim faks, periksa pengaturan faks yang terdaftar dalam laporan untuk memverifikasi bahwa pengtauran tersebut benar. Pengaturan faks yang kosong atau tidak benar dapat menimbulkan masalah dalam mengirim faks.
• Jika pengujian gagal, periksa kembali laporan untuk informasi lebih lanjut tentang mengatasi masalah yang muncul.
Menguji pengaturan faks 17

4 Mengatasi masalah
Bagian ini berisi petunjuk untuk mengatasi beberapa masalah paling umum yang terkait dengan instalasi perangkat keras dan perangkat lunak.
Untuk informasi perkembangan terbaru, lihat file readme dan catatan peluncuran pada Starter CD, atau kunjungi situs Web dukungan produk di www.hp.com/support.
Memecahkan masalah instalasiBagian ini berisi petunjuk untuk mengatasi beberapa masalah paling umum yang terkait dengan instalasi perangkat keras dan perangkat lunak.
Saran instalasi perangkat keras
Periksa perangkat• Pastikan semua pita dan bahan pengiriman tekah
dilepaskan dari bagian luar dan bagian dalam perangkat.
• Pastikan kertas diisikan dengan benar ke dalam baki, dan tidak macet di dalam perangkat.
• Pastikan tidak ada lampu yang menyala atau berkedip kecuali lampu Power [Daya], yang harus menyala. Jika lampu Attention [Perhatian] berkedip, periksa apakah ada pesan di panel kontrol. Ketika perangkat dihidupkan untuk pertama kali, dibutuhkan pemanasan sekitar 45 detik.
• Pastikan panel akses belakang atau duplekser terkunci pada tempatnya.
• Pastikan perangkat dapat mencetak halaman diagnostik Self-test [Uji sendiri]. Untuk informasi lebih lanjut, lihat “Halaman diagnostik uji sendiri” di halaman 22.
Periksa koneksi perangkat keras• Pastikan semua kabel yang Anda gunakan berfungsi
dengan baik.
• Pastikan kabel daya tersambung dengan kuat ke perangkat stopkontak listrik yang aktif.
• Pastikan kabel telepon terhubung ke port 1-LINE.
Periksa kepala cetak dan kartrid tinta• Pastikan Anda telah melepaskan tutup oranye dari
kepala cetak.
• Pastikan semua kepala cetak dan kartrid tinta terpasang dengan kuat pada slot berkode-warna yang benar. Tekan setiap kartrid ke bawah dengan kuat untuk memastikan kontak yang baik. perangkat tidak dapat bekerja jika tidak semua kartrid terpasang.
• Pastikan kait kepala cetak dan semua penutup dalam keadaan tertutup.
• Jika layar menampilkan pesan kesalahan kepala cetak, bersihkan kontak pada kepala cetak. Untuk informasi lebih lanjut, lihat panduan pengguna pada layar pada Starter CD.
Saran instalasi perangkat lunak
Periksa sistem komputer• Pastikan komputer Anda menggunakan salah satu
sistem operasi yang didukung. Untuk informasi lebih lanjut, lihat panduan pengguna pada layar pada Starter CD.
• Pastikan komputer memenuhi setidaknya persyaratan sistem minimal. Untuk informasi lebih lanjut, lihat panduan pengguna pada layar pada Starter CD.
Persiapan verifikasi instalasi• Pastikan untuk menggunakan Starter CD yang berisi
perangkat lunak instalasi yang benar untuk sistem operasi Anda.
• Sebelum menginstal perangkat lunak, pastikan semua program lain ditutup.
• Jika komputer tidak mengenali path ke drive CD-ROM yang Anda ketikkan, pastikan Anda memasukkan huruf drive yang benar.
• Jika komputer tidak dapat mengenali Starter CD dalam drive CD-ROM, periksa apakah ada kerusakan Starter CD. Anda dapat men-download driver perangkat dari www.hp.com/support.
• Pada device manager Windows, pastikan bahwa driver USB tidak dinonaktifkan.
Mengatasi masalah18
Bahasa
Indonesi
a
• Jika Anda menggunakan komputer berbasis Windows, dan komputer tidak dapat mendeteksi perangkat, jalankan utilitas hapus instalasi (util\ccc\uninstall.bat pada Starter CD) untuk menghapus sepenuhnya instalasi driver perangkat. Hidupkan ulang komputer Anda, lalu instal kembali driver perangkat.
Mengatasi masalah jaringan (hanya model tertentu)
CATATAN: Setelah mengatasi masalah berikut, jalankan kembali program instalasi.
Mengatasi masalah umum jaringan• Jika Anda tidak dapat menginstal perangkat lunak
perangkat, verifikasi bahwa:
• Semua koneksi kabel ke komputer dan perangkat terpasang kuat.
• Jaringan operasional dan hub jaringan diaktifkan.
• Semua aplikasi, termasuk program proteksi virus, program proteksi spyware, dan firewall, tertutup atau dinonaktifkan untuk komputer yang berbasis Windows.
• Pastikan perangkat diinstal pada subnet yang sama dengan komputer yang akan menggunakan perangkat.
• Jika program instalasi tidak dapat menemukan perangkat, cetak Halaman konfigurasi jaringan (lihat “Untuk mencetak Halaman konfigurasi jaringan” di halaman 22), lalu masukkan alamat IP secara manual pada program instalasi.
• Jika Anda menggunakan komputer berbasis Windows, pastikan port jaringan yang dibuat pada driver perangkat cocok dengan alamat IP perangkat:1) Cetak Halaman konfigurasi jaringan perangkat.2) Dari desktop Windows, klik Start [Mulai], arahkan ke Settings [Pengaturan], lalu klik Printers [Printer] atau Printers and Faxes [Printer dan Faks].
Atau
Klik Start [Mulai], klik Control Panel [Panek Kontrol], lalu klik ganda Printers [Printer].3) Klik kanan ikon perangkat, klik Properties, lalu klik tab Ports.
Atau
Klik kanan ikon perangkat, klik Run as administrator, klik Properties, klik Continue, kemudian klik tab Ports.
4) Pilih port TCP/IP untuk perangkat, lalu klik Configure Port. 5) Bandingkan alamat IP yang terdaftar di kotak dialog dan pastikan cocok dengan alamat IP yang terdaftar pada Halaman konfigurasi jaringan. Jika alamat IP-nya berbeda, ubah alamat IP di kotak dialog untuk menyamakan dengan alamat pada Halaman konfigurasi jaringan.6) Klik OK dua kali untuk menyimpan pengaturan tersebut dan menutup kotak dialog.
Masalah dalam menghubungkan ke jaringan kabel• Jika lampu Link pada konektor jaringan tidak
menyala, pastikan semua kondisi “Mengatasi masalah umum jaringan” di atas terpenuhi.
• Meskipun Anda tidak disarankan menetapkan alamat IP statik untuk perangkat, Anda mungkin dapat mengatasi beberapa masalah instalasi (misalnya konflik dengan personal firewall) dengan melakukannya. Untuk informasi lebih lanjut, lihat panduan pengguna pada layar pada Starter CD.
Mengatasi masalah jaringan (hanya model tertentu) 19

Mengatasi masalah faks (hanya model tertentu)Jika menjalankan uji faks dan gagal, lihat laporan pengujian untuk mengetahui kemungkinan solusinya. Untuk informasi lebih lanjut, lihat pedoman penggunaan pada layar pada Starter CD.
Perangkat mengalami masalah dalam mengirim dan menerima faks
Pastikan Anda menggunakan kabel telepon yang disertakan dengan perangkat.
Peralatan lain yang menggunakan saluran telepon yang sama dengan perangkat, mungkin sedang digunakan. Pastikan telepon ekstensi (telepon pada saluran telepon bersama, namun tidak terhubung ke perangkat) atau peralatan lain tidak sedang digunakan atau sibuk. Contohnya, Anda tidak dapat menggunakan perangkat untuk keperluan faks jika telepon ekstensi sedang diangkat, atau jika Anda menggunakan modem dial-up komputer untuk mengirim e-mail atau mengakses Internet.
Jika Anda menggunakan pembagi telepon, alat tersebut dapat menimbulkan masalah faks. Coba hubungkan langsung perangkat ke soket telepon di dinding.
Pastikan salah satu ujung kabel telepon terhubung ke soket telepon di dinding, dan ujung yang lain ke port berlabel “1-LINE” [1-SALURAN] di bagian belakang perangkat.
Coba hubungkan langsung telepon yang berfungsi ke soket di dinding dan periksa apakah ada nada panggil –- jika Anda tidak mendengarnya, hubungi perusahaan telepon Anda untuk memeriksa saluran tersebut.
Pastikan Anda menghubungkan perangkat ke saluran telepon analog, atau Anda tidak dapat mengirim atau menerima faks. Untuk memeriksa apakah saluran telepon Anda digital, hubungkan telepon analog biasa ke saluran tersebut dan dengarkan nada pilih. Jika Anda tidak mendengar nada panggil bersuara normal, mungkin saluran telepon telah diatur untuk telepon digital. Hubungkan perangkat ke saluran telepon analog dan coba mengirim atau menerima faks.
Koneksi saluran telepon mungkin berisik. Saluran telepon berkualitas suara buruk (derau) dapat menyebabkan masalah faks. Periksa kualitas suara saluran telepon dengan menghubungkan telepon ke konektor telepon dan dengarkan nada bising statis atau nada lainnya. Jika anda mendengar suara berisik, matikan Error Correction Mode (ECM - Modus Koreksi Eror) dan coba gunakan faks lagi.
Jika Anda menggunakan layanan saluran pelanggan digital (DSL), pastikan Anda telah menghubungkan filter DSL. Tanpa filter, Anda tidak dapat mengirim faks dengan baik.
Jika Anda menggunakan PBX (private branch exchange) atau konverter/terminal adapter ISDN (integrated services digital network), pastikan perangkat terhubung ke port yang benar dan adapter terminal diatur ke jenis switch yang sesuai dengan negara/kawasan Anda.
Mengatasi masalah20

Bahasa
Indonesi
a
Perangkat tidak dapat mengirim faks, namun dapat menerima faks
Jika Anda tidak menggunakan layanan dering berbeda, pastikan bahwa fitur Distinctive Ring [Dering Berbeda] pada perangkat diatur ke All Rings [Semua Dering].
Jika Jawab Oto. diatur ke Off [Tidak aktif], atau jika Anda memiliki layanan pesan suara pada nomor telepon yang sama dengan faks, maka Anda hanya dapat menerima faks secara manual.
Jika Anda mempunyai modem dial-up komputer tersambung pada saluran telepon yang sama dengan perangkat, pastikan perangkat lunak modem komputer tidak diatur untuk menerima faks secara otomatis.
Jika Anda memiliki mesin penjawab pada saluran yang sama dengan perangkat:
• Periksa apakah mesin penjawab bekerja dengan benar.
• Pastikan pengaturan awal Anda tampak seperti contoh kedua pada Tabel 3-1 di halaman 12.
• Pastikan perangkat diatur untuk menerima faks secara otomatis.
• Pastikan bahwa pengaturan jumlah dering Rings to Answer (Dering Sebelum Dijawab) dibuat lebih besar dari dering untuk mesin penjawab telepon.
• Cabut mesin penjawab telepon, lalu coba menerima faks.
• Rekam pesan sepanjang kurang lebih 10 detik. Bicaralah secara perlahan dan pelan saat merekam pesan Anda. Beri jeda paling tidak selama 5 detik di bagian akhir pesan suara.
Alat lain yang menggunakan saluran telepon yang sama mungkin menyebabkan pengujian gagal. Anda dapat melepaskan semua perangkat lain dan mengujinya kembali. Jika Dial Tone Detection Test [Uji Deteksi Nada Panggil] lulus, maka satu atau beberapa alat lain menyebabkan masalah tersebut. Coba tambahkan alat lain satu per satu dan ulangi pengujian setiap kali ditambah, sampai Anda mengetahui alat mana yang menimbulkan masalah.
Perangkat tidak dapat mengirim faks, namun dapat menerima faks
Perangkat mungkin memutar nomor terlalu cepat atau terlalu awal. Misalnya, jika Anda perlu mengakses jalur luar dengan memanggil “9”, coba masukkan jeda seperti berikut: 9-XXX-XXXX (di mana XXX-XXXX adalah nomor faks tujuan Anda). Untuk memasukkan jeda tekan Redial/Pause [Pgl. Ulang/Jeda], atau tekan tombol Space [Spasi] (#) berulang kali, sampai tanda hubung (-) muncul di layar.
Layar selalu menampilkan Phone Off Hook [Telepon Diangkat]
Anda menggunakan kabel telepon yang salah. Lihat kedua masalah pertama pada “Perangkat mengalami masalah dalam mengirim dan menerima faks” di halaman 20.
Perangkat mengalami masalah dalam mengirimkan faks manual
Kemungkinan solusi ini hanya berlaku di negara/kawasan yang menerima kabel telepon 2 kabel dalam kotak kemasan perangkat, mencakup: Argentina, Australia, Brazil, Kanada, Cile, Cina, Kolombia, Yunani, India, Indonesia, Irlandia, Jepang, Korea, Amerika Latin, Malaysia, Meksiko, Filipina, Polandia, Portugal, Rusia, Arab Saudi, Singapura, Spanyol, Taiwan, Thailand, Amerika Serikat, Venezuela dan Vietnam.
Pastikan pengaturan awal Anda tampak seperti contoh pertama pada Tabel 3-1 di halaman 12.
Jika Anda mengirim faks secara manual dari telepon yang terhubung langsung ke perangkat, Anda harus menggunakan tombol telepon untuk mengirim faks.
Nada faks terekam pada mesin penjawab saya
Lihat masalah keempat pada “Perangkat tidak dapat mengirim faks, namun dapat menerima faks” di halaman 21.
Kabel telepon yang menyertai perangkat saya tidak cukup panjang
Jika kabel telepon yang disertakan dengan perangkat tidak cukup panjang, Anda dapat menggunakan penyambung (coupler) untuk memperpanjang. Anda dapat membeli coupler di toko elektronik yang menjual aksesori telepon. Anda juga memerlukan kabel telepon lain, dapat berupa kabel telepon standar yang mungkin telah Anda miliki di rumah atau kantor Anda.
1. Dengan menggunakan kabel telepon yang menyertai perangkat, hubungkan salah satu ujungnya ke coupler, lalu hubungkan ujung yang lain ke port berlabel 1-LINE [1-SALURAN] di bagian belakang perangkat.
2. Hubungkan kabel telepon kedua ke port yang kosong pada coupler dan ke konektor telepon.
Mengatasi masalah faks (hanya model tertentu) 21
Mengatasi masalah dan alat konfigurasiTersedia beberapa alat berikut untuk mengatasi masalah atau mengkonfigurasi perangkat. Untuk informasi lebih lanjut, lihat panduan pengguna pada layar pada Starter CD.
Halaman diagnostik uji sendiriGunakan Halaman diagnostik uji sendiri untuk melihat pengaturan perangkat yang aktif, untuk membantu mengatasi masalah perangkat, dan untuk memverifikasi instalasi aksesori opsional, seperti duplekser. Halaman diagnostik uji sendiri juga berisi log aktivitas terbaru. Jika Anda perlu menghubungi HP, cetak Halaman diagnostik Self-test [Uji sendiri] sebelum menelpon.
Untuk mencetak Halaman diagnostik uji sendiri1. Di panel kontrol, tekan tombol Setup [Pengaturan].
2. Pilih Print Report [Cetak Laporan], pilih Self-Test Report [Laporan Uji Sendiri], lalu tekan OK.
Halaman konfigurasi jaringanJika perangkat terhubung ke jaringan, Anda dapat mencetak Halaman konfigurasi jaringan untuk melihat pengaturan jaringan untuk perangkat. Anda dapat menggunakan Halaman konfigurasi jaringan untuk membantu mengatasi masalah konektivitas jaringan.
Untuk mencetak Halaman konfigurasi jaringan1. Di panel kontrol, tekan tombol Setup [Pengaturan].
2. Pilih Network Setup [Peng. Awal Jaringan], pilih Print Network Settings [Cetak Peng. Jaringan], lalu tekan OK.
Server Web TerpaduServer Web memberikan lingkungan untuk menjalankan program Web, seperti halnya sistem operasi, seperti Microsoft® Windows®, memberikan lingkungan untuk menjalankan program pada komputer Anda. Browser Web, seperti Microsoft Internet Explorer, Netscape, Opera, Mozilla Firefox, atau Safari dapat menampilkan keluaran dari server Web.
Server Web terpadu (EWS) terpasang pada produk perangkat lunak (misalnya printer) atau dalam firmware, tidak berupa perangkat lunak yang dimuat pada server jaringan. Keuntungan dari server Web terpadu adalah tersedianya antarmuka ke produk sehingga semua orang yang memiliki komputer yang terhubung ke jaringan dan browser Web standar dapat membuka dan menggunakannya. Tidak ada perangkat lunak husus yang harus diinstal atau dikonfigurasikan.
Dengan Server Web Terpadu HP, Anda dapat melihat informasi status produk, mengubah pengaturan, dan mengelola produk dari komputer Anda.
Untuk membuka server Web terpaduDi browser Web yang didukung pada komputer Anda, ketikkan alamat IP yang telah ditetapkan untuk perangkat. Misalnya, jika alamat IP-nya adalah 123.123.123.123, ketikkan alamat berikut pada browser Web:
http://123.123.123.123
Alamat IP untuk perangkat terdaftar pada Halaman konfigurasi jaringan.
Setelah membuka server Web terpadu, Anda dapat menandainya agar Anda dapat kembali ke sana dengan cepat di lain kali.
Mengatasi masalah22

23
Bahasa
Indonesi
a
Keterangan jaminan terbatas Hewlett-Packard


1
���
1 ���������� ��������������. . . . . . . . . . . . . . . . . . . . . . . . . . . . . . . . . . . . . 2
� ������� ������� . . . . . . . . . . . . . . . . . . . . . . . . . . . . . . . . 2
�� � ���������������������� . . . . . . . . . . . . . . . . . . . . . . . . 4
� ����� ���!�"���� . . . . . . . . . . . . . . . . . . . . . . . . . . . 4
2 ������������ ��������� ����� ��������� ���� . . . . . . . . . . . . . . . . . . . . . . . . . . . . . . . . . 5
����� ��!�� . . . . . . . . . . . . . . . . . . . . . . . . . . . . . . . . . 6
#$��%��� . . . . . . . . . . . . . . . . . . . . . . . . . . . . . . . . . . . . 7
3 �������������� (��������)�&��'��(�"��#�� � �#!&�&��'��(�"��#������� . . . . . . . . . . . . . . . . . . . . . . . . . . . . . . 9
� )'��(�"���*�� ����� ����'��� �'�)�+" & . . . . . . . . . 10
� )'��(�"���*�,���%��� . . . . . . . . . . . . . . . . . . . . . . . . . . 11
� ����� �#!&� ��� ���� ������� '��� � . . . . . . . . . . . . 16
� ������� � )� �'����%� . . . . . . . . . . . . . . . . . . . . . . . . . 16
� ������� ������� '��� � . . . . . . . . . . . . . . . . . . . . . . . 16
4 ������!� "#$�� �#��- �./� ��*)%���� �������� . . . . . . . . . . . . . . . . . . . 18
� �#��- �./� ��*)%������0� � ) (� �������� ����). . . . . . . . 19
� �#��- �./� ��*)%���'��� � (� �������� ����) . . . . . . . . . 21
���0��0��� ����� ��� ����� #!&� �#��- �./� . . . . . . 23
����%��&'(���������� ������(���)���*��� Hewlett-Packard
������
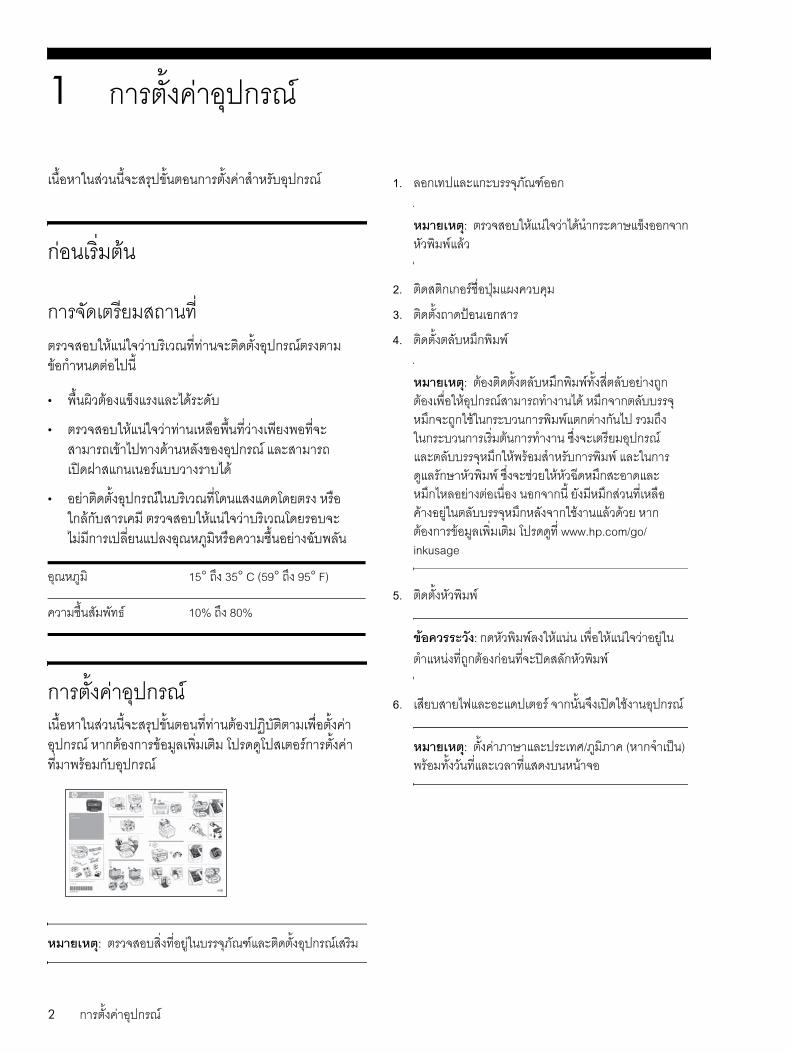
1 ���������� ����
������������ ������������������������������������
����������
���������� ��������������������������! "!�������#����������������$��������#���%�� �
� &���'��������(�����)�%#���#��
� ���������������!�����)��&���! "�����& *�&�! "���$��+����%�!��#����)������������ �)��$��+��,#-������������������%#�
� �*����#������������������! ".#����##.#*��� �����)��������$ ���������������������.#*�����%$�$ �����) "*���)�����/0$��������$1����*���2��&)��
� ������� ������������������� �������������! "!��������3�������$�&�"�������� ������� �������������$0)�&�"$���$ .��##0.����������������! "$�&���$����������
��������: ��%��������*�)���������2��3�#!&������������������
����2�� 15° 45� 35° C (59° 45� 95° F)
�% ,0����"��6� 10% 45� 80%
1. !�����#!&#�&�����2��3����
��������: ��%�������#����%� -���� ��&� 7# ������ ���%"�"�#!�%
2. ������������,0���8#$��%���
3. �������4 ��9������ �
4. ��������!���5�"�"�
��������: ������������!���5�"�"������*�!���)� �4�������"0������������ �4�� � �-�� �5�� ��!��������5��&4���,�����&�%�� �"�"�#���� ����-� �%45�����&�%�� �������� ��� � � :5��&���*)�������#!&�!��������5����"����� ����� �"�"� #!&��� ���#!���7 ��%"�"� :5��&,�%)�����%+*��5��&� �#!&�5�-�!�)� ������0�� ���� ��*� )��*�5���%��*��!0��� ��)�����!��������5��!��� ��,�� �#!�%��%) � ������ � ���!�"���� '������* www.hp.com/go/
inkusage
5. ���������%"�"�
�� ��� ��: ����%"�"�!����#��� �"0����#����%� �)������ #�����*4�����������*�&�;��!����%"�"�
6. ��*)�� )-<#!&�&#������� � ������5���;��,�� ��������
��������: ������ 2 7 #!&��&��(/2��2 � (� ��� ��=�)
"�������%���*#!&�%! �*#�������� ��
� ������� �������2

���
7. �0�* ���% �� �> 5�� ����9����&� 7 � ���������8 OK (��!�)
a. )�4 ������&� 7 5��b. �9����&� 7-����� 250 #$�� !���4 � 1 '�)�%�
�� ��*����� �"�"�!� #!&�������,������� � % ��4 � ��%�������#����%� ��&� 7�*% �:������,����� ���� � % #!&�� ��!�� ��4 � #!&-�!�� ���� *���4 �
c. �!0����%������&� 7��4 ����"��*��� � ���&� 7�*�� ��� !���9��
d. % �4 ������&� 7!�#!&�5��*�����&� 7�����������&����� � �#!&����������%"�"� �"0����#����%� -�����2 "� �"�"��*�*�*��� �������*��&�,��%! ��& � 12 � �*
8. �������:�<��#%��#!&�,0������������� �� �4�,0�����������'�)�,�� ��,0������&�2�����&�2���5�������-��*�:� USB
� ���0� � )�*��������� (� �������� ����)
� '��� � (� �������� ����)
� ������ � ���!�"������*)%���:�<��#%�� ������� #!&� ��,0���� '��������0�$���,������ ��:5��)����:*�*������� ��,�� �
a. ���#$��:*�*������� ��,�� � �!���* Install (�������) (Windows) ��0� Install Software (������������� ��) (Mac OS) � ������>������ �� #�&�� �*�� �>����� ���"0��������:�<��#%����������������
��������: � ���� �� CD -����'�)���'���� ���������!�!���*-����� ����������#$��:*�*������� ��,�� �
b. �0�* ���% #��� ����,0����� )�����! USB
� � �����"�%�����
USB
a. 4��? �����9��������� ���%�,0�������0� � ) �� �������
b. �,0 ������ )�����!���0� � )� � �����%�,0 �����#!&"�����*�,�� �-�� ��@�����0� � ) �%��,� ��0��� ����� � �-<��// �#���� ��,0���� ����%�,0����-��%� � 5�� ���!���,0����� � ���"�����0�
�� ��� ��: �)� ��*)�� )�����!���0� � )� � ���"���� WAN, Uplink ��0���������������@�� �%��,� ��0��� �����
c. ���#$��:*�*������� ��,�� � �!���* Install (�������) (Windows) ��0� Install Software (������������� ��) (Mac OS) � ������>������ �� #�&�� �*�� �>����� ���"0��������:�<��#%����������������� �'��#��� ��������#���%� *������� ��%� ��5�� )� � ���"�"���� � ��� ����� ���0� � )�"0��!0����������*4������
��������: � ���� �� CD -����'�)���'���� ���������!�!���*-����� ����������#$��:*�*������� ��,�� �
d. "�"���� � ��� ����� ���0� � ) ��0��� ����� �*��&#��� ���!�*�� ��=��� ����� ������� ����8 Setup
(�������) ��#$��%��� � ������>������ �������� ��������5����-��*�:� � �������� ���� �*��#���$!#�����
������ ����!0�� Network Setup (������������������) �!0�� Print Network Settings
(�����������������������) � ������� OK
(����)
� � �������� ���� �*��#���$!�* ����!0�� Network (��������) �!0�� View Network
Settings (��������������������) �!0�� Print
Network Configuration Page (������������ ���������������) � ������� OK (����)
� ��� ��������:�<��#%��'�)�,�'��#��� ����������:*�*������� ��,�� � �� �� �4�� ����� � ������� '��� �-�� �!��� ��������:�<��#%���������#!�% '�)�,� Fax Setup
Wizard (��%,�%)�������'��� �) (Windows) ��0� HP Device Manager (��%���� �������� HP) (Mac OS)
� ������ � ���!�"������*)%���� ������� '��� � '������* �� ������� '��� � (��%�!0��)" ����� 9
���������!�"�����#�
Fax ($"�%��)
� ������� ������� 3

�� � ����������������������
��� ����������������������������1. &�$&������������&)���1��! "!���1�������*
2. ��������)��+�#�4�������.#*��#���! "&�$&����*�5���)�����������*0����#
3. ��������������$�������&�# ������#��������
4. �# START COPY Black (����������� ��) ���� START COPY Color (�����������) ������� ��!������������ ���&��67�� .��##0! " �������%��67���� "*���������#����" ����� 18
5. ��������������+�#������#�8 ADF
6. ��,#-������������������
7. ���������������.#*��"������)���������������� &���$�����$�$9��*#��������������*0�! "��������$�$���#���)�����������
8. �,#-������������������
9. �# START COPY Black (����������� ��) ���� START COPY Color (�����������) ���������!������������ ���&��67�� .��##0! " �������%��67���� "*���������#����" ����� 18
��� ������������ �!���������� ��������������������������������#����9�:��������������*���+0���������%$� �����"$���1����9�:�������)�!������������������; (�1�� &�$&������ ���������! "���%�*����$&����������!���)
���������� ����� HP Photosmart (Windows)
1. #�����)�)��! "%����9�:������ HP Photosmart ���#��!(����� Windows
2. ���!�����#����������� HP $��������5"���*��� ���)����+�����������! "�������1����
���������� ����� HP Photosmart Studio (Mac OS)
1. �)��! "%���� HP Photosmart Studio � Dock
2. �)��! " Device (�������) ��������)����������
�������������$0)�&�"$���$�� "*�������1�9�:������������� .��##0! "��< 1�������%)��������9�:����������
#��$��������������!���*��%$�%#�)�!��� *� .��#%�! " www.register.hp.com
�)�)�!��� *��������
� ����� ���!�"�����������������$0)�&�"$���$�� "*�������1�������� �)�������%��67�� .��##0�����)�����$0)���%�� �:
� �0�$��'0�1����������)�%:)� readme ��'��9 # ���"$������1���� ����! " www.hp.com/support
� HP Instant Support �)���(��9���:��������-6���� (#0�0�$��'0�1���������)
� ��(�%9�����������')��/��=�! " www.hp.com/support
� ������� �������4

���
2 ����������� ��������� ����� ����
����� ����
1 ����4�����#�8���.�$��� (ADF)
2 �������������
3 �'������$
4 ���#�')
5 +�#������#�8
6 ! "������#�8���+�#������#�8
7 ����������$*��/���$�����
8 +�# 1
9 &�����������$�����) (USB) #�������
10 1���� *�����#����*���$���
11 %:�����������*���$���
12 +�#�4�������
13 ����������$�����
������� �����#%�� &�'������(��(�
1 -������)���$5�&�$&�
2 �)���$5�&�$&�
3 -��,#�����)���$5�&�$&�
4 ���&�$&�
5 )�����&�$&�
����� ���� 5

)���� �������'����*����&�
1 Compact flash (��� I �)� II �2&��/�&! "1����%#�# �!������)
2 Secure Digital, MultimediaCard (MMC), Secure MMC
3 xD
4 Memory Stick, Magic Gate Memory Stick,
Memory Stick Duo, and Memory Stick Pro
5 &�����������$�����) (USB) #������� (1����%#���� PictBridge)
����� ��!��
1 1���� *��*%:
2 &������������*� �!�����(� (HP Officejet Pro L7500)
3 &���� USB #����)��
4 &����.!��� (1-LINE �)� 2-EXT)
5 -��,##����)�� (HP Officejet Pro L7300)
6 ����������$���������&�$&���#���.#*���.�$��� (����������������&�$&���#���) (HP Officejet Pro
L7500)
65
2
3
1
4
�����������%���&����� �A ���������6

���
#$��%���
��������: � ����% ����#�� ��#$��%���#!&���������� �A �& 5���)��������� ����������*�� ��,�� � ������� ���� �� ��&-�*��8#!&-<#���� ��� � ��������*�6�� )����%��*�
1 +������ ���� Speed-dial (����� �):
����1�����$�*�)�.!�#�������$�*�)���� �$�*�)�.!�#����������>��$�*�)�.!��������)��$�$�*�)�.!���
��������������� �:
�����$�*�)�.!�#���! "��������?$.!�#���!��������?$ !����$��+�� *��$�*�)�)������#�8! "��$�#��* ����&�$&���*����$�*�)��&�"�� *�����%�%#�
2 !�� Scan To (��������):
�)����)�*!��! "�������! "���
START SCAN (��������):
���"$�������)���%�*���)�*!��! "!����)���.#*1���?$ Scan Menu (�$�0���)
3 +�� �� Menu (���!): ��,#�$�0���������!��������.!���
" ��#�����:
�������$��(��)����/�&���.!���! "��������������
Redial/Pause (���$%�/����&�� "� ):
.!�9����$�*�)�.!���! ".!����)���#
Auto Answer ('�(��(��'����'�): �����#���!��������.!����&�"�������.!�@�&!�.#*���.�$����)�����$ � *��� *�����#����$�����������! "����
START FAX Black (���������� ��) ���� START FAX
Color (����������): ���"$���.!�����0�������#������
4 ��,����4���$�*�)�.!��� ��� ����������$
5 ��! ��-#�#�+����)�������$�#����'�#&)�# .�$# �$�0�����������)�����)�������$�0��)������ ���$0)��< 1� �)���#���$5�&�$&�
�����!�)�: �)�"��%�*������)�������; ����$�0 �����)�"��#0/�&+��*! "�#����������#�') (+��$ )
OK ('���): �)����$�0���������� ��������������$ ���#�') ��1��&�"��)���/�&+��*! "�������&�$&�
6 ��,��%��.Setup ('�%�"�): ����1�����$�0�����&�"�#0��*��� ���������� �)����#0�)���8�
Cancel (������): �*�#���!����� �������$�0 ��������������������
#$��%��� 7
7 �&� &����Menu (���!): ��,#�$�0���������!�������
Reduce/Enlarge (���/���): ��) "*����#��������
Collate (�������*): �� *������������$)��#������! "����������������������� ADF
Quality ("��+,): �����$���$��(��)����/�&�������� %:�77�� Quality (���/�&) ! "�*0�+�#������/�&���
�����! "�)����������5��
START FAX Black (����������� ��) ���� START FAX
Color (�����������): ���"$!���������0�������#������
8 /�(����Menu (���!): ��,#�$�0���������!��������/�&+��*
Proof Sheet (�-����.��+,): &�$&��'���)���/�&�$�"������#����*���$���)��1���� *�����#����*���$���
PRINT PHOTOS (,��,�+,/��): ���"$������&�$&�/�&+��*
9 ��,� Power (��0�/�0�) !#$1 �22������ Power (��0�/�0�): ��,#�����,#������� �$�"��,#����"��
��������)�� ��*����$ %:����$���)(����*���*������������ ������������#%:! "���*������"����������*0� ���,#����"���)��+�#�)�A����
�$�"�%:�����5�� �#���� ���������,#�*0� %:����&����������)��!�����
�1���/�#�"�.����: �#�+�����������������������*
�1�22� Attention (�'.��): �$�"�%:��&��� �#�������#���'�#&)�#! "!���������$�#�����
�����������%���&����� �A ���������8

���
3 �������������� (��������)
���������!� ���������������� "*��������������.!���.#*��������#�����������������;
� ���1��*.!�@�&!�! "�����#������.!���.#*�2&��
� ���1��*.!�@�&!�! "1����$���
� �����#����)���������#���.!���
� ��������#���.�$#������
� ��������#���������� *��� *���������! "��������
� �����) "*��0����� *��� *������������ *��� *������2&��
� ����������������#�8.!���
� ���!#������������.!���
�������������$0)�&�"$���$�� "*�������$����.!��� .��##0�0�$��'0�1������������ 95"��*0��9 # ���"$������1����
��������: � ���������� ��,�� �'��� ��&*��� �������� ����
�� ��� ��: � ��� �-��,�� )�*��� �"0��,0����� �,�����*)�� )'��(�"���*$���� � ���������� �� �� �-�� �4�,�'��� �-��� )'��(�"���+" &�*��&#���� �� �� )'��(�"���*�� ��,��� �����*"��� (�)��0��� ���� � � �� )'��(�"���*��� ��������-� '����� ���!�"����� ����0�$���,�� ������ �� :5��)����#$��:*�*������� ��,�� �
�'��(��)�"��#�� � �#!'�'��(��)�"��#�����������! "!��������"$���������������&�"���.!��� �������#1��#�������.!�@�&!�! "����!@//0$�/�����!���1�
��������: �� #�&�� ��� ������� '��� ��&#���� ����-� '�) 5���)�����%� �� �*�&��'��(�"��#���������0�#�� � �
���%$�&���*1�"�����!@//0$�/�����!����������%�� � �#����!��������1�����.!�@�&!���������$ ���!���%$��������!���$ ����.!�@�&!�1��## (��������$�����������)
�����������!�����8�!.!�@�&!����!���
��$��3//���/�*��4)��$��+��3�(��!��5��������.!�@�&!�������� !����$��+�1�"�$����������.!�@�&!�! "1����$�����������*.!�@�&!�.#*1�&���� "2-EXT"
! "�*0�#����)������������
��������: � ��&��'��(�"�� ���� ���=�#�� � � HP �#�&�� ����,�� )'��(�"��#�� 2 �����*��� "������������� �"0��,0������������ � ���,�����*)�� )'��(�"����$���
��������� ������� � �����
������ �� � �
������� � �� � ���� �
����� �� � ��������� � �����
����� � � ������ ������ �
��"���� #$���$��� �������
������� ����� � �������� �� �
�%����� ���� �&�'��
�(� ����)������ �'��������
�' �����
�&��'��(�"��#�� � �#!&�&�� '��(�"��#������� 9

��$��3//���/�*��4)��$��+��3�(��!�������������.!�@�&!���������$ ����/!����1�"�$�������������.!�@�&!�! "1����$��� (.$�#($ .!�@�&!� �)�����"�����������.�$���) ��%$��$��+1��1�"�$������&���� �2-EXT" ���������%#� ����������!����$#������������1���� *��*.!�@�&!�! "�*0���'����!�
��������: ��� ���&��(/2��2 ��*�,��&��'��(�"��#������� � )'��(�"���* "�������������� �*,�����*)�� )'��(�"���*$����"�����"0�������'��(�"�� :5��� ����� �� �4�,0�����������'���� ��0�A � � ���,�����*)�� )'��(�"���*$����*�� ��,���*)�� � ����������-��
�������������$0)�&�"$���$�� "*���������������������������.!���#��*���1�����.!�@�&!���������$ .��##0! "��(�%9����������#���.!�������������!@//0$�/�����!���
� *(��)�"���+�� ����� ����(��� �(�*�," '1�����������! "�<���*����� � ���!����������1��*.!�@�&!�������.!�������/!���%�� �:
� �*.!�@�&!�! "�����#������.!���.#*�2&�� (%$�$ ���������"�; �1�� .!�@�&!���������"�����������.�$���1�����*.!�@�&!�� ����$���)
� �*.!�@�&!�! "�����#������.!���.#*�2&��! "%$�$ ����1�"�$������������"�! "1��*���$��� ���$ ���1�������� *��� *������2&��
� �*.!�@�&!�������1�$�*.!�@�&!�/�*��������� (PBX)
����.������*�������"������$����#�����) (ISDN)
�������������$0)�&�"$���$�� "*�����* PBX �)� ISDN
.��##0�0�$��'0�1������������ 95"��*0��9 # ���"$������1����
��������: �� ��&-�� �4���'��� ����'����-�� � ����� �%�):��!� ���� ��,�� )�! '��(�"����*)%����*�,����'��� � �� ��&�������'��� ���%)����� :5�� )�% %� �� �������=�$�����'��� ��*� � � ��� ������ ����'��� ����'���� '������������7��������� �'��(�"�� ���� ��"0������,����� ���*)���*)�� � �+" & ��0� ��*�� )'��(�"��#)��� �� ��� ����'��� �
� ������� ��������"0�������� )��*)�� � ��%)����� ����8 Auto
Answer (��&��&���$�����) ����&���-<��// ����!�
1. +�#�)�A��������.!�@�&!�������1���� *��*.!�@�&!�! "!����1�"�$�������������
2. �1�"�$����*.!�@�&!�! "��$�&���$�����������������&���� 1-LINE �������������1���� *��*.!�@�&!�
������*) www.hp.com/at/faxconfig
��!�)*) (���,�) www.hp.be/nl/faxconfig
��!�)*) (?����(�) www.hp.be/fr/faxconfig
��� ��� www.hp.dk/faxconfig
<;�#!��� www.hp.fi/faxconfig
?����(� www.hp.com/fr/faxconfig
�)���� www.hp.com/de/faxconfig
-���#!��� www.hp.com/ie/faxconfig
��� !* www.hp.com/it/faxconfig
�����%)� www.hp.no/faxconfig
���6���#!��� www.hp.nl/faxconfig
'������� www.hp.pt/faxconfig
���� www.hp.es/faxconfig
�%*��� www.hp.se/faxconfig
�%���:���#!��� (?����(�) www.hp.com/ch/fr/faxconfig
�%���:���#!��� (�)����) www.hp.com/ch/de/faxconfig
��� ,� � ���� www.hp.com/uk/faxconfig1-LINE
� ������� '��� � (��%�!0��)10
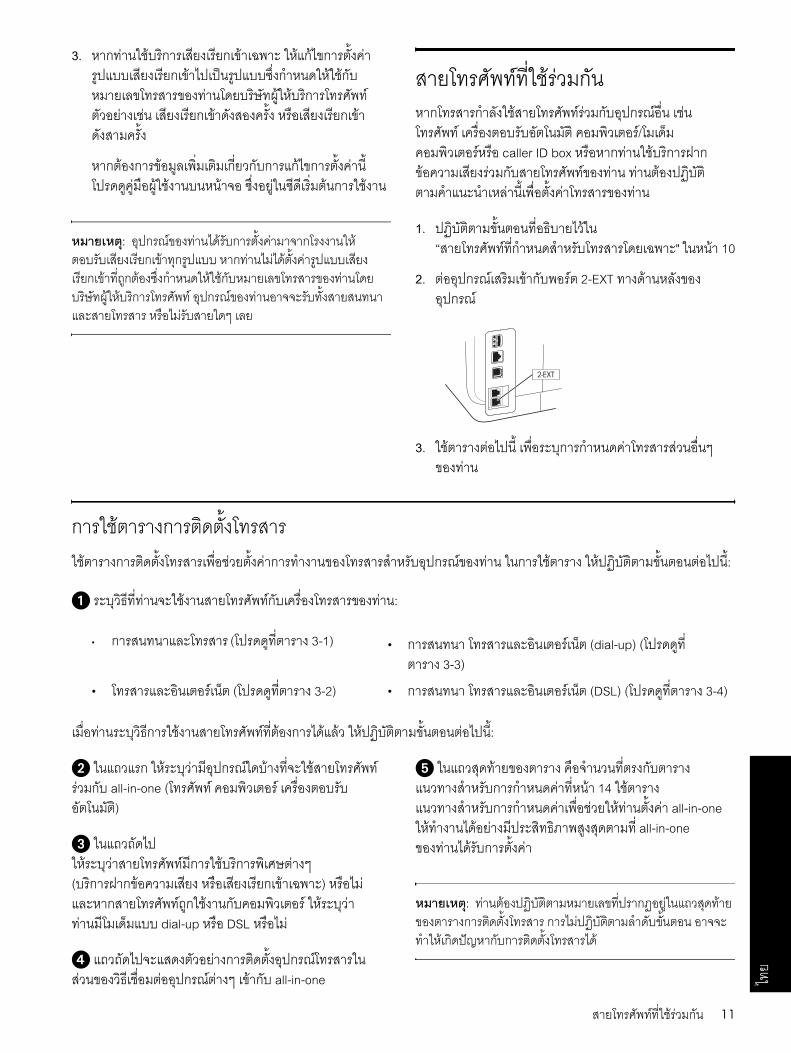
���
3. ���!���1�������� *��� *������2&�� �����%������������0����� *��� *�����%���>��0����95"������#��1�����$�*�)�.!������!���.#*���8�!'0���������.!�@�&!� ����*����1�� � *��� *�����#��������� ����� *��� *�����#���$�����
�������������$0)�&�"$���$�� "*����������%������������ � .��##0�0�$��'0�1������������ 95"��*0��9 # ���"$������1����
��������: ������� ���� �-������ ������� � �'��� ������������*)���*)�� � ������#�� � ��� �-�-�������� ���#����*)���*)�� � �*4������:5��� �������,����� )�! '��� � ���� �'�)���7��$��������� �'��(�"�� ������� ���� �� ��&�������� )���� #!&� )'��� � ��0�-����� )��A �!)
� *(��)�"���+�-���%������.!������)��1��*.!�@�&!����$������������"� �1�� .!�@�&!� ����"�����������.�$��� ��$&�������/.$�#($��$&����������� caller ID box �������!���1�������-��������$� *����$����*.!�@�&!����!��� !��������3�������$�����������)��� ��&�"��������.!������!���
1. �3�������$�������! "�<���*%��� ��*.!�@�&!�! "�����#������.!���.#*�2&��" ����� 10
2. �������������$�������&���� 2-EXT !��#����)������������
3. 1���������%�� � �&�"�������������#���.!��������"�; ���!���
���4)�������������+�� ��1�����������#����.!����&�"�1��*����������!��������.!�������������������!��� ����1������ ���3�������$����������%�� �:
� ������< ! "!�����1�����*.!�@�&!��������"��.!������!���:
�$�"�!���������< ���1�����*.!�@�&!�! "�������%#��)�� ���3�������$����������%�� �:
� ��+���� ���������$ �������#����! "��1��*.!�@�&!����$��� all-in-one (.!�@�&!� ��$&������� ����"�����������.�$���)
� ��+�+�#%� ����������*.!�@�&!�$ ���1�������&��@8����; (������-��������$� *� ����� *��� *������2&��) ����%$� �)�����*.!�@�&!�+0�1���������$&������� ���������!���$ .$�#($��� dial-up ���� DSL ����%$�
� �+�+�#%����#�����*��������#�����������.!������������< �1�"�$��������������; ������� all-in-one
� ��+��#!��*�������� ���������! "��������������!����������������#���! "���� 14 1���������!����������������#����&�"�1��*��!���������� all-in-one
��!�����%#��*���$ ����!<�/�&0��#��$! " all-in-one
���!���%#��������������
��������: �� ������>������ � )�! �*�� �>�)����#4%����� ) ��� � �� ��������'��� � � �-��>������ !� ��� ������ � ��&�� ��������./� ���� ��������'��� �-��
2-EXT
� ����!���)�.!��� (.��##0! "����� 3-1) � ����!�� .!����)�����������(� (dial-up) (.��##0! "����� 3-3)
� .!����)�����������(� (.��##0! "����� 3-2) � ����!�� .!����)�����������(� (DSL) (.��##0! "����� 3-4)
� )'��(�"���*�,���%��� 11

'�� 3-1 ����!���)�.!���
'�� 3-2 .!����)�����������(�
����������� ��*�� ��&�,0����� � ����������?
'��(�"�� � '��(�"��� ���0�����������'����
� )'��(�"�� ���� ��,�... ���� ���*)���*)�� � "��(7 ���� ���*)���*)�� � "��(7
� ��������'��� � ���� �*!��7�&����*�...
'������ )�*+�&���������� �������"!, 3 1, 9, 2 1, 7 1, 9, 7
����������� ��*�� ��&�,0����� � ����������?
� ��"�%������ '���
� )'��(�"�� ���� ���=�#��...
Dial-up DSL
� ��������'��� � ���� �*!��7�&����*�...
'������ )�*+�&���������� �������"!, 4, 5, 1, 2, 6 8, 1, 2, 6
�� ���%��$"
�� ���%�--�. DSL
� ������� '��� � (��%�!0��)12
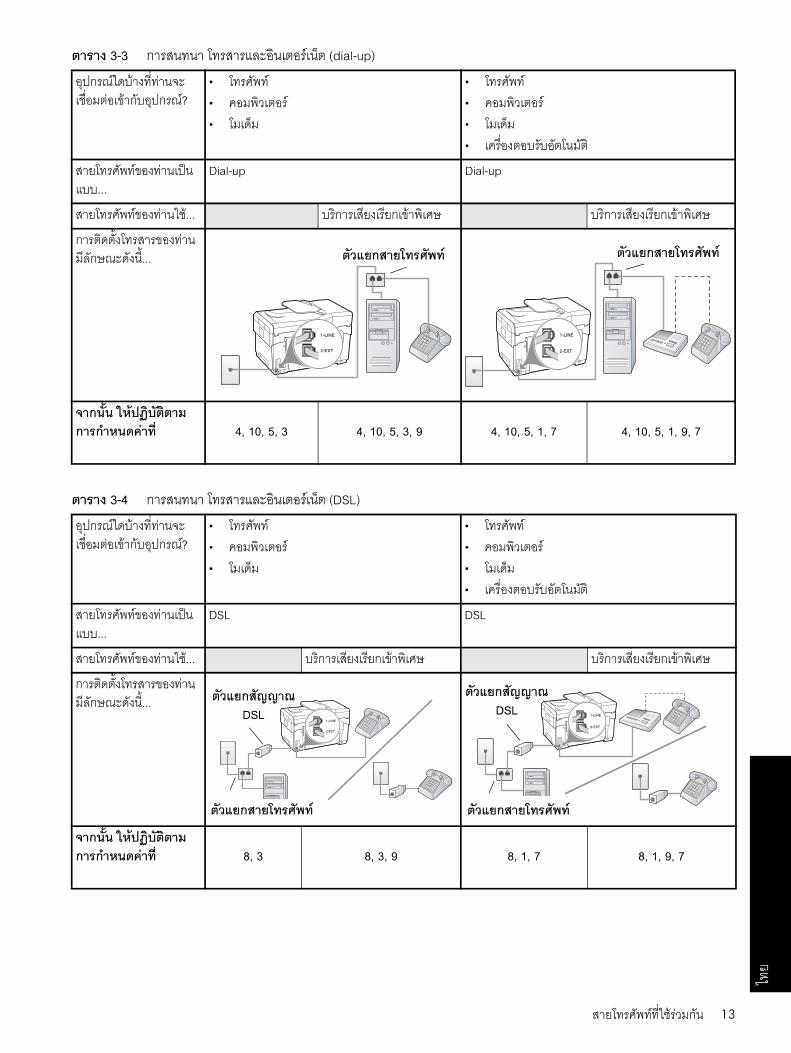
���
'�� 3-3 ����!�� .!����)�����������(� (dial-up)
'�� 3-4 ����!�� .!����)�����������(� (DSL)
����������� ��*�� ��&�,0����� � ����������?
� '��(�"��� ��"�%������ '���
� '��(�"��� ��"�%������ '���� ���0�����������'����
� )'��(�"�� ���� ���=�#��...
Dial-up Dial-up
� )'��(�"�� ���� ��,�... ���� ���*)���*)�� � "��(7 ���� ���*)���*)�� � "��(7
� ��������'��� � ���� �*!��7�&����*�...
'������ )�*+�&���������� �������"!, 4, 10, 5, 3 4, 10, 5, 3, 9 4, 10, 5, 1, 7 4, 10, 5, 1, 9, 7
�� ���%��$"�/��"� �� ���%��$"�/��"�
����������� ��*�� ��&�,0����� � ����������?
� '��(�"��� ��"�%������ '���
� '��(�"��� ��"�%������ '���� ���0�����������'����
� )'��(�"�� ���� ���=�#��...
DSL DSL
� )'��(�"�� ���� ��,�... ���� ���*)���*)�� � "��(7 ���� ���*)���*)�� � "��(7
� ��������'��� � ���� �*!��7�&����*�...
'������ )�*+�&���������� �������"!, 8, 3 8, 3, 9 8, 1, 7 8, 1, 9, 7
2
3
�� ���%��$"�/��"�
�� ���%�--�. DSL
2
3
�� ���%��$"�/��"�
�� ���%�--�. DSL
� )'��(�"���*�,���%��� 13

���������� �������������������� ����
���� ����� �% ����&���� �������
1 ������ ��������"0�������� )��*)�� � ���'���� ����8 Auto Answer (��&��&���$�����) ����&���-<��// ��%� � 5��
2 (��0�) #��- � ������� Rings to Answer (��*)���*)�� � ) ��=������5��������0���������� ������ � ���!�"������*)%���� �#��- � ������� �*� '��������0�$���,�� ������ �� :5��)����:*�*������� ��,�� �
3 �&��%�6*�*�� ������ ������������������ )��*)�� � : ���'������0���%)������ � ��� ������� ����������������� )��*)�� � ���'���� ��������&������� )��*)�� � ������#!&���'��� �
���*�*� ������� ���� ��&-�� �4#)��&�%� �'��� �#!&� )���� -�� � ��� �����)%� � )��*)�� � �����&��=�� )���� �� ��&�������� )�����*��������&���� )����� ������ �������'��� ����'���� �������8 Auto Answer (��&��&���$�����) ����&���-<��// ��%� � 5��
� � ��� ������� ����������������'��� ���%)����� �� ������)���"0����� )'��� ��*� � ��%)����� �+&���� ������� ���� ��&-�� �4���'��� �-��� ������ �������'��� ���%)����� �������8 Auto Answer (��&��&���$�����) ����&���-<��// ����!�
4
('��� Dial-up)
��0��� �'�����"�%����� ���� ��,�� )'��(�"����%���������� ���� � �� ��5�-�� �4�,�����'�����"�%�����#!&����������%! ��*)%���-�� ��%�)� ��,�� �� ��&-�� �4�,���������"0����#!&���'��� �-�� � ��� ��� !���,�'�����"�%������"0�����*�!���0�� � �,�� �������������
5
('��� Dial-up)
� ��� ������� :�<��#%��'�����"�%�����������'��� �� � �����0����"�%�����'�)���'���� ����;�� ������� ������ ��� ��: � ��� �-��;�� ������� �"0����'��� ����'������:�<��#%�� ��'�����"�%����� ������� ���� ��&-�� �4���'��� �-��
6 �0�'��(�"����� 5�� ������� ���� ��&������'�)���'�����!��� �*��*)���*)�� � ���� �� �%�������*�� ��� ���-%���� ������� Rings to Answer (��*)���*)�� � ) � ��������0���&��������// ����'��� �-�)�����0���*���'��� � #!&�&���'��� �
7
(���0�����������'����)������ ���0�����������'�����"0��������!��� ���*)���*)�� � ��� 4 �������0����)�%� ����#��- � ������� Rings to Answer (��*)���*)�� � ) �� ����������� ���� ���=���� 6 ������0�'��(�"����� 5�� ���0��������'��(�"���&���� )�!��� ���*)���*)�� � ��� 5��� �� �%��*�� ��� #!&�&�����*)��� ���� )�*����5�-%� ��������&�?9 ������� �'�����&�%� ��%! �*� "������ "<.�" ��*)���// �'��� � � ���%�"���*)���// �'��� � ��������&�����// ����'��� �#!&���'��� � � �-�*��*)���// �'��� � ��������&�)��� ���%����� )��// �#!&���0�����������'���� ���� ��&� �4����5� ���% ��*)�-��
8 %��$"�/��"��&& DSL �"������: �� ��&����:0����%#)���// � DSL �"������ ����������������� ('��(�"�� ��"�%�����) �*�,�� )'��(�"�� DSL ��%���
9
(���� ���*)���*)�� � �+" &)
#��- � ������� ���#����*)���*)�� � -���=����#��:5��� �������,����� )�! '��� � ���� �'�)���7��$��������� �'��(�"�� ��%�)� ��,�� ��*)���*)�� � ����������� ��0���*)���*)�� � ���� ������ ������ � ���!�"������*)%���� �#��- � ������� �*� '��������0�$���,�� ������ �� :5��)����:*�*������� ��,�� ���������: ������� ���� �-������ ������� � �'��� ������������*)���*)�� � ������#�� � ��� �-�-�������� ���#����*)���*)�� � �*4������:5��� �������,����� )�! '��� � ���� �'�)���7��$��������� �'��(�"�� ������� ���� �� ��&�������� )���� #!&� )'��� � ��0�-����� )��A �!)
� ������� '��� � (��%�!0��)14

���
10 *���%�6*�*#���� �����*�&������ ������� ���� �������0����"�%����� :5� 5���)������� �%�"����'��(�"�������0����"�%����� ���� � �� �)���� ��=�����*� )'��(�"���"���� (�)� ����) 3 � ) � ���"�%����� ���� �*"����'��(�"���"*)�"������*)% #!&�)� ����) 2 � ) � ���"�%����� ���� �*"����'��(�"�� 2 "����)
�����*�� ��&����,�� � �����%����%� ��"�%����� ���� �*"����'��(�"�� 1 ��0� 2 "����:
����� �����"!,�!�����$"�/��"� 1 �����
� ���"�%�����*"����'��(�"���"*)�"������*)% �� ��&����:0����%#)�� )'��(�"��#�� � � (��0���%���"�%�)
��%#)�� )'��(�"��#�� � �*"���� RJ-11 �� �%� 1 "�����*�� ���� #!&�*� 2 "�����*�� ��!�� �����,���%#)�� )'��(�"������ ) ��%#)�� )'��(�"��#������� ��0���%#)�� )'��(�"��#�� � ��**"���� RJ-11
�� �%� 2 "�����*�� ���� #!&�!�B� 1 ��%�*�� ��!�� �� �� �4:0����%#)�� )'��(�"��#�� � �-���*�� ��� ����������!���������� :5�*������������� ����'��(�"��1. ��*)��! )�� ���5� ��� )'��(�"���* "�������������� � ���,�����*)��*$��� #!&�! )�*��� ���5�
� � ���"���� 1-LINE ���������
2. ��*)��! )�� ���5� ��� )'��(�"�������*���� � ���"���� 2-EXT ��������� #!&�! )�*��� ���5�� � ����� ���� ����%#)�� )'��(�"��#�� � � (�� ��**"����'��(�"��"������*)%)
3. ��*)��! )�� ���5� ��� )'��(�"�������*� � � ����� ��!�� ����%#)�� )'��(�"��#�� � � (�� ��**"����'��(�"�����"����) #!&�! )�*��� �� � �����"�%�����
4. ��*)��! )�� ���5� ��� )'��(�"�������*�*� � ���"�����*��;��,�� �"��������� ) ����%#)�� )'��(�"��#�� � � #!&�! )�*��� �� � ���'��(�"����0����0�����������'���� � ��� ��� !���,0�����������'��(�"��#!&���0�����������'���� �����*)�� )'��(�"�������*�*� � ������0�����������'���� � ����� �,�� )'��(�"�������*�� �"0�������0�����������'�������'��(�"����������: � ��� �-�-���,0�������0�����������'������%)%�6*�*� ��// �'��� �� ����0�����'��� �� ��&4������5�-%������0�����������'���� #!&�� �� ��&-�� �4���'��� �'�)�,�������� ���� �-��
����� �����"!,�!�����$"�/��"� 2 �����
� ���"�%����� ���� �*"����'��(�"�� 2 "���� ����>������ ���������-��*��)� ����4�%� �"0��,0������������ � �����"�%�����1. ��*)��! )�� ���5� ��� )'��(�"���* "�������������� � ���,�����*)��*$��� #!&�! )�*��� ���5�
� � ���"���� 1-LINE ���������
2. ��*)��! )�� ���5� ��� )'��(�"�������*���� � ���"���� 2-EXT ��������� #!&�! )�*��� ���5�� � ���"���� IN ����"�%�����
3. ��*)��! )�� ���5� ��� )'��(�"�������*� � � ���"���� OUT ����"�%����� #!&�! )�*��� �� � ���'��(�"����0����0�����������'���� � ��� ��� !���,0�����������'��(�"��#!&���0�����������'���� �����*)�� )'��(�"�������*� � � ������0�����������'���� � ����� ������0�����������'�������'��(�"����������: � ��� �-�-���,0�������0�����������'������%)%�6*�*� ��// �'��� �� ����0�����'��� �� ��&4������5�-%������0�����������'���� #!&�� �� ��&-�� �4���'��� �'�)�,�������� ���� �-��
� )'��(�"���*�,���%��� 15

���������!#$����&�'��������*��+�� �����!����1�"�$�������������������$&�������.#*��� ����#����9�:������������� ���������,#!�����.�����$ Fax Setup
Wizard (���1��*����������.!���) (Windows) ���� HP Device
Manager (�����#���������� HP) (Mac OS) !���*���$��+1��������"��$��� ���)��� ���� Solution Center (Windows) ���� HP Device Manager (�����#���������� HP) (Mac OS) %#��/�*�)�� 1�����"��$����)��� ��&�"��������������#�8.!��� ����!@//0$�/�� �)����! "�)���)�
���������� !����$��+�����#����������.!��������(��9���:��������-6���� (EWS) %#�#��* �������������$0)�&�"$���$�� "*���� EWS .��##0! "���� 23
!���*���$��+�����#������������)��� �����'������$%#�#��* �������������$0)�&�"$���$�� "*�����'������$ .��##0�0�$��'0�1������������ 95"��*0��9 # ���"$������1����
� ������� � *� �(����%�!����$��+��#��(��$�*�)�.!��������)��$�$�*�)�.!�����>���*���.!�#���%#� ��*���.!�#���! " 1 +5� 5 ��+0��1�"�$.*������?$.!�#��������?$���'������$ !����$��+.!��$�*�)���)��� �%#��*�����#��(�����'������$
���������1��'������$ !���*���$��+���������*���.!�#���#��*���1���(��9���:��������-6�����)�9�:������ HP
Photosmart %#�#��* �������������$0)�&�"$���$ .��##0�0�$��'0�1������������ 95"��*0���'��9 # ���"$������1����
������*��������+������1. ����'������$ ���#��?$ Setup ('�%�"�)
2. �)��� Speed Dial Setup ('�%�"������������ �)
�)��3�������$���#�����5"����%�� �:
� ���,�����.����������������: �)��� Individual
Speed Dial (��������� ��((����� ) ���� Group
Speed Dial (��������� ��((�����) �)���#��?$)0�@��&�"��)�"��%�*���$�*�)���*���! "*��%$�+0�1���� ����&�$&�����)�.#*1���?$�# &�$&��$�*�)�.!��� ��������# OK ('���) ����$���������*���������)���"�; ! "�����>�#��* �1�� ���&���! " �������+5��������$�*�)�������� PBX (�����)������>� 9 ���� 0)
�������!��%�) &�$&�1�"�.#*1���?$����)� ��������# OK ('���)
� ���(�������� ��.��(������%����: �)��� Delete Speed Dial (�(��������� �) �)��#��?$)0�@��&�"��)�"��%�*���$�*�)�.!�#���! "!����������)� ��������# OK ('���)
� ������� ������� (��� �!����$��+!#������������.!����&�"�������+�������; ���������� �)��&�"��������������"��+0��������%��+0�������������������.!��� !�����!#��� ��)�����! "!���������� ������� �&�"���.!�����(��� *����*�)�� ���!#����!���"����%�� �:
� !#��B���#��������"��.!���
� ���������$+0������������/!�*.!�@�&!�! "���������� �������
� ����������*.!�@�&!�� *�����%��&����! "+0���������%$�
� �������77�����.!� (dial tone)
� ���������*.!�@�&!�! "�$��+1�%#�
� ������+�������1�"�$����*.!�@�&!�
���������&�$&���*����#�')���!#�� ������!#��'�#&)�# ������#0��*����&�"�#0���$0)�� "*������< ���%��67���)��!�����!#��� ������ �������������$0)�&�"$���$�� "*������< ���%��67�� .��##0! " �������%��67���� "*����.!��� (��������!������)" ����� 21
����� ����������+�� �� 1. ��#�������������������.!�����$������������#����
/�*�����������������
2. ����������������)��������$5��)����&�$&�%#���������#�����)�� �)��4�����#�8��($�'��)��+�#�4�����#�8��������!�����!#��
3. ����'������$ ���#��?$ Setup ('�%�"�)
4. �)��� Tools (�"�.����.�) ��������)��� Run Fax Test
(��������(����)
����������#�+���������!#�������#�')�)��&�$&���*���
� ������� '��� � (��%�!0��)16

���
5. !�!����*���
� ���')���!#��'��� �)�!���*��&��67���� "*����.!��� ����������*�������������.!������*����&�"������������������������+0����� ����������.!�����>������������%$�+0���������>�����������#�67���� "*����.!���
� ������!#��)�$��)� ��!�!����*����&�"������$0)! "��1�����67��! "���#�5��
� ������� ������� '��� � 17

4 �����������
������������ ���������������� "*����������%��67������67��! "&����* 95"��� "*�������������#����B���#�����)�9�:������
�������������$0))���# .��##0%:)� readme �)����!5��$�*�����9 # ���"$������1���� ��������%�*����(�%9��������')��/��=�! " www.hp.com/support
� �#��. �/0� ��+*%���� �������������������� ���������������� "*����������%��67������67��! "&����* 95"��� "*�������������#����B���#�����)�9�:������
5��!�$�&� &�'�����������6����!���
������ �������� ���������������%#�)���!��)����� ���������/��=�
������!���!��#�������)�#���������������)��
� ����������������4�����#�8)��+�#�*���+0����� �)�%$�$ ���#�8��#��#��������
� ���������������%$�$ %:�77������������&����*0� *�����%:�77�� Power (��,#/�,#) 95"�����������5�� ���%:�77�� Attention (�����) ��&��� ��������������$! "����3�*0����'������$ �$�"���,#1�������������>��������� ��1���)����$�� 45 ��! �&�"���� *$���"$���!�����
� ���������������-��,##����)����������������������&�$&���#���)(������! "�)��
� �����������������������$��+&�$&����������2�*���!#��#��*�����%#� �������������$0)�&�"$���$ .��##0! " �������������2�*���!#��#��*�����" ����� 23
������ ���������������������� ����������������*%:�����*�����)! "!������)��1�
����*0��/�&! "�$��+1����%#�#
� ���������������� *��*%:���������������)������ *�! "1����%#�����# �)��
� ���������������� *��*.!�@�&!��������&���� 1-LINE
������ ��� ����!"�!� �#�� ���� ���������������!���%#�#5�-��,# �$���������&�$&��)��
� �����������������#�������&�$&��)��)���$5�&�$&�!����$#���������! "+0�������$1���! "$ ��� ������ �#���&�$&��)��)���$5�&�$&�)������� �&�"�����������*0����������! "+0����� ���%$�%#���#�����)���$5�&�$&��)����&�$&� ���������%$��$��+!�����%#�
� ���������������)�����&�$&��)�-�����!����$#�,#��!
� ���������$�#����'�#&)�#�� "*�������&�$&�����3�5�������#�') ��!�����$���#�����$'�������&�$&� �������������$0)�&�"$���$ .��##0�0�$��'0�1��������� 95"��*0��9 # ���"$������1����
5��!�$�&� &�'������������� �!���
������ �" ���� ������� �����������������$&����������!���1������3��������
! "%#������������� �������������$0)�&�"$���$ .��##0�0�$��'0�1��������� 95"��*0��9 # ���"$������1����
� �����������������$&�������$ ���$���������$���$������������"��������� �������������$0)�&�"$���$ .��##0�0�$��'0�1��������� 95"��*0��9 # ���"$������1����
� �#��- �./� 18
���
������ $%������ �&���%����� ���� ���&�� ���������������1�9 # ���"$������1����! "$ 9�:������
�����#����! "+0����������������3�����������!���
� ������#����9�:������ ����������������,#.�����$��"�; !����$#�)��
� �����$&�������%$��$��+��&�<%�*��%#��:9 # ��$! "!�������%#� �����������������!�������������8�������%#��:�*���+0�����
� �����$&�������%$��$��+��9 # ���"$������1�����%#��:9 # ��$%#� ����������#! "1����#��&�������9 # ���"$������1���� !����$��+#����.�)#%#������������� %#���� www.hp.com/support
� ������#������������� Windows �����������������%$�%#��,#���1����%#������ USB %��
� ���!������)��1������$&�������! "��#���� Windows �)���$&�������%$��$��+����&��������%#� �����*0!�)�� �*��)�������#���� (util\ccc\uninstall.bat �9 # ���"$������1����) �&�"�#���������*��)�������#����%#�������������!����$# � ����!��$&��������)���#����%#�������������� ������
� �#��. �/0� ��+*%������1� � *
(� �������� ����)
��������: � �� ��� � �#��- �% $��"! ��� �A ���-��*�#!�% ������'��#����������*������
���!��15�72'�����1����������*�%�5���� ���!���%$��$��+��#����9�:�������������%#�
�����������:
� ����1�"�$����*�����)���������$&��������)�������� ����# �)��
� ������������*�$��+1����%#��)�B����������*���)����,#�*0�
� ��������$&�������! "��#���������3�������� Windows
%#��,#����*��)�����1�������&)���1��!����$# ��$!���.�����$�4�����%��� ��*���� �)�%:����))��)��
� �����������������#���������������������**��*�# *���������$&�������! "��1�����������
� ���.�����$�����#����%$��$��+�������������%#� ��&�$&�������������#�����������* (.��##0! " �����������&�$&�������������#�����������*"
����� 23) �)��4��%�& ��#�#��.�����$�����#����#��*�����
� ���!���1���$&�������! "��#���������3�������� Windows �����������������&������������*! "�����%#�������������������%�& ��#�#���� �������:1) &�$&�������������#�����������*����������2) ����#��!����� Windows ���)��! " Start
�)�"��%�! " Settings (��'�%�"�) ��������)��! " Printers
(�"�.���,��,�) ���� Printers and Faxes (�"�.���,��,���#����)
����
�)��! " Start, �)��! " Control Panel �������#�����)�)��! " Printers (�"�.���,��,�)3) �)�����! "%���� ������� �)��! " Properties
("���(�'�) ������� �)��! "�+� Ports (,���')
����
�)�����! "%��������������, �)��! " Run as
administrator (���3�4�#-!*�!���#(() �)��! " Properties ("���(�'�) �)��! " Continue (��'��)
��������)��! "�+� Ports (,���')
4) �)���&���� TCP/IP ������������� �)�������� �)��! " Configure Port (�����"�,���')
5) ��� *��! *�%�& ��#�#�! "�*0������.����� �)����������������������%�& ��#�#�! "�*0��������������#�����������* ���%�& ��#�#����������� ����) "*�%�& ��#�#�������!������������#�#��������������#�����������*6) �)��! " OK ('���) ��������&�"����!5������������)��,#����.�����
� �#��- �./� ��*)%������0� � ) (� �������� ����) 19

�72'�������������)%���������*�%�5���!��4)� ��� ���%:�77�� Link (�1�"�$���) ������1�"�$�����������*
%$������5�� �����������������%#�+��������$��$���"��%�������� "������%��67��!�"�%��� "*������������*" !����$#��������)��
� �$������%$���������!��������#%�& ��#�#������! "����� ������� �����< � ������!����!������%��67������*����� "*���������#���� (�1�� ���$��#�*�����%:����))��������)) �������������$0)�&�"$���$ .��##0�0�$��'0�1��������� 95"��*0��9 # ���"$������1����
� �#��- �./� 20
���
� �#��. �/0� ��+*%���(��� � (� �������� ����)
���!���#���������!#��.!����)����!#��)�$��)� .��##0��*������!#���&�"�����< ������%��67��! "��>�%�%#� �������������$0)��*)��� *#�&�"$���$ .��##0�0�$��'0�1��������� 95"��*0��9 # ���"$������1����
�������*�./� ��� ����#!&���'��� �
'�����%�������#����%� �� ��,�� )'��(�"���*��� "�������������
��������0�:5��,�� )'��(�"����*)%������������� � ��&�� !���,�� ��)�� ��%�������#����%� '��(�"���*���"�%� ('��(�"���*�)����� )'��(�"����*)%��� #��-��,0��������������) ��0���������0�A -�-��4���,�� ��)����0�*� ����"�%� ��%�)� ��,�� �� ��&-�� �4�,����������� �'��� �-�� � ����'��(�"��"�%�-%� ��0��� !���,�'��� dial-up ����"�%������"0�����*�!���0��,0�����������������)��
� ��� ��� !���,���%#)�� )'��(�"�� � ��&��=�� ������������./� ��*)%���� ����#!&���'��� �-�� !���,0������������ � ���,�����*)�� )'��(�"���*$���'�)���
��%�������#����%� �! ) � ���5� ��� )'��(�"��-����*)�� � ���,�����*)�� )'��(�"����$��� �&�*�! )�*� � ���*)�� � ���"���� �1-LINE� �*�� ��!�� ���������
!���,0����'��(�"���*�,�� �-��� � ���,�����*)�� )'��(�"���*$���'�)��� #!&��%������*)���// �"���'����� �- � ��� �-�-��)����*)���// � '������������� �$��������� �'��(�"���"0���%����� )'��(�"��
'�����%�������#����%� �� ��,0������������ � ���� )'��(�"���&� !��� �+&���� �� ��&-�� �4�����0����'��� �-�� %�6*� ���%����%� � )'��(�"����=�#���&��������!��0�-� �� -��'�)� ��,0����� )�&� !���#������� � ���� ) #!�%<.���*)���// � � ��� �-�-��)����*)���// ����� � ��&��=�-�-��%� ������ � )������!-%� �,0������������ � ���� )'��(�"���&� !��� #!�%!�������0����'��� �
� ��,0����� )'��(�"��� ��&*��*)����%� � )'��(�"���**���2 "��*)��� (*��*)����%�) � ������������./� ��� �'��� �-�� ��%�������2 "��*)� ��� )'��(�"��'�)��*)�'��(�"��� � ���,�����*)�� )'��(�"����$���#!&<.�%� *��*)�������*��0�*��*)����%���0�-� � ��� �-��)����*)����%� ����;� Error
Correction Mode (ECM - '��#��- ��$��"! �) #!�%!�����'��� �����*������
� ��� ��,��&��� )#�� DSL �����%����%� -���,0������%#)���// � DSL #!�% � �-�*��%#)���// � �� ��&-�� �4���#!&���'��� �-��
� ��� ��� !���,������������#�!���// �/�&#������� ��%��� ��'��(�"��2 )�� (PBX) ��0����0� � )���� ��0�� ���%�&��������! (ISDN) '�����%�������#����%� �������-���,0�������"�����*4������#!�% #!&�&#�������� ��%���-������ ������� ��=���&�2��%��,��*4�������� ������&��(/2��2 � ���� �
� �#��- �./� ��*)%���'��� � (� �������� ����) 21
�������� �4���'��� �-�� #��-�� �4���'��� �-��
� ��� �-�-���,����� ���*)���*)�� � �+" & �����%�������#����%� �������� Distinctive Ring
(��*)���*)�� � �+" &) ���������-������ ������� ��=� All Rings (�%!����!����"������)
� ������� Auto Answer (���������'����) ��=� Off (*0�) ��0��� ��,����� �? � ���% ��*)��*� )�! '��(�"����*)%�������*�� ��,��� ����'��� � �� ��&� �4���'��� �-����%)�������� ����
� ��� ��,�'��� dial-up ����"�%������*�,�� )'��(�"����*)%������������� '�����%�������#����%� -�-�������� :�<��#%�� ��'���������'��� �'�)���'����
� ��� ��,0�������0�����������'����� � ���� )'��(�"��������*)%�������������:� ��%����%� ���0�����������'������ � ��)� �4������� ��%�������#����%� � �������� ���� �*!��7�&�,����*)%�����%�)� ��*������ � � 3-1 �*��� 12
� '�����%�������#����%� �������-��4�������� �"0����'��� �'�)���'����� ��%�������#����%� -�������� �� �%������ �� Rings to Answer (��*)���*)�� � ) ��%� �� �%������
����*)���*)�� � �*����-%��*���0��������'��(�"�����'����� 4��� )���0��������'��(�"����� #!�%!�����'��� �� ����5� ���% �*�,��%! ��& � 10 %�� �* "��,� A ��%)�&�����*)��� A �0�����5� ���% ��*)�-%�
�)� ����) 5 %�� �*�0�"�� ���% ���� ������#!�%
��������0�:5��,�� )'��(�"����*)%��� � ��&�� ���� ������$��"! � �� �� �4�!�� ��,0������������0���������� #!&�� � �������*������ � �� ������� ���%�� ��// ���*)�"���'�����$� � #���%� ��������0�A ��5�� )� ���0� ��%� ������=�� ���� ���./� ���!��������������!� �����!��� � -��*������#!&�� � �������*!&,��� ����&����� ��� �%� �������,������*�����������./�
�������-�� �4���'��� �-�� #�����'��� �-��
�������� ��&��� )�! '��������%��0�������������-� ��%�)� ��,�� � ��� ��������� )�����%)� ��� "9" �� ��� ���!��#���� ��%���&)&����*�: 9-XXX-XXXX ('�)�* XXX-XXXX �0�� )�! '��� ��*�� ������ ����'��� �-�45�) � ������ ��%���&)& ����� Redial/Pause ($"��� �/����1�, ��� )
��0�����8 Space (� � ���) (#) :�� A ����&������0��� )���� *� (-) �� �> 5������#���$!
��#���$!�&#���%� '��(�"�����"�%�-%�
�� ��,�� )'��(�"��$����&�2� ������./� ��� ��#���� ��������*�./� ��� ����#!&��� '��� �"
����� 21
�������*�./� ��� ����'��� ���%)�����
%�6*#��- �./� �*��=�-�-�� �&�,�-������+" &��&��(/2��2 ��*-������ )'��(�"�� 2 ���� "���������������� ���� �%45�: � �������� �������!*) �� :�! #�� � ,�!* �*� '�!���*) ��*: �����*) ���'��*�:*) -���#!��� /*��8� �� �!* !&�������� �!�:*) ���:�'� <;!���;��� '�#!��� ������� ����:*) : ���*� �&��*) ����'��� ���� -���%�� -�) ����C����� �%��:���! #!&�%*)��
��%�������#����%� � �������� ���� �*!��7�&�,����*)%�����%�)� �#����� � � 3-1 �*��� 12
� ��� ��� !�����'��� ���%)������ �'��(�"�� ���� ��*�,0����'�)���� � ���������� �� ������,���8����'��(�"���"0����'��� �
� �#��- �./� 22

���
���1��1��� ����� ��� ����� #!'� �#��. �/0� ����"��$�����%�� ���1�������������%��67��������������#��� ������� �������������$0)�&�"$���$ .��##0�0�$��'0�1��������� 95"��*0��9 # ���"$������1����
'�����������8������� ����������1�������������2�*���!#��#��*������&�"�#0�����������6���������������� �&�"�1��*���%��67��! "���#�5������������ �)��&�"������������#��������������$ �1�� ����������������&�$&������#��� ������� � ������������2�*���!#��#��*�����*��$ ���!5����������)���##��* ���!��������>�����.!�@�&!���#������ HP ��&�$&����������2�*���!#��#��*���������! "��.!�@�&!�
���%������ ����%�� � �'�(������� �%�(�����1. ����'������$ ���#��?$ Setup ('�%�"�)
2. �)��� Print Report (,��,�����) �)��� Self-Test Report
(���������('����) ��������# OK ('���)
'�������&�'��*���*�%�5������ ������� �1�"�$��������������* !����$��+&�$&�������������#�����������*�&�"�#0������������������*�������������%#� !����$��+1�������������#�����������*�&�"�1��*���%��67��! "�� "*��������1�"�$�����������*%#�
���%������ ����%����������������$��(1. ����'������$ ���#��?$ Setup ('�%�"�)
2. �)��� Network Setup (��'�%�"��"�.����) �)��� Print
Network Settings (,��,���'�%�"��"�.����) ��������# OK ('���)
��9������ �����!��:7�����(��9���:������������ *$/�&��#)��$�&�"���.�����$��(��$��+���%#� �!������# *�������! "�����3�������� �1�� Microsoft® Windows® ��� *$/�&��#)��$�&�"���.�����$����; �$��+�������$&����������!���%#� ��(������9��� �1�� Microsoft Internet Explorer, Netscape, Opera, Mozilla
Firefox ���� Safari �$��+�#�'))�&<������(��9���:�����%#�
��(��9���:��������-6���� (EWS) $�����*0����������B���#���� (�1�� ����"��&�$&�) �����:,��$���� $������9�:������95"�.�)#���9���:�������������* ���# �����(��9���:��������-6������� ��(��9���:��������-6������$ ���!��������$���')��/��=� 95"����(��$! "�1�"�$�����������*�����$&��������)���(������9���$���C�����$��+��,#�)�1����%#� %$������>�������#����9�:���������������#���#; ��>�&��@8
#��*��(��9���:��������-6������� HP !������$��+#0���$0)+������')��/��=� ���%����������� �)���#���')��/��=����!���%#�#��*��$&����������!���
��// �'��� �4������5�-%������0�����������'����
������./� ���*�*�� ��������� �4���'��� �-�� #��-�� �4���'��� �-��" ����� 22
� )'��(�"���* "�������������*�% ) %-��"*)�"�
� �� )'��(�"��:5���� "���������������������-� �� �� ��&�,���%���"�%��"0��"��% ) % �� �� �4:0����%���"�%��*�� ��� ���!���������� :5�*����������� ��'��(�"�� �� ������,�� )'��(�"��� )�0� :5���=�� )'��(�"��#�� ��C ��**���� ���0��� ���� � ���� �1. � ��,�� )'��(�"���* "������������� �������! )� )�� ���5�� � �����%���"�%� � ���������! )
� )�*��� ���5�� � ���"���� 1-LINE �*�� ��!�� ���������
2. ��*)�� )'��(�"�������*���� � ���"�����*��;��)������%���"�%� #!&��*)��! )� )�*� � �� � ���,�����*)�� )'��(�"���*$���
���0��0��� ����� ��� ����� #!& � �#��- �./� 23

���%�������)���* �+ ��,������ -.����&�$&�%�& ��#�#�! "�����#����� ������� )����(������9���! "���������!���������$&����������!��� ����*����1�� ���%�& ��#�#���>� 123.123.123.123 ��&�$&���#�#����%�� �)����(������9���:
http://123.123.123.123
%�& ��#�#������� ������� ���#��*0��������������#�����������*
�)�����! "!�����,#��(��9���:��������-6�����)�� !����$��+������D�$�����&�"��)������$�*��������(�%#��*�����#��(����������%�
� �#��- �./� 24

25
���
����������� ����� ����� ���������� ���� Hewlett-Packard

© 2007 Hewlett-Packard Development Company, L.P.
Printed in Singapore新加坡印刷
Printed on recycled paper
Imprimé sur le Papier Recyclé
www.hp.com/support
Terdaftar di Departemen Perdagangan dan Perindustrian No. 0089/1.824.51
*C8187-90010**C8187-90010*
C8187-90010
EN THIDZHCN