


Bahasa
Halaman
Hukum

PowerPoint Presentations for Beginners (Video)
http://youtu.be/iYhDZ7yjM3w

Creating a new PowerPoint Presentation
Opening PowerPoint Presentation
There are two (2) option available in opening a
MS PowerPoint program; a new presentation/file
(which is the default when opening the said
program & to open for existing saved files.
For new presentation/file:
• The default one, or if you like to prepare
another presentation, click “MS Office button”
to select “New”, then choose customized
“templates” or begin a “blank presentation” by
clicking the “Create” button.
To open existing saved presentation/file:
• Click “MS Office button” to select “Open”,
then browse drive or folder for existing saved
presentation/file, then select to open
Adding text to MS PowerPoint slide
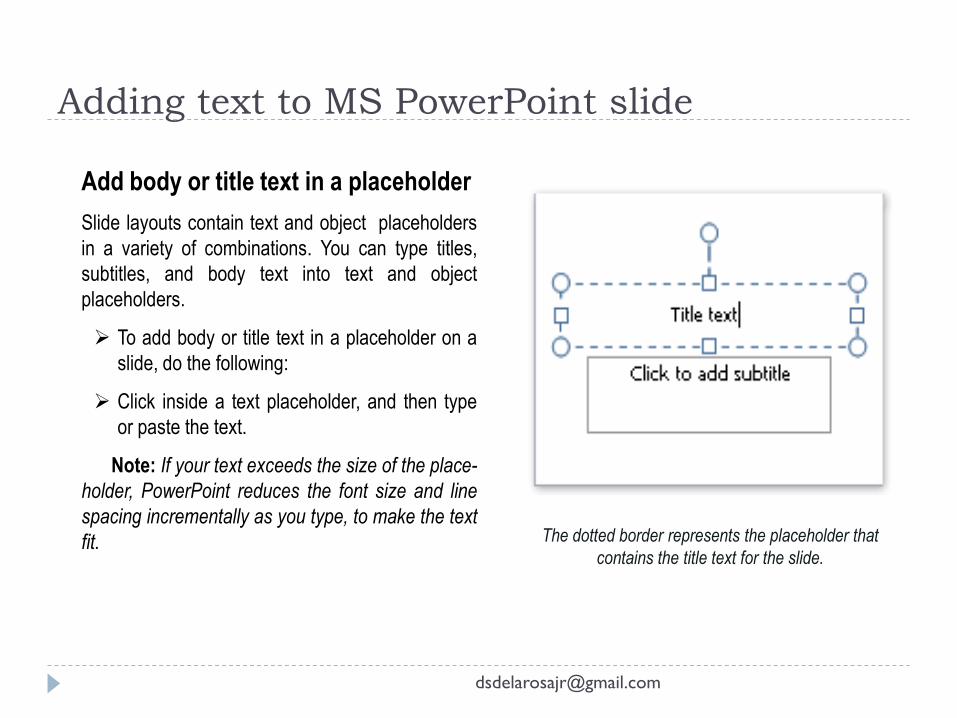
Add body or title text in a placeholder
Slide layouts contain text and object placeholders
in a variety of combinations. You can type titles,
subtitles, and body text into text and object
placeholders.
To add body or title text in a placeholder on a
slide, do the following:
Click inside a text placeholder, and then type
or paste the text.
Note: If your text exceeds the size of the place-
holder, PowerPoint reduces the font size and line
spacing incrementally as you type, to make the text
fit. The dotted border represents the placeholder that
contains the title text for the slide.
Add text to a shape
Shapes such as squares, circles, callout balloons, and block arrows can contain text. When you type text
into a shape, the text attaches to the shape and moves and rotates with it. You can also overlay text that is
independent of the shape and does not move when you move the shape.
Add text that becomes part of a shape
To add text that becomes part of a shape, select the shape, and then type or paste the text.
Add text that is independent of a shape
To add text that moves independently of a shape, add a text box, and then type or paste the text. Add a
text box.
• On the Insert tab, in the Text group, click Text Box.
Note: If you are using an East Asian language, from the Text Box drop-down menu, click either
Horizontal or Vertical alignment.
• Click the slide, and then drag the pointer to draw the text box.
Adding text to MS PowerPoint slide

Use text boxes to place text anywhere on a slide, such as outside a text placeholder. For example, you
can add a caption to a picture by creating a text box and positioning it near the picture. Also, a text box is
handy if you want to add text to a shape, but you don't want the text to attach to the shape. You can add a
border, fill, shadow, or three-dimensional (3-D) effect to text in a text box.
To add text to a text box, click inside the text box, and then type or paste the text.
Add text to a text box
Add a new slide
On the Home tab, in the Slides group, click New Slide.
Select a slide thumbnail from the layout gallery.
Duplicate slide within a presentation
To add a slide that contains the content of an existing slide in a presentation, you can duplicate the slide.
Important: If you need paste recovery (Paste recovery: Paste options that are available through a
button that appears after you paste content. If you click this button, you can choose formatting
options for pasted content.), which allows you to keep the formatting of the duplicated slide's
content, you will want to copy and paste the slides.
In the pane that contains the Outline and Slides tabs, click the Slides tab.
Select one or more slides that you want to duplicate.
On the Home tab, in the Slides group, click New Slide.
In the layout gallery, click Duplicate Selected Slides.
Note: The duplicated slides are inserted directly below the lowermost slide that you selected
Add a new or duplicate slide/s

When you save a file, you can save it to a folder on your hard disk drive, a network location, disk, CD,
the desktop, or another storage location. You need to identify the target location in the Save in list.
Otherwise, the saving process is the same, no matter what location you choose.
Save a file
Do the following in these 2007 Microsoft Office system programs:
Word, Excel, or PowerPoint
Click the Microsoft Office Button , and then click Save. Keyboard shortcut To save the file, press
CTRL+S.
InfoPath, OneNote, Project, Publisher, or Visio
On the File menu, click Save. Keyboard shortcut To save the file, press CTRL+S.
Note: If you are saving the file for the first time, you are asked to give it a name.
Saving the MS PowerPoint files
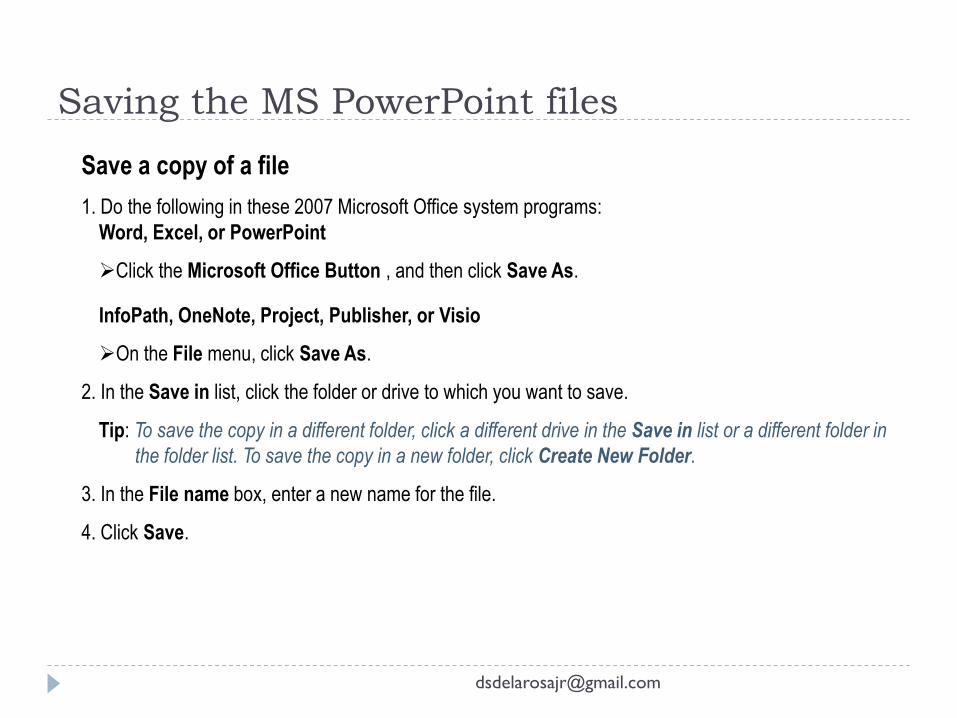
Save a copy of a file
1. Do the following in these 2007 Microsoft Office system programs:
Word, Excel, or PowerPoint
Click the Microsoft Office Button , and then click Save As.
InfoPath, OneNote, Project, Publisher, or Visio
On the File menu, click Save As.
2. In the Save in list, click the folder or drive to which you want to save.
Tip: To save the copy in a different folder, click a different drive in the Save in list or a different folder in
the folder list. To save the copy in a new folder, click Create New Folder.
3. In the File name box, enter a new name for the file.
4. Click Save.
Saving the MS PowerPoint files
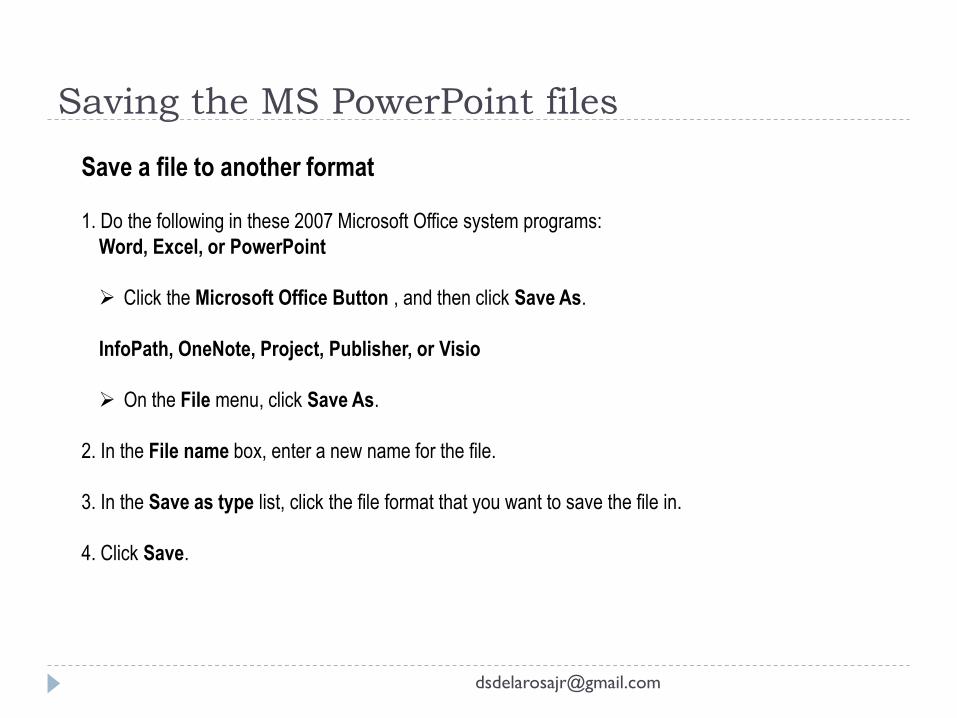
Save a file to another format
1. Do the following in these 2007 Microsoft Office system programs:
Word, Excel, or PowerPoint
Click the Microsoft Office Button , and then click Save As.
InfoPath, OneNote, Project, Publisher, or Visio
On the File menu, click Save As.
2. In the File name box, enter a new name for the file.
3. In the Save as type list, click the file format that you want to save the file in.
4. Click Save.
Saving the MS PowerPoint files
Test Out a Design Theme for Your PowerPoint
2007 Presentation
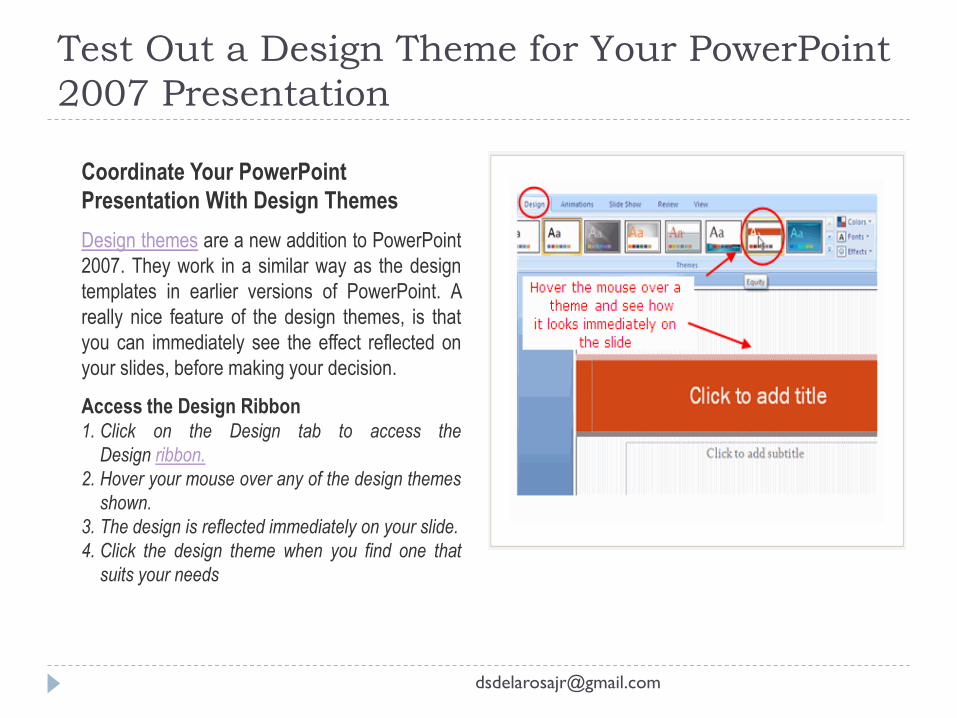
Coordinate Your PowerPoint
Presentation With Design Themes
Design themes are a new addition to PowerPoint
2007. They work in a similar way as the design
templates in earlier versions of PowerPoint. A
really nice feature of the design themes, is that
you can immediately see the effect reflected on
your slides, before making your decision.
Access the Design Ribbon1. Click on the Design tab to access the
Design ribbon.
2. Hover your mouse over any of the design themes
shown.
3. The design is reflected immediately on your slide.
4. Click the design theme when you find one that
suits your needs

More Design Themes are Available
Test Out More Design Themes
The design themes that are immediately visible
on the Design ribbon are not all the themes
available. You can scroll through the existing
design themes by clicking on the up or down
arrows to the right of the themes shown, or click
the drop down arrow to reveal all of the
available design themes at one time.
More design themes are available to download
from the Microsoft site, by clicking on that link.
Change the Color Scheme of the Design
Theme
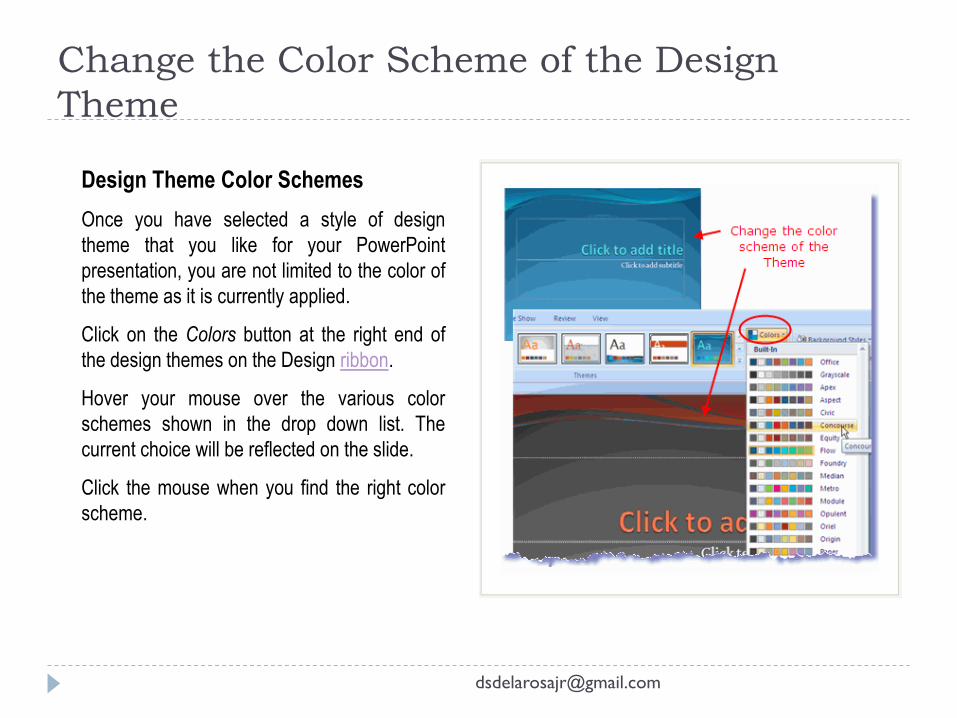
Design Theme Color Schemes
Once you have selected a style of design
theme that you like for your PowerPoint
presentation, you are not limited to the color of
the theme as it is currently applied.
Click on the Colors button at the right end of
the design themes on the Design ribbon.
Hover your mouse over the various color
schemes shown in the drop down list. The
current choice will be reflected on the slide.
Click the mouse when you find the right color
scheme.
Font Families are Part of the Design Themes
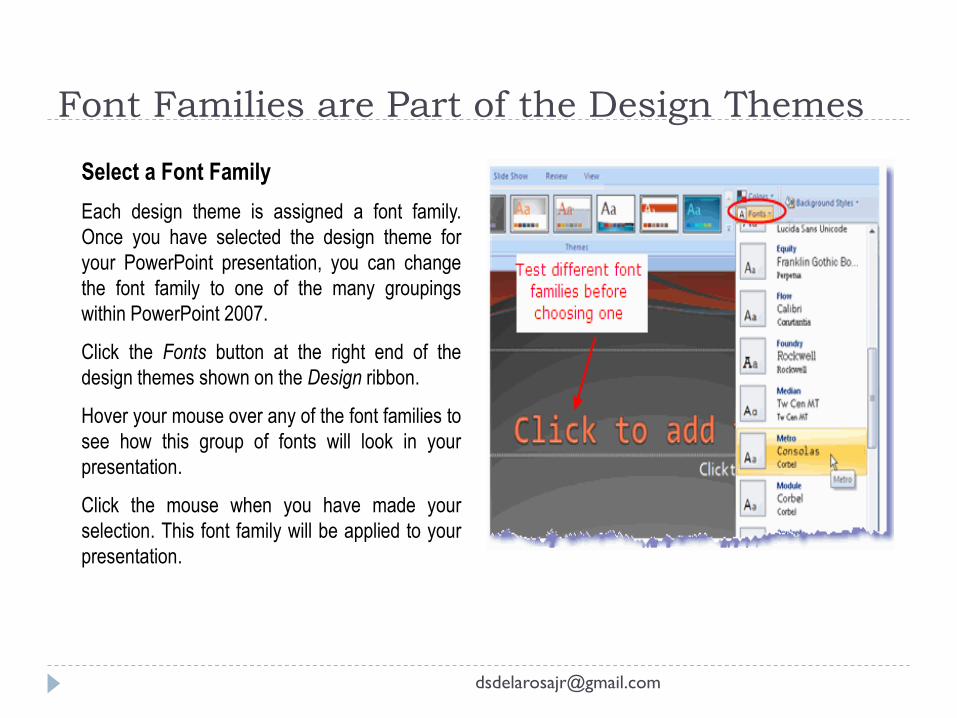
Select a Font Family
Each design theme is assigned a font family.
Once you have selected the design theme for
your PowerPoint presentation, you can change
the font family to one of the many groupings
within PowerPoint 2007.
Click the Fonts button at the right end of the
design themes shown on the Design ribbon.
Hover your mouse over any of the font families to
see how this group of fonts will look in your
presentation.
Click the mouse when you have made your
selection. This font family will be applied to your
presentation.

Background Styles of Design Themes
Change the Background Style
Just as you were able to change the
background on a plain PowerPoint slide, you
can do the same while using one of the
many design themes.
Click the Background Styles button on the
Design ribbon.
Hover your mouse over any of the
background styles.
The background style will be reflected on the
slide for you to evaluate.
Click the mouse when you find a background
style that you like.
Hide Background Graphics on the Design
Theme
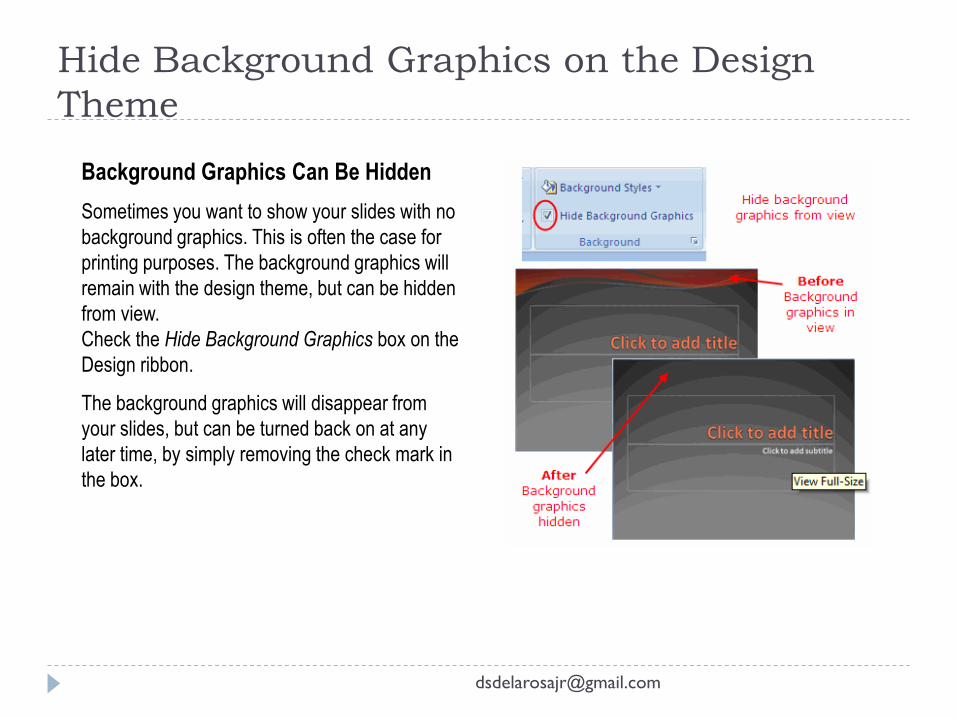
Background Graphics Can Be Hidden
Sometimes you want to show your slides with no
background graphics. This is often the case for
printing purposes. The background graphics will
remain with the design theme, but can be hidden
from view.
Check the Hide Background Graphics box on the
Design ribbon.
The background graphics will disappear from
your slides, but can be turned back on at any
later time, by simply removing the check mark in
the box.
Open the File Containing the Excel Chart
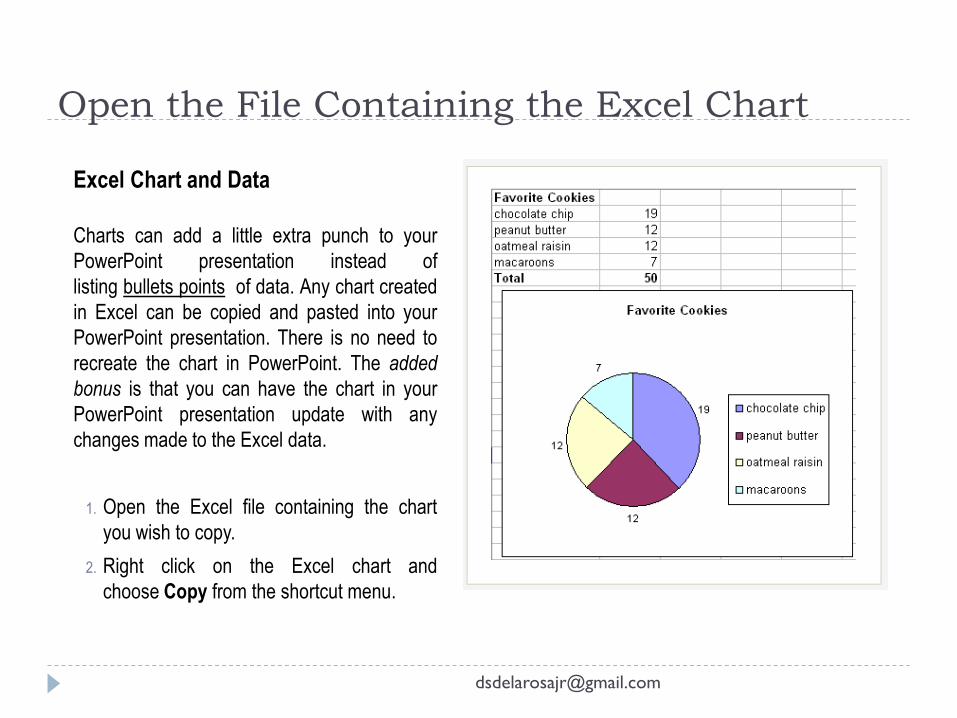
Excel Chart and Data
Charts can add a little extra punch to your
PowerPoint presentation instead of
listing bullets points of data. Any chart created
in Excel can be copied and pasted into your
PowerPoint presentation. There is no need to
recreate the chart in PowerPoint. The added
bonus is that you can have the chart in your
PowerPoint presentation update with any
changes made to the Excel data.
1. Open the Excel file containing the chart
you wish to copy.
2. Right click on the Excel chart and
choose Copy from the shortcut menu.
Paste Excel Chart to PowerPoint Slide
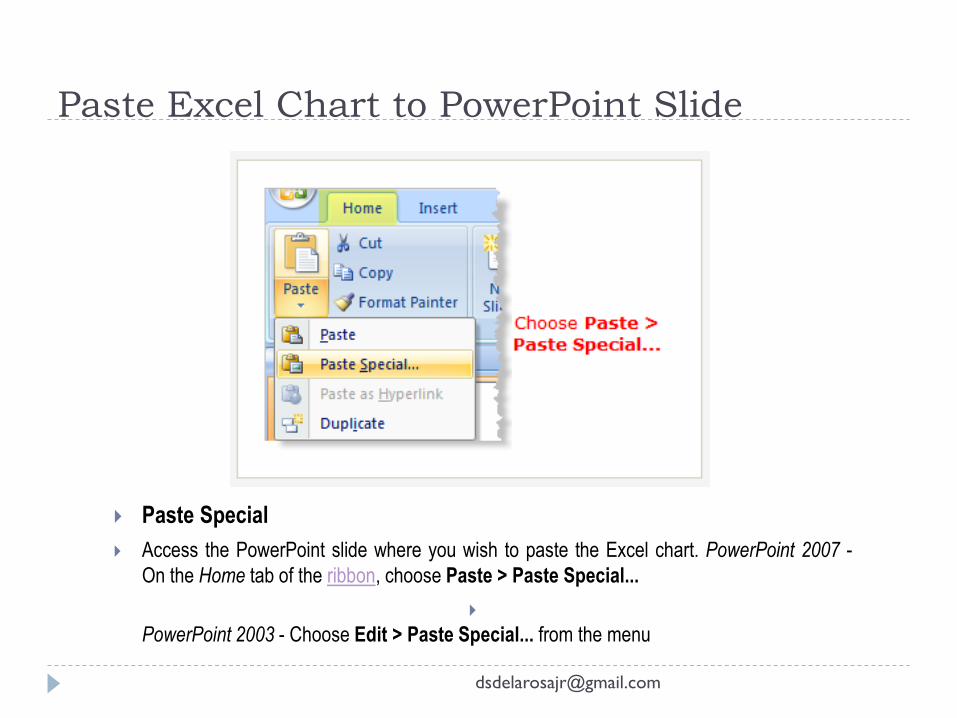
Paste Special
Access the PowerPoint slide where you wish to paste the Excel chart. PowerPoint 2007 -
On the Home tab of the ribbon, choose Paste > Paste Special...
PowerPoint 2003 - Choose Edit > Paste Special... from the menu
The Paste Special Dialog Box in PowerPoint
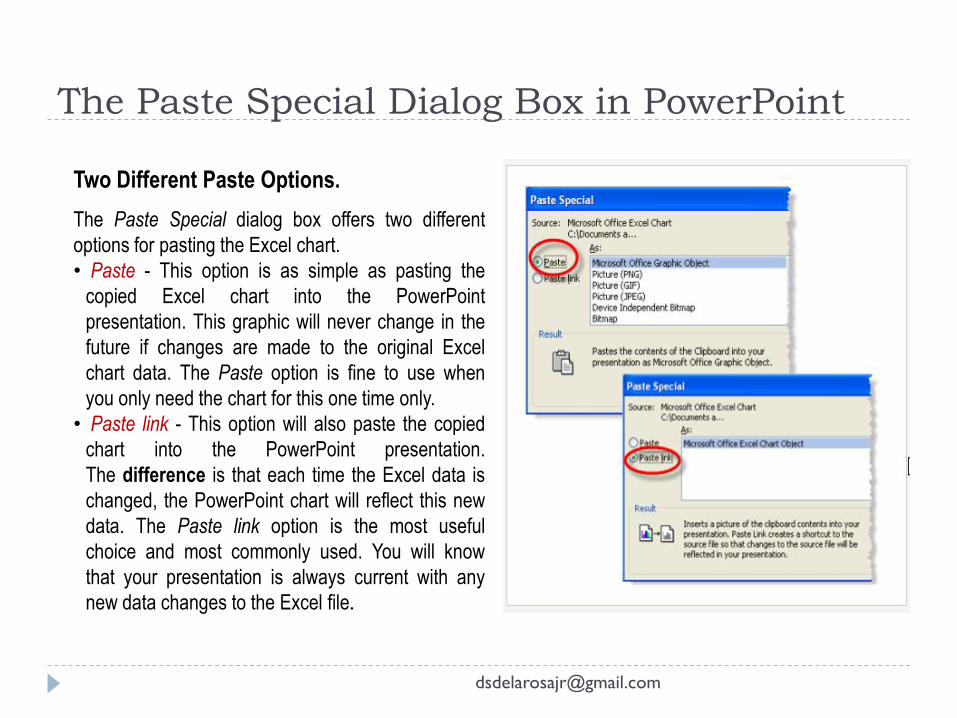
Two Different Paste Options.
The Paste Special dialog box offers two different
options for pasting the Excel chart.
• Paste - This option is as simple as pasting the
copied Excel chart into the PowerPoint
presentation. This graphic will never change in the
future if changes are made to the original Excel
chart data. The Paste option is fine to use when
you only need the chart for this one time only.
• Paste link - This option will also paste the copied
chart into the PowerPoint presentation.
The difference is that each time the Excel data is
changed, the PowerPoint chart will reflect this new
data. The Paste link option is the most useful
choice and most commonly used. You will know
that your presentation is always current with any
new data changes to the Excel file.
Change Chart Data in Original Excel File
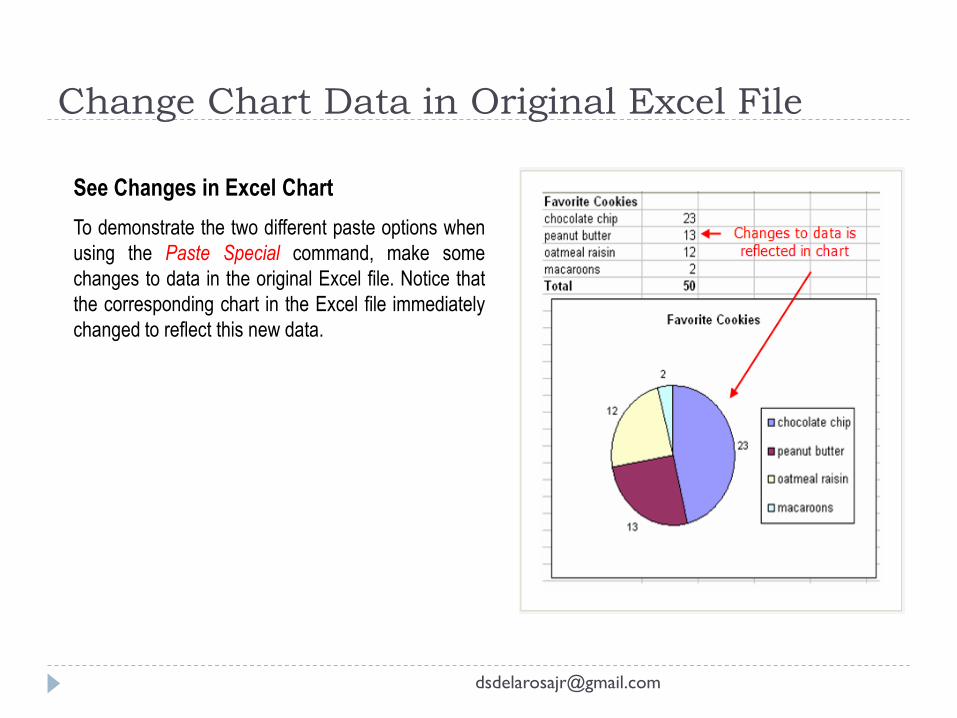
See Changes in Excel Chart
To demonstrate the two different paste options when
using the Paste Special command, make some
changes to data in the original Excel file. Notice that
the corresponding chart in the Excel file immediately
changed to reflect this new data.

Results When Pasting an Excel Chart
This Excel chart example was simply pasted
into the PowerPoint slide. Note that the
changes to data that were made in
the previous step, are not reflected on the
slide.
Pasting an Excel Chart Directly into PowerPoint
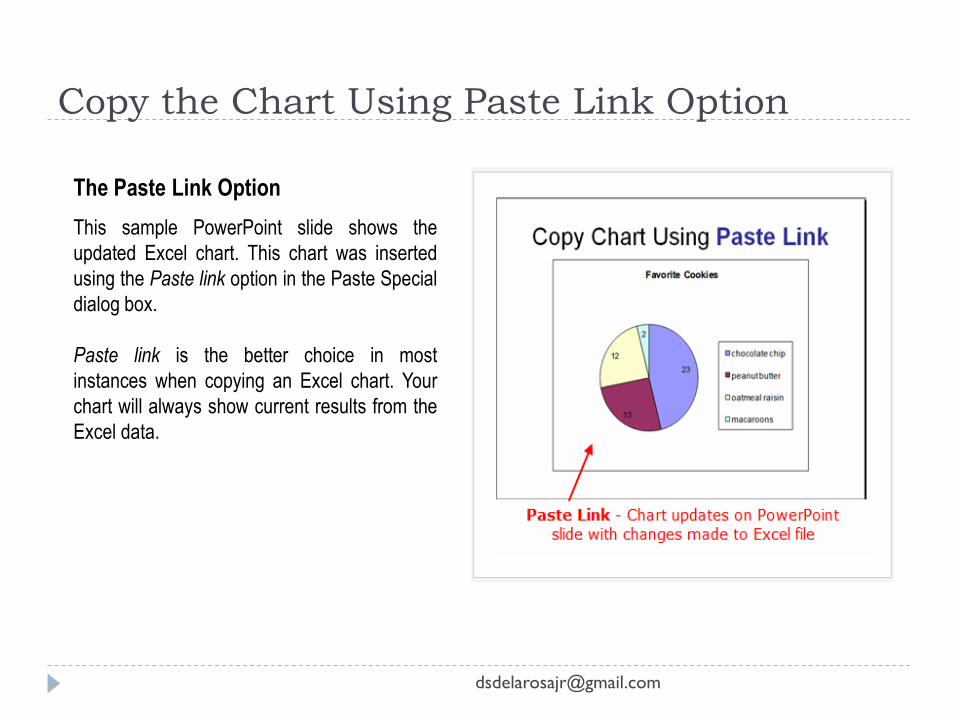
The Paste Link Option
This sample PowerPoint slide shows the
updated Excel chart. This chart was inserted
using the Paste link option in the Paste Special
dialog box.
Paste link is the better choice in most
instances when copying an Excel chart. Your
chart will always show current results from the
Excel data.
Copy the Chart Using Paste Link Option

Linked PowerPoint Files
Each time you open a PowerPoint
presentation that is linked to another Microsoft
Office product, such as Excel or Word, you
will be prompted to update the links in the
presentation file.
If you trust the source of the presentation,
then choose to update the links. All links to
other documents will be updated with any new
changes. If you choose the Cancel option in
this dialog box, the presentation will still open,
but any new information contained in linked
files, such as an Excel chart, will not be
updated.
Linked Files are Updated When Opened
Hyperlink Options in PowerPoint
Presentations
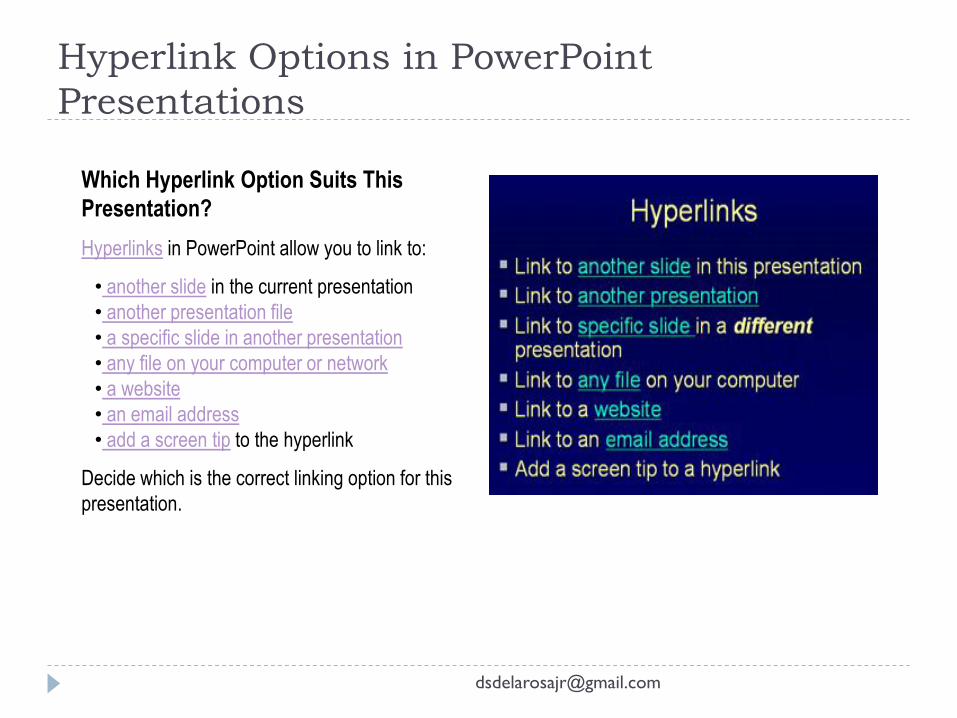
Which Hyperlink Option Suits This
Presentation?
Hyperlinks in PowerPoint allow you to link to:
• another slide in the current presentation
• another presentation file
• a specific slide in another presentation
• any file on your computer or network
• a website
• an email address
• add a screen tip to the hyperlink
Decide which is the correct linking option for this
presentation.

Use the Hyperlink Button in PowerPoint
PowerPoint 2003 and earlier:
Select the text or graphic object to be linked.
Click on the hyperlink button on the toolbar
or choose Insert > Hyperlink from the
menu.
PowerPoint 2007:
Select the text or graphic object to be linked.
Click on the Insert tab of the ribbon.
Click the hyperlink button in the Links
section of the ribbon.

Add a Hyperlink to a Specific Slide in This
Presentation
Locating the Slide for the Hyperlink
After clicking on the hyperlink button, the Edit
Hyperlink dialog box will open.
1. Select the option Place in This Document
2. Click on the slide that you wish to link to.
Options are –
• First Slide
• Last Slide
• Next Slide
• Previous Slide
• or choose the specific slide by its Title
A preview of the slide will appear to help
you make your choice.
3. Click OK
Hyperlink to a Specific Slide in a Different
PowerPoint Presentation
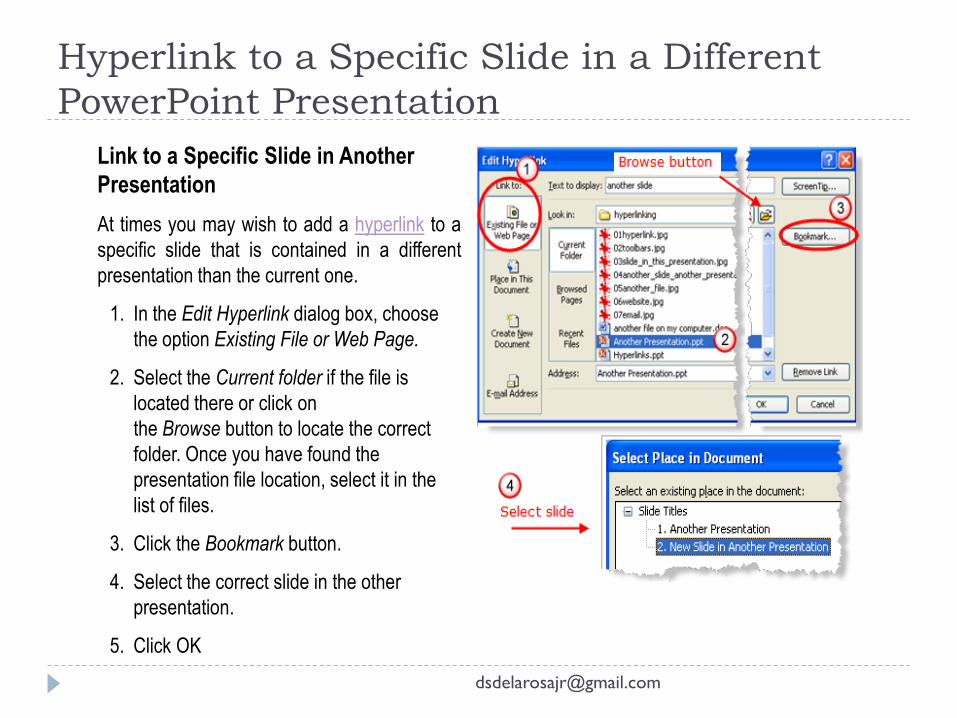
Link to a Specific Slide in Another
Presentation
At times you may wish to add a hyperlink to a
specific slide that is contained in a different
presentation than the current one.
1. In the Edit Hyperlink dialog box, choose
the option Existing File or Web Page.
2. Select the Current folder if the file is
located there or click on
the Browse button to locate the correct
folder. Once you have found the
presentation file location, select it in the
list of files.
3. Click the Bookmark button.
4. Select the correct slide in the other
presentation.
5. Click OK
Hyperlink to Another File on Your Computer
or Network
Link to Another Presentation or Another File Type
You are not limited to creating hyperlinks to other PowerPoint slides. You can create
a hyperlink to any file on your computer or network, no matter what program was
used to create the other file.
There are two separate scenarios available during your slide show presentation.
• If the hyperlink goes to another PowerPoint presentation, on click, that
presentation will simply open and be the active presentation on screen.
• If the hyperlink is to a file created in another program, on click, the file will open in
its corresponding program. This will then be the active program on screen.
Hyperlink to Another File on Your Computer
or Network…. (continuation)
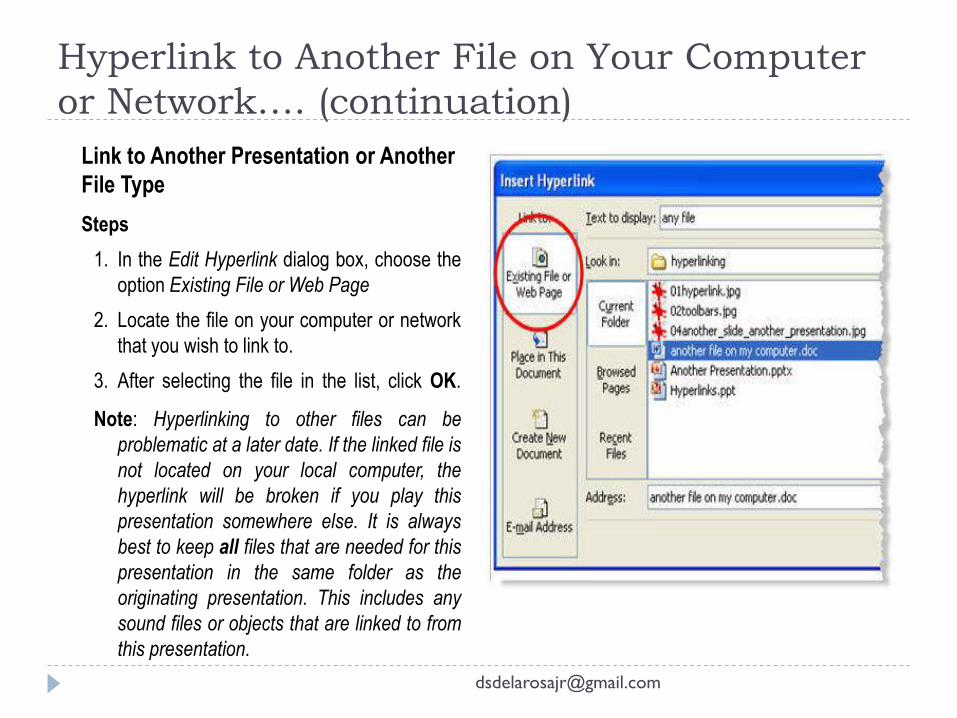
Link to Another Presentation or Another
File Type
Steps
1. In the Edit Hyperlink dialog box, choose the
option Existing File or Web Page
2. Locate the file on your computer or network
that you wish to link to.
3. After selecting the file in the list, click OK.
Note: Hyperlinking to other files can be
problematic at a later date. If the linked file is
not located on your local computer, the
hyperlink will be broken if you play this
presentation somewhere else. It is always
best to keep all files that are needed for this
presentation in the same folder as the
originating presentation. This includes any
sound files or objects that are linked to from
this presentation.
Hyperlink to a Website from PowerPoint
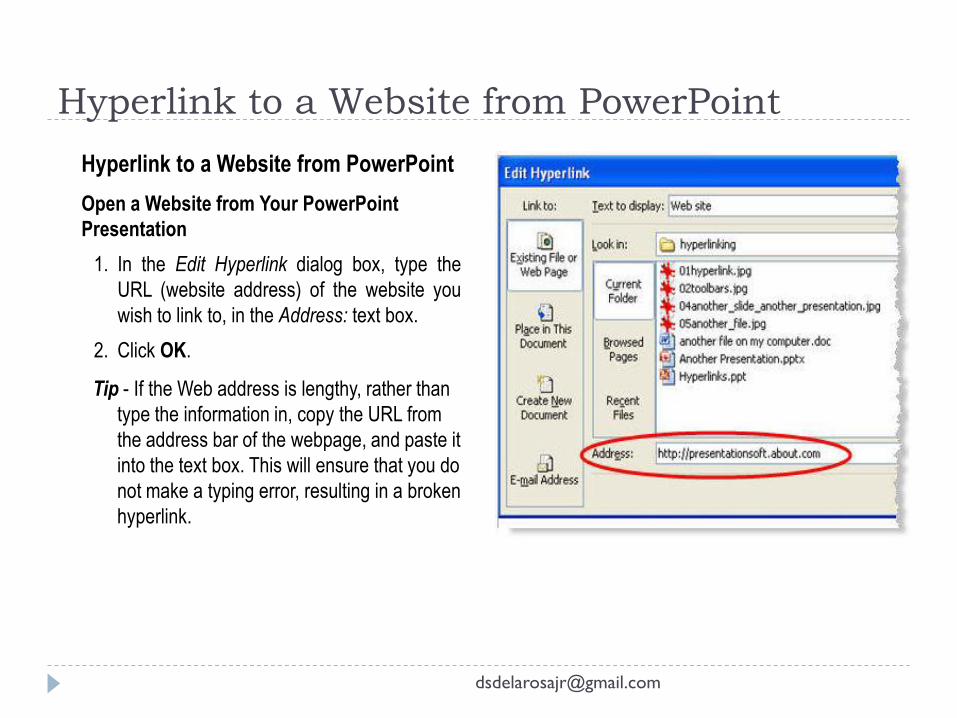
Hyperlink to a Website from PowerPoint
Open a Website from Your PowerPoint
Presentation
1. In the Edit Hyperlink dialog box, type the
URL (website address) of the website you
wish to link to, in the Address: text box.
2. Click OK.
Tip - If the Web address is lengthy, rather than
type the information in, copy the URL from
the address bar of the webpage, and paste it
into the text box. This will ensure that you do
not make a typing error, resulting in a broken
hyperlink.
Hyperlink to an Email Address from
PowerPoint
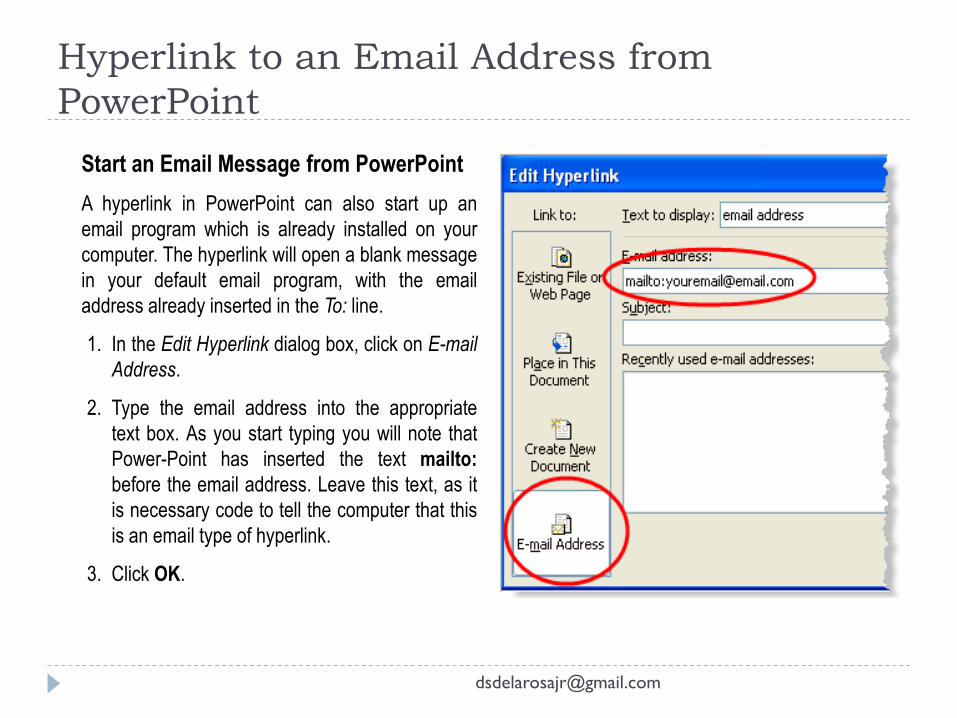
Start an Email Message from PowerPoint
A hyperlink in PowerPoint can also start up an
email program which is already installed on your
computer. The hyperlink will open a blank message
in your default email program, with the email
address already inserted in the To: line.
1. In the Edit Hyperlink dialog box, click on E-mail
Address.
2. Type the email address into the appropriate
text box. As you start typing you will note that
Power-Point has inserted the text mailto:
before the email address. Leave this text, as it
is necessary code to tell the computer that this
is an email type of hyperlink.
3. Click OK.
Add a Screen Tip to a Hyperlink on Your
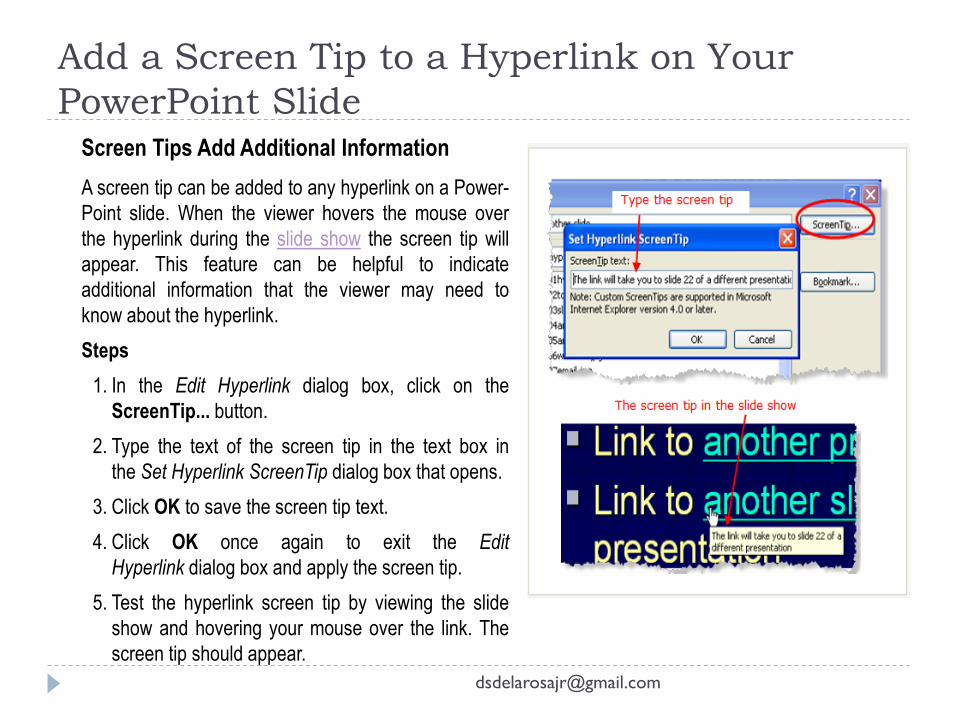
PowerPoint SlideScreen Tips Add Additional Information
A screen tip can be added to any hyperlink on a Power-
Point slide. When the viewer hovers the mouse over
the hyperlink during the slide show the screen tip will
appear. This feature can be helpful to indicate
additional information that the viewer may need to
know about the hyperlink.
Steps
1. In the Edit Hyperlink dialog box, click on the
ScreenTip... button.
2. Type the text of the screen tip in the text box in
the Set Hyperlink ScreenTip dialog box that opens.
3. Click OK to save the screen tip text.
4. Click OK once again to exit the Edit
Hyperlink dialog box and apply the screen tip.
5. Test the hyperlink screen tip by viewing the slide
show and hovering your mouse over the link. The
screen tip should appear.
Printing Options in PowerPoint 2007
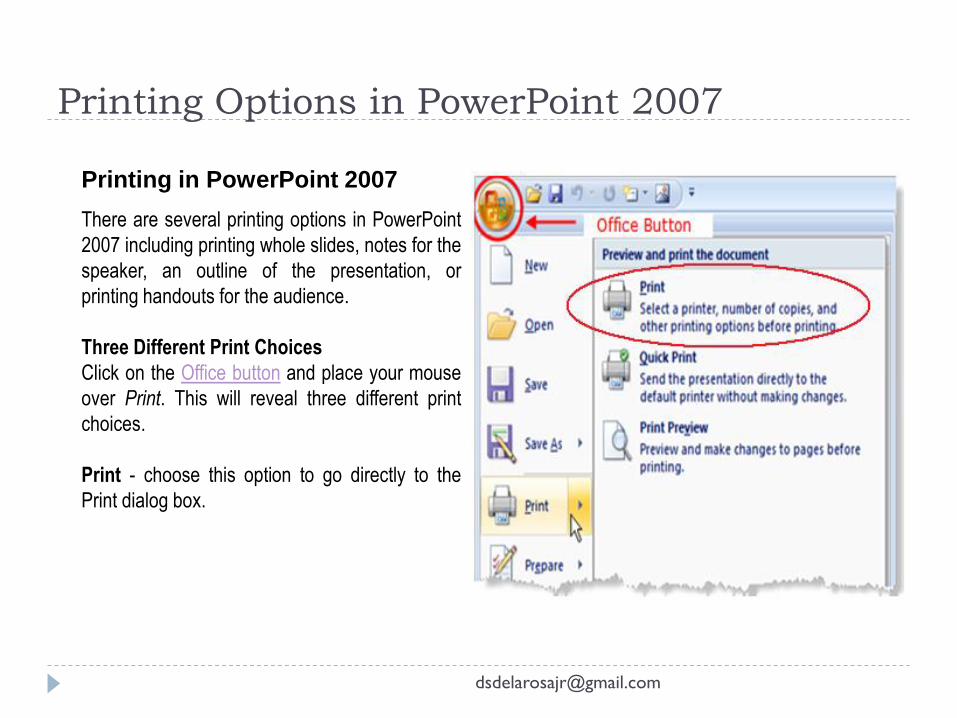
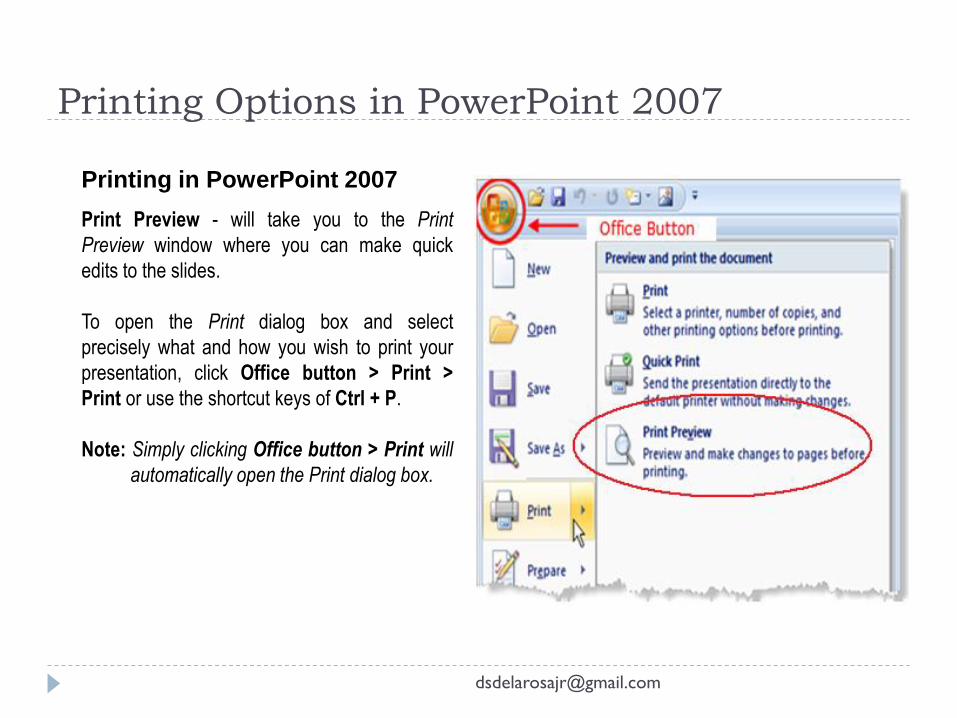
Printing in PowerPoint 2007
There are several printing options in PowerPoint
2007 including printing whole slides, notes for the
speaker, an outline of the presentation, or
printing handouts for the audience.
Three Different Print Choices
Click on the Office button and place your mouse
over Print. This will reveal three different print
choices.
Print - choose this option to go directly to the
Print dialog box.
Printing Options in PowerPoint 2007
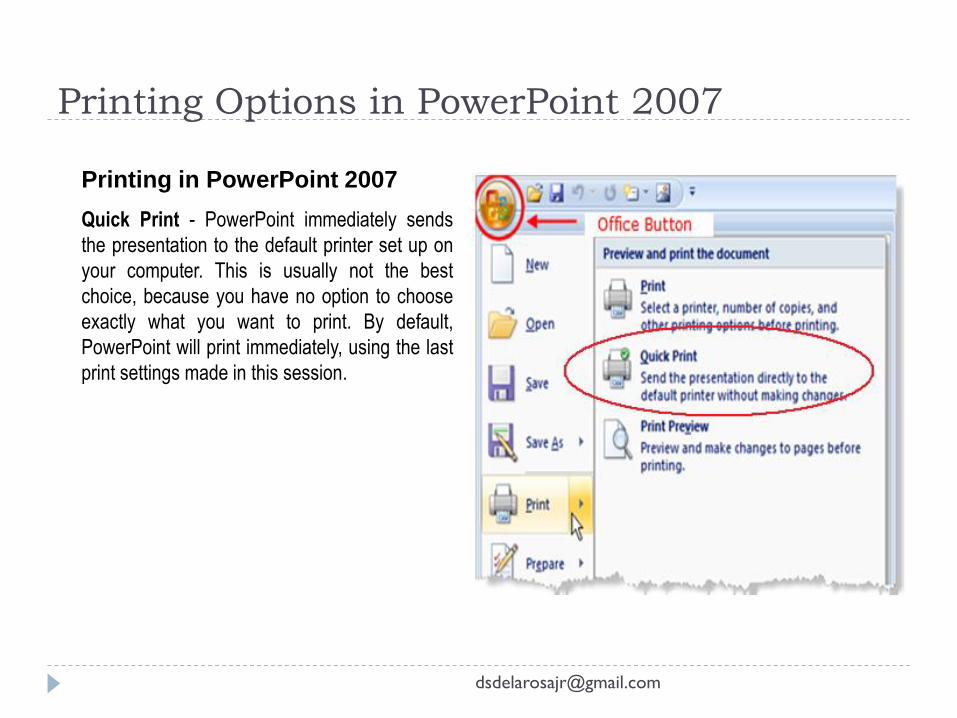
Printing in PowerPoint 2007
Quick Print - PowerPoint immediately sends
the presentation to the default printer set up on
your computer. This is usually not the best
choice, because you have no option to choose
exactly what you want to print. By default,
PowerPoint will print immediately, using the last
print settings made in this session.
Printing Options in PowerPoint 2007
Printing in PowerPoint 2007
Print Preview - will take you to the Print
Preview window where you can make quick
edits to the slides.
To open the Print dialog box and select
precisely what and how you wish to print your
presentation, click Office button > Print >
Print or use the shortcut keys of Ctrl + P.
Note: Simply clicking Office button > Print will
automatically open the Print dialog box.
Printing Options in the PowerPoint 2007 Print
Dialog Box
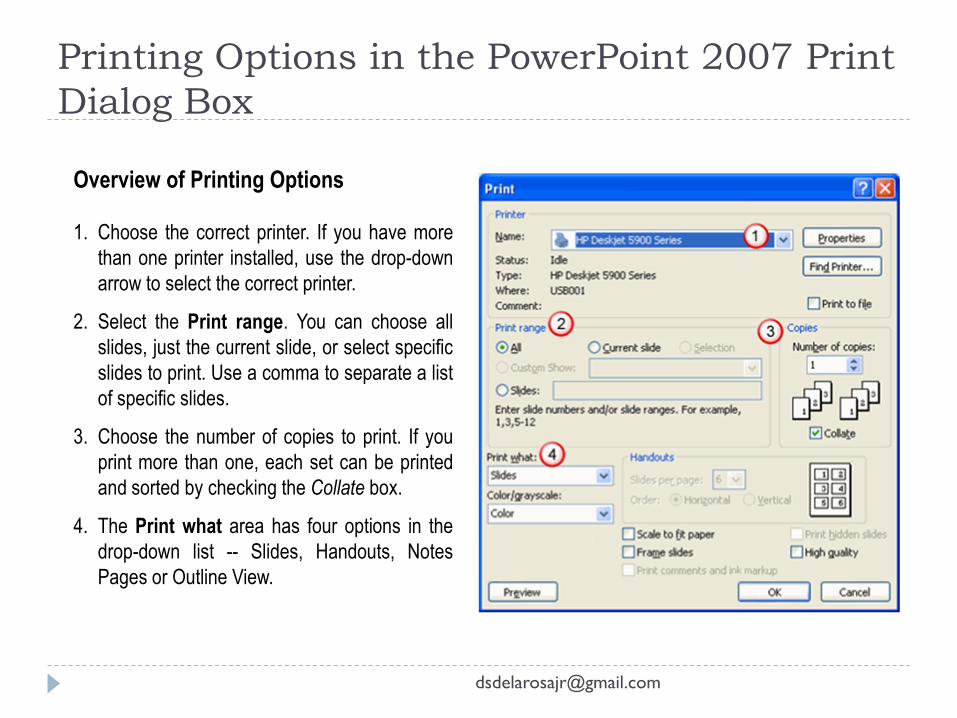
Overview of Printing Options
1. Choose the correct printer. If you have more
than one printer installed, use the drop-down
arrow to select the correct printer.
2. Select the Print range. You can choose all
slides, just the current slide, or select specific
slides to print. Use a comma to separate a list
of specific slides.
3. Choose the number of copies to print. If you
print more than one, each set can be printed
and sorted by checking the Collate box.
4. The Print what area has four options in the
drop-down list -- Slides, Handouts, Notes
Pages or Outline View.

Printing Options in the PowerPoint 2007 Print
Dialog Box
Overview of Printing Options
5. You can opt to scale the printout to fit special
paper and also to place frames around slides
printed in Handouts view.
6. A good way to save toner and paper is
to Preview the printout before sending it to
the printer, in case of errors.
7. When you are satisfied with your selections,
press the OK button.

Printing Whole Slides in PowerPoint 2007
To Print Whole Slides
1. Click Office button > Print.
2. Select which slides to print.
3. Make sure that Slides is selected in the Print
what box.
4. Choose the option to Scale to fit paper.
5. Choose color, grayscale or pure black and
white.
6. Preview (optional).
7. Click on OK.

Printing Handouts in PowerPoint 2007
A Take Home Package
Printing Handouts in PowerPoint 2007 creates a
take home package of the presentation for the
audience. You can choose to print one (full size)
slide to nine (miniature) slides per page.
Steps for printing Handouts
1. Click Office button > Print.
2. Select Handouts from the Print what drop-
down box.
3. Choose how many slides per page and
whether you want a frame around the slides.
Framing the slides adds a nice touch to a
printout.
4. It is always a good idea to choose Scale to fit
paper.
5. Click on OK
Printing Handouts for Note Taking in
PowerPoint 2007
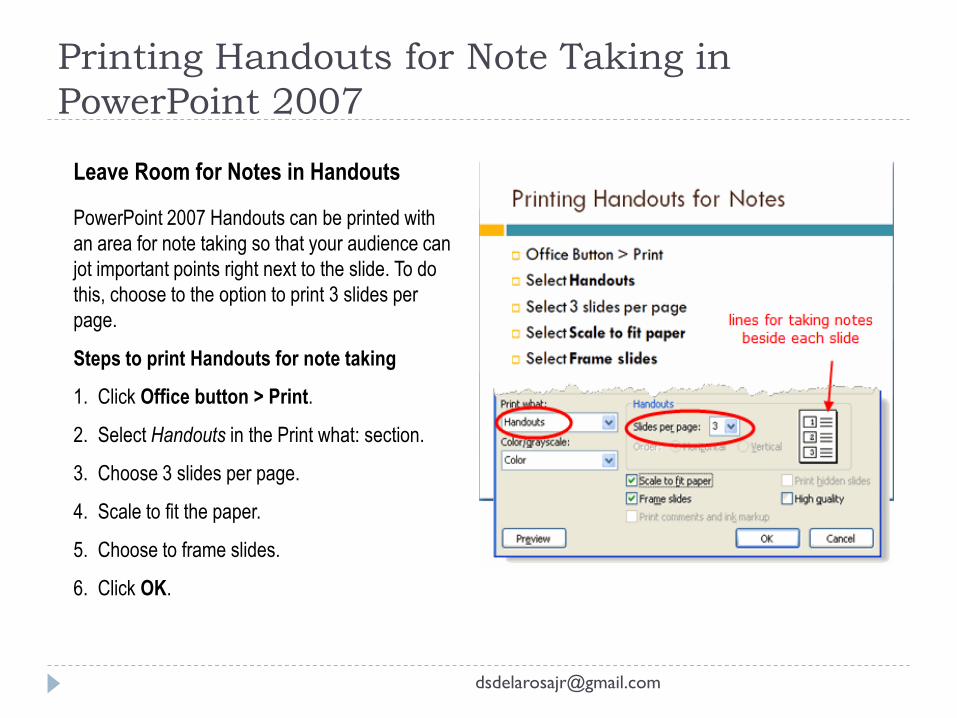
Leave Room for Notes in Handouts
PowerPoint 2007 Handouts can be printed with
an area for note taking so that your audience can
jot important points right next to the slide. To do
this, choose to the option to print 3 slides per
page.
Steps to print Handouts for note taking
1. Click Office button > Print.
2. Select Handouts in the Print what: section.
3. Choose 3 slides per page.
4. Scale to fit the paper.
5. Choose to frame slides.
6. Click OK.

Sample Handouts Page With Room for Notes
Sample PowerPoint Handouts for Notes
This sample Handouts page shows the area for
note taking to the right of each slide allowing
your audience to jot important points right next to
the slide.

Speaker Notes in PowerPoint 2007
Notes Pages for the Speaker Only
Speaker notes can be printed with each slide as an
aid when giving a PowerPoint 2007 presentation.
Each slide is printed in miniature on a single page,
with the speaker notes below.
1. Choose Office button > Print
2. Select the pages to print
3. Choose Notes Pages from the Print what drop-
down list
4. Choose any other options
5. Previewing the notes pages is a good idea
6. Click OK.
Note: Speaker notes can also be exported for use in
Microsoft Word documents by selecting
Office button > Publish > Create Handouts
in Microsoft Office Word.
Printing in Outline View
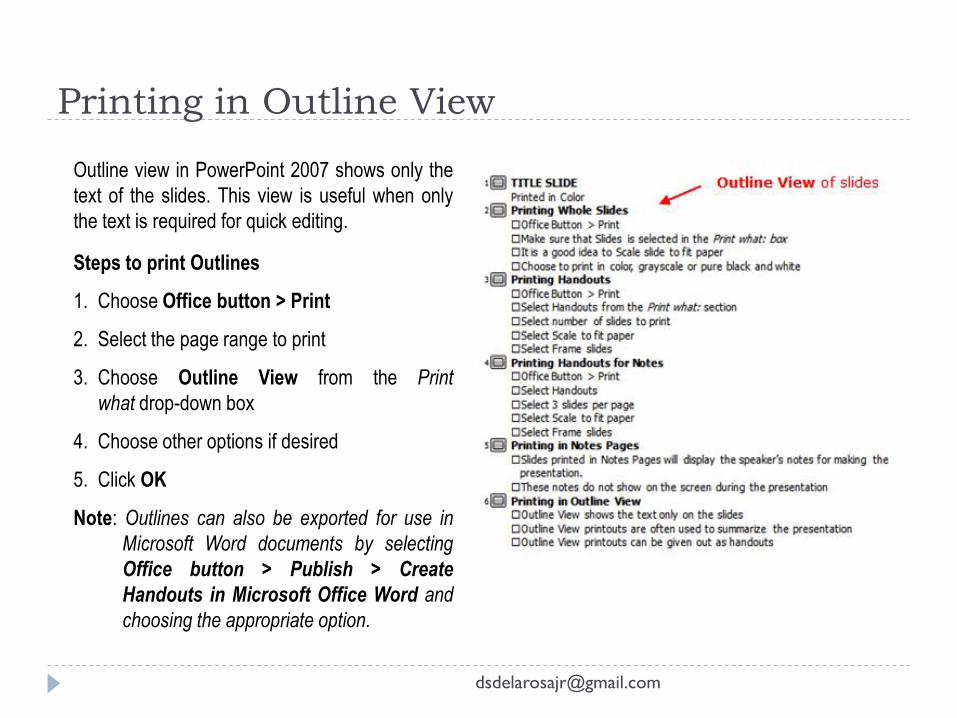
Outline view in PowerPoint 2007 shows only the
text of the slides. This view is useful when only
the text is required for quick editing.
Steps to print Outlines
1. Choose Office button > Print
2. Select the page range to print
3. Choose Outline View from the Print
what drop-down box
4. Choose other options if desired
5. Click OK
Note: Outlines can also be exported for use in
Microsoft Word documents by selecting
Office button > Publish > Create
Handouts in Microsoft Office Word and
choosing the appropriate option.
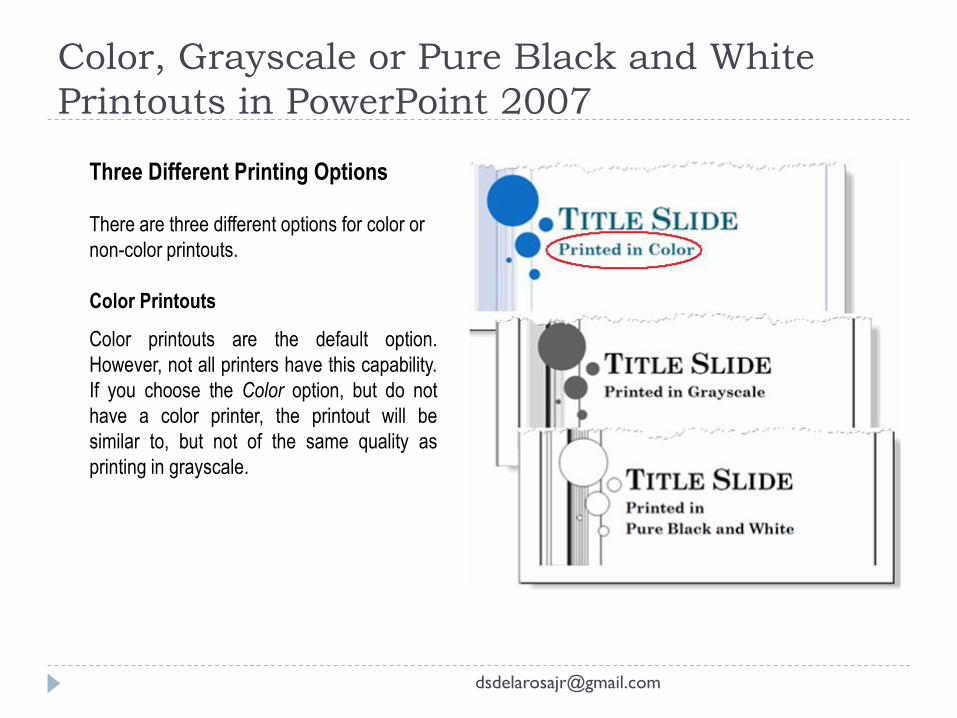
Color, Grayscale or Pure Black and White
Printouts in PowerPoint 2007
Three Different Printing Options
There are three different options for color or
non-color printouts.
Color Printouts
Color printouts are the default option.
However, not all printers have this capability.
If you choose the Color option, but do not
have a color printer, the printout will be
similar to, but not of the same quality as
printing in grayscale.

Color, Grayscale or Pure Black and White
Printouts in PowerPoint 2007
Three Different Printing Options
Grayscale Printouts
If you do not have a color printer or do not
require a color printout, choosing Grayscale
will print all objects on the page in shades of
gray. Objects will appear crisper and cleaner
if Grayscale is selected for non-color printers
rather than printing using the default Color
option.

Color, Grayscale or Pure Black and White
Printouts in PowerPoint 2007
Three Different Printing Options
Pure Black and White Printouts
As the name suggests, this option prints
slides in black and white. There are no
shades of gray. As a result, several objects
on the design theme of the slide, such as
embossing and drop shadows will not print.
Text will print out as black, even if you chose
gray as the original color of the text.
Top Related
Copyright © 2022 FDOKUMEN

