


Bahasa
Halaman
Hukum


SJW; Reviewed:
SPOC 4/9/2018
Solution & Interoperability Test Lab Application Notes
©2018 Avaya Inc. All Rights Reserved.
1 of 32
RBRMR_AES71
Avaya Solution & Interoperability Test Lab
Application Notes for Configuring Avaya Aura®
Communication Manager R7.1 and Avaya Aura®
Application Enablement Services R7.1 to interoperate with
Red Box Recorder’s Quantify 4B SP2 using Multiple
Registration – Issue 1.0
Abstract
The Application Notes describe the configuration steps for Red Box Recorders Quantify 4B
SP2 solution with Avaya Aura® Communication Manager R7.1 and Avaya Aura®
Application Enablement Services R7.1. Red Box Recorders Quantify 4B SP2 system is a voice
recording solution which can be used to record voice streams for Avaya telephony
Information in these Application Notes has been obtained through DevConnect compliance
testing and additional technical discussions. Testing was conducted via the DevConnect
Program at the Avaya Solution and Interoperability Test Lab.

SJW; Reviewed:
SPOC 4/9/2018
Solution & Interoperability Test Lab Application Notes
©2018 Avaya Inc. All Rights Reserved.
2 of 32
RBRMR_AES71
1. Introduction The purpose of this document is to describe the compliance testing carried out using the Multiple
Device Registration recording method on Red Box Recorder Quantify (Quantify) with Avaya
Aura® Communication Manager (Communication Manager) and Avaya Aura® Application
Enablement Services (AES). It includes a description of the configuration of both the Avaya and
the Quantify solutions, a description of the tests that were performed and a summary of the
results of those tests.
Quantify is a voice recording system which can be used to record the voice stream of Avaya
telephony endpoints. In this compliance test, it uses Communication Manager’s Multiple Device
Registration feature via the AES Device, Media, and Call Control (DMCC) interface to capture
the audio and call details for call recording. The application uses the AES DMCC service to
register the extensions that are to be recorded. When the extension receives an event pertaining
to the start of a call, the application receives the extensions RTP media stream.
The Quantify solution comprises of Red Box Recorder’s Server licensed for Avaya “Active”
recording.
2. General Test Approach and Test Results The test approach was to verify that the calls placed and recorded using the Quantify solution
with Avaya solution functioned correctly with good audio quality received. Functionality testing
included basic telephony operations such as answer, hold/retrieve, transfer, conference, call pick-
up, call park and calls to\from the PSTN. Tests also included ACD Agent Recording. All tests
were successful.
DevConnect Compliance Testing is conducted jointly by Avaya and DevConnect members. The
jointly-defined test plan focuses on exercising APIs and/or standards-based interfaces pertinent
to the interoperability of the tested products and their functionalities. DevConnect Compliance
Testing is not intended to substitute full product performance or feature testing performed by
DevConnect members, nor is it to be construed as an endorsement by Avaya of the suitability or
completeness of a DevConnect member’s solution.
Avaya recommends our customers implement Avaya solutions using appropriate security and
encryption capabilities enabled by our products. The testing referenced in these DevConnect
Application Notes included the enablement of supported encryption capabilities in the Avaya
products. Readers should consult the appropriate Avaya product documentation for further
information regarding security and encryption capabilities supported by those Avaya products.
Support for these security and encryption capabilities in any non-Avaya solution component is
the responsibility of each individual vendor. Readers should consult the appropriate vendor-
supplied product documentation for more information regarding those products.

SJW; Reviewed:
SPOC 4/9/2018
Solution & Interoperability Test Lab Application Notes
©2018 Avaya Inc. All Rights Reserved.
3 of 32
RBRMR_AES71
For the testing associated with these Application Notes, the interface between Avaya systems
and Quantify did not include use of any specific encryption features as requested by Red Box
Recorders.
2.1. Interoperability Compliance Testing
The interoperability compliance test included both feature functionality and serviceability
testing. The feature functionality testing focused on placing and recording calls in different call
scenarios to ensure good quality audio recordings were received. Intra-switch calls were made on
the Communication Manager, along with inbound and outbound calls from/to the PSTN. The
serviceability testing focused on verifying the ability of Quantify to recover from disconnection
and reconnection of the Avaya solution.
2.2. Test Results
All functionality and serviceability test cases were completed successfully with the following
observation.
When a call is transferred using the consult method the recording contained three calls.
Quantify shows the initial call, the consult, and the consult and transferred call. The call
containing the consult and transferred call displays as being between the called and
transferred party and does not indicate there is a call between the caller and transferred
party. This working as designed with Red Box Recorders having no plan for a fix.
2.3. Support
Technical support can be obtained for Red Box Recorder’s solution as follows:
Email: [email protected]
Website: www.redboxrecorders.com
Phone: +44 (0) 115 9377100

SJW; Reviewed:
SPOC 4/9/2018
Solution & Interoperability Test Lab Application Notes
©2018 Avaya Inc. All Rights Reserved.
4 of 32
RBRMR_AES71
3. Reference Configuration Figure 1 illustrates the network topology used during compliance testing. The Avaya solution
consists of an Avaya Aura® Communication Manager with Avaya G430 Media Gateway as the
PBX and Avaya Aura® Application Enablement Services. Avaya 96x1 series IP telephones and
9400 series Digital telephones are connected to the PBX and used in the testing. The Quantify
server was used in the compliance test. The system is installed on a Windows 2012 R2 server.
Figure 1: Avaya Aura® Communication Manager with Avaya Aura® Application
Enablement Services Server and Red Box Recorders Quantify 4B SP2 Configuration

SJW; Reviewed:
SPOC 4/9/2018
Solution & Interoperability Test Lab Application Notes
©2018 Avaya Inc. All Rights Reserved.
5 of 32
RBRMR_AES71
4. Equipment and Software Validated The following equipment and software were used for the sample configuration as shown in
Figure 1.
Equipment Software
Avaya Aura® Communication Manager
VMware Virtual machine
R7.1.2
CM 7.1.2.0.0.532.24184
KERNEL-3.10.0-693.e17.AV1
PLAT-rhe17.2-0010
Avaya G430 Media Gateway 38.21.0/1
Avaya Aura® Application Enablement
Services
R7.1.2.0.0.3-0
Avaya Aura® Media Server v7.8.0.309
Avaya Aura® System Manager R7.1.2.0
Build- 7.1.0.0.1125193
Update Revision – 7.1.2.0.057353
Feature Pack 2
Avaya Aura® Session Manager 7.1.2.0.712004
Avaya 9611g IP Telephone H323 6.6604
Avaya 9611g IP Telephone SIP 7.1.0.1.1
Avaya 9641g IP Telephone SIP 7.1.0.1.1
Avaya 9404 Digital Telephone
Red Box Recorders – Quantify
4B_SP2_Build_170
Quantify 4.6.170
Recorder 4.6.7.170
Active Recording PP 4.6.3.170
CTI Only PP 4.6.4.170
RTP_RAM 4.6.4.170
Avaya Active CTI 4.6.7.170
SNMP Agent Service 4.6.0.170
Named Pipe Proxy 4.6.0.170
RA Interface 4.6.2.170
BUI 4.6.0.170
Upload Manager 1.0
Update Manager 5.42
Support Manager 2.3

SJW; Reviewed:
SPOC 4/9/2018
Solution & Interoperability Test Lab Application Notes
©2018 Avaya Inc. All Rights Reserved.
6 of 32
RBRMR_AES71
5. Configure Avaya Aura® Communication Manager The configuration and verification operations illustrated in this section were all performed using
Communication Manager System Administration Terminal (SAT). The information provided in
this section describes the configuration of Communication Manager for this solution. For all
other provisioning information such as initial installation and configuration, please refer to the
product documentation as referenced in Section 10. The configuration operations described in
this section can be summarized as follows:
Verify System Parameters Customer Options
Verify System Parameters Features
Configure Service Observe
Configure Target Stations to be Recorded
Configure Station Button Assignments
Configure the Interface to AES
5.1. Verify System Parameters Customer Options
Use the display system-parameters customer-options command to verify that Communication
Manager has permissions for features illustrated in these Application Notes. On Page 3, ensure
that Computer Telephony Adjunct Links? is set to y as shown below.
display system-parameters customer-options Page 3 of 11
OPTIONAL FEATURES
Abbreviated Dialing Enhanced List? y Audible Message Waiting? n
Access Security Gateway (ASG)? n Authorization Codes? n
Analog Trunk Incoming Call ID? n CAS Branch? n
A/D Grp/Sys List Dialing Start at 01? n CAS Main? n
Answer Supervision by Call Classifier? n Change COR by FAC? n
ARS? y Computer Telephony Adjunct Links? y
ARS/AAR Partitioning? y Cvg Of Calls Redirected Off-net? y
ARS/AAR Dialing without FAC? y DCS (Basic)? y
ASAI Link Core Capabilities? y DCS Call Coverage? n
ASAI Link Plus Capabilities? y DCS with Rerouting? n
Async. Transfer Mode (ATM) PNC? n
Async. Transfer Mode (ATM) Trunking? n Digital Loss Plan Modification? n
ATM WAN Spare Processor? n DS1 MSP? y
ATMS? n DS1 Echo Cancellation? y
Attendant Vectoring? y
(NOTE: You must logoff & login to effect the permission changes.)

SJW; Reviewed:
SPOC 4/9/2018
Solution & Interoperability Test Lab Application Notes
©2018 Avaya Inc. All Rights Reserved.
7 of 32
RBRMR_AES71
5.2. Verify System Parameters Features
On Page 11 of the system-parameters features form, set Allow Two Observers in Same Call? to
y.
change system-parameters features Page 11 of 18
FEATURE-RELATED SYSTEM PARAMETERS
CALL CENTER SYSTEM PARAMETERS
EAS
Expert Agent Selection (EAS) Enabled? y
Minimum Agent-LoginID Password Length:
Direct Agent Announcement Extension: Delay:
Message Waiting Lamp Indicates Status For: station
VECTORING
Converse First Data Delay: 0 Second Data Delay: 2
Converse Signaling Tone (msec): 100 Pause (msec): 70
Reverse Star/Pound Digit For Collect Step? n
Store VDN Name in Station's Local Call Log? n
SERVICE OBSERVING
Service Observing: Warning Tone? y or Conference Tone? n
Service Observing Allowed with Exclusion? n
Allow Two Observers in Same Call? y

SJW; Reviewed:
SPOC 4/9/2018
Solution & Interoperability Test Lab Application Notes
©2018 Avaya Inc. All Rights Reserved.
8 of 32
RBRMR_AES71
5.3. Configure Service Observe
For the purposes of Multi Registration, service observe must be enabled for the COR to which
the Target Stations will be assigned. Using the command change cor 1 set both Can Be Service
Observed? and Can Be A Service Observer? to y.
change cor 1 Page 1 of 23
CLASS OF RESTRICTION
COR Number: 1
COR Description: Default
FRL: 0 APLT? y
Can Be Service Observed? y Calling Party Restriction: none
Can Be A Service Observer? y Called Party Restriction: none
Time of Day Chart: 1 Forced Entry of Account Codes? n
Priority Queuing? n Direct Agent Calling? y
Restriction Override: all Facility Access Trunk Test? n
Restricted Call List? n Can Change Coverage? n
Access to MCT? y Fully Restricted Service? n
Group II Category For MFC: 7 Hear VDN of Origin Annc.? y
Send ANI for MFE? n Add/Remove Agent Skills? n
MF ANI Prefix: Automatic Charge Display? n
Hear System Music on Hold? y PASTE (Display PBX Data on Phone)? y
Can Be Picked Up By Directed Call Pickup? y
Can Use Directed Call Pickup? y
Group Controlled Restriction: inactive
On Page 2 set Service Observing by Recording Device to y.
change cor 1 Page 2 of 23
CLASS OF RESTRICTION
MF Incoming Call Trace? n
Brasil Collect Call Blocking? n
Block Transfer Display? n
Block Enhanced Conference/Transfer Displays? y
Remote Logout of Agent? n
Station Lock COR: 1 TODSL Release Interval (hours):
Station-Button Display of UUI IE Data? n
Service Observing by Recording Device? y
Can Force a Work State Change? n
Work State Change can be Forced? n
Restrict Seecond Call Consult? n

SJW; Reviewed:
SPOC 4/9/2018
Solution & Interoperability Test Lab Application Notes
©2018 Avaya Inc. All Rights Reserved.
9 of 32
RBRMR_AES71
5.4. Configure Target Stations to be Recorded
Use the add station command to configure a station for each of the target stations to be
recorded. Enter in a descriptive Name and Security Code for each one. The Security Code will
be referenced by Quantify when setting up the recording extensions. Set the IP Softphone? to y.
add station 8237001 Page 1 of 5
STATION
Extension: 8237001 Lock Messages? n BCC: 0
Type: 9404 Security Code:1234 TN: 1
Port: S00040 Coverage Path 1: COR: 1
Name: Redbox,Digital Coverage Path 2: COS: 1
Hunt-to Station:
STATION OPTIONS
Time of Day Lock Table:
Loss Group: 2 Personalized Ringing Pattern: 1
Data Option: none Message Lamp Ext: 4000
Speakerphone: 2-way Mute Button Enabled? y
Display Language: english Expansion Module? n
Survivable COR: internal Media Complex Ext:
Survivable Trunk Dest? y IP SoftPhone? y
Remote Office Phone? n
IP Video Softphone? n
Short/Prefixed Registration Allowed: default
Customizable Labels? y

SJW; Reviewed:
SPOC 4/9/2018
Solution & Interoperability Test Lab Application Notes
©2018 Avaya Inc. All Rights Reserved.
10 of 32
RBRMR_AES71
On Page 2, ensure that the Multimedia Mode is set to enhanced.
add station 4000 Page 2 of 5
STATION
FEATURE OPTIONS
LWC Reception: spe Auto Select Any Idle Appearance? n
LWC Activation? y Coverage Msg Retrieval? y
LWC Log External Calls? n Auto Answer:
none
CDR Privacy? n Data Restriction? n
Redirect Notification? y Idle Appearance Preference? n
Per Button Ring Control? n Bridged Idle Line Preference? n
Bridged Call Alerting? n Restrict Last Appearance? y
Active Station Ringing: single
EMU Login Allowed? n
H.320 Conversion? n Per Station CPN - Send Calling Number?
Service Link Mode: as-needed EC500 State: enabled
Multimedia Mode: enhanced Audible Message Waiting? n
MWI Served User Type: Display Client Redirection? n
AUDIX Name: Select Last Used Appearance? n
Coverage After Forwarding? s
Multimedia Early Answer? n
Remote Softphone Emergency Calls: as-on-local Direct IP-IP Audio
Connections? y
Emergency Location Ext: 201 Always Use? n IP Audio Hairpinning? n

SJW; Reviewed:
SPOC 4/9/2018
Solution & Interoperability Test Lab Application Notes
©2018 Avaya Inc. All Rights Reserved.
11 of 32
RBRMR_AES71
5.5. Configure Station Button Assignments
Use the change station command to configure the button assignments of the stations to be
recorded, as required. Add the appropriate button assignments as shown on Page 4 below. In this
case there are three call appearance buttons call-appr. There are also buttons assigned for the
call functions call-pickup, bridged appearance and call park: call-pkup, brdg-appr, call-park.
change station 4000 Page 4 of 5
STATION
SITE DATA
Room: Headset? n
Jack: Speaker? n
Cable: Mounting: d
Floor: Cord Length: 0
Building: Set Color:
ABBREVIATED DIALING
List1: List2: List3:
BUTTON ASSIGNMENTS
1: call-appr 5: brdg-appr B:1 E:4001
2: call-appr 6: call-park
3: call-appr 7:
4: call-pkup 8:
voice-mail
SJW; Reviewed:
SPOC 4/9/2018
Solution & Interoperability Test Lab Application Notes
©2018 Avaya Inc. All Rights Reserved.
12 of 32
RBRMR_AES71
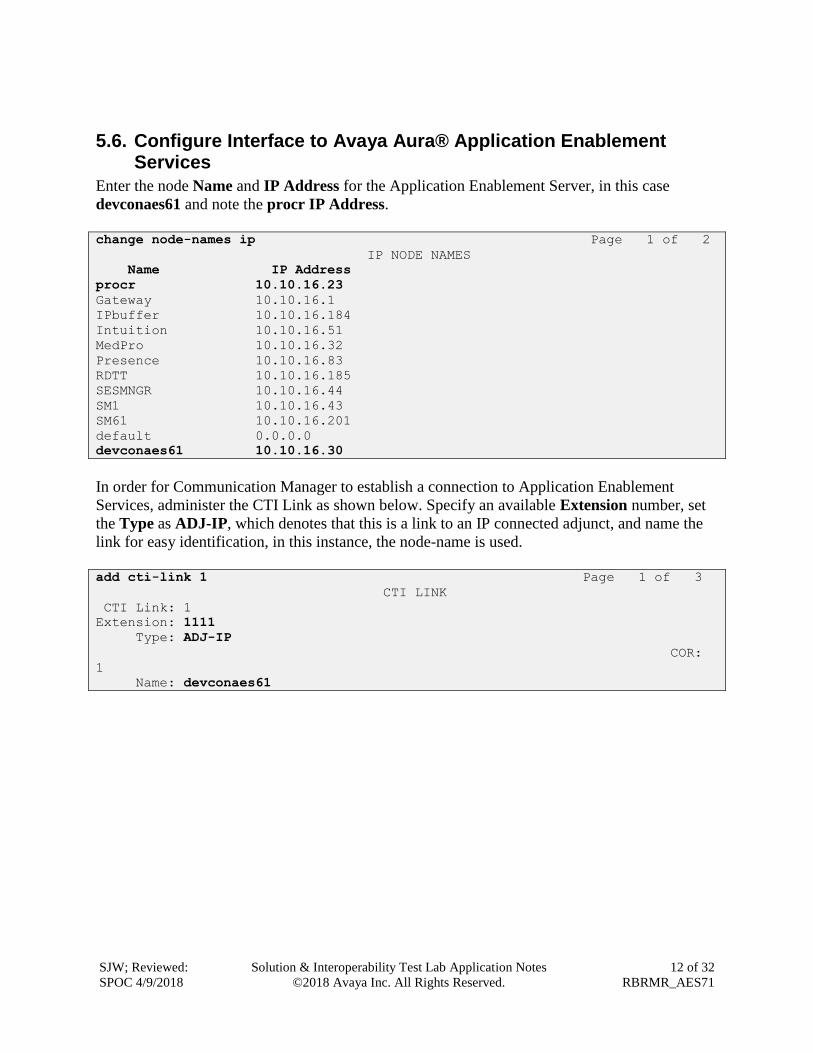
5.6. Configure Interface to Avaya Aura® Application Enablement Services
Enter the node Name and IP Address for the Application Enablement Server, in this case
devconaes61 and note the procr IP Address.
change node-names ip Page 1 of 2
IP NODE NAMES
Name IP Address
procr 10.10.16.23
Gateway 10.10.16.1
IPbuffer 10.10.16.184
Intuition 10.10.16.51
MedPro 10.10.16.32
Presence 10.10.16.83
RDTT 10.10.16.185
SESMNGR 10.10.16.44
SM1 10.10.16.43
SM61 10.10.16.201
default 0.0.0.0
devconaes61 10.10.16.30
In order for Communication Manager to establish a connection to Application Enablement
Services, administer the CTI Link as shown below. Specify an available Extension number, set
the Type as ADJ-IP, which denotes that this is a link to an IP connected adjunct, and name the
link for easy identification, in this instance, the node-name is used.
add cti-link 1 Page 1 of 3
CTI LINK
CTI Link: 1
Extension: 1111
Type: ADJ-IP
COR:
1
Name: devconaes61

SJW; Reviewed:
SPOC 4/9/2018
Solution & Interoperability Test Lab Application Notes
©2018 Avaya Inc. All Rights Reserved.
13 of 32
RBRMR_AES71
Configure IP-Services for the AESVCS service using change ip-services command. Using the
C-LAN node name as noted above i.e. procr
change ip-services Page 1 of 4
IP SERVICES
Service Enabled Local Local Remote Remote
Type Node Port Node Port
CDR1 CLAN 0 IPbuffer 9000
CDR2 CLAN 0 RDTT 9001
AESVCS y procr 8765
Navigate to Page 4, set the AE Services Server node-name and the Password the AES Server
will use to authenticate with Communication Manager.
change ip-services Page 4 of 4
AE Services Administration
Server ID AE Services Password Enabled Status
Server
1: devconaes61 Avayapassword1 y in use

SJW; Reviewed:
SPOC 4/9/2018
Solution & Interoperability Test Lab Application Notes
©2018 Avaya Inc. All Rights Reserved.
14 of 32
RBRMR_AES71
6. Configuration of Avaya Aura® Application Enablement Services
This section provides the procedures for configuring Application Enablement Services (AES).
The procedures fall into the following areas:
Verify Licensing
Create Switch Connection
Create CTI User
Enable CTI User
Configure DMCC Port
Enable Security Database
6.1. Verify Licensing
Access the Web License Manager of the Application Enablement Services Server. The Web
License Manager screen below is displayed. Select Licensed products APPL_ENAB
Application_Enablement in the left pane, to display the Licensed Features screen in the right
pane. Verify that there are sufficient licenses for Device Media and Call Control, as shown
below. If not, consult with your Avaya Account Manager or Business Partner to acquire the
proper license for your solution.

SJW; Reviewed:
SPOC 4/9/2018
Solution & Interoperability Test Lab Application Notes
©2018 Avaya Inc. All Rights Reserved.
15 of 32
RBRMR_AES71
6.2. Create Switch Connection
Access the OAM web-based interface of the Application Enablement Services Server, using the
URL https://<Server_IP>. The Management console is displayed; log in using the appropriate
credentials.
The Welcome to OAM screen is displayed next.

SJW; Reviewed:
SPOC 4/9/2018
Solution & Interoperability Test Lab Application Notes
©2018 Avaya Inc. All Rights Reserved.
16 of 32
RBRMR_AES71
To establish the connection between Communication Manager and the Application Enablement
Services Server, click Communication Manager Interface Switch Connections. In the field
next to next to Add Connection, enter CM and click on Add Connection, the following screen
will be displayed.
Complete the configuration as shown and enter the password specified in Section 5.6 when
configuring AESVCS in ip-services. In this instance Avayapassword1. Click on Apply, the
screen below will be displayed.

SJW; Reviewed:
SPOC 4/9/2018
Solution & Interoperability Test Lab Application Notes
©2018 Avaya Inc. All Rights Reserved.
17 of 32
RBRMR_AES71
Click on Edit PE/CLAN IPs (at the bottom of the last screenshot) in order to specify the IP
address of the Communication Manager, as noted in Section 5.6. Next to Add Name or IP, enter
the IP address of the Communication Manager and click on Add Name or IP.
Click on Back and then click on Edit H.323 Gatekeeper. Enter the IP address of the
Communication Manager and click on Add Name or IP

SJW; Reviewed:
SPOC 4/9/2018
Solution & Interoperability Test Lab Application Notes
©2018 Avaya Inc. All Rights Reserved.
18 of 32
RBRMR_AES71
Select AE Services from the left hand menu and select DMCC to verify that the DMCC Service
is licensed by ensuring that DMCC Service is in the list of services and that the License Mode
is showing NORMAL MODE. If not, consult with your Avaya Account Manager or Business
Partner to acquire the proper license for your solution.
6.3. Create CTI User
A user ID and password needs to be configured for the Red Box recorder to communicate as a
DMCC Client with the Application Enablement Services. Select User Management User
Admin Add User from the left hand menu, to display the Add User screen in the right pane.
Enter desired values for User Id, Common Name, Surname, User Password and Confirm
Password. For Avaya Role, select userservice.useradmin from the drop down list. For CT
User, select Yes from the drop-down list. Retain the default value in the remaining fields. Click
Apply at the bottom of the screen (not shown below).

SJW; Reviewed:
SPOC 4/9/2018
Solution & Interoperability Test Lab Application Notes
©2018 Avaya Inc. All Rights Reserved.
19 of 32
RBRMR_AES71
6.4. Enable CTI User
Navigate to the users screen by selecting Security Security Database CTI Users List All
Users. In the CTI Users window, select the user that was set up in Section 6.3 and select the Edit
option.

SJW; Reviewed:
SPOC 4/9/2018
Solution & Interoperability Test Lab Application Notes
©2018 Avaya Inc. All Rights Reserved.
20 of 32
RBRMR_AES71
The Edit CTI User screen appears. Tick the Unrestricted Access box and Apply Changes at the
bottom of the screen.

SJW; Reviewed:
SPOC 4/9/2018
Solution & Interoperability Test Lab Application Notes
©2018 Avaya Inc. All Rights Reserved.
21 of 32
RBRMR_AES71
6.5. Configure DMCC Port
On the AES Management Console navigate to Networking Ports to set the DMCC server
port. During the compliance test, the Unencrypted Port set to 4721 was Enabled as shown in
the screen below. Click the Apply Changes button (not shown) at the bottom of the screen to
complete the process.

SJW; Reviewed:
SPOC 4/9/2018
Solution & Interoperability Test Lab Application Notes
©2018 Avaya Inc. All Rights Reserved.
22 of 32
RBRMR_AES71
6.6. Enable Security Database
Select Security Security Database Control from the left pane, to display the SDB
Control for DMCC and TSAPI screen in the right pane. Check Enable SDB for DMCC
Service and Enable SDB TSAPI Service, JTAPI and Telephony Service, and click Apply
Changes.

SJW; Reviewed:
SPOC 4/9/2018
Solution & Interoperability Test Lab Application Notes
©2018 Avaya Inc. All Rights Reserved.
23 of 32
RBRMR_AES71
7. Configuration of Quantify The Quantify server is provided pre-installed with Quantify 4B Service Pack 2. Administering an
IP address on Microsoft Windows is outside of the scope of this document. There are two main
components to configure the recording solution as follows.
Register extensions to Quantify
Configure Quantify to connect to Application Enablement Services
7.1. Register Extensions to Red Box Recorder
Run the CTI Reg Tool, located in C:\LTR\utils on the Red Box Recorder Server, the CTI Reg
Tool is used to access the Red Box Recorder server and assign extensions which are to be
recorded. Accept the default Recorder IP Address, Recorder Username and Recorder
Password and click Connect. Select the radio button, Avaya Multiple Registration and enter
the extension numbers to be recorded in the Extension or Range to register field. Click
Register and the devices are registered with the recorder. Select Disconnect button when
complete and close down the CTI Registration Tool dialog box

SJW; Reviewed:
SPOC 4/9/2018
Solution & Interoperability Test Lab Application Notes
©2018 Avaya Inc. All Rights Reserved.
24 of 32
RBRMR_AES71
The web interface is used to configure the extensions. Use http://<server IP> to access the
Recording screen of the Red Box Recorder. The extensions which were added earlier in this
section should appear in the Recording screen as shown below.

SJW; Reviewed:
SPOC 4/9/2018
Solution & Interoperability Test Lab Application Notes
©2018 Avaya Inc. All Rights Reserved.
25 of 32
RBRMR_AES71
Tick the checkbox under column Recording Enabled to configure these extensions for
recording. Select Update and the extensions will be enabled for recording

SJW; Reviewed:
SPOC 4/9/2018
Solution & Interoperability Test Lab Application Notes
©2018 Avaya Inc. All Rights Reserved.
26 of 32
RBRMR_AES71
7.2. Configure Red Box Recorder to connect to the Avaya Aura®
Application Enablement Services
Use the config file CTIServer_AvayaActive.config placed in default location of
C:\LTR\Config to configure AES to Red Box Recorder solution. Open the file in text editor and
enter in the following values. See below sample config file.
aesAddress: Set this to 10.10.16.78 which is the AES IP Address
username: Set this to the CTI user name that was set in Section 6.3
password: Set this to the CTI user password set in Section 6.3
switchName: This is the name of the switch connection as set in Section
6.2
audioDestinationAddress: Enter in the IP address that was assigned to the Red Box
Recorder
add device: For Single recorded devices
add start/end: For a range of recorded devices
<avaya> <dmcc aesAddress="10.10.16.78" username="redbox" password="redbox123" /> <device switchName="CMLatest" audioDestinationAddress="10.10.16.95" multiRegistrationModeIndependent="true" /> <!-- ACD monitoring for agent in/out info--> <!—To add a single recording device --> <add device=”8230001”/> <!—To add a range of recording devices--> <add start=”8235001” end=”8235004”/> </avaya>
Save the file.
SJW; Reviewed:
SPOC 4/9/2018
Solution & Interoperability Test Lab Application Notes
©2018 Avaya Inc. All Rights Reserved.
27 of 32
RBRMR_AES71
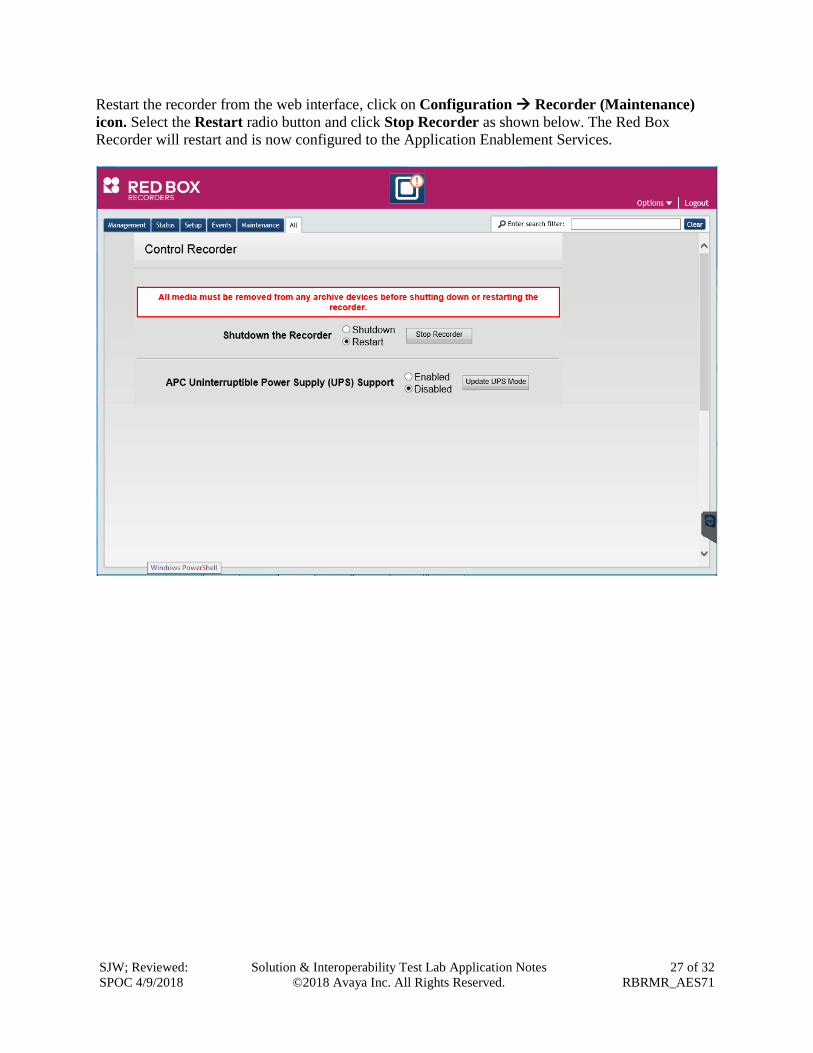
Restart the recorder from the web interface, click on Configuration Recorder (Maintenance)
icon. Select the Restart radio button and click Stop Recorder as shown below. The Red Box
Recorder will restart and is now configured to the Application Enablement Services.

SJW; Reviewed:
SPOC 4/9/2018
Solution & Interoperability Test Lab Application Notes
©2018 Avaya Inc. All Rights Reserved.
28 of 32
RBRMR_AES71
8. Verification Steps This section provides the tests that can be performed to verify correct configuration of Avaya
and Red Box Recorder solution.
8.1. Verify Avaya Aura® Communication Manager CTI Service State
The following steps can ensure that the communication between Communication Manager and the
Application Enablement Services server is functioning correctly. Check the AESVCS link status with
Application Enablement Services by using the command status aesvcs cti-link. The CTI Link is 1.
Verify the Service State of the CTI link is established.
status aesvcs cti-link
AE SERVICES CTI LINK STATUS
CTI Version Mnt AE Services Service Msgs Msgs
Link Busy Server State Sent Rcvd
1 4 no devconaes61 established 18 18
SJW; Reviewed:
SPOC 4/9/2018
Solution & Interoperability Test Lab Application Notes
©2018 Avaya Inc. All Rights Reserved.
29 of 32
RBRMR_AES71
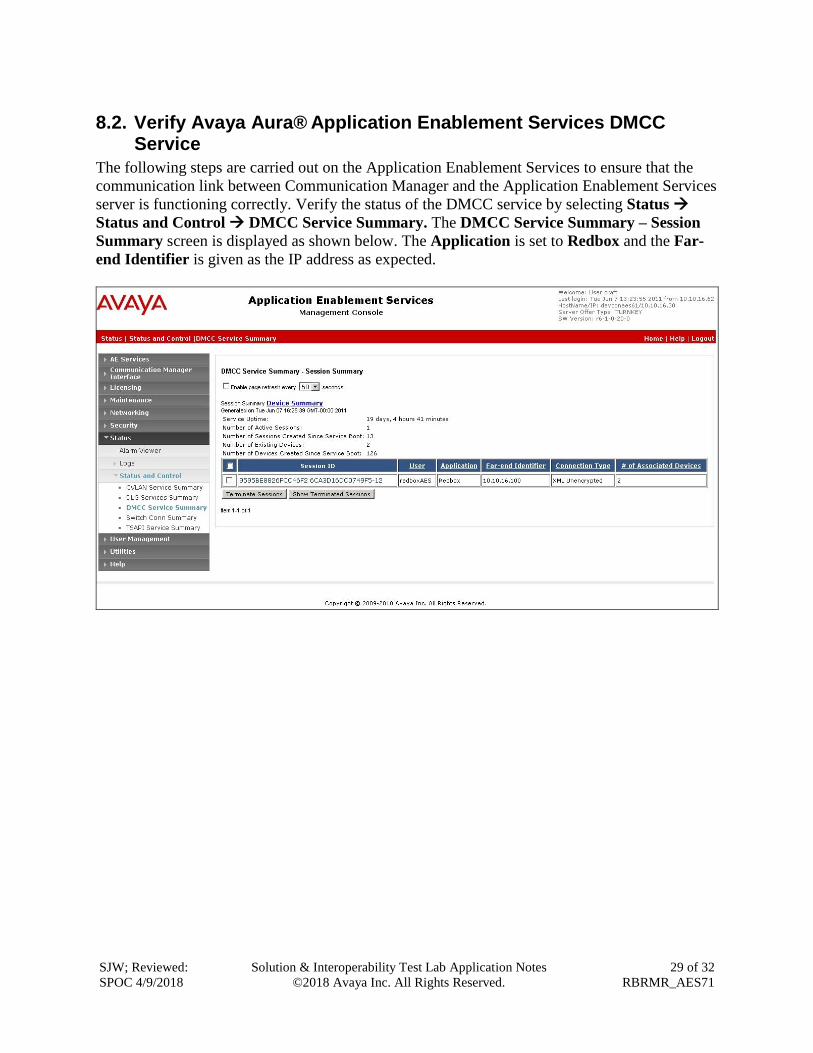
8.2. Verify Avaya Aura® Application Enablement Services DMCC Service
The following steps are carried out on the Application Enablement Services to ensure that the
communication link between Communication Manager and the Application Enablement Services
server is functioning correctly. Verify the status of the DMCC service by selecting Status
Status and Control DMCC Service Summary. The DMCC Service Summary – Session
Summary screen is displayed as shown below. The Application is set to Redbox and the Far-
end Identifier is given as the IP address as expected.

SJW; Reviewed:
SPOC 4/9/2018
Solution & Interoperability Test Lab Application Notes
©2018 Avaya Inc. All Rights Reserved.
30 of 32
RBRMR_AES71
8.3. Verify Quantify Configuration
The following steps can be performed to verify the basic operation of the system components. Click on Configuration Recorder Status (Status) icon. The Recorder Status page of the
Quantify Recorder will show any alarms running. Note Calls Being Recorded will show number of
calls currently being recorded. This page loads once logged into the recorder. See below screenshot.

SJW; Reviewed:
SPOC 4/9/2018
Solution & Interoperability Test Lab Application Notes
©2018 Avaya Inc. All Rights Reserved.
31 of 32
RBRMR_AES71
Choose the Version Information icon on the recorder screen to check the version numbers of
the recorder to ensure that the version is as expected.
9. Conclusion These Application Notes describe the configuration steps required for the Red Box Recorder’s
Quantify to successfully interoperate with Avaya Aura® Communication Manager and Avaya
Aura® Application Enablement Services. All functionality and serviceability test cases were
completed successfully with observations shown in Section 2.2.
10. Additional References Product documentation for Avaya products may be found at http://support.avaya.com
[1] Avaya Aura® Application Enablement Services Administration and Maintenance Guide –
Release 7.1.
[2] Administering Avaya Aura® Communication Manager – Release 7.1
Product documentation for Red Box Recorder can be found at http://www.redboxrecorders.com

SJW; Reviewed:
SPOC 4/9/2018
Solution & Interoperability Test Lab Application Notes
©2018 Avaya Inc. All Rights Reserved.
32 of 32
RBRMR_AES71
©2018 Avaya Inc. All Rights Reserved.
Avaya and the Avaya Logo are trademarks of Avaya Inc. All trademarks identified by ® and
™ are registered trademarks or trademarks, respectively, of Avaya Inc. All other trademarks
are the property of their respective owners. The information provided in these Application
Notes is subject to change without notice. The configurations, technical data, and
recommendations provided in these Application Notes are believed to be accurate and
dependable, but are presented without express or implied warranty. Users are responsible for
their application of any products specified in these Application Notes.
Please e-mail any questions or comments pertaining to these Application Notes along with the
full title name and filename, located in the lower right corner, directly to the Avaya
DevConnect Program at [email protected].
Top Related
Copyright © 2022 FDOKUMEN

