


Bahasa
Halaman
Hukum


FHD552-X LCD Panel
U s e r M a n u a l
020-000741-02


FHD552-X LCD Panel
U s e r M a n u a l
020-000741-02

NOTICES
COPYRIGHT AND TRADEMARKS
Copyright ©2014 Christie Digital Systems USA Inc. All rights reserved.
All brand names and product names are trademarks, registered trademarks or trade names of their respective holders.
GENERAL
Every effort has been made to ensure accuracy, however in some cases changes in the products or availability could occur which may not be reflected in this document. Christie reserves the right to make changes to specifications at any time without notice. Performance specifications are typical, but may vary depending on conditions beyond Christie's control such as maintenance of the product in proper working conditions. Performance specifications are based on information available at the time of printing. Christie makes no warranty of any kind with regard to this material, including, but not limited to, implied warranties of fitness for a particular purpose. Christie will not be liable for errors contained herein or for incidental or consequential damages in connection with the performance or use of this material. Canadian manufacturing facility is ISO 9001 and 14001 certified.
WARRANTY
Products are warranted under Christie’s standard limited warranty, the complete details of which are available by contacting your Christie dealer or Christie. In addition to the other limitations that may be specified in Christie’s standard limited warranty and, to the extent relevant or applicable to your product, the warranty does not cover:
a. Problems or damage occurring during shipment, in either direction.
b. Projector lamps (See Christie’s separate lamp program policy).
c. Problems or damage caused by use of a projector lamp beyond the recommended lamp life, or use of a lamp other than a Christie lamp supplied by Christie or an authorized distributor of Christie lamps.
d. Problems or damage caused by combination of a product with non-Christie equipment, such as distribution systems, cameras, DVD players, etc., or use of a product with any non-Christie interface device.
e. Problems or damage caused by the use of any lamp, replacement part or component purchased or obtained from an unauthorized distributor of Christie lamps, replacement parts or components including, without limitation, any distributor offering Christie lamps, replacement parts or components through the internet (confirmation of authorized distributors may be obtained from Christie).
f. Problems or damage caused by misuse, improper power source, accident, fire, flood, lightening, earthquake or other natural disaster.
g. Problems or damage caused by improper installation/alignment, or by equipment modification, if by other than Christie service personnel or a Christie authorized repair service provider.
h. Problems or damage caused by use of a product on a motion platform or other movable device where such product has not been designed, modified or approved by Christie for such use.
i. Problems or damage caused by use of a projector in the presence of an oil-based fog machine or laser-based lighting that is unrelated to the projector.
j. For LCD projectors, the warranty period specified in the warranty applies only where the LCD projector is in “normal use” which means the LCD projector is not used more than 8 hours a day, 5 days a week.
k. Except where the product is designed for outdoor use, problems or damage caused by use of the product outdoors unless such product is protected from precipitation or other adverse weather or environmental conditions and the ambient temperature is within the recommended ambient temperature set forth in the specifications for such product.
l. Image retention on LCD flat panels.
m.Defects caused by normal wear and tear or otherwise due to normal aging of a product.
The warranty does not apply to any product where the serial number has been removed or obliterated. The warranty also does not apply to any product sold by a reseller to an end user outside of the country where the reseller is located unless (i) Christie has an office in the country where the end user is located or (ii) the required international warranty fee has been paid.
The warranty does not obligate Christie to provide any on site warranty service at the product site location.
PREVENTATIVE MAINTENANCE
Preventative maintenance is an important part of the continued and proper operation of your product. Please see the Maintenance section for specific maintenance items as they relate to your product. Failure to perform maintenance as required, and in accordance with the maintenance schedule specified by Christie, will void the warranty.
REGULATORY
The product has been tested and found to comply with the limits for a Class A digital device, pursuant to Part 15 of the FCC Rules. These limits are designed to provide reasonable protection against harmful interference when the product is operated in a commercial environment. The product generates, uses, and can radiate radio frequency energy and, if not installed and used in accordance with the instruction manual, may cause harmful interference to radio communications. Operation of the product in a residential area is likely to cause harmful interference in which case the user will be required to correct the interference at the user’s own expense.

CAN ICES-3 (A) / NMB-3 (A)이 기기는 업무용 (A급 )으로 전자파적합등록을 한 기기이오니 판매자 또는 사용자는 이점을 주의하시기 바라며 , 가정 외의 지역에서 사용하는 것을 목적으로 합니다 .
Environmental
The product is designed and manufactured with high‐quality materials and components that can be recycled and reused. This symbol means
that electrical and electronic equipment, at their end‐of‐life, should be disposed of separately from regular waste. Please dispose of the product
appropriately and according to local regulations. In the European Union, there are separate collection systems for used electrical and electronic products. Please help us to conserve the environment we live in!


AddendumTranslated copies of this document are provided on the CD in the back of this document. The CD may also contain additional product documentation. Read all instructions before using or servicing this product.
本文档的翻译副本在本文档背面的 CD 上提供。该 CD 中还可能包含其他产品文
档。使用或维修本产品之前请务必阅读所有说明。
文件背面的光碟提供了本文件的翻譯副本。這張光碟可能另外包含其他產品文件。請先閱讀所有指示再使用或送修本產品。
Le CD au dos de ce document contient des traductions de celui‐ci dans différentes langues. Ce CD peut également contenir de la documentation supplémentaire sur le produit. Lisez toutes les instructions avant d'utiliser ou d'entretenir ce produit.
Übersetzte Versionen dieses Dokuments werden auf der CD auf dem Vorsatzblatt dieses Dokuments bereitgestellt. Die CD kann auch zusätzliche Produktdokumentation enthalten. Bitte lesen Sie diese Anweisungen vor der Verwendung dieses Produkts oder vor der Ausführung von Wartungsarbeiten am Produkt.
Le copie tradotte di questo documento sono fornite sul CD, sul retro di questo documento. Il CD potrebbe anche contenere altra documentazione sul prodotto. Si prega di leggere tutte le istruzioni prima di utilizzare questo prodotto o sottoporlo a manutenzione.
このドキュメントの翻訳版がこのドキュメントの裏面の CD で提供されています。CD に
は追加の製品マニュアルも収められています。この製品を使用したり、機能させたりする前に、すべての指示をお読みください。
이 문서의 번역된 사본이 이 문서 후면의 CD 에서 제공됩니다 . 이 CD 에는 추가 제품 설명
서가 포함되어 있을 수 있습니다 . 이 제품을 사용하거나 수리하기 전에 모든 지침을 확인
하십시오 .
Copias traduzidas deste documento são fornecida no CD contido na parte de trás deste documento. O CD pode conter documentação adicional do produto. Leia todas as instruções antes de usar ou prestar serviço com este produto.
Перевод данного документа представлен на компакт-диске на оборотной стороне документа. Компакт-диск может также содержать дополнительную документацию по продукту. Перед использованием или обслуживанием продукта ознакомьтесь со всеми инструкциями.
Las copias traducidas de este documento se proporcionan en el CD que se encuentra en la parte trasera. En el CD también puede encontrar documentación adicional del producto. Lea todas las instrucciones antes de utilizar o realizar el mantenimiento de este producto.
Перекладені екземпляри цього документа містяться на компакт-диску, який додано до цього документа. На компакт-диску може також бути додаткова документація до виробу. Перш ніж користуватися виробом або його обслуговувати, прочитайте всі інструкції.

Table of Contents
Unpacking . . . . . . . . . . . . . . . . . . . . . . . . . . . . . . . . . . . . . . . . . . . . . . . . . . . . 10
Handling and Care . . . . . . . . . . . . . . . . . . . . . . . . . . . . . . . . . . . . . . . . . . . . . . 11
Cleaning . . . . . . . . . . . . . . . . . . . . . . . . . . . . . . . . . . . . . . . . . . . . . . . . . . . . . 11
Introduction . . . . . . . . . . . . . . . . . . . . . . . . . . . . . . . . . . . . . . . . . . . . . . . . 12About This Manual . . . . . . . . . . . . . . . . . . . . . . . . . . . . . . . . . . . . . . . . . . . . . . 12
Target Audience . . . . . . . . . . . . . . . . . . . . . . . . . . . . . . . . . . . . . . . . . . . . . . 12
Textual and Graphic Conventions . . . . . . . . . . . . . . . . . . . . . . . . . . . . . . . . . . 12
Using This Manual . . . . . . . . . . . . . . . . . . . . . . . . . . . . . . . . . . . . . . . . . . . . . . 13
Description, Features and Benefits . . . . . . . . . . . . . . . . . . . . . . . . . . . . . . . . . . . 14
Key Features and Benefits . . . . . . . . . . . . . . . . . . . . . . . . . . . . . . . . . . . . . . . 14
Parts List . . . . . . . . . . . . . . . . . . . . . . . . . . . . . . . . . . . . . . . . . . . . . . . . . . 14
Controls and Functions . . . . . . . . . . . . . . . . . . . . . . . . . . . . . . . . . . . . . . . 15Display at a Glance . . . . . . . . . . . . . . . . . . . . . . . . . . . . . . . . . . . . . . . . . . . . . . 15
Input Panel . . . . . . . . . . . . . . . . . . . . . . . . . . . . . . . . . . . . . . . . . . . . . . . . . . . 17
Remote Control Unit . . . . . . . . . . . . . . . . . . . . . . . . . . . . . . . . . . . . . . . . . . . . . 19
Installation . . . . . . . . . . . . . . . . . . . . . . . . . . . . . . . . . . . . . . . . . . . . . 21Remote Control . . . . . . . . . . . . . . . . . . . . . . . . . . . . . . . . . . . . . . . . . . . . . . . . 21
Notes on Batteries . . . . . . . . . . . . . . . . . . . . . . . . . . . . . . . . . . . . . . . . . . . . 21
Notes on Remote Control Operation . . . . . . . . . . . . . . . . . . . . . . . . . . . . . . . . 21
Locking and Unlocking the Remote Control . . . . . . . . . . . . . . . . . . . . . . . . . . . 21
Quick Setup . . . . . . . . . . . . . . . . . . . . . . . . . . . . . . . . . . . . . . . . . . . . . . . . . . . 22
Installation Considerations . . . . . . . . . . . . . . . . . . . . . . . . . . . . . . . . . . . . . . . . . 22
Handling Guidelines . . . . . . . . . . . . . . . . . . . . . . . . . . . . . . . . . . . . . . . . . . . 22
Ambient Heat . . . . . . . . . . . . . . . . . . . . . . . . . . . . . . . . . . . . . . . . . . . . . . . 23
Ventilation . . . . . . . . . . . . . . . . . . . . . . . . . . . . . . . . . . . . . . . . . . . . . . . . . 23
Mounting the Display . . . . . . . . . . . . . . . . . . . . . . . . . . . . . . . . . . . . . . . . . . . . 23
Connections to the Display . . . . . . . . . . . . . . . . . . . . . . . . . . . . . . . . . . . . . . . . 24
Connecting a Control System or PC . . . . . . . . . . . . . . . . . . . . . . . . . . . . . . . . . 24
IR Extender Connection . . . . . . . . . . . . . . . . . . . . . . . . . . . . . . . . . . . . . . . . . 25
Connecting Source Components to the Display . . . . . . . . . . . . . . . . . . . . . . . . . 25
Setting Up a Video Wall . . . . . . . . . . . . . . . . . . . . . . . . . . . . . . . . . . . . . . . . . 28
Operation . . . . . . . . . . . . . . . . . . . . . . . . . . . . . . . . . . . . . . . . . . . . . . . . . . 30
FHD552-X LCD Panel User Manual 8020-000741-02 Rev. 1 (08-2014)

Turning on the Power . . . . . . . . . . . . . . . . . . . . . . . . . . . . . . . . . . . . . . . . . . . . 30
Changing the OSD Language . . . . . . . . . . . . . . . . . . . . . . . . . . . . . . . . . . . . . . . 30
Avoiding Image Retention . . . . . . . . . . . . . . . . . . . . . . . . . . . . . . . . . . . . . . . . . 30
Using the On-Screen Menus . . . . . . . . . . . . . . . . . . . . . . . . . . . . . . . . . . . . . . . . 32
Image Settings . . . . . . . . . . . . . . . . . . . . . . . . . . . . . . . . . . . . . . . . . . . . . . 33
Display Settings . . . . . . . . . . . . . . . . . . . . . . . . . . . . . . . . . . . . . . . . . . . . . . 38
Audio Settings . . . . . . . . . . . . . . . . . . . . . . . . . . . . . . . . . . . . . . . . . . . . . . . 39
Basic Settings . . . . . . . . . . . . . . . . . . . . . . . . . . . . . . . . . . . . . . . . . . . . . . . 40
Advanced Settings . . . . . . . . . . . . . . . . . . . . . . . . . . . . . . . . . . . . . . . . . . . . 42
System Status . . . . . . . . . . . . . . . . . . . . . . . . . . . . . . . . . . . . . . . . . . . . . . . 45
Using the Picture-in-Picture (PIP) . . . . . . . . . . . . . . . . . . . . . . . . . . . . . . . . . . . . 45
Maintenance and Troubleshooting . . . . . . . . . . . . . . . . . . . . . . . . . . . . . . . 48Maintenance . . . . . . . . . . . . . . . . . . . . . . . . . . . . . . . . . . . . . . . . . . . . . . . . . . 48
Troubleshooting . . . . . . . . . . . . . . . . . . . . . . . . . . . . . . . . . . . . . . . . . . . . . . . . 48
External Control . . . . . . . . . . . . . . . . . . . . . . . . . . . . . . . . . . . . . . . . . . . . . 50Serial Communications . . . . . . . . . . . . . . . . . . . . . . . . . . . . . . . . . . . . . . . . . . . 50
RS232 Connection and Port Configuration . . . . . . . . . . . . . . . . . . . . . . . . . . . . 50
Command and Response Format . . . . . . . . . . . . . . . . . . . . . . . . . . . . . . . . . . 50
Command and Response Examples . . . . . . . . . . . . . . . . . . . . . . . . . . . . . . . . . 51
Serial Command List . . . . . . . . . . . . . . . . . . . . . . . . . . . . . . . . . . . . . . . . . . 52
Using Video Wall Toolbox . . . . . . . . . . . . . . . . . . . . . . . . . . . . . . . . . . . . . . . . . . 57
Using Discrete IR Codes . . . . . . . . . . . . . . . . . . . . . . . . . . . . . . . . . . . . . . . . . . 62
IR Command Protocol . . . . . . . . . . . . . . . . . . . . . . . . . . . . . . . . . . . . . . . . . . 62
IR Control Code List . . . . . . . . . . . . . . . . . . . . . . . . . . . . . . . . . . . . . . . . . . . 63
Specifications . . . . . . . . . . . . . . . . . . . . . . . . . . . . . . . . . . . . . . . . . . . . . . . 64Display Specifications . . . . . . . . . . . . . . . . . . . . . . . . . . . . . . . . . . . . . . . . . . . . 64
Supported Timings . . . . . . . . . . . . . . . . . . . . . . . . . . . . . . . . . . . . . . . . . . . . . . 66
Overall Dimensions . . . . . . . . . . . . . . . . . . . . . . . . . . . . . . . . . . . . . . . . . . . . . . 68
FHD552-X LCD Panel User Manual 9020-000741-02 Rev. 1 (08-2014)

Package Handling
UnpackingEach LCD panel is packed inside a box carton. To protect the panel during transportation, additional packing material has been placed within the carton. Before unpacking, prepare a stable, level and clean surface near a wall outlet for your LCD panel. Set the box in an upright position and pull out the white carton locks. Lift up the top cover carton. Remove the ESD bag before removing the display from the bottom tray carton.
Failure to comply with the following could result in death or serious injury:• Do not drop the panel (even
a short distance), or apply pressure to the sides of the bezel. The small size of the bezel, which enables minimal image-to-image gaps, means there is reduced protection of the LCD glass and components. Dropping the panel or applying unnecessary force to the sides of the bezel will result in permanent damage.
• To avoid serious injury and/or serious damage to the LCD panel, moving the panel requires at least two people. Hold the white handles on the shipping package when moving/shipping. Failure to properly handle the package may result in serious injury.
• Extreme care must be taken when pushing the mounted display into its locked position. Always handle the display on the opposing corners of the frame to avoid direct contact with the LCD glass.
Due to the delicate nature of the display, we strongly recommend that you use the provided packing materials and secure the package onto a pallet during shipment.
FHD552-X LCD Panel User Manual 10020-000741-02 Rev. 1 (08-2014)

Handling and Care
To avoid damaging your LCD panel, follow these guidelines when handling or moving the panel:
• Always use the handles on the back of the LCD panel. Do not hold onto the frame when transporting.
• Two people are required when moving or raising the LCD panel. Use both hands, one positioned on the top handle and the other on the bottom handle.
• Hold and support the LCD panel at each side and keep at an even height above the ground.
• Do not twist or bend the panel.
• Use a cart to move several panels at one time.
• When the panel is sitting on a surface, do not tilt it more than 10° to avoid damaging the screen.
Cleaning
Use a cloth dampened with water or methyl alcohol to clean the screen surface. It is recommended you keep the protective plastic sheet shipped with the panel to replace it each time the panels are packed and shipped.
Make sure the power connector and any other cables are unplugged before moving the product. Failure to comply could result in minor or moderate injury.
Unplug the power cord before cleaning the LCD panel. Do not use a liquid, spray cleaners, or any abrasive cleaners to clean the LCD panel. Failure to comply may result in equipment damage.
FHD552-X LCD Panel User Manual 11020-000741-02 Rev. 1 (08-2014)

Introduction
About This ManualThis User Manual describes how to install, set up and operate the FHD651-P and FHD651-T LCD Panels.
Target AudienceThe manufacturer has prepared this manual to help end users get the most out of the display.
The manufacturer has made every effort to ensure that this manual is accurate as of the date it was printed. However, because of ongoing product improvements and customer feedback, it may require updating from time to time.
Textual and Graphic Conventions
Text ConventionsThe following conventions are used in this manual, in order to clarify the information and instructions provided:
• Remote and built-in keypad button identifiers are set in upper-case bold type; for example, “Press EXIT to return to the previous menu.”
• Computer input (commands you type) and output (responses that appear on-screen) is shown in monospace (fixed-width) type; for example: “To change the aspect ratio to Letterbox, type 07 00 02 41 53 50 03 08 <Enter>.”
• All keys with functional names are initial-capped, set in bold type and enclosed in angle brackets. These keys are the following: <Enter>, <Spacebar>, <Control>, <Esc> and <Tab>.
• <Enter> indicates that you may press either the RETURN or ENTER key on your keyboard if it has both keys.
In addition to these conventions, underlining, boldface and/or italics are occasionally used to highlight important information, as in this example:
A carriage return must be used after each command or string.
FHD552-X LCD Panel User Manual 12020-000741-02 Rev. 1 (08-2014)

Introduction
Graphic ConventionsThese symbols appear in numerous places throughout the manual, to emphasize points that you must keep in mind to avoid problems with your equipment or injury:
Using This ManualUse the following table to locate the specific information you need in this manual.
TIPS highlight time-saving short cuts and helpful guidelines for using certain features.
NOTICE emphasize text with unusual importance or special significance. They also provide supplemental information.
CAUTIONS alert users that a given action or omitted action can degrade performance or cause a malfunction.
WARNINGS appear when a given action or omitted action can result in damage to the equipment, or possible non-fatal injury to the user.
DANGER appears when a given action can cause severe injury or death.
If you need... ... Turn to page:
General information about the FHD651-P and FHD651-T LCD Panels
14
Installation instructions 21
First-time configuration instructions 33
Advanced configuration instructions 42
Troubleshooting tips 48
Product specifications 64
FHD552-X LCD Panel User Manual 13020-000741-02 Rev. 1 (08-2014)

Introduction
Description, Features and BenefitsThe FHD651-P and FHD651-T LCD Panels is a cutting-edge direct-view LCD that, when tiled with multiple units, can create enormous images in multiple configurations. The display combines a simple and slim design with unparalleled image quality with configurable I/O to provide a perfect building block for large-format video walls, which are idea in digital signage and control-room applications.
Key Features and BenefitsThe display offers these key features and benefits:
• Full-HD Native Resolution: 1920 x 1080 (16:9 Native Aspect Ratio)
• High Brightness: Up to 500 nits
• 178-degree Viewing Angle
• DisplayPort 1.1a, HDMI and DVI Inputs with High-bandwidth Digital Content Protection (HDCP)
• Video Signal Looping
• Direct LED Backlight
• Video Wall Toolbox software [included] simplifies setting up a large video wall, with up to 25 displays, using a Windows PC
• Portrait- and Landscape-Mode Compatible
Parts ListYour display is shipped with the following items. If any items are missing or damaged, please contact your dealer.
• FHD552-X LCD Panel
• Remote Control Unit and batteries
• AC Power cord
• DVI Cable
• RS232 Communications Cable
• RS485 Communications Cable
• IR Extender Cable
• Video Wall ToolBox Installation CD
FHD552-X LCD Panel User Manual 14020-000741-02 Rev. 1 (08-2014)

Controls and Functions
Display at a GlanceThe illustration below shows the key display components, and the paragraphs that follow describe them.
1. HANDLESAlways use the handles when carrying the display. DO NOT touch or hold the screen face.
2. MAIN POWER SWITCHConnects or disconnects the display panel from the AC power source.
3. STATUS LEDLights orange to indicate that the display is in standby mode; blinks orange if no input signal is present; off if the main power switch is set to off.
2
4
3
1
FHD552-X LCD Panel User Manual 15020-000741-02 Rev. 1 (08-2014)

Controls and Functions
4. KEYPADYou can use the keypad instead of the remote control unit to operate the on-screen display (OSD) controls. The keypad operates as follows:On/Standby ( )Press once to toggle from standby mode to on mode. Press it again to return to standby mode. SOURCETo select a source, press the SOURCE button repeatedly (with no menus visible on-screen).
When a menu is visible on-screen, this button operates identically to the right-arrow (or ENTER) button on the display remote control unit.
When a menu is visible on-screen, this button operates identically to the left-arrow button on the display remote control unit.
/ When a menu is visible on-screen, these buttons operate identically to the up- and down-arrow buttons on the display remote control unit.MENU/EXITPress this button to access the on-screen display (OSD) controls, or to exit the current menu and return to the previous one.
SOURCE
MENU/EXIT
FHD552-X LCD Panel User Manual 16020-000741-02 Rev. 1 (08-2014)

Controls and Functions
Input PanelThe illustration below shows the display input panel.
1. Power Input (100 to 240 VAC)Connect the display to power here.
2. DVI-D Out (HDCP-compliant)VESA-standard digital video output from the display to the next display in a video wall.
3. VGA Out (15-pin D-Sub)VESA-standard analog video output from the display to the next display in a video wall.
4. DisplayPortDisplayPort 1.1a and DisplayPort-HDCP 1.1 compliant, SD/HD input for connecting SDTV, EDTV or HDTV component video sources.
5. HDMI 1, HDMI 2Two (2) HDCP-compliant digital video inputs for connecting HDMI or DVI sources.
SOURCE
MENU/EXIT
23
9
13
17
15
10
14
16
18
4
6
87
1
5
1112
FHD552-X LCD Panel User Manual 17020-000741-02 Rev. 1 (08-2014)

Controls and Functions
6. DVI-D In (HDCP-compliant)VESA-standard digital video input from a personal computer, or digital video from a DVD player or HD set-top box.
7. VGA In (15-pin D-Sub)For connecting components that have RGB or component output jacks such as a personal computer or external DTV decoder (a break-out cable is needed for BNC-type connection).
8. PC Audio In Connect the audio output from a personal computer here.
9. IR ExtenderConnect the IR Extender cable provided with the display to this input.
10. Audio Out For connecting external, powered speakers or an external audio receiver/amplifier.
11. ComponentStandard- or high definition (up to 1080p), YPrPb component video input.
12. Comp. AudioStereo audio input from the Component video source.
13. S-VideoStandard S-video input for connecting a VCR, camcorder, gaming console, Super VHS (S-VHS) VCR or other S-video source.
14. VideoStandard composite input for connecting a VCR, camcorder, gaming console or other composite video source.
15. Video / S-V AudioStereo audio input from the Composite or S-video source.
16. RS232C InA female, 9-pin D-sub connector for interfacing with a PC or home theater automation/control system.
17. RS485 InA female, 8-pin RJ-45 connector that connects to the previous display in a video wall.
18. RS485 OutA female, 8-pin RJ-45 connector that connects to the next display in a video wall.
If both the Composite and S-video inputs are connected to sources, the S-video input takes precedence.
FHD552-X LCD Panel User Manual 18020-000741-02 Rev. 1 (08-2014)

Controls and Functions
Remote Control Unit The illustration below shows the display remote control, and the table that follows describes its functionality.
2
4
6
1
3
5
9
7
10
8
FHD552-X LCD Panel User Manual 19020-000741-02 Rev. 1 (08-2014)

Controls and Functions
Label Description
1 Turns the monitor on and off
2 INFO Provides source and resolution information
3 VGA Selects the PC RGB source
DVI Selects the PC DVI source
HDMI1 Selects the HDMI source 1
COMP Selects the Component source
AV Selects the Composite Video source
HDMI2 Selects the HDMI source 2
4 P-POSITION Selects the PIP position
DISPLAYPORT Select the DisplayPort source
PIP Turns the PIP feature on and off
S-V Selects the S-video source
5 P-SOURCE Selects the secondary sub-source
6 SWAP Swaps the main and PIP source
7 MENU Opens the monitor’s on-screen menu system. When the menu system is already open, pressing this button will select the previous submenu
, , , Navigates through submenus and settings
8 ENTER Selects highlighted menu choices
9 EXIT Closes the menu system
10 SCALING Selects each aspect ratio, in sequence: Full Screen, Native, Letter Box and Pillar Box
FREEZE Freezes the current source image
MUTE Turns off the sound
BRIGHT Adjusts the brightness
CONTRAST Adjusts the contrast
AUTO Auto adjustment of VGA source
SOURCE Selects each source, in sequence
VOLUME- Decreases the sound volume
VOLUME+ Increases the sound volume
FHD552-X LCD Panel User Manual 20020-000741-02 Rev. 1 (08-2014)

Installation
Remote ControlTo install batteries in the remote control:
1. Press down the tab on the cover and pull the cover up.
2. Insert the included batteries. Ensure that the polarities correctly match the and markings inside the battery compartment.
3. Insert the lower tab of the cover into the opening, and press down the cover until it clicks in place.
Notes on Batteries• Make sure that the battery polarities are correct when installing the batteries.
• Do not mix an old battery with a new one or different types of batteries.
• If you will not use the remote control for a long time, remove the batteries to avoid damage from battery leakage.
• Do not expose batteries to excessive heat such as from sunshine, fire or the like.
Notes on Remote Control Operation• Make sure that there is nothing obstructing the infrared beam between the remote control and
the IR receiver on the display.
• If the effective range of the remote control decreases, or it stops working, replace the batteries with new ones.
• The remote control may fail to operate if the infrared remote sensor is exposed to bright sunlight or fluorescent lighting.
• Ambient conditions may possibly impede the operation of the remote control. If this happens, point the remote control at the display, and repeat the operation.
Locking and Unlocking the Remote ControlYou can lock the remote control buttons to prevent unauthorized persons from changing settings on the display. To do this, press ENTER, ENTER, EXIT, EXIT, ENTER and EXIT, in sequence. To unlock a locked remote control unit, use the same sequence of button presses.
Installation must be performed by a qualified custom video installation specialist.
FHD552-X LCD Panel User Manual 21020-000741-02 Rev. 1 (08-2014)

Installation
Quick SetupHere is a quick overview of the display installation process. The sections following this one provide detailed instructions.
Installation ConsiderationsProper installation of your display will ensure a satisfying viewing experience. Whether you are installing a display temporarily or permanently, you should take the following into account to ensure your display performs optimally.
Handling GuidelinesSuper-narrow bezel displays are inherently very fragile devices. To avoid damaging your LCD panel, follow these guidelines when handling or moving the panel. Please note that damage die to improper handling is not covered under warranty.
• Always use the handles on the back of the LCD panel. Do not hold the display by its edges (outer bezel).
• Two people are required when moving or raising the LCD panel. Use both hands, one positioned on the top handle and the other on the bottom handle.
• Do not twist or bend the panel.
• Hold and support the LCD panel at each side and keep at an even height above the ground.
• Use a cart to move multiple panels at one time.
• When the panel is sitting on a surface, do not tilt it more than 10° to avoid damaging the screen.
Step Procedure For Details, Refer to page...
1 Mount the display(s) on a wall (optional) 23
2 Connect other external equipment to the display (optional):• Automation/control system (RS232 or Ethernet)• IR extender
2425
3 Connect signal sources to the display 25
4 For video wall installations, connect video cables and control cables to each display in a series (optional)
5 Apply power to the display 28
6 Change the OSD language (optional) 30
7 Display calibration: adjust the following for each input:• Aspect ratio • Color level• Brightness • Tint• Contrast • Input position• Color temperature and white balance
33
FHD552-X LCD Panel User Manual 22020-000741-02 Rev. 1 (08-2014)
Installation
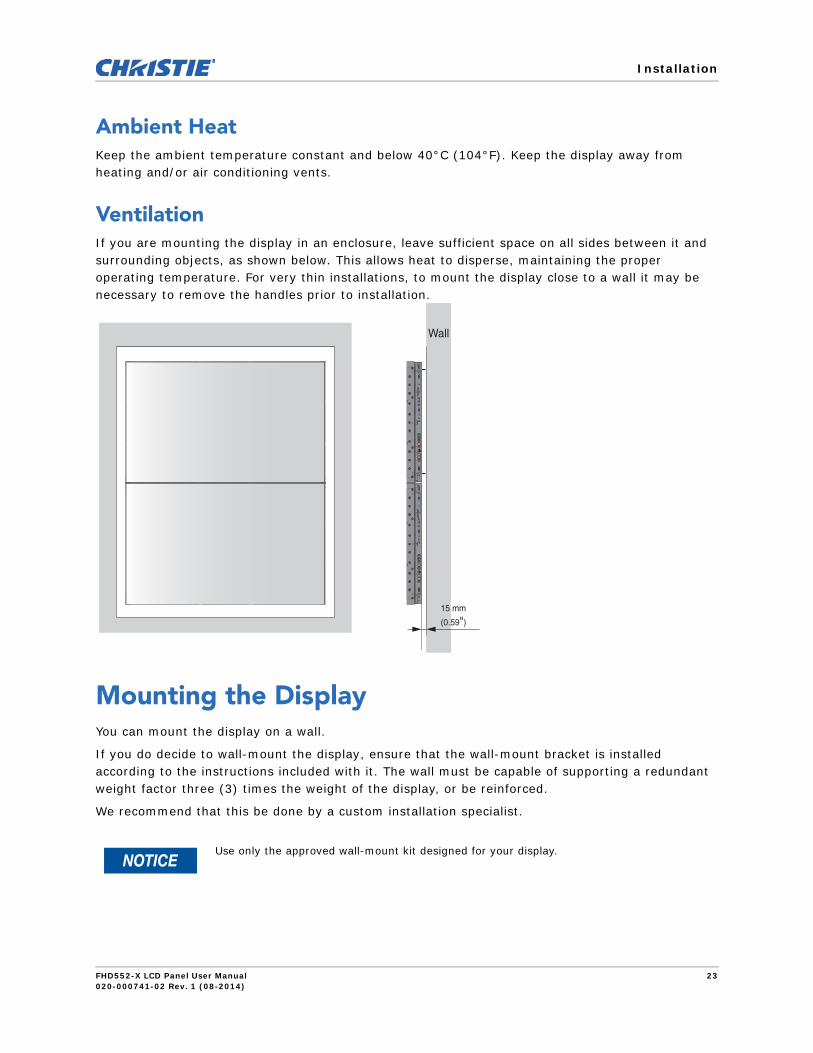
Ambient HeatKeep the ambient temperature constant and below 40°C (104°F). Keep the display away from heating and/or air conditioning vents.
VentilationIf you are mounting the display in an enclosure, leave sufficient space on all sides between it and surrounding objects, as shown below. This allows heat to disperse, maintaining the proper operating temperature. For very thin installations, to mount the display close to a wall it may be necessary to remove the handles prior to installation.
Mounting the DisplayYou can mount the display on a wall.
If you do decide to wall-mount the display, ensure that the wall-mount bracket is installed according to the instructions included with it. The wall must be capable of supporting a redundant weight factor three (3) times the weight of the display, or be reinforced.
We recommend that this be done by a custom installation specialist.
Use only the approved wall-mount kit designed for your display.
Wall
15 mm
(0.59")
FHD552-X LCD Panel User Manual 23020-000741-02 Rev. 1 (08-2014)

Installation
Connections to the DisplayProceed as follows to connect the display to your video sources, external controller(s) – if present – and AC power.
When connecting your equipment:
• Turn off all equipment before making any connections.
• Use the correct signal cables for each source.
• For best performance and to minimize cable clutter, use high-quality cables that are only as long as necessary to connect two devices. (Don’t use a 20-foot cable when a 6-foot cable will suffice.)
• Ensure that the cables are securely connected. Tighten the thumbscrews on connectors that have them.
Connecting a Control System or PC
RS232 ConnectionUse a straight-through RS232 cable with a 9-pin male connector to connect a PC or home theater control/automation system (if present) to the RS232 port on the display.
For more information about using this connection, refer to External Control on page 50.
to Automation/Control System
or PC
2 Receive Data
(to ctrl. system)
3 Transmit Data
(from ctrl. system)
5 Ground
12345
789 6
FHD552-X LCD Panel User Manual 24020-000741-02 Rev. 1 (08-2014)

Installation
IR Extender ConnectionConnect the provided IR extender cable to the IR Extender input as shown below.
Connecting Source Components to the DisplayConnect your video sources to the display as shown and described in the sections that follow.
DisplayPort Source Connection
(3.5-mm, miniphono plug)
Remote Control
FHD552-X LCD Panel User Manual 25020-000741-02 Rev. 1 (08-2014)

Installation
HDMI and DVI-D Source Connections
Use the HDMI inputs whenever possible. This ensures the highest video quality because the signal is carried in the digital domain throughout the entire signal path, from source component output into the display.
You can also connect computers with DVI output to these inputs. Refer to Supported Timings on page 66 for a list of compatible input signals. This display supports the VESA Display Data Channel (DDC) standard. This standard provides “Plug and Play” capability; the display and a VESA DDC-compatible computer communicate their setting requirements, allowing for quick and easy setup.For Plug and Play to work correctly, you must turn on the display before you turn on the connected computer.
HDMI orDVI-to-HDMI Cable
(sold separately)BD/HD-DVD/DVD/DTV STB
DVI-D Cable
Audio Cable(Sold Separately)
Rear of the PC
FHD552-X LCD Panel User Manual 26020-000741-02 Rev. 1 (08-2014)

Installation
Component Video Source ConnectionConnect your component video source to the Component inputs as shown below.
RGBHV (VGA) Source ConnectionConnect a personal computer or other RGB source to the VGA input as shown below.
Refer to Supported Timings on page 66 for a list of compatible input signals.
DVD/DTV STB
Audio Cable
Video Cable
D-Sub 15-pin Cable
Audio Cable(Sold Separately)
Rear of the PC
FHD552-X LCD Panel User Manual 27020-000741-02 Rev. 1 (08-2014)

Installation
Composite and S-Video Source Connection
Setting Up a Video WallThe maximum supported video wall size depends on the type of video source, as follows:
• Maximum video wall size using a single digital source and DVI pass through connectors: 3x3
• Maximum video wall size using a single analog source and VGA pass through connectors: 2x2
• Maximum video wall size using multiple source signals from an external splitter or distribution amplifier: 5x5
If both the Composite and S-Video inputs are connected to sources, the S-Video input takes precedence.
Audio Cable
Composite Video Cable
S-Video Cable
Gaming Console
VCR
Camcorder
FHD552-X LCD Panel User Manual 28020-000741-02 Rev. 1 (08-2014)

Installation
The example below shows a 3x3 matrix (9 displays):
RS232 RoutingThe external RS232 controller should be connected to the upper leftmost display, as shown in the illustration below. The remaining monitors should be connected via their RS485 connectors in the sequence shown below, using the RJ45 cables provided.
FHD552-X LCD Panel User Manual 29020-000741-02 Rev. 1 (08-2014)

Operation
Turning on the Power1. Turn on your source components.
2. Plug the female end of the supplied power cord into the AC receptacle on the side of the display (AC 100V ~ 240V).
3. Connect the other end to your AC power source.
4. Turn on the main power switch at the side of the display. The power indicator lights orange to indicate that the display is in “standby” mode.
5. Press the power button ( ) on the remote control to turn on the display (or press the power button ( ) on the keypad). After a brief warm-up period, the display will display an image.
Changing the OSD LanguageThe display OSD language is initially set to English, but can also display the menus in Simplified Chinese, French, German, Italian, Portuguese, Russian, Spanish, Korean or Japanese. To change the OSD language:
1. Press MENU.
2. Select Basic Settings from the Main Menu.
3. Select OSD Language from the Basic Settings Menu.
4. Press or to select the desired language and press ENTER. The change takes effect immediately.
Avoiding Image Retention
Follow the recommendations below to prolong the life of the display.
Operate the Display Within Its Rated Ambient Environment• Operating temperature: 0°C to 40°C (32°F to 104°F)
• Relative humidity: 85%, maximum.
Do not display static (non-moving) content on the display for long periods of time.This may cause image “burn-in” or image retention, which is not covered under warranty.
FHD552-X LCD Panel User Manual 30020-000741-02 Rev. 1 (08-2014)

Operation
Avoid Static Content• Display dynamic (moving) images whenever possible
• Consider using a screen saver to avoid displaying static (fixed) video content continuously.
• Turn off the display when not in use, or use the Real Time Clock feature (refer to Real Time Clock on page 41) to automatically turn off the display at preset times of the day.
Set IRFM to ONTo help prevent image retention, set IRFM (refer to Advanced Settings on page 42) to On.
FHD552-X LCD Panel User Manual 31020-000741-02 Rev. 1 (08-2014)

Operation
Using the On-Screen MenusTo display the on-screen menus, press MENU on the remote control or built-in keypad.
To select a sub-menu, use the and buttons to highlight it. Then, press to enter that sub-menu.
To select a menu item, use the and buttons to highlight it. Then, press or to adjust that setting and press ENTER.
The OSD menus are arranged hierarchically, as shown here and on the next page. Depending on the selected input source and signal characteristics, some menu options may not be available.
Image Settings
Scheme User, Vivid, Cinema, Game or SportBrightness 0, 1, 2 ... 50 ... 99, 100ContrastSharpness 0, 1, 2 ... 6, 7, 8Saturation 0, 1, 2 ... 50 ... 99, 100HueBacklight 0, 1, 2 ... 80 ... 99, 100
Color Temperature & Gamma
Gamma Off or 2.2Color Temperature 3200K, 3300K, 3400K, 9600K or UserRed / Green / Blue Gain 128, 129, 130 .. 256 ... 382, 383Red / Green / Blue Offset -50, -49, -48 ... 0 ... 48, 49, 50
Aspect Ratio Full Screen, Pillarbox or AutoAuto Scan On or OffSelect Source VGA, HDMI1, DVI, or DisplayPort
Display Settings
Main
Aspect Ratio Full Screen, Letterbox, Pillarbox or Native
Zoom 0, 1, 2 ... 9, 10Auto Scan On or Off
Select Source VGA, HDMI1, HDMI2, DVI, DisplayPort, S-Video, Video or Component
PIP
PIP Mode Off, Large PIP, Medium PIP, Small PIP or Side-by-Side
PIP Position Bottom Right, Top Left, Top Right or Bottom Right
Aspect Ratio Full Screen, Letterbox or PillarboxSide-by-Side Scale Zoom In, Zoom out, Main PIPAuto Scan On or Off
Select Source VGA, HDMI1, HDMI2, DVI, DisplayPort, S-Video, Video or Component
Audio Settings
Volume 0, 1, 2 ... 50 ... 99, 100Bass
0, 1, 2 ... 10 ... 19, 20TrebleBalanceHDMI Audio Input HDMI or PC AudioDP Audio Input DisplayPort or PC Audio
Basic Settings
OSD Transparent 0, 1, 2 ... 99, 100OSD Location Up, Down, Left, RightOSD Zoom Off or OnOSD Rotation Landscape or Portrait
OSD Language English, (Simplified Chinese), Français, Deutsch, Italiano, Português, (Russian), Español, (Korean) or (Japanese)
OSD Timeout 5, 6, 7 ... 30 ... 119, 120 secondsPower LED On or Off
Real Time Clock
Current Date and Time
Timer ModeUser, Same Settings on All or Same Settings on Work Days (Monday ... Friday)
Power-On Timer Disable or EnablePower-OffTimer
Note: Default settings appear in bold type.
FHD552-X LCD Panel User Manual 32020-000741-02 Rev. 1 (08-2014)

Operation
Image Settings
Use the controls in the Image Settings Menu to calibrate each display input to achieve optimum picture quality.
Connect your test pattern source to the input that you are calibrating and proceed as follows. Perform the adjustments in the order listed here.
Advanced Settings
Auto Adjustment No or YesImage Position (VGA mode) Up, Down, Left, RightPhase (VGA mode) 0, 1, 2 ... 63Clocks (VGA mode) 0, 1, 2 ... 100VGA ADC Settings User ADC CalibrationFlesh Tone (Video Mode) Off, Low, Medium or HighIRFM Off or Standard or Video WallBaud Rate 115200, 38400, 19200 or 9600Smart Light Control Off or Local Dimming
Wake Up from Sleep VGA Only, VGA, Digital, RS232 or Never Sleep
Temperature & Fan Status Temperature (°C, °F)Fan 1 Speed / Fan 2 Speed
Multi Display Control
Monitor ID 1, 2,3 ... 24, 25Video Wall Yes or NoDVI Indemnity Yes or No
Power On Delay 0, 0.05, 0.10, 0.15, 0.20 ... 29.90, 29.95 or 30 sec.
Frame Yes or NoMatrix X 1~10Matrix Y 1~10Division X 1~Matrix XDivision Y 1~Matrix YIR Mode Off or Target or AllRecipient ID 1~100Auto Video Wall Setup Bottom-Left or Top-Left
Factory Reset Yes or No
System Status
Channel Information Main Active Source / Signal Resolution and Refresh RatePIP
Total HoursFirmware Version
Note: Default settings appear in bold type.
FHD552-X LCD Panel User Manual 33020-000741-02 Rev. 1 (08-2014)

Operation
Scheme
Select Scheme from the Image Settings menu, then press or to select one of four image quality presets (Vivid, Cinema, Game or Sport) depending on the type of program material you are viewing. These presets automatically adjust the other image settings for optimal image quality. Or, select User to adjust Brightness, Contrast and other settings manually.
BrightnessOn your external test pattern source, select a PLUGE pattern. (PLUGE is an acronym for “Picture Line-Up Generation Equipment.”)
PLUGE patterns vary but generally consist of some combination of black, white and gray areas against a black background. The example above includes two vertical bars and four shaded boxes.
Select Brightness from the Image Settings menu and press or to adjust the brightness so that:
• The darkest black bars disappear into the background.
• The dark gray areas are barely visible.
• The lighter gray areas are clearly visible.
• The white areas are a comfortable level of true white.
• The image contains only black, gray and white (no color).
ContrastOn your external test pattern source, select a stepped, gray-bar pattern like the one shown below.
Below Black
Above Black
FHD552-X LCD Panel User Manual 34020-000741-02 Rev. 1 (08-2014)

Operation
Select Contrast and press or to adjust the contrast to a point just below which the white rectangle starts to increase in size.
Sharpness“Sharpness” is the amount of high-frequency detail in the image. To adjust sharpness, select Sharpness from the Image Settings menu. On your external test pattern source, select a pattern like the one shown below. Adjust as needed, looking for white edges around the transitions from black to gray and differently-sized lines in the “sweep” patterns at the top and bottom. Lower the sharpness setting to eliminate them.
SaturationOn your external test pattern source, select a color bar pattern like the one shown here.
Brightness and contrast controls are interactive. A change to one may require a subtle change to the other in order to achieve the optimum setting.
gray
yello
w
cyan
gree
n
mag
enta
red
blu
e
FHD552-X LCD Panel User Manual 35020-000741-02 Rev. 1 (08-2014)

Operation
1. Press MENU on the remote control or keypad.
2. Select Saturation from the Image Settings menu.
3. While looking at the color bar pattern through a blue filter, adjust the color saturation level until the outermost (gray and blue) color bars appear to be a single shade of blue:
Hue“Hue” (or “tint”) is essentially the ratio of red to green in the color portion of the image. When hue is decreased, the image appears redder; when it is increased the image appears greener.
To adjust the hue, use a blue filter when viewing the color bar pattern, as you would for adjusting color saturation (refer to the previous section, Saturation on page 35).
Select Hue from the Image Settings menu and press or to adjust it until the cyan and magenta color bars (on either side of the green bar) appear to be a single shade of blue.
BacklightThe Backlight control changes the apparent brightness of the displayed image. Its effect is similar to that of a lamp intensity control on a projector.
GammaSelect Gamma from the Image Settings menu and choose either 2.2 (default) or Off.
Color TemperatureSelect Color Temperature from the Image Settings menu to adjust the color temperature. Color temperature establishes the “color of gray” by adjusting the 75% white point to various color points.
Like the brightness and contrast controls, the color and tint controls are interactive. A change to one may require a subtle change to the other in order to achieve the optimum setting.
gray
yello
w
cyan
gree
n
mag
enta
red
blu
e
FHD552-X LCD Panel User Manual 36020-000741-02 Rev. 1 (08-2014)

Operation
What are “color points?”A “color point” is an x/y coordinate pair that defines a color’s location on the standard CIE chromaticity graph, shown below. (CIE stands for “Commission Internationale de l’Éclairage” (International Commission on Illumination), the organization responsible for color measurement and management standards.)
Select a value of from 3200K to 9600K. Higher settings produce a “bluer” picture; lower ones impart a reddish hue to the image. To select a custom color temperature, select User and set the Gain and Offset as described below.
GainUse the Gain controls to correct color imbalances in the bright areas of the image. A good way to do this is to use a test pattern consisting mostly of solid white areas, such as an 80 IRE “window” pattern. If the white areas contain traces of red, green or blue, decrease the Gain for that color.
OffsetUse the Offset controls to correct color imbalances in the dark areas of the image. A good way to do this is to use a test pattern consisting mostly of dark gray areas, such as a 30 IRE “window” pattern. If the gray areas contain traces of red, green or blue, decrease the Offset for that color.
0.0 0.1 0.2 0.3 0.4 0.5 0.6 0.7 0.8 0.9 1.00.0
0.1
0.2
0.3
0.4
0.5
0.6
0.7
0.8
0.9
1.0
x
y
2000
2222
2500
2857
3333
4000
5000
5714
6667
8000
1000
0
D50
D65
D93
Red
Blue
Green
Cyan
Magenta
Yellow
FHD552-X LCD Panel User Manual 37020-000741-02 Rev. 1 (08-2014)

Operation
Display Settings
Aspect RatioTo change the aspect ratio (size and shape) of the displayed image, select Aspect Ratio from the Display Settings menu and press ENTER. Select the appropriate aspect ratio for the type of program material being viewed.
Note that some aspect ratios are unavailable and/or not useful with certain types of source material. The optimal setting depends on a number of factors, such as:
• The aspect ratio of the source material, as broadcast or encoded on the playback medium.
• The “display type” (16:9 or 4:3) and output resolution settings at the source component. Most modern DVD/BD players and set-top boxes have such controls.
• Viewer preference (original aspect ratio with “black bars,” or a full-screen presentation with some distortion or cropping).
Zoom
Choose Zoom from the Display Settings menu and press or to choose one of 10 zoom levels.
Auto Scan
Select Auto Scan from the Display Settings menu and press or to turn this feature on or off. When set to On, Auto Scan causes the Main or PIP input select functions (using the SOURCE button on the remote control unit or keypad, or the P-Source button on the remote control unit) to skip over unused inputs, saving time.
FHD552-X LCD Panel User Manual 38020-000741-02 Rev. 1 (08-2014)

Operation
Select Source
Choose Select Source from the Display Settings menu and press or to select the video source.
PIP Mode
Choose PIP Mode from the Display Settings menu and press or to enable Picture-in-Picture mode and set the size of the PIP window.
PIP Position
Choose PIP Mode from the Display Settings menu and press or to set the location of the PIP menu.
Side By Side Scale
Choose Side By Side Scale from the Display Settings menu and press or to select PIP, Main, Zoom In or Zoom Out.
Audio Settings
Volume
Select Volume from the Audio Settings menu and press or to change the audio volume.
Bass
Select Bass from the Audio Settings menu and press or to cut or boost the low audio frequencies.
Treble
Select Treble from the Audio Settings menu and press or to cut or boost the high audio frequencies.
FHD552-X LCD Panel User Manual 39020-000741-02 Rev. 1 (08-2014)

Operation
BalanceTo adjust the left/right speaker balance, select Balance from the Audio Settings menu and press
or to make one channel louder than the other.
HDMI Audio InputIf you are using one of the HDMI inputs with a PC or other device that does not support audio output via HDMI, set HDMI Audio Input to PC for that input. (Also connect the audio output from your source.) This setting associates the PC Audio In input with that HDMI input.
DP Audio InputIf you are using the DisplayPort input with a PC or other device that does not support audio output via DisplayPort, set DP Audio Input to PC for that input. (Also connect the audio output from your source.) This setting associates the PC Audio In input with the DisplayPort input.
Basic Settings
OSD Transparent
Select OSD Transparent from the Basic Settings menu and press or to adjust the degree of translucence (show-through) in the menus and message boxes. Zero (0) means that the menus are opaque.
OSD Location
Select OSD Location from the Basic Settings menu and press or to move the OSD menu to the desired location.
OSD Zoom
Select OSD Zoom from the Basic Settings menu and press or to choose either a normal-sized or enlarged OSD menu.
FHD552-X LCD Panel User Manual 40020-000741-02 Rev. 1 (08-2014)

Operation
OSD Rotation
Select OSD Rotation from the Basic Settings menu and press or to change the orientation of the OSD menu to match that of the display.
OSD Language
Select OSD Language from the Basic Settings menu and press or to select the OSD Language
(English, (Simplified Chinese), Français, Deutsch, Italiano, Español, Português,
(Russian), (Korean) or (Japanese)).
OSD TimeoutSelect OSD Timeout from the Basic Settings menu to specify how long the menus remain on-screen after selecting them. Select from 5 to 120 seconds, in five-second increments.
Sleep TimerSelect Sleep Timer from the Basic Settings menu to turn off the display after a specified interval. Press or to select Off, 15 Minutes, 30 Minutes, 60 Minutes, 90 Minutes or 2 Hours.
Power LEDSelect Power LED from the Basic Settings menu to change the behavior of the status indicator LED during standby mode. When set to On, the LED lights orange to indicate that the display is in standby mode. When set to Off, the LED is always off, regardless of the operational state of the display.
Real Time ClockSelect Real Time Clock from the Basic Settings menu to set the display’s internal real-time clock.
From this menu, you can also program the display to turn on and off at specified times of day and days of the week:
• To set power-on and power-off times for each day of the week independently, set the Timer Mode to User.
• To set the same power-on and power-off times for every day of the week, set the Timer Mode to All Days.
• To set the same power-on and power-off times for Monday through Friday, set the Timer Mode to Work Days.
FHD552-X LCD Panel User Manual 41020-000741-02 Rev. 1 (08-2014)

Operation
Advanced Settings
Auto AdjustmentSelect Auto Adjustment from the Advanced Settings menu to force the display to reacquire and lock to the input signal. This is useful when the signal quality is marginal.
Image Position (VGA sources)Use the controls in the Image Position (VGA sources) Menu to fine-tune the image position.
• Left/Right: Select Left/Right from the Input Position menu to shift the projected image horizontally. Press to shift the image to the right; press to shift it to the left.
• Up/Down: Select Up/Down from the Input Position menu to shift the projected image vertically. Press to shift the image upward; press to shift it downward.
Phase (VGA sources)This control adjusts the phase of the pixel sampling clock relative to the incoming signal. Adjust the phase when an image still shows shimmer or “noise” after the Clock setting has been optimized.
For best results, use a good test pattern such as a smooth gray consisting of a clear pattern of black and white pixels, or a similar “half on, half off” graphic image. Adjust the slidebar until the image stabilizes and each pixel is clearly defined. You may notice that you can stabilize the image at more than one point. Use either setting in such cases.
Clocks (VGA sources)This control sets the frequency of the pixel sampling clock, indicated by the number of incoming pixels per line, so that all pixels generated by a particular source are sampled.
Steady flickering or several soft vertical stripes or bands across the entire image indicates poor pixel tracking. Proper pixel tracking helps ensure that the image quality is consistent across the screen, that aspect ratio is maintained and that pixel phase (see above) can be optimized.
Adjust the Phase after adjusting Clock (see below).
FHD552-X LCD Panel User Manual 42020-000741-02 Rev. 1 (08-2014)

Operation
VGA ADC SettingsSelect VGA ADC Settings from the Advanced Settings menu to calibrate the display’s analog-to-digital converter (ADC) for VGA sources.
Flesh ToneSelect Flesh Tone from the Advanced Settings menu to lighten or darken the flesh-colored areas of the image. (This setting is only available with Video sources.)
IRFM
Select IRFM from the Advanced Settings menu and press or to enable or disable this feature, which creates slight frame motion to help avoid image retention.
Baud Rate
Select Baud Rate from the Advanced Settings menu and press or to set the data rate of the RS232 communication link.
Smart Light ControlSelect ON to enable the dimming feature of the display. Local dimming improves the black level and contrast of the display by adjusting the backlight to match the image, but is not ideal for all content.
Wake Up From Sleep
Select Wake Up From Sleep from the Advanced Settings menu and press or to control this feature, which operates as follows:
• VGA Only: The display wakes up from power-saving mode when it receives an active video signal on its VGA (analog) input.
• VGA, Digital, RS232: The display wakes up when it receives an active signal from its VGA, HDMI, Display Port or DVI inputs, or receives a valid RS232 command.
• Never Sleep: The display never enters power-saving mode.
Temperature & Fan Status
Select Temperature & Fan Status from the Advanced Settings menu and press or to display information about the health of the display: the internal operating temperature and the cooling fan speeds.
Multi-Display Control
Select Multi-Display Control from the Advanced Settings menu and press to configure your video wall. This sub-menu provides the following controls:
• Monitor ID: This control lets you manually set the Monitor ID of each display in the video wall.
FHD552-X LCD Panel User Manual 43020-000741-02 Rev. 1 (08-2014)
Operation
• Power On Delay: When powering on a video wall, this control staggers the power-on sequence so that all monitors will not turn on at once, reducing current requirements. Select a value of from 0 to 30 seconds (inclusive) per monitor.
• DVI Indemnity: For large matrixes using a single digital source and a DVI pass-thru cables, setting this to On may enhance the video quality and reliability of the pass-thru signals.
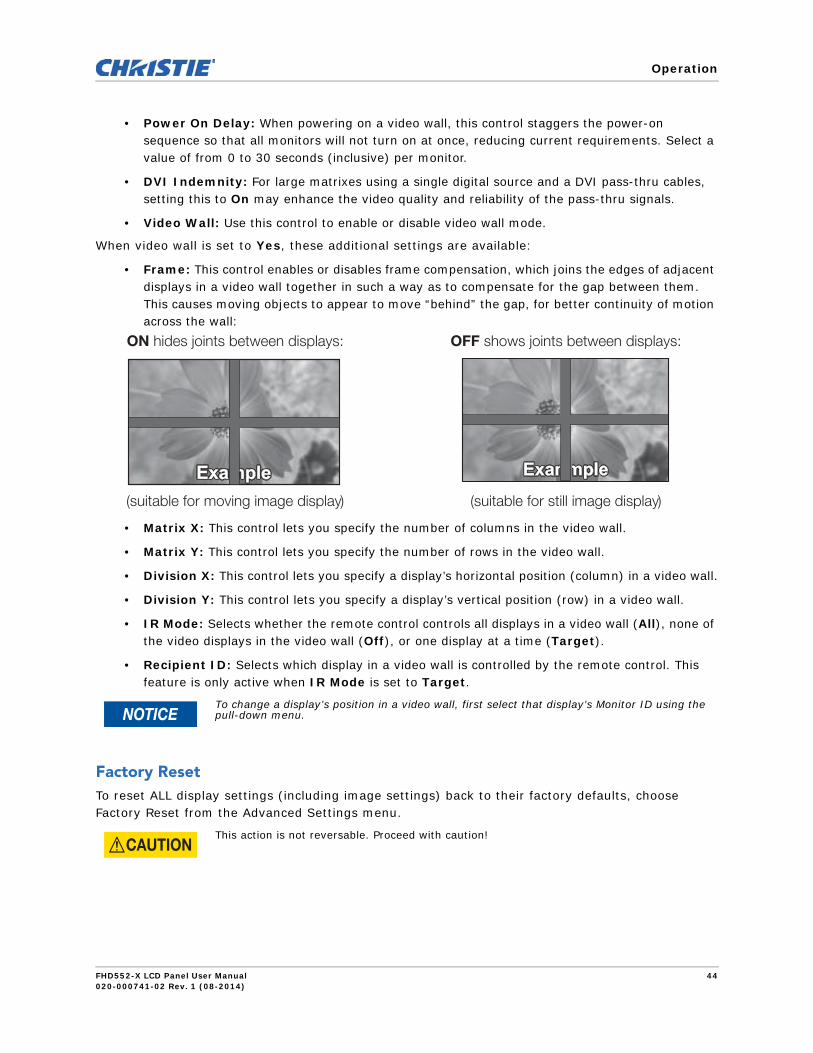
• Video Wall: Use this control to enable or disable video wall mode.
When video wall is set to Yes, these additional settings are available:
• Frame: This control enables or disables frame compensation, which joins the edges of adjacent displays in a video wall together in such a way as to compensate for the gap between them. This causes moving objects to appear to move “behind” the gap, for better continuity of motion across the wall:
• Matrix X: This control lets you specify the number of columns in the video wall.
• Matrix Y: This control lets you specify the number of rows in the video wall.
• Division X: This control lets you specify a display’s horizontal position (column) in a video wall.
• Division Y: This control lets you specify a display’s vertical position (row) in a video wall.
• IR Mode: Selects whether the remote control controls all displays in a video wall (All), none of the video displays in the video wall (Off), or one display at a time (Target).
• Recipient ID: Selects which display in a video wall is controlled by the remote control. This feature is only active when IR Mode is set to Target.
Factory ResetTo reset ALL display settings (including image settings) back to their factory defaults, choose Factory Reset from the Advanced Settings menu.
To change a display’s position in a video wall, first select that display’s Monitor ID using the pull-down menu.
This action is not reversable. Proceed with caution!
ON hides joints between displays:
(suitable for moving image display)
OFF shows joints between displays:
(suitable for still image display)
FHD552-X LCD Panel User Manual 44020-000741-02 Rev. 1 (08-2014)

Operation
System Status
The read-only System Status menu provides the following status information about the display:
• The resolution and refresh rate of the Main and PIP sources;
• The number of hours the display has been in operation; and
• The currently-installed firmware version.
Using the Picture-in-Picture (PIP)To use PIP, press the PIP button.
The PIP window appears inside the main image window.
Press PIP again to turn PIP off.
2. Press the (
FHD552-X LCD Panel User Manual 45020-000741-02 Rev. 1 (08-2014)

Operation
Press the P-Source button to select a PIP signal source. For each source, the table below shows whick of the other sources are available as a PIP source.
Changing the PIP PositionTo change the PIP window position, press the P-POSITION button on the remote control repeatedly until the window is in the desired position.
Changing the PIP Size or Selecting Side-by-Side PIP ModeSelect PIP Mode from the Display Settings menu and press or to change the PIP window size or to enable “side-by-side” PIP.
Main Input Source
VGA HDMI 1 HDMI 2 DVI DisplayPort Video S-Video Component
PIP
In
pu
t S
ourc
e
VGA –
HDMI 1 – – –
HDMI 2 – – –
DVI – – –
DisplayPort –
Video – –
S-Video – –
Component –
Note: “” means that source is available as a PIP source when that input is selected; “–” means that it is not.
1
2
4
3
FHD552-X LCD Panel User Manual 46020-000741-02 Rev. 1 (08-2014)

Operation
Swapping the Main and PIP ImagesTo swap the main and PIP images, press the SWAP button on the remote control.
FHD552-X LCD Panel User Manual 47020-000741-02 Rev. 1 (08-2014)

Maintenance and Troubleshooting
MaintenanceThe FHD651-P and FHD651-T LCD Panels does not require any routine maintenance. There are no user-serviceable or -replaceable parts. Unless you are a qualified, factory-trained technician, do not attempt to repair or replace any system component yourself. You will void the product warranty if you do so.
TroubleshootingThe table below provides some general guidelines for troubleshooting problems you may encounter with your display. If the suggested solutions fail to resolve the problem or if you encounter an issue not described here, please contact your dealer.
Symptom Possible Cause(s) Solution
The display does not turn on. • The display is not plugged in or the AC outlet is not active.
• The main power switch is off.
• The remote control batteries have run out.
• Ensure that the display is plugged in and that the AC outlet is active.
• Set the main power switch (see Display at a Glance on page 15) to the on position.
• Replace the batteries.
The display is on and menus appear, but there is no picture.
• Incorrect source selection. • Source component is not turned
on. • Source component is connected
incorrectly or not at all.
• Select the correct source. • Turn on the source component.
• Check connections from the source component to the display.
The remote control does not work. • The remote control batteries have run out.
• The buttons are locked.
• IR extender is not connected.
• Replace the batteries.
• Unlock the buttons by pressing ENTER, ENTER, EXIT, EXIT, ENTER and EXIT, in sequence.
• Verify that the IR extender cable is correctly connected (see IR Extender Connection on page 25).
Image geometry is incorrect. • Incorrect aspect ratio selection. • Select a different aspect ratio.
FHD552-X LCD Panel User Manual 48020-000741-02 Rev. 1 (08-2014)

Maintenance and Troubleshooting
The display is jittery or unstable. • Poor-quality or improperly connected source.
• The horizontal or vertical scan frequency of the input signal may be out of range for the display.
• Ensure that the source is properly connected and of adequate quality for detection.
• Correct at the source.
Image is too bright and/or lacks definition in the bright areas of the image.
• Contrast is set too high. • Decrease the contrast setting.
Image appears “washed out” and/or dark areas appear too bright.
• Brightness is set too high. • Decrease the brightness setting.
Image is too dark. • Brightness and/or Backlight are set too low.
• Increase the brightness and/or backlight settings.
Images from an HDMI source do not display.
• The resolution and frequency of the video card in the computer are not compatible with the display.
• HDMI cable from source to display is either defective or too long.
• Select a compatible resolution and vertical frequency (refer to Supported Timings on page 66).
• Try a known-good and/or shorter HDMI cable.
Computer images do not display correctly.
• The resolution and frequency of the video card in the computer are not compatible with the display.
• Clock and Phase settings need adjustment.
• Select a compatible resolution and vertical frequency (refer to Supported Timings on page 66).
• Adjust Clock and Phase settings (refer to Clocks (VGA sources) on page 42 and Phase (VGA sources) on page 42).
Images from A Composite video source do not display.
• Both the Composite and S-Video inputs are connected to sources
• Disconnect the S-Video source.
Symptom Possible Cause(s) Solution
FHD552-X LCD Panel User Manual 49020-000741-02 Rev. 1 (08-2014)

External ControlIn addition to using the display keypad or remote control unit, you can control the display using a serial (RS232/RS485) link to send ASCII commands and receive responses to those commands.
You also use discrete infrared (IR) control codes to program a third-party remote control unit. For more information, refer to Using Discrete IR Codes on page 62.
Serial CommunicationsThe display uses a simple text-based control protocol to take requests from control devices and to provide responses to such devices. This section describes how to send control messages over a serial link between the display and an automation/control system or a PC running either of the following:
• A terminal emulation program such as Windows® HyperTerminal or TeraTerm; or
• The Video Wall Toolbox, a Windows application that provides a graphical user interface that mimics the remote control buttons, as well as the ability to send serial commands and receive responses to those commands.
RS232 Connection and Port ConfigurationConnect your control system or PC to the RS232 input of the display; refer to Connecting a Control System or PC on page 24.
Configure the RS232 controller or PC serial port as follows: no parity, 8 data bits, 1 stop bit and no flow control. Set the baud rate to 115200, to match that of the display RS232 port.
Command and Response FormatCommands sent from an automation/control system or PC to the display must have this format:
[STX] [IDT] [TYPE] [CMD] ([VALUE] or [REPLY]) [ETX] [CR]
Where:
• [STX] indicates the start of the command data (always 07).
• [IDT] is the display ID Use hexadecimal values 01 to 19 inclusive to address a single display. Use 00 to broadcast a command to all panels in a video wall.
• [TYPE] is the command type:
• 00 = return to host (response from the LCD panel)
• 01 = read/action
• 02 = write
• [VALUE] is the parameter setting for the command.
FHD552-X LCD Panel User Manual 50020-000741-02 Rev. 1 (08-2014)

External Control
• [REPLY] is the parameter setting for the command, acknowledged by the display in its response to a command.
• [ETX] indicates the end of the command data (always 08).
• [CR] is the ASCII carriage return key (0x0D).
Command and Response ExamplesHere are some examples of serial commands and their responses:
Description Command Sent to LCD Panel Response Received from LCD Panel
Turn LCD panel power off. 07 01 02 50 4F 57 00 08 07 01 00 50 4F 57 00 08
Turn LCD panel power on. 07 01 02 50 4F 57 01 08 07 01 00 50 4F 57 01 08
Request LCD panel power status.
07 01 01 50 4F 57 08 07 01 00 50 4F 57 XX 08(XX = 0 when off or 1 when on)
Set the LCD panel contrast to 30 (1E hex).
07 02 02 43 4F 4E 1E 08 07 02 00 43 4F 4E 1E 08
Request the LCD panel to use large PIP
07 19 02 50 53 43 03 08 07 19 00 50 53 43 03 08
Reset the LCD panel display settings.
07 02 02 41 4C 4C 00 08 07 02 00 41 4C 4C 00 08
Request LCD panel serial number.
07 01 01 53 45 52 08 07 01 00 53 45 52 S(0)…S(12) 08S(0) …S(12) = the serial number in ASCII
Request LCD panel firmware version.
07 01 01 47 56 45 08 07 01 00 47 56 45 S(0)…S(5) 08S(0) …S(5) = the firmware version in ASCII
FHD552-X LCD Panel User Manual 51020-000741-02 Rev. 1 (08-2014)

External Control
Serial Command List
Main Item Control Item
CMD Type Value
(DEC)
Reply
(DEC)
Content CMD (HEX)
Power Control and Input Source
PowerControl
POW W/R 00 00 Off (soft power)(For advanced A/D boards – optional)
50 4F 57
01 01 On (soft power)
InputSource
MIN W/R 00 00 VGA 4D 49 4E
01 01 Digital DVI
02 02 S-Video
03 03 Composite Video
04 04 Component
09 09 HDMI 1
10 10 HDMI 2
13 13 DisplayPort
FHD552-X LCD Panel User Manual 52020-000741-02 Rev. 1 (08-2014)

External Control
Display Adjustment Display Adjustment
BRI W/R 0~100 Current value
Back Light Brightness
42 52 49
BRL W/R 0~100 Current value
Digital Brightness Level
42 52 4C
BLC W/R 00 00 Off (Back Light) 42 4C 43
01 01 On (Back Light)
CON W/R 0~100 Current value
Contrast 43 4F 4E
HUE W/R 0~100 Current value
Hue 48 55 45
SAT W/R 0~100 Current value
Saturation 53 41 54
COT W/R 00 00 User 43 4F 54
01 01 6500K
02 02 9300K
06 06 5000K
07 07 7500K
GAC W/R 00 00 Off (Gamma) 47 41 43
01 01 2.2 (Gamma)
USR W/R 0~255 Current value
Red Gain (128~383)
55 53 52
USG W/R 0~255 Current value
Green Gain (128~383)
55 53 47
USB W/R 0~255 Current value
Blue Gain (128~383)
55 53 42
UOR W/R 0~100 Current value
Red Offset (-50~50) 55 4F 52
UOG W/R 0~100 Current value
Green Offset (-50~50)
55 4F 47
UOB W/R 0~100 Current value
Blue Offset (-50~50)
55 4F 42
PHA W/R 0~63 Current value
Phase 50 48 41
CLO W/R 0~100 Current value
Clock 43 4C 4F
HOR R Current value
Horizontal Position 48 4F 52
VER R Current value
Vertical Position 56 45 52
ADJ W 00 00 Auto Adjust 41 44 4A
Main Item Control Item
CMD Type Value
(DEC)
Reply
(DEC)
Content CMD (HEX)
FHD552-X LCD Panel User Manual 53020-000741-02 Rev. 1 (08-2014)

External Control
Display Adjustment (cont.)
Video Mode
SHA W/R 0~24 Current value
Sharpness 53 48 41
Other Control Pip Adjust PSC W/R 00 00 PIP OFF 50 53 43
01 01 PIP Small
02 02 PIP Medium
03 03 PIP Large
04 04 PIP Side-by-Side
PIP Source Selection
PIN W/R 00 00 VGA 50 49 4E
01 01 Digital DVI
02 02 S-Video
03 03 Composite Video
04 04 Component
09 09 HDMI 1
10 10 HDMI 2
13 13 DisplayPort
PIP Position
PPO W/R 00 00 PIP Position Bottom-Left
50 50 4F
01 01 PIP Position Bottom-Right
02 02 PIP Position Top-Left
03 03 PIP Position Top-Right
PIP/Main Swap
SWA W 00 00 Swap Main and PIP 53 57 41
Scaling ASP W/R 00 00 Native 41 53 50
01 01 Full Screen
02 02 Pillar Box
03 03 Letter Box
ZOM W 00 00 Zoom In 5A 4F 4D
01 01 Zoom Out
Baud Rate Adjustment
BRA W/R 00 00 115200 42 52 41
01 01 38400
02 02 19200
03 03 9600
Main Item Control Item
CMD Type Value
(DEC)
Reply
(DEC)
Content CMD (HEX)
FHD552-X LCD Panel User Manual 54020-000741-02 Rev. 1 (08-2014)

External Control
Other Control (Cont.)
Other Control
RCU W 00 00 MENU Key 52 43 55
01 01 INFO Key
02 02 UP Key
03 03 DOWN Key
04 04 LEFT Key
05 05 RIGHT Key
06 06 ENTER Key
07 07 EXIT Key
08 08 VGA Key
09 09 DVI Key
10 10 HDMI1 Key
11 11 HDMI2 Key
12 12 DISPLAYPORT Key
13 13 COMP Key
14 14 S-V Key
15 15 AV Key
18 18 SOURCE Key
19 19 P-SOURCE Key
20 20 PIP Key
21 21 P-POSITION Key
22 22 SWAP Key
23 23 SCALING Key
24 24 FREEZE Key
25 25 MUTE Key
26 26 BRIGHT Key
27 27 CONTRAST Key
28 28 AUTO Key
29 29 VOLUME+ Key
30 30 VOLUME- Key
Main Item Control Item
CMD Type Value
(DEC)
Reply
(DEC)
Content CMD (HEX)
FHD552-X LCD Panel User Manual 55020-000741-02 Rev. 1 (08-2014)

External Control
Other Control (Cont.)
Other Control
All W 00 00 Reset All 41 4C 4C
KLC W/R 00 00 Un-Lock Keys 4B 4C 43
01 01 Lock Keys
SER R 13 bytes Read Serial Number 53 45 52
MNA R 13 bytes Read Model Name 4D 4E 41
GVE R 6 bytes Read Firmware Version
47 56 45
RTV R Current Value
Read RS232C Table Version
52 54 56
RTT R Current Value
Read the temperature of the internal thermal sensor
52 54 54
RSF W 0~255 00 Read speed of fan 0 (RPM
0~255 01 Read speed from fan 1 (RPM
WFS W/R 00 00 Wake Up from Sleep = VGA Only
57 46 53
01 01 Wake Up from Sleep = VGA, Digital, RS232
02 02 Wake Up from Sleep = Never Sleep
Audio VOL W/R 0~100 Current Value
Volume 56 4F 4C
MUT W/R 00 00 Mute Off 4D 55 54
01 01 Mute On
Scheme Selection
SCM W/R 00 00 User 53 43 4D
01 01 Sport
02 02 Game
03 03 Cinema
04 04 Vivid
Main Item Control Item
CMD Type Value
(DEC)
Reply
(DEC)
Content CMD (HEX)
FHD552-X LCD Panel User Manual 56020-000741-02 Rev. 1 (08-2014)

External Control
Using Video Wall ToolboxThe Video Wall Toolbox software (included with the display) simplifies setting up a video wall using a PC running Windows XP, Vista or 7. It can also be used to configure and control a single display.
Video Wall Toolbox provides an alternative to using the remote control unit or built-in keypad to control the display, presenting all of the controls in the OSD menus within an attractive, intuitive graphical user interface.
Installation and Initial SetupTo use the Video Wall Toolbox, proceed as follows:
1. Install the software on a Windows PC using the CD provided.
2. Connect the PC to the video wall as described in the section RS232 Routing on page 29.
3. Ensure the baud rate of the PC RS232 connection matches the baud rate of the monitor. The default baud rate is 115200.
4. Launch the Video Wall Toolbox software to display the Video Wall Configuration screen, shown below.
5. Select the COM port you are using to connect to the video wall from the SELECT COM Port: pull-down menu.
6. Select your video wall size from the Select Displays Matrix: pull-down menu.
7. Press Auto Setup and the Video Wall Toolbox software automatically assigns the proper Monitor IDs to all displays in the video wall.
FHD552-X LCD Panel User Manual 57020-000741-02 Rev. 1 (08-2014)

External Control
Video Wall Adjust ScreenThe Video Wall Adjust screen, shown below, provides the same controls as the Multi-Display Control OSD menu (refer to Multi-Display Control on page 43).
Color Adjustment ScreenThe Color Adjustment screen, shown below, provides the same image quality controls as the Image Settings OSD menus (refer to Image Settings on page 33).
FHD552-X LCD Panel User Manual 58020-000741-02 Rev. 1 (08-2014)

External Control
Remote Control ScreenThe Remote Control Screen, shown below, provides the same functionality as the hand-held remote control unit.
FHD552-X LCD Panel User Manual 59020-000741-02 Rev. 1 (08-2014)

External Control
RS232 Command ScreenThe RS232 Command screen, shown below, enables you to manually enter supported RS232 commands in either ASCII or hexadecimal format (Refer to Serial Command List on page 52 for all supported commands).
To send a command in ASCII format:
1. Click the ASCII Command radio button.
2. Check Read or Write to select that command type.
3. Use the Monitor ID: pull-down menu to select the command destination.
FHD552-X LCD Panel User Manual 60020-000741-02 Rev. 1 (08-2014)

External Control
4. Click the text box labeled 3 Char. CMD and enter a valid three-character command from those in the Serial Command List on page 52.–OR–Click 3 Char. CMD to display the command selection window. When you move the mouse pointer over a command, a brief description of the command and an example (in hexadecimal format) appear at the bottom of the window. Click on a command to select it.
5. For Write commands, click the text box labeled Value (Dec.) and enter a decimal parameter value to send with the command. Or, click Value (Dec.) to change the parameter entry mode to Value (Hex) and enter a hexadecimal value.
6. Click Send. If the command executes successfully, the sent command and the response from the target display appear in the window.
To send a command in hexadecimal format:
1. Click the HEX command radio button.
2. Check Read or Write to select that command type.
3. Click the left-most text box and enter 07.
4. Enter the Monitor ID in the second text box.
5. Enter 01(read) or 02(write) in the third text box.
6. Enter the command in the next three text boxes.
7. For Write commands, enter a parameter value to send with the command.
8. Enter 08 in the right-most text box.
9. Click Send. If the command executes successfully, the sent command and the response from the target display appear in the window.
FHD552-X LCD Panel User Manual 61020-000741-02 Rev. 1 (08-2014)

External Control
Using Discrete IR CodesThe display accepts commands in the form of infrared (IR) signals that conform to the NEC protocol. Each display remote control button has an IR control code associated with it.
You can use these codes to program a third-party, “universal” remote control unit to work with the display. These third-party products usually come with a computer software application for this purpose. For more information, consult the documentation provided with the remote control unit.
IR Command ProtocolThe IR control codes have the following characteristics:
• Each code consists of the following:
• A leader pulse (a modulated pulse of 9 ms followed by a non-modulated pulse of 4.5 ms);
• 16 address bits (also called a “custom code”): eight (8) bits for the address followed by the logical inverse of the address. The custom code for the display is 16559 decimal (0x40AF, binary 01000000 10101111).
• 16 data bits: eight (8) bits for the command followed by the logical inverse of the command; and
• An end pulse (a modulated pulse of 0.56 ms, similar to the modulated pulse in the ‘0’ and ‘1’ bits). The end of the modulated pulse constitutes the end of the data transmission.
• The carrier frequency is 38 kHz, with the modulated pulses having a 33% duty cycle.
• Commands are sent at a maximum rate of 9 Hz.
For example, here is the NEC control code for the POWER button on the display remote control unit:
Hex 40 AF 1C E3
Binary 01000000 10101111 00011100 11100011
Function Cust. Code Byte 1
Cust. Code Byte 2
Command Command(Logical Inverse)
FHD552-X LCD Panel User Manual 62020-000741-02 Rev. 1 (08-2014)

External Control
IR Control Code List
Customer Code Data Code Function
40AF 04FB INFO
40AF 1CE3 POWER
40AF 07F8 VGA
40AF 08F7 DVI
40AF 09F6 HDMI1
40AF 0AF5 COMP
40AF 0BF4 AV
40AF 0CF3 HDMI2
40AF 1AE5 PIP POSITION
40AF 15EA DISPLAY PORT
40AF 11EE PIP
40AF 0DF2 S-V
40AF 06F9 SWAP
40AF 13EC PIP SOURCE
40AF 0EF1 MENU
40AF 12ED ENTER
40AF 05FA EXIT
40AF 14EB SCALING
40AF 43BC FREEZE
40AF 00FF MUTE
40AF 17E8 BRIGHTNESS
40AF 18E7 s CONTRAST
40AF 1EE1 AUTO
40AF 0FF0 SOURCE
40AF 1BE4 VOLUME -
40AF 1DE2 VOLUME +
FHD552-X LCD Panel User Manual 63020-000741-02 Rev. 1 (08-2014)

Specifications
Display Specifications
LCD PANEL
Brightness 500 cd/m2
Contrast Ratio 1400:1
Viewing Angle H:178° / V:178°
Response Time 12 ms (GTG)
Supported Colors 1.07 billion colors
Display Resolution 1920 x 1080 (16:9)
Display Frame Rate 60 Hz
SIGNAL COMPATIBILITY / CONNECTIVITY
Horizontal / Vertical Frequency 31 ~ 91 KHz / 56 ~ 85 Hz
Input Resolution 1920 x 1080 @ 60 Hz (Analog); 1920 x 1080 @ 60 Hz (Digital)
Connectors DisplayPort / HDMI x 2 / DVI-D (In/Out) / VGA (In/Out) / PC Audio In / IR Extender / Audio Out / Component / S-Video / Composite
Communication Ports RS232C In, RS485 In/Out
MECHANICAL
Dimensions See Overall Dimensions on page 68.
Weight Net: 33.2 kg / 75 lbs; Gross: 44 kg / 99 lbs
Wall Mount 600mm x 400mm VESA
OSD FUNCTIONS
Control RS232C, Built-in Keypad, IR Remote Controller
Language English, (Simplified Chinese), Français, Deutsch, Italiano, Português, (Russian), Español, (Korean) or (Japanese)
Picture Options PIP, PBP (Side-by-Side, Zoom
Source Auto Detect Yes
Key Lock Yes
ELECTRICAL
Power Supply AC 100V ~ 240V (50/60 Hz), 3.0 Amps, maximum
Power Consumption (normal operation)
170 W (typical), 213 W (max)
Power Consumption (standby mode)
0.5 W
ENVIRONMENTAL
FHD552-X LCD Panel User Manual 64020-000741-02 Rev. 1 (08-2014)

Specifications
Operating Temperature 0°C ~ 40°C, 85% RH
Storage Temperature -20°C ~ 60°C, 85% RH
SOFTWARE
Video Wall Toolbox Requires Windows operating system
DIMENSIONS
Bezel Width 2.25 mm / 0.14 inch (Top/Left)1.15 mm / 0.08 inch (Bottom/Right)
Image to Image 3.8 mm (typical)
Specifications are subject to change without notice.
FHD552-X LCD Panel User Manual 65020-000741-02 Rev. 1 (08-2014)

Specifications
Supported Timings
Timing fH (kHz) fV (Hz) Dot clock(MHz)
HD
MI
PC
Com
pon
ent
S-V
ideo
Co
mp
osi
te
DV
I
Dis
pla
yPor
t
VESA VGA 640x480 31.469 59.94 25.175 O O O ● - - O O ● O
37.861 72.809 31.5 O O - - O O O
37.5 75 31.5 O O - - O O O
43.269 85.008 36 O O - - O O O
SVGA 800x600 35.156 56.25 36 O O - - O O O
37.879 60.317 40 O O ● - - O O ● O
48.077 72.188 50 O O - - O O O
46.875 75 49.5 O O - - O O O
53.674 85.06 56.25 O O - - O O O
XGA 1024x768 48.363 60.004 65 O O ● - - O O ● O
56.476 70.069 75 O O - - O O O
60.023 75.029 78.75 O O - - O O O
68.677 84.997 94.5 O O - - O O O
WXGA1360x768 47.712 60.015 85.5 O O ● - - O O ● O
1280 x 720 44.444 59.98 64 O O ● - - O O ● O
44.772 59.86 74.5 O O ● - - O O ● O
56.456 74.78 95.75 O O - - O O O
1280 x 768 47.776 59.87 79.5 O O ● - - O O ● O
47.396 59.995 68.25 O O ● - - O O ● O
68.633 84.837 117.5 O O - - O O O
1280 x 800 49.306 59.91 71 O O ● - - O O ● O
49.702 59.81 83 O O ● - - O O ● O
SXGA 1152x864 67.5 75 108 O O - - O O O
1280x1024 63.981 60.02 108 O O - - O O O
79.976 75.025 135 O O - - O O O
91.146 85.024 157.5 O O - - O O O
O = Compliant timing. ● = Compliant timing for video wall.480i means supported 480i@60Hz (YPbPr). 576i means supported 576i@50Hz (YPbPr).
FHD552-X LCD Panel User Manual 66020-000741-02 Rev. 1 (08-2014)

Specifications
VESA(cont.)
SXGA+ 1400 x 1050 64.744 59.95 101 O O - - - O O
65.317 59.98 121.75 O O - - - O O
1440 x 900 55.469 59.901 88.75 O O - - - O O
55.935 59.88 106.5 O O - - - O O
WSXGA+ 1680 x1050 64.674 59.883 119 O O ● - - - O ● O
65.29 59.954 146.25 O O ● - - - O ● O
UXGA 1600 x 1200 75 60 162 O O ● - - - O ● O
1920 x 1080 66.587 59.93 138.5 O O ● - - - O ● O
SDTV NTSC 15.734 29.97 13.5 - - 480i O O - -
PAL 15.625 25 13.5 - - 576i O O - -
EDTV 480p 31.5 60 27.03 O - O - O ● O
576p 31.25 50 27 O - O - O ● O
HDTV 720p 1280x720 37.5 50 74.25 O - O - O ● O
44.995 59.94 74.176 O - O - O ● O
45 60 74.25 O - O - O ● O
1080i 1920x1080 28.13 50 74.25 O - O - O O
33.716 59.94 74.176 O - O - O ● O
33.75 60 74.25 O - O - O ● O
1080p 1920x1080 27 24 74.25 O - - - - O
28.125 25 74.25 - - - - - -
33.716 29 74.18 - - - - - -
33.75 30 74.25 - - - - - -
56.25 50 148.5 O - O - O ● O
67.433 59.94 148.352 O - O - O ● O
67.5 60 148.5 O - O - O ● O
Timing fH (kHz) fV (Hz) Dot clock(MHz)
HD
MI
PC
Co
mp
on
ent
S-V
ideo
Co
mp
osi
te
DV
I
Dis
pla
yPor
t
O = Compliant timing. ● = Compliant timing for video wall.480i means supported 480i@60Hz (YPbPr). 576i means supported 576i@50Hz (YPbPr).
FHD552-X LCD Panel User Manual 67020-000741-02 Rev. 1 (08-2014)

Specifications
Overall DimensionsAll dimensions are in millimeters [inches].
684.
226
.94
O/A
1213
.447
.77
O/A
1.8
.07
HO
RIZO
NTA
LBE
ZEL
1.8
.07
VERT
ICA
LBE
ZEL
1209
.647
.62
ACT
IVE
DIS
PLA
Y
680.
426
.79
ACT
IVE
DIS
PLA
Y
1387
.854
.64
ACT
IVE
DIS
PLA
Y
DO
NO
TRE
ST P
AN
ELO
N A
NY
CORN
ER
ISO
FRO
NT
VIEW
81.1
3.19
102.
54.
03PA
NEL
WIT
HH
AN
DLE
CON
NEC
TOR
LOCA
TIO
NS
ON
TH
IS S
IDE
10.0
.39
MIN
CLE
ARA
NCE
FOR
VEN
TILA
TIO
N(B
ACK
OF
PAN
ELTO
WA
LL, W
ITH
HA
ND
LES
REM
OVE
D)
WA
LLRE
MO
VE H
AN
DLE
S TO
ACH
IEVE
MIN
CLE
ARA
NCE
FRO
NT
VIEW
AC
INLE
T
OSD
BU
TTO
ND
ISPL
AY
600.
023
.62
400.
015
.75
142.
15.
59
306.
712
.07
4X M
8 VE
SAM
OU
NTI
NG
HO
LES
This
sid
e up
in L
AN
DSC
APE
mod
e
This side upin PORTRAIT mode
(4) H
AN
DLE
S FO
R LI
FTIN
G(R
EMO
VABL
E)
LCD
PA
NEL
FH
D55
2-X
(135
-004
105-
XX)
LEFT
VIE
WRI
GH
T VI
EW
BOTT
OM
VIE
W
TOP
VIEW
BACK
VIE
W
FHD552-X LCD Panel User Manual 68020-000741-02 Rev. 1 (08-2014)

Italyph: +39 (0)
Consult
Canada – Kph: 519-744
USA – Cyprph: 714-23
Corpora
*000-104612-02*ASSY TECH DOCS FHD552-X
United Kingdomph: +44 (0) 118 977 8000
United Arab Emiratesph: +971 4 3206688
Spainph: +34 91 633 9990
Singaporeph: +65 6877-8737
Republic of South Africaph: +27 (0)11 510 0094
Korea (Seoul)ph: +82 2 702 1601
Japan (Tokyo)ph: 81 3 3599 7481
Indiaph: +91 (080) 6708 9999
Germanyph: +49 2161 664540
Franceph: +33 (0) 1 41 21 44 04
Eastern Europe andRussian Federationph: +36 (0) 1 47 48 100
China (Shanghai)ph: +86 21 6278 7708
China (Beijing)ph: +86 10 6561 0240
Brazilph: +55 (11) 2548 4753
Australiaph: +61 (0) 7 3624 4888
Worldwide offi ces
2 9902 1161
ant offi ces
itchener-8005
ess6-8610
te offi ces

For the
most current technical documentation, please visit www.christiedigital.comTop Related
Copyright © 2022 FDOKUMEN

