
WSIPC Guide to Payroll: September Payroll Processing
124
WSIPC Guide to Payroll: September Payroll Processing
-
Upload
khangminh22 -
Category
Documents
-
view
3 -
download
0
Transcript of WSIPC Guide to Payroll: September Payroll Processing
WSIPC Guide to
Payroll: September Payroll
Processing

WSIPC Guide to Payroll - September Payroll Processing (April 2017) i
Version 05.17.02.00.07
Contents
Contents i
About This Guide 1
What You Should Know Before You Start 1 Be Sure You’re Signed In 1
How to Use This Guide 2 Navigation Paths 2 Getting Around 2 Screen Shots 2
What’s in a WSIPC Guide 2 Do Not Post This Guide to the Public Internet 3
What’s New in This Edition 3
Understanding September Payroll Processing 5
Processing the Final Payroll of the Fiscal Year 5 Preparing Payroll Data for the Next Fiscal Year 6 Processing the First Payroll and Closing the Fiscal Year 6 When Does September Payroll Processing Occur? 7 Workflow for September Payroll Processing 8
PART ONE: Processing the Final Payroll of the Fiscal Year 9
Terminating Employees Who Will Not Return 9 Processing Leave Cashouts for Eligible Employees 10
Creating a Leave Cashout Pay Code 11 Verifying Time Off Code Settings for Leave Cashouts 14 Verifying Ded/Ben Code Settings 15 Entering a Leave Cashout as a Sale Record in Time Off 19 Processing Leave Cashout Pay Records 25 Verifying the Payroll Calculations for a Leave Cashout 28
Adjusting Pay Record Amounts for the Final Contract Payment 30 Using the Auto-Calc Mass Select Option 30 Manually Adjusting Pay Record Amounts 33
Running the W2 Audit 38 Processing Final Payroll of the Fiscal Year 38 Processing Payroll Encumbrance for Final Payroll of Fiscal Year in August 38 Processing Accrual Payroll 39 Terminating Employees after Running Final Payment 41
PART TWO: Preparing Payroll Data for the Next Fiscal Year 42
Updating Washington Rate Tables 42 Entering Workers’ Compensation Rate Tables for the Next Fiscal Year 43 Updating the Unemployment Compensation Rate Table 44
Maintaining Data in Employee Profile 45

Contents
WSIPC Guide to Payroll - September Payroll Processing (April 2017) ii
Version 05.17.02.00.07
Running the Profile Report 46 Running Reports on Paid-Off Contracts 47 Purging Pay Records and Contracts from Employee Profile 47 Changing Employee Types 55 Updating Individual Employee Deductions and Benefits 56 Mass Updating Deductions and Benefits 57
Preparing Employee Payroll Assignment Data for Payroll in Employee Management 58 Creating the Next Fiscal Year Employee Management Plan for Payroll 58 Importing Assignments into Your New Employee Management Plan 60
Updating Employee Assignment Information in Employee Management 64 Using the Contract Paid to Date Totals When Calculating the Pay Record Amounts Option 64 Running the Position - Assignments Mass Change Utility 64 Using Employee Management Reports to Verify That Your Data is Correct before Exporting to
Payroll 67 Exporting Employee Management Assignments to Payroll 67 Importing Employee Management Assignments to Payroll 68 Verifying and Setting the Primary Pay Code 69 Using Employee Management Reports to Verify That Data is Correct after Importing to Payroll 70 Verifying Contract Paid Start and Stop Dates 70 Running the Deduction/Benefit Audit 71 Verifying Benefit FTE 71
Updating Retro and Leave Without Pay (LWOP) Pay Codes in Contracts 71 Updating Retro and Dock (LWOP) Pay Codes 72
Updating WA Hourly Wage 74 Updating Hourly Rates on Pay Records 74
Method 1 – Using the Mass Processing Utility in Payroll to Update Hourly Rates 75 Method 2 – Creating an Employee Management Plan for Hourly Employees 77 Method 3 – Using the Mass Processing Utility in Payroll to Recalculate Pay Records 78 Method 4 – Using the Pay Record Update Utility to Update Pay Records 81 Method 5 – Auto Update Pay Records with WA Hourly Wage 86 Method 6 – Auto Create Additional Pay Rate Codes (Hourly, Daily, Overtime, and Lump Sum) from
Employee Management Assignments 93 Updating Insurance Tracking Data for the Next Fiscal Year 95 Updating Time Off Records for the Next Fiscal Year 97 Running the Substitute Tracking Year End Purge 99 Running Flex Year End Processing 103 Updating ACA Status Records 103
PART THREE: Processing the First Payroll and Closing the Fiscal Year 104
Processing the First Payroll of the Next Fiscal Year 104 Closing the Fiscal Year in Payroll 105
Appendix A - September Payroll Checklist 107
Appendix B - New Employee September Payroll Checklist 110
Appendix C - Setting Pay Record Amounts to Round Rather Than Truncate 112
Appendix D - Processing Batch Reports for Payroll 114

Contents
WSIPC Guide to Payroll - September Payroll Processing (April 2017) iii
Version 05.17.02.00.07
Appendix E - Resetting the Fiscal Year to the Prior Year 117
Appendix F - Processing Time Off Transactions for an Employee with a Paid Off
Contract 118

WSIPC Guide to Payroll - September Payroll Processing (April 2017) 1
Version 05.17.02.00.07
About This Guide
This Guide shows you how to complete the final payroll of the fiscal year and how to
prepare payroll data for the next fiscal year.
This Guide will help anyone who completes the August payroll and prepares data for,
or runs, the September Payroll. This may include payroll managers and their staff,
human resources staff, other finance and administrative staff, and anyone else
involved in the payroll or budget process. This Guide will also help anyone who
processes Administrator’s June and July payrolls.
This Guide is divided into several major sections that walk you through the
September Payroll process. This includes completing the final payroll of the fiscal
year in August and preparing payroll data for September Payroll (the first payroll of
the next fiscal year).
The Appendixes include a checklist that helps you track the work you’ve completed
during the September Payroll process.
What You Should Know Before You Start You’ll find that the Guide is much more helpful if you have experience working with
Assignments in Employee Management and are familiar with contracts, Pay Records,
and deductions and benefits in the Employee Profile. You should also be familiar with
the following modules: Insurance Tracking, Time Off, and Payroll. This Guide
references other WSIPC Guides. If you do not have access to any of these documents,
check with your Information Service Center.
Be Sure You’re Signed In This Guide is intended to be read while you are working in the Human Resources
module, so be sure you are signed in. Many of the procedures and concepts
discussed in the Guide are best understood if you practice as you read.

About This Guide
WSIPC Guide to Payroll - September Payroll Processing (April 2017) 2
Version 05.17.02.00.07
How to Use This Guide This section shows you how to follow navigation paths in a Guide, and how to
navigate around the Guide using various features. This section also describes how
and when screen shots are used in the Guide.
Navigation Paths The procedures in this Guide begin with navigation menu paths. Select the
check box in User Preferences to ensure that you can follow
these paths. The option is not available in User Preferences if it is already enabled for
the entire district. To learn more about setting User Preferences, see the WSIPC Guide
to Skyward’s School Management System.
Getting Around If you’re using this Guide electronically, you can click any text in blue font to move to
the section of the Guide that the text refers to. Because the Guides are published in
PDF format, you can also use the PDF navigation pane to quickly move from one
section to another. If the pane is hidden, click the button in the menu
bar on the left side of the screen.
Screen Shots You’ll find screen shots throughout the guide to help you learn how to use the
software. The data entered in the screen shots in this Guide is an example of the data
you might enter. These screen shots are updated with each edition to make sure
what you see on your screen matches what you see in the Guide. To prevent the
Guide from becoming a lengthy picture book, WSIPC Guides use screen shots only to
help illustrate a key idea or when options on a screen are described. This allows
WSIPC Guides to be effective and concise.
What’s in a WSIPC Guide WSIPC Guides are designed to provide readers with everything they need to know to
safely and effectively use Skyward’s software. WSIPC strives to make Guides that
address the diverse needs of these audiences. Therefore, this Guide doesn’t contain
information customized for specific audiences, districts, or schools.
If you need to create educational materials that address the specific needs of your
Service Center or district, consider using this Guide as a starting point for developing
your own customized materials.

About This Guide
WSIPC Guide to Payroll - September Payroll Processing (April 2017) 3
Version 05.17.02.00.07
Do Not Post This Guide to the Public Internet
The information contained in this Guide is copyright protected. You may store a
digital copy of this Guide on your internal server for access by authorized users.
Allowing access to this Guide by anonymous users, including search engine crawlers,
is not permitted. If you are unsure whether your website is open or your server is
protected from crawlers, contact your systems administrator.
What’s New in This Edition This section highlights the significant changes to the Guide since the last edition such
as content about new features, important notes and cautions, and sections of the
Guide that have been expanded or moved.
Description of Change Page #
Updated the Guide to reflect WSIPC’s February 2017 software
release version 05.17.02.00.07. N/A
Made all dates generic. N/A
Added the “Workflow for September Payroll Processing” section. 8
Added a note to the “Creating a Leave Cashout Pay Code” section. 11
Added a note to the “Adding a Time Off Sale Transaction in
Employee Profile” section. 20
Updated Table 4 Scenario 3 Details. 28
Updated the “Running the W2 Audit” section. 38
Updated the “Purging Pay Records and Contracts from Employee
Profile” section. 47
Added a note to the “Method 3 – Using the Mass Process to Delete
Contracts and Associate Pay Records” section. 52
Updated the “Mass Update Deductions and Benefits” section. 57
Added a note to the “Importing Employee Management
Assignments to Payroll” section. 68
Added the “Verifying Benefit FTE” section. 71

About This Guide
WSIPC Guide to Payroll - September Payroll Processing (April 2017) 4
Version 05.17.02.00.07
Description of Change Page #
Added a note to the “Updating Hourly Rates on Pay Records”
section. 74
Updated the “Method 6 – Auto Create Additional Pay Rate Codes
(Hourly, Daily, Overtime, and Lump Sum) from Employee
Management Assignments” section.
93
Updated the September Payroll Checklist. 107
WSIPC Guide to Payroll - September Payroll Processing (April 2017) 5
Version 05.17.02.00.07
Understanding September Payroll
Processing
September Payroll Processing is an “umbrella” term that includes three parts:
Processing the Final Payroll of the Fiscal Year
Preparing Payroll Data for the Next Fiscal Year
Processing the First Payroll and Closing the Fiscal Year
These steps consist of a series of tasks and processes that prepare payroll data for
the first payroll of the next fiscal year. As part of these steps, information for the
newest employees is added, and almost all employees are given new contracts or pay
amounts. “When Does September Payroll Processing Occur?” (page 7) explains when
these steps occur. The flowchart in “Workflow for September Payroll Processing”
(page 8) shows you how these steps can fit together when processing September
payroll.
Processing the Final Payroll of the Fiscal
Year Processing the final payroll of the Fiscal Year includes a number of tasks. You must
end the information in the records for terminated employees and for those who are
not returning, so that payments to them do not continue in error. Terminating an
Employee Record includes making the final contract payment and updating
retirement, leave balances, benefits, and running the final payroll.
Payments of sick and vacation cashouts to eligible employees may be made at this
time. To ensure that each employee’s contract is paid in full, you must also adjust the
Pay Record amounts for final payment. Run the W2 Audit before running the final
payroll so that adjustments can be included with the final payment before contracts
and Pay Records are deleted. After you prepare everything, you run the final payroll,
and close the final encumbrance if your district encumbers. In some districts, an
accrual payroll is run and posted to the ending fiscal year.
Understanding September Payroll Processing
WSIPC Guide to Payroll - September Payroll Processing (April 2017) 6
Version 05.17.02.00.07
Preparing Payroll Data for the Next Fiscal
Year While processing the final payroll of the fiscal year, you also begin to set up the data
for the next fiscal year. After the final payroll of the ending fiscal year, Washington
Rate Tables are updated. Employee Profile data is maintained, which includes
deleting Pay Records and purging contracts. New Employee Management Plans are
set up and the Assignments are imported from Salary Negotiations Plans—often
those that were used to create the budget for the next fiscal year. Employee
Management Assignments are exported and then imported to Payroll. Retro and
Leave without Pay (LWOP) Pay Codes are updated on Contracts and Hourly Rates on
Pay Records are updated.
In Insurance Tracking, Substitute Tracking, Flex, and Time Off, you may need to roll
data to the next fiscal year. You must also update deduction and benefit premiums, if
they are changing for the next fiscal year. If the district uses Insurance Tracking to
calculate benefits, you must update benefit FTEs, and you must enter employee
enrollment changes.
Processing the First Payroll and Closing
the Fiscal Year You process the first payroll of the next fiscal year. If you processed an accrual payroll
you process the Payroll Payables Expense Run payout. You also create new POs for
the encumbrance process.
The fiscal year in HR is closed after all payrolls and payroll transactions, including the
payroll payables and payables reversal, are complete. You must complete this
process before the first payroll in the second month of the next fiscal year.
Understanding September Payroll Processing
WSIPC Guide to Payroll - September Payroll Processing (April 2017) 7
Version 05.17.02.00.07
When Does September Payroll
Processing Occur? The first payroll for new contracts for administrators is performed in July. The first
payroll on the new contracts for most employees is performed in September. The
setup process for September Payroll Processing can begin after the budget for that
fiscal year is complete (usually in July).
While this Guide covers all tasks that make up the September Payroll process, your
district may perform these tasks in a different order than they are presented in this
Guide. The sequence depends on your district’s business practices. For example, as
part of the August payroll, your district may begin creating next fiscal year Employee
Management Plans in July, before performing the Processing Leave Cashouts process
or the Terminating Employees process—and in your district these processes may not
be performed by the same department.
Understanding September Payroll Processing
WSIPC Guide to Payroll - September Payroll Processing (April 2017) 8
Version 05.17.02.00.07
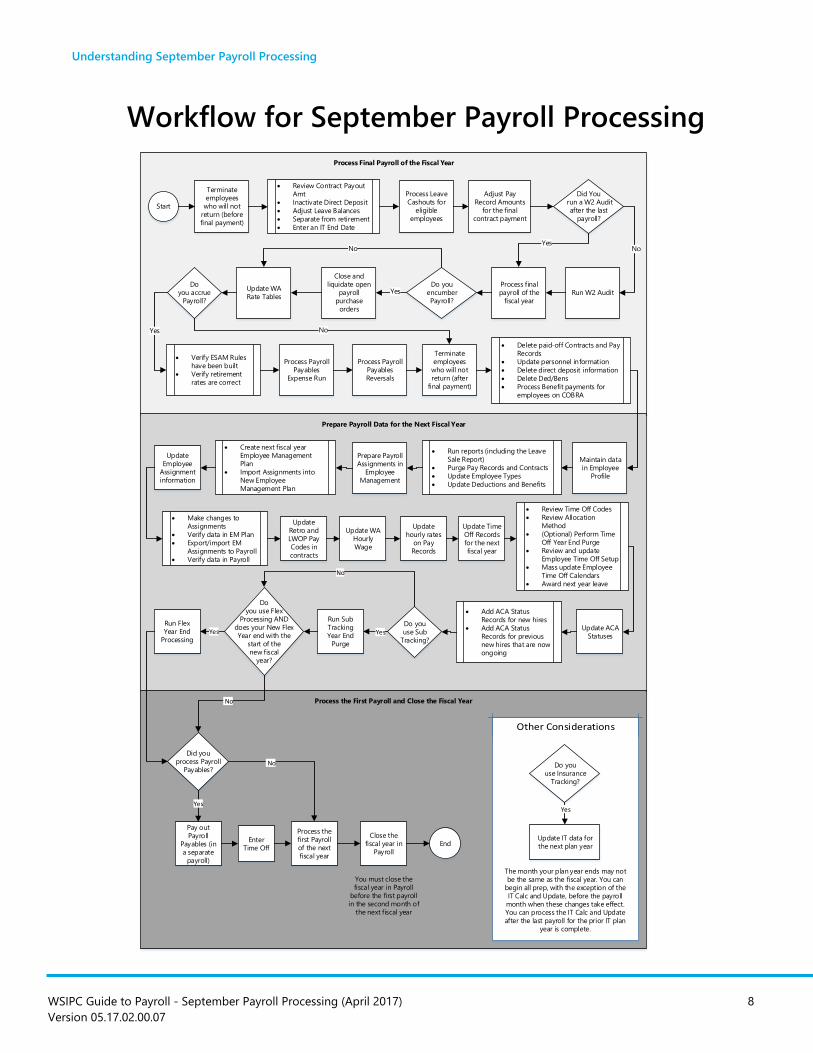
Workflow for September Payroll Processing
Process Final Payroll of the Fiscal Year
Prepare Payroll Data for the Next Fiscal Year
Process the First Payroll and Close the Fiscal Year
Start
Terminate employees
who will not return (before final payment)
Review Contract Payout Amt
Inactivate Direct Deposit
Adjust Leave Balances
Separate from retirement
Enter an IT End Date
Process Leave Cashouts for
eligible employees
Adjust Pay Record Amounts
for the final contract payment
Did You run a W2 Audit
after the last payroll?
Run W2 Audit
NoYes
Process final payroll of the
fiscal year
Do youencumber Payroll?
Close and liquidate open
payroll purchase
orders
Update WA Rate Tables
Yes
No
Do you accrue
Payroll?
Verify ESAM Rules have been built
Verify retirement rates are correct
Yes
Process Payroll Payables
Expense Run
Process Payroll Payables Reversals
Terminate employees
who will not return (after
final payment)
No
Delete paid-off Contracts and Pay Records
Update personnel information
Delete direct deposit information
Delete Ded/Bens
Process Benefit payments for employees on COBRA
Maintain data in Employee
Profile
Run reports (including the Leave Sale Report)
Purge Pay Records and Contracts
Update Employee Types
Update Deductions and Benefits
Prepare Payroll Assignments in
Employee Management
Create next fiscal year Employee Management Plan
Import Assignments into New Employee Management Plan
Update Employee
Assignment information
Make changes to Assignments
Verify data in EM Plan
Export/import EM Assignments to Payroll
Verify data in Payroll
Update Retro and LWOP Pay Codes in contracts
Update WA Hourly Wage
Update hourly rates
on Pay Records
Update Time Off Records for the next fiscal year
Review Time Off Codes
Review Allocation Method
(Optional) Perform Time Off Year End Purge
Review and update Employee Time Off Setup
Mass update Employee Time Off Calendars
Award next year leave
Update ACA Statuses
Add ACA Status Records for new hires
Add ACA Status Records for previous new hires that are now ongoing
Do you use Sub
Tracking?
Run Sub Tracking Year End
Purge
Yes
Do you use Flex
Processing AND does your New Flex Year end with the
start of the new fiscal
year?
No
Run Flex Year End
ProcessingYes
Did you process Payroll
Payables?
Pay out Payroll
Payables (in a separate
payroll)
Enter Time Off
No
Yes
Process the first Payroll of the next fiscal year
Close the fiscal year in
Payroll
You must close the fiscal year in Payroll
before the first payroll in the second month of
the next fiscal year
End
Do you use Insurance
Tracking?
Update IT data for the next plan year
Yes
The month your plan year ends may not be the same as the fiscal year. You can
begin all prep, with the exception of the IT Calc and Update, before the payroll month when these changes take effect. You can process the IT Calc and Update after the last payroll for the prior IT plan
year is complete.
No

WSIPC Guide to Payroll - September Payroll Processing (April 2017) 9
Version 05.17.02.00.07
PART ONE: Processing the Final
Payroll of the Fiscal Year
Processing the final payroll of the fiscal year includes the following processes:
Terminating Employees Who Will Not Return
Processing Leave Cashouts for Eligible Employees
Adjusting Pay Record Amounts for the Final Contract Payment
Running the W2 Audit
Processing Final Payroll of the Fiscal Year
Processing Payroll Encumbrance for Final Payroll of Fiscal Year in August
Processing Accrual Payroll
Terminating Employees after Running Final Payment
Part One describes these processes.
Terminating Employees Who Will Not
Return When the fiscal year ends, some employees may end their employment with your
agency. You must process information for terminated employees both before and
after you run the final payroll. To learn how to terminate employees who will not
return, see the WSIPC Guide to Payroll - Ending Employment. Table 1 describes the
process to consider when terminating employees who will not return, and the
location of further information about each part of the process.
Process
Section of the WSIPC Guide to Payroll –
Ending Employment that contains further
information about this process
Change payroll data before
running a final payment.
Reviewing the Contract Payout Amount
End an Employee’s direct
deposit.
Inactivating an Employee’s Direct Deposit
Adjust front-loaded leave
balances.
Adjusting Leave Balances

PART ONE: Processing the Final Payroll of the Fiscal Year
WSIPC Guide to Payroll - September Payroll Processing (April 2017) 10
Version 05.17.02.00.07
Process
Section of the WSIPC Guide to Payroll –
Ending Employment that contains further
information about this process
Enter retirement eligibility End
Date.
Separating an Employee from Retirement
Update the Master Record in
Insurance Tracking.
Entering an Insurance Tracking End Date
Table 1 - Process for terminating employees who will not return and the location of
further information about each part of the process
Processing Leave Cashouts for Eligible
Employees When employees end their employment with your agency, they may have the option
of cashing out unused leave. Your agency may also allow certain groups of
employees to cash out certain leave balances annually. This leave cashout may be in
the form of cash or may be converted to a VEBA account if VEBA is available at your
agency. Processing leave cashouts is similar to processing annual sick leave buyback
after the balance to buy back is determined.
To process leave cashouts for eligible employees, you must first answer the following
questions:
Is the cashout for sick pay, vacation leave, or personal leave?
Is the cashout reportable to DRS?
Is the cashout for a terminated employee who will not return?
Will a Plan 1 retirement member or a retiree who has returned to work be
receiving a cashout?
What is the cashout ratio for this type of leave? This is typically determined by
state law.
How should the cashout look in the employee’s time off data and in time off
reports?
Is the employee contributing the cashout to VEBA?

PART ONE: Processing the Final Payroll of the Fiscal Year
WSIPC Guide to Payroll - September Payroll Processing (April 2017) 11
Version 05.17.02.00.07
How many payments will you make to the employee for the cashout?
(Multiple payments can affect the employee’s FIT calc.)
What salary accounts do you charge for cashouts?
What should the settings be on the Ded/Bens used to process the cashout?
Which Ded/Bens should be attached to the cashout?
How should Ded/Ben dollars be distributed to the cashout?
Leave cashouts are entered through Time Off and processed through payroll on a
Pay Record.
Note Most leave cashouts are exempt from retirement reporting.
Sick leave cashout is exempt from retirement for all employees.
Vacation leave and personal leave cashouts are exempt from
retirement for all non-Plan 1 retirement members excluding
retirees who have returned to work.
See “Creating a Leave Cashout Pay Code” (page 11) to learn more
about handling taxes and Retirement Reporting for cashouts.
Creating a Leave Cashout Pay Code To process the cashout in a payroll, you create Pay Codes to use on Leave Cashout
Pay Records. The Leave Cashout Pay Code must be a lump-sum type Pay Code (
= and = ).
Washington State’s tax treatment of cashouts includes the following:
All cashout amounts are reportable and taxable for unemployment, but the
hours are not reportable to Employment Security. The lump-sum-type Pay
Code prevents hours from being reported for Unemployment. Lump-sum Pay
Codes have both the and fields set to Figure 1).
Workers’ Compensation is not processed on the leave cashout so no code is
necessary.
PART ONE: Processing the Final Payroll of the Fiscal Year
WSIPC Guide to Payroll - September Payroll Processing (April 2017) 12
Version 05.17.02.00.07
A Retirement Status Code is not required on Leave Cashout Pay Codes, with
the exception of vacation leave and personal leave cashouts for TRS Plan 1,
PERS Plan 1 and retirees who have returned to work. For a list of Status Codes
to use when reporting cashouts, see the DRS Employer Handbook.
Best
Practice
Create a separate Pay Code for Plan 1 and retirees who have
returned to work cashouts, using the correct Retirement Status Code
for the cashout. For all other cashouts, leave the Status Code blank. If
retirement Ded/Bens are attached to a Pay Code with a blank
Retirement Status Code, the payroll calculate generates an error.
Note In some cases one employee may need more than one Leave
Cashout Pay Code so that different portions may be reported under
different Retirement Status Codes. For a list of Status Codes to use
when reporting cashouts, see the DRS Employer Handbook.
To create a Leave Cashout Pay Code:
1. In the Web interface, go to Product Setup\Human Resources\PA\CO\PA.
2. Click
3. Click .
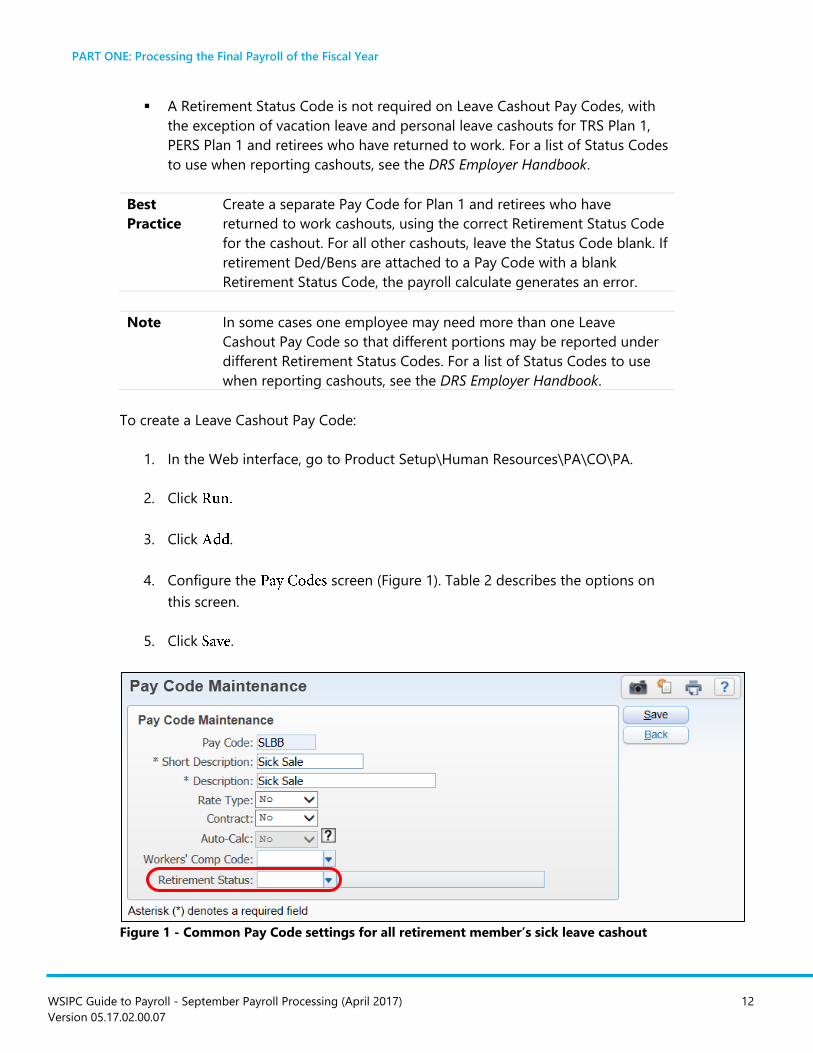
4. Configure the screen (Figure 1). Table 2 describes the options on
this screen.
5. Click .
Figure 1 - Common Pay Code settings for all retirement member’s sick leave cashout

PART ONE: Processing the Final Payroll of the Fiscal Year
WSIPC Guide to Payroll - September Payroll Processing (April 2017) 13
Version 05.17.02.00.07
Option Description
Value assigned to this Pay Code.
Short description of the Pay Code. This code appears on pay
stubs.
Long description of Pay Code.
Defines whether this Pay Code is an hourly Pay Code. For a
cashout, verify that this is set to . If it is set to , it is
used for hourly pay.
Defines whether this Pay Code is a Contract Pay Code. For a
cashout, verify that this is set to . If it is set to , it is
used for contract pay.
Makes the Pay Code available for selection by the
option in the payroll select step of the
payroll process. This field is only available when you set the
option to
Defines the Workers’ Comp rate associated with this Pay
Code. For a cashout, verify that this is blank. Do not attach
Workers’ Compensation deductions or benefits to a Cashout
Pay Record.
Defines the Retirement Status Code associated with this Pay
Code. The only Cashout Pay Codes requiring a Status Code
are those not exempt from retirement (for example, vacation
cashouts for Plan 1 members). To learn more about
Retirement Status Codes, see the DRS Employer Handbook.
For an example of a Sick Leave Cashout Pay Code with no
Retirement Status Code, see Figure 1 above.
Note: Do not attach retirement deductions or benefits to
Cashout Pay Records that are exempt from retirement.
Table 2 - Description of options on the Pay Codes screen

PART ONE: Processing the Final Payroll of the Fiscal Year
WSIPC Guide to Payroll - September Payroll Processing (April 2017) 14
Version 05.17.02.00.07
Verifying Time Off Code Settings for Leave
Cashouts Verify that the Time Off Code used for cashouts is defined with the correct Sale Ratio.
The Sale Ratio is the number of hours to be sold to receive one unit of pay. The
current state regulation is to pay sick cash outs at a ratio of 4 to 1. RCW 28A.400.210
states:
“…[A]t the time of separation from school district employment an eligible
employee…shall receive remuneration at a rate equal to one day’s current
monetary compensation of the employee for each four full days accrued
leave for illness or injury.”
Vacation and personal leave can be sold at a one-to-one ratio, but the agency
determines the specific policies, usually through negotiations with employee groups.
Time Off Codes may also be configured to contain minimum balance requirements
for cashout.
To verify Time Off Code settings for leave cashouts:
1. In the Web interface, go to Product Setup\Human Resources\TO\CO\TO.
2. In the area on the screen,
double-click the code you want to review (Figure 2).
3. Verify that the minimum required balance in the box is
correct and update it if necessary.
4. Verify that the Sale Ratio in the box is correct and update it if
necessary.
5. Click .
Note To learn more about the options on the
screen, see “Time Off Codes” in the WSIPC Guide to
Time Off.

PART ONE: Processing the Final Payroll of the Fiscal Year
WSIPC Guide to Payroll - September Payroll Processing (April 2017) 15
Version 05.17.02.00.07
Figure 2 - Time Off Code screen showing Minimum Balance of 0 hours and a Sale Ratio
of 1 to 1
Verifying Ded/Ben Code Settings Before processing a cashout, verify that Ded/Ben Codes are set properly so that
taxable earnings for FIT, FICA, and Medicare are correct on the cashout. This is
particularly important if the cashout includes a VEBA deduction.
Note The examples in this document assume that state taxable income
follows the same rules as federal taxable income. In this situation,
the check boxes for and
on all Ded/Bens should match.
If some employees pay income tax in a state other than
Washington, different settings or separate codes may be required to
properly calculate their state taxable income.
Depending on the scenario that applies, you may use some or all of the following
Deduction Codes: Plan 1 Retirement Deduction or Benefit, VEBA Deduction, or Net
Pay Adjustment.
PART ONE: Processing the Final Payroll of the Fiscal Year
WSIPC Guide to Payroll - September Payroll Processing (April 2017) 16
Version 05.17.02.00.07
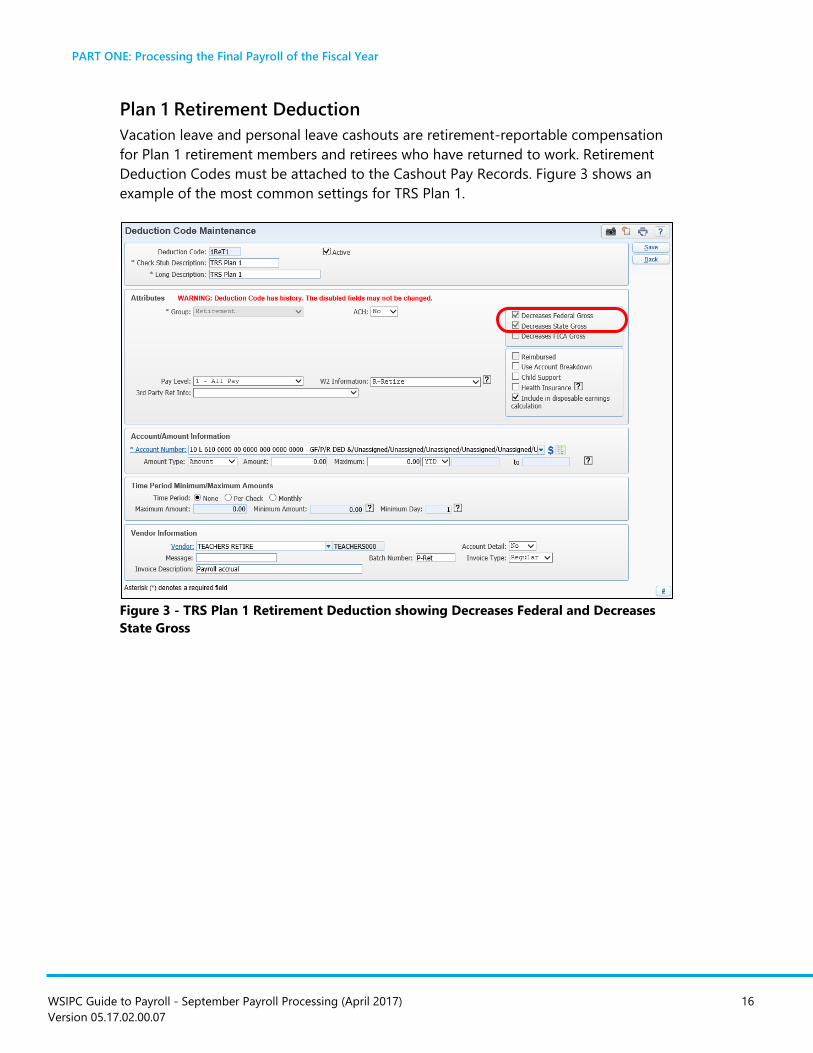
Plan 1 Retirement Deduction
Vacation leave and personal leave cashouts are retirement-reportable compensation
for Plan 1 retirement members and retirees who have returned to work. Retirement
Deduction Codes must be attached to the Cashout Pay Records. Figure 3 shows an
example of the most common settings for TRS Plan 1.
Figure 3 - TRS Plan 1 Retirement Deduction showing Decreases Federal and Decreases
State Gross

PART ONE: Processing the Final Payroll of the Fiscal Year
WSIPC Guide to Payroll - September Payroll Processing (April 2017) 17
Version 05.17.02.00.07
Plan 1 Retirement Benefit
Vacation leave and personal leave cashouts are retirement-reportable compensation
for Plan 1 retirement members and retirees who have returned to work. Benefit
Codes must be attached to their Cashout Pay Records. Figure 4 shows an example of
the most common settings for TRS Plan 1.
Figure 4 - TRS Plan 1 Retirement Benefit showing standard Cost to Employer option
selected

PART ONE: Processing the Final Payroll of the Fiscal Year
WSIPC Guide to Payroll - September Payroll Processing (April 2017) 18
Version 05.17.02.00.07
VEBA Deduction
If your agency contributes to VEBA for cashouts, vacation, sick, or both, this
Deduction Code is used to process these deductions. Figure 5 below shows typical
settings for this deduction.
Figure 5 - VEBA Deduction Code showing Decrease Federal, State, and FICA Gross
settings
Net Pay Adjustment
If a Plan 1 cashout is retirement eligible, and you are processing it separately from
other pay, and you are contributing the gross amount of the cashout to VEBA, you
may need to use a Net Pay Adjustment Deduction Code or one like it. This code is
used to offset the negative net pay on this type of cashout and post it to the
appropriate GL account. This GL posting is then offset by a check received from the
employee for his or her retirement contribution. No vendor is required, as it is not
necessary to create an A/P invoice for this item. See Figure 6 for an example. Check
with your accounting department to determine which Account Number to use on this
code.
Note To determine the amount to enter in the Net Pay Adjustment
deduction, run a Payroll Calculate on the Cashout Pay Record. Enter
the amount of the retirement deduction as a negative amount in Net
Pay Adjustment deduction.

PART ONE: Processing the Final Payroll of the Fiscal Year
WSIPC Guide to Payroll - September Payroll Processing (April 2017) 19
Version 05.17.02.00.07
Figure 6 - Example of a Net Pay Adjustment Deduction Code with no Vendor Reference
Entering a Leave Cashout as a Sale Record in Time
Off After adding or updating the necessary Cashout Pay Codes and Time Off Codes, you
can enter leave cashouts as Leave Sale Records. If the cashout is for a terminated
employee who will not return, ensure that the leave balance is accurate prior to
entering a leave cashout. Processing leave balance adjustments for terminated
employees is discussed in “Adjusting Leave Balances” in the WSIPC Guide to
Payroll – Ending Employment.
When entering a leave cashout as a Sale Record in Time Off, you can add Sale
Records individually in Employee Profile or use the Time Card import to add them all
at once. This section describes each method.
Note To determine the amount of leave available for a cashout, you can
run the Time Off Leave Sale Report (Human Resources\Time
Off\RE\LR). To learn more about this report, see “Leave Sale Report”
in the WSIPC Guide to Time Off.

PART ONE: Processing the Final Payroll of the Fiscal Year
WSIPC Guide to Payroll - September Payroll Processing (April 2017) 20
Version 05.17.02.00.07
Adding a Time Off Sale Transaction in Employee Profile
Entering a leave cashout as a Sale Record in Employee Profile allows you to
sequentially create a Leave Cashout Pay Record for that Time Off Transaction.
Note Once you add a Time Off Sale Transaction, if you need to make a
change to the Time Off Record you must also manually update the
Pay Record and vice versa.
To add a Time Off Sale Transaction in Employee Profile:
1. In the Web interface, go to Human Resources\Employee\EP\EP.
2. Select an employee.
3. Click the tab.
4. Click .
5. Click .
6. Configure the screen (Figure 7). Table 3
describes the options on this screen.
7. Click to create the Leave Cashout Pay Record.
8. On the screen (Figure 8), update the values as
needed. See “Processing Leave Cashout Pay Records” (page 25) for details.
9. Click .

PART ONE: Processing the Final Payroll of the Fiscal Year
WSIPC Guide to Payroll - September Payroll Processing (April 2017) 21
Version 05.17.02.00.07
Figure 7 - Example of a Time Off Sale Entry for a Sick Leave Cashout
Figure 8 - Pay Record Maintenance screen

PART ONE: Processing the Final Payroll of the Fiscal Year
WSIPC Guide to Payroll - September Payroll Processing (April 2017) 22
Version 05.17.02.00.07
Option Description
Time Off Group Code. The default is the code associated
with the Time Off Code that is selected.
Time Off Code. When you select a Time Off Code ( ,
or ), the Group Code for that Time Off Code
appears in the box.
Determines whether the values entered in the
field are measured in Hours or Days.
Default Hours per day for the employee’s selected Time
Off Code.
Transaction Date. This date must be in the month in
which the cashout is earned.
Describes the type of transaction, such as for a Time
Off Sale Entry.
For a Time Off Sale Entry, the total number of hours being
sold.
Reason for time off transaction.
Individual comment for this transaction.
The substitute teacher replacing the employee on leave.
This is left blank for Sick Leave Sale transactions.
Pay Code in the employee’s record used to obtain the
hourly rate and default values for the
including Frequency Code, Account Distribution,
Deductions, Benefits and Paid Start/Stop Dates. The base
contract Pay Code is usually selected.

PART ONE: Processing the Final Payroll of the Fiscal Year
WSIPC Guide to Payroll - September Payroll Processing (April 2017) 23
Version 05.17.02.00.07
Option Description
Pay Code used to pay the leave cashout. A Pay Code with
the appropriate Retirement Status Code should be
selected according to the employee’s retirement plan.
Tip: Use the button to verify that the
employee’s retirement plan is correct without leaving
your Time Off Sale Transaction.
Note: If you make a change, a message appears stating
that a Pay Item already exists with that Pay Code and
asking if you wish to overwrite the existing Pay Code.
Click to overwrite the existing Pay Code.
Click to create another pay item and then
click to update the employee’s existing SLBB
Pay Record.
Display only. This value is obtained from the Time Off
Code settings.
Rate per hour that the employee will be paid. Defaults
from the . You can override this by
manually entering a rate.
Calculated amount of the pay to be generated for this
transaction. Sale Amount = Amount x (Hourly Rate/Sale
Ratio).
Display only. Employee’s current leave balance.
Display only. Leave balance that the employee must have,
to be eligible for a leave sale. This value is obtained from
the Time Off Code settings.
Display only. Maximum leave the employee can sell in this
category. Calculated amount which equals the Current
Balance minus the Minimum Balance Required.
Note: If the Current Balance does not exceed the
Minimum Balance Required, this field is blank.
PART ONE: Processing the Final Payroll of the Fiscal Year
WSIPC Guide to Payroll - September Payroll Processing (April 2017) 24
Version 05.17.02.00.07
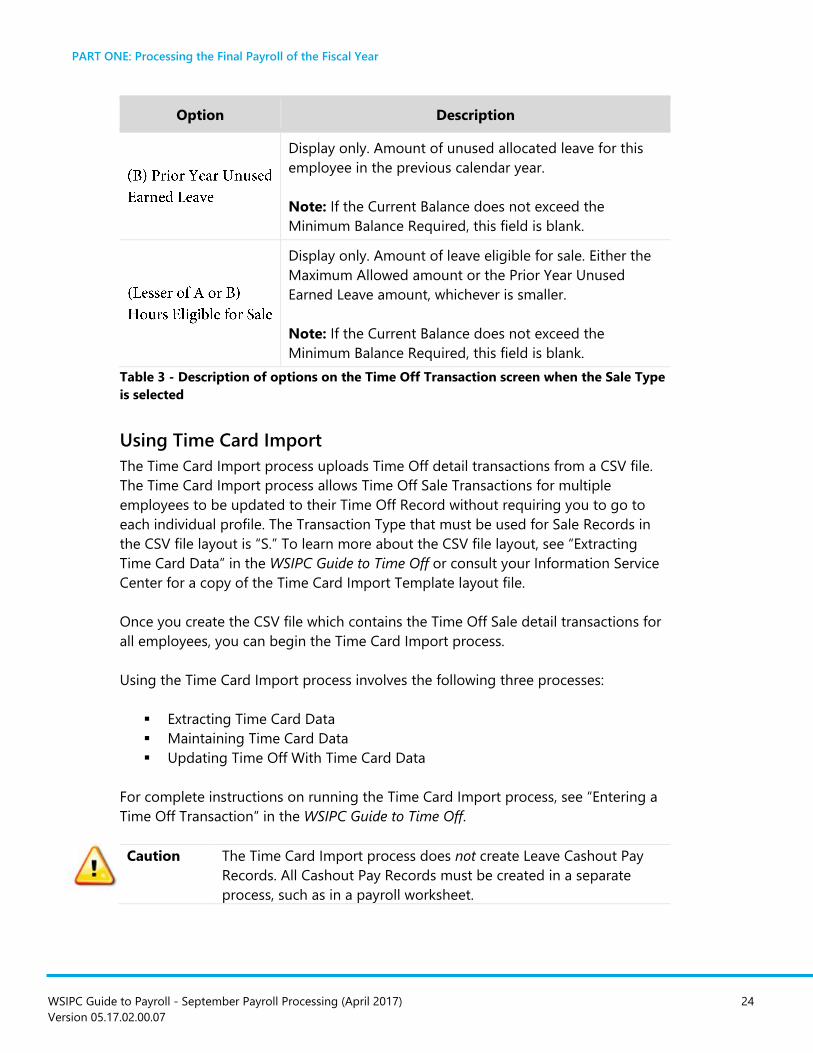
Option Description
Display only. Amount of unused allocated leave for this
employee in the previous calendar year.
Note: If the Current Balance does not exceed the
Minimum Balance Required, this field is blank.
Display only. Amount of leave eligible for sale. Either the
Maximum Allowed amount or the Prior Year Unused
Earned Leave amount, whichever is smaller.
Note: If the Current Balance does not exceed the
Minimum Balance Required, this field is blank.
Table 3 - Description of options on the Time Off Transaction screen when the Sale Type
is selected
Using Time Card Import
The Time Card Import process uploads Time Off detail transactions from a CSV file.
The Time Card Import process allows Time Off Sale Transactions for multiple
employees to be updated to their Time Off Record without requiring you to go to
each individual profile. The Transaction Type that must be used for Sale Records in
the CSV file layout is “S.” To learn more about the CSV file layout, see “Extracting
Time Card Data” in the WSIPC Guide to Time Off or consult your Information Service
Center for a copy of the Time Card Import Template layout file.
Once you create the CSV file which contains the Time Off Sale detail transactions for
all employees, you can begin the Time Card Import process.
Using the Time Card Import process involves the following three processes:
Extracting Time Card Data
Maintaining Time Card Data
Updating Time Off With Time Card Data
For complete instructions on running the Time Card Import process, see “Entering a
Time Off Transaction” in the WSIPC Guide to Time Off.
Caution The Time Card Import process does not create Leave Cashout Pay
Records. All Cashout Pay Records must be created in a separate
process, such as in a payroll worksheet.

PART ONE: Processing the Final Payroll of the Fiscal Year
WSIPC Guide to Payroll - September Payroll Processing (April 2017) 25
Version 05.17.02.00.07
Processing Leave Cashout Pay Records Once you create the Leave Cashout Pay Records, you can update the record to
properly process the compensation to the employee. The deductions and benefits
you apply to the Leave Cashout Record depend on what retirement plan the
employee is a member of, the kind of cashout, and how it is being compensated to
the employee.
Note If the cashout includes a VEBA contribution, the amount entered in
the VEBA deduction is the gross pay amount of the cashout.
To process the Leave Cashout Pay Record:
1. Determine which scenario applies to the cashout item.
Table 4 describes four common scenarios. The scenario that applies to the
employee determines which updates are necessary. These scenarios focus on
the deductions and benefits that apply to the type of cashout. Each scenario
specifies if the cashout is being paid separately or with other pay.
Note You must remove all deductions not addressed in Table 4
that are attached to the cloned Pay Record for the cashout.
2. Enter a Frequency that represents the number of times the cashout will be
paid on the Pay Record. Generally, the Frequency is 1.
Note The Frequency ensures that federal tax is calculated correctly,
especially if the payment is included with other pay to the
employee.
The Frequency is used to calculate FIT related to this pay
item. Even if the item is exempt because the cashout is going
to VEBA, use the correct frequency for the number of
payments to be made.
3. Verify that the , , and values are correct.
4. Apply the UC benefit if it is not already applied. (Apply the Unemployment
Compensation (UC) benefit to all Cashout Records.)
5. Apply the Ded/Bens that are appropriate to the scenario using the guidelines
in Table 4.

PART ONE: Processing the Final Payroll of the Fiscal Year
WSIPC Guide to Payroll - September Payroll Processing (April 2017) 26
Version 05.17.02.00.07
6. Enter a start and stop date on the Pay Record that is the date range for the
month(s) the payment will be made.
7. Click .
Note If the employee’s cashout is being contributed to VEBA, add
a VEBA deduction with the amount calculated from the Leave
Cashout Pay Record and the same date range. Then add the
VEBA deduction to the Leave Cashout Pay Record.
Your agency may allow groups of employees to contribute cashout amounts to a
VEBA plan. Visit the following web site to learn more about VEBA:
http://www.veba.org/.
Contributions to VEBA are exempt from Federal Income Tax, FICA, and Medicare.
Description Plan 1 and
retirees who have
returned to work
Vacation Leave
and Personal
Days
All Sick Leave
Plan 2 & 3
Vacation Leave
and Personal
Days
Details about this
scenario
Scenario 1
No VEBA
Paid with
other Pay
Deductions:
FIT
FICA
Medicare
Retirement
Benefits:
FICA
Medicare
Unemployment
Retirement
Deductions:
FIT
FICA
Medicare
Benefits:
FICA
Medicare
Unemployment
Easiest to process.
Distribution of benefit
dollars to the Cashout
Benefit Codes may be
different when included
with other pay.

PART ONE: Processing the Final Payroll of the Fiscal Year
WSIPC Guide to Payroll - September Payroll Processing (April 2017) 27
Version 05.17.02.00.07
Description Plan 1 and
retirees who have
returned to work
Vacation Leave
and Personal
Days
All Sick Leave
Plan 2 & 3
Vacation Leave
and Personal
Days
Details about this
scenario
Scenario 2
No VEBA
Paid
separately
Deductions:
FIT
FICA
Medicare
Retirement
Benefits:
FICA
Medicare
Unemployment
Retirement
Deductions:
FIT
FICA
Medicare
Benefits:
FICA
Medicare
Unemployment
Easiest to process.
Setup is the same as
Scenario 1.
Scenario 3
VEBA
Paid with
other pay
Deductions:
FIT
FICA
Medicare
Retirement
VEBA
Benefits:
FICA
Medicare
Unemployment
Retirement
Deductions:
FIT
FICA
Medicare
VEBA
Benefits:
FICA
Medicare
Unemployment
The entire gross pay
amount of the cashout is
entered as the amount of
the VEBA deduction.
Distribution of FICA and
Medicare benefit dollars
to the Cashout Pay
Records occurs when FICA
and Medicare benefits are
attached.

PART ONE: Processing the Final Payroll of the Fiscal Year
WSIPC Guide to Payroll - September Payroll Processing (April 2017) 28
Version 05.17.02.00.07
Description Plan 1 and
retirees who have
returned to work
Vacation Leave
and Personal
Days
All Sick Leave
Plan 2 & 3
Vacation Leave
and Personal
Days
Details about this
scenario
Scenario 4
VEBA
Paid
separately
from other
pay
Deductions:
FIT
FICA
Medicare
Retirement
VEBA
Net Pay
Adjustment
Benefits:
FICA
Medicare
Unemployment
Retirement
Deductions:
FIT
FICA
Medicare
VEBA
Benefits:
FICA
Medicare
Unemployment
The entire gross pay
amount of the cashout is
entered as the amount of
the VEBA deduction.
For Plan 2, Plan 3, and all
sick leave cashouts to
VEBA, setup is the same
as Scenario 3.
Non-sick leave cashouts
for Plan 1 and retirees
who have returned to
work requires an
additional Ded/Ben to
avoid negative net pay.
See “Net Pay Adjustment”
(page 18) for details.
Table 4 - Cashout Scenarios and Settings
Verifying the Payroll Calculations for a Leave
Cashout Once you set up the Pay Record for a cashout, run a payroll calculate so you can run
the Post Verify Check Verification Register Report to verify that the calculations are
correct, including all taxable wage categories and calculated deductions. If you are
using a net pay adjustment deduction, you can also use this report to determine the
amount to enter in the deduction. See “Net Pay Adjustment” (page 18) to learn more
about the use and setup of a net pay adjustment deduction. In the example report
shown in Figure 9, you can see that Federal Tax Gross and State Tax Gross are equal,
and so are FICA and Medicare gross.

PART ONE: Processing the Final Payroll of the Fiscal Year
WSIPC Guide to Payroll - September Payroll Processing (April 2017) 29
Version 05.17.02.00.07
Figure 9 - Post-Verify Payroll Report showing Taxable Gross and Deduction Calculations for a cashout that is contributed to
VEBA

PART ONE: Processing the Final Payroll of the Fiscal Year
WSIPC Guide to Payroll - September Payroll Processing (April 2017) 30
Version 05.17.02.00.07
Adjusting Pay Record Amounts for the
Final Contract Payment Most employee contracts end in either June (typically administrators) or August (for
all other employees). The final payments on these contracts are processed through
the associated Contract Pay Record. Because Pay Record amounts don’t always
divide evenly over the year, you may need to adjust the final pay amount on the Pay
Record to fully pay out the remaining contract balance. This happens less frequently
if you set your configuration to round Pay Record amounts rather than truncate
them. See “Configuring the Round Pay Records Up Option” (page 110) to learn more
about this configuration option. September Payroll Processing is an ideal time to
confirm that this option is selected.
You can use the option to adjust Pay Record amounts for the
final contract payment, or you can manually adjust Pay Record amounts. This section
describes both methods.
Best
Practice
Use the option to make the final payment on
contracts. This is more efficient and more accurate than manually
entering revised Pay Record amounts in individual Pay Records.
When you use the option, you can update the
Pay Record amounts to correctly pay off the exact remaining balance
on the contracts.
Using the Auto-Calc Mass Select Option The option allows you to recalculate the Pay Record amount
based on the remaining balance on the associated contract. Pay Codes must be set
to in the box in the Pay Code table (HR\PA\CO\PC) and the
box must be cleared on the employee’s Pay Record control file
(HR\PR\PR) for the Pay Record to be included in this option.
Best
Practice
Run the process once before the final payroll
selection process without updating the amounts in the Pay Records.
This allows you to review the data on the Auto-Calc Mass Select
Report. Once you verify that the amounts are correct, run the
process a second time with the same selection criteria to update the
profile Pay Record with the new amounts.

PART ONE: Processing the Final Payroll of the Fiscal Year
WSIPC Guide to Payroll - September Payroll Processing (April 2017) 31
Version 05.17.02.00.07
To use the option:
1. In the PaC interface, go to HR\PA\CP\SE.
If prompted to do so, select a
3. Enter an end date in the box. This is typically the last day of
the month.
4. Enter the check date in the box.
5. Configure the screen.
6. Click .
7. Click .
8. Configure the screen Figure 10 Table 5 describes the
options on this screen.
9. Click . The Auto-Calc Mass Select Report lists the Pay Records that will not
be included in the selection. Pay Records that will be adjusted and the
calculation used to determine the adjustment amounts are listed at the end
of the report.
10. Click or . The following message appears:
“Do you want to continue with the import? Select ‘Yes’ to continue. Select
‘No’ to stop the process.”
Note When the check
box is selected, you must click if you want the Pay
Records to be updated.
Tip To be ready for Processing Final Payroll of the Fiscal Year, you
can configure the
screen to include all pay, not just the contracts that are being
paid off with this payroll.
11. Click
12. Click .

PART ONE: Processing the Final Payroll of the Fiscal Year
WSIPC Guide to Payroll - September Payroll Processing (April 2017) 32
Version 05.17.02.00.07
Figure 10 - Auto-Calc Mass Select screen settings for administrator contracts for
reporting purposes (Update Profile Pay Record with new amount check box not
selected)
Option Description
Defines number of checks remaining. Used to calculate the
Pay Record amount by dividing the remaining contract
amount by the number of checks remaining. When making
the final contract payment this is typically 1.
Uses the number of pays remaining from the contract’s
associated Frequency Codes. Used to calculate the Pay
Record amount by dividing the remaining contract
amount by the number of pays remaining on the
contract’s associated Frequency Code.
Note: Clicking the
button to edit Frequency Codes,
changes the Pay Frequency Codes table (HR\PA\CO\PF).
Selects contracts within a specific pay start date range.
Selects contracts within a specific pay end date range. See
Figure 10 for an example of dates used to select
administrator contracts.

PART ONE: Processing the Final Payroll of the Fiscal Year
WSIPC Guide to Payroll - September Payroll Processing (April 2017) 33
Version 05.17.02.00.07
Option Description
Allows the software to update Pay Records with the Auto-
Calc amount. All Pay Records listed on the
Auto-Calc Mass Select Report under the
section are updated when the “Do you want to continue
with the import?” message appears and you click .
Lists the employees who will be included in the process on
the Auto-Calc Mass Select Report. Otherwise the report
lists only exceptions.
Table 5 - Description of options on the Auto-Calc Mass Select screen
Manually Adjusting Pay Record Amounts You can manually update the Pay Record amount for contracts that will not fully pay
off before the last payroll. You may choose to do this if you have a small number of
adjustments to make.
Reviewing the Contract Payout Amount
To determine which contract balances are greater than the amount of the associated
Pay Records, and which Pay Record amounts you may need to adjust, you can first
run reports. Print the report and use it to enter revised Pay Record amounts before
running the final payroll.
Running Payroll Reports on Employee Contract Remaining
Balances
You can access contract information including remaining balance on Employee
Contracts under Payroll Reporting. Date ranges, filters and selection parameters allow
you to select the appropriate contracts to view on the screen.
You can also export the report to Excel.
Caution The contract information on the screen is
actual contract data from the Employee Profile tab.
Changes made to contract data in this selection change the actual
contract.
PART ONE: Processing the Final Payroll of the Fiscal Year
WSIPC Guide to Payroll - September Payroll Processing (April 2017) 34
Version 05.17.02.00.07
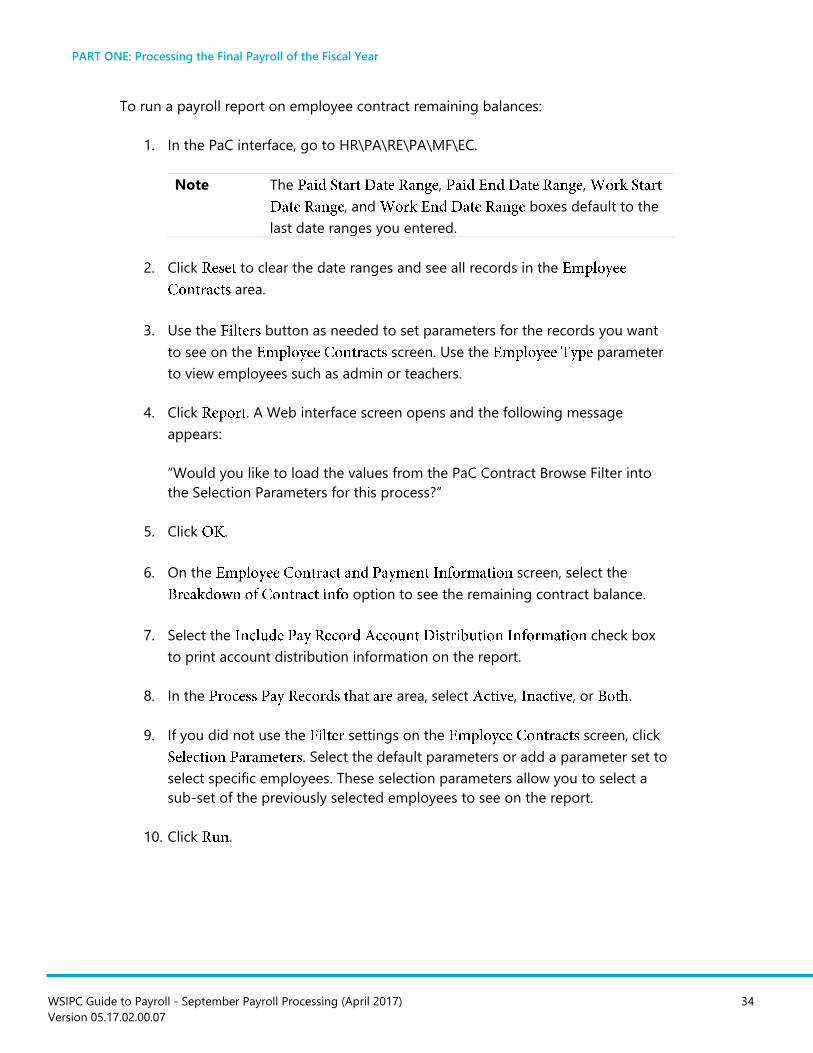
To run a payroll report on employee contract remaining balances:
1. In the PaC interface, go to HR\PA\RE\PA\MF\EC.
Note The , ,
, and boxes default to the
last date ranges you entered.
2. Click to clear the date ranges and see all records in the
area.
3. Use the button as needed to set parameters for the records you want
to see on the screen. Use the parameter
to view employees such as admin or teachers.
4. Click . A Web interface screen opens and the following message
appears:
“Would you like to load the values from the PaC Contract Browse Filter into
the Selection Parameters for this process?”
5. Click .
6. On the screen, select the
option to see the remaining contract balance.
7. Select the check box
to print account distribution information on the report.
8. In the area, select , , or .
9. If you did not use the settings on the screen, click
. Select the default parameters or add a parameter set to
select specific employees. These selection parameters allow you to select a
sub-set of the previously selected employees to see on the report.
10. Click .

PART ONE: Processing the Final Payroll of the Fiscal Year
WSIPC Guide to Payroll - September Payroll Processing (April 2017) 35
Version 05.17.02.00.07
11. Verify that the , , and
values are correct on the report (Figure 11). Compare the Contract Balance to
the amount remaining on the employee’s Pay Record (Figure 12). In this
example the Pay Record will be changed from $6,668.76 to the Contract
Balance, $6,668.64. To learn more about how to change the employee’s Pay
Record to be the same as the Contract Balance, go to “Manually Adjusting
Pay Record Amounts” (page 33).
Figure 11 - Employee Contract Amounts showing Employee Contract Balance
Figure 12 - Employee Pay Record Amount
Running a Quick Pick Report
The following Quick Pick Reports list remaining contract balances for a fiscal year:
Contract Amounts by Employee Type
Employee Contract Amounts Condensed
Employee Contract Amounts Detail
Update the filter on these reports to obtain the data for the correct year and/or
group of employees.
Note Because Quick Pick Reports are run by Fiscal Year for contracts with
payments that cross the fiscal year (such as administrator contracts),
these reports may not show the correct remaining contract balance.

PART ONE: Processing the Final Payroll of the Fiscal Year
WSIPC Guide to Payroll - September Payroll Processing (April 2017) 36
Version 05.17.02.00.07
To run a Quick Pick Report:
1. In the PaC interface, go to HR\RO\QP.
2. Click .
3. In the box, type the report name.
4. Select the report you want to run.
5. Click .
6. Click to update the filter for the fiscal year.
7. In the box, type a fiscal year.
8. Click .
9. Verify that the fiscal year filter is correct and click .
10. Select a printer and click .
Figure 13 - Contract Amounts by Employee Type Quick Pick Report
Downloading a Crystal Report
You can go to WSIPC’s Crystal Reports SharePoint Services page and download the
following Crystal Report if it is not already in your Quick Pick directory in the PaC
interface:
HR_PA_EmpContractBal_AllContracts (prompt value - contract stop date).
Displays the difference between the Contract Amount (Amt) and the Contract
to Date Payments (CTD Pmts) in the right column.

PART ONE: Processing the Final Payroll of the Fiscal Year
WSIPC Guide to Payroll - September Payroll Processing (April 2017) 37
Version 05.17.02.00.07
Instructions for downloading Crystal Reports into your agency’s database are also
located on this site.
Note Your Information Service Center can assist you with downloading a
Crystal Report. Reports are located in the WSIPC HR
and area on WSIPC’s Crystal Reports SharePoint Page.
Tutorials are also provided to help you add Crystal Reports to your
database.
If you are using Web Custom Reports, under Crystal Reports
Training and Help Documents, click
.
Manually Adjusting Pay Record Amounts
Once you determine which Contract Pay Record amounts differ from the remaining
Contract amount and need to changed, you can manually adjust the Pay Record
amount.
To manually adjust Pay Record amounts:
1. In the Web interface, go to Human Resources\Employee\EP\EP.
2. Select an employee.
3. Click the tab.
4. In the area, select the Pay Record to adjust.
5. Click .
6. Select the check box.
In the box, edit the amount.
8. Click .

PART ONE: Processing the Final Payroll of the Fiscal Year
WSIPC Guide to Payroll - September Payroll Processing (April 2017) 38
Version 05.17.02.00.07
Running the W2 Audit Before Contracts and Pay Records are purged, run the W-2 Audit process in the PaC
interface (HR\PA\RE\PA\HI\WA) to verify proper reporting of taxable amounts. If any
corrections are necessary, include them with the final payroll of the fiscal year.
Note You do not need to run the W2 Audit if you already ran it after
the previous payroll.
To learn more about running the W-2 Audit process, see “Appendix B – Running the
W2 Audit” in the WSIPC Guide to W2 Processing.
Processing Final Payroll of the Fiscal Year After you adjust all Pay Record amounts for final payment, complete the leave
cashout process, and complete the payroll processes for terminated employees. You
are now ready to process the final payroll. You process the final payroll of the fiscal
year as you would any other monthly payroll throughout the year.
To learn more about this process, see the Monthly Payroll Checklist – V3. This
document is available through your Information Service Center.
Note All Time Off transactions should be entered before the final
payroll. After the final payroll you many find employees that have
unprocessed time off transactions (employees were not paid in
the final payroll or time off transactions were entered after the
final payroll). To learn more about how to process remaining
time off transactions, see “Appendix F - Processing Time Off
Transactions for an Employee with a Paid Off Contract” (page 118).
Processing Payroll Encumbrance for Final
Payroll of Fiscal Year in August After you run the July payroll encumbrance, the remaining Payroll purchase orders
reflect the final amounts for the month of August. These purchase orders must be
closed and liquidated.
If you are running the encumbrance process in the Web interface, see “Closing and
Liquidating Open Payroll Purchase Orders at Fiscal Year End” in the WSIPC Guide to
Payroll - Encumbrance Processing to learn more about processing the final payroll
encumbrance.

PART ONE: Processing the Final Payroll of the Fiscal Year
WSIPC Guide to Payroll - September Payroll Processing (April 2017) 39
Version 05.17.02.00.07
Tip In Encumbrance processing in the Web interface, you can close
Purchase Orders regardless of their batch number by using the
process.
If you are running the encumbrance process in the PaC interface, you must run
of the Payroll Encumbrance process after the August Payroll.
Note When you run the Payroll Encumbrance process in the PaC interface
after the September Payroll, you only need to run
, and to begin the next
fiscal year. This procedure applies only to the end of the fiscal year
in August and the beginning of the next fiscal year in September.
You still must run the entire Payroll Encumbrance process in June
and July.
Processing Accrual Payroll Accrual Payroll allows you to post payroll expenses into the ending fiscal year
without actually writing the checks until the next fiscal year. For example, you can use
the Payroll Payables feature to pay an employee in September for time worked in
August while recording the expenses for that time in August. This process does not
apply to a cash-basis district.
Before beginning the payroll payables process, verify that retirement rates are correct
and that all updates to the Unemployment and Workers’ Compensation rates have
been made. See “Updating Washington Rate Tables” (page 42) to learn more about
updating rates. ESAM rules must also be built for the next fiscal year before
processing payroll payables. To learn more about building ESAM rules, see “New
Fiscal Year Setup” in the WSIPC Guide to Equity Summary Account Management
(ESAM).
Note Workers’ Compensation Codes should be entered with August 1
Effective Date and Rates. This ensures the rates used are effective
when the Payroll Payables items are actually paid.
If processing an Accrual Payroll, complete the Payables Expense Run and Payables
Reversal processes before running the actual September Payrolls. In some instances,
you may also need to process a Quick Void - Expense Run and a Quick Void - Reversal.
All processes under the option must be completed before the fiscal
year is closed in Financial Management.
PART ONE: Processing the Final Payroll of the Fiscal Year
WSIPC Guide to Payroll - September Payroll Processing (April 2017) 40
Version 05.17.02.00.07
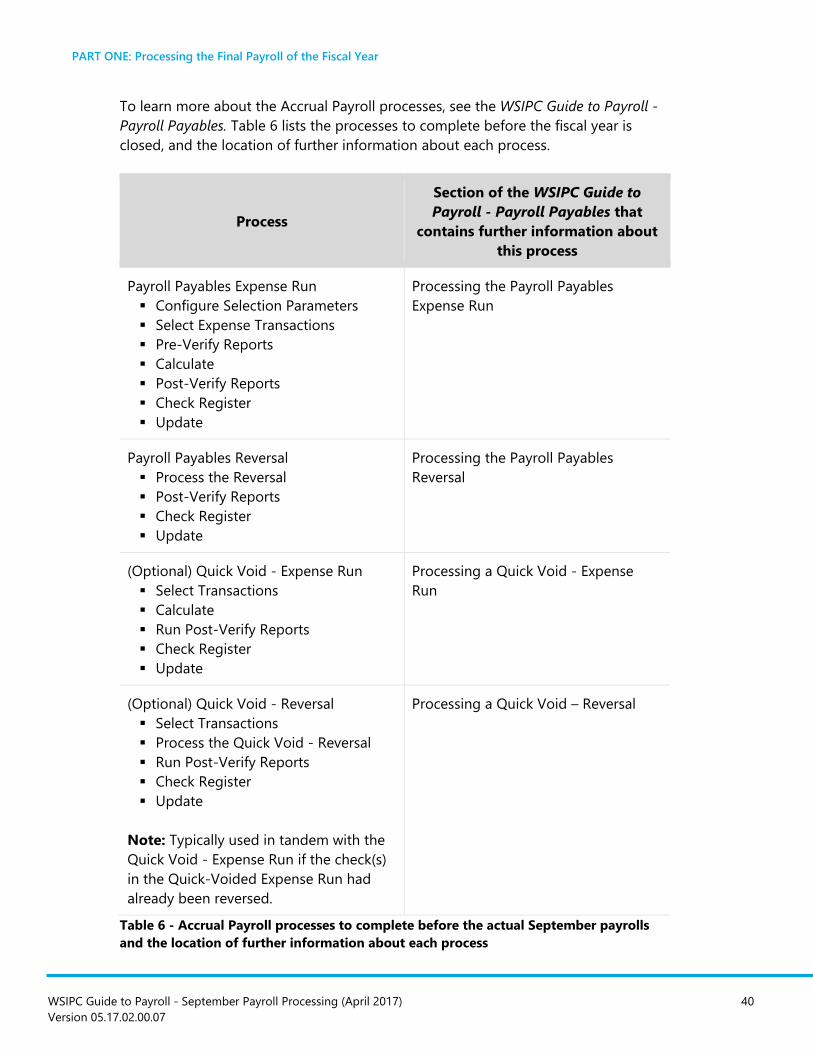
To learn more about the Accrual Payroll processes, see the WSIPC Guide to Payroll -
Payroll Payables. Table 6 lists the processes to complete before the fiscal year is
closed, and the location of further information about each process.
Process
Section of the WSIPC Guide to
Payroll - Payroll Payables that
contains further information about
this process
Payroll Payables Expense Run
Configure Selection Parameters
Select Expense Transactions
Pre-Verify Reports
Calculate
Post-Verify Reports
Check Register
Update
Processing the Payroll Payables
Expense Run
Payroll Payables Reversal
Process the Reversal
Post-Verify Reports
Check Register
Update
Processing the Payroll Payables
Reversal
(Optional) Quick Void - Expense Run
Select Transactions
Calculate
Run Post-Verify Reports
Check Register
Update
Processing a Quick Void - Expense
Run
(Optional) Quick Void - Reversal
Select Transactions
Process the Quick Void - Reversal
Run Post-Verify Reports
Check Register
Update
Note: Typically used in tandem with the
Quick Void - Expense Run if the check(s)
in the Quick-Voided Expense Run had
already been reversed.
Processing a Quick Void – Reversal
Table 6 - Accrual Payroll processes to complete before the actual September payrolls
and the location of further information about each process

PART ONE: Processing the Final Payroll of the Fiscal Year
WSIPC Guide to Payroll - September Payroll Processing (April 2017) 41
Version 05.17.02.00.07
Terminating Employees after Running
Final Payment Once the final payment for the fiscal year has been completed, you must complete
several processes to inactivate each employee’s record to ensure that no further
payments are made to that employee. To learn about these processes, see “Changing
Payroll Data after Running Final Payment” in the WSIPC Guide to Payroll – Ending
Employment. Table 7 lists the processes used to inactivate each employee and the
location of further information about each process.
Process
Section of the WSIPC Guide to Payroll – Ending
Employment that contains further information
about this process
Delete paid-off contracts
and Pay Records individually.
Deleting Paid-Off contracts and Pay Records
Individually
Update personnel
information (inactive status,
term date and reason, and
employee type).
Updating Personnel Information
Delete direct deposit
information.
Deleting Direct Deposit Records
Delete Ded/Bens on the
Employee Profile.
Deleting Deduction and Benefit Codes
Process payments for
employees on COBRA
Processing Benefit Payments for Employees on
COBRA
Table 7 - Process for terminating Employees after running final payment processes and
the location of further information about each process
WSIPC Guide to Payroll - September Payroll Processing (April 2017) 42
Version 05.17.02.00.07
PART TWO: Preparing Payroll Data
for the Next Fiscal Year
After you complete the final payroll process of the prior fiscal year, you continue to
prepare employee data for the beginning of the next fiscal year. Prepare and
maintain new contract and Pay Record information in the Employee Management
module while next fiscal year updates to other employee data are processed in other
modules such as Time Off and Insurance Tracking.
The following processes are included in preparing payroll data for the next fiscal year:
Updating Washington Rate Tables
Maintaining Data in Employee Profile
Preparing Employee Payroll Assignment Data for Payroll in Employee
Management
Updating Employee Assignment Information in Employee Management
Updating Retro and Leave Without Pay (LWOP) Pay Codes in Contracts
Updating WA Hourly Wage
Updating Hourly Rates on Pay Records
Updating Insurance Tracking Data for the Next Fiscal Year
Updating Time Off Records for the Next Fiscal Year
Running the Substitute Tracking Year End Purge
Running Flex Year End Processing
Updating ACA Status
This section explains each process.
Updating Washington Rate Tables If you receive new rates for Workers’ Compensation or Unemployment that are
effective with September Payroll, you must update the rates before running an
accrual payroll or September Payroll.
Best
Practice
Verify that Retirement Rates are correct and change the
Unemployment and Workers’ Compensation rates before running
the Payroll Payables Expense Run and Reversal, and before running
the regular payroll for September.
PART TWO: Preparing Payroll Data for the Next Fiscal Year
WSIPC Guide to Payroll - September Payroll Processing (April 2017) 43
Version 05.17.02.00.07
Entering Workers’ Compensation Rate Tables for
the Next Fiscal Year The Department of Labor and Industries or your L&I pool sends new Workers’
Compensation rates to agencies. Some districts may also be self-insured. Workers’
Compensation rates are entered based on effective dates and you can enter them at
any time. Some agencies’ rates are effective with the next calendar year and some are
effective with the next fiscal year.
If your agency’s rates change with the fiscal year, you must enter the new rate
manually in the rate table before a payroll is run for that effective date or the tax
calculations might be incorrect. The software does not correct Workers’
Compensation calculations for prior period payrolls. If your rates are not changing,
you do not need to perform this procedure.
Best
Practice
If your district processes an Accrual Payroll, use an August 1
effective date for Workers’ Compensation rates. This ensures that
the rate used is the rate that is effective when the Payroll Payables
items are actually paid.
To enter the Workers’ Compensation Rate Tables for the next fiscal year:
1. In the Web interface, go to Human Resources\Payroll\PA Setup\CO\WC.
2. Click .
3. Click .
4. Enter the correct code and start date in the and
boxes.
5. Enter the correct rates in the and ,
and boxes.
6. Click .
7. Repeat steps 3 through 6 to add new rates for other WC Codes as needed.
8. Click .

PART TWO: Preparing Payroll Data for the Next Fiscal Year
WSIPC Guide to Payroll - September Payroll Processing (April 2017) 44
Version 05.17.02.00.07
Updating the Unemployment Compensation Rate
Table The Washington State Employment Security Department collects taxes from the
employer on the earnings of each taxable employee. Some districts may choose to
participate in an unemployment cooperative or to be self-insured. Unemployment
tax rates and reporting options in Skyward’s School Management System meet the
Washington State requirements. The district maintains the rate tables that support
calculations for the benefit amount. You enter Unemployment rates at the beginning
of a next calendar or fiscal year.
If rates change at the beginning of the fiscal year or any other time during the year,
enter the rates shortly before the first payroll in which they become effective because
these dates only consist of the year, not a true effective date. Enter the correct rates
before a payroll is run for that effective date. The software does not correct
Unemployment calculations for prior period payrolls.
Best
Practice
If your district processes an Accrual Payroll, update Unemployment
Compensation rates shortly before running the Payroll Payables
Expense Run. This ensures that the rate used is the rate that is
effective when the Payroll Payables items are actually paid.
To update the Unemployment Compensation Rate Table:
1. In the PaC interface, go to HR\PA\UT\PA\TA\PT\OT.
2. Double-click
3. Click
4. Enter values in the , (WA00), and
boxes.

PART TWO: Preparing Payroll Data for the Next Fiscal Year
WSIPC Guide to Payroll - September Payroll Processing (April 2017) 45
Version 05.17.02.00.07
5. Select the check box to indicate that this is the current rate for the
payroll calculate process to use.
Note Enter a Rate as a decimal number for each UC State Code.
The Payroll Calculate process divides this rate by 100, to get
the percent to apply to the pay amount to determine the UC
benefit amount. Therefore, a rate of 5 percent, would be
entered as 0.0500.
The flag specifies which rate the Payroll Calculate
process uses if the table includes multiple rates for a calendar
year. Only one rate per State Code can be active for each
year.
6. Click .
7. Click .
Maintaining Data in Employee Profile The Employee Profile contains the data used to process payroll. When you import
data to payroll that was exported from Employee Management, the data is imported
into the Employee Profile. When the payroll is run, data from the profile is selected
for use in the payroll process.
The key elements that Payroll uses and updates include Contracts, Pay Records,
Deductions, and Benefits. Maintain and update these data elements as needed
throughout the year. You also refresh this data for almost all employees before the
first payroll of the fiscal year with the exception of administrators, whose contracts
run from July to June.
Note Additional setup is required to prepare new Employee Records for
the first Payroll. To learn more about new employees, see
“Appendix B - New Employee September Payroll Checklist”
(page 110).
This section describes the reports and processes you use to maintain data in
Employee Profile.

PART TWO: Preparing Payroll Data for the Next Fiscal Year
WSIPC Guide to Payroll - September Payroll Processing (April 2017) 46
Version 05.17.02.00.07
Running the Profile Report The Profile Report provides the current status of Employee Profile data. Run this
report and save it as a Historical Record of Employee Profile data at the conclusion of
the fiscal year prior to purging data and updating it for the next fiscal year.
To run the Profile Report:
1. In the Web interface, go to Human Resources\Employee\RE\EP.
2. Add or edit an template.
3. In the area, select or clear the areas you want
on the report.
Note Typically, minimum information for this report should include
the ,
and check boxes. Select other items as
needed.
4. In the area, select a section and click the or
buttons to change the print order.
5. In the area, choose the types of employees to print
and the employee sort order.
6. Click . You can select an existing parameters selection or
add a new one.
7. (Optional) Click the button and select user-defined fields
to include on the report.
8. Click
9. To ensure you have a saved copy of the report, click
and then click .
10. Configure the screen.
11. Click .

PART TWO: Preparing Payroll Data for the Next Fiscal Year
WSIPC Guide to Payroll - September Payroll Processing (April 2017) 47
Version 05.17.02.00.07
Running Reports on Paid-Off Contracts Before purging the contracts for the prior year, you can run reports on the
paid-off contracts for historical purposes. You can run these reports in Employee
Contracts (HR\PA\RE\PA\MF\EC) and Quick Pick Reports (HR\RO\QP). To learn more
about these reports, see “Reviewing the Contract Payout Amount” (page 33).
You may have run these reports earlier to verify that the payoff amounts were
correct. At this point, you can run them again to verify that all paid off contracts have
a zero balance.
Caution The contract information you see on the screen
is actual contract data from the tab in Employee Profile.
Changes you make to contract data in the Employee Contracts list
changes the actual contract.
Purging Pay Records and Contracts from
Employee Profile Remove Pay Records and paid contracts before setting up next fiscal year contracts
and Pay Records. This is the recommended procedure for clearing out paid data from
the prior year before adding new data for the next fiscal year’s contracts and Pay
Records.
Note Run the Leave Sale Report (Human Resources\Time Off\RE\LS)
before purging Pay Records and updating hourly rates, to ensure
that the district’s liability for unpaid leave is accurately reflected in
their financial statements. The rates used in this report come from
each employee’s primary Pay Code.
Note Delete any contracts you added for Insurance Tracking salary
calculations (no pay involved). To learn about deleting these
contracts, see “Build Insurance Contracts Utility” in the WSIPC Guide
to Insurance Tracking.

PART TWO: Preparing Payroll Data for the Next Fiscal Year
WSIPC Guide to Payroll - September Payroll Processing (April 2017) 48
Version 05.17.02.00.07
Identifying the Contracts to Be Purged
This process identifies contracts with a zero balance that have been completely paid
off and can be purged from the employees’ profiles.
Caution Although contained within the area, treat this set of
options like a powerful utility. Only users with advanced skills should
access this area because it provides an alternate view of the
tab, and functions performed here alter the data in the
Employee Profile Contracts. For example, if you delete a contract in
this area, the contract is deleted in the Employee Profile.
To identify the contracts to be purged:
1. In the PaC interface, go to HR\PA\RE\PA\MF\EC.
2. Since the , ,
, and boxes default to the last date ranges you
entered, click to clear the date ranges and see all records in the
area. Use the date ranges as needed to set parameters
for the records you want to see in the area.
Tip Enter to view Contracts that were paid
off in the last payroll.
Caution Do not select or .
3. Use the button as needed to set parameters for the records you want
to see in the area. Use the parameter to
view employees such as administrators or teachers.
Tip You can export the data in the area to
Excel. You can sort this data by various criteria including Pay
Code and paid start date. Use this information to develop
criteria for the Pay Code delete process.
4. Click . A Web interface screen opens and the following message
appears:
“Would you like to load the values from the PaC Contract Browse Filter into
the Selection Parameters for this process?”

PART TWO: Preparing Payroll Data for the Next Fiscal Year
WSIPC Guide to Payroll - September Payroll Processing (April 2017) 49
Version 05.17.02.00.07
5. Click .
6. On the screen, select one of
the two following Report Formats:
Breakdown of Contract Information
Breakdown of Payment Information
7. Select the check box
to print account distribution information on the report.
8. In the area, select , or .
9. Click if you did not use the settings on the
screen. Select the default parameters or add a parameter
set to select specific employees. These selection parameters allow you to
select a sub-set of the previously selected employees to see on the report.
10. Click .
Deleting Pay Records
There are three methods you can use to delete Pay Records that are associated with
contracts. The first method must be done before contracts are purged. The second
method can be done before or after contracts are purged. The third method deletes
contracts along with their associated Pay Records.
Note Delete Retro Pay Records when the Contract Pay Records they are
associated with are deleted. This clears the pay history associated
with them. If this is not done, the following error may appear:
“Contract to Date amount does not equal pay history for the Pay
Code.” To learn more about this topic, see the WSIPC Guide to
Retirement Transaction Processing.
Method 1 – Using the Pay Record Audit Utility
The Pay Record Audit compares selected active Pay Records to either Contract
Records or Payroll Check History Records, using a control date. You can report on,
delete, or inactivate Pay Records that match the selection criteria (including the
control date) and that do not have either a matching Contract or Check History
Record. To learn more, see “Pay Record Audit” in the WSIPC Guide to
Payroll – Utilities and Audits.

PART TWO: Preparing Payroll Data for the Next Fiscal Year
WSIPC Guide to Payroll - September Payroll Processing (April 2017) 50
Version 05.17.02.00.07
Method 2 – Using the Mass Process to Delete Pay Records
The Mass Process for Pay Records allows you to delete specific Pay Records for
specific groups of employees based on your selections.
Note You can use this method before or after purging contracts.
To use the mass process to delete Pay Records:
1. In the PaC interface, go to HR\PA\MP.
2. In the area, select .
3. Click .
4. Select .
5. Configure the screen (Figure 14). Table 8
describes the options on this screen.
6. Click .
7. Configure the screen.
Tip Create and save a parameter set for all Contract Pay Codes.
You can update and use this parameter set each time you
delete Contract Pay Codes.
8. Click .
9. Click . A message asks if you’re sure you want to continue with the delete
option.
10. Click .
11. In the box, select an output destination and click .
12. Review the Mass Delete of Pay Records Report for accuracy.
13. Click or click The following message appears:
“Do you want to continue with the mass delete of pay records? Select ‘Yes’
to continue. Select ‘No’ to stop the process.”

PART TWO: Preparing Payroll Data for the Next Fiscal Year
WSIPC Guide to Payroll - September Payroll Processing (April 2017) 51
Version 05.17.02.00.07
14. Click . The number of records deleted appears on the
screen.
15. Click .
16. Repeat steps 2 through 15 to delete remaining Pay Records you want to
delete.
Figure 14 - Mass Delete of Pay Records screen. (The Control Date refers to the Start
Date so you would use the date on this screen to delete Administrator Pay Records.)
Option Description
Displays a screen for each employee, listing the selected Pay
Records and allowing you to select the records to delete. If
you click at any point during this process, the process
ends without presenting the remaining records meeting the
selection parameters.
Lists the selected records on a report but does not delete
them.
Lists the selected records on a report and allows you to
delete them when the report is closed or saved.
Uses a control date as part of the selection criteria for the Pay
Records to delete. If you select this box, you must enter a
Control Date in the box. Only Pay Records with
a start date less than or equal to this date are removed. This
date is not required.

PART TWO: Preparing Payroll Data for the Next Fiscal Year
WSIPC Guide to Payroll - September Payroll Processing (April 2017) 52
Version 05.17.02.00.07
Option Description
When entered, only records with a start date less than or
equal to this date are removed.
Deletes records with payments processed against them. This
box must be selected to delete Pay Records when check
history exists for them, as in the case of contracts that have
been paid off.
Table 8 - Description of options on the Mass Delete of Pay Records screen
Method 3 – Using the Mass Process to Delete Contracts and
Associated Pay Records
The Mass Process for Pay Records allows you to delete specific Pay Records for
specific groups of employees based on your selections. You can use this method to
delete contracts and associated Pay Records all at once.
Note To automatically delete Retro and Dock Pay Records associated with
a contract, select the
box (SA\FM\FM\Payroll\General Options) before
beginning Method 3.
To use the mass process to delete Contracts and Associated Pay Records:
1. In the PaC interface, go to HR\PA\MP.
2. In the area, select .
3. Click .
4. Click .
5. Click .
6. Enter the date ranges to see the contracts you want to purge.
7. Click .

PART TWO: Preparing Payroll Data for the Next Fiscal Year
WSIPC Guide to Payroll - September Payroll Processing (April 2017) 53
Version 05.17.02.00.07
8. Configure the screen. For example, you may
select the Employee Type for administrators and the Pay Codes for their
contracts.
9. Click .
10. Click to generate the list of Employee Contracts and
associated Pay Records to mass delete.
Note This list shows the items that are deleted when you click the
button. Click to delete an item from
the list. Any item deleted from the list is not purged.
11. Click
12. Click . A message asks if you’re sure you want to continue.
13. Click .
You can repeat this process for another set of Contracts based on Employee Type or
other criteria.
Purging the Contracts
Once you identify the contracts to be purged, you can use this process to purge the
contracts from the database. This process deletes Contracts and associated Pay
Records all at once.
Note To automatically delete Retro and Dock Pay Records associated with
a contract, select the
box (SA\FM\FM\Payroll\General Options) before
beginning Method 3.
To purge the contracts and associated Pay Records:
1. In the PaC interface, go to HR\PA\RE\PA\MF\EC.
2. Click .

PART TWO: Preparing Payroll Data for the Next Fiscal Year
WSIPC Guide to Payroll - September Payroll Processing (April 2017) 54
Version 05.17.02.00.07
3. Enter the date ranges to see the contracts you want to purge.
Caution The date ranges that appear by default may not be the same
date ranges as those in the list. The
screen defaults to the last date
ranges entered for ,
, , and .
You must use the same date ranges you used when verifying
the contract balances in the process described in “Identifying
the Contracts to Be Purged” (page 48).
4. Click .
5. Configure the screen. For example, you may
select the Employee Type for administrators and the Pay Codes for their
contracts. You must use the same parameters you used when verifying the
contract balances in the previous process described in “Identifying the
Contracts to Be Purged” (page 48).
Tip Create and save a parameter set for all contract Pay Codes.
You can update and use this parameter set each time you
purge Contracts.
6. Click .
7. Click to generate the list.
Note This list shows the items that are purged when you click the
button on this screen. Click to delete an item
from the list. Any item deleted from the list is not purged.
Click to exit the process without making changes.
8. Click A message asks if you’re sure you want to continue.
9. Click .
You can repeat this process for another set of Contracts and associated Pay Records
based on Employee Type or other criteria.
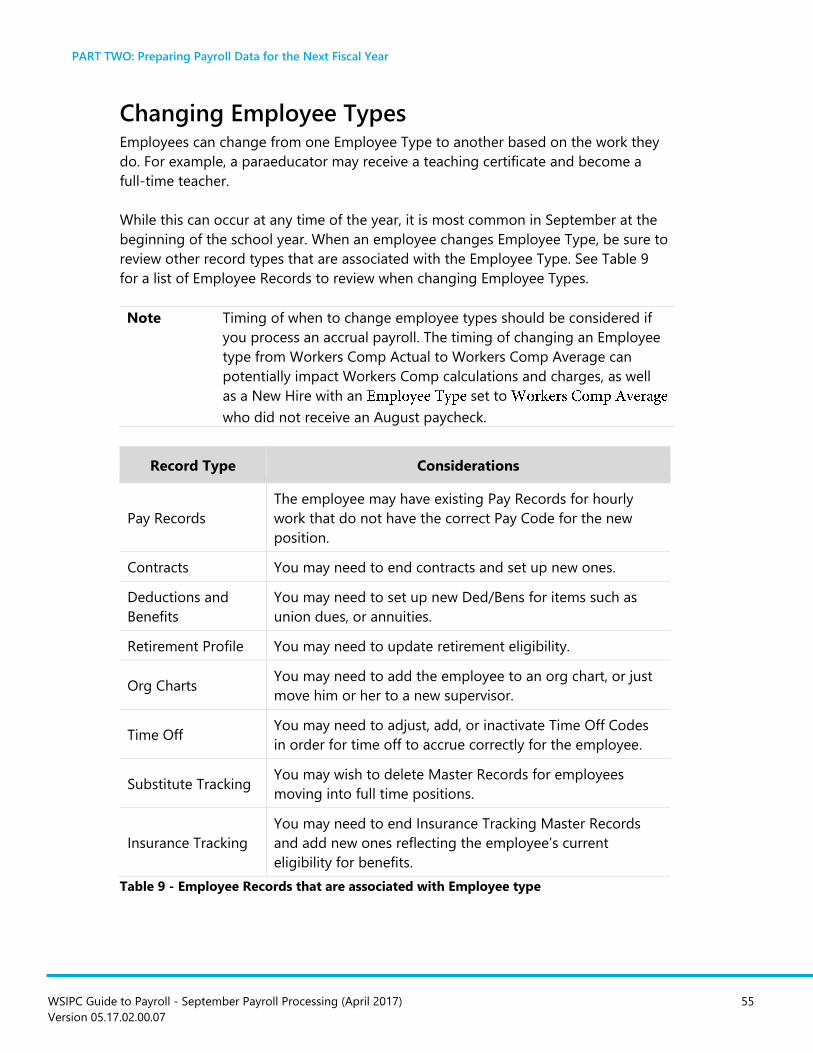
PART TWO: Preparing Payroll Data for the Next Fiscal Year
WSIPC Guide to Payroll - September Payroll Processing (April 2017) 55
Version 05.17.02.00.07
Changing Employee Types Employees can change from one Employee Type to another based on the work they
do. For example, a paraeducator may receive a teaching certificate and become a
full-time teacher.
While this can occur at any time of the year, it is most common in September at the
beginning of the school year. When an employee changes Employee Type, be sure to
review other record types that are associated with the Employee Type. See Table 9
for a list of Employee Records to review when changing Employee Types.
Note Timing of when to change employee types should be considered if
you process an accrual payroll. The timing of changing an Employee
type from Workers Comp Actual to Workers Comp Average can
potentially impact Workers Comp calculations and charges, as well
as a New Hire with an set to
who did not receive an August paycheck.
Record Type Considerations
Pay Records
The employee may have existing Pay Records for hourly
work that do not have the correct Pay Code for the new
position.
Contracts You may need to end contracts and set up new ones.
Deductions and
Benefits
You may need to set up new Ded/Bens for items such as
union dues, or annuities.
Retirement Profile You may need to update retirement eligibility.
Org Charts You may need to add the employee to an org chart, or just
move him or her to a new supervisor.
Time Off You may need to adjust, add, or inactivate Time Off Codes
in order for time off to accrue correctly for the employee.
Substitute Tracking You may wish to delete Master Records for employees
moving into full time positions.
Insurance Tracking
You may need to end Insurance Tracking Master Records
and add new ones reflecting the employee’s current
eligibility for benefits.
Table 9 - Employee Records that are associated with Employee type
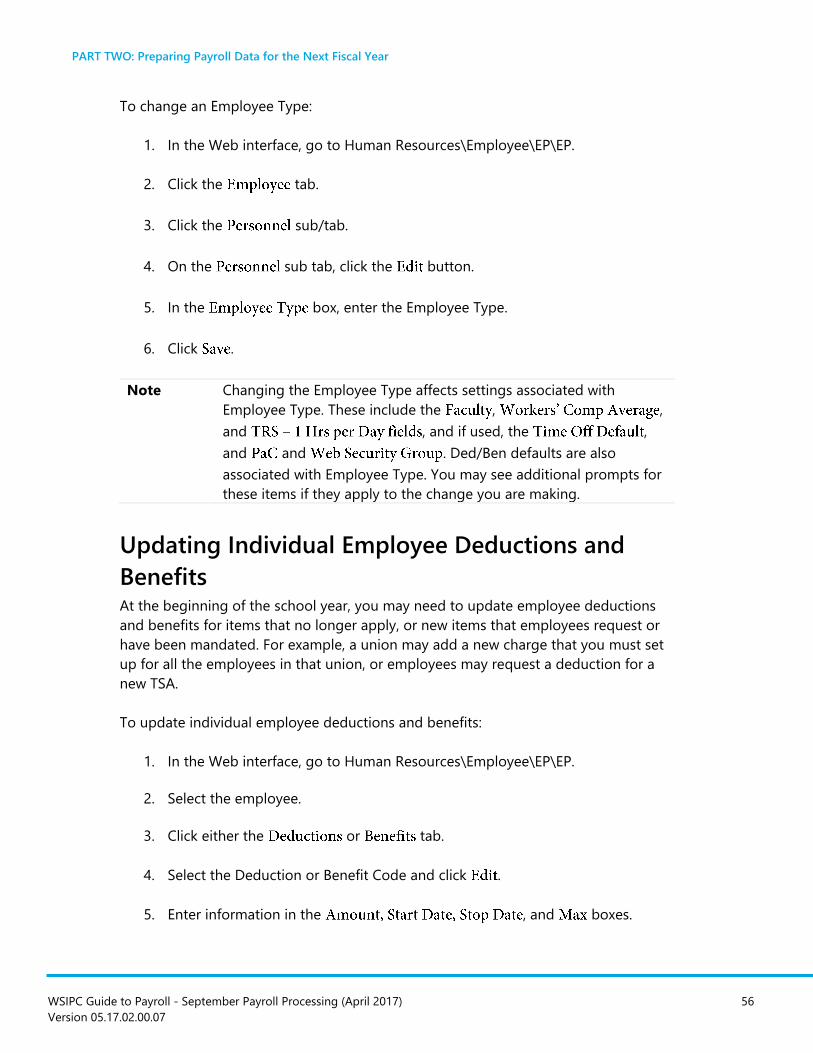
PART TWO: Preparing Payroll Data for the Next Fiscal Year
WSIPC Guide to Payroll - September Payroll Processing (April 2017) 56
Version 05.17.02.00.07
To change an Employee Type:
1. In the Web interface, go to Human Resources\Employee\EP\EP.
2. Click the tab.
3. Click the sub/tab.
4. On the sub tab, click the button.
5. In the box, enter the Employee Type.
6. Click .
Note Changing the Employee Type affects settings associated with
Employee Type. These include the , ,
and , and if used, the ,
and and . Ded/Ben defaults are also
associated with Employee Type. You may see additional prompts for
these items if they apply to the change you are making.
Updating Individual Employee Deductions and
Benefits At the beginning of the school year, you may need to update employee deductions
and benefits for items that no longer apply, or new items that employees request or
have been mandated. For example, a union may add a new charge that you must set
up for all the employees in that union, or employees may request a deduction for a
new TSA.
To update individual employee deductions and benefits:
1. In the Web interface, go to Human Resources\Employee\EP\EP.
2. Select the employee.
3. Click either the or tab.
4. Select the Deduction or Benefit Code and click .
5. Enter information in the , and boxes.

PART TWO: Preparing Payroll Data for the Next Fiscal Year
WSIPC Guide to Payroll - September Payroll Processing (April 2017) 57
Version 05.17.02.00.07
6. Click .
7. Click the button.
8. Select the Pay Record(s) to which you want to apply the deduction or benefit,
and click .
Note If Pay Records have not been added for the employee, deductions
and benefits are applied by the settings in the Assignment
Export/Payroll Import Utility.
Mass Updating Deductions and Benefits In addition to making changes to individual Ded/Ben Codes, you can edit and delete
multiple deductions and benefits. If you have many employees with the same Benefit
Code, and the dollar amount, stop date, or other fields for the code are changing for
everyone to the same new value, these utilities make it easier to make large scale
changes to the employees’ tab. To learn more about updating deductions
and benefits in mass, see “Mass Processing Deductions and Benefits” in the WSIPC
Guide to Payroll - Deductions and Benefits.
Furthermore, if you have Deduction and Benefit information in a spreadsheet, you
can run the Payroll Import/Export Utility to import data from the file into employee
Deduction or Benefit Control Files. Unlike the Ded/Ben Mass process, the values do
not have to be the same for everyone on your spreadsheet. To learn more about
updating deductions and benefits from a spreadsheet, see “Payroll Import/Export
Utility (Import)” in the WSIPC Guide to Payroll - Deductions and Benefits.
Tip Consider updating Deductions and Benefits before importing
assignments from Employee Management. This allows the pay level
rules to determine which Deductions and Benefits to attach to each
imported Pay Code.
Note You only need to keep current year deductions and benefits on the
tab. In addition to cleaning up the tab, there are
other advantages to running the
option to remove unneeded deductions and benefits. Mass
deleting unused retirement deductions and benefits from prior years
is helpful when running the Salary Negotiations Import Benefits from
Pay Records process because you only want to import current year
benefits.

PART TWO: Preparing Payroll Data for the Next Fiscal Year
WSIPC Guide to Payroll - September Payroll Processing (April 2017) 58
Version 05.17.02.00.07
Preparing Employee Payroll Assignment
Data for Payroll in Employee
Management You begin processing employee Assignment information for payroll in a newly
created plan for the fiscal year in Employee Management. Your Human Resources
department provides updated detail Assignment information to you from a Salary
Negotiations Plan that was prepared for the next fiscal year budget. Before you
create your Employee Management Plans for payroll, verify that OSPI has not made
any further changes that will impact the data in the budget plan, such as changes to
the number of calendar days or the salary allocation schedules in the LEAP
document.
When maintaining and updating employee Assignment information, begin with the
Salary Negotiations Plan prepared for budget and import that information to an
Employee Management Plan for payroll. Use that updated Employee Management
Plan as the source for S-275 personnel reporting.
If you use the Personnel Budget Salary Negotiations Plan as the source for the Payroll
Employee Management Plan, the majority of the updates of data for the next fiscal
year, such as calendars, salary matrixes, and employee salary placement should be
complete. Make only minor data updates in the Employee Management Plan before
importing it into payroll for the first payroll of the next fiscal year.
Creating the Next Fiscal Year Employee
Management Plan for Payroll Before you copy the employee Assignments from the Personnel Budget Salary
Negotiations Plan into the Employee Management Plan used for the next fiscal year
payroll, you must create the Employee Management Plan.
To create the next fiscal year Employee Management Plan for Payroll:
1. In the Web interface, go to Human Resources\Employee
Administration\EM\PL.
2. Click on the column to sort plans by year and review the plan list
before adding a new one. You can also create a Filter by Plan Year range to
limit what you see on the screen.
3. Click .

PART TWO: Preparing Payroll Data for the Next Fiscal Year
WSIPC Guide to Payroll - September Payroll Processing (April 2017) 59
Version 05.17.02.00.07
4. Enter the Employee Management Plan description in the box
(Figure 15).
Note Give it a descriptive name that includes the plan year.
You’ll be selecting the plan from the top of the screen for
most processes (except the Import). The field
displays up to 45 characters, which provides sufficient
space to enter a descriptive plan name.
5. Enter a detailed description in the box if needed.
6. Enter the plan year in the box.
7. Select because you are not
displaying the Employee Management Plan Assignment data. You may
choose to display the plan at a later time.
Note The
option is selected by default when you select the
check box.
The Step Descriptions on the
screen must be set up for each matrix step, and the
option must be selected on the Matrix
Master.
Tip Select the
check box when you want to display the salary step
description versus the salary step number. When selected,
clear the check box.
8. Select so you can have a history of
Assignment changes.
9. The is selected by default. Keep this
check box selected if you are using the plan for CEDARS reporting.
Note CEDARS only looks at current year plans, so it is ok to have it
selected before the start of the next year.
10. Click .

PART TWO: Preparing Payroll Data for the Next Fiscal Year
WSIPC Guide to Payroll - September Payroll Processing (April 2017) 60
Version 05.17.02.00.07
Figure 15 - Example settings for the Plan Maintenance screen
Importing Assignments into Your New Employee
Management Plan After you create the new Employee Management Plan, you can import Assignments
into this plan from a Salary Negotiations Plan.
To import Assignments into your new Employee Management Plan:
1. In the Web interface, go to Human Resources\Employee
Administration\EM\PL.
2. Select the Plan you want to import into.
3. Click .
4. In the area, select the Salary Negotiations Plan(s).
5. Configure the area (Figure 16). Table 10 describes the
options in this area.
Note Your choices vary depending on your
circumstances.
6. In the area, enter
dates as needed.
7. Click , click to add employee selection parameters,
click .

PART TWO: Preparing Payroll Data for the Next Fiscal Year
WSIPC Guide to Payroll - September Payroll Processing (April 2017) 61
Version 05.17.02.00.07
8. Click . Review the report to verify that the correct Assignments will be
imported.
Best
Practice
Run this report prior to importing because the import
process does not generate a report.
9. Click .
10. Read the Import confirmation message carefully. Verify that the plans listed
are the ones you want to import from and into.
11. Do one of the following:
Click to continue.
Click if you do not want to complete the import.
Figure 16 - Import Options area on the Import Assignments From screen

PART TWO: Preparing Payroll Data for the Next Fiscal Year
WSIPC Guide to Payroll - September Payroll Processing (April 2017) 62
Version 05.17.02.00.07
Option Description
Employees are assigned to a Position. Generally at the
beginning of the fiscal year, you begin with a clean slate and
create new positions. Clear the check box if you want to
import all . If changes are made during the
subsequent months, select the check box if you are
concerned about importing duplicate Positions. To learn
more about duplicate Positions, click the question mark.
Employees have Assignments (contracts) which change each
year. Generally at the beginning of the fiscal year you create
new Assignments. Clear the box if you want to import all
. Select the check box if you are concerned
about importing duplicate .
This setting is also honored if you are importing from
multiple plans. Duplicates are not imported if the check box is
selected, and duplicate Assignments exist in multiple plans,
and you are importing from multiple plans.
Note: The Position and Assignment duplicate options
function independently from one another. For example, if you
select the check box and clear the check
box you will not import duplicate Positions but could still
import Assignments that are coded identically. To learn more
about duplicate Assignments, click the question mark.
Some districts chose not to create Job Types for Assignments.
By selecting this check box you ensure that all Assignments
are updated even if the Job Type is blank.

PART TWO: Preparing Payroll Data for the Next Fiscal Year
WSIPC Guide to Payroll - September Payroll Processing (April 2017) 63
Version 05.17.02.00.07
Option Description
The field is used when an employee is
working in an Assignment that is a full year Assignment but
the employee is not working for the full year. Generally, it is
appropriate to select this check box for next year Assignment
imports. Most Assignment work and pay dates run for one
year and the Monthly Pay Frequency (M) with twelve
payments is used.
You can clear this check box if the Employee Management
Configuration option
(SA\FM\FM) is not selected
and you want to import a pay frequency other than monthly.
This option is used mostly for mid-year Assignment imports.
Copies over open positions from the source Employee
Management plan to the target plan.
Do not select this check box.
Position Groups may be used to monitor how many positions
the district has in a particular category. This option is only
used with Position Control Groups. Leave this option blank if
your district does not use Position Control Groups. If your
district is using Position Control Groups, test the difference
between selecting and not selecting this option.
Allows the district to exclude Assignments on the import
process when an employee has terminated employment.
This option is only used with Position Control Groups. Leave
this option blank if your district does not use Position Control
Groups. If your district is using Position Control Groups, this
rolls all users assigned to the Position Control Groups with
the new plan.
Job Types you want to include. All Job Types are included by
default. Verify that the values under
the box is correct.
Table 10 - Description of options in the Import Options area of the Import Assignments
From screen

PART TWO: Preparing Payroll Data for the Next Fiscal Year
WSIPC Guide to Payroll - September Payroll Processing (April 2017) 64
Version 05.17.02.00.07
Updating Employee Assignment
Information in Employee Management It’s best to prepare Assignments for the next fiscal year in Salary Negotiations during
budget preparation. When this process is used, the majority of the Position and
Assignment data is updated in Salary Negotiations during personnel budget
preparation.
At this time, verify that the Assignment data in Employee Management is correct, as
it is used to create employee contracts. This includes verifying calendars and
education and experience, and updating salary schedule placement, if this has not
already been done. In addition, verify work and pay start and end dates, the number
of payments, and Pay Codes.
Tip Use the Positions - Assignments Mass Change Utility to mass
update data such as work and pay start and end dates, the number
of payments, and Pay Codes. To learn more, see the WSIPC Guide to
the Positions - Assignments Mass Change Utility.
Using the Contract Paid to Date Totals When
Calculating the Pay Record Amounts Option This option designates that the calculation of Pay Record amounts is the contract
amount minus the contract to date paid amount ( field) divided by
the on the selected Frequency Code every time the EM
Assignment is exported and imported to Payroll. To learn more about Pay Frequency
Codes, see the WSIPC Guide to Payroll: Frequency Codes. To enable this feature, you
must select the check box in System EM configuration and
set up codes in the Pay Frequency Code Table. There are many considerations you
must make if you decide to implement this option. See “Appendix E – Employee
Management Contract Paid to Date Configuration” in the WSIPC Guide to Position
Control and Assignments in Employee Management and Salary Negotiations for
detailed information on this option.
Running the Position - Assignments Mass Change
Utility During September Payroll preparation, you may find that you need to correct some
Assignment fields. You can use the Position - Assignments Mass Change Utility to
make these changes.

PART TWO: Preparing Payroll Data for the Next Fiscal Year
WSIPC Guide to Payroll - September Payroll Processing (April 2017) 65
Version 05.17.02.00.07
When preparing for September Payroll, the Position - Assignments Mass Change
Utility is commonly used to correct the Paid Start and End dates on the
screen of the Assignments and to clear the Export and Import dates on the
screen of the Assignments. The most commonly changed fields on the
screen are shown in Figure 17.
Note The button does not work the same way in the parameters for
the Position - Assignments Mass Change Utility as it does in other
areas. This utility does not retain the settings from the last time it
was used. Instead, the user sets up templates for each mass change
process. The template is saved and can be modified and used again.
Note the settings on each parameter screen as you set up a mass
change to make sure that the mass change will execute as expected.
Figure 17 - Assignment Payroll Information screen with most commonly changed boxes
outlined

PART TWO: Preparing Payroll Data for the Next Fiscal Year
WSIPC Guide to Payroll - September Payroll Processing (April 2017) 66
Version 05.17.02.00.07
Using the Position - Assignments Mass Change Utility to Change
Pay Codes
You can also use the Position - Assignments Mass Change Utility to change Pay
Codes. Change Pay Codes only if Contract pay dates overlap and the employee will
be paid for the time in different Fiscal years on the same paycheck.
Example 1 New Pay Code needed because contract pay days overlap
2016-2017 contract work dates 08/27/2016-08/31/2017,
paid dates 09/1/2016-09/30/2017
2017-2018 contract work dates 08/26/2017-08/31/2018,
paid dates 09/1/2017-08/31/2018
Example 2 New Pay Code not needed
2016-2017 contract work dates 08/27/2016-08/31/2017,
paid dates 09/1/2016-08/31/2017
2017-2018 contract work dates 08/26/2017-08/31/2018,
paid dates 09/1/2017-08/31/2018
Best
Practice
Change Pay Codes from year to year only if you need to, based on
this scenario. Otherwise, it’s best to keep the same Pay Code from
year to year for the same type of work. You can attach Retirement
adjustments to a current year contract Pay Code for prior year
earning periods with the check box
cleared.
For complete instructions on running the Position - Assignments Mass Change
Utility, see the WSIPC Guide to Position - Assignments Mass Change Utility.

PART TWO: Preparing Payroll Data for the Next Fiscal Year
WSIPC Guide to Payroll - September Payroll Processing (April 2017) 67
Version 05.17.02.00.07
Using Employee Management Reports to Verify
That Your Data is Correct before Exporting to
Payroll Verifying that your Employee Management data is correct ensures that accurate
information is exported for the payroll department to use. You can run the following
reports to verify your data in Employee Management before exporting to payroll.
The following reports can be found in the Web interface (Human Resources\
Employee Administration\Reports):
Employee Management Report
Pay Distribution Report (to learn more about this report, see “Pay/Benefit
Distribution Report” in the WSIPC Guide to Human Resource Budgeting)
Education Detail Report
Experience Tracking Report
Assignment Breakdown Report (to learn more about this report, see the
WSIPC Guide to S-275 Reporting)
The following report can be found in the Web interface (Human Resources\
Federal/State Reporting\WA):
Mix Factor Report (to learn more about this report, see “Mix Factor Report” in
the WSIPC Guide to Human Resources Washington State Reporting)
Exporting Employee Management Assignments to
Payroll After you verify that Assignments in Employee Management are correct, you can
export them. This makes Employee Management Assignments available for import to
the Employee Profile as contracts and Pay Records. To learn how to export employee
data from Employee Management to Payroll, see “Exporting Employee Management
Assignments to Payroll” in the WSIPC Guide to Payroll - Processing Overpayment
Corrections.

PART TWO: Preparing Payroll Data for the Next Fiscal Year
WSIPC Guide to Payroll - September Payroll Processing (April 2017) 68
Version 05.17.02.00.07
Importing Employee Management Assignments to
Payroll After you export the Assignments from Employee Management, you can import them
to the Employee Profiles where they become contracts and Pay Records. Run the
report from the area to verify that the Assignment data
including amounts and the corresponding Pay Record, and contract dates are correct
before you import the Assignments into payroll.
Note The Assignment Export/Payroll Import has been updated to set the
Primary Pay Flag on the Pay Record with the largest amount when
importing multiple assignments with different Pay Codes.
The import will not reset a Primary Pay Flag that already exists on the
employee’s Pay Record control file.
The default parameters generally apply to most imports, with the exception of the
following two options:
When importing Assignments at any time of the year, select
in the area.
This is important to retain the Pay-Rec ID in the exported Profile Pay Record.
When importing for the first time, you must select
in the area. This option creates a new
Pay-Rec ID and is necessary for correct retirement processing. Otherwise, the
previous year’s Retirement Records (records with the same Pay Code) are
connected to the current contract, causing the retirement to be reversed.
See “Importing Employee Management Assignments to Payroll” in the WSIPC Guide
to Payroll - Processing Overpayment Corrections to learn more about this process.

PART TWO: Preparing Payroll Data for the Next Fiscal Year
WSIPC Guide to Payroll - September Payroll Processing (April 2017) 69
Version 05.17.02.00.07
Verifying and Setting the Primary Pay Code Once Assignments are imported and Pay Records are created, you can manually set
the Primary Pay Code using Payroll Mass Processing. This allows you to ensure that
the Contract Pay Code for each employee is set as the Primary Pay Code.
Tip Importing the primary contracts first ensures that the primary Pay
Record is flagged as the primary when it is imported. The first Pay
Record to be imported for an employee is flagged as the primary
when it is imported from Employee Management.
To verify and set the Primary Pay Code:
1. In the PaC interface, go to HR\PA\MP.
2. Select .
3. Click .
4. Click .
5. Configure the screen.
6. To update a specific Pay Code as the Primary Pay Code, select the
check box.
Note If you don’t select this check box, no updates occur.
7. Select a Pay Code in the box.
8. Click . The process looks at each employee’s Pay Records. If the
designated Pay Code is on the employee’s record, it is flagged as the Primary
Code. If the employee’s record does not contain the designated Pay Code,
the employee’s record is not changed.
9. Click . The Primary Pay Code Listing Report shows the selected
employees and the specific Pay Code that is designated as their Primary Pay
Code. The report does not show which Pay Codes were changed to Primary.
PART TWO: Preparing Payroll Data for the Next Fiscal Year
WSIPC Guide to Payroll - September Payroll Processing (April 2017) 70
Version 05.17.02.00.07
Using Employee Management Reports to Verify
That Data is Correct after Importing to Payroll Verifying that your Payroll data is correct ensures that accurate information was
imported for the payroll department to use. You can run the following reports to
verify that your data is correct after you import the Employee Management
Assignments and before you process your first payroll:
The EMS/Payroll Comparison Report compares Employee Management
Assignment data to the data that is currently on the tab of the
Employee Profile. A summary is provided at the end of the report by Pay
Code, listing the EMS Employee Count and Contract Amount as well as the
Payroll Employee Count and Contract Amount.
The Payroll Comparison Reports compare the Employee’s data in Payroll to
the data in Employee Management based on the report you select to print.
You can run five different reports from the
screen including a report that combines two of the reports.
The following Employee Management/Payroll Comparison Reports are used to verify
that data is correct after importing to Payroll:
Compare current Plan to Payroll
Compare Payroll to current Plan
Combine the 2 Reports into 1 Report
Compare Assigns in Employee Management to Pay Recs in Payroll
Compare Pay rec Accts to Assignment Accts
See “Appendix C – Reports” in the WSIPC Guide to Payroll - Processing Overpayment
Corrections to learn more about running these reports.
Verifying Contract Paid Start and Stop Dates Verify contracts’ paid start and stop dates before calculating your next fiscal year to
prevent any overlapping issues. If an employee has the same Contract Pay Code in
the current fiscal year and the next fiscal year, verify that the next fiscal year’s
Contract paid dates do not overlap with last year’s dates. If the contract paid dates
overlap and the contracts are included in a payroll calculate, the Retirement is
reversed for the last fiscal year.

PART TWO: Preparing Payroll Data for the Next Fiscal Year
WSIPC Guide to Payroll - September Payroll Processing (April 2017) 71
Version 05.17.02.00.07
The browse and filters in the area (HR\PA\RE\PA\MF\EC) can be
used to quickly identify old paid start and paid stop dates. Make any necessary
corrections before including the contract in a payroll calculate. See “Reviewing the
Contract Payout Amount” (page 33) to learn about the report that is available on this
screen.
Note You may have run this report earlier to verify and purge paid off
contracts. At this point, you can run it again to verify that all paid off
contracts have been purged, and to verify that paid start/stop dates
are accurate for the next year.
Running the Deduction/Benefit Audit This option allows you to select and report on all deductions and benefits assigned
to employees that are not used on employee Pay Records. After the report is
processed, you can remove all the reported deductions and benefits from the
employee’s control file. To learn more about the Deduction/Benefit Audit, see
“Deduction/Benefit Audit” in the WSIPC Guide to Payroll - Deductions and Benefits.
Verifying Benefit FTE If the district uses Insurance Tracking to calculate benefits, verify benefit FTEs. Once
Assignments are imported and Contracts are created in Employee Profile, you can
update multiple benefit FTEs using the Mass Change Benefit FTE Utility. To learn
more about the Mass Change Benefit FTE Utility, see “Mass Change Benefit FTE
Utility” in the WSIPC Guide to Employee Management and Salary Negotiations Utilities
for Washington.
Updating Retro and Leave Without Pay
(LWOP) Pay Codes in Contracts After the new contracts have been imported to the Profile, you can use the
area to update the Retro and Dock (LWOP) Pay Codes in the new
contracts. If your district commonly uses Retro or Dock Pay Codes, you may want to
update all contracts, but you can also update contracts when it becomes necessary to
apply Retro pay to a group of employees or to dock pay from employees for LWOP.
Retro Pay Codes must be a non-contract, non-rate type Pay Code. LWOP Pay Codes
must be a rate type, non-contract Pay Code. You can use only one Retro Pay Code
per contract per year. If an employee has multiple contracts, each contract must use
a unique Retro Pay Code.

PART TWO: Preparing Payroll Data for the Next Fiscal Year
WSIPC Guide to Payroll - September Payroll Processing (April 2017) 72
Version 05.17.02.00.07
Each year, you must delete Retro Pay Records, like Contract Pay Records, to
disconnect the previous year’s pay history associated with them. You must add new
Retro Pay Records for use in the next year. If this is not done, the error “Contract to
Date amount does not equal pay history for the pay code” may appear on contracts
with a Retro Pay Code attached to them.
Note The Associated Dock Pay amount on the
screen is listed for informational purposes. The same Dock Pay Code
can be used on multiple contracts but the total dock amount
appears on each contract. When you save the same Dock Pay Code
to multiple contracts, a message warns you that the same code is
already applied to another contract and unpredictable
contract-to-date amounts could result.
Updating Retro and Dock (LWOP) Pay Codes You can update Retro and Dock Pay Codes in contracts using utilities in the
area under . The same steps are performed for each utility.
To update Retro and Dock (LWOP) Pay Codes:
1. In the PaC interface, go to HR\PA\RE\PA\MF\EC.
2. Modify the date ranges to see the necessary contracts.
Note The screen defaults to the last date ranges you entered for
, ,
, and .
Tip If you see more data in the list than you want to work with, or
you don’t see all the data you expected to, click and
set parameters for the records you want to see in the list.
3. Verify that the contracts in the list are the ones you want to update.
4. Click and then click or
.
5. Click on the screen.
6. Configure the (or ) area by
adding, deleting, and moving codes in the order they will be processed.
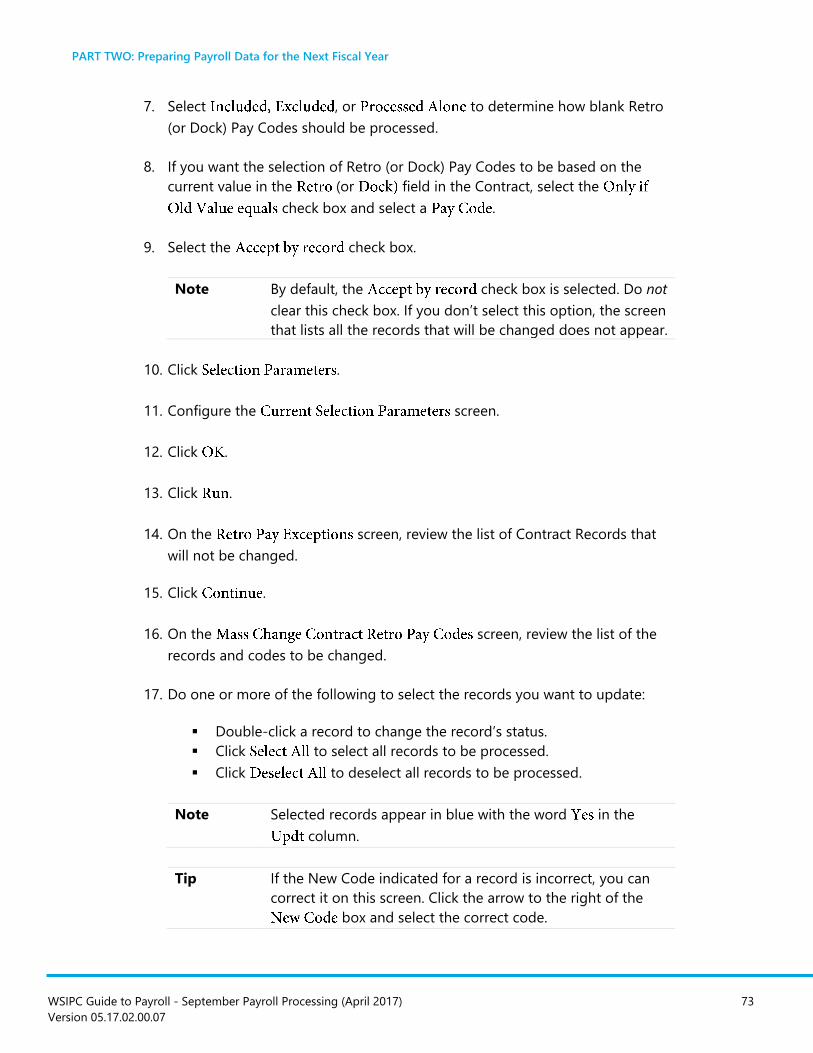
PART TWO: Preparing Payroll Data for the Next Fiscal Year
WSIPC Guide to Payroll - September Payroll Processing (April 2017) 73
Version 05.17.02.00.07
7. Select , or to determine how blank Retro
(or Dock) Pay Codes should be processed.
8. If you want the selection of Retro (or Dock) Pay Codes to be based on the
current value in the (or field in the Contract, select the
check box and select a .
9. Select the check box.
Note By default, the check box is selected. Do not
clear this check box. If you don’t select this option, the screen
that lists all the records that will be changed does not appear.
10. Click .
11. Configure the screen.
12. Click .
13. Click .
14. On the screen, review the list of Contract Records that
will not be changed.
15. Click .
16. On the screen, review the list of the
records and codes to be changed.
17. Do one or more of the following to select the records you want to update:
Double-click a record to change the record’s status.
Click to select all records to be processed.
Click to deselect all records to be processed.
Note Selected records appear in blue with the word in the
column.
Tip If the New Code indicated for a record is incorrect, you can
correct it on this screen. Click the arrow to the right of the
box and select the correct code.

PART TWO: Preparing Payroll Data for the Next Fiscal Year
WSIPC Guide to Payroll - September Payroll Processing (April 2017) 74
Version 05.17.02.00.07
18. When all records display the status you want, click .
19. On the screen, click .
Updating WA Hourly Wage You can update the on the WA - tab of the WSIPC Employee
Profile with values based on new contracts and Pay Records. The is not
automatically populated or updated when employee salary changes are made, so
you can update the field as part of September payroll preparation. You must update
this field before using Method 1 or 5 to update Hourly Rates on Pay Records, before
running Payroll, or before running the Washington Quarterly Wage Detail Report. To
learn about Methods 1 and 5, see “Updating Hourly Rates on Pay Records” below.
You can manually update the employee’s field in the Employee Profile
or you can run the Mass Calculate Hourly Wage Utility.
To update employee hourly wage using the Mass Calculate Hourly Wage Utility:
In the Web interface, go to Human Resources\Employee\EP Setup\UT\HW.
To learn more about the Mass Calculate Hourly Wage Utility, see “Update Employee
Hourly Wage” in the WSIPC Guide to Payroll: Unemployment.
Updating Hourly Rates on Pay Records Employees who are paid by the hour may have changes to their hourly rate at the
beginning of the fiscal year. You can use the following six methods to update these
hourly rates:
Method 1 – Using the Mass Processing Utility in Payroll to Update Hourly
Rates
Method 2 – Creating an Employee Management Plan for Hourly Employees
Method 3 – Using the Mass Processing Utility in Payroll to Recalculate Pay
Records
Method 4 – Using the Pay Record Update Utility to Update Pay Records
Method 5 – Auto Update Pay Records with WA Hourly Wage
Method 6 – Auto Create Additional Pay Rate Codes (Hourly, Daily, Overtime,
and Lump Sum) from Employee Management Assignments
Each method is described below.

PART TWO: Preparing Payroll Data for the Next Fiscal Year
WSIPC Guide to Payroll - September Payroll Processing (April 2017) 75
Version 05.17.02.00.07
Method 1 – Using the Mass Processing Utility in
Payroll to Update Hourly Rates This method allows you to update up to four hourly rates to new hourly rates to one
Pay Code, in one update. See Figure 18 for an example of the
screen configured to update hourly rates. You can also update employees’
Pay Records with WA hourly wage. To learn how to do this, see “Method 5 – Auto
Update Pay Records with WA Hourly Wage” (page 86).
To use the Mass Processing Utility in Payroll to update hourly rates:
1. In the PaC interface, go to HR\PA\MP.
2. In the area, select
3. Click .
4. On the screen, click .
5. Click the button to select the code to include in the process.
6. Select the check box to see totals on the
Mass Edit of Pay Records Report.
7. Click the button.
8. On the screen, select the employees you want
to include in the process.
9. Click .
10. In the column, select the check box.
11. Enter a new value for Amount 1 in the column.
12. In the column, select
the check box.
13. Enter a value in the box to the right of the check box. The
check box is now available.

PART TWO: Preparing Payroll Data for the Next Fiscal Year
WSIPC Guide to Payroll - September Payroll Processing (April 2017) 76
Version 05.17.02.00.07
14. Repeat Steps 10 through 13 for , , and .
15. Click . A message asks if you’re sure you want to continue with the
option.
16. Click .
17. In the box, select an output destination and click .
18. Review the Mass Edit of Pay Records Report for accuracy.
19. Click , or click . The following message appears:
“Do you want to continue with the mass edit of Pay 1 Records? Select ‘Yes’ to
continue. Select ‘No’ to stop the process.”
20. Click to update the records. The number of records changed appears on
the screen.
21. Click .

PART TWO: Preparing Payroll Data for the Next Fiscal Year
WSIPC Guide to Payroll - September Payroll Processing (April 2017) 77
Version 05.17.02.00.07
Figure 18 - Mass Edit of Pay Records screen configured to update hourly rates
Method 2 – Creating an Employee Management
Plan for Hourly Employees You can set up a separate Employee Management Plan for hourly employees with no
contracts who are reportable on the S-275. You can export these Assignments to the
Employee Profile.
If a Pay Code’s Rate Type is set to and the Contract is set to , when the
Assignment is exported from Employee Management and imported into the
Employee Profile, Pay Records are created but contracts are not. You can update the
Assignments using the Position - Assignments Mass Change Utility to change the
hourly rates.

PART TWO: Preparing Payroll Data for the Next Fiscal Year
WSIPC Guide to Payroll - September Payroll Processing (April 2017) 78
Version 05.17.02.00.07
Method 3 – Using the Mass Processing Utility in
Payroll to Recalculate Pay Records This method lets you update or add Hourly Pay Records for a group of employees
using another Pay Record to calculate the hourly rate, or you can update based on
the employee’s WA Hourly rate as described in “Method 5 – Auto Update Pay
Records with WA Hourly Wage” (page 86). You can also use a factor to create
Overtime Pay Records or to update Pay Records annually by a percentage from the
previous year’s rate.
To use the Mass Processing Utility in Payroll to recalculate Pay Records:
1. In the Web interface, go to Human Resources\Payroll\PA Setup\UT\PR\RP.
2. Click , or select a current template and click .
3. Configure the parameters screen. See Figure 19 for
an example of how to configure this screen. Table 11 describes the options
on this screen.
4. Click . The following message appears:
“Preview process has completed and has found records to process. Select the
‘Preview Data to Process’ button to continue.”
5. Click .
6. On the screen, review the data. Remove any records
that you do not want processed.
7. Click to continue.
8. If the data is correct, click . A message asks if you are sure you
want to run the update.
9. Click .

PART TWO: Preparing Payroll Data for the Next Fiscal Year
WSIPC Guide to Payroll - September Payroll Processing (April 2017) 79
Version 05.17.02.00.07
Figure 19 - Recalculate Pay Records parameters screen
Option Description
Updates this Pay Code with the new hourly rate.
Determines whether the process uses the employee’s
or a .
If you select , Pay Codes entered
are Source Codes for the hourly rate calculation.
If you select , the entered base Pay
Code is the Source Code for the hourly rate calculation.
If selected, the WA hourly wage amount (from the
tab) is used instead of the selected Base Pay
Record’s Amount.
Hourly rate is multiplied by this factor.
How many decimals the amount is rounded to.

PART TWO: Preparing Payroll Data for the Next Fiscal Year
WSIPC Guide to Payroll - September Payroll Processing (April 2017) 80
Version 05.17.02.00.07
Option Description
Adds the Pay Record to employees who do not already
have the Pay Record. If the Pay Record exists, the Pay
Record amount is updated with the newly recalculated
amount. If you don’t select this option, and the Pay
Record does not exist, an exception message is printed.
Determines what the added Pay Records factor will be.
Determines what the added Pay Records retire hours
value will be.
Determines which employees the Hourly Pay Record is
added to.
Makes the fields in the area available.
Makes the field available.
Start Date for new Pay Record.
Makes the field available.
The old start date to look for on the changing Pay
Record.
Makes the field available.
Stop Date for new Pay Record.
Makes the field available.
The old stop date to look for on the changing Pay
Record.
Makes the field available.
Maximum Amount for new Pay Record.
Makes the field available.
The old Maximum Amount to look for on the changing
Pay Record.
Table 11 - Description of options on the Recalculate Pay Records Parameters screen

PART TWO: Preparing Payroll Data for the Next Fiscal Year
WSIPC Guide to Payroll - September Payroll Processing (April 2017) 81
Version 05.17.02.00.07
Method 4 – Using the Pay Record Update Utility
to Update Pay Records This method allows you to update Hourly Pay Records for a group of employees
using a delimited or fixed width file. If you have Pay Record information in an excel
file, this is an alternative to update a group of employee’s Hourly Pay Records.
To use the Pay Record Update Utility to update Pay Records, you must complete the
following processes:
Creating an Import File
Creating a File Definition
Running the Pay Record Update via Import
Each process is described below.
Creating an Import File
To use the Pay Record Update Utility via Import you must have a delimited or fixed
width file with a minimum of Employee Identifier, Pay Code, and Pay Amount. Every
employee in the Import File must have the designated Pay Code on their profile. This
utility will not add Pay Records to an employee’s profile. The format for each field is
listed in Table 12. Once you create an Import File, you may continue with the Pay
Record Import process.
Note When creating your File Definition, the path and file name length is
limited to 50 characters. To avoid an error, ensure that you save your
Import File in a location that will not cause the full path (location
including file name) to exceed 50 characters.
Field
Number Field Required Format
1 Yes Social Security Number, Name Key,
or Name ID can be used. Entire file
must use one type of Employee
Identifier.
2 Yes 5 characters.
3 Yes 4 decimals.
4 No (Optional) Must contain spaces.
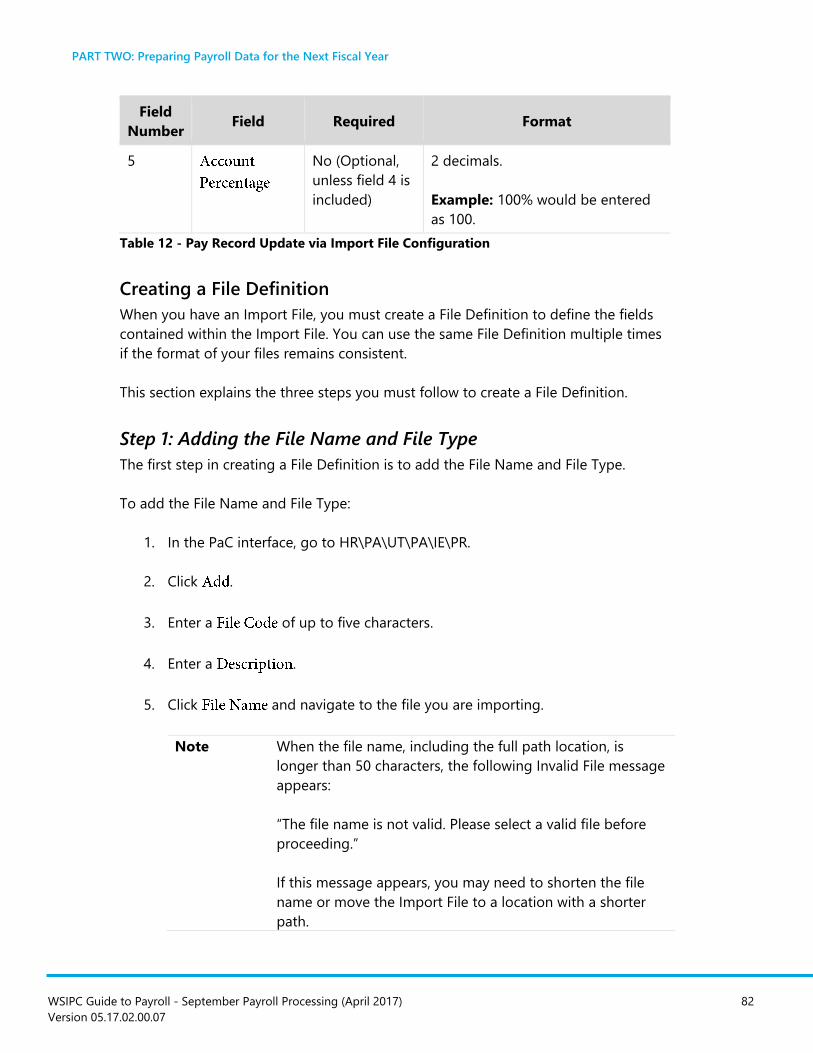
PART TWO: Preparing Payroll Data for the Next Fiscal Year
WSIPC Guide to Payroll - September Payroll Processing (April 2017) 82
Version 05.17.02.00.07
Field
Number Field Required Format
5 No (Optional,
unless field 4 is
included)
2 decimals.
Example: 100% would be entered
as 100.
Table 12 - Pay Record Update via Import File Configuration
Creating a File Definition
When you have an Import File, you must create a File Definition to define the fields
contained within the Import File. You can use the same File Definition multiple times
if the format of your files remains consistent.
This section explains the three steps you must follow to create a File Definition.
Step 1: Adding the File Name and File Type
The first step in creating a File Definition is to add the File Name and File Type.
To add the File Name and File Type:
1. In the PaC interface, go to HR\PA\UT\PA\IE\PR.
2. Click .
3. Enter a of up to five characters.
4. Enter a .
5. Click and navigate to the file you are importing.
Note When the file name, including the full path location, is
longer than 50 characters, the following Invalid File message
appears:
“The file name is not valid. Please select a valid file before
proceeding.”
If this message appears, you may need to shorten the file
name or move the Import File to a location with a shorter
path.

PART TWO: Preparing Payroll Data for the Next Fiscal Year
WSIPC Guide to Payroll - September Payroll Processing (April 2017) 83
Version 05.17.02.00.07
6. Select one of the following
: Select this if there is a separating character after
each field in your import file, which allows the width to vary for each
field.
: Select this if there are a specific number of characters for
each field in your Import File.
7. If you select a File Type of , click one of seven different
types, making a choice based on the source of your data file. For
example, comma-separated values (CSV) format files have a delimiter of
.
8. Click
9. Continue to “Step 2: Updating the Fields Detail” below.
Step 2: Updating the Fields Detail
The second step in creating a File Definition is to update the details in the
area.
To update the Fields detail:
1. Continuing from “Step 1: Adding the File Name and File Type” above, in the
area, click the that you just added.
2. Double-click a in the area (Figure 20).
3. Configure the screen (Figure 21).
Table 13 describes the options on this screen.
Note Field Numbers 1 through 3 are required fields. Fields 4 and 5
are not required. When Account Code is imported, Account
Percentage must be imported, and both fields must be
configured on the
screen.
4. Click .

PART TWO: Preparing Payroll Data for the Next Fiscal Year
WSIPC Guide to Payroll - September Payroll Processing (April 2017) 84
Version 05.17.02.00.07
5. Repeat steps 2 through 4 until all fields have been updated.
6. Continue to “Step 3: Running the Validation Report” below.
Figure 20 - Pay Record Update via Import File Definition screen
Figure 21 - Client Field definition Maintenance screen
Option Description
Names the field.
Field order within the import file (Required).
Identifies the data from a selection list (Required).
Table 13 - Description of options on the Client Field Definition Maintenance screen
PART TWO: Preparing Payroll Data for the Next Fiscal Year
WSIPC Guide to Payroll - September Payroll Processing (April 2017) 85
Version 05.17.02.00.07
Step 3: Running the Validation Report
The third step in creating the File Definition is running the validation report to make
sure there are no errors or incorrect fields in the file.
To run the validation report:
1. Continuing from “Step 2: Updating the Fields Detail” above, click .
Figure 20 (page 84) shows the button on the right side of the
screen.
2. In the box, select and click .
3. Review the Client File Definition Validation Report for accuracy.
4. Do one of the following:
Click , or click .
Note If messages appear identifying errors or warnings,
correct the necessary fields and repeat steps 1
through 3 of this procedure.
Click .
Running the Pay Record Update via Import Utility
After creating a File Definition free of errors, you can then run the Pay Record Update
via Import Utility. The Pay Record import process validates the File Definition,
validates the import data, and then imports valid data.
To run the Pay Record Update via Import Utility:
1. In the PaC interface, go to HR\PA\UT\PA\IE\PU.
2. Double-click the File Definition that was created.
3. In the box, select and click .
4. Review the Client File Definition Validation Report for accuracy.

PART TWO: Preparing Payroll Data for the Next Fiscal Year
WSIPC Guide to Payroll - September Payroll Processing (April 2017) 86
Version 05.17.02.00.07
5. Click or click .
Note If errors exist, the following message appears:
“Please correct errors prior to import of this file.”
Click , make corrections, and begin the process
again from step 1.
6. In the box, select and click .
7. Review the Pay Record Update Specific Validation Report for accuracy and
click , or click .
8. Review the list of records that will be added. To stop a record from being
included in the update, select the record and click . To add it back,
click .
Note Records that had errors cannot be imported and show in
the column and a of .
9. After you review all records and verify that they are accurate, click to
proceed with the update. An message appears stating the
number of records updated.
10. Click .
Method 5 – Auto Update Pay Records with WA
Hourly Wage This method allows you to use the mass processing utilities in the following ways to
update a Pay Record with the WA hourly wage:
Mass Add of Pay Records with WA Hourly Wage
Mass Edit of Pay Records with WA Hourly Wage
Mass Process Pay Records to Recalculate with WA Hourly Wage
Note Perform these mass processes on Rate Type Pay Codes only. These
Rate Type Pay Codes do not require the
option selected.

PART TWO: Preparing Payroll Data for the Next Fiscal Year
WSIPC Guide to Payroll - September Payroll Processing (April 2017) 87
Version 05.17.02.00.07
Mass Add of Pay Records with WA Hourly Wage
The first way you can update a Pay Record with the WA Hourly Wage is by using the
option.
To use the option:
1. In the PaC interface, go to HR\PA\MP.
2. In the area, select
3. Click .
4. Configure the screen (Figure 22). Table 14 describes
the options on the screen.
5. Click . A message asks if you’re sure you want to continue with the mass
process.
6. Click .
7. In the box, select an output destination and click .
8. Review the Mass Add of Pay Records Report for accuracy.
9. Click , or click . The following message appears:
“Do you want to continue with the mass Add of Pay Records? Select ‘Yes’ to
continue. Select ‘No’ to stop the process.”
10. Click to add the records. The number of records added appears on the
screen.
11. Click .

PART TWO: Preparing Payroll Data for the Next Fiscal Year
WSIPC Guide to Payroll - September Payroll Processing (April 2017) 88
Version 05.17.02.00.07
Figure 22 - Mass Add of Pay Records screen
Option Description
Opens a screen that allows you to add the Pay Record to
individual employees one by one.
Produces a report but does not add records.
Produces a report and allows you, optionally, to add the
records.
Pay Code you are adding.
Pay Frequency Code to be used with the Pay Code.
Project or Grant number applicable for the Pay Code.

PART TWO: Preparing Payroll Data for the Next Fiscal Year
WSIPC Guide to Payroll - September Payroll Processing (April 2017) 89
Version 05.17.02.00.07
Option Description
Amount for the Pay Record. When left blank, the WA
Hourly Wage is used if the
option has been selected.
Factor for the Pay Code.
Start date for the Pay Code.
Stop date for the Pay Code.
Allows the WA Hourly Wage Amount from the
tab to be used when adding the Pay Code.
Accounting number that entries will be charged to.
Deduction Codes that are attached to the Pay Code when
added. Select deductions.
Benefit Codes that are attached to the Pay Code when
added. Select benefits including Retirement,
unless the Pay Code is for pay that is not reported to DRS.
Options to choose from for employees who don’t have
the ded/ben selected:
(this option
adds ded/bens the user may not want added,
especially if all retirement ded/bens were selected
in the Deds and Bens areas)
Selection parameters used to determine who to add the
Pay Code to.
Table 14 - Mass add of Pay Records options

PART TWO: Preparing Payroll Data for the Next Fiscal Year
WSIPC Guide to Payroll - September Payroll Processing (April 2017) 90
Version 05.17.02.00.07
Mass Edit of Pay Records with WA Hourly Wage
The second way you can update a Pay Record with the WA Hourly Wage, is by using
the option (this is a slightly
different use than in Method 1). See Figure 23 for an example of the
screen configured to update with WA Hourly Wage.
To use the option:
1. In the PaC interface, go to HR\PA\MP.
2. In the area, select
3. Click .
4. On the screen, click .
5. Click the button to select the code to include in the process.
6. Select the check box to see totals on the Mass Edit of
Pay Records Report.
7. Click the button.
8. On the screen, select the employees you want
to include in the process.
9. Click .
10. Select the check box.
11. Click . A message asks if you’re sure you want to continue with the
option.
12. Click .
13. In the box, select an output destination and click .
14. Review the Mass Edit of Pay Records Report for accuracy.

PART TWO: Preparing Payroll Data for the Next Fiscal Year
WSIPC Guide to Payroll - September Payroll Processing (April 2017) 91
Version 05.17.02.00.07
15. Click , or click . The following message appears:
“Do you want to continue with the mass edit of Pay Records? Select ‘Yes’ to
continue. Select ‘No’ to stop the process.”
16. Click to update the records. The number of records changed appears on
the screen.
17. Click .
Figure 23 - Mass Edit of Pay Records screen configured to update WA Hourly Wage

PART TWO: Preparing Payroll Data for the Next Fiscal Year
WSIPC Guide to Payroll - September Payroll Processing (April 2017) 92
Version 05.17.02.00.07
Mass Process Pay Records to Recalculate with WA Hourly Wage
The third way you can update a Pay Record with the WA Hourly Wage is by using the
Recalculate Pay Records Utility to Recalculate Pay Records.
To use the Mass Process Pay Records to Recalculate with WA Hourly Wage:
1. In the Web interface, go to Human Resources\Payroll\PA Setup\UT\PR\RP.
2. Click or select a current template and click .
3. Configure the parameters screen and select
Figure 24 shows an example of how to configure the
parameters screen. Table 11 (page 84) describes the
options on this screen.
4. Click . The following message appears:
“Preview process has completed and has found records to process. Select the
‘Preview Data to Process’ button to continue.”
5. Click .
6. On the screen, review the data. Remove any records
that you do not want processed.
7. Click to continue.
8. If the preview data is correct, click . A message asks if you are
sure you want to run the update.
9. Click .

PART TWO: Preparing Payroll Data for the Next Fiscal Year
WSIPC Guide to Payroll - September Payroll Processing (April 2017) 93
Version 05.17.02.00.07
Figure 24 - Recalculate Pay Records parameters screen with the Use WA Hourly Wage
Amount option selected
Method 6 – Auto Create Additional Pay Rate
Codes (Hourly, Daily, Overtime, and Lump Sum)
from Employee Management Assignments This method allows you to create additional Pay Records (Hourly, Daily, Overtime and
Lump Sum) based on the calculated contract value of an Employee Management
Assignment. Pay Codes are specified in the Employee Assignments. Related Pay
Records are created when the Assignment is imported to the Employee Profile.
To auto create additional Pay Rate Codes:
1. In the Web interface, go to Human Resources\Employee
Administration\EM\AS.
2. Select an assignment and click .
3. Select the tab and click (Figure 25).

PART TWO: Preparing Payroll Data for the Next Fiscal Year
WSIPC Guide to Payroll - September Payroll Processing (April 2017) 94
Version 05.17.02.00.07
4. If you want to auto-create Hourly Pay Codes or Overtime Pay Codes do the
following:
a. Click and select a Pay Code, and then click .
b. Select in the box.
c. Enter a value in the box.
d. Click and select a Frequency Code, and then click .
Note You may need to add Hourly Pay Codes to the Pay Code table.
5. If you want to auto-create Daily Pay Codes, do the following:
a. Click and select a Pay Code, and then click .
b. Select in the box.
c. Enter a value in the box.
d. Click and select a Frequency Code, and then click .
6. If you want to auto-create Lump Sum Pay Codes, do the following:
a. Click and select a Pay Code, and then click .
b. Select in the box.
c. Enter a value in the box.
d. Click and select a Frequency Code, and then click .
Click
Note Even though you can create Daily Pay Codes, they are not
used in Washington State because they have no hours. Hours
are needed for WC and Retirement Reporting.

PART TWO: Preparing Payroll Data for the Next Fiscal Year
WSIPC Guide to Payroll - September Payroll Processing (April 2017) 95
Version 05.17.02.00.07
Figure 25 - Additional Pay Rate Codes selected on the Additional Pay Codes screen
Updating Insurance Tracking Data for the
Next Fiscal Year Insurance Tracking is set by plan year. When preparing for the next insurance plan
year, you can begin setting up the next plan year data as soon as you know the
insurance plan options and rates available for the next plan year. The month your
plan year ends for your Insurance Tracking data may not be the same as the fiscal
year.
You can begin all of the preparation steps, with the exception of the Insurance
Tracking Calculate and Update, before the payroll month when these changes take
effect. You cannot process the Insurance Tracking Calculate and Update until the last
payroll for the prior IT plan year is complete. Depending on the business practice in
your district, the Insurance Tracking Calculate and Update may be processed every
month or at specific times of the year.
Your district can choose to do electronic open enrollment through Employee Access.
Your district’s Open Enrollment period may differ from other districts. To learn more
about this process, see the WSIPC Guide to Open Enrollment in Employee Access.
Note The Insurance Tracking calculate and the update to deductions and
benefits must be completed before records are selected for the new
Insurance Tracking year, which could be relevant for the September
or October payroll, depending on the coverage year cycle of your
district’s insurance vendors.
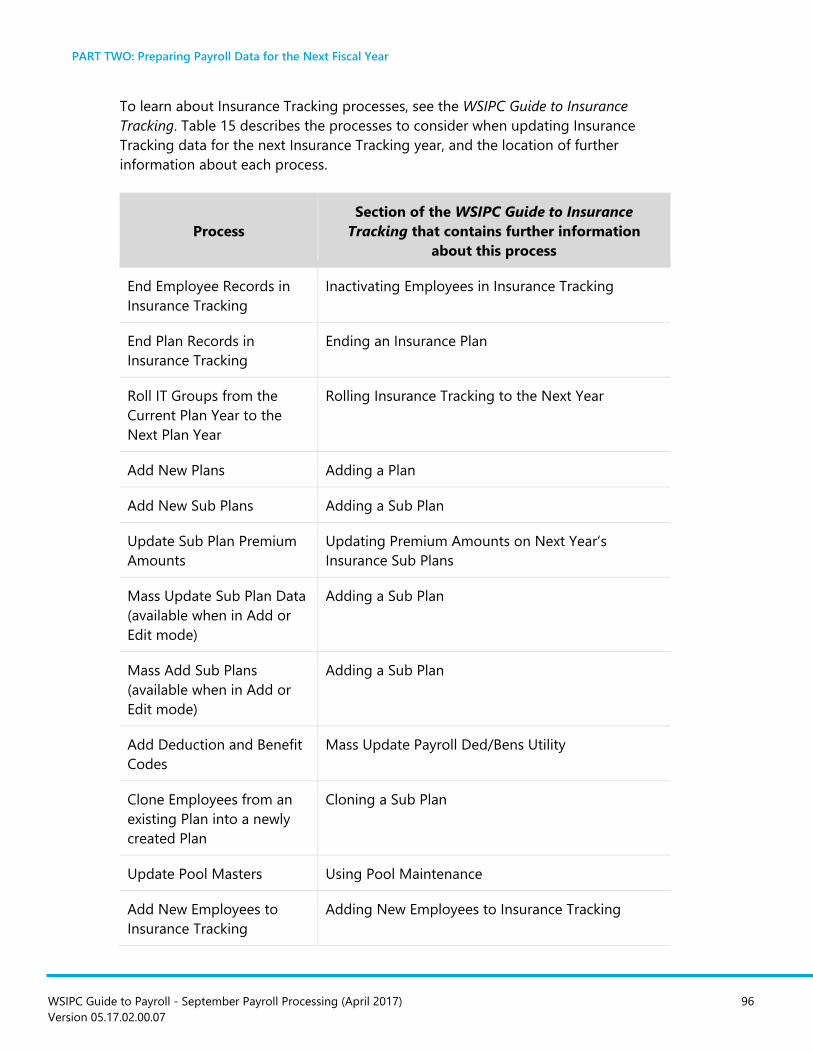
PART TWO: Preparing Payroll Data for the Next Fiscal Year
WSIPC Guide to Payroll - September Payroll Processing (April 2017) 96
Version 05.17.02.00.07
To learn about Insurance Tracking processes, see the WSIPC Guide to Insurance
Tracking. Table 15 describes the processes to consider when updating Insurance
Tracking data for the next Insurance Tracking year, and the location of further
information about each process.
Process
Section of the WSIPC Guide to Insurance
Tracking that contains further information
about this process
End Employee Records in
Insurance Tracking
Inactivating Employees in Insurance Tracking
End Plan Records in
Insurance Tracking
Ending an Insurance Plan
Roll IT Groups from the
Current Plan Year to the
Next Plan Year
Rolling Insurance Tracking to the Next Year
Add New Plans Adding a Plan
Add New Sub Plans Adding a Sub Plan
Update Sub Plan Premium
Amounts
Updating Premium Amounts on Next Year’s
Insurance Sub Plans
Mass Update Sub Plan Data
(available when in Add or
Edit mode)
Adding a Sub Plan
Mass Add Sub Plans
(available when in Add or
Edit mode)
Adding a Sub Plan
Add Deduction and Benefit
Codes
Mass Update Payroll Ded/Bens Utility
Clone Employees from an
existing Plan into a newly
created Plan
Cloning a Sub Plan
Update Pool Masters Using Pool Maintenance
Add New Employees to
Insurance Tracking
Adding New Employees to Insurance Tracking

PART TWO: Preparing Payroll Data for the Next Fiscal Year
WSIPC Guide to Payroll - September Payroll Processing (April 2017) 97
Version 05.17.02.00.07
Process
Section of the WSIPC Guide to Insurance
Tracking that contains further information
about this process
Open Enrollment Working with Open Enrollment in Insurance
Tracking
Update Coverage for
Existing Employees
Maintaining Employee Information
or
Working in Insurance Tracking Open Enrollment if
using Open Enrollment
Update Benefit and
Distribution FTE
Running Utilities in Insurance Tracking
Table 15 - Insurance Tracking Processes and the location of further information about
each process
Updating Time Off Records for the Next
Fiscal Year You must update Time Off Records at the end of the fiscal year. This includes the
annual purge and roll process, the update of accrual dates and calendars for the next
fiscal year, and other optional processes that may apply, depending on your district’s
policies. These tasks and related information are listed in Table 16.
The start of the next fiscal year is a good time to review your district’s leave
allocation method. If you use a monthly or front load Auto Accrual process and you
are satisfied with your allocation method, you can continue the same practice,
reusing your Accrual Date Codes and updating them for the next fiscal year. If you
are considering changing your leave allocation method, see “Allocating Time Off” in
the WSIPC Guide to Time Off for other ideas. You may also want to consider
allocating leave through Roll Codes used in the Purge process or through the Time
Off Transactions Mass Add Utility.

PART TWO: Preparing Payroll Data for the Next Fiscal Year
WSIPC Guide to Payroll - September Payroll Processing (April 2017) 98
Version 05.17.02.00.07
Tip For Buyback purposes do not condense detail transactions into a
summary line until after the Buyback process has been run. Consult
the DRS Leave Cash Out rules for employee retirement plan
requirements.
(http://www.drs.wa.gov/Employer/EmployerHandbook/
chpt7/statusCodes_rptgCO.htm).
Information in the DRS handbook will help you determine how long
you should keep Transaction Detail Records. For example,
Retirement Plan 1 leave cashouts are based on the last 24 months of
employment. At the end of the fiscal year, you might run the purge
process twice, once to keep the detail for the previous fiscal year
that is currently ending (to meet the 24 month requirement), and
once to create Summary Records for the fiscal year two years prior
to the year that is currently ending.
Table 16 lists Time Off processes and the location of further information about each
process.
Process
Section of the WSIPC Guide to Time Off
that contains further information about this
process
Plan Next Year Time Off
Review Codes
Setting Up Time Off
Review Allocation Method Allocating Time Off
Review Allocation Method
Auto Accrual –
Monthly or Front Load
Accrual Dates
Allotment Codes
Front Loading Leave
Allocating Time Off – Using Auto Accrual
Allocating Time Off – Using Auto Accrual
Review Allocation Method
Roll Codes
Setting Up Time Off – Roll Codes
Review Allocation Method
Mass Add Time Off Utility
Running Time Off Utilities – Time Off
Transactions Mass Add
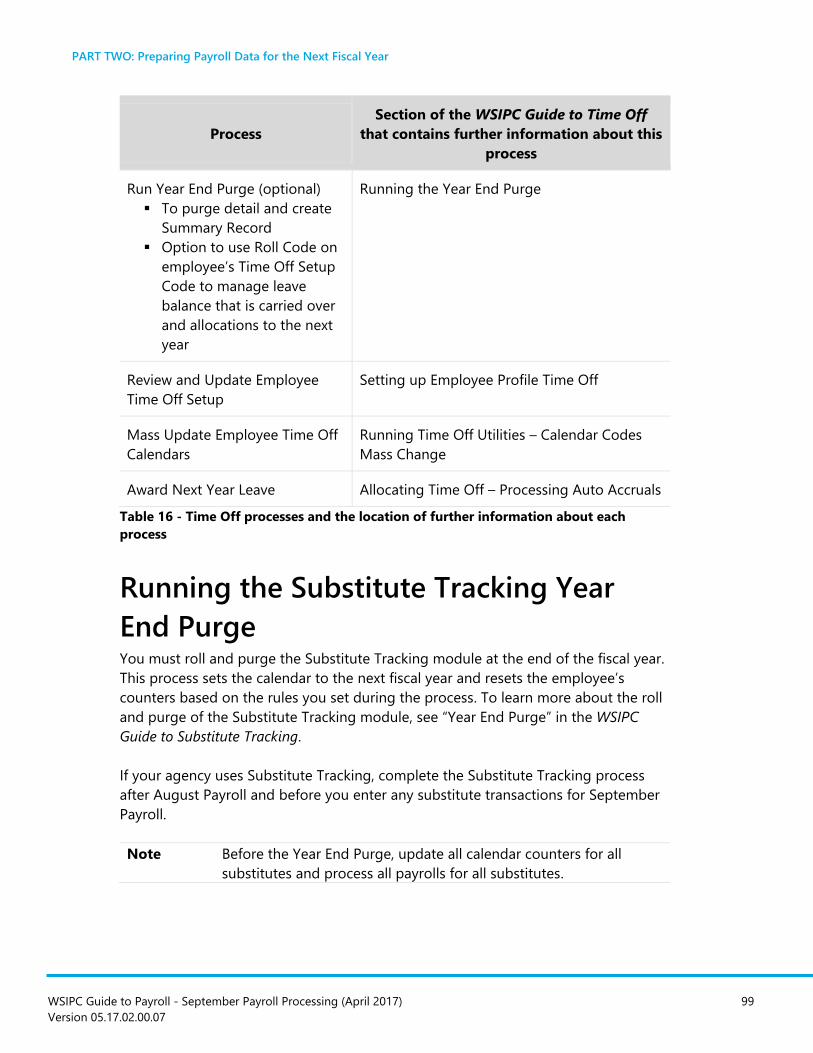
PART TWO: Preparing Payroll Data for the Next Fiscal Year
WSIPC Guide to Payroll - September Payroll Processing (April 2017) 99
Version 05.17.02.00.07
Process
Section of the WSIPC Guide to Time Off
that contains further information about this
process
Run Year End Purge (optional)
To purge detail and create
Summary Record
Option to use Roll Code on
employee’s Time Off Setup
Code to manage leave
balance that is carried over
and allocations to the next
year
Running the Year End Purge
Review and Update Employee
Time Off Setup
Setting up Employee Profile Time Off
Mass Update Employee Time Off
Calendars
Running Time Off Utilities – Calendar Codes
Mass Change
Award Next Year Leave Allocating Time Off – Processing Auto Accruals
Table 16 - Time Off processes and the location of further information about each
process
Running the Substitute Tracking Year
End Purge You must roll and purge the Substitute Tracking module at the end of the fiscal year.
This process sets the calendar to the next fiscal year and resets the employee’s
counters based on the rules you set during the process. To learn more about the roll
and purge of the Substitute Tracking module, see “Year End Purge” in the WSIPC
Guide to Substitute Tracking.
If your agency uses Substitute Tracking, complete the Substitute Tracking process
after August Payroll and before you enter any substitute transactions for September
Payroll.
Note Before the Year End Purge, update all calendar counters for all
substitutes and process all payrolls for all substitutes.

PART TWO: Preparing Payroll Data for the Next Fiscal Year
WSIPC Guide to Payroll - September Payroll Processing (April 2017) 100
Version 05.17.02.00.07
This process rolls life-long counters. These counters represent the employee’s total
substitute credit in your district, and making the wrong choice during the roll process
could affect the employee’s pay.
To run the Substitute Tracking Year End Purge:
1. In the Web interface, go to Human Resources\Substitute Tracking\ST
Setup\UT\YE.
2. Click
3. Add a description in the box.
4. In the area, select
one of the following (Figure 26):
: This adds the
current counter in the employee’s Master Record to the previous
year’s life long counter.
: This
adds the counters together as in the first option, then looks at the
levels in the rate table associated with the Master Record and reduces
the counter to the first day value of the current level based on the rate
table.
Example John Miller has a counter of 25 at the beginning of
the year. This year he has worked 17 days, which
brings his total to 42. The rate table moves to a new
rate at 40, so his counter in this example would be
40 if this option is selected.
: This adds the current
counter in the employee’s Master Record to the previous year’s
life-long counter. An adjustment is then created to set the counter to
zero.

PART TWO: Preparing Payroll Data for the Next Fiscal Year
WSIPC Guide to Payroll - September Payroll Processing (April 2017) 101
Version 05.17.02.00.07
Note Click the question mark button for an example and
to learn more about the
options. To learn more about these counters, see
“Appendix C – Option Details for Processing Life
Long Counters During Year End Purge” in the WSIPC
Guide to Substitute Tracking.
5. In the area, do one of the
following:
Select . This deletes all
History Records.
Select This
retains all History Records, and sets the status of these records to
.
Select
. If you select this option you must enter a date in the box.
All History Records with a date that falls before the date you enter in
the box are purged.
6. To increment the Current Substitute Tracking year to the next year, select the
check box
7. Click .
8. Click One of the following occurs:
If exceptions exist, the exception screen
appears. This shows any Contract Records that will not be changed.
You must correct the exceptions before the process can continue.
If no exceptions exists, the screen shows the
records to be changed.
9. Click .

PART TWO: Preparing Payroll Data for the Next Fiscal Year
WSIPC Guide to Payroll - September Payroll Processing (April 2017) 102
Version 05.17.02.00.07
10. If the data is correct, click . A message asks if you are sure you
want to run the update.
11. Click .
Figure 26 - Sub Tracking Year End Purge screen

PART TWO: Preparing Payroll Data for the Next Fiscal Year
WSIPC Guide to Payroll - September Payroll Processing (April 2017) 103
Version 05.17.02.00.07
Running Flex Year End Processing If you are using flex processing in the PaC interface and your year end for flex is
August, this is the time to roll the flex year. Otherwise, run this process during the
last month of your flex year, after the final payroll of the flex year is complete. You
can use either of the available options, (HR\PA\RE\PA\MF\FP), or
(HR\PA\RE\PA\MF\FP\Roll\Clone and Purge).
Best
Practice
is the recommended option to roll the flex year
because it allows you to use the flex information that was already
set up and then change only the items that are necessary.
Caution This process is done from a menu in Payroll reporting. Although this
is in the area, this menu is a very robust part of the
software and should be treated like a powerful utility. Only users
with advanced skills should be given access to this area, as it
provides an alternate view of the tab, and
functions performed here alter the data in the Employee Profile Flex
Records. For step-by-step instructions on Managing Flex Year End,
see the WSIPC Guide to Payroll - Flex Processing.
Tip To verify that the end date of your flex year is correct in system
configuration:
In the PaC interface, go to SA\FM\FM\Payroll\Flex Plan.
The fields reflect the end month of your flex plan.
Updating ACA Status Records Employees who were New Hires last year, and have completed a full Affordable Care
Act (ACA) Measurement Period, can now join the Standard Measurement Period. This
helps you manage ACA data in a more simplified manner, and is important because
you need to update Measurement Period and Stability Period dates so they are
relevant to the upcoming year. You can use the ACA Status Mass Process Utility to
add new ACA Status Records that are specific to the reporting year. To learn how to
update ACA Status, see “Entering an ACA Employee Status Record” in the WSIPC
Guide to Affordable Care Act Data Collection.

WSIPC Guide to Payroll - September Payroll Processing (April 2017) 104
Version 05.17.02.00.07
PART THREE: Processing the First
Payroll and Closing the Fiscal Year
After you prepare the employee data for the beginning of the next fiscal year, you
are ready to process the first payroll of the fiscal year, including the following
processes:
Processing the First Payroll of the Next Fiscal Year
Closing the Fiscal Year in Payroll
You close the Fiscal Year in Payroll after all accrual payroll payables processes are
complete. Each process is described below.
Processing the First Payroll of the Next
Fiscal Year You can process the first payroll of the next fiscal year by following the steps in the
Monthly Payroll Checklist – V3. This document is available through your Information
Service Center.
If you ran Payroll Payables, remember to import the Payroll Payables Expense Run of
the accrual payroll to pay the employees. To learn more about this process, see the
WSIPC Guide to Payroll - Payroll Payables.
Note When the September payment includes both Payroll Payables items
and September Payroll items, the gross pay from all pay items is
used to determine percentages to allocate benefits. This may cause a
different amount to be distributed to benefit accounts than was
posted in the Payroll Payables reversal.
Running a separate payroll to pay the Payroll Payables in September
is the recommended method, so that the benefit distribution
matches the original accrual run. It is also best to run the Payroll
Payables payroll before the September payroll, so that
Unemployment is calculated the same for anyone who reached the
maximum during the accrual payroll.

PART THREE: Processing the First Payroll and Closing the Fiscal Year
WSIPC Guide to Payroll - September Payroll Processing (April 2017) 105
Version 05.17.02.00.07
If you are running the encumbrance process in the PaC interface, after the September
Payroll, you only need to run , and
to begin the next fiscal year. This procedure applies only to the end of the
fiscal year in August and the beginning of the next fiscal year in September. You still
must run the entire Payroll Encumbrance process in June and July.
If you are running the encumbrance process in the Web interface, see “Setting Up the
Annual Encumbrance Process” in the WSIPC Guide to Payroll - Encumbrance
Processing to learn more about setting up the annual payroll encumbrance.
Tip After September payroll is complete, run the W2 audit to verify that
deductions and benefits are set correctly.
Closing the Fiscal Year in Payroll Close the fiscal year in HR only after all transactions, including all payrolls for the
fiscal year and the payroll payables processes, are complete. You must complete this
process before the first payroll in October of the next fiscal year. You cannot run a
calculate for the October payroll until this process is done. See Figure 27 for an
example of settings used to run this process.
To close the fiscal year in Payroll:
1. In the PaC interface, go to HR\PA\YE\PA\FI\CF.
2. In the box, select .
3. Select the check box. This
option creates user-defined records for this information in the area
for the fiscal year.
4. Enter the fiscal year end date in the box.
5. Click . A message asks if you want to continue with the update process.
Read the message carefully before proceeding.
6. Click . The following message appears:
“The Fiscal Year has been closed”
7. Click . A message asks you to confirm that you want to capture the Fiscal
Year Benefits/TSA Deductions.
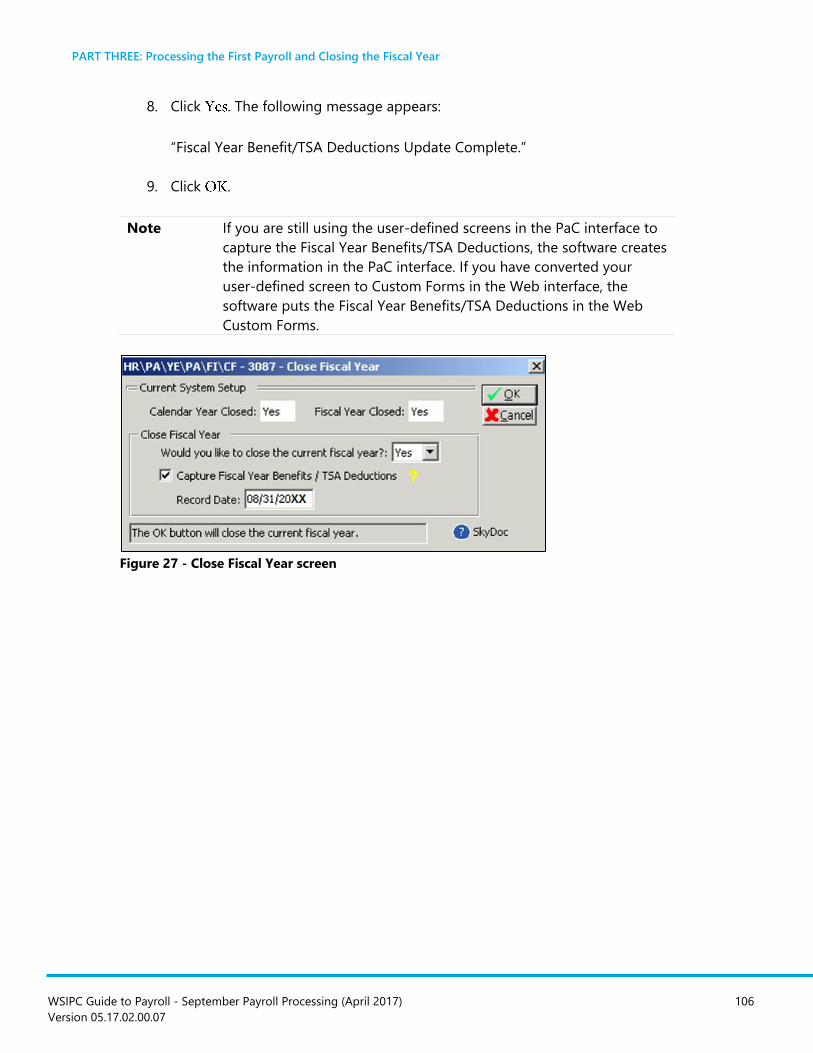
PART THREE: Processing the First Payroll and Closing the Fiscal Year
WSIPC Guide to Payroll - September Payroll Processing (April 2017) 106
Version 05.17.02.00.07
8. Click . The following message appears:
“Fiscal Year Benefit/TSA Deductions Update Complete.”
9. Click .
Note If you are still using the user-defined screens in the PaC interface to
capture the Fiscal Year Benefits/TSA Deductions, the software creates
the information in the PaC interface. If you have converted your
user-defined screen to Custom Forms in the Web interface, the
software puts the Fiscal Year Benefits/TSA Deductions in the Web
Custom Forms.
Figure 27 - Close Fiscal Year screen
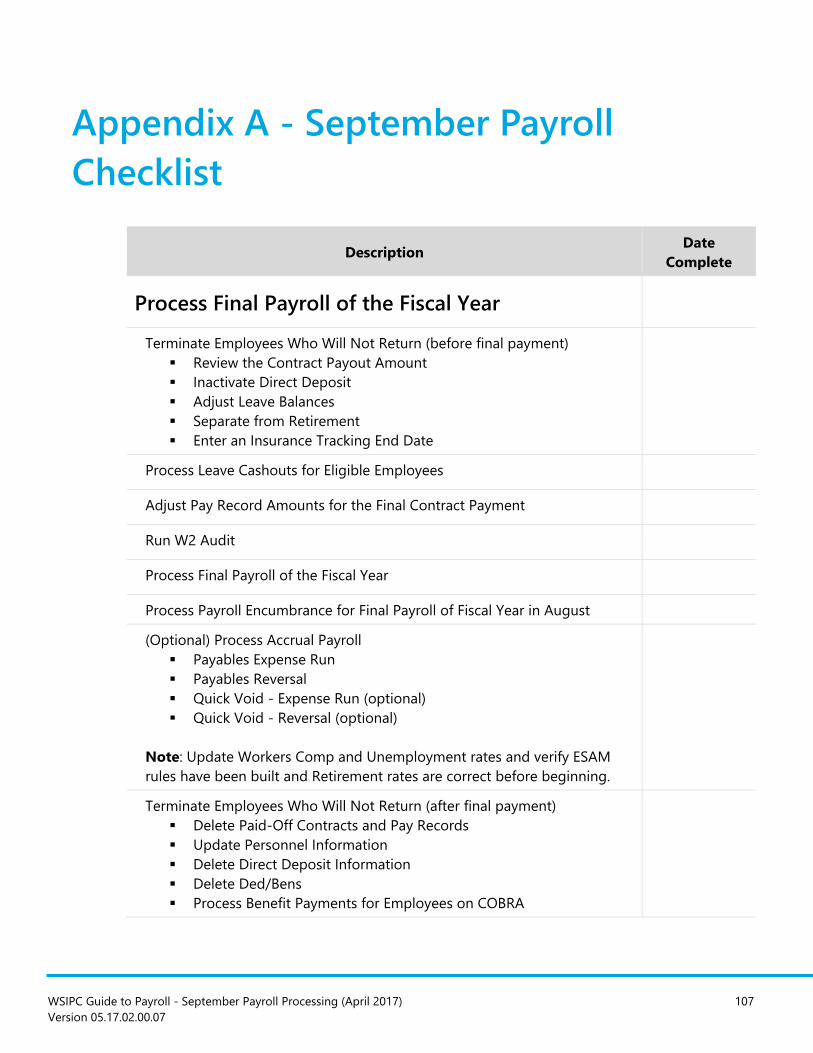
WSIPC Guide to Payroll - September Payroll Processing (April 2017) 107
Version 05.17.02.00.07
Appendix A - September Payroll
Checklist
Description Date
Complete
Process Final Payroll of the Fiscal Year
Terminate Employees Who Will Not Return (before final payment)
Review the Contract Payout Amount
Inactivate Direct Deposit
Adjust Leave Balances
Separate from Retirement
Enter an Insurance Tracking End Date
Process Leave Cashouts for Eligible Employees
Adjust Pay Record Amounts for the Final Contract Payment
Run W2 Audit
Process Final Payroll of the Fiscal Year
Process Payroll Encumbrance for Final Payroll of Fiscal Year in August
(Optional) Process Accrual Payroll
Payables Expense Run
Payables Reversal
Quick Void - Expense Run (optional)
Quick Void - Reversal (optional)
Note: Update Workers Comp and Unemployment rates and verify ESAM
rules have been built and Retirement rates are correct before beginning.
Terminate Employees Who Will Not Return (after final payment)
Delete Paid-Off Contracts and Pay Records
Update Personnel Information
Delete Direct Deposit Information
Delete Ded/Bens
Process Benefit Payments for Employees on COBRA

Appendix A - September Payroll Checklist
WSIPC Guide to Payroll - September Payroll Processing (April 2017) 108
Version 05.17.02.00.07
Description Date
Complete
Prepare Payroll Data for the Next Fiscal Year
Update Washington Rate Tables
Maintain Data in Employee Profile
Run Reports (including the Leave Sale Report)
Purge Pay Records and Contracts
Update Employee Types
Update Deductions and Benefits
Prepare Employee Payroll Assignment Data for Payroll in Employee
Management
Create Next Fiscal Year Employee Management Plan
Import Assignments into New Employee Management Plan
Update Employee Assignment Information
Make Changes to Assignments
Verify Data in Employee Management Plan
Export Employee Management Assignments
Import Employee Management Assignments to Payroll
Verify Data in Payroll
Update Retro and Leave without Pay (LWOP) Pay Codes in Contracts
Update WA Hourly Wage
Update Hourly Rates on Pay Records

Appendix A - September Payroll Checklist
WSIPC Guide to Payroll - September Payroll Processing (April 2017) 109
Version 05.17.02.00.07
Description Date
Complete
(Optional) Update Insurance Tracking Data for the Next Fiscal Year
End Employee Records in Insurance Tracking
End Plan Records in Insurance Tracking
Roll Insurance Tracking Groups from the Current Plan Year to the
Next Plan Year
Add New Plans
Add New Sub Plans
Update Sub Plan Premium Amounts
Mass Update Sub Plan Data
Mass Add Sub Plans
Clone Employees from an Existing Plan into a Newly Created Plan
Add Deduction and Benefit Codes
Update Pool Masters
Add New Employees to Insurance Tracking
Set up Open Enrollment
Update Coverage for Existing Employees
Update Benefit and Distribution FTE
Update Time Off Records for the Next Fiscal Year
Review Time Off Codes
Review Allocation Method
(Optional) Perform Time Off Year End Purge
Review and Update Employee Time Off Setup
Mass Update Employee Time Off Calendars
Award Next Year Leave
Update ACA Status Records
Add ACA Status Records for New Hires
Add ACA Status Records for previous New Hires that have now
completed a full Measurement Period and can now join the
Standard Measurement Period.
(Optional) Run the Substitute Tracking Year End Purge
(Optional) Run Flex Year End Processing
Process the First Payroll and Close the Fiscal Year
Process the First Payroll of the Next Fiscal Year
(Optional) Pay payroll payables in a separate payroll if you ran
payroll payables in August.
Close the Fiscal Year in Payroll

WSIPC Guide to Payroll - September Payroll Processing (April 2017) 110
Version 05.17.02.00.07
Appendix B - New Employee
September Payroll Checklist
This checklist is designed to help you set up new employees for September Payroll
(to learn more about the topics included in this checklist, see the WSIPC Guide for
each topic). In addition to adding new employees, you must follow the procedures in
“PART TWO: Preparing Payroll Data for the Next Fiscal Year” (page 42) with new
employees in mind.
Description Date
Complete
Prepare New Employee Payroll Data
Maintain Data in Employee Profile
Employee Type
Retirement Profile
Org Chart
Substitute Tracking (optional)
Insurance Tracking (optional)
Deductions and Benefits
ACA Employee Status Record
Prepare Employee Payroll Assignment Data for Payroll in Employee
Management
Add Assignments in Next Fiscal Year Employee Management Plan
Export Employee Management Employee Management
Assignments
Update Employee Assignment Information
Import Employee Management Assignments to Payroll
Verify Data in Payroll
Update Retro and Leave without Pay (LWOP) Pay Codes in Contracts
Update WA Hourly Wage
Update Hourly Rates on Pay Records
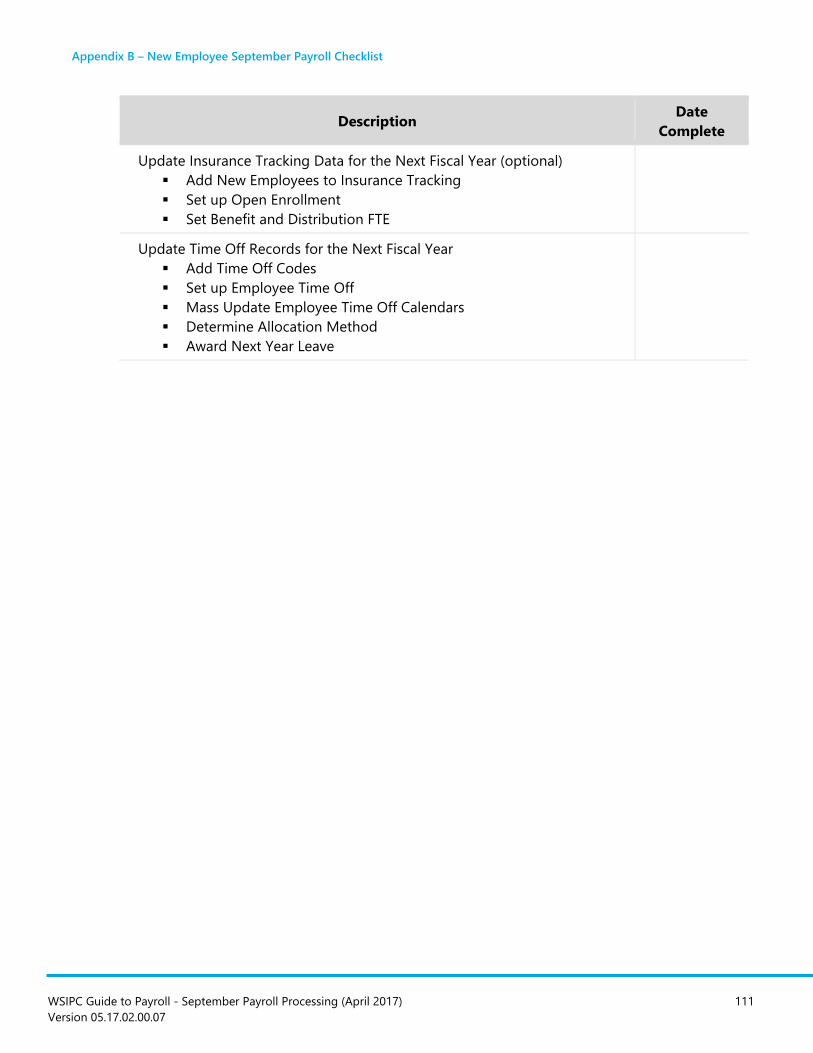
Appendix B – New Employee September Payroll Checklist
WSIPC Guide to Payroll - September Payroll Processing (April 2017) 111
Version 05.17.02.00.07
Description Date
Complete
Update Insurance Tracking Data for the Next Fiscal Year (optional)
Add New Employees to Insurance Tracking
Set up Open Enrollment
Set Benefit and Distribution FTE
Update Time Off Records for the Next Fiscal Year
Add Time Off Codes
Set up Employee Time Off
Mass Update Employee Time Off Calendars
Determine Allocation Method
Award Next Year Leave

WSIPC Guide to Payroll - September Payroll Processing (April 2017) 112
Version 05.17.02.00.07
Appendix C - Setting Pay Record
Amounts to Round Rather Than
Truncate
In the PaC interface, contracts do not always pay off every penny owed to the
employee. This is because Contract Pay Record amounts are determined in Employee
Management by dividing the Assignment amount by the frequency. In many cases,
the Pay Record amount does not divide evenly and may be either truncated or
rounded to the nearest penny. Even if it is rounded to the nearest penny, the Pay
Record may not fully pay off the contract in the specified number of payments.
Most employee contracts end with the fiscal year in either June (for most
administrators) or August. The final payments on these contracts are processed
through the associated contract Pay Record. Because Pay Record amounts don’t
always divide evenly over the year, you may need to adjust the final pay amount on
the Pay Record to correctly pay out the remaining contract balance. This happens
less frequently if you set your configuration to round Pay Record amounts rather
than truncate them.
To set Pay Record amounts to round rather than truncate:
1. In the PaC interface, go to SA\FM\FM.
2. Select the check box.
3. Click .
This allows Pay Records to round up rather than truncate when the calculation is
performed as described above.

Appendix C - Setting Pay Record Amounts to Round Rather Than Truncate
WSIPC Guide to Payroll - September Payroll Processing (April 2017) 113
Version 05.17.02.00.07
Table 17 shows Contract Pay Record amount calculations.
Payment Type Scenario 1 Scenario 2 Scenario 3
Contract Amount $50,000 $85,000 $3,325
# Payments 12 12 9
Pay Record Amount 4,166.6666 7,083.3333 369.44444
Truncated 4,166.66 7,083.33 369.44
Rounded 4,166.67 7,083.33 369.44
Rounded Payments 50,000.04 84,999.96 3,324.96
Truncated Payments 49,999.92 84,999.96 3,324.96
Table 17 - Contract Pay Record amount calculations
In some cases, the rounded amount causes the contract to overpay. In other cases, it
causes it to underpay. However, the Payroll Calculate prevents the contract from
overpaying. If the Pay Record amount is greater than the contract balance on the last
payment, the Payroll Calculate correctly stops payment at the contract amount and
the last payment is less than the actual Pay Record amount. For example, on the
$50,000 contract shown above, the last payment would be $4,166.63.

WSIPC Guide to Payroll - September Payroll Processing (April 2017) 114
Version 05.17.02.00.07
Appendix D - Processing Batch
Reports for Payroll
To improve payroll processing of reports, several reports are available to batch and
run in the Web interface. You can run most of the reports after you run a calculation.
One report, the Account Distribution Report, is run against check history after you
run the payroll. Table 18 lists the reports and when you should run them.
Report When to Run
Account Distribution Report Runs against check history after the payroll has
been run and the update process is complete.
Check Summary Report (Gross
and Net Amounts)
Run after the Payroll Calculate Process is
complete (Post Verify).
Check Summary Report (Net
Amounts Only)
Run after the Payroll Calculate Process is
complete (Post Verify).
Check Verification Register
Report
Run after the Payroll Calculate Process is
complete (Post Verify).
Labor/Benefit Distribution
Report
Run after the Payroll Calculate Process is
complete (Post Verify).
Payroll Variance Report Run after the Payroll Calculate Process is
complete (Post Verify).
Payroll Vendor Register Report Run after the Payroll Calculate Process is
complete (Post Verify).
Payroll Vendor Variances Report Run after the Payroll Calculate Process is
complete (Post Verify).
Post-Verify Pay/Ded/Ben Totals
Report
Run after the Payroll Calculate Process is
complete (Post Verify).
Retirement Activity Report
Run after the Payroll Calculate Process is
complete (Post Verify).
Note: No Template is available for this report.

Appendix D - Processing Batch Reports for Payroll
WSIPC Guide to Payroll - September Payroll Processing (April 2017) 115
Version 05.17.02.00.07
Report When to Run
Retirement Adjustments Report Run after the Payroll Calculate Process is
complete (Post Verify).
Retirement Transaction Report Run after the Payroll Calculate Process is
complete (Post Verify).
Workers’ Compensation Payroll
Report
Run after the Payroll Calculate Process is
complete (Post Verify).
Note: No Template is available for this report.
Table 18 - Batch Reports for Payroll
To process batch reports for Payroll:
1. In the Web interface, go to Human Resources\Payroll\PA\RE.
2. Click
3. Click
4. On the screen (Figure 28), enter a
description in the box.
Tip Add your initials to the Template Description to quickly
identify your reports.
5. Select a report to run. For each report you select, you create a template which
essentially is the parameters for that report.
6. Add a template for the report and complete the parameters selection.
7. Click .
8. Click .
9. Repeat Step 5 through Step 8 until all the reports you want to run are in the
batch reports process.
10. Click .

Appendix D - Processing Batch Reports for Payroll
WSIPC Guide to Payroll - September Payroll Processing (April 2017) 116
Version 05.17.02.00.07
11. Configure the screen for running the reports
and click .
Note This allows you to schedule the exact date and time when
you want to run the report. If you want the report to run
daily, weekly or monthly you can specify that. If you want to
have the results emailed to you, exported to a certain
location, or added to your widget on your
screen, you can also specify that.
To learn more about setting up Scheduled Tasks, see
“Tasks” in the WSIPC Guide to Skyward’s School
Management System.
12. If you want to run the reports at this time, on the screen
click The following message appears:
“The process Payroll Batch Report – (name of report) has been added to the
queue.”
13. Click .
14. Click .
Figure 28 - Payroll Batch Report Maintenance screen

WSIPC Guide to Payroll - September Payroll Processing (April 2017) 117
Version 05.17.02.00.07
Appendix E - Resetting the Fiscal
Year to the Prior Year
If the fiscal year was closed before all final steps were completed, you can reset the
year. For example, you might need to reset the year if you forgot to do the final
Payroll Payables run. After you complete everything for the fiscal year, repeat the
process for closing the fiscal year in Payroll.
To reset the fiscal year to the prior year:
1. In the PaC interface, go to SA\FM\FM.
2. Click
3. Click .
4. Change the box to
5. Click .

WSIPC Guide to Payroll - September Payroll Processing (April 2017) 118
Version 05.17.02.00.07
Appendix F - Processing Time Off
Transactions for an Employee with
a Paid Off Contract
You may find some employees who have no pay remaining for the year but have
unprocessed Time Off transactions. These employees also have sufficient Time Off
allocations to cover their used unprocessed Time Off transactions.
To see only employees with unprocessed Time Off, run a Time Off Detail Transactions
Report, selecting the option and a specific
Date Range. To learn more about this report, see “Detail Transactions Report” in the
WSIPC Guide to Time Off.
The following workaround cleans up the Time Off balances and corrects the Time Off
Code balances for next year. Complete these steps if you find unprocessed Time Off
Detail transactions (in the Fiscal Year to be closed) on an employee whose contract
has been paid off.
To process Time Off transactions for an employee with a paid off contract:
1. In the Web interface, go to Human Resources\Employee\EP.
2. Click the tab.
3. Click .
4. In the box enter “.0001.”
5. In the box enter “1.”
Note Entering these values in the and boxes allows
the employee’s Pay Record and unprocessed Time Off to be
pulled into a Payroll (without generating any pay).

Appendix F – Processing Time Off Transactions for an Employee with a Paid Off Contract
WSIPC Guide to Payroll - September Payroll Processing (April 2017) 119
Version 05.17.02.00.07
6. Verify that there are no deductions or benefits listed in the
area.
Note The Pay Record should not have any deductions or benefits.
7. In the boxes, enter the beginning and end dates for the
payroll to be processed.
8. Click .
9. Include employee’s Pay Record in the next payroll run.
TERMS OF USE
The information contained herein is licensed, trade-secret and proprietary and may not be used,
disclosed or reproduced without permission of the licensing authorities, WSIPC and/or Skyward, Inc. As
a condition of use, the User agrees to protect and keep the information from disclosure or falling into
the public domain. The failure to comply with this agreement may result in the immediate termination
of the User’s right to access the information.
COPYRIGHT
© Copyright 2017 WSIPC. All rights reserved.
Reproduction of any part of this manual in any medium without the express and written permission of
WSIPC is prohibited by law.
This edition is printed in the United States of America. The contents may be corrected or modified by
revisions without prior notice. Pages may be added, deleted, or changed as required.
The WSIPC logo is a registered trademark of WSIPC.
Skyward® is the registered trademark for Skyward, Inc. located in Stevens Point, Wisconsin.
WSIPC
2121 West Casino Road
Everett, WA 98204
425.349.6600
www.wsipc.org