Woodturner Meetings...
28
page one March 2018 Woodturner Meetings... Sarasota Woodturners monthly meeting and woodturning demonstrations feature well-known local and national woodturners. Meetings and demonstrations are held at Advantage Lumber Company’s Sarasota facility Hardwood Showroom on the 3rd Wednesday of each month from 6:00 p.m. to 9:00 p.m. The public is welcome. 7524 Commerce Place, Sarasota, FL 34243 Tuesday night sessions are at Franck Johannesen’s studio, 1051 Racimo Drive, Sarasota, FL 34240 beginning at 6:30 p.m. Racimo Drive is a left just a mile or two east of I75 traveling on Fruitville Rd. “We are dedicated to promoting the art of woodturning through educational demonstrations and hands-on training. We meet to share our techniques, meth- ods and skills. We provide assistance with tool and equipment recommendations.” A big thanks to everyone who came to our monthly meeting at Advantage Lumber on Feb 21st. Frank Didomizio gave a great demo, sharing with us some of the tech- niques he uses to create his award-winning embellished platters. For those who could not make the meeting, we are including a number of pictures taken that night and Frank’s handout (see pages 9-13). This month we will have Al Hockenbery, a fellow Floridian who has been a big presence in the world of turning for many years. Here is a link to some of his work (http://hocken- berywoodturning.com/gallery.pdfaa) and on page two you will find his bio and a link to a handout for his demo. He will be demon- strating how to set up, the word “balance” is not inappropriate, a piece of figured wood cut from the crotch of the tree, and turn it into a natural edge bowl. He has a YouTube video titled “Natural Edge Crotch Bowl” that is a good preview of what he will demonstrate for us. The board is very pleased with the turnout at recent meetings, most particularly, the increase in ‘show & tell’ items. As Franck has repeatedly reminded us, this part of the meeting represents the heart of what our club is about, and that is sharing our work and learning from discussion of it. We were pleased to see how many of the ‘show & tell’ items were destined to go to the Food Shelf fundraising effort. To date I have delivered close to 150 bowls to them! They are so appreciative! You will see several pictures in this newsletter of both students and instructors at our classes held the second Saturday of each month. The feedback from students has been extremely positive! We will keep it going as long as we have the interest. Vice President, Jim Weeks is our co-ordinatior, so speak to him if you would like to either attend or teach a session. Hope to see you at the meeting on March 21st at Advantage Lumber! Russ Fellows Volume 1 Issue 3
-
Upload
khangminh22 -
Category
Documents
-
view
0 -
download
0
Transcript of Woodturner Meetings...

page one
March 2018
Woodturner Meetings...Sarasota Woodturners monthly meeting and woodturning demonstrations feature well-known local and national woodturners. Meetings and demonstrations are held at Advantage Lumber Company’s Sarasota facility Hardwood Showroom on the 3rd Wednesday of each month from 6:00 p.m. to 9:00 p.m. The public is welcome. 7524 Commerce Place, Sarasota, FL 34243
Tuesday night sessions are at Franck Johannesen’s studio, 1051 Racimo Drive, Sarasota, FL 34240 beginning at 6:30 p.m. Racimo Drive is a left just a mile or two east of I75 traveling on Fruitville Rd.
“We are dedicated to promoting the art of woodturning through educational demonstrations and hands-on training. We meet to share our techniques, meth-ods and skills. We provide assistance with tool and equipment recommendations.”
A big thanks to everyone who came to our monthly meeting at Advantage Lumber on Feb 21st. Frank Didomizio gave a great demo, sharing with us some of the tech- niques he uses to create his award-winning embellished platters. For those who could not make the meeting, we are including a number of pictures taken that night and Frank’s handout (see pages 9-13).
This month we will have Al Hockenbery, a fellow Floridian who has been a big presence in the world of turning for many years. Here is a link to some of his work (http://hocken-berywoodturning.com/gallery.pdfaa) and on page two you will find his bio and a link to a handout for his demo. He will be demon-strating how to set up, the word “balance” is not inappropriate, a piece of figured wood cut from the crotch of the tree, and turn it into a natural edge bowl. He has a YouTube video titled “Natural Edge Crotch Bowl” that is a good preview of what he will demonstrate for us.
The board is very pleased with the turnout at recent meetings, most particularly, the increase in ‘show & tell’ items. As Franck has repeatedly reminded us, this part of the meeting represents the heart of what our club is about, and that is sharing our work and learning from discussion of it. We were pleased to see how many of the ‘show & tell’ items were destined to go to the Food Shelf fundraising effort. To date I have delivered close to 150 bowls to them! They are so appreciative!
You will see several pictures in this newsletter of both students and instructors at our classes held the second Saturday of each month. The feedback from students has been extremely positive! We will keep it going as long as we have the interest. Vice President, Jim Weeks is our co-ordinatior, so speak to him if you would like to either attend or teach a session.
Hope to see you at the meeting on March 21st at Advantage Lumber!
Russ Fellows
Volume 1 Issue 3

Al Hockenbery Demo “My turnings are inspired by work in mathematics, a love of nature, and fascination with early American cultures. I enjoy sharing my enthusiasm for turning through teaching and demonstrating for AAW chapters and at regional and national symposiums. My teaching experience includes John C Campbell, the AAW youth program, and running the woodturning program for Maryland Hall for the Creative Arts in Annapolis, MD. My Ball in a Ball presenta-tion may be seen on the 2010 AAW Symposium Techniques Vol. 1 DVD.
My work has appeared in numerous art shows, including six AAW shows. The Maryland Feder-ation of Art recognized my work with an invita-tional 6-week show in the Baltimore City Gallery.
The past few years I have been exploring ways to add sand carvings to my hollow forms and
Sarasota Woodturner’s Club Officers
President - Russ Fellowsemail: [email protected] Vice President - Jim Weeksemail: [email protected] Treasurer - Stephen Johnsemail: [email protected] Secretary - Dave Hausmannemail: [email protected] phone 703-608-4255
Director at Large - Franck Johannesenemail: [email protected] phone 941-323-4988
Upcoming Sarasota Woodturners Events and Demos
Al Hockenberry will demonstrate at Advantage Lumber in March 21, 2018 Intro to Bowl Turning Saturday AM Workshop April 14, 2018
Rudy Lopez will demonstrate at Advantage Lumber in April 18, 2018.
page two
Don’t forget our members only tool and supply auctions. See Tom Falcone for tickets.
Natural Edge Bowl from a Crotch Turning a natural edge bowl from a crotch produces a lovely bowl with an asymmetrical rim shape and flame grain pattern in the bot-tom. Learn how to cut a crotch with a chain saw, prepare the blank, mount the blank, and line up the three rim features in two steps. The techniques shown with the side ground gouge to turn smooth surfaces inside and out can be used on any facegrain turning. Additional details at: http://swat.hockenbery.net
bowls. This has been an exciting way for me to use my technical background to make the surface of a turning come alive with im-ages that mean something to me. I’ve been doubly rewarded with positive feedback and interest turners have shown in the process.”

page three
Russ Fellow holding a club member-turned wig stand. Directions for turning a wig stand are on pages 23 -27.
Sarasota Woodturners Club has three particu-lar areas of emphasis; education, camaraderie, and community service. We presently have thee ongoing service projects. The first is the Freedom Pens Project through which club members are asked to make pens with kits provided at no cost by the club. The pens are then distributed along with a note of apprecia-tion to worthy veterans. The second project is making wig stands in partnership with local chapters of The American Cancer Society. Patients with chemotherapy hair loss are given an attractive and fuctional stand to aid in the care of their wigs. The Empty Bowls program provides bowls turned by club members to assist in the fund raising efforts of local area charities serving the hungry. Our bowl dona-tions in 2017 generated approximately $5,600 in donations to this cause.
Each of these projects is supported with education and supplies through our club and, combined give great opportunities for club members to meet, learn, and enjoy one another.
Jim Weeks, Club Vice President
Sarasota Woodturners Club Projects
Freedom Pens made by Charles Bell.
Wood for bowls at Franck’s Studio.
page four
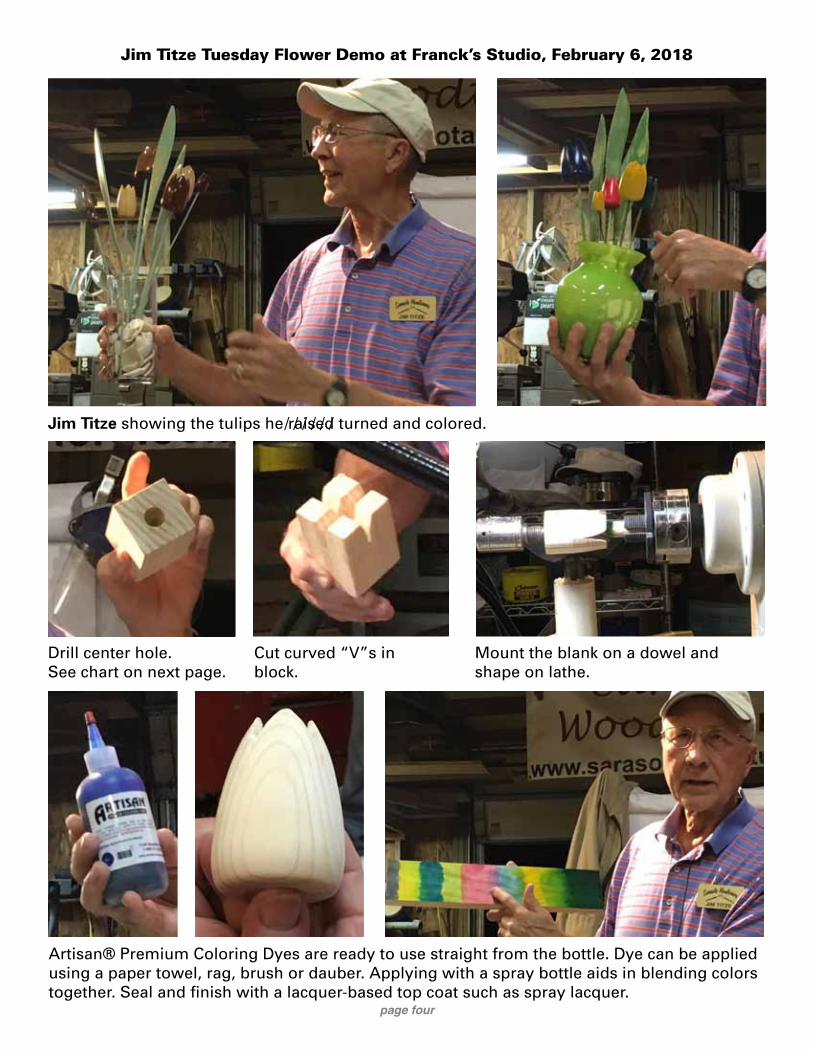
Jim Titze Tuesday Flower Demo at Franck’s Studio, February 6, 2018
Jim Titze showing the tulips he raised turned and colored. / / / / / /
Drill center hole. See chart on next page.
Cut curved “V”s in block.
Mount the blank on a dowel and shape on lathe.
Artisan® Premium Coloring Dyes are ready to use straight from the bottle. Dye can be applied using a paper towel, rag, brush or dauber. Applying with a spray bottle aids in blending colors together. Seal and finish with a lacquer-based top coat such as spray lacquer.

page five

page six

Sarasota Woodturner Members’ Show & Tell, February 6, 2018
Jim Weeks’ Spalted Maple bowl.
Chet Orzech‘s Natural Edge bowl.
Bill Clark‘s Maple Burl bowl.
Russ Fellows‘ Emerging Edge bowl with lid.
Al Conkle‘s China Berry bowl. Bill Clark‘s Pecan bowl.Norfolk Island Pine vessel.
page seven

Franck Johanessen on Lathe Maintenance, February 13, 2018
page eight
1200 grit sand paper removes dimple - pull paper under thumb.
Blaster from auto supply store.
Clean under side of end stock - oil with WD-40.
Polish with fine abrasive - run block of wood back and forth on bed.
Clean under side of tool rest - oil with WD-40.
Disassemble chuck and clean thoroughly.

Frank DiDomizio Platter Embellishing Demo at Advantage Lumber, February 21, 2018
Frank DiDimizio mounting and turning a platter.
Decorative platters by Frank DiDimizio.
Wire brush spinning opposite direction to the wood can create an interseting texture effect on the wood’s surface.
page nine
Various wood burning and engraving tools.
Various stains, dyes and coloring techniques.
DiDimizio demo photos by David Senecal.

page ten
Embellishing your Platter - Notes prepared by Frank DiDomizio
2018 Decoritive Platter Demo Notes - Frank DiDomizio Page 1 of 4
Turning Techniques
Suggested Turning Sequence for Platters
• The basic tools for platter turning are o ½” bowl gouge o Parting tool o Scraper or shear scraper ( skew)
• Drill a hole in the center on the face/front of the platter for mounting onto the screw chuck. For the oneway chuck they recommend a 3/8” hole, but I find this it too tight for most hardwoods. I typically will use a slightly larger drill bit at 13/32”.
• Set up the chuck and install the screw. The full depth of the screw is typically not needed for small or thin platters and I almost always use a spacer as shown in the image above.
• Mount the platter blank on to the screw chuck and use the tailstock to assure the wood is safely held until if it trued up
• True up the outside diameter of the blank with light cuts using the bowl gouge
• Mark the size of the tenon on the bottom of the platter. The tenon will be used to remount the platter into the chuck when doing the turning on the front face.
• Remove some of the wood which will be the bottom of the platter • Using a parting tool or gouge, cut the outside of the tenon 1/4" to
3/8” deep • If the platter blank if very thin a glue block can be used to serve as the
tenon. The glue block is then removed after the face of the platter is completed
• Shape the back of the platter with a gentle curve using the bowl gouge. I typically to this with a pull cut, but a traditional push cut can also be used, particularly if the pull cut is giving you tear out. Then using a skew, gouge or scraper gently shear scrape the back of the platter surface to a state of being ready for sanding.
• The objective is to finish the back of the platter surface completely with the bowl gouge. If there are some bumps or areas that need to be smoothed out, a shear scrape cut can be used with a skew, gouge on its side or a traditional scraper all of which are held at approximately a 45 degree angle

page eleven
Embellishing your Platter - Notes prepared by Frank DiDomizio
2018 Decoritive Platter Demo Notes - Frank DiDomizio Page 2 of 4
Turn the face of the platter • Once the back is completed it can be sanded at this point: however, I typically wait until the face of the
platter is complete and then sand both sides at that time. • Remove the finished back platter from the screw chuck (of faceplate if that has been used) • Mount the platter in the lathe scroll chuck clamping onto the tenon • Using a bowl gouge, gently face off and prepare the face of the platter, establishing how large of an outer
rim to leave. For decorative platters I often leave a large rim at 2/3 of the diameter for the rim and 1/3 for the inner bowl portion. I will normally use the “golden ratio” (1:1.618) to mark this out. As with the back of the platter, the front face can be cleaned up with gentle shear scraping to prepare it for sanding or embellishing.
• The steps from this point forward will depend on what is desired for the particular platter face in terms of decorative detail. If there is no embellishment to be added, then simply turn the inner bowl area and finish sand both sides.
• If the face of the platter is to be dyed or ebonized, I will typically either spray or brush adjacent surfaces with a sealer such as shellac
Finish the Platter • Remove the platter from the chuck and use the jumbo jaws to clean off the bottom of the bowl. Alternate
methods are available to finish the bottom such as vacuum chuck, mounting on a soft pad, etc. • Remove the platter from the chuck and ensure that the piece is dust free and the surface is clean to accept
the desired finish • Gently 'hand wipe' a finish on to all surfaces of the platter or spray with your favourite finish. For
embellished pieces I generally spray the platter with lacquer.
For turning the tenon off of large platters I have made up plywood extensions which allow the jumbo jaws to be extended to a larger diameter as shown in the image below.

page twelve
Embellishing your Platter - Notes prepared by Frank DiDomizio
2018 Decoritive Platter Demo Notes - Frank DiDomizio Page 3 of 4
Embellishing Techniques
The images below show some tools and techniques that I often use for embellishing my turnings. There are many other techniques which I may not have shown such as dying figured wood, bleaching selected areas, carving specific relief areas, etc. All of these can be used in various ways to embellish platters and other turned shapes.
A small skew can be used to create beads or grooves A V scraper can be used to create grooves A piece of arborite laminate can be used to create black burned lines when held in a groove while the lathe is spinning.
Black gesso can be applied to a surface and then carved through after it is dry. It is thick bodied and does not penetrate too deep. I often water down the gesso, adding 10 to 20% water to the mixture to make it flow a bit better India ink can be used to blacken or ebonize a surface. It penetrates a bit deeper than the gesso.
A wire brush spinning opposite to the direction of the wood can create an interesting texture effect on the surface of a platter. I often use this in specific areas. I primarily use this technique when the piece is on the lathe.
The sorby texturing tool can be used to create an grooved/carved effect by running it across the surface while the lathe is spinning.

page thirteen
Embellishing your Platter - Notes prepared by Frank DiDomizio
2018 Decoritive Platter Demo Notes - Frank DiDomizio Page 4 of 4
A wood burner can create interesting burned images or texture on the platter surfaces.
Rotary tools can be used to create textured surfaces. They can also be used to carve through a black gesso finish.
An engraving tool with a blunt end, hooked up to a variable speed device (used for routers) can be used to create surface texture similar to an orange peel effect.
An arbortech or other carving blade can be used to create a surface effect (with cuts/grooves) when used while the piece is spinning on the lathe.
A carver can be used to either create a carved texture or to carve through a surface with gesso on it.
Visit my website at www.frankdidomizio.com
Follow me on Facebook or Instragram under: Frank DiDomizio Woodturning
I offer one-on-one classes in my Studio at Selwyn, just outside of Peterborough or at the student’s home.

page fourteen
Bill Clark Tuesday Inlays Demo at Franck’s Studio, February 27, 2018
Hot glue gun beads along inner and outer edges of groove. Black inlace material, add white nuggets.
Turquoise inlay.
Bill’s Tips:Use leftover coffee grounds with CA glue to fill holes;Get brass filings from key shops;Clean out crevices with dremel tool;When using copper powder, build up slowly with multiple layers of CA glue and copper powder;Super glue from Harbor Freight;Corn starch thickens epoxy;Add black alcohol dye in CA glue bottle.
Metal Powders USA, an internet source for high quality atomized metal powders.
Clear Polyester Casting Resin bowl.

page fifteen
Black inlays and CA glue.
Clear Polyester Casting Resin is a polyester resin noted for its clarity. In its liquid form, it has a consistency of corn syrup and a slight color ranging from straw to light aqua. During the hardening process the slight color bleaches out and the resin becomes crystal clear.
Each InLace Kit conains a can of Inlace resin. Each kit also contains a bottle of hardener. When the resin is ready to be inlaid, either as is or further blended with InLace additives, the hardener is added to the mixture. Each kit also includes several measuring cups and stirrers, as well as general directions for use.
Copper and black inlays with CA glue.

TIPS FOR INLAYS
Avoid stones and minerals in the 1-3 and the 8-10 range on the Moh’s hardness scale.On the Moh’s hardness scale – talc (chalk) has a hardness of 1 and diamond has a hardness of 10. Most woodturners avoid stones in the 1-3 range (such as soapstone) because they do not provide enough durability. On the other hand, stones and minerals above 7 are difficult to turn and sand. Since aluminum oxide found in certain types of sandpaper has a hardness of 9, most turners avoid any stones in the 8-10 hardness range – because they would be almost impossible to sand. Crushed stones like turquoise with a hardness between 5 and 6 make a great choice for inlays.
Experiment with different stones and stone colors.Try using both manmade and natural stones. Some commonly used stones include the following. Malachite typically has a vibrant green color. Magnesite typically looks like unglazed porcelain (i.e., white – with a dull luster). Pipestone typically varies from a light pink to a deep red. Turquoise typically has a greenish-blue or sky-blue color.
Consider using inlay materials to fill a variety of recesses.Recesses which can be filled with an inlay material can include groves and rings created on the lathe, natural cracks and voids in the wood, freehand and predesigned patterns cut using carving tools.
Experiment with a variety of materials for inlays.Today there is wide selection of materials for inlays including soft metals (e.g., aluminum, brass, and copper powders), coffee grinds, crushed stone, and crushed stone powder. Turners are also using dyed sawdust, specialized nuggets and powders, and even glow in the dark inlays.
Use a clear or transparent binder when working with inlays.The goal is to find an adhesive, which is clear or transparent. This allows the color and texture of the inlay material to shine through. Once cured, both CA glue and epoxy are virtually crystal clear making them excellent adhesives for inlays. Avoid construction adhesives and most wood glues. Construction adhesives are “tan” when dried, and most yellow wood glues are “yellow” when dried – making them poor choices for inlays since they reduce the visibility of the inlay material.
Insert the stone inlay first when using CA glue.When using CA glue as the binder, first insert the stones and then apply the CA glue over the top. This is because CA glue polymerizes or hardens when it contacts dust, moisture, or other materials. If mixed with the stone inlay first, it could quickly become a lump of hardened glue, which would be difficult to spread smoothly in a recess.
Use “thin” CA glue when applying over a crushed stone powder inlay.The thin CA glue will flow through the material, being absorbed, then wick to the bottom of the recess or crack – securely holding the inlay in place.
Consider applying wax or sanding sealer to the surrounding areas.When using CA glue as the binder for a stone inlay, consider applying wax or sanding sealer to the surrounding areas. The wax or sanding sealer will keep the CA adhesive from staining the surround-ing wood as the stone is build up in the recess or crack. Sealing off the surrounding area also results in having to spend less time remove glue and excess inlay from the wood.
First mix the inlay with the resin.When using an epoxy to bind an inlay material first mix the mixed the inlay material and the resin and then add the hardener. By first mixing the inlay and resin together, you are not shortening your working time. Furthermore, using this approach you are more likely to get everything thoroughly mixed.
Understand the difference between “working time” and “cure time.”The term “5-minute epoxy” means it has a working time of 5 minutes. This is the time you have before the adhesive starts setting. Do not confuse this time with cure time. Depending upon the brand, the cure time for “5-minute epoxy” will vary from 1 hour to 24 hours. See Tips on Glue and Adhesives for more information on epoxy and other types of glues.
Suncatcherstudio.compage sixteen

page seventeen
Sarasota Woodturner Members’ Show & Tell, February 27, 2018
William Huff’s Cherry bowl.
Bill Clark’s Rosewood candle stick with rings.
Pete Jordan’s glossy bowl.
William Huff’s Maple Burl bowl.
Bill Foreman’s platter.

page eighteen
Bill Dooley’s Norfolk Island Pine bowl, 2 coats 3408 and 3 coats Minwax while on lathe.
Russ Fellow’s Textured bowl, sand blasted, bleached (50/50) in bowl overnight, wire brushed to give it texture.
Charley Bell’s China Berry “St. Pattys” bowl.
Russ Fellow’s Red Bay Wood from Selby Gardens given to Russ by Chet Orzech.

Sun-N-Fun Shop Woodworking Shop Tour with Bill Clark, March, 2018
page nineteen

page twenty

Intro to Bowl Turning Saturday AM Workshop March 10, 2018
page twenty one
Tom Falcone instructing Jim Coates.
Steve Johns instructing Tim Flow.

page twenty two
Russ Fellows instructing John Fallon.
Franck Johanessen instructing Mike Stahl.

TURNING A WIG STAND
A turned wooden stand is an attractive replacement for
the ugly, one time use polystyrene stand normally given
to chemotherapy patients to hold the wigs they wear
when their treatment causes total hair loss.
All of the turned wig stands made and donated via the
WGO will be given to patients at various cancer
treatment centres.
I would like to challenge each WGO member to make at
least one of these stands that we can then donate to local
cancer treatment centres.
So. . . read on to find out how easy it is to make one –
how about two or three! Even an inexperienced turner can
make two of these in one day. It's a great way to use up
those 'too small' bowl blanks sitting on your shelf.
If you have spare blanks or wood, give them to other
members who can convert them into wig stands.
This project was suggested by Max Blum, who has
already been making stands. Other turning groups have
previously taken on this project. See the success by other
woodturning groups at the following links:
Golden Horseshoe Woodturning Guild:
http://ghwg.ca/techniques/Wig_Stand_plans.pdf
The GHWG followed a project begun by the South
Auckland Woodturners Guild, their plans can be found at:
http://www.sawg.org.nz/wordpress/wp-
content/uploads/2011/09/Wig-Stand.pdf
A word of caution, the South Auckland project list, has
enough to keep you busy for years!
Raw materials list: See photo below for examples.
Top and base:
2 pieces: 6" x 6" x 2.5" (155mm x 155mm x 65mm)
Dry bowl blanks as shown in fig. 1. or squared timber
Note: If using thinner pieces, ensure that mortises made
in steps 4 and 11 do not pierce through top or base.
Pillar:
1 piece: 1.5" x 1.5" x 9.5" (40mm x 40mm x 240mm)
STEP 1; mounting top blank
Mount blank for the wig stand head between centres.
Ensure that blank turns true, this will help to conserve
wood and make it easier to turn the shape.
To simplify turning, corners may be cut off or blanks may
be bandsawn round before mounting on lathe.
STEP 2; turning top outside shape
Turn the outside shape of the wig stand head.
Include a tenon for your chuck. For safety, the tenon
should be at least 1.5” (38mm).
Shape as shown with a hemispherical top, almost straight
sides. If using thinner stock, resist the temptation to turn a
'flat' top, this will result in wigs not fitting properly when
stored and may affect their shape.
Turn the outer diameter to 5 3/4" (145mm).
page twenty three

STEP 3; drilling hole for shaft tenon
Mount the top in a chuck, using the tenon made.
Turn the face flat across, don't forget to slightly round the
outside corner for safety (sharp corners can cut your
fingers).
Drill a 1" (25mm) hole, 3/4" (19mm) deep in the centre.
This will be used to mount the shaft later. Easiest method
is to use a drill chuck with a forstner bit mounted in the
tailstock.
This hole can be later used to hold the piece in a chuck
with 1" (25mm) jaws. If you do not have such chuck
jaws, you can make a jam chuck for the 1" (25mm) hole.
STEP 4; tuning inside of top
Hollow out the inside of the top as shown, leaving
enough wood around the hole for strength. This
hollowing reduces the weight of the top for stability of
the finished stand and helps to prevent cracking.
Finish sand the underside of the top. A scratch free
220grit finish is suitable. Do not sand inside the hole.
STEP 5; reverse chucking top
Turn the top around and mount in a chuck with 1"
(25mm) jaws, or jam chuck.
STEP 6; finish turning of top
Remove tenon and complete shaping of top. The top
should have a slight domed curve shape as shown in the
photo.
Finish sand the surface. A scratch free 220grit finish is
suitable.
Note:
Ensure that the 'corner' where the top shape meets the
underside does not have a 'sharp' edge.
You have now completed the top of your wig stand, ready
for assembly and finishing.
page twenty four

STEP 7; mounting & initial turning of bottom
fig. 5. Mount the blank for the base, between centres as
shown in step 1 for the top.
Turn the preliminary shape of the base, include a tenon
for your chuck.
For safety, the tenon should be at least 1.5” (38mm).
Suggestions:
Make the tenon large enough to include it in the final
shape of the base.
Include a 'dip' in the outer part of the base's top that can
be used to store jewelry such as earrings etc. It's not
necessary to complete the shaping at this point, final
shape can be done
STEP 8; bottom, initial turning
Mount the base in a chuck using the tenon just turned.
Turn the bottom of the base flat and make a recess suitable for
your 2" (50mm) chuck jaws.
STEP 9; bottom, reverse chucking
Turn the base around and mount with expanding chuck
jaws inserted into the recess formed in step 8.
STEP 10; bottom, completion of topside
Turn the face flat. Note that the tenon used to mount the base in
step 8 may be used as part of the finished piece.
Using a forstner bit, drill a 1" (25mm) diameter hole, 3/4"
(19mm) deep.
Finish turning the base upper side. Ensure that there is enough
material left around the hole to cover the shoulder of the shaft
tenon and to provide strength around the completed stand.
Use your creativity to shape this surface, but do leave enough
material around the hole to match the shaft design.
Finish sand this surface, a scratch free 220grit finish is suitable.
Do not sand inside the hole.
page twenty five

STEP 11; bottom, completion of base side
fig. 12. Turn the base around and mount in chuck with 1"
(25mm) jaws, or jam chuck. Finish turn the bottom with a
slight depression which will ensure that the finished stand
will be stable. The mounting recess may be removed at
this time, or it can be included as part of the design.
Decorate the bottom, if desired.
Finish sand this surface, a scratch free 220grit finish is
suitable.
STEP 12; shaft design considerations
Before mounting the shaft for turning, cut it to final
length. The marks left by your drive and tailstock centres
will not be visible when the stand is assembled so they do
not need to be removed.
Final length of the shaft should result in a stand that is
11" – 12" (280mm – 300mm) tall.
If the top is 2" 'tall' and the base is 2" 'tall', the total
shaft length needs to be between 7" and 8"
– BUT – the tenons will 'disappear' into the top and
base, so the actual shaft length would then be between
8.5" and 9.5".
The design of the shaft should include some thought
regarding how the wig stand will be picked up. The shape
shown in this example allows one hand to pick up the wig
stand without slipping up against the top.
Note that the shape also has shoulders on the tenons so
that the glue line disappears when assembled.
These shoulders are also slightly concave, to have the
shaft fit tight against the base and top when assembled.
STEP 13; turning shaft
Turn the shaft round and add pencil marks at the
transition points for your design.
Mark off about 1/16" (1.5mm) to 1/8” (3mm) less than
3/4" (19mm) from each end for the tenons.
Remember they will be fitted into 3/4" (19mm) deep
holes, so you should leave a little space for glue to
prevent it from squeezing out past the shoulder.
fig. 14. Turn tenons at each end of the shaft. The
shoulders should be very slightly angled so that there will
be no gaps when
the stand is assembled. Remove the shaft and test fit
before proceeding. The tenons should slip fit into the
holes in the top and base, not tight and not sloppy.
As the tenons are made slightly shorter than the holes, the
shoulders will rest flat against the base and top faces.
STEP 14; shaft, final sanding
Finish turn the shaft according to your design.
Finish sand, but leave the tenon shoulder corners crisp so
that the joint will 'disappear' after glueing.
Sanding to a scratch free 220grit finish is suitable.
Do not sand the tenons as this will affect fitting.
page twenty six

STEP 15; final assembly
Glue the shaft to the base and top. Apply glue only to the
sides of the holes, this will help prevent glue from
squeezing out beyond the shoulder.
You could take a page out of the GHWG project and add
screws and threaded inserts so that the unit may be
disassembled, but this is not necessary.
Tenons and holes may also be directly threaded
1” x 8 tpi screw thread is recommended. If your lathe
headstock is the same thread, you can then use the tap/die
for making adapters etc.
To adapt dimensions for tapping/threading:
Drill 0.875” (22mm) holes in top and base
Shaft tenons to be 1.25” (32mm).
Finishing recommendations
The simplest finish would be a coat of polymerized
Linseed or Tung oil, easily kept clean, simple to
repair and, once fully cured (7 – 10 days) will not
contaminate wigs. This type of oil finish is also not
affected by compounds used in the making or care of
wigs.
A hard varnish (esp. Urethane) finish will work quite
well, although it is more difficult to apply. Varnish, when
cured must be waterproof.
NOTES:
- Do not use non curing oil finishes
e.g. Mineral or Walnut oil.
- Pure Tung oil is not recommended as it takes far too
long to fully cure and may leave unwanted aroma
on wigs placed on the stand.
- Shellac finishes could be damaged by compounds used
in the making or care of wigs. Shellac is also not
totally waterproof, a washed wigs hung to dry will
eventually destroy the finish.
- Wax finishes could contaminate the wig.
- No finish, while acceptable, would be difficult to clean.
page twenty seven

Woodturning Tips, Techniques, Ideas & Information
This newsletter was designed and produced by club secretary David Hausmann. Articles, digital photos and information that you would like to share with Sarasota Woodturner members are welcome. Please contact me at [email protected].
page twenty eight
Sarasota Woodturners’ Library
The board has asked Allen Coppes to pur-sue his interest in the holdings that Sarasota Woodturners has regarding DVDs and other instructional materials provided by previ-ous demonstrators or club members. Chet Orzech has been working on making copies of other instructional materials to add to a club library.
Tom Falcone will work with Allen with a goal of establishing what the club has and how it can be made available to the mem-bership.
Three new members Steve Blilzstein (pictured above) from Wayne, NJ now living full time in Venice, FL and Sheldon Crocker and Ken Reile (not shown).
Take a break from woodturrning and check out Wesley Neal Rasco’s Sculptures in glass. www.wnrglass.com
The always alert chief of our videography department, Joe Channey.