
Weatherfold 4s 50 & 100 - Allegion NZ
10
1 B WS 1 - 50 S H PB Finish: PB (Physical Vapour Deposition Brass), SS (Satin Stainless), PS (Polished Stainless) Hinge Type: See section Hinge Installation (page 5) Bearing Type: S (Stainless Steel Bearing), C (Chrome Steel Bearing) Load Capacity: 50kg (110lbs) and 100kg (220lbs) panels Set No.: 1(Pivot Set), 2 (End Hanger t), 4 (Intermediate Hanger t), 5 (Hinge t), 6 (Offset Hinge t), 7 (Offset Hinge Handle t), 8 (Meeting Rebate Door t) Se Se 3 (Hinge Handle Set), Se Se Se Se Brio Weatherfold 4s Codes Sets all sets shown with hinge type H except BWS8. BWS8 sets available in 100. No finishes shown. BWS1-100H BWS2-50SH BWS2-50CH BWS2-100SH BWS2-100CH BWS4-100SH BWS4-100CH BWS4-50SH BWS4-50CH BW3-100H BWS8-50S BWS8-50C BW5-100H BW6-100H BW7-100H Weatherfold 4s 50 & 100 INSTBWS1 REV O - MAR 2017 Brio Australia P: +61 2 87186718 W: E: [email protected] brio.com.au Brio UK P: +44 191 2291224 W: E: briouk.com [email protected] Brio USA P: +1 585 3195599 W: E: briousa.com [email protected]
-
Upload
khangminh22 -
Category
Documents
-
view
7 -
download
0
Transcript of Weatherfold 4s 50 & 100 - Allegion NZ

1
B WS 1 - 50 S H PB Finish: PB (Physical Vapour Deposition Brass), SS (Satin Stainless),PS (Polished Stainless)
Hinge Type: See section Hinge Installation (page 5)Bearing Type: S (Stainless Steel Bearing), C (Chrome Steel Bearing)Load Capacity: 50kg (110lbs) and 100kg (220lbs) panelsSet No.: 1(Pivot Set), 2 (End Hanger t), 4 (Intermediate Hanger t),
5 (Hinge t), 6 (Offset Hinge t),7 (Offset Hinge Handle t), 8 (Meeting Rebate Door t)
Se Se3 (Hinge Handle Set), Se Se
Se SeBrio Weatherfold 4s
Codes
Sets all sets shown with hinge type H except BWS8. BWS8 sets available in 100. No finishes shown.
BWS1-100H BWS2-50SHBWS2-50CH
BWS2-100SHBWS2-100CH
BWS4-100SHBWS4-100CH
BWS4-50SHBWS4-50CH
BW3-100H
BWS8-50SBWS8-50C
BW5-100H BW6-100H BW7-100H
Weatherfold 4s 50 & 100INSTBWS1 REV O - MAR 2017
Brio AustraliaP: +61 2 87186718W:E: [email protected]
brio.com.au
Brio UKP: +44 191 2291224W:E:
Brio USAP: +1 585 3195599W:E:

2
Door Hardware Set Orientation FB = Flush Bolt, FP = Flush Pull, LK = Lock, left systems shown
INWARD OPENING
OUTWARD OPENING
or 8 or 8
or 8 or 8

3
Opening Preparation outward opening system shown, dimensions shown in mm[inches]
Track Preparation width)track and chanel cut to length ‘W’ (finished opening
Install Track & Channel
19[0.75]
HEADBOARD
180/250TRACK
94PCHANNEL
Insert Polypile Fix track with 10G screws. After initial 6 fixings, fix screws at 400[15.75]intervals. Secure polypropylene channel with adhesive.
[15.75]
400
JA
MB
PS13BPOLYPILE
180 Track for 50kg(110lbs)250 Track for 75kg(165lbs) & 100kg(220lbs)
HEADBOARD
LIN
TEL
PA
CK
ING
BA
TTEN
FA
SC
IA
47[1.85]
43[1.69]
180 TRACK
PB180
W
JA
MB
REB
ATE
H
W
HEADBOARD
JA
MB
LEVEL +3[0.12] MAX- 0[0.00] MIN
±3
MA
X[0
.12]
±3
MA
X[0
.12]
W = FINISHED OPENING WIDTHH = FINISHED OPENING HEIGHT
PT = PANEL THICKNESSPB = PACKING BATTEN THICKNESS
180
250
PB = PT - 9.5[0.37]PB = PT - 11.0[0.43]
250 TRACKHEADBOARD
LIN
TEL
PA
CK
ING
BA
TTEN
FA
SC
IA
19[0.75]
H
OPENING IN BRICKWORK
INSIDE OUTSIDE
50[1.97]
48[1.89]
PB250
21[0.83]
20[0.79]
23[0.91]
X
X = 20[0.79]
X X
[3.94]
100
[3.94]
100
[3.94]
100
[15.75]
400
OUTSIDEINSIDE
Install polypile on inside of system
If installing 94PA, recess into sill 23[0.91] deep by 25[0.95] wide thencountersink and screw fix at 400[15.75] intervals. Install 94P last.
PIVOTEND
X
23[0.91]
SILLREBATE
OPTION A - Allows access to hangers through notch in track OPTION B - Allows access tohangers by removing track section
Use cover as a jig and align to
edge of the track to drill
2 x Ø5.0[0.2] holes
COVER
ALIGN
40[1.58]
40[1.58]56[2.21]
42[1.65]
27.6[1.09]
9.7[0.38] 2 x Ø5[0.2]
CUT TRACK56[2.21]

4
Panel Size Calculation free leaf width calculator available from Brio (includes BOM & pricing)
Seal Preparation left, outward opening system shown
Meeting Door Selection
W
PWPW
N = No. of PanelsPW = Panel WidthJC = Jamb Clearance = 6[0.24]PC = Panel Clearance = 4[0.16]
Brio Weatherfold 4s allows for equal size panels
JC
PC
PWPW
PW = W-[PC(N-1) + 2(JC)]N
Panel - AQ63
D
CB
D = 7.5[0.30]
PIVOT PANEL
INSIDE
OUTSIDE
D
CB
2 Meeting square doors
SWING DOOR
SET2-T
SWING DOOR
SET2-M SET2-M SET2-M
6[0.24]
6[0.24]
11[0.43] 11[0.43] 11[0.43]
11[0.43]6[0.24]
2 Meeting rebate doors
PH = H - 61[2.40]P
180 TRACK
H = H - 66[2.60]250 TRACK
H
PH
PH = Panel Height
45[2.95]50[1.97]
7[0.28]
9[0.35]
SET2-T
11[0.43]
SET2-T
11[0.43]
6[0.24]
SWING DOOR
SET2-H
6[0.24]11[0.43]
SET8
SET2-R
SWING DOOR
6[0.24]18[0.71]
18[0.71]
10[0.39]
6[0.24]18[0.71]
HALF PT
For more rebate detail contact Brio
SET2-H
11[0.43]
SET2-H
11[0.43]
12[0.48]
Add 7[0.28] towidth of eachleaf to create
rebate
A
CB
Frame - AQ21 perimeter seals to butt against each other in all corners
A = 12[0.47]B = 6[0.24]C = 2.7[0.11]
A
Lintel and sill rebate to be notched as shown
A
B
C
REB
ATE
NOTCH
REB
ATE
SILL REBATE
SILL REBATE

5
Hinge Installation pilot hole of Ø2.5mm[0.12"] recommended
Face Fix F
Drill holes 5[0.20]Ø
Non-mortice H35[1.38]-68[2.68] Panel Thickness
Mortice Radius Corner T44[1.73]-68[2.68] Panel Thickness
Mortice Square Corner M35[1.38]-68[2.68] Panel Thickness
X=20[0.79] on Set 4X=60[2.36] min on ts 3, 5, 6 & 7SeDrilling jig available for H Sets
X=20[0.79] on Set 4X=60[2.36] min on Sets 3, 5, 6 & 7
X=20[0.79] on Set 4X=60[2.36] min on Sets 3, 5, 6 & 7
10.3[0.41]
6[0.24]
12[0.47]
64[2.52]
12[0.47]
19[0.75]
19[0.75]
31[1.22]
12.5[0.49]
25[0.98]
25[0.98]
25[0.98]
8.8[0.35]
11[0.43]
CLIP INSTALLEDINSIDE EXTRUSION
20[0.79]
38[1.50]
32[1.23]
32[1.23]
CLIP
3[0.12]
X20[0.79]
100[3.94]
31.7[1.25] R16[0.63]R16[0.63]
12.5[0.49]
25[0.98]
25[0.98]
25[0.98]
9.1[0.36] 16.6[0.65]
8.8[0.35]
10.3[0.41]
100[3.94]
25[0.98]
12.5[0.49]
25[0.98]
25[0.98]
25[0.98]
X20[0.79]
3[0.12]
X20[0.79]
ONOTHERPANEL R16[0.63]
Meeting Rebate Door Set 8
EQ EQ
3[0.12]
10[0.39]
108[0.43]
15[0.59]
20[0.79]
34[1.34]
34[1.34]
2[0.08]
20[0.79]
3.5[0.14]
10[0.39]
100[3.94]
10[0.39]
17.5[0.69]
37.5[1.48]
37.5[1.48] 8.5[0.34]
12.5[0.49]
R16[0.63]
EQ EQ
20[0.79]
Rebate R
EQ EQ
3.5[0.14]
10[0.39]
100[3.94]
10[0.39]
17.5[0.69]
37.5[1.48]
37.5[1.48] 8.5[0.34]
12.5[0.49]
R16[0.63]
20[0.79]

6
FLUSH BOLT X456R 190[7.48]456RL 450[17.72]
456RLX-600 600[23.62]456RLX-1000 1000[39.37]
For square flush boltschisel out corners
60[2.36]
Counter borefor lockable
flush bolts
X
Install flush bolt to panel
Ø24[0.95]24[0.95]
41[1.61]
24[0.95]
2.5[0.10]11[0.43]
Flush bolt Position see page 2 for flush bolt location for all configurations, router available
Optional Security Aligner 199SS aligns panel to seal perimeter, secures against lifting
Optional Jamb Pivot BW189H_ non mortice type H shown but all hinge types available
Wind jamb pivot bolt in or out untilit aligns with hinge on panel aftertop and bottom pivot are set
Install flush bolt keeper to sill
FLUSH BOLTINSIDE
OUTSIDE
KEEPER
DUST BOX
Mark where flushbolt throw strikesand notch out
hollow for dust box
Extended keeper available
PIVOT PANEL
30[1.81]
8[0.32]
Installation
PIVOTPANEL
ENDPANEL
28[1.10]
Ø12[0.47]
11.5[0.45]
6[0.24]
JAMB
PIVOT PANEL
X = PT + 14[0.55]
JAMB MOUNT
PIVOTPANEL
Hinge assemblyaligned with other
centre hinges
6.5[0.26]
HINGE
PTX JAMB
PIVOT PANEL
6[0.24]
8[0.32]
REBATE
Adjustment
JAMB PIVOT BOLT
Adjustment
Wind nose of jamb mount awayfrom jamb until panel is pulled into seal perimeter when closed
JAMB MOUNTNOSE
Installation
PIVOTPANEL
ENDPANEL
Can be installed on either pivot or end panel, Minimum PT = 38[1.50]
65[2.56]
42[1.65]
29[1.14]
3[0.12]
6[0.24]
JAMB
PIVOT PANEL
JAMB MOUNTPIVOTPANELSOCKET
PT
X
X = ½(PT) + 6[0.24]
25[0.98]
28[1.10]
ROUTEDETAILEQ EQ
PT
PANELCENTRE
JAMB
PIVOT PANEL
REBATE 6[0.24]
PANEL FLUSH BOLT
PH 456R
456RL
456RLX-600
456RLX-1000
2200[86.6]
2200[86.6] PH 2440[96.1]
2440[96.1] PH 2740[107.9]
2740[107.9] PH 3300[129.9]
≤
≤ ≤
≤ ≤
≤ ≤
X

7
End Guide when viewed from outside doors folding left need a left end guide and vice versa for right
Bottom Pivot when viewed from outside doors folding left need a left pivot and vice versa for right
System Security type H hinge shown but security set/grub screw applicable in hinge types T and M too
Handing Bottom Pivot
For Right:Interchange pivot arm
Flip base over
Secure assembly by locking off cap screws
Handing End Guide
Back off cap screw and rotateguide arm into left or right position
LEFT RIGHT
Lock off anti-shake set/grub screw
Handing pivot set hinge
LEFT
RIGHT
ANTI-SHAKESET/GRUB
SCREW
Lock off anti-shake set/grub screw
Handing end set hinge
LEFTRIGHT
Determining System Orientation
For Right:Flip hinge
RIGHT
For Right:Flip hinge
INSIDE
OUTSIDE
Right, outward opening system
Left, outward opening system
INSIDE
OUTSIDE
Hanger security
HEX DRIVE
ANTI-SHAKESET/GRUB
SCREW
HIN
GE P
IN
HIN
GE
Anti-shake set/grub screw prevents pin being removed from hinge Lock off both set/grub screws
Guide security
ANTI-SHAKESET/GRUB
SCREW
ANTI-SHAKESET/GRUB
SCREW
SET/GRUBSCREW POSITION
ON END SET& PIVOT HINGES
ANTI-SHAKESET/GRUB
SCREW
Push in cap
LEFT
8
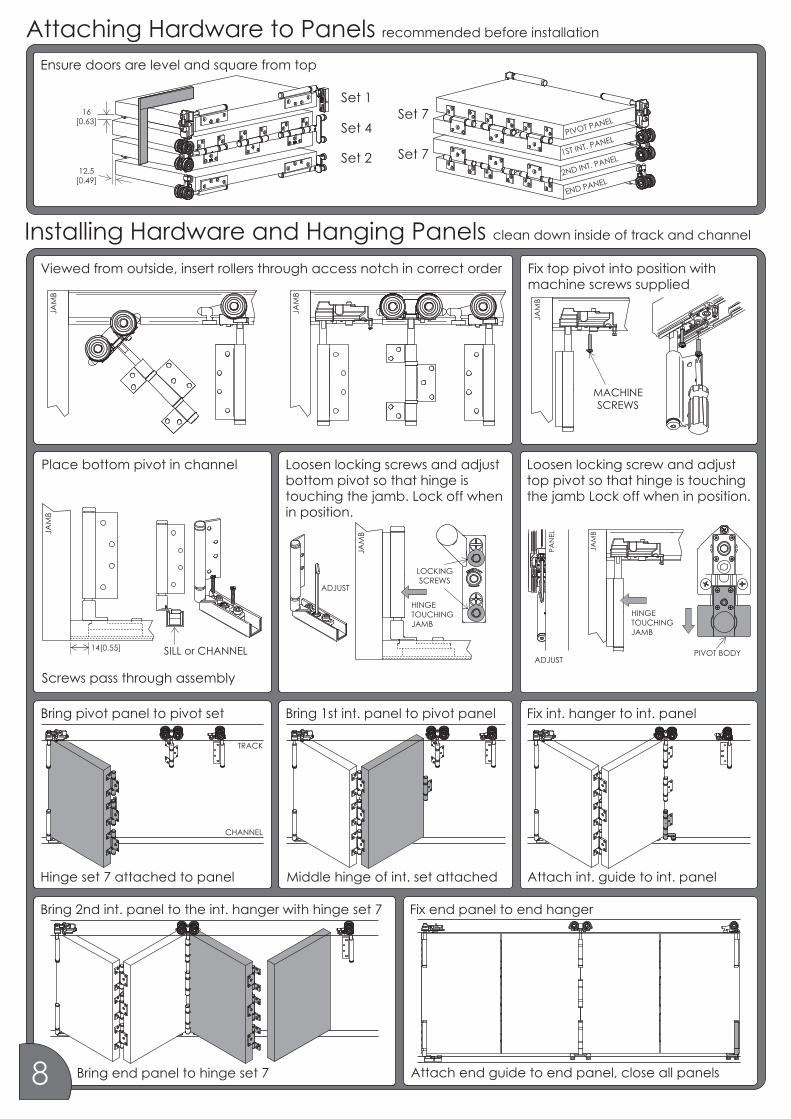
Attaching Hardware to Panels recommended before installation
Installing Hardware and Hanging Panels clean down inside of track and channel
16[0.63]
12.5[0.49]
Set 1
Set 4
Set 2
Set 7
Set 7
Ensure doors are level and square from top
Viewed from outside, insert rollers through access notch in correct order
JA
MB
Bring pivot panel to pivot set
PIVOT PANEL
END PANEL
1ST INT. PANEL
2ND INT. PANEL
Fix int. hanger to int. panel
Attach int. guide to int. panel
Bring 1st int. panel to pivot panel
Middle hinge of int. set attachedHinge set 7 attached to panel
TRACK
CHANNEL
Fix end panel to end hanger
Attach end guide to end panel, close all panelsBring end panel to hinge set 7
Bring 2nd int. panel to the int. hanger with hinge set 7
Fix top pivot into position withmachine screws supplied
Place bottom pivot in channel
Screws pass through assembly
Loosen locking screws and adjustbottom pivot so that hinge istouching the jamb. Lock off whenin position.
SILL or CHANNEL14[0.55]
JA
MB
LOCKINGSCREWS
JA
MB
Loosen locking screw and adjusttop pivot so that hinge is touchingthe jamb Lock off when in position.
ADJUST
HINGETOUCHINGJAMB
JA
MB
JA
MB
MACHINESCREWS
PIVOT BODY
JA
MB
HINGETOUCHINGJAMB
PA
NEL
ADJUST

9
Installation when using F hinge types or Set 8
Adjustment hinge pin locking mechanism applied to all hangers and top pivot
Hinges & pins remain on end panel
HANGERHINGE & PIN
GUIDEHINGE & PIN
Push fit plastic jig onto end hangerand insert into track
Bring end panel to system
Jig keeps hanger stable and static
180 T
RA
CK
250 T
RA
CK
Flip jigdependenton system
Align hanger pin with end hangerand rest panel on blocks in position
Depress button (see adjustmentbelow) engage bolt into hanger
O-RING
HINGEFIXED TOPANEL
HINGECOVER
SLIDES ON
HINGEPIN &
WASHERS
Remove jig from hanger
Attach guide to bottom hinge pin
CHANNELPANEL
TRACK
Close all panels
TRACK
PANEL
TRACK
PANEL
PANEL
To adjust height, depress buttonand wind bolt. Bolt locks offautomatically on flats.
depressbutton
Adjust all hangers and top pivotuntil panels are parallel with 7mmgap between the track
Open the panels and adjust thebottom pivot to the mark. Thentighten locking screws
CHANNEL
PANEL
PANELPANEL
JA
MB
ALIGN
TO
MARK
Now that the doors are in place,open doors and loosen lockingscrews.
Viewed frominside
CHANNEL JAMB
With the panels closed, loosen toppivot locking screw and adjust tocentralise door panels. Then lockoff top pivot and mark the positionof the bottom pivot
Close doors & fix cover into pivotto cover notch.
7[0.28]
= =
PA
NEL
JA
MB
JA
MB
Mark theposition of thebottom pivot
MARK
JA
MB TRACK
COVER
1.
2.
3.

Care and Maintenance
10
Hardware is subject to deterioration from everyday use and from the environment that it is in. In particular, it is importantthat routine maintenance be carried out in harsh coastal or marine environments and industrial applications.
Inspect all fixing bolts for tightness every six months, including those securing brackets. Tighten if necessary. Routinely checkfor wear and if excessively worn, the part should be replaced.
To help prevent surface corrosion, Brio recommends washing regularly; even stainless steel finishes in coastal environmentsmay show signs of surface corrosion If not washed regularly. Sheltered areas that are not rain washed are particularlysusceptible. Wash with soap or mild detergent and warm water followed by rinsing with clean cold water and wipe dry.
As a guide, if a window or door requires washing then wash the hardware, however recommend for marine andindustrial environments washing a minimum of every 3 months and 6 months for general environments. In coastal or marineenvironments recommends applying a light application of corrosion preventative such as CRC Marine 66 or Inox forMarine, to all surfaces and using a dry cloth to remove excess. When using lubricant or corrosion protection compounds,be careful to avoid the adjacent surfaces and always follow the manufacturer's instructions.
Keep track free from obstruction and excessive dirt or water. Visible surfaces should be cleaned using a damp cloth andmild detergent, then wiped dry.
Where fitting to the outside of the building, it is recommended that the appropriate track is specified.
All hangers are fitted with lubricated ball-bearings or plain bearings, requiring no greasing. If doors 'settle' and doorclearance is reduced causing friction, raise the door by the hanger adjustment nuts.
Wash as per the above recommendation and apply a light application of corrosion preventative to all surfaces, using a drycloth to remove excess.
Guide roller and guide channel must be kept clear and free of obstructions.
Wash as per the above recommendation and apply a light application of corrosion preventative to all surfaces, using a drycloth to remove excess.
All bottom rails should be free from obstruction and excessive dirt or water. Visible surfaces should be cleaned using adamp cloth and mild detergent, then wiped dry. All rollers are fitted with sealed precision bearings requiringno maintenance.
Visible surfaces should be cleaned using a damp cloth and mild detergent, then wiped dry. Apply a light application ofcorrosion preventative to all surfaces, using a dry cloth to remove excess. Repeat at intervals no greater than 3 months.
Visible surfaces should be cleaned using a damp cloth and mild detergent, then wiped dry. Apply a light application oflubricant to internal mechanisms and bolt using a suitable nozzle-spray.
General
Track
Hangers & Pivots
Guides
Rollers
Hinges
Flush Bolts
®
Brio
Brio
®
® ®
System Overview
TRACK
CHANNEL
INSIDE
OUTSIDE