![Python for Unix and Linux System Administration [Dr Lol]](https://static.fdokumen.com/doc/165x107/6333a597ce61be0ae50ec03a/python-for-unix-and-linux-system-administration-dr-lol.jpg)
VISUAL QUICKstart GUIDE unix and linux Fourth Edition
409
Transcript of VISUAL QUICKstart GUIDE unix and linux Fourth Edition


VISUAL QUICKStArt GUIDE
unix and linuxFourth Edition
Deborah S. ray and Eric J. ray
Peachpit Press

Visual QuickStart Guide Unix and Linux, Fourth EditionDeborah S. Ray and Eric J. Ray
Peachpit Press1249 Eighth StreetBerkeley, CA 94710510/524-2178510/524-2221 ( fax)
Find us on the Web at: www.peachpit.com To report errors, please send a note to: [email protected] Press is a division of Pearson Education.
Copyright © 2009 by Deborah Ray and Eric Ray
Editor: Rebecca GulickCopy Editor: Liz WelchProofreader: Elle Yoko Suzuki Production Coordinator: Myrna VladicCompositor: Debbie Roberti Technical Reviewer: Stephen TalleyIndexer: James MinkinCover design: Peachpit Press
Notice of rightsAll rights reserved. No part of this book may be reproduced or transmitted in any form by any means, electronic, mechanical, photocopying, recording, or otherwise, without the prior written permission of the publisher. For information on getting permission for reprints and excerpts, contact [email protected].
Notice of LiabilityThe information in this book is distributed on an “As Is” basis, without warranty. While every precaution has been taken in the preparation of the book, neither the authors nor Peachpit Press shall have any liability to any person or entity with respect to any loss or damage caused or alleged to be caused directly or indirectly by the instructions contained in this book or by the computer software and hardware products described in it.
trademarksVisual QuickStart Guide is a registered trademark of Peachpit Press, a division of Pearson Education. Other product names used in this book may be trademarks of their own respective owners. Images of Web sites in this book are copyrighted by the original holders and are used with their kind permission. This book is not officially endorsed by nor affiliated with any of the above companies.
Many of the designations used by manufacturers and sellers to distinguish their products are claimed as trademarks. Where those designations appear in this book, and Peachpit was aware of a trademark claim, the designations appear as requested by the owner of the trademark. All other product names and services identified throughout this book are used in editorial fashion only and for the benefit of such companies with no intention of infringement of the trademark. No such use, or the use of any trade name, is intended to convey endorsement or other affiliation with this book.
ISBN 13: 978-0-321-63678-2 ISBN 10: 0-321-63678-3
9 8 7 6 5 4 3 2 1
Printed and bound in the United States of America

DedicationTo each other, Ashleigh, and Alex.

AcknowledgmentsThis book came together with the invaluable assistance of a number of very talented and supportive people. Thanks to Clifford Colby for his continued confidence and support. Rebecca Gulick was a delight to work with and helped tremendously in pulling the various pieces together. Elle Yoko Suzuki was not only great as a proofreader, but pro-vided super technical feedback as well. Liz Welch was really helpful as copy editor. Myrna Vladic and Deb Roberti did a great job in production, even with our special needs. And, yet again, Steve Talley’s careful atten-tion to detail and deep knowledge of the idiosyncrasies of Unix helped iron out technical rough spots. Thanks, all!

v
Table of Co
nten
ts
Introduction xi
Chapter 1: Getting Started with Unix 1Accessing a Unix System . . . . . . . . . . . . . . . . . . . . . . . . . 3Connecting to the Unix System . . . . . . . . . . . . . . . . . . 7Logging In . . . . . . . . . . . . . . . . . . . . . . . . . . . . . . . . . . . . . . 10Changing Your Password with passwd . . . . . . . . . . . 11Listing Directories and Files with ls . . . . . . . . . . . . . 13Changing Directories with cd . . . . . . . . . . . . . . . . . . . 15Finding Yourself with pwd . . . . . . . . . . . . . . . . . . . . . . . 17Piping Input and Output . . . . . . . . . . . . . . . . . . . . . . . . 18Redirecting Output . . . . . . . . . . . . . . . . . . . . . . . . . . . . . 19Using Wildcards . . . . . . . . . . . . . . . . . . . . . . . . . . . . . . . . 21Viewing File Contents with more . . . . . . . . . . . . . . . . 22Displaying File Contents with cat . . . . . . . . . . . . . . . 23Exploring the System . . . . . . . . . . . . . . . . . . . . . . . . . . . 25Getting Help with man . . . . . . . . . . . . . . . . . . . . . . . . . . . 26Logging Out . . . . . . . . . . . . . . . . . . . . . . . . . . . . . . . . . . . . 28
Chapter 2: Using Directories and Files 29Creating Directories with mkdir . . . . . . . . . . . . . . . . . 30Creating Files with touch . . . . . . . . . . . . . . . . . . . . . . . 32Copying Directories and Files with cp . . . . . . . . . . . 34Listing Directories and Files with ls
(More Goodies) . . . . . . . . . . . . . . . . . . . . . . . . . . . . 36Moving Files with mv . . . . . . . . . . . . . . . . . . . . . . . . . . . . 38Removing Files with rm . . . . . . . . . . . . . . . . . . . . . . . . . 39Removing Directories with rmdir . . . . . . . . . . . . . . . 42Finding Forgotten Files with find . . . . . . . . . . . . . . . 44Locating Lost Files with locate . . . . . . . . . . . . . . . . . 46Linking with ln (Hard Links) . . . . . . . . . . . . . . . . . . . . 47Linking with ln -s (Soft Links) . . . . . . . . . . . . . . . . . 49
Table of Contents

vi
Table of Contents
Tabl
e o
f Co
nte
nts
Chapter 3: Working with Your Shell 51Discovering Which Shell You’re Using . . . . . . . . . . . 52Understanding Shells and Options . . . . . . . . . . . . . . 53Changing Your Shell with chsh . . . . . . . . . . . . . . . . . . 55Changing Your Shell Temporarily . . . . . . . . . . . . . . . . 57Using Completion in the bash Shell . . . . . . . . . . . . . 59Viewing Session History in the bash Shell . . . . . . . 60Using Completion in the zsh Shell . . . . . . . . . . . . . . . 62Viewing Session History in the zsh Shell . . . . . . . . . 63Changing Your Identity with su . . . . . . . . . . . . . . . . . 65Fixing Terminal Settings with stty . . . . . . . . . . . . . . 67Exiting the Shell . . . . . . . . . . . . . . . . . . . . . . . . . . . . . . . . 68
Chapter 4: Creating and Editing Files 69Choosing an Editor . . . . . . . . . . . . . . . . . . . . . . . . . . . . . 70Starting pico and Dabbling with It . . . . . . . . . . . . . . 73Saving in pico . . . . . . . . . . . . . . . . . . . . . . . . . . . . . . . . . . 74Cutting and Pasting Text Blocks in pico . . . . . . . . . 75Checking Spelling in pico . . . . . . . . . . . . . . . . . . . . . . . 76Getting Help in pico . . . . . . . . . . . . . . . . . . . . . . . . . . . . 77Exiting pico . . . . . . . . . . . . . . . . . . . . . . . . . . . . . . . . . . . . 78Starting vi and Dabbling with It . . . . . . . . . . . . . . . . . 79Saving in vi . . . . . . . . . . . . . . . . . . . . . . . . . . . . . . . . . . . . . 81Adding and Deleting Text in vi . . . . . . . . . . . . . . . . . . 82Importing Files into vi . . . . . . . . . . . . . . . . . . . . . . . . . . 83Searching and Replacing in vi . . . . . . . . . . . . . . . . . . . 84Exiting vi . . . . . . . . . . . . . . . . . . . . . . . . . . . . . . . . . . . . . . . 86Starting emacs and Dabbling with It . . . . . . . . . . . . . 87Using emacs Menus to Spell-Check . . . . . . . . . . . . . . 89Saving in emacs . . . . . . . . . . . . . . . . . . . . . . . . . . . . . . . . . 90Exiting emacs . . . . . . . . . . . . . . . . . . . . . . . . . . . . . . . . . . . 91
Chapter 5: Controlling Ownership and Permissions 93Understanding File Ownership
and Permissions . . . . . . . . . . . . . . . . . . . . . . . . . . . . 94Finding Out Who Owns What . . . . . . . . . . . . . . . . . . . 95Finding Out Which Group You’re In . . . . . . . . . . . . . 97Changing the Group Association of Files
and Directories with chgrp . . . . . . . . . . . . . . . . . 99Changing Ownership of Files and
Directories with chown . . . . . . . . . . . . . . . . . . . . 101Changing Permissions with chmod . . . . . . . . . . . . . . 103Translating Mnemonic Permissions
to Numeric Permissions . . . . . . . . . . . . . . . . . . . 106Changing Permission Defaults with umask . . . . . . 107

vii
Table of Co
nten
ts
Table of Contents
Chapter 6: Manipulating Files 109Counting Files and Their Contents with wc . . . . . 110Viewing File Beginnings with head . . . . . . . . . . . . . 111Viewing File Endings with tail . . . . . . . . . . . . . . . . 112Finding Text with grep . . . . . . . . . . . . . . . . . . . . . . . . . 113Using Regular Expressions with grep . . . . . . . . . . . 114Using Other Examples of
Regular Expressions . . . . . . . . . . . . . . . . . . . . . . . 116Making Global Changes with sed . . . . . . . . . . . . . . . 117Changing Files with awk . . . . . . . . . . . . . . . . . . . . . . . . 118Comparing Files with cmp . . . . . . . . . . . . . . . . . . . . . . 120Finding Differences in Files with diff . . . . . . . . . . 121Finding Differences in Files with sdiff . . . . . . . . . 122Sorting Files with sort . . . . . . . . . . . . . . . . . . . . . . . . . 123Eliminating Duplicates with uniq . . . . . . . . . . . . . . 125Redirecting to Multiple Locations with tee . . . . . 126Changing with tr . . . . . . . . . . . . . . . . . . . . . . . . . . . . . . 127Formatting with fmt . . . . . . . . . . . . . . . . . . . . . . . . . . . 129Splitting Files with split . . . . . . . . . . . . . . . . . . . . . . 131
Chapter 7: Getting Information About the System 133Getting System Information with uname . . . . . . . . 134Viewing File Systems with df . . . . . . . . . . . . . . . . . . . 135Determining Disk Usage with du . . . . . . . . . . . . . . . 138Finding Out File Types with file . . . . . . . . . . . . . . . 139Finding Out About Users with finger . . . . . . . . . . 140Learning Who Else Is Logged in with who . . . . . . . 143Learning Who Else Is Logged in with w . . . . . . . . . 144Getting Information About Your
Userid with id . . . . . . . . . . . . . . . . . . . . . . . . . . . . . 146
Chapter 8: Configuring Your Unix Environment 147Understanding Your Unix Environment . . . . . . . . 148Discovering Your Current Environment . . . . . . . . 150Adding or Changing Variables . . . . . . . . . . . . . . . . . . 152Looking at Your zsh Configuration Files . . . . . . . . 154Adding to Your zsh Path . . . . . . . . . . . . . . . . . . . . . . . 158Changing Your zsh Prompt . . . . . . . . . . . . . . . . . . . . 160Looking at Your bash Configuration Files . . . . . . . 163Adding to Your bash Path . . . . . . . . . . . . . . . . . . . . . . 166Changing Your bash Prompt . . . . . . . . . . . . . . . . . . . 168Setting Aliases with alias . . . . . . . . . . . . . . . . . . . . . 170

viii
Table of Contents
Tabl
e o
f Co
nte
nts
Chapter 9: running Scripts and Programs 173Running a Command . . . . . . . . . . . . . . . . . . . . . . . . . . 174Scheduling Onetime Jobs with at . . . . . . . . . . . . . . 175Scheduling Regularly Occurring
Jobs with cron . . . . . . . . . . . . . . . . . . . . . . . . . . . . 178Suspending Jobs . . . . . . . . . . . . . . . . . . . . . . . . . . . . . . . 180Checking Job Status with jobs . . . . . . . . . . . . . . . . . 181Running Jobs in the Background with bg . . . . . . . 182Running Jobs in the Foreground with fg . . . . . . . . 183Controlling Job Priority with nice . . . . . . . . . . . . . . 184Timing Jobs with time . . . . . . . . . . . . . . . . . . . . . . . . . 185Finding Out What Processes Are
Running with ps . . . . . . . . . . . . . . . . . . . . . . . . . . . 187Deleting Processes with kill . . . . . . . . . . . . . . . . . . 189
Chapter 10: Writing Basic Scripts 191Creating a Shell Script . . . . . . . . . . . . . . . . . . . . . . . . . 192Running a Shell Script . . . . . . . . . . . . . . . . . . . . . . . . . 194Making a Script Executable . . . . . . . . . . . . . . . . . . . . 195Getting a Head Start on Scripts
with history . . . . . . . . . . . . . . . . . . . . . . . . . . . . . . 197Embedding Commands . . . . . . . . . . . . . . . . . . . . . . . . 198Looping Your Scripts . . . . . . . . . . . . . . . . . . . . . . . . . . . 200Creating If-Then Statements . . . . . . . . . . . . . . . . . . . 202Accepting Command-Line Arguments
in Your Scripts . . . . . . . . . . . . . . . . . . . . . . . . . . . . 205Accepting Input While a Script Is Running . . . . . 206Debugging Scripts . . . . . . . . . . . . . . . . . . . . . . . . . . . . . 208
Chapter 11: Sending and reading E-mail 209Choosing an E-mail Program
and Getting Started . . . . . . . . . . . . . . . . . . . . . . . 210Reading E-mail with pine . . . . . . . . . . . . . . . . . . . . . . 212Sending E-mail with pine . . . . . . . . . . . . . . . . . . . . . . 214Customizing pine . . . . . . . . . . . . . . . . . . . . . . . . . . . . . 216Reading E-mail with mutt . . . . . . . . . . . . . . . . . . . . . . 218Sending E-mail with mutt . . . . . . . . . . . . . . . . . . . . . . 220Reading E-mail with mail . . . . . . . . . . . . . . . . . . . . . . 222Sending E-mail with mail . . . . . . . . . . . . . . . . . . . . . . 223Creating a Signature File . . . . . . . . . . . . . . . . . . . . . . . 225Automatically Forwarding
Incoming Messages . . . . . . . . . . . . . . . . . . . . . . . 227Announcing an Absence with vacation . . . . . . . . 228Configuring procmail . . . . . . . . . . . . . . . . . . . . . . . . . 230Managing E-mail with procmail . . . . . . . . . . . . . . . 232

ix
Table of Co
nten
ts
Table of Contents
Chapter 12: Accessing the Internet 235Getting Familiar with Unix Internet Lingo . . . . . . 236Logging in to Remote Systems with ssh . . . . . . . . 238Logging in to Remote Systems with telnet . . . . . 239Communicating with Others Using write . . . . . . 241Communicating with Others Using talk . . . . . . . 242Getting Files from the Internet with ftp . . . . . . . . 243Sharing Files on the Internet with ftp . . . . . . . . . . 247Surfing the Web with links . . . . . . . . . . . . . . . . . . . . 249Surfing the Web with lynx . . . . . . . . . . . . . . . . . . . . . 251Downloading Web Sites with wget . . . . . . . . . . . . . 253Checking Connections with ping . . . . . . . . . . . . . . 254Tracing Connections with traceroute . . . . . . . . . 255Matching Domain Names with IP Addresses . . . 257
Chapter 13: Working with Encoded and Compressed Files 259Encoding Files with uuencode . . . . . . . . . . . . . . . . . . 260Decoding Files with uudecode . . . . . . . . . . . . . . . . . . 263Archiving with tar . . . . . . . . . . . . . . . . . . . . . . . . . . . . . 264Unarchiving Files with tar . . . . . . . . . . . . . . . . . . . . . 266Compressing Files with compress . . . . . . . . . . . . . . 267Uncompressing Files with uncompress . . . . . . . . . 268Zipping a File or Directory with gzip . . . . . . . . . . . 269Unzipping a gzip File with gunzip . . . . . . . . . . . . . 270Zipping Files and Directories with zip . . . . . . . . . 271Unzipping Zipped Files with unzip . . . . . . . . . . . . . 272Combining Commands . . . . . . . . . . . . . . . . . . . . . . . . 273
Chapter 14: Using Handy Utilities 275Calendaring with cal . . . . . . . . . . . . . . . . . . . . . . . . . . 276Calculating with bc . . . . . . . . . . . . . . . . . . . . . . . . . . . . 279Evaluating Expressions with expr . . . . . . . . . . . . . . 280Converting with units . . . . . . . . . . . . . . . . . . . . . . . . . 281Looking It Up with look. . . . . . . . . . . . . . . . . . . . . . . . 282Keeping a Record of Your Session
with script . . . . . . . . . . . . . . . . . . . . . . . . . . . . . . . 283

x
Table of Contents
Tabl
e o
f Co
nte
nts
Chapter 15: Being root 287Acting Like root with sudo. . . . . . . . . . . . . . . . . . . . . 288Becoming root with su . . . . . . . . . . . . . . . . . . . . . . . . 290Starting, Stopping, and Restarting Daemons . . . . 292Changing the System Configuration . . . . . . . . . . . . 294Monitoring the System . . . . . . . . . . . . . . . . . . . . . . . . . 296Keeping up with watch . . . . . . . . . . . . . . . . . . . . . . . . . 299Checking Boot Messages with dmesg . . . . . . . . . . . 300Setting the Date and Time . . . . . . . . . . . . . . . . . . . . . 302
Chapter 16: Sensational Unix tricks 303Cleaning Up HTML Documents with tidy . . . . . 304Searching and Replacing Throughout
Multiple Documents with sed . . . . . . . . . . . . . 307Generating Reports with awk . . . . . . . . . . . . . . . . . . . 310Using Input to Customize
Your Environment . . . . . . . . . . . . . . . . . . . . . . . . . 311Using ROT13 Encoding with sed . . . . . . . . . . . . . . . 313Embedding ROT13 Encoding
in a Shell Script . . . . . . . . . . . . . . . . . . . . . . . . . . . . 315Making Backups with rsync . . . . . . . . . . . . . . . . . . . 318Using Advanced Redirection with stderr . . . . . . 320
Appendix A: Unix reference 323
Appendix B: What’s What and What’s Where 339
Appendix C: Commands and Flags 343
Index 377

Intro
ductio
n
xi
iGreetings, and welcome to Unix and Linux!
In this book, you’ll find the information you need to get started with the operating system, advance your skills, and make Linux or Unix do the hard work for you. This book focuses on the most common Unix and Linux commands, but it also gives you ideas for working smartly and efficiently.
For the purposes of this book, Unix and Linux are pretty much interchangeable—the com-mands and usages are the same. You may find small differences among Unix versions or between specific Unix or Linux versions, but they’ll be small indeed.
Introduction

Introduction
xii
Ho
w D
o Y
ou
Use
Th
is B
oo
k?
How Do You Use this Book?We designed this book to be used as both a tutorial and a reference. If you’re a Unix newbie, you should start at the beginning and work forward through the first several chapters. As you progress through the chap-ters, you’ll build on concepts and commands you learned in previous chapters. Then, as you become more proficient, you can start choosing topics, depending on what you want to do. Be sure to reference the table of contents, index, and the appendixes to find information at a glance.
The commands used throughout this book apply to any version of Unix (or Linux) you might be using, including OpenSolaris, BSD, Solaris through your local Internet service provider, Linux, AIX or HP-UX at work, your Mac OS X or Linux system at home, or any other flavor (that’s the technical term) you can find. Heck, you can even run Unix from your Windows system with Cygwin or VirtualBox. You’ll find more about flavors and getting access to Unix in Chapter 1.
Each chapter covers several topics, each of which is presented in its own section. Each section begins with a brief overview of the topic, often including examples or descrip-tions of how or when you’d use a command.
Next, you’ll find a step-by-step list (or a cou-ple of them) to show you how to complete a process. Note that the code you type appears as the numbered step, and a description fol-lows it, like this:
1. The code you type will appear like this in a blocky font.
An explanation will appear like this in a more regular font. Here, we often describe what you’re typing, give alternatives, or provide cross-references to related information.
If a line of code in a numbered step is particu-larly long, the code might wrap to a second line. Just type the characters shown, without pressing e until the end of the command. Also, in code listings throughout the book, a single line of code on screen might wrap to two lines in the book. If this happens, the continued line will start with a , so it might look like this:
The beginning of the code starts here but it continues on this line.
Sometimes you’ll have to press a special key or key combination—like cC, which means to hold down the c key and press C. We’ll use this special keyboard font for these keys, but not for multiple letters, or numbers, or symbols you might type.
Finally, most sections end with a couple of handy tips. Look here for ways to combine Unix commands, suggestions for using com-mands more efficiently, and ideas for finding out more information.
Bonus Chapter OnlineYou can download an additional chapter of this book, titled “Compiling and Installing Your Own Software,” for free from the pub-lisher’s Web site. Simply register for a free account at http://peachpit.com, and then, while signed in and at your Account page, register the book using its ISBN, 0321636783. After you register the book, a link to the addi-tional content will be listed on your Account page under Registered Products. You can also access the book’s Web page directly at www.peachpit.com/unixlinuxvqs.

Introduction
xiii
Ho
w D
o Yo
u U
se This B
oo
k?
Who Are You?We assume that you’ve picked up this book because you already have a need for or an interest in learning to use Unix, or any Unix-like operating system, like Linux, OpenSolaris, Mac OS X, BSD, HP -UX, AIX, Solaris, or others. We assume that
You want to know how to use Unix to do things at work, school, or home.
You may or may not already have experi-ence with Unix.
You don’t necessarily have other geeky—er, um, techie—computer skills or experience.
You want to learn to use Unix, but prob-ably do not want to delve into all of the arcane details about the Unix system.
In short, we assume you want to use Unix to achieve your computing goals. You want to know what you can do, get an idea of the potential that a command offers, and learn how to work smart. Very smart.
You can do all of these things using this book. Basically, all you need is access to a Unix account or system and a goal (or goals) that you want to achieve.
What Do You Need Computer-Wise?Computer-wise, you can learn or experi-ment with Unix using virtually any computer you might have available. If you’re using a Mac with OS X or later, you’re all set; it’s all Unix under the hood. If you have an extra computer sitting around, even something as old as a Pentium III, you can install several different flavors of Unix or Linux, including OpenSolaris, or Ubuntu, Redhat, or SuSE. Certainly you can install Unix on an extra hard drive (or empty space on your current hard drive) on your regular desktop com-puter, and generally without affecting your existing Windows configuration.
Alternatively, you can dabble in Unix less invasively by using an account on a system at work, or through an Internet service provider. Probably the easiest options, though, if you have a reasonably new computer and are concerned about not messing up what you have, are
Use Cygwin to run Unix as part of your Windows environment
Use VirtualBox or other similar programs to run Unix in a “virtual machine” as an application in your Windows environment
Use a bootable Unix (Linux or OpenSolaris) CD to experiment without having to install anything at all on your computer
What Do You Need to Know to Get Started?As you get started learning Unix, keep in mind the following Unix conventions for typing commands:
Unix terminology and commands are typically arcane, cryptic, and funny look-ing. For example, the command to list files or directories is just ls—short and cryptic. We’ll walk you through the com-mands one step at a time, so you know how to read them and apply them to your own uses. Just follow the steps in the order provided.
Unix is case sensitive, so type commands following the capitalization used in the book.
Whenever you type a command, you also have to press e. For example, if we say
1. funny-looking command goes hereyou’ll type the code, then press e, which sends the command along to the Unix system.

Introduction
xiv
Ho
w D
o Y
ou
Use
Th
is B
oo
k?
Often, we’ll tell you to press a combina-tion of keys on the keyboard, as in cV. Here, all you do is press the c key plus the (lowercase) V key, both at the same time (sequentially is fine also). Even though the keyboard uses capital letters (and, thus, the little key icons also do in this book), you would not take the extra step to capitalize the V (or whatever) in applying key combinations.
Some commands have flags associated with them (you might think of flags as options for the command) that give you additional control. For example, you might see the ls command used in variations like ls -la or ls -l -a. In either case, ls lists the files in a directory, the optional -l flag specifies that you want the long for-mat, and the optional -a flag specifies all files, including hidden ones (don’t worry, we’ll go over this again!). Just keep in mind that flags are essentially options you can use with a given command.
You can also put multiple commands on the same line. All you have to do is sepa-rate the commands with a semicolon (;), like this: ls ; pwd
which would list the files in the current directory (ls) and find out what directory you’re in (pwd)—all in one step!
So, with these things in mind, see you in Chapter 1!
Anything Else You Should Know?Yup! Please feel free to send us a message at [email protected]. We welcome your input, suggestions, and questions related to this book. Thanks, and we look forward to hearing from you!
Note to Mac Users
For simplicity, we consistently write e (not r), c (not C), a (not o), and we refer (not very often, though) to a Recycle Bin (not a Trash Can). No slight intended to those who do not use PCs or Windows—we just tried to keep the complexity of the instructions to a minimum.

1
Gettin
g Started w
ith U
nix
1To start you on your journey through Unix, we’ll take a quick look at a few basic concepts and commands. In this chapter, we’ll get you started with basic Unix skills, such as access-ing a Unix account, logging in, and listing and viewing files and directories, among other things. We’ll also show you how to explore Unix, see its capabilities, and discover just what you can do with it.
Getting Started with Unix
Chapter Contents
Accessing a Unix system
Connecting to the Unix system
Logging in
Changing your password
Listing directories and files
Changing directories
Finding out where you are in the directory tree
Piping input and output
Redirecting output
Using wildcards
Viewing file contents
Displaying file contents
Exploring the system
Getting help
Logging out

Chapter 1
2
Get
tin
g S
tart
ed w
ith
Un
ix
This chapter is essential for all Unix guru-wannabes. If you’re a Unix novice, you should start at the beginning of this chapter and work through each section in sequence. With these basic skills mastered, you can then skip through this book and learn new skills that look useful or interesting to you. If you’ve used Unix before, you might peruse this chapter to review the basics and dust off any cobwebs you might have.
The skills covered in this chapter apply to any version of Unix you might be using, includ-ing Linux, Solaris, or BSD through your local Internet service provider (ISP); Solaris, AIX, Linux or HP-UX at work; your Mac OS X or Linux system at home; CygWin or Unix through VMware or Unix from a bootable CD on your home system; or any other flavor (that’s the technical term) you can find. Keep in mind, though, that the exact output and prompts you see on the screen might differ slightly from what is illustrated in this book. The differences probably won’t affect the steps you’re completing, although you should be aware that differences could exist. (As much as possible, our examples will give you a sample of the diversity of Unix systems.)

Getting Started with Unix
3
Accessin
g a U
nix System
Accessing a Unix SystemUsing a Unix system is different from working on a PC. Using a PC, the computer’s hard drive is your personal space, and—generally—you don’t have access to what’s on someone else’s hard drive. With Unix, you have your own personal space that’s located within a much bigger system. You might think of Unix as an apartment building, with lots of individual apartment spaces, a central office, and perhaps other general spaces, like a mainte-nance office. With Unix, you have the entire system that houses dozens, hundreds, or even thousands of personal spaces as well as private spaces ( for, say, the system adminis-trator, bosses, or IT [Information Technology] department staff). You can access your apart-ment only, but the system administrator (or designated people with authorization) can access any apartment.
People choose to use Unix for a number of reasons:
Control: Unix offers users more control and customization on the legal and licensing side as well as the “getting stuff done” side.
Economy: Many flavors of Unix offer free or nearly free licensing.
Power: Experienced Unix geeks can do more with less effort on Unix than Windows—for many things, at least.
In the final analysis, though, most Unix people end up sticking with Unix because they tried it, slogged through the initial learn-ing curve, and then decided they like it.

Chapter 1
4
Acc
essi
ng
a U
nix
Sys
tem
Different types of Unix accessSo, the first question is how you might access a Unix system to get started with all of this. Given that this is Unix, you have exactly 1.2 bazillion options. Let’s look at these options:
Connect to a shell account
Access your company’s (or school’s or organization’s) Unix system
Use a live CD, such as an Ubuntu or OpenSolaris CD
Do a Unix installation in a virtual machine on your computer
Do a Unix-only installation on an old or spare computer
Do a Unix/Windows installation on your everyday computer
Accessing a shell accountThe traditional approach (back in the olden days, when we wrote the first version of this book) was to connect to a “shell account” provided by your dial-up ISP. That’s still an option, if you have certain ISPs (and even with some broadband connections). If your ISP offers a shell account, go ahead and use it; it’s still a good option. Try Googling “Unix shell account” as well.
Accessing your company’s systemIf not (that is, if you have a cable modem, DSL connection, or dial-up connection through any of the huge companies that provide Internet access, “not” is the case), you still have a ton of options. Check at work; many companies use Unix in a number of ways, and if you can provide the system administrator with appropriate quantities of cookies or other goodies, you may be able to get Unix system access.

Getting Started with Unix
5
Accessin
g a U
nix System
Installing Unix on an old or spare computerAlternatively, if you’d rather keep your Unix explorations closer to home, you can manage that as well. If you have an older computer sitting around (say, anything that’s a Pentium III or later), you can just install Unix (Linux, Solaris, or whatever) on that, and likely without hassles or problems. You could make it work on even older computers, but given how cheap new and used computers are, it’s likely not worth the trouble. Either way, you’ll download a CD or DVD from the Web, burn it onto a disc, and boot your system with the disc in the drive. The installation will start, and a few questions and few minutes later, you’ll be all set.
Installing Unix and Windows side by sideYou can also download the CD or DVD and install on your everyday desktop computer. Most of the time (actually virtually all the time, but we’re making no promises here), you can install Unix onto your desktop right alongside your Windows environment without breaking anything. You’ll get it installed, reboot your system, and choose Unix (Linux, OpenSolaris, whatever) or Windows when you boot up. This option isn’t bad, but it does require you to stop what you’re doing in Windows or Unix to change to the other. If your desktop computer is relatively old, this might be better than the following options, though.
If you have a pretty beefy desktop com-puter (relatively new with ample memory and disk space), you could try using Sun Microsystems’ VirtualBox or VMWare, VirtualPC, or other virtualization environ-ments, which give you computer emulation (think “picture in picture” for your computer, but with one operating system within the other operating system).
continues on next page

Chapter 1
6
Acc
essi
ng
a U
nix
Sys
tem
Many of the examples and screenshots for this book were taken from Unix systems running under VirtualBox on one of our desktop systems.
Cygwin provides you with a Unix environ-ment that’s actually part of your Windows system. It takes a bit of getting used to, but Cygwin is stable and reliable. The hardest part about using Cygwin is that it can be con-fusing to know whether you’re dealing with Unix or Windows at any given moment.
Different Unix flavorsSo, given all of those options for getting access to Unix, the choice of which kind of Unix (which Unix flavor) must be clear and straightforward—right? Of course not.
If you’re just getting started with Unix, we recommend having you choose the flavor that your most techie friends or the folks at work use. This will give you potential built-in tech support options.
If you’re starting purely from scratch, look into the most popular and highly rated Linux distributions. (Currently, the Web site www.distrowatch.com provides a great set of recommendations, but as you know, Web sites change, so you might want to also do some Web searching for recommended Linux distributions.)
A newly popular (or popular again) option is OpenSolaris, from Sun Microsystems. For a while Solaris was a bit tricky (well, a lot tricky) to get installed and functional on a regular desktop system; however, it’s now as easy as the easier Linux systems, and it offers a tre-mendous amount of power and flexibility, in addition to some cutting-edge technologies.
That said, any option you choose will be pretty similar for the purposes of this book. Differences among the options primarily show up in more advanced applications.
tip
If you’re using Mac OS X or later, you’re already using Unix—you just need to bring up a terminal window to be able to follow right along with the book.

Getting Started with Unix
7
Con
nectin
g to
the U
nix System
Connecting to the Unix SystemYour first step in using Unix is to connect to the Unix system. Exactly how you connect will vary depending on what kind of Internet connection you use, but the following steps should get you started.
to connect to the Unix system:
1. Connect to the Internet, if necessary.If you have to start your Internet connection manually, launch it now. If you use a full-time Internet connection at home, work, or school, or if you’re using your Mac or Linux system at home, just ignore this step.
2. If you’re connecting to a remote system, start your ssh program and connect to the Unix system.Using ssh you can connect to a remote computer (such as your ISP’s computer) and work as if the remote computer were sitting on your desk. Essentially, ssh brings a remote computer’s capabilities to your fingertips, regardless of where you’re physically located. (See the “About Connecting” sidebar for more informa-tion about connection technologies.)Exactly how you connect depends on the particular program you’re using. For Windows users, we recommend PuTTY, which is a free ssh client available at www.chiark.greenend.org.uk/~sgtatham/putty/. For Macintosh users (pre–OS X), we recommend the predictably named MacSSH, also free, available at http://sourceforge.net/projects/macssh.
continues on next page
About Connecting
Once upon a time, when dinosaurs roamed the earth, Unix users connected to their systems using telnet. With telnet, your password and everything else you do is sent straight across the wire and can be easily read by anyone on the same part of the network. Yikes is right! That’s why, more and more, ISPs and system admin-istrators require something called ssh (Secure SHell) to connect to their sys-tems. With ssh, everything is encrypted, precisely the way your Web connection is encrypted when you use an e-commerce site and see that the little padlock in your Web browser is closed.
Yes, we know, you don’t have any secrets, but if a hacker logs into your ISP’s system as you, that same hacker has won 50 percent of the battle for taking over that system for any number of illegal activities. And, if your neighbor’s 19-year-old son sniffs (that’s the technical term) your user identification (often called the userid or user ID) and password over your cable modem connection (and that’s entirely possible), he can probably guess that your eBay password, broker password, or what-ever are the same or at least similar.
Throughout this book, we’ll show exam-ples using an ssh connection. If, for what-ever reason, your system administrators don’t require ssh, we recommend using it anyway; there is absolutely no reason not to, because there are no disadvantages to ssh compared to telnet. If your systems don’t support ssh, you can use the telnet or rlogin/rsh program as alternatives.

Chapter 1
8
Con
nec
tin
g t
o t
he
Un
ix S
yste
m
And, of course, after you’re logged into your Unix-like system, you can use the Unix ssh command to access other computers. Each program works a bit differently, and you’ll have to refer to the specific documentation for details about using them.In this example, we’re connecting to a Unix system using PuTTY. Figure 1.1 shows the Configuration dialog box, in which we’ve specified Host Name ( frazz.raycomm.com), Port (22), and Protocol (ssh).If you’re looking for a quick start, just fill in the fields shown in Figure 1.2 and click Open.
3. Alternatively, if you’re on a Mac or Linux or Unix system already, just open a termi-nal window and you’ll be all set—and you won’t even have to log in.
4. Check out the Categories (or the Preferences dialog box in many other programs) and become familiar with your options. You will not need to change anything initially, but you might later want to customize colors or other settings. Generally, though, PuTTY provides usable settings.
5. Marvel at the login: prompt, which is what you should see if you’ve connected properly (Figure 1.3) and move along to the next section. (PuTTY displays “login as :”, while most other programs will just show you “login:”. Don’t worry about this difference; it’s just this pro-gram’s idiosyncrasy.)
Figure 1.1 Here we’re connecting to frazz.raycomm.com using PuTTY. Other ssh programs might look slightly different, but this shows the general idea.
Figure 1.2 For a quick start, fill in these fields, and then click Open.
Figure 1.3 PuTTY shows a login as: prompt from frazz.raycomm.com.

Getting Started with Unix
9
Con
nectin
g to
the U
nix System
tips
If you modify the connection settings, you may need to disconnect from the session, then reconnect again for the new settings to take effect. See your documen-tation for specifics about disconnecting from your session.
In addition to viewing the buffer to see commands you’ve used, as mentioned in the “The SSH Preferences Dialog Box” sidebar (later in this chapter), you can also use a command to let you review commands that you’ve issued. For more information, see the appropriate “Viewing Session History” section in Chapter 3.
Before You Begin
Before you begin, have your connection information, such as your login name and password, handy.
Contact your system administrator if you don’t yet have these. Throughout this book, we’ll use “system administrator” to refer to your help desk, ISP technical support line, or anyone else you can call on who runs your Unix system and can help you. Sometimes that geeky daughter, brother, or otherwise Unixy-person can help you out with Unix, too; however, in many cases you’ll find that you need to troubleshoot a problem with the person who can manage your account information.
Write Down Details About Your Specific login Procedure
As you go through your login procedure, take a minute to write down some details for future reference.
Your userid or login name (but not your password):
__________________________________________________________________________
The name of the program you use (or the icon you click) to connect to your Unix system and the process you use to get connected:
__________________________________________________________________________
__________________________________________________________________________
__________________________________________________________________________
__________________________________________________________________________
The name of your Unix system (such as frazz.example.com or example.com):
__________________________________________________________________________
The IP (Internet Protocol) address of your Unix system (such as 198.168.11.36 or 10.10.22.2):
__________________________________________________________________________

Chapter 1
10
Log
gin
g In
Logging InAfter you’ve connected to the Unix system, your next step is to log in, or identify yourself to the Unix system. Logging in serves a few purposes, including giving you access to your e-mail, files, and configurations. It also keeps you from inadvertently accessing someone else’s files and settings, and it keeps you from making changes to the system itself.
to log in:
1. Have your userid (user identification) and password ready.Contact your system administrator if you don’t have these yet.
2. Type your userid at the login prompt, then press e.Your userid is case sensitive, so be sure you type it exactly as your system admin-istrator instructed.
3. Type your password at the password prompt, then press e.Yup. Your password is case sensitive, too.
4. Read the information and messages that come up on the screen.The information that pops up—the mes-sage of the day—might be just funny or lighthearted, as in Figure 1.4, or it might contain information about system poli-cies, warnings about scheduled down-time, or useful tips, as shown in Figure 1.5. It may also contain both, or possibly neither, if your system administrators have nothing to say to you.
After you’ve logged in, you’ll see a shell prompt, which is where you type in com-mands. Also, note that you’ll be located in your home directory, which is where your personal files and settings are stored. Your “location” in the Unix system is a slightly unwieldy concept that we’ll help you under-stand throughout this chapter.
tips
If you get an error message after attempt-ing to log in, just try again. You likely just mistyped your userid or password. Whoops!
When you log in, you might see a mes-sage about failed login attempts. If you unsuccessfully tried to log in, then don’t worry about it; the message just confirms that you attempted to log in but failed. If, however, all of your login attempts (with you sitting at the keyboard) have been successful or if the number of failed login attempts seems high—say, five or more—then you might also mention the message to your system administrator, who can check security and login attempts. This could be a warning that someone unau-thorized is trying to log in as you.
Figure 1.4 Our Unix system (frazz.raycomm.com) greets us with a quote of the day, called a “fortune.”
Figure 1.5 Some systems might greet you with system information or helpful tips.
Getting Started with Unix
11
Chan
gin
g Yo
ur Passw
ord w
ith passw
d
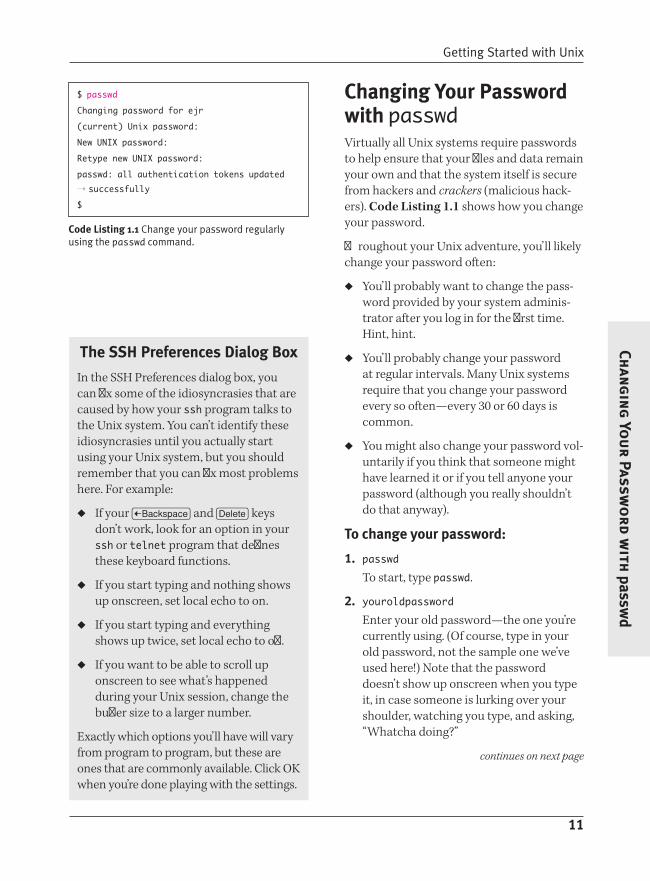
Changing Your Password with passwdVirtually all Unix systems require passwords to help ensure that your files and data remain your own and that the system itself is secure from hackers and crackers (malicious hack-ers). Code Listing 1.1 shows how you change your password.
Throughout your Unix adventure, you’ll likely change your password often:
You’ll probably want to change the pass-word provided by your system adminis-trator after you log in for the first time. Hint, hint.
You’ll probably change your password at regular intervals. Many Unix systems require that you change your password every so often—every 30 or 60 days is common.
You might also change your password vol-untarily if you think that someone might have learned it or if you tell anyone your password (although you really shouldn’t do that anyway).
to change your password:
1. passwdTo start, type passwd.
2. youroldpasswordEnter your old password—the one you’re currently using. (Of course, type in your old password, not the sample one we’ve used here!) Note that the password doesn’t show up onscreen when you type it, in case someone is lurking over your shoulder, watching you type, and asking, “Whatcha doing?”
continues on next page
the SSH Preferences Dialog Box
In the SSH Preferences dialog box, you can fix some of the idiosyncrasies that are caused by how your ssh program talks to the Unix system. You can’t identify these idiosyncrasies until you actually start using your Unix system, but you should remember that you can fix most problems here. For example:
If your N and D keys don’t work, look for an option in your ssh or telnet program that defines these keyboard functions.
If you start typing and nothing shows up onscreen, set local echo to on.
If you start typing and everything shows up twice, set local echo to off.
If you want to be able to scroll up onscreen to see what’s happened during your Unix session, change the buffer size to a larger number.
Exactly which options you’ll have will vary from program to program, but these are ones that are commonly available. Click OK when you’re done playing with the settings.
$ passwd
Changing password for ejr
(current) Unix password:
New UNIX password:
Retype new UNIX password:
passwd: all authentication tokens updated
successfully
$
Code Listing 1.1 Change your password regularly using the passwd command.

Chapter 1
12
Chan
gin
g Y
ou
r Pa
ssw
ord
wit
h p
assw
d
3. yournewpasswordType your new password. Check out the “Lowdown on Passwords” sidebar for specifics about choosing a password.
4. yournewpasswordHere, you’re verifying the password by typing it again.The system will report that your password was successfully changed (specific termi-nology depends on the system) after the changes take effect. This is also shown in Code Listing 1.1.
tips
Double-check your new password before you log out of the system by typing su - yourid at the prompt. Of course, substitute your real username (or login name) for yourid here. This command (switch user) lets you log in again without having to log out, so if you made a mistake when changing your password and now get a failed login message, you can find out before you actually disconnect from the system. If you have problems, contact your system administrator before you log out so you can get the problem resolved.
In some environments, you will use yppasswd, not passwd, to change your password, or even use a Web page or other means. When in doubt, defer to what your system administrator told you to do. (“The Rays said to use this other command” is likely to get all of us in trouble.)
the Lowdown on Passwords
In addition to following any password guidelines your system administrator mandates, you should choose a password that is
At least six characters long
Easy for you to remember
Not a word or name in any dictionary in any language
A combination of capital and lower-case letters, numbers, and symbols
Not similar to your username
Not identical or similar to one you’ve used recently
Not your telephone number, birth date, kid’s birth date, anniversary (even if you can remember it), mother’s maiden name, or anything else that someone might associate with you

Getting Started with Unix
13
Listing
Directo
ries and Files w
ith ls
Listing Directories and Files with lsYour Unix system is made up of directories and files that store a variety of information, including setup information, configuration settings, programs, and options, as well as other files and directories. You might think of your Unix system as a tree (tree roots, actually), with subdirectories stemming from higher-level directories. As shown in Figure 1.6, all of these files and directories reside within the root directory, which contains everything in the system.
Using the ls command, you can find out exactly what’s in your Unix system and thereby find out what’s available to you. You can list the files and directories of a directory that you’re currently in or a direc-tory that you specify.
to list the files and directories of the directory you’re in:
ls
At the shell prompt, type ls to list the files and directories in the current directory, which in this case is our home directory (Code Listing 1.2).
Figure 1.6 All files and directories are nested within the root directory, which serves to contain everything in the system.
[jdoe@frazz jdoe]$ ls
limerick mail/ Project/ public_html/
testfile testlink@ tmp/
[jdoe@frazz jdoe]$
Code Listing 1.2 Use ls by itself to list the files and subdirectories of the directory you’re in.

Chapter 1
14
List
ing
Dir
ecto
ries
an
d Fi
les
wit
h ls
to list the files and directories of a specified directory:
ls /bin
Here, you type the ls command plus the name of a directory. As shown in Code Listing 1.3, this command lists the files and directories in the /bin directory, in which you’ll find system commands and programs.
tips
You can list the files and directories of the root directory at any time and in any place by typing ls /. The root directory is the highest-level directory in a Unix system; all other directories are below the root directory.
Can’t remember that pesky filename? Just use ls to help jog your memory. Or, refer to “Finding Forgotten Files with find” in Chapter 2, which can also help you remember filenames.
[jdoe@frazz jdoe]$ ls /bin
arch* domainname@ ipcalc* open* tar*
awk@ echo* ip6c eys* red@ unlink*
chmod* fbresolution* login* rm* usleep*
chown* fgrep@ ls* rmdir* vi@
consolechars* find* lsb_release* rpm* view@
cp* gawk* mail* rvi@ vim@
cpio* gawk-3.1.1@ mkdir* rview@
date* gtar@ more* sleep* zcat*
dd* gunzip* mount* sort* zsh*
df* gzip* mv* stat*
dmesg* hostname* netstat* stty*
dnsdomainname@ id* nice* su*
doexec* igawk* nisdomainname@ sync*
[jdoe@frazz jdoe]$
Code Listing 1.3 Use ls with the name of a directory to list the contents of that directory ( /bin, in this case).
Many other ls options are available to control the amount of information about your files that you see and the format in which they appear onscreen. See Chapter 2’s “Listing Directories and Files with ls (More Goodies)” section for details.

Getting Started with Unix
15
Chan
gin
g D
irectories w
ith cd
Changing Directories with cdTo explore Unix and its capabilities, you’ll need to move around among the directories. You do so using the cd command, which takes you from the directory you’re currently in to one that you specify. Code Listing 1.4 illus-trates how you use cd to change directories.
to change directories:
1. cd ProjectsTo move to a specific directory, type cd plus the name of the directory. In this example, we move down in the directory tree to a subdirectory called Projects. (See the “Moving Up and Down” side-bar for an explanation of what “up” and “down” mean in Unix terms.)
2. cd ..Type cd .. to move up one level in the directory tree.
3. cd /etcHere, /etc tells the system to look for the etc directory located at the system root.
Moving Up and Down
Throughout this book, we’ll talk about moving “up” and “down” through the Unix file system. Moving “up” means moving into the directory that contains the cur-rent directory—that is, closer to the root directory. Moving “down” means moving into subdirectories that are contained by the current directory—that is, further from the root directory.
[jdoe@frazz jdoe]$ cd /
[jdoe@frazz /]$ cd
[jdoe@frazz jdoe]$ cd /home/jdoe/Project/
[jdoe@frazz Project]$ cd /etc
[jdoe@frazz etc]$ cd /home/jdoe/
[jdoe@frazz etc]$ cd /home/jdoe/mail/
[jdoe@frazz mail]$ cd ..
[jdoe@frazz jdoe]$
Code Listing 1.4 Using cd, you can change directories and move around in the system. Note that the prompt in this code listing shows the name of the current directory, which can be handy.
Chapter 1
16
Chan
gin
g D
irec
tori
es w
ith
cd
tips
If you don’t remember the name of the directory you want to change to, you can use ls to list the directories and files in your current directory, then use cd as shown earlier. See the previous section, “Listing Directories and Files with ls,” for more information.
You can return to your home directory from anywhere in the Unix system by entering cd without specifying a directory.
You can often use a tilde (~) as a handy shortcut to your home directory. For example, if you want to change to the Urgent directory within the Projects directory in your home directory, you could use something like cd /home/users/y/yourid/Projects/Urgent or just use the shortcut cd ~/Projects/Urgent.
Keep in mind that your home direc-tory isn’t the same as the system root directory. You might think of your home directory as “the very small section of the Unix system that I can call my own.” Every person using the Unix system has his or her own little personal section.The current directory is always indicated with a ., while the next higher directory (the one that contains the current direc-tory) is indicated with .. (two dots). That is why you use cd .. to move up a direc-tory. In Chapter 10, you will see a specific use for . to specify the current directory when running scripts or programs.
Visit Chapter 2 for much more about directories and files.

Getting Started with Unix
17
Findin
g Yo
urself w
ith pw
d
Finding Yourself with pwdAs you begin using Unix and start moving around in directories and files, you’re likely to get a bit lost—that is, forget which directory or subdirectory you’re in. You can use the pwd command to get a reminder of where you are, as shown in Code Listing 1.5.
You can request just the directory name, or you can get fancy and request the directory’s name and its contents, courtesy of ls.
to find out the name of the current directory:
pwd
This command displays the path and name of the directory you are currently in. The path names each of the directories “above” the current directory, giving you the full picture of where you are in rela-tionship to the system root.
to find out the name of the current directory and its contents:
ls ; pwd
By combining the ls and pwd commands, you can request the directory’s contents and name, as shown in Code Listing 1.5.
tips
Type pwd immediately after you log in. You’ll see where your home directory is in the overall system (aka the full path name for your home directory).
On some Unix systems, you won’t need to use pwd to find out where you are. Some systems display the current directory at the shell prompt by default—something like /home/ejr>. If you’d like to add or get rid of this, or if you want more informa-tion about shells and customizing your shell, see Chapter 8.
[jdoe@frazz jdoe]$ pwd
/home/jdoe
[jdoe@frazz jdoe]$ ls ; pwd
codelisting1.2 codelisting1.4 mail/
public_html/ testlink@
codelisting1.3 limerick Project/ testfile
tmp/
/home/jdoe
[jdoe@frazz jdoe]$ cd
[jdoe@frazz jdoe]$ cd /
[jdoe@frazz /]$ pwd
/
[jdoe@frazz /]$
Code Listing 1.5 pwd displays the name of the current directory, which is particularly handy if you’ve been exploring the system. By combining commands, you can request the directory’s name and contents at one time.

Chapter 1
18
Pip
ing
Inpu
t an
d O
utp
ut
Piping Input and OutputIn general, you can think of each Unix com-mand (ls, cd, and so on) as an individual program that Unix executes. For example, if you type cat /etc/motd at the prompt, Unix will display the contents of motd in the /etc directory. Each program requires input (in this example, cat, the program, takes the contents of /etc/motd as input) and pro-duces output (i.e., the displayed results).
Frequently, you’ll want to run programs in sequence. For example, you could tell Unix to read your resume and then spell-check it. In doing this, you connect two commands together and have them run in sequence. This process, in which you connect the output of one program to the input of another, is called piping. Depending on what you want to do, you can pipe together as many commands as you want—with the output of each com-mand acting as the input of the next.
As Figure 1.7 shows, you pipe commands together using the pipe symbol, which is the | character. In the following example, we’ll pipe the output of the ls command (which lists the contents of a directory) to the more command (which lets you read results one screen at a time). For details about more, see “Viewing File Contents with more,” later in this chapter.
to pipe commands:
ls | more
Here, all you do is include a pipe symbol between the two commands, with or without a space on both sides of the pipe. This code produces a list of the files in the current directory, then pipes the results to more, which then lists the results one screen at a time (see Figure 1.7).
tips
If you want to pipe more than two commands, you can. Just keep adding the commands (with a pipe symbol in between each, like | this) in the order you want them executed.
Remember that the output of each com-mand is piped to the next command. So a piped command, such as ls | spell | sort, could list files within a direc-tory, then spell-check the list, then sort the misspelled words and display them onscreen. The filenames that are found in the system dictionary would not appear.
Venture to Chapter 15 to find out more about running a spell-checker and Chapter 6 to find out more about sorting.
Figure 1.7 To execute multiple commands in sequence, pipe them together using the pipe symbol (|).

Getting Started with Unix
19
Redirectin
g O
utpu
t
redirecting OutputSuppose you’ve developed your resume and spell-checked it. As you learned in the previ-ous section, the results you see onscreen will be the output of the last command—in this case, a list of misspelled words. A lot of times, you’ll want to redirect the final output to another location, such as to a file or a printer (if a printer is an option for you), rather than view it onscreen. You can do this using redirection, which sends the final output to somewhere other than your screen.
As shown in Code Listing 1.6, you will often redirect output results to a file. Notice the greater-than symbol (>), which indicates that the output of the program is to be redirected to the location (or filename) you specify after the symbol.
In the following examples, we’ll show you how to redirect output to a new file and how to redirect output to append it to an existing file.
[jdoe@frazz jdoe]$ ls /usr/local/bin > local.programs.txt
[jdoe@frazz jdoe]$ ls local*
localize localono local.programs.txt localyokel
[jdoe@frazz jdoe]$ ls /usr/bin >> other.programs.txt
[jdoe@frazz jdoe]$
Code Listing 1.6 In this case, the output of ls gets redirected to local.programs.txt, as indicated by the greater-than (>) symbol. The asterisk wildcard (*) acts as a placeholder for letters or numbers. Finally, the listing of /usr/bin gets appended to the other.programs.txt file.

Chapter 1
20
Red
irec
tin
g O
utp
ut
to redirect output to a new file:
1. ls /usr/local/bin > local.programs.txtIn this case, we start with the ls com-mand and a specific directory, add a greater-than symbol (>), and then specify a filename. This will redirect the output of ls to a file named local.programs.txt.Be careful with this command! If the file already exists, it could be replaced with the output of the ls program here.
2. ls local*Here, we’re just checking to see that the new local.programs.txt file has success-fully been created. The asterisk wildcard (*) specifies that we want a list of all files that begin with the word local, such as localize, localyokel, or localono (see Code Listing 1.6). See the next section, “Using Wildcards,” for handy wildcard information.
to append output to an existing file:
ls /usr/bin >> all.programs.txt
Appending output to an existing file is similar to redirecting it to a new file; however, instead of creating a new file to hold the output (or replacing the contents of an existing file), you add content to the end of an existing file. Notice that you use two greater-than symbols here, rather than one.
tip
You can pipe and redirect at the same time. For example, you might list a directory, pipe it to wc to count the entries, then append the results to a directoryinfo file, like this: ls | wc -l >> directoryinfo. You can learn more about counting files and their contents with wc in Chapter 6.

Getting Started with Unix
21
Usin
g W
ildcards
Using WildcardsYou might think of wildcards as placeholders for omitted letters or numbers. For example, if you’re looking for a file but aren’t sure whether you named it kidnews or kidupdate, you can include a wildcard to stand for the part you’re uncertain of. That is, you could list the files of a directory with ls kid* (Code Listing 1.7), which would list all files starting with the characters kid. In the resulting list, you’d find a file named kid if there were one, as well as files that begin with kid but have varying endings, such as kidnews (aha, the lost file!), kiddo, or kidneypie.
You can use wildcards for just about any purpose in Unix, although listing files and directories will likely be the most common use. Just follow these guidelines:
You use ? as a placeholder for one charac-ter or number.
You use * as a placeholder for zero or more characters or numbers. Zero characters, in case you’re curious, specifies that the search results include all variants of kid, including the word itself with no suffix.
You can include a wildcard at any place in a name: at the beginning (*kid), some-where in the middle (k*d), at the end (ki*), or even in multiple places (*kid*).
[jdoe@frazz Project]$ ls
keep keeper.jpg kept kidder.txt
kiddo kidnews kidneypie
kids kidupdate
[jdoe@frazz Project]$ ls ki*
kidder.txt kiddo kidnews kidneypie
kids kidupdate
[jdoe@frazz Project]$ ls kid*
kidder.txt kiddo kidnews kidneypie
kids kidupdate
[jdoe@frazz Project]$ ls k???
keep kept kids
[jdoe@frazz Project]$ ls *date
kidupdate
[jdoe@frazz Project]$ ls *up*
kidupdate
[jdoe@frazz Project]$ ls k?d*
kidder.txt kiddo kidnews kidneypie
kids kidupdate
[jdoe@frazz Project]$
Code Listing 1.7 You use wildcards (? or *) to act as placeholders for missing characters.

Chapter 1
22
View
ing
Fil
e Co
nte
nts
wit
h m
ore
Viewing File Contents with moreAs you become more familiar with Unix, you’ll want to start exploring the contents of files, including some program files and scripts as well as files you eventually create. One of the easiest ways to view file contents is to use the more command, which tells Unix to display files onscreen, a page at a time. As shown in Figure 1.8, long files are displayed with “More” at the bottom of each screen so that you can move through the file one screen at a time using the spacebar.
to view a file with more:
1. more fortunesAt the prompt, type more plus the name of the file you want to view. You’ll see the contents of the file you requested, start-ing at the top (Figure 1.8).
2. z
Press z to see the next screen of information. As you move through the file, you can press B to move back through previous screens.
3. QWhen you’re done, press Q to go back to the shell prompt.
tips
If you want to view just an additional line (rather than an entire screen) when using more, press e instead of the z.You can also use less to view files. less is similar to more, but it’s more powerful and flexible. How can less be more and more be less? As you’ll see in Appendix C: “Commands and Flags,” the more com-mand has 10 options or so; the less com-mand has about 40.
You can also view files using the cat command. See the next section for the full scoop.
Figure 1.8 The more command lets you move through a file one screen at a time, providing a “More” indicator at the bottom of each screen.

Getting Started with Unix
23
Displayin
g File Co
nten
ts with
cat
Displaying File Contents with catInstead of using more to display files, you can use cat (as in “concatenate”), which displays files but does not pause so you can read the information. Instead, it displays the file or files—which whiz by onscreen—and leaves you looking at the last several lines of the file (Code Listing 1.8).
The cat command also lets you redirect one or more files, offering a function that some versions of more do not.
to display file contents with cat:
cat newest.programs.txt
To begin, type cat plus the filename (probably not newest.programs unless you’re naming your files just like we are).The file contents will appear onscreen; however, if the file is longer than a single screen, the contents will whirl by, and all you’ll see is the bottom lines of the file—the 24 or so that fit on a single screen.or
cat newer.programs.txt newest. programs.txt
You can also specify multiple files for cat, with each file displayed in the order specified. In this example the contents of newer.programs will zip by, then the con-tents of newest.programs will zip by.
continues on next page
[jdoe@frazz jdoe]$ cat newest.programs.txt
...
xpmtoppm*
xpp*
xpstat*
xrfbviewer*
xscreensaver.kss*
xvminitoppm*
xwdtopnm*
xxd*
yaf-cdda*
yaf-mpgplay*
yaf-splay*
yaf-tplay*
yaf-vorbis*
yaf-yuv*
ybmtopbm*
yelp*
yes*
ypcat*
ypchfn*
ypchsh*
ypmatch*
yppasswd*
ypwhich*
yuvsplittoppm*
yuvtoppm*
z42_cmyk*
z42tool*
zcmp*
zdiff*
zeisstopnm*
zforce*
zgrep*
zipgrep*
zipinfo*
zless*
zmore*
znew*
[jdoe@frazz jdoe]$ cat newer.programs.txt
newest.programs.txt > all.programs
[jdoe@frazz jdoe]$
Code Listing 1.8 With cat, long files whirl by, and all you’ll see is the bottom of the file. You can also redirect cat output to a file, as shown at the end of the listing.

Chapter 1
24
Dis
play
ing
Fil
e Co
nte
nts
wit
h c
at
or
cat newer.programs.txt newest. programs.txt > all.programs
In this example, we’ve added a redirec-tion symbol (>) plus a new filename. This tells Unix to print out both files; however, instead of displaying the files onscreen, it redirects them to the file called all.pro-grams. Aha! Here’s where cat does some-thing better than more. See “Redirecting Output,” earlier, for more information about redirecting commands.
tips
If you inadvertently use cat with a binary file (a nontext file), you might end up with a whole screen of garbage. On some systems, you might try stty sane or reset to fix it—more on this in “Fixing Terminal Settings with stty” in Chapter 3. You could also just close your terminal win-dow and log in again to fix it.
The tac command is just like cat, but backward. Try it! Oddly handy, eh?
You can also view file contents using the more command. See the previous section for details.

Getting Started with Unix
25
Explorin
g th
e System
Exploring the SystemWith these few key skills in hand, you’re ready to start exploring your Unix system. In doing so, you can quickly get an idea of what’s available and gain some useful experience in entering commands.
Think of your Unix system as a thoroughly kid-proofed house: You can look around and touch some stuff, but you can’t do anything to hurt yourself or the system. So, don’t worry! You can’t hurt anything by looking around, and even if you tried to break some-thing, most Unix systems are configured well enough that you couldn’t.
Table 1.1 shows some of the directories you’re likely to find most interesting or useful (Appendix B of this book provides a more comprehensive list of directories). You can use the following steps to get started exploring.
to explore locally installed programs:
1. cd /usr/binChange to /usr/bin, which is where most installed programs are.
2. ls | moreList the files (which will be programs, in this example) and pipe the output to more so you can read the names one screen at a time.
3. sshType the name of any program you want to run; ssh, in this case, allows you to con-nect to another system and use it just as you’re using your Unix system now.
tip
You can type man followed by a command name to learn more about Unix programs. See the next section for information about Unix help.
D i r e c t o r y C o n t e n t s
/bin Essential programs and com-mands for use by all users
/etc System configuration files and global settings
/home Home directories for users/sbin Programs and commands needed
for system boot/tmp Temporary files/usr/bin Commands and programs that
are less central to basic Unix system functionality than those in /bin but were installed with the system or that came as part of the distribution
/usr/local Most files and data that were developed or customized on the system
/usr/local/bin Locally developed or installed programs
/usr/local/man Manual (help) pages for local programs
/usr/share/man Manual (help) pages/var Changeable data, including sys-
tem logs, temporary data from programs, and user mail storage
Common Unix Directories and their Contents
table 1.1

Chapter 1
26
Get
tin
g H
elp
wit
h m
an
Getting Help with manOccasionally, you may need a bit of help remembering what a particular command does. Using man (which is short for “manual”), you can look up information about com-mands and get pointers for using them efficiently. Figure 1.9 shows a Unix help page (also called a man page, for obvious reasons) for passwords. In the following steps, we’ll show you how to look up specific Unix com-mands and find related topics.
to access a man page:
man passwd
At the prompt, type man plus the name of the command you want help with (in this case, passwd). You’ll get the man page for that command. Use the z and the B key ( for Back) to navigate through the file, just as you do with more.
to find a specific man page:
1. man -k passwdType man -k plus the name of the com-mand or the topic you want help with (in this case, passwd). As Code Listing 1.9 shows, you’ll see a list of possible man pages: command names, man page names, and a description. Note the man page name (and number if more than one page with the same name exists) so you can reference it in the next step.
Figure 1.9 Using man passwd, you can access the standard man file about the passwd program.
$ man -k passwd
chpasswd (8) - update password file in batch
gpasswd (1) - administer the /etc/group file
mkpasswd (1) - generate new password, optionally apply it to a user
mkpasswd (8) - Update passwd and group database files
passwd (1) - update a user’s authentication tokens(s)
passwd (5) - password file
userpasswd (1) - A graphical tool to allow users to change their passwords
Code Listing 1.9 man -k passwd gives you these results, showing specific password-related man pages.

Getting Started with Unix
27
Gettin
g H
elp with
man
2. man 1 passwdHere, you type man, the man page you want to view (indicated by 1 in this case to specify section 1—this is necessary because more than one man page with the name passwd was listed in the last step), and the command name (passwd). Figure 1.9 shows the resulting man page.
tips
You can make a copy of a man page so you can edit it or comment on it, adding additional notes for your information or deleting irrelevant (to you) stuff. Just type man commandname | col -b -x > somefilename. For example, use man passwd | col -b -x > ~/my.password.command.notes to make a copy of the passwd man page, sans formatting, in your home directory, under the name my.password.command.notes. Then you’ll use an editor ( from Chapter 4) to edit, add to, and tweak the important points. (The col -b -x command fixes some formatting oddities; without it, all of the underlined words might show up as _u_n_d_e_r_l_i_n_e, depending on the system.)
You can use apropos instead of the man -k flag. For example, you might use this: apropos passwd.
Some Unix systems might require a -s before the section number, as in man -s 1 passwd.

Chapter 1
28
Log
gin
g O
ut
Logging OutWhen you finish your session, you need to log out of the system to ensure that nobody else accesses your files while masquerading as you.
to log out:
logout
That’s it! Just type logout, and the system will clean up everything and break the connection, and the ssh program might very well just vanish completely.
tip
On some Unix systems, you can type exit or quit instead of logout, or press c D on your keyboard.

29
Usin
g D
irectories an
d Files
2As you learned in Chapter 1, directories and files are the heart of Unix; they contain things like setup information, configuration settings, programs, and options, as well as anything that you create. You access direc-tories and files every time you type in a Unix command, and for this reason, you need to become familiar with the various things you can do with them.
Again in this chapter, the skills and com-mands we’ll cover apply to any Unix flavor. What you see onscreen (particularly system prompts and responses) may differ slightly from what’s illustrated in this book. The gen-eral ideas and specific commands, however, will be the same on all Unix systems.
Using Directories and Files
Chapter Contents
Creating directories
Creating files
Copying directories and files
Listing directories and files
Moving directories and files
Removing files
Removing directories
Finding files
Locating program files
Linking with hard links
Linking with soft links

Chapter 2
30
Crea
tin
g D
irec
tori
es w
ith
mkd
ir
Creating Directories with mkdirYou might think of directories as being draw-ers in a file cabinet; each drawer contains a bunch of files that are somehow related. For example, you might have a couple of file drawers for your unread magazines, one for your to-do lists, and maybe a drawer for your work projects.
Similarly, directories in your Unix system act as containers for other directories and files; each subdirectory contains yet more related directories or files, and so on. You’ll probably create a new directory each time you start a project or have related files you want to store at a single location. You create new directo-ries using the mkdir command, as shown in Code Listing 2.1.
$ ls
Projects all.programs.txt local.programs.txt schedule
Xrootenv.0 files newer.programs short.fortunes
all.programs fortunes newest.programs temp
$ mkdir Newdirectory
$ ls -l
total 159
drwxrwxr-x 2 ejr users 1024 Jun 29 11:40 Newdirectory
drwxrwxr-x 2 ejr users 1024 Jun 28 12:48 Projects
-rw-rw-r- 1 ejr users 7976 Jun 28 14:15 all.programs
-rw-rw-r- 1 ejr users 7479 Jun 28 14:05 all.programs.txt
-rw-rw-r- 1 ejr users 858 Jun 28 12:45 files
-rw-rw-r- 1 ejr ejr 128886 Jun 27 09:05 fortunes
-rw-rw-r- 1 ejr users 0 Jun 28 14:05 local.programs.txt
-rw-rw-r- 1 ejr users 497 Jun 28 14:13 newer.programs
-rw-rw-r- 1 ejr users 7479 Jun 28 14:13 newest.programs
lrwxrwxrwx 1 ejr users 27 Jun 26 11:03 schedule -> /home/deb/Pre
-rw-rw-r- 1 ejr ejr 1475 Jun 27 09:31 short.fortunes
drwxrwxr-x 2 ejr users 1024 Jun 26 06:39 temp
$
Code Listing 2.1 Typing mkdir plus a directory name creates a new directory. Listing the files, in long format, shows the new directory. The “d” at the beginning of the line shows that it’s a directory.

Using Directories and Files
31
Creating
Directo
ries with
mkdir
to create a directory:
1. lsStart by listing existing directories to make sure that the planned name doesn’t conflict with an existing directory or filename.
2. mkdir NewdirectoryType the mkdir command to make a new directory; in this case, it’s called Newdirectory. Refer to the sidebar “Naming Directories (and Files)” for guidelines.
3. ls –lNow you can use ls -l (the -l flag speci-fies a long format) to look at the listing for your new directory (Code Listing 2.1). The d at the far left of the listing for Newdirectory indicates that it’s a direc-tory and not a file. Of course, after you trust Unix to do as you say, you can skip this verification step.
tips
If you attempt to create a directory with a file or directory name that already exists, Unix will not overwrite the existing direc-tory. Instead, you’ll be told that a file by that name already exists. Try again with a different name.
You can create several directories and subdirectories at once with the –p flag. For example, if you want to create a new subdirectory called Projects with a subdirectory called Cooking within that and a subdirectory called Desserts within that, you can use mkdir –p Projects/Cooking/Desserts and get it all done at once. Without the –p flag, you have to cre-ate Projects, Cooking, then Desserts in order, which is a longer recipe to make the same tree structure.
Naming Directories (and Files)
As you start creating directories (and files), keep in mind the following guidelines:
Directories and files must have unique names. For example, you cannot name a directory Golf and a file Golf. You can, however, have a directory called Golf and a file called golf. The dif-ference in capitalization makes each name unique. By the way, directories are often named with an initial cap, and filenames are often all lowercase.
Directory and filenames can, but should not include the following characters: angle brackets (< >), braces ({ }), brackets ([ ]), parenthe-ses (( )), double quotes (“ “), single quotes (‘ ‘), asterisks (*), question marks (?), pipe symbols (|), slashes (/ \), carets (^), exclamation points (!), pound signs (#), dollar signs ($), ampersands (&), and tildes (~).
Different shells handle special charac-ters differently, and some will have no problems at all with these characters. Generally, though, special characters are more trouble than they’re worth.
Generally, avoid names that include spaces. Some programs don’t deal with them correctly, so to use spaces you have to use odd workarounds. Instead, stick to periods (.) and under-scores (_) to separate words, charac-ters, or numbers.
Use names that describe the direc-tory’s or file’s contents so you easily remember them.

Chapter 2
32
Crea
tin
g F
iles
wit
h to
uch
Creating Files with touchAnother skill you’ll use frequently is creat- ing files. You might think of creating files as getting an empty bucket that you can later fill with water…or sand…or rocks…or what-ever. When you create a file, you designate an empty space that you can fill with programs, activity logs, your resume, or configurations—practically anything you want, or nothing at all.
Of course, you can always create a file by writing something in an editor and saving it, as described in Chapter 4, but you will some-times encounter situations where you just need an empty file as a placeholder for later use. You create empty files using the touch command, as shown in Code Listing 2.2.
to create a file:
1. touch file.to.createTo create a file, type touch followed by the name of the file. This creates an empty file.
$ ls
$ touch file.to.create
$ ls -l file*
-rw-rw-r- 1 ejr users 0 Jun 29 11:53 file.to.create
$ touch -t 12312359 oldfile
$ ls -l
total 0
-rw-rw-r- 1 ejr users 0 Jun 29 11:53 file.to.create
-rw-rw-r- 1 ejr users 0 Dec 31 2009 oldfile
$ touch -t 201012312359 new.years.eve
$ ls -l
total 0
-rw-rw-r- 1 ejr users 0 Jun 29 11:53 file.to.create
-rw-rw-r- 1 ejr users 0 Dec 31 2010 new.years.eve
-rw-rw-r- 1 ejr users 0 Dec 31 2009 oldfile
$
Code Listing 2.2 Use the touch command to create files, update their modification times, or both.
Using Directories and Files
33
Creating
Files with
touch
2. ls -l file*Optionally, verify that the file was created by typing ls –l file*. As shown in Code Listing 2.2, you’ll see the name of the new file as well as its length (0) and the date and time of its creation (likely seconds before the current time, if you’re following along).
tips
You can also use touch to update an existing file’s date and time. For example, typing touch -t 12312359 oldfile at the prompt would update oldfile with a date of December 31, 23 hours, and 59 minutes in the current year. Or, typing touch -t 201012312359 new.years.eve would update the file called new.years.eve to the same time in the year 2010.
Each time you save changes in a file, the system automatically updates the date and time. See Chapter 4 for details about editing and saving files.
Refer to the sidebar “Naming Directories (and Files)” in this chapter for file-naming guidelines.

Chapter 2
34
Copy
ing
Dir
ecto
ries
an
d Fi
les
wit
h c
p
Copying Directories and Files with cpWhen working in Unix, you’ll frequently want to make copies of directories and files. For example, you may want to copy a file you’re working on to keep an original, unscathed version handy. Or you might want to maintain duplicate copies of important directories and files in case you inadvertently delete them or save something over them. Accidents do happen, according to Murphy.
Whatever your reason, you copy directories and files using the cp command, as shown in Code Listing 2.3. When you copy direc-tories and files, all you’re doing is putting a duplicate in another location; you leave the original untouched.
to copy a directory:
1. cp -r /home/ejr/Projects /home/ shared/deb/Projects
At the shell prompt, type cp -r, followed by the old and new (to be created) direc-tory names, to copy a complete directory. The r stands for “recursive,” if that’ll help you remember it.
2. ls /home/shared/deb/ProjectsYou can use ls plus the new directory name to verify that the duplicate direc-tory and its contents are in the intended location (Code Listing 2.3).
$ cp -r /home/ejr/Projects
/home/shared/deb/Projects
$ ls /home/shared/deb/Projects
current new.ideas schedule
$
Code Listing 2.3 Use cp -r to copy directories.

Using Directories and Files
35
Copyin
g D
irectories an
d Files with
cp
to copy a file:
1. cp existingfile newfileAt the prompt, type cp, followed by the old and new (to be created) filename.
2. ls -lOptionally, check out the results with ls -l. The -l ( for long format) flag displays the file sizes and dates so you can see that the copied file is exactly the same as the new one (Code Listing 2.4).
3. cp -i existingfile oldfileIf you use cp with the -i flag, it prompts you before overwriting an existing file, also shown in Code Listing 2.4.
tips
When copying directories and files, you can use either absolute (complete) names, which are measured from the root directory (/home/ejr/Projects), or relative (partial) names, which specify files or directories in relationship to the current directory (ejr/Projects) and aren’t necessarily valid from elsewhere in the Unix file system. Using absolute names, you can manipulate directories and files with certainty anywhere in the Unix system. Using relative names, you can manipulate files only with reference to your current location.
You can compare the contents of two files or two directories using cmp and dircmp, respectively. For example, typing cmp filename1 filename2 would compare the contents of the specified files. Use diff or sdiff to see the differences between files. See Chapter 6 for more information.
$ cp existingfile newfile
$ ls -l
total 7
-rw-rw-r- 1 ejr users 1475 Jun 29
12:18 existingfile
-rw-rw-r- 1 ejr users 1475 Jun 29
12:37 newfile
-rw-rw-r- 1 ejr users 2876 Jun 29
12:17 oldfile
$ cp -i existingfile oldfile
cp: overwrite ‘oldfile’? n
$
Code Listing 2.4 Just use cp to copy files and add -i to insist that the system prompt you before you overwrite an existing file.
You can copy directories and files to or from someone else’s directory. Skip to Chapter 5 to find out how to get access, then use the copying procedure described here.
Use cp with a -i flag to force the system to ask you before overwriting files. Then, if you like that, visit Chapter 8 to find out about using aliases with cp so that the system always prompts you before over-writing files.

Chapter 2
36
List
ing
Dir
ecto
ries
an
d Fi
les
wit
h ls
Listing Directories and Files with ls (More Goodies)If you’ve been following along, you’re probably an expert at using ls to list directory con-tents and to verify that files and directories were copied as you intended. ls, though, has a couple more handy uses. In particular, you can also use it to
List filenames and information, which is handy for differentiating similar files (Figure 2.1).
List all files in a directory, including hid-den ones, such as .profile and .login configuration files (Code Listing 2.5). See Chapter 8 for more about configura-tion files.
to list filenames and information:
ls -l
At the shell prompt, type ls -l (that’s a lowercase “L,” not a one). You’ll see the list of files in your directory fly by with the fol-lowing information about each file (Code Listing 2.6): Filename. File size. Date of last modification. Permissions information ( find out
more about permissions in Chapter 5). Ownership and group membership
(also covered in Chapter 5).
Figure 2.1 Use ls -l to get extra information about the directories and files in a specific directory.
Ownership and group membership
Date of last modification Filename
Permissions and information for the file
Size Time of last modification or year of last modification
$ ls -l
total 13
-rw-rw-r- 1 ejr users 2151 Jun 29 12:26 current
-rw-rw-r- 2 ejr users 1475 Jun 29 12:35 deb.schedule
-rw-rw-r- 1 ejr users 4567 Jun 29 12:26 new.ideas
drwxrwxr-x 2 ejr users 1024 Jun 29 13:06 other
-rw-rw-r- 1 ejr users 1475 Jun 29 12:22 schedule
Code Listing 2.6 Use ls -l to see a listing of the contents of a directory in long format.
$ ls -a
. .stats deb.schedule other
.. current new.ideas schedule
Code Listing 2.5 If you want to see hidden files, use ls -a.

Using Directories and Files
37
Listing
Directo
ries and Files w
ith ls
Time of last modification (if the file’s been modified recently) or year of last modification (if the file was last modi-fied more than six months previously). Check out touch earlier in this chapter to see how files might have modifica-tion dates in the future.
to list all files in a directory:
ls -la
Enter ls -la at the shell prompt to list all the files in the directory, including hidden files, with full information, as shown in Code Listing 2.7.
tips
You can hide files by giving them a name that starts with a dot (.). That is, profile would not be hidden, but .profile would be.
Remember, you can combine any flags to specify multiple options. For example, if you want to list all files (-a) in the long format (-l) you would use ls -la.
Try ls –ltR to get the complete listing of your current directory, the directories it contains, and so forth until you run out of subdirectories to descend into.
$ ls -la
total 22
drwxrwxr-x 3 ejr users 1024 Jun 29 13:07 .
drwxrwx-- 7 ejr users 1024 Jun 29 12:16 ..
-rw-rw-r- 1 ejr users 6718 Jun 29 13:00 .stats
-rw-rw-r- 1 ejr users 2151 Jun 29 12:26 current
-rw-rw-r- 2 ejr users 1475 Jun 29 12:35 deb.schedule
-rw-rw-r- 1 ejr users 4567 Jun 29 12:26 new.ideas
drwxrwxr-x 2 ejr users 1024 Jun 29 13:06 other
-rw-rw-r- 1 ejr users 1475 Jun 29 12:22 schedule
$
Code Listing 2.7 If you want to see everything, use ls -la.

Chapter 2
38
Mo
vin
g F
iles
wit
h m
v
Moving Files with mvMoving directories and files means moving them from one location (think of location as an absolute file path, like /home/ejr/aFile) in your system to another location (say, /tmp/File or /home/ejr/AnotherFile). Essentially, you have only one version of a file, and you change the location of that version. For example, you might move a directory when you’re reorganizing your directories and files. Or, you might move a file to rename it—that is, move a file from one name to another name.
You move directories and files using mv, as shown in Code Listing 2.8.
to move a file or directory:
1. lsTo begin, use ls to verify the name of the file you want to move. If you’re chang-ing the name of the file, you’ll want to ensure that the new filename isn’t yet in use. If you move a file to an existing file-name, the contents of the old file will be replaced with the contents of the new file.
2. mv existingfile newfileType mv plus the existing filename and the new filename. Say goodbye to the old file and hello to the new one (Code Listing 2.8).You use the same process—exactly—to move directories; just specify the direc-tory names, as in mv ExistingDirectory NewDirectory.
3. lsVerify that the file is now located in the location you intended.
tips
You can also use mv to move files into or out of directories. For example, mv Projects/temp/testfile /home/deb/testfile moves testfile from the Projects and temp subdirectories of the current directory to Deb’s home directory, also using the name testfile.
Use mv -i oldfilename newfilename to require the system to prompt you before overwriting (destroying) existing files. The -i is for “interactive,” and it also works with the cp command.
Check out Chapter 8 to learn how to use aliases with mv so that the system always prompts you before overwriting files and you don’t have to remember the -i flag.
If you use mv and specify an existing directory as the target (as in, mv something ExistingDirectory), “something,” in this case, will be placed into ExistingDirectory. “Something” can be either a file or a directory.
$ ls
Completed existingfile oldfile
$ mv existingfile newfile
$ ls
Completed newfile oldfile
$
Code Listing 2.8 List files to see the current files, then use mv to rename one of the files.

Using Directories and Files
39
Rem
ovin
g Files w
ith rm
removing Files with rmYou can easily—perhaps too easily—remove (delete) files from your Unix system. As Murphy will tell you, it’s a good idea to think twice before doing this; once you remove a file, it’s gone (unless, of course, you plead with your system administrator to restore it from a backup tape—but that’s another story). At any rate, it’s permanent, unlike deletions in Windows or Mac OS, or even many Unix desktop environments like GNOME or KDE, where the Recycle Bin or Trash give you a second chance.
You remove files using rm, as shown in Code Listing 2.9. And, as you’ll see in the following steps, you can remove files one at a time or several at a time.
to remove a file:
1. ls -lList the files in the current folder to verify the name of the file you want to remove.
2. rm -i soon.to.be.gone.fileAt your shell prompt, type rm -i followed by the name of the file you want to remove. The -i tells the system to prompt you before removing the files (Code Listing 2.9).
3. lsIt is gone, isn’t it?
$ ls
Completed oldfile
newfile soon.to.be.gone.file
$ rm -i soon.to.be.gone.file
rm: remove ‘soon.to.be.gone.file’? y
$ ls
Completed newfile oldfile
$
Code Listing 2.9 Use rm -i to safely and carefully remove directories and files.

Chapter 2
40
Rem
ovi
ng
Fil
es w
ith
rm
to remove multiple files:
1. ls -l *.htmlList the files to make sure you know which files you want to remove (and not remove).
2. rm -i *.htmlUsing the asterisk wildcard (*), you can remove multiple files at one time. In this example, we remove all files in the current directory that end with .html. (Refer to Chapter 1, specifically the section called “Using Wildcards,” for details about using wildcards.)or
1. rm -i dangerousHere, -i specifies that you’ll be prompted to verify the removal of a directory or file named dangerous before it’s removed.
2. rm -ir dan*This risky command removes all of the directories or files that start with dan in the current directory and all of the files and subdirectories in the subdirectories starting with dan. If you’re sure, don’t use the -i flag to just have the files removed without prompting you for confirmation. (Remember that the flags -ir could also be written as -i -r or -ri or -r -i. Unix is rather flexible.)
Can You really Screw Up the System?
In general, no. When you log in to a Unix system and use your personal userid, the worst you can do is remove your own directories and files. As long as you’re logged in as yourself, commands you type won’t affect anything critical to the Unix system, only your own personal directo-ries and files. Score one for Unix—as an average user, you cannot really break the system. With Windows, though, it can be a different story.
If you have system administrator rights, meaning that you can log in as root (giv-ing you access to all the system directories and files), you can do a lot of damage if you’re not extremely careful. For this reason, don’t log in as root unless you absolutely have to.
Many newer systems won’t even let you log in as root. Instead, you need to use su or an equivalent, as discussed in Chapter 3. There, you’ll also find more information about su, which can help reduce the risk of being logged in as root.

Using Directories and Files
41
Rem
ovin
g Files w
ith rm
tips
If you have system administrator rights (or are logged in as root, rather than with your userid), be extremely careful when using rm. Rather than remove merely your personal directories or files, you could potentially remove system directories and files. Scope out the sidebar “Can You Really Screw Up the System?”
This is a good time to remind you to use the handy cp command to make backup copies of anything you value—before you experiment too much with rm. Even if the system administrator keeps good back-ups, it’s ever so much easier if you keep an extra copy of your goodies sitting around. Try cp –r . backup_files for a space-hogging—but effective—means of making a quick backup of everything in the current directory into the backup-files directory. ( Just ignore the error message about not copying a directory into itself-the system will do the right thing for you, and you don’t have to worry about it.)
We suggest using rm -i, at least until you’re sure you’re comfortable with irrevocable deletions. The -i flag prompts you to verify your command before it’s executed.
Check out Chapter 8 to find out about using aliases with rm so that the system always prompts you before removing the directories or files even if you forget the -i flag.
If you accidentally end up with a file that has a problematic filename (like one that starts with -, which looks to Unix like a command flag, not a filename), you can delete it (with a trick). Use rm –i -- bad-filename to get rid of it.

Chapter 2
42
Rem
ovi
ng
Dir
ecto
ries
wit
h r
mdi
r
removing Directories with rmdirAnother handy thing you can do is remove directories using rmdir. Think of removing directories as trimming branches on a tree. That is, you can’t be sitting on the branch you want to trim off. You have to sit on the next closest branch; otherwise, you’ll fall to the ground along with the branch you trim off. Ouch! Similarly, when you remove a directory, you must not be located in the directory you want to remove.
You must remove a directory’s contents (all subdirectories and files) before you remove the directory itself. In doing so, you can verify what you’re removing and avoid accidentally removing important stuff. In the following steps (illustrated in Code Listing 2.10), we’ll show you how to remove a directory’s con-tents, and then remove the directory itself.
$ cd /home/ejr/Yourdirectory
$ ls -la
total 7
drwxrwxr-x 2 ejr users 1024 Jun 29 20:59 .
drwxrwx-- 8 ejr users 1024 Jun 29 20:59 ..
-rw-rw-r- 1 ejr users 1475 Jun 29 20:59 cancelled.project.notes
-rw-rw-r- 1 ejr users 2876 Jun 29 20:59 outdated.contact.info
$ rm *
$ cd ..
$ rmdir Yourdirectory
$ ls
Newdirectory all.programs.txt newer.programs short.fortunes
Projects files newest.programs temp
Xrootenv.0 fortunes newstuff touching
all.programs local.programs.txt schedule
$
Code Listing 2.10 Removing directories with rmdir can be a little tedious—but better safe than sorry.

Using Directories and Files
43
Rem
ovin
g D
irectories w
ith rm
dir
to remove a directory:
1. cd /home/ejr/YourdirectoryTo begin, change to that directory by typ-ing cd plus the name of the directory you want to remove.
2. ls -aList all (-a) of the files, including any hidden files that might be present, in the directory, and make sure you don’t need any of them. If you see only . and .. (which indicate the current directory and its parent directory, respectively), you can skip ahead to step 4.
3. Do one or both of these: If you have hidden files in the direc-
tory, type rm .* * to delete those files plus all of the rest of the files.
If you have subdirectories in the directory, type cd and the subdirec-tory name, essentially repeating the process starting with step 1. Repeat this process until you remove all sub-directories.
When you finish this step, you should have a completely empty directory, ready to be removed.
4. cd ..Use the change directory command again to move up one level, to the parent of the directory that you want to remove.
5. rmdir YourdirectoryThere it goes—wave goodbye to the direc-tory! See Code Listing 2.10 for the whole sequence.
tips
You can remove multiple directories at one time. Assuming you’re start-ing with empty directories, just list them like this: rmdir Yourdirectory Yourotherdirectory OtherDirectory
As an alternative to rmdir, you can remove a directory and all of its contents at once using rm with the -r flag; for example, rm -r Directoryname. Be care-ful, though! This method automatically removes the directory and everything in it, so you won’t have the opportunity to examine everything you remove before-hand. If you’re getting asked for confirma-tion before deleting each file and you’re really, absolutely, positively, completely sure that you’re doing the right thing, use rm –rf Directoryname to force immedi-ate deletion.
If you’re getting comfortable with long command strings, you can specify com-mands with a complete directory path, as in ls /home/ejr/DirectorytoGo or rm /home/ejr/DirectorytoGo/*. This tech-nique is particularly good if you want to be absolutely sure that you’re deleting the right directory, and not a directory with the same name in a different place on the system.

Chapter 2
44
Fin
din
g F
org
otte
n F
iles
wit
h fi
nd
Finding Forgotten Files with findWhere, oh where, did that file go? Sometimes finding a file requires more than cursing at your computer or listing directory contents with ls. Instead, you can use the find com-mand, which lets you search in dozens of ways, including through the entire directory tree (Code Listing 2.11) or through directo-ries you specify (Code Listing 2.12).
to find a file:
find . -name lostfile -print
Along with the find command, this specifies to start in the current directory with a dot (.), provide the filename (-name lostfile), and specify that the results be printed onscreen (-print). See Code Listing 2.11.
to find files starting in a specific directory:
find /home/deb -name 'pending*' -print
This command finds all of the files and directories with names starting with pending under Deb’s home directory. You must use single quotes if you include a wildcard to search for.
Or, you can find files under multiple directo-ries at one time, like this:
find /home/deb /home/ejr -name 'pending*' -print
This command finds files with names starting with pending in Deb’s and Eric’s home directories or any subdirectories under them (Code Listing 2.12).
$ find . -name lostfile -print
./Projects/schedule/lostfile
$
Code Listing 2.11 Use find to locate a missing file.
$ find /home/deb -name ‘pending*’ -print
/home/deb/Projects/schedule/pending.tasks
$ find /home/deb /home/ejr -name ‘pending*’ -print
/home/deb/Projects/schedule/pending.tasks
/home/ejr/pending.jobs.to.do.today.to.do
$
Code Listing 2.12 By using wildcards and specifying multiple directories, you can make find yet more powerful.

Using Directories and Files
45
Findin
g Fo
rgotten
Files with
find
to find and act on files:
find ~ -name '*.backup' -ok rm { } \;
Type find with a wildcard expression, followed by -ok (to execute the follow-ing command, with confirmation), rm (the command to issue), and { } \; to fill in each file found as an argument (an additional piece of information) for the command. If you want to, say, compress matching files without confirmation, you might use find ~ -name ‘*.backup’ -exec compress { } \; to do the work for you.
tips
On some Unix systems, you may not need the -print flag. Try entering find without the -print flag. If you see the results onscreen, then you don’t need to add the -print flag.
Avoid starting the find command with the root directory, as in find / -name the.missing.file -print. In starting with the root directory (indicated by the /), you’ll likely encounter a pesky error message for each directory you don’t have access to, and there will be a lot of those. Of course, if you’re logged in as root, feel free to start with /.
If you know only part of the filename, you can use quoted wildcards with find, as in find . -name ‘*info*’ -print.
find offers many chapters’ worth of options. If you’re looking for a specific file or files based on any characteristics, you can find them with find. For example, you can use find /home/shared -mtime -3 to find all files under the shared directory that were modified within the last three days. See Appendix C for a substantial (but not comprehensive) listing of options.

Chapter 2
46
Loca
tin
g L
ost
Fil
es w
ith
loca
te
Locating Lost Files with locateIf you’re looking for a system file—that is, a program or file that is part of the Unix sys-tem itself, rather than one of your personal files in your home directory—try locate to find it. You’ll get more results than you can handle, but it’s a quick and easy way to locate system files.
The locate command isn’t available on all Unix systems, but it is worth a try at any rate. See Code Listing 2.13 for locate in action.
to locate a file:
locate fortune
If you try to locate fortune, you’ll get a listing of all of the system files that contain “fortune” in them. This listing includes the fortune program, fortune data files for the fortune program to use, and related stuff. It’s a huge list in most cases (Code Listing 2.13).
tips
Use locate in combination with grep (see “Using Regular Expressions with grep” in Chapter 6) to narrow down your list, if possible.
Many people use locate to get a quick look at the directories that contain rel-evant files (/usr/share/games/fortunes contains a lot of files related to the for-tune program), then other tools to take a closer look.
Not all systems include fortune—it’s certainly just a fun thing and not essential by any means. If you don’t “locate” it, try looking for bash or zsh (known as shells) to see how locate works. (See Chapter 8 for more information about different shells and their benefits and drawbacks.)
[jdoe@frazz jdoe]$ locate fortune
/usr/share/man/man6/fortune.6.bz2
/usr/share/doc/fortune-mod-1.0
/usr/share/doc/fortune-mod-1.0/cs
/usr/share/doc/fortune-mod-1.0/cs/HISTORIE
/usr/share/doc/fortune-mod-1.0/cs/LICENSE
/usr/share/doc/fortune-mod-1.0/cs/README
/usr/share/doc/fortune-mod-1.0/fr
/usr/share/doc/fortune-mod-1.0/fr/
COPYING.linuxfr
/usr/share/doc/fortune-mod-1.0/fr/
COPYING.glp
/usr/share/doc/fortune-mod-1.0/fr/ffr
...
/usr/share/games/fortunes/songs-poems
/usr/share/games/fortunes/sports.dat
/usr/share/games/fortunes/sports
/usr/share/games/fortunes/startrek.dat
/usr/share/games/fortunes/startrek
/usr/share/games/fortunes/translate-me.dat
/usr/share/games/fortunes/translate-me
/usr/share/games/fortunes/wisdom.dat
/usr/share/games/fortunes/wisdom
/usr/share/games/fortunes/work.dat
/usr/share/games/fortunes/work
/usr/share/games/fortunes/zippy.dat
/usr/share/games/fortunes/zippy
/usr/share/sol-games/fortunes.scm
/usr/games/fortune
[jdoe@frazz jdoe]$
Code Listing 2.13 Use locate to find everything—everything—related to most system files.

Using Directories and Files
47
Linkin
g w
ith ln (H
ard Link
s)
Linking with ln (Hard Links)Suppose your boss just hired an assistant for you (’bout time, right?). You’ll need to make sure your new helper can access your files so you can pawn off your work on him. And you’ll need to access the revised files just so you can keep up with what your helper’s been doing—and perhaps take credit for his work at the next staff meeting.
A great way to give your helper easy access to your files is to create a hard link from your home directory. In making a hard link, all you’re doing is starting with an existing file and creating a link, which (sort of) places the existing file in your helper’s home directory. The link does not create a copy of the file; instead, you’re creating a second pointer to the same physical file on the disk. Rather than the additional pointer being secondary (like an alias or shortcut in Macintosh or Windows computers), both of the pointers reference the same actual file, so from the perspective of the Unix system, the file actually resides in two locations (Code Listing 2.14).
Because using hard links often requires that you have access to another user’s home directory, you might venture to Chapter 5 for details about using chmod, chgrp, and chown to access another user’s directories and files.
$ ls /home/deb/Projects/schedule/our* /home/helper/our*
ls: /home/helper/our*: No such file or directory
/home/deb/Projects/schedule/our.projects.latest
/home/deb/Projects/schedule/our.projects.other
$ ln /home/deb/Projects/schedule/our.projects.latest /home/helper/our.projects
$ ls -l /home/helper/o*
-rw-r-r- 3 ejr users 1055 Jun 26 11:00 /home/helper/our.projects
$
Code Listing 2.14 Hard links let two users easily share files.

Chapter 2
48
Lin
kin
g w
ith
ln (
Har
d Li
nk
s)
to make a hard link:
1. ls -l /home/deb/Projects/schedule/ our* /home/helper/our*
To begin, list the files in both directories to make sure that the file to link exists and that there’s no other file with the intended name in the target directory. Here, we list the files that start with our in both /home/deb/Projects/schedule and in /home/helper. In this example, we’re verifying that the file does exist in Deb’s directory and that no matching files were found in the helper’s directory (Code Listing 2.14).
2. ln /home/deb/Projects/schedule/ our.projects.latest /home/helper/our.projects
Here, ln creates a new file with a similar name in the helper’s home directory and links the two files together, essentially making the same file exist in two home directories.
3. ls -l /home/helper/o*With this code, your helper can verify that the file exists by listing files that begin with o.Now the file exists in two places with exactly the same content. Either user can modify the file, and the content in both locations will change.
tips
You can remove hard links just like you remove regular files, by using rm plus the filename. See the section “Removing Files with rm,” earlier in this chapter.
If one user removes the file, the other user can still access the file from his or her directory.
Hard links work from file to file only within the same file system. To link directories or to link across different file systems, you’ll have to use soft links, which are covered in the next section.
If you’re sneaky, you can use hard links to link directories, not just files. Make a new directory where you want the linked directory to be, and then use ln /home/whoever/existingdirectory/* /home/you/newdirectory/ to hard-link all of the files in the old directory to the new directory. New files won’t be linked auto-matically, but you could use a cron job to refresh the links periodically—say, daily. See Chapter 9 for cron details.

Using Directories and Files
49
Linkin
g w
ith ln -s (S
oft Lin
ks)
Linking with ln -s (Soft Links)Now suppose you want to pawn off your entire workload on your new helper. Rather than just give him access to a single file, you’ll want to make it easy for him to access your entire project directory. You can do this using soft links (created with ln -s), which essen-tially provide other users with a shortcut to the file or directory you specify.
Like hard links, soft links allow a file to be in more than one place at a time; however, with soft links, there’s only one copy of it and, with soft links, you can link directories as well. The linked file or directory is dependent on the original one—that is, if the original file or directory is deleted, the linked file or direc-tory will no longer be available. With hard links, the file is not actually removed from disk until the last hard link is deleted.
Soft links are particularly handy because they work for directories as well as individual files, and they work across different file systems (that is, not just within /home, but anywhere on the Unix system).
Like hard links, soft links sometimes require that you have access to another user’s direc-tory and files. See Chapter 5 for more on file permissions and ownership and Chapter 7 for the lowdown on file systems.

Chapter 2
50
Lin
kin
g w
ith
ln -s
(S
oft
Lin
ks)
to make a soft link:
1. ls /home/deb /home/helperTo begin, list the contents of both users’ home directories. Here, we’re verifying that the directory we want to link does exist in Deb’s directory and that no matching directories or files exist in the helper’s directory. See Code Listing 2.15.
2. ln -s /home/deb/Projects /home/helper/Projects
This command creates a soft link so the contents of Deb’s Projects directory can also be easily accessed from the helper’s home directory.
3. ls -la /home/helperListing the contents of /home/helper shows the existence of the soft link to the directory. Notice the arrow showing the link in Code Listing 2.15.
tip
If you only need to create a link between two files within the same file system, consider using hard links, as discussed in the previous section, “Linking with ln (Hard Links).”
$ ls /home/deb /home/helper
/home/deb:
Projects
/home/helper:
our.projects
$ ln -s /home/deb/Projects /home/helper/Projects
$ ls -la /home/helper/
total 11
d-wxrwx-- 2 helper users 1024 Jun 29 21:18 .
drwxr-xr-x 11 root root 1024 Jun 29 21:03 ..
-rw-rwxr- 1 helper users 3768 Jun 29 21:03 .Xdefaults
-rw-rwxr- 1 helper users 24 Jun 29 21:03 .bash_logout
-rw-rwxr- 1 helper users 220 Jun 29 21:03 .bash_profile
-rw-rwxr- 1 helper users 124 Jun 29 21:03 .bashrc
lrwxrwxrwx 1 ejr users 18 Jun 29 21:18 Projects -> /home/deb/Projects
-rw-rwxr- 3 ejr users 1055 Jun 26 11:00 our.projects
$
Code Listing 2.15 Use ln -s to make soft links and connect directories.

51
Wo
rking
with
You
r Sh
ell
3When you access a Unix system, the first thing you see is the prompt, called the shell prompt, which is where you interact with Unix. The shell determines how easily you can enter and reenter commands and how you can control your environment. What’s cool about Unix is that you’re not stuck with one shell—that is, on most systems you can choose to use shells that have different fea-tures and capabilities.
In this chapter, we’ll look at your shell, show you how to change it, and get you started using a few of the more common shells.
Working with Your Shell
Chapter Contents
Discovering which shell you’re using
Understanding shells and options
Changing your shell
Changing your shell temporarily
Using completion in the bash shell
Viewing session history in the bash shell
Using completion in the zsh shell
Viewing session history in the zsh shell
Changing your identity
Fixing terminal settings
Exiting the shell

Chapter 3
52
Dis
cove
rin
g W
hic
h S
hel
l Yo
u’r
e U
sin
g
Discovering Which Shell You’re UsingWhen you first log in to your Unix account, you’ll be using the default shell on your system. The default shell, its features, and its options depend completely on what your sys-tem administrator specifies. Code Listings 3.1 and 3.2 show examples of how default shell prompts differ on two different systems.
to discover what shell you’re using:
echo $SHELL
At your shell prompt, type echo $SHELL (capitalization counts!). This command tells Unix to display (echo) information about shell settings. This information, by the way, is contained in one of the environment variables, so the technical phrasing (which you might hear in Unix circles) is to “echo your shell environment variable.”The system’s response will be the full path to your shell—something like /bin/zsh, /bin/bash, or /bin/ksh.
tips
You can also use finger userid, substi-tuting your login name for userid, to find out more about your shell settings. You can substitute any other userid and see comparable information about the other account holders. See Chapter 7 for more about finger. (Some systems do not sup-port finger, because finger can be a bit of a security hole.)
You’ll find more information about differ-ent shells and their capabilities through-out this chapter.
xmission> echo $SHELL
/bin/csh
xmission> finger ejray
Login name: ejray In real life: “RayComm"
Directory: /home/users/e/ejray Shell:
/bin/csh
On since Jul 23 06:58:48 on pts/16 from
calvin.raycomm.com
1 minute 28 seconds Idle Time
No unread mail
No Plan.
xmission>
Code Listing 3.1 This ISP account uses the /bin/csh shell by default.
[ejr@hobbes ejr]$ echo $SHELL
/bin/bash
[ejr@hobbes ejr]$ finger ejr
Login: ejr Name: Eric J. Ray
Directory: /home/ejr Shell: /bin/bash
On since Wed Jul 22 07:42 (MDT) on tty1
3 hours 15 minutes idle
On since Thu Jul 23 08:17 (MDT) on ttyp0
from calvin
No mail.
Project:
Working on UNIX VQS.
Plan:
This is my plan—work all day, sleep all
night.
[ejr@hobbes ejr]$
Code Listing 3.2 On hobbes, a Linux system, the default shell is /bin/bash.

Working with Your Shell
53
Un
derstandin
g S
hells an
d Optio
ns
Understanding Shells and OptionsDepending on the particular Unix system you’re using, you may have several shells available to you. Table 3.1 describes a few of the more common ones. Each of these shells has slightly different capabilities and features. Keep in mind that the differences in shells do not affect what you can do in Unix; rather, they affect how easily and flexibly you can interact with the system.
You’ll likely have bash as your shell, but you can change to one of many other shells fairly easily. As Code Listings 3.3 and 3.4 show, you can start by finding out which shells are available to you. Figure 3.1 shows some shells and how they relate to each other.
S h e l l N a m e F e a t u r e s
sh This shell, which is the original Unix shell (often called the Bourne shell), is fine for scripting but lacks a lot of the flexibility and power for interactive use. For example, it doesn’t have features like command completion, e-mail checking, history, or aliasing.
csh and tcsh This family of shells adds great interactive uses but discards the popular scripting support that sh-related shells offer in favor of a C programming-like syntax. Because of the C syntax, this shell is often just called the C shell. Unless you’re a C programmer, these are not likely to be your best choices.
ksh, bash, and zsh These provide a good blend of scripting and interactive capabilities, but they stem from different sources (bash is most similar to sh, hence the Bourne Again SHell name).
Common Unix Shells
table 3.1
Figure 3.1 Shells fit neatly into a few “families” with the exception of a few stragglers. Each shell in a family shares many characteristics with the others in the same family.

Chapter 3
54
Un
ders
tan
din
g S
hel
ls a
nd
Opt
ion
s
to see which shells are available to you:
cat /etc/shells
At the shell prompt, type cat /etc/shells to find out which shells are avail-able to you. Code Listings 3.3 and 3.4 show the results of this command on two different systems.
tips
Before you go leaping forward through the next sections and changing your shell, you might check with your system admin-istrator or help desk to find out which shells they support and sanction.
If all else is equal in terms of support from your system administrator or help desk, and you have no clear preference, we’d suggest zsh as a first choice, with bash as a close second. For most purposes, either will be fine. Power users will like zsh bet-ter in the long run.
Not all systems use /etc/shells to list acceptable shells—you may have to just look for specific shells, as shown later in this chapter.
[ejr@hobbes]$ cat /etc/shells
/bin/bash
/bin/sh
/bin/tcsh
/bin/csh
[ejr@hobbes]$
Code Listing 3.3 A minimal listing of available shells on a Unix system, including the basics but not too much in the way of choices.
xmission> cat /etc/shells
/usr/local/bin/tcsh
/bin/csh
/usr/bin/csh
/bin/ksh
/usr/bin/ksh
/sbin/sh
/usr/bin/sh
/usr/local/bin/zsh
/usr/local/bin/bash
/usr/local/bin/nologin
/usr/local/bin/terminated
/usr/local/bin/xmmenu.email
/usr/local/bin/xmmenu.noshell
/usr/lib/uucp/uucico
xmission>
Code Listing 3.4 These shells are available through an ISP. Notice the additional, custom shells that this ISP uses, including shells that provide special features such as not allowing logins.

Working with Your Shell
55
Chan
gin
g Yo
ur S
hell w
ith chsh
Changing Your Shell with chshIf you decide that you want to change your shell, you probably can, depending on how your system administrator has set things up. As Code Listing 3.5 shows, you would do so using chsh. We usually change to bash.
to change your shell with chsh:
1. cat /etc/shellsAt the shell prompt, list the available shells on your system with cat /etc/shells.
2. chshEnter chsh ( for “change shell”). Code Listing 3.5 shows the system response. Some systems prompt for a password, and some don’t.
3. /bin/zshType the path and name of your new shell.
4. su - youridType su - and your userid to log in again to verify that everything works correctly. If it doesn’t, use chsh again and change back to the original shell or to a different one. If you can’t change back, e-mail your system administrator for help.
continues on next page
[ejr@hobbes ejr]$ cat /etc/shells
/bin/bash
/bin/sh
/bin/tcsh
/bin/csh
/bin/zsh
[ejr@hobbes ejr]$ chsh
Changing shell for ejr.
Password:
New shell [/bin/bash]: /bin/zsh
Shell changed.
ejr@hobbes ~ $
ejr@hobbes ~ $ su - ejr
Password:
ejr@hobbes ~ $
Code Listing 3.5 You must remember the path to the shell to change shells on this system. Additionally, the password check helps ensure that only the account owner changes the shell.

Chapter 3
56
Chan
gin
g Y
ou
r S
hel
l w
ith
chs
h
tips
After changing shells, you might have problems running some commands or have a prompt or display that’s not as good as the original. That’s likely a result of your default shell being carefully cus-tomized by your system administrator. You’re probably on your own to set and configure your new shell, and Chapter 8 can help you do this.
Some systems don’t let users use chsh to change shells. If this is the case, you’ll need to e-mail your system administrator and ask for a change, or see if there are alternative methods, as shown in Figure 3.2. You could also change your shell tem-porarily, as described in the next section.
See “Changing Your Identity with su,” later in this chapter, for more about the su command.
Figure 3.2 Some ISPs provide a handy interface for changing shells that lets users pick their new shells from a menu, like this one.

Working with Your Shell
57
Chan
gin
g Yo
ur S
hell Tem
porarily
Changing Your Shell temporarilyYou can change your shell temporarily by cre-ating a subshell and using that instead of the original shell. You can create a subshell using any shell available on your Unix system. This means that you can look in the /etc/shells file and use a shell listed there, or you can use a shell installed elsewhere on the system (Code Listing 3.6).
to find out which temporary shells you can use:
1. cat /etc/shellsAt the shell prompt, type cat /etc/shells to find out which shells are listed in the shells file.If you don’t find a shell you want to use in the shells file, look for other shells installed elsewhere on the system.
2. ls /usr/local/bin/*shAt the shell prompt, type ls /usr/local/ bin/*sh to find additional shells in the /usr/local/bin directory. Note that not all programs that end with sh are shells, but most shells end with sh (Code Listing 3.6).
to create a temporary shell (subshell):
/usr/bin/csh
At the shell prompt, type the path and name of the temporary shell you want to use. In this case, we’re using the csh shell, located at /usr/bin/csh. You might see a new prompt, perhaps something like the one shown in Code Listing 3.7.
[ejr@hobbes]$ cat /etc/shells
/bin/bash
/bin/sh
/bin/tcsh
/bin/csh
[ejr@hobbes]$ ls /usr/local/bin/*sh
/usr/local/bin/pdksh
[ejr@hobbes]$
Code Listing 3.6 Checking the list of shells from /etc/shells and looking for other programs that end with sh is a good way to find all of the shells on the system.
[ejr@hobbes]$ /usr/bin/csh
ejr>
Code Listing 3.7 Type the shell name (which is really just another Unix command) to change shells.

Chapter 3
58
Chan
gin
g Y
ou
r S
hel
l Te
mpo
rari
ly
to exit a temporary shell (subshell):
exit
At the shell prompt, type exit. You’ll be returned to the shell from which you started the subshell. If you created more than one subshell, you’ll have to exit all of them.
tips
Using temporary shells is a great way to experiment with other shells and their options. We recommend using a tempo-rary shell to experiment with the shells covered in this chapter.
You can also often use c D to exit from a subshell, but this depends on the system configuration. Try it out and see.
See Chapter 1, specifically the listings of directories containing programs, for other places to look for shells.

Working with Your Shell
59
Usin
g Co
mpletio
n in
the bash S
hell
Using Completion in the bash ShellOne of the cool features of the bash shell is command argument completion. With this feature, you can type just part of a command, press t , and have bash complete the com-mand for you (Code Listing 3.8).
to use completion in the bash shell:
1. lsUse ls to list the files in your current directory.
2. cd pub tType a partial command, as shown here, and then press t to complete the command. In this example, we typed the cd command and part of the public_html directory (truncated to pub in the example), then pressed t to complete it (see Code Listing 3.8).
tips
Completion works only if there’s just one possible match to the letters you type before you hit t. For example, if you type cd pu ( for public_html) and there’s another subdirectory called puppy, the shell will beep and wait for you to type in enough letters to distinguish the two subdirectories.
You can use the completion feature to complete commands, directory names within commands, and nearly anything else you might enter that’s sufficiently unambiguous.
bash-2.00$ ls
Complete NewProject bogus2
ftp puppy
Completed News dead.letter
mail temp
Mail access files
public_html testme
bash-2.00$ cd public_html/
bash-2.00$
Code Listing 3.8 In this example, we typed only the ls command followed by cd pub and pressed the t key; bash completed the command for us.

Chapter 3
60
View
ing
Ses
sio
n H
isto
ry in
th
e ba
sh S
hel
l
Viewing Session History in the bash ShellAnother cool feature of the bash shell is that it lets you easily reuse commands from your session history, which shows you the list of commands you’ve used during a session or in previous sessions (Code Listing 3.9). Viewing history is handy for reviewing your Unix session, using previous commands again (rather than retyping them), and modifying (rather than completely retyping) complex commands.
to view session history in the bash shell:
1. Use the shell for a little while, changing directories, redirecting output, or doing other tasks.Take your time. We’ll wait.
2. Press the W key one time.Note that the last (previous) command you used appears on the command line, as shown in Code Listing 3.9. To reissue the command, just press e.
3. Continue to press W or Z to scroll back or forward through your history. When you reach a command you want to use, press e.If you see a command that’s close, but not exactly what you want to use, you can edit it. Just use the A and S keys to move across the line, insert text by typing it, and use B or D to delete text. When you’ve fixed the command, press e (you don’t have to be at the end of the line to do so).
4. historyType history at the shell prompt to see a numbered list of previous commands you’ve entered.
[ejr@hobbes clean]$ ls
background.htm info.htm logo.gif
[ejr@hobbes clean]$ ls
background.htm info.htm logo.gif
[ejr@hobbes clean]$ history
1 free
2 id deb
3 id ejr
4 uname -a
5 ls
...
40 cd
41 cp .bash_history oldhistory
42 vi .bash_history
43 elm
44 ls -la
45 ls -la .e*
46 elm
47 lynx
48 history
49 vi .bash*his*
50 history
51 cd clean
52 ls
53 ls
54 history
[ejr@hobbes clean]$ !40
cd
[ejr@hobbes ejr]$
Code Listing 3.9 In this example, we typed the first command, then pressed the W key to reuse the previous ls command. !40 recycled the 40th command from the listing.

Working with Your Shell
61
Viewin
g S
ession
Histo
ry in th
e bash Sh
ell
tips
Commands from the current session are kept in memory to scroll through, while commands from previous sessions are kept in the ~/.bash_history file. You can edit .bash_history with any editor to delete unneeded commands or simply delete the file to get rid of the whole his-tory file, which will then be re-created with the next command you issue. (A history of commands is a great jumping-off point to write a script to do the com-mands automatically. Chapter 10 gives you the specifics.)
When you’re viewing the history, you can recycle commands by typing an exclamation point (!) and the line num-ber of the command you want to run again. You’d type !40, for example, to rerun command 40.
Use history followed by a number to specify the number of items to list. For example, history 10 shows the last 10 commands.
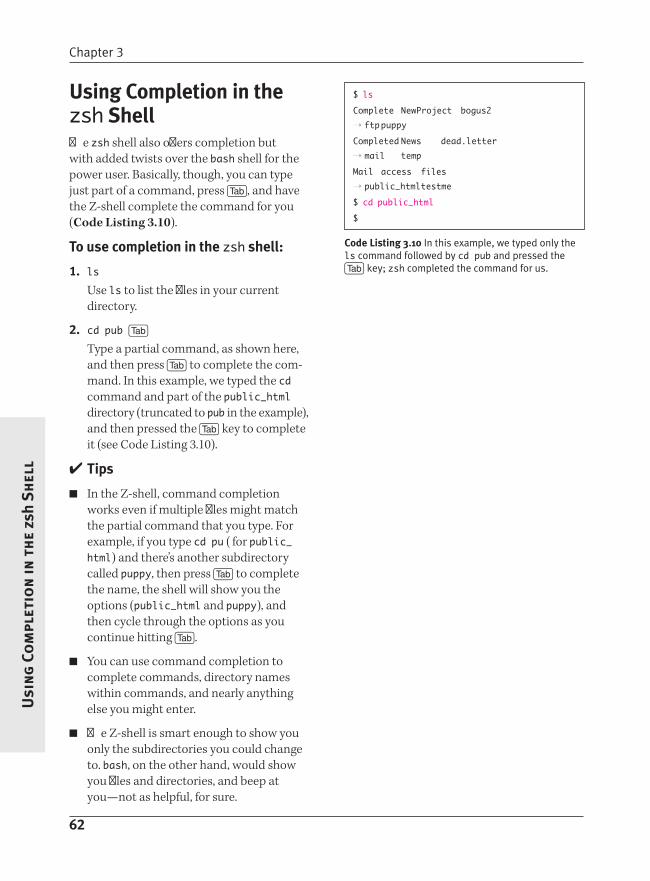
Chapter 3
62
Usi
ng
Co
mpl
etio
n in
th
e zs
h S
hel
l
Using Completion in the zsh ShellThe zsh shell also offers completion but with added twists over the bash shell for the power user. Basically, though, you can type just part of a command, press t, and have the Z-shell complete the command for you (Code Listing 3.10).
to use completion in the zsh shell:
1. ls Use ls to list the files in your current directory.
2. cd pub t
Type a partial command, as shown here, and then press t to complete the com-mand. In this example, we typed the cd command and part of the public_html directory (truncated to pub in the example), and then pressed the t key to complete it (see Code Listing 3.10).
tips
In the Z-shell, command completion works even if multiple files might match the partial command that you type. For example, if you type cd pu ( for public_html) and there’s another subdirectory called puppy, then press t to complete the name, the shell will show you the options (public_html and puppy), and then cycle through the options as you continue hitting t.
You can use command completion to complete commands, directory names within commands, and nearly anything else you might enter.
The Z-shell is smart enough to show you only the subdirectories you could change to. bash, on the other hand, would show you files and directories, and beep at you—not as helpful, for sure.
$ ls
Complete NewProject bogus2
ftp puppy
Completed News dead.letter
mail temp
Mail access files
public_html testme
$ cd public_html
$
Code Listing 3.10 In this example, we typed only the ls command followed by cd pub and pressed the t key; zsh completed the command for us.

Working with Your Shell
63
Viewin
g S
ession
Histo
ry in th
e zsh Sh
ell
Viewing Session History in the zsh ShellThe Z-shell also lets you easily reuse com-mands from your session history, which is the list of commands you’ve used during a session or in previous sessions (Code Listing 3.11). The history functions are handy for reviewing your Unix session, reusing previous commands (instead of retyping), and modify-ing (rather than completely redoing) long or complex commands.
to view session history in the zsh shell:
1. Use zsh as you usually would, changing directories, redirecting output, or doing other tasks. For example, review the previ-ous chapter and practice the commands you’ve learned so far.
2. Press W one time.Note that the last (previous) command you used appears on the command line, as shown in Code Listing 3.11. To reissue the command, just press e.
3. Continue to press W or Z to scroll back or forward through your history. When you reach a command you want to use, press e.If you see a command that’s close but not exactly what you want to use, you can edit it. Just use the A and S keys to move across the line. Then, insert text by typing it or using B or D to delete text. When you’ve modified the com-mand, press e (you don’t have to be at the end of the line to do so).
4. Type history at the shell prompt to see a numbered list of previous commands you’ve entered.
continues on next page
[ejr@hobbes clean]$ ls
background.htm info.htm logo.gif
[ejr@hobbes clean]$ ls
background.htm info.htm logo.gif
[ejr@hobbes clean]$ history
1 free
2 id deb
3 id ejr
4 uname -a
5 ls
...
40 cd
41 cp .bash_history oldhistory
42 vi .bash_history
43 elm
44 ls -la
45 ls -la .e*
46 elm
47 lynx
48 history
49 vi .bash*his*
50 history
51 cd clean
52 ls
53 ls
54 history
[ejr@hobbes clean]$ !40
cd
[ejr@hobbes ejr]$
Code Listing 3.11 In this example, we typed the first command, and then pressed the W key to reuse the previous command. !40 recycled the 40th command from the listing.

Chapter 3
64
View
ing
Ses
sio
n H
isto
ry in
th
e zs
h S
hel
l
tips
If you have just a minor change to a command, you can edit it quickly and easily. For example, if you just used ls /home/_users/e/eric and wanted to issue cd /home/_users/e/eric next, you could just type ^ls^cd to tell the system to replace ls from the previous command with cd and then reissue the command.
You can use c A and c E while editing a command line to move to the beginning and end of the line, respectively.
Commands from the current session are kept in memory to scroll through, while commands from previous sessions are kept in the ~/.zsh_history file. You can edit .zsh_history with any editor to delete unneeded commands or simply delete the file to get rid of the whole his-tory file, which will then be re-created with the next command you issue.
Reviewing session history is a great way to identify your work patterns and needs. If you find yourself repeatedly using the same series of commands, consider writ-ing a script to do the commands auto-matically, as Chapter 10 describes.
Most of the command completion options from bash also work in zsh. Give them a try!

Working with Your Shell
65
Chan
gin
g Yo
ur Iden
tity with
su
Changing Your Identity with suOccasionally, you may need to log in with a userid other than your own or need to relog in with your own userid. For example, you might want to check configuration settings that you’ve changed before logging out to make sure that they work. Or, if you change your shell, you might want to check it before you log out (and you should do that, by the way).
You can use the su (substitute user) com-mand to either log in as another user (Code Listing 3.12) or to start a new login shell.
[ejr@hobbes asr]$ ls
Projects testing
[ejr@hobbes asr]$ su asr
Password:
[asr@hobbes asr]$ ls
Projects testing
[asr@hobbes asr]$ su - ejr
Password:
[ejr@hobbes ejr]$ ls
Mail editme script2.sed
Projects fortunes.copy scriptextra.sed
Xrootenv.0 fortunes1.txt sedtest
above.htm fortunes2.txt sorted.address.temp
address.book groups temp.htm
address.temp history.txt tempsort
axhome html.htm test
bogus html.html test2
chmod.txt mail testing.gif
clean manipulate testing.wp
compression nsmail typescript
[ejr@hobbes ejr]$ exit
[asr@hobbes asr]$ exit
[ejr@hobbes ejr]$ exit
Code Listing 3.12 Changing back and forth from one user to another (and exiting from multiple shells) can get a little confusing, but the prompt often tells you who you are and what directory you’re in.

Chapter 3
66
Chan
gin
g Y
ou
r Id
enti
ty w
ith
su
to log in as a different user with su:
su asr
At the shell prompt, type su plus the userid of the user you’re logging in as. You’ll be prompted for a password just as though you were logging in to the system for the first time (Code Listing 3.12).If you do not specify a username, the sys-tem will assume you mean the root user.If you’re logged in as root to begin with, you won’t be prompted to give a password.You will now be logged in as the new user and be able to work just as if you were that user, though you’ll be in the same directory with the same settings that you had before you issued the su command.
to start a new login shell with su:
su - yourid
At the shell prompt, type su - yourid (of course, use your own userid or that of the user you want to change to). The addi-tion of the hyphen (-) will force a new login shell and set all of the environment variables and defaults according to the settings for the user.
to return to the previous shell:
exit
Type exit at the shell prompt to leave the current shell and return to the previ-ous one. If you use exit from the original login shell, you’ll log completely out of the Unix system.
tips
If you have root access and you ssh to the system to administer it, you should use su to provide a little extra security. Rather than log in directly as root and leave the remote possibility of having your password stolen (or sniffed) off your local system, log in as yourself, then use su (with no other information) to change to root.
If you su to another user with su user (no hyphen) and the new user doesn’t have read and execute permissions for the current directory, you will see shell error messages. You can disregard these. See Chapter 5 for more about read and execute permissions.

Working with Your Shell
67
Fixing
Termin
al Settin
gs w
ith stty
Fixing terminal Settings with sttyAnother handy thing you can do with your shell is use it to fix those annoying problems that occur with terminal programs. Back in Chapter 1, we mentioned that you might encounter oddities such as your B and D keys not working properly. You can fix these problems using stty (see Code Listing 3.13).
to fix B and D key oddities with stty:
stty erase '^?'
If you’re accustomed to using B to erase characters to the left of the cursor and you just get a bunch of ^H symbols on the screen when you try it, you need to educate the terminal about your preferences. Type stty erase and press B to fix it (Code Listing 3.13).In some cases, depending on your termi-nal program, you might need to set stty erase ‘^H’ and then press c H to backspace. To enter this command, type stty erase and press c V, then c H (Code Listing 3.14).
to fix general terminal weirdness with stty:
stty sane
Typing stty sane at the shell prompt will fix a lot of oddities. For example, if you accidentally issue a bad command and all of a sudden nothing shows up on the screen or if you have general gibberish showing up on the screen, stty sane may return your terminal session to sanity.The reset command is also often effective at fixing a messed-up terminal.
tips
If stty sane doesn’t fix a messed-up display, try reset or even logging out and logging back in or restarting your termi-nal program.
You can fix B oddities perma-nently by adding the appropriate stty command to your configuration files or by making changes in your terminal client. See Chapter 8 for details about your configuration files. Refer to Chapter 1 for more helpful details about terminal programs like ssh and telnet.
xmission> ls ^?^?^?^?
: No such file or directory
xmission> stty erase ‘^?’
xmission> ls
Code Listing 3.13 You can often straighten out a confused telnet program or Unix system by using an stty command. This one fixes the errant B key.
xmission> jf^H^H
jf^H^H: Command not found
xmission> ls ^H^H
: No such file or directory
xmission> stty erase ‘^H’
xmission>
Code Listing 3.14 The stty command here fixes the D key to work like B.

Chapter 3
68
Exit
ing
th
e S
hel
l
Exiting the ShellWhen you’re finished with your Unix session, you need to exit the Unix shell. If you’ve been playing with the su and shell commands, you might actually have shells within shells and need to exit from all of them. All you have to do is type exit once for each shell.
to exit from the shell:
exit
At the shell prompt, type exit. Ta-da!
tips
If you’re located at the login shell prompt, you could also type logout rather than exit. At all other shells, though, you need to type exit. In some cases, you could also press c D, but that depends on your local system configuration.
Be sure to log off rather than simply close your window or break your connection. It’s possible, if the settings at your Unix host are seriously incorrect, that your ses-sion could remain open and someone else could pick up right where you left off with your session under your userid.

69
Creating
and Editin
g Files
4Creating and editing files are likely the most common tasks you’ll perform in Unix. If you’re programming, developing Web pages, sending email (uh-huh, really), or just writing a letter, you’ll spend a lot of time in an editor.
In this chapter, we’ll introduce you to three of the most common editors: pico (and nano comes along for free), vi, and emacs. We’ll launch this chapter with a general overview of each, and then discuss some how-tos of using each one. With the information pre-sented here, you’ll be able to choose an editor based on your needs and get started using it (or using all of them).
Creating and Editing Files
Chapter Contents
Choosing an editor
Starting pico and dabbling with it
Saving in pico
Cutting and pasting text blocks in pico
Checking spelling in pico
Getting help in pico
Exiting pico
Starting vi and dabbling with it
Saving in vi
Adding and deleting text in vi
Importing files into vi
Searching for and replacing text in vi
Exiting vi
Starting emacs and dabbling with it
Using emacs menus to spell-check
Saving in emacs
Exiting emacs

Chapter 4
70
Cho
osi
ng
an
Edi
tor
Choosing an EditorBasically, all editors are designed to do the same things: enable you to create, modify, and save text files. These files could include configuration files, email messages, or shell scripts—essentially any text file you can cre-ate. Exactly which editor you choose is up to you, depending on your specific needs and how much you’re willing to learn.
In this book, we’ll stick to three biggies—pico, vi, and emacs—which will likely give you all the capabilities you’ll need. We chose these because pico is (arguably) the easiest Unix editor to use, vi is one of the most pow-erful and is available on almost every Unix system, and emacs provides an unbelievable number of options and is a handy tool for the up-and-coming Unix pro to have.
About picopico is one of the more straightforward Unix editors and has become quite popular because it’s extremely easy to use. In particu-lar, as shown in Figure 4.1, it’s menu-driven and intuitive. All of the commands are visible, and you can open, modify, and close files with little effort. pico is a great choice if you’re just getting started with Unix or if you won’t be needing an editor able to leap tall files in a single bound.
For a variety of reasons, mostly connected to open source licensing issues, a clone of pico, called nano, has been developed and is included in a number of Linux/Unix distribu-tions as well as on systems that you might be using. The nano editor is command-for-command the same as pico, but it does offer some supplemental higher-end (yet still easy-to-use) features.
Editors Abound
By the way, dozens of other editors exist, such as
ed, ex, and red, which are simple (in functionality, but not necessarily usage) line-by-line editors
joe and jed, which are fairly simple editors and comparable to pico in many ways
Figure 4.1 pico offers onscreen command reminders to make it easier to use.

Creating and Editing Files
71
Cho
osin
g an
Editor
For the purposes of this book, we’re going to treat pico and nano as equivalent—if you have nano, just mentally write that in wherever you see pico.
pico is distributed with the pine email program, so if you have pine available to you, you likely also have pico. (See Chapter 1 for a reminder on how to find out if pine and pico are available to you.) If pico is not available to you, and if you cannot find nano either, ask your system administrator to install one or the other.
About viAlthough vi is likely responsible for much of Unix’s reputation for being complicated and confusing, it offers enormous power and flexibility. Plus, vi is universally available (unlike pico), so for these two reasons, you should consider taking the time to learn it. You might find vi cryptic, counterintuitive, and nitpicky, and for this reason, you might want to choose a different editor if you won’t require vi’s capabilities. As Figure 4.2 shows, if you use vi, you won’t have menus at your disposal—you’ll have to get used to using commands like q:q or q:%s/vi is arcane/vi is powerful/.
Yes, continuing the theme from a couple of paragraphs ago, there is an equivalent of vi, called vim, that’s licensed differently and that’s somewhat more powerful. For basic use—everything in this book and far more—the two are identical. In this case, though, you will always find vi, even if it’s really vim (vi may actually be a symlink, or shortcut, to vim). If you find vim, though, it will assuredly be vim. All commands will be the same, so just dive in and enjoy.
Figure 4.2 vi gives you a clean screen and makes you remember all of its cryptic commands.

Chapter 4
72
Cho
osi
ng
an
Edi
tor
About emacsWith emacs, you start to understand how incredibly customizable Unix can be. It can be “just” an editor—although a very power-ful one with all kinds of helpful features—or it can be an email program, file manager, or darn near anything else. We’re going to stick to just the editorial functions, but if you find that you like emacs, don’t hesitate to explore the Web for other options and features of this editor. Figure 4.3 shows you what to expect from emacs, including the handy (and fairly familiar) menus.
tips
You aren’t bound to one editor or another. You can use any editor at any time. We often use pico for email or plain writing because we can type without thinking. We switch to vi when we really need power or just want to make a quick edit without pico’s menus, which often seem cumber-some to us.
You can specify a default editor that will launch automatically in programs that start up an editor for you. Chapter 8 provides details about setting your editor environment variable.
See Chapter 8 for more information about configuration files, Chapter 10 for more about shell scripts, and Chapter 11 for more about email.
If you type pico and get an error mes-sage telling you that the command is not found, use find, whereis, or ls to search through the likely directories (/usr/bin or /usr/local/bin) to see whether the pro-gram is available but not located where your shell can find it. See Chapter 1 for a quick review.
After you establish a file and start adding content, save your changes using the instructions in the next section.
You can get helpful information about pico’s features by accessing pico help. See the section called “Getting Help in pico,” later in this chapter.
Figure 4.3 emacs provides both menus and power, all at once.

Creating and Editing Files
73
Starting
pico and D
abbling
with
It
Starting pico and Dabbling with ItYou can start and dabble with pico using the following steps. Notice that the pico inter-face is intuitive and easy to navigate in, as shown in Figure 4.4.
to start pico and dabble with it:
1. picoTo begin, type pico at the shell prompt. The program starts up and you’ll see something like Figure 4.4, with the text area up at the top of the window and the command hints down at the bottom.If you know the name of the file you want to edit, type pico at the shell prompt fol-lowed by the path and name of the file you want to edit (hairyspiders, for example).
2. hairyspidersGo ahead. Type something—anything—just to try it out. Use d and B to help
edit text. Use the arrow keys to move up,
down, right, or left.
tips
Start pico with the -w option (e.g., pico -w filename) to disable word wrapping. You’ll find this particularly useful when editing configuration files, as covered in Chapter 8.
Throughout pico, you’ll see ^C, ^J, and dozens of other ^something characters hanging out in the menu at the bottom. The ^ stands for Ctrl, so ^C is cC, ^J is cJ, and so on.
Figure 4.4 pico offers an intuitive interface for editing text.

Chapter 4
74
Sav
ing
in p
ico
Saving in picoYou’ll generally save your files frequently whenever you’re editing them—and you should. Remember, Murphy is watching you!
to save in pico:
cO
Use cO periodically to save (write “out”) the text you’re editing.
hairyspiders
Specify the filename for your file (Figure 4.5).
tips
After you save a file for the first time and want to save new changes, just press cO and then press e to confirm the current filename and save it.
When you exit pico, you’ll get a last chance to save your changes. See “Exiting pico” in this chapter for the specifics.
If you try to save a new file over an exist-ing one—which would obliterate the original—pico carefully asks you if you want to overwrite the file. Answer Yes, and you’ll no longer have the original; No, and you’ll get to choose a new filename.
Figure 4.5 In pico lingo, “writing out” just means “saving.”
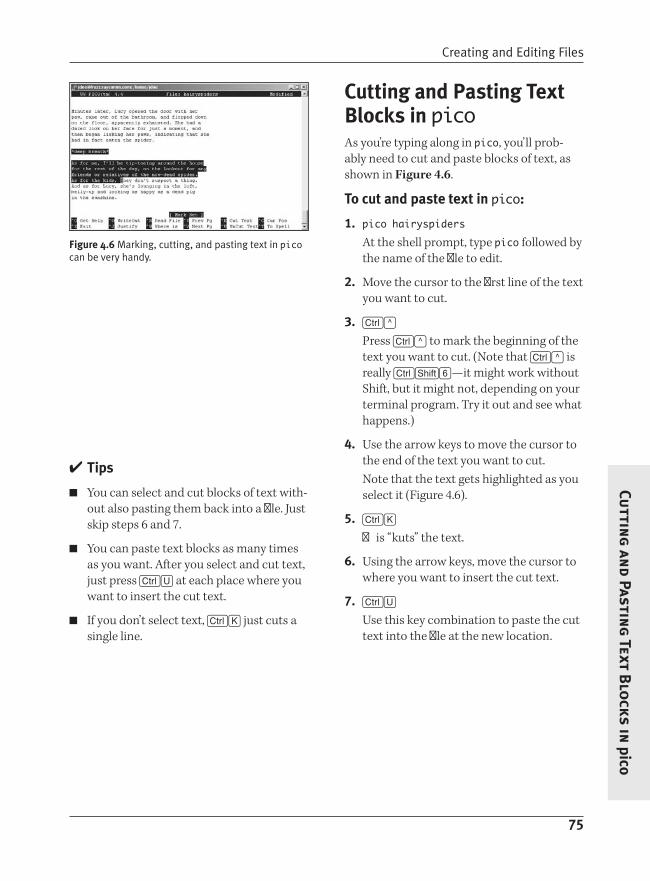
Creating and Editing Files
75
Cuttin
g an
d Pasting
Text Blo
cks in
pico
Cutting and Pasting text Blocks in picoAs you’re typing along in pico, you’ll prob-ably need to cut and paste blocks of text, as shown in Figure 4.6.
to cut and paste text in pico:
1. pico hairyspidersAt the shell prompt, type pico followed by the name of the file to edit.
2. Move the cursor to the first line of the text you want to cut.
3. c^
Press c^ to mark the beginning of the text you want to cut. (Note that c^ is really cs6—it might work without Shift, but it might not, depending on your terminal program. Try it out and see what happens.)
4. Use the arrow keys to move the cursor to the end of the text you want to cut.Note that the text gets highlighted as you select it (Figure 4.6).
5. cK
This “kuts” the text.
6. Using the arrow keys, move the cursor to where you want to insert the cut text.
7. cU
Use this key combination to paste the cut text into the file at the new location.
Figure 4.6 Marking, cutting, and pasting text in pico can be very handy.
tips
You can select and cut blocks of text with-out also pasting them back into a file. Just skip steps 6 and 7.
You can paste text blocks as many times as you want. After you select and cut text, just press cU at each place where you want to insert the cut text.
If you don’t select text, cK just cuts a single line.
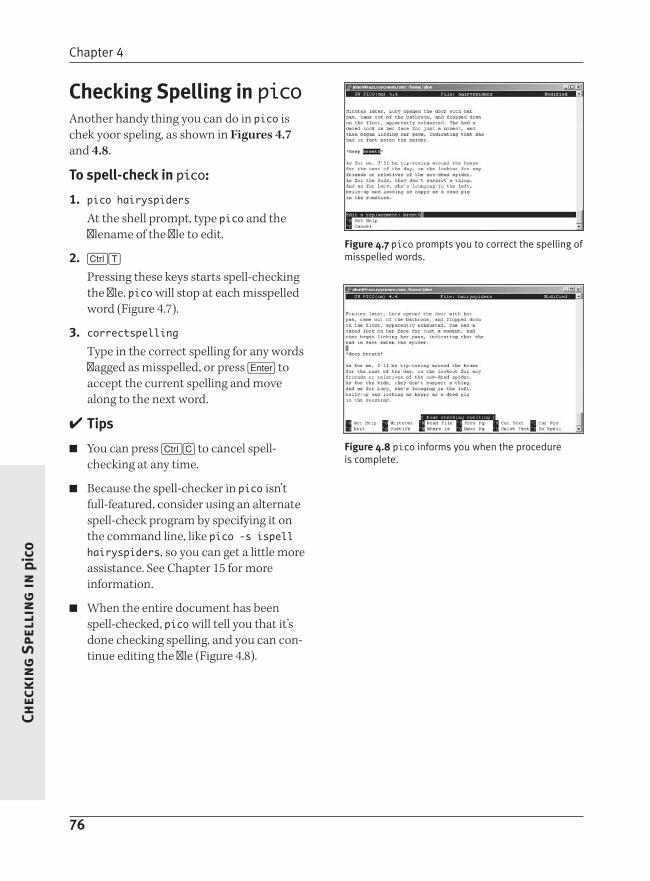
Chapter 4
76
Chec
kin
g S
pell
ing
in p
ico
Checking Spelling in picoAnother handy thing you can do in pico is chek yoor speling, as shown in Figures 4.7 and 4.8.
to spell-check in pico:
1. pico hairyspidersAt the shell prompt, type pico and the filename of the file to edit.
2. cT
Pressing these keys starts spell-checking the file. pico will stop at each misspelled word (Figure 4.7).
3. correctspellingType in the correct spelling for any words flagged as misspelled, or press e to accept the current spelling and move along to the next word.
tips
You can press cC to cancel spell-checking at any time.
Because the spell-checker in pico isn’t full-featured, consider using an alternate spell-check program by specifying it on the command line, like pico -s ispell hairyspiders, so you can get a little more assistance. See Chapter 15 for more information.
When the entire document has been spell-checked, pico will tell you that it’s done checking spelling, and you can con-tinue editing the file (Figure 4.8).
Figure 4.7 pico prompts you to correct the spelling of misspelled words.
Figure 4.8 pico informs you when the procedure is complete.

Creating and Editing Files
77
Gettin
g H
elp in pico
Getting Help in picoA great way to find out more about pico is to access pico help. In addition to finding answers to your questions, you can find out about pico features and capabilities of which you may not be aware (Figure 4.9).
to get help in pico:
1. cG
In pico, press cG to access help.
2. Move through the help pages: cV moves you down through the
help page. cY moves you up through the
help page.
3. cX
Use this combination to exit help.
to get help with pico startup options:
man pico
At the shell prompt, type man pico to learn more about startup options, includ-ing a variety of options that control how pico works.
tips
Keep your eyes on the pico status line for current information, error messages, and occasional hints about using pico. The status line is the third line from the bot-tom of the screen, just above the menu, as shown in Figure 4.9.
Keep in mind that pico really is a very basic program. If you’re looking for a com-mand or function that isn’t readily avail-able, it’s probably not there. You might check out vi or emacs instead. And keep in mind that nano is like pico but does have some supplemental features (and you don’t have to learn another editor). It too may be worth a try.
Figure 4.9 pico gives you all the information you need.

Chapter 4
78
Exit
ing
pic
o
Exiting picoWhen you’re done editing in pico, you’ll exit it using the following steps.
to exit pico:
1. cX
Within pico, press cX. If you haven’t made any changes to the text since you last saved the file, you’ll find yourself immediately back at the shell prompt. If you have made changes, you’ll be prompted to “Save modified buffer” (Figure 4.10).
2. At the “Save modified buffer” prompt: Press Y if you want to save your
changes. Proceed to step 3. Press N if you don’t want to save your
changes. You’ll end up back at the shell prompt.
3. bighairyspidersSpecify the filename for your file if it’s the first time you’ve saved it. If you’ve saved it before, press e to confirm the current filename or change the name to save a copy and not change the original file.
tip
A buffer is what the computer uses to temporarily store information, and if it’s modified, that means that it’s temporarily storing something that you haven’t saved to disk.
Figure 4.10 pico gives you the opportunity to “Save modified buffer.” Without the techno-babble, this means to save the text you just wrote or edited before you exit.

Creating and Editing Files
79
Starting
vi and D
abbling
with
It
Starting vi and Dabbling with ItBefore you go running off to use vi, under-stand that it has two modes (both of which look pretty much like Figure 4.11):
Insert mode (sometimes called input mode), in which the keys you press actu-ally show up in the file that you’re editing. You use this mode to add or change text.
Normal mode (sometimes called com-mand mode), in which every keystroke is interpreted as a command. You use this mode to do everything except enter text.
What’s confusing for many people about vi is that it starts you in command mode, mean-ing that if you just start typing, you may see some blank spaces, characters, and bits of words that you type—essentially, a bunch of garbage that does not exactly represent what you’re typing—and you’ll hear a lot of beep-ing. So, as we’ll show you in the following steps, you’ll need to access the input mode as soon as you start vi.
to start vi:
1. viAt the shell prompt, type vi. The program starts up and you’ll see something like Figure 4.11. The ~ symbols show blank lines below the end of the file.
2. iType i to get into input mode. This itself is a command issued in command mode, so it won’t show up on the screen.
continues on next page
Figure 4.11 The vi editor inundates you with tons of onscreen help and advice, as shown here. Well, documentation is available, but the vi interface itself isn’t really helpful at all!

Chapter 4
80
Star
tin
g v
i an
d D
abbl
ing
wit
h It
3. hairy spiders lurkIn input mode, type anything you want.Everything you type will show up on the screen until you return to command mode by pressing q. When you are in command mode, you can use the arrow keys to navigate up and down in the file line by line and use cF and cB to scroll one screen forward and backward, respectively.
tips
To get help for vi, type man vi. See Chapter 1 for more about man pages.
If you’re not sure what mode you’re in, press q to go into command mode. If you’re already in command mode, you’ll hear a beep. If you’re in input mode, you’ll change to command mode.
Many Unix-like systems, including Linux and Mac OS, actually provide a program called vim in the place of vi. vim (VI iMproved) is like vi but feature-rich and more flexible, and you can still start it with the command vi.
You can open specific files or even multiple files when you access vi. At the shell prompt, type vi filetoedit (or whatever) to open a specific file. Or, for example, type vi *.html to open all of the HTML documents in a directory, then use q:n ( for “next”) and then press e to move to each subsequent file.
See “Adding and Deleting Text in vi” later in this chapter for more details about editing in vi.

Creating and Editing Files
81
Savin
g in
vi
Saving in viYou’ll want to save changes to your docu-ments frequently, especially as you’re learning to use vi (Figure 4.12). Until you’re accus-tomed to switching between command and input mode, you may accidentally type in commands when you think you’re typing text, with unpredictable results. To save files, just follow these steps.
to save text in vi:
q:w limerick
Press q to get out of input mode and into command mode, then type :w ( for “write,” as in write to the disk) followed by a space and then the filename (limer-ick, in this example) you want to use for the file, then press e. If you’ve already saved the file once, just press q and type :w, then press e.
tips
If you’ve already saved your file at least once, you can save changes and exit vi in one fell swoop. In command mode, type :wq ( for “write quit”). For more informa-tion about quitting vi, see the section “Exiting vi,” later in this chapter.
If you want to save a file over an existing file (obliterating the original as you do), use :w! existingfilename in command mode. The ! forces vi to overwrite the original.
Figure 4.12 Save early, save often. That’s the safe rule for vi.

Chapter 4
82
Add
ing
an
d D
elet
ing
Tex
t in
vi
Adding and Deleting text in viAdding and deleting text in vi is a bit more complicated than doing the same in pico. Whereas in pico, you basically just place your cursor where you want to make changes, vi has a whole slew of commands that you use to specify where the changes should occur. (Tables 4.1, 4.2, and 4.3 list only a very few of your options.) Plus, to issue the commands, you have to switch to command mode.
to add or delete text in vi:
1. viTo begin, type vi at the shell prompt.
2. iChange into input mode.
3. There once was a man from NantucketType some text that you’ll want to add to.
4. q
Press q to enter command mode before you issue the commands.
5. Choose a command, based on what you want to do to the text.Table 4.1 lists commands to add text.Table 4.2 lists commands to delete text.Table 4.3 lists miscellaneous editing com-mands.
6. ddType the command. Here, we’re deleting the current line of text.
C o m m a n d F u n c t i o n
a Adds text after the cursorA Adds text at the end of the current linei Inserts text before the cursorI Inserts text at the beginning of the current lineo Inserts a blank line after the current lineO Inserts a blank line before the current line
vi Commands to Add text
table 4.1
C o m m a n d F u n c t i o n
x Deletes one character (under the cursor)X Deletes one character (behind the cursor)dd Deletes the current line5dd Deletes five lines starting with the current line
(any number would work here)dw Deletes the current wordcw Changes the current word (deletes it and
enters input mode)r Replaces the character under the cursor with
the next character you typeR Replaces the existing text with the text
you type (like overtype mode in most word processors)
vi Commands to Delete text
table 4.2
C o m m a n d F u n c t i o n
yy Copies the current linep Pastes any copied text after the cursor or lineJ Joins the current and following linesu Undoes the last changeU Undoes all changes on the current line. Repeats the last command
Other Handy vi Editing Commands
table 4.3

Creating and Editing Files
83
Impo
rting
Files into
vi
Importing Files into viYou can also merge multiple files in vi by reading additional files into the current one, as shown in Figure 4.13. Basically, all this means is that you insert one file into the file you’re currently editing.
to import files in vi:
1. vi hairyspiderAt the shell prompt, type vi followed by the filename to start vi with, in this case, the hairyspider file.
2. q:r filename
At the point in the file where you want to import text, press q, then type :r and the filename you want to read into the file.
tip
vi also lets you read the output of com-mands into the file. For example, if you want to read the list of files in a specific directory into the file, use q:r !ls in command mode.
Figure 4.13 Reading an additional file into the current one can make your editing tasks much easier.

Chapter 4
84
Sea
rch
ing
an
d R
epla
cin
g in
vi
Searching and replacing in viOne of vi’s better features (and advantages over pico) is that it allows you to search and replace throughout entire files. As shown in the next sections, you can just find a spe-cific string of text (a regular expression, in Unix lingo; see Figure 4.14), or you can find the text and replace it with other text, as in Figure 4.15.
to find a string of text in vi:
1. vi hairyspiderFor starters, access vi and a specific file.
2. q/spider
Enter command mode, then type / fol-lowed by the text you’re looking for. Here, we’re looking for “spider,” but you may be looking for “the fly” or “wiggled and jiggled and tickled inside her.” Or whatever.
3. e
Press e to find the first occurrence of the term. Type n to find the next one.
to search and replace in vi:
1. vi hairyspiderFor starters, access vi and a specific file.
2. q:%s/swallowed the fly/swallowed a spider to catch the fly/
Enter q:%s/ plus the text to find, another /, followed by the replacement text, as in Figure 4.15. Here, we replace “swallowed a fly” with “swallowed a spider to catch the fly,” but perhaps you might forego the spider and simply go for some antacid.
Figure 4.14 Searching for text in vi is quick and reliable.
Figure 4.15 Replacing text in vi requires a bit of arcane syntax, but you get used to it quickly.

Creating and Editing Files
85
Search
ing
and R
eplacing
in vi
tips
A great use for the search-and-replace feature is if you end up with DOS text files in your Unix account (by uploading a text file from a Windows machine as a binary file, most likely). If you view DOS files through a Unix shell, all the lines in the file will end with ^M. But if you try to type ^M when you’re doing a search and replace, the ^M won’t show up. What to do? Press cV, then cM. Just search and replace with :%s/cVcM//g. The cV command “escapes” the fol-lowing character, so you can press it with-out actually doing what the command would otherwise do. If you don’t escape the cM, vi thinks you just pressed e and tries to execute the unfinished command.
See the section on grep in Chapter 6 for information about searching with regular expressions.
Add a g at the end of the command to make it apply to all occurrences in the file. Otherwise, it applies only to the first occurrence on each line.

Chapter 4
86
Exit
ing
vi
Exiting viWhew! Time to exit vi (Figure 4.16).
to exit vi:
q:q
Enter command mode by typing q, then type :q to quit vi. If you haven’t saved your latest changes, vi will not quit and will tell you to use ! to override. To quit without saving your changes, use :q!, as shown in Figure 4.16.
tips
If you don’t really want to quit but want to edit a different file instead, type :e filename to open a new file to edit.
We recommend that you take a few minutes to try out some of the commands that you’ll use throughout your vi experi-ence. If you don’t think you’ll need this range of commands, consider using pico or nano rather than vi.
It takes some practice to get accustomed to vi, but the time spent is well worth it. With patience and practice, you’ll quickly become proficient in using vi. Take your time, take deep breaths, and plow ahead.
Figure 4.16 Use q:q! to quit vi without saving changes.

Creating and Editing Files
87
Starting
emacs an
d Dabblin
g w
ith It
Starting emacs and Dabbling with ItFor the novice, emacs offers a reasonable middle ground between the user-friendliness of pico and the power of vi (or vim). It’s not available on all systems, though, so you’ll just have to type in the command to see if you have access to it. (Refer back to Chapter 1 if you don’t.)
Using emacs, you can just type, as you’d expect, then use command sequences, which are basically c keys, to make emacs do useful things like save, quit, and the like. When you start emacs, it’ll probably look very much like Figure 4.17. Some systems “helpfully” open a new window and give you the graphical ver-sion; you’ll see something like Figure 4.18.
to start emacs:
1. emacsAt the shell prompt, type emacs. The pro-gram starts up and you’ll see something like Figure 4.17. The helpful information may or may not be present, but you can ignore it for now at any rate.
2. This morning I got up, went downstairs, and found a humongous spider in the bathroom. After I quietly composed myself, I looked around the house for something to put him in...the kids’ bug catcher thing (nowhere to be found)...a jar... tupperware...a lidded cup...the salad spinner (BwaaaaHaaaHaaa!)....
Type anything you want.
continues on next page
Figure 4.17 emacs starts out with some basic information, but you can just start typing if you want.
Figure 4.18 emacs might helpfully start out in a spiffier interface if you’re sitting at the keyboard of a Linux system. You can get the plain variety, though.

Chapter 4
88
Star
tin
g e
mac
s an
d D
abbl
ing
wit
h It
You can use the arrow keys to navigate up and down in the file line by line. See Table 4.4 for a brief summary of the most useful commands in emacs.
tips
To get help in emacs, type man emacs. See Chapter 1 for more about man pages.
If emacs helped you out by starting in the graphical mode, but you want to play along with us in the text mode, use emacs -nw to start the program. (The -nw flag means “no windows.”)
emacs uses both c keys and the “meta” key to issue commands. PC users should use the Windows key (if available) or a in place of the meta key (but you should remember that you’ll see M+ or Meta+ in most emacs documentation). For those of you using keyboards that actually have a key labeled “Meta,” by all means, you should use it when you see a. Mac users should use o.
As useful as emacs is, it does have a few quirks. For example, if you want to access help, you press the B key, which issues the cH command. To fix this idiosyncrasy, press aX and then type normal-erase-is-backspace.
C o m m a n d F u n c t i o n
cX, cF Opens a new file (existing or new)c/ Undoes the last changecG Cancels the current operation
q Bails out of menu selections (and other things)
cV Moves down one page (screen)aV Moves up one page (screen)a< Moves to the beginning of the filea> Moves to the end of the file
Handy emacs Commands
table 4.4

Creating and Editing Files
89
Usin
g em
acs Men
us to
Spell-Ch
eck
Using emacs Menus to Spell-CheckSpell-checking is good. Learning to use emacs menus is good. And in emacs, learning to spell-check also allows you to familiarize yourself with emacs menus. Use 0, then a key letter of each menu, menu item, and submenu as needed to navigate through the menus. (You’ll see hints and prompts at the bottom of the screen, as shown in Figure 4.19.) Follow along to use the menus to spell-check your file.
to use emacs menus to spell-check:
1. emacs hairyspidersFor starters, fire up emacs and a specific file.
2. Press 0 to access the menus.
3. tNext, type the first letter of the menu you want—this example uses t for Tools for now.
4. 0Try 0 (zero) for spell-checking.
5. Press e and enjoy your spell-check.
tips
Press q as many times as needed to back out of places (like menu selection choices) you do not want to be.
Reading and following along with the tips onscreen is essential to having a happy life (or a tolerable coexistence) with emacs.
Figure 4.19 Navigating emacs menus isn’t exactly intuitive, but it’s straightforward after you get started.

Chapter 4
90
Sav
ing
in e
mac
s
Saving in emacsSave yourself potential headaches by saving frequently. To save files in emacs (Figure 4.20), follow these steps.
to save text in emacs:
cX/cS hairyspiders
Press cX to let emacs know that another command is coming, and then cS to save. Finally, type the filename (hairyspiders, in this example) you want to use for the file, then type e. If you’ve already saved the file once, just press cX, followed by cS.
tips
If you look around in your home directory (or whatever directory you’re working in) after experimenting with emacs, you’ll probably notice a slew of files with names ending in ~. Those are emacs backup files, created for your convenience and sanity. If you don’t need them, just delete them with rm -i *~. If you do need them, just use mv oopsie~ oopsie and you’re back in business.
If you want to save a file over an existing file, use cX, cW, and then enter the existing filename to overwrite the original.
Figure 4.20 Saving is very important—at least if you want to keep the results of your efforts.

Creating and Editing Files
91
Exiting
emacs
Exiting emacsWow! It’s already time to exit emacs (Figure 4.21).
to exit emacs:
cX, cC
Press cX to let emacs know that another command is coming, then cC to close. If you haven’t saved your latest changes, emacs expects you to decide if you want to save or discard unsaved changes, as shown in Figure 4.20.
tip
If you end up down at the command line but don’t want to save or anything—you just want to return to your file—use cG to cancel.
Figure 4.21 Use cX, cC to quit emacs.

This page intentionally left blank

93
Con
trollin
g O
wn
ership an
d Perm
ission
s
5Unix and Unix-like operating systems are multiuser systems in which your files are separate from Jane’s files, which are separate from Joe’s files, and so on. Any file you create is separate from other users’ files and usually cannot be directly accessed by Jane, Joe, or any other user.
Occasionally, though, you will need to share files. For example, you might be collaborat-ing on a project with Jane where sharing files (rather than creating and maintaining separate ones) is essential.
This chapter provides an overview of Unix file permissions and ownership. For many sys-tems, only the root user can make ownership changes, so you may have to ask for help from your system administrator to do this.
Controlling Ownership and Permissions
Chapter Contents
Understanding file ownership and permissions
Finding out who owns what
Finding out which group you’re in
Changing the group association of files and directories
Changing ownership of files and directories
Changing permissions
Translating mnemonic permissions to numeric permissions
Changing permission defaults

Chapter 5
94
File
Ow
ner
ship
an
d P
erm
issi
on
s
Understanding File Ownership and PermissionsUnix provides three levels of file ownership:
User. Refers to the single userid that’s pri-marily in charge of the file. You have this level of ownership for the files you create.
Group. Refers to the group (of users) associated with a specific file. All users within a group have the same permissions for interacting with a file.
Other. Refers to any users not identified with either the group or user for a file.
Within these levels, you can specify per-missions for file access and rights in three categories:
Read. Users with read permission can only view a file; they cannot make changes to it.
Write. Users with write permission can make changes to or delete a file.
Execute. Users with execute permission can run files (programs or scripts) and view directories.
In this chapter, we’ll show you some of the commands that can be used (sometimes by you, usually by the root user) to set owner-ship and permissions. Keep in mind that you can set or change any permissions for files you create and possibly for files created by others; however, exactly which permissions and ownerships you can change depends on the system. Even if you don’t currently need to change file ownerships or permissions, you should take a quick read through this chapter to see what options might be available to you.
tips
An interesting twist on this whole ownership issue is that not all “owners” are people. Programs or processes run as a specific user, and if they create files, those files have permissions reflecting the individual and group membership of the program. See Chapter 9 for more information.
Some Unix-like operating systems have additional or supplementary means of controlling access to specific files. Usually, though, you’ll know if such a system is in use. For now, just know that such things exist; the procedures in this chapter will handle 95 percent of your needs.

Controlling Ownership and Permissions
95
Findin
g O
ut W
ho
Ow
ns W
hat
Finding Out Who Owns WhatYour first step in changing ownership and permissions is to find out who owns which files. You’ll need this information to deter-mine whether you can make changes to the permissions.
to find out who owns what:
1. cdAt the shell prompt, type cd to return to your home directory.
2. ls -lEnter ls -l to see the long listing of the files in the current directory. (See Code Listing 5.1.)
continues on next page
xmission> cd
/home/users/e/ejray
xmission> ls -l
total 60
drwx-x-x 2 ejray users 512 Jul 21 13:32 Complete/
drwx-x-x 2 ejray users 512 Jun 24 09:23 Completed/
drwx-x-x 2 ejray users 512 Sep 15 2007 Mail/
drwx-x-x 2 ejray users 512 Jun 24 09:35 NewProject/
drwx-x-x 2 ejray users 512 Sep 15 2007 News/
drwx-x-x 2 ejray users 512 Sep 15 2007 access/
-rw---- 1 ejray users 163 Jul 22 07:28 bogus2
drwxrwx-x 2 ejray www 512 Jul 24 04:44 chat.conf/
-rw---- 1 ejray users 853 Sep 13 2007 dead.letter
-rw---- 1 ejray users 14286 Jun 28 12:40 files
lrwxrwxrwx 1 ejray users 27 Sep 15 2007 ftp -> /home/ftp/pub/users
-rw---- 1 ejray users 36 Jul 24 12:09 limerick
drwx-x-x 2 ejray users 512 Jun 8 13:32 mail/
drwxr-s-x 15 ejray www 2560 Jul 10 10:30 public_html/
drwx-x-x 2 ejray users 512 Jul 22 08:23 puppy/
drwx-x-x 2 ejray users 512 Jul 24 04:44 temp/
-rw---- 1 ejray users 0 Jul 19 13:24 testme
Code Listing 5.1 Many systems use only a few group names to allow easy file sharing and collaboration.

Chapter 5
96
Fin
din
g O
ut
Wh
o O
wn
s W
hat
The left column contains ten characters, the last nine of which specify permissions for each file: r means read permission, w means
write permission, and x means execute permission.
The first set of rwx is for the user, the second set is for the group, and the last set is for other.
A dash (-) instead of a letter indicates that the user/group/other does not have that level of permission. For example, rwx------ would mean that the user has read, write, and execute permission, while group and other have no permissions at all.
The two columns in the middle indicate the file’s owner (in all likelihood your userid, for this example) and the group membership for the file. In Code Listing 5.1, ejray is the owner of all the files. Most of the files are associated with the users group, while just a few directories are associated with the www group.On this system, files that individual users create are associated with the users group, while files destined for the Web have www group associations. On other sys-tems, the default group for files might be a group with the same name as the userid, as shown in Code Listing 5.2.
3. ls -l /etcYou can also use the ls -l command on a system directory, such as /etc. Here, you’ll see that most of the files are owned by root, possibly with a variety of different group memberships (see Figure 5.1).
Figure 5.1 Most of the files in /etc are owned by root.
tips
Sometimes you’ll see references to world-readable or world permissions. This is the same as other. “Other” just refers to any-one who is not you or not in the group.
You might also hear of s or SetUID permis-sions, which indicate that the program or file can run with the effective userid of the file’s owner (usually root). For example, /usr/bin/passwd has s permissions because you can run passwd to change your password, but the command needs to run as root to actually modify the pass-word database.
You might also see a t at the end of the list of permissions, which indicates that the sticky bit is set. Setting the “sticky bit” means primarily that, in a shared direc-tory, you can delete only your own files (and not accidentally delete files belong-ing to others).
[ejr@hobbes permissions]$ ls -l
total 152
-rw-rw-r- 1 ejr ejr 128889 Jul 24 14:33 sage.sayings
-rw-rw-r- 1 ejr ejr 23890 Jul 24 14:33 sayings
[ejr@hobbes permissions]$
Code Listing 5.2 Sometimes the group name and username are the same, depending on how the system was set up.

Controlling Ownership and Permissions
97
Findin
g O
ut W
hich
Gro
up Yo
u’re In
Finding Out Which Group You’re InIf you want to collaborate on a project and share files, for example, you’ll need to be in the same group with the other people on the team. Your first step is to find out which group you’re in, as shown in Code Listing 5.3.
to find out which group you’re in:
1. grep yourid /etc/passwdHere, grep yourid pulls your userid out of the /etc/passwd file (which is where user information is stored) and displays it as shown in Code Listing 5.3. From left to right, you see Your username The encoded password (or nothing,
or an x if the system is configured for “shadow” passwords)
Your userid (each user has a unique number in the system)
2. Note the number of the group.You’ll need the number to match it up with a group name in step 3. In this case, our group id is 500.
3. more /etc/groupHere, we’re exploring the contents of the /etc/group file using more to see which groups are currently defined on the system. As shown in Code Listing 5.4, the first column contains the name of the group, the third contains the group num-ber, and the last column contains extra names the system administrator added to the group. Users can belong to multiple additional groups, and this is how the additional group membership is indicated.
continues on next page
[ejr@hobbes permissions]$ grep ejr
/etc/passwd
ejr:aag2.UyC7yJKJWE:500:500:Eric J.
Ray:/home/ejr:/bin/bash
[ejr@hobbes permissions]$
Code Listing 5.3 You’ll find tons of information in /etc/passwd, including your default group number.
[ejr@hobbes permissions]$ more /etc/group
kmem::9:
wheel::10:root,ejr
mail::12:mail
news::13:news
uucp::14:uucp
man::15:
games::20:
gopher::30:
dip::40:
ftp::50:
nobody::99:
users::100:ejr,deb,asr,awr
floppy:x:19:
pppusers:x:230:
popusers:x:231:
slipusers:x:232:
postgres:x:233:
ejr:x:500:
bash:x:501:
csh:x:502:
asr:x:503:
awr:x:504:
deb:x:505:
[ejr@hobbes permissions]$
Code Listing 5.4 The group file lists groups and additional members (as shown in the users group).

Chapter 5
98
Fin
din
g O
ut
Wh
ich
Gro
up
You
’re
In
4. Match up the group number for your ID with the group name.Our number was 500, which corresponds to the ejr group name here.
tips
If you’re collaborating on a project, ask your system administrator to create a special group just for the project. That way, you and your teammates can easily share files.
You can also use the groups or id com-mands, which offer a quicker way of find-ing out about group membership. These give you essential details about group membership (and userids, too), but they don’t flood you with these other most interesting and potentially useful details about the system. Wander to Chapter 7 for more information.
Check out Chapter 1 for more on more.
See Chapter 6 for the full scoop on grep.

Controlling Ownership and Permissions
99
Chan
gin
g G
rou
p Asso
ciation
with
chgrp
Changing the Group Association of Files and Directories with chgrpSuppose you have a file called black that is currently being used by the pot group and you want to change the file’s permissions so that it can be accessed by the kettle group. To do this, you’ll need to change which group the file is associated with—in this case, change the association from the pot group to the kettle group. You can change which group a file or directory is associated with using chgrp, as shown in Code Listing 5.5.
to change group association with chgrp:
1. ls -lType ls -l at the shell prompt to verify the file’s name and the group it’s associated with. Remember that the second column in the middle of the listing, just before the file sizes, lists the group membership.
2. chgrp kettle blackType chgrp followed by the name of the existing group you want the file to be associated with and the filename. Here, the chgrp command changes the group association for the file called black to the kettle group.
[ejr@hobbes permissions]$ ls -l
total 178
-rw-rw-r- 1 ejr pot 24850 Jul 24 14:59 black
-rw-rw-r- 1 ejr ejr 128889 Jul 24 14:33 sage.sayings
-rw-rw-r- 1 ejr ejr 23890 Jul 24 14:33 sayings
[ejr@hobbes permissions]$ chgrp kettle black
[ejr@hobbes permissions]$ ls -l
total 178
-rw-rw-r- 1 ejr kettle 24850 Jul 24 14:59 black
-rw-rw-r- 1 ejr ejr 128889 Jul 24 14:33 sage.sayings
-rw-rw-r- 1 ejr ejr 23890 Jul 24 14:33 sayings
Code Listing 5.5 Pots and kettles can both be black, but only one at a time.

Chapter 5
100
Chan
gin
g G
rou
p A
sso
ciat
ion
wit
h c
hgrp
tips
If you try to change group ownership and get an error message like “Not owner” or something similarly obscure, your userid doesn’t have the necessary authority to make the change. You’ll have to ask your system administrator for help.
Change group association only if you have a specific need to do so; you don’t want to make your files available to other people unnecessarily. Unless you are the system administrator, you won’t be able to con-trol exactly who belongs to the group to which you’ve given access to your files.
If you change the group association of a specific directory, you also need to check permissions for the directory containing it. Users will not be able to change into the specific directory (regardless of their group membership) unless they also have read and execute permission for the direc-tory containing it.
If you need to make changes to group permissions and find you can’t, consider looking at sudo to help out. Covered in Chapter 15, sudo provides some users with the ability to act with the power of a system administrator, in limited circum-stances. Take a look.
Just as with the cp and mv commands, cov-ered in Chapter 2, you can use the -R flag with chgrp to recursively apply changes to a directory and all of the subdirectories and files in it. For example, to change the group association of the LatestProject directory and all its contents to the project group, use chgrp -R project LatestProject from the directory above LatestProject.

Controlling Ownership and Permissions
101
Chan
gin
g O
wn
ership w
ith chow
n
Changing Ownership of Files and Directories with chownSuppose you’ve been working on a file called rowyourboat, and your boss decides to let a coworker, Merrilee, take over the project. In this case, to fully pawn off the project to your coworker, you need to change ownership of the file from you to her. Depending on how your system administrator set up the system, you can often change ownership of files using chown (Code Listing 5.6).
to change ownership with chown:
1. ls -lFor starters, type ls -l at the shell prompt to verify the file’s name and ownership, as in Code Listing 5.6. Remember that the ownership information is located after the permissions and linking information.
2. chown merrilee rowyourboatType chown followed by the userid of the person you want to transfer ownership to and the filename. In this case, the chown command changes the ownership for rowyourboat to merrilee. rowyourboat and its associated problems will now be hers, and life will be but a dream.
[ejr@hobbes merrilee]$ ls -l
total 26
-rw-rw-r- 1 ejr users 24850 Jul 24 15:17 rowyourboat
[ejr@hobbes merrilee]$ chown merrilee rowyourboat
[ejr@hobbes merrilee]$ ls -l
total 26
-rw-rw-r- 1 merrilee users 24850 Jul 24 15:17 rowyourboat
[ejr@hobbes merrilee]$
Code Listing 5.6 Changing ownership of files transfers complete control.

Chapter 5
102
Chan
gin
g O
wn
ersh
ip w
ith
cho
wn
tips
After you change a file’s ownership, what you can do with the file depends on the group and other permissions and mem-berships. The new owner, however, will be able to do anything with the file.
When changing the ownership of a direc-tory, you can add the -R flag to chown to make it apply recursively to all files and directories below it.
If the system does not allow you to use chown to give files away, consider using cp to make a copy of a file to accomplish the same thing. If you copy someone else’s file (that you have permission to read) to another name or location, the copy is fully yours. (In this giving-the-file-away example, the recipient should use cp.)
Again here, if you need to make changes to permissions and find you can’t, take a glance at sudo to see if that might help you in your situation. As described in Chapter 15, sudo provides some users with the ability to act with the power of a system administrator, in limited circum-stances. Of course, if that doesn’t solve your problem, there’s always the next tip.
Even if you can’t use chown, you are still able to request that the system administrator change file ownership for you: “Could you please change the owner-ship of my rowyourboat file to Merrilee, with chown merrilee /home/shared/ me/rowyourboat. Thanks!” (This could happen because many versions of Unix don’t allow nonroot users to change file ownership.)

Controlling Ownership and Permissions
103
Chan
gin
g P
ermissio
ns w
ith chm
od
Changing Permissions with chmodSuppose you’ve been working on a file called rowyourboat and you want to have your coworkers down the stream review it. To do so, you’ll need to give other people permis-sion to access the document. You can either give people in specific groups access or give everybody on the Unix system access. In particular, you can specify permissions for u(ser—that’s you), g(roup), o(thers), and a(ll).
In addition to specifying permissions, you can also specify how much access a person or group can have to your file. For example, you can specify r(ead), w(rite), and (e)x(ecute) access, depending on how much you trust them not to ruin your rowyourboat masterpiece.
As shown in Code Listing 5.7, your first step is to check out what the current permissions are. Then, you can set permissions, add to them, or remove them as necessary.
to check current permissions:
ls -l r*
To begin, type ls -l r* to get a long listing of rowyourboat in the current directory. Code Listing 5.7 shows that the permissions are rwxr-x---. This is actually three sets of permissions: For the user (rwx, in this example) For the group (r-x, here) or the world (---, here)In this example, the user has read, write, and execute permissions; the group has only read and execute permissions; and all other users have no permissions.
[ejr@hobbes permissions]$ ls -l r*
-rwxr-x--- 1 ejr users 152779 Jul 24 15:10
rowyourboat
[ejr@hobbes permissions]$
Code Listing 5.7 Use ls -l to see the permissions on files.

Chapter 5
104
Chan
gin
g P
erm
issi
on
s w
ith
chm
od
to set permissions:
chmod u=rwx,g=rx,o=r row*
Type chmod and specify who has access. In this case users have read, write, and execute permissions; the group has read and execute permissions; and others have read permission for all files in the direc-tory that start with row (Code Listing 5.8).The equals sign (=) specifies that the per-missions granted in the command are the only permissions that apply. Any previous permissions will be removed.The wildcard expression here (row*) speci-fies that the command applies to all files and directories that start with “row” in the current directory.
tips
You can also use the -R flag with chmod to recursively apply the changes you make to permissions to all files and subdirec-tories in a directory. For example, chmod -R go-rwx * revokes all permissions from everyone except the user for all files in the current directory, all subdirectories in the current directory, and all files in all subdirectories.
[ejr@hobbes permissions]$ ls -l
total 332
-rw-rw-r- 1 ejr users 24850 Jul 24 14:59 black
-rwxr-x-- 1 ejr users 152779 Jul 24 15:10 rowyourboat
-rw-rw-r- 1 ejr users 128889 Jul 24 14:33 sage.sayings
-rw-rw-r- 1 ejr users 23890 Jul 24 14:33 sayings
[ejr@hobbes permissions]$ chmod u=rwx,g=rx,o=r row*
[ejr@hobbes permissions]$ ls -l
total 329
-rw-rw-r- 1 ejr users 24850 Jul 24 14:59 black
-rwxr-xr- 1 ejr users 152779 Jul 24 15:10 rowyourboat
-rw-rw-r- 1 ejr users 128889 Jul 24 14:33 sage.sayings
-rw-rw-r- 1 ejr users 23890 Jul 24 14:33 sayings
[ejr@hobbes permissions]$
Code Listing 5.8 You can set permissions to ensure that all files have equivalent permissions.
There are about a million and one ways to express permissions. For example, you could use chmod ugo= * (note the space before the *) or chmod u-rwx,g-rwx, o-rwx * to revoke all permissions from all files in the directory. (Note that you’ll have to add your own permissions back to the files before you can do anything with them, if you try this out.)
If you want to change permissions for multiple files, use a wildcard expression.

Controlling Ownership and Permissions
105
Chan
gin
g P
ermissio
ns w
ith chm
od
to add permissions:
chmod g+w rowyourboat
At the shell prompt, enter chmod, followed by The category. In this case, we’ve used g,
for group, but you could also use o for others, or, of course, u for user, but you already have that access. You could also use a for all users (which includes u, g, and o).
A plus sign indicates that you’re add-ing the permission to the existing per-missions, rather than setting absolute permissions.
The permissions to grant. Here, we’ve used w, for write permission, but you could also use r for read or x for execute permissions, as your needs dictate.
The filename (rowyourboat).
to remove permissions:
chmod go-w rowyourboat
At the shell prompt, use chmod go-w plus the filename to remove write permis-sions for everyone except you, the file’s owner. Note that we handled both group and other in a single command this time, although we could have used chmod g-w rowyourboat and chmod o-w rowyourboat to accomplish the same thing.
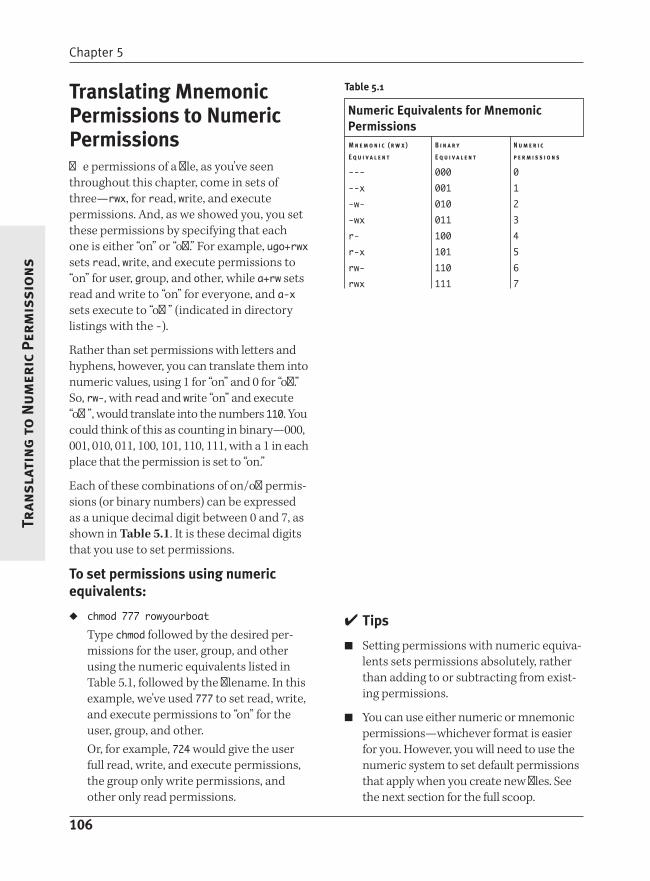
Chapter 5
106
Tran
slat
ing
to
Nu
mer
ic P
erm
issi
on
s
translating Mnemonic Permissions to Numeric PermissionsThe permissions of a file, as you’ve seen throughout this chapter, come in sets of three—rwx, for read, write, and execute permissions. And, as we showed you, you set these permissions by specifying that each one is either “on” or “off.” For example, ugo+rwx sets read, write, and execute permissions to “on” for user, group, and other, while a+rw sets read and write to “on” for everyone, and a-x sets execute to “off ” (indicated in directory listings with the -).
Rather than set permissions with letters and hyphens, however, you can translate them into numeric values, using 1 for “on” and 0 for “off.” So, rw-, with read and write “on” and execute “off ”, would translate into the numbers 110. You could think of this as counting in binary—000, 001, 010, 011, 100, 101, 110, 111, with a 1 in each place that the permission is set to “on.”
Each of these combinations of on/off permis-sions (or binary numbers) can be expressed as a unique decimal digit between 0 and 7, as shown in Table 5.1. It is these decimal digits that you use to set permissions.
to set permissions using numeric equivalents:
chmod 777 rowyourboat
Type chmod followed by the desired per-missions for the user, group, and other using the numeric equivalents listed in Table 5.1, followed by the filename. In this example, we’ve used 777 to set read, write, and execute permissions to “on” for the user, group, and other.Or, for example, 724 would give the user full read, write, and execute permissions, the group only write permissions, and other only read permissions.
M n e m o n i c ( r w x ) B i n a r y N u m e r i c
E q u i v a l e n t E q u i v a l e n t p e r m i s s i o n s
--- 000 0
--x 001 1
-w- 010 2
-wx 011 3
r- 100 4
r-x 101 5
rw- 110 6
rwx 111 7
Numeric Equivalents for Mnemonic Permissions
table 5.1
tips
Setting permissions with numeric equiva-lents sets permissions absolutely, rather than adding to or subtracting from exist-ing permissions.
You can use either numeric or mnemonic permissions—whichever format is easier for you. However, you will need to use the numeric system to set default permissions that apply when you create new files. See the next section for the full scoop.

Controlling Ownership and Permissions
107
Chan
gin
g P
ermissio
n D
efaults w
ith um
ask
Changing Permission Defaults with umaskEvery time you create a file, the Unix system applies default permissions for you. This is great because, for many uses, the default per-missions will be just what you want. In other cases, though, you’ll want to specify different default permissions.
You can change the default permissions using umask. The umask command uses a numeric representation for permissions (as discussed in the previous section), but the numeric value you specify here is not the same as the one you’d use with chmod. (Don’t ask why. We assume that Batman and Robin got together and made this command usable only by the Wonder Twins when their powers were acti-vated.) So you have to figure out the umask value for the permissions you want, then use that value to set the new default permissions.
Note that you cannot set execute permis-sions by default, so you’re really only figuring out the read and write permissions for u, g, and o categories.
to figure the umask value:
1. 666Start with 666. Again, don’t ask why; it’s just what you’re supposed to start with.
2. Figure out which numeric values you’d use to set your desired permissions with the chmod command.You might review the previous section, “Translating Mnemonic Permissions to Numeric Permissions,” and peek at Table 5.1 in that section.
3. Subtract that numeric value from 666.For example, if the numeric value you’d use with chmod is 644, subtract that value from 666: 666 – 644 = 022. So 022 is the number you’ll use with umask.

Chapter 5
108
Chan
gin
g P
erm
issi
on
Def
ault
s w
ith
um
ask
to set default file-creation permissions with umask:
umask 022
Enter umask plus the number you calcu-lated in the previous steps in this section (Code Listing 5.9).
tips
Any changes made with umask apply only to the current shell session. If you want to revert to the default permissions but don’t remember what they were, just log out and log back in and you’ll be back to normal.
If you want to change permission defaults permanently—or at least beyond the current shell session—change them in the configuration files as discussed in Chapter 8.
You cannot set the default permissions to include execute permission; it’s a security feature, not an omission in Unix’s capa-bilities. For example, suppose you make a new file and copy your favorite com-mands (or the ones you often forget) into it. If you accidentally type the filename and the file is executable, you’ll run that list of commands and the consequences could be unfortunate. Therefore, you have to explicitly grant execute permission for all files.
Yes, 666 is considered the Number of the Beast. We think that it’s just a coinci-dence, but given the potential for confu-sion in this section, we’re not sure.
Use umask or umask -s (depending on your specific shell and environment settings) to display your current umask settings.
ejr@hobbes permissions]$ umask 022
[ejr@hobbes permissions]$ touch tryit
[ejr@hobbes permissions]$ ls -l try*
-rw-r-r- 1 ejr users 0 Jul 26 16:35 tryit
Code Listing 5.9 Use umask to set default permissions for future files.

109
Man
ipulatin
g Files
6As you learned back in Chapter 4, you can fairly easily work with text by opening up an editor and making the changes you want. But you can do more than just copy, paste, cut, or move text in files. As we’ll discuss in this chapter, you can manipulate entire files and look at specific parts of them, get informa-tion about the files, find text in files, compare files, and sort files. All kinds of neat stuff !
In this chapter, we’ll use a lot of flags to aug-ment commands. You’ll find a full list of the most common commands and their flags in Appendix C if you need further explanation or a quick reminder later.
Manipulating Files
Chapter Contents
Counting files and file contents
Viewing file beginnings
Viewing file endings
Finding text
Using regular expressions
Making global changes
Changing files
Comparing files
Finding differences in files
Sorting files
Eliminating duplicates
Redirecting files to two locations
Changing case
Formatting files
Splitting files

Chapter 6
110
Cou
nti
ng
Fil
es a
nd
Thei
r Co
nte
nts
wit
h w
c
Counting Files and their Contents with wcOne of Unix’s handiest capabilities lets you count files and their contents. For example, you can count the number of files in a direc-tory, or you can count the number of words or lines in a file. You do this counting with the wc command, as shown in Code Listing 6.1.
to count words using wc:
wc -w honeydo
At the shell prompt, type wc -w ( for words) and the name of the file in which you want to count the words. wc will oblige, as shown in Code Listing 6.1.
to count lines with wc:
wc -l honeydo
Use wc -l followed by the filename to count the lines in the file (Code Listing 6.2). This is useful for poetry or for things like lists (e.g., our “honey-do” list always has a minimum of 73 items in it).
tips
You can find out how many files you have in a directory by using ls | wc -l to count the regular files and directories, or ls -A | wc -l to count all files and direc-tories (except for the . and .. directories).
You can also find out how many bytes a specific file takes up using wc -c. Or, you can use wc with no flags at all to get the lines, words, and bytes.
[ejr@hobbes manipulate]$ wc -w honeydo
235 honeydo
Code Listing 6.1 Use wc -w to count the words in a file. The “honey-do” list in this example is quite a way from being the length of a novel.
[ejr@hobbes manipulate]$ wc -l honeydo
85 honeydo
Code Listing 6.2 With 85 separate items in the list, however, it’s plenty long enough.

Manipulating Files
111
Viewin
g File B
egin
nin
gs w
ith head
Viewing File Beginnings with headUsing head, as shown in Code Listing 6.3, you can find out in a jiffy what’s in a file by viewing the top few lines. This is particularly handy when you’re browsing file listings or trying to find a specific file among several others with similar content.
to view file beginnings with head:
head honeydo
At the shell prompt, type head followed by the filename. As Code Listing 6.3 shows, you’ll see the first ten lines on the screen. Notice that “lines” are defined by hard returns, so a line could, in some cases, wrap to many screen lines.
to view a specified number of lines:
head -20 honeydo
Add -20 (or whatever number of lines you want to view) to view a specific number of lines.
to view the beginnings of multiple files:
head honey* | more
You can view the tops of multiple files by piping head (plus the filenames) to more. Note that head conveniently tells you the filename of each file, as shown in Code Listing 6.4.
[ejr@hobbes manipulate]$ head honeydo
Take garbage out
Clean litter box
Clean diaper pails
Clean litter box
Mow lawn
Edge lawn
Clean litter box
Polish swamp cooler
Buff garage floor
Clean litter box
[ejr@hobbes manipulate]$
Code Listing 6.3 Use head to look at just the top of a file, which gives you a manageable view of the file.
[ejr@hobbes manipulate]$ head honey* | more
= => honeyconsider <= =
Mother-in-law visits next week
Cat mess in hall to clean up
Cat mess in entry to clean up
Cat mess in living room to clean up
Toddler mess in family room to clean up
Cat and toddler mess in den to clean up
IRS called again today
Neighbors on both sides looking for
donations for the annual fund drive
Boss called last Friday and said it’s urgent= => honeydo <= =
Take garbage out
Clean litter box
Clean diaper pails
Clean litter box
Mow lawn
Edge lawn
Clean litter box
Polish swamp cooler
Buff garage floor
Code Listing 6.4 head, with the help of more, lets you see the beginnings of several files in sequence.

Chapter 6
112
View
ing
Fil
e En
din
gs
wit
h ta
il
Viewing File Endings with tailOccasionally, you might also need to use tail, which displays the last lines of a file. tail is particularly handy for checking foot-ers or for updating information in a footer (see Code Listing 6.5). Just as with head (described in the previous pages), tail offers several options for viewing files.
to view file endings with tail:
tail honeydo
At the shell prompt, type tail followed by the filename. As Code Listing 6.5 shows, you’ll see the last ten lines on the screen.
to view a specified number of lines:
tail -15 honeydo
Here, all you do is add a specific number of lines you want to view (-15).
to view the endings of multiple files:
tail honey* | more
Pipe the tail command and the files (multiple files indicated with *) to more (Code Listing 6.6).
tip
head and its counterpart, tail, are great for splitting long files. Use wc -l to count the lines. If the file has 500 lines, but you care about only the beginning and ending lines, then type head -25 filename > newfilename to put the first 25 lines of the file into a new file. Then do the same with tail to put the last 25 lines of the file into another new file.
[ejr@hobbes manipulate]$ tail honeydo
Empty diaper pails
Take garbage out.
-End of today’s list-
Buy more garbage bags
Get cleaning supplies at store
Take cat to vet
Fix lawnmower
[ejr@hobbes manipulate]$
Code Listing 6.5 tail lets you check out just the end of files.
[ejr@hobbes manipulate]$ tail honey* | more
= => honeyconsider <= =
Cat mess in entry to clean up
Cat mess in living room to clean up
Toddler mess in family room to clean up
Cat and toddler mess in den to clean up
IRS called again today
Neighbors on both sides looking for
donations for the annual fund drive
Boss called last Friday and said it’s urgent
-End of today’s list-
= => honeydo <= =
Empty diaper pails
Take garbage out
-End of today’s list-
Buy more garbage bags
Get cleaning supplies at store
Take cat to vet
Fix lawnmower
-More-
Code Listing 6.6 Use tail with more to see the ends of multiple files.

Manipulating Files
113
Findin
g Text w
ith grep
Finding text with grepYou can search through multiple files for specific strings of characters and then view the list of matching files onscreen. You do this using the grep command (which stands for “global regular expression print,” a once useful and now rather arcane ed or vi com-mand), as shown in Code Listing 6.7. As we’ll show you, you can add several flags to grep to get slightly different results.
to find text strings with grep:
grep bucket limericks
At the shell prompt, type grep, the text you’re trying to locate (in this case, bucket), and the file you’re searching in (here, limericks). grep will return all lines in the file that contain the specified string, as shown in Code Listing 6.7.
grep -5 bucket limericks
You can specify that a number of lines (say 5) on either side of the found text string should also be displayed. Sometimes you can’t tell what you need to know with just the line that contains your search string, and adding lines around it can help give you a context (see Code Listing 6.8).Note that this option isn’t available on all versions of grep, but it’ll work for most.
grep -c Nantucket limericks
By adding the -c flag, you can find out how many times a text string appears in a file.
grep -v Nantucket limericks
Or, with the -v flag, you can find all of the lines that do not contain the specified string.
grep -i nantucket limericks
With the -i flag, you can search with- out case-sensitivity. Here any line with nantucket or Nantucket or nAntuCKet would be found.
tips
Use the -n flag ( for example, grep -n string file) to print each found line with a line number.
You can use grep with multiple filenames, such as in grep Nantucket lim* or grep Nantucket lim* poetry humor.
If you want to get creative, you can look for spaces as well, but you need to use quotes, like grep “from Nantucket” limerick*.
Win nerdy bar bets by knowing the heri-tage of grep.
[ejr@hobbes manipulate]$ grep bucket
limericks
Who carried his lunch in a bucket,
[ejr@hobbes manipulate]$
Code Listing 6.7 Use grep to see all occurrences of a specific string in a file.
[ejr@hobbes manipulate]$ grep -5 bucket
limericks
he strummed and he hummed,
and sang dumdeedum,
But him a musician...whoda thunk it?
There once was a man from Nantucket,
Who carried his lunch in a bucket,
Said he with a sigh,
As he ate a whole pie,
If I just had a donut I’d dunk it.
A nice young lady named Debbie,
[ejr@hobbes manipulate]$
Code Listing 6.8 grep can show the context around instances of the string as well.

Chapter 6
114
Usi
ng
Reg
ula
r Ex
pres
sio
ns
wit
h g
rep
Using regular Expressions with grepIn addition to using grep to search for simple text strings, you can use grep to search for regular expressions. Regular expressions are like fancy wildcards, where you use a symbol to represent a character, number, or other symbol. With regular expressions, you can search for different parts of files, such as the end of a line or a text string next to another specified text string. Table 6.1 lists some of the more common regular expressions.
to use regular expressions with grep:
grep .logan limerick
Type grep followed by the regular expres-sion and the filename. Here, we’ve used the regular expression .logan to find all instances of “logan” that are preceded by a single character (Code Listing 6.9). Note that this usage of a . to match a single character closely resembles the ? wildcard.You could also use multiple periods for specific numbers of characters. For example, to find “Dogbert” and “Dilbert,” you might use grep D..bert plagiarized._sayings.In some cases, you may need to struc-ture the search string slightly differently, depending on the expression you’re using and the information you’re looking for. Check out the additional examples in Table 6.1 for more information.
[ejr@hobbes manipulate]$ grep .logan
limerick
Worked hard all day on a slogan,
You see, the slogan’s still brogan.[ejr@hobbes manipulate]$
Code Listing 6.9 Use grep with regular expressions to create fancy wildcard commands.

Manipulating Files
115
Usin
g R
egu
lar Expression
s with
grep
tips
“Regular expression” is often abbreviated as “regexp” or “regex” in Unix documenta-tion and Internet discussions.
The command egrep is closely related to grep, adding a little more flexibility for extended regular expressions, but it fundamentally works the same. On many systems the grep command is really egrep—when you type in either one, you’re really running egrep.
If you’re searching for whole words through large files, use fgrep for faster searching. It uses the same general syntax as grep, but searches only for whole words (not regular expressions) and so goes much faster.
See Chapter 1 for details about wildcards.
R e g u l a r F u n c t i o n E x a m p l e E x p l a n a t i o n
E x p r e s s i o n
. Matches any character. grep b.rry This finds all instances of “berry” or “barry.”* Matches zero or more grep ‘s*day’ Here, the * matches zero or more of the items that instances of the preceding /home/ejr/schedule immediately precede the *, in this case the letter ‘s’. item, so a*b would find “b” as well as “ab” and “aaab,” but not “acb.”^ Matches only instances of grep ‘^Some’ sayings With the ^, you specify that the search string must the string at the beginning appear at the beginning of a line. The example would of a line. find a line beginning with “Some” but not one begin-
ning with “Read Some.”$ Matches only instances of grep ‘ach$’ sayings This example finds all lines in the file sayings that the string at the end of a line. end with “ach.”\ Escapes (quotes) the grep ‘\*’ sayings grep \* sayings searches for all instances of * following character—so in the sayings file. The \ tells grep to interpret the you can search for literal * literally, as an asterisk character, rather than as characters like * or $ that a wildcard. are also operators.[ ] Matches any member of grep ‘number[0-9]’ Use square brackets ([ ]) to enclose a set of the set, like [a-z], [0-6], or instances of number1, number2, number3, and [321] (three or two or one). so forth in the file called specifications.
Here, number[0-9] would match all specifications options.
regular Expressions, Examples, and Explanations
table 6.1
Chapter 6
116
Oth
er E
xam
ples
of
Reg
ula
r Ex
pres
sio
ns
Using Other Examples of regular ExpressionsIn the previous section, we showed you how to use the grep command to search with regular expressions. You can do other neat finding tasks, as we’ll discuss in this section.
to find lines with specific characteristics:
grep '^Nantucket' limerick*
Here, we use grep to find all of the lines in the limericks that start with Nantucket, if there are any.
grep 'Nantucket$' limerick*
Similarly, you can find the lines that end with Nantucket.
grep '^[A-Z]' limerick
Or, you can find the lines that start with a capital letter by including the [A-Z] regular expression.
grep '^[A-Za-z]' limerick
Here, you can find all the lines that start with any letter, but not a number or sym-bol. Fancy, huh?
tip
You can also use regular expressions with awk and sed. See “Making Global Changes with sed” and “Changing Files with awk” in this chapter for details.

Manipulating Files
117
Makin
g G
lobal Ch
ang
es with
sed
Making Global Changes with sedAnother handy command you can use is sed, which lets you make multiple changes to files, without ever opening an editor. For example, as a new webmaster, you might use sed to change all occurrences of the previous webmaster’s e-mail address to your own. As we’ll show in this section, you can use sed to make global changes within documents.
to make global changes with sed:
sed 's/[email protected] /[email protected]/g' address.htm > address-new.htm
Type sed, followed by A single quote (‘) A leading “s” A slash (/) The text you want to replace
([email protected]) Another slash (/) The replacement text (newaddr@
raycomm.com) Yet another slash (/) g, which tells sed to apply the change
globally (If you omit the g, only the first occurrence on each line will be changed.)
Another single quote (‘) The name of the file in which
the changes should be made (address.htm)
You can redirect the output to a new filename (see Code Listing 6.10) or pipe it to another command entirely. You can’t redirect to the same filename or you’ll end up with no content in your file.
tips
You can have sed zip through multiple documents. See Chapter 10 for informa-tion on how to make a shell script with a loop.
Because sed commands can be long and unwieldy, it might be helpful to save the commands in a separate text file (so you don’t have to retype them). For example, if you saved the command s/oldaddr@ raycomm.com/[email protected]/g in a file called script.sed, you could issue sed -f script.sed address.htm > address-new.htm to run the sed com-mands from the script.sed file. You can have as many commands as you want in your script.sed file.
[ejr@hobbes manipulate]$ sed
‘s/[email protected]/newaddr@
raycomm.com/g’
address.htm > address-new.htm
[ejr@hobbes manipulate]$ head
address-new.htm
<BODY BACKGROUND=”/images/background.gif” BGCOLOR=”#FFFFFF” TEXT=”#000000” LINK= “#009900” VLINK=”#000000” ALINK=”#ff0000”><P>
Please send all comments to
<A HREF=”mailto:[email protected]”> [email protected]</A>.
</P>
<TABLE BORDER=0>
<TR>
<TD WIDTH=”150” VALIGN=TOP>[ejr@hobbes manipulate]$
Code Listing 6.10 You can use sed to make changes throughout files, such as the address change here.

Chapter 6
118
Chan
gin
g F
iles
wit
h a
wk
Changing Files with awkWhile sed is line oriented and lets you fiddle to your heart’s content, awk is field oriented and is ideal for manipulating database or comma-delimited files. For example, if you have an address book file, you can use awk to find and change information in fields you specify, as in Code Listing 6.11. In the fol-lowing steps, we’ll show you a sampling of the things you can do using awk to modify; in this example, an address book file.
to change files with awk:
1. awk ‘{ print $1 }’ address.bookAt the shell prompt, use awk ‘{ print $1 }’ address.book to look at the address.book file and select (and send to standard output) the first field in each record (line). More specifically, starting from the inside out $1 references the first field in each
line. Unless you specify otherwise, awk assumes that whitespace separates the fields, so the first field starts at the beginning of the line and continues to the first space.
{ } contain the awk command, and the quotes are necessary to tie the awk command together (so the first space within the command isn’t interpreted by the shell as the end of the com-mand). See Code Listing 6.11.
2. awk -F, ‘{ print $1 }’ address.bookThe -F flag tells awk to use the charac-ter following it—in this case, a comma (,)—as the field separator. This change makes the output of the command a little cleaner and more accurate. If you were working with /etc/passwd, you’d use -F: to specify that the : is the field separator.
De-what?
A delimited file uses a specific character to show where one bit of information ends and another begins. Each piece of infor-mation is a separate field. For example, a file that contains “John, Doe, Thornton, Colorado” is comma-delimited, sporting a comma between fields. Other files, such as the /etc/passwd file, use a colon (:) to separate the fields. Just about any symbol that’s not used in the content could be used as a delimiter.
[ejr@hobbes manipulate]$ awk ‘{ print $1 }’
address.book
Schmidt,
Feldman,
Brown,
Smith,
Jones,
[ejr@hobbes manipulate]$
Code Listing 6.11 awk lets you access individual fields in a file.

Manipulating Files
119
Chan
gin
g Files w
ith aw
k
3. awk -F, ‘{ print $2 “ “ $1 “ “ $7 }’ address.book > phone.list
With this code, you can pull specific fields, in an arbitrary order, from your database. Although it looks complex, it’s just one additional step from the previ-ous example. Rather than printing a single field from the address book, we’re printing field 2, then a space, then field 1, then a space, then field 7. The final bit just redirects the output into a new file. This example would produce a list of names and phone numbers, as shown in Code Listing 6.12.
4. awk -F, ‘/CA/{ print $2 “ “ $1 “ “ $7 }’ address.book > phone.list
You can also specify a matching pattern. Here, we added /CA/ to search and act on only the lines that contain CA, so only those lines will be in the phone.list file.
tips
You can load awk scripts from a file with awk -f script.awk filename. Just as with sed, this keeps the retyping to a minimum, which is helpful with these long and con-voluted commands. Refer to Chapter 10 for more details about scripting.
Take a glance at “Sorting Files with sort” later in this chapter and consider piping your awk output to sort. Let Unix do the tedious work for you!
[ejr@hobbes manipulate]$ awk -F, ‘{print
$2 “ ” $1 “ “ $7 }’ address.book
> phone.list
[ejr@hobbes manipulate]$ more phone.list
Sven Schmidt 555-555-8382
Fester Feldman
John Brown 918-555-1234
Sally Smith 801-555-8982
Kelly Jones 408-555-7253
[ejr@hobbes manipulate]$
Code Listing 6.12 With a little more tweaking, awk lets you do a lot of processing on the files to get just the information you need.

Chapter 6
120
Com
pari
ng
Fil
es w
ith
cm
p
Comparing Files with cmpSuppose you’ve been working on the dearliza file and you want to know how it differs from the dearhenry file. Using cmp, you can compare the two files as shown in Code Listing 6.13.
to compare files with cmp:
cmp dearliza dearhenry
At the shell prompt, type cmp followed by both filenames. As Code Listing 6.13 shows, these two files are not the same.If the files are identical, you’ll find yourself back at the shell prompt with no com-ment from cmp. If both files are identical until one of them ends—that is, say, the first 100 lines are the same, but one con-tinues and the other ends—then you’ll see an EOF (end of file) message, as in Code Listing 6.14.
tips
You can find out other ways that files differ using diff, as described in the next section, “Finding Differences in Files with diff.”
Unix provides an exit status message that you can use to get more information about how the program stopped and why. See “Using Advanced Redirection with stderr” in Chapter 16 for more information.
You can also use diff to find out which files are in one directory but not another. Just type diff followed by the names of the two directories; for example, diff /home/ejr/Directory /home/ ejr/Newdirectory.
You might also check out the section, “Finding Differences in Files with sdiff,” later in this chapter, for yet another way to compare files.
[ejr@hobbes manipulate]$ cmp dearliza
dearhenry
dearliza dearhenry differ: char 20, line 2
[ejr@hobbes manipulate]$
Code Listing 6.13 cmp gives just the facts about the first difference between two files.
[ejr@hobbes manipulate]$ cmp limerick
limericks
cmp: EOF on limerick
[ejr@hobbes manipulate]$
Code Listing 6.14 cmp also tells you if the files matched until one ended (EOF stands for “end of file”).

Manipulating Files
121
Findin
g D
ifferences in
Files with
diff
Finding Differences in Files with diffIn addition to using cmp to find out how files differ, you can use diff. This command tells you specifically where two files differ, not just that they differ and at which point the differ-ences start (see Code Listing 6.15).
to find differences with diff:
diff dearliza dearhenry
Type diff, followed by both filenames. The diff output, as in Code Listing 6.15, shows lines that appear only in one file or the other. The lines from file 1 are indi-cated with <, while the lines from file 2 are indicated with >.Above each line are the affected line num-bers in the first file, then d, a, or c, then the corresponding line numbers from the second file: d means that the line would have to be
deleted from file 1 to make it match file 2.
a means that text would have to be added to file 1 to match file 2.
c means that changes would have to be made to the line for the two files to match.
tip
If you’re comparing email messages or other less-structured documents, you might consider adding the flags -i (case insensitive), -B (ignore blank lines), or even -w (ignore spaces and tabs) to avoid cluttering your results with unimportant differences. For example, you could use diff -ibw file1 file2 to find all dif-ferences between two files except those involving blank lines, spaces, tabs, or lowercase/uppercase letters.
[ejr@hobbes manipulate]$ diff dearliza
dearhenry
2,3c2,3
< Dear Liza,
< There’s a hole in my bucket, dear Liza,
dear Liza, dear Liza.
> Dear Henry,
> Please fix it dear Henry, dear Henry,
dear Henry.
5,6c5,6
< Henry
<
> Liza
> PS, you forgot your toolbox last time.
[ejr@hobbes manipulate]$
Code Listing 6.15 diff tells you all you ever wanted to know about the differences between two files but not in an easily readable manner.

Chapter 6
122
Fin
din
g D
iffe
ren
ces
in F
iles
wit
h s
diff
Finding Differences in Files with sdiffYet another way to compare files is to use sdiff, which presents the two files onscreen so that you can visually compare them (see Code Listing 6.16).
to compare files with sdiff:
sdiff dearliza dearhenry
At the shell prompt, type sdiff and the filenames to compare the two files. The output, as shown in Code Listing 6.16, presents each line of the two files side by side, separating them with (Nothing) if the lines are identical < if the line exists only in the first file > if the line exists only in the second
file | if they are different
tips
If most of the lines are the same, consider using the -s flag so the identical lines are not shown. For example, type sdiff -s dearliza dearhenry.
If the output scoots by too fast to read, remember that you can pipe the entire command to more, as in sdiff dearliza dearhenry | more.
[ejr@hobbes manipulate]$ sdiff dearliza dearhenry
July 25, 1998 July 25, 1998
Dear Liza, | Dear Henry,
There’s a hole in my bucket, dear Liza, dear Liza. | Please fix it dear Henry, dear Henry.
Yours, Yours,
Henry | Liza
| PS, you forgot your toolbox last time.
[ejr@hobbes manipulate]$
Code Listing 6.16 sdiff puts the files side by side, so you can easily see the differences.

Manipulating Files
123
So
rting
Files with
sort
Sorting Files with sortIf you want to be really lazy—er, um, smart—let Unix sort files or the contents of files for you. You can use sort to, for example, sort your address book alphabetically—as opposed to the random order in which you might have entered addresses (see Code Listing 6.17).
to sort files with sort:
sort address.book > sorted.address.book
To begin, type sort, followed by the name of the file whose contents you want to sort. Unix will sort the lines in the file alphabetically and present the sorted results in the file you specify (here, sorted.address.book), as shown in Code Listing 6.17.
[ejr@hobbes manipulate]$ more address.bookSchmidt, Sven, 1 Circle Drive, Denver, CO, 80221, 555-555-8382
Feldman, Fester, RR1, Billings, MT 62832, 285-555-0281
Brown, John, 1453 South Street, Tulsa, OK, 74114, 918-555-1234
Smith, Sally, 452 Center Ave., Salt Lake City, UT, 84000, 801-555-8982
Jones, Kelly, 14 Main Street, Santa Clara, CA, 95051, 408-555-7253
[ejr@hobbes manipulate]$ sort address.book
Brown, John, 1453 South Street, Tulsa, OK, 74114, 918-555-1234
Feldman, Fester, RR1, Billings, MT 62832, 285-555-0281
Jones, Kelly, 14 Main Street, Santa Clara, CA, 95051, 408-555-7253
Schmidt, Sven, 1 Circle Drive, Denver, CO, 80221, 555-555-8382
Smith, Sally, 452 Center Ave., Salt Lake City, UT, 84000, 801-555-8982
[ejr@hobbes manipulate]$ sort address.book > sorted.address.book
[ejr@hobbes manipulate]$ cat sorted.address.book
Brown, John, 1453 South Street, Tulsa, OK, 74114, 918-555-1234
Feldman, Fester, RR1, Billings, MT 62832, 285-555-0281
Jones, Kelly, 14 Main Street, Santa Clara, CA, 95051, 408-555-7253
Schmidt, Sven, 1 Circle Drive, Denver, CO, 80221, 555-555-8382
Smith, Sally, 452 Center Ave., Salt Lake City, UT, 84000, 801-555-8982
[ejr@hobbes manipulate]$
Code Listing 6.17 An unsorted address book springs to order with the help of sort.

Chapter 6
124
So
rtin
g F
iles
wit
h s
ort
tips
If you have multiple files to sort, you can use sort file1 file2 file3 > complete. sorted.file, and the output will contain the contents of all three files—sorted, of course.
You can sort fields in comma-delimited files by adding -t to the command. For example, sort -t, +1 address.book tells Unix to sort by the second field. The -t and following character (,) indicate what character separates the fields—the comma in this case. If a character isn’t given, sort thinks that white space marks the boundaries between fields. The +1 says to skip the first field and sort on the second one.
You can sort numerically, too, with sort -n filename. If you don’t use the -n flag, the output will be ordered based on the leftmost digits in the numbers—for exam-ple “1, 203, 50”—because the alphabetic sort starts at the left of the field.

Manipulating Files
125
Elimin
ating
Du
plicates with
uniq
Eliminating Duplicates with uniqIf you’ve sorted files using the handy-dandy sort command, you might end up with results that have duplicates in them. Heck, you might have files with duplicates. At any rate, here’s how to find and work with them. As Code Listing 6.18 shows, you can get rid of duplicate lines by using the uniq command (short for “unique”) in conjunction with sort.
to eliminate duplicates with uniq:
sort long.address.book | uniq
At the shell prompt, type sort and the filename, then type | uniq to pipe the output to uniq. The output of uniq will not contain any duplicated entries (Code Listing 6.18).
tips
uniq finds only identical, adjacent (sorted) lines. For example, if you have both Jones and jones in your address book, uniq won’t identify either entry because they differ in capitalization.
You can also use the -d flag to specify that you want to see only the duplicate lines. For example, say you want to see all of the people who are in both your carpool file and your nightout file. You’d just use sort carpool nightout | uniq –d.
You can sort and eliminate duplicates in one step with sort -u address.book.
[ejr@hobbes manipulate]$ more long.address.book
Schmidt, Sven, 1 Circle Drive, Denver, CO, 80221, 555-555-8382
Feldman, Fester, RR1, Billings, MT 62832, 285-555-0281
Brown, John, 1453 South Street, Tulsa, OK, 74114, 918-555-1234
Smith, Sally, 452 Center Ave., Salt Lake City, UT, 84000, 801-555-8982
Jones, Kelly, 14 Main Street, Santa Clara, CA, 95051, 408-555-7253
Schmidt, Swen, 1 Circle Drive, Denver, CO, 80221, 555-555-8382
Feldman, Fester, RR1, Billings, MT 62832, 285-555-0281
Brown, Jonathon, 1453 South Street, Tulsa, OK, 74114, 918-555-1234
Smith, Sally, 452 Center Ave., Salt Lake City, UT, 84000, 801-555-8982
Jones, Kelly, 14 Main Street, Santa Clara, CA, 95051, 408-555-7253
[ejr@hobbes manipulate]$ sort long.address.book | uniq
Brown, John, 1453 South Street, Tulsa, OK, 74114, 918-555-1234
Brown, Jonathon, 1453 South Street, Tulsa, OK, 74114, 918-555-1234
Feldman, Fester, RR1, Billings, MT 62832, 285-555-0281
Jones, Kelly, 14 Main Street, Santa Clara, CA, 95051, 408-555-7253
Schmidt, Sven, 1 Circle Drive, Denver, CO, 80221, 555-555-8382
Smith, Sally, 452 Center Ave., Salt Lake City, UT, 84000, 801-555-8982
[ejr@hobbes manipulate]$
Code Listing 6.18 Use sort with uniq to eliminate duplicates.

Chapter 6
126
Red
irec
tin
g t
o M
ult
iple
Lo
cati
on
s w
ith
tee
redirecting to Multiple Locations with teeSuppose you just updated your address book file and want to send it to your boss in addi-tion to putting it in your own files. You can do just that, using tee, which redirects output to two different places (see Code Listing 6.19).
to redirect output to two locations with tee:
sort address.book new.addresses | tee sorted.all | mail [email protected] -s "Here's the address book, boss"
At the shell prompt, use the tee com-mand plus a filename in the middle of the pipe line to send the sorted information to that filename as well as to the stan-dard output (which could, of course, be redirected to another filename). Here, we send the results of the sort to the sorted.all file and to standard output, where mail will take over and send the file to the boss. See Chapter 11 for more on fancy mail tricks.
tee time?
You might think of the tee command as similar to a plumber’s pipe joint—that is, it takes stuff from one location and sends it out to two different places.
[ejr@hobbes manipulate]$ sort address.book new.addresses | tee sorted.all | mail
[email protected] -s “Here’s the address book, boss”
[ejr@hobbes manipulate]$
Code Listing 6.19 Use tee to send output to two different places at once.

Manipulating Files
127
Chan
gin
g w
ith tr
Changing with trSometimes you just have to make changes to a file to change all occurrences of one term or character to another. For example, you might have reversed the case in a file (by acciden-tally typing with Caps Lock on…argh!) and need to change it back. Or you might want to turn a document into a list of words (one per line) that you can sort or count. The tr utility is just what you need (see Code Listing 6.20).
to translate case with tr:
cat limerick | tr a-zA-Z A-Za-z
At the shell prompt, use the cat com-mand and the pipe to send a file to tr, which will then translate lowercase to uppercase, and vice versa.
to break lines with tr:
cat limerick | tr -c a-zA-Z "\n"
Change anything that’s not a letter (upper or lowercase) to a new line, thus break-ing the limerick into a list of words. The -c indicates that anything that does not match the first set of characters (the complement of those characters) should be changed to the new character.
continues on next page
[jdoe@frazz jdoe]$ cat limerick
There once was a man from Nantucket,
Who carried his lunch in a bucket,
Said he with a sigh,
As he ate a whole pie,
If I just had a donut I’d dunk it.
[jdoe@frazz jdoe]$ cat limerick | tr
a-zA-Z A-Za-z
tHERE ONCE WAS A MAN FROM nANTUCKET,
wHO CARRIED HIS LUNCH IN A BUCKET,
sAID HE WITH A SIGH,
aS HE ATE A WHOLE PIE,
iF i JUST HAD A DONUT i’D DUNK IT.
[jdoe@frazz jdoe]$ cat limerick | tr -c
a-zA-Z “\n”
There
once
was
a
man
from
Nantucket
Who
carried
his
lunch
in
a
bucket
Said
he
with
a
sigh
As
he
ate
a
whole
pie
If
continued
Code Listing 6.20 Use tr to translate characters in files. Code Listing 6.20 continued
I
just
had
a
donut
I
d
dunk
it

Chapter 6
128
Chan
gin
g w
ith
tr
tips
Rather than use cat to send the file to tr, you can use spiffy Unix redirection tools (< in this case) to do it. An equivalent command to translate case would be tr a-zA-Z A-Za-z < limerick.
With tr, you can accomplish all kinds of translations. For example, you could set up a bit of a code to keep secret informa-tion somewhat secret, by translating let-ters to garble your text, then retranslating when you want them. For example, use cat limerick | tr a-mA-Mn-zN-Z n-zN-Za-mA-M > limerick.rot13 to encode and cat limerick.rot13 | tr n-zN-Za-mA-M a-mA-Mn-zN-Z to decode. This is the same as ROT13, discussed in Chapter 16, but far more flexible and spiffy if you use tr to do it.
Check out the man page for tr (man tr) for details on the other cool translations and conversions it can do.

Manipulating Files
129
Form
atting
with
fmt
Formatting with fmtAfter you’ve been typing away—writing the Great American Novel, perhaps—you might notice that you’re suffering from creeping margin uglies, like those shown in Code Listing 6.21. Never fear, fmt can help. Just run your text through fmt, and all will be well.
[jdoe@frazz jdoe]$ cat spiderstory.unformatted
This morning I
got up, went
downstairs, and found a HUMONGOUS spider
in the bathroom where the little potty is.
After I
quietly composed myself
from the shock (I didn’t want
to alert the kids),
I looked around the
house for
something to put him in...the
kids’ bug catcher thing
(nowhere to be found)...a jar...tupperware...a lidded
cup...the
salad spinner (BwaaaaHaaaHaaa !)....
I went back and checked on the spider and decided that I just couldn’t face putting him in
something.
I mean, what if he got close to me...or TOUCHED
me?!?!
And, since I hate the crunching sound and feel of
squashing bugs,
I knew I couldn’t just kill him.
This spider had *bones*, I’m tellin’ ya’. So, I
hunted for bug spray.
And hunted. But
nothing.
[jdoe@frazz jdoe]$ fmt spiderstory.unformatted
This morning I got up, went downstairs, and found a HUMONGOUS spider in the bathroom where the
little potty is. After I quietly composed myself from the shock (I didn’t want to alert the kids),
I looked around the house for something to put him in...the kids’ bug catcher thing (nowhere to be
found)...a jar...tupperware...a lidded cup...the salad spinner (BwaaaaHaaaHaaa!)....
I went back and checked on the spider and decided that I just couldn’t face putting him in
something. I mean, what if he got close to me...or TOUCHED me?!?! And, since I hate the crunching
sound and feel of squashing bugs, I knew I couldn’t just kill him. This spider had *bones*, I’m
tellin’ ya’. So, I hunted for bug spray. And hunted. But nothing.
-
Code Listing 6.21 With fmt you can clean up all kinds of idiosyncrasies in the format of your documents.
Chapter 6
130
Form
atti
ng
wit
h fm
t
to format with fmt:
fmt spiderstory.unformatted At the shell prompt, just tell fmt to do its thing, and you’ll be in business.
tip
You can supplement fmt with handy flags to help make lines more readable. For example, you can often use fmt -u to make spacing uniform: one space between words, and two spaces between sentences. Or, try fmt -w to specify the width of the formatted text; for example, -w 60 would specify a 60-character-wide line.

Manipulating Files
131
Splittin
g Files w
ith split
Splitting Files with splitSuppose you’re futzing with your new digital camera and want to share a photo of your new computer (what else is cool enough to take pictures of?!) via e-mail with your friends and family. You access the file, attach it to an e-mail message, and then—argh!—your ISP fails to send the file because it’s too big. Although you could modify the file itself—reduce the physical size, reduce the number of colors used, or crop out nonessential parts, for example—you can also just split the file with split. For example, if the ISP tells you that no files larger than 0.51 MB will be accepted, you can use split to send the file in chunks—all using one easy command (Code Listing 6.22).
[jdoe@frazz split]$ ls -lh
total 1.1M
-rwxrwxr-x 1 jdoe jdoe 1.0M Jan 1 12:42 mongopicture.jpg*
[jdoe@frazz split]$ ls -l
total 1060
-rwxrwxr-x 1 jdoe jdoe 1079300 Jan 1 12:42 mongopicture.jpg*
[jdoe@frazz split]$ split -b 500k mongopicture.jpg
[jdoe@frazz split]$ ls -lh
total 2.1M
-rwxrwxr-x 1 jdoe jdoe 1.0M Jan 1 12:42 mongopicture.jpg*
-rw-rw-r- 1 jdoe jdoe 500K Jan 1 13:03 xaa
-rw-rw-r- 1 jdoe jdoe 500K Jan 1 13:03 xab
-rw-rw-r- 1 jdoe jdoe 54K Jan 1 13:03 xac
[jdoe@frazz split]$ split -b 500k mongopicture.jpg chunk
[jdoe@frazz split]$ ls -lh
total 3.2M
-rw-rw-r- 1 jdoe jdoe 500K Jan 1 13:03 chunkaa
-rw-rw-r- 1 jdoe jdoe 500K Jan 1 13:03 chunkab
-rw-rw-r- 1 jdoe jdoe 54K Jan 1 13:03 chunkac
-rwxrwxr-x 1 jdoe jdoe 1.0M Jan 1 12:42 mongopicture.jpg*
-rw-rw-r- 1 jdoe jdoe 500K Jan 1 13:03 xaa
-rw-rw-r- 1 jdoe jdoe 500K Jan 1 13:03 xab
-rw-rw-r- 1 jdoe jdoe 54K Jan 1 13:03 xac
[jdoe@frazz split]$ cat chunkaa chunkab chunkac > reconstitutedpicture.jpg
[jdoe@frazz split]$ cmp mongopicture.jpg reconstitutedpicture.jpg
[jdoe@frazz split]$
Code Listing 6.22 Use split to break files into smaller chunks.

Chapter 6
132
Spl
itti
ng
Fil
es w
ith
spl
it
to split files with split:
split -b 500k mongopicture.jpg With that, split gives you three files (xaa, xab, xac) that are each 500 KB (the first two) or less (the last one, containing the leftovers). Mail each of those, and you’ve squeaked under the ISP’s size limit.
tips
Control the names of the files by adding a prefix at the end. For example, try split -b 500k mongopicture.jpg chunk to get three pieces called chunkaa, chunkab, and chunkac.
Use cat to restore the original; for exam-ple, cat chunkaa chunkab chunkac > reconstitutedpicture.jpg.
If you’re following the photo file example used here, note that the recipient of the e-mailed file pieces will have to assemble the pieces in order to view the photo. Even if the recipient isn’t a Unix user, all systems have utilities to accomplish this task. Now, whether your recipient would want to take the time or would have the skill to do this is another question. You might check with him or her first.

133
Gettin
g In
form
ation
Abo
ut th
e System
7Now is your chance to nose around in everyone else’s business! In this chapter, we’ll show you how to get information about the system, about other users, and about your own userid.
Getting Information About the System
Chapter Contents
Finding out system information
Viewing file systems
Determining disk usage
Finding out file types
Finding out about other users
Learning who else is logged in
Getting information about your userid

Chapter 7
134
Get
tin
g S
yste
m In
form
atio
n w
ith
una
me
Getting System Information with unameInformation about your Unix system might come in handy if you’re planning to try some new software or need to figure out system idiosyncrasies. Some systems tell you this information when you log in. Sometimes, however, especially if you’re using an ISP, you may not have been told any particulars about the Unix system. You can easily find out what kind of Unix system you’re using with uname, as shown in Code Listings 7.1 and 7.2.
to find out about the system using uname:
1. unameTo begin, type uname to find out what kind of a system you’re on. The Unix system in Code Listings 7.1 and 7.2 is Solaris (aka SunOS). Other common systems (not an exhaustive list, by any means) are Linux, AIX, BSD, and HP/UX.
2. uname -srAdd the -sr flags to the command, yield-ing uname -sr, to find out both the operat-ing system type and the release level. This is useful to determine whether specific software is compatible with the operating system.
3. uname -aFor the whole nine yards, use uname -a to print all information, including the oper-ating system type, host name, version, and hardware. The specifics you get here will vary a bit from system to system.
ejray@home $ ssh frizz
Last login: Wed Oct 10 09:59:09 from frazz
Sun Microsystems Inc. SunOS 5.9 Generic
May 2002
ejray@frizz $ uname
SunOS
ejray@frizz $ uname -sr
SunOS 5.9
ejray@frizz $ uname -a
SunOS frizz 5.9 Generic_112233-01 sun4u
sparc SUNW,Ultra-5_10
Code Listing 7.1 Variants on the uname command provide all kinds of interesting or useful information about the system.
ejray@frazz $ uname
Linux
ejray@frazz $ uname -sr
Linux 2.4.19-16mdk
ejray@frazz $ uname -a
Linux frazz.raycomm.com 2.4.19-16mdk #1 Fri
Sep 20 18:15:05 CEST 2002 i686 unknown
unknown GNU/Linux
ejray@frazz $
Code Listing 7.2 On a different system, the same commands provide slightly different details, although the basic information remains the same.

Getting Information About the System
135
Viewin
g File System
s with
df
Viewing File Systems with dfIf you’re used to Windows or Macintosh oper-ating systems, you’re probably accustomed to seeing separate hard drives (C:, D:, E: for Windows users, or real names for Macs), which are just different storage spaces. In Unix systems, different storage spaces are grafted onto the overall tree structure—tacked onto what already exists without any clear distinction indicating where actual disk drives are located. For example, if you have a folder on a Windows computer, you know that all of the subfolders and files within it are located on the same hard drive. In Unix, everything resides within the root directory, but any different directory could be located on a different physical hard drive. You might think of it as tacking a new branch onto your artificial Christmas tree.
These tacked-on storage spaces are called file systems. Particularly if you’re running a Unix system (as opposed to just using one), you might need to find out what file systems are in use (or mounted in the system, in technical terms), how much space they have, and where they attach to the Unix system (or where their mountpoints are). You can find out this information using df, as shown in Code Listings 7.3 and 7.4 (on the following page).
[ejr@hobbes ejr]$ df
Filesystem 1024-blocks Used Available Capacity Mounted on
/dev/hda1 515161 316297 172255 65% /
/dev/hdb4 66365 4916 58022 8% /home
/dev/hdb1 416656 324633 70504 82% /usr/local
/dev/sbpcd 596704 596704 0 100% /mnt/cdrom
[ejr@hobbes ejr]$
Code Listing 7.3 This small Linux system has relatively simple file systems.

Chapter 7
136
View
ing
Fil
e Sy
stem
s w
ith
df
to find out about file systems with df:
df
At the shell prompt, type df. You’ll usually get output showing you the following: The name of the device, which refers
to the physical part that stores the data, such as a hard drive, CD-ROM, or whatever. In Code Listing 7.3 the first one is /dev/hda1, indicating the first hard drive in the system.
The number of blocks, which are 1 Kbyte-sized storage units (1 Kbyte-sized in this case, although some systems report them as 512 bytes).
The number of used and available blocks on the device.
The percentage of the space on the device that is being used.
The name of the file system, which is the full path name from the Unix system. This is also known as the mountpoint.
xmission> df
/ (/dev/dsk/c0t3d0s0 ): 154632 blocks 71721 files
/usr (/dev/dsk/c0t3d0s6 ): 225886 blocks 144820 files
/proc (/proc ): 0 blocks 7830 files
/dev/fd (fd ): 0 blocks 0 files
/var (/dev/dsk/c0t1d0s0 ): 1001142 blocks 962598 files
/tmp (swap ): 1236032 blocks 95277 files
/usr/local (/dev/dsk/c0t1d0s5 ): 630636 blocks 457211 files
/archive (/dev/dsk/c0t1d0s3 ): 1180362 blocks 1789487 files
/var/mail (mail.xmission.com:/var/mail): 2776576 blocks 1438385 files
/home (krunk1.xmission.com:/home): 20091072 blocks 13066932 files
/var/spool/newslib (news.xmission.com:/var/spool/newslib): 19327664 blocks 1248s
/.web (krunk1.xmission.com:/.web): 1019408 blocks 470095 files
/var/maillists (lists.xmission.com:/var/maillists): 293744 blocks 89732s
xmission>
Code Listing 7.4 This large ISP’s file systems are considerably more complex.

Getting Information About the System
137
Viewin
g File System
s with
df
Code Listings 7.3 and 7.4 show the output of df on two different systems.
If you’re a system administrator, you can use this information to help diagnose problems occurring in the system. If you’re an average user (of above-average curiosity), you can use this information to satisfy your inquisitive inclinations or to tip off a system administra-tor to problems. For example, if you’re getting odd errors or unpredictable results with a specific program, using df might reveal that the /home file system is full or maybe that you don’t have the /dev/cdrom file system that you thought was installed and mounted. Hmmm!
122 ejr@frazz $ df -h
Filesystem size used avail capacity Mounted on
/dev/dsk/c0d0s0 19G 4.5G 15G 24% /
/devices 0K 0K 0K 0% /devices
/dev 0K 0K 0K 0% /dev
ctfs 0K 0K 0K 0% /system/contract
proc 0K 0K 0K 0% /proc
mnttab 0K 0K 0K 0% /etc/mnttab
swap 1.5G 856K 1.5G 1% /etc/svc/volatile
objfs 0K 0K 0K 0% /system/object
/usr/lib/libc/libc_hwcap1.so.1
19G 4.5G 15G 24% /lib/libc.so.1
fd 0K 0K 0K 0% /dev/fd
swap 1.5G 164K 1.5G 1% /tmp
swap 1.5G 32K 1.5G 1% /var/run
/dev/dsk/c0d0s7 51G 18G 33G 36% /export
pooldata 226G 106M 69G 1% /pooldata
pooldata/family 226G 140G 69G 68% /pooldata/family
pooldata/raycomm 226G 5.9G 69G 8% /pooldata/raycomm
poolscratch 228G 46G 181G 21% /poolscratch
123 ejr@frazz $
Code Listing 7.5 Use df -h to get “human readable” output.
tips
You can use df with a specific directory to get a report on the status of the file system containing that directory. For example, you might use df /usr/local/src to find out where that directory is mounted and how much space is avail-able on it.
Use df -k to make sure that the usage is reported in 1 Kbyte blocks, not in 512 byte blocks. Adding the -k flag will also ensure that you get output like that shown in Code Listing 7.3.
Use df -h to get human-readable output. This works with many commands (like ls, for example) that output marginally comprehensible file information, as Code Listing 7.5 shows.

Chapter 7
138
Det
erm
inin
g D
isk
Usa
ge
wit
h d
u
Determining Disk Usage with duAnother piece of information that you can access is how much disk space within the Unix system is in use. You can do so using du, as shown in Code Listing 7.6.
to determine disk usage with du:
du
At the shell prompt, enter du. As Code Listing 7.6 shows, you’ll get information about disk usage in the current direc-tory as well as in all subdirectories. The numbers are usually measured in 1 Kbyte blocks (as with df). You can actually read the output by using du -h.
tips
If you’re on a system that enforces disk-space quotas (as many ISPs do), you can find out what your quota is and how close you are to reaching it. Just type quota -v at the shell prompt.
You can use du with a path name to check the disk usage in just a single directory or subdirectory (see Code Listing 7.7). du summarizes the usage by subdirectory as it prints the results.
Use du -s, optionally with a specific directory, to just print a summary of the amount of space used.
[ejr@hobbes ejr]$ du
2 ./Mail
1 ./nsmail
1 ./.netscape/cache/0F
3 ./.netscape/cache/1A
22 ./.netscape/cache
1 ./.netscape/archive
172 ./.netscape
1 ./Projects
28 ./.wprc
3 ./axhome
5 ./groups
1 ./manipulate/empty
154 ./manipulate
1 ./mail
1 ./unixvqs/ch6
2 ./unixvqs
6 ./dupgroups
255 ./compression/Folder
670 ./compression/temp/BackupFolder
1921 ./compression/temp
670 ./compression/BackupFolder
4657 ./compression
5 ./clean
1 ./.elm
15 ./editors
5619 .
[ejr@hobbes ejr]$
Code Listing 7.6 The du command reports—exhaustively—about the disk usage in the current directory and in its subdirectories.
[ejr@hobbes ejr]$ du /home/ejr/compression
255 /home/ejr/compression/Folder
670 /home/ejr/compression/temp/
BackupFolder
1921 /home/ejr/compression/temp
670 /home/ejr/compression/BackupFolder
4657 /home/ejr/compression
[ejr@hobbes ejr]$
Code Listing 7.7 Using du with a specific directory name gives you focused results.

Getting Information About the System
139
Findin
g O
ut File Types w
ith fi
le
Finding Out File types with fileIf you come from a Windows or Macintosh background, you’re probably used to accessing files and being able to see what type of files they are—HTML files, GIFs, documents, or whatever. In Unix, though, you often can’t tell the file type just by listing files or displaying directory contents. That’s where file comes in handy, as shown in Code Listing 7.8.
to identify file types with file:
file /usr/bin/pico
At the shell prompt, type file, followed by the path (if necessary) and filename. You’ll see output similar to that in Code Listing 7.8.
tip
Not all files have the “magic” informa-tion associated with them that makes file work, but most do. Where they don’t, you get a best-guess response, like the second response in Code Listing 7.8. Unfortunately, you can’t tell by looking if it’s definitive information or a guess, but if it’s terse (as in the second response), take it with a grain of salt.
[ejr@hobbes ejr]$ file /usr/bin/pico
/usr/bin/pico: ELF 32-bit LSB executable,
Intel 80386, version 1, dynamically ld
[ejr@hobbes ejr]$ file temp.htm
temp.htm: ASCII text
[ejr@hobbes ejr]$
Code Listing 7.8 The file command provides useful information about what kind of data is in specific files.

Chapter 7
140
Fin
din
g O
ut
Abo
ut
Use
rs w
ith
fing
er
Finding Out About Users with fingerUsing the finger command, you can find out who is currently logged into the Unix system as well as what they’re doing, how long they’ve been logged in, and other snoopy, not-necessarily-your-business information (Code Listing 7.9).
to find out who is logged in using finger:
1. fingerAt the shell prompt, type finger to see who else is logged into the system and to get a little information about them (Code Listing 7.9).
2. finger @example.comType finger, @, and a host name (in this case example.com) to find out who is logged into another host.Fingering a different host doesn’t always work, depending on security settings on the other host computer(s). If the host doesn’t allow it, you’ll get a message like the one in Code Listing 7.9.
[ejr@hobbes ejr]$ finger
Login Name Tty Idle Login Time Office Office Phone
asr *4 1 Jul 24 13:32
deb 5 1 Jul 24 13:32
ejr Eric J. Ray 1 3:20 Jul 22 07:42
ejr Eric J. Ray p1 1:12 Jul 24 12:14 (calvin)
ejr Eric J. Ray p0 Jul 24 13:02 (calvin)
root root *2 1d Jul 22 15:13
[ejr@hobbes ejr]$ finger @example.com
[example.com]
No one logged on
[ejr@hobbes ejr]$ finger @osuunx.ucc.okstate.edu
[osuunx.ucc.okstate.edu]
finger: connect: Connection refused
[ejr@hobbes ejr]$
Code Listing 7.9 The finger command often provides interesting information about who is logged onto different systems.

Getting Information About the System
141
Findin
g O
ut A
bou
t Users w
ith fi
nger
to find out about users using finger:
1. finger ejrAt the shell prompt, type finger followed by the userid of the person you want to know about. You’ll get a ton of informa-tion, including some or all of the follow-ing: the user’s name, home directory, and default shell; when, from where, and for how long they’ve been logged on; and whatever other information they choose to provide. Code Listing 7.10 shows two users with varying activity. deb has apparently been loafing, and ejr has been working his buns off.
continues on next page
[ejr@hobbes ejr]$ finger deb
Login: deb Name:
Directory: /home/deb Shell: /bin/bash
Never logged in.
No mail.
No Plan.
[ejr@hobbes ejr]$ finger ejr
Login: ejr Name:
Directory: /home/ejr Shell: /bin/bash
On since Wed Jul 22 07:42 (MDT) on tty1 2 hours 32 minutes idle
On since Wed Jul 22 06:58 (MDT) on ttyp1 from calvin
No mail.
Project:
Working on VQS.
Plan:
This is my plan---work all day, sleep all night.
[ejr@hobbes ejr]$ finger [email protected]
[xmission.com]
Login Name TTY Idle When Where
ejray “RayComm pts/57 <Jul 22 09:39> calvin.raycomm.c
[ejr@hobbes ejr]$
Code Listing 7.10 The finger command can also provide in-depth information about specific users.

Chapter 7
142
Fin
din
g O
ut
Abo
ut
Use
rs w
ith
fing
er
2. finger [email protected] finger plus a specific user address, you can find out about users on other systems. As with generic finger requests, sometimes they’re blocked for security reasons.
tips
You can also sniff out user information using who (see the next section).
You can provide extra information to anyone who gets your user information with finger by creating files that describe your “plan” and “project” (as ejr has done in Code Listing 7.10). Use your favorite editor to create .plan and .project files in your home directory. Then, change the protection so that the files are both world readable (chmod go+r .plan ; chmod go+r .project) and so the directory is acces-sible (chmod +rx .). See Chapter 5 for specifics about chmod.
Information you obtain through finger can be handy when diagnosing connec-tion difficulties. In particular, system administrators or help desk personnel are likely to ask where you’re connected (pts/57, for [email protected]) and what kind of software you’re using.

Getting Information About the System
143
Learnin
g W
ho
Else Is Log
ged in
with
who
Learning Who Else Is Logged in with whoIf you’re not interested in all the gory details you get about users when you finger them, you can instead use who to get just the basics. With who you get just the users’ names, con-nection information, login times, and host names, as shown in Code Listing 7.11.
to snoop with who:
who
At the shell prompt, type who. You’ll get user information like that shown in Code Listing 7.11. Optionally, you could pipe the output of who to more, as in who | more, which would give you a long list of results one screen at a time.
tips
If you’re a system administrator or use several different userids, you might occa-sionally need to use a special case of who, called whoami. Just type whoami at the shell prompt, and it’ll tell you which userid you’re currently logged in as.
See Chapter 1 for more on more and on piping commands.
[ejr@hobbes ejr]$ who
ejr tty1 Jul 22 07:42
root tty2 Jul 22 15:13
asr tty4 Jul 24 13:32
deb tty5 Jul 24 13:32
ejr ttyp1 Jul 24 12:14
(calvin.raycomm.com)
ejr ttyp0 Jul 24 13:02
(calvin.raycomm.com)
[ejr@hobbes ejr]$
Code Listing 7.11 Use who to find out who else is currently logged into the system.

Chapter 7
144
Lear
nin
g W
ho
Els
e Is
Lo
gg
ed in
wit
h w
Learning Who Else Is Logged in with wAnother way to find out about other people logged into the Unix system is to use w, which tells you who is logged in, what they’re doing, and a few other details (Code Listing 7.12).
to find out who is logged in with w:
w
At the shell prompt, type w. You’ll usually see output much like that in Code Listing 7.12. The top line shows The time System uptime in days, hours, and
minutes (uptime is how long it’s been since the system was restarted and is usually measured in weeks or months for Unix systems, as opposed to hours or days for personal computers).
The number of users System load averages (the numbers
indicate jobs—programs or scripts to execute—lined up to run in the past 1, 5, and 15 minutes)
[ejr@hobbes ejr]$ w
1:49pm up 6 days, 4:21, 6 users, load average: 0.08, 0.02, 0.01
USER TTY FROM LOGIN@ IDLE JCPU PCPU WHAT
ejr tty1 Wed 7am 3:36m 7.07s 6.01s -bash
root tty2 Wed 3pm 28:46m 1.22s 0.32s -bash
asr tty4 1:32pm 17:22 1.04s 0.30s pine
deb tty5 1:32pm 3.00s 1.22s 0.42s lynx
ejr ttyp1 calvin 12:14pm 1:28m 1.33s 0.57s vi hairyspiders
ejr ttyp0 calvin 1:02pm 1.00s 1.70s 0.24s w
[ejr@hobbes ejr]$
Code Listing 7.12 The w command provides tons of information about the system and its users.

Getting Information About the System
145
Learnin
g W
ho
Else Is Log
ged in
with
w
The following lines, one per logged-in user, show The login name The tty name (the connection to the
host) The remote host name The login time Current idle time (that is, the time
since a key on the keyboard was touched)
JCPU (job CPU time, or the total processing time for jobs on the current connection, which is the tty, for those into the jargon)
PCPU (process CPU time, or the pro-cessing time for the current process)
The command line of the current process
Whew! As you can see from Code Listing 7.12 and Code Listing 7.13, different systems’ w commands produce slightly different (but similar) output.
tip
Use w with grep to find information (slightly more abbreviated) about a specific user. For example, w | grep ejr gives limited information, but just about a specific user. See Chapter 1 for more information about piping commands.
xmission> w
1:47pm up 38 day(s), 23:35, 36 users, load average: 1.58, 1.78, 1.75
...
ejray pts/16 Thu 6am 1:14 -csh
...
Code Listing 7.13 w yields different information on different systems.

Chapter 7
146
Get
tin
g U
seri
d In
form
atio
n w
ith
id
Getting Information About Your Userid with idOccasionally, you may need to find out infor-mation about your userid, such as your use-rid’s numeric value and to what groups you belong. This information is essential when you’re sharing files (as discussed in Chapter 5) because you’ll need it to let people access your files and to access theirs. You can easily get information about your userid with id, as shown in Code Listing 7.14.
to check userid information using id:
id
At the shell prompt, type id to find the numeric value of your userid and to what groups (by name and numeric userid value) you belong (see Code Listing 7.14). See “Finding Out Which Group You’re In,” in Chapter 5, for more about the /etc/group file.
tips
You can also check someone else’s status with id to find out what groups they’re in. Just use id userid (substituting the other person’s userid for userid, of course).
Use groups to find out which groups—in human-readable terms—a specific userid is in. For example, ejr is in the ejr, wheel, and users groups, as shown in Code Listing 7.14.
[ejr@hobbes ejr]$ id
uid=500(ejr) gid=500(ejr) groups=500(ejr),
10(wheel),100(users)
[ejr@hobbes ejr]$ id deb
uid=505(deb) gid=505(deb) groups=100(users)
[ejr@hobbes ejr]$ groups ejr
ejr : ejr wheel users
Code Listing 7.14 Use id to get information about userids and group memberships.

147
Con
fig
urin
g Yo
ur U
nix En
viron
men
t
8Back in Chapter 3, we introduced you to Unix shells—what they are and what you can do with them. In this chapter, we’ll take you a bit further and look at configuring your environment using the zsh and bash shells. By configuring your environment, you can make the Unix system adapt to your needs, rather than adapting to an existing environment that may not work for you. These configura-tion tips differ (slightly) for different shells, so make sure you’re following along with the instructions appropriate for the shell you use.
Configuring Your Unix Environment
Chapter Contents
Understanding your Unix environment
Discovering your current environment
Adding or changing variables
Looking at your zsh configuration files
Changing your zsh path
Changing your zsh prompt
Looking at your bash configuration files
Changing your bash path
Changing your bash prompt
Setting aliases

Chapter 8
148
Un
ders
tan
din
g Y
ou
r U
nix
En
viro
nm
ent
Understanding Your Unix EnvironmentEnvironment variables are settings in the Unix system that specify how you, your shell, and the Unix system interact. When you log in to the Unix system, it sets up your standard environment variables—the shell prompt you want to use, the default search path, and other information to help programs run, among other things. You might think of your environment variables as being similar to having a standing order with a deli to deliver the same thing to you every day. You set up your “standing environment variables” and the Unix system delivers them to you session after session unless you specify otherwise.
Technically, there is a distinction between “shell” variables, which exist in the particu-lar shell you’re using, and “environment” variables, which are in your environment and independent of your particular shell. The key difference is that shell variables retain their values only in the current shell, whereas envi-ronment variables are propagated to all child processes of the shell. For most purposes, though, including this book, you can do as we’re doing and conveniently blur the distinc-tion. As long as you know that they’re not precisely synonymous, you’ll be fine.
Basically, just like with the lunch deli, you can configure your environment in one of two ways:
Changing the variables for the current session—kind of like calling in a special order for the day (as in ordering onion and extra cheese on the day’s sandwich). You do this from the shell prompt, as discussed in the “Adding or Changing Variables” section later in this chapter.
Configuring Your Unix Environment
149
Un
derstandin
g Yo
ur U
nix En
viron
men
t
Changing the variables for all subsequent sessions—kind of like changing your stan-dard order (say, when the doctor tells you to cut back on mayonnaise and suggests mustard for your long-term deli order). You do this within the configuration files, as discussed in sections following “Adding or Changing Variables.”
If you want to change your environment variables, you should first try changing them from the shell prompt for the current session. This way, you can try out the changes before you make them permanent (at least until you change them again) in your configuration files.
When you do change your environment in the configuration files, keep in mind that configuration files are generally run in a specific order:
Systemwide configuration files (such as /etc/profile) run first upon log in. These systemwide configuration files in /etc (if they exist) help set up your environment, but you cannot change them.
Configuration files specific to your Unix account (such as ~/.profile and ~/.bashrc) run next if they’re available. If you want to change environment variables originally set in the systemwide files, you can reset the values in your own personal files.
What this order means to you is that your own personal configurations override system ones. So, in making changes to your configu-ration files, be sure that you make changes to the configuration file that runs last. We’ll tell you which specific files to look for in the relevant sections of this chapter.
Find out about discovering your current envi-ronment variables and adding or changing environment variables manually in the next two sections in this chapter.
tips
You can use echo $SHELL to remind yourself of what shell you’re using. Visit Chapter 3 for more details.
Find out about changing environment variables in your system configuration files in other sections of this chapter, according to which shell you’re using.

Chapter 8
150
Dis
cove
rin
g Y
ou
r Cu
rren
t En
viro
nm
ent
Discovering Your Current EnvironmentA good first step in changing your environ-ment is determining what environment you have. Using the steps in this section, you can discover which environment and shell variables are currently set—including ones specified in the configuration files as well as ones you’ve set for the current session (Code Listing 8.1).
As you’re going through these steps, you might check out the sidebar “Variables in Your Environment You Shouldn’t Touch” in this section for a list of variables you should leave alone. Then, in the next section, check out “Variables You Can Mess With” to find ones you can change.
to show your current environment in zsh or bash:
set
At the shell prompt, type set. You’ll see a list of the current environment and shell variables, as shown in Code Listing 8.1.Some of the variables may look familiar to you (such as the ones showing your shell or user name), while others are likely to be more cryptic (such as the line showing the last command you ran, in this case, _=cd).
[ejr@hobbes ejr]$ set
BASH=/bin/bash
BASH_VERSION=1.14.7(1)
COLUMNS=80
ENV=/home/ejr/.bashrc
EUID=500
HISTFILE=/home/ejr/.bash_history
HISTFILESIZE=1000
HISTSIZE=1000
HOME=/home/ejr
HOSTNAME=hobbes.raycomm.com
HOSTTYPE=i386
IFS=
LINES=24
LOGNAME=ejr
MAIL=/var/spool/mail/ejr
MAILCHECK=60
OLDPWD=/home/ejr/src/rpm-2.5.1
OPTERR=1
OPTIND=1
OSTYPE=Linux
PATH=/usr/local/bin:/bin:/usr/bin:/usr/
_X11R6/bin:/home/ejr/bin
PPID=1943
PS1=[\u@\h \W]\$
PS2=>
PS4=+
PWD=/home/ejr
SHELL=/bin/bash
SHLVL=3
TERM=vt220
UID=500
USER=ejr
USERNAME=
_=cd
[ejr@hobbes ejr]$
Code Listing 8.1 You can find out which variables exist in the zsh or bash shells with set.

Configuring Your Unix Environment
151
Disco
vering
You
r Curren
t Enviro
nm
ent
tips
If you do as we often do and try to use show to show the environment variables (“showing” the variables seems logical, right?), you might get a weird question about the standard mail directories and the MH mailer. Just press cC to return to your shell prompt.
If the list of environment variables is long, you can pipe set to more so that you can read the variables one screen at a time. Try set | more. See Chapter 1 for a reminder about piping commands.
Variables in Your Environment You Shouldn’t touch
Before you go running off and changing your environment, note that there are some things you should really leave alone. These variables that the shell automatically sets affect how your Unix system works (or doesn’t work, if you try to change some of these variables!). Some of these can-not be changed, but some can, with unpredictable results. When in doubt, don’t. See the sidebar “Variables You Can Mess With” in the following section for a list of variables you can change.
z s h a n d b a s h D e s c r i p t i o n
HISTCMD Keeps track of the number of the current command from the history.HOSTTYPE Holds a string describing the type of hardware on which the shell is running.IFS Specifies the characters that indicate the beginning or end of words.LINENO Contains the number of the current line within the shell or a shell script.OLDPWD Contains the previous working directory.OSTYPE Holds a string describing the operating system on which the shell is running.PPID Contains the process ID of the shell’s parent.PWD Contains the current working directory.RANDOM Contains a special value to generate random numbers.SECONDS Contains the number of seconds since the shell was started.SHELL Contains the name of the current shell.SHLVL Contains a number indicating the sub-shell level (if SHLVL is 3, two parent shells exist and you’ll have
to exit from three total shells to completely log out).UID Contains the userid of the current user.

Chapter 8
152
Add
ing
or
Chan
gin
g V
aria
bles
Adding or Changing VariablesAfter you’ve poked around in your environ-ment, you might determine that you want to set a variable that’s currently not available or change one to make it better meet your needs. In general, you won’t randomly specify variables; you’ll do it because a certain program requires a specific variable in order to run.
Variables You Can Mess With
The following table includes some of the variables you can safely change. Keep in mind that the shell itself might not use a specific variable, like NNTPSERVER, while programs running under the shell might. Sometimes shells assign default variables, while in other cases you’ll have to manu-ally set the value.
z s h a n d b a s h D e s c r i p t i o n
CDPATH Specifies the search path for directories specified by cd. This is similar to PATH.COLUMNS Specifies the width of the edit window in characters.EDITOR Specifies the default editor.ENV Specifies where to look for configuration files.HISTFILE Specifies the name of the file containing the command history.HISTFILESIZE Specifies the maximum number of lines to keep in the history file.HISTSIZE Specifies the number of commands to keep in the command history.HOSTFILE Specifies the name of the file containing host name aliases for expansion.IGNOREEOF Specifies that cD should not log out of the shell. Use IGNOREEOF=.LINES Specifies the number of lines on the screen.MAIL Specifies the location of incoming mail so bash can notify you of mail arrival.MAILCHECK Specifies how often (in seconds) bash checks for mail.MAIL_WARNING Specifies the message to be displayed if you have read mail but not unread mail.noclobber Specifies that the shell should not overwrite an existing file when redirecting output.PATH Specifies the search path for commands, including multiple paths separated by colons.PROMPT_COMMAND Specifies the command to be run before displaying each primary prompt .PS1 Specifies the primary prompt.PS2 Specifies the default second-level prompt.PS3 Specifies the prompt for the select command in scripts.PS4 Specifies the prompt used when tracing execution of a script.TMOUT Specifies time in seconds to wait for input before closing the shell.VISUAL Specifies the default visual editor—usually the same as EDITOR, but referenced by
different programs.
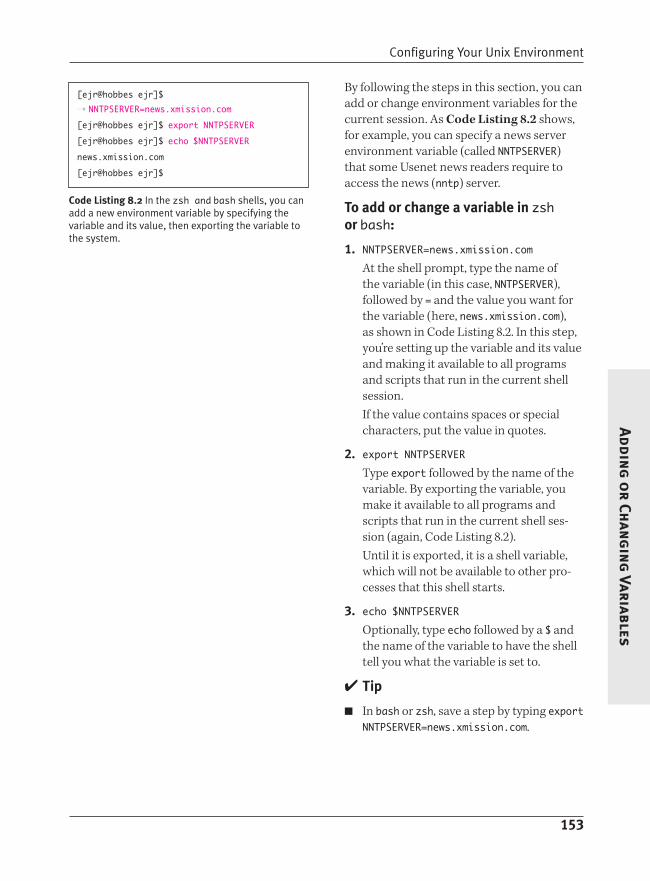
Configuring Your Unix Environment
153
Addin
g o
r Chan
gin
g Variables
By following the steps in this section, you can add or change environment variables for the current session. As Code Listing 8.2 shows, for example, you can specify a news server environment variable (called NNTPSERVER) that some Usenet news readers require to access the news (nntp) server.
to add or change a variable in zsh or bash:
1. NNTPSERVER=news.xmission.comAt the shell prompt, type the name of the variable (in this case, NNTPSERVER), followed by = and the value you want for the variable (here, news.xmission.com), as shown in Code Listing 8.2. In this step, you’re setting up the variable and its value and making it available to all programs and scripts that run in the current shell session.If the value contains spaces or special characters, put the value in quotes.
2. export NNTPSERVERType export followed by the name of the variable. By exporting the variable, you make it available to all programs and scripts that run in the current shell ses-sion (again, Code Listing 8.2).Until it is exported, it is a shell variable, which will not be available to other pro-cesses that this shell starts.
3. echo $NNTPSERVEROptionally, type echo followed by a $ and the name of the variable to have the shell tell you what the variable is set to.
tip
In bash or zsh, save a step by typing export NNTPSERVER=news.xmission.com.
[ejr@hobbes ejr]$
NNTPSERVER=news.xmission.com
[ejr@hobbes ejr]$ export NNTPSERVER
[ejr@hobbes ejr]$ echo $NNTPSERVER
news.xmission.com
[ejr@hobbes ejr]$
Code Listing 8.2 In the zsh and bash shells, you can add a new environment variable by specifying the variable and its value, then exporting the variable to the system.

Chapter 8
154
Loo
kin
g a
t Yo
ur
zsh
Con
fig
ura
tio
n F
iles
Looking at Your zsh Configuration FilesYour first step in modifying or adding zsh environment variables in your configura- tion files is to look at the configuration files, which show you the variables that are explicitly defined. As Code Listing 8.3 shows, you do this using more or the editor of your choice.
Remember that zsh configuration files exist in two places:
Systemwide configuration files (such as /etc/zprofile or /etc/zshenv)
Configuration files specific to your Unix account (such as ~/.zprofile or ~/.zshrc)
jdoe@sulley ~ $ more ~/.z* /etc/zl* /etc/zprofile /etc/zsh*
::::::::::::::
/home/jdoe/.zprofile
::::::::::::::
# /etc/zprofile and ~/.zprofile are run for login shells
#
::::::::::::::
/home/jdoe/.zshenv
::::::::::::::
export X11HOME=/usr/X11R6
if (( EUID == 0 )); then
path=(/sbin /usr/sbin)
fi
typeset -U path
path=($path $X11HOME/bin /bin /usr/bin /usr/local/bin)
PATH=$PATH:/home/jdoe/scripts
::::::::::::::
/home/jdoe/.zshrc
::::::::::::::
(code continues on next page)
Code Listing 8.3 Your zsh configuration files set up your environment variables and other features of your Unix experience.

Configuring Your Unix Environment
155
Loo
king
at You
r zsh Con
fig
uratio
n Files
# Reset prompts
PROMPT=”%n@%m %3~ %(!.#.$) “ # default prompt
#RPROMPT=’ %~’ # prompt for right side of screen
# bindkey -v # vi key bindings
bindkey -e # emacs key bindings
if [[ ! -r ${ZDOTDIR:-$HOME}/.zshrc ]];then
if [[ -f /usr/share/zsh/$ZSH_VERSION/zshrc_default ]];then
source /usr/share/zsh/$ZSH_VERSION/zshrc_default
fi
fi
::::::::::::::
/etc/zlogin
::::::::::::::
# /etc/zlogin and .zlogin are sourced in login shells.
::::::::::::::
/etc/zlogout
::::::::::::::
# /etc/zlogout and ~/.zlogout are run when an interactive session ends
# clear
::::::::::::::
/etc/zprofile
::::::::::::::
#
::::::::::::::
/etc/zshenv
::::::::::::::
export X11HOME=/usr/X11R6
if (( EUID == 0 )); then
path=(/sbin /usr/sbin)
fi
typeset -U path
path=($path $X11HOME/bin /bin /usr/bin /usr/local/bin)
::::::::::::::
/etc/zshrc
::::::::::::::
if [[ $(id -gn) = $USERNAME && $EUID -gt 14 ]]; then
umask 002
else
umask 022
(code continues on next page)
Code Listing 8.3 continued

Chapter 8
156
Loo
kin
g a
t Yo
ur
zsh
Con
fig
ura
tio
n F
iles
fi
# Get keys working
if [[ $TERM = “linux” ]];then
bindkey “^[[2~” yank
bindkey “^[[3~” delete-char
bindkey “^[[5~” up-line-or-history
bindkey “^[[6~” down-line-or-history
bindkey “^[[1~” beginning-of-line
bindkey “^[[4~” end-of-line
elif [[ $TERM = “xterm” || $TERM = “rxvt” ]];then
bindkey “^[[2~” yank
bindkey “^[[3~” delete-char
bindkey “^[[5~” up-line-or-history
bindkey “^[[6~” down-line-or-history
bindkey “” beginning-of-line
bindkey “” end-of-line
fi
# Set prompts
PROMPT=”%n@%m %3~ %(!.#.$) “ # default prompt
#RPROMPT=’ %~’ # prompt for right side of screen
# Some environment variables
path=($path $HOME/bin)
export HISTFILE=${HOME}/.bash_history
export HISTSIZE=1000
export SAVEHIST=1000
export USER=$USERNAME
export HOSTNAME=$HOST
# bindkey -v # vi key bindings
bindkey -e # emacs key bindings
for profile_func ( /etc/profile.d/*.sh ) source $profile_func
unset profile_func
# See comment at top.
if [[ ! -r ${ZDOTDIR:-$HOME}/.zshrc ]];then
if [[ -f /usr/share/zsh/$ZSH_VERSION/zshrc_default ]];then
source /usr/share/zsh/$ZSH_VERSION/zshrc_default
fi
fi
jdoe@sulley ~ $
Code Listing 8.3 continued

Configuring Your Unix Environment
157
Loo
king
at You
r zsh Con
fig
uratio
n Files
to look at your zsh configuration files:
1. more ~/.z* /etc/zl* /etc/zprofile /etc/zsh*
At the shell prompt, type more followed by each of the possible system configura-tion filenames to view your configuration files. If you don’t have all (or any) of the files mentioned here, don’t worry. Just make note of the ones you do have. Code Listing 8.3 shows an example of what you might see.
2. Write down, for your reference, the system configuration files and the order in which they’re run. (Remember, settings in the last file run override all previous ones.) Our system configuration files, all automati-cally called by the system, include /etc/zshenv then ~/.zshenv
/etc/zprofile then ~/.zprofile
/etc/zshrc then ~/.zshrc
/etc/zlogin then ~/.zlogin
Keep in mind that the files you have may differ from the files that we have.
tips
Take special note of any lines in any of the files that end with a path and filename, or that reference other files directly, with something like /etc/profile on a line by itself. Each of those lines references another file that plays a role in getting you set up. Notice that some of the lines will reference others that don’t directly configure your environment.
Some files include oddities like export HISTFILE=${HOME}/.bash_history line that reference the .bash_history file, containing the list of commands you’ve run. (Looks like a goof by the Linux dis-tributor. Good thing you’re checking up on them, huh?)
Fill in Your bash System Configuration Files
_______________________________________________________________________________________________________________________________________________________________________________________________________________________________________
Fill in Your zsh System Configuration Files
_______________________________________________________________________________________________________________________________________________________________________________________________________________________________________
You can use grep to make it easy to find the configuration files that set your path. grep -i path ~/.z* is a good way to start.
If you see something like path=($path $HOME/bin) in your configuration files, that’s okay. Just go ahead and use the syn-tax shown in this section on the following line anyway. It’s a feature of zsh that it understands about a bazillion different ways to express any single command.

Chapter 8
158
Add
ing
to
Yo
ur
zsh
Path
Adding to Your zsh PathOne of the most useful changes you can make to your environment is adding to the default path, which is determined by the path statement. The path statement tells the shell where to look for commands, scripts, and programs. That is, if you issue a com-mand, the path statement tells the system to look for that command in each of the named directories in a specific order.
Be sure not to remove anything from your path unless you really know what you’re doing, but feel free to add as many additional directories to it as you want. For example, if you get started writing scripts (as described in Chapter 10), you might put them in a scripts subdirectory and want to add that directory to your path.
As the following steps show, you change your zsh path by first identifying where your path statement is located, then editing the file that contains it (Code Listing 8.4).
to change your zsh path:
1. more ~/.zshenv ~/.zprofile ~/.zshrcTo begin, view your configuration files (just the ones you can edit) in the order they’re executed.Look through your system configuration files for a path statement. As Code Listing 8.4 shows, it will look something like PATH=/bin:/usr/bin:/opt/bin. If you have more than one path statement, find the last one executed.Remember that different systems will have different configurations, so you might need to do a little digging to find your personal path statement(s).
jdoe@sulley ~ $ tail .zshrc
# See comment at top.
if [[ ! -r ${ZDOTDIR:-$HOME}/
.zshrc ]];then
if [[ -f /usr/share/zsh/$ZSH_VERSION/
zshrc_default ]];then
source /usr/share/zsh/$ZSH_VERSION/
zshrc_default
fi
fi
PATH=/bin:/usr/bin:/opt/bin
jdoe@sulley ~ $
Code Listing 8.4 You should find your path statement in your configuration files.

Configuring Your Unix Environment
159
Addin
g to
You
r zsh Path
2. cp .zshrc .zshrc_backupMake a backup of the file containing the path statement so that you can recover the file when problems or errors occur. See Chapter 2 if you need more informa-tion on copying files.
3. vi .zshrcUse your favorite editor to open the file whose path you want to change.
4. PATH=$PATH:$HOME/scriptsAdd a new path statement immedi-ately below the last path statement. In this example, PATH is set to its current value ($PATH) plus the directory ($HOME/scripts) you wish to append to your path (Figure 8.1).
5. Save the file and exit from your editor.Refer to Chapter 4 for help if you need it.
6. su - youridAs you learned back in Chapter 3, this command starts a new login shell so you can test your changes before logging out.
7. echo $PATHDisplay the current path environment variable. This should include the addition you just made. It’s there, right? (See Code Listing 8.5.)
tips
If you look through the path statements in your various configuration files, you might find a path statement that includes just a . (dot). For example, you might see some-thing like PATH=/usr/bin:/usr/local/bin:.:. The . adds your current directory, whatever it might be, to your path. Keep in mind, though, that it’s often safer not to have the current directory in the path so you don’t unintentionally run a different program from the one you expect.
jdoe@sulley ~ $ su - jdoe
Password:
jdoe@sulley ~ $ echo $PATH
/bin:/usr/bin:/opt/bin:/home/jdoe/scripts/
jdoe@sulley ~ $
Code Listing 8.5 Test out your edits to the configuration files.
Figure 8.1 You add or modify a zsh path statement in your editor.
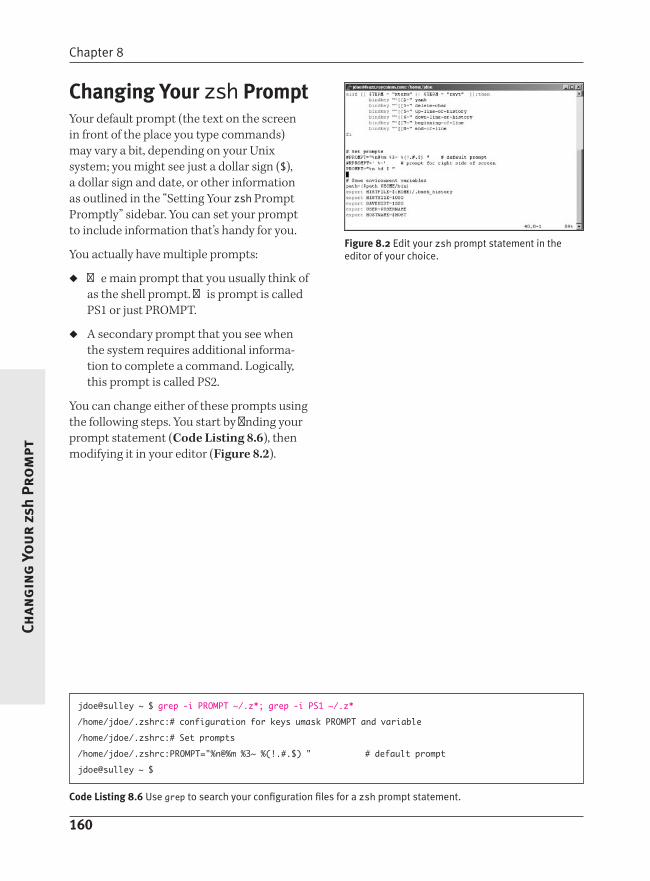
Chapter 8
160
Chan
gin
g Y
ou
r zs
h Pr
om
pt
Changing Your zsh PromptYour default prompt (the text on the screen in front of the place you type commands) may vary a bit, depending on your Unix system; you might see just a dollar sign ($), a dollar sign and date, or other information as outlined in the “Setting Your zsh Prompt Promptly” sidebar. You can set your prompt to include information that’s handy for you.
You actually have multiple prompts:
The main prompt that you usually think of as the shell prompt. This prompt is called PS1 or just PROMPT.
A secondary prompt that you see when the system requires additional informa-tion to complete a command. Logically, this prompt is called PS2.
You can change either of these prompts using the following steps. You start by finding your prompt statement (Code Listing 8.6), then modifying it in your editor (Figure 8.2).
jdoe@sulley ~ $ grep -i PROMPT ~/.z*; grep -i PS1 ~/.z*
/home/jdoe/.zshrc:# configuration for keys umask PROMPT and variable
/home/jdoe/.zshrc:# Set prompts
/home/jdoe/.zshrc:PROMPT=”%n@%m %3~ %(!.#.$) “ # default prompt
jdoe@sulley ~ $
Code Listing 8.6 Use grep to search your configuration files for a zsh prompt statement.
Figure 8.2 Edit your zsh prompt statement in the editor of your choice.

Configuring Your Unix Environment
161
Chan
gin
g Yo
ur zsh Pro
mpt
to change your zsh prompt:
1. grep -i PROMPT ~/.z*; grep -i PS1 ~/.z*
To begin, search through the configura-tion files located in your home directory and, if necessary, in the /etc directory, to find your prompt statement. It will look something like PROMPT=”%n@%m %3~ %(!.#.$) “ # default prompt, as shown in Code Listing 8.6.The “Setting Your zsh Prompt Promptly” sidebar will help translate these symbols.
2. cp ~/.zshrc ~/.zshrc-backup; vi ~/.zshrc
Make a backup copy. The ~/.zshrc file is a likely place for your prompt to be set, as it is only read when your shell is interactive.
continues on next page
Setting Your zsh Prompt Promptly
You can set your prompt to contain all sorts of information. The following list shows you what code to use to add certain kinds of information to your prompt (as well as help you translate the code in your existing prompt):
%n shows the userid of the current user—that’s you.
%~ shows the current working directory with a path, using a ~ notation within your home directory.
%c shows the current directory without the path.
%t shows the time.
%w shows the date without the year.
%W shows the date with the year.
\n forces a new line, making the prompt appear split on two lines (you need single quotes around the prompt).
%m shows the host name of the computer (like the frazz and hobbes examples in this book).
%M shows the complete host name of the computer, including the domain name.

Chapter 8
162
Chan
gin
g Y
ou
r zs
h Pr
om
pt
3. PROMPT=”%n %d $ “For example, we often set our prompt to include two tidbits of information: the userid (as we have many different accounts, we can always use a reminder!) and the date (time flies when you’re having fun, right?). We’re adding these bits of informa-tion instead of the existing default prompt, but saving the default with a # sign at the beginning, just in case (Figure 8.2).
4. Save the file and exit from the editor.
5. su - ejrLog in again with your changed prompt to try it out.
tips
Note the trailing space in the prompt code: PROMPT=”%n %d $ “. This space can help make it easier to use the prompt because it keeps your commands from bumping into your prompt.
You can also set your prompt so that the information you set appears on one line and your actual prompt appears on the next (Code Listing 8.7). To do so, use single quotes (‘’) and a $ in the environ-ment variable setting then a \n for the new line, as in PROMPT=$’%n %W\n $’. This forces the shell to treat the \n as a new line, not just as random characters in the prompt string.
jdoe /home/jdoe $ PROMPT=$’Top line
\nNext line $’
Top line
Next line $pwd
/home/jdoe
Top line
Next line $
Code Listing 8.7 Testing after you update your prompt is always a good idea.
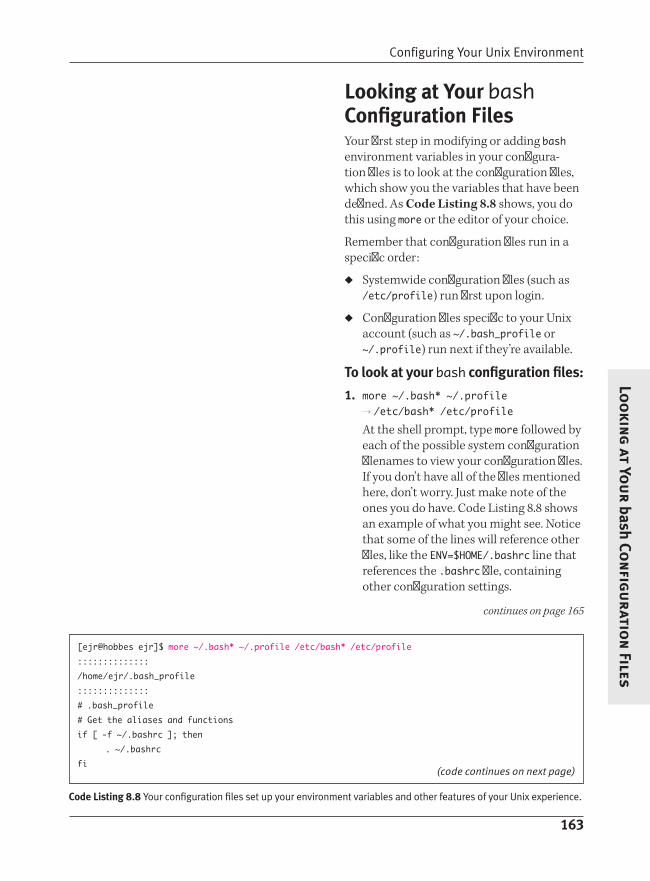
Configuring Your Unix Environment
163
Loo
king
at You
r bash Con
fig
uratio
n Files
Looking at Your bash Configuration FilesYour first step in modifying or adding bash environment variables in your configura-tion files is to look at the configuration files, which show you the variables that have been defined. As Code Listing 8.8 shows, you do this using more or the editor of your choice.
Remember that configuration files run in a specific order:
Systemwide configuration files (such as /etc/profile) run first upon login.
Configuration files specific to your Unix account (such as ~/.bash_profile or ~/.profile) run next if they’re available.
to look at your bash configuration files:
1. more ~/.bash* ~/.profile /etc/bash* /etc/profile
At the shell prompt, type more followed by each of the possible system configuration filenames to view your configuration files. If you don’t have all of the files mentioned here, don’t worry. Just make note of the ones you do have. Code Listing 8.8 shows an example of what you might see. Notice that some of the lines will reference other files, like the ENV=$HOME/.bashrc line that references the .bashrc file, containing other configuration settings.
continues on page 165
[ejr@hobbes ejr]$ more ~/.bash* ~/.profile /etc/bash* /etc/profile
::::::::::::::
/home/ejr/.bash_profile
::::::::::::::
# .bash_profile
# Get the aliases and functions
if [ -f ~/.bashrc ]; then
. ~/.bashrc
fi(code continues on next page)
Code Listing 8.8 Your configuration files set up your environment variables and other features of your Unix experience.

Chapter 8
164
Loo
kin
g a
t Yo
ur
bash
Co
nfi
gu
rati
on
Fil
es
# User-specific environment and startup programs
PATH=$PATH:$HOME/bin
ENV=$HOME/.bashrc
USERNAME=””
export USERNAME ENV PATH
/home/ejr/.profile: No such file or directory
::::::::::::::
/etc/bashrc
::::::::::::::
# /etc/bashrc
# System-wide functions and aliases
# Environment stuff goes in /etc/profile
# Putting PS1 here ensures that it gets loaded every time.
PS1=”[\u@\h \W]\\$ “
alias which=”type -path”
::::::::::::::
/etc/profile
::::::::::::::
# /etc/profile
# Systemwide environment and startup programs
# Functions and aliases go in /etc/bashrc
PATH=”$PATH:/usr/X11R6/bin”
PS1=”[\u@\h \W]\\$ “
ulimit -c 1000000
if [ ‘id -gn’ = ‘id -un’ -a ‘id -u’ -gt 14 ]; then
umask 002
else
umask 022
fi
USER=’id -un’
LOGNAME=$USER
MAIL=”/var/spool/mail/$USER”
HOSTNAME=’/bin/hostname’
HISTSIZE=1000
HISTFILESIZE=1000
export PATH PS1 HOSTNAME HISTSIZE HISTFILESIZE USER LOGNAME MAIL
for i in /etc/profile.d/*.sh ; do
if [ -x $i ]; then
. $i
fi
done
unset i
[ejr@hobbes ejr]$
Code Listing 8.8 continued

Configuring Your Unix Environment
165
Loo
king
at You
r bash Con
fig
uratio
n Files
2. Write down, for your reference, the system configuration files and the order in which they’re run. (Remember, settings in the last file run override all previous ones.) Our system configuration files include /etc/profile (automatically called by
the system if it exists) ~/.bash_profile (automatically
called by the system if it exists) ~/.bashrc (automatically called by the
system if it exists) /etc/bashrc (often called by
~/.bashrc)Keep in mind that the files you have may differ from the files that we have.
tips
The bash shell sometimes daisychains configuration files together, referencing one from the previous one. Be careful to preserve the references and sequence as you edit your configuration files, or you might end up with unexpected results.
All lines that start with # are comments, which contain notes to help you better understand the files. Comments don’t actually do anything, but they help you see what each section in the file does.
The techie term (that you’ll likely see in these files) for executing a configuration file or a script is to source it. That is, when you log in, your .profile may source .bashrc.

Chapter 8
166
Add
ing
to
Yo
ur
bash
Pat
h
Adding to Your bash PathOne of the most useful changes you can make to your environment is adding to the default path, which is determined by the path statement. The path statement tells the shell where to look for commands, scripts, and programs. That is, if you issue a com-mand, the path statement tells the system to look for that command in each of the named directories in a specific order.
Be sure not to remove anything from your path unless you really know what you’re doing, but feel free to add as many additional directories as you want to it.
As the following steps show, you change your bash path by first identifying where your path statement is located, then editing the file that contains it (Code Listing 8.9).
to change your bash path:
1. more ~/.bash_profile ~/.bashrcTo begin, view your configuration files (just the ones you can edit) in the order they’re executed.Look through your system configuration files for a path statement. As Code Listing 8.9 shows, it’ll look something like PATH=/bin:/usr/bin:/usr/local/bin. If you have more than one path statement, find the last one executed.Remember that different systems will have different configurations, so you might need to do a little digging to find your personal path statement(s).
2. cp .bash_profile .bash_profile_backupMake a backup of the file containing the path statement so that you can recover if you make mistakes. See Chapter 2 if you need more information on copying files.
[ejr@hobbes ejr]$ more ~/.bash_profile
~/.bashrc
::::::::::::::
/home/ejr/.bash_profile
::::::::::::::
# .bash_profile
# Get the aliases and functions
if [ -f ~/.bashrc ]; then
. ~/.bashrc
fi
PATH=/bin:/usr/bin:/usr/local/bin
# User-specific environment and startup
programs
PATH=$PATH:/usr/local/games
ENV=$HOME/.bashrc
USERNAME=””
export USERNAME ENV PATH
-More-(Next file: /home/ejr/.bashrc)
Code Listing 8.9 Your first step is finding out the location of your path statement(s).

Configuring Your Unix Environment
167
Addin
g to
You
r bash Path
3. vi .bash_profileUse your favorite editor to open up the file in which you’ll be changing the path.
4. PATH=$PATH:$HOME/scriptsAdd a new path statement immediately below the last path statement. In this example, PATH is set to its current value ($PATH) plus the directory ($HOME/scripts) you wish to append to your path (Figure 8.3).
5. Save the file and exit from your editor.Refer to Chapter 4 for help if you need it.
6. su - youridAs you learned back in Chapter 3, this command starts a new login shell so you can test your changes before logging out.
7. echo $PATHDisplay the current path environment variable. This should include the addition you just made. It’s there, right? (See Code Listing 8.10.)
tips
If you look through the path statements in your various configuration files, you might find a path statement that includes just a . (dot). For example, you might see something like PATH=/usr/bin:/usr/ local/bin:.:. The . adds your current directory, whatever it might be, to your path. Keep in mind, though, that it’s often safer not to have the current directory in the path so you don’t unintentionally run a program that isn’t the one you expect to run (because there’s an executable file by the same name in your current directory).
You can use grep to make it easy to find the configuration files that set your path. grep PATH ~/.bash* ~/.profile is a good way to start, and grep PATH /etc/* is another goodie.
[ejr@hobbes ejr]$ echo $PATH
/bin:/usr/bin:/usr/local/bin:/usr/bin/X11:/
usr/X11R6/bin:/usr/local/games:/home/ejr/
bin
[ejr@hobbes ejr]$
Code Listing 8.10 Using echo, you can verify that your new path statement exists.
Figure 8.3 You add or modify a bash path statement in your editor.
Your system configuration files will be much less confusing later on if you keep all related changes together. Therefore, you should keep the path statements together, rather than just plug an entirely random PATH statement into your con-figuration files.

Chapter 8
168
Chan
gin
g Y
ou
r ba
sh P
rom
pt
Changing Your bash PromptDepending on your Unix system, by default you might see as your prompt just a dollar sign ($), or perhaps a dollar sign and date, or other information as outlined in the “Setting Your bash Prompt Promptly” sidebar. You can set your prompt to include information that’s handy for you.
You have a couple of prompts in bash:
The main prompt that you usually think of as the shell prompt. This prompt is called PS1.
A secondary prompt that you see when the system requires additional informa-tion to complete a command. Logically, this prompt is called PS2.
You can change either of these prompts using the following steps. You start by finding your prompt statement (Code Listing 8.11), then modifying it in your editor (Figure 8.4).
to change your bash prompt:
1. grep PS1 ~/.bash* ~/.bashrc /etc/bashrc
To begin, search through the configura-tion files located in your home directory and in the /etc directory to find your prompt statement. It’ll look something like PS1=”$ “ or PS1=”[\u@\h \W]$ “, as shown in Code Listing 8.11.The “Setting Your bash Prompt Promptly” sidebar will help translate these symbols.
Figure 8.4 Edit your bash prompt statement in the editor of your choice.
[ejr@hobbes ejr]$ grep PS1 ~/.bash*
~/.bashrc /etc/bashrc
/home/ejr/.bashrc:PS1='\u \d $ '
/etc/bashrc:PS1='[\u@\h \W]$ '
[ejr@hobbes ejr]$
Code Listing 8.11 Use grep to search your configuration files for a prompt statement.

Configuring Your Unix Environment
169
Chan
gin
g Yo
ur bash Pro
mpt
2. vi ~/.bashrcBecause the files with the prompt setting are in the systemwide /etc directory, we cannot change them directly, so we have to make the changes to .bashrc or a different configuration file in our home directory.
3. PS1=”\u \d $ “For example, we often set our prompt to include the userid (because we have enough different accounts on different systems that we need a reminder) and the date (because we’re scattered). We’re add-ing this at the end of the file so it will take precedence over the PS1 setting in the /etc/bashrc file that is referenced from the ~/.bashrc file (Figure 8.4).
4. Save the file and exit from the editor.
5. su - ejrLog in again with your changed prompt to try it out.
tips
Note the trailing space in the prompt code: PS1=”\u \d $ “. This space can help make it easier to use the prompt because it keeps your commands from bumping into your prompt.
Consider changing your PS1 environment variable at the shell prompt, as discussed in Chapter 3, before you make changes in your configuration files. This way, you can try out a modified shell prompt before you change it in your configuration files.
Setting Your bash Prompt Promptly
You can set your prompt to contain all sorts of information. The following list shows you what code to use to add certain kinds of information to your prompt (as well as help you translate the code in your existing prompt):
\u shows the userid of the current user—that’s you.
\w shows the current working direc-tory with a path, using a ~ notation within your home directory.
\W shows the current directory without the path.
\t shows the time.
\d shows the date.
\n forces a new line, making the prompt appear split on two lines.
\h shows the host name of the computer.

Chapter 8
170
Set
tin
g A
lias
es w
ith
ali
as
Setting Aliases with aliasAliases are nicknames of sorts that you use to enter commands more easily. For example, if you frequently use the command mail -s “Lunch today?” deb < .signature, you could set an alias for this command and call it lunch. Then, in the future, all you have to do is type in lunch, and the result is the same as if you typed in the longer command.
to set an alias with alias:
1. Choose the appropriate file to edit, depending on which shell you’re using: zsh users should use ~/.zshrc bash users should use ~/.bashrcIf you don’t have the appropriate file, you’re welcome to use a different con-figuration file. Many people store all their aliases in a separate .alias file and update their standard configurations with a line that references their new .alias file.
2. vi .bashrcEdit the configuration file you’ve selected.
3. alias quit=“logout”Type alias followed by the term you want to use as the alias, =, and the command for which you’re making an alias (in quotes). Here, we’re setting the word quit as an alias for the system command log-out, so we can type quit instead of logout (Figure 8.5).
Figure 8.5 Setting aliases can keep you from typing long names and code.

Configuring Your Unix Environment
171
Settin
g A
liases with
alias
4. Add as many other aliases as you want. See the sidebar “Good Aliases to Set” for more ideas.
5. Save the file and exit from the editor.See Chapter 4 for details about saving and exiting in vi, pico, and nano.
6. su - youridStart a new login shell to test out the alias.
7. aliasType alias at the shell prompt for a listing of all the aliases you have defined (Code Listing 8.12).
continues on next page
xmission> alias
cd cd !*;echo $cwd
clr clear
cls clear
copy cp -i
del rm -i
delete rm -i
dir ls -alg
home cd ~
ls ls -F
md mkdir
move mv -i
pwd echo $cwd
type more
xmission>
Code Listing 8.12 Type alias at the shell prompt to see a list of aliases you’ve set.
Good Aliases to Set
Here are a few aliases you might find worthwhile to set on your system:
alias rm="rm -i" causes the system to prompt you about all deletions.
alias quit="logout" lets you use quit as a synonym for logout.
alias homepage="lynx http://www.raycomm.com/" lets you use homepage to start the lynx browser and connect to the Raycomm home page (substitute your home page as necessary).
Or, if you’re coming from a DOS background, you might find the following aliases handy:
alias dir="ls -l” lets you use dir to list files.
alias copy="cp" lets you use copy to copy files.
alias rename="mv" lets you use rename to move or rename files.
alias md="mkdir" lets you use md to make a directory.
alias rd="rmdir" lets you use rd to remove a directory.

Chapter 8
172
Set
tin
g A
lias
es w
ith
ali
as
tips
You can put aliases in other files, but it’s customary to put them in the .bashrc file ( for bash), or .zshrc ( for zsh), so they’ll be set automatically when you log in, rather than having to be manually set.
You can also issue alias commands from the shell prompt to set aliases for the cur-rent session.
Be sure to make a backup copy of any configuration files you plan to change before you change them. That way, if you mess up, you still have the original file to work with.

173
Ru
nn
ing
Scripts an
d Prog
rams
9Throughout this book, you’ve been running scripts and programs by typing commands and pressing e. The commands zoom along to the Unix system, which responds by obediently doing whatever the command or script dictates. In doing this, you run the commands and scripts—called jobs in this context—right then and there.
You can also run jobs at specified times; run them on a schedule you set up; or start, stop, or delete them as you choose. Plus, you can find out when they are scheduled to run, time how long they take, or monitor them as they run. Sound cool? Great! Let’s take a look.
Running Scripts and Programs
Chapter Contents
Running commands
Scheduling onetime jobs
Scheduling regularly occurring jobs
Suspending jobs
Checking job status
Running jobs in the background
Running jobs in the foreground
Controlling job priority
Timing jobs
Finding running processes
Deleting processes

Chapter 9
174
Ru
nn
ing
a C
om
man
d
running a CommandThroughout this book, you’ve been practic-ing running a single command. Unix doesn’t really care if you’re running a built-in com-mand that came with the system, a program you installed later, or a script your best friend wrote—it’s all the same to Unix. Code Listing 9.1 shows some options on running a command.
to run a command:
ls
At the shell prompt, type the command and press Enter.
to run a specific command:
/home/jdoe/scripts/ls
It’s certainly possible that you would want to write a script that would list the files in your directory in a special way—for example, a script to list the files and to save the listing into a new file for later reference. (You might name it something else but could certainly call it ls if you want to.) To run the specific script, enter the whole path to the script (so Unix doesn’t just run the first one it finds in your path). See Chapter 8 for more about path statements.
tips
You can combine commands on the same line, as you’ve seen earlier in this book. Just use a ; to separate the com-mands, and you’re set. For example, you could do ls; pwd to list files and show the current directory.
If you use && to combine commands, the system will run both in sequence but run the second only if the first succeeds. For example, you could use mv todolist todolist.done && touch todolist to move your to-do list to a different file and create a new to-do list. If the first com-mand fails ( for example, because you don’t have permission to create a new file), the second command won’t run.
[jdoe@frazz Project]$ ls
keep keeper.jpg kept kidder.txt kiddo
kidnews kidneypie kids kidupdate
[jdoe@frazz Project]$ /bin/ls
keep keeper.jpg kept kidder.txt kiddo
kidnews kidneypie kids kidupdate
[jdoe@frazz Project]$ /home/jdoe/
scripts/ls
keep keeper.jpg kept kidder.txt kiddo
kidnews kidneypie kids kidupdate
You listed these files.
[jdoe@frazz Project]$ ls ; pwd
keep keeper.jpg kept kidder.txt kiddo
kidnews kidneypie kids kidupdate
/home/jdoe/Project
[jdoe@frazz Project]$
Code Listing 9.1 To run a script, command, or program, just enter the name or the path and the name at the shell prompt.

Running Scripts and Programs
175
Sch
edulin
g O
netim
e Jobs w
ith at
Scheduling Onetime Jobs with atOccasionally, you may need to schedule jobs to run one time, at a time you designate. For example, you could schedule an e-mail message to yourself, reminding you to attend a staff meeting. Or, you could schedule a meeting reminder for your coworkers that includes a meeting agenda. You can schedule these and other onetime jobs using at, which lets you designate a time at which a job (or jobs) should run. Figure 9.1 demonstrates scheduling an e-mail about that all-impor-tant staff meeting.
to schedule a onetime job with at:
1. at 12:01 1 Jan 2004To begin, specify when you want the job to run, using at plus a time statement (Figure 9.1). In this example, we specify a time, date, month, and year, although you can create a variety of other time state-ments, like these: at noon tomorrow at 01/01/10 at 3:42am at now + 3 weeks at teatimeYes, teatime is a valid option. It’s at 4 p.m., by the way.
2. mail -s “Staff Meeting at 8:30am” ejr < ~/agenda
Specify the job. In this case, it sends e-mail to the user (ejr), specifies the sub-ject “Staff Meeting at 8:30am” and sends the contents of the file called agenda. See Chapter 11 for the full scoop on using mail.
3. cD
Indicate that you’ve finished issuing commands.
Figure 9.1 To schedule a onetime job, all you have to do is specify the time and the job to run.

Chapter 9
176
Sch
edu
lin
g O
net
ime
Jobs
wit
h a
t
to schedule sequential onetime jobs with at:
1. at midnightSpecify when you want the sequential jobs to run, using at plus a time state-ment (Code Listing 9.2). You can use a variety of time statements, as shown in the previous example.
2. tar -icf ~/bigdog.tar ~/HereKittyKittyEnter the first job you want to run. This job collects all of the files from the direc-tory called ~/HereKittyKitty into a single file called ~/bigdog.tar. Chapter 13 will tell you more about archiving with tar.
3. gzip ~/bigdog.tarEnter the next job to run. This compresses the ~/bigdog.tar file, making it easier to store and e-mail.
4. mutt -a bigdog.tar.gz -s “Read this by lunch time” deb < /dev/null
Specify the next job in the sequence. Here, we’re using mutt’s command-line mail options to attach a file, specify a subject, and mail the whole shebang to Deb. See Chapter 11 for more on e-mailing with mutt.
5. cD
Ta-daaaa! Use this key combination to finish the sequence.
tip
/dev/null will be explained later in this chapter
[ejr@hobbes ejr]$ at midnight
at> tar -icf ~/bigdog.tar ~/HereKittyKitty
at> gzip ~/bigdog.tar
at> mutt -a bigdog.tar.gz -s “Read this
by lunch time” deb < /dev/null
at>
at> <EOT>
warning: commands will be executed using
/bin/sh
job 12 at 2010-08-28 00:00
[ejr@hobbes ejr]$
Code Listing 9.2 To schedule sequential onetime jobs, just specify the time and the jobs in the order you want them to run.

Running Scripts and Programs
177
Sch
edulin
g O
netim
e Jobs w
ith at
to delete a scheduled job:
1. atqFor starters, show the list of jobs waiting in the at queue with atq (Code Listing 9.3). The second column, which shows the scheduled time, should jog your mem-ory about which job is which. The first column, which specifies the job number for each job, lets you identify which job to delete in the next step.
2. atrm 12Remove the queued job by typing atrm and the job number—in this case, job number 12.
tips
atq is also handy for reviewing jobs that you’ve scheduled.
Use at to send yourself reminders.
If you have a long list of commands that you want to run periodically, consider making them into a brief shell script, then using at to run the shell script. It’s less work in the long run, and you don’t have to concentrate on getting the commands just right as you do when telling at what to do. See Chapter 10 for the full scoop on shell scripts.
Different flavors of Unix sometimes pres-ent the information from at differently. You get all the information you need, but it may be arranged somewhat differently.
[ejr@hobbes ejr]$ atq
4 2010-08-28 12:01 a
9 2011-01-01 12:01 a
13 2010-08-27 16:00 a
12 2010-08-28 00:00 a
[ejr@hobbes ejr]$ atrm 12
[ejr@hobbes ejr]$ atq
4 2010-08-28 12:01 a
9 2011-01-01 12:01 a
13 2010-08-27 16:00 a
[ejr@hobbes ejr]$
Code Listing 9.3 Delete scheduled jobs by specifying the job number.

Chapter 9
178
Sch
edu
lin
g R
egu
lar
Jobs
wit
h c
ron
Scheduling regularly Occurring Jobs with cronSuppose you want to send yourself a reminder message just before you go home at the end of each day—say, a reminder to turn off the coffeepot. Or, suppose you want to make a backup copy of specific files each week. You can do this by using the crontab command to schedule commands or scripts to run regularly at times you specify. In doing so, you can schedule tasks to occur on spe-cific days at specific times and know that the jobs will happen unattended (Figure 9.2).
to schedule a regularly occurring job with cron:
1. crontab -eAt the shell prompt, type crontab, fol-lowed by the -e flag, which lets you edit your cron file. As shown in Figure 9.2, your cron file will appear in your default editor. It’s likely to be empty (if you haven’t set up cron jobs before), but you might have some content in there.
2. 55 16 * * 1-5 mail -s “Go home now!” [email protected]
On the first line of the cron file, enter val-ues for minutes, hours, day of the month, month, and day of the week, then the command you want to run. See the “What Are Those Funky Numbers?” sidebar for more details about specifying times and days. In this example, we’re sending an e-mail to ejray every weekday at 4:55 p.m. reminding him to go home.
Figure 9.2 The cron file, which is where you specify the cron job, opens in your default editor. If you’ve previously specified cron jobs, they’ll show up in the editor.
55 16 * * 1-5 mail -s “Go Home Now!”
[email protected] < /dev/null
~
~
~
~
~
~
~
~
~
~
~
~
~
~
~
~
~
~
~
“/tmp/crontab.16206” 3 lines,
192 characters written
crontab: installing new crontab
[ejr@hobbes ejr]$
Code Listing 9.4 This job reminds ejray to go home every day. The message toward the end indicates that the cron job has been successfully entered.

Running Scripts and Programs
179
Sch
edulin
g R
egu
lar Jobs w
ith cron
3. Save and close the file.Chapter 4 will give you a quick reminder about saving and closing with pico and vi.If you set the times and dates correctly (that is, if you didn’t accidentally set them to happen in the 59th hour of the day or whatever), you’ll see a message like the one near the end of Code Listing 9.4, confirming that you’re all set. (You’ll get an appropriate error message if you sched-uled something to happen at 55 hours, 12 minutes, on the ninth day of the week.)
tips
When scheduling cron jobs, you need to specify full and absolute paths to the files—that is, specify /home/ejray/file rather than file. Also, if you write a shell script and reference it in a cron job, you’ll need to specify paths in the shell script as well. cron doesn’t check out your personal environment variable settings when it runs, so the full path name is essential.
Use crontab -l to display a listing of your cron jobs.
What Are those Funky Numbers?
When entering a cron job, you specify
Minutes (0–59)
Hours (0–23)
Day of the month (1–31)
Month (1–12)
Day of the week (0–6, with Sunday as 0)
If you replace the number with a *, cron will match all possible values, so, if a job is scheduled for
1 * * * *, it will happen at one minute after every hour
15 3 * * *, it will happen at 3:15 a.m. every day
59 23 31 * *, it will happen at 11:59 p.m., seven times a year (once in each of the months with a 31st)
0 12 * * 0, it will happen at noon on Sundays
You can use a comma to separate multiple values. For example, if you want something to happen on the hour and half-hour during December, you might use 0,30 * * 12 *.
Use a hyphen (-) to indicate a range. For example, to schedule something for every hour from 9 a.m. to 5 p.m. every day, use 0 9-17 * * *.

Chapter 9
180
Su
spen
din
g Jo
bs
Suspending JobsSuppose you’ve just started a job that requires no input from you—say, downloading mul-tiple files with ftp—and you suddenly realize that you’ve got to finish something else right now. Instead of waiting for the files to down-load or stopping the job completely, you can instead just suspend the job and resume it later (Code Listing 9.5). In doing so, you can make the Unix system work your way—that is, you don’t lose the progress you’ve made toward getting the job done, and you can do the other stuff you need to do as well.
to suspend a job:
cZ
While the job is running, press these keys to suspend the process (Code Listing 9.5). cZ doesn’t actually terminate the process; it pauses the job in much the same way that pressing the Pause button on your iPod pauses the song.
tips
After you’ve suspended a job, you can restart it in the background using bg, restart it in the foreground using fg, check on its status using jobs, or delete it com-pletely using kill. Refer to the appropri-ate sections in this chapter for details on using these commands. (Note that if the suspended job requires input from you, as your ftp example above does, then it will be immediately re-suspended if you try to restart it in the background.)
You can suspend as many jobs at a time as you want. Just use cZ to do so, then use jobs to check the status of each suspended job if you need to.
[ejr@hobbes ejr]$ ftp calvin.raycomm.com
Connected to calvin.raycomm.com.
220 calvin Microsoft FTP Service
(Version 2.0).
Name (calvin.raycomm.com:ejr): anonymous
331 Anonymous access allowed, send identity
(e-mail name) as password.
Password:
230 Anonymous user logged in.
Remote system type is Windows_NT.
ftp>
[1]+ Stopped ftp calvin.raycomm.com
[ejr@hobbes ejr]$
Code Listing 9.5 Suspending jobs is just like pushing the Pause button on your iPod.
Because it’s pretty easy to forget that you’ve suspended a job, most shells will remind you that “there are stopped jobs” when you try to log out of the system. You should either resume the job or kill it before you log out. Yes, the Unix system uses the terms “stopped jobs” and “suspended jobs” more or less interchangeably.

Running Scripts and Programs
181
Checkin
g Jo
b Status w
ith jobs
Checking Job Status with jobsOccasionally, you may have multiple jobs running or suspended and need a quick update about the jobs’ status. Using jobs, you can find out whether a job is running, stopped, or waiting for input, as shown in Code Listing 9.6.
to check job status with jobs:
jobs
At the shell prompt, type jobs. You’ll see a list of the current jobs (that is, processes that you’ve suspended or otherwise controlled) either running or stopped, as shown in Code Listing 9.6. Using the job numbers on the left, you can choose to run the jobs in the background or foreground, to resume them, or to kill the jobs, as described in the next few sections in this chapter.
tip
Depending on your shell, you can often kill jobs with kill followed by a % and the job number or command name—for example, you could kill the ftp job in Code Listing 9.6 with kill %ftp or kill %1. See “Deleting Processes with kill” later in this chapter for more on killing jobs.
[ejr@hobbes ejr]$ jobs
[1]- Running ftp calvin.raycomm.com &
[2]+ Stopped (tty input) telnet
[3] Stopped (signal) lynx
http://www.raycomm.com/
[ejr@hobbes ejr]$
Code Listing 9.6 Viewing jobs lets you know which jobs you have suspended and their statuses.

Chapter 9
182
Ru
nn
ing
Jobs
in t
he
Bac
kgro
un
d w
ith
bg
running Jobs in the Background with bgIf you’re running a job that doesn’t require input from you, consider running it in the background using bg (Code Listing 9.7). In doing so, you can keep the program running while working on other Unix activities at the same time.
to run jobs in the background with bg:
1. jobsAt the shell prompt, type jobs to see the list of all jobs, running or stopped. Note the job numbers on the left.
2. bg %3Type bg followed by % and the number of the job you want to run in the back-ground (Code Listing 9.7).
tips
If you want to put the most recently sus-pended job into the background, just type bg (without the number) at the prompt.
You can also put jobs directly into the background without first suspending them. Just type the command to run and & (as in bigdog &). The & moves the job directly into the background.
[ejr@hobbes ejr]$ jobs
[3]- lynx http://www.raycomm.com/ &
calvin.raycomm.com
[2] Stopped (tty input) telnet
[3] Stopped (signal) lynx
http://www.raycomm.com/
[4]+ Stopped man telnet
[ejr@hobbes ejr]$ bg %3
[3]- lynx http://www.raycomm.com/ &
[ejr@hobbes ejr]$
Code Listing 9.7 Restarting suspended jobs in the background lets you do two things—or more—at once. To move a job to the background, just type bg followed by % and the job number.

Running Scripts and Programs
183
Ru
nn
ing
Jobs in
the Fo
regro
un
d with
fg
running Jobs in the Foreground with fgWhen you’re ready to resume a suspended or backgrounded job, you can do so using fg. Remember, when you suspend a job, what you’re doing is moving the job into limbo. fg just moves the job into the foreground again (Code Listing 9.8), so you can see, for example, what it’s doing or provide input.
to run jobs in the foreground with fg:
1. jobsAt the shell prompt, type jobs to list all stopped or running jobs. Note the job numbers at the left.
2. fg %1Enter fg followed by the number of the job that you want to bring back into the foreground (Code Listing 9.8).Depending on the job you’re bringing back into the foreground, you may or may not get to see the job running onscreen. Sometimes you’ll be plunked back into the job and be able to enter information as prompted. Other times, you’ll just see the prompt for the program you returned to the foreground. If this is the case, try typing ? ( for help), which often forces the program to display something onscreen and refresh the display.
tip
You can bring the last suspended job into the foreground by typing fg (with no job number) at the shell prompt.
[ejr@hobbes ejr]$ jobs
[1]+ Stopped ftp ftp.cdrom.com
[ejr@hobbes ejr]$ fg %1
ftp ftp.cdrom.com
Code Listing 9.8 Typing fg plus the job number brings that job into the foreground. When you bring suspended jobs into the foreground, you’ll sometimes see the job activities onscreen. At other times, you’ll see only a prompt and will need to summon help to see anything of the program.

Chapter 9
184
Con
tro
llin
g Jo
b Pr
iori
ty w
ith
nic
e
Controlling Job Priority with niceSuppose you need an enormous file from the Internet that would take practically all afternoon to download. By downloading it, you would hog system resources and make the system response time much slower for other users. OK, bad example. Suppose your coworker needs to download an enormous file and would hog system resources all after-noon. You’d hope that she’d have the courtesy to not tie up system resources that you need to use.
Fortunately, she can, using nice, which lets her control job priority. As Code Listing 9.9 shows, you rank your job’s priority using numbers from 1 to 19, with 1 being some-what nice (higher priority) and 19 being fabu-lously nice (lower priority). The Unix system uses the number you provide to determine how much attention to devote to the job.
to control job order with nice:
nice -n 19 slowscript
At the shell prompt, type nice, the -n flag, followed by the appropriate adjustment (19, here), and the name of the program or script to run (Code Listing 9.9). In this example, slowscript is run with the low-est priority possible.
tips
To find out how nice you need to be, you might check out how many processes (and which kinds) are currently running on the Unix system. You can do this using ps, as described later in this chapter.
You could use nice and run a job in the background—for example, use nice -n 12 funscript & to run funscript in the background with a niceness level of 12.
You can just type nice plus the job name (as in nice sortaslow). Doing so will automatically specify 10 as the niceness level (the default setting).
If you are the system administrator and logged in as root, you can use negative numbers (down to –20) with nice to increase the priority (nice -n -16 priorityjob).
Use renice to change the niceness of a running job. For example, use renice -n 18 2958 (the job number). If you’re the system administrator, you can increase or decrease the niceness of any job; if you’re a peon—whoops, we mean a regular computer user at your company—you can only decrease the priority of your own jobs, not increase it. In a pinch, you could ask your system administrator to increase the priority of your job.
[ejr@hobbes ejr]$ nice -n 19 slowscript
Code Listing 9.9 By using nice plus an adjustment, you can let Unix determine how hard to work on your job.

Running Scripts and Programs
185
Timin
g Jo
bs with
time
timing Jobs with timeSometimes, you might want to know how long a job takes to complete. You can do so using the time command, which times jobs according to the built-in Unix timer. As Code Listing 9.10 shows, all you have to do is enter time followed by the command you want to time.
to time a job using time:
time slowscript
At the shell prompt, type time followed by the complete command. After the command finishes, the system will tell you how long it took, as shown in Code Listing 9.10.
to compare job times with time:
1. time ls /usrAt the shell prompt, type time followed by a job (here, ls).
2. time nice -n 19 ls /usrThen, type time followed by another job. In this example, we’re comparing a regular ls command to a nice ls command. As Code Listing 9.10 shows, the elapsed time for the nice ls command was consider-ably longer than the regular ls command.
[ejr@hobbes running]$ time slowscript
0.05user 0.06system 0:50.12elapsed 0%CPU
[ejr@hobbes running]$ time ls
bigdog.tar.gz slowscript testing.gif
0.03user 0.00system 0:00.03elapsed 78%CPU
[ejr@hobbes running]$ time nice -19 ls
bigdog.tar.gz slowscript testing.gif
0.03user 0.03system 0:00.06elapsed 93%CPU
[ejr@hobbes running]$ time -p nice -n 19 ls
foo
real 0.00
user 0.00
sys 0.00
[ejr@hobbes running]$
Code Listing 9.10 Enter time plus the full job command to find out the job time.

Chapter 9
186
Tim
ing
Jobs
wit
h ti
me
tips
Keep in mind that the time a job takes to run may vary according to the system’s current load or capacity. For example, a job might take less time to run at 2 a.m., when few people are using the Unix sys-tem, compared with 2 p.m., when many more people are using the system.
Different systems produce slightly differ-ent time outputs. On some systems, you’ll get real (clock) time, user time, and system time. Real time is how many seconds on the clock elapsed while the program was running, while user and system time both refer to different measures of how long it took the system to run the job. On other systems, you might get a ton of supplemental information that looks like garbage, as shown in Code Listing 9.11, but the gist of the information is the same.
In the case of the ls example, you’re really not concerned with either the output or the errors—just the time—so you can creatively dispense with all of it. Try time ls /usr > /dev/null 2>&1 to send stan-dard output to /dev/null (the bitbucket) and send error messages to standard output (and thence to the bitbucket). See Chapter 16 for details.
Try time -p to get a more human-read-able output.
$ time slowscript
0.07user 0.05system 0:50.13elapsed 0%CPU
(0avgtext+0avgdata 0maxresident)k
0inputs+0outputs
(219major+59minor)pagefaults 0swaps
$
Code Listing 9.11 time output varies from system to system. Here, we get a bunch of garbage to decipher in addition to the time information.

Running Scripts and Programs
187
Finding What Pro
cesses Are Ru
nning with ps
Finding Out What Processes Are running with psThe jobs that we’ve been talking about so far are actually types of processes. Processes are programs, scripts, or commands—including anything you do in the Unix system. All jobs are processes, but not all processes are jobs.
Occasionally, you may want to find out what processes are running on the Unix system. You can do this using ps, as shown in Code Listing 9.12.
to find out what processes are running with ps:
ps
At the shell prompt, type ps to see the list of the current processes that you’re running in your current shell, including processes for your current shell, as well as any other jobs (Code Listing 9.12).The exact information you see will vary from system to system. In general, though, you’ll find the PID (process iden-tification) number at the far left and the process name at the right.
[jdoe@frazz jdoe]$ ps
PID TTY TIME CMD
21016 pts/22 00:00:00 bash
21707 pts/22 00:00:00 ps
[jdoe@frazz jdoe]$ ps -a
PID TTY TIME CMD
21407 pts/3 00:00:00 su
21411 pts/3 00:00:00 bash
21441 pts/3 00:00:00 su
21444 pts/3 00:00:00 bash
19274 pts/11 00:00:05 xterm
23357 pts/12 00:00:04 xterm
13369 pts/5 00:00:00 zsh
23815 pts/9 00:00:00 su
23818 pts/9 00:00:00 bash
23878 pts/9 00:00:00 csh
23942 pts/9 00:00:01 ssh
23972 pts/18 00:00:00 su
23975 pts/18 00:00:00 bash
24103 pts/5 00:00:00 ssh
4658 pts/15 00:00:11 ssh
24318 pts/8 00:00:01 xterm
29188 pts/4 00:00:00 rxvt-2.7.9
29368 pts/4 00:00:00 rxvt
29440 pts/8 00:00:00 vi
23883 pts/20 00:00:02 xterm
27257 pts/16 00:00:01 ssh
6004 pts/20 00:00:00 xterm
20531 pts/20 00:00:02 xterm
21013 pts/22 00:00:00 su
21016 pts/22 00:00:00 bash
21708 pts/22 00:00:00 ps
[jdoe@frazz jdoe]$
Code Listing 9.12 Using ps, you can find out what processes are currently running.

Chapter 9
188
Find
ing
Wha
t Pr
oce
sses
Are
Ru
nnin
g w
ith
ps
tips
You can find out what processes other people are running by typing ps -a at the shell prompt and what processes the system is running (also called daemons) with ps -ax. The ps -ef variant is usually pretty useful for us.
You can sometimes, depending on the system, get a broader look at currently running processes by typing ps -a f (that’s a -a, a space, and f). The f flag indicates “forest” view, which lets you see not only the processes, but also how they relate to each other, as shown in Code Listing 9.13.
The results ps offers vary greatly depend-ing on the Unix flavor you’re using. Type man ps at the shell prompt to find out more about your specific ps capabilities.
$ ps -a f
PID TTY STAT TIME COMMAND
15043 p0 S 0:00 /bin/login -h calvin raycomm.com -p
15044 p0 S 0:01 \_ -bash
16344 p0 T N 0:00 \_ sh ./slowscript
16345 p0 T N 0:00 | \_ sleep 50
16449 p0 R 0:00 \_ ps f
15911 p1 S 0:00 /bin/login -h calvin raycomm.com -p
15914 p1 S 0:01 \_ -bash
16216 p1 T 0:00 \_ telnet
16217 p1 T 0:00 \_ lynx http://www.raycomm.com/
16267 p1 T 0:00 \_ man telnet
16268 p1 T 0:00 \_ sh -c (cd /usr/man ; (echo -e “.pl 1100i”; cat /
16269 p1 T 0:00 \_ sh -c (cd /usr/man ; (echo -e “.pl 1100i”; c
16270 p1 T 0:00 \_ sh -c (cd /usr/man ; (echo -e “.pl 1100i
16272 p1 T 0:00 | \_ cat /usr/man/man1/telnet.1
16271 p1 T 0:00 \_ /usr/bin/gtbl
16273 p1 T 0:00 \_ sh -c (cd /usr/man ; (echo -e “.pl 1100i
$
Code Listing 9.13 The forest view gives you a broader look at running processes.

Running Scripts and Programs
189
Deletin
g Pro
cesses with
kill
Deleting Processes with killIn addition to suspending jobs and running them in the foreground and background, you can also choose to just delete them completely. For example, you might realize midway through a job that you goofed and need to redo it. Or perhaps you’ve accessed and suspended a man page and no longer need to reference it.
Using kill, you can delete essentially any process running or suspended on the Unix system. As Code Listing 9.14 shows, you delete a process by first listing the processes, then using the kill command.
to kill a job with kill:
1. jobsAt the shell prompt, type jobs, then note the number or name of the job you want to kill.
2. kill %ftpIn most shells, you can kill jobs with kill followed by % and the job number or com-mand name—for example, you could kill an ftp job with a job number of 1 using kill %ftp or kill %1. If your shell doesn’t cooperate, read on.
to delete a process with kill:
1. psAt the shell prompt, type ps to see the list of all your current jobs (Code Listing 9.14). Note the PID (process identification) number of the process you want to delete.
2. kill 16217Type kill followed by the PID number of the job you’re deleting.
$ ps -a f
PID TTY STAT TIME COMMAND
15911 p1 S 0:00 /bin/login -h calvin
raycomm.com -p
15914 p1 S 0:01 \_ -bash
16216 p1 T 0:00 \_ telnet
16217 p1 T 0:00 \_ lynx
http://www.raycomm.com/
$ kill 16217
$ ps -a f
PID TTY STAT TIME COMMAND
15911 p1 S 0:00 /bin/login -h calvin
raycomm.com -p
15914 p1 S 0:01 \_ -bash
16216 p1 T 0:00 \_ telnet
$
Code Listing 9.14 Using kill plus the PID number, you can delete practically any process running or suspended on the system, given the right permissions.

Chapter 9
190
Del
etin
g P
roce
sses
wit
h k
ill
tips
Occasionally, you’ll use kill and find that the process just keeps going. Try kill -9 followed by the PID number to delete the process. This is a last resort option, since it doesn't give the program any opportunity to close files or clean up before exiting.
Be careful not to kill your current shell process, or you’ll abruptly find your con-nection broken. Doing so would be like sawing off the branch you’re sitting on.
Many newer Unix systems allow you to use pkill to kill processes by name, not number. For example, you might use pkill ftp to kill a suspended FTP session.

191
Writin
g B
asic Scripts
10So far in this book, you’ve been typing com-mands (or perhaps combining commands), pressing e, then waiting for Unix to execute the command(s) you specified…and typing in commands, pressing e. You get the idea, and you probably have tired fingers by now.
Using shell scripts, you can create a series of commands, save them as a single file, and then execute them any time you want—without having to re-create the commands or do all that tedious typing over and over again. For example, suppose you want to do a com-plex search-and-replace on all the .htm files in your home directory. With a shell script, you can take the time to structure the commands just one time, save the commands as a single file, and then apply it to any directory at any time. You do the hard work one time, and then reuse the script any time you need to.
In this book we’ll discuss creating scripts using the sh (Bourne) shell. Scripts can be written with any shell—and zsh and bash in particular are quite good for scripting. Revisit Chapter 3, if needed, to learn more about zsh and bash shells.
In this chapter, we’ll show you how to get started creating and using shell scripts, and will give you enough information to create your own scripts and apply them to your particular uses.
Writing Basic Scripts
Chapter Contents
Creating shell scripts
Running shell scripts
Making scripts executable
Getting a head start on creating scripts
Embedding commands in scripts
Looping scripts
Creating if-then statements
Accepting command-line input
Accepting command-line input while a script is running
Debugging scripts

Chapter 10
192
Crea
tin
g a
Sh
ell
Scr
ipt
Creating a Shell ScriptA shell script is nothing more than a list of commands for Unix to execute. To write a shell script, follow these steps:
1. Open your favorite editor and start a script file.
2. Start the shell script with #!/bin/sh.
3. Add the shell script code one line at a time. This code will look strangely famil-iar—it’s similar to code you’ve already used in this book.
4. Save and close the file.
In the following steps, we’ll show you how to try out this process by writing a script that prints three lines onscreen (Figure 10.1). Yeah, we know—whoopee!—but you have to start somewhere, and you can apply the same principles to other shell scripts you create.
to create a shell script:
1. pico myscriptFor starters, access the editor of your choice and start a new file. In this case, we call it myscript.
2. #!/bin/shOn the first line of the script, enter #!/bin/sh, which specifies the complete path to the shell that should run the script.
3. # this is my first shell scriptOn the next line, type a # (to indicate a comment), and then add any other notes you want to make. It’s always a good idea to use extensive comments in your scripts to help you see what’s going on. Remember, comments are for your refer-ence only and won’t show up onscreen or do anything.
Figure 10.1 You create shell scripts in an editor one line at a time.

Writing Basic Scripts
193
Creating
a Sh
ell Script
4. echo friendsjustfriendsOn the next line of the script, type echo followed by the text you want to see onscreen. Here, echo tells Unix to display friendsjustfriends onscreen—a mes-sage just between friends.
5. echoAdd another line with echo and nothing else to display a blank line.
6. echo “ standing”Add another echo command. Note that if you use leading spaces or tabs, as we’ve done here, you must use quotes, as Figure 10.1 shows.
7. echo -e “\tgood”Using the -e flag plus \t, you can insert a tab character. See “Getting Fancy with echo” for more echo options.
8. Save and close your script.Check Chapter 4 if you need help saving a file and closing your editor.
9. sh myscriptUse sh myscript to run your new script. In doing so, you get good understanding (literally), as shown in Code Listing 10.1.Ta-daaaaa! You just wrote your first shell script! (See the following section for more information and details on running scripts.)
tip
Unless you have some compelling need to use a different shell ( for example, if you’re taking advantage of functions that exist only in zsh), just stick with sh for your scripts for now.
[ejr@hobbes scripting]$ sh myscript
friendsjustfriends
standing
good
Code Listing 10.1 Using echo options, you can get a good understanding—or, perhaps, a good understanding just between friends.
Getting Fancy with echo
In addition to the basic print-to-screen function that echo offers, you can also use these formatting flags with echo -e (the -e enables these special formatting characteristics):
\b moves the cursor back one space.
\c instructs echo not to print a new-line after printing the text.
\f forces the following text to appear on the next line at a specified horizon-tal location.
\n forces the following text to appear on a new line.
\t indents the following text output by one tab.
For example, echo -e “\tGreetings! \c” would move “Greetings!” one tab space to the right (as specified by the \t) and not insert a new line for any text following it (as specified by the \c).

Chapter 10
194
Ru
nn
ing
a S
hel
l S
crip
t
running a Shell ScriptAfter you’ve created a script in your editor and saved the script file, your next step is to run it, which means to execute every command in the script in the order provided. (Yes, you did this in the previous section, but we’ll expand on it here.) As Figure 10.2 shows, you do this using the sh command (or the name of the shell you’re using) followed by the name of the shell script you want to run.
to run a script:
sh myscript
At the shell prompt, type sh (or the name of the shell, like ksh or csh, you want to run the script) followed by the name of the script. In this case, you’re really just telling sh to run and to use the list of com-mands in the myscript file. You’ll see the results of the script—in this case, words appear onscreen, as shown in Figure 10.2.
tip
Note that in this example, you’re explicitly telling Unix the name of the script to run (myscript). When you do so, the #!/bin/sh line at the top of the script in the previ-ous section is technically superfluous. It’s essential only when the script is execut-able, as in the following section.
Figure 10.2 Running a script is as easy as typing sh plus the filename of the script.

Writing Basic Scripts
195
Makin
g a S
cript Executable
Making a Script ExecutableIn the previous section, we showed you that you can run a shell script by typing sh followed by the name of the shell script file. You can also make a script executable, which means that you can run it simply by typing the script name at the shell prompt (omit-ting the name of the shell). Doing so is handy because it allows you to use the script as con-veniently as you’d use any other command. As Code Listing 10.2 shows, you must set up a little before you can just execute the script.
1. head -2 myscriptAt the shell prompt, check to verify that your script does have the #!/bin/sh line at the top to specify the shell that runs it. Remember from Chapter 6 that head -2 will list the top two lines of the file speci-fied.
2. chmod u+x myscriptHere, use the chmod command to give the user (that’s you) execute permission. See the section in Chapter 5 called “Changing Permissions with chmod” for details on setting permissions.
3. pwd ; echo $PATHDisplay the name of your current direc-tory and the full path, and verify that the current directory is in the path. The current directory (the one in which you just granted yourself execute permission) must be contained in the path; otherwise, the script will not be as easily executable from the shell prompt.
4. myscriptAt the shell prompt, type the name of the script. Assuming that your current direc-tory is in the path, the script will run.
continues on next page
[ejr@hobbes scripting]$ head -2 myscript
#!/bin/sh
# This is my first shell script
[ejr@hobbes scripting]$ chmod u+x myscript
[ejr@hobbes scripting]$ pwd ; echo $PATH
/home/ejr/scripting
/usr/local/bin:/bin:/usr/bin:/usr/X11R6/
bin:/usr/local/games:/home/ejr/bin:/
home/ejr/scripting
[ejr@hobbes scripting]$ myscript
friendsjustfriends
standing
good
[ejr@hobbes scripting]$
Code Listing 10.2 After a little onetime preparation, you can run executable scripts by typing the script name at the shell prompt.

Chapter 10
196
Mak
ing
a S
crip
t Ex
ecu
tabl
e
tips
Every time you open up a new script, check to verify that the first line is #!/bin/sh so the file will run correctly. Also, check the permissions and your path to make sure you can run the script from the shell prompt. (You’ll almost always find it more convenient to use executable scripts than to specify the shell or path each time you want to run a script.)
If the current directory isn’t in the path (either explicitly or through a . notation, as in PATH=/usr/bin:.:), you’ll have to take an additional step to execute the script. You could Add the current directory to the path
with something like PATH=$PATH:/home/_yourid/_tempdir. Read more about this option in Chapter 8.
Execute the script with ./myscript instead of just myscript.
Move the script to a directory in the path.

Writing Basic Scripts
197
Head Start o
n S
cripts with
history
Getting a Head Start on Scripts with historyIf you find yourself performing a particular process over and over again, consider mak-ing that process into a script. An easy way to create a script is to work from the session history, as shown in Figure 10.3. Basically, all you have to do is complete the procedure one time, and then use the session history to help build the script for you.
to get a head start on your script with history:
1. Go through the process that you want to include in the script.We’ll wait.
2. Keep a rough count of the commands you issue.Don’t worry about the exact number of commands you use, but have an idea as to whether it’s 3, 30, or 300 commands.
3. history 20 > standyouWhen you’ve finished the process, type history followed by the approximate number of commands for your script. When estimating the number of com-mands, err on the high side, as it’s easier to delete extra commands than to add in missing ones. Then, redirect the output to the desired filename, and see your in-the-making script stand before you.
4. vi standyouUse the editor of your choice to edit your script file, deleting the initial line num-bers and spaces and generally whipping that script into shape. See the section “Creating a Shell Script” earlier in this chapter for more details.
Figure 10.3 You can enter a series of commands, and then use the code provided with history to help create a shell script.
tip
If you use vi, do a global search-and-replace to get rid of the line numbering (that history introduced) at the left—just use :%s/^ *[0-9]* *// (one space after the ^), and you’re in business. See Chapter 4 for more about clever vi tricks.

Chapter 10
198
Embe
ddin
g C
om
man
ds
Embedding CommandsSuppose you create a script that will auto-matically run when you log in each day. The script might, for example, print “Greetings!” onscreen and possibly deliver a cle(a)ver message: “Say, you’re looking sharp today!” You could easily do this with the information you’ve learned so far in this chapter.
What would be handy here would be to add a line to the script that tells Unix to do all those things plus name the most recently used file—for those of you who need a reminder about what you were last working on. You could just use an ls command, but that would only list the filenames and not integrate the information with the rest of your morning greeting. Instead, a better (and more attractive) idea would be to bundle a couple of commands and use them with echo (Figure 10.4) to embed the information right into the greeting.
to embed a command:
1. vi myscriptTo begin, open myscript or another script in your favorite editor. Your script might look like Figure 10.4, with the greeting onscreen.
Figure 10.4 Embedding commands just requires an additional couple of lines in the script.

Writing Basic Scripts
199
Embeddin
g Co
mm
ands
2. echo “You were most recently working on `ls -1Ft ~ | head -1`.”
Type echo followed by the descriptive text you want to see. Then embed the ls command (`ls -1Fc ~/ | head -1`) within the descriptive text. Note that the embedded code begins and ends with ` (back ticks) before the . (dot).The embedded command here lists just the most recently changed file or direc-tory in the home directory. 1 provides for one entry per line, F formats the directory names with a / so we can tell whether we’re working in a subdirectory or on a file, and c (or t) sorts by the modification date. We then pipe the output to head -1, which displays the top line of the file listings.
3. Save your script and exit the editor, and then try it out, as in Code Listing 10.3.
tips
You can embed dates into scripts, too. Try echo -e “Today is `date +%A`” if you work so much that you forget what the day of the week is. See the sidebar “Using Clever Dates” for more date details.
When you embed commands that are directory dependent—such as ls or find—be sure to specify the complete path. If you don’t, you’ll get paths relative to where the script is rather than relative to where you’re running the script from.
Embedded commands are useful in many ways. You can use them anytime that you want to have one program act based on the output of another program, just as echo displays something based on the output of a program.
Using Clever Dates
You can use the date command to deliver any date with any format. In general, use date +”Today is %A”, but you can use any or all of the following bits:
%d includes the two-digit day of month.
%y includes the two-digit year.
%Y includes the four-digit year.
%m includes the numeric month.
%b includes an abbreviated month.
%B includes the full month name.
%a includes the abbreviated day of the week.
%A includes the full day of the week.
%R includes the time in hours and min-utes.
%D includes the date in month/date/year format.
Check the man pages for the remaining several dozen options.
[ejr@hobbes scripting]$ myscript
Greetings! Say, you’re looking mighty sharp today!
You were most recently working on figlet.
[ejr@hobbes scripting]$
Code Listing 10.3 The results of embedded commands can be impressive.

Chapter 10
200
Loo
pin
g Y
ou
r S
crip
ts
Looping Your ScriptsSuppose you’ve created a script that you’d like to apply to several files. For example, say that at the end of each day you need to make backup copies of all .html files in your www directory. You could make a backup of each individual .html file, but that’s a lot of work. An easier way would be to create a short script to copy a .html file, and then loop (repeat) the script to apply to all .html files in your www directory (Figure 10.5). You create one short script; Unix does the tedious work for you.
to make a loop:
1. vi head_acheAt the shell prompt, start your editor and open the script you want to loop. In this case, we’re using vi and the head_ache file. (Of course, you could name the script html _backup or something mundane like that.)
2. #!/bin/shTell your Unix system which shell to use to run the shell script. In this example, we’re telling it (with #!) to run the shell script with /bin/sh.
3. cd ~/wwwMake sure that you’re in the directory in which the loop will take place. In this example, our shell script resides in our home directory, but the files to which the loop will apply reside in the www directory.
4. for i in `ls *.html`OK, don’t panic. Read this as: “Look for items in the list of .html files.” In this code, we’re providing the output of the embedded command (`ls *.html`) to the for loop (the .html files), as shown in Figure 10.5. The -1 flag on the ls com-mand, as mentioned in the previous sec-tion, forces a single list of output, which is ideal for script use, rather than several columns, which is easy to read onscreen but doesn’t work well for scripts.
Figure 10.5 Using a loop with an embedded command, you can automatically apply a script to several files.

Writing Basic Scripts
201
Loo
ping
You
r Scripts
5. doOn the line immediately after the for statement, type do. This tells the Unix system that the following information will be the loop to apply.
6. cp "$i" "$i.bak"Here, we copy (cp) the specified items ($i) to a backup file ($i.bak)—that is, one backup file per file copied. So, if you have 72 .html files to begin with, you’ll end up with those original 72, plus 72 new backup files.
7. echo “$i backed up!”Add echo “$i backed up!” so that the system displays onscreen what it has done.
8. doneOn the next line, announce that you’re done with the loop.
9. Save it, make it executable, and try it out.This example script will make backup copies of all .html files in the www direc-tory, as in Code Listing 10.4.
tips
Loop instructions can be much more complex. For example, you could make a loop to spell-check each of the chapter files in the directory and report how many misspelled words there are in each file. To do that, use this line in the loop: echo -e “$i has \t `cat $i | spell | wc -l` misspelled words”. Here again just build the loop one step at a time.
Loops are particularly handy for search-ing and replacing throughout multiple documents. For example, if you’re the new webmaster and want to replace the old webmaster’s name at the bottom of all .html files with your name, you can do so using a loop with sed. Check out Chapter 6 for more information about sed, which introduces sed to loops.
[ejr@hobbes scripting]$ more head_ache
#! /bin/sh
cd ~/www
for i in `ls -1 *.html`
do
cp "$i" "$i.bak"
echo “$i backed up!”done
[ejr@hobbes scripting]$ ./head_ache
above.html backed up!
file1.html backed up!
html.html backed up!
reference.html backed up!
temp.html backed up!
[ejr@hobbes scripting]$
Code Listing 10.4 This loop reports progress as it backs up each file.

Chapter 10
202
Crea
tin
g If
-Th
en S
tate
men
ts
Creating If-then StatementsThe basic principle of if-then statements is that if a certain condition is met, then one thing happens; if the condition is not met, then another thing happens. That is, if you walk into your office in the morning and you see your daily to-do list, then you sit down and work. If you walk into your office in the morning and you don’t see your to-do list, then you get to lounge all day. Or something like that.
As Figure 10.6 shows, you can create if-then statements using if, then, and else com-mands. When you set up these conditional statements, the computer then has to test the condition to determine whether it’s true or false, and act accordingly. In the next example, we set up a fairly simple if-then con-ditional statement requiring the computer to test whether or not a file exists and tell us what it finds. Use the following steps to get started with if-then statements, and see the “More on If-Then” sidebar in this section to learn how to expand your if-then statements.
Figure 10.6 Using if-then conditional statements, you can let the computer determine whether something is true or not, and then act accordingly.
Writing Basic Scripts
203
Creating
If-Then
Statemen
ts
To write an if-then conditional statement:
1. vi deefTo begin, access your editor and the script file. Here we’re adapting an existing script ( for feedback) in vi.
2. if [ -f feedback ]Start the loop with if, and then follow it with a conditional statement, in this caseif [ -f feedback ], which checks for the existence of a file named feedback in the current directory. If that file exists, then the expression is true.
More on If-Then
Using the steps provided in this section, try some of these other if-then possibilities:
[ -f filename ] checks to see whether a file exists.
[ ! -f filename ] checks to see whether a file does not exist. The ! symbol (not) makes this test report “true” when the previous example would be “false.”
[ -d name ] checks to see whether name exists and is a directory.
[ first -nt second ] checks to see whether the modification date of the first file or direc-tory is newer than the second.
[ first -ot second ] checks to see whether the modification date of the first file or direc-tory is older than the second.
[ -n string ] checks to see whether the string has a length greater than 0.
[ -z string ] checks to see whether the string is 0 length.
[ string1 = string2 ] checks to see whether the first string is equal to the second.
[ string1 != string2 ] checks to see whether the first string is not equal to the second.
[ \( condition1 \) -a \( condition2 \) ] checks to see whether both conditions are true (conditions can include other conditions).
[ \( condition1 \) -o \( condition2 \) ] checks to see if either condition1 or condi-tion2 is true.
Type man test for more information about creating conditional statements.
continues on next page

Chapter 10
204
Crea
tin
g If
-Th
en S
tate
men
ts
3. then echo “There’s feedback on the latest project”
On the line immediately after the if state-ment, enter the command to be carried out or message to be displayed if the if statement is true. In this example, a true if statement would result in “There’s feedback on the latest project” being printed onscreen.
4. else echo “Nope, no feedback yet”On the next line, use else followed by a statement specifying what should happen if the if statement is false. Here, we specify that “Nope, no feedback yet” would be printed onscreen if the feedback file was not found.
5. fiImmediately after the else statement, announce that you’re finished with fi.
6. Save the script and try it out.In this example, the script will check to see if feedback exists and print a differ-ent message depending on what it finds (Code Listing 10.5).
[ejr@hobbes scripting]$ ./deef
Greetings! Say, you’re looking mighty sharp today!
You were most recently working on scripting/.
Nope, no feedback yet
[ejr@hobbes scripting]$ touch feedback
[ejr@hobbes scripting]$ ./deef
Greetings! Say, you’re looking mighty sharp today!
You were most recently working on scripting/.
There’s feedback on the latest project[ejr@hobbes scripting]$
Code Listing 10.5 The last line produced by the feedback script differs, depending on the files found.

Writing Basic Scripts
205
Com
man
d-Line A
rgu
men
ts in Yo
ur S
cripts
Accepting Command-Line Arguments in Your ScriptsSuppose that at the end of every month you need to send a progress report to your boss. You might set up a script to address an e-mail message to your boss, provide an appropri-ate subject line, and send the file containing the progress report. You’d likely have this script automatically address a message to your boss and put in the subject line, but you’d want to use command-line input to tell the script which file you want to send. By using command-line input, you can give your scripts a bit more flexibility and still have much of a process automated for you. You run the script and specify the input at the shell prompt, as shown in Figure 10.7.
to accept command-line arguments in a script:
1. vi status-reportUse your favorite editor to edit your script.
2. mail -s “Status report for $1” [email protected] < ~/reports/$1
Enter a command, with $1 appearing in each place you want to use the first item of input from the command line. In this example, the script starts a message to the boss, fills in the subject line (adding the month automatically), and sends the appropriate monthly report (the one specified on the command line) from the reports directory under your home directory. See Chapter 11 for more information about sending e-mail.
3. Save and exit, and then run the script (Code Listing 10.6), though you might first have to find a boss to take your status report and have to provide the content for the status report.
tips
To see the information provided at the command line, echo it back out with echo $*. The $* variable provides all of the command-line input, with $1, $2, $3, etc. (up to $9) containing the individual arguments.
You can also accept input at specified points while a script is running. See the next section for more details.
[ejr@hobbes scripting]$ more status-report
#! /bin/sh
mail -s “Status report for $1”
[email protected] < ~/reports/$1
[ejr@hobbes scripting]$ ./status-report
August
[ejr@hobbes scripting]$
Code Listing 10.6 By providing command-line input (in this case August), you can control what the script does.
Figure 10.7 Using command-line input, you can add flexibility to a script and still have the script do the grunt work for you.
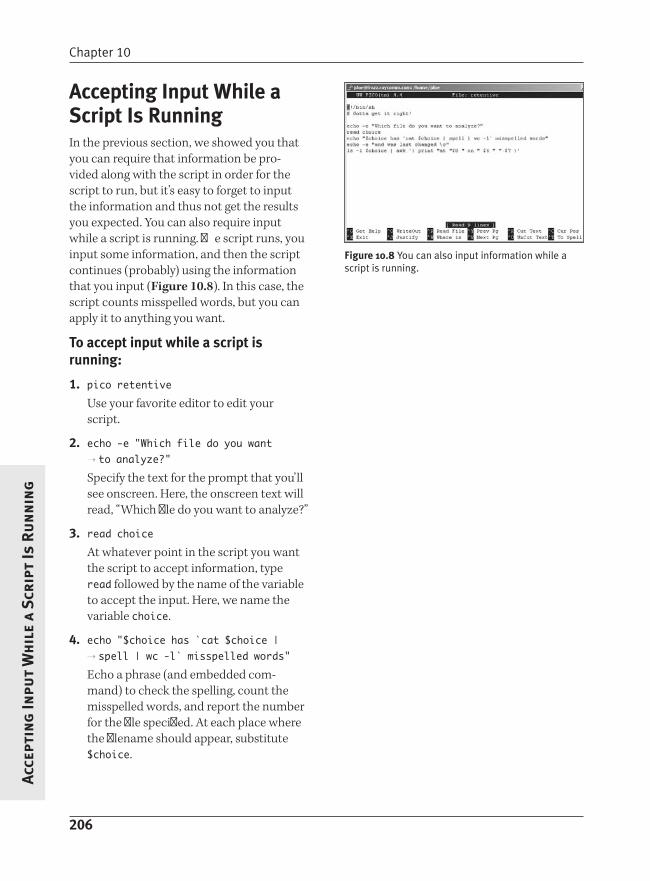
Chapter 10
206
Acc
epti
ng
Inpu
t W
hil
e a
Scr
ipt
Is R
un
nin
g
Accepting Input While a Script Is runningIn the previous section, we showed you that you can require that information be pro-vided along with the script in order for the script to run, but it’s easy to forget to input the information and thus not get the results you expected. You can also require input while a script is running. The script runs, you input some information, and then the script continues (probably) using the information that you input (Figure 10.8). In this case, the script counts misspelled words, but you can apply it to anything you want.
to accept input while a script is running:
1. pico retentiveUse your favorite editor to edit your script.
2. echo -e “Which file do you want to analyze?”
Specify the text for the prompt that you’ll see onscreen. Here, the onscreen text will read, “Which file do you want to analyze?”
3. read choiceAt whatever point in the script you want the script to accept information, type read followed by the name of the variable to accept the input. Here, we name the variable choice.
4. echo “$choice has `cat $choice | spell | wc -l` misspelled words”
Echo a phrase (and embedded com-mand) to check the spelling, count the misspelled words, and report the number for the file specified. At each place where the filename should appear, substitute $choice.
Figure 10.8 You can also input information while a script is running.

Writing Basic Scripts
207
Acceptin
g In
put W
hile a S
cript Is Ru
nn
ing
5. echo -e “and was last changed \c”Echo another line with text and (because of the \c) no line break at the end of the line.
6. ls -l $choice | awk ‘{ print “at “ $8 “ on “ $6 “ “ $7 }’
This very long and complex line uses awk to pluck the time, month, and day of the month fields out of the ls -l listing for the file given as $choice (Figure 10.8). See Chapter 6 for details about awk.
7. Save and exit.You have the hang of this by now.
8. ./retentiveRun the script (after making it executable and specifying the current directory, if necessary) and provide a filename when prompted, as shown in Code Listing 10.7.
tips
A great example of a use of prompted input is configuration files. See “Using Input to Customize Your Environment” in Chapter 16 for details and a specific example.
See Chapter 8 for more information about setting up configuration files and starting scripts upon log in.
You can use a set of lines like echo -e “Please enter the name: \c” and read name to have the input line and the intro-duction to it both appear on the same line.
[ejr@hobbes scripting]$ ./retentive
Which file do you want to analyze?
testfile
testfile has 11 misspelled words
and was last changed at 05:08 on Jan 12
[ejr@hobbes scripting]$
Code Listing 10.7 Accepting input while a script runs helps ensure that you don’t forget to type it in, and still gives customized results.

Chapter 10
208
Deb
ug
gin
g S
crip
ts
Debugging ScriptsAs you’re developing scripts, you’ll no doubt encounter a few problems in getting them to run properly. As Figure 10.9 shows, you can help debug your scripts by printing the script onscreen as it runs. That way, you can follow the script as it runs and see where the problems might be.
to print the script onscreen as it runs:
sh -x retentive
At the shell prompt, type sh -x followed by the script name (and any additional information you need to provide). The -x tells the shell to both execute the script (as usual) and print out the individual command lines, as shown in Figure 10.9.
tip
Use the name of an appropriate shell, fol-lowed by -x, followed by the script name for this kind of debugging output. For example, try bash -x retentive.
Figure 10.9 Printing the script onscreen as it runs is a great way to debug it.

209
Sen
ding
and R
eading
11If you’re anything like us, your whole day revolves around getting goodies in your e-mail inbox and sending “highly important” messages (of course, they’re important, right?). In any case, sending and receiving e-mail will probably be rather common tasks in your Unix experience.
In this chapter, we’ll introduce you to a few Unix e-mail programs and show you how to get started with them. (Of course, just use the instructions that apply to the program you’re using!) Then, we’ll show you some clever things you can do with e-mail in Unix, such as creating signature files and sending automatic vacation e-mail replies.
Throughout this chapter, we’ll be referring to a program called pine. Depending on your system, you might have pine, or you might have a newer, yet similar, program called alpine. The program called alpine is simply a newer version of pine (well, there are some licensing changes similar to those with pico and nano back in Chapter 4, but those won’t affect your daily life with e-mail). For your purposes, just use the program available—pine or alpine—and know that the instruc-tions for each will apply to both.
Sending and Reading E-mail
Chapter Contents
Choosing an e-mail program and getting started
Reading e-mail with pine (or alpine)
Sending e-mail with pine (or alpine)
Customizing pine (or alpine)
Reading e-mail with mutt
Sending e-mail with mutt
Reading e-mail with mail
Sending e-mail with mail
Creating a signature file
Automatically forwarding incoming messages
Announcing an absence
Configuring procmail
Managing e-mail with procmail

Chapter 11
210
Cho
osi
ng
an
E-m
ail
Pro
gra
m
Choosing an E-mail Program and Getting StartedIn general, you’ll have a choice of three kinds of programs for sending and receiving e-mail on a Unix system:
An e-mail program installed on your local computer or network that interacts with the Unix system for you. You might know these programs as mail clients and might have used ones like Thunderbird or Outlook Express. These are handy because they usually have a spiffy inter-face and can handle attachments without a lot of hassle on your part, but they’re not really Unix e-mail programs. These pro-grams also let you store your mail on your desktop system (Windows or Macintosh or even Unix desktops, but those are beyond the scope of this book).
A Web-based e-mail program that you access through your Web browser on your local computer. These include Gmail, Yahoo! Mail, and many more. These are also outside the scope of the book (although most of the servers that host Web mail programs actually run Unix or Linux).
An e-mail program that you access and use directly on the Unix system. These programs, such as pine, mutt, and mail, let you send and receive with varying degrees of ease. Additionally, pine and mutt let you send attachments with not a lot of hubbub. Because the mail remains on the Unix system, you can access your mail from anyplace you can access the Internet.
Figure 11.1 pine’s interface and features are intuitive and easy to use.
Figure 11.2 mutt’s interface and features are fairly easy to use but not as easy as pine’s.
Figure 11.3 mail’s interface and features are, well, kind of a pain to use.
Sending and Reading E-mail
211
Cho
osin
g an
E-mail Pro
gram
In this chapter, we’ll focus on the e-mail pro-grams that you access directly from the Unix system, as these are the true Unix e-mail programs. Although there are a bazillion dif-ferent ones available, you’ll likely have access to one (or more) of these:
pine: This program is intuitive to use and lets you send and receive e-mail and attachments very easily. New develop-ments in the pine world have now given us alpine as a choice on some systems. The alpine program is a new and improved version of pine, but is basically the same for the purposes of basic use—what we cover in this book. pine (or alpine) is our recommendation if you have it available. Figure 11.1 shows pine’s relatively simple interface. Just use the menu commands listed at the bottom of the screen.
mutt: This program is a bit less user-friendly, but it lets you send and receive e-mail and can deal with attachments nicely. mutt is our second choice if pine is not available, but mutt is quite friendly if you put a bit of time into customizing it for your needs. Figure 11.2 shows its interface, which provides ample features for most purposes.
mail: This program is available on practi-cally every Unix system; however, it’s fairly difficult to use and does not provide intui-tive options or commands, as Figure 11.3 shows. We recommend choosing another e-mail program if at all possible. Use this program for emergencies only.
tips
How do you know whether someone has sent you something? The shell will often announce (but not usually audibly) “You have mail” or “You have new mail” when you log in, as shown in Code Listing 11.1—that is, if you do in fact have e-mail waiting for you.
You’re not limited to using just a regu-lar Unix e-mail program or a POP mail program; you can use either or both, depending on your specific preferences and needs. You’re also not limited to using just one Unix e-mail program if you have more than one available, although reading mail from two different Unix programs can sometimes make it a little hard to keep track of what’s where. Try them out and see which program or combination of programs meets your needs.
We recommend using character-based e-mail programs like these to read mail. After you get used to the interface, you can whiz through your e-mail much faster than you can with a GUI (Graphical User Interface) mailer (like Outlook or Mozilla mail), and you don’t have spam graphics opened in your face either.
login: ejr
Password:
Last login: Sun Aug 2 07:41:00 on tty4
You have mail.
[ejr@hobbes ejr]$
Code Listing 11.1 Read with great interest the line that says “You have mail” when you log in.

Chapter 11
212
Rea
din
g E
-mai
l w
ith
pin
e
reading E-mail with pineIt’s likely that your first step in using pine will be to read e-mail. As Figures 11.4 through 11.7 show, you start by entering the pine command, and then work screen by screen, depending on what you want to do.
to read e-mail with pine:
1. pineAt the shell prompt, type pine to start the program. The first time you use pine, it will ask you if you want to be counted as a pine user (see Figure 11.4) before you get started. Thereafter, you’ll see the normal main screen, as shown in Figure 11.5.If you get an error message about the pine command not being found, look around on the system to try to find the program. See Chapter 1 for details on where to look.
2. LPress L to view the folder list, which includes an inbox folder as well as (even-tually) other folders that you set up.
3. Use the arrow keys to navigate the folder list (if you have other folders).
4. VPress V to view the selected folder. Note that the default selection in the bottom menu is shown with brackets, [ ] (see Figure 11.6). Rather than use arrow keys to select the default, you can press e.
5. Use theW and Z keys to move up and down in the message list.Your unread messages will appear at the bottom of the list by default.
6. e
Press e to read the selected message.
Figure 11.5 You’ll become well acquainted with pine’s main screen.
Figure 11.6 All you have to do is press e to select the default selection, which is shown at the bottom in brackets.
Figure 11.4 When you start pine for the first time, it will ask whether you want to be counted as a user before you begin.

Sending and Reading E-mail
213
Readin
g E-m
ail with
pine
7. Hmmm. Uh-huh. Wow. Marvy.Read your messages. Press < to get out of the current message and back to the mes-sage index for the current folder.
8. QPress Q when you’re ready to quit pine. You’ll be prompted to verify that you want to quit, as shown in Figure 11.7. Just press Y to quit, or N if you really didn’t want to quit.
tips
Notice the menu commands listed at the bottom of the pine screen. You can choose any of these options by pressing the appropriate key. pine is conveniently case-insensitive, so either lowercase or uppercase commands will work.
Start with pine -i to start in your inbox, rather than at the main menu.
As you’re perusing your e-mail, you can use t to jump to the next unread mes-sage in the folder.
Delete messages by pressing D, either when the message is highlighted in the message list or when the message is open onscreen. When you quit the program, pine will verify that you want to discard the deleted messages. Just press Y to confirm the deletion, or N if you really didn’t want to get rid of the messages. (Note that deleting in pine does not send them to the Recycle Bin, as the D key does when using a Windows e-mail pro-gram. In Unix, pressing D really deletes messages… they’re gone!)
You can reply to messages by pressing R with a message selected or while reading a message.
When using pine, keep your eyes open for an O in the menu at the bottom of the screen indicating that there are other options.
Figure 11.7 Do you really want to quit pine? Just checking.
Printing with pine
Although many Unix e-mail programs don’t let you print to your local printer, pine does. All you have to do is choose %, take the default printout on “attached to ansi,” as pine suggests, and your printout will most likely appear on your regular printer. Printing to a local printer this way doesn’t work with some communications programs (notably Windows telnet), but it does work with many. If you’re sitting in front of a Linux or Mac OS X system, you could also use other printing utilities on your system—the “attached to ansi” option is intended for people who are connected to the Unix system with ssh or telnet.

Chapter 11
214
Sen
din
g E
-mai
l w
ith
pin
e
Sending E-mail with pineOur next favorite thing to do with pine is to send new messages. Commonly, you’ll send messages after you’ve already started pine (Figure 11.8), but you can also start a new message directly from the shell prompt (see the accompanying tips).
to compose and send a message using pine:
1. pineType pine at the shell prompt to start pine, if it isn’t already running.
2. CPress C to compose a new message.
3. t
Press t to move through the message header fields. Fill in carbon copy recipi-ents (cc:) and the Subject: line. See the sidebar called “Our Two Cents on the Subject of Subjects” for details about including subject lines.If you’re sending an attachment, type in the Unix filename (and path, if appropri-ate) on the Attchmnt: line. For example, type ~/myfile, which includes the full path name and the filename.
4. Hi, John, when should we schedule that golf game -- er, um -- business meeting?
In the message window, type in your message. Figure 11.8 shows our message, complete with the header information and the message body.
5. cX
When you’re ready to send, press cX. pine will ask you to confirm that you really want to send the message. Press Y (or press e) to send it, or N if you don’t want to send it.
Figure 11.8 Preparing a message in pine is as easy as filling in the blanks.

Sending and Reading E-mail
215
Sen
ding
E-mail w
ith pine
tips
Rather than type in someone’s lengthy e-mail address (such as [email protected]), set up an alias—a shortened name that replaces the long-winded address. Yeah, you’d be able to just type in Joe or whatever, and Unix will know which long-winded address goes with that name. To set up aliases, use the address book (press A from the main menu) and follow the instructions given.
If you’re at the shell prompt and want to send e-mail without bothering with the main pine interface, type pine followed by the e-mail address you want to send mail to ( for example, pine [email protected]). If you want to send e-mail to multiple addresses, just separate them with commas or spaces, as in pine [email protected], [email protected].

Chapter 11
216
Cust
om
izin
g p
ine
Customizing pineAlthough pine is rather intuitive to use, it is also quite powerful, giving you ample options for customizing it. Figure 11.9 shows pine’s customization screen, as well as a few of the options you can choose.
to customize pine:
1. pineAt the shell prompt, type pine to start the program.
2. MPress M to visit the main menu.
3. SPress S to summon the setup menu.
4. CPress C to access the configuration setup menu, which is shown in Figure 11.9.
Figure 11.9 By using the configuration setup menu, you can tailor pine to your needs.

Sending and Reading E-mail
217
Custo
mizin
g pine
5. Scroll through the configuration list using the W and Z keys.pine offers you gobs of options to config-ure. Table 11.1 describes the ones you might find most useful.
6. e
Press e to select the option you want to change.
7. Make your selection or fill in the neces-sary information.
8. e
Press e to exit the configuration menu and return to the setup menu. You’ll be prompted to save your changes. If you want to do so, press Y; if not, press N. You’ll then whiz back to the main menu.
tip
You can customize pine so that it auto-matically opens up your inbox whenever you start it. In the initial-keystroke-list, just type l,v, and then press e, to specify the initial characters.
O p t i o n D e s c r i p t i o n
initial-keystroke-list Specifies key commands for pine to use when starting, just as if you’d typed them in directly.
quit-without-confirm Allows you to exit pine without the “are you sure?” message.signature-at-bottom Puts your automatic signature at the end of the message you’re replying to, rather than
above it.saved-msg-name-rule Sets pine to automatically file your saved messages in a specific folder, based on the char-
acteristics (sender, etc.) of the message.fcc-name-rule Sets your file copy of outgoing messages to be saved in a particular folder. We like the by-
recipient option, which files messages according to whom we sent them to.use-only-domain-name Sets pine to send all outgoing messages with just the domain name and not the machine
name on the From: line. For example, our messages come from @raycomm.com, not from @frazz.raycomm.com.
Commonly Used Configuration Options
table 11.1

Chapter 11
218
Rea
din
g E
-mai
l w
ith
mut
t
reading E-mail with muttIf you’re using mutt, you’ll probably find that reading e-mail messages is rather straightfor-ward. As Figure 11.10 shows, you just scroll through your list of messages with the W and Z keys and press e to open the message you want to read.
to read e-mail with mutt:
1. muttType mutt at the shell prompt to start the program. The system might ask you if you want it to create folders for you, as shown in Code Listing 11.2. We say let it do the work for you and enter [yes]. Enter [no] if you don’t want folders created. Figure 11.10 shows the main mutt screen.
2. Use the W and Z keys to move up and down in your list of e-mail messages.Your unread messages will be at the bot-tom of the list.
[awr@hobbes awr]$ mutt
/home/jdoe/Mail does not exist. Create
it? ([yes]/no):
Code Listing 11.2 mutt will create a mail directory for you.
Figure 11.10 mutt’s main index screen shows many of your options.

Sending and Reading E-mail
219
Readin
g E-m
ail with
mutt
3. e
Press e to open a message to read.
4. IPress I to return to the list of messages (index) or press the z to scroll down through the current message. Figure 11.10 shows the menu of com-mands, which should help you remember some of the basics of mutt.
5. QPress Q ( for quit), then wave goodbye to mutt. You might be prompted with questions to answer ( for example, about discarding deleted messages or moving read messages to your read-mail folder). Answer yes only if you’ll be using mutt as your primary mailer in the future.
tips
You can customize virtually every aspect of mutt but only by editing the ~/.muttrc configuration file. If you think you might like the flexibility of mutt, search the Internet for sample .muttrc files to get an idea of what you can do with it.
You can delete a message by pressing D when you’re viewing it or when it’s selected in the message index screen. When you quit mutt, you’ll be asked whether mutt should “Move unread messages to /home/yourid/mbox.” At that time, press N to keep them in your inbox or Y to move them.
You can reply to messages by pressing R with the message selected in the message list or while reading the message.
You can access mutt help, such as it is, from almost any screen by pressing ?.
You can move to a specific message in the message index by typing the message number.
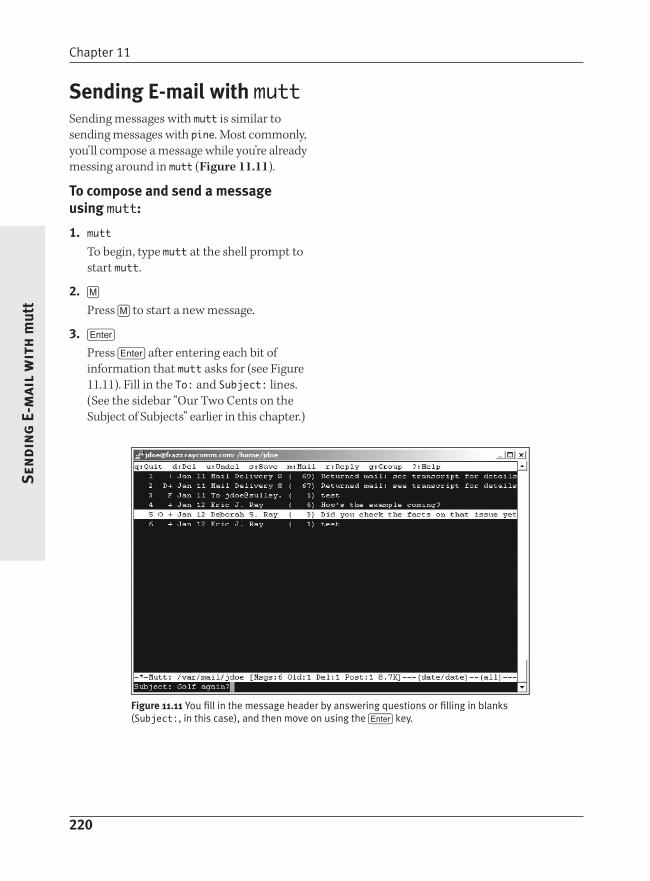
Chapter 11
220
Sen
din
g E
-mai
l w
ith
mut
t
Sending E-mail with muttSending messages with mutt is similar to sending messages with pine. Most commonly, you’ll compose a message while you’re already messing around in mutt (Figure 11.11).
to compose and send a message using mutt:
1. muttTo begin, type mutt at the shell prompt to start mutt.
2. MPress M to start a new message.
3. e
Press e after entering each bit of information that mutt asks for (see Figure 11.11). Fill in the To: and Subject: lines. (See the sidebar “Our Two Cents on the Subject of Subjects” earlier in this chapter.)
Figure 11.11 You fill in the message header by answering questions or filling in blanks (Subject:, in this case), and then move on using the e key.

Sending and Reading E-mail
221
Sen
ding
E-mail w
ith m
utt
4. Say hello to vi.Huh? After you enter the message header contents ( filling in what you want), you’ll be plunked right into vi, facing the top of a very blank message. See Chapter 4 for a quick reminder about using vi.
5. John, I was having this dream that I had my alarm clock installed in my stomach. I remembered this because, when my alarm went off, I found myself pushing my belly button trying to turn off the noise. Good grief...I need a vacation!
Type your message, whatever it may be.
6. q
When you’re finished, press q (to get into command mode).
7. :wqThen type :wq to save your work and exit the editor.
8. YPress Y to send the message. If you decide you don’t want to share details about your belly button after all, you can press E to edit your message or press Q to quit and forget the whole thing.
tips
You can change the default editor from vi to something else available on your Unix system. All you have to do is edit your ~/.muttrc file (or create one if it doesn’t exist) and add set editor=”emacs” (or whatever editor) to the file.
To send a quick message from the shell prompt, type mutt followed by the recipient’s e-mail address, as in mutt [email protected]. If you want to send e-mail to multiple addresses, just separate them with commas or spaces, as in mutt [email protected],[email protected].

Chapter 11
222
Rea
din
g E
-mai
l w
ith
mai
l
reading E-mail with mailIn general, using mail is a bit less intuitive than using either pine or mutt; however, reading e-mail with mail is particularly—um—challenging. Although we’d recommend using another program to read e-mail if at all possible, here are the steps for reading e-mail with mail if you’re daring enough or if you have no other options. Figure 11.12 illus-trates this fairly quick task.
to read e-mail with mail:
1. mailType mail at the shell prompt. You’ll get a list of messages and a prompt (Figure 11.12).
2. 3Type the number of the message you want to read and press e.
3. Marvelous...he’s such a jerk...oh, that’s neat....
Read your messages. Press N+e to move to the next message, or more to page through the message a screen at a time.
4. QPress Q to quit mail when you’re ready.
tips
If somebody really long-winded sends you a long message, your Unix system might just zip the message on by, leaving you reading only the bottom few lines. To read the message in its entirety, either type more to page through the message, or type s followed by the message number, followed by a filename (s 18 message-in-a-file) to save it to a file, then use the editor of your choice to read it.
Type h followed by a message number to see different message headers. For example, type h 117 to see the messages leading up to number 117.
Find a different mail program if at all possible—it’s useful to be able to cope with mail for times of need, but it’s not a good long-term solution.
Figure 11.12 The mail screen is anything but intuitive, but you can see the messages you have.

Sending and Reading E-mail
223
Sen
ding
E-mail w
ith m
ail
Sending E-mail with mailDespite mail’s unintuitive interface and features, it is a great program to use if you just want to dash off a quick message without fussing with niceties. As Code Listing 11.3 shows, you can send messages while in mail or from the shell prompt. You can also use mail to send files fairly easily.
to compose and send a message using mail:
1. mail [email protected] the shell prompt, type mail followed by the recipient’s address. If you want to send e-mail to multiple addresses, just separate them with commas but no spaces, as in mail [email protected],[email protected] you’re already in mail, just type m fol-lowed by the address or addresses, as in m [email protected],[email protected].
2. So, anyway, Winchester had perched himself on my stereo turntable (those were sooooo low-tech, weren’t they?!). He was waiting for me to turn on the stereo so he could go back to sleep while spinning in circles. I used to let him sleep that way at night. Well, that was until one night the lid closed on him...
Type in your message text (see Code Listing 11.3).
3. cD
Announce that you’re done with either a . (dot) by itself on the last line or with cD, and the message will zip off to the recipient(s).
[ejr@hobbes ejr]$ mail [email protected]
Subject: You’re in big trouble now!
So, anyway, Winchester had perched
himself on my stereo turntable (those were
sooooo low-tech, weren’t they?!). He was
waiting for me to turn on the stereo so he
could go back to sleep while spinning in
circles. I used to let him sleep that way
at night. Well, that was until one night
when the lid closed on him...
EOT
[ejr@hobbes ejr]$
Code Listing 11.3 Using mail, you can dash off a quick note by including the recipient’s address and the message text.

Chapter 11
224
Sen
din
g E
-mai
l w
ith
mai
l
to send text files with mail:
mail [email protected] < sendit.txt
At the shell prompt, type mail followed by the recipient’s address. Then use < and the filename to redirect the file (< sendit.txt), which tells Unix to send the file to the address provided (Code Listing 11.4).
tips
See “Scheduling Regularly Occurring Jobs with cron” in Chapter 9 for a spiffier way of using mail to send messages directly.
See the section in Chapter 1 called “Redirecting Output” for a refresher on redirection.
You’ll notice that the mail interface on some systems does not provide for a sub-ject line. On some systems, you can add one by including -s plus the subject text, like this: mail -s “An old Winchester story...dumb cat!” [email protected].
You can accomplish all of these com-mand-line mail sending options with mutt as well as mail, but you get added benefits with mutt, including being able to send attachments. For example mutt -s “Sending that file” -a bigolefile.tgz [email protected] < /dev/null will do the whole nine yards at once, including attaching the big ol’ file. Don’t try that with mail!
[ejr@hobbes ejr]$ mail [email protected]
< sendit.txt
[ejr@hobbes ejr]$
Code Listing 11.4 To send a text file through the mail, you just redirect the file to mail.

Sending and Reading E-mail
225
Creating
a Sig
natu
re File
Creating a Signature FileIf you’ve been using e-mail for any length of time, you’ve undoubtedly noticed signature files, which appear at the bottom of messages and include contact information, company name, and perhaps a short funny quote or saying. You can add a signature to your out-going messages by creating a .signature file (Figure 11.13).
to create a signature file:
1. pico ~/.signatureAt the shell prompt, type an editor’s name (here we use pico, but you can use the editor of your choice), specify the home directory (with ~/), and then specify the .signature filename. Note the leading dot in the filename, which makes the file hidden.
2. Eric J. Ray [email protected] My thoughts are my own ... is that OK, honey?
Go ahead, type your signature informa-tion (Figure 11.13). We recommend that your .signature file include, at mini-mum, your name and e-mail address. You can also add funny sayings (“You know you’re a geek when you refer to going to the bathroom as ‘downloading.’”) or disclaimers (“My opinions are mine and not my company’s.”). Whatever you want, really. Keep your signature as short as possible; long signatures are hard to wade through.
3. Save and exit the file.If you’re using pico or vi, you can get a quick reminder about this in Chapter 4.
Figure 11.13 Your signature file can contain any information you want. Be creative, but keep it concise!

Chapter 11
226
Crea
tin
g a
Sig
nat
ure
Fil
e
tips
If you want to get really fancy with your signature, use a figlet, which is a text rep-resentation of letters, as shown in Code Listing 11.5. Check out www.yahoo.com or your favorite Internet search engine and search for “figlet” or “figlet generator” for more information about creating your own.
Many e-mail purists think that four lines is the longest signature anyone should have. If you create one that’s longer, expect some people to chew you out for it.
Both mutt and pine automatically include a .signature file in outgoing mail.
[ejr@hobbes ejr]$ more figlet
_____ _____ _____
| __ \ / ____| |_ _|
| |__) |__ _ _ _| | ___ _ __ ___ _ __ ___ | | _ __ ___
| _ // _’ | | | | | / _ \| ‘_ ‘ _ \| ‘_ ‘ _ \ | | | ‘_ \ / __|
| | \ \ (_| | |_| | |___| (_) | | | | | | | | | | |_ _| |_| | | | (__ _
|_| \_\__,_|\__, |\_____\___/|_| |_| |_|_| |_| |_( ) |_____|_| |_|\___(_)
__/ | |/
|___/
Code Listing 11.5 Figlets are fun and fancy.

Sending and Reading E-mail
227
Forw
arding
Inco
min
g M
essages
Automatically Forwarding Incoming MessagesSuppose you’re the boss of a big project, and everyone sends you all the important related e-mail messages. You can tell Unix to automagically forward these incoming messages to the people who will actually do something about them. Hey, you’re the boss, right? Or maybe you just got a different e-mail account, and you want incoming mail sent to your old address forwarded to your new address. As Figure 11.14 shows, all you have to do is create a .forward file.
to forward incoming e-mail messages:
1. vi ~/.forwardTo begin, type vi at the shell prompt (or the appropriate command for whichever editor you are using), indicate your home directory (with ~/), and then type .forward as the filename.
2. [email protected], as the first line of the file, the address to which you want your e-mail forwarded (Figure 11.14). In addition to forwarding to a single address, you can also use a .forward file with multiple addresses on multiple lines to send incoming e-mail to several addresses at once.
3. Save and close the file.Check out Chapter 4 for details about sav-ing and closing files using pico or vi.
tips
Check with your system administrator to see if a .forward file will really do what you want. Many newer Linux and Unix systems automatically send mail to procmail (and ignore the .forward file), so you might need to use a procmail recipe to forward your mail. It’s equally effective, but just different. See “Managing e-mail with procmail” later in this chapter for details.
If you want, you can keep a copy of all incoming messages (in your incoming e-mail box, just where they’d usually be) and forward them to unsuspecting recipi-ents. Just type \yourid, [email protected] (substituting your userid on the cur-rent system for yourid and the address to which to forward the mail for [email protected]).
Forwarding messages is also handy when you change ISPs. You can forward all messages sent to your old address to your new one, which helps tremendously in ensuring that you receive all your impor-tant messages while your friends and coworkers update their address books.
Figure 11.14 All you have to do is tell Unix where you want your messages forwarded to.

Chapter 11
228
An
no
un
cin
g a
n A
bsen
ce w
ith
vac
atio
n
Announcing an Absence with vacationIf you’re planning a vacation and will be away from your e-mail for a while, let Unix announce your absence for you (Figure 11.15). Using the vacation program, you can have Unix send a reply saying that you’re out of the office to everyone who sends you e-mail.
Keep in mind that vacation is quite variable among different Unix systems and ISPs. What you have might be different from the “standard” form used here. Be sure to check with your system administrator for specific instructions if you have any problems, and also look at “Configuring procmail,” later in this chapter, as many newer Linux and Unix systems use procmail instead of a .forward file to tell vacation to respond to your messages.
to send “I’m on vacation” messages using vacation:
1. vi ~/.vacation.msgAt the shell prompt, type vi ~/vacation. msg. You’ll need to edit a message (a template, actually) for the response that people should receive when they e-mail you, as shown in Figure 11.15.
2. Subject: away from my mail Thanks for emailing me about $SUBJECT. Fortunately for me, I’m taking a fabulous vacation mowing my lawn, doing laundry, and catching up on other things I can’t do because I usually work so much. If you would like me to stay on vacation, please email my boss ([email protected]) and let her know. Thanks!
Create and edit the text to say what you want.The $SUBJECT term in the text will be replaced with the actual subject of the e-mail sent to you.
Figure 11.15 Using a template, you can customize the vacation message—even extensively, as we’ve done.

Sending and Reading E-mail
229
An
no
un
cing
an A
bsence w
ith vacation
3. Save your text and exit the editor.Chapter 4 has the gory details about sav-ing and exiting in pico and vi.
4. vacation -IType vacation -I at the shell prompt to start vacation and tell it to respond to all incoming messages. You’ll still get the incoming messages in your inbox. In fact, they’ll pile up in your inbox and wait for you to return.
5. cat ~/.forwardLook at the .forward file in your home directory to verify that it contains a refer-ence to the vacation program. Your .for-ward file specifies what should happen to your mail upon receipt. In this example, it should be processed by vacation. The reference to vacation is usually automati-cally inserted by the vacation program, but if it’s not there, you’ll need to edit the .forward file and add text like \yourid, “|vacation yourid”. Of course, substi-tute your real userid for the placeholder, and possibly include the full path to vaca-tion (/usr/bin/vacation on our system). (See Code Listing 11.6.)
to stop vacation e-mails:
mv .forward vacation-forward
At the shell prompt, move the .forward file that references the vacation program to a different name (in this case, vaca-tion-forward). You could just delete it or remove the reference to vacation, but it’s easier to save it so you can reuse it for your next vacation.
tip
Remember to unsubscribe to all mail-ing lists before you start vacation. If you don’t, you may send a vacation announce-ment to a whole list of people who likely don’t care (not to mention that you’ll irri-tate the list administrator!). Or, worse, you might cause a mail loop (in which your messages to the list are acknowledged by the server, and the acknowledgments are in turn sent vacation announcements), causing hundreds or thousands of mes-sages to accumulate in your account. It shouldn’t happen, but it sometimes does.
[ejr@hobbes ejr]$ cat ~/.forward
\ejr, “|vacation ejr”
[ejr@hobbes ejr]$
Code Listing 11.6 Your .forward file should reference the vacation file.
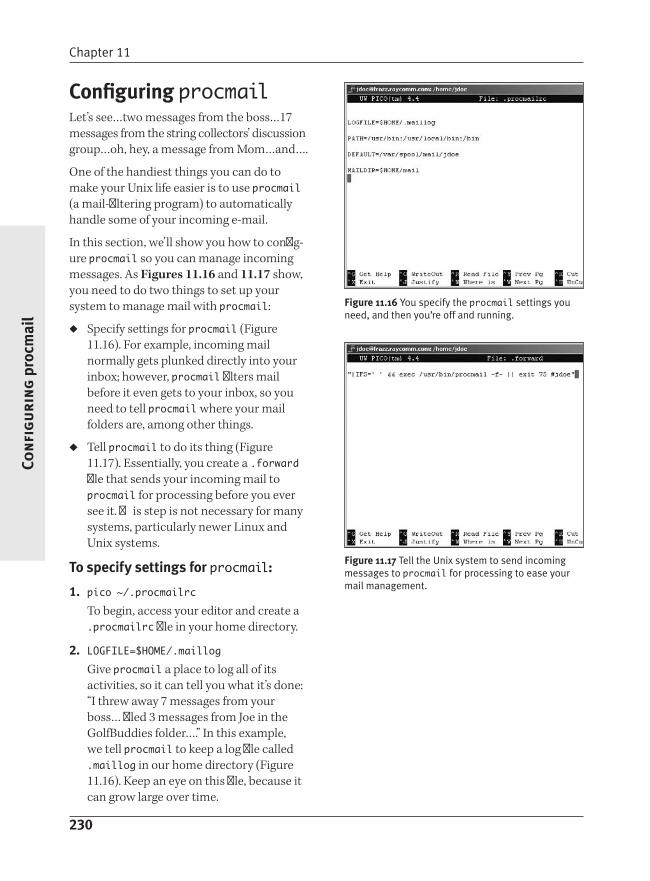
Chapter 11
230
Con
fig
uri
ng
pro
cmai
l
Configuring procmailLet’s see…two messages from the boss…17 messages from the string collectors’ discussion group…oh, hey, a message from Mom…and….
One of the handiest things you can do to make your Unix life easier is to use procmail (a mail-filtering program) to automatically handle some of your incoming e-mail.
In this section, we’ll show you how to config-ure procmail so you can manage incoming messages. As Figures 11.16 and 11.17 show, you need to do two things to set up your system to manage mail with procmail:
Specify settings for procmail (Figure 11.16). For example, incoming mail normally gets plunked directly into your inbox; however, procmail filters mail before it even gets to your inbox, so you need to tell procmail where your mail folders are, among other things.
Tell procmail to do its thing (Figure 11.17). Essentially, you create a .forward file that sends your incoming mail to procmail for processing before you ever see it. This step is not necessary for many systems, particularly newer Linux and Unix systems.
to specify settings for procmail:
1. pico ~/.procmailrcTo begin, access your editor and create a .procmailrc file in your home directory.
2. LOGFILE=$HOME/.maillogGive procmail a place to log all of its activities, so it can tell you what it’s done: “I threw away 7 messages from your boss… filed 3 messages from Joe in the GolfBuddies folder….” In this example, we tell procmail to keep a log file called .maillog in our home directory (Figure 11.16). Keep an eye on this file, because it can grow large over time.
Figure 11.16 You specify the procmail settings you need, and then you’re off and running.
Figure 11.17 Tell the Unix system to send incoming messages to procmail for processing to ease your mail management.

Sending and Reading E-mail
231
Con
fig
urin
g procm
ail
3. PATH=/usr/bin:/usr/local/bin:/binSpecify the path for your executable programs. It’s a good idea to do this now, just in case you eventually use procmail to more extensively filter or autorespond to messages.
4. DEFAULT=/var/spool/mail/youridSpecify the location for your incoming mail. Remember, the filter gets the mail before it ever reaches the inbox, so you need to tell procmail where your inbox is. Check with your system administra-tor to confirm the DEFAULT. (/var/spool/mail/yourid is typically, but not always, the location, but obviously with your real userid, not yourid.)
5. MAILDIR=$HOME/mailSpecify where procmail should find your mail program and all the folders and information it creates. If you’re using pine, you will probably type this line exactly as shown. If you’re using mutt, you might need to use Mail instead of mail.
to turn on procmail filtering:
1. pico ~/.forwardUse your favorite editor to create a .for-ward file in your home directory.
2. “|IFS=’ ‘ && exec /usr/bin/procmail -f- || exit 75 #yourid”
Enter the text exactly as shown, but substi-tute your userid for yourid (Figure 11.17). If procmail is not located at /usr/bin, type in the actual location. /usr/local/bin would be another likely directory.
3. Save and close the file.That’s it! Now all you have to do is wait for incoming messages and see if they get filtered as you intended (as you’ll set up in the next section). It's a good idea to use a different e-mail account to send yourself e-mail and confirm that your changes work as you expect.
tip
Don’t forget that many newer Unix and Linux systems are configured to automat-ically send your e-mail through procmail, even without you having to turn it on. We recommend trying the steps in the task “To specify settings for procmail” first and see if that works, and only try the steps in the “To turn on procmail filtering” task if just specifying settings isn’t sufficient.

Chapter 11
232
Man
agin
g E
-mai
l w
ith
pro
cmai
l
Managing E-mail with procmailprocmail can help you automatically—or selectively—respond to e-mail. As you’ll see, procmail is similar to forwarding e-mail and using the vacation program, but you’ll prob-ably find procmail much more flexible.
to specify how messages should be filtered (to “write a recipe”):
1. vi ~/.procmailrcIn vi, access your .procmailrc file.
2. Move to the end of the file, below the setup information.
3. :0:Start a new recipe with :0:, as shown in Figure 11.18. (Don’t ask why you use :0:. That’s just the way it is.)
4. * ^TOGolfBuddiesSet the criteria for procmail to filter with. Here, * ^TO tells procmail to examine the TO
line (and, actually, the CC line, too) of all incoming messages.
GolfBuddies is the text to match in the TO line (as in To: [email protected]). Of course, you’d put in the actual name of the list to look for (or the alias for your mailing list, or whatever), rather than GolfBuddies.
5. $MAILDIR/FriGolfBuddiesSpecify where the filtered mail should go. In this case, filtered mail would go in the FriGolfBuddies folder, but you might filter messages from mailing lists into a listmail folder.
6. Save and close the file.
Figure 11.18 Add the recipes of your choice to your .procmailrc file.

Sending and Reading E-mail
233
Man
agin
g E-m
ail with
procmail
to forward mail with procmail:
1. pico ~/.procmailrcTo begin, access your editor and edit the .procmailrc file that you previously cre-ated in your home directory.
2. :0:On a new line at the bottom of the file, add :0:, which starts a procmail recipe. This basically tells procmail to “lock” your mail directory while it’s processing mail.
3. ! [email protected] an exclamation point (!) and the address to which to send the mail.
4. Save and close the file.Now all e-mail that you receive will be automatically forwarded to [email protected]. Use procmail to toss
Spam Messages
The following recipe,
:0:
* !^TO.*awr@.*raycomm.com
$MAILDIR/spam
uses a regular expression to filter messages that aren’t explicitly addressed to a userid with awr before the @ and raycomm.com at the end and places them into a special folder called spam. Put the spam filter at the end of your list of rules so all of the messages originating from your mailing lists and other important messages are filed first. After testing this and making sure that you like it and it doesn’t pitch valuable messages, you could change the last line to /dev/null to just throw away the garbage.
For more complex and sophisticated spam solutions, check the options with a Google search for procmail spam filter at www.google.com.

Chapter 11
234
Man
agin
g E
-mai
l w
ith
pro
cmai
l
to invoke vacation with procmail:
1. pico ~/.procmailrcTo begin, access your editor and edit the .procmailrc file that you previously cre-ated in your home directory.
2. :0 c| /usr/bin/vacation jdoe
On a new line at the bottom of the file, add the recipe shown to send a copy (the c at the end of the first line) of your e-mail to the vacation program. See “Announcing an Absence with vacation” earlier in this chapter for more informa-tion about the vacation program.
3. Save and close the file.Now all e-mail that you receive will be stored and passed along for the vacation program to respond to.
tips
Your .procmailrc file gets processed in order. As soon as a recipe matches an incoming e-mail message, it’s applied. So if your first recipe is the forwarding recipe, procmail will never even get to any later recipes. If no recipes are matched, mail will be delivered to the DEFAULT location you specified (see “Configuring procmail,” earlier).
After you set up your procmail process-ing, be patient. Sometimes procmail processes e-mail on a specific schedule (hourly, for example), so testing it may be a little time-consuming.
Sample procmail recipes
The following recipes, with annotations, should help you get started filtering with procmail:
# Filter based on the To:, Cc: and similar headers
:0:* ^TO.*awr@.*raycomm.com$MAILDIR/interesting
# Filter based on the subject
:0:* ^Subject:.*Status Report.*$MAILDIR/status-reports
# Filter based on sender
:0:*^From:.*[email protected]$MAILDIR/IN.TO-DELETE
# Filter directly to garbage, irrevocably, based on sender
:0:*^From:.*[email protected]/dev/null
# Filter based on size (greater than 1000 bytes)
:0:* > 1000$MAILDIR/longish

235
Accessin
g th
e Intern
et
12So far in this book, you’ve been working with files and scripts located on the Unix system. In this chapter, we’ll show you how to venture beyond your Unix system and take advantage of the information on the Internet.
Accessing the Internet
Chapter Contents
Getting familiar with Unix Internet lingo
Logging in to remote systems
Communicating with other users
Getting files from the Internet
Sharing files on the Internet
Surfing the Web
Downloading Web sites
Checking connections
Tracing connections
Matching domain names

Chapter 12
236
Get
tin
g F
amil
iar
wit
h U
nix
Inte
rnet
Lin
go
Getting Familiar with Unix Internet LingoBefore you venture out onto the Internet using the information in this chapter, you should become familiar with some concepts and terminology.
A server is a computer that stores data and “serves” it whenever requested. For example, you might think of a Web server as a big storehouse for .html files. Its job is to store .html files, wait for another computer to request files, and then find the requested files and “serve” them to the requesting computer. And, yes, your Unix system might be a Web server, but it doesn’t have to be.
A client is a program that runs on your Unix system and is used to access data on a server. For example, your lynx Web browser is a client—that is, it runs on your Unix system and is used to access files on a Web server.
An IP (Internet Protocol) address is the address of a specific computer. This address identi-fies a computer, much the way your street address identifies your home. You use IP addresses, for example, every time you access a Web page. You may type www.raycomm.com (which is called the host name), but behind the scenes, that’s translated into a specific IP address, such as 192.168.141.12. You will use host names (such as www.oracle.com or www.sun.com) more often, because they’re easier to remember than a string of numbers. Whether you type in a character address or a number address, all you’re doing is accessing a specific address for a specific computer.
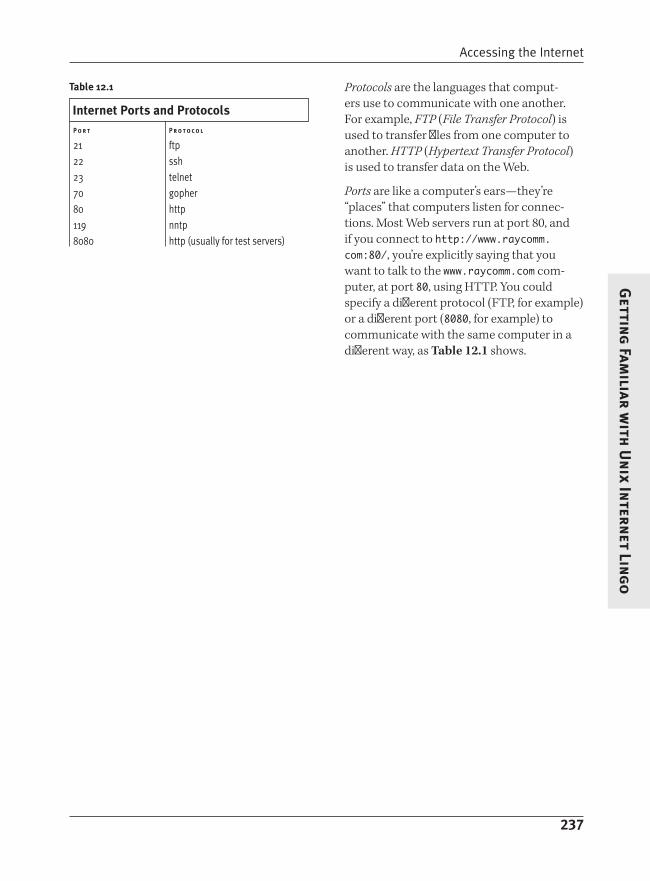
Accessing the Internet
237
Gettin
g Fam
iliar with
Un
ix Intern
et Ling
o
Protocols are the languages that comput-ers use to communicate with one another. For example, FTP (File Transfer Protocol) is used to transfer files from one computer to another. HTTP (Hypertext Transfer Protocol) is used to transfer data on the Web.
Ports are like a computer’s ears—they’re “places” that computers listen for connec-tions. Most Web servers run at port 80, and if you connect to http://www.raycomm.com:80/, you’re explicitly saying that you want to talk to the www.raycomm.com com-puter, at port 80, using HTTP. You could specify a different protocol (FTP, for example) or a different port (8080, for example) to communicate with the same computer in a different way, as Table 12.1 shows.
P o r t P r o t o c o l
21 ftp22 ssh23 telnet70 gopher80 http119 nntp8080 http (usually for test servers)
Internet Ports and Protocols
table 12.1

Chapter 12
238
Log
gin
g in
to
Rem
ote
Syst
ems
wit
h s
sh
Logging in to remote Systems with sshYou might already be using ssh to connect to your Unix system. You can, though, use it to connect to and use practically any other computer system on the Internet (assum-ing you have rights to log in to it), as Code Listing 12.1 shows.
to connect to another computer using ssh:
1. ssh server.example.comAt the shell prompt, type ssh followed by the name of the system to which you want to connect.
2. Log in using the instructions you have for accessing the system.Presumably, if you’re accessing a system over the Internet, you have some reason and permission to do so. In some cases, you’ll type the name of the application, or you might be using the remote system just as you use the system from which you are connecting.
3. After you’ve finished using the remote system, log out according to the instruc-tions and policies of the remote system.
tips
For help with ssh, type ssh at the shell prompt and look at the list of options, or type man ssh for more help. When you have an active session, use e~? to get help with the current session.
If you have a different login name on the remote system, you can specify that to ssh with ssh server.example.com -l otherusername to log in more eas-ily. Or, if it’s easier to remember, try ssh [email protected].
[jdoe@frazz jdoe]$ ssh server.example.com
jdoe@server’s password:
jdoe /home/jdoe $ whoami
jdoe
jdoe /home/jdoe $ uname -a
Linux server.example.com 2.4.19-ac4 #13 SMP
Sat Nov 16 05:30:56 MST 2002 i686
unknown unknown GNU/Linux
jdoe /home/jdoe $ logout
[jdoe@frazz jdoe]$
Code Listing 12.1 Use ssh to connect securely to other systems on the Internet.
You can use the wall (Write ALL) com-mand to send write-type messages to everyone logged in to the system. System administrators commonly use wall when they need to warn people that the system is being brought down.
Use w or who to find out who else is logged into the system. See the sections “Learning Who Else Is Logged In with who” and “Learning Who Else Is Logged In with w” in Chapter 7 for more information.

Accessing the Internet
239
Log
gin
g in
to R
emote System
s with
telnet
Logging in to remote Systems with telnetYou might already be using telnet to connect to your Unix system. You can, though, use it to connect to and use practically any other computer system on the Internet (assuming you have rights to log in to it and that the system administrator allows telnet access rather than requiring SSH), as Figure 12.1 shows.
to connect to another computer using telnet:
1. telnet ibm.okstate.eduAt the shell prompt, type telnet followed by the name of the system to which you want to connect. In this example, we’re connecting to the Oklahoma State University online library catalog.
2. Make note of the Escape character announced when you log in—look quickly, as it’ll whirl by onscreen. The Escape character is what you’ll press should your telnet connection stall or the system lock up. In our example, the Escape character is c], which will return us to the telnet prompt so we can quit the connection (Figure 12.1).
3. Log in using the instructions you have for accessing the system.Presumably, if you’re accessing a system over the Internet, you have some reason (and permission) to do so. In some cases, you’ll type the name of the application. In our example, we type pete, which is the name of the card catalog. In most other systems, you’ll log in with a userid and password, just as you log in to your Unix system (Figure 12.2).
continues on next page
Figure 12.1 Note the Escape character as it flashes by.
Figure 12.2 After you’re connected, you can use the remote system just like your own.
Chapter 12
240
Log
gin
g in
to
Rem
ote
Syst
ems
wit
h te
lnet
4. After you’ve finished using the remote system, log out according to the instruc-tions and policies of the remote system.
tips
For help with telnet, type telnet at the shell prompt, and then enter a ? at the telnet> prompt. open, close, and exit will be the most useful tools for you.
You’ll find that telnet connections to libraries and other mainframe computers are often difficult to use because of oddi-ties in keyboard emulations. Your best bet is to contact the site owner and ask for a FAQ list (with answers!). You won’t be the first to have questions.
A program closely related to telnet, tn3270, is designed specifically for com-municating with IBM mainframes, which are commonly used for college library catalogs as well as other professional and academic systems. If you know that you’re communicating with an IBM mainframe, tn3270 will probably be better to use.

Accessing the Internet
241
Com
mu
nicatin
g w
ith O
thers U
sing
write
Communicating with Others Using writeMost of the time when you connect to a Unix system, you’ll be communicating with the computer. You can, though, communicate with other people logged in to the same system. write is ideal for getting a quick message to other users—kind of like putting a yellow sticky note on their computer, as Figure 12.3 shows.
to communicate with others using write:
1. write useridAt the shell prompt, type write followed by the userid of the person to whom you want to send a message. You’ll get a blank line with a blinking cursor on it, just wait-ing for you to type something.
2. Wanna meet for lunch?Go ahead and type your message (Figure 12.3).
3. cD
When you’re finished typing, press cD to send the message. What you typed will appear on the other user’s screen (Figure 12.4).
tips
Keep in mind that a write message will suddenly appear on the recipient’s screen and can be an intrusive surprise!
If you don’t want to receive write mes-sages, type mesg n at the shell prompt. This command will keep other people from sending you write messages for the current session. Type mesg y to enable write again.
Figure 12.3 You can send quick messages to another user on your system with write.
Figure 12.4 The message suddenly appears on the user’s screen.

Chapter 12
242
Com
mu
nic
atin
g w
ith
Oth
ers
Usi
ng
talk
Communicating with Others Using talkYou can also have a real-time, two-way conversation (very much like an instant-messaging chat) with another user logged in to the system by using talk. As Figure 12.5 shows, you type your messages, the other person types his, and you can both see the exchanges onscreen.
to communicate with others using talk:
1. talk debAt the shell prompt, type talk and the userid of the person to whom you want to talk. The other user will be prompted to enter talk and your userid. Then, you’ll see the talk screen, as shown in Figure 12.5.
2. You just wouldn’t have believed it! I had just chased the dog for six blocks...Yeah, the stinkin’ pooch always thinks the garbage truck is stealing our stuff... Right. Hilarious. Anyway, there I was huffing and puffing on the front porch, when a neighbor informed me that some kids were rooting through my trash. Like, what did they expect to find? Old panty hose and cof-fee filters? Nawww. I stopped using panty hose for coffee filters a long time ago. It made me look too tan.
Type anything you want. Each keystroke will show up on the other person’s screen, so they’ll see exactly how quickly (and how well) you type.
3. cC
When you’re finished, break the connection.
Figure 12.5 talk lets you have a real-time, two-way online conversation.
tips
You can also talk to people logged in to other Unix systems. Just use talk [email protected]. Of course, fill in the other person’s actual userid and address, which will often be the same as that person’s e-mail address. Firewalls often—but not always—block these chats, though.
If someone requests a talk with you, just type talk and the person’s userid (or [email protected], if the person’s host name isn’t the same as yours).
As with write, you can type mesg n and mesg y at the shell prompt to turn talk off and on for the current session.
Though talk is not as groovy as some of the GUI-based instant messaging programs, it’s still pretty cool, huh? It’s also a good way to ask for help from more experienced users on your system.

Accessing the Internet
243
Gettin
g Files fro
m th
e Intern
et with
ftp
Getting Files from the Internet with ftpSome of the Internet’s great information resources are FTP sites, which contain hun-dreds of thousands of files from all over the Internet. FTP sites are similar to Web sites, but are directory oriented and speak a differ-ent protocol. They’re less fun than the Web usually is but often more practical.
One of the easiest ways to access information on FTP sites is to use anonymous ftp, which lets you access the sites and download files to your computer (Code Listing 12.2, shown on the next page).
Getting a single file through anonymous ftp:
1. ftp calvin.raycomm.comAt the shell prompt, type ftp followed by the name of the FTP site to which you’re connecting. Of course, if the computer has an IP address but no name, type the IP address instead. You’ll be prompted to log in, as shown in Code Listing 12.2.
2. anonymousFor the user name, type anonymous. (Type ftp if you get tired of typing anonymous— it nearly always works.)
3. [email protected] your e-mail address for the password. It’s polite to identify yourself to the people who provide the FTP service. Just you@ is usually sufficient.
4. cd /pub/filesUse standard Unix cd commands to move through the directory tree to the file you want.
continues on page 245

Chapter 12
244
Get
tin
g F
iles
fro
m t
he
Inte
rnet
wit
h ft
p
[ejr@hobbes ejr]$ ftp calvin.raycomm.com
Connected to calvin.raycomm.com.
220 calvin Microsoft FTP Service (Version 2.0).
Name (calvin.raycomm.com:ejr): anonymous
331 Anonymous access allowed, send identity (e-mail name) as password.
Password:
230 Anonymous user logged in.
Remote system type is Windows_NT.
ftp> cd /pub/files
250 CWD command successful.
ftp> binary
200 Type set to I.
ftp> hash
Hash mark printing on (1024 bytes/hash mark).
ftp> get jokearchive.gz
local: jokearchive.gz remote: jokearchive.gz
200 PORT command successful.
150 Opening BINARY mode data connection for jokearchive.gz(1481035 bytes).
################################################################################
################################################################################
################################################################################
################################################################################
################################################################################
################################################################################
################################################################################
################################################################################
################################################################################
################################################################################
################################################################################
################################################################################
################################################################################
################################################################################
################################################################################
################################################################################
################################################################################
################################################################################
######
226 Transfer complete.
1481035 bytes received in 4.07 secs (3.6e+02 Kbytes/sec)
ftp> quit
221
Code Listing 12.2 Use anonymous ftp to get files from archives across the Internet.

Accessing the Internet
245
Gettin
g Files fro
m th
e Intern
et with
ftp
5. binarySpecify the file type—in this case, binary, because we’re downloading a gzipped archive file. Specify ascii for README files, text, and HTML files.
6. hashNext, you have the option of typing hash to tell the ftp client to display a hash mark (#) for every 1,024 bytes transferred. If you’re transferring a small file or using a fast connection, this might not be neces-sary; however, for large files and slow connections, the hash marks will let you know that you’re making progress.If you’ll be downloading multiple files, check out the sidebar “Getting Multiple Files” in this section before proceeding. The instructions for getting single and multiple files differ at this point in the process.
7. get jokearchive.gzAt the ftp> prompt, type get and the file-name to get the file from the remote sys-tem and plunk it into your own account.
8. quitWhen it’s finished, just type quit.
continues on next page

Chapter 12
246
Get
tin
g F
iles
fro
m t
he
Inte
rnet
wit
h ft
p
tips
If the FTP connection seems to get stuck as soon as you log in, try [email protected] as the pass-word. The - character disables system announcements and helps keep your ftp client happy.
Some firewalls—particularly the ones on home networks—do not deal grace-fully with some of the intricacies of the FTP protocol. If you can connect and log in, but not list files or get anything, the firewall might be the problem. As soon as you log in, type pass ( for passive) and the problem should go away.
Another handy use for - is to view text files onscreen. For example, type get filename - to have the text just scroll by on the screen.
Instead of using get, use newer (as in newer goodjokes.gz) to get a more recent file with the same name as the one you have.
If you start downloading a file and the FTP connection breaks, type reget and the filename to continue the transfer from wherever it left off. (You’ll have to reestab-lish the connection first, of course.)
You can tell the ftp client to make sure that all the transferred files have unique names by using runique instead of get. This way, you can ensure that files don’t overwrite existing files on your local system.
Use regular Unix commands like ls and cd to move around in the remote system, and preface them with an l to apply to your system. For example, cd .. would change to the next higher directory on the remote system, and lcd .. ( from within the ftp client) would change to the next higher directory on the local system. The current local directory is where your files will be saved.
Getting Multiple Files
If you’ll be getting multiple files with ftp, follow steps 1 through 6 in this section, then
prompt
Optionally, type prompt to tell the ftp client not to prompt you for each indi-vidual file that you want to get. You’ll be informed that prompt is set to no. If you want to turn it back on, issue prompt again.
mget start*
At the ftp> prompt, type mget ( for “multiple get”) followed by the string or filenames to match. In this example, we use start* to get all files with names that begin with “start.” You could also use mget *.gz, for example, to get files with the .gz file extension. See Chapter 1 for more about using wildcards.
quit
When you’re finished getting files, just type quit.

Accessing the Internet
247
Sh
aring
Files on
the In
ternet w
ith ftp
Sharing Files on the Internet with ftpSharing files on the Internet with ftp is simi-lar to getting files; instead of retrieving files, however, you give files to other people (Code Listing 12.3).
to share files on the Internet with ftp:
1. ftp ftp.raycomm.comOpen the FTP connection as shown in the previous section.
2. youruseridLog in with your userid.
3. passwordEnter your password.
4. cd incomingUse standard Unix directory commands (ls, cd, and so on) to move into the direc-tory into which you want to put the files (Code Listing 12.3). incoming is often the right directory name to use, particularly on public FTP servers.
5. binarySet the file type. You’ll want to use the binary file type for any files other than text or HTML files; use ascii for text or HTML.
6. put myjokes.gzType put followed by the name of the file you’re making available.
7. quitType quit when you’re done.
continues on next page
[ejr@hobbes ejr]$ ftp ftp.raycomm.com
Connected to www.raycomm.com.
220 ftp.raycomm.com FTP server (NcFTPd
2.1.2, registered copy) ready.
Name (ftp.raycomm.com:ejr): ejray
331 User ejray okay, need password.
Password:
230-You are user #8 of 100 simultaneous
users allowed.
230-
230 Logged in.
Remote system type is UNIX.
Using binary mode to transfer files.
ftp> cd incoming
250 “/home/ftp/pub/users/e/ejray/incoming”
is new cwd.
ftp> binary
200 Type okay.
ftp> put myjokes.gz
local: myjokes.gz remote: myjokes.gz
200 PORT command successful.
150 Opening BINARY mode data connection.
226 Transfer completed.
128889 bytes sent in 15.5 secs
(8.1 Kbytes/sec)
ftp> quit
221 C-ya!
[ejr@hobbes ejr]$
Code Listing 12.3 Using put, you can share your files with other people on the Internet.

Chapter 12
248
Sh
arin
g F
iles
on
th
e In
tern
et w
ith
ftp
tips
On public FTP servers that accept incoming files, you might not be able to list the files in the incoming directory or see anything in there. In this case, you essentially just cast your file into a big open room and close the door. This allows FTP administrators to screen the incom-ing files before making them available for downloading.
You can use the mput command to make multiple files available.
If you’re transferring a lot of files at once—say, for example, you’re moving all of your files from your old ISP to your new one—consider using tar and gz to collect and zip up all of your files, and then transfer-ring just a single file. See Chapter 13 for more information about these commands.
Navigate in your local system ( for exam-ple, to change to a directory containing files to put) with regular Unix commands like ls and cd, prefaced with an l.
Use ! to execute a command on your local system from within the ftp application. For example, pwd would display the path and name of the current directory on the other system, and !pwd would display the path and name of the current directory on the local system.

Accessing the Internet
249
Su
rfin
g th
e Web w
ith links
Surfing the Web with linksUsing links, a really fancy text-based Web browser, you can surf the Web just as you might with Firefox or Internet Explorer, except with no graphics. That’s really not a bad thing; consider that you don’t have to deal with pop-up ads, banner ads, or similar junk. Just content, all the time. links even supports tables and complex Web page designs, which is unusual for a text-based browser (Figure 12.6). Related advantages of using links are that you won’t have to deal with slow download times for graph-ics, annoying sound files, plug-ins, or other showy Web page features.
Figure 12.6 The links browser provides great surfing capabilities, even without images.
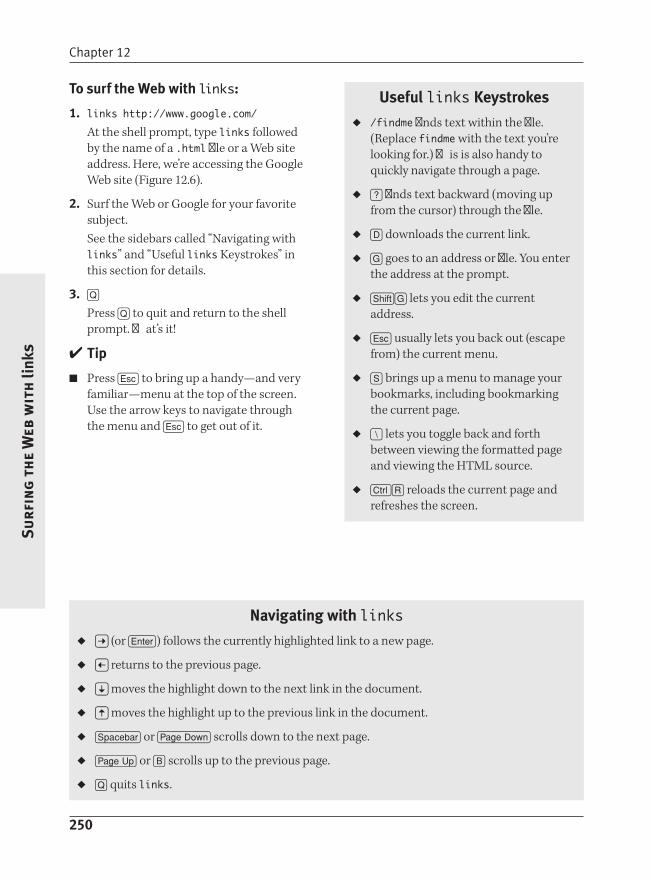
Chapter 12
250
Su
rfin
g t
he
Web
wit
h li
nks
to surf the Web with links:
1. links http://www.google.com/At the shell prompt, type links followed by the name of a .html file or a Web site address. Here, we’re accessing the Google Web site (Figure 12.6).
2. Surf the Web or Google for your favorite subject. See the sidebars called “Navigating with links” and “Useful links Keystrokes” in this section for details.
3. QPress Q to quit and return to the shell prompt. That’s it!
tip
Press q to bring up a handy—and very familiar—menu at the top of the screen. Use the arrow keys to navigate through the menu and q to get out of it.
Useful links Keystrokes
/findme finds text within the file. (Replace findme with the text you’re looking for.) This is also handy to quickly navigate through a page.
? finds text backward (moving up from the cursor) through the file.
D downloads the current link.
G goes to an address or file. You enter the address at the prompt.
sG lets you edit the current address.
q usually lets you back out (escape from) the current menu.
S brings up a menu to manage your bookmarks, including bookmarking the current page.
\ lets you toggle back and forth between viewing the formatted page and viewing the HTML source.
cR reloads the current page and refreshes the screen.
Navigating with links
S (or e) follows the currently highlighted link to a new page.
A returns to the previous page.
Z moves the highlight down to the next link in the document.
W moves the highlight up to the previous link in the document.
z or Y scrolls down to the next page.
U or B scrolls up to the previous page.
Q quits links.
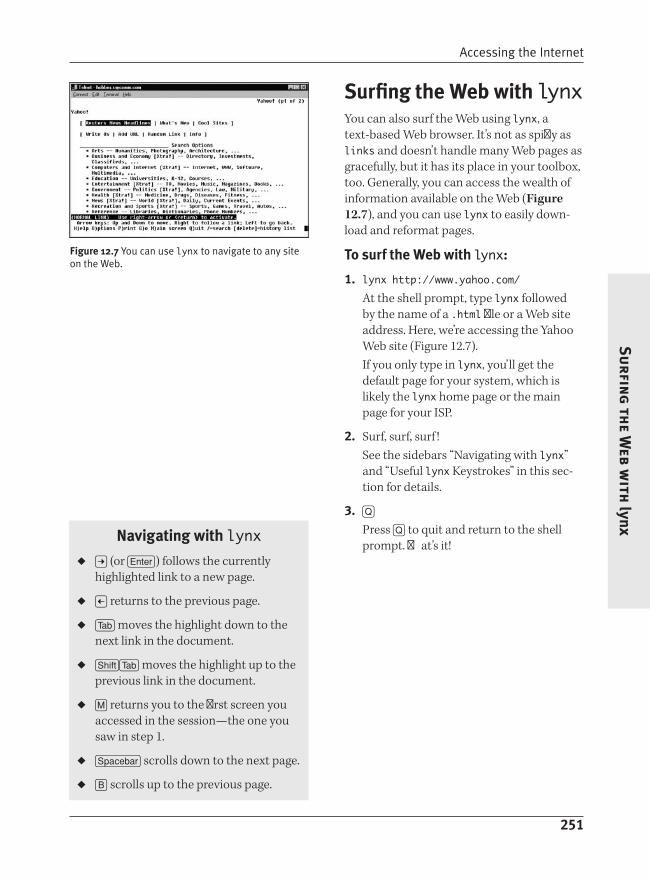
Accessing the Internet
251
Su
rfin
g th
e Web w
ith lynx
Surfing the Web with lynxYou can also surf the Web using lynx, a text-based Web browser. It’s not as spiffy as links and doesn’t handle many Web pages as gracefully, but it has its place in your toolbox, too. Generally, you can access the wealth of information available on the Web (Figure 12.7), and you can use lynx to easily down-load and reformat pages.
to surf the Web with lynx:
1. lynx http://www.yahoo.com/At the shell prompt, type lynx followed by the name of a .html file or a Web site address. Here, we’re accessing the Yahoo Web site (Figure 12.7).If you only type in lynx, you’ll get the default page for your system, which is likely the lynx home page or the main page for your ISP.
2. Surf, surf, surf !See the sidebars “Navigating with lynx” and “Useful lynx Keystrokes” in this sec-tion for details.
3. QPress Q to quit and return to the shell prompt. That’s it!
Figure 12.7 You can use lynx to navigate to any site on the Web.
Navigating with lynx
S (or e) follows the currently highlighted link to a new page.
A returns to the previous page.
t moves the highlight down to the next link in the document.
st moves the highlight up to the previous link in the document.
M returns you to the first screen you accessed in the session—the one you saw in step 1.
z scrolls down to the next page.
B scrolls up to the previous page.

Chapter 12
252
Su
rfin
g t
he
Web
wit
h ly
nx
tips
If you access a lynx-unfriendly page, like the one shown in Figure 12.8, press z to scroll down a few times. Usually you’ll be able to find the content.
lynx is a great way to get a spiffy plain-text file out of a .html document. Try lynx -dump http://example.com/goodpage.html > newname.txt to start lynx and direct it to send the display to standard output, and then redirect the output to the file called newname.txt. This will give you the text from the page, without HTML code, in a file in your Unix account.
lynx makes it really easy to get a quick view of a local .html document, but it isn’t as flexible as links for Web browsing in general.
Figure 12.8 Some sites are considerably less friendly than others if you’re not using graphics.
Useful lynx Keystrokes
/findme finds text within the file. (Replace findme with the text you’re looking for.)
? lets you access help.
D downloads the current link.
G goes to an address or file. You enter the address at the prompt.
sG lets you edit the current address.
AL adds the current link to your bookmark list.
V lets you view the bookmark list.
B lets you see a list of pages you’ve visited (your history).
\ lets you toggle back and forth between viewing the formatted page and viewing the HTML source.
cR reloads the current page and refreshes the screen.

Accessing the Internet
253
Do
wn
loadin
g W
eb Sites w
ith w
get
Downloading Web Sites with wgetThe wget utility allows you to download Web pages—and whole Web sites—to use offline. You just specify a URL and how many levels (links away from the starting page) you want to download, and let wget do its thing (as in Code Listing 12.4). Then you can use the Web pages when you’re not connected to the Internet, as when you’re on an airplane, in a hotel, or in a waiting room, for example.
to download Web sites with wget:
1. wget http://www.cnn.com/At the shell prompt, type wget followed by the URL of a Web site or FTP site. Here, we’re accessing the CNN Web site (Code Listing 12.4) and downloading the home page.
2. Slurp!
3. links index.htmlThen use your favorite Web browser to check out your handiwork.
tips
We recommend using a separate directory to contain the contents of different Web sites. Otherwise, wget will either rename files to avoid clobbering (or overwriting) existing files (thus breaking links) or clob-ber existing files (thus making it highly likely that only the last Web site you downloaded will be complete). If you use wget with the -x option (as in, wget -x http://www.example.com/), it’ll do this automatically. See Chapter 2 for more on using directories.
jdoe /home/jdoe $ wget http://www.cnn.com/
18:07:51 http://www.cnn.com/
=> ‘index.html’
Resolving www.cnn.com... don e.
Connecting to www.cnn.com[64.236.24.4]:
80... connected.
HTTP request sent, awaiting response...
200 OK
Length: unspecified [text/html]
[ <=> ] 51,290 53.28K/s
18:07:53 (53.28 KB/s) - ‘index.html’ saved
[51290]
jdoe /home/jdoe $
Code Listing 12.4 You can use wget to download as much of the Web as you can handle.
wget --recursive --level=2 http://www.example.com/ lets you get several (two, in this case) levels of a Web site. Be careful, because it’s easy to bite off more than you can chew. If you use wget -r http://www.example.com/, wget will try to recursively download the whole thing. We ended up with more than 20 MB from the first command on www.cnn.com.
wget also works for FTP sites. Just use wget ftp://ftp.example.com or wget jdoe:[email protected] if you need to specify a password. Check out the man page for wget (man wget) for more on the extensive options available.

Chapter 12
254
Chec
kin
g C
on
nec
tio
ns
wit
h p
ing
Checking Connections with pingThink of using ping as saying “Are you there?” to a remote computer. For example, sup-pose you’re trying to connect to a Web page but getting no response from the computer. Rather than wait and wonder what’s going on, type ping to find out if the computer is up and functional (Code Listing 12.5).
to check a computer with ping:
ping www.raycomm.com
At the shell prompt, type ping and the host name to test the connection to a spe-cific host, as shown in Code Listing 12.5.Depending on your Unix system, it may check the connection one time and report the results. Or, it may continue to pester the other computer every second or so until you tell it to stop. If that’s the case, just press cC to stop it.
tips
If you’re having problems connecting to a particular computer, you might consider using traceroute, which pings all the computers on the path between point A and point B. While ping tells you if a host responds or not, traceroute will give you an idea of where the problem might lie. See the next section for more details about traceroute.
The ping command doesn’t provide a definitive answer to the status of the remote computer. Some systems are configured not to respond to pings for security reasons. If you get a response from ping, the system is definitely up and you can communicate with it; however, a lack of response from ping may not mean anything about that system’s status.
[ejr@hobbes ejr]$ ping www.raycomm.com
PING www.raycomm.com (204.228.141.12): 56
data bytes
64 bytes from 204.228.141.12: icmp_seq=0
ttl=251 time=190.3 ms
64 bytes from 204.228.141.12: icmp_seq=1
ttl=251 time=197.7 ms
64 bytes from 204.228.141.12: icmp_seq=2
ttl=251 time=166.5 ms
64 bytes from 204.228.141.12: icmp_seq=3
ttl=251 time=157.5 ms
- www.raycomm.com ping statistics -
4 packets transmitted, 4 packets received,
0% packet loss
round-trip min/avg/max = 157.5/178.0/
197.7 ms
[ejr@hobbes ejr]$
Code Listing 12.5 Using ping, you can find out whether you can connect to a specific computer.

Accessing the Internet
255
Tracing
Con
nectio
ns w
ith traceroute
tracing Connections with tracerouteWhen you’re connecting to a remote com-puter, you’re actually connecting through a series of computers (and routers and other expensive Internet stuff). That is, your com-puter connects to another computer, which connects to another, which connects to yet another, and so on until your computer con-nects to the one you’re trying to reach.
The data that you’re sending or receiving actually meanders through the path in packets (little chunks of data) that are reas-sembled into the correct sequence at the other end. But not all packets take precisely the same route from the sending computer to the destination computer. Communication on the Internet is much more like sending a lot of letters than making a telephone call. It’s a bunch of little messages being passed along, not a continuous connection.
Using traceroute, you can satisfy your curi-osity or possibly identify bottlenecks. How? You find out what route the packets take to arrive at the destination computer, as shown in Code Listing 12.6. If, for example, you see that the routes to your three favorite (but
continues on next page
ejray> traceroute www.yahoo.com
traceroute to www10.yahoo.com (204.71.200.75), 30 hops max, 40 byte packets
1 198.60.22.1 (198.60.22.1) 8 ms 2 ms 3 ms
2 903.Hssi5-0-0.GW1.SLT1.ALTER.NET (157.130.160.141) 18 ms 13 ms 14 ms
3 124.ATM4-0-0.CR1.SFO1.Alter.Net (137.39.68.9) 68 ms 65 ms 52 ms
4 311.atm3-0.gw1.sfo1.alter.net (137.39.13.49) 60 ms 50 ms 39 ms
5 Hssi1-0.br1.NUQ.globalcenter.net (157.130.193.150) 40 ms 39 ms 28 ms
6 pos0-1-155M.wr1.NUQ.globalcenter.net (206.132.160.25) 30 ms 48 ms 42 ms
7 pos1-0-622M.wr1.SNV.globalcenter.net (206.251.0.74) 50 ms 67 ms 61 ms
8 pos5-0-0-155M.cr1.SNV.globalcenter.net (206.251.0.105) 48 ms 40 ms 41 ms
9 www10.yahoo.com (204.71.200.75) 43 ms 50 ms 53 ms
ejray>
Code Listing 12.6 Using traceroute, you can see how data meanders between your computer and a remote computer.
Chapter 12
256
Trac
ing
Co
nn
ecti
on
s w
ith
trac
erou
te
currently inaccessible) Web sites all end at a specific computer, that’s where the network outage is and whom you’re waiting for to get things up and running.
to trace a connection with traceroute:
traceroute www.google.com
At the shell prompt, type traceroute plus the address of the other computer in the connection. You’ll see results similar to those shown in Code Listing 12.6. Each line in the traceroute output represents a computer (or other device) on the Internet that receives your packets and passes them on to the next computer.
tips
If you’re experiencing connectivity prob-lems, try using traceroute to several dif-ferent, geographically dispersed hosts to isolate the problem. For example, if you’re in the Midwest and can traceroute all the way to www.stanford.edu (physically located in Palo Alto, California) but not to www.mit.edu (in Boston, Massachusetts), there’s likely trouble on the Internet between you and the East Coast.
You can speed the traceroute process by using the -n flag; for example, traceroute -n hostname. This checks the path using only IP addresses and does not translate the IP addresses into the DNS (Domain Name Server) host names with which you’re familiar.
Many firewalls do not pass through the ICMP (Internet Control Message Protocol, or ping) packets (there’s a techie term for you) that traceroute uses. If you get a lot of lines with * * * in them, as shown in Code Listing 12.7, that might be the problem.
jdoe /home/jdoe $ /usr/sbin/traceroute
www.google.com
traceroute to www.google.com
(216.239.51.101), 30 hops max, 38 byte
packets
1 192.168.1.1 (192.168.1.1) 0.907 ms
0.683 ms 0.632 ms
2 * * *
3 * * *
4 * * *
5 * * *
6 * * *
7 * * *
8 * * *
9 * * *
10 * * *
11 * * *
12 * * *
13 * * *
14 * * *
15 * * *
16 * * *
17 * * *
18 * * *
19 * * *
20 * * *
21 * * *
22 * * *
23 * * *
24 * * *
25 * * *
26 * * *
27 * * *
28 * * *
29 * * *
jdoe /home/jdoe $
Code Listing 12.7 Sometimes, traceroute has problems with firewalls between you and the target system.

Accessing the Internet
257
Match
ing
Do
main
Nam
es with
IP Addresses
Matching Domain Names with IP AddressesWhen accessing a computer on the Internet, you generally type in a domain name (such as www.raycomm.com) and your system translates it into an IP address (such as 204.228.141.12). As a rule, the translation from domain name to IP address proceeds without a problem. Heck, most of the time, you won’t even notice that it happened. Occasionally, though, you’ll come across an error message that says something like “failed DNS lookups.” All that this message means is that the domain name server (probably on your Unix system) cannot match the domain name you provided to an IP address.
So, what do you do?
Just be patient for a day or two until the problem is resolved. (In the meantime, make sure the problem isn’t a typo on your part.)
Use nslookup or dig. These commands manually convert a domain name to the matching IP address (Code Listing 12.8). Then you can connect directly to the IP address rather than use the domain name.
to match a domain name with an IP address using nslookup:
nslookup www.raycomm.com
At the shell prompt, type nslookup fol-lowed by the domain name you want to look up and the server you want to do the looking for you (Code Listing 12.8). Remember, if you get one of those pesky “failed DNS lookup” messages, the prob-lem likely resides with your name server; therefore, you’ll need to specify a different name server to match the domain name and IP address for you.
jdoe /home/jdoe $ nslookup www.raycomm.com
Note: nslookup is deprecated and may be
removed from future releases.
Consider using the ‘dig’ or ‘host’ programs
instead. Run nslookup with
the ‘-sil[ent]’ option to prevent this
message from appearing.
Server: ns1.netrack.net
Address: 206.168.112.16#53
Non-authoritative answer:
Name: www.raycomm.com
Address: 206.168.112.83
Code Listing 12.8 You can manually translate a domain name into an IP address using nslookup.

Chapter 12
258
Mat
chin
g D
om
ain
Nam
es w
ith
IP A
ddre
sses
to match a domain name with an IP address using dig:
dig @ns1.netrack.net www.raycomm.com
At the shell prompt, type dig followed by @server-you-want-to-query and the domain name you want to look up (Code Listing 12.9). Specifying the name server isn’t essential but can often be useful.
tips
You can also do reverse lookups (match-ing address to name). This can be handy for identifying the origins of unknown e-mail ( from the IP addresses in the e-mail headers), among many other tasks. Use nslookup 192.168.1.23 (substituting the appropriate IP address) or dig -x 192.168.1.82 to match an address to a name. Note that many servers have a single IP address that supports many domain names, so the answer from this may not be as definitive as it looks.
For most purposes, nslookup provides more quickly comprehensible out-put (Code Listing 12.8) than dig does. However, dig (with appropriate options) can help provide extra information that can be useful in some cases. See man dig for information about available options.
You can find alternate domain name servers by using the whois query server at http://www.internic.net/whois.html and looking up the domain name you want. All domain names have to be listed with two different domain name serv-ers that are responsible for the domain names. Either of those listed servers should be able to provide the IP address for the domain name you enter.
jdoe /home/jdoe $ dig @ns1.netrack.net
www.raycomm.com
; <<>> DiG 9.2.1 <<>> @ns1.netrack.net
www.raycomm.com
;; global options: printcmd
;; Got answer:
;; ->>HEADER<<- opcode: QUERY, status:
NOERROR, id: 32957
;; flags: qr rd ra; QUERY: 1, ANSWER: 1,
AUTHORITY: 2, ADDITIONAL: 0
;; QUESTION SECTION:
;www.raycomm.com. IN A
;; ANSWER SECTION:
www.raycomm.com. 3585 IN A
206.168.112.83
;; AUTHORITY SECTION:
raycomm.com. 3585 IN NS
ns2.raycomm.com.
raycomm.com. 3585 IN NS
ns1.raycomm.com.
;; Query time: 60 msec
;; SERVER:
206.168.112.16#53(ns1.netrack.net)
;; WHEN: Sun Jan 26 18:20:47 2003
;; MSG SIZE rcvd: 85
jdoe /home/jdoe $
Code Listing 12.9 You can use dig to look up domain names and IP addresses.

259
Wo
rking
with
Enco
ded & Co
mpressed Files
13As you use Unix, you will likely encounter encoded or compressed files and have to extract, unencode, encode, or otherwise manipulate the files to be able to view or use them. This chapter discusses ways of encoding and compressing files.
Working with Encoded and Compressed Files
Chapter Contents
Encoding files
Decoding files
Archiving files
Unarchiving files
Compressing files
Uncompressing files
Zipping single files
Unzipping single files
Zipping multiple files and directories
Unzipping multiple files and directories
Combining commands

Chapter 13
260
Enco
din
g F
iles
wit
h u
uenc
ode
Encoding Files with uuencodeYou’ll use encoding whenever you’re sending a binary file (a nontext file) through e-mail. Although many e-mail programs will take care of encoding for you (and, therefore, you won’t need to concern yourself with the infor-mation here), you may occasionally have to do it yourself.
Files must be encoded so that they can pass through Internet e-mail gateways unscathed. If you don’t encode a file and your program doesn’t do it for you, the file will arrive as a bunch of unusable gibberish. This is because the gateways assume that all text passing through uses 7-bit words while binary files use 8-bit (1 byte) words; therefore, binary files are garbled. To prevent gibberish, just uuen-code your files before you send them along, as shown in Code Listing 13.1.
[ejr@hobbes compression]$ ls
Folder bigfile.uue folderzip.zip home.gz.uue
Zipadeedoodah file1.htm fortunes1.txt newzip.zip
bigfile.gz file2.html fortunes1.zip ournewhouse.jpg
bigfile.new.gz folder.tar gzip temp
[ejr@hobbes compression]$ uuencode ournewhouse.jpg ourhouse.jpg > house.uue
[ejr@hobbes compression]$ head house.uue
begin 664 ourhouse.jpg
M”<@>H@(“’(“’@(“’@(“’@(“’@(“’@(“’@(“’@(“’@(“’@(“’@(“’@(“’@(
M(“‘@4F%N9&]M(%5.25@@1F]R=’5N97,A”@H*”@I)9B!Y;W4G<F4@;F]T(‘!A
M<G0@;V8@=&AE(‘-O; ‘5T:6]N+”!Y;W4G<F4@<&%R=”!O9B!T:&4@<’)E8VEP
M:71A=&4N”@H*”@I4:&4@;VYL>2!R96%L;’D@9V]O9”!P;&%C92!T;R!B=7D@
M;’5M8F5R(&ES(&%T(&$@<W1O<F4@=VAE<F4@=&AE(&QU;6)E<@IH87,@86QR
M96%D>2!B965N(&-U=”!A;F0@871T86-H960@=&]G971H97(@:6X@=&AE(&9O
M<FT@;V8@9G5R;FET=7)E+’IF:6YI<VAE9”P@86YD(‘!U=”!I;G-I9&4@8F]X
M97,N”B’@(“’@(“’@(“’@(“’@(“’M+2!$879E($)A<G)Y+”’B5&AE(%1A;6EN
M9R!O9B!T:&4@4V-R97<B”@H*”@HB1&ES8V\@:7,@=&\@;75S:6,@=VAA=”!%
[ejr@hobbes compression]$
Code Listing 13.1 Use uuencode to encode files and, optionally, to redirect the output to disk.

Working with Encoded and Compressed Files
261
Enco
ding
Files with
uuencode
to encode a file using uuencode:
uuencode ournewhouse.jpg ourhouse.jpg > house.uue
At the shell prompt, type uuencode fol-lowed by The name of the unencoded file
(ournewhouse.jpg, in this case). The name you want the (eventually)
unencoded file to have (ourhouse.jpg).
A command to redirect the output to a new filename (> house.uue). You add this bit so the file will be saved on disk and not displayed on the screen instead. We’ve used the .uue extension so we’ll more easily remember that the file is uuencoded.
Code Listing 13.1 lists the files in a directory (to verify the name) and then uuencodes the file. Also, notice that it shows what the top of a uuencoded file looks like.
to encode with uuencode and e-mail at once:
uuencode ournewhouse.jpg house.jpg | mail -s "Here's the new picture" [email protected]
At the shell prompt, use uuencode fol-lowed by The name of the unencoded file (ourne-
whouse.jpg in this case). The name you want the (eventually)
unencoded file to have (house.jpg). A command to pipe the output (|
mail -s “Here’s the new picture” [email protected]). This mails the file to a specific e-mail address with specific text in the subject line, which the -s flag sets. See Chapter 11 for more about mailing files and mailing from the shell prompt.
continues on next page

Chapter 13
262
Enco
din
g F
iles
wit
h u
uenc
ode
Code Listing 13.2 shows this command and and Code Listing 13.1 gives a glimpse into a uuencoded file.
tips
Also check out Chapter 11 for informa-tion about e-mail programs that will automatically handle attachments, such as encoding attached files for you.
You must (either manually or automati-cally) encode all binary files (graphics, programs, compressed files, etc.) before e-mailing them. Plain text (text files, scripts, or HTML documents) don’t need to be encoded.
[ejr@hobbes compression]$ uuencode
ournewhouse.jpg house.jpg | mail -s
“Here’s the new picture”
Code Listing 13.2 You can uuencode and mail all in one step to work more efficiently.

Working with Encoded and Compressed Files
263
Deco
ding
Files with
uudecode
Decoding Files with uudecodeYou’ll decode files whenever you receive binary files through e-mail—it’s the only way you can use encoded files. Although most e-mail programs will take care of decoding files for you (and, therefore, you won’t need the information here), you may need to do it manually on occasion. If you open up a file or an e-mail message and see something like Code Listing 13.4, you’ve got a little decod-ing to do. To avoid the gibberish, decode your files, as shown in Code Listing 13.3.
to decode files with uudecode:
uudecode rowboat.uue
At the shell prompt, type uudecode fol-lowed by the name of the file to decode (Code Listing 13.3).
tips
When you receive an encoded file, you might have to uncompress or unzip it in addition to decoding it. See the appropri-ate sections later in this chapter for details.
If you have a file that you suspect is uuencoded, use head plus the filename to view the top ten lines of the file. If it’s really uuencoded, you’ll see a line saying so at the top, as shown in Code Listing 13.4. The 644 in the line is the file’s permissions, and rowboat.jpg is the filename that the extracted file will have. See Chapter 5 for highly interesting details about file permissions.
[ejr@hobbes compression]$ uudecode
rowboat.uue
[ejr@hobbes compression]$ ls -l row*
-rw-rw-r- 1 ejr users 128886 Jul 27
09:52 rowboat.jpg
-rw-r-r- 1 ejr users 177606 Jul 27
09:51 rowboat.uue
[ejr@hobbes compression]$
Code Listing 13.3 Uudecoding files is straightforward.
[ejr@hobbes compression]$ head rowboat.uue
begin 664 rowboat.jpg
M”<@>H@(“’@(“’@(“’@(“’@(“’@(“’@(“’@(“’@(“’@(“’@(“’@(“’@(“’@(“M(“’@4F%N9&]M(%5.25@@1F]
R=’5N97,A”@H*”@I)9B!Y;W4G<F4@;F]T(‘!A
M<G0@;V8@=&AE(‘-O;’5T:6]N+”!Y;W4G<F4@<&%R=”!O9B!T:&4@<’)E8VEP
M:71A=&4N”@H*”@I4:&4@;VYL>2!R96%L;’D@9V]O9”!P;&%C92!T;R!B=7D@
M;’5M8F5R(&ES(&%T(&$@<W1O<F4@=VAE<F4@=&AE(&QU;6)E<@IH87,@86QR
M96%D>2!B965N(&-U=”!A;F0@871T86-H960@=&]G971H97(@:6X@=&AE(&9O
M<FT@;V8@9G5R;FET=7)E+’IF:6YI<VAE9”P@86YD(‘!U=”!I;G-I9&4@8F]X
M97,N”B’@(“’@(“’@(“’@(“’@(“’M+2!$879E($)A<G)Y+”’B5&AE(%1A;6EN
M9R!O9B!T:&4@4V-R97<B”@H*”@HB1&ES8V\@:7,@=&\@;75S:6,@=VAA=”!%
[ejr@hobbes compression]$
Code Listing 13.4 Use the head command to view the top of a file. The begin line is the tipoff that it’s a uuencoded file, with 644 permissions and the name of rowboat.jpg.

Chapter 13
264
Arc
hiv
ing
wit
h ta
r
Archiving with tarOccasionally, you’ll want to take a bunch of files and make them into one file, such as when you’re archiving information, for example. You might think of it as tossing a bunch of toys into a toy box—that is, taking a bunch of related things and storing them all in one place.
Using tar (which came from “tape archive”), you can take a bunch of files and store them as a single, uncompressed file (see Code Listing 13.5). You’ll use tar files not only to store information, but also to create a single source for compressing and gzipping files, which are discussed later in this chapter.
[ejr@hobbes compression]$ ls -l
total 2290
drwxrwxr-x 2 ejr users 1024 Jul 23 10:56 Feather
drwxrwxr-x 2 ejr users 1024 Jul 23 10:49 Zipadeedoodah
-rw-rw-r- 1 ejr users 53678 Jul 23 06:42 bigfile.gz
-rw-rw-r- 1 ejr users 53678 Jul 23 10:16 bigfile.new.gz
-rw-rw-r- 1 ejr users 73989 Jul 23 10:16 bigfile.uue
-rw-rw-r- 1 ejr users 128886 Jul 23 11:45 file1.htm
-rw-rw-r- 1 ejr users 128886 Jul 23 11:45 file2.html
-rw-rw-r- 1 ejr users 686080 Jul 23 10:41 folder.tar
-rw-rw-r- 1 ejr users 268156 Jul 23 06:53 folderzip.zip
-rw-rw-r- 1 ejr users 128886 Jul 23 06:37 fortunes1.txt
-rw-rw-r- 1 ejr users 55124 Jul 23 06:38 fortunes1.zip
-rw-rw-r- 1 ejr users 0 Jul 23 11:21 gzip
-rw-rw-r- 1 ejr users 73978 Jul 23 11:15 home.gz.uue
-rw-r-r- 1 ejr users 177607 Jul 27 09:34 house.uue
-rw-rw-r- 1 ejr users 53792 Jul 23 06:52 newzip.zip
-rw-rw-r- 1 ejr users 128886 Jul 23 08:19 ournewhouse.jpg
-rw-rw-r- 1 ejr users 128886 Jul 27 09:52 rowboat.jpg
-rw-r-r- 1 ejr users 177606 Jul 27 09:51 rowboat.uue
drwxrwxr-x 3 ejr users 1024 Jul 23 12:56 temp
[ejr@hobbes compression]$ tar -cf tarredfilename.tar Feather
[ejr@hobbes compression]$
Code Listing 13.5 Tarring files binds them all together into a single file.

Working with Encoded and Compressed Files
265
Arch
iving
with
tar
to archive a directory with tar:
1. ls -lFor starters, type ls -l at the shell prompt to verify the name of the directory you’re going to tar.
2. tar -cf tarredfilename.tar FeatherType tar followed by The -cf flags (to create a file and
specify the desired filename for it) The name you want the tarred
(archived) file to have (tarredfilename. tar in this example)
The name (or names) of the directory or files to tar (Feather, here)
tips
See the section called “Combining Commands” later in this chapter for timesaving ideas for combining and compressing files all in one fell swoop.
Some versions of tar also support gzip, so you can use tar -czf tarredfilename.tgz Feather to tar and gzip all at once.
You can add the v flag to the tar com-mand flags (-vcf) to get a verbose description of what’s being tarred.
If you want to sound like a real Unix geek, refer to tarred files as “tarballs.”

Chapter 13
266
Un
arch
ivin
g F
iles
wit
h ta
r
Unarchiving Files with tarYou’ll also use tar to unarchive files, where you take all of the individual files out of the single tarred file—like dumping the bunch of toys out of the toy box—as shown in Code Listing 13.6.
to unarchive files with tar:
tar -xf labrea.tar
At the shell prompt, type tar -xf (here, x means extract) followed by the name of the tarred file you want to unarchive. The bunch of once-tarred files will be sepa-rated into the original files or directories, as shown in Code Listing 13.6.
to unarchive selected files with tar:
tar -xf labrea.tar mammoth
You can also extract only specified files from a tar file. You might do this to restore just a couple of files from a backup archive, for example. This command extracts the file named mammoth from the labrea.tar file and places it back where it belongs (Code Listing 13.7).
tips
Consider moving tarred files into a temporary directory before you unarchive them. When you unarchive, tar over-writes any files with the same names as files that are extracted. Using a temporary directory will prevent this.
Use tar -tf filename to list the files (to check your work, perhaps, or find a backup file) without actually unarchiving the files.
Use tar -xvf filename to see the names of the files as they're extracted from the archive.
[ejr@hobbes compression]$ tar -xf
labrea.tar
[ejr@hobbes compression]$ ls -l Labrea/
total 483
-rw-r-r- 1 ejr users 53678 Jul 27
10:05 bigfile.gz
-rw-r-r- 1 ejr users 128886 Jul 27
10:06 mammoth.jpg
-rw-r-r- 1 ejr users 177607 Jul 27
10:05 house.uue
-rw-r-r- 1 ejr users 128886 Jul 27
10:06 rowboat.jpg
[ejr@hobbes compression]$
Code Listing 13.6 Untarring files reconstructs the original directory structure.
[ejr@hobbes compression]$ tar -xf
labrea.tar mammoth
[ejr@hobbes compression]$ ls -l Labrea/m*
-rw-r-r- 1 ejr users 128886 Jul 27
10:06 Labrea/mammoth
[ejr@hobbes compression]$
Code Listing 13.7 Unarchive just a single file to replace a missing or corrupted file.

Working with Encoded and Compressed Files
267
Com
pressing
Files with
compress
Compressing Files with compressCompressing a file just means making it smaller so that it takes up less hard disk space. It’s like overfilling a toy box, closing the lid, then sitting on it to smoosh the contents so that they fit into a smaller space. Any time you create a file that you’ll be sending via FTP or that people will access through the Web, you’ll want to compress the file so that it takes less time to send and download. As Code Listing 13.8 shows, you compress files using the compress command.
to compress a file with compress:
compress labrea.tar
At the shell prompt, type compress followed by the filename. Here, we’re compressing a tarred file, which contains multiple files. As you can see in Code Listing 13.8, the compressed file has a new extension (.Z) that shows that it’s compressed, and it replaces the original, uncompressed file.
tips
You can compress only one file at a time. If you have multiple files you want to compress, consider archiving them first using tar, and then compressing the single archived file. See the section called “Archiving with tar” earlier in this chapter.
You can add the -c flag to compress to leave the original file untouched and send the compressed version to standard output (where you’ll probably specify a name and save it to a file). For example, you might use compress -c labrea.tar > labrea.tar.Z. See Chapter 1 for some mighty interesting information on redirecting output.
[ejr@hobbes compression]$ ls -l l*
-rw-r-r- 1 ejr users 501760 Jul 27
10:06 labrea.tar
[ejr@hobbes compression]$ compress
labrea.tar
[ejr@hobbes compression]$ ls -l l*
-rw-r-r- 1 ejr users 297027 Jul 27
10:06 labrea.tar.Z
[ejr@hobbes compression]$
Code Listing 13.8 Listing files before and after compressing them lets you see how much smaller the new file is.

Chapter 13
268
Un
com
pres
sin
g F
iles
wit
h u
ncom
pres
s
Uncompressing Files with uncompressCompressing a file is handy for reducing the amount of disk space it uses, but you can’t do much with a compressed file—directly, at least. You’ll need to uncompress it first. As Code Listing 13.9 shows, you do so using the uncompress command.
to uncompress a file with uncompress:
uncompress labrea.tar.Z
At the shell prompt, type uncompress followed by the full filename of the file to uncompress. The compressed file is replaced by the uncompressed file, which is named like the original, but without the .Z (see Code Listing 13.9).
tips
Remember that uncompressed files take up more space—sometimes a lot more space—than compressed files. You might want to check your storage quota with your ISP before you uncompress a file to make sure that you don’t exceed your limit. As Chapter 7 explains, you can often check your quota by typing quota -v at the shell prompt.
You can add the -c flag to uncompress to leave the original file untouched and send the uncompressed version to standard output. For example, you might use uncompress -c tarred.tar.Z > tarred.tar. See Chapter 1 for more information on redirecting output, as is shown here.
You can also use gunzip to uncompress compressed files. Check out “Unzipping a gzip File with gunzip” later in this chapter.
[ejr@hobbes compression]$ ls -l l*
-rw-r-r- 1 ejr users 297027 Jul 27
10:06 labrea.tar.Z
[ejr@hobbes compression]$ uncompress
labrea.tar.Z
[ejr@hobbes compression]$ ls -l l*
-rw-r-r- 1 ejr users 501760 Jul 27
10:06 labrea.tar
[ejr@hobbes compression]$
Code Listing 13.9 You can uncompress files with a single swift command and possibly double your disk usage at the same time, as shown here.

Working with Encoded and Compressed Files
269
Zipping
a File or D
irectory w
ith gzip
Zipping a File or Directory with gzipIf you want to compress only a single file or directory, you might choose gzip, rather than compress. The gzip command is more efficient, so you wind up with smaller files than you do with compress. As Code Listing 13.10 shows, you use gzip in much the same way that you use compress.
to zip a file or directory with gzip:
1. ls -l z*At the shell prompt, use ls -l to confirm the name of the file or directory you want to zip. In this example, we’re looking for z (as in zipadeedoodah) files.
2. gzip zipadeedoodah.tarType gzip followed by the name of the file or directory to gzip. The zipped file will replace the unzipped version and will have a new .gz extension.
tips
Another utility used for compressing files is bzip (bzip2, actually). You can find more information about it at www.bzip.org/. It’s quite powerful and quickly gaining popularity.
You can tar a group of files and then com-press the single file using gzip.
If you want to keep a copy of the original, unzipped file, try gzip -c filetogzip > compressed.gz.
If the compressed files will be accessed by someone using Windows, you should con-sider using zip, which is discussed later in this chapter. Although gzip is more conve-nient in the Unix world, gzip is not the same as good old .zip files used in Windows.
[ejr@hobbes compression]$ ls -l z*
-rw-r-r- 1 ejr users 501760 Jul 27 10:22 zipadeedoodah.tar
[ejr@hobbes compression]$ gzip zipadeedoodah.tar
[ejr@hobbes compression]$ ls -l z*
-rw-r-r- 1 ejr users 239815 Jul 27 10:22 zipadeedoodah.tar.gz
[ejr@hobbes compression]$
Code Listing 13.10 Use gzip to zip up those bulky tar files.

Chapter 13
270
Un
zipp
ing
a g
zip
File
wit
h g
unzi
p
Unzipping a gzip File with gunzipTo access gzipped files, you’ll need to unzip them. You do so using gunzip, as Code Listing 13.11 shows.
to unzip a gzip file with gunzip:
1. ls -l *.gzAt the shell prompt, verify the name of the gzipped file with ls -l (Code Listing 13.11).
2. gunzip zipadeedoodah.tarEnter gunzip and the name of the file to unzip. gunzip will uncompress the file(s) and return you to the shell prompt.
tips
When you’re unzipping files with gunzip, you’re not required to enter the file exten-sion. gunzip zipadeedoodah would work just as well as gunzip zipadeedoodah.gz.
You might encounter gzipped files with a .tgz (tarred, gzipped), tar.gz, or just .gz extension. It’ll handle any of those gracefully.
Some systems don’t recognize the gunzip command, so you might need to use gzip -d to uncompress the files.
If you have a compressed file that you know is text—oldfunnysayingsfromthenet.gz, for example—you can uncompress it (without deleting the original file) and view it with a single command: gzcat oldfunnysayingsfromthenet | more.
gunzip understands how to uncompress most (compressed) files, including those compressed with compress or .zip files from Windows systems.
[ejr@hobbes compression]$ ls -l *.gz
-rw-rw-r- 1 ejr users 53678 Jul 23 06:42 bigfile.gz
-rw-rw-r- 1 ejr users 53678 Jul 23 10:16 bigfile.new.gz
-rw-r-r- 1 ejr users 239819 Jul 27 10:22 zipadeedoodah.tar.gz
[ejr@hobbes compression]$ gunzip zipadeedoodah.tar
[ejr@hobbes compression]$ ls -l z*
-rw-r-r- 1 ejr users 501760 Jul 27 10:22 zipadeedoodah.tar
[ejr@hobbes compression]$ ls -l *.gz
-rw-rw-r- 1 ejr users 53678 Jul 23 06:42 bigfile.gz
-rw-rw-r- 1 ejr users 53678 Jul 23 10:16 bigfile.new.gz
[ejr@hobbes compression]$
Code Listing 13.11 Use gunzip to uncompress zipped files.

Working with Encoded and Compressed Files
271
Zipping
Files and D
irectories w
ith zip
Zipping Files and Directories with zipIf you’re working with files and directories that will be accessed on the Windows plat-form, you might need to use zip (rather than gzip). This zip is like Windows zip, so it’s a safer option than gzip, which can work, but it depends on the software available on the Windows system. zip files are compressed to save disk space and sometimes contain multiple files (see Code Listing 13.12).
to zip files or directories with zip:
1. ls -l z*At the shell prompt, use ls -l to confirm the names of the files or directories you want to zip.
2. zip -r zipped zipadeedoodahType zip -r followed by the name of the zip file you’re creating (without an exten-sion), followed by the name of the file or directory to zip, where -r means recur-sive. Then just twiddle your thumbs while waiting for Unix to zip your files (Code Listing 13.12).
tips
Some Unix systems don’t offer the zip command. In this case, if you need to share files with Windows users, use either gzip or compress, send the file, and tell your col-leagues that they can use WinZip, among other programs, to extract the files.
If you zip a directory (remember to include the -r for recursive argument), you zip all the files within it.
If you can’t get the tune “Zip-A-Dee-Doo-Dah” out of your head after these examples, try humming “The Candy Man” or “I’d Like to Teach the World to Sing,” or whistling the “Colonel Bogey March” (theme from The Bridge on the River Kwai).
[ejr@hobbes compression]$ ls -l z*
-rw-r-r- 1 ejr users 501760 Jul 27 10:22 zipadeedoodah
[ejr@hobbes compression]$ zip -r zipped zipadeedoodah
adding: zipadeedoodah (deflated 52%)
[ejr@hobbes compression]$ ls -l z*
-rw-r-r- 1 ejr users 501760 Jul 27 10:22 zipadeedoodah
-rw-r-r- 1 ejr users 239943 Jul 27 10:41 zipped.zip
[ejr@hobbes compression]$
Code Listing 13.12 Use zip to compress files, particularly those you’ll share with Windows users.
Chapter 13
272
Un
zipp
ing
Zip
ped
File
s w
ith
unz
ip
Unzipping Zipped Files with unzipYou can unzip zipped files using unzip, which is logical because you certainly wouldn’t unzip zipped files with un-Velcro or unsnap (Code Listing 13.13).
to unzip a zip file using unzip:
1. ls -l *.zipAt the shell prompt, verify the name of the zip file with ls *.zip.
2. unzip zipped.zipEnter unzip and the name of the file to unzip (with or without the .zip exten-sion). unzip will uncompress the file(s) and return you to the shell prompt.
tips
If you attempt to unzip a file and the file or files to be unzipped already exist, unzip will prompt you for each one to deter-mine if you want to overwrite (destroy) the existing file, cancel the unzipping pro-cess, or rename the file you’re unzipping to a safe name. Alternatively, use the -n (never overwrite) or -o (always overwrite) flag to avoid this prompt entirely.
gunzip also understands how to uncom-press some .zip files, so you can use gunzip instead of unzip, if you’d like. On the Unix side of things, use whatever seems easiest to you, or gunzip if you really don’t care.
To see the contents of a zip file, use unzip -l zipped.zip.
[ejr@hobbes compression]$ ls -l *.zip
-rw-rw-r- 1 ejr users 268156 Jul 23 06:53 folderzip.zip
-rw-rw-r- 1 ejr users 55124 Jul 23 06:38 fortunes1.zip
-rw-rw-r- 1 ejr users 53792 Jul 23 06:52 newzip.zip
-rw-r-r- 1 ejr users 239943 Jul 27 10:41 zipped.zip
[ejr@hobbes compression]$ unzip zipped.zip
Archive: zipped.zip
replace zipadeedoodah.tar? [y]es, [n]o, [A]ll, [N]one, [r]ename: y
inflating: zipadeedoodah.tar
[ejr@hobbes compression]$
Code Listing 13.13 unzip lets you uncompress files without accidentally obliterating them.

Working with Encoded and Compressed Files
273
Com
binin
g Co
mm
ands
Combining CommandsAs we’ve shown you in this chapter, you use separate commands to uuencode/uudecode, tar/untar, compress/uncompress, and zip/unzip files and directories. A lot of times, however, you can pipe commands together and run them in sequence, saving you time and hassle. For example, as Code Listing 13.14 shows, you can uudecode and gunzip files at the same time by piping the com-mands together. You can also uncompress and untar at one time, and you can tar and gzip at one time.
to uudecode and gunzip at one time:
1. ls -l h*Use ls -l to verify the existence of your uuencoded and zipped file.
2. uudecode -o /dev/stdout home.gz.uue | gunzip > home
Here, we use -o /dev/stdout to send the uudecode output to the standard output, then pipe the output of the uudecode com-mand to gunzip, then redirect the output of gunzip to the home file. Whew! See Code Listing 13.14 for the details.
[ejr@hobbes compression]$ ls -l h*
-rw-rw-r- 1 ejr users 73978 Jul 23 11:15 home.gz.uue
-rw-r-r- 1 ejr users 177607 Jul 27 09:34 house.uue
[ejr@hobbes compression]$ uudecode -o /dev/stdout home.gz.uue | gunzip > home
[ejr@hobbes compression]$ ls -l h*
-rw-r-r- 1 ejr users 128886 Jul 27 10:48 home
-rw-rw-r- 1 ejr users 73978 Jul 23 11:15 home.gz.uue
-rw-r-r- 1 ejr users 177607 Jul 27 09:34 house.uue
[ejr@hobbes compression]$
Code Listing 13.14 Decoding and unzipping at once is a little cryptic but saves your typity typity fingers.

Chapter 13
274
Com
bin
ing
Co
mm
ands
to uncompress and untar at one time:
zcat filename.tar.Z | tar -xf -
At the shell prompt, type zcat followed by the filename (as usual) and pipe that out-put to tar. Follow the tar command and flags with a - so that tar will be able to save the file to the intended name (Code Listing 13.15).
to tar and gzip at one time:
tar -cf - Feather | gzip > feather.tar.gz
At the shell prompt, enter your tar com-mand as usual but add a - (and a space) before the filename so the output can be piped. Then, pipe the output to gzip and redirect the output of that to a filename with the .tar and .gz extensions to show that the file has been tarred and gzipped (Code Listing 13.16).
[ejr@hobbes compression]$ ls -l *.Z
-rw-r-r- 1 ejr users 297027 Jul 27
10:06 labrea.tar.Z
[ejr@hobbes compression]$ zcat
labrea.tar.Z | tar -xf -
[ejr@hobbes compression]$ ls -ld L*
drwxr-xr-x 2 ejr users 1024 Jul 27
10:16 Labrea
[ejr@hobbes compression]$
Code Listing 13.15 After you find the compressed files, you can uncompress and untar them at once, and then use ls -ld (long and directory flags) to check your work.
[ejr@hobbes compression]$ ls -ld F*
drwxrwxr-x 2 ejr users 1024 Jul 23 10:56 Feather
[ejr@hobbes compression]$ tar -cf - Feather | gzip > feather.tar.gz
[ejr@hobbes compression]$ ls -l f*
-rw-r-r- 1 ejr users 106752 Jul 27 10:54 feather.tar.gz
-rw-rw-r- 1 ejr users 128886 Jul 23 11:45 file1.htm
-rw-rw-r- 1 ejr users 128886 Jul 23 11:45 file2.html
-rw-rw-r- 1 ejr users 686080 Jul 23 10:41 folder.tar
-rw-rw-r- 1 ejr users 268156 Jul 23 06:53 folderzip.zip
-rw-rw-r- 1 ejr users 128886 Jul 23 06:37 fortunes1.txt
-rw-rw-r- 1 ejr users 55124 Jul 23 06:38 fortunes1.zip
[ejr@hobbes compression]
Code Listing 13.16 You can efficiently tar and gzip all at once as well.

275
Usin
g H
andy U
tilities
14Just when you thought Unix was great…it gets better! Unix gives you a plethora of handy-dandy utilities—small programs—that can make your life a bit easier. For example, you might want to use the calendar, calcula-tor, or interactive spell-checker. None of these utilities is likely to be essential to your day-to-day Unix doings; however, they are handy to have and use. Ask your system administrator about which utilities you have available or return to Chapter 1 to explore your system and find out what’s there. In this chapter, we’ll look at a few of the most useful ones.
Using Handy Utilities
Chapter Contents
Using the calendar utility
Using the calculator utility
Evaluating expressions
Converting units
Checking spelling interactively
Looking up words
Keeping session records

Chapter 14
276
Cal
enda
rin
g w
ith
cal
Calendaring with calOne of the handiest Unix utilities is cal, which—logically—is a calendar. Find out what today’s date is, what day of the week December 31 is, or what the calendar year looks like. As Code Listing 14.1 shows, all you have to do is type cal and any specific options you want.
to use the cal utility:
1. calType cal at the shell prompt to see the current month’s calendar, as shown in Code Listing 14.1. Then, start playing with options, as shown in the next few steps.
2. cal -jUse cal -j to see the Julian calendar, which shows each day numbered from the beginning of the year. (This argument doesn’t work on all systems.)
3. cal 2010 | morePipe cal 2010 to more to see the whole year’s calendar.
4. cal 12 1941Type cal plus specific dates to view dates for a particular year.
tips
Note that cal is Y2K compliant. If you ask for cal 98, you’ll get the calendar for the year 98—that is, 1900 and a dozen years ago.
Put cal into your startup configuration files to get a reminder of the date when-ever you log in. Check out Chapter 8 for details.

Using Handy Utilities
277
Calen
daring
with
cal
[jdoe@frazz jdoe]$ cal
May 2009
S M Tu W Th F S
1 2
3 4 5 6 7 8 9
10 11 12 13 14 15 16
17 18 19 20 21 22 23
24 25 26 27 28 29 30
31
[jdoe@frazz jdoe]$ cal -j 3 2010
March 2010
Su Mo Tu We Th Fr Sa
60 61 62 63 64 65
66 67 68 69 70 71 72
73 74 75 76 77 78 79
80 81 82 83 84 85 86
87 88 89 90
[jdoe@frazz jdoe]$ cal 2010 | more
2010
January February March
Su Mo Tu We Th Fr Sa Su Mo Tu We Th Fr Sa Su Mo Tu We Th Fr Sa
1 2 1 2 3 4 5 6 1 2 3 4 5 6
3 4 5 6 7 8 9 7 8 9 10 11 12 13 7 8 9 10 11 12 13
10 11 12 13 14 15 16 14 15 16 17 18 19 20 14 15 16 17 18 19 20
17 18 19 20 21 22 23 21 22 23 24 25 26 27 21 22 23 24 25 26 27
24 25 26 27 28 29 30 28 28 29 30 31
31
April May June
Su Mo Tu We Th Fr Sa Su Mo Tu We Th Fr Sa Su Mo Tu We Th Fr Sa
1 2 3 1 1 2 3 4 5
4 5 6 7 8 9 10 2 3 4 5 6 7 8 6 7 8 9 10 11 12
11 12 13 14 15 16 17 9 10 11 12 13 14 15 13 14 15 16 17 18 19
18 19 20 21 22 23 24 16 17 18 19 20 21 22 20 21 22 23 24 25 26
25 26 27 28 29 30 23 24 25 26 27 28 29 27 28 29 30
30 31
July August September
Su Mo Tu We Th Fr Sa Su Mo Tu We Th Fr Sa Su Mo Tu We Th Fr Sa
1 2 3 1 2 3 4 5 6 7 1 2 3 4
4 5 6 7 8 9 10 8 9 10 11 12 13 14 5 6 7 8 9 10 11
11 12 13 14 15 16 17 15 16 17 18 19 20 21 12 13 14 15 16 17 18
18 19 20 21 22 23 24 22 23 24 25 26 27 28 19 20 21 22 23 24 25
25 26 27 28 29 30 31 29 30 31 26 27 28 29 30
(code continues on next page)
Code Listing 14.1 Just type cal to see the current month’s calendar, or check out other calendar options with flags.

Chapter 14
278
Cal
enda
rin
g w
ith
cal
October November December
Su Mo Tu We Th Fr Sa Su Mo Tu We Th Fr Sa Su Mo Tu We Th Fr Sa
1 2 1 2 3 4 5 6 1 2 3 4
3 4 5 6 7 8 9 7 8 9 10 11 12 13 5 6 7 8 9 10 11
10 11 12 13 14 15 16 14 15 16 17 18 19 20 12 13 14 15 16 17 18
17 18 19 20 21 22 23 21 22 23 24 25 26 27 19 20 21 22 23 24 25
24 25 26 27 28 29 30 28 29 30 26 27 28 29 30 31
31
[jdoe@frazz jdoe]$ cal 12 1941
December 1941
Su Mo Tu We Th Fr Sa
1 2 3 4 5 6
7 8 9 10 11 12 13
14 15 16 17 18 19 20
21 22 23 24 25 26 27
28 29 30 31
[jdoe@frazz jdoe]$
Code Listing 14.1 continued
Using Handy Utilities
279
Calcu
lating
with
bc
Calculating with bcUnix even offers a handy calculator utility that lets you…er…calculate things. Just use bc, as shown in Code Listing 14.2.
to calculate with bc:
1. bcAt the shell prompt, type bc. You’ll find yourself at a blank line, waiting for math to do.
2. 6*5 e
Enter the numbers, operators, expres-sions, or whatever you want to calculate. Use + to add, - to subtract, * to multiply, and / to divide. The answer appears on the next line (Code Listing 14.2).
3. cD
Quit bc when you’re done.
tips
You can tell bc to calculate expressions within a file by using bc filename. (Of course, replace filename with the real filename.) Then, bc waits for more to do from the command line.
Type man bc for more details about bc’s capabilities.
xmission> bc
6*5
30
xmission>
Code Listing 14.2 Using the bc utility, you can calculate and calculate and calculate….

Chapter 14
280
Eval
uat
ing
Exp
ress
ion
s w
ith
exp
r
Evaluating Expressions with exprUnix also provides expr, which you can use for evaluating expressions. (In this use, the term expressions refers to the mathematical, logical, scientific meaning of the word.) In addition to evaluating mathematical expres-sions, you can evaluate darn near anything else. The expr utility is often used in shell scripts—and you’ll probably find the most value in expr in that context—but it works just fine at the command line, too, as shown in Code Listing 14.3.
to evaluate with expr:
expr 3 \* 4
At the shell prompt, enter expr followed by the expression it should evaluate. In this example, we’re multiplying 3 times 4. (We have to use a \ to escape (protect) the * from being interpreted as a wildcard by the shell.)
expr 5 % 3
Determine the modulo (remainder) of 5 divided by 3. The answer appears on the next line (Code Listing 14.3).
a=$PWD; b=$HOME; expr $a = $b
This cryptic expression sets a equal to the current directory and b equal to the home directory, and then compares the two. If it returns 1 (true), you’re in your home direc-tory. If it returns 0 ( false), you’re not.
tips
Comparisons within shell scripts allow you to check to see whether or not some-thing is true, and then act accordingly. See Chapter 10 for more information.
The expr man page isn’t particularly helpful; search the Internet to get help with expr.
[jdoe@frazz jdoe]$ expr 3 \* 4
12
[jdoe@frazz jdoe]$ expr 5 % 3
2
[jdoe@frazz jdoe]$ a=$PWD; b=$HOME; expr
$a = $b
1
[jdoe@frazz jdoe]$ cd bin
[jdoe@frazz bin]$ a=$PWD; b=$HOME; expr
$a = $b
0
[jdoe@frazz bin]$
Code Listing 14.3 Using the expr utility, evaluating the value or the truth (or lack thereof ) of expressions is straightforward.
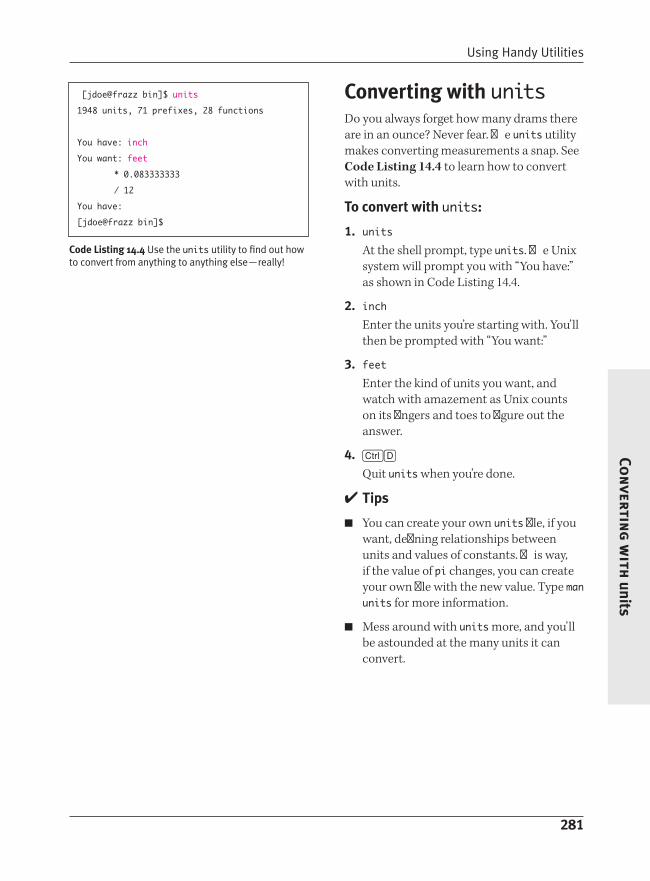
Using Handy Utilities
281
Con
verting
with
units
Converting with unitsDo you always forget how many drams there are in an ounce? Never fear. The units utility makes converting measurements a snap. See Code Listing 14.4 to learn how to convert with units.
to convert with units:
1. unitsAt the shell prompt, type units. The Unix system will prompt you with “You have:” as shown in Code Listing 14.4.
2. inchEnter the units you’re starting with. You’ll then be prompted with “You want:”
3. feetEnter the kind of units you want, and watch with amazement as Unix counts on its fingers and toes to figure out the answer.
4. cD
Quit units when you’re done.
tips
You can create your own units file, if you want, defining relationships between units and values of constants. This way, if the value of pi changes, you can create your own file with the new value. Type man units for more information.
Mess around with units more, and you’ll be astounded at the many units it can convert.
[jdoe@frazz bin]$ units
1948 units, 71 prefixes, 28 functions
You have: inch
You want: feet
* 0.083333333
/ 12
You have:
[jdoe@frazz bin]$
Code Listing 14.4 Use the units utility to find out how to convert from anything to anything else—really!

Chapter 14
282
Loo
kin
g It
Up
wit
h lo
ok
Looking It Up with lookSpeaking of spelling, you can also have Unix just look up a word for you in the system dictionary. It’s just like saying, “Hey, honey, how do I spell ‘unforgivably,’ as in ‘unforgiv-ably lazy’?” Just type look and the beginning of the word you want to look up (Code Listing 14.5).
to look up a word with look:
look unfo
At the shell prompt, type look followed by the first letters—all you know—of the word you want to look up. You’ll see a list-ing of all the words that start with those letters, as shown in Code Listing 14.5.
tip
You can use look from within vi, with q:!look unfo, as shown in Figure 14.1.
[jdoe@frazz jdoe]$ look unfo
unfold
unfolded
unfolding
unfolds
unforeseen
unforgeable
unforgiving
unformatted
unfortunate
unfortunately
unfortunates
unfounded
[jdoe@frazz jdoe]$
Code Listing 14.5 Look up words with look.
Figure 14.1 Use look to find words, even within vi.

Using Handy Utilities
283
Keepin
g R
ecord o
f You
r Sessio
n w
ith script
Keeping a record of Your Session with scriptOccasionally, you may need to keep a record of a Unix session—for example, if you’re using Unix as part of a class assignment or need a session record to submit to your untrusting boss. You can do this using script, which keeps a record of every command you type from the shell prompt (Code Listing 14.6). You might think of typing script as pressing a Record button on a tape recorder.
[ejr@hobbes ch14]$ more covermybutt
Script started on Fri May 15 14:30:16 2009
[ejr@hobbes ch14]$ pwd
/home/ejr/ch14
[ejr@hobbes ch14]$ who
root tty1 May 15 14:18
ejr ttyp0 May 15 14:20
(calvin.raycomm.com)
ejr ttyp1 May 15 14:28
(calvin.raycomm.com)
[ejr@hobbes ch14]$ ps ax
PID TTY STAT TIME COMMAND
1 ? S 0:02 init [3]
2 ? SW 0:00 (kflushd)
3 ? SW< 0:00 (kswapd)
48 ? S 0:00 /sbin/kerneld
229 ? S 0:00 syslogd
238 ? S 0:00 klogd
260 ? S 0:00 crond
272 ? S 0:00 inetd
283 ? S 0:00 lpd
298 ? S 0:00 sendmail: accepting
connections on port 25
310 ? S 0:00 gpm -t ms
321 ? S 0:00 httpd
355 ? S 0:00 nmbd -D
368 1 S 0:00 /bin/login - root
369 2 S 0:00 /sbin/mingetty tty2
370 3 S 0:00 /sbin/mingetty tty3
371 4 S 0:00 /sbin/mingetty tty4
372 5 S 0:00 /sbin/mingetty tty5
373 6 S 0:00 /sbin/mingetty tty6
375 ? S 0:00 update (bdflush)
381 1 S 0:00 -bash
402 ? S 0:00 in.telnetd
436 ? S 0:00 in.telnetd
249 ? S 0:00 /usr/sbin/atd
327 ? S 0:00 httpd
328 ? S 0:00 httpd
329 ? S 0:00 httpd
330 ? S 0:00 httpd
(code continues on next page)
Code Listing 14.6 Using script is a great way to keep records.

Chapter 14
284
Kee
pin
g R
eco
rd o
f Yo
ur
Ses
sio
n w
ith
scr
ipt
to record your session with script:
1. script covermybuttAt the shell prompt, type script to start recording your actions. You can save the transcript to a specified filename, as in script covermybutt. If you don’t specify a file, Unix will save the transcript in the current directory as typescript.
2. Do your thing. See you in a couple of hours.
3. cD
When you’re done, press cD to stop recording the session.
4. more covermybuttUse more or the editor of your choice to view the script. Code Listing 14.6 shows a sample transcript.
331 ? S 0:00 httpd
332 ? S 0:00 httpd
333 ? S 0:00 httpd
334 ? S 0:00 httpd
335 ? S 0:00 httpd
403 p0 S 0:00 /bin/login -h calvin
raycomm.com -p
404 p0 S 0:00 -bash
437 p1 S 0:00 /bin/login -h calvin
raycomm.com -p
438 p1 S 0:00 -bash
449 p1 S 0:00 ispell gudspeler
450 p0 S 0:00 script covermybutt
451 p0 S 0:00 script covermybutt
452 p3 S 0:00 bash -i
455 p3 R 0:00 ps ax
[ejr@hobbes ch14]$ exit
Script done on Fri May 15 14:30:44 2009
[ejr@hobbes ch14]$
Code Listing 14.6 continued

Using Handy Utilities
285
Keepin
g R
ecord o
f You
r Sessio
n w
ith script
tips
Screen-based programs, such as vi, pico, pine, mutt, or links, tend to wreak havoc with the output of script. You can still read the content, but the formatting is often badly out of whack, as shown in Figure 14.2.
You would use script if you want to record both what you did and what hap-pened (“Geez, I typed rm unbackedupdata, then ls, and sure enough, the ls listing showed that I was in big trouble”). On the other hand, if you just want the list of commands you typed with no indica-tion of what happened, check out his-tory from Chapter 3 (“Geez, I typed rm unbackedupdata, then I typed ls, then I logged out and cried”).
Figure 14.2 Some programs give you oddly formatted script output and strange beeps when you view the script.

This page intentionally left blank

287
Bein
g R
oot
15Up to now, we’ve been addressing Unix tools and tips that you, as a normal user of the sys-tem, can take advantage of. And, as a normal user, you can’t hurt the system as a whole—you can mess up your own files, certainly, but that’s as far as it goes. As we’ve mentioned, though, there’s also a different class of user, called “superuser,” or root. The root user has complete power within the system and can (must) handle configuration issues, software installation for everyone using the system, and troubleshooting. The root user can also easily wreck the system with a single tpyo. Thorough coverage of system administra-tion and being root is out of the scope of this book (look for the sequel, Unix Advanced: Visual QuickPro Guide), but it’s important to have some tools in your arsenal. In this chapter, we’ll give you some basic tools to use as root.
Being Root
Chapter Contents
Acting with root authority
Becoming root
Starting, stopping, and restarting daemons
Changing the system configuration
Monitoring the system
Setting the date and time

Chapter 15
288
Act
ing
Lik
e ro
ot w
ith
sud
o
Acting Like root with sudoAs you know by now, logging in as root gives you the power to make changes across the entire Unix system, not just within the directories and files that you individually have permissions to access, read, or modify. Of course, having all this power also comes with responsibilities—not to screw up the entire system, among other possibilities. Especially as you’re learning about system administration, you may want to experiment with these skills by logging in as sudo instead. Using the sudo utility, you can run some commands as if you were root, but it’s not as risky as being root. The real root user has to give permission to use sudo, and sometimes the permission is limited to using specific utilities—you’ll have to experiment.
[jdoe@frazz jdoe]$ cd /var/log
[jdoe@frazz log]$ tail messages
tail: messages: Permission denied
[jdoe@frazz log]$ sudo tail messages
We trust you have received the usual lecture from the local System Administrator. It usually boils
down to these two things:
#1) Respect the privacy of others.
#2) Think before you type.
Password:
Jan 25 06:01:01 frazz CROND[22809]: (root) CMD (nice -n 19 run-parts /etc/cron.hourly)
Jan 25 06:01:01 frazz CROND[22810]: (mail) CMD (/usr/bin/python -S /var/lib/mailman/cron/qrunner)
Jan 25 06:01:01 frazz su(pam_unix)[22814]: session opened for user news by (uid=0)
Jan 25 06:01:01 frazz su(pam_unix)[22814]: session closed for user news
Jan 25 06:01:02 frazz msec: unable to run chage: chage: unknown user: ejray
Jan 25 06:01:03 frazz msec: changed mode of /var/log/news/nntpsend.log from 660 to 640
Jan 25 06:02:00 frazz CROND[22865]: (mail) CMD (/usr/bin/python -S /var/lib/mailman/cron/qrunner)
Jan 25 06:03:00 frazz CROND[22867]: (mail) CMD (/usr/bin/python -S /var/lib/mailman/cron/qrunner)
Jan 25 06:04:00 frazz CROND[22872]: (mail) CMD (/usr/bin/python -S /var/lib/mailman/cron/qrunner)
Jan 25 06:04:17 frazz sudo: jdoe : TTY=pts/1 ; PWD=/var/log ; USER=root ; COMMAND=/usr/bin/tail
messages
[jdoe@frazz log]$
Code Listing 15.1 The sudo command lets you do things that you can’t do as a normal user, but that isn’t as risky as being root.

Being Root
289
Actin
g Like ro
ot with
sudo
Note that all uses of sudo are logged. If your system administrator won’t be happy with you experimenting with being root, don’t use sudo on any system other than your own. In Code Listing 15.1, we show the difference between being a normal user and acting with authority with sudo.
to act like root with sudo:
1. cd /var/log; tail messagesAs plain-old you, try to look at the system log files in /var/log. On a Linux system, it’s usually /var/log/messages; on a Solaris system, it’s usually /var/adm/messages. Other Unix flavors will have other, but similar, locations. Note that some of these files will require root access to view them, while others won’t. If you can view a file as you, then choose a different file to see how sudo helps.
2. sudo tail messagesAfter permission was denied on the previ-ous attempt, use sudo before the com-mand to try to issue the same command with root authority.
3. *******Enter your password after the interesting warning, and then note that the com-mand succeeded this time (see Code Listing 15.1).
tips
After you’ve used sudo once, you can use it again within a specific amount of time (usually five minutes) without entering your password again.
Some versions of sudo have pretty enter-taining prompts if you mess up your pass-word (Code Listing 15.2). You’re likely to irritate your system administrator tremendously if you try to look at these on purpose, though.
If you haven’t been given permission (not just technical permission, but actual, “you may do this” permission) to use sudo, don’t. Everything that happens with sudo is logged, and you’ll probably have to answer for your actions.
Whenever possible, it’s better to use sudo only when you need it than to become root. Any typo can be problematic, and it’s a good thing to have to consciously add sudo when you want to act with root authority.
Some Solaris and OpenSolaris systems support pfexec, which is generally com-parable to sudo and can be used in just the same way. Under the covers, it’s differ-ent, but the differences aren’t likely to be significant for you right now.
1001 jdoe@foo $ sudo ls
Password:
My mind is going. I can feel it.
Password:
Take a stress pill and think things over.
Password:
He has fallen in the water!
sudo: 3 incorrect password attempts
1002 jdoe@foo $
Code Listing 15.2 More surprisingly, sudo has a sense of humor.

Chapter 15
290
Bec
om
ing
root
wit
h s
u
Becoming root with suBecoming root, assuming that you know the root password, is really quite easy. To do so, you just apply the su command (introduced in the “Changing Your Identity with su” sec-tion in Chapter 3), where you change to the root identity (Code Listing 15.3).
Once again, we want to stress that being root on a Unix system carries with it a lot of responsibility. First, you must be extraordi-narily careful about what you type and where you type it. Every system administrator out there has a horror story about wrecking a system (to a greater or lesser degree) through careless use of the root shell. We’ve done it, too. Second, you must be very responsible about what you do. You can read anything, see anything, watch anything, and change anything. You can, therefore, easily infringe upon the privacy of your users. Don’t.
to become root:
1. suEnter su to become root.
2. *******Enter the root password when prompted. Note that, after you succeed, you’ll see a different prompt (#). This is your confir-mation that you succeeded and are now root (Code Listing 15.3).
3. exitUse exit or cD to exit the root shell and become yourself again.
jdoe /home/jdoe $ su
Password:
[root@sulley jdoe]# exit
jdoe /home/jdoe $ su - Password:
[root@sulley root]#
Code Listing 15.3 Becoming root is remarkably easy.

Being Root
291
Beco
min
g root w
ith su
tips
As with using su to become yourself (or another user), you can use su - to ensure that all of the root environment variables are set correctly. If you just use su without the hyphen, environment variables and the like will be set for only the root iden-tity and not you. Which is more appropri-ate depends completely on your situation. If you get unexpected error messages (file not found, for example) with one approach, try the other.
If you’re connecting to a system with telnet (as opposed to ssh), do not become root. The root password could be “sniffed” by malicious users, and if a hacker gains your root password, you’re potentially in big trouble. Your best choice is just to use ssh or to use sudo if ssh is simply impossible.
Usually, you’ll have to log in to a system as you, and then become root. It’s a rare sys-tem that will allow you to log directly in remotely as root. Again, this is a security measure to help minimize the possibil-ity of break-ins. Even if someone gets the root password on a system, they can’t act as root if they can’t also log in as a normal user.
There are no real secrets on a Unix sys-tem. If you have something that must be a secret, you must encrypt it, or the root user (as well as other users) could know it.

Chapter 15
292
Star
tin
g, S
topp
ing,
an
d R
esta
rtin
g D
aem
on
s
Starting, Stopping, and restarting DaemonsAs root, you can do anything on the sys-tem, but you shouldn’t have much to do at all. Generally, Unix (or Linux) systems are configured so that the programs that should be running all the time (like the Web server software, mail server software, or similar programs) are automatically started in the background when the system is booted. Then you, as root, need only handle crises and problems. (Ha! Easier said than done.)
That said, sometimes you’ll need to start or stop these daemons (programs running in the background—see Chapter 9 for details). Say, for example, that you get an e-mail from one of the system users complaining that the Web server (or, technically, the httpd daemon) isn’t running. As the system administrator, you’ll have to start it.
to start a daemon:
1. ps -ef | grep httpdVerify that the Web server really isn’t running. Sometimes users are wrong. If you see lines that list httpd (other than the one that reports the command you’re running), httpd is active and doesn’t need to be started. The problem may lie elsewhere.
2. cd /etc/init.dChange to the directory containing the generic init ( for initialization) scripts. This directory is likely /etc/init.d/ or /etc/rc.d/init.d/, as Code Listing 15.4 shows.

Being Root
293
Starting, Sto
pping, an
d Restartin
g Daem
on
s
3. sudo ./httpd startUse sudo ./httpd (to be absolutely sure that you’re running httpd from the current directory and not a program of the same name from elsewhere on the system) and start. The httpd in the /etc/init.d directory is a script to start the daemon with the appropriate options.
4. ps -ef | grep httpdVerify that the Web server now is running.
tips
To stop a daemon, use the same process, but use stop (as in, sudo ./httpd stop) to stop a daemon cleanly.
Sometimes you might need to restart a daemon. You could stop it, and then start it, but in many cases you could also use restart or reload (as in, sudo ./httpd restart).
Be careful about stopping or restarting daemons with which you are not familiar. Unix has a lot of interdependencies that are often not clear, and stopping some-thing you think you don’t need might have unexpected consequences.
[jdoe@frazz jdoe]$ ps -ef | grep httpd
jdoe 656 21562 0 04:51 pts/5 00:00:00 grep httpd
[jdoe@frazz jdoe]$ cd /etc/init.d
[jdoe@frazz init.d]$ sudo ./httpd start
Password:
Starting httpd-perl: [ OK ]
Starting httpd: [ OK ]
[jdoe@frazz init.d]$ ps -ef | grep httpd
root 793 1 0 04:52 ? 00:00:00 httpd-perl -f /etc/httpd/conf/ht
apache 794 793 0 04:52 ? 00:00:00 httpd-perl -f /etc/httpd/conf/ht
apache 795 793 0 04:52 ? 00:00:00 httpd-perl -f /etc/httpd/conf/ht
apache 796 793 0 04:52 ? 00:00:00 httpd-perl -f /etc/httpd/conf/ht
apache 800 793 0 04:52 ? 00:00:00 httpd-perl -f /etc/httpd/conf/ht
root 808 1 0 04:52 ? 00:00:00 httpd -DPERLPROXIED -DHAVE_PHP4
apache 816 808 0 04:52 ? 00:00:00 httpd -DPERLPROXIED -DHAVE_PHP4
apache 817 808 0 04:52 ? 00:00:00 httpd -DPERLPROXIED -DHAVE_PHP4
apache 818 808 0 04:52 ? 00:00:00 httpd -DPERLPROXIED -DHAVE_PHP4
apache 819 808 0 04:52 ? 00:00:00 httpd -DPERLPROXIED -DHAVE_PHP4
jdoe 822 21562 0 04:52 pts/5 00:00:00 grep httpd
[jdoe@frazz init.d]$
Code Listing 15.4 Sometimes you have to manually start system daemons.

Chapter 15
294
Chan
gin
g t
he
Syst
em C
on
fig
ura
tio
n
Changing the System ConfigurationMost (nearly all) of the system configuration files for Unix systems are contained in the /etc directory. If it’s a configuration setting that’s specific to a user, the setting will be located in the user’s home directory; other-wise, configuration settings for the whole system are located in the /etc directory.
We’re not going to get into changing much here—you really should know what you’re doing before you start futzing with the sys-tem configuration. However, if you’re root, you should have some fun with it, so here’s something fun to play with. In the follow-ing example, you’ll see how to change the Message of the Day (aka the motd), which users are greeted with when they log into the system (Figures 15.1 and 15.2).
to change the motd:
1. sudo vi /etc/motdUse sudo to gain root access and edit the /etc/motd file.
2. Hey, you have wrinkles in your stockings! Oh…sorry, you’re not wearing stockings! Uhhh, yikes! Add your favorite slogan, saying, or comment to the file. Keep in mind that everyone who logs into the system will see this message, so keep it clean…and be nice! (See Figure 15.2.)
3. logoutLog out, so you can log back in and see your handiwork.
4. ssh yoursystem.example.comLog back in to see the new message.
Figure 15.1 Any user will see the motd when logging in.
Figure 15.2 After a user with root privilege edits it, it’s…er…different.

Being Root
295
Chan
gin
g th
e System Co
nfi
gu
ration
tips
The /etc/motd file is really handy for providing warnings, notes, and comments to system users. Particularly if you’re planning on having system downtime or maintenance, it’s nice to warn users with a message in /etc/motd.
Virtually every other change you might make in /etc will also affect everyone on the system. Be careful.
Depending on what you choose to change or edit in /etc, you might need to restart the appropriate daemon (as described in the previous section) for your changes to take effect. If it looks like your change didn’t work, restart the daemon.
Unix man pages also usually describe the configuration files found in /etc. Use man filename (as in, man exports) to find out what the configuration does.
Installing Software
As root, you can also install your own software. The old way, which was a bit challenging at times, is outlined on the Web in our online chapter, “Compiling and Installing Your Own Software” (see the Intro for more information).
The new way, though, is far easier. On most newer Unix and Linux systems, you can use a special program that will go out on the Web and download the program you need (along with any supplemental programs needed for your choice to run) and install it automatically. Whee!
For example, on Ubuntu Linux, if you want to install the fortune application so you can see more cute or clever sayings than you otherwise might, you can simply type sudo apt-get install fortune and stand back.
The comparable command on OpenSolaris is pfexec pkg install fortune.
On CentOS, RedHat, SuSE, and others, you use sudo rpm --install fortune.
For any of these, we encourage you to explore the man pages for the command of your choice—you can do a lot with these commands, and it’s worth a couple of minutes to read up on the options.
In all of these cases, though, you can accomplish the same thing using a spiffy GUI tool from your Unix desktop. Not only does this tool install the software, but it also tells you what’s available to choose from. Poke around in the desktop menus (if you have more than just a ssh connec-tion to your system) and see what you can find. Look for things like “Package Manager,” and you’ll be set.
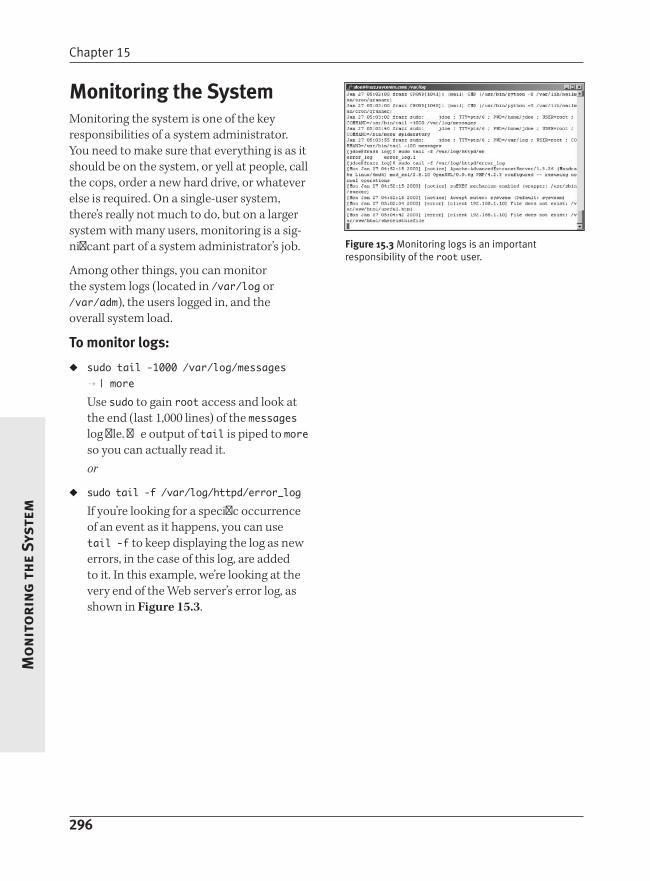
Chapter 15
296
Mo
nit
ori
ng
th
e Sy
stem
Monitoring the SystemMonitoring the system is one of the key responsibilities of a system administrator. You need to make sure that everything is as it should be on the system, or yell at people, call the cops, order a new hard drive, or whatever else is required. On a single-user system, there’s really not much to do, but on a larger system with many users, monitoring is a sig-nificant part of a system administrator’s job.
Among other things, you can monitor the system logs (located in /var/log or /var/adm), the users logged in, and the overall system load.
to monitor logs:
sudo tail -1000 /var/log/messages | more
Use sudo to gain root access and look at the end (last 1,000 lines) of the messages log file. The output of tail is piped to more so you can actually read it. or
sudo tail -f /var/log/httpd/error_log
If you’re looking for a specific occurrence of an event as it happens, you can use tail -f to keep displaying the log as new errors, in the case of this log, are added to it. In this example, we’re looking at the very end of the Web server’s error log, as shown in Figure 15.3.
Figure 15.3 Monitoring logs is an important responsibility of the root user.

Being Root
297
Mo
nito
ring
the System
to monitor users:
w; who
You don’t even need sudo for this one, but you do want to keep an eye on the users logged in, and where they’re coming from. After a while, you’ll be able to recognize patterns and react to them. If jdoe usually logs in by 9 a.m. and logs out by 4 p.m., and always logs in from the same system, then you see jdoe suddenly logging in from a different address at 1 a.m., you should wonder if jdoe’s secret password isn’t quite so secret anymore. or
last
The last utility tells you who logged in (and out) and when, and from where, as shown in Code Listing 15.5 (on the next page). Good stuff to know, particularly if you’re not online and actively monitoring w and who all of the time.
to monitor system load:
top
Use top to monitor your system loads, as shown in Figure 15.4. Different systems will show distinctly different patterns, but if you get accustomed to checking top when everything seems normal on your system, you’ll be able to better tell if something is abnormal or even what’s wrong when the time comes. Press Q to quit top.
tips
There’s a lot to monitor and a lot to keep up with. Take time to read man pages, search the Web, and ask around for tips and tricks. A wide variety of additional utilities exist to make these processes easier for you.
Develop shell scripts that automati-cally run when you log in and perform the “normal” system checks. By doing so, you don’t have to run routine checks manually, and you can come up to speed quickly on what’s going on.
Use top -d 2 | grep Mem for a running status check on your available memory. grep for other characteristics from top output, as appropriate.
Anything that’s different from usual is worth being concerned about. Check man pages or search the Web to find out for sure.
Figure 15.4 The top utility helps monitor the system status.

Chapter 15
298
Mo
nit
ori
ng
th
e Sy
stem
[jdoe@frazz init.d]$ w; who
5:05am up 42 days, 18:42, 22 users, load average: 0.44, 0.40, 0.38
USER TTY FROM LOGIN@ IDLE JCPU PCPU WHAT
root vc/1 - 15Dec09 42days 0.06s 0.06s -bash
ejray pts/0 - 16Dec09 41days 0.00s ? -
ejray pts/1 - Sat 6am 12:28m 0.88s 0.77s ssh mike
ejray pts/2 - 28Dec09 28days 0.25s 0.25s /bin/zsh
jdoe pts/6 192.168.1.104 4:58am 1:12 0.11s 0.02s tail -f /var/log/httpd/
ejray pts/19 mike.raycomm.c Sat12pm 12:28m 1.05s 0.94s ssh sulley
root vc/1 Dec 15 10:25
ejray :0 Dec 16 16:10
ejray pts/0 Dec 16 16:11
jdoe pts/6 Jan 27 04:58 (192.168.1.104)
ejray pts/8 Dec 23 19:49
ejray pts/17 Jan 7 18:29
ejray pts/20 Jan 4 08:31
jdoe pts/16 Jan 13 19:39 (192.168.1.104)
ejray pts/19 Jan 25 12:03 (mike.raycomm.com)
ejray pts/22 Jan 25 12:03
[jdoe@frazz init.d]$ last
jdoe pts/6 192.168.1.104 Mon Jan 27 04:58 still logged in
jdoe pts/6 192.168.1.104 Mon Jan 27 04:57 - 04:58 (00:01)
jdoe pts/6 192.168.1.104 Mon Jan 27 04:55 - 04:57 (00:01)
jdoe pts/6 192.168.1.104 Sun Jan 26 18:05 - 20:16 (02:11)
jdoe pts/6 mike.raycomm.c Sat Jan 25 12:12 - 06:52 (18:40)
ejray pts/19 mike.raycomm.c Sat Jan 25 12:03 still logged in
ejray pts/19 mike.raycomm.c Sat Jan 25 12:02 - 12:02 (00:00)
jdoe pts/6 mike.raycomm.c Sat Jan 25 10:35 - 12:11 (01:36)
jdoe pts/19 192.168.1.104 Tue Jan 21 20:59 - 00:11 (03:12)
jdoe pts/19 192.168.1.104 Mon Jan 13 20:59 - 23:56 (02:57)
jdoe pts/16 192.168.1.104 Mon Jan 13 19:39 - 23:34 (03:54)
jdoe pts/23 192.168.1.104 Sun Jan 12 06:02 - 08:14 (02:12)
jdoe pts/14 192.168.1.104 Mon Jan 6 20:54 - 23:42 (02:47)
ejray pts/17 frazz.raycomm.co Thu Jan 2 20:50 - 06:27 (1+09:36)
ejray pts/4 Wed Jan 1 04:55 gone - no logout
wtmp begins Wed Jan 1 04:55:40 2010[jdoe@frazz init.d]$
Code Listing 15.5 You can keep an eye on the users logged in and where they’re coming from using w, who, and last.

Being Root
299
Keepin
g u
p with
watch
Keeping up with watchAs a system administrator, you practically have to have eyes in the back of your head and be aware of all kinds of activities that might be going on. The watch command is your friend. It keeps an eye on pretty much anything (users, system, or files) you want to monitor.
to watch:
watch last
Use watch to monitor the output of a specific command. When something changes, you’ll see it in the watch output (Figure 15.5). In this case, we’re monitor-ing who logged in and when. or
watch --differences=cumulative ls -l /var/spool/mail
You can watch to see if mail’s getting delivered by monitoring an ls -l output from the /var/spool/mail directory. The extra flags show cumulative differences since you started watch.
tips
The watch utility can be really handy, but sometimes it’d be easier to just type something like tail -f /var/log/httpd/access_log to keep track of the Web server access log or to write a shell script to periodically run last. Basically, watch is useful, but it’s not the only way to monitor what’s going on.
On the lighter side, you can also use watch to periodically run other programs. For example, watch -n 5 fortune will display a new fortune every five seconds.
Figure 15.5 Use watch to keep an eye on the system.

Chapter 15
300
Chec
kin
g B
oot
Mes
sag
es w
ith
dm
esg
Checking Boot Messages with dmesgSometimes you might need extra informa-tion, beyond what is available on the running system, about the configuration or the hardware. The system automatically probes the hardware and generates all kinds of potentially useful information at that time but keeps it socked away in the bowels of the system. Use dmesg to get at what you need…in appalling detail.
to check status with dmesg:
dmesg | more
Use dmesg (with the help of more) to gain some insight into the system (Code Listing 15.6). or
dmesg | mail -s "Help me understand" [email protected]
Send the output of dmesg to a friend for advice, if you’re really stuck.
tip
See Chapter 11 for more information about mailing files and data from the command line.

Being Root
301
Checkin
g B
oot M
essages w
ith dm
esg
[jdoe@frazz jdoe]$ dmesg | more
x98 ptys configured
Serial driver version 5.05c (2001-07-08) with HUB-6 MANY_PORTS MULTIPORT SHARE_IRQ SERIA
L_PCI ISAPNP enabled
ttyS00 at 0x03f8 (irq = 4) is a 16550A
Uniform Multi-Platform E-IDE driver Revision: 7.00alpha2
ide: Assuming 33MHz system bus speed for PIO modes; override with idebus=xx
PIIX4: IDE controller on PCI bus 00 dev 39
PIIX4: chipset revision 1
PIIX4: not 100% native mode: will probe irqs later
ide0: BM-DMA at 0x1440-0x1447, BIOS settings: hda:pio, hdb:DMA
ide1: BM-DMA at 0x1448-0x144f, BIOS settings: hdc:DMA, hdd:pio
hda: QUANTUM FIREBALLP LM30.0, ATA DISK drive
hdb: Maxtor 32049H2, ATA DISK drive
hdc: SAMSUNG DVD-ROM SD-612, ATAPI CD/DVD-ROM drive
ide0 at 0x1f0-0x1f7,0x3f6 on irq 14
ide1 at 0x170-0x177,0x376 on irq 15
hda: 58633344 sectors (30020 MB) w/1900KiB Cache, CHS=3649/255/63, UDMA(33)
hdb: 40021632 sectors (20491 MB) w/2048KiB Cache, CHS=2491/255/63, UDMA(33)
Partition check:
/dev/ide/host0/bus0/target0/lun0: p1 p4 < p5 p6 >
/dev/ide/host0/bus0/target1/lun0:<6> [EZD] [remap 0->1] [2491/255/63] p1
p1: <solaris: [s0] p5 [s1] p6 [s2] p7 [s3] p8 [s4] p9 [s5] p10 [s6] p11 [s7] p12 >
RAMDISK driver initialized: 16 RAM disks of 32000K size 1024 blocksize
md: md driver 0.90.0 MAX_MD_DEVS=256, MD_SB_DISKS=27
md: Autodetecting RAID arrays.
md: autorun ...
...
Mounted devfs on /dev
Freeing unused kernel memory: 136k freed
Real Time Clock Driver v1.10e
usb.c: registered new driver usbdevfs
usb.c: registered new driver hub
usb-uhci.c: $Revision: 1.275 $ time 18:49:04 Sep 20 2002
usb-uhci.c: High bandwidth mode enabled
PCI: Found IRQ 9 for device 00:07.2
PCI: Sharing IRQ 9 with 00:10.0
usb-uhci.c: USB UHCI at I/O 0x1400, IRQ 9
usb-uhci.c: Detected 2 ports
usb.c: new USB bus registered, assigned bus number 1
hub.c: USB hub found
hub.c: 2 ports detected
-More-
Code Listing 15.6 The dmesg utility helps you see what happens at boot, including the processes started and hardware found.

Chapter 15
302
Set
tin
g t
he
Dat
e an
d Ti
me
Setting the Date and timeSetting the date and time is very important for a system administrator. Why? Because if you find something inappropriate or possibly problematic in your log files (e.g., repeated unsuccessful login attempts from a specific location), you want to be able to accurately cross-reference your log files with the log files of your colleagues at the other location. That can happen only if the time on both hosts is pretty close to accurate.
to set the time with ntpdate:
sudo /usr/sbin/ntpdate pool.ntp.org
Use ntpdate with the name of a time server (currently available servers are listed at www.ntp.org) to update your system clock to the current, accurate time (Code Listing 15.7). If you get an error message about the socket being in use, type ps -ef | grep ntp to find the ntp daemon that’s running to keep your time synchronized. (If this happens, your time is probably OK and doesn’t need to be set.)or
sudo date -s "Tues Jan 27 5:30:23 2010"
If your system doesn’t have ntpdate, you’ll have to set the time manually. Use sudo, date with the -s option, and all the rest of the needed information. (If you need to change, say, only the time, you can just pro-vide the time, as in sudo date -s 5:45).
tip
It’s much better to use ntpdate or have the ntpd daemon run to keep your time up-to-date at all times. Using date manu-ally is a poor second choice.
[jdoe@frazz jdoe]$ sudo /usr/sbin/ntpdate
pool.ntp.org too
27 Jan 05:26:50 ntpdate[1470]: adjust time
server 192.168.96.3 offset -0.004140 sec
[jdoe@frazz jdoe]$ sudo date -s 5:30
Mon Jan 27 05:30:00 MST 2010
[jdoe@frazz jdoe]$ sudo date -s “Tues
Jan 28 5:30:21”
Tue Jan 28 05:30:21 MST 2010
[jdoe@frazz jdoe]$ sudo date -s “Tues
Jan 28 5:30:21 2010”
Password:
Tues Jan 28 05:30:21 MST 2010
[jdoe@frazz jdoe]$ sudo date -s “Mon Jan
27 5:30:21 2010”
Mon Jan 27 05:30:21 MST 2010
[jdoe@frazz jdoe]$ date
Mon Jan 27 05:30:35 MST 2010
[jdoe@frazz jdoe]$ sudo /usr/sbin/
ntpdate 192.168.96.3
27 Jan 05:30:38 ntpdate[1616]: step time
server 192.168.96.3 offset -7.329083 sec
[jdoe@frazz jdoe]$ sudo /usr/sbin/
ntpdate 192.168.96.3
27 Jan 05:30:44 ntpdate[1622]: adjust time
server 192.168.96.3 offset 0.000479 sec
[jdoe@frazz jdoe]$
Code Listing 15.7 Setting the date (and making sure it stays up-to-date) is an important root user responsibility.

303
Sen
sation
al Un
ix Tricks
16Throughout this book, we’ve given you Unix building blocks—individual Unix commands, scripting techniques, and other insights that you can use individually or combine. In this chapter, we’ll show you some clever things to do with Unix. You might consider this an “advanced” chapter, but most of the things we’ll show you here are simply combinations of things you’ve already learned about in earlier chapters.
Sensational Unix Tricks
Chapter Contents
Cleaning up HTML documents
Searching and replacing throughout multiple documents
Generating reports
Using input to customize your environment
Using ROT13 encoding
Embedding ROT13 encoding in shell scripts
Making backups
Using advanced redirection

Chapter 16
304
Clea
nin
g U
p H
TML
Do
cum
ents
wit
h ti
dy
Cleaning Up HtML Documents with tidyIf you ever have to develop HTML docu-ments—when developing personal Web sites, completing a class project, or creating Web pages on the job—the tidy utility can be a handy resource for you. If you’re creating HTML pages by hand, you’ll likely make occa-sional errors. These errors probably won’t cause significant problems with using the pages, but they might make the pages harder to read, harder to maintain, and harder to subject to the scrutiny of your peers. Not to worry; tidy can help!
to clean up HtML documents with tidy:
1. vi sampledoc.htmlUse the editor of your choice to create an HTML document. Our sample docu- ment is called, well, sampledoc.html (Figure 16.1). Don’t worry about getting the tagging or syntax exactly right; tidy will take care of the details. Save and close your document.
Figure 16.1 Even a flawed HTML document, like this one, can be fixed by tidy.

Sensational Unix Tricks
305
Cleanin
g U
p HTM
L Do
cum
ents w
ith tidy
2. tidy sampledoc.htmlThe tidy utility will apply HTML format-ting rules and then output a massaged version of your document that is techni-cally correct (Code Listing 16.1). Cool, huh?
3. tidy sampledoc.html > fixedupdoc.html If you like the results, redirect the docu-ment to a new filename, as shown here, or use tidy -m sampledoc.html to replace the original document.
[jdoe@frazz public_html]$ tidy
sampledoc.html
Tidy (vers 4th August 2000) Parsing
“sampledoc.html” line 10 column 6 - Warning: discarding unexpected </ul>
sampledoc.html: Document content looks
like HTML 2.0
1 warnings/errors were found!
<!DOCTYPE html PUBLIC “-//IETF//DTD HTML 2.0//EN”><html>
<head>
<meta name=”generator” content=”HTML Tidy, see www.w3.org”><title>Jdoe’s Home Page</title>
</head>
<body>
<h1>Making Unix Work, One Day at a Time</h1>
<p>Read these tips, when I get around to
writing them, and weep.</p>
<ul>
<li>To be written</li>
<li>To be written later</li>
<li>To be written next week</li>
</ul>
<address>[email protected]</address>
</body>
</html>
[jdoe@frazz public_html]$
Code Listing 16.1 The tidy command is handy for cleaning up HTML documents.

Chapter 16
306
Clea
nin
g U
p H
TML
Do
cum
ents
wit
h ti
dy
tips
For even spiffier results, we like using tidy -indent -quiet --doctype loose -modify sampledoc.html, which sup-presses the informative messages from tidy, makes the output an HTML 4 document, tidily indents the output, and replaces the original with the modified file (Code Listing 16.2). All that, and only one command.
Consider using tidy with the sed script (described in the next section) to do a lot of cleanup at once.
[jdoe@frazz public_html]$ tidy -indent
-quiet --doctype loose sampledoc.html
line 10 column 6 -- Warning: discarding
unexpected </ul>
<!DOCTYPE html PUBLIC “-//W3C//DTD HTML 4.01 Transitional//EN”><html>
<head>
<meta name=”generator” content=”HTML Tidy, see www.w3.org”> <title>
Jdoe’s Home Page </title>
</head>
<body>
<h1>
Making Unix Work, One Day at a Time
</h1>
<p>
Read these tips, when I get around
to writing them, and weep.
</p>
<ul>
<li>
To be written
</li>
<li>
To be written later
</li>
<li>
To be written next week
</li>
</ul>
<address>
</address>
</body>
</html>
[jdoe@frazz public_html]$
Code Listing 16.2 The tidy command, with the appropriate flags, performs miracles—almost.

Sensational Unix Tricks
307
Searching and Replacing M
ultiple D
ocum
ents
Searching and replacing throughout Multiple Documents with sedBack in Chapter 6, we talked about sed and how to use it to search and replace throughout files, one file at a time. Although we’re sure you’re still coming down off the power rush from doing that, we’ll now show you how to combine sed with shell scripts and loops. In doing this, you can take your search-and-replace criteria and apply them to multiple documents. For example, you can search through all of the .html documents in a directory and make the same change to all of them. In this example (Figure 16.2), we strip out all of the <BLINK> tags, which are offensive to some HTML purists.
Before you get started, you might want to take a look at Chapter 6 for a review of sed basics and Chapter 10 for a review of scripts and loops.
to search and replace throughout multiple documents:
1. vi thestinkinblinkintagUse the editor of your choice to create a new script. Name the file whatever you want.
2. #!/bin/shStart the shell script with the name of the program that should run the script.
3. for i in `ls -1 *.htm*`Start a loop. In this case, the loop will pro-cess all of the .htm or .html documents in the current directory.
4. doIndicate the beginning of the loop content.
continues on next page
Figure 16.2 Create a script to search and replace in multiple documents.

Chapter 16
308
Sear
chin
g an
d R
epla
cing
Mu
ltip
le D
ocu
men
ts
5. cp $i $i.bakMake a backup copy of each file before you change it. Remember, Murphy is watching you.
6. sed “s/<\/*BLINK>//g” $i > $i.newSpecify your search criteria and replace-ment text. A lot is happening in this line, but don’t panic. From the left, this com-mand contains sed followed by ", which starts the command. s/, which tells sed to search for
something. <, which is the first character to be
searched for. \ /, which allows you to search for the
/. (The \ escapes the / so the / can be used in the search.)
*, which specifies zero or more of the previous characters (/), which takes care of both the opening and clos-ing tags (with and without a / at the beginning).
BLINK>, which indicates the rest of the text to search for. Note that this searches only for capital letters.
If you are searching for <BLINK> tags to delete and don't know if they might be uppercase, lowercase, or both, try adding the i ( for case-insensitive) option to your sed command, like this: sed "s/<\/*BLINK>//ig.
//, which ends the search section and the replace section (there’s nothing in the replace section because the tag will be replaced with nothing).
g, which tells sed to make the change in all occurrences (globally), not just in the first occurrence on each line.
", which closes the command. $i, which is replaced with each file-
name in turn as the loop runs. > $i.new, which indicates that the
output is redirected to a new filename. (See Code Listing 16.3.)

Sensational Unix Tricks
309
Searching and Replacing M
ultiple D
ocum
ents
7. mv $i.new $iMove the new file back over the old file.
8. echo “$i is done!”Optionally, print a status message onscreen, which can be reassuring if there are a lot of files to process.
9. doneIndicate the end of the loop.
10. Save and close out of your script.
11. Try it out.Remember to make your script executable with chmod u+x and the filename, and then run it with ./thestinkinblinkintag. In our example, we’ll see the “success reports” for each of the HTML docu-ments processed (Code Listing 16.3).
tip
You could perform any number of other operations on the files within the loop. For example, you could strip out other codes, use tidy as shown in the previous section, replace a former webmaster’s address with your own, or automatically insert comments and last-update dates.
[ejr@hobbes scripting]$ more
›thestinkinblinkintag
#! /bin/sh
for i in `ls -1 *.htm*`
do
cp $i $i.bak
sed “s/<\/*BLINK>//g” $i > $i.newmv $i.new $i
echo “$i is done!”done
[ejr@hobbes scripting]$ chmod u+x
thestinkinblinkintag
[ejr@hobbes scripting]$
./thestinkinblinkintag
above.htm is done!
file1.htm is done!
file2.htm is done!
html.htm is done!
temp.htm is done!
[ejr@hobbes scripting]$
Code Listing 16.3 You can even use sed to strip out bad HTML tags, as shown here.

Chapter 16
310
Gen
erat
ing
Rep
ort
s w
ith
aw
k
Generating reports with awkBack in Chapter 6, we showed you how to edit delimited files with awk, which is cool because it lets you extract specific pieces of information, such as names and phone num-bers, from delimited files. As shown in Code Listing 16.4, you can also use awk to generate reports. We start with the information from an ls -la command, and then use awk to generate a report about who owns what.
to generate reports with awk:
ls -la | awk '{print $9 " owned by " $3 } END { print NR " Total Files" }'
Whew! In general, pipe ls -la to the long-winded awk command. (Yes, this is the origin of awkward.) awk then prints the ninth field ($9), the words “owned by,” then the third field ($3), and at the end of the output, the total number of records processed (print NR “ Total Files”). Code Listing 16.4 shows the printed report.
tip
Remember that you could embed awk scripts in a shell script, as with the previ-ous sed example, if they're something you’ll use frequently.
[ejr@hobbes /home]$ ls -la | awk ‘{print
$9 “ owned by “ $3 } END { print NR “
Total Files” }’
owned by
. owned by root
.. owned by root
admin owned by admin
anyone owned by anyone
asr owned by asr
awr owned by awr
bash owned by bash
csh owned by csh
deb owned by deb
debray owned by debray
ejr owned by ejr
ejray owned by ejray
ftp owned by root
httpd owned by httpd
lost+found owned by root
merrilee owned by merrilee
oldstuff owned by 1000
pcguest owned by pcguest
raycomm owned by pcguest
samba owned by root
shared owned by root
22 Total Files
[ejr@hobbes /home]$
Code Listing 16.4 Use awk to generate quick reports.

Sensational Unix Tricks
311
Usin
g Inpu
t to Cu
stom
ize You
r Enviro
nm
ent
Using Input to Customize Your EnvironmentWay back in Chapter 8, we talked about setting up your environment variables by customizing the configuration files that run upon login. You can further customize your environment variables by requiring input whenever a startup script runs. For example, you can set your configuration files (which are actually scripts) so that they request that you specify the default editor for the session (Code Listing 16.5).
to use input to customize your environment:
1. vi .bash_profileUse your favorite editor to edit your script, and move to the end of the file.
2. echo -e “Which editor do you want as the default? (vi or pico)” Using echo -e, specify the text that will prompt you to input information (Figure 16.3).
continues on next page
[ejr@hobbes ejr]$ su - ejr
Password:
Which editor do you want as the default?
(vi or pico)
vi
You chose vi!
[ejr@hobbes ejr]$
Code Listing 16.5 When the system asks your preferences, you know you’re on top.
Figure 16.3 Add this mini-script to your .zprofile, .bash_profile, or .profile configuration file, right at the end.
Chapter 16
312
Usi
ng
Inpu
t to
Cu
sto
miz
e Yo
ur
Envi
ron
men
t
3. read choiceOn the next line, add read followed by the name of the variable to read in. We chose choice because we’re using this input to set the preferred EDITOR envi-ronment variable.
4. if [ $choice = “vi” ]Start an if statement—in this case, one that tests for the vi option.
5. then EDITOR=/usr/bin/vi ; export EDITOR ; echo “You chose vi!”
Here, the then clause sets the EDITOR environment variable to vi, exports the environment variable, and announces your choice.
6. elif [ $choice = “pico” ]Check for your other option with elif (else if ). This statement covers the pico option.
7. then EDITOR=/usr/bin/pico ; export EDITOR ; echo “You chose pico!”
This then clause sets the EDITOR envi-ronment variable to pico, exports the environment variable, and announces your choice.
8. else echo “Editor unchanged”Set up an else statement, which will be used if neither option was entered at the read prompt. In this example, if neither vi nor pico was entered, it’ll just say that the editor was unchanged.
9. fiEnd the if statement.
10. Save and exit.
11. su - youridAt the shell prompt, type su - followed by your userid to log in again and test the revised login script (Code Listing 16.5).
tip
This technique is very useful for setting the TERM(inal) environment variable if you access the system from different remote locations with different capabilities.

Sensational Unix Tricks
313
Usin
g R
OT13 En
codin
g w
ith sed
Using rOt13 Encoding with sedIn various places on the Internet, text is often encoded with something called ROT13, which is an abbreviation for “rotate (the alphabet by) 13.” That is, A becomes N, B becomes O, and so forth. If text is encoded, people have to take extra steps to decode the message. For example, if a message includes an offensive joke, people who don’t want to see the joke won’t have to. Similarly, if the message is a movie review, people who don’t want to know the ending won’t have the sur-prise spoiled. Instead, the message encoded with ROT13 might look like this:
Tbbq sbe lbh--lbh svtherq vg bhg! Naq ab,gurer’f ab chapuyvar. Ubcr lbh rawblrqgur obbx! Qrobenu naq Revp
A great way to use ROT13 encoding (and decoding) is with sed, which will let you eas-ily manipulate text.
to use rOt13 encoding with sed:
1. vi script.sedUse the editor of your choice to create a file called script.sed. Because the com-mand we’re using will be reused, we’ll create a sed script instead of just typing in everything at the shell prompt.
2. y/abcdefghijklmnopqrstuvwxyzABCDEFGH IJKLMNOPQRSTUVWXYZ/
Start with a y at the beginning of the com-mand. y is the sed command to translate characters (capital to lowercase or what-ever you specify).After y, type a slash (/), the original characters to look for (all lowercase and uppercase characters), and another slash.
continues on next page

Chapter 16
314
Usi
ng
RO
T13
Enco
din
g w
ith
sed
3. y/abcdefghijklmnopqrstuvwxyzABCDEFGH IJKLMNOPQRSTUVWXYZ/nopqrstuvwxyz abcdefghijklmNOPQRSTUVWXYZABCDEFG HIJKLM/
After the second slash, add the transla-tion characters (the lowercase alphabet, starting with n and continuing around to m, then uppercase from N to M), followed by a slash to conclude the replace string.
4. Save the script and exit the editor.
5. sed -f script.sed limerick | moreTest the ROT13 encoding by applying it to a file. Here we apply it to the limerick file, and then pipe the output to more for your inspection. You’ll see that all you get is gibberish. To test it more thoroughly, use sed -f script.sed limerick | sed -f script.sed | more to run it through the processor twice. You should end up with normal text at the end of this pipeline (Code Listing 16.6).
tips
Text is rotated by 13 simply because there are 26 letters in the alphabet, so you can use the same program to encode or decode. If you rotate by a different num-ber, you’ll need to have separate programs to encode and decode.
Check out the next section to see how to turn this lengthy process into a shell script and make it even easier to reuse over and over.
[ejr@hobbes creative]$ sed -f script.sed
limerick
Bhe snibevgr yvzrevpx
1.
Gurer bapr jnf n zna sebz Anaghpxrg,
Jub pneevrq uvf yhapu va n ohpxrg,
Fnvq ur jvgu n fvtu,
Nf ur ngr n jubyr cvr,
Vs V whfg unq n qbahg V’q qhax vg.
[ejr@hobbes creative]$ sed -f script.sed
limerick | sed -f script.sed
Our favorite limerick
1.
There once was a man from Nantucket,
Who carried his lunch in a bucket,
Said he with a sigh,
As he ate a whole pie,
If I just had a donut I’d dunk it.
[ejr@hobbes creative]$
Code Listing 16.6 A spiffy sed command can ROT13 encode and decode messages.
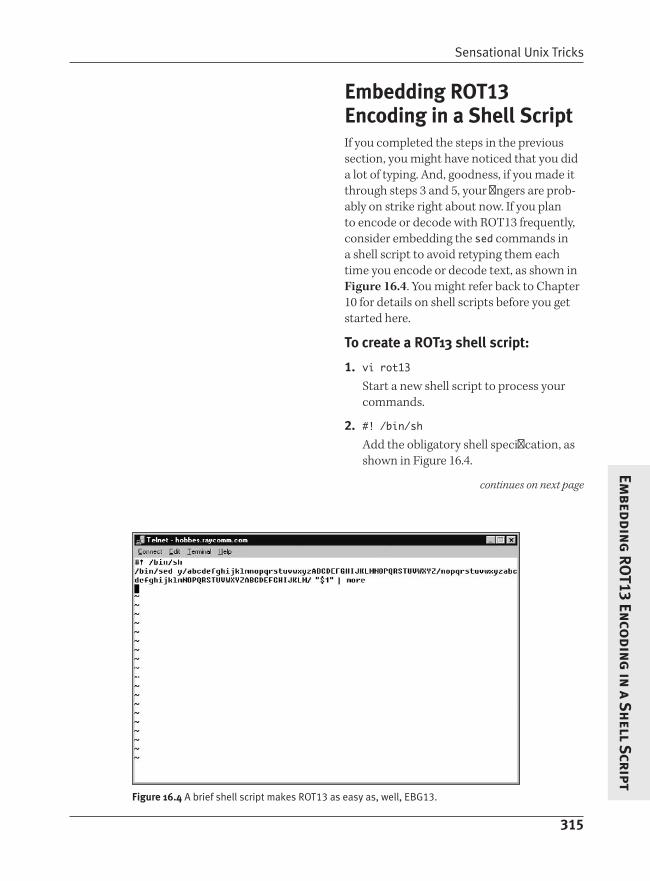
Sensational Unix Tricks
315
Embeddin
g RO
T13 Enco
ding in
a Sh
ell Script
Embedding rOt13 Encoding in a Shell ScriptIf you completed the steps in the previous section, you might have noticed that you did a lot of typing. And, goodness, if you made it through steps 3 and 5, your fingers are prob-ably on strike right about now. If you plan to encode or decode with ROT13 frequently, consider embedding the sed commands in a shell script to avoid retyping them each time you encode or decode text, as shown in Figure 16.4. You might refer back to Chapter 10 for details on shell scripts before you get started here.
to create a rOt13 shell script:
1. vi rot13Start a new shell script to process your commands.
2. #! /bin/shAdd the obligatory shell specification, as shown in Figure 16.4.
continues on next page
Figure 16.4 A brief shell script makes ROT13 as easy as, well, EBG13.

Chapter 16
316
Embe
ddin
g R
OT1
3 En
codi
ng
in a
Sh
ell
Scr
ipt
3. /bin/sed y/abcdefghijklmnopqrstuvwxy zABCDEFGHIJKLMNOPQRSTUVWXYZ/nopqr stuvwxyzabcdefghijklmNOPQRSTUVWXY ZABCDEFGHIJKLM/
Specify the sed program (using the full path to make the program a little more flexible) and the command that encodes and decodes ROT13 text. It’s better to make the shell script self-contained, so instead of referencing an external file with the sed script, we’ll just put it in the com-mand line here.
4. /bin/sed y/abcdefghijklmnopqrstuvwxy zABCDEFGHIJKLMNOPQRSTUVWXYZ/nopqr stuvwxyzabcdefghijklmNOPQRSTUVWXY ZABCDEFGHIJKLM/ “$1”
Here, we added $1 to pass the filename from the command line (as in rot13 thisfile) to sed.
5. /bin/sed y/abcdefghijklmnopqrstuvwxy zABCDEFGHIJKLMNOPQRSTUVWXYZ/nopqr stuvwxyzabcdefghijklmNOPQRSTUVWXY ZABCDEFGHIJKLM/ “$1” | more
Next, pipe the output to more so you see the file one screen at a time.
6. Save and exit out of the file.
7. chmod u+x rot13Make the shell script executable, so you can just enter the name rot13 rather than sh rot13.
8. ./rot13 limerickTest the script. Because we developed this script in a directory that’s not in the path, we have to execute the script with ./rot13. If you develop the script in a direc-tory in your path, you should just be able to type rot13.

Sensational Unix Tricks
317
Embeddin
g RO
T13 Enco
ding in
a Sh
ell Script
tip
You can also build in an option to redirect the output of the script to a file and save it for later. Basically, all you do is create an if-then statement and give yourself the option of automatically redirecting the output to a filename, as Code Listing 16.7 shows. Check out Chapter 10 for more information about scripts and if-then statements.
[ejr@hobbes creative]$ more rot13
#! /bin/sh
# If the first item (after the script name) on the command
# line is save or s, and the second item is a readable file
# then do the first case.
if [ \( “$1” = “save” -o “$1” = “s” \) -a \( -r “$2” \) ]
then
# This case saves the ROT13 output under the same filename with
# a rot13 extension.
/bin/sed y/abcdefghijklmnopqrstuvwxyzABCDEFGHIJKLMNOPQRSTUVWXYZ/nopqrstuvwxyzabcdefghijklmNOPQRST
UVWXYZABCDEFGHIJKLM/ “$2” > “$2.rot13”
else
# This case pipes the ROT13 output to more, because a save
# wasn’t specified.
/bin/sed y/abcdefghijklmnopqrstuvwxyzABCDEFGHIJKLMNOPQRSTUVWXYZ/nopqrstuvwxyzabcdefghijklmNOPQRST
UVWXYZABCDEFGHIJKLM/ “$1” | more
fi
[ejr@hobbes creative]$
Code Listing 16.7 If you want to get really fancy with the script, you can bring together some of the handiest bits of other chapters to make a masterpiece.

Chapter 16
318
Mak
ing
Bac
kups
wit
h r
sync
Making Backups with rsyncThe rsync utility is a fancy way to synchro-nize files and directories, either locally or across a network. We like to use it to make backups so we don’t have to worry when we mess something up. Yes, we could use cp or something equally boring, but we like the speed and flexibility of rsync. In this example, we’re copying files locally, but we could as easily be making remote backups to another server somewhere else.
to make backups with rsync:
1. mkdir ~/.BACKUPDIRCreate a directory to house your back-ups. Ideally, you’ll create the directory on a different physical disk from the stuff you’re backing up, but do what you can. We’re creating a backup directory that’s a subdirectory of the home directory, which will help protect us against self-inflicted damages but not against a disk failure. (We trust the system administrator for protecting against disk failures…er, Eric, you are up-to-date on our backups, aren’t you?)
2. rsync -v -a /home/jdoe/data ~/ .BACKUPDIR
Specify the rsync command, -v ( for verbose), and -a ( for archive) options, as well as the source and destination direc-tories (Code Listing 16.8).Wait while it does the initial backup (showing you each file as it gets copied). The first backup takes a while but no longer than using cp would.
[jdoe@frazz bin]$ rsync -v -a /home/jdoe/data ~/.BACKUPDIR
building file list ... done
data/
data/#*scratch*#
data/#all.programs#
data/#local.programs.txt#
data/*scratch*
data/1
data/2
data/Mail/
data/News/
data/Project/
data/Project/keep
data/Project/keeper.jpg
data/Project/kept
data/Project/kidder.txt
data/Project/kiddo
data/Project/kidnews
data/Project/kidneypie
data/Project/kids
data/Project/kidupdate
data/address.book
data/address.book~
data/all.programs
data/b
data/backup-files/
data/backup-files/.Xauthority
data/backup-files/.bash_history
data/backup-files/.bash_logout
data/backup-files/.bash_profile
data/backup-files/.bashrc
data/backup-files/.mailcap
data/backup-files/.screenrc
data/backup-files/.ssh/
...
wrote 24841142 bytes read 14708 bytes 741965.67 bytes/sec
total size is 24779055 speedup is 1.00
[jdoe@frazz bin]$
[jdoe@frazz jdoe]$ rsync -v -a /home/jdoe/data ~/.BACKUPDIR
building file list ... done
data/newer.programs.txt
wrote 30149 bytes read 36 bytes 20123.33 bytes/sec
total size is 24765461 speedup is 820.46
[jdoe@frazz jdoe]$
Code Listing 16.8 The rsync utility is a handy tool for making backups. Note that it takes much less time for all updates after the first one.

Sensational Unix Tricks
319
Makin
g B
ackups w
ith rsync
tips
When you subsequently run rsync, you’ll discover that it’s far faster because it copies only the files that have changed. Handy, huh?
You can gain benefits from rsync if you start making backups across a network. For example, you can synchronize your Web server content with your friend’s content located on a different server. Check the rsync man page (man rsync) for the specifics.

Chapter 16
320
Usi
ng
Adv
ance
d R
edir
ecti
on
wit
h s
tder
r
Using Advanced redirection with stderrThroughout this book, we’ve been redirecting input to output, piping the output of one com-mand to the input of another, and generally getting fairly fancy. Can you believe that there’s even more you can do with redirection?
Unix provides three channels (technically known as file descriptors) for communica-tion between the user and the system:
Standard input (stdin), which refers to providing information at the shell prompt or accepting information from a different program.
Standard output (stdout), which refers to the output you see whirring by on your screen after you issue a command—for example, if you issue the command find / -name test.
Standard error (stderr), which includes error messages you might see whir by on your screen after you issue a command. You might think of this channel as the “second” output channel.
Until now, you’ve been redirecting stdin and stdout with <, >, |, >>, and sometimes tee. Everything on stderr has just accompa-nied stdout. Adding separate redirection of stderr to your arsenal can make your Unix experience even more flexible.

Sensational Unix Tricks
321
Usin
g A
dvanced R
edirection
with
stderr
to redirect stderr in zsh, bash, and similar shells:
1. time -p lsUse the time utility, covered in Chapter 9, and note that you get both the output of ls and the output of time. As it hap-pens, the output of time is on the stderr channel, although you can’t see that (the output all just shows up on the screen).
2. time -p ls 2> time-results.txt Where you’d usually put a > to redirect everything to a file, use 2> to redirect the second output channel to a file. Now you’ll get the output of ls on stdout on your screen, and the output of time, sent to stderr, in time-results.txt (Code Listing 16.9).
continues on next page
[jdoe@sulley Project]$ ls
keep keeper.jpg kept kidder.txt kiddo kidnews kidneypie kids kidupdate
[jdoe@sulley Project]$ time -p ls
keep keeper.jpg kept kidder.txt kiddo kidnews kidneypie kids kidupdate
real 0.00
user 0.00
sys 0.01
[jdoe@sulley Project]$ time -p ls 2> time-results.txt
keep kept kiddo kidneypie kidupdate
keeper.jpg kidder.txt kidnews kids time-results.txt
[jdoe@sulley Project]$ time -p ls 1> /dev/null
real 0.00
user 0.00
sys 0.00
[jdoe@sulley Project]$ time -p ls >/dev/null 2>&1
[jdoe@sulley Project]$
Code Listing 16.9 Redirecting standard output and standard error separately can be handy.

Chapter 16
322
Usi
ng
Adv
ance
d R
edir
ecti
on
wit
h s
tder
r
3. time -p ls 1> /dev/null Or you can send the stdout to oblivion (/dev/null, which just throws it away) and get stderr on your screen.
4. time -p ls >/dev/null 2>&1Or you can send the stderr to stdout and stdout to oblivion. It’s apparently point-less but useful in shell scripts if you care only to know whether something suc-ceeded or failed. (Note that, technically, 1> and the old standby > are the same—but this example makes more sense if you regard redirecting stdout (1) and stderr (2) explicitly.)
tips
If you’re using zsh, you’ll need to specify the full path to time (/usr/bin/time). time is a special zsh built-in command, so it works a bit differently from the other shells.
Redirecting stdout and stderr separately in csh is more challenging, but you can accomplish the same thing with time -p ls >& /dev/null. This also works in bash and zsh.
You can echo $? to find out whether your command succeeded. You’ll get bonus points for being the first person who e-mails a valid original example of the value of this operation to [email protected].

In this appendix, you’ll find a fairly thoroughreference on Unix commands and flags as wellas examples and descriptions of each. Weorganized this appendix to generally parallelthe book, so that you can easily reference keycommands and related flags without beingoverwhelmed with long lists of commands.
Table A.a summarizes what you’ll find inthis appendix.
Tables A.1–A.15 contain commands andflags that relate to the topics covered by thesimilarly numbered chapter (Chapters 16and 17 do not introduce many new commands,so the commands from those chapters areincluded with similar commands in the otherappendices). In addition to the commandsand flags discussed in the chapters, you’ll alsofind related commands and options that youmight find useful in your Unix adventures,reference information that will jog your mem-ory, and ideas to help you get off and runningon additional projects. If you’re looking for athorough command flag reference, check outAppendix C.
323
UnixReference
AUnixReferen
ce
Table A.a
Tab l e Number Des c r i p t i on
Table A.1 Getting Started with UnixTable A.2 Using Directories and FilesTable A.3 Working with Your ShellTable A.4 Creating and Editing FilesTable A.5 Controlling File Ownership and
PermissionsTable A.6 Manipulating FilesTable A.7 Getting Information About Your SystemTable A.8 Configuring Your Unix EnvironmentTable A.9 Running Scripts and ProgramsTable A.10 Writing Basic ScriptsTable A.11 Sending and Reading E-mailTable A.12 Accessing the InternetTable A.13 Working with Encoded and Compressed
FilesTable A.14 Using Handy Utilities
Summary of Appendix Tables

Table A.1
Command Des c r i p t i on
apropos keyword Find appropriate man pages for keyword.cat file Display file contents onscreen or provide file contents to standard output.cat file1 file2 Display file1 and file2.cd Return to your home directory from anywhere in the Unix system.cd .. Move up one level in the directory tree.cd /etc Change to the /etc directory relative to the system root.cd ~/subdir Use a tilde (~) as a handy shortcut for your home directory.cd Projects Move to the Projects directory relative to the current directory.col -b Filter backspaces and reverse line feeds out of input. Use to make man pages editable without odd
formatting.cD Close your current process (often a shell) and your Unix session if you close the login shell.exit Close your current shell and your Unix session if you’re in the login shell.less file Use to view file screen by screen.logout Close your Unix session.ls List files and directories.ls / List the files and directories in the root directory.ls directory List the files and directories in directory.ls -a List all files and directories, including hidden ones.ls -c or ls -t List files and directories by modification date.ls -l List files and directories in long format, with extra information.ls -lh List files and directories in long format, with extra information and human readable sizes.man 5 command View the specified section (5) of the man pages for command. Sometimes used as man -s 5 command.man command View the manual (help) pages for command.man -k keyword Find appropriate man pages for keyword.more filetoview View filetoview screen by screen.passwd Change your password.pwd Display the path and name of the directory you are currently in.reset Reset the shell to fix display problems.stty sane Try to fix unexpected, sudden, and strange display problems.su - yourid Relog in without having to log out.su Become the root user.sudo command Run command with the authority of the root user.
324
Appendix A
UnixReference
Getting Started with Unix: Survival Skills

Table A.2
Command Des c r i p t i on
cp existingfile newfile Copy existingfile to a file named newfile.cp -i existingfile newfile Copy existingfile to a file named newfile, prompting you before
overwriting existing files.cp -r /Projects /shared/Projects Copy the directory /Projects to the new name
/shared/Projects, specifying recursive copy.find . -name lostfile -print Find a file or directory in the current directory or subdirectories
named lostfile.find /home -name “pending*” -print Find all files or directories with names starting with “pending”
in the home directory or subdirectories.find /home/shared -mtime -3 -print Find all files or directories in the shared directory that were
modified within the past three days.find ~ -name ‘*.backup’ -exec compress {} \; Compress all files in the home directory and its subdirectories,
whose names end with “.backup,” without confirmation.find ~ -name ‘*.backup’ -ok rm {} \; Find and remove, with confirmation, all files in the home directory
and its subdirectories, whose names end with “.backup”.ln /home/a/* /home/b Hard link all of the files in the a directory to the files in the
b directory.ln afile alink Link afile and alink, making the same file essentially exist in two
different directories.ln -s /home/deb/Projects /home/helper/Project Create a soft link from /home/deb/Projects to
/home/helper/Project.locate string Locate files with string in their names.mkdir Newdirectory Make a new directory named Newdirectory.mv existingfile newfile Rename existingfile to newfile.mv -i oldfile newfile Rename oldfile to newfile, requiring the system to prompt you
before overwriting (destroying) existing files.rm badfile Remove badfile.rm -i * Delete interactively, with prompting before deletion. Good for
files with problematic names that Unix thinks are command flags.rm -i badfile Remove badfile interactively.rm -ir dan* Interactively remove all the directories or files that start with
“dan” in the current directory and all of the files and subdirectoriesin the subdirectories starting with “dan”.
rmdir Yourdirectory Remove the empty directory Yourdirectory.touch newfile Create a file named newfile with no content.touch -t 201012312359 oldfile Update file date for oldfile to December 31, 23 hours, and 59
minutes in 2010.which command Find out the full path to command. This is valuable for seeing
which ofmultiple commandswith the same namewould be executed.whereis file Find out the full path to file and related files.
325
Unix Reference
UnixReferen
ce
Using Directories and Files

Table A.3
Command Des c r i p t i on
!10 Rerun command 10 from the history list in bash, csh, or zsh.bash Start a bash subshell or run a bash script.chsh Change your login shell.csh Start a csh (C) subshell or run a csh shell script.echo $SHELL Display the value of the $SHELL environment variable.exit Leave the current shell and return to the previous one, or log out of the login shell.history View a numbered list of previous commands.sh Start a sh (Bourne) subshell or run a sh shell script.stty erase ‘^?’ Make D erase characters to the left of the cursor.stty erase ‘^H’ Make B (cH ) erase characters to the left of the cursor.su - yourid Start a new login shell as yourid.su user Switch user to user.tcsh Start a tcsh subshell or run a tcsh shell script.zsh Start a zsh subshell or run a zsh shell script.
326
Appendix A
UnixReference
Working with Your Shell

Table A.4
Command Des c r i p t i on
ed Choose a line-oriented text editor.emacs Choose a tremendously powerful, somewhat easy to use text editor.emacs -n Open emacs and force a terminal-window- (not graphical window-) oriented session.emacs filename Open emacs and edit filename.joe Choose a fairly friendly editor.nano Choose for menu-oriented, user-friendly text editing.nano filename Open and edit filename in nano.nano -w filename Disable word wrapping for filename in nano. This is particularly useful for configuration files.pico Choose for menu-oriented, user-friendly text editing.pico filename Open and edit filename in pico.pico -w filename Disable word wrapping for filename in pico. This is particularly useful for configuration files.vi Choose a powerful editor with lots of power but little ease of use.vi filename Open and edit filename in vi.
Table A.5
Command Des c r i p t i on
chgrp Change the group association of files or directories.chgrp groupname filename Change the group association of filename to groupname.chgrp -R group directory Recursively change the group association of directory and all subdirectories and files
within it to group.chmod Change the permissions for a file or directory.chmod a-w file Remove write permission for file for all (everyone).chmod g+w file Add write permission for file for the owning group.chmod -R go-rwx * Revoke all permissions from everyone except the user for all files in the current directory
and all subdirectories and their contents.chmod u=rwx,g=rx,o=r file Set the permissions on file to user read, write, and execute, group read and execute,
and others read.chmod ugo= * Revoke all permissions for everything in the current directory from everyone.chown Change the ownership of files or directories.chown -R user Directory Recursively change the ownership of Directory and all contents to user.chown user file Change the ownership of file to user.umask 022 Specify the default permissions for all created files.
327
Unix Reference
UnixReferen
ce
Creating and Editing Files
Controlling File Ownership and Permissions

Table A.6
Command Des c r i p t i on
awk Manipulate a file as a database.awk /CA/’{ print $2 $1 $7 }’ file Select (and display) three fields in each record in file on lines
that contain “CA”.awk ‘{ print $1 }’ file Select (and display) the first field in each record in file.awk -f script.awk file Run an awk command from a script called script.awk on file.awk -F, ‘{ print $1 }’ file > newfile Select the first field in each record in file, specifying that a “,”
separates fields, and redirect the output to newfile.awk -F: ‘{ print $2 “ “ $1 “ in “ $7 }’ file Select (and display) several fields and some text for each record
in file, using a colon (:) as a field delimiter.basename Remove the path from a filename, leaving only the name proper.
Good to use in scripts to display just a filename.cmp newfile oldfile Compare newfile to oldfile.crypt Encrypt a password-protected file.csplit Divide files based on line number or other characteristics.diff -b newfile oldfile Find differences (ignoring white space) between newfile and oldfile.diff Directory Newdirectory Find differences between Directory and Newdirectory.diff -i newfile oldfile Find differences (except in case) between newfile and oldfile.diff -iBw file1 file2 Find all differences between file1 and file2 except those involving
blank lines, spaces, tabs, or lowercase/uppercase letters.diff newfile oldfile Find the differences between newfile and oldfile.diff -w newfile oldfile Find differences (ignoring spaces) between newfile and oldfile.fmt file Reformat file so it has even lines and a nicer appearance.fold -w 60 file Reformat file so no lines exceed a specified length (60 charac-
ters here).grep expression file Find expression in file and view the lines containing expression.grep -c expression file Count how many times expression appears in file.grep -i expression file Find all lines containing expression in file, using any capitalization
(case-insensitive).grep -n expression file Display each found line and a line number.grep ‘Nantucket$’ limerick* Find the lines in the limerick files that end with “Nantucket”.grep -v expression file Find all lines in file that do not contain expression.grep ‘^[A-Za-z]’ limerick Find all the lines in limerick that start with any letter, but not
with a number or symbol.grep ‘^[A-Z]’ limerick Find all the lines in limerick that start with a capital letter.grep ‘^There’ limerick* Find all the lines in the limerick files that start with “There”.grep -5 ‘word[1234]’ file Find word1, word2, word3, or word4 in file and view the sur-
rounding five lines as well as the lines containing the words.head -20 file View the first 20 lines of file.head file View the first 10 lines of file.pr file Reformat file for printing, complete with headers and footers.pr –-columns=2 file Reformat file for printing, complete with headers and footers
and two columns.
328
Appendix A
UnixReference
Manipulating Files

Table A.6
Command Des c r i p t i on
sdiff newfile oldfile View the differences between newfile and oldfile.sdiff -s newfile oldfile View the differences between newfile and oldfile, without showing
identical lines.sed Make changes throughout a file according to command-line
input or a sed script.sed ‘/old/new/g’ file.htm Search through file.htm and replace every occurrence of “old”
with “new”.sed -f script.sed file > file.new; Run the commands in script.sed, apply them to file, and� mv file.new file replace file with the manipulated content.split –b 500k file Split file into 500 KB chunks.sort file | uniq Sort file and send it to uniq to eliminate duplicates.sort file > sortedfile Sort the lines in file alphabetically and present the sorted
results in sortedfile.sort file1 | tee sorted | mail [email protected] Sort file1 and, with tee, send it both to the file sorted and to
standard output, where it gets mailed to the boss.sort file1 file2 | uniq -d Sort file1 and file2 together and find all the lines that are duplicated.sort file1 file2 file3 > bigfile Sort and combine the contents of file1, file2, and file3 and put
the sorted output in bigfile.sort -n file Sort file numerically.sort -t, file Sort fields in the comma-delimited file; the character following
-t (,) indicates the delimiter.sort -t, +2 file Sort on the third (really) field in the comma-delimited file.spell file Check the spelling of all words in file. Returns a list of possibly
misspelled words.tail -15 file View the last 15 lines of file.tail file View the last 10 lines of file.tidy file.html Clean file.html to make it “good” HTML, and optionally also eas-
ier to read and maintain.tr A-Za-z a-zA-Z < file Change uppercase to lowercase and lowercase to uppercase.uniq Use with sorted files to eliminate duplicate lines.wc -b file Count the bytes in file.wc file Count the lines, words, and bytes in file.wc -l file Count the lines in file.wc -w file Count the words in file.
329
Unix Reference
UnixReferen
ce
Manipulating Files (continued)

Table A.7
Command Des c r i p t i on
df See what file systems are mounted where, and how much space is used and available.df /usr/local/src Find out where /usr/local/src is mounted and how much space is available on it.df -k /home View the file system for /home with the usage reported in 1 KB, not 512-byte, blocks.df -h /home View the file system for /home with the usage reported in human-readable terms.du Get information about disk usage in the current directory as well as in all subdirectories.du /home Get information about disk usage in the /home directory.du -k Get information about disk usage, measured in 1 KB blocks.du -h Get information about disk usage, displayed in human-readable terms.file /usr/bin/pico Find out the file type of /usr/bin/pico.finger See who else is logged into the system and get a little information about them.finger @stc.org Find out who is logged into the stc.org system.finger ejr Get information about user ejr on your system.finger [email protected] Get information about user [email protected] Find out the numeric value of your userid and what groups (by name and numeric
userid value) you belong to.id otheruser Check someone else’s status to find out what groups they’re in.quota Find out if you’re over quota.quota -v View your current quota settings and space usage.uname Use to find out what kind of Unix system you’re using.uname -a Print all system information, including the Unix system type, host name, version, and
hardware.uname -sr Find both the system type and release level.watch Monitor a file or other data for changes.w Get information about other users on the system and what they’re doing.who Get information about the other users on the system.whoami Find out what userid you’re currently logged in as.
330
Appendix A
UnixReference
Getting Information About Your System

Table A.8
Command Des c r i p t i on
alias ourterm=”longhonking Create the alias ourterm to substitute for the command longhonkingcommand-w� command -w -many –flags -many -flags arguments.� arguments”
set Find out what environment variables are set and their current values in zshand bash.
set VARIABLE=”long value” Use in csh to set the value of VARIABLE with spaces or special characters in it.set VARIABLE=value Use in csh to set VARIABLE to value.setenv Use in csh to find out what environment variables are set and their current values.setenv VARIABLE value Use in csh to make the VARIABLE available to other scripts in the current shell.VARIABLE=”long value” Use in zsh and bash to set the value of VARIABLE with spaces or special
characters in it.VARIABLE=value Use in zsh and bash to set the VARIABLE to value.export VARIABLE Use in zsh and bash to make the value of VARIABLE available to other scripts.
331
Unix Reference
UnixReferen
ce
Configuring Your Unix Environment

Table A.9
Command Des c r i p t i on
at 01:01 1 Jan 2010 Schedule a job or jobs to run at 01:01 on January 1, 2010.at 01/01/10 Schedule a job to run on 1/1/10.at 3:42am Schedule a job to run at 3:42 a.m.at noon tomorrow Schedule a job to run at noon tomorrow.at now + 3 weeks Schedule a job to run in three weeks.at teatime Schedule a job to run at 4 p.m.atq Review jobs in the at queue.atrm 3 Remove the specified queued job (3, in this case).batch Schedule jobs to run when system load permits.bg Run the most recently suspended or controlled job in the background.bg %2 Run job 2 in the background.crontab -e Edit your crontab in the default editor to schedule regular processes or jobs.cZ Suspend a running job, program, or process.fg Run the most recently suspended or controlled job in the foreground.fg 1 Run job 1 in the foreground.jobs See a list of the currently controlled jobs.kill %ftp Kill a job by name or job number.kill 16217 Kill process number 16217.kill -9 16217 Kill process 16217; the -9 flag lets you kill processes that a regular kill won’t affect.nice Run a job “nicely”—slower and with less of an impact on the system and other users.
Bigger numbers are nicer, up to 19. 10 is the default.nice -n 19 slowscript Run slowscript nicely with a priority of 19.pkill badjob Kill the process called badjob.ps View the list of current processes that you’re running.ps e View all processes, including those from other users.ps f View processes and their interrelationships (the forest view).ps x View the processes that the system itself is running (also called daemons).renice 19 processid-of Run slowscript more nicely (change the niceness) with a priority of 19.� -slowscript
time script Time how long it takes (in real time and system time) to run script.top Monitor system load and processes in real time.
332
Appendix A
UnixReference
Running Scripts and Programs

Table A.10
Command Des c r i p t i on
break Use in a shell script to skip the rest of the commands in the loop and restart at thebeginning of the loop.
case ... in ... esac Use in a shell script to perform separate actions for a variety of cases.clear Clear the screen.continue Use in a for, while, until, or select loop to stop the current iteration and start the next one.echo Display a statement or the value of an environment variable onscreen.echo “Your shell is $SHELL” Display “Your shell is” and the name of your shell onscreen.echo -e “\tA Tab Stop” Move one tab stop to the right and print “A Tab Stop” on the screen.for ... do ... done Use in a shell script with conditions and commands to specify a loop to occur repeatedly.getopts Use in a shell script to read flags from the command line.if ... then ... else ... fi Use in a script (with conditions and commands) to set a conditional process.read variable Use in a script to get input (the variable) from the terminal.sh -x script Execute script and require the script to display each command line as it is executed.sleep 4h 5m 25s Pause for 4 hours, 5 minutes, and 25 seconds here.sleep 5s Pause for 5 seconds.test Use in a script to check to see if a given statement is true.test expression See if expression is true or false—usually used with conditional statements.while ... do ... done Use in a shell script to perform a loop only while the condition is true.
333
Unix Reference
UnixReferen
ce
Writing Basic Scripts

Table A.11
Command Des c r i p t i on
alpine Start the alpine mail program and read, respond to, or sendemail, or to read Usenet newsgroups.
alpine [email protected],[email protected] Start an alpine mail message to [email protected] [email protected].
alpine [email protected] Start an alpine mail message to [email protected] Start the mail program. (Use pine or mutt rather than mail
if possible.)mail [email protected] < file Send file to [email protected] -s “For you!” [email protected] < file Send file to [email protected] with the subject “For you!”.mail [email protected] Start a simple mail message to [email protected] [email protected] [email protected] Start a simple mail message to [email protected] and
[email protected] Start the mutt mail program and read, respond to, or send
e-mail.mutt [email protected] Start a new mutt mail message to [email protected] [email protected] -a file.tgz Start a new mutt mail message to [email protected] and
attach file.tgz.mutt [email protected],[email protected] Start a new mutt mail message to [email protected] and
[email protected] Start the pine mail program and read, respond to, or send
e-mail, or to read Usenet newsgroups.pine [email protected],[email protected] Start a pine mail message to [email protected] and
[email protected] [email protected] Start a pine mail message to [email protected] Filter and sort mail according to a “recipe.” Run from the
.forward file or automatically by the system.vacation Initialize vacation and edit the message template.vacation -I Start vacation and tell it to respond to incoming messages.vacation -j Start vacation and automatically respond to all messages.
334
Appendix A
UnixReference
Sending and Reading E-mail

Table A.12
Command Des c r i p t i on
dig @nameserver.some.net www.raycomm.com Look up the name www.raycomm.com from the name servernameserver.some.net.
dig –x 192.168.12.52 Look up the name corresponding to the IP address 192.168.12.52.ftp ftp.raycomm.com Transfer files to or from ftp.raycomm.com using the FTP protocol.irc wazoo irc.netcom.com Connect to the irc server at irc.netcom.com and use the nickname
wazoo.links Start the linksWeb browser.links http://www.google.com/ Start the linksWeb browser at http://www.google.com/.lynx -dump http://url.com > newname.txt Get a spiffy plain text file named newname.txt out of an HTML document
from http://url.com.lynx Start the lynxWeb browser.lynx http://www.yahoo.com/ Start the lynxWeb browser on http://www.yahoo.com/.mesg n Refuse talk and write messages.mesg y Accept talk and write messages.nslookup www.raycomm.com Look up the name www.raycomm.com from the name server� nameserver.some.net nameserver.some.net.nslookup www.raycomm.com Look up the IP address for the host www.raycomm.com.ping www.raycomm.com Test the connection to the host www.raycomm.com.ssh somewhere.com Securely connect to and use a computer on the Internet named some-
where.com.talk deb Talk interactively with the owner of the id deb.talk [email protected] Talk interactively with a user id on the system wherever.com.telnet somewhere.com Connect to and use a computer on the Internet named
somewhere.com.tn3270 library.wherever.edu Connect to a host computer named library.wherever.edu that uses an
IBM-mainframe-type operating system, like many library card catalogs.traceroute www.yahoo.com Identify the computers and other devices between you and the host
www.yahoo.com.traceroute -n hostname Check the path to hostname without resolving the intervening host
names for faster results.wall Send a write-type message to all users on the system.wget http://www.example.com/ Download the file found at http://www.example.com/.wget –r –l 2 http://www.example.com/ Download the files found at http://www.example.com/ for two levels
down in the Web structure.write otherid Send a message to the user otherid on the same system.
335
Unix Reference
UnixReferen
ce
Accessing the Internet

Table A.13
Command Des c r i p t i on
compress -c file.tar > file.tar.Z Compress file.tar under the same name with a .Z ending while retainingthe original file.
compress file.tar Compress file.tar. The named file will be replaced with a file of samename ending with .Z.
gunzip archive.tar.gz Uncompress (un-gzip) archive.tar.gz. Including .gz on the end of thefilename is optional.
gzip archive.tar Gzip (compress) archive.tar. The zipped file will replace the unzippedversion and will have a new .gz extension
gzip -c filetogzip > compressed.gz Gzip filetogzip and keep a copy of the original, unzipped file.gzip -d archive.tar.gz Uncompress (un-gzip) a file. Including .gz on the end of the filename
is optional.tar -cf newfile.tar Directory Create a new tar archive containing all of the files and directories in
Directory.tar -czf newfile.tgz Directory Create a new gzipped tar archive containing all of the files and directories
in Directory.tar -v Add the -v flag to tar for a verbose description of what is happening.tar -xf archive.tar --wildcards "*file*" Extract the files with names containing “file” from the tar archive.tar -xf archive.tar Extract the contents of archive.tar.tar -xzf archive.tgz Uncompress and extract the contents of archive.tgz.uncompress archive.tar.Z Uncompress archive.tar.Z, resulting in a file of the same name but without
the .Z ending.uncompress -c archive.tar.Z > archive.tar Uncompress archive.tar.Z and retain the original file.unzip zipped Unzip zipped without specifying the extension.uudecode file.uue Uudecode file.uue.uuencode afile.jpg a.jpg > tosend.uue Uuencode afile.jpg with the decode name a.jpg and save the encoded
output as tosend.uue.uuencode -m Use uuencode with the -m flag to specify base64 encoding, if your version
of uuencode supports it.gzcat archive.gz | more Uncompress (on the fly without deleting the original) archive.gz to read
the contents.zip zipped file Create a new zip file named zipped.zip from file.yencode file Create a new yencoded file from file.
336
Appendix A
UnixReference
Working with Encoded and Compressed Files

Table A.14
Command Des c r i p t i on
bc Use a calculator to add, subtract, multiply, divide, and more.bc bcfile Do the calculations specified in bcfile, then more calculations from stdin.expr Evaluate mathematical or logical expressions.cal View the current month’s calendar.cal 12 1941 View the calendar for December 1941.cal 1999 View the calendar for 1999.cal -j View the Julian calendar.calendar View reminders for the current date, read from the file ~/calendar.fortune Display a fortune, saying, quotation, or whatever happens to come up.look Look up a word in the system dictionary.lp Print a file.rsync file backupfile Remotely synchronize (copy) file to backupfile.script Record your actions in a file called typescript in the current directory.script covermybutt Record your actions in the file covermybutt.units Convert from one kind of unit to another.
337
Unix Reference
UnixReferen
ce
Installing Software

This page intentionally left blank

As you’re using Unix, you’ll undoubtedlyencounter files that look important or direc-tories that look interesting, but it’s often hardto know what files belong to which programs,and even harder to figure out what somedirectories are for. Therefore, we’re trying tohelp out a little with the information in thisappendix.
Table B.1 lists important Unix files anddirectories.
Table B.2 lists the contents of common Unixdirectories. In practice, the contents of thesedirectories (and their existence) vary greatlyby system, but the configuration describedhere is fairly standard.
339
What’s Whatand What’s Where
BW
hat’s
Wh
atan
dW
hat’s
Wh
ere

Table B.1
F i l e N a m e D e s c r i p t i o n
~/.forward Includes address(es) to forward mail to or redirects mail to a vacation program or to procmail.~/.newsrc Includes records of read, unread, and subscribed newsgroups for use by news readers.~/.procmailrc Includes configuration information for procmail.~/.pinerc Includes configuration information for pine.~/.muttrc Includes configuration information for mutt.~/.signature Contains your signature, which is appended to your messages by e-mail programs and news readers./etc/bashrc Systemwide bash resource file shared by all bash users./etc/csh.cshrc Systemwide csh resource file./etc/group System group records./etc/ksh.kshrc Systemwide configuration files for ksh users./etc/passwd System passwords and user records./etc/profile Systemwide configuration file used by bash and ksh./etc/skel Original configuration files placed into the home directory of new users.~/.bash_profile Primary personal configuration file for bash users.~/.cshrc Resource file for csh users.~/.kshrc Configuration file for ksh users.~/.login Configuration file for csh users in a login shell.~/.profile Primary configuration file for ksh users; used by bash if .bash_profile isn’t available.~/.vimrc Includes configuration information for vim.~/.zlogin Configuration file for zsh users in a login shell.~/.zshrc Resource file for zsh users.~/.zprofile Configuration file for zsh users.~/.zshenv Environment file for zsh users.~/mail Mail directory customarily used by pine.~/Mail Mail directory customarily used by system mailer and mutt.Makefile Includes configuration information used by make to compile and install new software.README Includes important information, usually distributed with a new program or script, about installation
or usage.
340
Appendix B
Wh
at’s
Wh
atan
dW
hat
’sW
her
e
Key Files in Your Unix Environment

Table B.2
d i r e c t o r y c o n t e n t s
/bin Essential programs and commands for use by all users./boot Files that the system boot loader uses./dev Devices (CD-ROM, serial ports, etc.) and special files./etc System configuration files and global settings./etc/skel Template configuration files for individual users./etc/X11 Configuration files and information for the X Window System./home Home directories for users./lib Essential shared libraries and kernel modules./mnt Mount point for temporarily mounted file systems./opt Directory for add-on application software packages./proc Location of kernel and process information (virtual file system)./root Home directory for the root user/system administrator./sbin Essential programs and commands for system boot./tmp Temporary files./usr/bin Commands and programs that are less essential for basic Unix system functionality than
those in /bin but were installed with the system./usr/include Standard include files and header files for C programs./usr/lib Libraries for programming and for installed packages./usr/local Most files and data that were developed or customized on the system./usr/local/bin Locally developed or installed programs./usr/local/man Manual (help) pages for local programs./usr/local/src Source code for locally developed or installed programs./usr/sbin Additional nonessential standard system binaries./usr/share Shared (system-independent) data files./usr/share/dict Word lists./usr/share/man Manual (help) pages for standard programs./usr/share/misc Miscellaneous shared system-independent data./usr/src Source code for standard programs./usr/X11R6 X Window System, Version 11 Release 6./usr/X386 X Window System, Version 11 Release 5, on x86 platforms./var Changeable data, including system logs, temporary data from programs, and user mail storage./var/account Accounting logs, if applicable./var/adm Administrative log files and directories./var/cache Application-specific cache data./var/cache/fonts Locally generated fonts./var/cache/man Formatted versions of manual pages./var/crash Information stored from system crashes, if applicable./var/games Variable game data./var/lock Lock files created by various programs./var/log Log files and directories./var/mail User mailbox files.
341
What’s What and What’s Where
Wh
at’sW
hat
and
Wh
at’sW
here
Common Unix Directories and Their Contents
continues on next page

Table B.2
d i r e c t o r y c o n t e n t s
/var/run Run-time variable files./var/spool General application spool data./var/spool/cron Contains cron and at job schedules./var/spool/lpd Line-printer daemon print queues./var/spool/mail Contains incoming mail for users./var/state Variable state information for the system./var/state/editorname Editor backup files and state information./var/state/misc Miscellaneous variable data./var/tmp Temporary files that the system keeps through reboots./var/yp Database files that the Network Information Service (NIS) uses.
342
Appendix B
Wh
at’s
Wh
atan
dW
hat
’sW
her
e
Common Unix Directories and Their Contents (continued)

This appendix provides a list of many (butcertainly not all) Unix commands and pro-grams as well as many of the related command-line flags.
In general, flags offer a thorough selection ofoptions for programs that operate exclusivelyfrom command-line input, as well as an over-view of the functionality for many other pro-grams. Please keep in mind, however, thatcommand flags only touch the surface of thecapabilities of interactive programs (like pico,vi, links, or pine) or particularly complexprograms that rely on special expressions (suchas grep or tr) or that use multiple files orsources for information (such as procmail).
Table C.1 should provide you with a briefreminder and starting point for learningmore about these Unix commands. Whilethe flags we’ve included here work on oursystems, they will likely vary somewhat ondifferent systems or different Unix versions,or with different shells. Check your local manpages for specifics.
Note that multiple equivalent commands orflags all appear on the same line, separatedby commas. Additionally, multiple flags(unless contradictory) can be used with allcommands. The [] brackets indicate thatone of the options enclosed may be used.
343
Commandsand Flags
CCo
mm
ands
and
Flags
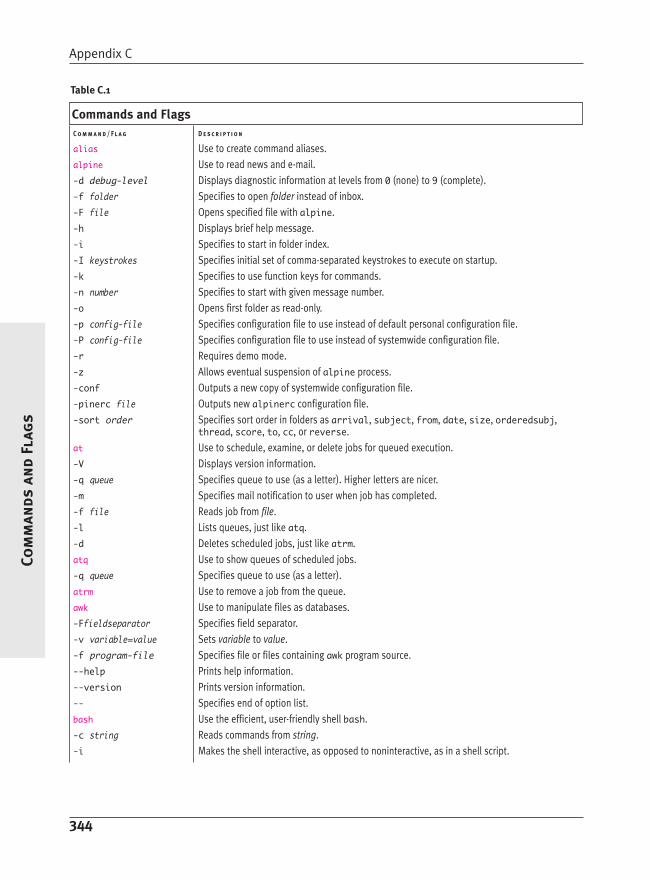
Table C.1
C o m m a n d / Fl a g D e s c r i p t i o n
alias Use to create command aliases.alpine Use to read news and e-mail.-d debug-level Displays diagnostic information at levels from 0 (none) to 9 (complete).-f folder Specifies to open folder instead of inbox.-F file Opens specified file with alpine.-h Displays brief help message.-i Specifies to start in folder index.-I keystrokes Specifies initial set of comma-separated keystrokes to execute on startup.-k Specifies to use function keys for commands.-n number Specifies to start with given message number.-o Opens first folder as read-only.-p config-file Specifies configuration file to use instead of default personal configuration file.-P config-file Specifies configuration file to use instead of systemwide configuration file.-r Requires demo mode.-z Allows eventual suspension of alpine process.-conf Outputs a new copy of systemwide configuration file.-pinerc file Outputs new alpinerc configuration file.-sort order Specifies sort order in folders as arrival, subject, from, date, size, orderedsubj,
thread, score, to, cc, or reverse.at Use to schedule, examine, or delete jobs for queued execution.-V Displays version information.-q queue Specifies queue to use (as a letter). Higher letters are nicer.-m Specifies mail notification to user when job has completed.-f file Reads job from file.-l Lists queues, just like atq.-d Deletes scheduled jobs, just like atrm.atq Use to show queues of scheduled jobs.-q queue Specifies queue to use (as a letter).atrm Use to remove a job from the queue.awk Use to manipulate files as databases.-Ffieldseparator Specifies field separator.-v variable=value Sets variable to value.-f program-file Specifies file or files containing awk program source.--help Prints help information.--version Prints version information.-- Specifies end of option list.bash Use the efficient, user-friendly shell bash.-c string Reads commands from string.-i Makes the shell interactive, as opposed to noninteractive, as in a shell script.
344
Appendix C
Com
man
dsan
dFl
ags
Commands and Flags

Table C.1
C o m m a n d / F l a g D e s c r i p t i o n
-s Specifies that additional options, beyond those given, should be read from standard input.-, -- Indicates the end of options and stops further option processing.--norc Specifies not to read ~/.bashrc.--noprofile Specifies not to read systemwide or individual configuration files.--rcfile file Specifies alternative configuration file.--version Displays bash version number.--login Specifies to start bash as a login shell.--posix Specifies Posix compliance, which helps make anything more portable from system to system.batch Use to schedule jobs for low system loads.bg Use to move a job to the background.cal Use to display a calendar-j Displays Julian dates with days numbered through the year from January 1.-y Displays the current year’s calendar.month year Specifies month (1 to 12) and year (1 to 9999).cat Use to send text to standard output, usually the screen.-b, --number-nonblank Specifies to number all nonblank output lines.-n, --number Specifies to number all output lines.-s, --squeeze-blank Specifies to replace adjacent blank lines with a single blank line.-v, --show-nonprinting Specifies to display control characters with “^” preceding them.-A, --show-all Specifies to show all control characters.-E, --show-ends Specifies to display a “$” at the end of each line.-T, --show-tabs Specifies to display tab characters as “^I”.--help Displays a help message.--version Displays the version number.cd Use to change the working directory.chgrp Use to change the group ownership of files.-c, --changes Specifies to list files whose ownership actually changes.-f, --silent, --quiet Suppresses error messages for files that cannot be changed.-v, --verbose Specifies to describe changed ownership.-R, --recursive Specifies to recursively change ownership of directories and contents.--help Displays help message.--version Displays version information.chmod Use to change the access permissions of files.-c, --changes Specifies to list files whose permissions actually change.-f, --silent, --quiet Suppresses error messages.-v, --verbose Specifies to describe changed permissions.-R, --recursive Specifies to recursively change permissions of directories and contents.--help Displays help message.--version Displays version information.
345
Commands and Flags
Com
man
dsan
dFlag
s
Commands and Flags (continued)
continues on next page

Table C.1
C o m m a n d / Fl a g D e s c r i p t i o n
chown Use to change the user and group ownership of files.-c, --changes Specifies to list files whose ownership actually changes.-f, --silent, --quiet Suppresses error messages for files that cannot be changed.-v, --verbose Specifies to describe changed ownership.-R, --recursive Specifies to recursively change ownership of directories and contents.--help Displays help message.--version Displays version information.chsh Use to change your login shell.-s, --shell Specifies the new login shell.-l, --list-shells Displays the shells in /etc/shells.-u, --help Prints a help message.--version Prints version information.cmp Use to compare two files.-l Displays the byte number (which starting byte in the file) in decimal
and the differing bytes in octal for each difference.-s Displays nothing for differing files except exit status.compress Use to compress and expand archives.-c Specifies that compress/uncompress write to standard output (usually your screen) and
leave files unchanged.-r Specifies to recursively process directories.-V Displays version information.cp Use to copy files or directories.-a, --archive Specifies to preserve file structure and attributes.-b, --backup Specifies to make backups of files before overwriting.-d, --no-dereference Specifies to copy symbolic links as symbolic links rather than the files that they point to.-f, --force Specifies to overwrite all existing destination files.-i, --interactive Requires prompting before overwriting.-l, --link Specifies to make hard links instead of copies of files.-P, --parents Completes destination filenames by appending the source filename to the target directory
name.-p, --preserve Specifies to preserve the original file characteristics, including permissions and ownership.-r, -R, --recursive Specifies to copy directories recursively.-s, --symbolic-link Specifies to make symbolic links instead of copies of files.-u, --update Specifies not to overwrite newer files.-v, --verbose Displays filenames before copying.-x, --one-file-system Restricts action to a single file system.--help Prints a help message.--version Prints version information.-S suffix, --suffix=suffix Specifies a suffix for backup files.
346
Appendix C
Com
man
dsan
dFl
ags
Commands and Flags (continued)

Table C.1
C o m m a n d / F l a g D e s c r i p t i o n
crontab Use to maintain crontab files.-l Displays current crontab.-r Removes current crontab.-e Opens crontab in default editor.df Use to display information about free disk space.-a, --all Specifies that all file systems, including special ones (e.g. CDROM, MSDOS), should be
processed.-i, --inodes Displays inode (disk element) usage information.-k, --block-size=1K Displays sizes in 1 KB blocks instead of 512-byte blocks.-h Provides file sizes in human-readable format.-P, --portability Uses Posix standard output format.-T, --print-type Displays type of each file system.-t, --type=fstype Displays only named file system types.-x, --exclude-type=fstype Displays only non-named file system types.--help Prints help information.--version Prints version information.diff Use to display differences between text files.-b Specifies to ignore trailing blanks (spaces and tabs) and consider other blanks equivalent.-i Specifies case-insensitive comparisons.-t Specifies to expand tab characters to spaces in output.-w Specifies to ignore all blanks.-c Specifies a listing of differences with three lines of context.-C number Specifies a listing of differences with number lines of context.-e Specifies output of a script for the ed editor to re-create the second file from the first.-f Specifies output of a script to create the first file from the second. This does not work
with ed.-h Specifies fast and not necessarily complete comparison.-n Specifies output of a script to create the first file from the second along with a total of
changed lines for each command.-D string Outputs combined version of first and second files with C preprocessor controls to compile
as the first or the second file.-r Specifies that diff should recursively process subdirectories common to both given
directories.-s Outputs names of identical (not different) files.-S name Begins comparison within a directory with the specified filename.dig Use to look up IP numbers or domain names.-b ip-address Specifies to set the source IP address of the query.-f filename Specifies to read lookup requests from a file (filename).-p portnumber Specifies a port number to use instead of the standard 53.-t type Specifies the query type.-x address Specifies reverse lookups (addresses to names).
347
Commands and Flags
Com
man
dsan
dFlag
s
continues on next page
Commands and Flags (continued)

Table C.1
C o m m a n d / Fl a g D e s c r i p t i o n
du Use to display disk usage information.-a, --all Displays information for all files.-b, --bytes Displays sizes in bytes.-c, --total Displays totals for all arguments.-k, --block-size=1K Displays sizes in kilobytes.-h, --human-readable Provides file sizes in human-readable format.-l, --count-links Displays sizes of all files, including linked files counted elsewhere.-s, --summarize Displays only totals for each argument.-x, --one-file-system Specifies not to process directories on other file systems.-L, --dereference Displays space used by linked file or directory, not just space used by link.-S, --separate-dirs Counts directories separately.--help Prints help information.--version Prints version information.emacs Use to edit files.file Specifies name of file to edit.+number Specifies to go to the specified line number.-q Specifies not to load an initialization file.-u user Specifies to load user’s initialization file.-t file Specifies to use file as the terminal.expr Use to evaluate expressions.--help Specifies to display help information.--version Specifies to display version information.fg Use to move a job to the foreground.file Use to determine file type.-m list Specifies alternative list of files with magic numbers (helping to indicate file type).-z Attempts to look into compressed files.-b Specifies brief output mode.-c Checks magic file.-f file Specifies to read names of the files to be examined from file.-follow Specifies to follow symbolic links.-L Specifies to follow symbolic links.find Use to find files in the Unix system.-daystart Specifies to measure all times starting today, not 24 hours ago.-depth Specifies to process directory contents before the directory.-help, --help Prints a help message.-maxdepth levels Specifies how many levels below starting directory level to descend.-mindepth levels Specifies how many levels below starting directory level to start processing.-mount, -xdev Specifies not to descend directories on other file systems.-noleaf Specifies not to optimize for Unix systems, which is needed for CD-ROM directories, for example.-version, --version Prints version information.-amin n Finds files accessed n minutes ago.
348
Appendix C
Com
man
dsan
dFl
ags
Commands and Flags (continued)

Table C.1
C o m m a n d / F l a g D e s c r i p t i o n
-anewer file Finds file accessed more recently than file was modified.-atime n Finds files accessed n days ago.-cmin n Finds files whose status was changed n minutes ago.-cnewer file Finds files whose status was changed more recently than the file was modified.-ctime n Finds files whose status was changed n days ago.-empty Finds files and directories that are empty.-fstype type Finds files on file systems of specified type.-gid n Finds files with numeric group ID of n.-group gname Finds files with group name of gname or corresponding group ID.-ilname pattern Finds files that are symbolic links with pattern text in the name, case-insensitive.-iname pattern Finds files with pattern in the name, case-insensitive.-inum n Finds files with inode number n.-ipath pattern Finds files with pattern in the path, case-insensitive.-iregex pattern Finds files whose full paths are matched by the regular expression pattern, case-insensitive.-links n Finds files with n links.-lname pattern Finds files that are symbolic links with pattern in the name.-mmin n Finds files last modified n minutes ago.-mtime n Finds files last modified n days ago.-name pattern Finds files with name of pattern.-newer file Finds files modified more recently than file.-nouser Finds files with no user name corresponding to the numeric userid.-nogroup Finds files with no group name corresponding to the numeric group ID.-path pattern Finds files with paths matching pattern.-regex pattern Finds files with regular expression pattern in name, case-sensitive.-size n[cwbkMG] Finds files using n bytes, words, 512-byte blocks, kilobytes, megabytes, or gigabytes,
respectively, of space.-type type Finds files of type type, where b is block (buffered) special, c is character (unbuffered) special,
d is directory, p is named pipe (FIFO), f is regular file, l is symbolic link, or s is socket.-uid n Finds files with numeric userid of n.-used n Finds files last accessed n days after status changed.-user uname Finds files owned by userid or numeric id user ID.-exec command \; Executes command for each found file.-fprint file Prints full filename into file.-ok command \; Executes command with confirmation for each found file.-print Prints results to standard output.finger Use to display information about users.-s Displays the login name, real name, terminal name and write status, idle time, login time, office
location, and office phone number.-l Specifies multiple-line format with information from -s option plus user’s home directory,
home phone number, login shell, mail status, and the contents of the .plan, .project,and .forward files.
-p Prevents -l from displaying contents of .plan and .project files.-m Disables matching user names.
349
Commands and Flags
Com
man
dsan
dFlag
s
continues on next page
Commands and Flags (continued)

Table C.1
C o m m a n d / Fl a g D e s c r i p t i o n
fmt Use to format files.-c, --crown-margin Specifies to preserve indent of first two lines.-p, --prefix=chars Specifies to combine lines with chars at the beginning.-s, --split-only Specifies to split long lines, but not to combine short ones.-t, --tagged-paragraph Specifies that the indent of the first line differs from the next.-u, --uniform-spacing Specifies to ensure one space between words, two after sentences.-w, --width=n Specifies a maximum line width (default of 75 chars).--help Specifies to display a usage message.--version Specifies to display version information.ftp Use to put files in or get files from FTP (File Transfer Protocol) archives.-v Specifies verbose output of responses and statistics.-n Restricts automatic log in.-i Turns off interactive prompting during multiple file transfers.-d Enables debugging output.-g Disables wildcards (“globbing”).grep Use to display lines matching a given pattern.-n Displays matches with n lines before and after matching lines.-A n, --after-context=n Displays matches with n lines after matching lines.-B n, --before-context=n Displays matches with n lines before matching lines.-C n, --context=n Displays matches with n lines of surrounding context.--version Displays version information.-c, --count Displays count of matches for each file.-e pattern, Specifies pattern explicitly.� --regexp=pattern
-f file, --file=file Reads patterns from file.-h, --no-filename Specifies not to display filenames in output.-i, --ignore-case Searches without regard to case.-L, --files-without-match Prints the names of all non-matching files.-l, --files-with-matches Prints the names of all matching files.-n, --line-number Displays output line numbers.-q, --quiet Suppresses output and stops scanning on first match.-s, --no-messages Suppresses error messages.-v, --invert-match Inverts matching to select non-matching lines.-w, --word-regexp Finds only matches for whole words.-x, --line-regexp Finds only matches for the whole line.gzip Use to compress (gzip) or expand files.-a, --ascii Specifies to convert ends of lines in ASCII text mode to conform to Unix conventions.-c, --stdout, --to-stdout Sends output to standard output while maintaining original files unchanged.-d, --decompress, Uncompresses files.� --uncompress
-f, --force Forces compression or decompression.
350
Appendix C
Com
man
dsan
dFl
ags
Commands and Flags (continued)

Table C.1
C o m m a n d / F l a g D e s c r i p t i o n
-h, –-help Displays help message.-l, –-list Lists information about compressed files.--verbose Displays additional information about archive files.-L, license Displays the gzip license.-n, --no-name Specifies not to save the original filename and time.-N, –-name Specifies to always save the original filename and time-stamp information when compressing.-q, –-quiet Suppresses all warnings.-r, –-recursive Specifies to descend subdirectories.-S .suf, --suffix .suf Specifies alternative suffixes.-t, –-test Tests compressed-file integrity.-v, –-verbose Displays name and percentage reductions for each file processed.-V, –-version Displays version information.head Use to output the first part of files.-c, --bytes n[b,k,m] Displays first n bytes of file, in b (512-byte blocks), k (1 KB blocks), or m (1 MB blocks).-n n, --lines=n Displays first N lines of a file.-q, --quiet, --silent Specifies not to display filenames.-v, --verbose Displays filename.--help Displays help message.--version Displays version information.id Use to display real and effective userids and group IDs.-g, --group Displays only group ID.-G, --groups Displays only supplementary groups.--help Displays help message.-n, --name Displays user or group name, not number.-r, --real Displays real, not effective, userid or group ID.-u, --user Displays only userid.--version Displays version information.jobs Use to display list of jobs under control.-l Displays additional information (long listing) for jobs.-p Displays job process IDs.-n Displays jobs that have stopped or exited since notification. Only in ksh.kill Use to terminate a process.-s signal, -signal Specifies kill signal to send.-l Displays a list of signal names.less Use to page through files; similar to more.-?, --help Displays a command summary.-a Specifies to start searches below visible display.-bn Specifies the amount of buffer space to use for each file, in kilobytes.-B Specifies automatic buffer allocation.-c Specifies not to scroll, but rather to paint each screen from the top.-C Specifies not to scroll, but rather to clear and display new text.
351
Commands and Flags
Com
man
dsan
dFlag
s
Commands and Flags (continued)
continues on next page
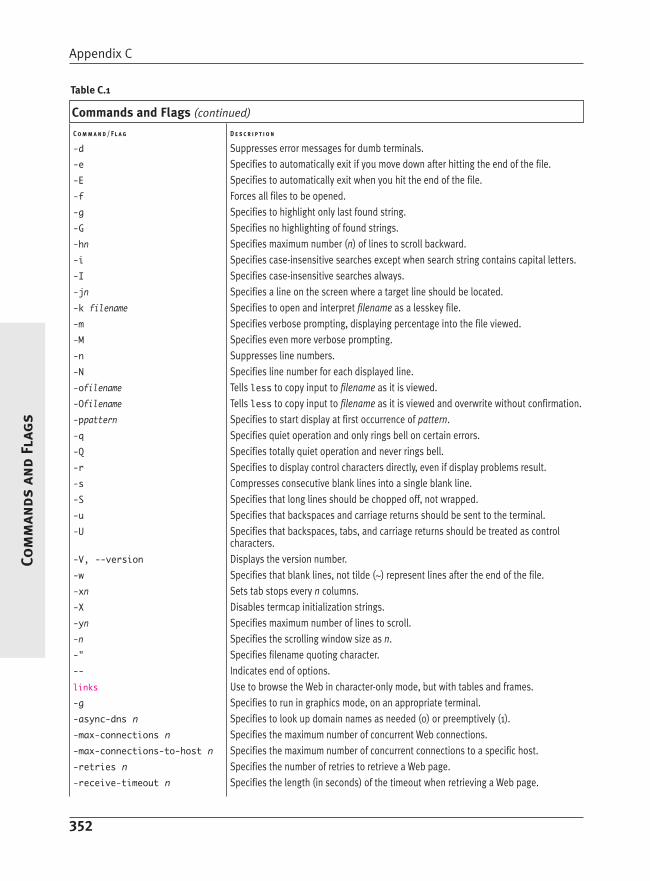
Table C.1
C o m m a n d / Fl a g D e s c r i p t i o n
-d Suppresses error messages for dumb terminals.-e Specifies to automatically exit if you move down after hitting the end of the file.-E Specifies to automatically exit when you hit the end of the file.-f Forces all files to be opened.-g Specifies to highlight only last found string.-G Specifies no highlighting of found strings.-hn Specifies maximum number (n) of lines to scroll backward.-i Specifies case-insensitive searches except when search string contains capital letters.-I Specifies case-insensitive searches always.-jn Specifies a line on the screen where a target line should be located.-k filename Specifies to open and interpret filename as a lesskey file.-m Specifies verbose prompting, displaying percentage into the file viewed.-M Specifies even more verbose prompting.-n Suppresses line numbers.-N Specifies line number for each displayed line.-ofilename Tells less to copy input to filename as it is viewed.-Ofilename Tells less to copy input to filename as it is viewed and overwrite without confirmation.-ppattern Specifies to start display at first occurrence of pattern.-q Specifies quiet operation and only rings bell on certain errors.-Q Specifies totally quiet operation and never rings bell.-r Specifies to display control characters directly, even if display problems result.-s Compresses consecutive blank lines into a single blank line.-S Specifies that long lines should be chopped off, not wrapped.-u Specifies that backspaces and carriage returns should be sent to the terminal.-U Specifies that backspaces, tabs, and carriage returns should be treated as control
characters.-V, --version Displays the version number.-w Specifies that blank lines, not tilde (~) represent lines after the end of the file.-xn Sets tab stops every n columns.-X Disables termcap initialization strings.-yn Specifies maximum number of lines to scroll.-n Specifies the scrolling window size as n.-” Specifies filename quoting character.-- Indicates end of options.links Use to browse the Web in character-only mode, but with tables and frames.-g Specifies to run in graphics mode, on an appropriate terminal.-async-dns n Specifies to look up domain names as needed (0) or preemptively (1).-max-connections n Specifies the maximum number of concurrent Web connections.-max-connections-to-host n Specifies the maximum number of concurrent connections to a specific host.-retries n Specifies the number of retries to retrieve a Web page.-receive-timeout n Specifies the length (in seconds) of the timeout when retrieving a Web page.
352
Appendix C
Com
man
dsan
dFl
ags
Commands and Flags (continued)

Table C.1
C o m m a n d / F l a g D e s c r i p t i o n
-unrestartable-receive Specifies the timeout on nonrestartable connections.� -timeout n
-format-cache-size n Specifies the number of Web pages to cache for quicker retrieval.-memory-cache-size n Specifies the amount of cache memory in kilobytes.-http-proxy name:n Specifies the name and port number of the HTTP proxy, if needed.-ftp-proxy name:n Specifies the name and port number of the FTP proxy, if needed.-download-dir path Specifies the default download directory.-anonymous Specifies to restrict capabilities to run in an anonymous account.-no-connect Specifies to run links as a separate process instead of within an existing process.-version Specifies to display the version number.-help Specifies to print help information.ln Use to make links between files.-b, --backup Backs up files before removing them.-f, --force Overwrites destination files.-i, --interactive Prompts before overwriting files.-n, --no-dereference Attempts to replace symbolic links.-s, --symbolic Specifies to make symbolic links when possible.-v, --verbose Specifies to display filenames before linking.--help Prints a help message.--version Prints version information.-S suffix, --suffix=suffix Specifies suffix for backup files.locate Use to find files with a specific string in their names or paths.-u Specifies to create locate database starting at the root directory.-U path Specifies to create locate database starting at path.-e dir,dir,... Specifies to exclude directories from the locate database.-f fstype Specifies to exclude files on named file system types from the database.-c Specifies to process /etc/updatedb.conf file when updating the database.-l n Specifies the security level as 0 (no checking, faster), or 1 (checking, slower).-i Specifies to do a case-insensitive search.-q Specifies to use quiet mode and suppress all error messages.-n n Specifies to limit the amount of results shown to n.-r regex, --regexp=regex Specifies to search the database using a regular expression.-o name, --output=name Specifies the database to create.-d path, --database=path Specifies the path of databases to search in.-h, --help Specifies to print help information.-v, --verbose Specifies to use verbose mode when creating database.-V,--version Specifies to display the version number.look Use to look up words in the system dictionary.-d Specifies to use dictionary (alphanumeric) character set and order.
353
Commands and Flags
Com
man
dsan
dFlag
s
continues on next page
Commands and Flags (continued)

Table C.1
C o m m a n d / Fl a g D e s c r i p t i o n
-f Specifies to use case-insensitive search.-a Specifies to use the alternate dictionary /usr/share/dict/web2.-t Specifies the end of the string to compare.lp Use to print files.-c Specifies to copy file to spool directory before printing.-d name Specifies to print files to the printer name.-i n Specifies an existing job number n to modify.-m Specifies to send e-mail when the job is completed.-n copies Specifies the number of copies to print.-q priority Specifies the job priority from 1 to 50 (highest).-s Specifies not to report the resulting job IDs.-t name Specifies the name for the job being submitted.-H handling Specifies immediate, hold, resume, or hh:mm to determine when the job will be printed.-P page-list Specifies which pages to print.ls Use to list directory contents.-a, --all Lists all files.-b, --escape Prints octal codes for nongraphic characters using backslash sequences.-c, --time=ctime, Sorts according to status change time, not modification time.� --time=status
-d, --directory Lists directory names, not contents.-f Does not sort directory contents.--full-time Provides full, not abbreviated time listings.-g Displays filename, file permissions, number of hard links, group, size, and time.-h Provides file sizes in human-readable format.-i, --inode Displays index number of each file.-k, --block-size=1K Displays file sizes in kilobytes.-l, --format=long, Displays filename, file permissions, number of hard links, owner, group, size in bytes, and time.� --format=verbose
-m, --format=commas Displays names separated by commas.-n, --numeric-uid-gid Displays numeric userid and group ID.-p, -F Displays extra character for each filename to show the file type.-q, --hide-control-chars Displays question marks rather than nongraphic characters.-r, --reverse Sorts names in reverse order.-s, --size Displays file sizes in 1 KB blocks.-t, --sort=time Sorts directory contents by modification time, newest first.-u, --time=atime, Sorts names by last access time instead of the modification time.� --time=access, --time=use
-x, --format=across, Displays names in columns, sorted horizontally.� --format=horizontal
-A, --almost-all Lists all names except for “.” and “..”.-B, --ignore-backups Does not display names that end with “~”.
354
Appendix C
Com
man
dsan
dFl
ags
Commands and Flags (continued)

Table C.1
C o m m a n d / F l a g D e s c r i p t i o n
-C, --format=vertical Displays names in columns, sorted vertically.-G, --no-group Does not display group information.-L, --dereference Lists names of symbolic links instead of the link contents.-N, --literal Does not quote names.-Q, --quote-name Quotes names in double quotes and nongraphic characters in C syntax.-R, --recursive Displays the contents of all directories recursively.-S, --sort=size Sorts names by file size, largest first.-U, --sort=none Does not sort names.-X, --sort=extension Sorts names alphabetically by file extension.-1, --format=single-column Lists one file per line.-w, --width n Sets display to n columns wide.-T, --tabsize n Sets tabs to n columns wide.-I, --ignore pattern Does not display names matching pattern.--color, --colour, Displays the names in color depending on the type of file and terminal characteristics.� --color=yes, --colour=yes
--color=tty, --colour=tty Displays names in color only if standard output is a terminal.--color=no, --colour=no Disables color display of names.--help Displays help message.--version Displays version information.lynx Use to browse the Web.- Specifies to take arguments from standard input.-anonymous Specifes anonymous account.-assume_charset=MIMEname Specifies default character set.-assume_local_charset= Specifies character set for local files.� MIMEname
-assume_unrec_charset= Specifies character set to use if remote character set is not recognizable.� MIMEname
-auth=ID:PASSWD Specifies authorization ID and password for protected documents.-base Specifies HTML BASE tag to use when dumping source code.-blink Specifies high-intensity background colors for color mode if possible.-book Specifies bookmark page as initial file.-buried_news Specifies automatic conversion of embedded URLs to links in Netnews.-cache=n Specifies to cache n documents in memory.-case Specifies case-sensitive searching within pages.-cfg=file Specifies alternative lynx configuration file.-child Specifies no save to disk and quick exit withD in first document.-color Specifies color mode, if possible.-cookies Toggles handling of cookies.-core Toggles core dumps on crashes.-crawl –traversal Specifies to output each browsed page to a file.-dump Specifies to dump formatted output of specified page to standard output.
355
Commands and Flags
Com
man
dsan
dFlag
s
Commands and Flags (continued)
continues on next page

Table C.1
C o m m a n d / Fl a g D e s c r i p t i o n
-editor=editor Enables editing with specified editor.-emacskeys Enables emacs-style key movement.-enable_scrollback Toggles scrollback when supported by communications programs.-error_file=FILE Specifies where to save error code.-force_html Specifies that the start document be considered HTML.-force_secure Toggles security flag for SSL cookies.-from Toggles use of From headers.-ftp Specifies no FTP access.-get_data Retrieves form data from standard input and dumps results.-head Requests MIME headers.-help Displays help message.-hiddenlinks= Specifies handling of hidden links.� [merge,listonly,ignore]
-historical Toggles use of > or --> as comment terminator.-homepage=URL Sets home page URL for session.-image_links Toggles display of links for all images.-index=URL Sets the default index file to the specified URL.-ismap Toggles presentation of links for client-side image maps.-link=NUMBER Specifies starting number for files crawled.-localhost Specifies only browsing on local host.-locexec Enables local program execution from local files.-mime_header Displays MIME header with document source.-minimal Toggles minimal or valid comment parsing.-newschunksize=n Specifies n articles in chunked news listings.-newsmaxchunk=n Specifies maximum number of news articles before chunking.-nobrowse Disables directory browsing.-nocc Disables prompts for user copies of sent mail.-nocolor Disables color mode.-noexec Disables local program execution.-nofilereferer Disables Referrer headers for file URLs.-nolist Disables link listings in formatted text output (dumps).-nolog Disables mailing error messages to document owners.-nopause Disables pauses on status messages.-noprint Disables printing.-noredir Disables automatic redirection.-noreferer Disables Referrer headers for all URLs.-nosocks Disables SOCKS proxy use.-nostatus Disables retrieval status messages.-number_links Numbers links.-pauth=ID:PASSWD Sets ID and password for a protected proxy server.-popup Toggles handling of single-choice SELECT options as pop-up windows or as lists of radio buttons.
356
Appendix C
Com
man
dsan
dFl
ags
Commands and Flags (continued)

Table C.1
C o m m a n d / F l a g D e s c r i p t i o n
-post_data Sends form data from standard input with POST dump results.-preparsed Specifies that HTML source be preparsed and reformatted when viewed.-print Enables printing.-pseudo_inlines Toggles pseudo-ALT text for inline images with no ALT string.-raw Toggles default setting of 8-bit character translations or CJK mode for the initial character set.-realm Specifies access only to URLs in initial domain.-reload Specifies to empty proxy server cache and reload document.-resubmit_posts Toggles forced resubmissions of forms when the documents they returned are revisited.-rlogin Disables rlogin commands.-selective Restricts directory browsing to those specified with .www_browsable.-show_cursor Specifies cursor to be shown at start of current link.-source Sends output as HTML source to standard output.-telnet Disables Telnet commands.-term=TERM Specifies terminal type for lynx.-tlog Toggles lynx tracing log.-trace Enables WWW trace mode.-traversal Follows links from start file.-underscore Toggles use of underline in dumps.-useragent=Name Specifies alternative lynx User-Agent header name.-validate Accepts only HTTP URLs for validation.-version Displays version information.-vikeys Enables vi-like key movement.-width=n Specifies number of columns for dump formatting.man Use to display online manual pages.-M path Specifies the directories to search for man pages.-P pager Specifies which pager (more or less) to use.-S section_list Specifies list (colon-separated) of manual sections to search.-a Specifies to display all matching man pages, not just the default first one.-d Specifies not to display man page; rather, display debugging information.-f Provides whatis information.-h Prints help message.-k Searches for string in all man pages.-m system Specifies alternate man pages for system.section, -s section Specifies to display man page from the given section.-w Specifies not to display man pages; rather, print the path of the files.-W Specifies not to display man mages; rather, print the filenames without additional information.mail Use to send and receive mail.-v Specifies verbose mode and displays delivery details.-i Specifies to ignore interrupt signals.-I Specifies interactive mode even if input is not from a terminal.
357
Commands and Flags
Com
man
dsan
dFlag
s
Commands and Flags (continued)
continues on next page

Table C.1
C o m m a n d / Fl a g D e s c r i p t i o n
-n Disables mail.rc reading when starting.-N Disables initial display of message headers when reading mail.-s subject Specifies subject on command line.-c addresses Specifies addresses for carbon copies.-b addresses Specifies addresses for blind carbon copies.-f file Reads contents of file for processing and returns undeleted messages to this file.mkdir Use to make directories.-m mode, --mode=mode Sets the mode of created directories as with chmod.-p, --parents Makes directories and any necessary parent directories.--help Displays help message.--version Displays version information.more Use to view files a screen at a time.-num Specifies number of lines onscreen.-d Specifies prompting and no bell on errors.-l Specifies not to pause after acL in the file.-f Specifies to count logical lines rather than screen lines.-p Specifies not to scroll, but rather to clear and display new text.-c Specifies not to scroll, but rather to paint each screen from the top.-s Specifies to squeeze multiple blank lines together.-u Specifies to suppress underlining.+/string Specifies a string to find and start at for displaying the file.+num Specifies to start at line number num.mutt Use a small but very powerful text-based program for e-mail.-a file Specifies to attach a file to your message.-b address Specifies a blind-carbon-copy (BCC) recipient.-c address Specifies a carbon-copy (CC) recipient.-e command Specifies a configuration command to be run after initialization files.-f mailbox Specifies which mailbox to load.-F muttrc Specifies an initialization file to read instead of ~/.muttrc.-h Specifies to display help information.-H draft Specifies a draft file to use for creating a message.-i include Specifies a file to include in a message.-m type Specifies a default mailbox type.-n Specifies to ignore the system configuration file.-p Specifies to resume a postponed message.-R Specifies to open a mailbox in read-only mode.-s subject Specifies the subject of the message.-v Specifies to display version information.-x Specifies to emulate mailx compose mode.-y Specifies to start with a listing of all mailboxes specified.-z Specifies not to start if there are no messages, when used with -f.
358
Appendix C
Com
man
dsan
dFl
ags
Commands and Flags (continued)

Table C.1
C o m m a n d / F l a g D e s c r i p t i o n
-Z Specifies to open the first mailbox specified that contains new mail.mv Use to rename or move files.-b, --backup Specifies to make backups of files before removal.-f, --force Specifies to overwrite all existing destination files.-i, --interactive Requires prompting before overwriting.-v, --verbose Displays filenames before moving.--help Prints a help message.--version Prints version information.-S suffix, --suffix=suffix Specifies suffix for backup files.nano Use for user-friendly text editing.+n Starts nano with the cursor located n lines into the file.-d Specifies that theD key rubs out the character the cursor is on rather than the char-
acter to its left.-k Specifies that “Cut Text” removes characters from the cursor position to the end of the line.-o dir Specifies operating directory.-rn Wraps lines at n columns.-t Specifies that a changed buffer will always be saved without prompting.-v Specifies view-only.-w Disables word wrap.-x Disables menu.-z AllowscZ suspension of nano.nice Use to run a program with a different priority.
-n adjustment, -adjustment, Adds adjustment number to initial priority.--adjustment=adjustment
--help Displays help message.
--version Displays version information.
passwd Use to set a password for the system.
pico Use for user-friendly text editing.
+n Starts pico with the cursor located n lines into the file.
-d Specifies that theD key rubs out the character the cursor is on rather than the char-acter to its left.
-e Enables filename completion.
-f Specifies to use function keys for commands.
-j Specifies that goto commands to indicate directories are allowed.
-k Specifies that “Cut Text” removes characters from the cursor position to the end of the line.
-nn Enables mail notification every n seconds.
-o dir Specifies operating directory.-rn Specifies column n for right margin of justify command.-t Sets tool mode for when pico is the default editor in other programs.-v Specifies view-only.-w Disables word wrap.
359
Commands and Flags
Com
man
dsan
dFlag
s
continues on next page
Commands and Flags (continued)

Table C.1
C o m m a n d / Fl a g D e s c r i p t i o n
-x Disables menu.-z AllowscZ suspension of pico.pine Use to read news and e-mail.-d debug-level Displays diagnostic information at levels from 0 (none) to 9 (complete).-f folder Specifies to open folder instead of inbox.-F file Opens specified file with pine.-h Displays brief help message.-i Specifies to start in folder index.-I keystrokes Specifies initial set of keystrokes to execute on startup.-k Specifies to use function keys for commands.-n number Specifies to start with given message number.-o Opens first folder as read-only.-p config-file Specifies configuration file to use instead of default personal configuration file.-P config-file Specifies configuration file to use instead of systemwide configuration file.-r Requires demo mode.-z Allows eventual suspension of pine process.-conf Outputs a new copy of systemwide configuration file.-pinerc file Outputs new pinerc configuration file.-sort order Specifies sort order in folders as arrival, subject, from, date, size, orderedsubj,
thread, score, to, cc, or reverse.ping Use to see if a specific host is reachable.-c count Specifies number of responses to receive before stopping.-d Specifies SO_DEBUG option.-f Specifies flood ping (for system administrators only).-i wait Specifies how many seconds to wait between packets.-l preload Specifies initial flurry of packets before reverting to normal behavior; for system administrators
only.-n Specifies not to look up domain names.-p pattern Specifies content for packets to diagnose data-dependent problems.-q Specifies quiet output with only initial and ending summary information displayed.-r Specifies to ignore routing and send directly to host on attached network.-s packetsize Specifies size of packet to send in bytes.-v Specifies verbose output and lists all received packets.pgrep Use to look up processes based on name or other characteristics.-d string Specifies the string used to delimit each process ID output.-f Specifies to match against full path.-g pgrp,... Specifies to match only processes under the specified process group IDs.-G gid,... Specifies to match only processes whose real group ID is listed.-l Specifies to list the process name as well as the process ID.-n Specifies to list only the newest matching process.-P ppid,... Specifies to match only processes whose parent process ID is listed.
360
Appendix C
Com
man
dsan
dFl
ags
Commands and Flags (continued)

Table C.1
C o m m a n d / F l a g D e s c r i p t i o n
-s sid,... Specifies to match only processes whose process session ID is listed.-t term,... Specifies to match only processes whose controlling terminal is listed.-u euid,... Specifies to match only processes whose effective user ID is listed.-U uid,... Specifies to match only processes whose real user ID is listed.-v Specifies to match the opposite of the characteristics given.-x Specifies to match only exactly.pkill Use to send a kill signal to processes based on name or other characteristics.-f Specifies to match against full path.-g pgrp,... Specifies to match only processes under the specified process group IDs.-G gid,... Specifies to match only processes whose real group ID is listed.-n Specifies to list only the newest matching process.-P ppid,... Specifies to match only processes whose parent process ID is listed.-s sid,... Specifies to match only processes whose process session ID is listed.-t term,... Specifies to match only processes whose controlling terminal is listed.-u euid,... Specifies to match only processes whose effective user ID is listed.-U uid,... Specifies to match only processes whose real user ID is listed.-v Specifies to match the opposite of the characteristics given.-x Specifies to match only exactly.-signal Specifies the signal (numeric or by name) to send to each matched process.procmail Use to process incoming e-mail.-v Specifies to display version information.-p Specifies to preserve existing environment.-t Specifies to retry failed deliveries later.-f name Specifies to regenerate the From line that separates messages with name.-o Specifies to override fake From lines.-Y Specifies to ignore any Content-Length: fields.-a argument Specifies arguments to pass to procmail.-d recipient ... Specifies delivery mode.-m Specifies that procmail should act as a general-purpose mail filter.ps Use to report process status (note that ps arguments work with or without a -, and
warn you not to use - in the future).-l Specifies long format.-j Specifies jobs format.-o s Specifies signal format.-o v Specifies vm (virtual memory) format.-m Displays thread information.-H Specifies “forest” tree format.-f Show full listing.-a Displays processes of other users on the same terminal.-x Displays processes without controlling terminal (daemons).
361
Commands and Flags
Com
man
dsan
dFlag
s
Commands and Flags (continued)
continues on next page

Table C.1
C o m m a n d / Fl a g D e s c r i p t i o n
-S Displays add child CPU time and page faults.
-w Specifies wide output and does not truncate command lines.
-h Disables header display.
-r Shows running processes only.
-n Specifies numeric output for user and wchan fields.
-t--x Specifies only processes with controlling tty x.
pids Lists only specified processes.
--help Displays help message.
--version Displays version information.
pr Use to convert and reformat files for printing or display.
-n, --columns=n Specifies to create n columns across the page.
-c, --show-control-chars Specifies to use hat notation (^G) and octal backslash notation.
-d, --double-space Specifies to double space the output.
-D, --date-format=FORMAT Specifies to use FORMAT for the header date.
-F, -f, --form-feed Specifies to use form feeds instead of newlines to separate pages.
-h header, --header=header Specifies to use a centered header instead of filename in page header.
-t, --omit-header Specifies to omit page headers and footers.
-T, --omit-pagination Specifies to omit page headers, footers, and all pagination.
-v, --show-nonprinting Specifies to use octal backslash notation to display nonprinting characters.
-W w, --page-width=w Specifies that page width be w (72 default) characters.
--help Specifies to display help message.
--version Specifies to display version information.
pwd Use to display name of current working directory.
--help Displays help message.
--version Displays version information.
quota Use to display disk usage and limits.
-g Displays group quotas for the executing user’s group.
-v Displays quotas on file systems where no storage is allocated.
-q Displays only information for file systems over quota.
renice Use to change the priority (niceness) of jobs.
-g Specifies to force parameters to be interpreted as process group IDs.
-u Specifies to force parameters to be interpreted as user names.
-p Specifies to require parameters to be process IDs.
rm Use to remove files.
-f, --force Specifies to overwrite all existing destination files.
-i, --interactive Requires prompting before overwriting.
-R, --recursive Specifies to copy directories recursively.
-v, --verbose Displays filenames before moving.
--help Displays a help message.
--version Displays version information.
362
Appendix C
Com
man
dsan
dFl
ags
Commands and Flags (continued)

Table C.1
C o m m a n d / F l a g D e s c r i p t i o n
reset Use to reset a terminal session to normal behavior.-q Specifies to display the terminal type only.-e a Specifies to set the erase character to the given character.-I Specifies not to send initialization strings to the terminal.-Q Specifies not to display values for erase, interrupt, and line kill characters.-V Specifies to display the version number.-i a Specifies to set the interrupt character to the given character.-k a Specifies to set the line kill character to the given character.-m Specifies to map a port type to a terminal type.-r Specifies to display the terminal type to standard error.-s Specifies to display the initialization commands.rmdir Use to remove empty directories.-p, --parents Specifies to remove any parent directories listed, if they are empty after the specified files
are removed.--help Displays a help message.--version Displays version information.rsync Use to copy files and synchronize directories.-v, --verbose Specifies to increase verbosity.-q, --quiet Specifies to decrease verbosity.-c, --checksum Specifies to calculate a checksum for files, not just check dates.-a, --archive Specifies to use archive mode.-r, --recursive Specifies to recursively copy.-R, --relative Specifies to use relative path names.-b, --backup Specifies to make backups with the default ~ suffix.--backup-dir Specifies to use this backup directory.--suffix=string Specifies to change backup suffix to string.-u, --update Specifies to update only and not overwrite newer files.-l, --links Specifies to copy symlinks as symlinks.-L, --copy-links Specifies to copy the associated file for symlinks.--copy-unsafe-links Specifies to copy links outside the source directory tree.--safe-links Specifies to ignore links outside the destination directory tree.-H, --hard-links Specifies to preserve hard links.-p, --perms Specifies to preserve permissions.-o, --owner Specifies to preserve owner, for use by root only.-g, --group Specifies to preserve group.-D, --devices Specifies to preserve devices, for use by root only.-t, --times Specifies to preserve times.-S, --sparse Specifies to handle sparse files efficiently.-n, --dry-run Specifies to show what would have been transferred, but not actually transfer.-W, --whole-file Specifies to copy whole files without making incremental checks.--no-whole-file Specifies not to copy whole files without checking.
363
Commands and Flags
Com
man
dsan
dFlag
s
continues on next page
Commands and Flags (continued)

Table C.1
C o m m a n d / Fl a g D e s c r i p t i o n
-x, --one-file-system Specifies not to cross file system boundaries.-B size, --block-size=size Specifies the checksum block size (default 700).-e command, --rsh=command Specifies the rsh replacement command (probably ssh).--rsync-path=PATH Specifies the path to rsync on the remote machine.-C, --cvs-exclude Specifies to autoignore files in the same way CVS does.--existing Specifies to update only files that already exist.--ignore-existing Specifies to ignore files that already exist on the receiving side.--delete Specifies to delete files that don’t exist on the sending side.--delete-excluded Specifies to also delete excluded files on the receiving side.--delete-after Specifies to delete after transferring, not before.--ignore-errors Specifies to delete even if there are I/O errors.--max-delete=NUM Specifies not to delete more than NUM files.--partial Specifies to keep partially transferred files.--force Specifies to force deletion of directories even if not empty.--numeric-ids Specifies to set permissions with numeric ids on target.--timeout=n Specifies to set I/O timeout in seconds.-I, --ignore-times Specifies to copy even files that match in length and time.--size-only Specifies to copy files only if file sizes differ.--modify-window=n Specifies range of time (n seconds) to consider equivalent.-T, --temp-dir=path Specifies to create temporary files in directory path.--compare-dest=DIR Specifies to compare destination files relative to path.-z, --compress Specifies to compress files when transferring.--exclude=string Specifies to exclude files matching string.--exclude-from=file Specifies to exclude patterns listed in file.--include=string Specifies to include files matching string.--include-from=file Specifies to include patterns listed in file.--version Specifies to display version number.--daemon Specifies to run as an rsync daemon.--no-detach Specifies not to detach from the parent.--address=ADDRESS Specifies to bind to the specified address.--config=file Specifies an alternate rsyncd.conf file.--port=PORT Specifies an alternate rsyncd port number.--blocking-io Specifies to use blocking I/O for the remote shell.--no-blocking-io Specifies to turn off --blocking-io.--stats Specifies to show some file transfer statistics.--progress Specifies to show progress during transfer.--log-format=format Specifies to log file transfers using specified format.--password-file=file Specifies to get password from file.--bwlimit=n Specifies to limit I/O bandwidth to n KBps.--read-batch=string Specifies to read batch fileset starting with string.
364
Appendix C
Com
man
dsan
dFl
ags
Commands and Flags (continued)

Table C.1
C o m m a n d / F l a g D e s c r i p t i o n
--write-batch=string Specifies to write batch fileset starting with string.
-h, --help Specifies to display help information.
sed Use for processing and editing files in batch mode.
-e Specifies edit commands to follow as the next argument.
-f Specifies edit commands to be taken from named file or files.
-n Suppresses default output.
set Use to set or view the values of variables.
setenv Use to change or view the value of an environment variable (csh).
screen Use to manage multiple virtual screens in a physical window.
-a Specifies to include all capabilities in each window.
-A Specifies to adapt the sizes of all windows to the size of the current terminal.
-c file Specifies to override the default configuration file (~/.screenrc) with file.
-d,-D Specifies to detach another running screen from the controlling terminal.
-d -r Specifies to reattach a session, after detaching it if necessary.
-d -R Specifies to reattach a session, after detaching or creating it first if necessary.
-d -RR Specifies to reattach a session, after detaching or creating it if necessary, and to use the firstsession if multiple sessions are available.
-D -r Specifies to reattach a session, after detaching and logging out remotely if necessary.
-D -R Specifies to attach immediately, after notifying other users.
-D -RR Specifies to attach immediately, after doing anything necessary to other sessions.
-e xy Specifies the command character (default iscAa), specified as ^Aa.
-f, -fn, -fa Specifies flow-control settings to off, on, or automatic.
-h n Specifies the size of the history as n lines.
-l, -ln Specifies to turn login mode on or off.
-ls, -list Specifies to display list of existing screen sessions.
-m Specifies to force creation of a new session.
-d -m Specifies to start screen in detached mode.
-D -m Specifies to start screen in detached mode, in existing process.
-q Specifies to suppress display error messages and exit codes.
-r Specifies to resume a detached screen session.
-R Specifies to attempt to resume the first available detached screen session it finds.
-s string Specifies the default shell as string.
-S name Specifies to use name as the name for the new session.
-t name Specifies the title for the default shell or specified program.
-v Specifies to display the version number.
-wipe Specifies to remove destroyed sessions.
-x Specifies to attach to a session in multidisplay mode.
-X Specifies to send the specified command to a running screen session.
ssh Use to securely log in to and run commands on a remote system.
-a Specifies not to forward the authentication agent connection.
365
Commands and Flags
Com
man
dsan
dFlag
s
Commands and Flags (continued)
continues on next page

Table C.1
C o m m a n d / Fl a g D e s c r i p t i o n
-A Specifies to forward the authentication agent connection.-b bind_address Specifies the interface to transmit from if multiple interfaces are available.-c blowfish|3des|des Specifies the encrpytion method to use.-e ch|^ch|none Specifies the escape character for sessions with a pty (default: ~).-f Specifies for ssh to go to the background before the command runs.-g Specifies that remote hosts can connect to local forwarded ports.-i identity_file Specifies the file from which to read the identify key.-l login_name Specifies the user name to log in as on the remote machine.-n Specifies to ignore standard input.-N Specifies not to execute a remote command.-o option Specifies to give options as presented in configuration file.-p port Specifies the port to connect to on the remote host.-P Specifies a nonprivileged port (>1024) for outgoing connections.-q Specifies that warning and diagnostic messages should be suppressed.-s Specifies to request invocation of a subsystem on the remote system.-t Specifies to allocate a pseudo-tty.-T Specifies not to allocate a pseudo-tty.-v Specifies to provide verbose output.-x Specifies to disable X11 forwarding.-X Specifies to enable X11 forwarding.-C Specifies to compress all data for transmission.-F configfile Specifies an alternative configuration file.-L port:host:hostport Specifies port forwarding from local to remote sides.-R port:host:hostport Specifies port forwarding from remote to local sides.-D port Specifies dynamic port forwarding from local to remote sides.-1 Specifies to use only protocol version 1.-2 Specifies to use only protocol version 2.-4 Specifies to use only IPv4 addresses.-6 Specifies to use only IPv6 addresses.split Use to split files into smaller parts.-b, --bytes=n Specifies to put n bytes in each output file (use k for kilobytes, m for megabytes).-C, --line-bytes=n Specifies to put no more than n bytes of lines in each output file.-l, --lines=n Specifies to put n lines into each output file.--verbose Specifies to provide verbose output.--help Specifies to display help information.--version Specifies to display version information.sort Use to sort text files by line.-c Checks to see if file is already sorted.-m Merges sorted files together.-b Ignores extra spaces at the beginning of each line.-d Sorts by ignoring everything but letters, digits, and blanks.
366
Appendix C
Com
man
dsan
dFl
ags
Commands and Flags (continued)

Table C.1
C o m m a n d / F l a g D e s c r i p t i o n
-f Sorts without case sensitivity.-M Sorts by month, recognizing three-character month abbreviations.-n Sorts numerically.-r Reverses result order.-o output-file Sends output to specified file instead of standard output.-t separator Uses indicated character as field separator.-u Displays only one of the matching lines.--help Displays help information.--version Displays version information.su otherid Use to substitute otherid for current userid.-c command, --command=command Runs specified command as other user.--help Displays help information.-, -l, --login Specifies to start as login shell.-m, -p, --preserve-environment Specifies not to change environment variables from current settings.-s shell, --shell=shell Uses the specified shell instead of the default.--version Displays program version.sudo Use to execute a command as another user.-V Specifies to display the version number.-l Specifies to list the available and forbidden commands for the issuing user.-L Specifies to list configurable default parameters.-h Specifies to display a help message.-v Specifies to update the timestamp and extend the timeout.-k Specifies to set the timeout to a past time, forcing revalidation.-K Specifies to remove the timestamp for a current user.-b Specifies to run the specified command in the background.-p prompt Specifies to replace the default password prompt with a custom prompt.-u user Specifies user, under whose id the command will run.-s Specifies to use the specified (default) shell.-H Specifies to change the $HOME environment variable to the target user.-P Specifies to preserve the user’s group ID when running the command.-S Specifies to read password from standard input.-- Specifies to stop processing command-line options.- Specifies to force a login shell.tail Use to output the last part of a file.-c, --bytes n[b,k,m] Displays last n bytes of file, in b (512-byte), k (1 KB), or m (1 MB) blocks.-f, --follow Specifies to keep running and trying to read more from end of file.-l, -n N, --lines N Displays last N lines of file.-q, --quiet, --silent Specifies not to display filenames.-v, --verbose Specifies to always display filenames.--help Displays help message.--version Displays version information.
367
Commands and Flags
Com
man
dsan
dFlag
s
continues on next page
Commands and Flags (continued)

Table C.1
C o m m a n d / Fl a g D e s c r i p t i o n
talk Use to talk to another user.tar Use to create tar archives.-A, --catenate, --concatenate Specifies to append tar files to an archive.-c, --create Creates a new archive.-d, --diff, --compare Identifies differences between archive and file system.--delete Removes files from the archive.-r, --append Appends files to the archive.-t, --list Lists contents of the archive.-u, --update Updates archive with newer files.-x, --extract, --get Extracts files from archives.--atime-preserve Specifies not to change access times.-b n, --block-size=n Specifies block size of n x 512 bytes.-C dir, --directory=dir Changes to specified directory.--checkpoint Displays directory names while processing.-f, --file Uses specified file or device.--force-local Forces local archive file regardless of filename.-h, --dereference Processes linked files, not symbolic links.-i, --ignore-zeros Specifies to ignore zeros in archives (and not to interpret as EOF).-k, --keep-old-files Specifies that old files should be retained, not overwritten.-K file, --starting-file=file Starts at file file in the archive.-l, --one-file-system Specifies to remain in current file system.-m, --modification-time Specifies not to extract the file modification time.-M, --multi-volume Specifies to process as multivolume archive.-N date, --after-date=date, Stores files newer than date.� --newer date
-o, --old-archive, Specifies old archive format.� --portability
-O, --to-stdout Specifies to extract files to standard output.-p, --same-permissions, Specifies to extract all permissions data.� --preserve-permissions
-P, --absolute-paths Specifies to maintain absolute paths.--remove-files Specifies to remove files that have been added to archive.-s, --same-order, Specifies list of filenames to match archive.� --preserve-order
--same-owner Specifies to extract files with same ownership.-T file, --files-from=file Retrieves names of files to extract or create from file file.--totals Displays total bytes of created files.-v, --verbose Displays verbose information about processed files.-V name, --label=name Creates archive with volume name of name.--version Displays version information.-w, --interactive, Requires confirmation for actions.� --confirmation
368
Appendix C
Com
man
dsan
dFl
ags
Commands and Flags (continued)

Table C.1
C o m m a n d / F l a g D e s c r i p t i o n
-W, --verify Verifies information in archive after creating archive.--exclude=file Specifies to exclude file from archive.-X file, --exclude-from=file Specifies to exclude files listed in file from archive.-Z, --compress, Specifies to compress or uncompress the archive.� --uncompress
-z, --gzip, --ungzip Specifies to process the archive with gzip.--use-compress-program= Specifies name of compression program as program.� program
tee Use to read from standard input and write to standard output and files.-a, --append Appends to specified files instead of overwriting.--help Prints help information.-i, --ignore-interrupts Specifies to ignore interrupt signals.--version Prints version information.telnet Use to connect to and use remote computers.-8 Specifies 8-bit operation, which is not the telnet default.-E Disables the escape character.-L Specifies 8-bit operation on output.-a Attempts automatic log in with the current user name.-d Enables debugging output.-r Specifies rlogin emulation.-e character Specifies the escape character to control command-mode access.-l user Specifies the user for remote log in.-n tracefile Starts tracing connection to tracefile.tidy Use to validate, correct, and clean up HTML files.-config file Specifies to set options from file.-indent, -i Specifies to indent contents of elements.-omit, -o Specifies to omit optional endtags.-wrap n Specifies to wrap output at column n.-upper, -u Specifies to output tags in uppercase.-clean, -c Specifies to replace formatting tags with CSS-style properties.-raw Specifies to output characters with values higher than 127 unchanged.-ascii Specifies to use Latin-1 (ISO 8859-1) character set for input, and US ASCII character set
for output.-latin1 Specifies to use Latin-1 (ISO 8859-1) character set for both input and output.-iso2022 Specifies to use ISO 2022 character set for both input and output.-utf8 Specifies to use UTF-8 character set for both input and output.-mac Specifies to use MacRoman character set for input.-numeric, -n Specifies to output numeric rather than named entities.-modify, -m Specifies to modify original files in place.-errors, -e Specifies to only show errors without modifying the original file.-quiet, -q Specifies to suppress extra output.-f file Specifies to write errors to file.
369
Commands and Flags
Com
man
dsan
dFlag
s
continues on next page
Commands and Flags (continued)

Table C.1
C o m m a n d / Fl a g D e s c r i p t i o n
-xml Specifies that input is well-formed XML.
-asxml Specifies to convert HTML to well-formed XML.
-help, -h Specifies to display a help message.
time Use to time a job.
tin Use to read Usenet news.
-c Creates or updates index for listed groups, marking all as read.
-f file Specifies file to use for newsrc data.
-h Displays help information.
-H Displays introduction to tin.
-I dir Specifies directory to hold newsgroup index files.
-m dir Specifies mailbox directory to use.
-M user Mails unread articles to user.
-n Specifies to load only active, subscribed groups.
-q Specifies startup without checking for new newsgroups.
-P Purges all articles that do not exist. Time-consuming, particularly on a slow connection.
-r Specifies remote news reading from nntpserver.
-s dir Saves articles to directory specified.
-S Saves unread articles for later reading with -R option.
-u Creates and updates index files for all groups.
-U Starts tin in background to update index files while reading news.
-v Specifies verbose mode for some commands.
-w Allows quick posting.
-z Specifies to start tin only with new or unread news.
-Z Checks for new or unread news.
touch Use to change file times and create empty files.
-a, --time=atime, Changes access time only.� --time=access,� --time=use
-c, --no-create Specifies not to create files that do not already exist.
-d, --date time Updates files with given (not current) time.
-m, --time=mtime, Changes modification time only.� --time=modify
-r, --reference file Updates files with time of reference file.
-t [[CC]YY]MMDDhhmm[.ss] Specifies time argument for setting time.
--help Displays help message.
--version Displays version information.
tr Use to translate or delete characters.
--help Specifies to display help message.
--version Specifies to display version information.
370
Appendix C
Com
man
dsan
dFl
ags
Commands and Flags (continued)

Table C.1
C o m m a n d / F l a g D e s c r i p t i o n
traceroute Use to identify the route packets take to a network host.-f first_hop Specifies initial time-to-live used in the first probe.-F Specifies “don’t fragment” setting for probes.-d Enables socket-level debugging.-g gateway Specifies a source route gateway.-i interface Specifies a network interface to use for probes.-I Specifies ICMP ECHO instead of UDP datagrams.-m max_hop Specifies maximum number of hops to use.-n Specifies not to look up domain names for addresses.-p port Sets base UDP port number for probes.-r Specifies to ignore routing and send directly to host on attached network.-s addr Specifies IP address as source for probe.-v Specifies verbose output and lists all received packets.-w seconds Specifies the number of seconds to wait for a response to a probe.umask Use to set the file creation mask.unalias Use to remove aliases from the list.-a Removes all alias definitions.uname Use to display system information.-m, --machine Displays the machine or hardware type.-n, --nodename Displays the node or host name.-r, --kernel-release Displays the operating system release number.-s, --kernel-name Displays the operating system name.-v, --kernel-version Displays the operating system version.-a, --all Displays all the above information.--help Displays help information.--version Displays version information.uniq Use to remove duplicate lines from a sorted list.-u, --unique Outputs only unique lines.-d, --repeated Outputs only duplicate lines.-c, --count Outputs number of occurences of each line followed by the text of each line.-number, -f number, Specifies number of fields to ignore before checking for uniqueness.� --skip-fields=number
+number, -s number, Specifies number of characters to skip before checking for uniqueness.� --skip-chars=number
-w number, Specifies number of characters to compare.� --check-chars=number
--help Prints help information.--version Prints version information.units Use to convert from one kind of unit to another.-c, --check Specifies to check that the units data file is valid.--check-verbose Specifies to check that the units data file is valid, with verbose output.
371
Commands and Flags
Com
man
dsan
dFlag
s
continues on next page
Commands and Flags (continued)

Table C.1
C o m m a n d / Fl a g D e s c r i p t i o n
-o format, Specifies the format for numeric output (in printf syntax).� --output-format=format
-f filename, Specifies to use filename as the units data file.� --file=filename
-h, --help Specifies to display a help message.-q, --quiet, --silent Specifies quiet output and suppression of prompts.-s, --strict Specifies not to convert to reciprocal units.-v, --verbose Specifies more verbose output.-V, --version Specifies to display version number.unzip Use to manipulate and extract compressed files in a zip file.-f Specifies to extract only files newer than those on disk.-l Lists archive files in short format.-p Extracts files to standard output.-t Tests archive files for accuracy and completeness.-T Sets the timestamp to the same as the newest file in the archive.-u Updates existing files from the archive and creates new files as needed.-v Displays verbose or diagnostic version information.-z Displays archive comments.-j Junks paths and puts all files in the current directory.-n Specifies never to overwrite existing files.-o Overwrites existing files without prompting.-P password Requires password to decrypt zip file entries.-q Performs operations quietly, without displaying most status information.-qq Performs operations even more quietly.uudecode Use to decode a file created by uuencode.-o file Directs output to file.uuencode Use to encode a binary file.-m Specifies MIME (Base 64) encoding.vacation Use to reply to mail automatically.-I Initializes .vacation.db file and starts vacation.-a alias Specifies alias for vacation user, so that mail sent to that alias generates a reply.-j Specifies to always reply, regardless of To: or CC: addressing.-tn Specifies the number of days between repeat replies to the same sender.-r Specifies to use the “Reply-To:” header if available.-? Displays a short help message.vi Use for powerful text editing.-s Specifies no interactive feedback.-l Specifies LISP program editing setup.-L Lists names of files saved after crashes.-R Forces read-only mode.-r filename Recovers filename: edit file saved after a crash.-t tag Starts editor with cursor at tag position.
372
Appendix C
Com
man
dsan
dFl
ags
Commands and Flags (continued)

Table C.1
C o m m a n d / F l a g D e s c r i p t i o n
-V Specifies verbose output with input echoed to standard error.-x Specifies encryption option like that of ex and prompts for a key.-wn Specifies default window size.+command, -c command Starts editor and executes specified command.w Use to show who is logged on and what they are doing.-h Disables header.-s Specifies short format, omitting log in, JCPU, and PCPU times.-f Toggles display of remote host name.-V Displays version information.watch Use to execute a program repeatedly with full-screen output.-h, --help Specifies to display a help message.-v, --version Specifies to display version number.-n n, --interval=n Specifies to override the default 2-second interval with n.-d, --differences Specifies to display differences between successive updates.--cumulative Specifies to keep all changes highlighted.wc Use to count the number of bytes, words, and lines in a file.-c, --bytes Displays the byte counts.-m, --chars Displays the character counts.-w, --words Displays only word counts.-l, --lines Displays only newline counts.--help Displays help message.--version Displays version information.wget Use to download files or entire Web sites.-V, --version Specifies to display the version number.-h, --help Specifies to display a help message.-b, --background Specifies to start as a background process.-e command, Specifies to execute command at end of startup process.� --execute=command
-o logfile, Specifies to log all messages to the specified file.� --output-file=logfile
-a logfile, Specifies to append all messages to the specified file.� --append-output=logfile
-d, --debug, Specifies to display debugging information.-q, --quiet Specifies to suppress output.-v, --verbose Specifies to provide verbose output (the default setting).-nv, --non-verbose Specifies to provide nonverbose, nonquiet output.-i file, Specifies to read URLs from the file given.� --input-file=file
-F, --force-html Specifies to force input to be treated as an HTML file.-B URL, --base=URL Specifies to prepend URL to relative links in specified file.-t n, --tries=n Specifies number of retries. Use 0 for infinite.-O file, Specifies to concatenate all documents as file or - for standard output.� --output-document=file
373
Commands and Flags
Com
man
dsan
dFlag
s
Commands and Flags (continued)
continues on next page

Table C.1
C o m m a n d / Fl a g D e s c r i p t i o n
-nc, --no-clobber Specifies to not destroy a file of the same name as the file being downloaded.-c, --continue Specifies to continue getting a partially downloaded file.--progress=type Specifies type of the progress indicator as “dot” and “bar”.-N, --timestamping Specifies to enable time stamps.-S, --server-response Specifies to print the headers and responses sent by servers.--spider Specifies to verify pages but not download them.-T seconds, --timeout=seconds Specifies length of the read timeout in seconds.--limit-rate=n Specifies to limit the download speed to n bytes (or kilobytes with k, or
megabytes with m) per second.-w n, --wait=n Specifies to wait the specified number (n) of seconds between retrievals.--waitretry=n Specifies interval to wait before retrying failed downloads.--random-wait Specifies to wait random intervals between requests.-Y on/off, --proxy=on/off Specifies to turn proxy support on or off.-Q quota, --quota=quota Specifies the download quota (in b, k, or m) for automatic retrieval.-nd, --no-directories Specifies not to create a hierarchy of directories on recursive retrieval.-x, --force-directories Specifies always to create a hierarchy of directories on recursive retrieval.-nH, --no-host-directories Specifies not to create host name-prefixed directories.--cut-dirs=number Specifies to ignore (flatten) specific numbers of directory levels.-P prefix, Specifies directory prefix to use.� --directory-prefix=prefix
-E, --html-extension Specifies to append .html to filenames.--http-user=user, Specifies the user name user and password password for an HTTP server.� --http-passwd=password
-C on/off, --cache=on/off Specifies to avoid or use server-side caching.--cookies=on/off Specifies to use or disable cookies.--load-cookies file Specifies to load cookies from file before the first retrieval.--save-cookies file Specifies to save cookies to file at the end of the session.--ignore-length Specifies to ignore “Content-Length” headers.--header=additional-header Specifies to define an additional-header to be passed to the HTTP servers.--proxy-user=user Specifies the user name user and password password for authentication on a proxy� proxy-passwd=password server.--referer=url Specifies to include “Referer: url” header in HTTP request.-s, --save-headers Specifies to save the headers sent by the HTTP server to the file.-U agent-string, Specifies agent-string to send to the HTTP server.� --user-agent=agent-string
-nr, --dont-remove-listing Specifies not to remove the temporary listing files generated by FTP retrievals.-g on/off, --glob=on/off Specifies to turn FTP globbing (wildcard use) on or off.--passive-ftp Specifies to use the passive FTP retrieval method for use behind firewalls.--retr-symlinks Specifies to retrieve files pointed to by symbolic links.-r, --recursive Specifies to turn on recursive retrieving.-l depth, --level=depth Specifies the maximum depth for recursive retrieval.--delete-after Specifies to delete files downloaded, as soon as they’re retrieved.
374
Appendix C
Com
man
dsan
dFl
ags
Commands and Flags (continued)

Table C.1
C o m m a n d / F l a g D e s c r i p t i o n
-k, --convert-links Specifies to convert the links in the document for local viewing.-K, --backup-converted Specifies to back up the original version with a .orig suffix.-m, --mirror Specifies to turn on options suitable for mirroring.-p, --page-requisites Specifies to download all required files to display a page.-A acclist, --accept acclist, Specifies lists of filename patterns to accept or reject.�-R rejlist --reject rejlist
-D domain-list, Specifies domains to be followed.� --domains=domain-list
--exclude-domains domain-list Specifies the domains that are not to be followed.--follow-ftp Specifies to follow FTP links from HTML documents.--follow-tags=list Specifies to use list for tags that indicate links.-G list, --ignore-tags=list Specifies to ignore listed tags for indication of links.-H, --span-hosts Specifies to recursively retrieve from multiple hosts.-L, --relative Specifies to follow relative links only.-I list, Specifies a list (with wildcards) of directories to follow when downloading.� --include-directories=list
-X list, Specifies a list (with wildcards) of directories to exclude when downloading.� --exclude-directories=list
-np, --no-parent Specifies not to download from the parent directory.whereis Use to find information about the specified file.-b Specifies to search only for binary files.-m Specifies to search only for man pages.-s Specifies to search only for source files.-u Specifies to search for unusual entries, which are files with fewer than one binary,
man, and source entry.-B directory Specifies to change or limit where whereis searches for binaries.-M directory Specifies to change or limit where whereis searches for man pages.-S directory Specifies to change or limit where whereis searches for source files.-f Specifies to end the directory list and start the filename list; for use with the -B, -M,
or -S options.who Use to display information about who is logged onto the system.-m Specifies “me”, as in “who am I?”.-q, --count Displays login names and total number of logged on users.-u, --users Lists the users who are currently logged in.-H, --heading Displays column headings.-T, -w, --mesg, --writable Displays user message status.� --message
--help Displays a help message.--version Displays version information.write Use to send a message to another user.ydecode Use to decode yencoded files.yencode Use to encode files with the yEnc algorithm.
375
Commands and Flags
Com
man
dsan
dFlag
s
Commands and Flags (continued)
continues on next page

Table C.1
C o m m a n d / Fl a g D e s c r i p t i o n
zsh Use the flexible, powerful Z-shell.-c Specifies to take the first argument as a command to execute.-i Specifies to force an interactive shell.-s Specifies to force shell to read commands on standard input.--version Specifies to print the version number.--help Specifies to print help information.zip Use to create a zip-format file archive.-A Accommodates a self-extracting executable archive.-b path Specifies a path for the temporary files.-c Provides one-line comments for each file in the archive.-d Deletes entries from an archive.-D Specifies not to create entries in the zip archive for directories.-e Encrypts the contents of the zip archive using a password.-f Freshens an existing entry in the archive if the new file has been modified more recently than
the version in the zip archive.-F Fixes the zip archive.-g Appends to the specified archive.-h Displays help information.-i files Includes only specified files.-j Junks path name and stores only filename.-J Junks prepended data (for self-extracting archives) from the archive.-l Translates Unix text files to MS-DOS text files.-ll Translates MS-DOS text files to Unix text files.-L Displays the zip license.-m Moves specified files into the archive and deletes originals.-n suffixes Specifies not to compress files with the given suffixes.-o Sets the modification time of the zip archive to that of oldest of the files in the archive.-q Specifies quiet mode to eliminate messages and prompts.-r Includes files and directories recursively.-t mmddyyyy Ignores files modified before the given date.-T Tests the new archive and reverts to the old archive if errors are found.-u Updates an existing entry in the archive only if the existing file has been changed more recently
than the copy in the archive.-v Specifies verbose mode to print diagnostic and version information.-x files Excludes the specified files.-z Requires a multiline comment for the entire archive.-@ Gets a list of input files from standard input.
376
Appendix C
Com
man
dsan
dFl
ags
Commands and Flags (continued)

ChapterTitle
377
Symbols* (asterisk)
function as regular expression, 115used as placeholder, 19, 21
\ (backslash), 115^ (caret)
as Ctrl in pico, 73function as regular expression, 115
$ (dollar sign)function as regular expression, 115setting prompt to appear on separate line, 162
. (dot)function as regular expression, 115hiding files starting with, 37included in path statements, 159, 167using with find command, 44
&& (double ampersand), 174= (equals sign), 104/ ( forward slash), 45> (greater than symbol), 19# (hash mark)
comment indicator, 165file transfer indicator, 245root prompt symbol, 290
| (pipe symbol), 18? (question mark), 21; (semicolon), xiv‘ ‘ (single quotes), 162[ ] (square brackets), 115, 343~ (tilde), 16
Indexi
Index
Aabbreviations for permissions, 96about this book, xiiabsolute names, 35accessing
man pages, 26Unix, 3–6
alias command, 170–172, 344aliases
for e-mail, 215recommended, 171setting, 170–172
alpine
flags used with, 344as newer version of pine, 209See also pine
alternative editors, 70ampersands (&&), 174anonymous ftp: command, 243–245appending output to existing file, 20applications
installing, 295See also utilities
archiving filesabout, 264tar used for, 264–265zipping while, 274
arguments, 45asterisk (*)
function as regular expression, 115used as placeholder, 19, 21

378
Inde
x
Index
at commanddeleting scheduled jobs with, 177flags used with, 344scheduling onetime jobs with, 175–176sequential job scheduling with, 176
atq command, 344atrm command, 344attachments, e-mail, 210, 224, 262awk command
changing files with, 118–119flags used with, 344generating reports with, 310
Bbackground jobs, 182backslash (\), 115backups
looping scripts for, 200–201making with cp command, 41rsync for making, 318–319
bash shelladding or changing environment
variables, 153alias setup for, 170–172changing path to, 166–167command argument completion in, 59daisychains in, 165features of, 53flags for commands in, 344–345redirecting stderr in, 321–322session history viewed in, 60–61setting prompt for, 168–169showing current environment in, 150–151viewing configuration files in, 163–165
.bashrc file, 172batch command, 345bc utility, 279bg command, 182, 345binary files
cat command and, 24downloading, 245encoding, 260, 262
bonus chapter online, xiiboot messages, 300–301Bourne Again Shell. See bash shellBourne shell. See sh shellbreaking lines, 127
browserslinks, 249–250, 352–353lynx, 251–252, 355–357
buffer, 78bzip command, 269
Ccal utility, 276–278, 345calculator utility, 279calendars, 276–278, 345caret (^)
as Ctrl in pico, 73function as regular expression, 115
case sensitivity, xiiicase translations, 127, 128cat command
displaying file contents with, 23–24flags used with, 345listing shells available with, 54
cd command, 15–16, 345changing
directories, 15–16passwords, 11–12shells, 55–56
charactersEscape, used with telnet, 239restricted for directories/filenames, 31using as delimiters, 118See also specific characters by name
checking new passwords, 12chgrp command, 99–100, 345chmod command, 103–105, 345choosing editors, 70–72chown command, 101–102, 346chsh command, 55–56, 346cleaning up HTML documents, 304–306clients
choosing mail, 210–211defined, 236
cmp command, 35, 120, 346code listings, xiicombining commands, 174comma-delimited files, 124command argument completion
bash shell and, 59zsh shell and, 62
command mode in vi, 79command-line arguments in scripts, 205

379
Index
Index
commandsabout flags and, 343argument completion for, 59, 62basic Unix, 324case sensitivity of, xiiicombining, 174configuring Unix environment, 331conventions for typing, xiii–xivcreating and editing files, 327directory and file management, 325emacs, 88e-mail, 334embedding in scripts, 198–199encoding and compressing files, 336flags associated with, xivgetting system information with, 330Internet, 335listed by topic, 323–337manipulating files, 328–329piping, 18running, 174scripts and programs, 332separating on same line, xivshell, 326summary table of flags and, 344–376utility, 337writing scripts, 333vi editing, 82See also flags; utilities; and specific commands
comments (#), 165comparing
directories, 35files, 35, 120job times, 185–186
composing and sending e-mailwith mail, 223–224with mutt, 220–221with pine, 214–215vacation messages, 228–229
compress command, 267, 346compressing files
about, 267compress for, 267gzip for, 269table of commands and flags for, 336zip for, 271
computer emulation, 5computer requirements, xiiiconditional statements, 202–204
configuration filesfinding with grep, 157, 160, 167running order of, 149, 163sourcing, 165See also editing configuration files
configuringaliases, 170–172bash
adding to paths, 166–167changing prompts, 168–169viewing configuration, 163–165
commands and flags for, 331environment variables
adding or changing, 152–153to leave unchanged, 151overview of, 148–149safe to change, 152
mutt, 219pine, 216–217procmail, 230–231prompt on separate line, 162showing current environment, 150–151zsh
adding to paths, 158–159changing prompts, 160–162viewing configuration, 154–157
See also editing configuration filesconnections
checking with ping, 254login information for, 9tracing with traceroute, 255–256troubleshooting ftp, 246to Unix systems, 7–9See also SSH connections
converting measurements, 281copying
directories and files, 34–35man pages, 27
counting files and contents, 110cp command
copying directories and files with, 34–35flags used with, 346making backups with, 41
CPU information, 145crackers, 11cron command, 178–179crontab command, 178–179, 347csh shell, 53cutting/pasting text in pico, 75Cygwin, xiii, 6

380
Inde
x
Index
Ddaemons
defined, 188, 292starting and stopping, 292–293
daisychains, 165date
formatting options for, 199manually setting, 302setting with ntpdate, 302updating file’s time and, 33
date command, 199debugging scripts, 208decoding files
unzipping and, 273uudecode for, 263
default permissions, 107–108deleting
e-mail in mutt, 219files, 39–41processes, 189–190scheduled jobs, 177text in vi, 82See also removing
delimited files, 118delimiters, 118df command, 135–137, 347dictionary lookup, 282diff command, 120, 121, 347differences in files, 121–122dig command, 258, 347dircmp command, 35directories
archiving, 265backing up, 41, 318–319changing, 15–16commands and flags for using, 325common Unix, 25, 341–342comparing, 35compressing, 269, 271copying, 34creating, 30–31determining disk usage for, 138displaying name for current, 17finding files in, 44getting status of file systems on, 137group association of, 99–100hard links for, 48listing, 13–14
loops to back up, 200–201moving, 38naming, 31navigating, 15ownership and permissions
changing, 101–102finding, 95–96
remote navigation of, 246removing, 42–43soft links for, 49, 50synchronizing, 318unzipping, 270, 272zipping, 269, 271See also files
disk usagedetermining with du, 138space required for uncompressed files, 268viewing number of blocks on device, 136
dmesg utility, 300–301documents
cleaning up HTML, 304–306searching and replacing in multiple, 307–309
dollar sign ($)function as regular expression, 115setting prompt to appear on separate line, 162
domain names, 257–258DOS aliases, 171dot (.)
function as regular expression, 115hiding files starting with, 37included in path statements, 159, 167using with find command, 44
downloadingfiles with ftp
multiple files, 246single files, 243–246
Web sites, 253du command, 138, 348duplicate files, 125
Eecho $SHELL command, 52, 149echo command, 193editing configuration files
alias setup, 170–172changing paths
bash, 166–167zsh, 158–159

381
Index
Index
changing promptsbash, 168–169zsh, 160–162
environment variablesadding or changing, 152–153to leave unchanged, 151safe to change, 152
to request default editor, 311–312as root user, 294–295running order of configuration files, 149, 163sourcing configuration files, 165viewing files for
bash shell, 163–165zsh shell, 154–157
editorsalternative, 70choosing, 70–72emacs
about, 72commands in, 88exiting, 91flags for, 348meta key in, 88saving files in, 90spelling checks in, 89starting, 87–88
nano, 70–71pico
about, 70–71cutting/pasting text in, 75exiting, 78flags for, 359–360getting help in, 77saving files in, 74, 78spelling checks in, 76starting, 73status line in, 77
setting configuration files to request, 311–312switching, 72vi
about, 71adding and deleting text in, 82exiting, 86importing files into, 83modes in, 79, 80removing line numbering in, 197saving files in, 81searching/replacing in, 84–85starting, 79–80
egrep command, 115eliminating duplicate files, 125else statement, 204emacs
about, 72commands in, 88exiting, 91flags for, 348meta key in, 88saving files in, 90spelling checks in, 89starting, 87–88
e-mailannouncing vacations in, 228–229attachments sent with, 210, 224automatically forwarding, 227choosing programs for, 210–211commands and flags for, 334composing and sending
with mail, 223–224with mutt, 220–221with pine, 214–215
customizing pine, 216–217encoding files for, 261–262figlets, 226filtering, 230, 232–234forwarding, 227, 233managing with procmail, 230, 232–234printing with pine, 213reading
with mail, 222with mutt, 218–219with pine, 212–213
sending from shell prompt, 215, 221signature files for, 225–226spam filters for, 233splitting files for, 131–132Web-based, 210
embeddingawk scripts in shell scripts, 310commands, 198–199ROT13 encoding in shell scripts, 315–317
encoding filesabout, 260decoding and, 263e-mailing and, 261–262ROT13 encoding
embedding in shell scripts, 315–317sed command used with, 313–314
table of commands and flags for, 336uuencode for, 260–262

382
Inde
x
Index
Enter key, xiiienvironment variables
about, 148–149adding or changing, 152–153commands and flags for configuring, 331input used to customize, 311–312list to leave unchanged, 151safe to change, 152setting TERM, 312showing current, 150–151su - for ensuring correct, 291viewing zsh configuration files, 154–157
equals sign (=), 104error, standard, 320Escape character for telnet, 239/etc directory, 294, 295executable scripts, 195–196execute permission, 94exit command
exiting shells with, 68returning to previous shell with, 66
exitingemacs, 91pico, 78returning to previous shell by, 66shells at end of session, 68temporary shell, 58vi, 86
expr utility, 280, 348expressions
calculating, 279evaluating, 280regular, 114–116
Ffailed login attempts, 10fg command, 183, 348fgrep command, 115fields, sorting, 124figlets, 226file command, 139, 348file systems, 135–137File Transfer Protocol (FTP), 237files
archiving, 264–265backing up, 41, 318–319changing
with awk, 118–119the motd, 294–295with tr, 127–128
cleaning up HTML documents, 304–306commands and flags
for creating and editing, 327for encoded and compressed, 336for managing directories and, 325for manipulating, 328–329
comparing, 35, 120compressing, 267, 269, 271copying, 34, 35counting contents of, 110creating with touch, 32–33decoding, 263, 273delimited, 118discovering differences in, 121–122displaying contents with cat, 23–24downloading with ftp
multiple files, 246single files, 243–246
eliminating duplicate, 125e-mailing text, 224encoding, 260–262finding, 44–45
regular expressions in, 114–116text strings in, 113
formatting, 129–130.forward, 227, 229, 230group association of, 99–100hiding, 37identifying types of, 139importing into vi, 83key, in Unix environment, 340linking, 47–50listing, 13–14, 36–37locating, 46looping scripts to back up, 200–201making global changes to, 117moving, 38naming, 31ownership of
changing, 101–102finding, 95–96levels of, 94
permissions foradding and removing, 105checking, 103finding, 95–96setting, 104
.plan and .project, 142redirecting output to, 19–20, 126

383
Index
Index
removing, 39–41running order of configuration, 149, 163saving
in emacs, 90in pico, 74, 78in vi, 81
searching and replacingDOS text in shells, 85text strings in vi, 84–85
setting permissions, 104sharing with ftp, 247–248signature, 225–226sorting, 123–124splitting, 131–132synchronizing, 318systemwide configuration, 149unarchiving with tar, 266, 274uncompressing, 268, 270, 272, 274unzipping, 270, 272, 273viewing
beginnings of, 111contents with more, 22endings of, 112
zipping, 269, 271See also directories
filtering e-mailconfiguring procmail for, 230–231tossing spam messages, 233writing procmail recipes, 232
find command, 44–45, 348–349finding
available shells, 54configuration files with grep, 157, 160, 167default groups, 97–98files, 44–45lines with specific characteristics, 116names of people logged on, 140–142path names, 17permissions, 95–96temporary shells, 57text and text strings, 113which group you’re in, 97–98See also searching and replacing
finger command, 52, 140–142, 349firewalls
ftp connections and, 246talk chats and, 242traceroute problems with, 256
flagsabout, xiv, 343command-based listing of, 343–376topical listing of, 323–337
basic Unix, 324configuring Unix environment, 331creating and editing files, 327directory and file management, 325e-mail, 334encoding and compressing files, 336file ownership and permissions, 327getting system information, 330Internet, 335manipulating files, 328–329running scripts and programs, 332shell management, 326utility, 337writing scripts, 333
See also specific commandsflavors of Unix, xii, 6fmt command, 129–130, 350foreground jobs, 183formatting
date display, 199files, 129–130
fortunes, 10, 46.forward file, 227, 229, 230forward slash (/), 45forwarding e-mail messages
automatically, 227with procmail, 233
FTP (File Transfer Protocol), 237ftp command
downloading files withmultiple files, 246single files, 243–246
flags used with, 350sharing files with, 247–248troubleshooting connections, 246
Gget command, 246getting started, 1–28
accessing Unix, 3–4basic commands and flags for, 324changing directories, 15–16choosing type of Unix, 6connecting to Unix systems, 7–9

384
Inde
x
Index
getting started (continued)displaying file contents
with cat, 23–24with more, 22
exploring local programs, 25getting help with, 25, 26–27installing Unix, 5–6listing directories and files, 13–14, 36–37logging in to Unix, 10logging out of Unix, 28overview of, 1–2password changes, 11–12piping input and output, 18redirecting output, 19–20viewing directory names, 17wildcards, 21
global changes to files, 117greater than symbol (>), 19grep command
findingconfiguration files with, 157, 160, 167lines with specific characteristics, 116text strings with, 113
flags used with, 350using regular expressions with, 114–116w command with, 145
groupschanging file and directory associations
for, 99–100determining by userid, 146file ownership by, 94finding out default, 97–98
groups command, 98GUI tool, 295gunzip command, 268, 270, 272, 273gz command, 248gzip command, 265, 269, 274, 350–351
Hhackers, 11hard drive information, 135–137hard links, 47–48hash mark (#)
comment indicator, 165file transfer indicator, 245root prompt symbol, 290
head command, 111, 263, 351help
expr utility, 280
man command for, 25, 26–27mutt, 219pico, 77ssh, 238telnet, 240vi, 80
hidden filescreating, 37viewing, 36
history commandrecreating scripts with, 197viewing session history, 60–61, 63–64
home directoryfiles stored in, 10shortcut to, 16system root directory vs., 16
host names, 236HTML (Hypertext Markup Language)
document cleanup for, 304searching and replacing tags in, 307–309
HTTP (Hypertext Transfer Protocol), 237human-readable output, 137
Iid command, 98, 146, 351if-then statements, 202–204importing files into vi, 83incoming directory, 247, 248information about files, 36input
accepting while running scripts, 206–207command-line arguments, 205customizing your environment using, 311–312piping, 18standard, 320
insert mode in vi, 79installing
software, 295Unix, 5–6
Internetchecking connections with ping, 254commands and flags for, 335communications with others
using talk, 242using write, 241
downloadingfiles with ftp, 243–246Web sites with wget, 253
file sharing with ftp, 247–248

385
Index
Index
links browser, 249–250lynx browser, 251–252matching domain names with IP addresses
with dig, 258with nslookup, 257
remote system loginwith ssh, 238with telnet, 239–240
surfing Web sites on, 249–252terminology related to, 236–237tracing connections with traceroute, 255–256See also Web sites
IP (Internet Protocol) addressesdefined, 236matching domain names with, 257–258
ISPs (Internet Service Providers)forwarding e-mail when changing, 227interface for changing shells, 56shell accounts offered by, 4
Jjobs
checkingprocesses running, 187–188status of, 181
controlling priority of, 184defined, 173deleting scheduled, 177killing, 181, 189running
background, 182foreground, 183sequential, 176
scheduling onetime, 175–176setting up regularly occurring, 178–179suspending, 180timing, 185–186See also scripts
jobs command, 181, 351Julian calendar, 276
Kkeystrokes
for links browser, 250for lynx browser, 252
kill command, 181, 189–190, 351killing jobs, 181, 189ksh shell, 53
Llast utility, 297less command, 22, 351–352lines
breaking with tr command, 127counting number in files, 110viewing specified number in files, 111, 112
linking fileshard links, 47–48soft links, 49–50
links browserflags used with, 352–353keystrokes for, 250navigating with, 250surfing the Web with, 249–250
Linux, 6, 295listing
directories and files, 13–14, 36–37files by type, 139jobs by time, 186
ln commandflags used with, 353hard links with, 47–48soft links with, 49–50
locate command, 46, 353locating files, 46logging in
cal utility used on, 276connection information for, 9as different user, 66finding names of current users
with finger, 140–142with w, 144–145with who, 143
remotelywith ssh, 238with telnet, 239–240
as root user, 40steps for, 10
logging out, 28logout command, 28, 68logs, monitoring, 296look utility, 282, 353–354looping scripts, 200–201lp utility, 354ls command
flags used with, 354–355listing directories and files with, 13–14,
16, 36–37showing permissions with, 95–96

386
Inde
x
Index
lynx browserflags used with, 355–357keystrokes for, 252navigating with, 251surfing the Web with, 251–252
MMacintosh computers
accessing Unix on, 6author’s note to users of, xivviewing contents of drives on, 135
MacSSH, 7mail
about, 211composing e-mail with, 223flags used with, 357–358reading e-mail with, 222sending e-mail with, 223–224text files sent with, 224using on Unix systems, 210
mail clients, 210–211mail loops, 229man command
editing man pages, 27flags used with, 357getting help with, 25, 26–27
managing e-mailconfiguring procmail for, 230–231writing procmail recipes, 232
manually setting date/time, 302measurement conversions, 281memory check, 297Message of the Day (motd) file, 294–295messaging
talk command, 242write command, 241
meta key, 88mkdir command, 30–31, 358mnemonic permissions, 106modes in vi, 79, 80monitoring
logs, 296scripts for, 297sudo activities, 289system load, 297users, 297, 298watch utility for, 299
more command, 22, 358
motd file, changing, 294–295mounted file systems, 135mountpoint, 136moving
files and directories, 38up/down in directories, 15
mput command, 248multiple files
downloading, 246making global changes to, 117sorting, 124viewing
beginnings of, 111endings of, 112
mutt
about, 211composing e-mail with, 220–221flags used with, 358–359reading e-mail with, 218–219sending e-mail with, 220–221using on Unix systems, 210
mv command, 38, 359
Nnaming
directories and files, 31using absolute or relative names, 35
nano editor, 70–71, 359navigating
in directories, 15with links browser, 250with lynx browser, 251
nice command, 184, 359normal mode in vi, 79nslookup command, 257, 258ntpdate command, 302numbers
sorting numerically, 124specifying for cron jobs, 179
numeric permissions, 106
OOpenSolaris, 6output
getting readable, 137piping, 18redirecting
to files, 19–20

387
Index
Index
to multiple locations, 126script, 317with stderr, 320–322
standard, 320overwriting files, 35ownership and permissions
about, 94adding permissions, 105changing
group association of files and directories, 99–100
ownership of files and directories, 101–102permission defaults, 107–108
checking current permissions, 103commands and flags for, 327finding out
which group you’re in, 97–98who owns files, 95–96
levels and categories of, 94removing permissions, 105setting permissions, 104translating mnemonic to numeric
permissions, 106
Ppackets, 255passwd command, 11–12, 359passwords
changing, 11–12checking new, 12choosing, 12telnet security and, 7, 291
path statement, 158, 166paths
changingbash, 166–167zsh, 158–159
finding name of, 17specifying in executable scripts, 196
performancechecking running processes, 187–188controlling job priority, 184deleting processes, 189–190monitoring system load, 297system capacity and time of day, 186tracing bottlenecks in, 255–256See also troubleshooting
permissionsadding, 105categories of, 94changing defaults for, 107–108checking current, 103commands and flags for, 327finding file and directory, 95–96interpreting abbreviations for, 96listing, 95–96removing, 105s or SetUID, 96setting, 104sticky bit set for, 96translating mnemonic to numeric, 106
pfexec utility, 289pgrep command, 360–361pico
about, 70–71cutting and pasting text in, 75exiting, 78flags used with, 359–360getting help in, 77saving files in, 74, 78spelling checks in, 76starting, 73status line in, 77
PID (process identification) number, 187, 189, 190
pine
about, 211composing e-mail with, 214–215customizing, 216–217e-mail configuration, 216–217flags used with, 360newer version of, 209pico distributed with, 71printing e-mail with, 213reading e-mail with, 212–213sending e-mail with, 214–215using on Unix systems, 210
ping command, 254, 360pipe symbol (|), 18pkill command, 190, 361.plan files, 142ports, 237pr command, 362Preferences dialog, 11-print flag, 45

388
Inde
x
Index
printing e-mail with pine, 213priority of jobs, 184processes
checking running, 187–188defined, 187deleting, 189–190ownership and, 94system information about, 144–145
procmail
about, 230configuring, 230–231flags used with, 361forwarding e-mail with, 227, 233invoking vacation with, 234sample recipes for, 234specifying settings for, 230–231tossing spam messages with, 233writing recipes for, 232
programsinstalling, 295See also running scripts and programs;
utilities.project files, 142prompts
about default, 160changing
bash, 168–169zsh, 160–162
sending e-mail from, 215, 221shell, 10, 51sudo, 289trailing space after, 162, 169
protocols, 237ps command, 187–188, 361–362put command, 247PuTTY, 7–8pwd command, 17, 362
Qquestion mark (?) wildcard, 21quota command, 362
Rread permission, 94reading e-mail
with mail, 222with mutt, 218–219with pine, 212–213
real time, 186recipes for procmail, 232, 233, 234recording scripts, 283–285redirecting output
to files, 19–20to multiple locations, 126of scripts, 317with stderr, 320
reget command, 246regular expressions
finding lines with specific characteristics, 116summary table describing, 115using with grep, 114–116
relative names, 35remote systems
checking connections to, 254connecting to
with ssh, 238with telnet, 239–240
tracing connections to, 255–256working with directories on, 246
removingdirectories, 42–43files, 39–41line numbering in vi, 197permissions, 105scheduled jobs, 177See also deleting
renice command, 184, 362replacing. See searching and replacingreports, generating, 310reset command, 67, 363restarting daemons, 293rm command
file removal with, 39–41, 43flags used with, 362hard link removal with, 48
rmdir command, 42–43, 363root directory, 14, 16, 45root users
about, 287becoming root with su, 290–291changing system configuration, 294–295checking boot messages, 300–301logging in as, 40monitoring the system, 296–298responsibilities of, 287, 288, 290setting date and time, 302

389
Index
Index
starting and stopping daemons, 292–293sudo utility used by, 288–289telnet security and, 291watch utility for, 299See also system administrators
ROT13 encodingembedding in shell scripts, 315–317using with sed, 313–314
rsync utility, 318–319, 363–365runique command, 246running scripts and programs
accepting input while running scripts, 206–207
background jobs, 182checking
job status, 181processes running, 187–188
command-line arguments in scripts, 205commands and flags for, 332controlling job priority, 184deleting
processes, 189–190scheduled jobs, 177
foreground jobs, 183making executable scripts, 195–196running commands, 174scheduling onetime jobs, 175–176setting up regularly occurring jobs, 178–179suspending jobs, 180timing jobs, 185–186
Ssaving files
in emacs, 90in pico, 74, 78in vi, 81
scheduling onetime jobs, 175–176screen command, 365script utility, 283–285scripts
accepting input while running, 206–207checking
processes running, 187–188status of, 181
command-line arguments in, 205commands and flags for writing, 333controlling priority of, 184creating shell, 192–193
debugging, 208deleting
processes, 189–190scheduled, 177
developing monitoring, 297embedding
awk in shell, 310commands in, 198–199ROT13 encoding in shell, 315–317
example of using, 191if-then statements in, 202–204looping, 200–201making executable, 195–196numbers for cron jobs, 179printing onscreen while running, 208recording with script utility, 283–285recreating with history, 197redirecting output of, 317running
in background, 182in foreground, 183shell, 194
scheduling onetime, 175–176sed search and replace with, 307–309setting up regularly occurring, 178–179suspending, 180tidy used with sed, 306timing, 185–186verifying first line of, 196See also running scripts and programs
sdiff command, 122searching and replacing
loops used for, 201in multiple documents with sed, 307–309text with vi, 84–85See also finding
securitytelnet vs. SSH connections, 7using su to change to root access, 66
sed commandflags used with, 365loops used with, 201making global changes with, 117ROT13 encoding used with, 313–314searching and replacing in multiple
documents with, 307–309tidy used with, 306
semicolon (;), xiv

390
Inde
x
Index
sending e-mailwith mail, 223–224with mutt, 220–221with pine, 214–215from shell prompt, 215vacation messages, 228–229
sequential onetime jobs, 176servers, 236sessions
exiting at end of, 68recording with script, 283–285viewing history
for bash shell, 60–61for zsh shell, 63–64
set command, 365setenv command, 365sh shell
creating scripts, 192–193features of, 53making executable scripts, 195–196running scripts, 194scripting with, 191, 193
shell prompt, 10, 51See also prompts
shell variables, 148shells
accepting input while running scripts, 206–207
accessing via shell accounts, 4adding or changing environment variables,
153alias setup for, 170–172basic commands and flags for, 326changing, 55–56command argument completion
bash, 59zsh, 62
command-line arguments in scripts, 205creating shell scripts, 192–193debugging scripts for, 208determining one in use, 149embedding
awk in scripts, 310commands in scripts, 198–199ROT13 encoding in scripts, 315–317
finding available, 54fixing terminal settings, 67identifying default, 52
killing current process in, 190mail announcements in, 211redirecting stderr in, 321–322running scripts, 194, 195–196sending e-mail from prompt
in mutt, 221in pine, 215
session history forbash, 60–61zsh, 63–64
temporary, 57–58types of Unix, 53userid changes for, 65–66viewing configuration files
bash, 163–165zsh, 154–157
See also specific shellssignature files, 225–226single quotations (‘ ‘), 162sniffing, 7soft links, 49–50software
installing, 295See also utilities
Solaris, 6sort command, 123–124, 125, 366–367sorting
and eliminating duplicate files, 125files with sort, 123–124
sourcing configuration files, 165spam filters, 233special characters. See charactersspelling checks
dictionary lookup for, 282emacs menus for, 89looping scripts for, 201pico editor, 76piped commands for, 18
split command, 131–132, 366splitting files, 131–132square brackets ([ ]), 115, 343ssh command
flags used with, 365–366logging in remotely with, 238
SSH (Secure Shell) connectionsconnecting to Unix, 7–8Preferences dialog box, 11security and, 7, 291

391
Index
Index
standard error (stderr)defined, 320redirecting in shells, 321–322
standard input (stdin), 320standard output (stdout), 320starting
daemons, 292–293emacs, 87–88pico, 73vi, 79–80
status line in pico, 77sticky bits, 96stopped jobs, 180stopping
daemons, 293vacation e-mails, 229
strings, text, 113stty command, 67su - yourid command, 12su command, 65–66, 290–291, 367subject line in mail, 224subshells, 57–58sudo utility, 102, 288–289, 367suspending jobs, 180switching editors, 72synchronizing files/directories, 318–319system administrators
asking for alternative shells, 56changing system configuration, 294–295checking boot messages, 300–301diagnosing system problems with df, 137monitoring the system, 296–298password security of, 7, 291rm command used by, 40setting date and time, 302starting and stopping daemons, 292–293sudo utility used by, 288–289wall command for, 238watch utility for, 299whoami command used by, 143
system informationchecking userid information, 146commands and flags for getting, 330daemons running, 188determining disk usage, 138finding out file types, 139getting with uname, 134
obtaining on logged in userswith finger, 140–142with w, 144–145with who, 143
setting zsh prompt to show, 161viewing file systems, 135–137
system load, 297system root directory, 16systemwide configuration files, 149
Ttac command, 24tail command, 112, 367talk command, 242, 368tar command
archiving files with, 264–265flags used with, 368–369gzip used with, 274transferring multiple files with, 248unarchiving files with, 266
tcsh shell, 53tee command, 126, 369telnet command
connections using, 7flags used with, 369logging in with, 239–240password security and, 7, 291
temporary shells, 57–58TERM environment variable, 312terminal settings, 67text
adding and deleting in vi, 82cutting and pasting in pico, 75finding in files, 113looking up words in, 282searching/replacing in vi, 84–85
tidy utility, 304–306, 369–370tilde (~), 16time
manually setting, 302real vs. user and system, 186setting with ntpdate, 302updating file’s date and, 33
time command, 185–186, 321, 322, 370timing jobs, 185–186tin, 370tn3270, 240touch command, 32–33, 370

392
Inde
x
Index
tr command, 127–128, 370traceroute command, 254, 255–256, 371trailing space after prompts, 162, 169translating case, 127, 128troubleshooting
file and directory removal, 40ftp connections, 246terminal displays, 67traceroute problems with firewalls, 256See also performance
UUbuntu Linux, 295umask command, 107–108, 371unalias command, 371uname command, 134, 371unarchiving files
tar command for, 266uncompressing while, 274
uncompress command, 268, 274uncompressing files
about, 268decoding and, 273gunzip for, 270unarchiving while, 274uncompress for, 268unzip for, 272
uniq command, 125, 371units utility, 281, 371–372Unix
accessing, 3–4choosing flavor of, 6common directories in, 25, 341–342connecting to, 7–9conventions for typing commands, xiii–xividentifying default shell on, 52installing, 5–6list of key files in, 340logging in to, 10logging out of, 28passwords, 11–12reasons for using, 3root users in, 40, 287, 288, 290shells in, 53software installation on, 295summary table of flags and commands,
344–376
untarring files, 274unzip command, 272, 372unzipping files, 270, 272, 273user and system time, 186users
changing identity with su, 65–66checking userid information, 146communicating with other, 241–242currently logged in, 140–145file ownership by, 94monitoring, 297, 298See also root users
utilitiesbc, 279cal, 276–278, 345commands and flags for, 337defined, 275dmesg, 300–301expr, 280, 348last, 297look, 282, 353–354lp, 354rsync, 318–319, 363–365script, 283–285sudo, 102, 288–289, 367tidy, 304–306, 369–370units, 281, 371–372watch, 299, 373
uudecode command, 263, 273, 372uuencode command, 260–262, 372
Vvacation program, 228–229, 234, 372–373vi
about, 71adding and deleting text in, 82composing e-mail in, 221exiting, 86getting help in, 80importing files into, 83modes in, 79, 80removing line numbers in, 197saving files in, 81searching/replacing text in, 84–85starting, 79–80

393
Index
Index
viewingbash configuration files, 163–165beginning of files, 111ending of files, 112file contents with more, 22file systems, 135–137hidden files, 36session history
in bash shell, 60–61in zsh shell, 63–64
specified number of lines in files, 111zsh configuration files, 154–157
VirtualBox, xiii, 5–6
Ww command, 144–145, 373wall command, 238watch utility, 299, 373wc command, 110, 373Web browsers
links, 249–250lynx, 251–252
Web sitesaccessing for this book, xiidownloading with wget, 253surfing, 249–252
wget command, 253, 373–375whereis command, 375who command, 143, 375whoami command, 143whois query server, 258wildcards
find command and, 44, 45guidelines for using, 21
Windowsinstalling Unix and, 5–6using zip for files accessed in, 269viewing contents of drives in, 135
WinZip program, 271words
counting in files, 110looking up, 282
write command, 241, 375write permission, 94
Yydecode command, 375yencode command, 375yppasswd command, 12
Zzip command, 269, 271, 376zipping files
about, 269gzip for, 269zip for, 271
zsh shellability to understand multiple expressions,
157adding or changing environment variables,
153alias setup for, 170–172changing paths in, 158–159command argument completion in, 62features of, 53flags for commands in, 376redirecting stderr in, 321–322session history viewed in, 63–64setting prompt for, 160–162showing current environment in, 150–151viewing configuration files in, 154–157
.zshrc file, 172

Simply visit www.peachpit.com/safarienabled and enter code GQMEREH to try it today.
Get free online access to this book for 45 days! And get access to thousands more by signing up for a free trial to Safari Books Online!
With the purchase of this book you have instant online,
searchable access to it for 45 days on Safari Books Online!
And while you’re there, be sure to check out Safari Books
Online’s on-demand digital library and their free trial offer
(a separate sign-up process). Safari Books Online subscribers
have access to thousands of technical, creative and business
books,instructional videos, and articles from the world’s
leading publishers.