Useand&m Wide - GE Appliances
40
Useand&m Wide Gas Stiatylnstru~ions . . . . . . . . . . . . . . . . . . . 2-6 Anti-Tip Device . . . . . . . . . . . . . . . . . . . . . . . . . . . . . . . . . . . 2,3,35 Operating lnstru@ions, ~ps Aluminum Foil. . . . . . . . . . . . . . . . . . . 5, 19, 22–24, 26 Features . . . . . . . . . . . . . . . . . . . . . . . . . . . . . . . . . . . . . . . . . . . . . . . . . . . . . . . 8,9 Oven . . . . . . . . . . . . . . . . . . . . . . . . . . . . . . . . . . . . . . . . . . . . . . . . . . . . . . . 15-29 Baking . . . . . . . . . . . . . . . . . . . . . . . . . . . . . . . . . . . . . . . . . . . . . . . . . 17–20 Broiling, Broiling Guide . . . . . . . . . . . . . . . . . . . 24,25 Control, Clock and Timer . . . . . . . . . . . . . . . . 13, 14 Fan..... 6,15,17, 19,20,22,24,27,28,38 Light; Bulb Replacement . . . . . . . . . . . . . . . . 16,34 Oven Vent. . . . . . . . . . . . . . . . . . . . . . . . . . . . . . . . . . . . . . 4, 16,33 Preheating . . . . . . . . . . . . . . . . . . . . . . . . . . . . . . . . . . 17,23,25 Roasting, Roasting Guide . . . . . . . . . . . . . . . 22,23 Self< leaning Instructions . . . . . . . . . . . . . 26–29 Shelves . . . . . . . . . . . . .5, 16-19,22,24-27,29 Timed Baking . . . . . . . . . . . . . . . . . . . . . . . . . . . . . . . . . . . . 19,20 Using Your Oven . . . . . . . . . . . . . . . . . . . . . . . . . . . . . . 15, 16 Surface Cooking . . . . . . . . . . . . . . . . . . . . . . . . . . . . . . . . . . 11, 12 Control Settings . . . . . . . . . . . . . . . . . . . . . . . . . . . . . . . . 11, 12 Cooktop Comparison . . . . . . . . . . . . . . . . . . . . . . . . . . . . . 10 Cookware Tips . . . . . . . . . . . . . . . . . . . . . . . . . . . . . . . . . . . . . . . . . 12 Range Problem solver . . . . . . . . . . . . . . . . . . . . . . 36,37 Thermostat Adjustment Do It Youmefi........ . . . . . . . . . . . . . . . . . . . . . . . . . . . . . . . . . . . . 21 More questions ?...call GEhwrbntiP 80~62&2000 Cam and cleaning . . . . . . . . . . . . . . . . . . . 26-34 Burner kwmb~.......... . . . . . . . . . . . . . . . . . . . . . . . . . . . . . . . . . . . . . . 30 Door Removel . . . . . . . . . . . . . . . . . . . . . . . . . . . . . . . . . . . . . . . . . . . . . . 32 Glass Cooktop........ . . . . . . . . . . . . . . . . . . . . . . . . . . . . . . . . . . . . . . 31 Removable Oven Bottom . . . . . . . . . . . . . . . . . . . . . . . . . . 34 Self<leaning Instructions ..................26-29 Shelves . . . . . . . . . . . . . . . . . . . . . . . . . . . . . . . . . . . . . . . . . . . . . . . . . . . . . . . . . . 33 Preparation . . . . . . . . . . . . . . . . . . . . . . . . . . . . . . . . . . . 7,35 Anti-Tip Device . . . . . . . . . . . . . . . . . . . . . . . . . . . . . . . . . . . . . . . . . . . . 35 Flooring Under the Range . . . . . . . . . . . . . . . . . . . . . . . . . . . 7 Leveling . . . . . . . . . . . . . . . . . . . . . . . . . . . . . . . . . . . . . . . . . . . . . . . . . . . . . . . . . . . . 7 Removal of Packaging Tape . . . . . . . . . . . . . . . . . . . . . . . 7 Consumer Services . . . . . . . . . . . . . . . . . . 39 Appliance Registration . . . . . . . . . . . . . . . . . . . . . . . . . . . . . . . . . 2 lmpo~nt Phone Numbers . . . . . . . . . . . . . . . . . . . . . . . 39 Model and Serial Number Location ..........2 Warran~ . . . . . . . . . . . . . . . . . . . . . . . . . . . . . . . . . . . . . . . Back Cover GE@phances Models: JGSP32 JGSP33 JGSP@ 1MD2966P120
-
Upload
khangminh22 -
Category
Documents
-
view
1 -
download
0
Transcript of Useand&m Wide - GE Appliances

Useand&m Wide
Gas
Stiatylnstru~ions . . . . . . . . . . . . . . . . . . . 2-6Anti-Tip Device . . . . . . . . . . . . . . . . . . . . . . . . . . . . . . . . . . . 2,3,35
Operating lnstru@ions, ~psAluminum Foil. . . . . . . . . . . . . . . . . . . 5, 19, 22–24, 26Features . . . . . . . . . . . . . . . . . . . . . . . . . . . . . . . . . . . . . . . . . . . . . . . . . . . . . . . 8,9Oven . . . . . . . . . . . . . . . . . . . . . . . . . . . . . . . . . . . . . . . . . . . . . . . . . . . . . . . 15-29
Baking . . . . . . . . . . . . . . . . . . . . . . . . . . . . . . . . . . . . . . . . . . . . . . . . . 17–20Broiling, Broiling Guide . . . . . . . . . . . . . . . . . . . 24,25Control, Clock and Timer . . . . . . . . . . . . . . . . 13, 14Fan..... 6,15,17, 19,20,22,24,27,28,38Light; Bulb Replacement . . . . . . . . . . . . . . . . 16,34Oven Vent. . . . . . . . . . . . . . . . . . . . . . . . . . . . . . . . . . . . . . 4, 16,33Preheating . . . . . . . . . . . . . . . . . . . . . . . . . . . . . . . . . . 17,23,25Roasting, Roasting Guide . . . . . . . . . . . . . . . 22,23Self< leaning Instructions . . . . . . . . . . . . . 26–29Shelves . . . . . . . . . . . . .5, 16-19,22,24-27,29Timed Baking . . . . . . . . . . . . . . . . . . . . . . . . . . . . . . . . . . . . 19,20Using Your Oven . . . . . . . . . . . . . . . . . . . . . . . . . . . . . . 15, 16
Surface Cooking . . . . . . . . . . . . . . . . . . . . . . . . . . . . . . . . . . 11, 12Control Settings . . . . . . . . . . . . . . . . . . . . . . . . . . . . . . . . 11, 12Cooktop Comparison . . . . . . . . . . . . . . . . . . . . . . . . . . . . . 10Cookware Tips . . . . . . . . . . . . . . . . . . . . . . . . . . . . . . . . . . . . . . . . . 12
Range
Problem solver . . . . . . . . . . . . . . . . . . . . . . 36,37Thermostat Adjustment
Do It Youmefi........ . . . . . . . . . . . . . . . . . . . . . . . . . . . . . . . . . . . . 21More questions ?...callGEhwrbntiP 80~62&2000
Cam and cleaning . . . . . . . . . . . . . . . . . . . 26-34Burner kwmb~.......... . . . . . . . . . . . . . . . . . . . . . . . . . . . . . . . . . . . . . . 30Door Removel . . . . . . . . . . . . . . . . . . . . . . . . . . . . . . . . . . . . . . . . . . . . . . 32Glass Cooktop........ . . . . . . . . . . . . . . . . . . . . . . . . . . . . . . . . . . . . . . 31Removable Oven Bottom . . . . . . . . . . . . . . . . . . . . . . . . . . 34Self<leaning Instructions ..................26-29Shelves . . . . . . . . . . . . . . . . . . . . . . . . . . . . . . . . . . . . . . . . . . . . . . . . . . . . . . . . . . 33
Preparation . . . . . . . . . . . . . . . . . . . . . . . . . . . . . . . . . . . 7,35Anti-Tip Device . . . . . . . . . . . . . . . . . . . . . . . . . . . . . . . . . . . . . . . . . . . . 35Flooring Under the Range . . . . . . . . . . . . . . . . . . . . . . . . . . . 7Leveling . . . . . . . . . . . . . . . . . . . . . . . . . . . . . . . . . . . . . . . . . . . . . . . . . . . . . . . . . . . . 7Removal of Packaging Tape . . . . . . . . . . . . . . . . . . . . . . . 7
Consumer Services . . . . . . . . . . . . . . . . . . 39Appliance Registration . . . . . . . . . . . . . . . . . . . . . . . . . . . . . . . . . 2lmpo~nt Phone Numbers . . . . . . . . . . . . . . . . . . . . . . . 39Model and Serial Number Location ..........2Warran~ . . . . . . . . . . . . . . . . . . . . . . . . . . . . . . . . . . . . . . . Back Cover
GE@phances
Models: JGSP32JGSP33JGSP@
1MD2966P120

~LP US ~LP YOU...
Before using your range,read tiis guide arefdly.It is intended to help you operate and maintain yournew range properly.Keep it handy for answers to your questions.If you don’t understand wmething ornd mom help, dl:
GE Answer Centerm
W.626.2~24 hours a day, 7 days a week
Write dom tie model and WM numbers.Youqll tind the model and serial numbers on a label onthe range frunt fr~me behind the storage drawer.These numbers are alst) on the Consumer PrductOwnership Registration Card that came with your “range. Before sending in this card, please write thesenumbers here:
Model Number Serial Number
Usc these numbers in any c(]rrespt~ndence ur servicecalls concerning your range.
If you received a damaged range...Immediately contact the dealer (or builder) that soldyou the mnge.
Save time and money. Before yourequest service...Check the P~]blem Sf)lver in the back of this guide.it lists causes of minor operating problems th~t youcan correct yuurself.
A W A R N I N G
● ALL RANGESCAN TIP
“ INJURY TO PERSONSCOULD RESULT
3 s INSTALL ANTI-TIPDEVICES PACKEDt
A WITH RANGE
“ SEE INSTALLATIONINSTRUCTIONS
IWARNING: If the information in thisguide is not followed exactly, a fire orexplosion may result causing propertydamage, personal injury or death.
— Do not store or use gasoline or otherflammable vapors and liquids in thevicinity of this or any other appliance.
— WHAT TO DO IF YOU SMEI.I. GAS
● Do not try to light any appliance.s Do not touch any electrical switch; do
not use any phone in your building.● Immediately call your gas supplier from
a neighbor’s phone. Follow the gassupplier’s instructions.
c If you cannot reach your gas supplier~call the fire department.
— Installation and service must beperformed by a qualified installer, serviceagency or the gas supplier.
W YOU ~ED SERVICETo obtain service. sce the consumer se~i~es Pagein the back of this guide.We’re prt]ud uf uur service and want yuu to bepleased. If ft)r some reason you are not happy withthe service you receive. here arc th~e stePs to f(Ill~)wfor further help.FIRST, c(]ntact the people who serviced yourappliance. Explain why you are not pleased.In most cases, this will solve the problem.NEXT, if you are still not pleased. write all thedetails—including your phune number-to:
Manager, Consumer RelationsGE AppliancesAppliance ParkLouisville, KY 40225
FINALLY, if your problem is still not resolved. write:Major Appliance Consumer Action Panel20 North Wacker DriveChicago, IL 60606
2
~lvlPORTANT SAFETY NOTICEc The California Safe Drinking Water and Toxic
Enforcement Act requires the Governor ofCalifornia to publish a list of substances known tothe state to cause cancer, birth defects or otherreproductive harm, and quires businesses to warncustomers of ptential exposure to such substances.
● Gas appliances can cause minor exposure tofour of these substances, namely benzene, carbonmonoxide, formaldehyde and s~t, causedprimarily by the incomplete combustion of naturalgtis or LP fuels. Properly adjusted burners,indicated by o bluish rather than a yellow flame,will minimize incomplete combustion, Exposure tothese substances can be minimized by venting withan open window or using a ventilation fan or hood.
When You Get Your ~ngec Have the installer show you the location of the
range gas cut-off valve and how to shut it offif n~~~~.
~ve your range installed and properlygrounded by a qualifid installer, in accordancewith the Installation Instructions. Any adjustmentand service should be performed only by qualifiedgas range installers or service technicians.
● Do not attempt to repair or replace anypart of your range unless it is specificallyrecommended in this guide. All other serviceshould be referred to a qualified technician.
c Plug your range into a 120-volt groundedoutlet only. Do not rcmove the round groundingprong from the plug. If in doubt about thegrounding of the home electrical system, it is yourpersonal responsibility and obligation to have anungrounded outlet replaced with a properlygrounded, three-prong outlet in accordance withthe National Electrical Code. Do not use anextension cord with this appliance.
c Be sure all packaging materials are removedfrom the range before operating it to preventfire or smoke damage should the packagingmaterial ignite.
qcate the range out of kitchen tra~c path.~ld out of drafty locations to prevent pilot
outage and poor air circulation.
● Be sure your range is correctfy a~usted by aqualified service technician or installer for thetype of gas (natural or LP) that is to be used.Your range can be converted for use with eithertype of gas. Seethe Installation Instructions.
WA~ING: These adjustments must be madeby a qualified service technician in accordancewith the manufacturer’s instructions and all codesand requirements of the authority havingjurisdiction. Failure to follow these instructionscould result in serious injury or property damage.The qualified agency performing this workassumes responsibility for the conversion.
c After prolonged use of a range, high floortemperatu~ may result and many floorcoverings will not withstid tis kind of use.Never install the range over vinyl tile or linoleumthat cannot withstand such type of use. Neverinstall it directly over interior kitchen carpeting.
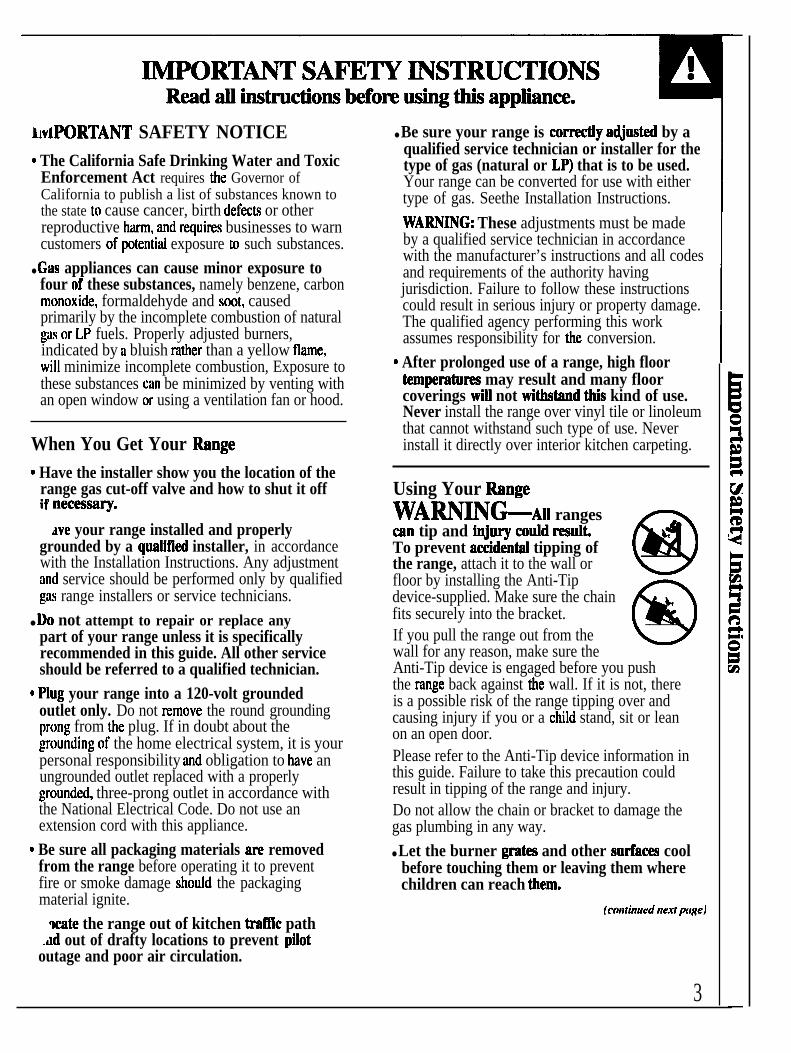
Using Your MngeWARNINGA]] rangescan tip and i@ury codd result
@
.4To prevent accidenti tipping ofthe range, attach it to the wall orfloor by installing the Anti-Tipdevice-supplied. Make sure the chainfits securely into the bracket.If you pull the range out from the wwall for any reason, make sure theAnti-Tip device is engaged before you pushthe mnge back against the wall. If it is not, thereis a possible risk of the range tipping over andcausing injury if you or a child stand, sit or leanon an open door.Please refer to the Anti-Tip device information inthis guide. Failure to take this precaution couldresult in tipping of the range and injury.Do not allow the chain or bracket to damage thegas plumbing in any way.
● Let the burner gram and other surfacm coolbefore touching them or leaving them wherechildren can reach hem.
(continue[ltle.rl Ixtgc)
3
-RTANT SA~~ ~STRUCmONS(continued)
● Do not leave chtidren alone or unattendedwhere a range is hot or in operation. They couldbe seriously burnd.
. Do not allow anyone b climb, stand or hangon the oven door, stirage drawer or cooktop.They could damage the range and even tip it over,causing severe personal injury.
c CAU~ON: ~MS OF ~EREST TOCHILDREN SHOULD NOT BE STORED INCABINETS ABOVE A RANGE OR ON THEBACKSPLASH OF A RANGMHILDRENCLIMBING ON THE RANGE TO REACHITEMS COULD BE SERIOUSLY ~JURED.
c Never wear loose fitting or hanging garmentswhile using tie appliance. Be careful whenreaching for items stored in cabinets over therange. Flammable material could be ignited ifbrought in contact with flame or hot oven surfacesand may cause severe bums.
● Teach children not to play with the controlsor any other part of the range.
● Never leave tie oven door open when you arenot watching the range.
c Always keep combustible wall coverings,curtains or drapes a safe distance fromyour range.
● For your safety, never use your appliancefor warming or heating the room.
s Always keep dish towels, dishcloths, potholders and other tinens a safe distancefrom your range.
● Always keep wooden and plastic utensilsand canned food a safe distance away fromyour range.
s Do not leave paper produti, cooking utensilsor food in the oven when not in use.
● Do not stire fimmable mahrials in an oven,a range storage drawer or near a cooktop.
c Do not store or use combustible materials,gasobe or other flammable vapors and liquidsin the vicinity of this or any other apptiance.
● Do not let cooking grease or other flammablemateti accumulate in or near the range.
e● Do not use water on grease fires.Never pick up a fiming pan.Turn the controls off. Smother aflaming pan on a surface burner by
covering the pan completely with a well-fittinglid, cookie sheet or tlat tray. Use a multi-purposedry chemical or foam-type fire extinguisher.
Flaming grease outside a pan can be put out bycovering it with baking soda or, if available, byusing a multi-purpose dry chemical or foam-typefire extinguisher.
Flame in the oven can be smothered completelyby closing the oven door and turning the ovenoff or by using a multi-purpose dry chemical orfoam-type fire extinguisher.
● When cooking pork, follow the directionsexactly and always cook the meat to an internaltemperature of at least 170°F. This assures that,in the remote possibility that trichina may bepresent in the meat, it will be killed and the meatwill be safe to eat.
Sufiace CwMgc Always use tie LITE position when
igniting the top burners and make sure theburners have ignited.
● Never leave the surface burners unattended athigh flame settings. Boilovers cause smoking andgreasy spillovers that may catch on fire.
s Adjust the top burner flame size so it does notextend beyond the edge of the cookware.Excessive flame is hazardous.
. Use only dry pot holdexmoistor damp pot holders on hot surfacesmay result in burns from steam.
Do not let pot holders come near open flameswhen lifting cookware. Do not use a towelor other bulky cloth in place of a pot holder.Such cloths can catch fire on a hot burner.
s When using @ass cookware, make sure itis designed for top-of-range cooking.
c To minimize the possibility of bums9ignition of flammable materials andspillage, turn cookware handles toward theside or back of the range without extendingover adjacent burners.
4

ways turn the surface burner controls offbefore removing cookware.
c Carefully watch foods being fried at a highflame setting.
s Never block the venk (air openings) of therange. They provide the air inlet and outlet thatare necessary for the range to operate properlywith correct combustion. Air openings are locatedat the rear of the cooktop, at the top of the ovendoor, and under the storage drawer.
c Do not use a wok on the cooking surface if thewok has a round metal ring that is placed overthe burner grate to support the wok. This ringacts as a heat trap, which may damage the burnergrate and burner head. Also, it may cause theburner to work improperly. This may cause acarbon monoxide level above that allowed bycurrent standards, resulting in a health hazard.
s Foods for frying should be as dry as possible.Frost on frozen foods or moisture on fresh foodscan cause hot fat to bubble up and over the sidesof the pan.
x the least possible amount of fat for effectiveshallow or deep-fat frying. Filling the pan toofull of fat can cause spillovers when food is added.
● If a combination of oils or fats will be usedin frying, stir together before heating or as fatsmelt slowly.
c Always heat fat slowly, and watch as it heats.
. Use a deep fat thermometer wheneverpossible to prevent overheating fat beyondthe smoking point.
c Never try to move a pan of hot fat, especiallya deep fat fryer. Wait until the fat is cool.
c Use proper pan si>Avoid pans that areunstable or easily tipped. Select cookware havingflat bottoms large enough to cover burner grates.T() avoid spillovers, make sure cookware is largeenough to contain the food properly. This will bothsave cleaning time md prevent hazardousaccumulations of food, since heavy spattering orspillovers left on range can ignite. Use pans withhandles that can be easily grasped and remain cool.‘Vhen flaming foods are under the hood, turn
,e fan off. The fan, if operating, may spreadthe flames.
c Do not leave plastic items on the cookto~they may melt if left too close to the vent.
s Keep dl pktim away fmm the surface burners.
c Do not leave any items on tie cooktop. The hotair from the vent may ignite flammable items andwill increase pressure in closed containers, whichmay cause them to burst.
● Myou smell gas, turn off the gas to the range andcall a qualified service technician. Never use anopen flame to locate a leak,
● To avoid the possibility of a bum, always becertain that the controls for dl burners are atthe off position and W grates are cool beforeattempting to remove them.
● Never clean the cooktop surface when it is hot.Some cleaners produce noxious fumes andwet cloths could cause steam bums if used ona hot surface.
● Never leave jam or cans of fat drippingson or near your range.
Ovenc Do not use the oven for a storage area. Items
stored in the oven can ignite.● Stand away from the range when opening the
door of a hot oven. The hot air and steam thatescape cm cause burns to hands, face and eyes.
● Keep the oven free from grease buildup,c Place the oven sheti in the desired position
while the oven is cool.
. Pulling out the shelf h the shelf-stop is aconvenience in ~ng heavy foods. It is dsoa precaution against bums from touching hotsurfaces of the door or oven walk.
● Do not heat unopend f~ containers.Pressure could build up and the container couldburst, causing m injury.
c Do not use aluminum fofl anywhere in the ovenexcept as descri~ in this guide. Misuse couldresult in a fire hazard or damage to the range.
c When using cooking or roasting bags in theoven, follow the package directions.
(ct~nlinnetitte.rt jnt,~e)
51
-RTANT SA~~ ~STRUCTIONS(continued)
c Do not use your oven h dry newspapers.If overheated, they can catch fire.
c Use ody @ss mkware that is recommendedfor use in ovens.
● When broiling, if meat is too dose to the flame, .the fat may ignik. Trim excess fat to preventexcessive flare-ups.
c After broting, always take the broiler pan out ofthe range and clean it. Leftover grease in the broilerpan can catch fire next time you use the pan.
● If you should have a grease fire in tie broilerpan, turn the oven off and keep the oven doorclosed to contain fire until it bums out.
● Keep the range dean and free of accumtiationsof grease or spillovers, which may ignite.
Self-Cleaning Oven● Be sure to wipe up excess spillage before
self-cleaning operation.s Clean only parts Iisti in the Use and
Care Guide.s Before self-cleaning the oven, remove the
broiler pan, rack and other cookware.Q Do not clean the door gasket. The door gasket
is essential for a good seal. Be careful not to rub,damage or move it.
● M the se~-deaning mode malfunctions, turnthe oven off and disconnect the power supply.Have it serviced by a qualified tmhnician.
● Do not use oven cleaners. No commercial ovencleaner or oven liner of any kind should be usedin or around any part of the oven. Residue fromoven cleaners will damage the inside of the ovenwhen the self-clean cycle is usd.
● Listen for a fan+ fan noise should be heardsometime during the cleaning cycle. If not, callfor service before self-cleaning again.
L.P. ConvemionYour range is shipped from the factory set tooperate only with Natural Gas. If you wish to useyour range with Liquefied Petroleum Gas, have theinstaller check the Installation Instructions thatcame with your range.WA~ING: These adjustments must be made by aqualified service technician in accordance with themanufacturer’s instructions and all codes andrequirements of the authority having jurisdiction.Failure to follow these instructions could result inserious injury or property damage. The qualifiedagency performing this work assumes responsibilityfor the conversion.
SAVE T~SE~STRUCTIONS
.
.-
6

PMPAMTION
~oring Under the RangeYour range, like so many other household items,is heavy and can settle into sofi floor coveringssuch as cushioned vinyl or car~ting. When movingthe range on this type of Il(]oring, it should bcinstalled on a l/4-inch-thick sheet of plywood (orsimilar material) as follows: When thefior coven.ngends at the front of the range, the area that the rangewill rest on should be built up with plywood to thesume level f)r higher than the floor covering. This willallow the range to be moved for cleaning or servicing.
Leveling the RangeUsc a 1 X“ open-end or adjustable wrench to equallyback (Jut the four legs. The tlanges (rims) belf)w thesides of the c{)oktop must be raised above the top ofthe countertop. Carefully slide the r~nge into itsinstallation space. Observe tha~ it is clearing thecountertop. Then place a spirit level or a glassmeasuring cup partially filled with water on one ofthe oven shelves to check for levelness. If using aspirit level, take two readings. with the level placeddiagonally first in one direction and then the other.
just the four legs curefully. Uvcl the range f~)nt to,,~ck and side to side. The range legs must rest on theIloor. The range must not hang f~)m the countertop.
How to Remove Packaging TapeT() assure no damage is done to the finish of thepruduct. the safest way to remove adhesive left frompackaging tape on new appliances is an application of;l household liquid dishwashing detergent. mineral uilor c(x)king oil. Apply with a soft cloth and allow tosoak. Wipe dry and then apply an appliance polish tothoroughly clean and protect the surface.NOTE: The plastic tape must be removed fromthe chrome trim on range parts. It cannot bc removedif it is baked (In.
Removing Packing MaterialsCheck yf)ur range to insure all packaging ,materials and protective tapecovering are removed frurn areas such as the dour trim, cooktop frame,under burner caps, end caps, etc. before using.
7
—.

— -———
FEATUmS OF YOUR RANGE
Q.
I
\
. .
v
JGSP32JGSP33JGSP#
8

ExplainedFeature Index on page
1 Model and Serial Numbers I 2
2 Oven Door Gasket 6,25,31
3 Removable Oven Bottom 33
4 Oven Shelves with Stop-Locks 5, 1418,2123-26,28
5 Automatic Oven Door Latch 25-28
6 Surface Burner Controls 10,30
7 Glass Cooktop I 30
8 oven Vent I 4 , 1 5 , 3 2
9 Anti-Tip Device 2,3,34Sec the Installation Instructions.
10 Surface Burners and Grates I 29,30
I I oven Light Switch 151
“ ~ oven ~ont~]s 12, 13Aut~)matic Oven Timer 13Oven Thermostat 20Clock 13Timer 13
13 Automatic Oven I.ight Switch 151
14 Oven Interior Light 15.33I
15 Broil Burner 23
16 oven Shelf Supports 5, 1~18, 21Shelf p(]sitions for cof)king are suggested 23-26,28in the Baking, Roasting and Broiling sectif)ns.
17 Lift-Off Oven Door I 3,4,6,25,31
18 Sure Grip Handle 32,
19 Broiler Pan and Mck 5,6,21,24Do nf)t clean in the self-cleaning oven.
20 Storage Drawer I 3,4,31
HOW DOES T~ COOKTOP COmAREm YOUR OLD ONE?
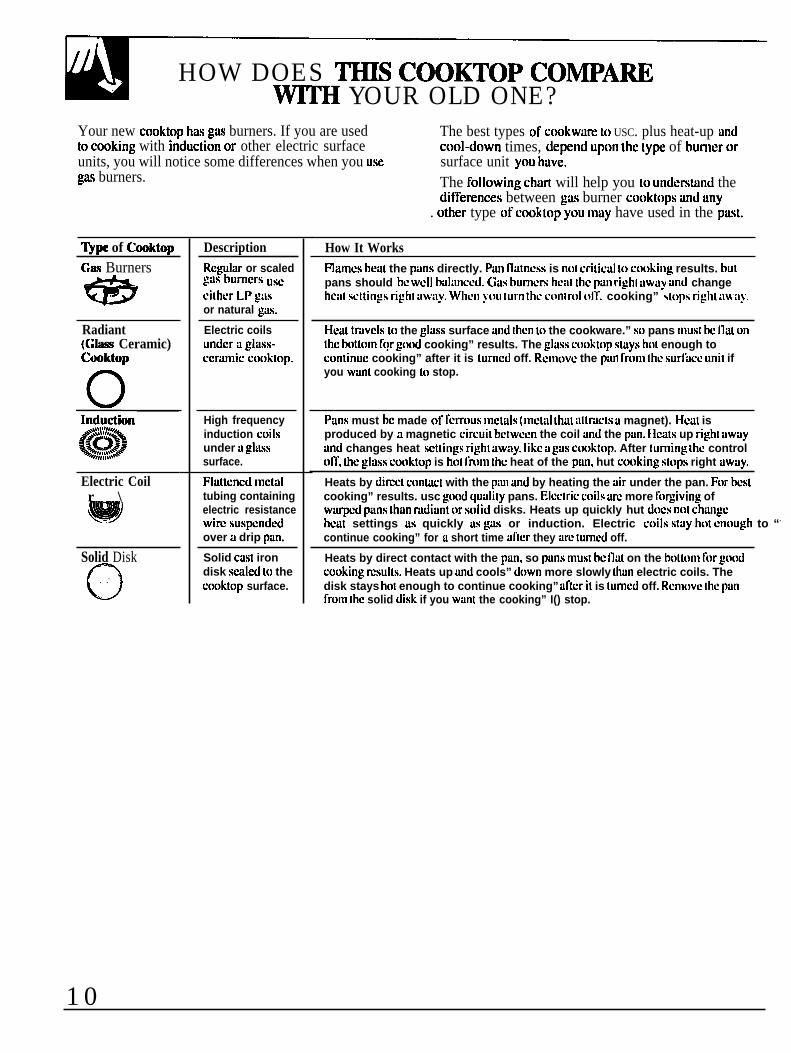
Your new cooktop has gas burners. If you are used The best types of c(x)kwtire LU USC. plus heat-up andto cmking with induction or other electric surface c(~ol-down” times, depend up(~n the Iype of burner orunits, you will notice some differences when you U.SC surface unit y(>u have.gas burners.
~pe of Cooktop(;as Burners
a.d
Radiant((;lass Ceramic)Cooktop
Electric Coilr \
Solid Disk
o
DescriptionRegular or scaled~ils bum~rs us~ci[hcr LP ~iisor natural gas.
Electric coilsunder a glass-ccramic cooklop.
High frequencyinduction coilsunder a ~lilSSsurface.
Flatlcncd metaltubing containingelectric resistancewim sus~’ndcdover a drip pan.
Solid cast irondisk scaled to thecooktop” surface.
The folluwing chart will help you 10 understand thedit~erences between gas burner cooktnps and any
. other type ufcooktop you may have used in the past.
How It WorksFliuncs heat the puns directly. PiuI Ilatncss is not crhiciil to col)king results. butpans should b~ WCII hilliln~~d. C;ils bumcrs h~ilt [h~ Piill right ilwti~ aIld changeh~iit scllings right il~’il~. Wh~I) ~I)U IUM IhC ~(JIIII-ol off. cooking” stops right il~il}.
Heat trilv~ls [() the glass surface and then to the cookware.” s() pans Inus[ he Ila[ onlhc bottotn” ll?r g(N)d cooking” results. The gloss col)ktop” sItiys hot enough toconiinuc cooking” after it is tumcd off. Rcnlovc the piln fn)tn Ihc surfticc unit ifyou want cooking to stop.
Pans must hC made of f~rrous ]nctals (tll~[ill that illtr~~ls a magnet). HCaI isproduced by a magnetic ci~ui[ bctwccn the coil and the piln. Ilcats up right ilw~yund changes heat sct[ings right tiwily. Iikc a ~ils cooktop. After turning [he control011.. the glass c(x)ktop is hot fn)m [hc heat of the piul. hut cuuking stops right awuy.
Heats by direct conttict with the Piltl and by heating the air under the pan. For hcstcooking” results. usc good” quality pans. Eicc[ric coils are more fo~iving ofwa~~d pans than radiant l)r solid disks. Heats up quickly hut docs not chiulgch~at settings as quickly ils ~ils or induction. Electric coils stay hot cnl)ugh to “-
continue cooking” for a short time tiftcr they arc tumcd off.
Heats by direct contact with the pan. so puns tnust bc Ilat on the bo[tl)tn I\)r good”cuoking rcsu]ts. Heats up and cools” dl)wn more slowly than electric coils. Thedisk stays hot enough to continue cooking” allcr it is tumcd off. Rcml)vc Ihc panfruln the solid disk if you Wiltlt the cooking” I() stop.
10

SU~ACE COOmG
ctric Ignition Sufiace Burner ControlsYour surface burners arc III by electric ignition. Knobs that turn the sudhce burners on and off areeliminating the need for standing pilot lights with marked as to which burners they control. The twoconstantly burning names. knobs on the left control the left front and left rearIn case of a power failure, you can light the surface burners. The two knobs on the right control the righthurncrs on your range with a match. Hold a lit match front and right rear burners.to the humir, then push in and turn the control knobto the LITE position. Use extreme caution whenlighting burners this way.Surface burners in use when an electrical powerf~lilure occurs will continue 10 operate normally.
To I.ight a Sutiace BurnerPush the c(~nt~~l kn(]b in and turn it counterclockwiseto LITE. After the burner ignites. turn the knob toudjust the tlamc size. To turn the burner off. turn theknob clockwise us far as it will go. to the OFF pusiti~)n.● The rear and left fn)nt hurncrs arc best fur smaller
pans and cooking” (~pcrations requiring carefullycontmllcd simmering conditions.” The front righthurncr is a high power burner for larger pans andf;lsl h)iling operations.”
● Dt) not operate the burner for an extended period oftime without cookware on the grate. The finish on thegrate may chip witht)ut cookware to absf)rb the heat.
● Check tt] be sure the burner you turn on is the oneyou want to use.
● Bc sure the burners and grates are cool before youplace your hand. a pot holder, cleaning cloths orother materials on them.
Simmer BurnerThe smidlcr burner (right reiu. positit)n) will give thebest simmer resulls.I’hc Iowcst setting of the burner has u small flame toprovide simmering capability. T() simrncr foods.” setthe cookt(~p” con[rol” knob t(] the lower setting that wilmaintain the desired simmer. If simmering on onehumcr ilnd the other burners are turned on. the gas
Super BurnerOn some m(~dels, the right f~)nt burner is cone-shaped with a circular opening through the center ofthe burner. This burner can provide 30% more pt]werthan any onc of the other three. Use it for conning orlarge pans.
Ilt)w of [he simmering burner may have to he a~usted.
11

SUmACE COOmG(continued)
How to Sel~t ~ame SizeWatch the flame, not the knob, as you Muce heat. The flame size on agas burner should match the cookware you are using.FOR SAFE HANDLING OF COOKWARE,NEVER LET THE FLAME EXTEND UP THESIDES OF THE COOKWARE. Any tlame largerthan the bottom of the cookware is wasted and onlyserves to heat the handle.
CookwareAluminum: Medium-weight cookware isrecumrnended because it heats quickly and evenly.Most foods brown evenly in an aluminum skillet. .Use saucepans with tight-fitting lids when cooking”with minimum amounts of water.Cast Iron: If heated slt)wly, most skillets will givehulisfactory results.Enamelware: Under some conditions. the enamelof some cookware may melt. Follf)w cookwaremanufactu~r’s ~commendations for cfx)king meth(fls.Glass: There are two types of glass cookwa~th(]sefor oven use only and those for top-of-range cooking(siiucep~ns, coffee and teapots). Glass conducts heatvery slowly.
Heatpmf Glass Ceramic: Can be used for eithersurface ur oven cuoking. It conducts heat very sluwlyand COOIS very slowly. Check ~()()kwil~ manufacturer’sdirections to be sure it can be used on gas riinges.Stainless Steel: This Inctal alone hiis poor heatingproperties and is usually combined with copper.aluminum or other metals fur improved heatdistribution. Combinatit)n metal skilicts usually worksatisfactorily if they are used with medium heat as themanufacturer recommends.
Wok CookingWe recommend that youuse only a flat-bottomedwok. They are availableat your local retail store.
Do not use woks that have
e
support ring%. Use of thesetypes of woks, with or without ..:.:: ,:: ,:i: “
Ihe ring in place, can be. .::a~;’’:”” ,,: <~.~~,
dangerous. Placing the ring ,: ::. !:!, . ..eve; the burner grate may cause “”the burner to work imp~)perly resulting in carbonmonoxide levels above idh)wable current standards.This could be dangerous to yt)ur health. Do not tryto use such woks without the ring. You could beseriously burned if the wok tipped over.
12
FEATURES OF YOUR OWN CONTROL
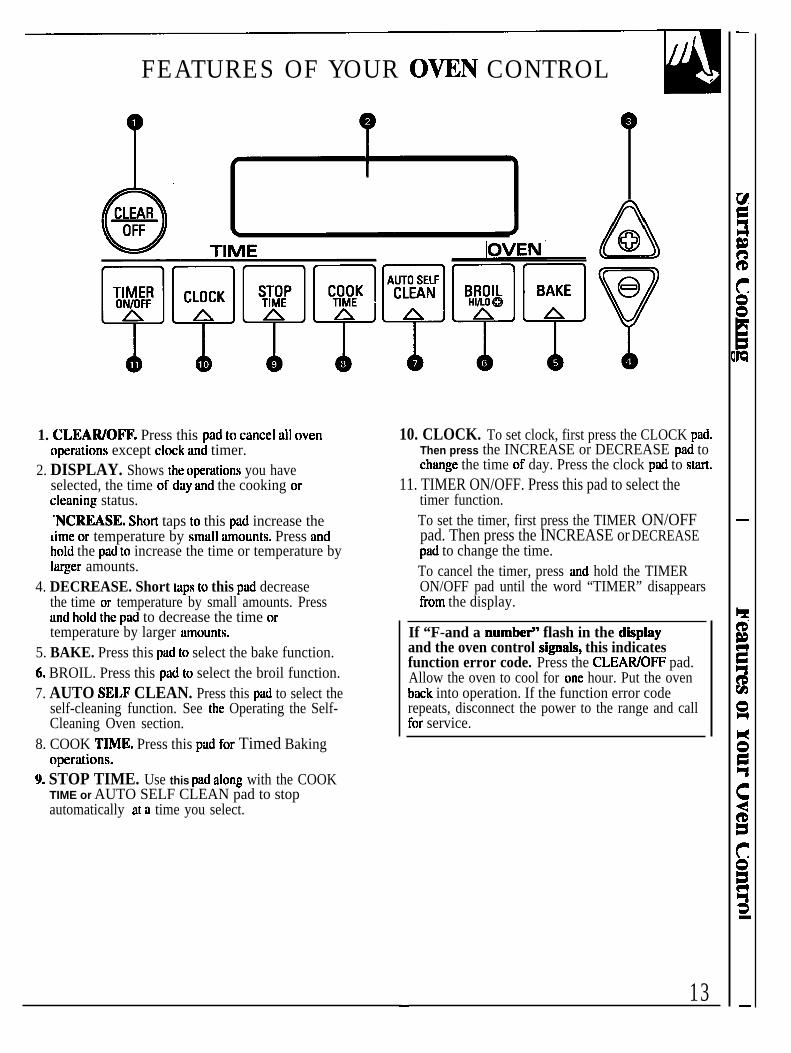
1. CI.EAWOFF. Press this pad tt) cancel all ovenopcrati(]ns except clock and timer.
2. DISPLAY. Shows the operations you haveselected, the time of day and the cooking orcleaning status..NCREASE. Short taps to this pad increase theLime (Jr temperature by small amounts. Press andhold the pad to increase the time or temperature bylarger amounts.
4. DECREASE. Short taps to this pad decreasethe time (]r temperature by small amounts. Pressand h[~ld the pad to decrease the time ortemperature by larger amounts.
5. BAKE. Press this pad to select the bake function.6. BROIL. Press this pad to select the broil function.7. AUTO SEI.F CLEAN. Press this pad to select the
self-cleaning function. See the Operating the Self-Cleaning Oven section.
8. COOK TIME. Press this pad for Timed Bakingoperations.
9. STOP TIME. Use this pad along with the COOKTIME or AUTO SELF CLEAN pad to stopautomatically at a time you select.
10. CLOCK. To set clock, first press the CLOCK pti.Then press the INCREASE or DECREASE pad tochange the time of day. Press the clock pud to sm.
11. TIMER ON/OFF. Press this pad to select thetimer function.To set the timer, first press the TIMER ON/OFFpad. Then press the INCREASE or DECREASEpad to change the time.To cancel the timer, press and hold the TIMERON/OFF pad until the word “TIMER” disappearsfmm the display.
If “F-and a numbe~’ flash in the disphyand the oven control si~als, this indicatesfunction error code. Press the CLEAWOFF pad.Allow the oven to cool for one hour. Put the ovenback into operation. If the function error coderepeats, disconnect the power to the range and callfor service.
13—
OWN CONTROL, CLOCK Am T~ER
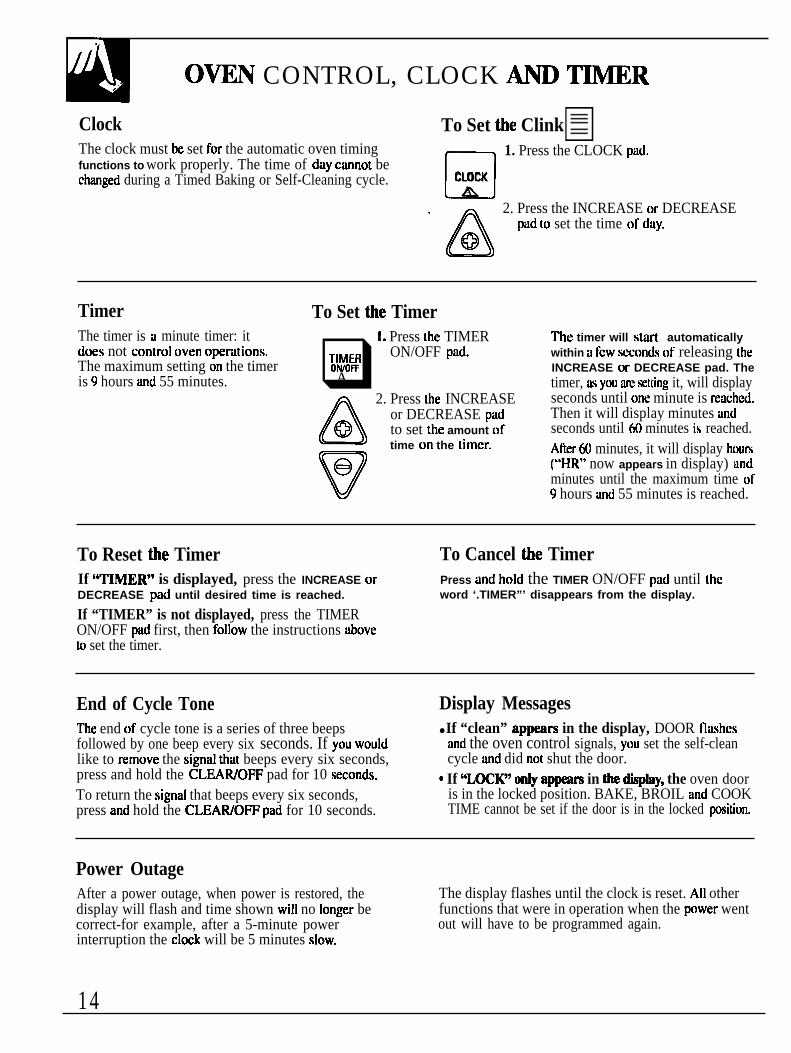
Clock To Set tie ClinkThe clock must be set for the automatic oven timing 1. Press the CLOCK pad.functions to work properly. The time of day cannot bechunged during a Timed Baking or Self-Cleaning cycle.
nCLOCKA
A
2. Press the INCREASE or DECREASEpad [() set the time of day.
@
Timer To Set tie TimerThe timer is a minute timer: it
❑1. Press the TIMER
does not c[)ntm)l oven operati{)ns. ~l~o$p ON/OFF pad.The maximum setting on the timeris 9 hours and 55 minutes. A
A
2. Press the INCREASE
Qor DECREASE padto set the amount oftime on the [imcr.
v
e
The timer will start automaticallywithin a fcw seconds of releasing theINCREASE or DECREASE pad. Thetimer, as you m .setiing it, will displayseconds until one minute is re:~chcd.Then it will display minutes andseconds until H) minutes is reached.Atir ti) minutes, it will display hours(“HR” now appears in display) andminutes until the maximum time of9 hours and 55 minutes is reached.
To Reset tie Timer To Cancel tie TimerIf ‘TIMER” is displayed, press the INCREASE or Press and hold the TIMER ON/OFF pad until theDECREASE pad until desired time is reached. word ‘.TIMER”’ disappears from the display.
If “TIMER” is not displayed, press the TIMERON/OFF pad first, then f(~llow the instructions akvetf) set the timer.
End of Cycle Tone Display MessagesThe end of cycle tone is a series of three beeps ● If “clean” appeam in the display, DOOR Ilashcsfollowed by one beep every six seconds. If you would and the oven control signals, yt)u set the self-cleanlike to remove the signal that beeps every six seconds, cycle and did not shut the door.press and hold the CLEAWOFF pad for 10 seconds. s If “~~’ ody ap~ in tie dispky, the oven doorTo return the signal that beeps every six seconds, is in the locked position. BAKE, BROIL and COOKpress and hold the CLEAWOFF pad for 10 seconds. TIME cannot be set if the door is in the locked positiun.
Power OutageAfter a power outage, when power is restored, the The display flashes until the clock is reset. All otherdisplay will flash and time shown will no longer be functions that were in operation when the p)wer wentcorrect-for example, after a 5-minute power out will have to be programmed again.interruption the clock will be 5 minutes slow.
14
GE Appliances
you guessed it! They meant clock

USmG YOUR OWN, ire Using Your Oven1. I.nuk at the c(]ntrols. Be sure you understand
how tu set [hem properly.2. Check the oven interiur. b)(]k at the shelves.
Take a practice run at removing and replacing themproperly to give sure, sturdy support.
3. Read (~ver inf(~rmati(~n and tips that folluw.4. Keep this guide handy so you can refer to it,
especially during the tirst w~ks of using yournew range.
NOTE:● You may notice a “burning” or “oily” smell the
first few times you turn your oven on. This is normalin a ncw oven and will disappear in a short time.To speed the process, set a self-clean cycle ff)r aminimum of 3 hours. See the Operating the Self-Cleaning Oven section.
● A fan may automatically turn on and off to coolinternal parts. This is normal and the fan maycontinue tu run even after the oven is turned off.
Electric IgnitionThe oven burner and broil burner are lit byelectric ignition.T() light either burner. touch the pad ft)r the desi~dfunction and press the INCREASE or DECREASEpad until the desired tcmpcratum is displayed. Theburner should ignite within 3(L90 secf)nds.After the {)vcn reaches the selected temperature, theburner cycle=)tl. complctcly, then on with a fulltltimc-to keep the oven temperature c[)ntrol]ed.
Power OutigeCAUTION: DO NOT MAKE ANY A~EMPT TOOPERATE THE ELECTRIC IGNITION OVENDURING AN ELECTRICAL ~WER OUTAGE.Neither the oven nor the broiler can be lit during anelectrical ~)wer outage. Gas will not flow unless theglow bar is hot.If the oven is in use when a power outage occurs,the oven burner shuts off and cannot be re-lit untilpt)wer is restored.
Oven ShelvesThe shelves are designed with stop-locks so thatwhen placed correctly on the shelf supports, theywill stop before coming out completely from theoven, and will not tilt when removing food from orplacing food on them.When placing coukwarc on a shelf, pull the shelf outto the bump on the shelf support. Place the cookwareon the shelf. then slide the shelf back into the oven.This will eliminate reaching into the hot oven.
To remove the shelves fmrn the oven, pull themt(~wtird you, tilt f~)nt end upward and pull them out.To replace, place the shelf on the shelf support withthe stop-locks (curved extension of the shel~ facing uptoward the rear of the oven. Tilt up the front and pushthe shelf toward the back of the oven until it goes pastthe bump on the shelf support. Then lower the f~)nt ofthe shelf and push it all the way back.
(1’f~lilillfll~li IIIB.rt pIgrj
15

USmG YOUR OVEN(continued)
SheKPositionsThe oven has four shelf supports, identified in thisillustration as A (bottom), B, C and D (top).Shelf positions for cooking are suggested in theBaking, Roasting and Broiling sections.
Oven LightThe light comes on automatically when the oven door-is” opened.Use the switch on the control panel to turn the light on and off when thedoor is closed.
Oven VentYour oven is vented through ducts at the rear ● Do not leave any items on the cooktop. The hot airof the range. Do not block these ducts when cooking from the vent may ignite flammable items and willin the oven—it is important that the flow of hot air increase pressure in closed ct)ntaincrs, which mayfrom the oven and fresh air to the oven burner be cause thcm L(J burst.uninterrupted. Avoid t{)uching the vent f)penings ur
.-● Metal items will become very hot if they are Iefi
nearby surfaces during oven or broiler operation—they may become hot.
on the cooktop, and could cause burns.
● Vent openings and nearby surfaces may becomehot. Do not touch them.
c Handles of pots and pans on the cooktop maybecome hot if left too close to the vent.
● Do not leave plastic ; ;“ = i ; ;:,items on the cookto~ ?’they may melt if lefitoo close to the vent. w.
Oven MoistureAs your oven heats up, the temperature change of the air in the oven maycause water droplets to form on the door glass. These droplets are hwmlessand will evapordte as the oven continues to heat up.
16
BA~G
. oven tcmpertiture is controlled very accurately If. you think an adjustment is necessary, see the Adjustusing an oven control” system. It is recommended that the Oven Thermostat section. It lists easy D(J Ityou upemte the range for a number of weeks using the H~ur,~e~instructions on how to adjust the thermostat.time given on recipes as a guide to become familiar NOTE: When the oven gets hot, the top and outsidewith your new oven’s performance. surfaces of the range get hot too.
How to Set Your Mnge for BakingTo avoid possible burns, place shelves in the correctposition before you turn the oven on.1. Press the BAKE pad.2. Press the INCREASE or DECREASE pad until the
desired temperature is displayed.The oven will start autf)mtitically. The word ‘“ON’.iu]d “I(N)”” will he displayed. As the uven heats up,the display will show the changing temperature.When the oven rcachcs the temperature you set,a t(]ne will sound.
3. Press the CLEAWOFF pad when baking is finishedand then remove the food from the oven.
NOTE: A fan may automatically turn on and off tocool internal parts. This is normal, and the fan maycontinue to run after the oven is turned off.
To cbnge the oven timpemture during BAKEqcle, press the BAKE pad and then the INCREASEor DECREASE pad to get the new temperature.
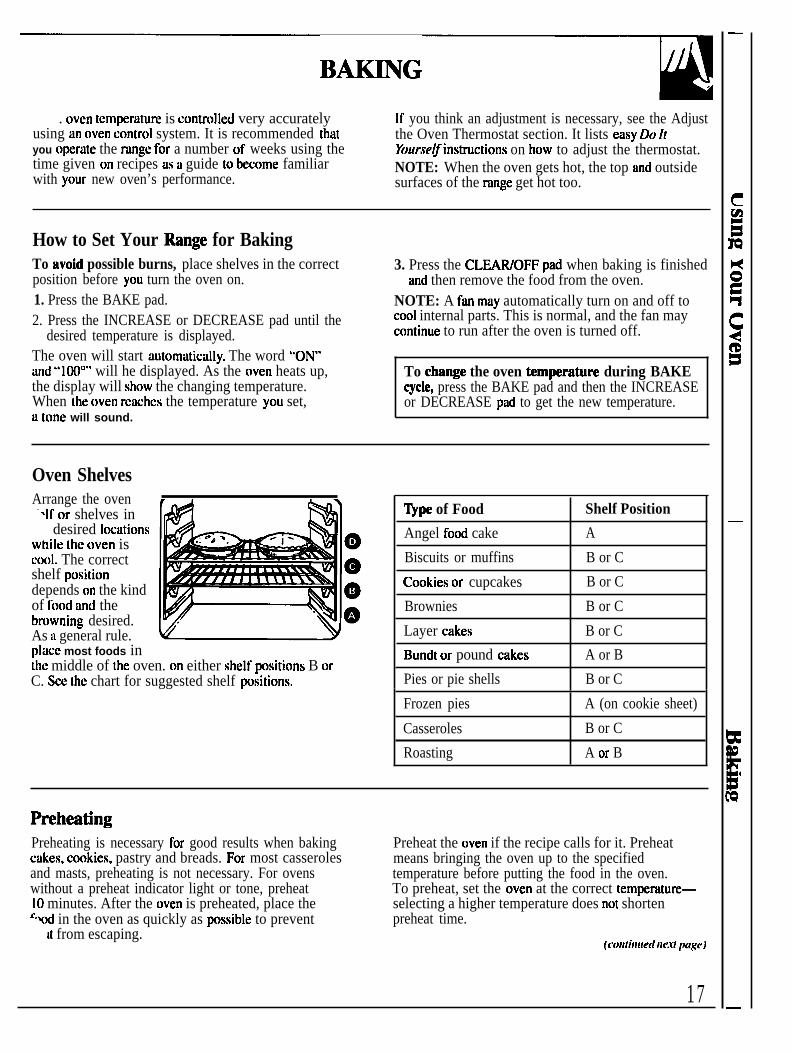
Oven ShelvesArrange the oven
- ‘If t)r shelves indesired locations
while the oven isCUU1. The correctshelf positi(mdepends on the kindof food and thebrowning desired.As ii general rule.place most foods in~hc middle of the oven. on either shelf positions B orC. See the chart for suggested shelf positions.
Qpe of Food Shelf Position
Angel foti cake A
Biscuits or muffins B or C
Cookies or cupcakes B or C
Brownies B or C
Layer cakes B or C
Bundt or pound cakes A or B
Pies or pie shells B or C
Frozen pies A (on cookie sheet)
Casseroles B or C
Roasting A or B
%heatingPreheating is necessary for good results when baking Preheat the oven if the recipe calls for it. Preheatcakes, ct)okies, pastry and breads. Ft)r most casseroles means bringing the oven up to the specifiedand masts, preheating is not necessary. For ovens temperature before putting the food in the oven.without a preheat indicator light or tone, preheat To preheat, set the oven at the correct tempcraturc—10 minutes. After the oven is preheated, place the selecting a higher temperature does not shorten‘.”’od in the oven as quickly as possible to prevent preheat time.
It from escaping.(t.[>fttitflfe(l )Ie.vt ]xi~~~)
17
.-
BA~G(continued)
Baking PansUse the proper baking pan. The type of finish on thepan determines the amount of browning that will occur.c Dark, rough or dull pans absorb heat resulting in a
browner, crisper crust. Use this type for pies.● Shiny, bright and smooth pans reflect heat, resulting
in a lighter, more delicate browning. Cakes andct)okies require this type of pan.
● Glass baking dishes absorb heat. When baking inglass baking dishes. the temperature may need to bereduced by 25°F.
● If you are using dmk non-stick pans, you may findthat you need to reduce the oven temperature 25°F.to prevent overbrowning.”
Pan PlacementFor even cmking and proper browning. there must bcenough room for air circulation in the oven. Bakingresults will be better if baking pans are centered asmuch as possible rather than being placed to the frontor to the back t]f the oven.Pans should not touch each other or the walls of theoven. Allow 1- to I K-inch space between pans as wellas from the back of the oven, the dot)r and the sides.If you need to use twn shelves, stagger the pans so(]ne is not directly above the other.
Baking GuidesWhen using prepared baking mixes, follow package recipe or instructi(]nsfor the best baking results.
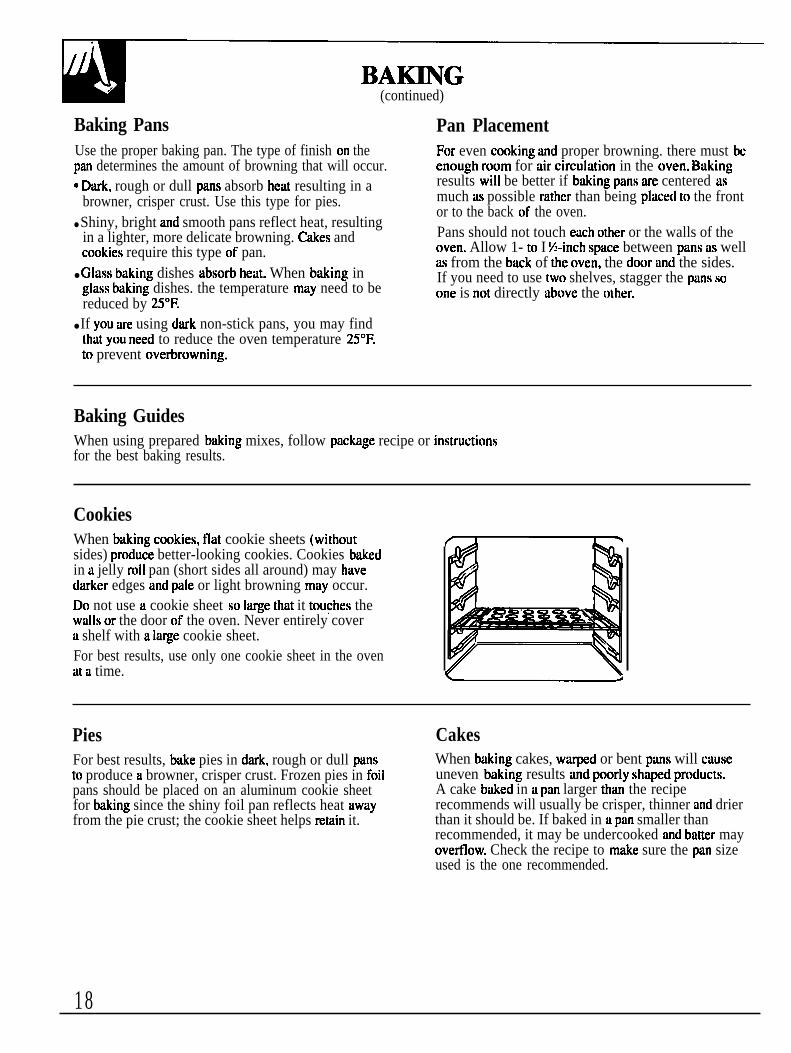
CookiesWhen baking cookies, tlat cookie sheets (withf)utsides) prtiuce better-looking cookies. Cookies bakedin a jelly roll pan (short sides all around) may havedarker edges and pale or light browning may occur.D() not use a cookie sheet so large that it tou$hes thewalls {)r the door of the oven. Never entirely covera shelf with a large cookie sheet.For best results, use only one cookie sheet in the ovenat a time.
Pies CakesFor best results, bake pies in dmk, rough or dull pans When baking cakes, warped or bent pans will causeto produce a browner, crisper crust. Frozen pies in foil uneven baking results and p(mrly shaped p~~ducts.pans should be placed on an aluminum cookie sheet A cake baked in a pan larger than the recipefor baking since the shiny foil pan reflects heat away recommends will usually be crisper, thinner and drierfrom the pie crust; the cookie sheet helps retain it. than it should be. If baked in a pan smaller than
recommended, it may be undercooked and batter mayovefflow. Check the recipe to make sure the pan sizeused is the one recommended.
18

uminum FoilNever cntirciy cnvcr ashelf with aluminum ft)ii.This will disturb the heatcirculaliun and result inpoor” bilking. A smallersheet of foil may be usedto catch a spillover byplacing it on a lowershelf several inches beh]wthe f(X)d.
Don’t PeekSet the timer tbr the estimated cooking time and donot open the door t(] hJt)k at y{)ur food. Most recipesprovide minimum and maximum b~ing times suchas “bake 30-~ minutes.’.DO NOT open the door to check until the minimumtime. Opening the oven door frequently duringct)oking idlf)ws heat to escape and makes bakingtimes longer. Your b~ing results may also be afiected.
TMD BA~GHow to Time BakeThe contrul alh~ws you to turn the oven on or off NOTE: Before beginning make sum the clock showsilutom~lticidly at specific times that you set. Examples the correct time {If day.of Immcdiutc Start (uvcn turns on now ~lnd you set it To set the clock, first press the CLOCK pad. PressIt) [urn off automatically) and Delay Start and Stop the INCREASE or DECREASE pad until the correct(sc[ting the oven to turn on automatically at u later time time of day is displayed.and turn oft. at a preset Stop Time) will be described.
Aow to Set Immediate Stati and Automatic StopTo avoid possible burns, place the shelves in thecorrect ~)sition before you turn the (]ven on.The oven will turn on immediately and c(]ok f(]r asclcctcd Icngth of time. At the end of Cook Time.the oven will turn off automatically.
D
1. Press the COOK TIME pad.$?$: NOTI;: If your recipe requires preheating.A you may need tt~ add additi{)nid time to
the Icngth of the C(]ok Time.2. Press the INCREASE pad until the desired length
(Jf buking time ~p~miirs in the display.3. Press the BAKE pad.
A
4. Press the INCREASE or DECREASE
@pad until the desired temperature isdisplayed. An attention tone will soundif step 3 is not done.
ve The words ● ’TIME BAKE’. and “COOK
TIME’. will be displayed along with theoven temperature that you set and theC()()k Time that you entered.
The oven will start automatically. The word .’ON”’imd ” 100”’’” will be displayed. The Ct](]k Time will~~gin to ct)unt d(]wn. As the (~vcn heats up. thedisplay will show the changing temperature. Whenthe oven reaches the temperature you set, a tonewill s(]und. The [~vcn will continue to cook” ft)r thepmgr~nmed umount oflirnc, then shut ofl-uutomtiicdly.
At the end of Timed Btie, the display will show“OHR:(N COOK TIME”’ and the oven will turn off.The end of cycle tone will sound.
5. Press the CLEAWOFF pad to clear the displayif necessary. Remove the food from the oven.Remember, even though the oven shuts ot~automatically, foods continue cooking after thecontrols tire off.
NOTE:● Foods that spoil easily, such as milk, eggs, fish.
stutlings, ~)ultry and pork, should not be allowed tosit for more than (me ht)ur before or after ctwking.Rtx)m temperature promotes the growth of hmfulbwteria. Be sure that the oven light is off because heatfmm the bulb will sped hmful b~.teriit g~)wth.
● A fan may automatically turn {~n and t~ff to coolinternal parts. This is normal, and the fan maycf)ntinue tf) run after the oven is turned ot~.
(t.(ltttitlltt~cl IIr.rt Imgr)
19

TMD BAmG(continued)
How to Set Delay Stiti and Automatic Stop
Quick Reminder:1. Press the COOK TIME pad.2. Press the INCREASWDECREASE pad to set
the length of baking time.3. Press the STOP TIME pad.4. Press the INCREASWDECREASE pad until
the desired Stop Time appears in the display.5. P~ss the BAKE pad.6. Press the INCREASHDECREASE pad to
select an oven temperature.
To avoid possible burns, place the shelves in thecorrect position before you turn the oven t)n.You can set the oven control” to delay-start the oven,cnok for a specific length of time and then turn offuutomtitically.
❑1. Press the COOK TIME pad.
\?{EK NOTE: If your recipe requiresA preheating, you may need to add
additional time to the Cook Time.2. Press the INCREASE pad until the desired length
of baking time appears in the display.
❑3. Press the STOP TIME pad. “STOP
{~:[ TIME” and the earliest Stop Time you
A can set appear in the display.
The control automatically sets the Stop Time byadding the Cfx~k Time to the time of day. Ft~rexample, the time of day is 2:(M and the CookTime-is 3 hours. Adding 3 hours to the time of dayequals 5:(N).
4. Chage the Stop Time by pressing theINCREASE pad until the desired Stop Timeappears in the display. The words “DELAY TIMEDBAKE” and “STOP TIME” appear in the display.
15. Press the BAKE pad.
BAKE
A
A 6. Press the INCREASE t)ra DECREASE pad until the desiredo temperature is displayed.
v
The oven will turn on automatically. Thee wf)rd “ON” and “l(M)”” will be displayed.
The C(x)k Time will kgin to count down.As the ~)vcn heats up, the display will sht)wthe changing temperature. The oven willcontinue to conk for the pn)grammcdtime and shut t)ty automatically.At the end 01. Timed Bake, the displaywill show ● ’OHR:(M) COOK TIME’” andthe oven will turn otl.. The cnd nf cycletone will sound.
o
7. Press the CLEAWOFF pad to clearCLEAR the display if necessary. Remove the
OFF food from the oven. Remember, eventht~ugh the oven shuts off automatically,foOds continue cuoking after the controlsare off.
NOTk;:● The 1(JW temperature zone uf this range (between
1700F. and 2000F.)” is available to keep ht)t cookedfoods warm. F()()d kept in the oven longer than 2h(]urs at these low temperatures may sp(]il.
● Foods that spoil easily, such as milk, eggs, Iish.stuffings. poultry and purk. should nut be allowed tosit for tnt)re than t)ne hour before or after c(x)king.Room temperature pr(xnotes the growth nf harmfulbacteria. Be sure the oven light is off because heatfrnrn the bulb will speed harmful bacteria grt)wth.
● A fan may automatically turn un and oi~ to cnolinternal parts. This is normal, and the fan maycontinue to run after the oven is turned otl”.
20

~mST T~ OWN Tm~OSTAT—DO ZT YOURSELF!
You may find that your new oven cooks differentlythan the one it replaced. We recommend that youuse your new oven for a few weeks to become morefamiliar with it, following the times given in your~cipes as ii guide.If you think your new oven is too hot or too cold,you can adjust the thermostat youme]f. [f you thinkit is too” hot, adjust the thermostat to make it cooler. Ifyou think it is too cool. adjust the thermostat to makeit hotter.We do not recommend the use of inexpensivethermometers, such as those found in grocery stores.tn check the temperature setting of your new t)ven.These thermometers may vilry 2(H() degrees.
To Adjust the Thermostat:
n
1. Press the BAKE pad.BAKE
w2. Select an oven temperature between 500°F.
and 550°F.3. Immediately, before the BAKE indicator stops
flashing, press and hold the BAKE pad for about4 seconds. The display will change to the ovenadjustment display.
A4. The oven temperature can be adjusted
up to (+) 35°F. hotter or (–) 35°F. cooler.a Use the INCREASE or DECREASE
v
pads to select the desired change in
ethe display.
o 5. After you have made the adjustment,CLEAR press the CLEAWOFF pad to go back
OFF to the time of day display. Use your ovenas you would normally.
NOTE: This adjustment will not affect the broiling orthe self-cleaning temperatures. It will be rememberedwhen power is removed.
21
—.

ROAST~G
Roasting is cooking by dry heat. Tender meat orpoultry can be roasted uncovered in your oven.Roasting temperatures, which should be low andsteady, keep spattering to a minimum.Roasting is really a baking pr(xedure used for meats.Therefore. the oven controls are set for Baking orTimed Baking. (You may hear a slight clicking sound,indicating the oven is working properly.) TimedBaking will turn the oven on and off automatically.
Most tncals continue to co{)k sligh[ly while st~lnding.after being removed frmn the oven. The standing timerectmlmcndcd for roasts is 10 t{) 20 minutes. Thisallows roasts tu firm up ;Ind makes thcrn easier tocarve. The internal temperature will rise about 5“ to1OOF.; to compensate for temperature rise. if desired.rcmove the roast from the oven sooner (at 5“ to I()”F.less than the temperature in lhc Roasting Guide).Remember that food will continue to co(]k in the hotoven and therei~)re shou]d be removed when thedesired internal temperature has been rcachcd.
1. Ptace the shelf in A or B position. The oven will start autornaticalty. The word “ON”N(J ureheatin~ is necessary. and b’ t ()()”” wilt be displayed. As the oven heats up,.
2. Check the weight of themeat. Place it fat sideup (or for pt~uttry bre:lstside up) on ~)astingrack in a shatlow pan.The melting fat wiltbaste the meat. Setect apan as close to the sizeof the meat as possibte.
the disptay will show the changing temperature.When the oven rcachcs the temperature yt)u set. atone wilt sound.
o
5. Press the CLEAR/OFF pild whenCLEAR roasting is Iinishcd and then rcmove
OFF the food from the oven.
NOTF1: A fun may automatically turn on ilnd off tocoot internal parts. This is normtit. and the fan mtiy
(The broiler pin with rack is a good pan fur this.) continue t(] run ufter the oven is turned off.
❑3. Press the BAKE pad.
BAKE To change the oven temperature during the
A roasting cycle, press the BAKE pad and thenthe INCREASE or DECREASE pad to get the
A
4. Press the INCREASE or DECREASE new temperature.
optid untit the desired tempcratu~t isdisplayed.
ve
Use of Aluminum FoilYou can use aluminum foit to tine the broiler pan.This makes clean-up easier when using the pan formarintiting, cooking with fruits, cooking heavitycured meats or basting food during cooking. Pressthe foil tightly an)und the inside of the pan.
22

.~estions and AnswersQ. Is it necessary to check for doneness with a
meat thermometer?A. Checking the finished internal temperature at the
completion of c~king time is recommended.Temperatures m shown in the Roasting Guidesection. For roasts over 8 Ibs., check withthermometer at half-hour intervals after halfthe cooking time has passed.
Q. Why is my roast crumbling when I try tocarve it?
A. Rf)asts are easier tf) slice if allowed tt~ C(MI I() to20 minutes after removing them f~]m the uven.Be sure to cut across the grain of the meat.
Q. Do I need to preheat my oven each timeI cook a roast or potitry?
A. It is not necessary to preheat your oven.Q. When buying a roast, are there any special tips
that would help me cook it more evetiy?A. Yes. Buy a roast as even in thickness as possible,
or buy rolled roasts.Q. Can I seal the sides of my foil “tent” when
roasting a turkey?A. Sealing the foil will steam the meat. kaving it
unsealed allt~ws the air to circulate and brownthe meat.
ROASTmG G~EFrozen RoaskFruzen ~)asts of beef, p(]rk, lamb, etc., can be started Make sure poultry is thawed before roasting.without thawing, but allow 10 to 25 minutes per Unthawed poultry often does not cook evenly.pound additional time (10 minutes per pound for Some commercial frozen poultry can be cooked
~.sts under 5 pounds, more time for larger roasts). successfully without thawing. Follow the directions
MeatTender cuts: rih. high qualitysirloin tip. rump or top round*
Lamb leg or b(mc-in sh(~uldcr*
Veal shoulder. Icg or Ioin*Pork loin. rib or shoulder*Hum. prcc(x)kcd
PoultryChicken or DuckChicken pieces
Turkey
*For boneless rolled masts over t
OvenTemwrature
325”
325”
325”32s032S0
32S03s0”
32S0
given on the package label.
Approximate Roasting TimeDoneness in Minutes per Pound
Rare:Medium:Well Done:Rare:Medium:Well Done:Well D(mc:Well Done:To Warm:
Well Done:Well Done:
Well Done:
3 b 5 Ibs. 6 to 8 Ibs.2433 18-223s-39 22-29us 3*3S21-2s 2UZ32S-30 26283W3S 28-333s4s 3W03s4s 3W()17-20 minutes per pound (any weight)
3 to 5 Ibs. Over 5 Ibs.354 3(L353s4010 to 15 lbs. Over 15 lbs.18-2s 15-20
lchcs thick, add S to 10 minutes per pound to times given above.
[ntermdTemperature ‘F.
14)0–lsOOt1s0°–160”170°–18s0la”–l soot1S0°–1600170°–18s01700–180”170°-18001 1s0–120°
18s0–190018S0–1900In tbigh:1850–1900
~The U. S. Department of Agriculture says “Rare beef is popular, but you should know that cnoking it to only I@°F. means somefood poisoning organisms may survive.” (Soume: S afe Food Book. Your Kitchen Guide. USDA Rev. June 198S.)
23
—.

Broiling is cooking foti by direct heat from above the Turn the food using t(.)ngs (rely once during broiling.food. Most fish and tender cuts of meat can be Time the foods for the tirst side according to thebroiled. Follow these directions to keep spattering and Broiling Guide. Turn the f(;t)d. then use the timessmoking to a minimum. given for the second side as a guide tu the preferredThe oven door should be closed during broiling. doneness.
1. If the meat has fat or gristle around the edge, cutvertical slashes through both about 2“ apart. Ifdesired, the fat may be trimmed. leaving layerabout 1/8” thick.
2. Place the meat on the broiler rack on the br(>iler panwhich comes with the range. Always use the rackso the fat drips into the broiler pan; otherwise thejuices may become hot enough to catch on tire. .
3. Position the shelf on the recommended shelfposition as suggested in the Broiling Guide.
4. Clwe the oven dwr.
❑5. Press the BROIL pad. Preheating the
;~~~ burner is not necessary. (See the
A Comments column in the Broiling Guide.)
6. Press the INCREASE pad (]nce for LO Broil orpress the INCREASE pad twice for HI Broil.To change from HI Broil to 1.0 Broil, press theDECREASE pad once.To change back to HI Broil, press the INCREASEpad once.
7. When broiling is ct]mpleted. press the CLEAR/OFFpad. Serve the food immediately, and leave thepan (]utsidc the oven to c(JOI during the meal foreasiest cleaning.
NOTE: A fan may automatically turn (In and off toct~ol internal parts. This is normal, and the filn mayc(~ntinuc to run after the oven is turned off.
Use of Aluminum FoilYou can usc aluminum foil to line your broiler panand brt)iler r~ck. However, you must mold the foiltightly to the rack and cut slits in it just like the rack.Without the slits, the foil will prevent fat and meatjuices fmm draining into the broiler pan. The juicescould become hot enf)ugh to catch on fire. If you d(]not cut the slits, you are frying. not broiling.
—
Questions and AnswersO. When broiling, is it nece~n b always ~~e a Q. Do I need to grease my broiler rack to prevent
rack in the P-n?A. Yes. Using the rack suspends the meat over the A.
pan. As the meat c~ks, the juices fall into the pan,thus keeping meat drier. Juices are protected by therack and stay cwler, thus preventing excessivespatter and smoking.
Q. Should I salt the meat before broiling?A. No. Salt draws out the juices and allows them to
evapordte. Always salt after cooking. Piercing themeat with a fork also allows the juices to escape.Turn the meat with tongs instead of a fork.
the meat from sticking?No. The broiler rack is designed to retlcct bmilcrheat, thus keeping the surface cof)l cn{~ugh toprevent the meat from sticking to the surface.Huwever, spraying the broiler rack lightly with avegetable c[~oking spray before cooking will makeclean-up easier.
24
—-—

~lways use the broiler pan and rack that comes withyour oven. It is designed to minimize smoking andspattering by trapping the juices in the shieldedlower part of the pan.
. Broiling should always be done with the ovendoor closed.
● For steaks and chops, slash fat evenly around theuutside edges of the meat. T() slash, cut crosswisethn)ugh the outer fat surface just to the edge of themeat. Use tongs to turn the meat over to preventpiercing the meat and losing the juices.
● When urranging food on the pan, do not let fattyedges hang over the sides because dripping fat couldsoil the oven.
● The broiler does not need to be preheated. However,for very thin foods, or to increase browning, preheatif desired.
● Use LO Broil to cook foods such as poultry or thickpork chops thoroughly without over-browning them.
● Frozen steaks cart be broiled by positioning the ovenshelf at next lowest shelf position and increasingcookin~ time given in this guide 1 M times per side.~ ~- ---
● If desired, marinate meats or chicken before broiling(Jr brush with barbecue sauce I&st 5 to 10 minutes oily.
Quantity andor Shelf First Sidek’ood Thickness Position Time, MinutesBacon l/~ lb. (ah(,ut ~ c 5
Second SideTime. Minu&
I Ihin slices) I IGround Beef I lb. (4 nattics) IWell DoneBeef SteaksRareMediumWell DoneRare
‘cdium~cll Dune
Chicken
Bakery ProductsBread (Toast) orTuastcr Pastriest;nglish Muffins
I.obster Tails
1/2 tt; 3j4 inch-thick C I 8–9I
1 inch thick B 9( 1 to I X Ibs.) B I 2-13
B t31X inch thick B 10
(2 to 2X Ibs.). I Isplit lengthwise I I~ t’, 4 s]i~cs C or D 2-31 pkg. (2)2 (split) C or D 34Z-4 Icl t 3-16
7548–9679–I 21618
t 8-20
(6 to 8 oz. each) I I I turn over.
Fish l-lb. tillcts 1/4 to B 5 51/2 inch thick
Ham Slices I inch thick c 8 8(preco(}kcd)
Pork Chop 2 (In inch thick) B l&t2 45Wctl Done 2(1 inch thick), B 12–1 3 8-9
about t tb.
Lamb ChopMedium 2(1 inch thick), B 8 67Welt Done about 10 to 12 oz. B 10 10
Medium 2 (I X inch thick), B 10 MWell Done about 1 lb. B t7 12-14
‘ienem and l-lb. pkg. (10) c 6 1-2.Imilar precooked
SaUS~&S. bratwurst
CommentsArrange in single layer.
SpM.e eventy.Up to 8 patties take about same time.
Steaks less than 1 inch thick cookthrough before browning. Pan fryingis recommended. Slash fat.
Reduce time abut 5 to 10 minutesper side for cut-up chicken. Brush eachside with melted butter. Broil skin-sidc-down first.
Space evenly. Place English rnuftinscut-side-up and brush with butter.if desired.Cut through back of shell. Spread upen.Brush with melted butter befure andafter half of broiling time.Handle and turn very carefully. Brushwith lemon butter before and duringcooking if desired. Preheat broiler toincrease browning.
Increase time 5 to 10 minutes per sidefor 1 X inch thick or home cured ham.
Slash fat.
Slash fat.
If desired, split sausages in halflengthwise; cut into 5-to 6-inch pieces.
—.
OPEMT~G = SELF=CLEA~G OVENNorma] Cleaning Time: 3 hours
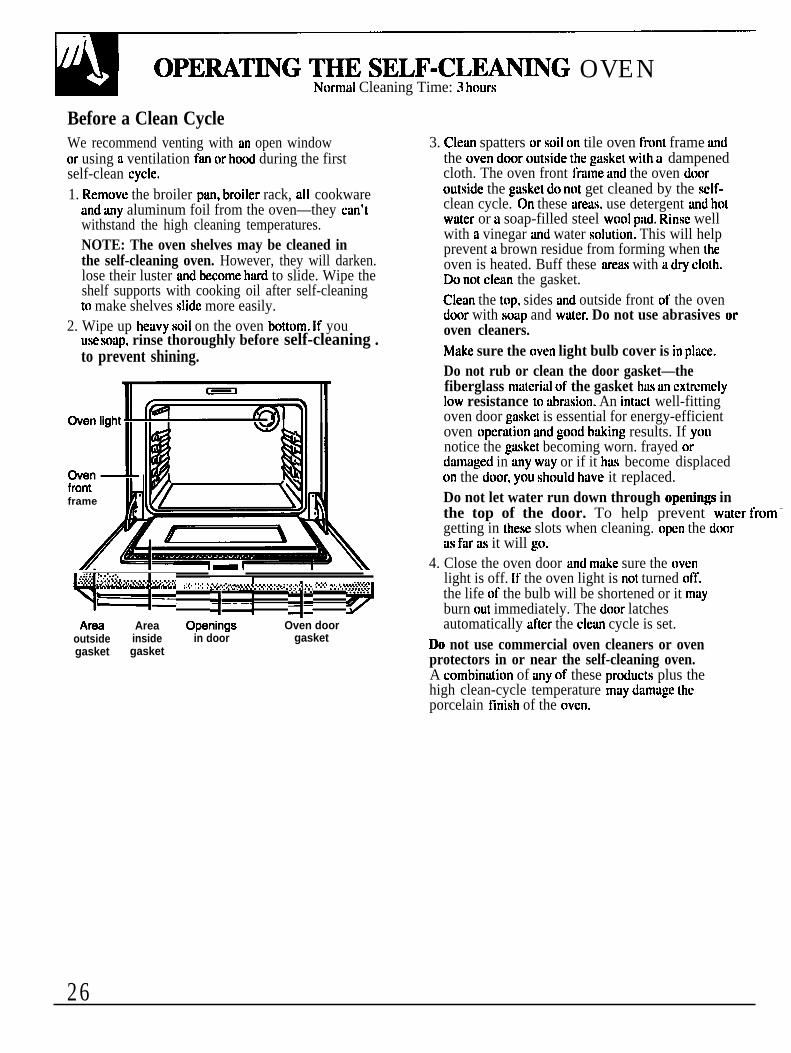
Before a Clean CycleWe recommend venting with an open windowor using a ventilation fan c>r hood during the firstself-clean cycle.1. Rernuvc the broiler pan, broiler rack, all cookware
and any aluminum foil from the oven—they can’twithstand the high cleaning temperatures.NOTE: The oven shelves may be cleaned inthe self-cleaning oven. However, they will darken.lose their luster and become hard to slide. Wipe theshelf supports with cooking oil after self-cleaningtu make shelves slide more easily.
2. Wipe up heavy soil on the oven bottom. If youuse SOap, rinse thoroughly before self-cleaning .to prevent shining.
frame
q::....,..~...... j::: .~ ;,. . . . . . . . . . . . . . . . . . . . . . . . . . . . . . . . . . . . . . . . . . . . . .. .. . . . . . .%.%.......:...:.::..%.::.:.:... .:. .:..%.% ..:..{.%.*..+.:...<:::
Area Area O~nings Oven dooroutside inside in door gasketgasket gasket
3. Clean spatters or soil un tile oven front frame undthe uven dour outside the gasket with a dampenedcloth. The oven front frame and the oven dt)orf)utside the gasket do not get cleaned by the sclf-clean cycle. On these areas. use detergent and hotwater or a soap-filled steel w{)oI p;id. Rinse wellwith a vinegar and water soluti(m. This will helpprevent a brown residue from forming when theoven is heated. Buff these areas with a dry cloth.Dt) not clean the gasket.Clean the top. sides and outside front of the ovendoor with sf)ap and water. Do not use abrasives oroven cleaners.Make sure the oven light bulb cover is in place.Do not rub or clean the door gasket—thefiberglass rnatcrial of the gasket htis an cxtrcmclyI(JW resistance to abrasiun. An intact well-fittingoven door gasket is essential for energy-efficientoven operation and good” baking results. If yuunotice the gasket becoming worn. frayed (Jrdamaged in any way or if it has become displacedon the door, yf)u should have it replaced.Do not let water run down through openin~ inthe top of the door. To help prevent water f~)m –
getting in these slots when cleaning. (~pcn the door”as far as it will go.
4. Close the oven door and make sure the uvenlight is off. If the oven light is not turned off.the life of the bulb will be shortened or it mayburn out immediately. The door” latchesautomatically after the clean cycle is set.
Do not use commercial oven cleaners or ovenprotectors in or near the self-cleaning oven.A combination of any of these products plus thehigh clean-cycle temperature may damage tllcporcelain tinish of the (~vcn.
26
——

.OW to Set Oven for Cleaning
Quick Reminder:1. Press the AUTO SELF CLEAN pad.2. Press the INCREASE or DECREASE pti
until the desired Clean Time appears.- . .1!” the oven is too hot and you start to set a cleancycle, the word ● ’OFF* will appeur in the display.Allow additional time for cooling before you try toset the cycle.1. Follow the directions in the Before a Clean
Cycle section.
oAUTO SELFCLEANA
AQ
ve
2. After closing the dnnr, press the AUTOSELF CLEAN pad.
3. Press the INCREASE or DECREASEpad until the desired Clean Time isdisplayed.
Clean Time is normally 3 hours. You cartchange the Clean Tim; to any time between2 and 4 hours. depending on the amount ofst)il in your oven.
The self-clean cycle will automatically begin after“CLEAN” is displayed and the time for the cleancycle is set. The words “ON” and “LOCK” willappear in the display when the door automaticallylocks. It will not be possible to open the oven dooruntil the temperature drops below the locktemperature and the LOCK light goes off.4. When the LOCK light is off, open the door.NOTE:
n ● You can find out when the clean cycle{~:: will be finished by pressing the STOP
A TIME pad.
● The word “clean” will be displayed, the word“DOOR”’ will fl~sh and oven control will signal if youset the clean cycle and forget to close the oven d(x~r.
● A fan may automatically turn on and off to coolinternal purts. This is rx)rmal, and the fan maycontinue to run after the oven is turned off.
To Stop a Clean Cycle
o 1. Press the CLEAWOFF pad. 2. When the LOCK light gws ot~, indicating that theCLEAR oven has cmlti below the h~king tempemture,F open the door.
After Self-CleaningYou may notice some white ash in the oven. Just wipeit up with a damp cloth after the oven cools.If white spots remain, remove them with a soap-filledsteel wf)ol pad. Be sure to rinse thoroughly witha vinegar and water mixture. These deposits areusually a salt residue that cannot be removed by theclean cycle.
If the oven is not clean after one clean cycle,repeat the cycle.If the shelves become hard to slide, wipe the shelfsupports with cooking oil.NOTE: No functions cart be p%grammed before thedoor automatically unlocks.
(C.t?lttitluetl tlext Ixlgr)
.

OPEMT~G T~ SELF-CLEA~G OWN(continued)
How to Set Delay Start of Cleaning
Quick Reminder:1. Press the AUTO SELF CLEAN pad.2. Press the INCREASE or D= REASE pad
until the desired Clean Time appears.3. Press the STOP TIME pad.4. Press the INCREASE or DECREASE pad until
the desired Stop Time appears in the display.
Delay Start is setting the oven timer to start the cleancycle automatically at a later time than the presenttime of day.NOTE: Before beginning, make sure the oven clockshows the correct time of day.1. Follow the directions in the Before a Clean
Cycle section.~“~0~~~~ 2. After closing the door, press the AUTO
❑CLEAN SELF CLEAN pad.
A
3. Press the INCREASE or DECREASE
apad to enter Clean Time.
❑4. Press the STOP TIME pad. “STOP
{~:[ TIME” and the earliest Stop Time you
A can set will appear in the display.
The earliest Stop Time will be the Clean Timeselected plus the time of day. For example: If theClean Time is three hours and the time of day is 6:W,the Stop Time that appears in the display will be 9:W.
A5. Press the INCREASE pad tu change the
Stop Time to a later time of day if@ desired. For example: If you set Stop
Time at 11 :(X), oven will start cleancycle at 8:(X) and end at 11 :W. The door”latches automatically.
When the time of day reaches the autt)matic stafltime, CLEAN, ON and LOCK appear in the display.
6. When the LOCK light is oft.. open the d(](}r.NOTE:
❑● During a delayed self-clean operatit)n
AUTO SELFCLEAN you can find (]ut when the oven is set to
A turn on by pressing and holding theAUTO SELF CLEAN pad for 3 sccunds.
● A fan may automatically turn (In and ot~ to cool”internal parts. This is normal, and the fun maycontinue to run after the t~ven is turned ofl..
28
—

~estions and AnswemQ. If my oven clock is not set to the correct time of
day, can I still self-clean my oven?A. If the clock is not set to the correct time of day you
will not be able t{) set a delay clean to end at aspecitic time.
Q. Can I use commercial oven cleaners on any partof my self-cleaning oven?
A. N() cleaners or coatings should be used around anypart of this oven. If you do use them and do nottho~)ughty rinse the oven with water, wiping itabsnluteiy clean afterwards, the residue can scarthe oven surface and damage metal parts the nexttime the oven is automatically cleaned.
Q. What should I do if excessive smoking occursduring cleaning?
A. This is caused by excessive soil. Turn the oven utl..Open the windows to rid the room of smoke. Waituntil the oven has c(x~led and the word “LOCK”’ isoft. in the displtiy. Wipe up the cxccss soil and resetthe clean cycle.
Q. 1s the “crackling” or “popping” sound I hearduring cleaning normal?Yes. This is the sound of the metal heating andc(x)ling during both the cooking and cleaningfunctions.
Q. Should there be any odor during the cleaning?A. Yes, there will bean odor during the first few
cleanings. Failure to wipe out excessive soil mightalso cause a strong (flor when cleaning.
Q. What causes the hair-like lines on the enameledsurface of my oven?
A. This is a normal condition, resulting f~)m heatingand cooling during cleaning. These lines do notaffect how your oven performs.
Q. Why do I have ash left in my oven aftercleaning?
A. Some types of soil will leave a deposit which is ash.It can be ~moved with a damp sponge or cloth.
Q. My oven shelves do not slide easily.What is the matter?
A. After many cleanings, the oven shelves will losetheir luster and become hard to slide. To make theshelves slide m(~re easily, wipe the shelf supportswith cooking oil.
Q. My oven shelves have become gray after theself-clean cycle. Is this normal?
A. Yes. After the self-clean cycle, the shelves willlose sornc Iustcr and discolor to a deep gray color.
Q. Can I cook food on the cooktop while the ovenis self-cleaning?
A. Yes. While the oven is self-cleaning, you can usethe c(x)ktop just as you normally do.

Proper care and cleaning are important so your range BE SURE ELECTRICAL POWh:R ISwill give you eflicient and satisfactory service. Folltlw OF1’ BEFORE CI.EANIN(; ANY PARI’ OFthese directions carefully in caring for your range tn THE RANGE.assure safe and proper maintenance.
Grate
-Burnercap!
eBurnerHead!
Mixing Tube /Spark IgniterI
Burner Wwl
Burner AssemblyThe burner assemblies should be washed regularlyand, of course, after spilh)vcrs.Turn all controls off before removing burner parts.
The electrode of the spark igniter is exposedbeyond the surface of the burner bowl. Whencleaning the burner bowl, be careful not to snagthe electrode of the spark igniter with yourcleaning cloth. Damage to the igniter couldoccur. Be careful not to push in any cooktopcontrols while cleaning the burner bowk. A slightelectrical shock might result which could causeyou to knock over hot cookware.
The burner grates. bumcr heads ilnd burner caps canbe rcrnovcd for easy cleaning. Rcmoving thcm givesyoU access to the burner buwls. (T(J avoid snagging ilcloth un the spark igniter. leave the burner hcuds inpltice when cleaning the burner bowls. Wash burnerparts with an all-purpose non-abrasive cleaner tindwarm water. Soak stubborn soil. Dry them with acloth~() not reassemble while wet. If the igniterorifice gets dirty or clogged you may usc a smallsewing needle to remove the soil.Tu reassemble, replace the burner head Iirst. then theburner cap tind last the burner grate.
CAUTION: ~ NOT OPERATE THE BURNERWITHOUT ALL BURNER PARTS IN PLACE.
30

~mer Gra@sPorcelain enamel To get rid of burned-on food, place the gratesburner grates should in a covered container or plastic bag. Add 1/4 cupbe washed regularly ammonia and let them soak for 30 minutes. Wash,and, of course, after rinse well, and dry.spillovers. Wash them To prevent rusting, apply a light coating of cmkingin hot, soapy water andrinse with clean water. oil to the grates.
You may also use Although they’re durable, the grates will graduallyabrasive cletincrs and steel woul pads to cletin burner lose their shine, regnrd]ess of the best care you cangrates. Dry the grates with a c]oth+on’t put them give them. This is due tu their continual exposure tohach un the range wet. When rcplticing the grates. he high temperatures.
sure they’re positioned” securely over the burners. Do not operate a burner for an extended periodof time without cookware on the grate. The finishon the grate may chip without cookware to absorbthe heat.
Control Panel and KnobsIt’s a good idea to wipe the control panel after eachuse. Clean with mild soup and water or vinegar and ~ .-~’water. rinse with clean water and polish dry with a -- —— --- -soft cloth.Do not use abrasive cleansers, strong liquid
*ansers, plastic scouring pads or oven cleaners
—~a--.-zqj
L’ @.
.4 the control panel–they will damage the iinish. A - - ~50/50” solution of vinegar and hot water wt]rks well. ,- ,.,..-.-~ —
The control knobs may be removed for easiercleaning.Before removing the knobs for cleaning, please note To remove a knob, pull it straight uff the stem. If athat the knobs t]n the left side and the knobs on the knob is difticult to remove, place a thin cloth (like aright side are in the proper OFF position. When handkerchie~ or a piece of string under and aroundreplacing the knubs. check the OFF position to insure the knob edge and pull up.pr(]per placement. Wash the knobs in soap and water but do not soak.
Avoid getting water into the knob stem holes.
Cooktop GlassTo keep the cooktop looking iti bes~ wipe up anyspills as they occur. This will keep them fromburning on and becoming more difticult to remove.As soon as the cooktop is cool, wash the glasssurface with a cloth moistened with warm, soapywater; rinse with clean water, and dry with a soft cloth.You can use any liquid household detergent.Do not use abrasive materials such as metal pads, cleasing powder andsoap tilled pads—they may scratch the surface. Do not use harsh chemicalssuch as bleach or chemical oven cleaners.‘nr streaks or spotting, you may find it helpful to rinse glass with white
iegar or a fifty percent white vinegar/water solution.
31
GE Appliances
time span for soaking the grates should be 3hrs to overnight not 30 mins.

CAm Am CLEAN~G(continued)
Lift-Off Oven DoorThe oven door is removable, but it is
3‘[
heavy. You may need help removing ~ ~and replacing the door. Do not lift the .4door by the handle. This can cause the [glass to break or can cause damage tothe door. 1To remove the door, open it a fewinches to the special stop ~sition that -l Iwill hold the door open. Grasp firmlyon each side and lift the door straightup and (]ff the hinges.NOTE:. Be careful not to place hands between the hinge and .
the f)vcn door frame as the hinge cuuld snap backand pinch tingers.
● While working in the oven area, cover the hingeswith towels or empty paper towel rolls to prevempinched tingers and chipping the porcelain enamelon the frame.
To replace the door, make sure the hinges arc in thespecial stop position. Position the slots in the bottomof the door squarely (]ver the hinges. Then lower thed(x)r slowly and evenly over both hinges at the sametime. If hinges snap back against the oven frame, pullthem back out.TO CLEAN THE DOOR:Inside of the door:● Because the area inside the gasket is cleaned during
the self clean cycle, you do not need to cletin this byhand. Any soap left on the liner causes additionalstains when the oven is heated.
● The area outside the gasket can be cleaned with asoap-filled scouring pad.
● Do not rub or clean the door gasket-the fiberglassmaterial (If the gasket has an extremely I(JWresistance to abrasion. An intact and well-tittingoven door gasket is essential fur energy-efficientoven operati(]n and guud baking results. If J.(JUnotice the gasket becoming w(~rn. frayed or damagedin any way ur if it has become displaced on the door.”you should have it replaced.
NOTE: The gasket is designed with a gap at thebf)tt(~m to allow for proper air circulation.
Inside Gasket
Gasket
Outside Gasket
Outside of the door:● Use soap and water to tho~)ughly clean the top,
sides and front of the oven door. DO NOT let waterrun duwn through openings in the top of the door.” .-Rinse well. You may alsu use a glass cleaner toclean the glass on the outside of the door.
● Spillage of marinades, fruit juices, tt~rnato saucesand basting materials containing acids may causediscol{)ration and should be wiped up immediately.When surface is cool. clean and rinse.
● Do “not use oven cleaners, cleansing powders orharsh abrasives on the outside of the door.
Removable Storage DrawerThe storage drawer is a good place to store ct)t)kwarc To remove: Pull theand bakcware. Do not store plastics and flammable drawer straight outmaterial in the drawer. and lift over theDo not overload the storage drawer. If the drawer is guide stops.tuo heavy, it may slip off the track when opened. To To replace: Liftopen the drawer, grasp the center of the handle and over the guide stopsDull straight out. and slide the drawer
%*
-.’...-,/ ./v.
i / “‘ :.: /.,:. >.-. .,,... .,
1!
under the range.
32
.The storage drawer may be removed for cleaning into place.
To clean both the inside and the outiide:Wipe with soap and water. Rinse well. Do not use -cleansing powders or harsh abrasives which mayscratch the surface.
—

-——
ven ShelvesClean the shelves with a mild abrmive cleanser orsteel wool. After cleaning. rinse the shelves with cleanwater and dry with a clean cloth.NOTE: The oven shelves may ulsu be cleaned in theself-cleaning oven, however, the shelves will darken,lose their lus[er and become hard to slide. Wipe theshelf supp)rts with cooking oil to make the shelvesslide more CilSily.
Broiler Pan and Rack
Afier broiling, rcmovc the hroilcr pan and rack fromthe overt. Rcnlovc the ril~k fn)m the pan. Curefullypt)ur the grease from the pan into a prnpcr conttiiner.Wash and rinse the broiler pan and rack in hut waterwith it soup-lillcd or plastic scouring Pitd.If food bs burned on, sprinkle the rick with detergentwhile hot and cover with wet paper tnwels ur a dishcluth.““~aking the pun will remove burned-on foods.”
Both the broiler pan and rack may be cleaned with acommercial oven cleaner.D(J not st(]re a suilcd pan and rack anywhere inthe range.Both the b~)ilcr pan ilnd rack can also be cleaned inthe dishwasher.Do not clean the broiler pan or rack in the self-cleaning oven.
Oven Vent Painted SutiacesThe oven is vented through art opening at the rear 01. The drawer front is a painted surface. Clean itthe cooktt)p.” Never cover the t)pening with aluminum with soap and water or a vinegar and water solution.fuil or ilny other material. This would prevent the Do not use commercial oven cleaners, cleansingoven vent from working properly. powders, steel wool or harsh abrasives on anyThe vent grille mtiy discolor during self-cleaning. painted surface.Clctirt the (]ven vent grille with Bon Ami”:.
Sure Grip HanWeThe soft door handle is easy to keep clean. Soil will easily wash off withsoap and water or a non-abrasive cleaner. Avoid using heavy-duty all-purposc cleaners and detergents, as they may contain chemicids whichmight harm the sure grip handle.
33
—

CA~ Am CLEANmG(conlinucd)
Oven Light BulbThe light bulb is located on the back t~vcn wall.Befurc replacing the bulb, disconnect the electricpower to the range at the main fuse f)r circuit breakerpanel or unplug the range f~~m the electric outlet.Let the bulb cool completely before rcmt)ving it.D() not touch a hot bulb with a damp cloth. If you do,the bulb will break.TO REMOVE:● Remove the 3 screws in the light cover.● Detach the light cover and remove the bulb.TO REPLACE:Q Put in a new 40-watt appliance bulb.
NOTE: A 40-watt appliance bulb is smaller .than a standard 40-watt househuld bulb.
● Install the light cover. Replace the 3 screws andtighten, making sure the cover fits flush with thef)ven wall.
● Rcct]nnect the electric power to the range.
Removable Oven BottomThe oven b(~ttom can be removed to clean largespills, and tu enable you to reach the oven burner.The oven bottom must be replaced before usingthe self-clean cycle.
Unlink bck
To remove:1. Slide the tab at the center front of the oven b(~ttom
to the left.2. Lift the oven bottom up and out.To replace:1. Slip the oven bottom into the oven so the tabs in
the rear of the oven bottom fit into the slots in theoven back.
2. L(]wer the front of the oven bottom into place andslide the front tab to the right to lock the ovenbottom into place.
The oven bottom has a porcelain enamel finish.T() make cleaning easier, protect the oven bottom”frnrn excessive spilh~vers. This is particularlyim~)rtant when baking a fruit pic or other foods withhigh acid content. H{~t fruit tillings or ft~ods that arcacidic (such as milk, tt]mat{)es or sauerkraut. andsauces with vinegar or Icmon juice) may cause pittingand damage to the porcelain enamel surface.To protect the oven bottom surface, place a picccof aluminum foil slightly larger than the baking dishur a small cookie sheet on a Iowcr shelf or under thebaking dish to catch any spillf)vers. It should notcompletely cover the shelf as this would cause unevenheat in the oven. Aluminum foil sht)uld not bc placedon the oven bottom.If a spillover does occur on the oven bottom, allowthe oven to ct)ol first. You can clean the oven bottomwith soap and water. a mild abrasive cleanser or soap-tilled abrasive pads. Rinse WCII tf~ remuve any soapbefore self-cleaning.
--

AN~-TW DEWCE
3efom placing range in the counter, notice thelocation of the stability bracket which is alreadyattached to the back of the range. This locationshould work for most installations. However, itmay be more convenient to hook the stabilitychain to the unit when the stability bracket isattached to the upper set of holes in the back ofthe range. See Fig. A. The upper level set of holesare intended for use with a backsplash kit. If thebacksplash is not being used, make sure that themtire nn structural supp)rts for the countertop whichwill interfere with the stability bracket whenlocated in the upper set of holes.
BracketOptional/
:,, ,,: ?!
Location
&
; I ! ,: , : ,:
Bracket .,:.Fado~ IILo~tion I : :
ii,
a 91’b,,; i :I
i il ~ I ‘i i‘ \
Ai \ !1 I ,! ‘,,
! I I::
Chain i: ,
2. Fasten unc cnd ofthe stability chain to @the fluur or wall withthe long screw and
~ Backguard
4
, .\
“~
Mainback
Chain
II
I\
,*
washer-supplied. See ~~~~er andFig. B. Make certainthe screw is goingintt) th~ WUII plate atthe base t)f the wall or one of the studs in the baseof the wall. Sce Fig. C. Whether you attach thechain to the wall or tloor, be certain that the screwis in at Icast 3/4 inch thickness of wood other thanbaseb(}ard and that there are no electrical wires orplumbing in the area which the screw couldpcnetmte. Attach the stability chain in a locationwhich will allow the chain to be in line with thebracket side to aide as much as possible whenattached to the unit. Test to see if the chain issecurely fastened by tugging on the chain.
@\A.~Chain\L o n g S c r e w ,, Wall Plate
Waaher ‘
3. Temporarily attach the loose end of the chainto the rear of the countertop with the tape fromthe packaging. See Fig. D.
4. Place the range in the counter cutout leaving justenough mom between the back of the range and thewall ~o reach the stability bracket.
5. Hook the loose end of the chain onto the br~cketby slipping the nearest link of the chain into theslot in the bracket. See Fig. A and make sure thechain is pulled as tight as possible and that thereis no excess slack in the chain after the chain isattached to the bracket.
A CAUTION: Excessive slack in the chaincould allow the range to tip over.
6. Slide the range all the way back into the counter.Once the range is pushed back in place, there willbe a small amount of slack in the chain. Thisis nt)rmal.
.----fl.-. Tape
NOTE:● If attaching to masonry, you can buy suitable screws
and anchors at hardware stores. Use a m~~sonry drillto drill the required holes.
● If range is removed for cleaning or any other reason,make sure chain is reattached.
35
—

● QUESTIONS?USE THM PROBLEM SOLmR
PROBLEM
“F- AND A NUMBER”FLASH IN THE DISPLAY
BURNERS HAVE YELLOW ORYELLOW-TIPPED FLAMES
SURFACE BURNER KNOBSWILL NOT TURNSURFACE BURNERSDO NOT LIGHT
TICKING SOUNDOF SPARK IGNITERPERSISTS A~ERBURNER LIGHTSTICKING SOUNDPERSISTS A~RBURNER 1STURNED OFFBURNER FLAMES VERYLARGE OR YELLOWFOOD DOES NOTBROIL PROPERLY
POSSIBLE CAUSE
Q This is a function error code. Press the CLEAWOFF pad. Allow the oven tocm] for one hour. Put the t)ven hack int(] t)peration. If the failure code repeats,disconnect all power to the range. Call for service.
(A) Yellow time (B) Yellow tip on outer (C) Sofi blue flmn-Call for service &+No~l for LP gas Normal for natural gas● If burner flames look like (A), call for service. Normal burner flames should
look like (B) or (C), depending on the type of gas you use.Q With LP gas, some yellow tipping on outer cones is normal.c To turn from OFF positi(m, push the knob in and then turn.
● Make sure electrical plug is plugged into a live, properly g~)unded p(]wcr outlet.● Gas supply not connected or not turned on.● Check for power outage.● Pan sitting on burner gr~te may be partially blocking the free air fh~w needed
for combustion. Remove pan and try again.● Igniter {)rifice in burner kdy may be clt~gged. See the Care and
Cleaning section. Remove the obstruction.● Burner parts not replaced correctly. See the Care and Cleaning sectit)n.● Hole in burner top behind igniter may be clogged. Usc a small sewing
needle to unplug.● Turn knob out of the LITE posit(m.
● ~m burner off and relight. [f ticking is still present, call for service.
● Be sure knob is in the OFF position. Remove knob by pulling it straight offthe stem and check bottom” of knob for any build-up of soil.
● If range is connected to LP gas. check all steps in the Installati(m Instructit)ns.
. The oven controls are nf)t properly set. See the Broiling section.● The dmr is not closed.● Improper shelf position is being used. See the Broiling section.● Food is being cooked on a hot pan.● Cookware is not suited for broiling.c Oven bottom not securely seated in position.c Aluminum foil used on the broiler rack has not been fitted properly and slit,
as ~ommended.
36

AOBLEM
FOOD DOES NOT ROASTOR BAKE PROPERLY
OVEN TEMPERATURETOO HOT OR TOO COLDOVEN CONTROL SIGNAL!A~ER ENTERING COOKTIME OR STOP TIMEOVENWILLNOTWORKBUTCOOKTOPDOESOVENNOTCLEANAFTERCLEANCYCLE
STRONGODOR
OVENLIGHTDOESNOTCOMEON
OVENWILLNOTSELF-CLEAN
“BURNING”OR”OILY”ODOREMl~lNGFROMOVENWHENTURNEDONFANNOISE
CLOCKANDTIMERDONOTWORK
~SSIBLECAUSE
● The oven controls are not properly set. See the Baking or Roasting section.. Shelf position is incorrect.● lrnproper cookware is being used.● Oven thermostat n~ds adjustment. SW the Adjust the Oven Thermostat—
Do It Your,re~section.● Clock not set correctly.● Aluminum foil used improperly in the oven.c Oven bottom not securely sated in position.● Oven thermostat needs adjustment. See the Adjust the Oven Thcrmostat—
D() It ti~ur.ve~section.. This is reminding you to enter a bake tempcmture.
c Oven shut off valve is in closed position. Locate oven shut off valve on pressureregulator of self-cleaning oven. Move shut off lever to open position.
● Oven c(~ntrols nf)t set properly.● Heavily soiled ovens require 3’/~ to 4-hour clean time.● Heavy spillovers should be cleaned up before starting clean cycle.● An odor from the insulation around the inside of the oven is normal for the
first few times the oven is used. This is temporary.● Improper air/gas ratio in oven. Call for service.● Bulb may be l(x)se or burned out.● Electrical plug must bc plugged into a Iivc power outlet.● Switch operating oven light is broken. Call for service.● Stop time must be at least 3 hours later than stirt time.● Oven temperature is t(m high to set self-clean operation. Allow the range to
c(ml to ~x)m temperature and reset controls.● This is normal in a new oven and will disappear in time. To speed the pmxcss.
set a self-clean cycle for a minimum of 3 hours. See the Operating the Self-Cleaning Oven section.
● A fan may automatically turn on and off to cool internal ptis. This is normaland the fan may continue to run after the oven is turned otl.
● Make sure the electrical plug is pluggd into a live, properly groundedpower outlet.
● Check for power outage.● See the Oven Control, Clock and Timer section.
If you need more help... call, toll free:GE Answer CenteF~.626.2~consumer information service
37

NOTES
Wdll Be ThemWith the purchase ofyour” nw GE appliance, receive the wsurdnce that ifyou ever need
formation” or assistance from GE, wdll be there. All you have to do is call–toll-free!
GEAnswrtinti~80f162E2000Wh;iteveryour qucsii(m ahout ;~ny (;E m~!jor applian{.c, (;E Answer (:enter”infi)t-nliltion selvic.c is ;iv:lilahlc to help. Your c:lll—:lnd your question-will heiillsw~’rt’[1 proinptly :ind C.OUI.IchoUSly.” And y{)u {.;u~ c:dl :iny time’. (;k: Answer(:csnttsr” sclvit.c is open 24 1l{)uIx ii day, 7 d:iys ;l week.
/tiome RepairSeM==80UMRES(80W2-273flA (;k:(.ollslllllct.setvi(.c prolkssif)n:ll will providccxpcrl rcp;lirsclvit.e,S(.IIL’(lUIL’( 1:11 ii Iitllc’ lll;il’s (.ollk’cllictlt fi)ryoll. MilIl}’ (;k:(:ollSlllll~l. Sclvice(.ollll)illl~<) l)t’l.illt’(1 1()(.;lli()ns ofli’1. YOU setvic.c Iodily (Jr 1011101 .I.OW, 01- ilt }.0111. (.oll-vc’nit’n(.e (7:()() il.111. to 7:()() 1].tll. ~’~~~kdilys. !):()() ii.111. I() 2:()() p.1~1. Silturdiiys).ollr lil(.toty-tl.ilill~tl lc(.htli{.iill~s know your ilpplii~tlt.~ inside ;uld OUt-S() mostrt.p:iirs (.illl 1)(’ Ililll(ilt’(1 ill.jllsl OIIC v i s i t .
For fistimem W& SpcialNeeds...80~62&2W0
Upon rc’quest, (;k: will provide131-ilillC C.01111.OIS” Ii)l” il v;lricly 01.(;11ilppli:lll(.CS, illld ii 111. (){.11111.t? 10ilSSiSl in plilnllillg ii l)iU.l.it’l--fi.CL.kitt.hc.n li)r pers(ms with Iimitcdnlohilil}’. “I’() ohlilill these items,Ii.ee of.(.llill~C, (ill] 800.[;2(;.2000.
(Iotlsunlcrs with impi~ircd he:lring or speech who havei~~.{.~ss to ii TIII) or ii ~.otlv~tltiol~ill” tcletypewritc.r Illily{id] 80(h’I.lll)<;FA(: (~()()~:~f~~~~) 10 l.~[]UCS~inli)t.lllillioll or sclvit.e.
Y()~I c.;in lli~ve thc se(.ure fkcling tlliit (;E (IOIISUIIIeI. Selvice will still be thereiific’r yo~lr wilrriil~ty t)xpircs. l>~lr{~hilse ;l (;E (:ont~’~ct while yoUI. warriinty is stillin c’flk.c.t iilld you’ll re[.civc a Suhstiintiid discount. With a multiplc+year contr:lcl,}.ou’re ilSSlll.~(1 of.t.utllrc service ill Lt)d~y’S prices.
Pa& andA-orim
kdivid- qua3ified to servim their- apptim User maintenanm instictiona mntained in W guide!n h;lve needed parts or accessories sent directly t.(~ mverp-ed- intended to be performed by any=.
.leir hnme. The (;F: pii]-ts system provides access to river Otierservidnggen_ *otid be referred to qfified47,()()() p:lrts...ilnd ;dl (;E (Jenuine Renewal Parts are da personnel. Cwtion mwt be =+d, sinmfully w;irr:~nted. VI.SA, Mastclf;;lrd and Discc)ver cards improper servi~gmaycawe tie operation.ilr~ accepted.

YOUR GE GAS RANGE Staple sales slip or cancelled check
WARRANTY here. Proof of original purchase dateis needed to obtain semice
II under warranty.
WHAT IS COVERED FULL ONE-YEAR WARRANTY *************** ********For one year from date of original This warranty is extended to thepurchase, we will provide, free of original purchaser and anycharge, parts and sewice labor in succeeding owner for productsyour home to repair or replace purchased for ordir~a~ home use inany pati of the range that fails the 48 mainland states, Hawaii andbecause of. a manufacturing defect. Washington, D.C. In Alaska the
warranty is the same except that it isLtMITED because you must pay toship the product to the service shopor for the service technician’s travetcosts to your home.
All warranty sewice wilt be providedby our Factory Service Centers or byour authorized Customer Car@servicers during normat working hours.
Should your appliance need service,during the warranty period or beyond,call 800-GE-CARES (800-432-2737).
WHAT IS NOT COVERED ● Service trips to your home to described in the tnstaltationteach you how to use the product. instructions provided with the product.
Read vour Use and Care material. . Replacement of house fuses ortf you ~hen have any questions resetting of circuit breakers.about operating the product,
● Failure of the product if it is used forplease contact your dealer or ourConsumer Affairs office at the
other than its intended purpose or
address below, or call, totl free:used commercially.
GE Answer CenteF● Damage to product caused by
800.626.2000accident, fire, floods or acts of G~.
consumer information service WARRANTOR IS NOT RESPONSIBLE
. Improper instantiation.FOR CONSEQUENTIAL DAMAGES.
If you have an installation problem,contact your deater or installer.You are responsible for providingadequate electrical, gas, exhaustingand other connecting facilities as
Some slalos do nut SIIOW Ihe exclusion or Iimitslion of incidental or mnaequenlial dsmages, ao the above limitation or exclusionmay I1OI apply to you. Ttlis warranty givea you specific legal rights, and you may also have other rights which vary from slste to slste.To know whst your Iegsl righls are in your state, consult your local or slate consumer affslrs office or your state’s Allorney General.
Warrantor: Ganeral Electric Company
If further help la needed concerning this warranty, write:Manager+onsumer Affaira, GE Appliance, Louiavllle, KY 40225
.—
a Recycled Paper
Palt No. 164 D2986P120
I
JGSP32Pllb No. 49.8599 JGSP332 gb CG JGSP44
Printed in LaFayetle, GA