Unified Contact Center Express ( UCCX ) Scripting for the ...
352
1 | Page Unified Contact Center Express ( UCCX ) Scripting for the CCNP Candidate LTRCRT-2101 Speaker: Alex Hannah
-
Upload
khangminh22 -
Category
Documents
-
view
0 -
download
0
Transcript of Unified Contact Center Express ( UCCX ) Scripting for the ...
1 | P a g e
Unified Contact Center Express ( UCCX ) Scripting for the CCNP Candidate
LTRCRT-2101
Speaker:
Alex Hannah
2 | P a g e
Learning Objectives and Table of Contents Upon completion of this lab, you will be able to:
• Configure CUCM Disaster Recovery
• Configure Unified IP Communicator Endpoints
• Configure Cisco 8865 Video Endpoints
• Configure and Use UnifiedFX PhoneView for remote IP Phone control
• Perform initial UCCX Server initialization and CUCM Integration
• Perform UCCX Disaster Recovery
• Configure Telephony and Media integration from UCCX to CUCM
• Install the UCCX Script Editor and customize common settings
• Create a Basic UCCX Script emulating a real-world Physician Application and Scenario
• Utilize Prompt and Collect functions inside the UCCX Script Editor
• Utilize Database Access steps inside the UCCX Script Editor
• Utilize Logical Operations inside the UCCX Script Editor
• Configure Time of Day routing inside the UCCX Script Editor
• Implement advanced ACD and Queue logic inside a UCCX Script
Scenario In this lab activity, you will configure, integrate, build, and troubleshoot a UCCX script for a fictitious
Physician’s office. The overall goal of this session is to provide you with enough foundational
knowledge for CUCM, UCCX, and Scripting that you could potentially create scripts for your own
business entities when you return from Cisco Live. While this session cannot teach you every aspect
of UCCX, we feel it will provide a solid foundation for your Collaboration future.
3 | P a g e
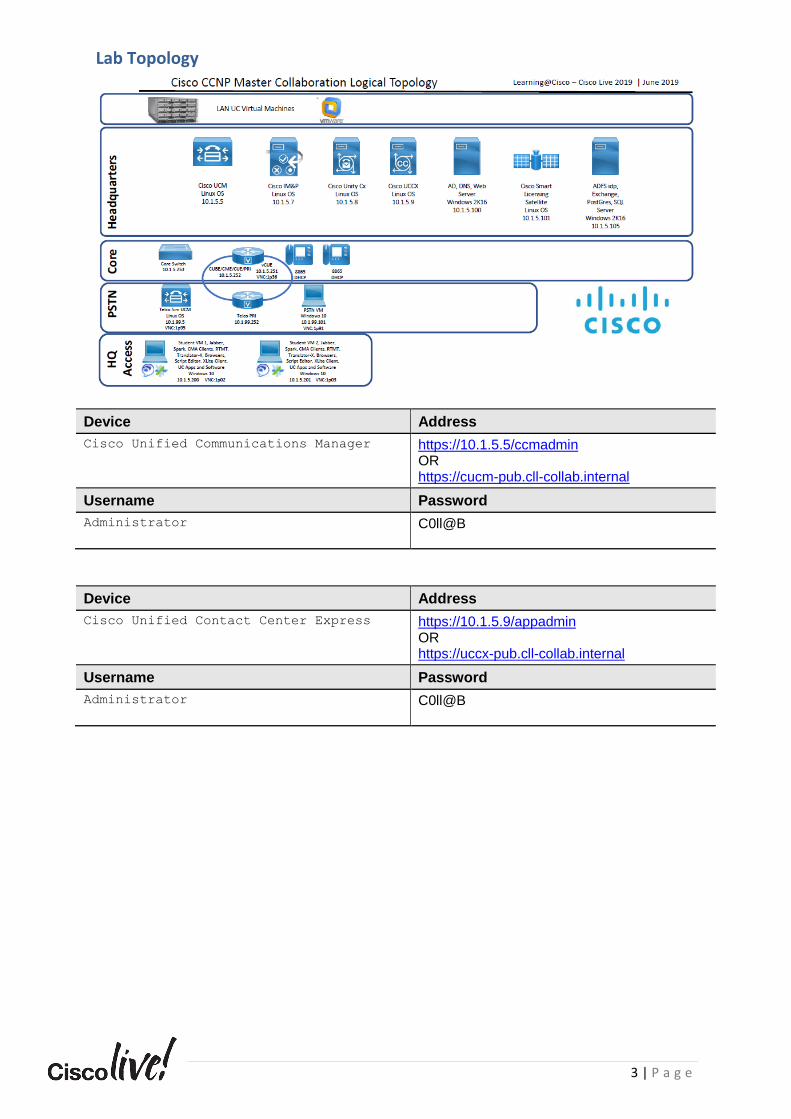
Lab Topology
Device Address
Cisco Unified Communications Manager
https://10.1.5.5/ccmadmin OR https://cucm-pub.cll-collab.internal
Username Password
Administrator
C0ll@B
Device Address
Cisco Unified Contact Center Express
https://10.1.5.9/appadmin OR https://uccx-pub.cll-collab.internal
Username Password
Administrator
C0ll@B

4 | P a g e
Lab 0: Lab Access and Pod Assignments Welcome to Cisco Live 2019 San Diego! We hope you will have a great time in this UCCX Scripting
lab. Before you can dive in learning how to script, we need to connect to the lab environment. This
lab will serve as instructions to get you into the lab and starting on Lab 1.
1. Your instructor will set up your Cisco Live laptops to connect to our Lab VPN. At any time
during Cisco Live you wish to continue your labs; you may need to use the Cisco AnyConnect
client to connect back into the lab.
2. If you do not already have Cisco AnyConnect installed on your personal machines, you will
need it for remote access into the lab environment. Please note: AnyConnect is already
installed on the Cisco Live laptops, there is no need to re-install it.
3. ( Optional ): Install Cisco AnyConnect on your personal laptop by opening up a web browser
and visiting the WebEx Teams room for our session: https://teams.webex.com/
4. Authenticate to the WebEx Teams Web App by using your username and password.
5. Click on the room titled “LTRCRT-2101: Unified Contact Center Express ( UCCX ) Scripting …
6. Click the down arrow beside the session name, you will see a Files icon. Click the files icon to
access session files that the instructor has uploaded for you.
5 | P a g e
7. Windows users will need to install the following file: anyconnect-win-4.6.03049-core-vpn-
webdeploy-k9.exe
Note: Please remember, this installation comes with a no money back guarantee, if you
nuke your laptop, we are not responsible!
8. Once installed please open the Cisco AnyConnect client.
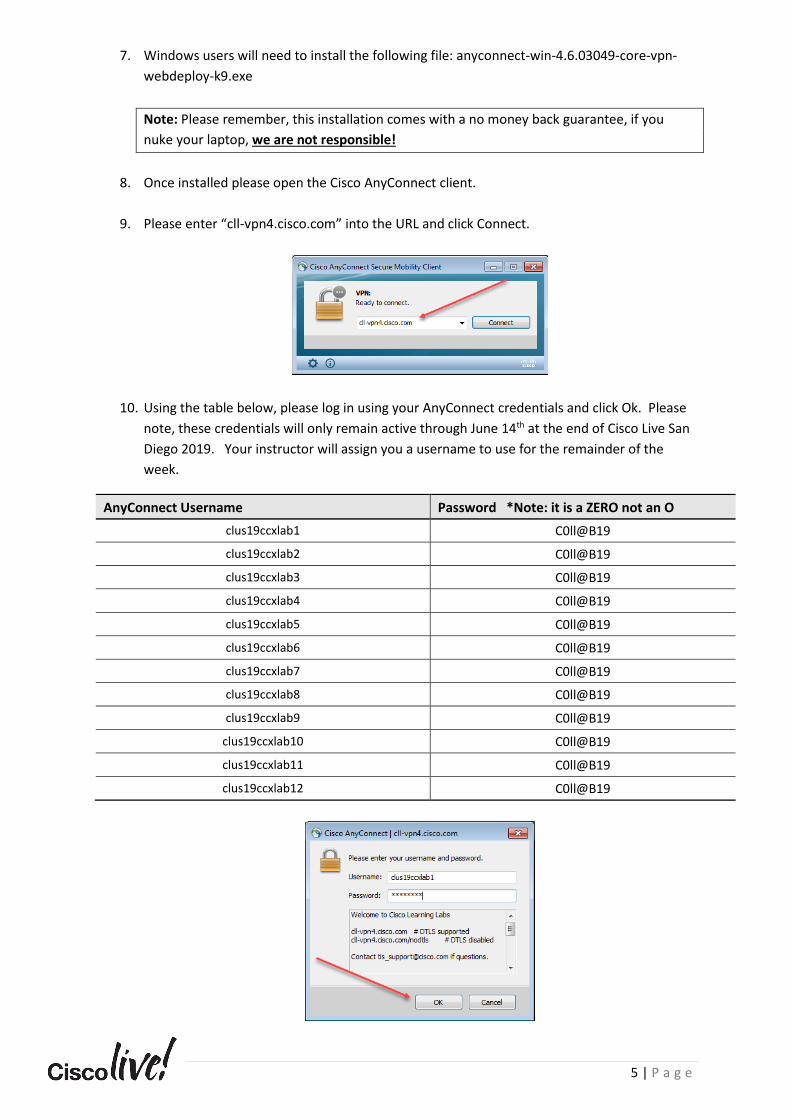
9. Please enter “cll-vpn4.cisco.com” into the URL and click Connect.
10. Using the table below, please log in using your AnyConnect credentials and click Ok. Please
note, these credentials will only remain active through June 14th at the end of Cisco Live San
Diego 2019. Your instructor will assign you a username to use for the remainder of the
week.
AnyConnect Username Password *Note: it is a ZERO not an O
clus19ccxlab1 C0ll@B19
clus19ccxlab2 C0ll@B19
clus19ccxlab3 C0ll@B19
clus19ccxlab4 C0ll@B19
clus19ccxlab5 C0ll@B19
clus19ccxlab6 C0ll@B19
clus19ccxlab7 C0ll@B19
clus19ccxlab8 C0ll@B19
clus19ccxlab9 C0ll@B19
clus19ccxlab10 C0ll@B19
clus19ccxlab11 C0ll@B19
clus19ccxlab12 C0ll@B19
6 | P a g e
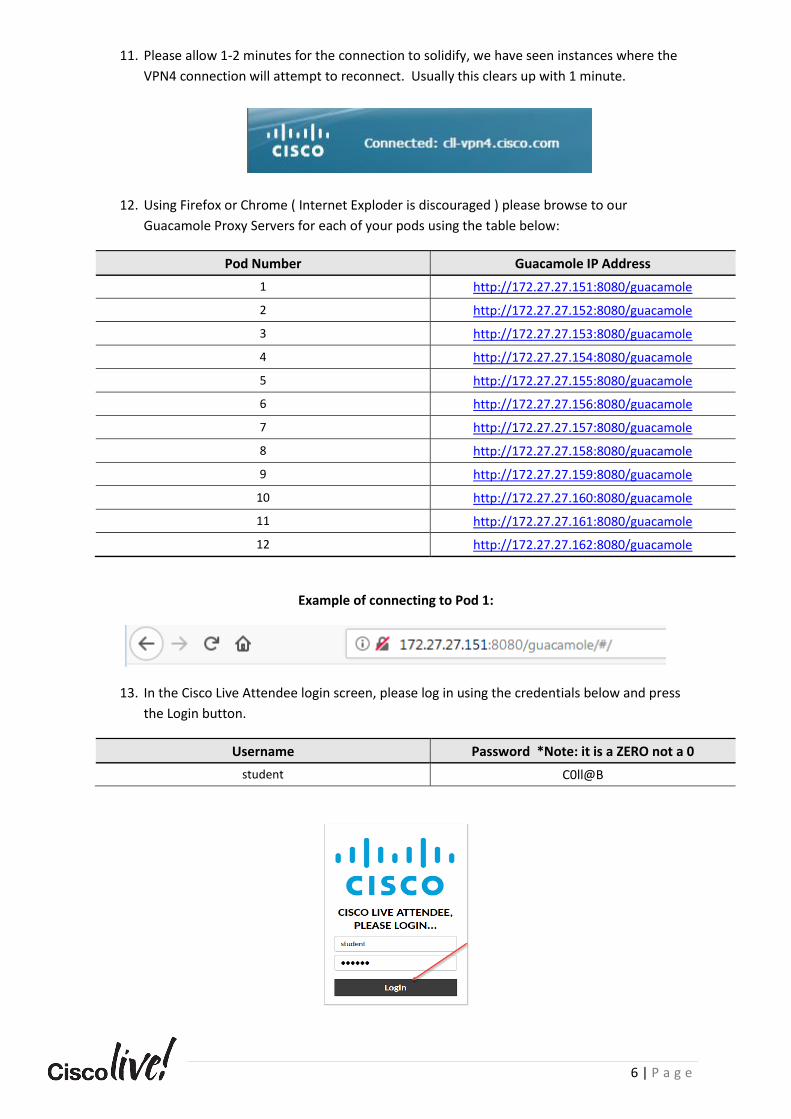
11. Please allow 1-2 minutes for the connection to solidify, we have seen instances where the
VPN4 connection will attempt to reconnect. Usually this clears up with 1 minute.
12. Using Firefox or Chrome ( Internet Exploder is discouraged ) please browse to our
Guacamole Proxy Servers for each of your pods using the table below:
Pod Number Guacamole IP Address
1 http://172.27.27.151:8080/guacamole
2 http://172.27.27.152:8080/guacamole
3 http://172.27.27.153:8080/guacamole
4 http://172.27.27.154:8080/guacamole
5 http://172.27.27.155:8080/guacamole
6 http://172.27.27.156:8080/guacamole
7 http://172.27.27.157:8080/guacamole
8 http://172.27.27.158:8080/guacamole
9 http://172.27.27.159:8080/guacamole
10 http://172.27.27.160:8080/guacamole
11 http://172.27.27.161:8080/guacamole
12 http://172.27.27.162:8080/guacamole
Example of connecting to Pod 1:
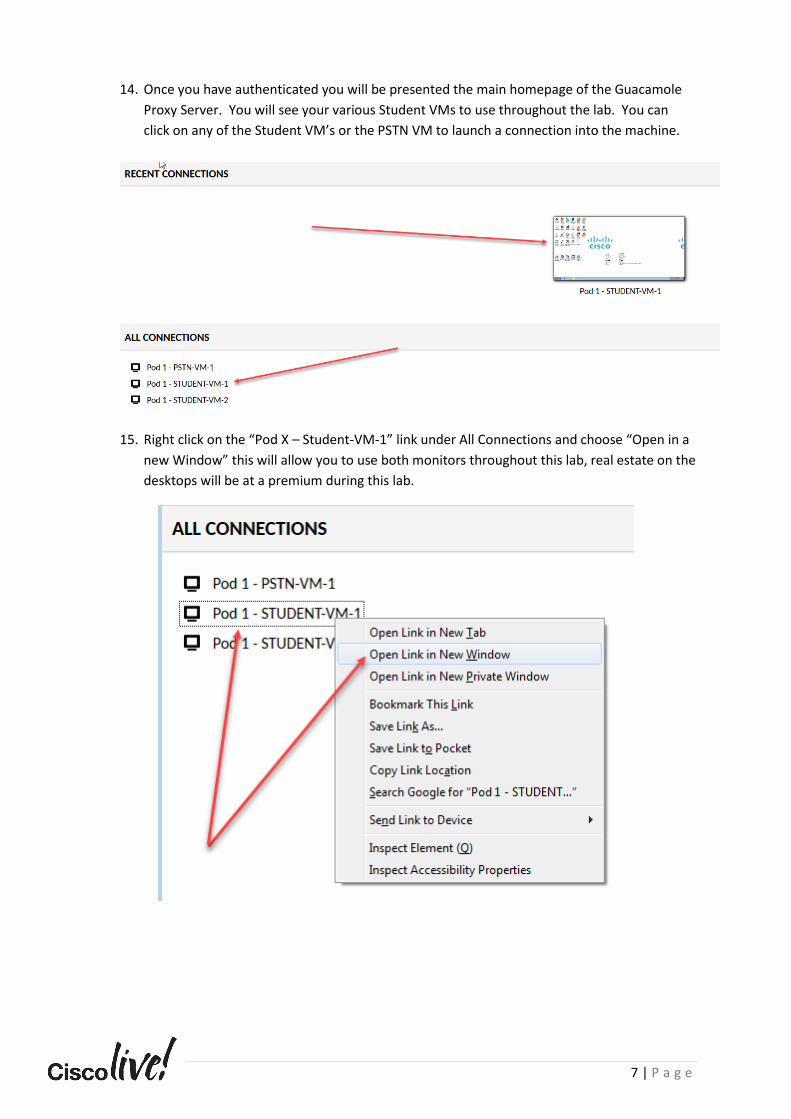
13. In the Cisco Live Attendee login screen, please log in using the credentials below and press
the Login button.
Username Password *Note: it is a ZERO not a 0
student C0ll@B
7 | P a g e
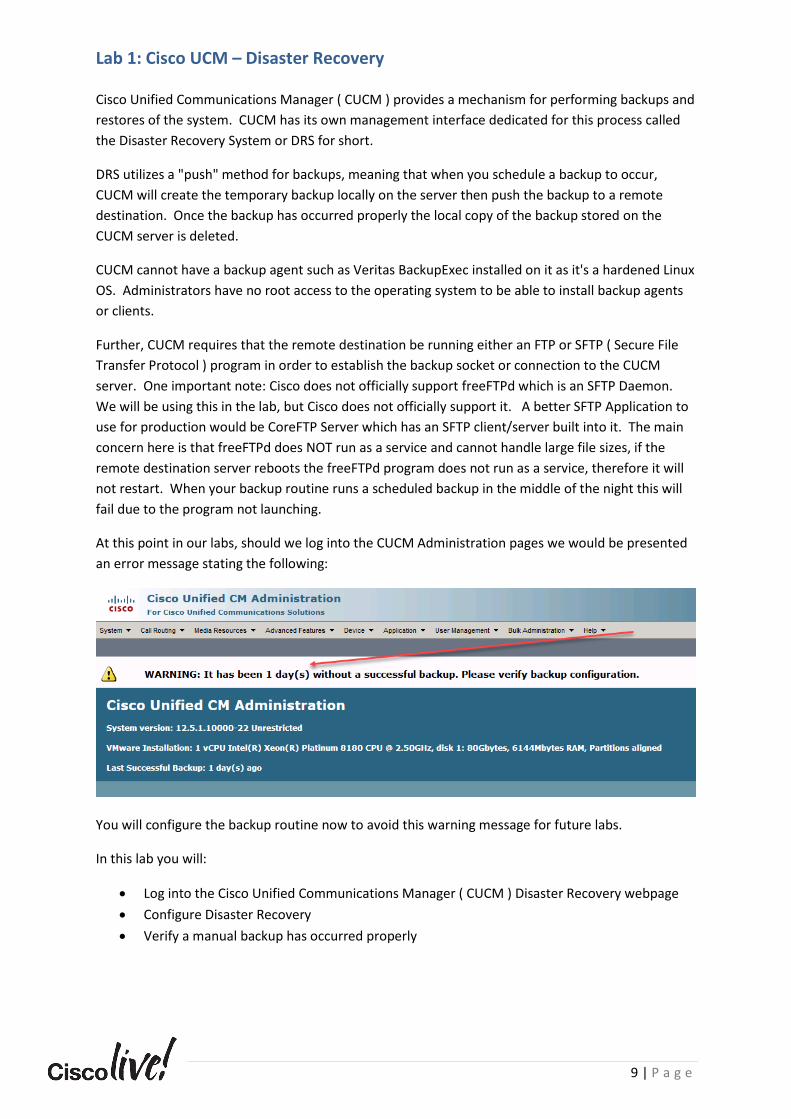
14. Once you have authenticated you will be presented the main homepage of the Guacamole
Proxy Server. You will see your various Student VMs to use throughout the lab. You can
click on any of the Student VM’s or the PSTN VM to launch a connection into the machine.
15. Right click on the “Pod X – Student-VM-1” link under All Connections and choose “Open in a
new Window” this will allow you to use both monitors throughout this lab, real estate on the
desktops will be at a premium during this lab.

8 | P a g e
16. You will now be logged into an RDP Session on the Virtual Machine you clicked on. From
here you will continue with the later lab steps.
17. Repeat step 15 for the other Virtual Machines ( Pod X – STUDENT-VM-2 and PSTN-VM-1 ).
You will now have 3 separate windows open with RDP sessions into each VM. Arrange your
desktop in a layout and workflow that best suits your preferences. Continue onto the next
lab.
Note: There is a special break out sequence for Guacamole to return to the Login page or the System
Administration view. Please remember “Control + Alt + Shift”. Should you need to modify audio
properties notify your instructor and he will assist you.
9 | P a g e
Lab 1: Cisco UCM – Disaster Recovery Cisco Unified Communications Manager ( CUCM ) provides a mechanism for performing backups and
restores of the system. CUCM has its own management interface dedicated for this process called
the Disaster Recovery System or DRS for short.
DRS utilizes a "push" method for backups, meaning that when you schedule a backup to occur,
CUCM will create the temporary backup locally on the server then push the backup to a remote
destination. Once the backup has occurred properly the local copy of the backup stored on the
CUCM server is deleted.
CUCM cannot have a backup agent such as Veritas BackupExec installed on it as it's a hardened Linux
OS. Administrators have no root access to the operating system to be able to install backup agents
or clients.
Further, CUCM requires that the remote destination be running either an FTP or SFTP ( Secure File
Transfer Protocol ) program in order to establish the backup socket or connection to the CUCM
server. One important note: Cisco does not officially support freeFTPd which is an SFTP Daemon.
We will be using this in the lab, but Cisco does not officially support it. A better SFTP Application to
use for production would be CoreFTP Server which has an SFTP client/server built into it. The main
concern here is that freeFTPd does NOT run as a service and cannot handle large file sizes, if the
remote destination server reboots the freeFTPd program does not run as a service, therefore it will
not restart. When your backup routine runs a scheduled backup in the middle of the night this will
fail due to the program not launching.
At this point in our labs, should we log into the CUCM Administration pages we would be presented
an error message stating the following:
You will configure the backup routine now to avoid this warning message for future labs.
In this lab you will:
• Log into the Cisco Unified Communications Manager ( CUCM ) Disaster Recovery webpage
• Configure Disaster Recovery
• Verify a manual backup has occurred properly
10 | P a g e
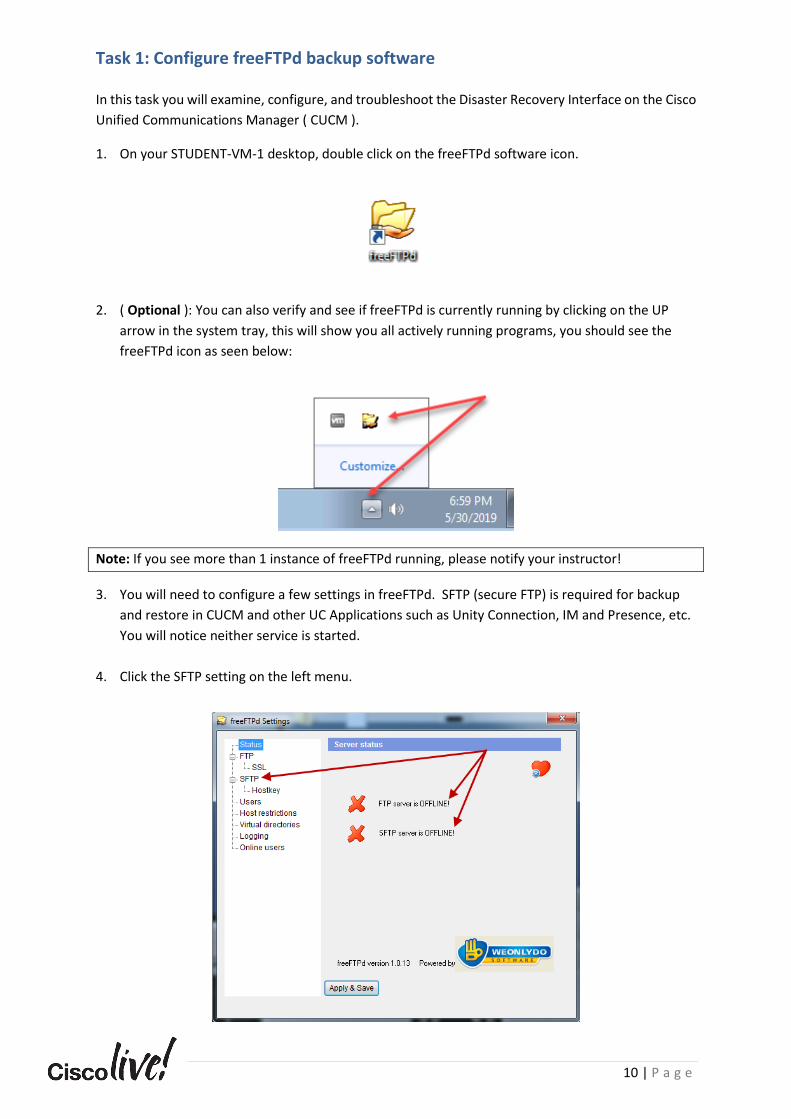
Task 1: Configure freeFTPd backup software In this task you will examine, configure, and troubleshoot the Disaster Recovery Interface on the Cisco
Unified Communications Manager ( CUCM ).
1. On your STUDENT-VM-1 desktop, double click on the freeFTPd software icon.
2. ( Optional ): You can also verify and see if freeFTPd is currently running by clicking on the UP
arrow in the system tray, this will show you all actively running programs, you should see the
freeFTPd icon as seen below:
Note: If you see more than 1 instance of freeFTPd running, please notify your instructor!
3. You will need to configure a few settings in freeFTPd. SFTP (secure FTP) is required for backup
and restore in CUCM and other UC Applications such as Unity Connection, IM and Presence, etc.
You will notice neither service is started.
4. Click the SFTP setting on the left menu.

11 | P a g e
5. In the Listen address drop down, select the interface with the IP address 10.1.5.200.
6. At the bottom of the SFTP screen, change the SFTP root directory to the following path:
C:\UC_Backups. Note this location as we will need to create the folder in a later step.
7. Click Apply & Save, then click Start. Pay attention to the order here! If you click Start before
applying your settings, you will lose the backup path and it will revert to the default location.
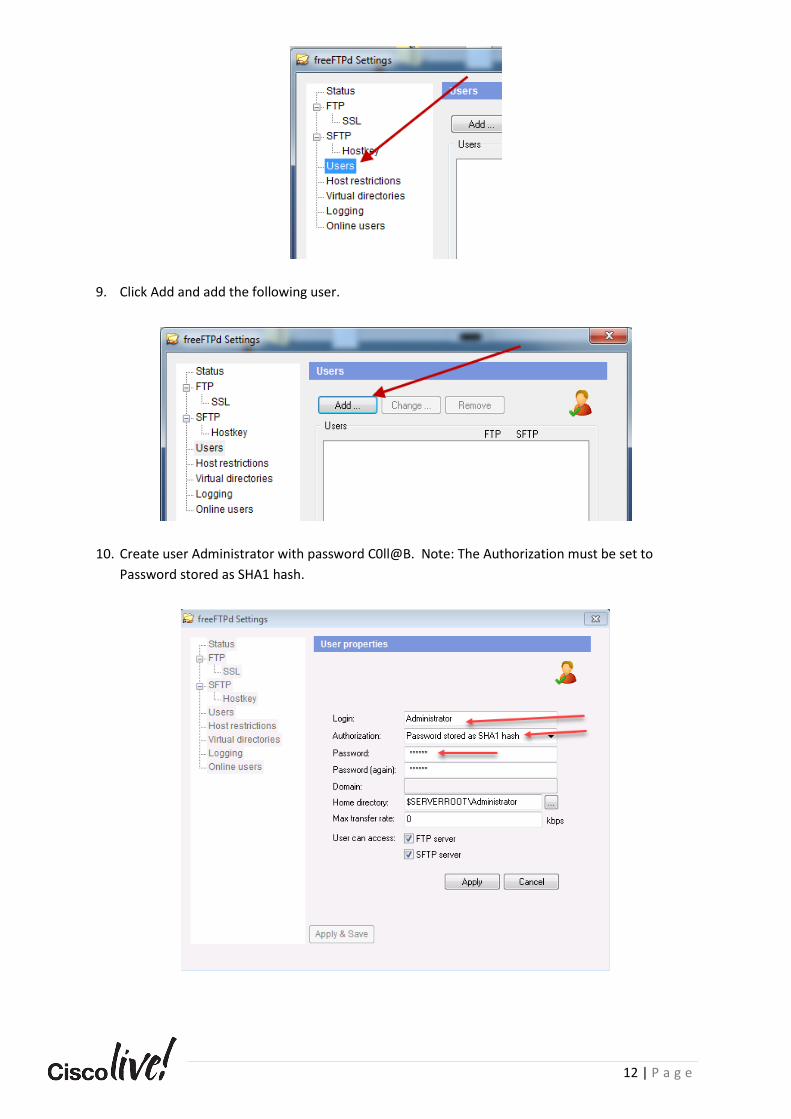
8. Click the Users setting on the left menu.
12 | P a g e
9. Click Add and add the following user.
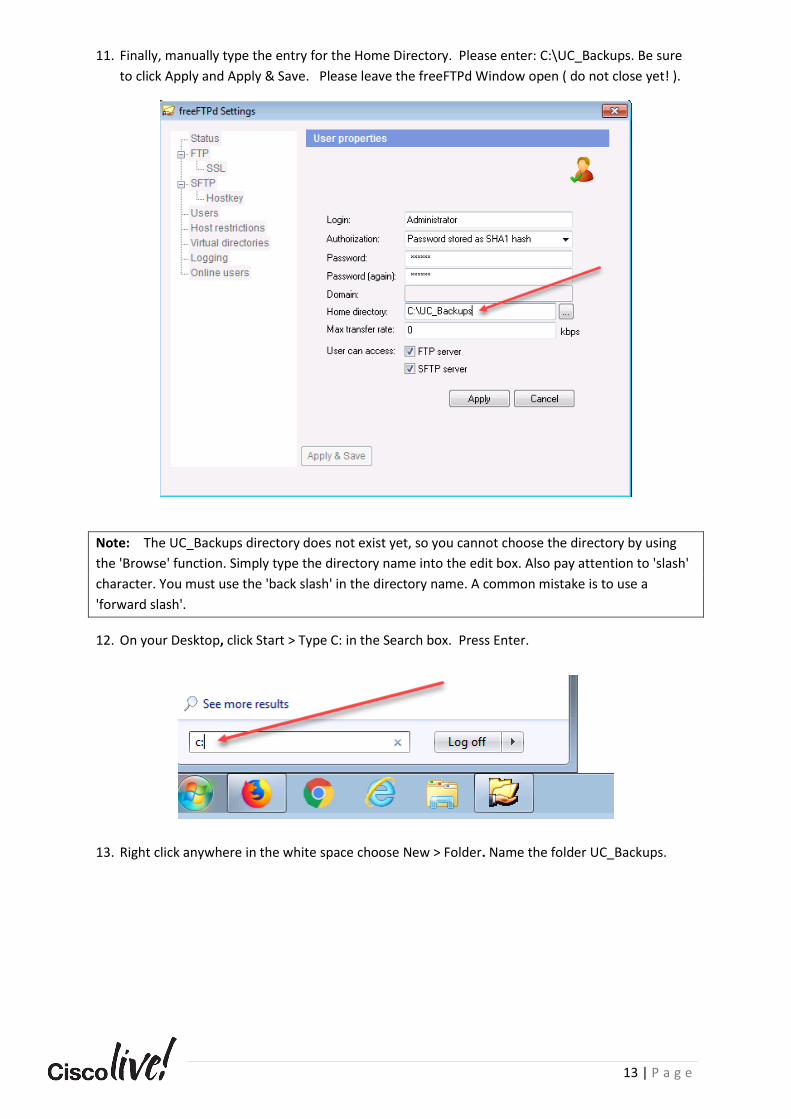
10. Create user Administrator with password C0ll@B. Note: The Authorization must be set to
Password stored as SHA1 hash.
13 | P a g e
11. Finally, manually type the entry for the Home Directory. Please enter: C:\UC_Backups. Be sure
to click Apply and Apply & Save. Please leave the freeFTPd Window open ( do not close yet! ).
Note: The UC_Backups directory does not exist yet, so you cannot choose the directory by using
the 'Browse' function. Simply type the directory name into the edit box. Also pay attention to 'slash'
character. You must use the 'back slash' in the directory name. A common mistake is to use a
'forward slash'.
12. On your Desktop, click Start > Type C: in the Search box. Press Enter.
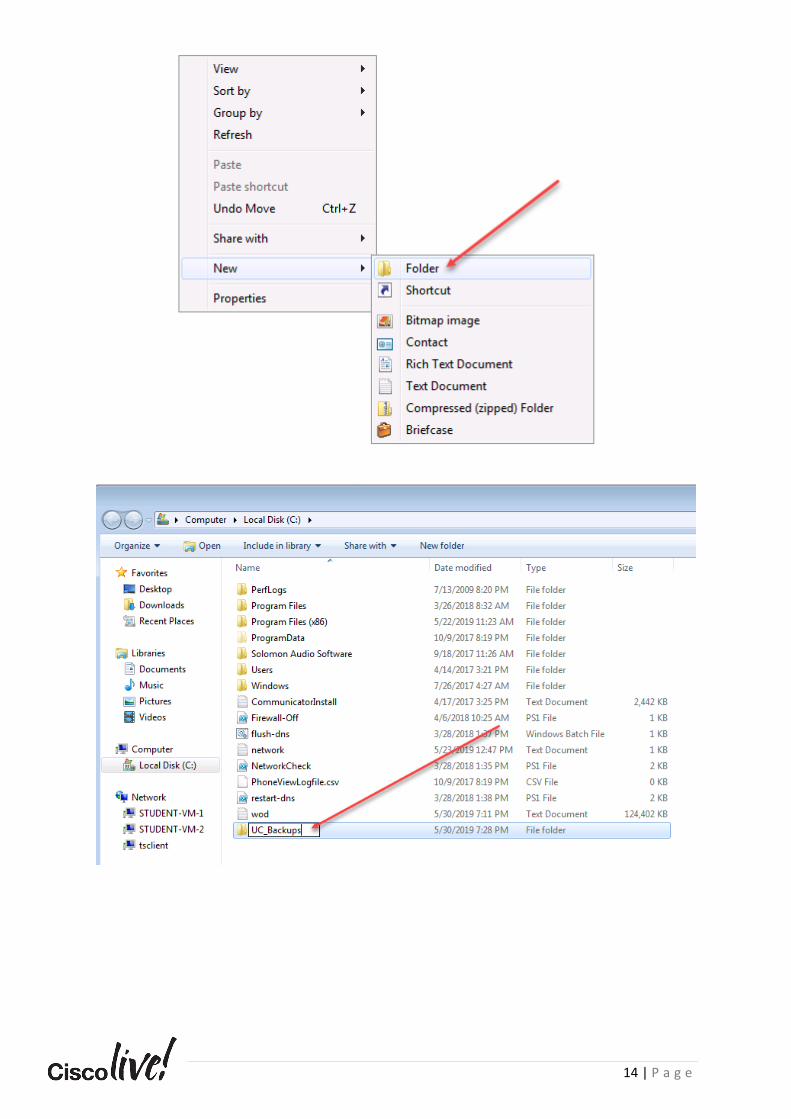
13. Right click anywhere in the white space choose New > Folder. Name the folder UC_Backups.
14 | P a g e

15 | P a g e
Task 2: Configure CUCM Disaster Recovery System In this task you will examine the Disaster Recovery Interface on the Cisco Unified Communications
Manager ( CUCM ). Our lab environment for this Cisco Live session contains a single CUCM Server,
Unity Connection Server, and IM & Presence Server. The CUCM server that you will configure
backups on in this section emulates a United States CUCM server with a US Dial plan that is
preconfigured. Sorry if anyone feels left out, but you are in San Diego eh?
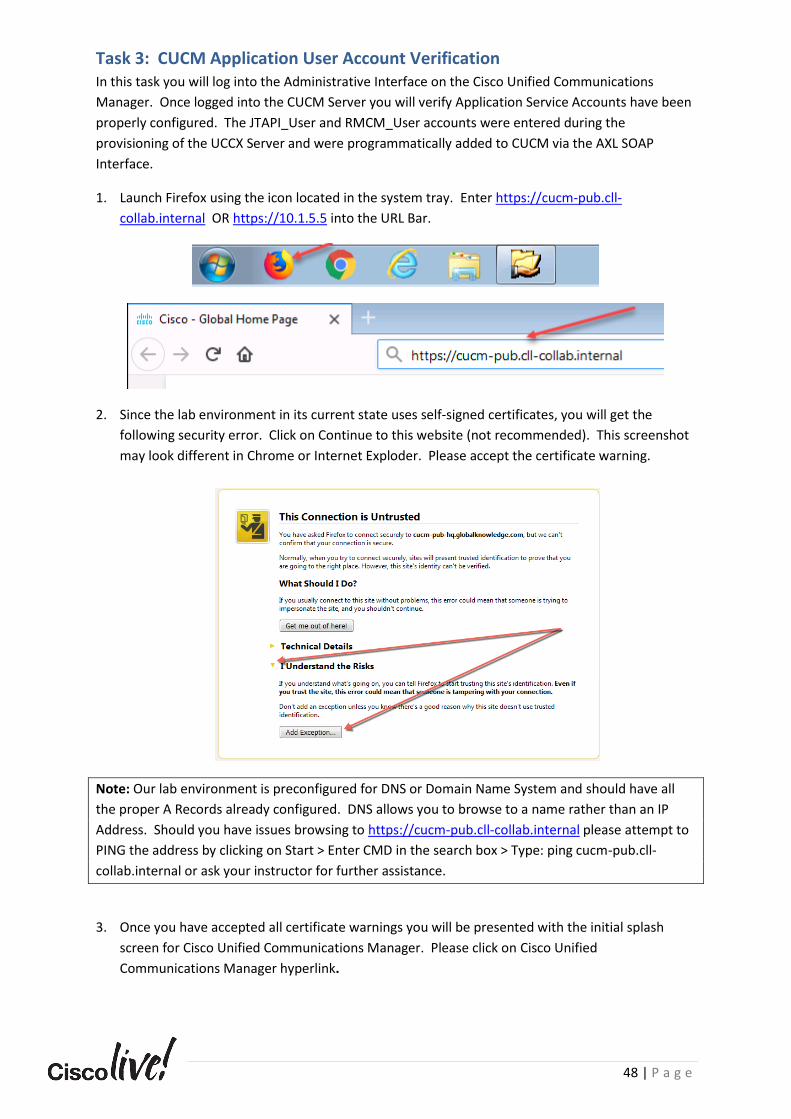
1. Launch Firefox using the icon located in the system tray. Enter https://cucm-pub.cll-
collab.internal OR https://10.1.5.5 into the URL Bar.
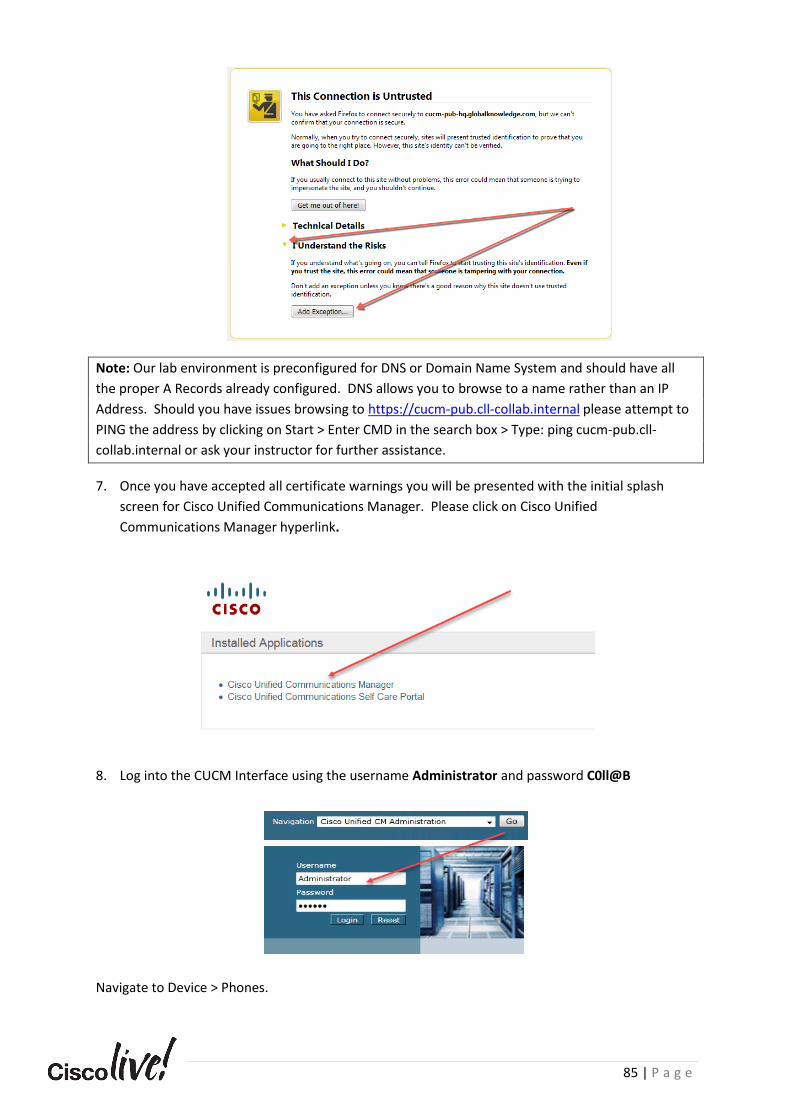
2. Since the lab environment in its current state uses self-signed certificates, you will get the
following security error. Click on Continue to this website (not recommended). This
screenshot may look different in Chrome or Internet Exploder. Please accept the certificate
warning.
Note: Our lab environment is preconfigured for DNS or Domain Name System and should have all
the proper A Records already configured. DNS allows you to browse to a name rather than an IP
Address. Should you have issues browsing to https://cucm-pub.cll-collab.internal please attempt to
PING the address by clicking on Start > Enter CMD in the search box > Type: ping cucm-pub.cll-
collab.internal or ask your instructor for further assistance.
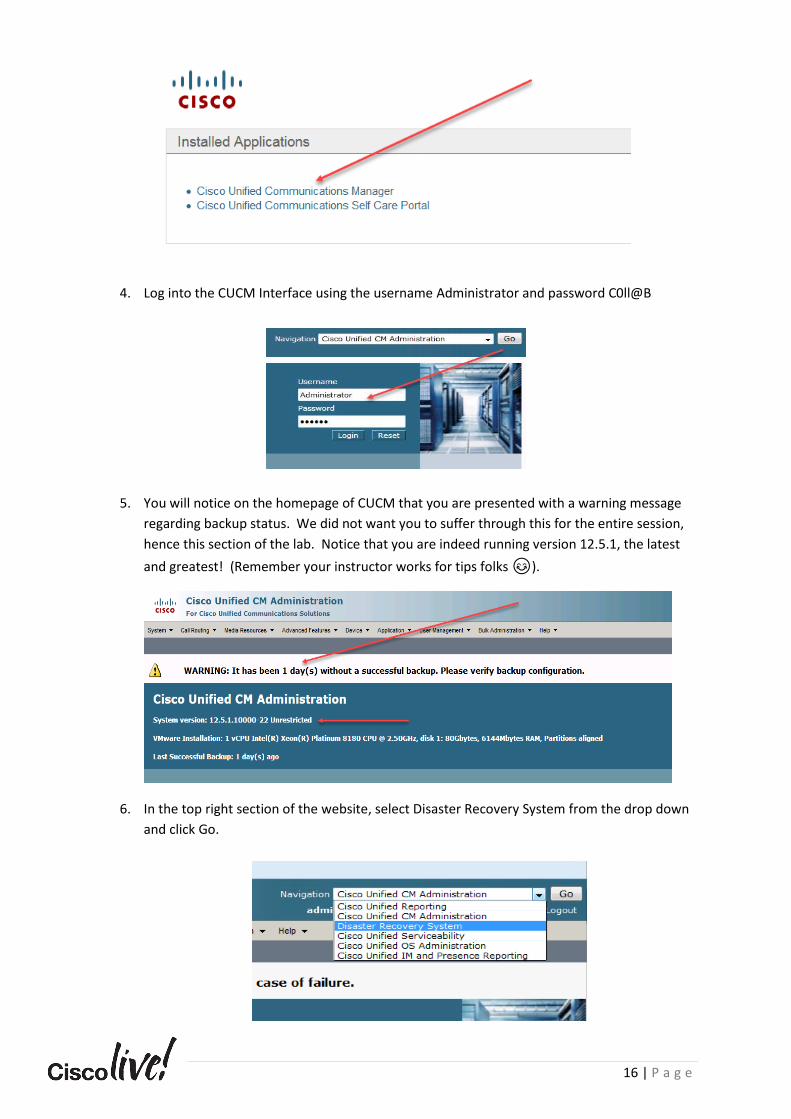
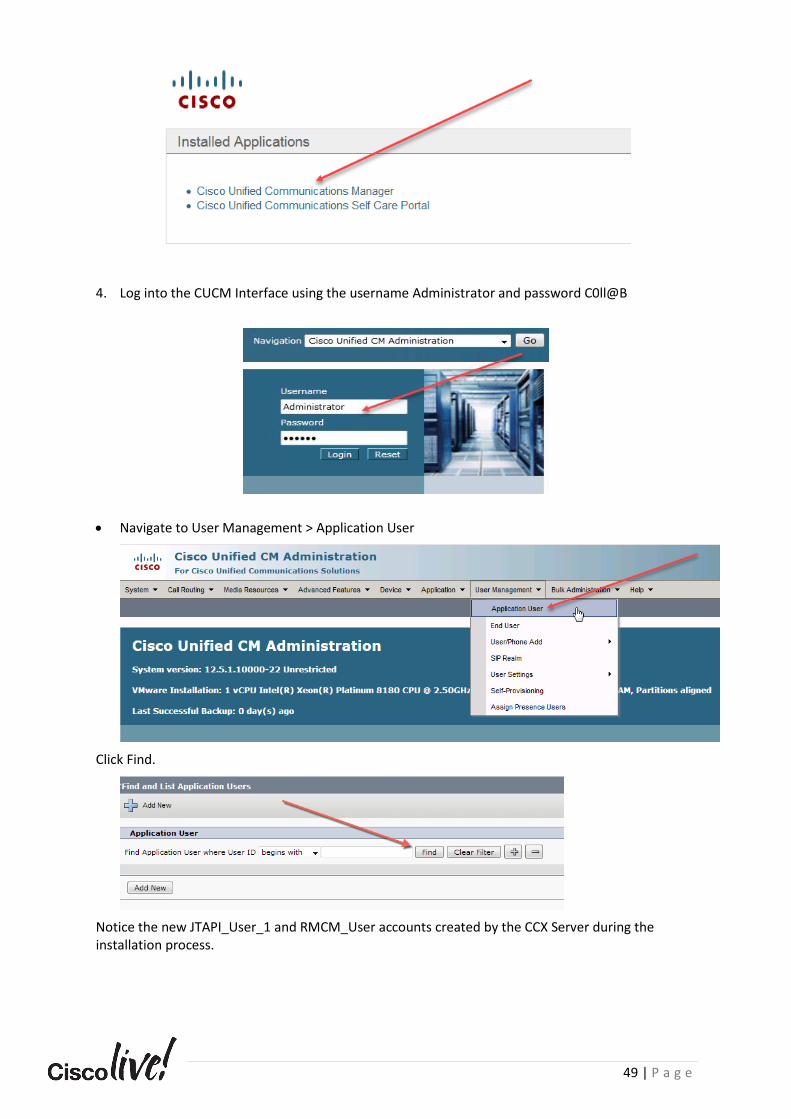
3. Once you have accepted all certificate warnings you will be presented with the initial splash
screen for Cisco Unified Communications Manager. Please click on Cisco Unified
Communications Manager hyperlink.
16 | P a g e
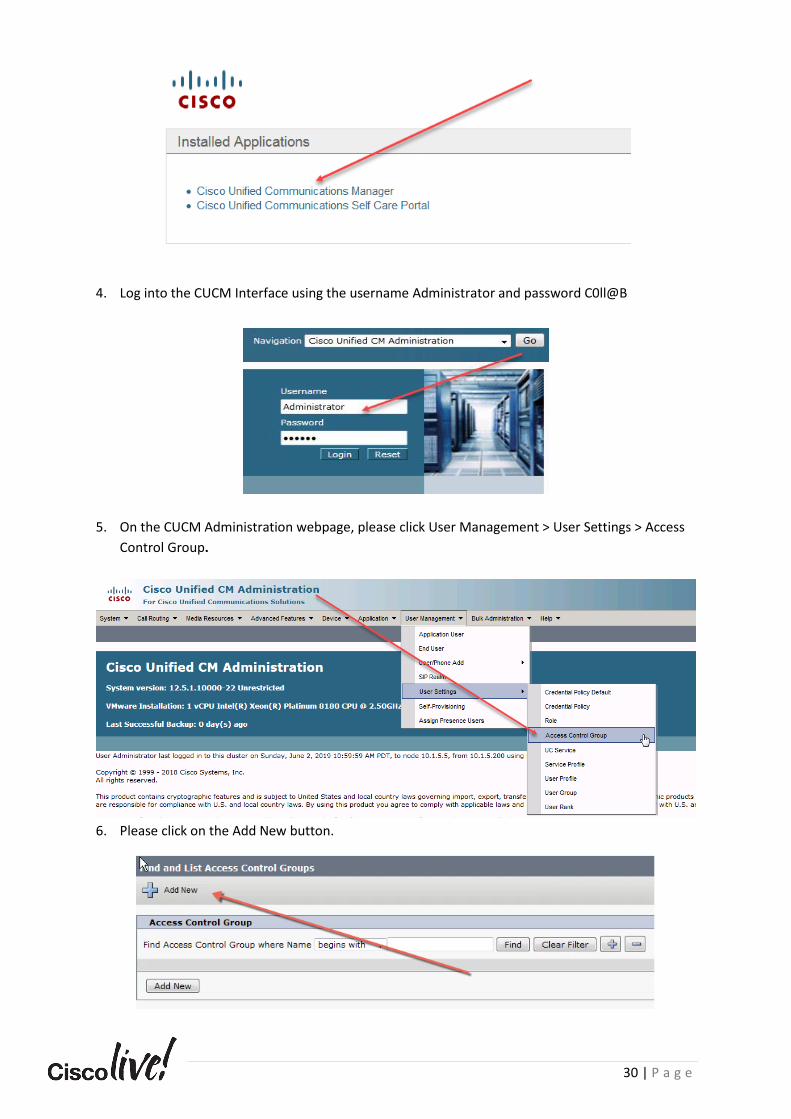
4. Log into the CUCM Interface using the username Administrator and password C0ll@B
5. You will notice on the homepage of CUCM that you are presented with a warning message
regarding backup status. We did not want you to suffer through this for the entire session,
hence this section of the lab. Notice that you are indeed running version 12.5.1, the latest
and greatest! (Remember your instructor works for tips folks 😊).
6. In the top right section of the website, select Disaster Recovery System from the drop down
and click Go.
17 | P a g e
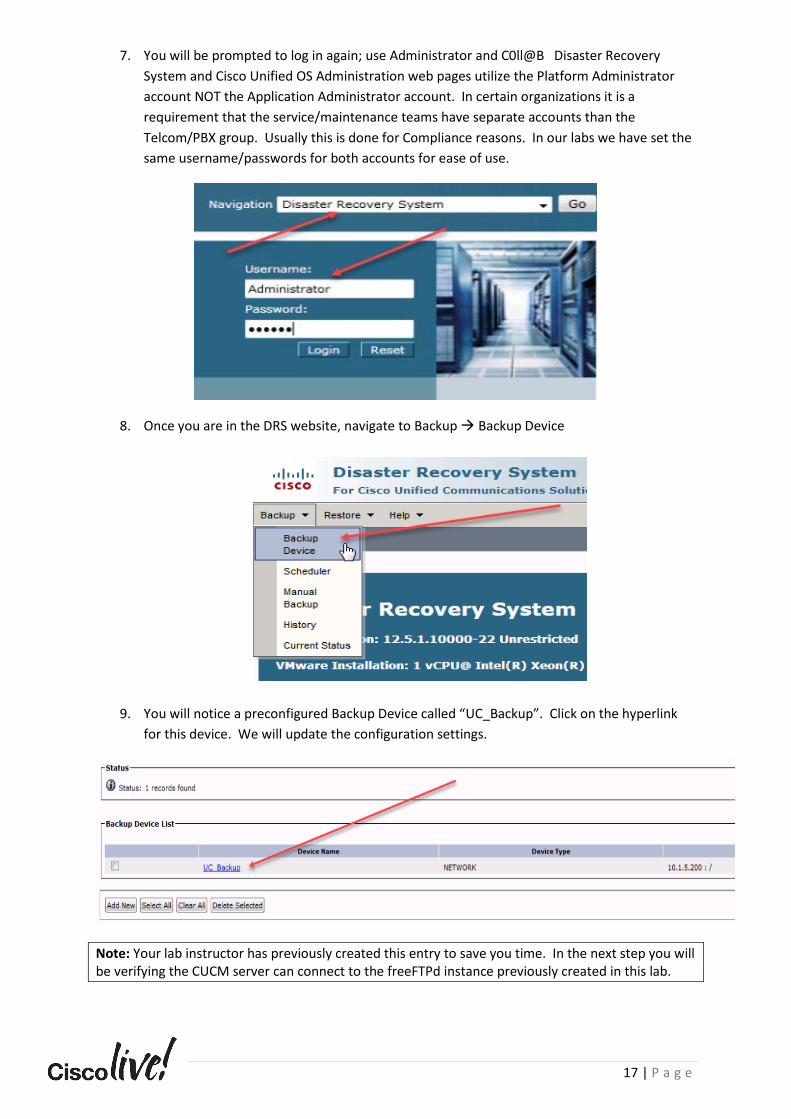
7. You will be prompted to log in again; use Administrator and C0ll@B Disaster Recovery
System and Cisco Unified OS Administration web pages utilize the Platform Administrator
account NOT the Application Administrator account. In certain organizations it is a
requirement that the service/maintenance teams have separate accounts than the
Telcom/PBX group. Usually this is done for Compliance reasons. In our labs we have set the
same username/passwords for both accounts for ease of use.
8. Once you are in the DRS website, navigate to Backup → Backup Device
9. You will notice a preconfigured Backup Device called “UC_Backup”. Click on the hyperlink
for this device. We will update the configuration settings.
Note: Your lab instructor has previously created this entry to save you time. In the next step you will be verifying the CUCM server can connect to the freeFTPd instance previously created in this lab.

18 | P a g e
10. Examine the settings for the UC_Backup destination. You will notice they are preconfigured
for the freeFTPd instance previously configured. Click Save to test the connectivity to
freeFTPd.
11. Please note the Update Successful Message located at the top of the screen once you
pressed Save. If you did not receive this message please notify your instructor, it's likely that
your freeFTPd executable is not running in the system tray OR the SFTP process is not
running inside freeFTPd, please refer to previous steps for troubleshooting.
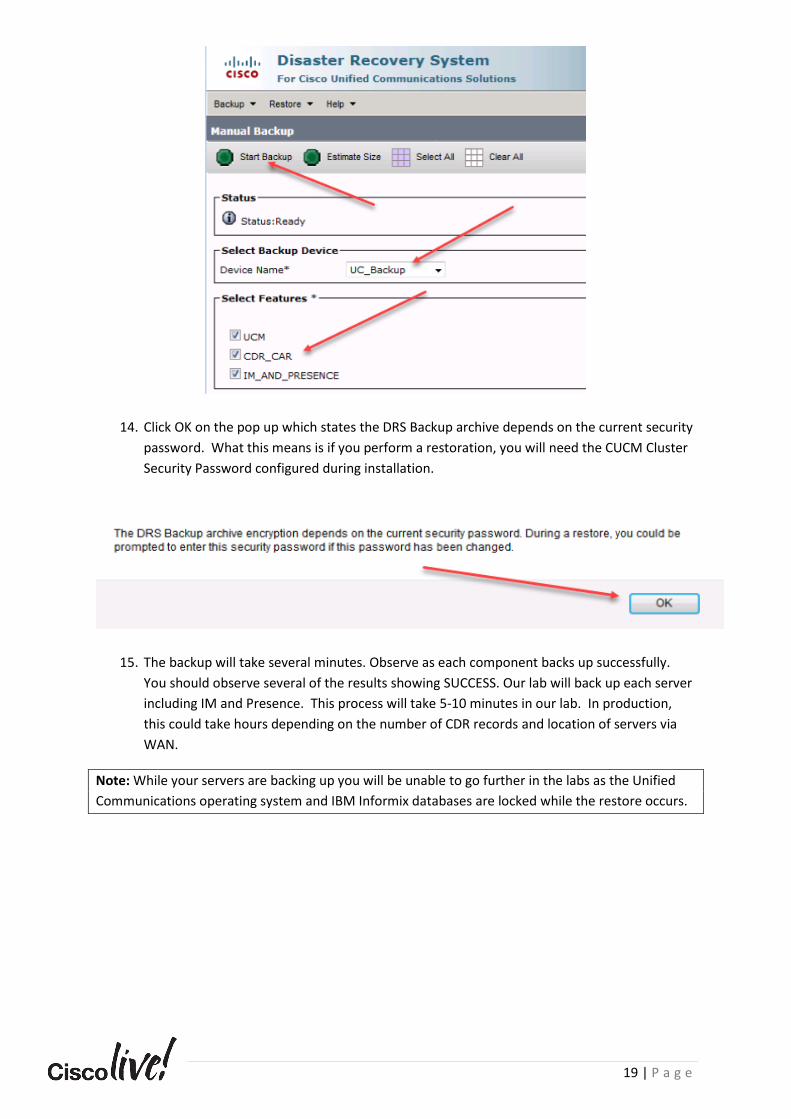
12. Next, navigate to Backup → Manual Backup.
13. Please choose UC_Backup as the backup device and choose all 3 features, then click Start
Backup.
19 | P a g e
14. Click OK on the pop up which states the DRS Backup archive depends on the current security
password. What this means is if you perform a restoration, you will need the CUCM Cluster
Security Password configured during installation.
15. The backup will take several minutes. Observe as each component backs up successfully.
You should observe several of the results showing SUCCESS. Our lab will back up each server
including IM and Presence. This process will take 5-10 minutes in our lab. In production,
this could take hours depending on the number of CDR records and location of servers via
WAN.
Note: While your servers are backing up you will be unable to go further in the labs as the Unified
Communications operating system and IBM Informix databases are locked while the restore occurs.
20 | P a g e
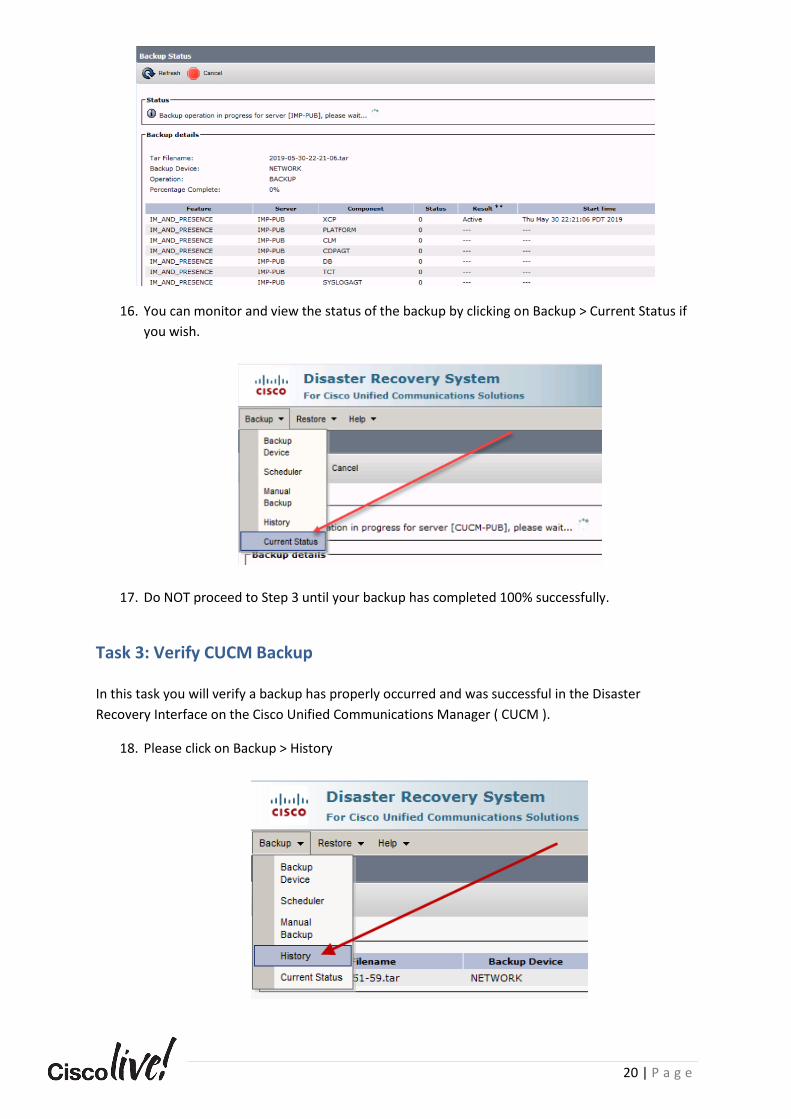
16. You can monitor and view the status of the backup by clicking on Backup > Current Status if
you wish.
17. Do NOT proceed to Step 3 until your backup has completed 100% successfully.
Task 3: Verify CUCM Backup In this task you will verify a backup has properly occurred and was successful in the Disaster
Recovery Interface on the Cisco Unified Communications Manager ( CUCM ).
18. Please click on Backup > History
21 | P a g e
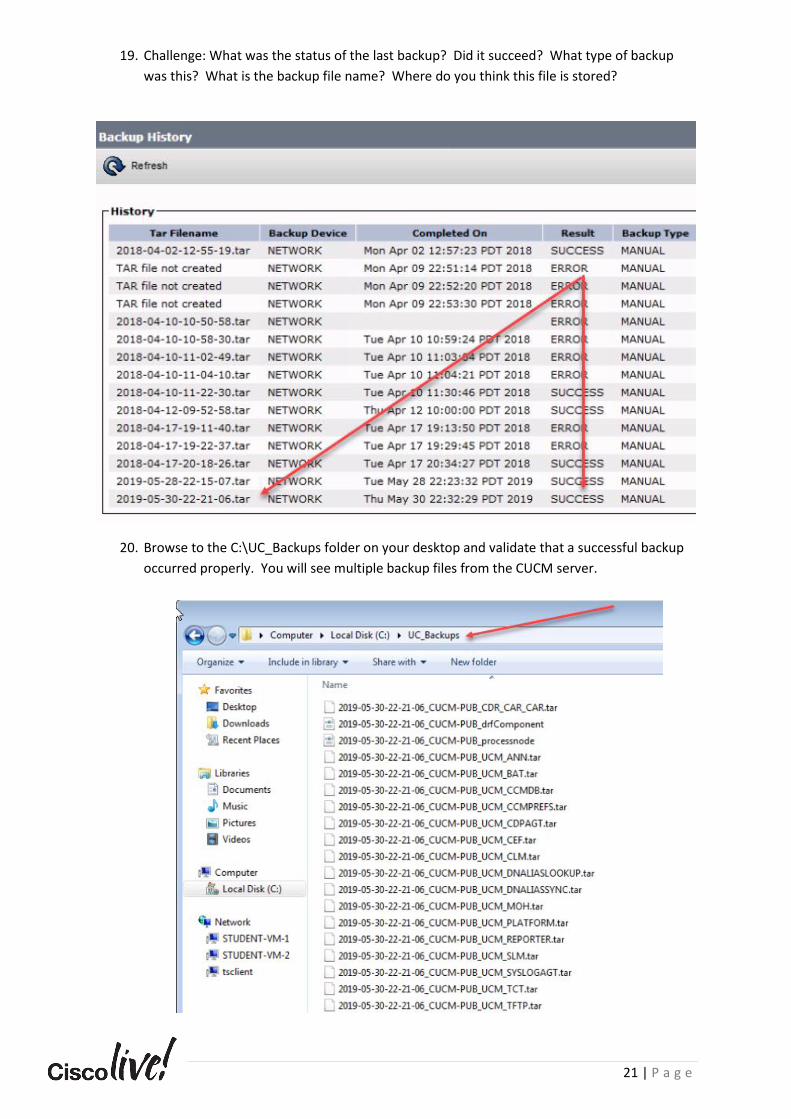
19. Challenge: What was the status of the last backup? Did it succeed? What type of backup
was this? What is the backup file name? Where do you think this file is stored?
20. Browse to the C:\UC_Backups folder on your desktop and validate that a successful backup
occurred properly. You will see multiple backup files from the CUCM server.
22 | P a g e
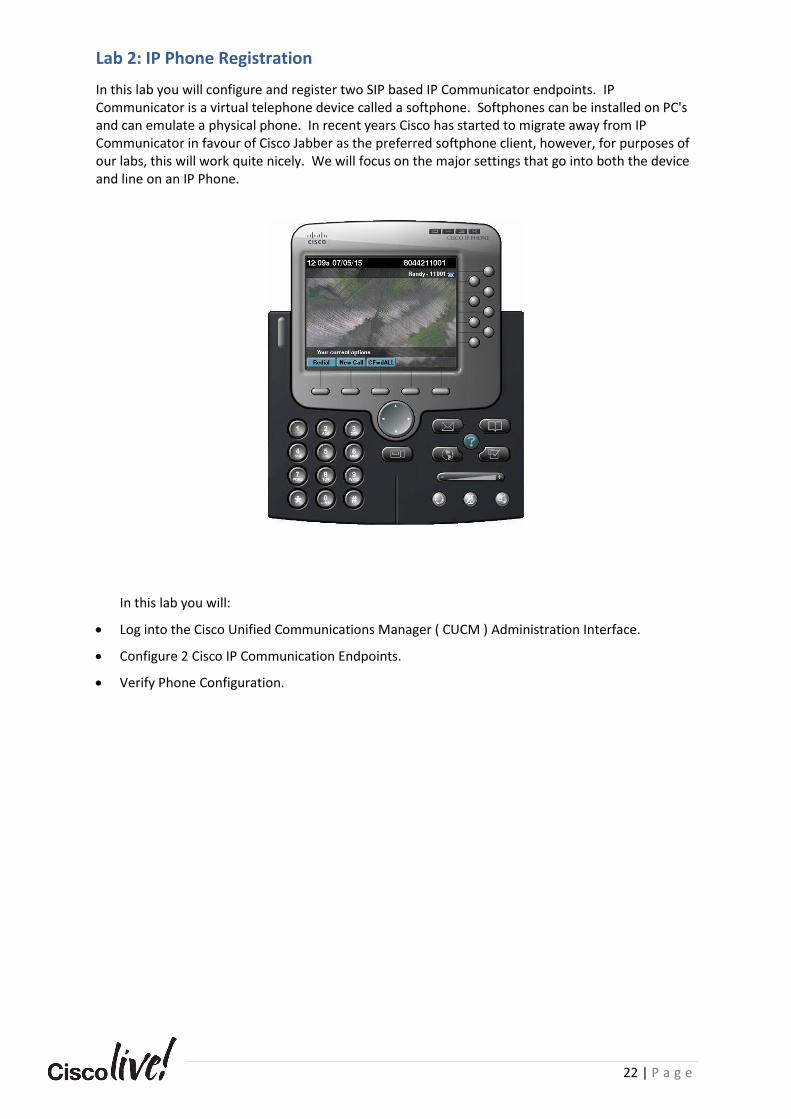
Lab 2: IP Phone Registration
In this lab you will configure and register two SIP based IP Communicator endpoints. IP Communicator is a virtual telephone device called a softphone. Softphones can be installed on PC's and can emulate a physical phone. In recent years Cisco has started to migrate away from IP Communicator in favour of Cisco Jabber as the preferred softphone client, however, for purposes of our labs, this will work quite nicely. We will focus on the major settings that go into both the device and line on an IP Phone.
In this lab you will:
• Log into the Cisco Unified Communications Manager ( CUCM ) Administration Interface.
• Configure 2 Cisco IP Communication Endpoints.
• Verify Phone Configuration.
23 | P a g e
Task 1: Register IP Communicator
In this task, you will configure IP Communicator to register properly to the CUCM Server. Various IP Communicator network properties will be explored as well. Your CUCM has been pre-programmed with configurations for these endpoints in an effort to save you time in the lab we want your focus to be on UCCX configuration and not the build out of a CUCM.
On your desktops you will see an icon for Cisco IP Communicator. Please double click on the icon to open the CIPC program up.
NOTE: You will need to load the IP Communicator program on ALL 3 Desktops via the Guacamole Web Interface. You will need to load this on the Student-VM-1 Desktop, Student-VM-2 Desktop, as well as the PSTN-VM-1 Desktop.
IP Communicator may take between 20 - 30 seconds to load up on your machines, it may or may not immediately register automatically with CUCM. Remember: Patience is a virtue none of us have ☺.
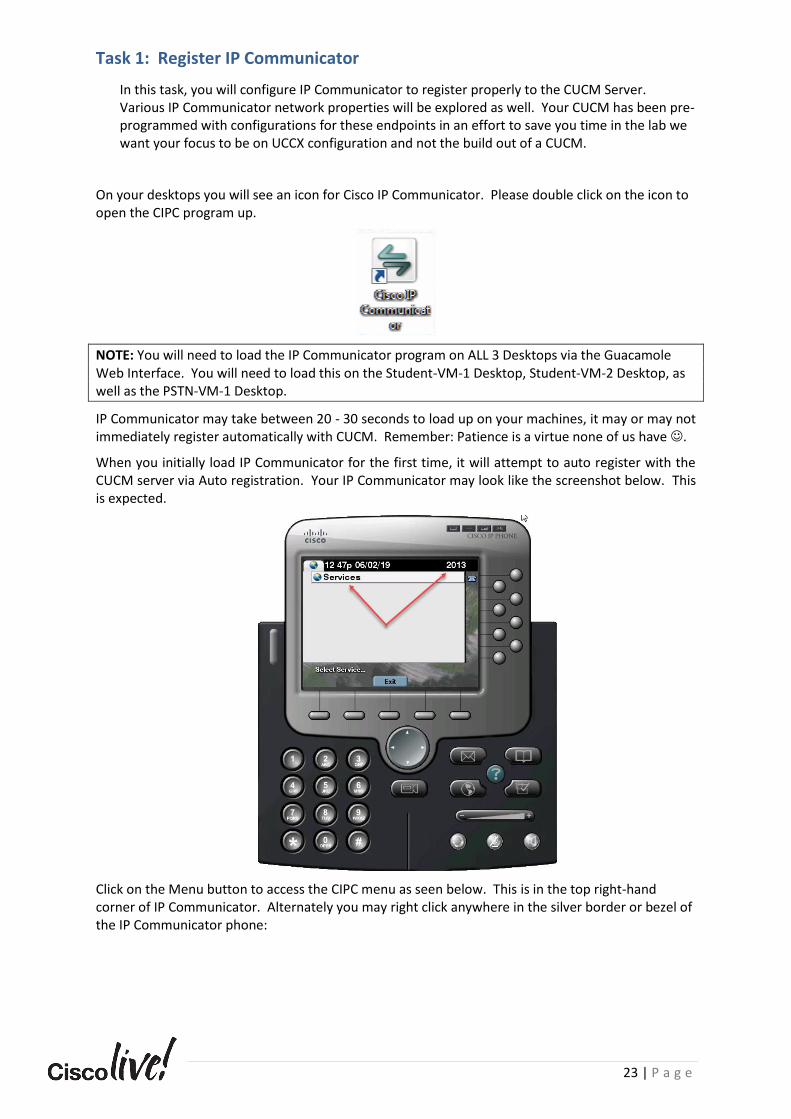
When you initially load IP Communicator for the first time, it will attempt to auto register with the CUCM server via Auto registration. Your IP Communicator may look like the screenshot below. This is expected.
Click on the Menu button to access the CIPC menu as seen below. This is in the top right-hand corner of IP Communicator. Alternately you may right click anywhere in the silver border or bezel of the IP Communicator phone:
24 | P a g e
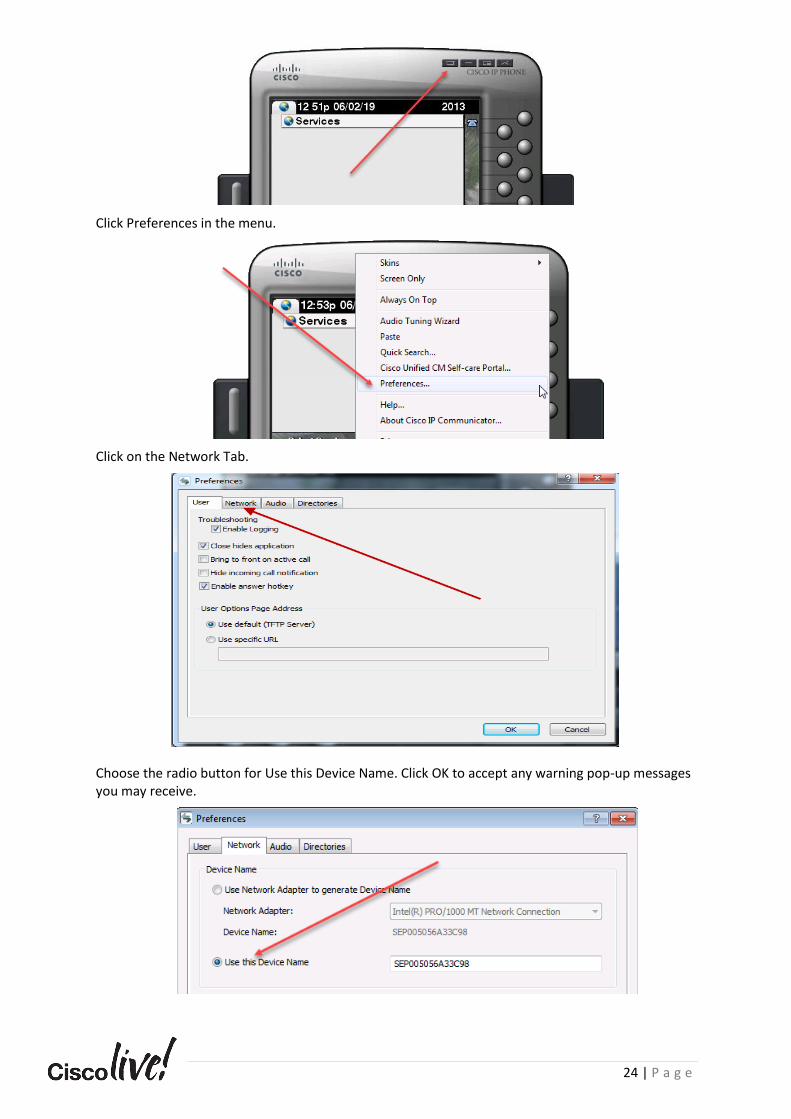
Click Preferences in the menu.
Click on the Network Tab.
Choose the radio button for Use this Device Name. Click OK to accept any warning pop-up messages you may receive.

25 | P a g e
Pay close attention to the Use this Device Name textbox, using the table below please enter the appropriate values, it is crucial that you pay attention to which desktop you are located on. We have provided both the Guacamole Name, VM Host Name, and the CIPC Device name in this table for your reference.
Guacamole – Student VM Name Use this Device Name Value
Student-VM-1 HQ-CIPC-1
Student-VM-2 HQ-CIPC-2
PSTN-VM-1 PSTN-VM-1
Place a radio button in the Use these TFTP servers. For TFTP Server 1 enter the TFTP Address located in the table below, which is the IP Address of your CUCM Publisher. Again, play close attention to which VM you are using when entering the TFTP Server IP.
Guacamole – Student VM Name Use this Device Name Value
Student-VM-1 10.1.5.5
Student-VM-2 10.1.5.5
PSTN-VM-1 10.1.99.5
Click OK to save the IP Communicator Settings. You may receive a message stating that the Call control protocol is changing, click OK. This is normal, we are about to download the SIP Firmware for IP Communicator.

26 | P a g e
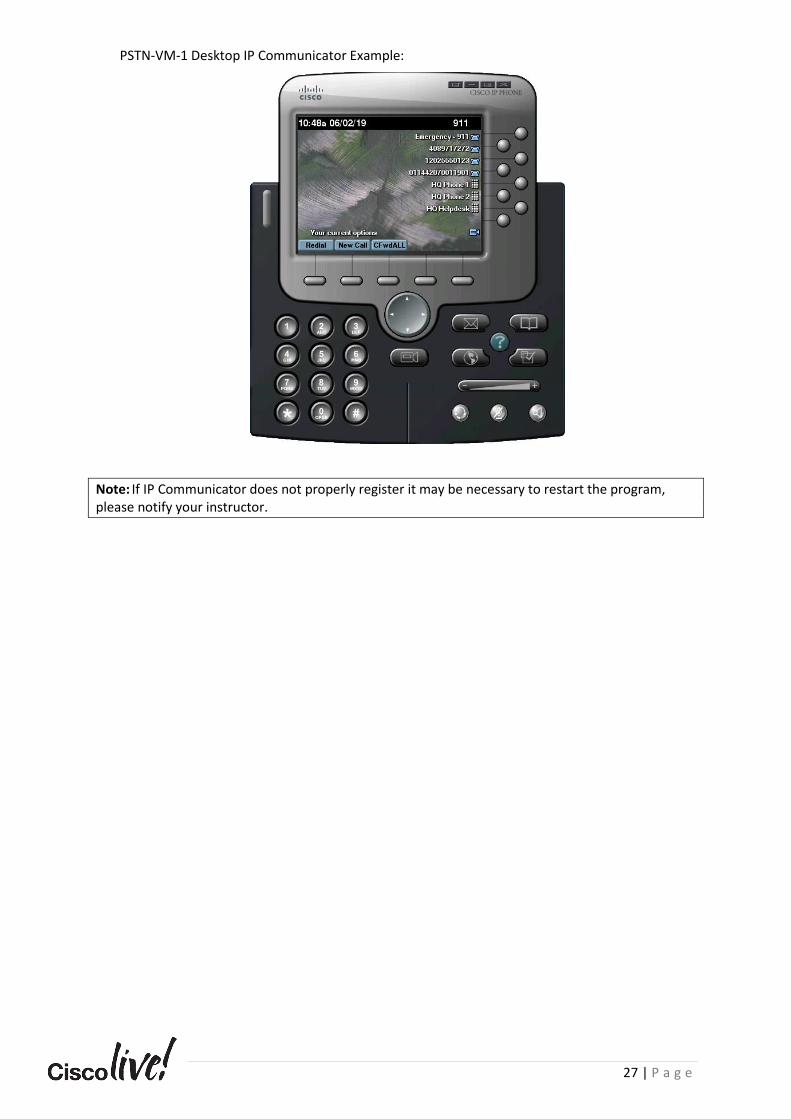
If you have properly configured your CIPC IP Phone and selected the settings above on the network tab of CIPC, your phone should attempt registration with the CUCM server. This may take up to 2 minutes to register and download SIP firmware. Your phone will register and if properly configured you should see the following three IP Communicators:
Student-VM-1 Desktop IP Communicator Example:
Student-VM-2 Desktop IP Communicator Example:
27 | P a g e
PSTN-VM-1 Desktop IP Communicator Example:
Note: If IP Communicator does not properly register it may be necessary to restart the program, please notify your instructor.

28 | P a g e
Lab 3: UCCX Initialization In this lab you will perform the Unified Contact Center Express system initialization wizard which will
integrate UCCX with CUCM. This process will also create a set of Application Users on the CUCM
server via the AXL SOAP API. In addition, we will verify key system services have started. You will
log into the CUCM Administration Webpage and create a special Application User which elevated
permissions. The permissions this account requires is the AXL API Access rights. The Administrative
XML Layer or AXL API is a programmatic interface that other servers and applications can use to
access the CUCM Database. Think of this as the “middleware” or “business logic” interface of CUCM.
This is a REST/JSON Based API and more information can be found at http://developer.cisco.com
In this task you will:
• Log into the Cisco Unified Communications Manager ( CUCM ) Administration Interface.
• Log into the Cisco Unified Contact Center Express ( UCCX ) Administration Interface.
• Configure UCCX Platform and System Initialization settings.
• Log into the UCCX Administration Interface and verify key system services.
• Log into CUCM and verify Application User accounts created during initialization.
Task 1: CUCM Preparation for UCCX Integration In this task, you will configure CUCM for the initial UCCX Server Integration. This will consist
of configuring several service parameters and accounts used by the UCCX integration wizard.

29 | P a g e
1. Launch Firefox using the icon located in the system tray. Enter https://cucm-pub.cll-
collab.internal OR https://10.1.5.5 into the URL Bar.
2. Since the lab environment in its current state uses self-signed certificates, you will get the
following security error. Click on Continue to this website (not recommended). This screenshot
may look different in Chrome or Internet Exploder. Please accept the certificate warning.
Note: Our lab environment is preconfigured for DNS or Domain Name System and should have all
the proper A Records already configured. DNS allows you to browse to a name rather than an IP
Address. Should you have issues browsing to https://cucm-pub.cll-collab.internal please attempt to
PING the address by clicking on Start > Enter CMD in the search box > Type: ping cucm-pub.cll-
collab.internal or ask your instructor for further assistance.
3. Once you have accepted all certificate warnings you will be presented with the initial splash
screen for Cisco Unified Communications Manager. Please click on Cisco Unified
Communications Manager hyperlink.
30 | P a g e
4. Log into the CUCM Interface using the username Administrator and password C0ll@B
5. On the CUCM Administration webpage, please click User Management > User Settings > Access
Control Group.
6. Please click on the Add New button.

31 | P a g e
7. Enter UCCX_AXL_Users for the Access Control Group name. Click Save.
Note: AXL API enabled Access Groups DO NOT exist by default on CUCM and this is required for the
UCCX integration.
8. In the Related Links section in the upper right-hand corner of the website, using the drop down select Assign Role to Access Control Group and click Go.
9. Click Assign Role to Group.
• In the pop-up window for Find and List Roles, click Find.
32 | P a g e
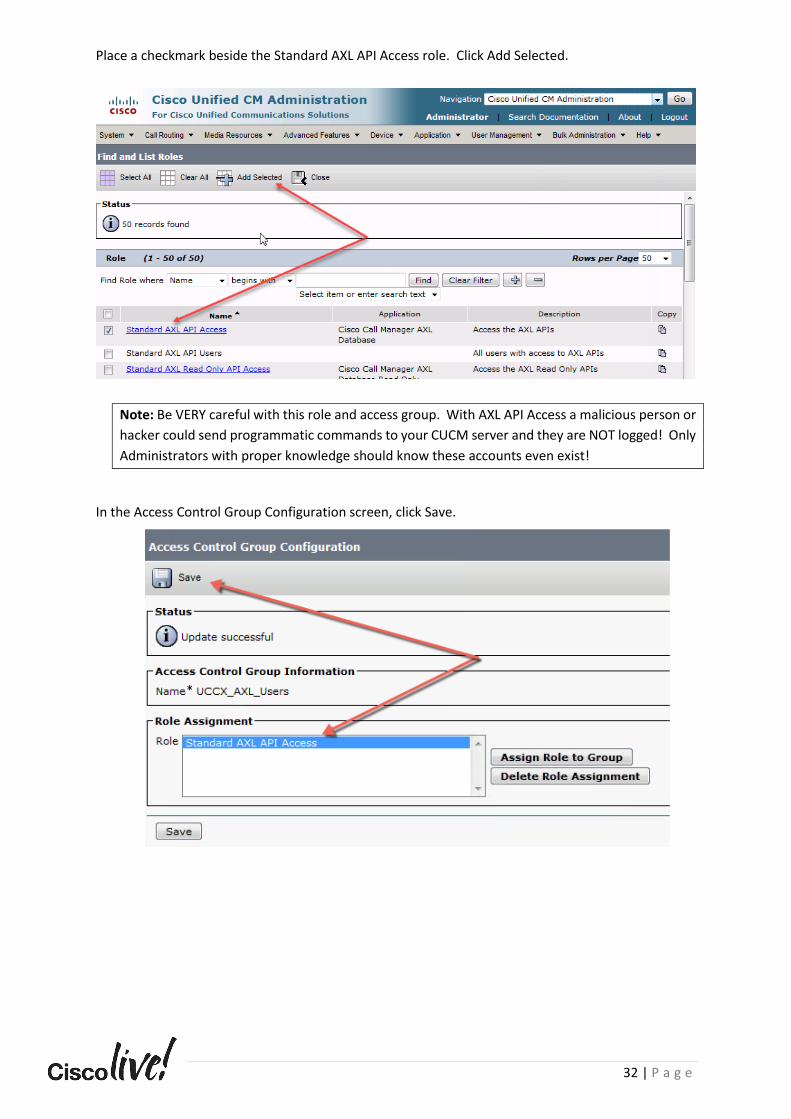
Place a checkmark beside the Standard AXL API Access role. Click Add Selected.
Note: Be VERY careful with this role and access group. With AXL API Access a malicious person or
hacker could send programmatic commands to your CUCM server and they are NOT logged! Only
Administrators with proper knowledge should know these accounts even exist!
In the Access Control Group Configuration screen, click Save.
33 | P a g e
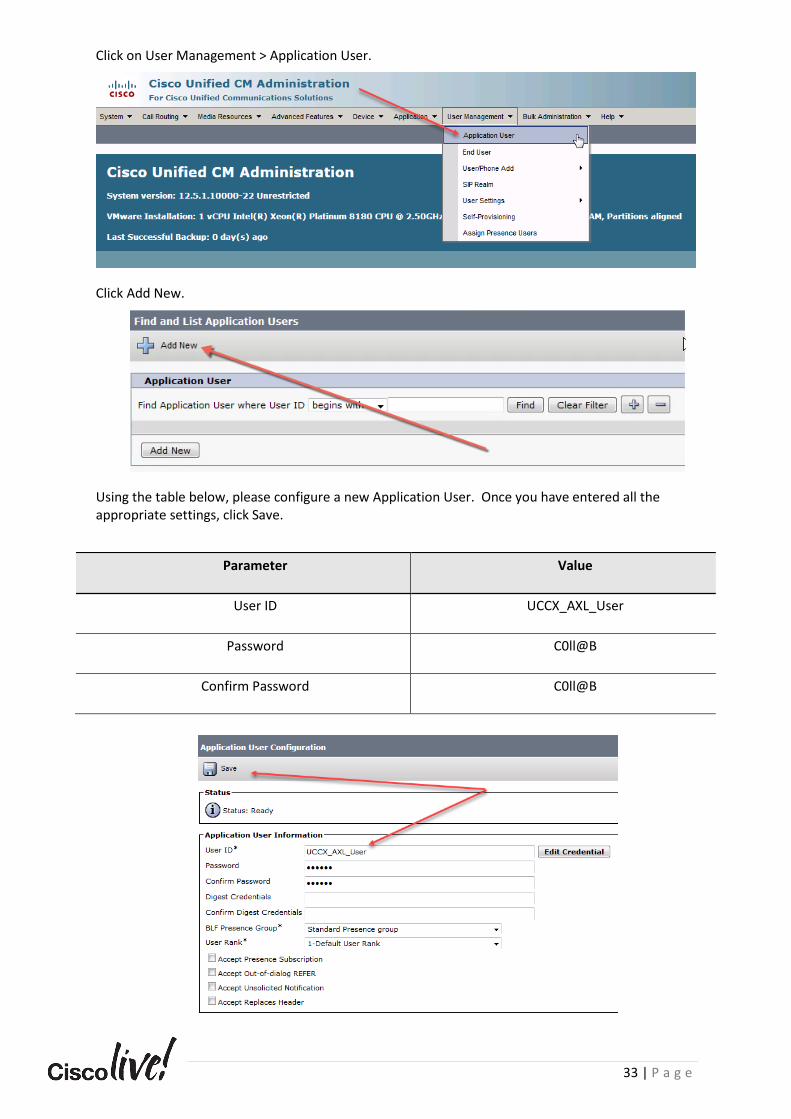
Click on User Management > Application User.
Click Add New.
Using the table below, please configure a new Application User. Once you have entered all the appropriate settings, click Save.
Parameter Value
User ID UCCX_AXL_User
Password C0ll@B
Confirm Password C0ll@B
34 | P a g e
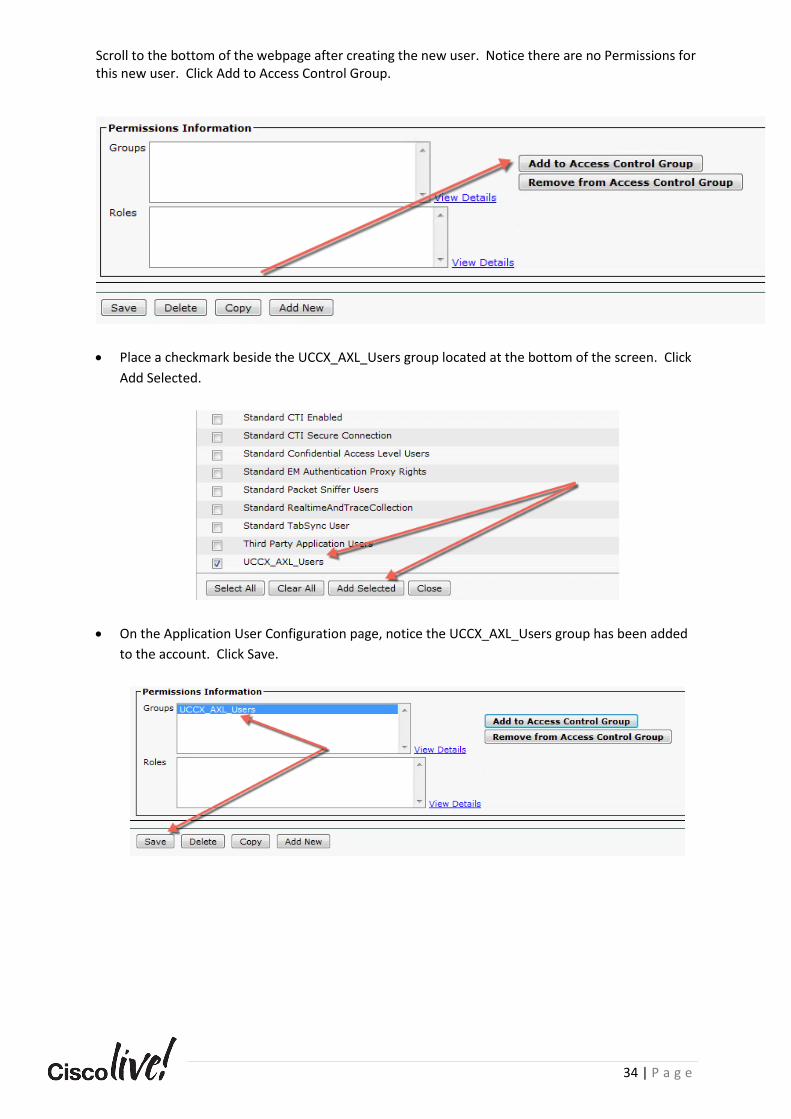
Scroll to the bottom of the webpage after creating the new user. Notice there are no Permissions for this new user. Click Add to Access Control Group.
• Place a checkmark beside the UCCX_AXL_Users group located at the bottom of the screen. Click
Add Selected.
• On the Application User Configuration page, notice the UCCX_AXL_Users group has been added
to the account. Click Save.

35 | P a g e
Task 2: UCCX System Initialization In this task you will log into the Administrative Interface on the Cisco Unified Contact Center
Express Server. Once logged into the UCCX Server, you will perform the Platform and System
Initialization script. This script runs the first time a login occurs after the system is installed. It
allows you to properly integrate UCCX with CUCM and sets up basic services/subsystems on the
UCCX server.
• In your web browser please open a new tab. You may add a new tab by clicking on the “+”
arrow.
Note: You may have previously opened windows; thus, your screenshot may not match what is
listed below. It’s okay, keep on rocking!
• Enter the following URL: http://10.1.5.100/UCCX 12.0 License.zip and press enter.
• When the download pop up window is displayed please select Save File and click OK.
36 | P a g e
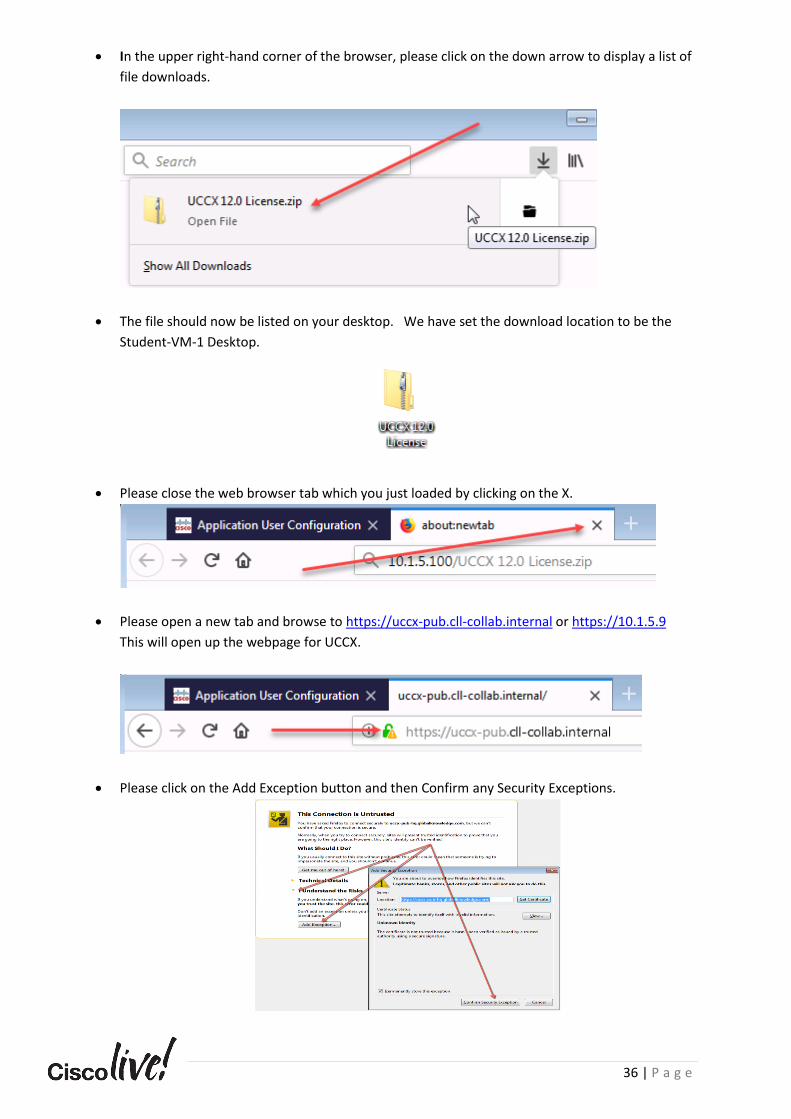
• In the upper right-hand corner of the browser, please click on the down arrow to display a list of
file downloads.
• The file should now be listed on your desktop. We have set the download location to be the
Student-VM-1 Desktop.
• Please close the web browser tab which you just loaded by clicking on the X.
• Please open a new tab and browse to https://uccx-pub.cll-collab.internal or https://10.1.5.9
This will open up the webpage for UCCX.
• Please click on the Add Exception button and then Confirm any Security Exceptions.

37 | P a g e
Note: In our course we will not be installing “Signed Certificates” by a Certificate Authority,
therefore you may be presented with the pop-up warnings asking you to trust the website.
• Please click on the Cisco Unified Contact Center Express Administration hyperlink displayed on
the website.
Note: You are redirected to the https://uccx-pub.cll-collab.internal/appadmin webpage.
Please authenticate by using the Username: Administrator and Password: C0ll@B Click Login or press Enter.
Using the table below, please configure the Unified CM Service Provider connectivity. Once you have entered all appropriate values, click Next.
Parameter Value
Unified CM Server Hostname or IP Address 10.1.1.5
AXL Admin Username UCCX_AXL_User
Password C0ll@B

38 | P a g e
Note: If clicking Next seems to hang or fail, you may have improperly configured the
permissions in the previous task in CUCM. The user account entered here is an Application User
on the CUCM Server with special AXL API Access roles and permissions configured.
Pro Tip: If you choose to use DNS names instead of IP Addresses, they are limited to 25
characters, and you MUST have a highly available DNS infrastructure ( Multiple DNS Servers,
Infoblox, etc. )
On the License Information screen, please click Browse.
Please click and select the ZIP File you previously copied to the desktop with the filename UCCX 12.0 Premium License.zip. This file contains your UCCX 12.x Premium Licenses. Click Open.
39 | P a g e
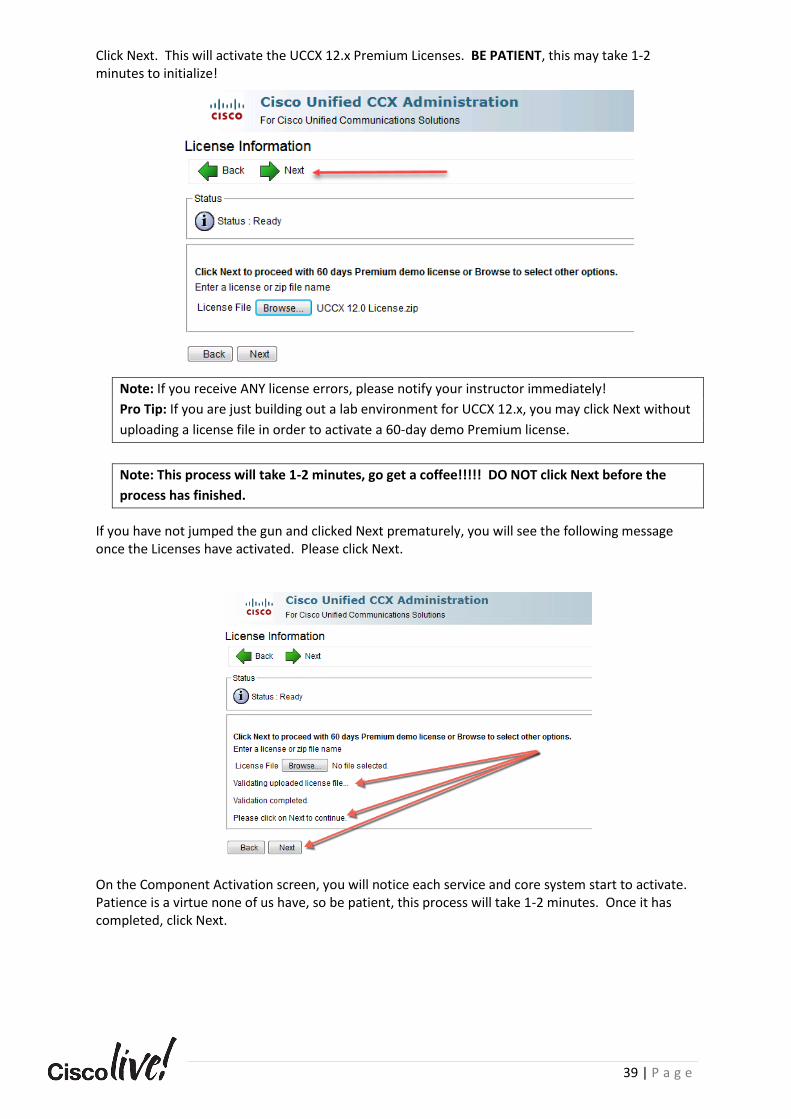
Click Next. This will activate the UCCX 12.x Premium Licenses. BE PATIENT, this may take 1-2 minutes to initialize!
Note: If you receive ANY license errors, please notify your instructor immediately!
Pro Tip: If you are just building out a lab environment for UCCX 12.x, you may click Next without
uploading a license file in order to activate a 60-day demo Premium license.
Note: This process will take 1-2 minutes, go get a coffee!!!!! DO NOT click Next before the
process has finished.
If you have not jumped the gun and clicked Next prematurely, you will see the following message once the Licenses have activated. Please click Next.
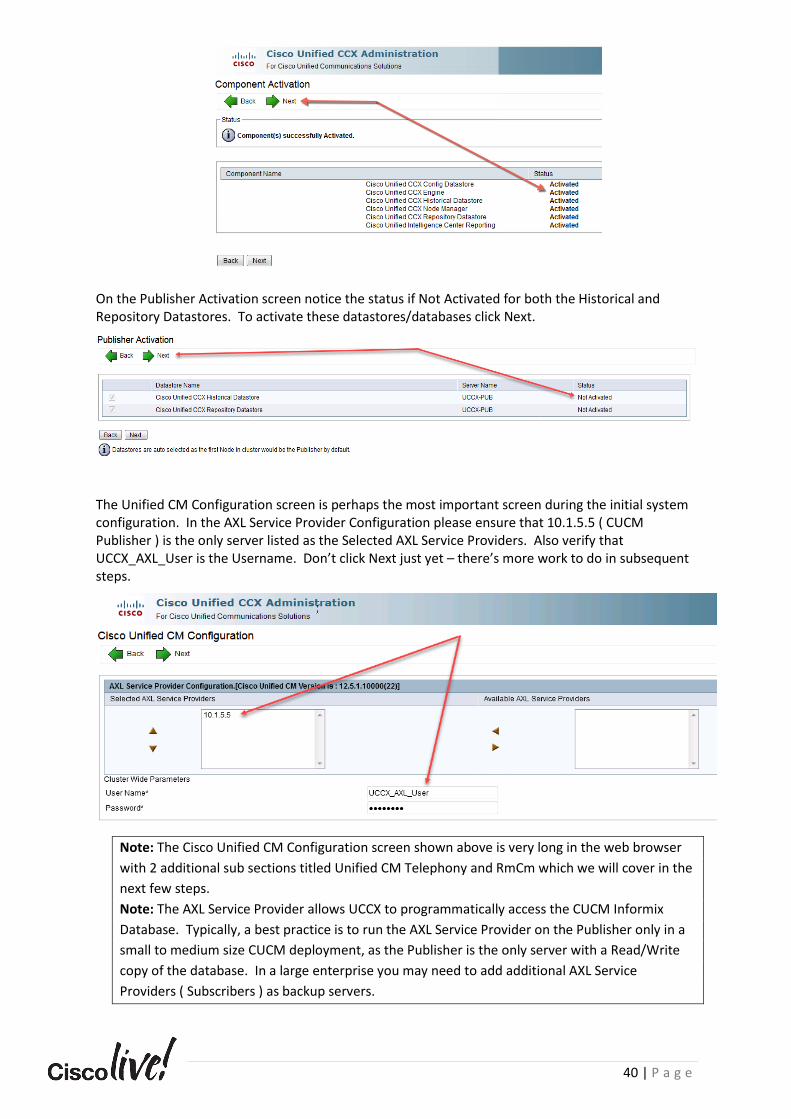
On the Component Activation screen, you will notice each service and core system start to activate. Patience is a virtue none of us have, so be patient, this process will take 1-2 minutes. Once it has completed, click Next.
40 | P a g e
On the Publisher Activation screen notice the status if Not Activated for both the Historical and Repository Datastores. To activate these datastores/databases click Next.
The Unified CM Configuration screen is perhaps the most important screen during the initial system configuration. In the AXL Service Provider Configuration please ensure that 10.1.5.5 ( CUCM Publisher ) is the only server listed as the Selected AXL Service Providers. Also verify that UCCX_AXL_User is the Username. Don’t click Next just yet – there’s more work to do in subsequent steps.
Note: The Cisco Unified CM Configuration screen shown above is very long in the web browser
with 2 additional sub sections titled Unified CM Telephony and RmCm which we will cover in the
next few steps.
Note: The AXL Service Provider allows UCCX to programmatically access the CUCM Informix
Database. Typically, a best practice is to run the AXL Service Provider on the Publisher only in a
small to medium size CUCM deployment, as the Publisher is the only server with a Read/Write
copy of the database. In a large enterprise you may need to add additional AXL Service
Providers ( Subscribers ) as backup servers.
41 | P a g e
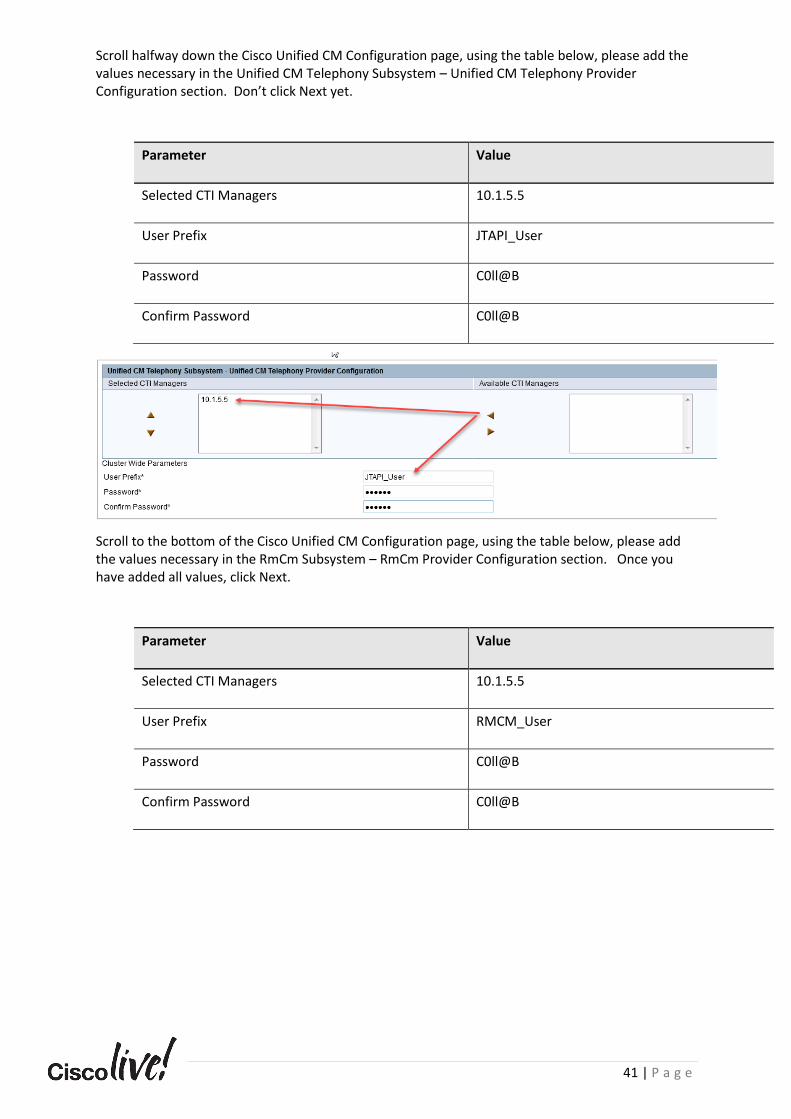
Scroll halfway down the Cisco Unified CM Configuration page, using the table below, please add the values necessary in the Unified CM Telephony Subsystem – Unified CM Telephony Provider Configuration section. Don’t click Next yet.
Parameter Value
Selected CTI Managers 10.1.5.5
User Prefix JTAPI_User
Password C0ll@B
Confirm Password C0ll@B
Scroll to the bottom of the Cisco Unified CM Configuration page, using the table below, please add the values necessary in the RmCm Subsystem – RmCm Provider Configuration section. Once you have added all values, click Next.
Parameter Value
Selected CTI Managers 10.1.5.5
User Prefix RMCM_User
Password C0ll@B
Confirm Password C0ll@B

42 | P a g e
Using the table below, please set the parameters required on the System Parameters Configuration page. Once you have entered all necessary parameters, click Next.
Parameter Value
Number of Direct Preview Outbound seats 5
Codec G.711
Note: UCCX IVR prompt playback at G.729 can be problematic. You may need to Transcode calls into
the Contact Center from G.711 endpoints to G.729. Also, the quality of the prompts and recordings
suffers as well as it is in a proprietary codec format in which many audio editing applications such as
Audacity cannot use!
Using the table below, please set the parameters required on the Languages Configuration screen. Once you have entered all necessary parameters, click Next.
Parameter Value
IVR Language Configuration English
Group Default en_US

43 | P a g e
Note: The Language of English and the en_US for Language Group and Group Default dictate which
folder on the server is the default playback folder for prompts. In this case each script will look for
prompts in the en_US folder first inside the English language. When the server is installed it comes
with over 1,000 pre-recorded prompts such as numerical values 1-1000, dates, times, and characters
which can all be used inside of scripts if you know how to reference them ☺
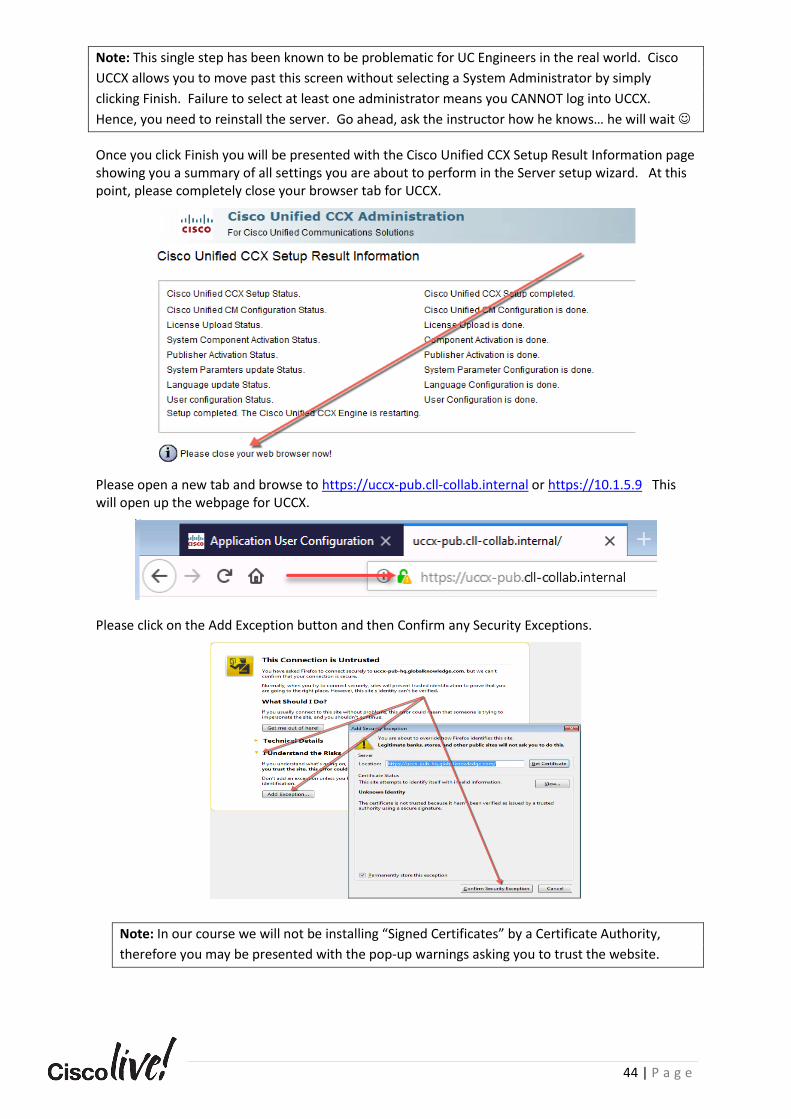
In the User Configuration screen, you MUST pick at least one system administrator for UCCX. Please highlight BOTH the jdoe, and jwhite accounts in the Cisco Unified CM Users list and click the left arrow to place them into the Cisco Unified CCX Administrator role. Once you have added all system administrators, click Finish.
44 | P a g e
Note: This single step has been known to be problematic for UC Engineers in the real world. Cisco
UCCX allows you to move past this screen without selecting a System Administrator by simply
clicking Finish. Failure to select at least one administrator means you CANNOT log into UCCX.
Hence, you need to reinstall the server. Go ahead, ask the instructor how he knows… he will wait ☺
Once you click Finish you will be presented with the Cisco Unified CCX Setup Result Information page showing you a summary of all settings you are about to perform in the Server setup wizard. At this point, please completely close your browser tab for UCCX.
Please open a new tab and browse to https://uccx-pub.cll-collab.internal or https://10.1.5.9 This will open up the webpage for UCCX.
Please click on the Add Exception button and then Confirm any Security Exceptions.
Note: In our course we will not be installing “Signed Certificates” by a Certificate Authority,
therefore you may be presented with the pop-up warnings asking you to trust the website.

45 | P a g e
Please click on the Cisco Unified Contact Center Express Administration hyperlink displayed on the website.
Note: You are redirected to the https://uccx-pub.cll-collab.internal/appadmin webpage.
Please authenticate by using the Username: Administrator and Password: C0ll@B Click Login or press Enter.
In the upper right corner of the screen, use the navigation drop-down and select Cisco Unified CCX Serviceability and click Go.
Inside the Cisco Unified CCX Serviceability webpage, navigate to Tools -> Control Center – Network Services.

46 | P a g e
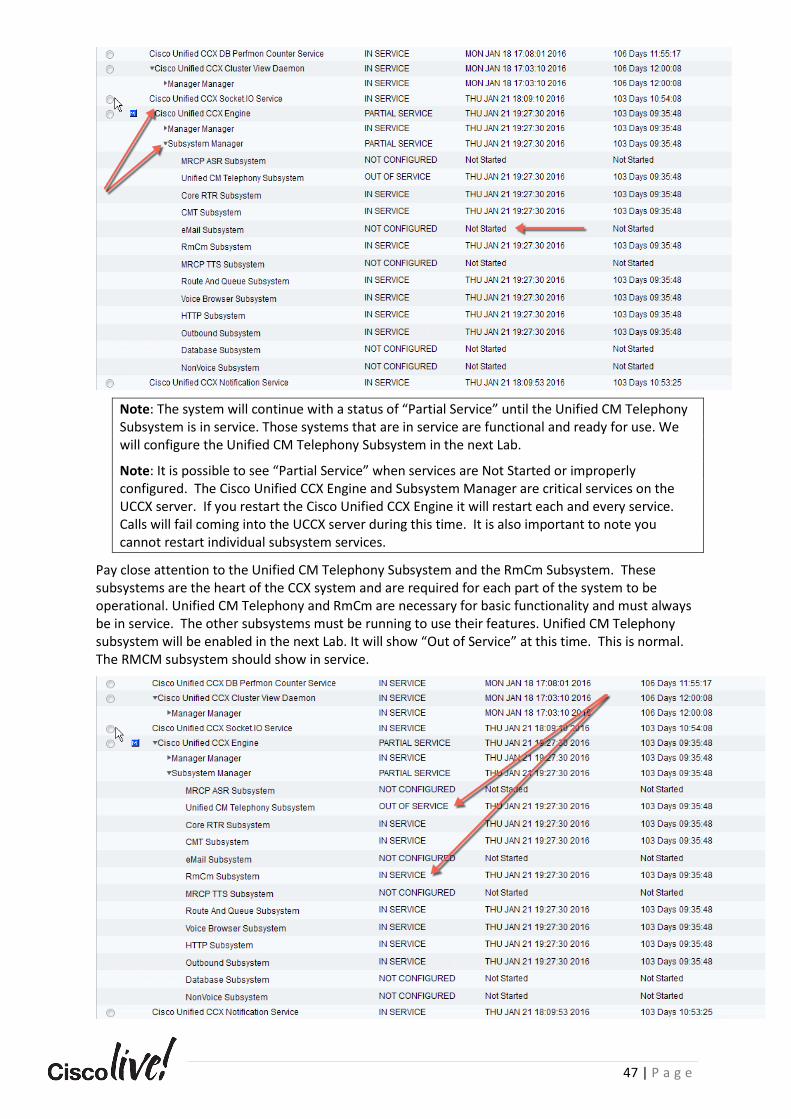
On the Control Center – Network Services page, note the indication of Partial Service for the Cisco Unified CCX Engine.
Expand the Subsystem Manager services under the Cisco Unified CCX Engine by clicking the right-pointing arrow next to Subsystem Manager. Note, some subsystems are not in service. This is normal, as some services have NOT been configured!
47 | P a g e
Note: The system will continue with a status of “Partial Service” until the Unified CM Telephony Subsystem is in service. Those systems that are in service are functional and ready for use. We will configure the Unified CM Telephony Subsystem in the next Lab.
Note: It is possible to see “Partial Service” when services are Not Started or improperly configured. The Cisco Unified CCX Engine and Subsystem Manager are critical services on the UCCX server. If you restart the Cisco Unified CCX Engine it will restart each and every service. Calls will fail coming into the UCCX server during this time. It is also important to note you cannot restart individual subsystem services.
Pay close attention to the Unified CM Telephony Subsystem and the RmCm Subsystem. These subsystems are the heart of the CCX system and are required for each part of the system to be operational. Unified CM Telephony and RmCm are necessary for basic functionality and must always be in service. The other subsystems must be running to use their features. Unified CM Telephony subsystem will be enabled in the next Lab. It will show “Out of Service” at this time. This is normal. The RMCM subsystem should show in service.
48 | P a g e
Task 3: CUCM Application User Account Verification In this task you will log into the Administrative Interface on the Cisco Unified Communications
Manager. Once logged into the CUCM Server you will verify Application Service Accounts have been
properly configured. The JTAPI_User and RMCM_User accounts were entered during the
provisioning of the UCCX Server and were programmatically added to CUCM via the AXL SOAP
Interface.
1. Launch Firefox using the icon located in the system tray. Enter https://cucm-pub.cll-
collab.internal OR https://10.1.5.5 into the URL Bar.
2. Since the lab environment in its current state uses self-signed certificates, you will get the
following security error. Click on Continue to this website (not recommended). This screenshot
may look different in Chrome or Internet Exploder. Please accept the certificate warning.
Note: Our lab environment is preconfigured for DNS or Domain Name System and should have all
the proper A Records already configured. DNS allows you to browse to a name rather than an IP
Address. Should you have issues browsing to https://cucm-pub.cll-collab.internal please attempt to
PING the address by clicking on Start > Enter CMD in the search box > Type: ping cucm-pub.cll-
collab.internal or ask your instructor for further assistance.
3. Once you have accepted all certificate warnings you will be presented with the initial splash
screen for Cisco Unified Communications Manager. Please click on Cisco Unified
Communications Manager hyperlink.
49 | P a g e
4. Log into the CUCM Interface using the username Administrator and password C0ll@B
• Navigate to User Management > Application User
Click Find.
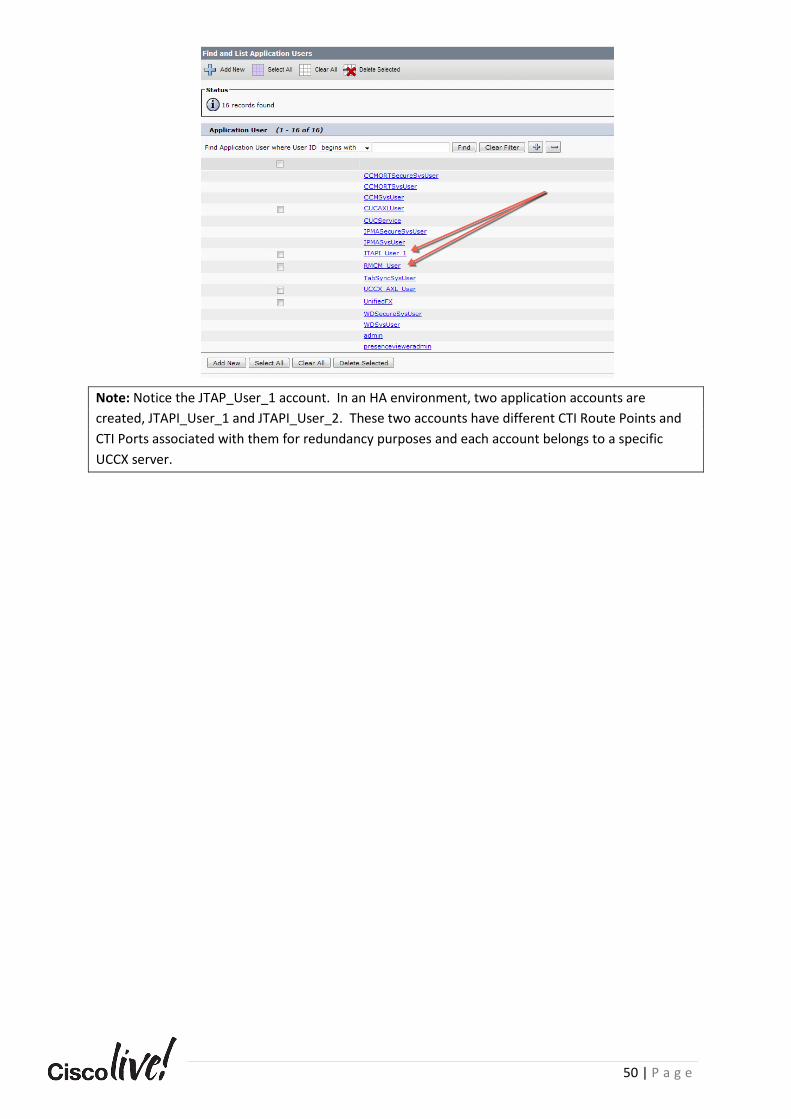
Notice the new JTAPI_User_1 and RMCM_User accounts created by the CCX Server during the installation process.
50 | P a g e
Note: Notice the JTAP_User_1 account. In an HA environment, two application accounts are
created, JTAPI_User_1 and JTAPI_User_2. These two accounts have different CTI Route Points and
CTI Ports associated with them for redundancy purposes and each account belongs to a specific
UCCX server.
51 | P a g e
Lab 4: UCCX Disaster Recovery Cisco Unified Contact Center Express ( UCCX ) provides a mechanism for performing backups and
restores of the system. UCCX has its own management interface dedicated for this process called
the Disaster Recovery System or DRS for short.
DRS utilizes a "push" method for backups, meaning that when you schedule a backup to occur, UCCX
will create the temporary backup locally on the server then push the backup to a remote
destination. Once the backup has occurred properly the local copy of the backup stored on the
UCCX server is deleted.
UCCX cannot have a backup agent such as Veritas BackupExec installed on it as it's a hardened Linux
OS. Administrators have no root access to the operating system to be able to install backup agents
or clients. A VMWare based “snapshot” and the other hypervisor backup facilities may also present
issues. Cisco also does not support VMware DRS or vMotion currently for Cisco UC Virtual Machines.
Further, UCCX requires that the remote destination be running either an FTP or SFTP ( Secure File
Transfer Protocol ) program in order to establish the backup socket or connection to the UCCX
server. One important note: Cisco does not officially support freeFTPd which is an SFTP Daemon.
We will be using this in the lab, but Cisco does not officially support it, a better SFTP Application to
use for production would be CoreFTP Server which has an SFTP client/server built into it. The main
concern here is that freeFTPd does NOT run as a service and cannot handle large file sizes, if the
remote destination server reboots the freeFTPd program does not run as a service, therefore it will
not restart. When your backup routine runs a scheduled backup in the middle of the night this will
fail due to the program not launching.
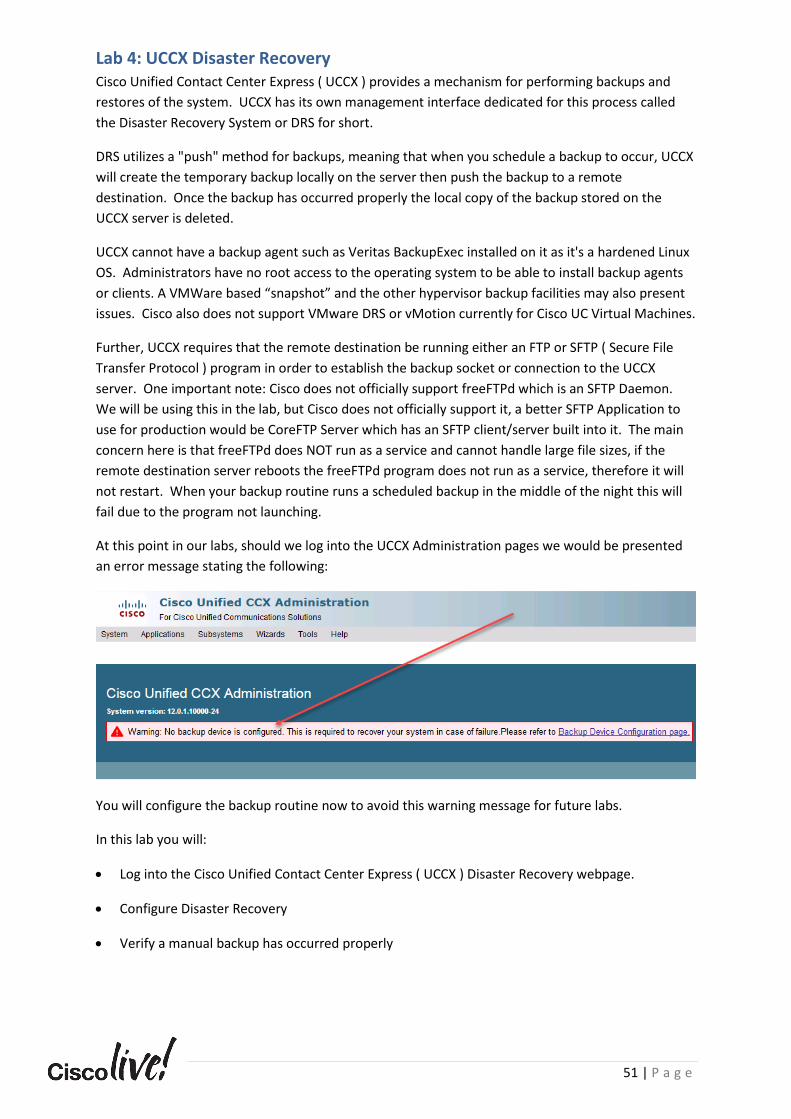
At this point in our labs, should we log into the UCCX Administration pages we would be presented
an error message stating the following:
You will configure the backup routine now to avoid this warning message for future labs.
In this lab you will:
• Log into the Cisco Unified Contact Center Express ( UCCX ) Disaster Recovery webpage.
• Configure Disaster Recovery
• Verify a manual backup has occurred properly
52 | P a g e
Task 1: UCCX System Initialization In this task you will examine the Disaster Recovery Interface on the Cisco Unified Contact Center
Express ( UCCX ) server. Our lab environment for the UCCXd course contains a single Unified Contact
Center Express server.
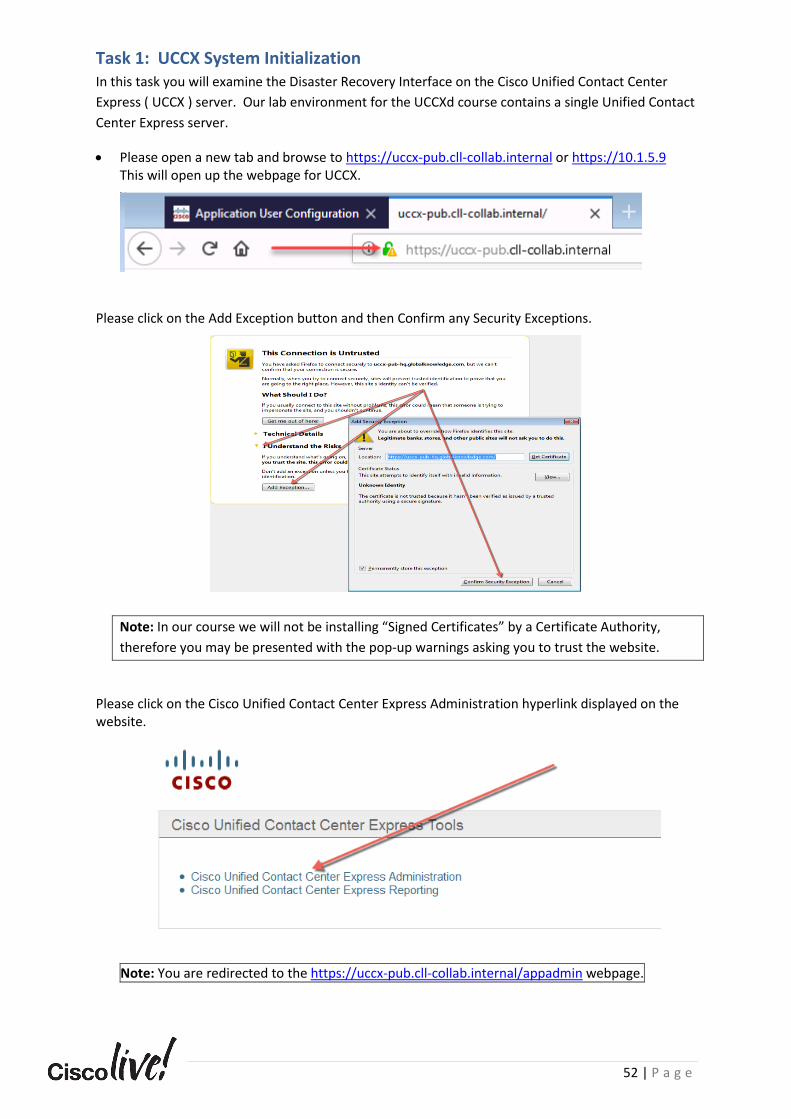
• Please open a new tab and browse to https://uccx-pub.cll-collab.internal or https://10.1.5.9 This will open up the webpage for UCCX.
Please click on the Add Exception button and then Confirm any Security Exceptions.
Note: In our course we will not be installing “Signed Certificates” by a Certificate Authority,
therefore you may be presented with the pop-up warnings asking you to trust the website.
Please click on the Cisco Unified Contact Center Express Administration hyperlink displayed on the website.
Note: You are redirected to the https://uccx-pub.cll-collab.internal/appadmin webpage.
53 | P a g e
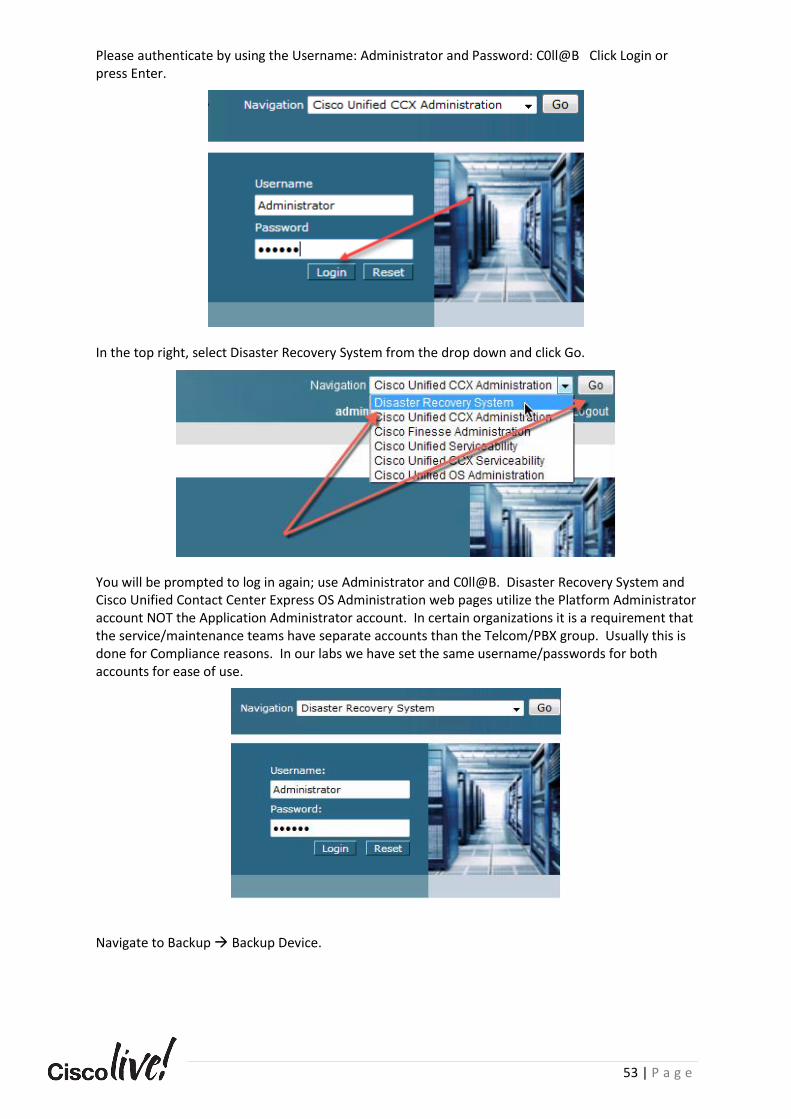
Please authenticate by using the Username: Administrator and Password: C0ll@B Click Login or press Enter.
In the top right, select Disaster Recovery System from the drop down and click Go.
You will be prompted to log in again; use Administrator and C0ll@B. Disaster Recovery System and Cisco Unified Contact Center Express OS Administration web pages utilize the Platform Administrator account NOT the Application Administrator account. In certain organizations it is a requirement that the service/maintenance teams have separate accounts than the Telcom/PBX group. Usually this is done for Compliance reasons. In our labs we have set the same username/passwords for both accounts for ease of use.
Navigate to Backup → Backup Device.

54 | P a g e
Click Add New.
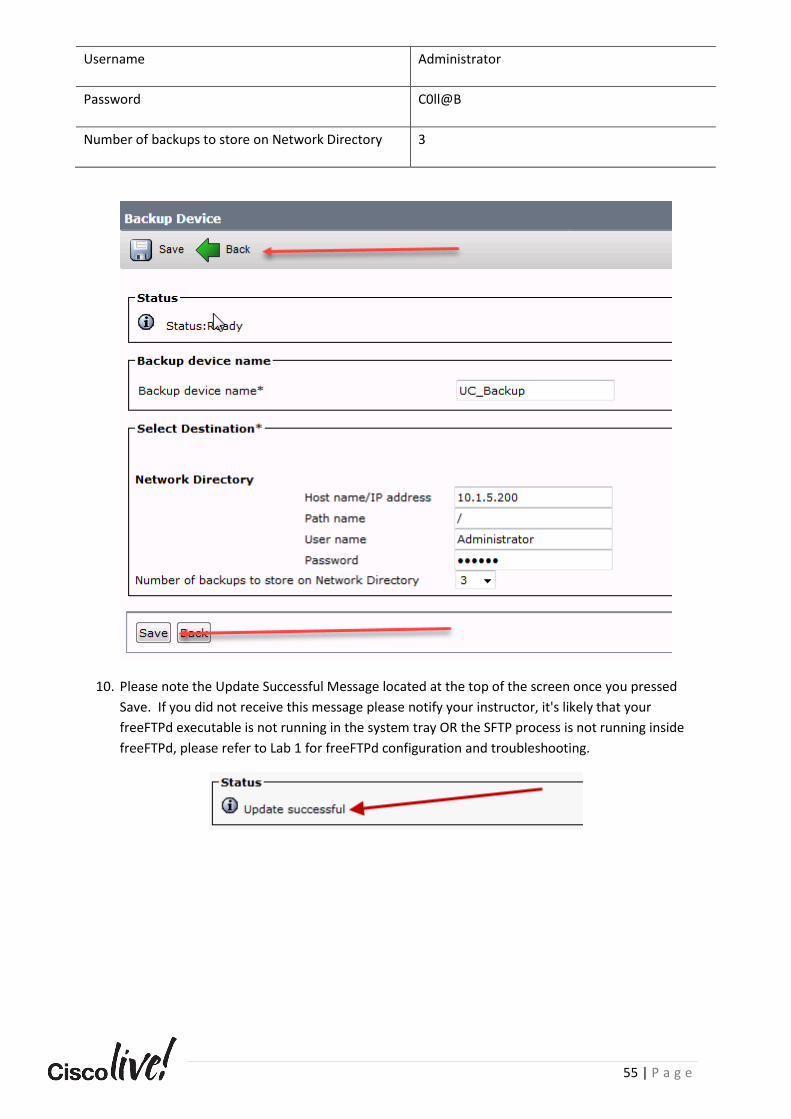
Using the table below, please enter the parameters required to configure UCCX Backups. These settings will mimic those in which you verified in Lab 1. In our Cisco Live lab environment, we will be backing up all VM’s to the same destination folder on the Student-VM-1 Virtual Machine using freeFTPd. Once you have entered all required settings, click Save.
Parameter Value
Backup Device Name UC_Backup
Hostname/IP address 10.1.5.200
Path name /
55 | P a g e
Username Administrator
Password C0ll@B
Number of backups to store on Network Directory 3
10. Please note the Update Successful Message located at the top of the screen once you pressed
Save. If you did not receive this message please notify your instructor, it's likely that your
freeFTPd executable is not running in the system tray OR the SFTP process is not running inside
freeFTPd, please refer to Lab 1 for freeFTPd configuration and troubleshooting.

56 | P a g e
• Please navigate to Backup → Manual Backup.
Please choose UC_Backup as the backup device and choose the UCCX feature, then click Start Backup.
Click OK on the pop up which states the DRS Backup archive depends on the current security password. What this means is if you perform a restoration, you will need the CUCM Cluster Security Password configured during installation.

57 | P a g e
The backup will take several minutes. Observe as each component backs up successfully. You should observe several of the results showing SUCCESS. When you perform a backup, it will back up each and every server in the cluster. This process will take 10-15 minutes on a new build/lab environment. In production, this could take an hour or so depending on the size of the UCCX server.
Note: While your servers are backing up you will be unable to go further in the labs as the Unified
Contact Center Express server operating system and IBM Informix databases are locked while the
restore occurs. Please grab a soda or coffee!
( Optional ): You can monitor and view the status of the backup by clicking on Backup > Current Status.

58 | P a g e
Task 4: Verifying UCCX Backups In this task you will verify a backup has properly occurred and was successful in the Disaster
Recovery Interface on Cisco Unified Contact Center Express ( UCCX ).
Click on Backup > History.
What was the status of the last backup? Did it succeed? What type of backup was this? What is the backup file name? Where do you think this file is stored?
Instructor Challenge: Browse to the C:\UC_Backups folder on your desktop and validate that a successful backup occurred properly. Please note that the backup folder was added on Student-VM-1 Virtual Machine.
59 | P a g e
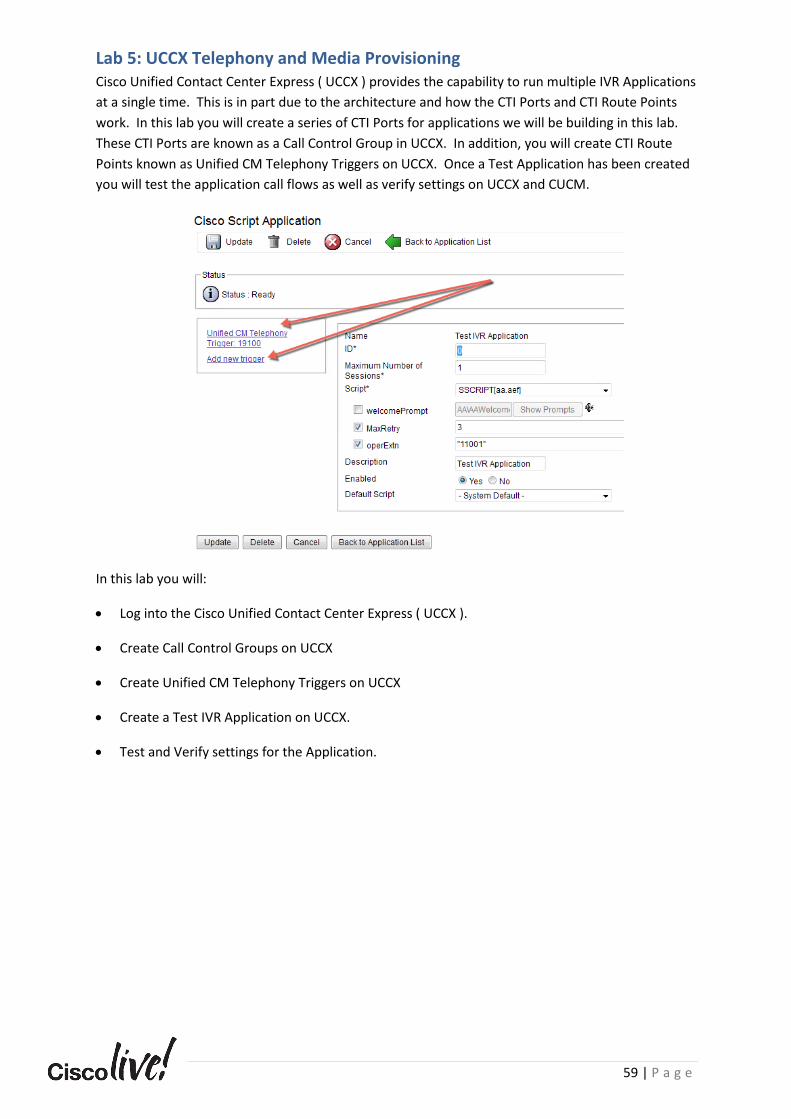
Lab 5: UCCX Telephony and Media Provisioning Cisco Unified Contact Center Express ( UCCX ) provides the capability to run multiple IVR Applications
at a single time. This is in part due to the architecture and how the CTI Ports and CTI Route Points
work. In this lab you will create a series of CTI Ports for applications we will be building in this lab.
These CTI Ports are known as a Call Control Group in UCCX. In addition, you will create CTI Route
Points known as Unified CM Telephony Triggers on UCCX. Once a Test Application has been created
you will test the application call flows as well as verify settings on UCCX and CUCM.
In this lab you will:
• Log into the Cisco Unified Contact Center Express ( UCCX ).
• Create Call Control Groups on UCCX
• Create Unified CM Telephony Triggers on UCCX
• Create a Test IVR Application on UCCX.
• Test and Verify settings for the Application.
60 | P a g e
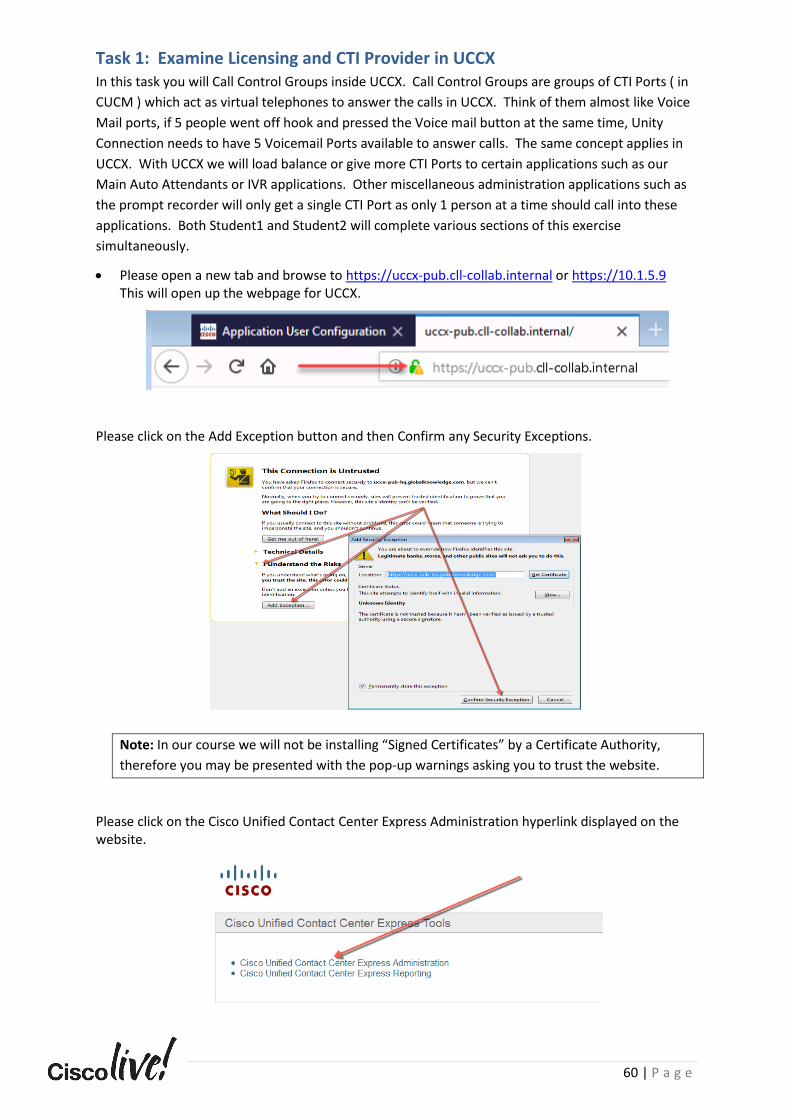
Task 1: Examine Licensing and CTI Provider in UCCX In this task you will Call Control Groups inside UCCX. Call Control Groups are groups of CTI Ports ( in
CUCM ) which act as virtual telephones to answer the calls in UCCX. Think of them almost like Voice
Mail ports, if 5 people went off hook and pressed the Voice mail button at the same time, Unity
Connection needs to have 5 Voicemail Ports available to answer calls. The same concept applies in
UCCX. With UCCX we will load balance or give more CTI Ports to certain applications such as our
Main Auto Attendants or IVR applications. Other miscellaneous administration applications such as
the prompt recorder will only get a single CTI Port as only 1 person at a time should call into these
applications. Both Student1 and Student2 will complete various sections of this exercise
simultaneously.
• Please open a new tab and browse to https://uccx-pub.cll-collab.internal or https://10.1.5.9 This will open up the webpage for UCCX.
Please click on the Add Exception button and then Confirm any Security Exceptions.
Note: In our course we will not be installing “Signed Certificates” by a Certificate Authority,
therefore you may be presented with the pop-up warnings asking you to trust the website.
Please click on the Cisco Unified Contact Center Express Administration hyperlink displayed on the website.

61 | P a g e
Note: You are redirected to the https://uccx-pub.cll-collab.internal/appadmin webpage.
Please authenticate by using the Username: Administrator and Password: C0ll@B Click Login or press Enter.
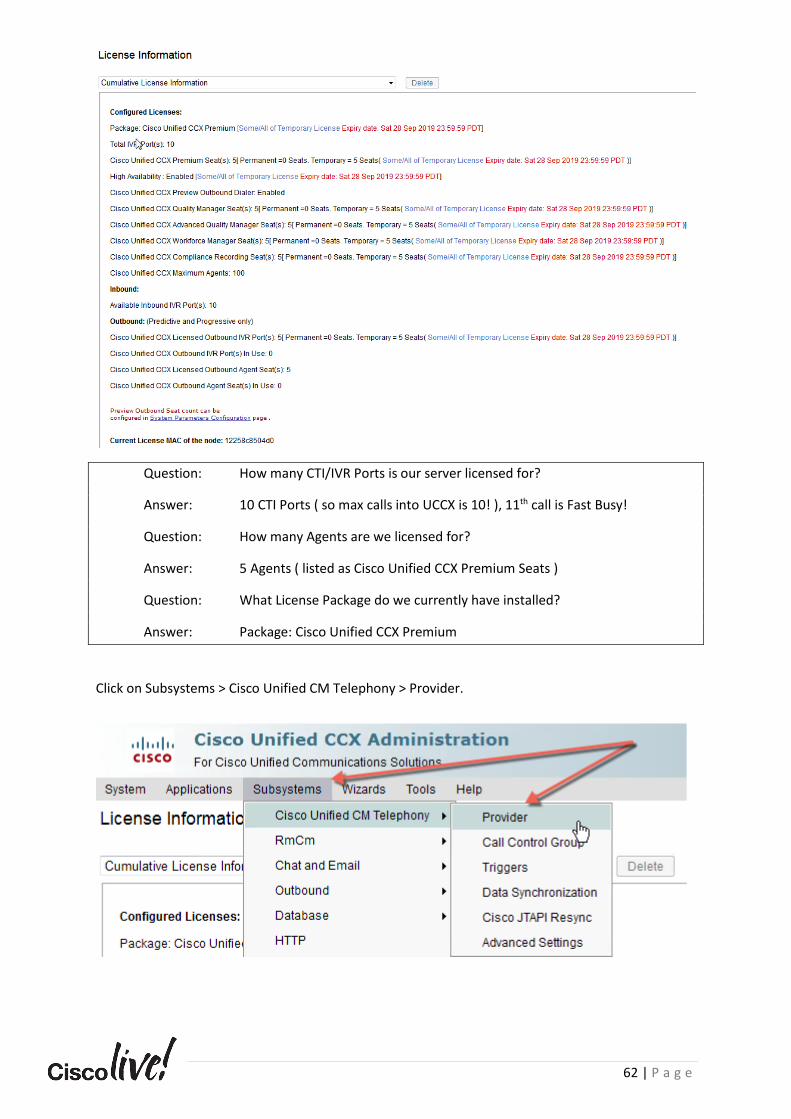
We will start by examining the number of CTI Ports we have available on the UCCX server. CTI Ports are virtual telephones which answer calls into the IVR and our various applications. Click on System > License Information > Display License(s).
Examine the license information and answer the questions below:
62 | P a g e
Question: How many CTI/IVR Ports is our server licensed for?
Answer: 10 CTI Ports ( so max calls into UCCX is 10! ), 11th call is Fast Busy!
Question: How many Agents are we licensed for?
Answer: 5 Agents ( listed as Cisco Unified CCX Premium Seats )
Question: What License Package do we currently have installed?
Answer: Package: Cisco Unified CCX Premium
Click on Subsystems > Cisco Unified CM Telephony > Provider.

63 | P a g e
Examine the output from the Provider configuration. This was configured during the initial server setup in the previous labs.
Question: What is our primary CUCM server?
Answer: Our CTI Ports and Route Points ( JTAPI Triggers ) should register to the CUCM
Publisher at 10.1.5.5.
Question: What is our backup CUCM server?
Answer: None – we have no subscriber in this lab!
Question: Our CTI Route Points and CTI Ports are associated to an Application User
that starts with what prefix?
Answer: JTAPI_User
Task 2: Add the Test Application CTI Ports in UCCX In this task you will create the Call Control Groups inside UCCX. Call Control Groups are groups of
CTI Ports ( in CUCM ) which act as virtual telephones to answer the calls in UCCX. Think of them
almost like Voice Mail ports, if 5 people went off hook and pressed the Voice mail button at the
same time, Unity Connection needs to have 5 Voicemail Ports available to answer calls. The same
concept applies in UCCX. With UCCX we will load balance or give more CTI Ports to certain
applications such as our Main Auto Attendants or IVR applications.
In this section, you will create the CTI Ports for our “Test IVR Application” which will be an
application we create to merely play a sample script and ensure that the UCCX environment is up
and running properly and can process calls.
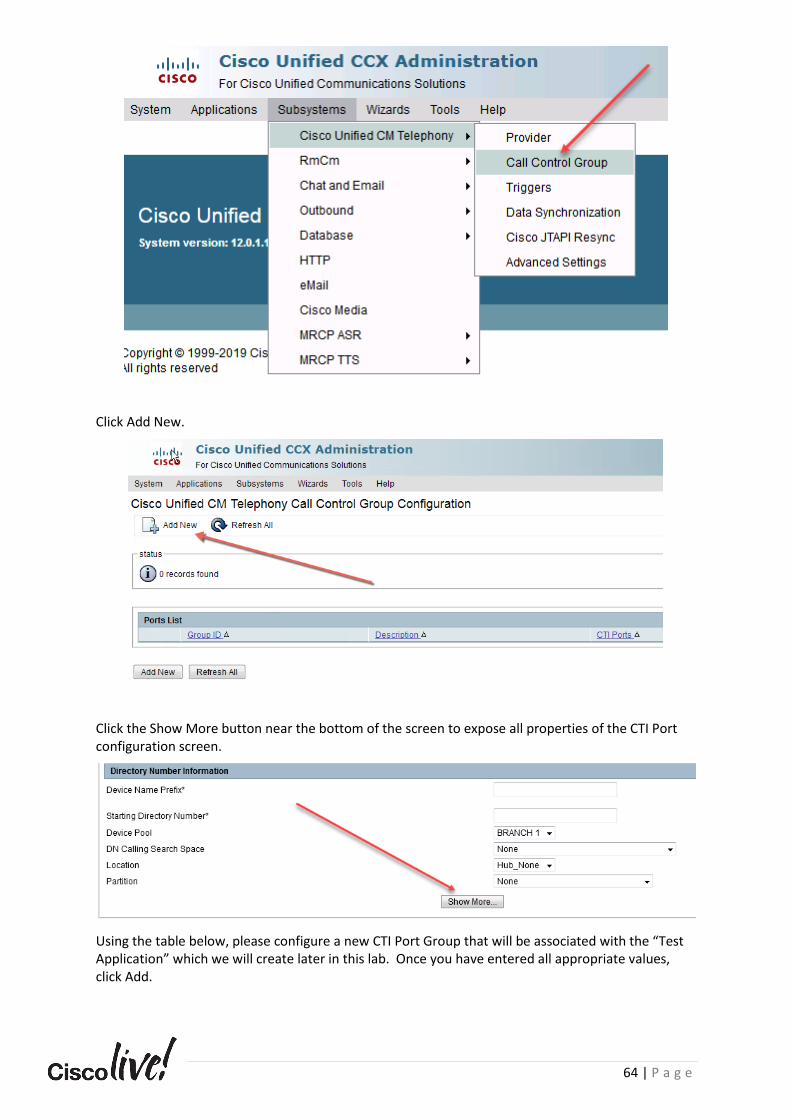
Click on Subsystems > Cisco Unified CM Telephony > Call Control Group. Note there are no Call Control Groups configured at this time.
64 | P a g e
Click Add New.
Click the Show More button near the bottom of the screen to expose all properties of the CTI Port configuration screen.
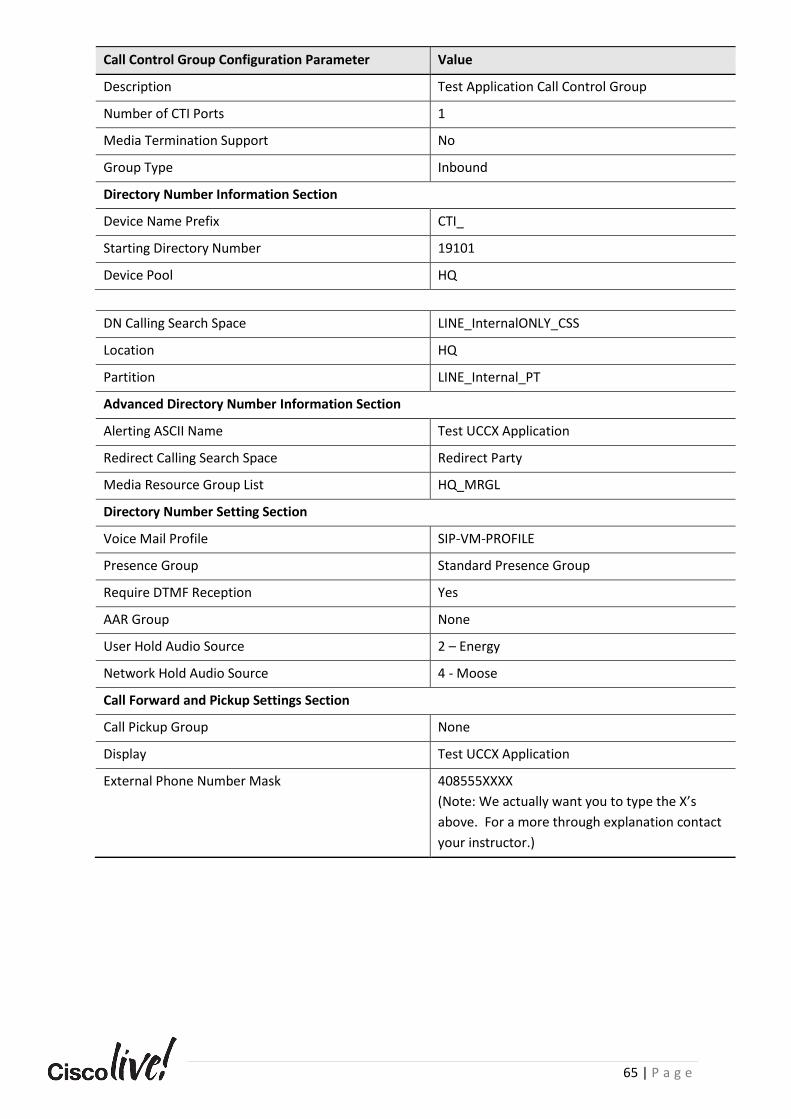
Using the table below, please configure a new CTI Port Group that will be associated with the “Test Application” which we will create later in this lab. Once you have entered all appropriate values, click Add.
65 | P a g e
Call Control Group Configuration Parameter Value
Description Test Application Call Control Group
Number of CTI Ports 1
Media Termination Support No
Group Type Inbound
Directory Number Information Section
Device Name Prefix CTI_
Starting Directory Number 19101
Device Pool HQ
DN Calling Search Space LINE_InternalONLY_CSS
Location HQ
Partition LINE_Internal_PT
Advanced Directory Number Information Section
Alerting ASCII Name Test UCCX Application
Redirect Calling Search Space Redirect Party
Media Resource Group List HQ_MRGL
Directory Number Setting Section
Voice Mail Profile SIP-VM-PROFILE
Presence Group Standard Presence Group
Require DTMF Reception Yes
AAR Group None
User Hold Audio Source 2 – Energy
Network Hold Audio Source 4 - Moose
Call Forward and Pickup Settings Section
Call Pickup Group None
Display Test UCCX Application
External Phone Number Mask 408555XXXX
(Note: We actually want you to type the X’s
above. For a more through explanation contact
your instructor.)

66 | P a g e
If you scroll to the top of the page after clicking Add, you will notice a “In Progress” message. UCCX is using the AXL API ( Administrative XML Layer ) on CUCM to programmatically add a CTI Port on CUCM and tie it to UCCX. At this point if you were to log into CUCM and browse to Device > Phone and search for CTI Ports you would see this CTI Port being added. We will examine this in a later section.
67 | P a g e
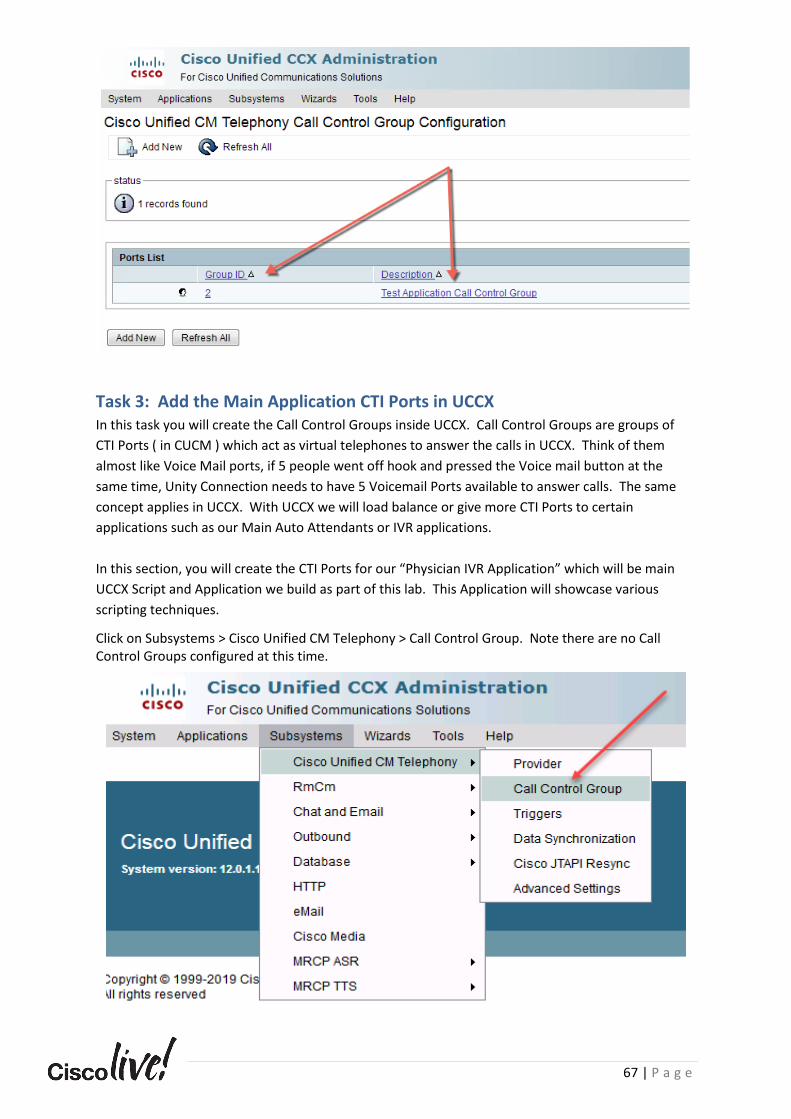
Task 3: Add the Main Application CTI Ports in UCCX In this task you will create the Call Control Groups inside UCCX. Call Control Groups are groups of
CTI Ports ( in CUCM ) which act as virtual telephones to answer the calls in UCCX. Think of them
almost like Voice Mail ports, if 5 people went off hook and pressed the Voice mail button at the
same time, Unity Connection needs to have 5 Voicemail Ports available to answer calls. The same
concept applies in UCCX. With UCCX we will load balance or give more CTI Ports to certain
applications such as our Main Auto Attendants or IVR applications.
In this section, you will create the CTI Ports for our “Physician IVR Application” which will be main
UCCX Script and Application we build as part of this lab. This Application will showcase various
scripting techniques.
Click on Subsystems > Cisco Unified CM Telephony > Call Control Group. Note there are no Call Control Groups configured at this time.
68 | P a g e
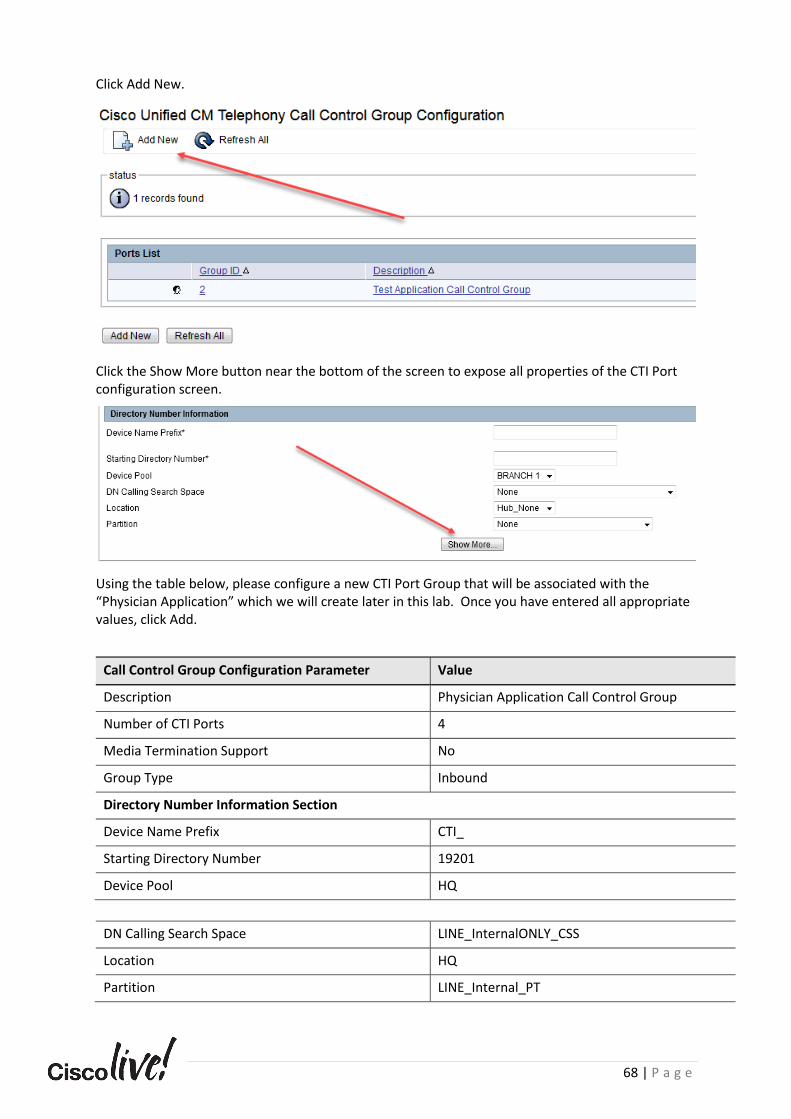
Click Add New.
Click the Show More button near the bottom of the screen to expose all properties of the CTI Port configuration screen.
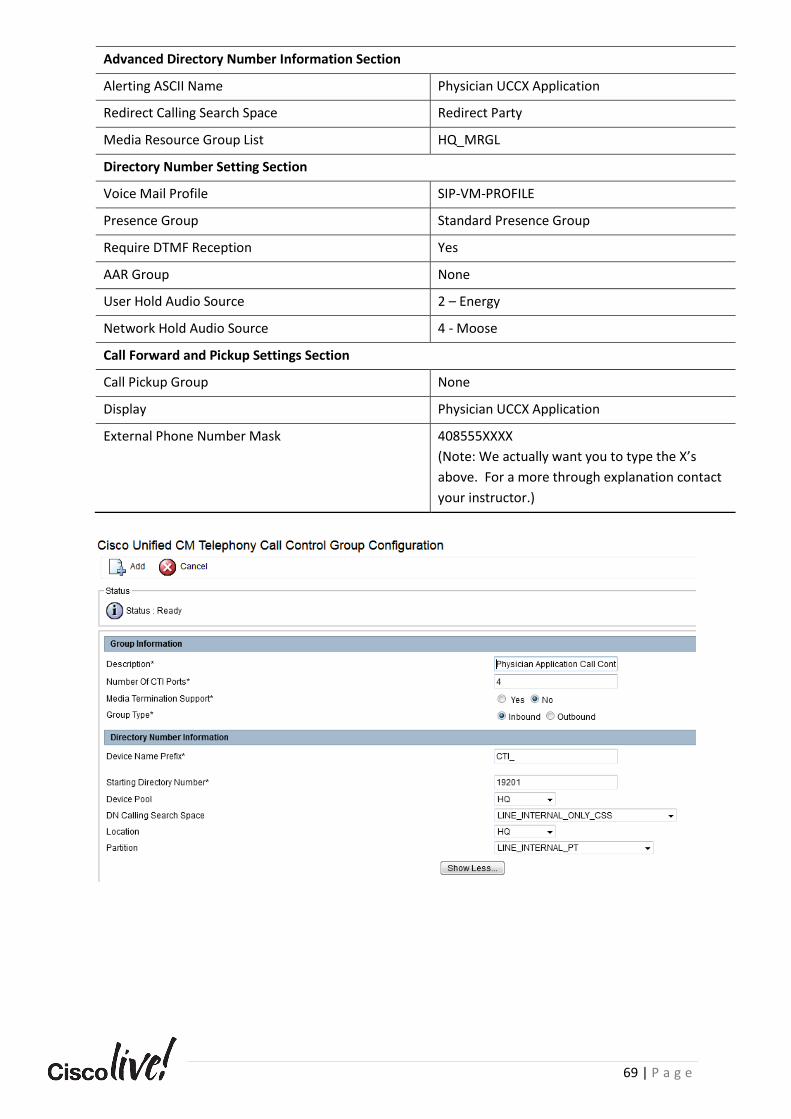
Using the table below, please configure a new CTI Port Group that will be associated with the “Physician Application” which we will create later in this lab. Once you have entered all appropriate values, click Add.
Call Control Group Configuration Parameter Value
Description Physician Application Call Control Group
Number of CTI Ports 4
Media Termination Support No
Group Type Inbound
Directory Number Information Section
Device Name Prefix CTI_
Starting Directory Number 19201
Device Pool HQ
DN Calling Search Space LINE_InternalONLY_CSS
Location HQ
Partition LINE_Internal_PT
69 | P a g e
Advanced Directory Number Information Section
Alerting ASCII Name Physician UCCX Application
Redirect Calling Search Space Redirect Party
Media Resource Group List HQ_MRGL
Directory Number Setting Section
Voice Mail Profile SIP-VM-PROFILE
Presence Group Standard Presence Group
Require DTMF Reception Yes
AAR Group None
User Hold Audio Source 2 – Energy
Network Hold Audio Source 4 - Moose
Call Forward and Pickup Settings Section
Call Pickup Group None
Display Physician UCCX Application
External Phone Number Mask 408555XXXX
(Note: We actually want you to type the X’s
above. For a more through explanation contact
your instructor.)
70 | P a g e
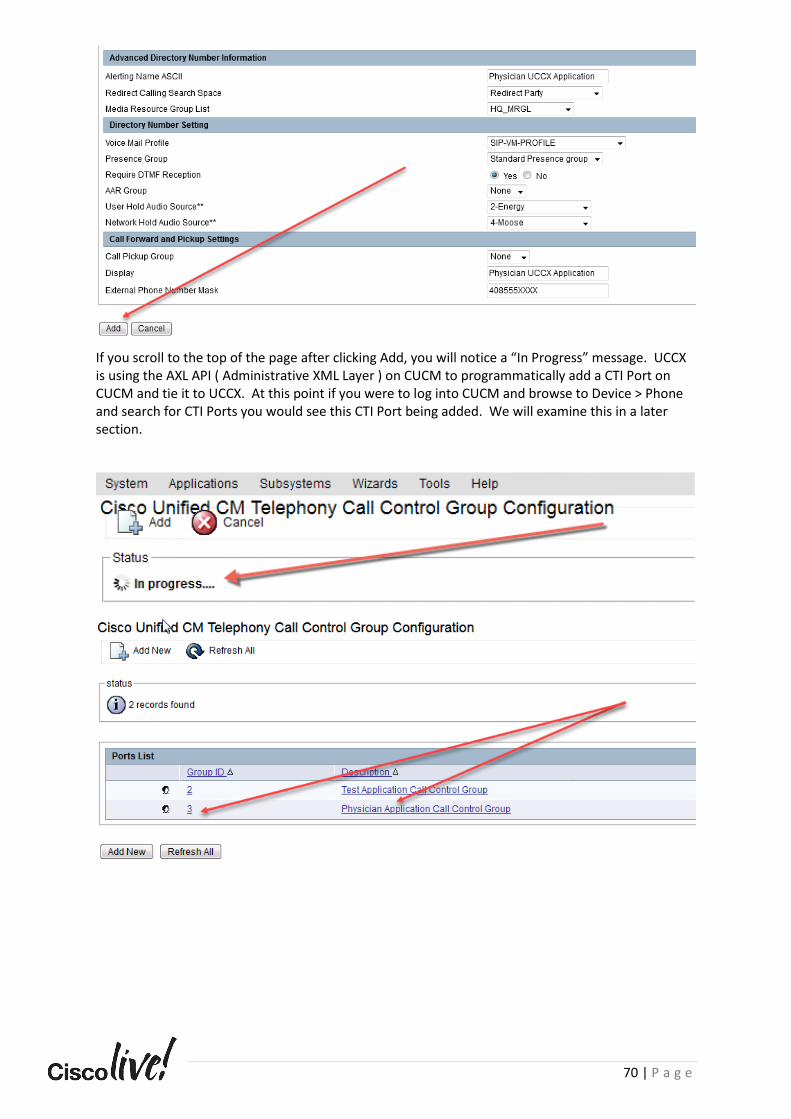
If you scroll to the top of the page after clicking Add, you will notice a “In Progress” message. UCCX is using the AXL API ( Administrative XML Layer ) on CUCM to programmatically add a CTI Port on CUCM and tie it to UCCX. At this point if you were to log into CUCM and browse to Device > Phone and search for CTI Ports you would see this CTI Port being added. We will examine this in a later section.
71 | P a g e
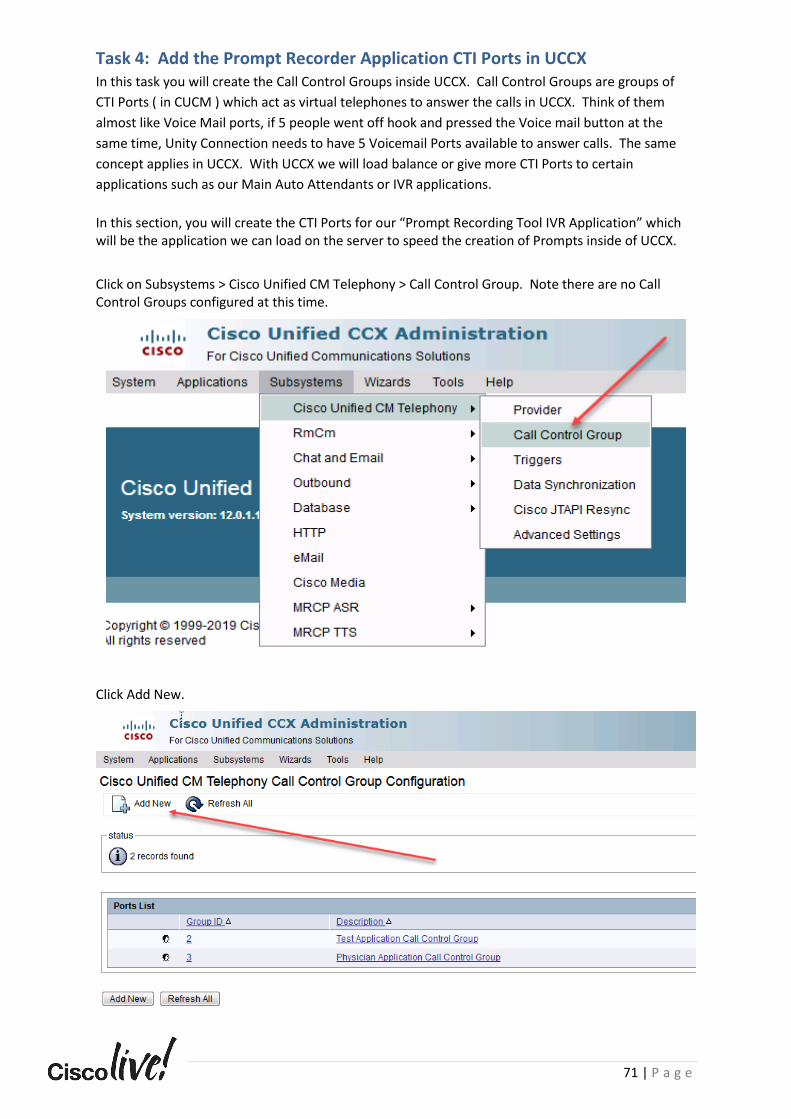
Task 4: Add the Prompt Recorder Application CTI Ports in UCCX In this task you will create the Call Control Groups inside UCCX. Call Control Groups are groups of
CTI Ports ( in CUCM ) which act as virtual telephones to answer the calls in UCCX. Think of them
almost like Voice Mail ports, if 5 people went off hook and pressed the Voice mail button at the
same time, Unity Connection needs to have 5 Voicemail Ports available to answer calls. The same
concept applies in UCCX. With UCCX we will load balance or give more CTI Ports to certain
applications such as our Main Auto Attendants or IVR applications.
In this section, you will create the CTI Ports for our “Prompt Recording Tool IVR Application” which will be the application we can load on the server to speed the creation of Prompts inside of UCCX.
Click on Subsystems > Cisco Unified CM Telephony > Call Control Group. Note there are no Call Control Groups configured at this time.
Click Add New.
72 | P a g e
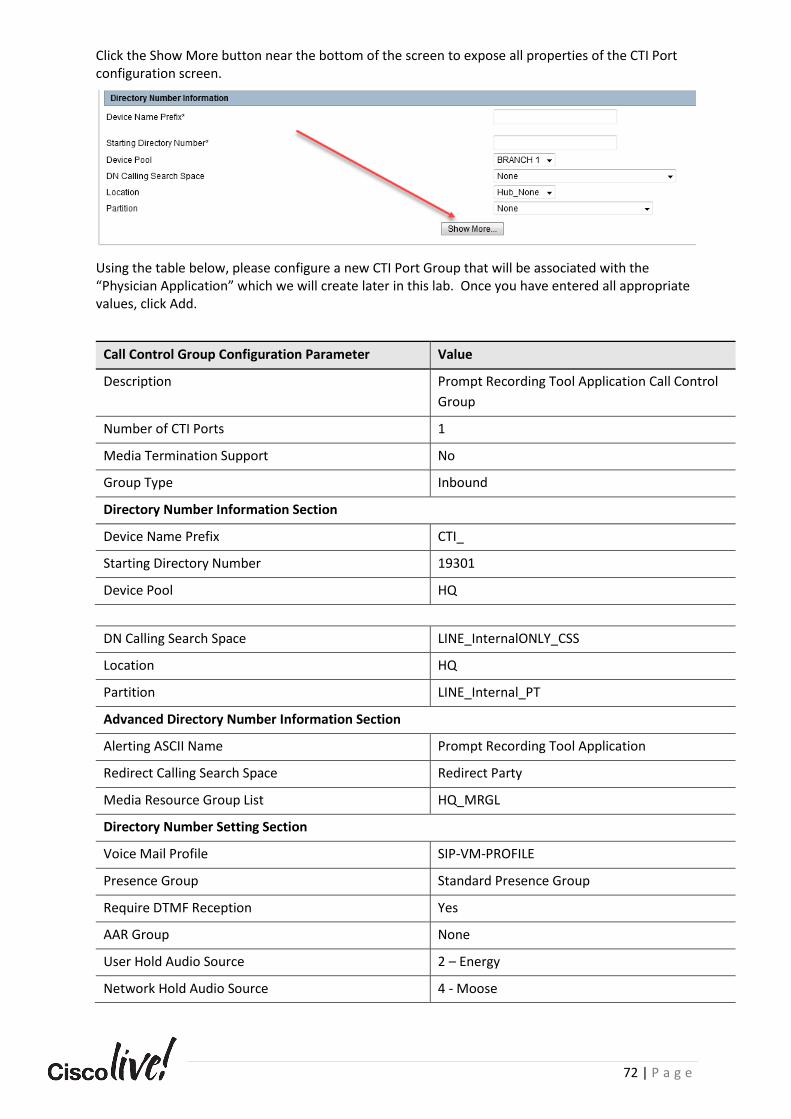
Click the Show More button near the bottom of the screen to expose all properties of the CTI Port configuration screen.
Using the table below, please configure a new CTI Port Group that will be associated with the “Physician Application” which we will create later in this lab. Once you have entered all appropriate values, click Add.
Call Control Group Configuration Parameter Value
Description Prompt Recording Tool Application Call Control
Group
Number of CTI Ports 1
Media Termination Support No
Group Type Inbound
Directory Number Information Section
Device Name Prefix CTI_
Starting Directory Number 19301
Device Pool HQ
DN Calling Search Space LINE_InternalONLY_CSS
Location HQ
Partition LINE_Internal_PT
Advanced Directory Number Information Section
Alerting ASCII Name Prompt Recording Tool Application
Redirect Calling Search Space Redirect Party
Media Resource Group List HQ_MRGL
Directory Number Setting Section
Voice Mail Profile SIP-VM-PROFILE
Presence Group Standard Presence Group
Require DTMF Reception Yes
AAR Group None
User Hold Audio Source 2 – Energy
Network Hold Audio Source 4 - Moose

73 | P a g e
Call Forward and Pickup Settings Section
Call Pickup Group None
Display Prompt Recording Tool
External Phone Number Mask 408555XXXX
(Note: We actually want you to type the X’s
above. For a more through explanation contact
your instructor.)
If you scroll to the top of the page after clicking Add, you will notice a “In Progress” message. UCCX is using the AXL API ( Administrative XML Layer ) on CUCM to programmatically add a CTI Port on CUCM and tie it to UCCX. At this point if you were to log into CUCM and browse to Device > Phone and search for CTI Ports you would see this CTI Port being added. We will examine this in a later section.
74 | P a g e
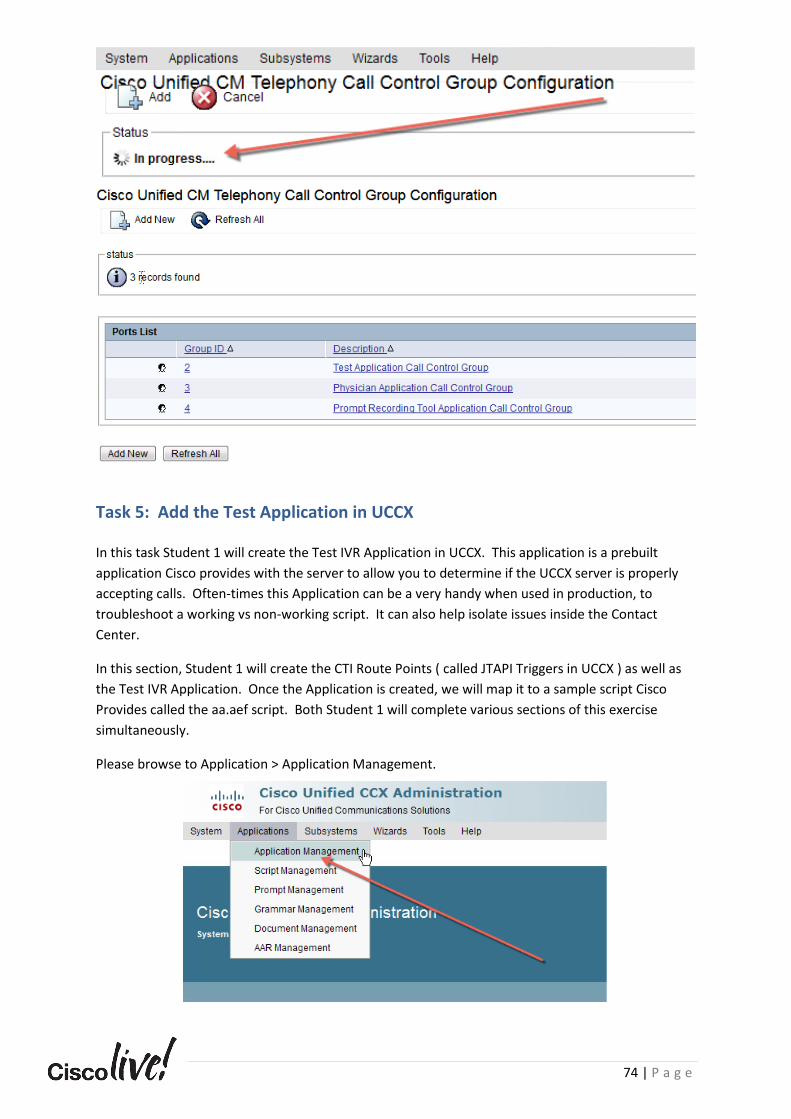
Task 5: Add the Test Application in UCCX
In this task Student 1 will create the Test IVR Application in UCCX. This application is a prebuilt
application Cisco provides with the server to allow you to determine if the UCCX server is properly
accepting calls. Often-times this Application can be a very handy when used in production, to
troubleshoot a working vs non-working script. It can also help isolate issues inside the Contact
Center.
In this section, Student 1 will create the CTI Route Points ( called JTAPI Triggers in UCCX ) as well as
the Test IVR Application. Once the Application is created, we will map it to a sample script Cisco
Provides called the aa.aef script. Both Student 1 will complete various sections of this exercise
simultaneously.
Please browse to Application > Application Management.

75 | P a g e
Observe there are no IVR Applications currently. Click Add New.
In the Application Type drop down choose Cisco Script Application, click Next.
Note: Not sure why anyone would want to do this, but you can add an Application that literally plays a “busy signal” or fast busy to a caller, if you wish to create that type of application, you would select Busy. Additionally, you can create an application that rings forever by selecting Ring-No-Answer.
Using the table below please enter the values for the Test IVR Application. Once you have added all values click Add.
Application Parameters Value
Name Test IVR Application
ID 0
Maximum Number of Sessions 1
Script SSCRIPT [ aa.aef ]
Script Parameters ( These values will be exposed once you select the script )
WelcomePrompt Leave as the Default Values – ( Don’t Check )
MaxRetry 3 – ( Place a checkmark beside variable )
operExtn “11001” – ( Place a checkmark beside variable ) We do mean to type the quotation marks. Failure to do so will cause undesirable behavior.
Application Parameters ( Continued )
Description Test IVR Application
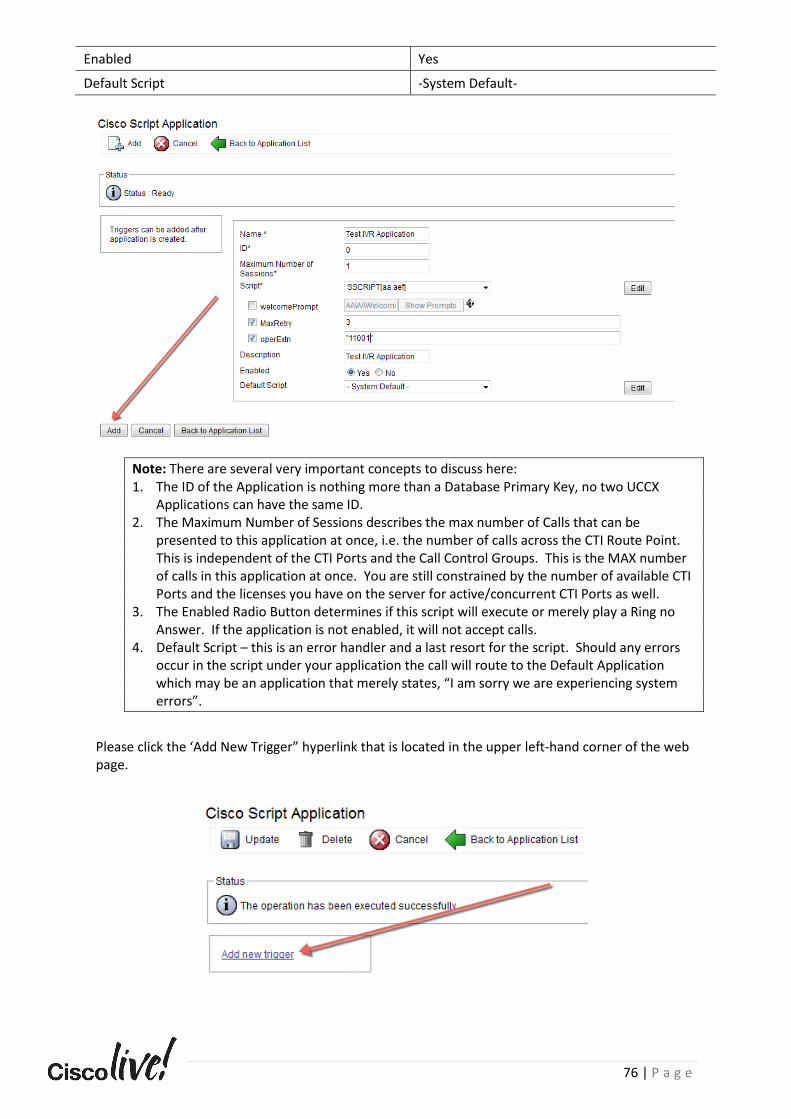
76 | P a g e
Enabled Yes
Default Script -System Default-
Note: There are several very important concepts to discuss here: 1. The ID of the Application is nothing more than a Database Primary Key, no two UCCX
Applications can have the same ID. 2. The Maximum Number of Sessions describes the max number of Calls that can be
presented to this application at once, i.e. the number of calls across the CTI Route Point. This is independent of the CTI Ports and the Call Control Groups. This is the MAX number of calls in this application at once. You are still constrained by the number of available CTI Ports and the licenses you have on the server for active/concurrent CTI Ports as well.
3. The Enabled Radio Button determines if this script will execute or merely play a Ring no Answer. If the application is not enabled, it will not accept calls.
4. Default Script – this is an error handler and a last resort for the script. Should any errors occur in the script under your application the call will route to the Default Application which may be an application that merely states, “I am sorry we are experiencing system errors”.
Please click the ‘Add New Trigger” hyperlink that is located in the upper left-hand corner of the web page.
77 | P a g e
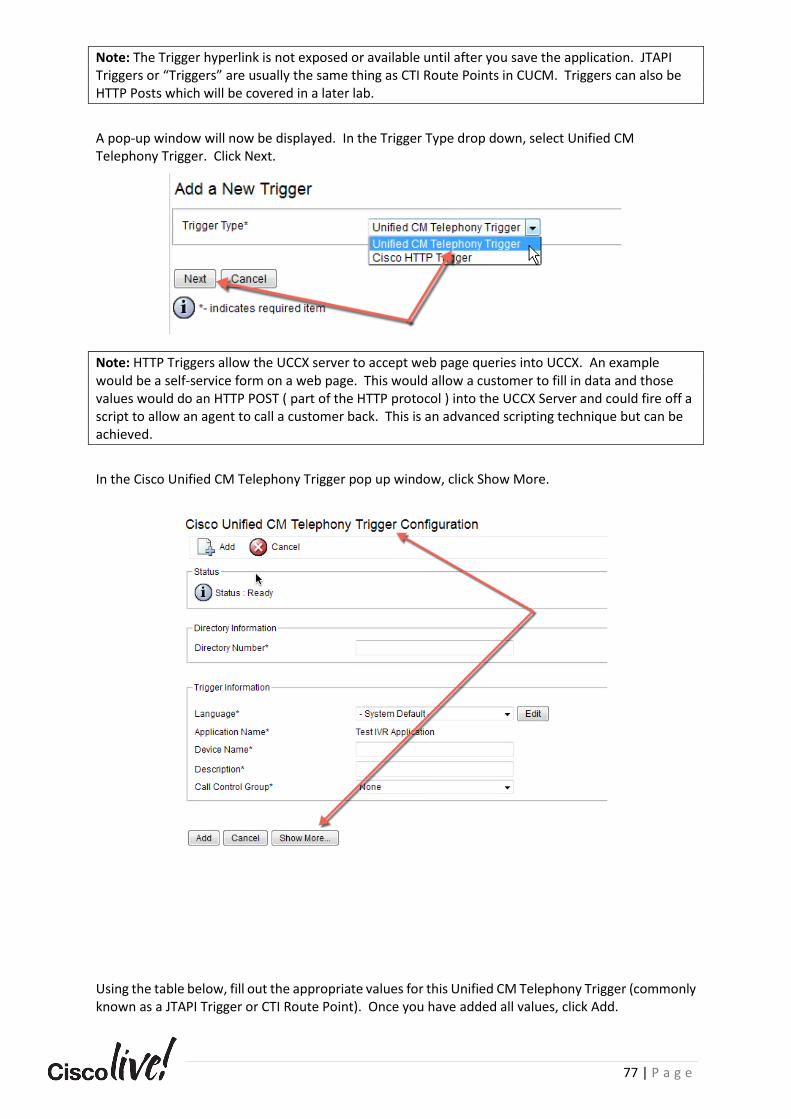
Note: The Trigger hyperlink is not exposed or available until after you save the application. JTAPI Triggers or “Triggers” are usually the same thing as CTI Route Points in CUCM. Triggers can also be HTTP Posts which will be covered in a later lab.
A pop-up window will now be displayed. In the Trigger Type drop down, select Unified CM Telephony Trigger. Click Next.
Note: HTTP Triggers allow the UCCX server to accept web page queries into UCCX. An example would be a self-service form on a web page. This would allow a customer to fill in data and those values would do an HTTP POST ( part of the HTTP protocol ) into the UCCX Server and could fire off a script to allow an agent to call a customer back. This is an advanced scripting technique but can be achieved.
In the Cisco Unified CM Telephony Trigger pop up window, click Show More.
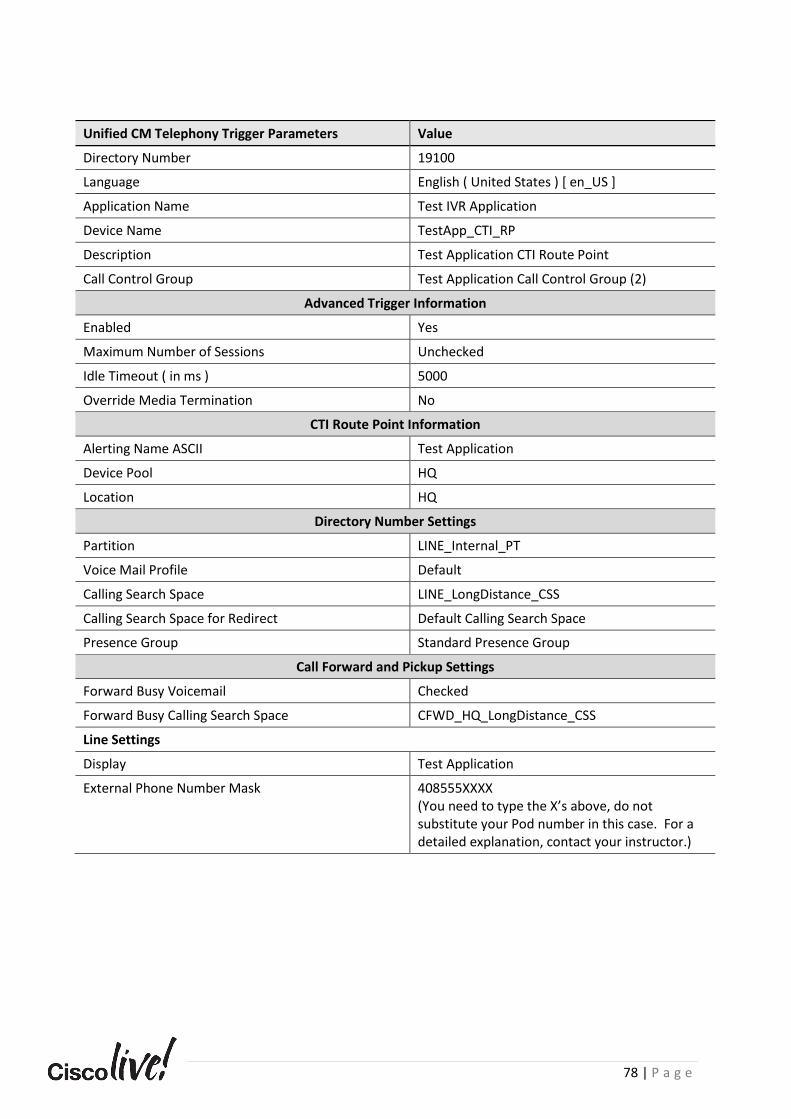
Using the table below, fill out the appropriate values for this Unified CM Telephony Trigger (commonly known as a JTAPI Trigger or CTI Route Point). Once you have added all values, click Add.
78 | P a g e
Unified CM Telephony Trigger Parameters Value
Directory Number 19100
Language English ( United States ) [ en_US ]
Application Name Test IVR Application
Device Name TestApp_CTI_RP
Description Test Application CTI Route Point
Call Control Group Test Application Call Control Group (2)
Advanced Trigger Information
Enabled Yes
Maximum Number of Sessions Unchecked
Idle Timeout ( in ms ) 5000
Override Media Termination No
CTI Route Point Information
Alerting Name ASCII Test Application
Device Pool HQ
Location HQ
Directory Number Settings
Partition LINE_Internal_PT
Voice Mail Profile Default
Calling Search Space LINE_LongDistance_CSS
Calling Search Space for Redirect Default Calling Search Space
Presence Group Standard Presence Group
Call Forward and Pickup Settings
Forward Busy Voicemail Checked
Forward Busy Calling Search Space CFWD_HQ_LongDistance_CSS
Line Settings
Display Test Application
External Phone Number Mask 408555XXXX (You need to type the X’s above, do not substitute your Pod number in this case. For a detailed explanation, contact your instructor.)

79 | P a g e
80 | P a g e
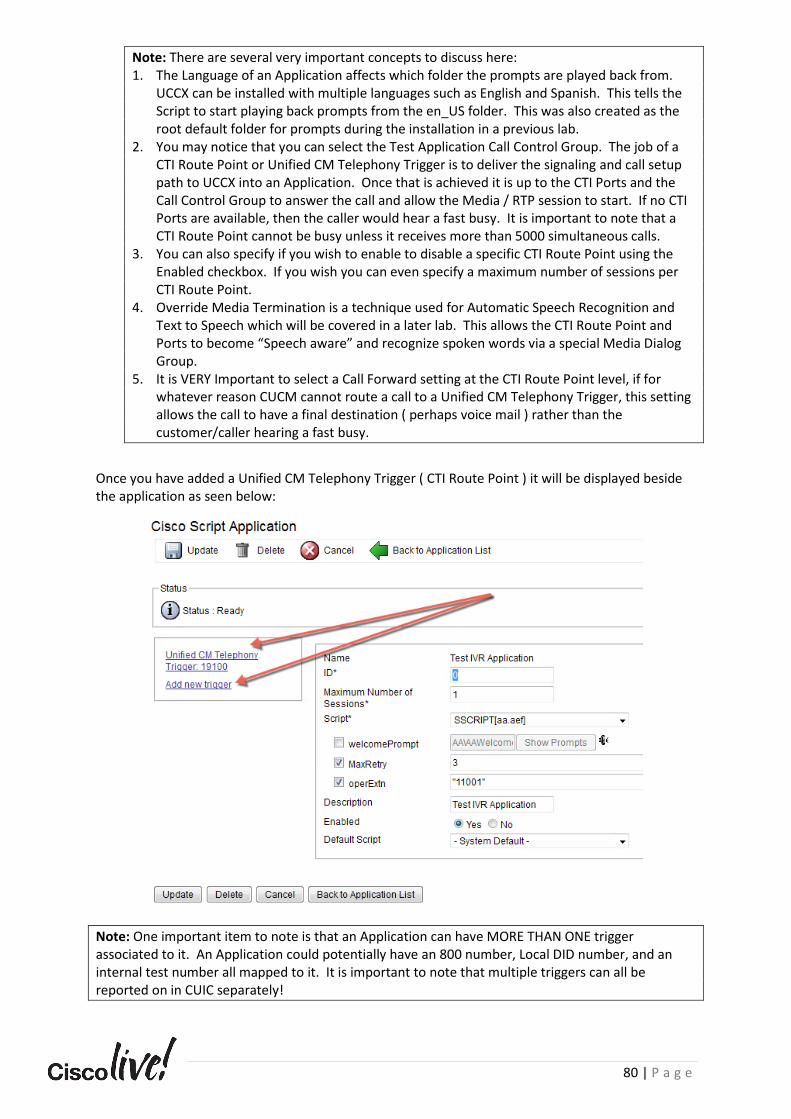
Note: There are several very important concepts to discuss here: 1. The Language of an Application affects which folder the prompts are played back from.
UCCX can be installed with multiple languages such as English and Spanish. This tells the Script to start playing back prompts from the en_US folder. This was also created as the root default folder for prompts during the installation in a previous lab.
2. You may notice that you can select the Test Application Call Control Group. The job of a CTI Route Point or Unified CM Telephony Trigger is to deliver the signaling and call setup path to UCCX into an Application. Once that is achieved it is up to the CTI Ports and the Call Control Group to answer the call and allow the Media / RTP session to start. If no CTI Ports are available, then the caller would hear a fast busy. It is important to note that a CTI Route Point cannot be busy unless it receives more than 5000 simultaneous calls.
3. You can also specify if you wish to enable to disable a specific CTI Route Point using the Enabled checkbox. If you wish you can even specify a maximum number of sessions per CTI Route Point.
4. Override Media Termination is a technique used for Automatic Speech Recognition and Text to Speech which will be covered in a later lab. This allows the CTI Route Point and Ports to become “Speech aware” and recognize spoken words via a special Media Dialog Group.
5. It is VERY Important to select a Call Forward setting at the CTI Route Point level, if for whatever reason CUCM cannot route a call to a Unified CM Telephony Trigger, this setting allows the call to have a final destination ( perhaps voice mail ) rather than the customer/caller hearing a fast busy.
Once you have added a Unified CM Telephony Trigger ( CTI Route Point ) it will be displayed beside the application as seen below:
Note: One important item to note is that an Application can have MORE THAN ONE trigger associated to it. An Application could potentially have an 800 number, Local DID number, and an internal test number all mapped to it. It is important to note that multiple triggers can all be reported on in CUIC separately!
81 | P a g e
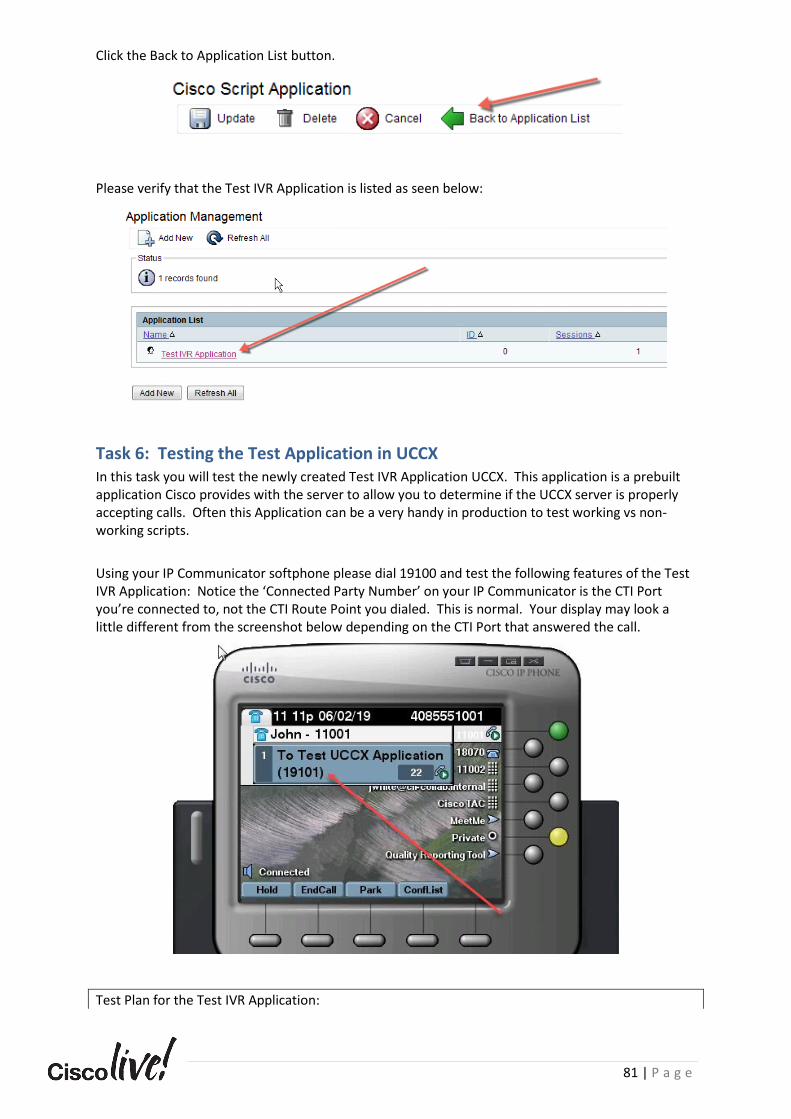
Click the Back to Application List button.
Please verify that the Test IVR Application is listed as seen below:
Task 6: Testing the Test Application in UCCX In this task you will test the newly created Test IVR Application UCCX. This application is a prebuilt application Cisco provides with the server to allow you to determine if the UCCX server is properly accepting calls. Often this Application can be a very handy in production to test working vs non-working scripts.
Using your IP Communicator softphone please dial 19100 and test the following features of the Test IVR Application: Notice the ‘Connected Party Number’ on your IP Communicator is the CTI Port you’re connected to, not the CTI Route Point you dialed. This is normal. Your display may look a little different from the screenshot below depending on the CTI Port that answered the call.
Test Plan for the Test IVR Application:

82 | P a g e
• Dial Extension 19100 ( CTI Route Point for the Test IVR Application ):
• Question: Was the call Answered by the UCCX Server?
• Once the Test IVR Application answers, press Option 1 to transfer the call.
• Enter a valid IP Communicator extension followed by the # key
• ( Student-VM-1 dial 11002, Student-VM-2 dial 11001 ).
• Question: Did your IP Communicator extension ring?
• Disconnect the call. Redial Extension 19100.
• Enter Option 0 to transfer to the Operator.
Task 7: Verify the Unified CM Telephony Subsystem on the UCCX Server.
In this task you will verify that the Unified CM Telephony Subsystem has fully activated and shows and “In Service” state inside Unified CCX Serviceability. Unified CM Telephony is one of the most important services in all of UCCX. It controls the JTAPI Protocol ( Java Telephony Application Programming Interface ) which is the signaling and protocol which communicates with Call Manager. Now that you have added CTI Route Points and CTI Ports this should show as In Service.
In the upper right corner of the screen, use the navigation drop-down and select Cisco Unified CCX Serviceability and click Go.
Inside the Cisco Unified CCX Serviceability webpage, navigate to Tools -> Control Center – Network Services.
83 | P a g e
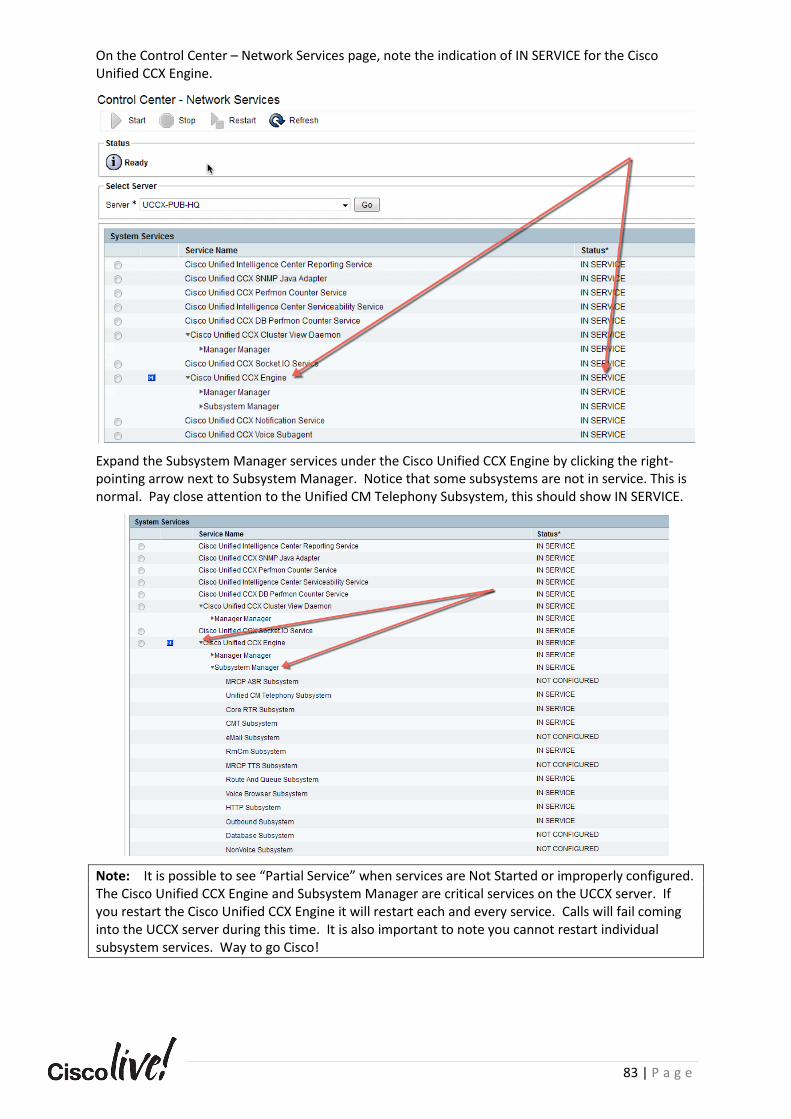
On the Control Center – Network Services page, note the indication of IN SERVICE for the Cisco Unified CCX Engine.
Expand the Subsystem Manager services under the Cisco Unified CCX Engine by clicking the right-pointing arrow next to Subsystem Manager. Notice that some subsystems are not in service. This is normal. Pay close attention to the Unified CM Telephony Subsystem, this should show IN SERVICE.
Note: It is possible to see “Partial Service” when services are Not Started or improperly configured. The Cisco Unified CCX Engine and Subsystem Manager are critical services on the UCCX server. If you restart the Cisco Unified CCX Engine it will restart each and every service. Calls will fail coming into the UCCX server during this time. It is also important to note you cannot restart individual subsystem services. Way to go Cisco!
84 | P a g e
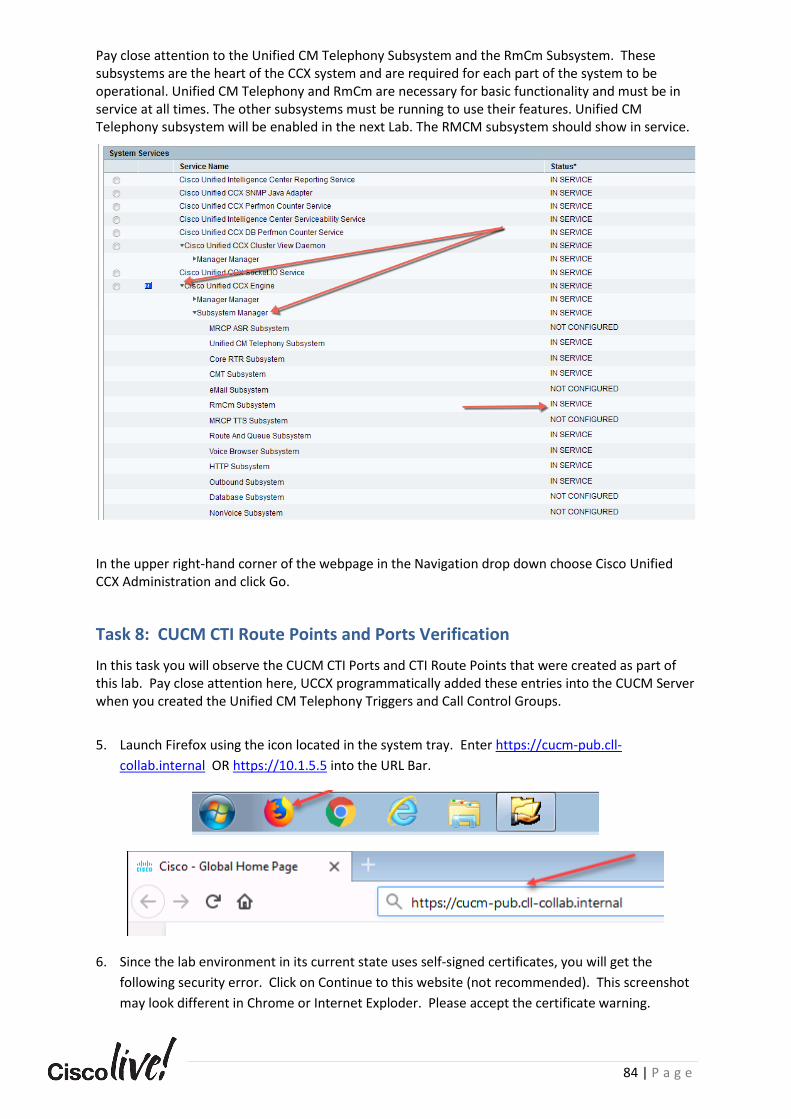
Pay close attention to the Unified CM Telephony Subsystem and the RmCm Subsystem. These subsystems are the heart of the CCX system and are required for each part of the system to be operational. Unified CM Telephony and RmCm are necessary for basic functionality and must be in service at all times. The other subsystems must be running to use their features. Unified CM Telephony subsystem will be enabled in the next Lab. The RMCM subsystem should show in service.
In the upper right-hand corner of the webpage in the Navigation drop down choose Cisco Unified CCX Administration and click Go.
Task 8: CUCM CTI Route Points and Ports Verification
In this task you will observe the CUCM CTI Ports and CTI Route Points that were created as part of this lab. Pay close attention here, UCCX programmatically added these entries into the CUCM Server when you created the Unified CM Telephony Triggers and Call Control Groups.
5. Launch Firefox using the icon located in the system tray. Enter https://cucm-pub.cll-
collab.internal OR https://10.1.5.5 into the URL Bar.
6. Since the lab environment in its current state uses self-signed certificates, you will get the
following security error. Click on Continue to this website (not recommended). This screenshot
may look different in Chrome or Internet Exploder. Please accept the certificate warning.
85 | P a g e
Note: Our lab environment is preconfigured for DNS or Domain Name System and should have all
the proper A Records already configured. DNS allows you to browse to a name rather than an IP
Address. Should you have issues browsing to https://cucm-pub.cll-collab.internal please attempt to
PING the address by clicking on Start > Enter CMD in the search box > Type: ping cucm-pub.cll-
collab.internal or ask your instructor for further assistance.
7. Once you have accepted all certificate warnings you will be presented with the initial splash
screen for Cisco Unified Communications Manager. Please click on Cisco Unified
Communications Manager hyperlink.
8. Log into the CUCM Interface using the username Administrator and password C0ll@B
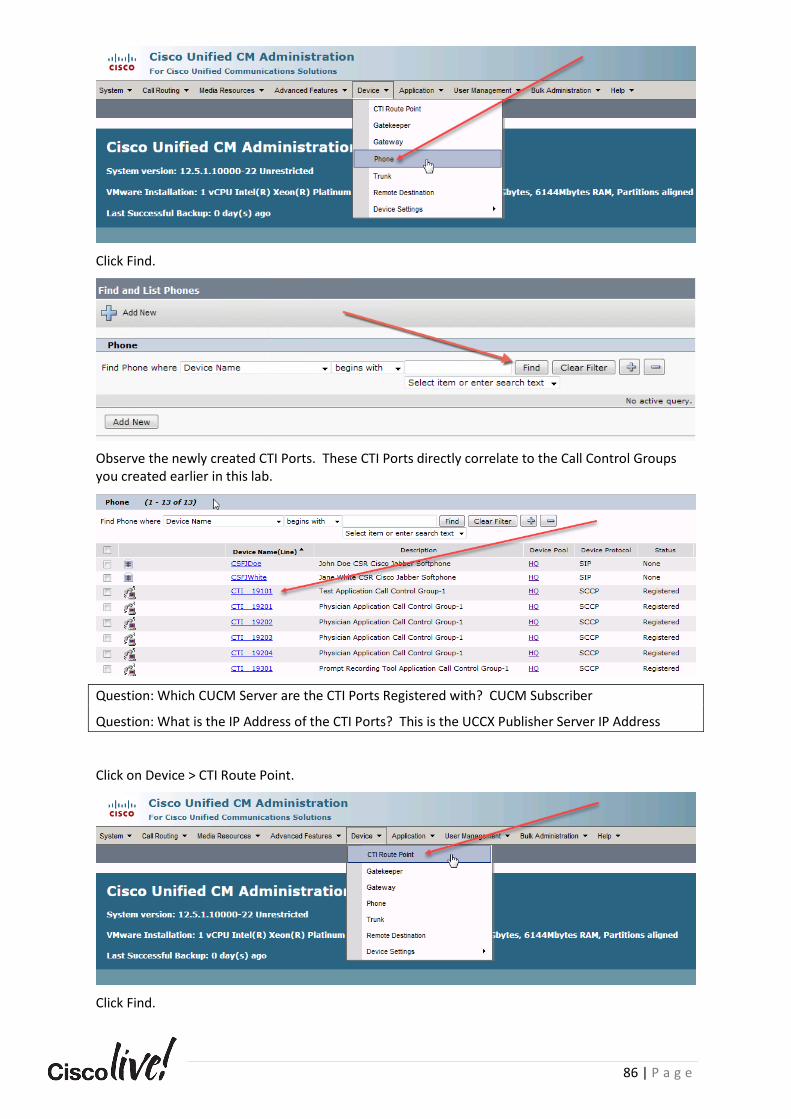
Navigate to Device > Phones.
86 | P a g e
Click Find.
Observe the newly created CTI Ports. These CTI Ports directly correlate to the Call Control Groups you created earlier in this lab.
Question: Which CUCM Server are the CTI Ports Registered with? CUCM Subscriber
Question: What is the IP Address of the CTI Ports? This is the UCCX Publisher Server IP Address
Click on Device > CTI Route Point.
Click Find.

87 | P a g e
Notice the newly created CTI Route Point. CTI Route Points equate to Unified CM Telephony Triggers on the UCCX Server.
Note: The 2nd CTI Route Point listed here is the Voice Mail CTI Route Point which allows a direct
transfer to VM by dialing * + 5-digit extension. Remember, Instructor works for tips folks 😊
Click on User Management > Application User.
Click Find.
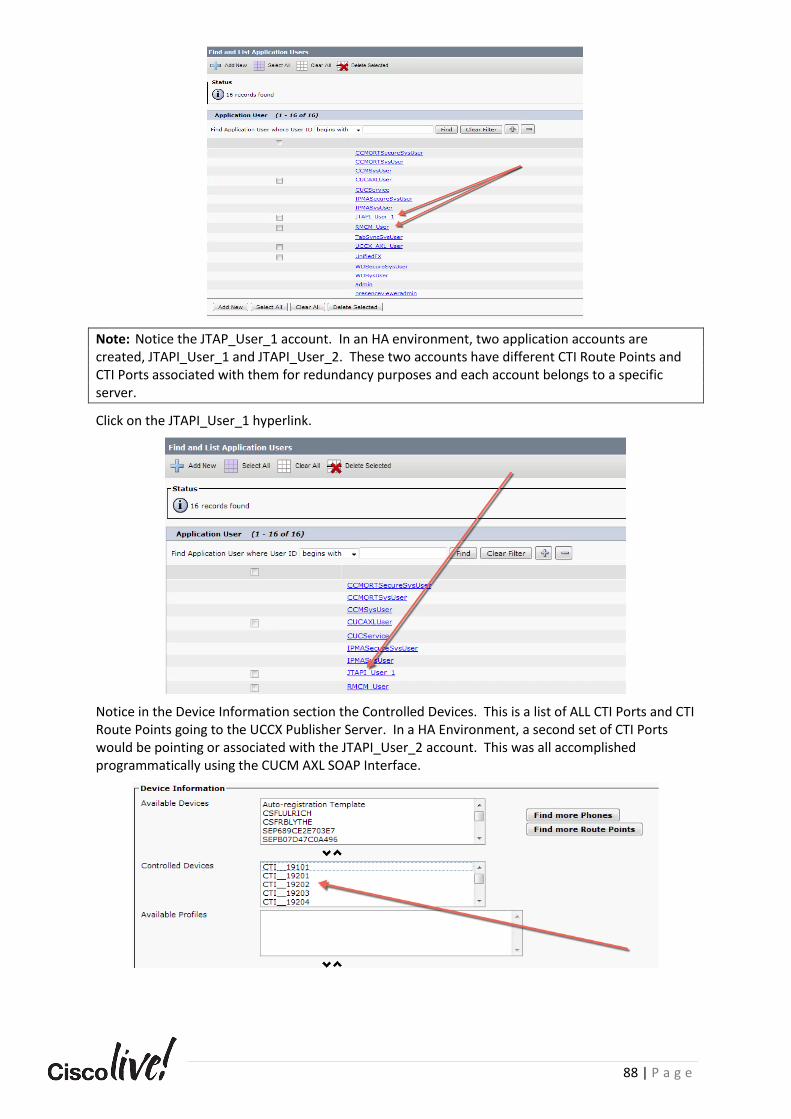
Notice the JTAPI_User_1 and RMCM_User accounts created by the UCCX Server during the installation process.
88 | P a g e
Note: Notice the JTAP_User_1 account. In an HA environment, two application accounts are created, JTAPI_User_1 and JTAPI_User_2. These two accounts have different CTI Route Points and CTI Ports associated with them for redundancy purposes and each account belongs to a specific server.
Click on the JTAPI_User_1 hyperlink.
Notice in the Device Information section the Controlled Devices. This is a list of ALL CTI Ports and CTI Route Points going to the UCCX Publisher Server. In a HA Environment, a second set of CTI Ports would be pointing or associated with the JTAPI_User_2 account. This was all accomplished programmatically using the CUCM AXL SOAP Interface.

89 | P a g e
Lab 6: UCCX Script Editor Installation Cisco Unified Contact Center Express ( UCCX ) provides an application that allows you to code and
program the IVR component of the server. This application is referred to as the Cisco UCCX Script
Editor. The Script Editor is downloaded from the UCCX Server and is version specific. In this lab we
will download, setup, and explore some of the features of the script editor.
In this lab you will:
• Log into the Cisco Unified Contact Center Express ( UCCX ) Disaster Recovery webpage.
• Download and Install the UCCX Script Editor
• Explore the Script Editor Interface
• Set Script Editor Options
• View the pre-built Cisco sample scripts

90 | P a g e
Task 1: Download and Install the UCCX Script Editor In this task you will download and install the Cisco UCCX Script Editor on your student virtual
machine.
1. Please open a new tab and browse to https://uccx-pub.cll-collab.internal or https://10.1.5.9
This will open up the webpage for UCCX.
2. Please click on the Add Exception button and then Confirm any Security Exceptions.
Note: In our lab we will not be installing “Signed Certificates” by a Certificate Authority,
therefore you may be presented with the pop-up warnings asking you to trust the website.
3. Please click on the Cisco Unified Contact Center Express Administration hyperlink displayed
on the website.
Note: You are redirected to the https://uccx-pub.cll-collab.internal/appadmin webpage.
4. Please authenticate by using the Username: Administrator and Password: C0ll@B Click
Login or press Enter.

91 | P a g e
5. In the UCCX Administration Interface, click Tools > Plugins.
6. Click the Cisco Unified CCX Editor hyperlink.
92 | P a g e
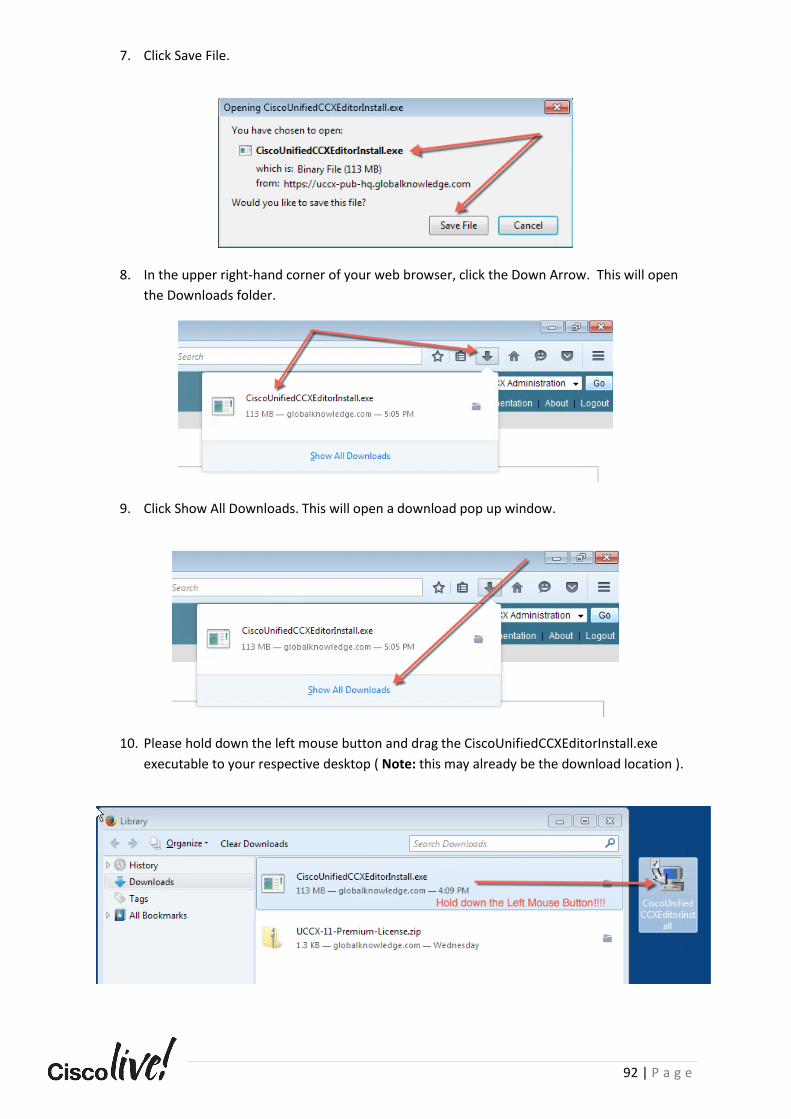
7. Click Save File.
8. In the upper right-hand corner of your web browser, click the Down Arrow. This will open
the Downloads folder.
9. Click Show All Downloads. This will open a download pop up window.
10. Please hold down the left mouse button and drag the CiscoUnifiedCCXEditorInstall.exe
executable to your respective desktop ( Note: this may already be the download location ).
93 | P a g e
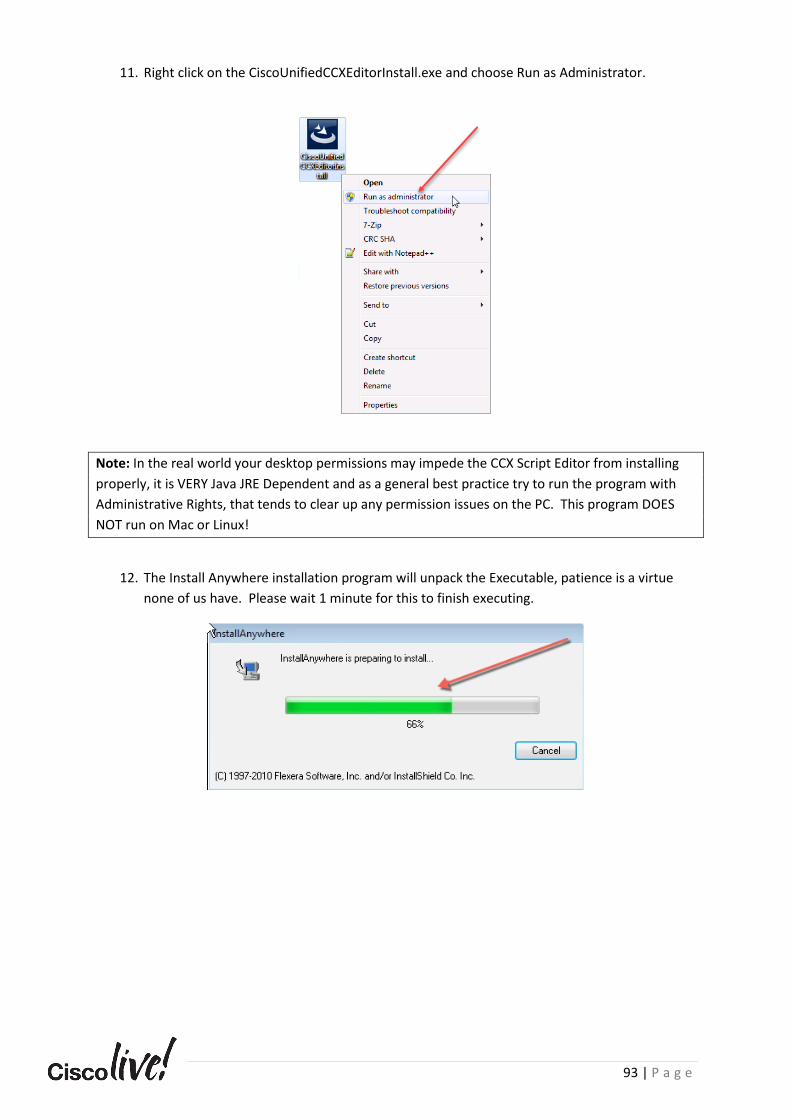
11. Right click on the CiscoUnifiedCCXEditorInstall.exe and choose Run as Administrator.
Note: In the real world your desktop permissions may impede the CCX Script Editor from installing
properly, it is VERY Java JRE Dependent and as a general best practice try to run the program with
Administrative Rights, that tends to clear up any permission issues on the PC. This program DOES
NOT run on Mac or Linux!
12. The Install Anywhere installation program will unpack the Executable, patience is a virtue
none of us have. Please wait 1 minute for this to finish executing.
94 | P a g e
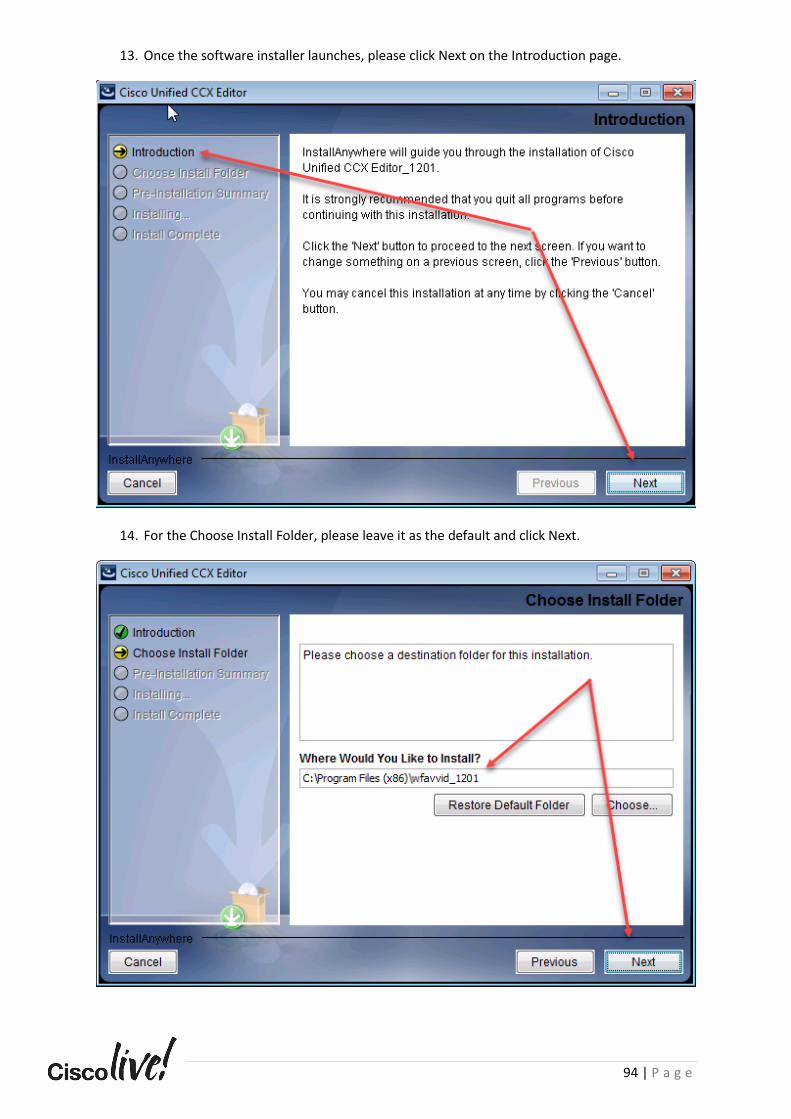
13. Once the software installer launches, please click Next on the Introduction page.
14. For the Choose Install Folder, please leave it as the default and click Next.
95 | P a g e
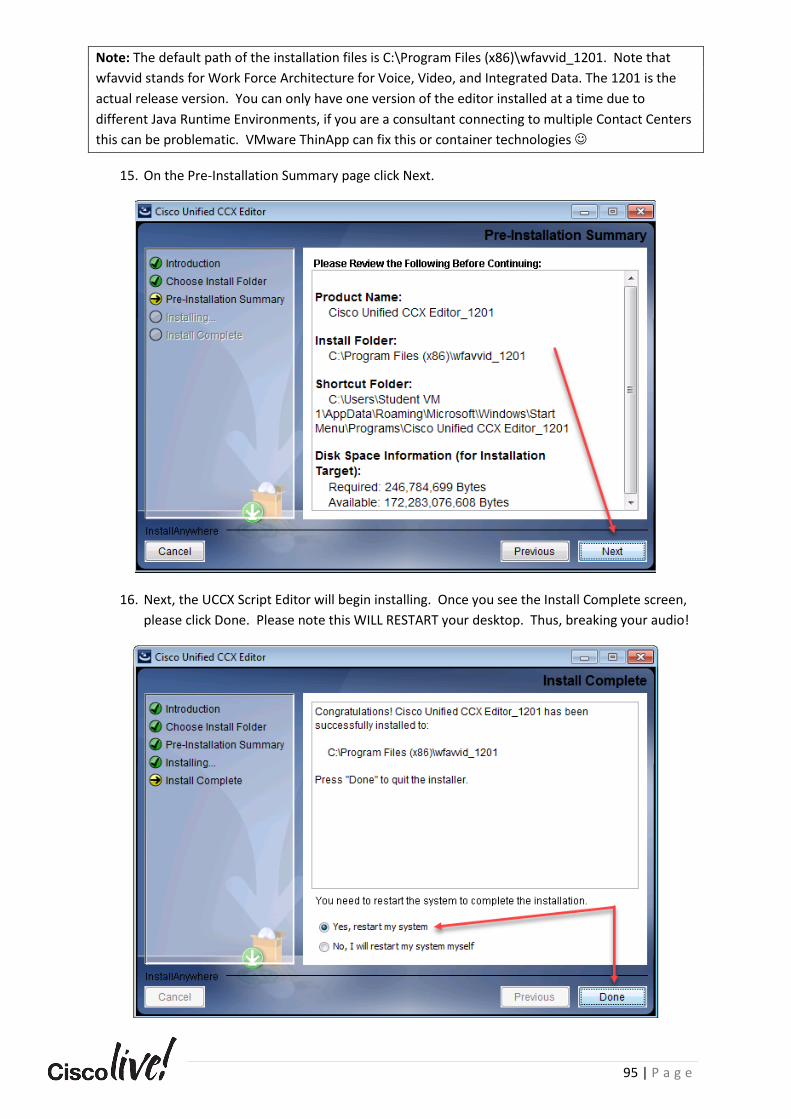
Note: The default path of the installation files is C:\Program Files (x86)\wfavvid_1201. Note that
wfavvid stands for Work Force Architecture for Voice, Video, and Integrated Data. The 1201 is the
actual release version. You can only have one version of the editor installed at a time due to
different Java Runtime Environments, if you are a consultant connecting to multiple Contact Centers
this can be problematic. VMware ThinApp can fix this or container technologies ☺
15. On the Pre-Installation Summary page click Next.
16. Next, the UCCX Script Editor will begin installing. Once you see the Install Complete screen,
please click Done. Please note this WILL RESTART your desktop. Thus, breaking your audio!
96 | P a g e
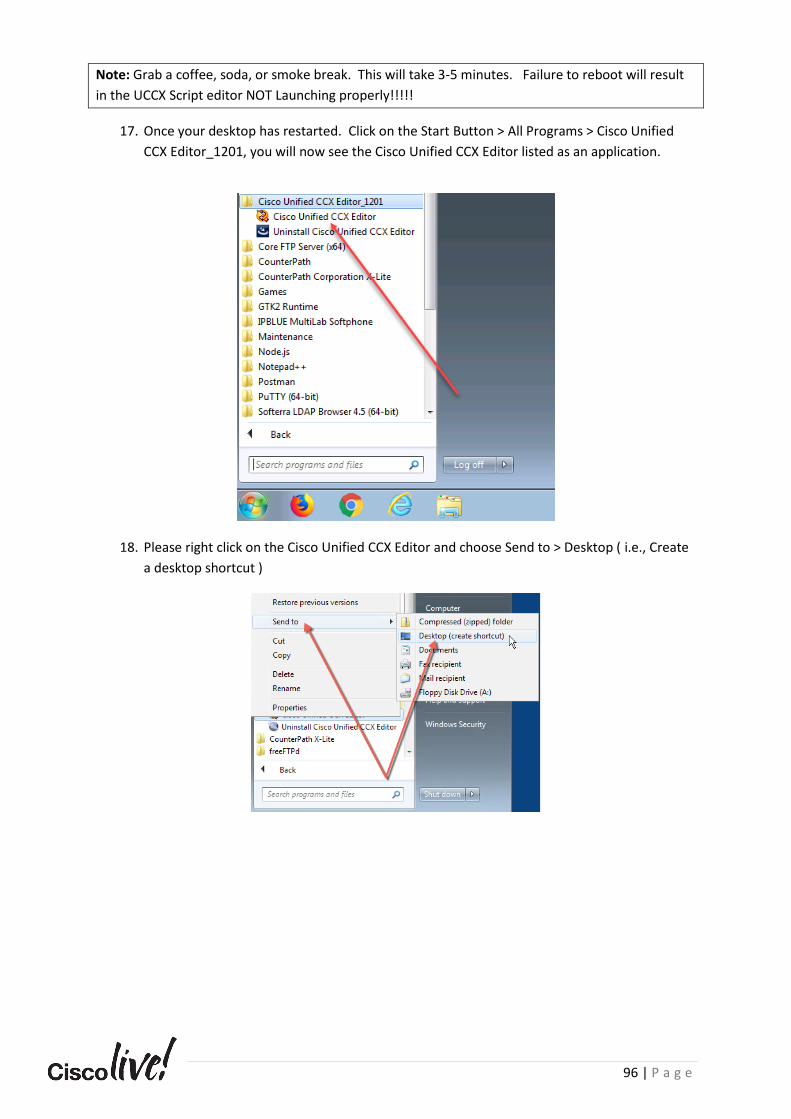
Note: Grab a coffee, soda, or smoke break. This will take 3-5 minutes. Failure to reboot will result
in the UCCX Script editor NOT Launching properly!!!!!
17. Once your desktop has restarted. Click on the Start Button > All Programs > Cisco Unified
CCX Editor_1201, you will now see the Cisco Unified CCX Editor listed as an application.
18. Please right click on the Cisco Unified CCX Editor and choose Send to > Desktop ( i.e., Create
a desktop shortcut )
97 | P a g e
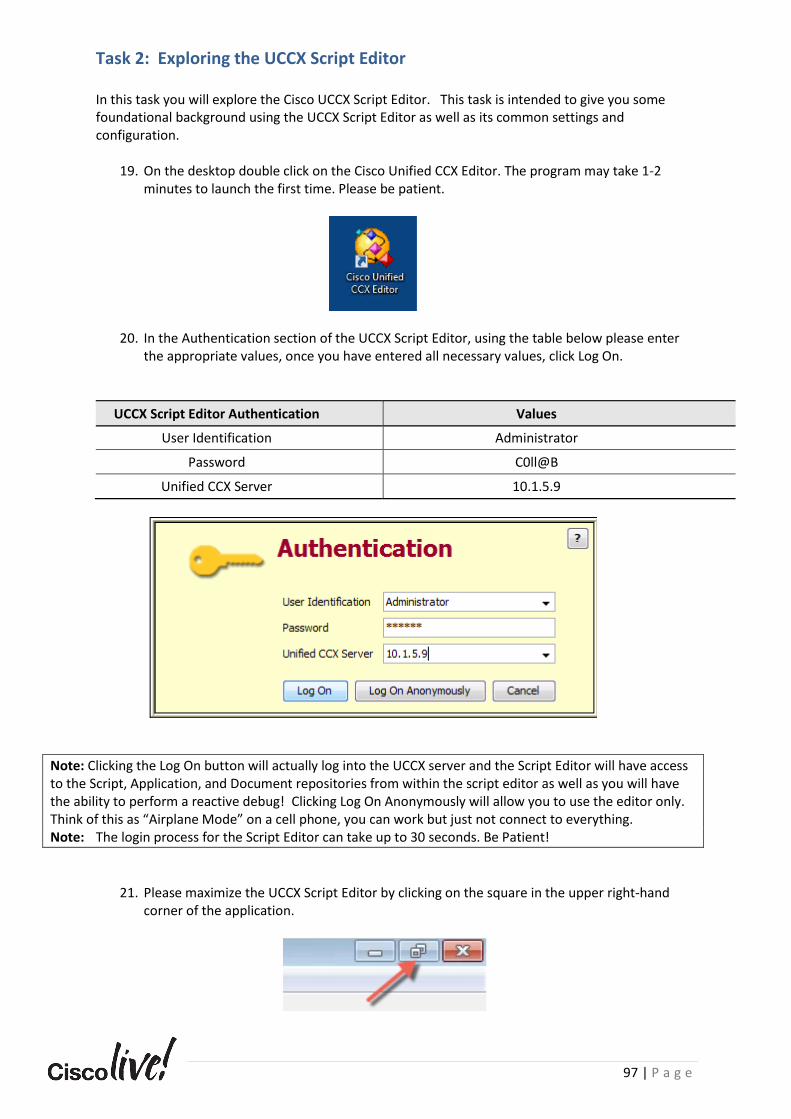
Task 2: Exploring the UCCX Script Editor
In this task you will explore the Cisco UCCX Script Editor. This task is intended to give you some foundational background using the UCCX Script Editor as well as its common settings and configuration.
19. On the desktop double click on the Cisco Unified CCX Editor. The program may take 1-2
minutes to launch the first time. Please be patient.
20. In the Authentication section of the UCCX Script Editor, using the table below please enter the appropriate values, once you have entered all necessary values, click Log On.
UCCX Script Editor Authentication Values
User Identification Administrator
Password C0ll@B
Unified CCX Server 10.1.5.9
Note: Clicking the Log On button will actually log into the UCCX server and the Script Editor will have access to the Script, Application, and Document repositories from within the script editor as well as you will have the ability to perform a reactive debug! Clicking Log On Anonymously will allow you to use the editor only. Think of this as “Airplane Mode” on a cell phone, you can work but just not connect to everything. Note: The login process for the Script Editor can take up to 30 seconds. Be Patient!
21. Please maximize the UCCX Script Editor by clicking on the square in the upper right-hand corner of the application.

98 | P a g e
22. Using the two diagrams located below, we are going to re-organize the real estate on the
UCCX Script Editor so that it is a little more advantageous to scripting. You can reposition the different panes of the UCCX Script Editor by clicking on the divider bars and dragging them by holding down on the left mouse button.
Before Layout Modification:
After Layout Modification:
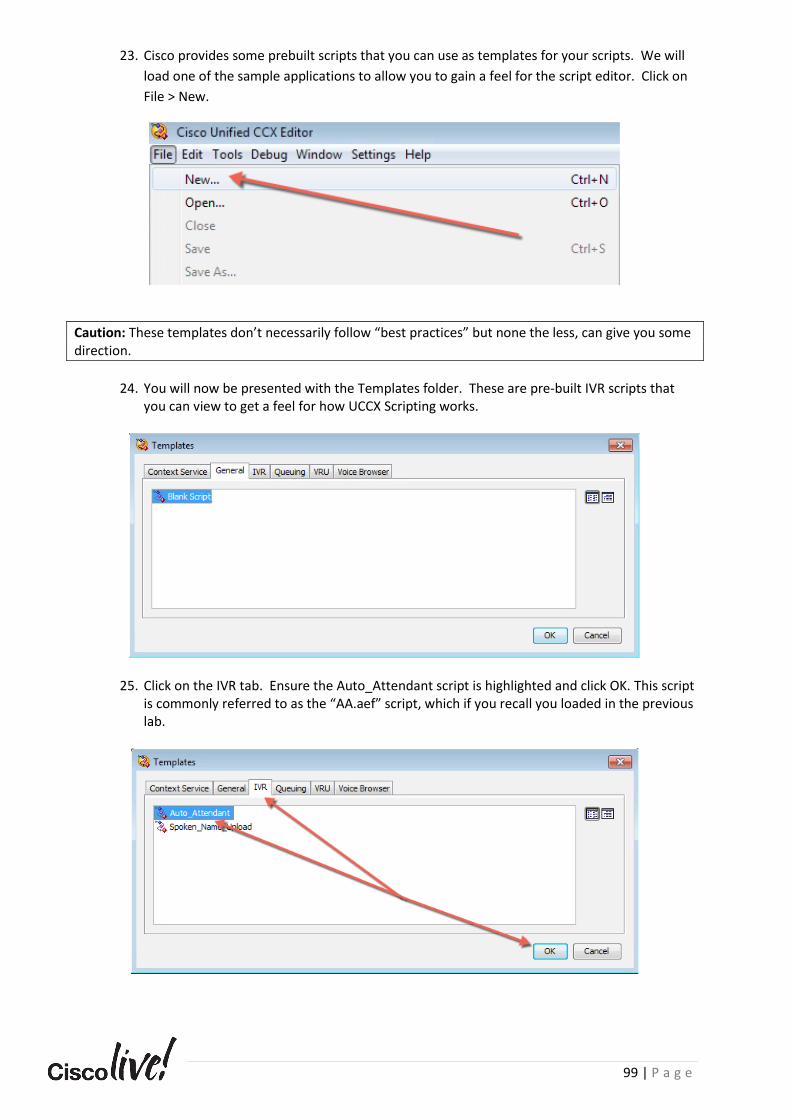
99 | P a g e
23. Cisco provides some prebuilt scripts that you can use as templates for your scripts. We will
load one of the sample applications to allow you to gain a feel for the script editor. Click on
File > New.
Caution: These templates don’t necessarily follow “best practices” but none the less, can give you some direction.
24. You will now be presented with the Templates folder. These are pre-built IVR scripts that
you can view to get a feel for how UCCX Scripting works.
25. Click on the IVR tab. Ensure the Auto_Attendant script is highlighted and click OK. This script is commonly referred to as the “AA.aef” script, which if you recall you loaded in the previous lab.
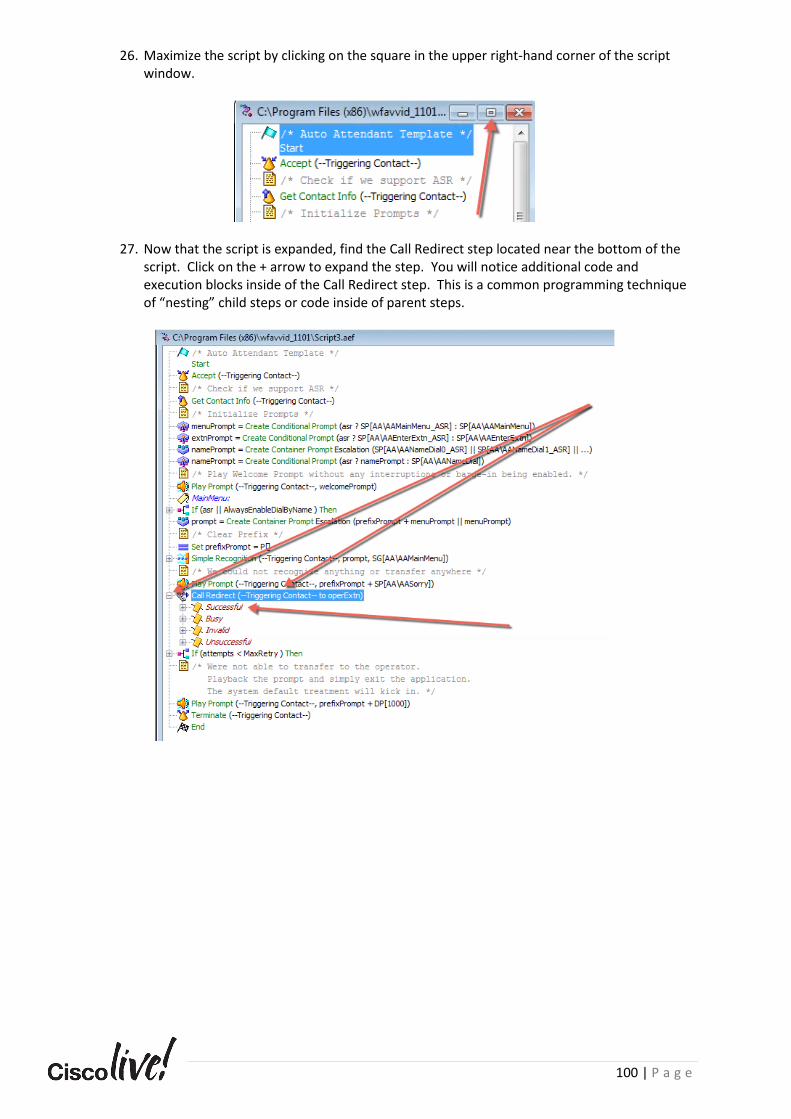
100 | P a g e
26. Maximize the script by clicking on the square in the upper right-hand corner of the script window.
27. Now that the script is expanded, find the Call Redirect step located near the bottom of the script. Click on the + arrow to expand the step. You will notice additional code and execution blocks inside of the Call Redirect step. This is a common programming technique of “nesting” child steps or code inside of parent steps.
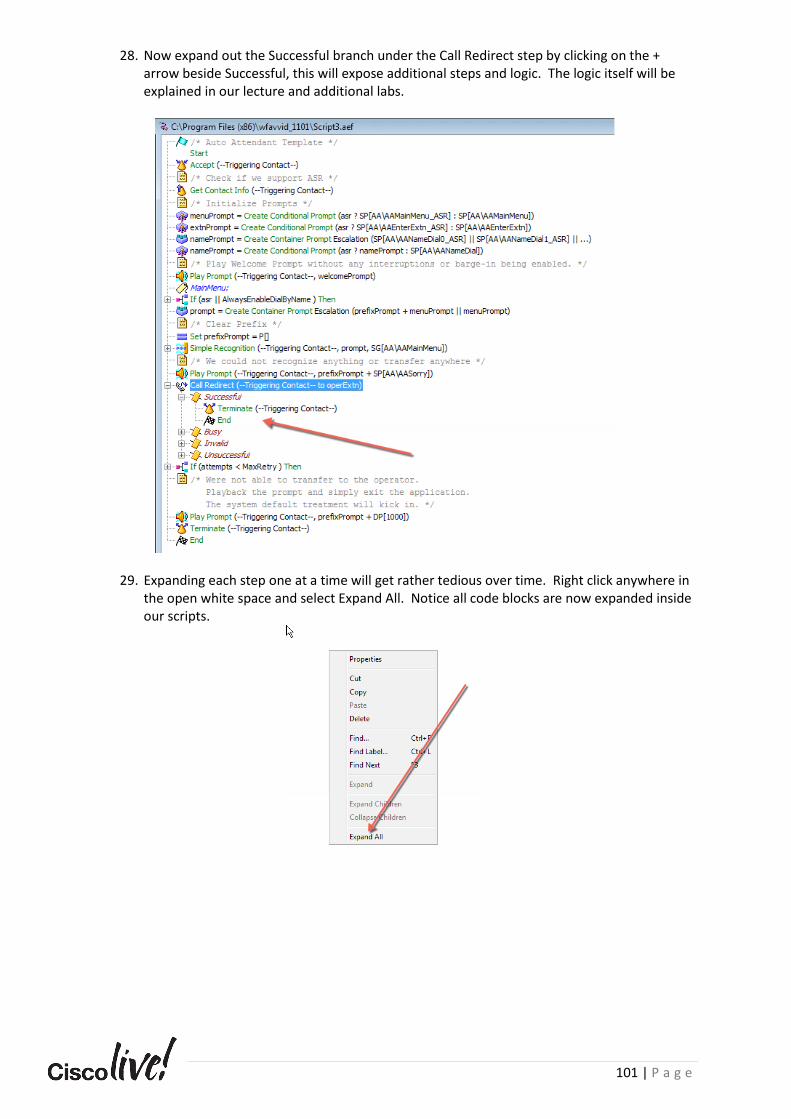
101 | P a g e
28. Now expand out the Successful branch under the Call Redirect step by clicking on the + arrow beside Successful, this will expose additional steps and logic. The logic itself will be explained in our lecture and additional labs.
29. Expanding each step one at a time will get rather tedious over time. Right click anywhere in the open white space and select Expand All. Notice all code blocks are now expanded inside our scripts.

102 | P a g e
30. Ensure that the Start step that is titled “Auto Attendant Template” at the very top of the script is highlighted blue. The blue background indicates that the Start step is highlighted and any steps added to the script would fall or be placed immediately below.
31. From time to time it may be nice to “fast forward” or jump to other places in our script. Major milestones in our scripts can be referred to as “Labels” a technique we will learn in the next lab. With the Start step being highlighted, right click anywhere in the white space and select Find.
32. In the Find pop up window, ensure that “Match label only” is selected, and enter “MainMenu”. Press Find Next.

103 | P a g e
33. Notice the blue background has now highlighted the Main Menu label.
34. Anywhere in the white space and select Find.
35. In the Find pop up window, ensure that “Match label only” is selected, and enter “XferOperator”. Press Find Next.
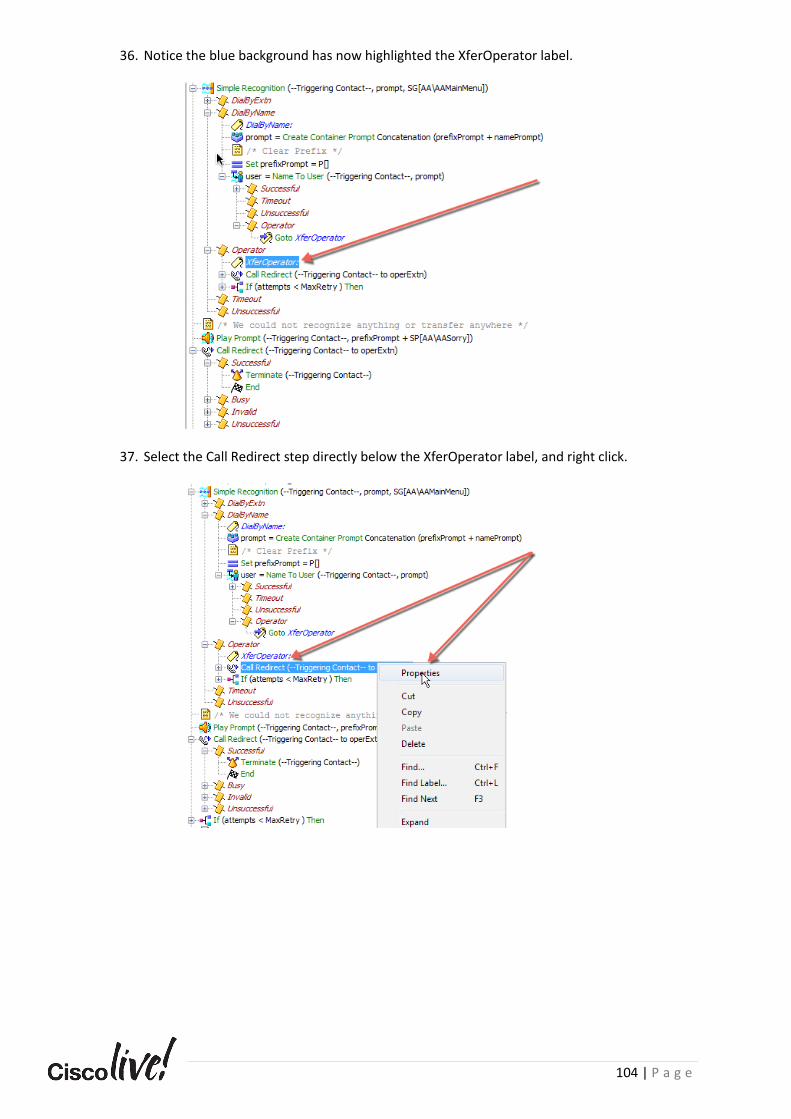
104 | P a g e
36. Notice the blue background has now highlighted the XferOperator label.
37. Select the Call Redirect step directly below the XferOperator label, and right click.
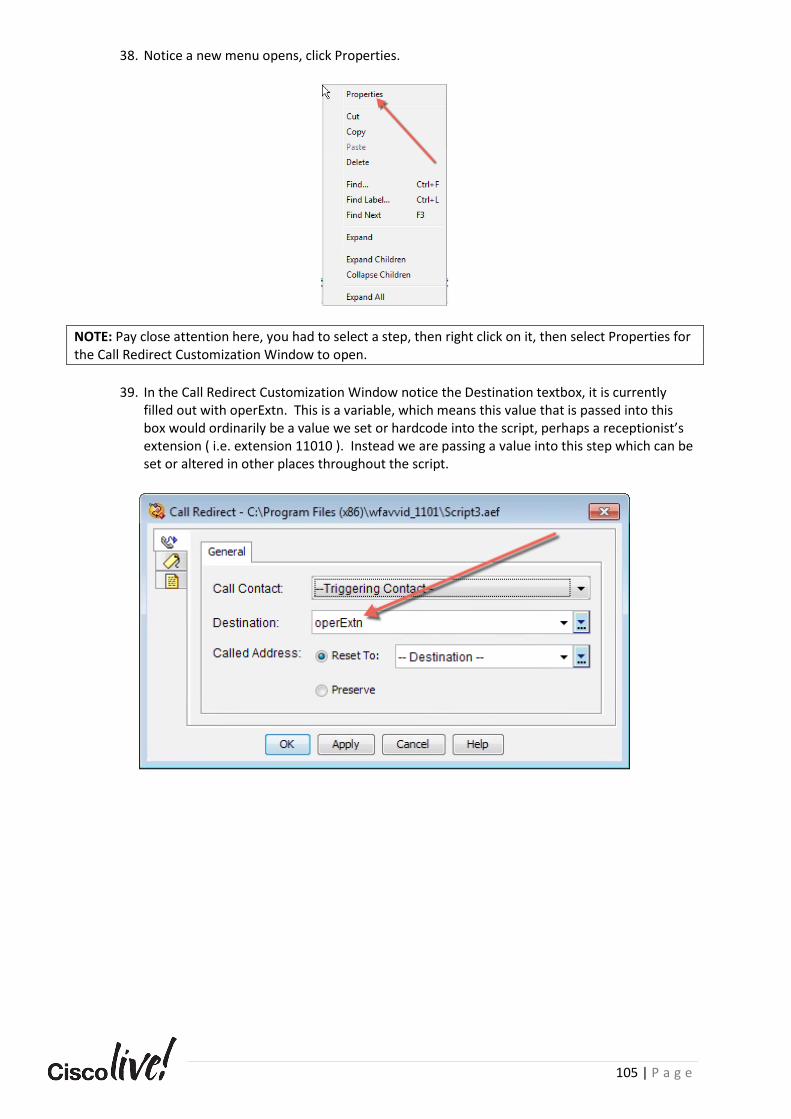
105 | P a g e
38. Notice a new menu opens, click Properties.
NOTE: Pay close attention here, you had to select a step, then right click on it, then select Properties for the Call Redirect Customization Window to open.
39. In the Call Redirect Customization Window notice the Destination textbox, it is currently
filled out with operExtn. This is a variable, which means this value that is passed into this box would ordinarily be a value we set or hardcode into the script, perhaps a receptionist’s extension ( i.e. extension 11010 ). Instead we are passing a value into this step which can be set or altered in other places throughout the script.

106 | P a g e
40. In the Variable Pane, located at the bottom of the script editor, please scroll down and find the variable titled operExtn.
Question: What is the value set to currently? Question: What does a Parameter mean? Answer: The value is blank, or “” empty strings. A Parameter is a variable or value we pass into the script from the Applications webpage in UCCX. We will explore this in later labs. This allows us to dynamically change values in our script without requiring code changes. This can be handy for Operator Extensions ( what if he/she calls out sick? ) or queue changes ( we can redirect calls to a different queue on the fly ).
41. Click Cancel on the Call Redirect Step, this will close the Call Redirect window.
42. At the top of the Script Editor click on Settings > Options.
43. In the View tab, notice that Labels are highlighted or have a color of Blue. This is CRUCIAL to understand and train your eyes to the fact that major milestones or “code blocks” in the IVR often point to Labels. Labels represent placeholders in a script, such as Play Main Menu, or Queue Call, or Close Menu. If you can train your eyes and brain into looking for Blue color steps this makes navigating the scripts very easy. You may also notice that all Labels have italic lettering. Now look at your AA.aef script and see if you can pick out the Labels.
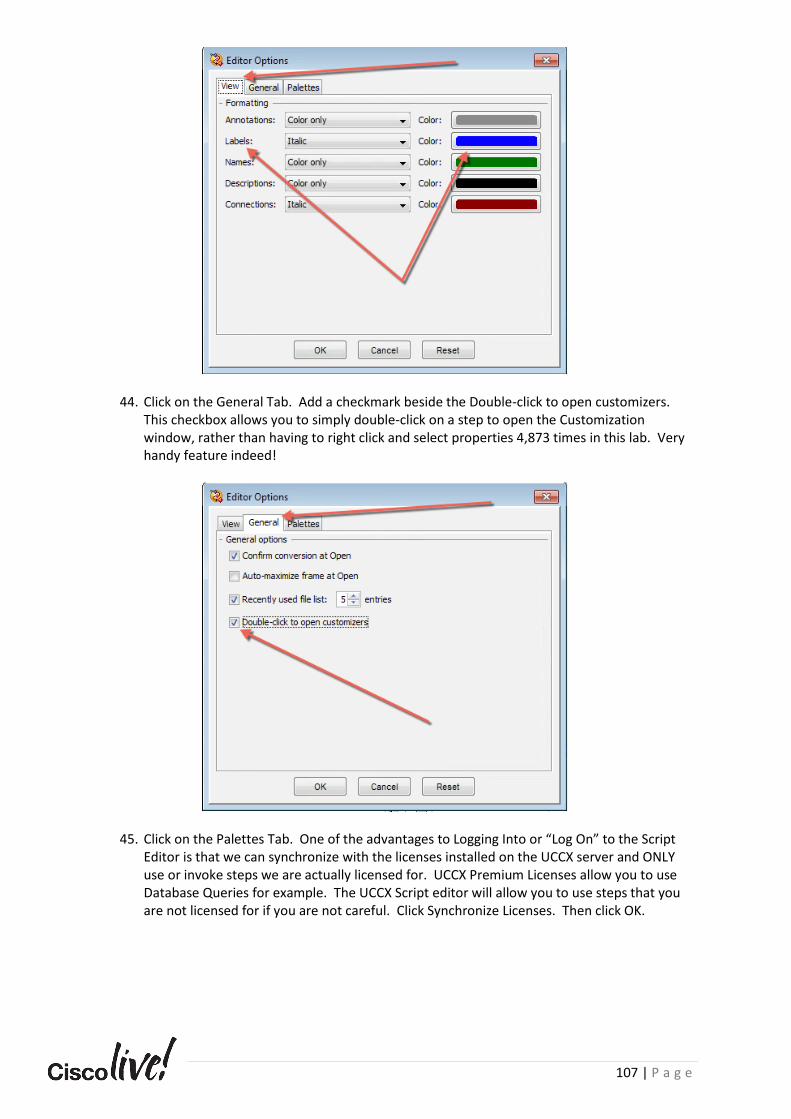
107 | P a g e
44. Click on the General Tab. Add a checkmark beside the Double-click to open customizers. This checkbox allows you to simply double-click on a step to open the Customization window, rather than having to right click and select properties 4,873 times in this lab. Very handy feature indeed!
45. Click on the Palettes Tab. One of the advantages to Logging Into or “Log On” to the Script Editor is that we can synchronize with the licenses installed on the UCCX server and ONLY use or invoke steps we are actually licensed for. UCCX Premium Licenses allow you to use Database Queries for example. The UCCX Script editor will allow you to use steps that you are not licensed for if you are not careful. Click Synchronize Licenses. Then click OK.

108 | P a g e
46. With the Call Redirect step still being highlighted in the Script Editor, now double-click on the step, the Customizer window will open automatically ( NOTE: you no longer need to “right click > Properties” )
47. Click Cancel to close the Call Redirect customization window.

109 | P a g e
48. Click the “ + “ arrow beside the General folder in the Palettes window. Take a moment to observe the steps listed in this window. We will explore many of the steps in this Lab.
49. Left click and continue to hold the left mouse button on the Annotate Step, drag the Annotate Step from the Palette Window into the Script Editor Pane. Notice that the Annotate step is placed below the Call Redirect steps.
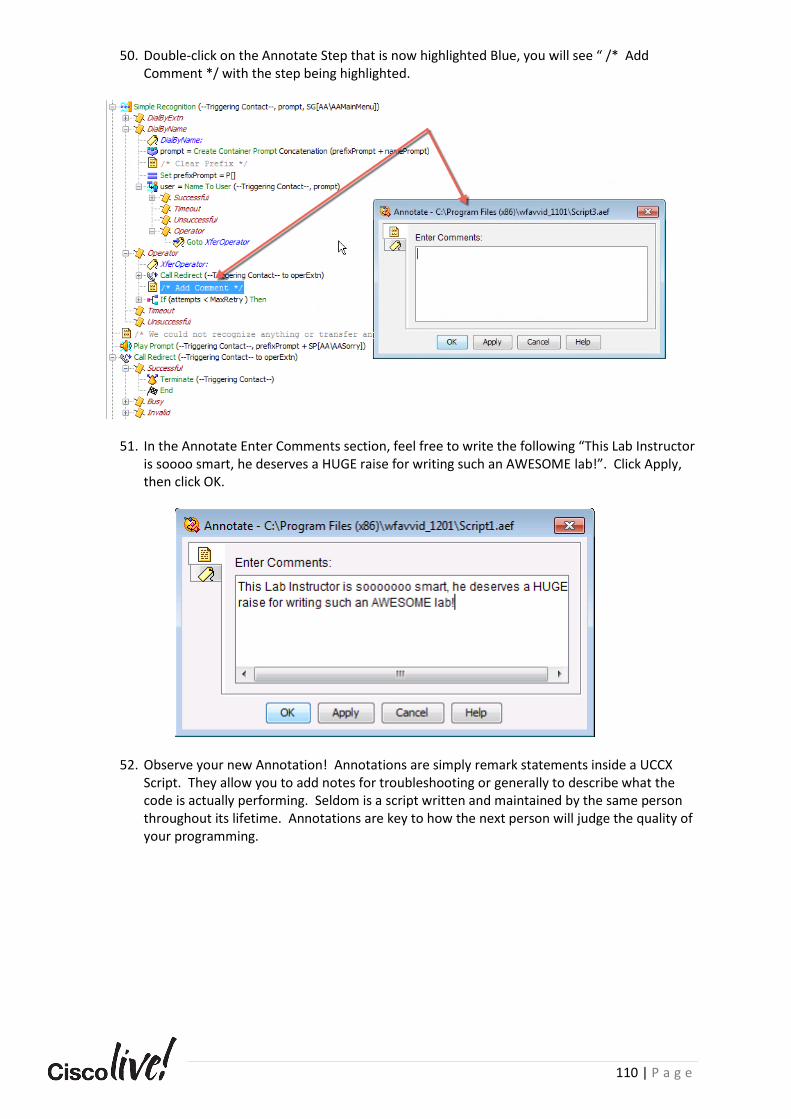
110 | P a g e
50. Double-click on the Annotate Step that is now highlighted Blue, you will see “ /* Add Comment */ with the step being highlighted.
51. In the Annotate Enter Comments section, feel free to write the following “This Lab Instructor is soooo smart, he deserves a HUGE raise for writing such an AWESOME lab!”. Click Apply, then click OK.
52. Observe your new Annotation! Annotations are simply remark statements inside a UCCX Script. They allow you to add notes for troubleshooting or generally to describe what the code is actually performing. Seldom is a script written and maintained by the same person throughout its lifetime. Annotations are key to how the next person will judge the quality of your programming.
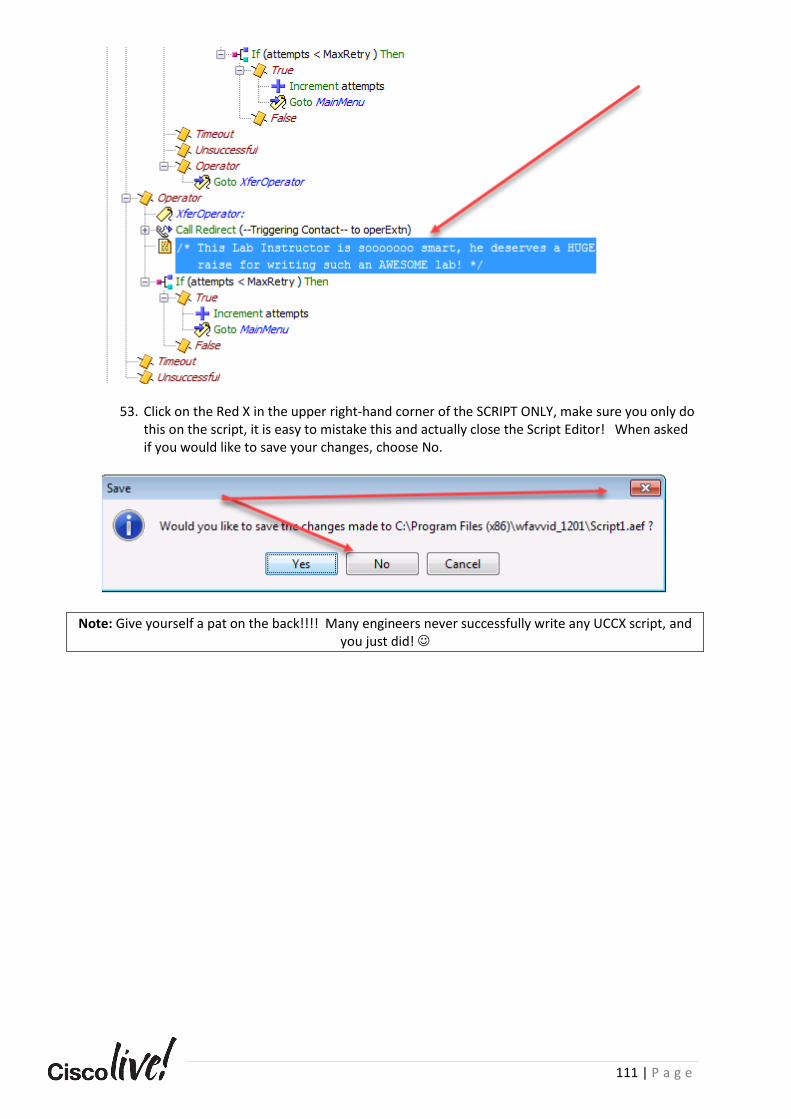
111 | P a g e
53. Click on the Red X in the upper right-hand corner of the SCRIPT ONLY, make sure you only do this on the script, it is easy to mistake this and actually close the Script Editor! When asked if you would like to save your changes, choose No.
Note: Give yourself a pat on the back!!!! Many engineers never successfully write any UCCX script, and you just did! ☺
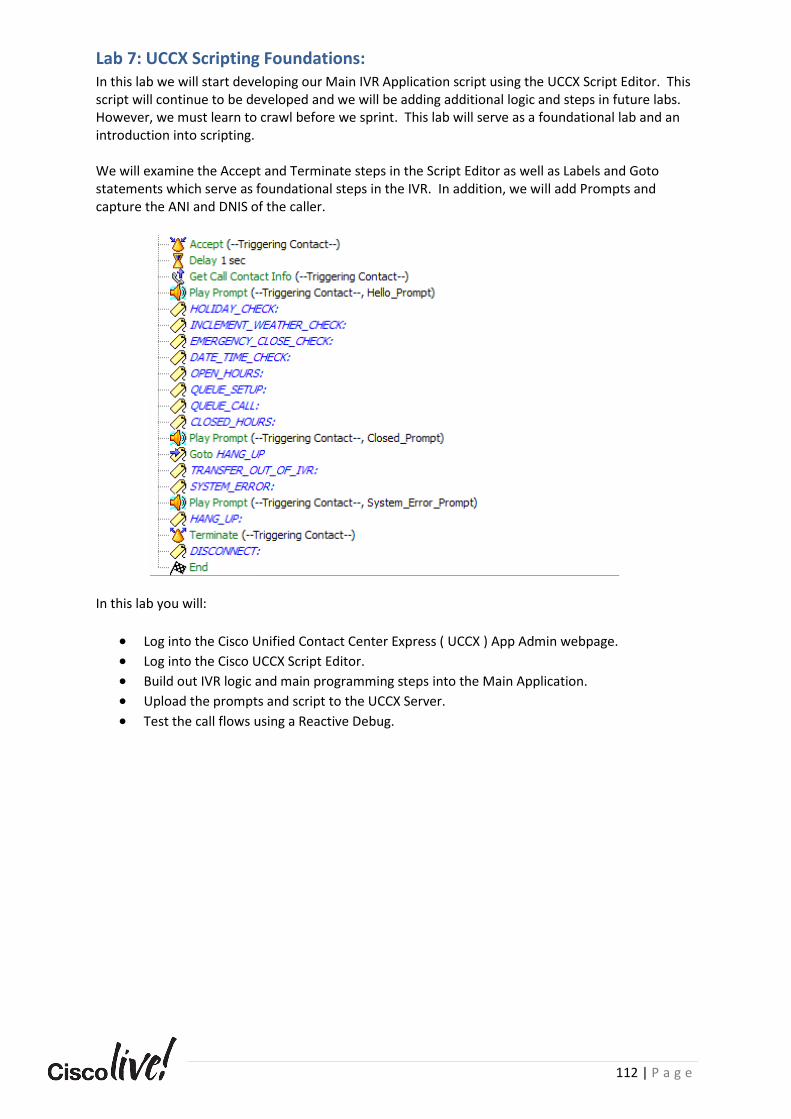
112 | P a g e
Lab 7: UCCX Scripting Foundations: In this lab we will start developing our Main IVR Application script using the UCCX Script Editor. This script will continue to be developed and we will be adding additional logic and steps in future labs. However, we must learn to crawl before we sprint. This lab will serve as a foundational lab and an introduction into scripting. We will examine the Accept and Terminate steps in the Script Editor as well as Labels and Goto statements which serve as foundational steps in the IVR. In addition, we will add Prompts and capture the ANI and DNIS of the caller.
In this lab you will:
• Log into the Cisco Unified Contact Center Express ( UCCX ) App Admin webpage.
• Log into the Cisco UCCX Script Editor.
• Build out IVR logic and main programming steps into the Main Application.
• Upload the prompts and script to the UCCX Server.
• Test the call flows using a Reactive Debug.

113 | P a g e
Task 1: Logging into the UCCX Administration Webpage In this task you will log into the UCCX Administration webpage on your student virtual machine.
1. Please open a new tab and browse to https://uccx-pub.cll-collab.internal or https://10.1.5.9
This will open up the webpage for UCCX.
2. Please click on the Add Exception button and then Confirm any Security Exceptions.
Note: In our lab we will not be installing “Signed Certificates” by a Certificate Authority,
therefore you may be presented with the pop-up warnings asking you to trust the website.
3. Please click on the Cisco Unified Contact Center Express Administration hyperlink displayed
on the website.
Note: You are redirected to the https://uccx-pub.cll-collab.internal/appadmin webpage.
4. Please authenticate by using the Username: Administrator and Password: C0ll@B Click
Login or press Enter.

114 | P a g e
Task 2: Creating the Main Application on the UCCX Server In this task you will create the Main IVR Application in UCCX. This application will be expanded in future labs. We are having you build an IVR application for a doctor’s office called the “Physician Application”. In this section, you will create the CTI Route Points (JTAPI Triggers in UCCX) as well as the Main Application IVR Application. Once the Application is created, we will map it to the script you build in this lab.
5. Please browse to Application > Application Management.
6. Observe the Test IVR Application created in an earlier lab. Click Add New.
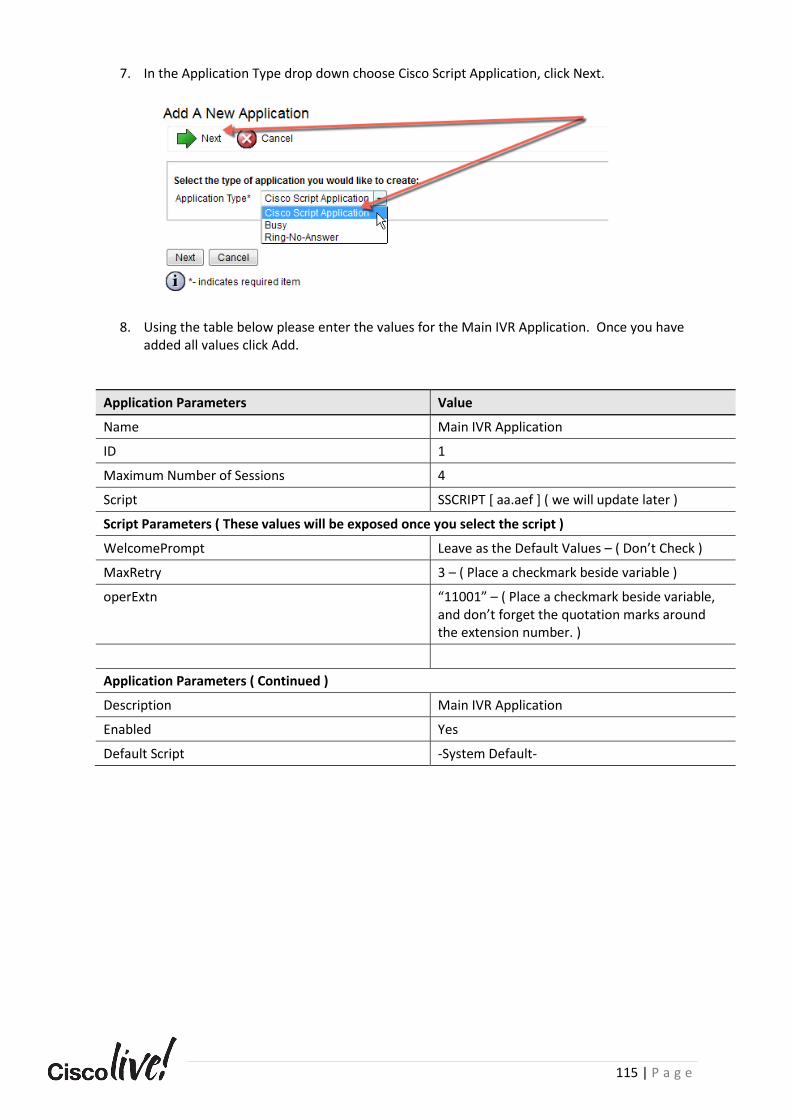
115 | P a g e
7. In the Application Type drop down choose Cisco Script Application, click Next.
8. Using the table below please enter the values for the Main IVR Application. Once you have added all values click Add.
Application Parameters Value
Name Main IVR Application
ID 1
Maximum Number of Sessions 4
Script SSCRIPT [ aa.aef ] ( we will update later )
Script Parameters ( These values will be exposed once you select the script )
WelcomePrompt Leave as the Default Values – ( Don’t Check )
MaxRetry 3 – ( Place a checkmark beside variable )
operExtn “11001” – ( Place a checkmark beside variable, and don’t forget the quotation marks around the extension number. )
Application Parameters ( Continued )
Description Main IVR Application
Enabled Yes
Default Script -System Default-
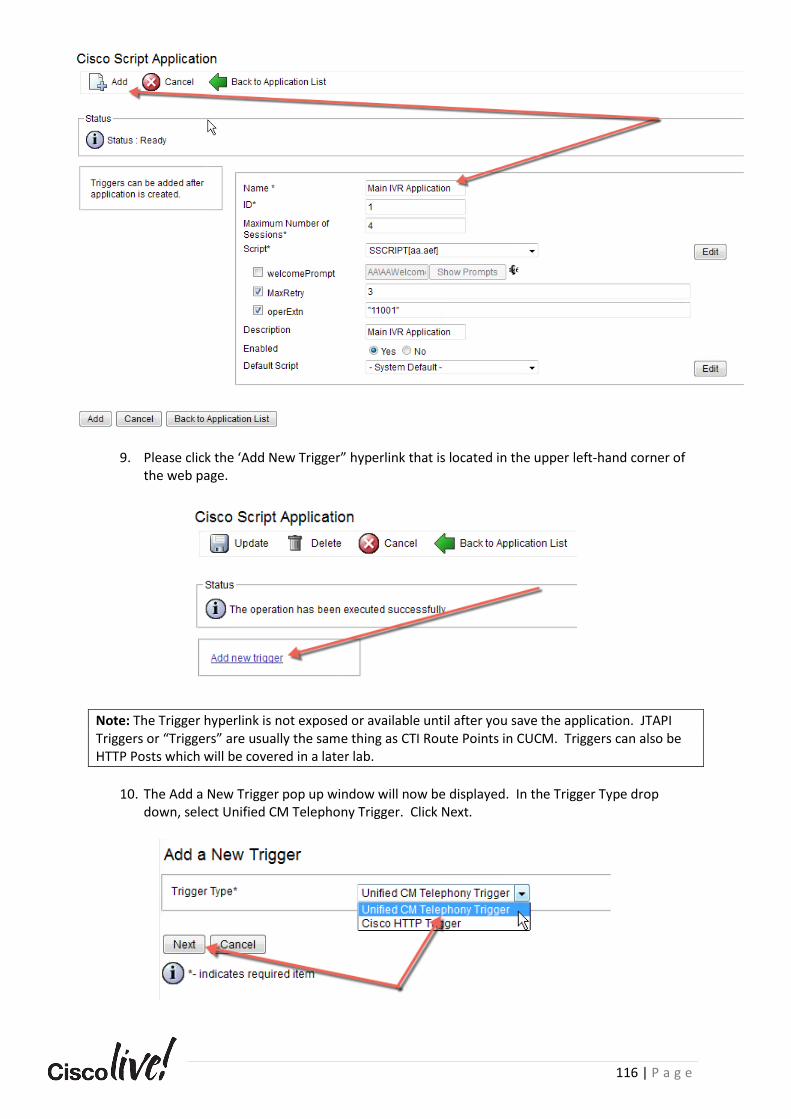
116 | P a g e
9. Please click the ‘Add New Trigger” hyperlink that is located in the upper left-hand corner of the web page.
Note: The Trigger hyperlink is not exposed or available until after you save the application. JTAPI Triggers or “Triggers” are usually the same thing as CTI Route Points in CUCM. Triggers can also be HTTP Posts which will be covered in a later lab.
10. The Add a New Trigger pop up window will now be displayed. In the Trigger Type drop
down, select Unified CM Telephony Trigger. Click Next.
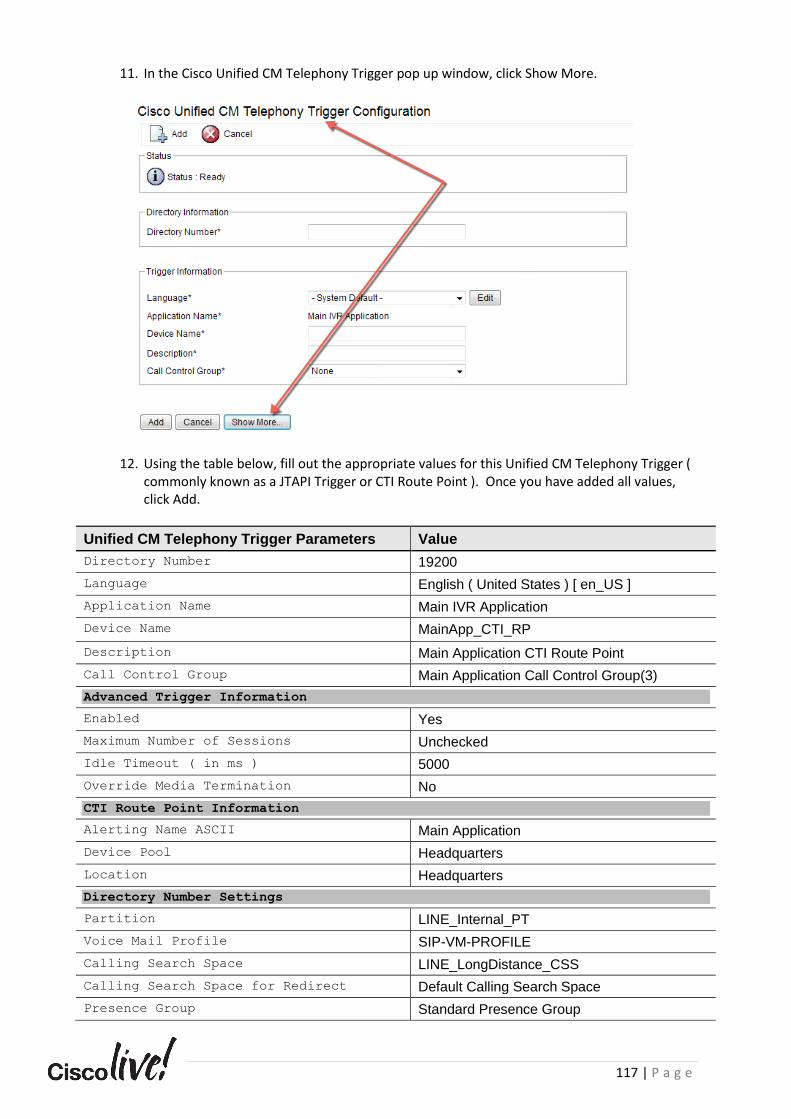
117 | P a g e
11. In the Cisco Unified CM Telephony Trigger pop up window, click Show More.
12. Using the table below, fill out the appropriate values for this Unified CM Telephony Trigger ( commonly known as a JTAPI Trigger or CTI Route Point ). Once you have added all values, click Add.
Unified CM Telephony Trigger Parameters Value
Directory Number 19200
Language English ( United States ) [ en_US ]
Application Name Main IVR Application
Device Name MainApp_CTI_RP
Description Main Application CTI Route Point
Call Control Group Main Application Call Control Group(3)
Advanced Trigger Information
Enabled Yes
Maximum Number of Sessions Unchecked
Idle Timeout ( in ms ) 5000
Override Media Termination No
CTI Route Point Information
Alerting Name ASCII Main Application
Device Pool Headquarters
Location Headquarters
Directory Number Settings
Partition LINE_Internal_PT
Voice Mail Profile SIP-VM-PROFILE
Calling Search Space LINE_LongDistance_CSS
Calling Search Space for Redirect Default Calling Search Space
Presence Group Standard Presence Group
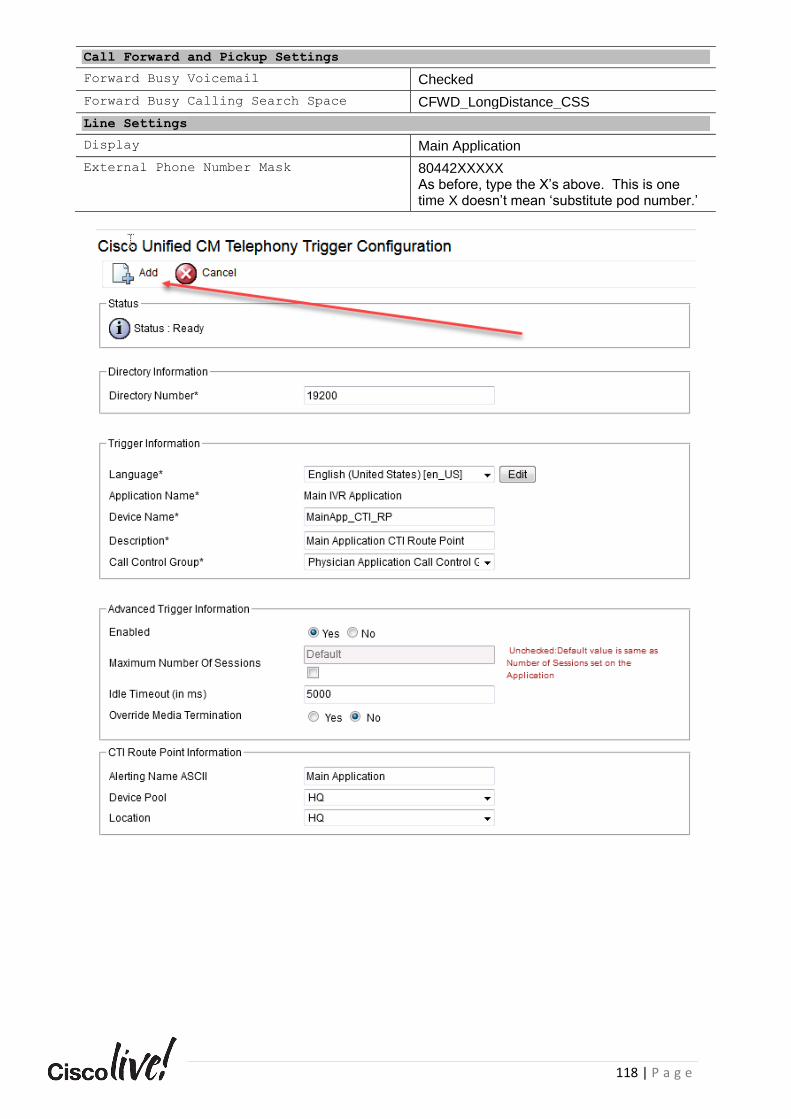
118 | P a g e
Call Forward and Pickup Settings
Forward Busy Voicemail Checked
Forward Busy Calling Search Space CFWD_LongDistance_CSS
Line Settings
Display Main Application
External Phone Number Mask 80442XXXXX As before, type the X’s above. This is one time X doesn’t mean ‘substitute pod number.’

119 | P a g e
13. Once you have added a Unified CM Telephony Trigger ( CTI Route Point ) it will be displayed beside the application as seen below:
14. Click the Back to Application List button.
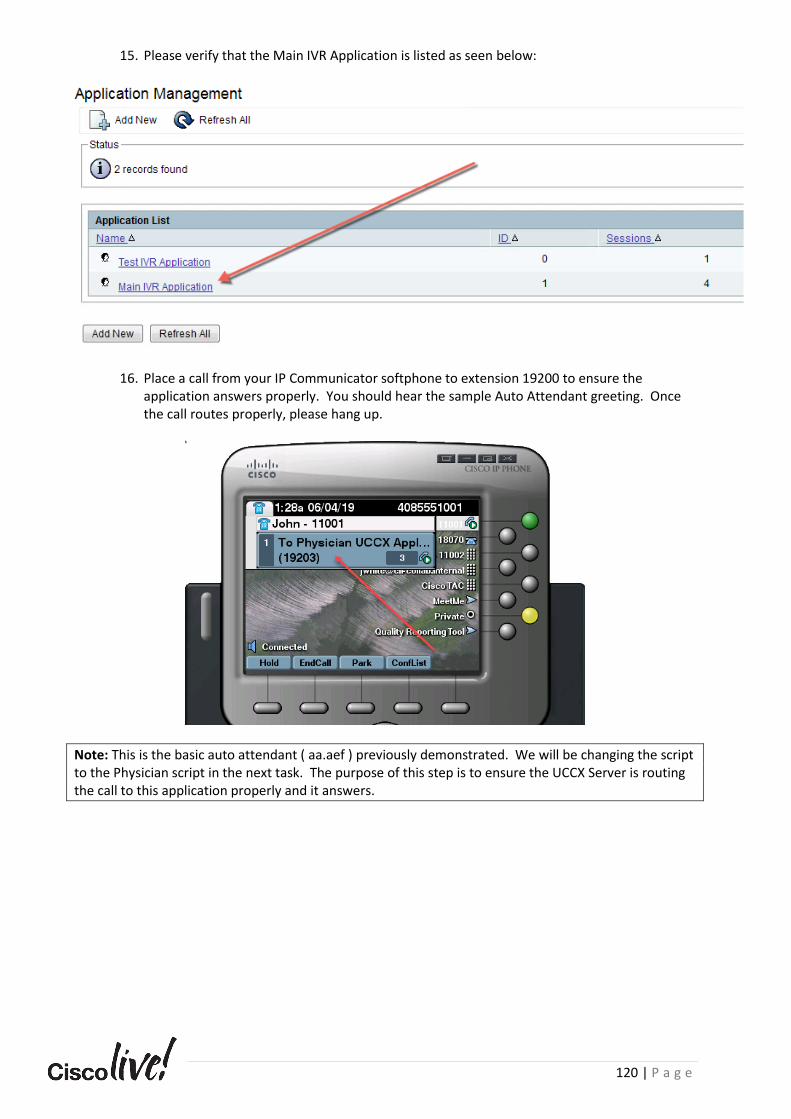
120 | P a g e
15. Please verify that the Main IVR Application is listed as seen below:
16. Place a call from your IP Communicator softphone to extension 19200 to ensure the application answers properly. You should hear the sample Auto Attendant greeting. Once the call routes properly, please hang up.
Note: This is the basic auto attendant ( aa.aef ) previously demonstrated. We will be changing the script to the Physician script in the next task. The purpose of this step is to ensure the UCCX Server is routing the call to this application properly and it answers.
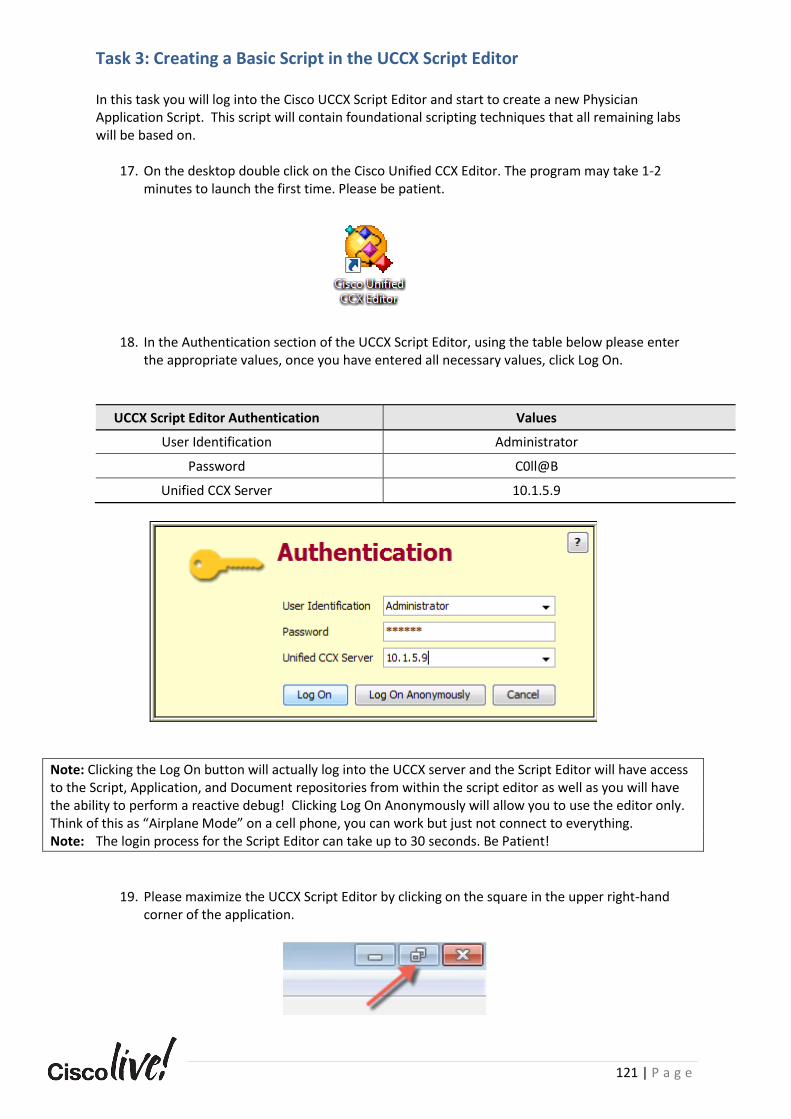
121 | P a g e
Task 3: Creating a Basic Script in the UCCX Script Editor
In this task you will log into the Cisco UCCX Script Editor and start to create a new Physician Application Script. This script will contain foundational scripting techniques that all remaining labs will be based on.
17. On the desktop double click on the Cisco Unified CCX Editor. The program may take 1-2 minutes to launch the first time. Please be patient.
18. In the Authentication section of the UCCX Script Editor, using the table below please enter the appropriate values, once you have entered all necessary values, click Log On.
UCCX Script Editor Authentication Values
User Identification Administrator
Password C0ll@B
Unified CCX Server 10.1.5.9
Note: Clicking the Log On button will actually log into the UCCX server and the Script Editor will have access to the Script, Application, and Document repositories from within the script editor as well as you will have the ability to perform a reactive debug! Clicking Log On Anonymously will allow you to use the editor only. Think of this as “Airplane Mode” on a cell phone, you can work but just not connect to everything. Note: The login process for the Script Editor can take up to 30 seconds. Be Patient!
19. Please maximize the UCCX Script Editor by clicking on the square in the upper right-hand corner of the application.
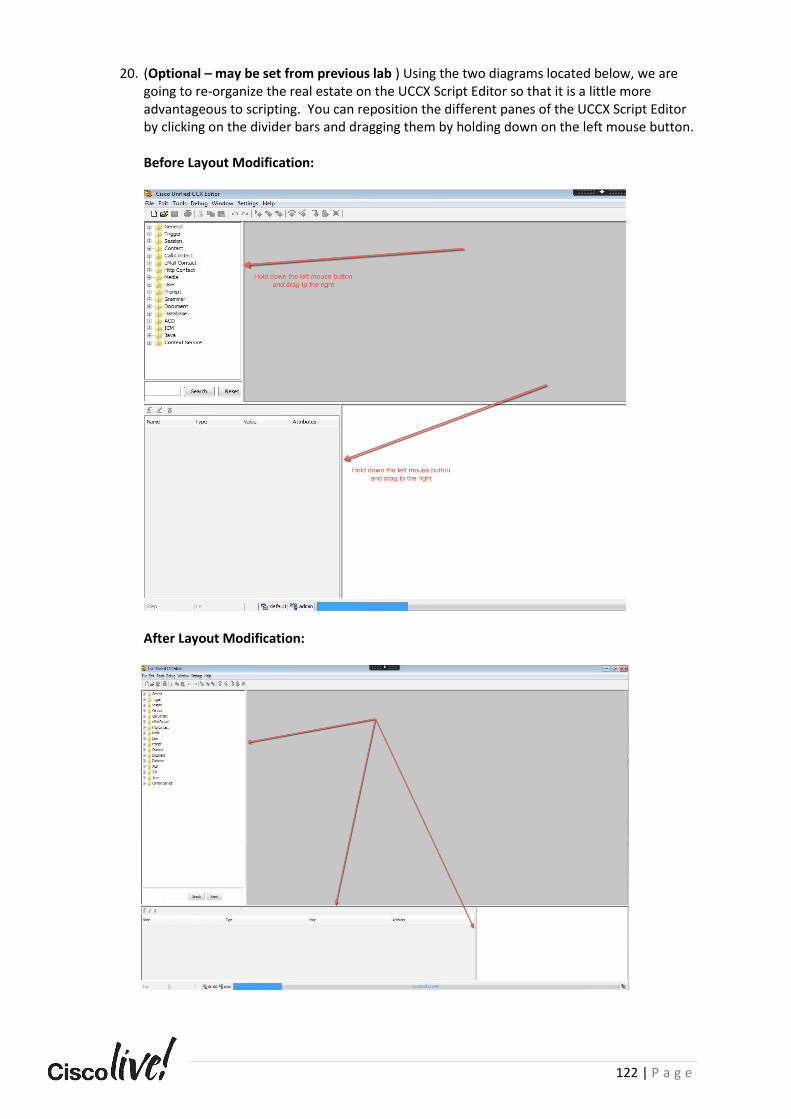
122 | P a g e
20. (Optional – may be set from previous lab ) Using the two diagrams located below, we are
going to re-organize the real estate on the UCCX Script Editor so that it is a little more advantageous to scripting. You can reposition the different panes of the UCCX Script Editor by clicking on the divider bars and dragging them by holding down on the left mouse button.
Before Layout Modification:
After Layout Modification:
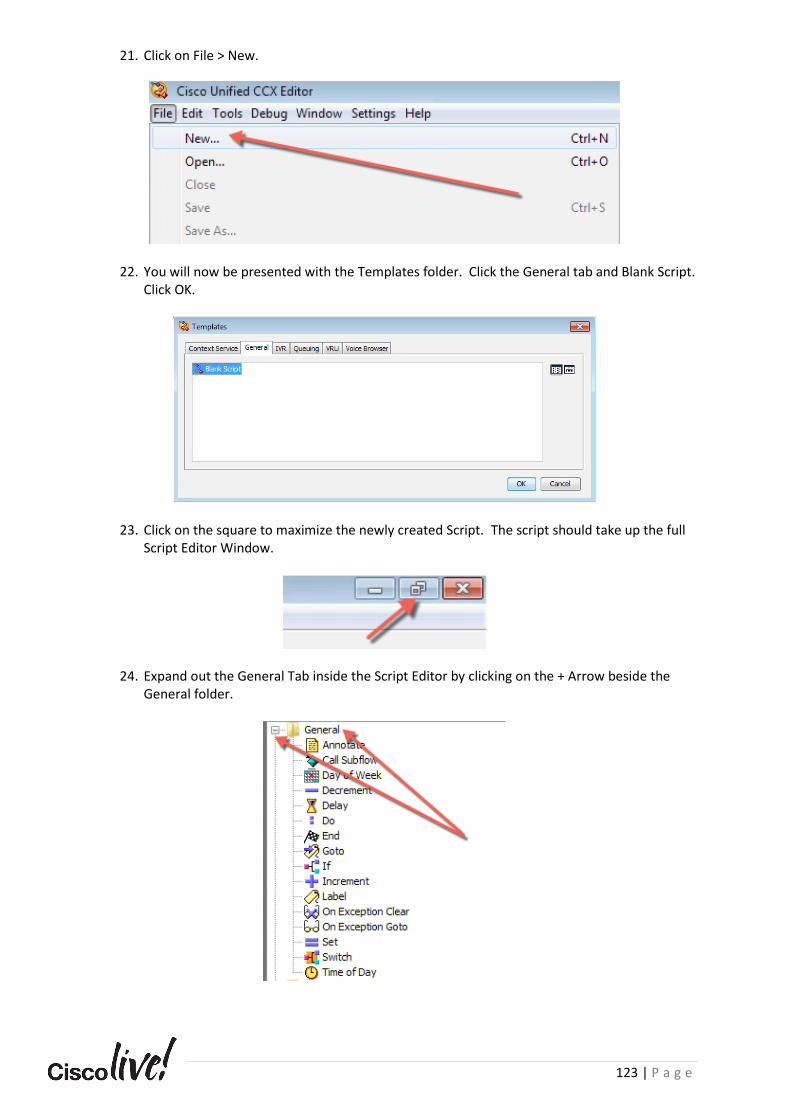
123 | P a g e
21. Click on File > New.
22. You will now be presented with the Templates folder. Click the General tab and Blank Script. Click OK.
23. Click on the square to maximize the newly created Script. The script should take up the full Script Editor Window.
24. Expand out the General Tab inside the Script Editor by clicking on the + Arrow beside the General folder.

124 | P a g e
25. Highlight the Annotate step, and while holding down the left mouse button, drag it into the script editor pane and release it directly below the Start step.
26. Double click on the Annotate step to open the properties of this step.
Use the screenshot below, please enter all required data. You will use this screenshot as a template to customize your values.
Note: The values in the brackets should be substituted for your personal data. We are providing a graphic for reference. Once you have completely filled out this step click Apply and OK.
Example Annotate Step Syntax is listed below: ( Replace brackets with your own data }
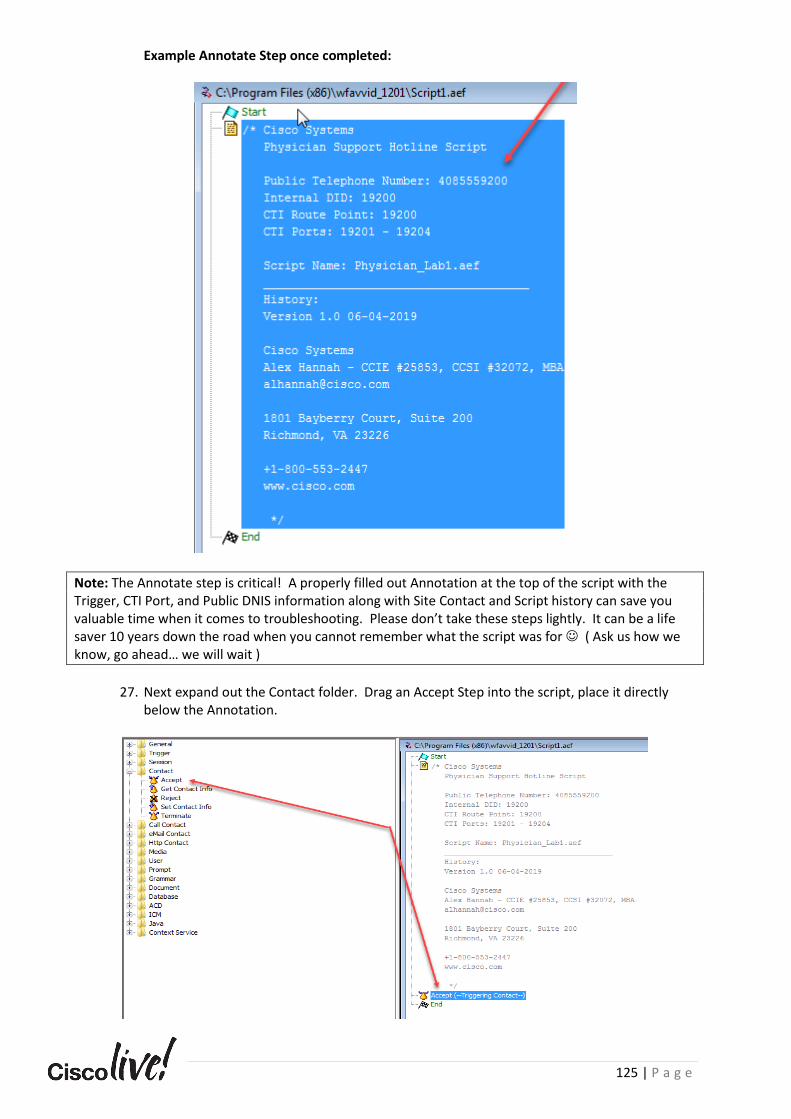
125 | P a g e
Example Annotate Step once completed:
Note: The Annotate step is critical! A properly filled out Annotation at the top of the script with the Trigger, CTI Port, and Public DNIS information along with Site Contact and Script history can save you valuable time when it comes to troubleshooting. Please don’t take these steps lightly. It can be a life saver 10 years down the road when you cannot remember what the script was for ☺ ( Ask us how we know, go ahead… we will wait )
27. Next expand out the Contact folder. Drag an Accept Step into the script, place it directly
below the Annotation.
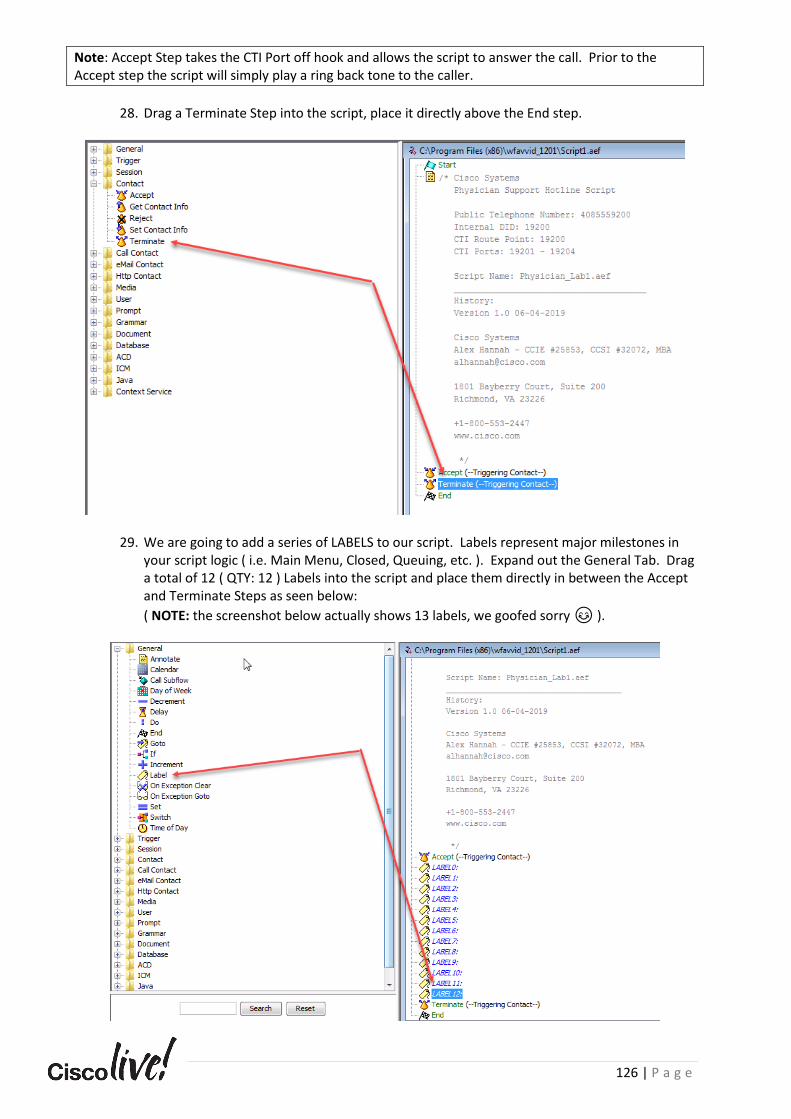
126 | P a g e
Note: Accept Step takes the CTI Port off hook and allows the script to answer the call. Prior to the Accept step the script will simply play a ring back tone to the caller.
28. Drag a Terminate Step into the script, place it directly above the End step.
29. We are going to add a series of LABELS to our script. Labels represent major milestones in your script logic ( i.e. Main Menu, Closed, Queuing, etc. ). Expand out the General Tab. Drag a total of 12 ( QTY: 12 ) Labels into the script and place them directly in between the Accept and Terminate Steps as seen below:
( NOTE: the screenshot below actually shows 13 labels, we goofed sorry 😊 ).

127 | P a g e
30. Double click on the LABEL0 step located in the script. This will open the customization window. Please change the label to read HOLIDAY_CHECK as seen below. Once you have changed the Label click Apply and then OK.
31. Using the table below please double click on each of the remaining Labels ( Label 1 – 11 ) and rename them to more accurately reflect the code that will be contained in between them. Once you have opened each Label and changed the text, please remember to click Apply and OK. A Screenshot has been provided below the table to aide you in this process.
Label Number Label Text ( NOTE: ALL UPPER CASE! )
LABEL0 HOLIDAY_CHECK
LABEL1 INCLEMENT_WEATHER_CHECK
LABEL2 EMERGENCY_CLOSE_CHECK
LABEL3 DATE_TIME_CHECK
LABEL4 OPEN_HOURS
LABEL5 QUEUE_SETUP
LABEL6 QUEUE_CALL
LABEL7 CLOSED_HOURS
LABEL8 TRANSFER_OUT_OF_IVR
LABEL9 SYSTEM_ERROR
LABEL10 HANG_UP
LABEL11 DISCONNECT
Example Label Steps once completed:
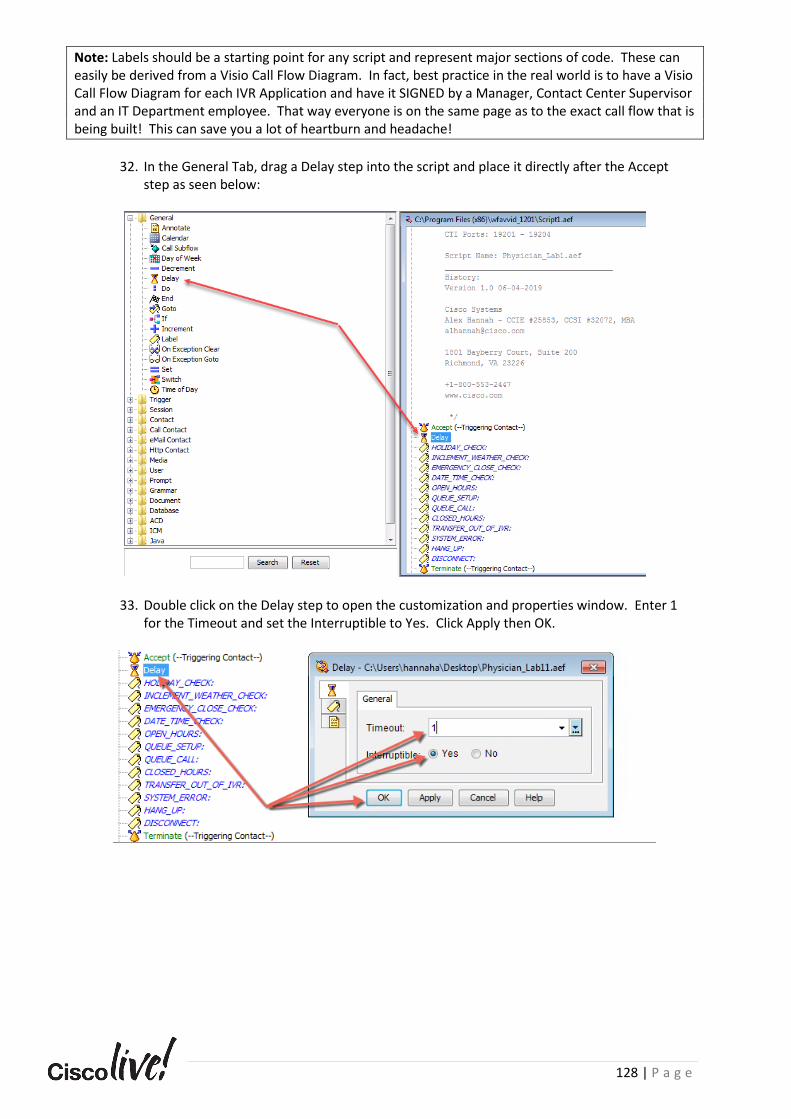
128 | P a g e
Note: Labels should be a starting point for any script and represent major sections of code. These can easily be derived from a Visio Call Flow Diagram. In fact, best practice in the real world is to have a Visio Call Flow Diagram for each IVR Application and have it SIGNED by a Manager, Contact Center Supervisor and an IT Department employee. That way everyone is on the same page as to the exact call flow that is being built! This can save you a lot of heartburn and headache!
32. In the General Tab, drag a Delay step into the script and place it directly after the Accept
step as seen below:
33. Double click on the Delay step to open the customization and properties window. Enter 1 for the Timeout and set the Interruptible to Yes. Click Apply then OK.
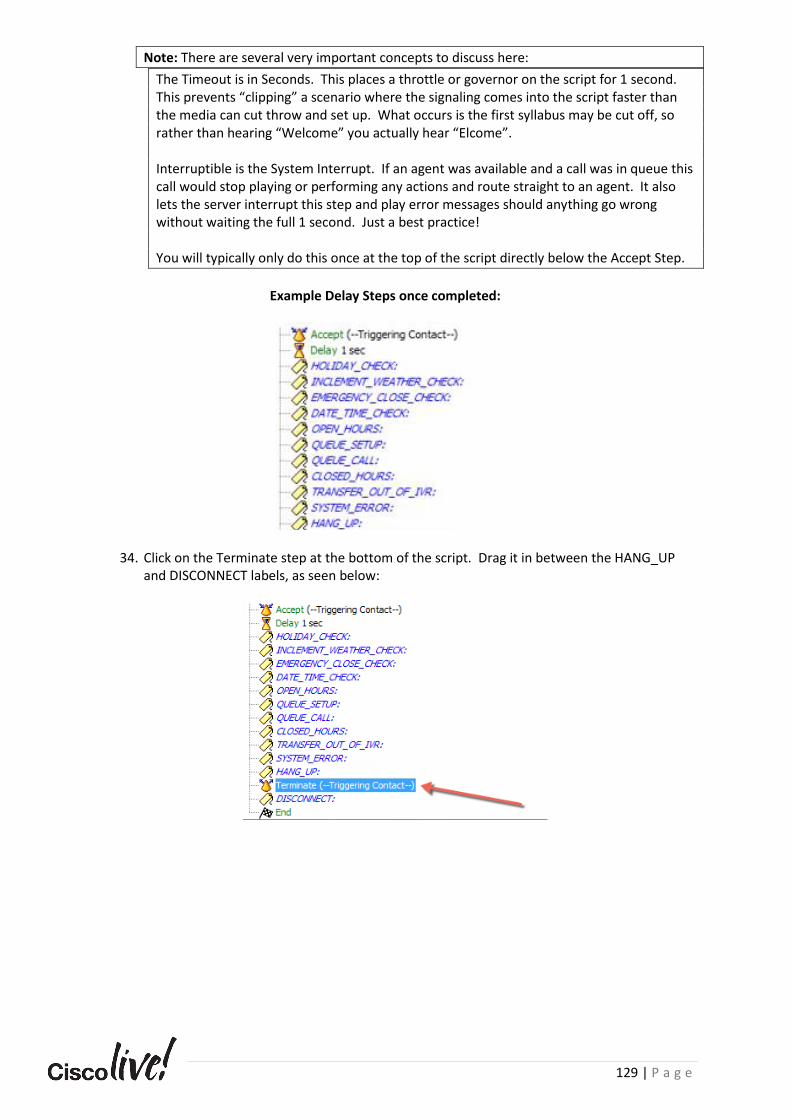
129 | P a g e
Note: There are several very important concepts to discuss here:
The Timeout is in Seconds. This places a throttle or governor on the script for 1 second. This prevents “clipping” a scenario where the signaling comes into the script faster than the media can cut throw and set up. What occurs is the first syllabus may be cut off, so rather than hearing “Welcome” you actually hear “Elcome”. Interruptible is the System Interrupt. If an agent was available and a call was in queue this call would stop playing or performing any actions and route straight to an agent. It also lets the server interrupt this step and play error messages should anything go wrong without waiting the full 1 second. Just a best practice! You will typically only do this once at the top of the script directly below the Accept Step.
Example Delay Steps once completed:
34. Click on the Terminate step at the bottom of the script. Drag it in between the HANG_UP and DISCONNECT labels, as seen below:
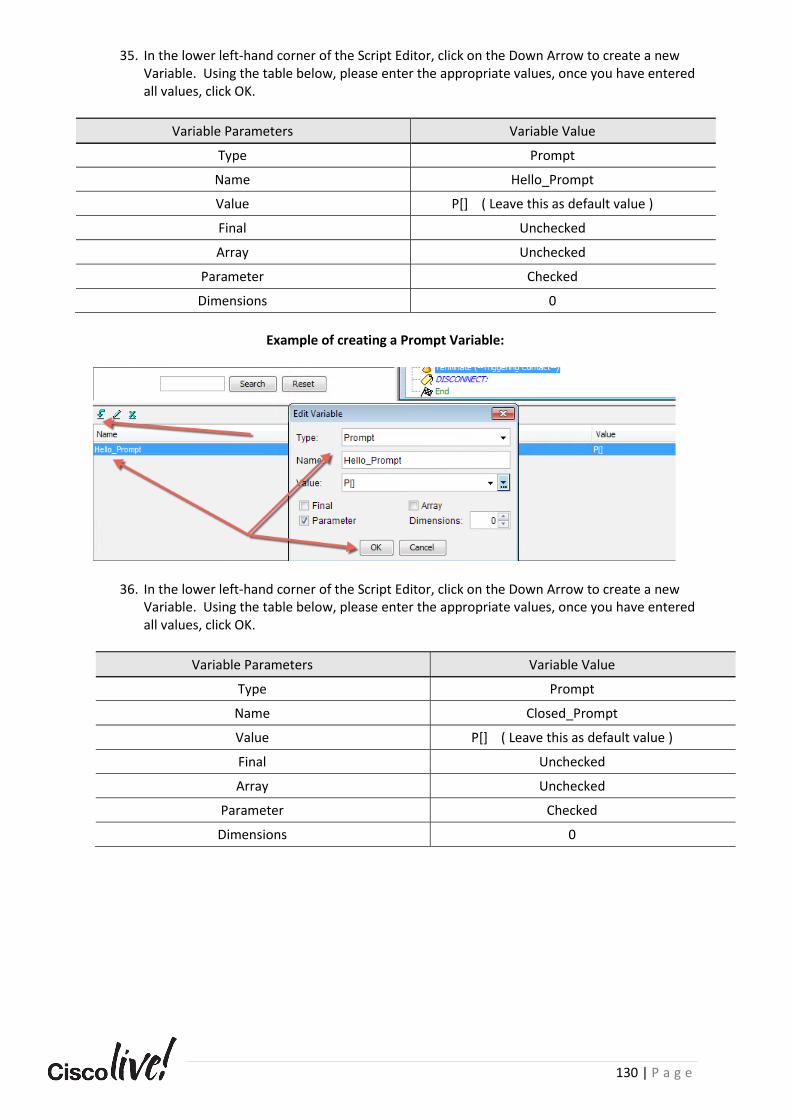
130 | P a g e
35. In the lower left-hand corner of the Script Editor, click on the Down Arrow to create a new Variable. Using the table below, please enter the appropriate values, once you have entered all values, click OK.
Variable Parameters Variable Value
Type Prompt
Name Hello_Prompt
Value P[] ( Leave this as default value )
Final Unchecked
Array Unchecked
Parameter Checked
Dimensions 0
Example of creating a Prompt Variable:
36. In the lower left-hand corner of the Script Editor, click on the Down Arrow to create a new Variable. Using the table below, please enter the appropriate values, once you have entered all values, click OK.
Variable Parameters Variable Value
Type Prompt
Name Closed_Prompt
Value P[] ( Leave this as default value )
Final Unchecked
Array Unchecked
Parameter Checked
Dimensions 0

131 | P a g e
Example of creating a Prompt Variable:
37. In the lower left-hand corner of the Script Editor, click on the Down Arrow to create a new Variable. Using the table below, please enter the appropriate values, once you have entered all values, click OK.
Variable Parameters Variable Value
Type Prompt
Name System_Error_Prompt
Value P[] ( Leave this as default value )
Final Unchecked
Array Unchecked
Parameter Checked
Dimensions 0
Example of creating a Variable:
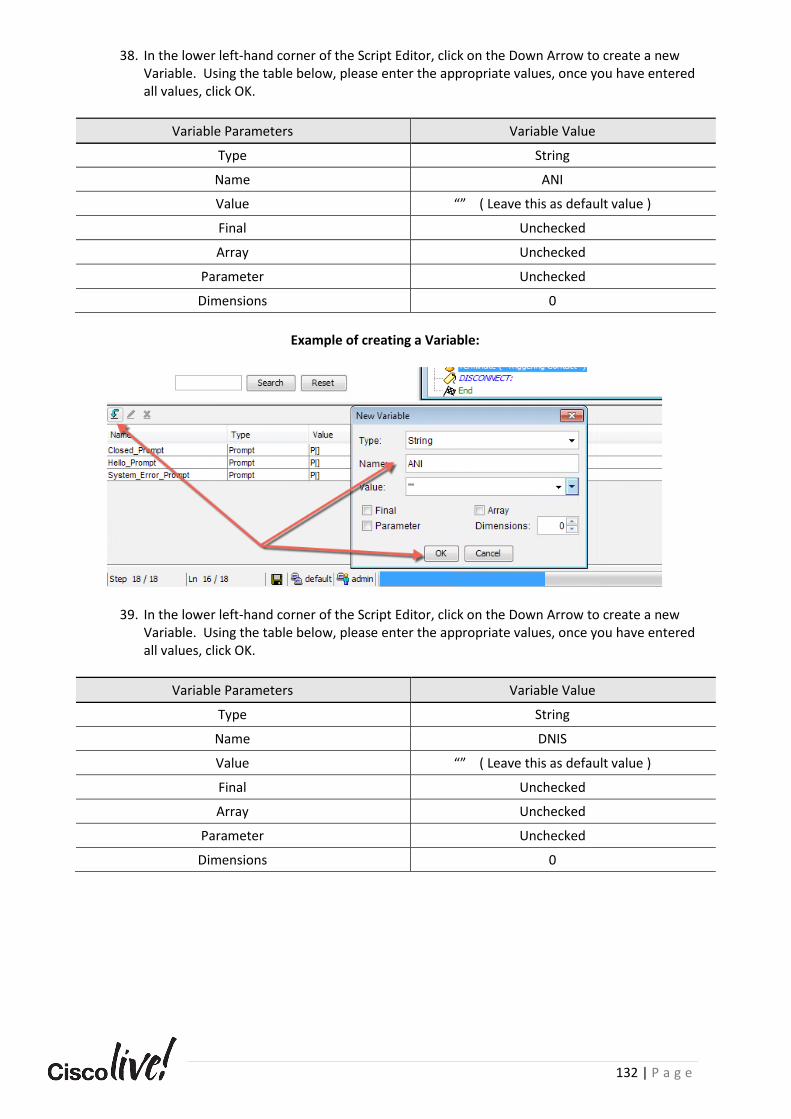
132 | P a g e
38. In the lower left-hand corner of the Script Editor, click on the Down Arrow to create a new Variable. Using the table below, please enter the appropriate values, once you have entered all values, click OK.
Variable Parameters Variable Value
Type String
Name ANI
Value “” ( Leave this as default value )
Final Unchecked
Array Unchecked
Parameter Unchecked
Dimensions 0
Example of creating a Variable:
39. In the lower left-hand corner of the Script Editor, click on the Down Arrow to create a new Variable. Using the table below, please enter the appropriate values, once you have entered all values, click OK.
Variable Parameters Variable Value
Type String
Name DNIS
Value “” ( Leave this as default value )
Final Unchecked
Array Unchecked
Parameter Unchecked
Dimensions 0

133 | P a g e
Example of creating a Variable:
40. Once you have entered all five variables your variables pane in the Script Editor should look like the image shown below:
41. Expand the Call Contact folder, drag the Get Call Contact Info step into the script and place it directly below the Delay step as seen below:

134 | P a g e
42. Double click on the Get Call Contact Info step to open the customization window. Highlight the Called Number so the background is blue, click Set.
43. In the Set Called Number Attribute pop up window, select DNIS as the variable and click Apply then OK.
44. Highlight the Called Number so the background is blue, click Set.
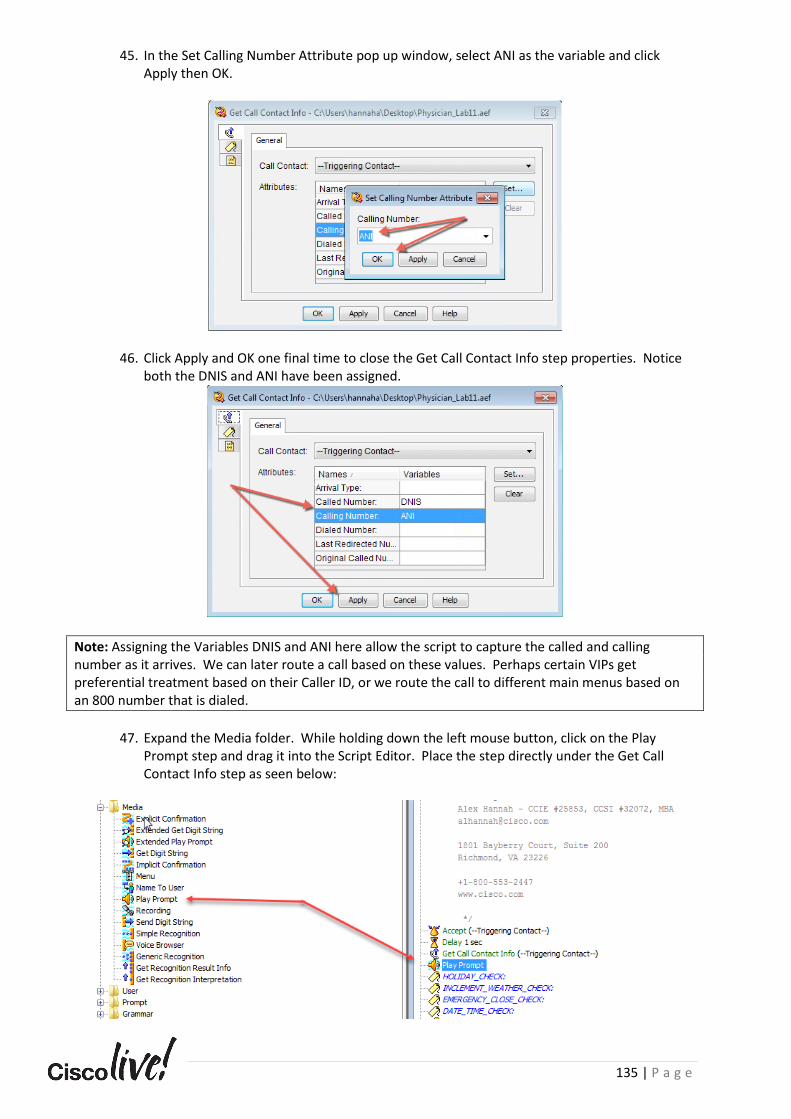
135 | P a g e
45. In the Set Calling Number Attribute pop up window, select ANI as the variable and click Apply then OK.
46. Click Apply and OK one final time to close the Get Call Contact Info step properties. Notice both the DNIS and ANI have been assigned.
Note: Assigning the Variables DNIS and ANI here allow the script to capture the called and calling number as it arrives. We can later route a call based on these values. Perhaps certain VIPs get preferential treatment based on their Caller ID, or we route the call to different main menus based on an 800 number that is dialed.
47. Expand the Media folder. While holding down the left mouse button, click on the Play
Prompt step and drag it into the Script Editor. Place the step directly under the Get Call Contact Info step as seen below:
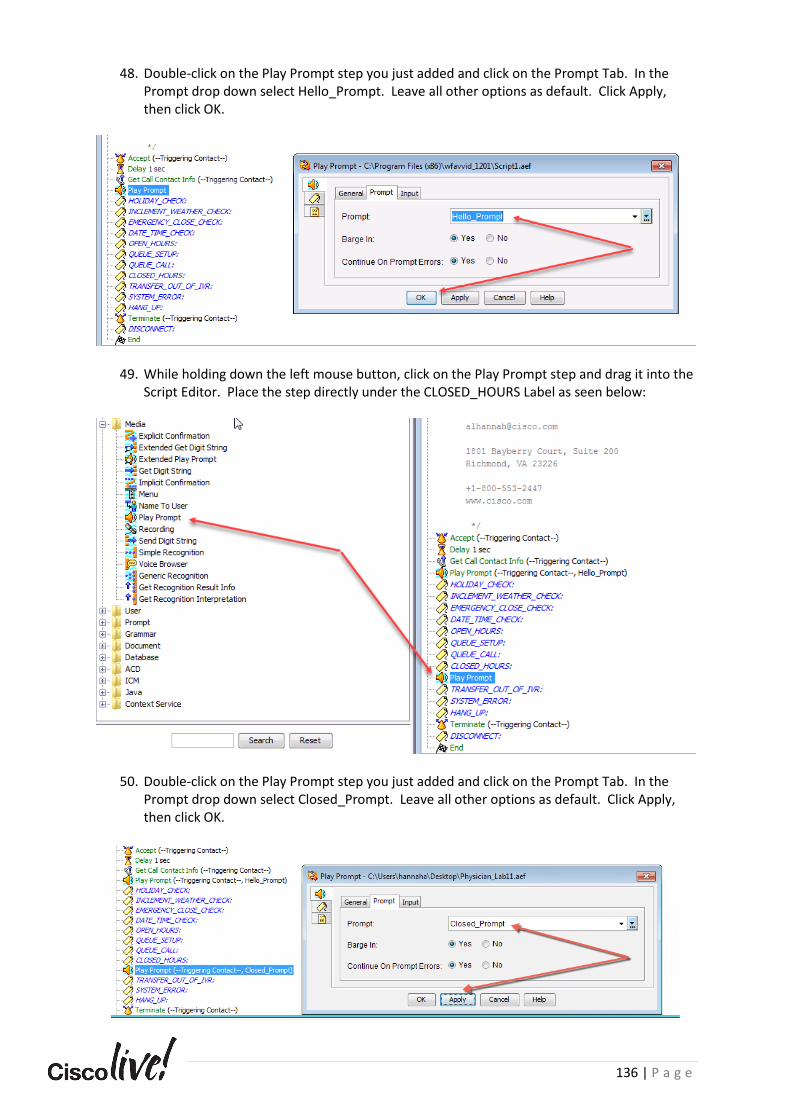
136 | P a g e
48. Double-click on the Play Prompt step you just added and click on the Prompt Tab. In the
Prompt drop down select Hello_Prompt. Leave all other options as default. Click Apply, then click OK.
49. While holding down the left mouse button, click on the Play Prompt step and drag it into the Script Editor. Place the step directly under the CLOSED_HOURS Label as seen below:
50. Double-click on the Play Prompt step you just added and click on the Prompt Tab. In the Prompt drop down select Closed_Prompt. Leave all other options as default. Click Apply, then click OK.

137 | P a g e
51. While holding down the left mouse button, click on the Play Prompt step and drag it into the
Script Editor. Place the step directly under the SYSTEM_ERROR Label as seen below:
52. Double-click on the Play Prompt step you just added and click on the Prompt Tab. In the Prompt drop down select System_Error_Prompt. Leave all other options as default. Click Apply, then click OK.
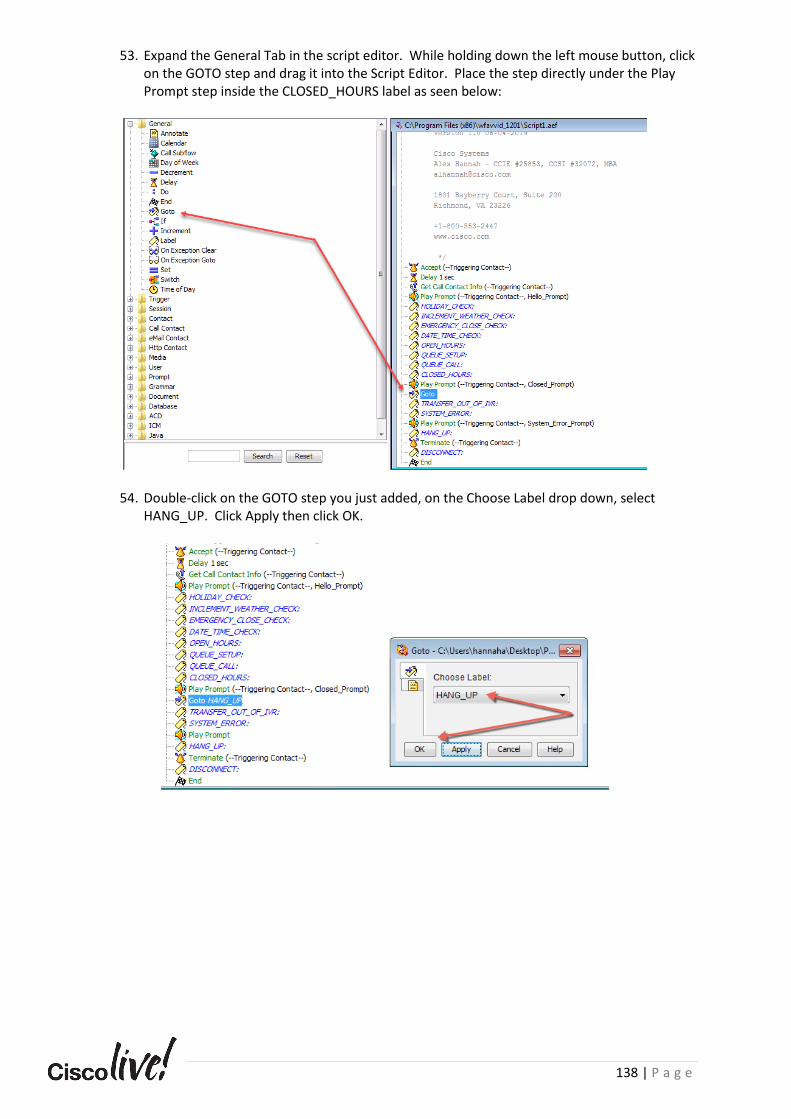
138 | P a g e
53. Expand the General Tab in the script editor. While holding down the left mouse button, click on the GOTO step and drag it into the Script Editor. Place the step directly under the Play Prompt step inside the CLOSED_HOURS label as seen below:
54. Double-click on the GOTO step you just added, on the Choose Label drop down, select HANG_UP. Click Apply then click OK.
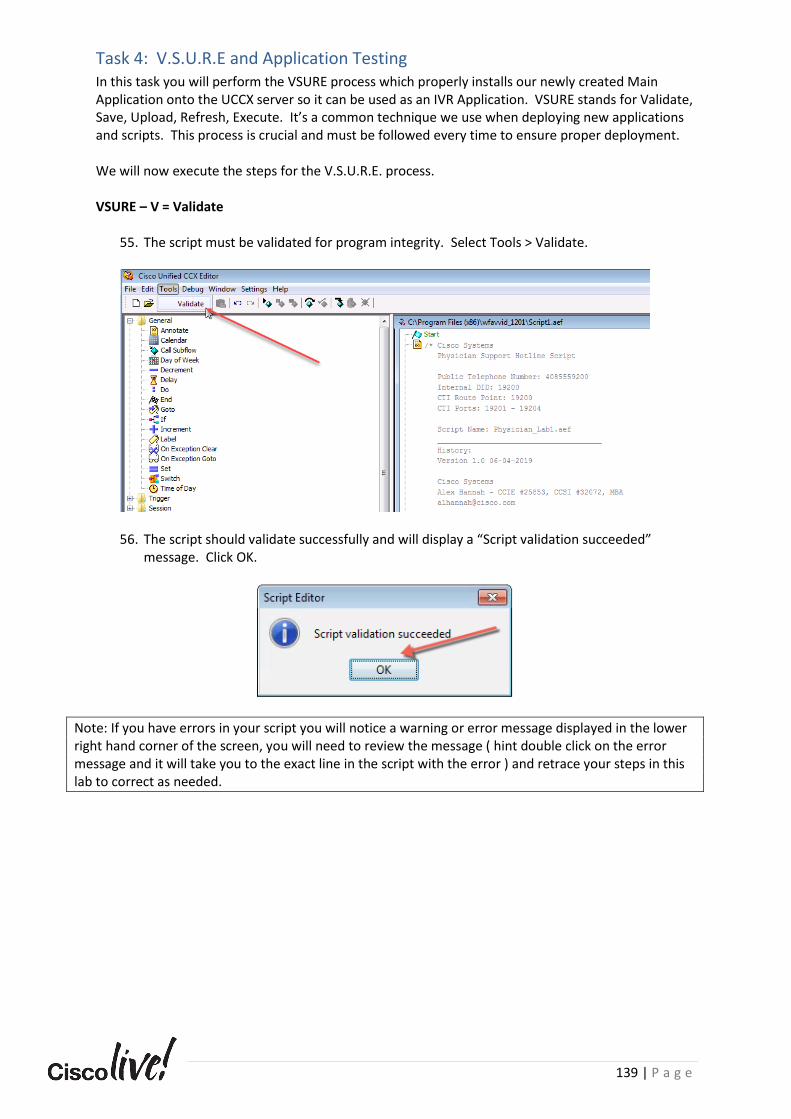
139 | P a g e
Task 4: V.S.U.R.E and Application Testing In this task you will perform the VSURE process which properly installs our newly created Main Application onto the UCCX server so it can be used as an IVR Application. VSURE stands for Validate, Save, Upload, Refresh, Execute. It’s a common technique we use when deploying new applications and scripts. This process is crucial and must be followed every time to ensure proper deployment.
We will now execute the steps for the V.S.U.R.E. process.
VSURE – V = Validate
55. The script must be validated for program integrity. Select Tools > Validate.
56. The script should validate successfully and will display a “Script validation succeeded” message. Click OK.
Note: If you have errors in your script you will notice a warning or error message displayed in the lower right hand corner of the screen, you will need to review the message ( hint double click on the error message and it will take you to the exact line in the script with the error ) and retrace your steps in this lab to correct as needed.

140 | P a g e
VSURE – S = Save As
57. In the top left corner of the UCCX Script Editor please choose File > Save As.
58. Ensure the Save In drop down shows the Desktop. Enter the filename Physician_Lab1.aef. Click Save.
Note: It is best practice to always ‘Save As’ instead of simply ‘Save’. In this way, you are always sure of the correct saved location of scripts.

141 | P a g e
VSURE – U = Upload In this next section you will upload the script onto the server.
59. Return to the CCX Administration page.
NOTE: You may need to log into the server if your session has timed out. Please browse to https://uccx-pub.cll-collab.internal. The username is Administrator and the password is C0ll@B
60. Choose Applications > Script Management.
61. Click on the Upload Scripts button.
62. In the Upload Script pop up window click Browse.
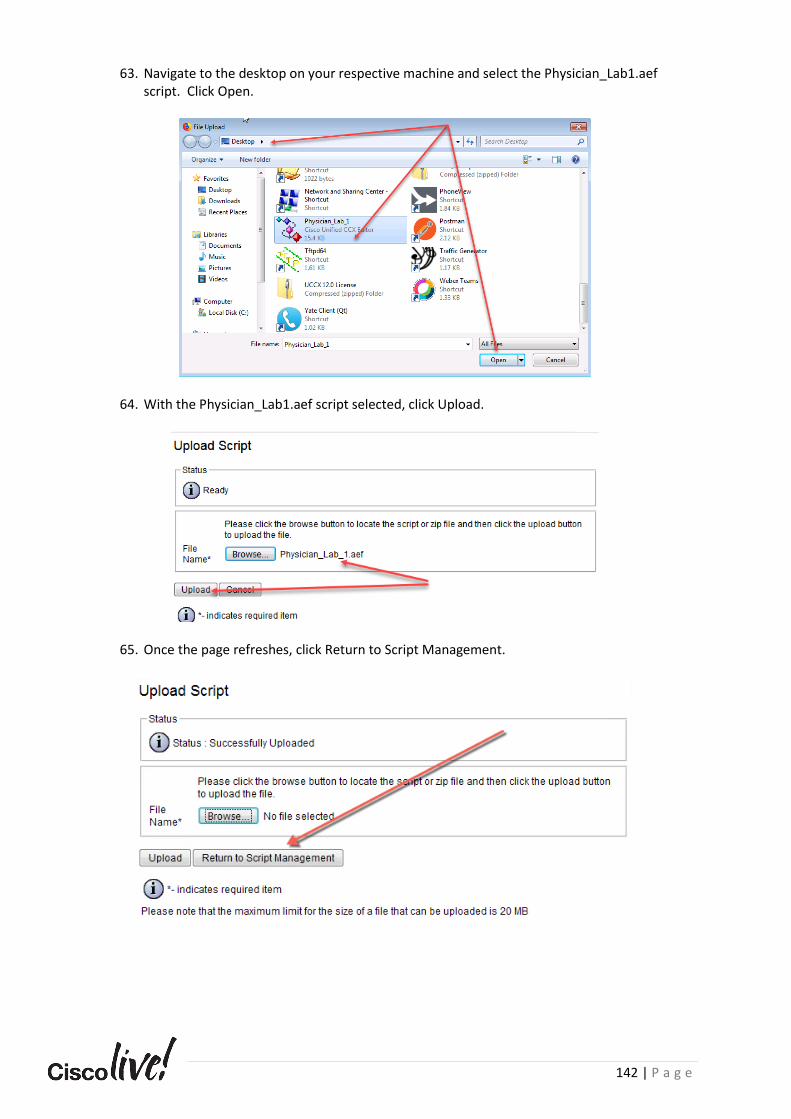
142 | P a g e
63. Navigate to the desktop on your respective machine and select the Physician_Lab1.aef
script. Click Open.
64. With the Physician_Lab1.aef script selected, click Upload.
65. Once the page refreshes, click Return to Script Management.
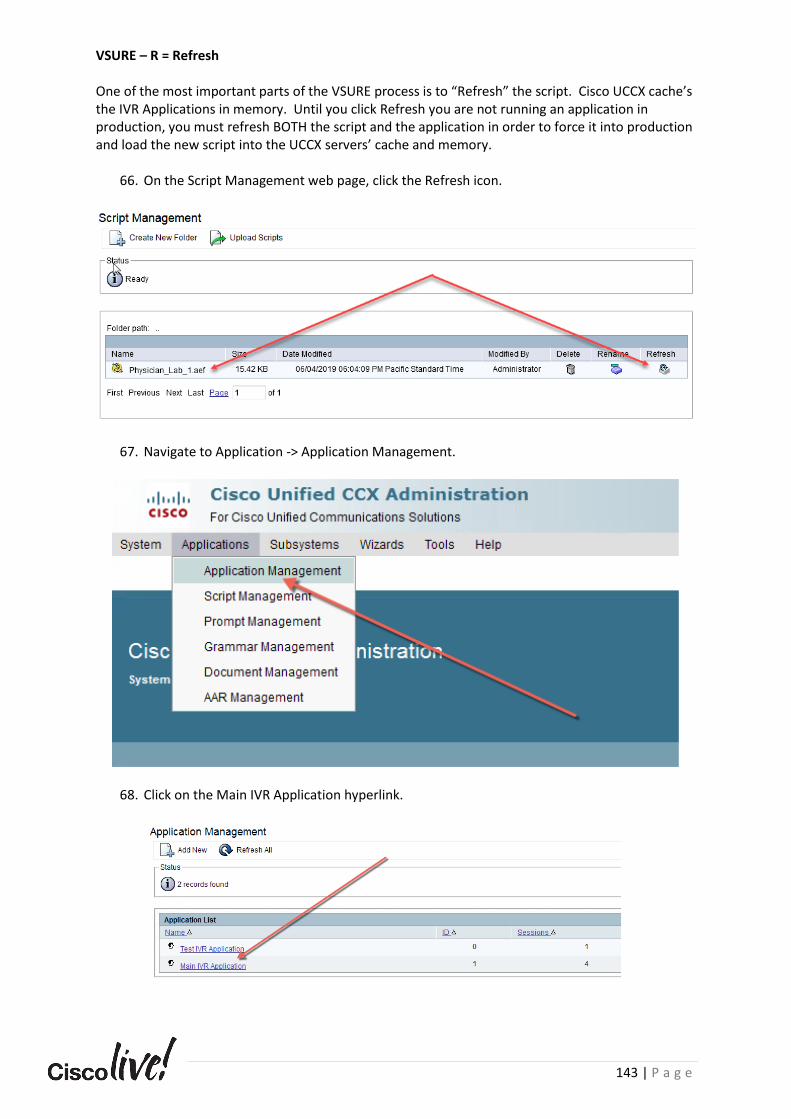
143 | P a g e
VSURE – R = Refresh
One of the most important parts of the VSURE process is to “Refresh” the script. Cisco UCCX cache’s the IVR Applications in memory. Until you click Refresh you are not running an application in production, you must refresh BOTH the script and the application in order to force it into production and load the new script into the UCCX servers’ cache and memory.
66. On the Script Management web page, click the Refresh icon.
67. Navigate to Application -> Application Management.
68. Click on the Main IVR Application hyperlink.

144 | P a g e
69. Modify the Script* from SSCRIPT[aa.aef] to SCRIPT[Physician_Lab1.aef]. Click Update. You will notice the page will refresh and you will be presented with a new list of script parameters. Where did these parameters come from?
NOTE: Pay close attention to the Main IVR Application before the Update button is pressed - notice the Script Parameters MaxRetry, operExt, etc. These parameters are part of the SSCRIPT[aa.aef] script.
Note: Pay close attention to the Main IVR Application after the Update button is pressed - notice the Script Parameters: Hello_Prompt, System_Error_Prompt, Closed_Prompt etc. These parameters are part of the SCRIPT[Physician_Lab11.aef] script. You may recall different “Parameters” as part of the SSCRIPT[aa.aef]. Parameters are exposed when you define Variables in your script and set the ‘Parameters’ checkbox.

145 | P a g e
VSURE – E = Execute
70. Test the Main IVR Application by calling the pilot number 19200 from your respective Cisco IP Communicator softphone. The system will answer the call but then abruptly hang up, you will notice no prompts were played back through the IVR. Why not?
Question: Why are the prompts not playing in our new Physician Application and Script? Answer: We have not uploaded any prompts to the server yet! It’s literally playing dead air. Any time you try to play a prompt that does not exist on the server, the UCCX Script will play a 1 ms sample of dead air. The script will not crash; it will just be silent. Very annoying to troubleshoot, we know!
Task 5: Upload Main IVR Application Prompts and Testing of Application In this task you will perform additional testing once we have uploaded prompts for the IVR to play. We will upload prerecorded prompts in the proper format for the Main IVR Application to use for playback to a caller.
71. In your web browser please open a new tab. You may add a new tab by clicking on the “+”
arrow.
Note: You may have previously opened windows; thus your screenshot may not match what is listed below. It’s okay, keep on rocking!
Please enter the following URL: http://10.1.5.100/LAB_Prompts.zip and press enter.

146 | P a g e
72. When the download pop up window is displayed please select Save File and click OK.
73. In the upper right-hand corner of the browser, please click on the down arrow to display a list of file downloads.
74. Please drag the file LAB_Prompts.zip over to the desktop. The file should now be listed on your desktop. Note: The file may already be placed on the desktop, depending on browser settings!
75. Please close the web browser tab which you just loaded by clicking on the X.
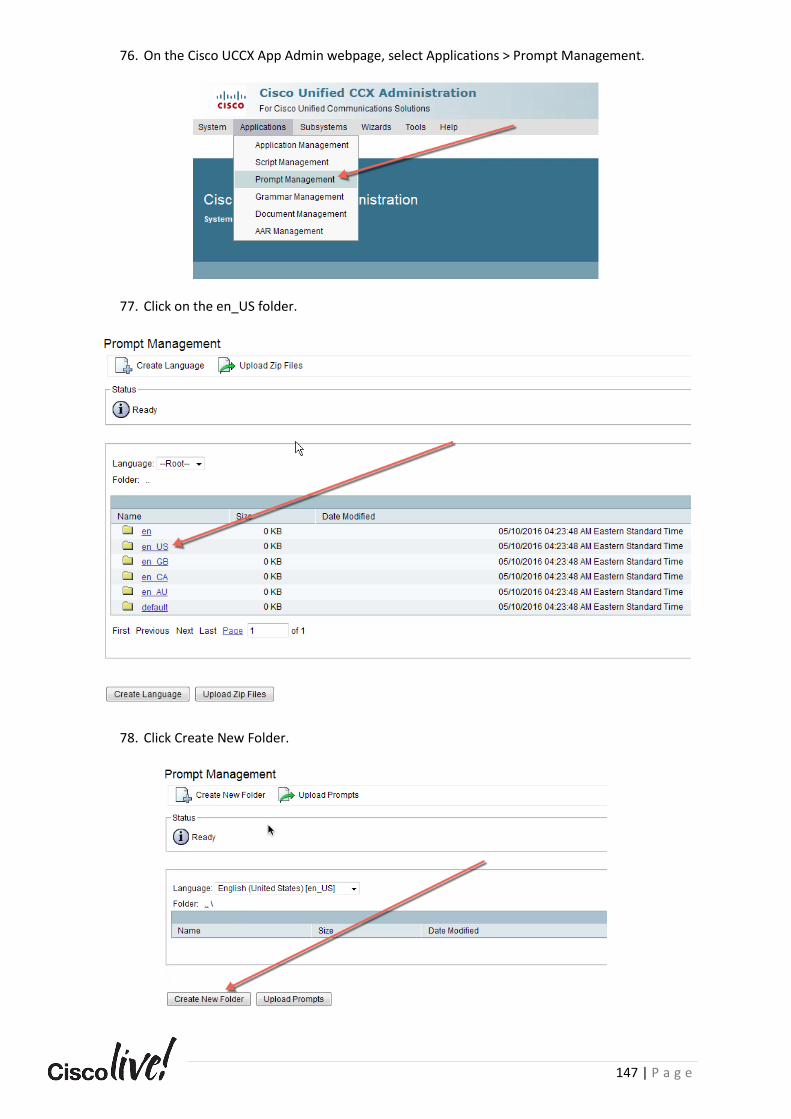
147 | P a g e
76. On the Cisco UCCX App Admin webpage, select Applications > Prompt Management.
77. Click on the en_US folder.
78. Click Create New Folder.
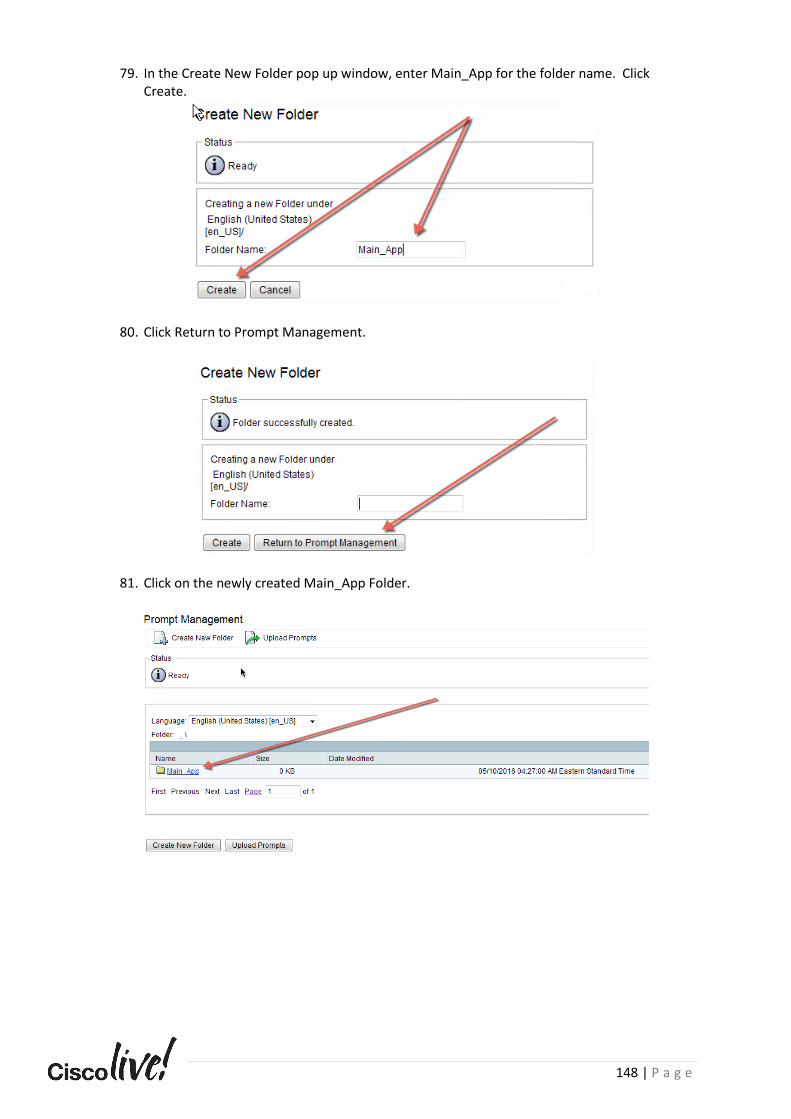
148 | P a g e
79. In the Create New Folder pop up window, enter Main_App for the folder name. Click
Create.
80. Click Return to Prompt Management.
81. Click on the newly created Main_App Folder.
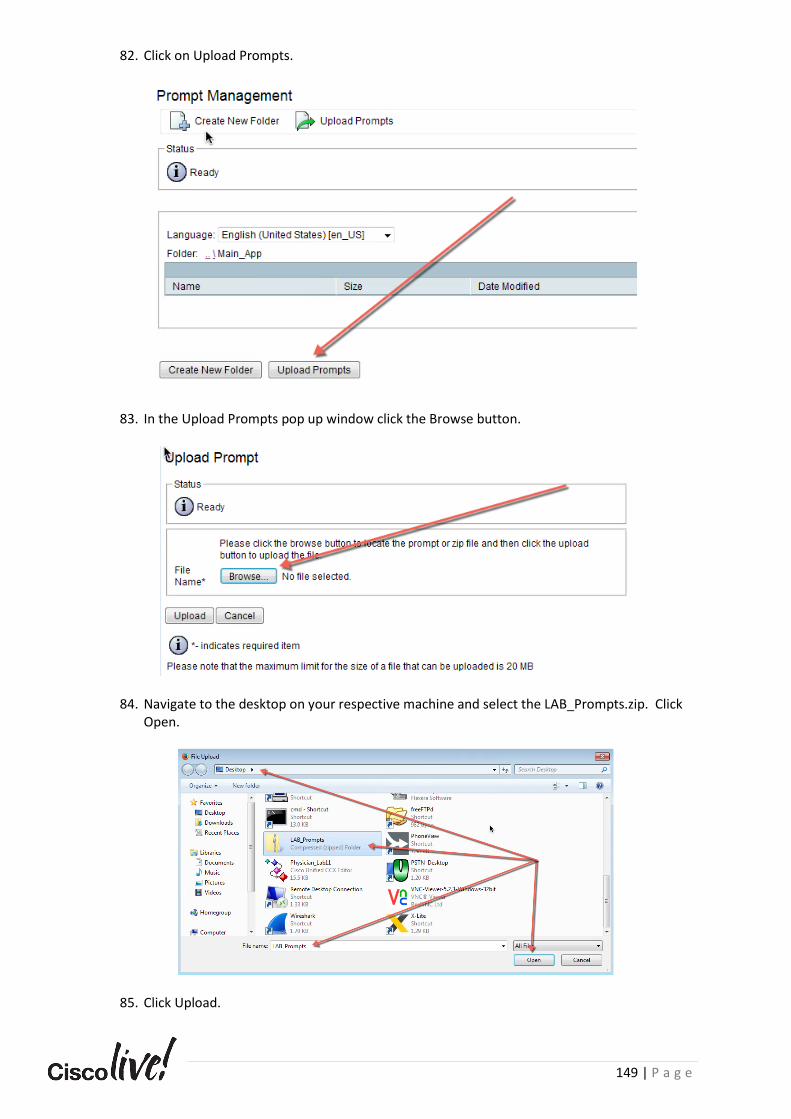
149 | P a g e
82. Click on Upload Prompts.
83. In the Upload Prompts pop up window click the Browse button.
84. Navigate to the desktop on your respective machine and select the LAB_Prompts.zip. Click Open.
85. Click Upload.
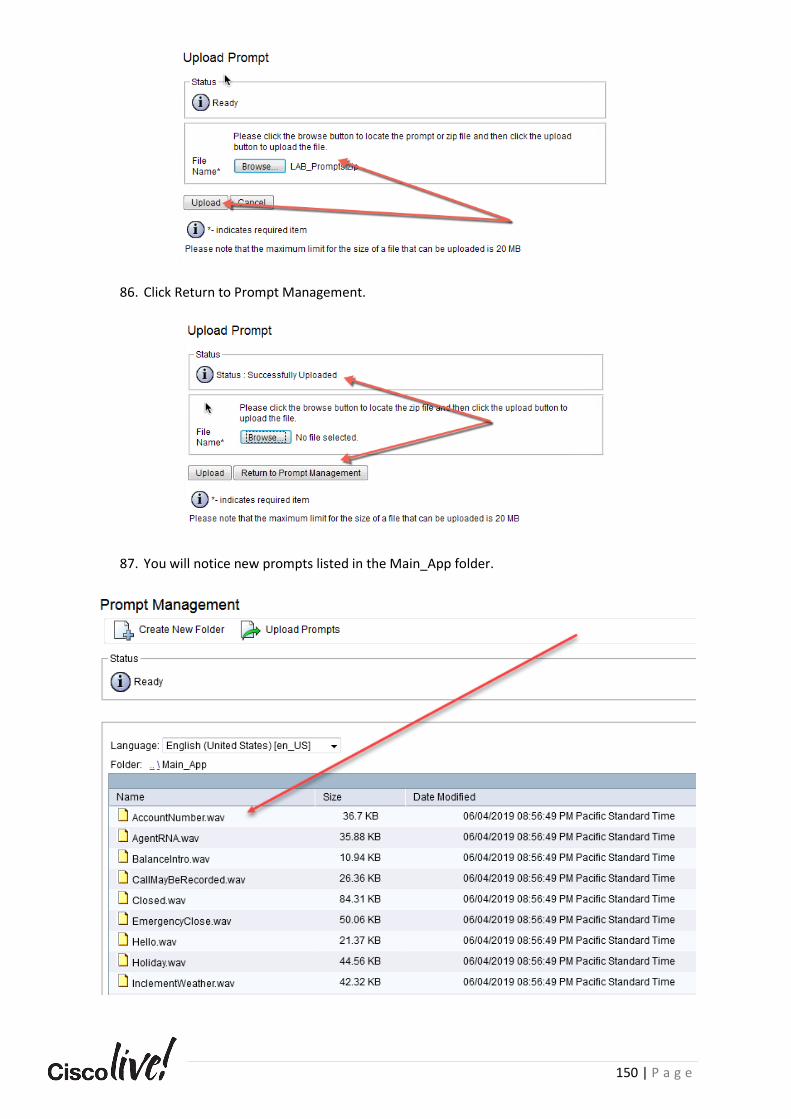
150 | P a g e
86. Click Return to Prompt Management.
87. You will notice new prompts listed in the Main_App folder.
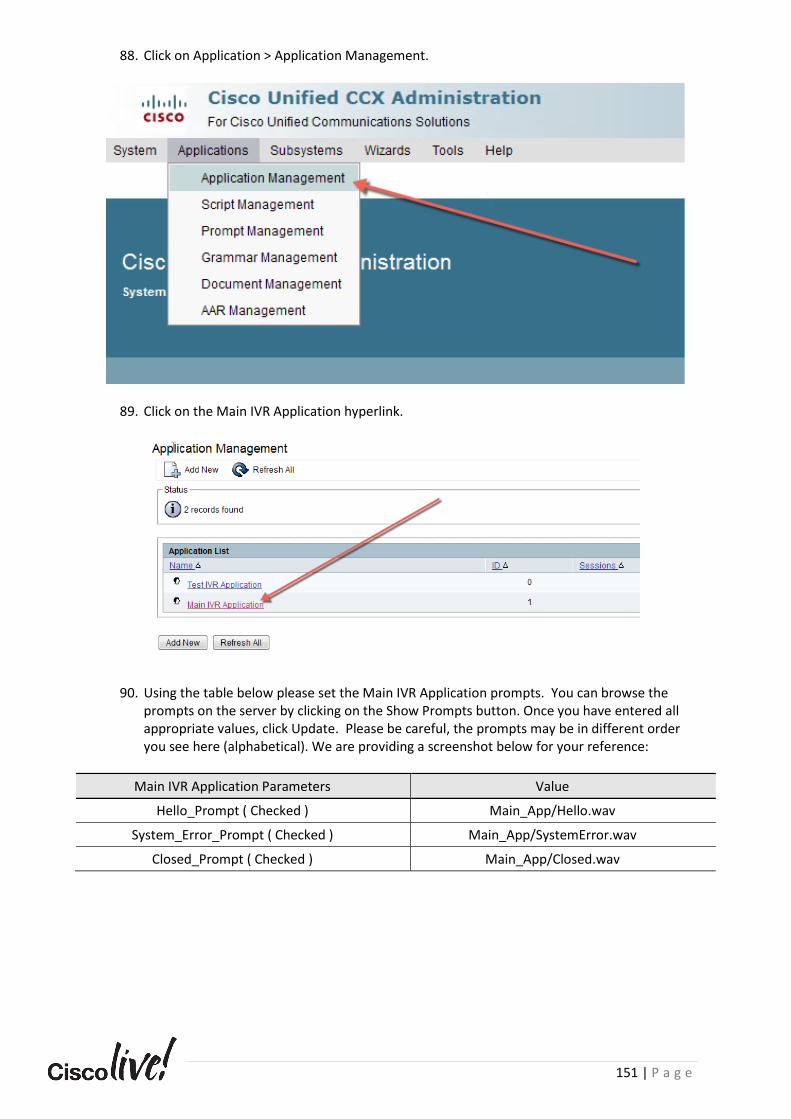
151 | P a g e
88. Click on Application > Application Management.
89. Click on the Main IVR Application hyperlink.
90. Using the table below please set the Main IVR Application prompts. You can browse the prompts on the server by clicking on the Show Prompts button. Once you have entered all appropriate values, click Update. Please be careful, the prompts may be in different order you see here (alphabetical). We are providing a screenshot below for your reference:
Main IVR Application Parameters Value
Hello_Prompt ( Checked ) Main_App/Hello.wav
System_Error_Prompt ( Checked ) Main_App/SystemError.wav
Closed_Prompt ( Checked ) Main_App/Closed.wav
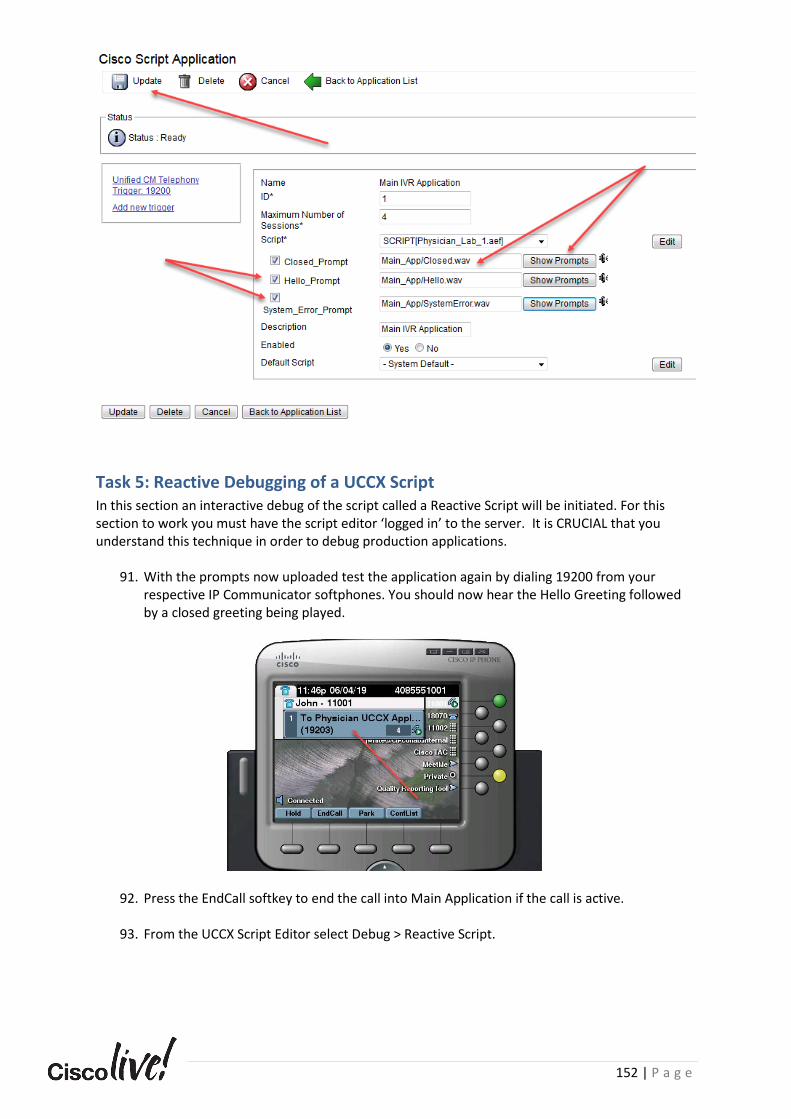
152 | P a g e
Task 5: Reactive Debugging of a UCCX Script In this section an interactive debug of the script called a Reactive Script will be initiated. For this section to work you must have the script editor ‘logged in’ to the server. It is CRUCIAL that you understand this technique in order to debug production applications.
91. With the prompts now uploaded test the application again by dialing 19200 from your
respective IP Communicator softphones. You should now hear the Hello Greeting followed by a closed greeting being played.
92. Press the EndCall softkey to end the call into Main Application if the call is active.
93. From the UCCX Script Editor select Debug > Reactive Script.
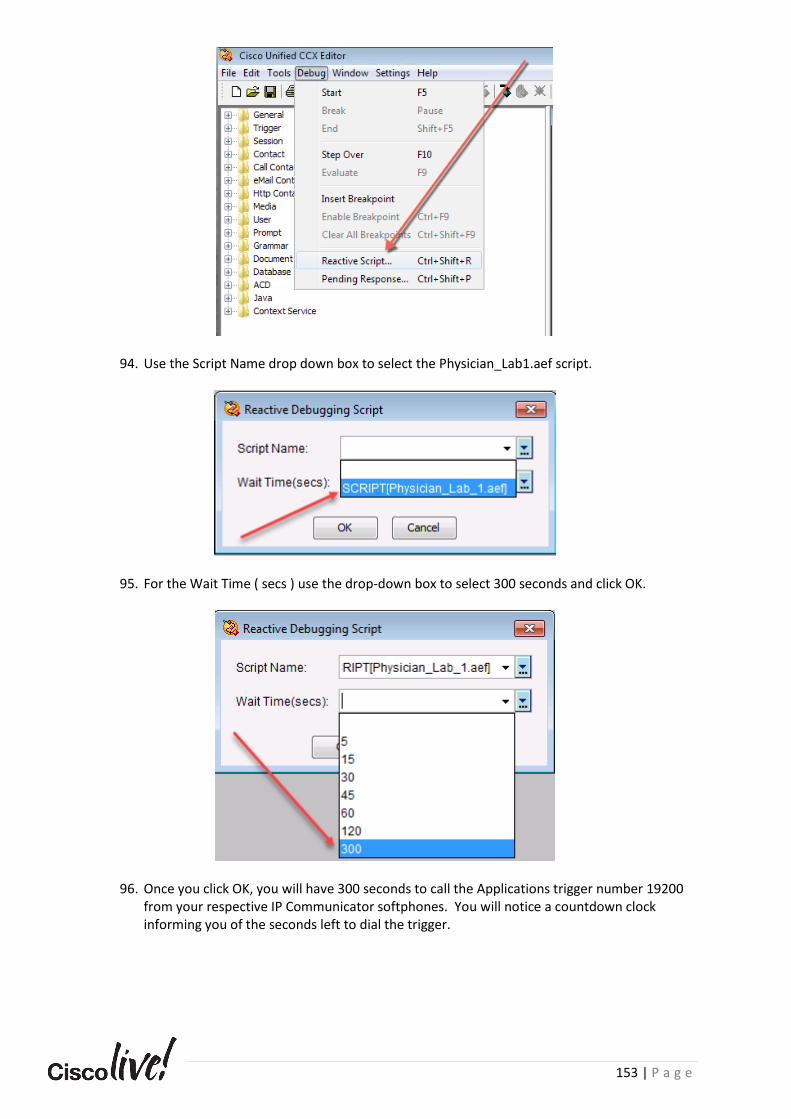
153 | P a g e
94. Use the Script Name drop down box to select the Physician_Lab1.aef script.
95. For the Wait Time ( secs ) use the drop-down box to select 300 seconds and click OK.
96. Once you click OK, you will have 300 seconds to call the Applications trigger number 19200 from your respective IP Communicator softphones. You will notice a countdown clock informing you of the seconds left to dial the trigger.
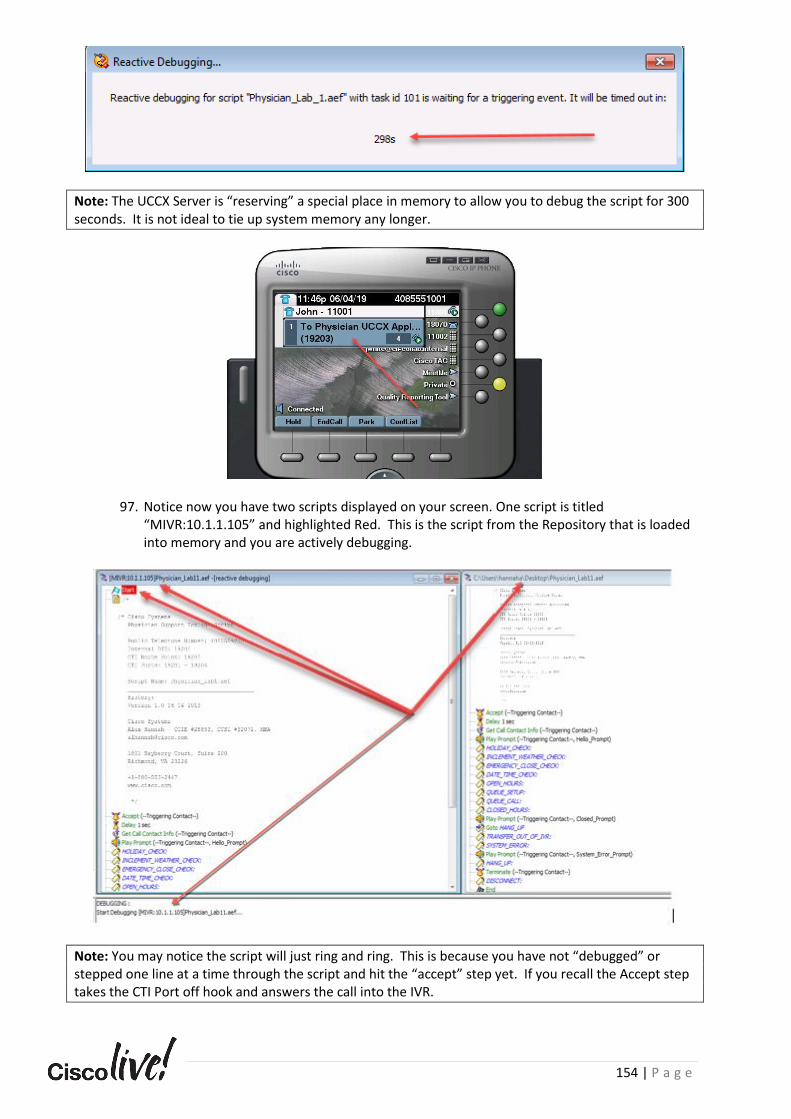
154 | P a g e
Note: The UCCX Server is “reserving” a special place in memory to allow you to debug the script for 300 seconds. It is not ideal to tie up system memory any longer.
97. Notice now you have two scripts displayed on your screen. One script is titled “MIVR:10.1.1.105” and highlighted Red. This is the script from the Repository that is loaded into memory and you are actively debugging.
Note: You may notice the script will just ring and ring. This is because you have not “debugged” or stepped one line at a time through the script and hit the “accept” step yet. If you recall the Accept step takes the CTI Port off hook and answers the call into the IVR.
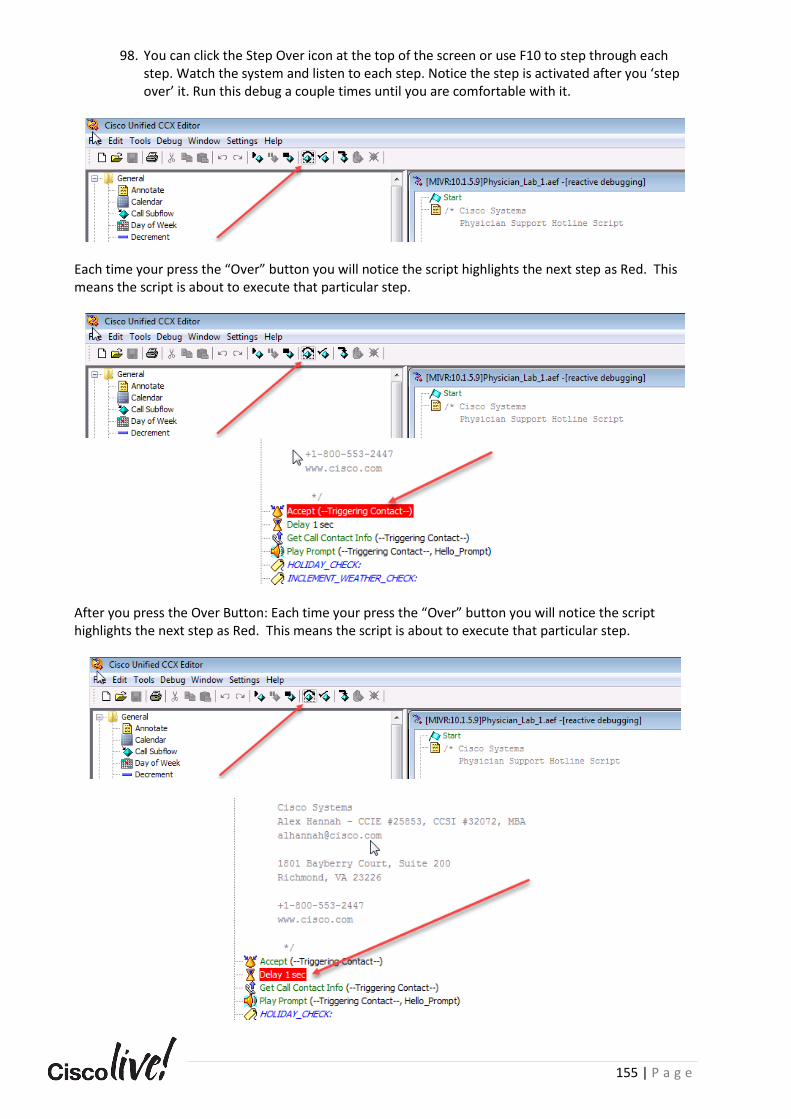
155 | P a g e
98. You can click the Step Over icon at the top of the screen or use F10 to step through each step. Watch the system and listen to each step. Notice the step is activated after you ‘step over’ it. Run this debug a couple times until you are comfortable with it.
Each time your press the “Over” button you will notice the script highlights the next step as Red. This means the script is about to execute that particular step.
After you press the Over Button: Each time your press the “Over” button you will notice the script highlights the next step as Red. This means the script is about to execute that particular step.
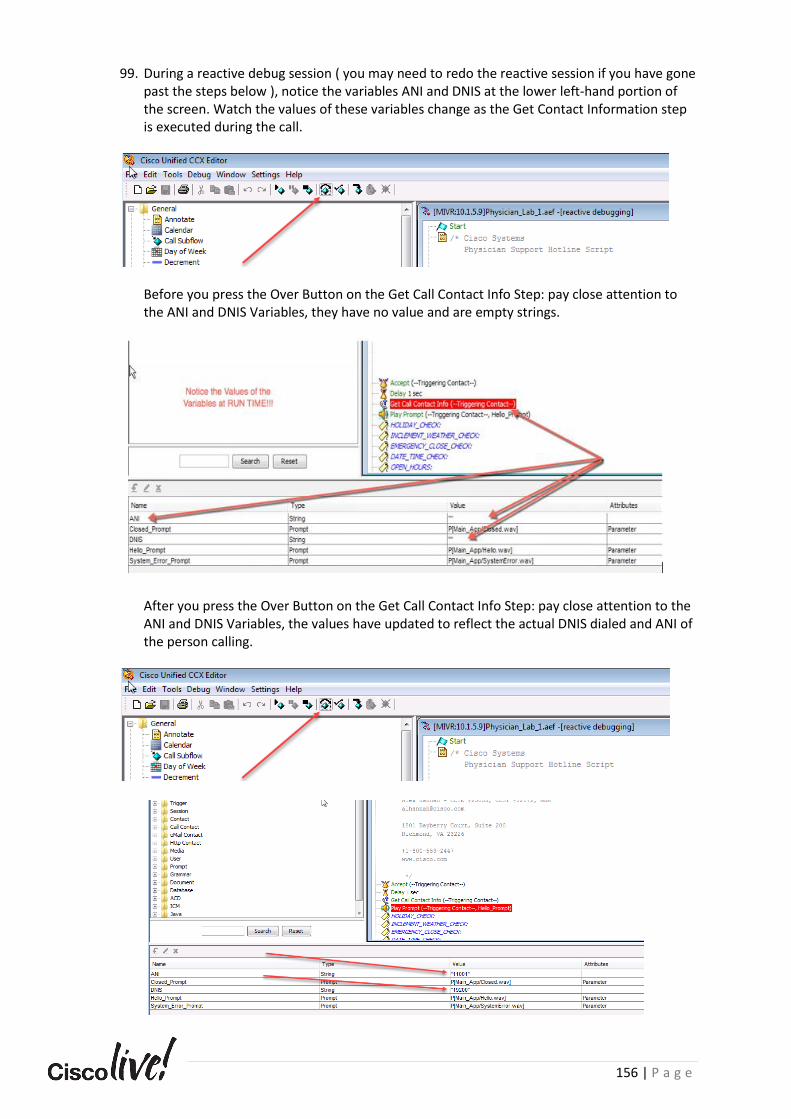
156 | P a g e
99. During a reactive debug session ( you may need to redo the reactive session if you have gone
past the steps below ), notice the variables ANI and DNIS at the lower left-hand portion of the screen. Watch the values of these variables change as the Get Contact Information step is executed during the call.
Before you press the Over Button on the Get Call Contact Info Step: pay close attention to the ANI and DNIS Variables, they have no value and are empty strings.
After you press the Over Button on the Get Call Contact Info Step: pay close attention to the ANI and DNIS Variables, the values have updated to reflect the actual DNIS dialed and ANI of the person calling.

157 | P a g e
100. Press the EndCall softkey to end the call into Main Application if the call is active.
101. Close the MIVR:10.1.1.105 application in the script editor.
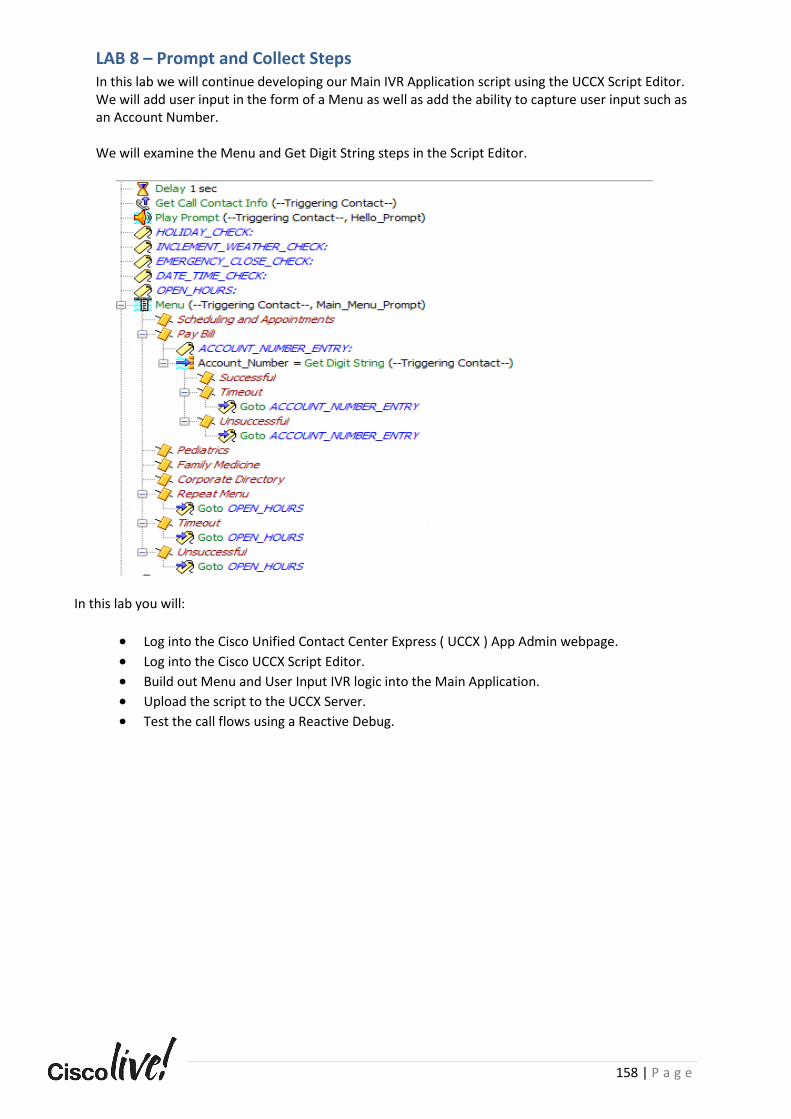
158 | P a g e
LAB 8 – Prompt and Collect Steps In this lab we will continue developing our Main IVR Application script using the UCCX Script Editor. We will add user input in the form of a Menu as well as add the ability to capture user input such as an Account Number.
We will examine the Menu and Get Digit String steps in the Script Editor.
In this lab you will:
• Log into the Cisco Unified Contact Center Express ( UCCX ) App Admin webpage.
• Log into the Cisco UCCX Script Editor.
• Build out Menu and User Input IVR logic into the Main Application.
• Upload the script to the UCCX Server.
• Test the call flows using a Reactive Debug.
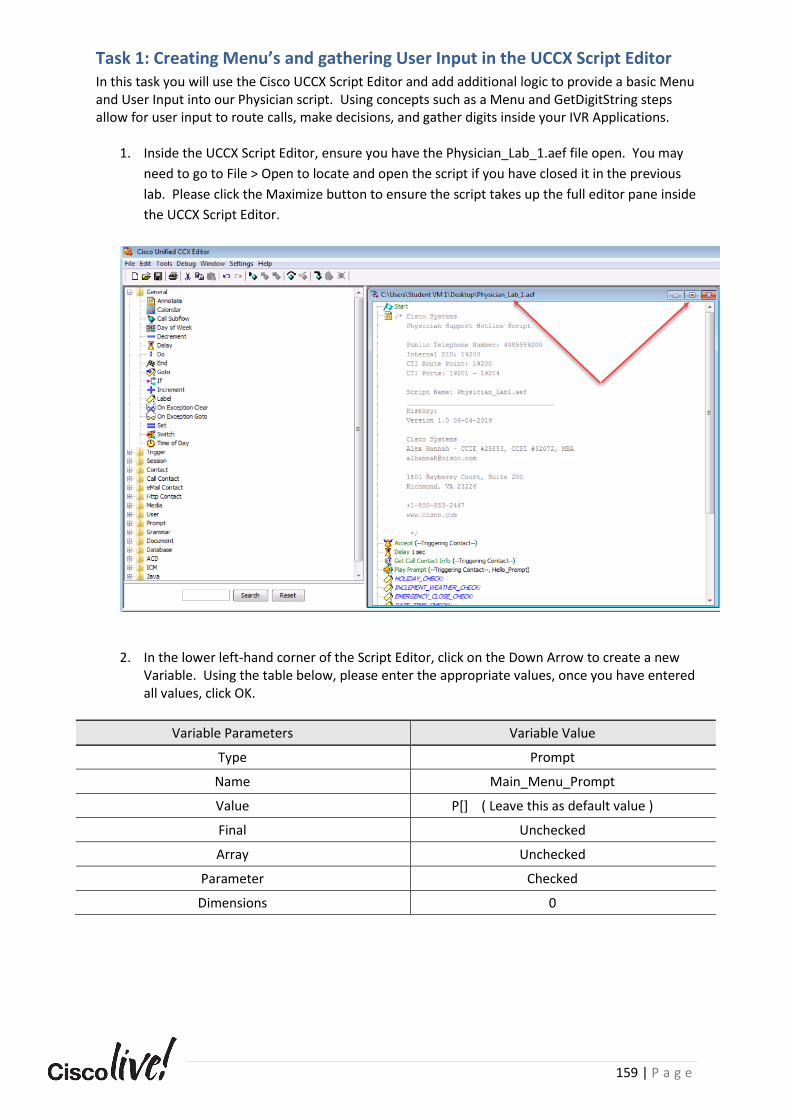
159 | P a g e
Task 1: Creating Menu’s and gathering User Input in the UCCX Script Editor In this task you will use the Cisco UCCX Script Editor and add additional logic to provide a basic Menu and User Input into our Physician script. Using concepts such as a Menu and GetDigitString steps allow for user input to route calls, make decisions, and gather digits inside your IVR Applications.
1. Inside the UCCX Script Editor, ensure you have the Physician_Lab_1.aef file open. You may
need to go to File > Open to locate and open the script if you have closed it in the previous
lab. Please click the Maximize button to ensure the script takes up the full editor pane inside
the UCCX Script Editor.
2. In the lower left-hand corner of the Script Editor, click on the Down Arrow to create a new Variable. Using the table below, please enter the appropriate values, once you have entered all values, click OK.
Variable Parameters Variable Value
Type Prompt
Name Main_Menu_Prompt
Value P[] ( Leave this as default value )
Final Unchecked
Array Unchecked
Parameter Checked
Dimensions 0
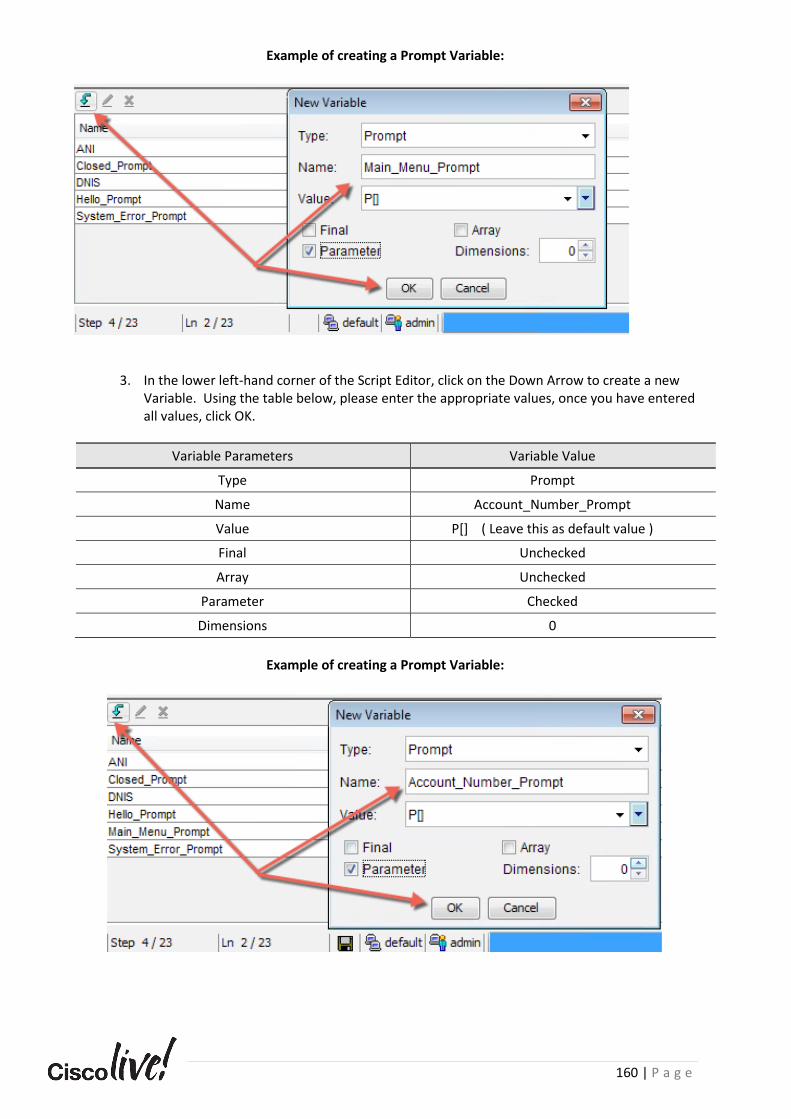
160 | P a g e
Example of creating a Prompt Variable:
3. In the lower left-hand corner of the Script Editor, click on the Down Arrow to create a new Variable. Using the table below, please enter the appropriate values, once you have entered all values, click OK.
Variable Parameters Variable Value
Type Prompt
Name Account_Number_Prompt
Value P[] ( Leave this as default value )
Final Unchecked
Array Unchecked
Parameter Checked
Dimensions 0
Example of creating a Prompt Variable:
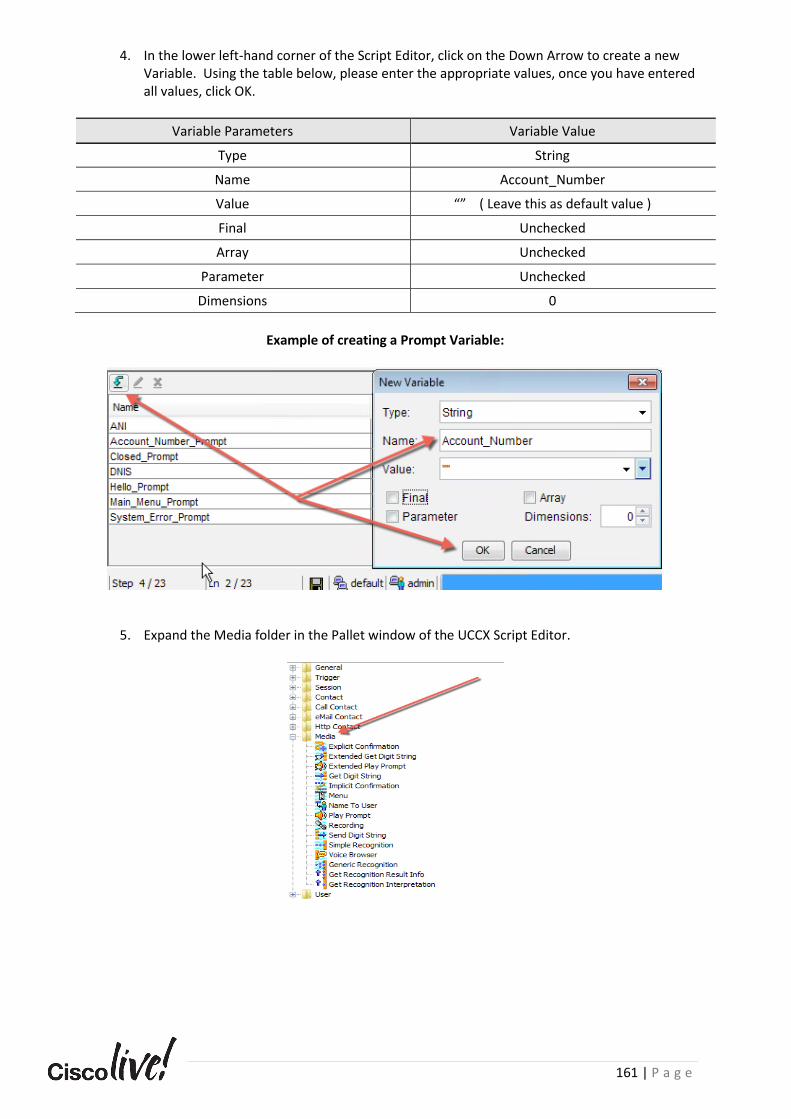
161 | P a g e
4. In the lower left-hand corner of the Script Editor, click on the Down Arrow to create a new Variable. Using the table below, please enter the appropriate values, once you have entered all values, click OK.
Variable Parameters Variable Value
Type String
Name Account_Number
Value “” ( Leave this as default value )
Final Unchecked
Array Unchecked
Parameter Unchecked
Dimensions 0
Example of creating a Prompt Variable:
5. Expand the Media folder in the Pallet window of the UCCX Script Editor.
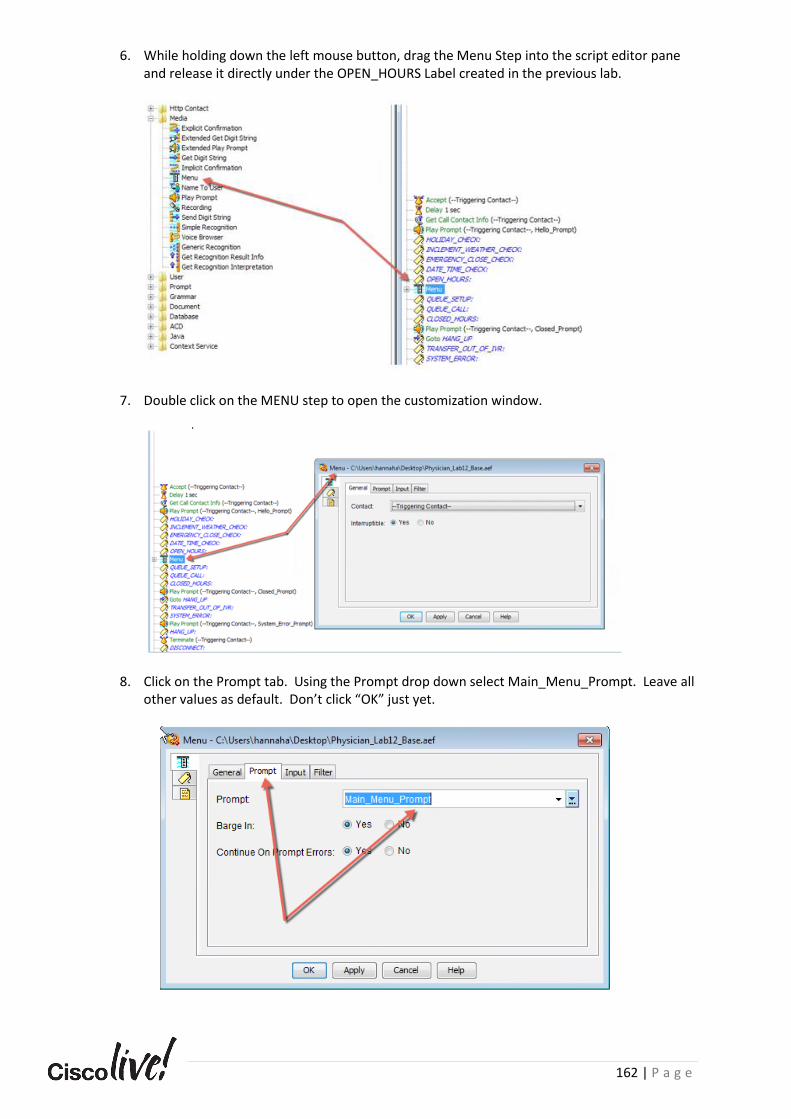
162 | P a g e
6. While holding down the left mouse button, drag the Menu Step into the script editor pane and release it directly under the OPEN_HOURS Label created in the previous lab.
7. Double click on the MENU step to open the customization window.
8. Click on the Prompt tab. Using the Prompt drop down select Main_Menu_Prompt. Leave all other values as default. Don’t click “OK” just yet.

163 | P a g e
9. Click the Input tab. Change the Flush Input Buffer radio button option to Yes. Leave all other values as default. Don’t click “OK” yet.
10. Click the Filter tab. Notice there are no Connections or menu options currently. Click the Add button on the right-hand side of this step.
11. In the Add Option pop up window, enter Scheduling and Appointments. Click Ok.

164 | P a g e
12. With the Scheduling and Appointments options now entered and highlighted blue we must
map this to a telephone keypad event. Press button 1 on the keypad, ensure the numeral 1 is highlighted RED. Click Apply.
13. Click the Add button on the right-hand side of this step.
14. In the Add Option pop up window, enter Pay Bill. Click Ok.
15. With the Pay Bill options now entered and highlighted blue we must map this to a telephone keypad event. Press button 2 on the keypad, ensure the numeral 2 is highlighted RED. Click Apply.
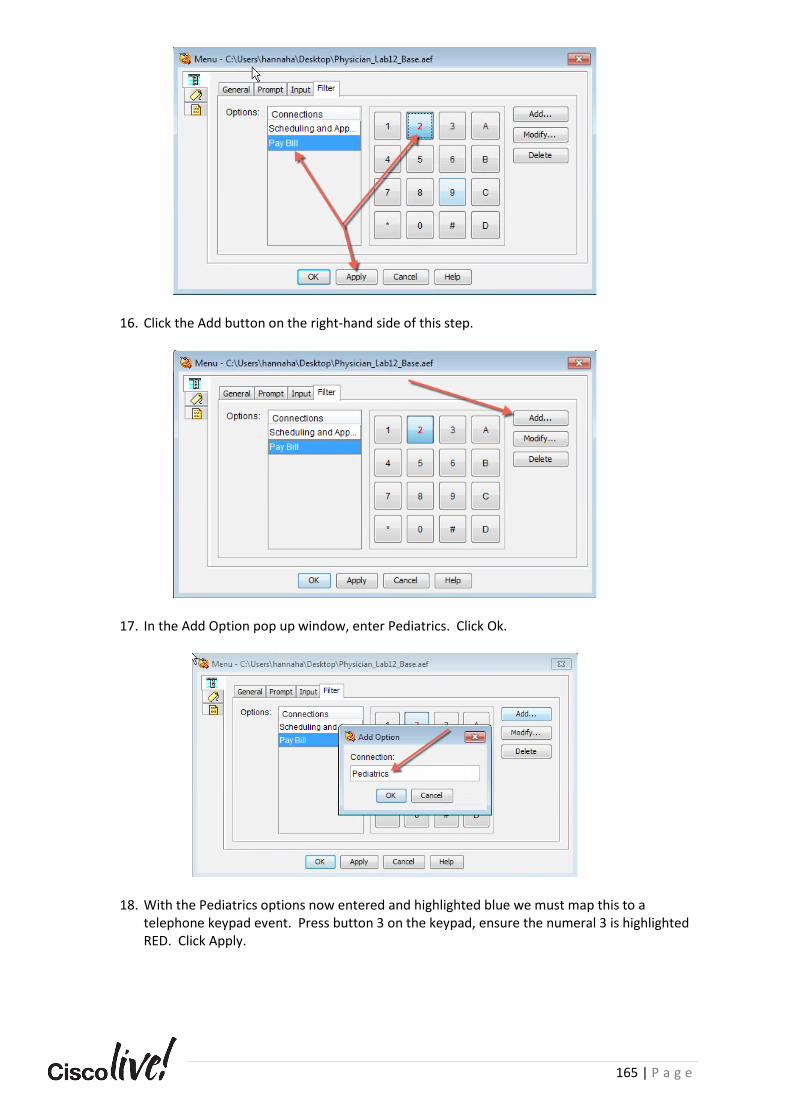
165 | P a g e
16. Click the Add button on the right-hand side of this step.
17. In the Add Option pop up window, enter Pediatrics. Click Ok.
18. With the Pediatrics options now entered and highlighted blue we must map this to a telephone keypad event. Press button 3 on the keypad, ensure the numeral 3 is highlighted RED. Click Apply.

166 | P a g e
19. Click the Add button on the right-hand side of this step.
20. In the Add Option pop up window, enter Family Medicine. Click Ok.
21. With the Family Medicine options now entered and highlighted blue we must map this to a telephone keypad event. Press button 4 on the keypad, ensure the numeral 4 is highlighted RED. Click Apply.

167 | P a g e
22. Click the Add button on the right-hand side of this step.
23. In the Add Option pop up window, enter Corporate Directory. Click Ok.
24. With the Corporate Directory options now entered and highlighted blue we must map this to a telephone keypad event. Press button 7 on the keypad, ensure the numeral 7 is highlighted RED. Click Apply.

168 | P a g e
25. Click the Add button on the right-hand side of this step.
26. In the Add Option pop up window, enter Repeat Menu. Click Ok.

169 | P a g e
27. With the Repeat Menu options now entered and highlighted blue we must map this to a telephone keypad event. Press button 9 on the keypad, ensure the numeral 9 is highlighted RED. Click Apply.
28. Now that all Menu Options have been entered, press OK. Your Menu logic should look like the screenshot below:
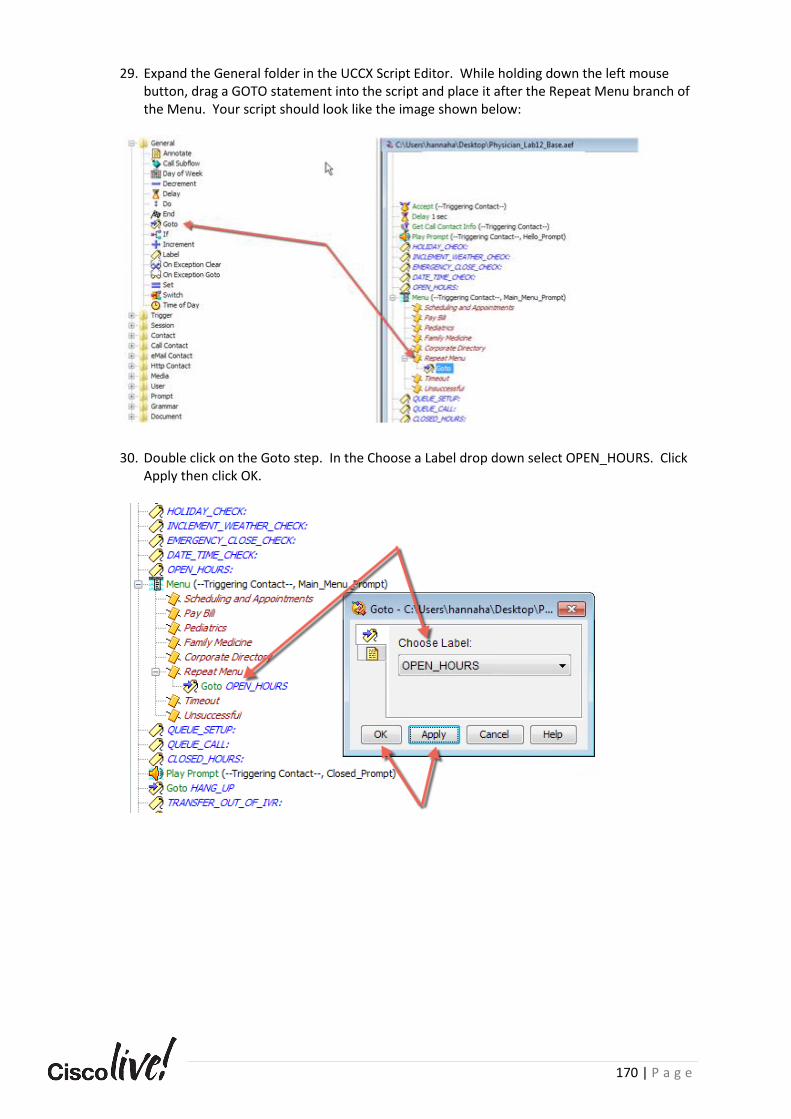
170 | P a g e
29. Expand the General folder in the UCCX Script Editor. While holding down the left mouse
button, drag a GOTO statement into the script and place it after the Repeat Menu branch of the Menu. Your script should look like the image shown below:
30. Double click on the Goto step. In the Choose a Label drop down select OPEN_HOURS. Click Apply then click OK.
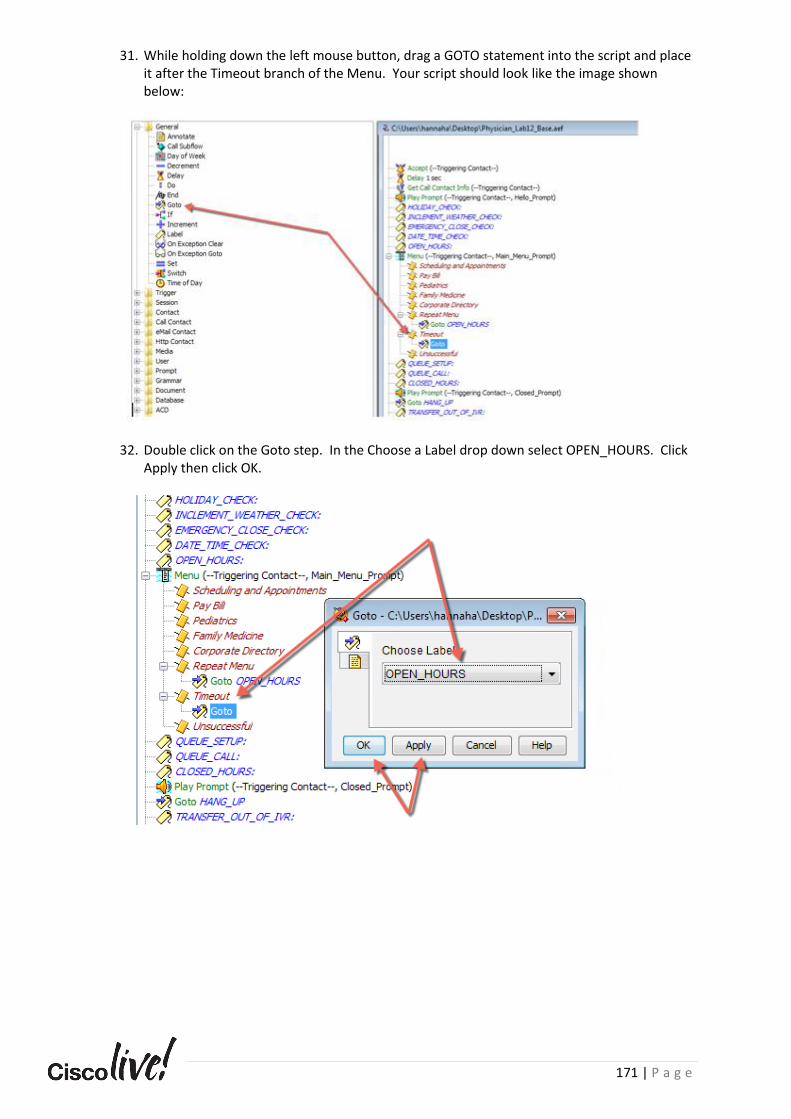
171 | P a g e
31. While holding down the left mouse button, drag a GOTO statement into the script and place it after the Timeout branch of the Menu. Your script should look like the image shown below:
32. Double click on the Goto step. In the Choose a Label drop down select OPEN_HOURS. Click Apply then click OK.

172 | P a g e
33. While holding down the left mouse button, drag a GOTO statement into the script and place it after the Unsuccessful branch of the Menu. Your script should look like the image shown below:
34. Ensure the Start step at the very top of the script is highlighted blue by clicking on it.
35. In the top of the UCCX Script Editor choose Tools > Validate.
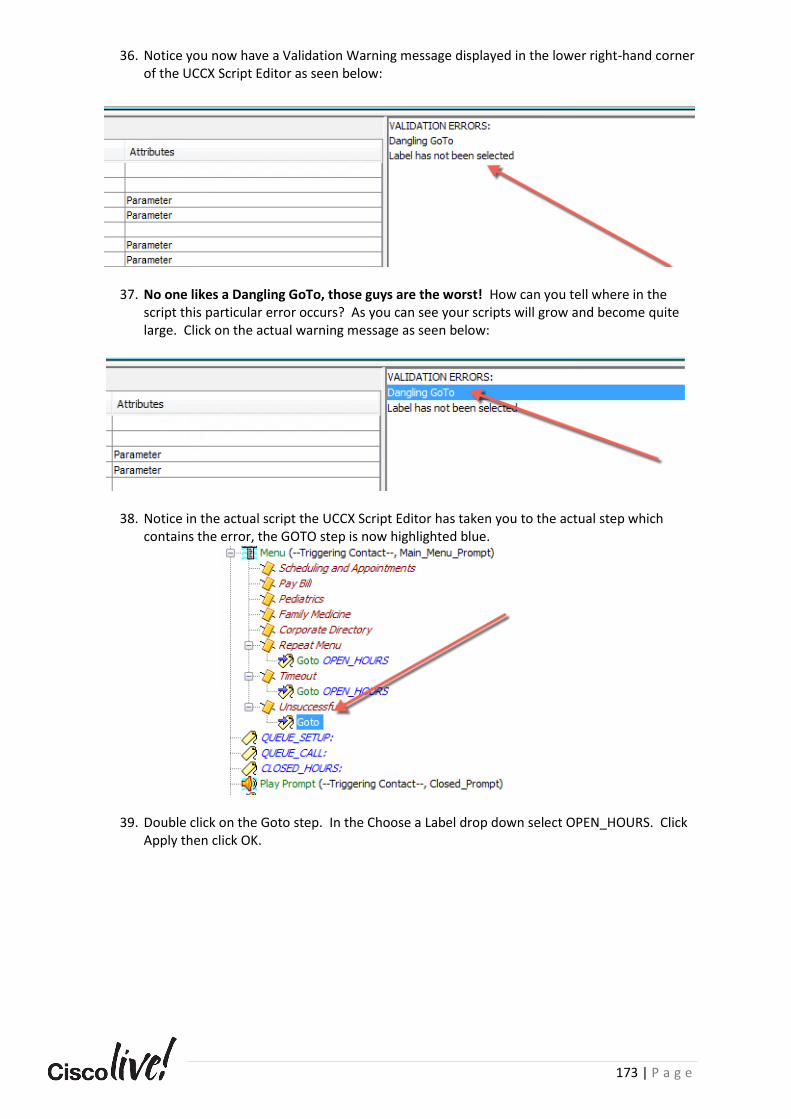
173 | P a g e
36. Notice you now have a Validation Warning message displayed in the lower right-hand corner of the UCCX Script Editor as seen below:
37. No one likes a Dangling GoTo, those guys are the worst! How can you tell where in the script this particular error occurs? As you can see your scripts will grow and become quite large. Click on the actual warning message as seen below:
38. Notice in the actual script the UCCX Script Editor has taken you to the actual step which contains the error, the GOTO step is now highlighted blue.
39. Double click on the Goto step. In the Choose a Label drop down select OPEN_HOURS. Click Apply then click OK.

174 | P a g e
40. Expand the Media folder inside the UCCX Script Editor.
41. While holding down the left mouse button, drag the Get Digit String step into the script and place it directly below the Pay Bill branch of the Menu.
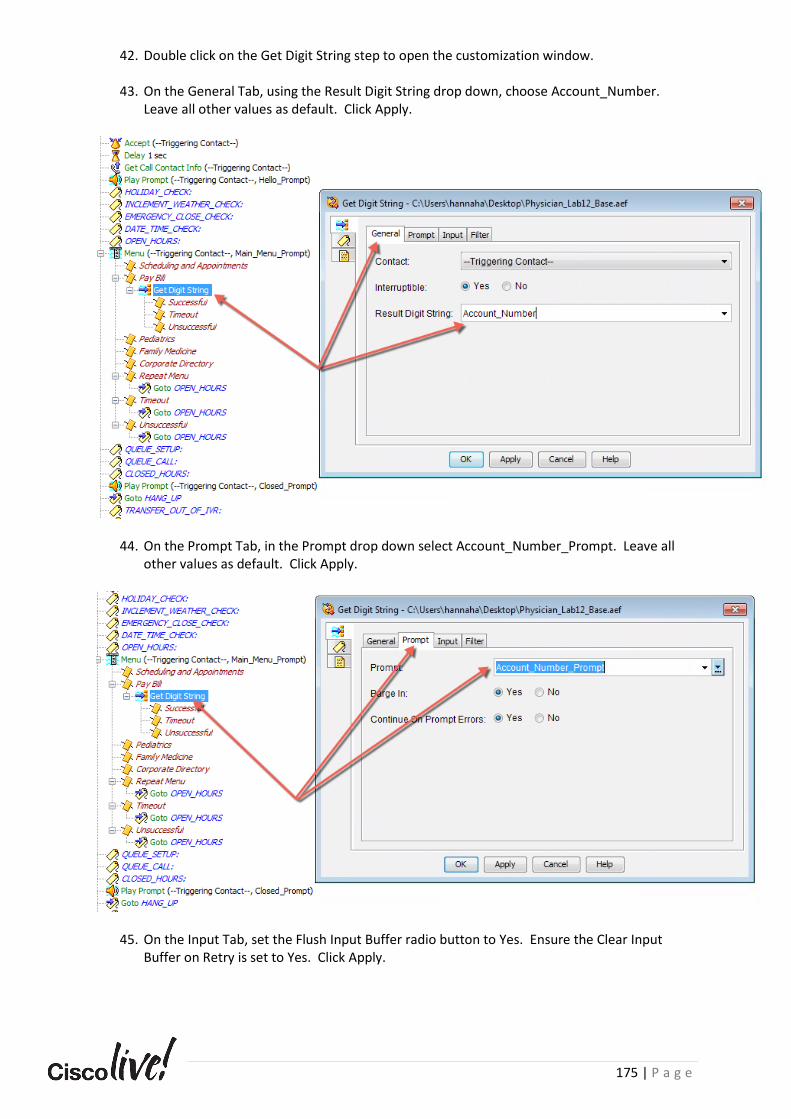
175 | P a g e
42. Double click on the Get Digit String step to open the customization window.
43. On the General Tab, using the Result Digit String drop down, choose Account_Number. Leave all other values as default. Click Apply.
44. On the Prompt Tab, in the Prompt drop down select Account_Number_Prompt. Leave all other values as default. Click Apply.
45. On the Input Tab, set the Flush Input Buffer radio button to Yes. Ensure the Clear Input Buffer on Retry is set to Yes. Click Apply.

176 | P a g e
46. On the Filter Tab, set the Input Length to 7. Ensure the Terminating Digit is set to Pound (#) and the Cancel Digit to Star ( * ). Click Apply.
Note: The Terminating Digit has special meaning which will be demonstrated in a later lab! It can be quite tricky in the real world.
47. Click OK to close the Get Digit String step.
48. Expand the General Folder, while holding the left mouse button down, drag a LABEL step
into the script and place it directly below the Pay Bill output branch. This step will be directly above the Get Digit String step you previously added. A screenshot has been provided below for your reference:

177 | P a g e
49. Double click on the LABEL. In the Enter Label text box enter ACCOUNT_NUMBER_ENTRY. Click Apply, then click OK.

178 | P a g e
50. In the General Folder, while holding the left mouse button down, drag a GOTO step into the script and place it directly the Timeout branches of the Get Digit String step. A screenshot has been provided below for your reference:
51. Double click on Goto statement. In the Choose Label drop down select ACCOUNT_NUMBER_ENTRY. Click Apply then click OK.
52. In the General Folder, while holding the left mouse button down, drag a GOTO step into the script and place it directly the Unsuccessful branches of the Get Digit String step. A screenshot has been provided below for your reference:

179 | P a g e
53. Double click on Goto statement. In the Choose Label drop down select ACCOUNT_NUMBER_ENTRY. Click Apply then click OK.
54. The Menu and Get Digit String code block should look like the image shown below:

180 | P a g e
Task 2: V.S.U.R.E and Application Testing In this task you will perform the VSURE process which properly installs our updated Main Application onto the UCCX server so it can be used as an IVR Application. VSURE stands for Validate, Save, Upload, Refresh, Execute. It’s a common technique we use when deploying new applications and scripts. This process is crucial and must be followed every time to ensure proper deployment.
We will now execute the steps for the V.S.U.R.E. process.
VSURE – V = Validate
55. The script must be validated for program integrity. Select Tools > Validate.
56. The script should validate successfully and will display a “Script validation succeeded” message. Click OK.
Note: If you have errors in your script you will notice a warning or error message displayed in the lower right hand corner of the screen, you will need to review the message ( hint double click on the error message and it will take you to the exact line in the script with the error ) and retrace your steps in this lab to correct as needed.
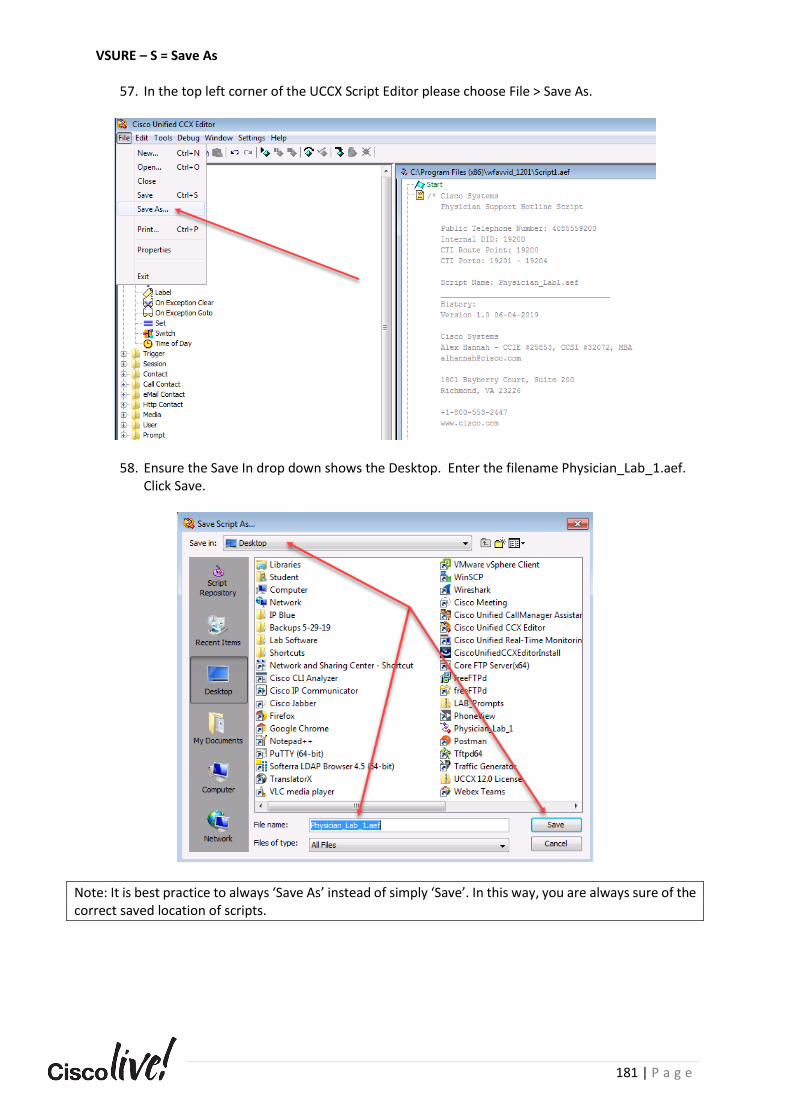
181 | P a g e
VSURE – S = Save As
57. In the top left corner of the UCCX Script Editor please choose File > Save As.
58. Ensure the Save In drop down shows the Desktop. Enter the filename Physician_Lab_1.aef. Click Save.
Note: It is best practice to always ‘Save As’ instead of simply ‘Save’. In this way, you are always sure of the correct saved location of scripts.

182 | P a g e
VSURE – U = Upload In this next section you will upload the script onto the server.
59. Return to the CCX Administration page.
NOTE: You may need to log into the server if your session has timed out. Please browse to https://uccx-pub.cll-collab.internal. The username is Administrator and the password is C0ll@B
60. Choose Applications > Script Management.
61. Click on the Upload Scripts button.
62. In the Upload Script pop up window click Browse.
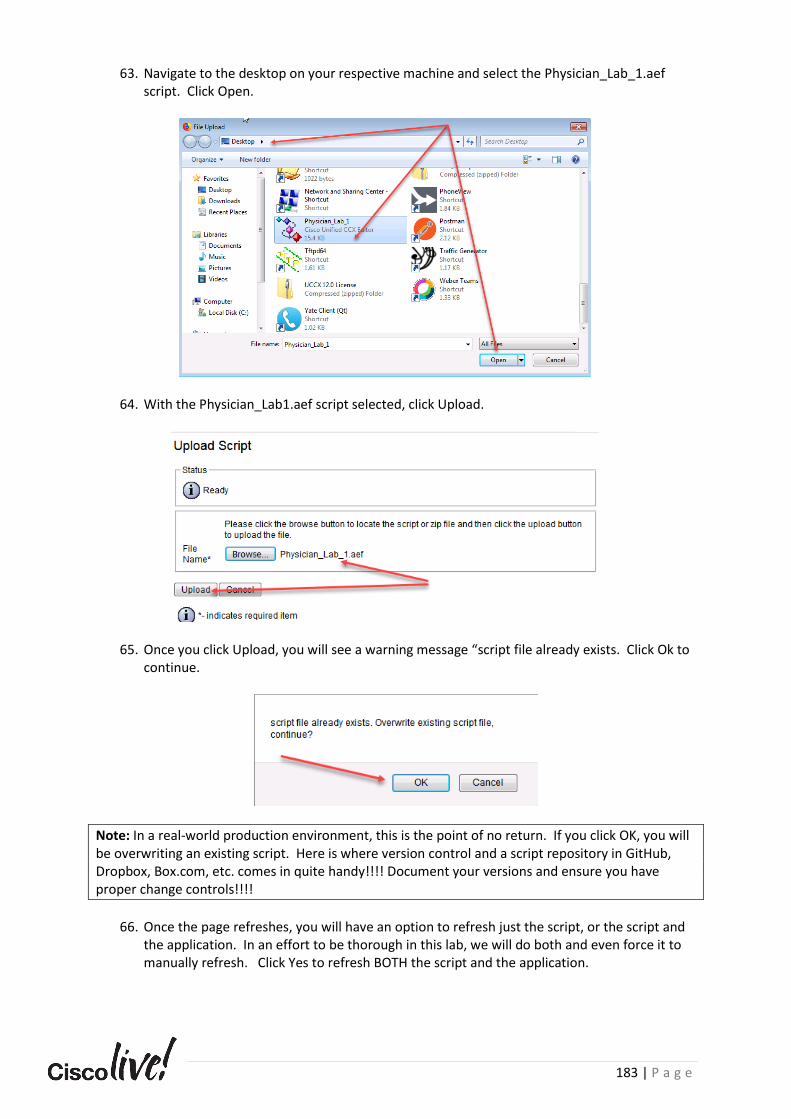
183 | P a g e
63. Navigate to the desktop on your respective machine and select the Physician_Lab_1.aef
script. Click Open.
64. With the Physician_Lab1.aef script selected, click Upload.
65. Once you click Upload, you will see a warning message “script file already exists. Click Ok to continue.
Note: In a real-world production environment, this is the point of no return. If you click OK, you will be overwriting an existing script. Here is where version control and a script repository in GitHub, Dropbox, Box.com, etc. comes in quite handy!!!! Document your versions and ensure you have proper change controls!!!!
66. Once the page refreshes, you will have an option to refresh just the script, or the script and
the application. In an effort to be thorough in this lab, we will do both and even force it to manually refresh. Click Yes to refresh BOTH the script and the application.
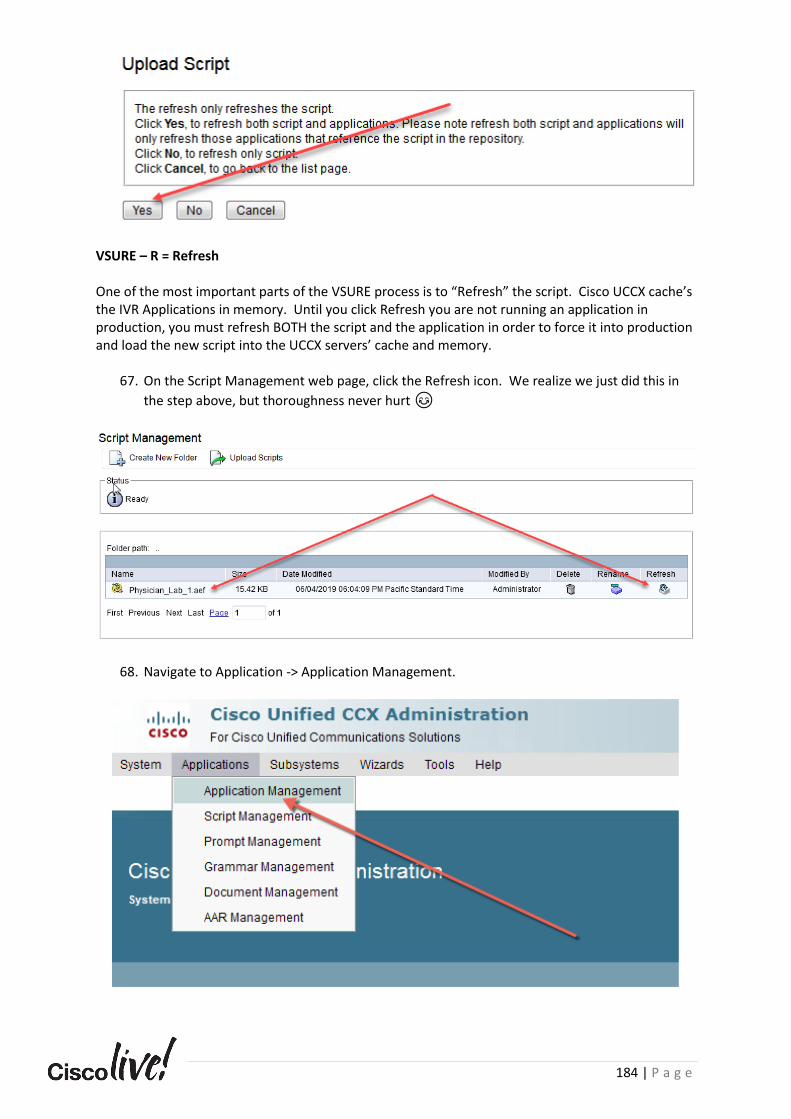
184 | P a g e
VSURE – R = Refresh
One of the most important parts of the VSURE process is to “Refresh” the script. Cisco UCCX cache’s the IVR Applications in memory. Until you click Refresh you are not running an application in production, you must refresh BOTH the script and the application in order to force it into production and load the new script into the UCCX servers’ cache and memory.
67. On the Script Management web page, click the Refresh icon. We realize we just did this in
the step above, but thoroughness never hurt 😊
68. Navigate to Application -> Application Management.
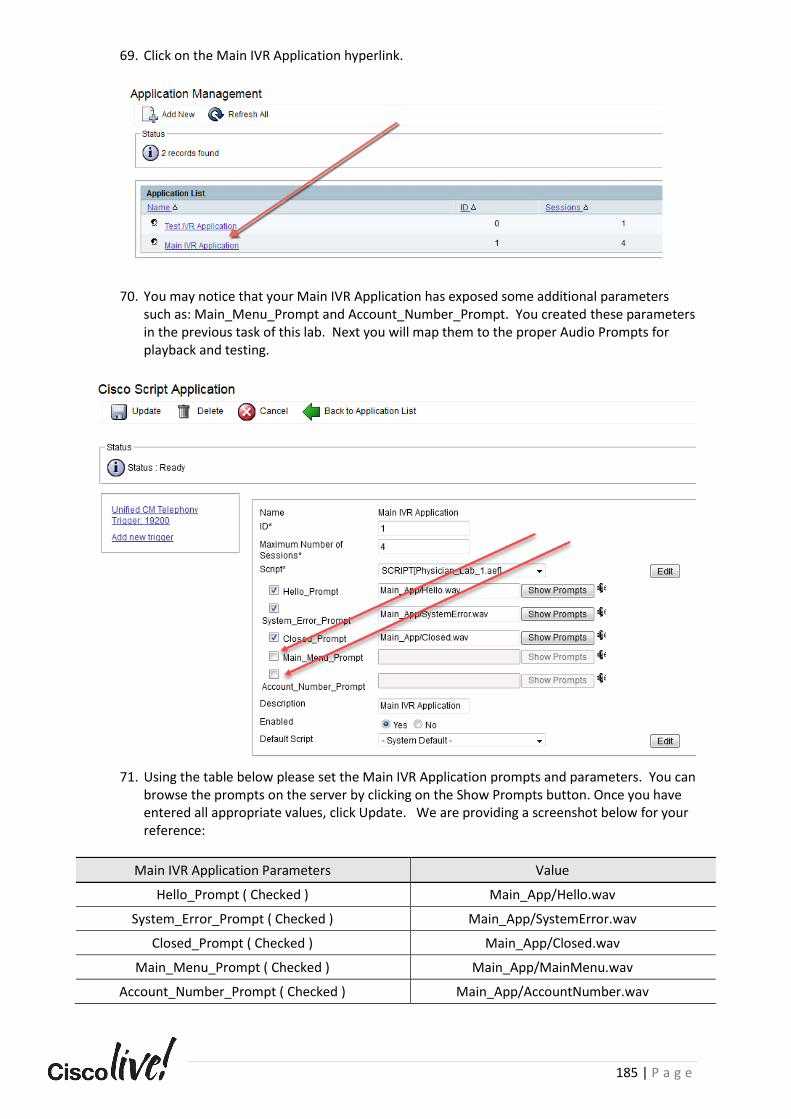
185 | P a g e
69. Click on the Main IVR Application hyperlink.
70. You may notice that your Main IVR Application has exposed some additional parameters such as: Main_Menu_Prompt and Account_Number_Prompt. You created these parameters in the previous task of this lab. Next you will map them to the proper Audio Prompts for playback and testing.
71. Using the table below please set the Main IVR Application prompts and parameters. You can
browse the prompts on the server by clicking on the Show Prompts button. Once you have entered all appropriate values, click Update. We are providing a screenshot below for your reference:
Main IVR Application Parameters Value
Hello_Prompt ( Checked ) Main_App/Hello.wav
System_Error_Prompt ( Checked ) Main_App/SystemError.wav
Closed_Prompt ( Checked ) Main_App/Closed.wav
Main_Menu_Prompt ( Checked ) Main_App/MainMenu.wav
Account_Number_Prompt ( Checked ) Main_App/AccountNumber.wav

186 | P a g e
VSURE – E = Execute
72. Test the Main IVR Application by calling the pilot number 19200 from your respective Cisco IP Communicator softphone. The system will answer the call.
Test Plan for the Application:
• Did you hear the Hello Prompt?
• Did you hear the Main Menu Prompt?
• Was DTMF Digits recognized? If you press option 1 did the menu respond?
• Could you enter a 7-digit account number followed by #? Instructor Challenge:
• Perform a new Reactive Debug ( See steps in the previous labs for a refresher )
• Prove that your Account Number is being captured by the script into the Account Number String variable at run time.

187 | P a g e
LAB 9: UCCX Scripting and SQL Server Database Access Steps In this lab we will continue developing our Main IVR Application script using the UCCX Script Editor. We will add database access in the Main application. The IVR will communicate with a Microsoft SQL Server. This will allow a caller to enter an account number and retrieve a balance from the database to be played back via the script.
We will examine the DB Read, DB Get, and DB Release steps in the Script Editor. Database access in an IVR can be performed via Web Services and more formal programming techniques, however, this lab will focus on the steps embedded into the script editor for quick access to SQL databases for IVR integrations.
In this lab you will:
• Log into the Cisco Unified Contact Center Express ( UCCX ) App Admin webpage.
• Log into the Cisco UCCX Script Editor.
• Build MS SQL Server Database Access into the IVR logic in the Main Application.
• Upload the script to the UCCX Server.
• Test the call flows using a Reactive Debug.

188 | P a g e
Task 1: Downloading the SQL Server JDBC Drivers In this task you will download SQL Server JDBC Drivers that we are providing for this lab. The IVR can communicate with a Microsoft SQL Server for customer record retrieval, however there must be specific drivers installed on the UCCX Server. In this task you will download these drivers from our webserver.
1. In your web browser please open a new tab. You may add a new tab by clicking on the “+” arrow.
Note: You may have previously opened windows; thus, your screenshot may not match what is listed below. It’s okay, keep on rocking!
2. Please enter the following URL: http://10.1.5.100/jtds-1.2.5.jar and press enter.
3. When the download pop up window is displayed please select Save File and click OK.
4. In the upper right-hand corner of the browser, please click on the down arrow to display a list of file downloads.
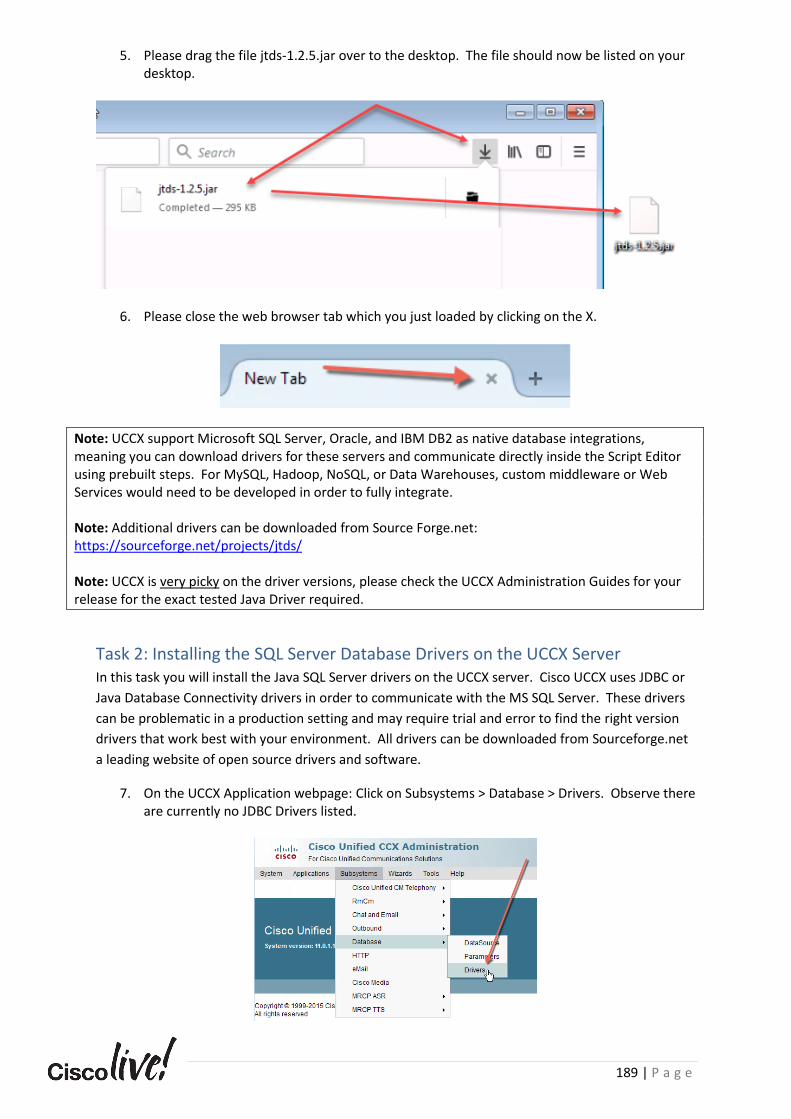
189 | P a g e
5. Please drag the file jtds-1.2.5.jar over to the desktop. The file should now be listed on your desktop.
6. Please close the web browser tab which you just loaded by clicking on the X.
Note: UCCX support Microsoft SQL Server, Oracle, and IBM DB2 as native database integrations, meaning you can download drivers for these servers and communicate directly inside the Script Editor using prebuilt steps. For MySQL, Hadoop, NoSQL, or Data Warehouses, custom middleware or Web Services would need to be developed in order to fully integrate. Note: Additional drivers can be downloaded from Source Forge.net: https://sourceforge.net/projects/jtds/ Note: UCCX is very picky on the driver versions, please check the UCCX Administration Guides for your release for the exact tested Java Driver required.
Task 2: Installing the SQL Server Database Drivers on the UCCX Server In this task you will install the Java SQL Server drivers on the UCCX server. Cisco UCCX uses JDBC or
Java Database Connectivity drivers in order to communicate with the MS SQL Server. These drivers
can be problematic in a production setting and may require trial and error to find the right version
drivers that work best with your environment. All drivers can be downloaded from Sourceforge.net
a leading website of open source drivers and software.
7. On the UCCX Application webpage: Click on Subsystems > Database > Drivers. Observe there are currently no JDBC Drivers listed.

190 | P a g e
8. Click Add New.
9. In the Driver File section, click Browse. This will open a File Upload pop up window.
10. Click on the jtds-1.2.5.jar file located on your desktop, ensure that the File name box has the entry jtds-1.2.5. Click Open.

191 | P a g e
11. In the Driver class name dropdown, select net.sourceforge.jtds.jdbc.Driver. Next, click Upload.
Note: net.sourceforge.jtds.jdbc.Driver is the common driver used by Microsoft SQL Server 2008,
2012, and 2016.
12. Observe the newly uploaded driver is installed as seen below:
Note: It is possible to upload multiple drivers and connect to different databases inside UCCX. This is
common in large enterprises with multiple customer record sources.
13. Click Subsystems > Database > Parameters.
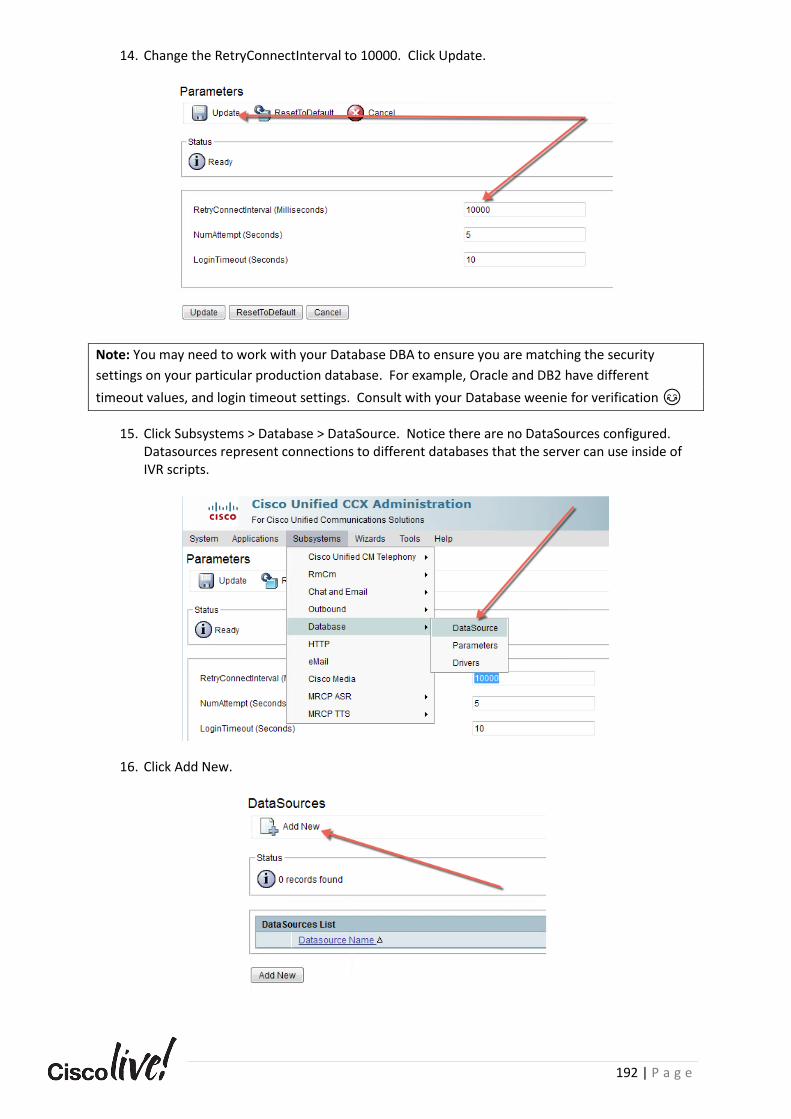
192 | P a g e
14. Change the RetryConnectInterval to 10000. Click Update.
Note: You may need to work with your Database DBA to ensure you are matching the security
settings on your particular production database. For example, Oracle and DB2 have different
timeout values, and login timeout settings. Consult with your Database weenie for verification 😊
15. Click Subsystems > Database > DataSource. Notice there are no DataSources configured. Datasources represent connections to different databases that the server can use inside of IVR scripts.
16. Click Add New.
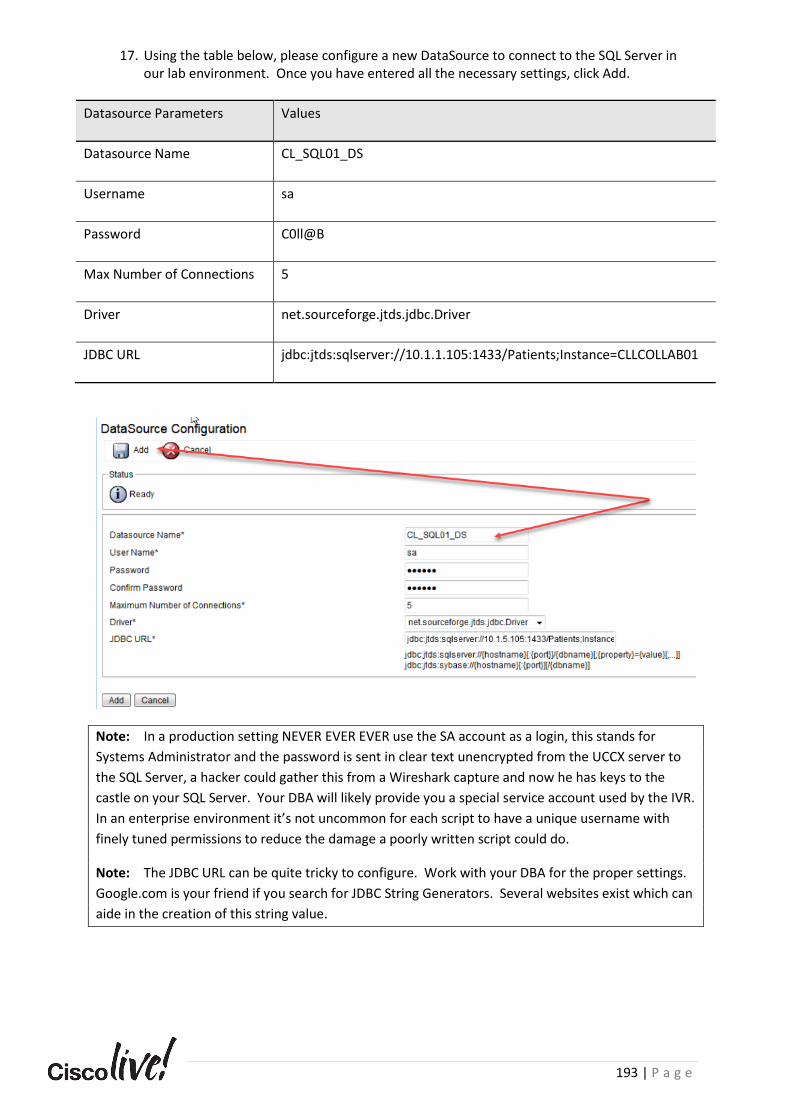
193 | P a g e
17. Using the table below, please configure a new DataSource to connect to the SQL Server in our lab environment. Once you have entered all the necessary settings, click Add.
Datasource Parameters Values
Datasource Name CL_SQL01_DS
Username sa
Password C0ll@B
Max Number of Connections 5
Driver net.sourceforge.jtds.jdbc.Driver
JDBC URL jdbc:jtds:sqlserver://10.1.1.105:1433/Patients;Instance=CLLCOLLAB01
Note: In a production setting NEVER EVER EVER use the SA account as a login, this stands for
Systems Administrator and the password is sent in clear text unencrypted from the UCCX server to
the SQL Server, a hacker could gather this from a Wireshark capture and now he has keys to the
castle on your SQL Server. Your DBA will likely provide you a special service account used by the IVR.
In an enterprise environment it’s not uncommon for each script to have a unique username with
finely tuned permissions to reduce the damage a poorly written script could do.
Note: The JDBC URL can be quite tricky to configure. Work with your DBA for the proper settings.
Google.com is your friend if you search for JDBC String Generators. Several websites exist which can
aide in the creation of this string value.
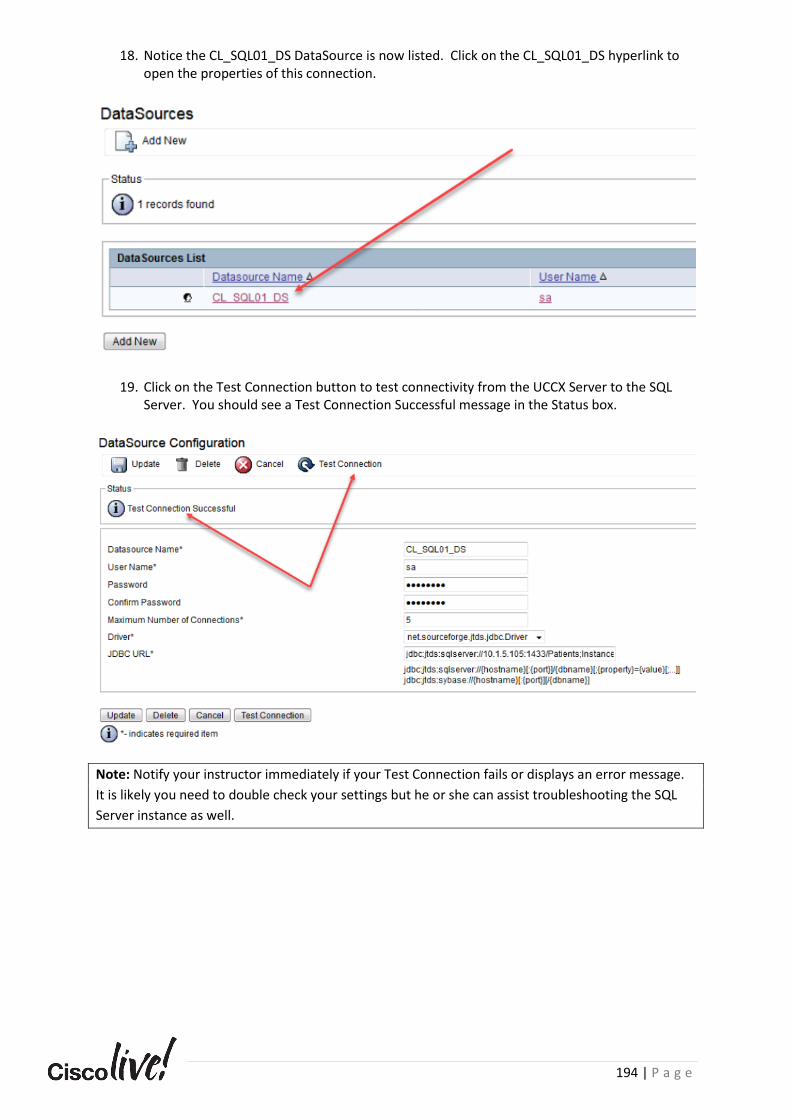
194 | P a g e
18. Notice the CL_SQL01_DS DataSource is now listed. Click on the CL_SQL01_DS hyperlink to open the properties of this connection.
19. Click on the Test Connection button to test connectivity from the UCCX Server to the SQL Server. You should see a Test Connection Successful message in the Status box.
Note: Notify your instructor immediately if your Test Connection fails or displays an error message.
It is likely you need to double check your settings but he or she can assist troubleshooting the SQL
Server instance as well.
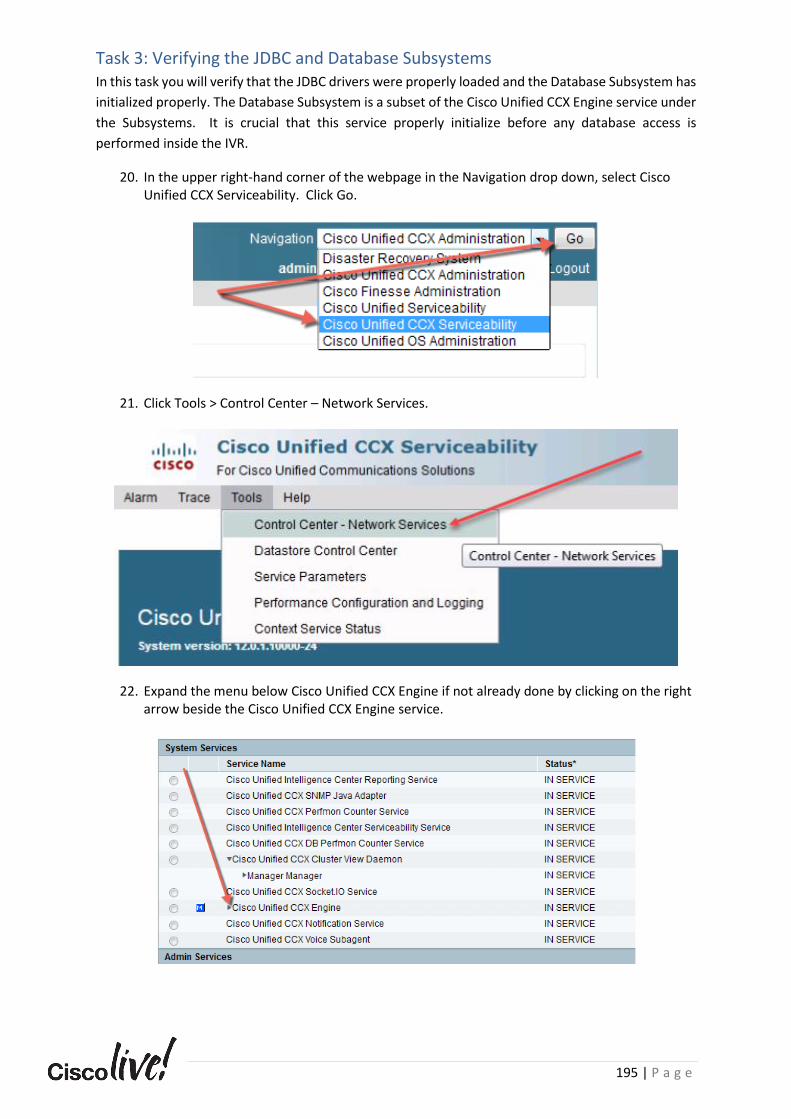
195 | P a g e
Task 3: Verifying the JDBC and Database Subsystems In this task you will verify that the JDBC drivers were properly loaded and the Database Subsystem has
initialized properly. The Database Subsystem is a subset of the Cisco Unified CCX Engine service under
the Subsystems. It is crucial that this service properly initialize before any database access is
performed inside the IVR.
20. In the upper right-hand corner of the webpage in the Navigation drop down, select Cisco Unified CCX Serviceability. Click Go.
21. Click Tools > Control Center – Network Services.
22. Expand the menu below Cisco Unified CCX Engine if not already done by clicking on the right arrow beside the Cisco Unified CCX Engine service.
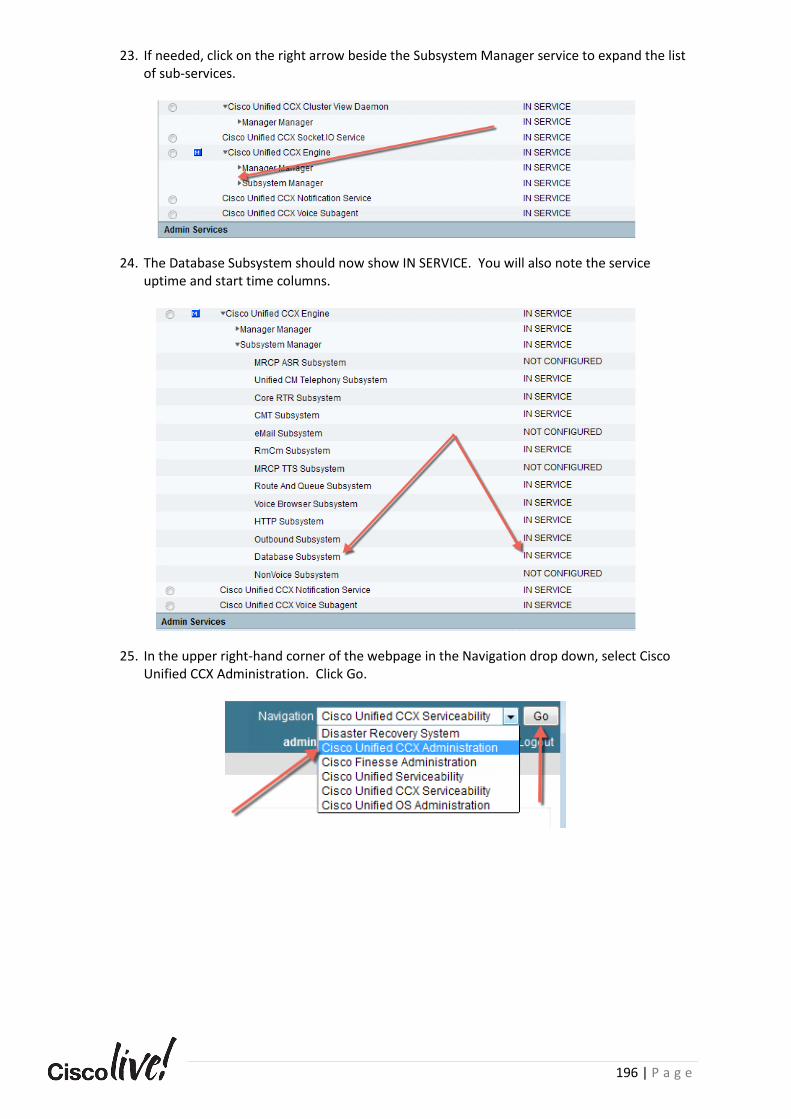
196 | P a g e
23. If needed, click on the right arrow beside the Subsystem Manager service to expand the list of sub-services.
24. The Database Subsystem should now show IN SERVICE. You will also note the service uptime and start time columns.
25. In the upper right-hand corner of the webpage in the Navigation drop down, select Cisco Unified CCX Administration. Click Go.

197 | P a g e
Task 4: Examining the Microsoft SQL Server Database In this task you will log into and examine the Microsoft SQL Server database and the table which
houses the Account Balance information for our IVR script. The purpose of this step is to allow you
to see the values in the database and to have a better understanding of the database architecture.
1. On your STUDENT-VM-1 desktop, click on Start > Remote Desktop Connection.
2. In the Remote Desktop Connection box, please enter 10.1.5.105 for the computer name, this is the IP Address of our WIN-SERVER02 VM. in the lab which houses the Microsoft SQL Server 2016. Click Connect.
3. In the Windows Security dialog window, enter the username Administrator ( Note: this may be filled out or entered already ) and the password: C0ll@B Once you have entered the proper credentials, Click OK.
Note: Please be patient, the connection may take 1-2 minutes to set up the first time.
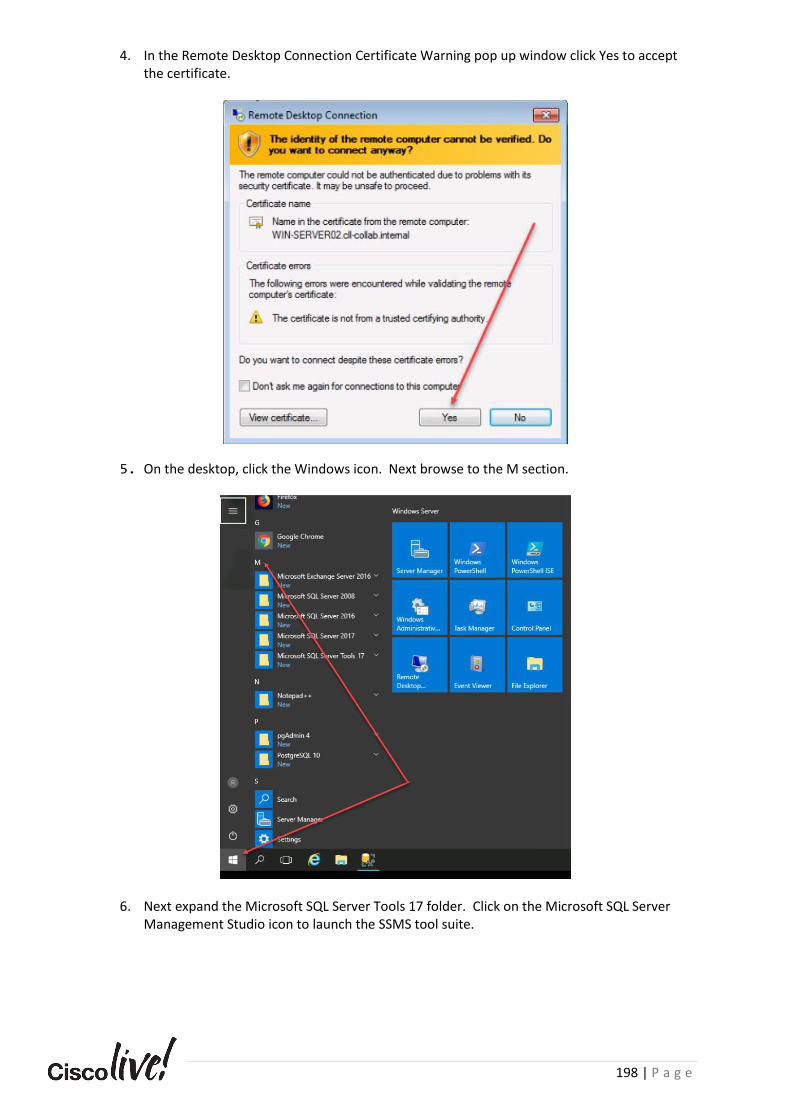
198 | P a g e
4. In the Remote Desktop Connection Certificate Warning pop up window click Yes to accept the certificate.
5. On the desktop, click the Windows icon. Next browse to the M section.
6. Next expand the Microsoft SQL Server Tools 17 folder. Click on the Microsoft SQL Server Management Studio icon to launch the SSMS tool suite.
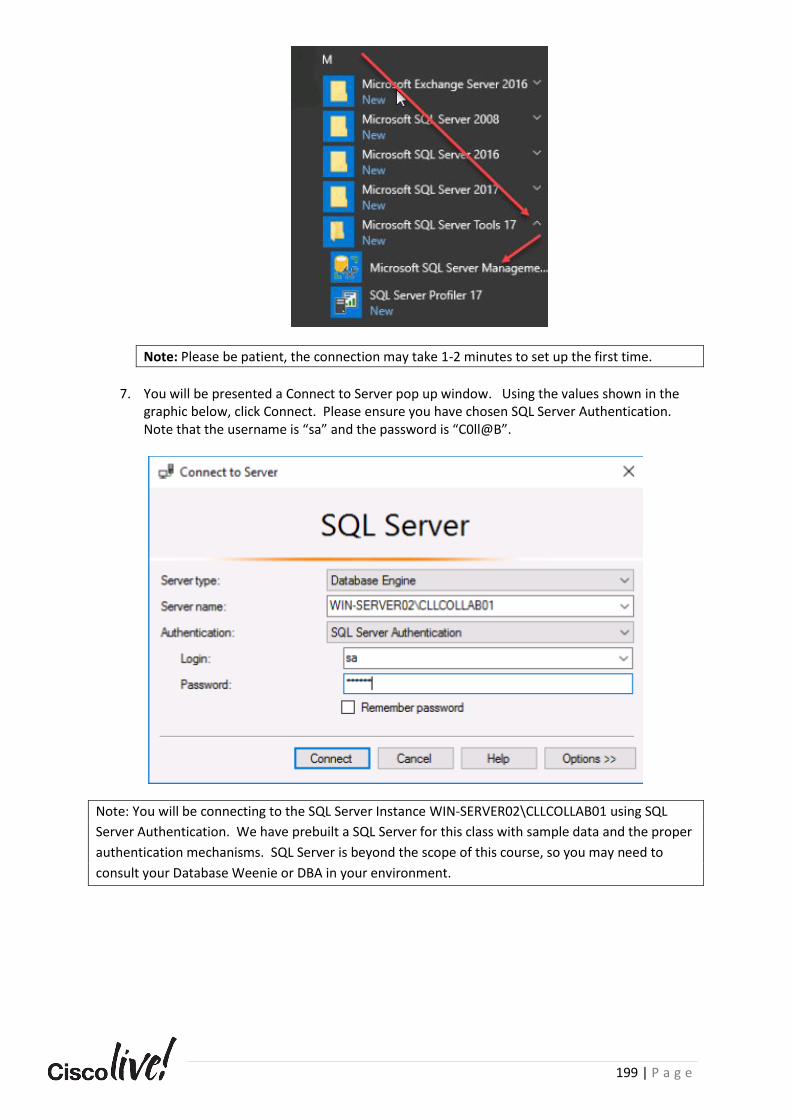
199 | P a g e
Note: Please be patient, the connection may take 1-2 minutes to set up the first time.
7. You will be presented a Connect to Server pop up window. Using the values shown in the
graphic below, click Connect. Please ensure you have chosen SQL Server Authentication. Note that the username is “sa” and the password is “C0ll@B”.
Note: You will be connecting to the SQL Server Instance WIN-SERVER02\CLLCOLLAB01 using SQL
Server Authentication. We have prebuilt a SQL Server for this class with sample data and the proper
authentication mechanisms. SQL Server is beyond the scope of this course, so you may need to
consult your Database Weenie or DBA in your environment.
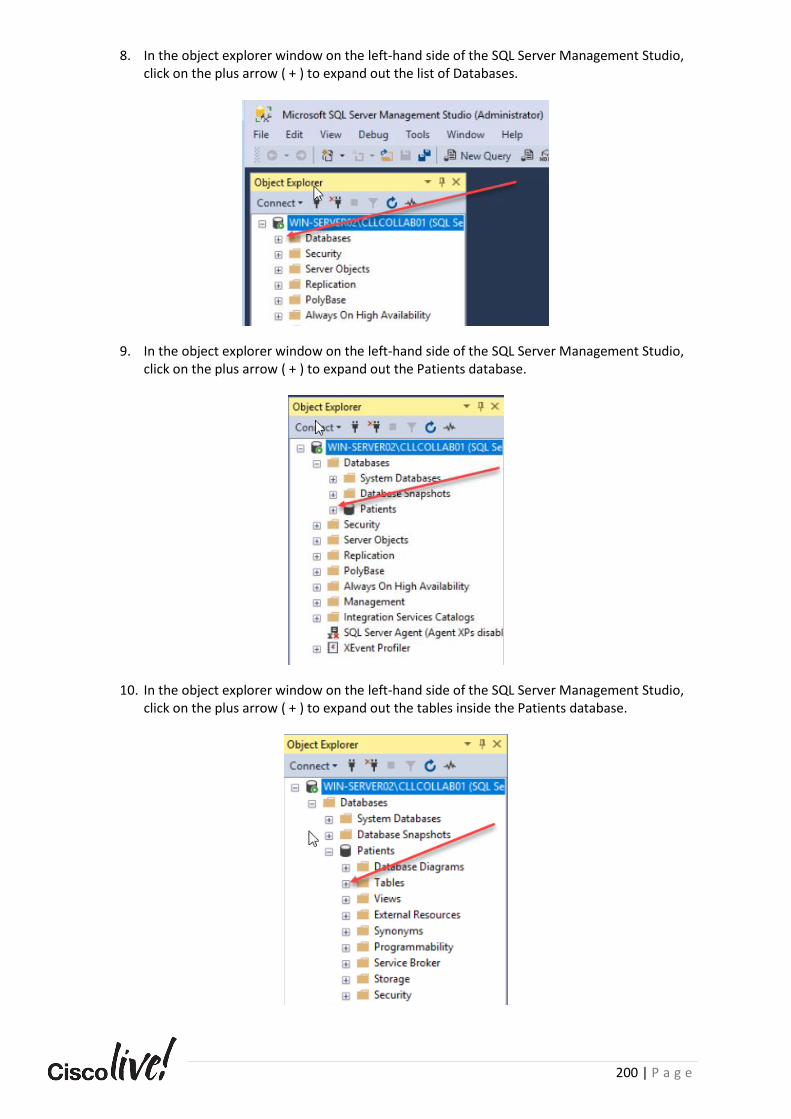
200 | P a g e
8. In the object explorer window on the left-hand side of the SQL Server Management Studio, click on the plus arrow ( + ) to expand out the list of Databases.
9. In the object explorer window on the left-hand side of the SQL Server Management Studio, click on the plus arrow ( + ) to expand out the Patients database.
10. In the object explorer window on the left-hand side of the SQL Server Management Studio, click on the plus arrow ( + ) to expand out the tables inside the Patients database.

201 | P a g e
11. In the object explorer window on the left-hand side of the SQL Server Management Studio, click on the plus arrow ( + ) to expand out the dbo.Patient-Records table.
12. In the object explorer window on the left-hand side of the SQL Server Management Studio, click on the plus arrow ( + ) to expand out the Columns of the Patient database. Notice there are 10 columns inside this database which represent various customer data we will tie into the IVR application.
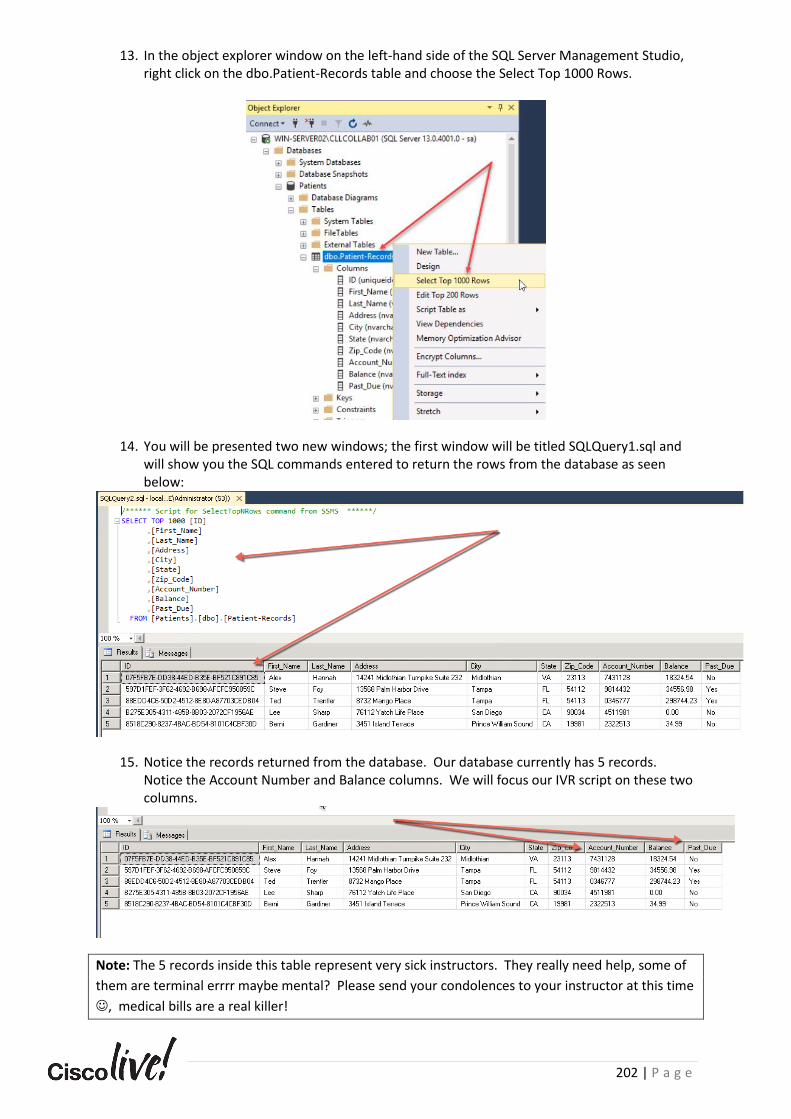
202 | P a g e
13. In the object explorer window on the left-hand side of the SQL Server Management Studio, right click on the dbo.Patient-Records table and choose the Select Top 1000 Rows.
14. You will be presented two new windows; the first window will be titled SQLQuery1.sql and will show you the SQL commands entered to return the rows from the database as seen below:
15. Notice the records returned from the database. Our database currently has 5 records. Notice the Account Number and Balance columns. We will focus our IVR script on these two columns.
Note: The 5 records inside this table represent very sick instructors. They really need help, some of
them are terminal errrr maybe mental? Please send your condolences to your instructor at this time
☺, medical bills are a real killer!

203 | P a g e
16. Please write down several of the account numbers, balances, and note if the account is Past Due on a sheet of paper or copy them into notepad, these account numbers will be used in a later step in this lab when you call into the IVR application and enter an account number.
Note: You can open Notepad.exe on your student desktops and copy the account numbers and
balances by clicking on Start and in the search box type Notepad.exe.
17. Please minimize the Remote Desktop connection at this time, we will revisit the SQL Server in a later section.
Task 5: Adding the Database Steps to the Script In this task you will continue modifying and adding database logic to the existing
Physician_Lab_1.aef script. You will also finish coding the Menu and User Inputs in this section.
18. Please return to the UCCX Script Editor on your Student-VM-1 Desktop. This script should already be open in the UCCX Script Editor from the previous lab. If you happened to close the editor, you will need to log back in and open Physician_Lab_1.aef.
19. Maximize the script by clicking on the square in the upper right-hand corner of the script.

204 | P a g e
20. Right click anywhere in the white space of the script. Choose Expand All.
21. Scroll to the roughly halfway down the script on the Script Editor Pane. This will expose the Menu and Get Digit String steps we added in the previous lab. We will be adding code in between these labels.

205 | P a g e
22. In the lower left-hand corner of the Script Editor, click on the Down Arrow to create a new Variable. Using the table below, please enter the appropriate values, once you have entered all values, click OK.
Variable Parameters Variable Value
Type String
Name balance
Value “” ( Leave this as default value )
Final Unchecked
Array Unchecked
Parameter Unchecked
Dimensions 0
Example of creating a String Variable:
Note: We will begin to introduce a common best practice with scripting. A common practice in
naming Variables is to use lower case for non-parameter variables and upper case for parameters.
This is another visual indicator and clue when debugging scripts that can draw attention to the
different variable types.
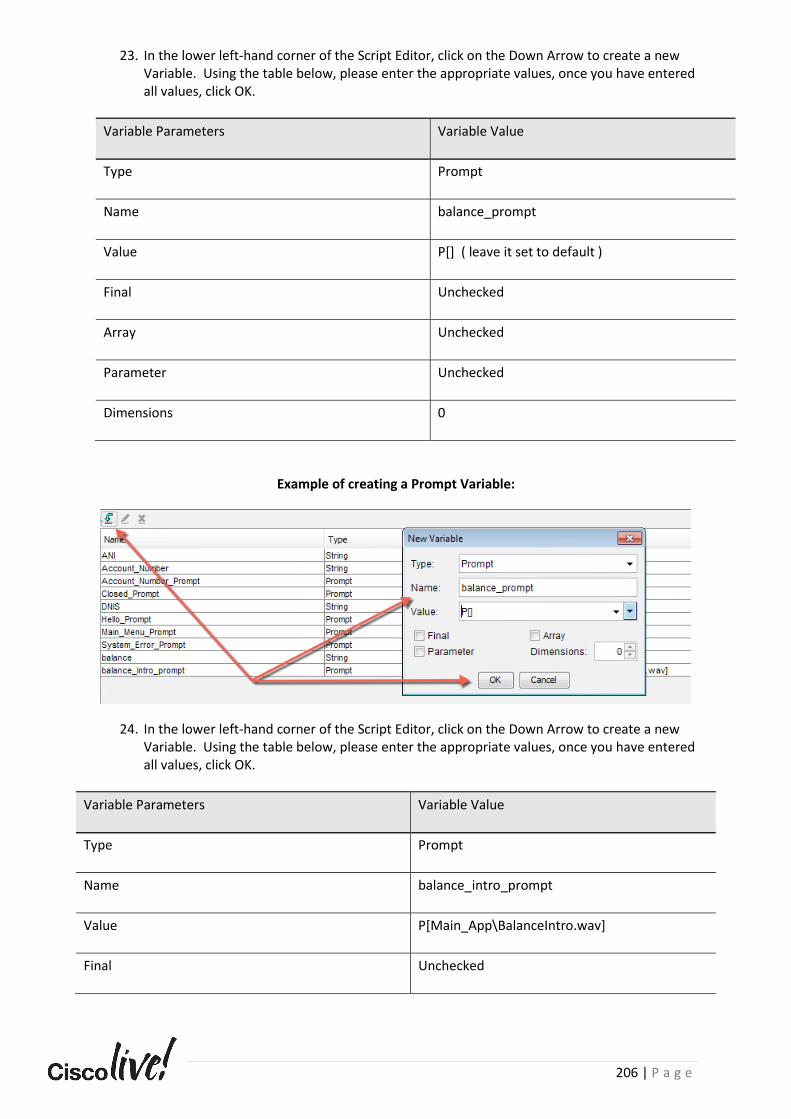
206 | P a g e
23. In the lower left-hand corner of the Script Editor, click on the Down Arrow to create a new Variable. Using the table below, please enter the appropriate values, once you have entered all values, click OK.
Variable Parameters Variable Value
Type Prompt
Name balance_prompt
Value P[] ( leave it set to default )
Final Unchecked
Array Unchecked
Parameter Unchecked
Dimensions 0
Example of creating a Prompt Variable:
24. In the lower left-hand corner of the Script Editor, click on the Down Arrow to create a new Variable. Using the table below, please enter the appropriate values, once you have entered all values, click OK.
Variable Parameters Variable Value
Type Prompt
Name balance_intro_prompt
Value P[Main_App\BalanceIntro.wav]
Final Unchecked

207 | P a g e
Array Unchecked
Parameter Unchecked
Dimensions 0
Example of creating a Prompt Variable:
Note: We are introducing yet another new scripting technique above. You will notice we are hard
coding the path to the WAV file in the Value textbox to Main_App\BalanceIntro.wav. The P[] (
brackets ) that enclose the wav file path tell UCCX to play a prompt. The value inside the brackets is
which prompt to play. We do this to cut down on the number of parameters on the application page
in UCCX. Typically, you only expose parameters for prompts that may change frequently like a main
menu.
25. In the lower left-hand corner of the Script Editor, click on the Down Arrow to create a new Variable. Using the table below, please enter the appropriate values, once you have entered all values, click OK.
Variable Parameters Variable Value
Type Prompt
Name sql_results_menu_prompt
Value P[Main_App\SQLResultsMenu.wav]
Final Unchecked
Array Unchecked
Parameter Unchecked
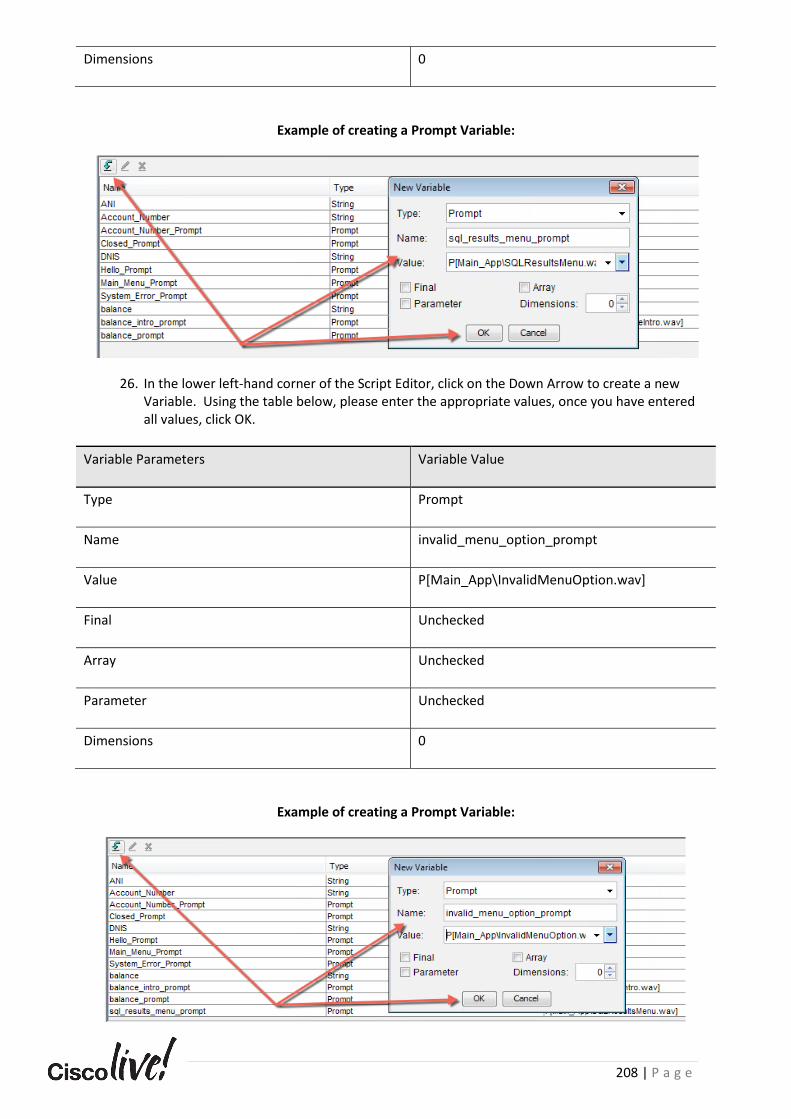
208 | P a g e
Dimensions 0
Example of creating a Prompt Variable:
26. In the lower left-hand corner of the Script Editor, click on the Down Arrow to create a new Variable. Using the table below, please enter the appropriate values, once you have entered all values, click OK.
Variable Parameters Variable Value
Type Prompt
Name invalid_menu_option_prompt
Value P[Main_App\InvalidMenuOption.wav]
Final Unchecked
Array Unchecked
Parameter Unchecked
Dimensions 0
Example of creating a Prompt Variable:
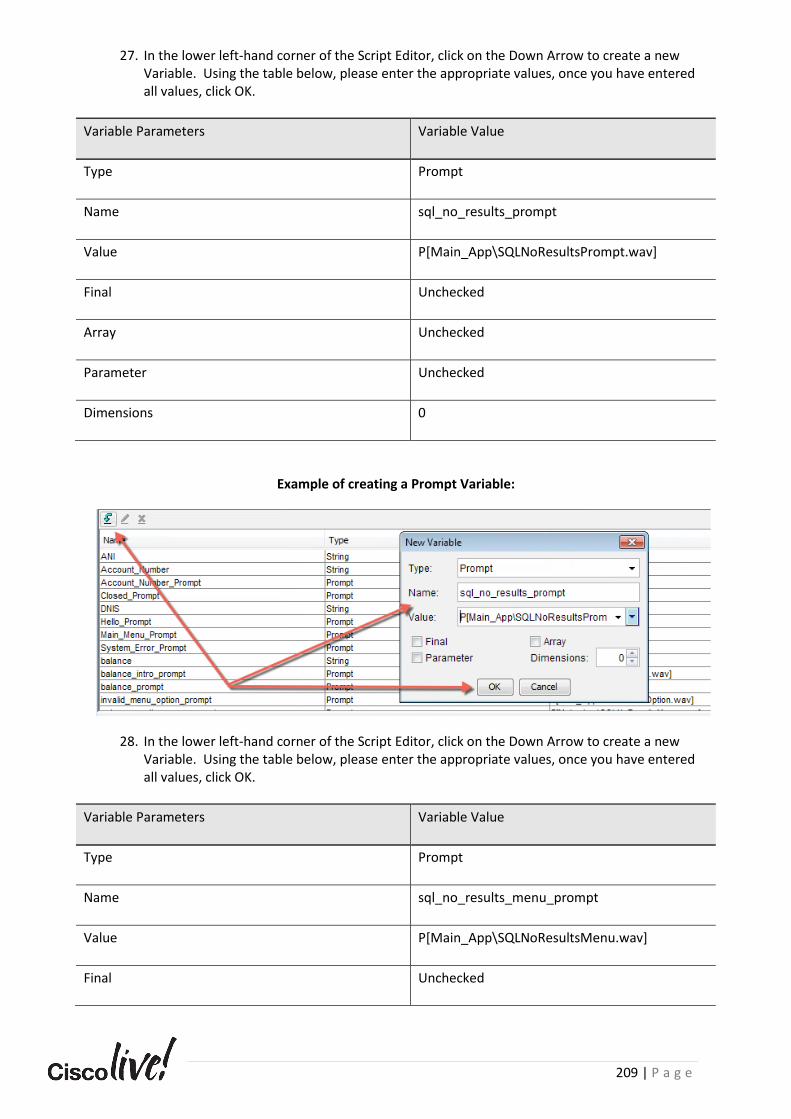
209 | P a g e
27. In the lower left-hand corner of the Script Editor, click on the Down Arrow to create a new Variable. Using the table below, please enter the appropriate values, once you have entered all values, click OK.
Variable Parameters Variable Value
Type Prompt
Name sql_no_results_prompt
Value P[Main_App\SQLNoResultsPrompt.wav]
Final Unchecked
Array Unchecked
Parameter Unchecked
Dimensions 0
Example of creating a Prompt Variable:
28. In the lower left-hand corner of the Script Editor, click on the Down Arrow to create a new Variable. Using the table below, please enter the appropriate values, once you have entered all values, click OK.
Variable Parameters Variable Value
Type Prompt
Name sql_no_results_menu_prompt
Value P[Main_App\SQLNoResultsMenu.wav]
Final Unchecked
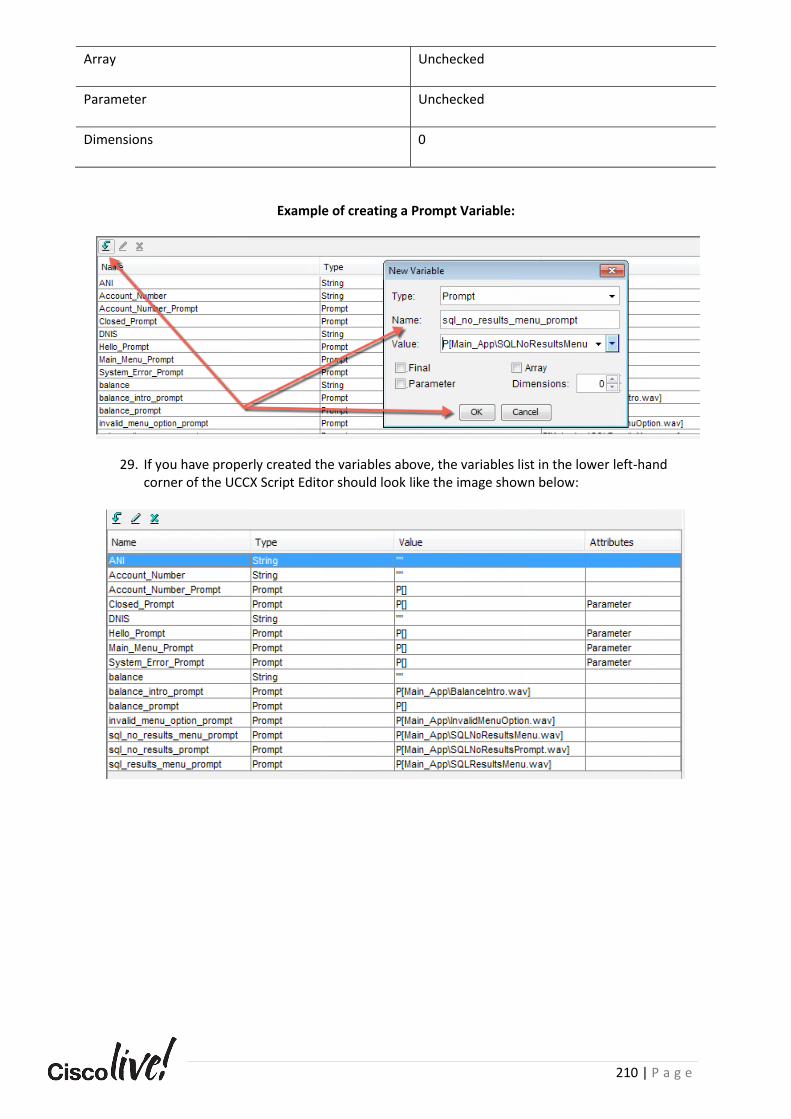
210 | P a g e
Array Unchecked
Parameter Unchecked
Dimensions 0
Example of creating a Prompt Variable:
29. If you have properly created the variables above, the variables list in the lower left-hand corner of the UCCX Script Editor should look like the image shown below:

211 | P a g e
30. Expand the Database folder in the Pallet window.
Note: Database steps require UCCX Premium licenses in order to execute. The IVR Script editor will
let you “design” a script using database steps. Remember that licenses are enforced at run time, not
design time!
31. While holding down the left mouse button, drag the DB Read Step into the script editor pane and release it directly under the Successful branch of the Get Digit String step which returns the Account Number. This step was created in the previous lab.
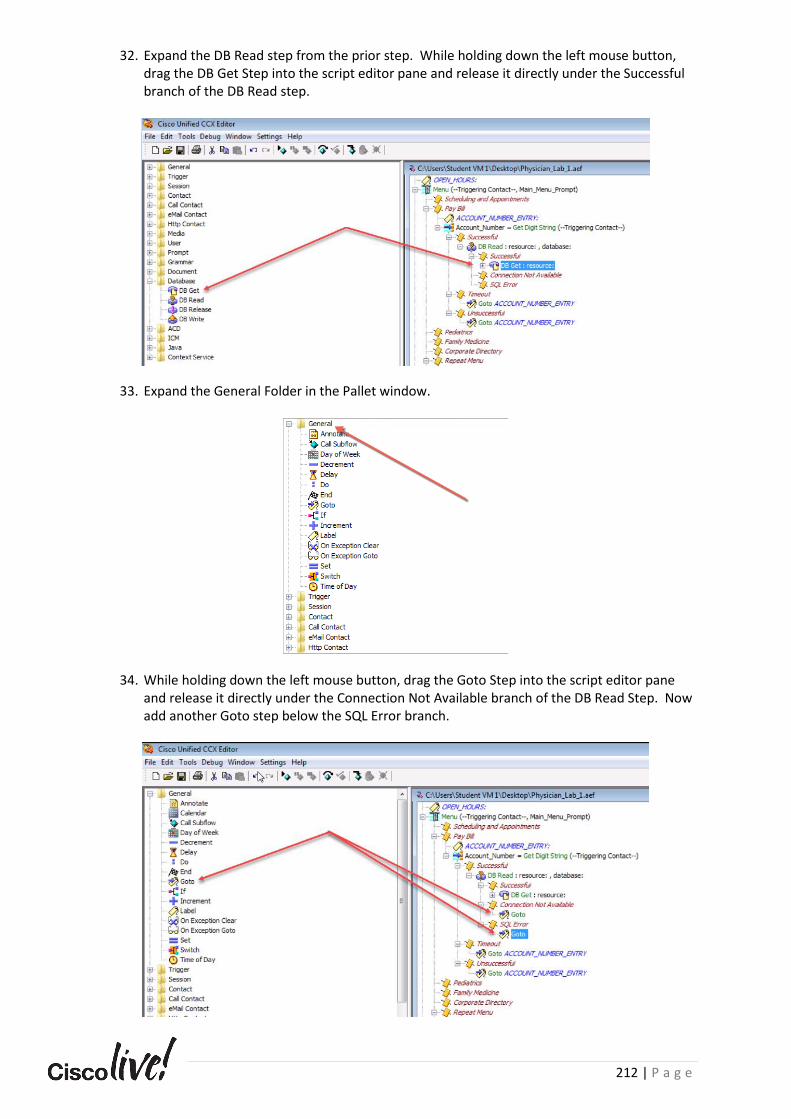
212 | P a g e
32. Expand the DB Read step from the prior step. While holding down the left mouse button, drag the DB Get Step into the script editor pane and release it directly under the Successful branch of the DB Read step.
33. Expand the General Folder in the Pallet window.
34. While holding down the left mouse button, drag the Goto Step into the script editor pane and release it directly under the Connection Not Available branch of the DB Read Step. Now add another Goto step below the SQL Error branch.
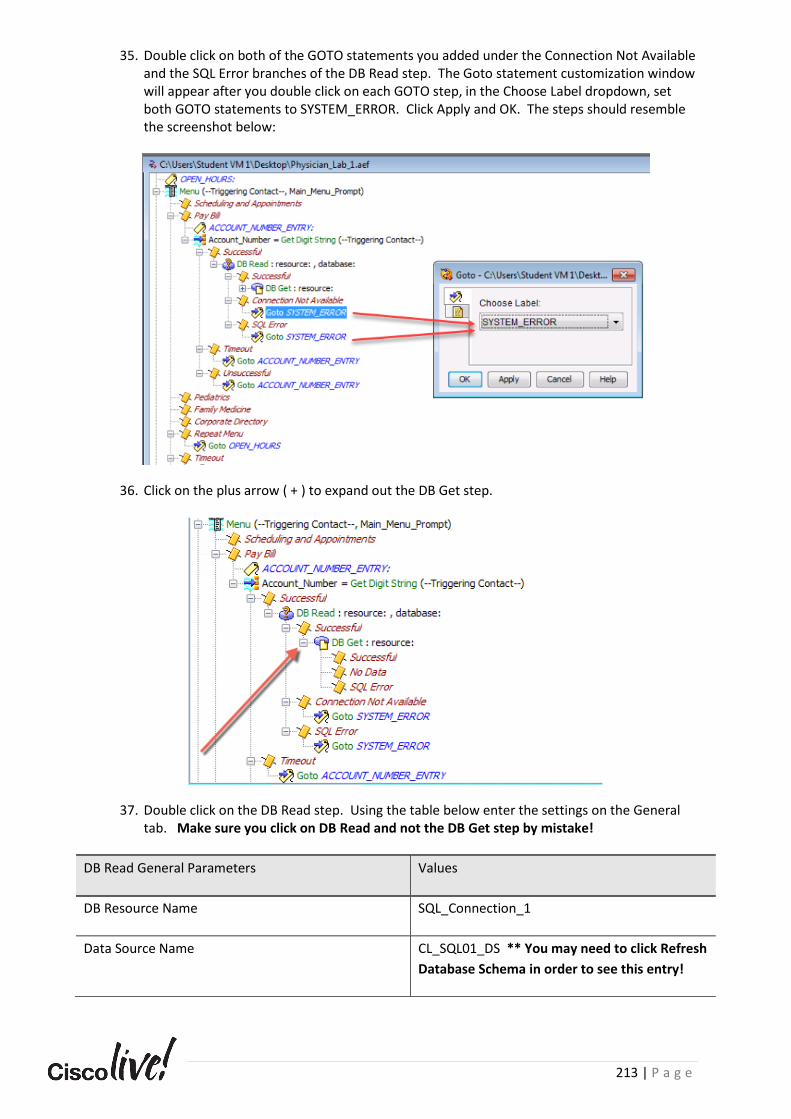
213 | P a g e
35. Double click on both of the GOTO statements you added under the Connection Not Available and the SQL Error branches of the DB Read step. The Goto statement customization window will appear after you double click on each GOTO step, in the Choose Label dropdown, set both GOTO statements to SYSTEM_ERROR. Click Apply and OK. The steps should resemble the screenshot below:
36. Click on the plus arrow ( + ) to expand out the DB Get step.
37. Double click on the DB Read step. Using the table below enter the settings on the General tab. Make sure you click on DB Read and not the DB Get step by mistake!
DB Read General Parameters Values
DB Resource Name SQL_Connection_1
Data Source Name CL_SQL01_DS ** You may need to click Refresh
Database Schema in order to see this entry!
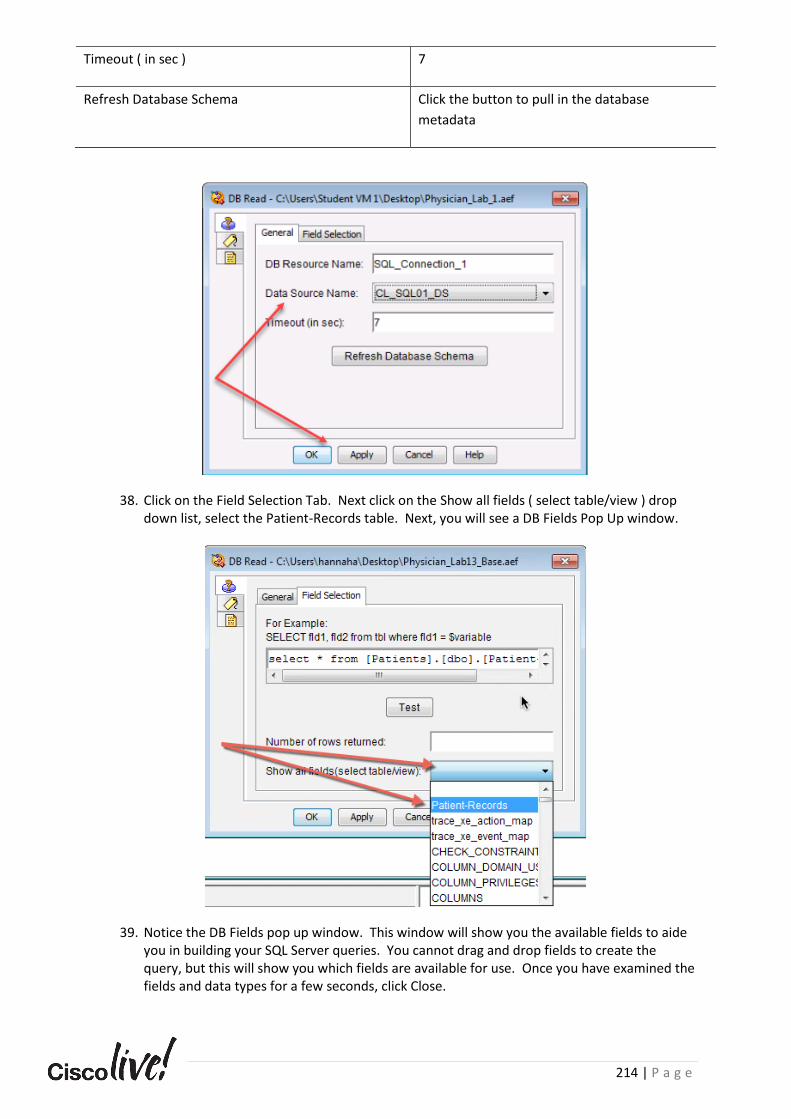
214 | P a g e
Timeout ( in sec ) 7
Refresh Database Schema Click the button to pull in the database
metadata
38. Click on the Field Selection Tab. Next click on the Show all fields ( select table/view ) drop down list, select the Patient-Records table. Next, you will see a DB Fields Pop Up window.
39. Notice the DB Fields pop up window. This window will show you the available fields to aide you in building your SQL Server queries. You cannot drag and drop fields to create the query, but this will show you which fields are available for use. Once you have examined the fields and data types for a few seconds, click Close.
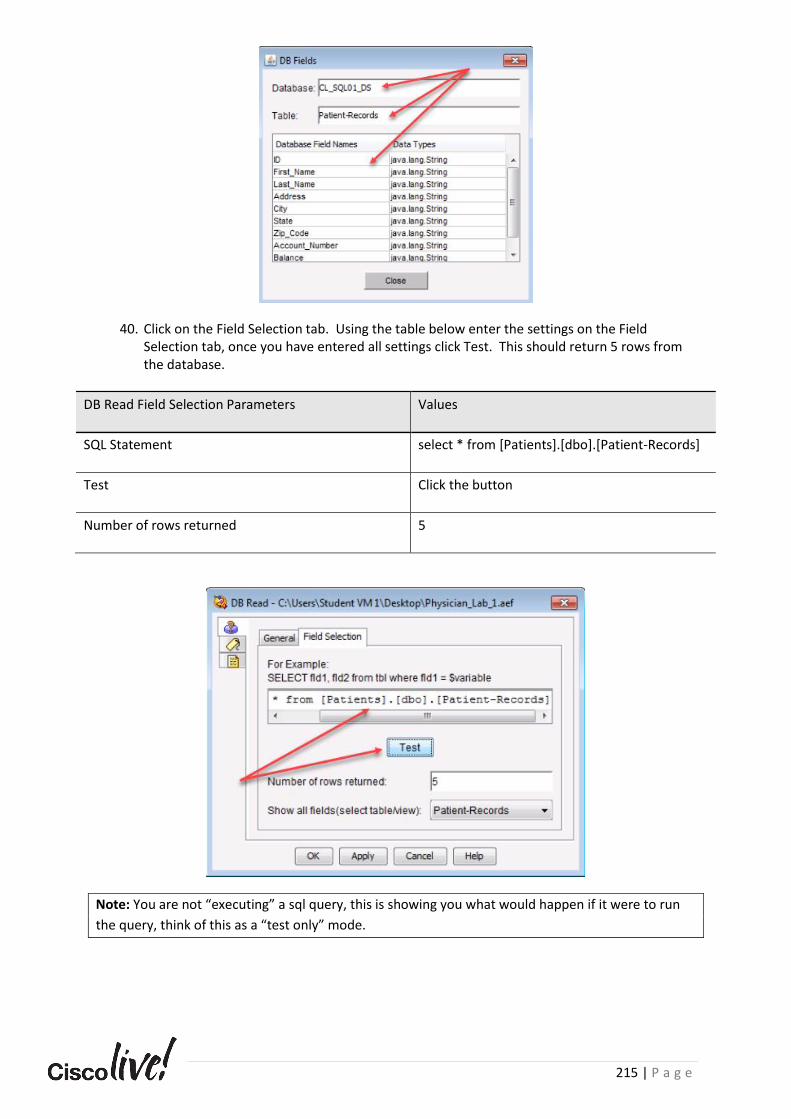
215 | P a g e
40. Click on the Field Selection tab. Using the table below enter the settings on the Field Selection tab, once you have entered all settings click Test. This should return 5 rows from the database.
DB Read Field Selection Parameters Values
SQL Statement select * from [Patients].[dbo].[Patient-Records]
Test Click the button
Number of rows returned 5
Note: You are not “executing” a sql query, this is showing you what would happen if it were to run
the query, think of this as a “test only” mode.
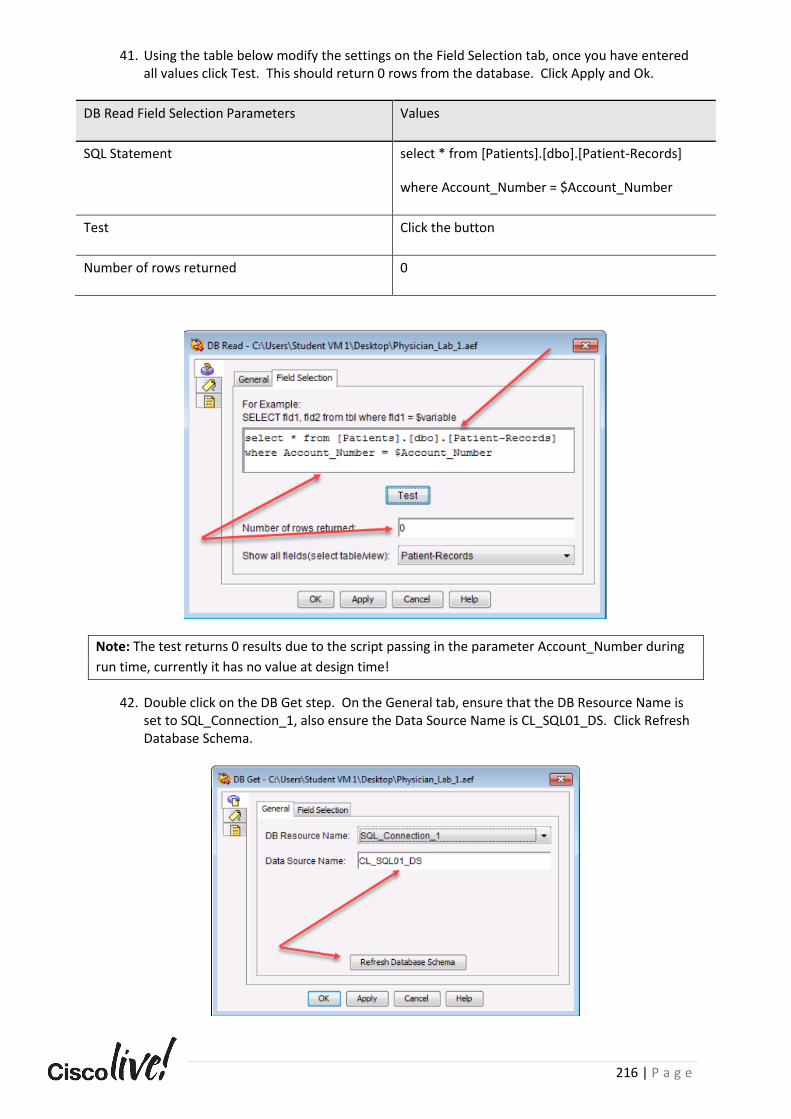
216 | P a g e
41. Using the table below modify the settings on the Field Selection tab, once you have entered all values click Test. This should return 0 rows from the database. Click Apply and Ok.
DB Read Field Selection Parameters Values
SQL Statement select * from [Patients].[dbo].[Patient-Records]
where Account_Number = $Account_Number
Test Click the button
Number of rows returned 0
Note: The test returns 0 results due to the script passing in the parameter Account_Number during
run time, currently it has no value at design time!
42. Double click on the DB Get step. On the General tab, ensure that the DB Resource Name is set to SQL_Connection_1, also ensure the Data Source Name is CL_SQL01_DS. Click Refresh Database Schema.
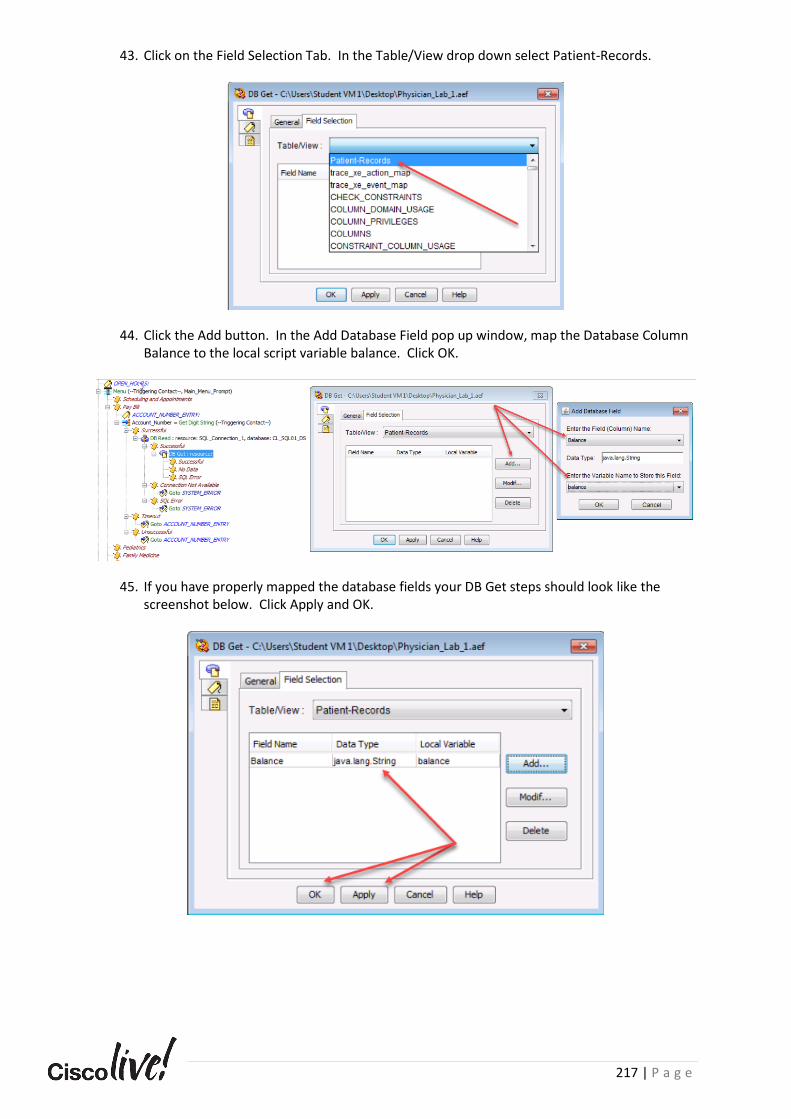
217 | P a g e
43. Click on the Field Selection Tab. In the Table/View drop down select Patient-Records.
44. Click the Add button. In the Add Database Field pop up window, map the Database Column Balance to the local script variable balance. Click OK.
45. If you have properly mapped the database fields your DB Get steps should look like the screenshot below. Click Apply and OK.
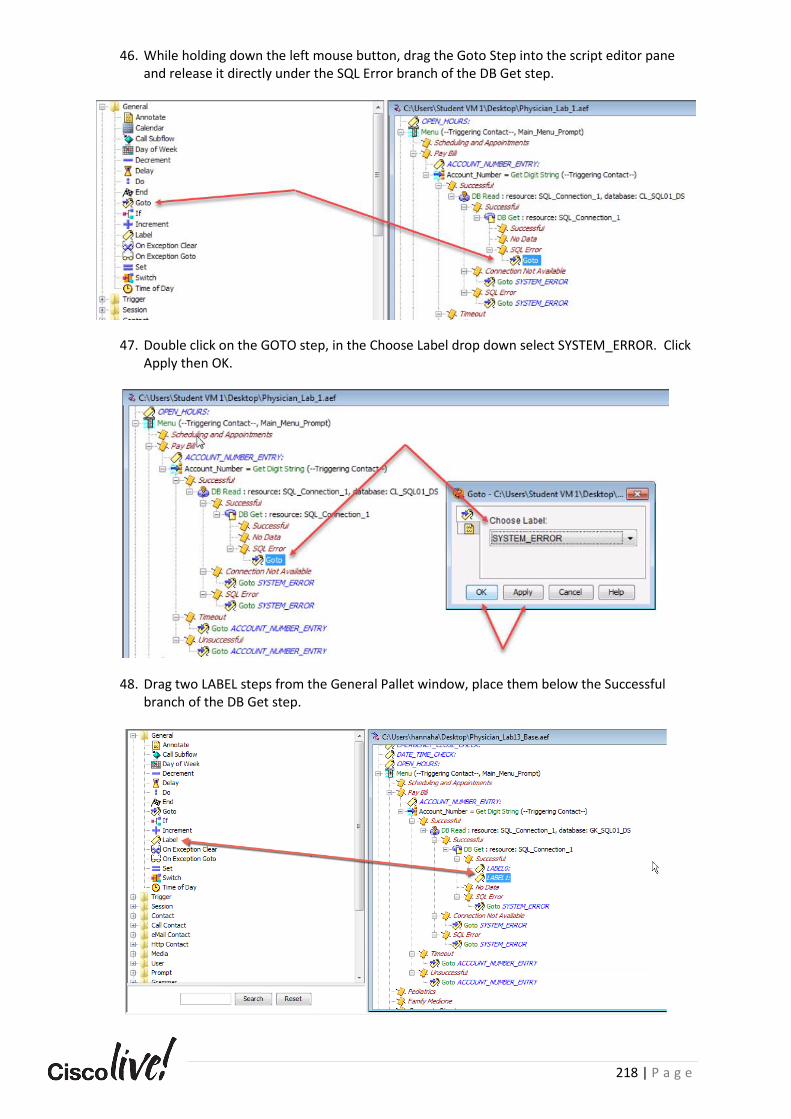
218 | P a g e
46. While holding down the left mouse button, drag the Goto Step into the script editor pane and release it directly under the SQL Error branch of the DB Get step.
47. Double click on the GOTO step, in the Choose Label drop down select SYSTEM_ERROR. Click Apply then OK.
48. Drag two LABEL steps from the General Pallet window, place them below the Successful branch of the DB Get step.

219 | P a g e
49. Double click on each of the newly added LABEL steps. Change the LABEL to BALANCE_DETAILS and AFTER_BALANCE_MENU. Click Apply and Ok. If you have properly completed this step your script will look like the image below:
50. Drag one LABEL step from the General Pallet window, place the step below the No Data branch of the DB Get step.

220 | P a g e
51. Double click on the newly added LABEL step. Change the LABEL to NO_DATA_MENU. Click Apply and Ok. If you have properly completed this step your script will look like the image below:
52. Expand the Prompt Folder in the Pallet window.
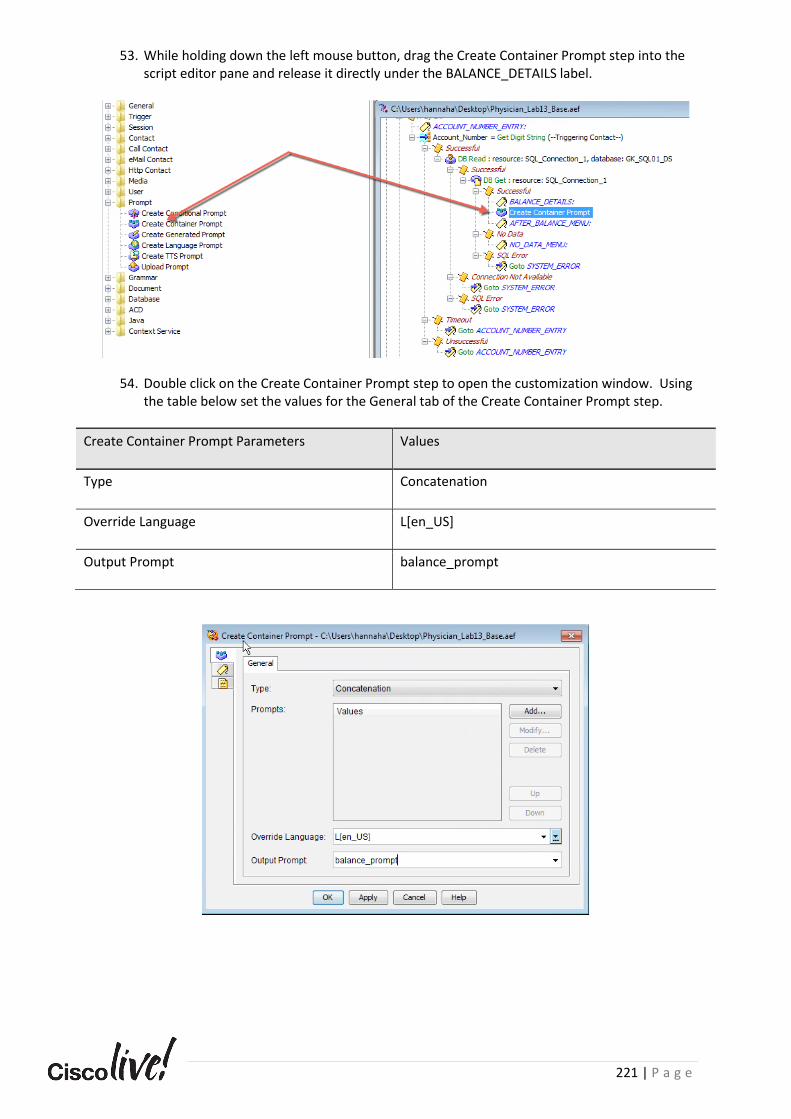
221 | P a g e
53. While holding down the left mouse button, drag the Create Container Prompt step into the script editor pane and release it directly under the BALANCE_DETAILS label.
54. Double click on the Create Container Prompt step to open the customization window. Using the table below set the values for the General tab of the Create Container Prompt step.
Create Container Prompt Parameters Values
Type Concatenation
Override Language L[en_US]
Output Prompt balance_prompt
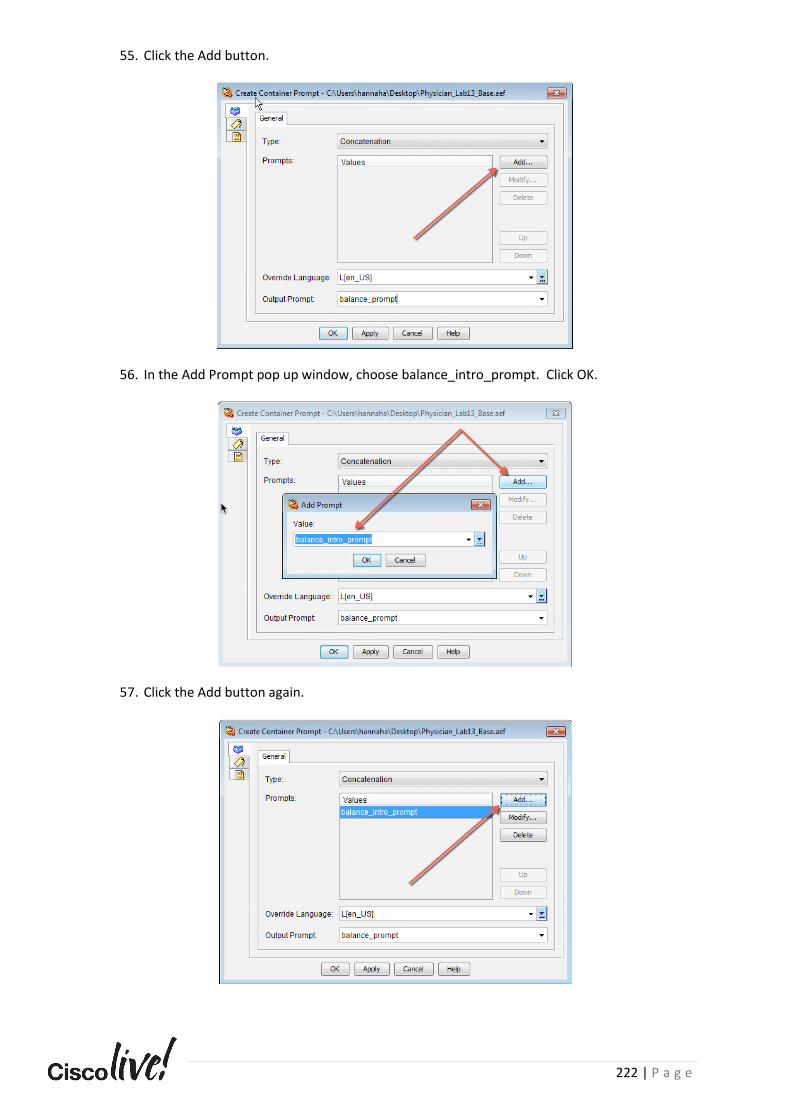
222 | P a g e
55. Click the Add button.
56. In the Add Prompt pop up window, choose balance_intro_prompt. Click OK.
57. Click the Add button again.

223 | P a g e
58. Click on the right most down arrow. This will open the UCCX Script Express Editor pop up window.
59. In the Expression Editor pop up window, click on the Prompt tab, this will allow you to add custom code to your prompts including the power of raw java code!
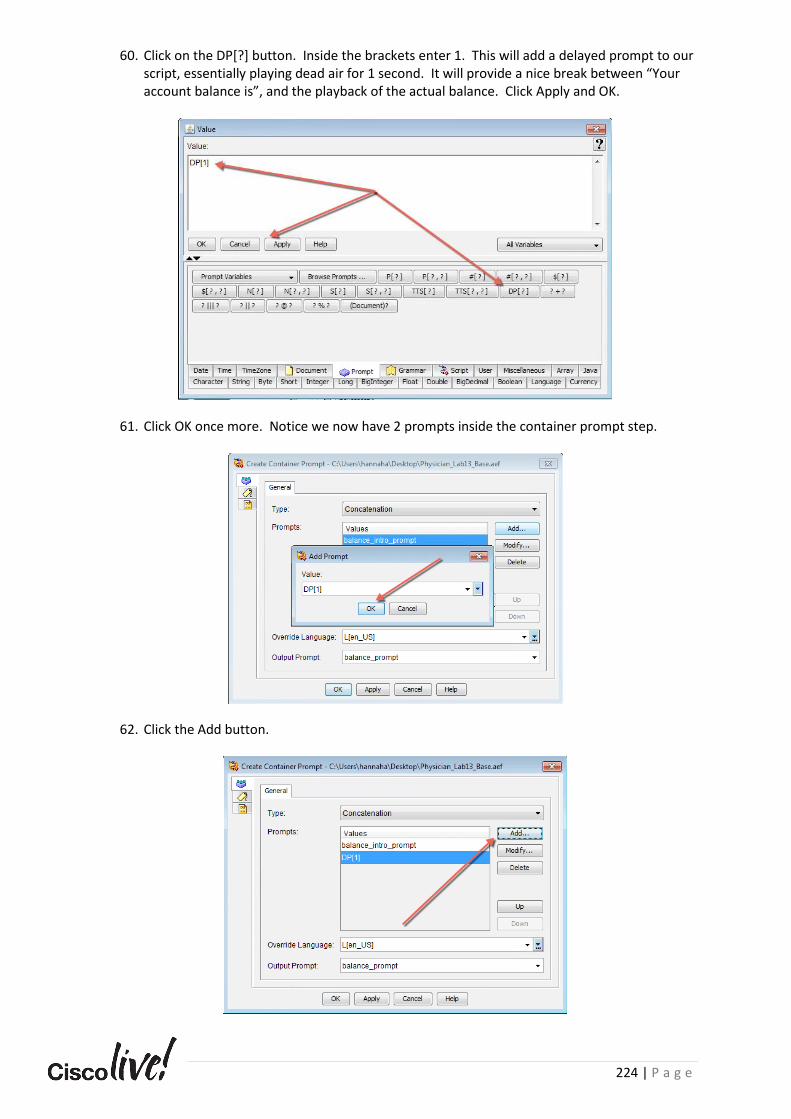
224 | P a g e
60. Click on the DP[?] button. Inside the brackets enter 1. This will add a delayed prompt to our script, essentially playing dead air for 1 second. It will provide a nice break between “Your account balance is”, and the playback of the actual balance. Click Apply and OK.
61. Click OK once more. Notice we now have 2 prompts inside the container prompt step.
62. Click the Add button.
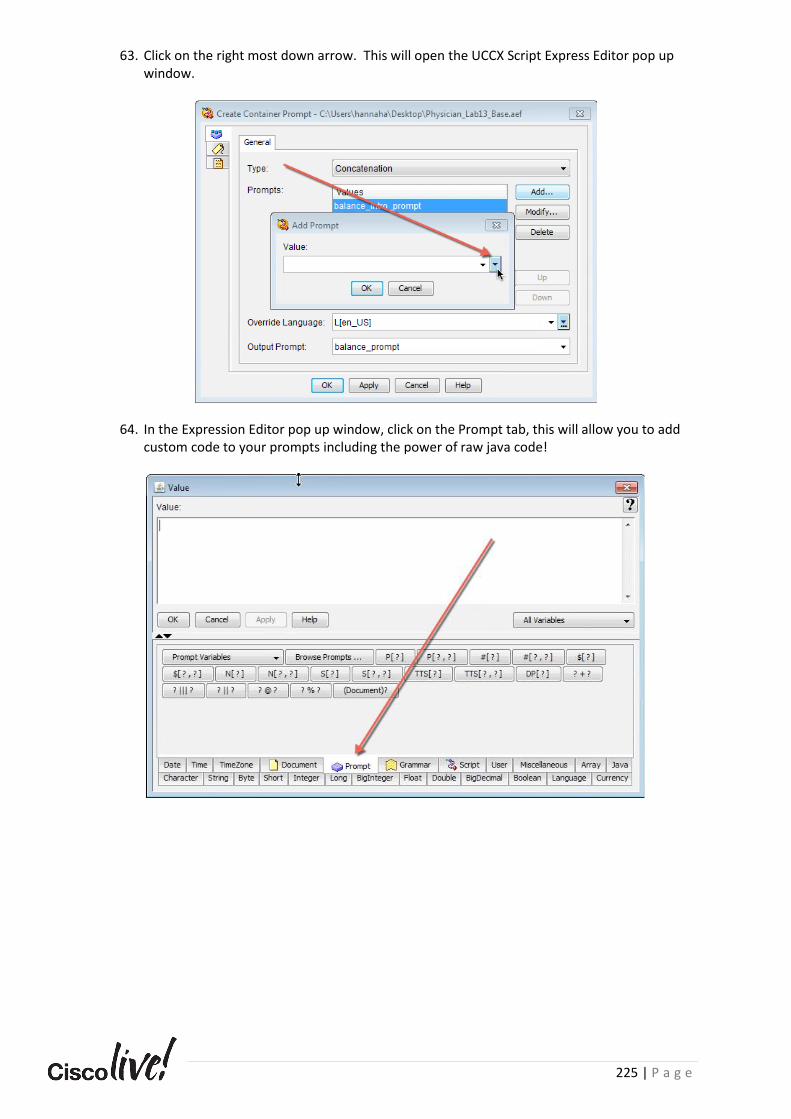
225 | P a g e
63. Click on the right most down arrow. This will open the UCCX Script Express Editor pop up window.
64. In the Expression Editor pop up window, click on the Prompt tab, this will allow you to add custom code to your prompts including the power of raw java code!

226 | P a g e
65. Click on the $[?] button. Next, click the All Variables drop down and select balance. Your Value textbox should look like the screenshot below:
66. Click Apply and OK to close the expression editor. Next click OK to close the Add Prompt pop up window.
67. The Create Container Prompt step should have the following 3 prompts added, once you have verified these settings, click Apply and OK.
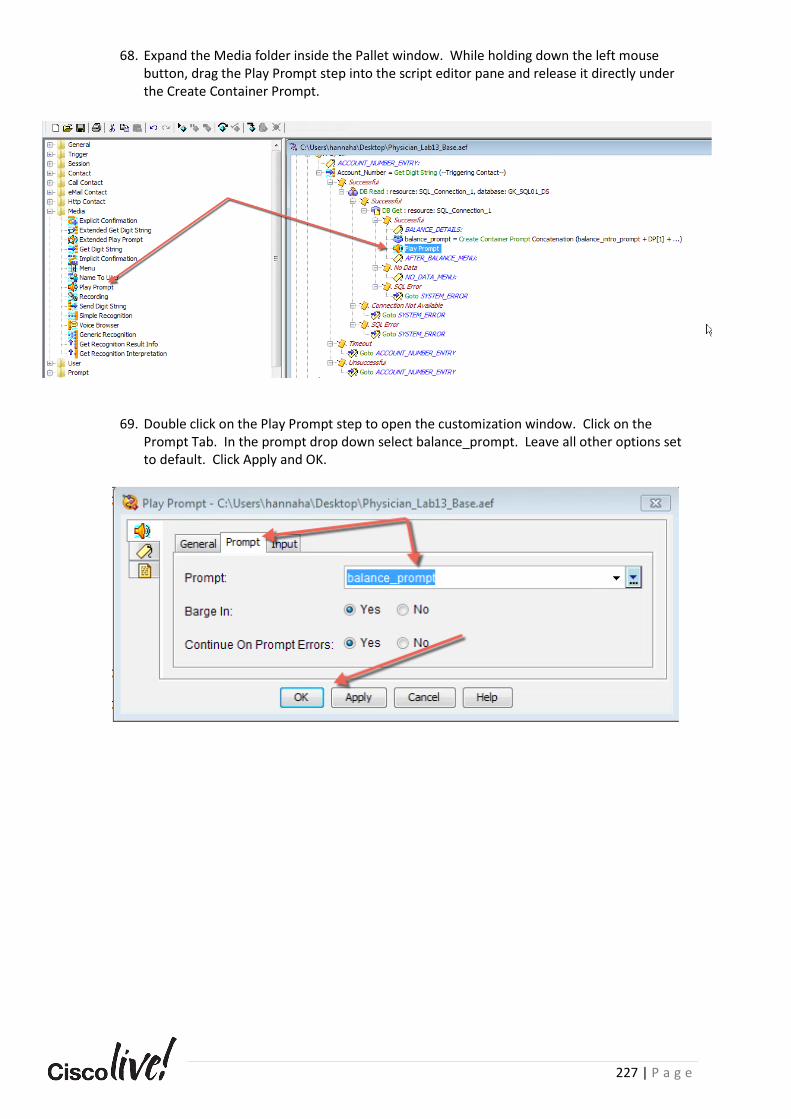
227 | P a g e
68. Expand the Media folder inside the Pallet window. While holding down the left mouse button, drag the Play Prompt step into the script editor pane and release it directly under the Create Container Prompt.
69. Double click on the Play Prompt step to open the customization window. Click on the Prompt Tab. In the prompt drop down select balance_prompt. Leave all other options set to default. Click Apply and OK.

228 | P a g e
70. While holding down the left mouse button, drag the Menu step into the script editor pane and release it directly under the AFTER_BALANCE_MENU label. Your script should resemble the screenshot below:
71. Double click on the Menu step to open the customization window. Click on the Prompt tab. Using the drop down set the prompt to sql_results_menu_prompt. Leave all other values as default. Click Apply.
72. Click on the Input tab. Set the Maximum Retries to 0, and set the Flush Input Buffer to Yes.
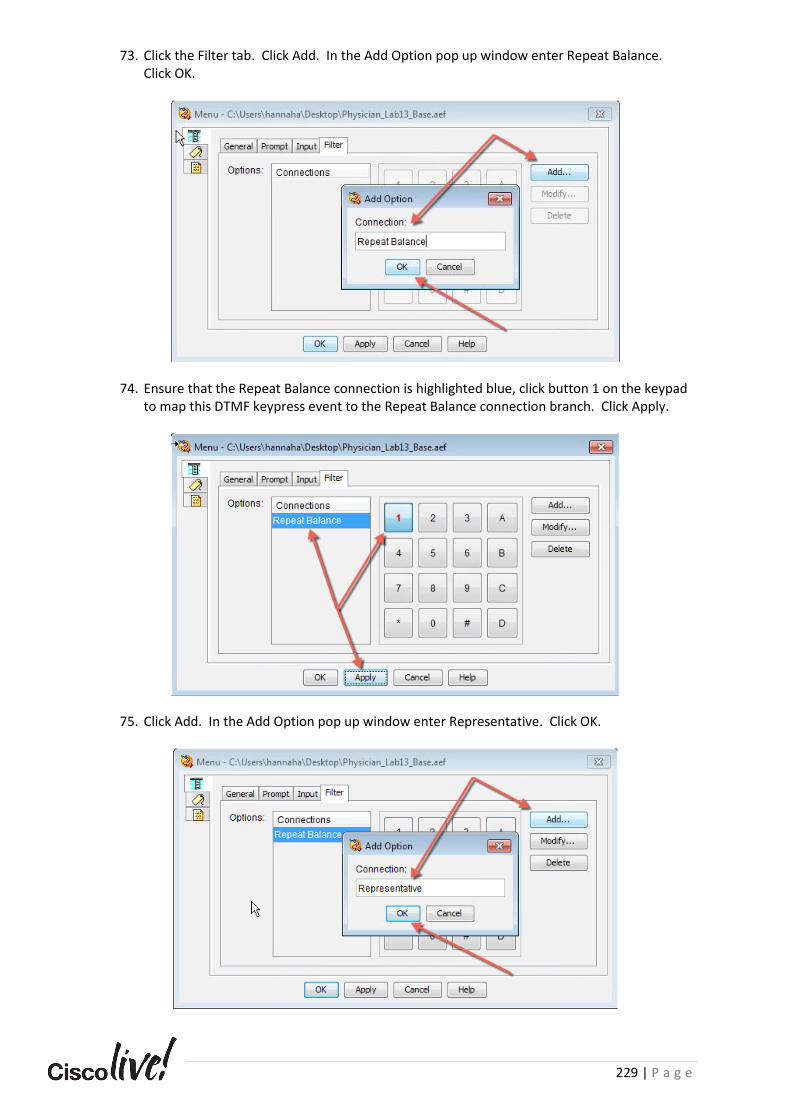
229 | P a g e
73. Click the Filter tab. Click Add. In the Add Option pop up window enter Repeat Balance. Click OK.
74. Ensure that the Repeat Balance connection is highlighted blue, click button 1 on the keypad to map this DTMF keypress event to the Repeat Balance connection branch. Click Apply.
75. Click Add. In the Add Option pop up window enter Representative. Click OK.
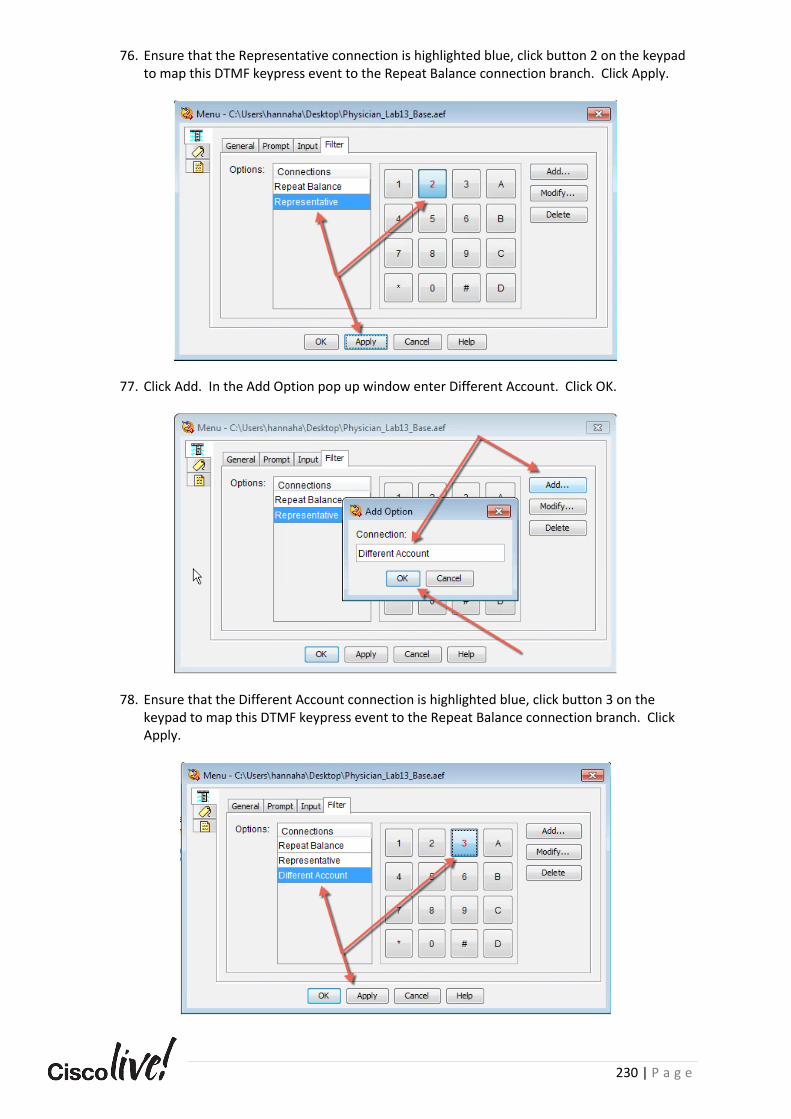
230 | P a g e
76. Ensure that the Representative connection is highlighted blue, click button 2 on the keypad to map this DTMF keypress event to the Repeat Balance connection branch. Click Apply.
77. Click Add. In the Add Option pop up window enter Different Account. Click OK.
78. Ensure that the Different Account connection is highlighted blue, click button 3 on the keypad to map this DTMF keypress event to the Repeat Balance connection branch. Click Apply.
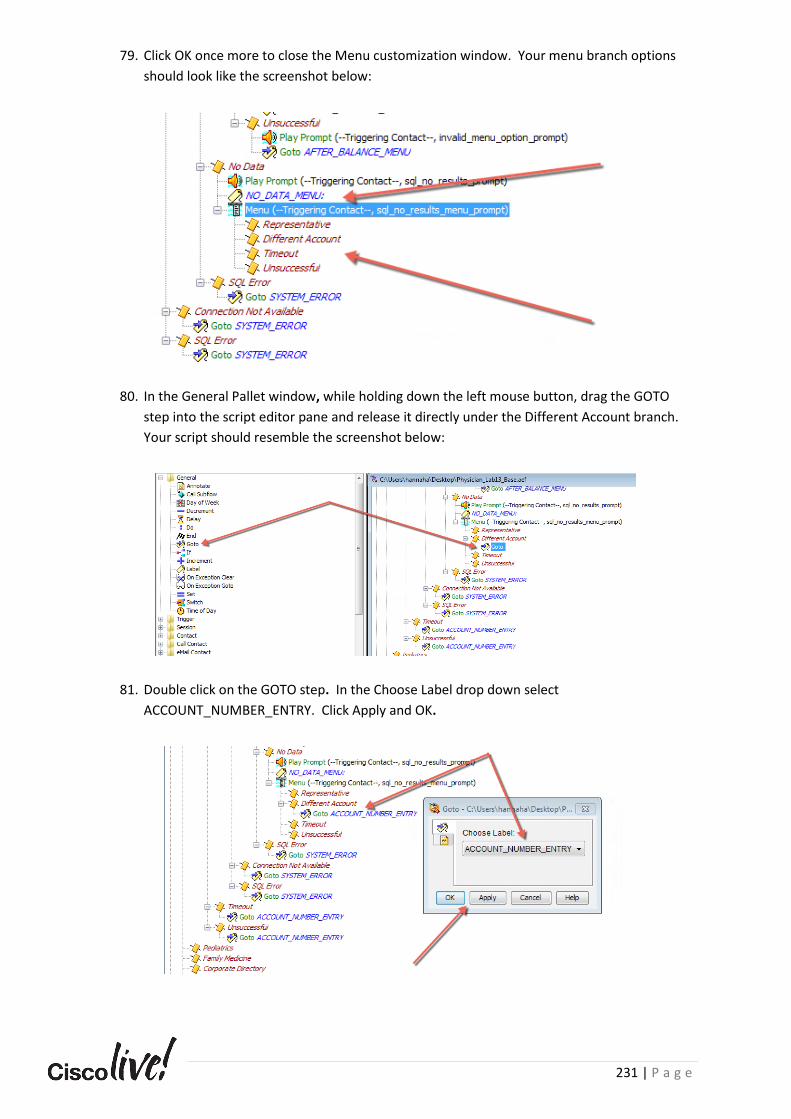
231 | P a g e
79. Click OK once more to close the Menu customization window. Your menu branch options
should look like the screenshot below:
80. In the General Pallet window, while holding down the left mouse button, drag the GOTO
step into the script editor pane and release it directly under the Different Account branch.
Your script should resemble the screenshot below:
81. Double click on the GOTO step. In the Choose Label drop down select
ACCOUNT_NUMBER_ENTRY. Click Apply and OK.

232 | P a g e
82. In the General Pallet window, while holding down the left mouse button, drag a GOTO steps
into the script editor pane and release it directly under the Timeout branch. Your script
should resemble the screenshot below:
83. Double click on the GOTO step. In the Choose Label drop down select NO_DATA_MENU.
Click Apply and OK.
84. In the General Pallet window, while holding down the left mouse button, drag a GOTO steps
into the script editor pane and release it directly under the Unsuccessful branch. Your script
should resemble the screenshot below:

233 | P a g e
85. Double click on the GOTO step. In the Choose Label drop down select NO_DATA_MENU.
Click Apply and OK.
86. In an effort to save time, locate the timeout branch of the AFTER_BALANCE_MENU ( Hint: it
is above your present location in the script ). Right click on the Play Prompt step that was
configured previously and select Copy. Your screen should resemble the screenshot below:
87. In an effort to save time, click on the Timeout branch under the NO DATA MENU, it should
be highlighted blue. Right click and choose Paste. Notice we can copy existing steps and
paste them in different locations in our script. Your screen should now resemble the
screenshot below:
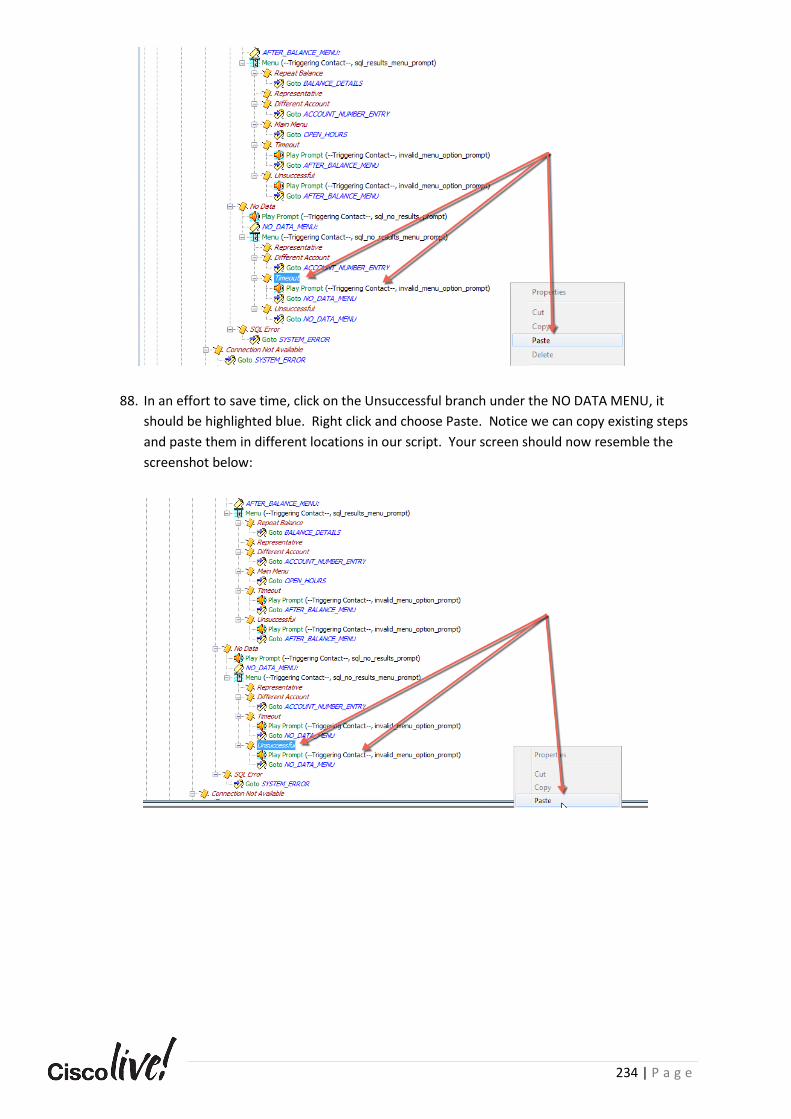
234 | P a g e
88. In an effort to save time, click on the Unsuccessful branch under the NO DATA MENU, it
should be highlighted blue. Right click and choose Paste. Notice we can copy existing steps
and paste them in different locations in our script. Your screen should now resemble the
screenshot below:

235 | P a g e
89. If you have properly configured the NO DATA MENU, your script should look like the
screenshot below:
90. The MOST IMPORTANT steps of this entire lab will be added next. In order to properly
release a database connection, we must add Database Release steps to our scripts. Please
expand the Database pallet window.
91. While holding down the left mouse button, drag a DB Release steps into the script editor
pane and release it directly under the Successful branch of the DB Get Step. Your script
should resemble the screenshot below:
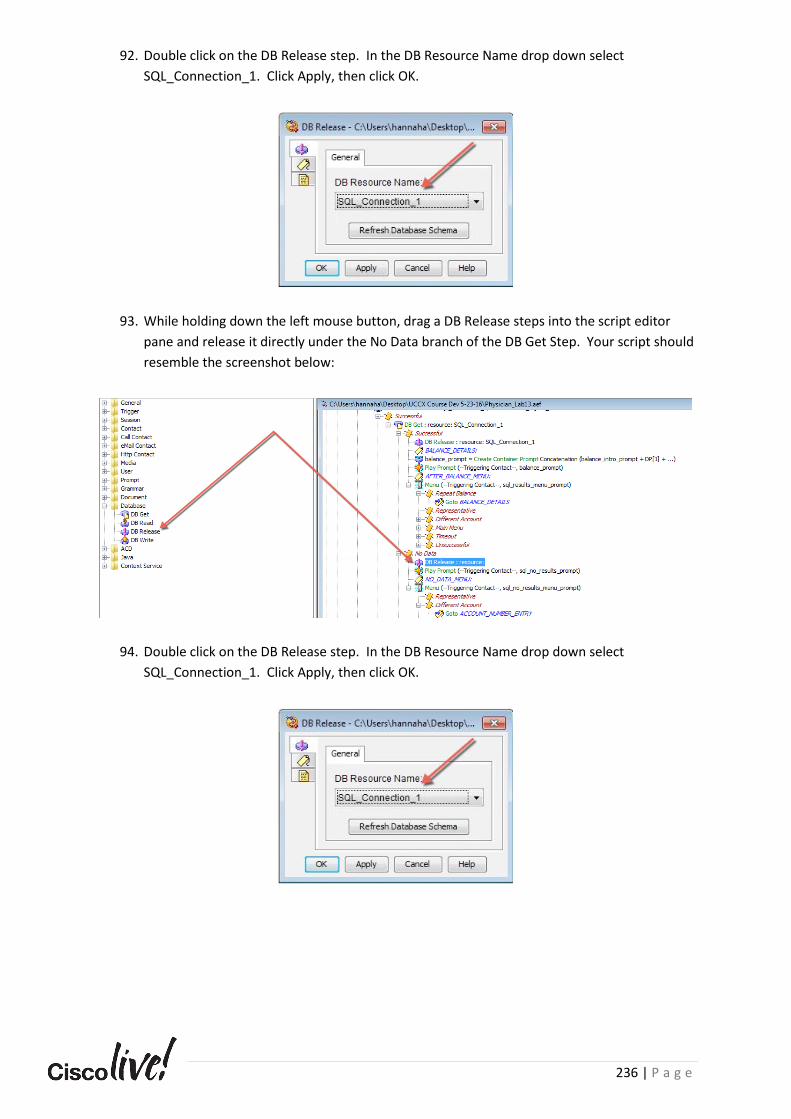
236 | P a g e
92. Double click on the DB Release step. In the DB Resource Name drop down select
SQL_Connection_1. Click Apply, then click OK.
93. While holding down the left mouse button, drag a DB Release steps into the script editor
pane and release it directly under the No Data branch of the DB Get Step. Your script should
resemble the screenshot below:
94. Double click on the DB Release step. In the DB Resource Name drop down select
SQL_Connection_1. Click Apply, then click OK.

237 | P a g e
95. While holding down the left mouse button, drag a DB Release steps into the script editor
pane and release it directly under the SQL Error branch of the DB Get Step. Your script
should resemble the screenshot below:
96. Double click on the DB Release step. In the DB Resource Name drop down select
SQL_Connection_1. Click Apply, then click OK.
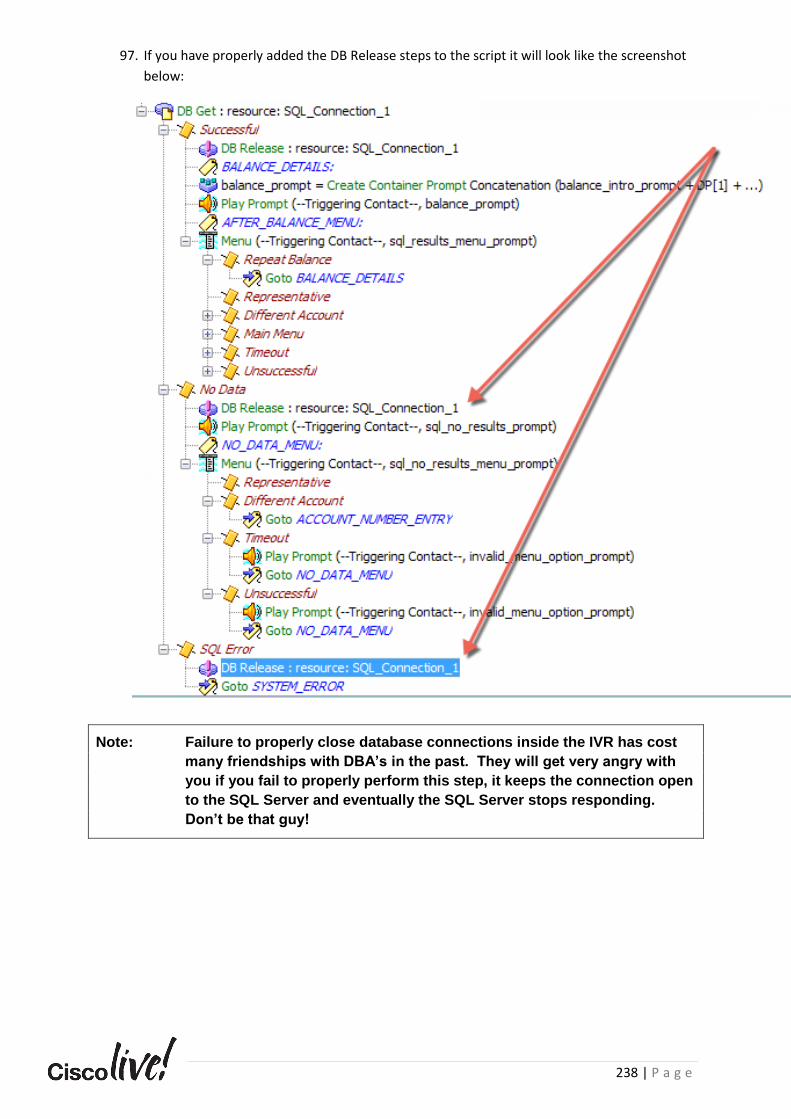
238 | P a g e
97. If you have properly added the DB Release steps to the script it will look like the screenshot
below:
Note: Failure to properly close database connections inside the IVR has cost
many friendships with DBA’s in the past. They will get very angry with
you if you fail to properly perform this step, it keeps the connection open
to the SQL Server and eventually the SQL Server stops responding.
Don’t be that guy!

239 | P a g e
Task 6: V.S.U.R.E and Application Testing In this task you will perform the VSURE process which properly installs our updated Main Application onto the UCCX server so it can be used as an IVR Application. VSURE stands for Validate, Save, Upload, Refresh, Execute. It’s a common technique we use when deploying new applications and scripts. This process is crucial and must be followed every time to ensure proper deployment.
We will now execute the steps for the V.S.U.R.E. process.
VSURE – V = Validate
98. The script must be validated for program integrity. Select Tools > Validate.
99. The script should validate successfully and will display a “Script validation succeeded” message. Click OK.
Note: If you have errors in your script you will notice a warning or error message displayed in the lower right hand corner of the screen, you will need to review the message ( hint double click on the error message and it will take you to the exact line in the script with the error ) and retrace your steps in this lab to correct as needed.

240 | P a g e
VSURE – S = Save As
100. In the top left corner of the UCCX Script Editor please choose File > Save As.
101. Ensure the Save In drop down shows the Desktop. Enter the filename Physician_Lab_1.aef. Click Save.
Note: It is best practice to always ‘Save As’ instead of simply ‘Save’. In this way, you are always sure of the correct saved location of scripts.
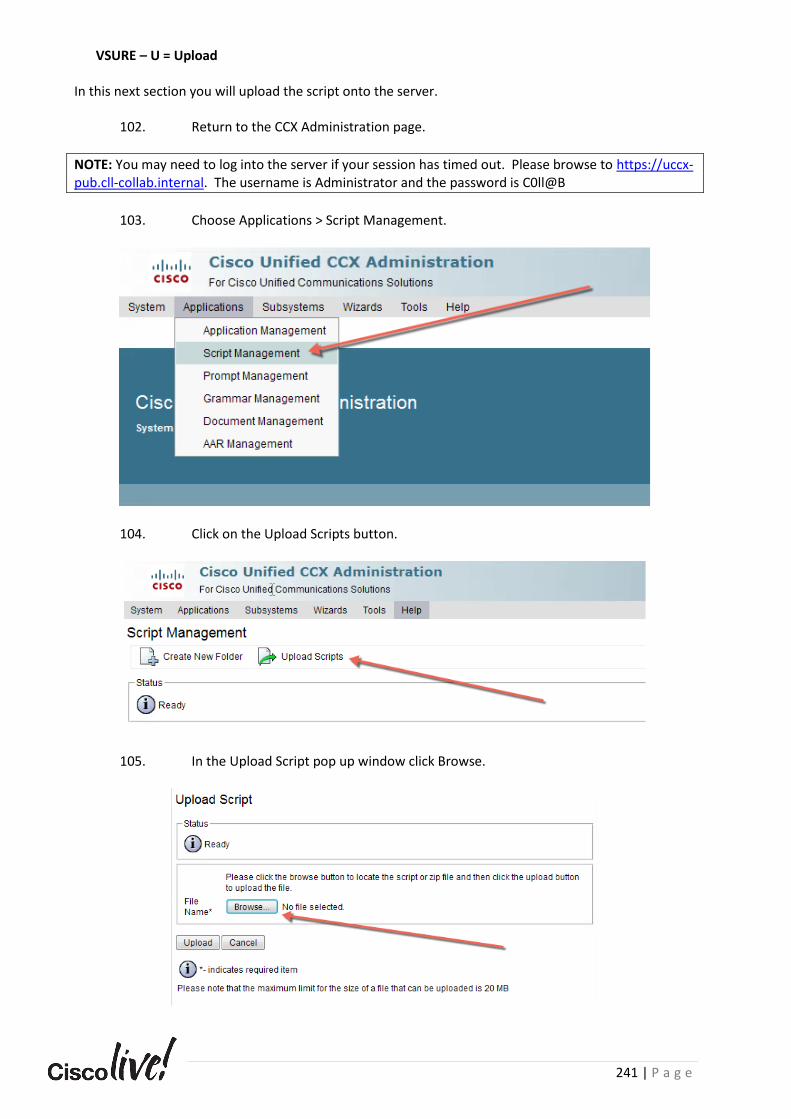
241 | P a g e
VSURE – U = Upload In this next section you will upload the script onto the server.
102. Return to the CCX Administration page.
NOTE: You may need to log into the server if your session has timed out. Please browse to https://uccx-pub.cll-collab.internal. The username is Administrator and the password is C0ll@B
103. Choose Applications > Script Management.
104. Click on the Upload Scripts button.
105. In the Upload Script pop up window click Browse.

242 | P a g e
106. Navigate to the desktop on your respective machine and select the
Physician_Lab_1.aef script. Click Open.
107. With the Physician_Lab1.aef script selected, click Upload.
108. Once you click Upload, you will see a warning message “script file already exists. Click Ok to continue.
Note: In a real-world production environment, this is the point of no return. If you click OK, you will be overwriting an existing script. Here is where version control and a script repository in GitHub, Dropbox, Box.com, etc. comes in quite handy!!!! Document your versions and ensure you have proper change controls!!!!
109. Once the page refreshes, you will have an option to refresh just the script, or the
script and the application. In an effort to be thorough in this lab, we will do both and even force it to manually refresh. Click Yes to refresh BOTH the script and the application.
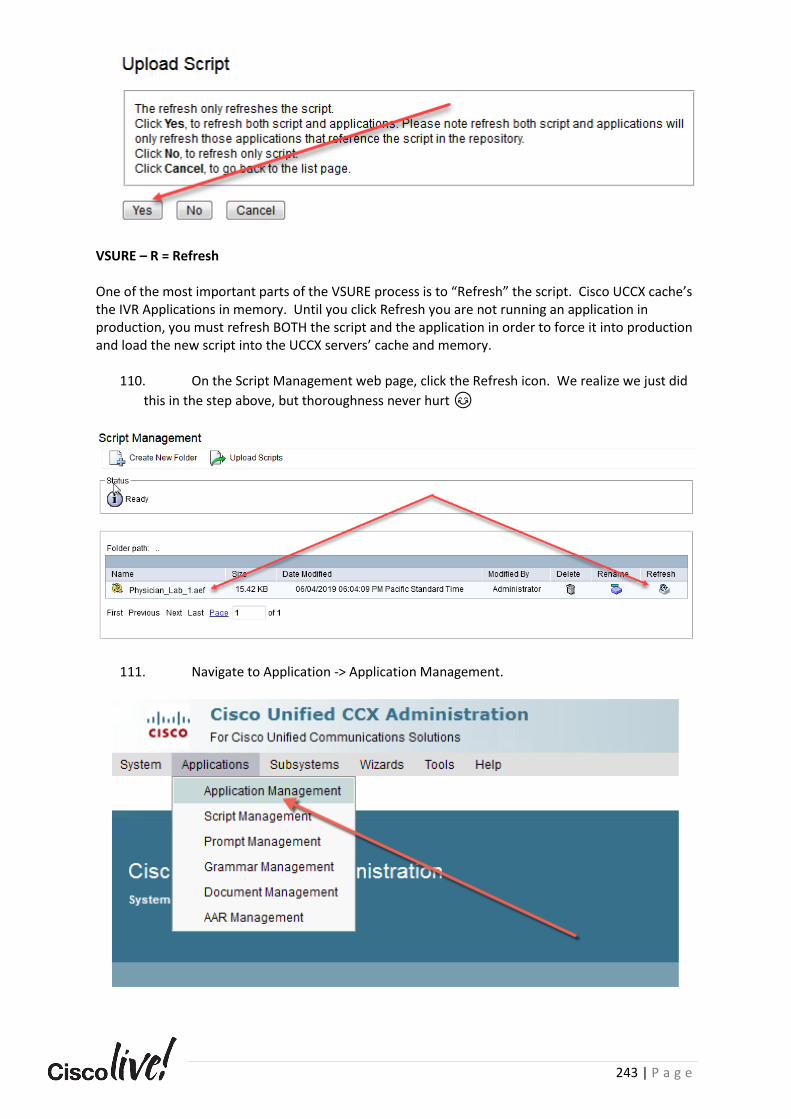
243 | P a g e
VSURE – R = Refresh
One of the most important parts of the VSURE process is to “Refresh” the script. Cisco UCCX cache’s the IVR Applications in memory. Until you click Refresh you are not running an application in production, you must refresh BOTH the script and the application in order to force it into production and load the new script into the UCCX servers’ cache and memory.
110. On the Script Management web page, click the Refresh icon. We realize we just did
this in the step above, but thoroughness never hurt 😊
111. Navigate to Application -> Application Management.
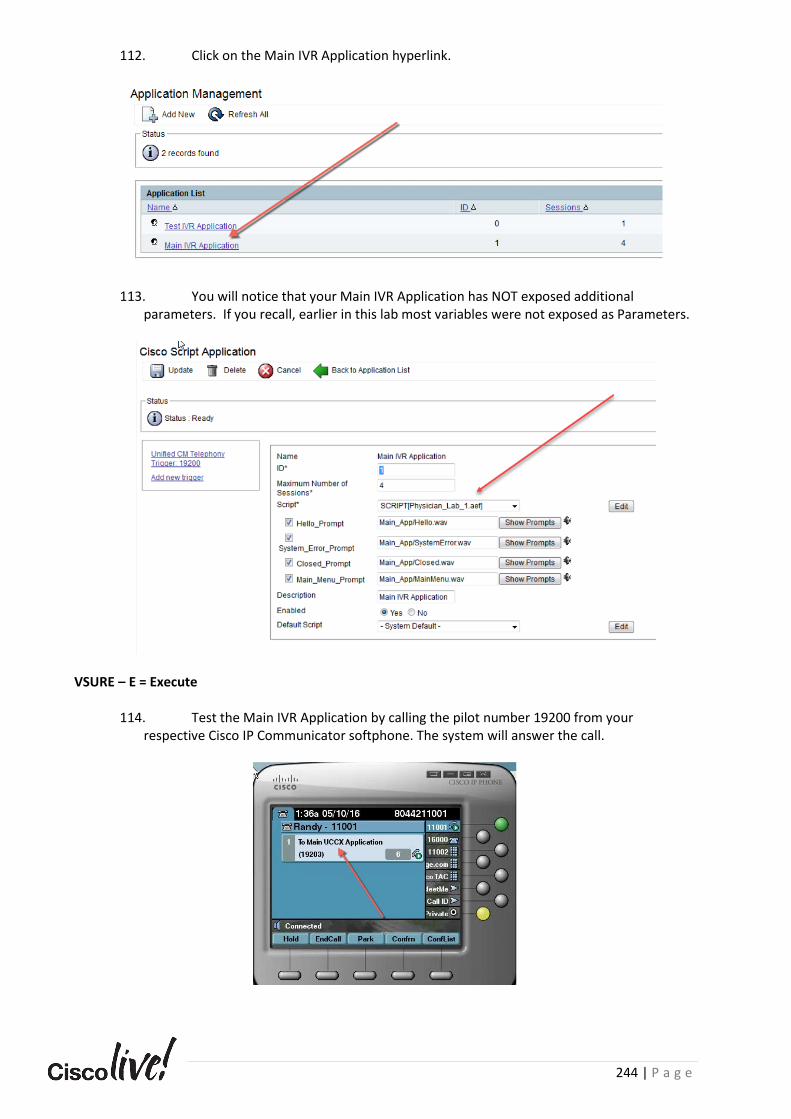
244 | P a g e
112. Click on the Main IVR Application hyperlink.
113. You will notice that your Main IVR Application has NOT exposed additional parameters. If you recall, earlier in this lab most variables were not exposed as Parameters.
VSURE – E = Execute
114. Test the Main IVR Application by calling the pilot number 19200 from your respective Cisco IP Communicator softphone. The system will answer the call.

245 | P a g e
Test Plan for the Application:
• Did you hear the Hello Prompt?
• Did you hear the Main Menu Prompt?
• Was DTMF Digits recognized? If you press option 2 did the menu respond?
• Did you hear the “Please enter your account number” prompt?
• Enter a 7-digit account number that you recorded on the notepad file in an earlier section of
this lab.
• Was the system able to retrieve your balance? Did you hear your balance?
• Did you hear the after balance menu options?
• Examine the different menu options, were you able to repeat the balance? Could you return
to the main menu?
• Enter an account number which does not exist in the database. Did the system notify you
that it could not locate your records?
• Examine the no results menu, were you able to enter a different account number?
Instructor Challenge:
• Perform a new Reactive Debug ( See steps in the previous labs for a refresher )
• Prove that your Account Number is being captured by the script into the Account Number String variable at run time.
• Examine the various database steps inside a reactive debug, prove that your account number was captured by examining the values of the variables at run time.
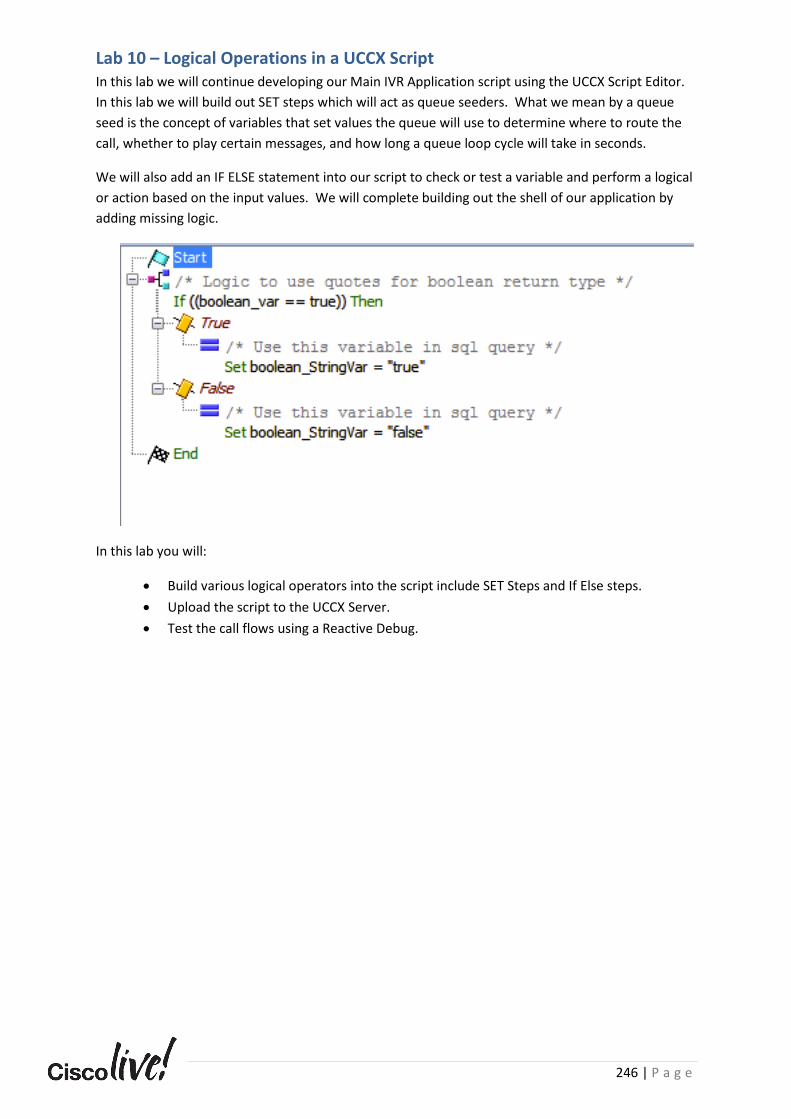
246 | P a g e
Lab 10 – Logical Operations in a UCCX Script In this lab we will continue developing our Main IVR Application script using the UCCX Script Editor.
In this lab we will build out SET steps which will act as queue seeders. What we mean by a queue
seed is the concept of variables that set values the queue will use to determine where to route the
call, whether to play certain messages, and how long a queue loop cycle will take in seconds.
We will also add an IF ELSE statement into our script to check or test a variable and perform a logical
or action based on the input values. We will complete building out the shell of our application by
adding missing logic.
In this lab you will:
• Build various logical operators into the script include SET Steps and If Else steps.
• Upload the script to the UCCX Server.
• Test the call flows using a Reactive Debug.

247 | P a g e
Task 1: Add Logical Operations to the existing UCCX Script In this task you will use Boolean and logical operators inside the UCCX Script. This will act as Queue
Seeds and routing logic.
1. Please log into the UCCX Script Editor if you have closed it during a previous lab exercise.
2. Please open the Physician_Lab_1.aef script. This should have been saved on the desktop of
the STUDENT-VM-1 VM after the completion of the previous lab.
3. Scroll roughly halfway down the script on the Script Editor Pane. This will expose the Menu and Get Digit String steps we added in the previous labs. We will be adding additional code in this section of the script.
4. In the lower left-hand corner of the Script Editor, click on the Down Arrow to create a new Variable. Using the table below, please enter the appropriate values, once you have entered all values, click OK.
Variable Parameters Variable Value
Type boolean
Name play_call_monitoring_message
Value false ( Leave this as default value )
Final Unchecked
Array Unchecked
Parameter Unchecked
Dimensions 0
Example of creating the Variable:
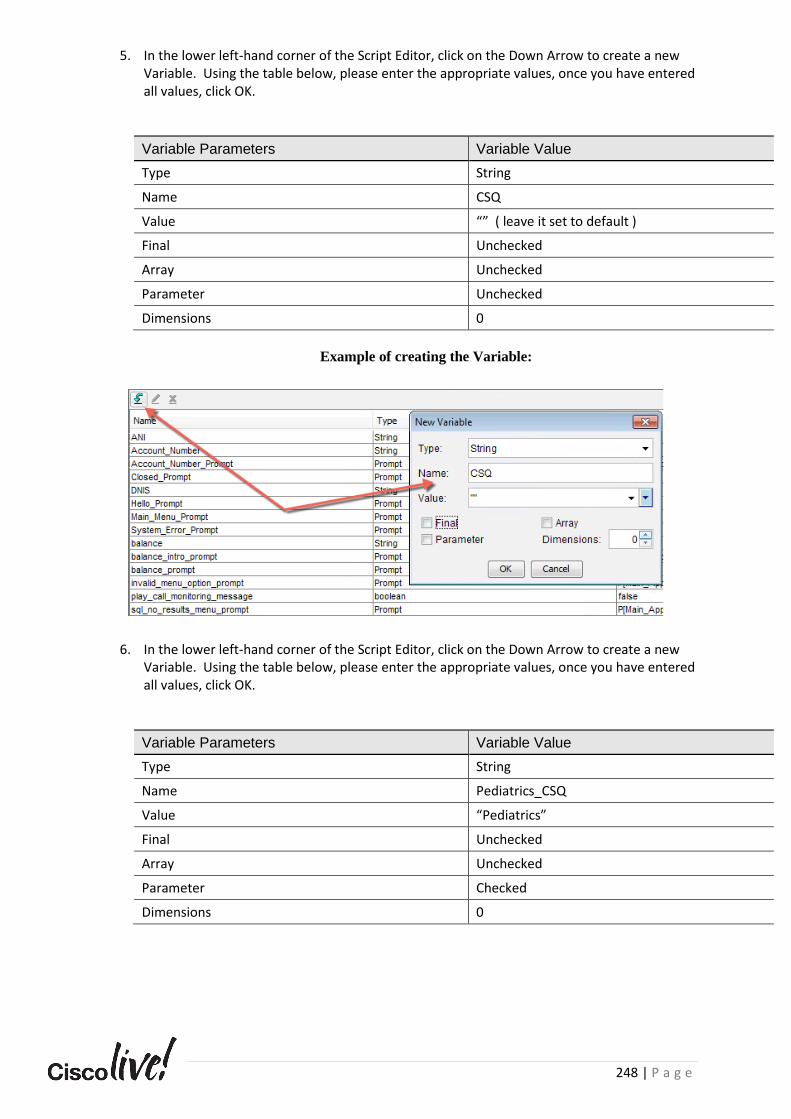
248 | P a g e
5. In the lower left-hand corner of the Script Editor, click on the Down Arrow to create a new Variable. Using the table below, please enter the appropriate values, once you have entered all values, click OK.
Variable Parameters Variable Value
Type String
Name CSQ
Value “” ( leave it set to default )
Final Unchecked
Array Unchecked
Parameter Unchecked
Dimensions 0
Example of creating the Variable:
6. In the lower left-hand corner of the Script Editor, click on the Down Arrow to create a new Variable. Using the table below, please enter the appropriate values, once you have entered all values, click OK.
Variable Parameters Variable Value
Type String
Name Pediatrics_CSQ
Value “Pediatrics”
Final Unchecked
Array Unchecked
Parameter Checked
Dimensions 0

249 | P a g e
Example of creating the Variable:
7. In the lower left-hand corner of the Script Editor, click on the Down Arrow to create a new Variable. Using the table below, please enter the appropriate values, once you have entered all values, click OK.
Variable Parameters Variable Value
Type String
Name Family_Medicine_CSQ
Value “Family Medicine”
Final Unchecked
Array Unchecked
Parameter Checked
Dimensions 0
Example of creating the Variable:

250 | P a g e
8. In the lower left-hand corner of the Script Editor, click on the Down Arrow to create a new Variable. Using the table below, please enter the appropriate values, once you have entered all values, click OK.
Variable Parameters Variable Value
Type String
Name Appointments_CSQ
Value “Appointments”
Final Unchecked
Array Unchecked
Parameter Checked
Dimensions 0
Example of creating the Variable:
9. In the lower left-hand corner of the Script Editor, click on the Down Arrow to create a new Variable. Using the table below, please enter the appropriate values, once you have entered all values, click OK.
Variable Parameters Variable Value
Type String
Name Accounting_CSQ
Value “”
Final Unchecked
Array Unchecked
Parameter Checked
Dimensions 0
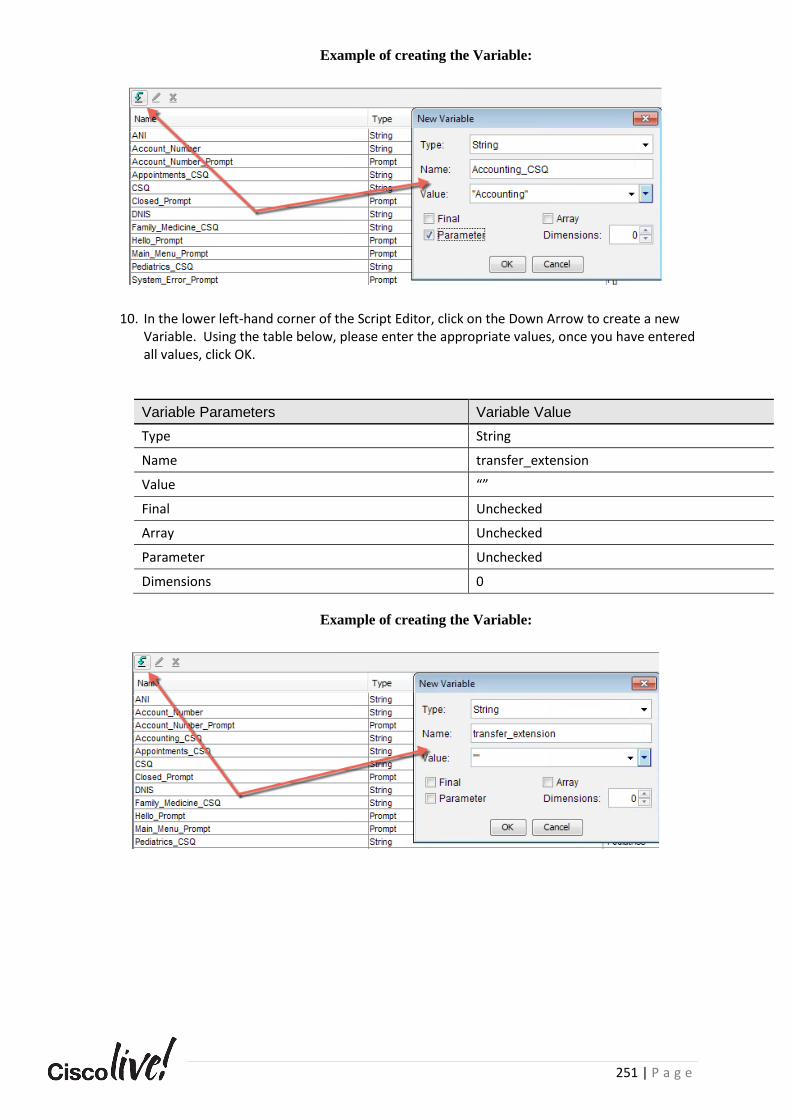
251 | P a g e
Example of creating the Variable:
10. In the lower left-hand corner of the Script Editor, click on the Down Arrow to create a new Variable. Using the table below, please enter the appropriate values, once you have entered all values, click OK.
Variable Parameters Variable Value
Type String
Name transfer_extension
Value “”
Final Unchecked
Array Unchecked
Parameter Unchecked
Dimensions 0
Example of creating the Variable:
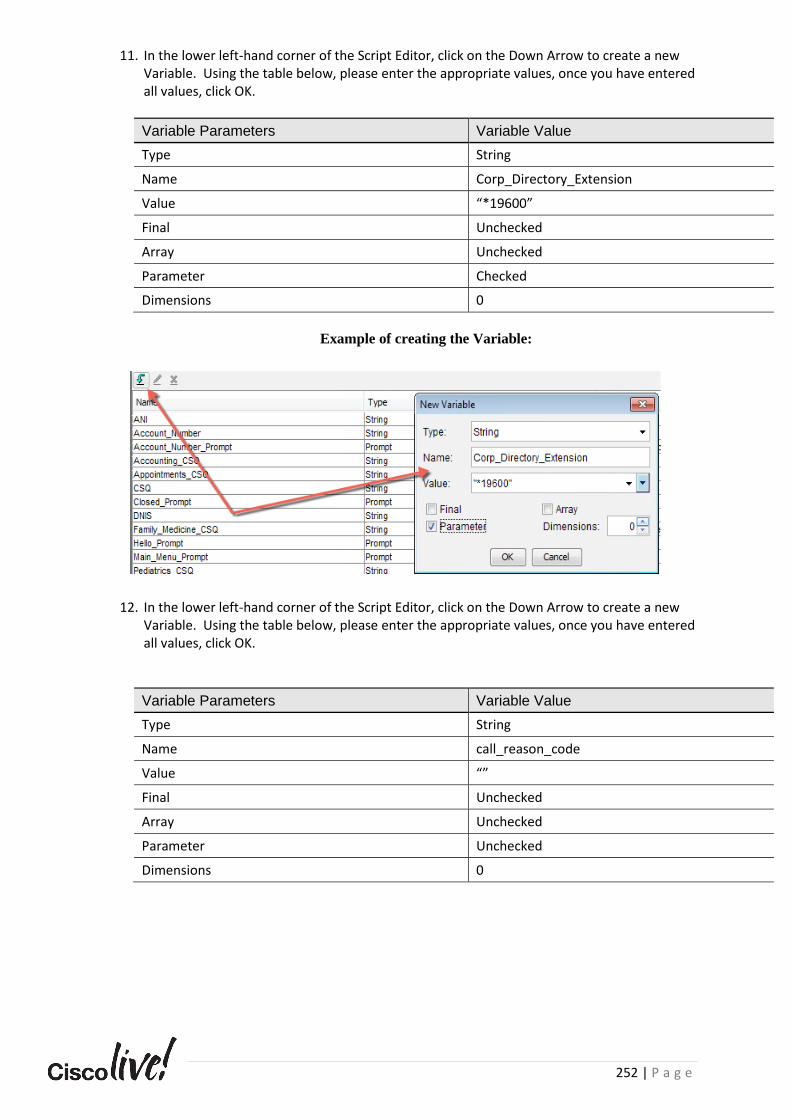
252 | P a g e
11. In the lower left-hand corner of the Script Editor, click on the Down Arrow to create a new Variable. Using the table below, please enter the appropriate values, once you have entered all values, click OK.
Variable Parameters Variable Value
Type String
Name Corp_Directory_Extension
Value “*19600”
Final Unchecked
Array Unchecked
Parameter Checked
Dimensions 0
Example of creating the Variable:
12. In the lower left-hand corner of the Script Editor, click on the Down Arrow to create a new Variable. Using the table below, please enter the appropriate values, once you have entered all values, click OK.
Variable Parameters Variable Value
Type String
Name call_reason_code
Value “”
Final Unchecked
Array Unchecked
Parameter Unchecked
Dimensions 0
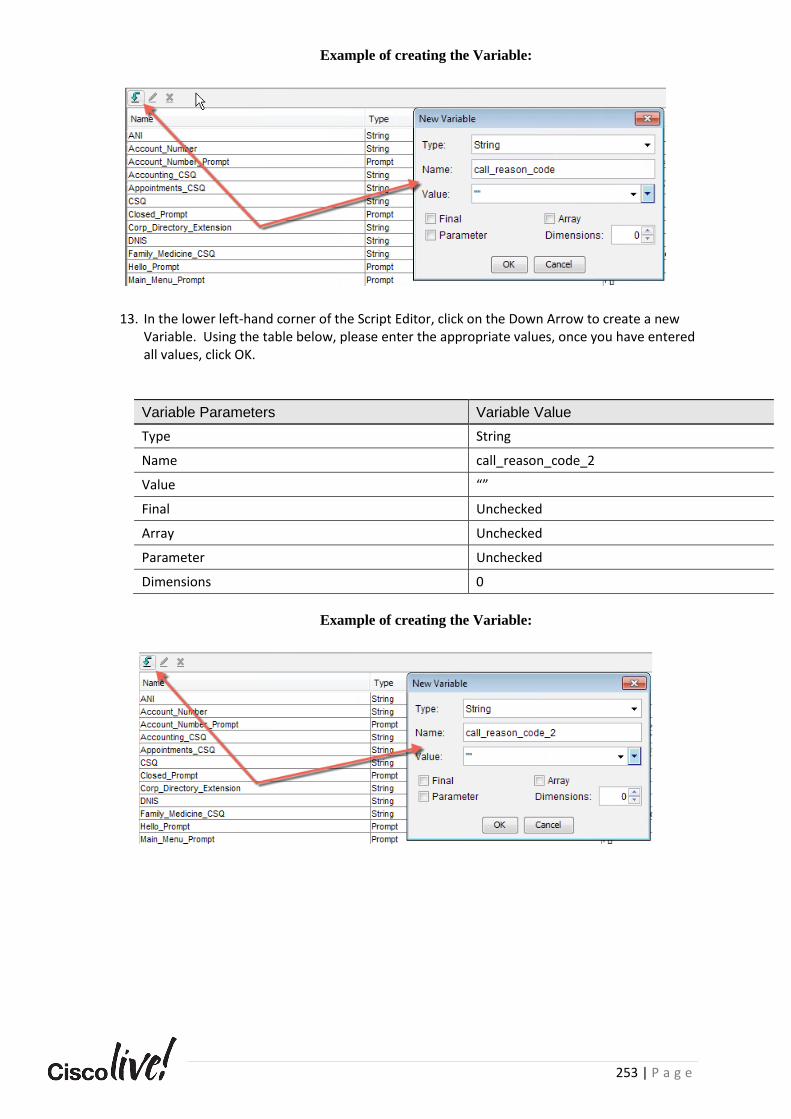
253 | P a g e
Example of creating the Variable:
13. In the lower left-hand corner of the Script Editor, click on the Down Arrow to create a new Variable. Using the table below, please enter the appropriate values, once you have entered all values, click OK.
Variable Parameters Variable Value
Type String
Name call_reason_code_2
Value “”
Final Unchecked
Array Unchecked
Parameter Unchecked
Dimensions 0
Example of creating the Variable:
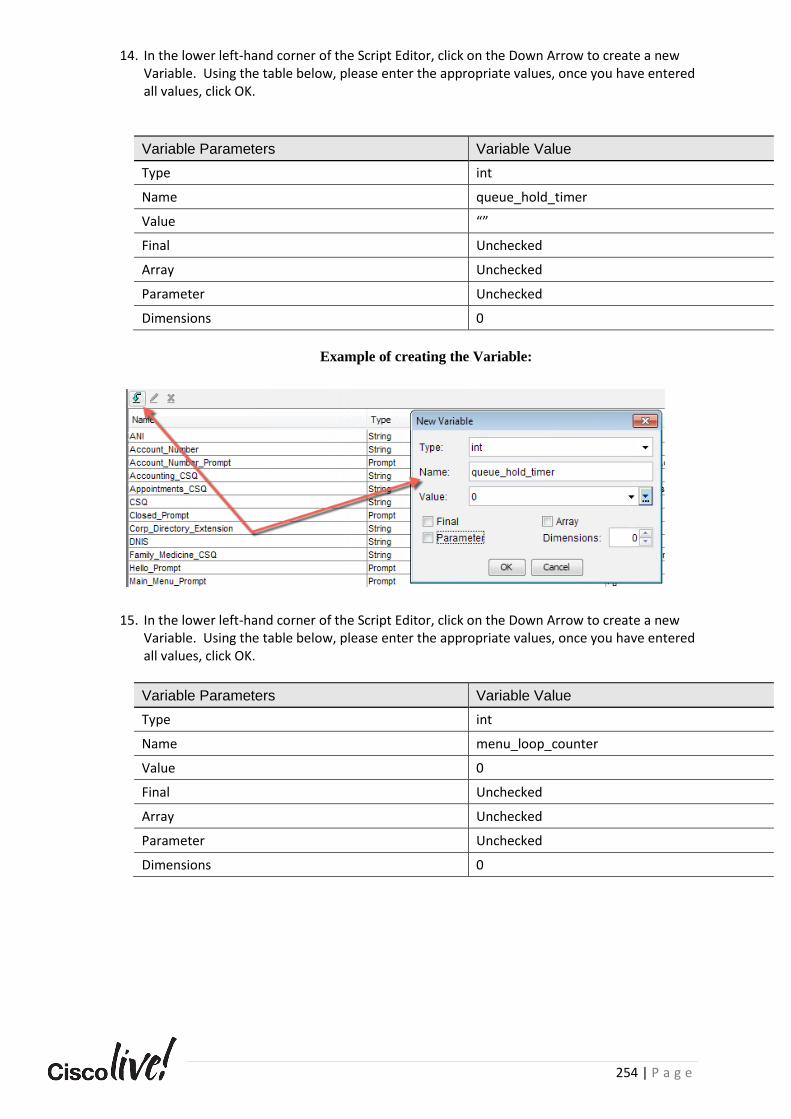
254 | P a g e
14. In the lower left-hand corner of the Script Editor, click on the Down Arrow to create a new Variable. Using the table below, please enter the appropriate values, once you have entered all values, click OK.
Variable Parameters Variable Value
Type int
Name queue_hold_timer
Value “”
Final Unchecked
Array Unchecked
Parameter Unchecked
Dimensions 0
Example of creating the Variable:
15. In the lower left-hand corner of the Script Editor, click on the Down Arrow to create a new Variable. Using the table below, please enter the appropriate values, once you have entered all values, click OK.
Variable Parameters Variable Value
Type int
Name menu_loop_counter
Value 0
Final Unchecked
Array Unchecked
Parameter Unchecked
Dimensions 0
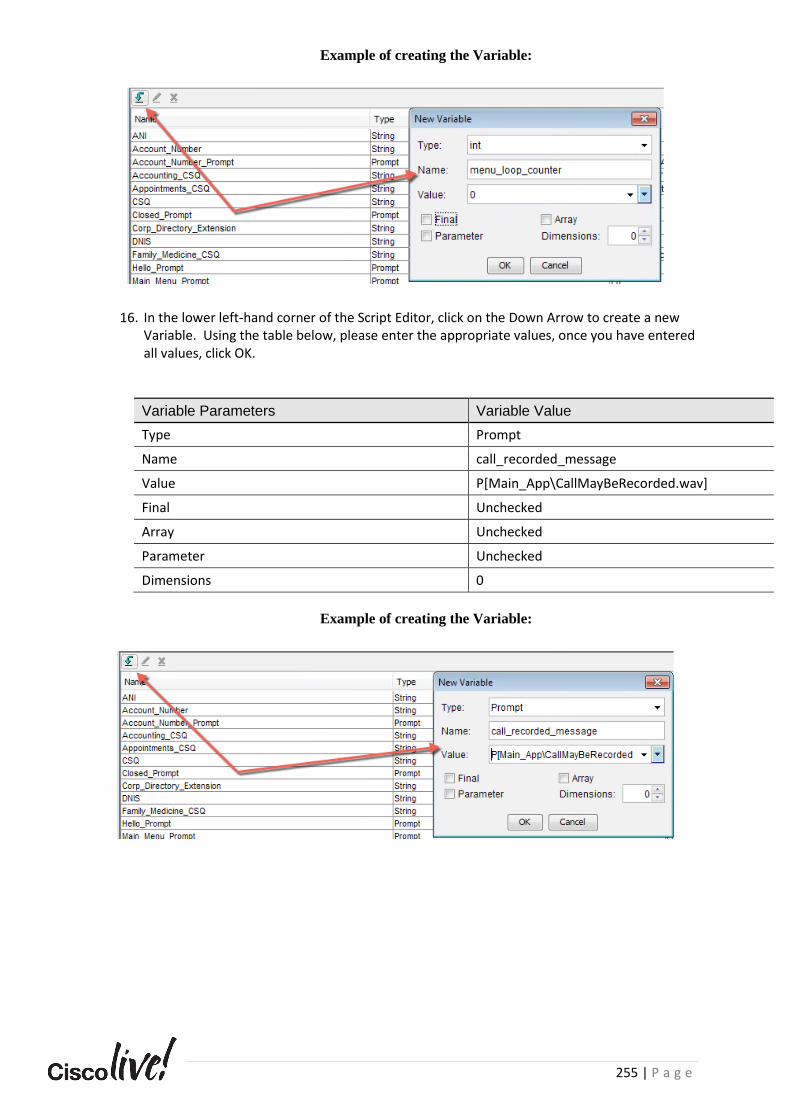
255 | P a g e
Example of creating the Variable:
16. In the lower left-hand corner of the Script Editor, click on the Down Arrow to create a new Variable. Using the table below, please enter the appropriate values, once you have entered all values, click OK.
Variable Parameters Variable Value
Type Prompt
Name call_recorded_message
Value P[Main_App\CallMayBeRecorded.wav]
Final Unchecked
Array Unchecked
Parameter Unchecked
Dimensions 0
Example of creating the Variable:
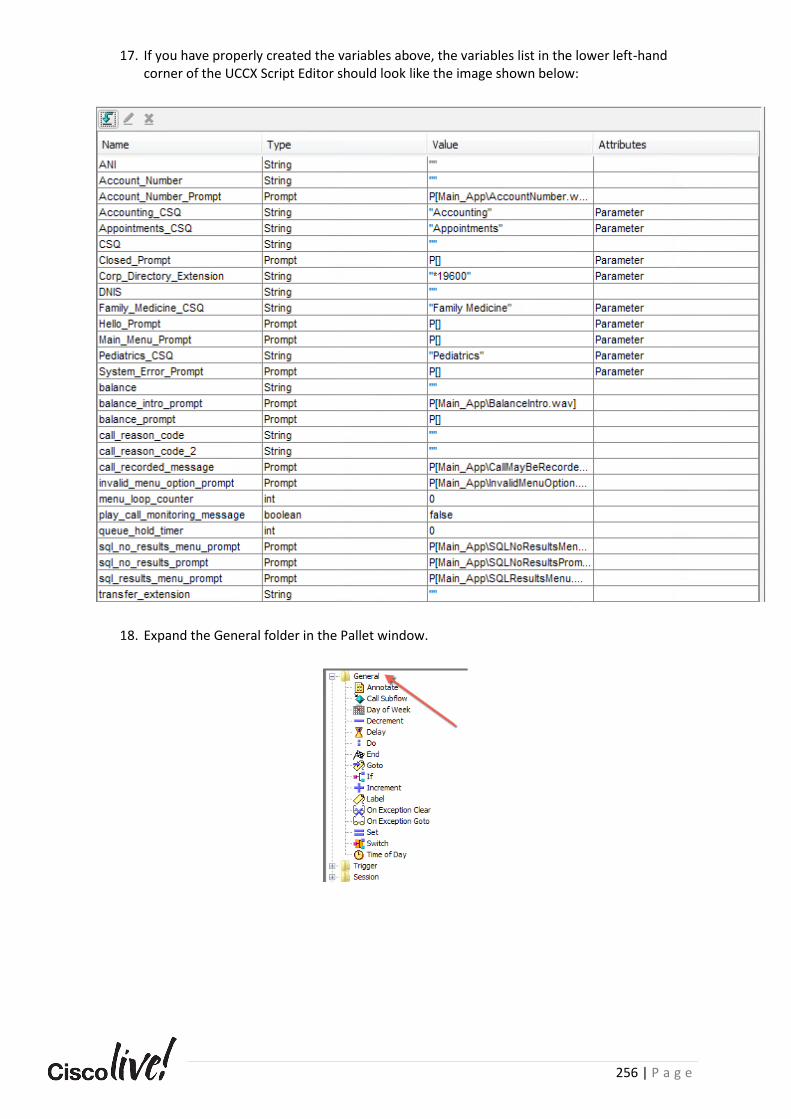
256 | P a g e
17. If you have properly created the variables above, the variables list in the lower left-hand corner of the UCCX Script Editor should look like the image shown below:
18. Expand the General folder in the Pallet window.
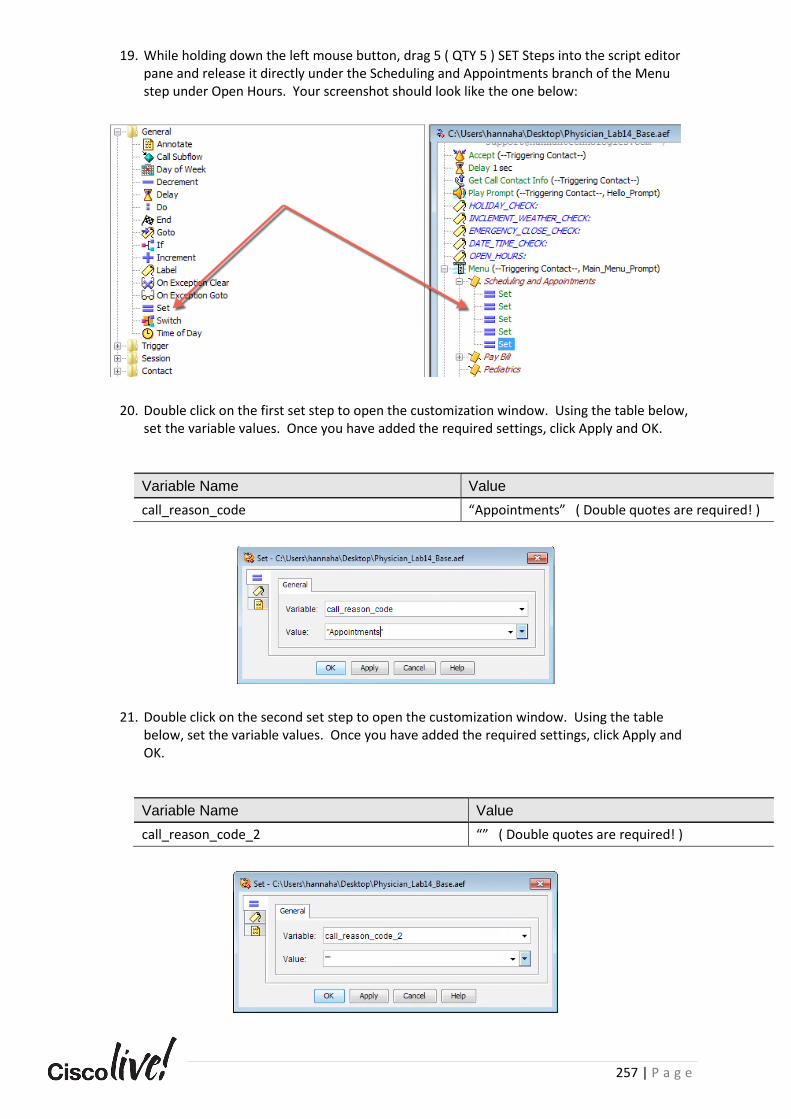
257 | P a g e
19. While holding down the left mouse button, drag 5 ( QTY 5 ) SET Steps into the script editor pane and release it directly under the Scheduling and Appointments branch of the Menu step under Open Hours. Your screenshot should look like the one below:
20. Double click on the first set step to open the customization window. Using the table below, set the variable values. Once you have added the required settings, click Apply and OK.
Variable Name Value
call_reason_code “Appointments” ( Double quotes are required! )
21. Double click on the second set step to open the customization window. Using the table below, set the variable values. Once you have added the required settings, click Apply and OK.
Variable Name Value
call_reason_code_2 “” ( Double quotes are required! )
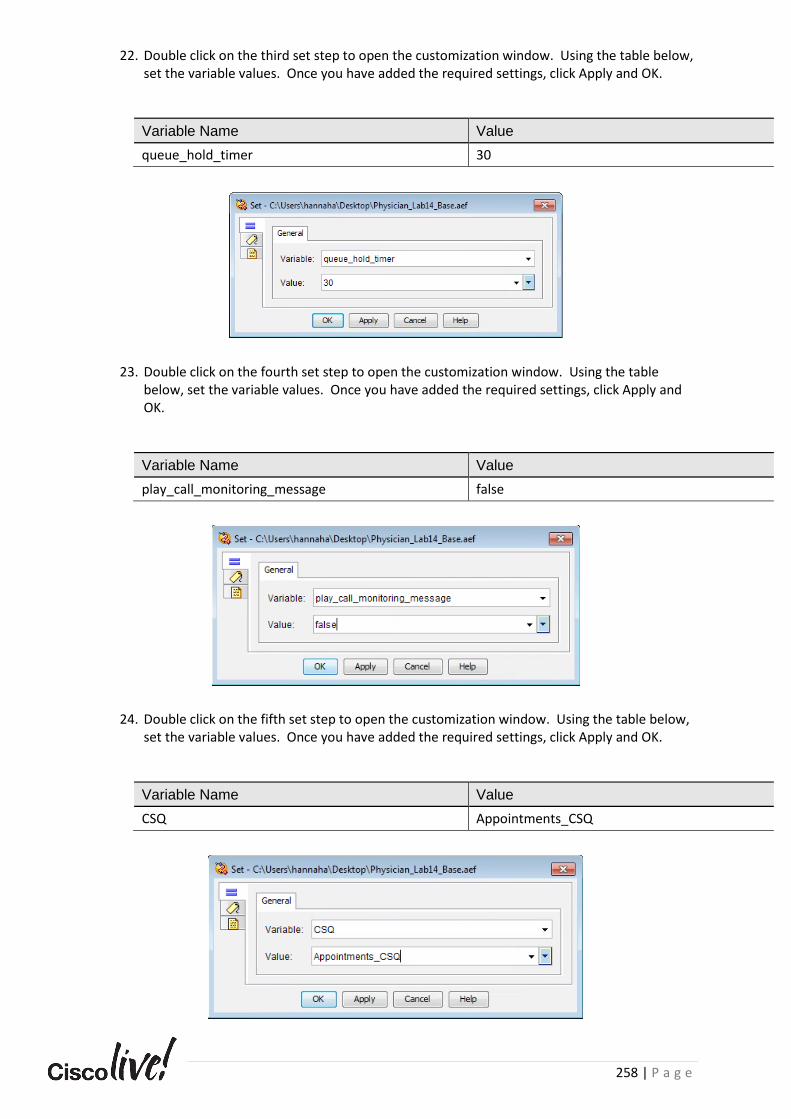
258 | P a g e
22. Double click on the third set step to open the customization window. Using the table below, set the variable values. Once you have added the required settings, click Apply and OK.
Variable Name Value
queue_hold_timer 30
23. Double click on the fourth set step to open the customization window. Using the table below, set the variable values. Once you have added the required settings, click Apply and OK.
Variable Name Value
play_call_monitoring_message false
24. Double click on the fifth set step to open the customization window. Using the table below, set the variable values. Once you have added the required settings, click Apply and OK.
Variable Name Value
CSQ Appointments_CSQ

259 | P a g e
25. While holding down the left mouse button, drag a GOTO Steps into the script editor pane and release it directly under the 5th SET STEP added in the previous section. Your script should look like the one below:
26. Double click on the GOTO step, in the choose label drop down select QUEUE_SETUP. Click Apply and OK.
27. Once you have completed adding the necessary SET STEPS and the GOTO step, your script should look like the one shown below:
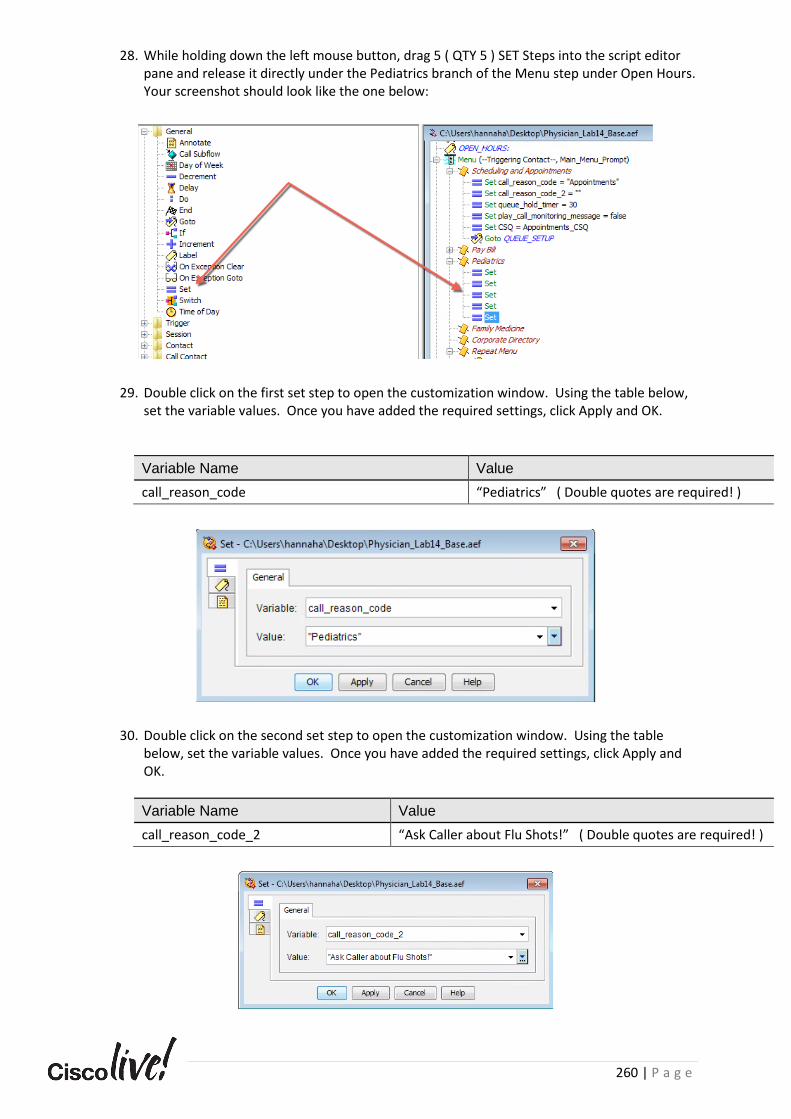
260 | P a g e
28. While holding down the left mouse button, drag 5 ( QTY 5 ) SET Steps into the script editor pane and release it directly under the Pediatrics branch of the Menu step under Open Hours. Your screenshot should look like the one below:
29. Double click on the first set step to open the customization window. Using the table below, set the variable values. Once you have added the required settings, click Apply and OK.
Variable Name Value
call_reason_code “Pediatrics” ( Double quotes are required! )
30. Double click on the second set step to open the customization window. Using the table below, set the variable values. Once you have added the required settings, click Apply and OK.
Variable Name Value
call_reason_code_2 “Ask Caller about Flu Shots!” ( Double quotes are required! )

261 | P a g e
31. Double click on the third set step to open the customization window. Using the table below, set the variable values. Once you have added the required settings, click Apply and OK.
Variable Name Value
queue_hold_timer 30
32. Double click on the fourth set step to open the customization window. Using the table below, set the variable values. Once you have added the required settings, click Apply and OK.
Variable Name Value
play_call_monitoring_message true
33. Double click on the fifth set step to open the customization window. Using the table below, set the variable values. Once you have added the required settings, click Apply and OK.
Variable Name Value
CSQ Pediatrics_CSQ
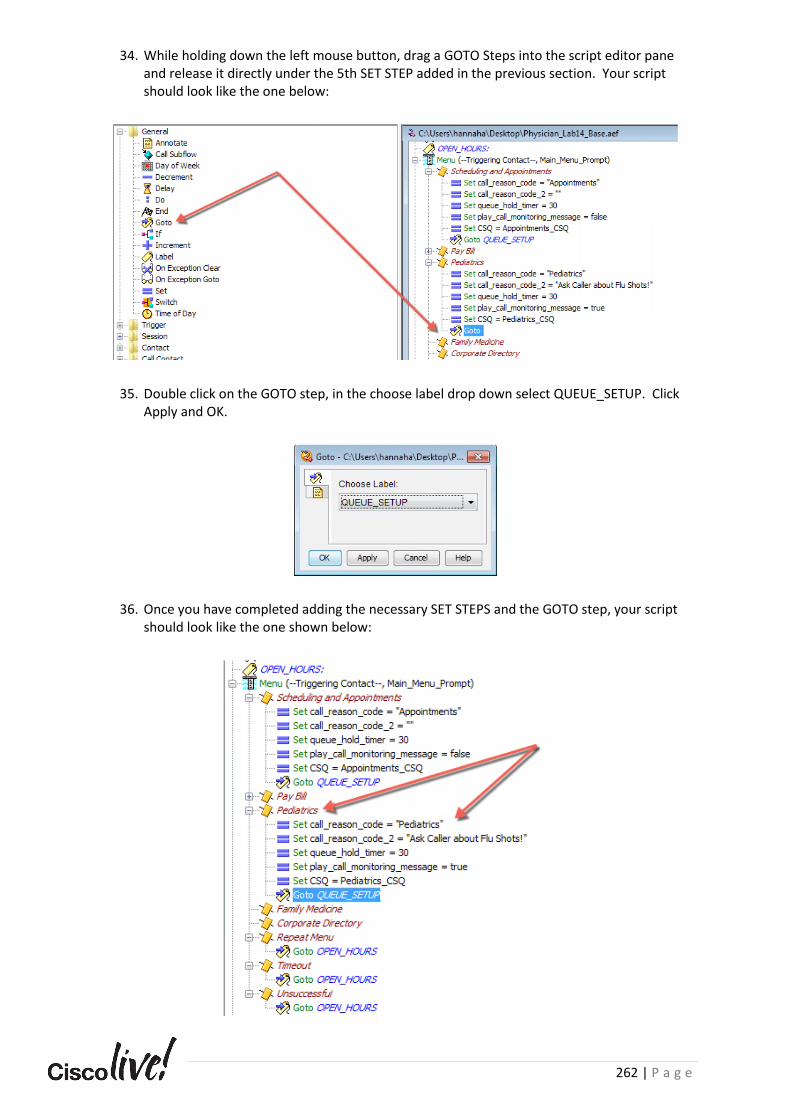
262 | P a g e
34. While holding down the left mouse button, drag a GOTO Steps into the script editor pane and release it directly under the 5th SET STEP added in the previous section. Your script should look like the one below:
35. Double click on the GOTO step, in the choose label drop down select QUEUE_SETUP. Click Apply and OK.
36. Once you have completed adding the necessary SET STEPS and the GOTO step, your script should look like the one shown below:
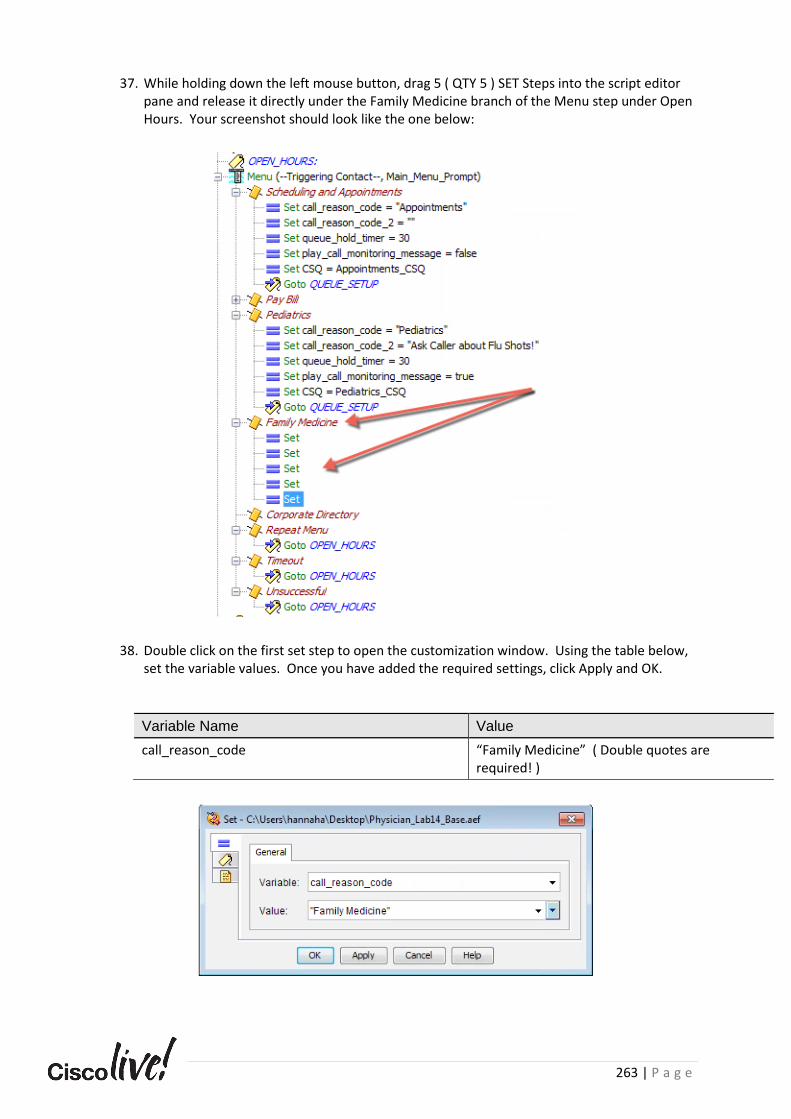
263 | P a g e
37. While holding down the left mouse button, drag 5 ( QTY 5 ) SET Steps into the script editor pane and release it directly under the Family Medicine branch of the Menu step under Open Hours. Your screenshot should look like the one below:
38. Double click on the first set step to open the customization window. Using the table below, set the variable values. Once you have added the required settings, click Apply and OK.
Variable Name Value
call_reason_code “Family Medicine” ( Double quotes are required! )

264 | P a g e
39. Double click on the second set step to open the customization window. Using the table below, set the variable values. Once you have added the required settings, click Apply and OK.
Variable Name Value
call_reason_code_2 “Warn Caller of Allergy Season!” ( Double quotes required! )
40. Double click on the third set step to open the customization window. Using the table below, set the variable values. Once you have added the required settings, click Apply and OK.
Variable Name Value
queue_hold_timer 60
41. Double click on the fourth set step to open the customization window. Using the table below, set the variable values. Once you have added the required settings, click Apply and OK.
Variable Name Value
play_call_monitoring_message true

265 | P a g e
42. Double click on the fifth set step to open the customization window. Using the table below, set the variable values. Once you have added the required settings, click Apply and OK.
Variable Name Value
CSQ Family_Medicine_CSQ
43. While holding down the left mouse button, drag a GOTO Steps into the script editor pane and release it directly under the 5th SET STEP added in the previous section. Your script should look like the one below:
44. Double click on the GOTO step, in the choose label drop down select QUEUE_SETUP. Click Apply and OK.

266 | P a g e
45. Once you have completed adding the necessary SET STEPS and the GOTO step, your script should look like the one shown below:
46. While holding down the left mouse button, drag a SET Step into the script editor pane and release it directly under the Corporate Directory branch of the Menu step under Open Hours. Your screenshot should look like the one below:
47. Double click on the set step to open the customization window. Using the table below, set the variable values. Once you have added the required settings, click Apply and OK.
Variable Name Value
transfer_extension Corp_Directory_Extension

267 | P a g e
48. While holding down the left mouse button, drag a GOTO Steps into the script editor pane and release it directly under the SET STEP added in the previous section. Your script should look like the one below:
49. Double click on the GOTO step, in the choose label drop down select TRANSFER_OUT_OF_IVR. Click Apply and OK.
50. Once you have completed adding the necessary SET STEPS and the GOTO step, your script should look like the one shown below:
51. While holding down the left mouse button, drag an If Step into the script editor pane and release it directly under the QUEUE_SETUP label. Your script should look like the one below:

268 | P a g e
52. Double click on the If step, in the condition text box enter play_call_monitoring_message == true Click Apply and OK.
53. While holding down the left mouse button, drag a Play Prompt Step into the script editor pane and release it directly under the true branch of the If statement. Your script should look like the one below:

269 | P a g e
54. Double click on the Play Prompt step. Click on the Prompt tab. In the prompt drop down select call_recorded_message. Leave all other settings default. Click Apply and OK.
55. While holding down the left mouse button, drag a Goto Step into the script editor pane and release it directly under the true branch of the If statement. Your script should look like the one below:
56. Double click on the Goto step. In the choose label drop down select QUEUE_CALL. Click Apply and OK.
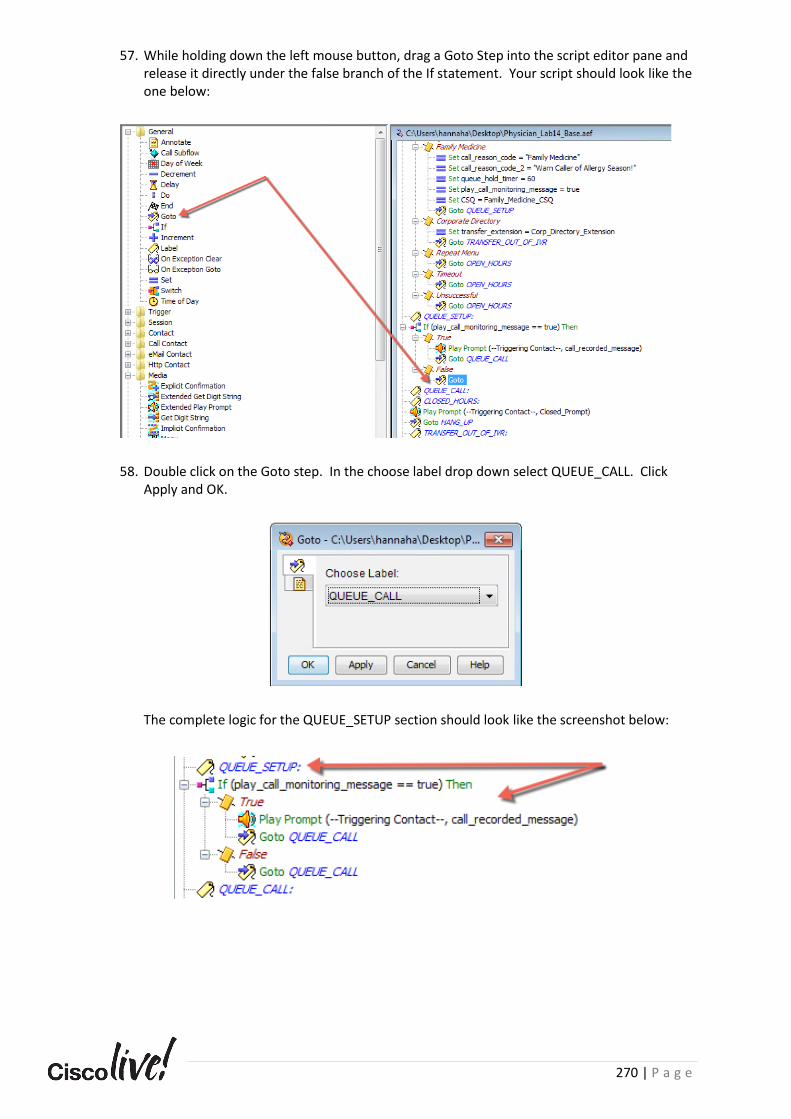
270 | P a g e
57. While holding down the left mouse button, drag a Goto Step into the script editor pane and release it directly under the false branch of the If statement. Your script should look like the one below:
58. Double click on the Goto step. In the choose label drop down select QUEUE_CALL. Click Apply and OK.
The complete logic for the QUEUE_SETUP section should look like the screenshot below:

271 | P a g e
59. Expand the Call Contact folder in the pallet window.
60. While holding down the left mouse button, drag a Call Redirect step into the script editor pane and release it directly under the TRANSFER_OUT_OF_IVR label. Your script should look like the one below:
61. Double click on the Call Redirect step. In the Destination drop down select transfer_extension. Leave all other settings at default. Click Apply and OK.
62. While holding down the left mouse button, drag 4 ( QTY: 4) GOTO step into the script editor pane and release it directly under the the Successful, Busy, Invalid, and Unsuccessful branches. Your script should look like the one below:
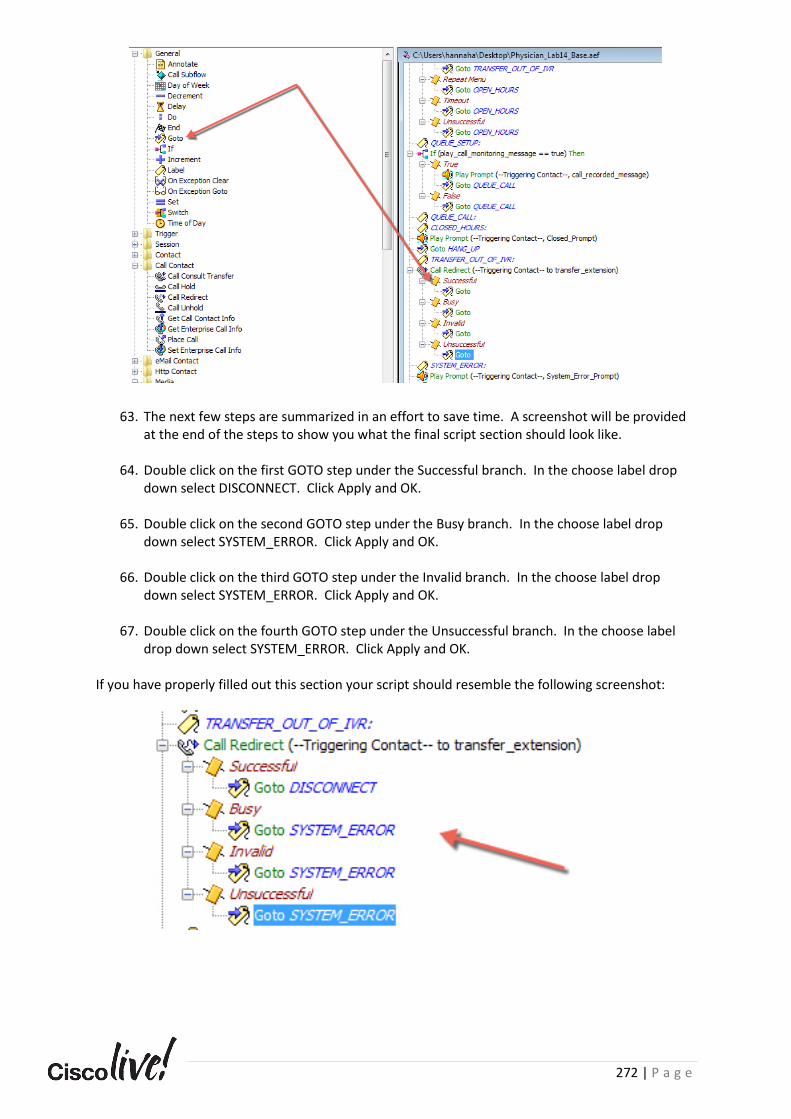
272 | P a g e
63. The next few steps are summarized in an effort to save time. A screenshot will be provided at the end of the steps to show you what the final script section should look like.
64. Double click on the first GOTO step under the Successful branch. In the choose label drop down select DISCONNECT. Click Apply and OK.
65. Double click on the second GOTO step under the Busy branch. In the choose label drop down select SYSTEM_ERROR. Click Apply and OK.
66. Double click on the third GOTO step under the Invalid branch. In the choose label drop
down select SYSTEM_ERROR. Click Apply and OK.
67. Double click on the fourth GOTO step under the Unsuccessful branch. In the choose label drop down select SYSTEM_ERROR. Click Apply and OK.
If you have properly filled out this section your script should resemble the following screenshot:

273 | P a g e
68. Locate the NO_DATA_MENU label. ( Hint, you can click Edit > Find Label at the top of the Script Editor ). Expand out the Menu under the NO_DATA_MENU label. Your script should look like the screenshot below:
69. While holding down the left mouse button, drag a SET step into the script editor pane and release it directly above the NO_DATA_MENU label. Your script should look like the one below:
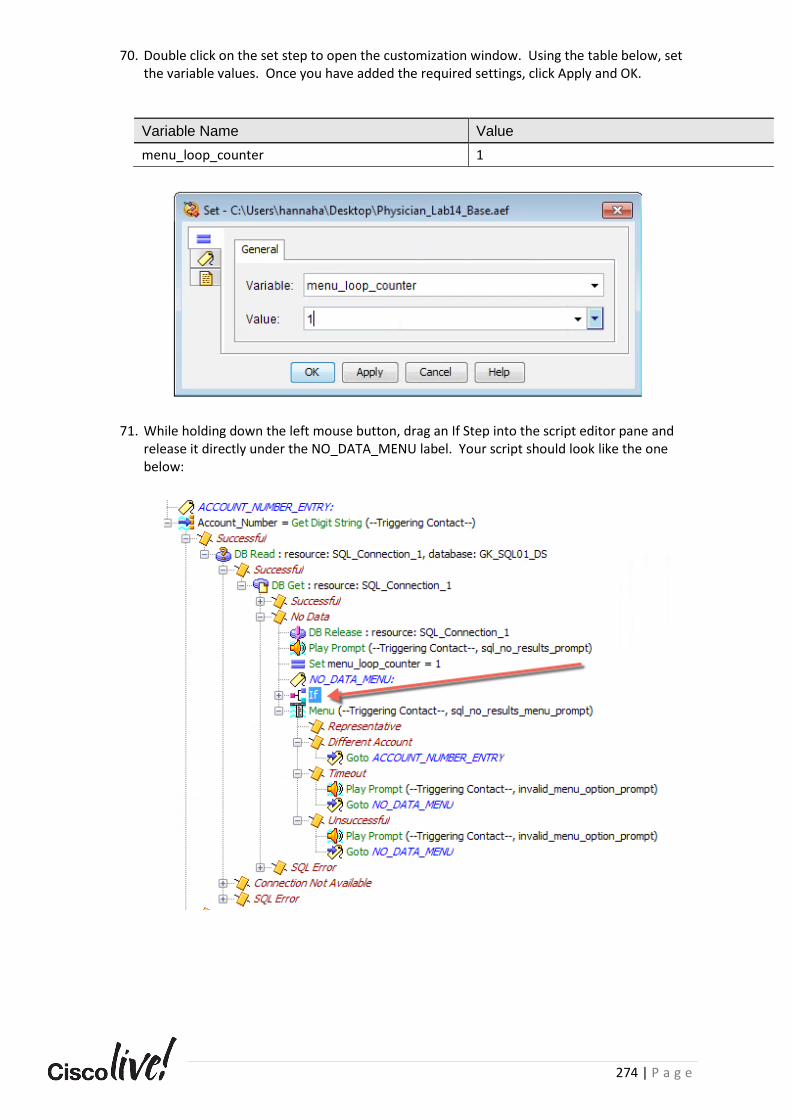
274 | P a g e
70. Double click on the set step to open the customization window. Using the table below, set the variable values. Once you have added the required settings, click Apply and OK.
Variable Name Value
menu_loop_counter 1
71. While holding down the left mouse button, drag an If Step into the script editor pane and release it directly under the NO_DATA_MENU label. Your script should look like the one below:
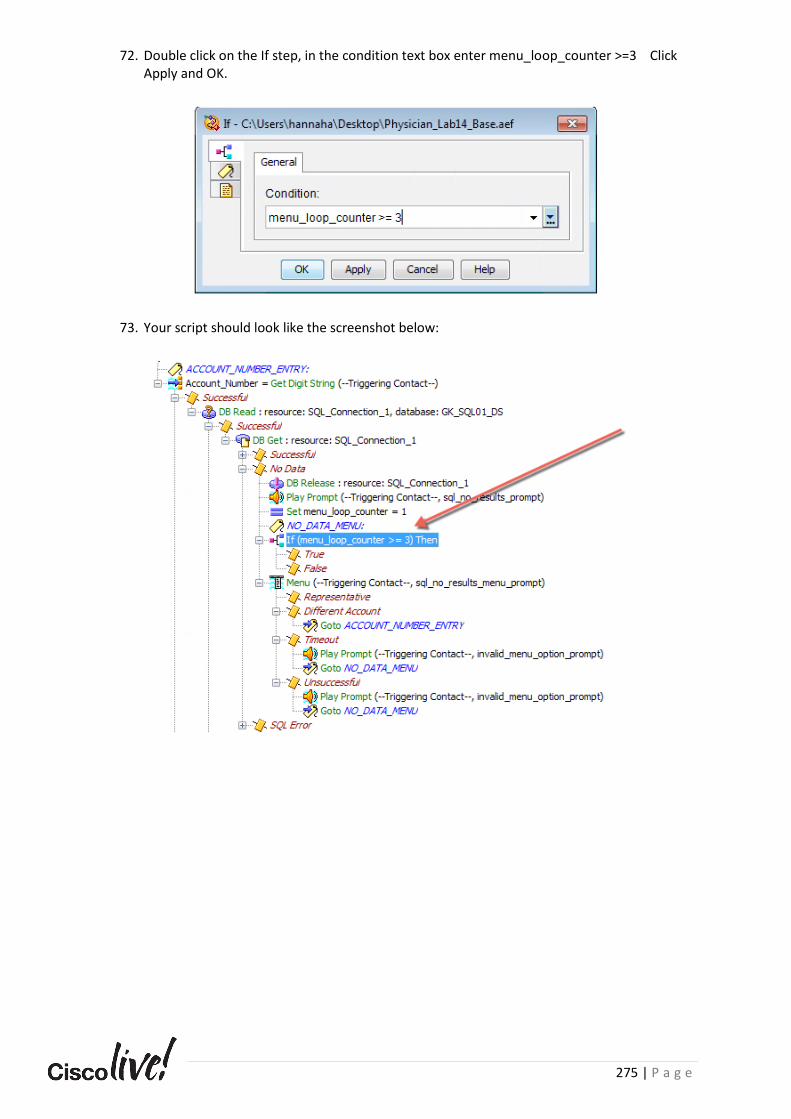
275 | P a g e
72. Double click on the If step, in the condition text box enter menu_loop_counter >=3 Click Apply and OK.
73. Your script should look like the screenshot below:

276 | P a g e
74. While holding down the left mouse button, drag the Menu step up and release it over the False branch. This will “nest” the Menu inside the False branch. Your script should look like the screenshot below:
75. While holding down the left mouse button, drag 5 ( QTY 5 ) SET Steps into the script editor pane and release it directly under the true branch of the IF statement. Your screenshot should look like the one below:
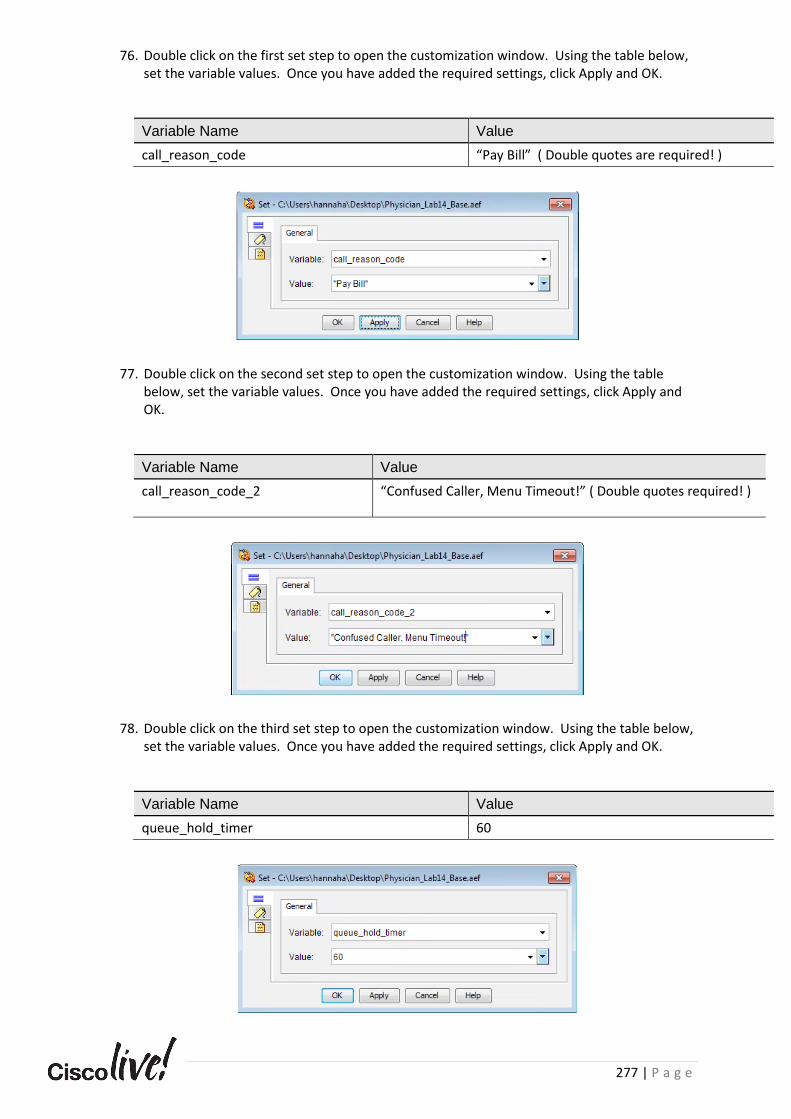
277 | P a g e
76. Double click on the first set step to open the customization window. Using the table below, set the variable values. Once you have added the required settings, click Apply and OK.
Variable Name Value
call_reason_code “Pay Bill” ( Double quotes are required! )
77. Double click on the second set step to open the customization window. Using the table below, set the variable values. Once you have added the required settings, click Apply and OK.
Variable Name Value
call_reason_code_2 “Confused Caller, Menu Timeout!” ( Double quotes required! )
78. Double click on the third set step to open the customization window. Using the table below, set the variable values. Once you have added the required settings, click Apply and OK.
Variable Name Value
queue_hold_timer 60

278 | P a g e
79. Double click on the fourth set step to open the customization window. Using the table below, set the variable values. Once you have added the required settings, click Apply and OK.
Variable Name Value
play_call_monitoring_message true
80. Double click on the fifth set step to open the customization window. Using the table below, set the variable values. Once you have added the required settings, click Apply and OK.
Variable Name Value
CSQ Accounting_CSQ
81. While holding down the left mouse button, drag a GOTO Steps into the script editor pane and release it directly under the 5th SET STEP added in the previous section. Your script should look like the one below:
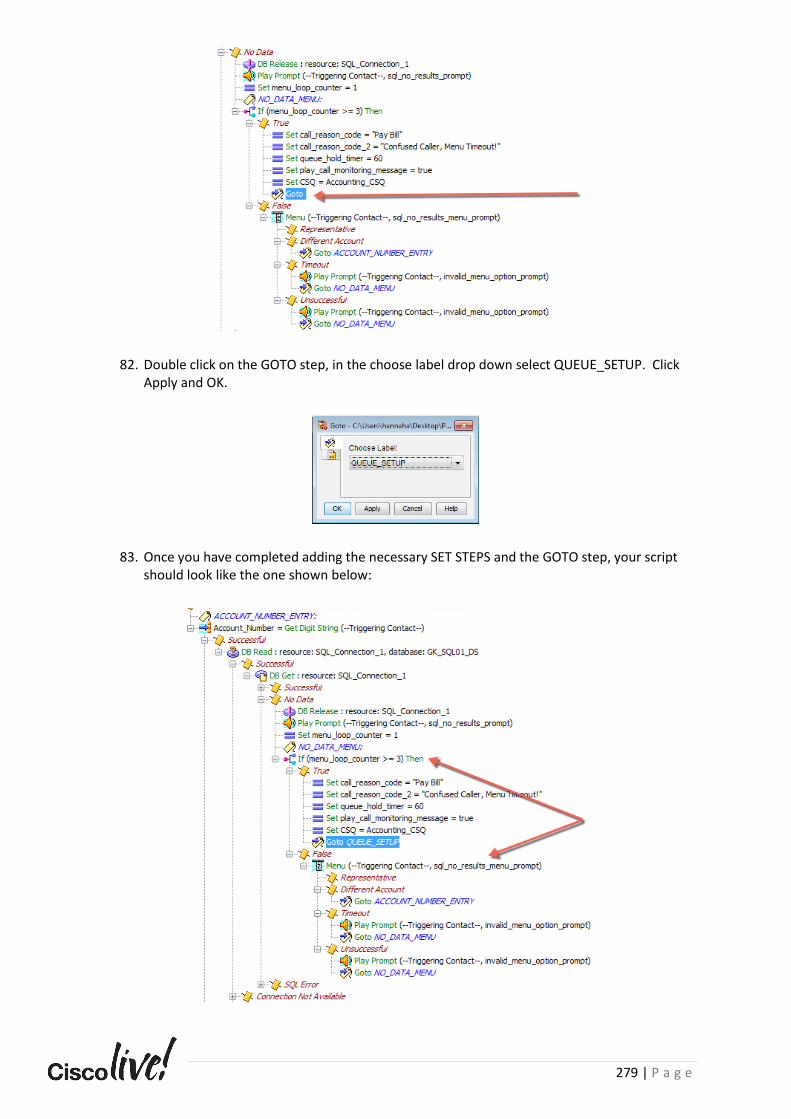
279 | P a g e
82. Double click on the GOTO step, in the choose label drop down select QUEUE_SETUP. Click Apply and OK.
83. Once you have completed adding the necessary SET STEPS and the GOTO step, your script should look like the one shown below:
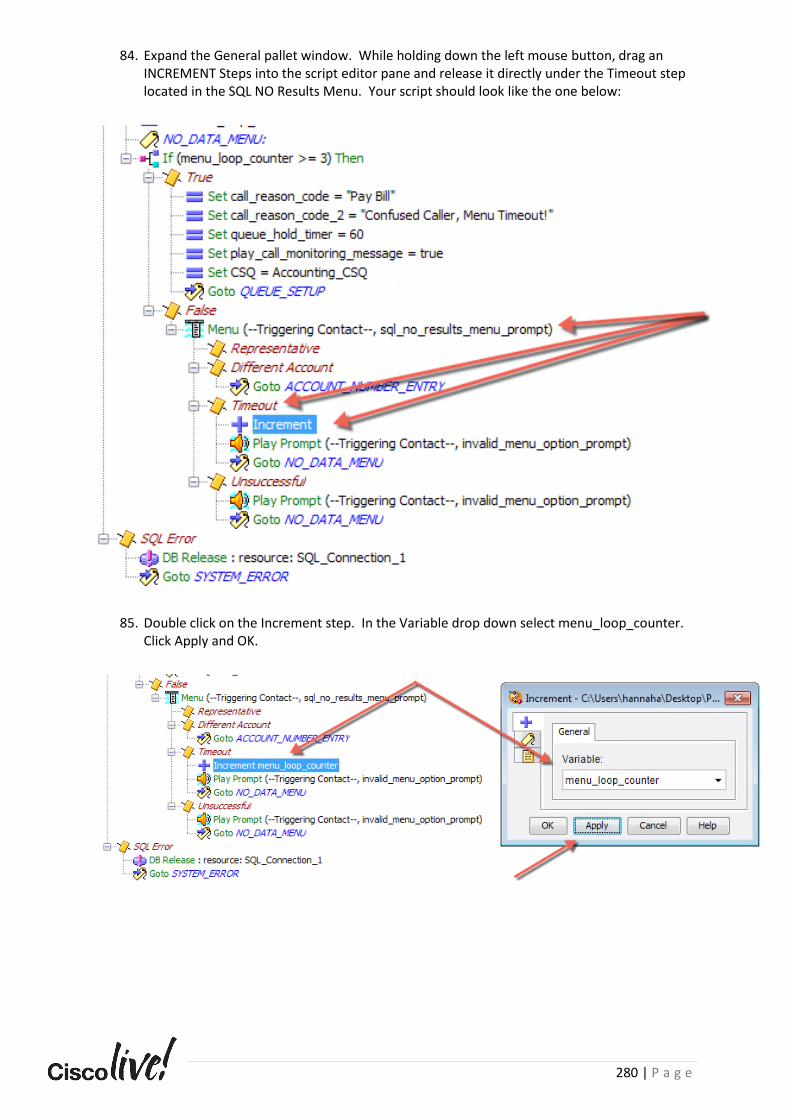
280 | P a g e
84. Expand the General pallet window. While holding down the left mouse button, drag an INCREMENT Steps into the script editor pane and release it directly under the Timeout step located in the SQL NO Results Menu. Your script should look like the one below:
85. Double click on the Increment step. In the Variable drop down select menu_loop_counter. Click Apply and OK.

281 | P a g e
86. Right click on the newly added Increment step. Choose Copy. Next, paste this step under the Unsuccessful branch. If you have completed this step successfully your script should look like the screenshot below:
87. While holding down the left mouse button, drag 5 ( QTY 5 ) SET Steps into the script editor pane and release it directly under the Representative label under the SQL NO RESULTS MENU. Your screenshot should look like the one below:

282 | P a g e
88. Double click on the first set step to open the customization window. Using the table below, set the variable values. Once you have added the required settings, click Apply and OK.
Variable Name Value
call_reason_code “Pay Bill” ( Double quotes are required! )
89. Double click on the second set step to open the customization window. Using the table below, set the variable values. Once you have added the required settings, click Apply and OK.
Variable Name Value
call_reason_code_2 “Account not found!” ( Double quotes required! )
90. Double click on the third set step to open the customization window. Using the table below, set the variable values. Once you have added the required settings, click Apply and OK.
Variable Name Value
queue_hold_timer 60
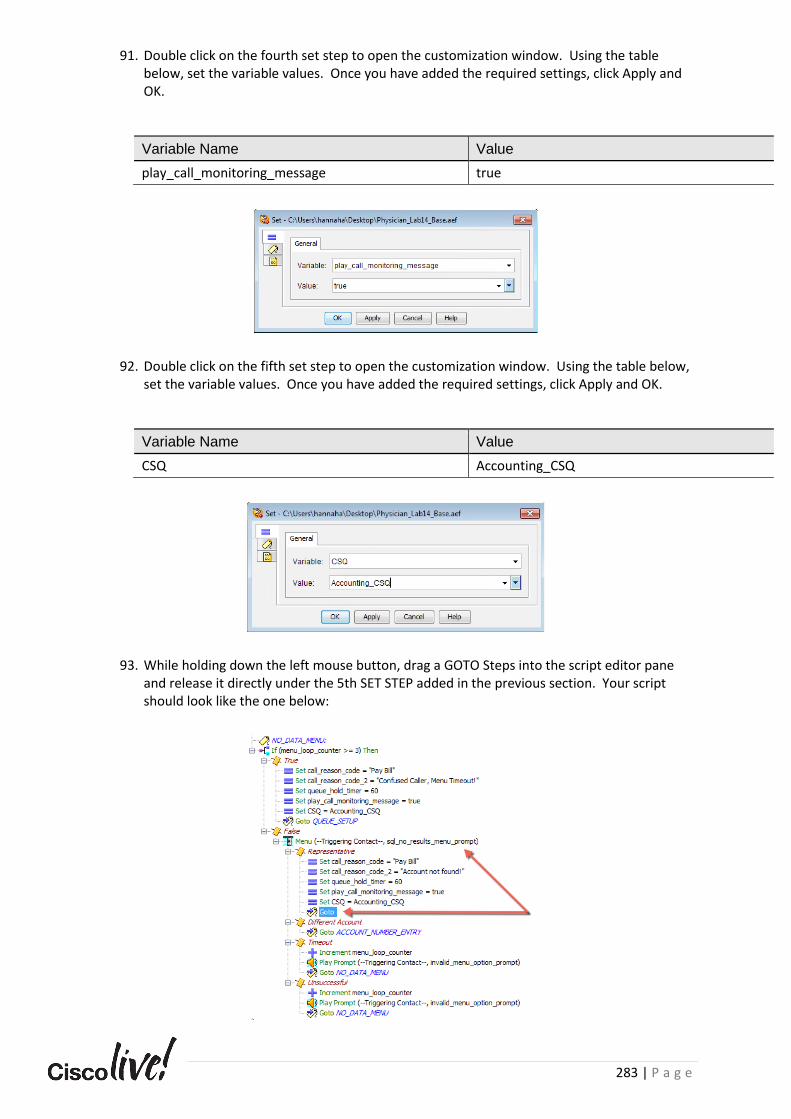
283 | P a g e
91. Double click on the fourth set step to open the customization window. Using the table below, set the variable values. Once you have added the required settings, click Apply and OK.
Variable Name Value
play_call_monitoring_message true
92. Double click on the fifth set step to open the customization window. Using the table below, set the variable values. Once you have added the required settings, click Apply and OK.
Variable Name Value
CSQ Accounting_CSQ
93. While holding down the left mouse button, drag a GOTO Steps into the script editor pane and release it directly under the 5th SET STEP added in the previous section. Your script should look like the one below:

284 | P a g e
94. Double click on the GOTO step, in the choose label drop down select QUEUE_SETUP. Click Apply and OK.
95. Once you have completed adding the necessary SET STEPS and the GOTO step, your script should look like the one shown below:
Task 2: V.S.U.R.E and Application Testing In this task you will perform the VSURE process which properly installs our updated Main Application onto the UCCX server so it can be used as an IVR Application. VSURE stands for Validate, Save, Upload, Refresh, Execute. It’s a common technique we use when deploying new applications and scripts. This process is crucial and must be followed every time to ensure proper deployment.
We will now execute the steps for the V.S.U.R.E. process.
VSURE – V = Validate
96. The script must be validated for program integrity. Select Tools > Validate.
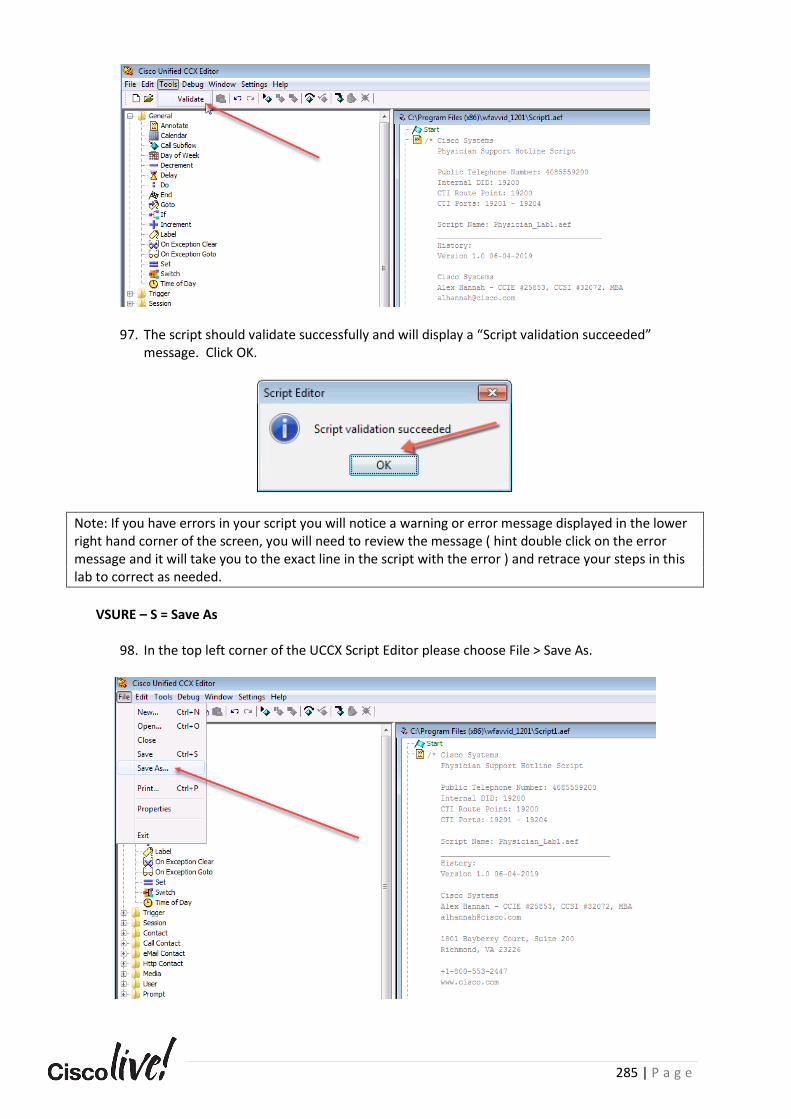
285 | P a g e
97. The script should validate successfully and will display a “Script validation succeeded” message. Click OK.
Note: If you have errors in your script you will notice a warning or error message displayed in the lower right hand corner of the screen, you will need to review the message ( hint double click on the error message and it will take you to the exact line in the script with the error ) and retrace your steps in this lab to correct as needed.
VSURE – S = Save As
98. In the top left corner of the UCCX Script Editor please choose File > Save As.
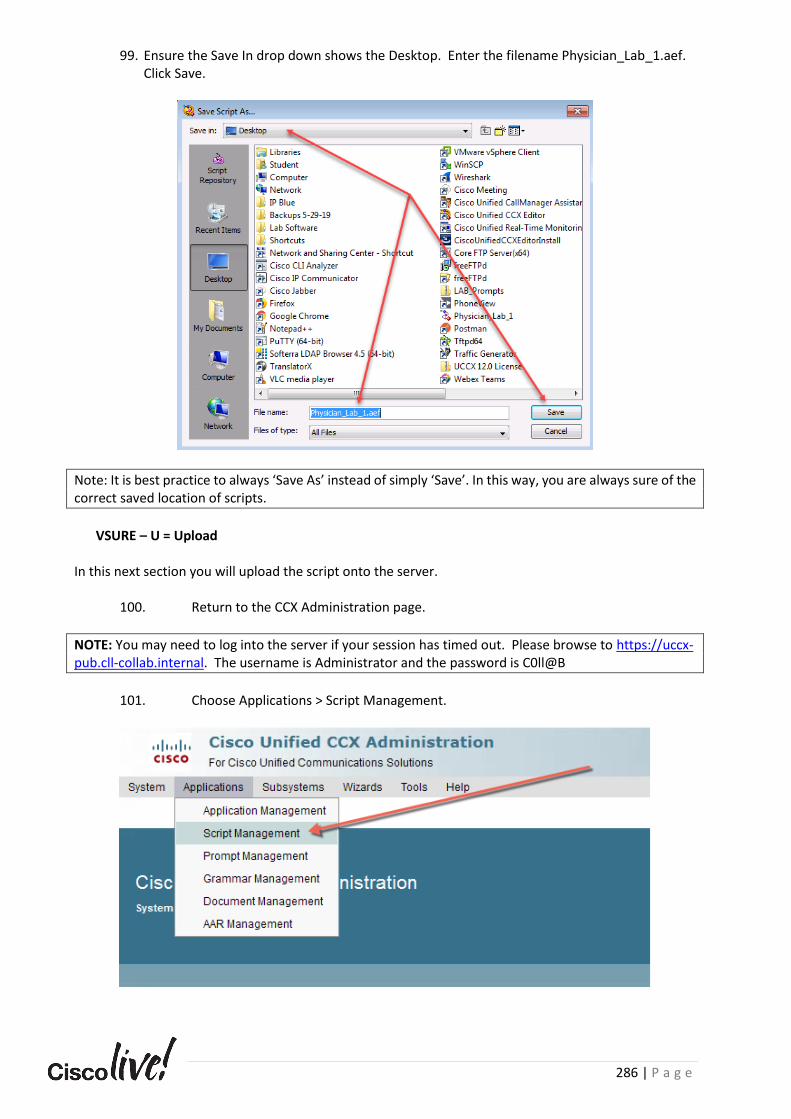
286 | P a g e
99. Ensure the Save In drop down shows the Desktop. Enter the filename Physician_Lab_1.aef. Click Save.
Note: It is best practice to always ‘Save As’ instead of simply ‘Save’. In this way, you are always sure of the correct saved location of scripts.
VSURE – U = Upload
In this next section you will upload the script onto the server.
100. Return to the CCX Administration page.
NOTE: You may need to log into the server if your session has timed out. Please browse to https://uccx-pub.cll-collab.internal. The username is Administrator and the password is C0ll@B
101. Choose Applications > Script Management.

287 | P a g e
102. Click on the Upload Scripts button.
103. In the Upload Script pop up window click Browse.
104. Navigate to the desktop on your respective machine and select the Physician_Lab_1.aef script. Click Open.
105. With the Physician_Lab1.aef script selected, click Upload.
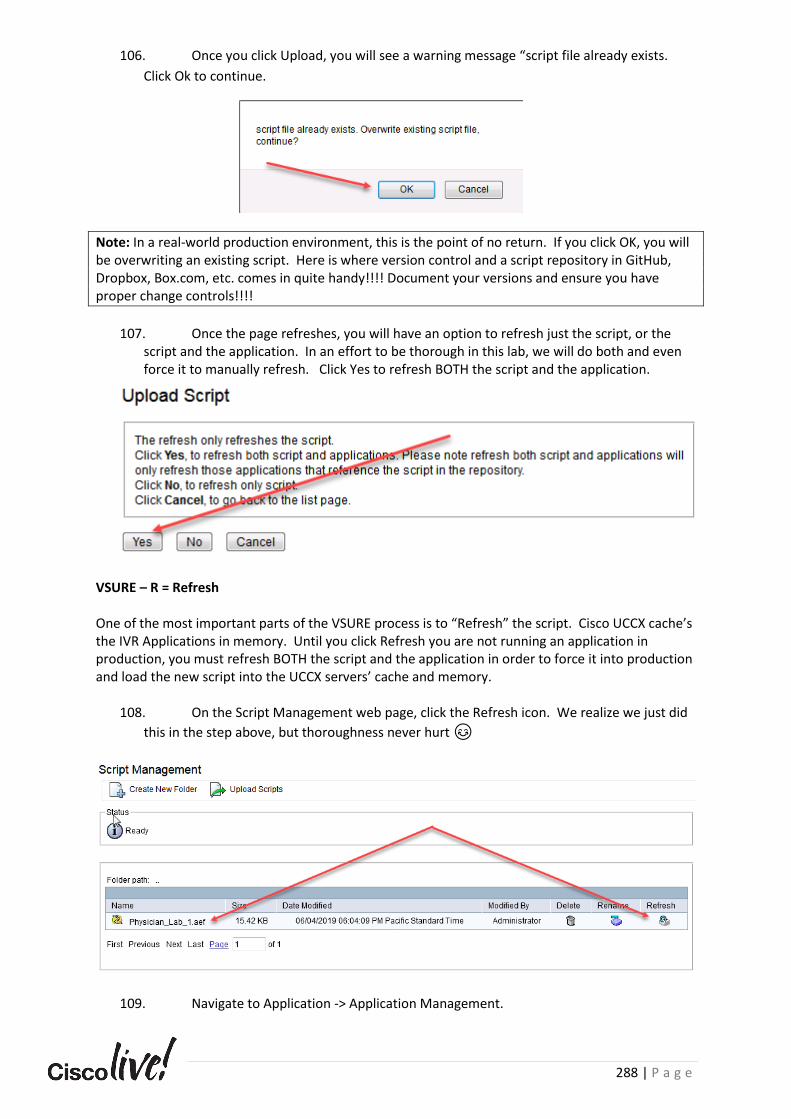
288 | P a g e
106. Once you click Upload, you will see a warning message “script file already exists.
Click Ok to continue.
Note: In a real-world production environment, this is the point of no return. If you click OK, you will be overwriting an existing script. Here is where version control and a script repository in GitHub, Dropbox, Box.com, etc. comes in quite handy!!!! Document your versions and ensure you have proper change controls!!!!
107. Once the page refreshes, you will have an option to refresh just the script, or the
script and the application. In an effort to be thorough in this lab, we will do both and even force it to manually refresh. Click Yes to refresh BOTH the script and the application.
VSURE – R = Refresh
One of the most important parts of the VSURE process is to “Refresh” the script. Cisco UCCX cache’s the IVR Applications in memory. Until you click Refresh you are not running an application in production, you must refresh BOTH the script and the application in order to force it into production and load the new script into the UCCX servers’ cache and memory.
108. On the Script Management web page, click the Refresh icon. We realize we just did
this in the step above, but thoroughness never hurt 😊
109. Navigate to Application -> Application Management.
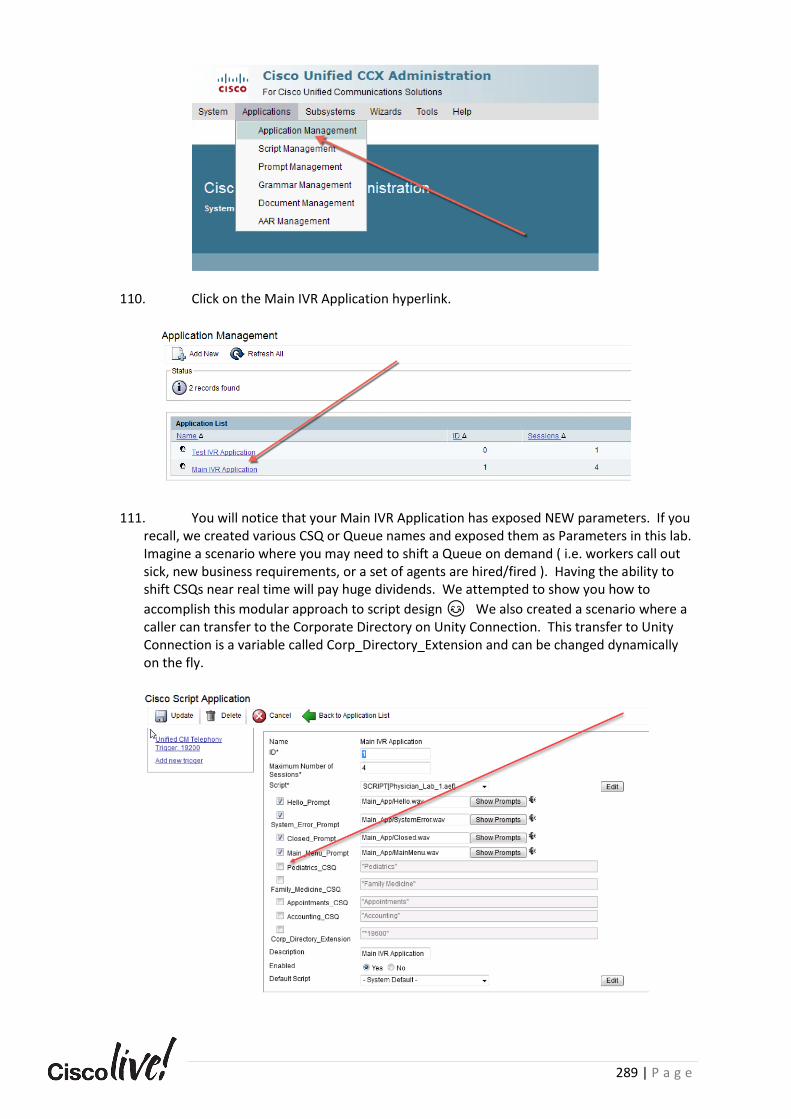
289 | P a g e
110. Click on the Main IVR Application hyperlink.
111. You will notice that your Main IVR Application has exposed NEW parameters. If you recall, we created various CSQ or Queue names and exposed them as Parameters in this lab. Imagine a scenario where you may need to shift a Queue on demand ( i.e. workers call out sick, new business requirements, or a set of agents are hired/fired ). Having the ability to shift CSQs near real time will pay huge dividends. We attempted to show you how to
accomplish this modular approach to script design 😊 We also created a scenario where a caller can transfer to the Corporate Directory on Unity Connection. This transfer to Unity Connection is a variable called Corp_Directory_Extension and can be changed dynamically on the fly.
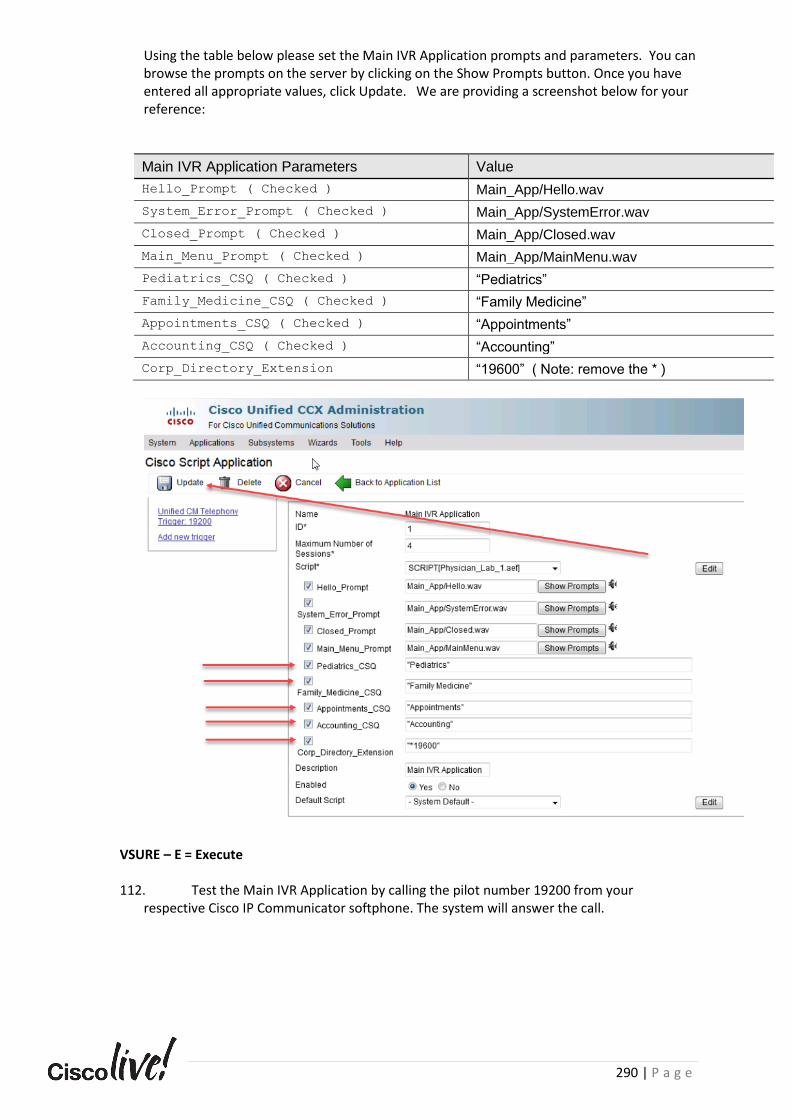
290 | P a g e
Using the table below please set the Main IVR Application prompts and parameters. You can browse the prompts on the server by clicking on the Show Prompts button. Once you have entered all appropriate values, click Update. We are providing a screenshot below for your reference:
Main IVR Application Parameters Value
Hello_Prompt ( Checked ) Main_App/Hello.wav
System_Error_Prompt ( Checked ) Main_App/SystemError.wav
Closed_Prompt ( Checked ) Main_App/Closed.wav
Main_Menu_Prompt ( Checked ) Main_App/MainMenu.wav
Pediatrics_CSQ ( Checked ) “Pediatrics”
Family_Medicine_CSQ ( Checked ) “Family Medicine”
Appointments_CSQ ( Checked ) “Appointments”
Accounting_CSQ ( Checked ) “Accounting”
Corp_Directory_Extension “19600” ( Note: remove the * )
VSURE – E = Execute
112. Test the Main IVR Application by calling the pilot number 19200 from your respective Cisco IP Communicator softphone. The system will answer the call.
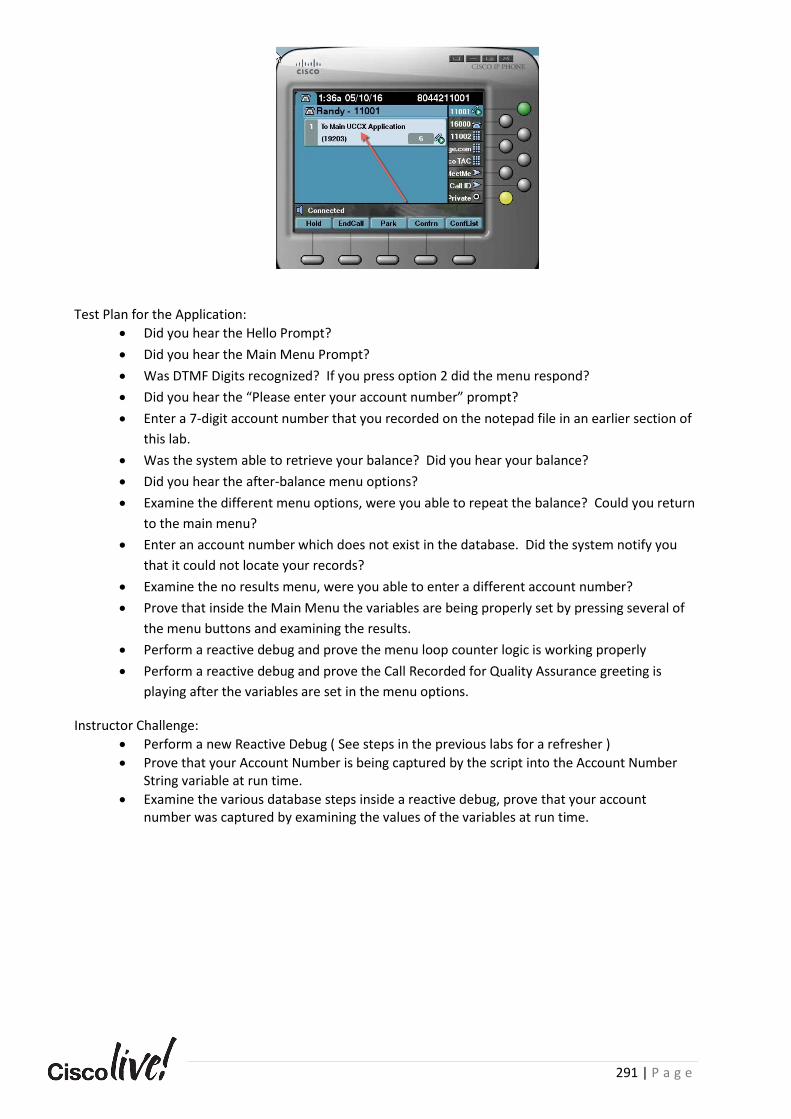
291 | P a g e
Test Plan for the Application:
• Did you hear the Hello Prompt?
• Did you hear the Main Menu Prompt?
• Was DTMF Digits recognized? If you press option 2 did the menu respond?
• Did you hear the “Please enter your account number” prompt?
• Enter a 7-digit account number that you recorded on the notepad file in an earlier section of
this lab.
• Was the system able to retrieve your balance? Did you hear your balance?
• Did you hear the after-balance menu options?
• Examine the different menu options, were you able to repeat the balance? Could you return
to the main menu?
• Enter an account number which does not exist in the database. Did the system notify you
that it could not locate your records?
• Examine the no results menu, were you able to enter a different account number?
• Prove that inside the Main Menu the variables are being properly set by pressing several of
the menu buttons and examining the results.
• Perform a reactive debug and prove the menu loop counter logic is working properly
• Perform a reactive debug and prove the Call Recorded for Quality Assurance greeting is
playing after the variables are set in the menu options.
Instructor Challenge:
• Perform a new Reactive Debug ( See steps in the previous labs for a refresher )
• Prove that your Account Number is being captured by the script into the Account Number String variable at run time.
• Examine the various database steps inside a reactive debug, prove that your account number was captured by examining the values of the variables at run time.
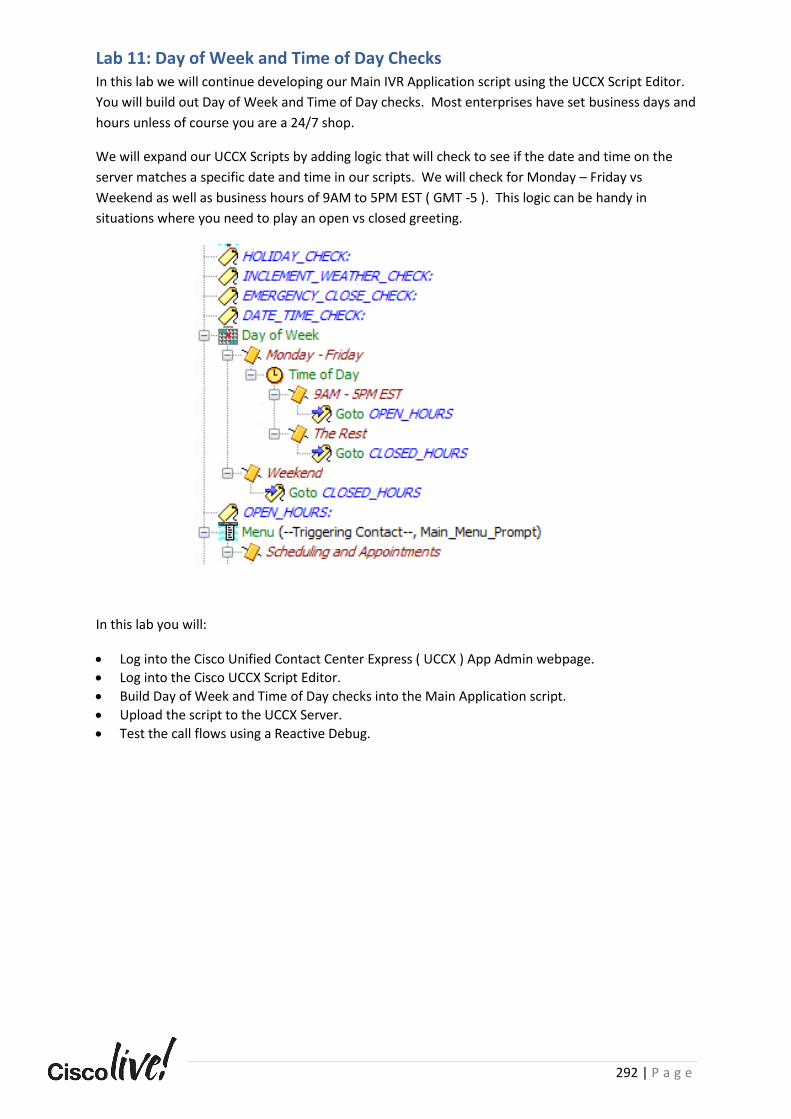
292 | P a g e
Lab 11: Day of Week and Time of Day Checks In this lab we will continue developing our Main IVR Application script using the UCCX Script Editor.
You will build out Day of Week and Time of Day checks. Most enterprises have set business days and
hours unless of course you are a 24/7 shop.
We will expand our UCCX Scripts by adding logic that will check to see if the date and time on the
server matches a specific date and time in our scripts. We will check for Monday – Friday vs
Weekend as well as business hours of 9AM to 5PM EST ( GMT -5 ). This logic can be handy in
situations where you need to play an open vs closed greeting.
In this lab you will:
• Log into the Cisco Unified Contact Center Express ( UCCX ) App Admin webpage.
• Log into the Cisco UCCX Script Editor.
• Build Day of Week and Time of Day checks into the Main Application script.
• Upload the script to the UCCX Server.
• Test the call flows using a Reactive Debug.
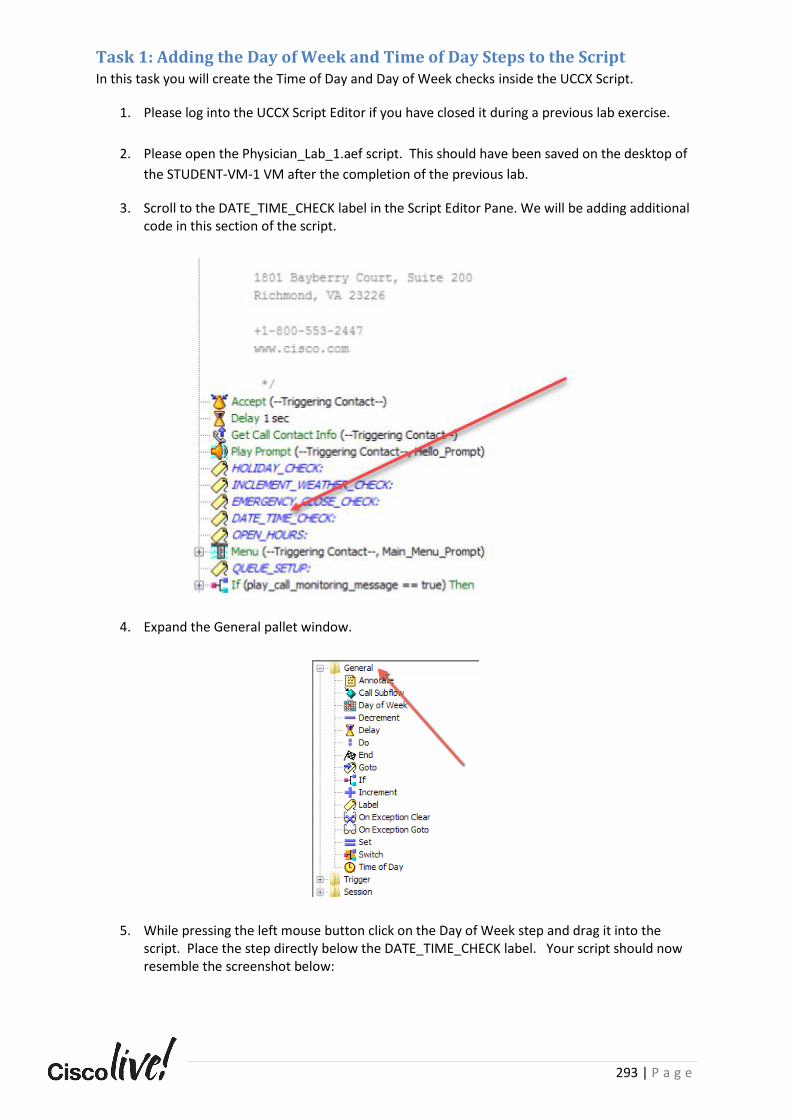
293 | P a g e
Task 1: Adding the Day of Week and Time of Day Steps to the Script In this task you will create the Time of Day and Day of Week checks inside the UCCX Script.
1. Please log into the UCCX Script Editor if you have closed it during a previous lab exercise.
2. Please open the Physician_Lab_1.aef script. This should have been saved on the desktop of
the STUDENT-VM-1 VM after the completion of the previous lab.
3. Scroll to the DATE_TIME_CHECK label in the Script Editor Pane. We will be adding additional code in this section of the script.
4. Expand the General pallet window.
5. While pressing the left mouse button click on the Day of Week step and drag it into the script. Place the step directly below the DATE_TIME_CHECK label. Your script should now resemble the screenshot below:

294 | P a g e
6. Double click on the Day of Week step to open the customization window. Using the Time Zone drop down, set the time zone to TZ[America/New_York]. Click the Add button.
Note: The TZ[America\New_York] time zone setting is based on the time zone of where
you are located. Should you be located in a different time zone other than GMT -
5, please set the value to Primary.
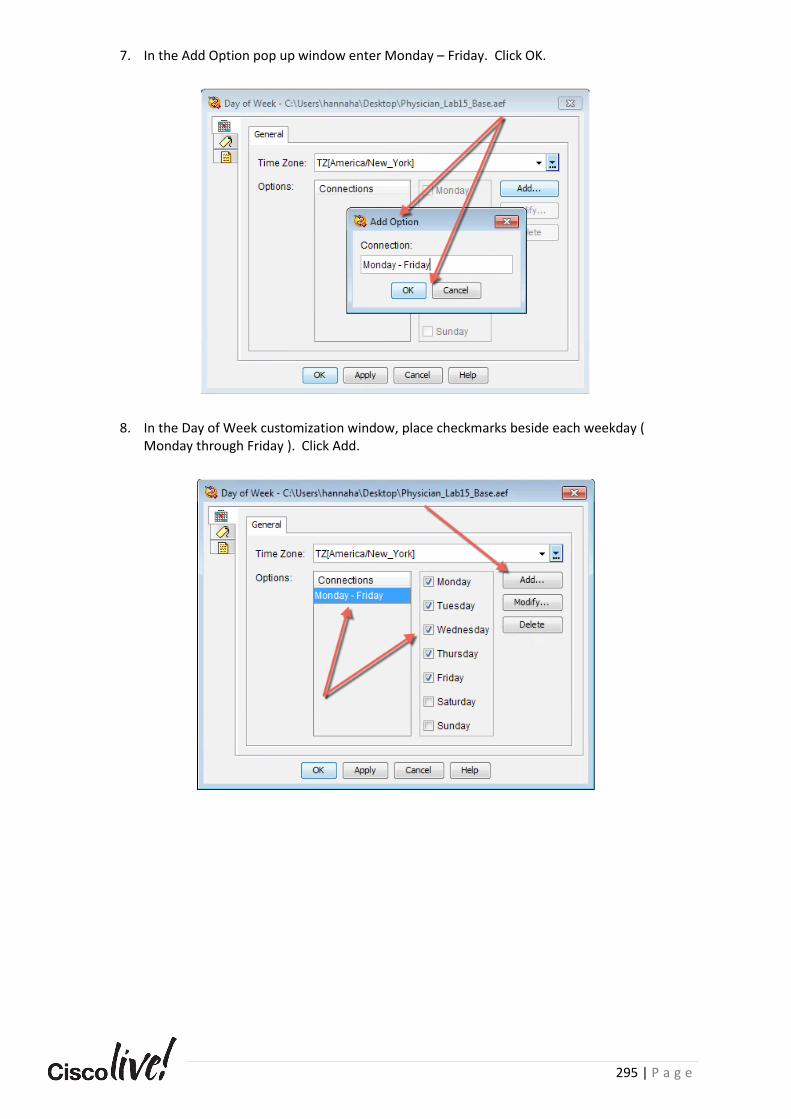
295 | P a g e
7. In the Add Option pop up window enter Monday – Friday. Click OK.
8. In the Day of Week customization window, place checkmarks beside each weekday ( Monday through Friday ). Click Add.
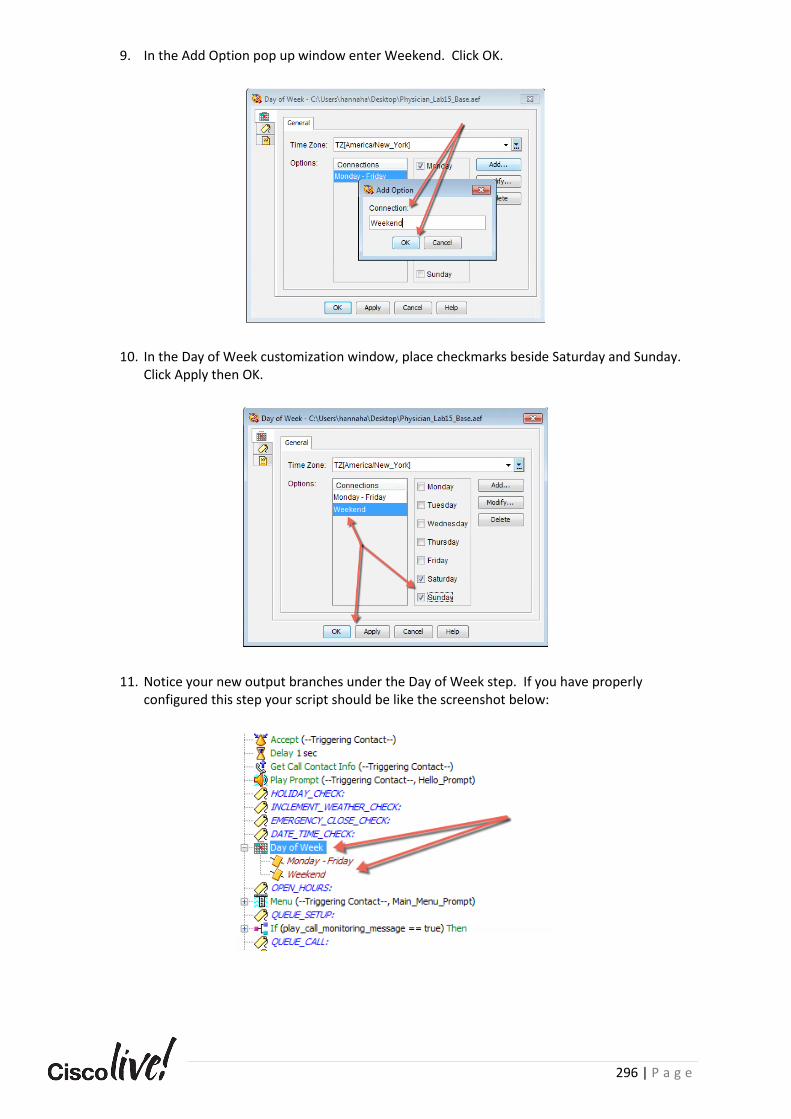
296 | P a g e
9. In the Add Option pop up window enter Weekend. Click OK.
10. In the Day of Week customization window, place checkmarks beside Saturday and Sunday. Click Apply then OK.
11. Notice your new output branches under the Day of Week step. If you have properly configured this step your script should be like the screenshot below:
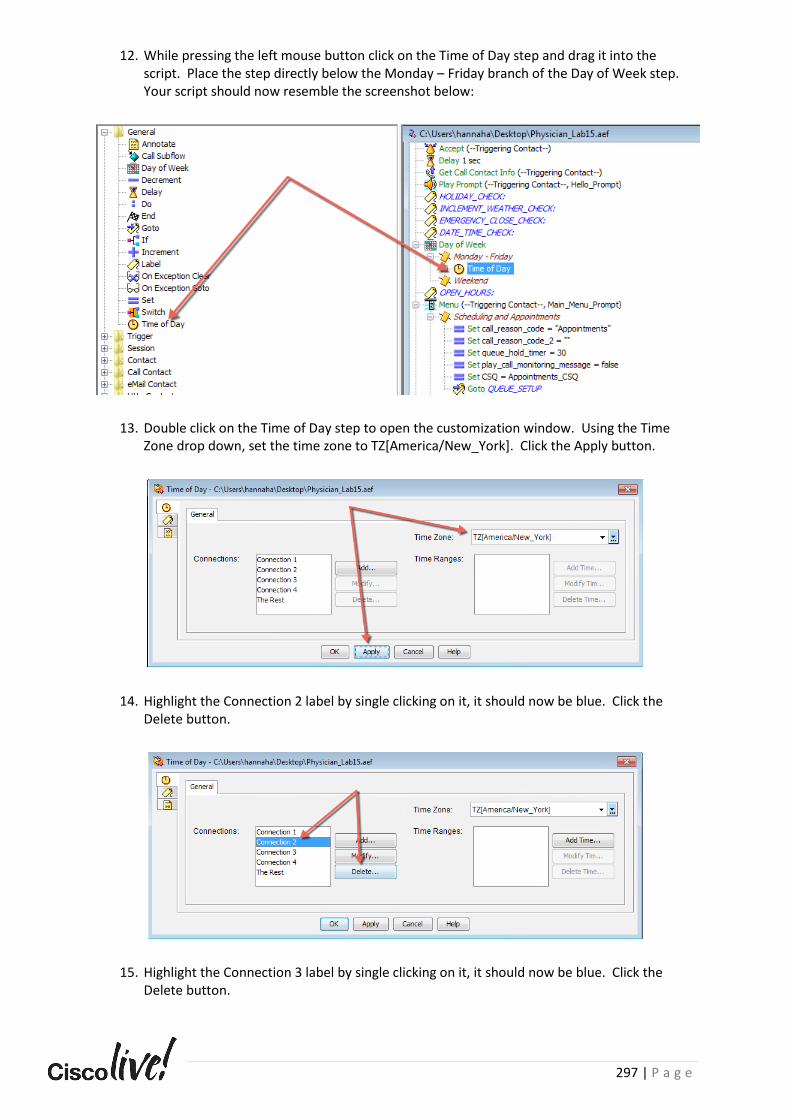
297 | P a g e
12. While pressing the left mouse button click on the Time of Day step and drag it into the script. Place the step directly below the Monday – Friday branch of the Day of Week step. Your script should now resemble the screenshot below:
13. Double click on the Time of Day step to open the customization window. Using the Time Zone drop down, set the time zone to TZ[America/New_York]. Click the Apply button.
14. Highlight the Connection 2 label by single clicking on it, it should now be blue. Click the Delete button.
15. Highlight the Connection 3 label by single clicking on it, it should now be blue. Click the Delete button.
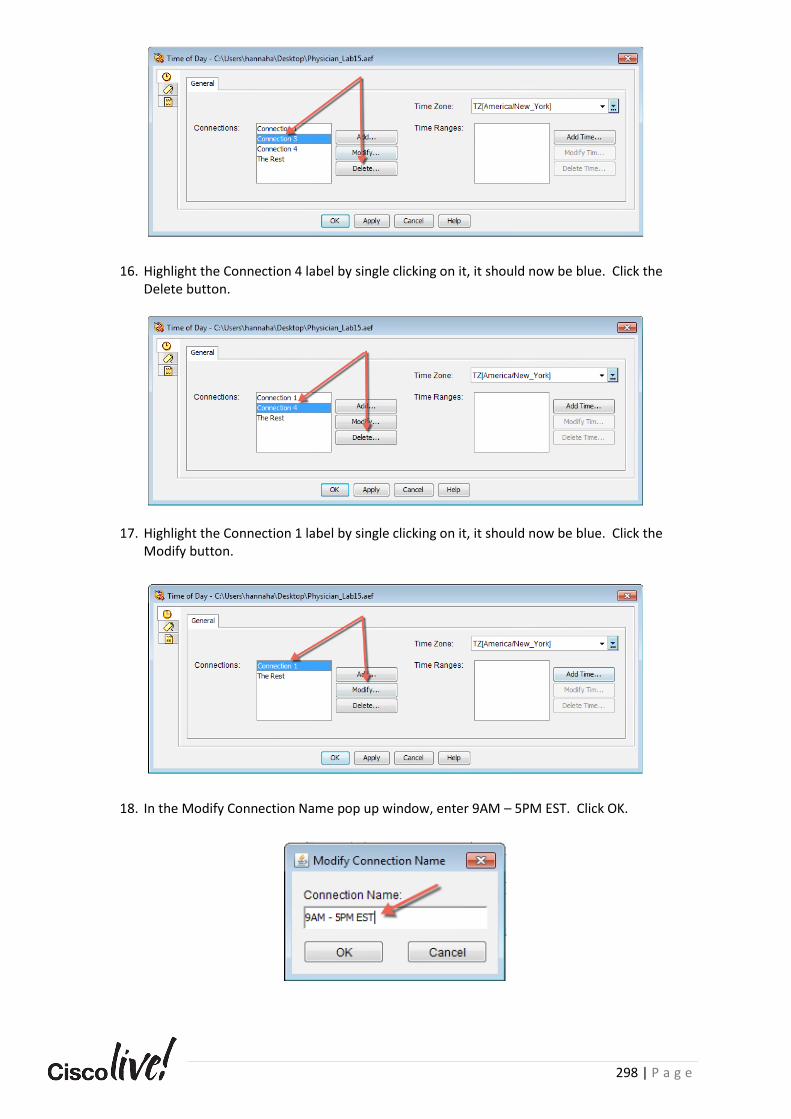
298 | P a g e
16. Highlight the Connection 4 label by single clicking on it, it should now be blue. Click the Delete button.
17. Highlight the Connection 1 label by single clicking on it, it should now be blue. Click the Modify button.
18. In the Modify Connection Name pop up window, enter 9AM – 5PM EST. Click OK.
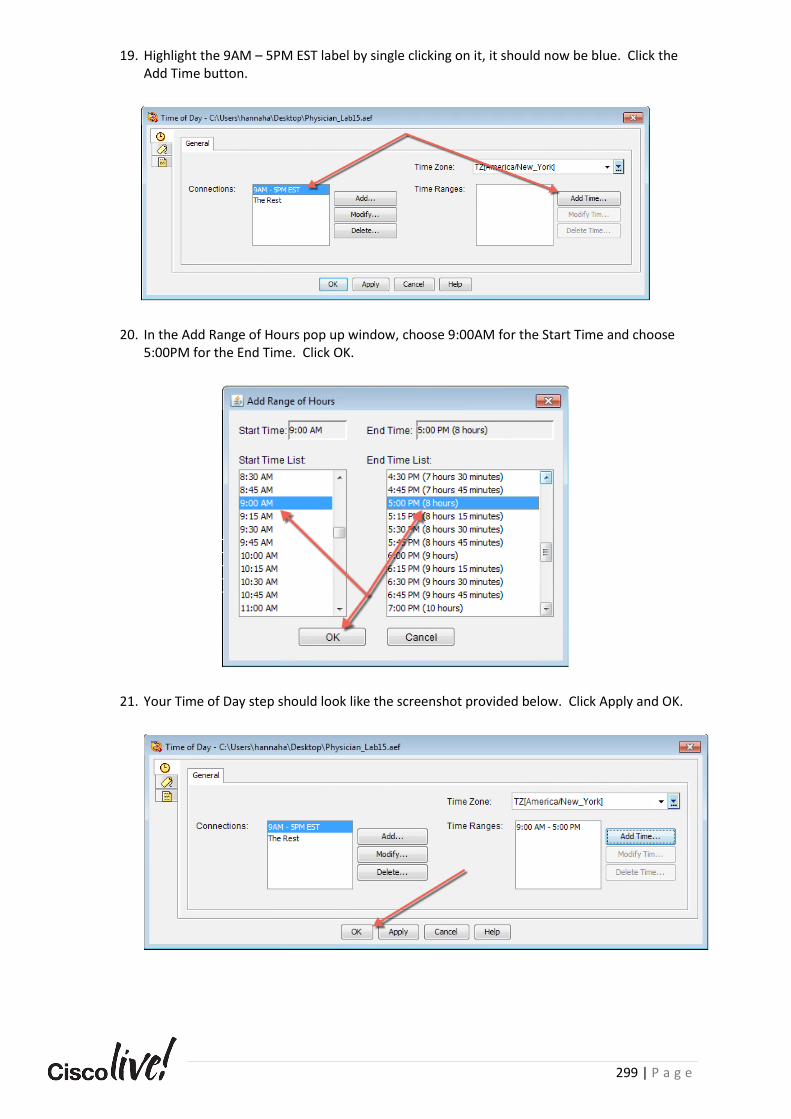
299 | P a g e
19. Highlight the 9AM – 5PM EST label by single clicking on it, it should now be blue. Click the Add Time button.
20. In the Add Range of Hours pop up window, choose 9:00AM for the Start Time and choose 5:00PM for the End Time. Click OK.
21. Your Time of Day step should look like the screenshot provided below. Click Apply and OK.
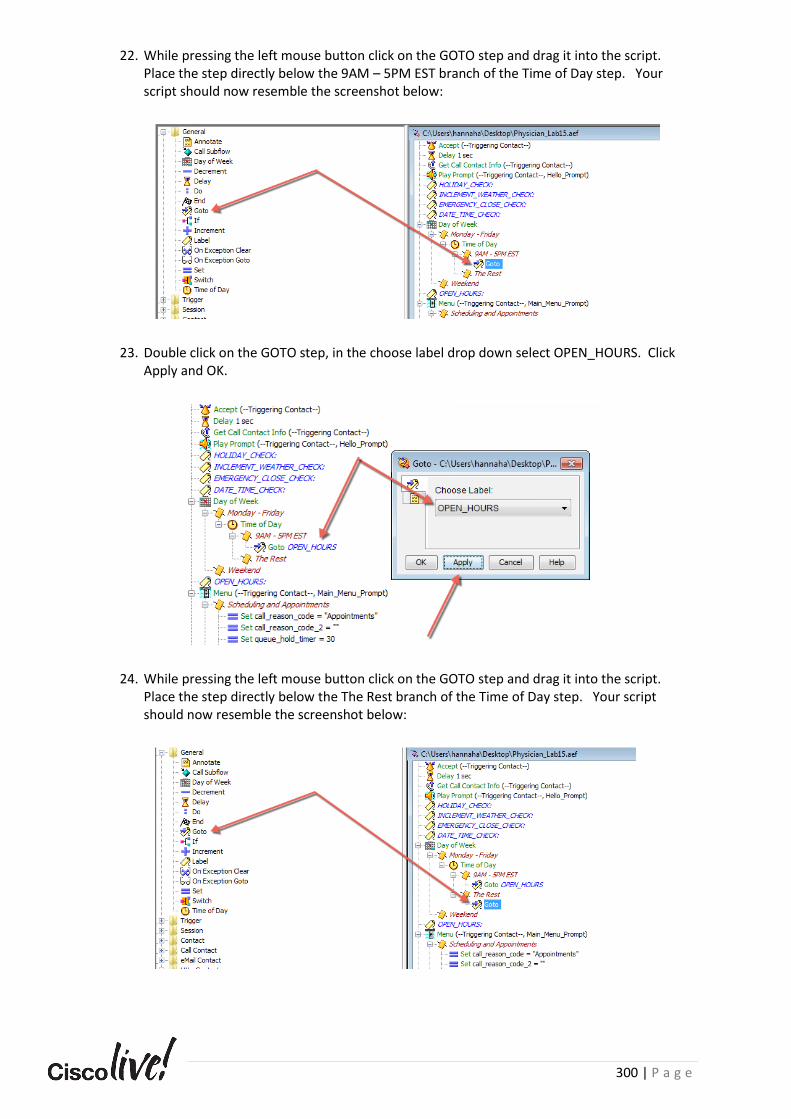
300 | P a g e
22. While pressing the left mouse button click on the GOTO step and drag it into the script. Place the step directly below the 9AM – 5PM EST branch of the Time of Day step. Your script should now resemble the screenshot below:
23. Double click on the GOTO step, in the choose label drop down select OPEN_HOURS. Click Apply and OK.
24. While pressing the left mouse button click on the GOTO step and drag it into the script. Place the step directly below the The Rest branch of the Time of Day step. Your script should now resemble the screenshot below:
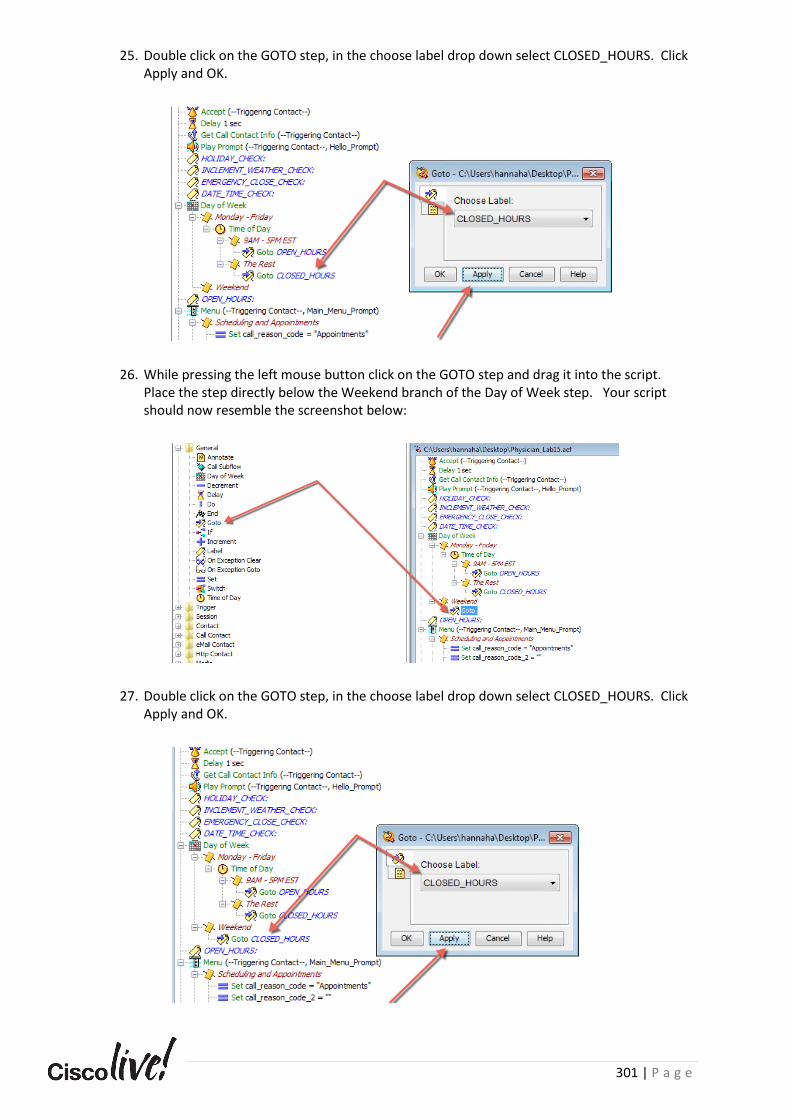
301 | P a g e
25. Double click on the GOTO step, in the choose label drop down select CLOSED_HOURS. Click Apply and OK.
26. While pressing the left mouse button click on the GOTO step and drag it into the script. Place the step directly below the Weekend branch of the Day of Week step. Your script should now resemble the screenshot below:
27. Double click on the GOTO step, in the choose label drop down select CLOSED_HOURS. Click Apply and OK.
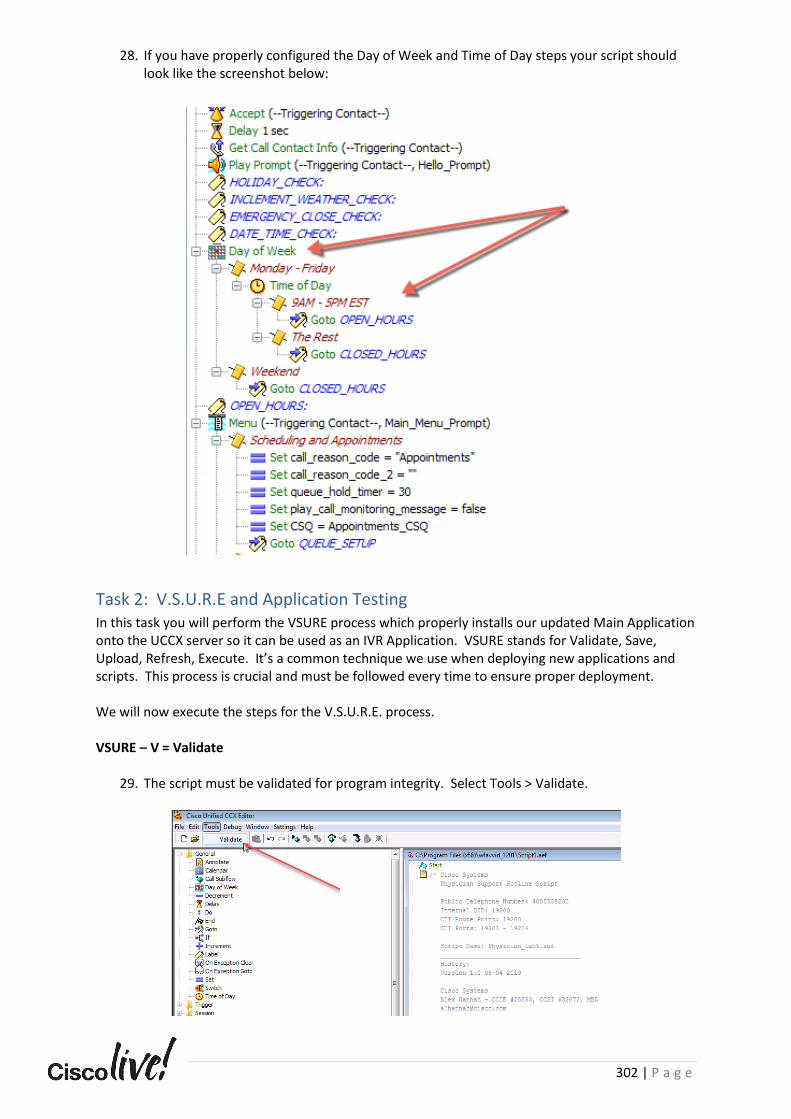
302 | P a g e
28. If you have properly configured the Day of Week and Time of Day steps your script should look like the screenshot below:
Task 2: V.S.U.R.E and Application Testing In this task you will perform the VSURE process which properly installs our updated Main Application onto the UCCX server so it can be used as an IVR Application. VSURE stands for Validate, Save, Upload, Refresh, Execute. It’s a common technique we use when deploying new applications and scripts. This process is crucial and must be followed every time to ensure proper deployment.
We will now execute the steps for the V.S.U.R.E. process.
VSURE – V = Validate
29. The script must be validated for program integrity. Select Tools > Validate.
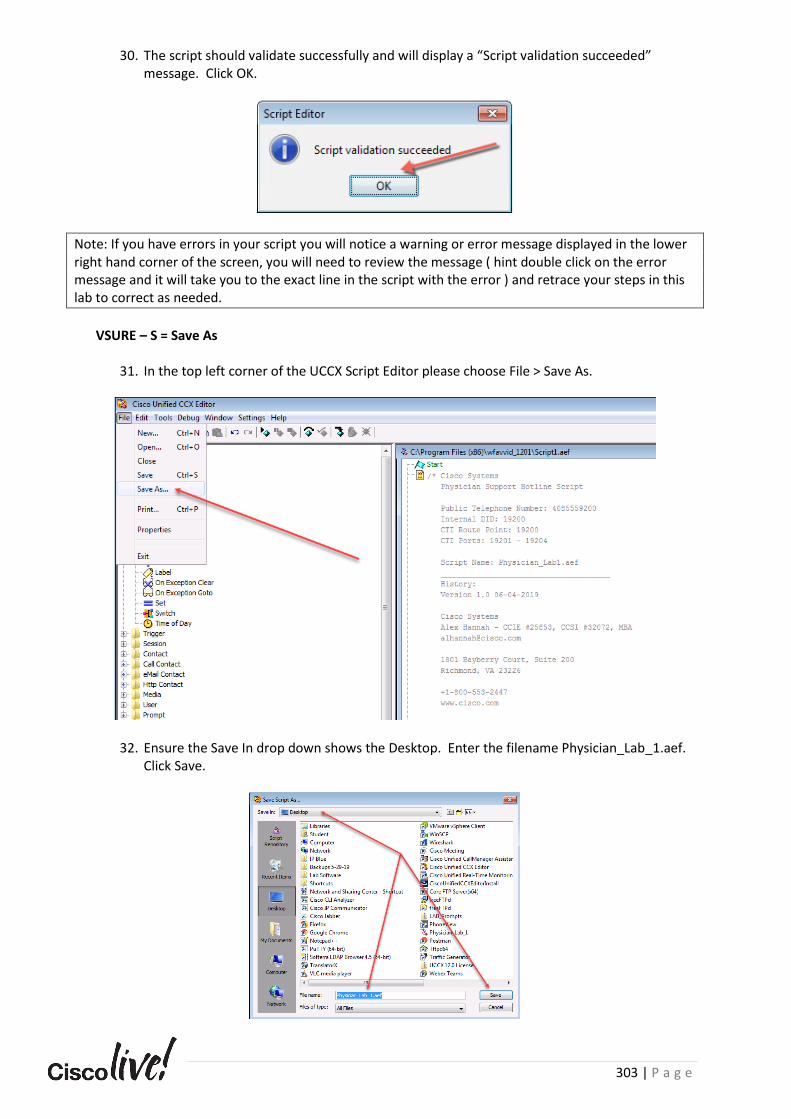
303 | P a g e
30. The script should validate successfully and will display a “Script validation succeeded” message. Click OK.
Note: If you have errors in your script you will notice a warning or error message displayed in the lower right hand corner of the screen, you will need to review the message ( hint double click on the error message and it will take you to the exact line in the script with the error ) and retrace your steps in this lab to correct as needed.
VSURE – S = Save As
31. In the top left corner of the UCCX Script Editor please choose File > Save As.
32. Ensure the Save In drop down shows the Desktop. Enter the filename Physician_Lab_1.aef. Click Save.
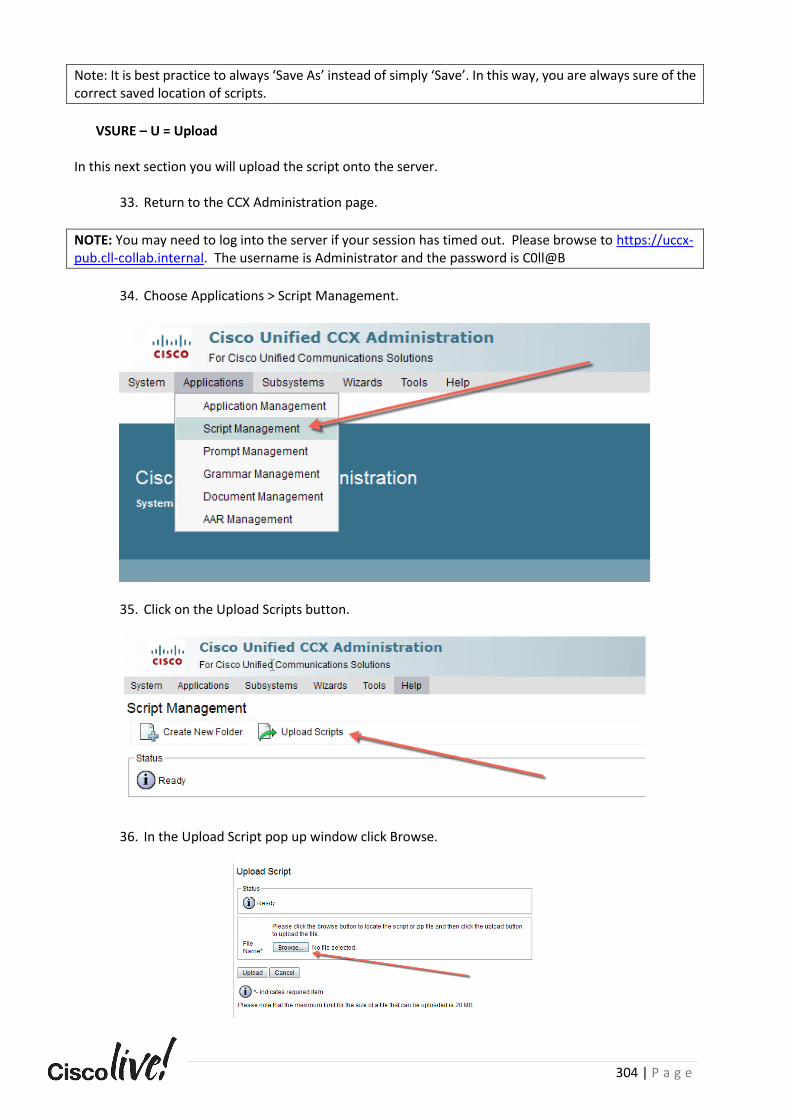
304 | P a g e
Note: It is best practice to always ‘Save As’ instead of simply ‘Save’. In this way, you are always sure of the correct saved location of scripts.
VSURE – U = Upload
In this next section you will upload the script onto the server.
33. Return to the CCX Administration page.
NOTE: You may need to log into the server if your session has timed out. Please browse to https://uccx-pub.cll-collab.internal. The username is Administrator and the password is C0ll@B
34. Choose Applications > Script Management.
35. Click on the Upload Scripts button.
36. In the Upload Script pop up window click Browse.

305 | P a g e
37. Navigate to the desktop on your respective machine and select the Physician_Lab_1.aef
script. Click Open.
38. With the Physician_Lab1.aef script selected, click Upload.
39. Once you click Upload, you will see a warning message “script file already exists. Click Ok to
continue.
Note: In a real-world production environment, this is the point of no return. If you click OK, you will be overwriting an existing script. Here is where version control and a script repository in GitHub, Dropbox, Box.com, etc. comes in quite handy!!!! Document your versions and ensure you have proper change controls!!!!
40. Once the page refreshes, you will have an option to refresh just the script, or the script and
the application. In an effort to be thorough in this lab, we will do both and even force it to manually refresh. Click Yes to refresh BOTH the script and the application.

306 | P a g e
VSURE – R = Refresh
One of the most important parts of the VSURE process is to “Refresh” the script. Cisco UCCX cache’s the IVR Applications in memory. Until you click Refresh you are not running an application in production, you must refresh BOTH the script and the application in order to force it into production and load the new script into the UCCX servers’ cache and memory.
41. On the Script Management web page, click the Refresh icon. We realize we just did this in
the step above, but thoroughness never hurt 😊
42. Navigate to Application -> Application Management.
43. Click on the Main IVR Application hyperlink.
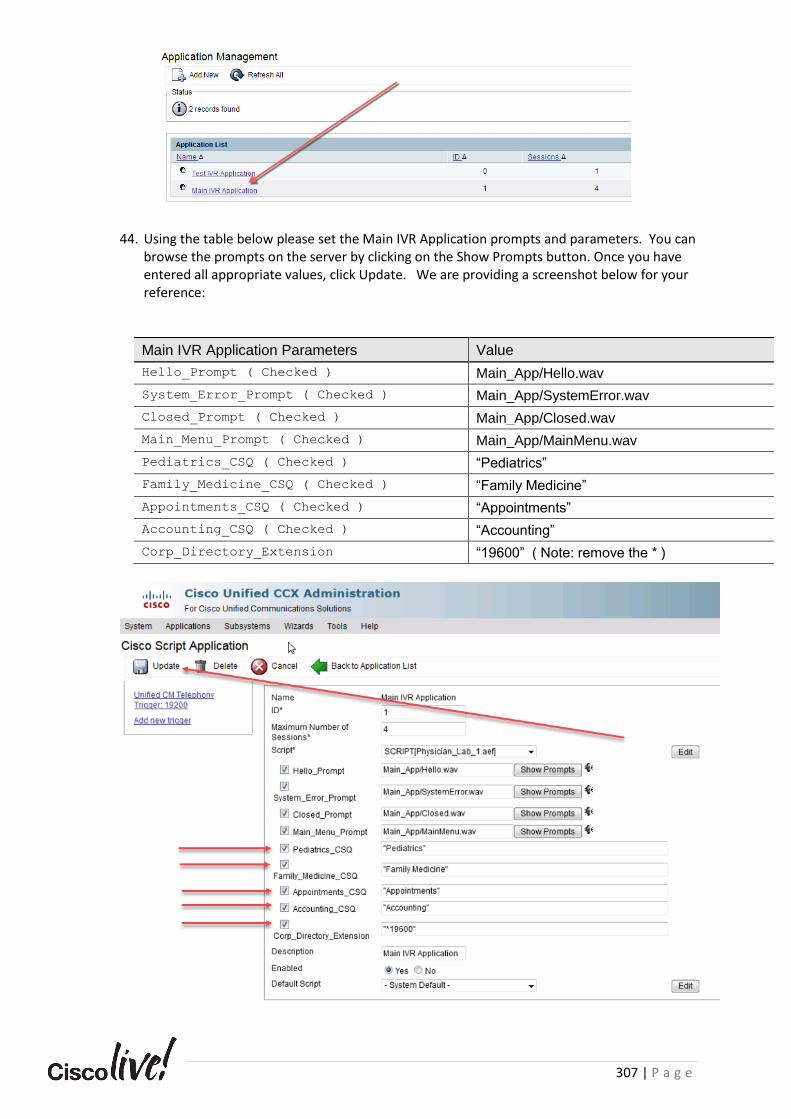
307 | P a g e
44. Using the table below please set the Main IVR Application prompts and parameters. You can browse the prompts on the server by clicking on the Show Prompts button. Once you have entered all appropriate values, click Update. We are providing a screenshot below for your reference:
Main IVR Application Parameters Value
Hello_Prompt ( Checked ) Main_App/Hello.wav
System_Error_Prompt ( Checked ) Main_App/SystemError.wav
Closed_Prompt ( Checked ) Main_App/Closed.wav
Main_Menu_Prompt ( Checked ) Main_App/MainMenu.wav
Pediatrics_CSQ ( Checked ) “Pediatrics”
Family_Medicine_CSQ ( Checked ) “Family Medicine”
Appointments_CSQ ( Checked ) “Appointments”
Accounting_CSQ ( Checked ) “Accounting”
Corp_Directory_Extension “19600” ( Note: remove the * )
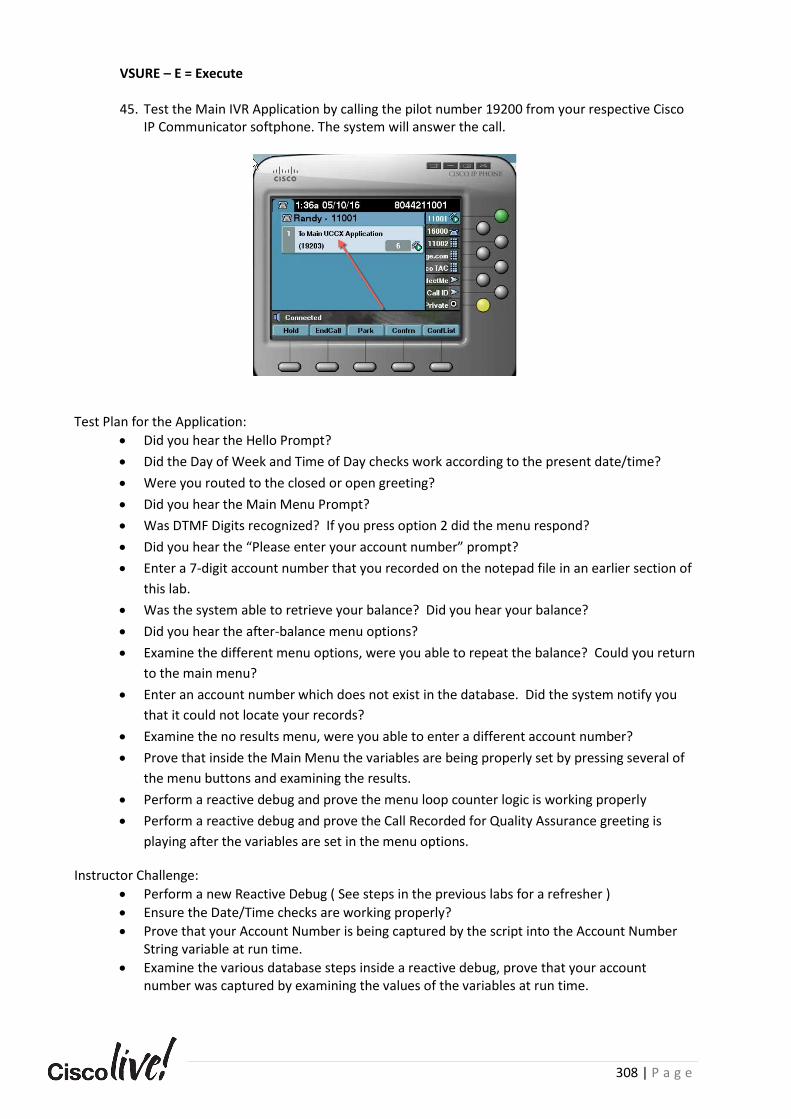
308 | P a g e
VSURE – E = Execute
45. Test the Main IVR Application by calling the pilot number 19200 from your respective Cisco
IP Communicator softphone. The system will answer the call.
Test Plan for the Application:
• Did you hear the Hello Prompt?
• Did the Day of Week and Time of Day checks work according to the present date/time?
• Were you routed to the closed or open greeting?
• Did you hear the Main Menu Prompt?
• Was DTMF Digits recognized? If you press option 2 did the menu respond?
• Did you hear the “Please enter your account number” prompt?
• Enter a 7-digit account number that you recorded on the notepad file in an earlier section of
this lab.
• Was the system able to retrieve your balance? Did you hear your balance?
• Did you hear the after-balance menu options?
• Examine the different menu options, were you able to repeat the balance? Could you return
to the main menu?
• Enter an account number which does not exist in the database. Did the system notify you
that it could not locate your records?
• Examine the no results menu, were you able to enter a different account number?
• Prove that inside the Main Menu the variables are being properly set by pressing several of
the menu buttons and examining the results.
• Perform a reactive debug and prove the menu loop counter logic is working properly
• Perform a reactive debug and prove the Call Recorded for Quality Assurance greeting is
playing after the variables are set in the menu options.
Instructor Challenge:
• Perform a new Reactive Debug ( See steps in the previous labs for a refresher )
• Ensure the Date/Time checks are working properly?
• Prove that your Account Number is being captured by the script into the Account Number String variable at run time.
• Examine the various database steps inside a reactive debug, prove that your account number was captured by examining the values of the variables at run time.
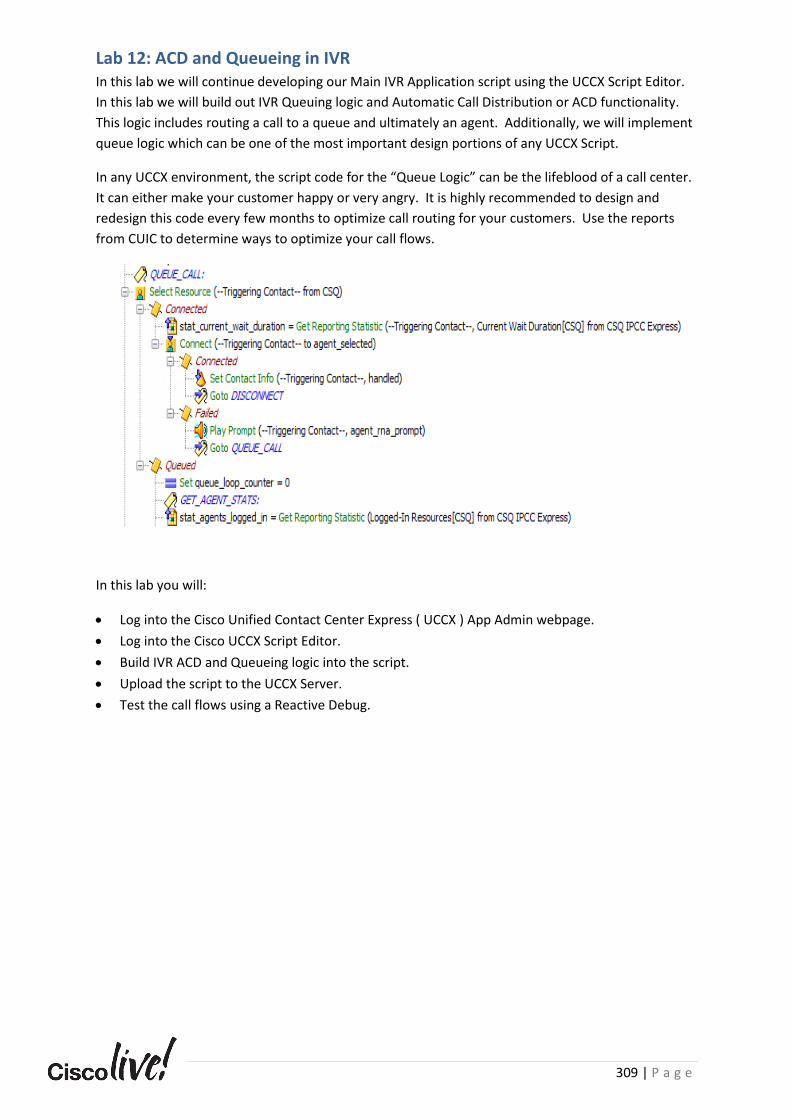
309 | P a g e
Lab 12: ACD and Queueing in IVR In this lab we will continue developing our Main IVR Application script using the UCCX Script Editor.
In this lab we will build out IVR Queuing logic and Automatic Call Distribution or ACD functionality.
This logic includes routing a call to a queue and ultimately an agent. Additionally, we will implement
queue logic which can be one of the most important design portions of any UCCX Script.
In any UCCX environment, the script code for the “Queue Logic” can be the lifeblood of a call center.
It can either make your customer happy or very angry. It is highly recommended to design and
redesign this code every few months to optimize call routing for your customers. Use the reports
from CUIC to determine ways to optimize your call flows.
In this lab you will:
• Log into the Cisco Unified Contact Center Express ( UCCX ) App Admin webpage.
• Log into the Cisco UCCX Script Editor.
• Build IVR ACD and Queueing logic into the script.
• Upload the script to the UCCX Server.
• Test the call flows using a Reactive Debug.
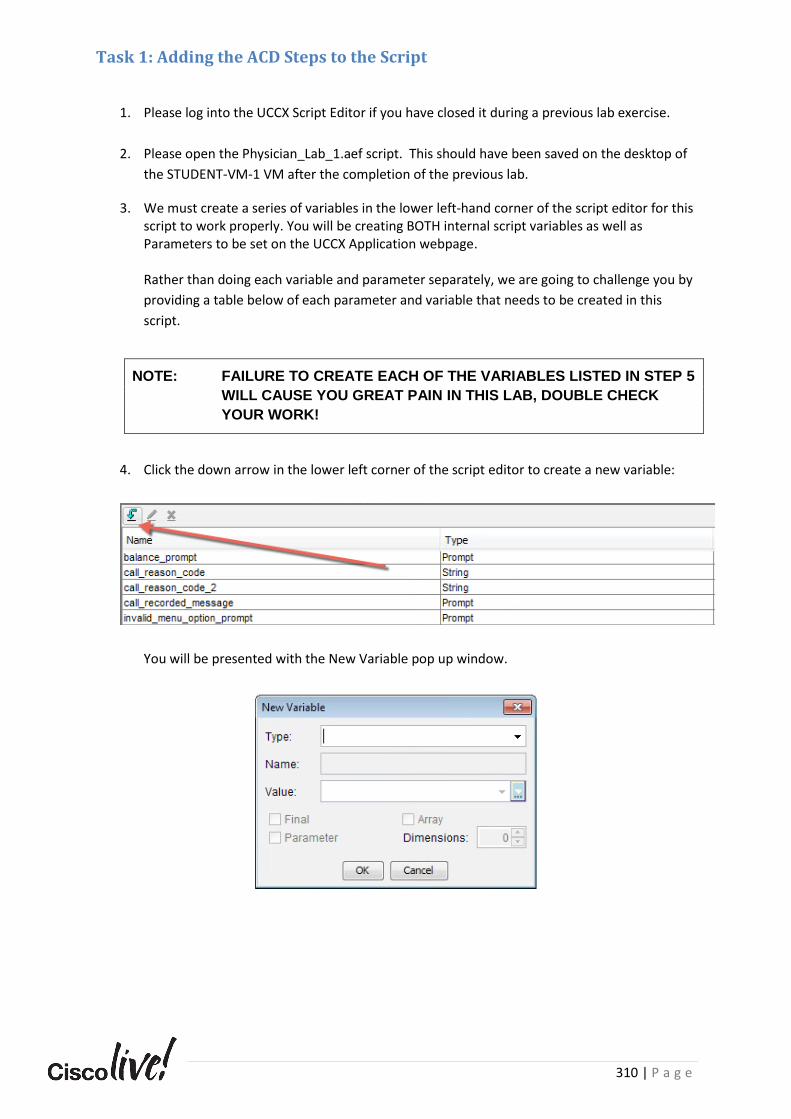
310 | P a g e
Task 1: Adding the ACD Steps to the Script
1. Please log into the UCCX Script Editor if you have closed it during a previous lab exercise.
2. Please open the Physician_Lab_1.aef script. This should have been saved on the desktop of
the STUDENT-VM-1 VM after the completion of the previous lab.
3. We must create a series of variables in the lower left-hand corner of the script editor for this script to work properly. You will be creating BOTH internal script variables as well as Parameters to be set on the UCCX Application webpage. Rather than doing each variable and parameter separately, we are going to challenge you by
providing a table below of each parameter and variable that needs to be created in this
script.
NOTE: FAILURE TO CREATE EACH OF THE VARIABLES LISTED IN STEP 5
WILL CAUSE YOU GREAT PAIN IN THIS LAB, DOUBLE CHECK
YOUR WORK!
4. Click the down arrow in the lower left corner of the script editor to create a new variable:
You will be presented with the New Variable pop up window.
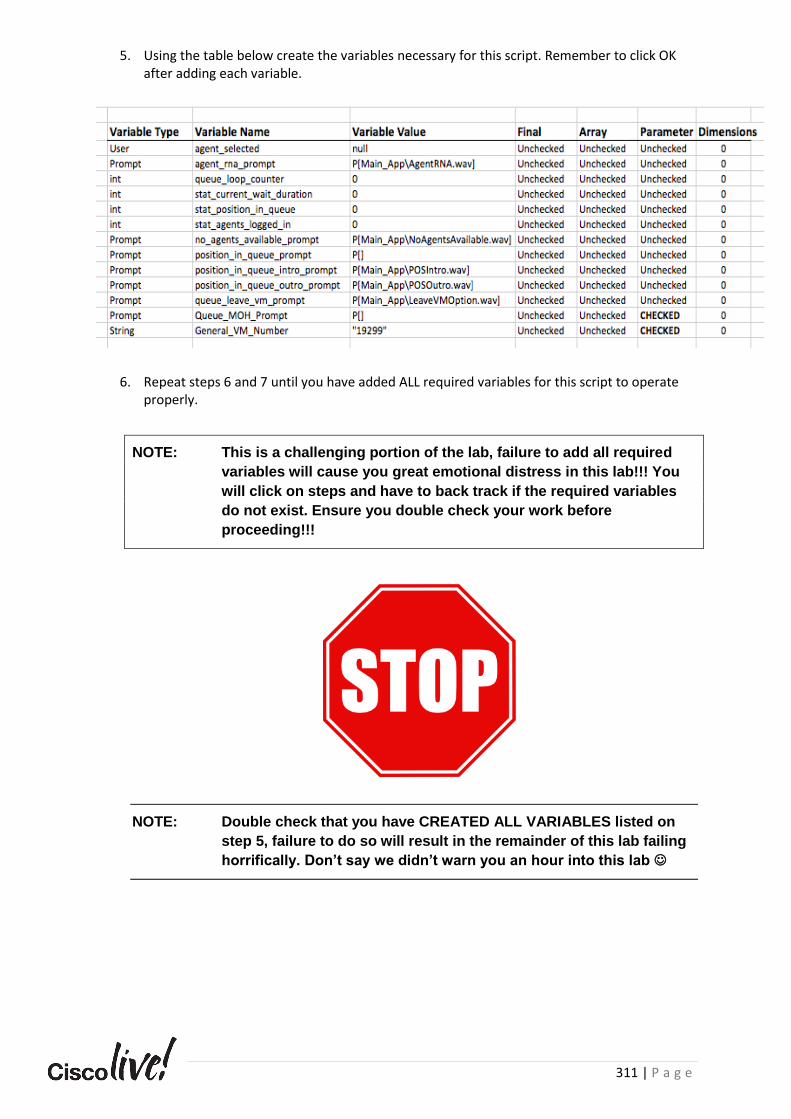
311 | P a g e
5. Using the table below create the variables necessary for this script. Remember to click OK after adding each variable.
6. Repeat steps 6 and 7 until you have added ALL required variables for this script to operate properly.
NOTE: This is a challenging portion of the lab, failure to add all required
variables will cause you great emotional distress in this lab!!! You
will click on steps and have to back track if the required variables
do not exist. Ensure you double check your work before
proceeding!!!
NOTE: Double check that you have CREATED ALL VARIABLES listed on
step 5, failure to do so will result in the remainder of this lab failing
horrifically. Don’t say we didn’t warn you an hour into this lab ☺
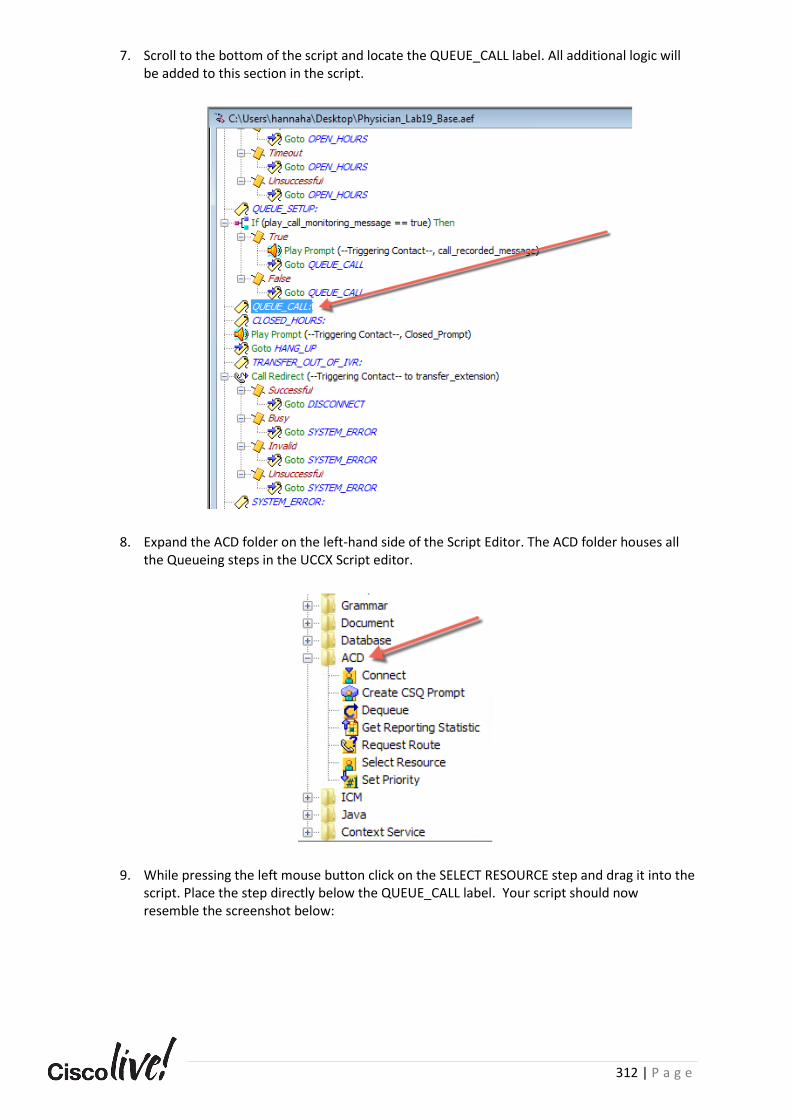
312 | P a g e
7. Scroll to the bottom of the script and locate the QUEUE_CALL label. All additional logic will be added to this section in the script.
8. Expand the ACD folder on the left-hand side of the Script Editor. The ACD folder houses all the Queueing steps in the UCCX Script editor.
9. While pressing the left mouse button click on the SELECT RESOURCE step and drag it into the script. Place the step directly below the QUEUE_CALL label. Your script should now resemble the screenshot below:

313 | P a g e
10. Click the “+” plus arrow beside the SELECT RESOURCE step to expand its output branches. Notice there are 2 output branches, the Connected and Queued branches.

314 | P a g e
11. Double click on the SELECT RESOURCE step to open the customization window for the step. Using the table below, set the relevant values. Once you have set all properties, click Apply and OK.
Select Resource Property Value
Contact --Trigger Contact--
Routing Target Type Contact Service Queue
CSQ Target CSQ
Connect Yes
Timeout 20
Resource Selected agent_selected
Note: Contact represents a “triggered call” in other words an inbound call. It is
possible to make outbound calls from a script which would represent a
different contact.
Note: Routing Target Type could either be set to a CSQ or Queue or directly to a
particular agent in the case of an Agent Based Routing algorithm.
Note: The Connect Step is a VERY important settings, it indicates if the script will
automatically “reserve” the agent or if you will write code to “connect” the call
to the agent manually. This allows you to perform screen pops to the agent
before the RmCm subsystem selects them automatically.

315 | P a g e
Note: Timeout represents the Ring No Answer (RNA) timer for the agent. If they fail to
answer the call within the allotted time the caller should be placed back into
Queue to the next available agent. This may be code you need to add
depending on the Connect setting selected.
Note: Resource Selected represents the database object ID of the agent who is
selected by RmCm to take the caller in queue. This can be used for various
scripting techniques such as playing back the agents name to the caller;
however, advanced scripting techniques are beyond the scope of this course.
12. While pressing the left mouse button click on the GET REPORTING STATISTIC step and drag it into the script. Place the step directly below the CONNECTED branch of the select resource step. Your script should now resemble the screenshot below:
13. Double click on the GET REPORTING STATISTIC step to open the customization window for the step. Using the table below, set the relevant values. Once you have set all properties, click Apply and OK.
Get Reporting Statistic Property Value
Report Object CSQ IPCC Express
Field Current Wait Duration
Row Identifier CSQ
Contact --Triggered Contact--
Resulting Statistic stat_current_wait_duration
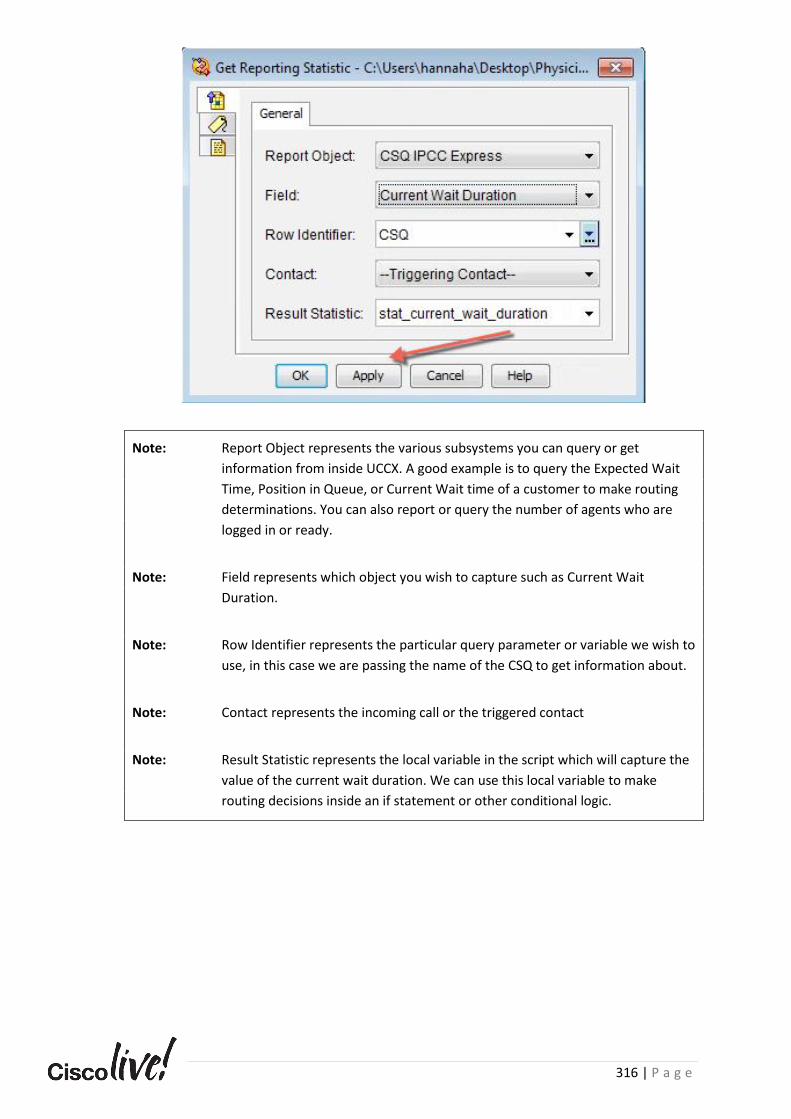
316 | P a g e
Note: Report Object represents the various subsystems you can query or get
information from inside UCCX. A good example is to query the Expected Wait
Time, Position in Queue, or Current Wait time of a customer to make routing
determinations. You can also report or query the number of agents who are
logged in or ready.
Note: Field represents which object you wish to capture such as Current Wait
Duration.
Note: Row Identifier represents the particular query parameter or variable we wish to
use, in this case we are passing the name of the CSQ to get information about.
Note: Contact represents the incoming call or the triggered contact
Note: Result Statistic represents the local variable in the script which will capture the
value of the current wait duration. We can use this local variable to make
routing decisions inside an if statement or other conditional logic.

317 | P a g e
14. While pressing the left mouse button click on the CONNECT step and drag it into the script. Place the step directly below the Get Reporting Statistic step. Your script should now resemble the screenshot below:
15. Expand the CONNECT step by clicking on the “+” plus arrow. Notice the two output branches Connected and Failed.
16. Double click on the CONNECT step to open the customization window for the step. Using the table below, set the relevant values. Once you have set all properties, click Apply and OK.
Connect Property Value
Contact --Triggered Contact--
Resource Selected agent_selected
Timeout 20
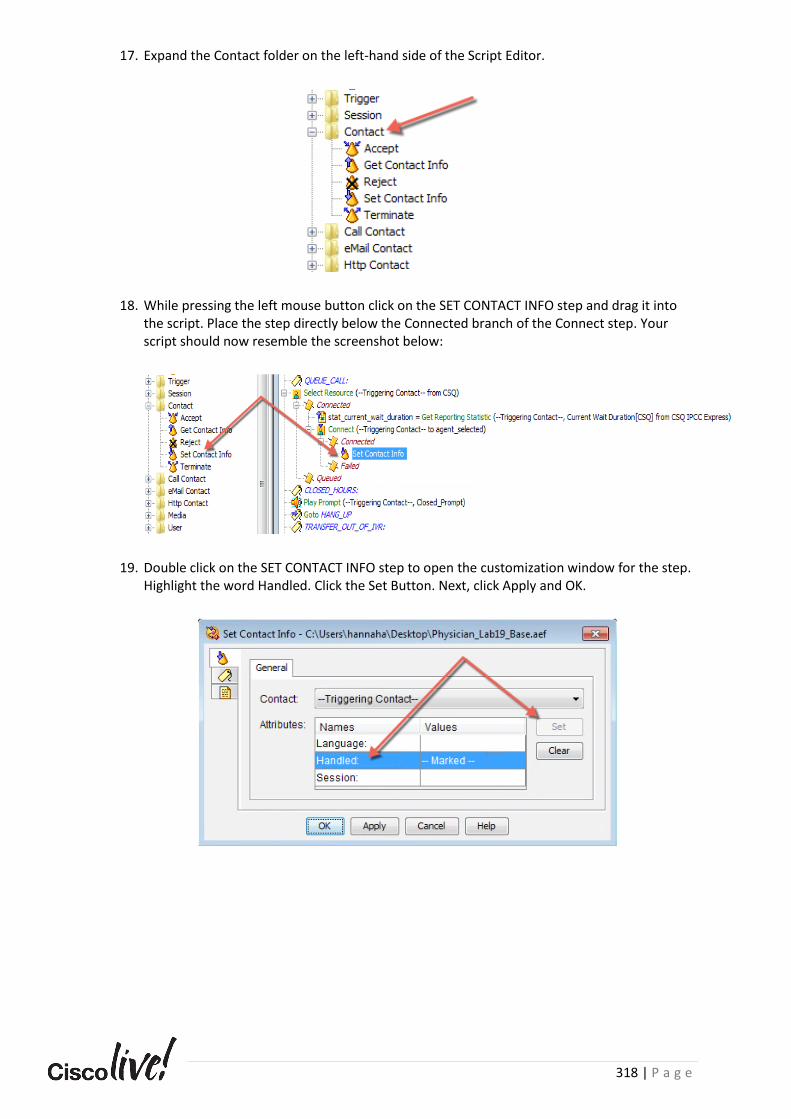
318 | P a g e
17. Expand the Contact folder on the left-hand side of the Script Editor.
18. While pressing the left mouse button click on the SET CONTACT INFO step and drag it into the script. Place the step directly below the Connected branch of the Connect step. Your script should now resemble the screenshot below:
19. Double click on the SET CONTACT INFO step to open the customization window for the step. Highlight the word Handled. Click the Set Button. Next, click Apply and OK.
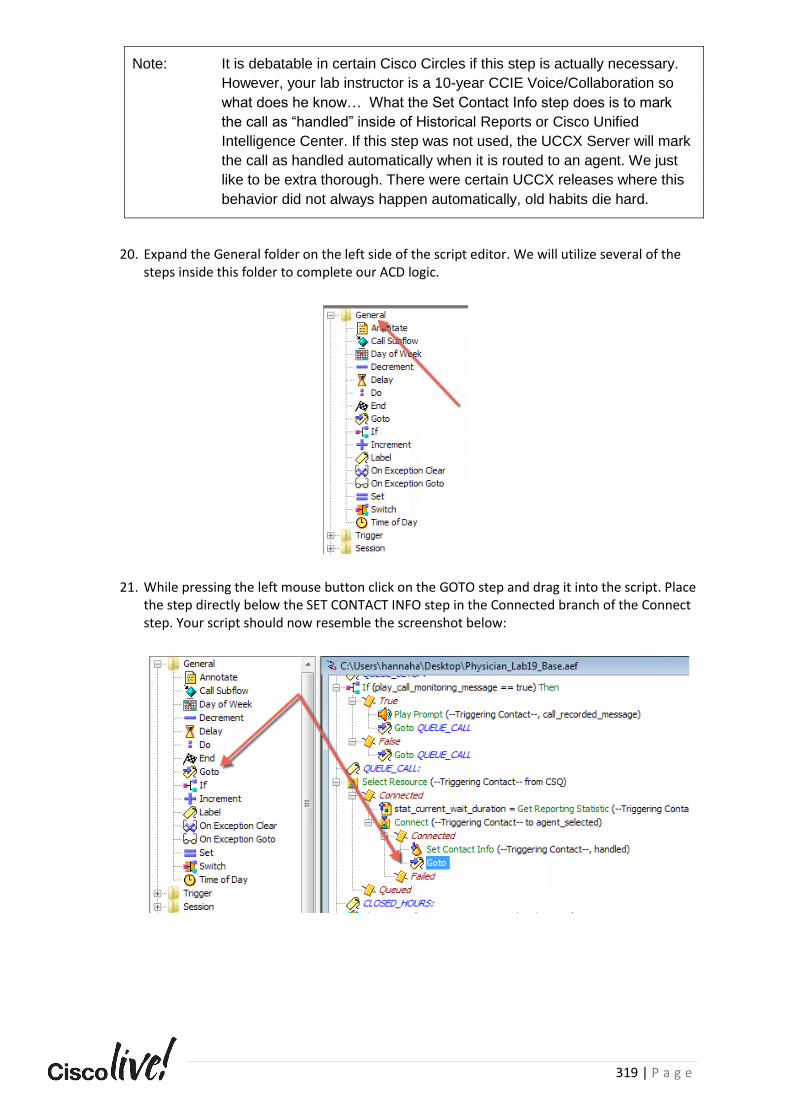
319 | P a g e
Note: It is debatable in certain Cisco Circles if this step is actually necessary.
However, your lab instructor is a 10-year CCIE Voice/Collaboration so
what does he know… What the Set Contact Info step does is to mark
the call as “handled” inside of Historical Reports or Cisco Unified
Intelligence Center. If this step was not used, the UCCX Server will mark
the call as handled automatically when it is routed to an agent. We just
like to be extra thorough. There were certain UCCX releases where this
behavior did not always happen automatically, old habits die hard.
20. Expand the General folder on the left side of the script editor. We will utilize several of the steps inside this folder to complete our ACD logic.
21. While pressing the left mouse button click on the GOTO step and drag it into the script. Place the step directly below the SET CONTACT INFO step in the Connected branch of the Connect step. Your script should now resemble the screenshot below:
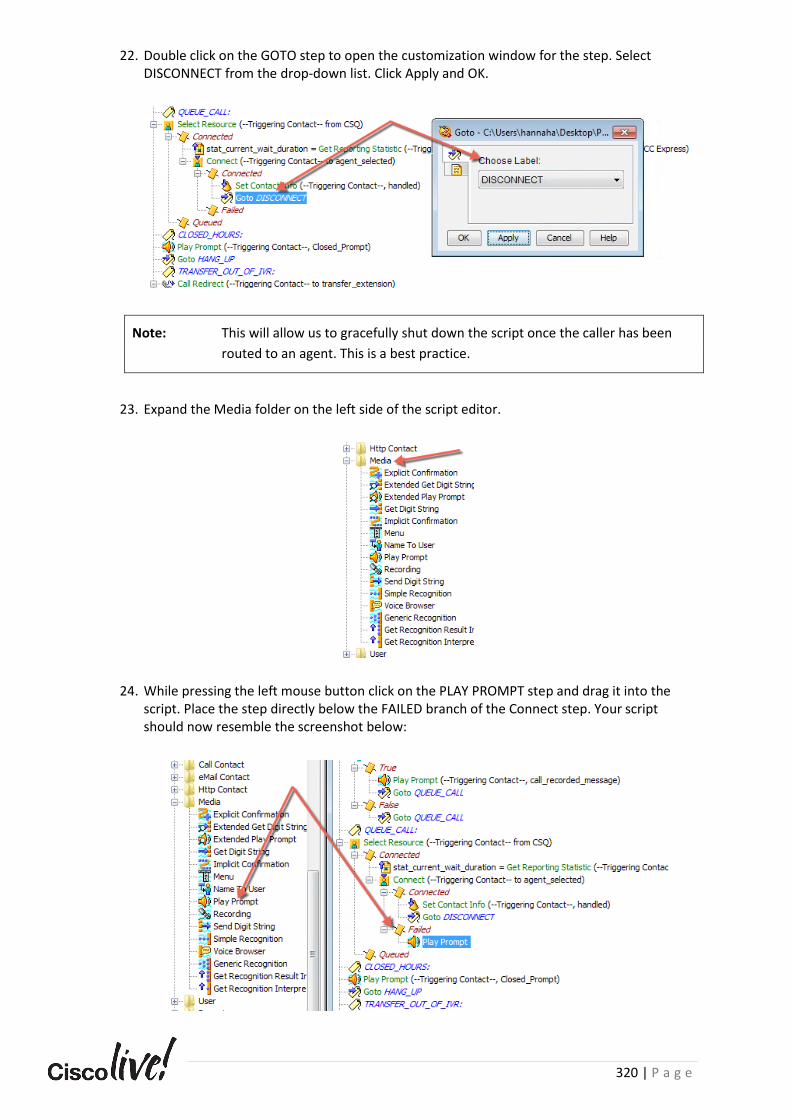
320 | P a g e
22. Double click on the GOTO step to open the customization window for the step. Select DISCONNECT from the drop-down list. Click Apply and OK.
Note: This will allow us to gracefully shut down the script once the caller has been
routed to an agent. This is a best practice.
23. Expand the Media folder on the left side of the script editor.
24. While pressing the left mouse button click on the PLAY PROMPT step and drag it into the script. Place the step directly below the FAILED branch of the Connect step. Your script should now resemble the screenshot below:
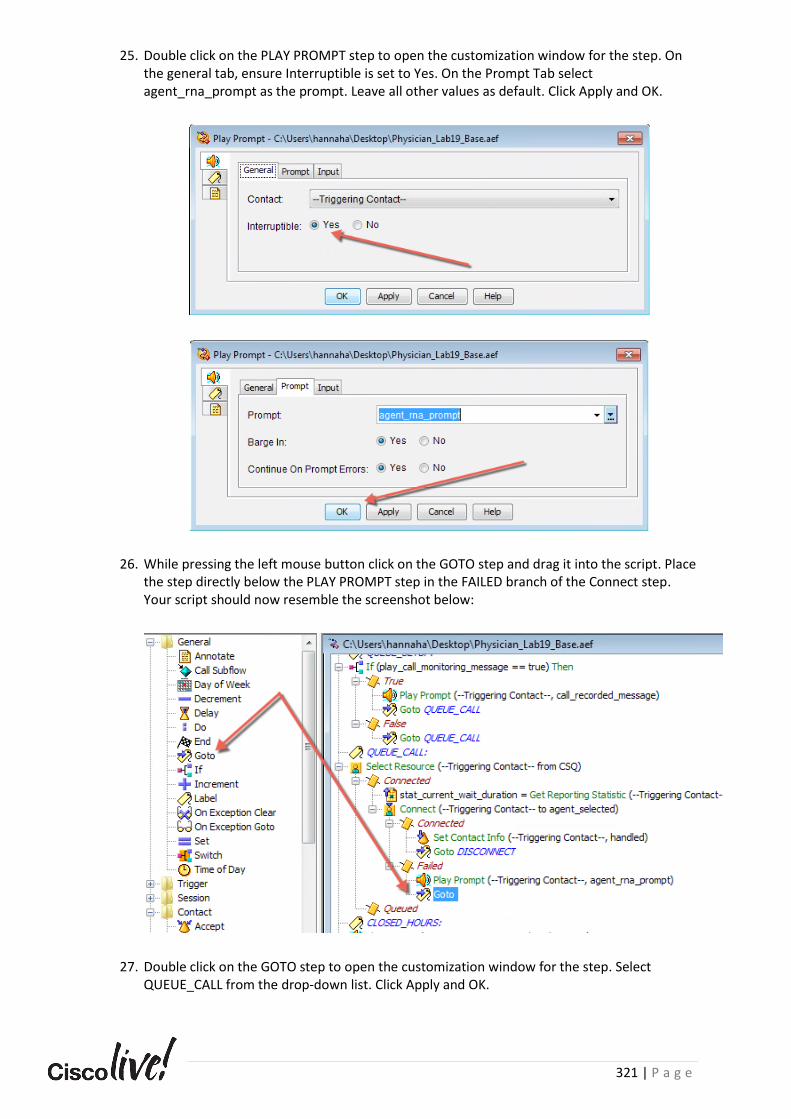
321 | P a g e
25. Double click on the PLAY PROMPT step to open the customization window for the step. On the general tab, ensure Interruptible is set to Yes. On the Prompt Tab select agent_rna_prompt as the prompt. Leave all other values as default. Click Apply and OK.
26. While pressing the left mouse button click on the GOTO step and drag it into the script. Place the step directly below the PLAY PROMPT step in the FAILED branch of the Connect step. Your script should now resemble the screenshot below:
27. Double click on the GOTO step to open the customization window for the step. Select QUEUE_CALL from the drop-down list. Click Apply and OK.
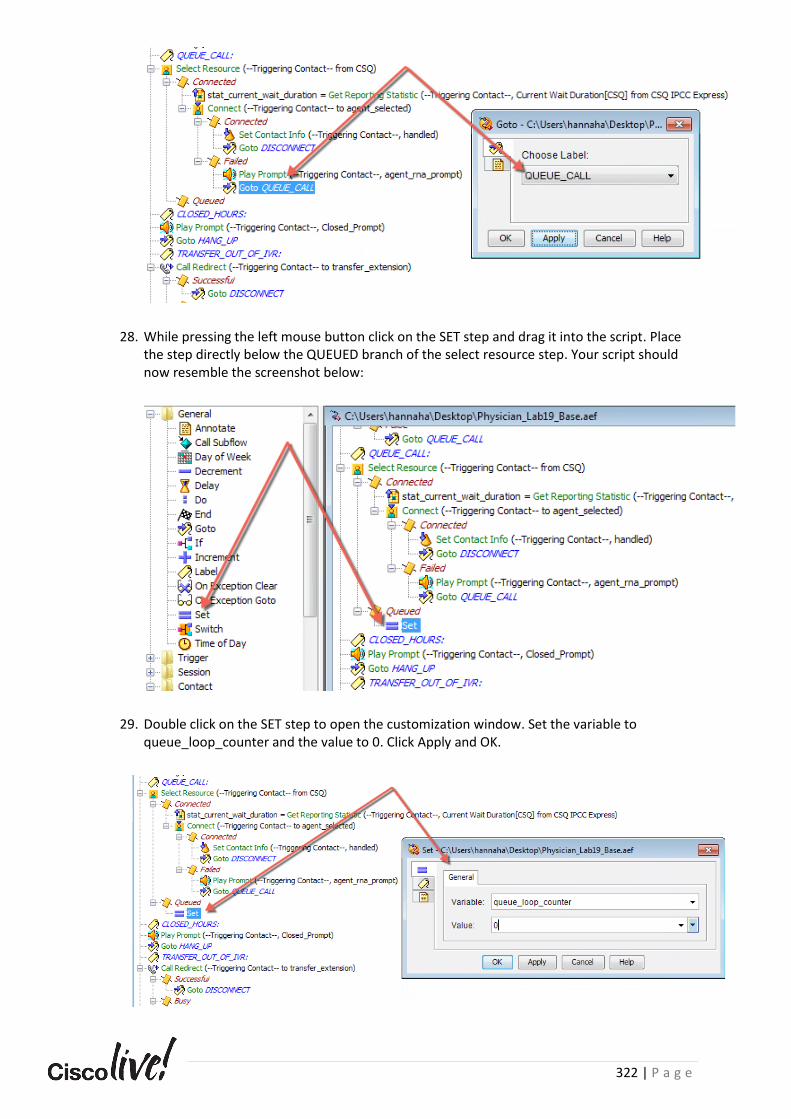
322 | P a g e
28. While pressing the left mouse button click on the SET step and drag it into the script. Place the step directly below the QUEUED branch of the select resource step. Your script should now resemble the screenshot below:
29. Double click on the SET step to open the customization window. Set the variable to queue_loop_counter and the value to 0. Click Apply and OK.
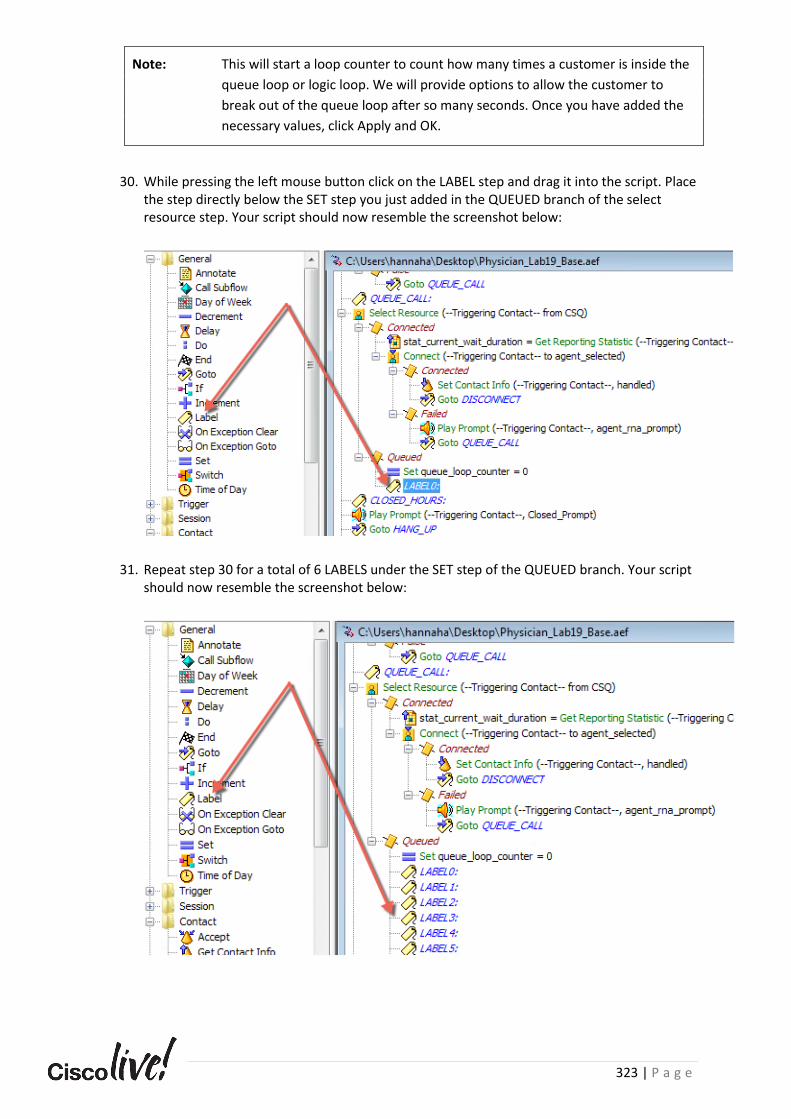
323 | P a g e
Note: This will start a loop counter to count how many times a customer is inside the
queue loop or logic loop. We will provide options to allow the customer to
break out of the queue loop after so many seconds. Once you have added the
necessary values, click Apply and OK.
30. While pressing the left mouse button click on the LABEL step and drag it into the script. Place the step directly below the SET step you just added in the QUEUED branch of the select resource step. Your script should now resemble the screenshot below:
31. Repeat step 30 for a total of 6 LABELS under the SET step of the QUEUED branch. Your script should now resemble the screenshot below:

324 | P a g e
32. Using the table below, rename each of the 6 generic labels under the QUEUED branch of the SELECT RESOURCE step. You may double click on each of the LABELS to rename them. Remember to click Apply and OK to save your work.
Label Number Label Text
Label0 GET_AGENTS_STATS
Label1 QUEUE_LOOP
Label2 PLAY_POSITION_IN_QUEUE_NOTIFICATION
Label3 CONTINUE_QUEUE_LOGIC
Label4 GET_CURRENT_WAIT_STATS
Label5 INCREMENT_QUEUE_COUNTER
Once you have renamed the LABELS, your script should resemble the screenshot below:
33. While pressing the left mouse button click on the GET REPORTING STATISTIC step and drag it into the script. Place the step directly below the GET_AGENT_STATS label. Your script should now resemble the screenshot below:
34. Double click on the GET REPORTING STATISTIC step to open the customization window for the step. Using the table below, set the relevant values. Once you have set all properties, click Apply and OK.
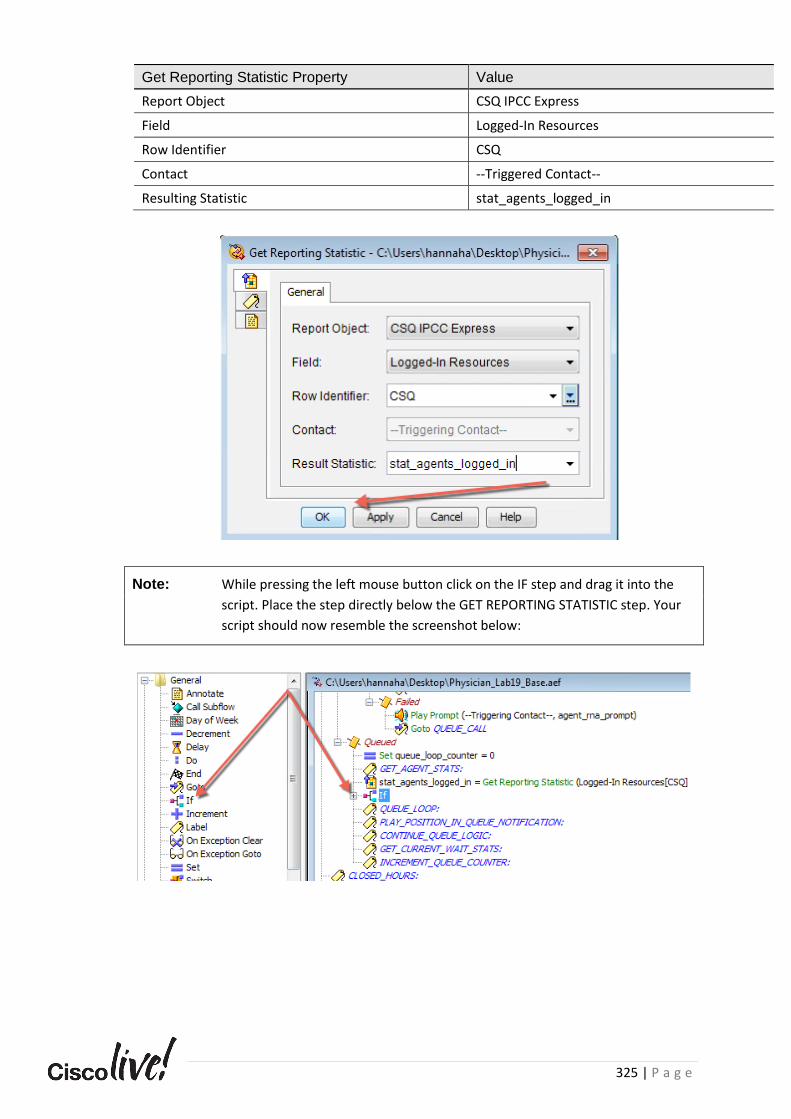
325 | P a g e
Get Reporting Statistic Property Value
Report Object CSQ IPCC Express
Field Logged-In Resources
Row Identifier CSQ
Contact --Triggered Contact--
Resulting Statistic stat_agents_logged_in
Note: While pressing the left mouse button click on the IF step and drag it into the
script. Place the step directly below the GET REPORTING STATISTIC step. Your
script should now resemble the screenshot below:

326 | P a g e
35. Expand the IF step by clicking on the “+” plus arrow. Notice the two output branches True and False.
36. Double click on the IF step to open the customization window for the step. Enter the expression shown below. Once you have set all properties, click Apply and OK.
Note: The equation “stat_agents_logged_in == 0 || stat_agents_logged_in == -1” is
an OR Boolean logic expression test. This test will determine if no agents are
logged into the UCCX server via Finesse. It will also check if the RmCm
subsystem can determine if agents are logged in. A “-1” value indicates that the
server could not determine the number of agents currently logged in.
37. While pressing the left mouse button click on the PLAY PROMPT step and drag it into the script. Place the step directly below the TRUE Branch of the IF step. Your script should now resemble the screenshot below:
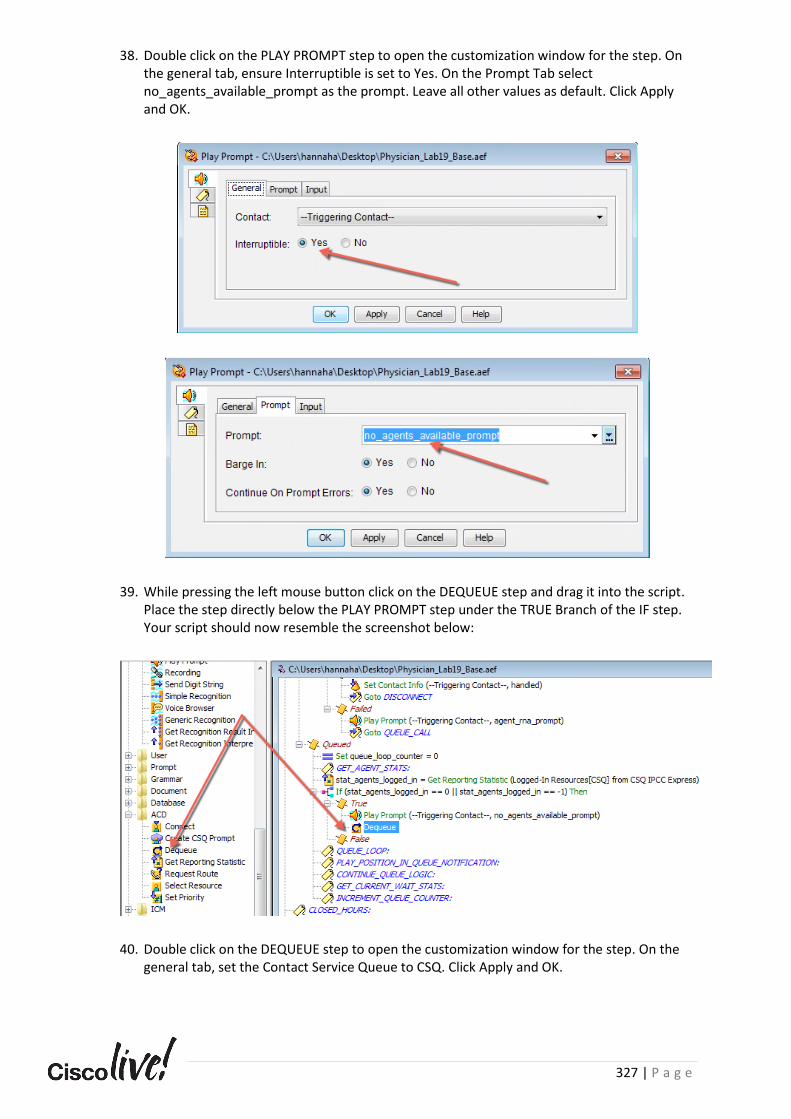
327 | P a g e
38. Double click on the PLAY PROMPT step to open the customization window for the step. On the general tab, ensure Interruptible is set to Yes. On the Prompt Tab select no_agents_available_prompt as the prompt. Leave all other values as default. Click Apply and OK.
39. While pressing the left mouse button click on the DEQUEUE step and drag it into the script. Place the step directly below the PLAY PROMPT step under the TRUE Branch of the IF step. Your script should now resemble the screenshot below:
40. Double click on the DEQUEUE step to open the customization window for the step. On the general tab, set the Contact Service Queue to CSQ. Click Apply and OK.
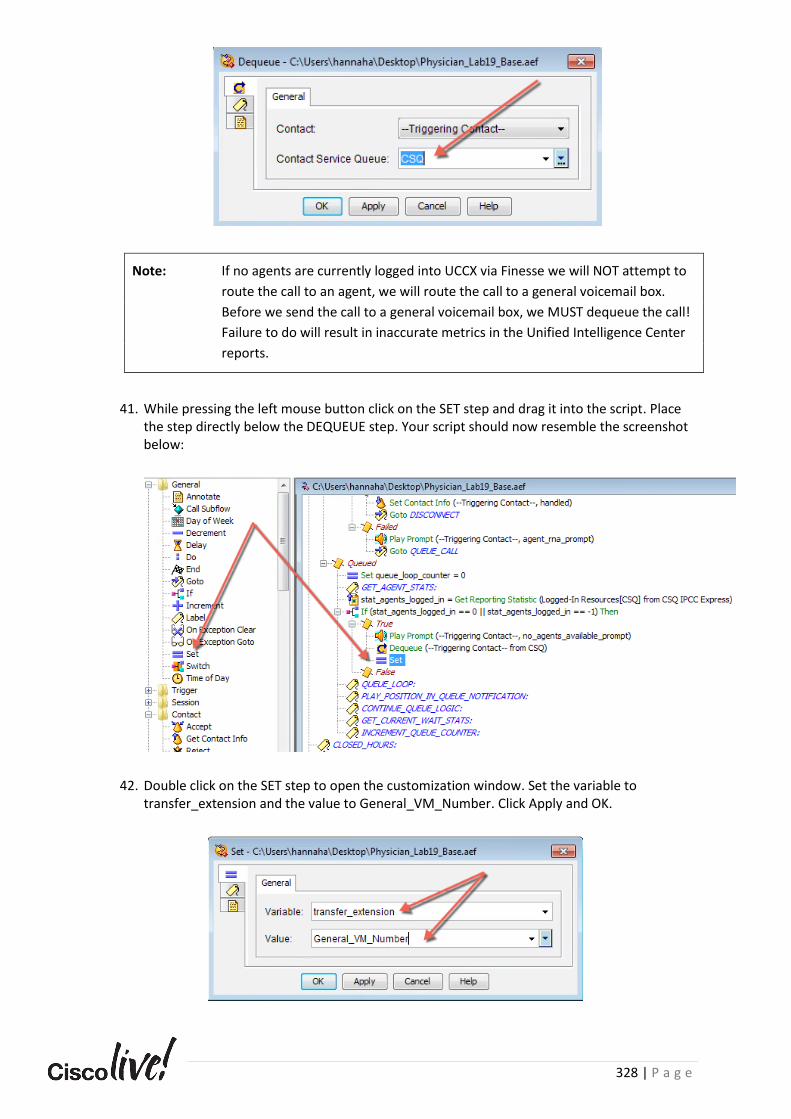
328 | P a g e
Note: If no agents are currently logged into UCCX via Finesse we will NOT attempt to
route the call to an agent, we will route the call to a general voicemail box.
Before we send the call to a general voicemail box, we MUST dequeue the call!
Failure to do will result in inaccurate metrics in the Unified Intelligence Center
reports.
41. While pressing the left mouse button click on the SET step and drag it into the script. Place the step directly below the DEQUEUE step. Your script should now resemble the screenshot below:
42. Double click on the SET step to open the customization window. Set the variable to transfer_extension and the value to General_VM_Number. Click Apply and OK.
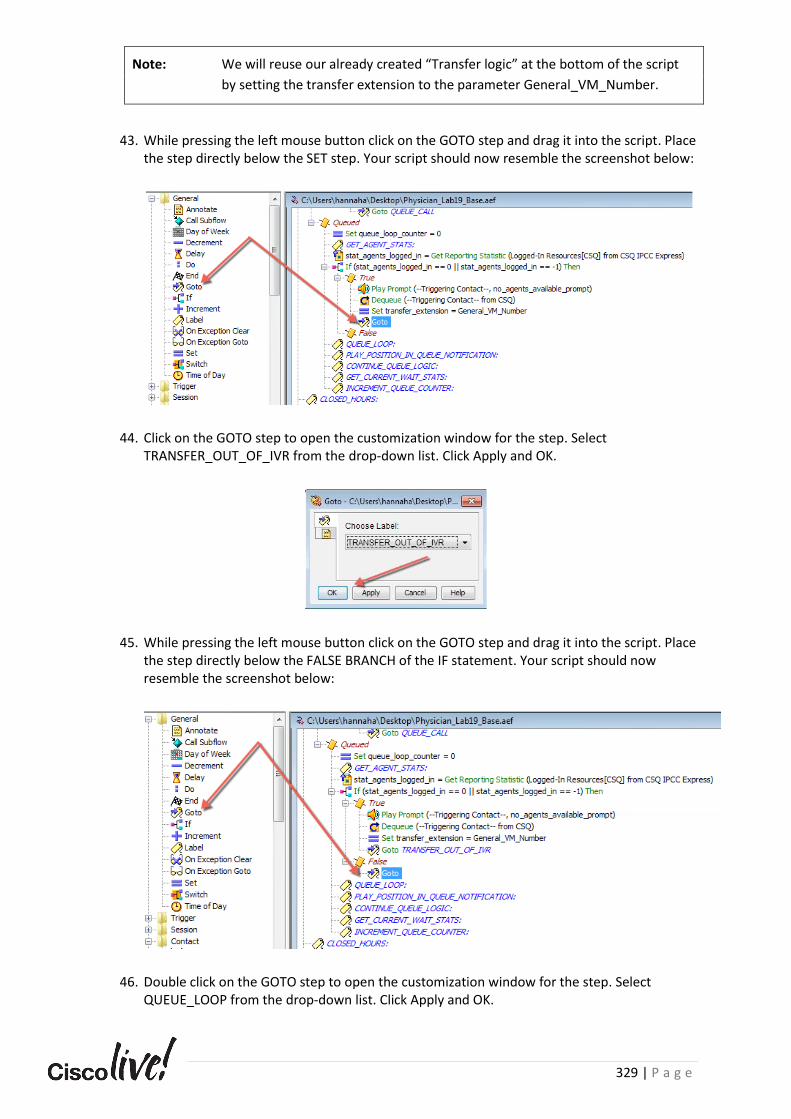
329 | P a g e
Note: We will reuse our already created “Transfer logic” at the bottom of the script
by setting the transfer extension to the parameter General_VM_Number.
43. While pressing the left mouse button click on the GOTO step and drag it into the script. Place the step directly below the SET step. Your script should now resemble the screenshot below:
44. Click on the GOTO step to open the customization window for the step. Select TRANSFER_OUT_OF_IVR from the drop-down list. Click Apply and OK.
45. While pressing the left mouse button click on the GOTO step and drag it into the script. Place the step directly below the FALSE BRANCH of the IF statement. Your script should now resemble the screenshot below:
46. Double click on the GOTO step to open the customization window for the step. Select QUEUE_LOOP from the drop-down list. Click Apply and OK.
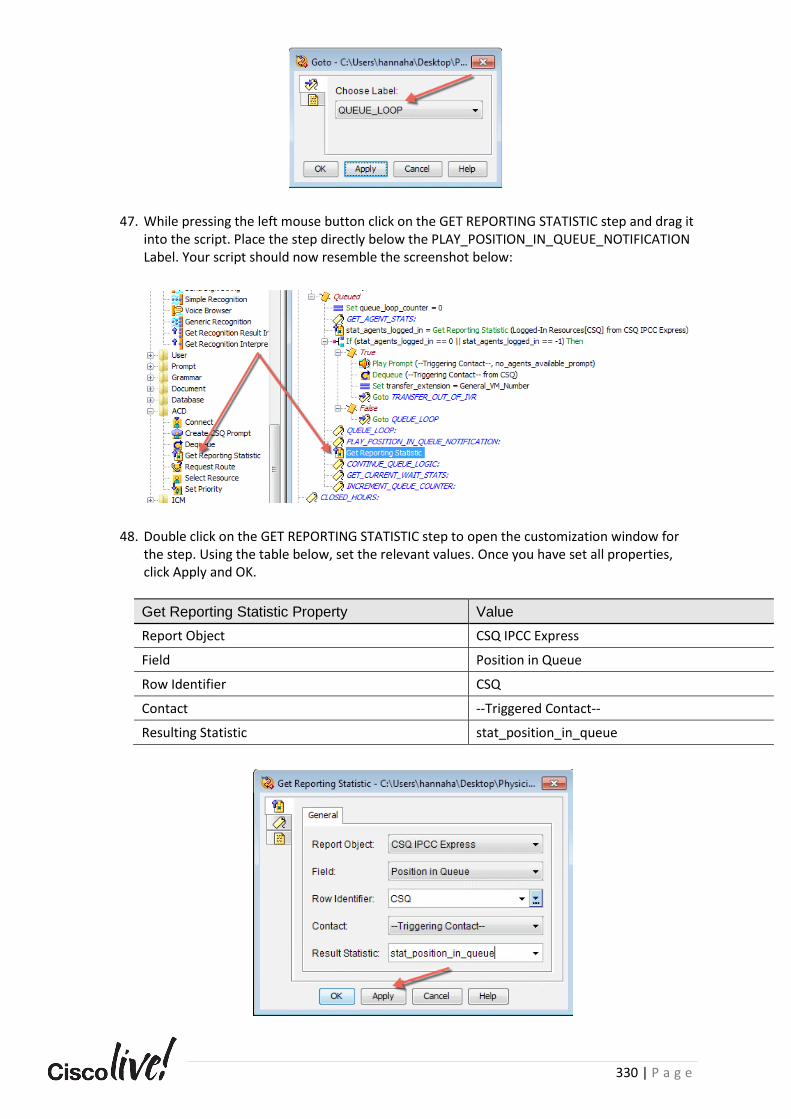
330 | P a g e
47. While pressing the left mouse button click on the GET REPORTING STATISTIC step and drag it into the script. Place the step directly below the PLAY_POSITION_IN_QUEUE_NOTIFICATION Label. Your script should now resemble the screenshot below:
48. Double click on the GET REPORTING STATISTIC step to open the customization window for the step. Using the table below, set the relevant values. Once you have set all properties, click Apply and OK.
Get Reporting Statistic Property Value
Report Object CSQ IPCC Express
Field Position in Queue
Row Identifier CSQ
Contact --Triggered Contact--
Resulting Statistic stat_position_in_queue
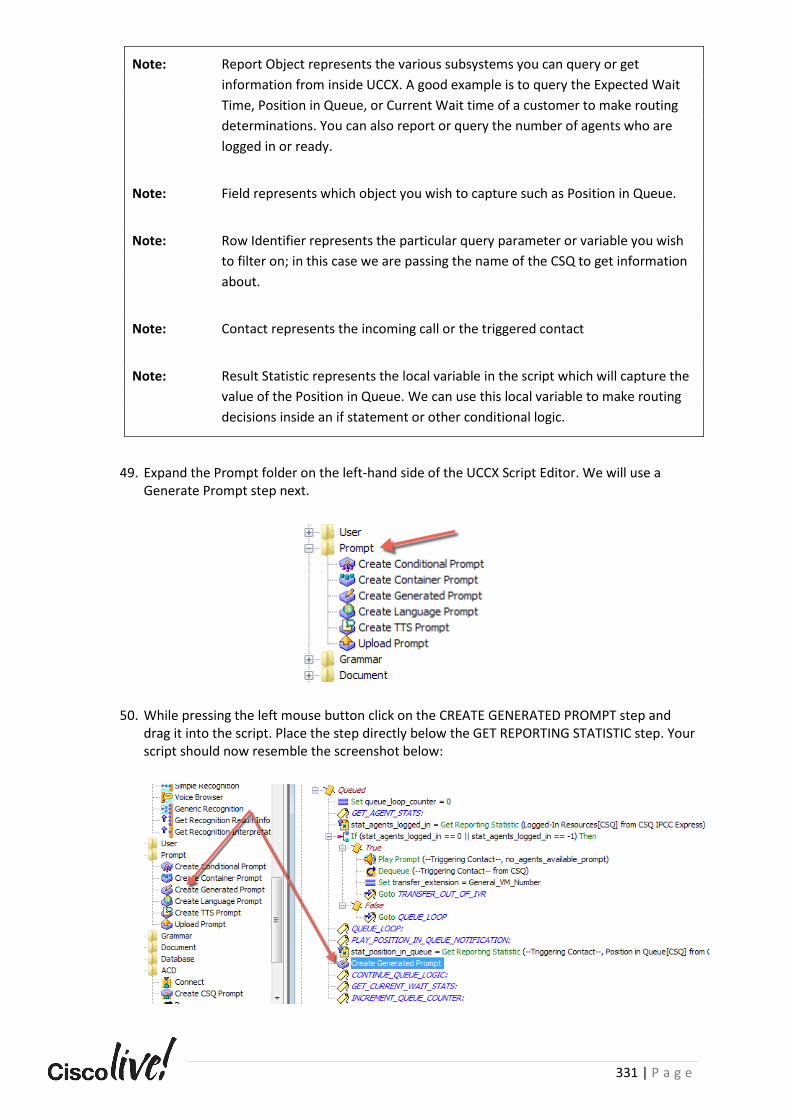
331 | P a g e
Note: Report Object represents the various subsystems you can query or get
information from inside UCCX. A good example is to query the Expected Wait
Time, Position in Queue, or Current Wait time of a customer to make routing
determinations. You can also report or query the number of agents who are
logged in or ready.
Note: Field represents which object you wish to capture such as Position in Queue.
Note: Row Identifier represents the particular query parameter or variable you wish
to filter on; in this case we are passing the name of the CSQ to get information
about.
Note: Contact represents the incoming call or the triggered contact
Note: Result Statistic represents the local variable in the script which will capture the
value of the Position in Queue. We can use this local variable to make routing
decisions inside an if statement or other conditional logic.
49. Expand the Prompt folder on the left-hand side of the UCCX Script Editor. We will use a Generate Prompt step next.
50. While pressing the left mouse button click on the CREATE GENERATED PROMPT step and drag it into the script. Place the step directly below the GET REPORTING STATISTIC step. Your script should now resemble the screenshot below:

332 | P a g e
51. Double click on the CREATE GENERATED PROMPT step to open the customization window for the step. Using the table below, set the relevant values. Once you have set all properties, click Apply and OK.
Get Reporting Statistic Property Value
Generator Type ordinal
Constructor Type (number)
Arguments number: stat_position_in_queue ** Click number so it is highlighted blue, then click SET button to select variable stat_position_in_queue
Override Language L[en_US]
Output Prompt position_in_queue_prompt
52. While pressing the left mouse button click on the PLAY PROMPT step and drag it into the script. Place the step directly below the CREATE GENERATED PROMPT step. Your script should now resemble the screenshot below:
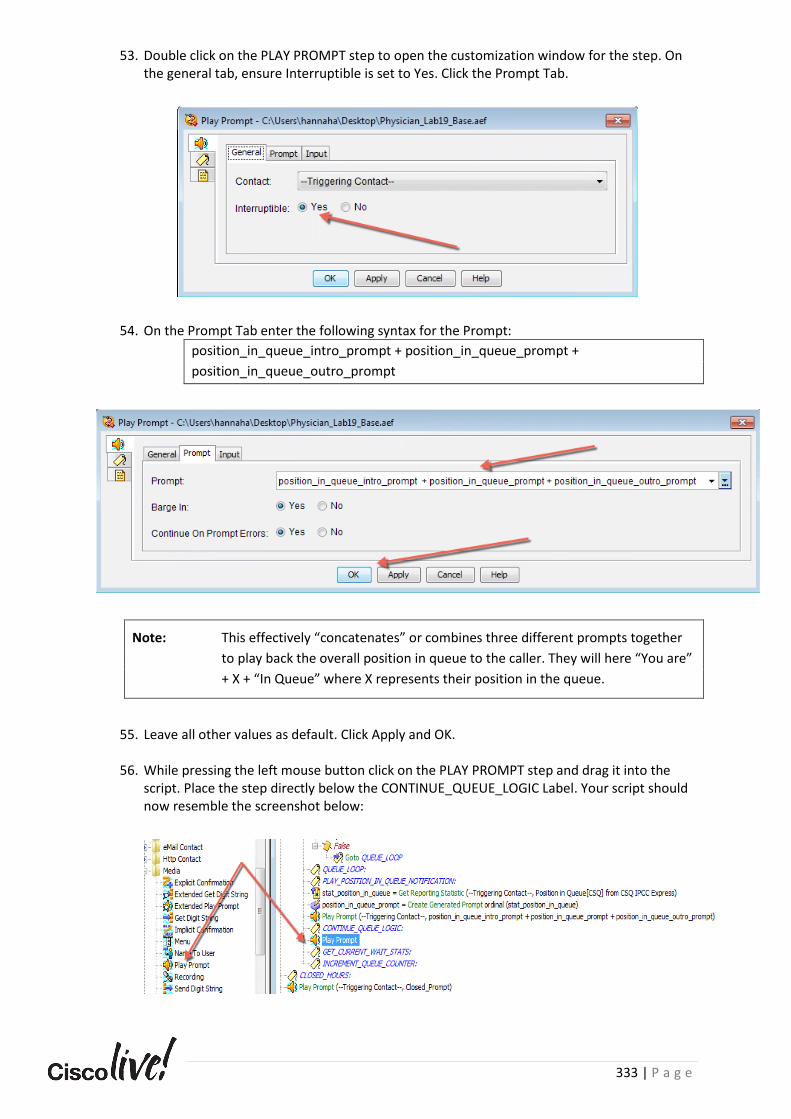
333 | P a g e
53. Double click on the PLAY PROMPT step to open the customization window for the step. On the general tab, ensure Interruptible is set to Yes. Click the Prompt Tab.
54. On the Prompt Tab enter the following syntax for the Prompt:
position_in_queue_intro_prompt + position_in_queue_prompt +
position_in_queue_outro_prompt
Note: This effectively “concatenates” or combines three different prompts together
to play back the overall position in queue to the caller. They will here “You are”
+ X + “In Queue” where X represents their position in the queue.
55. Leave all other values as default. Click Apply and OK.
56. While pressing the left mouse button click on the PLAY PROMPT step and drag it into the script. Place the step directly below the CONTINUE_QUEUE_LOGIC Label. Your script should now resemble the screenshot below:
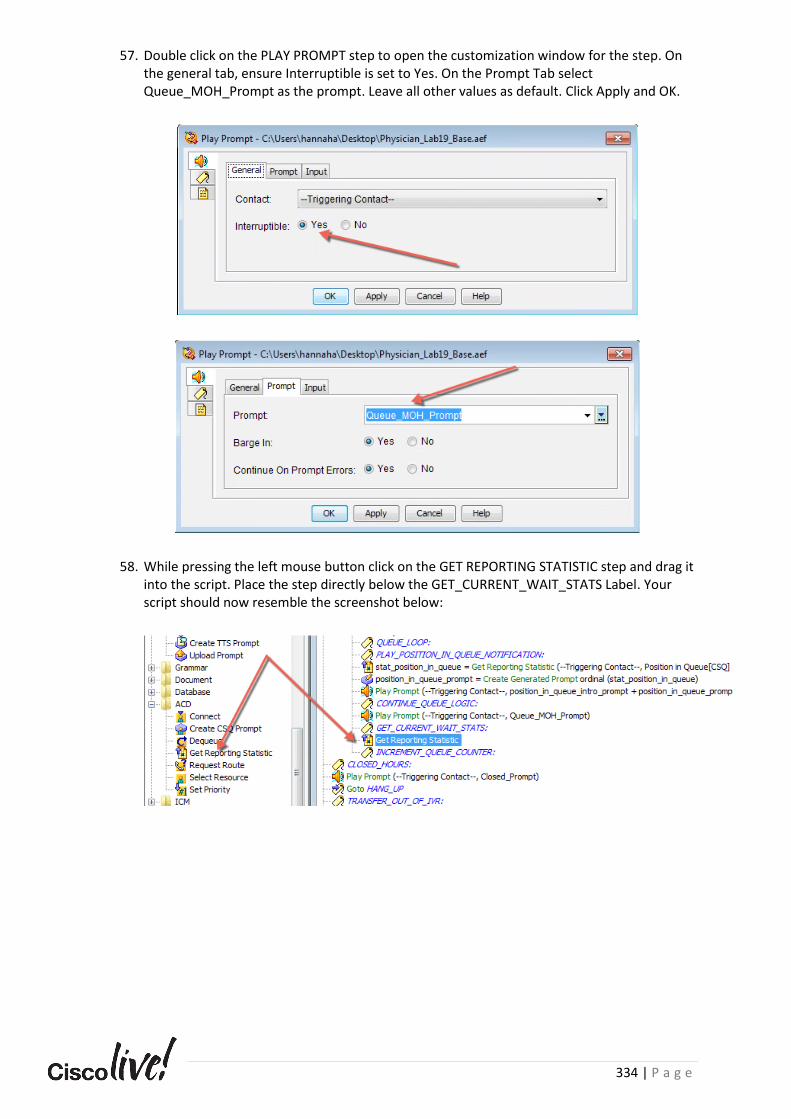
334 | P a g e
57. Double click on the PLAY PROMPT step to open the customization window for the step. On the general tab, ensure Interruptible is set to Yes. On the Prompt Tab select Queue_MOH_Prompt as the prompt. Leave all other values as default. Click Apply and OK.
58. While pressing the left mouse button click on the GET REPORTING STATISTIC step and drag it into the script. Place the step directly below the GET_CURRENT_WAIT_STATS Label. Your script should now resemble the screenshot below:
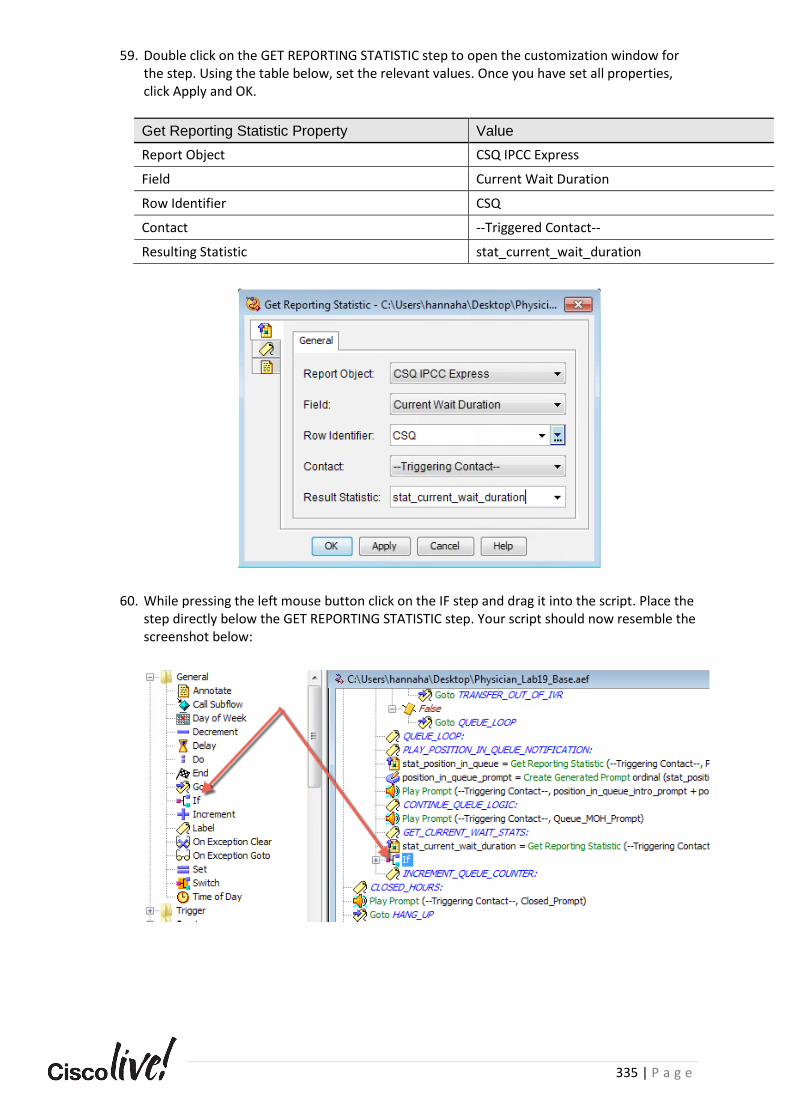
335 | P a g e
59. Double click on the GET REPORTING STATISTIC step to open the customization window for the step. Using the table below, set the relevant values. Once you have set all properties, click Apply and OK.
Get Reporting Statistic Property Value
Report Object CSQ IPCC Express
Field Current Wait Duration
Row Identifier CSQ
Contact --Triggered Contact--
Resulting Statistic stat_current_wait_duration
60. While pressing the left mouse button click on the IF step and drag it into the script. Place the step directly below the GET REPORTING STATISTIC step. Your script should now resemble the screenshot below:
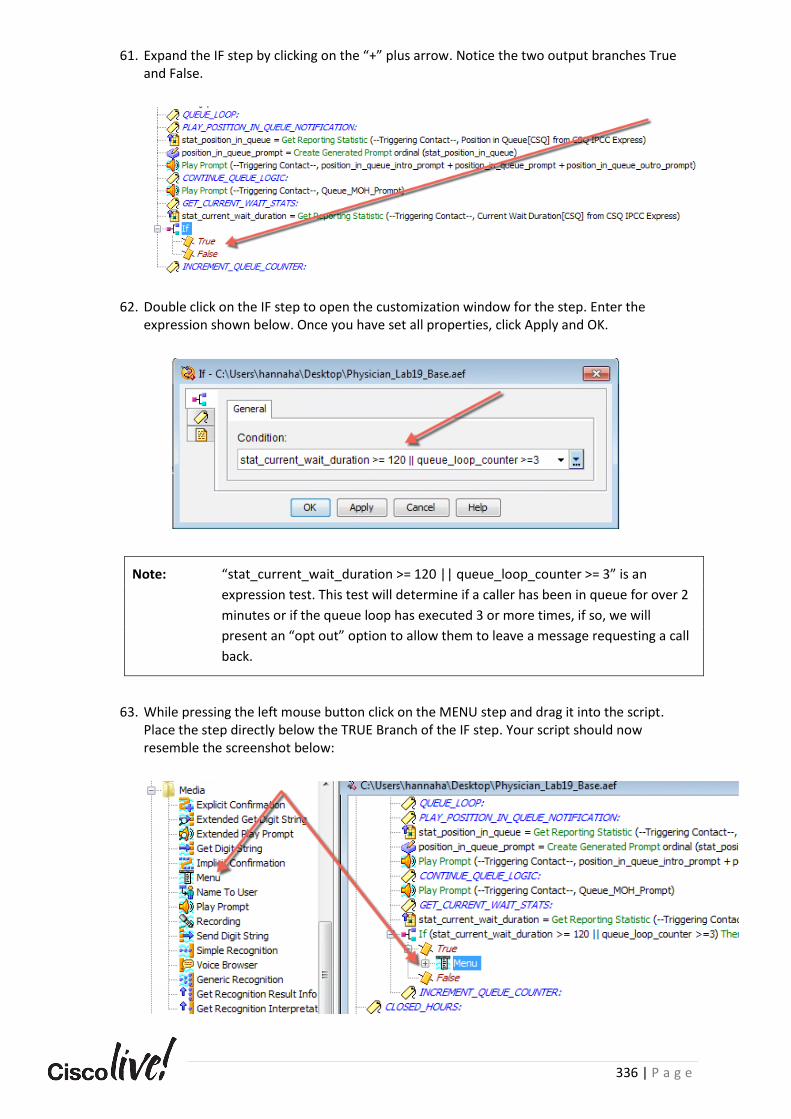
336 | P a g e
61. Expand the IF step by clicking on the “+” plus arrow. Notice the two output branches True and False.
62. Double click on the IF step to open the customization window for the step. Enter the expression shown below. Once you have set all properties, click Apply and OK.
Note: “stat_current_wait_duration >= 120 || queue_loop_counter >= 3” is an
expression test. This test will determine if a caller has been in queue for over 2
minutes or if the queue loop has executed 3 or more times, if so, we will
present an “opt out” option to allow them to leave a message requesting a call
back.
63. While pressing the left mouse button click on the MENU step and drag it into the script. Place the step directly below the TRUE Branch of the IF step. Your script should now resemble the screenshot below:
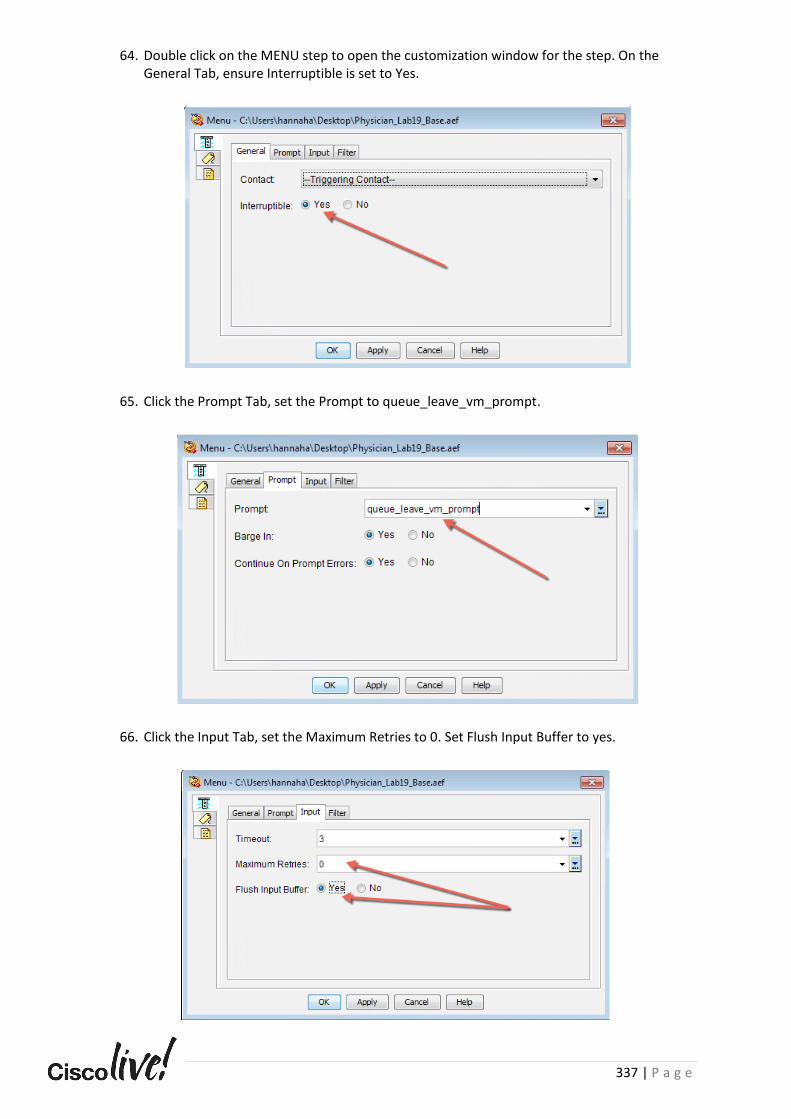
337 | P a g e
64. Double click on the MENU step to open the customization window for the step. On the General Tab, ensure Interruptible is set to Yes.
65. Click the Prompt Tab, set the Prompt to queue_leave_vm_prompt.
66. Click the Input Tab, set the Maximum Retries to 0. Set Flush Input Buffer to yes.
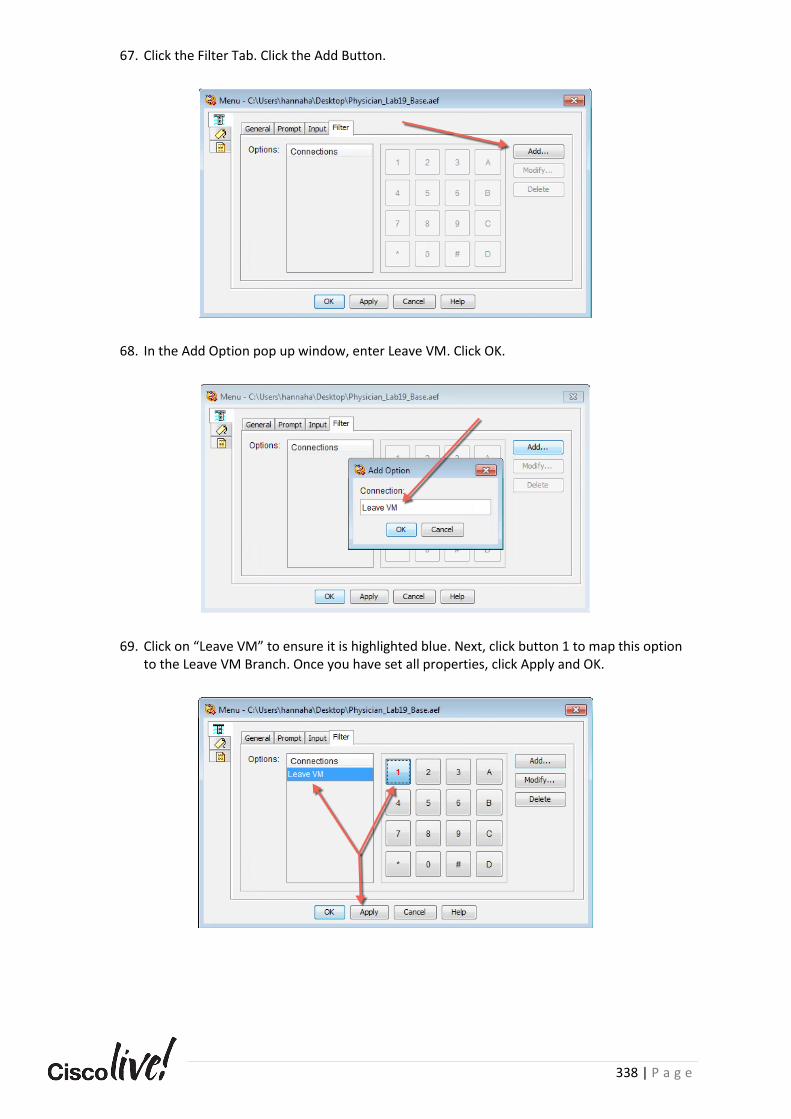
338 | P a g e
67. Click the Filter Tab. Click the Add Button.
68. In the Add Option pop up window, enter Leave VM. Click OK.
69. Click on “Leave VM” to ensure it is highlighted blue. Next, click button 1 to map this option to the Leave VM Branch. Once you have set all properties, click Apply and OK.

339 | P a g e
70. While pressing the left mouse button click on the DEQUEUE step and drag it into the script. Place the step directly below the LEAVE VM branch under the MENU step. Your script should now resemble the screenshot below:
71. Double click on the DEQUEUE step to open the customization window for the step. On the general tab, set the Contact Service Queue to CSQ. Click Apply and OK.
Note: A caller sits in queue over 2 minutes and wishes to leave a VM, before we send
the call to a general voicemail box, we MUST dequeue the call! Failure to do
will result in inaccurate metrics in the Unified Intelligence Center reports.
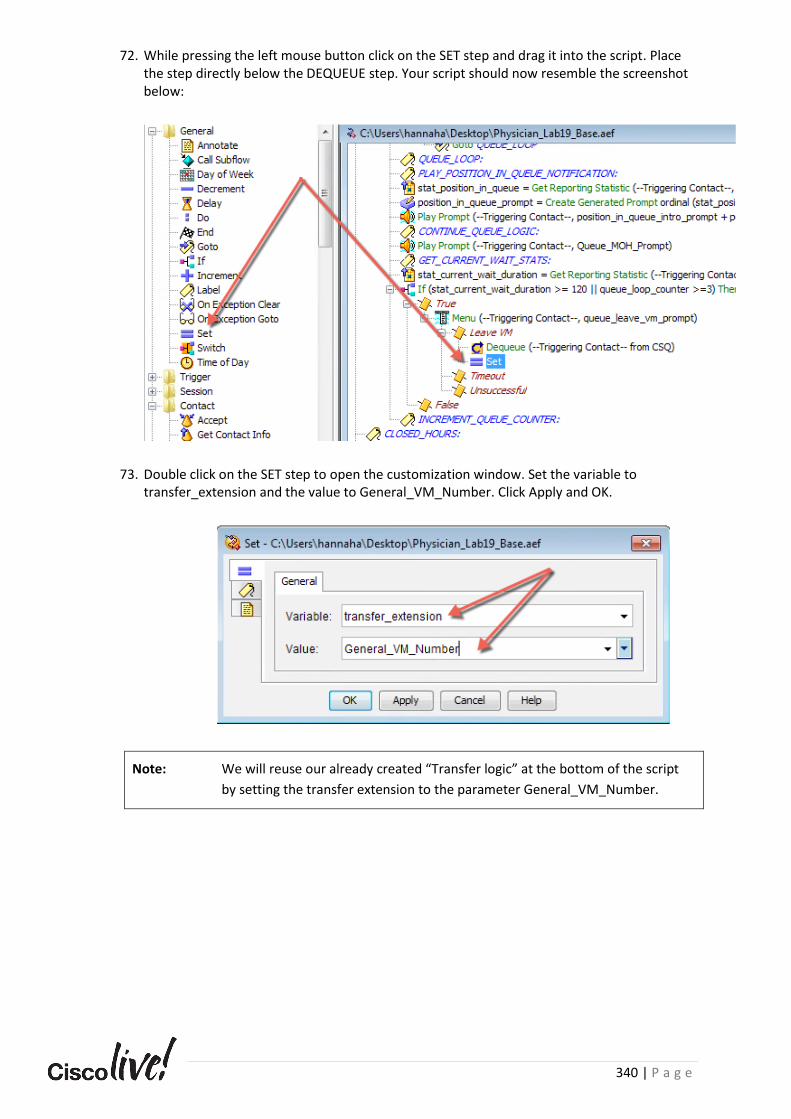
340 | P a g e
72. While pressing the left mouse button click on the SET step and drag it into the script. Place the step directly below the DEQUEUE step. Your script should now resemble the screenshot below:
73. Double click on the SET step to open the customization window. Set the variable to transfer_extension and the value to General_VM_Number. Click Apply and OK.
Note: We will reuse our already created “Transfer logic” at the bottom of the script
by setting the transfer extension to the parameter General_VM_Number.

341 | P a g e
74. While pressing the left mouse button click on the GOTO step and drag it into the script. Place the step directly below the SET step. Your script should now resemble the screenshot below:
75. Double click on the GOTO step to open the customization window for the step. Select TRANSFER_OUT_OF_IVR from the drop-down list. Click Apply and OK.
76. While pressing the left mouse button click on the GOTO step and drag it into the script. Place the step directly below the Timeout Branch of the Menu. Your script should now resemble the screenshot below:

342 | P a g e
77. Double click on the GOTO step to open the customization window for the step. Select INCREMENT_QUEUE_COUNTER from the drop-down list. Click Apply and OK.
78. While pressing the left mouse button click on the GOTO step and drag it into the script. Place the step directly below the Unsuccessful Branch of the Menu. Your script should now resemble the screenshot below:
79. Double click on the GOTO step to open the customization window for the step. Select INCREMENT_QUEUE_COUNTER from the drop-down list. Click Apply and OK.
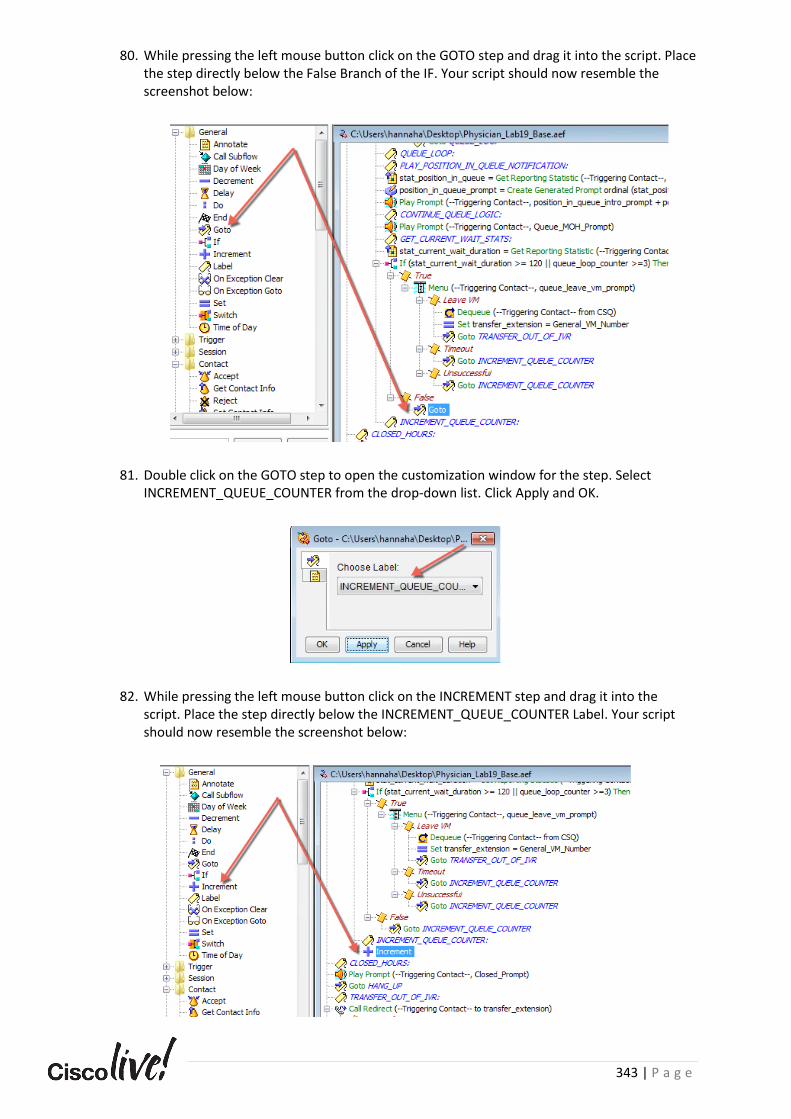
343 | P a g e
80. While pressing the left mouse button click on the GOTO step and drag it into the script. Place the step directly below the False Branch of the IF. Your script should now resemble the screenshot below:
81. Double click on the GOTO step to open the customization window for the step. Select INCREMENT_QUEUE_COUNTER from the drop-down list. Click Apply and OK.
82. While pressing the left mouse button click on the INCREMENT step and drag it into the script. Place the step directly below the INCREMENT_QUEUE_COUNTER Label. Your script should now resemble the screenshot below:
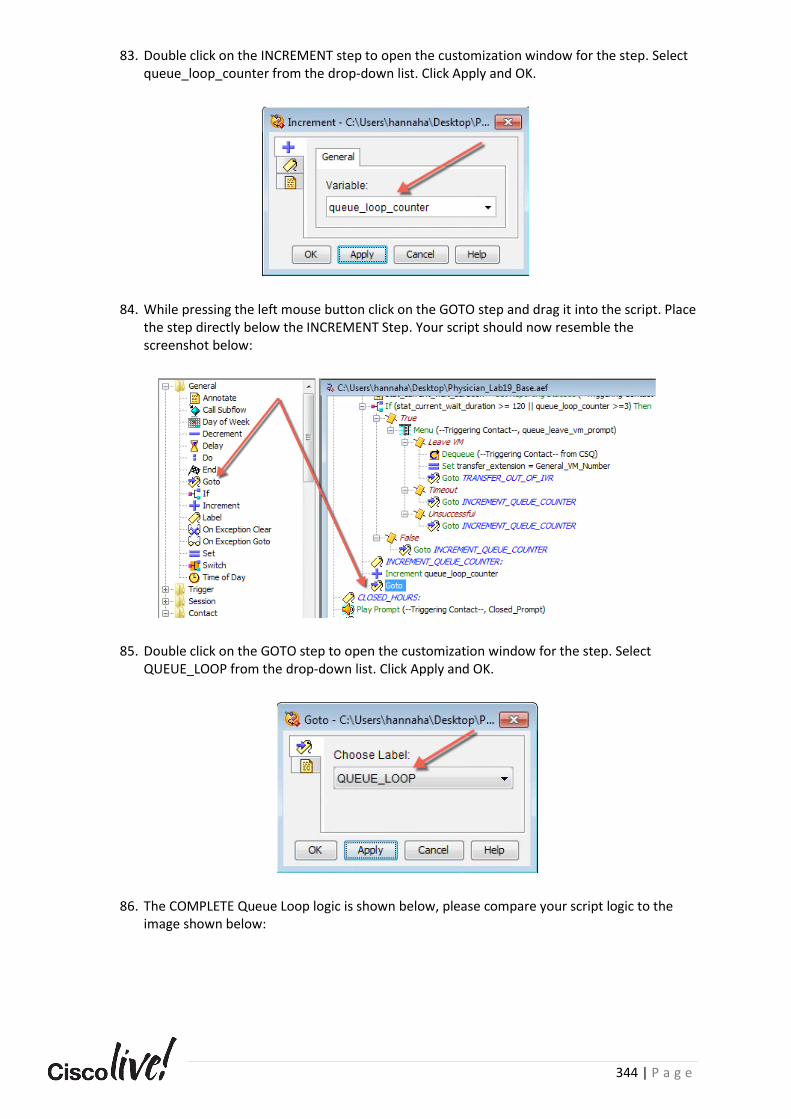
344 | P a g e
83. Double click on the INCREMENT step to open the customization window for the step. Select queue_loop_counter from the drop-down list. Click Apply and OK.
84. While pressing the left mouse button click on the GOTO step and drag it into the script. Place the step directly below the INCREMENT Step. Your script should now resemble the screenshot below:
85. Double click on the GOTO step to open the customization window for the step. Select QUEUE_LOOP from the drop-down list. Click Apply and OK.
86. The COMPLETE Queue Loop logic is shown below, please compare your script logic to the image shown below:

345 | P a g e
Task 2: V.S.U.R.E and Application Testing In this task you will perform the VSURE process which properly installs our updated Main Application onto the UCCX server so it can be used as an IVR Application. VSURE stands for Validate, Save, Upload, Refresh, Execute. It’s a common technique we use when deploying new applications and scripts. This process is crucial and must be followed every time to ensure proper deployment.
We will now execute the steps for the V.S.U.R.E. process.
VSURE – V = Validate
87. The script must be validated for program integrity. Select Tools > Validate.
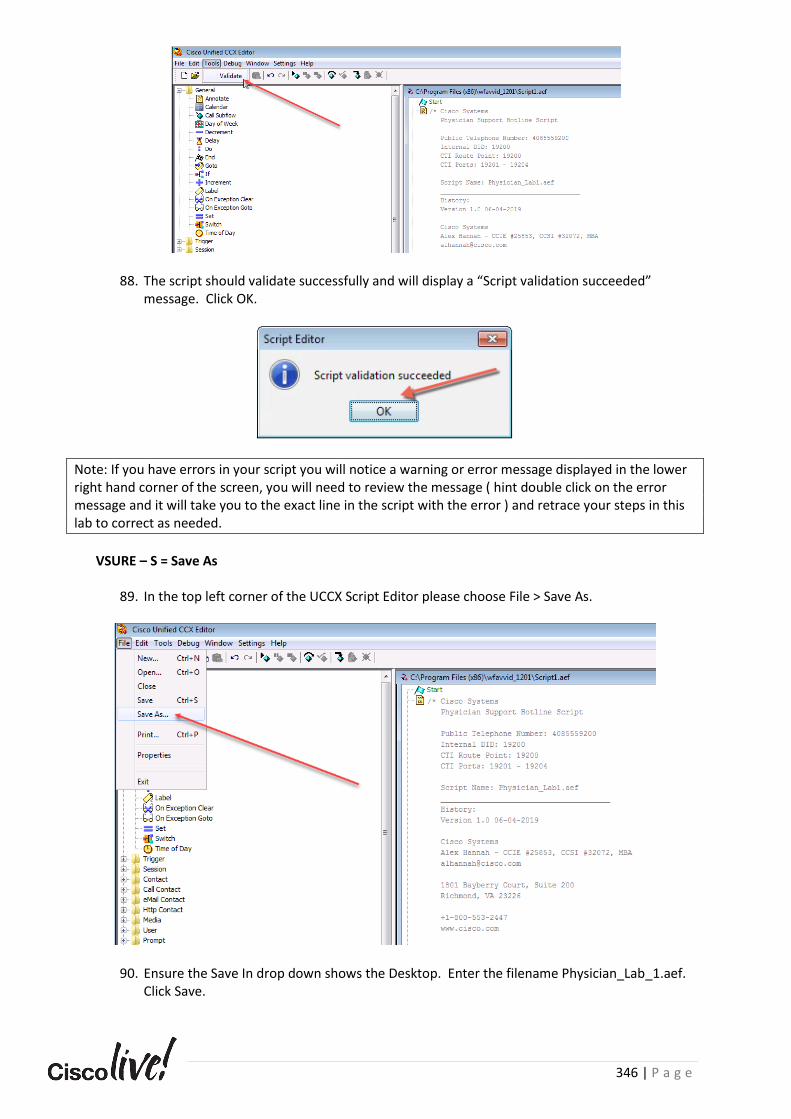
346 | P a g e
88. The script should validate successfully and will display a “Script validation succeeded” message. Click OK.
Note: If you have errors in your script you will notice a warning or error message displayed in the lower right hand corner of the screen, you will need to review the message ( hint double click on the error message and it will take you to the exact line in the script with the error ) and retrace your steps in this lab to correct as needed.
VSURE – S = Save As
89. In the top left corner of the UCCX Script Editor please choose File > Save As.
90. Ensure the Save In drop down shows the Desktop. Enter the filename Physician_Lab_1.aef. Click Save.
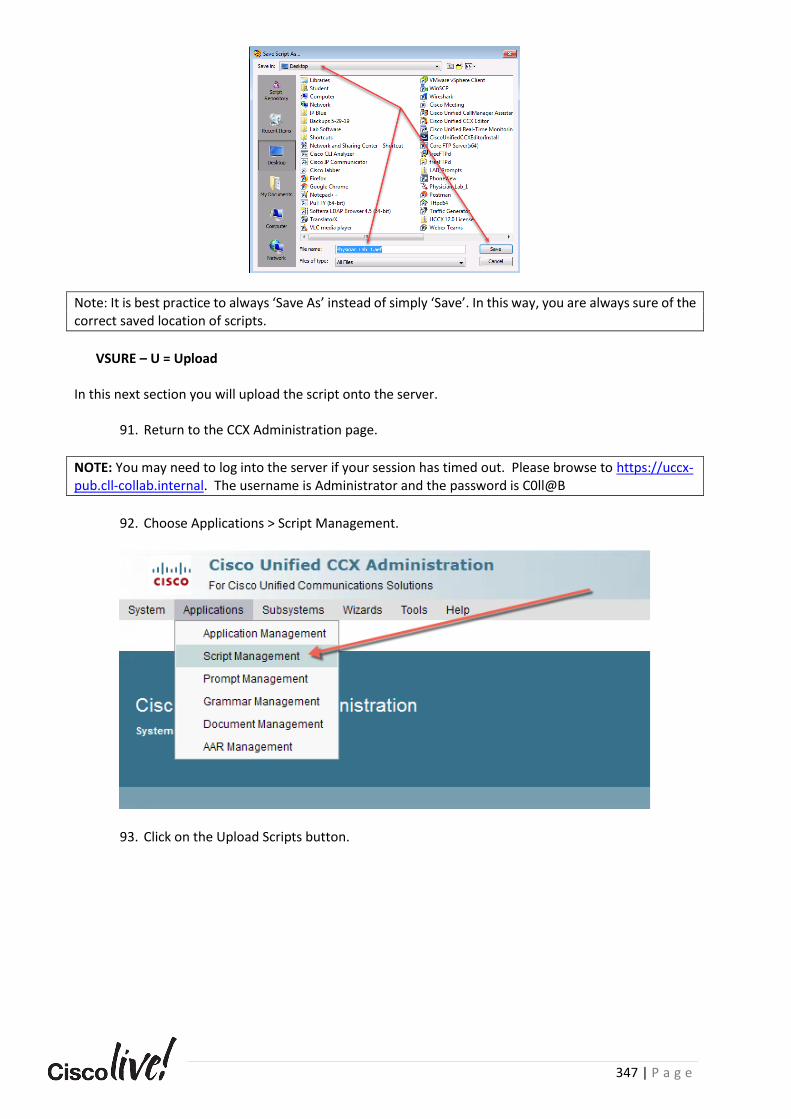
347 | P a g e
Note: It is best practice to always ‘Save As’ instead of simply ‘Save’. In this way, you are always sure of the correct saved location of scripts.
VSURE – U = Upload
In this next section you will upload the script onto the server.
91. Return to the CCX Administration page.
NOTE: You may need to log into the server if your session has timed out. Please browse to https://uccx-pub.cll-collab.internal. The username is Administrator and the password is C0ll@B
92. Choose Applications > Script Management.
93. Click on the Upload Scripts button.
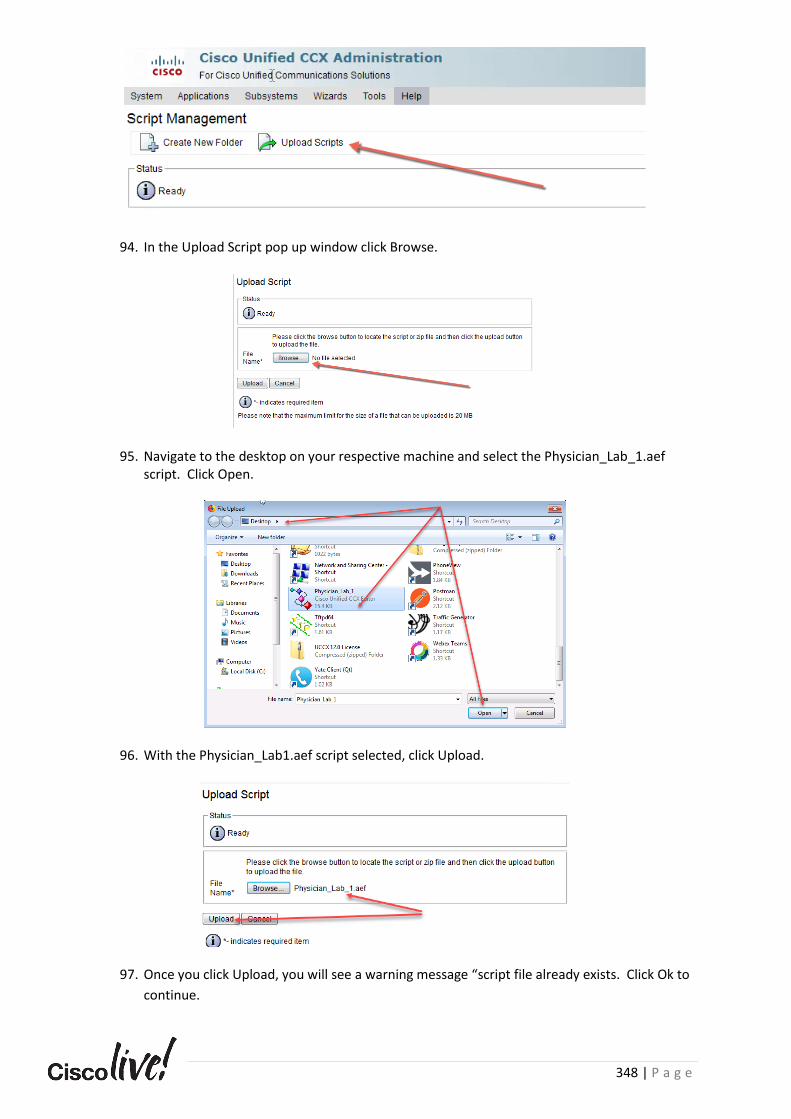
348 | P a g e
94. In the Upload Script pop up window click Browse.
95. Navigate to the desktop on your respective machine and select the Physician_Lab_1.aef script. Click Open.
96. With the Physician_Lab1.aef script selected, click Upload.
97. Once you click Upload, you will see a warning message “script file already exists. Click Ok to
continue.
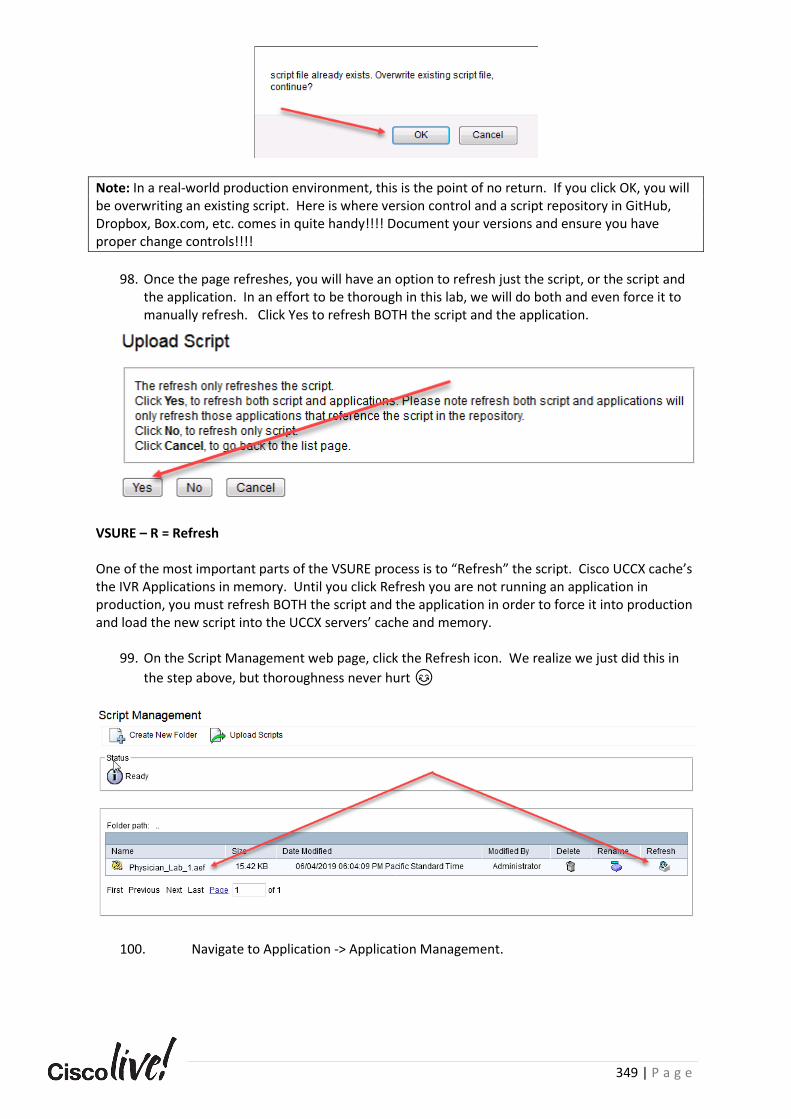
349 | P a g e
Note: In a real-world production environment, this is the point of no return. If you click OK, you will be overwriting an existing script. Here is where version control and a script repository in GitHub, Dropbox, Box.com, etc. comes in quite handy!!!! Document your versions and ensure you have proper change controls!!!!
98. Once the page refreshes, you will have an option to refresh just the script, or the script and
the application. In an effort to be thorough in this lab, we will do both and even force it to manually refresh. Click Yes to refresh BOTH the script and the application.
VSURE – R = Refresh
One of the most important parts of the VSURE process is to “Refresh” the script. Cisco UCCX cache’s the IVR Applications in memory. Until you click Refresh you are not running an application in production, you must refresh BOTH the script and the application in order to force it into production and load the new script into the UCCX servers’ cache and memory.
99. On the Script Management web page, click the Refresh icon. We realize we just did this in
the step above, but thoroughness never hurt 😊
100. Navigate to Application -> Application Management.
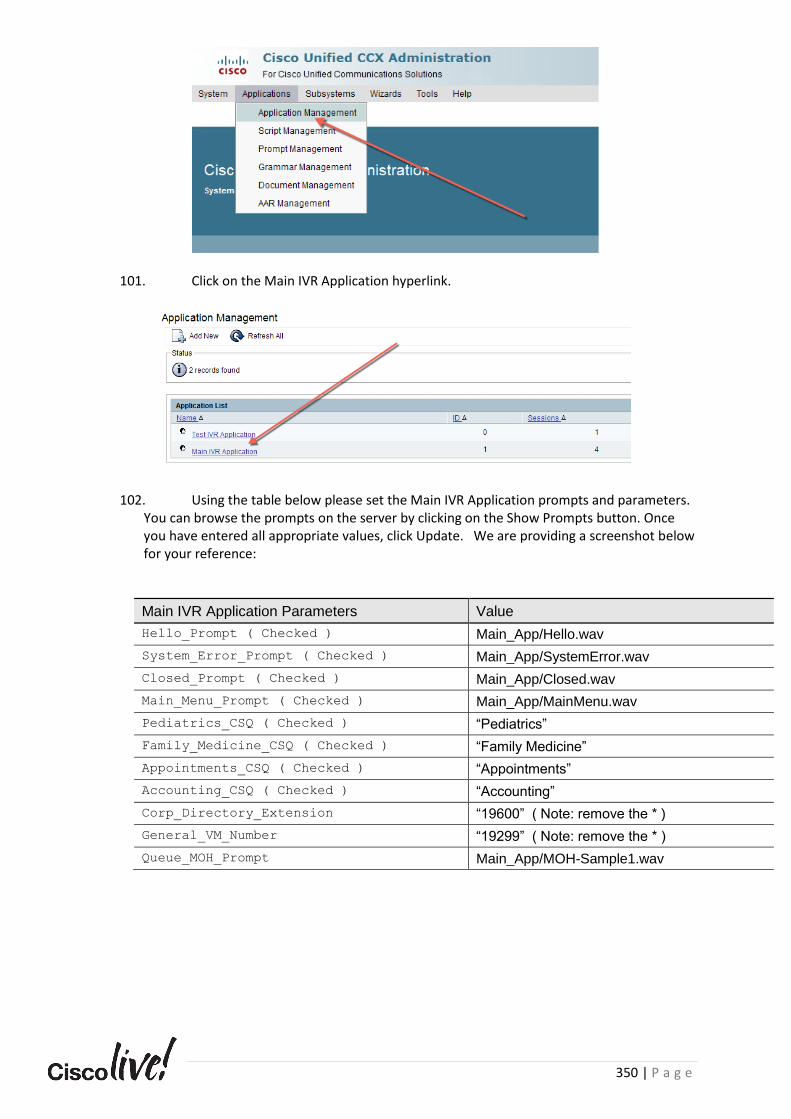
350 | P a g e
101. Click on the Main IVR Application hyperlink.
102. Using the table below please set the Main IVR Application prompts and parameters. You can browse the prompts on the server by clicking on the Show Prompts button. Once you have entered all appropriate values, click Update. We are providing a screenshot below for your reference:
Main IVR Application Parameters Value
Hello_Prompt ( Checked ) Main_App/Hello.wav
System_Error_Prompt ( Checked ) Main_App/SystemError.wav
Closed_Prompt ( Checked ) Main_App/Closed.wav
Main_Menu_Prompt ( Checked ) Main_App/MainMenu.wav
Pediatrics_CSQ ( Checked ) “Pediatrics”
Family_Medicine_CSQ ( Checked ) “Family Medicine”
Appointments_CSQ ( Checked ) “Appointments”
Accounting_CSQ ( Checked ) “Accounting”
Corp_Directory_Extension “19600” ( Note: remove the * )
General_VM_Number “19299” ( Note: remove the * )
Queue_MOH_Prompt Main_App/MOH-Sample1.wav
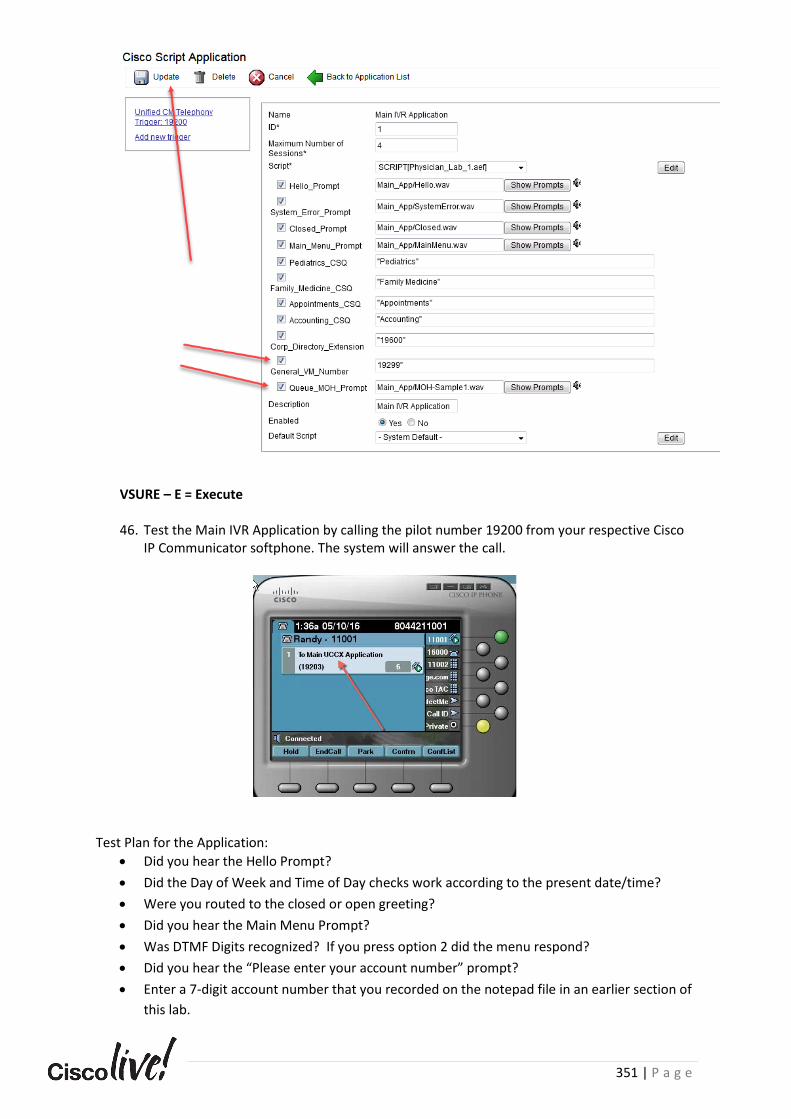
351 | P a g e
VSURE – E = Execute
46. Test the Main IVR Application by calling the pilot number 19200 from your respective Cisco IP Communicator softphone. The system will answer the call.
Test Plan for the Application:
• Did you hear the Hello Prompt?
• Did the Day of Week and Time of Day checks work according to the present date/time?
• Were you routed to the closed or open greeting?
• Did you hear the Main Menu Prompt?
• Was DTMF Digits recognized? If you press option 2 did the menu respond?
• Did you hear the “Please enter your account number” prompt?
• Enter a 7-digit account number that you recorded on the notepad file in an earlier section of
this lab.

352 | P a g e
• Was the system able to retrieve your balance? Did you hear your balance?
• Did you hear the after-balance menu options?
• Examine the different menu options, were you able to repeat the balance? Could you return
to the main menu?
• Enter an account number which does not exist in the database. Did the system notify you
that it could not locate your records?
• Examine the no results menu, were you able to enter a different account number?
• Prove that inside the Main Menu the variables are being properly set by pressing several of
the menu buttons and examining the results.
• Perform a reactive debug and prove the menu loop counter logic is working properly
• Perform a reactive debug and prove the Call Recorded for Quality Assurance greeting is
playing after the variables are set in the menu options.
• Perform a reactive debug and attempt to troubleshoot and understand the Queue logic
Instructor Challenge:
• Perform a new Reactive Debug ( See steps in the previous labs for a refresher )
• Ensure the Date/Time checks are working properly?
• Prove that your Account Number is being captured by the script into the Account Number String variable at run time.
• Examine the various database steps inside a reactive debug, prove that your account number was captured by examining the values of the variables at run time.