Student Handouts WLC Book 5c.pdf - AskTOP.net
420
WARRIOR LEADER COURSE MODIFIED (MOD), OCT 2005 BOOK 5C Student Handouts, Appendix D, to Training Support Packages 600-WLC (MOD) "NO ONE IS MORE PROFESSIONAL THAN I" The Army Training System (TATS) Courseware Prepared by The United States Army Sergeants Major Academy Fort Bliss, Texas 79918-8002 FOR THE ARMY SCHOOL SYSTEM (TASS) INSTITUTIONS FIELDING DATE: As Directed
-
Upload
khangminh22 -
Category
Documents
-
view
2 -
download
0
Transcript of Student Handouts WLC Book 5c.pdf - AskTOP.net

WARRIOR LEADER COURSEMODIFIED (MOD), OCT 2005
BOOK 5C
Student Handouts, Appendix D, to Training Support Packages
600-WLC (MOD)
"NO ONE IS MORE PROFESSIONAL THAN I"
The Army Training System (TATS) Courseware
Prepared by
The United States Army Sergeants Major Academy Fort Bliss, Texas 79918-8002
FOR THE ARMY SCHOOL SYSTEM (TASS) INSTITUTIONS
FIELDING DATE: As Directed

This page intentionally left blank

INTRUCTOR / STUDENT RECOVERABLE MATERIAL
This instruction material is ACCOUNTABLE/RECOVERABLE. Instructors and students MUST TURN IN this material upon course completion or upon reassignment to other duties. The Army School System (TASS) Institutions are responsible for the issue and control of this material. To receive additional or replacement material requires that a WRITTEN JUSTIFICATION be forwarded to ATSC through Command Channels. The student handout book is broken down into four books (Book 5A, 5B, 5C, and 5D). This is Student Handout Book 5C. This book contains the student handouts to the following Training Support Packages: (NOTE) The order given below is in the same order as the recommended sequence found in the Course Map in the Course Management Plan.
TSP# Title T223 Training the Force W221 Map Reading
Printed and distributed by: U.S. Army Training Support Center, Training Media Support Directorate, Training Medial Management Team, Fort Eustis, VA 23604-5168

This page intentionally left blank

Appendix D, Student Handouts C1
TSP: T223 TITLE: Training the Force

This page intentionally left blank

D-1
Appendix D, HANDOUTS FOR LESSON 1: T223 version 1
This appendix contains the items listed in this table--
Title/Synopsis Pages SH-1, Advance Sheet SH-1-1 to SH-1-3
SH-2, Extracted Material from FM 7-1, Battle Focused Training
SH-2-1 to SH-2-91
SH-3, Extracted Material from ARTEP 7-8-MTP SH-3-1 to SH-3-51
SH-4, Extracted Material from STP 21-1-SMCT and STP 21-24-SMCT
SH-4-1 to SH-4-86

This page intentionally left blank

SH-1-1
Student Handout 1
This student handout contains the advance sheet.

This page intentionally left blank

SH-1-2
Student Handout 1
Advanced Sheet Lesson Hours This lesson consists of 4 hours and 30 minutes of small group discussion, 1 hour and
20 minutes of practical exercise, and 8 hours of performance test evaluation. Overview During this lesson you will look at the Army’s training doctrine and some basic terms
you need to know. You will receive a basic introduction to battle focused training, and the rest of the time you will be conducting battle focused training. You will learn that the Army intends to train its force on ten principles that we will call the “Principles of Training.” If you train your squad according to these principles, you can’t go wrong. We require you, as part of your graduation requirement (GO/NOGO), to conduct one individual training session.
Learning Objective
Terminal Learning Objective (TLO).
Action: Train a Team.
Conditions: In a classroom environment given FM 7-1 (SH-2), ARTEP 7-8-MTP (SH-3), and STP 21-1-SMCT, STP 21-24-SMCT (SH-4).
Standards: Trained a Team by:
• Explaining how the chain of command develops the METL. • Explaining the link between collective mission essential
tasks and the leader and soldier tasks that support them.
IAW FM 7-1 (SH-2), ARTEP 7-8-MTP (SH-3), and STP 21-1-SMCT, STP 21-24-SMCT (SH-4).
ELO A Identify the Army’s training doctrine. ELO B Explain the Army’s Mission Essential Task List (METL) development process. ELO C Identify the training planning process. ELO D Explain the requirements for training execution. ELO E Identify preparations necessary to conduct individual training. ELO F Identify training execution considerations. ELO G Conduct individual training.
Assignments The student assignments for this lesson are:
• Read Student Handouts 2 thru 4.

SH-1-3
Additional Subject Area Resources
None
Bring to Class You must bring the following materials to class:
• All reference material received. • Pencil or pen and writing paper.

SH-2-1
Student Handout 2
This student handout contains 90 pages of material extracted from FM 7-1 (SH-2), Battle Focused Training, 06 Jun 2003. Disclaimer: The training developer downloaded the material from the U.S. Army Publishing Directorate Home Page. The text may contain passive voice, misspellings, grammatical errors, etc., and may not be in compliance with the Army Writing Style Program.

This page intentionally left blank

SH-2-3
2-1. Commanders train their units to be combat ready. Training is their number one priority. Commanders achieve combat readiness using tough, realistic, and challenging training. At every level, commanders must train to the Army standard. Battle-focus is a concept used to derive peacetime training requirements from the wartime operational mission. This enables the commander to plan and execute training that produces lethal units for success on the battlefield. Using the Army Training Management Cycle, the commander continuously plans, prepares, executes, and assesses the state of training in the unit. This cycle provides the framework for commanders to develop their unit’s METL, establish training priorities, and allocate resources.
2-2. Commanders and leaders at all levels use the Principles of Training to develop and execute effective training. As commanders train their units on METL tasks, senior commanders reinforce training by approving and protecting training priorities and providing resources.
PRINCIPLES OF TRAINING
2-3. There are ten principles of training.
COMMANDERS ARE RESPONSIBLE FOR TRAINING
2-4. Commanders are responsible for the training and performance of their soldiers and units. They are the primary training managers and trainers for their organization, are actively engaged in the training process, and adhere to the
Commanders are Responsible for TrainingNCOs Train Individuals, Crews, and Small TeamsTrain as a Combined Arms and Joint TeamTrain for Combat Proficiency
Realistic ConditionsPerformance-Oriented
Train to Standard Using Appropriate DoctrineTrain to AdaptTrain to Maintain and SustainTrain Using Multiechelon TechniquesTrain to Sustain ProficiencyTrain and Develop Leaders
Figure 2-1. Principles of Training

SH-2-4
principles of training. To accomplish their training responsibility, commanders and leaders at each echelon— • Should be present and lead training. • Base training on METL. • Provide the required resources. • Train to the Army standard. • Develop and execute training plans that result in proficient individuals,
leaders, and units. • Incorporate risk management into all aspects of training. • Assess current levels of proficiency.
2-5. Commanders and leaders at all levels must be personally involved in training. Brigade commanders train battalion commanders and staffs. Battalion commanders train company commanders with their companies; company commanders train platoon leaders with their platoons; platoon leaders train squad leaders with their squads; and NCOs train individuals, crews, and small teams. The command sergeant major (CSM), first sergeant (1SG), and platoon sergeants (PSG) actively participate in leader training and leader development. A detailed discussion of leader training and leader development is found in Appendix A.
NCOS TRAIN INDIVIDUALS, CREWS, AND SMALL TEAMS
2-6. NCOs are responsible for conducting standards based, performance-oriented, battle focused training. They identify specific individual, crew, and small team tasks that support the unit’s collective mission essential tasks; plan, prepare, rehearse, and execute training; and evaluate training, conduct after action reviews and provide feedback to the commander on individual, crew, and small team proficiency. Senior NCOs coach junior NCOs and officers to master a wide range of individual and leader tasks. The training management process is used to focus on the most important tasks, those critical to the collective tasks being trained. 2-7. NCOs continue the soldierization process of newly assigned enlisted soldiers, and begin their professional development. Not all skill level 1 tasks can be trained in IMT. Skill level 1 tasks not trained in IMT must be trained in the units. The tasks that will be trained by the unit vary by MOS based on complexity. NCOs are responsible to complete the training of newly assigned enlisted soldiers by training them to standard on the remaining skill level 1 tasks.
TRAIN AS A COMBINED ARMS AND JOINT TEAM
2-8. The Army provides the JFC a trained and ready force able to execute full spectrum operations. This provides the JFC the capability to— • Seize areas previously denied by the enemy. • Dominate land operations. • Provide support to civil authorities.

SH-2-5
2-9. Army forces seldom operate unilaterally. Corps and division headquarters may serve as either a joint task force headquarters or as a joint or combined force land component headquarters to provide command and control of joint or coalition forces. Many of the tasks necessary to execute these missions are the same for Army forces, but based on joint and multinational doctrine. Corps and division headquarters train on these tasks periodically based on MACOM guidance or contingency plans. 2-10. The fundamental basis for the organization and operations of Army forces is combined arms. Combined arms is the integrated application of several arms to achieve an effect on the enemy which is greater than if used separately or in sequence. Integration involves arrangement of battlefield actions in time, space, and purpose for maximum effects of combat power at a decisive place and time. Commanders and their staffs integrate and synchronize the Battlefield Operating Systems (BOS) to achieve combined arms effects and accomplish the mission.
2-11. Today's Army doctrine emphasizes teamwork at all echelons. When committed to battle, each unit must be prepared to execute operations without additional training or lengthy adjustment periods. Leaders must regularly practice task organization of all combat, combat support (CS), and combat service support (CSS) units. Teams achieve combined arms proficiency and cohesiveness when they train together. Peacetime training relationships must mirror wartime task organization to the greatest extent possible.

SH-2-6
2-12. Commanders are responsible for training all warfighting systems. The full integration of the combined arms team is attained through the task organization approach to training management. Task organizing is a temporary grouping of forces to accomplish a particular mission, and they are habitually associated for peacetime training. An example of a "task organized brigade" and its warfighting systems is depicted at Figure 2-2.
2-13. The commander is responsible for the training of all elements of the formation, and must develop a training plan that addresses two complimentary challenges. The unit must be proficient in functional tasks and able to conduct combined arms operations. For example, "attack" may be a corps or division METL task. The commander, with the task organized subordinate unit commanders, develops training scenarios, events, and exercises that integrate relevant functional tasks that support execution of an “attack”. 2-14. Functional training proficiency of subordinate units is an essential prerequisite for effective combined arms training. Each supporting unit commander performs an analysis to determine specific functional and technical training requirements necessary for effective execution of a deliberate attack. For example, the corps or division Engineer Coordinator (ENCOORD) could identify “conduct mobility operations” as the critical engineer functional task in this case. 2-15. The combined arms training challenge is the same for all echelons of command. The complexity, however, increases at each higher echelon. The
X
Figure 2-2. Brigade Combat Team Organization
• Infantry Battalions• Field Artillery Battalion• Brigade Support Battalion
•Engineer Company•MI Company•Antitank Company•Signal Company
Brigade Combat Team
HHC
MI HHC
MGS
HHTHHT
BSB
SUPPORT

SH-2-7
tempo, scope, and scale of operations at higher command echelons increases coordination requirements for planning and executing staff, joint, interagency, and multinational training. Commanders, from company through corps, focus combined arms training based on their METL. Figure 2-3 illustrates the scope and scale of the combined arms training challenge from company to corps.
TRAIN FOR COMBAT PROFICIENCY
2-16. The goal of all training is to achieve the Army standard to enable warfighting readiness. Within the confines of safety and common sense, commanders and leaders must be willing to accept less than perfect results initially and demand realism in training. Commanders integrate realistic conditions such as imperfect intelligence; reduced communications; smoke; noise; rules of engagement; simulated nuclear, biological, and chemical environments; battlefield debris; loss of key leaders; civilians on the battlefield; JIM requirements; and varying extremes in weather. Commanders take every opportunity to move soldiers out of the classroom into the field, fire weapons, maneuver as a combined arms team, and incorporate protective measures against enemy actions. CTCs provide the most realistic and challenging training experience in the Army, but should not be viewed as an "end point" in the unit training lifecycle. Rather, they provide a "go to war experience" that allows commanders to assess their METL proficiency and determine the effectiveness of their training program. Additionally, commanders must maximize resources and time by training in all available training environments – Live, Virtual, and Constructive (L-V-C). Realistic.
XXX
XX
X
II
ICompany Team Commanders• 3 to 5 Maneuver Platoons• Company FSO• Company Trains (Maint & Medics)• DS Engineer Platoon• DS ADA Section
METL Proficiency
Figure 2-3. Combined Arms Training—Scope and Scale
FireSupport Intel
CombatServiceSupport
AirDefense
MobilityCounter Mobility
Survivability
Commandand
ControlManeuver
Same Challenges--Increasing ComplexityCorps Commanders• Command Group• Staff• Command Posts• ASOC • 3 to 5 Divisions• ACR• Corps Artillery• COSCOM• MI Brigade• AVN Brigade• Signal Brigade• ADA Brigade • Engineer Brigade• MP Brigade• Chemical Brigade• Civil Affairs Brigade• PSYOP Tactical Support BN • Finance Group• Personnel Group

SH-2-8
2-17. Tough, realistic, and intellectually and physically challenging training excites and motivates soldiers and leaders. Realistic training-- • Builds competence and confidence by developing and honing
skills. • Instills loyalty and dedication to the unit through a shared sense of
accomplishment. • Inspires excellence by fostering initiative, enthusiasm, and eagerness to learn. • Develops aggressive, well-trained, disciplined soldiers.
2-18. Leaders must make conditions in training as close to wartime conditions as possible. Innovative leaders seize every opportunity to increase training challenges for soldiers, leaders, and units. Successful completion of each training event increases the capability and motivation of individuals and units for more sophisticated and advanced training. This is the commanders' continuous quest.
2-19. Conducting realistic training is challenging business. Commanders incorporate risk management throughout their mission planning and execution to identify risk or other factors that will hinder mission accomplishment and take action to reduce or mitigate the risk. Accordingly, risk management is a critical command and leader function that encompasses more than a single event or a learned process. It is both an art and a science. Risk management enables commanders and leaders to proactively identify, control, and mitigate hazards.
2-20. The scope of risk management extends well beyond the “enemy” in mission, enemy, terrain and weather, troops and support available, time available, and civilian considerations (METT-TC). Commanders must also consider potential risks such as the experience of their soldiers and leaders, their training proficiency, adverse terrain, weather, and time available to accomplish the mission. Because training and combat conditions are dynamic, risk management must be a continuous process throughout training and combat operations and embedded in the military decision making process (MDMP). Performance-Oriented. 2-21. Performance-oriented training is hands on and conducts the task under the conditions and to the standard specified. Soldiers and leaders must be proficient in the basic skills required to perform their wartime missions under battlefield conditions. Units become proficient in the performance of critical tasks and missions by repeatedly practicing the tasks and missions to standard. Soldiers learn best through repetition, using a hands-on approach. 2-22. Soldiers train better and faster, and to a higher degree of proficiency, when they know the task, condition, and standard. Likewise, training is more effective when it is performance-oriented and standards-based. Enforcing standards allows leaders to identify and correct training deficiencies, resulting in a more accurate assessment of combat capabilities.

SH-2-9
2-23. The complexity of the conditions are increased as soldier performance levels increase, while the standard remains constant. Soldiers and leaders must execute the planned training, evaluate performance, and retrain until the Army standard is achieved under the most realistic conditions possible. Evaluate and reinforce individual skills at each opportunity.
2-24. The same standard must be enforced whether performed individually or as part of a larger operation. For example, the squad leader enforces individual movement techniques during squad training as well as when executed as part of a company attack exercise. Soldier and leader task training must occur continuously and be fully integrated into the collective training plan.
TRAIN TO STANDARD USING APPROPRIATE DOCTRINE
2-25. Training must be done to the Army standard and conform to Army doctrine. When mission tasks involve emerging doctrine or non-standard tasks, commanders establish the tasks, conditions, and standards using mission orders and guidance, lessons learned from similar operations, and their professional judgment. The next higher commander approves the standards for these tasks. FM 3-0, Operations, provides the doctrinal foundations, and supporting doctrinal manuals describe common TTP that permit commanders and organizations to adjust rapidly to changing situations. Doctrine provides the basis for a common vocabulary across the force. Therefore, units must train to the Army standard contained in MTPs and soldier training publications, while applying Army doctrine and current regulatory guidance. 2-26. While serving as a joint headquarters and performing joint tasks, Army organizations use joint doctrine and TTP. Joint doctrine establishes the fundamentals of joint operations and provides guidance on how best to employ joint forces. Army doctrine is consistent with and nested in joint doctrine.
TRAIN TO ADAPT 2-27. Commanders train and develop adaptive leaders and units, and prepare their subordinates to operate in positions of increased responsibility. Commanders intensify training experiences by varying training conditions, making them increasingly difficult and unpredictable. Repetitive and increasingly complex training gives soldiers and leaders a foundation that can be used to adapt to new situations. Commanders establish a training environment that encourages initiative and innovation, and recognize the benefits of allowing leaders the opportunity to learn from their mistakes. 2-28. Training experiences coupled with timely feedback build competence. Leaders build confidence when they consistently demonstrate competence in tasks. Competence, confidence, and discipline promote initiative and enable leaders to adapt to changing situations and conditions. They improvise with the resources at hand, exploit opportunities and accomplish the assigned mission within the commander’s intent in the absence of orders. Commanders, at every

SH-2-10
echelon, integrate training events in their training plans to develop and train imaginative, adaptive leaders and units.
TRAIN TO MAINTAIN AND SUSTAIN
2-29. Maintenance is essential for sustained operations, therefore maintenance must be a routine part of how we operate and train. Soldiers and leaders are responsible for maintaining all assigned equipment in a high state of readiness to support training or operational missions. Units must be capable of fighting for sustained periods of time with the equipment they are issued. Soldiers must become experts in both the operation and maintenance of their equipment. This link between operations and maintenance is vital to mission success and must be emphasized in training. 2-30. The standard for the Army is to train to maintain to the published standards in Technical Manuals (TMs) -10 and -20. Maintenance is vital to mission accomplishment. METL cannot be executed if essential equipment and systems (such as tracks, weapons, wheeled vehicles, or radios) are nonmission capable (NMC). Everyone, leaders, maintenance personnel, and operators, must be trained and involved in maintaining and sustaining the organization. 2-31. In war, soldiers and crews perform preventive maintenance checks and services (PMCS) under combat conditions. This requires equipment and vehicle operators and maintenance personnel who are proficient in their maintenance duties. Leaders must carefully plan training objectives for maintenance periods and ensure they are achieved. Leaders must train soldiers to meet Army maintenance standards. Success on the battlefield requires well-honed tactical and maintenance skills. 2-32. Commanders must ensure the unit is prepared to maintain equipment under battlefield conditions. Organizations must train all levels of maintenance to include: • Individual soldier equipment, such as common table of allowances (CTA) 50,
individual weapons, protective masks, and other individual nuclear, biological, and chemical (NBC) clothing, and equipment.
• Crew served weapons and equipment, such as NBC monitoring and detection equipment, night vision and position locating devices, etc.
• Major end items, such as tracked and wheeled vehicles, helicopters, shop vans and their associated sub systems (such as armament, automotive, communications, electronics, and computers).
2-33. Maintenance is training. Scheduled maintenance allows units to train to maintain and sustain. Time must be allotted for maintenance and other logistical personnel (for example, supply, cooks, medics, and mechanics) to maintain their equipment to standard.

SH-2-11
2-34. The training schedule also includes PMCS, equipment services, and command maintenance periods. Soldiers must understand PMCS requirements and how they are executed. Leaders must train soldiers to maintain entire systems, not just pieces of a system. For example, a Bradley fighting vehicle (BFV) squad would focus on maintaining weapons, radios, basic issue items (BII), and NBC equipment, as well as the vehicle. Maintenance training periods must be planned, prepared, executed and have AARs conducted with the same intensity as other training events. These periods should have clear, focused, and measurable objectives. Normally, they are informally evaluated by the chain of command. 2-35. The commanders, command sergeants major (CSM), and first sergeants (1SG) instill in soldiers and leaders the importance of keeping equipment in the fight. The commander reviews the unit maintenance proficiency based on readiness standards, completion of scheduled equipment services, and identified training weaknesses. The commander adjusts the emphasis on the unit’s maintenance training program to correct identified shortcomings during the weekly training meeting.
TRAIN USING MULTIECHELON TECHNIQUES
2-36. Multiechelon training is the most effective and efficient way of sustaining proficiency on mission essential tasks with limited time and resources. Commanders use multiechelon training to— • Train leaders, battle staffs, units, and individuals at each echelon of the
organization simultaneously. • Maximize use of allocated resources and available time. • Reduce the effects of personnel turbulence. 2-37. All multiechelon training techniques have these distinct characteristics— • They require detailed planning and coordination by commanders and leaders
at each echelon. • They habitually train at least two echelons simultaneously on selected METL
tasks, associated battle tasks, or supporting collective and individual tasks.
TRAIN TO SUSTAIN PROFICIENCY 2-38. Once individuals and units have trained to the required level of proficiency, leaders must structure individual and collective training strategies to retrain critical tasks at the minimum frequency necessary for sustainment. Sustainment training is the key to maintaining unit proficiency through personnel turbulence, operational deployments, and NET, for example. ARTEP-MTP and individual training plans are tools to help achieve and sustain collective and individual proficiency. Sustainment training must occur often enough to train new soldiers as they arrive in the unit and minimize skill decay. Army units train to accomplish their missions by frequent sustainment training on critical tasks. Infrequent "peaking" of training for an event (CTC rotation, for example) does not sustain wartime proficiency. Battle focused training is training on wartime tasks. Many of the METL tasks on which a unit trains for its wartime mission are

SH-2-12
the same as required for a stability or support operation. This prepares a unit for the entire spectrum of missions that it may execute. 2-39. Sustainment training enables units to operate in a band of excellence through appropriate repetition of critical tasks using a mixture of live, virtual, and constructive training. The band of excellence is the range of proficiency within which a unit is capable of executing its critical wartime METL tasks. Training to sustain proficiency in the band of excellence includes training leaders, battle staffs, and units. Units fluctuate in proficiency because of many factors, such as training frequency, key personnel turnover, new equipment fielding, and resource constraints. The commander takes these factors into consideration when assessing the unit’s readiness and developing the training strategy. Well-trained units minimize peaking for selected events or at predetermined times.

SH-2-13
2-40. An example of how a commander planned the yearly sustainment training to remain in the Band of Excellence is at Figure 2-4. The solid black line shows the results of an effective unit training strategy that sustains training proficiency over time, maintaining it within the Band of Excellence. The plan schedules critical training at the minimum frequency necessary for sustainment. The dotted black line shows an ineffective training strategy that often causes the unit to fall outside the Band of Excellence, requiring significant additional training before the unit is capable of executing its critical wartime tasks.
2-41. This common sense approach precludes deep valleys in proficiency that would require a significant amount of resources and time to retrain the unit to standard on its wartime mission. This is training in the band of excellence.
TRAIN AND DEVELOP LEADERS 2-42. Commanders have a duty and execute a vital role in leader training and leader development. They teach subordinates how to fight and how to train. They also teach soldiers and leaders how to think, not what to think. They mentor, guide, listen to, and “think with” subordinates. They train leaders to plan training in detail, prepare for training thoroughly, execute training aggressively, conduct effective AARs, and evaluate short-term training proficiency in terms of desired long-term results. Training and developing leaders is an embedded component of every training event. Nothing is more important to the Army than building confident, competent, adaptive leaders for tomorrow.
COMMANDERS AND TRAINING
Band of Excellence
Time
EXEVAL
CTCRotation
orAT Period
Range of Proficiency
Bn FTX
CCTT Sustained Mean
Unsustained Mean
Individual Skills
UCOFT
AC Predeployment proficiencyRC Premobilization proficiency
Sustained Training Proficiency
Unsustained Training Proficiency
Crew/Squad Qualification
PLT Maneuver
Co/Btry Proficiency
TEWT
Figure 2-4. Band of Excellence

SH-2-14
2-43. Effective training is the number one priority of commanders. The commander is the primary trainer. In war, training continues with a priority second only to combat or to the support of combat operations. Commanders and senior leaders must extract the greatest training value from every training opportunity. Effective training requires the commander's continuous personal time and energy to accomplish the following:
• Develop and communicate a clear vision. The senior leader's training vision
provides the direction, purpose, and motivation necessary to prepare individuals and organizations to win in battle. It is based on a comprehensive understanding of the following: • Mission, doctrine, and history. • Enemy/threat capabilities. • Operational environment • Organizational and personnel strengths and weaknesses • Training environment.
• Train one echelon below and evaluate two echelons below. Commanders
are responsible for training their own unit and one echelon below. Commanders evaluate units two echelons below. For example, brigade commanders train battalions and evaluate companies; battalion commanders train companies and evaluate platoons.

SH-2-15
• Require subordinates to understand and perform their roles in training. Since good training results from leader involvement, one of the commander's principal roles in training is to teach subordinate trainers how to train and how to fight. The commander provides the continuing leadership that focuses on the organization's wartime mission. The commander assigns officers the primary responsibility for collective training and NCOs the primary responsibility for individual, crew, and small team training. (Figure 2-5). The commander, as the primary trainer, uses multiechelon techniques to meld leader, battle staff, and individual training requirements into collective training events, while recognizing the overlap in training responsibilities: commanders teach, coach, and mentor subordinates throughout.
• Train all elements to be proficient on their mission essential tasks.
Commanders must integrate and train to Army standard all BOS, within and supporting their command, on their selected mission essential tasks. An important requirement for leaders is to project training plans far enough into the future and coordinate resources with sufficient lead-time.
• Train and develop subordinates. Competent and confident leaders build
cohesive organizations with a strong chain of command, high morale, and good discipline. Commanders create leader development programs that develop warfighter professionalism--skills and knowledge. They mentor, guide, listen to, and "think with" subordinates to challenge their depth of knowledge and understanding. Commanders ensure their subordinates know
Commander
Figure 2-5. Overlapping Training Responsibilities
Collective Training
LeaderTraining
Individual Training
Officers NoncommisionedOfficers

SH-2-16
"how to think" instead of what to think. They develop their subordinates' confidence and empower them to make independent, situational-based decisions. The goal is to develop subordinates who have an agile and adaptive mindset.
• Assist subordinates with self-development program. Commanders assist
subordinates with a self-development program and share experienced insights that encourage subordinates to study and learn their profession. Effective leader development programs will continuously influence the Army as junior leaders progress to higher levels of responsibility.
• Involve themselves personally in planning, preparing, executing, and
assessing training. The commander resources training and protects subordinates’ training time. They are actively involved in planning for future training. They create a sense of stability throughout the organization by protecting approved training plans from training distracters. Commanders are responsible for executing the approved training to standard. Commanders are present, to the maximum extent possible, during the conduct of training and provide timely, experienced feedback to all participants.
• Demand training standards be achieved. Leaders anticipate some tasks
may not be performed to standard. They design time in training events for additional training on tasks not performed to standard. Leaders cannot assume or rationalize time will be available to train to standard next time. It is better to train to standard on a limited number of tasks, rather than attempting and failing to achieve the standard on too many tasks, rationalizing that corrective action will occur during some later training period. Soldiers will remember the enforced standard, not the one discussed.
• Ensure proper task and event discipline. Senior leaders ensure junior
leaders plan the correct task-to-time ratio. Too many tasks guarantee nothing gets trained to standard and no time is allocated for retraining. Too many events result in improper preparation and recovery.
• Foster a command climate that is conducive to good training.
Commanders create a climate that rewards subordinates who are bold and innovative trainers and offer support for honest mistakes. They challenge the organization and each individual to train to full potential.
• Manage training distracters. The commander who has planned and
resourced a training event is responsible to ensure participation by the maximum number of soldiers. Administrative support burdens cannot be ignored; however, they can be managed using an effective time management system. Senior commanders must support subordinate commanders' efforts to train effectively by managing training distracters and reinforcing the

SH-2-17
requirement for all assigned personnel to be present during prime training time.
• Incorporate Risk Management. The nature of the military profession is
inherently dangerous. Commanders must train their units to tough standards under the most realistic conditions possible. Application of the risk management process does not detract from this training goal, but will enhance execution of highly effective, realistic training. Risk management is the process of identifying, assessing, and controlling risks arising from operational factors and making decisions that balance risk costs with mission training benefits. Leaders and soldiers at all echelons use risk management to conserve combat power and resources in both peace and war.
TOP-DOWN/BOTTOM-UP APPROACH TO TRAINING
2-44. The Top-Down/Bottom-Up approach to training is a team effort between commanders and subordinate leaders. Commanders provide the training focus, direction, and resources, while subordinate leaders provide feedback on unit training proficiency, identify specific unit training needs, and execute training to standard in accordance with the approved plan. It is a team effort that maintains training focus, establishes training priorities, and enables effective communication between command echelons.
2-45. Guidance, based on wartime mission and priorities, flows from the top-down and results in subordinate units’ identification of specific collective and individual tasks that support the higher unit’s mission. Input from the bottom-up is essential because it identifies training needs to achieve task proficiency on identified collective and individual tasks. Leaders at all echelons communicate with each other about requirements, and planning, preparing, executing, and evaluating training.
2-46. Senior leaders centralize planning to provide a consistent training focus from the top to the bottom of the organization. However, they decentralize detailed planning and execution to ensure that the conduct of mission related training sustains strengths and overcomes the weaknesses unique to each unit. Decentralized execution promotes subordinate leaders’ initiative to train their units, but does not mean senior leaders give up their responsibility to supervise training, develop leaders, and provide feedback.
BATTLE FOCUS
2-47. Battle focus is the concept used to derive peacetime training requirements from assigned missions. The priority of training in units is to train to standard on the wartime mission. Battle focus guides the planning, preparation, execution, and assessment of each organization's training program to ensure its members train as they are going to fight. Battle focus is critical throughout the entire training process and is used by commanders to allocate resources for training based on wartime and operational mission requirements. Battle focus enables

SH-2-18
commanders and staffs at all echelons to structure a training program to cope with non-mission related requirements while focusing on mission essential training activities. Battle focus recognizes a unit or organization cannot attain proficiency to standard on every task whether due to time or other resource constraints. The commander must focus on those critical tasks essential to mission accomplishment. 2-48. A critical aspect of the battle focus concept is to understand the responsibility for, and the linkage between collective mission essential tasks and the supporting individual tasks. The diagram at Figure 2-6 depicts the relationships and the proper sequence to derive optimum training benefit from each training opportunity.
2-49. The commander and the CSM/1SG work together to coordinate the
collective mission essential tasks and individual training tasks on which the unit will focus during a given period. The CSM/1SG identifies the supporting individual tasks for each collective task. The unit’s ARTEP-MTP provides an excellent resource for this process and contains a comprehensive listing of all combat critical collective tasks cross referenced to supporting individual tasks by task number and title. Although NCOs have the primary role in training and sustaining individual soldier skills, officers at every level remain responsible for training to established standards during both individual and collective training.
Battle Focus
Selects CollectiveMission Essential Task
Conducts TrainingAssessment
Determines TrainingObjectives
Determines Strategy and Plans for Training
Conducts Pre-ExecutionChecks
Executes Trainingand Conducts
After-Action Review
Selects SupportingIndividual Task
Conducts TrainingAssessment
Determines TrainingObjectives
Determines Strategy and Plans for Training
Conducts Pre-ExecutionChecks
Executes Trainingand Conducts
After-Action Review
Evaluates TrainingAgainst Established
Standards
Each Commander Each CSM and NCO Leader
Figure 2-6. Integration of Collective and Individual Training

SH-2-19
2-50. Battle focus is applied to all missions across the full spectrum of operations. Units may be diverted from their primary wartime mission to execute stability or support tasks. Successful execution of stability operations or support operations is important in the pursuit of national objectives. Generally, MACOM and corps commanders know in advance of the requirement to perform stability or support missions and identify those organizations required to perform these critical missions. Commanders of these identified organizations are responsible for conducting a mission analysis and, based on results, for developing a METL for the directed mission. They then identify and train to standard on the directed-mission METL. If time permits prior to deployment, units should execute a mission rehearsal exercise (MRE) with all participating units.
2-51. Upon being relieved from a directed mission, the unit reverts to its assigned wartime missions and associated METL. The commander uses the training management cycle to identify specific training requirements; then plans, prepares and executes training that will reestablish proficiency in the unit’s wartime METL. Commanders recognize and take into account the additional time this reintegration process may take.

SH-2-20
ARMY TRAINING MANAGEMENT CYCLE 2-52. The foundation of the training process is the Army Training Management Cycle (figure 2-7). In the METL development process (chapter 3), training must relate to the organization’s wartime operational plans and focus on METL tasks. The availability of resources does not affect METL development. The METL is an unconstrained statement of the tasks required to accomplish wartime missions. Resources for training, however, are constrained and compete with other missions and requirements. Leaders develop synchronized long-range, short-range, and near-term training plans (chapter 4) to effectively utilize available resources to train for proficiency on METL tasks. After training plans are developed, units execute training by preparing, conducting, and recovering from training (chapter 5). The process continues with training evaluations that provide bottom-up input to organizational assessment. Organizational assessments provide necessary feedback to the senior commander that assists in preparing the training assessment (chapter 6).
PLAN
EXECUTE
ASSESS
Resources
EstablishMission
EssentialTask List
• Enduring Combat Capability
• External Guidance• Directed Missions
• Wartime Operational Plans
• Operational Environment
Assess
Chapter 6Develop METL
Chapter 3
Plan
Chapter 4
Execute
Chapter 5
Figure 2-7. Army Training Management Cycle

SH-2-21
Chapter 3
Mission Essential Task List (METL) Development
We focus our training programs to accomplish unit missions decisively for our nation's warfighting needs. • Maximize all training opportunities. • Commander's first priority is training. • Training must be standards-based and should include assessments against an
established standard. • Train as we fight. • Every training event is a leader development opportunity (training builds soldier and
leader confidence). General John N. Abrams

SH-2-22
METL DEVELOPMENT PROCESS 3-1. The METL development process links the unit’s wartime operational mission with its training. Battle-focused training programs are based on wartime operational requirements. Army organizations, whether they are AC or RC, Modification Table of Organization and Equipment (MTOE) or Table of Distribution and Allowances (TDA), cannot achieve and sustain proficiency on every possible training task. The commander is responsible to identify the tasks essential to accomplish the organization's wartime operational mission. Battle focused METL identifies the tasks essential to accomplish the unit’s wartime operational mission and provides the foundation for the unit’s training program. All company level and above units, AC and RC, MTOE and TDA develop a METL. Staffs, at each level, also develop a METL that supports their unit’s METL. Detachments, organized with a commander and under a distinct MTOE or TDA, also develop a METL; Special Forces detachments, explosive ordnance detachments, transportation port operation cargo detachments, and preventive medicine medical detachments are examples of these units.
3-2. METL development is the catalyst to focus training on wartime operational missions. Application of the METL development process accomplishes the following: • Uses the wartime operational mission and other inputs to METL development
to focus the unit’s training on essential tasks. • Provides a forum for professional discussion and leader development among
senior, subordinate, and adjacent commanders concerning the linkage between mission and training.
• Enables subordinate commanders and key NCOs to crosswalk collective, leader, and individual tasks to the mission.
• Leads to “buy-in” and commitment to the organization’s training plan by unit leaders.
3-3. Figure 3-1 depicts the process commanders use to identify and select mission essential tasks.

SH-2-23
INPUTS TO METL DEVELOPMENT
3-4. There are five primary inputs to METL development— • Wartime Operational Plans. The most critical input to METL development
is the organization's wartime operational mission.
• Enduring Combat Capabilities. The fundamental reason for the
organization and operation of Army forces is to generate effects of combined arms. Army commanders form combat, CS, and CSS forces into cohesive teams through training for combat proficiency. Enduring combat capabilities are the unique contribution each unit makes to ensure the Army successfully accomplishes any mission, anytime, anywhere.
• Operational Environment. The six dimensions of operational environment
are defined in FM 3-0, Chapter 1; threat, political, unified action, land combat operations, information, and technology.
• Directed Missions. Army organizations are frequently directed to execute a
mission other than their assigned wartime operational mission. These missions can range from major combat operations to humanitarian assistance, security cooperation activities or other types of stability operations or support operations, and often include a combination of all.
• External Guidance. External guidance serves as an additional source of
training tasks that relate to an organization's wartime operational mission. Some examples are—
Figure 3-1. Mission Essential Task List Development Process
CDR’s MSN
Analysis
MissionEssential Task List(METL)
SubordinateCommanders’MSN Analysis
OperationalEnvironment
ExternalGuidance
DirectedMissions
WartimeOperational
Plans
Enduring Combat
Capabilities
Higher Commander’s
Guidance
Higher Commander’s
Approval

SH-2-24
• Higher headquarters directives. • ARTEP-MTP • Mobilization plans. • Installation wartime transition and deployment plans. • Force integration plans. • Army Universal Task List (AUTL). • Universal Joint Task List (UJTL).
3-5. The UJTL, CJCSM 3500.04C, serves as a common language and common reference system for joint force commanders to communicate mission requirements. It is the basic language for development of a joint METL (JMETL). The UJTL defines tasks and functions performed by joint headquarters, Army, and other service components operating at the operational and strategic levels of war.
3-6. The AUTL, FM 7-15, is a comprehensive listing of Army tactical-level collective tasks and functions for tactical units, company through corps, and staffs, and complements the UJTL. The AUTL provides a basis for establishing unit-specific ARTEP-MTP linkage to the UJTL. This mission-to-task-to-training linkage assists forces in training the way they intend to fight. The AUTL-- • Provides a common, doctrinal structure for Army tactical mission tasks. • Articulates what the Army does to accomplish missions. • Applies to all four types of military operations (offense, defense, stability,
support). • Lists collective Army tactical tasks (ART) subordinate to each of the seven
BOS.

SH-2-25
3-7. Figure 3-2 illustrates the UJTL, AUTL, and ARTEP-MTP relationship.
3-8. Unit specific doctrinal manuals are primary sources for training tasks. The applicable ARTEP-MTP is a good start point for selecting collective tasks to support the missions at battalion and company level. Leaders may develop task lists using the following sources when no ARTEP-MTP exists, for example-- • MTO&E. • TDA. • Tactical standing operating procedures (TSOPs). • ARTEP-MTPs for other units with similar organization or a similar
mission/task. • Technical manuals (TMs). • Training circulars (TCs). • Combined Arms Center (CAC) Lessons Learned Data Base. • Readiness standing operating procedures (RSOPs). • State operational contingency plans for ARNG.
3-9. METLs may vary significantly in similar type organizations because of different wartime operational missions and geographical location. For example, a Continental United States (CONUS) based power projection organization may identify strategic deployment requirements as critical tasks while a like forward-deployed organization may identify tactical deployment requirements such as rapid assembly and tactical road march as critical tasks. Geography also influences the selection of different mission essential tasks for units. Presence of
UJTLTACTICAL TASK AREA• TA 1 Deploy/Conduct Maneuver• TA 2 Develop Intelligence• TA 3 Employ Firepower• TA 4 Perform Logistics &CSS• TA 5 Exercise C2• TA 6 Protect the Force• TA 7 Operation in CBRNE
Environment
AUTL• ART 1.0- Intelligence• ART 2.0- Maneuver• ART 3.0- Fire Support• ART 4.0- Air Defense• ART 5.0- Mobility/
Countermobility/ Survivability
• ART 6.0- CSS• ART 7.0- C2
ARTEP-MTP• Task• Condition• Standard
UJTL provides:• Overall description of tasks &
functions performed at strategic and operational levels of war.
• Common language and reference system.
AUTL provides: • Tasks performed by Army units at tactical level of war.• Basis for unit specific Armytraining & evaluation programs.
MTP provides:• Detailed T&EO with specific
collective tasks essential to unit’s mission.
Figure 3-2. UJTL-AUTL-MTP Crosswalk

SH-2-26
significant water obstacles, mountainous terrain, tropical, cold or desert environments, indigenous population patterns, and other related demographics all have the potential to affect an organization’s METL.
COMMANDERS’ ANALYSIS
3-10. To identify mission essential tasks, the commander conducts an analysis of the unit’s operational mission. In the absence of a directed operational mission, analysis is based on the unit’s assigned mission in wartime operational plans. In the absence of clear alignment with wartime operational plans, mission analysis is based on analysis of missions for which the unit was designed to accomplish in wartime, as established in the unit’s MTOE/TDA and how-to-fight doctrine. Higher commanders provide guidance to help their subordinate commanders focus their analysis. Mission analysis results in identification of specified and implied tasks the unit must perform and in a restatement of the unit’s mission. To provide battle focus, the commander identifies those tasks critical for mission accomplishment. These tasks constitute the organization’s METL. The next higher commander approves the METL. A change of operational mission will require the commander to again analyze his mission and adjust his unit’s METL accordingly. 3-11. The METL development process reduces the number of tasks on which the organization must train and focuses the organization's training efforts on the most important collective training tasks required to accomplish the mission.
METL DEVELOPMENT FUNDAMENTALS
3-12. The following fundamentals apply to METL development— • The METL is derived from the organization’s war plans and related
tasks in external guidance. • Mission essential tasks must apply to the entire organization. METL
does not include tasks assigned solely to subordinate organizations. • Each organization’s METL must support and complement the METL
of higher headquarters or the supported unit. • The availability of resources does not affect METL development. The
METL is an unconstrained statement of tasks required to accomplish wartime missions.
• METL is not prioritized; however, all tasks may not require equal training time.
• Commanders direct operations and integrate the BOS through plans and orders. The BOS are used to systematically ensure that interdependent organizational tasks necessary to generate, sustain, and apply combat power are directed toward accomplishing the overall mission.

SH-2-27
3-13. Figure 3-3 summarizes the fundamental concepts in the METL development process: Battlefield Operating Systems 3-14. The Battlefield Operating Systems are—
• Intelligence. The intelligence system plans, directs, collects, processes, produces, and disseminates intelligence on the threat and the environment; performs Intelligence Preparation of the Battlefield (IPB); and other intelligence tasks. Intelligence is developed as a part of a continuous process and is fundamental to Army operations. • Maneuver. Commanders maneuver forces to create the conditions for
tactical and operational success. Maneuver involves movement to achieve positions of advantage with respect to enemy forces. Through maneuver, friendly forces gain the ability to destroy enemy forces or hinder enemy movement by direct and indirect application of firepower or threat of its application.
• Fire Support. Fire support consists of fires that directly support land, maritime, amphibious, and special operations forces (SOF) in engaging enemy forces, combat formations, and facilities in pursuit of tactical and operational objectives. Fire support integrates and synchronizes fires and effects to delay, disrupt, or destroy enemy forces, systems, and facilities. The fire support system includes the collective and coordinated use of target acquisition data, indirect fire weapons, fixed-winged aircraft, electronic warfare, and other lethal and non-lethal means to attack targets.
• Air Defense. Air defense protects the force from air and missile attack and aerial surveillance. It prevents enemies from interdicting friendly forces
Figure 3-3. Fundamental Concepts used in METL Development
• METL is derived from the organization’s war plans and related tasks in external guidance.
• Mission essential tasks must apply to the entire organization. METL does not include tasks assigned solely to subordinate organizations.
• The METL must support and complement the METL of the next higher headquarters. The METL for CS and CSS units must also support and complement the supported unit METL.
• Resource availability does not affect METL development. the METL is an unconstrained statement of tasks required to accomplish wartime missions.
• METL is not prioritized. However, all tasks may not require equal training time.
• Commanders use BOS to apply combat power.

SH-2-28
while freeing commanders to synchronize maneuver and fire power. Weapons of mass destruction and proliferation of missile technology increase the importance of the air defense systems.
• Mobility/Counter-mobility/Survivability. Mobility operations preserve the freedom of maneuver for friendly forces. Mobility missions include breaching obstacles, increasing battlefield circulation, improving or building roads, providing bridge and raft support, and identifying routes around contaminated areas. Counter-mobility denies mobility to enemy forces. Survivability operations protect friendly forces from the effects of enemy weapon systems and from natural occurrences. Nuclear, biological, and chemical defense measures are essential survivability tasks.
• Combat Service Support. CSS provides the physical means with which forces operate, from the production base and replacement centers in CONUS to soldiers engaged in close combat. CSS includes many technical specialties and functional activities. It includes maximizing the use of host nation infrastructure and contracted support.
• Command and Control. Command and control (C2) has two components--the commander and the C2 system. The C2 system supports the commander's ability to make informed decisions, delegate authority, and synchronize the BOS. Moreover, the C2 system supports the commander's ability to adjust plans for future operations, even while focusing on current operations. Reliable communications are central to C2 systems. Staffs work within the commander's intent to direct units and control resource allocations. Through C2, commanders initiate and integrate all BOS toward the common goal--mission accomplishment.
METL DEVELOPMENT SEQUENCE
3-15. Commanders involve subordinate commanders and their CSM/1SG and key NCOs in METL development to create a team approach to battle focused training. Subordinate participation develops a common understanding of the organization's critical wartime operational mission requirements so that METLs throughout the organization are mutually supporting. Subordinate commanders can subsequently apply insights gained during preparation of the next higher headquarters' METL in the development of their METL. The CSM/1SG and other key NCOs must understand the organization's collective METL so that they can identify individual tasks for each collective mission essential task.
3-16. The higher commander should use the METL for leader development. The senior commander can have a professional dialogue on METL development, selection of battle tasks, and training. This gives the commander the opportunity to coach and mentor subordinates and train them for positions of higher authority. This should be done at all levels.

SH-2-29
BATTLE TASKS 3-17. After review and approval of subordinate organizations' METL, the senior commander selects battle tasks. A battle task is a staff or subordinate organization mission essential task that is so critical that its accomplishment will determine the success of the next higher organization's mission essential task. Like units may have different battle tasks selected depending on their mission. Battle tasks are selected down to the company level. Company commanders are the lowest echelon commander who selects battle tasks. Battle tasks allow the senior commander to define the training tasks that-- • Integrate the BOS. • Receive the highest priority for resources such as ammunition, training areas
and facilities (to include Live and Virtual simulators and Constructive simulations), materiel, and funds.
• Receive emphasis during external evaluations.

SH-2-30
3-18. Figure 3-4 depicts the higher-to-lower relationship of mission and METL. It illustrates the relationship the subordinate unit METLs have, through the selection of battle tasks, on the higher headquarters’ METL. Although an MTO&E brigade is used as the example, the METL/battle/critical/leader/individual task construct is the same for all units, including TDA and echelons above divisions/echelons above corps.
• Battalions have METL tasks selected as brigade battle tasks. • Companies have METL tasks selected as battalion battle tasks. • Platoons have critical tasks selected as company battle tasks.
3-19. Finally, it shows the connection between company METL to platoon, squad, leader and individual soldier tasks. These relationships will be examined in detail later in this chapter.
Figure 3-4. Relationships Between Mission, METL,Critical Tasks, and Battle Task
Commander’s Guidance
PlatoonCritical Tasks
IndividualSoldier Tasks
Squad CriticalTasks & Drills
PlatoonLeader Tasks
SquadLeader Tasks
BattalionMission
BattalionMETL
BattalionBattleTasks
CompanyMission
CompanyMETL
Selected
METLTasks
BrigadeMission
BrigadeMETL
BrigadeBattleTasks
Selected
METLTasks
PlatoonMission
CompanyBattleTasks
Selected
Tasks
Selected
Tasks
Selected
Tasks

SH-2-31
BRIGADE METL DEVELOPMENT 3-20. The BCT commander involves all subordinate combat, CS, and CSS unit commanders, their CSM/1SG’s, and the BCT staff in the METL development process. Their participation ensures a better understanding of the BCT mission and METL, providing insights that can be applied when they develop their METL. The BCT commander follows the METL development sequence shown in figure 3-5.
3-21. The brigade commander: • Analyzes the brigade’s assigned mission and identifies specified and implied
tasks. • Analyzes the operational environment, and other external guidance to identify
any other tasks. • Reviews the division commander’s mission and METL. • Restates the brigade wartime operational mission. • Uses the mission-to-collective task matrix found in the ARTEP-MTP to
identify the collective tasks that support the brigade’s restated mission, and selects those collective tasks that are critical for wartime mission accomplishment. These tasks become the brigade’s METL.
• Sequences the METL tasks as they are expected to occur during the execution of the wartime operational mission.
• Back briefs the division commander and obtains approval of the brigade METL. The division commander selects specific brigade METL tasks as division battle tasks.
Figure 3-5. Brigade METL Development Sequence
METL DEVELOPMENT SEQUENCE:• Analyze brigade assigned mission, and identify specified and implied
tasks.• Analyze operational environment and external guidance.• Review division commander’s mission & METL.• Restate brigade operational mission.• Identify collective tasks that support brigade restated mission. Select
tasks critical for mission accomplishment. These tasks become the brigade’s METL.
• Sequence METL tasks as they are expected to occur during missionexecution.
• Back brief division commander and obtain approval of brigade METL. Division commander designates selected brigade METL tasks as Division Battle Tasks.
• Provide approved METL to staff, and battalion and separate company commanders.

SH-2-32
• Provides the approved METL to the staff, and battalion and separate company commanders.
BATTALION METL DEVELOPMENT 3-22. The battalion commander involves all subordinate company commanders, CSM/1SGs, staff and key NCOs in the battalion METL development process. Their participation ensures a better understanding of the battalion mission and METL, providing insights that can be applied when they develop company METLs. The battalion commander follows the METL development sequence shown in figure 3-6.
3-23. The battalion commander: • Analyzes the battalion’s assigned mission and identifies specified and implied
tasks. • Analyzes the operational environment, and other external guidance to identify
any other tasks. • Reviews the brigade commander’s mission and METL. • Restates the battalion wartime operational mission. • Uses the mission-to-collective task matrix found in the ARTEP-MTP to
identify the collective tasks that support the battalion’s restated mission, and selects those collective tasks that are critical for wartime mission accomplishment. These tasks become the battalion’s METL.
• Sequences the METL tasks as they are expected to occur during the execution of the wartime operational mission.
Figure 3-6. Battalion METL Development Sequence
METL DEVELOPMENT SEQUENCE:• Analyze battalion assigned mission, and identify specified and implied
tasks.• Analyze operational environment and external guidance.• Review brigade commander’s mission & METL.• Restate battalion operational mission.• Identify collective tasks that support battalion restated mission. Select
tasks critical for mission accomplishment. These tasks become the battalion’s METL.
• Sequence METL tasks as they are expected to occur during missionexecution.
• Back brief brigade commander and obtain approval of battalion METL. Brigade commander designates selected battalion METL tasks as Brigade Battle Tasks.
• Provide approved METL to staff and company commanders.

SH-2-33
• Back briefs the brigade commander and obtains approval of the battalion METL. The brigade commander selects specific battalion METL tasks as Brigade battle tasks.
• Provides the approved METL to the staff and company commanders.
3-24. Figure 3-7 illustrates battalion and separate company METL for the BCT METL “Conduct an Attack.”
3-25. The remainder of this chapter will describe and illustrate: • Company METL development. • Platoon critical task and drill list development. • Squad, section, crew, team critical task and drill list development. • Individual soldier task list development.
BCT MISSION:“On order, BCT attacks…In order to … “
X
BCT METL:Conduct an Attack
IN BN MISSION:“On order, BN attacks…In order to … “
IN BN METL:•• Conduct an Attack vs.
a Stationary Force•• Conduct a Breach of
an Obstacle
MI
MI Co MISSION:Provide ISR Intelligence Supportfor an ATTACK
•
FA BN MISSION:Provide FS for an ATTACK
FA BN METL:•• Coordinate FS• Acquire Targets• Deliver Fires
ENGR MISSION:Provide MobilitySupport for an ATTACK
BSC MISSION:Provide C4 OPS for an ATTACK
BSC METL:• IOM C4
InformationNetworks
DETERMINES
SUPPORTS
BSB
BSB MISSION:Provide CSS foran ATTACK
BSB METL:• Defend Against•
Level I And II Threats
Provide DS levelCombat ServiceSupport
• • Conduct TrojanSpirit Operations
DETERMINES
MI Co METL:•Conduct OM, IP&D•Conduct ISR ASAS•Performa Target Development
SUPPORTSSUPPORTS
SUPPORTS
ENGR METL• Conduct
Tactical & Technical ENGR Recon
• Conduct Mobility OPS
Figure 3-7. METL-Battle Task Crosswalk
DETERMINES

SH-2-34
COMPANY METL DEVELOPMENT 3-26. The commander involves the 1SG, all platoon leaders, and key NCOs in the company METL development process. Their participation ensures a better understanding of the company mission and METL, providing them insights that can be applied when they develop platoon critical tasks and platoon-level leader tasks. The company commander follows the METL development sequence shown in figure 3-8.
3-27. The company commander: • Analyzes the company’s assigned mission and identifies specified and implied
tasks. • Analyzes the operational environment, and other external guidance to identify
any other tasks. • Reviews the battalion commander’s mission and METL. • Restates the company wartime operational mission. • Uses the mission-to-collective task matrix found in the ARTEP-MTP to
identify the collective tasks that support the company’s restated mission, and selects those collective tasks that are critical for wartime mission accomplishment. These tasks become the company’s METL.
• Sequences the METL tasks as they are expected to occur during the execution of the wartime operational mission.
• Back briefs the battalion commander and obtains approval of the company METL. The battalion commander selects specific company METL tasks as battalion battle tasks.
Figure 3-8. Company METL Development Sequence
METL DEVELOPMENT SEQUENCE:• Analyze company assigned mission, and identify specified and
implied tasks.• Analyze operational environment and external guidance.• Review battalion commander’s mission & METL.• Restate company operational mission.• Identify collective tasks that support company restated mission.
Select tasks critical for mission accomplishment. These tasks become the company’s METL.
• Sequence METL tasks as they are expected to occur during mission execution.
• Back brief battalion commander and obtain approval of company METL. Battalion commander designates selected company METL tasks as Battalion Battle Tasks.
• Provide approved METL to platoon leaders and subordinate leaders.

SH-2-35
• Provides the approved METL to the platoon leaders and other subordinate leaders.
3-28. The importance of METL development followed by the collective task to individual task crosswalk at company, battery, and troop level and below cannot be over emphasized. Figure 3-9 illustrates the company commander’s analysis sequence used during METL development. The company commander pays particular attention to company METL tasks selected by the battalion commander as battalion battle tasks. The company commander must acknowledge the critical importance of achieving and sustaining proficiency on company METL tasks necessary to the battalion accomplishing its wartime operational mission.
Figure 3-9. Company METL Development
BATTALION MISSION:“On order, BN …”
BATTALION METL:Task 1a:Task 1b:
BATTALION BATTLETASKS:Task 1:Task 2:
SELECTED COMPANYMETL TASKS
COMPANY MISSION:“On order, CO …In order to …”
COMPANY METL:Task 1:Task 2: Task 3: Task 4:
SUPPORTS
SUPPORTS
DETERMINES
DETERMINES

SH-2-36
Company METL Development Examples 3-29. An example of METL development for an infantry company is shown in figure 3-10. It illustrates the supporting relationships of the infantry company mission and METL to the infantry battalion mission and METL.
3-30.
DETERMINES
SUPPORTS
IN BN MISSION:“On order, BN attacks…In order to … “
IN BN METL:•• Conduct an Attack vs.
a Stationary Force• Conduct a Breach of
an Obstacle
DETERMINES
SUPPORTS
IN COMPANY METL:• Conduct Troop Leading Procedures• Conduct a Rehearsal•• Assault an Objective• Breach an Obstacle• Conduct an Area Recon• Integrate Direct Fire• Integrate Indirect Fire Support• Treat & Evacuate Casualties
DETERMINES
SUPPORTS
IN CO MISSION:“On order, CO attacks…In order to … “
SUPPORTS
Figure 3-10. Infantry Company METL Development

SH-2-37
PLATOON CRITICAL TASK AND DRILL LIST DEVELOPMENT
3-31. Platoon and below must perform critical tasks that are essential to company METL accomplishment. The development of the platoon critical tasks and drills list requires discussion between the company commander and platoon leader. • The company commander and 1SG discuss the company mission and METL
with the platoon leader and platoon sergeant (PSG). The platoon leader back briefs the company commander on the platoon mission.
• The platoon leader, with the PSG, using the appropriate ARTEP-MTP, selects platoon critical tasks and drills that support the company METL and platoon mission.
• The platoon leader discusses the proposed platoon critical tasks and drills list with the company commander. The company commander provides feedback on the selected platoon critical tasks and drills list. The company commander approves (modifies as necessary) the platoon critical tasks and drills list.
• The company commander designates platoon-level leader tasks that are essential for the platoon leader to execute platoon critical tasks/drills to standard.

SH-2-38
3-32. Figure 3-13 illustrates company commander, platoon leader, and platoon sergeant actions during selection of platoon critical tasks and drills and platoon-level leader tasks. The platoon leader use the battalion commander approved METL as their start point.
Figure 3-13. Platoon Critical Task and Platoon–Level Leader Task Selection
PLATOON MISSION:“On order, PLT …In order to … “
PLATOON CRITICAL TASKS & DRILLS:Task 1:Task 2:Task 3: Drill 1:Drill 2:
COMPANY MISSION:“On order, CO …In order to …”
COMPANY METL:Task 1:Task 2: Task 3: Task 4:
PLATOON LEADER TASKS:Task 1:Task 2: Task 3:Task 4:
DETERMINES
DETERMINES
DETERMINES
DETERMINES
SUPPORTS SUPPORTS
SUPPORTS
SUPPORTS

SH-2-39
PLATOON CRITICAL TASK AND LEADER TASK DEVELOPMENT EXAMPLES 3-33. An example of platoon critical tasks and platoon-level leader tasks selected for an infantry platoon is shown in figure 3-14. This figure illustrates the relationship of the platoon mission and critical tasks to the company mission and METL. It further shows the supporting relationship of the platoon leader tasks to the platoon critical tasks.
PLATOON -LEVEL LEADER TASKS:Analyze terrain.Perform TLPs. Emphasize Step#3, Make a Tentative Plan.Conduct platoon maneuver.Plan for supporting fires.
Figure 3-14. Selection of Infantry Platoon Critical Tasks and Platoon-Level Leader Tasks
INFANTRY PLT MISSION:“On order, PLT attacks…In order to … “
INFANTRY PLT CRITICAL TASKS:• Conduct Troop Leading Procedures• Conduct a Rehearsal• Assault an Objective• Attack by Fire• Breach an Obstacle• Treat & Evacuate Casualties
DETERMINES
SUPPORTS
IN CO MISSION:“On order, CO attacks…In order to … “
IN COMPANY METL:• Conduct Troop Leading Procedures• Conduct a Rehearsal• Assault an Objective• Breach an Obstacle• Conduct an Area Recon• Integrate Direct Fire• Integrate Indirect Fire Support• Treat & Evacuate Casualties
DETERMINES
SUPPORTS
SUPPORTSDETERMINES
SUPPORTS
DETERMINES
SUPPORTS

SH-2-40
SQUAD, SECTION, CREW, TEAM CRITICAL TASK AND DRILL LIST DEVELOPMENT
3-34. The development of the squad/crew/team critical tasks and drills list, supporting squad-level leader tasks, and supporting individual soldier tasks requires discussion between the platoon leader, PSG and squad leaders. • The platoon leader briefs the platoon sergeant and squad leaders on the
platoon mission, critical tasks and drills list, and platoon level leader tasks. • The platoon sergeant and squad leaders, using appropriate ARTEP-MTP and
drills, discuss and select squad/crew/team collective tasks and drills, and squad-level leader tasks that support the platoon’s critical tasks and drills list.
• The PSG and squad leaders back brief the platoon leader on selected supporting squad/crew/team critical tasks and drills, and squad-level leader tasks. The platoon leader approves (modifies as necessary) the proposed squad/crew/team critical tasks and drills list, and squad-level leader tasks.

SH-2-41
3-35. Figure 3-17 depicts platoon leader, platoon sergeant, and squad leader actions during selection of squad critical tasks and drills and squad-level leader tasks. The platoon leader uses the platoon mission and the company commander approved platoon critical tasks and drills list as the start point.
Figure 3-17. Squad Critical Task & Drill, and Squad-Level Leader Task Selection
PLATOON MISSION:“On order, PLT …In order to … “
PLATOON CRITICAL TASKS & DRILLS:Task 1:Task 2:Task 3: Drill 1:Drill 2:
PLATOON LEADER TASKS:Task 1:Task 2: Task 3:Task 4:
SQUAD CRITICAL TASKS & DRILLS:Task 1:Task 2: Drill 1:Drill 2:Drill 3:
SQUAD LEADER TASKS:Task 1:Task 2:Task 3:Task 4:
COMPANY MISSION:“On order, CO …In order to …”
COMPANY METL:Task 1:Task 2: Task 3: Task 4:
SUPPORTS
SUPPORTS SUPPORTS
SUPPORTSSUPPORTS
DETERMINES
DETERMINESDETERMINES
DETERMINES
DETERMINES

SH-2-42
SQUAD, SECTION, CREW, TEAM CRITICAL TASK AND DRILL LIST DEVELOPMENT EXAMPLES 3-36. Figure 3-18 illustrates the process for an infantry squad.
INFANTRY PLT MISSION:“On order, PLT attacks…In order to … “
DETERMINES
SUPPORTS
INFANTRY PLT CRITICAL TASKS:• Conduct Troop Leading Procedures• Conduct a Rehearsal• Assault an Objective• Attack by Fire• Breach an Obstacle• Treat & Evacuate Casualties
DETERMINES
SUPPORTS
SUPPORTS
DETERMINESPLATOON LEVEL LEADER TASKS:
Analyze terrain.Perform TLPs. Emphasize Step#3, Make a Tentative Plan.Conduct platoon maneuver.Plan for supporting fires.
INFANTRY SQD CRITICAL TASKS:
Enter/Clear TrenchKnock Out a BunkerReact to Chemical Attack
DETERMINES
SUPPORTS
SQUAD LEADER TASKS:Analyze terrainPerform TLPs. Conduct Squad ManeuverControl Organic Fires
SUPPORTS
Figure 3-18. Selection of Infantry Squad Critical Tasks and Squad-Level Leader Tasks

SH-2-43
INDIVIDUAL SOLDIER TASK SELECTION
3-37. The development and selection of supporting individual soldier tasks requires discussion between the platoon leader, PSG, and squad leaders. • Based on the platoon leader’s guidance, the PSG and squad leaders, using
appropriate ARTEP-MTP and STPs, select individual soldier tasks that support platoon and squad/crew/team critical tasks and drills.
• The PSG provides feedback to the squad leaders on selected individual soldier tasks. The PSG reviews and modifies as necessary supporting individual soldier tasks selected by the squad leaders.
• The platoon leader approves the supporting individual soldier tasks selected by the squad leaders.
• The PSG briefs the company 1SG on the platoon leader’s approved squad/crew/team critical collective tasks/drills and supporting individual soldier tasks.
Figure 3-21. Individual Soldier Task Selection
PLATOON MISSION:“On order, PLT …In order to … “
PLATOON CRITICAL TASKS & DRILLS:Task 1:Task 2:Task 3: Drill 1:Drill 2:
PLATOON LEADER TASKS:Task 1:Task 2: Task 3:Task 4:
SQUAD CRITICAL TASKS & DRILLS:Task 1:Task 2: Drill 1:Drill 2:Drill 3:
SQUAD LEADER TASKS:Task 1:Task 2:Task 3:Task 4:
INDIVIDUAL SOLDIER TASKS:Task 1:Task 2:Task 3:
DETERMINES DETERMINES
DETERMINESDETERMINES
DETERMINES
SUPPORTS SUPPORTS
SUPPORTS
SUPPORTS
SUPPORTS
SUPPORTS

SH-2-44
3-38. Figure 3-21 illustrates the process of selecting individual soldier tasks. This figure shows that individual task proficiency provides the basic building
block of collective task proficiency.
Figure 3-21. Individual Soldier Task Selection
PLATOON MISSION:“On order, PLT …In order to … “
PLATOON CRITICAL TASKS & DRILLS:Task 1:Task 2:Task 3: Drill 1:Drill 2:
PLATOON LEADER TASKS:Task 1:Task 2: Task 3:Task 4:
SQUAD CRITICAL TASKS & DRILLS:Task 1:Task 2: Drill 1:Drill 2:Drill 3:
SQUAD LEADER TASKS:Task 1:Task 2:Task 3:Task 4:
INDIVIDUAL SOLDIER TASKS:Task 1:Task 2:Task 3:
DETERMINES DETERMINES
DETERMINESDETERMINES
DETERMINES
SUPPORTS SUPPORTS
SUPPORTS
SUPPORTS
SUPPORTS
SUPPORTS

SH-2-45
INDIVIDUAL SOLDIER TASK SELECTION EXAMPLES 3-39. Figure 3-22 illustrates the individual soldier task selection process for the soldiers of the infantry squad.
INFANTRY SQUAD CRITICAL TASKS:
Enter/Clear TrenchKnock Out a BunkerReact to Chemical Attack
DETERMINES
DETERMINES
SUPPORTS
SUPPORTS
SQUAD-LEVEL LEADER TASKS:• Analyze terrain• Perform TLPs• Conduct Squad Maneuver• Control Organic Fires
INDIVIDUAL SOLDIER TASKS:• Move as a fire team member
• Engage targets with M16A2, M203, and M249
• Employ hand grenades
Figure 3-22. Selection of Infantry Individual Soldier Tasks

SH-2-46
3-40. An example of individual soldier task selection for a FA battery FDC, howitzer section and company FIST is figure 3-23.
Figure 3-23. Selection of Individual Tasks
DETERMINES
SUPPORTS
INDIVIDUAL TASKS:• Process Fire Missions withAFC/DS (Registration, Priority, Fire PlanTarget, Area & Special Missions)
• Process Fire Plans Using AFC/DS• Execute Scheduled Fires• Supervise/Compute Special Fire Missions
in Degraded Mode
INDIVIDUAL TASKS:• Align Close in Aiming Points with
Panoramic Telescope• Check Panoramic Telescope Boresight
with M139 or M140 Alignment Device• Lay a Howitzer for Initial Direction of
Fire Using the Panoramic Telescope• Process Fire Missions on the Gun
Display (GDU)
BATTERY METL:• Determine Firing Data• Conduct Fire Missions• Move the Battery• Conduct Occupation of
Position Area
SUPPORTSBATTERY TOC/FDCCRITICAL TASKS:• Determine Firing
Data (FDC)• Conduct Battle Tracking (TOC)• Coordinate Positioning & Direct
Movement of Platoons (TOC)
INDIVIDUAL FO TASKS:• Call for & Adjust Fire• Establish Observation Post(s)• Process Data in the AN/PSG-7
CO FIST CRITICAL TASKS:• Plan Fires to Support Maneuver OPS.• Participate in Maneuver & FS Rehearsals • Coordinate, Direct & Adjust other FS Assets• Coordinate & Control Fire Plan Execution• Conduct Fire Missions
DETERMINES
HOWITZER PLATOONCRITICAL TASKS:• Establish & Maintain
Platoon FDC• Conduct Fire Missions• Move the Platoon• Conduct Occupation of Position Area.

SH-2-47
3-41. Individual soldier task selection for soldiers of the ambulance squad is shown at figure 3-24.
.
DS AMBULANCE SQUAD CRITICAL TASKS:
• Set up unit (section) defense• Defend against Level I attack• Operate Ambulance Exchange Points
(AXPs)
SQUAD-LEVEL LEADER TASKS:
• Conduct a defense by a squad/section
• Reorganize a squad/section following enemy contact while in the defense
• Supervise the establishment of AXPs
INDIVIDUAL SOLDIER TASKS:• Engage targets with M16A1/M16A2• Construct individual fighting position• Open the airway• Manage a convulsive and/or seizing patient• Initiate treatment for hypovolemic shock
DETERMINES
DETERMINES
SUPPORTS
SUPPORTS
Figure 3-24. Selection of Medical Individual Soldier Tasks

SH-2-48
BATTLE STAFF METL 3-42. The battle staff consists of the battalion staff, and attached and direct support CS and CSS elements. Battalion staff and CS and CSS leaders develop mission essential tasks that support the battalion METL. They use the same process as the battalion and company commanders to develop their METL. Battle staff mission essential task lists are reviewed and approved by the battalion executive officer. 3-43. The battalion commander must ensure the battle staff METL integrates combined arms tasks and functional tasks to enable the battalion to fight as a combined arms team. As additional assets are task-organized, they must be integrated into the battle staff. The process for the development of battle staff METL and associated staff officer tasks for the infantry battalion of the BCT is shown at figure 3-25.
DETERMINES
SUPPORTS
IN BN MISSION:“On order, BN attacks…In order to … “
IN BN METL:•• Conduct an Attack vs.
a Stationary Force• Conduct a Breach of
an Obstacle
IN BN BATTLE STAFF METL TASKS:•• Plan OPS using MDMP• Conduct IPB• Establish Common Operating
Picture (COP)• Develop a R&S Plan
STAFF OFFICER TASKS:S3: Develop Attack PlanS2: Develop R&S planFSO: Develop Fire Support PlanCHEMO: Develop NBC Survey PlansENGR: Utilize Digital Terrain SupportSystem (DTSS) to Produce TerrainAnalysis Products; Develop a Scheme of Engineer Support (SOES)
DETERMINES
DETERMINES
SUPPORTS
SUPPORTS
Figure 3-25. Infantry Battalion Battle Staff METL Development

SH-2-49
TRAINING OBJECTIVES
3-44. After mission essential tasks are selected, the commander develops each METL task statement into a complete statement of required unit performance for mission success. Doing so establishes the training objective for each METL task, consisting of: • Task. A clearly defined and measurable activity accomplished by
organizations and individuals. • Condition(s). The circumstances and environment in which a task is to be
performed. • Standard. The minimum acceptable proficiency required in the performance
of a particular training task. Each time a METL task is selected as a training objective, the task and standards remain the same for different training events. However, conditions may be varied for different training events to match the skill level of the training audience at that time. Task 3-45. After identifying battalion and company METLs, supporting platoon and squad collective tasks, and supporting leader and soldier tasks, leaders establish the conditions and standard for each task using the applicable ARTEP-MTP, and STP. Condition 3-46. Commanders modify conditions to fit the training environment and their assessment of the units' level of proficiency. By following a crawl-walk-run approach to training, commanders may decide to modify conditions to increase the level of difficulty under which a task is performed. This technique is particularly useful when moving from crawl to walk and eventually to run level training on a specific task. The goal is to create a realistic and demanding training environment with the resources available.
3-47. To modify a condition statement, the commander takes the following steps: • Read the existing ARTEP-MTP or STP statement. (It is deliberately general
because a more specific conditions statement may not apply to all units.) • Read the applicable references with suggested support requirements and
identify the resources needed to train the task. • Consider the local situation--ammunition available, Opposition Force
(OPFOR), time, terrain, ranges, TADSS, and weather conditions. • Prepare a revised condition statement. Conditions established should be
realistic and practical.
3-48. The condition statement will include comments on one or more of the following: • Status and capability of threat forces.

SH-2-50
• Equipment, material, tools, or other resources allocated for use in performing the task.
• References, checklists, and other memory aids for use during actual task performance.
• Physical or environmental conditions; for example, darkness, dense tropical forests, cold weather, or NBC conditions.
• Assistance available during performance of the task. • Time allocated for task performance. • Restrictions or limitations.
Standard 3-49. The standard for most tasks is found in applicable ARTEP-MTP and STP. The standard for task performance is the Army standard. For tasks without published training objectives, commanders establish task, condition, and standards using mission orders and guidance, lessons learned from similar exercises or operations, and their professional judgment. The commander who approves these specific tasks, conditions, and standards also approves the unit’s METL. Commanders may use the following documents to help develop appropriate tasks, conditions, and standards:
• ARTEP-MTP. • STP • DA Pamphlet 350-38. • Deployment or mobilization plans. • AUTL • UJTL. • Army, MACOM, and local regulations. • Local standing operating procedures (SOP). • FM. • Equipment TM and TC.

SH-2-51
3-50. The following training objectives are examples for BCT through soldier level that support the BCT METL task of “Conduct an Attack”, Figure 3-31. Figures 3-32 through 3-36 cover the training objectives for an infantry battalion, down to the soldier level, that supports the BCT METL of “Conduct and Attack.”
Figure 3-31. Example of Training Objective for a BCT Mission Essential Task
Conduct an attack
The brigade is conducting operations independently or as part of a division or Army forces (ARFOR) and has received an operation order (OPORD) or fragmentary order (FRAGO) to conduct an attack at the location and time specified. Coalition forces and noncombatants may be present in the operational environment.
1. Brigade leaders gain and or maintain situational awareness (SA). Brigade commander and staff receive an order or anticipate a new mission and begin the military decision-making process (MDMP). Brigade task organizes forces within the brigade.
2. Effects coordination cell (ECC) obtains guidance from the commander; plans, coordinates, and achieves the desired effects utilizing organic and attached assets.
3. Staff plans mobility, countermobility, and survivability: nuclear, biological, and chemical support; air defense (AD) support; and combat service support supporting operations.
4. Brigade commander and staff conduct risk management.5. Brigade commander and staff conduct back briefs and
rehearsals to ensure subordinates understand commander's intent and concept.
6. Brigade executes the attack; masses all available combat power to destroy enemy IAW the commander’s intent.
7. Brigade consolidates and reorganizes as necessary.8. Brigade continues operations as necessary.
MISSION ESSENTIAL TASK:
CONDITIONS:
STANDARD:
Figure 3-32. Example of Training Objective for an Infantry Battalion, BCT Mission Essential Task
Conduct an attack against a stationary force.
The battalion is conducting operations independently or as part of the brigade and has received an operation order (OPORD) or fragmentary order (FRAGO) to conduct a force-oriented attack against a stationary force at the location and time specified. Coalition forces and noncombatants may be present in the operational environment.
1. Battalion leaders gain and or maintain situational awareness (SA). Battalion commander and staff receive an order or anticipate a new mission and begin the military decision-making process (MDMP). Staff planning: organizes the battalion to accomplish the mission; integrate and synchronize the BOS.
2. Battalion leaders conduct risk management.3. Battalion prepares for the attack: maximize use of available
time; conduct R&S; units conduct pre-combat checks and rehearsals.
4. Battalion executes the attack; masses all available combat power to destroy enemy IAW the commander’s intent.
5. Battalion consolidates and reorganizes as necessary.6. Battalion secures and processes EPWs as required.7. Battalion treats and evacuates casualties.8. Battalion continues operations as necessary.
MISSION ESSENTIAL TASK:
CONDITIONS:
STANDARD:
Figure 3-33. Example of Training Objective for an Infantry Company Mission Essential Task
Assault an Objective.
The company is conducting operations as part of the battalionand has received an operation order (OPORD) or fragmentary order(FRAGO) to assault an objective. The company has been provided guidance on the ROE. Coalition forces and noncombatants may be present in the operational environment.
MISSION ESSENTIAL TASK:
CONDITIONS:
STANDARD: The Company moves tactically to assault, support, or breach positions using the appropriate formation and technique. The Company provides supporting fires. The Company assaults the objective and destroys, captures, or forces the enemy to withdraw. The Company complies with the ROE.
Figure 3-35. Example of Training Objective for an Infantry Squad Battle Task
Knock Out a Bunker
The squad is conducting operations as part of a larger force andhas received an operations order (OPORD) or fragmentary order(FRAGO) to knock out a bunker at a specified location. All necessary personnel and equipment are available. The squad hascommunications with higher, adjacent, and subordinate elements.The squad has been provided guidance on the rules of engagement(ROE) and/or rules of interaction (ROI). Coalition forces andnoncombatants may be present in the operational environment.
The squad knocks out the bunker in accordance with (IAW) tactical standing operating procedures (TSOP), the order and/or commander’s guidance. The squad destroys the designatedbunker by killing, capturing or forcing the withdrawal of the enemy.The squad complies with ROE and/or ROI.
MISSION ESSENTIAL TASK:
CONDITIONS:
STANDARD:

SH-2-52
Figure 3-34. Example of Training Objective for an Infantry Platoon Battle Task
Assault an Objective
The platoon is conducting operations as part of a larger force and has received an operation order (OPORD) or fragmentary order(FRAGO) to assault an objective. The company has been provided
guidance on the ROE. Coalition forces and noncombatants may be present in the operational environment.
The Platoon moves tactically to assault, support, or breach positions using the appropriate formation and technique.The Platoon assaults the objective and destroys, captures,or forces the enemy to withdraw. The Platoon complies withthe ROE.
MISSION ESSENTIAL TASK:
CONDITIONS:
STANDARD:
Figure 3-36. Example of Training Objective for an Infantry Individual Soldier Task
Engage Targets with an M203 Grenade Launcher
In a field or garrison environment, given a zeroed M203 grenadeLauncher mounted on an M16A1 or M16A2 rifle, enemy targetslocated at engageable ranges, and sufficient ammunition.
Enemy targets are destroyed or disabled without causing injury ordeath to friendly personnel.
MISSION ESSENTIAL TASK:
CONDITIONS:
STANDARD:

SH-2-53
3-51. Figures 3-37 through 3-41 cover the training objectives for a brigade support battalion and its brigade support medical company, down to the soldier level, that support the BCT METL task of “Conduct an Attack.”
Figure 3-37. Example of Training Objective for a Brigade Support Battalion, BCT Mission Essential Task
Provide DS level Combat Service Support (Manage Distribution Systems)
The BSB HQ has analog and digital communication with higher andlower HQs. The higher HQ OPORD with all annexes, statusreports, maps, overlays, and other required documents are continuously updated using BFACS, MC4, logistics and combathealth support STAMIS, and movement tracking devices. Unit higher and lower TSOPs are available. Logistics and CHS requirements are generated by the brigade and attached units. Sustainment controls have been established by the brigade servicesupport order. The Distribution Management Center (DMC) provides the brigade with total assets and in transit visibility(TAV/ITV) of: commodities, movements, units within, unitsassigned, or units inbound or outbound from the battlespace. TheDMC conducts reach operations using digital communications toprogram and obtain sustainment resources from worldwidesources. The DMC integrates regionally available contracted, hostnation or third country resources into the brigade distribution system. The DMC has authority to direct, redirect, cross-level ormass logistics and combat health support (CHS) resources at critical points within brigade battlespace.
The DMC is managed with TAV/ITV of all commodities, movementsand units within, assigned, inbound or outbound to the brigade area of responsibility IAW command directives.
MISSION ESSENTIAL TASK:
CONDITIONS:
STANDARD:

SH-2-54
Figure 3-39. Example of Training Objective for an Ambulance Platoon Battle Task
Provide Ground Ambulance Evacuation Support
Battalion aid station or supported units have requested ground ambulance support. Ambulance support may be pre-positioned with the supported unit or dispatched from the unit area. Ambulance personnel are briefed on location and directions to location of supported unit casualties. Casualties located in supported units may be contaminated and require initial medicaltreatment. Authorized medical supplies and equipment are in theambulance. AXPs may be used. Ambulance modules may be deployed forward for reconstitution or reinforcement of supportedBattalion aid station. The unit is equipped with components of theABCS system and MC4. In addition, the unit uses analogcommunications or messengers, as required. This task is performed under all environmental conditions. The unit may besubject to attack by threat forces, include air, ground, NBC, orDE attack.
Patient(s) are evacuated IAW FM 8-10-4, FM 8-10-6 and the TSOP.
MISSION ESSENTIAL TASK:
CONDITIONS:
STANDARD:
Figure 3-38. Example of Training Objective for a Bde Support Medical Company Mission Essential Task
Perform Combat Health Support Opns
Unit is receiving and evacuating patient(s). The unit is providing CHS from its established field or MOUT location in support of BCT tactical operations. AXPs may be established. Module(s) forReconstitution or reinforcement may be provided to forward Supported elements. The unit is equipped with components of ABCS system and MC4. In addition, the unit uses analog Communications or messengers, as required. TSOP and requiredPublications are available. This task is performed under all Environmental conditions. The unit may be subject to attack by Threat forces, include air, ground, NBC, or DE attack.
MISSION ESSENTIAL TASK:
CONDITIONS:
STANDARD: Unit CHS is provided IAW the TSOP

SH-2-55
Figure 3-40. Example of Training Objective for an Ambulance Squad Battle Task
Ambulance Squad Operates Ambulance Exchange Point(s) (AXPs)
Ambulance Exchange Points will be employed to reduce the timerequired for casualty evacuation from the BAS or supported unit.Ambulance personnel in the supporting and supported unit are briefed on the location of the AXP(s) and primary and alternate routes to the AXP. Authorized medical supplies and equipment arein the ambulance. Ambulance modules are deployed forwardfor reconstitution or reinforcement of supported BAS. The unitis equipped with components of the ABCS system and MC4. Inaddition, the unit uses analog communications or messengers, as required. This task is performed under all environmental conditions.
Patients are exchanged from one ground evacuation platform toanother IAW FM 8-10-4, FM 8-10-6 and the TSOP.
MISSION ESSENTIAL TASK:
CONDITIONS:
STANDARD:
Figure 3-41. Example of Training Objective for Individual Soldier Battle Task
Open the Airway
You are evaluating a casualty who is not breathing. You are not inan NBC environment
Complete all of the steps required to open the casualty’s airwayWithout causing unnecessary injury.
MISSION ESSENTIAL TASK:
CONDITIONS:
STANDARD:

SH-2-56
3-52. The METL, with supporting soldier, leader, and unit collective tasks, provides the foundation for the training plan. The battalion and company commanders in concert with the CSM, first sergeants, and subordinate leaders are now ready to plan the unit training.

SH-2-57
CHAPTER 4
Planning
Training in all its phases must be intensive . . . It must be intelligently directed so that every individual [soldier] including the last private in the ranks, can understand the reasons for the exertions he is called upon to make.
General Dwight D. Eisenhower
PLAN
EXECUTE
ASSES
S
Resources
EstablishMission EssentialTask List
• Endur ing Combat Capability
• External Guidance
• Directed M issions
• Wartime Operational Plans
• Operational E nvironment
PLAN
Long-Range
Short-Range
Near-Term
Plan

SH-2-58
4-1. Training excellence requires mastery of our doctrine by all leaders in the chain of command. Allow subordinates the freedom to develop their training programs in concert with their approved METL. Training meetings and training schedule lock-ins must work if we want to attain excellence in training. Establish discipline in the training management process and lock in our training calendars in accordance with established doctrine.
4-2. Division and brigade level commanders establish direction and focus for training. They allocate resources, ensure stability and predictability, and protect training from interference, and discipline the training planning process. Division and brigade commanders ensure ARTEP-MPT and STP standards are met during training; if they are not, they ensure retraining is conducted until the tasks are performed to standard. They fence resources and shield prime time training from un-programmed, last minute, non-mission related tasks. They reduce compliance-training requirements in their command training guidance, and establish policies to enable exceptions from conducting compliance training to enable subordinates to focus on METL proficiency. Division and brigade commanders ensure all subordinate leaders discipline the training management process.
4-3. Excellence in training requires excellence in both training management and training execution—but you cannot achieve excellence in training execution without excellence in training management.

SH-2-59
TRAINING PLANNING PROCESS 4-4. This chapter describes the training planning process of the Army training management cycle and illustrates how leaders plan training. This process links the unit METL with execution of battle focused training by emphasizing the connection of the unit’s METL assessment with battle focused training execution. Figure 4-1 depicts the training planning process used to develop battle-focused training programs.
4-5. The training planning process is the same for long-range, short-range and near-term training planning. Commanders, at all echelons, AC and RC, MTOE, and TDA assess training, provide guidance, and publish training plans. What differs is the complexity of assessment, scope, scale, and form of the command guidance, and associated future planning horizons between command echelons in AC and RC organizations and units. These differences are by deliberate design and intended to simplify the common training challenge at all echelons--to maintain warfighting readiness. Organizations and units achieve warfighting readiness when commanders ensure training is executed to the Army standard under realistic conditions. Maintaining warfighting readiness requires senior commanders to give subordinate commanders adequate time to plan, prepare, and execute training to standard. Senior commanders support execution of training to standard when they-- • Enforce and discipline the training management process. • Emphasize comprehensive organizational and unit aggregate assessments.
Figure 4-1. Training Planning Process
Assessment
Training Planning ProcessTrainingStrategy
Commander'sGuidance
TrainingAssessmentMETL Training
Execution
Feedback
TrainingPlans

SH-2-60
• Develop training strategies that integrate combat, CS, and CSS unit training plans in the form of combined arms multiechelon training. • Align training priorities and allocate available training resources with operational METL training requirements.
• Protect subordinate units from changes once training schedules are published.
4-6. Commanders use the risk management process integrated within the training planning process to enable tough, realistic training. Commanders identify training shortfalls that may create a risk hazard, and other training hazards to conduct training and establish controls to eliminate those hazards. Risk management is as integral to the operations process as it is to the training planning process. Commanders identify enemy capabilities and other hazards that may prevent successful completion of the mission, and identify actions to reduce or mitigate those capabilities and hazards. In both training and operations, risk management is a continuous process.
TRAINING ASSESSMENT
4-7. A training assessment begins the training planning process – whether developing long-range training plans, short-range plans, or near-term training schedules. Commanders assess their unit’s ability to execute mission essential tasks based on personal observations, training evaluation results, and input from subordinates. For battle tasks that support their METL, commanders collect performance assessments from responsible subordinates, key staff members, and NCO leaders. Additionally, commanders analyze all available evaluations of task proficiency from recent training events. Commanders use these evaluations, personal observations, and other feedback (like CTC take home packages) to arrive at an overall assessment of the unit’s ability to perform each METL task. Results of the commander’s assessment represent training requirements – task on which performance needs improvement and other tasks where performance needs to be sustained.

SH-2-61
4-8. Assessment links the evaluation of training that has been executed to the planning of upcoming training. The commander develops a strategy to improve proficiency on specific weaknesses and plans sustainment training on demonstrated strengths. Figure 4-2 highlights that the training planning process starts with the commander’s training assessment.
4-9. A risk assessment parallels the training assessment. It identifies training proficiency shortfalls that could create a hazard and prevent achievement of the training objectives. Hazard controls, in the form of education and training, physical safety measures, and avoidance, are then established to enhance safety and promote realism.
Assessments by Commanders of Battalions, Brigades, and Above 4-10. Commanders of battalions, brigades, and above rely on their own firsthand observations as well as evaluation input and feedback from --
• Subordinate commanders on current proficiency of supporting battle tasks. • Coordinating, special and personal staff officers on current proficiency of supporting staff battle tasks. • NCO leaders on current proficiency of supporting critical individual, crew, and small team tasks. • All leaders on current leader proficiency on critical leader tasks. • ARTEP-MTP external evaluations (EXEVAL), CTC rotation take home packages, annual training reports, operational and readiness deployment
Figure 4-2. Training Planning Process (Training Assessment)
TrainingExecution
Assessment
Training Planning ProcessTrainingStrategy
Commander'sGuidance
TrainingAssessmentMETL
Feedback
TrainingPlans

SH-2-62
exercise after action reports, Expert Infantry Badge (EIB), Expert Field Medic Badge (EFMB), field training exercise (FTX) evaluations, et al. • Organizational Inspection Program (OIP) trends, and other reports such as monthly unit status reports (USR), etc. • Subordinate commander risk assessment of training shortfalls that could create a hazard.
Company, Battery, and Troop Commanders Assessment. 4-11. Company, battery, and troop commanders likewise rely on their own firsthand observations as well as evaluation input and feedback from --
• Subordinate leaders on current proficiency of supporting critical collective tasks. • 1SG, PSGs, and other key NCOs of current proficiency on supporting critical section, squad, crew, and individual soldier proficiency. • All leaders on current leader proficiency on critical leader tasks. • EXEVAL and CTC Rotation take home packages, annual training reports, operational and readiness deployment exercise after action reports, results and trends from higher headquarters’ OIP, and other reports such as monthly USR, etc. • Subordinate leaders knowledge of risk management principles and potential training hazards.
Noncommissioned Officers. 4-12. NCOs may use a leader book and battle rosters to record section, squad, crew, and soldier tasks evaluations.
• Leader books are a tool for the NCO to maintain up-to-date, easy-to-reference information on soldiers, training status, maintenance status, and equipment accountability. The books are used for recording and tracking soldier proficiency on mission-oriented tasks. The exact composition of leader books varies depending on the mission and type of unit. Leader books are used to:
• Track and evaluate soldiers' training status and proficiency on essential soldier tasks. • Provide feedback to the chain of command on the training proficiency of the squad or crew. • Conduct soldier performance counseling.
• Battle rosters are maintained at battalion level and below to track key training information on selected mission essential systems. The exact composition of battle rosters varies depending on the mission and type of unit. Battle rosters are used to:
• Track such pertinent training data as crew stability, manning levels, and qualification status. • Track training and qualification status of back-up operators or crew members assigned in other positions in the organization.

SH-2-63
• Track key training information on selected weapon and support systems, such as tanks, howitzers, automated command and control systems, forklifts, etc.
Assessment Ratings. 4-13. The commander’s training assessment is required for each METL task. Task proficiency is rated as either:
• “T” (trained): The unit is trained and has demonstrated proficiency in accomplishing the task to the Army standard. The leader judges task performance to be free of significant shortcomings. Training on “T” tasks is designed sustain proficiency. • “P” (needs practice): The unit can perform the task with some shortcomings. Performance has demonstrated that the unit does not achieve the standard without some difficulty or has failed to perform some task steps to standard. The shortcomings are not severe enough to require complete retraining. Only refresher training is required.
• “U” (untrained): The unit cannot demonstrate an ability to achieve wartime proficiency. The leader prepares a comprehensive plan to train all supporting tasks not executed to standard. Unless the task is a new METL task, a rating of “U” indicates a serious training deficiency and reflects on the unit’s wartime readiness posture.
4-14. Evaluation ratings are given for task proficiency and should not be confused with leader assessments. Evaluation ratings are ratings assigned directly to task proficiency

SH-2-64
SUMMARY 4-14. The training planning process links the unit METL with the execution of battle focused training. Planning for training is a continuous, integrated process done in parallel at all organizational levels for long-range, short-range, and near-term planning. The planning process culminates with the publication of training schedules and leads to training execution.

SH-2-65
Chapter 5
Execution
In no other profession are the penalties for employing untrained personnel so appalling or so irrevocable as in the military.
General Douglas MacArthur
PLAN
EXECUTE
ASSE
SS
Resources
EstablishMission EssentialTask List
• Enduring Combat Capability
• External Guidance
• Directed M issions
• Wartime Operational Plans
• Operational E nvironment
Execute
EXECUTE Prep
are
Conduct
Recovery

SH-2-66
5-1. Leaders must ensure their units train, as they will fight. Training for warfighting is not for the faint of heart and is a responsibility shared by all leaders in the Force—Active, Guard and Reserve; Operational and Institutional. Every leader shares the responsibility of imbuing our Soldiers and units with a warfighter’s tenacity for victory in battle.
5-2. Training for decisive warfighting means focusing our training events to achieve realistic, doctrinally sound, and performance-oriented training outcomes that closely approximate the stress and rigors of combat. Training for battle must be rigorous, mission-focused, METL-based, and conducted to realistic METT-T wartime conditions and standards.
5-3. Competence in units is built on the mastery of fundamentals, steeled by a warrior ethos honed by rehearsed precision. Plan and execute training events with this in mind-train hard-fight easy.

SH-2-67
SECTION I: TRAINING EXECUTION
5-4. All good training, regardless of the specific collective, leader, or individual soldier tasks being executed, must comply with certain common requirements. These include adequate preparation, effective presentation and practice, and evaluation. (Evaluation is discussed in Chapter 6.) The execution of training includes preparation for training, conduct of training, and recovery from training (figure 5-1). These components are applicable at all echelons, from a high level staff participating in a joint training exercise to a first-line leader's individual training of the team. Training execution is the same for both AC and RC.
5-5. Commanders and NCO leaders use the training execution phases to train unit, staff, and individual soldiers to standard.
The Role Of Commanders 5-6. Training planning is centralized to align training priorities at all levels of an organization. Training execution is decentralized. Decentralization tailors training execution to available resources and promotes bottom-up communication of mission related strengths and weaknesses of each individual soldier, leader, and unit.
5-7. Commanders must personally observe and evaluate training execution to the maximum extent possible. Through personal observation, and participation in training, commanders communicate to subordinates units and leaders the importance of training. Commanders are the training managers for their commands and evaluate how leaders and soldiers perform. Based upon their
Figure 5-1. Training Execution
Preparation for Training:• Select Tasks• Plan the Training• Train the Trainers• Recon the Site• Conduct Risk
Assessment• Issue Training Plan• Rehearse • Conduct Pre-Execution
Checks
Conduct of Training:• Conduct Pre-Combat
ChecksConduct Risk Assessment
• Execute Training• Conduct After Action
Review• Retrain at First Opportunity
Recovery from Training:• Conduct after operations
maintenance checks & services
• Equipment accountability• Turn in support items• Close out training sites• Conduct After Action
Reviews• Individual soldier recovery• Conduct final inspections• Conduct Risk Management
Assessment and Review
EXECUTE Prep
are
Conduct
Recovery

SH-2-68
evaluations, commanders provide feedback to the chain of command, to the trainers, and to those being trained. More importantly, commanders conduct a realistic and accurate assessment of unit training based upon personal observation and feedback from unit leaders and soldiers. Personal observation allows commanders to-- • Observe and evaluate the quality of training at all echelons down to the lowest
levels of the organization. • Receive feedback from subordinate leaders and soldiers during training visits. • Identify and resolve problems in training planning, leadership, management,
support, and other functions. • Check the adequacy of external training support and require prompt and
effective corrective action. • Maintain awareness of key risk management actions throughout the course of
training execution.
The Role Of Noncommissioned Officers 5-8. CSM/1SG and key NCOs select and train specific individual soldier tasks that support the units' collective mission essential tasks. NCOs are responsible for-- • Individual soldier, crew, and small team training. • Standards-based, performance-oriented training. • Cross training to ensure critical wartime skills within the unit. • Explaining how individual soldier task training relates to the unit’s
collective mission essential tasks. • Planning, preparing, rehearsing, and executing training, conducting after
action reviews, and providing bottom-up feedback. • Status of ongoing risk management actions that support individual, crew, and
small team training.
Sergeants Time Training (STT) 5-9. STT is standards-based, performance-oriented, battle focused training. Commanders emphasize individual soldier training in support of collective METL training by allocating dedicated training time for NCO’s using STT. STT recognizes the NCO’s primary role in conducting individual, crew, and small team training. STT requires dedicated time on the training schedule and must be planned, resourced, rehearsed, and executed with no external distracters. 5-10. STT develops junior leaders and builds cohesive teams. NCOs select specific individual, crew, and small team tasks that support the unit’s METL based on their training assessment and platoon leader guidance. Once these tasks are approved, they plan, prepare, rehearse, and execute the training. Training to standard, not to time is paramount. Commanders approved the selected tasks, provide the resources, allocate time to prepare, and monitor the training. CSMs/1SGs supervise the training and coach, teach, and mentor junior NCOs.

SH-2-69
Crawl-Walk-Run Training 5-11. Ideally, training is executed using the crawl-walk-run approach. This allows and promotes an objective, standards-based approach to training. Training starts at the basic level. Crawl events are relatively simple to conduct and require minimum support from the unit. After the crawl stage, training becomes incrementally more difficult as the training progresses through the walk stage, requiring more resources from the unit and home station, and increasing the level of realism. At the run stage, the level of difficulty for the training event intensifies. Run stage training requires optimum resources and ideally approaches the level of realism expected in combat. Progression from the walk to the run stage for a particular task may occur during a one-day training exercise or may require a succession of training periods. C-W-R training provides repetition to ensure soldiers are proficient at the task. Achievement of the Army standard determines progression between stages.
5-12. In crawl-walk-run training, the task and the standard remain the same; however, the conditions may vary. Commanders change the conditions by increasing— • The difficulty of the conditions under which the task is being performed. • The tempo of the task being trained. • The number of tasks being trained. • The number of personnel involved in the training.

SH-2-70
5-13. All leaders and soldiers need to understand the stage they are currently training and understand the Army standard. Figure 5-2 summarizes key aspects of crawl-walk-run training.
Efficient and Effective Training 5-14. The commander’s understanding of crawl-walk-run training enables the development of a training plan that is efficient and effective. For example, the unit commander sequences individual and collective training using a mix of virtual (e.g., STX with MILES) and LFXs to execute selected tasks under increasingly demanding conditions. 5-15. Efficient training ensures that training resources are properly used. This includes the irreplaceable resource of time -- efficiently executed training makes full use of every participant’s time. Continuing advances in training technology enhance the commander's ability to hone warfighting skills and are increasingly required to balance constraints to training, such as environmental protection considerations and availability of training areas and ranges. Similarly, TSS products and services, such as SATS and TADSS, are critical resources o assist the commander in planning, executing, and assessing training. TSS not only provides a means for initial and sustainment training on warfighting fundamentals, but also provides relatively inexpensive preparation for resource intensive training events. Although TSS products provide excellent virtual and constructive training supplements, there is no substitute for live training. TSS products and services are addressed at APPENDIX G.
Soldiers• Train each task step.• Train task steps in
sequence• Train complete task until
done correctly
Leaders/Trainer• Talk through and demonstrate
each task• Supervise step-by-step practice• Coach frequently• Control the environment
Figure 5-2. Crawl-Walk-Run Training
Soldiers• Train to training objective
standard• Train with more realism• Learn transfer skills which link
other tasks.• Work as crews or small units
Leaders/Trainer• Walk through task using more
realism.• Increase complexity• Demonstrate authorized field
expedients• Participate as leader of crew or
small units• Observe, coach, and review
Soldiers• Train collectively to
achieve and sustain proficiency
• Train under conditionssimulating actual combat
• Develop effective team relationships
Leaders/Trainer• Add realism and complexity• Combine tasks• Review soldier and
collectiveperformance
• Practice leader tasks• Work with soldiers as a team.• Coach and teach subordinate
leaders
CRAWL WALK RUN

SH-2-71
5-16. Today’s resource constrained training environment and complex training tasks demand the “right mix” of training methods and tools to achieve and sustain unit training readiness. The term “mix” refers to the types and order of L-V-C training used to train from squad to battalion task force and BCT level.
5-17. Optimizing training and training resources requires a comprehensive plan for the mix of L-V-C training. Given current and anticipated constraints, optimizing the training mix and annual training event frequency is necessary to sustain proficiency within the “Band of Excellence.” Live training is essential for building and sustaining lethal crews/squads, platoons and company teams/batteries and troops. Virtual and constructive training will supplement live walk-stage training in preparation for run-stage training events. Live training “in the dirt” is the best place for battalions and below. Higher echelons may rely on virtual and constructive training to enhance combat readiness.
5-18. Effective training builds proficiency, teamwork, confidence, and cohesiveness. Effective training is competitive. Although individuals and organizations may compete against one another, they should always compete to achieve the Army standard. If they do not initially achieve the standard, trainers take corrective actions so that the proper performance level results.
5-19. Efficient and effective training is well structured. In the examples that follow, training events and exercises are sequenced to increase individual soldier and leader task proficiency before and during training on collective critical tasks. The example training plans contain a mix of C-W-R training and include a mix of L-V-C training to obtain the maximum training benefit from available resources.
Presentation of Training 5-20. Trainers execute training using three basic methods of presentation. They are-- • Demonstration (preferred method) • Conference • Lecture (least preferred method) 5-21. These methods may be used in any combination to present training. The trainer’s selection of a specific method depends on the complexity of the task(s) and proficiency of the soldiers (or unit) being trained. 5-22. Demonstration is the preferred method of presentation used at company level and below. Demonstrations accelerate the learning process. The impact of a brief visual demonstration showing the correct method of execution of a given task to standard cannot be overstated. Seeing a task performed correctly provides greater understanding than any amount of explanation. Demonstrations stimulate soldier interest by providing realism that other techniques do not offer. Demonstrations – • Save time by showing soldiers the correct way to perform a task.

SH-2-72
• Use the leader as the primary trainer whenever possible. • Present information in a manner that properly motivates. • Conclude when soldiers understand the task. 5-23. Trainers conduct demonstrations with very simple, basic tools such as map boards, dry-erase boards, and sand tables, or with more advanced tools such as simulations and simulators. The sand tables and terrain models can be used to conduct rock drills to demonstrate tasks before and after executing them on the ground during squad and platoon training. Sand tables and terrain models can also be used during STX and LFX rehearsals and AARs. Some basic guidance for effective use of sand tables, terrain models, and rock drills includes-- • Keep the model simple. Cardboard cutouts, pieces of wood, stones or rocks
may represent equipment and units. • Keep the training informal. Soldier participation is essential because soldiers
learn from one another. • The trainer presents information that soldiers and leaders need to perform the
task. Trainers check for soldier understanding by asking questions. The task is explained again, as required, until all soldiers understand the task.
5-24. Conference provides soldiers the opportunity to discuss the information presented. The trainer initiates and guides the discussion. Conferences are most effective when soldiers are familiar with the subject, when there is more than one correct technique or solution, and when time is not critical. Conferences normally do not require hands-on performance. An example of a conference is an AAR.
5-25. Lecture presents information with little discussion other than a question and answer period at the end of the training. Lectures are used when time is limited, when soldiers know little about the subject, and when the lecture is preparing them for demonstration and practice. Lectures are only appropriate if there is a large group to be trained. An example of a lecture is a pre-deployment briefing. Lectures are the least preferred method of training. 5-26. STX training under varying conditions gives the unit a distinct advantage when executing combat operations. STX training at night and during adverse weather provides a training opportunity to execute critical tasks and drills under naturally occurring light and weather conditions and enhances training realism. Reverse cycle training should be planned to take advantage of every opportunity to replicate a 24-hour operational environment.

SH-2-73
SECTION II: PREPARATION FOR TRAINING
5-27. As discussed in Chapter 4, formal near-term planning for training culminates with the publication of the unit training schedule. Preparation for training is the vital step between planning and conduct of training. Preparation is key to ensure the optimum use of resources and provide quality training to standard. In the digital environment, this becomes especially important with the need to set message handling tables to ensure the proper flow of information to the right places at the right times. During preparation for training, commanders identify and eliminate potential training distracters. Commanders also stress personnel accountability to ensure maximum attendance at training. Figure 5-6 illustrates the core training preparation tasks.
5-28. Subordinate leaders, as result of the bottom-up feed from training meetings, identify and select the collective, leader, and individual soldier tasks necessary to support the identified training objectives. Commanders identify the resource requirements for preparatory training, concurrent training, and training execution. At a minimum, these training requirements should include-- • Confirmation of training areas and locations. • Training ammunition allocations. • Required TSPs and terrain database availability. • Training simulations and simulators availability. • Transportation requirements. • Soldier support items. • Risk management/assessment.
Preparation for Training:• Select Tasks• Plan the Training• Train the Trainers• Recon the Site• Implement Hazard Controls• Issue Training Plan• Rehearse • Conduct Pre-Execution
ChecksFigure 5-6. Training Execution (Preparation for Training)
EXECUTEPr
epar
e

SH-2-74
• Assign responsibility for the training. • Designate trainers responsible for training. • Time and other necessary resources to support retraining.
5-29. Preparation for training includes – • Select Tasks Identify and select training task as a result of bottom-up
feedback and commander’s assessment. • Plan the Training
• “Who” - Identify the units, staffs, leaders and individual soldiers to be trained.
• “What” – • Specify the training objectives and the types of training events. • Link training objectives to METL with specific critical collective,
leader, and individual soldier tasks. • “When” –
• Specify sequence of the training tasks and events. • Consider crawl and walk stages of training and individual soldier
training needs required prior to run stage of training events. • “Where” - Coordinate ranges, training areas, simulations and simulators,
and other essential equipment to support identified training tasks and events.
• Back brief Higher Commander on Major Training Events
• Brief higher headquarters on major events (FTXs, CPXs, etc). • Provide detailed objectives, scenarios, support requirements, and
timelines. • Provide initial risk management assessment.
• Train the Trainers
• Identify leaders, trainers, evaluators, OCs and OPFOR to be trained to standard and rehearsed prior to the conduct of training.
• Prepare leaders, trainers, evaluators, OCs, and OPFOR to evaluate leader, unit, staff, and individual soldier performance IAW specific ARTEP-MTP or soldier MOS specific task(s).
• Prepare OPFOR leaders and units to replicate desired threat situations; designated OPFOR leaders and units should use specific ARTEP-MTP or soldier MOS specific tasks.
• Allocate time on the training schedule for preparation tasks to occur.
• Recon the Site • Conduct a reconnaissance of the range and/or training site. • Execute “Rock Drills” and “Walk-thrus” for trainers, evaluators, OCs, and
OPFOR as required.

SH-2-75
• Conduct Risk Management/Assessment • For details on conduct of risk assessment refer to FM 100-14, Risk
Management.
• Issue the Training Plan. • Clearly identify the responsibilities for the conduct of the training. • May be issued as an operation order (OPORD), training directive, or training schedule.
• Rehearse
• Conduct rehearsals for trainers, evaluators, OCs and OPFOR. • Allocate time on the training schedule for adequate rehearsals.
• Conduct Pre-execution checks
• Continue informal planning and detailed coordination until the training is conducted.
• Ensure chain of command identifies and fixes responsibility for pre-execution checks.
• Continue coordination during training meetings. • Include preparation of individuals to be trained, trainers who will execute
and evaluate training, and training support required. • Ensure all planning and prerequisite training (leader, collective, and
individual soldier) is conducted prior to the execution of training. • Provide attention to detail needed to use resources efficiently.
5-30. Preparation for training in reserve component units can require complex pre-execution checks. RC trainers must often conduct detailed coordination to obtain equipment, TSS products, and ammunition from distant locations. In many cases, RC pre-execution checks may require coordination for AC assistance from the numbered Continental United States Armies (CONUSAs), divisions (training support) and associated units.
Train The Trainer 5-31. Although addressed in paragraph 5-41, train the trainer is so important it requires elaboration. Leadership by example is especially important for trainers. Trainers must demonstrate task proficiency before teaching a task to others. Commanders and leaders must ensure trainers are thoroughly prepared to conduct performance-oriented training. Trainer competence and confidence is contagious. 5-32. Commanders and leaders ensure trainers are prepared to conduct performance-oriented training to standard when they provide specific guidance and resources and ensure adequate preparation time so that the trainer can-- • Review references, such as ARTEP-MTPs, soldier's manuals, FMs, and
TMs to understand tasks, conditions, and standards. • Gather and prepare training support items. • Conduct a reconnaissance of the training site.

SH-2-76
• Prepare the training. • Conduct a risk assessment • Schedule rehearsals for the trainer.
• Conduct rehearsals to-- • Verify trainer task proficiency (technically and tactically). • Identify any weak points in the training presentation. • Coach the trainer on effective training techniques. • Determine how the trainer will evaluate soldier/unit performance and have
the trainer demonstrate evaluation procedures. • Promote trainer confidence. • Verify trainer ability to conduct AARs.
• Ensure appropriate use of training and evaluation outline (T&EO)-- • Whenever possible, use published T&EO. • If T&EO must be developed, use appropriate MTPs, soldier manuals, drill
books, and similar publications. • To guide soldier, leader, and collective training. • To specify training objectives.

SH-2-77
5-33. Figure 5-7 provides a trainer preparation checklist.
Figure 5-7. Trainer Preparation Checklist
Prepare Yourself• Know how to perform the task being trained (master the task)
- Rehearse training- Backbrief the chain of command on your training plan and get their feedback
• Know how to train others to perform the tasks- Ensure training is performance-oriented- Conduct yourself in a confident manner- Accurately answer your soldier’s questions- Train an assistant who can conduct the training to standard in your absence
• Know how to set-up and conduct an AAR
•Prepare the Resources- Identify and request TADSS- Get equipment and materials before rehearsal- Operate the equipment to become familiar with it and check for completeness and spare parts
• Ensure Training Support Personnel (to include OPFOR)- Understand their support roles- Know their roles as evaluators, OCs and OPFOR- Are equipped and prepared to perform the tasks to standard- Conduct recons and rehearsals
• Prepare the soldier- Identify the soldiers to be trained- Evaluate levels of training proficiency- Train any prerequisite tasks or skills first- Motivate the soldiers. (Tell them why the task is important and how it relates to their METL)

SH-2-78
Conduct Pre-execution Checks 5-34. Pre-execution checks are the informal coordination conducted prior to the conduct of training. They are developed by the chain of command to systematically prepare individual soldiers, leaders, trainers, and units, to ensure training is resourced and conducted properly. They become increasingly detailed as training schedules are developed. Pre-execution checks provide the attention to detail needed to use resources efficiently. These checks are developed and responsibilities for them fixed. Pre-execution checks are an important component of both preparation for training, and conduct of training. Figure 5-8 shows a sample pre-execution checklist.
Preparation For Training Examples 5-35. This section provides three different, detailed training preparation examples. • The first example follows A/1-77 IN training preparation to execute infantry
squad evaluations and squad live fire exercises. The A/1-77 IN training preparation plan is based on the A/1-77 IN and the 1-77 IN commanders’ assessment and training strategy presented in Chapter 4.
• The second example follows the 1st BSB’s training preparation for the BSB FTX as part of the BCT’s CFX. The 1st BSB training preparation plan is based on the 1st BSB commander’s and the 1st BCT commander’s assessment and training strategy presented in Chapter 4.
• The third example details BCT staff training preparation for the BCT’s shaping operations exercise immediately following the BCT CFX. The BCT
Figure 5-8. Sample Pre-execution Checklist
• Are soldiers trained on prerequisite tasks prior to conduct of training?
• Have ranges and facilities been requested; has a reconnaissance been conducted?
• Are leaders certified to conduct range operations?• Have convoy clearances been submitted and
approved?• Have TADSS been identified and requested?• Has Class I, III, V been requested and pickup
times and turn-in times coordinated?• Has transportation been requested?• Are there risk assessments for each training
event?• Has back brief for chain of command been
coordinated?• Is time scheduled for retraining?

SH-2-79
staff training preparation plan will be based on the BCT commander’s staff assessment and training strategy presented in Chapter 4.
A/1-77 In Squad EVAL And LFX
Select Tasks 5-36. This is the first task involved in preparation for training. Recall the A/1-77 IN commander conducted an assessment of the METL task “Assault an Objective” and identified the company’s training requirements (Chapter 4). The A/1-77 commander reviewed platoon critical collective tasks, drills and individual soldier tasks evaluations that impacted on the company’s proficiency to execute the METL task “Assault an Objective”. The company commander conducted the review with the 1SG, rifle and MGS platoon leaders, company FSO, mortar section sergeant and other key NCOs. The company medic and a representative from the BSB S2/3 were also present. The commander identified shortcomings as follows-- • Rifle platoons:
• “P” for “Assault an Objective.” • “U” for “Breach an Obstacle.” • “P” for “Attack by Fire.” • “P” for “Conduct an Area Recon.”
• MGS platoon: “U” for “Attack by Fire”. • Mortar section
• “U” for “Fire a Priority Target.” • “P” for “Fire Immediate Suppression.”
• All platoons and sections: “P” for “Treat and Evacuate Casualties.” • Platoon Leader tasks:
• “P” for “Integrate Direct and Indirect Fires.” • “P” for “Analyze Terrain.” • “P” for “Perform TLPs (Emphasize Step #3, Make a Tentative Plan).” • “P” for “Conduct Risk Management.” • “U” for “Call for/Adjust Indirect Fire.”
5-37. The 1st Squad Leader of the 1st Platoon began the task selection process with an evaluation of the team leaders’ ability to perform supporting critical leader tasks and the soldiers’ ability to perform supporting individual soldier tasks. This evaluation was based upon the squad leader’s personal observations, feedback from the team leaders, and feedback from external sources, for example, the platoon leader and platoon sergeant. The squad leader identified the following shortcomings: • Individual soldier tasks:

SH-2-80
• “P” for engaging targets (day and night) with M16A2, M203, M249 SAW and M 240 MG and hand grenades.
• “U” move as part of an assault team. • Fire team leader tasks:
• “P” for “Control Organic Fires.” • “P” for “Conduct Squad Maneuver.” • “P” for “Analyze Terrain.” • “P” for “Perform Troop Leading Procedures.” • “U” for “Call for/Adjust Indirect Fire.”
5-38. The 1st Platoon Leader reviewed squad collective tasks, drills and individual soldier tasks evaluations that impacted on the platoon’s proficiency to execute the critical task “Assault an Objective” with the platoon sergeant and squad leaders. The platoon leader identified the following shortcomings –
• Rifle squads: • “P” for “Enter/Clear a Trench.” • “P” for “Knock Out a Bunker.” • “U” for “Support by Fire.” • “P” for “Breach an Obstacle.”
• Weapons squad: “U” for “Support by Fire”.
• Squad leader tasks:
• “P” for “Control Organic Fires.” • “P” for “Conduct Squad Maneuver.”
• “P” for “Analyze Terrain.” • “P” for “Conduct Troop Leading Procedures.” • “P” for “Conduct Risk Management.” • “U” for “Call for/Adjust Indirect Fire.”

SH-2-81
5-39. Figure 5-9 highlights training tasks the A/1-77 IN commander selected to improve the company’s METL proficiency for METL tasks “Assault an Objective” and “Integrate Direct & indirect Fires.” The A/1-77 IN commander selected these tasks based on bottom-up feedback and input received from the platoon and squad leaders which was considered in assessing the unit’s current proficiency on these particular METL tasks.
PLATOON CRITICAL COLLECTIVE TASK:• Conduct an Assault “P”• Breach (mined wire) Obstacles “U”• Support By Fire “P”
INDIVIDUAL SOLDIER TASKS:• Engage Targets With M249, M203,
M16A2 & Hand Grenades “P”• Move as part of an assault team. “U”
MORTAR SECTIONCRITICAL COLLECTIVE TASK:Fire Priority Target “P
MGS PLATOON CRITICAL COLLECTIVE TASK:• Support by Fire “P”• Attack by Fire “U”
MGS
Figure 5-9. Selected Training Tasks to Improve A/1-77 IN METL Proficiency For METL Tasks: “Assault an Objective” & “Integrate Indirect & Direct Fires”
SQUAD & FIRE TEAM LEADER TASKS:• Perform Troop Leading Procedures “P”• Analyze Terrain “P”• Conduct Squad Maneuver “P”• Control Organic Direct Fires “P”• Call for/Adjust Indirect Fire “U”
SQUAD CRITICAL DRILL(S):• Knock Out a Bunker “P”• Enter/Clear trench line “P”
SQUAD CRITICAL TASK(S):• Breach (mined wire) Obstacles “P”• Follow & Support “P”
COMPANY METL TASK(S):• Assault an Objective “P”• Integrate Direct Fire “P”• Integrate Indirect Fire “P”
PLATOON LEADER TASKS:• Perform Troop Leading Procedures “P”• Analyze Terrain “P”• Conduct Platoon Maneuver “P”• Control Platoon Direct Fires “P”• Call for/Adjust Indirect Fire “U”

SH-2-82
5-40. The A/1-77 IN commander develops a company training strategy consistent with the 1-77 IN commander’s training strategy (Chapter 4). Figure 5-10 illustrates the A/1-77 IN commander’s strategy to improve the company’s training proficiency for the company METL task “Assault an Objective”.
5-41. Notice the A/1-77 IN commander selects squad STX and LFX as two of
the training events to improve A/1-77 IN training proficiency for the METL task “Assault an Objective”. STXs and LFXs are common training events included in many unit training strategies, designed to maintain proficiency on METL tasks related to attack operations.
5-42. The commander decides to build the squad STXs and LFXs around critical rifle squad tasks and drills that support the platoon critical task of “Conduct an Assault.” The commander selects two specific tactical tasks -- “Breach (mined wire obstacles)” and “Follow and Support”. Also, the commander selects two specific rifle squad drills -- “Knock Out a Bunker” and “Enter/Clear a Trench Line”.
5-43. The commander recognizes that the mortar section has not conducted a LFX since before their deployment to Bosnia. However, the company mortar section has conducted a gunner’s skills test and FDC proficiency training during mission training while deployed. The commander decides the mortar section must train on “Occupation of Firing Positions” (Day and Night) and “Fire a Priority Target”.
Figure 5-10. A/1-77 IN Commander’s Training Strategy
(Breach)
(Follow & Support)
(Clear TrenchLines & Knock Out Bunkers)
(Breach)
(Follow & Support)
(Clear TrenchLines & Knock Out Bunkers)
(Breach)STX 1
(Follow & Support)
STX 2
(Clear TrenchLines & Knock Out Bunkers)
STX 3
(Breach)LFX 1
(Follow & Support)
LFX 2
(Clear TrenchLines & Knock Out Bunkers)
LFX 3
TEWT
8
FTX STX LFX
9 10 11

SH-2-83
5-44. This completes the A/1-77 IN commander’s selection of tasks to be trained. The commander reviews these tasks in the appropriate ARTEP-MTP with the key leaders present.

SH-2-84
5-45. Objective”. The company commander plans to train TLPs, and emphasize—
• Company R&S planning
• Specific actions of assault, breach, and support elements. • Details of direct fire execution. • Details of integrating indirect fires. • During day and limited visibility conditions.
• Supporting critical platoon and squad collective tasks and drills.
• “Knock Out a Bunker.” • “Enter/Clear a Trench Line.” • “Breach a mined wire obstacle.” • “Conduct an Area Recon.”
5-46. The company commander and 1SG recognize that all leaders will continue to work on “preparing risk assessments”. The company commander emphasizes that “risk assessment” is not a euphemism for ‘avoid any and all risks”, but that detailed risk assessments allow the company to enhance training realism. While this is done during training it also reinforces that risk assessment is conducted in operations to mitigate risks that may impact on accomplishing the mission.

SH-2-85
SECTION III: CONDUCT OF TRAINING
5-47. Conduct of training involves actions taken to execute the unit’s training strategy outlined in the commander’s quarterly training guidance. Conduct of training begins with the execution of pre-combat checks and inspections. Conduct of training ends when designated training objectives for the particular training event or exercise are performed to the Army standard. Unit commanders and other trainers review results of the conduct of training during weekly training meetings and adjust training plans if necessary. Figure 5-47 illustrates the core conduct of training tasks.
Figure 5-47. Training Execution (Conduct of Training)
Weekly Training Meeting
Tasks selected at weekly training meeting Training preparation and execution is reviewed weeklyTraining results feed back into training meetingsTraining evaluations feedback into Training Management Cycle
Conduct of Training:• Conduct Pre-Combat Checks• Conduct Risk Assessment• Execute Training• Conduct After Action Review• Retrain at First Opportunity
EXECUTE
Prep
are
Conduct

SH-2-86
Conduct Pre-Combat Checks 5-48. Pre-combat checks are detailed final checks that units conduct immediately before and during the execution of training and operations. These checks are usually included in unit SOPs. They are normally conducted as part of troop leading procedures and can be as simple or as complex as the training or operation dictates. Pre-combat checks start in garrison and many are completed in the assembly area or in the training location; for example, applying camouflage, setting radio frequencies and distributing ammunition. Commanders
must allocate sufficient time for subordinate leaders to execute pre-combat checks and inspections to standard. Examples of pre-combat checks are at figure 5-48. Execute Training 5-49. Performance-oriented, standards-based training is the result of detailed planning and preparation. The proper execution of training to standard is a rewarding process. It places a significant burden on the trainer in terms of preparation and evaluation of performance. The payoff for properly executed training is a unit trained to standard on its wartime operational mission. Division and brigade commanders and their staffs must be actively involved in the execution of battalion and company training. A unit executes training the same way it executes a combat mission. The chain of command is present, in charge, and responsible.
• OPORD briefed. Leaders and soldiers know what is expected of them.• Safety checks and briefings completed.• All required TADSS on hand and operational; for example, MILES equipment zeroed.• Before operations PMCS completed on vehicles, weapons, communications, and • NBC equipment.• Leaders and equipment inspected (for example, compasses, maps, strip maps and• binoculars)• Soldiers and equipment inspected and camouflaged; for example, weapons, ID cards, • drivers licenses.• Soldier packing lists checked and enforced.• Medical support present and prepared• Communications Checks completed.• Ammunition (Class V) drawn, accounted for, prepared, and issued.• Vehicle load plans checked and confirmed; cargo secured.• Rations (Class I) drawn and issued.• Quartering party briefed and dispatched.• OPFOR personnel deployed and ready to execute their OPORD.
Figure 5-48. Sample Pre-combat Checks

SH-2-87
5-50. Using the principles of training discussed in Chapter 2, commanders ensure that properly executed training is well structured, realistic, safe, and effective. Other important considerations include: • Focus on the Fundamentals. Units must be proficient on basic tasks before
progressing to the more complex tasks. All basic tasks provide the foundation on which to build performance of individual soldier tasks, drills, and METL tasks to standard. Command and control, logistics operations, and NBC must be incorporated into all training.
• Night and Adverse Weather Training. Night training and adverse weather training are keys to success in combat. All units in the U.S. Army, not just combat units, must be proficient in operating at night and during adverse weather conditions. Routine training under these conditions gives units a distinct advantage in combat operations.
• Tough, Realistic Training. Training must be structured to expose soldiers and leaders to unexpected situations, both favorable and unfavorable. Tasks must be executed confidently and completely during the fog of battle. Tough, realistic training challenges leaders and soldiers to overcome the hardships and uncertainties of combat. Leaders must teach soldiers that combat cannot be reduced to a set of calculations or checklists. Challenging training inspires excellence by fostering initiative, enthusiasm, confidence, and the ability to apply learned tasks in the dynamic environment of combat.
• Competition. Effective training can be competitive. Although soldiers, leaders, and units may sometimes compete with one another, they should always compete to achieve the Army standard. Once units can perform a task to the Army standard, leaders progressively increase the difficulty or conditions under which the task is executed. During competition, leaders should recognize soldiers or units exceeding established standards. Competition can be used to stimulate soldier interest and morale, select participants for higher level competitions, encourage higher levels of performance, and provide an event for a rigorous training period.
Conducting After Action Reviews 5-51. A significant part of learning occurs as a result of After Action Reviews (AARs), which ensure that the training audience understands when they have not performed to standard and how they must perform to do so. Accordingly, whenever possible AARs are conducted immediately following performance during training sessions. AARs are covered in detail in Chapter 6 and Appendix C of this manual, and TC 25-20, A Leader’s Guide to After Action Review.
Retraining 5-52. Retraining must be conducted at the first available opportunity. Commanders must program time and other resources for retraining as an integral part of their long, short, and near-term training planning cycle. Training is incomplete until the task is trained to standard. The critical question for commanders and trainers is, “When do you conduct retraining?”
• Retraining is conducted as soon as possible after the AAR.

SH-2-88
• Commanders determine when retraining will be conducted based on current training plans and available resources.
• Commanders program time and other resources for retraining
5-53. Figure 5-49 provides examples that illustrate the relationship among three variables commanders and trainers consider when deciding when to conduct retraining.
Figure 5-49. Retraining
When do you conduct retraining? Depends on the situation.
Trained and confident soldiers, leaders, and units.
Individual
Weapon Qual
Refire till qualified
Squad / Crew
Clear trench line/Table VIII
MCOFT/TWGSS/PGS
Refire
IMMEDIATELY DURING CURRENT TRNG FUTURE
PLT / CO Team
Conduct Assault
TEWT/CCTTSTX
BN TF / BDE
Attack
TEWT/JANUSFTX
Scope ofTraining
TrainingEvent
RetrainingMethod
Bottom Line:• Retraining must be conducted as soon as possible after the AAR.• Commanders determine when retraining will be conducted based
on current training plans and availability of resources• Commanders program time and other resources for retraining
When you Retrain

SH-2-89
SECTION IV: RECOVERY FROM TRAINING
5-54. The recovery process is an extension of training and once completed, signifies the end of the training event. While recovery tasks will vary depending on the type and intensity of training most will include maintenance training, turn-in of training support items, inspection of equipment, and the conduct of AARs that review the overall effectiveness of the training just completed. Figure 5-50 illustrates the core recovery from training tasks.
5-55. A sample list of recovery activities follows: • Post operations preventative maintenance checks and services. • Sensitive item accountability • Accountability of organizational and individual equipment • Ensure Class IV, V and TADSS and other support items are maintained,
accounted for and turned in. • Close out training areas and ranges. • Conduct AARs of the training event and exercise just completed. • Time for the individual soldier to recover personal equipment and hygiene. • Conduct final inspections.
5-56. AARs conducted during recovery focus on collective, leader, and individual task performance, and on the planning, preparation, and conduct of the training just completed. Unit AARs focus on individual and collective task performance, and identify shortcomings and the training required to correct
Figure 5-50. Training Execution (Recovery)
Recovery from Training:• Conduct after operations
maintenance checks & services• Equipment accountability• Turn in support items• Close out training sites• Conduct After Action Reviews• Individual soldier recovery and
fitness• Conduct final inspections• Conduct risk management
assessment and review
EXECUTE
Prep
are
Conduct
Recovery

SH-2-90
deficiencies. AARs with leaders focus on tactical judgment. These AARs contribute to leader learning and provide opportunities for leader development. AARs with trainers, evaluators, observer/controllers, and OPFOR provide additional opportunities for leader development. 5-57. Figure 5-51 provides a guide to assist the unit commander and key officer and NCO leaders in making an assessment of the overall training proficiency of the organization, and to determine the overall effectiveness of the training strategy. Did the training strategy improve the unit’s METL proficiency; if not, why not, and what changes need to be incorporated in the company’s training strategy.
5-58. The AARs conducted during recovery along with the AARs that took place during the conduct of training enhance future training. They provide the feedback that contributes to the development of training plans to correct identified deficiencies. Finally, these AARs contribute to the commander’s overall evaluation of training effectiveness and unit assessment; however, they are not in themselves the end state of recovery. Recovery from training is complete when the unit is again prepared to conduct its assigned mission.
Figure 5-51. Overall Training Effectiveness AAR
• Did the unit’s performance during this training exercise/event improve training proficiency on selected training tasks and objectives?
• Did the unit’s training strategy --• select the right type of events and exercises?• select the right mix of live and virtual simulators?• select the right “who”, “what”, “when” and “where”?
• Did the unit’s preparation for training –• select the right leader and unit training tasks?• select and sequence the right leader and unit trainingevents and exercises?
• adequately prepare trainers, evaluators and O/Cs?• adequately prepare the designated OPFOR?• require changes to the unit’s pre-execution checks?

SH-2-91
SUMMARY 5-59. Training execution includes preparation for training, conduct of training, and recovery from training. Pre-execution checks are developed by the chain of command and provide the attention to detail needed to use resources efficiently. Completion of recovery from training is not the end of training. The assessment of training proficiency (Chapter 6) is critical to determining the effectiveness of the preparation and conduct of training just completed.
Figure 5-52. Training Execution
Preparation for Training:• Select Tasks• Plan the Training• Train the Trainers• Recon the Site• Conduct Risk
Assessment• Issue Training Plan• Rehearse • Conduct Pre-Execution
Checks
Conduct of Training:• Conduct Pre-Combat
ChecksSupervise, Evaluate Hazard Controls
• Implement Hazard Controls• Execute Training• Conduct After Action
Review• Retrain at First Opportunity
Recovery from Training:• Conduct after operations
maintenance checks & services
• Equipment accountability• Turn in support items• Close out training sites• Conduct After Action
Reviews• Individual soldier recovery• Conduct final inspections• Conduct Risk Management
Assessment and Review
EXECUTE Prep
are
Conduct
Recovery

This page intentionally left blank

SH-3-1
Student Handout 3
This student handout contains 51 pages of material extracted from ARTEP 7-8-MTP, 01 October 2001. Disclaimer: The training developer downloaded the material from the U.S. Army Publishing Directorate Home Page. The text may contain passive voice, misspellings, grammatical errors, etc., and may not be in compliance with the Army Writing Style Program.

This page intentionally left blank

SH-3-2
ARTEP 7-8-MTP CHAPTER 2 - TRAINING MATRIXES NOTICE:
This document is generated from relational data submitted by the proponent. The complete, authenticated document, when available, may be downloaded from the "Official Departmental Publications" side of the RDL.
Questions relating to information displayed should be addressed to the proponent school.
2-1. General Training matrixes are designed to help plan unit training. The matrixes provide an organized set of relationships that make the planning job easier.
2-2. Training Matrix Description There are three matrixes in this chapter.
Table 2-1. Location of Training Matrixes Training Matrix 1 Mission to Collective Task Matrix Training Matrix 2 Publication Reference to Collective Task Matrix Training Matrix 3 Collective Task to Individual Task Matrix

SH-3-3
NOTICE: This document is generated from relational data submitted by the proponent. The complete, authenticated document, when available, may be downloaded from the "Official Departmental Publications" side of the RDL. Questions relating to information displayed should be addressed to the proponent school.
2-3. Training Matrix 1 (Mission to Collective Task Matrix) This training matrix displays the relationship between the unit mission and the component collective tasks. The collective tasks are listed under the appropriate combined arms functional systems. This matrix is provided to plan training on missions directed by the commander. To use this matrix, determine the mission you are concerned with and look down the vertical column to find the collective tasks that are subordinate parts of the mission. Determine which of the collective tasks to concentrate on based on the demonstrated and perceived proficiency of the unit. The least practiced or least demonstrated proficiency will have a higher priority for training and evaluation. Remember, training should concentrate on those tasks that are not performed to standard.
Table 2-2. Training Matrix 1 (Mission to Collective Task Matrix)
MISSION
COLLECTIVE TASK T&EO Defen
se
Generic
Mission
Offense
Reconnaissance and Security
Retrograde
Stability
Support
Deploy/Conduct Maneuver Assault a Building (Infantry Platoon/Squad)
07-3-1000 X
Conduct a Deliberate Attack (Infantry Platoon/Squad)
07-3-1009 X
Breach an Obstacle (Infantry Platoon/Squad)
07-3-1027 X
Clear a Trench Line (Infantry Platoon/Squad)
07-3-1036 X
Conduct a Bypass (Infantry/Reconnaissance Platoon/Squad)
07-3-1045 X
Conduct a Defense (Infantry/Reconnaissance Platoon/Squad)
07-3-1054 X

SH-3-4
Conduct a Delay (Infantry Platoon/Squad)
07-3-1063 X
Conduct a Disengagement (Infantry/Reconnaissance Platoon/Squad)
07-3-1072 X
Conduct a Link-up (Infantry/Mortar/Reconnaissance Platoon/Squad)
07-3-1081 X
Conduct a Movement to Contact (Infantry/Reconnaissance Platoon/Squad)
07-3-1090 X
Conduct a Passage of Lines as the Passing Unit (Infantry/Mortar/Reconnaissance Platoon/Squad)
07-3-1099 X
Conduct a Passage of Lines as the Stationary Unit (Infantry/Reconnaissance Platoon/Squad)
07-3-1108 X
Conduct a Presence Patrol (Antiarmor/Infantry/Reconnaissance Platoon/Squad)
07-3-1117 X X
Conduct a Raid (Infantry Platoon/Squad)
07-3-1126 X
Conduct a Deliberate Relief in Place (Infantry/Mortar/Reconnaissance Platoon/Squad)
07-3-1135 X
Conduct a Screen (Infantry/Reconnaissance Platoon/Squad)
07-3-1144 X
Conduct a Security Patrol (Infantry/Reconnaissance Platoon/Squad)
07-3-1153 X
Conduct a Strongpoint Defense of a Building (Infantry Platoon/Squad)
07-3-1162 X
Conduct a Tactical Road March (Dismounted) (Infantry/Reconnaissance Platoon/Squad)
07-3-1171 X

SH-3-5
Conduct Actions at Danger Areas (Infantry/Reconnaissance Platoon)
07-3-1189 X
Conduct an Airborne Assault (Infantry Platoon/Squad)
07-3-1198 X
Conduct an Ambush (Infantry Platoon/Squad)
07-3-1207 X
Conduct an Infiltration or Exfiltration (Infantry/Reconnaissance Platoon/Squad)
07-3-1216 X
Conduct Operations during Limited Visibility (Antiarmor/Infantry/Mortar/Reconnaissance Platoon/Squad)
07-3-1234 X
Conduct Operations with Armored or Mechanized Vehicles in an Urban Environment (Infantry Platoon/Squad)
07-3-1243 X
Conduct Stay-behind Operations (Antiarmor/Infantry/Reconnaissance Platoon/Squad)
07-3-1261 X
Conduct Tactical Movement (Mounted or Dismounted) (Antiarmor/Infantry/Mortar/Reconnaissance Platoon/Squad)
07-3-1270 X
Conduct Tactical Movement in a Built-up Area (Antiarmor/Infantry/Reconnaissance Platoon/Squad)
07-3-1279 X
Cross a Water Obstacle (Dismounted) (Infantry/Reconnaissance Platoon/Squad)
07-3-1288 X
Establish a Checkpoint (Infantry/Reconnaissance Platoon/Squad)
07-3-1324 X X
Knock Out a Bunker (Infantry Platoon/Squad)
07-3-1333 X

SH-3-6
Perform Air Assault Operations (Infantry/Mortar/Reconnaissance Platoon/Squad)
07-3-1369 X
Perform Deployment or Redeployment Activities (Infantry/Mortar/Reconnaissance Platoon/Squad)
07-3-1378 X
React to a Civil Disturbance (Antiarmor/Infantry/Reconnaissance Platoon/Squad)
07-3-1396 X X
React to Snipers (Infantry/Reconnaissance Platoon/Squad)
07-3-1406 X
Search a Building (Infantry Platoon/Squad)
07-3-1414 X X
Secure a Route (Antiarmor/Infantry/Reconnaissance Platoon/Squad)
07-3-1423 X
Take Action on Contact (Infantry/Mortar/Reconnaissance Platoon/Squad)
07-3-1432 X
Develop Intelligence Conduct a Route Reconnaissance (Infantry/Reconnaissance Platoon/Squad)
07-3-2000 X
Conduct an Area or Zone Reconnaissance (Infantry/Reconnaissance Platoon/Squad)
07-3-2009 X
Establish an Observation Post (OP) (Antiarmor/Infantry/Reconnaissance Platoon/Squad)
07-3-2018 X
Operate in an Electronic Warfare Environment (Infantry/Mortar/Reconnaissance Platoon/Squad)
07-3-2027 X
Reconnoiter a Built-up Area (Infantry/Reconnaissance Platoon/Squad)
07-3-2036 X

SH-3-7
Report Tactical Information (Infantry/Mortar/Reconnaissance Platoon/Squad)
07-3-2054 X
Employ Firepower Conduct Overwatch and or Support by Fire (Antiarmor/Infantry Platoon/Squad)
07-3-1252 X
Employ Fire Support (Infantry/Reconnaissance Platoon/Squad)
07-3-3009 X
Exercise Command and Control Conduct a Rehearsal (Infantry/Mortar/Reconnaissance Platoon/Squad)
07-3-5000 X
Conduct Consolidation and Reorganization (Infantry/Reconnaissance Platoon/Squad)
07-3-5009 X
Conduct Risk Management (Infantry/Mortar/Reconnaissance Platoon/Squad)
07-3-5027 X
Conduct Troop-leading Procedures (Infantry/Mortar/Reconnaissance Platoon/Squad)
07-3-5036 X
Establish Radio Communications (Infantry/Mortar/Reconnaissance Platoon/Squad)
07-3-5054 X
Occupy an Assembly Area (Infantry/Mortar/Reconnaissance Platoon/Squad)
07-3-5063 X
Prepare for Combat (Infantry/Mortar/Reconnaissance Platoon/Squad)
07-3-5081 X
Perform CSS and Sustainment

SH-3-8
Handle Enemy Prisoners of War (Infantry/Mortar/Reconnaissance Platoon/Squad)
07-3-4009 X
Perform Resupply Operations (Antiarmor/Infantry/Mortar/Reconnaissance Platoon/Squad)
07-3-4018 X
Process Captured Documents and Equipment (Infantry/Mortar/Reconnaissance Platoon/Squad)
07-3-4027 X
Secure Civilians During Operations (Infantry/Reconnaissance Platoon/Squad)
07-3-4036 X
Treat and Evacuate Casualties (Infantry/Mortar/Reconnaissance Platoon/Squad)
07-3-4045 X
Protect the Force Employ Protective Obstacle(s) (Antiarmor/Infantry/Mortar/Reconnaissance Platoon/Squad)
07-3-1315 X
Conduct Active Air Defense Measures Against Hostile Aircraft (Antiarmor/Infantry/Mortar/Reconnaissance Platoon/Squad)
07-3-6000 X
Conduct Passive Air Defense Measures (Infantry/Mortar/Reconnaissance Platoon/Squad)
07-3-6009 X
Cross an NBC Contaminated Area (Infantry/Mortar/Reconnaissance Platoon/Squad)
07-3-6018 X
Maintain Operations Security (Infantry/Mortar/Reconnaissance Platoon/Squad)
07-3-6027 X
Prepare for a Chemical Attack (Infantry/Mortar/Reconnaissance Platoon/Squad)
07-3-6036 X

SH-3-9
Prepare for a Nuclear Attack (Infantry/Mortar/Reconnaissance Platoon/Squad)
07-3-6045 X
React to a Chemical Attack (Infantry/Mortar/Reconnaissance Platoon/Squad)
07-3-6054 X
Respond to the Initial Effects of a Nuclear Attack (Infantry/Mortar/Reconnaissance Platoon/Squad)
07-3-6063 X

SH-3-10
NOTICE: This document is generated from relational data submitted by the proponent. The complete, authenticated document, when available, may be downloaded from the "Official Departmental Publications" side of the RDL.
Questions relating to information displayed should be addressed to the proponent school.
2-4. Training Matrix 2 (Publication Reference to Collective Task matrix) This training matrix identifies the references that contain detailed information about the collective tasks the unit must perform. This matrix is used to identify references to be used as sources of information about the tasks being used.
Table 2-3. Training Matrix 2 (Publication Reference to Collective Task Matrix).
Task Title Task Number Publication Reference
Deploy/Conduct Maneuver Assault a Building (Infantry Platoon/Squad) 07-3-1000 FM 7-5 (3-21.9), FM 7-7J, FM 7-8,
FM 90-10(HTF), FM 90-10-1 Conduct a Deliberate Attack (Infantry Platoon/Squad)
07-3-1009 FM 7-5 (3-21.9), FM 7-7, FM 7-7J, FM 7-8, FM 7-85
Breach an Obstacle (Infantry Platoon/Squad) 07-3-1027 FM 100-14, FM 21-60, FM 24-35, FM 3-34.2, FM 7-5 (3-21.9), FM 7-7, FM 7-7J, FM 7-8, FM 7-85
Clear a Trench Line (Infantry Platoon/Squad) 07-3-1036 FM 7-5 (3-21.9), FM 7-7J, FM 7-8 Conduct a Bypass (Infantry/Reconnaissance Platoon/Squad)
07-3-1045 FM 7-4 (3-21.94), FM 7-5 (3-21.9), FM 7-7, FM 7-7J, FM 7-8, FM 7-85, FM 7-92
Conduct a Defense (Infantry/Reconnaissance Platoon/Squad)
07-3-1054 FM 7-5 (3-21.9), FM 7-7, FM 7-7J, FM 7-8
Conduct a Delay (Infantry Platoon/Squad) 07-3-1063 FM 7-5 (3-21.9), FM 7-7, FM 7-7J, FM 7-8, FM 7-85
Conduct a Disengagement (Infantry/Reconnaissance Platoon/Squad)
07-3-1072 FM 7-4 (3-21.94), FM 7-5 (3-21.9), FM 7-7, FM 7-7J, FM 7-8
Conduct a Link-up (Infantry/Mortar/Reconnaissance Platoon/Squad)
07-3-1081 FM 100-14, FM 100-55, FM 21-60, FM 24-35, FM 24-35-1, FM 7-4 (3-21.94), FM 7-5 (3-21.9), FM 7-7, FM 7-7J, FM 7-8, FM 7-85, FM 7-90, FM 7-92

SH-3-11
Task Title Task Number Publication Reference
Conduct a Movement to Contact (Infantry/Reconnaissance Platoon/Squad)
07-3-1090 FM 100-14, FM 21-60, FM 24-35, FM 24-35-1, FM 6-30, FM 7-4 (3-21.94), FM 7-5 (3-21.9), FM 7-7, FM 7-7J, FM 7-8, FM 7-85, FM 7-92
Conduct a Passage of Lines as the Passing Unit (Infantry/Mortar/Reconnaissance Platoon/Squad)
07-3-1099 FM 7-4 (3-21.94), FM 7-5 (3-21.9), FM 7-7, FM 7-7J, FM 7-8, FM 7-85, FM 7-90, FM 7-92
Conduct a Passage of Lines as the Stationary Unit (Infantry/Reconnaissance Platoon/Squad)
07-3-1108 FM 100-14, FM 21-60, FM 24-35, FM 24-35-1, FM 7-4 (3-21.94), FM 7-5 (3-21.9), FM 7-7, FM 7-7J, FM 7-8, FM 7-85, FM 7-92
Conduct a Presence Patrol (Antiarmor/Infantry/Reconnaissance Platoon/Squad)
07-3-1117 FM 7-4 (3-21.94), FM 7-5 (3-21.9), FM 7-7, FM 7-7J, FM 7-8, FM 7-92
Conduct a Raid (Infantry Platoon/Squad) 07-3-1126 FM 7-7, FM 7-7J, FM 7-8, FM 7-85 Conduct a Deliberate Relief in Place (Infantry/Mortar/Reconnaissance Platoon/Squad)
07-3-1135 FM 7-4 (3-21.94), FM 7-5 (3-21.9), FM 7-7, FM 7-7J, FM 7-8, FM 7-85, FM 7-90, FM 7-92
Conduct a Screen (Infantry/Reconnaissance Platoon/Squad)
07-3-1144 FM 17-95, FM 7-7, FM 7-7J, FM 7-8, FM 7-85
Conduct a Security Patrol (Infantry/Reconnaissance Platoon/Squad)
07-3-1153 FM 7-4 (3-21.94), FM 7-5 (3-21.9), FM 7-7, FM 7-7J, FM 7-8, FM 7-85, FM 7-92
Conduct a Strongpoint Defense of a Building (Infantry Platoon/Squad)
07-3-1162 FM 7-5 (3-21.9), FM 7-7, FM 7-7J, FM 7-8, FM 7-85, FM 90-10-1
Conduct a Tactical Road March (Dismounted) (Infantry/Reconnaissance Platoon/Squad)
07-3-1171 FM 21-18, FM 7-7, FM 7-7J, FM 7-8, FM 7-85, FM 7-92
Conduct Actions at Danger Areas (Infantry/Reconnaissance Platoon)
07-3-1189 FM 7-4 (3-21.94), FM 7-5 (3-21.9), FM 7-7, FM 7-7J, FM 7-8, FM 7-85, FM 7-92
Conduct an Airborne Assault (Infantry Platoon/Squad)
07-3-1198 FM 7-8, FM 7-85, FM 90-26
Conduct an Ambush (Infantry Platoon/Squad) 07-3-1207 FM 7-5 (3-21.9), FM 7-7, FM 7-7J, FM 7-8, FM 7-85
Conduct an Infiltration or Exfiltration (Infantry/Reconnaissance Platoon/Squad)
07-3-1216 FM 7-4 (3-21.94), FM 7-5 (3-21.9), FM 7-7, FM 7-7J, FM 7-8, FM 7-85, FM 7-92
Conduct Operations during Limited Visibility (Antiarmor/Infantry/Mortar/Reconnaissance Platoon/Squad)
07-3-1234 FM 7-7, FM 7-7J, FM 7-8, FM 7-91, FM 7-92, TM 11-5855-213-10, TM 11-5855-214-10, TM 11-5855-249-10,

SH-3-12
Task Title Task Number Publication Reference
TM 11-5855-262-10-1, TM 11-5855-262-10-2, TM 11-5855-302-12&P
Conduct Operations with Armored or Mechanized Vehicles in an Urban Environment (Infantry Platoon/Squad)
07-3-1243 FM 17-15, FM 7-7, FM 7-7J, FM 7-8, FM 7-85
Conduct Stay-behind Operations (Antiarmor/Infantry/Reconnaissance Platoon/Squad)
07-3-1261 FM 7-4 (3-21.94), FM 7-5 (3-21.9), FM 7-7, FM 7-7J, FM 7-8, FM 7-85, FM 7-92
Conduct Tactical Movement (Mounted or Dismounted) (Antiarmor/Infantry/Mortar/Reconnaissance Platoon/Squad)
07-3-1270 FM 7-4 (3-21.94), FM 7-5 (3-21.9), FM 7-7, FM 7-7J, FM 7-8, FM 7-85, FM 7-90, FM 7-92
Conduct Tactical Movement in a Built-up Area (Antiarmor/Infantry/Reconnaissance Platoon/Squad)
07-3-1279 FM 90-10(HTF), FM 90-10-1
Cross a Water Obstacle (Dismounted) (Infantry/Reconnaissance Platoon/Squad)
07-3-1288 FM 7-4 (3-21.94), FM 7-5 (3-21.9), FM 7-7, FM 7-7J, FM 7-8, FM 7-85, FM 7-92
Establish a Checkpoint (Infantry/Reconnaissance Platoon/Squad)
07-3-1324 FM 100-20, FM 19-25, FM 19-4, FM 7-4 (3-21.94), FM 7-5 (3-21.9), FM 7-7, FM 7-7J, FM 7-8, FM 7-92, FM 7-98
Knock Out a Bunker (Infantry Platoon/Squad) 07-3-1333 FM 23-37, FM 7-5 (3-21.9), FM 7-7J, FM 7-8
Perform Air Assault Operations (Infantry/Mortar/Reconnaissance Platoon/Squad)
07-3-1369 FM 1-113, FM 90-4
Perform Deployment or Redeployment Activities (Infantry/Mortar/Reconnaissance Platoon/Squad)
07-3-1378 FM 100-17, FM 55-10, FM 55-15, FM 55-9
React to a Civil Disturbance (Antiarmor/Infantry/Reconnaissance Platoon/Squad)
07-3-1396 FM 19-15, FM 19-40, FM 7-4 (3-21.94), FM 7-5 (3-21.9), FM 7-7J, FM 7-8, FM 7-92, FM 7-98, TC 7-98-1
React to Snipers (Infantry/Reconnaissance Platoon/Squad)
07-3-1406 FM 21-60, FM 24-35, FM 24-35-1, FM 7-4 (3-21.94), FM 7-5 (3-21.9), FM 7-7, FM 7-7J, FM 7-8, FM 7-85, FM 7-92, FM 90-10(HTF), FM 90-10-1
Search a Building (Infantry Platoon/Squad) 07-3-1414 FM 7-5 (3-21.9), FM 7-7J, FM 7-8, FM 7-85, FM 7-98, FM 90-10-1
Secure a Route (Antiarmor/Infantry/Reconnaissance Platoon/Squad)
07-3-1423 FM 7-4 (3-21.94), FM 7-5 (3-21.9), FM 7-7, FM 7-7J, FM 7-8, FM 7-85,

SH-3-13
Task Title Task Number Publication Reference
FM 7-92, FM 90-10(HTF), FM 90-10-1
Take Action on Contact (Infantry/Mortar/Reconnaissance Platoon/Squad)
07-3-1432 FM 34-2-1, FM 7-4 (3-21.94), FM 7-5 (3-21.9), FM 7-7J, FM 7-8, FM 7-85, FM 7-90, FM 7-92
Develop Intelligence Conduct a Route Reconnaissance (Infantry/Reconnaissance Platoon/Squad)
07-3-2000 FM 100-14, FM 100-55, FM 21-60, FM 24-35, FM 24-35-1, FM 5-170, FM 7-4 (3-21.94), FM 7-5 (3-21.9), FM 7-7, FM 7-7J, FM 7-8, FM 7-85, FM 7-92
Conduct an Area or Zone Reconnaissance (Infantry/Reconnaissance Platoon/Squad)
07-3-2009 FM 100-14, FM 100-55, FM 21-60, FM 24-35, FM 24-35-1, FM 7-4 (3-21.94), FM 7-5 (3-21.9), FM 7-7, FM 7-7J, FM 7-8, FM 7-85, FM 7-92
Establish an Observation Post (OP) (Antiarmor/Infantry/Reconnaissance Platoon/Squad)
07-3-2018 FM 100-14, FM 100-5, FM 101-5, FM 101-5-1, FM 101-5-2, FM 20-3, FM 20-32, FM 21-10, FM 21-10-1, FM 21-11, FM 21-26, FM 21-60, FM 23-23, FM 23-25, FM 23-27, FM 23-31, FM 23-34, FM 23-37, FM 23-65, FM 23-67, FM 23-68, FM 24-1, FM 24-18, FM 24-19, FM 24-35, FM 24-35-1, FM 25-100, FM 25-101, FM 27-1, FM 3-100, FM 3-3, FM 3-4, FM 3-5, FM 3-7, FM 5-34, FM 55-15, FM 7-1 (SH-2), (SH-2),0, FM 7-20, FM 7-4 (3-21.94), FM 7-5 (3-21.9), FM 7-7, FM 7-7J, FM 7-8, FM 7-85, FM 7-91, FM 7-92, FM 9-43-1, FM 9-43-2, FM 90-10(HTF), FM 90-10-1, FM 90-13, FM 90-2, FM 90-4
Operate in an Electronic Warfare Environment (Infantry/Mortar/Reconnaissance Platoon/Squad)
07-3-2027 FM 21-60, FM 24-19, FM 24-33, FM 24-35, FM 24-35-1, FM 34-40-7, FM 7-4 (3-21.94), FM 7-5 (3-21.9), FM 7-7, FM 7-7J, FM 7-8, FM 7-85, FM 7-90, FM 7-92
Reconnoiter a Built-up Area (Infantry/Reconnaissance Platoon/Squad)
07-3-2036 FM 100-14, FM 100-55, FM 17-98, FM 21-60, FM 24-35, FM 24-35-1, FM 7-4 (3-21.94), FM 7-5 (3-21.9),

SH-3-14
Task Title Task Number Publication Reference
FM 7-7, FM 7-7J, FM 7-8, FM 7-85, FM 7-92, FM 90-10(HTF), FM 90-10-1
Report Tactical Information (Infantry/Mortar/Reconnaissance Platoon/Squad)
07-3-2054 FM 101-5-2, FM 7-4 (3-21.94), FM 7-5 (3-21.9), FM 7-7, FM 7-7J, FM 7-8, FM 7-85, FM 7-90, FM 7-92
Employ Firepower Conduct Overwatch and or Support by Fire (Antiarmor/Infantry Platoon/Squad)
07-3-1252 FM 100-14, FM 100-55, FM 20-3, FM 20-32, FM 21-60, FM 23-23, FM 24-35, FM 24-35-1, FM 7-5 (3-21.9), FM 7-7, FM 7-7J, FM 7-8, FM 7-85, FM 7-91
Employ Fire Support (Infantry/Reconnaissance Platoon/Squad)
07-3-3009 FM 7-4 (3-21.94), FM 7-5 (3-21.9), FM 7-7, FM 7-7J, FM 7-8, FM 7-85, FM 7-90, FM 7-92
Exercise Command and Control Conduct a Rehearsal (Infantry/Mortar/Reconnaissance Platoon/Squad)
07-3-5000 FM 101-5, FM 7-4 (3-21.94), FM 7-5 (3-21.9), FM 7-7, FM 7-7J, FM 7-8, FM 7-85, FM 7-90, FM 7-92
Conduct Consolidation and Reorganization (Infantry/Reconnaissance Platoon/Squad)
07-3-5009 FM 7-4 (3-21.94), FM 7-5 (3-21.9), FM 7-7, FM 7-7J, FM 7-8, FM 7-85, FM 7-92
Conduct Risk Management (Infantry/Mortar/Reconnaissance Platoon/Squad)
07-3-5027 FM 100-14
Conduct Troop-leading Procedures (Infantry/Mortar/Reconnaissance Platoon/Squad)
07-3-5036 FM 7-4 (3-21.94), FM 7-5 (3-21.9), FM 7-7, FM 7-7J, FM 7-8, FM 7-85, FM 7-90, FM 7-92
Establish Radio Communications (Infantry/Mortar/Reconnaissance Platoon/Squad)
07-3-5054 FM 24-1, FM 24-12, FM 24-18, FM 24-19
Occupy an Assembly Area (Infantry/Mortar/Reconnaissance Platoon/Squad)
07-3-5063 FM 7-4 (3-21.94), FM 7-5 (3-21.9), FM 7-7, FM 7-7J, FM 7-8, FM 7-85, FM 7-92
Prepare for Combat (Infantry/Mortar/Reconnaissance Platoon/Squad)
07-3-5081 FM 7-4 (3-21.94), FM 7-5 (3-21.9), FM 7-7, FM 7-7J, FM 7-8, FM 7-85, FM 7-90, FM 7-92
Perform CSS and Sustainment

SH-3-15
Task Title Task Number Publication Reference
Handle Enemy Prisoners of War (Infantry/Mortar/Reconnaissance Platoon/Squad)
07-3-4009 DA FORM 5976, FM 17-98, FM 19-40, FM 34-2-1, FM 7-1 (SH-2), (SH-2),0, FM 7-20, FM 7-4 (3-21.94), FM 7-5 (3-21.9), FM 7-7J, FM 7-8, FM 7-91, FM 7-92, FM 71-2
Perform Resupply Operations (Antiarmor/Infantry/Mortar/Reconnaissance Platoon/Squad)
07-3-4018 FM 10-27-4, FM 100-10, FM 7-4 (3-21.94), FM 7-5 (3-21.9), FM 7-7, FM 7-7J, FM 7-8, FM 7-85, FM 7-90, FM 7-92
Process Captured Documents and Equipment (Infantry/Mortar/Reconnaissance Platoon/Squad)
07-3-4027 FM 17-98, FM 19-40, FM 34-2-1, FM 7-1 (SH-2), (SH-2),0, FM 7-20, FM 7-4 (3-21.94), FM 7-5 (3-21.9), FM 7-7J, FM 7-8, FM 7-92, FM 71-2
Secure Civilians During Operations (Infantry/Reconnaissance Platoon/Squad)
07-3-4036 FM 27-10, FM 90-10(HTF), FM 90-10-1
Treat and Evacuate Casualties (Infantry/Mortar/Reconnaissance Platoon/Squad)
07-3-4045 DA FORM 1155, DA FORM 1156, DD FORM 1380, FM 21-11, FM 8-10-6
Protect the Force Employ Protective Obstacle(s) (Antiarmor/Infantry/Mortar/Reconnaissance Platoon/Squad)
07-3-1315 DA FORM 1355-1-R, FM 20-32, FM 7-4 (3-21.94), FM 7-5 (3-21.9), FM 7-7, FM 7-7J, FM 7-8, FM 7-85, FM 7-90, FM 7-92
Conduct Active Air Defense Measures Against Hostile Aircraft (Antiarmor/Infantry/Mortar/Reconnaissance Platoon/Squad)
07-3-6000 FM 7-4 (3-21.94), FM 7-5 (3-21.9), FM 7-7, FM 7-7J, FM 7-8, FM 7-85, FM 7-90, FM 7-92
Conduct Passive Air Defense Measures (Infantry/Mortar/Reconnaissance Platoon/Squad)
07-3-6009 FM 44-80, FM 5-20, FM 7-7J, FM 7-8, FM 7-90, FM 7-92
Cross an NBC Contaminated Area (Infantry/Mortar/Reconnaissance Platoon/Squad)
07-3-6018 FM 3-100, FM 3-4, FM 7-4 (3-21.94), FM 7-5 (3-21.9), FM 7-7, FM 7-7J, FM 7-8, FM 7-85, FM 7-90, FM 7-92
Maintain Operations Security (Infantry/Mortar/Reconnaissance Platoon/Squad)
07-3-6027 FM 100-6, FM 20-3, FM 7-4 (3-21.94), FM 7-5 (3-21.9), FM 7-7J, FM 7-8, FM 7-90, FM 7-91, FM 7-92, FM 90-2
Prepare for a Chemical Attack 07-3-6036 FM 24-35, FM 24-35-1, FM 3-3, FM

SH-3-16
Task Title Task Number Publication Reference
(Infantry/Mortar/Reconnaissance Platoon/Squad) 3-4, FM 3-5, FM 34-2-1, FM 7-4 (3-21.94), FM 7-5 (3-21.9), FM 7-7, FM 7-7J, FM 7-8, FM 7-85, FM 7-90, FM 7-92
Prepare for a Nuclear Attack (Infantry/Mortar/Reconnaissance Platoon/Squad)
07-3-6045 FM 3-100, FM 3-4, FM 7-4 (3-21.94), FM 7-5 (3-21.9), FM 7-7, FM 7-7J, FM 7-8, FM 7-85, FM 7-90, FM 7-92
React to a Chemical Attack (Infantry/Mortar/Reconnaissance Platoon/Squad)
07-3-6054 FM 3-100, FM 3-3, FM 3-4, FM 3-5, FM 7-4 (3-21.94), FM 7-5 (3-21.9), FM 7-7, FM 7-7J, FM 7-8, FM 7-85, STP 21-24-SMCT
Respond to the Initial Effects of a Nuclear Attack (Infantry/Mortar/Reconnaissance Platoon/Squad)
07-3-6063 FM 3-100, FM 3-3, FM 3-5, FM 3-7, FM 7-4 (3-21.94), FM 7-5 (3-21.9), FM 7-7, FM 7-7J, FM 7-8, FM 7-85, FM 7-92

SH-3-17
NOTICE: This document is generated from relational data submitted by the proponent. The complete, authenticated document, when available, may be downloaded from the "Official Departmental Publications" side of the RDL.
Questions relating to information displayed should be addressed to the proponent school.
2-5. Training Matrix 3 (Collective Task to Individual Task Matrix) This training matrix displays the relationship between the unit collective tasks and supporting individual tasks. This matrix is used to plan individual training to support collective training. To use this matrix, determine the collective tasks that require work (tasks that aren't practiced or are performed poorly) and look across the horizontal row to find the supporting individual soldier tasks. Remember to determine the individual tasks to concentrate on based on basic unit nonproficiency.
Table 2-4. Training Matrix 3 (Collective Task to Individual Task Matrix).
Task Title Task Number Individual Task Number
Deploy/Conduct Maneuver Assault a Building (Infantry Platoon/Squad) 07-3-1000 No Individual Task linked to
Collective Task Conduct a Deliberate Attack (Infantry Platoon/Squad)
07-3-1009 052-192-3060, 071-004-0006, 071-010-0006, 071-010-0007, 071-052-0004, 071-052-0005, 071-052-0005-A, 071-052-0006, 071-054-0001, 071-054-0002, 071-054-0003, 071-054-0004, 071-056-0003, 071-311-2007, 071-311-2130, 071-311-6005, 071-313-4006, 071-313-4007, 071-314-0011, 071-314-0012, 071-315-2352, 071-316-3002, 071-316-3006, 071-316-3015, 071-317-3302, 071-317-3306, 071-324-4003, 071-325-4407, 071-326-0502, 071-326-0503, 071-326-0510, 071-326-5910, 071-326-5921, 071-410-0010, 071-410-0020, 071-420-0007, 071-710-0002, 071-710-0004,

SH-3-18
Task Title Task Number Individual Task Number
113-571-1022, 113-587-2070, 113-587-2071, 301-348-1050
Breach an Obstacle (Infantry Platoon/Squad) 07-3-1027 052-192-1021, 052-193-1013, 052-193-1025, 052-193-1025-A, 071-010-0006, 071-025-0001, 071-025-0003, 071-025-0004, 071-025-0007, 071-311-2007, 071-311-2025, 071-311-2026, 071-311-2027, 071-311-2028, 071-311-2029, 071-311-2125, 071-311-2126, 071-311-2127, 071-311-2128, 071-311-2129, 071-311-2130, 071-312-4025, 071-312-4026, 071-312-4027, 071-312-4028, 071-315-0091, 071-325-4407, 071-326-0501, 071-326-0503, 071-326-0510, 071-326-0512, 071-326-0513, 071-326-0608, 071-326-5502, 071-326-5503, 071-326-5505, 071-326-5775, 071-328-5301, 071-331-0804, 071-331-0815, 071-331-0820, 071-410-0020, 071-420-0005, 071-710-0004, 071-710-0006, 071-710-0008, 081-831-1000
Clear a Trench Line (Infantry Platoon/Squad) 07-3-1036 071-010-0006, 071-311-2007, 071-311-2130, 071-325-4407, 071-326-0501, 071-326-0502, 071-326-0503, 071-326-5605, 071-326-5606, 071-326-5611, 071-326-5630, 071-331-0820, 071-410-0019, 071-410-0020, 071-420-0005
Conduct a Bypass (Infantry/Reconnaissance Platoon/Squad)
07-3-1045 052-192-1021, 071-315-0091, 071-326-0502, 071-326-0503, 071-326-0510, 071-326-0513, 071-326-0515, 071-326-5606, 071-329-1001, 071-329-1002, 071-329-1003, 071-329-1005, 071-329-1006, 071-329-1008, 071-329-1009, 071-329-1011, 071-329-1018, 071-420-0005,

SH-3-19
Task Title Task Number Individual Task Number
071-510-0002, 071-710-0004, 071-710-0006, 071-710-0008, 113-571-1022, 113-587-2070, 113-587-2071, 301-348-1050
Conduct a Defense (Infantry/Reconnaissance Platoon/Squad)
07-3-1054 031-503-2008, 052-192-1021, 052-193-1025, 052-193-1025-A, 052-193-2030, 071-004-0005, 071-004-0006, 071-010-0006, 071-010-0007, 071-098-0001, 071-098-0002, 071-311-2007, 071-311-2029, 071-311-2129, 071-311-2130, 071-312-3004, 071-312-3007, 071-312-3029, 071-312-3031, 071-312-4029, 071-312-4032, 071-315-0003, 071-315-0008, 071-315-0030, 071-315-2308, 071-315-2352, 071-325-4407, 071-325-4425, 071-325-4426, 071-326-0502, 071-326-0503, 071-326-0510, 071-326-0511, 071-326-0512, 071-326-0513, 071-326-0515, 071-326-3001, 071-326-3002, 071-326-5502, 071-326-5606, 071-326-5611, 071-326-5703, 071-326-5705, 071-329-1000, 071-329-1001, 071-329-1002, 071-329-1003, 071-329-1005, 071-329-1006, 071-329-1008, 071-329-1011, 071-329-1014, 071-329-1015, 071-329-1019, 071-329-1030, 071-331-0804, 071-331-1000, 071-331-1002, 071-410-0001, 071-410-0002, 071-410-0019, 071-510-0001, 071-710-0004, 071-710-0008, 071-710-0009, 071-730-0008, 071-730-0012, 071-730-0013, 113-573-4003, 113-573-4006
Conduct a Delay (Infantry Platoon/Squad) 07-3-1063 031-503-1021, 031-503-1021-A, 052-192-1021, 052-193-1003, 052-193-1003-A, 061-283-1004, 071-025-0003, 071-025-0010,

SH-3-20
Task Title Task Number Individual Task Number
071-025-0010-A, 071-030-0005, 071-030-0007, 071-052-0003, 071-052-0004, 071-054-0002, 071-311-2026, 071-311-2027, 071-311-2126, 071-311-2127, 071-312-4027, 071-312-4032, 071-317-0000, 071-317-3302, 071-317-3306, 071-317-3324, 071-326-0501, 071-326-0511, 071-326-0512, 071-326-0550, 071-326-5502, 071-326-5503, 071-326-5505, 071-326-5605, 071-326-5606, 071-326-5770, 071-326-5775, 071-331-0804, 071-410-0010, 071-410-0019, 071-410-0020, 071-420-0005, 071-710-0006, 071-710-0008, 113-600-2007
Conduct a Disengagement (Infantry/Reconnaissance Platoon/Squad)
07-3-1072 071-008-0011, 071-010-0006, 071-025-0003, 071-025-0007, 071-025-0010, 071-025-0010-A, 071-032-0006, 071-311-2006, 071-311-2007, 071-311-2025, 071-311-2026, 071-311-2027, 071-311-2029, 071-311-2125, 071-311-2126, 071-311-2127, 071-311-2129, 071-311-2130, 071-312-4004, 071-312-4025, 071-312-4026, 071-312-4027, 071-312-4029, 071-312-4032, 071-325-4401, 071-325-4407, 071-325-4426, 071-326-0501, 071-326-0502, 071-326-0503, 071-326-0510, 071-326-0511, 071-326-0513, 071-326-0515, 071-326-5502, 071-326-5503, 071-326-5505, 071-326-5605, 071-326-5606, 071-326-5611, 071-326-5775, 071-326-5805, 071-326-5832, 071-329-1000, 071-329-1001, 071-329-1002, 071-329-1003, 071-329-1004, 071-329-1005, 071-329-1006,

SH-3-21
Task Title Task Number Individual Task Number
071-329-1008, 071-329-1009, 071-329-1011, 071-329-1012, 071-329-1019, 071-331-0815, 071-331-0820, 071-331-0852, 071-410-0010, 071-410-0012, 071-410-0019, 071-420-0005, 071-430-0007, 071-430-0008, 071-710-0004, 071-710-0006, 071-710-0008, 113-571-1022, 113-587-2070, 113-587-2071, 301-348-1050
Conduct a Link-up (Infantry/Mortar/Reconnaissance Platoon/Squad)
07-3-1081 03-3711.04-0001, 04-1910.11-1001, 071-315-0091, 071-326-0513, 071-326-0515, 071-326-5606, 071-326-5611, 071-326-5630, 071-326-5705, 071-326-5775, 071-326-5805, 071-329-1000, 071-329-1001, 071-329-1002, 071-329-1003, 071-329-1004, 071-329-1005, 071-329-1006, 071-329-1008, 071-329-1009, 071-329-1011, 071-329-1012, 071-329-1018, 071-329-1019, 071-331-0801, 071-331-0804, 071-331-0815, 071-331-0852, 071-410-0010, 071-410-0019, 071-420-0005, 071-510-0001, 071-510-0002, 071-710-0004, 071-710-0006, 071-710-0008, 071-720-0012, 071-720-0015, 113-571-1022, 113-573-8006, 113-587-2070, 113-587-2071, 301-348-1050
Conduct a Movement to Contact (Infantry/Reconnaissance Platoon/Squad)
07-3-1090 052-193-1025, 052-193-1025-A, 061-283-1004, 071-004-0002, 071-004-0003, 071-008-0011, 071-010-0006, 071-010-0007, 071-024-0002, 071-024-0006, 071-025-0003, 071-025-0007, 071-026-0001, 071-030-0004, 071-030-0005, 071-030-0007, 071-034-0005, 071-052-0004, 071-052-0005, 071-052-0005-A,

SH-3-22
Task Title Task Number Individual Task Number
071-052-0006, 071-054-0003, 071-056-0001, 071-056-0003, 071-100-0003, 071-311-2126, 071-311-2127, 071-311-2130, 071-312-4028, 071-313-4007, 071-314-0011, 071-314-0012, 071-315-0003, 071-315-0008, 071-315-0030, 071-315-0091, 071-315-2308, 071-315-2352, 071-316-3002, 071-317-3302, 071-317-3306, 071-324-4003, 071-324-6004, 071-324-6026, 071-326-0501, 071-326-0502, 071-326-0503, 071-326-0511, 071-326-0512, 071-326-0515, 071-326-3001, 071-326-3002, 071-326-5502, 071-326-5503, 071-326-5605, 071-326-5606, 071-326-5611, 071-326-5630, 071-326-5911, 071-329-1002, 071-329-1003, 071-329-1005, 071-329-1006, 071-329-1008, 071-329-1011, 071-329-1012, 071-329-1014, 071-329-1030, 071-331-0820, 071-332-5034, 071-410-0001, 071-410-0002, 071-410-0010, 071-410-0019, 071-410-0020, 071-420-0005, 071-420-0007, 071-510-0001, 071-710-0002, 071-710-0004
Conduct a Passage of Lines as the Passing Unit (Infantry/Mortar/Reconnaissance Platoon/Squad)
07-3-1099 No Individual Task linked to Collective Task
Conduct a Passage of Lines as the Stationary Unit (Infantry/Reconnaissance Platoon/Squad)
07-3-1108 071-326-0515, 071-326-0608, 071-326-5502, 071-326-5503, 071-326-5505, 071-326-5630, 071-326-5775, 071-328-5301, 071-329-1000, 071-329-1001, 071-329-1003, 071-329-1005, 071-329-1006, 071-329-1008, 071-329-1019, 071-329-1030, 071-331-0815, 071-410-0020, 113-573-0002, 113-573-8006, 113-587-1064, 113-587-2070,

SH-3-23
Task Title Task Number Individual Task Number
113-587-2071 Conduct a Presence Patrol (Antiarmor/Infantry/Reconnaissance Platoon/Squad)
07-3-1117 071-326-0512, 071-326-0515, 071-326-3001, 071-326-5502, 071-326-5606, 071-326-5630, 071-326-5805, 071-329-1000, 071-329-1001, 071-329-1002, 071-329-1003, 071-329-1005, 071-329-1006, 071-329-1008, 071-329-1011, 071-329-1014, 071-329-1015, 071-329-1019, 071-329-1030, 071-710-0004, 071-710-0008, 113-573-4003, 113-573-4006
Conduct a Raid (Infantry Platoon/Squad) 07-3-1126 052-192-1021, 052-193-1013, 052-193-1025, 052-193-1025-A, 061-283-1002, 061-283-1004, 071-004-0002, 071-004-0003, 071-004-0004, 071-004-0005, 071-004-0006, 071-008-0007, 071-008-0011, 071-010-0006, 071-010-0007, 071-025-0003, 071-025-0004, 071-025-0007, 071-030-0004, 071-030-0005, 071-030-0006, 071-030-0007, 071-030-0008, 071-052-0004, 071-052-0005, 071-052-0005-A, 071-052-0006, 071-054-0001, 071-054-0002, 071-054-0003, 071-054-0004, 071-100-0003, 071-100-0006, 071-100-0007, 071-311-2007, 071-311-2126, 071-311-2127, 071-311-2128, 071-311-2129, 071-311-2130, 071-312-3004, 071-312-3028, 071-312-4026, 071-312-4027, 071-312-4028, 071-312-4029, 071-315-0091, 071-315-2308, 071-315-2352, 071-317-3302, 071-317-3306, 071-317-3324, 071-325-4407, 071-326-0501, 071-326-0502, 071-326-0503, 071-326-0510, 071-326-0511, 071-326-0512, 071-326-0515,

SH-3-24
Task Title Task Number Individual Task Number
071-326-5502, 071-326-5503, 071-326-5505, 071-326-5605, 071-326-5606, 071-326-5611, 071-326-5630, 071-329-1001, 071-329-1002, 071-329-1003, 071-329-1005, 071-329-1006, 071-329-1030, 071-331-0820, 071-332-5034, 071-334-4002, 071-410-0001, 071-410-0010, 071-410-0019, 071-410-0020, 071-420-0005, 071-710-0004, 071-710-0006, 071-710-0008, 113-573-4003, 113-573-4006
Conduct a Deliberate Relief in Place (Infantry/Mortar/Reconnaissance Platoon/Squad)
07-3-1135 01-5700.01-0001, 01-5700.01-0002, 04-3303.01-0020, 04-3306.01-0006, 04-3306.01-0007, 04-3311.02-0001, 04-3312.02-0003, 04-3312.02-0008, 04-3312.03-0021, 04-3317.02-0001, 071-326-0513, 071-326-0515, 071-326-0608, 071-326-5502, 071-326-5503, 071-326-5505, 071-326-5630, 071-326-5775, 071-328-5301, 071-329-1011, 071-329-1012, 071-329-1019, 071-331-0815, 071-410-0010, 071-410-0012, 071-410-0019, 071-410-0020, 071-420-0005, 071-430-0006, 071-450-0027, 071-600-0009, 071-710-0004, 071-710-0006, 071-710-0008, 071-720-0015, 113-571-1022, 113-573-8006
Conduct a Screen (Infantry/Reconnaissance Platoon/Squad)
07-3-1144 052-193-1013, 061-283-1002, 071-010-0006, 071-052-0006, 071-054-0004, 071-311-2028, 071-311-2029, 071-311-2127, 071-311-2128, 071-311-2129, 071-311-2130, 071-312-3027, 071-312-3028, 071-312-3029, 071-312-3031, 071-312-4027, 071-315-0003, 071-315-0008, 071-315-0030, 071-315-0091,

SH-3-25
Task Title Task Number Individual Task Number
071-315-2308, 071-315-2352, 071-317-3302, 071-317-3306, 071-325-4401, 071-325-4407, 071-326-0501, 071-326-0502, 071-326-0510, 071-326-0511, 071-326-0512, 071-326-0513, 071-326-5502, 071-326-5605, 071-326-5606, 071-326-5611, 071-326-5630, 071-326-5705, 071-326-5775, 071-331-0801, 071-331-0804, 071-331-0820, 071-410-0010, 071-410-0012, 071-410-0019, 071-410-0020, 071-420-0005, 071-450-0005, 071-710-0004, 081-831-0101, 113-573-4006, 113-573-8006
Conduct a Security Patrol (Infantry/Reconnaissance Platoon/Squad)
07-3-1153 04-1910.11-1001, 04-3302.01-0003, 04-3303.01-0019, 04-3303.01-0034, 04-3305.01-0002, 04-3305.01-0005, 04-3305.01-0006, 04-3305.01-0007, 04-3305.01-0008, 04-3305.01-0012, 04-3305.01-0013, 04-3305.01-0014, 04-3306.01-0001, 04-3306.01-0002, 04-3306.01-0003, 04-3306.01-0005, 04-3306.01-0007, 04-3311.02-0001, 04-3312.02-0006, 04-3312.02-0008, 04-3312.02-0009, 04-3312.02-0010, 04-3312.02-0013, 04-3312.02-0015, 04-3312.03-0016, 04-3317.02-0001, 04-3317.02-0002, 04-8951.00-0892, 052-191-1501, 071-010-0006, 071-315-0091, 071-326-5505, 071-326-5606, 071-326-5626, 071-326-5775, 071-410-0010, 071-600-0009
Conduct a Strongpoint Defense of a Building (Infantry Platoon/Squad)
07-3-1162 071-025-0003, 071-025-0007, 071-025-0010, 071-025-0010-A, 071-326-5704, 071-326-5705, 071-326-5775, 071-331-0801, 071-331-1000, 071-331-1002,
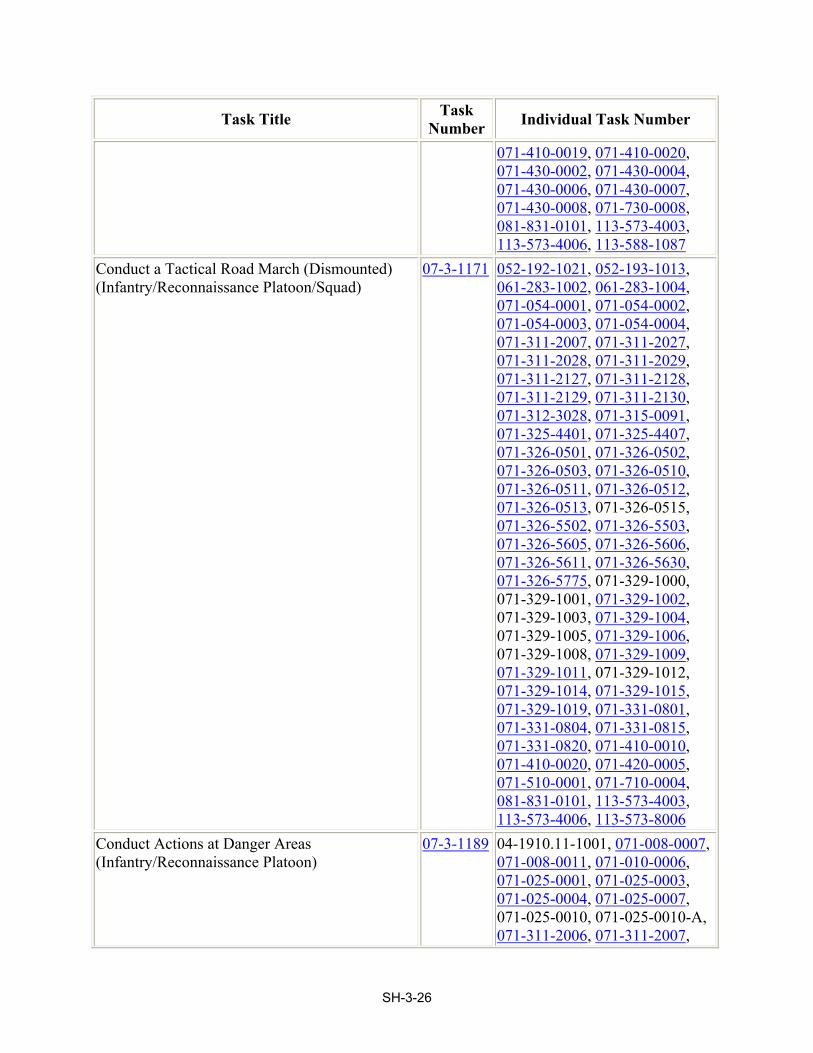
SH-3-26
Task Title Task Number Individual Task Number
071-410-0019, 071-410-0020, 071-430-0002, 071-430-0004, 071-430-0006, 071-430-0007, 071-430-0008, 071-730-0008, 081-831-0101, 113-573-4003, 113-573-4006, 113-588-1087
Conduct a Tactical Road March (Dismounted) (Infantry/Reconnaissance Platoon/Squad)
07-3-1171 052-192-1021, 052-193-1013, 061-283-1002, 061-283-1004, 071-054-0001, 071-054-0002, 071-054-0003, 071-054-0004, 071-311-2007, 071-311-2027, 071-311-2028, 071-311-2029, 071-311-2127, 071-311-2128, 071-311-2129, 071-311-2130, 071-312-3028, 071-315-0091, 071-325-4401, 071-325-4407, 071-326-0501, 071-326-0502, 071-326-0503, 071-326-0510, 071-326-0511, 071-326-0512, 071-326-0513, 071-326-0515, 071-326-5502, 071-326-5503, 071-326-5605, 071-326-5606, 071-326-5611, 071-326-5630, 071-326-5775, 071-329-1000, 071-329-1001, 071-329-1002, 071-329-1003, 071-329-1004, 071-329-1005, 071-329-1006, 071-329-1008, 071-329-1009, 071-329-1011, 071-329-1012, 071-329-1014, 071-329-1015, 071-329-1019, 071-331-0801, 071-331-0804, 071-331-0815, 071-331-0820, 071-410-0010, 071-410-0020, 071-420-0005, 071-510-0001, 071-710-0004, 081-831-0101, 113-573-4003, 113-573-4006, 113-573-8006
Conduct Actions at Danger Areas (Infantry/Reconnaissance Platoon)
07-3-1189 04-1910.11-1001, 071-008-0007, 071-008-0011, 071-010-0006, 071-025-0001, 071-025-0003, 071-025-0004, 071-025-0007, 071-025-0010, 071-025-0010-A, 071-311-2006, 071-311-2007,

SH-3-27
Task Title Task Number Individual Task Number
071-311-2025, 071-311-2026, 071-311-2027, 071-311-2028, 071-311-2029, 071-311-2030, 071-311-2103, 071-311-2125, 071-311-2126, 071-311-2127, 071-311-2128, 071-311-2129, 071-311-2130, 071-312-4004, 071-312-4025, 071-312-4026, 071-312-4027, 071-312-4028, 071-312-4029, 071-312-4030, 071-312-4032, 071-315-0091, 071-325-4401, 071-325-4407, 071-326-0502, 071-326-0503, 071-326-0513, 071-326-0515, 071-326-0608, 071-326-5606, 071-326-5611, 071-326-5630, 071-329-1000, 071-329-1001, 071-329-1002, 071-329-1003, 071-329-1004, 071-329-1005, 071-329-1006, 071-329-1008, 071-329-1009, 071-329-1011, 071-329-1012, 071-329-1014, 071-329-1015, 071-329-1019, 071-331-0815, 071-331-0852, 071-410-0010, 071-410-0019, 071-410-0020, 071-420-0005, 071-710-0008, 071-710-0009
Conduct an Airborne Assault (Infantry Platoon/Squad)
07-3-1198 04-3317.02-0001
Conduct an Ambush (Infantry Platoon/Squad) 07-3-1207 No Individual Task linked to Collective Task
Conduct an Infiltration or Exfiltration (Infantry/Reconnaissance Platoon/Squad)
07-3-1216 04-3312.02-0015, 04-3312.03-0019, 04-3317.03-0003, 052-192-1021, 052-193-1025, 052-193-1025-A, 052-193-2030, 071-008-0007, 071-008-0011, 071-010-0006, 071-010-0007, 071-025-0001, 071-025-0003, 071-025-0004, 071-025-0007, 071-025-0010, 071-025-0010-A, 071-032-0006, 071-098-0001, 071-098-0002, 071-311-2006, 071-311-2007, 071-311-2025, 071-311-

SH-3-28
Task Title Task Number Individual Task Number
2026, 071-311-2027, 071-311-2028, 071-311-2029, 071-311-2125, 071-311-2126, 071-311-2127, 071-311-2128, 071-311-2129, 071-311-2130, 071-312-4004, 071-312-4025, 071-312-4026, 071-312-4027, 071-312-4028, 071-312-4029, 071-312-4030, 071-312-4032, 071-315-0091, 071-325-4401, 071-325-4407, 071-325-4425, 071-325-4426, 071-326-0501, 071-326-0502, 071-326-0503, 071-326-0510, 071-326-0511, 071-326-0512, 071-326-0513, 071-326-0515, 071-326-0608, 071-326-5502, 071-326-5503, 071-326-5505, 071-326-5606, 071-326-5611, 071-326-5630, 071-326-5703, 071-328-5301, 071-329-1000, 071-329-1001, 071-329-1002, 071-329-1003, 071-329-1004, 071-329-1005, 071-329-1006, 071-329-1008, 071-329-1009, 071-329-1011, 071-329-1012, 071-329-1014, 071-329-1015, 071-329-1019, 071-331-0804, 071-331-0815, 071-331-0820, 071-410-0001, 071-410-0002, 071-410-0019, 071-410-0020, 071-420-0005, 071-510-0001, 071-710-0004, 071-710-0006, 071-710-0008, 071-710-0009, 071-730-0012, 071-730-0013
Conduct Operations during Limited Visibility (Antiarmor/Infantry/Mortar/Reconnaissance Platoon/Squad)
07-3-1234 071-008-0001, 071-008-0002, 071-008-0004, 071-008-0005, 071-008-0006, 071-008-0008, 071-008-0009, 071-008-0010, 071-008-0011-A, 071-010-0001-A, 071-010-0002-A, 071-010-0003-A, 071-010-0007-A, 071-010-0008, 071-010-0009, 071-

SH-3-29
Task Title Task Number Individual Task Number
010-0010, 071-010-0011, 071-010-0012, 071-010-0013, 071-010-0014, 071-010-0015, 071-025-0013, 071-025-0014, 071-025-0017, 071-025-0018, 071-025-0019, 071-025-0020, 071-025-0021, 071-025-0022, 071-025-0023, 071-025-0024, 071-025-0025, 071-025-0026, 071-025-0027, 071-025-0028, 071-025-0029, 071-025-0030, 071-030-0016, 071-030-0017, 071-030-0018, 071-030-0019, 071-032-0001, 071-032-0002, 071-032-0012, 071-032-0013, 071-032-0014, 071-032-0015, 071-056-0011-A, 071-100-0009, 071-100-0010, 071-100-0011, 071-100-0012, 071-100-0013, 071-100-0014, 071-100-0015, 071-100-0016, 071-100-0017, 071-100-0018, 071-100-0019, 071-100-0020, 071-315-0003-A, 071-315-0030-A, 071-315-0031, 071-315-0090, 071-315-0091-A, 071-315-2307-A
Conduct Operations with Armored or Mechanized Vehicles in an Urban Environment (Infantry Platoon/Squad)
07-3-1243 04-3306.01-0001, 04-3306.01-0002, 04-3306.01-0003, 04-3306.01-0005
Conduct Stay-behind Operations (Antiarmor/Infantry/Reconnaissance Platoon/Squad)
07-3-1261 No Individual Task linked to Collective Task
Conduct Tactical Movement (Mounted or Dismounted) (Antiarmor/Infantry/Mortar/Reconnaissance Platoon/Squad)
07-3-1270 052-192-1021, 052-192-1135, 052-193-1013, 052-193-1025, 052-193-1025-A, 071-326-0502, 071-326-0503, 071-326-0510, 071-326-0511, 071-326-0513, 071-326-0515, 071-326-3001, 071-326-5606, 071-329-1000, 071-329-1001, 071-329-1002, 071-329-1003, 071-329-1004, 071-329-1005, 071-329-1006, 071-329-1008, 071-329-1009,

SH-3-30
Task Title Task Number Individual Task Number
071-329-1011, 071-329-1012, 071-329-1014, 071-329-1015, 071-329-1018, 071-329-1019, 071-329-1030, 071-331-0804, 071-331-0820, 071-410-0001, 071-510-0002, 071-710-0004, 071-710-0008, 093-401-5000, 113-571-1022, 113-573-4006, 113-587-2070, 113-587-2071
Conduct Tactical Movement in a Built-up Area (Antiarmor/Infantry/Reconnaissance Platoon/Squad)
07-3-1279 031-503-2008, 052-192-1021, 052-193-1025, 052-193-1025-A, 052-193-2030, 071-004-0005, 071-004-0006, 071-010-0006, 071-010-0007, 071-098-0001, 071-098-0002, 071-311-2007, 071-311-2029, 071-311-2129, 071-311-2130, 071-312-3004, 071-312-3007, 071-312-3029, 071-312-3031, 071-312-4029, 071-312-4032, 071-315-0003, 071-315-0008, 071-315-0030, 071-315-2308, 071-315-2352, 071-325-4407, 071-325-4425, 071-325-4426, 071-326-0502, 071-326-0503, 071-326-0510, 071-326-0511, 071-326-0512, 071-326-0513, 071-326-0515, 071-326-3001, 071-326-3002, 071-326-5502, 071-326-5606, 071-326-5611, 071-326-5703, 071-326-5705, 071-329-1000, 071-329-1001, 071-329-1002, 071-329-1003, 071-329-1005, 071-329-1006, 071-329-1008, 071-329-1011, 071-329-1014, 071-329-1015, 071-329-1019, 071-329-1030, 071-331-0804, 071-331-1000, 071-331-1002, 071-410-0001, 071-410-0002, 071-410-0019, 071-510-0001, 071-710-0004, 071-710-0008, 071-710-0009, 071-730-0008, 071-730-0012, 071-730-0013,

SH-3-31
Task Title Task Number Individual Task Number
113-573-4003, 113-573-4006 Cross a Water Obstacle (Dismounted) (Infantry/Reconnaissance Platoon/Squad)
07-3-1288 061-283-1002, 071-008-0007, 071-008-0011, 071-010-0006, 071-025-0001, 071-025-0003, 071-025-0004, 071-025-0007, 071-025-0010, 071-025-0010-A, 071-032-0006, 071-311-2006, 071-311-2007, 071-311-2025, 071-311-2026, 071-311-2027, 071-311-2028, 071-311-2029, 071-311-2030, 071-311-2103, 071-311-2125, 071-311-2126, 071-311-2127, 071-311-2128, 071-311-2129, 071-311-2130, 071-312-4004, 071-312-4025, 071-312-4026, 071-312-4027, 071-312-4028, 071-312-4029, 071-312-4030, 071-312-4032, 071-315-0091, 071-325-4401, 071-325-4407, 071-325-4425, 071-325-4426, 071-326-0501, 071-326-0502, 071-326-0503, 071-326-0510, 071-326-0512, 071-326-0513, 071-326-0515, 071-326-0608, 071-326-5502, 071-326-5503, 071-326-5505, 071-326-5605, 071-326-5606, 071-326-5611, 071-326-5630, 071-326-5703, 071-326-5704, 071-326-5705, 071-326-5770, 071-326-5805, 071-328-5301, 071-329-1000, 071-329-1001, 071-329-1002, 071-329-1003, 071-329-1004, 071-329-1005, 071-329-1006, 071-329-1008, 071-329-1011, 071-329-1012, 071-329-1019, 071-331-0815, 071-331-0820, 071-331-0852, 071-410-0010, 071-410-0019, 071-410-0020, 071-420-0005, 071-710-0004, 071-710-0006, 071-710-0008, 071-710-0009, 071-720-0015, 071-730-0012,

SH-3-32
Task Title Task Number Individual Task Number
071-730-0013 Establish a Checkpoint (Infantry/Reconnaissance Platoon/Squad)
07-3-1324 No Individual Task linked to Collective Task
Knock Out a Bunker (Infantry Platoon/Squad) 07-3-1333 052-193-1013, 061-283-1004, 071-054-0004, 071-311-2007, 071-311-2130, 071-325-4407, 071-326-0501, 071-326-0502, 071-326-0503, 071-326-0512, 071-326-0513, 071-326-5605, 071-326-5606, 071-326-5611, 071-326-5630, 071-331-0820, 071-410-0019, 071-410-0020, 071-420-0005
Perform Air Assault Operations (Infantry/Mortar/Reconnaissance Platoon/Squad)
07-3-1369 071-326-5502, 071-326-5606, 071-329-1002, 071-329-1003, 071-329-1005, 071-329-1009, 071-329-1011, 071-329-1012, 071-334-4001, 071-334-4002, 071-410-0010, 071-510-0002, 071-710-0004, 071-710-0008
Perform Deployment or Redeployment Activities (Infantry/Mortar/Reconnaissance Platoon/Squad)
07-3-1378 No Individual Task linked to Collective Task
React to a Civil Disturbance (Antiarmor/Infantry/Reconnaissance Platoon/Squad)
07-3-1396 031-503-1024, 031-503-1025, 031-503-1026, 04-3304.01-0002, 04-3305.01-0001, 04-3317.02-0002, 04-8310.00-3007, 04-8951.00-0892, 071-025-0001, 071-025-0003, 071-025-0004, 071-311-2025, 071-311-2026, 071-311-2027, 071-311-2028, 071-311-2125, 071-311-2126, 071-311-2127, 071-311-2128, 071-312-4025, 071-312-4026, 071-312-4027, 071-312-4028, 071-326-0608, 071-326-5502, 071-326-5503, 071-326-5505, 071-326-5626, 071-328-5301
React to Snipers (Infantry/Reconnaissance Platoon/Squad)
07-3-1406 No Individual Task linked to Collective Task
Search a Building (Infantry Platoon/Squad) 07-3-1414 01-5700.01-0001, 01-5700.01-0002, 04-3306.01-0007, 04-

SH-3-33
Task Title Task Number Individual Task Number
3311.02-0001, 052-192-1021, 071-025-0003, 071-025-0004, 071-311-2027, 071-311-2028, 071-311-2127, 071-311-2128, 071-312-4027, 071-312-4028, 071-325-4407, 071-326-5502, 071-326-5606, 071-730-0013
Secure a Route (Antiarmor/Infantry/Reconnaissance Platoon/Squad)
07-3-1423 071-326-0503, 071-326-0515, 071-326-5502, 071-326-5606, 071-326-5705, 071-329-1000, 071-329-1001, 071-329-1002, 071-329-1003, 071-329-1005, 071-329-1006, 071-329-1011, 071-329-1014, 071-329-1015, 071-329-1019, 071-329-1030, 071-410-0019, 113-573-4003
Take Action on Contact (Infantry/Mortar/Reconnaissance Platoon/Squad)
07-3-1432 No Individual Task linked to Collective Task
Develop Intelligence Conduct a Route Reconnaissance (Infantry/Reconnaissance Platoon/Squad)
07-3-2000 061-283-1002, 071-326-0501, 071-326-0510, 071-326-0515, 071-326-5605, 071-326-5611, 071-329-1001, 071-329-1002, 071-329-1003, 071-329-1005, 071-329-1006, 071-329-1009, 071-329-1011, 071-329-1012, 071-329-1015, 071-331-0815, 071-331-0820, 071-410-0010, 071-420-0005
Conduct an Area or Zone Reconnaissance (Infantry/Reconnaissance Platoon/Squad)
07-3-2009 04-3306.01-0001, 04-3312.02-0010, 071-315-0091, 071-326-0501, 071-326-0510, 071-326-0512, 071-326-5502, 071-326-5503, 071-326-5605, 071-326-5611, 071-326-5775, 071-329-1003, 071-329-1005, 071-329-1009, 071-329-1014, 071-329-1015, 071-329-1018, 071-331-0804, 071-331-0820, 071-410-0010, 071-410-0019, 071-510-0001, 071-710-0004, 071-720-

SH-3-34
Task Title Task Number Individual Task Number
0015, 071-730-0013, 081-831-0101, 081-831-0102, 081-831-1000, 081-831-1003, 081-831-1005, 081-831-1007, 081-831-1008, 081-831-1009, 081-831-1016, 081-831-1017, 081-831-1025, 081-831-1026, 081-831-1030, 081-831-1031, 081-831-1033, 081-831-1034, 081-831-1040, 081-831-1041, 081-831-1042
Establish an Observation Post (OP) (Antiarmor/Infantry/Reconnaissance Platoon/Squad)
07-3-2018 071-098-0001, 071-098-0002, 071-312-4032, 071-315-0003, 071-315-0030, 071-315-2308, 071-315-2352, 071-325-4425, 071-325-4426, 071-326-0503, 071-326-0510, 071-326-0511, 071-326-0512, 071-326-3013, 071-326-5606, 071-326-5705, 071-329-1003, 071-329-1014, 071-329-1015, 071-329-1019, 071-410-0019, 071-510-0001, 071-710-0004, 071-710-0008, 071-710-0009, 071-730-0004, 071-730-0008, 071-730-0012, 071-730-0013, 093-403-5030, 113-573-4003, 113-573-4006, 301-348-1050, 441-091-3001, 441-091-3001-A
Operate in an Electronic Warfare Environment (Infantry/Mortar/Reconnaissance Platoon/Squad)
07-3-2027 01-5700.01-0001, 113-573-8006
Reconnoiter a Built-up Area (Infantry/Reconnaissance Platoon/Squad)
07-3-2036 071-326-0501, 071-326-0502, 071-326-0503, 071-326-0510, 071-326-0513, 071-326-0541, 071-326-0557, 071-326-5606, 071-326-5705, 071-329-1002, 071-329-1003, 071-329-1005, 071-329-1011, 071-329-1012
Report Tactical Information (Infantry/Mortar/Reconnaissance Platoon/Squad)
07-3-2054 031-503-1019, 031-503-4003, 071-326-0511, 071-326-0512, 071-326-5705, 071-326-5775, 071-329-1000, 071-329-1003,

SH-3-35
Task Title Task Number Individual Task Number
071-329-1012, 071-331-0801, 071-331-0804, 071-331-0820, 071-410-0010, 113-573-4003, 113-573-4006
Employ Firepower Conduct Overwatch and or Support by Fire (Antiarmor/Infantry Platoon/Squad)
07-3-1252 052-192-3032, 052-192-3032-A, 071-010-0006, 071-010-0007, 071-052-0004, 071-052-0005, 071-052-0005-A, 071-052-0006, 071-054-0001, 071-054-0002, 071-054-0003, 071-054-0004, 071-056-0003, 071-311-2007, 071-311-2130, 071-311-6005, 071-313-4006, 071-313-4007, 071-314-0011, 071-314-0012, 071-315-2352, 071-316-3002, 071-316-3006, 071-316-3015, 071-317-3302, 071-317-3306, 071-324-4003, 071-325-4407, 071-326-0502, 071-326-0510, 071-326-0512, 071-326-0513, 071-326-3001, 071-326-5606, 071-326-5910, 071-326-5921, 071-410-0020, 071-420-0007, 071-710-0004, 071-710-0008, 113-571-1022, 113-587-2070, 113-587-2071, 301-348-1050
Employ Fire Support (Infantry/Reconnaissance Platoon/Squad)
07-3-3009 01-5700.01-0001, 01-5700.01-0002, 03-2830.00-6003, 03-3711.04-0001, 04-3303.01-0019, 04-3303.01-0020, 04-3306.01-0007, 04-3312.02-0006, 04-3312.02-0008, 04-3312.02-0009, 04-3312.02-0013, 04-3313.02-0001, 04-3313.03-0002, 04-3317.02-0001, 061-283-1002, 061-283-1003, 061-283-1004, 071-074-0016, 071-326-0512, 071-326-0608, 071-326-5502, 071-326-5503, 071-326-5505, 071-326-5705, 071-326-5770,

SH-3-36
Task Title Task Number Individual Task Number
071-326-5775, 071-329-1001, 071-329-1002, 071-329-1003, 071-329-1004, 071-329-1005, 071-329-1008, 071-329-1009, 071-329-1011, 071-329-1012, 071-329-1014, 071-329-1015, 071-329-1019, 071-331-0804, 071-331-0815, 071-331-0820, 071-331-0852, 071-331-1000, 071-331-1002, 071-410-0010, 071-410-0019, 071-410-0020, 071-420-0005, 071-430-0006, 071-450-0005, 071-510-0001, 113-571-1022, 113-573-0002, 113-573-8006
Exercise Command and Control Conduct a Rehearsal (Infantry/Mortar/Reconnaissance Platoon/Squad)
07-3-5000 071-326-5503, 071-326-5505
Conduct Consolidation and Reorganization (Infantry/Reconnaissance Platoon/Squad)
07-3-5009 04-3306.01-0005, 04-3306.01-0006, 071-025-0003, 071-025-0010, 071-025-0010-A, 071-311-2026, 071-311-2027, 071-311-2029, 071-311-2125, 071-311-2126, 071-311-2127, 071-311-2129, 071-312-4004, 071-312-4025, 071-312-4026, 071-312-4027, 071-312-4029, 071-312-4032, 071-325-4401, 071-326-0513, 071-326-0515, 071-326-5502, 071-326-5505, 071-326-5705, 071-328-5301, 071-329-1001, 071-329-1002, 071-329-1003, 071-329-1005, 071-329-1008, 071-329-1009, 071-329-1011, 071-329-1012, 071-331-0815, 071-410-0019, 071-420-0005, 071-430-0003, 071-430-0004, 071-430-0007, 071-430-0008, 081-831-1000, 121-030-3534, 191-377-5250, 301-337-6001, 301-348-1050

SH-3-37
Task Title Task Number Individual Task Number
Conduct Risk Management (Infantry/Mortar/Reconnaissance Platoon/Squad)
07-3-5027 No Individual Task linked to Collective Task
Conduct Troop-leading Procedures (Infantry/Mortar/Reconnaissance Platoon/Squad)
07-3-5036 01-5700.01-0001, 01-5700.01-0002, 01-7300.75-0500, 031-503-2012, 04-3303.01-0020, 04-3303.02-0014, 04-3306.01-0008, 04-3311.02-0001, 071-074-0002, 071-074-0017, 071-326-0515, 071-326-5502, 071-326-5503, 071-326-5505, 071-326-5626, 071-326-5770, 071-326-5775, 071-329-1000, 071-329-1001, 071-329-1002, 071-329-1004, 071-329-1005, 071-329-1006, 071-329-1008, 071-329-1009, 071-329-1011, 071-329-1012, 071-329-1014, 071-329-1015, 071-329-1018, 071-329-1019, 071-331-0820, 071-332-5000, 071-332-5000-A, 071-410-0010, 071-410-0020, 071-510-0001, 071-510-0002, 071-710-0006, 071-730-0004, 091-309-0710, 091-309-0711, 113-571-1022, 113-573-4003, 113-573-4006, 113-573-8006, 171-122-1012, 551-721-3359, 551-721-3359-A, 850-001-2001, 850-001-3001, 850-001-4001
Establish Radio Communications (Infantry/Mortar/Reconnaissance Platoon/Squad)
07-3-5054 01-5700.01-0001, 01-5700.01-0002, 01-5700.01-0003, 113-573-8006
Occupy an Assembly Area (Infantry/Mortar/Reconnaissance Platoon/Squad)
07-3-5063 031-503-2001, 031-503-2008, 031-503-3008, 052-191-1501, 052-192-3032, 052-192-3032-A, 071-010-0001, 071-010-0002, 071-025-0010, 071-025-0010-A, 071-032-0006, 071-311-2006, 071-312-4004, 071-312-4032, 071-325-4425, 071-325-4426, 071-326-0513, 071-326-5502, 071-326-5503, 071-326-5505, 071-326-5703, 071-326-5704,

SH-3-38
Task Title Task Number Individual Task Number
071-326-5705, 071-326-5770, 071-326-5775, 071-331-0801, 071-331-0852, 071-730-0004, 071-730-0008, 113-571-1022, 113-573-0002
Prepare for Combat (Infantry/Mortar/Reconnaissance Platoon/Squad)
07-3-5081 No Individual Task linked to Collective Task
Perform CSS and Sustainment Handle Enemy Prisoners of War (Infantry/Mortar/Reconnaissance Platoon/Squad)
07-3-4009 No Individual Task linked to Collective Task
Perform Resupply Operations (Antiarmor/Infantry/Mortar/Reconnaissance Platoon/Squad)
07-3-4018 071-326-5503, 071-334-4002
Process Captured Documents and Equipment (Infantry/Mortar/Reconnaissance Platoon/Squad)
07-3-4027 No Individual Task linked to Collective Task
Secure Civilians During Operations (Infantry/Reconnaissance Platoon/Squad)
07-3-4036 01-5700.02-0001, 071-025-0001, 071-025-0003, 071-025-0004, 071-311-2025, 071-311-2026, 071-311-2027, 071-311-2028, 071-311-2125, 071-311-2126, 071-311-2127, 071-311-2128, 071-312-4025, 071-312-4026, 071-312-4027, 071-312-4028, 071-325-4401, 071-326-0608, 071-326-5502, 071-326-5503, 071-326-5505, 071-326-5630, 071-326-5775, 071-328-5301, 071-331-0815, 071-331-1004, 071-420-0005, 071-730-0012, 071-730-0013, 301-348-1050, 301-348-6001, 850-001-3001, 850-001-4001
Treat and Evacuate Casualties (Infantry/Mortar/Reconnaissance Platoon/Squad)
07-3-4045 04-8310.00-3008, 04-8310.00-3009, 04-8310.00-3010, 04-8310.00-3011, 04-8310.00-3012, 04-8310.00-3013, 04-8310.00-3014, 04-8310.00-3016, 04-8310.00-3024, 04-8310.00-3025, 04-8310.00-3027, 04-8310.00-3028, 071-334-4001, 071-334-

SH-3-39
Task Title Task Number Individual Task Number
4002, 081-831-0101, 081-831-0101-A
Protect the Force Employ Protective Obstacle(s) (Antiarmor/Infantry/Mortar/Reconnaissance Platoon/Squad)
07-3-1315 052-192-3032, 052-192-3032-A, 052-193-1003, 052-193-1003-A, 071-098-0002, 071-325-4425, 071-326-5606, 071-331-0820, 071-410-0010
Conduct Active Air Defense Measures Against Hostile Aircraft (Antiarmor/Infantry/Mortar/Reconnaissance Platoon/Squad)
07-3-6000 031-503-1019, 071-010-0006, 071-025-0007, 071-311-2007, 071-311-2029, 071-312-3027, 071-312-3029, 071-312-3031, 071-312-4025, 071-312-4027, 071-313-3454, 071-313-3455, 071-326-0502, 071-326-5502, 071-326-5503, 071-331-0804, 071-331-0815, 071-331-0820, 071-410-0019, 441-091-1040, 441-091-1040-A
Conduct Passive Air Defense Measures (Infantry/Mortar/Reconnaissance Platoon/Squad)
07-3-6009 04-1910.11-1001, 04-3306.01-0001, 052-191-1501, 071-326-0513, 071-326-5606, 071-326-5705, 071-331-0815, 441-091-1040, 441-091-1040-A
Cross an NBC Contaminated Area (Infantry/Mortar/Reconnaissance Platoon/Squad)
07-3-6018 031-503-1006, 031-503-1007, 031-503-1008, 031-503-1012, 031-503-1014, 031-503-1028, 031-503-1033, 031-503-1034, 031-503-2001, 031-503-2008, 031-503-2013, 031-503-2020, 031-503-2022, 031-503-3004, 031-503-3006, 031-503-3008, 031-503-4003, 071-324-6026, 113-571-1022, 113-587-2070, 113-587-2071, 301-348-1050
Maintain Operations Security (Infantry/Mortar/Reconnaissance Platoon/Squad)
07-3-6027 052-191-1501, 071-326-5705, 071-331-0801, 071-331-0804, 071-710-0004, 071-710-0006, 071-710-0008, 071-730-0008
Prepare for a Chemical Attack 07-3-6036 031-503-1005, 031-503-1012,

SH-3-40
Task Title Task Number Individual Task Number
(Infantry/Mortar/Reconnaissance Platoon/Squad) 031-503-1014, 031-503-1015, 031-503-1019, 031-503-1020, 031-503-1021, 031-503-1021-A, 031-503-1023, 031-503-1024, 031-503-1025, 031-503-1026, 031-503-1028, 031-503-2001, 031-503-2008, 031-503-2012, 031-503-2013, 031-503-2020, 031-503-2022, 031-503-3005, 031-503-3006, 031-503-3008, 031-503-3009, 031-503-3010, 031-503-4002, 031-503-4003, 031-504-3001, 031-506-1052, 031-506-1052-A
Prepare for a Nuclear Attack (Infantry/Mortar/Reconnaissance Platoon/Squad)
07-3-6045 031-503-3005, 031-503-3006, 031-503-3008, 031-503-4002, 031-503-4003, 071-326-0608, 071-326-5502, 071-326-5503, 071-326-5505, 071-331-0820, 113-571-1022
React to a Chemical Attack (Infantry/Mortar/Reconnaissance Platoon/Squad)
07-3-6054 031-503-1004, 031-503-1006, 031-503-1007, 031-503-1008, 031-503-1012, 031-503-1014, 031-503-1015, 031-503-1019, 031-503-1020, 031-503-1021, 031-503-1021-A, 031-503-1022, 031-503-1023, 031-503-1028, 031-503-1033, 031-503-1034, 031-503-2001, 031-503-2002, 031-503-2002-A, 031-503-2004, 031-503-2008, 031-503-3002, 031-503-3004, 031-503-3005, 031-503-3008, 031-503-3009, 031-503-3010, 031-503-4002, 031-504-3001, 031-506-1052, 031-506-1052-A, 031-507-3003, 081-831-1000, 081-831-1000-A, 081-831-1030, 081-831-1031
Respond to the Initial Effects of a Nuclear Attack (Infantry/Mortar/Reconnaissance Platoon/Squad)
07-3-6063 031-503-1006, 031-503-1018, 031-503-2013, 031-503-2020, 031-503-2022, 031-503-3005, 031-503-3006, 081-831-1000, 081-831-1000-A, 081-831-1007,

SH-3-41
Task Title Task Number Individual Task Number
081-831-1007-A, 113-571-1022, 113-587-2070, 113-587-2071,
NOTICE: This document is generated from relational data submitted by the proponent. The complete, authenticated document, when available, may be downloaded from the "Official Departmental Publications" side of the RDL.
Questions relating to information displayed should be addressed to the proponent school.
5-1. General
This chapter contains training objectives (tasks, conditions, and standards) for all of the collective tasks that a unit must master to perform critical wartime missions.
5-2. Structure
The T&EOs in this chapter are listed in Table 5-1. They are grouped by functional category to make it easier to locate a specific T&EO. The mission to collective task matrix in Chapter 2 lists the T&EOs required to train critical wartime missions.
5-3. Format
The T&EOs are the training objectives prepared for every collective task that supports critical wartime mission accomplishment. Each T&EO contains the following components:
a. Element. This identifies the unit or element that performs the task.
b. Task. This is a description of the action to be performed by the unit. The Task Number, in parentheses after the task title, identifies the task throughout the MTP.
c. Iteration. This is used for evaluation. It is used to identify how many times the task is performed and evaluated during an excercise. This would indicate if the unit improved during multiple performances during an exercise.
d. Training Status. This is used to record the evaluation of the unit's capability to perform the task and task steps. The ratings are:
1. T - Trained. The unit successfully performed all subtasks.
2. P - Needs Practice. The unit needs to practice the task. All critical subtasks were performed successfully, but one or more noncritical subtasks were performed unsuccessfully.

SH-3-42
3. U - Untrained. The unit incorrectly performed or failed to perform one or more critical subtasks.
e. Conditions. This describes the environment or situation in which the task is performed. The conditions list equipment, manuals, or supervision necessary to perform the task. The conditions also contain the initiating cue for the task.
f. Task Standard. This is a statement of overall task criteria that must be met to receive credit for successful execution of the task.
g. Task Steps. These are the actions necessary to perform the task. The subtasks are arranged sequentially when the performance sequence is important. An asterisk (*) indicates a leader task step. All critical task steps are annotated with a plus sign (+).
h. Performance Measures. Detailed performance measures are listed for each task step. These identify how well the task must be performed or the desired outcome. The performance for the task step is the accomplishment of all the statements. For example, statements "a" through "h" must be accomplished before the task step measures is met.
5-4. Use of T&EO
The T&EO is used individually to train a single task, or it is used in sequence with other T&EOs to train and evaluate larger tasks (STX), an entire mission (FTX), or a series of missions (higher echelon exercise or external evaluations).
5-5. Training and Evaluation Outlines
Table 5-1 List of T&EOs
Task Title Task Number
Deploy/Conduct Maneuver Assault a Building (Infantry Platoon/Squad) 07-3-1000 Conduct a Deliberate Attack (Infantry Platoon/Squad) 07-3-1009 Breach an Obstacle (Infantry Platoon/Squad) 07-3-1027 Clear a Trench Line (Infantry Platoon/Squad) 07-3-1036 Conduct a Bypass (Infantry/Reconnaissance Platoon/Squad) 07-3-1045 Conduct a Defense (Infantry/Reconnaissance Platoon/Squad) 07-3-1054 Conduct a Delay (Infantry Platoon/Squad) 07-3-1063 Conduct a Disengagement (Infantry/Reconnaissance Platoon/Squad) 07-3-1072 Conduct a Link-up (Infantry/Mortar/Reconnaissance Platoon/Squad) 07-3-1081 Conduct a Movement to Contact (Infantry/Reconnaissance Platoon/Squad) 07-3-1090

SH-3-43
Task Title Task Number
Conduct a Passage of Lines as the Passing Unit (Infantry/Mortar/Reconnaissance Platoon/Squad)
07-3-1099
Conduct a Passage of Lines as the Stationary Unit (Infantry/Reconnaissance Platoon/Squad)
07-3-1108
Conduct a Presence Patrol (Antiarmor/Infantry/Reconnaissance Platoon/Squad) 07-3-1117 Conduct a Raid (Infantry Platoon/Squad) 07-3-1126 Conduct a Deliberate Relief in Place (Infantry/Mortar/Reconnaissance Platoon/Squad)
07-3-1135
Conduct a Screen (Infantry/Reconnaissance Platoon/Squad) 07-3-1144 Conduct a Security Patrol (Infantry/Reconnaissance Platoon/Squad) 07-3-1153 Conduct a Strongpoint Defense of a Building (Infantry Platoon/Squad) 07-3-1162 Conduct a Tactical Road March (Dismounted) (Infantry/Reconnaissance Platoon/Squad)
07-3-1171
Conduct Actions at Danger Areas (Infantry/Reconnaissance Platoon) 07-3-1189 Conduct an Airborne Assault (Infantry Platoon/Squad) 07-3-1198 Conduct an Ambush (Infantry Platoon/Squad) 07-3-1207 Conduct an Infiltration or Exfiltration (Infantry/Reconnaissance Platoon/Squad) 07-3-1216 Conduct Operations during Limited Visibility (Antiarmor/Infantry/Mortar/Reconnaissance Platoon/Squad)
07-3-1234
Conduct Operations with Armored or Mechanized Vehicles in an Urban Environment (Infantry Platoon/Squad)
07-3-1243
Conduct Stay-behind Operations (Antiarmor/Infantry/Reconnaissance Platoon/Squad)
07-3-1261
Conduct Tactical Movement (Mounted or Dismounted) (Antiarmor/Infantry/Mortar/Reconnaissance Platoon/Squad)
07-3-1270
Conduct Tactical Movement in a Built-up Area (Antiarmor/Infantry/Reconnaissance Platoon/Squad)
07-3-1279
Cross a Water Obstacle (Dismounted) (Infantry/Reconnaissance Platoon/Squad) 07-3-1288 Establish a Checkpoint (Infantry/Reconnaissance Platoon/Squad) 07-3-1324 Knock Out a Bunker (Infantry Platoon/Squad) 07-3-1333 Perform Air Assault Operations (Infantry/Mortar/Reconnaissance Platoon/Squad) 07-3-1369 Perform Deployment or Redeployment Activities (Infantry/Mortar/Reconnaissance Platoon/Squad)
07-3-1378
React to a Civil Disturbance (Antiarmor/Infantry/Reconnaissance Platoon/Squad) 07-3-1396 React to Snipers (Infantry/Reconnaissance Platoon/Squad) 07-3-1406

SH-3-44
Task Title Task Number
Search a Building (Infantry Platoon/Squad) 07-3-1414 Secure a Route (Antiarmor/Infantry/Reconnaissance Platoon/Squad) 07-3-1423 Take Action on Contact (Infantry/Mortar/Reconnaissance Platoon/Squad) 07-3-1432 Develop Intelligence Conduct a Route Reconnaissance (Infantry/Reconnaissance Platoon/Squad) 07-3-2000 Conduct an Area or Zone Reconnaissance (Infantry/Reconnaissance Platoon/Squad)
07-3-2009
Establish an Observation Post (OP) (Antiarmor/Infantry/Reconnaissance Platoon/Squad)
07-3-2018
Operate in an Electronic Warfare Environment (Infantry/Mortar/Reconnaissance Platoon/Squad)
07-3-2027
Reconnoiter a Built-up Area (Infantry/Reconnaissance Platoon/Squad) 07-3-2036 Report Tactical Information (Infantry/Mortar/Reconnaissance Platoon/Squad) 07-3-2054 Employ Firepower Conduct Overwatch and or Support by Fire (Antiarmor/Infantry Platoon/Squad) 07-3-1252 Employ Fire Support (Infantry/Reconnaissance Platoon/Squad) 07-3-3009 Exercise Command and Control Conduct a Rehearsal (Infantry/Mortar/Reconnaissance Platoon/Squad) 07-3-5000 Conduct Consolidation and Reorganization (Infantry/Reconnaissance Platoon/Squad)
07-3-5009
Conduct Risk Management (Infantry/Mortar/Reconnaissance Platoon/Squad) 07-3-5027 Conduct Troop-leading Procedures (Infantry/Mortar/Reconnaissance Platoon/Squad)
07-3-5036
Establish Radio Communications (Infantry/Mortar/Reconnaissance Platoon/Squad) 07-3-5054 Occupy an Assembly Area (Infantry/Mortar/Reconnaissance Platoon/Squad) 07-3-5063 Prepare for Combat (Infantry/Mortar/Reconnaissance Platoon/Squad) 07-3-5081 Perform CSS and Sustainment

SH-3-45
Task Title Task Number
Handle Enemy Prisoners of War (Infantry/Mortar/Reconnaissance Platoon/Squad) 07-3-4009 Perform Resupply Operations (Antiarmor/Infantry/Mortar/Reconnaissance Platoon/Squad)
07-3-4018
Process Captured Documents and Equipment (Infantry/Mortar/Reconnaissance Platoon/Squad)
07-3-4027
Secure Civilians During Operations (Infantry/Reconnaissance Platoon/Squad) 07-3-4036 Treat and Evacuate Casualties (Infantry/Mortar/Reconnaissance Platoon/Squad) 07-3-4045 Protect the Force Employ Protective Obstacle(s) (Antiarmor/Infantry/Mortar/Reconnaissance Platoon/Squad)
07-3-1315
Conduct Active Air Defense Measures Against Hostile Aircraft (Antiarmor/Infantry/Mortar/Reconnaissance Platoon/Squad)
07-3-6000
Conduct Passive Air Defense Measures (Infantry/Mortar/Reconnaissance Platoon/Squad)
07-3-6009
Cross an NBC Contaminated Area (Infantry/Mortar/Reconnaissance Platoon/Squad)
07-3-6018
Maintain Operations Security (Infantry/Mortar/Reconnaissance Platoon/Squad) 07-3-6027 Prepare for a Chemical Attack (Infantry/Mortar/Reconnaissance Platoon/Squad) 07-3-6036 Prepare for a Nuclear Attack (Infantry/Mortar/Reconnaissance Platoon/Squad) 07-3-6045 React to a Chemical Attack (Infantry/Mortar/Reconnaissance Platoon/Squad) 07-3-6054 Respond to the Initial Effects of a Nuclear Attack (Infantry/Mortar/Reconnaissance Platoon/Squad)
07-3-6063

SH-3-46
07-3-1333 NOTICE:
This document is generated from relational data submitted by the proponent. The complete, authenticated document, when available, may be downloaded from the "Official Departmental Publications" side of the RDL.
Questions relating to information displayed should be addressed to the proponent school.
TASK: Knock Out a Bunker (Infantry Platoon/Squad) (07-3-1333)
(FM 23-37) (FM 7-5 (3-21.9)) (FM 7-7J) (FM 7-8)
ITERATION 1 2 3 4 5 M (circle) TRAINING STATUS T P U (circle)
CONDITION: The platoon is conducting operations as part of a larger force and has received an
operation order (OPORD) or fragmentary order (FRAGO) to knock out a bunker at the location
specified. All necessary personnel and equipment are available. The platoon has communications
with higher, adjacent, and subordinate elements. The platoon has been provided guidance on the
rules of engagement (ROE) and or rules of interaction (ROI). Coalition forces and
noncombatants may be present in the operational environment. Some iterations of this task
should be conducted during limited visibility conditions.
Some iterations of this task should be performed in MOPP4.
TASK STANDARD: The platoon knocks out the bunker in accordance with (IAW) tactical
standing operating procedures (TSOP), the order, and or commander's guidance. The platoon
destroys the designated bunker by killing, capturing, or forcing the withdrawal of the enemy. The
platoon complies with the ROE and or ROI.
TASK STEPS and PERFORMANCE MEASURES GO NO GO
*1. Platoon leader gains and or maintains situational understanding using information

SH-3-47
that is gathered from FORCE XXI Battle Command - Brigade and Below (FBCB2) (if
applicable), frequency modulated (FM) communications, maps, intelligence
summaries, situation reports (SITREPs), and or other available information sources.
*2. Platoon leader receives an OPORD or FRAGO and issues warning order
(WARNO) to the platoon using FBCB2, FM, or other tactical means.
*3. Platoon leader plans using troop leading procedures.
a. Conducts a digital and or conventional map reconnaissance.
(1) Identifies tentative objective rally point (ORP).
(2) Identifies tentative security, support by fire, and assault positions.
(3) Identifies likely enemy avenues of approach.
(4) Identifies routes to and from the ORP and objective.
(5) Marks tentative dismount points on digital and conventional maps as appropriate.
b. Plans and coordinates indirect fire support and or close air support, if available.
c. Identifies direct fire responsibilities.
d. Organizes the platoon as necessary to accomplish the mission and or compensate for combat losses.
*4. Platoon leader addresses actions on chance contact with the enemy.
*5. Platoon leader disseminates digital reports (if applicable), overlays, and other pertinent information to each squad to keep them abreast of the situation.
*6. Platoon leader issues orders and instructions to include ROE and or ROI.
7. Platoon conducts a rehearsal.
*8. Platoon leader issues FRAGOs, as necessary, to address changes to the plan identified during the rehearsal.
9. Platoon enters waypoints into position navigation (POSNAV) equipment to aid navigation.

SH-3-48
10. Platoon starts movement to ORP, if applicable.
a. Secures ORP.
*11. Platoon leader conducts a reconnaissance (based on factors of mission, enemy,
terrain, troops, time available, and civil considerations [METT-TC].)
a. Makes an estimate of the situation to determine where he can maneuver.
b. Pinpoints enemy bunkers, other supporting positions, and any obstacles.
c. Determines which bunker is to be assaulted first, if more than one.
d. Determines the size of the enemy force (the number of enemy automatic
weapons, the presence of any vehicles, and the employment of indirect fires
are indicators of enemy strength).
e. Identifies a vulnerable flank of at least one bunker.
f. Identifies a covered and concealed route to the flank of that bunker.
g. Selects security, support, and assault positions
h. Verifies and updates intelligence information.
i. Leaves a surveillance team to observe the bunker, if required.
j. Returns to the ORP, if applicable.
*12. Platoon leader adjust the plan based on updated intelligence and reconnaissance effort.
*13. Platoon leader updates the enemy situation.
*14. Platoon leader disseminates updated digital reports (if applicable), overlays, and
other pertinent information.
*15. Platoon leader positions security, support, and assault elements.
16. Platoon sergeant directs the support element to suppress the enemy. (May include
Bradley Fighting Vehicles [BFVs] or Interim Armored Vehicles [IAVs].)

SH-3-49
a. Destroys or suppresses enemy crew served weapons first.
b. Obscures the enemy position with smoke.
c. Sustains suppressive fires.
d. Shifts indirect fire as the platoon continues.
+*17. Platoon assaults the bunker. (Platoon leader normally accompanies the assault
element.)
a. Moves along the covered and concealed route.
b. Approaches the bunker from its blind side and does not mask the fires of the base of fire element.
c. Constantly watches for other bunkers or enemy positions in support of it.
d. Conducts the assault upon reaching the last covered and concealed position.
(1) The assault squad leader:
(a) Directs the fire team leader and the automatic rifleman to
remain in place and add their fires to suppress the bunker
(includes the use of Javelins and or AT4s).
(b) Positions himself where he can best control his teams. On
the squad leader's signal, the base of fire element lifts fire or
shifts fires to the opposite side of the bunker from the assaulting
fire team's approach.
(2) The grenadier and the rifleman continue forward to the blind side of
the bunker. One soldier takes up a covered position near the exit, while
the other soldier cooks off (two seconds) a grenade and throws it
through an aperture.

SH-3-50
(3) After the grenade detonates, the soldier covering the exit enters the
bunker, firing short bursts, to destroy the enemy. (The soldier who
throws the grenade should not be the first one to clear the bunker.)
(4) The assault squad leader inspects the bunker to ensure it is
destroyed and marked. He reports, reorganizes as needed, and
continues the mission.
*18. Platoon leader directs the PSG to reposition the support element, as necessary,
using FBCB2, FM, or other tactical means.
a. Continues to isolate and suppress the remaining bunkers, if applicable.
*19. Platoon leader reorganizes the platoon to maintain the momentum of the attack.
a. Directs the assault squad to continue and knock out the next bunker, if
applicable, using FBCB2, FM, or other tactical means. (May use part of the
support element for this step.) Note: The platoon leader must consider the
condition of the assault squad (ammunition and exhaustion) and rotate squads
as necessary.
b. Ensures the assault squad follows the same procedures listed above when
knocking out the next bunker.
*20. Platoon leader directs the actions of the platoon once it has cleared its assigned
portion of the bunker complex.
a. Reports to higher headquarters using FBCB2, FM, or other tactical means as
required.

SH-3-51
21. Platoon passes another platoon from the company through to continue the attack as
required.
22. Platoon consolidates and reorganizes as necessary.
23. Platoon secures enemy prisoners of war (EPW) as required.
24. Platoon processes captured documents and or equipment as required.
25. Platoon continues operations as directed.
NOTE * Indicates a leader task. NOTE + Indicates a critical task.
TASK PERFORMANCE SUMMARY BLOCK
ITERATION 1 2 3 4 5 M TOTAL
TOTAL TASK STEPS & PERFORMANCE MEASURES EVALUATED
TOTAL TASK STEPS & PERFORMANCE MEASURES "GO"
SUPPORTING SOLDIER'S MANUAL TASKS 052-193-1013 Neutralize Booby Traps 061-283-1004 Locate a Target by Shift From a Known Point 071-054-0004 ENGAGE TARGETS WITH AN M136 LAUNCHER 071-311-2007 ENGAGE TARGETS WITH AN M16A1 OR M16A2 RIFLE 071-311-2130 Engage Targets with an M203 Grenade Launcher 071-325-4407 Employ Hand Grenades 071-326-0501 Move as a Member of a Fire Team 071-326-0502 Move Under Direct Fire 071-326-0503 Move Over, Through, or Around Obstacles (Except Minefields) 071-326-0512 Estimate Range 071-326-0513 Select Temporary Fighting Positions 071-326-5605 Control Movement of a Fire Team 071-326-5606 Select an Overwatch Position 071-326-5611 Conduct the Maneuver of a Squad 071-326-5630 Conduct Movement Techniques by a Platoon

SH-3-52
071-331-0820 Analyze Terrain 071-410-0019 Control Organic Fires 071-410-0020 Plan for Use of Supporting Fires 071-420-0005 Conduct the Maneuver of a Platoon
SUPPORTING COLLECTIVE TASKS 07-2-5000 Conduct a Rehearsal (Antiarmor Company/Platoon) 07-2-5072 Conduct Troop-leading Procedures (Antiarmor Company/Platoon) 07-2-6054 Maintain Operations Security (Antiarmor Company/Platoon) 07-3-1252 Conduct Overwatch and or Support by Fire (Antiarmor/Infantry Platoon/Squad) 07-3-1270 Conduct Tactical Movement (Mounted or Dismounted)
(Antiarmor/Infantry/Mortar/Reconnaissance Platoon/Squad) 07-3-2009 Conduct an Area or Zone Reconnaissance (Infantry/Reconnaissance Platoon/Squad) 07-3-2054 Report Tactical Information (Infantry/Mortar/Reconnaissance Platoon/Squad) 07-3-3009 Employ Fire Support (Infantry/Reconnaissance Platoon/Squad) 07-3-4009 Handle Enemy Prisoners of War (Infantry/Mortar/Reconnaissance Platoon/Squad) 07-3-4027 Process Captured Documents and Equipment (Infantry/Mortar/Reconnaissance
Platoon/Squad) 07-3-4045 Treat and Evacuate Casualties (Infantry/Mortar/Reconnaissance Platoon/Squad) 07-3-5000 Conduct a Rehearsal (Infantry/Mortar/Reconnaissance Platoon/Squad) 07-3-5009 Conduct Consolidation and Reorganization (Infantry/Reconnaissance Platoon/Squad) 07-3-5027 Conduct Risk Management (Infantry/Mortar/Reconnaissance Platoon/Squad) 07-3-5036 Conduct Troop-leading Procedures (Infantry/Mortar/Reconnaissance Platoon/Squad) 07-3-5081 Prepare for Combat (Infantry/Mortar/Reconnaissance Platoon/Squad) 07-3-6027 Maintain Operations Security (Infantry/Mortar/Reconnaissance Platoon/Squad)
OPFOR TASKS AND STANDARDS 07-OPFOR-0030 Maintain Operations Security (Infantry/Mortar/Reconnaissance Platoon/Squad)

This page intentionally left blank

SH-4-1
Student Handout 4
This student handout contains 85 pages of material extracted from STP 21-1-SMCT, Soldier’s Manual of Common Tasks, Skill Level 1 (01 Jun 2003) and STP 21-24-SMCT Soldier’s Manual of Common Tasks, Skill Level 2-4 (01 Apr 2003), respectively. Disclaimer: The training developer downloaded the material from the U.S. Army Publishing Directorate Home Page. The text may contain passive voice, misspellings, grammatical errors, etc., and may not be in compliance with the Army Writing Style Program.

This page intentionally left blank

SH-4-2
HEADQUARTERS, DEPARTMENT OF THE ARMY
STP 21-1-SMCT
SOLDIER’S MANUAL OF
COMMON TASKS
SKILL LEVEL 1
DISTRIBUTION RESTRICTION. Approved for public release; distribution is unlimited.

SH-4-3
STP 21-1-SMCT
SOLDIER TRAINING HEADQUARTERS
PUBLICATION DEPARTMENT OF THE ARMY
No. 21-1-SMCT
Washington, DC, 01 Apr 2003
SOLDIER’S MANUAL AND TRAINER’S GUIDE MOS COM
SOLDIER’S MANUAL OF COMMON TASKS SKILL LEVEL 1 Skill Level 1

SH-4-4
Introduction to the SMCT System
GENERAL Training prepares soldiers, leaders, and units to fight and win in combat—the Army's basic mission. As explained in the Army's CAPSTONE training document, FM 7-0 Training the Force, units do not have the time and resources to achieve and sustain proficiency on every possible training task. Commanders must identify the unit's critical wartime tasks. These tasks make up the unit's Mission Essential Task List (METL). Commanders use this list to develop their unit training plan. Noncommissioned Officer (NCO) trainers then plan the individual training that soldiers in the unit need to accomplish the METL. The soldier training publications (STP), also known as soldier's manuals (SMs), provide the critical individual tasks for each military occupational specialty (MOS) that support the unit's full spectrum of missions. The NCO trainer uses the tasks in the SMs to train the soldiers and measure the soldier's proficiency on these unit critical tasks. The manuals provide task performance and evaluation criteria and are the basis for individual training and evaluation in the unit and for task-based evaluation during resident training.
PURPOSE The Soldier's Manual of Common Tasks (SMCT), Skill Level (SL) I, contains the common tasks that are essential to the Army's ability to win on the modern battlefield. In the event of war, regardless of job or individual MOS, each soldier risks exposure to hostile actions. This manual contains the common tasks that soldiers must be able to perform to fight, survive, and win in combat. The SMCT provides the commander, NCO trainer or first-line supervisor, and individual soldiers with the information necessary to support integration and sustainment training in their units. This information allows trainers to plan, prepare, train, evaluate, and monitor individual training of common tasks. Using the appropriate mission training plan (MTP), MOS specific STPs, and this manual, will help provide the foundation for an effective unit training plan.
COMMANDER'S RESPONSIBILITIES The commander at each level develops a unit METL in consultation with the command sergeant major and subordinate commanders. Using the Training Planning Process described in FM 7-0, the commander develops the METL and then determines the level of training needed to attain and maintain proficiency. After determining the necessary training, the commander develops a strategy to accomplish the required training. The commander also gives his or her trainers the guidance they need to carry out this strategy. Each commander must design a unit training plan that prepares the unit for the full spectrum of operations. Soldiers must develop and sustain proficiency in the critical tasks for their MOS and skill level. The commander's unit training program should provide individual training for all soldiers assigned to the unit and routinely evaluate soldier proficiency. The leader's assessment and the Common Task Test (CTT) are two tools that give the trainer and commander feedback on the status of training for individuals and for the unit. This feedback should also be integrated with collective training such as the MTP and crew drills. The Common Task Training Plan, located in Chapter 2, provides information on where the common tasks are first trained to standard and how often the tasks should be trained to maintain proficiency. Based on the commander's guidance, individual training in the unit is the responsibility of the NCO trainers. The commander must give the NCO trainer the priorities, resources, and direction needed to carry out training. He or she must also assess the training results of the MTP and other training events, and adjust the training plan accordingly. To develop a training program, we recommend the following seven-step approach:
Step 1. Set the objectives for training. Step 2. Plan the resources (personnel, time, funds, facilities, devices, training aids). Step 3. Train the trainers. Step 4. Provide the resources. Step 5. Manage risks, environmental and safety considerations. Step 6. Conduct the training. Step 7. Evaluate the results.

SH-4-5
TRAINER'S RESPONSIBILITIES Trainers use the steps below to plan and evaluate training.
Identify individual training requirements. The NCO determines which tasks soldiers need to train based on the commander's training strategy. The unit's training plan, METL, MTP, and the Common Task Training Plan (Chapter 2) are sources for helping the trainer define the individual training needed.
Plan the training. Plan individual training based on the unit’s training plan. Be prepared to take advantage of opportunities to conduct individual training (“hip pocket” training).
Gather the training references and materials. The task summaries list references that can assist the trainer in preparing for the training of that task. Check the Reimer Digital Library to see if any new resources have been added.
Manage risks and environmental and safety concerns. Assess the risks involved in training a specific task under the conditions current at the time you are scheduled to train and implement controls, if necessary, to lessen the risk level. Ensure that your training preparation takes into account those cautions, warnings, and dangers associated with each task as well as environmental and safety concerns.
Train each soldier. Show the soldier how to do the task to standard and explain step-by-step how to do the task. Give each soldier a chance to practice the task step-by-step.
Emphasize training in Mission-Oriented Protective Posture (MOPP) Level 4 clothing. Soldiers have difficulty performing even very simple tasks in a nuclear/chemical environment. The combat effectiveness of the soldier and the unit can degrade quickly when trying to perform in MOPP 4. Practice is the best way to improve performance. The trainer is responsible for training and evaluating soldiers in MOPP 4 so that they are able to perform critical tasks to standards within a nuclear/chemical environment.
Check each soldier. Evaluate how well each soldier performs the tasks in this manual. Conduct these evaluations during individual training sessions or while evaluating individual proficiency during the conduct of unit collective tasks. This manual provides a training and evaluation guide for each task to enhance the trainer's ability to conduct year-round, hands-on evaluations of tasks critical to the unit's mission. Use the information in the Common Task Training Plan as a guide to determine how often to train the solder on each task to maintain proficiency.
Record the results. Use the leader book referred to in FM 7-1 (SH-2), to record task performance. This gives the leader total flexibility on the method of recording training. The trainer may use DA Form 5164-R (Hands-on Evaluation} and DA Form 5165-R (Field Expedient Squad Book} as part of the leader book. These forms are optional and locally reproducible. More information on the use of these forms is provided in Appendix B of this manual.
Retrain and evaluate. Work with each soldier until the individual performs the task to standard. Well-planned, integrated training increases the professional competence of each soldier and contributes to the development of an efficient unit. The NCO or first-line supervisor is a vital link in the conduct of training.
SOLDIER'S RESPONSIBILITIES Each soldier must be able to perform the individual tasks that the first-line supervisor has identified based on the unit's METL. The soldier must perform the task to the standard listed in the SMCT. If a soldier has a question about how to do a task, or which tasks in this manual he or she must perform, it is the soldier's responsibility to go to the first-line supervisor for clarification. The first-line supervisor knows how to perform each task or can direct the soldier to the appropriate training materials. Additionally, each soldier should—
a. Know the training progression for both the common critical tasks and their MOS specific critical tasks for their skill level. Lists of the critical tasks can be found in Chapter 2 of this manual (for common tasks) and the STP for their specific MOS (MOS specific tasks).
Check the Reimer Digital Library for new training materials to support self-development either to maintain previously trained tasks or to learn new tasks.
TASK SUMMARIES Task summaries document the performance requirements of a critical common task. They provide the soldier and the trainer with the information necessary to evaluate critical tasks. The format for the task

SH-4-6
summaries is— b. Task Title. The task title identifies the action to be performed. Task Number. A l0-digit number that identifies each task. The first three digits of the number
represent the proponent code for that task. (A list of the proponent codes is given in Appendix A.) Include the entire 10-digit task number, along with the task title, in any correspondence relating to the task.
Conditions. The task conditions identify all the equipment, tools, materials, references, job aids, and supporting personnel that the soldier needs to perform the task. This section identifies any environmental conditions that can alter task performance such as visibility, temperature, or wind. This section also identifies any specific cues or events (for example, a chemical attack or identification of an unexploded ordnance hazard) that trigger task performance.
Standard. A task standard specifies the requirements for task performance by indicating how well, completely, or accurately a product must be produced, a process must be performed, or both. Standards are described in terms of accuracy, tolerances, completeness, format, clarity, number of errors, quantity, sequence, or speed of performance.
Training and Evaluation Guide. This section has two parts. The first part, Performance Steps, lists the individual steps that the soldier must complete to perform the task. The second part is the Performance Evaluation Guide. This provides guidance on how to evaluate a soldier’s performance of the task. It is composed of three subsections. The Evaluation Preparation subsection identifies special setup procedures and, if required, instructions for evaluating the task performance. Sometimes the conditions and standard must be modified so that the task can be evaluated in a situation that does not exactly duplicate actual field performance. This subsection may also include instructions that the evaluator should give to the soldier before the performance test. The Performance Measures subsection identifies the criteria for acceptable task performance. The soldier is rated (GO/NO GO) on how well he or she performs specific actions or produces specific products. As indicated in the Evaluation Guidance subsection, the soldier must score a GO on all or specified performance measures to receive a GO on the task.
References. This section identifies references that provide more detailed and thorough explanations of task performance requirements than that given in the task summary description. This section identifies resources the soldier can use to improve or maintain performance.
Additionally, task summaries can include safety statements, environmental considerations, and notes. Safety statements (danger, warning, caution) alert users to the possibility of immediate death, personal injury, or damage to equipment. Notes provide additional information to support task performance.
EVALUATING TASK PERFORMANCE Trainers need to keep the following points in mind when preparing to evaluate their soldiers—
c. Review the performance measures to become familiar with the criteria on which the soldier will be scored.
Ensure that all necessary equipment and clothing needed for proper performance of the job are on hand at the training site. Don’t forget to include safety equipment.
Prepare the test site according to the conditions section of the task summary. Some tasks contain special evaluation preparation instructions. These instructions tell the trainer what modifications must be made to the job conditions to evaluate the task. Reset the site to its original condition after evaluating each soldier to ensure that the conditions are the same for each soldier.
Advise each soldier of any special guidance that appears in the Evaluation Preparation section of the task summary before evaluating.
Score each soldier based on the information in the Performance Measures and Evaluation Guidance sections.
Record the date and task performance score ("GO" or "NO GO") in the Leader Book.

SH-4-7
TRAINING TIPS FOR TRAINERS d. Prepare yourself:
1) Get training guidance from your chain of command on when to train, which soldiers to train, the availability of resources, and a training site.
2) Get task conditions and standards from the task summary in this manual. 3) Ensure that you can do the task. Review the task summary and the references in the
reference section. Practice doing the task or, if necessary, have someone train you on the task. Prepare the resources:
4) Obtain the required resources as identified in the conditions statement for each task and/or modified in the Training and Evaluation Guide.
5) Gather the equipment and ensure that it is operational. 6) Prepare a training outline consisting of informal notes on what you want to cover during your
training session. 7) Practice your training presentation. 8) Coordinate for the use of training aids and devices. 9) Prepare the training site using the conditions statement as modified in the Training and
Evaluation Guide. Prepare the soldiers:
10) Tell the soldier what task to do and how well it must be done. Refer to the task standard and the performance measures for the task, as appropriate.
11) Caution soldiers about safety, environment, and security considerations. 12) Provide any necessary training on basic skills that soldiers must have before they can be
trained on the task. 13) Test each soldier to determine who needs training in what areas by having the soldier perform
the task. Train soldiers who fail the initial test:
14) Demonstrate how to do the task or the specific performance steps to those soldiers who could not perform to standard. Have the soldiers study the appropriate training materials.
15) Have the soldiers practice the task until they can perform it to standard. 16) After remedial training, retest each solider who did not initially pass the performance test. 17) Provide feedback to those soldiers who fail to perform to the SMCT standards, and have them
continue to practice until they can perform to the SMCT standards. 18) Record the results in the Leader Book.
TRAINING SUPPORT: THIS MANUAL INCLUDES THE FOLLOWING THAT PROVIDE ADDITIONAL TRAINING SUPPORT INFORMATION.
e. Appendix A - Proponent School and Agency Codes guide, lists the task proponents and agency codes (first three digits of the task number) with addresses for submitting comments concerning specific tasks in this manual.
Appendix B - Guide to Forms, explains the use of various SMCT training and evaluation forms and, in the online version of this manual, provides links to the forms.
Appendix C - Land Navigation Skills and Knowledge, provides additional training support related to the two land navigation tasks in Subject Area 5 (Navigate).
Glossary - The Glossary section lists abbreviations and acronyms and their definitions. References - The Reference section lists all reference materials cited in the task summaries by type,
identification number, and title.

SH-4-8
Note: Combine training on the individual tasks contained in this manual with the collective tasks contained in the MTP. Ensure that the necessary safety equipment and clothing needed for proper performance of the job are on hand at the training site.

This page intentionally left blank

SH-4-9
081-831-0101 Request Medical Evacuation
Conditions: You have a casualty requiring medical evacuation (MEDEVAC) and a patient pickup site. Necessary equipment and materials: operational communications equipment, MEDEVAC request format, a standard scale military map, a grid coordinate scale, and unit signal operation instructions (SOI). Standards: Transmitted a MEDEVAC request, providing all necessary information within 25 seconds. Transmitted, as a minimum, line numbers 1 through 5 during the initial contact with the evacuation unit. Transmitted lines 6 through 9 while the aircraft or vehicle was en route, if not included during initial contact.
Performance Steps 1. Collect all applicable information needed for the MEDEVAC request.
a. Determine the grid coordinates for the pickup site. b. Obtain radio frequency, call sign, and suffix. c. Obtain the number of patients and precedence. d. Determine the type of special equipment required. e. Determine the number and type (litter or ambulatory) of patients. f. Determine the security of the pickup site. g. Determine how the pickup site will be marked. h. Determine patient nationality and status. i. Obtain pickup site nuclear, biological, and chemical (NBC) contamination information normally obtained from
the senior person or medic. Note. NBC line 9 information is only included when contamination exists.
2. Record the gathered MEDEVAC information using the authorized brevity codes. (See table 081-831-0101-1.) Note. Unless the MEDEVAC information is transmitted over secure communication systems it must be encrypted except as noted in step 3b(1).
a. Location of pickup site (line 1). (See STP 21-1-SMCT, Task 071-329-1006.) b. Radio frequency, call sign, and suffix (line 2). (See STP 21-1-SMCT, Task 113-637-2001.) c. Numbers of patients by precedence (line 3). d. Special equipment required (line 4). e. Number of patients by type (line 5). f. Security of pickup site (line 6). g. Method of marking pickup site (line 7). h. Patient nationality and status (line 8). i. NBC contamination (line 9).
3. Transmit the MEDEVAC request. a. Contact the unit that controls the evacuation assets.
(1) Make proper contact with the intended receiver. (2) Use effective call sign and frequency assignments from the SOI. (3) Give the following in the clear "I HAVE A MEDEVAC REQUEST"; wait one to three seconds for
response. If no response, repeat the statement. b. Transmit the MEDEVAC information in the proper sequence.
(1) State all line item numbers in clear text. The call sign and suffix (if needed) in line 2 may be transmitted in the clear. Note. Line numbers 1 through 5 must always be transmitted during the initial contact with the evacuation unit. Lines 6 through 9 may be transmitted while the aircraft or vehicle is en route.
(2) Follow the procedure provided in the explanation column of the MEDEVAC request format to transmit other required information.
(3) Pronounce letters and numbers in accordance with appropriate radiotelephone procedures. (4) Take no longer than 25 seconds to transmit. (5) End the transmission by stating "OVER." (6) Keep the radio on and listen for additional instructions or contact from the evacuation unit.
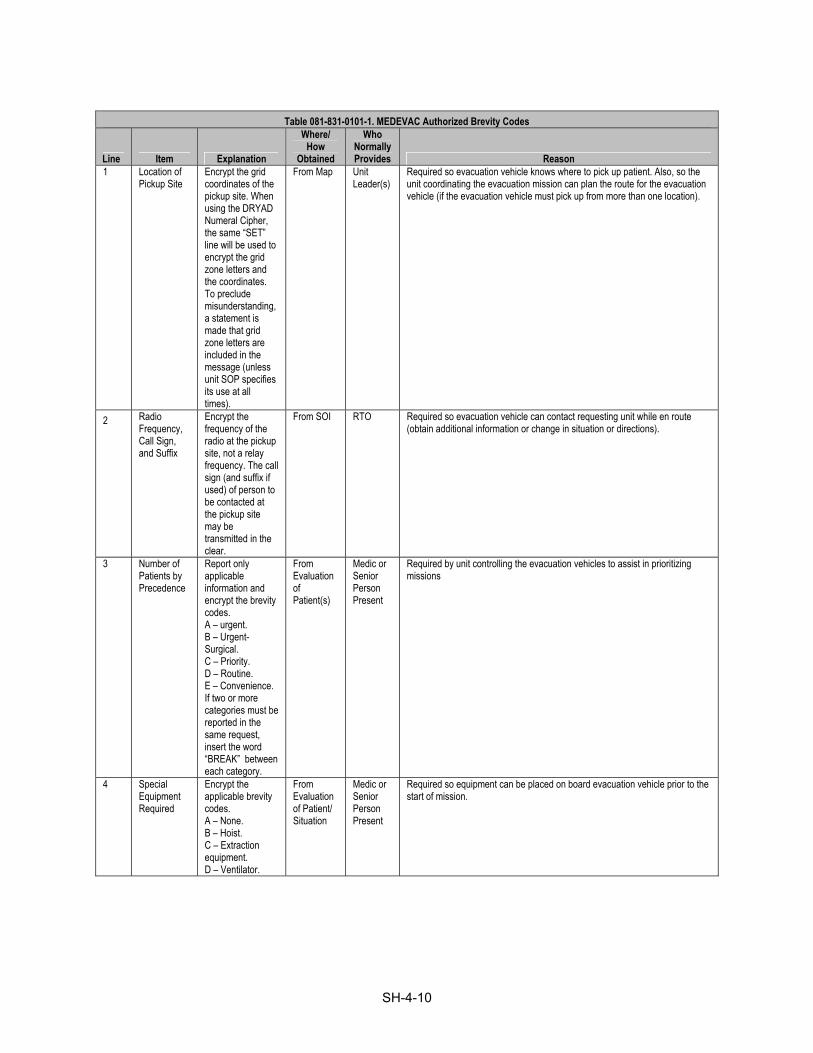
SH-4-10
Table 081-831-0101-1. MEDEVAC Authorized Brevity Codes
Line Item Explanation
Where/ How
Obtained
Who Normally Provides Reason
1 Location of Pickup Site
Encrypt the grid coordinates of the pickup site. When using the DRYAD Numeral Cipher, the same “SET” line will be used to encrypt the grid zone letters and the coordinates. To preclude misunderstanding, a statement is made that grid zone letters are included in the message (unless unit SOP specifies its use at all times).
From Map Unit Leader(s)
Required so evacuation vehicle knows where to pick up patient. Also, so the unit coordinating the evacuation mission can plan the route for the evacuation vehicle (if the evacuation vehicle must pick up from more than one location).
2 Radio Frequency, Call Sign, and Suffix
Encrypt the frequency of the radio at the pickup site, not a relay frequency. The call sign (and suffix if used) of person to be contacted at the pickup site may be transmitted in the clear.
From SOI RTO Required so evacuation vehicle can contact requesting unit while en route (obtain additional information or change in situation or directions).
3 Number of Patients by Precedence
Report only applicable information and encrypt the brevity codes. A – urgent. B – Urgent-Surgical. C – Priority. D – Routine. E – Convenience. If two or more categories must be reported in the same request, insert the word “BREAK” between each category.
From Evaluation of Patient(s)
Medic or Senior Person Present
Required by unit controlling the evacuation vehicles to assist in prioritizing missions
4 Special Equipment Required
Encrypt the applicable brevity codes. A – None. B – Hoist. C – Extraction equipment. D – Ventilator.
From Evaluation of Patient/ Situation
Medic or Senior Person Present
Required so equipment can be placed on board evacuation vehicle prior to the start of mission.

SH-4-11
Table 081-831-0101-1. MEDEVAC Authorized Brevity Codes
Line Item Explanation
Where/ How
Obtained
Who Normally Provides Reason
5 Number of Patients by Type
Report only applicable information and encrypt the brevity code. If requesting MEDEVAC for both types, insert the word “BREAK” between the litter entry and ambulatory entry. L+# of Patient – Litter A+# of Patient – Ambulatory (sitting)
From Evaluation of Patient(s)
Medic or Senior Person Present
Required so appropriate number of evacuation vehicles may be dispatched to pickup site. They should be configured to carry patients requiring evacuation.
6 Security of Pickup Site (Wartime)
N – No enemy troops in area. P – Possible enemy troops in area (approach with caution). E – Enemy troops in area (approach with caution). X – Enemy troops in area (armed escort required).
From Evaluation of Situation
Unit Leader
Required to assist the evacuation crew in assessing the situation and determining if assistance is required. More definitive guidance can be furnished the evacuation vehicle while it is en route (specific location or enemy to assist an aircraft in planning its approach).
6 Number and Type of Wound, Injury, or Illness (Peacetime)
Specific information regarding patient wounds by type (gunshot or shrapnel). Report serious bleeding, along with patient blood type, if known.
From Evaluation of Patient
Medic or Senior Person Present
Required to assist evacuation personnel in determining treatment and special equipment needed.
7 Method of Marking Pickup Site
Encrypt the brevity codes. A – Panels. B – Pyrotechnic signal. C – Smoke signal. D – None. E – Other.
Based on Situation and Availability of Materials
Medic or Senior Person Present
Required to assist the evacuation crew in identifying the specific location of the pickup. Note that the color of the panels or smoke should not be transmitted until the evacuation vehicle contacts the unit (just prior to its arrival). For security, the crew should identify the color and the unit should verify it.
8 Patient Nationality and Status
The number of patients in each category need not be transmitted. Encrypt only the applicable brevity codes. A = U.S. military. B – U.S. civilian. C – Non-U.S. military. D – Non-U.S. civilian. E – EPW
From Evaluation of Patient
Medic or Senior Person Present
Required to assist in planning for destination facilities and need for guards. Unit requesting support should ensure there is an English-speaking representative at the pickup site.

SH-4-12
Table 081-831-0101-1. MEDEVAC Authorized Brevity Codes
Line Item Explanation
Where/ How
Obtained
Who Normally Provides Reason
9 NBC Con-tamination (Wartime)
Include this line only when applicable. Encrypt the applicable brevity codes. N – Nuclear. B = Biological. C – Chemical.
From Situation
Medic or Senior Person Present
Required to assist in planning for the mission. (Determine which evacuation vehicle will accomplish the mission and when it will be accomplished.)
9 Terrain Description (Peacetime)
Include details of terrain features in and around pro-posed landing site. If possible, describe relationship of site to prominent terrain feature (lake, mountain, tower).
From Area Survey
Personnel at site
Required to allow evacuation personnel to assess route/avenue of approach into area. Of particular importance if hoist operation is required.
Evaluation Preparation: Setup: Evaluate this task during a training exercise involving a MEDEVAC aircraft or vehicle, or simulate it by creating a scenario and providing the information as the soldier requests it. You or an assistant will act as the radio contact at the evacuation unit during "transmission" of the request. Give a copy of the MEDEVAC request format to the soldier. Brief Soldier: Tell the soldier to prepare and transmit a MEDEVAC request. State that the communications net is secure.
Performance Measures GO NO GO
1. Collected all information needed for the MEDEVAC request line items 1 through 9. —— ——
2. Recorded the information using authorized brevity codes. —— ——
3. Transmitted the MEDEVAC request within 25 seconds. —— ——
Evaluation Guidance: Score the soldier GO if all performance measures are passed. Score the soldier NO GO if any performance measure is failed. If the soldier scores NO GO, show what was done wrong and how to do it correctly. References Required Related FM 8-10-6

SH-4-13
081-831-1054 Evacuate Casualties
Conditions: You are a soldier deployed to a unit in a forward area. There are casualties that must be evacuated to receive medical aid. The casualties have had self-aid or buddy-aid applied. A military vehicle (ground vehicle or rotary-wing aircraft) is available. You may have a litter and straps (or materials to improvise them) to secure the casualty and other soldiers available to assist in the evacuation. Standards: Transported the casualties to medical aid or a pickup site using an appropriate carry or, if other soldiers are available, by litter. The litter was loaded onto a military vehicle (ground vehicle or rotary-wing aircraft) without dropping or causing further injury to the casualty.
Performance Steps 1. Request medical evacuation. (See Task 081-831-0101.)
a. Make contact. b. Determine whether casualties must be moved or will be picked up at current location. If they must be moved,
continue with step 2. If they will not be moved, continue to monitor communications and go to step 5. 2. Transport a casualty using the one and two man carries. (See STP 21-1-SMCT, Task 081-831-1046.) Note. Perform these procedures when medical and combat lifesaver personnel are not available. As soon as medical personnel are available, assist them, as necessary, in treating and evacuating the casualties.
3. Move a casualty, if necessary, using a four-man litter squad. Note. If military vehicles and litter materials are not available, continue with step 4.
Note. Four-man litter squad bearers should be designated with a number from 1 to 4. The litter bearer designated as #1 is the leader of the squad.
a. Prepare the litter. (1) Open a standard litter. (2) Lock the spreader bars at each end of the litter with your foot.
b. Prepare the casualty. (1) Place the casualty onto the litter using the modified two-man arms carry or the modified two-man fore-
and-aft carry. (2) Secure the casualty to the litter with litter straps.
c. Lift the litter. (1) Position one squad member at each litter handle with the litter squad leader at the casualty's right
shoulder. Note. The leader should be at the right shoulder to monitor the casualty's condition.
(2) On the preparatory command, "PREPARE TO LIFT,” the four bearers kneel beside and grasp the litter handles.
(3) On the command, "LIFT,” all bearers rise together. (4) On the command, "FOUR MAN CARRY, MOVE,” all bearers walk forward in unison.
(a) If the casualty does not have a fractured leg, carry the casualty feet first on level ground and head first when going up hill.
(b) If the casualty has a fractured leg, carry the casualty head first, except when going up hill. (5) To change direction of movement, such as from feet first to head first, begin in a litter-post carry position.
The front and back bearers release the litter and the middle bearers rotate the litter and themselves. 4. Load casualties onto a military vehicle.
a. Ground ambulance. Note. Ground ambulances have medical specialists to take care of the casualties during evacuation. Follow any special instructions for loading, securing, or unloading casualties.
(1) Make sure each litter casualty is secured to his or her litter. (Use litter straps when available.) (2) Load the most serious casualty last. (3) Load the casualty head first (head in the direction of travel) rather than feet first. (4) Make sure each litter is secured to the vehicle.

SH-4-14
Performance Steps b. Air ambulance.
Note. Air ambulances have medical specialists to take care of the casualties during evacuation. Follow any special instructions for loading, securing, or unloading casualties.
(1) Remain 50 yards from the helicopter until the litter squad is signaled to approach the aircraft. (2) Approach the aircraft in full view of the aircraft crew, maintaining visual confirmation that the crew is
aware of the approach of the litter party. Ensure that the aircrew can continue to visually distinguish friendly from enemy personnel at all times. Maintain a low silhouette when approaching the aircraft.
(3) Approach UH-60/UH-1 aircraft from the sides. Do not approach from the front or rear. If you must move to the opposite side of the aircraft, approach from the side to the skin of the aircraft. Then, hug the skin of the aircraft, and move around the front of the aircraft to the other side.
(4) Load the most seriously injured casualty last. (5) Load the casualty who will occupy the upper birth first, then load the next litter casualty immediately under
the first casualty. Note. This is done to keep the casualty from accidentally falling on another casualty if his litter is dropped before it is secured.
(6) When casualties are placed lengthwise, position them with their heads toward the direction of travel. (7) Make sure each litter casualty is secured to his or her litter. (8) Make sure each litter is secured to the aircraft.
c. Ground military vehicles. Note. Nonmedical military vehicles may be used to evacuate casualties when no medical evacuation vehicles are available. If medical personnel are present, follow their instructions for loading, securing, and unloading casualties.
(1) When loading casualties into the vehicle, load the most seriously injured casualty last. (2) When a casualty is placed lengthwise, load the casualty with his or her head pointing forward, toward the
direction of travel. (3) Ensure each litter casualty is secured to the litter. (Use litter straps, if available.) (4) Secure each litter to the vehicle as it is loaded into place. Make sure each litter is secured. (5) Watch the casualties closely for life-threatening conditions and provide first aid, as necessary. (See STP
21-1-SMCT, Task 081-831-1000.)

SH-4-15
Evaluation Preparation: Setup: Evaluate this task during a training exercise involving a MEDEVAC aircraft or vehicle, or simulate it by creating a scenario, and provide the equipment needed for the evaluation. Brief Soldier: Tell the soldiers the scenario to include the end result desired.
Performance Measures GO NO GO
1. Requested medical evacuation (not measured). (See Task 081-831-0101.) —— ——
2. Transported a casualty using one- and two-man carries, if necessary (not measured). (See STP 21-1-SMCT, Task 081-831-1046.)
—— ——
3. Moved a casualty using a four-man litter squad, if necessary. —— ——
a. Prepared the litter. b. Prepared the casualty. c. Lifted the litter.
4. Loaded casualties onto a military vehicle. —— —— a. Ground ambulance. b. Air ambulance. c. Ground military vehicles.
Evaluation Guidance: Score the soldier GO if all the performance measures are passed. Score the soldier NO GO if any of the performance measures are failed. If the soldier scores NO GO, show what was done wrong and how to do it correctly. References Required Related STP 21-1-SMCT FM 4-25.11, FM 8-10-6

This page intentionally left blank

SH-4-16
805C-PAD-2060 Report Casualties
Conditions: Given a casualty, DA Form 1155, DA Form 1156, a map, and a pen or pencil. Standards: Recorded all known data elements accurately and legibly on DA Forms 1156 and DA Form 1155, without error.
Performance Steps
1. Prepare DA Form 1156. a. Leave the Control Number item blank. b. Complete the Check Applicable Box item as it pertains to the casualty. c. Complete item 1 with the casualty's last name, first name, and middle initial (to include Jr, Sr, III,
etc.). d. Complete item 2 with the casualty's complete Social Security number. e. Complete item 3 with the casualty's rank. f. Complete item 4 with the hour and date of incident to include the time zone. g. Complete item 5 with the casualty's unit. h. Complete item 6 with the geographical location (nearby town) and grid coordinates to include the
100,000-meter square grid coordinates, 2--letter designator, and nearest village or field trainers. i. Complete item 7 with a check in the appropriate box to enter the type of casualty (only medical
personnel may enter a check in the lightly wounded or injured in action and seriously injured or injured in action boxes); checks yes or no to indicate if the body was recovered; checked yes or no to indicate if the body has been identified; enter the collection point to which the casualty is evacuated, if unknown indicates "unknown."
j. Complete item 8 with the witnesses who saw the incident or identified remains to include the name, grade, social security number, and unit(s) of witnesses.
k. Complete item 9 with the applicable remarks to include additional circumstances such as, religious ministration performed, type of mission the unit was conducting, short synopsis of the incident, etc.
l. Do not complete the first three boxes in item 10 but enter his/her or his/unit, grade, Social Security number, date, and signature in item 10 as the person who prepared the report. 2. Prepare DA Form 1155.
a. Check the applicable box at the top of the form as it relates to the casualty witnessed. b. Complete item 1 with the casualty's last name, first name, and middle name. c. Leave item 2 blank. d. Complete item 2a with the casualty's complete Social Security Number e. Complete item 3 with the casualty's rank. f. Complete item 4, if appropriate, with the date of the casualty's death or the date when the casualty
was last seen along with the time zone. g. Complete item 5 with the casualty's unit. h. Complete item 6 with the geographical location including the six-digit coordinate as well as the
nearest town to the incident. i. Complete item 7 only if name or Social Security Number of the casualty is unknown or not positive.
If they are unknown or not positive enter the estimated age, weight, height, hair color, eye color, race, home town, civilian occupation, nickname, spouse's name, children's name(s), (if applicable), other identifying marks (such as e.g. birthmarks or tattoos), and other persons who may have witnessed the incident or have further information.
j. Complete item 8 with a short, concise narrative of the circumstances regarding the incident and, if known, the cause of death or condition when last seen and how identified.

SH-4-17
Performance Steps
k. Complete items 9 through 13 with the name, Social Security number SSN, unit, date, and signature of the person making the statement.
l. Submit form in accordance with local guidance. Evaluation Preparation: Setup: Provide soldier with DA Form 1155 and DA Form 1156, a map, pencil and paper. Give the soldier a scenario that provides all the information needed to accomplish the performance measures. Brief Soldier: Tell the soldier that he or she will be evaluated on his/her ability to report casualties, by preparing DA Form 1155 and DA Form 1156.
Performance Measures GO NO-GO
1. Prepared DA Form 1156. —— —— a. Left the Control Number item blank.
b. Completed the Check Applicable Box item as it pertained to the casualty.
c. Completed item 1 with the casualty's last name, first name, and middle initial (to include Jr. Sr. III, etc.).
d. Completed item 2 with the casualty's complete Social Security Number.
e. Completed item 3 with the casualty's rank.
f. Completed item 4 with the hour and date of incident to include the time zone.
g. Completed item 5 with the casualty's unit.
h. Completed item 6 with the geographical location (nearby town) and grid coordinates to include the 100,000-meter square grid coordinates, 2-letter designator, and nearest village or field trainers.
i. Completed item 7 with a check in the appropriate box; entered the type of casualty (only medical personnel may enter a check in the lightly wounded or injured in action and seriously injured or injured in action boxes); checked yes or no to indicate if the body was recovered; checked yes or no to indicate if the body has been identified; entered the collection point to which the casualty was evacuated, if unknown indicated "unknown.".
j. Completed item 8 with the witnesses who saw the incident or identified remains to include the name, grade, Social Security Number, and unit(s) of witnesses.
k. Completed item 9 with the applicable remarks to include additional circumstances, such as religious ministration performed, type of mission the unit was conducting, short synopsis of the incident., etc.
l. Did not complete the first three boxes in item 10 but entered his/her unit, grade, Social Security number, date, and signature in item 10 as the person who prepared the report.
2. Prepared DA Form 1155. —— —— a. Checked the applicable box at the top of the form as it related to the
casualty witnessed.
b. Completed item 1 with the casualty's last name, first name, and middle name.
c. Left item 2 blank.
d. Completed item 2a with the casualty's complete Social Security number.
e. Completed item 3 with the casualty's rank.

SH-4-18
Performance Measures GO NO-GO
f. Completed item 4, if appropriate, with the date of the casualty's death or the date when the casualty was last seen along with the time zone.
g. Completed item 5 with the casualty's unit.
h. Completed item 6 with the geographical location including the six-digit coordinate as well as the nearest town to the incident.
i. Completed item 7 only if name or Social Security Number SSN of the casualty is unknown or not positive. If they are unknown or not positive entered the estimated age, weight, height, hair color, eye color, race, home town, civilian occupation, nickname, spouse's name, children's name(s), (if applicable), other identifying marks (such as e.g. birthmarks or tattoos), and other persons who may have witnessed the incident or have further information.
j. Completed item 8 with a short, concise narrative of the circumstances regarding the incident and, if known, the cause of death or condition when last seen and how identified.
k. Completed items 9 through 13 with the name, Social Security Number SSN, unit, date, and signature of the person making the statement.
l. Submitted form in accordance with local guidance. Evaluation Guidance: Score the soldier GO on performance measures passed. Score the soldier NO-GONO GO on any performance measures failed. The soldier must score a GO on all of the performance measures to receive a GO on the task. If the soldier scores NO-GONO GO, show the soldier what was done wrong. References
Required Related DA Form 1155 AR 600-8-1 DA Form 1156
SUBJECT AREA 21: DEFENSE MEASURES

This page intentionally left blank

SH-4-19
071-326-0510 React to Indirect Fire While Dismounted
Conditions: You are a member (without leadership responsibilities) of a squad or team. You are either in a defensive position or moving on foot. You hear incoming rounds, shells exploding or passing overhead, or someone shouting "incoming." Standards: Reacted to each situation by shouting "Incoming," followed the leader's directions, if available. Took or maintained cover.
Performance Steps
1. Shout "incoming" in a loud, easily recognizable voice. 2. Look to your leader for additional instructions. 3. Remain in your defensive position (if appropriate), making no unnecessary movements that could alert the enemy to your location. 4. Take cover outside the impact area (if you are in an exposed position or moving), keeping the body low if the leader is not in sight.
Evaluation Preparation: Setup: Take the soldiers on a simulated march or field exercise. Brief Soldier: Tell the soldiers they must react to indirect fire on the move and when in a fixed position, when they receive the command "Incoming!"
Performance Measures GO NO GO
1. Shouted "incoming" in a loud, easily recognizable voice. —— —— 2. Looked to leader for additional instructions. —— —— 3. Remained in defensive position (if appropriate), making no unnecessary movements that could alert the enemy to your location.
—— ——
4. Took cover outside the impact area (if you were in an exposed position or moving), keeping the body low if the leader was not in sight.
—— ——
Evaluation Guidance: Score the soldier GO if all performance measures are passed. Score the soldier NO GO if any performance measure is failed. If the soldier scores NO GO, show him what was done wrong and how to do it correctly. References Required Related FM 21-75

This page intentionally left blank

SH-4-20
052-192-1242 Locate Mine and Booby Trap Indicators by Visual Means
Conditions: Given an urban/rural area, (containing mine and booby trap indicators) to maneuver in, around or through in support of missions and operations. Standards: Visually locate all mine/booby trap indicators, and improvised markings in the prescribed area without causing injury to personnel and damage to equipment. Report indicators to immediate supervisor. Performance Steps 1. Gather information pertaining to mines and booby traps associated with the area of operations through—
a. Leader disseminated information. b. References (graphic training aids, land mine handbooks, and special publications). c. Mine boards. d. Reports. e. Intelligence briefs. f. Operation orders.
2. Recognize mine and booby trap indicators during movement. Note: The only true indicators that there are mines or booby traps present are if someone spots a mine or booby trap or if a person or vehicle detonates a mine or booby trap. Spotting mines or booby traps as an initial indicator is extremely rare and should not be the primary focus of checking for mines or booby traps.
CAUTION You must be alert for signs of anything out of place or unnatural as you maneuver through an area. If you see something that is a possible indicator, the element must stop, assess the indicator, and look for other indicators to confirm or deny the suspicious area before continuing or taking further action.
WARNING Unexploded ordnance (UXO) is a hazard on the battlefield. UXO includes ordnance items that have been fired, projected, dropped, or placed in such a way that they could become armed and go off. Whether in an area by design or accident, these items have not yet functioned. Whatever the reason, UXO poses the risk of injury or death to all personnel in its immediate vicinity. Once recognized, never approach any closer to a UXO.
Note: Refer to the task number 093-401-5040 (React to Unexploded Ordnance Hazards) for information on identifying and taking immediate actions when dealing with a UXO.
a. Mine and booby trap indicators. Note: With the exception of stake mines and the majority of directional fragmentation mines, most hand or mechanically laid mines are buried. Once burying a mine has disturbed the natural surface of the ground, nature usually has a way of showing where this event took place. Unusual erosion, plant growth, or animal casualties may be vital clues to alert you that there might be mines, booby traps, improvised explosive devices (IEDs), or UXOs present.
(1) Dead animals with missing or damaged limbs. Note: The animal may have walked several miles before dying.
(2) Human remains. (a) Overgrown, unattended fields and pastures next to cultivated used areas. (b) Trees and bushes not collected for firewood.
(3) Damaged vehicles left on or off the road.

SH-4-21
Performance Steps (4) Wilted or dead patches of vegetation. (5) Circles of lush grass among thin grass. (6) Odd features in the ground or patterns that are not normally present in nature. (7) Unattended vehicles, trailers, or boxes and abandoned military equipment such as weapons,
ammunition, uniforms, or papers. CAUTION
These indicators may represent an IED or booby trap. Be alert for wires, detonating cord, or a shock tube running from these devices to the roadside. Cables or wires used in command detonated devices are sometimes buried, so look for disturbed soil in lines running up to the road and away from the suspected area.
(8) Disturbed ground. (a) Depressions in the ground (regular or odd spacing). (b) Raised patches of earth (regular or odd spacing).
(9) Unused paths, routes, or trails. (10) Debris on or along a route. (11) Signs of road repair (such as new fill, pavement, patches, ditches, or culverts).
Note: There may be signs of single holes or several holes, possibly in some form of a pattern at tactical or key locations.
(12) Potholes in tracks. (13) Disturbances in previous tire tracks or tracks that stop unexplainably. (14) Craters. (15) Areas avoided by local civilians. (16) Patterns of objects that could be used as a sighting line. (17) Mine or explosive packaging. (18) Patches of new brick work, plaster, or mud on walls (19) Abandoned defensive positions, trenches, and destroyed buildings. (20) Abandoned buildings, piles of wood, or materials not claimed by the locals.
CAUTION Buildings are excellent sites for booby traps. Assume that all unsecured buildings are booby-trapped.
(21) Trip wires, strings, or cables. (22) Evidence of electrical wires, batteries, mouse traps, clothes pins, steel tubes, or springs. (23) Small shiny metal plates, split lightweight bomb casings, empty cluster bomb canisters, and
small parachutes or drogues (funnel shaped drag chute) from submunitions (all indicators of cluster bomb strikes or scatterable-mine attacks).
b. Improvised markings of mines, booby traps, and UXOs (Figure 052-192-1242-1).

SH-4-22
Performance Steps
Figure 052-192-1242-1. Samples of Mine Markings Note: Not all armies and fighting organizations mark their minefields to the same standards as required by the United States (US) Army. Many local factions, militia, or units will lay mines and mark them in their own way with readily available materials rather than formal markings. These markings are generally used to warn their own troops and local civilians of the presence of mines, booby traps, IEDs, or UXOs. Friendly units operating in these environments must gain this local knowledge in order to identify mine markers and hazardous areas.
(1) Rock piles or individual rocks painted red are United Nations (UN), threat army, or local-faction danger area markers. Note: Used by the various fighting factions and locals to mark the minefield perimeters.
(2) Different color tapes attached to a stick, tree limb, picket, pole, or wall. (3) Crossed bones, sticks, or twigs. (4) Rows of light colored or painted white stones.
Note: Used by the UN to mark safe lanes and cleared areas. Stones are usually in regular patterns and close together.
(5) Circle of stones surrounding objects. Note: Signs used by locals to mark individual mines and UXOs. Where there is one mine or explosive hazard, there are usually more in the area.
(6) Pieces of both cloth and metal material attached to poles, sticks, or walls. (7) Burned fields normally indicate UN mine clearance operations. (8) Red lettering and marks painted on rock faces or building walls. For example, start point (SP),
indicating minefield start point. UN demining reference markers, such as reference point (RP) and benchmark (BM). Minefields will be close to these markers.
c. Man-made markings of mines, booby traps, IEDs, and UXOs (Figure 052-192-1242-2).

SH-4-23
Performance Steps
Figure 052-192-1242-2. Samples of Mine Signs
(1) Red rectangular or triangular signs attached to wire, stakes, posts, or pickets with a written warning on one side. Note: Generally, if you can read the writing, you are on the safe side.
(2) Triangular signs with a picture of someone being blown up by a mine. (3) Ongoing UN minefield clearance operations are delineated with wooden posts with red and
white tops. (4) Burned fields, indicating UN mine clearance operations.
3. Report all suspected areas to the immediate supervisor. Evaluation Preparation: Setup: Provide an area which contains suspected mine and booby trap indicators. Record and provide description of all suspected mine, booby trap indicators and locations on the evaluation sheet. Performance Measures GO NO GO
1. Gathered information pertaining to mines and booby traps associated with the area of operations. —— ——
2. Recognized mine and booby trap indicators during movement. —— —— 3. Reported all suspected areas to the immediate supervisor. —— —— Evaluation Guidance: Score the soldier GO if all performance measures are passed (P). Score the soldier NO-GO if any performance measure is failed. If the soldier fails any performance measure, show him how to do it correctly. References
Required Related FM 20-32 GTA 05-10-044 TC 20-32-5

SH-4-24
093-401-5040 React to Unexploded Ordnance Hazards
Conditions: In a field environment, given an item(s) of simulated unexploded ordnance (UXO), marking materials, and a UXO Spot Report format. Standards: Identified UXO by type and subgroup; recognized associated hazards; took immediate action to prevent death, injury, or damage to materiel; reported the UXO hazard using the UXO Spot Report format.
Performance Steps
1. Recognize the UXO hazard.
DANGER Never approach a UXO once it has been identified. Approaching UXO may cause them to explode.
DANGER Never strike, jar, or touch a UXO. Do not move or remove anything on or near a suspect UXO. UXO can be extremely sensitive and can cause serious injury or death if disturbed in any way.
DANGER Many types of UXO may contain an incendiary (fire producing), chemical, biological, or radiological hazard in addition to explosives.
DANGER Do not make radio transmissions within 100 meters of a UXO. Some types of UXO are sensitive to electromagnetic radiation (EMR) and may explode.
a. Identify the four types and subgroups of UXO. (1) Dropped.
(a) Bombs (figure 093-401-5040-1): –Vary from 3 to 6 feet in length. –Vary in diameter from 5 to 36 inches. –Often have a sloped or "bullet" shaped nose, fins and/or a parachute on the back. –May contain high explosive, incendiary, or chemical fillers.
(b) Dispensers (figure 093-401-5040-2): –Contain numerous submunitions or bomblets. –Most have the same characteristics of bombs. –May be found intact or partially open.

SH-4-25
Performance Steps
Figure 093-401-5040-1. Bombs
Figure 093-401-5040-2. Dispensers

SH-4-26
Performance Steps
(c) Submunitions (figures 093-401-5040-3a through 093-401-5040-3e):
DANGER When a submunition is identified, leave the area by the same path you entered. There may be many more submunitions in the same area. Small size does not diminish the danger of submunitions. The smallest can easily injure or kill.
–May contain the same hazards of bombs (explosive, chemical, biological, radiological, incendiary).
–Are designed to be scattered over a wide area. –Come in many shapes and sizes; may or may not be "bullet" shaped. –May look like balls, wedges, or cylinders. –May have fins, ribbons, parachutes, or trip wires.
Figure 093-401-5040-3a.
Figure 093-401-5040-3b.
Figure 093-401-5040-3c.

SH-4-27
Performance Steps
Figure 093-401-5040-3d
Figure 093-401-5040-3e.
(2) Projected. (a) Projectiles (figures 093-401-5040-4a through 093-401-5040-4b):
–Include munitions from large machine guns, artillery howitzers, and naval guns. –Range in size from 20mm up to 16 inches in diameter; 10 to 30 inches in length. –Most resemble a "bullet" shape. –Can contain explosive, chemical, biological, radiological, and/or incendiary hazards.
Figure 093-401-5040-4a.
Figure 093-401-5040-4b.
(b) Mortars (figures 093-401-5040-5a through 093-401-5040-5b): –Most have fins and a "bullet" shape.

SH-4-28
Performance Steps –Range in size from 60mm to 120mm in diameter; 12 inches to 36 inches in length. –Can contain explosive, chemical, or incendiary hazards.
Figure 093-401-5040-5a.
Figure 093-401-5040-5b.
(c) Rockets (figures 093-401-5040-6a through 093-401-5040-6c): –May or may not have fins. –Have some sort of rocket motor vents in back. –Range in length from 24 inches to several feet. –Can contain explosive, chemical, or incendiary hazards.
Figure 093-401-5040-6a.

SH-4-29
Performance Steps
Figure 093-401-5040-6b.
Figure 093-401-5040-6c.
(d) Guided Missiles (figure 093-401-5040-7a through 093-401-5040-7b): –Most have fins. –Some have wires in the end for guidance. –Very similar to rockets. –Can contain explosive or incendiary hazards.
Figure 093-401-5040-7a.

SH-4-30
Performance Steps
Figure 093-401-5040-7b.
(e) Rifle Grenades (figures 093-401-5040-8a through 093-401-5040-8b): –Designed to be fired from rifles or shoulder fired launchers. –Resemble rockets but are smaller. –Can contain explosive or incendiary hazards.
Figure 093-401-5040-8a.
Figure 093-401-5040-8b.
(3) Thrown (figures 093-401-5040-9a through 093-401-5040-9b): –Includes all types of grenades, including simulators. –Most are round or cylindrical. –Are small enough to be thrown by a person. –Can contain explosive or incendiary hazards. –Dud simulators require the same safety procedures as other ordnance.

SH-4-31
Performance Steps
Figure 093-401-5040-9a.
Figure 093-401-5040-9b.
DANGER Never approach a grenade that was thrown and did not detonate, even if you threw it. Do not move, jar, or disturb—the fuse may function at any time. Never pick up, move, or disturb a found grenade, even if spoon or safety pin are attached. The grenade may be booby-trapped and explode when disturbed.
(4) Placed (figures 093-401-5040-10a through 093-401-5040-10b): –Includes all land or sea mines. –Range in size from 2 inches in diameter to several feet in length. –Have a variety of fuse types; pressure plates, tilt rods, trip wires, electronic sensors, or
command detonated. –Can contain explosive, incendiary, or chemical hazards.

SH-4-32
Performance Steps
Figure 093-401-5040-10a.
Figure 093-401-5040-10b.
DANGER Consider all mines to be booby-trapped or to have anti-disturbance fusing. Never attempt to uncover or remove placed ordnance.

SH-4-33
2. React to the UXO hazard.
a. Do not touch or disturb the UXO or any wires, parachutes, or anything attached or surrounding the UXO. Do not move closer to UXO.
b. If any peculiar smells, liquids, or dead animals are present, chemical or biological agents may be present; don mask and MOPP gear immediately.
c. Mark location with material such as white engineer tape, marking ribbon, clothing, or sign. Place marker above ground at waist level if possible. Take note of physical terrain features of location and route back to UXO so EOD team can return and dispose of UXO.
d. Evacuate personnel and equipment from area surrounding the UXO: (1) Bombs, dispensers, large projected munitions (90-mm diameter and larger)—evacuate a 360-
degree perimeter at least 600 meters. (2) Submunitions, placed, thrown, small projected munitions (smaller than 90-mm diameter)—
evacuate a 360-degree perimeter at least 300 meters. e. If personnel or equipment cannot be evacuated, seek as much frontal and overhead cover as
possible. f. If UXO is suspected to have a chemical agent, ensure all personnel stay upwind of item and are in
full MOPP. 3. Report the UXO hazard.
a. Report UXO hazard to your chain of command. You or your chain of command should request Explosive Ordnance Disposal (EOD) support using the nine-line UXO Spot Report:
(1) Date and time of the fall, impact, or finding of the UXO item(s). (2) The exact location of item(s) including grid coordinate, landmarks, reference points, or street
addresses. (3) The name and organization of person reporting the incident including call sign or phone
number. (4) Identify UXO by type (Dropped, Projected, Thrown, Placed) and subgroup. (5) Any NBC contamination present. (6) What resources are threatened? (7) How the UXO has affected unit mission. (8) The safety measures that have been taken including the evacuation distances that have been
accomplished. (9) The requested priority for receiving EOD support (Immediate, Indirect, Minor, No Threat)
b. Be prepared to provide a guide to the EOD team. Evaluation Preparation: Setup: Do not evaluate this task using live UXO. Utilize training items from your installation Training Aids Support Center. Preliminary instruction of this task can be obtained by requesting support from nearest Army EOD company. Evaluate this task during any training exercise where UXO is likely to be encountered. Place UXO training aid near personnel, facilities, or equipment within the soldier's area of responsibility. Soldier should identify UXO from at least 5-10 meters away or through the use of binoculars. Brief Soldier: Tell the soldier he will be evaluated on his ability to properly recognize, react to, and report a UXO hazard. The soldier will identify the UXO by type and subgroup, take appropriate actions to react to the hazards, and report the hazard using the nine-line UXO Spot Report format.

SH-4-34
Performance Measures GO NO GO 1. Identified UXO by type and subgroup. —— —— 2. Reacted to UXO hazard, observing all applicable safety precautions. —— —— 3. Marked the UXO. —— —— 4. Determined appropriate evacuation distance (Large item: 600m; Small item: 300m). —— ——
5. Reported UXO hazard using the nine-line UXO Spot Report. —— —— Evaluation Guidance: Score the soldier GO if all performance measures are performed correctly. Score the soldier NO GO if any performance measure is not performed correctly. If the soldier scores NO GO, show him what was done wrong and how to do it correctly. References
Required Related FM 21-16 GTA 9-12-1

This page intentionally left blank

SH-4-35
061-283-6003 Adjust Indirect Fire
Conditions: Given a pair of binoculars, a radio, a compass, pencils, a coordinate scale, a map of the target area, a target to engage within the area, and grid location of friendly troops. Standards: Determined the target location to within 250 meters of its actual location. The initial call for fire was made within 3 minutes after the target was identified. Adjustments were sent within 45 seconds after each round impacted. Observer entered the fire-for-effect phase using no more than six rounds (initial round plus five for adjustment). Fire for effect was within 50 meters of the target using successive bracketing procedures (or creeping fire if danger close).
Performance Steps 1. Locate the target within 250 meters of the actual target location.
a. Locate the target by grid coordinates. b. Determine the direction from your position to the target. c. Formulate a call for fire. Include the elements of the call for fire in sequence.
(1) Observer identification (your call sign). (2) Warning order (adjust fire). (3) Location of target. (4) Description of the target (for example "INFANTRY PLATOON IN THE OPEN"). (5) Method of engagement (may be omitted if area fire is desired).
(a) If the target is within 600 meters of friendly troops, announce "DANGER CLOSE" to the fire direction center (FDC) in the initial call for fire, in the method of engagement phase.
(b) Use creeping procedures to adjust danger close fire. Range corrections should NOT exceed 100 meters.
(c) Initial target location is reported on the enemy side of the target. (6) Method of fire control.
Note. The request for a fire mission would be similar to figure 061-283-6003-1.
Figure 061-283-6003-1. Initial Fire Request
2. Transmit the call for fire to the FDC within three minutes of target identification. a. Conduct three transmissions.
(1) Send observer identification and warning order. Example: “A4Z57, THIS IS G3H71, ADJUST FIRE, OVER.”
(2) Send target location. Example: “GRID NG180513, OVER.” (Give the six-digit grid of the target, with the grid zone identifier, to within 250 meters of the actual target location.)

SH-4-36
Performance Steps (3) Send target description, method of engagement, method of fire and control. Example: “INFANTRY IN
THE OPEN, ICM IN EFFECT, OVER.” b. Give the direction to the target within 100 mils (M2 compass) or five degrees (lensatic compass) or give an
accurate cardinal direction (no compass available) of the actual target location. This should be sent before the first correction, or with the first correction. 3. Adjust rounds to within 50 meters of the target, within 45 seconds of the impact of each adjusting round.
a. Spot each round when it impacts as right or left, over or short of your target. b. Determine corrections for deviation left or right of the target.
Note. Measure deviation. Measure the horizontal angle in mils, using the reticle pattern in the binoculars or hand measurement of angular deviation. Estimate the range to the target and divide by 1,000. This is the observer-target (OT) factor. If the OT distance is 1,000 meters or greater, the OT factor is expressed to the nearest whole number. If the OT distance is less than 1,000 meters, the OT factor is expressed to the nearest 1/10th. For example, 800 = 0.8. Multiplying the OT factor by the deviation measured in mils produces deviation corrections in meters.
c. When the first range spotting is observed, make a range correction that would result in a range spotting in the opposite direction. For example, if the first round is short, add enough to get an over on the next round. This is called successive bracketing (figure 061-283-6003-2). Figure 061-283-6003-3 shows the impact of the initial round. The target is 2100 meters away. Since the round is beyond the target, you must drop. You estimate that the round is 250 meters beyond the target. Therefore, you must drop 400 meters to start successive bracketing procedures. The round impacted 50 mils left of the target. With an OT factor of 2, the round impacted 100 meters left. Your correction to the FDC is "RIGHT 100—DROP 400—OVER.”
WARNING
DO NOT BRACKET when DANGER CLOSE, it could result in friendly casualties, use the creeping fire procedure (all corrections are 100 meters or less).
Figure 061-283-6003-2. Successive Bracketing

SH-4-37
Performance Steps
Figure 061-283-6003-3. Impact of Initial Round
d. Continue splitting the range bracket until a 100-meter bracket is split or range correct spotting is observed, maintaining deviation on line. (Figure 061-283-6003-4 and 061-283-6003-5 show the next adjustments).
Figure 061-283-6003-4. Second Round

SH-4-38
Performance Steps
Figure 061-283-6003-5. Third Round
e. Transmit corrections to the FDC in meters. The initial correction should bracket the target in range. The adjustment phase of a fire mission would resemble the example shown in figure 061-283-6003-6. Deviation correction should be made to keep the rounds on the observer target line.
Figure 061-283-6003-6. Adjustment Phase
f. Use the following guide to establish a bracket. When the estimated round impact distance to the target is— (1) More than 400 meters, add or drop 800 meters. (2) More than 200 but less than 400 meters, add or drop 400 meters. (3) More than 100 but less than 200 meters, add or drop 200 meters. (4) Less than 100 meters, add or drop 100 meters. (5) Add or drop 50 meters and announce fire for effect.
4. Initiate fire for effect. When a 100-meter bracket is split or a range correct spotting is made, the fire-for-effect phase is entered (figure 061-283-6003-7). Figure 061-283-6003-8 shows a simulated pattern that might be observed in the fire-for-effect phase and the observed results of fire for effect are reported.

SH-4-39
Performance Steps
Figure 061-283-6003-7. Fourth Round
Figure 061-283-6003-8. Fire for Effect Pattern
5. Observe the results of fire for effect, transmit refinements (if necessary), and provide end of mission and surveillance (figure 061-283-6003-9).
a. Determine the effects on the target.

SH-4-40
Performance Steps b. Give a brief description of what happened to the target. Example: “EOM, TARGET DESTROYED,
ESTIMATE TWO CAUSALITIES, OVER.”
Figure 061-283-6003-9. End of Mission
Evaluation Preparation: Setup: Ensure that a target is readily identifiable to the soldier and the required equipment is present and operational. The evaluator must know the grid location, direction, and distance to the target that will be used. Brief Soldier: Identify the target to the soldier. Tell the soldier he must enter the fire-for-effect phase using no more than six rounds (initial round plus five for adjustment). Fire for effect must be within 50 meters of the target, using successive bracketing procedures. The initial call for fire must be made within 3 minutes after the target has been identified. Adjustments must be sent within 45 seconds after each round impacts. Note. Ensure that the soldier understands exactly what is expected of him, but do not help him in any way.
Performance Measures GO NO GO
1. Located the target to within 250 meters of the actual target location. —— ——
2. Transmitted the call for fire to the FDC within three minutes of target identification. —— ——
3. Adjusted rounds to within 50 meters of the target, within 45 seconds of the impact of each adjusting round.
—— ——
4. Entered the fire for effect phase when a 100-meter bracket was split, or when a range correct spotting was obtained.
—— ——
5. Observed the results of fire for effect, transmitted refinements (if necessary), and provided end of mission and surveillance.
—— ——
Evaluation Guidance: Score the soldier GO if all performance measures are passed. Score the soldier NO GO if any performance measure is failed. If the soldier fails any performance measure, show what was done wrong and how to do it correctly. References Required Related FM 3-90.30

SH-4-41
071-326-0511 React to Flares
Conditions: Given a tactical situation at night, upon hearing a flare rising or when suddenly illuminated by a ground or overhead flare. Standards: Reacted to a ground or an overhead flare without being seen by the enemy or losing night vision.
Performance Steps
1. Respond to ground flares. a. Move out of the illuminated area. b. Reorient yourself when alone or in a group by SOP, or as instructed. c. Continue the mission.
2. Respond to an overhead flare with warning (for example, the sound of a rising flare). a. Assume the prone position (behind concealment when available) before the flare bursts. b. Protect your night vision by closing one eye and observing with the other. c. Use your night vision eye to reorient yourself or rejoin your group when the flare burns out. d. Continue the mission.
3. Respond to an overhead flare without warning. a. Assume the prone position behind concealment (when available) until the flare burns out. b. Protect your night vision by closing one eye and observing with the other. c. Crouch low until the flare burns out when crossing wire obstacles where the prone position is not
possible. d. Use your night vision eye to reorient yourself or rejoin your group when the flare burns out. e. Continue the mission.
Evaluation Preparation: Setup: Have ground flares set so that you can ignite them. Have hand-held flares to use to simulate the overhead flares. Brief Soldier: Tell the soldier that he is to react to the flares as they appear. After grading the soldier on the ground flare and the overhead flare with warning, tell him that the next flare should be acted on only after the flare has burst (simulate "without warning").
Performance Measures GO NO GO
1. Responded to a ground flare. —— —— a. Moved out of the illuminated area. b. Reoriented alone or in a group. c. Continued the mission.
2. Responded to an overhead flare with warning. —— —— a. Assumed the prone position before the flare burst. b. Protected night vision by closing one eye and observing with the other eye. c. Reoriented or rejoined group when the flare burned out. d. Continued the mission.

SH-4-42
3. Responded to an overhead flare without warning. —— ——
a. Assumed the prone position until the flare burned out. b. Protected night vision by closing one eye and observing with the other eye. c. Crouched low until the flare burned out when crossing wire obstacles when
the prone position was not possible.
d. Used night vision eye to reorient or rejoin group when the flare burned out. e. Continued the mission.
Evaluation Guidance: Score the soldier GO if all performance measures are passed. Score the soldier NO GO if any performance measure is failed. If the soldier scores NO GO, show him what was done wrong and how to do it correctly. References Required Related FM 21-75

SH-4-43
071-326-0513 Select Temporary Fighting Positions
Conditions: You must select a temporary fighting position when at an overwatch position, after initial movement into a tentative defensive position, at a halt during movement, or upon receiving direct fire. Standards: Selected a firing position that protected you from enemy observation and fire, and allowed you to place effective fire on enemy positions without exposing most of your head and body.
Performance Steps
1. Choose a position that takes advantage of available cover and concealment (figure 071-326-0511-1).
Figure 071-326-0511-1. Temporary fighting positions
Note. Cover gives protection from bullets, fragments of exploding rounds, flame, nuclear effects, and biological and chemical agents. Cover can also conceal you from enemy observation. Cover can be natural or man-made. Concealment is anything that hides you from enemy observation. Concealment DOES NOT protect you from enemy fire. DO NOT think that you are protected from the enemy's fire just because you are concealed. Concealment, like cover, can also be natural or man-made.
2. Choose a position that allows you to observe and fire around the side of an object while concealing most of your head and body. 3. Choose a position that allows you to stay low when observing and firing, whenever possible. Note. This position allows you to aim better and take advantage of concealing vegetation.
4. Choose a position with a background that does not silhouette you against the surrounding environment. Note. A position like this reduces your chances of being detected.
5. Follow your leader's directions after your initial selection of a temporary battlefield position. Note. Your leader may reposition you to gain better coverage of the area.
Evaluation Preparation: Setup: Evaluate this task during a march or a simulated march in an area with varying degrees of cover and concealment. Have the soldiers in full battle gear. Brief Soldier: Tell each soldier the enemy has been reported in the area and may be encountered at any time. At preselected points during the march, at a rest halt, after ordering the soldier to take an overwatch position, or after ordering the soldier to take a tentative defensive position, have him select a temporary fighting position.

SH-4-44
Performance Measures GO NO GO
1. Chose a position that took advantage of available cover and concealment. —— —— 2. Chose a position that allowed for observation and fire around the side of an object while concealing most of head and body. —— ——
3. Chose a position that allowed you to stay low when observing and firing, whenever possible. —— ——
4. Chose a position with a background that did not silhouette you against the surrounding environment. —— ——
5. Followed leader's directions after initial selection of a temporary battlefield position. —— ——
Evaluation Guidance: Score the soldier GO if all performance measures are passed. Score the soldier NO GO if any performance measure is failed. If the soldier scores NO GO, show him what was done wrong and how to do it correctly. References Required Related FM 21-75

SH-4-45
071-326-5704 Supervise Construction of a Fighting Position
Conditions: Given soldiers, TOE equipment, and a sector of responsibility. The equipment listed in task 071-326-5703, Construct an individual fighting position and a sector of responsibility Standards: Ensured that the initial preparation was accomplished for each fighting position and that the completed position provides cover, concealment, and fields of fire. Performance Steps 1. Through supervision, evaluation and on the spot corrections, Ensure that the construction of the individual fighting position generally follows the sequence below. See STP 21-1-SMCT, Task number 071-326-5703, the tank Construct individual Fighting, Position, STP 21-1-SMCT, task number 071-326-5703, STP 21-1-SMCT. 2. Assign the location of the position and the sector of fire. The soldier constructing the position should emplace sector-of-fire stakes. 3. Ensure the soldiers partially clear fields of fire within their sector and dig a hasty hole for minimum protection, being careful not to destroy natural camouflage around their positions. They should save sod, grass clumps, and so forth, for use as camouflage later. 4. Next ensure the soldiers dig a hole that is armpit deep. If they have a natural frontal parapet, the dirt from the hole should be carried away and camouflaged; if not, it should be used to make a frontal parapet. 5. They can now complete clearing fields of fire, clearing only what is absolutely necessary. Ensure that the soldiers get into the firing positions and check their fields of fire. They can now complete a clearing field of fire, clearing only what is absolutely necessary. 6. The soldiers should next Ensure the soldiers camouflage their positions using available materials (such as (sod, grass clumps, foliage, etc) blending the positions with the surrounding area. The camouflage should be checked from about 35 meters to the front; if the position can be spotted easily, more camouflage work is needed. 7. Ensure the soldiers After all of the above have been accomplished satisfactorily; the soldier should construct overhead cover after all of the above have been accomplished satisfactorily. . They should use longs and planks, 4 to 6 inches thick, that will support at least 6 or 8 inches of dirt (logs and dirt should total 12 inches), and dig a cave-like area big enough to get under. 8. Ensure the soldiers Upon completion of the overhead cover; the soldiers should begin to improve their positions upon completion of the overhead cover. Items to check for include grenade sump, drainage trench, elbow holes, night firing stakes, range cards, and camouflage. Evaluation Preparation: Setup: At the site, assign each soldier an area of responsibility. Issue any required equipment or supplies needed to construct the fighting position. Brief Soldier: Tell the soldier to supervise the construction of a fighting position with his soldiers, while being and evaluated.
Performance Measures GO NO-GO
1. Assigned sector of fire to each position. —— —— 2. Checked that initial position was completed first. —— ——
a. Sector-of-fire stakes were emplaced.
b. Hasty hole for minimum protection was dug.
c. Natural camouflage around position was preserved.

SH-4-46
3. Supervised completion of fighting position. —— ——
a. Position was at least armpit deep.
b. Excess dirt from hole was carried away and hidden.
c. Fields of fire were cleared only of minimum foliage.
d. Position was camouflaged so it could not be seen 35 meters to the front.
e. Overhead cover was at least 12 inches (with 4 to 6 inches of logs or planks and 6 to 8 inches of dirt).
f. Grenade trenches were dug in position. Evaluation Guidance: Score the soldier GO if all steps performance measures are passed. Score the soldier NO --GO if any performance measure steps are failed. If the soldier scores NO --GO, show what was done wrong and how to do it correctly. References Required Related FM 5-103 FM 7-8 STP 21-1-SMCT

SH-4-47
071-326-5705 Establish an Observation Post
Conditions: Given a squad- or platoon-size element in a defensive position, a TA-312/PT field telephone and communication wire, or a radio, and a probable enemy avenue of approach. Standards: Selected a location for an observation post (OP) that provided observation of the avenues of approach, was within small-arms range of the element, and offered adequate cover and concealment. Established communication between the OP and the platoon leader or squad leader. Performance Steps NOTE: OPs are generally established along probable avenues of approach to listen and observe and to provide early warning of enemy approach.
1. Select an OP. a. The site selected for an OP should provide—:
(1) Maximum observation of the desired area (specified by the platoon leader). (2) Cover and concealment for the occupants of the OP. (3) Concealed routes to and from the OP.
b. Observation is the best way to determine whether the above conditions exist at a site. c. Usually, the best location for an OP is on or near the military crest of a hill. Topographical crests
should be avoided because of the possibility of being skylined. It may be appropriate to establish the OP well down the forward slope when observation is restricted by the terrain (Figure 071-326-57053-53-1160).
Figure 071-326-57053-53-1 1. OP Position.
d. OPs should be within effective small-arms range of the unit establishing the OP, and should be supported by other supporting fire when possible. 2. Establish and operate an OP.
a. Wire is the primary means of communication with an OP and may be supplemented by radio. Wire and radio antennas should be carefully positioned and camouflaged to avoid detection by the enemy (Figure 071-326-57053-54-22161).

SH-4-48
Performance Steps
Figure 071-326-57053-54-22. Camouflage Communication Lines.
b. Personnel going to and from the OP must move carefully so movement does not reveal the location to the enemy. Separate routes to and from the OP are established. Camouflage is most important. The OP should be camouflaged even when natural concealment is adequate.
c. OPs are operated in reliefs. A minimum of two soldiers is necessary for each relief. One observes while the other records and reports observed information. The observer and recorder should switch duties every 20 to 30 minutes, because the visual efficiency of an observer decreases rapidly after that length of time. 3. Establish and operate an OP during limited visibility.
a. The enemy may use a different, more open avenue of approach during limited visibility conditions; therefore, an OP may have to be moved to another position to serve as an OP at night.
b. Limited visibility OPs are usually closer to defensive positions. Night vision devices may be given for use on the OP. The enemy deploys infiltrators against the defense at night, so a series of OPs, backed up by alert troops equipped with night vision devices and by snipers, can counter this infiltration.
c. OPs are operated in relief except when movement to and from positions would reveal their locations or endanger the personnel. Evaluation Preparation: Setup: In a field environment with terrain, on which an OP can be established, provide the element leader with a TA-312/PT field telephone and communication wire, or a radio, and two personnel to act as the observer and the recorder. Brief Soldier: Tell the soldier to establish an OP to observe an area (designated by the tester) forward or to the flanks of his element.

SH-4-49
Performance Measures GO NO-GO
1. Selected an area within small-arms range of the squad- or platoon-size element. —— ——
2. Selected a site that provided maximum observation of the desired area. —— ——
3. Established and operated an area that offered cover and concealment. —— ——
4. Ensured wire or radio communication was established. —— —— 5. Ensured that radio antenna, if used, was camouflaged. —— —— 6. Established several concealed routes to and from the observation post. —— ——
7. Ensured that the observation post was camouflaged. —— —— 8. Placed a minimum of two personnel on the observation post. —— —— 9. Instructed observer and recorder to switch duties every 20 to 30 minutes. —— ——
Evaluation Guidance: Score the soldiers GO if all steps performance measures are passed. Score the soldier NO --GO if any steps performance measure is failed. If the soldier scores NO --GO; show what was done wrong and how to do it correctly. References Required Related FM 7-8 FM 21-75
SUBJECT AREA 5: NAVIGATE

This page intentionally left blank

SH-4-50
081-831-1000 Evaluate a Casualty
Conditions: You have a casualty who has signs and/or symptoms of an injury. Standards: Evaluated the casualty following the correct sequence. All injuries and/or conditions were identified. The casualty was immobilized if a neck or back injury was suspected.
Performance Steps
Note. When evaluating and/or treating a casualty, seek medical aid as soon as possible. Do not stop treatment, but, if the situation allows, send another person to find medical aid.
WARNING If there are signs of chemical or biological agent poisoning, immediately mask the casualty. If it is not nerve agent poisoning, decontaminate exposed skin and gross contamination (large wet or oily spots) of the clothing or overgarments. If nerve agent poisoning, administer the antidote before decontamination. (See Task 081-831-1044.)
WARNING If a broken neck or back is suspected, do not move the casualty unless to save his life.
1. Check for responsiveness. a. Ask in a loud, but calm voice, "Are you okay?" b. Gently shake or tap the casualty on the shoulder. c. Watch for a response. If the casualty does not respond, go to step 2. d. If the casualty is conscious, ask where he feels different than usual or where it hurts. Go to step 3.
If the casualty is conscious but is choking and cannot talk, stop the evaluation and begin treatment. (See Task 081-831-1003.) 2. Check for breathing.
a. Look for rise and fall of the casualty's chest. b. Listen for breathing by placing your ear about one inch above the casualty's mouth and nose. c. Feel for breathing by placing your hand or cheek about 1 inch above the casualty's mouth and
nose. If the casualty is not breathing, stop the evaluation and begin treatment. (See Task 081-831-1042.) Note. Check for pulse during mouth-to-mouth resuscitation, as necessary.
3. Check for bleeding.
WARNING In a chemically contaminated area, do not expose the wound(s).
a. Look for spurts of blood or blood-soaked clothes. b. Look for entry and exit wounds. c. If bleeding is present, stop the evaluation and begin treatment as appropriate.
(1) Arm or leg wound. (See Task 081-831-1032.) (2) Partial or complete amputation. (See Task 081-831-1032.) (3) Open head wound. (See Task 081-831-1033.) (4) Open abdominal wound. (See Task 081-831-1025.) (5) Open chest wound. (See Task 081-831-1026.)

SH-4-51
4. Check for shock.
a. Look for any of the following signs and/or symptoms. (1) Sweaty but cool skin (clammy skin). (2) Paleness of skin. (3) Restlessness or nervousness. (4) Thirst. (5) Loss of blood (bleeding). (6) Confusion. (7) Faster than normal breathing rate. (8) Blotchy or bluish skin, especially around the mouth. (9) Nausea and/or vomiting.
b. If signs or symptoms of shock are present, stop the evaluation and begin treatment. (See Task 081-831-1005.)
WARNING Leg fractures must be splinted before elevating the legs for shock. (See Task 081-831-1034.)
5. Check for fractures. a. Look for the following signs and symptoms of a back or neck injury:
(1) Pain or tenderness of the neck or back area. (2) Cuts or bruises in the neck and back area. (3) Inability of the casualty to move (paralysis or numbness).
(a) Ask about the ability to move (paralysis). (b) Touch the casualty's arms and legs; ask whether he can feel your hand (numbness).
(4) Unusual body or limb position.
WARNING Unless there is immediate life-threatening danger, do not move a casualty whom you suspect has a back or neck injury.
b. Immobilize any casualty suspected of having a neck or back injury by doing the following: (1) Tell the casualty not to move. (2) If a back injury is suspected, place padding under the natural arch of the casualty's back. (3) If a neck injury is suspected, place a roll of cloth under the casualty's neck and put boots (filled
with dirt, sand, etc.) or rocks on both sides of the head. c. Check the casualty's arms and legs for open or closed fractures.
(1) Check for open fractures. (a) Look for bleeding. (b) Look for bone sticking through the skin.
(2) Check for closed fractures. (a) Look for swelling. (b) Look for discoloration. (c) Look for deformity. (d) Look for unusual body position.
d. If a fracture to an arm or leg is suspected, stop the evaluation and begin treatment. (See Task 081-831-1034.)

SH-4-52
6. Check for burns. a. Look carefully for reddened, blistered, or charred skin. Also check for singed clothes. b. If burns are found, stop the evaluation and begin treatment. (See Task 081-831-1007.)
7. Check for head injury. a. Look for the following signs and symptoms:
(1) Unequal pupils. (2) Fluid from the ear(s), nose, mouth, or injury site. (3) Slurred speech. (4) Confusion. (5) Sleepiness. (6) Loss of memory or consciousness. (7) Staggering in walking. (8) Headache. (9) Dizziness. (10) Vomiting. (11) Paralysis. (12) Convulsions or twitches.
b. If a head injury is suspected, continue to watch for signs that would require mouth-to-mouth resuscitation (see Task 081-831-1042), treatment for shock (see Task 081-831-1005), or control of bleeding (see Task 081-831-1033). 8. Seek medical aid. Seek medical assistance as soon as possible, but do not interrupt treatment. If possible, send another person to find medical aid.
Evaluation Preparation: Setup: Prepare a "casualty" for the soldier to evaluate by simulating one or more wounds or conditions. Simulate the wounds using a war wounds moulage set, casualty simulation kit, or other available materials. You can coach a "conscious casualty" to show signs of such conditions as shock or head injury and to respond to the soldier's questions about location of pain or other symptoms of injury. However, you will have to cue the soldier during evaluation of an "unconscious casualty" as to whether the casualty is breathing and describe the signs or conditions, such as shock, as the soldier is making the checks. Brief Soldier: Tell the soldier to do, in order, all necessary steps to evaluate the casualty and identify all wounds and/or conditions. Tell the soldier to tell you what first aid action (give mouth-to-mouth resuscitation, bandage the wound, etc.) he would take, but that no first aid is to be performed unless a neck or back injury is found.

SH-4-53
Performance Measures GO NO GO
1. Checked for responsiveness. —— —— 2. Checked for breathing, if necessary. —— —— 3. Checked for bleeding. —— —— 4. Checked for shock. —— —— 5. Checked for fractures and immobilized neck or back injuries, if found. —— —— 6. Checked for burns. —— —— 7. Checked for a head injury. —— —— 8. Sought medical aid. —— —— 9. Performed all necessary steps in sequence. —— —— 10. Identified all wounds and/or conditions. —— ——
Evaluation Guidance: Score the soldier GO if all performance measures are passed. Score the soldier NO GO if any performance measure is failed. If the soldier scores NO GO, show what was done wrong and how to do it correctly. References
Required Related FM 4-25.11

SH-4-54
081-831-1005 Perform First Aid to Prevent or Control Shock
Conditions: You see a casualty who is breathing. There is no uncontrolled bleeding. The casualty has one or more of the symptoms of shock. Necessary equipment and materials: a field jacket and blanket or poncho. Standards: Attempted to prevent a casualty from going into shock by correctly positioning the casualty, loosening binding clothes, calming and reassuring, and providing shade from direct sunlight during hot weather, or covering to prevent body heat loss during cold weather. Did not cause further injury to the casualty.
Performance Steps
1. Position the casualty. a. Move the casualty to cover, if cover is available and the situation permits. b. Lay the casualty on his back unless a sitting position will allow the casualty to breathe easier. c. Elevate the casualty's feet higher than the heart using a stable object so the feet will not fall.
WARNING If the casualty has a fractured or broken leg, an abdominal wound, or a head wound, do not elevate the casualty's legs.
2. Loosen clothing at the neck, waist, or anywhere it is binding.
WARNING Do not loosen clothing if in a chemical area.
3. Prevent the casualty from chilling or overheating. a. Cover the casualty to avoid loss of body heat and, in cold weather, place cover under as well as
over the casualty. Use a blanket or clothing, or improvise a cover. b. Place the casualty under permanent or improvised shelter in hot weather to shade him from direct
sunlight.
WARNING Do not give the casualty anything to eat or drink.
4. Calm and reassure the casualty. a. Take charge and show self-confidence. b. Assure the casualty that he is being taken care of.
WARNING If you must leave the casualty, turn his head to the side to prevent choking if vomiting occurs.
5. Seek medical aid. Note. Watch the casualty closely for life-threatening conditions, check for other injuries, and seek medical aid.

SH-4-55
Evaluation Preparation: Setup: You will need another soldier to play the part of the casualty. Have the casualty lie down. You can have a canteen of water available and have the casualty say that he is thirsty while testing step 3. Brief Soldier: Tell the soldier to do all necessary first aid steps to prevent shock. You can vary the test by telling the soldier whether it is hot or cold or that the casualty has a broken leg or abdominal wound to see if the soldier knows what to do. Do not evaluate step 5 in the simulated mode.
Performance Measures GO NO GO
1. Positioned the casualty correctly. —— —— 2. Loosened tight or binding clothes. —— —— 3. Prevented the casualty from chilling or overheating. —— —— 4. Reassured the casualty. —— —— 5. Sought medical aid. —— ——
Evaluation Guidance: Score the soldier GO if all performance measures are passed. Score the soldier NO GO if any performance measure is failed. If the soldier scores NO GO, show what was done wrong and how to do it correctly. References Required Related FM 4-25.11

SH-4-56
081-831-1025 Perform First Aid for an Open Abdominal Wound
Conditions: You see a casualty who has an open abdominal wound. The casualty is breathing. Necessary equipment and materials: casualty's first aid packet and material for an improvised dressing (clothing or blankets). Standards: Applied a dressing to the wound following the correct sequence without causing further injury to the casualty. The dressing was secure and protected the wound without putting pressure on the bowel.
Performance Steps
1. Position the casualty by placing the casualty on his back with the knees up (flexed). 2. Uncover the wound unless clothing is stuck to the wound or in a chemical environment.
CAUTION Uncovering the wound in a chemical environment or removing stuck clothing could cause additional harm.
3. Pick up any organs that are on the ground. a. Use a clean, dry dressing or the cleanest material available and gently pick up the organs without
touching them with your bare hands. b. Place the organs on top of the casualty's abdomen.
4. Apply the casualty's field dressing. Note. If the field dressing is not large enough to cover the entire wound, the inner surface of the plastic wrapper from the dressing may be used to cover the bowel before the dressing is applied. Other improvised dressings can be made from clothing, blankets, or the cleanest material available.
a. Apply the dressing, white side down, directly over the wound.
WARNING Do not apply pressure to the wound or other exposed internal parts.
b. Wrap the tails around the casualty's body completely covering the dressing if possible. c. Loosely tie the tails into a nonslip knot at the casualty's side. d. Check to make sure the tails are tied firmly enough to prevent slipping without applying pressure to
the bowel. Note. Field dressings can be covered with improvised reinforcement materials (cravats, strips of torn cloth) for additional support and protection. The improvised bandages should be tied on the casualty's side—the one opposite to where the dressing is tied.
Note. Do not cause further injury. Observe the following: Do not touch exposed organs with bare hands. Do not push organs back inside the body. Do not probe, clean, or remove any foreign object from the wound.
WARNING Do not give food or water to the casualty. (Moistening the casualty's lips is allowed.)
Note. Watch the casualty closely for life-threatening conditions, check for other injuries, and seek medical aid.

SH-4-57
Evaluation Preparation: Setup: Use the same field dressing repeatedly. Have another soldier act as the casualty. Use a moulage or otherwise simulate the abdominal wound. You can have a canteen of water available and have the casualty say that he is thirsty while testing step 4. Brief Soldier: Tell the soldier to do, in order, all necessary first aid steps to treat the casualty's wound. When testing step 2, you can vary the test by telling the soldier that clothing is stuck to the wound or that a chemical environment exists.
Performance Measures GO NO GO
1. Positioned the casualty. —— —— 2. Uncovered the wound. —— —— 3. Picked up organs. —— —— 4. Applied the casualty's field dressing. —— —— 5. Performed steps 1 through 4 in the correct sequence. —— —— 6. Watched the casualty closely for life-threatening conditions and checked for other injuries, if necessary. (See the Task 081-831-1000.) —— ——
Evaluation Guidance: Score the soldier GO if all performance measures are passed. Score the soldier NO GO if any performance measure is failed. If the soldier scores NO GO, show what was done wrong and how to do it correctly. References Required Related FM 4-25.11

SH-4-58
081-831-1026 Perform First Aid for an Open Chest Wound
Conditions: You see a casualty who has an open chest wound. The casualty is breathing. Necessary equipment and materials: casualty's first aid packet and material to improvise a dressing (clothing or blankets). Standards: Applied a dressing to the wound following the correct sequence, without causing further injury to the casualty. The wound was properly sealed and the dressing was firmly secured without interfering with breathing.
Performance Steps
Note. If there are two wounds, the same procedure should be followed for both. Start with the one that is more serious; (the one that has the heavier bleeding or is larger).
1. Uncover the wound unless clothing is stuck to the wound or in a chemical environment. CAUTION
Uncovering the wound in a chemical environment or removing stuck clothing could cause additional harm.
WARNING Do not attempt to clean the wound.
2. Apply airtight material over the wound. a. Use the fully opened outer wrapper of the casualty's field dressing or other airtight material. b. Apply the inner surface of the airtight material directly over the wound after the casualty exhales
completely. Note. When applying the airtight material try not to touch the inner surface.
c. Hold the material in place. 3. Apply the casualty's field dressing.
a. Apply the dressing, white side down, directly over the airtight material. b. Have the casualty breathe normally. c. Maintain pressure on the dressing while you wrap the tails around the body back to the starting
point. d. Tie the tails into a nonslip knot over the center of the dressing after the casualty has exhaled
completely. e. Check to make sure the knot is tied firmly enough to secure the dressing without interfering with
breathing. Note. When practical, apply direct manual pressure over the dressing for 5 to 10 minutes to help control the bleeding.
4. Position the casualty on the injured side or in a sitting position, whichever makes breathing easier.
WARNING If the casualty's condition (difficulty in breathing, shortness of breath, restlessness, or blueness of skin) worsens after placing the dressing, quickly lift or remove and then replace the airtight dressing.
Note. Watch the casualty for life-threatening conditions, check for other injuries, and seek medical aid.

SH-4-59
Evaluation Preparation: Setup: Use the same field dressing repeatedly. Prepare the field dressing outer wrapper or provide a piece of airtight material (plastic, cellophane, foil). Have another soldier act as the casualty. Use a moulage or otherwise simulate the chest wound. Brief Soldier: Tell the soldier to do, in order, all necessary first aid steps to treat the casualty's wound. When testing step 1, you can vary the test by telling the soldier that clothing is stuck to the wound or that a chemical environment exists.
Performance Measures GO NO GO
1. Uncovered the wound unless clothing is stuck to the wound or a chemical environment exists. —— ——
2. Applied airtight material over the wound without touching the inner surface. —— —— a. Used the fully opened outer wrapper of the casualty's field dressing or
other airtight material.
b. Applied the inner surface of the airtight material directly over the wound after the casualty exhaled completely.
c. Held the material in place. 3. Applied the casualty's field dressing. —— ——
a. Applied the dressing, white side down, directly over the airtight material. b. Had the casualty breathe normally. c. Maintained pressure on the dressing while wrapping the tails around the
body back to the starting point.
d. Tied the tails into a nonslip knot over the center of the dressing, after the casualty exhaled completely.
e. Checked to make sure the knot is tied firmly enough to secure the dressing without interfering with breathing.
4. When practical, applied direct manual pressure over the dressing for 5 to 10 minutes to help control the bleeding. —— ——
5. Positioned the casualty on the injured side or in a sitting position, whichever made breathing easier. —— ——
6. Performed steps 1 through 5 in the correct sequence. —— —— Evaluation Guidance: Score the soldier GO if all performance measures are passed. Score the soldier NO GO if any performance measure is failed. If the soldier scores NO GO, show what was done wrong and how to do it correctly. References
Required Related FM 4-25.11

SH-4-60
081-831-1032 Perform First Aid for Bleeding of an Extremity
Conditions: You have a casualty who has a bleeding wound of the arm or leg. The casualty is breathing. Necessary equipment and materials: casualty's first aid packet, materials to improvise a pressure dressing (wadding and cravat or strip of cloth), materials to elevate the extremity (blanket, shelter half, poncho, log, or any available material), rigid object (stick, tent peg, or similar object), and a strip of cloth. Standards: Controlled bleeding from the wound following the correct sequence. Placed a field dressing over the wound with the sides of the dressing sealed so it did not slip. Checked to ensure the field and pressure dressing did not have a tourniquet-like effect. Applied a tourniquet to stop profuse bleeding not stopped by the dressings, or for missing arms and legs.
Performance Steps
1. Uncover the wound unless clothing is stuck to the wound or in a chemical environment.
WARNING Do not remove protective clothing in a chemical environment. Apply dressings over the protective clothing.
Note. If an arm or leg has been cut off, go to step 5.
2. Apply the casualty's field dressing. a. Apply the dressing, white side down, directly over the wound. b. Wrap each tail, one at a time, in opposite directions around the wound so the dressing is covered
and both sides are sealed. c. Tie the tails into a nonslip knot over the outer edge of the dressing, not over the wound. d. Check the dressing to make sure it is tied firmly enough to prevent slipping without causing a
tourniquet-like effect.
WARNING Field and pressure dressings should not have a tourniquet-like effect. The dressing must be loosened if the skin beyond the injury becomes cool, blue, or numb.
3. Apply manual pressure and elevate the arm or leg to reduce bleeding, if necessary. a. Apply firm manual pressure over the dressing for 5 to 10 minutes. b. Elevate the injured part above the level of the heart unless a fracture is suspected and has not
been splinted. 4. Apply a pressure dressing if the bleeding continues.
a. Keep the arm or leg elevated. b. Place a wad of padding directly over the wound. c. Place an improvised dressing over the wad of padding and wrap it tightly around the limb. d. Tie the ends in a nonslip knot directly over the wound. e. Check the dressing to make sure it does not have a tourniquet-like effect.
Note. If the bleeding stops, watch the casualty closely, and check for other injuries.
Note. If heavy bleeding continues, apply a tourniquet.
WARNING The only time a tourniquet should be applied is when an arm or leg has been cut off or when heavy bleeding cannot be stopped by a pressure dressing. If only part of a hand or foot has been cut off, the bleeding should be stopped using a pressure dressing.

SH-4-61
Performance Steps
5. Apply a tourniquet. a. Make a tourniquet at least two inches wide. b. Position the tourniquet.
(1) Place the tourniquet over the smoothed sleeve or trouser leg if possible. (2) Place the tourniquet around the limb two to four inches above the wound between the wound
and the heart but not on a joint or directly over a wound or a fracture. (3) Place the tourniquet just above, and as close to the joint as possible, when wounds are just
below a joint. c. Put on the tourniquet.
(1) Tie a half knot. (2) Place a stick (or similar object) on top of the half knot. (3) Tie a full knot over the stick. (4) Twist the stick until the tourniquet is tight around the limb and bright red bleeding has stopped.
Note. In case of an amputation, dark oozing blood may continue for a short time.
d. Secure the tourniquet. The tourniquet can be secured using the ends of the tourniquet band or with another piece of cloth as long as the stick does not unwind. Note. If a limb is completely amputated, the stump should be padded and bandaged (do not cover the tourniquet).
Note. If possible, severed limbs or body parts should be saved and transported with, but out of sight of, the casualty. The body parts should be wrapped in dry, sterile dressing and placed in a dry, plastic bag and in turn placed in a cool container (do not soak in water or saline or allow to freeze). It is entirely possible that your location in the field/combat may not allow for the correct preserving of parts; do what you can.
WARNING Do not loosen or release a tourniquet once it has been applied.
e. Mark the casualty's forehead with a letter T using a pen, mud, the casualty's blood, or whatever is available. 6. Watch the casualty closely for life-threatening conditions, check for other injuries, if necessary, and treat for shock.
Evaluation Preparation: Setup: Use the same field dressing repeatedly. Have materials available for a pressure dressing (wadding and cravat or a strip of cloth). Have one soldier play the part of the casualty and another apply the field and pressure dressing. Use a moulage or mark a place on the casualty's arm or leg to simulate a wound. For applying a tourniquet, use a mannequin or simulated arm or leg (padded length of 2-inch by 4-inch wood with a glove or boot on one end) with a field dressing appropriately placed on the arm or leg. Under no circumstances will a live simulated casualty be used to evaluate the application of a tourniquet. Place the tourniquet materials (a stick and one or two pieces of cloth) nearby. Brief Soldier: Tell the soldier to do, in order, the first aid steps required to put on a field dressing and, if necessary, a pressure dressing on the casualty's wound. When testing step 1, you can vary the test by telling the soldier that clothing is stuck to the wound or that a chemical environment exists. After step 2 and 3, tell the soldier that the bleeding has not stopped. After step 4, tell the soldier the bleeding is continuing and ask the soldier to describe and perform first aid on the simulated arm or leg provided.

SH-4-62
Performance Measures GO NO GO
1. Uncovered the wound. —— —— 2. Applied a field dressing. —— —— 3. Applied manual pressure and elevated the arm or leg, if necessary. —— —— 4. Applied a pressure dressing, if necessary. —— —— 5. Applied a tourniquet, if necessary. —— —— 6. Performed steps 1 through 5, as necessary, in sequence. —— ——
Evaluation Guidance: Score the soldier GO if all performance measures are passed. Score the soldier NO GO if any performance measure is failed. If the soldier scores NO GO, show what was done wrong and how to do it correctly. References Required Related FM 4-25.11

This page intentionally left blank

SH-4-63
081-831-1033 Perform First Aid for an Open Head Wound
Conditions: You see a casualty who has an open head wound. The casualty is breathing. Necessary equipment and materials: casualty's first aid packet and a canteen of water. Standards: Applied a dressing to the wound following the correct sequence without causing further injury to the casualty. The casualty was properly positioned and the dressing was secured without applying unnecessary pressure.
Performance Steps
1. Check the casualty's level of consciousness. a. Question the casualty.
(1) "What is your name?" (2) "Where are you?" (3) "What is today's date (day, month, year)?"
b. Report incorrect answers, inability to answer, or changes in answers to medical personnel. 2. Position the casualty.
WARNING Do not move the casualty if he exhibits signs and/or symptoms, other than minor bleeding, of a neck, spine, or severe head injury.
a. The casualty is conscious or has a minor scalp wound. (1) Have the casualty sit up unless other injuries prohibit sitting up. (2) Raise the head slightly if the casualty is lying down and is not accumulating fluids in his throat. (3) Turn his head to the side or position the casualty on his side (opposite the wound) if the wound
is bleeding into the mouth or throat. b. The casualty is unconscious or has a severe head injury.
(1) Treat the casualty as having a potential neck or spinal injury. Immobilize and do not move the casualty unless absolutely necessary.
(2) Turn the casualty, if he is choking and/or vomiting or bleeding into the mouth. Position the casualty on his side opposite the wound.
WARNING If it is necessary to turn a casualty with a suspected neck or spinal injury, assistance will be required. Roll the casualty gently onto his side keeping the head, neck, and body aligned while providing support for the head and neck.
3. Expose the wound by removing the casualty's helmet if necessary.
WARNING In a chemical environment removing the mask or other protective clothing could be hazardous to the casualty.
Note. In a chemical environment— If the casualty's mask and hood are not breached, do not apply a dressing. If the all clear has not
been given, do not remove the casualty's mask to treat the wound. If the casualty's mask or hood has been breached, and the all clear has not been given, attempt to
repair the breach with tape or wet cloth stuffing. Do not apply a dressing. If the casualty's mask or hood has been breached and the all clear has been given, remove the
mask to apply a dressing.

SH-4-64
Performance Steps
4. Apply the casualty's field dressing to the wound.
WARNING To prevent further injury to the casualty—
Do not try to clean the wound.
Do not put unnecessary pressure on the wound.
Do not try to push brain matter back into the head.
Do not give the casualty any food or drink.
Do not move the casualty if a broken neck or broken back is suspected.
a. Forehead or back of the head. (1) Apply the dressing, white side down, directly over the wound with the tails extending toward the
sides of the head. (2) Wrap the tails, one at a time, around the head in opposite directions making sure the tails cover
the dressing but not the eyes and ears. (3) Tie the tails at the side of the head using a nonslip knot.
b. Top of the head. (1) Apply the dressing, white side down, directly over the wound. (2) Wrap one tail down under the chin and bring it up in front of the ear over the dressing to a point
just above, and in front of, the opposite ear. (3) Wrap the other tail down under the chin in the opposite direction and up the side of the head to
meet the first tail. (4) Cross the tails. (5) Wrap one tail across the forehead above the eyebrows to a point just above and in front of the
opposite ear. (6) Wrap the other tail above the ear, low over the back of the head, and above the opposite ear to
meet the other tail. (7) Tie the tails using a nonslip knot.
c. Side of the head or cheek. (1) Apply the dressing, white side down, directly over the wound with the tails extending up and
down. (2) Wrap the top tail over the top of the head, down in front of the ear, under the chin, and up over
the dressing to a point just above the ear. (3) Wrap the other tail in the opposite direction to meet the first tail. (4) Cross the tails and complete the procedure as follows:
(a) Wrap one tail across the forehead above the eyebrows to a point just above, and in front of, the opposite ear.
(b) Wrap the other tail above the ear, low over the back of the head, and above the opposite ear to meet the other tail.
(c) Tie the tails using a nonslip knot. 5. Monitor the casualty.
a. Check the casualty's level of consciousness every 15 minutes. b. Awaken the casualty every 15 minutes if he falls asleep. c. Note any changes from earlier checks.
6. Watch the casualty for life-threatening conditions and check for other injuries, if necessary.

SH-4-65
Evaluation Preparation: Setup: Use the same field dressing repeatedly. Have another soldier act as the casualty. Use a moulage or otherwise simulate a wound to the forehead, back of the head, side of the head, cheek, or top of the head. Brief the casualty on how to answer the soldier's questions during step 1. You can have a canteen of water available and have the casualty say that he is thirsty to see if the soldier knows what to do. Brief Soldier: Tell the soldier to do, in order, all necessary first aid steps to treat the casualty's wound. Tell the soldier that it is not in a chemical environment. After the soldier completes step 4, ask him how often the casualty's level of consciousness should be checked and what should be done if the casualty falls asleep. Score step 5 based on the soldier's responses.
Performance Measures GO NO GO
1. Checked the casualty's level of consciousness. —— —— 2. Positioned the casualty. —— —— 3. Exposed the wound. —— —— 4. Applied the casualty's field dressing. —— —— 5. Monitored the casualty. —— —— 6. Performed steps 1 through 5 in the correct sequence. —— ——
Evaluation Guidance: Score the soldier GO if all performance measures are passed. Score the soldier NO GO if any performance measure is failed. If the soldier scores NO GO, show what was done wrong and how to do it correctly. References
Required Related FM 4-25.11

This page intentionally left blank

SH-4-66
071-325-4425 Employ an M18A1 Claymore Mine
Conditions: You must employ the M18A1 Claymore mine against enemy targets. Given an M18A1 Claymore mine in a bandoleer, an M57 firing device, an M40 test set, and a firing wire with blasting cap, packed in an M7 bandoleer; a sandbag; and two wooden stakes. Standards: 1. Conducted a circuit test of the firing device with the blasting cap secured under a sandbag. 2. Installed the M18A1 Claymore mine so— a. The front of the mine was centered on a kill zone. b. The firing device was 16 meters to the rear or side of the emplaced mine and fired from a covered position. c. The mine, firing wire, and firing device were camouflaged. d. The installation was confirmed by conducting a final circuit test. 3. Fired the mine by actuating the firing device handle with a firm, quick squeeze when the target was in the kill zone.
Performance Steps
1. Inventory the M18A1 Claymore mine bandoleer, accounting for all accessories. (figure 071-325-4425-1).
Figure 071-325-4425-1. Components of the M18A1 Claymore mine
WARNING During testing and installation, keep the M57 firing device in your possession to prevent accidental firing by someone else.
2. Conduct a circuit test at the firing point (figure 071-325-4425-2).
Figure 071-325-4425-2. Circuit test of the M57 firing device and M40 test set
a. Remove the electrical wire and accessories while leaving the mine in the bandoleer. b. Remove the dust cover from the connector of the M57 firing device and from the female connector
of the M40 test set. c. Plug the test set into the firing device.

SH-4-67
Performance Steps
d. Position the firing device bail to the FIRE position. e. Actuate the handle of the firing device with a firm, quick squeeze, observing the flash of light
through the window of the test set. Note. The flashing light indicates that the M57 firing device and M40 test set are functioning correctly.
f. Remove the shorting plug cover from the connector of the firing wire and from the end of the test set.
g. Plug the connector of the firing wire into the test set (figure 071-325-4425-3).
Figure 071-325-4425-3. Circuit test of the M18A1 Claymore mine firing system
WARNING The blasting cap must be placed under a sandbag, behind a tree or in a hole in the ground to protect the person performing the circuit check in case the blasting cap detonates.
h. Place the M57 firing device bail in the FIRE position and actuate the firing handle. Note. The lamp in the window of the M40 test set should flash.
i. Place the firing device on SAFE, remove the M57 firing device and M40 test set. j. Place the shorting plug cover on the firing wire.
3. Install the M18A1 Claymore mine. a. Tie the shorting plug end of the firing wire to a fixed object, such as a stake or tree at the firing
position (figure 071-325-4425-4).
Figure 071-325-4425-4. Firing wire secured
b. Place the bandoleer on your shoulder. c. Unroll the firing wire to the selected installation position.

SH-4-68
Performance Steps
Note. The firing wire is laid from the firing position to the mine installation site because the blasting cap end is on the inside of the firing wire spool.
4. Aim the mine. a. Remove the mine from the bandoleer. b. Open both pairs of legs to a 45-degree angle with two legs facing to the front and two legs facing
to the rear of the mine (figure 071-325-4425-5).
Figure 071-325-4425-5. Placing and aiming the mine
c. Push the legs about one-third of the way into the ground with the mine facing in the desired direction of fire. In windy areas or when the legs cannot be pressed into the ground, spread the legs as far as they will go (about 180 degrees) so the legs are to the front and rear of the mine and the mine will not tip over.
Figure 071-325-4425-6. Aiming knife-edge sight
d. Select an aiming point at ground level about 50 meters (150 feet) in front of the mine (figure 071-325-4425-6).
e. Position one eye about 6 inches to the rear of the sight. (1) On a knife-edge sight, align the two edges of the sight with the aiming point (figure 071-325-
4425-7 and figure 071-325-4425-8).
Figure 071-325-4425-7. Aiming knife-edge sight (continued)

SH-4-69
Performance Steps
Figure 071-325-4425-8. Aiming knife-edge sight (continued)
(2) On a slit-type peep sight, align the groove of the sight with the aiming point that is 2.5 meters (8 feet) off the ground (figure 071-325-4425-9 and figure 071-325-4425-10).
Figure 071-325-4425-9. Aiming slit-type peep sight
Figure 071-325-4425-10. Aiming slit-type peep sight (continued)
Note. The aiming point should be in the center of the desired area of coverage with the bottom edge of the peep sight parallel to the ground that is to be covered with the fragment spray.
5. Arm the mine. a. Secure the firing wire about one meter to the rear of the mine so the mine will not become
misaligned if the firing wire is disturbed. b. Unscrew one of the shipping plug priming adapters from the mine. c. Slide the slotted end of the shipping plug priming adapter onto the firing wire of the blasting cap
between the crimped connections and the blasting cap. d. Pull the excess wire through the slotted end of the adapter until the top of the blasting cap is firmly
seated in the bottom portion of the shipping plug priming adapter (figure 071-325-4425-11).

SH-4-70
Performance Steps
Figure 071-325-4425-11. Arming the mine
e. Screw the adapter, with the blasting cap, into the detonator well.
WARNING Ensure that the face of the mine marked "front toward enemy" and the arrows on the mine point in the direction of the enemy.
f. Recheck the aim of the mine. 6. Camouflage the mine. 7. Bury the firing wire (if possible) from the mine back to the firing position. Note. The firing position should be in a hole or covered position at least 16 meters to the rear or the side of the emplaced mine.
WARNING The M40 test set must be used during retest of the circuit.
8. Repeat step 2 to test the circuit after the firing wire is laid out and the cap is placed inside the mine to see if there are any breaks in the wire (figure 071-325-4425-12).

SH-4-71
Performance Steps
Figure 071-325-4425-12. Retesting the circuit
Note. To ensure that the mine will function properly after installation, retest the firing circuit to check for any break in the wire that may have occurred during installation.
Note. Friendly troops within 250 meters to the front and sides and 100 meters to the rear of the mine must be under cover.
WARNING You must be behind cover or in a fighting position when retesting the circuit on a Claymore mine with the blasting cap inserted in the detonation well.
9. Fire the mine. a. Remove the dust cover from the firing device and firing wire. b. Connect the firing wire to the firing device. c. Position the firing device safety bail in the FIRE position (figure 071-325-4425-13).

SH-4-72
Performance Steps
Figure 071-325-4425-13. Firing device in the SAFE position
d. Actuate the firing device handle with a firm, quick squeeze. e. Assume a prone position behind cover.
Note. The mine is most effective when employed against targets 20 to 30 meters in front of it. Evaluation Preparation: Setup: During training, use only inert blasting caps and mines. At the test site, place one M7 bandoleer containing an inert M18A1 Claymore mine, an M57 firing device, and an M40 test set. Check to make sure each mine is complete and serviceable. Place one wooden stake in the ground at the test position and another at the mine emplacement point. The distance between the emplacement point and firing point must be no less than 16 meters. The stake at the aiming point should be painted red or some other distinguishable color. Once the soldier has emplaced the mine and completed the circuit test, assume a prone position and visually confirm that the mine is correctly aimed. To assist you, place stakes one meter on each side of the aiming point stake. The height of the stakes should not exceed one foot above the ground. During the circuit test, do not attempt to observe the flash on the M40 test set because it may interfere with the soldier's performance. Throughout the evaluation, if the soldier states that he cannot see the flashing light, tell him "CONTINUE WITH THE TEST." Brief Soldier: Tell the soldier to perform a circuit check on the firing wire and then install the mine. Camouflaging and burying the wire are not covered during the evaluation.
Performance Measures GO NO GO
1. Inventoried the M18A1 Claymore mine bandoleer, and ensured all components were present and in serviceable condition. —— ——
2. Conducted a circuit test. —— —— a. Removed the electrical wire and accessories while leaving the mine in
the bandoleer.
b. Removed the dust cover from the connector of the M57 firing device and from the female connector of the M40 test set.
c. Plugged the test set into the firing device. d. Positioned the firing device bail to the FIRE position. e. Actuated the firing handle, and observed the flash in the test set
window.
f. Removed the shorting plug cover from the connector of the firing wire and from the end of the test set.
Note. The soldier can place the sandbag over the blasting cap any time before plugging the test set into the firing wire connector.
g. Plugged the test set into the firing wire connector.

SH-4-73
Performance Measures GO NO GO
h. Placed the M57 firing device bail in the FIRE position and actuated the firing handle.
i. Placed the firing device on SAFE, removed the M57 firing device and M40 test set.
j. Placed the shorting plug cover on the firing wire. 3. Installed the M18A1 Claymore mine. —— ——
a. Tied the shorting plug end of the firing wire to fixed object (stake, tree, etc.) at the firing position.
b. Placed the bandoleer on shoulder. c. Unrolled the wire to the mine emplacement site.
4. Aimed the mine. —— —— 5. Armed the mine. —— ——
a. Secured the wire at the mine site. b. Inserted the blasting cap in either detonator well. c. Locked the blasting cap in place with the shipping plug priming adapter. d. Rechecked the lay of the mine.
Note. If the soldier tries to put the blasting cap through the hole in the shipping plug priming adapter, he fails performance measure 3.
6. Camouflaged the mine. —— —— 7. Buried the firing wire from the mine back to the firing position. —— —— 8. Rechecked the circuit. —— ——
a. Removed the electrical wire and accessories while leaving the mine in the bandoleer.
b. Removed the dust cover from the connector of the M57 firing device and from the female connector of the M40 test set.
c. Plugged the test set into the firing device. d. Positioned the firing device bail to the FIRE position. e. Actuated the firing handle. f. Observed the flash through the window on the test set. g. Placed a sandbag over the blasting cap. h. Plugged the test set into the firing wire connector. i. Actuated the firing handle and observed the window in the test set for a
flash.
j. Placed the firing device on SAFE. k. Replaced the shorting plug cover on the firing wire.
9. Fired the M18A1 Claymore mine. —— —— a. Removed the dust cover from the firing device and firing wire. b. Connected the firing wire to the firing device. c. Positioned the firing device safety bail in the FIRE position. d. Actuated the firing device handle with a firm, quick squeeze. e. Assumed a prone position behind cover.

SH-4-74
Performance Measures GO NO GO
Note. The soldier may assume the prone position any time before placing the firing device on FIRE.
f. Completed steps 9a through 9e sequence. Evaluation Guidance: Score the soldier GO if all performance measures are passed. Score the soldier NO GO if any performance measure is failed. If the soldier scores NO GO, show him what was done wrong and how to do it correctly. References Required Related FM 23-23

This page intentionally left blank

SH-4-75
301-371-1000 Report Intelligence Information
Conditions: You have observed enemy activity, significant terrain, and weather features and must immediately report the activity to your chain of command via radio, wire, cable, or messenger. Standards: Submitted observations in a spot report, using the SALUTE format, to your chain of command, within five minutes of observing enemy activity. You correctly identified six out of six SALUTE items.
Performance Steps
1. Identify enemy activity. Determine whether observed activity is friendly or enemy. If unable to make determination, report activity as unknown. 2. Record information in a spot report, using the SALUTE format.
a. Spot report is a report containing information for which speed of transmission is essential. A spot report does not have a prescribed format, but use of the SALUTE format will ensure reporting of essential information.
b. Define SALUTE acronym. (1) S—Size. Report the number of personnel, vehicles, aircraft, or size of an object. (2) A—Activity. Report detailed account of actions, for example, direction of movement, troops
digging in, artillery fire, type of attack, NBC activity, etc. (3) L—Location. Report where you saw the activity. Include grid coordinates or reference from a
known point including the distance and direction from the known point. (4) U—Unit. Report the enemy's unit. If the unit is unknown, report any distinctive features, such
as uniforms, patches or colored tabs, headgear, vehicle identification markings, etc. (5) T—Time. Report the time the activity was observed, not the time you report it. Always report
local or Zulu time. (6) E—Equipment. Report all equipment associated with the activity, such as weapons, vehicles,
tools. If unable to identify the equipment, provide as much detail as you can so an identification can be made by higher headquarters.
(c) Remarks. Include any information not included in the SALUTE format. 3. Provide spot report to chain of command.
Evaluation Preparation: Setup: Position two to four personnel (dressed in aggressor uniforms if available) where they are observable with the naked eye (or binoculars if available). Direct the aggressors to perform some type of activity such as setting up camp, cleaning weapons, working on a vehicle, or studying maps. Provide the soldier with a 1:50,000 scale topographic map of the test area. If you require the soldier to write the report, provide paper and pen or pencil. If you require the soldier to radio the report to someone else, provide two radios and an SOI. Brief Soldier: Have the soldier write or radio the report of activity to the chain of command.

SH-4-76
Performance Measures GO NO GO
1. Recorded observations of enemy activity in a spot report which included: —— —— a. Size. b. Activity. c. Location. d. Unit. e. Time. f. Equipment.
2. Reported all information to the chain of command within five minutes of observation. —— ——
Evaluation Guidance: Score the soldier GO if all performance measures are passed within five minutes. Score the soldier NO GO if any performance measure is failed. If a soldier scores NO GO, show him what was done wrong and how to do it correctly. References Required Related FM 21-75

SH-4-77
031-503-3005 Submit an NBC 1 Report
Conditions: A nuclear, biological, and chemical (NBC) attack has just occurred in your area. You are given a watch, a map, a compass, a protractor, a pencil, paper, and the NBC report format guide (Graphic Training Aid [([GTA])] 03-06-008) or [DA ] Form 1971-7-R, NBC-1 Observers Initial/Follow-Up Report. Standards: Submitted the NBC 1 report with the required information. Completed and submitted a spot report (SPOTREP) to give an immediate attack notification. Performance Steps 1. React to an NBC attack or hazard.
a. React to a nuclear attack or hazard. b. React to a chemical or biological attack or hazard.
NOTE: The purpose of the SPOTREP is to give immediate notification of the NBC attack.
2. Submit a SPOTREP immediately (use the size, activity, location, unit, time, and equipment [[SALUTE]] format if possible) for attack notification. 3. Submit an NBC 1 (observer’s) report after gathering the available data.
a. Complete the required information as outlined in GTA 03-06-008, FM 3-3 (chemical or biological), or FM 3-3-1 (nuclear) to include--—
(1) Line B: Location of observer (use grid coordinates or place name). (2) Line D: Date-time group (DTG) of the attack (specify local or Zulu time). (3) Line H: Type and height of burst (nuclear) or type of agent and persistency (chemical or
biological). (4) Line C: Direction of attack in mils or degrees from the observer; or Line F: Location of attack, grid coordinates, or place name.
b. Select the proper communication precedence. NOTE: Flash reports should NOT be delayed for lack of information.
(1) Use flash precedence if this is the first attack of its type (the first nuclear attack, the first biological attack, or the first chemical attack). (Flash precedence is used to report the first use of NBC weapons against United States [U.S.] troops.) Note. A flash precedence is used to report the first use of NBC weapons against U.S. troops.
(2) Use immediate precedence for all other attacks. NOTE: Line L (nuclear) is measured 5 minutes after the attack, and Line M (nuclear) is measured 10 minutes after the attack. Submit the NBC 1 nuclear report after Line L or Line M is measured. The M256-series chemical agent detector kit takes 16 minutes to produce reliable results. Submit the NBC 1 Report after this test is done.
c. Submit the NBC 1 report to the correct places. Note. Units selected by the division level NBC center (NBCC) as designated observers (applies only to nuclear bursts) also submit the NBC 1 report directly to the division level NBCC. All units submit the NBC 1 report to their higher headquarters. Evaluation Preparation: Setup: Gather the items provided in the conditions statement. Develop a situation containing observer data. (This information may be written.) A different situation should be developed for each type of report. Brief Soldier: Tell the soldier that the test will consist of submitting SPOTREPs and preparing and submitting NBC 1 reports. Give the necessary items to the soldier, including the data you developed. Tell the individual to give a warning and prepare reports of an NBC event.

SH-4-78
Performance Measures GO NO-GO
1. Reacted to an NBC attack or hazard. —— —— 2. Submitted a SPOTREP immediately for attack notification. —— —— 3. Submitted an NBC 1 report after gathering available data and completing the required information for the report according to GTA 03-06-008. —— ——
Evaluation Guidance: Score the soldier GO if all steps performance measures are passed (P). Score the soldier NO --GO if any performance measure step is failed (F). If the soldier fails any step, show him how to do it correctly. References Required Related FM 3-3 DA Form 1971-2-R FM 3-3-1 DA Form 1971-7-R GTA 03-06-008

SH-4-79
031-506-1053 Report Nuclear, Biological and Chemical NBC Information Using Nuclear, Biological and Chemical NBCNBC 4 Report
Conditions: You are in a nuclear, biological, or chemical contaminated tactical environment. Given a watch, a map, a compass, a protractor, a pencil, paper and the NBC report format guide ([GTA] 03-06-008 or [DA] Form 1971-10-R, NBC 4-Radiation Dose Rate Measurements/Chemical/Biological Areas of Contamination). Standards: Reported NBC information using the NBC report. Completed NBC 4 reports with all heading information and mandatory line items (Q, R, and S for nuclear or H, Q, and S for chemical or biological). Included all other appropriate data, and ensured that each report was in the correct format. Disseminated completed NBC 4 reports to the proper authority. Performance Steps NOTE: Go to step 12 if it is a nuclear report. Go to step 23 if it is a chemical and biological (CB) report. Treat depleted uranium (DU) the same as a nuclear hazard.
1. Prepare an NBC 4 nuclear report. NOTE: The mandatory information in an NBC 4 nuclear report is the location of the reading (line Q), the dose rate (line R), and the date-time group (DTG) of the reading (line S).
a. Report the heading information for the NBC 4 nuclear report: (1) FROM: Enter your unit identification. (2) TO: Enter the unit identification you are calling. (3) PRECEDENCE: Use "IMMEDIATE." (4) CLASSIFICATION: Usually sent unclassified. (5) DATE-TIME: Use eight digits (DDHHMM—two digits for the day, four digits to represent
military time) plus "Zulu" or "LOCAL." (6) TYPE OF REPORT: Enter "NUCLEAR." (7) CATEGORY OF REPORT: Enter "INITIAL" if this is the first report on this attack you will
submit; otherwise, enter "FOLLOW-UP." b. Turn DA Form 1971-10-R to the reverse side.
(1) Line A: Enter the strike serial number. (2) Line Q: Enter grid coordinates of the location of the reading (grid coordinates or place name,
state actual or estimated). (3) Line R: Enter the dose rate in centigray per hour (Gy/phr). (4) Line S: Enter the DTG of the reading.
NOTE: The NBC 4 report can contain more than one reading. Repeat lines Q, R, and S, if necessary.
c. Go to step 4. 2. Prepare an NBC 4 CB report. NOTE: The mandatory information in an NBC 4 CB report is the type of agent (line H), the location of the reading (line Q), and the DTG of the reading (line S).
a. Report the heading information for the NBC 4 CB report. (1) FROM: Enter your unit identification. (2) TO: Enter the unit identification you are calling. (3) PRECEDENCE: Use "IMMEDIATE." (4) CLASSIFICATION: Usually sent unclassified. (5) DATE-TIME: Use eight digits (DDHHMM—two digits for the day, four digits to represent
military time) plus "Zulu" or "LOCAL."

SH-4-80
Performance Steps (6) TYPE OF REPORT: Enter "CHEMICAL" or "BIOLOGICAL." (7) CATEGORY OF REPORT: Enter "INITIAL" if this is the first report on this attack you will
submit; otherwise, enter "FOLLOW-UP." b. Use Section I on DA Form 1971-10-R.
(1) Line A: Enter the strike serial number. (2) Line H: Enter the type of agent. (3) Line Q: Enter grid coordinates of the location of the reading (grid coordinates or place name,
state actual or estimated). (4) Line S: Enter the DTG of the reading.
NOTE: The NBC 4 report can contain more than one reading. Repeat lines Q, R, and S if necessary.
c. Go to step 4. 3. Submit the completed NBC 4 report using any means possible. Evaluation Preparation: Setup: Gather the items provided in the conditions statement. Develop a situation containing observer data. The information may be written and given to the soldier. Develop a different situation for each type of report. Brief Soldier: Tell the soldier that the test will consist of preparing and submitting NBC 4 reports. Give him the necessary items, including the data you developed. Tell the individual to prepare and submit NBC 4 reports.
Performance Measures GO NO-GO
1. Prepared an NBC 4 nuclear report. —— —— 2. Prepared an NBC 4 CB report. —— —— 3. Submitted the completed NBC report. —— ——
Evaluation Guidance: Score the soldiers GO if all steps performance measures are passed (P). Score the soldier NO- -GO if any performance measure steps are failed (F). If the soldier fails any step performance measure, show him how to do it correctly. References Required Related DA Form 1971-10-R FM 3-3 GTA 03-06-008 FM 3-3-1

SH-4-81
052-191-1361 Camouflage Yourself and Your Individual Equipment
Conditions: Given load-carrying equipment (LCE), an individual weapon, a Kevlar helmet with camouflage cover, grass, bushes, trees, shadows, pieces of the lightweight camouflage screen system (LCSS), skin paint, and charcoal and/or mud for camouflage. You are wearing a battle dress uniform (BDU). SPECIAL CONDITIONS: When this task is performed in a nuclear, biological and chemical (NBC) environment, there will be no change in standards due to mission-oriented protective posture (MOPP) 4. Standards: Camouflage yourself and your individual equipment to prevent detection by visual, near-infrared, infrared, ultraviolet, radar, acoustic, and radio sensors.
Performance Steps
1. Identify critical camouflage considerations, incorporating an analysis of the following considerations: a. Movement.
Note. Movement draws attention, and darkness does not prevent observation. The naked eye and infrared/radar sensors can detect movement.
(1) Minimize movement. (2) Move slowly and smoothly when movement is necessary.
b. Shape. (1) Use artificial materials to break up shapes, outlines, and equipment. (2) Stay in shadows when moving. (3) Disguise or distort the shape of your helmet and your body with artificial materials when
conducting operations close to the enemy. c. Light reflection. Cover or remove the following items eliminating light reflection:
(1) Mess kits. (2) Mirrors. (3) Eye glasses. (4) Watch crystals. (5) Plastic map cases. (6) Starched uniforms. (7) Clear plastic garbage bags. (8) Dust goggles worn on top of helmets. (9) Cigarettes and pipes. (10) Red-filtered flashlights.
Note. Replace all red filters on flashlights with blue-green filters.
d. Color. Blend individual camouflage with the surroundings, or at a minimum, ensure that objects do not contrast with the background (figure 052-191-1361-1). Note. When moving from one area to another, change camouflage as required. What works well in one location may draw fire in another.
2. Camouflage your skin.

SH-4-82
Performance Steps
Figure 052-191-1361-1. Colors used in camouflage
Note. Exposed skin reflects light.
a. Cover your skin oils, even if you have very dark skin, using paint sticks. Note. Paint sticks cover these oils and provide blending with the background.
Note. Do not use oils or insect repellant to soften paint sticks. This defeats the purpose of paint sticks by making the skin shiny. Work in pairs when applying paint, because self-application may leave gaps, such as behind the ears.
b. Use information in table 052-191-1361-1 when applying paint on the face. Table 052-191-1361-1. Color Chart
Skin Color Shine Areas Shadow Areas Camouflage material
Light or dark Forehead, cheekbones, ears, nose, and chin
Around eyes, under nose, and under chin
Loam and light green stick
All troops use in areas with green vegetation
Use loam Use light green
Sand and light green stick
All troops use in areas lacking green vegetation
Use light green
Use sand
Loam and white
All troops use only in snow-covered terrain
Use loam Use white
Burnt cork, bark charcoal, or lamp black
All troops, if camouflage sticks not available
Use Do not use
Light-color mud
All troops, if camouflage sticks not available
Do not use Use
c. Paint high, shiny areas (forehead, cheekbones, nose, ears, chin) with a dark color. d. Paint low, shadow areas with a light color.

SH-4-83
Performance Steps
e. Paint exposed skin on the back of the neck, arms, and hands with an irregular pattern. CAUTION
Mud contains bacteria, some of which is harmful and may cause disease or infection. Mud should be considered as a last resort as field expedient paint.
CAUTION Expedient paint containing motor oil should be used with extreme caution.
3. Camouflage your BDU and helmet. a. Roll your sleeves down and button all buttons. b. Attach leaves, grass, small branches, or pieces of LCSS to your uniform and helmet (figure 052-
191-1361-2).
Figure 052-191-1361-2. Camouflaged helmet
Note. These items will distort shapes and blend colors with the natural background.
Note. BDUs provide visual and near-infrared camouflage.
c. Do not starch BDUs. Note. Starch counters the infrared properties of the dyes.
d. Replace excessively faded and worn BDUs because camouflage effectiveness is lost. 4. Camouflage your personal equipment.
a. Cover or remove shiny items. b. Secure items that rattle or make noise when moved or worn.

SH-4-84
Evaluation Preparation: Setup: Ensure that all materials required in the conditions are available to the soldier. The buddy system should be used when applying paint to the face. Brief Soldier: Tell the soldier, in preparation for unit defense, he is to identify critical camouflage considerations, camouflage himself or a buddy's exposed skin with paint sticks, and camouflage his individual equipment.
Performance Measures GO NO GO
1. Identified critical camouflage considerations. —— —— a. Minimized movement, and moved slowly and smoothly. b. Broke up, disguised, or distorted shapes and outlines. c. Covered or removed light-reflecting items. d. Blended camouflage with the natural surroundings.
2. Camouflaged exposed skin. —— —— a. Selected the correct combination of paint sticks for the present location. b. Used paint sticks to camouflage exposed skin on face with irregular
patterns.
c. Used paint sticks to camouflage exposed areas of neck, arms, and hands with irregular patterns.
3. Camouflaged uniform and helmet. —— —— a. Ensured that uniform was not faded or starched. b. Rolled down and buttoned both sleeves. c. Broke up shape and pattern by attaching leaves, grass, small branches,
and/or pieces of LCSS to uniform and helmet.
4. Camouflaged personal equipment. —— —— a. Covered or removed all items that reflected light (for example, mess kits,
mirrors, eye glasses, watch crystals, plastic map cases, starched uniforms, plastic map cases, clear plastic garbage bags, goggles worn on top of helmet, and red-filtered flashlights).
b. Secured items that rattled or made noise when moved or worn. Evaluation Guidance: Score the soldier GO if all performance measures are passed. Score the soldier NO GO if any performance measure is failed. If the soldier fails any performance measure, show him how to do it correctly. References Required Related FM 20-3 FM 21-75

SH-4-85
805C-PAD-2402 Provide Input on Personnel Actions Affecting Subordinates
Conditions: You are a squad/section leader and must assess your subordinates and make recommendations as to actions, qualifications, potential, and experience for pertinent personnel actions. Standards: Determined soldier's eligibility and potential for promotion, assignments, education/training, and career. Counseled soldier on actions required to maintain or obtain eligibility for appropriate personnel action. Provided recommendation/input to commander on personnel action. Provided commander with any change in previous recommendation/input as required. Performance Steps 1. Determine eligibility requirements for PV2 to SPC.
a. Assess eligibility and potential of assigned soldiers for promotion. b. Counsel soldier on actions required to maintain or obtain promotion eligibility. c. Submit recommendation/input through channels to the commander.
2. Determine availability of professional/educational programs or courses. a. Determine eligibility requirements, training benefits, frequency, and how to schedule soldier for
attendance. b. Assess eligibility and potential of assigned soldiers for attendance at professional/educational
training course/programs. c. Counsel soldier on potential effects of attending professional/educational training
courses/programs. d. Counsel soldier on actions required to be recommended for attendance. e. Submit recommendation/input through channels to the commander.
3. Determine assignment eligibility. a. Determine eligibility requirements for reassignment or request for special assignment. b. Assess eligibility and potential of assigned soldiers for reassignment/special assignment. c. Counsel soldier on eligibility for the assignment and the effect the assignment could have on his
career. d. Submit recommendation/input through channels to the commander.
4. Determine soldier's career potential. a. Assess soldier's current duty performance and potential for continued service. b. Counsel soldier on actions required to maintain or obtain eligibility for continued service. c. Counsel soldier on the possible long-term effects that poor performance could have on his/her
personal benefits and future. d. Submit recommendation/input through channels to the commander.
5. Keep abreast of changes in assigned soldiers’ eligibilities and potential. a. Determine changes in requirements and effect of new policies and programs on assigned soldiers. b. Inform soldiers when their performance has improved or fallen down. c. Submit change to previous recommendation/input when warranted through channels to the
commander. Evaluation Preparation: Setup: To evaluate this task, prepare a scenario that provides information on the soldier(s) affected and the specifics of the personnel action(s) involved. Have the soldier determine if the subordinate soldier meets eligibility requirements and has the potential for the personnel action, and to prepare their recommendation for the commander. Brief Soldier: Tell the soldier he/she will be evaluated on his/her ability to provide input on personnel actions (promotion, assignments, education/training, and career potential) affecting subordinate personnel.

SH-4-86
Performance Measures GO NO-GO
1. Determined eligibility requirements for PV2 to SPC. —— —— a. Assessed eligibility and potential of assigned soldiers for promotion.
b. Counseled soldiers on actions required to maintain or obtain promotion eligibility.
c. Submitted recommendation/input through channels to the commander.
2. Determined availability of professional/educational programs or courses. —— —— a. Determined eligibility requirements, training benefits, frequency, and how
to schedule soldier for attendance.
b. Assessed eligibility and potential of assigned soldiers for attendance at professional/educational training courses/programs.
c. Counseled soldier on potential effects of attending professional/educational training courses/programs.
d. Counseled soldier on actions required to be recommended for attendance.
e. Submitted recommendation/input through channels to the commander.
3. Determined assignment eligibility. —— —— a. Determined eligibility requirements for reassignment or request for
special assignment.
b. Assessed eligibility and potential of assigned soldiers for reassignment/special assignment.
c. Counseled soldiers on their eligibility for and the effect the assignment could have on their career.
d. Submitted recommendation/input through channels to the commander.
4. Determined soldier's career potential. —— —— a. Assessed soldier's current duty performance and potential for continued
service.
b. Counseled soldiers on actions required to maintain or obtain eligibility for continued service.
c. Counseled soldier on the possible long -term effects that poor performance could have on his/her personal benefits and future.
d. Submitted recommendation/input through channels to the commander.
5. Kept abreast of changes in assigned soldiers’ eligibilities and potential. —— —— a. Determined changes in requirements and effect of new policies and
programs on assigned soldiers
b. Informed soldiers when their performance has improved or fallen down.
c. Submitted change to previous recommendation/ input when warranted through channels to the commander.
Evaluation Guidance: Score the soldier GO on performance measures passed. Score the soldier NOGONO-GONO GO on any performance measures failed. The soldier must score a GO on all of the performance measures listed above to receive a GO on the task. If the soldier scores NOGONO-GONO GO, show him the soldier what was wrong

Appendix D, Student Handouts
TSP: W221 TITLE: Map Reading

This page intentionally left blank

D-1
Appendix D, HANDOUTS FOR LESSON 1: W221 version 1
This appendix contains the items listed in this table—
Title/Synopsis Pages SH-1, Advance Sheet SH-1-1 to SH-1-3 SH-2, FM 3-25.26 extract SH-2-1 to SH-2-88 SH-3, FM 21-31 extract SH-3-1 to SH-3-3 SH-4, Reinforcement Training Package SH-4-1

This page intentionally left blank

SH-1-1
Student Handout 1
This student handout contains the Advance Sheet.

This page intentionally left blank

SH-1-2
Student Handout 1 Advance Sheet
Lesson Hours This lesson consists of 8.5 hours of small group instruction and a 4.5 hour practical
exercise reinforcement training package (RTP) overview
Overview During this lesson you will receive reinforcement training for the skill level one and
two map reading skills necessary to read a map. You should have received initial training on these tasks in basic training or in your unit. This lesson will also serve as a foundation for future lesson on land navigation. Successful completion of the Primary leadership Development Course (PLDC) depends on your ability to apply map reading skills.
Learning Objective
Terminal Learning Objective (TLO).
Action: Apply map reading skills. Conditions: In a classroom and field environment given a 1:50,000
TENINO map, 1:50,000 map of local training area, lensatic compass, GTA 5-2-12, (Coordinate Scale and Protractor), pencil, paper, and SH-2 and SH-3.
Standards: Applied map reading skills to-- • Determine elevation on a map. • Orient a map using a lensatic compass. • Determine direction on a map using a protractor. • Determine polar coordinates. • Convert azimuths using the declination diagram. • Find unknown locations on a map using intersection and
resection. IAW STP 21-1-SMCT, FM 3-25.26, and FM 21-31.
ELO A: Review reinforcement training package.
ELO B: Determine elevation on a map. ELO C: Orient a map using a lensatic compass. ELO D: Determine direction on a map. ELO E: Convert azimuths using the declination diagram. ELO F: Determine polar coordinates. ELO G: Locate an unknown point on a map and on the ground by intersection. ELO H: Locate an unknown point on a map and on the ground by resection.
Assignment The student assignments for this lesson are:
• Read SH-2, SH-3. • Study and complete the Reinforced Training Package (RTP) provided to you at
inprocessing and answer all quizzes. Turn in your quiz answer sheets to your SGL NLT three days prior to the start of Lesson W221, Map Reading.
BertaF
C 3

SH-1-3
Additional Subject Area Resources
None
Bring to Class
You must bring the following materials to class: • All reference material received for this lesson. • Pencil and writing paper.
Note to Students It is your responsibility to do the homework prior to class. We expect you to come to
class prepared. You will participate in small group discussion. We expect you to participate in the discussion by providing information you learned from your study, and also your personal and observed experiences. Failure to study and read the assignments above will result in your inability to participate with the rest of the group. Not having your input affects the group’s ability to fully discuss the information.

Extract from FM 3-25.26 JAN 05 C 3
SH-2-1
Student Handout 2
This student handout contains 87 pages of extracted material from FM 3-25.26:
Page (Reading/Study) Requirement SH-2-2 thru SH-2-7 Chapter 3, pages 3-1 thru 3-6, read SH-2-8 thru SH-2-21 Chapter 4, pages 4-12 thru 4-25, read SH-2-22 thru SH-2-31 Chapter 5, pages 5-1 thru 5-10, read SH-2-32 thru SH-2-50 Chapter 6, page 6-1 thru 6-19, read SH-2-51 thru SH-2-63 Chapter 9, pages 9-1 thru 9-13, read SH-2-64 thru SH-2-74 Chapter 10, pages 10-1 thru 10-11, read SH-2-75 thru SH-2-88 Chapter 11, pages 11-1 thru 11-14, read
Disclaimer: The training developer downloaded this extract from the General Dennis J. Reimer training and Doctrine Library. The text may contain passive voice, misspelled words, grammatical errors, etc., and may not be in compliance with the Army Writing Style Program.
RECOVERABLE PUBLICATIONS
YOU RECEIVED THIS DOCUMENT IN A DAMAGE-FREE CONDITION. DAMAGE IN ANY WAY, TO INCLUDE HIGHLIGHTING, PENCIL MARKS, OR MISSING PAGES, WILL SUBJECT YOU TO PECUNIARY LIABILITY (STATEMENT OF CHARGES, CASH COLLECTION ETC.) TO RECOVER PRINTING COSTS.

This page intentionally left blank

Extract from FM 3-25.26 JAN 05 C 3
SH-2-2
CHAPTER 3
MARGINAL INFORMATION AND SYMBOLS A map could be compared to any piece of equipment, in that before it is placed into operation the user must read the instructions. It is important that you, as a soldier, know how to read these instructions. The most logical place to begin is the marginal information and symbols, where useful information telling about the map is located and explained. All maps are not the same, so it becomes necessary every time a different map is used to examine the marginal information carefully.
3-1. MARGINAL INFORMATION ON A MILITARY MAP Figure 3-1 shows a reduced version of a large-scale topographic map. The circled numbers indicate the items of marginal information that the map user needs to know. These circled numbers correspond to the following listed items.
a. Sheet Name (1). The sheet name is found in bold print at the center of the top and in the lower left area of the map margin. A map is generally named for the settlement contained within the area covered by the sheet, or for the largest natural feature located within the area at the time the map was drawn.
b. Sheet Number (2). The sheet number is found in bold print in both the upper right and lower left areas of the margin, and in the center box of the adjoining sheets diagram, which is found in the lower right margin. It is used as a reference number to link specific maps to overlays, operations orders, and plans. For maps at 1:100,000 scale and larger, sheet numbers are based on an arbitrary system that makes possible the ready orientation of maps at scales of 1:100,000, 1:50,000, and 1:25,000.
c. Series Name (3). The map series name is found in the same bold print as the sheet number in the upper left corner of the margin. The name given to the series is generally that of a major political subdivision, such as a state within the United States or a European nation. A map series usually includes a group of similar maps at the same scale and on the same sheet lines or format designed to cover a particular geographic area. It may also be a group of maps that serve a common purpose, such as the military city maps.
d. Scale (4). The scale is found both in the upper left margin after the series name, and in the center of the lower margin. The scale note is a representative fraction that gives the ratio of a map distance to the corresponding distance on the earth's surface. For example, the scale note 1:50,000 indicates that one unit of measure on the map equals 50,000 units of the same measure on the ground.
e. Series Number (5). The series number is found in both the upper right margin and the lower left margin. It is a sequence reference expressed either as a four-digit numeral (1125) or as a letter, followed by a three- or four-digit numeral (M661; T7110).
f. Edition Number (6). The edition number is found in bold print in the upper right area of the top margin and the lower left area of the bottom margin. Editions are numbered consecutively; therefore, if you have more than one edition, the highest numbered sheet is the most recent. Most military maps are now published by the DMA, but older editions of maps may have been produced by the US Army Map Service. Still others may have been drawn, at

Extract from FM 3-25.26 JAN 05 C 3
SH-2-3
least in part, by the US Army Corps of Engineers, the US Geological Survey, or other agencies affiliated or not with the United States or allied governments. The credit line, telling who produced the map, is just above the legend. The map information date is found immediately below the word "LEGEND" in the lower left margin of the map. This date is important when determining how accurately the map data might be expected to match what you will encounter on the ground.
g. Index to Boundaries (7). The index to boundaries diagram appears in the lower or right margin of all sheets. This diagram, which is a miniature of the map, shows the boundaries that occur within the map area, such as county lines and state boundaries.
h. Adjoining Sheets Diagram (8). Maps at all standard scales contain a diagram that illustrates the adjoining sheets. On maps at 1:100,000 and larger scales and at 1:1,000,000 scale, the diagram is called the index to adjoining sheets. It consists of as many rectangles representing adjoining sheets as are necessary to surround the rectangle that represents the sheet under consideration. The diagram usually contains nine rectangles, but the number may vary depending on the locations of the adjoining sheets. All represented sheets are identified by their sheet numbers. Sheets of an adjoining series, whether published or planned, that are at the same scale are represented by dashed lines. The series number of the adjoining series is indicated along the appropriate side of the division line between the series.
i. Elevation Guide (9). This is normally found in the lower right margin. It is a miniature characterization of the terrain shown. The terrain is represented by bands of elevation, spot elevations, and major drainage features. The elevation guide provides the map reader with a means of rapid recognition of major landforms.
j. Declination Diagram (10). This is located in the lower margin of large-scale maps and indicates the angular relationships of true north, grid north, and magnetic north. On maps at 1:250,000 scale, this information is expressed as a note in the lower margin. In recent edition maps, there is a note indicating the conversion of azimuths from grid to magnetic and from magnetic to grid next to the declination diagram.
k. Bar Scales (11). These are located in the center of the lower margin. They are rulers used to convert map distance to ground distance. Maps have three or more bar scales, each in a different unit of measure. Care should be exercised when using the scales, especially in the selection of the unit of measure that is needed.
l. Contour Interval Note (12). This note is found in the center of the lower margin normally below the bar scales. It states the vertical distance between adjacent contour lines of the map. When supplementary contours are used, the interval is indicated. In recent edition maps, the contour interval is given in meters instead of feet.
m. Spheroid Note (13). This note is located in the center of the lower margin. Spheriods (ellipsoids) have specific parameters that define the X Y Z axis of the earth. The spheriod is an integral part of the datum.
n. Grid Note (14). This note is located in the center of the lower margin. It gives information pertaining to the grid system used and the interval between grid lines, and it identifies the UTM grid zone number.
o. Projection Note (15). The projection system is the framework of the map. For military maps, this framework is of the conformal type; that is, small areas of the surface of the earth retain their true shapes on the projection; measured angles closely approximate true values; and

Extract from FM 3-25.26 JAN 05 C 3
SH-2-4
the scale factor is the same in all directions from a point. The projection note is located in the center of the lower margin. Refer to DMA for the development characteristics of the conformal-type projection systems.
(1) Between 80° south and 84° north, maps at scales larger than 1:500,000 are based on the transverse Mercator projection. The note reads TRANSVERSE MERCATOR PROJECTION.
(2) Between 80° south and 84° north, maps at 1:1,000,000 scale and smaller are based on standard parallels of the lambert conformal conic projection. The note reads, for example, LAMBERT CONFORMAL CONIC PROJECTIONS 36° 40' N AND 39° 20' N.
(3) Maps of the polar regions (south of 80° south and north of 84° north) at 1:1,000,000 and larger scales are based on the polar stereographic projection. The note reads POLAR STEREOGRAPHIC PROJECTION.
p. Vertical Datum Note (16). This note is located in the center of the lower margin. The vertical datum or vertical-control datum is defined as any level surface (for example, mean sea level) taken as a surface of reference from which to determine elevations. In the United States, Canada, and Europe, the vertical datum refers to the mean sea level surface. However, in parts of Asia and Africa, the vertical-control datum may vary locally and is based on an assumed elevation that has no connection to any sea level surface. Map readers should habitually check the vertical datum note on maps, particularly if the map is used for low-level aircraft navigation, naval gunfire support, or missile target acquisition.
q. Horizontal Datum Note (17). This note is located in the center of the lower margin. The horizontal datum or horizontal-control datum is defined as a geodetic reference point (of which five quantities are known: latitude, longitude, azimuth of a line from this point, and two constants, which are the parameters of reference ellipsoid). These are the basis for horizontal-control surveys. The horizontal-control datum may extend over a continent or be limited to a small local area. Maps and charts produced by DMA are produced on 32 different horizontal-control data. Map readers should habitually check the horizontal datum note on every map or chart, especially adjacent map sheets. This is to ensure the products are based on the same horizontal datum. If products are based on different horizontal-control data, coordinate transformations to a common datum must be performed. UTM coordinates from the same point computed on different data may differ as much as 900 meters.
r. Control Note (18). This note is located in the center of the lower margin. It indicates the special agencies involved in the control of the technical aspects of all the information that is disseminated on the map.
s. Preparation Note (19). This note is located in the center of the lower margin. It indicates the agency responsible for preparing the map.
t. Printing Note (20). This note is also located in the center of the lower margin. It indicates the agency responsible for printing the map and the date the map was printed. The printing data should not be used to determine when the map information was obtained.
u. Grid Reference Box (21). This box is normally located in the center of the lower margin. It contains instructions for composing a grid reference.
v. Unit imprint and Symbol (22). The unit imprint and symbol is on the left side of the lower margin. It identifies the agency that prepared and printed the map with its respective symbol. This information is important to the map user in evaluating the reliability of the map.

Extract from FM 3-25.26 JAN 05 C 3
SH-2-5
w. Legend (23). The legend is located in the lower left margin. It illustrates and identifies the topographic symbols used to depict some of the more prominent features on the map. The symbols are not always the same on every map. Always refer to the legend to avoid errors when reading a map.
Figure 3-1. Topographical Map

Extract from FM 3-25.26 JAN 05 C 3
SH-2-6
3-2. ADDITIONAL NOTES Not all maps contain the same items of marginal information. Under certain conditions, special notes and scales may be added to aid the map user. The following are examples:
a. Glossary. This is an explanation of technical terms or a translation of terms on maps of foreign areas where the native language is other than English.
b. Classification. Certain maps require a note indicating the security classification. This is shown in the upper and lower margins.
c. Protractor Scale. This scale may appear in the upper margin on some maps. It is used to lay out the magnetic-grid declination for the map, which, in turn, is used to orient the map sheet with the aid of the lensatic compass.
d. Coverage Diagram. On maps at scales of 1:100,000 and larger, a coverage diagram may be used. It is normally in the lower or right margin and indicates the methods by which the map was made, dates of photography, and reliability of the sources. On maps at 1:250,000 scale, the coverage diagram is replaced by a reliability diagram.
e. Special Notes (24). A special note is any statement of general information that relates to the mapped area. It is normally found in the lower right margin. For example: This map is red-light readable.
f. User's Note (25). This note is normally located in the lower right-hand margin. It requests cooperation in correcting errors or omissions on the map. Errors should be marked and the map forwarded to the agency identified in the note.
g. Stock Number Identification (26). All maps published by the DMA that are in the Department of the Army map supply system contain stock number identifications that are used in requisitioning map supplies. The identification consists of the words "STOCK NO" followed by a unique designation that is composed of the series number, the sheet number of the individual map and, on recently printed sheets, the edition number. The designation is limited to 15 units (letters and numbers). The first 5 units are allotted to the series number; when the series number is less than 5 units, the letter "X" is substituted as the fifth unit. The sheet number is the next component; however, Roman numerals, which are part of the sheet number, are converted to Arabic numerals in the stock number. The last 2 units are the edition number; the first digit of the edition number is a zero if the number is less than 10. If the current edition number is unknown, the number 01 is used. The latest available edition will be furnished. Asterisks are placed between the sheet number and the edition number when necessary to ensure there are at least 11 units in the stock number.
h. Conversion Graph (27). Normally found in the right margin, this graph indicates the conversion of different units of measure used on the map.
3-3. TOPOGRAPHIC MAP SYMBOLS The purpose of a map is to permit one to visualize an area of the earth's surface with pertinent
features properly positioned. The map's legend contains the symbols most commonly used in a particular series or on that specific topographic map sheet. Therefore, the legend should be referred to each time a new map is used. Every effort is made to design standard symbols that resemble the features they represent. If this is not possible, symbols are selected that logically imply the features they portray. For example, an open-pit mining operation is represented by a small black drawing of a crossed hammer and pickax.

Extract from FM 3-25.26 JAN 05 C 3
SH-2-7
a. Ideally, all the features within an area would appear on a map in their true proportion, position, and shape. This, however, is not practical because many of the features would be unimportant and others would be unrecognizable because of their reduction in size.
b. The mapmaker has been forced to use symbols to represent the natural and man-made features of the earth's surface. These symbols resemble, as closely as possible, the actual features themselves as viewed from above. They are positioned in such a manner that the center of the symbol remains in its true location. An exception to this would be the position of a feature adjacent to a major road. If the width of the road has been exaggerated, then the feature is moved from its true position to preserve its relation to the road. FM 21-31 gives a description of topographic features and abbreviations authorized for use on our military maps.
3-4. MILITARY SYMBOLS In addition to the topographic symbols used to represent the natural and man-made features of the earth, military personnel require some method for showing identity, size, location, or movement of soldiers; and military activities and installations. The symbols used to represent these military features are known as military symbols. These symbols are not normally printed on maps because the features and units that they represent are constantly moving or changing; military security is also a consideration. They do appear in special maps and overlays (Chapter 7) The map user draws them in, in accordance with proper security precautions. Refer to FM 101-5-1 for complete information on military symbols.
3-5. COLORS USED ON A MILITARY MAP By the fifteenth century, most European maps were carefully colored. Profile drawings of mountains and hills were shown in brown, rivers and lakes in blue, vegetation in green, roads in yellow, and special information in red. A look at the legend of a modern map confirms that the use of colors has not changed much over the past several hundred years. To facilitate the identification of features on a map, the topographical and cultural information is usually printed in different colors. These colors may vary from map to map. On a standard large-scale topographic map, the colors used and the features each represent are:
a. Black. Indicates cultural (man-made) features such as buildings and roads, surveyed spot elevations, and all labels. b. Red-Brown. The colors red and brown are combined to identify cultural features, all relief features, non-surveyed spot elevations, and elevation, such as contour lines on red-light readable maps. c. Blue. Identifies hydrography or water features such as lakes, swamps, rivers, and drainage. d. Green. Identifies vegetation with military significance, such as woods, orchards, and vineyards. e. Brown. Identifies all relief features and elevation, such as contours on older edition maps, and cultivated land on red-light readable maps. f. Red. Classifies cultural features, such as populated areas, main roads, and boundaries, on older maps. g. Other. Occasionally other colors may be used to show special information. These are indicated in the marginal information as a rule.

Extract from FM 3-25.26 JAN 05 C 3
SH-2-8
CHAPTER 4
GRIDS This chapter covers how to determine and report positions on the
ground in terms of their location on a map. Knowing where you are (position fixing)l and being able to communicate that knowledge is crucial to successful and navigation as well as to the effective employment of direct and indirect fire, tactical air support, and medical evacuation. It is essential for valid target acquisition; accurate reporting of NBC contamination and various danger areas; and obtaining emergency resupply. Few factors contribute as much to the survivability of troops and equipment and to the successful accomplish of a mission as always knowing where you are. The chapter includes explanation of geographical coordinates, Universal Transverse Mercator grids, the military grid reference system, and the use of grid coordinates.
4-4. UNITED STATES ARMY MILITARY GRID REFERENCE SYSTEM This grid reference system is designated for use with the UTM and UPS grids. The coordinate value of points I these grids could contain as many as 15 digits if numerals alone were used. The US military grid reference system reduces the length of written coordinates by substituting single letters for several numbers. Using the UTM and the UPS grids, it is possible for the location of a point (identified by numbers alone) to be in many different places on the surface of the earth. With the use of the military grid reference system, there is no possibility of this happening.
a. Grid Zone Designation. The world is divided into 60 grid zones, which are large, regularly shaped geographic areas, each of which is given a unique identification called the grid zone designation.
(1) UTM Grid. The first major breakdown is the division of each zone into area 60 wide by 80 high and 60 wide by 120 high. Remember, for the transverse Mercator projection, the earth's surface between 800S and 840N is divided into 60 N-S zones, each 60 wide. These zones are numbered from west to east, 1 through 60, starting at the 1800 meridian. This surface is divided into 20 each-west rows in which 19 are 80 high and 1 row at the extreme north is 120 high. These rows are then lettered, from south to north, C through X (I and O were omitted). Any 60 by 80 zone or 60 by 120 zone is identified by giving the number and letter of the grid zone and row in which it lies. These are read ?RIGHT and UP so the number is always written before the letter. This combination of zone number and row letter constitutes the grid zone designation. Columbus lies in zone 16 and row S, or in grid zone designation 16S.

Extract from FM 3-25.26 JAN 05 C 3
SH-2-9
(2) UPS Grid. The remaining letters of the alphabet, A, B, Y, and Z, are used for the UPS grids. Each polar area is divided into two zones separated by the 0-1800 meridian. In the south polar area, the letter A is the grid zone designation for the area west of the 0-1800
meridian, and B for the area to the east. In the north polar area, Y is the grid zone designation for the western area and Z for the eastern area (Figure 4-10)
b. 100,000-Meter Square. Between 84°N and 80°S, each 6° by 8° or 6° by 12° zone is covered by 100,000-meter squares that are identified by the combination of two alphabetical letters. This identification is unique within the area covered by the grid zone designation. The first letter is the column designation; the second letter is the row designation (Figure 4-11, page 4-14). The north and south polar areas are also divided into 100,000-meter squares by columns and rows. A detailed discussion of the polar system can be found in Technical Report 8358.1. The 100,000-meter square identification letters are located in the grid reference box in the lower margin of the map.

Extract from FM 3-25.26 JAN 05 C 3
SH-2-10
c. Grid Coordinates. We have now divided the earth's surface into 6° by 8° quadrangles,
and covered these with 100,000-meter squares. The military grid reference of a point consists of the numbers and letters indicating in which of these areas the point lies, plus the coordinates locating the point to the desired position within the 100,000-meter square. The next step is to tie in the coordinates of the point with the larger areas. To do this, you must understand the following.
(1) Grid Lines. The regularly spaced lines that make the UTM and the UPS grid on any large-scale maps are divisions of the 100,000-meter square; the lines are spaced at 10,000-or 1,000-meter intervals (Figure 4-12). Each of these lines is labeled at both ends of the map with its false easting or false northing value, showing its relation to the origin of the zone. Two digits of the values are printed in large type, and these same two digits appear at intervals along the grid lines on the face of the map. These are called the principal digits, and represent the 10,000 and 1,000 digits of the grid value. They are of major importance to the map reader because they are the numbers he will use most often for referencing points. The smaller digits complete the UTM grid designation.

Extract from FM 3-25.26 JAN 05 C 3
SH-2-11
EXAMPLE: The first grid line north of the south-west corner of the Columbus map is labeled 3570000m N. This means its false northing (distance north of the equator) is 3,570,000 meters. The principal digits, 70, identify the line for referencing points in the northerly direction. The smaller digits, 35, are part of the false coordinates and are rarely used. The last three digits, 000, of the value are omitted. Therefore, the first grid line east of the south-west corner is labeled 689000m E. The principal digits, 89, identify the line for referencing points in the easterly direction (Figure 4-13, page 4-16).

Extract from FM 3-25.26 JAN 05 C 3
SH-2-12
(2) Grid Squares. The north-south and east-west grid lines intersect at 90°, forming grid squares. Normally, the size of one of these grid squares on large-scale maps is 1,000 meters (1 kilometer).
(3) Grid Coordinate Scales. The primary tool for plotting grid coordinates is the grid coordinate scale. The grid coordinate scale divides the grid square more accurately than can be done by estimation, and the results are more consistent. When used correctly, it presents less chance for making errors. GTA 5-2-12, 1981, contains four types of coordinate scales (Figure 4-14).

Extract from FM 3-25.26 JAN 05 C 3
SH-2-13
(a) The 1:25,000/1:250,000 (lower right in figure) can be used in two different scale maps, 1:25,000 or 1:250,000. The 1:25,000 scale subdivides the 1,000-meter grid block into 10 major subdivisions, each equal to 100 meters. Each 100-meter block has five graduations, each equal to 20 meters. Points falling between the two graduations can be read accurately by the use of estimation. These values are the fourth and eighth digits of the coordinates. Likewise, the 1:250,000 scale is subdivided in 10 major subdivisions, each equal to 1,000 meters. Each 1,000-meter block has five graduations, each equal to 200 meters. Points falling between two graduations can be read approximately by the use of estimation.
(b) The 1:50,000 scale (upper left in Figure 4-14) subdivides the 1,000-meter block into 10 major subdivisions, each equal to 100 meters. Each 100-meter block is then divided in half. Points falling between the graduations must be estimated to the nearest 10 meters for the fourth and eighth digits of the coordinates.
(c) The 1:100,000 scale (lower left in Figure 4-14) subdivides the 1,000-meter grid block into five major subdivisions of 200 meters each. Each 200-meter block is then divided in half at 100-meter intervals. 4-5. LOCATE A POINT USING GRID COORDINATES Based on the military principle for reading maps (RIGHT and UP), locations on the map can be determined by grid coordinates. The number of digits represents the degree of precision to

Extract from FM 3-25.26 JAN 05 C 3
SH-2-14
to which a point has been located and measured on a mapthe more digits the more precise the measurement.
a. Without a Coordinate Scale. Determine grids without a coordinate scale by referring to the north-south grid lines numbered at the bottom margin of any map. Then read RIGHT to the north-south grid line that precedes the desired point (this first set of two digits is the RIGHT reading). Then by referring to the east-west grid lines numbered at either side of the map, move UP to the east-west grid line that precedes the desired point (these two digits are the UP reading). Coordinate 1484 locate the 1,000-meter grid square in which point X is located; the next square to the right would be 1584; the next square up would be 1485, and so forth (Figure 4-15). Locate the point to the nearest 100 meters using estimation. Mentally divide the grid square in tenths, estimate the distance from the grid line to the point in the same order (RIGHT and UP). Give complete coordinate RIGHT, then complete coordinate UP. Point X is about two-tenths or 200 meters to the RIGHT into the grid square and about seven-tenths or 700 meters UP.
RESULTS: The coordinates to the nearest 100 meters are 142847.
b. With a Coordinate Scale (1:25,000). In order to use the coordinate scale for determining grid coordinates, ensure that the appropriate scale is being used on the corresponding map, and that the scale is right side up. To ensure the scale is correctly aligned, place it with the zero-zero point at the lower left corner of the grid square. Keeping the horizontal line of the scale directly on top of the east-west grid line, slide it to the right until the vertical line of the scale touches the point for which the coordinates are desired (Figure 4-16). When reading coordinates, examine the two sides of the coordinate scale to ensure that the horizontal line of the scale is aligned with the east-west grid line, and the vertical line of the scale is parallel with the north-south grid line. Use the scale when precision of more than 100 meters is required. To locate the point to the nearest 10 meters, measure the hundredths of a grid square RIGHT and UP from the grid lines to the point.

Extract from FM 3-25.26 JAN 05 C 3
SH-2-15
Point X is about 17 hundredths or 170 meters RIGHT and 84 hundredths or 840 meters UP. The coordinates to the nearest 10 meters are 14178484.
NOTE: Care should be exercised by the map reader using the coordinate scale when the
desired point is located within the zero-zero point and the number 1 on the scale. Always prefix a zero if the hundredths reading is less than 10. In Figure 4-17, the desired point is reported as 14818407.

Extract from FM 3-25.26 JAN 05 C 3
SH-2-16
c. 1:50,000 Coordinating Scale. On the 1:50,000 coordinate scale, there are two sides: vertical and horizontal. These sides are 1,000 meters in length. The point at which the sides meet is the zero-zero point. Each side is divided into 10 equal 100-meter segments by a long tick mark and number. Each 100-meter segment is subdivided into 50-meter segments by a short tick mark (Figure 4-18). By using interpolation, mentally divide each 50-meter segment into tenths. For example, a point that lies after a whole number but before a short tick mark is identified as 10, 20, 30, or 40 meters and any point that lies after the short tick mark but before the whole number is identified as 60, 70, 80, or 90 meters.
d. Example of Obtaining an Eight-Digit Coordinate Using 1:50,000 Scale. To ensure
the scale is correctly aligned, place it with the zero-zero point at the lower left corner of the grid square. Keeping the horizontal line of the scale directly on top of the east-west grid line, slide the scale to the right until the vertical line of the scale touches the point for which the coordinates are desired (Figure 4-19, page 4-21). Reading right, you can see that the point lies 530 meters to the right into the grid square, which gives a right reading of 7853. Reading up, you can see that the point lies 320 meters up into the grid square, giving an up reading of 0032.

Extract from FM 3-25.26 JAN 05 C 3
SH-2-17
e. Recording and Reporting Grid Coordinates. Coordinates are written as one continuous
number without spaces, parentheses, dashes, or decimal points; they must always contain an even number of digits. Therefore, whoever is to use the written coordinates must know where to make the split between the RIGHT and UP readings. It is a military requirement that the 100,000-meter square identification letters be included in any point designation. Normally, grid coordinates are determined to the nearest 100 meters (six digits) for reporting locations. With practice, this can be done without using plotting scales. The location of targets and other point locations for fire support are determined to the nearest 10 meters (eight digits).
NOTE: Special care should be exercised when recording and reporting coordinates.
Transposing numbers or making errors could be detrimental to military operations. 4-6. LOCATE A POINT USING THE US ARMY MILITARY
GRID REFERENCE SYSTEM There is only one rule to remember when reading or reporting grid coordinatesalways read to the RIGHT and then UP. The first half of the reported set of coordinate digits represents the left-to-right (easting) grid label, and the second half represents the label as read from the

Extract from FM 3-25.26 JAN 05 C 3
SH-2-18
bottom to top (northing). The grid coordinates may represent the location to the nearest 10-,100-, or 1,000-meter increment.
a. Grid Zone. The number 16 locates a point within zone 16, which is an area 6° wide and extends between 80°S latitude and 84°N latitude (Figure 4-8, page 4-11).
b. Grid Zone Designation. The number and letter combination, 16S, further locates a point within the grid zone designation 16S, which is a quadrangle 6° wide by 8° high. There are 19 of these quads in zone 16. Quad X, which is located between 72°N and 84°N latitude, is 12° high (Figure 4-8, page 4-11).
c. 100,000-Meter Square Identification. The addition of two more letters locates a point within the 100,000-meter grid square. Thus 16SGL (Figure 4-11, page 4-14) locates the point within the 100,000-meter square GL in the grid zone designation 16S. For information on the lettering system of 100,000-meter squares, see TM 5-241-1.
d. 10,000-Meter Square. The breakdown of the US Army military grid reference system continues as each side of the 100,000-meter square is divided into 10 equal parts. This division produces lines that are 10,000 meters apart. Thus the coordinates 16SGL08 would locate a point as shown in Figure 4-20. The 10,000-meter grid lines appear as index (heavier) grid lines on maps at 1:100,000 and larger.

Extract from FM 3-25.26 JAN 05 C 3
SH-2-19
e. 1,000-Meter Square. To obtain 1,000-meter squares, each side of the 10,000-meter square is divided into 10 equal parts. This division appears on large-scale maps as the actual grid lines; they are 1,000 meters apart. On the Columbus map, using coordinates 16SGL0182, the easting 01 and the northing 82 gives the location of the southwest corner of grid square 0182 or to the nearest 1,000 meters of a point on the map (Figure 4-21).
f. 100-Meter Identification. To locate to the nearest 100 meters, the grid coordinate
scale can be used to divide the 1,000-meter grid squares into 10 equal parts (Figure 4-22, page 4-24).
g. 10-Meter Identification. The grid coordinate scale has divisions every 50 meters on the 1:50,000 scale and every 20 meters on the 1:25,000 scale. These can be used to estimate to the nearest 10 meters and give the location of one point on the earth's surface to the nearest 10 meters.

Extract from FM 3-25.26 JAN 05 C 3
SH-2-20
EXAMPLE: 16SGL01948253 (gas tank) (Figure 4-22).
h. Precision. The precision of a point's location is shown by the number of digits in the coordinates; the more digits, the more precise the location (Figure 4-22, insert).
4-7. GRID REFERENCE BOX A grid reference box (Figure 4-23) appears in the marginal information of each map sheet. It contains step-by-step instructions for using the grid and the US Army military grid reference system. The grid reference box is divided into two parts.
a. The left portion identifies the grid zone designation and the 100,000-meter square. If the sheet falls in more than one 100,000-meter square, the grid lines that separate the squares are shown in the diagram and the letters identifying the 100,000-meter squares are given.
EXAMPLE: On the Columbus map sheet, the vertical line labeled 00 is the grid line that
separates the two 100,000-meter squares, FL and GL. The left portion also shows a sample for the 1,000-meter square with its respective labeled grid coordinate numbers and a sample point within the 1,000-meter square.
b. The right portion of the grid reference box explains how to use the grid and is keyed on
the sample 1,000-meter square of the left side. The following is an example of the military grid reference: EXAMPLE: 16S locates the 6° by 8° area (grid zone designation).

Extract from FM 3-25.26 JAN 05 C 3
SH-2-21
4-8. OTHER GRID SYSTEMS The military grid reference system is not universally used. Soldiers must be prepared to interpret and use other grid systems, depending on the area of operations or the personnel the soldiers are operating with.
a. British Grids. In a few areas of the world, British grids are still shown on military maps. However, the British grid systems are being phased out. Eventually all military mapping will be converted to the UTM grid.
b. World Geographic Reference System (GEOREF). This system is a worldwide position reference system used primarily by the US Air Force. It may be used with any map or chart that has latitude and longitude printed on it. Instructions for using GEOREF data are printed in blue and are found in the margin of aeronautical charts (Figure 4-24, page 4-26). This system is based upon a division of the earth's surface into quadrangles of latitude and longitude having a systematic identification code. It is a method of expressing latitude and longitude in a form suitable for rapid reporting and plotting. Figure 4-24 illustrates a sample grid reference box using GEOREF. The GEOREF system uses an identification code that has three main divisions.

Extract from FM 3-25.26 JAN 05 C 3
SH-2-22
CHAPTER 5
SCALE AND DISTANCE
A map is a scaled graphic representation of a portion of the earth's surface. The scale of the map permits the user to convert distance on the map to distance on the ground or vice versa. The ability to determine distance on a map, as well as on the earth's surface, is an important factor in planning and executing military missions.
5-1. REPRESENTATIVE FRACTION The numerical scale of a map indicates the relationship of distance measured on a map and the corresponding distance on the ground. This scale is usually written as a fraction and is called the representative fraction. The RF is always written with the map distance as 1 and is independent of any unit of measure. (It could be yards, meters, inches, and so forth.) An RF of 1/50,000 or 1:50,000 means that one unit of measure on the map is equal to 50,000 units of the same measure on the ground.
a. The ground distance between two points is determined by measuring between the same two points on the map and then multiplying the map measurement by the denominator of the RF or scale (Figure 5-1, page 5-2).
EXAMPLE: The map scale is 1:50,000 RF = 1/50,000 The map distance from point A to point B is 5 units 5 x 50,000 = 250,000 units of ground distance b. Since the distance on most maps is marked in meters and the RF is expressed in this
unit of measurement in most cases, a brief description of the metric system is needed. In the metric system, the standard unit of measurement is the meter.
1 meter contains 100 centimeters (cm). 100 meters is a regular football field plus 10 meters. 1,000 meters is 1 kilometer (km). 10 kilometers is 10,000 meters.
Appendix C contains the conversion tables. c. The situation may arise when a map or sketch has no RF or scale. To be able to
determine ground distance on such a map, the RF must be determined. There are two ways to do this:
(1) Comparison with Ground Distance. (a) Measure the distance between two points on the map—map distance (MD). (b) Determine the horizontal distance between these same two points on the ground—
ground distance (GD). (c) Use the RF formula and remember that RF must be in the general form: RF = 1 = MD
X GD

Extract from FM 3-25.26 JAN 05 C 3
SH-2-23
(d) Both the MD and the GD must be in the same unit of measure and the MD must be reduced to 1. EXAMPLE:
MD = 4.32 centimeters GD = 2.16 kilometers (216,000 centimeters)
RF = 1 = 4.32
X 216,000
or
216,000 = 50,000
4.32 therefore RF = 1 or 1:50,000
50,000 (2) Comparison With Another Map of the Same Area that Has an RF. (a) Select two points on the map with the unknown RF. Measure the distance (MD)
between them. (b) Locate those same two points on the map that have the known RF. Measure the
distance (MD) between them. Using the RF for this map, determine GD, which is the same for both maps.
(c) Using the GD and the MD from the first map, determine the RF using the formula:
RF = 1 = MD
X GD

Extract from FM 3-25.26 JAN 05 C 3
SH-2-24
d. Occasionally it may be necessary to determine map distance from a known ground distance and the RF:
MD = GD
Denominator or RF Ground Distance = 2,200 meters RF = 1:50,000 MD = 2,200 meters
50,000 MD = 0.044 meters x 100 (centimeters per meter) MD = 4.4 centimeters
e. When determining ground distance from a map, the scale of the map affects the accuracy. As the scale becomes smaller, the accuracy of measurement decreases because some of the features on the map must be exaggerated so that they may be readily identified. 5-2. GRAPHIC (BAR) SCALES A graphic scale is a ruler printed on the map and is used to convert distances on the map to actual ground distances. The graphic scale is divided into two parts. To the right of the zero, the scale is marked in full units of measure and is called the primary scale. To the left of the zero, the scale is divided into tenths and is called the extension scale. Most maps have three or more graphic scales, each using a different unit of measure (Figure 5-2). When using the graphic scale, be sure to use the correct scale for the unit of measure desired.
Extract from FM 3-25.26 JAN 05 C 3
SH-2-25
a. To determine straight-line distance between two points on a map, lay a straight-edged piece of paper on the map so that the edge of the paper touches both points and extends past them. Make a tick mark on the edge of the paper at each point (Figure 5-3).
b. To convert the map distance to ground distance, move the paper down to the graphic
bar scale, and align the right tick mark (b) with a printed number in the primary scale so that the left tick mark (a) is in the extension scale (Figure 5-4).

Extract from FM 3-25.26 JAN 05 C 3
SH-2-26
c. The right tick mark (b) is aligned with the 3,000-meter mark in the primary scale,
thus the distance is at least 3,000 meters. To determine the distance between the two points to the nearest 10 meters, look at the extension scale. The extension scale is numbered with zero at the right and increases to the left. When using the extension scale, always read right to left (Figure 5-4). From the zero left to the beginning of the first shaded area is 100 meters. From the beginning of the shaded square to the end of the shaded square is 100 to 200 meters. From the end of the first shaded square to the beginning of the second shaded square is 200 to 300 meters. Remember, the distance in the extension scale increases from right to left.
d. To determine the distance from the zero to tick mark (a), divide the distance inside the squares into tenths (Figure 5-4). As you break down the distance between the squares in the extension scale into tenths, you will see that tick mark (a) is aligned with the 950-meter mark. Adding the distance of 3,000 meters determined in the primary scale to the 950 meters you determined by using the extension scale, we find that the total distance between points (a) and (b) is 3,950 meters.
e. To measure distance along a road, stream, or other curved line, the straight edge of a piece of paper is used. In order to avoid confusion concerning the point to begin measuring from and the ending point, an eight-digit coordinate should be given for both the starting and ending points. Place a tick mark on the paper and map at the beginning point from which the curved line is to be measured. Align the edge of the paper along a straight portion and make a tick mark on both map and paper when the edge of the paper leaves the straight portion of the line being measured (Figure 5-5A, page 5-7).

Extract from FM 3-25.26 JAN 05 C 3
SH-2-27
f. Keeping both tick marks together (on paper and map), place the point of the pencil close to the edge of the paper on the tick mark to hold it in place and pivot the paper until another straight portion of the curved line is aligned with the edge of the paper. Continue in this manner until the measurement is completed (Figure 5-5B, page 5-7).
g. When you have completed measuring the distance, move the paper to the graphic scale to determine the ground distance. The only tick marks you will be measuring the distance between are tick marks (a) and (b). The tick marks in between are not used (Figure 5-5C, page 5-7).
h. There may be times when the distance you measure on the edge of the paper exceeds the graphic scale. In this case, there are different techniques you can use to determine the distance.
(1) One technique is to align the right tick mark (b) with a printed number in the primary scale, in this case the 5. You can see that from point (a) to point (b) is more than 6,000 meters when you add the 1,000 meters in the extension scale. To determine the exact distance to the nearest 10 meters, place a tick mark (c) on the edge of the paper at the end of the extension scale (Figure 5-6A, page 5-8). You know that from point (b) to point (c) is 6,000 meters. With the tick mark (c) placed on the edge of the paper at the end of the extension scale, slide the paper to the right. Remember the distance in the extension is always read from right to left. Align tick mark (c) with zero and then measure the distance between tick marks (a) and (c). The distance between tick marks (a) and (c) is 420 meters. The total ground distance between start and finish points is 6,420 meters (Figure 5-6B, page 5-8).

Extract from FM 3-25.26 JAN 05 C 3
SH-2-28
Figure 5-5. Measuring a curved line.

Extract from FM 3-25.26 JAN 05 C 3
SH-2-29
(2) Another technique that may be used to determine exact distance between two points when the edge of the paper exceeds the bar scale is to slide the edge of the paper to the right until tick mark (a) is aligned with the edge of the extension scale. Make a tick mark on the paper, in line with the 2,000-meter mark (c) (Figure 5-7A). Then slide the edge of the paper to the left until tick mark (b) is aligned with the zero. Estimate the 100-meter increments into 10-meter increments to determine how many meters tick mark (c) is from the zero line (Figure 5-7B). The total distance would be 3,030 meters.
(3) At times you may want to know the distance from a point on the map to a point off the map. In order to do this, measure the distance from the start point to the edge of the map. The marginal notes give the road distance from the edge of the map to some towns, highways, or junctions off the map. To determine the total distance, add the distance measured on the map to the distance given in the marginal notes. Be sure the unit of measure is the same.
(4) When measuring distance in statute or nautical miles, round it off to the nearest one tenth of a mile and make sure the appropriate bar scale is used.
(5) Distance measured on a map does not take into consideration the rise and fall of the land. All distances measured by using the map and graphic scales are flat distances. Therefore, the distance measured on a map will increase when actually measured on the ground. This must be taken into consideration when navigating across country.

Extract from FM 3-25.26 JAN 05 C 3
SH-2-30
i. The amount of time required to travel a certain distance on the ground is an important
factor in most military operations. This can be determined if a map of the area is available and a graphic time-distance scale is constructed for use with the map as follows:
R = Rate of travel (speed) T = Time
D = Distance (ground distance) T = D
R For example, if an infantry unit is marching at an average rate (R) of 4 kilometers per
hour, it will take about 3 hours (T) to travel 12 kilometers.
12 (D) = 3 (T)
4 (R) j. To construct a time-distance scale (Figure 5-8A), knowing your length of march, rate
of speed, and map scale, that is, 12 kilometers at 3 kilometers per hour on a 1:50,000-scale map, use the following process:
(1) Mark off the total distance on a line by referring to the graphic scale of the map or, if this is impracticable, compute the length of the line as follows:

Extract from FM 3-25.26 JAN 05 C 3
SH-2-31
(a) Convert the ground distance to centimeters: 12 kilometers x 100,000 (centimeters per kilometer) = 1,200,000 centimeters.
(b) Find the length of the line to represent the distance at map scale—
MD = 1 = 1,200,000 = 24 centimeters
50,000 50,000 (c) Construct a line 24 centimeters in length (Figure 5-8A). (2) Divide the line by the rate of march into three parts (Figure 5-8B), each part representing the distance traveled in one hour, and label. (3) Divide the scale extension (left portion) into the desired number of lesser time divisions—
1-minute divisions — 60 5-minute divisions — 12 10-minute divisions — 6
(4) Figure 5-8C shows a 5-minute interval scale. Make these divisions in the same
manner as for a graphic scale. The completed scale makes it possible to determine where the unit will be at any given time. However, it must be remembered that this scale is for one specific rate of march only, 4 kilometers per hour.

Extract from FM 3-25.26 JAN 05 C 3
SH-2-32
CHAPTER 6
DIRECTION
Being in the right place at the prescribed time is necessary to successfully accomplish military missions. Direction plays an important role in a soldier's everyday life. It can be expressed as right, left, straight ahead, and so forth; but then the question arises, "To the right of what?" This chapter defines the word azimuth and the three different norths. It explains in detail how to determine the grid and the magnetic azimuths with the use of the protractor and the compass. It explains the use of some field-expedient methods to find directions, the declination diagram, and the conversion of azimuths from grid to magnetic and vice versa. It also includes some advanced aspects of map reading, such as intersection, resection, modified resection, and polar plots.
6-1. METHODS OF EXPRESSING DIRECTION Military personnel need a way of expressing direction that is accurate, is adaptable to any part of the world, and has a common unit of measure. Directions are expressed as units of angular measure.
a. Degree. The most common unit of measure is the degree (°) with its subdivisions of minutes (') and seconds (").
1 degree = 60 minutes. 1 minute = 60 seconds. b. Mil. Another unit of measure, the mil (abbreviated m/ ), is used mainly in artillery,
tank, and mortar gunnery. The mil expresses the size of an angle formed when a circle is divided into 6,400 angles, with the vertex of the angles at the center of the circle. A relationship can be established between degrees and mils. A circle equals 6400 mils divided by 360 degrees, or 17.78 mils per degree. To convert degrees to mils, multiply degrees by 17.78.
c. Grad. The grad is a metric unit of measure found on some foreign maps. There are 400 grads in a circle (a 90-degree right angle equals 100 grads). The grad is divided into 100 centesimal minutes (centigrads) and the minute into 100 centesimal seconds (milligrads). 6-2. BASE LINES In order to measure something, there must always be a starting point or zero measurement. To express direction as a unit of angular measure, there must be a starting point or zero measure and a point of reference These two points designate the base or reference line. There are three base linestrue north, magnetic north, and grid north. The most commonly used are magnetic and grid.
a. True North. A line from any point on the earth's surface to the north pole. All lines of longitude are true north lines. True north is usually represented by a star (Figure 6-1, page 6-2).
b. Magnetic North. The direction to the north magnetic pole, as indicated by the northseeking needle of a magnetic instrument. The magnetic north is usually symbolized by

Extract from FM 3-25.26 JAN 05 C 3
SH-2-33
a line ending with half of an arrowhead (Figure 6-1). Magnetic readings are obtained with magnetic instruments, such as lensatic and M2 compasses.
c. Grid North. The north that is established by using the vertical grid lines on the map.
Grid north may be symbolized by the letters GN or the letter “y” (Figure 6-1).
6-3. AZIMUTHS An azimuth is defined as a horizontal angle measured clockwise from a north base line. This north base line could be true north, magnetic north, or grid north. The azimuth is the most common military method to express direction. When using an azimuth, the point from which the azimuth originates is the center of an imaginary circle (Figure 6-2). This circle is divided into 360 degrees or 6400 mils (Appendix G).

Extract from FM 3-25.26 JAN 05 C 3
SH-2-34
a. Back Azimuth. A back azimuth is the opposite direction of an azimuth. It is comparable to doing “about face.” To obtain a back azimuth from an azimuth, add 180 degrees if the azimuth is 180 degrees or less, or subtract 180 degrees if the azimuth is 180 degrees or more (Figure 6-3). The back azimuth of 180 degrees may be stated as 0 degrees or 360 degrees. For mils, if the azimuth is less than 3200 mils, add 3200 mils, if the azimuth is more than 3200 mils, subtract 3200 mils.
WARNING
When converting azimuths into back azimuths, extreme care should be exercised when adding or subtracting the 180 degrees. A simple mathematical mistake could cause disqastrous consequences.
b. Magnetic Azimuth. The magnetic azimuth is determined by using magnetic
instruments, such as lensatic and M2 compasses. Refer to Chapter 9, paragraph 4, for details.
c. Field-Expedient Methods. Several field-expedient methods to determine direction are discussed in Chapter 9, paragraph 5.
6-4. GRID AZIMUTHS When an azimuth is plotted on a map between point A (starting point) and point B
(ending point), the points are joined together by a straight line. A protractor is used to measure the angle between grid north and the drawn line, and this measured azimuth is the grid azimuth (Figure 6-4).
WARNING
When measuring azimuths on a map, remember that you are measuring from a starting point to an ending point. If a mistake is made and the reading is taken from then ending point, the grid azimuth will be opposite, thus causing the used to go in the wrong direction
Example: Azimuth + Back Azimuth 115O + 180O = 295O 337O - 180O = 157O
90O270O
0O or 360O
180O
Back Azimuth
180O
115O
295O

Extract from FM 3-25.26 JAN 05 C 3
SH-2-35
Figure 6-4. Measure an azimuth 6-5. PROTRACTOR There are several types of protractors—full circle, half circle, square, and rectangular (Figure 6-5). All of them divide the circle into units of angular measure, and each has a scale around the outer edge and an index mark. The index mark is the center of the protractor circle from which all directions are measured.

Extract from FM 3-25.26 JAN 05 C 3
SH-2-36
a. The military protractor, GTA 5-2-12, contains two scales: one in degrees (inner
scale) and one in mils (outer scale). This protractor represents the azimuth circle. The degree scale is graduated from 0 to 360 degrees; each tick mark on the degree scale represents one degree. A line from 0 to 180 degrees is called the base line of the protractor. Where the base line intersects the horizontal line, between 90 and 270 degrees, is the index or center of the protractor (Figure 6-6).

Extract from FM 3-25.26 JAN 05 C 3
SH-2-37
Figure 6-6. Military protractor
b. When using the protractor, the base line is always oriented parallel to a north-south grid line. The 0- or 360-degree mark is always toward the top or north on the map and the 90° mark is to the right.
(1) To determine the grid azimuth— (a) Draw a line connecting the two points (A and B). (b) Place the index of the protractor at the point where the drawn line crosses a vertical
(north-south) grid line. (c) Keeping the index at this point, align the 0- to 180-degree line of the protractor on
the vertical grid line. (d) Read the value of the angle from the scale; this is the grid azimuth from point A to
point B (Figure 6-4). (2) To plot an azimuth from a known point on a map (Figure 6-7)— (a) Convert the azimuth from magnetic to grid, if necessary. (See paragraph 6-6.) (b) Place the protractor on the map with the index mark at the center of mass of the
known point and the base line parallel to a north-south grid line. (c) Make a mark on the map at the desired azimuth. (d) Remove the protractor and draw a line connecting the known point and the mark on
the map. This is the grid direction line (azimuth). NOTE: When measuring an azimuth, the reading is always to the nearest degree or 10
mils. Distance does not change an accurately measured azimuth.

Extract from FM 3-25.26 JAN 05 C 3
SH-2-38
c. To obtain an accurate reading with the protractor (to the nearest degree or 10 mils),
there are two techniques to check that the base line of the protractor is parallel to a northsouth grid line.
(1) Place the protractor index where the azimuth line cuts a north-south grid line, aligning the base line of the protractor directly over the intersection of the azimuth line with the northsouth grid line. The user should be able to determine whether the initial azimuth reading was correct.
(2) The user should re-read the azimuth between the azimuth and north-south grid line to check the initial azimuth.
(3) Note that the protractor is cut at both the top and bottom by the same north-south grid line. Count the number of degrees from the 0-degree mark at the top of the protractor to this north-south grid line and then count the number of degrees from the 180-degree mark at the bottom of the protractor to this same grid line. If the two counts are equal, the protractor is properly aligned.
6-6. DECLINATION DIAGRAM Declination is the angular difference between any two norths. If you have a map and a
compass, the one of most interest to you will be between magnetic and grid north. The declination diagram (Figure 6-8) shows the angular relationship, represented by prongs, among grid, magnetic, and true norths. While the relative positions of the prongs are correct, they are seldom plotted to scale. Do not use the diagram to measure a numerical value. This

Extract from FM 3-25.26 JAN 05 C 3
SH-2-39
value will be written in the map margin (in both degrees and mils) beside the diagram. a. Location. A declination diagram is a part of the information in the lower margin on
most larger maps. On medium-scale maps, the declination information is shown by a note in the map margin.
b. Grid-Magnetic Angle. The G-M angle value is the angular size that exists between grid north and magnetic north. It is an arc, indicated by a dashed line, that connects the gridnorth and magnetic-north prongs. This value is expressed to the nearest 1/2 degree, with mil equivalents shown to the nearest 10 mils. The G-M angle is important to the map reader/land navigator because azimuths translated between map and ground will be in error by the size of the declination angle if not adjusted for it.
c. Grid Convergence. An arc indicated by a dashed line connects the prongs for true north and grid north. The value of the angle for the center of the sheet is given to the nearest full minute with its equivalent to the nearest mil. These data are shown in the form of a gridconvergence note.
d. Conversion. There is an angular difference between the grid north and the magnetic north. Since the location of magnetic north does not correspond exactly with the grid-north lines on the maps, a conversion from magnetic to grid or vice versa is needed.
(1) With Notes. Simply refer to the conversion notes that appear in conjunction with the diagram explaining the use of the G-M angle (Figure 6-8). One note provides instructions for converting magnetic azimuth to grid azimuth; the other, for converting grid azimuth to magnetic azimuth. The conversion (add or subtract) is governed by the direction of the magnetic-north prong relative to that of the north-grid prong.
GN
Magnetic N
orth
Grid N
orth
True North
1960 G-M ANGLE5O (90 MILS)
GN
Magnetic N
orth
Grid N
orthT rue North
GN
Magnetic N
orth
Grid N
orth True North
--
-- --
--
----
1960 G-M ANGLE7 1/2O (130 MILS)
1960 G-M ANGLE8O (140 MILS)
TO CONVERT AMAGNETIC AZIMUTH
TO GRID AZIMUTHADD G-M ANGLE
TO CONVERT AMAGNETIC AZIMUTH
TO GRID AZIMUTHSUBTRACT G-M ANGLE
TO CONVERT AMAGNETIC AZIMUTH
TO GRID AZIMUTHSUBTRACT G-M ANGLE
TO CONVERT AGRID AZIMUTH TO A MAGNETIC AZIMUTH
ADD G-M ANGLE
TO CONVERT AGRID AZIMUTH TO A MAGNETIC AZIMUTH
ADD G-M ANGLE
TO CONVERT AGRID AZIMUTH TO A MAGNETIC AZIMUTH
SUBTRACT G-M ANGLE
GRID CONVERGENCE1O 19’ (23 MILS)
FOR CENTER OF SHEET
GRID CONVERGENCE2O 26’ (43 MILS)
FOR CENTER OF SHEET
GRID CONVERGENCE1O 24’ (25 MILS)
FOR CENTER OF SHEET
Figure 6-8. Declination diagrams.
(2) Without Notes. In some cases, there are no declination conversion notes on the margin of the map; it is necessary to convert from one type of declination to another. A magnetic compass gives a magnetic azimuth; but in order to plot this line on a gridded map, the magnetic azimuth value must be changed to grid azimuth. The declination diagram is used for these conversions. A rule to remember when solving such problems is this:

Extract from FM 3-25.26 JAN 05 C 3
SH-2-40
No matter where the azimuth line points, the angle to it is always measured clockwise from the reference direction (base line). With this in mind, the problem is solved by the following steps:
(a) Draw a vertical or grid-north line (prong). Always align this line with the vertical lines on a map (Figure 6-9).
(b) From the base of the grid-north line (prong), draw an arbitrary line (or any azimuth
line) at a roughly right angle to north, regardless of the actual value of the azimuth in degrees (Figure 6-9).
(c) Examine the declination diagram on the map and determine the direction of the magnetic north (right-left or east-west) relative to that of the grid-north prong. Draw a magnetic prong from the apex of the grid-north line in the desired direction (Figure 6-9).
(d) Determine the value of the G-M angle. Draw an arc from the grid prong to the magnetic prong and place the value of the G-M angle (Figure 6-9).
(e) Complete the diagram by drawing an arc from each reference line to the arbitrary line. A glance at the completed diagram shows whether the given azimuth or the desired azimuth is greater, and thus whether the known difference between the two must be added or subtracted.
(f) The inclusion of the true-north prong in relationship to the conversion is of little importance.
e. Applications. Remember, there are no negative azimuths on the azimuth circle. Since 0 degree is the same as 360 degrees, then 2 degrees is the same as 362 degrees. This is because 2 degrees and 362 degrees are located at the same point on the azimuth circle. The grid azimuth can now be converted into a magnetic azimuth because the grid azimuth is now larger than the G-M angle.
(1) When working with a map having an east G-M angle:

Extract from FM 3-25.26 JAN 05 C 3
SH-2-41
(a) To plot a magnetic azimuth on a map, first change it to a grid azimuth (Figure 6-10).
(b) To use a magnetic azimuth in the field with a compass, first change the grid azimuth plotted on a map to a magnetic azimuth (Figure 6-11).

Extract from FM 3-25.26 JAN 05 C 3
SH-2-42
(c) Convert a grid azimuth to a magnetic azimuth when the G-M angle is greater than a grid azimuth (Figure 6-12).
(2) When working with a map having a west G-M angle: (a) To plot a magnetic azimuth on a map, first convert it to a grid azimuth (Figure 6-13).

Extract from FM 3-25.26 JAN 05 C 3
SH-2-43
(b) To use a magnetic azimuth in the field with a compass, change the grid azimuth plotted on a map to a magnetic azimuth (Figure 6-14).
(c) Convert a magnetic azimuth when the G-M angle is greater than the magnetic
azimuth (Figure 6-15).

Extract from FM 3-25.26 JAN 05 C 3
SH-2-44
(3) The G-M angle diagram should be constructed and used each time the conversion of azimuth is required. Such procedure is important when working with a map for the first time. It also may be convenient to construct a G-M angle conversion table on the margin of the map.
NOTE: When converting azimuths, exercise extreme care when adding and subtracting
the G-M angle. A simple mistake of 1° could be significant in the field.
6-7. INTERSECTION Intersection is the location of an unknown point by successively occupying at least two (preferably three) known positions on the ground and then map sighting on the unknown location. It is used to locate distant or inaccessible points or objects such as enemy targets and danger areas. There are two methods of intersection: the map and compass method and the straightedge method (Figures 6-16 and 6-17 on pages 6-14 and 6-15).
a. When using the map and compass method (1) Orient the map using the compass. (2) Locate and mark your position on the map, (3) Determine the magnetic azimuth to the unknown position using the compass. (4) Convert the magnetic azimuth to grid azimuth. (5) Draw a line on the map from your position on this grid azimuth. (6) Move to a second known point and repeat steps 1, 2, 3, 4, and 5. (7) The location of the unknown position is where the lines cross on the map. Determine
the grid coordinates to the desired accuracy. b. The straight edge method is used when a compass is not available. When using it— (1) Orient the map on a flat surface by the terrain association method. (2) Locate and mark your position on the map. (3) Lay a straight edge on the map with one end at the user’s position (A) as a pivot
point; then, rotate the straightedge until the unknown point is sighted along the edge. (4) Draw a line along the straight edge (5) Repeat the above steps at position (B) and check for accuracy.

Extract from FM 3-25.26 JAN 05 C 3
SH-2-45

Extract from FM 3-25.26 JAN 05 C 3
SH-2-46
(6) The intersection of the lines on the map is the location of the unknown point (C). Determine the grid coordinates to the desired accuracy (Figure 6-17).
6-8. RESECTION Resection is the method of locating one's position on a map by determining the grid
azimuth to at least two well-defined locations that can be pinpointed on the map. For greater accuracy, the desired method of resection would be to use three or more well-defined locations.
a. When using the map and compass method (Figure 6-18)— (1) Orient the map using the compass. (2) Identify two or three known distant locations on the ground and mark them on the
map. (3) Measure the magnetic azimuth to one of the known positions from your location
using a compass. (4) Convert the magnetic azimuth to a grid azimuth. (5) Convert the grid azimuth to a back azimuth. Using a protractor, draw a line for the
back azimuth on the map from the known position back toward your unknown position. (6) Repeat 3, 4, and 5 for a second position and a third position, if desired.
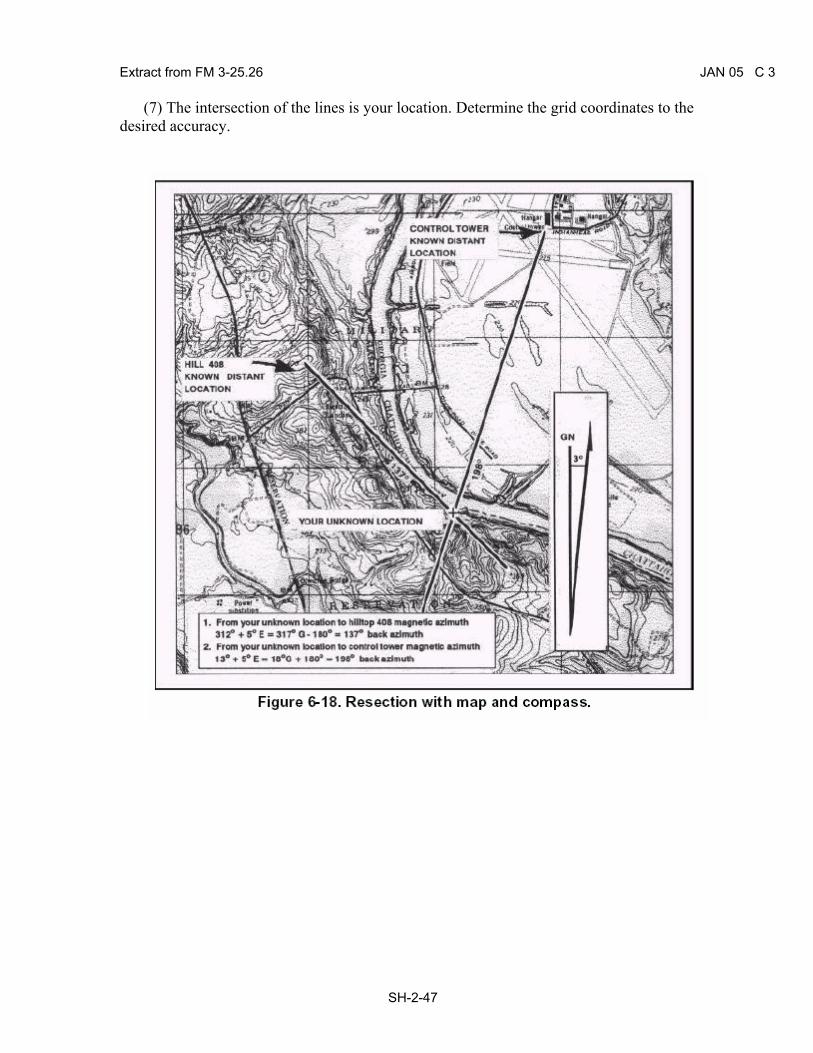
Extract from FM 3-25.26 JAN 05 C 3
SH-2-47
(7) The intersection of the lines is your location. Determine the grid coordinates to the desired accuracy.

Extract from FM 3-25.26 JAN 05 C 3
SH-2-48
a. When using the straightedge method (Figure 6-19)— (1) Orient the map on a flat surface by the terrain association method. (2) Locate at least two known distant locations or prominent features on the ground and
mark them on the map. (3) Lay a straightedge on the map using a known position as a pivot point. Rotate the
straightedge until the known position on the map is aligned with the known position on the ground.
(4) Draw a line along the straightedge away from the known position on the ground toward your position.
(5) Repeat 3 and 4 using a second known position. (6) The intersection of the lines on the map is your location. Determine the grid
coordinates to the desired accuracy.

Extract from FM 3-25.26 JAN 05 C 3
SH-2-49
6-9. MODIFIED RESECTION Modified resection is the method of locating one's position on the map when the person is located on a linear feature on the ground, such as a road, canal, or stream (Figure 6-20). Proceed as follows:
a. Orient the map using a compass or by terrain association. b. Find a distant point that can be identified on the ground and on the map. c. Determine the magnetic azimuth from your location to the distant known point. d. Convert the magnetic azimuth to a grid azimuth. e. Convert the grid azimuth to a back azimuth. Using a protractor, draw a line for the
back azimuth on the map from the known position back toward your unknown position. f. The location of the user is where the line crosses the linear feature. Determine the
grid coordinates to the desired accuracy.

Extract from FM 3-25.26 JAN 05 C 3
SH-2-50
6-10. POLAR COORDINATES A method of locating or plotting an unknown position from a known point by giving a direction and a distance along that direction line is called polar coordinates. The following elements must be present when using polar coordinates (Figure 6-21).
• Present known location on the map. • Azimuth (grid or magnetic). • Distance (in meters).
Using the laser range finder to determine the range enhances your accuracy in determining the unknown position's location.

This page intentionally left blank

Extract from FM 3-25.26 JAN 05 C 3
SH-2-51
PART TWO LAND NAVIGATION
CHAPTER 9
NAVIGATION EQUIPMENT AND METHODS
Compasses are the primary navigation tools to use when moving in an outdoor world where there is no other way to find directions. Soldiers should be thoroughly familiar with the compass and its uses. Part One of this manual discussed the techniques of map reading. To complement these techniques, a mastery of field movement techniques is essential. This chapter describes the lensatic compass and its uses, and some of the field expedient methods used to find directions when compasses are not available.
9-1. TYPES OF COMPASSES The lensatic compass is the most common and simplest instrument for measuring direction. It is discussed in detail in paragraph 9-2. The artillery M2 compass is a special-purpose instrument designed for accuracy; it will be discussed in Appendix G. The wrist/pocket compass is a small magnetic compass that can be attached to a wristwatch band. It contains a north-seeking arrow and a dial in degrees. A protractor can be used to determine azimuths when a compass is not available. However, it should be noted that when using the protractor on a map, only grid azimuths are obtained. 9-2. LENSATIC COMPASS The lensatic compass (Figure 9-1) consists of three major parts: the cover, the base, and the lens.

Extract from FM 3-25.26 JAN 05 C 3
SH-2-52
a. Cover. The compass cover protects the floating dial. It contains the sighting wire (front sight) and two luminous sighting slots or dots used for night navigation.
b. Base. The body of the compass contains the following movable parts: (1) The floating dial is mounted on a pivot so it can rotate freely when the compass is
held level. Printed on the dial in luminous figures are an arrow and the letters E and W. The arrow always points to magnetic north and the letters fall at east (E) 90° and west (W) 270° on the dial. There are two scales; the outer scale denotes mils and the inner scale (normally in red) denotes degrees.
(2) Encasing the floating dial is a glass containing a fixed black index line. (3) The bezel ring is a ratchet device that clicks when turned. It contains 120 clicks
when rotated fully; each click is equal to 3°. A short luminous line that is used in conjunction with the north-seeking arrow during navigation is contained in the glass face of the bezel ring.
(4) The thumb loop is attached to the base of the compass. c. Lens. The lens is used to read the dial, and it contains the rear-sight slot used in
conjunction with the front for sighting on objects. The rear sight also serves as a lock and clamps the dial when closed for its protection. The rear sight must be opened more than 45° to allow the dial to float freely.
NOTE: When opened, the straightedge on the left side of the compass has a coordinate
scale; the scale is 1:50,000 in newer compasses.
9-3. COMPASS HANDLING Compasses are delicate instruments and should be cared for accordingly.
a. Inspection. A detailed inspection is required when first obtaining and using a compass. One of the most important parts to check is the floating dial, which contains the magnetic needle. The user must also make sure the sighting wire is straight, the glass and crystal parts are not broken, the numbers on the dial are readable, and most important, that the dial does not stick.
b. Effects of Metal and Electricity. Metal objects and electrical sources can affect the performance of a compass. However, nonmagnetic metals and alloys do not affect compass readings. The following separation distances are suggested to ensure proper functioning of a compass:
High-tension power lines .................. .....................55 meters. Field gun, truck, or tank...................................... ...18 meters. Telegraph or telephone wires and barbed wire........10 meters. Machine gun........................................................ ..2 meters. Steel helmet or rifle........................................... .....1/2 meter.

Extract from FM 3-25.26 JAN 05 C 3
SH-2-53
c. Accuracy. A compass in good working condition is very accurate. However, a compass has to be checked periodically on a known line of direction, such as a surveyed azimuth using a declination station. Compasses with more than 3° + variation should not be used.
d. Protection. If traveling with the compass unfolded, make sure the rear sight is fully folded down onto the bezel ring. This will lock the floating dial and prevent vibration, as well as protect the crystal and rear sight from damage.
9-4. USING A COMPASS Magnetic azimuths are determined with the use of magnetic instruments, such as lensatic and M2 compasses. The techniques employed when using the lensatic compass are as follows:
a. Using the Centerhold Technique. First, open the compass to its fullest so that the cover forms a straightedge with the base. Move the lens (rear sight) to the rearmost position, allowing the dial to float freely. Next, place your thumb through the thumb loop, form a steady base with your third and fourth fingers, and extend your index finger along the side of the compass. Place the thumb of the other hand between the lens (rear sight) and the bezel ring; extend the index finger along the remaining side of the compass, and the remaining fingers around the fingers of the other hand. Pull your elbows firmly into your sides; this will place the compass between your chin and your belt. To measure an azimuth, simply turn your entire body toward the object, pointing the compass cover directly at the object. Once you are pointing at the object, look down and read the azimuth from beneath the fixed black index line (Figure 9-2). This preferred method offers the following advantages over the sighting technique:
(1) It is faster and easier to use. (2) It can be used under all conditions of visibility. (3) It can be used when navigating over any type of terrain. (4) It can be used without putting down the rifle; however, the rifle must be slung well back over either shoulder. (5) It can be used without removing eyeglasses.

Extract from FM 3-25.26 JAN 05 C 3
SH-2-54
b. Using the Compass-to-Cheek Technique. Fold the cover of the compass containing the sighting wire to a vertical position; then fold the rear sight slightly forward. Look through the rear-sight slot and align the front-sight hairline with the desired object in the distance. Then glance down at the dial through the eye lens to read the azimuth (Figure 9-3). NOTE: The compass-to-cheek technique is used almost exclusively for sighting, and it is
the best technique for this purpose.
c. Presetting a Compass and Following an Azimuth. Although different models of
the lensatic compass vary somewhat in the details of their use, the principles are the same. (1) During daylight hours or with a light source: (a) Hold the compass level in the palm of the hand. (b) Rotate it until the desired azimuth falls under the fixed black index line (for
example, 320°), maintaining the azimuth as prescribed (Figure 9-4). (c) Turn the bezel ring until the luminous line is aligned with the north-seeking arrow.
Once the alignment is obtained, the compass is preset. (d) To follow an azimuth, assume the centerhold technique and turn your body until the
north-seeking arrow is aligned with the luminous line. Then proceed forward in the direction of the front cover's sighting wire, which is aligned with the fixed black index line that contains the desired azimuth.

Extract from FM 3-25.26 JAN 05 C 3
SH-2-55
Figure 9-4. Compass preset at 320 degrees
(2) During limited visibility, an azimuth may be set on the compass by the click method. Remember that the bezel ring contains 3° intervals (clicks).
(a) Rotate the bezel ring until the luminous line is over the fixed black index line. (b) Find the desired azimuth and divide it by three. The result is the number of clicks
that you have to rotate the bezel ring. (c) Count the desired number of clicks. If the desired azimuth is smaller than 180°, the
number of clicks on the bezel ring should be counted in a counterclockwise direction. For example, the desired azimuth is 51°. Desired azimuth is 51°÷ 3 = 17 clicks counterclockwise. If the desired azimuth is larger than 180°, subtract the number of degrees from 360° and divide by 3 to obtain the number of clicks. Count them in a clockwise direction. For example, the desired azimuth is 330°; 360°-330° = 30 ÷3 = 10 clicks clockwise.
(d) With the compass preset as described above, assume a centerhold technique and rotate your body until the north-seeking arrow is aligned with the luminous line on the bezel. Then proceed forward in the direction of the front cover's luminous dots, which are aligned with the fixed black index line containing the azimuth.
(e) When the compass is to be used in darkness, an initial azimuth should be set while light is still available, if possible. With the initial azimuth as a base, any other azimuth that is a multiple of three can be established through the use of the clicking feature of the bezel ring.
NOTE: Sometimes the desired azimuth is not exactly divisible by three, causing an option
of rounding up or rounding down. If the azimuth is rounded up, this causes an

Extract from FM 3-25.26 JAN 05 C 3
SH-2-56
increase in the value of the azimuth, and the object is to be found on the left. If the azimuth is rounded down, this causes a decrease in the value of the azimuth, and the object is to be found on the right.
d. Bypassing an Obstacle. To bypass enemy positions or obstacles and still stay oriented, detour around the obstacle by moving at right angles for specified distances.
(1) For example, while moving on an azimuth of 90° change your azimuth to 180° and travel for 100 meters. Change your azimuth to 90°and travel for 150 meters. Change your azimuth to 360°and travel for 100 meters. Then, change your azimuth to 90°and you are back on your original azimuth line (Figure 9-5).
(2) Bypassing an unexpected obstacle at night is a fairly simple matter. To make a 90° turn to the right, hold the compass in the centerhold technique; turn until the center of the luminous letter E is under the luminous line (do not move the bezel ring). To make a 90° turn to the left, turn until the center of the luminous letter W is under the luminous line. This does not require changing the compass setting (bezel ring), and it ensures accurate 90° turns.
e. Offset. A deliberate offset is a planned magnetic deviation to the right or left of an azimuth to an objective. Use it when the objective is located along or in the vicinity of a linear feature such as a road or stream. Because of errors in the compass or in map reading, the linear feature may be reached without knowing whether the objective lies to the right or left. A deliberate offset by a known number of degrees in a known direction compensates for possible errors and ensures that upon reaching the linear feature, the user knows whether to go right or left to reach the objective. Ten degrees is an adequate offset for most tactical uses. Each degree offset moves the course about 18 meters to the right or left for each 1,000 meters traveled. For example, in Figure 9-6, the number of degrees offset is 10. If the distance traveled to "x" in 1,000 meters, then "x" is located about 180 meters to the right of the objective.

Extract from FM 3-25.26 JAN 05 C 3
SH-2-57
9-5. FIELD-EXPEDIENT METHODS When a compass is not available, different techniques should be used to determine the four cardinal directions.
a. Shadow-Tip Method. (1) This simple and accurate method of finding direction by the sun consists of four
basic steps (Figure 9-7).
Figure 9-7. Determining directions and time by shadow

Extract from FM 3-25.26 JAN 05 C 3
SH-2-58
Step 1. Place a stick or branch into the ground at a level spot where a distinctive shadow will be cast. Mark the shadow tip with a stone, twig, or other means. This first shadow mark is always the west direction.
Step 2. Wait 10 to 15 minutes until the shadow tip moves a few inches. Mark the new position of the shadow tip in the same way as the first.
Step 3. Draw a straight line through the two marks to obtain an approximate east-west line.
Step 4. Standing with the first mark (west) to your left, the other directions are simple; north is to the front, east is to the right, and south is behind you.
(2) A line drawn perpendicular to the east-west line at any point is the approximate northsouth line. If you are uncertain which direction is east and which is west, observe this simple rule--the first shadow-tip mark is always in the west direction, everywhere on earth.
(3) The shadow-tip method can also be used as a shadow clock to find the approximate time of day (Figure 9-7 on page 9-7).
(a) To find the time of day, move the stick to the intersection of the east-west line and the north-south line, and set it vertically in the ground. The west part of the east-west line indicates 0600 hours, and the east part is 1800 hours, anywhere on earth, because the basic rule always applies.
(b) The north-south line now becomes the noon line. The shadow of the stick is an hour hand in the shadow clock, and with it you can estimate the time using the noon line and the 6 o'clock line as your guides. Depending on your location and the season, the shadow may move either clockwise or counterclockwise, but this does not alter your manner of reading the shadow clock.
(c) The shadow clock is not a timepiece in the ordinary sense. It makes every day 12 unequal hours long, and always reads 0600 hours at sunrise and 1800 hours at sunset. The shadow clock time is closest to conventional clock time at midday, but the spacing of the other hours compared to conventional time varies somewhat with the locality and the date. However, it does provide a satisfactory means of telling time in the absence of properly set watches.
(d) The shadow-tip system is not intended for use in polar regions, which the Department of Defense defines as being above 60° latitude in either hemisphere. Distressed persons in these areas are advised to stay in one place so that search/rescue teams may easily find them. The presence and location of all aircraft and ground parties in polar regions are reported to and checked regularly by governmental or other agencies, and any need for help becomes quickly known.
b. Watch Method. (1) A watch can be used to determine the approximate true north and true south. In the
north temperate zone only, the hour hand is pointed toward the sun. A south line can be found midway between the hour hand and 1200 hours, standard time. If on daylight saving time, the north-south line is found between the hour hand and 1300 hours. If there is any doubt as to which end of the line is north, remember that the sun is in the east before noon and in the west after noon.
(2) The watch may also be used to determine direction in the south temperate zone; however, the method is different. The 1200-hour dial is pointed toward the sun, and halfway

Extract from FM 3-25.26 JAN 05 C 3
SH-2-59
between 1200 hours and the hour hand will be a north line. If on daylight saving time, the north line lies midway between the hour hand and 1300 hours (Figure 9-8).
(3) The watch method can be in error, especially in the lower latitudes, and may cause
circling. To avoid this, make a shadow clock and set your watch to the time indicated. After traveling for an hour, take another shadow-clock reading. Reset your watch if necessary.
c. Star Method. (1) Less than 60 of approximately 5,000 stars visible to the eye are used by navigators.
The stars seen as we look up at the sky at night are not evenly scattered across the whole sky. Instead they are in groups called constellations.
(2) The constellations that we see depends partly on where we are located on the earth, the time of the year, and the time of the night. The night changes with the seasons because of the journey of the earth around the sun, and it also changes from hour to hour because the turning of the earth makes some constellations seem to travel in a circle. But there is one star that is in almost exactly the same place in the sky all night long every night. It is the North Star, also known as the Polar Star or Polaris.
(3) The North Star is less than 1° off true north and does not move from its place because the axis of the earth is pointed toward it. The North Star is in the group of stars called the Little Dipper. It is the last star in the handle of the dipper. There are two stars in the Big Dipper, which are a big help when trying to find the North Star. They are called the Pointers, and an imaginary line drawn through them five times their distance points to the North Star. There are many stars brighter than the North Star, but none is more important because of its location. However, the North Star can only be seen in the northern hemisphere so it cannot serve as a guide south of the equator. The farther one goes north, the higher the North Star is in the sky, and above latitude 70°, it is too high in the sky to be useful (Figure 9-9).

Extract from FM 3-25.26 JAN 05 C 3
SH-2-60
(4) Depending on the star selected for navigation, azimuth checks are necessary. A star
near the north horizon serves for about half an hour. When moving south, azimuth checks should be made every 15 minutes. When traveling east or west, the difficulty of staying on azimuth is caused more by the likelihood of the star climbing too high in the sky or losing itself behind the western horizon than it is by the star changing direction angle. When this happens, it is necessary to change to another guide star. The Southern Cross is the main constellation used as a guide south of the equator, and the above general directions for using north and south stars are reversed. When navigating using the stars as guides, the user must know the different constellation shapes and their locations throughout the world (Figure 9-10 and Figure 9-11 on page 9-12).

Extract from FM 3-25.26 JAN 05 C 3
SH-2-61
Figure 9-10. Constellations, northern hemisphere

Extract from FM 3-25.26 JAN 05 C 3
SH-2-62
Figure 9-11. Constellations, southern hemisphere 9-6. GLOBAL POSITIONING SYSTEM The GPS is a space-based, global, all-weather, continuously available, radio positioning navigation system. It is highly accurate in determining position location derived from signal triangulation from a satellite constellation system. It is capable of determining latitude, longitude, and altitude of the individual user. It is being fielded in hand-held, manpack, vehicular, aircraft, and watercraft configurations. The GPS receives and processes data from satellites on either a simultaneous or sequential basis. It measures the velocity and range with respect to each satellite, processes the data in terms of an earth-centered, earth-fixed coordinate system, and displays the information to the user in geographic or military grid coordinates.
a. The GPS can provide precise steering information, as well as position location. The receiver can accept many checkpoints entered in any coordinate system by the user and convert them to the desired coordinate system. The user then calls up the desired checkpoint and the receiver will display direction and distance to the checkpoint. The GPS does not have

Extract from FM 3-25.26 JAN 05 C 3
SH-2-63
inherent drift, an improvement over the Inertial Navigation System, and the receiver will automatically update its position. The receiver can also compute time to the next checkpoint.
b. Specific uses for the GPS are position location; navigation; weapon location; target and sensor location; coordination of firepower; scout and screening operations; combat resupply; location of obstacles, barriers, and gaps; and communication support. The GPS also has the potential to allow units to train their soldiers and provide the following:
• Performance feedback. • Knowledge of routes taken by the soldier. • Knowledge of errors committed by the soldier. • Comparison of planned versus executed routes. • Safety and control of lost and injured soldiers.
(See Appendix J for more information of the GPS.)

This page intentionally left blank

Extract from FM 3-25.26 JAN 05 C 3
SH-2-64
CHAPTER 10
ELEVATION AND RELIEF
The elevation of points on the ground and the relief of an area affect the movement, positioning, and, in some cases, effectiveness of military units. Soldiers must know how to determine locations of points on a map, measure distances and azimuths, and identify symbols on a map. They must also be able to determine the elevation and relief of areas on standard military maps. To do this, they must first understand how the mapmaker indicated the elevation and relief on the map.
10-1. DEFINITIONS The reference or start point for vertical measurement of elevation on a standard military map are the datum plane or mean sea level, the point halfway between high tide and low tide. Elevation of a point on the earth’s surface is the vertical distance it is above or below mean sea level. Relief is the representation (as depicted by the mapmaker) of the shapes of hills, valleys, streams, or terrain features on the earth's surface. 10-2. METHODS OF DEPICTING RELIEF Mapmakers use several methods to depict relief of the terrain.
a. Layer Tinting. Layer tinting is a method of showing relief by color. A different color is used for each band of elevation. Each shade of color, or band, represents a definite elevation range. A legend is printed on the map margin to indicate the elevation range represented by each color. However, this method does not allow the map user to determine the exact elevation of a specific point—only the range.
b. Form Lines. Form lines are not measured from any datum plane. Form lines have no standard elevation and give only a general idea of relief. Form lines are represented on a map as dashed lines and are never labeled with representative elevations.
c. Shaded Relief. Relief shading indicates relief by a shadow effect achieved by tone and color that results in the darkening of one side of terrain features, such as hills and ridges. The darker the shading, the steeper the slope. Shaded relief is sometimes used in conjunction with contour lines to emphasize these features.
d. Hachures. Hachures are short, broken lines used to show relief. Hachures are sometimes used with contour lines. They do not represent exact elevations, but are mainly used to show large, rocky outcrop areas. Hachures are used extensively on small-scale maps to show mountain ranges, plateaus, and mountain peaks.
e. Contour Lines. Contour lines are the most common method of showing relief and elevation on a standard topographic map. A contour line represents an imaginary line on the ground, above or below sea level. All points on the contour line are at the same elevation. The elevation represented by contour lines is the vertical distance above or below sea level. The three types of contour lines (Figure 10-1, page 10-2) used on a standard topographic map are as follows:

Extract from FM 3-25.26 JAN 05 C 3
SH-2-65
(1) Index. Starting at zero elevation or mean sea level, every fifth contour line is a heavier line. These are known as index contour lines. Normally, each index contour line is numbered at some point. This number is the elevation of that line.
(2) Intermediate. The contour lines falling between the index contour lines are called intermediate contour lines. These lines are finer and do not have their elevations given. There are normally four intermediate contour lines between index contour lines.
(3) Supplementary. These contour lines resemble dashes. They show changes in elevation of at least one-half the contour interval. These lines are normally found where there is very little change in elevation, such as on fairly level terrain.
10-3. CONTOUR INTERVALS Before the elevation of any point on the map can be determined, the user must know the contour interval for the map he is using. The contour interval measurement given in the marginal information is the vertical distance between adjacent contour lines. To determine the elevation of a point on the map—
a. Determine the contour interval and the unit of measure used, for example, feet, meters, or yards (Figure 10-2).

Extract from FM 3-25.26 JAN 05 C 3
SH-2-66
b. Find the numbered index contour line nearest the point of which you are trying to determine the elevation (Figure 10-3).
c. Determine if you are going from lower elevation to higher, or vice versa. In Figure
10-3, point (a) is between the index contour lines. The lower index contour line is numbered 500, which means any point on that line is at an elevation of 500 meters above mean sea level. The upper index contour line is numbered 600, or 600 meters. Going from the lower to the upper index contour line shows an increase in elevation.
d. Determine the exact elevation of point (a), start at the index contour line numbered 500 and count the number of intermediate contour lines to point (a). Locate point (a) on the second intermediate contour line above the 500-meter index contour line. The contour interval is 20 meters (Figure 10-2), thus each one of the intermediate contour lines crossed to get to point (a) adds 20 meters to the 500-meter index contour line. The elevation of point (a) is 540 meters; the elevation has increased.
e. Determine the elevation of point (b). Go to the nearest index contour line. In this case, it is the upper index contour line numbered 600. Locate point (b) on the intermediate contour line immediately below the 600-meter index contour line. Below means downhill or a lower elevation. Therefore, point (b) is located at an elevation of 580 meters. Remember, if you are increasing elevation, add the contour interval to the nearest index contour line. If you are decreasing elevation, subtract the contour interval from the nearest index contour line.
f. Determine the elevation to a hilltop point (c). Add one-half the contour interval to the elevation of the last contour line. In this example, the last contour line before the hilltop is an index contour line numbered 600. Add one-half the contour interval, 10 meters, to the index contour line. The elevation of the hilltop would be 610 meters.

Extract from FM 3-25.26 JAN 05 C 3
SH-2-67
g. There may be times when you need to determine the elevation of points to a greater accuracy. To do this, you must determine how far between the two contour lines the point lies. However, most military needs are satisfied by estimating the elevation of points between contour lines (Figure 10-4).
(1) If the point is less than one-fourth the distance between contour lines, the elevation
will be the same as the last contour line. In Figure 10-4, the elevation of point a will be 100 meters. To estimate the elevation of a point between one-fourth and three-fourths of the distance between contour lines, add one-half the contour interval to the last contour line.
(2) Point b is one-half the distance between contour lines. The contour line immediately below point b is at an elevation of 160 meters. The contour interval is 20 meters; thus one-half the contour interval is 10 meters. In this case, add 10 meters to the last contour line of 160 meters. The elevation of point b would be about 170 meters.
(3) A point located more than three-fourths of the distance between contour lines is considered to be at the same elevation as the next contour line. Point c is located three-fourths of the distance between contour lines. In Figure 10-4, point c would be considered to be at an elevation of 180 meters.
h. To estimate the elevation to the bottom of a depression, subtract one-half the contour interval from the value of the lowest contour line before the depression. In Figure 10-5, the lowest contour line before the depression is 240 meters in elevation. Thus, the elevation at the edge of the depression is 240 meters. To determine the elevation at the bottom of the depression, subtract one-half the contour interval. The contour interval for this example is 20 meters. Subtract 10 meters from the lowest contour line immediately before the depression. The result is that the elevation at the bottom of the depression is 230 meters. The tick marks on the contour line forming a depression always point to lower elevations.

Extract from FM 3-25.26 JAN 05 C 3
SH-2-68
i. In addition to the contour lines, bench marks and spot elevations are used to indicate
points of known elevations on the map. (1) Bench marks, the more accurate of the two, are symbolized by a black X, such as X
BM 214. The 214 indicates that the center of the X is at an elevation of 214 units of measure (feet, meters, or yards) above mean sea level. To determine the units of measure, refer to the contour interval in the marginal information.
(2) Spot elevations are shown by a brown X and are usually located at road junctions and on hilltops and other prominent terrain features. If the elevation is shown in black numerals, it has been checked for accuracy; if it is in brown, it has not been checked.
NOTE: New maps are being printed using a dot instead of brown Xs. 10-4. TYPES OF SLOPES Depending on the military mission, soldiers may need to determine not only the height of a hill, but the degree of the hill's slope as well. The rate of rise or fall of a terrain feature is known as its slope. The speed at which equipment or personnel can move is affected by the slope of the ground or terrain feature. This slope can be determined from the map by studying the contour lines—the closer the contour lines, the steeper the slope; the farther apart the contour lines, the gentler the slope. Four types of slopes that concern the military are as follows:
a. Gentle. Contour lines showing a uniform, gentle slope will be evenly spaced and wide apart (Figure 10-6, page 10-6). Considering relief only, a uniform, gentle slope allows the defender to use grazing fire. The attacking force has to climb a slight incline.

Extract from FM 3-25.26 JAN 05 C 3
SH-2-69
b. Steep. Contour lines showing a uniform, steep slope on a map will be evenly spaced,
but close together. Remember, the closer the contour lines, the steeper the slope (Figure 10-7). Considering relief only, a uniform, steep slope allows the defender to use grazing fire, and the attacking force has to negotiate a steep incline.
c. Concave. Contour lines showing a concave slope on a map will be closely spaced at
the top of the terrain feature and widely spaced at the bottom (Figure 10-8, page 10-7). Considering relief only, the defender at the top of the slope can observe the entire slope and the terrain at the bottom, but he cannot use grazing fire. The attacker would have no cover from the defender's observation of fire, and his climb would become more difficult as he got farther up the slope.

Extract from FM 3-25.26 JAN 05 C 3
SH-2-70
d. Convex. Contour lines showing a convex slope on a map will be widely spaced at
the top and closely spaced at the bottom (Figure 10-9). Considering relief only, the defender at the top of the convex slope can obtain a small distance of grazing fire, but he cannot observe most of the slope or the terrain at the bottom. The attacker will have concealment on most of the slope and an easier climb as he nears the top.
7

Extract from FM 3-25.26 JAN 05 C 3
SH-2-71
10-5. PERCENTAGE OF SLOPE The speed at which personnel and equipment can move up or down a hill is affected by the slope of the ground and the limitations of the equipment. Because of this, a more exact way of describing a slope is necessary.
a. Slope may be expressed in several ways, but all depend upon the comparison of vertical distance (VD) to horizontal distance (HD) (Figure 10-10). Before we can determine the percentage of a slope, we must know the VD of the slope. The VD is determined by subtracting the lowest point of the slope from the highest point. Use the contour lines to determine the highest and lowest point of the slope (Figure 10-11).
b. To determine the percentage of the slope between points (a) and (b) in Figure 10-11,
determine the elevation of point (b) (590 meters). Then determine the elevation of point (a)

Extract from FM 3-25.26 JAN 05 C 3
SH-2-72
(380 meters). Determine the vertical distance between the two points by subtracting the elevation of point (a) from the elevation of point .The difference (210 meters) is the VD between points (a) and (b). Then measure the HD between the two points on the map in Figure 10-12. After the horizontal distance has been determined, compute the percentage of the slope by using the formula shown in Figure 10-13.

Extract from FM 3-25.26 JAN 05 C 3
SH-2-73
Fig 10-13. Percentabe of slope in meters.
c. The slope angle can also be expressed in degrees. To do this, determine the VD and HD of the slope. Multiply the VD by 57.3 and then divide the total by the HD (Figure 10-14). This method determines the approximate degree of slope and is reasonably accurate for slope angles less than 20º.

Extract from FM 3-25.26 JAN 05 C 3
SH-2-74
d. The slope angle can also be expressed as a gradient. The relationship of horizontal and vertical distance is expressed as a fraction with a numerator of one (Figure 10-15).
Figure 10-15. Gradient. 10-6. TERRAIN FEATURES All terrain features are derived from a complex landmass known as a mountain or ridgeline (Figure 10-16). The term ridgeline is not interchangeable with the term ridge. A ridgeline is a line of high ground, usually with changes in elevation along its top and low ground on all sides from which a total of 10 natural or man-made terrain features are classified.

This page intentionally left blank

Extract from FM 3-25.26 JAN 05 C 3
SH-2-75
CHAPTER 11
TERRAIN ASSOCIATION
Failure to make use of the vast amounts of information presented by the map and available to the eye on the ground reduces the chances for success in land navigation. The soldier who has repeatedly practiced the skills of identifying and discriminating among the many types of terrain and other features knows how these features are mapped. He can begin to visualize the shape of the land by studying the map, estimate distances, and perform quick resection from the many landmarks he sees is the one who will be at the right place to help defeat the enemy on the battlefield. This chapter tells how to orient a map with and without a compass, how to find locations on a map as well as on the ground, how to study the terrain, and how to move on the ground using terrain association and dead reckoning.
11-1. ORIENTING THE MAP The first step for a navigator in the field is orienting the map. A map is oriented when it is in a horizontal position with its north and south corresponding to the north and south on the ground. Some orienting techniques follow:
a. Using a Compass. When orienting a map with a compass, remember that the compass measures magnetic azimuths. Since the magnetic arrow points to magnetic north, pay special attention to the declination diagram. There are two techniques used.
(1) First Technique. Determine the direction of the declination and its value from the declination diagram.
(a) With the map in a horizontal position, take the straightedge on the left side of the compass and place it alongside the north-south grid line with the cover of the compass pointing toward the top of the map. This procedure places the fixed black index line of the compass parallel to north-south grid lines of the map.
(b) Keeping the compass aligned as directed above, rotate the map and compass together until the magnetic arrow is below the fixed black index line on the compass. At this time, the map is close to being oriented.
(c) Rotate the map and compass in the direction of the declination diagram. (d) If the magnetic north arrow on the map is to the left of the grid north, check the
compass reading to see if it equals the G-M angle given in the declination diagram. The map is then oriented (Figure 11-1, page 11-2).

Extract from FM 3-25.26 JAN 05 C 3
SH-2-76
(e) If the magnetic north is to the right of grid north, check the compass reading to see
if it equals 360 degrees minus the G-M angle (Figure 11-2).

Extract from FM 3-25.26 JAN 05 C 3
SH-2-77
(2) Second Technique. Determine the direction of the declination and its value from the declination diagram.
(a) Using any north-south grid line on the map as a base, draw a magnetic azimuth equal to the G-M angle given in the declination diagram with the protractor.
(b) If the declination is easterly (right), the drawn line is equal to the value of the G-M angle. Then align the straightedge, which is on the left side of the compass, alongside the drawn line on the map. Rotate the map and compass until the magnetic arrow of the compass is below the fixed black index line. The map is now oriented (Figure 11-3).
(c) If the declination is westerly (left), the drawn line will equal 360 degrees minus the
value of the G-M angle. Then align the straightedge, which is on the left side of the compass, alongside the drawn line on the map. Rotate the map and compass until the magnetic arrow of the compass is below the fixed black index line. The map is now oriented (Figure 11-4, page 11-4). NOTES:
1. Once the map is oriented, magnetic azimuths are determined using the compass. Do not move the map from its oriented position since any change in its position moves it out of line with the magnetic north. [See paragraph 11-6b(1).]
2. Special care should be taken whenever orienting your map with a compass. A small mistake can cause you to navigate in the wrong direction.

Extract from FM 3-25.26 JAN 05 C 3
SH-2-78

Extract from FM 3-25.26 JAN 05 C 3
SH-2-79
b. Using Terrain Association. A map can be oriented by terrain association when a compass is not available or when the user has to make many quick references as he moves across country. Using this method requires careful examination of the map and the ground, and the user must know his approximate location (Figure 11-5). Orienting by this method is discussed in detail in paragraph 11-3.

Extract from FM 3-25.26 JAN 05 C 3
SH-2-80
c. Using Field-Expedient Methods. When a compass is not available and there are no recognizable terrain features, a map may be oriented by any of the field-expedient methods described in paragraph 9-5. Also see Figure 11-6.
11-2. LOCATIONS The key to success in land navigation is to know your location at all times. With this basic knowledge, you can decide what direction and what distance to travel.
a. Known Position. Most important of all is the initial location of the user before starting any movement in the field. If movement takes place without establishing the initial location, everything that is done in the field from there on is a gamble. Determine the initial location by referring to the last known position, by grid coordinates and terrain association, or by locating and orienting your position on the map and ground.
b. Known Point/Known Distance (Polar Plot). This location can be determined by knowing the starting point, the azimuth to the desired objective, and the distance to it.
c. Resection. See Chapter 6. d. Modified Resection. See Chapter 6. e. Intersection. See Chapter 6. f. Indirect Fire. Finding a location by indirect fire is done with smoke. Use the point of
impact of the round as a reference point from which distances and azimuth can be obtained.

Extract from FM 3-25.26 JAN 05 C 3
SH-2-81
11-3. TERRAIN ASSOCIATION USAGE The technique of moving by terrain association is more forgiving of mistakes and far less time-consuming than dead reckoning. It best suits those situations that call for movement from one area to another. Errors made using terrain association are easily corrected because you are comparing what you expected to see from the map to what you do see on the ground. Errors are anticipated and will not go unchecked. You can easily make adjustments based upon what you encounter. Periodic position-fixing through either plotted or estimated resection will also make it possible to correct your movements, call for fire, or call in the locations of enemy targets or any other information of tactical or logistical importance.
a. Matching the Terrain to the Map by Examining Terrain Features. By observing the contour lines in detail, the five major terrain features (hilltop, valley, ridge, depression, and saddle) should be determined. This is a simple task in an area where the observer has ample view of the terrain in all directions. One-by-one, match the terrain features depicted on the map with the same features on the ground. In restricted terrain, this procedure becomes harder; however, constantly check the map as you move since it is the determining factor (Figure 11-5).
b. Comparing the Vegetation Depicted on the Map. When comparing the vegetation, a topographic map should be used to make a comparison of the clearings that appear on the map with the ones on the ground. The user must be familiar with the different symbols, such as vineyards, plantations, and orchards that appear on the legend. The age of the map is an important factor when comparing vegetation. Some important vegetation features were likely to be different when the map was made. Another important factor about vegetation is that it can change overnight by natural accidents or by man (forest fires, clearing of land for new developments, farming, and so forth).
c. Masking by the Vegetation. Camouflage the important landforms using vegetation. Use of camouflage makes it harder for the navigator to use terrain association.
d. Using the Hydrography. Inland bodies of water can help during terrain association. The shape and size of lakes in conjunction with the size and direction of flow of the rivers and streams are valuable help.
e. Using Man-made Features. Man-made features are an important factor during terrain association. The user must be familiar with the symbols shown in the legend representing those features. The direction of buildings, roads, bridges, high-tension lines, and so forth make the terrain inspection a lot easier; however, the age of the map must be considered because man-made features appear and disappear constantly.
f. Examining the Same Piece of Terrain During the Different Seasons of the Year. In those areas of the world where the seasons are distinctive, a detailed examination of the terrain should be made during each of the seasons. The same piece of land does not present the same characteristics during both spring and winter.
(1) During winter, the snow packs the vegetation, delineating the land, making the terrain features appear as clear as they are shown by the contour lines on the map. Ridges, valleys, and saddles are very distinctive.
(2) During spring, the vegetation begins to reappear and grow. New vegetation causes a gradual change of the land to the point that the foliage conceals the terrain features and makes the terrain hard to recognize.

Extract from FM 3-25.26 JAN 05 C 3
SH-2-82
(3) During summer months, the effects are similar to those in the spring. (4) Fall makes the land appear different with its change of color and gradual loss of
vegetation. (5) During the rainy season, the vegetation is green and thick, and the streams and
ponds look like small rivers and lakes. In scarcely vegetated areas, the erosion changes the shape of the land.
(6) During a period of drought, the vegetation dries out and becomes vulnerable to forest fires that change the terrain whenever they occur. Also during this season, the water levels of streams and lakes drop, adding new dimensions and shape to the existing mapped areas.
g. Following an Example of Terrain Association. Your location is hilltop 514 in the lower center of the map in Figure 11-7.
(1) To The North. The contour lines indicate that the hill slopes down for about 190
meters, and that it leads into a small valley containing an intermittent stream. On the other side of the stream as you continue with your northerly inspection, the terrain starts a gradual ascent, indicating a hilltop partially covered with vegetation, until an unimproved road is reached. This road runs along a gradual ridgeline with north-west direction. Then the contour line spacings become narrow, indicating a steeper grade that leads to a narrow valley containing a small intermittent stream. As you continue up, you find a small but prominent ridge with a clearing. The contour lines once again show a steeper grade leading to a moderate valley containing an intermittent stream running in a south-east direction.

Extract from FM 3-25.26 JAN 05 C 3
SH-2-83
(2) To The East. There is a clearing of the terrain as it slopes down to Schley Pond. An ample valley is clearly seen on the right side of the pond, as indicated by the "U" and "V" shape of the contour lines. This valley contains some swamp areas and there is a long ridgeline on the north portion of the valley.
(3) To The South. The terrain gently slopes downward until a clear area is reached. It continues in a downward direction to an intermittent stream running south-east in a small valley. There is also an improved road running in the same direction as the valley. At the intersection of the roads as you face south, there is a clearing of about 120 meters on the ridge. At the bottom of it, a stream runs from Schley Pond in a south-west direction through an ample valley fed by two intermittent streams. As you continue, a steep, vegetated hill is found with a clearing on its top, followed by a small saddle and another hilltop.
(4) To The West. First, you see a small, clear valley. It is followed by a general ridgeline running north-west in which an unimproved road is located just before a hilltop. Continuing on a westerly direction, you will find a series of alternate valleys and ridges.
11-4. TACTICAL CONSIDERATIONS Military cross-country navigation is intellectually demanding because it is imperative that the unit, crew, or vehicle survive and successfully complete the move in order to accomplish its mission. However, the unnecessary use of a difficult route makes navigation too complicated, creates more noise when proceeding over it, causes wear and tear on equipment and personnel, increases the need for and needlessly complicate recovery operations, and wastes scarce time. On receipt of a tactical mission, the leader begins his troop-leading procedures and makes a tentative plan. He bases the tentative plan on a good terrain analysis. He analyzes the considerations covered in the following mnemonics—OCOKA and METT-T.
a. OCOKA. The terrain should be analyzed for observation and fields of fire, cover and concealment, obstacles, key terrain, and avenues of approach.
(1) Observation and Fields of Fire. The purpose of observation is to see the enemy (or various landmarks) but not be seen by him. Anything that can be seen can be hit. Therefore, a field of fire is an area that a weapon or a group of weapons can cover effectively with fire from a given position.
(2) Cover and Concealment. Cover is shelter or protection (from enemy fire) either natural or artificial. Always try to use covered routes and seek cover for each halt, no matter how brief it is planned to be. Unfortunately, two factors interfere with obtaining constant cover. One is time and the other is terrain. Concealment is protection from observation or surveillance, including concealment from enemy air observation. Before, trees provided good concealment, but with modern thermal and infrared imaging equipment, trees are not always effective. When you are moving, concealment is generally secondary; therefore, select routes and positions that do not allow covered or concealed enemy near you.
(3) Obstacles. Obstacles are any obstructions that stop, delay, or divert movement. Obstacles can be natural (rivers, swamps, cliffs, or mountains) or they may be artificial (barbed wire entanglements, pits, concrete or metal anti-mechanized traps). They can be readymade or constructed in the field. Always consider any possible obstacles along your movement route and, if possible, try to keep obstacles between the enemy and yourself.

Extract from FM 3-25.26 JAN 05 C 3
SH-2-84
(4) Key Terrain. Key terrain is any locality or area that the seizure or retention of affords a marked advantage to either combatant. Urban areas that are often seen by higher headquarters as being key terrain because they are used to control routes. On the other hand, an urban area that is destroyed may be an obstacle instead. High ground can be key because it dominates an area with good observation and fields of fire. In an open area, a draw or wadi (dry streambed located in an arid area) may provide the only cover for many kilometers, thereby becoming key. You should always attempt to locate any area near you that could be even remotely considered as key terrain.
(5) Avenues of Approach. These are access routes. They may be the routes you can use to get to the enemy or the routes they can use to get to you. Basically, an identifiable route that approaches a position or location is an avenue of approach to that location. They are often terrain corridors such as valleys or wide, open areas.
b. METT-T. Tactical factors other than the military aspects of terrain must also be considered in conjunction with terrain during movement planning and execution as well. These additional considerations are mission, enemy, terrain and weather, troops, and time available.
(1) Mission. This refers to the specific task assigned to a unit or individual. It is the duty or task together with the purpose that clearly indicates the action to be taken and the reason for it—but not how to do it. Training exercises should stress the importance of a thorough map reconnaissance to evaluate the terrain. This allows the leader to confirm his tentative plan, basing his decision on the terrain's effect on his mission.
(a) Marches by foot or vehicle are used to move troops from one location to another. Soldiers must get to the right place, at the right time, and in good fighting condition. The normal rate for an 8-hour foot march is 4 kmph. However, the rate of march may vary, depending on the following factors:
• Distance. • Time allowed. • Likelihood of enemy contact. • Terrain. • Weather. • Physical condition of soldiers. • Equipment/weight to be carried. • A motor march requires little or no walking by the soldiers, but the factors affecting the
rate of march still apply. (b) Patrol missions are used to conduct combat or reconnaissance operations. Without
detailed planning and a thorough map reconnaissance, any patrol mission may not succeed. During the map reconnaissance, the mission leader determines a primary and alternate route to and from the objectives.
(c) Movement to contact is conducted whenever an element is moving toward the enemy but is not in contact with the enemy. The lead element must orient its movement on the objective by conducting a map reconnaissance, determining the location of the objective on both the map and the ground, and selecting the route to be taken.
(d) Delays and withdrawals are conducted to slow the enemy down without becoming decisively engaged, or to assume another mission. To be effective, the element leader must know where he is to move and the route to be taken.

Extract from FM 3-25.26 JAN 05 C 3
SH-2-85
(2) Enemy. This refers to the strength, status of training, disposition (locations), doctrine, capabilities, equipment (including night vision devices), and probable courses of action that impact upon both the planning and execution of the mission, including a movement.
(3) Terrain and Weather. Observation and fields of fire influence the placement of positions and crew-served weapons. The leader conducts a map reconnaissance to determine key terrain, obstacles, cover and concealment, and likely avenues of approach.
(a) Key terrain is any area whose control affords a marked advantage to the force holding it. Some types of key terrain are high ground, bridges, towns, and road junctions.
(b) Obstacles are natural or man-made terrain features that stop, slow down, or divert movement. Consideration of obstacles is influenced by the unit's mission. An obstacle may be an advantage or disadvantage, depending upon the direction of attack or defense. Obstacles can be found by conducting a thorough map reconnaissance and study of recent aerial photographs.
(c) Cover and concealment are determined for both friendly and enemy forces. Concealment is protection from observation; cover is protection from the effects of fire. Most terrain features that offer cover also provide concealment from ground observation. There are areas that provide no concealment from enemy observation. These danger areas may be large or small open fields, roads, or streams. During the leader's map reconnaissance, he determines any obvious danger areas and, if possible, adjusts his route.
(d) Avenues of approach are routes by which a unit may reach an objective or key terrain. To be considered an AA, a route must provide enough width for the deployment of the size force for which it is being considered. The AAs are also considered for the subordinate enemy force. For example, a company determines likely AAs for an enemy platoon; a platoon determines likely AAs for an enemy squad. Likely AAs may be either ridges, valleys, or by air. By examining the terrain, the leader determines the likely enemy AAs based on the tactical situation.
(e) Weather has little effect on dismounted land navigation. Rain and snow could possibly slow down the rate of march, that is all. But during mounted land navigation, the navigator must know the effect of weather on his vehicle. (See Chapter 12 for mounted land navigation.)
(4) Troops. Consideration of your own troops is equally important. The size and type of the unit to be moved and its capabilities, physical condition, status of training, and types of equipment assigned all affect the selection of routes, positions, fire plans, and the various decisions to be made during movement. On ideal terrain such as relatively level ground with little or no woods, a platoon can defend a front of up to 400 meters. The leader must conduct a thorough map reconnaissance and terrain analysis of the area his unit is to defend. Heavily wooded areas or very hilly areas may reduce the front a platoon can defend. The size of the unit must also be taken into consideration when planning a movement to contact. During movement, the unit must retain its ability to maneuver. A small draw or stream may reduce the unit's maneuverability but provide excellent concealment. All of these factors must be considered.
(a) Types of equipment that may be needed by the unit can be determined by a map reconnaissance. For example, if the unit must cross a large stream during its movement to the objective, ropes may be needed for safety lines.

Extract from FM 3-25.26 JAN 05 C 3
SH-2-86
(b) Physical capabilities of the soldiers must be considered when selecting a route. Crossing a large swampy area may present no problem to a physically fit unit, but to a unit that has not been physically conditioned, the swampy area may slow or completely stop its movement.
(5) Time Available. At times, the unit may have little time to reach an objective or to move from one point to another. The leader must conduct a map reconnaissance to determine the quickest route to the objective; this is not always a straight route. From point A to point B on the map may appear to be 1,000 meters, but if the route is across a large ridge, the distance will be greater. Another route from point A to B may be 1,500 meters—but on flat terrain. In this case, the quickest route would be across the flat terrain; however, concealment and cover may be lost.
11-5. MOVEMENT AND ROUTE SELECTION One key to success in tactical missions is the ability to move undetected to the objective. There are four steps to land navigation. Being given an objective and the requirement to move there, you must know where you are, plan the route, stay on the route, and recognize the objective.
a. Know Where You Are (Step 1). You must know where you are on the map and on the ground at all times and in every possible way. This includes knowing where you are relative to—
• Your directional orientation. • The direction and distances to your objective. • Other landmarks and features. • Any impassable terrain, the enemy, and danger areas. • Both the advantages and disadvantages presented by the terrain between you and your
objective. This step is accomplished by knowing how to read a map, recognize and identify specific terrain and other features; determine and estimate direction; pace, measure, and estimate distances, and both plot and estimate a position by resection.
b. Plan the Route (Step 2). Depending upon the size of the unit and the length and type of movement to be conducted, several factors should be considered in selecting a good route or routes to be followed. These include—
• Travel time. • Travel distance. • Maneuver room needed. • Trafficability. • Load-bearing capacities of the soil. • Energy expenditure by troops. • The factors of METT-T. • Tactical aspects of terrain (OCOKA). • Ease of logistical support. • Potential for surprising the enemy. • Availability of control and coordination features. • Availability of good checkpoints and steering marks.

Extract from FM 3-25.26 JAN 05 C 3
SH-2-87
In other words, the route must be the result of careful map study and should address the requirements of the mission, tactical situation, and time available. It must also provide for ease of movement and navigation.
(1) Three route-selection criteria that are important for small-unit movements are cover, concealment, and the availability of reliable checkpoint features. The latter is weighted even more heavily when selecting the route for a night operation. The degree of visibility and ease of recognition (visual effect) are the key to the proper selection of these features.
(2) The best checkpoints are linear features that cross the route. Examples include perennial streams, hard-top roads, ridges, valleys, railroads, and power transmission lines. Next, it is best to select features that represent elevation changes of at least two contour intervals such as hills, depressions, spurs, and draws. Primary reliance upon cultural features and vegetation is cautioned against because they are most likely to have changed since the map was last revised.
(3) Checkpoints located at places where changes in direction are made mark your decision points. Be especially alert to see and recognize these features during movement. During preparation and planning, it is especially important to review the route and anticipate where mistakes are most likely to be made so they can be avoided.
(4) Following a valley floor or proceeding near (not on) the crest of a ridgeline generally offers easy movement, good navigation checkpoints, and sufficient cover and concealment. It is best to follow terrain features whenever you can—not to fight them.
(5) A lost or a late arriving unit, or a tired unit that is tasked with an unnecessarily difficult move, does not contribute to the accomplishment of a mission. On the other hand, the unit that moves too quickly and carelessly into a destructive ambush or leaves itself open to air strikes also have little effect. Careful planning and study are required each time a movement route is to be selected.
c. Stay on the Route (Step 3). In order to know that you are still on the correct route, you must be able to compare the evidence you encounter as you move according to the plan you developed on the map when you selected your route. This may include watching your compass reading (dead reckoning) or recognizing various checkpoints or landmarks from the map in their anticipated positions and sequences as you pass them (terrain association). A better way is to use a combination of both.
d. Recognize the Objective (Step 4). The destination is rarely a highly recognizable feature such as a dominant hilltop or road junction. Such locations as this are seldom missed by the most inexperienced navigators and are often dangerous places for soldiers to occupy. The relatively small, obscure places are most likely to be the destinations.
(1) Just how does a soldier travel over unfamiliar terrain for moderate to great distances and know when he reaches the destination? One minor error, when many are possible, can cause the target to be missed.
(2) The answer is simple. Select a checkpoint (reasonably close to the destination) that is not so difficult to find or recognize. Then plan a short, fine-tuned last leg from the new expanded objective to the final destination. For example, you may be able to plan and execute the move as a series of sequenced movements from one checkpoint or landmark to another using both the terrain and a compass to keep you on the correct course. Finally, after

Extract from FM 3-25.26 JAN 05 C 3
SH-2-88
arriving at the last checkpoint, you might follow a specific compass azimuth and pace off the relatively short, known distance to the final, pinpoint destination. This procedure is called point navigation. A short movement out from a unit position to an observation post or to a coordination point may also be accomplished in the same manner.

Extract from FM 21-31 C1, Dec 68
SH-3-1
Student Handout 3
This student handout contains 2 pages of extracted material from pages 79 thru
81, para 22 of FM 21-31.
Disclaimer: The training developer downloaded this extract from the General
Dennis J. Reimer training and Doctrine Library. The text may contain passive voice, misspelled words, grammatical errors, etc., and may not be in compliance with the Army Writing Style Program.
RECOVERABLE PUBLICATIONS
YOU RECEIVED THIS DOCUMENT IN A DAMAGE-FREE CONDITION. DAMAGE IN ANY WAY, TO INCLUDE HIGHLIGHTING, PENCIL MARKS, OR MISSING PAGES, WILL SUBJECT YOU TO PECUNIARY LIABILITY (STATEMENT OF CHARGES, CASH COLLECTION ETC.) TO RECOVER PRINTING COSTS.

This page intentionally left blank

Extract from FM 21-31 C1, Dec 68
SH-3-2
22. Control Points and Elevations a. Applications of Definitions. The definitions of horizontal and vertical control stations which follow are generally applicable only to the United States. b. Exceptions. In foreign areas, horizontal stations may not be monumented and in some cases, may be less than third order accuracy. Whenever information is available, exceptions are noted in the marginal legend of the map. c. Symbols. The following pages contain the approved symbols for control points and elevations. Figure 227. Horizontal Control Point. The symbol represents a described
horizontal control point which is marked on the ground and which was established by triangulation or traverse of third or higher order accuracy. Large Scale Medium Scale Small Scale
Figure 228. Monumented Bench Mark. The symbol represents a described vertical
control point which is marked by a tablet on the ground and which was established by survey methods of third or higher order accuracy. On medium and small-scale maps Bench Marks are not specially symbolized. Their elevations are shown as spot elevations. (a) and (b) are alternate symbols. Large Scale Medium Scale Small Scale
a BM b BM
792
792
X 792
792

Extract from FM 21-31 C1, Dec 68
SH-3-3
Figure 229. Monumented Bench Mark At Horizontal Control Point. The symbol
represents a described control point which is marked on the ground and whose horizontal and vertical positions were established by survey methods of third or higher order accuracy. Large Scale Medium Scale Small Scale
Figure 230. Non-monumented Bench Mark (Sometimes called temporary,
supplemental, or intermediate). The symbol represents a described control point which is marked on the ground and whose horizontal and vertical positions were established by survey methods of third or higher order accuracy. Large Scale Medium Scale Small Scale
BM
792 792 792
X
792 792 792

SH-4-1
Student Handout 4
This student handout contains the Reinforcement Training Package (RTP) and the overview and instructions for completing the RTP.
Disclaimer: The training developer downloaded this extract from the General Dennis J.
Reimer Training and Doctrine Library. The text may contain passive voice, misspelled words, grammatical errors, etc., and may not be in compliance with the Army Writing Style Program.
RECOVERABLE PUBLICATIONS
YOU RECEIVED THIS DOCUMENT IN A DAMAGE-FREE CONDITION. DAMAGE IN ANYWAY, TO INCLUDE HIGHLIGHTING, PENCIL MARKS, OR MISSING PAGES, WILL SUBJECT YOU TO PECUNIARY LIABILITY (STATEMENT OF CHARGES, CASH COLLECTION, ETC.) TO RECOVER PRINTING COSTS.

This page intentionally left blank
RTP-i
Map Reading/Land Navigation Reinforcement Training Package (RTP).
Overview: This reinforcement-training package (RTP) is for PLDC students to refresh some of their map reading and land navigation skills to prepare them for the map reading and land navigation training they will receive following this RTP.
Passing the quizzes in this RTP is not a graduation requirement. The quizzes are for the students and small group leaders (SGLs) to determine how well the students understand the tasks, and to improve upon their weak areas. However, completion of this RTP is a graduation requirement. SGLs will file the students' RTPs in their individual records.
USASMA used the references listed on this page and RTP-ii of this package. This RTP provides
the information needed to complete all the tasks for practical exercise 1.
1. Student Responsibilities:
a. Study the material in this RTP and answer or perform all questions or tasks in the quiz answer sheets found in this package or given by the NCOA. Note: Do not use the answer sheets in this RTP. Use a separate piece of paper. This is a recoverable document, damage in any way, to include highlighting, pencil marks, or missing pages, will subject you to pecuniary liability (statement of charges, cash collection, etc.) to recover printing costs. The NCOA will determine if you may write on the answer sheets they provide you for quizzes two, five and six.
b. Turn in all quiz answer sheets to your SGL NLT three days prior to the start of TSP W221, Map
Reading.
2. NCOA Responsibilities:
a. Issue the following to the students when they inprocess:
(1) Map Reading/Land Navigation Reinforced Training Package (Appendix D, SH-4). NOTE: DO NOT ISSUE the Quiz Answer Sheets to the students. You can find the quiz answer sheets attached at the end of the RTP, pages RTPQAS-1 thru RTPQAS-6.
(2) FM 3-25.26 (SH-2), Map Reading and Land Navigation (SH-2) in Appendix D. (3) FM 21-31, Topographical Symbols (SH-3) in Appendix D. (4) STP 21-1-SMCT, Soldier Manual of Common Tasks, Skill Level One, Appendix C,
Aug 03. (5) GTA 5-2-12, Coordinate Scale and Protractor. (6) 1:50,000 Tenino map. (7) 1:50,000 map of the local STX area. (8) Lensatic compass. (9) Quiz sheets 2, 5, and 6.
BertaF
C 3
BertaF

RTP-ii
Map Reading/Land Navigation RTP, cont
b. Set up a sufficient number of points in the NCOA Garrison, or other areas close to the NCOA, where students can accomplish the following tasks:
(1) App C, Task 5, Determine a Magnetic Azimuth Using a Lensatic Compass. (2) App C, Task 7, Determine a Location on the Ground by Terrain Association. (3) App C, Task 11, Orient a Map to the Ground by Map-Terrain Association.
c. Design Quiz sheets for quizzes two, five, and six. See the Standards Statements of the above
three tasks in STP 21-1-SMCT when making up the quizzes and for setting up your points. Also, see the bold printed instructions on pages RTP-36, RTP-54 and RTP-56.
d. SGLs will collect and review the student quiz sheets NLT three days prior to the start of W221,
Map Reading, to ensure completeness and provide assistance to students who ask for help, and to those students who may have had difficulty--based on their quizzes--performing the tasks. SGLs will also file the quizzes in the students' records.
e. SGLs should take the results of the Quizzes to determine the strengths and weaknesses of each
student and the group as a whole. Based on the SGL’s analysis of the quizzes, he can use the first 4.5 hours of W221, Map Reading, and prepare any special training for each student and possibly the entire class. The SGL will use the entire first 4.5 hours of W221 for students to review the RTP and conduct hands on training to insure mastery of the skill level one tasks listed above.
e. Ensure SGLs are available to assist students.
3. Recommendation to the NCOA Commandants. Contact the CSMs that send their soldiers to your NCOA and recommend to them that their soldiers--at a minimum--read and study the following prior to arriving at PLDC.
a. STP 21-1-SMCT, Draft, Soldier's Manual of Common TasksDraft), Appendix C, the following tasks:
(1) Task 2, Identify topographic symbols on a military map. (2) Task 3, Identify terrain features on a map. (3) Task 4, Determine the grid coordinates of a point on a military map. (4) Task 5, Determine a magnetic azimuth using a lensatic compass. (5) Task 7, Determine a location on the ground by terrain association. (6) Task 8, Measure distance on a map. (7) Task 11, Orient a map to the ground by map terrain association. (8) Task 14, Determine direction without a compass.
b. FM 3-25.26 (SH-2), Map Reading and Land Navigation:
(1) Chapter 3, para 3-1, 3-3, and 3-5. (2) Chapter 4, para 4-4 thru 4-7. (3) Chapter 5, para 5-1 and 5-2. (4) Chapter 9, para 9-2 thru 9-3c, and 9-5 (5) Chapter 10, para 10-6 (6) Chapter 11, para 11-1b thru 11-3.

RTP-iii
NOTE: The NCOA will not formally teach skill level one tasks; however, the students will receive reinforcement training for the purpose of refreshing themselves in these skills.
NOTE: The NCOA can make this RTP available to the CSMs to design their own refresher package. The CSMs will have to replace and design their own exercises with a map of their local area wherever this RTP references the Tenino map. NOTE: Recommend that NCOAs place this RTP on their homepage.

RTP-1
Map Reading/Land Navigation Student RTP
Purpose This RTP provides students with a standardized plan for reinforcement training of
the skill level one tasks listed below: STP 21-1-SMCT, Appendix C, Aug 03.
Table of Contents This RTP
Contains: Task Number Task Title Page
App C, Task 2 Identify Topographic Symbols on a Military Map.
RTP-2
App C, Task 4 Determine the Grid Coordinates of a Point on a Military Map.
RTP-8
App C, Task 3 Identify Terrain Features on a Map. RTP-18 Quiz One RTP-25 App C, Task 5 Determine a Magnetic Azimuth using a
Lensatic Compass RTP-29
Quiz Two (Answers provided by SGL) RTP-36 App C, Task 8 Measure Distance on a Map RTP-37 Quiz Three RTP-46 App C, Task 14 Determine Direction Without a Compass RTP-47 Quiz Four RTP-51 App C, Task 11 Orient a Map to the Ground by Map-Terrain
Association. RTP-53
Quiz Five (Answers provided by SGL) RTP-54 App C, Task 7 Determine a Location on the Ground by Terrain
Association. RTP-55
Quiz Six (Answers provided by SGL) RTP-56 Answers to Quiz One RTPQAS-1 Answers to Quiz Three RTPQAS-4 Answers to Quiz Four RTPQAS-5
RECOVERABLE PUBLICATIONS
YOU RECEIVED THIS DOCUMENT IN A DAMAGE-FREE CONDITION. DAMAGE IN ANY WAY, TO INCLUDE HIGHLIGHTING, PENCIL MARKS, OR MISSING PAGES, WILL SUBJECT YOU TO PECUNIARY LIABILITY (STATEMENT OF CHARGES, CASH COLLECTION ETC.) TO RECOVER PRINTING COSTS.
BertaF
BertaF
C 3

RTP-2
Identify Topographic Symbols on a Military Map
Task This section of the RTP teaches--
Task Number: App C, Task 2, STP 21-1-SMCT Task Title: Identify topographic symbols on a military map. Conditions: Given a standard 1:50,000-scale military map. Standards: Identified the topographic symbols, colors, and marginal
information on a military map with 100 percent accuracy IAW FM 3-25.26 (SH-2), Chapter 3 (RTP-2 thru RTP-7); STP 21-1-SMCT, App C, p C-4 and C-5.
Colors on a Military Map
The ideal situation would be that every mapmaker could show every map feature in its true shape and size; however, it's impossible. The amount of detail the map shows will increase or decrease dependent on the scale of the map.
Topographic symbols show details on the map and these symbols
use six basic colors, Figure 1.
COLORS SYMBOLS Black Cultural (man-made) features other than roads. Blue Water. Brown All relief features--contour lines on old maps--cultivated land
on red-light readable maps. Green Vegetation. Red Major roads, built-up areas, special features on old maps. Red-brown All relief features and main roads on red-light readable maps. Figure 1 Symbols on a Military Map
Mapmakers use symbols on a map to represent physical features, such as physical surroundings or objects, as shown in Figure 2.
The shape of an object on the map will usually tell what it is, e.g., a
black solid square is a building or a house, and a round or irregular blue item--a lake or pond.
Logic and what the colors mean must work together to determine a
map feature, e.g., blue represents water. If you see a symbol that is blue and has clumps of grass, this would be a swamp.
BertaF
BertaF
C 3

RTP-3
Symbols on a Military Map, continued
The size of the symbol shows the approximate size of that object. Most symbols are six to ten times larger so that you can see them under dim light.
You should use the legend--located in the lower left margin of a
map--to find an explanation of the symbols and features used on the map.
FEATURES COLORS DESCRIPTION Drainage Blue These symbols include lakes, streams, rivers,
marshes, swamps, and coastal waters. Relief Brown These features are normally shown by contour
lines, intermediate contour lines, and form lines. In addition to contour lines, there are relief symbols to show cuts, levees, sand, sand dunes, ice fields, strip mines, and glaciers.
Vegetation Green These symbols include woods, scrub, orchards, vineyards, tropical grass, mangrove and marshy areas, or tundra.
Roads Red, Black, or Red-brown
These symbols show hard-surface, heavy-duty roads; hard surface, medium-duty roads; improved light-duty roads; unimproved dirt roads; and trails. On foreign road maps, symbols may differ slightly; check the map legend for proper identification of roads.
Railroads Black These symbols show single-track railroads in operation; single-track railroads not in operation; double or multiple-track railroads.
Buildings Black, yellow, Red, or Pink
These symbols show built-up areas, schools, churches, ruins, lighthouses, windmills, and cemeteries.
Figure 2 Marginal Information
Marginal information explains useful information about a map. All maps do not have the same marginal information. Examine all marginal information each time you use a different map.
NOTE: Each of the items listed below has a reference, e.g., (Ref: FM 3-25.26 (SH-2), Chapter 3, page 3-1, para 3-1a(1)), or (Ref: FM 3-25.26 (SH-2), Chapter 3, page 3-1, para 3-1f(6)), The numbers in bold parenthesis (1) will match the number in Figure 3 on page 4 of this RTP to provide you the location of the item. You can then look at the item on your Tenino map in order to see the item clearer.

RTP-4
Marginal Information, continued
Figure 3 Sheet Name (1) (Ref: FM 3-25.26 (SH-2), Chapter 3, page 3-1, para 3-1a(1))
The sheet name, located at the center of the top and in the lower left
area of the map margin, is in bold print. The map name on your Tenino map is just that "Tenino." Mapmakers generally name the map after the largest settlement or natural feature located entirely within the area of the map sheet.

RTP-5
Sheet Number (2) (Ref: FM 3-25.26 (SH-2), Chapter 3, page 3-1, para 3-1b(2))
The location of the sheet number--in bold print--is in both the upper
right and lower left areas of the margin, and in the center box of the adjoining sheets diagram, found in the lower right margin. You use it as a reference number to link specific maps to overlays, operations orders, and plans. On the Tenino Map, the sheet number is 1477 IV.
Series Name (3) (Ref: FM 3-25.26 (SH-2), Chapter 3, page 3-1, para 3-1c(3))
You will find the map series name in bold print in the upper left
corner of the margin. The name given to the series is generally that of a major political subdivision, such as a state within the United States, or a European nation. On your Tenino map, the Series Name is Washington.
Scale (4) (Ref: FM 3-25.26 (SH-2), Chapter 3, page 3-1, para 3-1d(4))
The scale of the map appears in both the upper left margin after the
series name and in the lower center of the bottom margin. The scale is a representative fraction that gives the ratio of a map distance to the corresponding distance on the earth's surface. For example, the scale 1:50,000 indicates that one unit of measure on the map equals 50,000 units of the same measure on the ground. One inch on the map represents 50,000 inches on the ground. On your Tenino map, the scale is 1:50,000.
Series Number (5) (Ref: FM 3-25.26 (SH-2), Chapter 3, page 3-1, para 3-1e(5)) You will find the series number in both the upper right margin and
the lower left margin. It is a sequence reference expressed either as a four-digit number or as a letter, followed by a three- or four-digit number. The Series Number on your Tenino map is V791.
Edition Number (6)
(Ref: FM 3-25.26 (SH-2), Chapter 3, page 3-1, para 3-1f(6))
You will find the edition number in bold print in the upper right area of the top margin and lower left area of the bottom margin. Mapmakers number the editions consecutively; therefore, if you have more than one edition, the highest numbered sheet is the most recent (newest). On your Tenino map, the edition number is 7-DMATC.

RTP-6
Index to Boundaries (7)
(Ref: FM 3-25.26 (SH-2), Chapter 3, page 3-1, para 3-1g(7))
The index to boundaries diagram appears on the lower or right margin of all map sheets. This diagram, which is a miniature of the map, shows the boundaries that occur within the map area, such as county lines and state boundaries. Note on your Tenino map in the lower right corner, that the Boundaries Index depicts a line that separates Thurston County from Lewis County. Look at the Tenino map between latitudes 78 and 79, the dashed line that goes across the entire map just like the one in the Boundaries Index.
Adjoining Sheets Diagram (8)
(Ref: FM 3-25.26 (SH-2), Chapter 3, page 3-1, para 3-1h(8))
The adjoining sheet diagram--lower right margin--contains a diagram that illustrates the adjoining sheets to your map sheet. On maps at 1:100,000 and larger scales and at 1:1,000,000 scale, the diagram is called the index to adjoining sheets. The diagram usually contains nine rectangles, but the number may vary depending on the locations of the adjoining sheets. Your Tenino has a total of nine sheets. Note that Tenino Map Sheet Number--1477 IV--is in the center. Should your operations extend out from your Map Sheet, then you will know which map sheet--based on the direction your operation will take you--to use.
(Ref: FM 3-25.26 (SH-2), Chapter 3, page 3-1, para 3-1i(9)) Elevation Guide
(9) The elevation guide normally appears in the lower right margin. It is
a miniature characterization of the terrain shown. This map represents the terrain by bands of elevation, spot elevation, and major drainage features. The elevation guide provides the map reader with a means of rapid recognition of major landforms. Note that the Elevation Guide is right next to the adjoining sheets diagram.
Declination Diagram (10)
(Ref: FM 3-25.26 (SH-2), Chapter 3, page 3-1, para 3-1j(10))
You will find the declination diagram in the lower margin of large-scale maps. The scale indicates the angular relationships of true north, grid north, and magnetic north. In recent edition maps, there is a note indicating the conversion of azimuths from grid to magnetic and from magnetic to grid next to the declination diagram. These are very important--as you will see later on--in conducting land navigation when you have to convert grid azimuths to magnetic azimuths and magnetic to grid.

RTP-7
Bar Scales (11) (Ref: FM 3-25.26 (SH-2), Chapter 3, page 3-1, para 3-1k(11)) You will find the bar scale located in the center of the lower margin.
The bar scales are rulers that you use to convert map distance to ground distance. Maps have three or more bar scales, each in a different unit of measure. Take care when using the scales, especially in the selection of the unit of measure that you need. On your Tenino map, there are four scales, meters, yards, statute miles, and nautical miles.

RTP-8
Determine the Grid Coordinates of a Point on a Military Map
Task This section of the RTP teaches--
Task Number: App C, Task 4, STP 21-1-SMCT. Task Title: Determine the grid coordinates of a point on a military
map. Conditions: Given a standard 1:50,000-scale military map in a field
location, a 1:50,000 grid coordinate scale, a pencil, paper, and determine coordinates for a point on the map.
Standards: Determined the six-digit grid coordinates for the point on the map with a 100-meter tolerance. Record the grid coordinates with the correct two-letter 100,000-meter-square identifier IAW FM 3-25.26 (SH-2), Chapter 4, p SH-2-8; STP 21-1-SMCT, Aug 03, App C, p C-15.
Notes To keep from getting lost, you have to know how to find out where
you are. There are no street addresses in a combat area, but a military map can spot your location accurately. The map has Vertical Lines (top to bottom), and Horizontal Lines (left to right). These lines form small squares 1,000 meters on each side called Grid Squares.
The lines that form grid squares have numbers along the outside
edge of the map picture. No two grid squares will have the same number. We use digits to locate a point on a map. The more digits there are
in a coordinate, the more precise the location. You will refresh you memory by covering the four, six, and eight-digit coordinates.
BertaF
C
BertaF
BertaF
BertaF
C 3

RTP-9
Four-Digit Coordinate
Look at Figure 4 below. Someone tells you that your location is somewhere in grid square 1181. Your first question may be, how do I know where I am?
Begin by reading LEFT to RIGHT (easterly) on your map until you
reach number 11. You have found the first half of your grid square. Next you read UP (northerly) the map until you reach number 81. Now you have the second half of the grid square and your location in a 1000-meter grid square. So, your location is somewhere in grid square 1181.
83
82
81
80
Grid 1181
Southwest Corner
Note: Always begin your reading from the Southwest Corner.
10 11 12 13 14
Figure 4 Six-Digit Grid Coordinates
Now that you know you are in grid square 1181, you may want a more precise idea of where you are in this 1000-meter grid square. In other words, you are in the general neighborhood, but it would be nice to determine where your location is within 100 meters. To do this, you just need to add two more numbers, one to the first half (easterly reading 11) and the other number to the second half (northerly reading 81).
To get those extra numbers, imagine that each grid square has ten
lines inside spaced evenly running east and west, and another ten lines spaced evenly running north and south. This breaks down the grid square into 100 smaller squares. Now you can estimate where these imaginary lines are and determine where your location is within 100 meters.

RTP-10
Six-Digit Grid Coordinates, continued
Take a look at Figure 5. As you can see, grid zone 1181 breaks down into 100-meter squares.
Suppose you are halfway--about 500 meters--between grid line 11
and grid line 12. Starting at the southwest corner (Ref: Figure 4) of grid square 11, you count from left to right (easterly) (Ref: Figure 5). Since the location is five, then you add 5 to the first half of the coordinate (easterly) 11, and it becomes 115.
Now suppose you are approximately 3/10ths--300 meters--of the
way between grid line 81 and grid line 82. Starting from grid line 81, you count UP, (northerly) until you reach the 3/10ths--300-meter point (Ref: Figure 5). Since the location is three, then you add 3 to the second half of the coordinate (northerly) 81, and it becomes 813. So, your six-digit grid is 115813 as shown in Figure 5.
In another example, if you are exactly on line 11, then the first half
coordinate (easterly) would be 110, and if you are exactly on line 81, then the second half of the coordinate (northerly) would be 810. Then the six-digit grid is 110810.
115813
(3)
(5)11 12
1000 MeterGrid Square
82
81
Figure 5

RTP-11
Coordinate Scale The most accurate way to determine the coordinate of a point on a
map is to use a coordinate scale. With the coordinate scale, you don't have to use imaginary lines because the coordinate scale will give you the exact coordinates. This scale is on the Coordinate Scale and Protractor--GTA 5-2-12--see Figure 6 below.
1:50,000 Coordinate Scale
1:25,000CoordinateScale
Coordinate scale and protractor, GTA 5-2-12
1:100,000CoordinateScale
Figure 6 Six-Digit Grid Coordinates Using Coordinate Scale
As you can see, the protractor has three coordinate scales: 1:25,000, 1:50,000 and 1:100,000. Make sure that when you use the coordinate scale that you use the proper one based on the scale of your map. For the PLDC course, you will be using 1:50,000 scale maps.
Let's locate a point on a grid square using the coordinate scale,
Figure 7, page RTP-12. 1. Locate the four-digit grid square of Point A. 2. Read RIGHT and UP, you should have a four-digit grid of 1181. 3. Place the coordinate scale on the bottom horizontal grid line (81)
of the grid square containing Point A to determine the third and sixth digits of the coordinate.

RTP-12
Six-Digit Grid Coordinates Using Coordinate Scale
Figure 7 4. Place the coordinate scale so that the ZEROS of the coordinate
scale are in the lower left-hand (southwest corner) of grid square 1181, the grid square containing Point A, Figure 7.
83
82
81
80
09 10 11 12
Southwest Corner Grid Square 1181
SLIDE To The Right
Point A

RTP-13
Six-Digit Grid Coordinates Using Coordinate Scale, continued
5. Slide the scale to the right, keeping the bottom of the scale on the bottom grid line (81), until Point A is under the vertical (right-hand) scale, Figure 8.
Figure 8
83
82
81
80
09 10 11 12
Southwest Corner Grid Square 1181
SLIDE To The Right
Point A

RTP-14
Six-Digit Grid Coordinates Using Coordinate Scale, continued
6. To find the third-digit for the first half (easterly) grid coordinate, go to grid line 11. There, as you see in Figure 8, grid line 11 runs through the number five on the bottom line of the coordinate scale. Five becomes your third number for grid 11 (easterly), so the first half of the grid coordinate is 115.
7. To find the third-digit for the second half (northerly) grid
coordinate, go to grid line 81. As you can see in Figure 8, Point A on the map is right under the number 3 (vertical scale) on the coordinate scale. The 3 becomes your third number for grid 81 (northerly), so the second half of the grid coordinate is 813.
8. You have now determined your location on the map to within 100
meters as 115813.
Eight-Digit Grid Coordinates Using Coordinate Scale
To determine an eight-digit coordinate, which will locate a point on the ground to within 10 meters, you must keep in mind that there are 100 meters between each 100-meter mark (number) on the coordinate scale. As you may have already noticed, the coordinate scale has short tickmarks to indicate 50 meters between each 100-meter mark. See Figure 9.
50 Meter Tickmarks
Figure 9

RTP-15
Determine an Eight-Digit Grid Coordinates Using Coordinate Scale
To find the eight-digit coordinate, you use the same procedures as those used to find the six-digit coordinate using the coordinate scale. If the point on the map lies at a spot where the vertical grid line falls between two 100-meter marks on the horizontal scale of the coordinate scale, and between two 100-meter marks on the vertical scale of the coordinate scale, then you interpolate (estimate) the distance, Figure 10, p RTP 16.
To determine the four digits of the first half of the grid coordinate,
you can see where grid line 11 runs through the number 5 (500-meter mark) on the horizontal scale of the coordinate scale. Since the line runs right through the 5, then the third number is 5, and the fourth number is 0. So, the first half of the grid coordinate is 1150.
To determine the four digits of the second half of the grid coordinate,
you can see where Point A lies between the number 5 (500-meter mark) and the 50 meter tickmark that lies between numbers 5 and 4 (400-meter mark) on the vertical scale of the coordinate scale. The third number of the second half of the grid coordinate will be 4. To determine the fourth number of the second half, you must interpolate (estimate) the distance between the 50 meter tickmark and the number 5 in 10 meter increments. In this case the estimate is 30 meters from the 50 meter tickmark. So, the second half of the grid coordinate is 8148.
The eight-digit grid coordinate for Point A on Figure 10 then reads
as 11508148.
100,000-Meter Square Identifier
The last thing in determining a grid coordinate is to place the correct 100,000-meter square identifier in front of your four, six, or eight-digit grid coordinate. You can find the 100,000-meter square identifier, made up of two letters, in the lower center margin of your map in the grid reference box, Figure 11, page 17.
As you can see in the grid reference box, the 100,000 meter square
identification is in the left column center, identified as:
EH EG
5200
Take out your Tenino map, and find the grid reference box. Notice
that the 100,000-meter square identification is the same as above, and that the grid reference box is the same as Figure 11, page RTP-17.

RTP-16
Figure 10
83
82
81
80
09 10 11 12
Southwest Corner Grid Square 1181
SLIDE To The Right
Point A

RTP-17
100,000-Meter Square Identifier, continued
Don’t let the EH over the EG confuse you. What this indicates is that the Tenino map happens to fall within two different 100,000-meter map squares. The numbers to the right (5200) tell you where on your map the division between the two 100,000-meter map squares are. Since the EH is over the EG--as shown below--separated by a horizontal line, the division is on grid line 00 that runs east and west. If the grid reference was shown with the EH and EG beside each other with a vertical line between them, then the division would have been on Grid Line 00 running north and south.
12 1345
46
X Sample Point
Sample 1,000 Meter Grid Square
100,000 M. Square Identification
EHEG
5200
Grid Zone Designation
10T
1. Read large number labeling the VERTICAL grid line left of point and estimate tenths (100 meters) from grid line to point. 12 3
2. Read large numbers labeling the HORIZONTAL grid line below point and estimate tenths (100 meters) from grid line to point. 45 6
Example: 123456
WHEN REPORTING OUTSIDE THE 100, 000METER SQUARE AREA IN WHICH THE POINT LIES. PREFIX THE 100,000 METER SQUARE IDENTIFICATION
Example: EG123456
WHEN REPORTING OURISDE THE GRID ZONEDESIGNATION AREA IN WHICH THE POINT LIES.PREFIX THE GRID ZONE DESIGNATION
Example: 10TEG123456
GRID Reference Box
Figure 11 The significance of this is that all coordinates above the 00 grid line
running east and west will begin with the letters EH and all coordinates below the 00 grid line running east and west will begin with the letters EG. For Example: On your Tenino Map:
EH0401, See the two ponds? EH053045, See the lake? EG0493, See Maytown? EG086958, See Pitman Lake? Without the EH or EG, when you report locations, the people who
receive your report would not know which 100,000-meter map square you are reporting about.

RTP-18
Identify Terrain Features on a Map
Task This section of RTP teaches--
Task Number: App C, Task 3, STP 21-1-SMCTTask Title: Identify terrain features on a map. Conditions: Given a standard 1:50,000-scale military map. Standards: Identified the five major and three minor features on the
map IAW FM 3-25.26 (SH-2), Chapter 10, p SH-2-64; STP 21-1-SMCT, Aug 03, App C, p C-8.
Identify Terrain Features
You identify terrain features in the same manner on all maps, regardless of the coutour interval, but you must realize that a hill in the Rocky Mountains will be much bigger than the one in south Florida. You must be able to recognize all the terrain features to locate a point on the ground or to navigate from one point to another.
Terrain Features Mapmakers derived all terrain features from a complex landmass
known as a mountain or ridgeline (Figure 12). The term ridgeline is not interchangeable with the term ridge. A ridgeline is a line of high ground, usually with changes in elevation along its top and low ground on all sides. It is from the ridgeline that mapmakers have classified a total of 10 natural or man-made terrain features. These features break down into five major, three minor, and two supplementary features.
Figure 12
BertaF
C 3

RTP-19
Five Major Terrain Features
1. Hill. A hill is an area of high ground. From a hilltop, the ground slopes down in all directions. A map depicts a hill by showing contour lines forming concentric circles (circles having a common center). The inside of the smallest closed circle is the hilltop, Figure 13.
Figure 13, Hill 2. Saddle: A saddle is a dip or low point between two areas of high
ground. A saddle is not necessarily the lower ground between two hilltops; it may be simply a dip or break along a level ridgecrest. If you are in a saddle, there is high ground in two opposite directions and lower ground in the other two directions. An hourglass normally represents a saddle. Figure 14.
Figure 14, Saddle 3. Valley. A valley is a stretched-out groove in the land, usually
formed by streams or rivers. A valley begins with high ground on three sides, and usually has a course of running water through it. If standing in a valley, there is high ground in two opposite directions and there is a decline from the third direction to the fourth. Depending on its size and where a

RTP-20
Five Major Terrain Features, continued
person is standing, it may not be obvious that there is high ground in the third direction, but water flows from higher to lower ground. Contour lines forming a valley are either U shaped or V shaped. To determine the direction water is flowing, look at the coutour lines. The closed end of the contour line (U or V) always points upstream or toward high ground, Figure 15.
Figure 15, Valley 4. Ridge. A ridge is a sloping line of high ground. If you are
standing on the centerline of a ridge, you will normally have low ground in three directions and high ground in one direction with varying degrees of slope. If you cross a ridge at right angles, you will climb steeply to the crest and then descend steeply to the base. When you move along the path of the ridge, depending on the geographic location, there may be either an almost unnoticeable slope or a very obvious incline. Contour lines forming a ridge tend to be U-shaped or V-shaped. The closed end of the contour line points away from high ground, Figure 16.
Figure 16, Ridge

RTP-21
Five Major Terrain Features, continued
5. Depression. A depression is a low point in the ground or a sinkhole. One could describe it as an area of low ground surrounded by higher ground in all directions, or simply a hole in the ground. Usually mapmakers only show depressions that are equal to or greater than the contour interval. Maps show depressions by closed contour lines that have tickmarks pointing toward low ground, Figure 17.
Figure 17, Depression Three Minor Terrain Features
1. Draw. A draw is a less developed stream course than a valley. In a draw, there is essentially no level ground and, therefore, little or no maneuver room within its confines. If you are standing in a draw, the ground slopes upward in three directions and downward in the other direction. You can consider a draw as the initial formation of a valley. The contour lines depicting draws are U-shaped or V-shaped, pointing toward high ground, Figure 18.
Figure 18, Draw

RTP-22
Three Minor Terrain Features, continued
2. Spur. A spur is a short, continuous sloping line of higher ground, normally jutting out from the side of a ridge. A spur often forms when two roughly parallel streams cut draws down the side of a ridge. The ground will slope down in three directions and up in one. Contour lines on a map depict a spur with the U or V pointing away from high ground, Figure 19.
Figure 19, Spur 3. Cliff. A cliff is a vertical or near vertical feature; an abrupt
change of the land. When a slope is so steep that the contour lines converge into one "carrying" contour of contours, this last contour line has tick marks pointing toward low ground, Figure 20.
Figure 20, Cliff (With Tick Marks)

RTP-23
Three Minor Terrain Features, continued
Maps also depict cliffs by showing contour lines very close together and, in some instances, touching each other, Figure 21.
Figure 21, Cliff with Converging Contours Two Supplementary Terrain Features.
1. Cut. A cut is a man-made feature resulting from cutting through raised ground, usually to form a level bed for a road or railroad track. Maps identify cuts when they are at least 10 feet high, and they appear with a contour line along the cut line. This contour line extends the length of the cut and has tick marks that extend from the cut line to the roadbed, if the map scale permits this level of detail, Figure 22.
2. Fill. A fill is a man-made feature resulting from filling a low
area, usually to form a level bed for a road or railroad track. Maps depict fills when they are at least 10 feet high; they appear with a contour line along the fill line. This contour line extends the length of the filled area and has tick marks that point toward lower ground. If the map scale permits, the length of the fill tickmarks--drawn to scale--extend from the base line of the fill symbol, Figure 22.
Figure 22, Cut and Fill
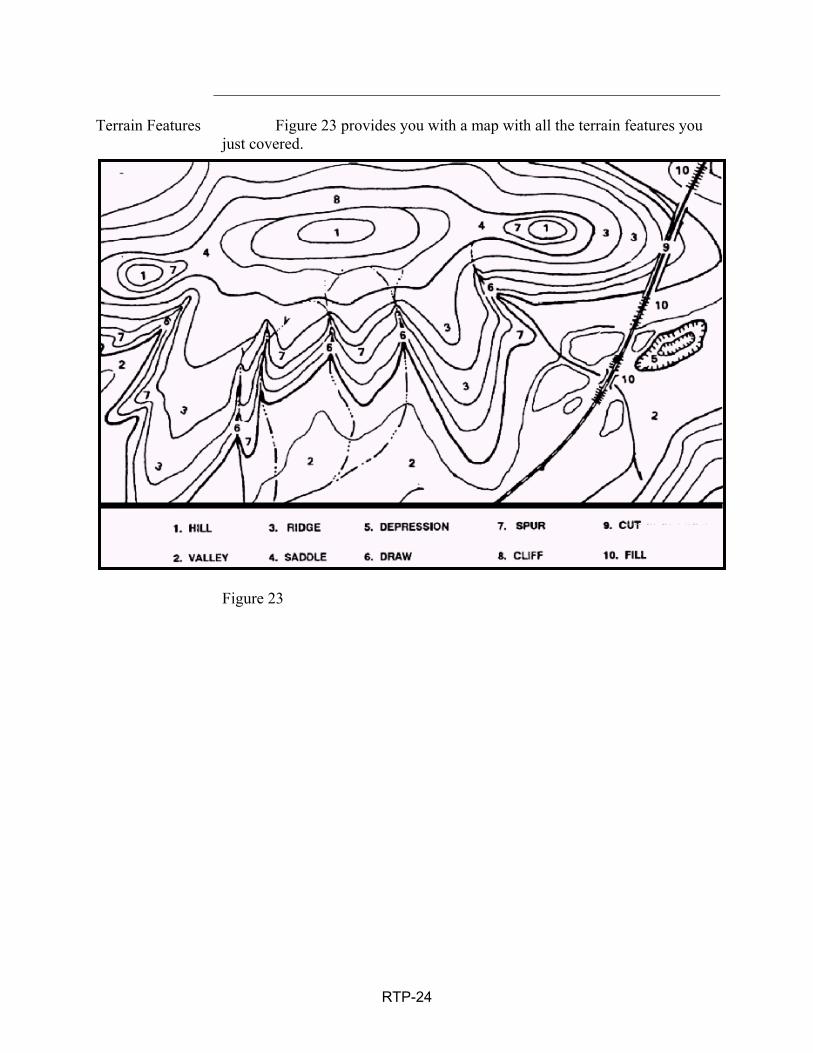
RTP-24
Terrain Features Figure 23 provides you with a map with all the terrain features you
just covered.
Figure 23

RTP-25
Quiz 1
Quiz 1 Take a few moments now to review tasks 2, Identify Topographic Symbols on a Military Map; task 4, Determine the Grid Coordinates of a Point on a Military Map; and task 5, Identify Terrain Features on a Map. Answer the questions below by circling the correct response, filling in the blank, or writing in the space provided. After you finish, check your answers with the answers on pages RTPQAS-1 thru RTPQAS-3.
You will need your Tenino Map and your GTA 5-2-12 Coordinate
Scale and Protractor. If you need additional help, begin by reviewing this RTP and then ask your SGL for assistance.
NOTE: Do not use the answer sheet below unless directed by the SGL. Write the questions on a separate sheet of paper and then answer them.
Question 1 What are the six colors used on a military map?
1. ______________, 2. _____________, 3. ____________, 4. __________ 5. ______________. 6. _____________.
Question 2 What do the six colors on a military map represent?
1. ___________________________________________________________ 2. ___________________________________________________________ 3. ___________________________________________________________ 4. ___________________________________________________________ 5. ___________________________________________________________ 6. ___________________________________________________________

RTP-26
Quiz 1, cont
Question 3 What portion of a map explains the symbols and features used, and where
can you find it? __________________________________________ Question 4 What is the "map series name," "scale," and "series number" of your Tenino
map? 1. Map Series Name: _________________
2. Scale: __________________
3. Series Number: ____________________
Question 5 What is the adjoining sheet number directly south of the Tenino Map
sheet?_____________________________ Question 6 What information is on the map that will tell you the angular relationships of
true north, grid north, and magnetic north? __________________________ _____________________________________________________________
Question 7 Where on the map will you find the declination diagram? ______________
_________________. Question 8 The more digits in a coordinate, the _________ ___________ the location. Question 9 Regardless of the scale of a military map, how many meters are in a grid
square? __________________________ Question 10 How do you read a map to find a grid coordinate? _____________________ Question 11 How many digits must there be in the grid coordinate of a target that would
place that target to within 100 meters in a 1,000-meter grid square? ____________

RTP-27
Quiz 1, cont
Question 12 Without the use of a coordinate scale, identify on the Tenino map the
topographic symbols at the following six-digit grid coordinates within 100 meters. (Don’t forget to use the "legend" and common sense.) a. EG065824 _________________ b. EG127841 _________________ c. EG032913 _________________ d. EH064028 _________________ e. EG180903 _________________ f. EG177951 _________________
Question 13 Using a coordinate scale, identify on the Tenino map the topographic
symbols at the following grid coordinates: a. EG099821 _________________ b. EH021005 _________________ c. EG086958 _________________ d. EG037994 _________________ e. EG094847 _________________ f. EH123045 _________________
Question 14 With the use of a coordinate scale, and the Tenino map, determine the eight-
digit grid coordinate of the items named in the following four-digit grid squares, to within 10 meters. a. Church of God, EG0385. _________________ b. Water tower, EG1088. _________________ c. Open pit mine or quarry (active), EG1095. _________________ d. Oil tank, EG0893. _________________ e. Road intersection, EH0404. _________________ f. Zion Chapel, EH1102. _________________
Question 15. What terrain feature is along the unimproved road from the tower at grid
coordinate EG180875 to grid coordinate EG184862 on the Tenino map? a. Depression. b. Cliff. c. Ridge. d. Valley.

RTP-28
Quiz 1, cont
Question 16 What terrain feature runs from grid coordinate EG153841 along the
intermittent stream to grid coordinate EG158847 on the Tenino map? a. Cliff. b. Draw. c. Ridge. d. Saddle.
Question 17 What major terrain feature is in grid coordinate EG1297?
a. Valley. b. Ridgeline. c. Hill d. Saddle.
Question 18 What minor terrain features are in grid squares EG1786 and EG1785?
____________ and ___________.
Question 19 What major terrain feature on the Tenino map is at grid coordinate
EG16458470? a. Hill top. b. Valley. c. Depression. d. Saddle.
Question 20 On what major terrain feature does the city of Tenino sit?
a. Ridgeline. b. Saddle. c. Valley. d. Hill.

RTP-29
Determine a Magnetic Azimuth using a Lensatic Compass
Task This section of the RTP teaches--
Task Number: App C, Task 5, STP 21-1-SMCT Task Title: Determine a magnetic azimuth using a lensatic compass. Conditions: Given a compass and a designated point on the ground. Standards: Determined the correct magnetic azimuth to the
designated point within 3 degrees using the compass-to-cheek method, and within 10 degrees using the center-hold method IAW FM 3-25.26 (SH-2), Chapter 9, p SH-2-51; STP 21-1-SMCT, Aug 03, App C, p C-23.
The Lensatic Compass
The lensatic compass, Figure 24, consists of three major parts: the cover, the base, and the lens or rear sight.
Figure 24 A. Cover: The compass cover protects the floating dial. It contains
the sighting wire (front sight) and two luminous sighting slots or dots used for night navigation.
BertaF
BertaF
C 3

RTP-30
The Lensatic Compass, continued
B. Base: The body of the compass contains the following movable parts:
1. Floating Dial, Figure 25. Used to determine the direction in
which you point your compass. The dial, mounted on a pivot, rotates freely when you hold the compass level. Printed on the dial in luminous figures are an arrow and the letters E and W. The arrow always points to magnetic north and the letters (E) east 90o and (W) west 270O are on the dial.
310 Degrees
Figure 25 There are two scales; the outer in black numbers denotes mils and
the inner numbers (normally in red) denotes degrees.
2. Encasing the floating dial is a glass containing a fixed black index line, Figures 24 and 25.
3. The bezel ring is a ratchet device that clicks when turned. It
contains 120 clicks when rotated fully; each click is equal to 3o. The glass face of the bezel ring contains a short luminous line that you use in conjunction with the north-seeking arrow during navigation, Figure 24.
4. The thumb loop is attached to the base of the compass,
Figure 24.

RTP-31
The Lensatic Compass, continued
C. Lens or Rear Sight: You use the lens to read the dial. Above the lens is the rear-sight slot used in conjunction with the front for sighting on objects. The rear sight also serves as a lock and clamps the dial when closed for its protection. You must open the rear sight more than 45o to allow the dial to float freely, Figure 24.
Care of the Compass
As soon as you get your compass, inspect it in detail. One of the most important parts is the floating dial that contains the magnetic needle. Make sure that the dial floats freely and DOES NOT STICK. Also, make sure the sighting wire is straight, the glass and crystal parts are not broken, and you can read all the numbers on the dial.
Metal objects and electrical sources have an effect on the
performance of a compass. However, nonmagnetic metals and alloys do not affect compass readings. Maintain the following separation distances when using a compass:
High-tension power line…………..55 meters. Field gun, truck, or tank…………..18 meters. Telegraph or telephone wire and barbed wire……………………..10 meters. Machine gun………………………..2 meters. Steel helmet or rifle 1/2 meter. Your compass, if in good working condition, is very accurate.
However, you must check your compass periodically to ensure it works properly. Check it by using it on a known line of direction, such as a surveyed azimuth using a declination station. Do no use a compass with more than a 3o + variation. Note: The NCOA should have some locations in the NCOA area where you can test the accuracy of your compass. Check with your SGL.
When you travel with the compass unfolded, make sure you fold down the rear sight all the way to the bezel ring. This will lock the floating dial and prevent vibration, as well as protect the crystal and rear sight from damage.
Shooting an Azimuth
1. Use the floating dial to determine the direction in which you are pointing your compass.
2. Use the outer black ring of numbers and tick marks for finding
directions in mils, Figure 25.

RTP-32
Shooting an Azimuth
3. Use the inner red ring of numbers and tick marks for finding direction in degrees, Figure 25.
a. There are 360 degrees (inner red ring) and 6,400 mils (outer
black ring) in a circle. The compass depicts the degrees at 5 degree intervals and depicts the mils at 20 mil intervals. For the lines in degrees and mils that do not have a number, you will have to determine the line's number using the numbers given on the dial.
Note: In Figure 25, the dial is resting with the index line over 5,550 mils
and 310 degrees. Note: You will use the degree ring (inner red ring) for this course.
b. To read direction, point the compass in the direction you want
to go or want to determine. c. Look beneath the index line on the outer glass cover and
estimate to the nearest degree or 10 mils the position of the index line over the Red (degree) or black (mils) scale.
d. Be careful to hold the compass still so that the dial remains
stationary while you read the scale.
Note: If you understand these readings and can apply either of the holding and sighting techniques of shooting an azimuth, you will be proficient in performing this task.
4. Use the compass to determine or follow an azimuth. The arrow on the compass points toward magnetic north. The arrow is also attracted by any mass of metal; for example, a truck, your rifle, and even electrical power lines. Thus, be sure you use your compass away from metal objects so it will not give a wrong reading.
5. Always hold the compass level and firm when sighting on an
object and reading an azimuth. Compass Holding Methods
There are two methods to holding and reading a compass.
NOTE: At this time you will need your compass that the NCOA issued to you.
A. Compass-to-Cheek Method: (Figure 26)
1. Open the cover to a 90-degree angle to the base. Position the
eyepiece at a 45-degree angle to the base.

RTP-33
Figure 26, Compass-to-Cheek Method
Compass Holding Methods, continued
2. Place your thumb through the thumb loop, form a steady base with your third and fourth fingers, and extend your index finger along the side of the compass base.
3. Place the hand holding the compass into the palm of the other
hand. 4. Bring both hands up to your face and position the thumb that
is through the loop against your cheekbone. 5. Look through the lens of the eyepiece. If the dial is not in
focus, move the eyepiece up or down until the dial is in focus. Don't forget that the lens/rear sight must be at a 45o angle to ensure the dial floats freely.
6. Align the sighting slot of the eyepiece with the sighting wire
in the cover on the point for which your are trying to determine the azimuth, Figure 27.

RTP-34
Compass Holding Methods, continued
Rear Sight
Sighting Slot
Lens
Target
Sighting WireIn Front Cover
Figure 27 B. Centerhold Method (Figure 28)
Note: Use this method only when you don't need a precise direction.
Figure 28, Centerhold Method 1. Open the compass so that the cover forms a straight edge with
the base. Move the lens/rear sight to the rear as far as it will move.

RTP-35
Compass Holding Methods, continued
2. Next, place your thumb through the thumb loop, form a steady base with your third and fourth fingers, and extend your index finger along the side of the compass.
3. Place the thumb of the other hand between the eyepiece and
the lens, extend the index finger along the remaining side of the compass, wrap the remaining fingers around the fingers of the other hand, and pull your elbows firmly into your sides. This will place the compass between your chin and your belt.
4. To measure an azimuth, you must turn your entire body
toward the object and point the compass cover directly at the object. Look down and read the azimuth from beneath the fixed black index line. You may use this method at night.
5. To keep from going in circles when you are land navigating,
stop occasionally to check the azimuth along which you are moving. Also, you can move from object to object along your path by shooting an azimuth to each object and then moving to that object. Repeating this process while you navigate should keep you straight.

RTP-36
Quiz 2
Quiz 2 The NCOA will provide you with the locations of some compass
points, and Quiz Sheet 2. Take your compass out to the NCOA's known compass points.
Shoot an azimuth from those points using the Compass-to-Cheek and Centerhold methods.
You azimuth should be within 3 degrees of the azimuth using the
Compass-to-Cheek method and 10 degrees using the Centerhold method.
NOTE: Check with your classmates to see if you are shooting the same azimuth as they are. If you are experiencing difficulties, make sure your compass is working properly. If the compass is working properly, contact your SGL for assistance.
NOTE TO NCOA: Set up points throughout the NCOA, or points in close proximity, where students can check the accuracy of their compasses, and to test themselves to the standards given above. Provide the students with Quiz Sheet 2 where they must shoot three Compass-to-Cheek shots, and three Centerhold shots. Provide them three to four choices of azimuths for each shot.

RTP-37
Measure Distance on a Map
Task This section of the RTP teaches--
Task Number: App C, Task 8, STP 21-1-SMCT Task Title: Measure distance on a map. Conditions: Given a standard 1:50,000-scale military map, a strip of
paper with a straight edge, and a pencil. Standards: 1. Determined the straight-line distance, in meters,
between two points, with no more than 5 percent error. 2. Determined the road (curved line) distance, in meters, between two points, with no more than 10 percent error IAW FM 3-25.26 (SH-2), Chapter 5, p SH-2-22; STP 21-1-SMCT, Aug 03, App C, p C-34
Determining Distance on a Map
If you were to plot the coordinates to two points, one inch apart on your 1:50,000-scale map, your first thought might be--this isn't very far. However, once you convert the one-inch of map distance to actual distance you must travel on the ground, you will discover that your trip, at a minimum, would be 1,270 meters long!
A definite relationship exists between the distance of points on the
map and the distance between the same points on the ground. Normally, we express this relationship in one of two ways: by a representative fraction or by a graphic scale.
A representative fraction (RF) is the numerical scale of a map (on
your Tenino map it is 1:50,000). Keep in mind, RF expresses the ratio of horizontal distance on the map to the corresponding horizontal distance on the ground. You always write the RF with the map distance as one (1) and in either linear form (1:50,000) or fraction form 1/50,000.
An RF written in either form simply means that one unit of measure
on the map is equal to (on your Tenino map) 50,000 of the same units on the ground. For example, one-inch (1") map distance (MD) measured on a map scaled at 1:50,000 is equal to 50,000 inches of ground distance (GD).
BertaF
C 3

RTP-38
Determining Distance on a Map
If you don't like working with inches, you can convert to other units of measure by dividing the 50,000 by the appropriate divisor. The following are examples to convert to feet and meters.
Feet: 50,000 inches divided by 12 inches (1 Ft) = 4,166.7 Ft. Meters: 50,000 inches divided by 39.37 inches (1 Meter) = 1270 Meters
A bar scale is a graphic representation of ground distance drawn to
the scale of the map. These scales appear on most military maps in the bottom center margin. Look at your Tenino map, you will see that your map has a bar scale. The unit of measure for an individual scale appears to the right or above the scale, Figure 29.
Figure 29 The bar scale shows the "primary scale" in full units of measure to
the right of zero (0), and the "extension scale" left of zero shows the unit divided into tenths.
The number and types of measurement found on bar scales will vary.
The most commonly used units of measurement are meters, yards, statute miles, and nautical miles. As you can see on you Tenino map, the bar scale provides all four of these measurements.

RTP-39
Types of Distance Measuring
The two types of distances you can measure on a map are straight-line distance and curved or road distance. In order to measure them on a map you will need:
1. A straight edge piece of paper long enough to cover your selected
points on the map. 2. A sharp pencil used for marking tick marks between map points.
Straight-line Distance, continued
NOTE: You will now review the method to determine straight-line distance between two points. As you follow the steps below, you will use the figure given below and also perform the task on your Tenino Map.
Straight-line. A straight-line distance is the shortest route between two points. To convert a straight-line map distance to miles, meters, or yards, perform the following:
Step 1. Determine the two points between which you want to find the
straight-line distance. Step 2. Align a straight edge piece of paper on the map so that the
edge of the paper touches both points on the map. Step 3. Place a tickmark on the paper for both points, Figure 30.
..
Point A
Point B
Note: When measuring distance, use center of mass of symbol or object
TICK MARKS ON PAPER STRIP
Figure 30

RTP-40
Straight-line Distance, continued
NOTE: At this time go to your Tenino map and find Grid EG079874. At this point you should find BM 83, Point A. Next, find the TV Relay Tower at Grid EG126877, this is Point B. Once done, conduct steps two and three.
Step 4. Align the piece of paper on the bar scale for the ground unit of measure that you need, and read the distance from the graphic scale to the nearest tenth of a unit, Figure 31.
Figure 31 Step 5. Since the military measures distance in meters, lay your
straight edge piece of paper on the meter bar on you Tenino map. You line up the tickmarks so that the right end is on a full 1000 meter increment in the primary scale and the other tickmark is on the inside of the extension scale. The only time your left tick mark does not fall in the extension scale is when you have a distance that is a full 1000-meter increment. In that case the left tickmarks will fall on Zero (0). By following this step of instruction, your right tickmark should line up on the 4000 meter mark, and your left tick mark should line up on 600.
Step 6. You obtain the total distance by adding the 600 meters from
the extension scale to the 4000 meters from the primary scale. Therefore, you have a total straight-line distance of 4600 meters from BM 86 to the TV relay tower.
Now you will find another straight-line distance; however this time,
you will have to break down the extension scale into tenths to interpolate (estimate) the distance between the 100-meter marks on the extension scale, Fig 31.
Go to you Tenino map and find the distance in meters between the
water towers in grid squares EG0982 and EG1185.
NOTE: Make sure your pencil is sharp, you need to be as precise as possible.

RTP-41
Straight-line Distance, continued
If you followed the steps above, the distance between the two water towers is 3,450 meters. In this instance the right tickmark lined up on 3000 meters on the primary scale, and the left tickmark fell halfway between the 400- and 500-meter marks on the extension scale. You must interpolate, and you should have estimated at a distance of 50 meters, the distance between the 400- and 500-meter marks on the extension scale. Therefore, you add the 450 meters to your 3000 meters from the primary scale. This gives you a total straight-line distance of 3,450 meters.
Now you will work a straight-line distance, when the distance
measured (a) to (b) is longer than the bar scale. This is simple to do following the steps above with one additional step. Simply place the right tickmark on the largest number in the primary scale, and place a tickmark under the highest number of the extension scale (c) so you will know how much distance you have already measured, Figure 32, part A.
Figure 32
A
B
a b c
Total of 6 Kilometers (6000 Meters) 1000 Meters equals 1 Kilometer
Meters 5 Kilometers

RTP-42
Straight-line Distance, continued
Take out your Tenino map and mark your straight-line measurement between the horizontal control point "Skook" in grid square EG1682 and the water tower in grid square EG1088. Mark your points A and B, then place your measurement on the meter bar scale, and mark your point C on your piece of paper, see Figure 32, part A.
Once you mark the distance point C between points A and B, slide
the paper where as new point C is lined up in the primary scale on one of the 1000 meter tickmarks and point A lining up somewhere in the extension scale. In Figure 32, part B, the distance happens to be less than 1000 meters, so (c) lines up under the Zero (0) of the extension scale.
On your Tenino map, you see that your point C will line up under the
2000 meter mark in the primary scale and point A falls in the extension scale between the 600 meter mark and the 700 meter mark.
Now you must add everything up, as follows: Distance between Points B and C: 6,000 meters. Distance between Point C and Zero: 2,000 meters. Distance between Zero and Point B: 640 meters* Total: 8,640 meters
Note: *Don't forget, when a tickmark falls between two 100-meter marks, you must interpolate (estimate) the distance. The estimated distance between the 600 meter mark and the 700 meter mark appears to be 40 meters. With a 5 percent margin of error, your distance should read between 8208 and 9072 meters.
Curved or Road Distance
The bar scales are simple to use, and there is a need for very precise work; however, many map users may find or arrive at different results. Did you come up with 8640 meters as we did with the above straight-line distance? Hopefully you were no more than 5 percent off. Just the sharpness of your pencil can make a difference. As you will see, when measuring curved or road distances, the variation of measurements will increase.
To measure curved or road distances, you will also use a straight
edge piece of paper to measure the distance along a winding road, stream, or any other route following an irregular course. For the rest of this lesson, we will use roads, but remember you use the same process for any route that is irregular.

RTP-43
Curved or Road Distance, continued
NOTE: Before starting, make sure you pencil is sharp and you have a clean piece of paper with a straight edge. You will use the figures provided below and you will also measure a road on your Tenino map.
NOTE: It does not matter if you measure from point A to point B or vice versa. It also does not matter if you place your paper above, below, left, or right of the road as long as you measure along the same side all the time and do not cross the road.
Step 1. Mark on your map starting point A and finishing point B.
See Figure 33. Step 2. Place a tick mark near one end of a straight edge piece of
paper. Step 3. Align the straight edge of the paper with the road on the
map so that the tick mark is on one of the points (start point in the example) and the edge of the paper extends along the route to a point where the route changes direction. See Figure 33.
(a)
FINISHING POINT B
STARTING POINT A
Figure 33

RTP-44
Curved or Road Distance, continued
Step 4. At the point where the road changes direction and does not follow the edge of the paper, place a tick mark at that point on your map and the piece of paper, Figure 34.
(a)
FINISHING POINT B
Note: The Tickmark is drawn exactly at the point
where the Road changes direction. The Tickmark
is drawn on the straight edge and the map.
Figure 34 NOTE: Now it is time to take out your Tenino map and accomplish the first
four steps above. On your map select the horizontal control station "Skook" in grid square EG16108255 as Point A and the bridge in grid square EG13558355 as point B. NOTE: Don't forget to measure from the center of mass of the object or symbol.
Step 5. Rotate the paper so that the tickmark you just made on the
paper and map are aligned and the straight edge follows the road until the road changes direction again. As before, place a tickmark on the piece of paper and the map at the location where the road changes direction. Continue this process until you reach Point B, Figure 35.

RTP-45
Curved or Road Distance, continued
(a)
(b)
Figure 35 NOTE: Continue with step 5 on your Tenino map until you reach Point B.
Once you reach Point B, you have successfully taken the curved road or route and turned it into a straight-line measurement on your piece of paper.
Step 6. Now that you have a straight-line measurement, determine
the distance on the bar scale the same way to you learned to measure straight-line distances.
NOTE: After determining the distance on your meter bar scale on the Tenino map, your distance should be 3240 meters. With a 10 percent error margin, your distance should read between 2916 meters and 3564 meters.
Now let's take time out to check your proficiency in determining
distances on a map by measuring straight-line distances and curved or road distances. Take Quiz 3 on the next page.

RTP-46
Quiz 3
Quiz 3 Take a few moments now to review task 8, Measure Distance on a Map.
You will need your Tenino map, straight edge pieces of paper, and a
sharp pencil. If you experience any problems, go back through this RTP or ask your fellow student or SGL for assistance.
NOTE: Do not use this page for your answers unless directed by the SGL. Write the questions on a separate piece of paper and then answer them.
Question 1 What is the straight-line distance in meters, from the road junction located at
EG11159339 to the road junction at EG13558919? Question 2 What is the straight-line distance in meters from the water tank in grid square
EG1088 and the Deschutes Fire Tower in grid square EG1795? Question 3 What is the road distance in meters from the bridge in grid square EG1198 to
the road junction at EH12750111? Question 4 What is the road distance, in meters, from the road junction at EG149884 to
the road junction at EG168884? Question 5 What is the shortest road distance in meters from the bridge in grid square
EG0385 to the church in grid square EG0687?
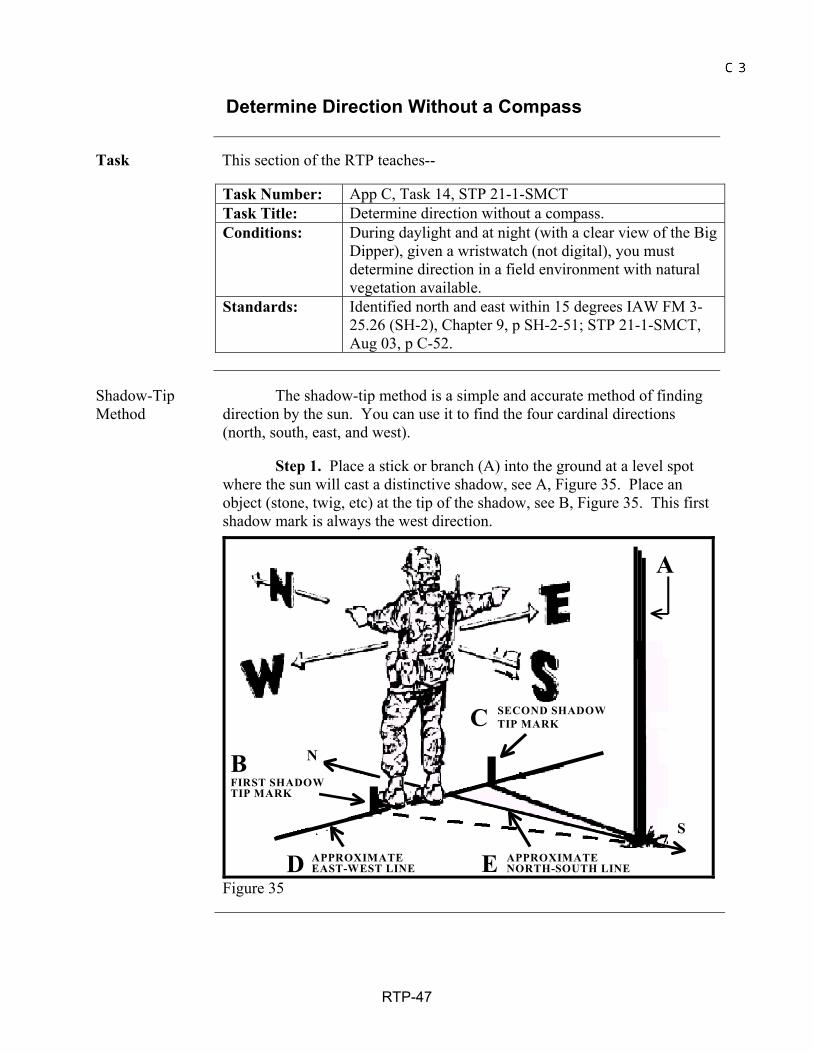
RTP-47
Determine Direction Without a Compass
Task This section of the RTP teaches--
Task Number: App C, Task 14, STP 21-1-SMCTTask Title: Determine direction without a compass. Conditions: During daylight and at night (with a clear view of the Big
Dipper), given a wristwatch (not digital), you must determine direction in a field environment with natural vegetation available.
Standards: Identified north and east within 15 degrees IAW FM 3-25.26 (SH-2), Chapter 9, p SH-2-51; STP 21-1-SMCT, Aug 03, p C-52.
Shadow-Tip Method
The shadow-tip method is a simple and accurate method of finding direction by the sun. You can use it to find the four cardinal directions (north, south, east, and west).
Step 1. Place a stick or branch (A) into the ground at a level spot
where the sun will cast a distinctive shadow, see A, Figure 35. Place an object (stone, twig, etc) at the tip of the shadow, see B, Figure 35. This first shadow mark is always the west direction.
N
S
A
BFIRST SHADOW TIP MARK
C SECOND SHADOWTIP MARK
D APPROXIMATEEAST-WEST LINE E APPROXIMATE
NORTH-SOUTH LINE Figure 35
BertaF
C 3

RTP-48
Shadow-Tip Method, continued
Step 2. Wait 10 to 15 minutes until the shadow tip moves. Mark the new tip of the shadow in the same way as you did the first shadow tip, see C, Figure 35. This will be your eastern setting.
NOTE. Since the sun rises in the east and sets in the west, the first shadow tip you mark is always west and the second mark is always east.
Step 3. Draw a line through the two marks/points that you made of the shadow tips to get an approximate east-west line, see D, Figure 35.
Step 4. Standing with the first mark (west) to your left, the other
directions become simple. You are facing north, to your right is east and to your rear is south, Figure 35.
NOTE. A line drawn perpendicular to the east-west line at any point is the approximate north-south line, see E, Figure 35.
Watch Method You can use a watch to also determine the approximate true north
and true south. You must use a watch that has hands. 1. North Temperate Zone. For standard time, point the hour hand
toward the sun. You can find a south line between the hour hand and 1200 hours, Figure 36. For daylight saving time, you will find the north-south line between the hour hand and 1300 Hours.
H ou r H and12 00 H o urs
S
Figure 36

RTP-49
Watch Method, continued
NOTE: If there is any doubt as to which end of the line is north, remember that the sun is in the east before noon and west after noon.
2. Southern Temperate Zone. Refer to Chapter 9, FM 3-25.26 (SH-2), page 9-8 for instructions on this method.
Star Method at Night, Northern Hemisphere
The main constellations to learn are the Ursa Major--Big Dipper--and Cassiopeia. Neither of these constellations ever set. They are always visible on a clear night. Use them to locate the North Star, also known as Polaris or Polar Star. The North Star forms part of the Little Dipper--Ursa Minor--handle and could cause confusion with the Big Dipper. Prevent confusion by using both the Big Dipper and Cassiopeia together. The Big Dipper and Cassiopeia are always directly opposite of each other with the North Star between them, Figure 37. They rotate in a counterclockwise direction around the North Star. So, the North Star stays stationary in the sky.
Star Method at Night, Northern Hemisphere
The Big Dipper is a seven-star constellation in the shape of a dipper. The two stars forming the outer lip of the dipper are "pointer stars" because they direct you to the North Star.
Mentally draw a line using the two "pointer stars." Starting with the
"pointer star" at the closed end of the Bid Dipper, draw a line through the second "pointer star" to a distance of about five times the distance between the pointer stars. At this point you will find the North Star.
B ig D ip p er
P o la r is
C assio p e ia
Im aginary L ine
1 2
3 4 5
N orth P o le /T ru e N o rth
Figure 37

RTP-50
Cassiopeia has five stars that form a shape like a "W" or "M" on its
side. The North star is straight out from Cassiopeia's center star, Figure 37. Once you find the North Star, you locate the North Pole or True
North by drawing an imaginary line directly to the earth from the North Star.
NOTE: The North Star is less than one degree off true north and does not move from its place in the sky because the axis of the earth points towards it. This is why the Big Dipper and Cassiopeia rotate around the North Star.
Star Method at Night, Southern Hemisphere
Refer to Chapter 9, FM 3-25.26 (SH-2), page SH-2-59 and SH-2-60, for information on the star method at night, southern hemisphere.

RTP-51
Quiz 4
Quiz 4 Take a few moments now to review task 14, Determine Direction Without a Compass.
After sunset, go out on the NCOA grounds and look for the Big
Dipper and Cassiopeia to find the North Star.
NOTE: Do not write your answers on the sheet below unless directed by the SGL. Write the questions on a separate piece of paper and answer them.
Question 1 When using the shadow-tip method to determine direction, where on the
shadow do you place a mark, stone, etc? ___________________________ Question 2 When you place an object (stone, twig, etc.) to mark your first shadow,
which directional setting have you made? Question 3 What line do you set by drawing a line from the first shadow mark to the
second shadow mark? ________________________________ Question 4 If you draw a line perpendicular anywhere to the approximate east-west line,
what line will you have made?________________________________ Question 5 Once you establish your approximate east-west line on the shadow tip
method, how do you position yourself on that line to determine north, south, east, or west? _____________________________________________
Question 6 In the northern temperate zone, what piece on the watch do you point toward
the sun? ____________________ Question 7 What is the difference between determining direction in the northern
temperate zone during daylight saving and standard times? _____________

RTP-52
Quiz 4, cont
Question 8 Which two constellations can direct you to the North Star? ______________
and _______________. Question 9 Which two stars on the Big Dipper point to the North Star, and what are they
called? ___________________________________________________ Question 10 How far out from the Big Dipper do you draw your imaginary line to the
North Star? ___________________________________________________. Question 11 When you have found the North Star, which North have you found?
a. True North. b. Grid North. c. Magnetic North.
Question 12 In which direction does Cassiopeia and the Big Dipper rotate around the
North Star? a. Clockwise. b. North to South. c. Counterclockwise. d. They do not rotate around the North Star, they are fixed in the sky.

RTP-53
Orient a Map to the Ground by Map Terrain Association
Task This section of the RTP teaches--
Task Number: App C, Task 11, STP 21-1-SMCT Task Title: Orient a map to the ground by map terrain association. Conditions: Given a standard 1:50,000-scale military map in the field
in daylight. Standard: Oriented the map to within 30 degrees of north IAW FM
3-25.26 (SH-2), Chapter 11, p SH-2-75; STP 21-1-SMCT, Aug 03, p C-44.
Terrain Association
You can orient your map by terrain association when you don't have a compass, or you want to make a quick reference as you move across country.
Using this method requires a careful examination of the map and the
ground. You must know your approximate location and a knowledge of the terrain features appearing on your map so you can compare them with the physical features on the ground.
Hold the map in a horizontal position and line up the features you
see on the ground with those on the map. If you have a compass, you can check your orientation by:
1. Placing a compass along one of the north-south grid lines to
keep from orienting the map in the wrong direction, meaning 180 degrees out.
2. Aligning two or more features, e.g., a swamp to the left, and a water tower near a known city.
BertaF
C 3

RTP-54
Quiz 5
Quiz 5 NOTE TO STUDENTS: Utilize the points located in the NCOA area or
areas designate by the NCOA, 1:50,000 map of the local area, lensatic compass, pencil and paper, and quiz sheet 5. Orient your map to the ground by terrain association. Use your compass to ensure you are within 30 degrees of north including the incorporation of the declination constant. Should you have difficulties, contact your SGL or fellow students to compare your findings. NOTE TO NCOA: Provide students a map of the local area, and points throughout the NCOA, or areas in close proximity, where students can orient their maps by terrain association. Students must orient their maps to within 30 degrees of north, including the incorporation of the declination constant. Provide the student with Quiz Sheet 5.

RTP-55
Determine a Location on the Ground by Terrain Association
Task This section of the RTP teaches--
Task Number: App C, Task 7, STP 21-1-SMCT Task Title: Determine a location on the ground by terrain
association. Conditions: In the field during daylight, while at an unknown
location on the ground, given a standard 1:50,000-scale map of the area, pencil, paper, a coordinate scale and protractor, and a known point on the ground.
Standards: Determined the six-digit coordinate of your location with a 100-meter tolerance within seven minutes IAW FM 3-25.26 (SH-2), Chapter 11, p SH-2-75; STP 21-1-SMCT, Aug 03, p C-33.
Determine Location by Terrain Association
First you must determine the terrain features of your location. You must have a knowledge of the terrain features appearing on your map so you can compare them with the physical features on the ground at your location.
Orient the map to the ground by terrain association, and then
determine the four cardinal directions (north, south, east, and west). Remember, you can determine the directions by lining up know terrain features on the ground with those on your map, e.g., swamp on the left, and a known town on the right. Also, you can use the shadow-tip method of direction.
To determine your location, you must relate the terrain features on the ground to those shown on the map. After determining where the terrain features on the ground and those on your map coincide, determine the six-digit grid coordinate of your location using the coordinate scale and protractor.
BertaF
C 3

RTP-56
Quiz 6
Quiz 6 NOTE TO STUDENTS: Utilize the points located in the NCOA area or areas designated by the NCOA, map of the local area, pencil, paper, GTA 5-2-12, and Quiz Sheet 6. Determine your location on the ground by terrain association--within a 100 meter tolerance--by providing a six-digit coordinate.
NOTE TO NCOA: Set up points through out the NCOA, or points in close proximity, where students can determine a location on the ground by terrain association to the standards described above. Provide the students with quiz sheet 6.
This concludes the RTP

This page intentionally left blank