Sony Ericsson Mobile Communications AB - Altehandys.de
78
Contents Getting started......................6 Assembly............................................6 Turning on the phone.........................6 Help....................................................7 Charging the battery..........................7 Phone overview..................................9 Menu overview.................................11 Navigation........................................13 Memory............................................14 Phone language...............................15 Entering text.....................................15 Walkman™ .........................16 Stereo portable handsfree...............16 Walkman™ player............................17 TrackID™ and MusicID™ ................20 Video player.....................................20 FM radio ..........................................21 MusicDJ™........................................22 Record sound...................................22 AT&T Music......................................22 Transferring and handling content.................23 Handling content in the phone.........23 Sending content to another phone...............................................24 Using a USB cable...........................24 Transferring content to and from a computer.......................................26 Phone name.....................................28 Using Bluetooth™ wireless technology........................................28 Backing up and restoring.................29 Calling..................................31 Making and receiving calls...............31 Address Book ..................................33 Speed dial........................................36 More calling features........................36 Messaging...........................39 Text and multimedia messages.......39 Conversations..................................41 Voice messages...............................41 Mobile Email.....................................41 Instant Messaging (IM).....................42 Imaging ...............................44 Using the camera.............................44 More camera features......................45 1 This is an Internet version of this publication. © Print only for private use.
-
Upload
khangminh22 -
Category
Documents
-
view
0 -
download
0
Transcript of Sony Ericsson Mobile Communications AB - Altehandys.de

Contents
Getting started......................6Assembly............................................6Turning on the phone.........................6Help....................................................7Charging the battery..........................7Phone overview..................................9Menu overview.................................11Navigation........................................13Memory............................................14Phone language...............................15Entering text.....................................15
Walkman™ .........................16Stereo portable handsfree...............16Walkman™ player............................17TrackID™ and MusicID™ ................20Video player.....................................20FM radio ..........................................21MusicDJ™........................................22Record sound...................................22AT&T Music......................................22
Transferring andhandling content.................23Handling content in the phone.........23
Sending content to anotherphone...............................................24Using a USB cable...........................24Transferring content to and froma computer.......................................26Phone name.....................................28Using Bluetooth™ wirelesstechnology........................................28Backing up and restoring.................29
Calling..................................31Making and receiving calls...............31Address Book ..................................33Speed dial........................................36More calling features........................36
Messaging...........................39Text and multimedia messages.......39Conversations..................................41Voice messages...............................41Mobile Email.....................................41Instant Messaging (IM).....................42
Imaging ...............................44Using the camera.............................44More camera features......................45
1This is an Internet version of this publication. © Print only for private use.

Camera tips and tricks.....................45Viewing and tagging photos............46Using photos....................................47Working with photos........................47Printing photos.................................47
MEdia™ Net........................48Bookmarks.......................................48History pages...................................48More browser features.....................49Internet security and certificates......50
Synchronizing.....................50Synchronizing using a computer......50
More features......................51Flight mode......................................51Gesture control................................51Alarms..............................................52Calendar...........................................53Notes................................................53Tasks................................................54Profiles.............................................54Time and date..................................55Theme..............................................55Main menu layout.............................55Ringtones.........................................55Screen orientation............................56
Games..............................................56Applications.....................................56Locks................................................57Password Saver ..............................58IMEI number.....................................59Using the flip....................................59
Troubleshooting..................59Common questions..........................59Error messages................................62
Hearing Aid Compatibility...63Hearing Aid Settings........................63Hearing Aid Compatibility andNew Technologies............................63Hearing Aid Compatibility Rating.....64
Important information.........65
Index....................................75
2This is an Internet version of this publication. © Print only for private use.

Sony Ericsson W518a Walkman™This User guide is published by Sony EricssonMobile Communications AB or its local affiliatedcompany, without any warranty. Improvements andchanges to this User guide necessitated bytypographical errors, inaccuracies of currentinformation, or improvements to programs and/orequipment, may be made by Sony Ericsson MobileCommunications AB at any time and without notice.Such changes will, however, be incorporated intonew editions of this User guide.All rights reserved.©Sony Ericsson Mobile Communications AB, 2009Publication number: 1225-2673.1Attention: Some of the services and featuresdescribed in this User guide are not supported byall networks and/or service providers in all areas.Without limitation, this applies to the GSMInternational Emergency Number 112. Pleasecontact AT&T or your service provider todetermine availability of any specific service orfeature and whether additional access or usagefees apply.Please read the Important information before youuse your phone.Your phone has the capability to download, storeand forward additional content, for exampleringtones. The use of such content may be restrictedor prohibited by rights of third parties, including butnot limited to restriction under applicable copyrightlaws. You, and not Sony Ericsson, are entirelyresponsible for additional content that youdownload to or forward from your phone. Prior toyour use of any additional content, please verify thatyour intended use is properly licensed or isotherwise authorized. Sony Ericsson does notguarantee the accuracy, integrity or quality of anyadditional content or any other third party content.Under no circumstances will Sony Ericsson be liablein any way for your improper use of additionalcontent or other third party content.
Smart-Fit Rendering is a trademark or a registeredtrademark of ACCESS Co., Ltd.Bluetooth is a trademark or a registered trademarkof Bluetooth SIG Inc. and any use of such mark bySony Ericsson is under license.The Liquid Identity logo, SensMe, MusicDJ,PhotoDJ, TrackID and VideoDJ are trademarks orregistered trademarks of Sony Ericsson MobileCommunications AB.TrackID™ is powered by Gracenote MobileMusicID™. Gracenote and Gracenote MobileMusicID are trademarks or registered trademarks ofGracenote, Inc.WALKMAN, WALKMAN logo, Sony, Memory StickMicro™ and M2™ are trademarks or registeredtrademarks of Sony Corporation.Media Go is a trademark or registered trademark ofSony Media Software and Services.PictBridge is a trademark or registered trademark ofCanon Kabushiki Kaisha Corporation.Style-Up is a trademark or registered trademark ofSony Ericsson Mobile Communications AB.MEdia is a trademark or registered trademark of ATTMobility.Yahoo! Is a trademark or a registered trademark ofYahoo! Inc.AOL and AIM are trademarks or registeredtrademarks of AOL LLC.AT&T is a registered trademark of AT&T Corporation.Ericsson is a trademark or registered trademark ofTelefonaktiebolaget LM Ericsson.Adobe Photoshop Album Starter Edition is atrademark or registered trademark of AdobeSystems Incorporated in the United States and/orother countries.Microsoft, ActiveSync, Windows, Outlook, WindowsMedia and Vista are registered trademarks ortrademarks of Microsoft Corporation in the UnitedStates and/or other countries.
3This is an Internet version of this publication. © Print only for private use.

T9™ Text Input is a trademark or a registeredtrademark of Tegic Communications. T9™ TextInput is licensed under one or more of the following:U.S. Pat. Nos. 5,818,437, 5,953,541, 5,187,480,5,945,928, and 6,011,554; Canadian Pat. No.1,331,057, United Kingdom Pat. No. 2238414B;Hong Kong Standard Pat. No. HK0940329; Republicof Singapore Pat. No. 51383; Euro.Pat. No. 0 842463(96927260.8) DE/DK, FI, FR, IT, NL, PT, ES, SE,GB; and additional patents are pending worldwide.This product is protected by certain intellectualproperty rights of Microsoft. Use or distribution ofsuch technology outside of this product is prohibitedwithout a license from Microsoft.Content owners use Windows Media digital rightsmanagement technology (WMDRM) to protect theirintellectual property, including copyrights. Thisdevice uses WMDRM software to access WMDRM-protected content. If the WMDRM software fails toprotect the content, content owners may askMicrosoft to revoke the software's ability to useWMDRM to play or copy protected content.Revocation does not affect unprotected content.When you download licenses for protected content,you agree that Microsoft may include a revocationlist with the licenses. Content owners may requireyou to upgrade WMDRM to access their content. Ifyou decline an upgrade, you will not be able toaccess content that requires the upgrade.This product is licensed under the MPEG-4 visualand AVC patent portfolio licenses for the personaland non-commercial use of a consumer for (i)encoding video in compliance with the MPEG-4visual standard ("MPEG-4 video") or the AVCstandard ("AVC video") and/or (ii) decoding MPEG-4 or AVC video that was encoded by a consumerengaged in a personal and non-commercial activityand/or was obtained from a video provider licensedby MPEG LA to provide MPEG-4 and/or AVC video.No license is granted or shall be implied for any otheruse. Additional information including that relating topromotional, internal and commercial uses and
licensing may be obtained from MPEG LA, L.L.C.See http://www.mpegla.com. MPEG Layer-3 audiodecoding technology licensed from Fraunhofer IISand Thomson.Java, JavaScript and Java-based trademarks andlogos are trademarks or registered trademarks ofSun Microsystems, Inc. in the U.S. and othercountries.End-user license agreement for Sun Java Platform,Micro Edition.1. Restrictions: Software is confidential copyrightedinformation of Sun and title to all copies is retainedby Sun and/or its licensors. Customer shall notmodify, decompile, disassemble, decrypt, extract,or otherwise reverse engineer Software. Softwaremay not be leased, assigned, or sublicensed, inwhole or in part.2. Export regulations: This product, including anysoftware or technical data contained in oraccompanying the product, may be subject toimport and export regulations of the EuropeanUnion, the United States and other countries. Theuser and any possessor of the product agrees tocomply strictly with all such regulations andacknowledges that it is their responsibility to obtainany required licenses to export, re-export, or importthis product. Without limiting the foregoing, and asan example, the user and any possessor of theproduct: (1) must not knowingly export or re-exportProducts to destinations identified pursuant toArticles in Chapter II of European Council Regulation(EC) 1334/2000; (2), must comply with U.S.government Export Administration Regulations("EAR", 15 C.F.R. §§ 730-774, http://www.bis.doc.gov/ ) administered by Department ofCommerce, Bureau of Industry and Security; and (3)must comply with economic sanctions regulations(30 C.F.R. §§ 500 et. seq.,., http://www.treas.gov/offices/enforcement/ofac/) administered by the U.S.Department of Treasury, Office of Foreign AssetsControl. The user and any possessor of the product
4This is an Internet version of this publication. © Print only for private use.

may not transport or deliver the product, itsaccessories or separate software to any country,region, entity or person prohibited by theseregulations.Restricted Rights: Use, duplication or disclosure bythe United States government is subject to therestrictions as set forth in the Rights in TechnicalData and Computer Software Clauses in DFARS252.227-7013(c) (1) (ii) and FAR 52.227-19(c) (2) asapplicable.Other product and company names mentionedherein may be the trademarks of their respectiveowners.Any rights not expressly granted herein are reserved.All illustrations are for illustration only and may notaccurately depict the actual phone.Your phone is designed to make it easy for you toaccess a wide variety of content. For yourprotection, we want you to be aware that someapplications that you enable may involve thelocation of your phone being shared. Forapplications available through AT&T, we offerprivacy controls that let you decide how anapplication may use the location of your phone andother phones on your account. However, the AT&Tprivacy tools do not apply to applications availableoutside of AT&T. Please review the terms andconditions and the associated privacy policy foreach location-based service to learn how locationinformation will be used and protected. In addition,your AT&T phone may be used to access the Internetand to download, and/or purchase goods,applications, and services from AT&T or elsewherefrom third parties. AT&T provides tools for you tocontrol access to the Internet and certain Internetcontent. These controls may not be available forcertain devices which bypass AT&T controls.
Instruction symbolsThese symbols may appear in the Userguide.
Note
Tip
Warning
> Use a selection or navigation key toscroll and select. See Navigation onpage 13.
5This is an Internet version of this publication. © Print only for private use.

Getting started
AssemblyBefore you start using your phone, youneed to insert a SIM card and thebattery.
To insert the SIM card
1 Remove the battery cover.2 Slide the SIM card into its holder with
the gold-colored contacts facingdown.
To insert the battery
1 Insert the battery with the label side upand the connectors facing each other.
2 Attach the battery cover.
Turning on the phone
To turn on the phone
1 Press and hold down .2 Enter your SIM card PIN, if requested,
and select OK.3 Select a language.4 Follow the instructions to use the setup
wizard for basic settings and usefultips.
If you want to correct a mistake when youenter your PIN, press .
SIM cardWhen you register as a subscriber withAT&T, you get a SIM (SubscriberIdentity Module) card, which containsinformation about your subscription.Always turn off your phone and detach
6 Getting startedThis is an Internet version of this publication. © Print only for private use.

the charger before you insert or removethe SIM card.
You can save contacts on the SIM cardbefore you remove it from your phone.See To copy names and numbers to theSIM card on page 34.
PINYou may need a PIN (PersonalIdentification Number) to activate theservices and functions in your phone.Your PIN is supplied by AT&T. EachPIN digit appears as *, unless it startswith emergency number digits, forexample, 112 or 911. You can see andcall an emergency number withoutentering a PIN.
If you enter the wrong PIN three times ina row, the SIM card is blocked. See SIMcard lock on page 57.
StandbyAfter you have turned on your phoneand entered your PIN, the name of thenetwork operator appears. This view iscalled standby. Your phone is nowready for use.
Using other networksMaking and receiving calls, usingmessaging, and data transfer, forexample, Internet-based services,
outside your home network (roaming),may incur additional costs. ContactAT&T for more information.
HelpIn addition to this User guide, Featureguides and more information areavailable atwww.sonyericsson.com/support.
Help and information are also availablein your phone.
To view information about functions• Scroll to a function and select Info, if
available. In some cases, Info appearsunder Options.
To view the phone status• Select Menu > Settings > General >
Phone status.
Charging the batteryThe phone battery is partly chargedwhen you buy it.
Getting started 7This is an Internet version of this publication. © Print only for private use.

To charge the battery
1 Connect the charger to the phone. Ittakes approximately 2.5 hours to fullycharge the battery. Press a key to viewthe screen.
2 Remove the charger by tilting the plugupwards.
You can use your phone while it ischarging. You can charge the battery atany time and for more or less than 2.5hours. You can interrupt the chargingwithout damaging the battery.
8 Getting startedThis is an Internet version of this publication. © Print only for private use.

Phone overview
1 Ear speaker
2 Screen
3 Selection keys
4 Call key
5 Activity menu key
6 Microphone
7 Connector for charger, handsfree and USB cable
8 End key, On/off key
9 C key (Clear)
10 Navigation key
11 Silent key
Getting started 9This is an Internet version of this publication. © Print only for private use.

12 Media player key - play/stop
13 Media player key - next/fast forward
14 Screen light sensor
15 Volume, digital zoom keys
16 Battery cover
17 Key lock switch
18 Memory Stick Micro™ (M2™) slot
19 Loudspeaker
20 Media player key - previous/rewind
21 External display
22 Main camera
10 Getting startedThis is an Internet version of this publication. © Print only for private use.

Menu overview
AT&T MusicWALKMANShop MusicMusic IDXM RadioMusic VideosMake-UR-TonesCommunityMusic Apps
MEdia Net
Camera
My StuffCamera albumMusicPicturesVideoThemesWeb pagesGamesApplicationsOther
MessagingWrite newInbox/ConversationsMobile EmailIM*Call voicemailSent messagesDrafts
Saved messagesTemplatesManage messagesSettings
MEdia Mall
Address BookMyselfNew contact
Tools & AppsApplicationsToolsOrganiserAlarmsFM RadioRecord soundRecent calls
Yellow Pages
AT&T GPSAT&T NavigatorWhereShop GPS Apps
EntertainmentPhotoMusicVideoGamesSettings
Settings
GeneralProfilesTime & dateLanguageGesture controlSoftware update ***Voice controlNew eventsShortcutsFlight modeSecuritySetup wizardAccessibilityPhone statusMaster reset
Sounds & alertsRing volumeRingtoneSilent modeIncreasing ringVibrating alertMessage alertKey response
DisplayWallpaperMain menu layoutThemeScreen saverBrightness
CallsSpeed dialSmart search
Getting started 11This is an Internet version of this publication. © Print only for private use.
Forward callsManage callsVideo Share*Time & cost*Show/hide my no.HandsfreeOpen to answer
ConnectivityBluetoothUSBGPSPhone nameMobile networks***Internet settingsStreaming settingsMessage settings*SIP settingsIMS settingsAccessories
* Some menus are operator-,network- and subscription-dependent.*** Menu appears only whenavailable.
12 Getting startedThis is an Internet version of this publication. © Print only for private use.

Navigation
To access the main menu• When Menu appears on the screen,
press the right selection key to selectMenu.
• If Menu does not appear on the screen,press , and then press the rightselection key to select Menu.
To navigate the phone menus
• Press the navigation key , , or tomove through the menus.
To select actions on the screen• Press the left, center or right selection
key.
To view options for an item• Select Options to, for example, edit.
To end a function• Press .
To return to standby• Press .
To navigate your media1 Select Menu > Media.2 Scroll to a menu item and press .3 To go back, press .
To delete items• Press to delete items such as
numbers, letters, pictures and sounds.
Status bar iconsYou may see icons in the standbyscreen of your phone.
Icon Description
GSM network signal strength
GPRS network is within range andcan be used
EDGE network is within range andcan be used
HSDPA network is within rangeand can be used
Battery strength indicator
Battery is charging
Missed incoming call
Voicemail waiting
Alarm is set and turned on
Getting started 13This is an Internet version of this publication. © Print only for private use.

Text messaging waiting
Bluetooth is turned on
Headphones are attached
Internet session is active
Key lock is on
Silent mode is on
ShortcutsYou can use keypad shortcuts to godirectly to functions from standby.
To use navigation key shortcuts• Press , , or to go directly to a
function.
To edit a navigation key shortcut1 Select Menu > Settings > General >
Shortcuts.2 Scroll to an option and select Edit.3 Scroll to a menu option and select
Shortc..
Main menu shortcutsMenu numbering starts from the top lefticon and moves across and then downrow by row.
To go directly to a main menu item• Select Menu and press – , ,
or .The Main menu layout must be set toGrid. See To change the main menulayout on page 55.
Activity menuThe activity menu allows you tomultitask and gives you a quick accessto:
• New events – missed calls and newmessages.
• Running apps – applications that arerunning in the background.
• My shortcuts – add your favoritefunctions to access them quickly.
• Internet – quick access to theInternet.
To open the activity menu• Press .
MemoryYou can save content on a memorycard, in the phone memory and on theSIM card. Photos and music are savedon the memory card, if a memory cardis inserted. If not, or if the memory cardis full, photos and music are saved inthe phone memory. Messages and
14 Getting startedThis is an Internet version of this publication. © Print only for private use.

contacts are saved in the phonememory, but you can choose to savethem on the SIM card.
Memory card
You may have to purchase a memory cardseparately.
Your phone supports Memory StickMicro™ (M2™) memory card addingmore storage space to your phone. Itcan also be used as a portable memorycard with other compatible devices.
You can move content between amemory card and the phone memory.See Handling content in the phone onpage 23.
To insert a memory card
• Remove the battery cover and insertthe memory card with the gold-coloredcontacts facing down.
Phone languageYou can select a language to use inyour phone.
To change the phone language1 Select Menu > Settings > General >
Language > Phone language.2 Select an option.
Entering textYou can use multitap text input or T9™Text Input to enter text. The T9 TextInput method uses a built-in dictionary.
To change text input method• When you enter text, press and hold
down .
To shift between capitals and lower-case letters
• When you enter text, press .
To enter numbers• When you enter text, press and hold
down – .
To enter periods and commas• When you enter text, press .
To enter a symbol1 When you enter text, select Options >
Add symbol.
Getting started 15This is an Internet version of this publication. © Print only for private use.

2 Scroll to a symbol and select Insert.
To enter text using T9™ Text Input1 Select, for example, Menu >
Messaging > Write new > Message.2 If is not displayed, press and hold
down to change to T9 Text Input.3 Press each key only once, even if the
letter you want is not the first letter onthe key. For example, to write the word“Jane”, press , , , . Writethe whole word before looking at thesuggestions.
4 Use or to view suggestions.5 Press to accept a suggestion.
To enter text using multitap1 Select, for example, Menu >
Messaging > Write new > Message.2 If is displayed, press and hold down
to change to multitap text input.3 Press – repeatedly until the
desired letter appears.4 When a word is written, press to
add a space.
To add words to the built-in dictionary1 When you enter text using T9 Text
Input, select Options > Spell word.2 Write the word using multitap input and
select Insert.
Walkman™You can listen to music, audio booksand podcasts. For more information,see Transferring content to and from acomputer on page 26.
Stereo portable handsfree
To use a handsfree• Connect a portable handsfree. Music
stops when you receive a call andresumes when the call has ended.If headphones are not included with thephone, you may purchase themseparately.
16 Walkman™This is an Internet version of this publication. © Print only for private use.

Walkman™ player
You can use the media player keys tocontrol the Walkman™ player when thephone is closed. The keys must beunlocked. For information on how tounlock the keys, see To unlock themedia player keys on page 59.
To play music1 When the phone is open, select Menu
> AT&T Music > WALKMAN.2 Browse by category using the
navigation key.3 Scroll to a title and select Play.
You can use to start playing musicwhen the phone is closed. starts thelast used music application, that is theWalkman™ player or the radio.
To stop playing music• When the phone is closed, press .
To fast forward and rewind• When the phone is closed, press and
hold down or .
To move between tracks• When the phone is closed, press or
.
To minimize the player• When the phone is open, select
Options > Minimise.
To return to the player• When the phone is open and you are
not in any menu, press .
Shake control
To switch tracks
1 When the phone is closed and music isplaying, press and hold down andmove the phone to the right with a flickof your wrist to go to the next track.
2 To go to the previous track, use thesame action to the left.
Walkman™ 17This is an Internet version of this publication. © Print only for private use.

To shuffle tracks
• When the phone is closed and music isplaying, press and hold down andshake your phone.
To change the volume
1 When the phone is closed and music isplaying, hold the phone out in front ofyou facing upwards.
2 Press and hold down and bendyour arm upwards towards you toincrease the volume. To decrease thevolume, repeat the action in theopposite direction.
PlaylistsYou can create playlists to organizeyour music. You can add tracks andfolders to a playlist. It may take a fewminutes for the phone to create aplaylist.
To create a playlist1 Select Menu > AT&T Music >
WALKMAN > Playlists.2 Scroll to New playlist and select Add.3 Enter a name and select OK.4 For each track you want to add, scroll
to the track and select Mark.5 Select Add to add the marked tracks to
the playlist.
To add tracks to a playlist1 When the phone is open, select Menu
> AT&T Music > WALKMAN > Playlists.2 Select a playlist.3 Scroll to Add music and select Add.4 For each track you want to add, scroll
to the track and select Mark.
18 Walkman™This is an Internet version of this publication. © Print only for private use.

5 Select Add to add the marked tracks tothe playlist.
SensMe™
With SensMe™ you can createplaylists in two ways, by mood or fromall the tracks in your phone. By mood,you first use Media Go™ to transfertracks to your phone. Information suchas mood, tempo and chords is thenadded. The tracks are displayed asdots on a map with two axes. In theAll view, all the tracks in your phone areplaced randomly on the map.
To create a playlist by mood1 When the phone is open, select Menu
> Media > Music.2 Scroll to SensMe™ and select Open.3 Press , , or .4 Make sure you are in Mood view. If you
are not, select Mood.5 To preview different tracks, press , ,
or .
6 To choose an area of tracks, selectAdd and press or .
7 To create the playlist and play it in theWalkman™ player, select Create.
8 Select Options > Save playlist.9 Enter a name and select OK.
To create a playlist from All view1 When the phone is open, select Menu
> Media > Music.2 Scroll to SensMe™ and select Open.3 Press , , or .4 Make sure you are in All view. If you are
not, select All.5 To preview different tracks, press , ,
or .6 To choose an area of tracks, select
Add and press or .7 To create the playlist and play it in the
Walkman™ player, select Create.8 Select Options > Save playlist.9 Enter a name and select OK.
Audio booksIf you use Media Go™ to transfer audiobooks to your phone from a computer,you can listen to the audio books inyour phone. It may take a few minutesbefore a transferred audio book
Walkman™ 19This is an Internet version of this publication. © Print only for private use.
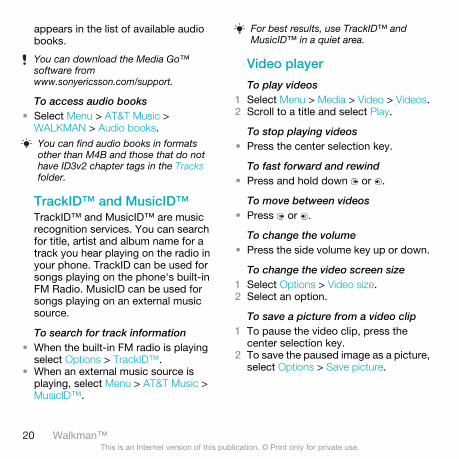
appears in the list of available audiobooks.
You can download the Media Go™software fromwww.sonyericsson.com/support.
To access audio books• Select Menu > AT&T Music >
WALKMAN > Audio books.You can find audio books in formatsother than M4B and those that do nothave ID3v2 chapter tags in the Tracksfolder.
TrackID™ and MusicID™TrackID™ and MusicID™ are musicrecognition services. You can searchfor title, artist and album name for atrack you hear playing on the radio inyour phone. TrackID can be used forsongs playing on the phone's built-inFM Radio. MusicID can be used forsongs playing on an external musicsource.
To search for track information• When the built-in FM radio is playing
select Options > TrackID™.• When an external music source is
playing, select Menu > AT&T Music >MusicID™.
For best results, use TrackID™ andMusicID™ in a quiet area.
Video player
To play videos1 Select Menu > Media > Video > Videos.2 Scroll to a title and select Play.
To stop playing videos• Press the center selection key.
To fast forward and rewind• Press and hold down or .
To move between videos• Press or .
To change the volume• Press the side volume key up or down.
To change the video screen size1 Select Options > Video size.2 Select an option.
To save a picture from a video clip1 To pause the video clip, press the
center selection key.2 To save the paused image as a picture,
select Options > Save picture.
20 Walkman™This is an Internet version of this publication. © Print only for private use.

FM radio
You can use the media player keys tocontrol the radio when the phone isclosed. The keys must be unlocked.For information on how to unlock thekeys, see To unlock the media playerkeys on page 59.
Do not use your phone as a radio in placeswhere this is prohibited.
To turn on the FM radio1 Connect a handsfree to the phone.2 Select Menu > Tools & Apps > Radio.
You can use to turn on the radiowhen the phone is closed. starts thelast used music application, that is theradio or the Walkman™ player.
To search for channels automatically• When the phone is open, select
Search.
To search for channels manually• When the phone is closed, press or
.
To change the volume• Press the side volume key up or down.
To minimize the FM radio• When the phone is open, select
Options > Minimise.
To return to the FM radio• Select Menu > Tools & Apps > Radio.
Saving channelsYou can save up to 20 preset channels.
To save channels automatically• When the phone is open, select
Options > Auto save.
To save channels manually1 When the phone is open and you have
found a radio channel, select Options >Save.
2 Scroll to a position and select Insert.
To select saved channels1 When the phone is open, select
Options > Channels.2 Select a radio channel.
To switch between saved channels• When the phone is closed, press and
hold down or .
Walkman™ 21This is an Internet version of this publication. © Print only for private use.

MusicDJ™You can compose and edit your ownmelodies to use as ringtones. Pre-arranged sounds with differentcharacteristics are available.
To compose a melody1 Select Menu > Tools & Apps > Tools >
MusicDJ™.2 Select to Insert, Copy or Paste sounds.3 Use , , or to scroll between the
sounds.4 Select Options > Save melody.
Record soundYou can record a voice memo or a call.Recorded sounds can also be set asringtones.In some countries or states it is requiredby law that you inform the other personbefore recording the call.
To record a sound• Select Menu > Entertainment > Record
sound > Record.
To record a call1 During an ongoing call, select Options
> Record.2 To save the recording, select Save.
To listen to a recording1 Select Menu > Entertainment.2 Scroll to Music and select Open.3 Scroll to a recording and select Play.
AT&T MusicGo to AT&T Music to access yourWalkman player, purchase ringtones orto access other music applications.
AT&T Music options• WALKMAN – a music player.• Shop Music – discover, sample and
download songs directly from yourphone.
• MusicID – identify the song title, artistor album in a flash by holding yourphone up to the music. MusicID canidentify millions of songs.
• XM Radio – XM Mobile Radio® offerscommercial-free music stations.
• Music Videos – stream your favoritemobile videos straight to your phone.
• Make-UR-Tones – lets you createcustom ringtones from full tracksongs.
• Community – access a hot usercommunity where you can chat withyour friends about the latest music.
• Music Apps – purchase music relatedapplications.
22 Walkman™This is an Internet version of this publication. © Print only for private use.

To access AT&T Music• Select Menu > AT&T Music and select
an option.
Transferring andhandling contentYou can transfer and handle contentsuch as pictures and music.
You are not allowed to exchange somecopyright-protected material. identifiesa protected item.
Handling content in the phoneYou can use File manager in yourphone, to handle content saved in thephone memory or on a memory card.Tabs and icons in File manager showwhere the content is saved. If thememory is full, delete some content tocreate space.
To view memory status1 Select Menu > File manager.2 Select Options > Memory status.3 Select Memory card or Phone.
To select more than one item in afolder
1 Select Menu > File manager.2 Scroll to a folder and select Open.3 Select Options > Mark > Mark several.4 For each item you want to mark, scroll
to the item and select Mark.
Transferring and handling content 23This is an Internet version of this publication. © Print only for private use.

To move items between the phonememory and the memory card
1 Select Menu > File manager.2 Find an item and select Options >
Manage file > Move.3 Select Memory card or Phone.4 Scroll to a folder and select Open.5 Select Paste.
To view information about content1 Select Menu > File manager.2 Find an item and select Options >
Information.
Sending content to anotherphoneYou can send content, for example, inmessages or using Bluetooth™wireless technology.
To send content1 Scroll to an item and select Options >
Send.2 Select a transfer method.
Make sure the receiving device supportsthe transfer method you select.
Using a USB cableYou can connect your phone to acomputer with a USB cable to
synchronize, transfer and back upphone content and use your phone asa modem. For more information, go towww.sonyericsson.com/support toread Feature guides.
You may have to purchase a USB cableseparately.
Before using a USB cableSee Required operating systems onpage 27.
Only use a USB cable supported by yourphone. Do not remove the USB cablefrom your phone or computer duringtransfer as this may corrupt the memorycard or the phone memory.
PC SoftwareYou may use Windows® Explorer,Sony Ericsson PC Suite, or Media Go™with your phone. Sony Ericsson PCsoftware is available fromwww.sonyericsson.com/support to usewith your phone.
In the phone menu, you must select theUSB mode based on how you plan touse the USB cable with your phone.The table lists the available computerapplications and the correspondingUSB mode for each.
24 Transferring and handling contentThis is an Internet version of this publication. © Print only for private use.
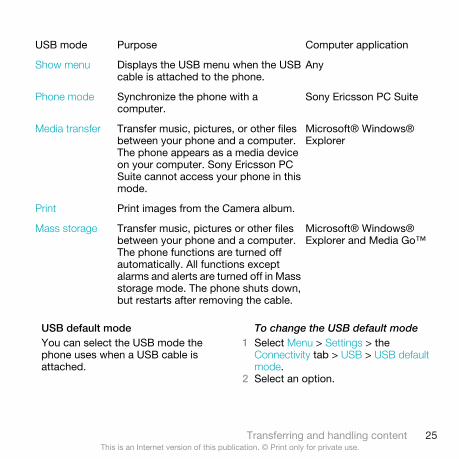
USB mode Purpose Computer application
Show menu Displays the USB menu when the USBcable is attached to the phone.
Any
Phone mode Synchronize the phone with acomputer.
Sony Ericsson PC Suite
Media transfer Transfer music, pictures, or other filesbetween your phone and a computer.The phone appears as a media deviceon your computer. Sony Ericsson PCSuite cannot access your phone in thismode.
Microsoft® Windows®Explorer
Print Print images from the Camera album.
Mass storage Transfer music, pictures or other filesbetween your phone and a computer.The phone functions are turned offautomatically. All functions exceptalarms and alerts are turned off in Massstorage mode. The phone shuts down,but restarts after removing the cable.
Microsoft® Windows®Explorer and Media Go™
USB default modeYou can select the USB mode thephone uses when a USB cable isattached.
To change the USB default mode1 Select Menu > Settings > the
Connectivity tab > USB > USB defaultmode.
2 Select an option.
Transferring and handling content 25This is an Internet version of this publication. © Print only for private use.

Disconnect the USBThe correct method for disconnectingthe USB cable depends on the USBmode.
To disconnect the USB cable safely inMass storage or Phone mode
1 When the phone is in Mass storage orPhone mode, right-click the removabledisk icon in Windows Explorer.
2 Select Eject.3 When the message is shown, Mass
storage session ended. It is now safe toremove the USB cable..
To disconnect the USB cable safely inMedia transfer or Printer mode
• Remove the USB cable.
Transferring content to andfrom a computerWith Windows® Explorer or MediaGo™, you can transfer music fromCDs, music on your computer, or musicthat you have purchased online to amemory card. Windows® Explorer is afile manager that often comes with yourcomputer and can be used to view andmanage your files and folders. MediaGo™ enables you to transfer music,photos and videos between yourphone and a computer. You can
download Media Go™ fromwww.sonyericsson.com/support. Formore information on using the phonewith a USB cable, see Using a USBcable on page 24.
To use the phone with Windows®Explorer
1 Connect a USB cable to the phone andthe computer.
2 On your phone (depending on thephone setup):• The phone may switch to Media
transfer and be ready to use.• If prompted with a USB mode menu,
select Media transfer.3 On your computer:
• Wait until the memory card appearsas an external disk in WindowsExplorer.
• Drag and drop selected filesbetween the phone and thecomputer.
• For full access to your music in themusic player, place it in the Musicfolder on the phone’s memory or amemory card. For more informationon how to move files already storedon your phone or memory card to theMusic folder, see To move items
26 Transferring and handling contentThis is an Internet version of this publication. © Print only for private use.

between the phone memory and thememory card on page 24.
Do not remove the USB cable from yourphone or computer during transfer, as thismay corrupt the memory card.
Required operating systemsYou need one of these operatingsystems to use Sony Ericsson PCsoftware:
• Microsoft® Windows Vista™• Microsoft® Windows XP, Service
Pack 2 or higher
To download Media Go™1 Computer: In your Internet browser, go
to www.sonyericsson.com/support.2 Select a region and country.3 Select Software downloads.4 Select a phone from the list.5 Select Read more and download under
Media Go™.6 Select Download now and save the file
to your computer.
Remember where you have saved thefile.
To install Media Go™ from thedownloaded file
1 Locate the downloaded Media Go™file on the computer.
2 Double-click the file and follow theinstructions.
To transfer content using Media Go™
Do not remove the USB cable from yourphone or computer during transfer, as thismay corrupt the memory card or thephone memory.
1 Connect the phone to a computer witha USB cable supported by your phone.
2 On your phone (depending on setup):
• The phone may switch to Mediatransfer. If so, disconnect the cableand change the USB default mode toMass storage. See USB defaultmode on page 25. Do not remove theUSB cable from your phone orcomputer during transfer, as thismay corrupt the memory card. MediaGo™ software is available fordownload atwww.sonyericsson.com/support.
• If prompted with a USB mode menu,select Mass storage. The phone willshut down in this mode but willrestart again when it is disconnectedfrom the USB cable.
3 On your computer: Drag and dropselected files between the phone andthe computer.
Transferring and handling content 27This is an Internet version of this publication. © Print only for private use.

4 Wait until the phone appears in MediaGo™.
5 Move files between your phone and thecomputer in Media Go™.
Phone nameYou can enter a name for your phonethat is shown to other devices whenusing, for example, Bluetooth™wireless technology.
To enter a phone name1 Select Menu > Settings > Connectivity >
Phone name.2 Enter the phone name and select OK.
Using Bluetooth™ wirelesstechnologyThe Bluetooth™ function is free ofcharge and makes wireless connectionto other Bluetooth devices possible.You can, for example:
• Connect to handsfree devices.• Connect to several devices at the
same time.• Connect to computers and access
the Internet.• Exchange items.• Play multiplayer games.
A range within 10 metres (33 feet), with nosolid objects in between, is
recommended for Bluetoothcommunication.
Before using Bluetooth wirelesstechnologyYou must turn on the Bluetoothfunction to communicate with otherdevices. You may also have to pair yourphone with other Bluetooth devices.
To turn on the Bluetooth function• Select Menu > Settings > Connectivity >
Bluetooth > Turn on.Make sure that the device you want to pairyour phone with has the Bluetoothfunction activated and Bluetooth visibilityturned on.
To pair the phone with a device1 Select Menu > Settings > Connectivity >
Bluetooth > My devices.2 Scroll to New device and select Add to
search for available devices.3 Select a device.4 Enter a passcode, if required.
To allow connection to the phone1 Select Menu > Settings > Connectivity >
Bluetooth > My devices.2 Select a device from the list.3 Select Options > Allow connection.
28 Transferring and handling contentThis is an Internet version of this publication. © Print only for private use.

4 Select Always ask or Always allow.
This is only possible with devices thatrequire access to a secure service.
To pair the phone with a Bluetoothhandsfree for the first time
1 Select Menu > Settings > Connectivity >Bluetooth > Handsfree.
2 Select a device.3 Enter a passcode, if required.
Power savingYou can save battery power with thePower save function. In Power savemode you can only connect with asingle Bluetooth device. If you want toconnect with more than one Bluetoothdevice at the same time you must turnthis function off.
To turn on power save• Select Menu > Settings > Connectivity >
Bluetooth > Power save > On.
Transferring sound to and from aBluetooth handsfreeYou can transfer the sound to and froma Bluetooth handsfree using a phonekey or the handsfree key.
To transfer sound1 Select Menu > Settings > Connectivity >
Bluetooth > Handsfree > Incoming call.2 Select an option. In phone transfers
sound to the phone. In handsfreetransfers sound to the handsfree.
You need to answer the call with thephone key for this setting to apply.
To transfer sound during a call1 During a call, select Sound.2 Select from the list.
Backing up and restoringYou can backup and restore contacts,the calendar, tasks, notes andbookmarks using the Sony Ericsson PCSuite.
You can backup and restore AddressBook contacts, the calendar, tasks,notes and bookmarks using theSony Ericsson PC Suite.
Before backing up and restoring, youneed to install the Sony Ericsson PCSuite, which is available fromwww.sonyericsson/support.
You can backup and restore contactswithin your phone using a MemoryStick Micro™ (M2™) memory card.You can move content between the
Transferring and handling content 29This is an Internet version of this publication. © Print only for private use.

memory card and the phone memory.See Handling content in the phone onpage 23.
Back up your phone content regularly tomake sure you do not lose it.
To make a backup using theSony Ericsson PC Suite
1 Computer: Start the Sony Ericsson PCSuite from Start/Programs/Sony Ericsson/Sony Ericsson PCSuite.
2 Follow the instructions in theSony Ericsson PC Suite for how toconnect.
3 Phone: Select Phone mode.4 Computer: Go to the backup and
restore section in the Sony Ericsson PCSuite and make a backup.
To restore phone content using theSony Ericsson PC SuiteThe Sony Ericsson PC Suite will overwriteall the phone content during the restoreprocess. You may damage your phone ifyou interrupt the process.
1 Computer: Start the Sony Ericsson PCSuite from Start/Programs/Sony Ericsson/Sony Ericsson PCSuite.
2 Follow the instructions in theSony Ericsson PC Suite for how toconnect.
3 Phone: Select Phone mode.4 Computer: Go to the backup and
restore section in the Sony Ericsson PCSuite and restore your phone.
30 Transferring and handling contentThis is an Internet version of this publication. © Print only for private use.

Calling
Making and receiving callsYou need to turn on your phone and bewithin range of a network.
To make a call1 Enter a phone number (with
international country code and areacode, if applicable).
2 Press .
You can call numbers from your AddressBook and call list. See Address Book onpage 33, and Call list on page 33. Youcan also use your voice to make calls.See Voice control on page 36.
To end a call• Press .
To make international calls1 Press and hold down until a “+”
sign appears.2 Enter the country code, area code
(without the first zero) and phonenumber.
3 Press .
To re-dial a number• When Retry? appears select Yes.
Do not hold your phone to your ear whenwaiting. When the call connects, yourphone gives a loud signal.
To answer a call• Press .
To reject a call• Press .
To change the ear speaker volumeduring a call
• Press the volume key up or down.
To mute the microphone during a call1 Press and hold down .2 Press and hold down again to
resume.
To turn on the loudspeaker during acall
• Press SpkrOn.Do not hold your phone to your ear whenusing the loudspeaker. This coulddamage your hearing.
To view missed calls• Press to open the call list.
NetworksYour phone switches automaticallybetween GSM and 3G (UMTS)networks depending on availability.
Calling 31This is an Internet version of this publication. © Print only for private use.

Emergency callsYour phone supports internationalemergency numbers, for example, 112or 911. You can normally use thesenumbers to make emergency calls inany country, with or without the SIMcard inserted, if you are within range ofa network.
In some countries, other emergencynumbers may also be promoted. Yournetwork operator may therefore havesaved additional local emergencynumbers on the SIM card.
To make an emergency call• Enter 112 (the international emergency
number) and press .
To view your local emergencynumbers
1 Select Menu > Contacts.2 Scroll to New contact and select
Options > Special numbers >Emergency nos..
AT&T Video ShareYou can share experiences while on acall with friends and family when theyhappen or save them to share later.When on a call, the person who initiatesthe Video Share session transmits thevideo. Only the person placing a Video
Share call can save the Video Sharesession.
Types of Video Share callsYou can share information live or aprerecorded session.• Live share – streams live information
as the camera captures it.• Pre-recorded – allows you to share a
previously recorded Video Sharesession.
Before you beginTo use Video Share service, bothparties on the call must have:
• Video share service activated ontheir account.
• 3G coverage.• Video Share turned on.
To initiate a Video Share session• While on a call, select Share.
To accept a Video Share session• When you receive a Video Share call
request, press Yes.
To end a Video Share session• To continue the call, but end the Video
Share session, press Stop.
32 CallingThis is an Internet version of this publication. © Print only for private use.

To save Video Share sessions• Select Menu > Settings > the Calls tab
> Video Share > Auto record.
Call listYou can view information about recentcalls.
To call a number from the call list1 Press and scroll to a tab.2 Scroll to a name or a number and press
.
Address BookYou can save names, phone numbersand personal information in Contacts.Information can be saved in the phonememory or on the SIM card.
You can synchronize your contacts usingthe Sony Ericsson PC Suite.
Default contactsYou can choose which contactinformation is shown as default. IfPhone contacts is selected as default,your contacts show all the informationsaved in Contacts. If you select SIMcontacts as default, your contactsshow names and numbers saved onthe SIM card.
To select default contacts1 Select Menu > Contacts.2 Scroll to New contact and select
Options > Advanced > Default contacts.3 Select an option.
Phone contactsPhone contacts can contain names,phone numbers and personalinformation. They are saved in thephone memory.
To add a phone contact1 Select Menu > Contacts.2 Scroll to New contact and select Add.3 Enter the name and select OK.4 Scroll to New Number: and select Add.5 Enter the number and select OK.6 Select a number option.7 Scroll between the tabs and add
information to the fields.8 Select Save.
Calling contacts
To call a contact1 Select Menu > Contacts.2 Scroll to a contact and press .
To go directly to the contacts list• Press and hold down – .
Calling 33This is an Internet version of this publication. © Print only for private use.

To call with Smart search1 Press – to enter a sequence of
(at least two) digits. All entries whichmatch the sequence of digits orcorresponding letters are shown in alist.
2 Scroll to a contact or a phone numberand press .
To turn on or off Smart search1 Select Menu > Settings > Calls > Smart
search.2 Select an option.
Editing contacts
To add information to a phonecontact
1 Select Menu > Contacts.2 Scroll to a contact and select Options >
Edit contact.3 Scroll between the tabs and select
Add or Edit.4 Select an option and an item to add or
edit.5 Select Save.
If your subscription supports Calling LineIdentification (CLI) service, you canassign personal ringtones and pictures tocontacts.
To copy names and numbers tophone contacts
1 Select Menu > Contacts.2 Scroll to New Contact and select
Options > Advanced > Copy from SIM.3 Select an option.
To copy names and numbers to theSIM card
1 Select Menu > Contacts.2 Scroll to New contact and select
Options > Advanced > Copy to SIM.3 Select an option.
When you copy all contacts from yourphone to the SIM card, all existing SIMcard information is replaced.
To automatically save names andphone numbers on the SIM card
1 Select Menu > Contacts.2 Scroll to New contact and select
Options > Advanced > Auto save onSIM.
3 Select an option.
To save contacts on a memory card1 Select Menu > Contacts.2 Scroll to New contact and select
Options > Advanced > Back up to m.card.
34 CallingThis is an Internet version of this publication. © Print only for private use.

SIM contactsSIM contacts can contain names andnumbers only. They are saved on theSIM card.
To add a SIM contact1 Select Menu > Contacts.2 Scroll to New contact and select Add.3 Enter the name and select OK.4 Enter the number and select OK.5 Select a number option and add more
information, if available.6 Select Save.
Deleting contacts
To delete all contacts1 Select Menu > Contacts.2 Scroll to New contact and select
Options > Advanced > Delete allcontacts.
3 Select an option.
Contact memory statusThe number of contacts you can savein your phone or on the SIM carddepends on available memory.
To view contact memory status1 Select Menu > Contacts.2 Scroll to New contact and select
Options > Advanced > Memory status.
MyselfYou can enter information aboutyourself and, for example, send yourbusiness card.
To enter Myself information1 Select Menu > Contacts.2 Scroll to Myself and select Open.3 Scroll to an option and edit the
information.4 Select Save.
To add your own business card1 Select Menu > Contacts.2 Scroll to Myself and select Open.3 Scroll to My contact info and select
Add > Create new.4 Scroll between the tabs and add
information to the fields.5 Enter the information and select Save.
GroupsYou can create a group of phonenumbers and email addresses fromPhone contacts to send messages to.See Messaging on page 39. You canalso use groups (with phone numbers)when you create accepted callers lists.See Accept calls on page 38.
To create a group of numbers andemail addresses
1 Select Menu > Contacts.
Calling 35This is an Internet version of this publication. © Print only for private use.

2 Scroll to New contact and selectOptions > Groups.
3 Scroll to New group and select Add.4 Enter a name for the group and select
Cont..5 Scroll to New and select Add.6 For each contact phone number or
email address you want to mark, scrollto it and select Mark.
7 Select Cont. > Done.
Speed dialSpeed dialing lets you select ninecontacts that you can dial quickly fromstandby. The contacts can be saved inpositions 1-9.
To add contacts to speed dialnumbers
1 Select Menu > Contacts.2 Scroll to New contact and select
Options > Speed dial.3 Scroll to a position number and select
Add.4 Select a contact.
To speed dial• Enter the position number and press
.
More calling features
VoicemailIf your subscription includes ananswering service, callers can leave avoicemail message when you cannotanswer a call.
To enter your voicemail number1 Select Menu > Messaging > Settings >
the Message settings tab > Voicemailnumber.
2 Enter the number and select OK.
To call your voicemail service• Press and hold down .
Voice controlBy creating voice commands you can:
• Voice dial – call someone by sayingtheir name
• Answer and reject calls when youuse a handsfree
To record a voice command usingvoice dialing
1 From standby select Menu > Settings >the General tab > Voice control > Voicedialling > Activate.
2 Select Yes > New voice command andselect a contact. If the contact has
36 CallingThis is an Internet version of this publication. © Print only for private use.

more than one number, select thenumber to add the voice command to.
3 Record a voice command such as“John mobile.”
4 Follow the instructions that appear.Wait for the tone and say the commandto record. The voice command isplayed back to you.
5 If the recording sounds OK, select Yes.If not, select No and repeat steps 3 and4.
Voice commands are saved in the phonememory only. They cannot be used inanother phone.
To voice dial1 Press and hold down a volume key.2 Wait for the tone and say a recorded
name, for example “John mobile.” Thephone plays the name back to you andconnects the call.
Forwarding callsYou can forward calls, for example, toan answering service.
To forward calls1 Select Menu > Settings > Calls > Divert
calls.2 Select a call type and a forward option.3 Select Activate.
4 Enter the number to forward calls toand select OK.
More than one callYou can handle more than one call at atime. For example, you can put anongoing call on hold, while you make oranswer a second call. You can alsoswitch between the two calls. Youcannot answer a third call withoutending one of the first two calls.
Call waitingYou will hear a beep if you receive asecond call while call waiting is active.
To activate call waiting• Select Menu > Settings > Calls >
Manage calls > Call waiting > Activate.
To make a second call1 During the call, press . This puts the
ongoing call on hold.2 Select Options > Add call.3 Enter the number to call and press
.
To answer a second call• During the call, press . This puts the
ongoing call on hold.
Calling 37This is an Internet version of this publication. © Print only for private use.

To reject a second call• During the call, press and continue
with the ongoing call.
To end an ongoing call and answer asecond call
• During the call, select Replace activecall.
Handling two voice callsYou can have calls ongoing and onhold at the same time.
To switch between two calls• During the call, press .
To join two calls• During the call, select Options > Join
calls.
To connect two calls• During the call, select Options >
Transfer call. You are disconnectedfrom both calls.
To end an ongoing call and return tothe call on hold
• First press and then .
Conference callsWith a conference call, you can have ajoint conversation with up to fivepeople.
To add a new participant1 During the call, press . This puts the
joined calls on hold.2 Select Options > Add call.3 Enter the number to call and press
.4 Select Options > Join calls to add the
new participant.5 Repeat this task to add more
participants.
To release a participant1 Select Options > Release part..2 Select the participant to release.
To have a private conversation1 During the call, select Options > Talk
to and select the participant to talk to.2 To resume the conference call, select
Options > Join calls.
Accept callsYou can choose to receive calls fromcertain phone numbers only.
To add numbers to the acceptedcallers list
1 Select Menu > Settings > Calls >Manage calls > Accept calls > Only fromlist.
2 Scroll to New and select Add.
38 CallingThis is an Internet version of this publication. © Print only for private use.

3 Select a contact or Groups.
See Groups on page 35.
To accept all calls• Select Menu > Settings > Calls >
Manage calls > Accept calls > Allcallers.
Showing or hiding your phone numberYou can decide to show or hide yourphone number when you make a call.
To hide your phone number1 Select Menu > Settings > Calls > Show/
hide my no..2 Select Hide number.
Messaging
Text and multimediamessagesMessages can contain text, pictures,sound effects, animations, andmelodies. You can also create and usetemplates for your messages.
When sending messages, the phoneautomatically selects the most suitablemethod (as a text or multimediamessage) for sending the message.
Sending messagesYou can send messages from yourphone. The maximum size of astandard text message is 160characters including spaces if no otheritems are added to the message. If youenter more than 160 characters, asecond message is created. Yourmessages are sent as oneconcatenated message.
To create and send a message1 Select Menu > Messaging > Write new
> Message.2 Enter text. To add items to the
message, press , scroll and selectan item.
3 Select Continue > Contacts look-up.
Messaging 39This is an Internet version of this publication. © Print only for private use.

4 Select a recipient and select Send.
If you send a message to a group, youwill be charged for each member.
To copy and paste text in a message1 When you write the message, select
Options > Copy & paste.2 Select Copy all or Mark & copy. Scroll to
and mark text in the message.3 Select Options > Copy & paste > Paste.
Receiving and saving messagesYou are notified when you receive amessage. Messages are automaticallysaved in the phone memory. When thephone memory is full, you can deletemessages or save them on a memorycard or on the SIM card.
To save an incoming message on amemory card
• Select Menu > Messaging > Settings >the Message settings tab > Save to >Memory card.
To save a message on the SIM card1 Select Menu > Messaging > Messages
and select a folder.2 Scroll to a message and select
Options > Save message.
To view a message from the inbox1 Select Menu > Messaging > Inbox.
2 Scroll to the message and select View.
To call a number in a message• When you view the message, scroll to
the phone number and press .
TemplatesIf you often use the same phrases andpictures in a message, you can savethe message as a template.
To add a message template1 Select Menu > Messaging > Templates
> New template > Add.2 Enter text. To add items to the
message, press , scroll and selectan item.
3 Select Save.4 Enter a title and select Ok.
To save a message as a template1 Select Menu > Messaging > Inbox.2 Scroll to the message and select View
> Options > Save as template.
Message optionsYou can set some options, such as theMessage alert and default storagelocation, to apply to all messages. Youcan set other options, such as theDelivery priority and Delivery time, foreach message you send.
40 MessagingThis is an Internet version of this publication. © Print only for private use.

To set options for all messages1 Select Menu > Messaging > the
Message settings tab.2 Select an option.
To set options for a specific message1 When the message is ready and a
recipient is selected, select Options >Advanced.
2 Scroll to an option and select Edit.
ConversationsYou can choose whether to view yourmessages in Conversations or Inbox. Amessaging conversation shows allmessaging communication betweenyou and one of your contacts.
To view messages in Conversations• Select Menu > Messaging > Inbox > the
Conversations tab.• Select Menu > Messaging >
Conversations and select aconversation.
To send a message fromConversations
1 Select Menu > Messaging >Conversations.
2 Select a conversation.3 Write a message and select Send.
Voice messagesYou can send and receive a soundrecording as a voice message.The sender and recipient must have asubscription supporting multimediamessaging.
To record and send a voice message1 Select Menu > Messaging > Write new
> Voice message.2 Record the message and select Stop >
Send > Contacts look-up.3 Select a recipient and select Send.
Mobile EmailCheck your email accounts, such asYahoo!™ Mail, AT&T Yahoo!™,Windows™ Live Mail, AOL™ andAIM™ quickly and easily.
Before using Mobile Email
• Verify that your AT&T accountsupports a data plan.
• Have your email account informationready.
To use Mobile Email1 Select Menu > Messaging > Mobile
Email.
Messaging 41This is an Internet version of this publication. © Print only for private use.
2 Select the provider you want to use.Follow the prompts to enter yourusername and password.
3 Select Next to log into your account.
To write a new email1 From your Mobile Email inbox, select
Options > Compose New.2 Fill in each field.3 Press Send.
To delete an email1 From your Mobile Email inbox, select
an email.2 Select Options > Delete.
Menu names may change with differentemail providers.
To view message options1 From your Mobile Email inbox, select
an email.2 Select Options and scroll to an option.
Menu names may change with differentemail providers.
Instant Messaging (IM)Connect and log into the IM server tocommunicate online with your familyand friends. If your subscriptionsupports instant messaging andpresence services, you can send and
receive messages and see contactstatus when they are online.
To choose your IM settings1 Select Menu > Messaging > IM.2 Select IM community > Sign In.3 Enter your account name and
password to configure the account.4 Select Sign In.
After signing into an IM community, itsname replaces IM in the menu.
To use IM1 Select Menu > Messaging .2 Select your IM community > Sign In.3 Enter your password, if needed.4 Press Sign In.
To add a contact to the list1 Select Menu > Messaging.2 Select your IM community >Sign In.3 Enter your password, if needed.4 Press Sign In.5 Select the Buddies tab > Options > Add
buddy.6 Enter the contact’s screen name.
The tab name varies depending on IMcommunity chosen.
To send an IM1 Select Menu > Messaging.2 Select your IM community >Sign In.
42 MessagingThis is an Internet version of this publication. © Print only for private use.

3 Enter your password, if needed.4 Press Sign In.5 Select your IM community > the
Buddies tab.6 Select a buddy > Send IM.7 Type your message and select Send.
StatusShow your status to your contacts onlyor show it to all users on the IM server.
To set the status1 Select Menu > Messaging.2 Select your IM community > My Status
tab.3 Choose Available and select Edit.4 Select an option.
Save passwordPrior to logging in, you can store thepassword for your community to avoidentering it at each sign on.
To save the password1 Select Menu > Messaging.2 Select your IM community >Sign In.3 Select Save password:.
Auto Sign inYou can bypass the sign in screenwhen logging in to your IM communityby turning on the phone.
To automatically sign in1 Verify Save password: is on.2 Select Menu > Messaging.3 Select your IM community >Sign In.
See Save password on page 43.
Messaging 43This is an Internet version of this publication. © Print only for private use.

ImagingYou can take photos and record videoclips to view, save or send. You findsaved photos and video clips in Mediaand in File manager.
Using the camera
To activate the camera• Select Menu > Camera.
Viewfinder and camera keys
1 Zoom in or out
2 Take photos/Record video
3 Select still camera or video camera
4 Brightness
5 Self-timer
6 Night mode
7 Camera: Shoot modeVideo: Video length
8 Camera key guide
To take a photo1 Activate the camera and press the
navigation key to scroll to .2 Press the center selection key to take a
photo. The photo is automaticallysaved.
To record a video clip1 Activate the camera and press the
navigation key to scroll to .2 Press the center selection key to start
recording.3 To stop recording, press the center
selection key. The video clip isautomatically saved.
44 ImagingThis is an Internet version of this publication. © Print only for private use.

To use zoom• Press or .
When taking a photo, zoom is availableonly in VGA picture size.
To adjust brightness• Press the volume key up or down.
To view photos1 Activate the camera and press the
navigation key to scroll to .2 Select Options > View all photos3 Press or to scroll to a photo.
To view video clips1 Activate the camera and press the
navigation key to scroll to .2 Select Options > View all clips.3 Scroll to a video clip and press the
center selection key.
More camera features
To change settings• Activate the camera and select
Options.
To view information about settings• Scroll to a setting and select Info.
Photo fixYou can use Photo fix to improvephotos. In a one-click operation,
brightness, light and contrast areadjusted to give you the best possiblephoto. The improvements are saved asa copy of the photo. The original photois not affected.
To improve a photo with Photo fix1 Activate the camera and press the
navigation key to scroll to .2 Make sure Review is set to On. Select
Options > Review > On.3 Take a photo.4 During review, select Options > Photo
fix.
Camera tips and tricks
Rule of thirdsDon’t place your subject in the middleof the frame. By placing it a third of theway in, you will achieve a better result.
Hold it steadyAvoid blurry pictures by holding thecamera steady. Try to steady your handby leaning it against a solid object.
Get closerBy getting as close as possible to yoursubject you won’t have to rely on thezoom. Try to fill your viewfinder withyour subject.
Imaging 45This is an Internet version of this publication. © Print only for private use.

Stay within the flash rangePictures taken beyond the maximumflash range will be too dark. Themaximum flash range is about foursteps away.
Consider varietyThink different angles, move towardsthe object. Take some vertical pictures.Try different positions.
Use a plain backgroundA plain background will help tohighlight your subject.
Keep your lens cleanPhones are used in all manner ofweather and places and carried inpockets and bags. This results in thecamera lens becoming dirty andcovered with fingerprints. Use a softcloth to clean the lens.
Viewing and tagging photos
To view photos in a slide show1 Select Menu > Media > Camera media
> Camera album.2 Select a month.3 Scroll to a photo and select View.4 Select Options > Slide show.5 Select a mood.
Photo tagsYou can organize your photos withphoto tags. You can create new tags,assign one or several tags to a photo,or remove a tag from a photo. Photoswith the same tag are put togetherunder Photo tags. For example, you canadd tag "Vacation" to all your vacationphotos, and view them all in Phototags, under the tag "Vacation".
To create a new photo tag1 Select Menu > Media > Camera media
> Camera album.2 Select a month.3 Scroll to a photo and select View.4 Press and select Options > New tag.5 Enter a name and select OK.6 Select an icon.7 To tag the photo, select Options > Tag
this photo.
To tag photos1 Select Menu > Media > Camera media
> Camera album.2 Select a month.3 Scroll to a photo and select View.4 Press and scroll to a tag.5 Select Options > Tag this photo.6 For each photo you want to tag, scroll
to the photo and select Options > Tagthis photo.
46 ImagingThis is an Internet version of this publication. © Print only for private use.

Using photosYou can add a photo to a contact.
To use photos1 Select Menu > Media > Camera media
> Camera album.2 Select a month.3 Scroll to a photo and select View.4 Select Options > Use as.5 Select an option.
Working with photosYou can view, enhance and organizeyour photos and video clips on yourcomputer by installing the Adobe™Photoshop™ Album Starter Edition. Itis available for download atwww.sonyericsson.com/support.
Use Media Go™ to transfer content toand from your phone. For moreinformation, see Transferring contentto and from a computer on page 26.
PhotoDJ™ and VideoDJ™You can edit photos and video clips.
To edit and save a photo1 Select Menu > Media > Photo > Camera
album.2 Select a month.3 Scroll to a photo and select View.
4 Select Options > Edit in PhotoDJ™.5 Edit the photo.
To edit and save a video clip1 Select Menu > Tools & Apps > Tools >
VideoDJ.2 Select Add > Video clip and scroll to a
video clip.3 Select Edit and choose an option.4 Edit the video clip.5 Select Options > Save.
To trim a video clip1 Select Menu > Tools & Apps > Tools >
VideoDJ.2 Select Add > Video clip and scroll to a
video clip.3 Select Edit > Trim.4 Select OK > Set > Start to set the
starting point.5 Select Set > End to set the ending
point.6 Select Trim > Options > Save.
Printing photosYou can print your photos bytransferring them to a computer that isconnected to a standard printer. Formore information, see Transferringcontent to and from a computer onpage 26. You can also print photoswithout a computer by connecting your
Imaging 47This is an Internet version of this publication. © Print only for private use.

phone directly to a printer that acceptsUSB, Bluetooth, or Memory Stick Duoconnections.
To print photos using a USB cable1 Connect a USB cable to the phone.2 Connect the USB cable to the printer.3 Select Menu > Settings > the
Connectivity tab > USB > USB mode.4 Disconnect and reconnect the cable to
the phone.5 Select Print.6 Select a month.7 Scroll to a photo and select Options >
Print.
You should disconnect and re-connectthe USB cable if there is a printer error.
To print photos via memory stick1 Save the photos on your phone to M2
Memory Stick.2 Insert the M2 Memory Stick into a
Memory Stick Duo adaptor.3 Insert the Memory Stick Duo adaptor
into a printer that accepts MemoryStick Duo.
You may have to purchase a M2 MemoryStick and a Memory Stick Duo adaptorseparately.
You can also print using a Bluetoothcompatible printer that supports theObject Push Profile.
MEdia™ NetYou can browse the Internet byaccessing MEdia Net.
To start browsing1 Select .2 Enter a Web address, a search phrase
or the name of a bookmark.
To exit the browser• Select Options > Exit browser.
BookmarksYou can create and edit bookmarks asquick links to your favorite Web pages.
To create a bookmark1 When you browse the Internet, select
Options > Tools > Add Bookmark.2 Enter a title and an address. Select
Save.
To select a bookmark1 Select .2 Select Options > Go to > Bookmarks.3 Scroll to a bookmark and select Go to.
History pagesYou can view Web pages you havebrowsed.
48 MEdia™ NetThis is an Internet version of this publication. © Print only for private use.

To view history pages• Select > Options > Go to > History.
More browser features
To use pan and zoom on a Web page1 When you browse the Internet, press
.2 Use the navigation key to move the
frame.3 Press Zoom.4 To switch back to pan, press .
To use pan and zoom, Smart-Fit must beturned off.
To turn on or off Smart-FitRendering™
1 Select Menu > > Options > Advanced >Smart-Fit.
2 Select an option.
To make a call when you browse• Press .
To save a picture from a Web page1 When you browse the Internet, select
Options > Tools > Save picture.2 Select a picture.
To find text on a Web page1 Select Options > Tools > Find on page.2 Enter text and select Find.
To send a link1 When you browse the Internet, select
Options > Tools > Send link.2 Select a transfer method.
Make sure the receiving device supportsthe transfer method you select.
Internet keypad shortcutsYou can use the keypad to go directlyto an Internet browser function.
Key Shortcut
Bookmarks
- Enter text to Enter address,Search Internet or search inBookmarks
Zoom
Pan & zoom (when Smart-Fit isoff)
To select Internet keypad shortcuts1 Select .2 Select Options > Advanced > Keypad
mode > Shortcuts.
MEdia™ Net 49This is an Internet version of this publication. © Print only for private use.

Internet security andcertificatesYour phone supports secure browsing.Certain Internet services, such asbanking, require certificates in yourphone. Your phone may alreadycontain certificates when you buy it oryou can download new certificates.
To view certificates in the phone• Select Menu > Settings > General >
Security > Certificates.
SynchronizingYou can synchronize your phone usinga computer program.
For more information, go towww.sonyericsson.com/support toread the Synchronization Featureguide.
Synchronizing using acomputerYou can use a USB cable or Bluetoothwireless technology to synchronizephone contacts, appointments,bookmarks, tasks and notes with acomputer program such as MicrosoftOutlook®.
Before synchronizing, you need toinstall the Sony Ericsson PC Suite.
Sony Ericsson PC Suite software isavailable for download atwww.sonyericsson.com/support.
See Required operating systems onpage 27.
To download Sony Ericsson PC Suite1 Computer: In your Internet browser, go
to www.sonyericsson.com/support.2 Select a region and country.3 Select Software downloads.
50 SynchronizingThis is an Internet version of this publication. © Print only for private use.

4 Select a phone from the list.5 Select Read more and download under
PC Suite.6 Select Download now and save the file
to your computer.
Remember where you save the file.
To install Sony Ericsson PC Suite fromthe downloaded file
1 Locate the downloaded Sony EricssonPC Suite file on the computer.
2 Double-click the file and follow theinstructions.
To synchronize using theSony Ericsson PC Suite
1 Computer: Start Sony Ericsson PCSuite from Start/Programs/Sony Ericsson/Sony Ericsson PCSuite.
2 Follow the instructions in theSony Ericsson PC Suite for how toconnect.
3 Phone: Select Phone mode.4 Computer: When you are notified that
the Sony Ericsson PC Suite has foundyour phone, you can startsynchronizing.
For usage details, see theSony Ericsson PC Suite Help sectiononce the software has been installed onyour computer.
More features
Flight modeIn Flight mode the network and radiotransceivers are turned off to preventdisturbance to sensitive equipment.
When the flight mode menu is activatedyou are asked to select a mode the nexttime you turn on your phone:
• Normal mode – full functionality• Flight mode – limited functionality
To activate the flight mode menu• Select Menu > Settings > General >
Flight mode > Continue > Show atstartup.
To select flight mode1 When the flight mode menu is
activated, turn off your phone.2 Turn on your phone and select Flight
mode.
Gesture controlWhen the phone is closed, you canmute incoming calls or snooze alarmswith a hand gesture.
To use gesture control• When a call comes in or the alarm rings,
a light appears adjacent to the camera.
More features 51This is an Internet version of this publication. © Print only for private use.

When the light appears, sweep yourhand back and forth once in front of thecamera lens to mute the call or snoozethe alarm.The distance between your hand and thecamera lens must be 0–3 inches (0–7 cm).
To turn on gesture control• Select Menu > Settings > General >
Gesture control > Turn on.
AlarmsYou can set a sound or the radio as analarm signal. The alarm sounds even ifthe phone is turned off. When the alarmsounds you can silence it or turn it off.
To set the alarm1 Select Menu > Tools & Apps > Alarms.2 Scroll to an alarm and select Edit.3 Scroll to Time: and select Edit.4 Enter a time and select OK > Save.
To set the recurring alarm1 Select Menu > Tools & Apps > Alarms.2 Scroll to an alarm and select Edit.3 Scroll to Recurrent: and select Edit.4 Scroll to a day and select Mark.5 To select another day, scroll to the day
and select Mark.6 Select Done > Save.
To set the alarm signal1 Select Menu > Tools & Apps > Alarms.2 Scroll to an alarm and select Edit.3 Scroll to the tab.4 Scroll to Alarm signal: and select Edit.5 Find and select an alarm signal. Select
Save.
To silence the alarm• When the alarm sounds, press any key.• To repeat the alarm, select Snooze.
To turn off the alarm• When the alarm sounds, press any key,
then select Turn off.
To cancel the alarm1 Select Menu > Tools & Apps > Alarms.2 Scroll to an alarm and select Turn off.
The alarm in silent modeYou can set the alarm not to soundwhen the phone is in silent mode.
To set an alarm to sound or not insilent mode
1 Select Menu > Tools & Apps > Alarms.2 Scroll to an alarm and select Edit.3 Scroll to the tab.4 Scroll to Silent mode and select Edit.5 Select an option.
52 More featuresThis is an Internet version of this publication. © Print only for private use.

To set the snooze duration1 Select Menu > Tools & Apps > Alarms.2 Scroll to an alarm and select Edit.3 Scroll to Snooze duration and select
Edit.4 Select an option.
CalendarYou can synchronise your calendar witha computer calendar, with a calendar onthe Web or with a Microsoft® ExchangeServer (Microsoft® Outlook®).
You can synchronize your calendar witha Microsoft® Exchange Server(Microsoft® Outlook®).
AppointmentsYou can add new appointments orreuse existing appointments.
To add an appointment1 Select Menu > Tools & Apps >
Organizer > Calendar.2 Select a date.3 Scroll to New appointment and select
Add.4 Enter the information and confirm each
entry.5 Select Save.
To view an appointment1 Select Menu > Tools & Apps >
Organizer > Calendar.2 Select a date.3 Scroll to an appointment and select
View.
To edit an appointment1 Select Menu > Tools & Apps >
Organizer > Calendar.2 Select a date.3 Scroll to an appointment and select
View.4 Select Options > Edit.5 Edit the appointment and confirm each
entry.6 Select Save.
To set when reminders should sound1 Select Menu > Tools & Apps >
Organizer > Calendar.2 Select a date.3 Select Options > Advanced >
Reminders.4 Select an option.
A reminders option set in calendar affectsa reminders option set in tasks.
NotesYou can make notes and save them.You can also show a note in standby.
More features 53This is an Internet version of this publication. © Print only for private use.

To add a note1 Select Menu > Tools & Apps >
Organizer > Notes.2 Scroll to New note and select Add.3 Write a note and select Save.
To show a note in standby1 Select Menu > Tools & Apps >
Organizer > Notes.2 Scroll to a note and select Options >
Show in standby.
To hide a note from standby1 Select Menu > Tools & Apps >
Organizer > Notes.2 Scroll to the note shown in standby.
This is marked with an icon. SelectOptions > Hide in standby.
TasksYou can add new tasks or reuseexisting tasks.
To add a task1 Select Menu > Tools & Apps >
Organizer > Tasks.2 Select New task and select Add.3 Select an option.4 Enter details and confirm each entry.
To set when reminders should sound1 Select Menu > Tools & Apps >
Organizer > Tasks.2 Scroll to a task and select Options >
Reminders.3 Select an option.
A reminders option set in tasks affects areminders option set in calendar.
ProfilesYou can change settings such as thering volume and vibrating alert to suitdifferent locations. You can reset allprofiles to the phone’s original settings.
To select a profile1 Select Menu > Settings > General >
Profiles.2 Select a profile.
To view and edit a profile1 Select Menu > Settings > General >
Profiles.2 Scroll to a profile and select Options >
View and edit.
You cannot rename the Normal profile.
54 More featuresThis is an Internet version of this publication. © Print only for private use.

Time and date
To set the time1 Select Menu > Settings > General >
Time & date > Time.2 Enter the time and select Save.
To set the date1 Select Menu > Settings > General >
Time & date > Date.2 Enter the date and select Save.
To set the time zone1 Select Menu > Settings > General >
Time & date > My time zone.2 Select the time zone you are in.
If you select a city, My time zone alsoupdates the time when daylight savingtime changes.
ThemeYou can change the appearance of thescreen through items such as colorsand wallpaper. You can also createnew themes and download them. Formore information, go towww.sonyericsson.com/fun.
To set a theme1 Select Menu > Settings > Display >
Theme.2 Scroll to a theme and select Set.
Main menu layoutYou can change the layout of the iconsin the main menu.
To change the main menu layout1 Select Menu > Options > Main menu
layout.2 Select an option.
Ringtones
To set a ringtone1 Select Menu > Settings > Sounds &
alerts > Ringtone.2 Find and select a ringtone.
To set the ringtone volume• Use the side volume keys to raise or
lower the volume.
To turn off the ringtone• Press and then press and hold
down .The alarm signal is not affected.
To set the vibrating alert1 Select Menu > Settings > Sounds &
alerts > Vibrating alert.2 Select an option.
More features 55This is an Internet version of this publication. © Print only for private use.

Screen orientationYou can change between landscapeand portrait orientation, or select Autorotate to have the orientation changewhen you rotate the phone.
To change screen orientation in thebrowser
1 Select .2 Select Options > View.3 Select Landscape or Portrait.
To change screen orientation inMedia
1 Select Menu > Media > Settings >Orientation.
2 Select an option.
GamesYour phone contains preloadedgames. You can also download games.For more information, go towww.sonyericsson.com/fun. Helptexts are available for most games.
To start a game1 Select Menu > Media > Games.2 Select a game.
To end a game• Press .
ApplicationsYou can download and run Javaapplications. You can also viewinformation or set differentpermissions.
To select a Java application1 Select Menu > Tools & Apps >
Applications.2 Select an application.
Java application screen sizeSome Java applications are designedfor a specific screen size. For moreinformation, contact the applicationvendor.
The screen size of your phone is 240 x 320pixels.
To set the screen size for a Javaapplication
1 Select Menu > Tools & Apps >Applications.
2 Scroll to an application and selectOptions > Screen size.
3 Select an option.
To set a Java™ application as awallpaper
1 Select Menu > Settings > Display.2 Select Wallpaper > Application.
56 More featuresThis is an Internet version of this publication. © Print only for private use.

3 Select a Java application.
You can only see the Java applicationsthat have support for wallpaper.
Locks
SIM card lockThis lock only protects yoursubscription. Your phone will work witha new SIM card. If the lock is on, youhave to enter a PIN (Personal IdentityNumber).
If you enter your PIN incorrectly threetimes in a row, the SIM card is blockedand you need to enter your PUK(Personal Unblocking Key). Your PINand PUK are supplied by AT&T.
To unblock the SIM card1 When PIN blocked appears, enter your
PUK and select OK.2 Enter a new four-to-eight-digit PIN and
select OK.3 Re-enter the new PIN and select OK.
To edit the PIN1 Select Menu > Settings > General >
Security > Locks > SIM protection >Change PIN.
2 Enter your PIN and select OK.3 Enter a new four-to-eight-digit PIN and
select OK.
4 Re-enter the new PIN and select OK.
If Codes do not match appears, youentered the new PIN incorrectly. If WrongPIN appears, followed by Old PIN:, youentered your old PIN incorrectly.
To use the SIM card lock1 Select Menu > Settings > General >
Security > Locks > SIM protection >Protection.
2 Select an option.3 Enter your PIN and select OK.
Phone lockYou can stop unauthorized use of yourphone. Change the phone lock code(0000) to any four-to-eight-digitpersonal code.
It is important that you remember yournew code. If you forget it, you have to takeyour phone to your local Sony Ericssonretailer.
To use the phone lock1 Select Menu > Settings > General >
Security > Locks > Phone protection >Protection.
2 Select an option.3 Enter the phone lock code and select
OK.
More features 57This is an Internet version of this publication. © Print only for private use.

To unlock the phone• Enter your code and select OK.
To change the phone lock code1 Select Menu > Settings > General >
Security > Locks > Phone protection >Change code.
2 Enter the old code and select OK.3 Enter the new code and select OK.4 Repeat the code and select OK.
Password SaverYou can save security codes, forexample, for credit cards. You must seta passcode to open the PasswordSaver.
CheckwordThe checkword confirms that you haveentered the correct passcode. If thepasscode is correct, the correct codesare shown. If the passcode is incorrect,the checkword and the codes shownare also incorrect.
To open Password Saver for the firsttime
1 Select Menu > Tools & Apps >Organizer > Code memo.
2 Follow the instructions that appear andselect Continue.
3 Enter a passcode and select Continue.
4 Confirm the passcode and selectContinue.
5 Enter a checkword and select Done.
To add a code1 Select Menu > Tools & Apps
>Organizer > Code memo.2 Enter a passcode and select Continue.3 Scroll to New code and select Add.4 Enter a name associated with the code
and select Continue.5 Enter the code and select Done.
To change a passcode1 Select Menu > Tools & Apps
>Organizer > Code memo.2 Enter your passcode and select Ok.3 Select Options > Change passcode.4 Enter your new passcode and select
Ok.5 Re-enter the new passcode and select
Ok.
Forget your passcode?If you forget your passcode, you mustreset the Password Saver. This meansthat all entries in the Password Saverare deleted. The next time you enter thePassword Saver, you must proceed asif you are opening it for the first time.See To open Password Saver for thefirst time on page 58.
58 More featuresThis is an Internet version of this publication. © Print only for private use.

IMEI numberKeep a copy of your IMEI (InternationalMobile Equipment Identity) number incase your phone is stolen.
To view your IMEI number• Press , , , , .
Using the flipWhen the phone is closed, you can usethe media player keys on the flip tocontrol your Walkman™ player orradio. You can lock these keys to avoidaccidental touch.
To unlock the media player keys• Slide the key lock switch away from
.
To lock the media player keys• Slide the key lock switch towards .
TroubleshootingSome problems will require you to callAT&T.
For more support go towww.sonyericsson.com/support.
Common questions
I have problems with memorycapacity or the phone is workingslowlyRestart your phone every day to freememory or do a Master reset.
Master resetIf you select Reset settings, thechanges that you have made tosettings will be deleted.
If you select Reset all, your settings andcontent, such as contacts, messages,pictures, sounds and downloadedgames, will be deleted. You may alsolose content that was in the phone atpurchase.
To reset the phone1 Select Menu > Settings > General >
Master reset.2 Select an option.3 Follow the instructions that appear.
Troubleshooting 59This is an Internet version of this publication. © Print only for private use.

I cannot charge the phone or batterycapacity is lowThe charger is not properly connectedor the battery connection is poor.Remove the battery and clean theconnectors.
The battery is worn out and needs to bereplaced. See Charging the battery onpage 7.
No battery icon appears when I startcharging the phoneIt may take a few minutes before thebattery icon appears on the screen.
Some menu options appear in grayA service is not activated. ContactAT&T.
I cannot use Internet-based servicesYour subscription does not includedata capability. Settings are missing orincorrect.
You can download settings using thesetup wizard or by going towww.sonyericsson.com/support.
To download settings1 Select Menu > Settings > User help >
Settings download.2 Follow the instructions that appear.
Contact your network operator or serviceprovider for more information.
I cannot send messages from myphoneMost messages require a servicecenter number to send them. Thenumber is supplied by AT&T and isusually saved on the SIM card. If thenumber to your service center is notsaved on your SIM card, you mustenter the number yourself. To sendmost picture messages, you must setan MMS profile and the address of yourmessage server.
To send most multimedia messages,you must set an MMS profile and theaddress of your message server. If noMMS profile or message server exists,you may be able to obtain the settingsautomatically from AT&T oratwww.sonyericsson.com/support.
To enter a service center number1 Select Menu > Settings > Connectivity >
Message settings > Text message andscroll to Service centre. The number isshown if it is saved on the SIM card.
2 If there is no number shown, selectEdit.
3 Scroll to New ServiceCentre and selectAdd.
60 TroubleshootingThis is an Internet version of this publication. © Print only for private use.

4 Enter the number, including theinternational “+” sign and countrycode.
5 Select Save.
To select an MMS profile1 Select Menu > Settings > Connectivity >
Message settings > Picture message.2 Select an existing profile or create a
new one.
To set the message server address1 Select Menu > Settings > Connectivity >
Message settings > Picture message.2 Scroll to a profile and select Options >
Edit.3 Scroll to Message server and select
Edit.4 Enter the address and select OK >
Save.
The phone does not ring or rings toosoftlyMake sure that Silent mode has notbeen set to On. See To turn off theringtone on page 55.
Check the ringtone volume. See To setthe ringtone volumeon page 55.
Check the profile. See To select aprofile on page 54.
Check the forward call options. See Toforward calls on page 37.
The phone cannot be detected byother devices using Bluetoothwireless technologyYou have not turned the Bluetoothfunction on. Make sure that the visibilityis set to Show phone. See To turn onthe Bluetooth function on page 28.
I cannot synchronize or transfercontent between my phone and mycomputer, when using a USB cable.The cable or software has not beenproperly installed. Go towww.sonyericsson.com/support toread Feature guides which containdetailed installation instructions andtroubleshooting sections.
I have forgotten my Password SaverpasscodeIf you forget your passcode, you mustreset the Password Saver. This meansthat all entries in the Password Saverare deleted. The next time you enter thePassword Saver, you must proceed asif you are opening it for the first time.
To reset Password Saver1 Select Menu > Tools & Apps >
Organizer > Code memo.
Troubleshooting 61This is an Internet version of this publication. © Print only for private use.

2 Enter an incorrect passcode threetimes.
3 Reset code memo and delete all items?appears.
4 Select Yes.
Where can I find the regulatoryinformation such as my IMEI numberif I cannot turn on my phone?
Error messages
Insert SIMThere is no SIM card in your phone oryou may have inserted it incorrectly.
See To insert the SIM card on page 6.
The SIM card connectors needcleaning. If the card is damaged,contact AT&T.
Insert correct SIM cardYour phone is set to work only withcertain SIM cards. Check if you areusing the correct operator SIM card.
Wrong PIN/Wrong PIN2You have entered your PIN or PIN2incorrectly.
Enter the correct PIN or PIN2 andselect Yes.
PIN blocked/PIN2 blockedYou have entered your PIN or PIN2code incorrectly three times in a row.
To unblock, see SIM card lock onpage 57.
Codes do not matchCodes that you have entered do notmatch. When you want to change asecurity code, for example your PIN,you have to confirm the new code. SeeSIM card lock on page 57.
No netw. coverageYour phone is in flight mode. See Flightmode on page 51.
Your phone is not receiving anynetwork signal, or the received signal istoo weak. Contact AT&T and makesure that the network has coveragewhere you are.
The SIM card is not working properly.Insert your SIM card in another phone.If this works, it is probably your phone
62 TroubleshootingThis is an Internet version of this publication. © Print only for private use.

that is causing the problem. Pleasecontact the nearest Sony Ericssonservice location.
Emerg. calls onlyYou are within range of a network, butyou are not allowed to use it. However,in an emergency, some networkoperators allow you to call theinternational emergency number 112.See Emergency calls on page 32.
PUK blocked. Contact operator.You entered your personal unblockingkey code (PUK) incorrectly 10 times ina row.
Hearing AidCompatibilityYour phone is designed for Hearing AidCompatibility (HAC) and uses settingsto optimize its use with hearing aids.
Hearing Aid SettingsYou can choose the setting in thephone to match the setting in yourhearing aid before making or receivingcalls.
To select a phone setting for HAC• Select Menu > Settings > General >
Accessibility > Hearing aid and choosean option:
• On – Use when your hearing aid is setto T-coil mode.
• Off – Use when your hearing aid is setto Microphone mode.
Hearing Aid Compatibility andNew TechnologiesThis phone has been tested and ratedfor use with hearing aids for some of thewireless technologies that it uses.However, there may be some newerwireless technologies used in thisphone that have not been tested yet foruse with hearing aids. It is important to
Hearing Aid Compatibility 63This is an Internet version of this publication. © Print only for private use.

try the different features of this phonethoroughly and in different locations,using your hearing aid or cochlearimplant, to determine if you hear anyinterfering noise. Consult your serviceprovider about its return and exchangepolicies and for information on hearingaid compatibility.
Hearing Aid CompatibilityRatingThis model handset was designed tocomply with the requirements set forthin Section 20.19 of the FederalCommunication Commission's (FCC)rules governing hearing aidcompatibility (HAC), for the reductionof RF interference and magneticcoupling (T-coil) to hearing aids. TheMicrophone (M) rating and T-coil (T)rating is defined and labeled on thehandset box. Devices meeting HACcompliance must have a minimum M3and/or T3 rating or above as defined bythe FCC in accordance with the latestANSI Standard C63.19. The (M) ratingrefers to lower RF emission levels of thehandset. The (T) rating refers to themagnetic coupling between thehandset and the T-coil compatiblehearing aid. Some hearing aids are alsoprovided an (M) rating, and are more
immune than others to interference. Todetermine the (M) rating of your hearingaid, please contact your hearing healthprofessional. More information aboutdigital wireless devices and hearing aidcompatibility can be found atwww.sonyericsson-snc.com.
64 Hearing Aid CompatibilityThis is an Internet version of this publication. © Print only for private use.

Important information
Sony Ericsson Consumer WebsiteAt www.sonyericsson.com/support there is asupport section where help and tips are only a fewclicks away. Here you will find the latest computersoftware updates and tips on how to use yourproduct more efficiently.
Service and supportYou have access to a portfolio of exclusive serviceadvantages such as:
• Global and local Web sites providing support.• A global network of call centers.• An extensive network of Sony Ericsson service
partners.• A warranty period. Learn more about the
warranty conditions in the Important information.
At www.sonyericsson.com/support, you can find thelatest support tools and information. For operator-specific services and features, please contact yournetwork operator.You can also contact our call centers. If yourcountry/region is not represented in the list below,please contact your local dealer. (Calls are chargedaccording to national rates, including local taxes,unless the phone number is a toll-free number.)If your product needs service, please contact thedealer from whom it was purchased, or one of ourservice partners. For warranty claims, save proof ofpurchase.
Guidelines for Safe andEfficient UsePlease follow these guidelines. Failureto do so might entail a potential healthrisk or product malfunction. If in doubtas to its proper function, have theproduct checked by a certified service partnerbefore charging or using it.
Recommendations for care and safeuse of our products
• Handle with care and keep in a clean and dust-free place.
• Warning! May explode if disposed of in fire.• Do not expose to liquid or moisture or excess
humidity.• For optimum performance, the
product should not be operatedin temperatures below+14°F(-10°C) or above+113°F(+45°C). Do not expose the battery totemperatures above +140°F(+60°C).
• Do not expose to flames or littobacco products.
• Do not drop, throw or try to bendthe product.
• Do not paint or attempt todisassemble or modify theproduct. Only Sony Ericssonauthorized personnel shouldperform service.
• Consult with authorized medical staff and theinstructions of the medical device manufacturerbefore using the product near pacemakers orother medical devices or equipment.
• Discontinue use of electronic devices, or disablethe radio transmitting functionality of the device,where required or requested to do so.
• Do not use where a potentially explosiveatmosphere exists.
Important information 65This is an Internet version of this publication. © Print only for private use.

• Do not place the product, or install wirelessequipment, in the area above an air bag in a car.
• Caution: Cracked or broken displays may createsharp edges or splinters that could be harmfulupon contact.
• Do not use the Bluetooth Headset in positionswhere it is uncomfortable or will be subject topressure.
ChildrenWarning! Keep out of the reach ofchildren. Do not allow children to playwith phones or accessories. They could hurtthemselves or others. Products may contain smallparts that could become detached and create achoking hazard.
Power supply (Charger)Connect the charger to power sources as marked onthe product. Do not use outdoors or in damp areas.Do not alter or subject the cord to damage or stress.Unplug the unit before cleaning it. Never alter theplug. If it does not fit into the outlet, have a properoutlet installed by an electrician. When a powersupply is connected there is a small drain of power.To avoid this small energy waste, disconnect thepower supply when the product is fully charged. Useof charging devices that are not Sony Ericssonbranded may pose increased safety risks.
BatteryNew or idle batteries can have short-term reducedcapacity. Fully charge the battery before initial use.Use for the intended purpose only. Charge thebattery in temperatures between +41°F(+5°C) and+113°F(+45°C). Do not put the battery into yourmouth. Do not let the battery contacts touch anothermetal object. Turn off the product before removingthe battery. Performance depends on temperatures,signal strength, usage patterns, features selected
and voice or data transmissions. OnlySony Ericsson service partners should remove orreplace built-in batteries. Use of batteries that arenot Sony Ericsson branded may pose increasedsafety risks. Replace the battery only with anotherSony Ericsson battery that has been qualified withthe product per the standard IEEE-1725. Use of anunqualified battery may present a risk of fire,explosion, leakage or other hazard.
Personal medical devicesMobile phones may affect implanted medicalequipment. Reduce risk of interference by keepinga minimum distance of 6 inches(15 cm) between thephone and the device. Use the phone at your rightear. Do not carry the phone in your breast pocket.Turn off the phone if you suspect interference. Forall medical devices, consult a physician and themanufacturer.
DrivingSome vehicle manufacturers forbid the use ofphones in their vehicles unless a handsfree kit withan external antenna supports the installation. Checkwith the vehicle manufacturer's representative to besure that the phone or Bluetooth handsfree will notaffect the electronic systems in the vehicle. Fullattention should be given to driving at all times andlocal laws and regulations restricting the use ofwireless devices while driving must be observed.
GPS/Location based functionsSome products provide GPS/Location basedfunctions. Location determining functionality isprovided “As is” and “With all faults”.Sony Ericsson does not make any representation orwarranty as to the accuracy of such locationinformation.Use of location-based information by the devicemay not be uninterrupted or error free and may
66 Important informationThis is an Internet version of this publication. © Print only for private use.

additionally be dependent on network serviceavailability. Please note that functionality may bereduced or prevented in certain environments suchas building interiors or areas adjacent to buildings.Caution: Do not use GPS functionality in a mannerwhich causes distraction from driving.
Emergency callsCalls cannot be guaranteed under all conditions.Never rely solely upon mobile phones for essentialcommunication. Calls may not be possible in allareas, on all networks, or when certain networkservices and/or phone features are used.
AntennaUse of antenna devices not marketed bySony Ericsson could damage the phone, reduceperformance, and produce SAR levels above theestablished limits. Do not cover the antenna withyour hand as this affects call quality, power levelsand can shorten talk and standby times.
Radio Frequency (RF) exposure andSpecific Absorption Rate (SAR)When the phone or Bluetooth handsfree is turnedon, it emits low levels of radio frequency energy.International safety guidelines have been developedthrough periodic and thorough evaluation ofscientific studies. These guidelines establishpermitted levels of radio wave exposure. Theguidelines include a safety margin designed toassure the safety of all persons and to account forany variations in measurements.Specific Absorption Rate (SAR) is used to measureradio frequency energy absorbed by the body whenusing a mobile phone. The SAR value is determinedat the highest certified power level in laboratoryconditions, but because the phone is designed touse the minimum power necessary to access thechosen network, the actual SAR level can be well
below this value. There is no proof of difference insafety based on difference in SAR value.Products with radio transmitters sold in the US mustbe certified by the Federal CommunicationsCommission (FCC). When required, tests areperformed when the phone is placed at the ear andwhen worn on the body. For body-worn operation,the phone has been tested when positioned aminimum of 15 mm from the body without any metalparts in the vicinity of the phone or when properlyused with an appropriate Sony Ericsson accessoryand worn on the body.For more information about SAR and radiofrequency exposure, go to:www.sonyericsson.com/health.
Flight modeBluetooth and WLAN functionality, if available in thedevice, can be enabled in Flight mode but may beprohibited onboard aircraft or in other areas whereradio transmissions are prohibited. In suchenvironments, please seek proper authorizationbefore enabling Bluetooth or WLAN functionalityeven in Flight mode.
MalwareMalware (short for malicious software) is softwarethat can harm the phone or other computers.Malware or harmful applications can include viruses,worms, spyware, and other unwanted programs.While the device does employ security measures toresist such efforts, Sony Ericsson does not warrantor represent that the device will be impervious to theintroduction of malware. You can however reducethe risk of malware attacks by using care whendownloading content or accepting applications,refraining from opening or responding to messagesfrom unknown sources, using trustworthy servicesto access the Internet, and only downloadingcontent to the phone from known, reliable sources.
Important information 67This is an Internet version of this publication. © Print only for private use.

AccessoriesUse only Sony Ericsson branded originalaccessories and certified service partners.Sony Ericsson does not test third-party accessories.Accessories may influence RF exposure, radioperformance, loudness, electric safety and otherareas. Third-party accessories and parts may posea risk to your health or safety or decreaseperformance.
Accessible Solutions/Special NeedsIn the US, compatible Sony Ericsson phones mayoffer compatibility with TTY terminals (with use ofnecessary accessory). For more information call theSony Ericsson Special Needs Center on877 878 1996 (TTY) or 877 207 2056 (voice), or goto www.sonyericsson-snc.com.
Disposal of old electricaland electronic equipmentElectronic equipment and batteriesshould not be included as household waste butshould be left at an appropriate collection point forrecycling. This helps prevent potential negativeconsequences for the environment and humanhealth. Check local regulations by contacting yourlocal city office, your household waste disposalservice, the shop where you purchased the productor calling a Sony Ericsson call center.
Disposing of the batteryCheck local regulations or call aSony Ericsson call center forinformation. Never use municipal waste.
Memory cardIf the product comes complete with a removablememory card, it is generally compatible with thehandset purchased but may not be compatible with
other devices or the capabilities of their memorycards. Check other devices for compatibility beforepurchase or use. If the product is equipped with amemory card reader, check memory cardcompatibility before purchase or use.Memory cards are generally formatted prior toshipping. To reformat the memory card, use acompatible device. Do not use the standardoperating system format when formatting thememory card on a PC. For details, refer to theoperating instructions of the device or contactcustomer support.
Warning!If the device requires an adapter for insertion into thehandset or another device, do not insert the carddirectly without the required adapter.
Precautions on memory card use
• Do not expose the memory card to moisture.• Do not touch terminal connections with your
hand or any metal object.• Do not strike, bend, or drop the memory card.• Do not attempt to disassemble or modify the
memory card.• Do not use or store the memory card in humid or
corrosive locations or in excessive heat such asa closed car in summer, in direct sunlight or neara heater, etc.
• Do not press or bend the end of the memory cardadapter with excessive force.
• Do not let dirt, dust, or foreign objects get into theinsert port of any memory card adapter.
• Check you have inserted the memory cardcorrectly.
• Insert the memory card as far as it will go into anymemory card adapter needed. The memory cardmay not operate properly unless fully inserted.
• We recommend that you make a backup copy ofimportant data. We are not responsible for any
68 Important informationThis is an Internet version of this publication. © Print only for private use.
loss or damage to content you store on thememory card.
• Recorded data may be damaged or lost whenyou remove the memory card or memory cardadapter, turn off the power while formatting,reading or writing data, or use the memory cardin locations subject to static electricity or highelectrical field emissions.
Protection of personal informationErase personal data before disposing of the product.To delete data, perform a master reset. Deleting datafrom the phone memory does not ensure that itcannot be recovered. Sony Ericsson does notwarrant against recovery of information and doesnot assume responsibility for disclosure of anyinformation even after a master reset.
Loudness warning!Avoid volume levels that may be harmful to yourhearing.
End User License AgreementSoftware delivered with this device and its media isowned by Sony Ericsson Mobile CommunicationsAB, and/or its affiliated companies and its suppliersand licensors.Sony Ericsson grants you a non-exclusive limitedlicense to use the Software solely in conjunction withthe Device on which it is installed or delivered.Ownership of the Software is not sold, transferred orotherwise conveyed.Do not use any means to discover the source codeor any component of the Software, reproduce anddistribute the Software, or modify the Software. Youare entitled to transfer rights and obligations to theSoftware to a third party, solely together with theDevice with which you received the Software,provided the third party agrees in writing to bebound by the terms of this License.
This license exists throughout the useful life of thisDevice. It can be terminated by transferring yourrights to the Device to a third party in writing.Failure to comply with any of these terms andconditions will terminate the license immediately.Sony Ericsson and its third party suppliers andlicensors retain all rights, title and interest in and tothe Software. To the extent that the Softwarecontains material or code of a third party, such thirdparties shall be beneficiaries of these terms.This license is governed by the laws of Sweden.When applicable, the foregoing applies to statutoryconsumer rights.In the event Software accompanying or provided inconjunction with your device is provided withadditional terms and conditions, such provisionsshall also govern your possession and usage of theSoftware.
Limited WarrantySony Ericsson Mobile Communications AB,SE-221 88 Lund, Sweden, (Sony Ericsson) or itslocal affiliated company, provides this LimitedWarranty for your phone, original accessorydelivered with your phone, and/or your mobilecomputing product (hereinafter referred to as“Product”).Should your Product need warranty service, pleasereturn it to the dealer from whom it was purchased,or contact your local Sony Ericsson Call Center(national rates may apply) or visitwww.sonyericsson.com to get further information.
Our warrantySubject to the conditions of this Limited Warranty,Sony Ericsson warrants this Product to be free fromdefects in design, material and workmanship at thetime of its original purchase by a consumer. ThisLimited Warranty will last for a period of one (1) yearas from the original date of purchase of the Product.
Important information 69This is an Internet version of this publication. © Print only for private use.

What we will doIf, during the warranty period, this Product fails tooperate under normal use and service, due todefects in design, materials or workmanship,Sony Ericsson authorized distributors or servicepartners, in the country/region* where youpurchased the Product, will, at their option, eitherrepair or replace the Product in accordance with theterms and conditions stipulated herein.Sony Ericsson and its service partners reserve theright to charge a handling fee if a returned Productis found not to be under warranty according to theconditions below.Please note that some of your personal settings,downloads and other information may be lost whenyour Sony Ericsson Product is repaired or replaced.At present, Sony Ericsson may be prevented byapplicable law, other regulation or technicalrestrictions from making a backup copy of certaindownloads. Sony Ericsson does not take anyresponsibility for any lost information of any kind andwill not reimburse you for any such loss. You shouldalways make backup copies of all the informationstored on your Sony Ericsson Product such asdownloads, calendar and contacts before handingin your Sony Ericsson Product for repair orreplacement.
Conditions
1. This Limited Warranty is valid only if the originalproof of purchase for this Product issued by aSony Ericsson authorized dealer specifying the dateof purchase and serial number**, is presented withthe Product to be repaired or replaced.Sony Ericsson reserves the right to refuse warrantyservice if this information has been removed orchanged after the original purchase of the Productfrom the dealer.
2. If Sony Ericsson repairs or replaces the Product, therepair for the defect concerned, or the replacedProduct shall be warranted for the remaining time of
the original warranty period or for ninety (90) daysfrom the date of repair, whichever is longer. Repairor replacement may involve the use of functionallyequivalent reconditioned units. Replaced parts orcomponents will become the property ofSony Ericsson.
3. This warranty does not cover any failure of theProduct due to normal wear and tear, or due tomisuse, including but not limited to use in other thanthe normal and customary manner, in accordancewith the Sony Ericsson instructions for use andmaintenance of the Product. Nor does this warrantycover any failure of the Product due to accident,software or hardware modification or adjustment,acts of God or damage resulting from liquid.A rechargeable battery can be charged anddischarged more than a hundred times. However, itwill eventually wear out – this is not a defect andcorresponds to normal wear and tear. When the talk-time or standby time is noticeably shorter, it is timeto replace the battery. Sony Ericsson recommendsthat you use only batteries and chargers approvedby Sony Ericsson.Minor variations in display brightness and color mayoccur between phones. There may be tiny bright ordark dots on the display. These are called defectivepixels and occur when individual dots havemalfunctioned and can not be adjusted. Twodefective pixels are deemed acceptable.Minor variations in camera image appearance mayoccur between phones. This is nothing uncommonand is not regarded as a defective camera module.
4. Since the cellular system on which the Product is tooperate is provided by a carrier independent fromSony Ericsson, Sony Ericsson will not be responsiblefor the operation, availability, coverage, services orrange of that system.
5. This warranty does not cover Product failurescaused by installations, modifications, or repair oropening of the Product performed by a non-Sony Ericsson authorized person.
70 Important informationThis is an Internet version of this publication. © Print only for private use.

6. The warranty does not cover Product failures whichhave been caused by use of accessories or otherperipheral devices which are not Sony Ericssonbranded original accessories intended for use withthe Product.
7. Tampering with any of the seals on the Product willvoid the warranty.
8. THERE ARE NO EXPRESS WARRANTIES,WHETHER WRITTEN OR ORAL, OTHER THAN THISPRINTED LIMITED WARRANTY. ALL IMPLIEDWARRANTIES, INCLUDING WITHOUT LIMITATIONTHE IMPLIED WARRANTIES OFMERCHANTABILITY OR FITNESS FOR APARTICULAR PURPOSE, ARE LIMITED TO THEDURATION OF THIS LIMITED WARRANTY. IN NOEVENT SHALL SONY ERICSSON OR ITSLICENSORS BE LIABLE FOR INCIDENTAL ORCONSEQUENTIAL DAMAGES OF ANY NATUREWHATSOEVER, INCLUDING BUT NOT LIMITED TOLOST PROFITS OR COMMERCIAL LOSS TO THEFULL EXTENT THOSE DAMAGES CAN BEDISCLAIMED BY LAW.
Some countries/states do not allow the exclusion orlimitation of incidental or consequential damages, orlimitation of the duration of implied warranties, sothe preceding limitations or exclusions may notapply to you.The warranty provided does not affect theconsumer’s statutory rights under applicable
legislation in force, nor the consumer’s rights againstthe dealer arising from their sales / purchasecontract.
*Geographical scope of the warrantyIf you have purchased your Product in a countrymember of the European Economic Area (EEA) or inSwitzerland or the Republic of Turkey, and suchProduct was intended for sale in the EEA or inSwitzerland or in Turkey, you can have your Productserviced in any EEA country or in Switzerland or inTurkey, under the warranty conditions prevailing inthe country in which you require servicing, providedthat an identical Product is sold in such country byan authorised Sony Ericsson distributor. To find outif your Product is sold in the country you are in,please call the local Sony Ericsson Contact Center.Please observe that certain services may not beavailable outside the country of original purchase,for example, due to the fact that your Product mayhave an interior or exterior which is different fromequivalent models sold in other countries. Pleasenote in addition that it may sometimes not bepossible to repair SIM-locked Products.** In some countries/regions additional information(such as a valid warranty card) may be requested.
Anguilla 1-800-080-9518 (Toll Free) [email protected]
Antigua and Barbuda 1-800-081-9518 (Toll Free) [email protected]
Argentina 0800-333-7427 (número gratuito) [email protected]
Australia 1300 650-050 (Toll Free) [email protected]
The Bahamas 1-800-205-6062 (Toll Free) [email protected]
Barbados 1-800-082-9518 (Toll Free) [email protected]
Belgique/België 02-0745 1611 [email protected]
Belize AN 815, PIN 5597 (Toll Free) [email protected]
Important information 71This is an Internet version of this publication. © Print only for private use.

Bermuda 1-800-083-9518 (Toll Free) [email protected]
Bolivia 800-100-542 (número gratuito) [email protected]
Brasil 4001-0444 (ligação gratuita) [email protected]
Canada 1 866 766 9374 (Toll Free / sans frais) [email protected]
Cayman Islands 1-800-084-9518 (Toll Free) [email protected]
Central and SouthernAfrica
+27 11 506 0123 [email protected]
Česká republika 0844 550 055 [email protected]
Chile 800-646-425 (número gratuito) [email protected]
Colombia 01800-0966-080 (número gratuito) [email protected]
Costa Rica 0 800 011 0400 (número gratuito) [email protected]
Danmark 3331 2828 [email protected]
Deutschland 0180 534 2020 (ortsübliche Gebühren) [email protected]
Dominica 1-800-085-9518 (Toll Free) [email protected]
Ecuador 1-800-0102-50 (número gratuito) [email protected]
Eesti 06 032 032 [email protected]
Egypt/مصر 16727 [email protected]
Ελλάδα 801 11 810 810 +30 210 899 19 19 (από κινητό τηλέφωνο)
El Salvador 800-6323 (número gratuito) [email protected]
España 902 180 576 (tarifa local) [email protected]
France 09 69 32 21 21 09 69 32 21 22 (Xperia™uniquement)
Guatemala 1-800-300-0057 (número gratuito) [email protected]
Haïti/Ayiti AN 193, PIN 5598 (numéro gratuit / nimewogratis)
Honduras AN 8000122, PIN 5599 (número gratuito) [email protected]
Hong Kong/香港 +852 8203 8863 [email protected]
Hrvatska 062 000 000 [email protected]
India/भारत 1800 11 1800 (Toll Free)+91 (011) 39011111
Indonesia 021 2701388 [email protected]
72 Important informationThis is an Internet version of this publication. © Print only for private use.

Ireland 1850 545 888 (Local rate) [email protected]
Italia 06 48895206 (tariffa locale) [email protected]
Jamaica 1-800-442-3471 (Toll Free) [email protected]
Κύπρος/Kıbrıs 0800 90 909 [email protected]
Latvija 67 21 43 01 [email protected]
Lietuva 8 700 55030 [email protected]
Magyarország 01 880 47 47 [email protected]
Malaysia 1800-88-9900 (Toll Free / bebas tol) [email protected]
Maroc/المغرب +212 2 2958 344 [email protected]
México 0 1800 000 4722 (número gratuito) [email protected]
Nederland 0900 8998318 [email protected]
Nederlandse Antillen 001-866-509-8660 (gratis nummer) [email protected]
New Zealand 0800-100-150 (Toll Free) [email protected]
Nicaragua AN 1800-0166, PIN 5600 (número gratuito) [email protected]
Norge 815 00 840 (lokaltakst) [email protected]
Österreich 0810 200 245 [email protected]
Pakistan/پاکستان 021 - 111 22 55 73 [email protected]
Panamá 00800-787-0009 (número gratuito) [email protected]
Paraguay 009 800 54 20032 (número gratuito) [email protected]
Perú 0800-532-38 (número gratuito) [email protected]
Philippines/Pilipinas +63 2 7891860 [email protected]
Polska +48 22 22 77 444 [email protected]
Portugal 808 204 466 (chamada local) [email protected]
República Dominicana 1-800-751-3370 (número gratuito) [email protected]
România +40 21 401 0401 [email protected]
Saint Kitts and Nevis 1-800-087-9518 (Toll Free) [email protected]
Saint Vincent and theGrenadines
1-800-088-9518 (Toll Free) [email protected]
Schweiz/Suisse/Svizzera 0848 824 040 [email protected]
Singapore +65 6744 0733 [email protected]
Slovensko 02 5443 6443 [email protected]
Important information 73This is an Internet version of this publication. © Print only for private use.

South Africa 0861 632222 [email protected]
South Κorea/대한민국 (+82) 1588 4170 [email protected]
Suomi 09 299 2000 [email protected]
Sverige 013 24 45 00 (lokal taxa) [email protected]
Trinidad and Tobago 1-800-080-9521 (Toll Free) [email protected]
Türkiye +90 212 473 77 77 [email protected]
United Kingdom 08705 237 237 (Local rate) [email protected]
United States 1 866 766 9374 [email protected]
Uruguay 000-401-787-013 (número gratuito) [email protected]
Venezuela 0-800-1-00-2250 (número gratuito) [email protected]
Việt Nam 1900 1525 (miễn phí) [email protected]
Беларусь 8 82 00 361 0001 [email protected]
България 0800 1 8778 [email protected]
Россия +7 (495) 7870986 [email protected]
Україна (+380) 44 590 1515 [email protected]
الأردن +971 4 3919 880 [email protected]
المتحدة العربية الإمارات +971 4 3919 880 (UAE) [email protected]
الكويت +971 4 3919 880 [email protected]
السعودية العربية المملكة 800-8200-727 [email protected]
中国 +86 400 810 0000 [email protected]
台灣 +886 2 25625511 [email protected]
ไทย 02 2483 030 [email protected]
74 Important informationThis is an Internet version of this publication. © Print only for private use.

Index
Aactivity menu ........................................14Address Book .......................................33alarms ...................................................52answering service .................................36applications ..........................................56appointments .......................................53assembly ................................................6AT&T Video Share ................................32audio book ...........................................19auto rotate ............................................56
Bbacking up and restoring .....................29battery
capacity ..........................................7charging .........................................8inserting ..........................................6use and care .................................66
Bluetooth™ wireless technology .........28bookmarks ...........................................48business card .......................................35
Ccalendar ................................................53call forward ...........................................37call list ..................................................33call numbers in message ......................40caller-specific ringtones .......................34
callsaccepting .....................................38answering and rejecting ...............31emergency ...................................32handling two calls ........................38international ..................................31making and receiving ...................31putting on hold .............................37recording ......................................22
camera .................................................44printing .........................................47
conference calls ...................................38contacts
adding phone contacts ................33default contacts ...........................33groups ..........................................35Smart search ................................34
costs .......................................................7
Ddate ......................................................55download
settings .........................................60
Eemergency numbers ............................32end user license agreement .................69entering text .........................................15
Index 75This is an Internet version of this publication. © Print only for private use.

Fflight mode ...........................................51flip
locking ..........................................59unlocking ......................................59
FM radio ...............................................21
Ggames ...................................................56gesture control .....................................51groups ..................................................35
Hhandsfree .......................................16, 36
Bluetooth™ wireless technology . 29hearing aid compatibility ......................64help .........................................................7hiding number ......................................39
IIM .........................................................42imaging .................................................44IMEI number .........................................59instant messaging ................................42Internet
bookmarks ...................................48screen orientation ........................56security and certificates ...............50settings .........................................60
Kkeys ........................................................9
Llanguage ...............................................15lock
phone ...........................................57SIM card .......................................57
lockingflip .................................................59
Mmaster reset .........................................59Media Go™ ..........................................26media transfer ......................................27MEdia™ Net .........................................48memory ................................................14memory card ........................................15memory status .....................................35menu overview .....................................11messages
text and picture ............................39voice .............................................41
messaginginstant ...........................................42
microphone ..........................................31MMS See multimedia messagesMobile Email .........................................41model name ...........................................7multimedia messages ..........................39MusicDJ™ ............................................22MusicID™ .............................................20my phone number ..................................7My Stuff ................................................23
76 IndexThis is an Internet version of this publication. © Print only for private use.

Nnavigating menus .................................13notes ....................................................53
Ppan and zoom
Web pages ...................................49password saver ..............................58, 61PC Suite ...............................................50phone memory .................................7, 14phone mode .........................................51phone name .........................................28phone, turning on ...................................6photo fix ...............................................45PhotoDJ™ ............................................47photos ..................................................46
editing ..........................................47improving .....................................45tags ..............................................46
pictures ................................................46PIN ....................................................7, 57playlists ................................................18power saving ........................................29profiles ..................................................54PUK ......................................................57
Rrecording
listening to ....................................22ringtones ..............................................55
setting ..........................................55roaming ..................................................7
Ssafety guidelines ...................................65screen orientation .................................56search
on Web pages ..............................49selection keys .......................................13SensMe™ .............................................19setting
ringtones ......................................55settings
download .....................................60Internet .........................................60
shake control ........................................17shortcuts ..............................................14SIM card
copying to/from ............................34inserting ..........................................6lock and unblock ..........................57
SMS See text messagesSOS See emergency numberssound recorder .....................................22speed dialing ........................................36standby ..................................................7
notes ............................................54support .................................................65synchronizing .......................................50
TT9™ Text Input .....................................16tagging photos .....................................46tasks .....................................................54templates ..............................................40
Index 77This is an Internet version of this publication. © Print only for private use.

theme ...................................................55time ......................................................55time zone ..............................................55TrackID™ .............................................20transfer method
Bluetooth™ wireless technology . 28USB cable ....................................24
transferringmusic ............................................26photos ..........................................26sound ...........................................29
turning on/offBluetooth™ function ....................28phone lock ....................................57SIM lock protection ......................57
UUSB cable ............................................24
Vvideo editing .........................................47video player ..........................................20video recorder ......................................44video ringtones .....................................55Video Share ..........................................32VideoDJ™ ............................................47voice control .........................................36voice messages ....................................41voicemail ..............................................36volume
ear speaker ..................................31
WWalkman™ player ..........................16, 17warranty ...............................................69Web pages
history ...........................................49
Zzoom ....................................................45
78 IndexThis is an Internet version of this publication. © Print only for private use.