Sentinel RMS SDK v9.4.0 - Quick Start Guide for On-premise ...
27
Sentinel RMS SDK v9.4.0 Quick Start Guide for On-premise Served Network License Deployment
-
Upload
khangminh22 -
Category
Documents
-
view
9 -
download
0
Transcript of Sentinel RMS SDK v9.4.0 - Quick Start Guide for On-premise ...
Sentinel RMS SDK v9.4.0Quick Start Guide for On-premise Served Network License Deployment

Document Revision History
Revision Major Changes Date
B Updated for the Sentinel RMS 9.4.0 release August 2018
A Created for the Sentinel RMS 9.3.0 release June 2018
Disclaimer and CopyrightsAll information herein is either public information or is the property of and owned solely by Gemalto NV. and/or itssubsidiaries who shall have and keep the sole right to file patent applications or any other kind of intellectual propertyprotection in connection with such information.
Nothing herein shall be construed as implying or granting to you any rights, by license, grant or otherwise, under anyintellectual and/or industrial property rights of or concerning any of Gemalto’s information.
This document can be used for informational, non-commercial, internal and personal use only provided that:
• The copyright notice below, the confidentiality and proprietary legend and this full warning notice appear in allcopies.
• This document shall not be posted on any network computer or broadcast in any media and nomodification of anypart of this document shall bemade.
Use for any other purpose is expressly prohibited andmay result in severe civil and criminal liabilities.
The information contained in this document is provided “AS IS” without any warranty of any kind. Unless otherwiseexpressly agreed in writing, Gemalto makes no warranty as to the value or accuracy of information contained herein.
The document could include technical inaccuracies or typographical errors. Changes are periodically added to theinformation herein. Furthermore, Gemalto reserves the right to make any change or improvement in the specificationsdata, information, and the like described herein, at any time.
Gemalto hereby disclaims all warranties and conditions with regard to the information contained herein, including allimplied warranties of merchantability, fitness for a particular purpose, title and non-infringement. In no event shallGemalto be liable, whether in contract, tort or otherwise, for any indirect, special or consequential damages or anydamages whatsoever including but not limited to damages resulting from loss of use, data, profits, revenues, orcustomers, arising out of or in connection with the use or performance of information contained in this document.
Gemalto does not and shall not warrant that this product will be resistant to all possible attacks and shall not incur, anddisclaims, any liability in this respect. Even if each product is compliant with current security standards in force on thedate of their design, security mechanisms' resistance necessarily evolves according to the state of the art in securityand notably under the emergence of new attacks. Under no circumstances, shall Gemalto be held liable for any thirdparty actions and in particular in case of any successful attack against systems or equipment incorporating Gemaltoproducts. Gemalto disclaims any liability with respect to security for direct, indirect, incidental or consequentialdamages that result from any use of its products. It is further stressed that independent testing and verification by theperson using the product is particularly encouraged, especially in any application in which defective, incorrect orinsecure functioning could result in damage to persons or property, denial of service or loss of privacy.
© 1994 - 2018Gemalto NV. All rights reserved. Gemalto, the Gemalto logo, are trademarks and servicemarks ofGemalto and are registered in certain countries.
Product Version: 9.4.0
Document Number: 007-000135-001, Revision B
SentinelRMSSDKQuickStart Guide for On-premise Served Network License DeploymentRelease v9.4.0 August 2018 Copyright 2019Gemalto NV All rights reserved. 2

Release Date: August 2018
SentinelRMSSDKQuickStart Guide for On-premise Served Network License DeploymentRelease v9.4.0 August 2018 Copyright 2019Gemalto NV All rights reserved. 3

CONTENTS
Quick Start Guide for On-premises Served Network License Deployment 5About This Guide 5
Document Conventions 5Documentation Resources 6Support Contacts 6
Introduction 8Sentinel EMS 8Sentinel RMS 8Network Licenses (Supported using the RMS LicenseManager) 8Prerequisites 9Steps for Licensing 10
Define Product Catalog 11Create Entitlement 15Generate License 18Install and Consume License 21
Documentation Resources 27
SentinelRMSSDKQuickStart Guide for On-premise Served Network License DeploymentRelease v9.4.0 August 2018 Copyright 2019Gemalto NV All rights reserved. 4

Quick Start Guide for On-premises ServedNetwork License Deployment
About This GuideThis document provides step by step instructions for generating and consuming Sentinel RMS on-premises servednetwork licenses.
Document ConventionsThis document uses standard conventions for describing the user interface and for alerting you to important information.
NotesNotes are used to alert you to important or helpful information. They use the following format:
Note: Take note. Contains important or helpful information.
CautionsCautions are used to alert you to important information that may help prevent unexpected results or data loss. They usethe following format:
CAUTION: Exercise caution. Contains important information that may help preventunexpected results or data loss.
WarningsWarnings are used to alert you to the potential for catastrophic data loss or personal injury. They use the followingformat:
WARNING! Be extremely careful and obey all safety and security measures. In thissituation you might do something that could result in catastrophic data loss orpersonal injury.
SentinelRMSSDKQuickStart Guide for On-premise Served Network License DeploymentRelease v9.4.0 August 2018 Copyright 2019Gemalto NV All rights reserved. 5
Quick Start Guide for On-premises Served Network License Deployment
Command Syntax and Typeface Conventions
Convention Description
Bold lettering Denotes keystrokes, menu items, window names or fields.
Courier Denotes syntax, prompts, and code examples.
Italic lettering Denotes file names and directory names. Else, used for emphasis.
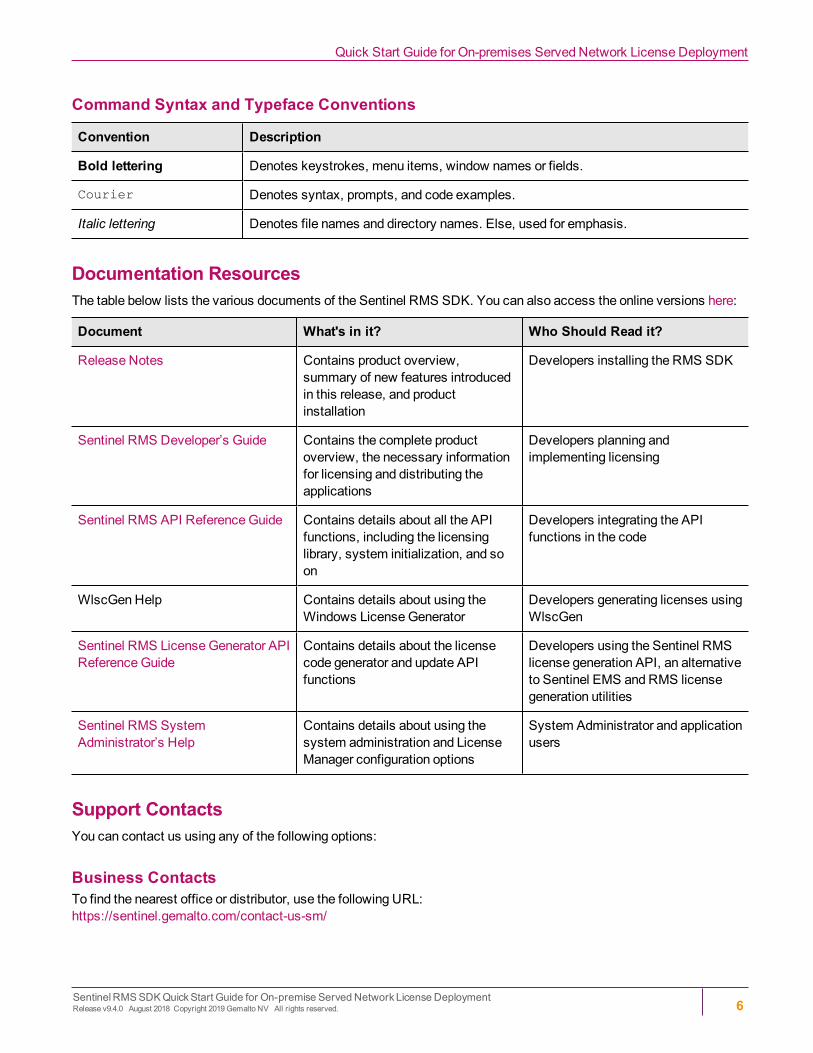
Documentation ResourcesThe table below lists the various documents of the Sentinel RMS SDK. You can also access the online versions here:
Document What's in it? Who Should Read it?
Release Notes Contains product overview,summary of new features introducedin this release, and productinstallation
Developers installing the RMS SDK
Sentinel RMS Developer’s Guide Contains the complete productoverview, the necessary informationfor licensing and distributing theapplications
Developers planning andimplementing licensing
Sentinel RMS API ReferenceGuide Contains details about all the APIfunctions, including the licensinglibrary, system initialization, and soon
Developers integrating the APIfunctions in the code
WlscGen Help Contains details about using theWindows LicenseGenerator
Developers generating licenses usingWlscGen
Sentinel RMS LicenseGenerator APIReferenceGuide
Contains details about the licensecode generator and update APIfunctions
Developers using the Sentinel RMSlicense generation API, an alternativeto Sentinel EMS and RMS licensegeneration utilities
Sentinel RMS SystemAdministrator’s Help
Contains details about using thesystem administration and LicenseManager configuration options
System Administrator and applicationusers
Support ContactsYou can contact us using any of the following options:
Business ContactsTo find the nearest office or distributor, use the following URL:https://sentinel.gemalto.com/contact-us-sm/
SentinelRMSSDKQuickStart Guide for On-premise Served Network License DeploymentRelease v9.4.0 August 2018 Copyright 2019Gemalto NV All rights reserved. 6

Quick Start Guide for On-premises Served Network License Deployment
Technical SupportTo obtain assistance in using Gemalto Sentinel Products, feel free to contact our Technical Support team:
• Customer Support Portal: (Preferred)
– https://supportportal.gemalto.com/csm?id=sentinel
• Phone:
– AMER: 800-545-6608 (US toll free), +1-410-931-7520 (International)
– EMEA / APAC: https://supportportal.gemalto.com/csm?id=sentinelClick on “Contact us”
• E-mail (only if having issue submitting the technical issue via portal)[email protected]
DownloadsYoumay want to explore updated installers and other components here:https://sentinelcustomer.gemalto.com/sentineldownloads/
SentinelRMSSDKQuickStart Guide for On-premise Served Network License DeploymentRelease v9.4.0 August 2018 Copyright 2019Gemalto NV All rights reserved. 7
Introduction
Introduction
This document provides step by step instructions for generating and consuming RMS licenses for the on-premisesserved network mode. The purpose of this document is to help the reader to become familiar with different aspectsinvolved in the process of generating a license, installing the license, and executing a licensed application onWindows.
This document uses:
• Sentinel EMS for defining the Product catalog and generating Entitlements and Licenses.
• Code sample provided with the Sentinel RMS SDK to consume the Licenses.
• Sentinel RMS tools for generating License Fingerprints and installing the Licenses.
Sentinel EMSSentinel EMS is a web-based Entitlement Management System that enables software developers and devicemanufacturers to define andmanage their product portfolio and the associated licensing policies. The Sentinel EMSplatform includes out-of-the-box interfaces for license generation, activation, tracking, reporting, and back-officeintegration and customer self-service portals.
For more details, refer to the Sentinel EMS User Guide.
Sentinel RMSSentinel RMS provides a set of APIs and tools to be integrated within the software that needs to be licensed andprotected. Licenses are generated by the Sentinel RMS license generator that’s integrated with Sentinel EMS.Licenses generated are uniquely encrypted for each software Vendor so that only their application licensed by them canunderstand and decrypt the licenses for use.
For more details, refer to the Sentinel RMS Vendor's Guide.
Network Licenses (Supported using the RMS LicenseManager)Sentinel RMS provides the followingmodes in which a protected application can be deployed and executed:
• Standalone mode: The protected application runs on a device or machine independently and has its ownindependent License.
• Network mode: Protected applications share the License from a common pool that is typically installed on alicense server accessible over network. Optionally license servers can be setup in a redundant mode as well forhigh availability.
For bothmodes licenses can be generated and activated in one of the following ways:
SentinelRMSSDKQuickStart Guide for On-premise Served Network License DeploymentRelease v9.4.0 August 2018 Copyright 2019Gemalto NV All rights reserved. 8

Introduction
• On-premises served mode: In this mode, the entitlement is activated and license is generated using the EMSportal or EMS web services. Further, the license is transferred to the target device for use. This guide focuses onthe on-premises servedmode.
• Cloud served mode: In this mode, licensed application connects to SCC (a component hosted andmanaged byGemalto on AWS) to get licenses and any future updates.
PrerequisitesThis section contains information on what is required for running the licensed application.
• Sentinel RMS SDK: Youmust meet the software and hardware requirements for installing the Sentinel RMSSDK. For details, refer to the section “Installation Information” in the Release Notes.
• Compiler: For compiling the sample application onWindows (32-bit and 64-bit), you need to install MicrosoftVisual Studio (any version from 2008 to 2017).
Note: Wehave usedMicrosoft Visual Studio 2015 to explain the procedures in this document.
Download and Install Sentinel RMS SDKBefore you can execute the sample, you need to install the Sentinel RMS SDK.
• If you are a production customer, refer to the Gemalto’s Order emails for links to download the RMS SDK.Alternatively, you can login to your Gemalto’s support account and use the available links to download the SDK.
• If you are an evaluation/trial customer, SDK download links are present in the trial portal. URL and credentials fortrial portal are shared in the trial access details email that was sent to you.
Downloading the Sentinel RMS SDK1. Open theGemalto Sentinel Order Credential email. In theDownload Details table, click theDownload link
corresponding to theSentinel RMS SDK field.
2. For trial licenses, clicking the link will directly start the SDK download. For all other licenses, you will be redirectedto the Gemalto Support Portal.
Installing Sentinel RMS License Manager and Sentinel System Driver
For UNIXThe Sentinel System Driver on UNIX is known as Sentinel UNIX Driver (SUD)—its installer is provided in your RMSSDK installation. The installation instructions are provided in the release notes corresponding to your UNIX platform.You can ship this installer to your customers if the supported hardware key needs to be accessed.
For installing the Sentinel RMS LicenseManager, you can share the LicenseManager executable (lserv) available inthe /redistributable/licenseManager directory.
For WindowsThe installation program at: <installdir>\Redistributable\LicenseManagerwill install both the Sentinel RMS LicenseManager and Sentinel System Driver onWindows systems. The installer detects whether the operating system isWindows 32 or 64-bit and installs the appropriate version of the Sentinel System Driver accordingly.
Given below are various methods to perform the installation.
SentinelRMSSDKQuickStart Guide for On-premise Served Network License DeploymentRelease v9.4.0 August 2018 Copyright 2019Gemalto NV All rights reserved. 9
Introduction
Method 1 - Wizard-based Installation
This is a wizard-based graphical installer that does a full step-by-step installation. Since it involves user-interaction,most of your customers will be able to run it on their own.
Method 2: Quiet Installation
Either during your application's installation or afterward, you can call the setup.exe in quiet mode. The installation is runwithout any noticeable user interaction. This method is very similar to the first method, except that you call setup.exeyourself, to run without displayingmessages (quiet mode).
The following files are required, totaling about 8MB:
• Sentinel RMS LicenseManager <version>.msi
• Data1.cab
• Setup.exe
The command-line switches are as follows:
• Use the following option to install both the LicenseManager and Sentinel System Driver from command-line:msiexec /quiet INSTALLLEVEL=101 /i "Sentinel RMS License Manager <version>.msi"
• Use the following option to install only the LicenseManager from command-line:msiexec /quiet /i "Sentinel RMS License Manager <version>.msi”
Method 3: Calling the MSI
With your application's Windows Installer-based installation program, you can easily call the LicenseManager MSI file.It is a supported custom action built intoWindows Installer. The trick is to allow the installer to find the files it needs toinstall. The Sentinel RMS LicenseManager installer is written using InstallShield forWindows Installer and has all itsfiles placed in the archive data1.cab. After you add a custom action to call this MSI file from your installer, all thecomponents will be installed quietly right along with your application in a seamless manner.
Note: Youmust haveWindows Installer 2.0 (or later) installed on the target machine.
The following files are required, totaling about 4MB:
• Sentinel RMS LicenseManager <version>.msi
• Data1.cab
Note: It is possible that if you use InstallShield forWindows Installer you also have a .cab filecorresponding to your application. In this case, the two files need to bemerged together—asthey need to reside in one directory. Otherwise, just include the Sentinel RMS LicenseManagerMSI file and.cab file in the same directory as your ownMSI.
Steps for LicensingA typical process of licensing an application involves the following steps:
1. "Define Product Catalog" on the next page: This step involves defining the LicenseModels, Features, andProducts. A LicenseModel is associated with a Feature and a Product is a collection of Features. The Product isused at the time of creating an Entitlement.
SentinelRMSSDKQuickStart Guide for On-premise Served Network License DeploymentRelease v9.4.0 August 2018 Copyright 2019Gemalto NV All rights reserved. 10

Introduction
2. "Create Entitlement" on page 15: This step involves creating an Entitlement for a customer. The Entitlementcontains the Products, Features, and associated LicenseModel that the customer is entitled to use.
3. "Generate License " on page 18: This step involves activating the License the end user is entitled to. Users arerequired to generate the Fingerprint of themachine on which the license will be installed to perform the activation.
4. "Install and Consume License " on page 21: The license that is generated after the entitlement is activatedmust beinstalled on the device/machine where the licensed application will run. During license consumption, the applicationuses RMS APIs to validate the license(s).
Define Product CatalogThis includes the following steps:
1. "Log on to the Sentinel EMS Portal" below
2. "Create Namespace" below
3. "Customize the Flexible LicenseModel" on the next page
4. "Create Feature" on page 13
5. "Create Product" on page 14
Log on to the Sentinel EMS PortalTo log on to EMS, you need a user ID and password assigned by the administrator. The default user ID and passwordare shared in the Gemalto Sentinel Order Credential email.
Navigate to the URL on which your EMS instance is running, and enter the user ID and password to login to the portal.
Note:
• If you are an EMSaaS customer, use the URL sent by Gemalto in email for login to EMS portal.
• If you host EMS yourself, use the URL on which you are hosting EMS.
• If you are an evaluation/trial customer, the EMS access URL is present in the trial portal. URL and credentials fortrial portal are shared in the trial access details email.
To create a product catalog, you need to use theCatalogmenu from the Sentinel EMS mainmenu.
Create NamespaceA Namespace acts as a logical partition for your Sentinel EMS workspace. If you have different Product lines, you canmaintain a different Namespace for each and definemultiple Products in each Namespace. For details, refer to theSentinel EMS User Guide.
1. UnderCatalog, click Namespaces. The Namespaces page is displayed.
2. Click New. TheCreate Namespace page is displayed.
3. In theName field, typeSampleNetwork.
SentinelRMSSDKQuickStart Guide for On-premise Served Network License DeploymentRelease v9.4.0 August 2018 Copyright 2019Gemalto NV All rights reserved. 11

Introduction
4. Click Save. The “Successfully saved the data” message is displayed, and the SampleNetwork namespace isdisplayed in themain pane of the Namespaces page.
Customize the Flexible License ModelA LicenseModel is a combination of various parameters that define how a Product/Suite can be used by an end user.Sentinel EMS provides you with the flexibility to addmultiple LicenseModels to your Product/Suite so that you canprotect your Product once and generate different types of licenses according to your requirement. For details, refer tothe Sentinel EMS User Guide.
Sentinel EMS provides various out of the box LicenseModels that can be further customized as per requirements. Forthe purpose of this guide, we will use “Flexible LicenseModel”.
1. UnderCatalog, click LicenseModel. The LicenseModel page is displayed.
2. In the left pane, use the License Model Name search criteria to search for the Flexible License Model. Whenselected, the LicenseModel details are displayed in the right pane.
3. Click Copy. The Add LicenseModel page is displayed.
4. In the License Model Name field, typeNetworkLM.
5. From theDeployment Type drop-down, select On-premises Served.
6. From the License Type drop-down, select Network.
7. Expand thePolicy section, and clear theEnforce Clock Tampered check box to disable time tamperingdetection.
Note: Clock tempering is handled by the licensemanager itself.
8. Expand the Locking section, and select the desired locking Criteria by clickingChange.
SentinelRMSSDKQuickStart Guide for On-premise Served Network License DeploymentRelease v9.4.0 August 2018 Copyright 2019Gemalto NV All rights reserved. 12

Introduction
For the purpose of this guide, let us useDisk ID as the Locking Criteria, so no further change is required.
9. Click Save. TheNetworkLM licensemodel is displayed in themain pane of the LicenseModel page.
Create FeatureA Feature is a functional part of an application that can be independently licensed. Features are the basic buildingblocks of a Product. For details, refer to the Sentinel EMS User Guide.
1. UnderCatalog, click Feature. The Feature page is displayed.
2. Click New. The Create Feature page is displayed.
SentinelRMSSDKQuickStart Guide for On-premise Served Network License DeploymentRelease v9.4.0 August 2018 Copyright 2019Gemalto NV All rights reserved. 13

Introduction
3. From theNamespace drop-down, select SampleNetwork.
4. In the Feature Name field, typeNetwork.
5. In the Feature Version field, type 1.
6. From the License Models Available list, select theNetworkLM licensemodel, and click the right arrow.
7. Click Save. The “Successfully saved the data” message is displayed, and the feature is displayed in themain paneof the Feature page.
Create ProductA Product is a combination of individual Features and is associated with one or more LicenseModels. One or moreFeatures are bundled into a Product as defined by your sales andmarketingmodel. For details, refer to the SentinelEMS User Guide.
1. UnderCatalog, click Product. The Product page is displayed.
2. Click New. The Create Product page is displayed.
SentinelRMSSDKQuickStart Guide for On-premise Served Network License DeploymentRelease v9.4.0 August 2018 Copyright 2019Gemalto NV All rights reserved. 14

Introduction
3. From theNamespace drop-down, select SampleNetwork.
4. In theProduct Name field, typeProduct .
5. In theVersion field, type 1.
6. From theAvailable list, select theNetwork feature and click the right arrow.
7. Click Save. The “Successfully saved the data” message is displayed, and the Product is displayed in themainpane of the Product page.
8. Click Complete. This changes the product's Lifecycle Stage to Complete andmakes the product available fordistribution.
With this step, you have successfully created a Product catalog.
Create EntitlementAn Entitlement refers to the rights of an end-user to use a software package. It includes information like who can use itand for what duration. After the end-user obtains these rights he can activate, which generates a license to use thesoftware conforming to the defined terms. After Features and Products have been defined in Sentinel EMS,Entitlements can be generated for the Products. In simple terms, Entitlement generationmeans producing orders for thegiven Products. For details, refer to the Sentinel EMS User Guide.
1. UnderEntitlements, click Entitlements. The Entitlements page is displayed.
2. Click New. The Configure Entitlement page is displayed.
3. Place the cursor in theCustomer Name field and press any key. Click theAdd New drop-down option thatappears.
SentinelRMSSDKQuickStart Guide for On-premise Served Network License DeploymentRelease v9.4.0 August 2018 Copyright 2019Gemalto NV All rights reserved. 15

Introduction
4. TheCreate New Customer pop-up is displayed.
5. In theCustomer Name field, typeCustNetwork.
6. In theCustomer ID field, typeCustNetwork.
7. Click Save to close the Create New Customer pop-up.
8. In theContact E-mail, add your email ID to receive the entitlement certificate.
9. Click Add Product. The Select Product page is displayed.
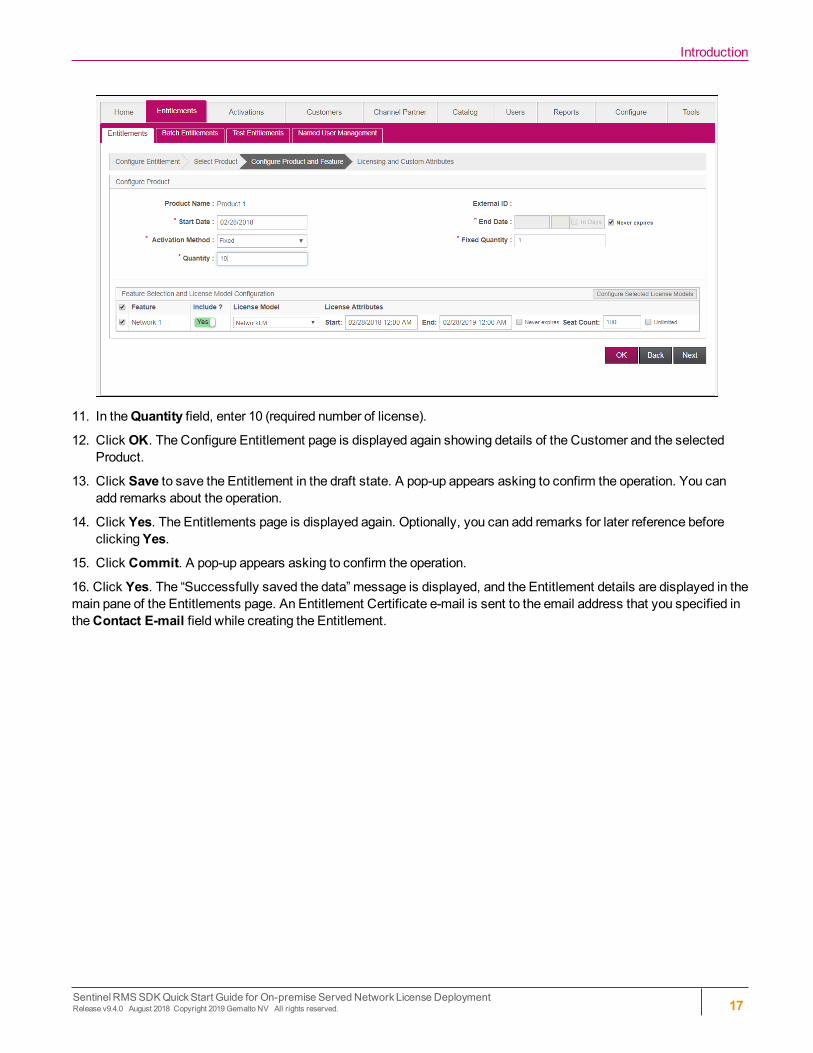
10. Select theProduct 1 product, and click Add. The Configure Product and Feature page is displayed.
SentinelRMSSDKQuickStart Guide for On-premise Served Network License DeploymentRelease v9.4.0 August 2018 Copyright 2019Gemalto NV All rights reserved. 16
Introduction
11. In theQuantity field, enter 10 (required number of license).
12. Click OK. The Configure Entitlement page is displayed again showing details of the Customer and the selectedProduct.
13. Click Save to save the Entitlement in the draft state. A pop-up appears asking to confirm the operation. You canadd remarks about the operation.
14. Click Yes. The Entitlements page is displayed again. Optionally, you can add remarks for later reference beforeclickingYes.
15. Click Commit. A pop-up appears asking to confirm the operation.
16. Click Yes. The “Successfully saved the data” message is displayed, and the Entitlement details are displayed in themain pane of the Entitlements page. An Entitlement Certificate e-mail is sent to the email address that you specified intheContact E-mail field while creating the Entitlement.
SentinelRMSSDKQuickStart Guide for On-premise Served Network License DeploymentRelease v9.4.0 August 2018 Copyright 2019Gemalto NV All rights reserved. 17

Introduction
Generate LicenseLicenses can be locked or unlocked. Licenses generated for RMS in this guidemust be bound to the Fingerprint of thedevice on which the License is going to be used. Steps required are:
1. "Generate Fingerprint " below
2. "Activate Product" on page 21
Generate FingerprintFingerprint generation is a client-side operation. Sentinel EMS provides an out-of-the-box tool that can be used by yourEnd Customer to generate the Fingerprint to be used for License activation. This tool is called “Wechoid”. To downloadthe tool, use the following steps:
1. Click Activate on the Entitlement screen shown above. The Activate Product (s) pop-up is displayed.
SentinelRMSSDKQuickStart Guide for On-premise Served Network License DeploymentRelease v9.4.0 August 2018 Copyright 2019Gemalto NV All rights reserved. 18

Introduction
2. Click theWechoid link to download theWechoid.exe.
3. Run theWechoid.exe on the system where the licensemanager is hosted to obtain the locking code.
SentinelRMSSDKQuickStart Guide for On-premise Served Network License DeploymentRelease v9.4.0 August 2018 Copyright 2019Gemalto NV All rights reserved. 19

Introduction
4. Under Locking Criteria, ensure that none of the fields except Disk ID is selected. This is because for the purposeof this guide we are using only Disk ID as the Locking Criteria. See Step 8 of the section "Customize the FlexibleLicenseModel" on page 12
SentinelRMSSDKQuickStart Guide for On-premise Served Network License DeploymentRelease v9.4.0 August 2018 Copyright 2019Gemalto NV All rights reserved. 20

Introduction
Note: The Locking Criteria must be the same as specified in the licensemodel associated withthe entitlement; otherwise, the fingerprints in the license will not match the fingerprint on themachine/device.
5. TheCode field automatically displays the Fingerprint based on the selected criteria. Select and copy it.
Note: Run theWechoid tool on the system where the licensemanager is hosted, and obtainthe locking code.
Note: The terms “Locking Criteria”, “Primary criteria”, and “Locking Selector” are usedinterchangeably throughout this guide and within Sentinel EMS, tools, and documentation.Likewise, the terms “Locking Code”, “Client info”, and “Fingerprint” are used interchangeably.The former are used to define what machine characteristics the latter will be based on.Combined, the ‘criteria’ and ‘fingerprint’ are referred to as the ‘Locking Data’.
For details of these terms, refer to Sentinel RMS Vendor's Guide.
Activate ProductProduct activation refers to amethod by which themachine-specific lock code of a computer is used to generate alicense code or file specific to that computer or device. The license code ensures that the Product can be used only onthe system(s) to which it is locked. For details, refer to the Sentinel EMS User Guide.
1. After obtaining the Fingerprint from theWechoid tool, return to the Activate Product (s) pop up in Sentinel EMS.
2. Paste the Fingerprint generated above into thePrimary 1 info field.
3. Click Activate to generate the License string.
4. Click Save To File to create a lservrc file that contains the generated license string.
Note: The end user can activate the product using the customer portal. For further information,refer to the Sentinel EMS user guide.
Install and Consume LicenseTo consume the license, you need to compile the sample, install the license, and run the sample.
Note:- Before compiling and running the sample, ensure to complete the prerequisites.- Microsoft Visual Studio 2015 has been used to explain the steps in this section.- In the steps below, change 9.x to the RMS version you are using where path is referring to thelocation of sample or output.
Compile Sample (MSVS 2015 and Later)You need to compile the sntl_demo.c sample to get the executable application, which can be run to consume thelicense.
SentinelRMSSDKQuickStart Guide for On-premise Served Network License DeploymentRelease v9.4.0 August 2018 Copyright 2019Gemalto NV All rights reserved. 21

Introduction
To compile the sntl_demo.c sample:
1. OpenMicrosoft Visual Studio as Administrator.
2. Open theSamples32.MSVS2008.sln solution file in Visual Studio. This file is available in theC:\Program Files(x86)\SafeNet Sentinel\Sentinel RMS Development Kit\9.x\Samples\C folder.
3. Edit the sntl_demo.c file:
a. In theSolution Explorer, navigate to the sntl_demo folder, expandSource Files and double-click the sntl_demo.c file to open it.
b. You do not need tomake changes in #define CONTACT_SERVER if your server is hosted on samemachine.
Note: If you are using a different sever, you need to provide the IP address of the server (wherethe license is present) in #define CONTACT_SERVER; otherwise, it is localhost by default.
c. Change the feature name toNetwork in the sample source file.
Note: By default, the feature name is Addition and feature version is 1 in the sample sourcefile. However, if you have created a feature in EMS by a different name and version, you needto change the defaults in the sample to the values defined in EMS.
4. Before building the sample, you need to change the properties of the sntl_demo project. To do so, right-click thesntl_demo folder in theSolution Explorer, click Properties, and perform the following changes:
a. Add the library ws2_32.lib (Configuration properties > Linker > Input > Additional Dependencies).
b. Change the library path (Configuration properties > Linker > General > Additional Library Directories) to thefollowing:
C:\Program Files (x86)\SafeNet Sentinel\Sentinel RMS DevelopmentKit\9.x\Development\C\Lib\MSVS2015\x86\Static\MT
c. Change the output file path (Configuration properties > Linker > General > Output File) to the following:
C:\Program Files (x86)\SafeNet Sentinel\Sentinel RMS DevelopmentKit\9.x\Samples\C\Out\MSVS2015\x86\Debug\sntl_demo.exe
Note: The above steps are performed so that Sentinel RMS libraries are used for building thesample.
5. Build the sample. To do so, right-click the sntl_demo folder in theSolution Explorer, and click Build. The outputis the sample application executable created in the path that you have set in the step above.
Install LicenseBefore executing the sntl_demo.c sample, you have to install the license.
For network applications, the license file (lservrc) containing the license strings should be in the same folder where thelicensemanager is installed, as shown below.
C:\Program Files (x86)\Common Files\SafeNet Sentinel\Sentinel RMS LicenseManager\WinNT
1. From theStartmenu, access the RMS LicenseManager.
SentinelRMSSDKQuickStart Guide for On-premise Served Network License DeploymentRelease v9.4.0 August 2018 Copyright 2019Gemalto NV All rights reserved. 22

Introduction
2. On theWlmAdmin utility, click Edit -> Defined Server List.
3. Enter the server name as localhost (or the IP address of the computer hosting the LicenseManager).
4. Click Add.
5. Click OK.
6. Expand theDefined Server list and select localhost.
7. Right-click and select Add -> Feature -> From a File -> To server and it's file.
8. Browse to locate the license file. A message is displayed to inform the user that the license has been installed.
Note: You can use a different file name (other than lservrc) through the environment variables,licensing library API functions, and command-line switches.
Run SampleNext, you need to run the sample application executable (.exe) to consume licenses. To run the sntl_demo.exe file:
1. Open the command prompt as Administrator.
2. Change the directory to the output folder by running the following command:
cd C:\Program Files (x86)\SafeNet Sentinel\Sentinel RMS DevelopmentKit\9.x\Samples\C\Out\MSVS2015\x86\Debug
3. Execute the sntl_demo.exe file.
Once the sample compiles and runs, the Console window displays the execution results.
1. First, an application context is created.
2. The login call is executed to consume the license. Errors are thrown, if the license is not present (error 210018) or ifthe existing license on themachine has expired (error 214109).
3. When a valid license is present, information about theNetwork feature is displayed as shown in the figure below:
SentinelRMSSDKQuickStart Guide for On-premise Served Network License DeploymentRelease v9.4.0 August 2018 Copyright 2019Gemalto NV All rights reserved. 23

Introduction
SentinelRMSSDKQuickStart Guide for On-premise Served Network License DeploymentRelease v9.4.0 August 2018 Copyright 2019Gemalto NV All rights reserved. 24

Introduction
4. Press Enter to call the login API. This requests the license for the Network feature, as shown in the figure below:
SentinelRMSSDKQuickStart Guide for On-premise Served Network License DeploymentRelease v9.4.0 August 2018 Copyright 2019Gemalto NV All rights reserved. 25

Introduction
5. The session information is displayed, which is the information for the current license session. Note that asuccessful license request creates a license session. For example, <tokensInUse> is shown as 1 because onelicense has been used with the call to the login API.
6. Next, the refresh API is called to periodically refresh the license and keep the license session alive for a longerperiod.
7. Afterward, the logout call is executed to release licenses.
8. Press Enter to close the sample.
SentinelRMSSDKQuickStart Guide for On-premise Served Network License DeploymentRelease v9.4.0 August 2018 Copyright 2019Gemalto NV All rights reserved. 26

Introduction
Error CodeRefer to the Sentinel RMS SDK API ReferenceGuide for information about errors and status codes.
Documentation ResourcesRefer to the following online pages to access Sentinel product documentation:
• Sentinel RMS: http://sentinelrms.gemalto.com/
• Sentinel EMS: http://sentinelems.gemalto.com/Default.htm
SentinelRMSSDKQuickStart Guide for On-premise Served Network License DeploymentRelease v9.4.0 August 2018 Copyright 2019Gemalto NV All rights reserved. 27