RULEBOOK & CODEX - Arcane Wonders
16
RULEBOOK & CODEX Created By Bryan Pope
-
Upload
khangminh22 -
Category
Documents
-
view
0 -
download
0
Transcript of RULEBOOK & CODEX - Arcane Wonders

RULEBOOK & CODEX
Created By Bryan Pope

1
Welcome back to the world of Etheria – the world of Mage Wars®! Within this Battlegrounds: Domination expansion, you will discover entirely new ways to challenge your rivals!
Battlegrounds is a new series of expansions for Mage Wars® Arena! Each Battlegrounds expansion will come with special puzzle-cut tiles which can be used to build exciting new arenas for you to conquer. You can create some large arenas which are perfect for multiplayer battles, and we have included extended multiplayer rules.
These modular tiles are the heart of Battlegrounds, but there is more: Each Battlegrounds expansion will provide a new scenario – a different way to play and enjoy Mage Wars® Arena. Playing a scenario can completely alter the style of the game, creating new and interesting challenges for veteran Mages. Of course, you will still have to protect yourself from your enemy. After all, a dead Mage can’t claim victory!
In this Battlegrounds expansion, you will find the first Battlegrounds scenario, Domination. Domination is a game of territory control, with players vying to take control of the mysterious V’Tar Orbs scattered throughout the arena. Move out, seize control, and dominate!
Battlegrounds: Domination includes:
• 20 modular tiles• 116 new spell cards• 1 sheet of die-cut markers• These rules
Many of the new spells were designed specifically with the Domination Scenario in mind. Among these you will find 18 guardians for the V’Tar Orbs—The Sslak and Usslak.
Included with the die-cut markers are control markers, which are used to denote control of V’Tar Orbs. They can also easily be used to denote control of conjurations or other objects. These are two-sided with different colors on each side. Players should choose a color to match their action markers.
Now let’s get started!
You have 20 tiles at your disposal, which can be arranged in nearly any combination. Each tile is a zone in the arena. Of those tiles, 9 are “special tiles” that have special abilities that you can use during a game.
Of course, you could use these tiles to build a standard 3 by 4 arena, like the one in the Mage Wars® Arena Core Set. But they can also be arranged in many other ways to create many different kinds of arenas. To inspire you, we have included a number of Battlegrounds arenas that we have designed. You can find those starting on page 11.
Of course, you can also design your own Battlegrounds arenas! When designing your own arena, we recommend that you follow a couple of guidelines to help keep the battleground balanced (at least for your first few battles!):
• Avoid creating narrow corridors or chokepoints connected by only one tile side. Wall spells can often be a very potent tool in the modular arena, particularly when it has narrow corridors. A tile connected on only one side can be walled off easily and removed from the action.
• In the standard arena, the players begin 5 zones apart from each other. If your Mages start out less than 5 zones apart, you will have a shorter game that is generally more focused on killing the other Mage. On the other hand, starting with more than 5 zones between the Mages will increase the length of the game and reduce player interaction during the early rounds of play.
Building Tip: Obviously, some rules are meant to be broken, and you should feel free to design any arena you can imagine. But, if you keep these two guidelines in mind, you will have a more balanced and exciting game!
INTRODUCTION
THE MODULAR BOARD

2
There are 9 modular board tiles that are “special tiles”, denoted by special icons on them. You can use these as normal tiles if you wish, but you can create even more exciting battles by using the special abilities of these tiles. Each tile is treated just like a normal zone in the arena but has its own unique effect on the battleground.
When building your own arena, you should be careful with the placement of the special tiles. Keep the arena balanced; if you put too many on one side of the arena, you may slant the game in favor of one of the mages. Of course, you could use this as a way to provide a “handicap” for a particularly cunning player…
Tiles which protect your Mage or his minions are best placed closer to the action. Tiles which grant a beneficial ability can be placed off to the side to create interesting tactics and choices – do you want to detour and grab that special tile? Hazards and harmful tiles can be placed across zones of travel to create interesting choices and tactics – should you risk going through the molten rock, or just take a longer route?
Altar of Oblivion
In the depths, there is an ancient altar to a forgotten god. The weathered features of the statues are now lost to time, but some say that the altar still accepts sacrifices…
If you control this zone (See Zone Control in the Codex on page 10), once per round, before or after a friendly creature’s Action Phase, you may destroy a creature that you own and control, to gain mana equal to half its casting cost and one V’Tar (see “V’Tar Orbs” sidebar on page 7). Use a Ready marker to keep track of this ability. The creature you destroy can be anywhere in the arena; it does not have to be in the Altar of Oblivion’s zone.
Placement Tip: As a beneficial zone, there are many possibilities for placing the Altar of Oblivion. If you place it in the center of your arena, it can be an interesting item to fight over. But its ability requires a sacrifice, so it may not be used often if it is in an inconvenient location. Often, the best place for the Altar of Oblivion is with a V’Tar Orb (see ”V’Tar Orbs” sidebar on page 7). This creates an added incentive for both sides to control it.
Corrosive Pool
A bubbling green liquid fills this small pool. Its acrid scent serves as a warning: don’t get the liquid on you. But the pool spits and splashes,
almost with a mind of its own…
This zone hinders Non-Flying Corporeal creatures. During each Upkeep Phase, place a Corrode condition on each Non-Flying Corporeal creature in this zone.
Placement Tip: The Corrosive Pool can be devastating to creatures with low armor, making them easy to destroy if attacked. Additional Corrode conditions will likely destroy them.
This zone will probably be avoided by both players. Thus, the Corrosive Pool can be used to funnel the flow of creatures in a particular direction, and players who include walls in their spellbook can try to force an opponent to go through this zone. If you place a V’Tar Orb here, we recommend that you don’t place a guardian in this zone: this zone is already quite hostile in its own right, and odds are the acid will kill the guards!
Ethereal Mist
An unnatural fog fills the air. Only a moment ago, you could clearly see the Orc and his soldiers, but now they seem blurred and hazy. Other enemies in
the distance behind them are still clear and distinct. What sort of sorcery is this fog?
Objects in this zone gain the Obscured Trait.
Placement Tip: This is a simple but beneficial zone. It works very well as a centerpiece for an arena, particularly
with a V’Tar Orb in this zone. If someone wants to take control of that orb, they’ll have to get up close and personal.
Molten Rock
A sweltering heat hangs over this area. And it’s no wonder, as bubbling magma illuminates the arena.
As the lava burbles and percolates, it would be wise to find a hasty exit…
This zone hinders Non-Flying Corporeal creatures. Each Upkeep Phase, place a Burn condition on each Non-Flying Corporeal creature in this zone. Those Burn conditions roll their damage during that Upkeep Phase.
SPECIAL TILES
Terrain
For future compatibility, each of these special tiles counts as terrain. Terrain is a type of conjuration spell players will be able to cast in future Mage Wars® expansions. A terrain spell changes a zone, giving it special new features. For example, a “Mud” terrain spell might turn a zone into a sticky pool of mud, whereas a “Hellscape” terrain spell might create a hellish fire zone.
When you cast a terrain spell on a zone which already has terrain in it, the new terrain spell cancels out and replaces the old terrain spell effects. The special tiles of Battlegrounds all count as terrain, and you can cancel their effects by casting a Terrain spell on top of them. However, they cannot be destroyed or moved.
You must follow all of the normal rules for overlaying Terrain. For the purposes of using terrain rules, these special tiles have a mana cost of 0.
If, for some reason, the Terrain that overlays a special tile is removed or destroyed, the original special ability of the tile functions again.

3Placement Tip: Molten Rock is very similar to the Corrosive Pool in many respects. As such, the general thoughts for placing it are almost the same. It’s a hostile zone, and you’ll want to avoid putting guardians here, since they’ll burn up pretty quickly anyway.
Samandriel’s Circle
This mystic circle is emblazoned with the runes of the Angel of Light. It invigorates the faithful and repels the undead and the unnatural. This
is a perfect spot for a rest…
Living creatures in this zone gain the Regenerate 1 trait. During each Upkeep Phase, each Nonliving creature in this zone receives 1 direct damage. This zone hinders Nonliving creatures.
Placement Tip: How you will respond to Samandriel’s Circle will depend very much on what type of spellbook you have, especially if you use lots of zombies—the direct damage ignores their Resilient trait. If you run with more traditional Living creatures, this is an amazing zone to set up camp in. With that in mind, you’ll want to be aware of the spellbooks being used when you add this tile to your arena.
This zone is better used without any V’Tar Orbs in it. It will still encourage players to take it and hold it, but it won’t directly reduce the ability of some players to win.
Septagram
Many mystic circles are crafted with protection in mind, and the most powerful is known as the Septagram, or seven-pointed star. No greater
defense against hostile magics has yet been imagined…
This zone, and all non-Mage objects within it, gain the Warded trait (See Warded in the Codex page 10). Note that Mages are very special and powerful creatures, constantly casting spells and flowing with magic, and
are not easily warded. Thus, Septagram will not protect them.
Placement Tip: Like Ethereal Mist, this is a simple but beneficial zone. It works well towards the center of the arena, possibly with a V’Tar Orb inside of it!
Optional Rule: For experienced players, let Septagram affect Mages as well (gives them the Warded trait).
Spiked Pit
There is something strange about the ground here. Only a close examination will reveal the edges of a long-hidden trap. Good thing you were able to
avoid it. Or were you…
At the start of the game, place the Spiked Pit marker on this zone. While the Spiked Pit Trap marker is on this zone, when a Non-Flying Corporeal creature enters this zone, roll the effect die: On a 9+ that creature receives
an Unavoidable attack of 4 attack dice with the Piercing +2 trait. Then, remove the Spiked Pit Trap marker. Also, this zone hinders Non-Flying Corporeal creatures, regardless of whether it has a Spiked Pit Trap marker or not.
Placement Tip: The effect of the Spiked Pit is quite different from other hostile zones, but the thought behind placing it is very similar. Remember that the Spiked Pit will at most trap one creature for the entire game, so you could still place a V’Tar Orb in this zone and give it a guardian. Players will have to take calculated risks when they enter this zone!
V’Torrak
The artifact you have ventured so far to find is now in sight! As soon as you enter the area, you feel the pull of Voltari. With just a little effort, you
could pierce that veil and bring something across…
If you control this zone (See Zone Control in the codex, on page 10), once per round, during the Deployment Phase, you may Summon one Sslak into this zone. To Summon the Sslak, you must pay its mana cost and
spend one V’Tar (more on V’Tar later), fetching its spell card from outside your spellbook. As with any creature you Summon, the Sslak is under your control.
Note that if this tile loses its special ability [perhaps because a terrain spell replaces its effect] the V’Torrak artifact is still considered “buried beneath the zone”, and the player who collects enough V’Tar still wins the game! (see Domination scenario rules on page 6). Even in arenas without the V’Torrak, it is still possible to win domination.
Placement Tip: The V’Torrak does well when placed near zones which have V’Tar Orbs. In this way, you can use it to summon Sslak to help guard the nearby orbs. It makes a great centerpiece for your arena, or at least placed within equal reach of all starting zones or zones with V’Tar Orbs. If you choose to place a V’Tar Orb here, consider adding an extra guardian to the zone.
Secret Passages
Those who travel unseen travel faster, travel farther. These tunnels are connected, and we can swiftly traverse the distance between the two.
There are two Secret Passage markers included with this set. Some of our recommended arenas use these markers, and you can include them whenever you build a custom
arena. Place one of these markers on a zone to show it has a Secret Passage. These markers are always used in pairs and there will always be 2 zones which have a Secret Passage marker.
As a move action, a creature in a zone with a Secret Passage may move directly to another zone with a Secret Passage. This creature ignores intervening walls and zones during this move.
In this way, the 2 zones with Secret Passages are connected. Unlike the Special Tiles, the Secret Passages are not Terrain and are not canceled when a Terrain spell is cast on that zone. They are not objects, and they cannot be destroyed or targeted.
A cunning commander will guard the Secret Passages, but a legendary commander will use them!

4 4
Mage Wars® is the game of head-to-head arena combat, but the action doesn’t have to stop there! The modular Battlegrounds board makes it perfect for multiplayer games. While the standard 12 zone Mage Wars® arena is great for one-on-one duels or battles between teams of two Mages each, Battlegrounds offers larger arenas built for battles with three or four Mages in a free-for-all, or larger teams of three mages each.
Each player must have their own spellbook and action markers. It’s often a good idea to bring extra dice, as well. If possible, each player should use his own unique colored action markers. The Mage Wars® Arena Core Set includes only two colors, but you can buy additional packs in a variety of colors.
The “control markers” included in this game are used to distinguish control of V’Tar Orbs (more on this later). You can also use these same control markers to denote control of your conjurations or other objects. If possible, choose a color which matches the color of the action markers you use on your creatures.
In a Free-For-All game, each Mage fights for his or her own glory. A Free-For-All game plays much like a standard head-to-head Mage Wars® Arena duel. There are a few things to keep in mind when playing this kind of battle:
• Initiative: Instead of passing the initiative back and forth between two people, you will be passing it clockwise around the table.
• Action Phases: Similarly, during the Action Stage, players will take turns acting with one creature at a time, starting with the player who has initiative, and then proceeding clockwise around the table. When it is your turn to activate
a creature, you may pass if at least one of your opponents has more active creatures in the arena than you. If none of the other players have more active creatures than you, you cannot pass.
• Quickcast Action: During the First and Final Quickcast Phases, each Mage has a chance to use their Quickcast action (if it has not already been used), starting with the player who has initiative, then proceeding clockwise around the table.
• Mage Death: When a Mage is destroyed, remove his Mage card and all of the objects he controls from the game. Any enemy objects attached to the removed Mage, or his removed objects, are also destroyed.
• Victory: In a standard Free-For-All game, the last Mage standing wins. Other scenarios, such as Domination (see page 7), offer alternative ways to claim victory. The first Mage to fulfill those requirements wins the match.
If a Free-For-All battle isn’t what you yearn for, you can strike a truce with another Mage and fight against your mutual enemies! Playing a Team Game involves two (or more!) Mages on a side, each controlled by a different player, but working together as a team.
There are a number of things you need to remember when playing this kind of battle:
Spells: Each Mage is an independent character with their own spellbook. Each Mage chooses their own spells during the Planning Phase. Mages cannot cast each other’s spells.
Starting Zones: You can find an example team arena in this rulebook (see “Truce at Straywood” on page 14). This arena is meant for team play and gives each player their own starting zone. This is better than having all the Mages on the same team start in the same zone, which can leave very little space to place Zone Exclusive conjurations during the early part of the game.
Initiative: The initiative will be passed between two teams rather than between the individual Mages. So, one team will act first in round one, then the other team will act first in round two, and so on.
Action Phases: During the Action Stage, the teams will take turns activating one creature at a time. When it is your team’s turn to act, you may activate any creature that belongs to any team member. Players may have to discuss which creature should act next. A team may pass if the other team has more active creatures than your team. Continue going back and forth between teams until all creatures have acted.
Quickcast Actions: During the First and Final Quickcast Phases, each Mage has a chance to use their Quickcast action (if it has not already been used). Similar to the Action Stage, teams alternate, starting with the Team who has the initiative, and each team has a chance for a Mage on that team to use their Quickcast action. Continue going back and forth between teams until all Mages have used their Quickcast action, or have passed.
FREE-FOR-ALL
TEAM GAMES
MULTIPLAYER RULES

5Before or after any friendly creature Action Phase, a team may choose for one of their Mages to use their Quickcast Action (if they have not already used it). In other words, each team may use one Quickcast action per creature Action Phase on their team, and may use it either before or after that creature acts.
For example, before the Beastmaster activates his Timber Wolf, he or one of his teammates may use their Quickcast action to cast a quick spell. Perhaps his Priestess ally will heal up his Timber Wolf, in which case no one else on that team can use their Quickcast action before the wolf acts or after it has acted.
Equipment: One of the big advantages of being on a team is the ability to place equipment spells on your partner. Allied Mages may cast equipment spells on each other, and they can replace pieces that have already been played.
Some equipment is restricted to a specific Mage class or school of training. You cannot cast an equipment spell on a friendly Mage if they are restricted from that equipment. For example, a Warlock could cast Lash of Hellfire on another Warlock, but not onto a Beastmaster on his team.
Enchantments: Allied players may look at all facedown enchantments cast by their partner (it’s a simple matter for an experienced Mage to signal his allies so they know what enchantments to expect). Regardless of who cast the enchantments, each object in the game cannot have multiple enchantments with the same name attached to it. This includes hidden enchantments that have not yet been revealed. For example, if the Warlock cast Poisoned Blood on an enemy Priestess, his Beastmaster ally could not also cast his own Poisoned Blood on her.
Unique Cards: Each Mage on a team is allowed to control their own copy of each Unique card. For example, a team of two Warlocks could have two copies of Death Link in play, as long as each was controlled by a different Warlock (and they enchanted different creatures).
Ability Markers: For the purpose of ability markers—such as Pet, Bloodreaper, Holy Avenger, Undying Servant, or Treebond—the Mage that has that ability (or a spawnpoint under their control) must be the one who casts the required object in order to place that ability marker on it. For example, if the Warlock casts Darkfenne Bat, his Beastmaster ally could not place his Pet token on it. The Beastmaster would have to Summon his own animal, instead.
Loss of an Ally: If one of the Mages on your team is destroyed, the game isn’t over yet! Remove his Mage card and destroy any objects attached to the Mage (such as equipment or enchantments). All of the other objects he controlled remain in play, and control of each object is transferred to another Mage on his team. Objects that are attached to other objects, such as enchantments, stay attached to their current objects, even though control of the card has changed.
This is easiest if control of all of his objects goes to just one Mage on that team. However, control can be divided up amongst the mages on that team. The team must clearly state which objects are under whose control. For creatures, be sure to swap out the action markers, using the color of the new controlling mage.
Note that you cannot transfer control of some restricted objects. For example, if the Warlock on a team dies, his creature Goran, Werewolf Pet is removed from play unless there is another Warlock on that team who can take control of Goran.
Victory: Normally, a team game is played to the bitter end: when one team is completely wiped out. However, you could choose to play only until one Mage dies: the first team to kill an enemy Mage is the victor.
Lifelink: This is an optional rule to use with team games, and works particularly well if you play with the rule above (you only need to destroy one enemy Mage to win the game). Each Mage gains the Lifelink +2 trait (look up “Lifelink +X” in the codex on page 10). This allows each Mage to transfer up to 2 damage to or from another Mage on his team during the Upkeep Phase. This makes it a little more difficult to gang up on one of the Mages on a team while ignoring their partners.
Alternately, players can choose to increase or decrease the Lifelink trait. Try Lifelink +3 for a longer, tougher game.
For example, a Wizard has 2 partners on his team (3 players total), and he is getting ganged up on by the enemy. The Wizard could transfer up to 6 damage from himself to his teammates during the Upkeep Phase. He would use his Lifelink +2 trait to transfer 2 damage to a team Mage, and his partners would each use their Lifelink +2 trait to each transfer 2 damage to themselves from the Wizard.
Of course, if you’re playing a different scenario, like Domination, you can simply play until one team accomplishes the scenario victory conditions.

6 6
Domination is the first Mage Wars® Battelgrounds scenario. In Domination, a Mage can win by “activating” a powerful artifact called the V’Torrak, using the power of V’Tar. The first Mage to accomplish this feat or destroy his opponent wins the game!
From Thaumographical Treatise on Draconic Magic, author unknown:
The dragons of ancient times were extremely powerful and wielded incredible magics that we can only dream about in present-day Etheria. The amount of magical energy a dragon was able to absorb and wield would blast any mage currently alive into oblivion.
The mechanism by which dragons channeled magic is still relatively unknown. It has been shown that they did not require mana crystals or flowers. Instead, it appears that they had the ability to open a portal directly to the Plane of Voltari, the source of all eldritch power, and absorb energy directly from that plane. This is an extremely dangerous process, as Voltari is like a living thing, eager to flood our world with its power. Yet, the dragons were intelligent enough and powerful enough to handle this power without endangering our own plane of existence. And it gave them the ability to weave incredible magic and perform miraculous spells.
One method by which dragons could open a portal to Voltari was through an artifact known as the V’Torrak. Each dragon would create its own V’Torrak using its knowledge of long-forgotten sciences. By carefully manipulating its V’Torrak, a dragon could control the opening of the portal, much like floodgates can control the flow of a mighty river. The mana that flowed through the portal could then be channeled directly into whatever the controller of the V’Torrak desired. So great is this power that it can alter the very reality of our world, churning the land into new terrain as the will of Voltari seeks to enter our plane.
When the great dragons created the V’Torrak, a mechanism to control them was required. To fill this role, they built the mysterious V’Tar Orbs. Crafted from magical science that is far beyond the ken of mortal men, these powerful artifacts can channel the energy of Voltari—called V’Tar—directly into the Mage that controls them. While this energy is similar to Mana in many ways, it is also very different. These “V’Tar Orbs” can be activated by touch. Thus, a dragon would reach out and grasp the orbs, each generating a portion of the power needed to open the V’Torrak gateway. Once enough power was generated, the portal would open automatically.
When the dragons perished from this world eons ago, they left behind many of their creations and artifacts. Among them were a number of V’Torrak and their V’Tar Orbs. Most of these relics were buried deep underground in what remains of their ancient lairs. Some of the dragons were wise enough to realize that they should not leave such a powerful device unprotected, so they created a race of orb guardians called Antarians. The smaller guardians were called Sslaks, while the larger ones were called Usslaks. The sole purpose of these creatures was to guard the V’Tar Orbs from any trespassers. They were granted an immortality of sorts, kept alive in a special pocket dimension between worlds that had neither time nor space, linked to the very orb they guarded. Should a trespasser enter the vicinity of an orb, the Sslak or Usslak would be awoken from its suspended animation, appearing near the orb it was charged to protect.
Recently, the ancient lair of a dragon was uncovered, including a V’Torrak, surrounded by orbs. Once news got out that it was possible to channel this incredible power directly from Voltari, many of the greatest mages from different schools decided that they also needed to journey forth and recover these artifacts. Some hope to control them, gaining their incredible power that they might further their own ends. More sinister mages hope only to open the floodgates to Voltari, causing chaos and destruction on an unimaginable scale. Their ultimate goal is nothing less than allowing Voltari into our world, for these deluded souls worship the intelligent plane and hope to see its total
domination of our own. Still others seek a way to destroy these dangerous artifacts forever, seeing that they are too dangerous for our world.
Unfounded rumors also persist of dragons still alive. Appalled by the destruction of the lairs of their kin, they have set out to recover these powerful artifacts for themselves. Some even claim that a so-called “Scaled Order,” minions of these last mighty dragons, exists to fulfill this mission and keep the V’Torrak from the hands of mortals.
With the discovery of V’Torrak, Mages scour the world of Etheria in search of these mighty artifacts. When one is discovered, the race is on! Mages from across the land descend on the site, hoping to activate enough V’Tar Orbs to control the V’Torrak and its awesome power. Some will bend that power to banish their foes, while others lay waste to entire regions. The raw mana that can be channeled through this artifact is immense, and all Mages know that control of the V’Torrak is a sure path to victory.
In Etheria, Mages normally settle their differences in the arena. This time-honored tradition of Mage on Mage combat has stood for hundreds of years. However, with the discovery of the V’Torrak, many conflicts now occur outside of the arena. Mages actively search for the mysterious V’Tar Orbs, and conflict has spilled out into the world of Etheria itself.
Now, it is a battle for Domination!
DOMINATION SCENARIO
HISTORY OF THE ORBS

7If you are playing the Domination scenario, all of the rules from Mage Wars® Arena are still in effect, except for the changes and rules below:
First, you will need to build the arena for your battle. We recommend that you use the “Path of War” map (on page 13), at least for your first few games. But all of the maps on pages 11 to 14 of this rulebook are designed with Domination games in mind. Of course, you could design your own arena to dominate as well!
Set up the tiles shown on the map, placing V’Tar Orbs, Sslaks, and Usslaks as indicated.
Each Mage selects a set of control markers he will use to denote Orbs he has control of. If possible, choose a color which matches the color of the action markers you use on your creatures.
Then, roll for initiative as normal. The player who loses the roll for initiative gets to choose one of the starting zones for his Mage first, with his opponent starting in the other. Now, the battle can begin!
V’Tar Orbs and V’Tar Energy
All V’Tar Orbs begin the game neutral (they are not controlled by any Mage) and powered “off” (see the sidebar “V’Tar Orbs”). You can change the status of a V’Tar Orb by touching it with a Mage or a creature he controls. How do you “touch” it? Just hit it with a melee attack. (See “Hit” in the Codex on page 10). You do not need to actually deal any damage to an Orb (they cannot be destroyed and do not receive damage).
Note that you can guard your V’Tar orbs as you would a normal conjuration, and thus keep enemies from taking control of them.
When an Orb is touched by your Mage, or a creature they control, it changes control:
• If the Orb was neutral, you now control it. Place one of your control markers on it.
• If it was controlled by another player, it becomes neutral again instead. Remove that player’s colored control marker.
Orbs begin the game powered “off.” The first time that each Orb is touched by a Mage, or a creature they control, it becomes powered “on” (flip the Orb marker to its “on” side). Once they are powered “on,” they remain powered “on” for the rest of the game, even if their control changes.
Note that some zones may have more than one Orb in them. It is possible for each Orb to be controlled by a different Mage or team.
The first time an Orb is “touched” it will both power on, and the Mage who “touched” the Orb will take control of it. When the Orb is first powered “on”, it releases a small amount of residual energy, and the Mage gains an immediate bonus: The Mage may gain 2 mana, or may heal 2 damage, or may gain 1 mana and heal 1 damage.
Gaining V’Tar Energy: Each round, during the Upkeep Phase, you gain 1 V’Tar for each Orb you control. In addition, for each V’Tar you gain, your Mage may either gain 1 Mana or heal 1 damage. This is in addition to any bonus he may have received when he first powered on the same Orb in a prior turn.
Use the V’Tar tokens included with the game to keep track of how much V’Tar your Mage has accumulated.
V’Tar can be spent in much the same way as mana. Various game effects can be triggered by spending V’Tar (such as using the V’Torrak to Summon a Sslak), and V’Tar can also be collected to fulfill the Domination Victory condition.
Although V’Tar is similar to Mana in many ways, they are not interchangeable. You may not spend V’Tar to cast normal spells.
What Is V’Tar?
V’Tar is the unique energy channeled through the V’Tar Orbs and other artifacts of dragonkind. This raw and powerful form of mana is pulled directly from the plane of Voltari itself, and can be used to activate the V’Torrak and other draconic magics. Normally, V’Tar is too unstable for mortal Mages to use, but the V’Tar Orbs are designed to minimize the fluctuations and allow Mages to utilize this amazing power.
In Domination, you win the game by collecting a certain amount of V’Tar as determined by the particular arena you are playing.
SETTING UP THE GAME
V’Tar Orbs
The V’Tar Orbs are conjuration objects placed into various zones in the arena at the start of each Domination game. Controlling these Orbs is the key to victory!
The Orbs are represented by two-sided markers. One side of the marker shows the Orb powered “off.” All V’Tar Orbs start the game in this state, just as they have rested for hundreds of years! The first time they are hit by a melee attack, they are powered “on;” flip the marker to its “on” side!
The Orbs begin the game “neutral,” and are not controlled by any player. During the game, players will strive to seize control of an Orb. When you control an Orb, mark it with a colored control marker. Orbs are controlled by the Mage whose control marker is on them. Orbs without a control marker are “neutral.”
Orbs cannot be destroyed. They can be attacked, but you do not record damage on them.
Controlled Neutral

8
V’Tar Orb Guardians
V’Tar Orb guardians are not controlled by any Mage and do not have an action marker or an Action Phase. They are treated as “enemies” by all players and creatures in the game.
V’Tar Orb Guardians are stubborn and do not leave their zone voluntarily. While in a zone with a V’Tar Orb they gain both the Unmovable and Anchored traits, so they cannot be forced out of their zone.
No creature or Mage can attempt to touch (melee attack) a V’Tar Orb as long as its guardian is still in play. So, if you wish to take control of a V’Tar Orb, you must destroy all of its guardians first!
Each round, during the Upkeep Phase, each Orb guardian in the same zone as a V’Tar Orb, receives a Guard marker, if they do not already have one. If they are melee attacked while they have a Guard marker, they will get to make a counter attack against their attacker (and then remove the Guard marker). This counterattack can be rolled for
by one of your opponents.
If the guardian is destroyed, it is removed from the game. It does not go to any player’s discard pile.
Note: Players can cast their own Sslak and Usslak Orb guardians. When they build their spellbook, they may include these spells in their spellbook, as per the normal rules for building spellbooks. Or, they might cast a Sslak spell if they control the V’Torrak special tile.
When you Summon your own Orb guardian, it behaves a little differently than those which start in the arena and are not controlled. You control the guardian you Summon, and it behaves like any other creature you Summon. It does get an action marker and an Action Phase. It does not get a Guard marker each Upkeep Phase. It does not automatically protect Orbs in its zone (enemy players may attack or touch an unguarded Orb in their zone). When it is destroyed, it will go to your discard pile.
Domination Victory Conditions
When you are playing the Domination scenario, you can still win the game by eliminating your opponent’s Mage. But there is another route to victory that you can choose to pursue, called Domination Victory. Domination Victory is achieved by collecting the amount of V’Tar required to take control of the V’Torrak.
Each map shows the amount of V’Tar you must collect to declare Domination Victory. During the Upkeep Phase, if you have the required amount of V’Tar, you win the game immediately! If both players have enough V’Tar to win, the player with the higher amount of V’Tar is victorious. If both players are tied for the most, you must play another round. Check to see if either player can declare a Domination Victory during each Upkeep Phase until there is a winner. As normal, if a Mage is eliminated, he loses the game immediately. The zone with the V’Torrak Artifact does not need to be controlled for the victory.
Domination games can be played with any of these variants, if all players agree before the game begins:
Undying Mages
The invigorating energy of Voltari permeates the entire area, surrounding and penetrating everything. In the presence of such unlimited mystical power, no Mage can truly be destroyed…
When playing with the Undying Mages variant, any time that a Mage is killed, he is immediately resurrected!
Variant Rules: If a Mage dies, that player does not lose the game. The Mage is destroyed as usual, and all objects that were attached to the Mage are destroyed. All of their other objects still remain in play. During the next Reset Phase, the Mage is automatically returned to the arena, in the same zone they were destroyed in, with their original starting Life and no damage on them.
The only way to win this variant is by activating the V’Torrak (by collecting the required V’Tar energy).
Leylines of Power
Like many Mages today, the dragons had unlocked the secret of the leylines. Positioning their most powerful artifacts on the nexus of these lines enhanced them greatly. Or, perhaps, these artifacts actually create the leylines…
Sometimes, a V’Torrak is linked to the V’Tar Orbs in an unusual way. Instead of simply activating them through the expenditure of V’Tar, the proper number of Orbs must be activated, directly powering the device.
Variant Rule: The V’Tar Orbs generate V’Tar energy as normal. However, instead of activating the artifact (and winning the game) by collecting the required amount of V’Tar, a Mage must control all but one of the V’Tar Orbs in the arena at the same time. A Mage that controls the required number of Orbs can declare Domination Victory only during the Upkeep Phase.
Important: If there are less than four Orbs in the arena, you must control all of them to declare Domination Victory when playing with this variant.
Note: Some maps are better suited for this variant than others. If there are more Orbs in the arena, this victory condition becomes much more difficult to achieve.
DOMINATION VARIANTS
The Sslak and Usslak
These mysterious guardians were crafted by the mightiest of dragonkind eons before the coming of man. Functionally immortal, they exist only to protect the long-hidden relics of the dragons from the prying eyes and covetous fingers of lesser races.
Some V’Tar Orbs are protected by Antarians, dark and mysterious creatures created by dragonkind. These guardians can be Sslak, or the more powerful Usslak, or sometimes both! They are represented in the game by special spell cards, just like other creatures.

9Faulty Orbs
Of all things, Time is the most powerful. Even the mightiest achievements of the proud will ultimately crumble into decay under its merciless hand. Yea, even the incredible accomplishments of dragonkind…
When playing with the Faulty Orbs variant, the Orbs in the arena are unreliable and require a continued presence in the zone to maintain control and the flow of V’Tar.
Variant Rule: You can no longer take control of a V’Tar Orb by touching it. Instead, you must control the zone in order to power on or change control the V’Tar Orb (See Zone Control in the Codex on page 10). Whoever controls the zone controls the Orb. Switch control immediately. If no one controls the zone, the Orb is neutral.
How does Astral Anchor interact with Banish?
Astral Anchor prevents objects from teleporting into or out of the zone that it enchants. So, a revealed Astral Anchor will stop a creature from being teleported away from the zone it is in by Banish. However, it cannot prevent a banished creature from returning to the arena. Once all of the Banish tokens are removed, the creature returns to the last zone it occupied, even if there is a revealed Astral Anchor there.
How does Cascading Force Push work?
When you cast Cascading Force Push, you must choose a target creature, like normal. That creature gets Pushed one zone in the direction of your choice. After that creature has been Pushed, you may pay three additional Mana to choose a different creature in the Pushed creature’s new zone and Push that creature one zone in the direction of your choice. You may continue to pay three Mana to
Push a creature as long as there are different creatures you can Push.
You can Push multiple creatures back and forth between the same two zones, paying the required Mana each time.
Important: You cannot Push the same creature twice with the same Cascading Force Push.
How does Dragon’s Breath work?
When you cast Dragon’s Breath, you make the attack shown on the target creature as normal. Then, as part of the same action, you may also attack another target creature exactly one zone further away, but still in range of the spell.
How does V’Tarrian Energy Wave work?
The two zones targeted by this spell must both be within range and adjacent to each other. The spell attacks both zones and any walls that may be between them.
SPELL CLARIFICATIONS

10 10
Anchored (Object Trait)
This object has an exceptionally strong connection to the plane of Etheria, and it resists attempts to magically transport it. Objects with this trait cannot be Teleported.
Hit (Game Term)
If an attack reaches the Damage & Effects Step then it is considered to have “hit” its target. If this step is skipped (for example, the attack misses due to a Daze condition, or is avoided by a Defense) or if the attack is canceled before this step can occur (for example, the target uses Divine Intervention to Teleport away), then the attack does not “hit.”
Lifelink +X (Mage trait)
This is a Mage trait which can be used in team games. During the Upkeep Phase, a Mage with this trait may transfer up to X damage to or from another Mage on his team.
Moving Conjurations
Conjurations are attached to the zone they occupy, but some conjurations can move (such as Raincloud). A conjuration can only move into a zone that it could legally be attached to. You cannot move a Conjuration into a zone that already has a conjuration with the same name attached to it (each zone can only have one Conjuration of a given name attached to it at a time).
Reconstruct (Effect)
Reconstruct is an effect that removes damage from Nonliving objects. It is not Regeneration or Healing, and is not affected by the Finite Life trait.
Skeelax, Taunting Imp’s Taunt (Effect)
Skeelax is a special creature who can taunt his enemies into attacking him. His Trident attack can place a Taunt marker on its target. A Taunted creature must make a melee attack against Skeelax, Taunting Imp during its next Action Phase, if possible, unless Skeelax, Taunting Imp is not in the same zone. The Taunted creature cannot move or take any other action if it is able to make a melee attack against Skeelax, Taunting Imp.
If the Taunted creature is also required to take a different action (such as attack a different creature because of Bloodthirsty), its controller may choose which of these targets to attack.
Taunt is a psychic effect, so it does not work on creatures with Psychic Immunity. It also cannot affect Mages.
Remove Taunt at the end of the creature’s next Action Phase, or when Skeelax, Taunting Imp is activated, whichever comes first.
Vigilant (Object Trait)
This creature is constantly guarding, protecting, or sheltering friendly objects. At the end of its Action Phase you may place a Guard marker on this creature, if it does not already have one.
V’Tar (Domination Term)
This is the raw and unrefined power of the plane of Voltari. It has a myriad of uses, including powering up the V’Torrak to achieve victory in Domination. See “What Is V’Tar?” sidebar on page 7.)
V’Tar Orb (Domination Object)
The V’Tar Orbs are the key to powering the ancient V’Torrak artifact. Mages fight for control of these Orbs in the Domination scenario. (See “V’Tar Orbs and V’Tar Energy” on page 7.)
V’Torrak Artifact (Special Tile)
This zone contains a legendary V’Torrak artifact capable of breaking down the barriers between worlds and providing nearly limitless mana to its controller. (See the V’Torrak section on page 3.)
Warded (Object Trait)
This object is protected from hostile magic. It cannot be targeted by an enemy-controlled incantation or enchantment spell. It can still be affected by enemy incantations or enchantments which do not directly target it, such as a zone effect.
Zone Control (Game Term)
A player controls a zone if they control a creature in that zone and their opponent(s) do(es) not. Do not count Pests or Incapacitated creatures.
CODEX
11
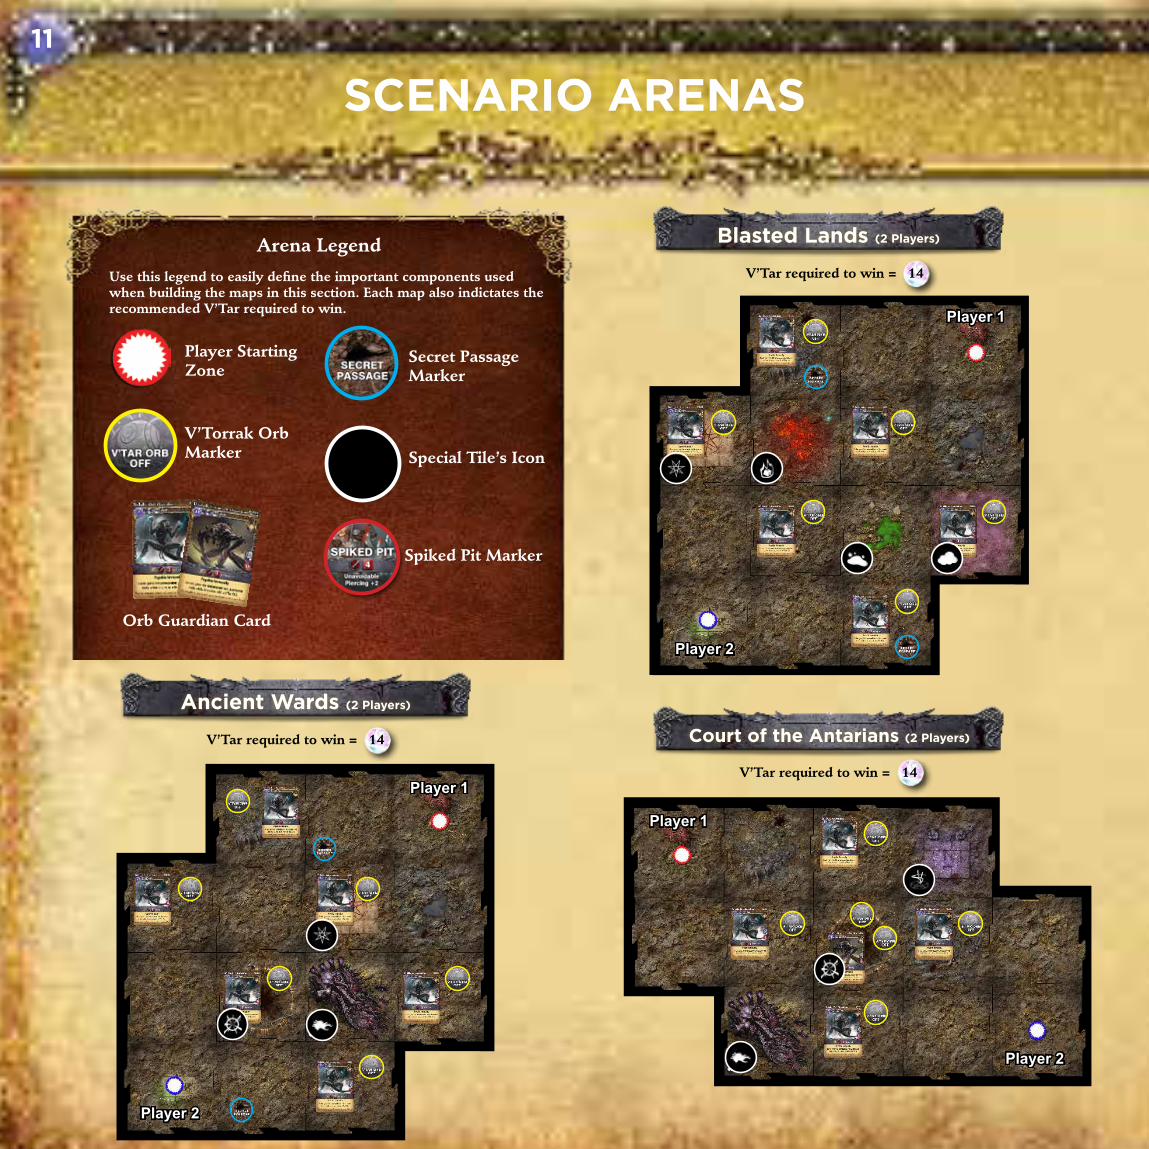
SCENARIO ARENAS
Player 1
Player 1
Player 2
Player 2
Arena Legend
Player Starting Zone
Secret Passage Marker
V’Torrak Orb Marker
Orb Guardian Card
Special Tile’s Icon
Spiked Pit Marker
Use this legend to easily define the important components used when building the maps in this section. Each map also indictates the recommended V’Tar required to win.
Blasted Lands (2 Players)
Court of the Antarians (2 Players)
Ancient Wards (2 Players)
Player 1
Player 2
V’Tar required to win = 14
V’Tar required to win = 14
V’Tar required to win = 14

12
Gauntlet of V’Tar (2 Players)
Lost Expedition (2 Players) No Man’s Land (2 Players)
Player 2
Player 2 Player 2
Player 1
Player 1 Player 1
V’Tar required to win = 9 V’Tar required to win = 14
V’Tar required to win = 11 V’Tar required to win = 11
Weathered Sanctuary (2 Players)
Player 1
Player 2

13
Path of War (2 Players) Triumvirate (3 Players)
Unseen Passage (3 Players)
Player 1 Player 1
Player 1
Player 2
Player 3
Player 2
Player 2 Player 3
Ziggurat’s Rise (3 Players)
Player 1
Player 2 Player 3
V’Tar required to win = 11
V’Tar required to win = 9
V’Tar required to win = 11
V’Tar required to win = 9

14
Wartorn Expanse (3 Players)
Wheel of Death (4 Players)
Player 1
Player 1
Player 2
Player 3
Player 4
Player 2
Player 3
Grand Arena (4 Players)
Player 2
Player 1 Player 3
Player 4
V’Tar required to win = 7
V’Tar required to win = 7
Truce at Straywood (4 Players)
This arena is intended to be played as a team match. Each team is composed of two mages.
Player 2 Player 3
Player 1 Player 4
V’Tar required to win = 9 V’Tar required to win = 11

Created by Bryan Pope
Co-Designer: Aaron Brosman
PLAYTESTERS
Special thanks to all of our Playtesters for their suggestions, feedback, and support!
Dr. Thomas AllenJim AnthonyAndrew AllardyceLewis BronsonMatthew BurchAlex CarrollMartin CubberleyFrederick CzajkaRay D’arcyRichard H Daly
Malcom GordonJannis GrimmAnanda GuneratneJeremy HeckJoshua HughesAdam HumpolickMatt HumpolickStephane HonnoratTJ HuzlIvan “Zuberi” Kidd
Jan KrizPhilipp LindenbergJustin “Coshade” LoweRafael LukardRonald MackCameron MaynardTim McCurryDylan McInnisMatt McInnisColin Meller
Adilia Mon RamosChris MusgroveRafael Henrique Dos SantosŽydrūnas Saukevičius Raymond Slover Jr.Tobias Zolles
Find us on Facebook or visit us at WWW.MAGEWARS.COMfor more information, including a complete spell list for the Battlegrounds: Domination.
Special Consultant Alexander MontStory Concept Dr. Thomas Allen, Cameron MaynardRules William NieblingEditors Jill Brosman, Laura Fischer, Gabe Schneider Creative Director David Hanold
Art Directors Matthew Burch, John GuytanGraphics Design Chris HensonProduction Manager John RogersSales and Marketing Scott Morris
©2015 Arcane Wonders.This book may not be reproduced in whole or in part without the express written consent of Arcane Wonders®.
Mage Wars® is a registered trademark of Arcane Wonders®. All rights reserved.