Python 2 1 Bible 2001
769
Python 2.1 Python 2.1 Master all major Python components and see how they work together Leverage Python standard libraries for rapid application development Harness XML, Unicode, and other cutting-edge technologies P ython 2.1 Dave Brueck and Stephen Tanner INCLUDES A COMPLETE PYTHON LANGUAGE REFERENCE 100% ONE HUNDRED PERCENT COMPREHENSIVE AUTHORITATIVE WHAT YOU NEED ONE HUNDRED PERCENT P ython 2.1
-
Upload
stiki-indonesia -
Category
Documents
-
view
1 -
download
0
Transcript of Python 2 1 Bible 2001

BRUECKTANNER
If Python 2.1 can do it, you can do it too . . . Packed with crystal-clear explanations, hands-on examples, and a complete language reference, this authoritative guide gives you all the tools you need for rapid application development with Python 2.1. From variables, expressions, and other basics to XML, multimedia, and multithreading, Python pros Dave Brueck and Stephen Tanner show you step by step how to master Python components, put them together, and create full-featured applications — in practically no time!
Inside, you’ll find completecoverage of Python 2.1• Get up to speed on basics with a quick one-hour tutorial
• Work with Python data types, expressions, and object-oriented features
• Take advantage of Python operating system services and database features
• Create Web-savvy applications that can handle Internet data and parse XML
• Build graphical applications using Tkinter and wxPython
• Process sound and image files
• Harness multithreading, encryption, tokenizing, and otheradvanced techniques
• Use Python tools to create number-crunching routines and internationalized applications
• Distribute Python applications and modules on aWindows or UNIX system
Shelving Category:Programming
Reader Level:Beginning to Advanced
ISBN 0-7645-4807-7
$39.99 USA$59.99 Canada£29.99 UK
Python2.1
Python2.1
Master all majorPython componentsand see how theywork together
Leverage Pythonstandard libraries for rapid applicationdevelopment
Harness XML,Unicode, and othercutting-edge technologies
Python 2.1
Dave Brueck and Stephen Tanner
,!7IA7G4-feiahj!:p;N;t;T;tIncludes a complete language reference
INCLUDES A
COMPLETE PYTHON LANGUAGE REFERENCE
w w w . h u n g r y m i n d s . c o m
100%O N E H U N D R E D P E R C E N T
C O M P R E H E N S I V EA U T H O R I T A T I V EW H A T Y O U N E E DO N E H U N D R E D P E R C E N T
Usescales andlistboxesto design a colorscheme Python 2.1
*85555-AHCEJh
100%C O M P R E H E N S I V E
Bible
See thechat/whiteboard
application in action
Use thedevice
contextsto drawgraphics
4807-7 cover 5/16/01 12:25 PM Page 1

Python 2.1 Bible
4807-7 FM.F 5/24/01 8:57 AM Page i

4807-7 FM.F 5/24/01 8:57 AM Page ii

Python 2.1 Bible
Dave Brueck and Stephen Tanner
Hungry Minds, Inc.
New York, NY ✦ Cleveland, OH ✦ Indianapolis, IN ✦
4807-7 FM.F 5/24/01 8:57 AM Page iii

Python 2.1 Bible
Published byHungry Minds, Inc.909 Third AvenueNew York, NY 10022www.hungryminds.comCopyright © 2001 Hungry Minds, Inc. All rightsreserved. No part of this book, including interiordesign, cover design, and icons, may be reproducedor transmitted in any form, by any means (electronic,photocopying, recording, or otherwise) without theprior written permission of the publisher.
Library of Congress Catalog Card No.: 2001090703
ISBN: 0-7645-4807-7
Printed in the United States of America
10 9 8 7 6 5 4 3 2 1
1B/RS/QW/QR/IN
Distributed in the United States by Hungry Minds, Inc.
Distributed by CDG Books Canada Inc. for Canada; byTransworld Publishers Limited in the UnitedKingdom; by IDG Norge Books for Norway; by IDGSweden Books for Sweden; by IDG Books AustraliaPublishing Corporation Pty. Ltd. for Australia andNew Zealand; by TransQuest Publishers Pte Ltd. forSingapore, Malaysia, Thailand, Indonesia, and HongKong; by Gotop Information Inc. for Taiwan; by ICGMuse, Inc. for Japan; by Intersoft for South Africa; byEyrolles for France; by International ThomsonPublishing for Germany, Austria, and Switzerland; byDistribuidora Cuspide for Argentina; by LRInternational for Brazil; by Galileo Libros for Chile; byEdiciones ZETA S.C.R. Ltda. for Peru; by WSComputer Publishing Corporation, Inc. for thePhilippines; by Contemporanea de Ediciones forVenezuela; by Express Computer Distributors for theCaribbean and West Indies; by Micronesia MediaDistributor, Inc. for Micronesia; by ChipsComputadoras S.A. de C.V. for Mexico; by EditorialNorma de Panama S.A. for Panama; by AmericanBookshops for Finland.
For general information on Hungry Minds’ productsand services please contact our Customer CareDepartment within the U.S. at 800-762-2974, outsidethe U.S. at 317-572-3993 or fax 317-572-4002.
For sales inquiries and reseller information, includingdiscounts, premium and bulk quantity sales, andforeign-language translations, please contact ourCustomer Care Department at 800-434-3422, fax317-572-4002 or write to Hungry Minds, Inc., Attn:Customer Care Department, 10475 CrosspointBoulevard, Indianapolis, IN 46256.
For information on licensing foreign or domesticrights, please contact our Sub-Rights Customer CareDepartment at 212-884-5000.
For information on using Hungry Minds’ productsand services in the classroom or for orderingexamination copies, please contact our EducationalSales Department at 800-434-2086 or fax 317-572-4005.
For press review copies, author interviews, or otherpublicity information, please contact our PublicRelations Department at 317-572-3168 or fax317-572-4168.
For authorization to photocopy items for corporate,personal, or educational use, please contactCopyright Clearance Center, 222 Rosewood Drive,Danvers, MA 01923, or fax 978-750-4470.
LIMIT OF LIABILITY/DISCLAIMER OF WARRANTY: THE PUBLISHER AND AUTHOR HAVE USED THEIRBEST EFFORTS IN PREPARING THIS BOOK. THE PUBLISHER AND AUTHOR MAKE NOREPRESENTATIONS OR WARRANTIES WITH RESPECT TO THE ACCURACY OR COMPLETENESS OF THECONTENTS OF THIS BOOK AND SPECIFICALLY DISCLAIM ANY IMPLIED WARRANTIES OFMERCHANTABILITY OR FITNESS FOR A PARTICULAR PURPOSE. THERE ARE NO WARRANTIES WHICHEXTEND BEYOND THE DESCRIPTIONS CONTAINED IN THIS PARAGRAPH. NO WARRANTY MAY BECREATED OR EXTENDED BY SALES REPRESENTATIVES OR WRITTEN SALES MATERIALS. THEACCURACY AND COMPLETENESS OF THE INFORMATION PROVIDED HEREIN AND THE OPINIONSSTATED HEREIN ARE NOT GUARANTEED OR WARRANTED TO PRODUCE ANY PARTICULAR RESULTS,AND THE ADVICE AND STRATEGIES CONTAINED HEREIN MAY NOT BE SUITABLE FOR EVERYINDIVIDUAL. NEITHER THE PUBLISHER NOR AUTHOR SHALL BE LIABLE FOR ANY LOSS OF PROFIT ORANY OTHER COMMERCIAL DAMAGES, INCLUDING BUT NOT LIMITED TO SPECIAL, INCIDENTAL,CONSEQUENTIAL, OR OTHER DAMAGES.
Trademarks: All trademarks are the property of their respective owners. Hungry Minds, Inc., is notassociated with any product or vendor mentioned in this book.
is a trademark of Hungry Minds, Inc.
4807-7 FM.F 5/24/01 8:57 AM Page iv

4807-7 FM.F 5/24/01 8:57 AM Page v

CreditsAcquisitions Editor
Debra Williams Cauley
Project Editor
Barbra Guerra
Technical Editor
Joseph Traub
Copy Editors
Lisa Blake
Luann Rouff
Editorial Manager
Colleen Totz
Project Coordinator
Regina Snyder
Graphics and Production Specialists
Brian Torwelle
Quality Control Technicians
Laura Albert, Carl Pierce, Nancy Price,
Charles Spencer
Book Designer
Drew R. Moore
Proofreading and Indexing
TECHBOOKS Production Services
About the AuthorsDave Brueck is a professional software developer who loves to use Python when-
ever possible. His current projects include developing networked games, develop-
ing Python interfaces to his stockbroker’s C SDK, and plotting to overturn various
world governments. Previously Dave was a contributing author to 3D Studio Max R3Bible by Kelly Murdock, published by Hungry Minds (formerly IDG Books
Worldwide).
Stephen Tanner is currently using Python to build a black-box software testing frame-
work. His side projects include Python tools to perform probabilistic derivatives-
trading analysis, and to download mass quantities of .mp3s.
Aside from their “real” jobs, Dave and Stephen enjoy convincing people to pay them
big bucks for consulting jobs.
4807-7 FM.F 5/24/01 8:57 AM Page vi

To Jennie, Rachael, and Jacob — thanks for being patient.To Pokey the Penguin — NOW who is going to the restaurant?To the weeds in my unfinished back yard — playtime is over.— Dave
For great justice!— Stephen
4807-7 FM.F 5/24/01 8:57 AM Page vii

4807-7 FM.F 5/24/01 8:57 AM Page viii

Preface
Python is an object-oriented, interpreted programming language useful for a
wide range of tasks, from small scripts to entire applications. It is freely avail-
able in binary or source code form and can be used royalty-free on all major plat-
forms including Windows, Macintosh, Linux, FreeBSD, and Solaris.
Compared with most programming languages, Python is very easy to learn and is
considered by many to be the language of choice for beginning programmers.
Instead of outgrowing the language, however, experienced developers enjoy lower
maintenance costs without missing out on any features found in other major lan-
guages such as C++, Java, or Perl.
Python is well known for its usefulness as a rapid application development tool,
and we often hear of Python projects that finish in hours or days instead of the
weeks or months that would have been required with traditional programming lan-
guages. It boasts a rich, full-featured set of standard libraries as well as the ability
to interface with libraries in other languages like C++.
Despite being incredibly powerful and enabling very rapid application develop-
ment, the real reason we love to use Python is that it’s just plain fun. Python is like a
lever — with it, you can do some pretty heavy lifting with very little effort. It frees
you from lots of annoying, mundane work, and before long you begin to wonder
how you endured your pre-Python days.
About This BookAlthough Python is a great first programming language, in this book we do assume
that you already have some programming experience.
The first section of the book introduces you to Python and tells you everything you
need to know to get started. If you’re new to Python, then that section is definitely
the place to start; otherwise, it serves as a useful language reference with many
examples.
We’ve worked hard to ensure that the book works well as a quick reference. Often
the quickest way to understand a feature is to see it in use: Flip through the book’s
pages and you’ll see that they are dripping with code examples.
4807-7 FM.F 5/24/01 8:57 AM Page ix

x Python 2.1 Bible
All the examples in the book work and are things you can try on your own. Where
possible, the chapters also build complete applications that have useful and inter-
esting purposes. We’ve gone to great lengths to explain not only how to use each
module or feature but also why such a feature is useful.
What You NeedBesides the book, all you need is a properly installed copy of Python. Appendix A
lists some Python resources available online, but a good place to start is
www.python.org; it has prebuilt versions of Python for all major platforms as well
as the Python source code itself. Once you’ve downloaded Python you’ll be under-
way in a matter of minutes.
If you’re a user of Microsoft Windows, you can download an excellent distribution
of Python from www.activestate.com. ActiveState provides a single download
that includes Python, a free development environment and debugger, and Win32
extensions.
PythonWare (www.pythonware.com) also offers a distribution of Python that
comes bundled with popular third-party Python modules. PythonWare’s version
peacefully coexists with older versions of Python, and the small distribution size
makes for a quick download.
No matter which site you choose, Python is free, so go download it and get started.
How the Book Is OrganizedWe’ve tried to organize the book so that related topics are close together. If you find
the topic of one chapter particularly interesting, chances are that the chapters
before and after it will pique your interest too.
Part I: The Python LanguageThe first chapter in this section is a crash course in Python programming. If you
have many programming languages under your belt or just want to whet your
appetite, try out the examples in that chapter to get a feel for Python’s syntax and
powerful features.
The remaining chapters in this first section cover the same material as Chapter 1
but in much greater detail. They work equally well as an initial tutorial of the
Python language and as a language reference for seasoned Pythonistas.
4807-7 FM.F 5/24/01 8:57 AM Page x

xiPreface
Part II: Files, Data Storage, andOperating System ServicesThis part covers Python’s powerful string and regular expression handling features
and shows you how to access files and directories. In this section we also cover
how Python enables you to easily write objects to disk or send them across net-
work connections, and how to access relational databases from your programs.
Part III: Networking and the InternetPython is an ideal tool for XML processing, CGI scripting, and many other network-
ing tasks. This part guides you through Internet programming with Python, whether
you need to send e-mail, run a Web site, or just amass the world’s largest .mp3
collection.
Part IV: User Interfaces and MultimediaThis part covers Tkinter and wxPython, two excellent tools for building a GUI in
Python. In this part, we also cover Python’s text interface tools, including support
for Curses. This section also delves into Python’s support for graphics and sound.
Part V: Advanced Python ProgrammingThis part answers the questions that come up in larger projects: How do I create
multithreaded Python applications? How can I optimize my code, or glue it to C
libraries? How can I make my program behave correctly in other countries? We also
cover Python’s support for number crunching and security.
Part VI: Deploying Python ApplicationsThis part covers what you need to know to deploy your Python programs quickly
and painlessly. Python’s distribution utilities are great for bundling and distributing
applications on many platforms.
Part VII: Platform-Specific SupportSometimes it’s nice to take advantage of an operating system’s strengths. This part
addresses some Windows-specific topics (like accessing the registry), and some
UNIX-specific topics (like file descriptors).
4807-7 FM.F 5/24/01 8:57 AM Page xi

xii Python 2.1 Bible
AppendixesAppendix A is a guide to online Python resources. Appendix B introduces you to
IDLE and PythonWin — two great IDEs for developing Python programs. It also
explains how to make Emacs handle Python code.
Conventions Used in This BookSource code, function definitions, and interactive sessions appear in monospacedfont. Comments appear in bold monospaced font preceded by a hash mark for
easy reading. For example, this quick interpreter session checks the version of the
Python interpreter. The >>> at the start of a line is the Python interpreter prompt
and the text after the prompt is what you would type:
>>> import sys # This is a comment.>>> print sys.version 2.0 (#8, Oct 16 2000, 17:27:58) [MSC 32 bit (Intel)]
References to variables in function definitions appear in italics. For example, the
function random.choice(seq) chooses a random element from the sequence seqand returns it.
We divided up the writing of this book’s chapters between ourselves. So, through-
out the book’s body, we use “I” (not “we”) to relate our individual opinions and
experiences.
What the Icons MeanThroughout the book, we’ve used icons in the left margin to call your attention to
points that are particularly important.
This icon indicates that the material discussed is new to Python 2.0 or Python 2.1.
The Note icons tell you that something is important — perhaps a concept that mayhelp you master the task at hand or something fundamental for understandingsubsequent material.
Tip icons indicate a more efficient way of doing something or a technique thatmay not be obvious.
Tip
Note
NewFeature
4807-7 FM.F 5/24/01 8:57 AM Page xii

xiiiPreface
Caution icons mean that the operation we’re describing can cause problems ifyou’re not careful.
We use the Cross-Reference icon to refer you to other sections or chapters thathave more to say on a subject.
Visit Us!We’ve set up a Web site for the book at www.pythonapocrypha.com. On the site
you’ll find additional information, links to Python Web sites, and all the code sam-
ples from the book (so you can be lazy and not type them in). The Web site also has
a section where you can give feedback on the book, and we post answers to com-
mon questions.
Have fun and enjoy the book!
Cross-Reference
Caution
4807-7 FM.F 5/24/01 8:57 AM Page xiii

Acknowledgments
Although this book represents many hours of work on our part, there are many
others without whom we would have failed.
First and foremost is Guido van Rossum, Python’s creator and Benevolent Dictator
for Life. We’re glad he created such a cool language and that many others have
joined him along the way.
Many thanks go to the good people at Hungry Minds: Debra Williams Cauley, our
acquisitions editor, for making it all possible; Barb Guerra, our project editor, for
keeping everything on track; Joseph Traub, our technical editor, for clarifying expo-
sition and squashing bugs; and Lisa Blake and Luann Rouff, our copy editors, who
fixed more broken grammar and passive-voice constructions than a stick could be
shaken at.
4807-7 FM.F 5/24/01 8:57 AM Page xiv

Contents at a GlancePreface . . . . . . . . . . . . . . . . . . . . . . . . . . . . . . . . . . . . . . . . . . . ix
Acknowledgments . . . . . . . . . . . . . . . . . . . . . . . . . . . . . . . . . . . . xiv
Part I: The Python Language . . . . . . . . . . . . . . . . . . . . . . . . . 1Chapter 1: Python in an Hour . . . . . . . . . . . . . . . . . . . . . . . . . . . . . . . 3
Chapter 2: Identifiers, Variables, and Numeric Types . . . . . . . . . . . . . . . . 19
Chapter 3: Expressions and Strings . . . . . . . . . . . . . . . . . . . . . . . . . . 29
Chapter 4: Advanced Data Types . . . . . . . . . . . . . . . . . . . . . . . . . . . . 49
Chapter 5: Control Flow . . . . . . . . . . . . . . . . . . . . . . . . . . . . . . . . . 73
Chapter 6: Program Organization . . . . . . . . . . . . . . . . . . . . . . . . . . . . 87
Chapter 7: Object-Oriented Python . . . . . . . . . . . . . . . . . . . . . . . . . . . 99
Chapter 8: Input and Output . . . . . . . . . . . . . . . . . . . . . . . . . . . . . . 119
Part II: Files, Data Storage, and Operating System Services . . . . . 131Chapter 9: Processing Strings and Regular Expressions . . . . . . . . . . . . . . 133
Chapter 10: Working with Files and Directories . . . . . . . . . . . . . . . . . . . 155
Chapter 11: Using Other Operating System Services . . . . . . . . . . . . . . . . 179
Chapter 12: Storing Data and Objects . . . . . . . . . . . . . . . . . . . . . . . . . 195
Chapter 13: Accessing Date and Time . . . . . . . . . . . . . . . . . . . . . . . . 219
Chapter 14: Using Databases . . . . . . . . . . . . . . . . . . . . . . . . . . . . . . 229
Part III: Networking and the Internet . . . . . . . . . . . . . . . . . . 245Chapter 15: Networking . . . . . . . . . . . . . . . . . . . . . . . . . . . . . . . . . 247
Chapter 16: Speaking Internet Protocols . . . . . . . . . . . . . . . . . . . . . . . 275
Chapter 17: Handling Internet Data . . . . . . . . . . . . . . . . . . . . . . . . . . 303
Chapter 18: Parsing XML and Other Markup Languages . . . . . . . . . . . . . . 325
Part IV: User Interfaces and Multimedia . . . . . . . . . . . . . . . . 345Chapter 19: Tinkering with Tkinter . . . . . . . . . . . . . . . . . . . . . . . . . . 347
Chapter 20: Using Advanced Tkinter Widgets . . . . . . . . . . . . . . . . . . . . 371
Chapter 21: Building User Interfaces with wxPython . . . . . . . . . . . . . . . . 391
Chapter 22: Using Curses . . . . . . . . . . . . . . . . . . . . . . . . . . . . . . . . 415
Chapter 23: Building Simple Command Interpreters . . . . . . . . . . . . . . . . 433
Chapter 24: Playing Sound . . . . . . . . . . . . . . . . . . . . . . . . . . . . . . . 453
4807-7 FM.F 5/24/01 8:57 AM Page xv

Part V: Advanced Python Programming . . . . . . . . . . . . . . . . . 465Chapter 25: Processing Images . . . . . . . . . . . . . . . . . . . . . . . . . . . . 467
Chapter 26: Multithreading . . . . . . . . . . . . . . . . . . . . . . . . . . . . . . . 481
Chapter 27: Debugging, Profiling, and Optimization . . . . . . . . . . . . . . . . 497
Chapter 28: Security and Encryption . . . . . . . . . . . . . . . . . . . . . . . . . 515
Chapter 29: Writing Extension Modules . . . . . . . . . . . . . . . . . . . . . . . 527
Chapter 30: Embedding the Python Interpreter . . . . . . . . . . . . . . . . . . . 553
Chapter 31: Number Crunching . . . . . . . . . . . . . . . . . . . . . . . . . . . . 581
Chapter 32: Using NumPy . . . . . . . . . . . . . . . . . . . . . . . . . . . . . . . 589
Chapter 33: Parsing and Interpreting Python Code . . . . . . . . . . . . . . . . . 605
Part VI: Deploying Python Applications . . . . . . . . . . . . . . . . . 617Chapter 34: Creating Worldwide Applications . . . . . . . . . . . . . . . . . . . . 619
Chapter 35: Customizing Import Behavior . . . . . . . . . . . . . . . . . . . . . . 629
Chapter 36: Distributing Modules and Applications . . . . . . . . . . . . . . . . 643
Part VII: Platform-Specific Support . . . . . . . . . . . . . . . . . . . . 659Chapter 37: Windows . . . . . . . . . . . . . . . . . . . . . . . . . . . . . . . . . . 661
Chapter 38: UNIX-Compatible Modules . . . . . . . . . . . . . . . . . . . . . . . . 671
Appendix A: Online Resources . . . . . . . . . . . . . . . . . . . . . . . . . . . 685
Appendix B: Python Development Environments . . . . . . . . . . . . . . . . 689
Index . . . . . . . . . . . . . . . . . . . . . . . . . . . . . . . . . . . . . . . . . . 701
4807-7 FM.F 5/24/01 8:57 AM Page xvi

ContentsPreface . . . . . . . . . . . . . . . . . . . . . . . . . . . . . . . . . . . . . . . ix
Acknowledgments . . . . . . . . . . . . . . . . . . . . . . . . . . . . . . . . xiv
Part I: The Python Language 1
Chapter 1: Python in an Hour . . . . . . . . . . . . . . . . . . . . . . . . 3Jumping In: Starting the Python Interpreter . . . . . . . . . . . . . . . . . . . 3
Experimenting with Variables and Expressions . . . . . . . . . . . . . . . . . 4
Pocket calculator . . . . . . . . . . . . . . . . . . . . . . . . . . . . . . . 4
Variables . . . . . . . . . . . . . . . . . . . . . . . . . . . . . . . . . . . . 5
Defining a Function . . . . . . . . . . . . . . . . . . . . . . . . . . . . . . . . . 5
Running a Python Program . . . . . . . . . . . . . . . . . . . . . . . . . . . . . 6
Looping and Control . . . . . . . . . . . . . . . . . . . . . . . . . . . . . . . . 6
Integer division . . . . . . . . . . . . . . . . . . . . . . . . . . . . . . . . 7
Looping . . . . . . . . . . . . . . . . . . . . . . . . . . . . . . . . . . . . . 8
Branching with if-statements . . . . . . . . . . . . . . . . . . . . . . . . 8
Breaking and continuing . . . . . . . . . . . . . . . . . . . . . . . . . . . 8
Lists and Tuples . . . . . . . . . . . . . . . . . . . . . . . . . . . . . . . . . . . 9
Tuples . . . . . . . . . . . . . . . . . . . . . . . . . . . . . . . . . . . . . 9
Slicing and dicing . . . . . . . . . . . . . . . . . . . . . . . . . . . . . . . 9
Dictionaries . . . . . . . . . . . . . . . . . . . . . . . . . . . . . . . . . . . . . 10
Reading and Writing Files . . . . . . . . . . . . . . . . . . . . . . . . . . . . . 11
Sample Program: Word Frequencies . . . . . . . . . . . . . . . . . . . . . . . 11
Loading and Using Modules . . . . . . . . . . . . . . . . . . . . . . . . . . . . 14
Creating a Class . . . . . . . . . . . . . . . . . . . . . . . . . . . . . . . . . . . 14
Some quick object jargon . . . . . . . . . . . . . . . . . . . . . . . . . . 14
Object orientation, Python style . . . . . . . . . . . . . . . . . . . . . . 15
Keep off the grass — Accessing class members . . . . . . . . . . . . . 15
Example: the point class . . . . . . . . . . . . . . . . . . . . . . . . . . 15
Recommended Reading . . . . . . . . . . . . . . . . . . . . . . . . . . . . . . 17
Chapter 2: Identifiers, Variables, and Numeric Types . . . . . . . . . . 19Identifiers and Operators . . . . . . . . . . . . . . . . . . . . . . . . . . . . . 19
Reserved words . . . . . . . . . . . . . . . . . . . . . . . . . . . . . . . 20
Operators . . . . . . . . . . . . . . . . . . . . . . . . . . . . . . . . . . . 20
Numeric Types . . . . . . . . . . . . . . . . . . . . . . . . . . . . . . . . . . . 21
Integers . . . . . . . . . . . . . . . . . . . . . . . . . . . . . . . . . . . . 21
Long integers . . . . . . . . . . . . . . . . . . . . . . . . . . . . . . . . . 21
Floating point numbers . . . . . . . . . . . . . . . . . . . . . . . . . . . 22
4807-7 FM.F 5/24/01 8:57 AM Page xvii

xviii Python 2.1 Bible
Imaginary numbers . . . . . . . . . . . . . . . . . . . . . . . . . . . . . 22
Manipulating numeric types . . . . . . . . . . . . . . . . . . . . . . . . 23
Assigning Values to Variables . . . . . . . . . . . . . . . . . . . . . . . . . . . 26
Simple assignment statements . . . . . . . . . . . . . . . . . . . . . . . 26
Multiple assignment . . . . . . . . . . . . . . . . . . . . . . . . . . . . . 27
Augmented assignment . . . . . . . . . . . . . . . . . . . . . . . . . . . 27
Chapter 3: Expressions and Strings . . . . . . . . . . . . . . . . . . . . 29Expressions . . . . . . . . . . . . . . . . . . . . . . . . . . . . . . . . . . . . . 29
Comparing numeric types . . . . . . . . . . . . . . . . . . . . . . . . . 29
Compound expressions. . . . . . . . . . . . . . . . . . . . . . . . . . . 31
Complex expressions . . . . . . . . . . . . . . . . . . . . . . . . . . . . 32
Operator precedence . . . . . . . . . . . . . . . . . . . . . . . . . . . . 33
Strings . . . . . . . . . . . . . . . . . . . . . . . . . . . . . . . . . . . . . . . . 34
String literals . . . . . . . . . . . . . . . . . . . . . . . . . . . . . . . . . 35
Manipulating strings . . . . . . . . . . . . . . . . . . . . . . . . . . . . 37
Comparing strings . . . . . . . . . . . . . . . . . . . . . . . . . . . . . . 42
Unicode string literals . . . . . . . . . . . . . . . . . . . . . . . . . . . . 43
Converting Between Simple Types . . . . . . . . . . . . . . . . . . . . . . . . 43
Converting to numerical types . . . . . . . . . . . . . . . . . . . . . . . 44
Converting to strings . . . . . . . . . . . . . . . . . . . . . . . . . . . . 45
Chapter 4: Advanced Data Types . . . . . . . . . . . . . . . . . . . . . . 49Grouping Data with Sequences . . . . . . . . . . . . . . . . . . . . . . . . . . 49
Creating lists . . . . . . . . . . . . . . . . . . . . . . . . . . . . . . . . . 50
Creating tuples . . . . . . . . . . . . . . . . . . . . . . . . . . . . . . . . 52
Working with Sequences . . . . . . . . . . . . . . . . . . . . . . . . . . . . . 52
Joining and repeating with arithmetic operators . . . . . . . . . . . . 52
Comparing and membership testing . . . . . . . . . . . . . . . . . . . 53
Accessing parts of sequences . . . . . . . . . . . . . . . . . . . . . . . 53
Iterating with for...in . . . . . . . . . . . . . . . . . . . . . . . . . . . . . 55
Using sequence utility functions . . . . . . . . . . . . . . . . . . . . . . 55
Using Additional List Object Features . . . . . . . . . . . . . . . . . . . . . . 57
Additional operations . . . . . . . . . . . . . . . . . . . . . . . . . . . . 57
List object methods . . . . . . . . . . . . . . . . . . . . . . . . . . . . . 58
Mapping Information with Dictionaries . . . . . . . . . . . . . . . . . . . . . 60
Creating and adding to dictionaries . . . . . . . . . . . . . . . . . . . . 61
Accessing and updating dictionary mappings . . . . . . . . . . . . . . 61
Additional dictionary operations . . . . . . . . . . . . . . . . . . . . . 62
Understanding References . . . . . . . . . . . . . . . . . . . . . . . . . . . . 63
Object identity . . . . . . . . . . . . . . . . . . . . . . . . . . . . . . . . 63
Counting references . . . . . . . . . . . . . . . . . . . . . . . . . . . . . 64
Copying Complex Objects . . . . . . . . . . . . . . . . . . . . . . . . . . . . . 65
Shallow copies . . . . . . . . . . . . . . . . . . . . . . . . . . . . . . . . 65
Deep copies . . . . . . . . . . . . . . . . . . . . . . . . . . . . . . . . . 66
4807-7 FM.F 5/24/01 8:57 AM Page xviii

xixContents
Identifying Data Types . . . . . . . . . . . . . . . . . . . . . . . . . . . . . . . 67
Working with Array Objects . . . . . . . . . . . . . . . . . . . . . . . . . . . . 68
Creating arrays . . . . . . . . . . . . . . . . . . . . . . . . . . . . . . . . 68
Converting between types . . . . . . . . . . . . . . . . . . . . . . . . . 69
Array methods and operations . . . . . . . . . . . . . . . . . . . . . . 71
Chapter 5: Control Flow . . . . . . . . . . . . . . . . . . . . . . . . . . . 73Making Decisions with If-Statements . . . . . . . . . . . . . . . . . . . . . . . 73
Using For-Loops . . . . . . . . . . . . . . . . . . . . . . . . . . . . . . . . . . 74
Anatomy of a for-loop . . . . . . . . . . . . . . . . . . . . . . . . . . . . 74
Looping example: encoding strings . . . . . . . . . . . . . . . . . . . . 75
Ranges and xranges . . . . . . . . . . . . . . . . . . . . . . . . . . . . . 76
Breaking, continuing, and else-clauses . . . . . . . . . . . . . . . . . . 77
Changing horses in midstream . . . . . . . . . . . . . . . . . . . . . . . 78
Using While-Loops . . . . . . . . . . . . . . . . . . . . . . . . . . . . . . . . . 79
Throwing and Catching Exceptions . . . . . . . . . . . . . . . . . . . . . . . 79
Passing the buck: propagating exceptions . . . . . . . . . . . . . . . . 80
Handling an exception . . . . . . . . . . . . . . . . . . . . . . . . . . . 80
More on exceptions . . . . . . . . . . . . . . . . . . . . . . . . . . . . . 81
Defining and raising exceptions . . . . . . . . . . . . . . . . . . . . . . 82
Cleaning up with finally . . . . . . . . . . . . . . . . . . . . . . . . . . . 82
Debugging with Assertions . . . . . . . . . . . . . . . . . . . . . . . . . . . . 83
Assertions in Python . . . . . . . . . . . . . . . . . . . . . . . . . . . . 83
Toggling assertions . . . . . . . . . . . . . . . . . . . . . . . . . . . . . 84
Example: Game of Life . . . . . . . . . . . . . . . . . . . . . . . . . . . . . . . 84
Chapter 6: Program Organization . . . . . . . . . . . . . . . . . . . . . 87Defining Functions . . . . . . . . . . . . . . . . . . . . . . . . . . . . . . . . . 87
Pass by object reference . . . . . . . . . . . . . . . . . . . . . . . . . . 88
All about parameters . . . . . . . . . . . . . . . . . . . . . . . . . . . . 88
Arbitrary arguments . . . . . . . . . . . . . . . . . . . . . . . . . . . . 89
Apply: passing arguments from a tuple . . . . . . . . . . . . . . . . . . 90
A bit of functional programming . . . . . . . . . . . . . . . . . . . . . . 90
Grouping Code with Modules . . . . . . . . . . . . . . . . . . . . . . . . . . . 91
Laying out a module . . . . . . . . . . . . . . . . . . . . . . . . . . . . . 91
Taking inventory of a module . . . . . . . . . . . . . . . . . . . . . . . 92
Importing Modules . . . . . . . . . . . . . . . . . . . . . . . . . . . . . . . . . 92
What else happens upon import? . . . . . . . . . . . . . . . . . . . . . 93
Reimporting modules . . . . . . . . . . . . . . . . . . . . . . . . . . . . 93
Exotic imports . . . . . . . . . . . . . . . . . . . . . . . . . . . . . . . . 94
Locating Modules . . . . . . . . . . . . . . . . . . . . . . . . . . . . . . . . . 94
Python path . . . . . . . . . . . . . . . . . . . . . . . . . . . . . . . . . 94
Compiled files . . . . . . . . . . . . . . . . . . . . . . . . . . . . . . . . 95
Understanding Scope Rules . . . . . . . . . . . . . . . . . . . . . . . . . . . 95
Is it local or global? . . . . . . . . . . . . . . . . . . . . . . . . . . . . . 95
Listing namespace contents . . . . . . . . . . . . . . . . . . . . . . . . 96
Grouping Modules into Packages . . . . . . . . . . . . . . . . . . . . . . . . 96
Compiling and Running Programmatically . . . . . . . . . . . . . . . . . . . 97
4807-7 FM.F 5/24/01 8:57 AM Page xix

xx Python 2.1 Bible
Chapter 7: Object-Oriented Python . . . . . . . . . . . . . . . . . . . . 99Overview of Object-Oriented Python . . . . . . . . . . . . . . . . . . . . . . 99
Creating Classes and Instance Objects . . . . . . . . . . . . . . . . . . . . . 100
Creating instance objects . . . . . . . . . . . . . . . . . . . . . . . . . 101
More on accessing attributes . . . . . . . . . . . . . . . . . . . . . . . 101
Deriving New Classes from Other Classes . . . . . . . . . . . . . . . . . . . 102
Multiple inheritance . . . . . . . . . . . . . . . . . . . . . . . . . . . . 103
Creating a custom list class . . . . . . . . . . . . . . . . . . . . . . . . 104
Creating a custom string class . . . . . . . . . . . . . . . . . . . . . . 105
Creating a custom dictionary class . . . . . . . . . . . . . . . . . . . 106
Hiding Private Data . . . . . . . . . . . . . . . . . . . . . . . . . . . . . . . . 106
Identifying Class Membership . . . . . . . . . . . . . . . . . . . . . . . . . . 107
Overloading Standard Behaviors . . . . . . . . . . . . . . . . . . . . . . . . 108
Overloading basic functionality . . . . . . . . . . . . . . . . . . . . . 109
Overloading numeric operators . . . . . . . . . . . . . . . . . . . . . 111
Overloading sequence and dictionary operators . . . . . . . . . . . 112
Overloading bitwise operators . . . . . . . . . . . . . . . . . . . . . . 114
Overloading type conversions . . . . . . . . . . . . . . . . . . . . . . 115
Using Weak References . . . . . . . . . . . . . . . . . . . . . . . . . . . . . . 115
Creating weak references . . . . . . . . . . . . . . . . . . . . . . . . . 116
Creating proxy objects . . . . . . . . . . . . . . . . . . . . . . . . . . 117
Chapter 8: Input and Output . . . . . . . . . . . . . . . . . . . . . . . 119Printing to the Screen . . . . . . . . . . . . . . . . . . . . . . . . . . . . . . 119
Accessing Keyboard Input . . . . . . . . . . . . . . . . . . . . . . . . . . . . 120
raw_input . . . . . . . . . . . . . . . . . . . . . . . . . . . . . . . . . . 120
input . . . . . . . . . . . . . . . . . . . . . . . . . . . . . . . . . . . . . 121
Opening, Closing, and Positioning Files . . . . . . . . . . . . . . . . . . . . 121
open . . . . . . . . . . . . . . . . . . . . . . . . . . . . . . . . . . . . . 122
File object information . . . . . . . . . . . . . . . . . . . . . . . . . . 123
close . . . . . . . . . . . . . . . . . . . . . . . . . . . . . . . . . . . . . 123
File position . . . . . . . . . . . . . . . . . . . . . . . . . . . . . . . . . 123
Writing Files . . . . . . . . . . . . . . . . . . . . . . . . . . . . . . . . . . . . 124
Reading Files . . . . . . . . . . . . . . . . . . . . . . . . . . . . . . . . . . . 125
Accessing Standard I/O . . . . . . . . . . . . . . . . . . . . . . . . . . . . . 126
Using Filelike Objects . . . . . . . . . . . . . . . . . . . . . . . . . . . . . . . 127
Part II: Files, Data Storage, and Operating System Services 131
Chapter 9: Processing Strings and Regular Expressions . . . . . . . 133Using String Objects . . . . . . . . . . . . . . . . . . . . . . . . . . . . . . . 133
String formatting methods . . . . . . . . . . . . . . . . . . . . . . . . 134
String case-changing methods . . . . . . . . . . . . . . . . . . . . . . 134
String format tests (the is-methods) . . . . . . . . . . . . . . . . . . . 135
4807-7 FM.F 5/24/01 8:57 AM Page xx

xxiContents
String searching methods . . . . . . . . . . . . . . . . . . . . . . . . . 135
String manipulation methods . . . . . . . . . . . . . . . . . . . . . . . 137
Using the String Module . . . . . . . . . . . . . . . . . . . . . . . . . . . . . 138
Character categories . . . . . . . . . . . . . . . . . . . . . . . . . . . . 138
Miscellaneous functions . . . . . . . . . . . . . . . . . . . . . . . . . . 139
Defining Regular Expressions . . . . . . . . . . . . . . . . . . . . . . . . . . 140
Regular expression syntax . . . . . . . . . . . . . . . . . . . . . . . . 140
Backslashes and raw strings . . . . . . . . . . . . . . . . . . . . . . . 142
Character groups and other backslash magic . . . . . . . . . . . . . 142
Nongreedy matching . . . . . . . . . . . . . . . . . . . . . . . . . . . . 143
Extensions . . . . . . . . . . . . . . . . . . . . . . . . . . . . . . . . . . 143
Creating and Using Regular Expression Objects . . . . . . . . . . . . . . . 144
Using regular expression objects . . . . . . . . . . . . . . . . . . . . . 145
Applying regular expressions without compiling . . . . . . . . . . . 147
Using Match Objects . . . . . . . . . . . . . . . . . . . . . . . . . . . . . . . 147
group([groupid,...]) . . . . . . . . . . . . . . . . . . . . . . . . . . . . 148
groups([nomatch]) . . . . . . . . . . . . . . . . . . . . . . . . . . . . . 148
groupdict([nomatch]) . . . . . . . . . . . . . . . . . . . . . . . . . . . 148
start([groupid]), end([groupid]), span([groupid]) . . . . . . . . . . 148
re,string,pos,endpos, . . . . . . . . . . . . . . . . . . . . . . . . . . . 149
Treating Strings as Files . . . . . . . . . . . . . . . . . . . . . . . . . . . . . 149
Encoding Text . . . . . . . . . . . . . . . . . . . . . . . . . . . . . . . . . . . 151
Using Unicode strings . . . . . . . . . . . . . . . . . . . . . . . . . . . 151
Reading and writing non-ASCII strings . . . . . . . . . . . . . . . . . . 151
Using the Unicode database . . . . . . . . . . . . . . . . . . . . . . . 153
Formatting Floating Point Numbers . . . . . . . . . . . . . . . . . . . . . . 154
fix(number,precision) . . . . . . . . . . . . . . . . . . . . . . . . . . . 154
sci(number,precision) . . . . . . . . . . . . . . . . . . . . . . . . . . . 154
Chapter 10: Working with Files and Directories . . . . . . . . . . . . 155Retrieving File and Directory Information . . . . . . . . . . . . . . . . . . . 155
The piecemeal approach . . . . . . . . . . . . . . . . . . . . . . . . . 156
The I-want-it-all approach . . . . . . . . . . . . . . . . . . . . . . . . . 159
Building and Dissecting Paths . . . . . . . . . . . . . . . . . . . . . . . . . . 161
Joining path parts . . . . . . . . . . . . . . . . . . . . . . . . . . . . . 161
Breaking paths into pieces . . . . . . . . . . . . . . . . . . . . . . . . 162
Other path modifiers . . . . . . . . . . . . . . . . . . . . . . . . . . . 162
Listing Directories and Matching File Names . . . . . . . . . . . . . . . . . 163
Obtaining Environment and Argument Information . . . . . . . . . . . . . 165
Environment variables . . . . . . . . . . . . . . . . . . . . . . . . . . 165
Current working directory . . . . . . . . . . . . . . . . . . . . . . . . 165
Command-line parameters . . . . . . . . . . . . . . . . . . . . . . . . 166
Example: Recursive Grep Utility . . . . . . . . . . . . . . . . . . . . . . . . 166
Copying, Renaming, and Removing Paths . . . . . . . . . . . . . . . . . . . 168
Copying and linking . . . . . . . . . . . . . . . . . . . . . . . . . . . . 168
Renaming . . . . . . . . . . . . . . . . . . . . . . . . . . . . . . . . . . 168
Removing . . . . . . . . . . . . . . . . . . . . . . . . . . . . . . . . . . 169
4807-7 FM.F 5/24/01 8:57 AM Page xxi

xxii Python 2.1 Bible
Creating Directories and Temporary Files . . . . . . . . . . . . . . . . . . . 169
Comparing Files and Directories . . . . . . . . . . . . . . . . . . . . . . . . 171
Working with File Descriptors . . . . . . . . . . . . . . . . . . . . . . . . . . 173
General file descriptor functions . . . . . . . . . . . . . . . . . . . . . 173
Pipes . . . . . . . . . . . . . . . . . . . . . . . . . . . . . . . . . . . . . 174
Other File Processing Techniques . . . . . . . . . . . . . . . . . . . . . . . 174
Randomly accessing lines in text files . . . . . . . . . . . . . . . . . . 174
Using memory-mapped files . . . . . . . . . . . . . . . . . . . . . . . 175
Iterating over several files . . . . . . . . . . . . . . . . . . . . . . . . . 176
Chapter 11: Using Other Operating System Services . . . . . . . . . 179Executing Shell Commands and Other Programs . . . . . . . . . . . . . . . 179
Spawning Child Processes . . . . . . . . . . . . . . . . . . . . . . . . . . . . 181
popen functions . . . . . . . . . . . . . . . . . . . . . . . . . . . . . . 181
spawn functions . . . . . . . . . . . . . . . . . . . . . . . . . . . . . . 182
fork . . . . . . . . . . . . . . . . . . . . . . . . . . . . . . . . . . . . . . 183
Process management and termination . . . . . . . . . . . . . . . . . 183
Handling Process Information . . . . . . . . . . . . . . . . . . . . . . . . . . 185
Retrieving System Information . . . . . . . . . . . . . . . . . . . . . . . . . 187
Managing Configuration Files . . . . . . . . . . . . . . . . . . . . . . . . . . 188
Understanding Error Names . . . . . . . . . . . . . . . . . . . . . . . . . . . 190
Handling Asynchronous Signals . . . . . . . . . . . . . . . . . . . . . . . . . 191
Chapter 12: Storing Data and Objects . . . . . . . . . . . . . . . . . . 195Data Storage Overview . . . . . . . . . . . . . . . . . . . . . . . . . . . . . . 195
Text versus binary . . . . . . . . . . . . . . . . . . . . . . . . . . . . . 195
Compression . . . . . . . . . . . . . . . . . . . . . . . . . . . . . . . . 196
Byte order (“Endianness”) . . . . . . . . . . . . . . . . . . . . . . . . 196
Object state . . . . . . . . . . . . . . . . . . . . . . . . . . . . . . . . . 196
Destination . . . . . . . . . . . . . . . . . . . . . . . . . . . . . . . . . 196
On the receiving end . . . . . . . . . . . . . . . . . . . . . . . . . . . . 196
Loading and Saving Objects . . . . . . . . . . . . . . . . . . . . . . . . . . . 197
Pickling with pickle . . . . . . . . . . . . . . . . . . . . . . . . . . . . 197
The marshal module . . . . . . . . . . . . . . . . . . . . . . . . . . . . 200
Example: Moving Objects Across a Network . . . . . . . . . . . . . . . . . 200
Using Database-Like Storage . . . . . . . . . . . . . . . . . . . . . . . . . . 203
Converting to and from C Structures . . . . . . . . . . . . . . . . . . . . . . 204
Converting Data to Standard Formats . . . . . . . . . . . . . . . . . . . . . 208
Sun’s XDR format . . . . . . . . . . . . . . . . . . . . . . . . . . . . . . 208
Other formats . . . . . . . . . . . . . . . . . . . . . . . . . . . . . . . . 210
Compressing Data . . . . . . . . . . . . . . . . . . . . . . . . . . . . . . . . 210
zlib . . . . . . . . . . . . . . . . . . . . . . . . . . . . . . . . . . . . . . 211
gzip . . . . . . . . . . . . . . . . . . . . . . . . . . . . . . . . . . . . . . 213
zipfile . . . . . . . . . . . . . . . . . . . . . . . . . . . . . . . . . . . . 214
4807-7 FM.F 5/24/01 8:57 AM Page xxii

xxiiiContents
Chapter 13: Accessing Date and Time . . . . . . . . . . . . . . . . . . 219Telling Time in Python . . . . . . . . . . . . . . . . . . . . . . . . . . . . . . 219
Ticks . . . . . . . . . . . . . . . . . . . . . . . . . . . . . . . . . . . . . 219
TimeTuple . . . . . . . . . . . . . . . . . . . . . . . . . . . . . . . . . . 220
Stopwatch time . . . . . . . . . . . . . . . . . . . . . . . . . . . . . . . 220
Converting Between Time Formats . . . . . . . . . . . . . . . . . . . . . . . 221
Parsing and Printing Dates and Times . . . . . . . . . . . . . . . . . . . . . 222
Fancy formatting . . . . . . . . . . . . . . . . . . . . . . . . . . . . . . 222
Parsing time . . . . . . . . . . . . . . . . . . . . . . . . . . . . . . . . . 223
Localization . . . . . . . . . . . . . . . . . . . . . . . . . . . . . . . . . 223
Accessing the Calendar . . . . . . . . . . . . . . . . . . . . . . . . . . . . . 224
Printing monthly and yearly calendars . . . . . . . . . . . . . . . . . 224
Calendar information . . . . . . . . . . . . . . . . . . . . . . . . . . . 225
Leap years . . . . . . . . . . . . . . . . . . . . . . . . . . . . . . . . . . 226
Using Time Zones . . . . . . . . . . . . . . . . . . . . . . . . . . . . . . . . . 226
Allowing Two-Digit Years . . . . . . . . . . . . . . . . . . . . . . . . . . . . . 227
Chapter 14: Using Databases . . . . . . . . . . . . . . . . . . . . . . . 229Using Disk-Based Dictionaries . . . . . . . . . . . . . . . . . . . . . . . . . . 229
DBM Example: Tracking Telephone Numbers . . . . . . . . . . . . . . . . . 231
Advanced Disk-Based Dictionaries . . . . . . . . . . . . . . . . . . . . . . . 232
dbm . . . . . . . . . . . . . . . . . . . . . . . . . . . . . . . . . . . . . 232
gdbm . . . . . . . . . . . . . . . . . . . . . . . . . . . . . . . . . . . . . 232
dbhash . . . . . . . . . . . . . . . . . . . . . . . . . . . . . . . . . . . . 233
Using BSD database objects . . . . . . . . . . . . . . . . . . . . . . . 233
Accessing Relational Databases . . . . . . . . . . . . . . . . . . . . . . . . . 234
Connection objects . . . . . . . . . . . . . . . . . . . . . . . . . . . . 234
Transactions . . . . . . . . . . . . . . . . . . . . . . . . . . . . . . . . 234
Cursor objects . . . . . . . . . . . . . . . . . . . . . . . . . . . . . . . 235
Example: “Sounds-Like” Queries . . . . . . . . . . . . . . . . . . . . . . . . 235
Examining Relational Metadata . . . . . . . . . . . . . . . . . . . . . . . . . 237
Example: Creating Auditing Tables . . . . . . . . . . . . . . . . . . . . . . . 238
Advanced Features of the DB API . . . . . . . . . . . . . . . . . . . . . . . . 240
Input and output sizes . . . . . . . . . . . . . . . . . . . . . . . . . . . 241
Reusable SQL statements . . . . . . . . . . . . . . . . . . . . . . . . . 242
Database library information . . . . . . . . . . . . . . . . . . . . . . . 242
Error hierarchy . . . . . . . . . . . . . . . . . . . . . . . . . . . . . . . 243
Part III: Networking and the Internet 245
Chapter 15: Networking . . . . . . . . . . . . . . . . . . . . . . . . . . 247Networking Background . . . . . . . . . . . . . . . . . . . . . . . . . . . . . 247
Working with Addresses and Host Names . . . . . . . . . . . . . . . . . . . 248
4807-7 FM.F 5/24/01 8:57 AM Page xxiii

xxiv Python 2.1 Bible
Communicating with Low-Level Sockets . . . . . . . . . . . . . . . . . . . . 250
Creating and destroying sockets . . . . . . . . . . . . . . . . . . . . . 250
Connecting sockets . . . . . . . . . . . . . . . . . . . . . . . . . . . . 251
Sending and receiving data . . . . . . . . . . . . . . . . . . . . . . . . 252
Using socket options . . . . . . . . . . . . . . . . . . . . . . . . . . . . 253
Converting numbers . . . . . . . . . . . . . . . . . . . . . . . . . . . . 256
Example: A Multicast Chat Application . . . . . . . . . . . . . . . . . . . . 256
Using SocketServers . . . . . . . . . . . . . . . . . . . . . . . . . . . . . . . 261
The SocketServer family . . . . . . . . . . . . . . . . . . . . . . . . . . 261
Request handlers . . . . . . . . . . . . . . . . . . . . . . . . . . . . . . 263
Processing Web Browser Requests . . . . . . . . . . . . . . . . . . . . . . . 264
BaseHTTPRequestHandler . . . . . . . . . . . . . . . . . . . . . . . . 265
SimpleHTTPRequestHandler . . . . . . . . . . . . . . . . . . . . . . . 266
CGIHTTPRequestHandler . . . . . . . . . . . . . . . . . . . . . . . . . 267
Example: form handler CGI script . . . . . . . . . . . . . . . . . . . . 267
Handling Multiple Requests Without Threads . . . . . . . . . . . . . . . . 269
asyncore . . . . . . . . . . . . . . . . . . . . . . . . . . . . . . . . . . . 271
Chapter 16: Speaking Internet Protocols . . . . . . . . . . . . . . . . 275Python’s Internet Protocol Support . . . . . . . . . . . . . . . . . . . . . . 275
Retrieving Internet Resources . . . . . . . . . . . . . . . . . . . . . . . . . . 276
Manipulating URLs . . . . . . . . . . . . . . . . . . . . . . . . . . . . . 276
Treating a URL as a file . . . . . . . . . . . . . . . . . . . . . . . . . . 277
URLopeners . . . . . . . . . . . . . . . . . . . . . . . . . . . . . . . . 277
Extended URL opening . . . . . . . . . . . . . . . . . . . . . . . . . . 278
Sending HTTP Requests . . . . . . . . . . . . . . . . . . . . . . . . . . . . . 279
Building and using request objects . . . . . . . . . . . . . . . . . . . 279
Sending and Receiving E-Mail . . . . . . . . . . . . . . . . . . . . . . . . . . 281
Accessing POP3 accounts . . . . . . . . . . . . . . . . . . . . . . . . . 281
Accessing SMTP accounts . . . . . . . . . . . . . . . . . . . . . . . . 283
Accessing IMAP accounts . . . . . . . . . . . . . . . . . . . . . . . . . 285
Transferring Files via FTP . . . . . . . . . . . . . . . . . . . . . . . . . . . . 289
Retrieving Resources Using Gopher . . . . . . . . . . . . . . . . . . . . . . 291
Working with Newsgroups . . . . . . . . . . . . . . . . . . . . . . . . . . . . 292
Using the Telnet Protocol . . . . . . . . . . . . . . . . . . . . . . . . . . . . 296
Connecting . . . . . . . . . . . . . . . . . . . . . . . . . . . . . . . . . 296
Reading and writing . . . . . . . . . . . . . . . . . . . . . . . . . . . . 296
Watching and waiting . . . . . . . . . . . . . . . . . . . . . . . . . . . 297
Other methods . . . . . . . . . . . . . . . . . . . . . . . . . . . . . . . 297
Writing CGI Scripts . . . . . . . . . . . . . . . . . . . . . . . . . . . . . . . . 298
Setting up CGI scripts . . . . . . . . . . . . . . . . . . . . . . . . . . . 298
Accessing form fields . . . . . . . . . . . . . . . . . . . . . . . . . . . 299
Advanced CGI functions . . . . . . . . . . . . . . . . . . . . . . . . . . 301
A note on debugging . . . . . . . . . . . . . . . . . . . . . . . . . . . . 301
A note on security . . . . . . . . . . . . . . . . . . . . . . . . . . . . . 302
4807-7 FM.F 5/24/01 8:57 AM Page xxiv

xxvContents
Chapter 17: Handling Internet Data . . . . . . . . . . . . . . . . . . . 303Manipulating URLs . . . . . . . . . . . . . . . . . . . . . . . . . . . . . . . . 303
Formatting Text . . . . . . . . . . . . . . . . . . . . . . . . . . . . . . . . . . 304
Formatter interface . . . . . . . . . . . . . . . . . . . . . . . . . . . . 304
Writer interface . . . . . . . . . . . . . . . . . . . . . . . . . . . . . . . 305
Other module resources . . . . . . . . . . . . . . . . . . . . . . . . . . 306
Reading Web Spider Robot Files . . . . . . . . . . . . . . . . . . . . . . . . 307
Viewing Files in a Web Browser . . . . . . . . . . . . . . . . . . . . . . . . . 308
Dissecting E-Mail Messages . . . . . . . . . . . . . . . . . . . . . . . . . . . 309
Parsing a message . . . . . . . . . . . . . . . . . . . . . . . . . . . . . 309
Retrieving header values . . . . . . . . . . . . . . . . . . . . . . . . . 309
Other members . . . . . . . . . . . . . . . . . . . . . . . . . . . . . . . 310
Address lists . . . . . . . . . . . . . . . . . . . . . . . . . . . . . . . . 310
rfc822 utility functions . . . . . . . . . . . . . . . . . . . . . . . . . . . 311
MIME messages . . . . . . . . . . . . . . . . . . . . . . . . . . . . . . . 311
Working with MIME Encoding . . . . . . . . . . . . . . . . . . . . . . . . . . 312
Encoding and decoding MIME messages . . . . . . . . . . . . . . . . 312
Parsing multipart MIME messages . . . . . . . . . . . . . . . . . . . . 313
Writing out multipart MIME messages . . . . . . . . . . . . . . . . . . 313
Handling document types . . . . . . . . . . . . . . . . . . . . . . . . . 316
Encoding and Decoding Message Data . . . . . . . . . . . . . . . . . . . . . 317
Uuencode . . . . . . . . . . . . . . . . . . . . . . . . . . . . . . . . . . 317
Base64 . . . . . . . . . . . . . . . . . . . . . . . . . . . . . . . . . . . . 318
Quoted-printable . . . . . . . . . . . . . . . . . . . . . . . . . . . . . . 319
Working with UNIX Mailboxes . . . . . . . . . . . . . . . . . . . . . . . . . . 320
Working with MH mailboxes . . . . . . . . . . . . . . . . . . . . . . . 320
Using Web Cookies . . . . . . . . . . . . . . . . . . . . . . . . . . . . . . . . 321
Cookies . . . . . . . . . . . . . . . . . . . . . . . . . . . . . . . . . . . 322
Morsels . . . . . . . . . . . . . . . . . . . . . . . . . . . . . . . . . . . 322
Example: a cookie importer . . . . . . . . . . . . . . . . . . . . . . . . 323
Chapter 18: Parsing XML and Other Markup Languages . . . . . . . 325Markup Language Basics . . . . . . . . . . . . . . . . . . . . . . . . . . . . . 325
Tags are for metatext . . . . . . . . . . . . . . . . . . . . . . . . . . . 326
Tag rules . . . . . . . . . . . . . . . . . . . . . . . . . . . . . . . . . . . 326
Namespaces . . . . . . . . . . . . . . . . . . . . . . . . . . . . . . . . . 327
Processing XML . . . . . . . . . . . . . . . . . . . . . . . . . . . . . . 327
Parsing HTML Files . . . . . . . . . . . . . . . . . . . . . . . . . . . . . . . . 327
HTMLParser methods . . . . . . . . . . . . . . . . . . . . . . . . . . . 328
Handling tags . . . . . . . . . . . . . . . . . . . . . . . . . . . . . . . . 328
Other parsing methods . . . . . . . . . . . . . . . . . . . . . . . . . . 328
Handling unknown or bogus elements . . . . . . . . . . . . . . . . . 329
Example: Bold Only . . . . . . . . . . . . . . . . . . . . . . . . . . . . . . . . 330
Example: Web Robot . . . . . . . . . . . . . . . . . . . . . . . . . . . . . . . 331
4807-7 FM.F 5/24/01 8:57 AM Page xxv

xxvi Python 2.1 Bible
Parsing XML with SAX . . . . . . . . . . . . . . . . . . . . . . . . . . . . . . 334
Using a ContentHandler . . . . . . . . . . . . . . . . . . . . . . . . . . 334
Example: blood-type extractor . . . . . . . . . . . . . . . . . . . . . . 335
Using parser (XMLReader) objects . . . . . . . . . . . . . . . . . . . 336
SAX exceptions . . . . . . . . . . . . . . . . . . . . . . . . . . . . . . . 337
Parsing XML with DOM . . . . . . . . . . . . . . . . . . . . . . . . . . . . . . 338
DOM nodes . . . . . . . . . . . . . . . . . . . . . . . . . . . . . . . . . 338
Elements, attributes, and text . . . . . . . . . . . . . . . . . . . . . . 338
The document node (DOM) . . . . . . . . . . . . . . . . . . . . . . . . 339
Example: data import and export with DOM . . . . . . . . . . . . . . 339
Parsing XML with xmllib . . . . . . . . . . . . . . . . . . . . . . . . . . . . . 341
Elements and attributes . . . . . . . . . . . . . . . . . . . . . . . . . . 342
XML handlers . . . . . . . . . . . . . . . . . . . . . . . . . . . . . . . . 343
Other XMLParser members . . . . . . . . . . . . . . . . . . . . . . . . 343
Part IV: User Interfaces and Multimedia 345
Chapter 19: Tinkering with Tkinter . . . . . . . . . . . . . . . . . . . . 347Getting Your Feet Wet . . . . . . . . . . . . . . . . . . . . . . . . . . . . . . 347
Creating a GUI . . . . . . . . . . . . . . . . . . . . . . . . . . . . . . . . . . . 348
Building an interface with widgets . . . . . . . . . . . . . . . . . . . . 348
Widget options . . . . . . . . . . . . . . . . . . . . . . . . . . . . . . . 349
Laying Out Widgets . . . . . . . . . . . . . . . . . . . . . . . . . . . . . . . . 349
Packer options . . . . . . . . . . . . . . . . . . . . . . . . . . . . . . . 350
Grid options . . . . . . . . . . . . . . . . . . . . . . . . . . . . . . . . . 351
Example: Breakfast Buttons . . . . . . . . . . . . . . . . . . . . . . . . . . . 352
Using Common Options . . . . . . . . . . . . . . . . . . . . . . . . . . . . . 354
Color options . . . . . . . . . . . . . . . . . . . . . . . . . . . . . . . . 354
Size options . . . . . . . . . . . . . . . . . . . . . . . . . . . . . . . . . 355
Appearance options . . . . . . . . . . . . . . . . . . . . . . . . . . . . 355
Behavior options . . . . . . . . . . . . . . . . . . . . . . . . . . . . . . 355
Gathering User Input . . . . . . . . . . . . . . . . . . . . . . . . . . . . . . . 356
Example: Printing Fancy Text . . . . . . . . . . . . . . . . . . . . . . . . . . 357
Using Text Widgets . . . . . . . . . . . . . . . . . . . . . . . . . . . . . . . . 359
Building Menus . . . . . . . . . . . . . . . . . . . . . . . . . . . . . . . . . . 360
Using Tkinter Dialogs . . . . . . . . . . . . . . . . . . . . . . . . . . . . . . . 361
File dialogs . . . . . . . . . . . . . . . . . . . . . . . . . . . . . . . . . 362
Example: Text Editor . . . . . . . . . . . . . . . . . . . . . . . . . . . . . . . 362
Handling Colors and Fonts . . . . . . . . . . . . . . . . . . . . . . . . . . . . 365
Colors . . . . . . . . . . . . . . . . . . . . . . . . . . . . . . . . . . . . 365
Fonts . . . . . . . . . . . . . . . . . . . . . . . . . . . . . . . . . . . . . 366
Drawing Graphics . . . . . . . . . . . . . . . . . . . . . . . . . . . . . . . . . 366
The canvas widget . . . . . . . . . . . . . . . . . . . . . . . . . . . . . 366
Manipulating canvas items . . . . . . . . . . . . . . . . . . . . . . . . 367
Using Timers . . . . . . . . . . . . . . . . . . . . . . . . . . . . . . . . . . . . 368
Example: A Bouncing Picture . . . . . . . . . . . . . . . . . . . . . . . . . . 368
4807-7 FM.F 5/24/01 8:57 AM Page xxvi

xxviiContents
Chapter 20: Using Advanced Tkinter Widgets . . . . . . . . . . . . . 371Handling Events . . . . . . . . . . . . . . . . . . . . . . . . . . . . . . . . . . 371
Creating event handlers . . . . . . . . . . . . . . . . . . . . . . . . . . 371
Binding mouse events . . . . . . . . . . . . . . . . . . . . . . . . . . . 372
Binding keyboard events . . . . . . . . . . . . . . . . . . . . . . . . . 372
Event objects . . . . . . . . . . . . . . . . . . . . . . . . . . . . . . . . 373
Example: A Drawing Canvas . . . . . . . . . . . . . . . . . . . . . . . . . . . 373
Advanced Widgets . . . . . . . . . . . . . . . . . . . . . . . . . . . . . . . . 375
Listbox . . . . . . . . . . . . . . . . . . . . . . . . . . . . . . . . . . . . 375
Scale . . . . . . . . . . . . . . . . . . . . . . . . . . . . . . . . . . . . . 376
Scrollbar . . . . . . . . . . . . . . . . . . . . . . . . . . . . . . . . . . . 376
Example: Color Scheme Customizer . . . . . . . . . . . . . . . . . . . . . . 377
Creating Dialogs . . . . . . . . . . . . . . . . . . . . . . . . . . . . . . . . . . 381
Supporting Drag-and-Drop Operations . . . . . . . . . . . . . . . . . . . . . 382
Using Cursors . . . . . . . . . . . . . . . . . . . . . . . . . . . . . . . . . . . 385
Designing New Widgets . . . . . . . . . . . . . . . . . . . . . . . . . . . . . 387
Further Tkinter Adventures . . . . . . . . . . . . . . . . . . . . . . . . . . . 389
Additional widgets . . . . . . . . . . . . . . . . . . . . . . . . . . . . . 389
Learning more . . . . . . . . . . . . . . . . . . . . . . . . . . . . . . . 389
Chapter 21: Building User Interfaces with wxPython . . . . . . . . . 391Introducing wxPython . . . . . . . . . . . . . . . . . . . . . . . . . . . . . . 391
Creating Simple wxPython Programs . . . . . . . . . . . . . . . . . . . . . . 392
Choosing Different Window Types . . . . . . . . . . . . . . . . . . . . . . . 394
Managed windows . . . . . . . . . . . . . . . . . . . . . . . . . . . . . 394
Nonmanaged windows . . . . . . . . . . . . . . . . . . . . . . . . . . . 395
Using wxPython Controls . . . . . . . . . . . . . . . . . . . . . . . . . . . . 399
Common controls . . . . . . . . . . . . . . . . . . . . . . . . . . . . . 399
Tree controls . . . . . . . . . . . . . . . . . . . . . . . . . . . . . . . . 400
Editor controls . . . . . . . . . . . . . . . . . . . . . . . . . . . . . . . 401
Controlling Layout . . . . . . . . . . . . . . . . . . . . . . . . . . . . . . . . 401
Specifying coordinates . . . . . . . . . . . . . . . . . . . . . . . . . . 402
Sizers . . . . . . . . . . . . . . . . . . . . . . . . . . . . . . . . . . . . . 403
Layout constraints . . . . . . . . . . . . . . . . . . . . . . . . . . . . . 406
Layout algorithms . . . . . . . . . . . . . . . . . . . . . . . . . . . . . 407
Using Built-in Dialogs . . . . . . . . . . . . . . . . . . . . . . . . . . . . . . . 407
Drawing with Device Contexts . . . . . . . . . . . . . . . . . . . . . . . . . 408
Adding Menus and Keyboard Shortcuts . . . . . . . . . . . . . . . . . . . . 411
Accessing Mouse and Keyboard Input . . . . . . . . . . . . . . . . . . . . . 412
Other wxPython Features . . . . . . . . . . . . . . . . . . . . . . . . . . . . 412
Clipboard, drag and drop, and cursors . . . . . . . . . . . . . . . . . 413
Graphics . . . . . . . . . . . . . . . . . . . . . . . . . . . . . . . . . . . 413
Date and time . . . . . . . . . . . . . . . . . . . . . . . . . . . . . . . . 413
Fonts . . . . . . . . . . . . . . . . . . . . . . . . . . . . . . . . . . . . . 413
HTML . . . . . . . . . . . . . . . . . . . . . . . . . . . . . . . . . . . . 414
Printing . . . . . . . . . . . . . . . . . . . . . . . . . . . . . . . . . . . 414
Other . . . . . . . . . . . . . . . . . . . . . . . . . . . . . . . . . . . . . 414
4807-7 FM.F 5/24/01 8:57 AM Page xxvii

xxviii Python 2.1 Bible
Chapter 22: Using Curses . . . . . . . . . . . . . . . . . . . . . . . . . . 415A Curses Overview . . . . . . . . . . . . . . . . . . . . . . . . . . . . . . . . 415
Starting Up and Shutting Down . . . . . . . . . . . . . . . . . . . . . . . . . 416
Displaying and Erasing Text . . . . . . . . . . . . . . . . . . . . . . . . . . . 416
Reading from the window (screen-scraping) . . . . . . . . . . . . . . 417
Erasing . . . . . . . . . . . . . . . . . . . . . . . . . . . . . . . . . . . . 418
Refreshing . . . . . . . . . . . . . . . . . . . . . . . . . . . . . . . . . . 418
Boxes and lines . . . . . . . . . . . . . . . . . . . . . . . . . . . . . . . 418
The window background . . . . . . . . . . . . . . . . . . . . . . . . . 418
Example: masking a box . . . . . . . . . . . . . . . . . . . . . . . . . . 419
Moving the Cursor . . . . . . . . . . . . . . . . . . . . . . . . . . . . . . . . 420
Getting User Input . . . . . . . . . . . . . . . . . . . . . . . . . . . . . . . . 421
Reading keys . . . . . . . . . . . . . . . . . . . . . . . . . . . . . . . . 422
Other keyboard-related functions . . . . . . . . . . . . . . . . . . . . 422
Fancy characters . . . . . . . . . . . . . . . . . . . . . . . . . . . . . . 422
Reading mouse input . . . . . . . . . . . . . . . . . . . . . . . . . . . 423
Example: yes, no, or maybe . . . . . . . . . . . . . . . . . . . . . . . . 424
Managing Windows . . . . . . . . . . . . . . . . . . . . . . . . . . . . . . . . 425
Pads . . . . . . . . . . . . . . . . . . . . . . . . . . . . . . . . . . . . . 425
Stacking windows . . . . . . . . . . . . . . . . . . . . . . . . . . . . . 426
Editing Text . . . . . . . . . . . . . . . . . . . . . . . . . . . . . . . . . . . . 426
Using Color . . . . . . . . . . . . . . . . . . . . . . . . . . . . . . . . . . . . 427
Numbering . . . . . . . . . . . . . . . . . . . . . . . . . . . . . . . . . 427
Setting colors . . . . . . . . . . . . . . . . . . . . . . . . . . . . . . . . 428
Tweaking the colors . . . . . . . . . . . . . . . . . . . . . . . . . . . . 428
Example: A Simple Maze Game . . . . . . . . . . . . . . . . . . . . . . . . . 428
Chapter 23: Building Simple Command Interpreters . . . . . . . . . 433Beginning with the End in Mind . . . . . . . . . . . . . . . . . . . . . . . . . 433
Understanding the Lepto Language . . . . . . . . . . . . . . . . . . . . . . 435
Creating a Lepto Lexical Analyzer . . . . . . . . . . . . . . . . . . . . . . . 436
The shlex module . . . . . . . . . . . . . . . . . . . . . . . . . . . . . 436
Putting shlex to work . . . . . . . . . . . . . . . . . . . . . . . . . . . 437
Adding Interactive-Mode Features . . . . . . . . . . . . . . . . . . . . . . . 440
Using the cmd module . . . . . . . . . . . . . . . . . . . . . . . . . . . 440
Subclassing cmd.Cmd . . . . . . . . . . . . . . . . . . . . . . . . . . . 442
Executing Lepto Commands . . . . . . . . . . . . . . . . . . . . . . . . . . . 445
Chapter 24: Playing Sound . . . . . . . . . . . . . . . . . . . . . . . . . 453Sound File Basics . . . . . . . . . . . . . . . . . . . . . . . . . . . . . . . . . 453
Playing Sounds . . . . . . . . . . . . . . . . . . . . . . . . . . . . . . . . . . 454
Playing sound on Windows . . . . . . . . . . . . . . . . . . . . . . . . 454
Playing and recording sound on SunOS . . . . . . . . . . . . . . . . . 455
Examining Audio Files . . . . . . . . . . . . . . . . . . . . . . . . . . . . . . 456
4807-7 FM.F 5/24/01 8:57 AM Page xxviii

xxixContents
Reading and Writing Audio Files . . . . . . . . . . . . . . . . . . . . . . . . 456
Reading and writing AIFF files with aifc . . . . . . . . . . . . . . . . . 457
Reading and writing AU files with sunau . . . . . . . . . . . . . . . . 458
Reading and writing WAV files with wave . . . . . . . . . . . . . . . . 458
Example: Reversing an audio file . . . . . . . . . . . . . . . . . . . . . 458
Reading IFF chunked data . . . . . . . . . . . . . . . . . . . . . . . . . 460
Handling Raw Audio Data . . . . . . . . . . . . . . . . . . . . . . . . . . . . 461
Examining a fragment . . . . . . . . . . . . . . . . . . . . . . . . . . . 461
Searching and matching . . . . . . . . . . . . . . . . . . . . . . . . . . 462
Translating between storage formats . . . . . . . . . . . . . . . . . . 462
Manipulating fragments . . . . . . . . . . . . . . . . . . . . . . . . . . 463
Part V: Advanced Python Programming 465
Chapter 25: Processing Images . . . . . . . . . . . . . . . . . . . . . . 467Image Basics . . . . . . . . . . . . . . . . . . . . . . . . . . . . . . . . . . . . 467
Identifying Image File Types . . . . . . . . . . . . . . . . . . . . . . . . . . . 468
Converting Between Color Systems . . . . . . . . . . . . . . . . . . . . . . 469
Color systems . . . . . . . . . . . . . . . . . . . . . . . . . . . . . . . . 469
Converting from one system to another . . . . . . . . . . . . . . . . 470
Handling Raw Image Data . . . . . . . . . . . . . . . . . . . . . . . . . . . . 472
Using the Python Imaging Library . . . . . . . . . . . . . . . . . . . . . . . 472
Retrieving image information . . . . . . . . . . . . . . . . . . . . . . . 473
Copying and converting images . . . . . . . . . . . . . . . . . . . . . 474
Using PIL with Tkinter . . . . . . . . . . . . . . . . . . . . . . . . . . . 475
Cropping and resizing images . . . . . . . . . . . . . . . . . . . . . . 476
Modifying pixel data . . . . . . . . . . . . . . . . . . . . . . . . . . . . 476
Other PIL features . . . . . . . . . . . . . . . . . . . . . . . . . . . . . 480
Chapter 26: Multithreading . . . . . . . . . . . . . . . . . . . . . . . . 481Understanding Threads . . . . . . . . . . . . . . . . . . . . . . . . . . . . . 481
Spawning, Tracking, and Killing Threads . . . . . . . . . . . . . . . . . . . 482
Creating threads with the thread module . . . . . . . . . . . . . . . . 482
Starting and stopping threads with the threading module . . . . . . 483
Thread status and information under threading . . . . . . . . . . . . 484
Finding threads under threading . . . . . . . . . . . . . . . . . . . . . 484
Waiting for a thread to finish . . . . . . . . . . . . . . . . . . . . . . . 484
Avoiding Concurrency Issues . . . . . . . . . . . . . . . . . . . . . . . . . . 485
Locking with thread . . . . . . . . . . . . . . . . . . . . . . . . . . . . 485
Locking with threading . . . . . . . . . . . . . . . . . . . . . . . . . . 486
Preventing Deadlock . . . . . . . . . . . . . . . . . . . . . . . . . . . . . . . 488
Example: Downloading from Multiple URLs . . . . . . . . . . . . . . . . . . 489
Porting Threaded Code . . . . . . . . . . . . . . . . . . . . . . . . . . . . . 494
Weaving Threads Together with Queues . . . . . . . . . . . . . . . . . . . . 495
Technical Note: How Simultaneous Is Simultaneous? . . . . . . . . . . . . 495
For More Information . . . . . . . . . . . . . . . . . . . . . . . . . . . . . . . 496
4807-7 FM.F 5/24/01 8:57 AM Page xxix

xxx Python 2.1 Bible
Chapter 27: Debugging, Profiling, and Optimization . . . . . . . . . 497Debugging Python Code . . . . . . . . . . . . . . . . . . . . . . . . . . . . . 497
Starting and stopping the debugger . . . . . . . . . . . . . . . . . . . 497
Examining the state of things . . . . . . . . . . . . . . . . . . . . . . . 498
Setting breakpoints . . . . . . . . . . . . . . . . . . . . . . . . . . . . 499
Running . . . . . . . . . . . . . . . . . . . . . . . . . . . . . . . . . . . 500
Aliases . . . . . . . . . . . . . . . . . . . . . . . . . . . . . . . . . . . . 500
Debugging tips . . . . . . . . . . . . . . . . . . . . . . . . . . . . . . . 500
Working with docstrings . . . . . . . . . . . . . . . . . . . . . . . . . . . . . 501
Automating Tests . . . . . . . . . . . . . . . . . . . . . . . . . . . . . . . . . 502
Synching docstrings with code . . . . . . . . . . . . . . . . . . . . . . 502
Unit testing . . . . . . . . . . . . . . . . . . . . . . . . . . . . . . . . . 503
Finding Bottlenecks . . . . . . . . . . . . . . . . . . . . . . . . . . . . . . . . 505
Profiling code . . . . . . . . . . . . . . . . . . . . . . . . . . . . . . . . 505
Using Profile objects . . . . . . . . . . . . . . . . . . . . . . . . . . . . 506
Calibrating the profiler . . . . . . . . . . . . . . . . . . . . . . . . . . 507
Customizing statistics . . . . . . . . . . . . . . . . . . . . . . . . . . . 507
Common Optimization Tricks . . . . . . . . . . . . . . . . . . . . . . . . . . 509
Sorting . . . . . . . . . . . . . . . . . . . . . . . . . . . . . . . . . . . . 509
Looping . . . . . . . . . . . . . . . . . . . . . . . . . . . . . . . . . . . 510
I/O . . . . . . . . . . . . . . . . . . . . . . . . . . . . . . . . . . . . . . 510
Strings . . . . . . . . . . . . . . . . . . . . . . . . . . . . . . . . . . . . 511
Threads . . . . . . . . . . . . . . . . . . . . . . . . . . . . . . . . . . . 511
Taking out the Trash — the Garbage Collector . . . . . . . . . . . . . . . . 512
Reference counts and Python code . . . . . . . . . . . . . . . . . . . 512
Reference counts and C/C++ code . . . . . . . . . . . . . . . . . . . . 513
Chapter 28: Security and Encryption . . . . . . . . . . . . . . . . . . . 515Checking Passwords . . . . . . . . . . . . . . . . . . . . . . . . . . . . . . . 515
Running in a Restricted Environment . . . . . . . . . . . . . . . . . . . . . 516
The rexec sandbox . . . . . . . . . . . . . . . . . . . . . . . . . . . . . 517
Using a class fortress . . . . . . . . . . . . . . . . . . . . . . . . . . . 520
Creating Message Fingerprints . . . . . . . . . . . . . . . . . . . . . . . . . 521
MD5 . . . . . . . . . . . . . . . . . . . . . . . . . . . . . . . . . . . . . 522
SHA . . . . . . . . . . . . . . . . . . . . . . . . . . . . . . . . . . . . . . 522
Other uses . . . . . . . . . . . . . . . . . . . . . . . . . . . . . . . . . . 523
Using 1940s-Era Encryption . . . . . . . . . . . . . . . . . . . . . . . . . . . 523
Chapter 29: Writing Extension Modules . . . . . . . . . . . . . . . . . 527Extending and Embedding Overview . . . . . . . . . . . . . . . . . . . . . . 527
Writing a Simple Extension Module . . . . . . . . . . . . . . . . . . . . . . . 528
Building and Linking . . . . . . . . . . . . . . . . . . . . . . . . . . . . . . . 531
Converting Python Data to C . . . . . . . . . . . . . . . . . . . . . . . . . . 532
Unpacking normal arguments . . . . . . . . . . . . . . . . . . . . . . 532
Using special format characters . . . . . . . . . . . . . . . . . . . . . 535
Unpacking keyword arguments . . . . . . . . . . . . . . . . . . . . . . 537
Unpacking zero arguments . . . . . . . . . . . . . . . . . . . . . . . . 538
4807-7 FM.F 5/24/01 8:57 AM Page xxx

xxxiContents
Converting C Data to Python . . . . . . . . . . . . . . . . . . . . . . . . . . 538
Creating simple Python objects . . . . . . . . . . . . . . . . . . . . . 539
Creating complex Python objects . . . . . . . . . . . . . . . . . . . . 540
Embedding the Interpreter . . . . . . . . . . . . . . . . . . . . . . . . . . . 541
A simple example . . . . . . . . . . . . . . . . . . . . . . . . . . . . . . 541
Shutting down . . . . . . . . . . . . . . . . . . . . . . . . . . . . . . . 541
Other setup functions . . . . . . . . . . . . . . . . . . . . . . . . . . . 542
System information functions . . . . . . . . . . . . . . . . . . . . . . 542
Running Python Code from C . . . . . . . . . . . . . . . . . . . . . . . . . . 543
Using Extension Tools . . . . . . . . . . . . . . . . . . . . . . . . . . . . . . 546
SWIG . . . . . . . . . . . . . . . . . . . . . . . . . . . . . . . . . . . . . 546
CXX . . . . . . . . . . . . . . . . . . . . . . . . . . . . . . . . . . . . . . 549
Extension classes . . . . . . . . . . . . . . . . . . . . . . . . . . . . . . 550
Chapter 30: Embedding the Python Interpreter . . . . . . . . . . . . 553Tracking Reference Counts . . . . . . . . . . . . . . . . . . . . . . . . . . . 553
Types of reference ownership . . . . . . . . . . . . . . . . . . . . . . 553
Reference conventions . . . . . . . . . . . . . . . . . . . . . . . . . . 554
Common pitfalls . . . . . . . . . . . . . . . . . . . . . . . . . . . . . . 555
Using the Abstract and Concrete Object Layers . . . . . . . . . . . . . . . 555
Object layers . . . . . . . . . . . . . . . . . . . . . . . . . . . . . . . . 556
Working with generic objects . . . . . . . . . . . . . . . . . . . . . . . 556
Working with Number Objects . . . . . . . . . . . . . . . . . . . . . . . . . 558
Any numerical type . . . . . . . . . . . . . . . . . . . . . . . . . . . . 558
Integers . . . . . . . . . . . . . . . . . . . . . . . . . . . . . . . . . . . 560
Longs . . . . . . . . . . . . . . . . . . . . . . . . . . . . . . . . . . . . 560
Floating-point numbers . . . . . . . . . . . . . . . . . . . . . . . . . . 561
Complex numbers . . . . . . . . . . . . . . . . . . . . . . . . . . . . . 561
Working with Sequence Objects . . . . . . . . . . . . . . . . . . . . . . . . 561
Any sequence type . . . . . . . . . . . . . . . . . . . . . . . . . . . . . 562
Strings . . . . . . . . . . . . . . . . . . . . . . . . . . . . . . . . . . . . 563
Lists . . . . . . . . . . . . . . . . . . . . . . . . . . . . . . . . . . . . . 564
Tuples . . . . . . . . . . . . . . . . . . . . . . . . . . . . . . . . . . . . 565
Buffers . . . . . . . . . . . . . . . . . . . . . . . . . . . . . . . . . . . . 566
Unicode strings . . . . . . . . . . . . . . . . . . . . . . . . . . . . . . . 567
Working with Mapping Objects . . . . . . . . . . . . . . . . . . . . . . . . . 569
Functions for any mapping type . . . . . . . . . . . . . . . . . . . . . 569
Dictionaries . . . . . . . . . . . . . . . . . . . . . . . . . . . . . . . . . 570
Using Other Object Types . . . . . . . . . . . . . . . . . . . . . . . . . . . . 571
Type . . . . . . . . . . . . . . . . . . . . . . . . . . . . . . . . . . . . . 571
None . . . . . . . . . . . . . . . . . . . . . . . . . . . . . . . . . . . . . 571
File . . . . . . . . . . . . . . . . . . . . . . . . . . . . . . . . . . . . . . 571
Module . . . . . . . . . . . . . . . . . . . . . . . . . . . . . . . . . . . . 572
CObjects . . . . . . . . . . . . . . . . . . . . . . . . . . . . . . . . . . . 574
Creating Threads and Sub-Interpreters . . . . . . . . . . . . . . . . . . . . 574
Threads . . . . . . . . . . . . . . . . . . . . . . . . . . . . . . . . . . . 575
Sub-interpreters . . . . . . . . . . . . . . . . . . . . . . . . . . . . . . 576
4807-7 FM.F 5/24/01 8:57 AM Page xxxi

xxxii Python 2.1 Bible
Handling Errors and Exceptions . . . . . . . . . . . . . . . . . . . . . . . . 576
Checking for errors . . . . . . . . . . . . . . . . . . . . . . . . . . . . 577
Signaling error conditions . . . . . . . . . . . . . . . . . . . . . . . . . 577
Creating custom exceptions . . . . . . . . . . . . . . . . . . . . . . . 578
Raising warnings . . . . . . . . . . . . . . . . . . . . . . . . . . . . . . 578
Managing Memory . . . . . . . . . . . . . . . . . . . . . . . . . . . . . . . . 579
Chapter 31: Number Crunching . . . . . . . . . . . . . . . . . . . . . . 581Using Math Routines . . . . . . . . . . . . . . . . . . . . . . . . . . . . . . . 581
Rounding and fractional parts . . . . . . . . . . . . . . . . . . . . . . 581
General math routines . . . . . . . . . . . . . . . . . . . . . . . . . . . 582
Logarithms and exponentiation . . . . . . . . . . . . . . . . . . . . . 582
Trigonometric functions . . . . . . . . . . . . . . . . . . . . . . . . . . 582
Computing with Complex Numbers . . . . . . . . . . . . . . . . . . . . . . 583
Generating Random Numbers . . . . . . . . . . . . . . . . . . . . . . . . . . 583
Random numbers . . . . . . . . . . . . . . . . . . . . . . . . . . . . . 583
Example: shuffling a deck . . . . . . . . . . . . . . . . . . . . . . . . . 585
Random distributions . . . . . . . . . . . . . . . . . . . . . . . . . . . 585
Example: plotting distributions using Monte Carlo sampling . . . . 586
Using Arbitrary-Precision Numbers . . . . . . . . . . . . . . . . . . . . . . 587
Chapter 32: Using NumPy . . . . . . . . . . . . . . . . . . . . . . . . . 589Introducing Numeric Python . . . . . . . . . . . . . . . . . . . . . . . . . . 589
Installing NumPy . . . . . . . . . . . . . . . . . . . . . . . . . . . . . . 589
Some quick definitions . . . . . . . . . . . . . . . . . . . . . . . . . . 590
Meet the array . . . . . . . . . . . . . . . . . . . . . . . . . . . . . . . 590
Accessing and Slicing Arrays . . . . . . . . . . . . . . . . . . . . . . . . . . 590
Contiguous arrays . . . . . . . . . . . . . . . . . . . . . . . . . . . . . 592
Converting arrays to lists and strings . . . . . . . . . . . . . . . . . . 592
Calling Universal Functions . . . . . . . . . . . . . . . . . . . . . . . . . . . 593
Ufunc destinations . . . . . . . . . . . . . . . . . . . . . . . . . . . . . 594
Example: editing an audio stream . . . . . . . . . . . . . . . . . . . . 594
Repeating ufuncs . . . . . . . . . . . . . . . . . . . . . . . . . . . . . . 595
Creating Arrays . . . . . . . . . . . . . . . . . . . . . . . . . . . . . . . . . . 597
Array creation functions . . . . . . . . . . . . . . . . . . . . . . . . . 597
Seeding arrays with functions . . . . . . . . . . . . . . . . . . . . . . 598
Using Element Types . . . . . . . . . . . . . . . . . . . . . . . . . . . . . . . 600
Reshaping and Resizing Arrays . . . . . . . . . . . . . . . . . . . . . . . . . 600
Using Other Array Functions . . . . . . . . . . . . . . . . . . . . . . . . . . 601
sort(array,[axis=-1]) . . . . . . . . . . . . . . . . . . . . . . . . . . . . 601
where(condition,X,Y) . . . . . . . . . . . . . . . . . . . . . . . . . . . 602
swapaxes(array,axis1,axis2) . . . . . . . . . . . . . . . . . . . . . . . 602
Matrix operations . . . . . . . . . . . . . . . . . . . . . . . . . . . . . 602
Array Example: Analyzing Price Trends . . . . . . . . . . . . . . . . . . . . 603
4807-7 FM.F 5/24/01 8:57 AM Page xxxii

xxxiiiContents
Chapter 33: Parsing and Interpreting Python Code . . . . . . . . . . 605Examining Tracebacks . . . . . . . . . . . . . . . . . . . . . . . . . . . . . . 605
Printing a traceback — print_exc and friends . . . . . . . . . . . . . 605
Extracting and formatting exceptions . . . . . . . . . . . . . . . . . . 606
Example: reporting exceptions in a GUI . . . . . . . . . . . . . . . . . 607
Eating arbitrary exceptions is bad for you . . . . . . . . . . . . . . . 607
Introspection . . . . . . . . . . . . . . . . . . . . . . . . . . . . . . . . . . . 608
Review: basic introspection . . . . . . . . . . . . . . . . . . . . . . . . 608
Browsing classes . . . . . . . . . . . . . . . . . . . . . . . . . . . . . . 609
Browsing function information . . . . . . . . . . . . . . . . . . . . . . 609
Checking Indentation . . . . . . . . . . . . . . . . . . . . . . . . . . . . . . . 611
Tokenizing Python Code . . . . . . . . . . . . . . . . . . . . . . . . . . . . . 611
Example: Syntax-Highlighting Printer . . . . . . . . . . . . . . . . . . . . . 612
Inspecting Python Parse Trees . . . . . . . . . . . . . . . . . . . . . . . . . 613
Creating an AST . . . . . . . . . . . . . . . . . . . . . . . . . . . . . . . 613
ASTs and sequences . . . . . . . . . . . . . . . . . . . . . . . . . . . . 614
Using ASTs . . . . . . . . . . . . . . . . . . . . . . . . . . . . . . . . . 614
Low-Level Object Creation . . . . . . . . . . . . . . . . . . . . . . . . . . . . 614
Disassembling Python Code . . . . . . . . . . . . . . . . . . . . . . . . . . . 615
Part VI: Deploying Python Applications 617
Chapter 34: Creating Worldwide Applications . . . . . . . . . . . . . 619Internationalization and Localization . . . . . . . . . . . . . . . . . . . . . 619
Preparing Applications for Multiple Languages . . . . . . . . . . . . . . . . 620
An NLS example . . . . . . . . . . . . . . . . . . . . . . . . . . . . . . 620
What it all means . . . . . . . . . . . . . . . . . . . . . . . . . . . . . . 623
Formatting Locale-Specific Output . . . . . . . . . . . . . . . . . . . . . . . 624
Changing the locale . . . . . . . . . . . . . . . . . . . . . . . . . . . . 624
Locale-specific formatting . . . . . . . . . . . . . . . . . . . . . . . . . 625
Properties of locales . . . . . . . . . . . . . . . . . . . . . . . . . . . . 626
Chapter 35: Customizing Import Behavior . . . . . . . . . . . . . . . 629Understanding Module Importing . . . . . . . . . . . . . . . . . . . . . . . 629
Finding and Loading Modules with imp . . . . . . . . . . . . . . . . . . . . 631
Importing Encrypted Modules . . . . . . . . . . . . . . . . . . . . . . . . . 633
Retrieving Modules from a Remote Source . . . . . . . . . . . . . . . . . . 636
Subclassing Importer . . . . . . . . . . . . . . . . . . . . . . . . . . . 636
Creating the remote Importer . . . . . . . . . . . . . . . . . . . . . . 637
Testing the remote Importer . . . . . . . . . . . . . . . . . . . . . . . 640
4807-7 FM.F 5/24/01 8:57 AM Page xxxiii

xxxiv Python 2.1 Bible
Chapter 36: Distributing Modules and Applications . . . . . . . . . 643Understanding distutils . . . . . . . . . . . . . . . . . . . . . . . . . . . . . 643
Creating a simple distribution . . . . . . . . . . . . . . . . . . . . . . 644
Installing the simple distribution . . . . . . . . . . . . . . . . . . . . . 645
Other distutils Features . . . . . . . . . . . . . . . . . . . . . . . . . . . . . 647
Distributing packages . . . . . . . . . . . . . . . . . . . . . . . . . . . 647
Including other files . . . . . . . . . . . . . . . . . . . . . . . . . . . . 648
Customizing setup . . . . . . . . . . . . . . . . . . . . . . . . . . . . . 650
Distributing Extension Modules . . . . . . . . . . . . . . . . . . . . . . . . . 650
Creating Source and Binary Distributions . . . . . . . . . . . . . . . . . . . 651
Source distributions . . . . . . . . . . . . . . . . . . . . . . . . . . . . 652
Binary distributions . . . . . . . . . . . . . . . . . . . . . . . . . . . . 653
Installers . . . . . . . . . . . . . . . . . . . . . . . . . . . . . . . . . . . 653
Building Standalone Executables . . . . . . . . . . . . . . . . . . . . . . . . 655
py2exe . . . . . . . . . . . . . . . . . . . . . . . . . . . . . . . . . . . . 655
Freeze . . . . . . . . . . . . . . . . . . . . . . . . . . . . . . . . . . . . 656
Other tools . . . . . . . . . . . . . . . . . . . . . . . . . . . . . . . . . 657
Part VII: Platform-Specific Support 659
Chapter 37: Windows . . . . . . . . . . . . . . . . . . . . . . . . . . . . 661Using win32all . . . . . . . . . . . . . . . . . . . . . . . . . . . . . . . . . . . 661
Data types . . . . . . . . . . . . . . . . . . . . . . . . . . . . . . . . . . 661
Error handling . . . . . . . . . . . . . . . . . . . . . . . . . . . . . . . 662
Finding what you need . . . . . . . . . . . . . . . . . . . . . . . . . . . 662
Example: Using Some Windows APIs . . . . . . . . . . . . . . . . . . . . . . 662
Accessing the Windows Registry . . . . . . . . . . . . . . . . . . . . . . . . 664
Accessing the registry with win32all . . . . . . . . . . . . . . . . . . . 664
Example: setting the Internet Explorer home page . . . . . . . . . . 666
Creating, deleting, and navigating keys . . . . . . . . . . . . . . . . . 666
Example: recursive deletion of a key . . . . . . . . . . . . . . . . . . 667
Other registry functions . . . . . . . . . . . . . . . . . . . . . . . . . . 668
Accessing the registry with _winreg . . . . . . . . . . . . . . . . . . . 668
Using msvcrt Goodies . . . . . . . . . . . . . . . . . . . . . . . . . . . . . . 669
Console I/O . . . . . . . . . . . . . . . . . . . . . . . . . . . . . . . . . 669
Other functions . . . . . . . . . . . . . . . . . . . . . . . . . . . . . . . 670
Chapter 38: UNIX-Compatible Modules . . . . . . . . . . . . . . . . . 671Checking UNIX Passwords and Groups . . . . . . . . . . . . . . . . . . . . 671
Accessing the System Logger . . . . . . . . . . . . . . . . . . . . . . . . . . 673
Calling Shared Library Functions . . . . . . . . . . . . . . . . . . . . . . . . 675
Providing Identifier and Keyword Completion . . . . . . . . . . . . . . . . 675
4807-7 FM.F 5/24/01 8:57 AM Page xxxiv
xxxvContents
Retrieving File System and Resource Information . . . . . . . . . . . . . . 677
File system information . . . . . . . . . . . . . . . . . . . . . . . . . . 678
Resource usage . . . . . . . . . . . . . . . . . . . . . . . . . . . . . . . 678
Resource limits . . . . . . . . . . . . . . . . . . . . . . . . . . . . . . . 679
Controlling File Descriptors . . . . . . . . . . . . . . . . . . . . . . . . . . . 680
Handling Terminals and Pseudo-Terminals . . . . . . . . . . . . . . . . . . 681
Interfacing with Sun’s NIS “Yellow Pages” . . . . . . . . . . . . . . . . . . . 682
Appendix A: Online Resources . . . . . . . . . . . . . . . . . . . . . . 685
Appendix B: Python Development Environments . . . . . . . . . . . 689
Index . . . . . . . . . . . . . . . . . . . . . . . . . . . . . . . . . . . . . . 701
4807-7 FM.F 5/24/01 8:57 AM Page xxxv

4807-7 FM.F 5/24/01 8:57 AM Page xxxvi

The PythonLanguage
✦ ✦ ✦ ✦
Chapter 1Python in an Hour
Chapter 2Identifiers, Variables,and Numeric Types
Chapter 3Expressions andStrings
Chapter 4Advanced DataTypes
Chapter 5Control Flow
Chapter 6ProgramOrganization
Chapter 7Object-OrientedPython
Chapter 8Input and Output
✦ ✦ ✦ ✦
P A R T
II
4807-7 PO1.F 5/24/01 8:57 AM Page 1

4807-7 PO1.F 5/24/01 8:57 AM Page 2

Python in an Hour
Python is a rich and powerful language, but also one that
is easy to learn. This chapter gives an overview of
Python’s syntax, its useful data-types, and its unique features.
As you read, please fire up the Python interpreter, and try out
some of the examples. Feel free to experiment, tinker, and
wander away from the rest of the tour group. Everything in
this chapter is repeated, in greater detail, in later chapters, so
don’t worry too much about absorbing everything at once.
Try some things out, get your feet wet, and have fun!
Jumping In: Starting the Python Interpreter
The first thing to do, if you haven’t already, is to install
Python. You can download Python from www.python.org. As
of this writing, the latest versions of Python are 2.0 (stable)
and 2.1 (still in beta).
You can start the Python interpreter from the command line.
Change to the directory where the interpreter lives, or add
the directory to your path. Then type:
python
On UNIX, Python typically lives in /usr/local/bin; on
Windows, Python probably lives in c:\python20.
On Windows, you can also bring the interpreter up from
Start ➪ Programs ➪ Python 2.0 ➪ Python (command line).
11C H A P T E R
✦ ✦ ✦ ✦
In This Chapter
Jumping in: Startingthe Python interpreter
Experimenting withvariables andexpressions
Defining a function
Running a Pythonprogram
Looping and control
Lists and tuples
Dictionaries
Reading and writingfiles
Loading and usingmodules
Creating a class
✦ ✦ ✦ ✦
4807-7 ch01.F 5/24/01 8:57 AM Page 3

4 Part I ✦ The Python Language
Once you start the interpreter, Python displays something like this:
Python 2.0 (#8, Oct 16 2000, 17:27:58) [MSC 32 bit (Intel)] on win32Type “copyright”, “credits” or “license” for more information.>>>
The interpreter displays the >>> prompt to show that it’s ready for you to type in
some Python. And so, in the grand tradition of programming books everywhere, we
proceed to the “Hello world” example:
>>> print “Hello world!”Hello world!
To exit the interpreter, type the end-of-file character (Ctrl-Z on Windows, or Ctrl-D
on Linux) and press Enter.
You may prefer to interact with the interpreter in IDLE, the standard Python IDE.IDLE features syntax coloring, a class browser, and other handy features. SeeAppendix B for tips on starting and using IDLE.
Experimenting with Variables and Expressions
Python’s syntax for variables and expressions is close to what you would see in C
or Java, so you can skim this section if it starts looking familiar. However, you
should take note of Python’s loose typing (see below).
Pocket calculatorPython understands the standard arithmetic operators, including +, -, / (division),
and * (multiplication). The Python interpreter makes a handy calculator:
>>> 8/24>>> 5+4*629
Note that the second example evaluates 29 (and not 54); the interpreter multiplies 4
by 6 before adding 5. Python uses operator precedence rules to decide what to do
first. You can control order explicitly by using parentheses:
>>> (5+4)*654
In practice, it’s often easiest to use parentheses (even when they aren’t required) to
make code more readable.
Note
4807-7 ch01.F 5/24/01 8:57 AM Page 4

5Chapter 1 ✦ Python in an Hour
VariablesYou can use variables to hold values over time. For example, this code computes
how long it takes to watch every episode of Monty Python’s Flying Circus (including
the two German episodes of Monty Python’s Fliegende Zirkus):
>>> NumberOfEpisodes=47>>> EpisodeLength=0.5>>> PythonMarathonLength=(NumberOfEpisodes*EpisodeLength)>>> PythonMarathonLength23.5
A variable is always a reference to a value. Variables do not have types, but objects
do. (Python is loosely typed; the same variable may refer to an integer value in the
morning and a string value in the afternoon.)
Python does not require variable declarations. However, you cannot access a
variable until you have assigned it a value. If you try to access an undefined vari-
able, the interpreter will complain (the wording of the error may be different in
your version of Python):
>>> print ScrumptiousTraceback (most recent call last):File “<stdin>”, line 1, in ?
NameError: There is no variable named ‘Scrumptious’
This example raised an exception. In Python, most errors are represented by excep-
tion objects that the surrounding code can handle. Chapter 5 describes Python’s
exception-handling abilities.
Python is case-sensitive. This means that names that are capitalized differentlyrefer to different variables:
>>> FavoriteColor=”blue”>>> favoritecolor=”yellow” >>> print FavoriteColor,favoritecolorblue yellow
Defining a FunctionAssume you and some friends go out to dinner and decide to split the bill evenly.
How much should each person pay? Here is a function that calculates each
person’s share:
>>> def SplitBill(Bill,NumberOfPeople):... # The hash character (#) starts a comment. Python... # ignores everything from # to the end of the line.... TotalWithTip = Bill * (1.15) # Add a 15% tip.
Note
4807-7 ch01.F 5/24/01 8:57 AM Page 5

6 Part I ✦ The Python Language
... return (TotalWithTip / NumberOfPeople)
...>>> SplitBill(23.35,3)8.9508333333333336
The statement def FunctionName (parameter,...): starts a function definition. I
indented the following four lines to indicate that they are a control block — a
sequence of statements grouped by a common level of indentation. Together, they
make up the body of the function definition.
Python statements with the same level of indentation are grouped together. In this
example, Python knows the function definition ends when it sees a non-indented
line. Grouping statements by indentation-level is common practice in most pro-
gramming languages; in Python it is actually part of the syntax. Normally, one
indentation level equals four spaces, and eight spaces equals one tab.
Running a Python ProgramA text file consisting of Python code is called a program, or a script, or a module.There is little distinction between the three terms — generally a script is smaller
than a program, and a file designed to be imported (rather than executed directly)
is called a module. Normally, you name Python code files with a .py extension.
To run a program named spam.py, type the following at a command prompt:
python spam.py
In Windows, you can run a program by double-clicking it. (If the file association for
the .py extension is not set up at installation time, you can configure it by right-
clicking the script, choosing “Open With...” and then choosing python.exe.)
In UNIX, you can run a script directly by using the “pound-bang hack.” Add this line
at the top of the Python script (replacing the path with the path to env if it’s differ-
ent on your system):
#!/usr/bin/python
Then make the file executable (by running chmod +x <filename>), and you can run
it directly.
Looping and ControlListing 1-1 illustrates Python’s looping and conditional statements. It prints out all
the prime numbers less than 500.
4807-7 ch01.F 5/24/01 8:57 AM Page 6

7Chapter 1 ✦ Python in an Hour
Listing 1-1: PrimeFinder.py
print 1# Loop over the numbers from 2 to 499:for PrimeTest in range(2,500):
# Assume PrimeTest prime until proven otherwise:IsPrime = 1 # 0 is false, nonzero is true # Loop over the numbers from 2 to (PrimeTest-1):for TestFactor in range(2,PrimeTest):
# a % b equals the remainder of a/b:if (PrimeTest % TestFactor == 0):
# PrimeTest divides TestFactor (remainder is 0).IsPrime=0 break # Jump out of the innermost for-loop.
if (IsPrime):print PrimeTest
Integer divisionThe modulo operator, %, returns the remainder when the first number is divided by
the second. (For instance, 8 % 5 is equal to 3.) If PrimeTest is zero modulo
TestFactor, then this remainder is zero, so TestFactor is one of PrimeTest’s
divisors.
In Python, dividing one integer by another returns another integer — the quotient,
rounded down:
>>> 8/3 # I want an integer, not the “right answer.”2
So, here is a sneaky replacement to line 7 of PrimeFinder.py. If TestFactor does
not divide PrimeTest evenly, then the quotient is rounded off, and so the compari-
son will fail:
if ((PrimeTest/TestFactor)*TestFactor == PrimeTest)
Python uses the float class for floating-point (decimal) numbers. The float func-
tion transforms a value into a float:
>>> 8.0/3.02.6666666666666665>>> float(8)/float(3) # Give me the “real” quotient. 2.6666666666666665
4807-7 ch01.F 5/24/01 8:57 AM Page 7

8 Part I ✦ The Python Language
LoopingThe for statement sets up a loop — a block of code that is executed many times.
The function range(startnum,endnum) provides a list of integers starting with
startnum and ending just before endnum.
In the example, PrimeTest takes on each value in the range in order, and the outer
loop executes once for each value of PrimeTest. The inner loop iterates over the
“possible factors” of PrimeTest, starting at 2 and continuing until (PrimeTest-1).
Branching with if-statementsThe statement if expression: begins a control block that executes only if
expression is true. You can enclose the expression in parentheses. As far as
Python is concerned, the number 0 is false, and any other number is true.
Note that in a condition, we use the == operator to test for equality. The = operator
is used only for assignments, and assignments are forbidden within a condition.
(Here Python differs from C/C++, which allows assignments inside an if-condition,
even though they are usually a horrible mistake.)
In an if statement, an else-clause executes when the condition is not true. For
example:
if (MyNumber % 2 == 0):print “MyNumber is even!”
else:print “MyNumber is odd!”
Breaking and continuingThe break statement jumps out of a loop. It exits the innermost loop in the current
context. In Listing 1-1, the break statement exits the inner TestFactor loop, and
continues on line 11. The continue statement jumps to the next iteration of a loop.
Loops can also be set up using the while statement. The syntax while (expres-sion) sets up a control block that executes as long as expression is true. For
example:
# print out powers of 2 less than 2000X=2while (X<2000):
print XX=X*2
4807-7 ch01.F 5/24/01 8:57 AM Page 8

9Chapter 1 ✦ Python in an Hour
Lists and TuplesA list is an ordered collection of zero or more elements. An element of a list can be
any sort of object. You can write lists as a comma-separated collection of values
enclosed in square brackets. For example:
FibonacciList=[1,1,2,3,5,8]FishList=[1,2,”Fish”] # Lists can contain various types.AnotherList=[1,2,FishList] # Lists can include other lists.YetAnotherList=[1,2,3,] # Trailing commas are ok.RevengeOfTheList=[] # The empty list
TuplesA tuple is similar to a list. The difference is that a tuple is immutable — it cannot be
modified. You enclose tuples in parentheses instead of brackets. For example:
FirstTuple=(“spam”,”spam”,”bacon”,”spam”)SecondTuple=() # The empty tupleLonelyTuple=(5,) # Trailing comma is *required*, since (5) is
# just a number-in-parens, not a tuple.
Slicing and dicingLists are ordered, so each list element has an index. You can access an element with
the syntax listname[index]. Note that index numbering begins with zero:
>>> FoodList=[“Spam”,”Egg”,”Sausage”]>>> FoodList[0]‘Spam’>>> FoodList[2]‘Sausage’>>> FoodList[2]=”Spam” # Modifying list elements in place >>> FoodList[‘Spam’, ‘Egg’, ‘Spam’]
Sometimes it’s easier to count from the end of the list backwards. You can
access the last item of a list with listname[-1], the second-to-last item with
listname[-2], and so on.
You can access a sublist of a list via the syntax listname[start:end]. The sublist
contains the original list elements, starting with index start, up to (but not includ-
ing) index end. Both start and end are optional; omitting them makes Python go all
the way to the beginning (or end) of the list. For example:
>>>WordList=[“And”,”now”,”for”,”something”,”completely”,“different”]>>> WordList[0:2] # From index 0 to 2 (not including 2)[‘And’, ‘now’]
4807-7 ch01.F 5/24/01 8:57 AM Page 9

10 Part I ✦ The Python Language
>>> WordList[2:5][‘for’, ‘something’, ‘completely’]>>> WordList[:-1] # All except the last[‘And’, ‘now’, ‘for’, ‘something’, ‘completely’]
SubstringsLists, tuples, and strings are all sequence types. Sequence types all support indexed
access. So, taking a substring in Python is easy:
>>> Word=”pig”>>> PigLatinWord=Word[1:]+Word[0]+”ay”>>> PigLatinWord‘igpay’
Immutable typesTuples and strings are immutable types. Modifying them in place is not allowed:
FirstTuple[0]=”Egg” # Object does not support item assignment.
You can switch between tuples and lists using the tuple and list functions. So,
although you cannot edit a tuple directly, you can create a new-and-improved tuple:
>>> FoodTuple=(“Spam”,”Egg”,”Sausage”)>>> FoodList=list(FoodTuple)>>> FoodList[‘Spam’, ‘Egg’, ‘Sausage’]>>> FoodList[2]=”Spam”>>> NewFoodTuple=tuple(FoodList)>>> NewFoodTuple(‘Spam’, ‘Egg’, ‘Spam’)
DictionariesA dictionary is a Python object that cross-references keys to values. A key is an
immutable object, such as a string. A value can be any object. A dictionary has a
canonical string representation: a comma-separated list of key-value pairs, enclosed
in curly braces: {key:value, key:value}. For example:
>>> PhoneDict={“bob”:”555-1212”,”fred”:”555-3345”}>>> EmptyDict={} # Initialize a new dictionary.>>> PhoneDict[“bob”] # Find bob’s phone number.‘555-1212’>>> PhoneDict[“cindy”]=”867-5309” # Add an entry.>>> print “Phone list:”,PhoneDictPhone list: {‘fred’: ‘555-3345’, ‘bob’: ‘555-1212’, ‘cindy’:‘867-5309’}
4807-7 ch01.F 5/24/01 8:57 AM Page 10
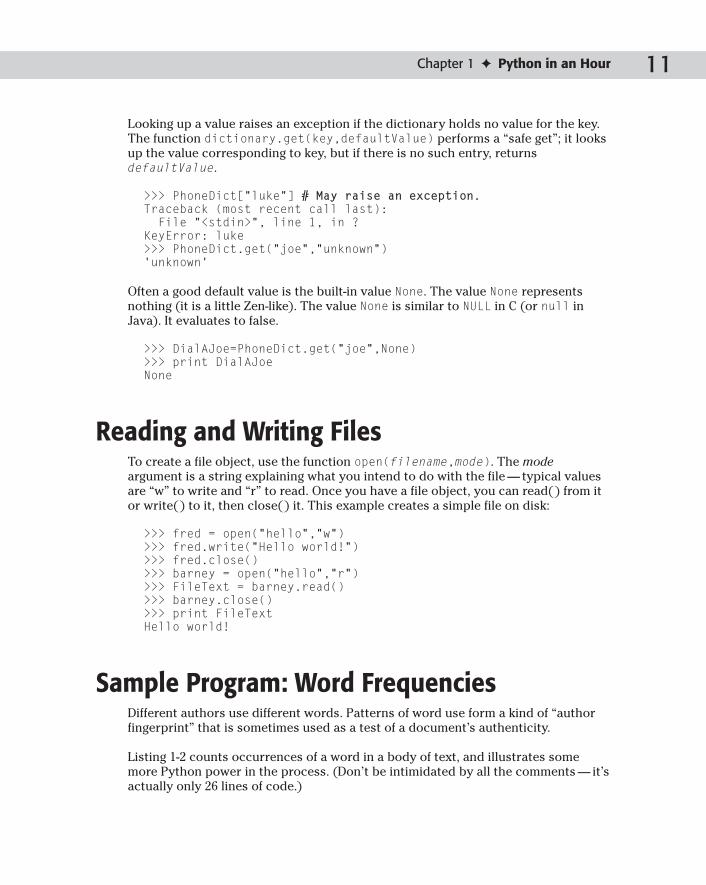
11Chapter 1 ✦ Python in an Hour
Looking up a value raises an exception if the dictionary holds no value for the key.
The function dictionary.get(key,defaultValue) performs a “safe get”; it looks
up the value corresponding to key, but if there is no such entry, returns
defaultValue.
>>> PhoneDict[“luke”] # May raise an exception.Traceback (most recent call last):File “<stdin>”, line 1, in ?
KeyError: luke>>> PhoneDict.get(“joe”,”unknown”)‘unknown’
Often a good default value is the built-in value None. The value None represents
nothing (it is a little Zen-like). The value None is similar to NULL in C (or null in
Java). It evaluates to false.
>>> DialAJoe=PhoneDict.get(“joe”,None)>>> print DialAJoeNone
Reading and Writing FilesTo create a file object, use the function open(filename,mode). The modeargument is a string explaining what you intend to do with the file — typical values
are “w” to write and “r” to read. Once you have a file object, you can read( ) from it
or write( ) to it, then close( ) it. This example creates a simple file on disk:
>>> fred = open(“hello”,”w”)>>> fred.write(“Hello world!”)>>> fred.close()>>> barney = open(“hello”,”r”)>>> FileText = barney.read()>>> barney.close()>>> print FileTextHello world!
Sample Program: Word FrequenciesDifferent authors use different words. Patterns of word use form a kind of “author
fingerprint” that is sometimes used as a test of a document’s authenticity.
Listing 1-2 counts occurrences of a word in a body of text, and illustrates some
more Python power in the process. (Don’t be intimidated by all the comments — it’s
actually only 26 lines of code.)
4807-7 ch01.F 5/24/01 8:57 AM Page 11

12 Part I ✦ The Python Language
Listing 1-2: WordCount.py
# Import the string module, so we can call Python’s standard# string-related functions.import string
def CountWords(Text):“Count how many times each word occurs in Text.” # A string immediately after a def statement is a # “docstring” - a comment intended for documentation.WordCount={}# We will build up (and return) a dictionary whose keys # are the words, and whose values are the corresponding # number of occurrences.
CurrentWord=””# To make the job cleaner, add a period at the end of the # text; that way, we are guaranteed to be finished with # the current word when we run out of letters:Text=Text+”.”
# We assume that ‘ and - don’t break words, but any other# nonalphabetic character does. This assumption isn’t # entirely accurate, but it’s close enough for us.# string.letters is a string of all alphabetic characters.PiecesOfWords = string.letters + “‘-”
# Iterate over each character in the text. The # function len () returns the length of a sequence, # such as a string:for CharacterIndex in range(0,len(Text)):
CurrentCharacter=Text[CharacterIndex]
# The find() method of a string finds# the starting index of the first occurrence of a # substring within a string, or returns –1# if it doesn’t find the substring. The next# line of code tests to see whether CurrentCharacter# is part of a word:if (PiecesOfWords.find(CurrentCharacter)!=-1):
# Append this letter to the current word.CurrentWord=CurrentWord+CurrentCharacter
else:# This character is not a letter. if (CurrentWord!=””):
# We just finished off a word.# Convert to lowercase, so “The” and “the”# fall in the same bucket.CurrentWord = string.lower(CurrentWord)
# Now increment this word’s count.CurrentCount=WordCount.get(CurrentWord,0)WordCount[CurrentWord]=CurrentCount+1
4807-7 ch01.F 5/24/01 8:57 AM Page 12

13Chapter 1 ✦ Python in an Hour
# Start a new word.CurrentWord=””
return (WordCount)
if (__name__==”__main__”):# Read the text from the file song.txt.TextFile=open(“poem.txt”,”r”)Text=TextFile.read()TextFile.close()
# Count the words in the text.WordCount=CountWords(Text)# Alphabetize the word list, and print them all out.SortedWords=WordCount.keys() SortedWords.sort()for Word in SortedWords:
print Word,WordCount[Word]
Listing 1-3: poem.txt
Shall I compare thee to a summer’s day?Thou art more lovely and more temperate:Rough winds do shake the darling buds of May,And summer’s lease hath all too short a date:Sometime too hot the eye of heaven shinesAnd often is his gold complexion dimmed;And every fair from fair sometimes declines,By chance or nature’s changing course untrimmed;But thy eternal summer shall not fade,Nor lose possession of that fair thou ow’st:Nor shall Death brag thou wander’st in his shade,When in eternal lines to time thou grow’st:So long as men can breathe, or eyes can see,So long lives this, and this gives life to thee.
Listing 1-4: WordCount output
all 1and 5art 1as 1brag 1[. . .omitted for brevity. . .]too 2untrimmed 1wander’st 1when 1winds 1
4807-7 ch01.F 5/24/01 8:57 AM Page 13

14 Part I ✦ The Python Language
Loading and Using ModulesPython comes with a collection of libraries to do all manner of useful things. To use
the functions, classes, and variables in another Python module, you must first
import that module with the statement import modulename. (Note: No parenthe-
ses.) After importing a module, you can access any of its members using the syntax
moduleName.itemName. For instance, this line (from the preceding example) calls
the function lower in the module string to convert a string to lowercase.
CurrentWord = string.lower(CurrentWord)
When you import a module, any code at module level (that is, code that isn’t part of
a function or class definition) executes. To set aside code to execute only when
someone runs your script from the command line, you can enclose it in an if(__name__==”__main__”) block, as in Listing 1-2 above.
As an alternative to “import foo,” you can use the syntax from foo importitemName to import a function or variable all the way into the current namespace.
For example, after you include the line from math import sqrt in a Python script,
you can call the square-root function sqrt directly, instead of calling math.sqrt.
You can even bring in everything from a module with from foo import *. However,
although this technique does save typing, it can become confusing — especially if
you import functions with the same name from several different modules!
Python does not enforce “privacy” in modules; you can call any of a module’sfunctions. It is generally a good idea to be polite and only call those you are sup-posed to.
Creating a ClassPython is an object-oriented language. In fact, every piece of Python data is an
object. Working with objects in Python is easy, as you will soon see.
Some quick object jargonA class is a mechanism for tying together data and behavior. An instance of a partic-
ular class is called an object. Class instances have certain methods (functions) and
attributes (data values). In Python, all data items behave like objects, even though a
few base types (like integers) are not actual instances of a class.
You can derive a class from a parent class; this relationship is called inheritance.
Instances of the child (derived) class have the same attributes and methods of the
parent class. The child class may add new methods and attributes, and override
methods of the parent. A class may be derived from more than one parent class;
this relationship is called multiple inheritance.
Note
4807-7 ch01.F 5/24/01 8:57 AM Page 14
15Chapter 1 ✦ Python in an Hour
Object-oriented programming (OOP) is a mindset that may take some getting used
to. When inheritance becomes natural, and you start talking about your data in
anthropomorphic terms, you will know that your journey to the OO side is com-
plete. See the References section for some resources that explain object-oriented
programming in detail.
Object orientation, Python styleYou define a new class with the syntax class ClassName. The control block
following the class statement is the class declaration; it generally consists of sev-
eral method definitions. You define a child class (using inheritance) via the syntax
class ClassName(ParentClass).
You create an object via the syntax NewObject = ClassName(). When you create
an object, Python calls its constructor, if any. In Python, a constructor is a member
function with the name __init__. A constructor may require extra parameters
to create an object. If so, you provide them when creating the object: NewObject =ClassName(param1,param2,...).
Every object method takes, as its first parameter, the argument self, which is a
reference to the object. (Python self is similar to this in C++/Java, but self is
always explicit.)
You do not explicitly declare attributes in Python. An object’s attributes are not
part of the local namespace — in other words, to access an object’s attribute foo in
one of its methods, you must type self.foo.
Keep off the grass — Accessing class membersAttributes and methods are all “public” — they are visible and available outside the
object. However, to preserve encapsulation, many classes have some attributes or
methods you should not access directly. The motivation for this is that an object
should be something of a “black box” — code outside the object should only care
what it does, not how it does it. This helps keep code easy-to-maintain, especially in
big programs.
Example: the point classListing 1-5 defines a class representing a point in the plane (or on a computer
screen):
4807-7 ch01.F 5/24/01 8:57 AM Page 15

16 Part I ✦ The Python Language
Listing 1-5: Point.py
import math# The next statement starts our class declaration; the# function declarations inside the indented control block are # the class’s methods.class Point:
# The method __init__ is the class’s constructor. It# executes when you create an instance of the class.# When __init__ takes extra parameters (as it does here),# you must supply parameter values in order to create an # instance of the class. Writing an __init__ method is # optional.def __init__(self,X,Y):
# X and Y are the attributes of this class. You do not# have to declare attributes. I like to initialize# all my attributes in the constructor, to ensure that # the attributes will be available when I need them.self.X=Xself.Y=Y
def DistanceToPoint(self, OtherPoint):“Returns the distance from this point to another”SumOfSquares = ((self.X-OtherPoint.X)**2) +\((self.Y-OtherPoint.Y)**2)return math.sqrt(SumOfSquares)
def IsInsideCircle(self, Center, Radius):“””Return 1 if this point is inside the circle,
0 otherwise”””if (self.DistanceToPoint(Center)<Radius):
return 1else:
return 0
# This code tests the point class.PointA=Point(3,5) # Create a point with coordinates (3,5)PointB=Point(-4,-4)
# How far is it from point A to point B?print “A to B:”,PointA.DistanceToPoint(PointB)
# What if I go backwards?print “B to A:”,PointB.DistanceToPoint(PointA)
# Who lives inside the circle of radius 5 centered at (3,3)?CircleCenter=Point(3,3)print “A in circle:”,PointA.IsInsideCircle(CircleCenter,5)print “B in circle:”,PointB.IsInsideCircle(CircleCenter,5)
4807-7 ch01.F 5/24/01 8:57 AM Page 16

17Chapter 1 ✦ Python in an Hour
Recommended ReadingIf you are new to computer programming, you may find this tutorial useful:
http://www.honors.montana.edu/~jjc/easytut/easytut/.
To learn all about the language on one (large!) page, see the Python Quick
Reference at http://starship.python.net/quick-ref1_52.html.
If you like to learn by tinkering with finished programs, you can download a
wide variety of source code at the Vaults of Parnassus: http://www.vex.net/parnassus/.
SummaryThis wraps up our quick tour of Python. We hope you enjoyed the trip. You now
know most of Python’s notable features. In this chapter, you:
✦ Ran the Python interpreter for easy interaction.
✦ Grouped statements by indentation level.
✦ Wrote functions to count words in a body of text.
✦ Created a handy Point class.
The next chapter digs a little deeper and introduces all of Python’s standard types
and operators.
✦ ✦ ✦
4807-7 ch01.F 5/24/01 8:57 AM Page 17

4807-7 ch01.F 5/24/01 8:57 AM Page 18
Identifiers,Variables, andNumeric Types
One of the simplest forms of data on which your pro-
grams operate is numbers. This chapter introduces the
numeric data types in Python, such as integers and floating
point numbers, and shows you how to use them together in
simple operations like assignment to variables.
As with Chapter 1, you’ll find it helpful to have a Python inter-
preter up and running as you read this and the following chap-
ters. Playing around with the examples in each section will
pique your curiosity and help keep Python’s features firmly
rooted in your brain.
Identifiers and OperatorsVariable names and other identifiers in Python are similar to
those in many other languages: they start with a letter (A–Z or
a–z) or an underscore (“_”) and are followed by any number
of letters, numbers, and underscores. Their length is limited
only by your eagerness to type, and they are case-sensitive
(that is, spam and Spam are different identifiers). Regardless of
length, choose identifiers that are meaningful. (Having said
that, I’ll break that rule for the sake of conciseness in many of
the examples in this chapter.)
The following are some examples of valid and invalid identifiers:
wordCounty_axiserrorField2_logFile_2 # Technically valid, but not agood idea
22C H A P T E R
✦ ✦ ✦ ✦
In This Chapter
Identifiers andoperators
Numeric types
Assigning values tovariables
✦ ✦ ✦ ✦
4807-7 ch02.F 5/24/01 8:57 AM Page 19

20 Part I ✦ The Python Language
7Index # Invalid, starts with a numberwon’t_work # Invalid due to apostrophe character
Python considers these forms to have special meaning:
_name— Not imported by “from x import *” (see Chapter 6)
__name__— System name (see Chapter 6)
__name— Private class member (see Chapter 7)
When you’re running the Python interpreter in interactive mode, a single underscore
character (_) is a special identifier that holds the result of the last expression evalu-
ated. This is especially handy when you’re using Python as a desktop calculator:
>>> “Hello”‘Hello’>>> _‘Hello’>>> 5 + 27>>> _ * 214>>> _ + 519>>>
Reserved wordsAlthough it would make for some interesting source code, you can’t use the follow-
ing words as identifiers because they are reserved words in the Python language:
and del for is raise assert elif from lambda return break else global not try class except if or while continue exec import pass def finally in print
OperatorsPython has the following operators, each of which we’ll discuss in context with the
applicable data types they operate on:
- != % & * ** / ^ | ~ + < << <= <> == > >= >>
Note
4807-7 ch02.F 5/24/01 8:57 AM Page 20

21Chapter 2 ✦ Identifiers, Variables, and Numeric Types
Numeric TypesPython has four built-in numeric data types: integers, long integers, floating point
numbers, and imaginary numbers.
IntegersIntegers are whole numbers in the range of -2147483648 to 2147483647 (that is, they
are signed, 32-bit numbers).
For convenience, the sys module has a maxint member that holds the maxi-mum positive value of an integer variable:
>>> import sys>>> sys.maxint2147483647
In addition to writing integers in the default decimal (base 10) notation, you can
also write integer literals in hexadecimal (base 16) and octal (base 8) notation by
preceding the number with a 0x or 0, respectively:
>>> 300 # 300 in decimal300>>> 0x12c # 300 in hex300>>> 0454 # 300 in octal300
Keep in mind that for decimal numbers, valid digits are 0 through 9. For hexa-
decimal, it’s 0 through 9 and A through F, and for octal it’s 0 through 7. If you’re not
familiar with hexadecimal and octal numbering systems, or if you are but they don’t
thrill you, just nod your head and keep moving.
Long integersLong integers are similar to integers, except that the maximum and minimum val-
ues of long integers are restricted only by how much memory you have (yes, you
really can have long integers with thousands of digits). To differentiate between the
two types of integers, you append an “L” to the end of long integers:
>>> 200L # A long integer literal with a value of 200200L
>>> 11223344 * 55667788 # Too big for normal integers...Traceback (innermost last):File “<interactive input>”, line 1, in ?
OverflowError: integer multiplication
>>> 11223344L * 55667788L # ...but works with long integers624778734443072L
Tip
4807-7 ch02.F 5/24/01 8:57 AM Page 21

22 Part I ✦ The Python Language
The “L” on long integers can be uppercase or lowercase, but do yourself a favorand always use the uppercase version. The lowercase “L” and the one digit looktoo similar, especially if you are tired, behind schedule on a project, or both.
Floating point numbersFloating point numbers let you express fractional numeric values such as 3.14159.
You can also include an optional exponent. If you include neither an exponent nor a
decimal point, Python interprets the number as an integer, so to express “the float-
ing point number two hundred,” write it as 200.0 and not just 200. Here are a few
examples of floating point numbers:
200.059.80665.120005e-26.0221367E23
Occasionally you may notice what appear to be rounding errors in how Pythondisplays floating point numbers:
>>> 0.30.29999999999999999
Don’t worry; this display is not indicating a bug, but is just a friendly reminder thatyour digital computer just approximates real world numbers. See “Formattingstrings” in Chapter 3 to learn about printing numbers in a less ugly format.
The valid values for floating point numbers and the accuracy with which Python
uses them is implementation-dependent, although it is at least 64-bit, double-
precision math and is often IEEE 754 compliant.
Imaginary numbersUnlike many other languages, Python has language-level support for imaginary
numbers, making it trivial to use them in your programs. You form an imaginary
number by appending a “j” to a decimal number (integer or floating point):
3j2.5e-3j
When you add a real and an imaginary number together, Python recognizes the
result as a complex number and handles it accordingly:
>>> 2 + 5j(2+5j)>>> 2 * (2 + 5j)(4+10j)
Note
Tip
4807-7 ch02.F 5/24/01 8:57 AM Page 22

23Chapter 2 ✦ Identifiers, Variables, and Numeric Types
Manipulating numeric typesYou can use most of Python’s operators when working with numeric data types.
Numeric operatorsTable 2-1 lists operators and how they behave with numeric types.
Table 2-1Operations on Numeric Types
Operator Description Example Input Example Output
Unary Operations
+ Plus +2 2
- Minus -2 2
-(-2) 2
~ Inversion1 ~5 6
Binary Operations
+ Addition 5 + 7 12
5 + 7.0 12.0
- Subtraction 5 – 2 3
5 – 2.0 3.0
* Multiplication 2.5 * 2 5.0
/ Division 5 / 2 2
5 / 2.0 2.5
% Modulo (remainder) 5 % 2 1
7.5 % 2.5 0.0
** Power 5 ** 2 25
1.2 ** 2.1 1.466...
Binary Bitwise Operations2
& AND 5 & 2 0
11 & 3 3
| OR 5 | 2 7
11 | 3 11
^ XOR (exclusive-or) 5 ^ 2 7
11 ^ 3 8
Continued
4807-7 ch02.F 5/24/01 8:57 AM Page 23

24 Part I ✦ The Python Language
Table 2-1 (continued)
Operator Description Example Input Example Output
Shifting Operations2
<< Left bit-shift 5 << 2 20
>> Right bit-shift 50 >> 3 6
1 Unary bitwise inversion of a number x is defined as –(x+1).
2 Numbers used in binary bitwise and shifting operations must be integers or long integers.
It is important to notice what happens when you mix standard numeric types
(adding an integer and a floating point number, for example). If needed, Python first
coerces (converts) either of the numbers according to these rules (stopping as
soon as a rule is satisfied):
1. If one of the numbers is a complex number, convert the other to a complex
number too.
2. If one of the numbers is a floating point number, convert the other to floating
point.
3. If one of the numbers is a long integer, convert the other to a long integer.
4. No previous rule applies, so both are integers, and Python leaves them
unchanged.
Other functionsPython has a few other built-in functions for working with numeric types, as
described in the following sections.
Absolute value — absThe abs(x) function takes the absolute value of any integer, long integer, or floating
point number:
>>> abs(-5.0)5.0>>> abs(-20L)20L
When applied to a complex number, this function returns the magnitude of the num-
ber, which is the distance from that point to the origin in the complex plane. Python
calculates the magnitude just like the length of a line in two dimensions: for a com-
plex number (a + bj), the magnitude is the square root of a squared plus bsquared:
>>> abs(5 - 2j)5.3851648071345037
4807-7 ch02.F 5/24/01 8:57 AM Page 24

25Chapter 2 ✦ Identifiers, Variables, and Numeric Types
Convert two numbers to a common type — coerce(x, y)The coerce function applies the previously explained numeric conversion rules to
two numbers and returns them to you as a tuple (we cover tuples in detail in the
next chapter):
>>> coerce(5,2L)(5L, 2L)>>> coerce(5.5,2L)(5.5, 2.0)>>> coerce(5.5,5 + 2j)((5.5+0j), (5+2j))
Quotient and remainder — divmod(a, b)This function performs long division on two numbers and returns the quotient and
the remainder:
>>> divmod(5,2)(2, 1)>>> divmod(5.5,2)(2.0, 1.5)
Power — pow(x, y [, z]) The pow function is similar to the power (**) operator in Table 2-1:
>>> pow(5,2)25>>> pow(1.2,2.1)1.4664951016517147
As usual, Python coerces the two numbers to a common type if needed. If the
resulting type can’t express the correct result, Python yells at you:
>>> pow(2.0,-1) # The coerced type is a floating point.0.5>>> pow(2,-1) # The coerced type is an integer.Traceback (innermost last):File “<interactive input>”, line 1, in ?
ValueError: integer to the negative power
An optional third argument to pow specifies the modulo operation to perform on
the result:
>>> pow(2,5)32>>> pow(2,5,10)2>>> (2 **5) % 102
4807-7 ch02.F 5/24/01 8:57 AM Page 25

26 Part I ✦ The Python Language
The result is the same as using the power and modulo operators, but Python
arrives at the result more efficiently. (Speedy power-and-modulo is useful in some
types of cryptography.)
Round — round(x [, n])This function rounds a floating point number x to the nearest whole number.
Optionally, you can tell it to round to n digits after the decimal point:
>>> round(5.567)6.0>>> round(5.567,2)5.57
Chapter 31, “Number Crunching,” covers several Python modules that deal withmath and numerical data types.
Assigning Values to VariablesWith basic numeric types out of the way, we can take a break before moving on to
other data types, and talk about variables and assignment statements. Python cre-
ates variables the first time you use them (you never need to explicitly declare
them beforehand), and automatically cleans up the data they reference when they
are no longer needed.
Refer back to “Identifiers and Operators” at the beginning of this chapter for the
rules regarding valid variable names.
Simple assignment statementsThe simplest form of assignment statements in Python are of the form variable = value:
>>> a = 5>>> b = 10>>> a5>>> b10>>> a + b15>>> a > b0
“Understanding References” in Chapter 4 goes into more depth about how andwhen Python destroys unneeded data, and “Taking Out the Trash” in Chapter 26covers the Python garbage collector.
Cross-Reference
Cross-Reference
4807-7 ch02.F 5/24/01 8:57 AM Page 26

27Chapter 2 ✦ Identifiers, Variables, and Numeric Types
A Python variable doesn’t actually contain a piece of data but merely references a
piece of data. The details and importance of this are covered in Chapter 4, but for
now it’s just important to note that the type of data that a variable refers to can
change at any time:
>>> a = 10>>> a # First it refers to an integer.10>>> a = 5.0 + 2j>>> a # Now it refers to a complex number.(5+2j)
Multiple assignmentPython provides a great shorthand method of assigning values to multiple variables
at the same time:
>>> a,b,c = 5.5,2,10>>> a5.5>>> b2>>> c10
You can also use multiple assignment to swap any number of variables. Continuing
the previous example:
>>> a,b,c = c,a,b>>> a10>>> b5.5>>> c2
Multiple assignment is really tuple packing and unpacking, covered in Chapter 4.
Augmented assignmentAnother shorthand feature is augmented assignment, which enables you to combine
an assignment and a binary operation into a single statement:
>>> a = 10>>> a += 5>>> a15
Cross-Reference
4807-7 ch02.F 5/24/01 8:57 AM Page 27

28 Part I ✦ The Python Language
Augmented assignment was introduced in Python 2.0.
Python provides these augmented assignment operators:
+= -= *= /= %= **=>>= <<= &= |= ^=
The statement a += 5 is nearly identical to the longer form of a = a + 5 with two
exceptions (neither of which you need to worry about too often, but are worth
knowing):
1. In augmented assignment, Python evaluates a only once instead of the two
times in the longhand version.
2. When possible, augmented assignment modifies the original object instead of
creating a new object. In the longhand example above, Python evaluates the
expression a + 5, creates a place in memory to hold the result, and then re-
assigns a to reference the new data. With augmented assignment, however,
Python places the result in the original object.
SummaryPython has several built-in data types and many features to help you work with
them. In this chapter you:
✦ Learned the rules for valid Python variable names and other identifiers.
✦ Created variables using integer, floating point, and other numerical data.
✦ Used augmented assignment statements to combine basic operations such as
addition with assignment.
In the next chapter you discover how to use expressions to compare data and you
learn how character strings work in Python.
✦ ✦ ✦
NewFeature
4807-7 ch02.F 5/24/01 8:57 AM Page 28

Expressions and Strings
Character strings can hold messages for users to read
(a la “Hello, world!”), but in Python they can also hold a
sequence of binary data. This chapter covers how you use
strings in your programs, and how you can convert between
strings, numbers, and other Python data types.
Before you leave this chapter, you’ll also have a solid grasp of
expressions and how your programs can use them to make
decisions and compare data.
ExpressionsExpressions are the core building blocks of decision making in
Python and other programming languages, and Python evalu-
ates each expression to see if it is true or false.
The most basic form of a Python expression is any value: if
the value is nonzero, it is considered to be “true,” and if it
equals 0, it is considered to be “false.”
Chapter 4 goes on to explain that Python also considersany nonempty and non-None objects to be true.
More common, however, is the comparison of two or more
values with some sort of operator:
>>> 12 > 5 # This expression is true.1>>> 2 < 1 # This expression is false.0
Comparing numeric typesPython supplies a standard set of operators for comparing
numerical data types. Table 3-1 lists these comparison opera-
tors with examples.
Cross-Reference
33C H A P T E R
✦ ✦ ✦ ✦
In This Chapter
Expressions
Strings
Converting betweensimple types
✦ ✦ ✦ ✦
4807-7 ch03.F 5/24/01 8:57 AM Page 29

30 Part I ✦ The Python Language
Table 3-1Comparison Operators
Operator Description Sample Input Sample Output
< Less than 10 < 5 0
> Greater than 10 > 5 1
<= Less than or equal 3 <= 5 1
3 <= 3 1
>= Greater than or equal 3 >= 5 0
== Equality 3 == 3 1
3 == 5 0
!= Inequality* 3 != 5 1
* Python also supports an outdated inequality operator: <>. It may not be supported in the future.
Before comparing two numbers, Python applies the usual coercion rules if
necessary.
A comparison between two complex numbers involves only the real part of each
number if they are different. Only if the real parts of both are the same does the
comparison depend on the imaginary part:
>>> 3 + 10j < 2 + 1000j0>>> 3 + 10j < 3 + 1000j1
Python doesn’t restrict you to just two operands in a comparison; for example, you
can use the common a < b < c notation common in mathematics:
>>> a,b,c = 10,20,30>>> a < b < c# True because 10 < 20 and 20 < 30
Note that a < b < c is the same as comparing a < b and then comparing b < c, except
that b is evaluated only once (besides being nifty, this could really make a differ-
ence if evaluating b required a lot of processing time).
Expressions like a < b > c are legal but discouraged, because to the casual observer
(for example, you, late at night, searching for a bug in your code) they appear to
imply a comparison or relationship between a and c, which is not really the case.
Python has three additional functions that you can use when comparing data:
4807-7 ch03.F 5/24/01 8:57 AM Page 30

31Chapter 3 ✦ Expressions and Strings
min (x[, y,z,...])The min function takes two or more arguments of any type and returns the smallest:
>>> min(10,20.5,5,100L)5
max (x[, y,z,...])Similarly, max chooses the largest of the arguments passed in:
>>> max(10,20.5,5,100L)100L
Both min and max can accept a sequence as an argument (See Chapter 4 for infor-
mation on lists and tuples.):
>>> Ages=[42,37,26]>>> min(Ages)26
cmp (x,y)The comparison function takes two arguments and returns a negative number, 0, or
a positive number if the first argument is less than, equal to, or greater than the
second:
>>> cmp(2,5)-1>>> cmp(5,5.0)0>>> cmp(5,2)1
Do not rely on the values being strictly 1, -1, or 0, especially when calling cmp with
other data types (for example, strings).
Compound expressionsA compound expression combines simple expressions using the Boolean operators
and, or, and not. Python treats Boolean operators slightly differently than many
other languages do.
andWhen evaluating the expression a and b, Python evaluates a to see if it is false, and
if so, the entire expression takes on the value of a. If a is true, Python evaluates band the entire expression takes on the value of b. There are two important points
here. First, the expression does not evaluate to just true or false (0 or 1):
4807-7 ch03.F 5/24/01 8:57 AM Page 31

32 Part I ✦ The Python Language
>>> a,b = 10,20>>> a and b # a is true, so evaluate b20>>> a,b = 0,5>>> a and b0
Second, if a (the first expression) evaluates to false, then Python never bothers to
evaluate b (the second expression):
>>> 0 and 2/0 # Doesn’t cause division by zero error0
orWith the expression a or b, Python evaluates a to see if it is true, and if so, the
entire expression takes on the value of a. When a is false, the expression takes on
the value of b:
>>> a,b = 10,20>>> a or b10>>> a,b = 0,5>>> a or b5
Similar to the and operator, the expression takes on the value of either a or binstead of just 0 or 1, and Python evaluates b only if a is false.
notFinally, not inverts the “truthfulness” of an expression: if the expression evaluates
to true, not returns false, and vice versa:
>>> not 50>>> not 01>>> not (0 > 2)1
Unlike the and and or operators, not always returns a value of 0 or 1.
Complex expressionsYou can form arbitrarily complex expressions by grouping any number of expres-
sions together using parentheses and Boolean operators. For example, if you just
can’t seem to remember if a number is one of the first few prime numbers, this
expression will bail you out:
4807-7 ch03.F 5/24/01 8:57 AM Page 32

33Chapter 3 ✦ Expressions and Strings
>>> i = 5>>> (i == 2) or (i % 2 != 0 and 0 < i < 9)1>>> i = 2>>> (i == 2) or (i % 2 != 0 and 0 < i < 9)1>>> i = 4>>> (i == 2) or (i % 2 != 0 and 0 < i < 9)0
If the number is 2, the first sub-expression (i == 2) evaluates to true and Python
stops processing the expression and returns 1 for true. Otherwise, two remaining
conditions must be met for the expression to evaluate to true. The number must
not be evenly divisible by 2, and it must be between 0 and 9 (hey, I said the first fewprimes, remember?).
Parentheses let you explicitly control the order of what gets evaluated first. Without
parentheses, the order of evaluation may be unclear and different than what you
expect (and a great source of bugs):
>>> 4 or 1 * 24
A well-placed pair of parentheses clears up any ambiguity:
>>> (4 or 1) * 28
Operator precedencePython uses the ordering in Table 3-2 to guide the evaluation of complex expres-
sions. Expressions using operators higher up in the table get evaluated before
those towards the bottom of the table. Operators on the same line of the table have
equal priority or precedence. Python evaluates operators with the same prece-
dence from left to right.
Table 3-2Operator Precedence (from lowest to highest)
Operators Description
`x` String conversion
{key:datum, ...} Dictionary
[x,y,...] List
(x,y,...) Tuple
Continued
4807-7 ch03.F 5/24/01 8:58 AM Page 33

34 Part I ✦ The Python Language
Table 3-2 (continued)
Operators Description
f(x,y,...) Function call
x[j:k] Slice
x[j] Subscription
x.attribute Attribute reference
~x Bitwise negation (inversion)
+x, -x Plus, minus
** Power
*, /, % Multiply, divide, modulo
+, - Add, subtract
<<, >> Shifting
& Bitwise AND
^ Bitwise XOR
| Bitwise OR
<, <=, ==, !=, >=, > Comparisons
is, is not Identity
in, not in Membership
not x Boolean NOT
and Boolean AND
or Boolean OR
lambda Lambda expression
See Chapters 4 through 7 for more information on operators and data types suchas lists and tuples that we have not yet covered.
StringsA string is Python’s data type for holding not only text but also “non-printable” or
binary data. If you’ve done much work with strings in languages like C or C++, pre-
pare to be liberated from mundane memory management tasks as well as a plethora
of bugs lying in wait. Strings in Python were not added as an afterthought or tacked
on via a third party library, but are part of the core language itself, and it shows!
Cross-Reference
4807-7 ch03.F 5/24/01 8:58 AM Page 34

35Chapter 3 ✦ Expressions and Strings
String literalsA string literal is a sequence of characters enclosed by a matching pair of single or
double quotes:
“Do you like green eggs and ham?”‘Amu vian najbaron’“Tuesday’ # Illegal: quotes do not match.
Which of the two you use is more of a personal preference (in some nerdy way I
find single-quoted strings more sexy and “cool”), but sometimes the text of the
string makes one or the other more convenient:
‘Quoth the Raven, _Nevermore._ ‘_Monty Python’s Flying Circus__Enter your age (I’ll know if you’re lying, so don’t): _
Python automatically joins two or more string literals separated only by whitespace:
>>> “one” ‘two’ “three”‘onetwothree’
A single backslash character inside a string literal lets you break a string across
multiple lines:
>>> ‘Rubber baby \... buggy bumpers’‘Rubber baby buggy bumpers’
If your string of text covers several lines and you want Python to preserve the exact
formatting you used when typing it in, use triple-quoted strings (the string begins
with three single or double quotes and ends with three more of the same type of
quote). An example:
>>> s = “”””Knock knock.”... “Who’s there?”... “Knock knock.”... “Who’s there?”... “Knock knock.”... “Who’s there?”... “Philip Glass.”... “””>>> print s“Knock knock.”“Who’s there?”“Knock knock.”“Who’s there?”“Knock knock.”“Who’s there?”“Philip Glass.”
4807-7 ch03.F 5/24/01 8:58 AM Page 35

36 Part I ✦ The Python Language
String lengthRegardless of the quoting method you use, string literals can be of any length. You
can use the len(x) function to retrieve the length of a string:
>>> len(‘Pokey’)5>>> s = ‘Data:\x00\x01’>>> len(s)7
Escape sequencesYou can also use escape sequences to include quotes or other characters inside a
string (see Table 3-3):
>>> print “\”Never!\” shouted Skeptopotamus.”“Never!” shouted Skeptopotamus.
Table 3-3Escape Sequences
Sequence Description
\n Newline (ASCII LF)
\’ Single quote
\” Double quote
\\ Backslash
\t Tab (ASCII TAB)
\b Backspace (ASCII BS)
\r Carriage return (ASCII CR)
\xhh Character with ASCII value hh in hex
\ooo Character with ASCII value ooo in octal
\f Form feed (ASCII FF)*
\a Bell (ASCII BEL)
\v Vertical tab (ASCII VT)
* Not all output devices support all ASCII codes. You won’t use \v very often, for example.
Table 3-3 lists the valid escape sequences. If you try to use an invalid escape
sequence, Python leaves both the backslash and the character after it in the string:
>>> print ‘Time \z for foosball!’Time \z for foosball!
4807-7 ch03.F 5/24/01 8:58 AM Page 36

37Chapter 3 ✦ Expressions and Strings
As shown in Table 3-3, you can specify the characters of a string using their ASCII
value:
>>> ‘\x50\x79\x74\x68\x6f\x6e’‘Python’
See “Converting Between Simple Types” later in this chapter for more on the ASCIIcodes for characters.
The values can be in the range of 0 to 255 (the values that a single byte can have).
Remember: a string in Python doesn’t have to be printable text. A string could hold
the raw data of an image file, a binary message received over a network, or any-
thing else.
Raw stringsOne final way to specify string literals is with raw strings, in which backslashes can
still be used as escape characters, but Python leaves them in the string. You flag a
string as a raw string with an r prefix. For example, on Windows systems the path
separator character is a backslash, so to use it in a string you’d normally have to
type ‘\\’ (the escape sequence for the backslash). Alternatively, you could use a
raw string:
>>> s = r”c:\games\half-life\hl.exe”>>> s‘c:\\games\\half-life\\hl.exe’>>> print sc:\games\half-life\hl.exe
The os.path module provides easy, cross-platform path manipulation. SeeChapter 10 for details.
Manipulating stringsYou can use the plus and multiply operators to build strings. The plus operator
concatenates strings together:
>>> a = ‘ha ‘>>> a + a + a‘ha ha ha ‘
The multiply operator repeats a string:
>>> ‘=’ * 10‘==========’
Cross-Reference
Cross-Reference
4807-7 ch03.F 5/24/01 8:58 AM Page 37

38 Part I ✦ The Python Language
Note that operator precedence rules apply, as always:
>>> ‘Wh’ + ‘e’ * 10 +’!’‘Wheeeeeeeeee!’
Augmented assignment works as well:
>>> a = ‘Ah’>>> a += ‘ Hah! ‘>>> a‘Ah Hah! ‘>>> a *= 2>>> a‘Ah Hah! Ah Hah! ‘
Accessing individual characters and substringsBecause strings are sequences of characters, you can use on them the same opera-
tors that are common to all of Python’s sequence types, among them, subscriptionand slice.
See Chapter 4 for a discussion of Python sequence types.
Subscription lets you use an index number to retrieve a single character from a
Python string, with 0 being the first character:
>>> s = ‘Python’>>> s[1]‘y’
Additionally, you can reference characters from the end of the string using negative
numbers. An index of -1 means the last character, -2 the next to last, and so on:
>>> ‘Hello’[-1]‘o’>>> ‘Hello’[-5]‘H’
Python strings are immutable, which means you can’t directly change them or indi-
vidual characters (you can, of course, assign the same variable to a new string):
>>> s = ‘Bad’>>> s[2] = ‘c’ # Can’t modify the string valueTraceback (innermost last):File “<interactive input>”, line 1, in ?
TypeError: object doesn’t support item assignment>>> s = ‘Good’ # Can reassign the variable
Cross-Reference
4807-7 ch03.F 5/24/01 8:58 AM Page 38

39Chapter 3 ✦ Expressions and Strings
Slicing is similar to subscription except that with it you can retrieve entire sub-
strings instead of single characters. The operator takes two arguments for the
lower and upper bounds of the slice:
>>> ‘Monty’[2:4]‘nt’
It’s important to understand that the bounds are not referring to character indices
(as with subscription), but really refer to the spots between characters:
M o n t y| | | | | |0 1 2 3 4 5
So the slice of 2:4 is like telling Python, “Give me everything from the right of 2 and
to the left of 4,” which is the substring “nt”.
The lower and upper bounds of a slice are optional. If omitted, Python sticks in the
beginning or ending bound of the string for you:
>>> s = ‘Monty’>>> s[:2]‘Mo’>>> s[2:]‘nty’>>> s[:]‘Monty’
Don’t forget: Python doesn’t care if you use negative numbers as bounds for the
offset from the end of the string. Continuing the previous example:
>>> s[1:-1]‘ont’>>> s[-3:-1]‘nt’
Strings Are Objects
Python strings are actually objects with many built-in methods:
>>> s = ‘Dyn-o-mite!’>>> s.upper()‘DYN-O-MITE!’>>> ‘ text ‘.strip()‘text’
Refer to Chapter 9 for a discussion of all the String methods and how to use them.
4807-7 ch03.F 5/24/01 8:58 AM Page 39

40 Part I ✦ The Python Language
You can also access each character via tuple unpacking. This feature isn’t used as
often because you have to use exactly the same number of variables as characters
in the string:
>>> a,b,c = ‘YES’>>> print a, b, cY E S
Python does not have a separate ‘character’ data type; a character is just a string oflength 1.
Formatting stringsThe modulo operator (%) has special behavior when used with strings. You can use
it like the C printf function for formatting data:
>>> “It’s %d past %d, %s!” % (7,9,”Fred”)“It’s 7 past 9, Fred!”
Python scans the string for conversion specifiers and replaces them with values
from the list you supply. Table 3-4 lists the different characters you can use in a
conversion and what they do; those in bold are more commonly useful.
Table 3-4String Formatting Characters
Character Description
d or I Decimal (base 10) integer
f Floating point number
s String or any object
c Single character
u Unsigned decimal integer
X or x Hexadecimal integer (upper or lower case)
o Octal integer
e or E Floating point number in exponential form
g or G Like %f unless exponent < -4 or greater than theprecision. If so, acts like %e or %E
r repr() version of the object*
% Use %% to print the percentage character.
* %s prints the str() version, %r prints the repr() version. See “Converting Between Simple Types” in this chapter.
Note
4807-7 ch03.F 5/24/01 8:58 AM Page 40

41Chapter 3 ✦ Expressions and Strings
Here are a few more examples:
>>> ‘%x %X’ % (57005,48879)‘dead BEEF’>>> pi = 3.14159>>> ‘%f %E %G’ % (pi,pi,pi)‘3.141590 3.141590E+000 3.14159’>>> print ‘%s %r’ % (‘Hello’,’Hello’)Hello ‘Hello’
Beyond these features, Python has several other options, some of which are
holdovers from C. Between the % character and the conversion character you
choose, you can have any combination of the following (in this order):
Key nameInstead of a tuple, you can provide a dictionary of values to use (dictionaries are
covered in Chapter 4). Place the key names (enclosed in parentheses) between the
percent sign and the type code in the format string. This one is best explained with
an example (although fans of Mad-Libs will be at home):
>>> d = {‘name’:’Sam’, ‘num’:32, ‘amt’:10.12}>>> ‘%(name)s is %(num)d years old. %(name)s has $%(amt).2f’ %d‘Sam is 32 years old. Sam has $10.12’
- or 0A minus indicates that numbers should be left justified, and a 0 tells Python to pad
the number with leading zeros. (This won’t have much effect unless used with the
minimum field modifier, explained below.)
+A plus indicates that the number should always display its sign, even if the number
is positive:
>>> ‘%+d %+d’ % (5,-5)‘+5 -5’
Minimum field width numberA number indicates the minimum field this value should take up. If printing the
value takes up less space, Python adds padding (either spaces or zeros, see above)
to make up the difference:
>>> ‘%5d’ % 2 # Don’t need () if there’s only one value‘ 2’>>> ‘%-5d, %05d’ % (2,2)‘2 , 00002’
4807-7 ch03.F 5/24/01 8:58 AM Page 41

42 Part I ✦ The Python Language
Additional precision-ish numberThis final number is a period character followed by a number. For a string, the
number is the maximum number of characters to print. For a floating-point number,
it’s the number of digits to print after the decimal point, and for integers it’s the
minimum number of digits to print. Got all that?
>>> ‘%.3s’ % ‘Python’‘Pyt’>>> ‘%05.3f’ % 3.5‘3.500’>>> ‘%-8.5d’ % 10‘00010 ‘
Last but not least, you can use an asterisk in place of any number in a width field. If
you supply an asterisk, you also provide a list of values (instead of a single num-
ber). Python looks in the list of values for that width value:
>>> ‘%*.*f’ % (6,3,1.41421356)‘ 1.414’
Comparing stringsString comparison works much the same way numeric comparison does by using
the standard comparison operators (<, <=, !=, ==, >=, >). The comparison is
lexicographic (‘A’ < ‘B’) and case-sensitive:
>>> ‘Fortran’ > ‘Pascal’0>>> ‘Perl’ < ‘Python’1
For a string in an expression, Python evaluates any nonempty string to true, and an
empty string to false:
>>> ‘OK’ and 55>>> not ‘fun’0>>> not ‘’1
This behavior provides a useful idiom for using a default value if a string is empty.
For example, suppose that the variable s in the following example came from user
input instead of you supplying the value. If the user chose something, name holds
its value; otherwise name holds the default value of ‘index.html’.
>>> s = ‘’; name = s or ‘index.html’>>> name‘index.html’
4807-7 ch03.F 5/24/01 8:58 AM Page 42

43Chapter 3 ✦ Expressions and Strings
>>> s = ‘page.html’; name = s or ‘index.html’>>> name‘page.html’
You can use the min, max, and cmp functions on strings:
>>> min(‘abstract’) # Find the least character in the string.‘a’>>> max(‘i’,’love’,’spam’) # Find the greatest string.‘spam’>>> cmp(‘Vader’,’Maul’) # Vader is greater.9
Strings (and other sequence types) also have the in (and not in) operator, which
tests if a character is a member of a string:
>>> ‘u’ in ‘there?’0>>> ‘i’ not in ‘teamwork’ # Cheesy1
Chapter 9 covers advanced string searching and matching with regular expressions.
Unicode string literalsMany computer languages limit characters in a string to values in the range of 0 to
255 because they store each one as a single byte, making nearly impossible the sup-
port of non-ASCII characters used by so many other languages besides plain old
English. Unicode characters are 16-bit values (0 to 65535) and can therefore handle
just about any character set imaginable.
Full support for Unicode strings was a new addition in Python 2.0.
You can specify a Unicode literal string by prefixing a string with a u:
>>> u’Rang’u’Rang’
See Chapter 9 for more on using Unicode strings.
Converting Between Simple TypesPython provides many functions for converting between numerical and string data
types in addition to the string formatting feature in the previous section.
Cross-Reference
NewFeature
Cross-Reference
4807-7 ch03.F 5/24/01 8:58 AM Page 43

44 Part I ✦ The Python Language
Converting to numerical typesThe int, long, float, complex, and ord functions convert data to numerical types.
int (x[, radix])This function uses a string and an optional base to convert a number or string to an
integer:
>>> int(‘15’)15>>> int(‘15’,16) # In hexadecimal, sixteen is written “10”21
The string it converts from must be a valid integer (trying to convert the string 3.5would fail). Alternatively, the int function can convert other numbers to integers:
>>> int(3.5)3>>> int(10L)10
The int function drops the fractional part of a number. To find the “closest” inte-
ger, use the round function (below).
long (x[, radix])The long function can convert a string or another number to a long integer (you
can also include a base):
>>> long(‘125’)125L>>> long(17.6)17L>>> long(‘1E’,16)30L
float (x)You should be seeing a pattern by now:
>>> float(12.1)12.1>>> float(10L)10.0>>> int(float(“3.5”)) # int(“3.5”) is illegal.3
The exception is with complex numbers; use the abs function to “convert” a
complex number to a floating-point number.
4807-7 ch03.F 5/24/01 8:58 AM Page 44

45Chapter 3 ✦ Expressions and Strings
round (num[, digits])This function rounds a floating point number to a number having the specified
number of fractional digits. If you omit the digits argument, the result is a whole
number:
>>> round(123.5678,3)123.568>>> round(123.5678)124.0>>> round(123.4)123.0
complex (real[, imaginary])The complex function can convert a string or number to a complex number, and it
also takes an optional imaginary part to use if none is supplied:
>>> complex(‘2+5j’)(2+5j)>>> complex(‘2’)(2+0j)>>> complex(6L,3)(6+3j)
ord (ch)This function takes a single character (a string of length 1) as its argument and
returns the ASCII or Unicode value for that character:
>>> ord(u’a’)97>>> ord(‘b’)98
Converting to stringsGoing the other direction, the following functions take numbers and make them into
strings.
chr (x) and unichr (x)Inverses of the ord function, these functions take a number representing an ASCII
or Unicode value and convert it to a character:
>>> chr(98)‘b’
4807-7 ch03.F 5/24/01 8:58 AM Page 45

46 Part I ✦ The Python Language
oct (x) and hex (x)These two functions take numbers and convert them to octal and hexadecimal
string representations:
>>> oct(123)‘0173’>>> hex(123)‘0x7b’
str (obj)The str function takes any object and returns a printable string version of that
object:
>>> str(5)‘5’>>> str(5.5)‘5.5’>>> str(3+2j)‘(3+2j)’
Python calls this function when you use the print statement.
repr (obj)The repr function is similar to str except that it tries to return a string version of
the object that is valid Python syntax. For simple data types, the outputs of str and
repr are often identical. (See Chapter 9 for details.)
A popular shorthand for this function is to surround the object to convert in back
ticks (above the Tab key on most PC keyboards):
>>> a = 5>>> ‘Give me ‘ + a # Can’t add a string and an integer!Traceback (innermost last):File “<interactive input>”, line 1, in ?
TypeError: cannot add type “int” to string>>> ‘Give me ‘ + `a` # Convert to a string on-the-fly.‘Give me 5’
As of Python 2.1, str and repr display newlines and other escape sequences thesame way you type them (instead of displaying their ASCII code):
>>> ‘Hello\nWorld’‘Hello\nWorld’
When you use the Python interpreter interactively, Python calls repr to display
objects. You can have it use a different function by setting the value of sys.displayhook:
NewFeature
4807-7 ch03.F 5/24/01 8:58 AM Page 46

47Chapter 3 ✦ Expressions and Strings
>>> 5.35.2999999999999998 # The standard representation is ugly.>>> def printstr(s):... print str(s)>>> import sys>>> sys.displayhook = printstr>>> 5.35.3 # A more human-friendly format
The sys.displayhook feature is new in Python 2.1.
SummaryPython has a complete set of operators for building expressions as complex as you
need. Python’s built-in string data type offers powerful but convenient control over
text and binary strings, freeing you from many maintenance tasks you’d be stuck
with in other programming languages. In this chapter you:
✦ Built string literals and formatted data in strings.
✦ Used Python’s operators to modify and compare data.
✦ Learned to convert between various data types and strings.
In the next chapter you’ll unleash the power of Python’s other built-in data types
including lists, tuples, and dictionaries.
✦ ✦ ✦
NewFeature
4807-7 ch03.F 5/24/01 8:58 AM Page 47

4807-7 ch03.F 5/24/01 8:58 AM Page 48

Advanced Data Types
The simple data types in the last few chapters are com-
mon to many programming languages, although often not
so easily managed and out-of-the-box powerful. The data
types in this chapter, however, set Python apart from lan-
guages such as C, C++, or even Java, because they are built-in,
intuitive and easy to use, and incredibly powerful.
Grouping Data with SequencesStrings, lists, and tuples are Python’s built-in sequence data
types. Each sequence type represents an ordered set of data
elements. Unlike strings, where each piece of data is a single
character, the elements that make up a list or a tuple can be
anything, including other lists, tuples, strings, and so on.
Though much of this section applies to strings, the focus here
is on lists and tuples.
Go directly to Chapter 3 to learn more about strings. Donot pass Go.
The main difference between lists and tuples is one of muta-
bility: you can change, add, or remove items of a list, but you
cannot change a tuple. Beyond this, though, you will find a
conceptual difference on where you apply each. You’d use a
list as an array to hold the lines of text from a file, for exam-
ple, and a tuple to represent a 3-D point in space (x,y,z). Put
another way, lists are great for dealing with many items
that you’d process similarly, while a tuple often represents
different parts of a single item. (Don’t worry — when you go to
use either in a program it becomes pretty obvious which one
you need.)
Cross-Reference
44C H A P T E R
✦ ✦ ✦ ✦
In This Chapter
Grouping data withsequences
Working withsequences
Using additional listobject features
Mapping informationwith dictionaries
Understandingreferences
Copying complexobjects
Identifying data types
Working with arrayobjects
✦ ✦ ✦ ✦
4807-7 ch04.F 5/24/01 8:58 AM Page 49

50 Part I ✦ The Python Language
Creating listsCreating a list is straightforward because you don’t need to specify a particular
data type or length. You can surround any piece of data in square brackets to create
a list containing that data:
>>> x = [] # An empty list>>> y = [‘Strawberry’,’Peach’]>>> z = [10,’Howdy’,y] # Mixed types and a list within a list>>> z[10, ‘Howdy’, [‘Strawberry’, ‘Peach’]]
You can call the list(seq) function to convert from one sequence type to a list:
>>> list((5,10)) # A tuple[5, 10]>>> list(“The World”)[‘T’, ‘h’, ‘e’, ‘ ‘, ‘W’, ‘o’, ‘r’, ‘l’, ‘d’]
If you call list on an object that is already a list, you get a copy of the original list
back.
See “Copying Complex Objects” in this chapter for more on copying objects.
RangesYou use the range([lower,] stop[, step]) function to generate a list whose
members are some ordered progression of integers. Instead of idling away your
time typing in the numbers from 0 to 10, you can do the same with a call to range:
>>> range(10)[0, 1, 2, 3, 4, 5, 6, 7, 8, 9] # 10 items, starting at 0
You can also call the function with start and stop indices, and even a step to tell it
how quickly to jump to the next item:
>>> range(6,12)[6, 7, 8, 9, 10, 11] # Stops just before the stop index.>>> range (2,20,3)[2, 5, 8, 11, 14, 17]>>> range (20,2,-3) # Going down![20, 17, 14, 11, 8, 5]
You most commonly use the range function in looping (which we cover in the next
chapter):
>>> for i in range(10):... print i,0 1 2 3 4 5 6 7 8 9
Cross-Reference
4807-7 ch04.F 5/24/01 8:58 AM Page 50

51Chapter 4 ✦ Advanced Data Types
The xrange ([lower,] stop[, step]) function is similar to range except that
instead of creating a list, it returns an xrange object that behaves like a list but
doesn’t calculate each list value until needed. This feature has the potential to save
memory if the range is very large or to improve performance if you aren’t likely to
iterate through every single member of the equivalent list.
List comprehensionsOne final way to create a list is through list comprehensions, which are great if you
want to operate on each item in a list and store the result in a new list, or if you
want to create a list that contains only items that meet certain criteria. For
example, to generate a list containing x2 for the numbers 1 through 10:
>>> [x*x for x in range(1,11)][1, 4, 9, 16, 25, 36, 49, 64, 81, 100]
List comprehensions are new in Python 2.0.
Python uses the range(1,11) to generate a list containing the numbers 1 through
10. Then, for each number in that list, it evaluates the expression x*x and adds the
result to the output list.
You can add an if to the list comprehension so that items get added to the new list
only if they pass some test. For example, to generate the same list as above while
weeding out odd numbers:
>>> [x*x for x in range(10) if x % 2 == 0][0, 4, 16, 36, 64]
But wait, there’s more! You can list more than one for statement and Python evalu-
ates each in order, processing the rest of the list comprehension each time:
>>> [a+b for a in ‘ABC’ for b in ‘123’][‘A1’, ‘A2’, ‘A3’, ‘B1’, ‘B2’, ‘B3’, ‘C1’, ‘C2’, ‘C3’]
Python loops through each character of ‘ABC’ and for each one goes through the
entire loop of each character in ‘123’.
See where this is going? You can have as many for statements as you want, and
each one can have an if statement (but if you think you need five or six then you
might want to break them into separate statements for sanity’s sake):
>>> [a+b+c for a in “HI” for b in “JOE” if b != ‘E’... for c in ‘123’ if c!= ‘2’][‘HJ1’, ‘HJ3’, ‘HO1’, ‘HO3’, ‘IJ1’, ‘IJ3’, ‘IO1’, ‘IO3’]
NewFeature
4807-7 ch04.F 5/24/01 8:58 AM Page 51

52 Part I ✦ The Python Language
Finally, the expression that Python evaluates to generate each item in the new list
doesn’t have to be a simple data type such as an integer. You can also have it be
lists, tuples, and so forth:
>>> [(x,ord(x)) for x in ‘Ouch’][(‘O’, 79), (‘u’, 117), (‘c’, 99), (‘h’, 104)]
Creating tuplesCreating a tuple is similar to creating a list, except that you use parentheses instead
of square brackets:
>>> x = () # Any empty tuple>>> y = 22407,’Fredericksburg’ # ()’s are optional>>> z = (‘Mrs. White’,’Ballroom’,’Candlestick’)
Parentheses can also enclose any expression, so Python has a special syntax to des-
ignate a tuple with only one item. To create a tuple containing the string ‘lonely’:
>>> x = (‘lonely’,)
Use the tuple(seq) function to convert one of the other sequence types to a tuple:
>>> tuple(‘tuple’)(‘t’, ‘u’, ‘p’, ‘l’, ‘e’)>>> tuple([1,2,3])(1, 2, 3)
Working with SequencesNow that you have your list or tuple, what do you do with it? This section shows
you the operators and functions you can use to work on sequence data.
Joining and repeating with arithmetic operatorsOf the arithmetic operators, Python defines addition and multiplication for working
with sequences. As with strings, the addition operator concatenates sequences and
the multiplication operator repeats them:
>>> [1,2] + [5] + [‘EGBDF’][1, 2, 5, ‘EGBDF’]>>> (‘FACEG’,) + (17,88)(‘FACEG’, 17, 88)>>> (1,3+4j) * 2(1, (3+4j), 1, (3+4j))
4807-7 ch04.F 5/24/01 8:58 AM Page 52

53Chapter 4 ✦ Advanced Data Types
The augmented assignment version of these operators works as well (although for
strings and tuples Python doesn’t perform the operation in place but instead cre-
ates a new object):
>>> z = [‘bow’,’arrow’]>>> z *= 2>>> z[‘bow’, ‘arrow’, ‘bow’, ‘arrow’]>>> q = (1,2)>>> q += (3,4)>>> q(1, 2, 3, 4)
Comparing and membership testingYou can use the normal comparison (<, <=, >=, >) and equality (!=, ==) operators
with sequence objects:
>>> [‘five’,’two’] != [5,2]1>>> (0.5,2) < (0.5,1)0
Python checks the corresponding element of each sequence until it can make a
determination. When the items in two sequence objects are equal except that one
has more items than the other, the longer is considered greater:
>>> [1,2,3] > [1,2]1
You can use the in operator to test if something is in a list or tuple, and not in to
test if it is not:
>>> trouble = (‘Dan’,’Joe’,’Bob’)>>> ‘Bob’ in trouble1>>> ‘Dave’ not in trouble1
Accessing parts of sequencesWhen you need to retrieve data from a sequence object, you have several
alternatives.
SubscriptionWhen you want to access a single element of a sequence object, you use the sub-
script or index of the element you want to reference, with the first element having
an index of zero (For some reason I get strange looks when I say, “Back to square
zero!”):
4807-7 ch04.F 5/24/01 8:58 AM Page 53

54 Part I ✦ The Python Language
>>> num = [‘dek’,’dudek’,’tridek’]>>> num[1]‘dudek’>>> num[-1] # A negative index starts from the other end.‘tridek’
SlicesSlices let you create a new sequence containing all or part of another sequence. You
specify a slice in the form of [start:end] and for each element Python adds that
element to the new sequence if its index i is start <= i < end.
Conceptually, thinking of the slice parameters as pointing between items in asequence is helpful.
>>> meses = [‘marzo’,’abril’,’mayo’,’junio’]>>> meses[1:3][‘abril’, ‘mayo’]>>> meses[0:-2] # Parameters can count from the right, too.[‘marzo’, ‘abril’]
The start and end parameters are both optional, and Python silently corrects
invalid input:
>>> meses[2:][‘mayo’, ‘junio’]>>> meses[:2][‘marzo’, ‘abril’]>>> meses[-2:5000][‘mayo’, ‘junio’]
See “Accessing individual characters and substrings” in Chapter 3 for more exam-ples of using slices.
UnpackingJust as you can create a tuple by assigning a comma-separated list of items to a
single variable, you can unpack a sequence object (not just tuples!) by doing the
opposite:
>>> s = 801,435,804>>> x,y,z = s>>> print x,y,z801 435 804
Keep in mind that the number of variables on the left must match the length of the
sequence you’re unpacking on the right.
Multiple assignment (in Chapter 3) is really just a special case of tuple packing andunpacking: you pack the objects into a single tuple and then unpack them into thesame number of original variables.
Note
Cross-Reference
Tip
4807-7 ch04.F 5/24/01 8:58 AM Page 54

55Chapter 4 ✦ Advanced Data Types
Iterating with for...inA common task is to loop over all the elements of a list or tuple and operate on
each one. One of the easiest ways to do this is with a for...in statement:
>>> for op in [‘sin’,’cos’,’tan’]:... print opsincostan
Using sequence utility functionsPython provides a rich complement of sequence processing functions.
len (x), min (x[, y,z,...]), and max (x[, y,z,...])These three aren’t really specific to sequences, but they’re quite useful nonetheless:
>>> data = [0.5, 12, 18, 2, -5]>>> len(data) # Count of items in the sequence5>>> min(data) # The minimum item in the sequence-5>>> max(data) # The maximum item in the sequence18
filter (function, list)When you call filter it applies a function to each item in a sequence, and returns
all items for which the function returns true, thus filtering out all items for which
the function returns false. In the following example I create a tiny function,
nukeBad, that returns false if the string passed in contains the word ‘bad’.
Combining filter with nukeBad eliminates all those ‘bad’ words:
>>> def nukeBad(s):... return s.find(‘bad’) == -1>>> s = [‘bad’,’good’,’Sinbad’,’bade’,’welcome’]>>> filter(nukeBad,s)[‘good’, ‘welcome’]
If you pass in None for the function argument, filter removes any 0 or empty
items from the list:
>>> stuff = [12,0,’Hey’,[],’’,[1,2]]>>> filter(None,stuff)[12, ‘Hey’, [1, 2]]
The filter function returns the same sequence type as the one you passed in. The
example below removes any number characters from a string and returns a new
string:
4807-7 ch04.F 5/24/01 8:58 AM Page 55

56 Part I ✦ The Python Language
>>> filter(lambda d:not d.isdigit(),”P6yth12on”)‘Python’
See Chapter 6 for more information on lambda expressions.
map (function, list[, list, ...])The map function takes a function and a sequence and returns to you the result of
applying the function to each item in the original sequence. Regardless of the type
of sequence you pass in, map always returns a list:
>>> import string>>> s = [‘chile’,’canada’,’mexico’]>>> map(string.capitalize,s)[‘Chile’, ‘Canada’, ‘Mexico’]
You can pass in several multiple lists, too, as long as the function you supply takes
the same number of arguments as the number of lists you pass in:
>>> import operator>>> s = [2,3,4,5]; t = [5,6,7,8]>>> map(operator.mul,s,t) # s[j] * t[j][10, 18, 28, 40]
Chapter 7 covers the operator class, which contains function versions of thestandard operators so you can pass them into functions like map.
If the lists you use are of different lengths, map uses empty (None) items to make up
the difference. Also, if you pass in None instead of a function, map combines the cor-
responding elements from each sequence and returns them as tuples (compare this
to the behavior of the zip function, later in this section):
>>> a = [1,2,3]; b = [4,5,6]; c = [7,8,9]>>> map(None,a,b,c)[(1, 4, 7), (2, 5, 8), (3, 6, 9)]
reduce (function, seq[, init])This function takes the first two items in the sequence you pass in, passes them to
the function you supply, takes the result and the next item in the list, passes them
to the function, and so on until it has processed all the items:
>>> import operator>>> reduce(operator.mul,[2,3,4,5])120 # 120 = ((2*3)*4)*5
An optional third parameter is an initializer reduce uses in the very first calcula-
tion, or when the list is empty. The following example starts with the string “-” and
adds each character of a word to the beginning and end of the string (because
strings are sequences, reduce calls the function once for each letter in the string):
Cross-Reference
Cross-Reference
4807-7 ch04.F 5/24/01 8:58 AM Page 56

57Chapter 4 ✦ Advanced Data Types
>>> reduce(lambda x,y: y+x+y, “Hello”, “-”)‘olleH-Hello’
zip (seq[, seq, ...])The zip function combines corresponding items from two or more sequences and
returns them as a list of tuples, stopping after it has processed all the items in the
shortest sequence:
>>> zip([1,1,2,3,5],[8,13,21])[(1, 8), (1, 13), (2, 21)]
You may find the zip function convenient when you want to iterate over several
lists in parallel:
>>> names = [‘Joe’,’Fred’,’Sam’]>>> exts = [116,120,100]>>> ages = [26,34,28]>>> for name,ext,age in zip(names,exts,ages):... print ‘%s (extension %d) is %d’ % (name,ext,age)Joe (extension 116) is 26Fred (extension 120) is 34Sam (extension 100) is 28
Passing in just one sequence to zip returns each item as a 1-tuple:
>>> zip((1,2,3,4))[(1,), (2,), (3,), (4,)]
The zip function was introduced in Python 2.0.
Using Additional List Object FeaturesList objects have several methods that further facilitate their use, and because they
are mutable they support a few extra operations.
Additional operationsYou can replace the value of any item with an assignment statement:
>>> todo = [‘dishes’,’garbage’,’sweep’,’mow lawn’,’dust’]>>> todo[1] = ‘boogie’>>> todo[‘dishes’, ‘boogie’, ‘sweep’, ‘mow lawn’, ‘dust’]
What gets replaced in the list doesn’t need to be limited to a single item. You can
choose to replace an entire slice with a new list:
NewFeature
4807-7 ch04.F 5/24/01 8:58 AM Page 57
58 Part I ✦ The Python Language
>>> todo[1:3] = [‘nap’] # Replace from 1 to before 3>>> todo[‘dishes’, ‘nap’, ‘mow lawn’, ‘dust’]>>> todo[2:] = [‘eat’,’drink’,’be merry’]>>> todo[‘dishes’, ‘nap’, ‘eat’, ‘drink’, ‘be merry’]
And finally, you can delete items or slices using del:
>>> del z[0]>>> z[‘nap’, ‘eat’, ‘drink’, ‘be merry’]>>> del z[1:3]>>> z[‘nap’, ‘be merry’]
List object methodsThe following methods are available on all list objects.
append (obj) and extend (obj)The append method adds an item to the end of a list like the += operator (Python
modifies the original list in place) except that the item you pass to append is not a
list. The extend method assumes the argument you pass it is a list:
>>> z = [‘Nevada’,’Virginia’]>>> z.append(‘Utah’)>>> z[‘Nevada’, ‘Virginia’, ‘Utah’]>>> z.extend([‘North Carolina’,’Georgia’])>>> z[‘Nevada’, ‘Virginia’, ‘Utah’, ‘North Carolina’, ‘Georgia’]
index (obj)This method returns the index of the first matching item in the list, if present, and
raises the ValueError exception if not. Continuing the previous example:
>>> x.index(12)1>>> try: print x.index(‘Farmer’)... except ValueError: print ‘NOT ON LIST!’NOT ON LIST!
See the next chapter for information on try...exception blocks.
count (obj)You use the count method to find out how many items in the list match the one you
pass in:
Cross-Reference
4807-7 ch04.F 5/24/01 8:58 AM Page 58

59Chapter 4 ✦ Advanced Data Types
>>> x = [15,12,’Foo’,16,12]>>> x.count(12)2
String objects also have count and index methods. See Chapter 9 for details.
insert (j, obj)Use the insert method to add a new item anywhere in the list. Pass in the index of
the item you want the new one to come before and the item to insert:
>>> months = [‘March’,’May’,’June’]>>> months.insert(1,’April’)>>> months[‘March’, ‘April’, ‘May’, ‘June’]
Notice that insert is pretty forgiving if you pass in a bogus index:
>>> months.insert(-1,’February’) # Item added at start>>> months.insert(5000,’July’) # Item added at end>>> months[‘February’, ‘March’, ‘April’, ‘May’, ‘June’, ‘July’]
remove (obj)This function locates the first occurrence of an item in the list and removes it, if
present, and yells at you if not:
>>> months.remove(‘March’)>>> months[‘February’, ‘February’, ‘April’, ‘May’, ‘June’, ‘July’]>>> months.remove(‘August’)Traceback (innermost last):File “<interactive input>”, line 1, in ?
ValueError: list.remove(x): x not in list
pop([j])If you specify an index, pop removes the item from that place in the list and returns
it. Without an index, the pop function removes and returns the last item from the
list:
>>> saludos = [‘Hasta!’,’Ciao’,’Nos vemos’]>>> saludos.pop(1)‘Ciao’>>> saludos[‘Hasta!’, ‘Nos vemos’]>>> saludos.pop()‘Nos vemos’
Cross-Reference
4807-7 ch04.F 5/24/01 8:58 AM Page 59

60 Part I ✦ The Python Language
Calling pop on an empty list causes it to raise IndexError.
reverse( )As named, the reverse function reverses the order of the list:
>>> names = [‘Jacob’,’Hannah’,’Rachael’,’Jennie’]>>> names.reverse()>>> names[‘Jennie’, ‘Rachael’, ‘Hannah’, ‘Jacob’]
sort([func])This function orders the items in a list. Continuing the previous example:
>>> names.sort()>>> names[‘Hannah’, ‘Jacob’, ‘Jennie’, ‘Rachael’]
Additionally, you can provide your own comparison function to use during the sort.
This function accepts two arguments and returns a negative number, 0, or a posi-
tive number if the first argument is less than, equal to, or greater than the second.
For example, to order a list by length of each item:
>>> names.sort(lambda a,b:len(a)-len(b)) # Ch 5 covers lambdas.>>> names[‘Jacob’, ‘Hannah’, ‘Jennie’, ‘Rachael’]
If you want to add and remove items to a sorted list, use the bisect module.When you insert an item using the insort(list, item) function, it uses a bisec-tion algorithm to inexpensively find the correct place to insert the item so that theresulting list remains sorted. The bisect(list, item) function in the samemodule finds the correct insertion point without actually adding the item to the list.
Mapping Information with DictionariesA dictionary contains a set of mappings between unique keys and their values; they
are Python’s only built-in mapping data type. The examples in this section use the
following dictionary that maps login user names and passwords to Web site names
(who can ever keep track of them all?):
>>> logins = {‘yahoo’:(‘john’,’jyahooohn’), ... ‘hotmail’:(‘jrf5’,’18thStreet’)} >>> logins[‘hotmail’] # What’s my name/password for hotmail?(‘jrf5’, ‘18thStreet’)
Tip
4807-7 ch04.F 5/24/01 8:58 AM Page 60

61Chapter 4 ✦ Advanced Data Types
Creating and adding to dictionariesYou create a dictionary by listing zero or more key-value pairs within curly braces.
The keys used in a dictionary must be unique and immutable, so strings, numbers,
and tuples with immutable items in them can all be used as keys. The values in the
key-value pair can be anything, even other dictionaries if you want.
Adding or replacing mappings is easy:
>>> logins[‘slashdot’] = (‘juan’,’lemmein’)
Accessing and updating dictionary mappingsIf you try to use a key that doesn’t exist in the dictionary, Python barks out a
KeyError exception. When you don’t want to worry about handling the exception,
you can instead use the get (key[, obj]) method, which returns None if the
mapping doesn’t exist, and even lets you specify a default value for such cases:
>>> logins[‘sourceforge’,’No such login’]Traceback (innermost last):File “<interactive input>”, line 1, in ?
KeyError: (‘sourceforge’, ‘No such login’)>>> logins.get(‘sourceforge’) == None1>>> logins.get(‘sourceforge’,’No such login’)‘No such login’
The setdefault(key[, obj]) method works like get with the default parameter,
except that if the key-value pair doesn’t exist, Python adds it to the dictionary:
>>> logins.setdefault(‘slashdot’,(‘jimmy’,’punk’))(‘juan’, ‘lemmein’) # Existing item returned>>> logins.setdefault(‘justwhispers’,(‘jimmy’,’punk’))(‘jimmy’, ‘punk’) # New item returned AND added to dictionary
If you just want to know if a dictionary has a particular key-value pair (or if you
want to check before requesting it), you can use the has_key(key) method:
>>> logins.has_key(‘yahoo’)1
The del statement removes an item from a dictionary:
>>> del logins[‘yahoo’]>>> logins.has_key(‘yahoo’)0
4807-7 ch04.F 5/24/01 8:58 AM Page 61

62 Part I ✦ The Python Language
You can use the update (dict) method to add the items from one dictionary to
another:
>>> z = {}>>> z[‘slashdot’] = (‘fred’,’fred’)>>> z.update (logins)>>> z{‘justwhispers’: (‘jimmy’, ‘punk’), ‘slashdot’: (‘juan’, ‘lemmein’), # Duplicate key overwritten‘hotmail’: (‘jrf5’, ‘18thStreet’)}
Additional dictionary operationsHere are a few other functions and methods of dictionaries that are straightforward
and useful:
>>> len(logins) # How many items?3>>> logins.keys() # List the keys of the mappings[‘justwhispers’, ‘slashdot’, ‘hotmail’]>>> logins.values() # List the other half of the mappings[(‘jimmy’, ‘punk’), (‘juan’, ‘lemmein’), (‘jrf5’,‘18thStreet’)]>>> logins.items() # Both pieces together as tuples
“Hashability”
The more precise requirement of a dictionary key is that it must be hashable. An object’shash value is a semi-unique, internally generated number that can be used for quick com-parisons. Consider comparing two strings, for example. To see if the strings are equal, youwould have to compare each character until one differed. If you already had the hash valuefor each string, however, you could just compare the two and be done.
Python uses hash values in dictionary lookups for the same reason: so that dictionarylookups will not be too costly.
You can retrieve the hash value of any hashable object by using the hash (obj) function:
>>> hash(‘hash’)-1671425852>>> hash(10)10>>> hash(10.0) # Numbers of different types have the same hash. 10>>> hash((1,2,3))-821448277
The hash function raises the TypeError exception on unhashable objects (lists, for example).
4807-7 ch04.F 5/24/01 8:58 AM Page 62

63Chapter 4 ✦ Advanced Data Types
[(‘justwhispers’, (‘jimmy’, ‘punk’)), (‘slashdot’, (‘juan’,‘lemmein’)), (‘hotmail’, (‘jrf5’, ‘18thStreet’))]>>> logins.clear() # Delete everything>>> logins{}
You can destructively iterate through a dictionary by calling its popitem() method,
which removes a random key and its value from the dictionary:
>>> d = {‘one’:1, ‘two’:2, ‘three’:3}>>> try:... while 1:... print d.popitem()... except KeyError: # Raises KeyError when empty... pass(‘one’, 1)(‘three’, 3)(‘two’, 2)
popitem is new in Python 2.1.
Dictionary objects also provide a copy() method that creates a shallow copy of the
dictionary:
>>> a = {1:’one’, 2:’two’, 3:’three’}>>> b = a.copy()>>> b{3: ‘three’, 2: ‘two’, 1: ‘one’}
See “Copying Complex Objects” later in this chapter for a comparison of shallowand deep copies.
Understanding ReferencesPython stores any piece of data in an object, and variables are merely references to
an object; they are names for a particular spot in the computer’s memory. All
objects have a unique identity number, a type, and a value.
Object identityBecause the object, and not the variable, has the data type (for example, integer), a
variable can reference a list at one moment and a floating-point number the next.
An object’s type can never change, but for lists and other mutable types its value
can change.
Cross-Reference
NewFeature
4807-7 ch04.F 5/24/01 8:58 AM Page 63

64 Part I ✦ The Python Language
Python provides the id(obj) function to retrieve an object’s identity (which, in the
current implementation, is just the object’s address in memory):
>>> shoppingList = [‘candy’,’cookies’,’ice cream’]>>> id(shoppingList)17611492>>> id(5)3114676
The is operator compares the identities of two objects to see if they are the same:
>>> junkFood = shoppingList # Both reference the same object>>> junkFood is shoppingList1>>> yummyStuff = [‘candy’,’cookies’,’ice cream’]>>> junkFood is not yummyStuff # Different identity, but...1>>> junkFood == yummyStuff # ...same value1
Because variables just reference objects, a change in a mutable object’s value is
visible to all variables referencing that object:
>>> a = [1,2,3,4]>>> b = a>>> a[2] = 5>>> b[1, 2, 5, 4]>>> a = 6>>> b = a # Reference the same object for now.>>> b6>>> a = a + 1 # Python creates a new object to hold (a+1)>>> b # so b still references the original object.6
Counting referencesEach object also contains a reference count that tells how many variables are cur-
rently referencing that object. When you assign a variable to an object or when you
make an object a member of a list or other container, the reference count goes up.
When you destroy, reassign, or remove an object from a container the reference
count goes down. If the reference count reaches zero (no variables reference this
object), Python’s garbage collector destroys the object and reclaims the memory it
was using.
The sys.getrefcount(obj) function returns the reference count for the given
object.
4807-7 ch04.F 5/24/01 8:58 AM Page 64

65Chapter 4 ✦ Advanced Data Types
See Chapter 26 for more on Python’s garbage collector.
As of version 2.0, Python now also collects objects with only circular references.For example,
a = []; b = []a.append(b); b.append(a)a = 5; b = 10 # Reassign both variables to differentobjects.
The two list objects still have a reference count of 1 because each is a member ofthe other’s list. Python now recognizes such cases and reclaims the memory usedby the list objects.
Keep in mind that the del statement deletes a variable and not an object, although
if the variable you delete was the last to reference an object then Python may end
up deleting the object too:
>>> a = [1,2,3]>>> b = a # List object has 2 references now>>> del a # Back to 1 reference>>> b[1, 2, 3]
You can also create weak references to objects, or references that do not affect anobject’s reference count. See Chapter 7 for more information.
Copying Complex ObjectsAssigning a variable to a list object creates a reference to the list, but what if you
want to create a copy of the list? Python enables you to make two different types of
copies, depending on what you need to do.
Shallow copiesA shallow copy of a list or other container object makes a copy of the object itself
but creates references to the objects contained by the list. An easy way to make a
shallow copy of a sequence is by requesting a slice of the entire object:
>>> faceCards = [‘A’,’K’,’Q’,’J’]>>> myHand = faceCards[:] # Create a copy, not a reference>>> myHand is faceCards0 >>> myHand == faceCards1
Cross-Reference
NewFeature
Cross-Reference
4807-7 ch04.F 5/24/01 8:58 AM Page 65

66 Part I ✦ The Python Language
You can also use the copy(obj) function of the copy module:
>>> import copy>>> highCards = copy.copy(faceCards)>>> highCards is faceCards, highCards == faceCards(0, 1)
Deep copiesA deep copy makes a copy of the container object and recursively makes copies of
all the children objects. For example, consider the case when a list contains a list. A
shallow copy of the parent list would contain a reference to the child list, not a sep-
arate copy. As a result, changes to the inner list would be visible from both copies
of the parent list:
>>> myAccount = [1000, [‘Checking’,’Savings’]]>>> yourAccount = myAccount[:]>>> myAccount[1].remove(‘Savings’) # Modify the child list.>>> myAccount[1000, [‘Checking’]] # Different parent objects share a >>> yourAccount # reference to the same child list.[1000, [‘Checking’]]
Now look at the same example by using the deepcopy(obj) function in the copymodule:
>>> myAccount = [1000, [‘Checking’,’Savings’]]>>> yourAccount = copy.deepcopy(myAccount)>>> myAccount[1].remove(‘Savings’)>>> myAccount[1000, [‘Checking’]] # deepcopy copied the child list too.>>> yourAccount[1000, [‘Checking’, ‘Savings’]]
The deepcopy function tracks which objects it copied so that if an object directly
or indirectly references itself, deepcopy makes only one copy of that object.
Not all objects can be copied safely. For example, copying a socket that has an open
connection to a remote computer won’t work because part of the object’s internal
state (the open connection) is outside the realms of Python. File objects are
another example of forbidden copy territory, and Python lets you know:
f = open(‘foo’,’wt’)>>> copy.deepcopy(f)Traceback (innermost last):File “<interactive input>”, line 1, in ?File “D:\Python20\lib\copy.py”, line 147, in deepcopyraise error, \
Error: un-deep-copyable object of type <type ‘file’>
4807-7 ch04.F 5/24/01 8:58 AM Page 66

67Chapter 4 ✦ Advanced Data Types
Chapter 7 shows you how to override standard behaviors on classes you create. Bydefining your own __getstate__ and __setstate__ methods you can controlhow your objects respond to shallow and deep copy operations.
Identifying Data TypesYou can check the data type of any object at runtime, enabling your programs to
correctly handle different types of data (for example, think of the int function that
works when you pass it an integer, a float, a string, and so on). You can retrieve the
type of any object by passing the object to the type(obj) function:
>>> type(5)<type ‘int’>>>> type(‘She sells seashells’)<type ‘string’>>>> type(operator)<type ‘module’>
The types module contains the type objects for Python’s built-in data types. The
following example creates a function that prints a list of words in uppercase. To
make it more convenient to use, the function accepts either a single string or a list
of strings:
>>> import types>>> def upEm(words):... if type(words) != types.ListType: # Not a list so... words = [words] # make it a list.... for word in words:... print word.upper()>>> upEm(‘horse’)HORSE>>> upEm([‘horse’,’cow’,’sheep’])HORSECOWSHEEP
The following list shows a few of the more common types you’ll use.
BuiltinFunctionType
FunctionType
MethodType
BuiltinMethodType
InstanceType
ModuleType
ClassType
Cross-Reference
4807-7 ch04.F 5/24/01 8:58 AM Page 67

68 Part I ✦ The Python Language
IntType
NoneType
DictType
LambdaType
StringType
FileType
ListType
TupleType
FloatType
LongType
Classes and instances of classes have the types ClassType and InstanceType,
respectively. Python provides the isinstance(obj) and issubclass(obj) func-
tions to test if an object is an instance or a subclass of a particular type:
>>> isinstance(5.1,types.FloatType)1>>> class Foo:... pass... >>> a = Foo()>>> isinstance(a,Foo)1
Chapter 7 covers creating and using classes and objects.
Working with Array ObjectsWhile lists are flexible in that they let you store any type of data in them, that flexi-
bility comes at a cost of more memory and a little less performance. In most cases,
this isn’t an issue, but in cases where you want to exchange a little flexibility for
performance or low level access, you can use the array module to create an array
object.
Creating arraysAn array object is similar to a list except that it can hold only certain types of sim-
ple data and only one type at any given time. When you create an array object, you
specify which type of data it will hold:
>>> import array>>> z = array.array (‘B’) # Create an array of bytes>>> z.append(5)
Cross-Reference
4807-7 ch04.F 5/24/01 8:58 AM Page 68

69Chapter 4 ✦ Advanced Data Types
>>> z[0]5>>> q = array.array(‘i’,[5,10,-12,13]) # Optional initializer>>> qarray(‘i’, [5, 10, -12, 13])
Table 4-1 lists the type code you use to create each type of array. You can retrieve
the size of items and the type code of an array object using its itemsize and
typecode members.
Table 4-1Array Type Codes
Code Equivalent C Type Minimum Size in Bytes*
c char 1
b (B) byte (unsigned byte) 1
h (H) short (unsigned short) 2
i (I) int (unsigned int) 2
l (L) long (unsigned long) 4
f float 4
d double 8
* Actual size may be greater, depending on the implementation.
Converting between typesArray objects have built-in support for converting to and from lists and strings, and
for reading and writing with files. The following examples all deal with an array
object of two-byte short integers initially containing the numbers 10, 1000, and 500:
>>> z = array.array(‘h’,[10,1000,500])>>> z.itemsize2
ListsThe tolist() method converts the array to an ordinary list:
>>> z.tolist()[10, 1000, 500]
4807-7 ch04.F 5/24/01 8:58 AM Page 69

70 Part I ✦ The Python Language
The fromlist(list) method appends items from a normal list to the end of the
array:
>>> z.fromlist([2,4])>>> zarray(‘h’, [10, 1000, 500, 2, 4])
If any item in the list to add is of an incorrect type, fromlist adds none of the
items to the array object.
StringsYou can convert an array to a sequence of bytes using the tostring() method:
>>> z.tostring()‘ \n\x00\xe8\x03\xf4\x01\x02\x00\x04\x00’>>> len(z.tostring()) 6 # 3 items, 2 bytes each
The fromstring(str) method goes in the other direction, taking a string of bytes
and converting them to values for the array:
>>> z.fromstring(‘\x10\x00\x00\x02’) # x10 = 16, x0200 = 512>>> zarray(‘h’, [10, 1000, 500, 2, 4, 16, 512])
FilesThe tofile(file) method converts the array to a sequence of bytes (just like
tostring) and writes the resulting bytes to a file you pass in:
>>> z = array.array(‘h’,[10,1000,500])>>> f = open(‘myarray’,’wb’) # Chapter 8 covers files.>>> z.tofile(f)>>> f.close()
The fromfile(file, count) method reads the specified number of items in from
a file object and appends them to the array. Continuing the previous example:
>>> z.fromfile(open(‘myarray’,’rb’),3) # Read 3 items.>>> zarray(‘h’, [10, 1000, 500, 10, 1000, 500])
If the file ends before reading in the number of items you requested, fromfile raises
the EOFError exception, but still adds as many valid items as it could to the array.
The marshal, pickle, and struct modules all provide additional — and oftenbetter — methods for converting to and from sequences of bytes for use in filesand network messages. See Chapter 12 for more.
Cross-Reference
4807-7 ch04.F 5/24/01 8:58 AM Page 70

71Chapter 4 ✦ Advanced Data Types
Array methods and operationsArray objects support many of the same functions and methods of lists: len,
append, extend, count, index, insert, pop, remove, and reverse. You can access
individual members with subscription, and you can use slicing to return a smaller
portion of the array (although it returns another array object and not a list).
The buffer_info() method returns some low-level information about the current
array. The returned tuple contains the memory address of the buffer and the length
in bytes of the buffer. This information is valid until you destroy the array or it
changes length.
You can use the byteswap() method to change the byte order of each item in the
array, which is useful for converting between big-endian and little-endian data:
>>> z = array.array(‘I’,[1,2,3])>>> z.byteswap()>>> zarray(‘I’, [16777216L, 33554432L, 50331648L])
See Chapter 12 for information on cross-platform byte ordering.
NumPy (Numeric Python) is a Python extension that you can also use to createarrays, but it has much better support for using the resulting arrays in calculations.See Chapter 31 for more information on NumPy.
SummaryPython provides several powerful and easy-to-use data types that simplify working
with different types of data. In this chapter you:
✦ Learned the differences between Python’s sequence types.
✦ Organized data with lists, sequences, and dictionaries.
✦ Created shallow and deep copies of complex objects.
✦ Used an object’s type to handle it appropriately.
✦ Built array objects to hold homogenous data.
The next chapter shows you how to expand your programs to include loops and
decisions and how to catch errors with exceptions.
✦ ✦ ✦
Cross-Reference
Cross-Reference
4807-7 ch04.F 5/24/01 8:58 AM Page 71

4807-7 ch04.F 5/24/01 8:58 AM Page 72

Control Flow
Aprogram is more than simply a list of actions. A program
can perform an action several times (with for- and while-
loops), handle various cases (with if-statements), and cope
with problems along the way (with exceptions).
This chapter explains how to control the flow of execution in
Python. A simple Game of Life program illustrates these tech-
niques in practice.
Making Decisions with If-Statements
The if-statement evaluates a conditional expression. If the
expression is true, the program executes the if-block. For
example:
if (CustomerAge>55): print “You get a senior citizen’s discount!”
An if-statement may have an else-block. If the expression is
false, the else-block (if any) executes. This code block prints
one greeting for Bob, and another for everyone else:
if (UserName==”Bob”):print “Greetings, O supreme commander!” else:print “Hello, humble peasant.”
An if-statement may have one or more elif-blocks (“elif” is
shorter to type than “else if” and has the same effect). When
Python encounters such a statement, it evaluates the if-
expression, then the first elif-expression, and so on, until one
of the expressions evaluates to true. Then, Python executes
the corresponding block of code.
When Python executes an if-statement, it executes no more
than one block of code. (If there is an else-block, then exactlyone block of code gets executed.)
55C H A P T E R
✦ ✦ ✦ ✦
In This Chapter
Making decisionswith if-statements
Using for-loops
Using while-loops
Throwing andcatching exceptions
Debugging withassertions
Example: Game of Life
✦ ✦ ✦ ✦
4807-7 ch05.F 5/24/01 8:58 AM Page 73

74 Part I ✦ The Python Language
Listing 5-1 is a sample script that uses an if-statement (shown in both italics and
bold) in a simple number-guessing game.
Listing 5-1: NumberGuess.py
import randomimport sys
# This line chooses a random integer >=1 and <=100.# (See Chapter 15 for a proper explanation.)SecretNumber=random.randint(1,100)
print “I’m thinking of a number between 1 and 100.”# Loop forever (at least until the user hits Ctrl-Break).while (1):
print “Guess my number.”# The following line reads a line of input from # the command-line and converts it to an integer.NumberGuess=int(sys.stdin.readline())if (NumberGuess==SecretNumber):
print “Correct! Choosing a new number...”SecretNumber=random.randint(1,100)
elif (NumberGuess > SecretNumber):print “Lower.”
else:print “Higher.”
You can use many elif clauses; the usual way to write Python code that handles five
different cases is with an if-elif-elif-elif-else statement. (Veterans of C and Java, take
note: Python does not have a switch statement.)
Python stops checking if-expressions as soon as it finds a true one. If you write anif-statement to handle several different cases, consider putting the most commonand/or cheapest-to-check cases first in order to make your program faster.
Using For-LoopsFor-loops let your program do something several times. In addition, you can iterate
over elements of a sequence with a for-loop.
Anatomy of a for-loopA simple for statement has the following syntax:
Note
4807-7 ch05.F 5/24/01 8:58 AM Page 74
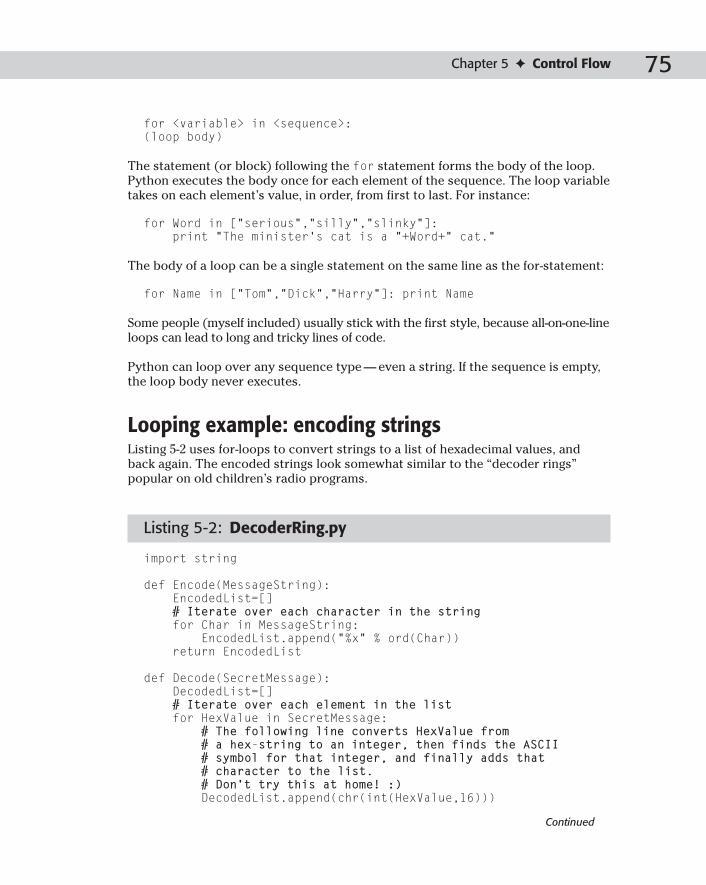
75Chapter 5 ✦ Control Flow
for <variable> in <sequence>:(loop body)
The statement (or block) following the for statement forms the body of the loop.
Python executes the body once for each element of the sequence. The loop variable
takes on each element’s value, in order, from first to last. For instance:
for Word in [“serious”,”silly”,”slinky”]:print “The minister’s cat is a “+Word+” cat.”
The body of a loop can be a single statement on the same line as the for-statement:
for Name in [“Tom”,”Dick”,”Harry”]: print Name
Some people (myself included) usually stick with the first style, because all-on-one-line
loops can lead to long and tricky lines of code.
Python can loop over any sequence type — even a string. If the sequence is empty,
the loop body never executes.
Looping example: encoding stringsListing 5-2 uses for-loops to convert strings to a list of hexadecimal values, and
back again. The encoded strings look somewhat similar to the “decoder rings”
popular on old children’s radio programs.
Listing 5-2: DecoderRing.py
import string
def Encode(MessageString):EncodedList=[]# Iterate over each character in the stringfor Char in MessageString:
EncodedList.append(“%x” % ord(Char))return EncodedList
def Decode(SecretMessage):DecodedList=[]# Iterate over each element in the listfor HexValue in SecretMessage:
# The following line converts HexValue from# a hex-string to an integer, then finds the ASCII# symbol for that integer, and finally adds that# character to the list. # Don’t try this at home! :)DecodedList.append(chr(int(HexValue,16)))
Continued
4807-7 ch05.F 5/24/01 8:58 AM Page 75

76 Part I ✦ The Python Language
Listing 5-2 (continued)
# Join these strings together, with no separator.return string.join(DecodedList,””)
if (__name__==”__main__”):SecretMessage=Encode(“Remember to drink your Ovaltine!”)print SecretMessageprint Decode(SecretMessage)
Listing 5-3: DecoderRing.py output
[‘52’, ‘65’, ‘6d’, ‘65’, ‘6d’, ‘62’, ‘65’, ‘72’, ‘20’, ‘74’,‘6f’, ‘20’, ‘64’, ‘72’, ‘69’, ‘6e’, ‘6b’, ‘20’, ‘79’, ‘6f’,‘75’, ‘72’, ‘20’, ‘4f’, ‘76’, ‘61’, ‘6c’, ‘74’, ‘69’, ‘6e’,‘65’, ‘21’]Remember to drink your Ovaltine!
Ranges and xrangesMany loops do something a fixed number of times. To iterate over a range of
numbers, use range. For example:
# print 10 numbers (from 0 to 9)for X in range(10): print X
The function range returns a list of numbers that you can use anywhere (not just in
a loop). The syntax is: range(start[,end[,step]]). The numbers in the range
begin with start, increment by step each time, and stop just before end. Both start and
step are optional; by default, a range starts at 0 and increments by 1. For example:
>>> range(10,0,-1) # Countdown![10, 9, 8, 7, 6, 5, 4, 3, 2, 1]>>> range(5,10)[5, 6, 7, 8, 9]
Code that does something once for each element of a sequence sometimes loops
over range(len(SequenceVariable)). This range contains the index of each ele-
ment in the sequence. For example, this code prints the days of the week:
DaysOfWeek=[“Monday”, “Tuesday”, “Wednesday”, “Thursday”,“Friday”, “Saturday”, “Sunday”]for X in range(len(DaysOfWeek)):
print “Day”,X,”is”,DaysOfWeek[X]
4807-7 ch05.F 5/24/01 8:58 AM Page 76

77Chapter 5 ✦ Control Flow
An xrange is an object that represents a range of numbers. You can loop over an
xrange instead of the list returned by range. The only real difference is that creat-
ing a large range involves creating a memory-hogging list, while creating an xrangeof any size is cheap. Try checking your system’s free memory while running these
interpreter commands:
>>> MemoryHog=range(1000000) # There goes lots of RAM!>>> BigXRange=xrange(1000000) # Only uses a little memory.
To see the contents of an xrange in convenient list form, use the tolist method:
>>> SmallXRange=xrange(10,110,10)>>> SmallXRange.tolist()[10, 20, 30, 40, 50, 60, 70, 80, 90, 100]
Breaking, continuing, and else-clausesPython’s continue statement jumps to the next iteration of a loop. The breakstatement jumps out of a loop entirely. These statements apply only to the inner-
most loop; if you are in a loop-within-a-loop-within-a-loop, break jumps out of only
the innermost loop.
You can follow the body of a for-loop with an else-clause. The code in the else-clause
executes after the loop finishes iterating, unless the program exits the loop due to a
break statement. (If you have no break statement in the loop, the else-clause
always executes, so you really have no need to put the code in an else-clause.)
Listing 5-4 illustrates break, continue, and an else-clause:
Listing 5-4: ClosestPoint.py
import mathdef FindClosestPointAboveXAxis(PointList,TargetPoint):“”” Given a list of points and a target point, this functionreturns the list’s closest point, and its distance from thetarget. It ignores all points with a negative y-coordinate. Werepresent points in the plane (or on screen) as a two-valuedtuple of the form (x-coordinate,y-coordinate). “””
ClosestPoint=None # Initialize.ClosestDistance=None # Iterate over each point in the list.for Point in PointList:# Throw out any point below the X axis.if (Point[1]<0):
# Skip to the next point in the list.continue
# Compute the distance from this point to the target.
Continued
4807-7 ch05.F 5/24/01 8:58 AM Page 77

78 Part I ✦ The Python Language
Listing 5-4 (continued)
# The following two lines are one statement; # indentation for clarity is optional.DistToPoint=math.sqrt((TargetPoint[0]-Point[0])**2 +
(TargetPoint[1]-Point[1])**2) if (ClosestDistance == None or
DistToPoint < ClosestDistance):ClosestPoint=PointClosestDistance = DistanceToPoint
if (DistanceToPoint==0):print “Point found in list”# Exit the loop entirely, since no point will# be closer than thisbreak
else:# This clause executes unless we hit the break above.print “Point not found in list”
return (ClosestPoint, ClosestDistance)
Here is the function in action:
>>> SomePoints=[(-1,-1),(4,5),(-5,7),(23,-2),(5,2)]>>> ClosestPoint.FindClosestPointAboveXAxis(SomePoints,(1,1))Point not found in list((5, 2), 4.1231056256176606)>>> ClosestPoint.FindClosestPointAboveXAxis(SomePoints,(-1,-1))Point not found in list((5, 2), 6.7082039324993694)>>> ClosestPoint.FindClosestPointAboveXAxis(SomePoints,(4,5))Point found in list((4, 5), 0.0)
Changing horses in midstreamModifying the sequence that you are in the process of looping over is not recom-mended — Python won’t get confused, but any mere mortals reading your program
will.
The loop variable keeps iterating over its reference sequence, even if you change a
sequence variable. For example, this loop prints the numbers from 0 to 99; chang-
ing the value that MyRange points to does not affect control flow:
MyRange=range(100)for X in MyRange:
print X MyRange = range(30) # No change in looping behavior!
4807-7 ch05.F 5/24/01 8:58 AM Page 78

79Chapter 5 ✦ Control Flow
However, changing the reference sequence does affect the loop. After executing for
the nth element in a sequence, the loop proceeds to the (n+1)th element, even if the
sequence changes in the process. For example, this loop prints even numbers from
0 to 98:
MyRange=range(100)for X in MyRange:
print X del MyRange[0] # Changing the loop-sequence in place
Modifying the loop variable inside a for-loop is also inadvisable. It does not change
looping behavior; Python will continue the next iteration of the loop as usual.
Using While-LoopsIf you could crossbreed an if-statement and a for-loop, you would get a while-
statement, Python’s other looping construct.
A while-statement has the form:
while (<expression>): <block of code>
When Python encounters a while-statement, it evaluates the expression, and if the
expression is true, it executes the corresponding block of code. Python keeps exe-
cuting the block of code until the expression is no longer true. For example, this
code counts down from 10 to 1:
X=10while (X>0):print XX -= 1
Within a while-loop, you can use the continue statement to jump to the next itera-
tion, or the break statement to jump out of the loop entirely. A while-loop can also
have an else-block. Code in the else-block executes immediately after the last itera-
tion, unless a break statement exits the loop. These statements work similarly for
for-loops and while-loops. See the section on for-loops, above, for examples of
break, continue, and else.
Throwing and Catching ExceptionsImagine a Python program innocently going about its business, when suddenly . . .
[dramatic, scary music] something goes wrong.
4807-7 ch05.F 5/24/01 8:58 AM Page 79

80 Part I ✦ The Python Language
In general, when a function or method encounters a situation that it can’t cope
with, it raises an exception. An exception is a Python object that represents an
error.
Passing the buck: propagating exceptionsWhen a function raises an exception, the function must either handle the exception
immediately or terminate. If the function doesn’t handle the exception, the caller
may handle it. If not, the caller also terminates immediately as well. The exception
propagates up the call-stack until someone handles the error. If nobody catches the
exception, the whole program terminates.
In general, functions that return a value should return None to indicate a “reason-
able” failure, and only raise an exception for “unreasonable” problems. Just what is
reasonable is open to debate, so it is generally a good idea to clearly document the
exceptions your code raises, and to handle common exceptions raised by the code
you call.
Handling an exceptionIf you have some “suspicious” code that may raise an exception, you can defend
your program by placing the suspicious code in a try: block. After the try: block,
include an except statement, followed by a block of code which handles the prob-
lem (as elegantly as possible).
For example, the guess-the-number program from earlier in this chapter crashes if
you try to feed it something other than an integer. The error looks something like
this:
Traceback (most recent call last):File “C:\Python20\NumberGuess.py”, line 7, in ?NumberGuess=int(sys.stdin.readline())
ValueError: invalid literal for int(): whoops!
Listing 5-5 shows a new-and-improved script that handles the exception. The call to
sys.stdin.readline() is now in a try: block:
Listing 5-5: NumberGuess2.py
import randomimport sys
# This line chooses a random integer >=1 and <=100.# (See Chapter 15 for a proper explanation.)SecretNumber=random.randint(1,100)
4807-7 ch05.F 5/24/01 8:58 AM Page 80

81Chapter 5 ✦ Control Flow
print “I’m thinking of a number between 1 and 100.”# Loop forever (at least until the user hits Ctrl-Break).while (1):
print “Guess my number.”# The following line reads a line of input from # the command line and converts it to an integer.try:
NumberGuess=int(sys.stdin.readline())except ValueError:
print “Please type a whole number.”continue
if (NumberGuess==SecretNumber):print “Correct! Choosing a new number...”SecretNumber=random.randint(1,100)
elif (NumberGuess > SecretNumber):print “Lower.”
else:print “Higher.”
More on exceptionsAn exception can have an argument, which is a value that gives additional informa-
tion about the problem. The contents (and even the type) of the argument vary by
exception. You capture an exception’s argument by supplying a variable in the
except clause: except ExceptionType,ArgumentVariable
You can supply several except clauses to handle various types of exceptions. In this
case, exceptions are handled by the first applicable except clause. You can also
provide a generic except clause, which handles any exception. If you do this, I
highly recommend that you do something with the exception. Code that silently
“swallows” exceptions may mask important bugs, like a NameError. Here is some
cookie-cutter code I use for quick-and-dirty error handling:
try:DoDangerousStuff()
except:# The show must go on!# Print the exception and the stack trace, and continue.(ErrorType,ErrorValue,ErrorTB)=sys.exc_info()print sys.exc_info()traceback.print_exc(ErrorTB)
After the except clause(s), you can include an else-clause. The code in the else-block
executes if the code in the try: block does not raise an exception. The else-block is a
good place for code that does not need the try: block’s protection.
Python raises an IOError exception if you try to open a file that doesn’t exist. Here
is a snippet of code that handles a missing file without crashing. (This code grabs
the exception argument — a tuple consisting of an error number and error string —
but doesn’t do anything interesting with it.)
4807-7 ch05.F 5/24/01 8:58 AM Page 81

82 Part I ✦ The Python Language
try:OptionsFile=open(“SecretOptions.txt”)
except IOError, (ErrorNumber,ErrorString):# Assume our default option values are all OK.# We need a statement here, but we have nothing # to do, so we pass.pass
else:# This executes if we opened it without an IOError.ParseOptionsFile(OptionsFile)
Defining and raising exceptionsYou can raise exceptions with the statement raise exceptionType,argument.
ExceptionType is the type of exception (for example, NameError). Argument is a
value for the exception argument. Argument is optional; if not supplied, the excep-
tion argument is None.
An exception can be a string, a class, or an object. Most of the exceptions that the
Python core raises are classes, with an argument that is an instance of the class.
Defining new exceptions is quite easy, as this contrived example demonstrates:
def CalculateElfHitPoints(Level):if Level<1:
raise “Invalid elf level!”,Level# (The code below won’t execute if we raise# the exception.) HitPoints=0for DieRoll in range(Level):
HitPoints += random.randint(1,6)
In order to catch an exception, an “except” clause must refer to the same excep-tion thrown. Python compares string exceptions by reference identity (is, not ==).So, if you have code to raise “BigProblem” and an except-clause for “BigProblem,”the except clause may not catch the exception. (The strings are equivalent, butmay not point to the same spot in memory.) To handle exceptions properly, use anamed constant string, or a class. (See Listing 5-6 for an example.)
Cleaning up with finallyAn alternative mechanism for coping with failure is the finally block. The
finally block is a place to put any code that must execute, whether the try-block
raised an exception or not. You can provide except clause(s), or a finally clause,
but not both.
For example, multithreaded programs often use a lock to prevent threads from
stomping on each other’s data. If a thread acquires a lock and crashes without
releasing it, the other threads may be kept waiting forever — an unpleasant situa-
tion called deadlock. This example is a perfect job for the finally clause:
Note
4807-7 ch05.F 5/24/01 8:58 AM Page 82

83Chapter 5 ✦ Control Flow
try:DataLock.acquire()# ... do things with the data ...
finally:# This code *must* execute. The fate of the# free world hangs in the balance!DataLock.release()
Debugging with AssertionsAn assertion is a sanity-check that you can turn on (for maximum paranoia) or turn
off (to speed things up). Using an assertion can help make code self-documenting;
raising an AssertionError implies that a problem is due to programmer error and
not normal problems. Programmers often place assertions at the start of a function
to check for valid input, and after a function call to check for valid output.
Assertions in PythonYou can add assertions to your code with the syntax assert <Expression>. When
it encounters an assert statement, Python evaluates the accompanying expres-
sion, which is hopefully true. If the expression is false, Python raises an
AssertionError.
You can include an assertion argument, via the syntax assertExpression,ArgumentExpression. If the assertion fails, Python uses
ArgumentExpression as the argument for the AssertionError.
For example, here is a function that converts a temperature from degrees Kelvin to
degrees Fahrenheit. Since zero degrees Kelvin is as cold as it gets, the function bails
out if it sees a negative temperature:
>>> def KelvinToFahrenheit(Temperature):... assert (Temperature >= 0),”Colder than absolute zero!”... return ((Temperature-273)*1.8)+32>>> KelvinToFahrenheit(273)32.0>>> int(KelvinToFahrenheit(505.78))451>>> KelvinToFahrenheit(-5)Traceback (innermost last):File “<pyshell#186>”, line 1, in ?KelvinToFahrenheit(-5)
File “<pyshell#178>”, line 2, in KelvinToFahrenheitassert (Temperature >= 0),”Colder than absolute zero!”
AssertionError: Colder than absolute zero!
4807-7 ch05.F 5/24/01 8:58 AM Page 83

84 Part I ✦ The Python Language
Toggling assertionsNormally, assertions are active. They are toggled by the internal variable __debug__.
Turning on optimization (by running python with the -O command-line argument)
turns assertions off. (Direct access to __debug__ is also possible, but not
recommended.)
In assert statements, avoid using expressions with side effects. If the assertionexpression affects the data, then the “release” and “debug” versions of your scriptsmay behave differently, leaving you with twice as much debugging to do.
Example: Game of LifeListing 5-6 simulates John Conway’s Game of Life, a simple, cellular automata. The
game is played on a grid. Each cell of the grid can be “alive” or “dead.” Each “gener-
ation,” cells live or die based on the state of their eight neighboring cells. Cells with
three living neighbors come to life. Live cells with two living neighbors stay alive.
All other cells die (or stay dead).
This example introduces a class to represent the playing field. For further informa-tion on classes, see Chapter 7.
Listing 5-6: LifeGame.py
# We arbitrarily set the field size to 10x10. Naming the size# in upper-case implies that we shouldn’t change its value.FIELD_SIZE=10
# Create two strings for use as exceptions. We raise and catch# these variables, instead of raw strings (which would be ==-# equivalent, but possibly not is-equivalent).STEADY_STATE=”Steady state”EVERYONE_DEAD=”Everyone dead”
class PlayField:# Constructor. When creating a PlayField, initialize the # grid to be all dead:def __init__(self):
self.LifeGrid={}for Y in range(FIELD_SIZE):
for X in range(FIELD_SIZE):self.LifeGrid[(X,Y)]=0
def SetAlive(self,X,Y):self.LifeGrid[(X,Y)]=1
def SetDead(self,X,Y):self.LifeGrid[(X,Y)]=0
def PrintGrid(self,Number):print “Generation”,Number
Cross-Reference
Tip
4807-7 ch05.F 5/24/01 8:58 AM Page 84

85Chapter 5 ✦ Control Flow
for Y in range(FIELD_SIZE):for X in range(FIELD_SIZE):
# Trailing comma means don’t print newline:print self.LifeGrid[(X,Y)],
# Print newline at end of row:print
def GetLiveNeighbors(self,X,Y):# The playing field is a “donut world”, where the# edge cells join to the opposite edge.LeftColumn=X-1if (LeftColumn<0): LeftColumn=FIELD_SIZE-1RightColumn=(X+1) % FIELD_SIZEUpRow=Y-1if (UpRow<0): UpRow=FIELD_SIZE-1DownRow=(Y+1) % FIELD_SIZELiveCount=(self.LifeGrid[(LeftColumn,UpRow)]+
self.LifeGrid[(X,UpRow)]+self.LifeGrid[(RightColumn,UpRow)]+self.LifeGrid[(LeftColumn,Y)]+self.LifeGrid[(RightColumn,Y)]+self.LifeGrid[(LeftColumn,DownRow)]+self.LifeGrid[(X,DownRow)]+self.LifeGrid[(RightColumn,DownRow)])
return (LiveCount)def RunGeneration(self):
NewGrid={}AllDeadFlag=1for Y in range(FIELD_SIZE):
for X in range(FIELD_SIZE):CurrentState=self.LifeGrid[(X,Y)]LiveCount=self.GetLiveNeighbors(X,Y)if ((LiveCount==2 and CurrentState)
or (LiveCount==3)):NewGrid[(X,Y)]=1AllDeadFlag=0
else:NewGrid[(X,Y)]=0
if (AllDeadFlag): raise EVERYONE_DEADif self.LifeGrid==NewGrid: raise STEADY_STATEself.LifeGrid,OldGrid=NewGrid,self.LifeGrid
def ShowManyGenerations(self,GenerationCount):try:
for Cycle in range(GenerationCount):self.PrintGrid(Cycle)self.RunGeneration()
except EVERYONE_DEAD:print “The population is now dead.”
except STEADY_STATE:print “The population is no longer changing.”
if (__name__==”__main__”):# This first grid quickly settles into a pattern# that does not change.
Continued
4807-7 ch05.F 5/24/01 8:58 AM Page 85

86 Part I ✦ The Python Language
Listing 5-6 (continued)
BoringGrid=PlayField()BoringGrid.SetAlive(2,2)BoringGrid.SetAlive(2,3)BoringGrid.SetAlive(2,4)BoringGrid.SetAlive(3,2)BoringGrid.ShowManyGenerations(50)
# This grid contains a “glider” – a pattern of live# cells which moves diagonally across the grid.GliderGrid=PlayField()GliderGrid.SetAlive(0,0)GliderGrid.SetAlive(1,0)GliderGrid.SetAlive(2,0)GliderGrid.SetAlive(2,1)GliderGrid.SetAlive(1,2)GliderGrid.ShowManyGenerations(50)
SummaryPython has several tools for controlling the flow of execution. In this chapter you:
✦ Made decisions with if-statements.
✦ Set up repeating tasks with for-loops and while-loops.
✦ Built code that copes with problems by handling exceptions.
✦ Learned to add test scaffolding with assertions.
In the next chapter you’ll learn how to organize all your Python code into functions,
modules, and packages.
✦ ✦ ✦
4807-7 ch05.F 5/24/01 8:58 AM Page 86

ProgramOrganization
Python lets you break code down into reusable functions
and classes, then reassemble those components into
modules and packages. The larger the project, the more useful
this organization becomes.
This chapter explains function definition syntax, module and
package structure, and Python’s rules for visibility and scope.
Defining FunctionsHere is a sample function definition:
def ReverseString(Forwards):“””Convert a string to a list of
characters, reverse the list, and join the list back into a string
“”” CharacterList=list(Forwards)CharacterList.reverse()return string.join(CharacterList,””);
The statement def FunctionName([parameters,...])begins the function. Calling the function executes the code
within the following indented block.
A string following the def statement is a docstring. A docstring
is a comment intended as documentation. Development envi-
ronments like IDLE display a function’s docstrings to show
how to call the function. Also, tools like HappyDoc can extract
docstrings from code to produce documentation. So, a doc-
string is a good place to describe a function’s behavior,
parameter requirements, and the like. Modules can also have
a docstring — a string preceding any executable code is taken
to be the module’s description.
66C H A P T E R
✦ ✦ ✦ ✦
In This Chapter
Defining functions
Grouping code withmodules
Importing modules
Locating modules
Understanding scoperules
Grouping modulesinto packages
Compiling andrunningprogrammatically
✦ ✦ ✦ ✦
4807-7 ch06.F 5/24/01 8:58 AM Page 87

88 Part I ✦ The Python Language
The statement return [expression] exits a function, optionally passing back an
expression to the caller. A return statement with no arguments is the same as
return None. A function also exits (returning None) when the last statement fin-
ishes, and execution “runs off the end of” the function code block.
Pass by object referenceA Python variable is a reference to an object. Python passes function parameters
using call-by-value. If you change what a parameter refers to within a function, the
change does not affect the function’s caller. For example:
>>> def StupidFunction(InputList):... InputList=[“I”,”Like”,”Cheese”]...>>> MyList=[1,2,3]>>> StupidFunction(MyList)>>> print MyList # MyList is unchanged![1, 2, 3]
The parameter InputList is local to the function StupidFunction. Changing InputList
within the function does not affect MyList. The function accomplishes nothing.
However, a function can change the object that a parameter refers to. For example,
this function removes duplicate elements from a list:
def RemoveDuplicates(InputList):ListIndex=-1# We iterate over the list from right to left, deleting# all duplicates of element -1, then -2, and so on. (Because# we are removing elements of the list, using negative# indices is convenient: element -3 is still element -3 # after we delete some items preceding it.)while (-ListIndex<len(InputList)):
# list.index() returns a positive index, so get the# positive equivalent of ListIndex and name it# CurrentIndex (same element, new index number).CurrentIndex=len(InputList)+ListIndexCurrentElement=InputList[ListIndex]# Keep removing duplicate elements as long as # an element precedes the current one.while (InputList.index(CurrentElement)<CurrentIndex):
InputList.remove(CurrentElement)CurrentIndex=CurrentIndex-1
ListIndex=ListIndex-1
All about parametersA function parameter can have a default value. If a parameter has a default value,
you do not need to supply a value to call the function.
4807-7 ch06.F 5/24/01 8:58 AM Page 88

89Chapter 6 ✦ Program Organization
When you call a function, you can supply its parameters by name. It is legal to name
some parameters and not others — but after supplying the name for one parameter,
you must name any other parameters you pass.
For example, this function simulates the rolling of dice. By default, it rolls ordinary
6-sided dice, one at a time:
>>> import whrandom>>> def RollDice(Dice=1,Sides=6):... Total=0... for Die in range(Dice):... Total += whrandom.randint(1,Sides)... return Total...>>> RollDice()5>>> RollDice(2) # Come on, snake-eyes!8>>> RollDice(2,4) # Roll two four-sided dice.5>>> RollDice(Sides=20) # Named parameter17>>> # After naming one parameter, you must name the rest:>>> RollDice(Sides=5,4)SyntaxError: non-keyword arg after keyword arg
A function evaluates its argument defaults only once. We recommend avoiding
dynamic (or mutable) default values. For example, if you do not pass a value to this
function, it will always print the time that you first called it:
def PrintTime(TimeStamp=time.time()):# time.time() is the current time in milliseconds,# time.localtime() puts the time into the # canonical tuple-form, and time.asctime() converts# the time-tuple to a cute string format.# The function’s default argument, TimeStamp, does # not change between calls!
print time.asctime(time.localtime(TimeStamp))
This improved version of the function prints the current time if another time is not
provided:
def PrintTime(TimeStamp=None):if (TimeStamp==None): TimeStamp=time.time()print time.asctime(time.localtime(TimeStamp))
Arbitrary argumentsA function can accept an arbitrary sequence of parameters. The function collects
these parameters into one tuple. This logging function shows the internal object IDs
of a sequence of arguments:
4807-7 ch06.F 5/24/01 8:58 AM Page 89

90 Part I ✦ The Python Language
def LogObjectIDs(LogString, *args):print LogStringfor arg in args: print id(arg)
A function can also accept an arbitrary collection of named parameters. The func-
tion collects these named parameters into one dictionary. This version of the log-
ging function lets you give names to the objects passed in:
def LogObjectIDs(LogString, **kwargs):print LogStringfor (ParamName,ParamValue) in kwargs.items():
print “Object:”,ParamName,”ID:”,id(ParamValue)
To make a truly omnivorous function, you can take a dictionary of arbitrary named
parameters and a tuple of unnamed parameters.
Apply: passing arguments from a tupleThe function apply(InvokeFunction,ArgumentSequence) calls the function
InvokeFunction, passing the elements of ArgumentSequence as arguments. The use-
fulness of apply is that it breaks arguments out of a tuple cleanly, for any length of
tuple.
For example, assume you have a function SetColor(Red,Green,Blue), and a tuple
representing a color:
>>> print MyColor(255, 0, 255)>>> SetColor(MyColor[0],MyColor[1],MyColor[2]) # Kludgy!>>> apply(SetColor,MyColor) # Same as above, but cleaner.
A bit of functional programmingPython can define new functions on the fly, giving you some of the functional flexi-
bility of languages like Lisp and Scheme.
You define an anonymous function with the lambda keyword. The syntax is lambda[parameters,...]: <expression>. For example, here is an anonymous function
that filters list entries:
>>> SomeNumbers=[5,10,15,3,18,2]>>> filter(lambda x:x>10, SomeNumbers)[15, 18]
This code uses anonymous functions to test for primes:
4807-7 ch06.F 5/24/01 8:58 AM Page 90

91Chapter 6 ✦ Program Organization
def FindPrimes(EndNumber):NumList = range(2,EndNumber)Index=0 while (Index<len(NumList)):
NumList=filter(lambda y,x=NumList[Index]:(y<=x or y%x!=0), NumList)
Index += 1print NumList
Lambda functions can be helpful for event handling in programs with a GUI. For
example, here is some code to add a button to a Tkinter frame.
def AddCosmeticButton(ButtonFrame,ButtonLabel):Button(ButtonFrame,text=ButtonLabel,command = lambda=ButtonLabel:LogUnimplemented(l)).pack()
Clicking the button causes it to call LogUnimplemented with the button label as an
argument. Presumably, LogUnimplemented makes note of the fact that somebody is
clicking a button that does nothing.
An anonymous function cannot be a direct call to print because lambdarequires an expression.
Lambda functions have their own local namespace and cannot access variablesother than those in their parameter list and those in the global namespace.
Grouping Code with ModulesA module is a file consisting of Python code. A module can define functions, classes,
and variables. A module can also include runnable code.
A stand-alone module is often called a script or program. You can use whichever
word you like, because Python makes no distinction between them.
Grouping related code into a module makes the code easier to understand and use.
When writing a program, split off code into separate modules whenever a file starts
becoming too large or performing too many different functions.
Laying out a moduleThe usual order for module elements is:
✦ Docstring and/or general comments (revision log or copyright information,
and so on)
✦ Import statements (see below for more information on importing modules)
Note
Note
4807-7 ch06.F 5/24/01 8:58 AM Page 91

92 Part I ✦ The Python Language
✦ Definitions of module-level variables (“constants”)
✦ Definitions of classes and functions
✦ Main function, if any
This organization is not required, but it works well and is widely used.
People often store frequently used values in ALL_CAPS_VARIABLES to make latercode easier to maintain, or simply more readable. For example, the standardlibrary ftplib includes this definition:
FTP_PORT = 21 # The standard FTP server control port
Such a variable is “constant by convention” — Python does not forbid modifica-tions, but callers should not change its value.
Taking inventory of a moduleThe function dir(module) returns a list of the variables, functions, and classes
defined in module. With no arguments, dir returns a list of all currently defined
names. dir(__builtin__) returns a list of all built-in names. For example:
>>> dir() # Just after starting Python[‘__builtins__’, ‘__doc__’, ‘__name__’]>>> import sys>>> dir()[‘__builtins__’, ‘__doc__’, ‘__name__’, ‘sys’]
You can pass any object (or class) to dir to get a list of class members.
Importing ModulesTo use a module, you must first import it. Then, you can access the names in the
module using dotted notation. For example:
>>> string.digits # Invalid, because I haven’t imported stringTraceback (most recent call last):File “<stdin>”, line 1, in ?
NameError: There is no variable named ‘string’>>> import string # Note: No parentheses around module name.>>> string.digits‘0123456789’
Another option is to import names from the module into the current namespace,
using the syntax from ModuleName import Name, Name2,.... For example:
>>> from string import digits>>> digits # Without a dot‘0123456789’
Note
4807-7 ch06.F 5/24/01 8:58 AM Page 92

93Chapter 6 ✦ Program Organization
>>> string.digits # I don’t know about the module, only digits.Traceback (most recent call last):File “<stdin>”, line 1, in ?
NameError: There is no variable named ‘string’
To bring every name from a module into the current namespace, use a blanket
import: from module import *. Importing modules this way can make for confusing
code, especially if two modules have functions with the same name. But it can also
save a lot of typing.
The import statements for a script should appear at the beginning of the file. (This
arrangement is not required, but importing halfway though a script is confusing.)
What else happens upon import?Within a module, the special string variable __name__ is the name of the module.
When you execute a stand-alone module, its __name__ is always __main__. This
provides a handy way to set aside code that runs when you invoke a module, but not
when you import it. Some modules use this code as a test driver. (See Listing 6-1.)
Listing 6-1: Alpha.py
import string
def Alphabetize(Str):“Alphabetize the letters in a string”CharList=list(Str)CharList.sort()return (string.join(CharList,””))
if (__name__==”__main__”):# This code runs when we execute the script, not when# we import it.X=string.upper(“BritneySpears”)Y=string.upper(“Presbyterians”)# Strange but true!print (Alphabetize(X)==Alphabetize(Y))
else:# This code runs when we import (not run) the module.print “Imported module Alpha”
Reimporting modulesOnce Python has imported a module once, it doesn’t import it again for subsequent
import statements. You can force Python to “reimport” a module with a call to
reload(LoadedModule). This procedure is useful for debugging — you can edit a
4807-7 ch06.F 5/24/01 8:58 AM Page 93

94 Part I ✦ The Python Language
module on disk, then reload it without having to restart an interactive interpreter
session.
Exotic importsA module can override standard import behavior by implementing the function
__import__ (name[, globals[, locals[, fromlist]]]). Because a module is a
class, defining __import__ in a module amounts to overriding the default version
of __import__.
We don’t recommend overriding __import__ as it is a very low-level operationfor such a high-level language! See the libraries imp, ihooks, and rexec for exam-ples of overridden import behavior.
Locating ModulesWhen you import a module, the Python interpreter searches for the module in the
current directory. If the module isn’t found, Python then searches each directory in
the PythonPath. If all else fails, Python checks the default path. On Windows, the
default path consists of c:\python20\lib\ and some subdirectories; on UNIX, this
default path is normally /usr/local/lib/python/. (The code for Python’s stan-
dard libraries is installed into the default path. Some modules, such as sys, are
built into the Python interpreter, and have no corresponding .py files.)
Python stores a list of directories that it searches for modules in the variable
sys.path.
Python pathThe PythonPath is an environment variable, consisting of a list of directories. Here
is a typical PythonPath from a Windows system:
set PYTHONPATH=c:\python20\lib;c:\python20\lib\proj1;c:\python20\lib\bob
And here is a typical PythonPath from a UNIX system:
set PYTHONPATH=/home/stanner/python;/usr/bin/python/lib
I generally use a scratch folder to hold modules I am working on; other files I put in
the lib directory (or, if they are part of a package, in subdirectories). I find that set-
ting the PythonPath explicitly is most useful for switching between different ver-
sions of a module.
Caution
4807-7 ch06.F 5/24/01 8:58 AM Page 94

95Chapter 6 ✦ Program Organization
Compiled filesYou can compile a Python program into system-independent bytecodes. The inter-
preter stores the compiled version of a module in a corresponding file with a .pycextension. This precompiled file runs at the same speed, but loads faster because
Python need not parse the source code. Files compiled with the optimization flag
on are named with a .pyo extension, and behave like .pyc files.
When you import a module foo, Python looks for a compiled version of foo. Python
looks for a file named foo.pyc that is as new as foo.py. If so, Python loads foo.pyc instead of re-parsing foo.py. If not, Python parses foo.py, and writes out the
compiled version to foo.pyc.
When you run a script from the command line, Python does not create (or lookfor) a precompiled version. To save some parsing time, you can invoke a short“stub” script that imports the main module. Or, you can compile the main script byhand (by importing it, by calling py_compile.compile(ScriptFileName), orby calling compileall.compile_dir(ScriptDirectoryName)), then invokethe .pyc file directly. However, be sure to precompile the script again when youchange it!
Understanding Scope Rules Variables are names (identifiers) that map to objects. A namespace is a dictionary
of variable names (keys) and their corresponding objects (values). A Python state-
ment can access variables in a local namespace and in the global namespace. If
(heaven forfend!) a local and a global variable have the same name, the local vari-
able shadows the global variable.
Each function has its own local namespace. Class methods follow the same scoping
rule as ordinary functions. Python accesses object attributes via the self argu-
ment; attributes are not brought separately into the namespace.
At the module level, or in an interactive session, the local namespace is the same as
the global namespace. For purposes of an eval, exec, execfile, or input state-
ment, the local namespace is the same as the caller’s.
Is it local or global?Python makes educated guesses on whether variables are local or global. It
assumes that any variable assigned a value in a function is local. Therefore, in order
to assign a value to a global variable within a function, you must first use the globalstatement. The statement global VarName tells Python that VarName is a global
variable. Python stops searching the local namespace for the variable.
Note
4807-7 ch06.F 5/24/01 8:58 AM Page 95

96 Part I ✦ The Python Language
For example, Listing 6-2 defines a variable NumberOfMonkeys in the global name-
space. Within the function AddMonkey, we assign NumberOfMonkeys a value —
therefore, Python assumes NumberOfMonkeys is a local variable. However, we
access the value of the local variable NumberOfMonkeys before setting it, so an
UnboundLocalError is the result. Uncommenting the global statement fixes the
problem.
Listing 6-2: Monkeys.py
NumberOfMonkeys = 11
def AddMonkey():# Uncomment the following line to fix the code:#global NumberOfMonkeys NumberOfMonkeys = NumberOfMonkeys + 1
print NumberOfMonkeysAddMonkey()print NumberOfMonkeys
Listing namespace contentsThe built-in functions locals and globals return local and global namespace con-
tents in dictionary form. These operations are handy for debugging.
Grouping Modules into PackagesYou can group related modules into a package. Packages can also contain subpack-
ages, and sub-subpackages, and so on. You access modules inside a package using
dotted notation — for example, seti.log.FlushLogFile() calls the function
FlushLogFile in the module log in the package seti.
Python locates packages by looking for a directory containing a file named
__init__.py. The directory can be a subdirectory of any directory in sys.path.
The directory name is the package name.
The script __init__.py runs when the package is imported. It can be an empty
file, but should probably at least contain a docstring. It may also define the special
variable __all__, which governs the behavior of a blanket import of the form fromPackageName import *. If defined, __all__ is a list of names of modules to bring into
4807-7 ch06.F 5/24/01 8:58 AM Page 96

97Chapter 6 ✦ Program Organization
the current namespace. If the script __init__.py does not define __all__, then a
blanket-import brings into the current namespace only the names defined and
modules imported in __init__.py.
See Chapter 36 for information on how to install new modules and packages, andhow to distribute your own code.
Compiling and Running ProgrammaticallyThe exec statement can run an arbitrary chunk of Python code. The syntax is execExecuteObject [in GlobalDict[, LocalDict]]. ExecuteObject is a string, file
object, or code object containing Python code. GlobalDict and LocalDict are diction-
aries used for the global and local namespaces, respectively. Both GlobalDict and
LocalDict are optional. If you omit LocalDict, it defaults to GlobalDict. If you omit
both, the code runs using the current namespaces.
The eval function evaluates a Python expression. The syntax is eval(ExpressionObject[,GlobalDict[,LocalDict]]). ExpressionObject is a string
or a code object; GlobalDict and LocalDict have the same semantics as for exec.
The execfile function has the same syntax as exec, except that it takes a file
name instead of an execute object.
These functions raise an exception if they encounter a syntax error.
The compile function transforms a code string into a runnable code object. Python
passes the code object to exec or eval. The syntax is
compile(CodeString,FileName,Kind). CodeString is a string of Python code.
FileName is a string describing the code’s origin; if Python read the code from a file,
FileName should be the name of that file. Kind is a string describing the code:
✦ “exec” — one or more executable statements
✦ “eval” — a single expression
✦ “single” — a single statement, which is printed upon evaluation if not None
Multiline expressions should have two trailing newlines in order for Python to passthem to compile or exec. (This requirement is a quirk of Python that may befixed in a later version.)
Note
Cross-Reference
4807-7 ch06.F 5/24/01 8:58 AM Page 97

98 Part I ✦ The Python Language
SummaryProgram organization helps make code reusable, as well as more easily compre-
hended. In this chapter you:
✦ Defined functions with variable argument lists.
✦ Organized code into modules and packages.
✦ Compiled and ran Python code on-the-fly.
In the next chapter you’ll harness the power of object-oriented programming in
Python.
✦ ✦ ✦
4807-7 ch06.F 5/24/01 8:58 AM Page 98

Object-OrientedPython
Python has been an object-oriented language from day
one. Because of this, creating and using classes and
objects are downright easy. This chapter helps you become an
expert in using Python’s object-oriented programming support.
Overview of Object-OrientedPython
If you don’t have any previous experience with object-oriented
(OO) programming, you may want to consult an introductory
course on it or at least a tutorial of some sort so that you have
a grasp of the basic concepts.
Python’s object-oriented programming support is very
straightforward and easy: you create classes (which are some-
thing akin to blueprints), and you use them to create instanceobjects (which are like the usable and finished versions of
what the blueprints represent).
An instance object (or just “object,” for short) can have any
number of attributes, which include data members (variables
belonging to that object) and methods (functions belonging to
that object that operate on that object’s data).
You can create a new class by deriving it from one or more
other classes. The new child class, or subclass, inherits the
attributes of its parent classes, but it may override any of
the parent’s attributes as well as add additional attributes
of its own.
77C H A P T E R
✦ ✦ ✦ ✦
In This Chapter
Overview of object-oriented Python
Creating classes andinstance objects
Deriving new classesfrom other classes
Hiding private data
Identifying classmembership
Overloadingstandard behaviors
Using weakreferences
✦ ✦ ✦ ✦
4807-7 ch07.F 5/24/01 8:58 AM Page 99

100 Part I ✦ The Python Language
Creating Classes and Instance ObjectsBelow is a sample class and an example of its use:
>>> class Wallet:“Where does my money go?”walletCnt = 0def __init__(self,balance=0):
self.balance = balanceWallet.walletCnt += 1
def getPaid(self,amnt):self.balance += amntself.displayBalance()
def spend(self,amnt):self.balance -= amntself.displayBalance()
def displayBalance(self):print ‘New balance: $%.2f’ % self.balance
The class statement creates a new class definition (which is itself also an object)
called Wallet. The class has a documentation string (which you can access via
Wallet.__doc__), a count of all the wallets in existence, and three methods.
You declare methods like normal functions with the exception that the first argu-
ment to each method is self, the conventional Python name for the instance of the
object (it has the same role as the this object in Java or the this pointer in C++).
Python adds the self argument to the list for you; you don’t need to include it
when you call the methods. The first method is a special constructor or initializa-
tion method that Python calls when you create a new instance of this class. Note
that it accepts an initial balance as an optional parameter. The other two methods
operate on the wallet’s current balance.
All methods must operate on an instance of the object (if you’re coming fromC++, there are no “static methods”).
Objects can have two types of data members: walletCnt, which is outside of any
method of the class, is a class variable, which means that all instances of the class
share it. Changing its value in one instance (or in the class definition itself) changes
it everywhere, so any wallet can use walletCnt to see how many wallets you’ve
created:
>>> myWallet = Wallet(); yourWallet = Wallet()>>> print myWallet.walletCnt, yourWallet.walletCnt2,2
Note
4807-7 ch07.F 5/24/01 8:58 AM Page 100

101Chapter 7 ✦ Object-Oriented Python
The other type of data member is an instance variable, which is one defined inside a
method and belongs only to the current instance of the object. The balance mem-
ber of Wallet is an instance variable. So that you’re never confused as to what
belongs to an object, you must use the self parameter to refer to its attributes
whether they are methods or data members.
Creating instance objectsTo create an instance of a class, you “call” the class and pass in whatever argu-
ments its __init__ method accepts, and you access the object’s attributes using
the dot operator:
>>> w = Wallet(50.00)>>> w.getPaid(100.00)New balance $150.00>>> w.spend(25.0)New balance $125.00>>> w.balance125.0
An instance of a class uses a dictionary (named __dict__) to hold the attributes
and values specific to that instance. Thus object.attribute is the same as
object.__dict__[‘attribute’]. Additionally, each object and class has a few
other special members:
>>> Wallet.__name__ # Class name‘Wallet’>>> Wallet.__module__ # Module in which class was defined‘__main__’>>> w.__class__ # Class definition for this object<class __main__.Wallet at 010C1CFC>>>> w.__doc__ # Doc string‘Where does my money go?’
More on accessing attributesYou can add, remove, or modify attributes of classes and objects at any time:
>>> w.owner = ‘Dave’ # Add an ‘owner’ attribute.>>> w.owner = ‘Bob’ # Bob stole my wallet.>>> del w.owner # Remove the ‘owner’ attribute.
Modifying a class definition affects all instances of that class:
>>> Wallet.color = ‘blue’ # Add a class variable.>>> w.color‘blue’
4807-7 ch07.F 5/24/01 8:58 AM Page 101
102 Part I ✦ The Python Language
Note that when an instance modifies a class variable without naming the class, it’s
really only creating a new instance attribute and modifying it:
>>> w.color = ‘red’ # You might think you’re changing the >>> Wallet.color # class variable, but you’re not!‘blue’
Because you can modify a class instance at any time, a class is a great way tomimic a more flexible version of a C struct:
class myStruct: passz = myStruct()z.whatever = ‘howdy’
Instead of using the normal statements to access attributes, you can
use the getattr(obj, name[, default]), hasattr(obj,name),
setattr(obj,name,value), and delattr(obj, name) functions:
>>> hasattr(w,’color’) # Does w.color exist?1>>> getattr(w,’color’) # Return w.color please.‘red’>>> setattr(w,’size’,10) # Same as ‘w.size = 10’.>>> delattr(w,’color’) # Same as ‘del w.color’.
As with functions, methods can also have data attributes. The method of the follow-
ing class, for example, includes an HTML docstring for use with a Web browser-
based class browser:
>>> class SomeClass:... def deleteFiles(self, mask):... os.destroyFiles(mask)... deleteFiles.htmldoc = ‘<bold>Use with care!</bold>’>>> hasattr(SomeClass.deleteFiles,’htmldoc’)1>>> SomeClass.deleteFiles.htmldoc‘<bold>Use with care!</bold>’
You can read more about function attributes in Chapter 6.
Method attributes are new in Python 2.1.
Deriving New Classes from Other ClassesInstead of starting from scratch, you can create a class by deriving it from a pre-
existing class by listing the parent class in parentheses after the new class name:
NewFeature
Cross-Reference
Tip
4807-7 ch07.F 5/24/01 8:58 AM Page 102

103Chapter 7 ✦ Object-Oriented Python
>>> class GetAwayVehicle:... topSpeed = 200... def engageSmokeScreen(self):... print ‘<Cough!>’... def fire(self):... print ‘Bang!’>>> class SuperMotorcycle(GetAwayVehicle):... topSpeed = 250... def engageOilSlick(self):... print ‘Enemies destroyed.’... def fire(self):... GetAwayVehicle.fire(self) # Use method in parent.... print ‘Kapow!’
The child class (SuperMotorcycle) inherits the attributes of its parent class
(GetAwayVehicle), and you can use those attributes as if they were defined in the
child class:
>>> myBike = SuperMotorcycle()>>> myBike.engageSmokeScreen()<Cough!>>>> myBike.engageOilSlick()Enemies destroyed.
A child class can override data members and methods from the parent. For
example, the value of topSpeed in child overrides the one in the parent:
>>> myBike.topSpeed250
The fire method doesn’t just override the original version in the parent, but it also
calls the parent version too:
>>> myBike.fire()Bang!Kapow!
Multiple inheritanceWhen deriving a new child class, you aren’t limited to a single parent class:
>>> class Glider:... def extendWings(self):... print ‘Wings ready!’... def fire(self):... print ‘Bombs away!’>>> class FlyingBike(Glider,SuperMotorcycle):... pass
4807-7 ch07.F 5/24/01 8:58 AM Page 103

104 Part I ✦ The Python Language
In this case a FlyingBike enjoys all the benefits of being both a Glider and a
SuperMotorcycle (which is also a GetAwayVehicle). When searching for an
attribute not defined in a child class, Python does a left-to-right, depth-first search
on the base classes until it finds a match. If you fire with a FlyingBike, it drops
bombs, because first and foremost, it’s a Glider:
>>> betterBike = FlyingBike()>>> betterBike.fire()Bombs away!
You can get a list of base classes using the __bases__ member of the class
definition object:
>>> for base in FlyingBike.__bases__:... print base__main__.Glider # __main__ is the module in__main__.SuperMotorcycle # which you defined the class.
Just because multiple inheritance lets you have child classes with many parents(and other strange class genealogies) doesn’t always mean it’s a good idea. If yourdesign calls for more than a few direct parent classes, chances are you need a newdesign.
Multiple inheritance really shines with mix-ins, which are small classes that over-
ride a portion of another class to customize behavior. The SocketServer module,
for example, defines a generic TCP socket server class called TCPServer that han-
dles a single connection at a time. The module also provides several mix-ins, includ-
ing ForkingMixIn and ThreadingMixIn that provide their own process_requestmethod. This lets the TCPServer code remain simple while making it easy to create
multi-threaded or multi-process socket server classes:
class ThreadingServer(ThreadingMixIn, TCPServer): passclass ForkingServer(ForkingMixIn, TCPServer): pass
Furthermore, you can use the same threading and forking code to create other
types of servers:
class ThreadingUDPServer(ThreadingMixIn, UDPServer): pass
See Chapter 15 for information on networking and socket servers.
Creating a custom list classThe UserList class (in the UserList module) provides a listlike base class that
you can extend to suit your needs. UserList accepts a list to use as an initializer,
and internally you can access the actual Python list via the data member. The fol-
lowing example creates an object that behaves like an ordinary list except that it
also provides a method to randomly reorder the items in the list:
Cross-Reference
Tip
4807-7 ch07.F 5/24/01 8:58 AM Page 104

105Chapter 7 ✦ Object-Oriented Python
>>> import UserList, whrandom>>> from whrandom import randint>>> class MangleList(UserList.UserList):... def mangle(self):... data = self.data... count = len(data)... for i in range(count):... data.insert(randint(0,count-1),data.pop())>>> z = MangleList([1,2,3,4,5])>>> z.mangle() ; print z[1, 3, 5, 4, 2]>>> z.mangle() ; print z[5, 4, 1, 2, 3]
Creating a custom string classYou can also create your own custom string behaviors using the UserString class
in the UserString module. As with UserLists and lists, a UserString looks and
acts a lot like a normal string object:
>>> from UserString import *>>> s = UserString(‘Goal!’)>>> s.data # Access the underlying Python string.‘Goal!’>>> s‘Goal!’>>> s.upper()‘GOAL!’>>> s[2]‘a’
Of course, the whole point of having the UserString class is so that you can sub-
class it. As an example, the UserString module also provides the MutableStringclass:
>>> m = MutableString(‘2 + 2 is 5’)>>> m‘2 + 2 is 5’>>> m[9] = ‘4’>>> m‘2 + 2 is 4’
MutableString does its magic by overriding (among other things) the__setitem__ method, which is a special method Python calls to handle theindex-based assignment in the example above. We cover __setitem__ andother special methods in the “Overloading Standard Behaviors” section later inthis chapter.
Cross-Reference
4807-7 ch07.F 5/24/01 8:58 AM Page 105

106 Part I ✦ The Python Language
Creating a custom dictionary classAnd finally, Python also has the UserDict class in the UserDict module so that
you can create your own subclasses of dictionaries:
>>> from UserDict import *>>> d = UserDict({1:’one’,2:’two’,3:’three’})>>> d{3: ‘three’, 2: ‘two’, 1: ‘one’}>>> d.data{3: ‘three’, 2: ‘two’, 1: ‘one’}>>> d.has_key(3)1
The following example creates a dictionary object that, instead of raising an excep-
tion, returns None if you try to use a nonexistent key:
>>> from UserDict import *>>> class NoFailDict(UserDict):... def __getitem__(self,key):... try:... value = self.data[key]... except KeyError:... value = None... return value>>> q = NoFailDict({‘orange’:’0xFF6432’,’yellow’:’0xFFFF00’})>>> print q[‘orange’]0xFF6432>>> print q[‘blue’]None
Hiding Private DataIn other object-oriented languages such as C++ or Java, an object’s attributes may
or may not be visible outside the class definition (you can say a member is public,
private, or protected). Such conventions help keep the implementation details hid-
den and force you to work with objects through well-defined interfaces.
Python, however, takes more of a minimalist approach and assumes you know what
you’re doing when you try to access attributes of an object. Python programs usu-
ally have smaller and more straightforward implementations than their C++ or Java
counterparts, so private data members aren’t as useful or necessary (although if
you’re accustomed to using them you may feel a little “overexposed” for awhile).
Having said that, there still may come a time when you really don’t want users of an
object to have access to the implementation, or maybe you have some members in
a base class that you don’t want children classes to access. For these cases, you
can name attributes with a double underscore prefix, and those attributes will not
be directly visible to outsiders:
4807-7 ch07.F 5/24/01 8:58 AM Page 106

107Chapter 7 ✦ Object-Oriented Python
>>> class FooCounter:... __secretCount = 0... def foo(self):... self.__secretCount += 1... print self.__secretCount>>> foo = FooCounter()>>> foo.foo()1>>> foo.foo()2>>> foo.__secretCountTraceback (innermost last):File “<interactive input>”, line 1, in ?
AttributeError: ‘FooCounter’ instance has no attribute‘__secretCount’
Python protects those members by internally changing the name to include the
class name. You can be sneaky and thwart this convention (valid reasons for
doing this are rare!) by referring to the attribute using its mangled name:
_className__attrName:
>>> foo._FooCounter__secretCount2
Identifying Class MembershipClass definitions and instance objects each have their own data type:
>>> class Tree:... pass>>> class Oak(Tree):... pass>>> seedling = Oak()>>> type(seedling); type(Oak)<type ‘instance’><type ‘class’>
Refer to Chapter 4 for more on identifying the data types of an object.
Because the type is instance or class, all class definitions have the same type and
all instance objects have the same type. If you want to see if an object is an instance
of a particular class, you can use the isinstance(obj,class) function:
>>> isinstance(seedling,Oak)1>>> isinstance(seedling,Tree) # True because an Oak is a Tree.1
The issubclass(class,class) checks to see if one class is a descendent of
another:
Cross-Reference
4807-7 ch07.F 5/24/01 8:58 AM Page 107

108 Part I ✦ The Python Language
>>> issubclass(Oak,Tree)1>>> issubclass(Tree,Oak)0
You can also retrieve the string name for a class using the __name__ member:
>>> seedling.__class__.__name__‘Oak’>>> seedling.__class__.__bases__[0].__name__‘Tree’
Your programs will often be more flexible if, instead of depending on an object’stype or class, they check to see if an object has a needed attribute. This enablesyou and others to use your code with data types that you didn’t necessarily con-sider when you wrote it. For example, instead of checking to see if an objectpassed in is a file before you write to it, just check for a write method, and if pre-sent, use it. Later you may find it useful to call the same routine passing in someother object that also has a write method. “Using Filelike Objects” in Chapter 8covers this theme in more detail.
Overloading Standard BehaviorsSuppose you’ve created a Vector class to represent two-dimensional vectors. What
happens when you use the plus operator to add them? Most likely Python will yell
at you. You could, however, define the __add__ method in your class to perform
vector addition, and then the plus operator would behave:
>>> class Vector:... def __init__(self,a,b):... self.a = a... self.b = b... def __str__(self):... return ‘Vector(%d,%d)’ % (self.a,self.b)... def __add__(self,other):... return Vector(self.a+other.a,self.b+other.b)>>> v1 = Vector(2,10)>>> v2 = Vector(5,-2)>>> print v1 + v2Vector(7,8)
Not only do users now have an intuitive way to add two vectors (much better than
having them call some clunky function directly), but vectors also display them-
selves nicely when converted to strings (thanks to the __str__ method).
The operator module defines many functions for which you can overload or define
new behavior when used with your classes. The following sections describe these
functions and how to use them.
Tip
4807-7 ch07.F 5/24/01 8:58 AM Page 108

109Chapter 7 ✦ Object-Oriented Python
Note that some functions have two or even three very similar versions. For exam-
ple, in the numeric operators, you can create an __add__ function, an __iadd__function, and an __radd__ function all for addition. The first is to implement nor-
mal addition (x + y), the second for in-place addition (x += y), and the third for x + y
when x does not have an __add__ method (so Python calls y.__radd(x) instead). If
you don’t define in-place operator methods, Python checks for an overloaded ver-
sion of the normal operator (for example, if you don’t define __iadd__, x += y
causes Python to still call __add__ if defined). For simplicity, it’s best to leave the
in-place operators undefined unless your class in some way benefits from special
in-place processing (such as a huge matrix class that could save memory by per-
forming addition in place).
Overloading basic functionalityTable 7-1 lists some generic functionality that you can override in your own classes.
Table 7-1Base Overloading Methods
Method Sample Call
__init__ (self[, args...]) obj = className(args)
__del__ (self) del obj
__call__ (self[, args...]) , callable function obj(5)
__getattr__ (self, name) obj.foo
__setattr__ (self, name, value) obj.foo = 5
__delattr__ (self, name) del obj.foo
__repr__ (self) `obj` or repr(obj)
__str__ (self) str(obj)
__cmp__ (self, x) cmp(obj,x)
__lt__(self, x) obj < x
__le__(self,x) obj <= x
__eq__(self,x) obj == x
__ne__(self,x) obj != x
__gt__(self, x) obj > x
__ge__(self,x) obj >= x
__hash__ (self) hash(obj)
__nonzero__ (self) nonzero(obj)
4807-7 ch07.F 5/24/01 8:58 AM Page 109

110 Part I ✦ The Python Language
Note that with the del statement, Python won’t call the __del__ method unless the
object’s reference count is finally 0.
Python invokes the __call__ method any time someone tries to treat an instance
of your object as a function. Users can test for “callability” using the
callable(obj) function, which tries to determine if the object is callable
(callable may return true and be wrong, but if it returns false, the object really
isn’t callable).
Python calls the __getattr__ function only after a search through the instance dic-
tionary and base classes comes up empty-handed. Your implementation should
return the desired attribute or raise an AttributeError exception. If __setattr__needs to assign a value to an instance variable, be sure to assign it to the instance
dictionary instead (self.__dict__[name] = val) to prevent a recursive call to
__setattr__. If your class has a __setattr__ method, Python always calls it to
set member variable values, even if the instance dictionary already contains the
variable being set.
The hash and cmp functions are closely related: if you do not implement __cmp__,
you should not implement __hash__. If you provide a __cmp__ but no __hash__,
then instances of your object can’t act as dictionary keys (which is correct if your
objects are mutable). Hash values are 32-bit integers, and two instances that are
considered equal should also return the same hash value.
The nonzero function performs truth value testing, so your implementation should
return 0 or 1. If not implemented, Python looks for a __len__ implementation to use,
and if not found, then all instances of your object will be considered “true.”
You use the __lt__, __gt__, and other methods to implement support for richcomparisons where you have more complete control over how objects behave dur-
ing different types of comparisons. If present, Python calls any of these methods
before looking for a __cmp__ method. The following example prints a message each
time Python calls a comparison function so you can see what happens:
>>> class Simple:... def __cmp__(self, obj):... print ‘__cmp__’... return 1... def __lt__(self, obj):... print ‘__lt__’... return 0>>> s = Simple()>>> s < 5__lt__ # Python uses rich comparisons first.0>>> s > 5__cmp__ # Uses __cmp__ if there are no rich comparison methods.1
4807-7 ch07.F 5/24/01 8:58 AM Page 110

111Chapter 7 ✦ Object-Oriented Python
Your rich comparison methods can return NotImplemented to tell Python that you
don’t want to handle a particular comparison. For example, the following class imple-
ments an equality method that works on integers. If the object to which it is compar-
ing isn’t an integer, it tells Python to figure out the comparison result on its own:
>>> class MyInt:... def __init__(self, val):... self.val = val... def __eq__(self, obj):... print ‘__eq__’... if type(obj) != type(0):... print ‘Skipping’... return NotImplemented... return self.val == obj>>> m = MyInt(16)>>> m == 10__eq__0>>> m == ‘Hi’__eq__Skipping0
Although __cmp__ methods must return an integer to represent the result of thecomparison, rich comparison methods can return data of any type or raise anexception if a particular comparison is invalid or meaningless.
Rich comparisons are new in Python 2.1.
Overloading numeric operatorsBy overloading the numeric operators methods, your classes can correctly respond
to operators like +, -, and so on. Note that Python calls the right-hand side version
of operators (for example, __radd__) if the left-hand operator doesn’t have a corre-
sponding method defined (__add__):
>>> class Add:... def __init__(self,val):... self.val = val... def __add__(self,obj):... print ‘add’,obj... return self.val + obj... def __radd__(self,obj):... print ‘radd’,obj... return self.val + obj>>> a = Add(10)>>> a<__main__.Add instance at 00E5D354>>>> a + 5 # Calls a.__add__(5).
NewFeature
Tip
4807-7 ch07.F 5/24/01 8:58 AM Page 111

112 Part I ✦ The Python Language
add 515>>> 5 + a # Calls a.__radd__(5).radd 515
Table 7-2 lists the mathematic operations (and the right-hand and in-place variants)
that you can overload and examples of how to invoke them.
Table 7-2Numeric Operator Methods
Method Sample Call
__add__ (self, obj), __radd__, __iadd__ obj + 10.5
__sub__ (self, obj), __rsub__, __isub__ obj – 16
__mul__ (self, obj), __rmul__, __imul__ obj * 5.1
__div__ (self, obj), __rdiv__, __idiv__ obj / 15
__mod__ (self, obj), __rmod__, __imod__ obj % 2
__divmod__ (self, obj), __rdivmod__ divmod(obj,3)
__pow__ (self, obj[, modulo]), pow(obj,3)__rpow__(self,obj)
__neg__ (self) -obj
__pos__ (self) +obj
__abs__ (self) abs(obj)
__invert__ (self) ~obj
Overloading sequence and dictionary operatorsIf you create your own sequence or mapping data type, or if you just like those nifty
bracket operators, you can overload the sequence operators with the methods
listed in Table 7-3.
4807-7 ch07.F 5/24/01 8:58 AM Page 112

113Chapter 7 ✦ Object-Oriented Python
Table 7-3Sequence and Dictionary Operator Methods
Method Sample Call
__len__ (self) len(obj)
__getitem__ (self, key) obj[‘cheese’]
__setitem__ (self, key, value) obj[5] = (2,5)
__delitem__ (self, key) del obj[‘no’]
__setslice__ (self, i, j, sequence) obj[1:7] = ‘Fellow’
__delslice__ (self, i, j) del obj[5:7]
__contains__(self,obj) x in obj
This class overrides the slice operator to provide an inefficient way to create a list
of numbers:
>>> class DumbRange:... def __getitem__(self,slice):... step = slice.step... if step is None:... step = 1... return range(slice.start,slice.stop+1,step)>>> d = DumbRange()>>> d[2:5][2, 3, 4, 5]>>> d[2:10:2] # Extended (step) slicing![2, 4, 6, 8, 10]
The argument to __getitem__ is either an integer or a slice object. Slice objects
have start, stop, and step attributes, so your class can support the extended slic-
ing shown in the example.
If the key passed to __getitem__ is of the wrong type, your implementation should
raise the TypeError exception, and the slice methods should reject invalid indices
by raising the IndexError exception.
If your __getitem__ method raises IndexError on an invalid index, Python can
iterate over object instances as if they were sequences. The following class behaves
like a range object with a user-supplied step, but it limits itself to only 6 iterations:
4807-7 ch07.F 5/24/01 8:58 AM Page 113

114 Part I ✦ The Python Language
>>> class Stepper:... def __init__(self, step):... self.step = step... def __getitem__(self, index):... if index > 5:... raise IndexError... return self.step * index>>> s = Stepper(3)>>> for i in s:... print i0 # Python calls __getitem__ with index=03691215 # Python stops after a __getitem__call raises an exception
Overloading bitwise operatorsThe bitwise operators let your classes support operators such as << and xor:
>>> class Vector2D:... def __init__(self,i,j):... self.i = i... self.j = j... def __lshift__(self,x):... return Vector2D(self.i << x, self.j << x)... def __repr__(self):... return ‘Vector2D(%s,%s)’ % (`self.i`,`self.j`)>>> v1 = Vector2D(5,2)>>> v1 << 2Vector2D(20,8)
Table 7-4 lists the methods you define to overload the bitwise operators.
Table 7-4Bitwise Operator Methods
Method Sample Call
__lshift__ (self, obj), __rlshift__, obj << 3__ilshift__
__rshift__ (self, obj), __rrshift__, obj >> 1__irshift__
__and__ (self, obj), __rand__, __iand__ obj & 17
__or__ (self, obj), __ror__, __ior__ obj | otherObj
__xor__ (self, obj), __rxor__, __ixor__ obj ^ 0xFE
4807-7 ch07.F 5/24/01 8:58 AM Page 114

115Chapter 7 ✦ Object-Oriented Python
Overloading type conversionsBy overloading type conversion methods, you can convert your object to different
data types as needed:
>>> class Five:... def __int__(self):... return 5>>> f = Five()>>> int(f)5
Python calls these methods when you pass an object to one of the type conversion
routines. Table 7-5 lists the methods, sample Python code that would invoke them,
and sample output they might return.
Table 7-5Type Conversion Methods
Method Sample Call Sample Output
__int__(self) int(obj) 53
__long__(self) long(obj) 12L
__float__(self) float(obj) 3.5
__complex__(self) complex(obj) 2 + 3j
__oct__(self) oct(obj) ‘012’
__hex__(self) hex(obj) ‘0xFE’
Python calls the __coerce__(self, obj) method, if present, to coerce two numer-
ical types into a common type before applying an arithmetic operation. Your imple-
mentation should return a 2-item tuple containing self and obj converted to a
common numerical type or None if you don’t support that conversion.
Using Weak ReferencesLike many other high-level languages, Python uses a form of garbage collection to
automatically destroy objects that are no longer in use. Each Python object has a
reference count that tracks how many references to that object exist; when the ref-
erence count is 0, then Python can safely destroy the object.
While reference counting saves you quite a bit of error-prone memory management
work, there can be times when you want a weak reference to an object, or a refer-
ence that doesn’t prevent Python from garbage collecting the object if no other
4807-7 ch07.F 5/24/01 8:58 AM Page 115

116 Part I ✦ The Python Language
references exist. With the weakref module, you can create weak references to
objects, and Python will garbage collect an object if its reference count is 0 or if the
only references that exist are weak references.
The weakref module is new in Python 2.1.
Creating weak referencesYou create a weak reference by calling ref(obj[, callback]) in the weakrefmodule, where obj is the object to which you want a weak reference and callbackis an optional function to call when Python is about to destroy the object because
no strong references to it remain. The callback function takes a single argument, the
weak reference object.
Once you have a weak reference to an object, you can retrieve the referenced
object by calling the weak reference. The following example creates a weak refer-
ence to a socket object:
>>> ref = weakref.ref(a)>>> from socket import *>>> import weakref>>> s = socket(AF_INET,SOCK_STREAM)>>> ref = weakref.ref(s)>>> s<socket._socketobject instance at 007B4A94>>>> ref<weakref at 0x81195c; to ‘instance’ at 0x7b4a94>>>> ref() # Call it to access the referenced object.<socket._socketobject instance at 007B4A94>
Once there are no more references to an object, calling the weak reference returns
None because Python has destroyed the object.
Most objects are not accessible through weak references.
The getweakrefcount(obj) and getweakrefs(obj) functions in the weakrefmodule return the number of weak references and a list of referents for the given
object.
Weak references can be useful for creating caches of objects that are expensive to
create. For example, suppose you are building a distributed application that sends
messages between computers using connection-based network sockets. In order to
reuse the socket connections without keeping unused connections open, you
decide to keep a cache of open connections:
Note
NewFeature
4807-7 ch07.F 5/24/01 8:58 AM Page 116

117Chapter 7 ✦ Object-Oriented Python
import weakreffrom socket import *
socketCache = {}def getSocket(addr):
‘Returns an open socket object’if socketCache.has_key(addr):
sock = socketCache[addr]()if sock: # Return the cached socket.
return sock
# No socket found, so create and cache a new one.sock = socket(AF_INET,SOCK_STREAM)sock.connect(addr)socketCache[addr] = weakref.ref(sock)return sock
In order to send a message to a remote computer, your program calls getSocket to
obtain a socket object. If a connection to the given address doesn’t already exist,
getSocket creates a new one and adds a weak reference to the cache. When all
strong references to a given socket are gone, Python destroys the socket object and
the next request for the same connection will cause getSocket to create a new one.
The mapping([dict[,weakkeys]]) function in the weakref module returns a
weak dictionary (initializing it with the values from the optional dictionary dict). If
weakkeys is 0 (the default), the dictionary automatically removes any entry whose
value no longer has any strong references to it. If weakkeys is nonzero, the dictio-
nary automatically removes entries whose keys no longer have strong references.
Creating proxy objectsProxy objects are weak reference objects that behave like the object they reference
so that you don’t have to first call the weak reference to access the underlying
object. Create a proxy by calling weakref’s proxy(obj[, callback]) function.
You use the proxy object as if it was the actual object it references:
>>> from socket import *>>> import weakref>>> s = socket(AF_INET,SOCK_STREAM)>>> ref = weakref.proxy(s)>>> s<socket._socketobject instance at 007E4874>>>> ref # It looks like the socket object.<socket._socketobject instance at 007E4874>>>> ref.close() # The object’s methods work too.
4807-7 ch07.F 5/24/01 8:58 AM Page 117

118 Part I ✦ The Python Language
The callback parameter has the same purpose as the ref function. After
Python deletes the referenced object, using the proxy results in a
weakref.ReferenceError:
>>> del s>>> refTraceback (most recent call last):File “<stdin>”, line 1, in ?
This example assumes that Python immediately destroys the object once the laststring is gone. While true of the current garbage collector implementation, futureversions may be different.
SummaryPython fully supports object-oriented programming while requiring minimal effort
from you, the programmer. In this chapter you:
✦ Created your own custom classes.
✦ Derived new classes from other classes.
✦ Extended built-in data types like strings and lists.
✦ Defined custom behaviors for operations on your classes.
In the next chapter you learn to create programs that interact with the user and
store and retrieve data.
✦ ✦ ✦
Note
4807-7 ch07.F 5/24/01 8:58 AM Page 118

Input andOutput
In order to be useful, most programs must interact with the
“outside world” in some way. This chapter introduces
Python’s functions for reading and writing files, printing to the
screen, and retrieving keyboard input from the user.
Printing to the ScreenThe simplest way to produce output is using the print state-
ment, which converts the expressions you pass it to a string
and writes the result to standard output, which by default is
the screen or console. You can pass in zero or more expres-
sions, separated by commas, between which print inserts a
space:
>>> print ‘It is’,5+7,’past’,3It is 12 past 3
Before printing each expression, print converts any non-
string expressions using the str function. If you don’t want
the spaces between expressions, you can do the conversions
yourself:
>>> a = 5.1; z = (0,5,10)>>> print ‘(%0.1f + %0.1f) = \n%0.1f’ %(a,a,a*2)(5.1 + 5.1) = 10.2>>> print ‘Move to ‘+str(z)Move to (0, 5, 10)>>> print ‘Two plus ten is ‘+`2+10` # `` isthe same as repr.Two plus ten is 12
Chapter 3 covers converting different data types to strings.Cross-Reference
88C H A P T E R
✦ ✦ ✦ ✦
In This Chapter
Printing to the screen
Accessing keyboardinput
Opening, closing,and positioning files
Writing files
Reading files
Accessing standardI/O
Using filelike objects
✦ ✦ ✦ ✦
4807-7 ch08.F 5/24/01 8:58 AM Page 119

120 Part I ✦ The Python Language
If you append a trailing comma to the end of the statement, print won’t move to
the next line:
>>> def addEm(x,y):... print x,... print ‘plus’,... print y,... print ‘is’,... print x+y>>> addEm(5,2)5 plus 2 is 7
Python uses the softspace attribute of stdout (stdout is in the sys module) to
track whether it needs to output a space before the next item to be printed. You can
use this feature to manually shut off the space that would normally appear due to
using a comma:
>>> import sys>>> def joinEm(a,b):... print a,... sys.stdout.softspace = 0... print b... >>> joinEm(‘Thanks’,’giving’)Thanksgiving
An extended form of the print statement lets you redirect output to a file instead
of standard output:
>>> print >> sys.stderr ,”File not found”File not found
The extended form of print was introduced in Python 2.0.
Any filelike object will do, as you will see in the “Using Filelike Objects” section later
in this chapter.
Accessing Keyboard InputGoing the other direction, Python provides two built-in functions to retrieve a line
of text from standard input, which by default comes from the user’s keyboard. The
examples in this section use italics for text you enter in response to the prompts.
raw_inputThe raw_input([prompt]) function reads one line from standard input and
returns it as a string (removing the trailing newline):
NewFeature
4807-7 ch08.F 5/24/01 8:58 AM Page 120

121Chapter 8 ✦ Input and Output
>>> s = raw_input()Uncle Gomez>>> print sUncle Gomez
You can also specify a prompt for raw_input to use while waiting for user input:
>>> s = raw_input(‘Command: ‘)Command: launch missiles>>> print ‘Ignoring command to’,sIgnoring command to launch missiles
If raw_input encounters the end of file, it raises the EOFError exception.
inputThe input([prompt]) function is equivalent to raw_input, except that it assumes
the input is a valid Python expression and returns the evaluated result to you:
>>> input(‘Enter some Python: ‘)Enter some Python: [x*5 for x in range(2,10,2)][10, 20, 30, 40]
Note that input isn’t at all error-proof. If the expression passed in is bogus, inputraises the appropriate exception, so be wary when using this function in your
programs.
Chapter 38 covers the readline module for UNIX systems. If enabled, this mod-ule adds command history tracking and completion to these input routines (andPython’s interactive mode as well).
You may have noticed that you can’t read one character at a time (instead youhave to wait until the user hits Enter). To read a single character on UNIX systems(or any system with curses support), you can use the getch function in thecurses module (Chapter 22). For Windows systems, you can use the getch func-tion in the msvcrt module (Chapter 37).
Opening, Closing, and Positioning FilesThe remaining sections in this chapter show you how to use files in your programs.
Part II of this book — “Files, Data Storage, and Operating System Services” — coversmany additional features you’ll find useful when using files.
Cross-Reference
Cross-Reference
Cross-Reference
4807-7 ch08.F 5/24/01 8:58 AM Page 121

122 Part I ✦ The Python Language
openBefore you can read or write a file, you have to open it using Python’s built-in
open(name[, mode[, bufsize]]) function:
>>> f = open(‘foo.txt’,’wt’,1) # Open foo.txt for writing.>>> f<open file ‘foo.txt’, mode ‘wt’ at 010C0488>
The mode parameter is a string (similar to the mode parameter in C’s fopenfunction) and is explained in Table 8-1.
Table 8-1Mode Values for open
Value Description
R Opens for reading.
W Creates a file for writing, destroying any previous file with thesame name.
A Opens for appending to the end of the file, creating a new one ifit does not already exist.
r+ Opens for reading and writing (the file must already exist).
w+ Creates a new file for reading and writing, destroying anyprevious file with the same name.
a+ Opens for reading and appending to the end of the file, creatinga new file if it does not already exist.
If you do not specify a mode string, open uses the default of ‘r’. To the end of the
mode string you can append a ‘t’ to open the file in text mode or a ‘b’ to open it in
binary mode:
>>> f = open(‘somepic.jpg’,’w+b’) # Open/create binary file.
If you omit the optional buffer size parameter (or pass in a negative number), openuses the system’s default buffering. A value of 0 is for unbuffered reading and writing,
a value of 1 buffers data a line at a time, and any other number tells open to use a
buffer of that size (some systems round the number down to the nearest power of 2).
If for any reason the function call fails (file doesn’t exist, you don’t have permis-
sion), open raises the IOError exception.
The os module (Chapter 10) provides the fdopen, popen, popen2, and popen3functions as additional ways to obtain file objects. You can also create a filelike objectwrapping an open socket with the socket.makefile function (Chapter 15).
Cross-Reference
4807-7 ch08.F 5/24/01 8:58 AM Page 122

123Chapter 8 ✦ Input and Output
File object informationOnce you have a file object, you can use the name, fileno(), isatty(), mode, and
closed methods and attributes to get different information about the object’s
status:
>>> f = open(‘foo.txt’,’wt’)>>> f.mode # Get the mode used to create the file object.‘wt’>>> f.closed # Boolean: has the file been closed already?0>>> f.name # Get the name of the file.‘foo.txt’>>> f.isatty() # Is the file connected to a terminal?0>>> f.fileno() # Get the file descriptor number.0
With the file descriptor returned by the fileno method you can call read andother functions in the os module (Chapter 10).
closeThe close() method of a file object flushes any unwritten information and closes
the file object, after which no more writing can occur:
>>> f = open(‘foo.txt’,’wt’)>>> f.write(‘Foo!!’)>>> f.close()
File positionThe tell() method tells you the current position within the file (in other words,
the next read or write will occur at that many bytes from the beginning of the file):
>>> f = open(‘tell.txt’,’w+’) # Open for reading AND writing.>>> f.write(‘BRAWN’) # Write 5 characters.>>> f.tell()5 # Next operation will occur at offset 5 (starting from 0).
The seek(offset[, from]) method changes the current file position. The follow-
ing example continues the previous one by seeking to an earlier point in the file,
overwriting some of the previous data, and then reading the entire file:
>>> f.seek(2) # Move to offset 2 from the start of the file.>>> f.write(‘AI’)>>> f.seek(0) # Now move back to the beginning.>>> f.read() # Read everything from here on.‘BRAIN’
Cross-Reference
4807-7 ch08.F 5/24/01 8:58 AM Page 123

124 Part I ✦ The Python Language
You can pass an additional argument to seek to change how it interprets the first
parameter. Use a value of 0 (which is the default) to seek from the beginning of the
file, 1 to seek relative to the current position, and 2 to seek relative to the end of the
file. Using the previous example:
>>> f.seek(-4,2) # Seek 4 bytes back from the end of the file.>>> f.read()‘RAIN’
When you open a file in text mode on a Microsoft Windows system, Windowssilently and automatically translates newline characters (‘\n’) into ‘\r\n’ instead. Insuch cases use seek only with an offset of 0 (to seek to the beginning or the endof the file) or to seek from the beginning of the file with an offset returned from aprevious call to tell.
Writing FilesThe write(str) method writes any string to an open file (keep in mind that
Python strings can have binary data and not just text). Notice that write does not
add a newline character (‘\n’) to the end of the string:
>>> f = open(‘snow.txt’,’w+t’)>>> f.write(‘Once there was a snowman,\nsnowman, snowman.\n’)>>> f.seek(0) # Move to the beginning of the file.>>> print f.read()Once there was a snowman,snowman, snowman.
The writelines(list) method takes a list of strings to write to a file (as with
write, it does not append newline characters to the end of each string you pass
in). Continuing the previous example:
>>> lines = [‘Once there was a snowman ‘,’tall, tall,’,’tall!’]>>> f.writelines(lines)>>> f.seek(0)>>> print f.read()Once there was a snowman,snowman, snowman.Once there was a snowman tall, tall, tall!
Like stdout, all file objects have a softspace attribute (covered in the first sec-tion of this chapter) telling whether or not Python should insert a space beforewriting out the next piece of data. As with stdout, you can modify this attribute toshut off that extra space.
The truncate([offset]) method deletes the contents of the file from the current
position until the end of the file:
Tip
Caution
4807-7 ch08.F 5/24/01 8:58 AM Page 124

125Chapter 8 ✦ Input and Output
>>> f.seek(10)>>> f.truncate()>>> f.seek(0)>>> print f.read()Once there
Optionally you can specify a file position at which to truncate instead of the current
file position:
>>> f.seek(0)>>> f.truncate(5)>>> print f.read()Once
You can also use the flush() method to commit any buffered writes to disk.
See the pickle, shelve, and struct modules in Chapter 12 for information onwriting Python objects to files in such a way that you can later read them back inas valid objects.
Reading FilesThe read([count]) method returns the specified number of bytes from a file (or
less if it reaches the end of the file):
>>> f = open(‘read.txt’,’w+t’) # Create a file.>>> for i in range(3):... f.write(‘Line #%d\n’ % i)>>> f.seek(0)>>> f.read(3) # Read 3 bytes from the file.‘Lin’
If you don’t ask for a specific number of bytes, read returns the remainder of the file:
>>> print f.read()e #0Line #1Line #2
The readline([count]) method returns a single line, including the trailing new-
line character if present:
>>> f.seek(0)>>> f.readline()‘Line #0\012’
Cross-Reference
4807-7 ch08.F 5/24/01 8:58 AM Page 125

126 Part I ✦ The Python Language
You can have readline return a certain number of bytes or an entire line
(whichever comes first) by passing in a size argument:
>>> f.readline(5)‘Line ‘>>> f.readline()‘#1\012’
The readlines([sizehint]) method repeatedly calls readline and returns a list
of lines read:
>>> f.seek(0)>>> f.readlines()[‘Line #0\012’, ‘Line #1\012’, ‘Line #2\012’]
Once they reach the end of the file, the read and readline methods returnempty strings, and the readlines method returns an empty list.
The optional sizehint parameter limits how much data readlines reads into
memory instead of reading until the end of the file.
When you’re processing the lines of text in a file, you often want to remove the new-
line characters along with any leading or trailing whitespace. Here’s an easy way to
open the file, read the lines, and remove the newlines all in a single step (this exam-
ple assumes you have the read.txt file from above):
>>> [x.strip() for x in open(‘read.txt’).readlines()][‘Line #0’, ‘Line #1’, ‘Line #2’] # Yay, Python!
One drawback to the readlines method is that it reads the entire file into memory
before returning it to you as a list (unless you supply a sizehints parameter, in
which case you have to call readlines over and over again until the end of the
file). The xreadlines works like readlines but reads data into memory as
needed:
>>> for line in open(‘read.txt’).xreadlines():... print line.strip().upper() # Print uppercase version oflines.
The xreadlines function is new in Python 2.1.
Accessing Standard I/OThe sys module provides three file objects that you can always use: stdin(standard input), stdout (standard output), and stderr (standard error). Most
often stdin holds input coming from the user’s keyboard while stdout and stderrprint messages to the user’s screen.
NewFeature
Note
4807-7 ch08.F 5/24/01 8:58 AM Page 126

127Chapter 8 ✦ Input and Output
Some IDEs like PythonWin implement their own version of stdin, stdout,input, and so on, so redirecting them may behave differently. When in doubt, tryit out from the command line.
Routines like input and raw_input read from stdin, and routines like print write
to stdout, so an easy way to redirect input and output is to put file objects of your
own into sys.stdin and sys.stdout:
>>> import sys>>> sys.stdout = open(‘fakeout.txt’,’wt’)>>> print “Now who’s going to the restaurant?”>>> sys.stdout.close()>>> sys.stdout = sys.__stdout__>>> open(‘fakeout.txt’).read()“Now who’s going to the restaurant?\012”
As the example shows, the original values are in the __stdin__, __stdout__, and
__stderr__ members of sys; be a good Pythonista and point the variables to their
original values when you’re done fiddling with them.
External programs started via os.system or os.popen do not look insys.stdin or sys.stdout. As a result, their input and output come from thenormal sources, regardless of changes you’ve made to Python’s idea of stdin andstdout.
Using Filelike ObjectsOne of the great features of Python is its flexibility with data types, and a neat
example of this is with file objects. Many functions or methods require that you
pass in a file object, but more often than not you can get away with passing in an
object that acts like a file instead.
The following example implements a filelike object that reverses the order of any-
thing you write to it and then sends it to the original version of stdout:
>>> import sys,string>>> class Reverse:... def write(self,s):... s = list(s)... s.reverse()... sys.__stdout__.write(string.join(s,’’))... sys.__stdout__.flush()
Not much of a file object is it? But, you’d be surprised at how often it’ll do the trick:
>>> sys.stdout = Reverse()>>> print ‘Python rocks!’!skcor nohtyP
Note
Note
4807-7 ch08.F 5/24/01 8:58 AM Page 127

128 Part I ✦ The Python Language
In fact, you can trick most of Python into using your new file object, even when
printing error messages:
>>> sys.stderr = Reverse()>>> Reverse.foo # This action causes an error.:)tsal llac tnecer tsom( kcabecarT? ni ,1 enil ,”>nidts<” eliF rorrEetubirttA :oof
The point here is that no part of the Python interpreter or the standard libraries
has any knowledge of your special file class, nor does it need to. Sometimes a cus-
tom class can act like one of a different type even if it’s not derived from a common
base class (that is, files and Reverse do not share some common “generic file”
superclass).
One instance in which this feature is useful is when you’re building GUI-based
applications (see Chapter 19) and you want text messages to go to a graphical
window instead of to the console. Just write your own filelike class that sends a
Detecting Redirected Input
Suppose you’re writing a nifty utility program that would most often be used in a scriptwhere the input would come from piped or redirected input, but you also want to providemore of an interactive mode for other uses. Instead of having to pass in a command lineparameter to choose the mode, your program could use the isatty method of sys.stdin todetect it for you.
To see this in action, save this tiny program to a file called myutil.py:
import sysif sys.stdin.isatty():
print ‘Interactive mode!’else:
print ‘Batch mode!’
Now run it from an MS-DOS or UNIX shell command prompt:
C:\temp>python myutil.pyInteractive mode!
Run it again, this time redirecting a file to stdin using the redirection character (any fileworks as input — in the example below I chose myutil.py because you’re sure to have it inyour directory):
C:\temp>python myutil.py < myutil.pyBatch mode!
Likewise, a more complex (and hopefully more useful) utility could automatically behavedifferently depending on whether a person or a file was supplying the input.
4807-7 ch08.F 5/24/01 8:58 AM Page 128

129Chapter 8 ✦ Input and Output
string to the window, replace sys.stdout (and probably sys.stderr), and
magically output goes to the right place, even if some third-party module that is
completely ignorant of your trickery generates the output.
This flexibility comes in handy at other times too. For example, map lets you pass in
the function to apply. The ability to recognize cases where it is both useful and intu-
itive is a talent worth cultivating.
As of Python 2.1, you can create a xreadlines object around any filelike objectthat implements a readlines method:
import xreadlinesobj = SomeFileLikeObject()for line in xreadlines.xreadlines(obj):
... do some work ...
SummaryWhether you’re using files or standard I/O, Python makes handling input and output
easy. In this chapter you:
✦ Printed information to the user’s console.
✦ Retrieved input from the keyboard.
✦ Learned to read and write text and binary files.
✦ Used filelike objects in place of actual file objects.
In the next chapter you’ll learn to use Python’s powerful string handling features.
With them you can easily search strings, match patterns, and manipulate strings in
your programs.
✦ ✦ ✦
Tip
4807-7 ch08.F 5/24/01 8:58 AM Page 129

4807-7 ch08.F 5/24/01 8:58 AM Page 130

Files, DataStorage, andOperatingSystem Services
✦ ✦ ✦ ✦
Chapter 9Processing Stringsand RegularExpressions
Chapter 10Working with Filesand Directories
Chapter 11Using OtherOperating SystemServices
Chapter 12Storing Data andObjects
Chapter 13Accessing Dateand Time
Chapter 14Using Databases
✦ ✦ ✦ ✦
P A R T
IIII
4807-7 PO2.F 5/24/01 8:58 AM Page 131

4807-7 PO2.F 5/24/01 8:58 AM Page 132

ProcessingStrings andRegularExpressions
Strings are a very common format for data display, input,
and output. Python has several modules for manipulat-
ing strings. The most powerful of these is the regular expres-
sion module. Python also offers classes that can blur the
separation between a string (in memory) and a file (on disk).
This chapter covers all of the things you can do with strings,
ordered from the crucial to the seldom used.
Using String ObjectsString objects provide methods to search, edit, and format the
string. Because strings are immutable, these functions do not
alter the original string. They return a new string:
>>> bob=”hi there”>>> bob.upper() # Say it LOUDER!‘HI THERE’>>> bob # bob is immutable, so he didn’tmutate.>>> ‘hi there’>>> string.upper(bob) # Module function, sameas bob.upper‘HI THERE’
String object methods are also available (except as noted
below) as functions in the string module. The corresponding
module functions take, as an extra first parameter, the string
object to operate on.
99C H A P T E R
✦ ✦ ✦ ✦
In This Chapter
Using string objects
Using the stringmodule
Defining regularexpressions
Creating and usingregular expressionobjects
Using match objects
Treating strings asfiles
Encoding text
Formatting floatingpoint numbers
✦ ✦ ✦ ✦
4807-7 ch09.F 5/24/01 8:58 AM Page 133

134 Part II ✦ Files, Data Storage, and Operating System Services
See Chapter 3 for an introduction to string syntax and formatting in Python.
String formatting methodsSeveral methods are available to format strings for printing or processing. You can
justify the string within a column, strip whitespace, or expand tabs.ljust(width),
center(width), or rjust(width). These methods right-justify, center, or left-justify a
string within a column of a given width. They pad the string with spaces as neces-
sary. If the string is longer than width, these methods return the original string.
This kind of formatting works in a monospaced font, such as Courier New, where all
characters have the same width. In a proportional font, strings with the same length
generally have different widths on the screen or printed page.
>>> “antici”.ljust(10)+”pation”.rjust(10)‘antici pation’
lstrip, rstrip, striplstrip returns a string with leading whitespace removed, rstrip removes trailing
whitespace, and strip removes both. “Whitespace” characters are defined in
string.whitespace — whitespace characters include spaces, tabs, and newlines.
>>> “ hello world “.lstrip()‘hello world ‘>>> _.rstrip() # Interpreter trick: _ = last expression value‘hello world’
expandtab([tabsize])This method replaces the tab characters in a string with tabsize spaces, and returns
the result. The parameter tabsize is optional, defaulting to eight. This method is
equivalent to replace(“\t”,” “*tabsize).
String case-changing methodsYou can convert strings to UPPERCASE, lowercase, and more.
lower, upperThese methods return a string with all characters shifted to lowercase and
uppercase, respectively. They are useful for comparing strings when case is not
important.
capitalize, title, swapcaseThe method capitalize returns a string with the first character shifted to uppercase.
Cross-Reference
4807-7 ch09.F 5/24/01 8:58 AM Page 134

135Chapter 9 ✦ Processing Strings and Regular Expressions
The method title returns a string converted to “titlecase.” Titlecase is similar to the
way book titles are written: it places the first letter of each word in uppercase, and
all other letters in lowercase. Python assumes that any group of adjacent letters
constitutes one word.
The method swapcase returns a string where all lowercase characters changed to
uppercase, and vice versa.
>>> “hello world”.title()‘Hello World’>>> “hello world”.capitalize()‘Hello world’>>> “hello world”.upper()‘HELLO WORLD’
String format tests (the is-methods)These methods do not have corresponding functions in the string module. Each
returns false for an empty string. For instance, “”.isalpha() returns 0.
✦ isalpha — Returns true if each character is alphabetic. Alphabetic characters
are those in string.letters. Returns false otherwise.
✦ isalnum — Returns true if each character is alphanumeric. Alphanumeric
characters are those in string.letters or string.digits. Returns false otherwise.
✦ isdigit — Returns true if each character is a digit (from string.digits). Returns
false otherwise.
✦ isspace — Returns true if each character is whitespace (from string.
whitespace). Returns false otherwise.
✦ islower — Returns true if each letter in the string is lowercase, and the string
contains at least one letter. Returns false otherwise. For example:
>>> “2 + 2”.islower() # No letters, so test fails!0>>> “2 plus 2”.islower() # A-ok!1
✦ isupper — Returns true if each letter in the string is uppercase, and the string
contains at least one letter. Returns false otherwise.
✦ istitle — Returns true if the letters of the string are in titlecase, and the string
contains at least one letter. Returns false otherwise. (See the title formatting
method discussed previously for a description of titlecase.)
String searching methodsStrings offer various methods for simple searching. For more powerful searching,
use the regular expressions module (covered later in this chapter).
4807-7 ch09.F 5/24/01 8:58 AM Page 135

136 Part II ✦ Files, Data Storage, and Operating System Services
find(substring[, firstindex[, lastindex]])Search for substring within the string. If found, return the index where the first
occurrence starts. If not found, return -1.
A call to str.find searches the slice str[firstindex:lastindex]. So, the
default behavior is to search the whole string, but you can pass values for firstindexand lastindex to limit the search.
>>> str=”the rest of the story”>>> str.find(“the”)0>>> str.find(“the”,1) # Start search at index 1.12>>> str.find(“futplex”)-1
Here are some relatives of find, which you may find useful:
✦ index — Same syntax and effect as find, but raises the exception ValueErrorif it doesn’t find the substring .
✦ rfind — Same as find, but returns the index of the last occurrence of the
substring.
✦ rindex — Same as index, but returns the index of the last occurrence of the
substring.
startswith(substr[,firstindex[,lastindex]]) Returns true if the string starts with substr. A call to str.startswith compares
substr against the slice str[firstindex:lastindex]. You can pass values for
firstindex and lastindex to test whether a slice of your string with substr. No equiva-
lent function in the string module.
endswith(substr[,firstindex[,lastindex]])Same as startswith, but tests whether the string ends with substr. The string module
contains no equivalent function.
count(substr[,firstindex[,lastindex]])Counts the number of occurrences of substr within a string. If you pass indices,
count searches within the slice [firstindex:lastindex].
This example gives the answer to an old riddle: “What happens once today, three
times tomorrow, but never in three hundred years?”
>>> RiddleStrings=[“today”,”tomorrow”,”three hundred years”]>>> for str in RiddleStrings: print str.count(“o”)...130
4807-7 ch09.F 5/24/01 8:58 AM Page 136

137Chapter 9 ✦ Processing Strings and Regular Expressions
String manipulation methodsStrings provide various methods to replace substrings, split the string on delim-
iters, or join a list of strings into a larger string.
translate(table[,deletestr])Returns a string translated according to the translation string table. If you supply a
string deletestr, translate removes all characters in that string before applying the
translation table. The string table must have a length of 256; a character with ASCII
value n is replaced with table[n]. The best way to create such a string is with a
call to string.maketrans, as described below.
For example, this line of code converts a string to “Hungarian style,” with words
capitalized and concatenated. It also swaps exclamation points and question marks:
>>>ProductName=”power smart report now?”>>>ProductName.title().translate(string.maketrans(“?!”,”!?”),string.whitespace)‘PowerSmartReportNow!’
replace(oldstr,newstr[,maxreplacements])Returns a string with all occurrences of oldstr replaced by newstr. If you provide
maxreplacements, replace replaces only the first maxreplacements occurrences of
oldstr.
>>> “Siamese cat”.replace(“c”,”b”)‘Siamese bat’
split([separators[,maxsplits]])Breaks the string on any of the characters in the string separators, and returns a list
of pieces. The default value of separators is string.whitespace. If you supply a
value for maxsplits, then split performs up to maxsplits splits, and no more.
This method is useful for dealing with delimited data:
>>> StockQuoteLine = “24-Nov-00,45.9375,46.1875,44.6875,45.1875,3482500,45.1875”>>> ClosingPrice=float(StockQuoteLine.split(“,”)[4])>>> ClosingPrice45.1875
splitlines([keepends])Splits a string on line breaks (carriage return and/or line feed). If you set keependsto true, splitlines retains the terminating character on each line. The stringmodule has no corresponding function. For example:
>>> “The\r\nEnd\n\n”.splitlines()[‘The’, ‘End’, ‘’]>>> “The\r\nEnd\n\n”.splitlines(1)[‘The\015\012’, ‘End\012’, ‘\012’]
4807-7 ch09.F 5/24/01 8:58 AM Page 137

138 Part II ✦ Files, Data Storage, and Operating System Services
join(StringSequence)Returns a string consisting of all the strings in StringSequence concatenated
together, using the string as a delimiter.
This method in generally used in the corresponding function form:
string.join(StringSequence[, Delimiter]). The default value of Delimiter is a
single space.
>>> Words=[“Ready”,”Set”,”Go”]>>> “...”.join(Words) # weird-looking‘Ready...Set...Go’>>> string.join(Words,”...”) # equivalent, and more intuitive‘Ready...Set...Go’
encode([scheme[,errorhandling]])Returns the same string, encoded in the encoding scheme scheme. The parameter
scheme defaults to the current encoding scheme. The parameter errorhandlingdefaults to “strict,” indicating that encoding problems should raise a ValueError
exception. Other values for errorhandling are “ignore” (do not raise any errors),
and “replace” (replace un-encodable characters with a replacement marker). See
the section “Encoding Text,” for more information.
Using the String ModuleBecause strings have so many useful methods, it is often not necessary to import
the string module. But, the string module does provide many useful members.
Character categoriesThe string module includes several constant strings that categorize characters as
letters, digits, punctuation, and so forth. Avoid editing these strings, as it may break
standard routines.
✦ letters — All characters considered to be letters; consists of lowercase +
uppercase.
✦ lowercase — All lowercase letters.
✦ uppercase — All uppercase letters.
✦ digits — The string ‘0123456789’.
✦ hexdigits — The string ‘0123456789abcdefABCDEF’.
4807-7 ch09.F 5/24/01 8:58 AM Page 138

139Chapter 9 ✦ Processing Strings and Regular Expressions
✦ octdigits — The string ‘01234567’.
✦ punctuation — String of all the characters considered to be punctuation.
✦ printable — All the characters that are considered printable. Consists of
digits, letters, punctuation, and whitespace.
✦ whitespace — All characters that are considered whitespace. On most sys-
tems this string includes the characters space, tab, linefeed, return, formfeed,
and vertical tab.
Miscellaneous functionsMost of the functions in the string module correspond to methods of a string
object, and are covered in the section on string methods. The other functions,
which have no equivalent object methods, are covered here.
atoi,atof,atolThe function string.atoi(str) returns an integer value of str, and raises a
ValueError if str does not represent an integer. It is equivalent to the built-in
function int(str).
The function atof(str) converts a string to a float; it is equivalent to the floatfunction.
The function atol(str) converts a string to a long integer; it is equivalent to the
long function.
>>> print string.atof(‘3.5’)+string.atol(‘2’)5.5
capwords(str)Splits a string (on whitespace) into words, capitalizes each word, then joins the
words together with one space between them:
>>> string.capwords(“The end...or is it?”)‘The End...or Is It?’
maketrans(fromstring,tostring)Creates a translation table suitable for passing to maketrans (or to regex.compile).
The translation table instructs maketrans to translate the nth character in fromstringinto the nth character in tostring. The strings fromstring and tostring must have the
same length.
The translation table is a string of length 256 representing all ASCII characters, but
with fromstring[n] replaced by tostring[n].
4807-7 ch09.F 5/24/01 8:58 AM Page 139

140 Part II ✦ Files, Data Storage, and Operating System Services
splitfields,joinfieldsThese functions have the same effect as split and join, respectively. (Before
Version 2.0, splitfields and joinfields accepted a string of separators, and
split and join did not.)
zfill(str,width)Given a numeric string str and a desired width width, returns an equivalent numeric
string padded on the left by zeroes. Similar to rjust. For example:
>>> string.zfill(“-3”,5)‘-0003’
Defining Regular ExpressionsA regular expression is an object that matches some collection of strings. You can
use regular expressions to search and transform strings in sophisticated ways.
Regular expressions use their own special syntax to describe strings to match.
They can be very efficient, but also very cryptic if taken to extremes. Regular
expressions are widely used in UNIX world. The module re provides full support for
Perl-like regular expressions in Python.
The re module raises the exception re.error if an error occurs while compiling or
using a regular expression.
Prior to Version 1.5, the modules regex and regsub provided support for regular
expressions. These modules are now deprecated.
Regular expression syntaxThe definition of a regular expression is a string. In general, a character in the regu-
lar expression’s definition matches a character in a target string. For example, the
regular expression defined by fred matches the string “fred,” and no others. Some
characters have special meanings that permit more sophisticated matching.
. A period (dot) matches any character except a newline. For example,
b.g matches “big,” “bag,” or “bqg,” but not “b\ng.” If the DOTALL flag is
set, then dot matches any character, including a newline.
[] Brackets specify a set of characters to match. For example, p[ie]nmatches “pin” or “pen” and nothing else. A set can include ranges: the set
[a-ex-z] is equivalent to [abcdexyz]. Starting a set with ^ means
“match any character except these.” For example, b[^ae]d matches “bid”
or “b%d,” but not “bad” or “bed.”
* An asterisk indicates that the preceding regular expression is optional,
and may occur any number of times. For example, ba*n* matches
“banana” or “baaaa” or “bn” or simply “b.”
4807-7 ch09.F 5/24/01 8:58 AM Page 140

141Chapter 9 ✦ Processing Strings and Regular Expressions
+ A plus sign indicates that the preceding regular expression must occur at
least once, and may occur many times. For example, [sweatrd]+matches various words, the longest of which is “stewardesses.” The reg-
ular expression [0-9]+/[0-9]+ matches fractions like “13/64” or “2/3.”
? A question mark indicates that the preceding regular expression is
optional, and can occur, at most, once. For example, col?d matches
either “cod” or “cold,” but not “colld.” The question mark has other
uses, explained below in the sections on “Nongreedy matching” and
“Extensions.”
{m,n} The general notation for repetition is two numbers in curly-braces. This
syntax indicates that the preceding regular expression must appear at
least m times, but no more than n times. If m is omitted, it defaults to 0.
If n is omitted, it defaults to infinity. For example, [^a-zA-Z]{3,}matches any sequence of at least three non-alphabetic characters.
^ A caret matches the beginning of the string. If the MULTILINE flag is set,
it also matches the beginning of a new line. For example, ^bob matches
“bobsled” but not “discombobulate.” Note that the caret has an unre-
lated meaning inside brackets [].
$ A dollar sign matches the end of the string. If the MULTILINE flag is set,
it also matches the end of a line. For example, is$ matches “this” but
not “fish.” It matches “This\nyear” only if the MULTILINE flag is set.
| A vertical slash splits a regular expression into two parts, and matches
either the first half or the last half. For example, ab|cd matches the
strings “ab” and “cd.”
() Enclosing part of a regular expression in parentheses does not change
matching behavior. However, Python flags the regular expression
enclosed in parentheses as a group. After the first match, you can match
the group again using backslash notation. For instance, the regular
expression ^[\w]*(\w)\1[\w]*$ matches a single word with double
letters, like “pepper” or “narrow” but not “salt” or “wide.” (The syntax
\w, explained below, matches any letter.) A regular expression can have
up to 99 groups, which are numbered starting from 1.
Grouping is useful even if the group is only matched once. For example,
Ste(ph|v)en matches “Stephen” or “Steven.” Without parens,
Steph|ven matches only the strings “Steph” and “ven.”
Python also uses parentheses in extensions (see “Extensions” later in
this chapter).
\ Escape special characters. You can use a backslash to escape any spe-
cial characters. For example, ca\$h matches the string “ca$h.” Note that
without the backslash, ca$h could never match anything (except in
MULTILINE mode). The backslash also forms character groups, as
described below.
4807-7 ch09.F 5/24/01 8:58 AM Page 141

142 Part II ✦ Files, Data Storage, and Operating System Services
Backslashes and raw stringsYou should generally write the Python string defining a regular expression as a raw
string. Otherwise, because you must escape backslashes in the regular expression’s
definition, the excessive backslashes become confusing:
>>> ThePath=”c:\\temp\\download\\”>>> print ThePathc:\temp\download\>>> re.search(r”c:\\temp”,ThePath) # Raw. Reasonably clear.<SRE_Match object at 007CC7A8>>>> re.search(“c:\\temp”,ThePath) # no match!>>> re.search(“c:\\\\temp”,ThePath) # Less clear than raw<SRE_Match object at 007ACFD0>
The second search fails to find a match, because the regular expression defined by
c:\temp matches only the string consisting of “c:,” then a tab, then “emp”!
Character groups and other backslash magicIn addition to escaping special characters, you can also use the backslash in con-
junction with a letter to match various things. A rule of thumb is that if backslash
plus a lowercase letter matches something, backslash plus the uppercase letter
matches the opposite.
\1, \2, etc. Matches a numbered group. If part of a regular expression is
enclosed in parentheses, Python flags it as a group. Python num-
bers groups, starting from 1 and proceeding to 99. You can match
groups again by number. For example, (.+ )\1 matches the
names of 80’s bands “The The,” “Mister Mister,” and “Duran
Duran.”
Python interprets escaped three-digit numbers, or numbers start-
ing with 0, as the octal value of a character. For example, \012matches a newline.
Inside set brackets [], Python treats all escaped numbers as
characters.
\A Matches the start of the string: equivalent to ^.
\b Matches a word boundary. Here “word” means “sequence of
alphanumeric characters.” For example, snow\b matches “snow
angel” but not “snowball.” Note that \b in the middle of a word
indicates backspace, just as it would in an ordinary string. For
instance, “bozo\b\b\b\bgentleman” matches the string consist-
ing of “bozo,” four backspace characters, then “gentleman.”
\B Matches a non-word-boundary. For example, \Bne\B matches
part of “planet,” but not “nest” or “lane.”
\d Matches a digit: equivalent to [0–9].
4807-7 ch09.F 5/24/01 8:58 AM Page 142

143Chapter 9 ✦ Processing Strings and Regular Expressions
\D Matches a non-digit: equivalent to [^0–9].
\s Matches a whitespace character: equivalent to [ \t\n\r\f\v].
\S Matches a non-whitespace character: equivalent to [^ \t\n\r\f\v].
\w Matches an alphanumeric character: equivalent to
[a–zA–Z0–9_]. If the LOCALE flag is set, \w matches [0–9_] or any
character defined as alphabetic in the current locale. If the
UNICODE flag is set, matches [0–9_] or any character marked as
alphanumeric in the full Unicode character set.
\W Matches a non-alphanumeric character.
\Z Matches the end of the string: equivalent to $.
\\ Matches a backslash. (Similarly, \. matches a period, \? matches
a question mark, and so forth.)
Nongreedy matchingThe repetition operators ?,+,* and {m,n} normally match as much as the target
string as possible. You can modify the operators with a question mark to be “non-
greedy,” and match as little of the target string as possible. For example, when
matched against the string “over the top,” \b.*\b would normally match the entire
string. The corresponding non-greedy version, \b.*?\b, matches only the first
word, “over.”
ExtensionsSyntax n of the form (?...) marks a regular expression extension. The meaning of
the extension depends on the character after the question mark.
(?#...) Is a comment. Python ignores this portion of the regular
expression.
(?P<name>...) Creates a named group. Named groups work like numbered
groups. You can match them again using (?P=name). For example,
this regular expression matches a single word that begins and
ends with the same letter: ^(?P<letter>\w)\w*(?P=letter)$.
A named group receives a number, and can be referred to by num-
ber or by name.
(?:...) Are non-grouping parentheses. You can use these to enhance read-
ability; they don’t change the regular expression’s behavior. For
example, (?:\w+)(\d)\1 matches one or more letters followed
by a repeated digit, such as “bob99” or “x22.” The string (?:\w+)does not create a group, so \1 matches the first group, (\d).
(?i), (?L), Are REs that set the flags re.I, re.L, re.M, re.S, re.U, and re.X
(?m),(?s), respectively. Note that (?L) uses an uppercase letter; the
(?u),(?x) others are lowercase.
4807-7 ch09.F 5/24/01 8:58 AM Page 143

144 Part II ✦ Files, Data Storage, and Operating System Services
(?=...) Is a lookahead assertion. Python matches the enclosed regular
expression, but does not “consume” any of the target string. For
example, blue(?=berry) matches the string “blue,” but only if
it is followed by “berry.”
(?!...) Is a negative lookahead assertion. The enclosed regular
expression must not match the target string. For example,
electron(?!ic\b) matches the string “electron” only when it
is not part of the word “electronic.”
Creating and Using Regular Expression Objects
The function re.compile(pattern[, flags]) compiles the specified patternstring and returns a new regular expression object. The optional parameter flagstweak the behavior of the expression. Each flag value has a long name and an
equivalent short name.
You can combine flags using bitwise or. For example, this line returns a regular
expression that searches for two occurrences of the word “the,” ignoring case, with
any character (including newline) in between.
re.compile(“the.the”,re.IGNORECASE | re.DOTALL)
re.IGNORECASE, re.I Performs case-insensitive matching.
re.LOCALE, re.L Interprets words according to the current locale.
This interpretation affects the alphabetic group
(\w and \W), as well as word boundary behavior
(\b and \B).
re.MULTILINE, re.M Makes $ match the end of a line (not just the end
of the string) and makes ^ match the start of any
line (not just the start of the string).
re.DOTALL, re.S Makes a period (dot) match any character, includ-
ing a newline.
re.UNICODE, re.U Interprets letters according to the Unicode char-
acter set. This flag affects the behavior of \w, \W,
\b, \B.
re.VERBOSE, re.X Permits “cuter” regular expression syntax. It
ignores whitespace (except inside a set [] or when
escaped by a backslash), and treats unescaped #
as a comment marker. For example, the following
two lines of code are equivalent. They match a sin-
gle word containing three consecutive pairs of
doubled letters, such as “zrqqxxyy.” (Finding an
4807-7 ch09.F 5/24/01 8:58 AM Page 144

145Chapter 9 ✦ Processing Strings and Regular Expressions
English word matching this description is left as
an exercise for the reader.) Note that the second
VERBOSE form of the regular expression is a bit
more readable.
NewRE = re.compile(r”^\w*(\w)\1(\w)\2(\w)\3\w*$”)NewRE = re.compile(r”^\w* (\w)\1 (\w)\2 (\w)\3 \w*$#three doubled letters”,
re.VERBOSE)
Using regular expression objectsYou can use regular expressions to search, replace, split strings, and more.
search(targetstring[,startindex[,endindex]])The core use of a regular expression! The method search(targetstring) scans
through targetstring looking for a match. If it finds one, it returns a MatchObject
instance. If it finds no match, it returns None. (See below for MatchObject meth-
ods.) The search method searches the slice targetstring[startindex:endindex]— by default, the whole string.
The characters $ and ^ match the beginning and ending of the entire string, not nec-
essarily the start or end of the substring. For example, ^friends$ does not match
the string “are friends electric?” even if one takes the slice “friends” from index 4 to
index 11.
match(targetstring[,startindex[,endindex]])Attempts to match the regular expression against the first part of targetstring. The
match method is more restrictive than search, as it must match the first zero or
more characters of targetstring. It returns a MatchObject instance if it finds a match,
None otherwise. The parameters startindex and endindex function here as they do
in search.
findall(targetstring)Matches against targetstring and returns a list of nonoverlapping matches. For
example:
>>> re.compile(r”\w+”).findall(“the larch”) # Greedy matching[‘the’, ‘larch’]>>> re.compile(r”\w+?”).findall(“the larch”) # Nongreedy[‘t’, ‘h’, ‘e’, ‘l’, ‘a’, ‘r’, ‘c’, ‘h’]
If the regular expression contains a group, the list returned is a list of group values
(in tuple form, if it contains multiple groups). For example:
>>> re.compile(r”(\w+)(\w+)”).findall(“the larch”)[(‘th’, ‘e’), (‘larc’, ‘h’)]
4807-7 ch09.F 5/24/01 8:58 AM Page 145

146 Part II ✦ Files, Data Storage, and Operating System Services
split(targetstring[,maxsplit])Breaks targetstring on each match of the regular expression, and returns a list of
pieces. If the regular expression consists of a single large group, then the list of
pieces includes the delimiting strings; otherwise, the list of pieces does not include
the delimiters. If you specify a nonzero value for maxsplit, then split makes, at
most, maxsplit cuts, and the remainder of the string remains intact.
For example, this regular expression removes all ifs, ands, and buts from a string:
>>> MyRE=re.compile(r”\bif\b|\band\b|\bbut\b”,re.I)>>> LongString=”I would if I could, and I wish I could, but Ican’t.”””>>> MyRE.split(LongString)[‘I would ‘, ‘ I could, ‘, ‘ I wish I could, ‘, “ I can’t.”]>>> MyRE=re.compile(r”(\bif\b|\band\b|\bbut\b)”,re.I)>>> MyRE.split(LongString) # Keep the matches in the list.[‘I would ‘, ‘if’, ‘ I could, ‘, ‘and’, ‘ I wish I could, ‘,‘but’, “ I can’t.”]
sub(replacement, targetstring[, count])Search for the regular expression in targetstring, and perform a substitution at each
match. The parameter replacement can be a string. It can also be a function that
takes a MatchObject as an argument, and returns a string. If you specify a nonzero
value for count, then sub makes, at most, count substitutions.
This example translates a string to “Pig Latin.” (It moves any leading consonant
cluster to the end of the word, then adds “ay” so that “chair” becomes “airchay.”)
>>> def PigLatinify(thematch):>>> ... return thematch.group(2)+thematch.group(1)+”ay”>>> ...>>> WordRE=re.compile(r”\b([b-df-hj-np-tv-z]*)(\w+)\b”,re.I)>>> WordRE.sub(PigLatinify, “fetch a comfy chair”)‘etchfay aay omfycay airchay’
If replacement is a string, it can contain references to groups from the regular expres-
sion. For example, sub replaces a \1 or \g<1> in replacement with the first group
from the regular expression. You can insert named groups with the syntax \g<name>.
The sub method replaces empty (length-0) matches only if they are not adjacent to
another substitution.
subn(replacement, targetstring[, count])Same as sub, but returns a two-tuple whose first element is the new string, and
whose second element is the number of substitutions made.
4807-7 ch09.F 5/24/01 8:58 AM Page 146

147Chapter 9 ✦ Processing Strings and Regular Expressions
Applying regular expressions without compilingThe methods of a regular expression object correspond to functions in the remodule. If you call these functions directly, you don’t need to call re.compile in
your code. However, if you plan to use a regular expression several times, it is more
efficient to compile and reuse it. The following module functions are available:
escape(str)Returns a copy of str with all special characters escaped. This feature is useful for mak-
ing a regular expression for an arbitrary string. For example, this function searches for
a substring in a larger string, just like string.find, but case-insensitively:
def InsensitiveFind(BigString,SubString):TheMatch = re.search(re.escape(SubString),BigString,re.I)if (TheMatch):
return TheMatch.start()else:
return -1
search(pattern,targetstring[,flags])Compiles pattern into a regular expression object with flags set, then uses it to per-
form a search against targetstring.
match(pattern,targetstring[,flags])Compiles pattern into a regular expression object with flags set, then uses it to per-
form a match against targetstring.
split(pattern,targetstring[,maxsplit])Compiles pattern into a regular expression object, then uses it to split targetstring.
findall(pattern,targetstring)Compiles pattern into a regular expression object, then uses it to find all matches in
targetstring.
sub(pattern,replacement,targetstring[,count])Compiles pattern into a regular expression object, then calls its sub method with
parameters replacement, targetstring, and count. The function subn is similar, but
calls the subn method instead.
Using Match ObjectsSearching with a regular expression object returns a MatchObject, or None if the
search finds no matches. The match object has several methods, mostly to provide
details on groups used in the match.
4807-7 ch09.F 5/24/01 8:58 AM Page 147

148 Part II ✦ Files, Data Storage, and Operating System Services
group([groupid,...])Returns the substring matched by the specified group. For index 0, it returns the
substring matched by the entire regular expression. If you specify several group
identifiers, group returns a tuple of substrings for the corresponding groups. If the
regular expression includes named groups, groupid can be a string.
groups([nomatch])Returns a tuple of substrings matched by each group. If a group was not part of
the match, its corresponding substring is nomatch. The parameter nomatch defaults
to None.
groupdict([nomatch])Returns a dictionary. Each entry’s key is a group name, and the value is the sub-
string matched by that named group. If a group was not part of the match, its corre-
sponding value is nomatch, which defaults to None.
This example creates a regular expression with four named groups. The expression
parses fractions of the form “1 1/3,” splitting them into integer part, numerator, and
denominator. Non-fractions are matched by the “plain” group.
>>> FractionRE=re.compile(... r”(?P<plain>^\d+$)?(?P<int>\d+(?= ))??(?P<num>\d+(?=/))?/?(?P<den>\d+$)?”)>>> FractionRE.match(“1 1/3”).groupdict(){‘den’: ‘3’, ‘num’: ‘1’, ‘plain’: None, ‘int’: ‘1’}>>> FractionRE.match(“42”).groupdict(“x”){‘den’: ‘x’, ‘num’: ‘x’, ‘plain’: ‘42’, ‘int’: ‘x’}
start([groupid]), end([groupid]), span([groupid])The methods start and end return the indices of the substring matched by the
group identified by groupid. If the specified group didn’t contribute to the match,
they return -1.
The method span(groupid) returns both indices in tuple form:
(start(groupid),end(groupid)).
By default, groupid is 0, indicating the entire regular expression.
4807-7 ch09.F 5/24/01 8:58 AM Page 148

149Chapter 9 ✦ Processing Strings and Regular Expressions
re,string,pos,endpos,These members hold the parameters passed to search or match:
✦ re — The regular expression object used in the match
✦ string — The string used in the match
✦ pos — First index of the substring searched against
✦ endpos — Last index of the substring searched against
Treating Strings as FilesThe module StringIO defines a class named StringIO. This class wraps an in-memory
string buffer, and supports standard file operations. Since a StringIO instance does
not correspond to an actual file, calling its close method simply frees the buffer.
The StringIO constructor takes, as a single optional parameter, an initial string for
the buffer.
The method getvalue returns the contents of the buffer. It is equivalent to calling
seek(0) and then read().
See Chapter 8 for a description of the standard file operations.
The module cStringIO defines a similar class, also named StringIO. Because
cStringIO.StringIO is implemented in C, it is faster than StringIO.StringIO; the one
drawback is that you cannot subclass it. The module cStringIO defines two addi-
tional types: InputType is the type for StringIO objects constructed with a string
parameter, and OutputType is the type for StringIO objects constructed without a
string parameter.
The StringIO class is useful for building up long strings without having to do many
small concatenations. For instance, the function demonstrated in Listing 9-1 builds
up an HTTP request string, suitable for transmission to a Web server:
Listing 9-1: httpreq.py
import reimport urlparseimport cStringIOimport stringimport socket
Continued
Cross-Reference
4807-7 ch09.F 5/24/01 8:58 AM Page 149

150 Part II ✦ Files, Data Storage, and Operating System Services
Listing 9-1 (continued)
STANDARD_HEADERS = “””HTTP/1.1Accept: image/gif, image/x-xbitmap, image/jpeg, */*Accept-Language: en-usAccept-Encoding: gzip, deflateUser-Agent: Mozilla/4.0 (compatible)”””def CreateHTTPRequest(URL, CookieDict):
“”” Create an HTTP request for a given URL (as returned byurlparse.urlparse) and a dictionary of cookies (where key is the host string, and the value is the cookie in theform “param=value”. “””Buffer = cStringIO.StringIO()Buffer.write(“GET “)FileString = URL[2] # File nameif URL[3]!=””: # Posted values
FileString = FileString + “;” + URL[3]if URL[4]!=””: # Query parameters
FileString = FileString + “?” + URL[4] FileString = string.replace(FileString,” “,”%20”)Buffer.write(FileString+”\r\n”)Buffer.write(STANDARD_HEADERS)# Add cookies to the request.GotCookies=0for HostString in CookieDict.keys():
# Perform a case-insensitive search. (Call re.escape so# special characters like . are searched for normally.)if (re.search(re.escape(HostString),URL[1],re.I)):
if (GotCookies==0):Buffer.write(“\r\nCookie: “)GotCookies=1
else:Buffer.write(“; “)
Buffer.write(CookieDict[HostString])if (GotCookies):
Buffer.write(“\r\n”) Buffer.write(“Host: “+URL[1])Buffer.write(“\r\n\r\n”)RequestString=Buffer.getvalue()Buffer.close()return RequestString
if (__name__==”__main__”):CookieDict={}CookieDict[“python”]=”cookie1=value1”CookieDict[“python.ORG”]=”cookie2=value2”CookieDict[“amazon.com”]=”cookie3=value3”URL = urlparse.urlparse(“http://www.python.org/2.0/”)print CreateHTTPRequest(URL,CookieDict)
4807-7 ch09.F 5/24/01 8:58 AM Page 150

151Chapter 9 ✦ Processing Strings and Regular Expressions
Encoding TextAll digital data, including text, is ultimately represented as ones and zeroes. A
character set is a way of encoding text as binary numbers. For example, the ASCII
character set represents letters using a number from 0 to 255. The built-in function
ord returns the number corresponding to an ASCII character; the function chrreturns the ASCII character corresponding to a number:
>>> ord(‘a’)97>>> chr(97)‘a’
The ASCII character set has limitations — it does not contain Cyrillic letters, Chinese
ideograms, et cetera. And so, various character sets have been created to handle
various collections of characters. The Unicode character set is the mother of all
character sets. Unicode subsumes ASCII and Latin-1. It also includes all widely used
alphabets, symbols of some ancient languages, and everything but the kitchen sink.
Using Unicode stringsA Unicode string behaves just like an ordinary string — it has the same methods.
You can denote a string literal as Unicode by prefixing it with a u. You can denote
Unicode characters with \u followed by four hexadecimal digits. For example:
>>> MyUnicodeString=u”Hello”>>> MyString=”Hello”>>> MyUnicodeString==MyString # Legal comparison1>>> MyUnicodeString=u”\ucafe\ubabe”>>> len(MyUnicodeString)2>>> MyString=”\ucafe\ubabe” # No special processing!>>> len(MyString) 12
For a reference on the Unicode character set, and its character categories, see
http://www.unicode.org/Public/UNIDATA/UnicodeData.html.
Reading and writing non-ASCII stringsYou cannot use Unicode characters with an ordinary file object created by the openfunction:
4807-7 ch09.F 5/24/01 8:58 AM Page 151

152 Part II ✦ Files, Data Storage, and Operating System Services
>>> MyUnicodeString=u”\ucafe\ubabe”>>> ASCIIFile=open(“test.txt”,”w”) # This file can’t handleunicode!>>> ASCIIFile.write(MyUnicodeString)Traceback (innermost last):File “<pyshell#39>”, line 1, in ?ASCIIFile.write(MyUnicodeString)
UnicodeError: ASCII encoding error: ordinal not in range(128)
The codecs module provides file objects to help read and write Unicode text.
open(filename,mode[,encoding[,errorhandler[,buffering]]])The function codecs.open returns a file object that can handle the character set
specified by encoding. The encoding parameter is a string specifying the desired
encoding. The errorhandler parameter, which defaults to “strict,” specifies what to
do with errors. The “ignore” handler skips characters not in the character set; the
“strict” handler raises a ValueError for unacceptable characters. The mode and
buffering parameters have the same effect as for the built-in function open.
>>> Bob=codecs.open(“test-uni.txt”,”w”,”unicode-escape”)>>> Bob.write(MyUnicodeString)>>> Bob.close()>>> Bob=codecs.open(“test-utf16.txt”,”w”,”utf16”)>>> Bob.write(MyUnicodeString)>>> Bob.close()
You should generally read and write files using the same character set, or extreme
garbling can result. The function sys.getdefaultencoding returns the name of
the current default encoding.
EncodedFile(fileobject,sourceencoding[,fileencoding[,errorhandler]])The function codecs.EncodedFile returns a wrapper object for the file fileobjectto handle character set translation. This function translates data written to the file
from the sourceencoding character set to the fileencoding character set; data read
from the file does the reverse. For example, this code writes a file using UTF-8
encoding, then translates from UTF-8 to escaped Unicode:
>>> UTFFile=codecs.open(“utf8.txt”,”w”,”utf8”)>>> UTFFile.write(MyUnicodeString)>>> UTFFile.close()>>> MyFile=open(“utf8.txt”,”r”)>>> Wrapper=codecs.EncodedFile(MyFile,”unicode-escape”,”utf8”)>>> Wrapper.read()‘\\uCAFE\\uBABE’
4807-7 ch09.F 5/24/01 8:58 AM Page 152

153Chapter 9 ✦ Processing Strings and Regular Expressions
Using the Unicode databaseThe module unicodedata provides functions to check a character’s meaning in the
Unicode 3.0 character set.
CategorizationThese functions give information about a character’s general category:
category(unichr) Returns a string denoting the category of unichr.For example, underscore has category “PC” for
connector punctuation.
bidirectional(unichr) Returns a string denoting the bidirectional
category of unichr. For example, unicode.bidirectional(u”e”) is “L,” indicating that
“e” is normally written left-to-right.
combining(unichr) Returns an integer indicating the combining class
of unichr. Returns 0 for non-combining characters.
mirrored(unichr) Returns 1 if unichr is a mirrored character, 0
otherwise.
decomposition(unichr) Returns the character-decomposition string corre-
sponding to unichr, or a blank string if no decom-
position exists.
Numeric charactersThese functions give details about numeric characters:
decimal(unichr[,default]) Returns unichr’s decimal value as an integer. If
unichr has no decimal value, returns default or (if
default is unspecified) raises a ValueError.
numeric(unichr[,default]) Returns unichr’s numeric value as a float. If unichrhas no decimal value, returns default or (if defaultis unspecified) raises a ValueError.
digit(unichr[,default]) Returns unichr’s digit value as an integer. If unichrhas no digit value, returns default or (if default is
unspecified) raises a ValueError.
4807-7 ch09.F 5/24/01 8:58 AM Page 153

154 Part II ✦ Files, Data Storage, and Operating System Services
Formatting Floating Point NumbersThe fpformat module provides convenience functions for displaying floating point
numbers.
fix(number,precision)Formats floating point value number with at least one digit before the decimal point,
and at most precision digits after. The number is rounded to the specified precision
as needed. If precision is zero, this function returns a string with the number
rounded to the nearest integer. The parameter number can be either a float, or a
string that can be passed to the function float.
sci(number,precision)Formats floating point value number in scientific notation — one digit before the
decimal point, and the exponent indicated afterwards. The parameters number and
precision behave as they do for the function fix.
Here are some examples of formatting with fpformat:
>>> fpformat.fix(3.5,0)‘4’>>> fpformat.fix(3.555,2)‘3.56’>>> fpformat.sci(3.555,2)‘3.56e+000’>>> fpformat.sci(“0.03555”,2)‘3.56e-002’
These functions raise the exception fpformat.NotANumber (a subclass of ValueError)
if the parameter number is not a valid value. The exception argument is the value of
number.
SummaryPython offers a full suite of string-manipulation functions. It also provides regular
expressions, which enable even more powerful searching and replacing. In this
chapter you:
✦ Searched, formatted, and modified string objects.
✦ Searched and parsed strings using regular expressions.
✦ Formatted floating point numbers cleanly and easily.
In the next chapter you’ll learn how Python can handle files and directories.
✦ ✦ ✦
4807-7 ch09.F 5/24/01 8:58 AM Page 154

Working withFiles andDirectories
Chapter 8 discussed the basics of file input and output in
Python, but the routines covered there assume you
know what file you want to read and write and where it’s
located. This chapter explains operating system features that
Python supports such as finding a list of files that match a
given search pattern, navigating directories, and renaming
and copying files.
This chapter and the next cover many modules, primarily os,
os.path, and sys. Instead of organizing the chapters around
the functions provided in each module, we’ve tried to group
them by feature so that you can find what you need quickly. For
example, you can find a file’s size with os.stat(filename)[stat.ST_SIZE] or with os.path.getsize(filename)(something you wouldn’t know unless you read through both
the os and os.path modules), so I cover them in the same sec-
tion. Where this is not possible, I’ve added cross-references to
help guide you.
Retrieving File and DirectoryInformation
With the exception of a few oddballs, modern operating sys-
tems let you store files in directories (locations in a named
hierarchy or tree) for better organization. (Just imagine the
mess if everything was in one chaotic lump.) This and the
following sections consider a path to be a directory or file
name. You can refer to a path relative to another one
(..\temp\bob.txt means go up the tree a step, down into
the temp directory to the file called bob.txt) while others are
absolute (/usr/local/bin/destroystuff tells how to go
from the top of the tree all the way down to destroystuff).
1010C H A P T E R
✦ ✦ ✦ ✦
In This Chapter
Retrieving file anddirectory information
Building anddissecting paths
Listing directories andmatching file names
Obtainingenvironment andargument information
Example: RecursiveGrep Utility
Copying, renaming,and removing paths
Creating directoriesand temporary files
Comparing files anddirectories
Working with filedescriptors
Other file processingtechniques
✦ ✦ ✦ ✦
4807-7 ch10.F 5/24/01 8:58 AM Page 155

156 Part II ✦ Files, Data Storage, and Operating System Services
You can choose how you want to access path information: Python provides several
functions to retrieve a single bit of information (does this path exist?) or all of it in
one big glob (give me creation time, last access time, file size, and so forth).
Please note that many of the examples in this chapter use file and directory namesthat may not exist in your system. Accept the examples on faith or substitute validfile names of your own (just don’t go and erase something important, though).
The piecemeal approachThe access(path, mode) function tests to see that the current process has
permission to read, write, or execute a given path. The mode parameter can be any
combination of os.R_OK (read permission), os.W_OK (write permission), or
os.X_OK (execute permission):
>>> os.access(‘/usr/local’,os.R_OK | os.X_OK)1 # I have read AND execute permissions...>>> os.access(‘/usr/local’,os.W_OK)0 # ...but not write permissions.
Note
The Secret Identities of os and os.path
The os module contains plenty of functions for performing operating system-ish stuff likechanging directories and removing files, while os.path helps extract directory names, filenames, and extensions from a given path.
The great thing is that these modules work on any Python-supported platform, making yourprograms much more portable. For example, to join a directory name with a file name,using os.path.join makes sure the result is correct for the current operating system:
>>> print os.path.join(‘maps’,’dungeon12.map’)maps\dungeon12.map # Result when run on Windows>>> print os.path.join(‘maps’,’dungeon12.map’)maps/dungeon12.map # Result when run on UNIX
To make this happen, each platform defines two modules to do the platform-specific work.(On Macintosh systems they are mac and macpath; on Windows they’re nt and ntpath,and so on.) When the os module is imported, it looks inside sys.builtin_module_namesfor the name of a platform-specific module (such as nt), loads its contents into the osnamespace, and then loads the platform-specific path module and renames it to os.path.
You can check the os.name variable to see which operating system-specific module osloaded, but you should rarely need to use it. The whole point of os and os.path is to makeyour programs blissfully ignorant of the underlying operating system.
4807-7 ch10.F 5/24/01 8:58 AM Page 156
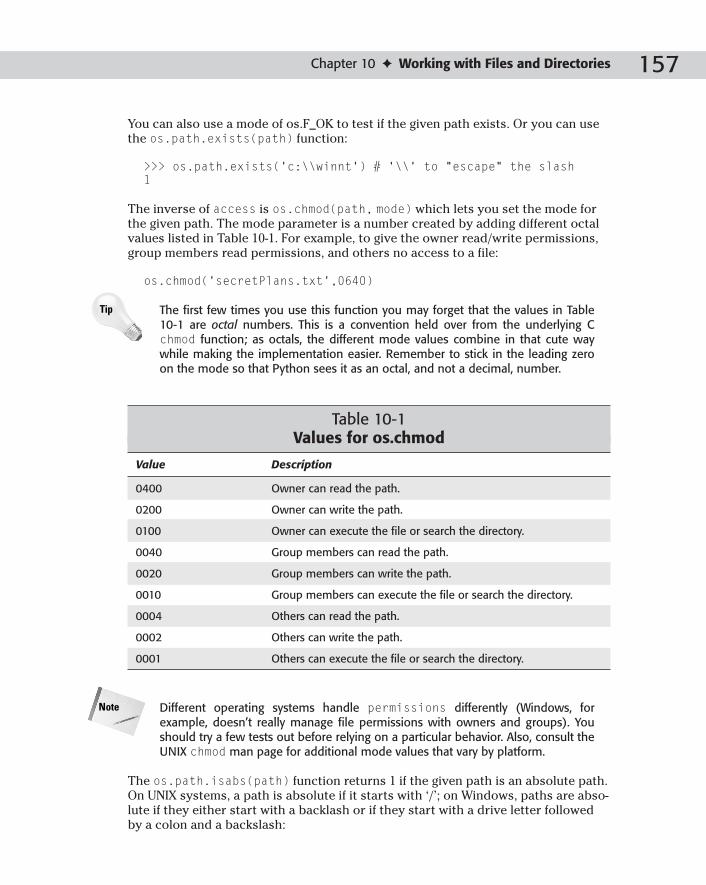
157Chapter 10 ✦ Working with Files and Directories
You can also use a mode of os.F_OK to test if the given path exists. Or you can use
the os.path.exists(path) function:
>>> os.path.exists(‘c:\\winnt’) # ‘\\’ to “escape” the slash1
The inverse of access is os.chmod(path, mode) which lets you set the mode for
the given path. The mode parameter is a number created by adding different octal
values listed in Table 10-1. For example, to give the owner read/write permissions,
group members read permissions, and others no access to a file:
os.chmod(‘secretPlans.txt’,0640)
The first few times you use this function you may forget that the values in Table10-1 are octal numbers. This is a convention held over from the underlying Cchmod function; as octals, the different mode values combine in that cute waywhile making the implementation easier. Remember to stick in the leading zeroon the mode so that Python sees it as an octal, and not a decimal, number.
Table 10-1Values for os.chmod
Value Description
0400 Owner can read the path.
0200 Owner can write the path.
0100 Owner can execute the file or search the directory.
0040 Group members can read the path.
0020 Group members can write the path.
0010 Group members can execute the file or search the directory.
0004 Others can read the path.
0002 Others can write the path.
0001 Others can execute the file or search the directory.
Different operating systems handle permissions differently (Windows, forexample, doesn’t really manage file permissions with owners and groups). Youshould try a few tests out before relying on a particular behavior. Also, consult theUNIX chmod man page for additional mode values that vary by platform.
The os.path.isabs(path) function returns 1 if the given path is an absolute path.
On UNIX systems, a path is absolute if it starts with ‘/’; on Windows, paths are abso-
lute if they either start with a backlash or if they start with a drive letter followed
by a colon and a backslash:
Note
Tip
4807-7 ch10.F 5/24/01 8:58 AM Page 157
158 Part II ✦ Files, Data Storage, and Operating System Services
>>> os.path.isabs(‘c:\\temp’)1>>> os.path.isabs(‘temp\\foo’)0
The following four functions in the os.path module, isdir(path), isfile(path),
islink(path), and ismount(path), test what kind of file system entry the given
path refers to:
>>> os.path.isdir(‘c:\\winnt’) # Is it a directory?1 >>> os.path.isfile(‘c:\\winnt’) # Is it a normal file?0 >>> os.path.islink(‘/usr/X11R6/bin/X’) # Is it a symbolic link?1 >>> os.path.ismount(‘c:\\’) # It is a mount point?1
On platforms that support symbolic links, isdir and isfile return true if the path
is a link to a directory or file, and the os.readlink(path) function returns the
actual path to which a symbolic link points.
A mounting point is essentially where two file systems connect. On UNIX, ismountreturns true if path and path/.. have a different device or inode. On Windows,
ismount returns true for paths like c:\ and \\endor\.
An inode is a UNIX file system data structure that holds information about a direc-tory entry. Each directory entry is uniquely identified by a device number and aninode number. Some of the following routines may return inode numbers; for UNIXmachines these are valid, but for other platforms they are just dummy values.
You can retrieve a file’s size in bytes using os.path.getsize(path):
>>> os.path.getsize(‘c:\\winnt\\uninst.exe’)299520 # About 290K
The os.path.getatime(path) and os.path.getmtime(path) functions return
the path’s last access and modified times, respectively, in seconds since the epoch(you know, New Year’s Eve 1969):
>>> os.path.getmtime(‘c:\\winnt\\readme.exe’)786178800>>> os.path.getatime(‘c:\\winnt\\readme.exe’)956901600>>> import time>>> time.ctime(os.path.getatime(‘c:\\winnt\\readme.exe’))‘Fri Apr 28 00:00:00 2000’
Note
4807-7 ch10.F 5/24/01 8:58 AM Page 158

159Chapter 10 ✦ Working with Files and Directories
Going the other direction, the os.utime(path, (atime, mtime)) function sets the
time values for the given path. The following example sets the last access and modi-
fication times of a file to noon on March 1, 1977:
>>> sec = time.mktime((1977,3,1,12,0,0,-1,-1,-1))>>> os.utime(‘c:\\temp\\foo.txt’,(sec,sec))
You can also “touch” a file’s times so that they are set to the current time:
>>> os.utime(‘c:\\temp\\foo.txt’,None) # Set to current time.
See the time module in Chapter 13 for a discussion of its features and a betterdefinition of the epoch.
UNIX-compatible systems have the os.chown(path, userID, groupID) that
changes the ownership of a path to that of a different user and group:
os.chown(‘grumpy.png’,os.getuid(),os.getgid())
Chapter 11 covers functions to get and set group and user IDs.
Non-Windows systems include the os.path.samefile(path1,path2) and os.path.sameopenfile(f1,f2) functions that return true if the given paths or file objects
refer to the same item on disk (they reside on the same device and have the same
inode).
The I-want-it-all approachIf you want to know several pieces of information about a path (for example, you
need to know a file’s size as well as the time it was last modified), the previous func-
tions are inefficient because each one results in a call to the operating system. The
os.stat(path) function solves this problem by returning a tuple with ten pieces of
information all at once (many of the previous section’s functions quietly call os.stat
behind the scenes and throw away the information you didn’t request):
>>> os.stat(‘c:\\winnt\\uninst.exe’)(33279, 0, 2, 1, 0, 0, 299520, 974876400, 860551690, 955920365)
Don’t worry too much if the numbers returned look useless! The stat module pro-
vides names (listed in Table 10-2) for indexes into the tuple:
>>> import stat>>> os.stat(‘c:\\winnt\\uninst.exe’)[stat.ST_SIZE] # File size299520 # Hmm... still about 290K
Cross-Reference
Cross-Reference
4807-7 ch10.F 5/24/01 8:58 AM Page 159

160 Part II ✦ Files, Data Storage, and Operating System Services
Table 10-2Index Names for os.stat Tuple
Name Description
ST_SIZE File size (in bytes)
ST_ATIME Time of last access (in seconds since the epoch)
ST_MTIME Time of last modification (in seconds since the epoch)
ST_MODE Mode (see below for possible values)
ST_CTIME Time of last status change (access, modify, chmod, chown, and so on)
ST_UID Owner’s user ID
ST_GID Owner’s group ID
ST_NLINK Number of links to the inode
ST_INO inode’s number
ST_DEV inode’s device
Once you have a path’s mode value (stat.ST_MODE), you can use other stat-
provided functions to test for certain types of path entries (see Table 10-3 for the
complete list):
>>> mode = os.stat(‘c:\\winnt’)[stat.ST_MODE]>>> stat.S_ISDIR(mode) # Is it a directory?1 # Yes!
Table 10-3Path Type Test Functions
Function Returns true for
S_ISREG(mode) Regular file
S_ISDIR(mode) Directory
S_ISLNK(mode) Symbolic link
S_ISFIFO(mode) FIFO (named pipe)
S_ISSOCK(mode) Socket
S_ISBLK(mode) Special block device
S_ISCHR(mode) Special character device
4807-7 ch10.F 5/24/01 8:58 AM Page 160

161Chapter 10 ✦ Working with Files and Directories
When you call os.stat with a path to a symbolic link, it returns information about
the path that the link references. The os.lstat(path) function behaves just like
os.stat except that on symbolic links it returns information about the link itself
(although the OS still borrows much of the information from the file it references).
See “Working with File Descriptors” later in this chapter for coverage of theos.fstat function that returns stats for open file descriptors.
On UNIX-compatible systems you can call os.samestat(stat1,stat2) to see if
two sets of stats refer to the same file (it compares the device and inode number).
The Python standard library also comes with the statcache module, which
behaves just like os.stat but caches the results for later use:
>>> import statcache>>> statcache.stat(‘c:\\temp’)(16895, 0, 2, 1, 0, 0, 0, 975999600, 969904112, 969904110)
You can call forget(path) to remove a particular cached entry, or reset() to
remove them all. The forget_prefix(prefix) function removes all entries that
start with a given prefix, and forget_except_prefix(prefix) removes all that do
not start with the prefix (removing a cache entry means a call to stat will have to
check with the operating system again). The forget_dir(prefix) function
removes all entries in a directory, but not in its subdirectories.
Building and Dissecting PathsThe different path conventions that operating systems follow can make path manip-
ulation a nuisance. Fortunately Python has plenty of routines to help.
Joining path partsThe os.path.join(part[, part...]) joins any number of path components into
a path valid for the current operating system:
>>> print os.path.join(‘c:’,’r2d2’,’c3po’,’r5d4’)c:\r2d2\c3po\r5d4>>> print os.path.join(os.pardir,os.pardir,’tmp’)..\..\tmp
The separator character used is defined in os.sep. You can use os.curdir and
os.pardir with join when you want to refer to the current and parent directories,
respectively.
Cross-Reference
4807-7 ch10.F 5/24/01 8:58 AM Page 161

162 Part II ✦ Files, Data Storage, and Operating System Services
Breaking paths into pieces Given a path, it’s not too hard to separate it into its pieces (file name, extension,
directory name, and so on) using one of the os.path.split functions:
>>> os.path.split(r’c:\temp\foo.txt’) # Yay, raw strings!(‘c:\\temp’, ‘foo.txt’) # Split into path and filename.>>> os.path.splitdrive(r’c:\temp\foo.txt’)(‘c:’, ‘\\temp\\foo.txt’) # Split off the drive.>>> os.path.splitext(r’c:\temp\foo.txt’)(‘c:\\temp\\foo’, ‘.txt’) # Split off the extension.>>> os.path.splitunc(r’\\endor\temp\foo.txt’)(‘\\\\endor\\temp’, ‘\\foo.txt’) # Split off machine and mount.
The splitdrive function is present on UNIX systems, but for any path just returns
the tuple (‘’,path); the splitunc function is available only on Windows.
The os.path.dirname(path) and os.path.basename(path) functions are short-
hand functions that together return the same information as split:
>>> os.path.dirname(r’c:\temp\foo.txt’)‘c:\\temp’>>> os.path.basename(r’c:\temp\foo.txt’)‘foo.txt’
Other path modifiersThe os.path.normcase(path) function normalizes the case of a path (makes it all
lowercase on case-insensitive platforms, leaves it unchanged on others) and
replaces forward slashes with backwards slashes on Windows platforms:
>>> print os.path.normcase(‘kEwL/lAmeR/hAckUr/d00d’)kewl\lamer\hackur\d00d
The os.path.normpath(path) function normalizes a given path by removing
redundant separator characters and collapsing references to the parent directory
(it also fixes forward slashes for Windows systems):
>>> print os.path.normpath(r’c:\work\\\temp\..\..\games’)c:\games
The os.path.abspath(path) function normalizes the path and then converts it to
an absolute path:
>>> os.getcwd()‘/export/home’>>> os.path.abspath(‘fred/backup/../temp/cool.py’)‘/export/home/fred/temp/cool.py’
4807-7 ch10.F 5/24/01 8:58 AM Page 162
163Chapter 10 ✦ Working with Files and Directories
The os.path.expandvars(path) function searches the given path for variable
names of the form $varname and ${varname}. If the variables are defined in the
environment, expandvars substitutes in their values, leaving undefined variable
references in place (you can use $$ to print $):
>>> os.environ.update({‘WORK’:’work’,’BAKFILE’:’kill.bak’})>>> p = os.path.join(‘$WORK’,’${BAKFILE}’)>>> print os.path.expandvars(p)work\kill.bak
The os.path.expanduser(path) function replaces “~” or “~username” at the
beginning of a path with the path to the user’s home directory. For “~” (meaning the
current user), expanduser uses the value of the HOME environment variable if pre-
sent. On Windows, if HOME is not defined, then it also tries to find and join
HOMEDRIVE and HOMEPATH, returning the original path unchanged if it fails. For
users other than the current user (“~username”), Windows always returns the
original path and UNIX uses the pwd module to locate that user’s home directory.
See Chapter 38 to learn more about the pwd module.
Listing Directories and Matching File NamesThis section lists several ways to retrieve a list of file names, whether they are all the
files in a particular directory or all the files that match a particular search pattern.
The os.listdir(dir) function returns a list containing all the files in the given
directory:
>>> os.listdir(‘c:\\sierra’)[‘LAND’, ‘Half-Life’, ‘SETUP.EXE’]
The dircache module provides its own listdir function that maintains a cache to
increase the performance of repeated calls (and uses the modified time on the
directory to detect when a cache entry needs to be tossed out):
>>> import dircache>>> dircache.listdir(‘c:\\sierra’)[‘Half-Life’, ‘LAND’, ‘SETUP.EXE’]
The list returned is a reference, not a copy, so modifying it means your modifications
are returned to future callers too. The module also has an annotate(head,list)function that adds a slash to the end of any entry in the list that is a directory:
>>> x = dircache.listdir(‘c:\\sierra’)[:] # Make a copy>>> dircache.annotate(‘c:\\sierra’,x)>>> x[‘Half-Life/’, ‘LAND/’, ‘SETUP.EXE’]
Cross-Reference
4807-7 ch10.F 5/24/01 8:58 AM Page 163

164 Part II ✦ Files, Data Storage, and Operating System Services
Use the head parameter to join to each item in the list so that annotate can then
call os.path.isdir.
The os.path.commonprefix(list) function takes a list of paths and returns the
longest prefix that all items have in common:
>>> l = [‘c:\\ax\\nine.txt’,’c:\\ax\\ninja.txt’,’c:\\axle’]>>> os.path.commonprefix(l)‘c:\\ax’
The os.path.walk(top,func,arg) function walks a directory tree starting at top,
calling func in each directory. The function func should take three arguments: arg(whatever you passed to arg in the call to walk), dirname (the name of the current
directory being visited), and names (a list of directory entries in this directory).
The following example prints the names of any executable files in the d:\gamesdirectory or any of its subdirectories:
>>> def walkfunc(ext,dir,files):... goodFiles = [x for x in files if x.find(ext) != -1]... if goodFiles:... print dir,goodFiles... >>> os.path.walk(‘d:\\games’,walkfunc,’.exe’)d:\games\Half-Life [‘10051013.exe’]d:\games\q3a [‘quake3.exe’]d:\games\q3a\Extras\cs [‘sysinfo.exe’]
With the fnmatch module you can test to see if a file name matches a specific pat-
tern. Asterisks match everything, question marks match any single character:
>>> import fnmatch>>> fnmatch.fnmatch(‘python’,’p*n’)1 # It’s a match!>>> fnmatch.fnmatch(‘python’,’pyth?n’)1
You can also enclose in square brackets a sequence of characters to match:
>>> fnmatch.fnmatch(‘python’,’p[a,e,i,o,u,y,0-9]thon’)1 # Matches p + [any vowel or number] + thon>>> fnmatch.fnmatch(‘p5thon’,’p[a,e,i,o,u,y,0-9]thon’)1>>> fnmatch.fnmatch(‘p5thon’,’p[!0-9]thon’)0 # Doesn’t match p + [any char EXCEPT a digit] + thon>>> fnmatch.fnmatch(‘python’,’p[!0-9]thon’)1
The fnmatch module also has a fnmatchcase(filename,pattern) function that
forces a case-sensitive comparison regardless of whether or not the filesystem is
case-sensitive.
4807-7 ch10.F 5/24/01 8:58 AM Page 164

165Chapter 10 ✦ Working with Files and Directories
The glob module takes the fnmatch module a step further by returning all the
paths matching a search pattern you provide:
>>> import glob>>> for file in glob.glob(‘c:\\da*\\?ytrack\\s*.*[y,e]’):... print filec:\dave\pytrack\sdaily.pyc:\dave\pytrack\std.pyc:\dave\pytrack\StkHistInfo.pyc:\dave\mytrack\sdkaccess1.exec:\dave\mytrack\sdkaccess2.exe
Obtaining Environment and Argument Information
It’s often useful to know a little about the world around Python. This section
explains how to get and set environment variables, how to discover and change the
current working directory, and how to read in options from the command line.
Environment variables When you import the os module, it populates a dictionary named environ with all
the environment variables currently in existence. You can use normal dictionary
access to get and set the variables, and child processes or shell commands your
programs execute see any changes you make:
>>> os.environ[‘SHELL’]‘/usr/local/bin/tcsh’>>> os.environ[‘BOO’] = `2 + 2` # Convert value to string.>>> print os.popen(‘echo $BOO’).read() # Use %BOO% on Win32.4
See Chapter 11 for information on child processes and executing shell commands.
The dictionary used is actually a subclass of UserDict, and requires that the value
you assign be a string.
Current working directoryThe current working directory is initially the directory in which you started the
Python interpreter. You can find out what the current directory is and change to
another directory using the os.getcwd() and os.chdir(path) functions:
Cross-Reference
4807-7 ch10.F 5/24/01 8:58 AM Page 165

166 Part II ✦ Files, Data Storage, and Operating System Services
>>> os.chdir(‘/usr/home’)>>> os.chdir(‘..’)>>> os.getcwd()‘/usr’
Command-line parametersThe sys.argv variable is a list containing the command-line parameters passed to
the program on startup. Save the tiny program in Listing 10-1 to a file called
args.py and try the following example from a command prompt:
C:\temp>args.py pants beableThere are 3 arguments[‘C:\\temp\\args.py’, ‘pants’, ‘beable’]
Listing 10-1: args.py – Display Command-Line Arguments
#!/usr/bin/env python# Prints out command-line arguments
import sysprint ‘There are %d arguments’ % len(sys.argv)print sys.argv
The sys.argv list always has a length of at least one; as in C, the item at index zero
is the name of the script that is running. If you’re running the Python interpreter in
interactive mode, however, that item is present but is the empty string.
Example: Recursive Grep UtilityListing 10-2 combines several of the features covered so far in this chapter to create
rgrep, a grep-like utility that searches for a string in a list of files in the current
directory or any subdirectory. The sample output below shows searching for “def”
in any file that matches the pattern “d*.py” or “h*”:
D:\Dev\pytrack>\rgrep.py def d*.py h*D:\Dev\pytrack\dataio.py 185 def __init__(self,sTick):D:\Dev\pytrack\dataio.py 189 def getData(self):D:\Dev\pytrack\histInfo.py 9 def sum(self,count,tups,index):D:\Dev\pytrack\histInfo.py 16 def ave(self,count,tups,index):D:\Dev\pytrack\old\dataio.py 12 def __init__(self,sTick):D:\Dev\pytrack\old\dataio.py 16 def getData(self):...
4807-7 ch10.F 5/24/01 8:58 AM Page 166

167Chapter 10 ✦ Working with Files and Directories
Listing 10-2: rgrep.py – Recursive File Search Utility
#!/usr/bin/env python# Recursively searches for a string in a file or list of files.
import sys, os, fnmatch
def walkFunc(arg,dir,files):“Called by os.path.walk to process each dir”pattern,masks = arg
# Cycle through each mask on each file.for file in files:
for mask in masks:if fnmatch.fnmatch(file,mask):
# Filename matches!name = os.path.join(dir,file)try:
# Read the file and search.data = open(name,’rb’).read()
# Do a quick check. if data.find(pattern) != -1:
i = 0data = data.split(‘\n’)
# Now a line-by-line check.for line in data:
i += 1if line.find(pattern) != -1:
print name,i,lineexcept (OSError,IOError):
passbreak # Stop checking masks.
if __name__ == ‘__main__’:if len(sys.argv) < 3:
print ‘Usage: %s pattern file [files...]’ % sys.argv[0]else:
try:
os.path.walk(os.getcwd(),walkFunc,(sys.argv[1],sys.argv[2:]))except KeyboardInterrupt:
print ‘** Halted **’
UNIX shells usually expand wildcards before your program gets them, so whenrunning this on UNIX you’d have to enclose in quotes command-line parametersthat contain asterisks:
/usr/bin> rgrep.py alligator “*.txt”
Tip
4807-7 ch10.F 5/24/01 8:58 AM Page 167
168 Part II ✦ Files, Data Storage, and Operating System Services
You can use rgrep as a starting point for a more powerful search tool. For example,
you could make it accept true regular expressions (as seen in Chapter 9) or make it
support case-insensitive searches too. Although performance is pretty decent, you
could fix the fact that rgrep reads the entire file into memory by reading the files
one piece at a time.
Copying, Renaming, and Removing PathsThe routines to copy, rename, and remove paths are in the os and shutil modules.
The shutil module aims to provide features normally found in command shells.
Copying and linkingThe shutil.copyfile(src, dest) function copies a file from src to dest;
shutil.copy(src, dest) does about the same thing, except that if dest is a direc-
tory it copies the file into that directory (just like when you copy a file in an MS-DOS
or UNIX shell). copy also copies the permission bits of the file. The shutil.copy2(src, dest) function is identical to copy except that it also copies last access and
last modification times of the original file. shutil.copyfileobj(src, dest[,buflen]) copies two file-like objects, passing the optional buflen parameter to the
source object’s read function.
See Chapter 8 for more information on filelike objects.
The shutil.copymode (src, dest) function copies the permission bits of a file
(see os.chmod earlier in this chapter), as does shutil.copystat(src, dest),
which also copies last access and last modification times.
The shutil.copytree (src, dest[, symlinks]) function uses copy2 to recur-
sively copy an entire tree. copytree raises an exception if dest already exists. If
the symlinks parameter is 1, any symbolic links in the source tree also become
symbolic links in the new copy of the tree. If symlinks is omitted or equal to zero,
the copy of the tree contains copies of the files referenced by symbolic links.
On platforms that support links, os.symlink(src,dest) creates a symbolic link to
src and names it dest, and os.link(src,dest) creates a hard link to src named
dest.
RenamingThe os.rename(old,new) function renames a path, and os.renames(old,new)renames an entire path from one thing to another, creating new directories as
needed and removing empty ones to cleanup when done. For example:
os.renames(‘cache/logs’,’/usr/home/dave/backup/0105’)
Cross-Reference
4807-7 ch10.F 5/24/01 8:58 AM Page 168

169Chapter 10 ✦ Working with Files and Directories
basically moves the logs directory in cache to /usr/home/dave/backup and calls
it 0105. If the cache directory is empty after the move, the function deletes it.
Before the move, renames creates any intermediate directories along the way to
make /usr/home/dave/backup/0105 a valid path. The old and new parameters
can be individual files and not just entire directories.
RemovingThe os.remove(filename) function deletes a file, os.rmdir(dir) removes an
empty directory, and os.removedirs(dir) removes an empty directory and all
empty parent directories.
If a directory is not empty, neither rmdir nor removedirs removes it. That job is
reserved for shutil.rmtree(path[, ignore_errors[, onerror]]), which
recursively deletes all files in the given directory (including the directory itself) as
well as any subdirectories and their files. ignore_errors is 0 by default, if you
supply a value of 1 then rmtree attempts to continue processing despite any errors
that occur, and won’t bother to tell you about them. You can provide a function in
the onerror parameter to handle any errors that occur. The function must take
three arguments, as shown in this example:
>>> def errFunc(raiser,problemPath,excInfo):... print raiser.__name__,’had problems with’,problemPath>>> shutil.rmtree(‘c:\\temp\\foo’,0,errFunc)rmdir had problems with c:\temp\foo\bar\yeahrmdir had problems with c:\temp\foo\barrmdir had problems with c:\temp\foo
The arguments passed to your error function are the function object that raised an
exception, the particular path it had a problem on, and information about the
exception, equivalent to a call to sys.exc_info().
Please be careful with rmtree; it assumes you’re smart and trusts your judgment.If you tell it to erase all your files on your hard drive, it’ll obediently do so and with-out hesitation.
Creating Directories and Temporary FilesThe os.mkdir(dir[, mode]) function creates a new directory. The optional modeparameter is for the permissions on the new directory, and they follow the form of
those listed for os.chmod in Table 10-1. (If you don’t supply mode, the directory has
read, write, and execute permissions for everyone.)
The os.makedirs(dir[, mode]) function creates a new directory and any inter-
mediate directories needed along the way:
>>> os.makedirs(r’c:\a\b\c\d\e\f\g\h\i’)>>> os.removedirs(r’c:\a\b\c\d\e\f\g\h\i’)
Caution
4807-7 ch10.F 5/24/01 8:58 AM Page 169

170 Part II ✦ Files, Data Storage, and Operating System Services
Even though my computer didn’t have an a directory or an a\b directory, and so
on, makedirs took care of creating them until at last it created i, a subdirectory of
h (and then I used os.removedirs to clean up the mess).
The tempfile module helps when you need to use a file as a temporary storage
area for data. In such cases you don’t generally care about a file name or where the
file lives on disk, so tempfile takes care of that for you. Temporary files can help
conserve memory by storing temporary information on disk instead of keeping it all
loaded in memory.
The tempfile.mktemp([suffix]) function returns the absolute path to a unique
temporary file name that does not exist at the time of the call, and includes the suffix
in the file name if you supply it. Although two calls to mktemp won’t return the same
file name, it doesn’t create the file, so it’s possible (although quite unlikely) that if
you wait long enough someone else may create a file by the same name. While it’s
safe to use the file name as soon as you get it, it isn’t as safe to save a copy of the
name and then at a later date expect to create a file by that name, for example.
You can set the tempfile.tempdir variable to tell mktemp where to store tempo-
rary files. By default, it tries its best to find a good home for them, first checking the
values of the environment variables $TMPDIR, $TEMP, and $TMP. If none of them are
defined, it then checks if it can create temporary files in known temporary file
safe-havens such as /var/temp, /usr/tmp, or /tmp on UNIX and c:\temp or \temp
on Windows. If all these fail, it’ll try to use the current working directory.
tempfile.gettempprefix() returns the prefix of the temporary files you
have (you can set this value via tempfile.template).
The ultimate in hassle-free temporary files comes from the tempfile.TemporaryFile class. It gives you a file or filelike object that you can read and
write to without worrying about cleanup when you’re done. You use
tempfile.TemporaryFile([mode[, bufsize[, suffix]]]) to create a new
instance object. The following example figures out how many digits it takes to write
out the numbers from 1 to high. (Of the many better ways to do this, the simplest
improvement is simply to add the length of each number to a counter instead of
building the entire string and taking its length, but that wouldn’t give me an oppor-
tunity to use TemporaryFile now would it?):
>>> def digitCount(high):... import tempfile... f = tempfile.TemporaryFile()... for i in range(1,high+1):... f.write(`i`)... f.flush()... f.seek(0)... return len(f.read())>>> digitCount(12)15 # len(‘123456789101112’) = 15>>> digitCount(100)192>>> digitCount(100000)488895
4807-7 ch10.F 5/24/01 8:58 AM Page 170

171Chapter 10 ✦ Working with Files and Directories
By default, mode is ‘w+b’ so you can read and write data and not worry about the
type of data you’re writing (binary or text). The optional bufsize argument gets
passed to the open function, and the optional suffix argument is passed to
mktemp. On UNIX systems, the file doesn’t even have a directory entry, making it
more secure. Other systems delete the temporary file as soon as you call close or
when Python garbage collects the object.
On UNIX systems, the os module has three functions for working with temporary
files. os.tmpfile() creates a new file object that you can read and write to. As
with tempfile’s TemporaryFile class, the file has no directory entry and ceases
to exist when you close the file.
The os.tmpnam() function returns an absolute path to a unique file name suitable
for use as a temporary file (it doesn’t create an actual file). os.tempnam([dir,[prefix]]) does the same as tmpnam except that it enables you to specify the
directory in which the file name will live, as well as supplies an optional prefix to
use in the temporary file’s name.
Comparing Files and DirectoriesThe filecmp module aids in comparing files and directories. To compare two files,
call filecmp.cmp(f1,f2[,shallow[,use_statcache]]):
>>> import filecmp>>> open(‘one’,’wt’).write(‘Hey’)>>> open(‘two’,’wt’).write(‘Hey’)>>> filecmp.cmp(‘one’,’two’)1 # Files match
The shallow parameter defaults to 1, which means that if both are regular files
with the same size and modification time, the comparison returns true. If they
differ (or if shallow=0), the function compares the contents of the two. The
use_statcache parameter defaults to 0 and cmp calls os.stat for file info. If 1, cmpcalls statcache.stat.
The filecmp.cmpfiles(a, b, common[, shallow[, use_statcache]]) function
takes a list of file names located in two directories (each file is in both directory aand b) and returns a three-tuple containing a list of files that compared equal, a list
of those that were different, and a list of files that weren’t regular files and therefore
weren’t compared. The shallow and use_statcache parameters behave the same
as for cmp.
The dircmp class in the filecmp module can help you generate that list of common
files, as well as do some other comparison work for you. You use filecmp.dircmp(a, b[, ignore[, hide]]) to create a new instance:
4807-7 ch10.F 5/24/01 8:58 AM Page 171

172 Part II ✦ Files, Data Storage, and Operating System Services
>>> d = filecmp.dircmp(‘c:\\Program Files’,’d:\\Program Files’)>>> d.report()diff c:\Program Files d:\Program FilesOnly in c:\Program Files : [‘Accessories’, ‘Adobe’, ...<snip>Only in d:\Program Files : [‘AnalogX’, ‘Paint Shop Pro...<snip>Common subdirectories : [‘WinZip’, ‘Yahoo!’,’work’]
The ignore function is a list of file names to ignore (it defaults to [‘RCS’, ‘CVS’, ‘tags’])
and hide is a list of file names not to show in the listings (it defaults to [os.curdir,
os.pardir], the entries corresponding to the current and parent directories).
The dircmp.report() method prints to standard output a comparison between aand b. dircmp.report_partial_closure() does the same, but also compares
common immediate subdirectories. dircmp.report_full_closure() goes the
whole nine yards and compares all common subdirectories, no matter how deep.
After you create a dircmp object, you can access any of the attributes listed in
Table 10-4 for more information about the comparison.
Table 10-4Other dircmp Object Attributes
Attribute Description
left_list Items in a after being filtered through hide and ignore
right_list Items in b after being filtered through hide and ignore
common Items in both a and b
left_only Items only in a
right_only Items only in b
common_dirs Subdirectories found in both a and b
common_files Files found in both a and b
common_funny Items found in both a and b, but either the type differsbetween a and b or os.stat reports an error for that item
same_files Common_files that are identical
diff_files Common_files that are different
funny_files Common_files that couldn’t be compared
subdirs Dictionary of dircmp objects — keys are common_dirs
The Python distribution comes with ndiff (Tools/Scripts/ndiff.py), a utility that pro-vides the details of what differs between two files (similar to the UNIX diff andWindows windiff utilities).
Tip
4807-7 ch10.F 5/24/01 8:58 AM Page 172

173Chapter 10 ✦ Working with Files and Directories
Working with File DescriptorsAn alternative to using Python’s file objects is to use file descriptors, a somewhat
lower level approach to working with files.
General file descriptor functionsYou create a file descriptor with the os.open(file, flags[, mode]) function. You
can combine various values from the next table, Table 10-5, for the flags parame-
ter, and the mode values are those you pass to os.chmod:
>>> fd = os.open(‘fumble.txt’,os.O_WRONLY|os.O_CREAT)>>> os.write(fd,’I like fudge’)12 # Wrote 12 bytes.>>> os.close(fd)>>> open(‘fumble.txt’).read() # Use the nice Python way.‘I like fudge’
The os.dup(fd) function returns a duplicate of the given descriptor, and
os.dup2(fd1,fd2) makes fd2 a duplicate of fd1, but closes fd2 first if necessary.
Given a file descriptor, you can use os.fdopen(fd[, mode[, bufsize]]) to create
an open Python file object connected to the same file. The optional mode and
bufsize arguments are the same as those used for the normal Python open function.
Table 10-5File Descriptor Open Flags
Name Description
O_RDONLY Allow reading only
O_WRONLY Allow writing only
O_RDWR Allow reading and writing
O_BINARY Open in binary mode
O_TEXT Open in text mode
O_CREAT Create file if it does not exist
O_EXCL Return error if create and file exists
O_TRUNC Truncate file size to 0
O_APPEND Append to the end of the file on each write
O_NONBLOCK Do not block
4807-7 ch10.F 5/24/01 8:58 AM Page 173

174 Part II ✦ Files, Data Storage, and Operating System Services
The os module also has other flags such as O_DSYNC, O_RSYNC, O_SYNC, and
O_NOCTTY. Their behavior varies by platform so you should consult the UNIX openman page for your system for details.
The os.openpty function returns two file descriptors for a new pseudo-terminal.See Chapter 38 for details.
The following os file descriptor functions closely mirror their file method counter-
parts covered mostly in Chapter 8, “Input and Output”:
close(fd) isatty(fd) lseek(fd,pos,how) read(fd,n)write(str) fstat(fd) ftruncate(fd,len)
UNIX systems can use the os.ttyname(fd) to retrieve the name of the terminal
device the file descriptor represents (if it is a terminal):
>>> os.ttyname(1) # 1 is stdout‘/dev/ttyv1’
PipesA pipe is a communications mechanism through which you can read or write data
as if it were a file. You use os.pipe() to create two file descriptors connected via
a pipe:
>>> r,w = os.pipe() # One for reading, one for writing>>> os.write(r,’Pipe dream’)>>> os.write(w,’Pipe dream’)10>>> os.read(r, 1000)‘Pipe dream’
On UNIX, the os.mkfifo(path[, mode]) function creates a named pipe (FIFO) that
you can use to communicate between processes. The mode defaults to read and
write permissions for everyone (0666). After you create the FIFO on disk, you open
it and read or write to it just like any other file.
Other File Processing TechniquesThe modules below provide alternative methods for operating on file contents.
Randomly accessing lines in text filesThe linecache module returns to you any line in any file you want:
>>> import linecache
Cross-Reference
4807-7 ch10.F 5/24/01 8:58 AM Page 174

175Chapter 10 ✦ Working with Files and Directories
>>> linecache.getline(‘linecache.py’,5)‘that name.\012’
The first time you request a line from a particular file, it reads the file and caches
the lines, but future calls for lines from the same file won’t have to go back to the
disk. Line numbers are 1-based (yes, line one is line one).
If keeping too many files around makes you nervous, you can call linecache.clearcache() to empty the cache. Also, calling linecache.checkcache() tosses
out cached entries that are no longer valid.
This module was designed to read lines from modules (Python uses it to printtraceback information in exceptions), so if linecache can’t find the file younamed it also searches for the file in the module search path.
Using memory-mapped filesA memory-mapped file (in the mmap module) behaves like some sort of file-mutable
string hybrid. You can access individual characters and slices as well as change
them, and you can use memory-mapped files with many routines that expect strings.
(The re module, for example, is quite happy to do regular expression searching and
mapping on a memory-mapped file.) They also work well for routines that operate
on files, and you can commit to disk any changes you make to their contents.
When you create a new mmap object, you supply a file descriptor to a file opened for
reading and writing and a length parameter specifying the number of bytes from the
file the memory map will use:
>>> f = open(‘mymap’,’w+b’)>>> f.write(‘And now for something completely different’)>>> f.flush()>>> import mmap>>> m = mmap.mmap(f.fileno(),45) # Use the open file mymap.>>> m[5:10] # It slices.‘ow fo’>>> m[5:10] = ‘ew fi’ # It dices.>>> m[5:10]‘ew fi’>>> m.flush(); m.close() # But wait, there’s more!1>>> open(‘mymap’).read()‘And new fir something completely different\000\000\000’
The Windows version for creating a new mmap object accepts an optional third argu-
ment of a string that represents the tag name for the mapping (Windows lets you
have many mappings for the same file). If you use a mapping that doesn’t exist,
Python creates a new one; otherwise the mapping by that name is opened.
Note
4807-7 ch10.F 5/24/01 8:58 AM Page 175

176 Part II ✦ Files, Data Storage, and Operating System Services
The UNIX version optionally takes flags and prot arguments. flags can be either
MAP_PRIVATE or MAP_SHARED (the default), signifying that changes are visible only
to the current process or are visible to all processes mapping the same portions of
the file. The prot argument is the logical OR of arguments specifying the type of
protection that mapping has, such as PROT_READ | PROT_WRITE (the default).
Avoid using the optional flags if possible so that your code will work on Windowsor UNIX.
You can use mmap.size() to retrieve the size of a mmap object, and
mmap.resize(newsize) to change it:
>>> m.size()50>>> m.resize(100)
Call mmap.flush([offset, size]) to save changes to disk. Passing no arguments
flushes all changes to disk, otherwise the memory map flushes only size bytes
starting at offset.
Don’t forget to flush. If you don’t call flush, you have no guarantee that yourchanges will make it to disk.
All mmap objects have the close(), tell(), seek(), read(num), write(str),
readline(), and find(str[, start]) methods which behave just like their file
and string counterparts. The mmap.read_byte() and mmap.write_byte(byte)methods are useful for reading and writing one byte at a time (the bytes are passed
and returned as strings of length 1). You can copy data from one location to another
within the memory-mapped file using mmap.move(dest, src, count). It copies
count bytes from src to dest.
Iterating over several filesThe fileinput class lets you iterate over several files as if they were a single file,
eliminating a lot of the housekeeping involved. Its designed use is for iterating all
files passed in on the command line, processing each line individually:
>>> import fileinput>>> for line in fileinput.input():... print line
The above example iterates over the files listed in sys.argv[1:] and prints out each line.
The input(files,inplace,backup) function uses the command-line arguments if
you don’t pass it a files list. Any file (or command-line argument) that is just ‘-’ reads
from stdin instead. If the inplace parameter is 1, fileinput copies each file to a
backup and routes any output on stdout to the original file, thus enabling in-place
modification or filtering of each file. If inplace is 1 and you supply a value for backup(in the form of ‘.ext’), fileinput uses backup’s value as an extension when creating
backups of the original files, and it doesn’t erase the backups when finished.
Caution
Tip
4807-7 ch10.F 5/24/01 8:58 AM Page 176

177Chapter 10 ✦ Working with Files and Directories
While iterating over the files, you can call fileinput.filename() to get the name of
the current file, and filename.isstdin() to test if the current file is actually stdin.
The fileinput.lineno() function gives you the overall line number of the line
just read, and fileinput.filelineno() returns the number of that line within the
current file. You can also call fileinput.isfirstline() to see if it is the first line
of that file.
The fileinput.nextfile() function skips the rest of the current file and moves
to the next one in the sequence, and fileinput.close() closes the sequence and
quits.
You can customize the fileinput functionality by subclassing the fileinput.FileInput class.
SummaryPython gives you a full toolbox of high-level functions to manipulate files and paths.
In this chapter you learned to:
✦ Manipulate paths and retrieve file and directory information.
✦ Traverse directory trees and match file names to search patterns.
✦ Create and destroy directories and temporary files.
✦ Use file descriptors.
The next chapter covers more of Python’s operating system features. You’ll learn to
access process information, start child processes, and run shell commands.
✦ ✦ ✦
Tip
4807-7 ch10.F 5/24/01 8:58 AM Page 177

4807-7 ch10.F 5/24/01 8:58 AM Page 178

Using OtherOperatingSystem Services
This chapter finishes coverage of Python’s main operating
system services. One of the main points of focus is work-
ing outside the boundaries in which the interpreter is running.
After you’re done with this chapter you’ll be able to execute
commands in a sub-shell or spawn off an entirely new process.
Executing Shell Commands andOther Programs
The simplest way to execute a shell command is with the
os.system(cmd) function (which is just a wrapper for the C
system function). The following example uses the shell com-
mand echo to write contents to a file, including an environ-
ment variable set from within the Python interpreter:
>>> import os>>> os.environ[‘GRUB’] = ‘spam!’>>> os.system(‘echo Mmm, %GRUB% > mm.txt’) #Use $GRUB on UNIX0>>> print open(‘mm.txt’).read()Mmm, spam!
The return values vary by system and command, but 0 gener-
ally means the command executed successfully.
Unfortunately, os.system has some limitations. On Windows,
your command runs in a separate MS-DOS window that rears
its ugly head until the command is done, and on all operating
systems it’s kind of a pain to retrieve the output from the com-
mand (especially if the output is on both stdout and
1111C H A P T E R
✦ ✦ ✦ ✦
In This Chapter
Executing shellcommands and otherprograms
Spawning childprocesses
Handling processinformation
Retrieving systeminformation
Managingconfiguration files
Understanding errornames
Handlingasynchronous signals
✦ ✦ ✦ ✦
4807-7 ch11.F 5/24/01 8:59 AM Page 179

180 Part II ✦ Files, Data Storage, and Operating System Services
stderr). The next section shows how to get around this using the much cleaner
calls to os.popen and friends.
Windows systems can use os.startfile(path) to launch a program by sending a
file to the program associated with its file type. For example, if the current direc-
tory has a file called yoddle.html, you can launch a Web browser to view that file
like this:
>>> os.startfile(‘yoddle.html’)
The os.exec family of functions executes another program, but in doing so
replaces the current process — your program doesn’t continue when the exec func-
tion returns. Instead, your program terminates and at the same time launches a dif-
ferent program. Each of the exec functions comes in two versions: one that accepts
a variable number of arguments and one that takes all the program’s arguments in a
list or tuple. All arguments are strings, and you always need to provide argument 0,
which is just the name of the program being executed.
The os.execv(path,args) and os.execl(path, arg0, arg1, ...) functions
execute the program pointed to by path and pass it the arguments. The following
example shuts down the Python interpreter and launches the Windows calculator
(the location of the calc program may vary):
>>> os.execv(‘c:\\winnt\\system32\\calc’,[‘calc’])
The os.execvp(file, args) and os.execlp(file, arg0, arg1, ...) functions
work the same as execv, except they look in the PATH environment variable to find
the executable, so you don’t have to name its absolute path. This example calls
another Python interpreter, telling it to just print out a message. Note the use of the
variable-argument form (execlp) and that you still have to list the program twice,
once for the file argument, and once as argument 0:
>>> os.execlp(‘python’,’python’,’-c’,’”print \’Goodbye!\’”’)
If you need to modify the PATH environment variable, you can use os.defpathto see the default PATH used if it isn’t set in the environment. os.pathsep is theseparator character used between each directory listed in the PATH variable.
The os.execve(path, args, env) and os.execle(path, arg0, arg1, ..., env)functions are also like execv, except that you pass in a dictionary containing all the
environment variables to be defined for the new program. The dictionary should
contain string keys mapping to string values.
The final exec functions, os.execvpe(file, args, env) and os.execlpe(file,arg0, arg1, ..., env), are like execve and execvp combined. You pass in a file
name instead of an absolute path because the functions search through the path for
you, and you also pass in a dictionary of environment variables to use.
Tip
4807-7 ch11.F 5/24/01 8:59 AM Page 180

181Chapter 11 ✦ Using Other Operating System Services
You don’t really have to name the program twice for the exec calls. When supply-ing a value for argument 0, you can actually use any value you want. Be advised,however, that some programs (like gzip and gunzip) may expect argument 0 tohave certain values.
Spawning Child ProcessesDepending on your needs, you can start child processes using the popen, spawn,
and fork functions.
popen functionsThe popen family of functions opens pipes to communicate with a child process.
The os.popen(cmd[, mode[, bufsize]]) function opens a single pipe to read or
write to another process. You pass in the command to execute in the cmd parame-
ter, followed by an optional mode parameter to tell whether you’ll be reading (‘r’)
or writing (‘w’) with the pipe. An optional third parameter is a buffer size like the
one used in the built-in open function. popen returns a file object ready for use:
>>> a = os.popen(‘dir /w /ad e:\\’) # Mode defaults to ‘r’.>>> print a.read()Volume in drive E has no label.Volume Serial Number is 2C40-1AF5
Directory of e:\
[RACER] [maxdev] [VideoDub][FlaskMPEG] [Diablo II] [archive][VNC] [dxsdk] [VMware][AnalogX] [Python20]...
The close() method of the file object returns None if the command was successful,
or an error code if the command was unsuccessful.
The os.popen2(cmd[, bufsize[, mode]]) function is a more flexible alternative
to popen; it returns to you the two-tuple (stdin, stdout) containing the standard
input and output of the child process (the mode parameter is ‘t’ for text or ‘b’ for
binary). The following example uses the external program grep to look through
lines of text and print any that have a colon character in them:
>>> someText = “””... def printEvents():... for i in range(100):... if i % 2 == 0:... print i
Note
4807-7 ch11.F 5/24/01 8:59 AM Page 181

182 Part II ✦ Files, Data Storage, and Operating System Services
... “””>>> w,r = os.popen2(‘grep “:”’) # Grep for lines with ‘:’>>> w.write(someText)>>> w.close()>>> print r.read()def printEvents():for i in range(100):if i % 2 == 0:
Depending on the program you execute, you often need to flush or even closestdin of the child process in order to have it produce its output.
The os.popen3(cmd[, bufsize[, mode]]) function does the same work as
popen2 but instead returns the three-tuple (stdin, stdout, stderr) of the child
process. os.popen4(cmd[, bufsize[, mode]]) does the same except that it
returns the output of stdout and stderr together in a single stream for conve-
nience. This function is a great way to execute arbitrary shell commands cleanly
because you have to look in only one place for the output, and no matter what the
command is, your users won’t see error output sneaking past you and onto the
screen. And on Windows systems, you don’t get the ugly MS-DOS window while
your command executes:
>>> w,r = os.popen4(‘iblahblahasdfasdfr *.foo’)>>> print r.read()‘iblahblahasdfasdfr’ is not recognized as an internal orexternal command, operable program or batch file.
The popen2, popen3, and popen4 functions were new in Python 2.0.
spawn functionsThe spawn functions start a child process that doesn’t replace the current process
(like the exec functions do) unless specifically asked to. For example, to start up
another Python interpreter (assuming it lives in D:\Python20) without stopping
the current one:
>>> os.spawnl(os.P_NOWAIT,’d:\\python20\\python’,’python’)400 # Process ID of new interpreter
Like the exec functions, the spawn functions have many variations, as shown in the
following paragraphs.
os.spawnv(mode, path, args) and os.spawnl(mode, path, arg0, arg1, ...)start a new child process.
os.spawnve(mode, path, args, env) and os.spawnle(mode, path, arg0,arg1, ..., env) start a child process using the environment variables contained
in the dictionary env.
NewFeature
Tip
4807-7 ch11.F 5/24/01 8:59 AM Page 182

183Chapter 11 ✦ Using Other Operating System Services
On UNIX systems, variants of each of the above functions search the current path
for the program to execute, and are named spawnlp, spawnlpe, spawnvp, and
spawnvpe.
The arguments passed in should include the program name for argument 0. A modeof os.P_WAIT forces the current thread to wait until the child process ends.
os.P_NOWAIT runs the child process concurrently, and os.P_OVERLAY terminates
the calling process before running the child process (making it identical to the execfunctions). os.P_DETACH also runs the process concurrently, but in the background
where it has no access to the console or the keyboard.
When you start a child process concurrently, the spawn function returns the pro-
cess ID of the child process. If you use os.P_WAIT instead, the function returns the
exit code of the child once the child process finally quits.
forkThe os.fork() function (available on UNIX systems) creates a new process that is
a duplicate of the current process. To distinguish between the two processes,
os.fork() returns 0 in the child process, and in the parent process it returns the
process ID of the child:
>>> def forkFunc():... pid = os.fork()... if pid == 0:... print ‘I am the child!’... os._exit(0)... else:... print ‘I am the parent. Child PID is’,pid>>> forkFunc()I am the parent. Child PID is 1844I am the child!
Notice that the child process can force itself to terminate by calling
os._exit(status), which terminates a process without the usual cleaning up
(which is good because the parent and child processes access some of the same
resources, such as open file descriptors).
Chapter 38 has information on the pty (pseudo-terminal) module, its fork andspawn functions, and the os.forkpty function.
Process management and terminationWhen you call os._exit() to end a process, Python skips the normal cleanup opera-
tions. The normal way to end the current process is by calling sys.exit([status]).
The status parameter can be a numerical status code that Python returns to the par-
ent process (which by convention is 0 for success and nonzero for an error), or any
other object. For non-numeric objects, sys.exit prints the object to stderr and then
Cross-Reference
4807-7 ch11.F 5/24/01 8:59 AM Page 183

184 Part II ✦ Files, Data Storage, and Operating System Services
exits with a status code of 1, making it a useful way for programs to exit when users
supply invalid command-line arguments:
>>> import sys>>> sys.exit(‘Usage: zapper [-force]’)Usage: zapper [-force]
C:\>
Other ways to shut downAnother way to terminate the current process is by raising the SystemExit excep-
tion (which is what sys.exit does anyway). You can cause the process to termi-
nate abnormally by calling os.abort(), causing it to receive a SIGABRT signal.
The atexit module provides a way for you to register cleanup functions for Python
to call when the interpreter is shutting down normally. You can register multiple
functions, and Python calls them in the reverse order of how you registered them.
Use atexit.register(func [, args]) to register each function, where args are
any arguments (normal or keyword) that you want sent to the function:
>>> import atexit>>> def bye(msg):... print msg
>>> def allDone(*args):... print ‘Here are my args:’,args
>>> atexit.register(bye,”I’m melting!”)>>> atexit.register(allDone,1,2,3)>>> raise SystemExit # Shut down.Here are my args: (1, 2, 3)I’m melting!
The atexit module was new in Python 2.0.
Waiting aroundOn UNIX systems, you can call os.wait([option]) to wait for any child process to
stop or terminate, or os.waitpid(pid,option) to wait for a particular child pro-
cess. The values available to use for the option parameter vary by system, but you
can always use os.WNOHANG to tell wait to return immediately if no processes have
a termination to report, or 0 to wait. The wait functions return a two-tuple
(pid,status), and you can decipher the status using any of the os functions listed
in Table 11-1. The following example forks off a child process that sleeps for five
seconds and then exits. The parent waits until the child finishes and then prints the
exit information for the child:
NewFeature
4807-7 ch11.F 5/24/01 8:59 AM Page 184

185Chapter 11 ✦ Using Other Operating System Services
>>> import os,time>>> def useless():... z = os.fork()... if z == 0:... for i in range(5):... time.sleep(1)... os._exit(5)... else:... print ‘Waiting on ‘,z... status = os.waitpid(z,0)[1]... print ‘Exited normally:’,os.WIFEXITED(status)... print ‘Exit code:’,os.WEXITSTATUS(status)>>> useless()Waiting on 1915Exited normally: 1Exit code: 5
Table 11-1Wait Status Interpretation Functions
Function Value returned
WIFSTOPPED(status) 1 if process was stopped (and not terminated)
WSTOPSIG(status) Signal that stopped the process if WIFSTOPPED was true
WIFSIGNALED(status) 1 if process was terminated due to a signal
WTERMSIG(status) Signal that terminated the process if WIFSIGNALED was true
WIFEXITED(status) 1 if the process exited due to _exit() or exit()
WEXITSTATUS(status) Status code if WIFEXITED was true
Instead of spawning off separate processes to do your bidding, you may just needto use threads. Chapter 26 covers multithreaded Python programs.
Handling Process InformationTable 11-2 lists the plethora of functions in the os module for getting and setting
information about the current process. Except where noted, the functions are
available only on UNIX.
Cross-Reference
4807-7 ch11.F 5/24/01 8:59 AM Page 185
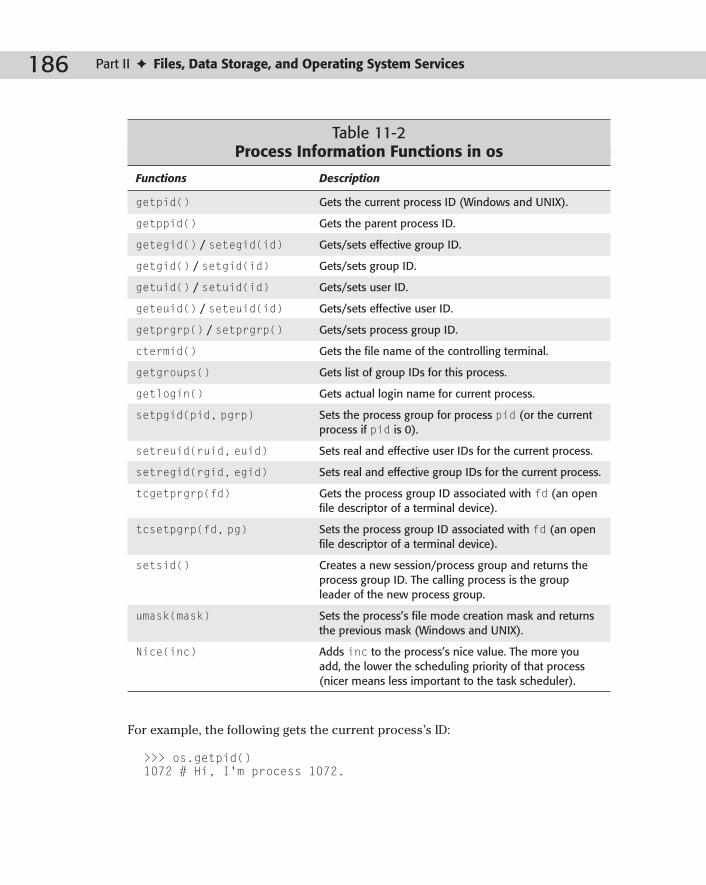
186 Part II ✦ Files, Data Storage, and Operating System Services
Table 11-2Process Information Functions in os
Functions Description
getpid() Gets the current process ID (Windows and UNIX).
getppid() Gets the parent process ID.
getegid() / setegid(id) Gets/sets effective group ID.
getgid() / setgid(id) Gets/sets group ID.
getuid() / setuid(id) Gets/sets user ID.
geteuid() / seteuid(id) Gets/sets effective user ID.
getprgrp() / setprgrp() Gets/sets process group ID.
ctermid() Gets the file name of the controlling terminal.
getgroups() Gets list of group IDs for this process.
getlogin() Gets actual login name for current process.
setpgid(pid, pgrp) Sets the process group for process pid (or the currentprocess if pid is 0).
setreuid(ruid, euid) Sets real and effective user IDs for the current process.
setregid(rgid, egid) Sets real and effective group IDs for the current process.
tcgetprgrp(fd) Gets the process group ID associated with fd (an openfile descriptor of a terminal device).
tcsetpgrp(fd, pg) Sets the process group ID associated with fd (an openfile descriptor of a terminal device).
setsid() Creates a new session/process group and returns theprocess group ID. The calling process is the groupleader of the new process group.
umask(mask) Sets the process’s file mode creation mask and returnsthe previous mask (Windows and UNIX).
Nice(inc) Adds inc to the process’s nice value. The more youadd, the lower the scheduling priority of that process(nicer means less important to the task scheduler).
For example, the following gets the current process’s ID:
>>> os.getpid()1072 # Hi, I’m process 1072.
4807-7 ch11.F 5/24/01 8:59 AM Page 186

187Chapter 11 ✦ Using Other Operating System Services
Retrieving System InformationMany programs don’t need to know too much about the platform on which they run,
but when they do need to know, there’s plenty of information available to them:
>>> import os, sys>>> os.name # Name of the os module implementation‘posix’>>> sys.byteorder # Is the processor big or little endian?‘little’>>> sys.platform # Platform identifier‘freebsd3’>>> os.uname() # UNIX only(‘FreeBSD’, ‘’, ‘3.4-RELEASE’, ‘FreeBSD 3.4-RELEASE #0’,’i386’)
The five-tuple returned by os.uname is (sysname, nodename, release, version,machine).
See Chapter 38 for coverage of the UNIX statvfs module, useful for retrievingfile system information.
UNIX system configuration information is available through os.confstr,
os.sysconf, os.pathconf, and os.fpathconf:
os.confstr(name) Returns the string value for the specified
configuration item; the list of items defined
for the current platform is in os.confstr_names.
os.sysconf(name) Similar to os.confstr(name) except that
the values os.sysconf(name) returns are
integers. It also lists the names of the items
you can retrieve.
os.pathconf(path,name) and Return system configuration information
os.fpathconf(fd,name) relating to a specific path of an open file
descriptor. os.pathconf_names lists valid
names.
For example, to retrieve the system memory page size you can use the following:
>>> os.sysconf(‘SC_PAGESIZE’)8192
Chapter 37 covers the winreg module that lets you access system informationstored in the Windows registry.
Cross-Reference
Cross-Reference
4807-7 ch11.F 5/24/01 8:59 AM Page 187

188 Part II ✦ Files, Data Storage, and Operating System Services
Managing Configuration FilesThe ConfigParser module makes reading and writing configuration files simple.
Users can simply edit the configuration files to set various run-time options to cus-
tomize your program’s behavior. The config files are normal text files, organized
into sections that contain key-value pairs. The files can have comments and can
contain variables that ConfigParser evaluates when your program accesses them.
If you save the file shown in Listing 11-1 to your current working directory as
sample.cfg, you can then follow along with the examples.
Listing 11-1: sample.cfg – Sample Configuration File
# This listing is a sample configuration file.# Comment lines start with pound symbols or semicolons.[Server]Address=171.15.2.5Port=50002
[Hoth]ID: %(team)s-1Team=goldDefaultName=%(__name__)s_User
Notice that the file can contain blank and comment lines, and that key-value pairs
can be separated by equal signs or colons. A value can be anything, and you can
use variable substitution to create values from other values. For example,
%(team)s evaluates to the value of the team variable, and %(__name__)s evaluates
to the name of the current section. If ConfigParser does not find a variable name
in the current section, it also looks in a section named DEFAULT. The variable
name in parentheses should be lowercase.
You create a ConfigParser by calling ConfigParser.ConfigParser([defaults]),
where defaults is an optional dictionary containing values for the DEFAULT section.
The readfp(f[, filename]) method reads a config file from an open filelike object.
If the filelike object has a filename attribute, ConfigParser uses that for the config
file’s name (some exceptions it raises include the file name). You can also pass in an
optional file name to use. The read(filenames) method reads in the contents of one
or more config files. It fails silently on nonexistent files, making it safe to pass in a list
of potential config files that may or may not exist:
>>> import ConfigParser>>> cfg = ConfigParser.ConfigParser()>>> cfg.read(‘sample.cfg’)[‘Server’, ‘Hoth’]
4807-7 ch11.F 5/24/01 8:59 AM Page 188

189Chapter 11 ✦ Using Other Operating System Services
When ConfigParser encounters an error while reading a file or retrieving values, it
raises one of the exceptions listed in Table 11-3.
Table 11-3ConfigParser Exceptions
Exception Raised when
NoSectionError The specified section does not exist.
DuplicateSectionError A section with the specified name already exists.
NoOptionError An option with the specified name does not exist.
InterpolationError A problem occurred while performing variableevaluation.
InterpolationDepthError The variable evaluation required too manyrecursive substitutions.
MissingSectionHeaderError A key-value pair is not part of any section.
ParsingError ConfigParser encountered a syntactic problemnot covered by any of the other exceptions.
Once you have a valid ConfigParser instance object, you can use its methods to get
and set values or learn more about the configuration file. The defaults() method
returns a dictionary containing the default key-value pairs for this instance.
sections() returns a list of section names for this config file (not including
DEFAULT), and has_section(section) is a quick way to see if a given section exists.
For any section, the options(section) method returns a list of options in that sec-
tion, and has_option(section, option) tests for the existence of a particular
option in that section:
>>> cfg.has_option(‘Server’,’port’)1>>> cfg.options(‘Server’)[‘address’, ‘port’]
Use the get(section, option[, raw[, vars]]) method to retrieve the value of
an option in a given section. If raw is 1, no variable evaluation takes place. You can
optionally pass in a dictionary of key-value pairs that get uses in the variable
evaluation:
>>> cfg.get(‘Hoth’,’ID’,1) # Raw version‘%(team)s-1’>>> cfg.get(‘Hoth’,’ID’) # After variable evaluation‘gold-1’>>> cfg.get(‘Hoth’,’ID’,vars={‘team’:’blue’})‘blue-1’ # Override values in the file
4807-7 ch11.F 5/24/01 8:59 AM Page 189

190 Part II ✦ Files, Data Storage, and Operating System Services
ConfigParser has a few other get convenience methods. getint(section,option) coerces the value into an integer before returning it, getfloat(section,option) does the same for floats, and getboolean(section,option) makes sure
the value is a 0 or a 1 and returns it as an integer.
You can create a new section using the add_section(section) method, and you
can set the value for an option by calling set(section, option, value):
>>> cfg.get(‘Server’,’port’)‘50002’>>> cfg.set(‘Server’,’port’,’4000’) # Use string values!>>> cfg.get(‘Server’,’port’)‘4000’
The write(file) method writes the configuration file out to the given filelike
object. The output is guaranteed to be readable by a future call to read or readfp.
The remove_option(section, option) method removes the given option from
the given section. If the option didn’t exist, remove_option returns 0, otherwise 1.
remove_section(section) removes the given section from the config file. As with
remove_option, remove_section returns 0 if the section didn’t even exist, 1
otherwise.
Understanding Error NamesWhen an error occurs in the os module, it usually raises the OSError exception
(found in os.error). OSError is a class, and instances of this class have the errnoand strerror members that you can access to learn more about the problem:
>>> try:... os.close(-1) # A bogus file descriptor... except OSError, e:... print ‘Blech! %s [Err #%d]’ % (e.strerror,e.errno)... Blech! Bad file descriptor [Err #9]
The strerror member is the result of calling os.strerror(code) with the errnomember of the exception:
>>> os.strerror(2)‘No such file or directory’
The errno module contains the textual message for each error code. The list of
defined errors varies by system (for example, the Windows version includes some
Winsock error messages), but you can access the whole list through the errno.errorcode dictionary.
4807-7 ch11.F 5/24/01 8:59 AM Page 190

191Chapter 11 ✦ Using Other Operating System Services
For errors involving files or directories, the filename member of OSError has a
non-empty value:
>>> try:... os.open(‘asdfsf’,os.O_RDONLY)... except OSError, e:... print e.errno, e.filename, e.strerror... 2 asdfsf No such file or directory
Handling Asynchronous SignalsThe signal module lets your programs handle asynchronous process signals. If
you’ve used the underlying C equivalents, you’ll find that the Python version is
pretty similar. A signal is just a message sent from the operating system or a pro-
cess to the current process; most signals aren’t handled directly by the process but
are handled by default behavior in the operating system.
The signal module lets you register handler functions that override the default
behavior and let your process respond to the signal itself. To register a signal han-
dler, call signal.signal(num,handler) where num is the signal to handle and
handler is your handler function. A signal handler should take two arguments, the
signal number and a frame object containing the current stack frame. Instead of a
function, handler can also be signal.SIG_DFL (meaning that you want the default
behavior to occur for that signal) or signal.SIG_IGN (meaning that you want that
signal to be ignored). The signal function returns the previous value of handler.
The signals that you can process vary by platform and are defined in your plat-
form’s signal.h file, but Table 11-4 lists some of the most common signals.
Table 11-4Common Signals
Name Description
SIGINT Interrupt (Ctrl-C hit)
SIGQUIT Quit the program
SIGTERM Request program termination
SIGFPE Floating point error occurred (for example, division by zero, overflow)
SIGALRM Alarm signal (not supported on Windows)
SIGBUS Bus error
SIGHUP Terminal line hangup
SIGSEGV Illegal storage access
4807-7 ch11.F 5/24/01 8:59 AM Page 191

192 Part II ✦ Files, Data Storage, and Operating System Services
The getsignal(signalnum) function returns the current handler for the specified
signal. It returns a callable Python object, SIG_DFL, SIG_IGN, or None (for non-
Python signal handlers). default_int_handler is the default Python signal handler.
Except for handlers for SIGCHD, all signal handlers ignore the underlying implementa-
tion and continue to work until they are reset. Even though the signal handling hap-
pens asynchronously, Python dispatches the signals between bytecode instructions,
so a long call into a C extension module could delay the arrival of some signals.
On UNIX, you can call signal.pause() to wait until a signal arrives (at which time
the correct handler receives it). signal.alarm(time) causes the system to send a
SIGALRM signal to the current process after time seconds; it returns the number of
seconds left until the previous alarm would have gone off (if any). alarm cancels
any previous alarm, and a time of 0 removes any current alarm. You can also call
os.kill(pid, sig) to send the given signal to the process with the ID of pid.
Be careful when using threads and signals in the same program. In such cases youshould call signal.signal only from the main thread (although other threadscan call alarm, pause, and getsignal). Be aware that signals are always sent tothe main thread, regardless of the underlying implementation.
The following example prompts the user for input, but times out if the user doesn’t
respond in the allotted time (it uses signal.alarm, so it works on UNIX systems):
import signal,sys
def handler(sig, frm):raise ‘timeout’ # Raise an exception when time runs out.
signal.signal(signal.SIGALRM,handler) # Set up the handler.try:
signal.alarm(2.5) # Send ALARM signal in 2.5 seconds.while 1:
print ‘Enter code to halt detonation:’,s = sys.stdin.readline()if s.strip() == ‘stop’:
print ‘You did it!’break
print ‘Sorry.’signal.alarm(0) # Disable the alarm.
except: # Handle all exceptions so Ctrl-C will blow you up too.print ‘\nSorry. Too late.\n*KABOOM*’
I saved the file as sig.py. Here’s some sample output:
/work> python sig.pyEnter code to halt detonation: [ Wait a few seconds. ]Sorry. Too late.*KABOOM*
Caution
4807-7 ch11.F 5/24/01 8:59 AM Page 192

193Chapter 11 ✦ Using Other Operating System Services
/work> python sig.pyEnter code to halt detonation: fooSorry.Enter code to halt detonation: stopYou did it!
SummaryPython’s great support for executing shell commands makes it an ideal solution as
a scripting language or as a glue that holds various technologies together. Python
also has ample functionality for starting, controlling, and monitoring child pro-
cesses. In this chapter you learned to:
✦ Launch other programs in the foreground or the background.
✦ Access process and system configuration information.
✦ Read and write human-readable configuration files.
✦ Used file descriptors.
✦ Interpret os error message codes.
In the next chapter you’ll learn to covert data between various formats, compress
it, and decompress it. You’ll also learn to convert Python objects to byte streams
that can be saved for later retrieval or transmitted across a network.
✦ ✦ ✦
4807-7 ch11.F 5/24/01 8:59 AM Page 193

4807-7 ch11.F 5/24/01 8:59 AM Page 194

Storing Data and Objects
This chapter covers the many ways that you can convert
Python objects to some form suitable for storage.
Storage, however, is not limited to just saving data to disk. By
the end of this chapter you’ll be able to take a Python object
and stick it in a database, compress it, send it across a net-
work connection, or even convert it to a format that a C pro-
gram could understand.
Data Storage OverviewPython’s data storage features are easy to use, but before you
say, “Hey, store this stuff” (it really is that easy), you should
put some thought into how you might use the data down the
road. The issues listed below are merely some things you
should keep in mind; don’t worry too much yet about how
actually to deal with them.
Text versus binaryIf you’re storing data to file, you have to choose whether to
store it in text or binary mode. A configuration file, for exam-
ple, is in text mode because humans have to be able to read it
and edit it with a text editor. It’s often easier to debug your
program if the output is stored in some human-readable for-
mat, and you can easily pass such a file around and use it on
different platforms. Of course, storing it in a human-readable
format means you handle the details of parsing it back in if
you need to load it.
A binary mode representation of data often takes up less
space, and can be processed faster if it is stored in fixed-size
blocks or records.
1212C H A P T E R
✦ ✦ ✦ ✦
In This Chapter
Data storageoverview
Loading and savingobjects
Example: movingobjects across anetwork
Using database-likestorage
Converting to andfrom C structures
Converting data tostandard formats
Compressing data
✦ ✦ ✦ ✦
4807-7 ch12.F 5/24/01 8:59 AM Page 195

196 Part II ✦ Files, Data Storage, and Operating System Services
CompressionIf the size of an object is an issue, compression may be something you want to con-
sider. In return for some additional processing power, compression often signifi-
cantly shrinks the size of your data, which could really help if you have a lot of data
or are transferring it over slow network connections.
Byte order (“Endianness”)The way a processor stores multibyte numbers in memory is either big-endian or
little-endian:
>>> import sys>>> print ‘“...%s-endian”, Gulliver said.’ % sys.byteorder“...little-endian”, Gulliver said. # On my Intel box
Most Python programs wouldn’t care about such a low-level detail, but if your data
has the potential to end up on another platform (by copying a data file, for exam-
ple), the program on the other end has to know the byte order of the data in order
to understand the data.
Object stateBefore you store an object, you need to remember that some objects have state
“outside” the Python interpreter. If you tried to save an open socket connection to
disk, you certainly couldn’t expect the connection to be open once you reload the
socket.
DestinationYou should keep in mind the destination of your data, because knowing that may let
you take advantage of features particular to that medium. Is it going to a file on
disk? How about a network connection or a database?
On the receiving endOne last thing to consider is what the receiving end of your data will be (who will
read it in the future?). If you are saving a file that your same program will read later,
you can use just about whatever storage format you like. If a C program is on the
other end, maybe you need to send it data in the form of a C structure. Or maybe
you don’t even know who will read the data, so an industry standard format such as
XDR or XML may be the answer.
4807-7 ch12.F 5/24/01 8:59 AM Page 196

197Chapter 12 ✦ Storing Data and Objects
Loading and Saving ObjectsTo save an object to disk, you convert it to a string of bytes that the program can
later read back in to recreate the original object. If you’re coming from a Java or C++
background, then you recognize this process as marshaling or serialization, but
Python refers to making preserves out of your objects as pickling.
Pickling with pickleThe pickle module converts most Python objects to and from a byte representation:
>>> import pickle>>> stuff = [5,3.5,’Alfred’]>>> pstuff = pickle.dumps(stuff)>>> pstuff“(lp0\012I5\012aF3.5\012aS’Alfred’\012p1\012a.”>>> pickle.loads(pstuff)[5, 3.5, ‘Alfred’]
The pstuff variable in the above example is a string of bytes, so it’s easy to send it
to another computer via a network connection or write it out to a file.
The pickle.dumps(object[, bin]) function returns the serialized form of an
object, and pickle.dump(object, file[, bin]) sends the serialized form to an
open filelike object. If the optional bin parameter is 0 (the default), the object is
pickled in a text form. A value of 1 generates a slightly more compact but less read-
able binary form. Either form is platform-independent.
The pickle.loads(str) function unpickles an object, converting the given string
to its original object form. pickle.load(file) reads a pickled object from the
given filelike object and returns the original, unpickled object.
The load and dump methods are really shorthand ways of instantiating the Pickleand Unpickler classes:
>>> s = StringIO.StringIO() # Create a temp filelike object.>>> p = pickle.Pickler(s,1) # 1 = binary>>> p.dump([1,2,3])>>> p.dump(‘Hello!’)>>> s.getvalue() # See the pickled form.‘]q\000(K\001K\002K\003e.U\006Hello!q\001.’>>> s.seek(0) # Reset the “file.”>>> u = pickle.Unpickler(s)>>> u.load()[1, 2, 3]>>> u.load()‘Hello!’
4807-7 ch12.F 5/24/01 8:59 AM Page 197

198 Part II ✦ Files, Data Storage, and Operating System Services
Using the Pickler and Unpickler classes is convenient if you need to pickle many
objects, or if you need to pass the picklers around to other functions. You can also
subclass them to create a custom pickler.
The cPickle module is a C version of the pickle module, making it up to several
orders of magnitude faster than the pure Python pickle module. Anytime you need
to do lots of pickling, use cPickle. Objects pickled by cPickle are compatible
with those pickled by pickle, and vice versa. The only drawback to the cPicklemodule is that you can’t subclass Pickler and Unpickler.
>>> import cPickle,pickle>>> s = cPickle.dumps({‘one’:1,’two’:2})>>> pickle.loads(s){‘one’: 1, ‘two’: 2}
As Python evolves, future versions could change the format of pickled objects. To
prevent disasters, each version of the format has a version number, and pickle has
a list of other versions (in addition to the current one) that it knows how to read:
>>> pickle.format_version‘1.3’>>> pickle.compatible_formats[‘1.0’, ‘1.1’, ‘1.2’] # It can read some pretty old objects.
If you try to unpickle an unsupported version, pickle raises an exception.
What can I pickle?You can pickle numbers, strings, None, and containers (tuples, lists, and dictionar-
ies) that contain “picklable” objects.
When you pickle built-in functions, your own functions, or class definitions, picklestores its name along with the module name in which it was defined, but not its
implementation. In order to unpickle such an object, pickle first imports its mod-
ule, so you must define the function or class at the top level of that module.
To save an instance object, pickle calls its __getstate__ method, which
should return whatever information you need to capture the state of the object.
When Python loads the object, pickle instantiates a new object and calls its
__setstate__ method, passing it the unpickled version of its state:
>>> class Point:... def __init__(self,x,y):... self.x = x; self.y = y... def __str__(self):... return ‘(%d,%d)’ % (self.x,self.y)... def __getstate__(self):... print ‘Get state called!’... return (self.x,self.y)... def __setstate__(self,state):... print ‘Set state called!’
4807-7 ch12.F 5/24/01 8:59 AM Page 198

199Chapter 12 ✦ Storing Data and Objects
... self.x,self.y = state
... >>> p = Point(10,20)>>> z = pickle.dumps(p)Get state called!>>> newp = pickle.loads(z)Set state called!>>> print newp(10,20)
If an object doesn’t have a __getstate__ member, pickle saves the contents of its
__dict__ member. When unpickling an object, the load function doesn’t normally
call the object’s constructor (__init__). If you really want load to call the con-
structor, implement a __getinitargs__ method. As it saves the object , picklecalls __getinitargs__ for a tuple of arguments that it should pass to __init__when the object is later loaded.
You can add pickling support for data types in C extension modules using the
copy_reg module. To add support, you register a reduction function and a con-
structor for the given type by calling copy_reg.pickle(type, reduction_func[,constructor_ob]). For example, imagine you’re creating a C extension module
that determines the right stocks to trade on the stock market, and that the module
defines a new data type called StockType (representing a particular security). Your
constructor object (such as a function) returns a new StockType object and takes
as arguments whatever data needed to create such an object. Your reduction func-
tion takes a StockType object and returns a two-tuple containing a constructor
object for creating a new StockType object (most likely the same constructor
function mentioned above). The reduction function also takes a tuple containing
arguments to pass to that constructor. After registering your functions for the new
type, any serialized StockType objects can use them.
See Chapter 29 for information on writing your own extension modules.
Other pickling issuesBecause pickling a class doesn’t store the class implementation, you can usually
change the class definition without breaking your pickled data (you can still
unpickle instance objects that were saved previously).
Multiple references to a particular object also reference a single object once you
unpickle it. In the following example, a list has two members that are both refer-
ences to another list. After pickling and unpickling it, the two members still refer to
a single object:
>>> z = [1,2,3]>>> y = [z,z] >>> y[0] is y[1] # Two references to the same object1>>> s = pickle.dumps(y)
Cross-Reference
4807-7 ch12.F 5/24/01 8:59 AM Page 199

200 Part II ✦ Files, Data Storage, and Operating System Services
>>> x = pickle.loads(s)>>> x[[1, 2, 3], [1, 2, 3]]>>> x[0] is x[1] # Both members still reference one object.1
Of course, if you pickle an object, modify it, and pickle it again, pickle saves only
the first version of the object.
If, while pickling to a filelike object, an error occurs (for example, you try to serial-ize a module), pickle raises the PicklingError exception, but it may havealready written bytes to the file. The contents of the file will be in an unknownstate and not too trustworthy.
The marshal moduleUnder the covers, the pickle module calls the marshal module to do some of its
work, but most programs should not use marshal at all. The one advantage of mar-shal is that, unlike pickle, it can handle code objects (the implementation itself):
>>> def adder(a,b):... return a+b>>> adder(10,2)12>>> import marshal>>> s = marshal.dumps(adder.func_code)>>> def newadder():... pass>>> newadder.func_code = marshal.loads(s)>>> newadder(20,10)30
Chapter 33 shows you how to access code objects and other attributes of Pythonobjects such as functions.
Example: Moving Objects Across a NetworkThe example in this section puts all this pickling stuff to work for you. Listing 12-1 is
the swap module that creates a background thread that sends objects between two
Python interpreters running in interactive mode. Although it works on a single com-
puter, you can also run it between two separate computers if you change the IP
address it uses.
Cross-Reference
Caution
4807-7 ch12.F 5/24/01 8:59 AM Page 200

201Chapter 12 ✦ Storing Data and Objects
Consider this example as a sneak preview. Chapter 15 covers networking andChapter 26 covers threads.
Here is some sample output from the program in Listing 12-1 (I opened two sepa-
rate MS-DOS Windows on the same computer). After the sample output is a short
explanation of how the program works. The first half shows what is happening in
the first window, and the second in the other window, although both programs are
running at the same time and interacting:
C:\temp>python -i -c “import swap”Listen thread started.Use swap.send(obj) to send an objectLook in swap.obj to see a received object
>>> swap.send([‘game’,’of’,’the’,’year’]) # See Obj1 below.
Received new object(5, 10) # Obj2 from below>>> swap.obj(5, 10)>>> swap.obj[1] # Yep, it’s a real Python object!10
C:\temp>python -i -c “import swap”Listen thread started.Use swap.send(obj) to send an objectLook in swap.obj to see a received objectReceived new object[‘game’, ‘of’, ‘the’, ‘year’] # Obj1 from above
>>> swap.obj[2] # Poke around a little‘the’>>> swap.send((5,10)) # See Obj2 above
Once both interpreters are up and running, they connect to each other via a net-
work socket. Anytime you call swap.send(obj) in one interpreter, swap sends your
object to the other interpreter, which stores it in swap.obj. Either side can send
any picklable object to the other.
Notice that I started the Python interpreter using the “-c” argument (telling it to exe-
cute the command import swap) and the “-i” argument (telling it to keep the inter-
preter running after it executes its command). This feature lets you start with the
swap module already loaded and running.
Cross-Reference
4807-7 ch12.F 5/24/01 8:59 AM Page 201

202 Part II ✦ Files, Data Storage, and Operating System Services
Listing 12-1: swap.py – Swap Objects Between PythonInterpreters
from socket import *import cPickle,threading
ADDR = ‘127.0.0.1’ # ‘127.0.0.1’ = localhostPORT = 50000bConnected = 0
def send(obj):“Sends an object to a remote listener”if bConnected:
conn.send(cPickle.dumps(obj,1))else:
print ‘Not connected!’
def listenThread():“Receives objects from remote side”global bServer, conn, obj, bConnected
while 1:# Try to be the server.s = socket(AF_INET,SOCK_STREAM)try:
s.bind((ADDR,PORT))s.listen(1)bServer = 1conn = s.accept()[0]
except Exception, e:# Probably already in use, so I’m the client.bServer = 0conn = socket(AF_INET,SOCK_STREAM)conn.connect((ADDR,PORT))
# Now just accept objects forever.bConnected = 1while 1:
o = conn.recv(8192)if not o: break;
obj = cPickle.loads(o)print ‘Received new object’print obj
bConnected = 0
# Start up listen thread.threading.Thread(target=listenThread).start()print ‘Listen thread started.’print ‘Use swap.send(obj) to send an object’print ‘Look in swap.obj to see a received object’
4807-7 ch12.F 5/24/01 8:59 AM Page 202

203Chapter 12 ✦ Storing Data and Objects
For the sake of simplicity, the example leaves out a lot of error checking that you’dwant if you were to use this for something important.
This module has two functions: send and listenThread. send takes any object
you pass in, pickles it, and sends it out through the socket that is connected to the
other Python interpreter.
The listenThread function loops forever, waiting for objects to come in over the
socket. When the function first starts, it tries to bind to the given IP address and
port so it can act as the server side of the connection. If this attempt fails, it
assumes that the bind failed because the other interpreter is already acting as the
server, so listenThread tries to connect (thus becoming the client side of the
connection). Once connected, listenThread receives each object, unpickles it,
prints it out and also saves it to the global variable obj so that you can then fiddle
with it in your interpreter.
At the module level, a call to threading.Thread().start() starts the listening
thread. By placing the call there, the background thread starts up automatically as
soon as you import the module.
After you’ve played around with this a little, sit back and relish the fact that all this
power required a measly 50 lines of Python code!
Using Database-Like StorageThe shelve module enables you to save Python objects into persistent, database-
like storage, similar to the dbm module.
See Chapter 14 for information on dbm and other Python database modules.
The shelve.open(file[, mode]) function opens and returns a shelve object.
The mode parameter (which is the same as the mode parameter to dbm.open)
defaults to ‘c’, which means that the function opens the database for reading and
writing, and creates it if it doesn’t already exist. Use the close() method of the
shelve object when you are finished using it.
You access the data as if the database were a dictionary:
>>> import shelve>>> db = shelve.open(‘objdb’) # Don’t use a file extension!>>> db[‘secretCombination’] = [5,23,17]>>> db[‘account’] = 5671012>>> db[‘secretCombination’][5, 23, 17]>>> del db[‘account’]>>> db.has_key(‘account’)0
Cross-Reference
Note
4807-7 ch12.F 5/24/01 8:59 AM Page 203

204 Part II ✦ Files, Data Storage, and Operating System Services
>>> db.keys()[‘secretCombination’]>>> db.close()
The shelve module uses pickle, so you can store any objects that pickle can
store. shelve has the same limitations as dbm. Among other things, you should not
use it to store large Python objects.
Converting to and from C StructuresAlthough pickle makes converting Python objects to a byte stream easy, really
only Python programs can convert them back to objects. The struct module, how-
ever, lets you create a string of bytes equivalent to a C structure, so you could read
and write binary files generated by a non-Python program or send binary network
messages to something besides a Python interpreter.
To use struct, you call struct.pack(format, v1, v2, ...) with a format string
describing the layout of the data followed by the data itself. Construct the format
string using format characters listed in Table 12-1.
Table 12-1struct Format Characters
Character C type Python type
c Char string of length 1
s char[] string
p (Pascal string) string
i Int integer
I Unsigned int integer or long*
b Signed char integer
B unsigned char integer
h Short integer
H unsigned short integer
l Long integer
L unsigned long long
f Float float
d Double float
x (pad byte) -
P void * integer or long*
* The type Python uses is based on whether a pointer for this platform is 32 or 64 bits.
4807-7 ch12.F 5/24/01 8:59 AM Page 204

205Chapter 12 ✦ Storing Data and Objects
For example, to create the equivalent of this C struct:
struct{
int a;int b;char c;
};
with the values 10, 20, and ‘Z,’ use:
>>> import struct>>> z = struct.pack(‘iic’,10,20,’Z’)>>> z‘\012\000\000\000\024\000\000\000Z’
Given a string of bytes in a particular format, you can convert them to Python
objects by calling struct.unpack(format, data). It returns a tuple of the recon-
structed data:
>>> struct.unpack(‘iic’,z)(10, 20, ‘Z’)
The format string you pass to unpack must account for all the data in the string you
pass it, or struct raises an exception. Use the struct.calcsize(format) func-
tion to figure out how many bytes would be taken up by the given format string:
>>> struct.calcsize(‘iic’)9>>> len(z) # The earlier example verifies this.9
As a shortcut, you can put a number in front of any format character to repeat that
data type that many times:
>>> struct.pack(‘3f’,1.2,3.4,5.6) # ‘3f’ is the same as ‘fff’‘\232\231\231?\232\231Y@33\263@’
For clarity, you can put whitespace between format characters in your format string
(but not between the format character and a repeater number):
>>> struct.pack(‘2i h 3c’,5,6,7,’a’,’b’,’c’)‘\005\000\000\000\006\000\000\000\007\000abc’
The repeater number works a little differently with the ‘s’ (string) format character.
The repeater tells the length of the string (5s means a 5 character string). 0s means
an empty string, but 0c means zero characters.
The ‘I’ format character unpacks the given number to a Python long integer if the C
int and long are the same size. If the C int is smaller than the C long, ‘I’ converts
the number to a Python integer.
4807-7 ch12.F 5/24/01 8:59 AM Page 205

206 Part II ✦ Files, Data Storage, and Operating System Services
The ‘p’ format character is for a Pascal string. Pascal uses the first byte to store the
length of the string (so Pascal first truncates strings longer than the maximum
length of 255) and then the characters in the string follow. If you supply a repeater
number with this format character, it represents the total number of bytes in the
string including the length byte. If the string is less than the specified number of
bytes, pack adds empty padding characters to bring it up to snuff.
By default, struct stores numbers using the native format for byte order and struc-
ture member alignment (whatever your current platform’s C compiler would use).
You can override this behavior by starting your format string with one of the modi-
fiers listed in Table 12-2. For example, you can force struct to use network order, a
standard byte ordering for network messages:
>>> struct.pack(‘ic’,65535,’D’) # Native is little-endian.‘\377\377\000\000D’>>> struct.pack(‘!ic’,65535,’D’) # Force network order.‘\000\000\377\377D’
Table 12-2Order, Alignment, and Size Modifiers
Modifier Byte order Alignment Size
< Little-endian None Standard
> or ! Big-endian (Network) None Standard
= Native None Standard
@ Native Native Native
If you don’t choose a modifier from Table 12-2, struct uses native byte ordering,
alignment, and size. When you use a modifier whose size is “standard,” a C shorttakes up 2 bytes, an int, long, or float uses 4, and a double uses 8.
If you need to have alignment but aren’t using the ‘@’ (native alignment) modifier,
you can insert pad bytes using the ‘x’ format character from Table 12-1. If you need
to force the end of a structure to be aligned according to the alignment rules for a
particular type, you can end your format string with the format code for that type
with a count of 0. The following example shows how to force a single-character
structure to end on an integer boundary:
>>> struct.pack(‘c’,’A’)‘A’>>> struct.pack(‘c0i’,’A’)‘A\000\000\000’
The ‘P’ (pointer) format character is available with native alignment only.
4807-7 ch12.F 5/24/01 8:59 AM Page 206

207Chapter 12 ✦ Storing Data and Objects
The struct module is very useful for reading and writing binary files. For example,
if you read the first 36 bytes of a Windows WAV file, you can use struct to extract
some information about the file. The header of a WAV file starts with:
‘RIFF’ (4 bytes)little-endian length field (4 bytes)‘WAVE’ (4 bytes)‘fmt ‘ (4 bytes)format subchunk length (4 bytes)format specifier (2 bytes)number of channels (2 bytes)sample rate in Hertz (4 bytes)bytes per second (4 bytes)bytes per sample (2 bytes)bits per channel (2 bytes)
One way to represent this header would be with the format string
‘<4s i 4s 4s ihhiihh’
The following code extracts this information from a WAV file:
>>> s = open(‘c:\\winnt\\media\\ringin.wav’,’rb’).read(36)>>> struct.unpack(‘<4si4s4sihhiihh’,s)(‘RIFF’, 10018, ‘WAVE’, ‘fmt ‘, 16, 1, 1, 11025, 11025, 1, 8)
Extending that example, the following function rates the sound quality of a given
WAV file:
>>> def rateWAV(filename):... format = ‘<4si4s4sihhiihh’... fsize = struct.calcsize(format)... data = open(filename,’rb’).read(fsize)... data = struct.unpack(format,data)... if data[0] != ‘RIFF’ or data[2] != ‘WAVE’:... print ‘Not a WAV file!’... rate = data[7]... if rate == 11025:... print ‘Telephone quality!’... elif rate == 22050:... print ‘Radio quality!’... elif rate == 44100:... print ‘Oooh, CD quality!’... else:... print ‘Rate is %d Hz’ % rate
>>> rateWAV(r’c:\winnt\media\notify.wav’)Radio quality!>>> rateWAV(‘online.wav’)Oooh, CD quality!
4807-7 ch12.F 5/24/01 8:59 AM Page 207

208 Part II ✦ Files, Data Storage, and Operating System Services
Converting Data to Standard FormatsNow that you have the struct module under your belt, you can build on that
knowledge to read and write just about any file format. If your data needs to be
readable by your own programs only, then you can create your own convention for
storing data. In other cases, however, you may find it useful to convert your data to
an industry-wide standard.
Sun’s XDR formatThe XDR (eXternal Data Representation) format is a standard data format created
by Sun Microsystems. RFC 1832 defines the format, and it’s most common use is in
NFS (Network File System). Storing data in a standard format like XDR makes shar-
ing files easier for different hardware platforms and operating systems.
The xdrlib module implements a subset of the XDR format, leaving out some of
the less-used data types. To convert data to XDR, you create an instance of the
xdrlib.Packer class, and to convert from XDR, you create an instance of
xdrlib.Unpacker.
Packer objectsThe Packer constructor takes no arguments:
>>> import xdrlib>>> p = xdrlib.Packer()
Once you have a Packer object you can use any of its pack_<type> methods to
pack basic data types:
>>> p.pack_float(3.5) # 32-bit floating point number>>> p.pack_double(10.5) # 64-bit floating point number>>> p.pack_int(-15) # Signed 32-bit integer>>> p.pack_uint(15) # Unsigned 32-bit integer>>> p.pack_hyper(100) # Signed 64-bit integer>>> p.pack_uhyper(200) # Unsigned 64-bit integer>>> p.pack_enum(3) # Enumerated type>>> p.pack_bool(1) # Booleans are 1 or 0>>> p.pack_bool(“Hi”) # Value is true, so stores a 1
The pack_fstring(count, str) method packs a fixed-length string count charac-
ters long. The function does not store the size of the string, so to unpack it you
have to know how long it is beforehand. Better yet, use pack_string(str), which
lets you pack a variable-length string:
>>> p.pack_string(‘Lovely’)>>> p.pack_fstring(3,’day’)
4807-7 ch12.F 5/24/01 8:59 AM Page 208

209Chapter 12 ✦ Storing Data and Objects
The pack_string function calls pack_uint with the size of the string and then
pack_fstring with the string itself. To more fully follow the XDR specification, a
Packer object also has pack_bytes and pack_opaque methods, but they are really
just calls to pack_string. Likewise, a call to pack_fopaque is really just a call to
pack_fstring.
The pack_farray(count, list, packFunc) function packs a fixed-length array
(count items long) of homogenous data. Unfortunately, pack_farray requires that
you pass in the count as well as the list itself, but it won’t let you use a count that is
different from the length of the list (go figure). As with pack_fstring, the function
does not store the length of the array with the data, so you have to know the length
when you unpack it. Or you can call pack_array(list, packFunc) to pack the
size and then the list itself. The packFunc tells Packer which method to use to
pack each item. For example, if each item in the list is an integer:
>>> p.pack_array([1,2,3,4],p.pack_int)
The pack_list(list,packFunc) method also packs an array of homogenous data, but
it works with sequence objects whose size might not be known ahead of time. For
example, you could create a class that defines its own __getitem__ method:
>>> class MySeq:... def __getitem__(self,i):... if i < 5:... return i... raise IndexError>>> m = MySeq()>>> for i in m:... print i01234>>> p.pack_list(m,p.pack_int)
The get_buffer() method returns a string representing the packed form of all the
data you’ve packed. reset() empties the buffer:
>>> p.reset()>>> p.pack_int(10)>>> p.get_buffer()‘\000\000\000\012’>>> p.reset()>>> p.get_buffer()‘’
4807-7 ch12.F 5/24/01 8:59 AM Page 209

210 Part II ✦ Files, Data Storage, and Operating System Services
Unpacker objectsNot surprisingly, an Unpacker object has methods that closely mirror those of a
Packer object. When you construct an Unpacker, you pass in a string of bytes for it
to decode, and then begin calling its unpack_<type> methods (each pack_ method
has a corresponding unpack_ method):
>>> import xdrlib>>> p = xdrlib.Packer()>>> p.pack_float(2.0)>>> p.pack_fstring(4,’Dave’)>>> p.pack_string(‘/export/home’)
>>> u = xdrlib.Unpacker(p.get_buffer())>>> u.unpack_float()2.0>>> u.unpack_fstring(4)‘Dave’>>> u.unpack_string()‘/export/home’>>> u.done()
The done() method tells the Unpacker that you are finished decoding data. If
Unpacker still has data left in its internal buffer, it raises an Error exception to
inform you that the internal buffer has leftover data.
Calling the reset(str) method replaces the current buffer with the data in str. At
any time, you can call the get_buffer() method to retrieve the string representa-
tion of the data stream.
You can use the get_position() and set_position(pos) methods to track and
reposition where in the buffer the Unpacker decodes from next. To be safe, set a
position to 0 or to a value returned from get_position.
Other formatsOf course, you might use many other data formats. XML is gaining popularity as a
data storage markup language; see Chapter 18 for more information.
For any given file format, a quick search on a Web search engine locates many
documents describing the details of that format (for example, try searching for
“WAV spec”). Once you have that information, creating format strings that structcan understand is usually a straightforward process.
Compressing DataThis final section covers the use of the zlib, a module wrapping the free zlib com-
pression library. The gzip and zipfile modules use zlib to manipulate GZIP and
ZIP files, respectively.
4807-7 ch12.F 5/24/01 8:59 AM Page 210

211Chapter 12 ✦ Storing Data and Objects
zlibYou can use the zlib module to compress any sort of data; if you are transferring
large messages over a network, it may be worthwhile to compress them first, for
example.
The most straightforward use of zlib is through the compress(string[, level])and decompress(string[, wbits[, bufsize]]) functions. The level used dur-
ing compression is from 1 (fastest) to 9 (best compression), defaulting to 6. During
decompression, the wbits argument controls the size of the history buffer, and
should have a value between 8 and 15 (the default). A higher value consumes more
memory but increases the chances of better compression. The bufsize argument
determines the initial size of the buffer used to hold decompressed data. The
library modifies this size as needed, so you never really have to change it from its
default of 16384. Both compress and decompress take a string of bytes and return
the compressed or decompressed equivalent:
>>> import zlib>>> longString = 100 * ‘That zlib module sure is fun!’>>> compressed = zlib.compress(longString)>>> len(longString); len(compressed)290062 @code:# Yay, zlib!>>> zlib.decompress(compressed)[:40]‘That zlib module sure is fun!That zlib m’
To learn more about zlib’s features, visit the zlib Web site at http://www.info-zip.org/pub/infozip/zlib/.
The zlib module has two functions for computing the checksum of a string (useful
in detecting changes and errors in data or as a way to warm your CPU),
crc32(string[, value]) and adler32(string[, value]). If present, the
optional value argument is the starting value of the checksum, so you can calcu-
late the checksum of several pieces of input. The following example shows you how
to use a checksum to detect data corruption:
>>> data = ‘My dog has no fleas!’>>> zlib.adler32(data)1193871046>>> data = data[:5]+’z’+data[6:] >>> data‘My doz has no fleas!’ # A solar flare corrupts your data...>>> zlib.adler32(data) 1212548825 # ...resulting in a different checksum.
The value returned from crc32 is more reliable than that returned from adler32,
but it also requires much more computation. (More reliable means that the function
is less likely to return the same checksum if the data changes at all.) Don’t forget to
dazzle your friends by informing them that Mark Adler wrote the decompression
portion of zlib.
Tip
4807-7 ch12.F 5/24/01 8:59 AM Page 211

212 Part II ✦ Files, Data Storage, and Operating System Services
If you have more data than you can comfortably fit in memory, zlib lets you
create compression and decompression objects. Create a compression object by
calling compressobj([level]). Once you have your object, you can repeatedly call
its compress(string) method. Each call returns another portion of the com-
pressed version of the data, although some is saved for later processing. Calling the
compression object’s flush([mode]) method finishes the compression and
returns the remaining compressed data:
>>> c = zlib.compressobj(9)>>> out = c.compress(1000 * ‘I will not throw knives’)>>> out += c.compress(200 * ‘or chairs’)>>> out += c.flush()>>> len(out) # out holds the entire compressed stream.115
If you call flush with a mode of Z_FULL_FLUSH or Z_SYNCH_FLUSH, all the currently
buffered compressed data is returned, but you can later compress more data with
the same object. Without those mode values, the compression object assumes
you’re finished and doesn’t allow any additional compression.
You create a decompression object by calling zlib’s decompressobj([wbits])function. A decompression object lets you decompress a stream of data one piece
at a time (for example, you could decompress a file by repeatedly reading a chunk
of data, decompressing that chunk, and writing the result to an output file).
Call the decompress(string) method of your decompression object to decom-
press the next chunk of data. decompress returns the largest amount of decom-
pressed data that it can, although it may need to buffer some until you supply more
data to decompress. The following code decompresses the output from the previ-
ous example 20 bytes at a time:
>>> d = zlib.decompressobj() # Create a decompressor.>>> msg = ‘’>>> while out:... msg += d.decompress(out[:20]) # Decompress some.... out = out[20:]>>> msg += d.flush() # Let it know that we’re all done.>>> len(msg) 24800>>> 1000 * len(‘I will not throw knives’) +\... 200 * len(‘or chairs’)24800 # Length matches that of the original message.>>> msg[:50] # Looks like the message itself matches too.‘I will not throw knivesI will not throw knivesI wi’
Call the decompression object’s flush() method when you’re done giving it more
data (after this you can’t call decompress any more with that object).
4807-7 ch12.F 5/24/01 8:59 AM Page 212

213Chapter 12 ✦ Storing Data and Objects
Decompression objects also have an unused_data member that holds any leftover
compressed data from the last call to decompress. A nonempty unused_datastring means that the decompression object is still waiting on additional data to
finish decompressing this particular piece of data.
gzipThe gzip module lets you read and write .gz (GNU gzip) files as if they were ordi-
nary files (that is, your program can pretty much ignore the fact that compression/
decompression is taking place).
The GNU gzip and gunzip programs support additional formats (for example,compress and pack), but the gzip Python module does not.
The gzip.GzipFile([filename[, mode[, compresslevel[, fileobj]]]])function constructs a new GzipFile object. You must supply either the filenameor the fileobj argument, although the file object can be anything that looks like a
file such as a cStringIO object. The compresslevel parameter has the same
values as for zlib module earlier in this section.
If you don’t supply a mode, then gzip tries to use the mode of fileobj. If that’s not
possible, the mode defaults to ‘rb’ (open for reading). A GzipFile can’t be open
for both reading and writing, so you should use a mode of ‘rb’, ‘wb’, or ‘ab’.
When you call the close() method of a GzipFile, the file object (if you supplied
one) remains open.
To further the illusion of normal file I/O, you can call the open(filename[, mode[,level]]) function in the gzip module. The filename argument is required, so the
call looks very similar to Python’s built-in open function:
>>> f = gzip.open(‘small.gz’,’wb’)>>> f.write(‘’’Old woman!... Man!... Old Man, sorry. What knight lives in that castle overthere?... I’m thirty-seven.... What?... I’m thirty-seven -- I’m not old!... Well, I can’t just call you ‘Man’.... Well, you could say ‘Dennis’.>>> f.close()
>>> f = gzip.open(‘small.gz’)>>> print f.read()
Old woman!Man!Old Man, sorry. What knight lives in that castle over there?I’m thirty-seven.
Note
4807-7 ch12.F 5/24/01 8:59 AM Page 213

214 Part II ✦ Files, Data Storage, and Operating System Services
What?I’m thirty-seven -- I’m not old!Well, I can’t just call you ‘Man’.Well, you could say ‘Dennis’.
zipfileThe zipfile module lets you read, write, and get information about files stored in
the common ZIP file format.
The zipfile module does not currently support ZIP files with appended com-ments or files that span multiple disks.
The ipfile.is_zipfile(filename) function returns true if the given file name
appears to be a valid zip file.
The zipfile module defines the ZipFile, ZipInfo, and PyZipFile classes.
The ZipFile classThis class is the primary one used to read and write a ZIP file. You create a ZipFile
instance object by calling the ZipFile(filename[, mode[, compression]])constructor:
>>> import zipfile>>> z = zipfile.ZipFile(‘room.zip’)>>> z.printdir() # Print formatted summary of the archiveFile Name Modified Sizeworld 2000-09-05 09:25:14 10919cryst.cfg 1999-03-07 06:14:34 27
The mode is ‘r’ (read, the default), ‘w’ (write), or ‘a’ (append). If you append to a ZIP
file, Python adds new files to it. If you append to a non-ZIP file, however, Python
adds a ZIP archive to the end of the file. Not all ZIP readers can understand this
format. The compression argument is either ZIP_STORED (no compressed) or
ZIP_DEFLATED (use compression).
The namelist() method of your ZipFile object returns the list of files the ZIP
contains. You can get a ZipInfo object (described in the next section) for any file
via the getinfo(name) method, or you can get a list of ZipInfos for the entire
archive with the infolist() method:
>>> z.namelist()[‘world’, ‘cryst.cfg’] # The ZIP contains two files.>>> z.getinfo(‘world’) # Get some info for file named ‘world.’<zipfile.ZipInfo instance at 010FD14C>>>> z.getinfo(‘world’).file_size10919
Note
4807-7 ch12.F 5/24/01 8:59 AM Page 214

215Chapter 12 ✦ Storing Data and Objects
>>> z.infolist()[<zipfile.ZipInfo instance at 010FD14C>, <zipfile.ZipInfo instance at 010E116C>]
If you open the ZIP in read or append mode, read(name) decompresses the speci-
fied file and returns its contents:
>>> print z.read(‘cryst.cfg’)[World]MIXLIGHTS=true_rgb
The testzip() method returns the name of the first corrupt file or None if all files
are okay:
>>> z.testzip()‘world’ # The file called ‘world’ is corrupt.
For ZIPs opened in write or append mode, the write(zipInfo, bytes) method
adds a new file to the archive. bytes contains the content of the file, and zipInfois a ZipInfo object (see the next section) with the file’s information. You don’t
have to fill in every attribute of ZipInfo, but at least fill in the file name and
compression type.
The write(filename[, arcname[, compress_type]]) function adds the con-
tents of the file filename to the archive. If you supply a value for arcname, that is
the name of the file stored in the archive. If you supply a value for compress_type,
it overrides whatever compression type you used when you created the ZipFile.
After making any changes to a ZIP file, calling the close() method is essential to
guaranteeing the integrity of the archive.
A ZipFile object has a debug attribute that you can use to change the level ofdebug output messages. Most output comes with a value of 3, the least (no out-put) is with a value of 0, the default.
The ZipInfo classInformation about each member of a ZIP archive is represented by a ZipInfoobject. You can use the ZipInfo([filename[, date_time]]) constructor to cre-
ate one; getinfo() and infolist() also return ZipInfo objects. The filenameshould be the full path of the file and date_time is a six-tuple containing the last
modification timestamp (see the date_time attribute in Table 12-3).
Each ZipInfo instance object has many attributes; the most useful are listed in
Table 12-3.
Tip
4807-7 ch12.F 5/24/01 8:59 AM Page 215
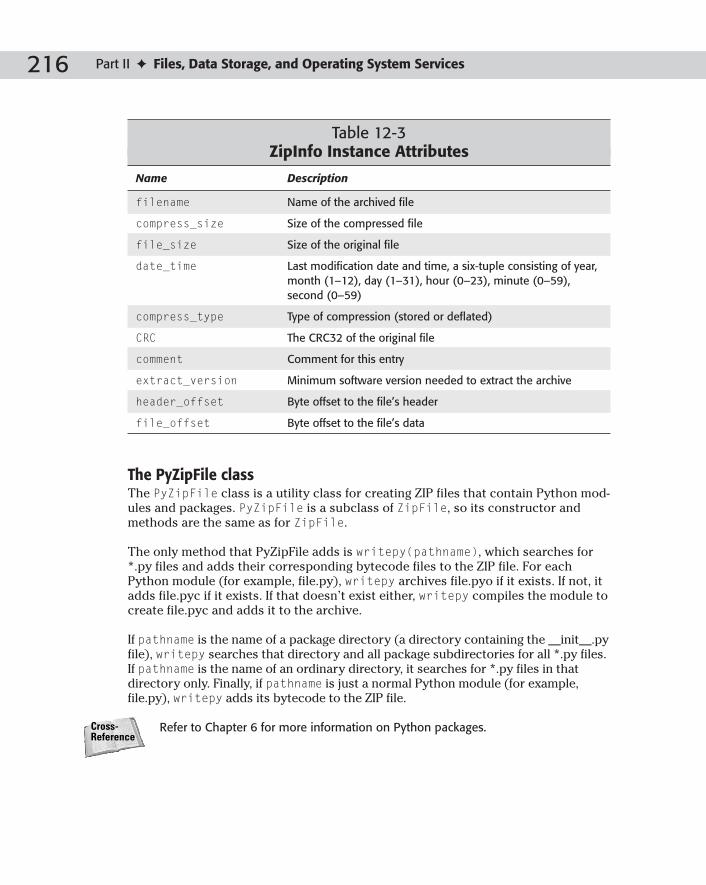
216 Part II ✦ Files, Data Storage, and Operating System Services
Table 12-3ZipInfo Instance Attributes
Name Description
filename Name of the archived file
compress_size Size of the compressed file
file_size Size of the original file
date_time Last modification date and time, a six-tuple consisting of year,month (1–12), day (1–31), hour (0–23), minute (0–59),second (0–59)
compress_type Type of compression (stored or deflated)
CRC The CRC32 of the original file
comment Comment for this entry
extract_version Minimum software version needed to extract the archive
header_offset Byte offset to the file’s header
file_offset Byte offset to the file’s data
The PyZipFile classThe PyZipFile class is a utility class for creating ZIP files that contain Python mod-
ules and packages. PyZipFile is a subclass of ZipFile, so its constructor and
methods are the same as for ZipFile.
The only method that PyZipFile adds is writepy(pathname), which searches for
*.py files and adds their corresponding bytecode files to the ZIP file. For each
Python module (for example, file.py), writepy archives file.pyo if it exists. If not, it
adds file.pyc if it exists. If that doesn’t exist either, writepy compiles the module to
create file.pyc and adds it to the archive.
If pathname is the name of a package directory (a directory containing the __init__.py
file), writepy searches that directory and all package subdirectories for all *.py files.
If pathname is the name of an ordinary directory, it searches for *.py files in that
directory only. Finally, if pathname is just a normal Python module (for example,
file.py), writepy adds its bytecode to the ZIP file.
Refer to Chapter 6 for more information on Python packages.Cross-Reference
4807-7 ch12.F 5/24/01 8:59 AM Page 216

217Chapter 12 ✦ Storing Data and Objects
SummaryPython makes a breeze of serializing or marshaling objects to disk or over a net-
work, and its support for compression and data conversion only makes life easier.
In this chapter you:
✦ Serialized objects.
✦ Transported objects across a network connection.
✦ Converted objects to formats readable by C programs.
✦ Stored objects in the standard XDR format.
✦ Compressed data to save space.
In the next chapter you’ll learn to track how long parts of your program take to run,
retrieve the date and time, and print the date and time in custom formats.
✦ ✦ ✦
4807-7 ch12.F 5/24/01 8:59 AM Page 217

4807-7 ch12.F 5/24/01 8:59 AM Page 218

Accessing Dateand Time
Dates can be written in many ways. Converting between
date formats is a common chore for computers. Date
arithmetic — like finding the number of days between June 10
and December 13 — is another common task. Python’s time
and calendar modules help track dates and times. They even
handle icky details like daylight savings time and leap years.
Telling Time in PythonTime is usually represented as either a number or a tuple. The
time module provides functions for working with times, and
for converting between representations.
TicksYou can represent a point in time as a number of “ticks” — the
number of seconds that have elapsed since the epoch. The
epoch is an arbitrarily chosen “beginning of time.” For UNIX
and Windows systems, the epoch is 12:00am, 1/1/1970. For
example, on my computer, my next birthday is 983347200 in
ticks (which translates into February 28, 2001).
The function time.time returns the current system time in
ticks. For example, here is the number of days from now until
my birthday:
>>> 983347200 - time.time()7186162.7339999676
Note that Python uses a floating-point value for ticks. Because
time precision varies by operating system, time.time is
always an integer on some systems.
1313C H A P T E R
✦ ✦ ✦ ✦
In This Chapter
Telling time in Python
Converting betweentime formats
Parsing and printingdates and times
Accessing thecalendar
Using time zones
Allowing two-digityears
✦ ✦ ✦ ✦
4807-7 ch13.F 5/24/01 8:59 AM Page 219

220 Part II ✦ Files, Data Storage, and Operating System Services
Date arithmetic is easy to do with ticks. However, dates before the epoch cannot be
represented in this form. Dates in the far future also cannot be represented this
way — the cutoff point is sometime in 2038 for UNIX and Windows.
Third-party modules such as mxDateTime provide date/time classes that functionoutside the range 1970–2038.
TimeTupleMany of Python’s time functions handle time as a tuple of 9 numbers, as shown in
Table 13-1:
Table 13-1Time Functions
Index Field Values
0 4-digit year 1993
1 Month 1–12
2 Day 1–31
3 Hour 0–23 (0 is 12 a.m.)
4 Minute 0–59
5 Second 0–61 (60 or 61 are leap-seconds)
6 Day of week 0–6 (0 is Monday)
7 Day of year 1–366 (Julian day)
8 Daylight savings -1,0,1
Note that the elements of the tuple proceed from broadest (year) to most granular
(second). This means that one can do linear comparisons on TimeTuples:
>>> TimeA = (1972, 5, 15, 12, 55, 32, 0, 136, 1)>>> TimeB = (1972, 5, 16, 7, 9, 10, 1, 137, 1)>>> TimeA<TimeB # TimeA is a day before TimeB.1
Note that a TimeTuple does not include a time zone. To pinpoint an actual time, one
needs a time zone as well as a TimeTuple.
Stopwatch timeThe clock function acts as a stopwatch for timing Python code — you call clockbefore doing something, call it again afterwards, and take the difference between
Note
4807-7 ch13.F 5/24/01 8:59 AM Page 220

221Chapter 13 ✦ Accessing Date and Time
numbers to get the elapsed seconds. The actual values returned by clock are
system-dependent and generally don’t translate into a time-of-day. This code
checks how quickly Python counts to one million:
>>> def CountToOneMillion():... StartTime=time.clock()... for X in xrange(0,1000000): pass... EndTime=time.clock()... print EndTime-StartTime...>>> CountToOneMillion() # Elapsed time, in seconds0.855862726726
The proper way to pause execution is with time.sleep(n), where n is a floatingpoint number of seconds. In a Tkinter application, once can call the aftermethod on the root object to make a function execute after n seconds. (SeeChapter 19 for more on Tkinter.)
Converting Between Time FormatsThe function localtime converts from ticks to a TimeTuple for the local time zone.
For example, this code gets the current time:
>>> time.localtime(time.time()) (2000, 12, 6, 20, 0, 9, 2, 341, 0)
Reading the fields of the TimeTuple, I can see that it is the year 2000, December 6,
at 20:00 (8 p.m.) and 9 seconds. The day of the week is 2 (Wednesday), it is the
341st day of the year, and local clocks are not currently on Daylight Savings Time.
The function gmtime also converts from EpochSeconds to a TimeTuple. It returns the
current TimeTuple for UTC (Universal Coordinated Time, formerly Greenwich Mean
Time). This call to gmtime shows that it is 4 a.m. in England (a bad time to telephone):
>>> time.gmtime(time.time())(2000, 12, 7, 4, 4, 9, 3, 342, 0)
The function mktime converts from a TimeTuple to EpochSeconds. It interprets the
TimeTuple according to the local time zone. The function mktime is the inverse of
localtime, and it is useful for doing date arithmetic. (The inverse function of
gmtime is calendar.timegm.) This code finds the number of seconds between two
points in time:
>>> TimeA = (1972, 5, 15, 12, 55, 32, 0, 136, 1)>>> TimeB = (1972, 5, 16, 7, 9, 10, 1, 137, 1)>>> time.mktime(TimeB)-time.mktime(TimeA)65618.0>>> _ / (60*60) # How many hours is that?18.227222222222224
Note
4807-7 ch13.F 5/24/01 8:59 AM Page 221

222 Part II ✦ Files, Data Storage, and Operating System Services
Parsing and Printing Dates and TimesThe asctime function takes a TimeTuple, and returns a human-readable timestamp.
It is especially useful in log files:
>>> Now=time.localtime(time.time()) # Now is a TimeTuple.>>> time.asctime(Now) ‘Sun Dec 10 10:09:41 2000’>>> # In version 2.1, you can call asctime() and localtime() >>> # with no arguments to use the current time:>>> time.asctime()‘Sun Dec 10 10:09:41 2000’
The function ctime returns a timestamp for a time expressed in ticks:
>>> time.ctime(time.time()) ‘Sun Dec 10 10:11:29 2000’
Fancy formattingThe function strftime(format,timetuple) formats a TimeTuple in a format you
specify. The function strftime returns the string format after performing substitu-
tions on various codes marked with a percent sign, as shown in Table 13-2:
Table 13-2Time Formatting Syntax
Code Substitution Example / Range
%a Abbreviated day name Thur
%A Full day name Thursday
%b Abbreviated month name Jan
%B Full month name January
%c Date and time representation 12/10/00 10:09:41(equivalent to %x %X)
%d Day of the month 01–31
%H Hour (24-hour clock) 00–23
%h Hour (12-hour clock) 01–12
%j Julian day (day of the year) 001–366
%m Month 01–12
%M Minute 00–59
%p A.M. or P.M. AM
4807-7 ch13.F 5/24/01 8:59 AM Page 222

223Chapter 13 ✦ Accessing Date and Time
Code Substitution Example / Range
%S Second 00–61
%U Week number. Week starts with 00–53Sunday; days before the first Sunday of the year are in week 0.
%w Weekday as a number (0=Sunday) 0–6
%W Week number. Week starts with 00–53Monday; days before the first Monday of the year are in week 0.
%x Date 12/10/00
%X Time 10:09:41
%y 2-digit year 00–99
%Y 4-digit year 2000
%Z Time-zone name Pacific Standard Time
%% Literal % sign
For example, I can print the current week number:
>>> time.strftime(“It’s week %W!”,Now)“It’s week 49!”
Here is the default formatting string (with the same results as calling ctime):
>>> time.strftime(“%a %b %d %I:%M:%S %Y”,Now) ‘Sun Dec 10 10:09:41 2000’
Parsing timeThe function strptime(timestring[,format]) is the reverse of strftime; it
parses a string and returns a TimeTuple. It guesses at any unspecified time compo-
nents. It raises a ValueError if it cannot parse the string timestring using the format
format. The default format is the one that ctime uses: “%a %b %d %I:%M:%S %Y”.
The strptime function is available on most UNIX systems; however, it is unavail-able on Windows.
LocalizationDifferent countries write dates differently — for example, the string “2/5” means
“February 5” in the United States, but “May 2” in England. The function strftimerefers to the current locale when performing each substitution. For example, the
Note
4807-7 ch13.F 5/24/01 8:59 AM Page 223

224 Part II ✦ Files, Data Storage, and Operating System Services
format string “%x” uses the correct day-month ordering for the current locale.
However, you still need to take locale into account when writing code — for
instance, the format string “%m/%d” is not correct for all locales.
See Chapter 34 for an overview of the locale module and other information oninternationalization.
Accessing the CalendarThe calendar module provides high-level functions and constants that comple-
ment the lower-level functions in the time module. Because calendar uses ticks
internally to represent dates, it cannot provide calendars outside the epoch
(usually 1970–2038).
Printing monthly and yearly calendarsThe following sections show examples of printing monthly and yearly calendars.
monthcalendar(yearnum,monthnum)The function monthcalendar returns a list of lists, representing a monthly calen-
dar. Each entry in the main list represents a week. The sublists contain the seven
dates in that week. A 0 (zero) in the sublist represents a day from the previous or
next month:
>>> calendar.monthcalendar(2000,5) # 4 1/2 weeks in May, 2000[[1, 2, 3, 4, 5, 6, 7], [8, 9, 10, 11, 12, 13, 14], [15, 16,17, 18, 19, 20, 21], [22, 23, 24, 25, 26, 27, 28], [29, 30, 31,0, 0, 0, 0]]
month(yearnum,monthnum[,width[,linesperweek]])The month function returns a multiline string that looks like a monthly calendar for
month monthnum of year yearnum. Months are numbered normally (from 1 for
January up to 12 for December). The parameter width specifies how wide each col-
umn is; the minimum (and default) value is 2. The parameter linesperweek specifies
how many rows to print for each week. It defaults to 1; setting it to a higher number
like 5 leaves space to write on a printed calendar. Here are two examples:
>>> print calendar.month(2002,5) May 2002
Mo Tu We Th Fr Sa Su1 2 3 4 5
6 7 8 9 10 11 1213 14 15 16 17 18 1920 21 22 23 24 25 2627 28 29 30 31
Cross-Reference
4807-7 ch13.F 5/24/01 8:59 AM Page 224

225Chapter 13 ✦ Accessing Date and Time
>>> # 2 rows per week; 3 cols per day>>> print calendar.month(2002,5,3,2)
May 2002
Mon Tue Wed Thu Fri Sat Sun
1 2 3 4 5
6 7 8 9 10 11 12
13 14 15 16 17 18 19
20 21 22 23 24 25 26
27 28 29 30 31
The function prmonth(yearnum,monthnum[,width[,linesperweek]]) prints the
corresponding output of month.
calendar(yearnum[,width[,linesperweek[,columnpadding]]])The function calendar prints a yearly calendar, with three months per row. The
parameters width and linesperweek function as for month. The parameter column-padding indicates how many spaces to add between month-columns; it defaults to
6. The function prcalendar prints the corresponding output of calendar.
Calendar informationThe weekday function looks up the day of the week for a particular date. The syntax
is weekday(year,month,day). Weekdays range from Monday (0) to Sunday (6).
Constants for each day (in all-caps) are available, for convenience and code-clarity:
>>> # Is May 1, 2002 a Wednesday?>>> calendar.weekday(2002,5,1)==calendar.WEDNESDAY1
The function monthrange(yearnum,monthnum) returns a two-tuple: The weekday
of the first day of month monthnum in year yearnum, and the length of the month.
>>> calendar.monthrange(2000,2) # 2000 was a leap year!(1, 29)
By default, calendar starts its weeks on Monday, and ends them on Sunday. I like
this setting best, because the week ends with the weekend. But you can start your
calendar’s weeks on another day by calling setfirstweekday(weekday). The func-
tion firstweekday tells you which day of the week is currently the first day of the
week:
4807-7 ch13.F 5/24/01 8:59 AM Page 225

226 Part II ✦ Files, Data Storage, and Operating System Services
>>> calendar.setfirstweekday(calendar.WEDNESDAY) >>> print calendar.month(2002,5)
May 2002We Th Fr Sa Su Mo Tu1 2 3 4 5 6 78 9 10 11 12 13 1415 16 17 18 19 20 2122 23 24 25 26 27 2829 30 31>>> calendar.firstweekday() # Weeks start with day #2 (Wed.)2
Leap yearsThe function isleap(yearnum) returns true if year yearnum is a leap year. The
function leapdays(firstyear,lastyear) returns the number of leap days from
firstyear to lastyear, inclusive.
Using Time ZonesThe value time.daylight indicates whether a local DST (Daylight Savings Time)
time zone is defined. A value of 1 indicates that a DST time zone is available.
The value time.timezone is the offset, in seconds, from the local time zone to
UTC. This makes it easy to convert between time zones. The value time.altzoneis an offset from the local DST time zone to UTC. The offset altzone is more accu-
rate, but it is available only if time.daylight is 1.
>>> Now=time.time()>>> time.ctime(Now) # Time in Mountain time zone, USA‘Sun Dec 10 10:44:49 2000’>>> time.ctime(Now+time.altzone) # Time in England‘Sun Dec 10 17:44:49 2000’
The value time.tzname is a tuple. The first entry is the name of the local time
zone. The second entry, if available, is the name of the local Daylight Savings Time
time zone. The second entry is available only if time.daylight is nonzero. For
example:
>>> time.tzname(‘Pacific Standard Time’, ‘Pacific Daylight Time’)
4807-7 ch13.F 5/24/01 8:59 AM Page 226

227Chapter 13 ✦ Accessing Date and Time
Allowing Two-Digit YearsTwo-digit dates are convenient, but they can be ambiguous. For example, the year
“97” should precede the year “03” if the years are 1997 and 2003, but not if they are
1997 and 1903.
In 1999, programmers around the world began rooting through legacy code to solve
the Y2K Bug — a blanket term for all bugs caused by indiscriminate use of two-digit
years. Some people worried that the Y2K Bug would cause The End Of The World
As We Know It on January 1, 2000. Fortunately, it didn’t and we can all sleep safely
at night — at least until 2038 when epoch-based time starts to overflow.
Normally, Python adds 2000 to a two-digit year from 00 to 68, and adds 1900 to two-
digit years from 69 to 99. However, for paranoia’s sake, the value
time.accept2dyear can be set to 0; this setting causes all two-digit years to be
rejected. If you set the environment variable PYTHON2K, the value
time.accept2dyear is initialized to 0. For example:
>>> Y4=(2000, 12, 10, 10, 9, 41, 6, 345, 0)>>> Y2=(00, 12, 10, 10, 9, 41, 6, 345, 0) # Same date>>> time.mktime(Y4)976471781.0>>> time.mktime(Y2) # 2-digit year below 69; add 2000976471781.0>>> time.accept2dyear=0 # Zero tolerance for YY!>>> time.mktime(Y2)Traceback (most recent call last):File “<stdin>”, line 1, in ?
ValueError: year >= 1900 required
SummaryPython includes standard libraries for telling time, doing date arithmetic, and con-
verting between time zones. In this chapter, you:
✦ Converted time between tuple and ticks representations.
✦ Formatted and parsed times in human-readable formats.
✦ Checked months and days on a yearly calendar.
✦ Handled various time zones, as well as Daylight Savings Time.
In the next chapter you will learn how to use Python to store and retrieve data from
databases.
✦ ✦ ✦
4807-7 ch13.F 5/24/01 8:59 AM Page 227

4807-7 ch13.F 5/24/01 8:59 AM Page 228

Using Databases
Databases support permanent storage of large amounts
of data. You can easily perform CRUD (Create, Read,
Update, and Delete) on database records. Relational
databases divide data between tables and support sophisti-
cated SQL operations.
Python’s standard libraries include a simple disk-dictionary
database. The Python DB API provides a standard way to
access relational databases. Various third-party modules
implement this API, providing easy access to many flavors of
database, including Oracle and MySQL.
Using Disk-Based DictionariesPython’s standard libraries provide a simple database that
takes the form of a single disk-based dictionary (or disktionary).
This functionality is based on the UNIX utility dbm — on UNIX,
you can access databases created by the dbm utility. Several
modules define such a database, as shown in Table 14-1.
Table 14-1Disk-Based Dictionary Modules
Module Description
anydbm Portable database; chooses the bestmodule from among the others
dumbdbm Slow and limited, but available on allplatforms
dbm Wraps the UNIX dbm utility; available onUNIX only
gdbm Wraps GNU’s improved dbm; availableon UNIX only
dbhash Wraps the BSD database library;available on UNIX and Windows
1414C H A P T E R
✦ ✦ ✦ ✦
In This Chapter
Using disk-baseddictionaries
DBM example:tracking telephonenumbers
Advanced disk-baseddictionaries
Accessing relationaldatabases
Example: “sounds-like” queries
Examining relationalmetadata
Example: creatingauditing tables
Advanced features ofthe DB API
✦ ✦ ✦ ✦
4807-7 ch14.F 5/24/01 8:59 AM Page 229

230 Part II ✦ Files, Data Storage, and Operating System Services
In general, it is recommended that you use anydbm, as it is available on any plat-
form (even if it has to use dumbdbm!)
Each dbm module defines a dbm object and an exception named error. The fea-
tures in this section are available from every flavor of dbm; the “Advanced Disk-
Based Dictionaries” section describes extended features not available in dumbdbm.
The open function creates a new dbm object. The function’s syntax is open(filename[,flag[,mode]]). The filename parameter is the path to the file used
to store the data. The flag parameter is normally optional, but is required for
dbhash. It has the following legal values:
r [default] Opens the database for read-only access
w Opens the database for read and write access
c Same as w, but creates the database file if necessary
n Same as w, but always creates a new, empty database file
The flag parameter is required for dbhash.open.
Some flavors of dbm (including dumbdbm) permit modifications to a databaseopened read-only!
The optional parameter mode specifies the UNIX-style permissions to set on the
database file.
Once you have opened a database, you can access it much like a standard dictionary:
>>> SimpleDB=anydbm.open(“test”,”c”) # create a new datafile>>> SimpleDB[“Terry”]=”Gilliam” # add a record>>> SimpleDB[“John”]=”Cleese”>>> print SimpleDB[“Terry”] # access a recordGilliam>>> del SimpleDB[“John”] # delete a record
The keys and values in a dbm must all be strings. For example:
>>> SimpleDB[“Eric”]=5 # illegal; value is not a string!Traceback (most recent call last):File “<stdin>”, line 1, in ?
TypeError: bsddb value type must be string
Attempting to access a key with no value raises a KeyError exception. You can use
the has_key method to verify that a key exists, or call keys to get a list of keys.
However, the safe get method from a dictionary is not available:
Caution
Note
4807-7 ch14.F 5/24/01 8:59 AM Page 230

231Chapter 14 ✦ Using Databases
>>> SimpleDB.keys()[‘Terry’]>>> SimpleDB.has_key(“Eric”)0
When you are finished with a dbm object, call its close method to sync it to disk
and free its used resources.
DBM Example: Tracking Telephone NumbersThe example shown in Listing 14-1 uses a dbm object to track telephone numbers.
The dictionary key is a person’s name; the value is his or her telephone number.
Listing 14-1: Phone list
import anydbmimport sys
def AddName(DB):print “Enter a name. (Null name to cancel)”# Take the [:-1] slice to remove the \n at the endNewName=sys.stdin.readline()[:-1]if (NewName==””): return print “Enter a phone number.”PhoneNumber=sys.stdin.readline()[:-1]DB[NewName]=PhoneNumber # Poke value into database!
def PrintList(DB):# Note: A large database may have MANY keys (too many to# casually put into memory). See Listing 14-2 for a better# way to iterate over keys in dbhash.for Key in DB.keys():
print Key,DB[Key]
if (__name__==”__main__”):PhoneDB= dbhash.open(“phone”,”c”)while (1):
print “\nEnter a name to look up\n+ to add a name”print “* for a full listing\n. to exit”Command=sys.stdin.readline()[:-1]if (Command==””):
continue # Nothing to do; prompt againif (Command==”+”):
AddName(PhoneDB)elif (Command==”*”):
PrintList(PhoneDB)
Continued
4807-7 ch14.F 5/24/01 8:59 AM Page 231

232 Part II ✦ Files, Data Storage, and Operating System Services
Listing 14-1 (continued)
elif (Command==”.”):break # quit!
else:try:
print PhoneDB[Command]except KeyError:
print “Name not found.”print “Saving and closing...”PhoneDB.close()
Advanced Disk-Based DictionariesThe various flavors of dbm don’t use compatible file formats — for example, a
database created using dbhash cannot be read using gdbm. This means that the
only database file-format available on all platforms is that used by dumbdbm. The
whichdb module can examine a database to determine which flavor of dbm created
it. The function whichdb.whichdb(filename) returns the name of the module that
created the datafile filename, returns None if the file is unreadable or does not exist,
and returns an empty string if it can’t figure out the file’s format. For example, the
following code uses anydbm to create a database, and then queries the database to
see what type it really is:
>>> MysteryDB=anydbm.open(“Unknown”,”c”)>>> MysteryDB.close() # write file so we can check its db-type >>> whichdb.whichdb(“Unknown”) ‘dbhash’
dbmThe dbm module provides an extra string variable, library, which is the name of
the underlying ndbm implementation.
gdbmThe gdbm module provides improved key navigation. The dbm method firstkeyreturns the first key in the database; the method nextkey(currentkey) returns
the key after currentkey. After doing many deletions from a gdbm database, you can
call reorganize to free up space used by the datafile. In addition, the method syncflushes any unwritten changes to disk.
4807-7 ch14.F 5/24/01 8:59 AM Page 232
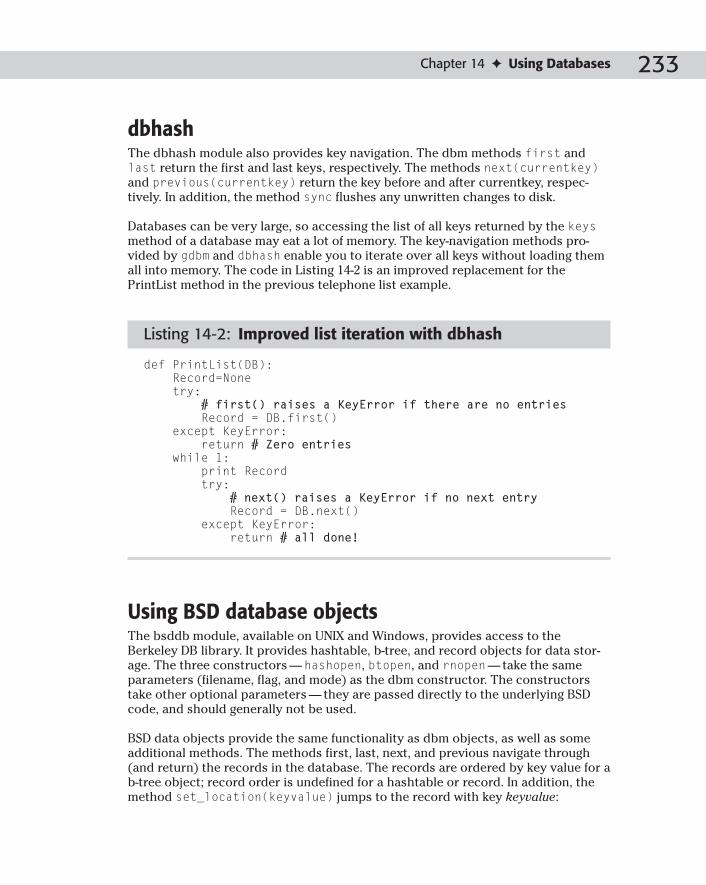
233Chapter 14 ✦ Using Databases
dbhashThe dbhash module also provides key navigation. The dbm methods first and
last return the first and last keys, respectively. The methods next(currentkey)and previous(currentkey) return the key before and after currentkey, respec-
tively. In addition, the method sync flushes any unwritten changes to disk.
Databases can be very large, so accessing the list of all keys returned by the keysmethod of a database may eat a lot of memory. The key-navigation methods pro-
vided by gdbm and dbhash enable you to iterate over all keys without loading them
all into memory. The code in Listing 14-2 is an improved replacement for the
PrintList method in the previous telephone list example.
Listing 14-2: Improved list iteration with dbhash
def PrintList(DB):Record=Nonetry:
# first() raises a KeyError if there are no entriesRecord = DB.first()
except KeyError:return # Zero entries
while 1:print Recordtry:
# next() raises a KeyError if no next entryRecord = DB.next()
except KeyError:return # all done!
Using BSD database objectsThe bsddb module, available on UNIX and Windows, provides access to the
Berkeley DB library. It provides hashtable, b-tree, and record objects for data stor-
age. The three constructors —hashopen, btopen, and rnopen— take the same
parameters (filename, flag, and mode) as the dbm constructor. The constructors
take other optional parameters — they are passed directly to the underlying BSD
code, and should generally not be used.
BSD data objects provide the same functionality as dbm objects, as well as some
additional methods. The methods first, last, next, and previous navigate through
(and return) the records in the database. The records are ordered by key value for a
b-tree object; record order is undefined for a hashtable or record. In addition, the
method set_location(keyvalue) jumps to the record with key keyvalue:
4807-7 ch14.F 5/24/01 8:59 AM Page 233

234 Part II ✦ Files, Data Storage, and Operating System Services
>>> bob=bsddb.btopen(“names”,”c”)>>> bob[“M”]=”Martin”>>> bob[“E”]=”Eric”>>> bob[“X”]=”Xavier”>>> bob.first() # E is first, since this is a b-tree(‘E’, ‘Eric’)>>> bob.next()(‘M’, ‘Martin’)>>> bob.next()(‘X’, ‘Xavier’)>>> bob.next() # navigating “off the edge” raises KeyErrorTraceback (most recent call last):File “<stdin>”, line 1, in ?
KeyError>>> bob.set_location(“M”)(‘M’, ‘Martin’)
The sync method of a BSD database object flushes any changes to the datafile.
Accessing Relational DatabasesRelational databases are a powerful, flexible way to store and retrieve many kinds
of data. There are many relational database implementations, which vary in scala-
bility and richness of features. The standard libraries do not include relational
database support; however, Python modules exist to access almost any relational
database, including Oracle, MySQL, DB/2, and Sybase.
The Python Database API defines a standard interface for Python modules that
access a relational database. Most third-party database modules conform to the API
closely, though not perfectly. This chapter covers Version 2.0 of the API.
Connection objectsThe connect method constructs a database connection. The connection is used in
constructing cursors. When finished with a connection, call its close method to free
it. Databases generally provide a limited pool of connections, so a program should
not needlessly use them up.
The parameters of the connect method vary by module, but typically include dsn(data source name), user, password, host, and database.
TransactionsConnections oversee transactions. A transaction is a collection of actions that must
execute atomically — completely, or not at all. For example, a bank transfer might
debit one account and credit another; this should be done within a single transac-
tion, as performing only one half of the transfer would obviously be unacceptable.
4807-7 ch14.F 5/24/01 8:59 AM Page 234

235Chapter 14 ✦ Using Databases
Calling the commit connection method completes the current transaction; calling
rollback cancels the current transaction. Not all databases support transactions —
for example, Oracle does, MySQL doesn’t (yet). The commit method is always avail-
able; rollback is only available where transaction support is provided.
Cursor objectsA cursor can execute SQL statements and retrieve data. The connection method
cursor creates and returns a new cursor. The cursor method execute(command[,parameters]) executes the specified SQL statement command, passing any
necessary parameters. After executing a command that affects row data, the cursor
attribute rowcount indicates the number of rows altered or returned; and the
description attribute (described in the “Examining Relational Metadata” section)
describes the columns affected. After executing a command that selects data, the
method fetchone returns the next row of data (as a sequence, with one entry for
each column value). The method fetchmany([size]) returns a sequence of
rows — up to size of them. The method fetchall returns all the rows.
After using a cursor, call its close method to free it. Databases typically have a
limited pool of available cursors, so it is important to free cursors after use.
Example: “Sounds-Like” QueriesThe example shown in Listing 14-3 uses the mxODBC module to look up people
whose names “sound like” another name. ODBC is a standard interface for rela-
tional databases; ODBC drivers are available for many databases, including Oracle
and MySQL. Therefore, the mxODBC module can handle most of the databases you
are likely to deal with. Listing 14-4 shows the output from the example.
Listing 14-3: Soundex.py
# Replace this import with the appropriate one for your system:import ODBC.Windows
# Dictionary used for sounds-like codingSoundexDict = {“B”:”1”,”P”:”1”,”F”:”1”,”V”:”1”,
“C”:”2”,”S”:”2”,”G”:”2”,”J”:”2”,“K”:”2”,”Q”:”2”,”X”:”2”,”Z”:”2”,“D”:”3”,”T”:”3”,“L”:”4”,“M”:”5”,”N”:”5”,“R”:”6”,“A”:”7”,”E”:”7”,”I”:”7”,”O”:”7”,”U”:”7”,”Y”:”7”,“H”:”8”,”W”:”8”}
Continued
4807-7 ch14.F 5/24/01 8:59 AM Page 235

236 Part II ✦ Files, Data Storage, and Operating System Services
Listing 14-3 (continued)
# These SQL statements may need to be tweaked for your database# (They work with MySQL)CREATE_EMPLOYEE_SQL = “””CREATE TABLE EMPLOYEE (EMPLOYEE_ID INT NOT NULL,FIRST_NAME VARCHAR(20) NOT NULL,LAST_NAME VARCHAR(20) NOT NULL,MANAGER_ID INT)”””DROP_EMPLOYEE_SQL=”DROP TABLE EMPLOYEE”INSERT_SQL = “INSERT INTO EMPLOYEE VALUES “
def SoundexEncoding(str):“””Return the 4-character SOUNDEX code for a string. Take first letter, then encode subsequent consonants as numbers. Ignore repeated codes (e.g MM codes as 5, not 55), unless separated by a vowel (e.g. SOS codes as 22)”””if (str==None or str==””): return Nonestr = str.upper() # ignore case!SoundexCode=str[0]LastCode=SoundexDict[str[0]]for char in str[1:]:
CurrentCode=SoundexDict[char]if (CurrentCode==”8”):
pass # Don’t include, or separate used consonantselif (CurrentCode==”7”):
LastCode=None # Include consonants after vowelselif (CurrentCode!=LastCode): # Skip doubled letters
SoundexCode+=CurrentCodeif len(SoundexCode)==4: break # limit to 4 characters
# Pad with zeroes (e.g. Lee is L000):SoundexCode += “0”*(4-len(SoundexCode))return SoundexCode
# Create the EMPLOYEE tabledef CreateTable(Conn):
NewCursor=Conn.cursor()try:
NewCursor.execute(DROP_EMPLOYEE_SQL)NewCursor.execute(CREATE_EMPLOYEE_SQL)
finally:NewCursor.close()
# insert a new employee into the table def CreateEmployee(Conn,DataValues):
NewCursor=Conn.cursor()try:
NewCursor.execute(INSERT_SQL+DataValues)finally:
NewCursor.close()
# Do a sounds-like query on a namedef PrintUsersLike(Conn,Name):
4807-7 ch14.F 5/24/01 8:59 AM Page 236

237Chapter 14 ✦ Using Databases
if (Name==None or Name==””): returnprint “Users with last name similar to”,Name+”:”SoundexName = SoundexEncoding(Name)QuerySQL = “SELECT EMPLOYEE_ID, FIRST_NAME, LAST_NAME FROM”QuerySQL+= “ EMPLOYEE WHERE LAST_NAME LIKE ‘“+Name[0]+”%’”NewCursor=Conn.cursor()try:
NewCursor.execute(QuerySQL)for EmployeeRow in NewCursor.fetchall():
if (SoundexEncoding(EmployeeRow[2])==SoundexName):print EmployeeRow
finally:NewCursor.close()
if (__name__==”__main__”):# pass clear_auto_commit=0, because MySQL doesn’t support # transactions (yet) and can’t handle autocommit flag# Replace “MyDB” with your datasource name!Conn=ODBC.Windows.Connect(“MyDB”,clear_auto_commit=0)CreateTable(Conn)CreateEmployee(Conn,’(1,”Bob”,”Hilbert”,Null)’)CreateEmployee(Conn,’(2,”Sarah”,”Pfizer”,Null)’)CreateEmployee(Conn,’(3,”Sandy”,”Lee”,1)’)CreateEmployee(Conn,’(4,”Pat”,”Labor”,2)’)CreateEmployee(Conn,’(5,”Larry”,”Helper”,Null)’) PrintUsersLike(Conn,”Heilbronn”)PrintUsersLike(Conn,”Pfizer”)PrintUsersLike(Conn,”Washington”)PrintUsersLike(Conn,”Lieber”)
Listing 14-4: Soundex output
Users with last name similar to Heilbronn:(1.0, ‘Bob’, ‘Hilbert’)(5.0, ‘Larry’, ‘Helper’)Users with last name similar to Pfizer:(2.0, ‘Sarah’, ‘Pfizer’)Users with last name similar to Washington:Users with last name similar to Lieber:(4.0, ‘Pat’, ‘Labor’)
Examining Relational MetadataWhen a cursor returns data, the cursor attribute description is metadata —
definitions of the columns involved. A column’s definition is represented as a
seven-item sequence; description is a sequence of such definitions. The items in
the sequence are listed in Table 14-2.
4807-7 ch14.F 5/24/01 8:59 AM Page 237

238 Part II ✦ Files, Data Storage, and Operating System Services
Table 14-2Metadata Sequence Pieces
Index Data
0 Column name
1 Type code
2 Display size (in columns)
3 Internal size (in characters or bytes)
4 Numeric scale
5 Numeric precision
6 Nullable (if 0, no nulls are allowed)
For example, the following is metadata from the Employee table of the Soundex
example:
>>> mc.execute(“select FIRST_NAME, MANAGER_ID from EMPLOYEE”)>>> mc.description((‘FIRST_NAME’, 12, None, None, 5, 0, 0), (‘MANAGER_ID’, 3,None, None, 1, 0, 1))
The mxODBC module does not return display size and internal size.
Example: Creating Auditing TablesSometimes, it is useful to view old versions of data. For example, you may want to
know both someone’s current address and his or her old address. Or, a medical
database may track who changed a patient’s record, and when. One way to capture
this data is with a mirror table — whenever an insert or update or delete occurs
in the main table, a corresponding row is written to the mirror table. The mirror
rows contain data, a timestamp, and the ID of the editing user — therefore, they
provide a full audit trail of all data changes. Ideally, mirror rows should be inserted
in the same transaction as the data-manipulation, to ensure that the audit trail is
accurate.
The script shown in Listing 14-5 uses metadata to write SQL that creates a mirror
table for a data table. Listing 14-6 shows a sample of the script’s output.
Note
4807-7 ch14.F 5/24/01 8:59 AM Page 238

239Chapter 14 ✦ Using Databases
Listing 14-5: MirrorMaker.py
import ODBC.Windows“”” MirrorMaker builds mirror tables, for purposes of auditing.For a table TABLEX, we create SQL to add a mirror tableTABLEX_M. The mirror table tracks version numbers, updatetimes, and updating users. “””# Replace these constants with values for your databaseSERVER_NAME = “MyDB”USER_NAME = “eva”PASSWORD = “destruction”SAMPLE_TABLE = “EMPLOYEE”
# Metadata for the mirror table’s special columnsVERSION_NUMBER_COLUMN=(“VERSION_NUMBER”,
ODBC.Windows.NUMERIC,None,None,0,0,0)LAST_UPDATE_COLUMN=(“LAST_UPDATE”,
ODBC.Windows.TIMESTAMP,None,None,0,0,0)UPDATE_USER_COLUMN=(“UPDATE_USER_ID”,
ODBC.Windows.NUMERIC,None,None,0,0,0)
def CreateColumnDefSQL(ColumnTuple): ColumnSQL = ColumnTuple[0] #nameColumnSQL += “ “# The mxODBC function sqltype returns the SQL name of a# (numeric) column type. (For a different database # module, you may need to code this translation yourself.)OracleColumnType = ODBC.Windows.sqltype[ColumnTuple[1]]ColumnSQL += OracleColumnType# width of character fieldsif (OracleColumnType == “VARCHAR2” or
OracleColumnType == “VARCHAR”):# Internal size not returned by mxODBC; so, use scaleColumnSQL += “(“+`ColumnTuple[4]`+”)” # width
if (OracleColumnType == “NUMBER”):if (ColumnTuple[4]): # precision+scaleColumnSQL += “(“ + `ColumnTuple[4]` + “,”+`ColumnTuple[5]`+”)” #
if (ColumnTuple[6]): # nullableColumnSQL += “ NULL”
else:ColumnSQL += “ NOT NULL”
return ColumnSQL
def CreateMirrorTableDefSQL(MyConnection,TableName):MyCursor = MyConnection.cursor()# This query returns no rows (because 1!=2), but returns# metadata (the definitions of each column in the table).
Continued
4807-7 ch14.F 5/24/01 8:59 AM Page 239
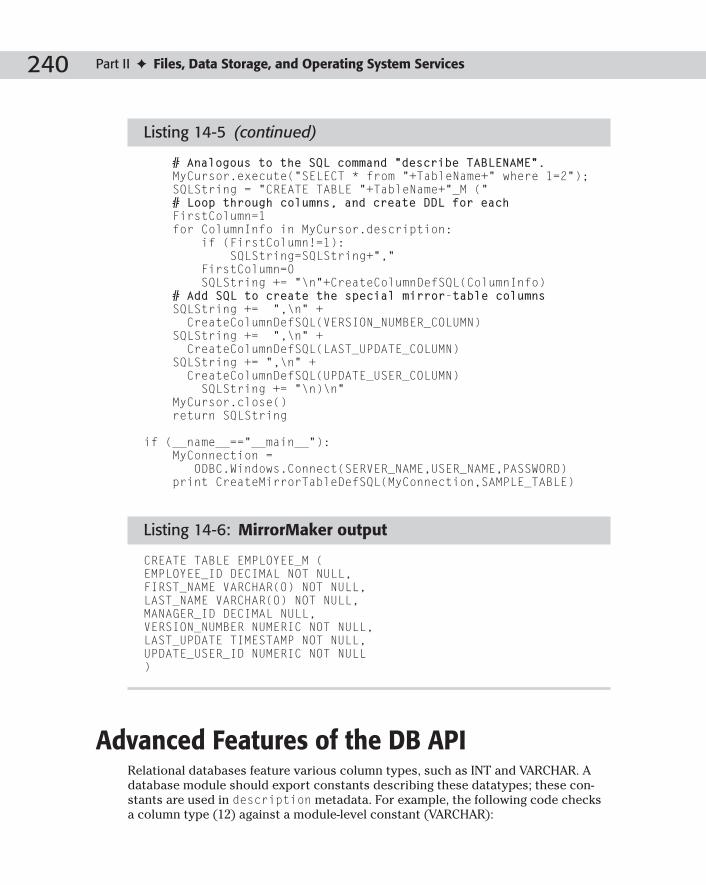
240 Part II ✦ Files, Data Storage, and Operating System Services
Listing 14-5 (continued)
# Analogous to the SQL command “describe TABLENAME”. MyCursor.execute(“SELECT * from “+TableName+” where 1=2”);SQLString = “CREATE TABLE “+TableName+”_M (“# Loop through columns, and create DDL for eachFirstColumn=1for ColumnInfo in MyCursor.description:
if (FirstColumn!=1):SQLString=SQLString+”,”
FirstColumn=0SQLString += “\n”+CreateColumnDefSQL(ColumnInfo)
# Add SQL to create the special mirror-table columnsSQLString += “,\n” + CreateColumnDefSQL(VERSION_NUMBER_COLUMN)
SQLString += “,\n” + CreateColumnDefSQL(LAST_UPDATE_COLUMN)
SQLString += “,\n” + CreateColumnDefSQL(UPDATE_USER_COLUMN) SQLString += “\n)\n”
MyCursor.close()return SQLString
if (__name__==”__main__”):MyConnection =
ODBC.Windows.Connect(SERVER_NAME,USER_NAME,PASSWORD)print CreateMirrorTableDefSQL(MyConnection,SAMPLE_TABLE)
Listing 14-6: MirrorMaker output
CREATE TABLE EMPLOYEE_M (EMPLOYEE_ID DECIMAL NOT NULL,FIRST_NAME VARCHAR(0) NOT NULL,LAST_NAME VARCHAR(0) NOT NULL,MANAGER_ID DECIMAL NULL,VERSION_NUMBER NUMERIC NOT NULL,LAST_UPDATE TIMESTAMP NOT NULL,UPDATE_USER_ID NUMERIC NOT NULL)
Advanced Features of the DB APIRelational databases feature various column types, such as INT and VARCHAR. A
database module should export constants describing these datatypes; these con-
stants are used in description metadata. For example, the following code checks
a column type (12) against a module-level constant (VARCHAR):
4807-7 ch14.F 5/24/01 8:59 AM Page 240

241Chapter 14 ✦ Using Databases
>>> MyCursor.execute(“SELECT EMPLOYEE_NAME from EMPLOYEE whereFIRST_NAME=’Bob’”)>>> MyCursor.description[0](‘FIRST_NAME’, 12, None, None, 3, 0, 0)>>> MyCursor.description[0][1]==ODBC.Windows.VARCHAR1
Some column types, such as dates, demand a particular kind of data. A database
module should export functions to construct date, time, and timestamp values. For
example, the function Date(year,month,day) constructs a date value (suitable for
insertion into the database) corresponding to the given year, month, and day. The
module mxDateTime provides the preferred implementation of date and time objects.
Input and output sizesThe cursor attribute arraysize specifies how many rows, by default, to return in
each call to fetchmany. It defaults to 1, but you can increase it if desired. Manipulating
arraysize is more efficient than passing a size parameter to fetchmany:
>>> MyCursor.execute(“SELECT FIRST_NAME FROM EMPLOYEE”)>>> MyCursor.rowcount # total fetchable rows5>>> MyCursor.fetchmany() # default arraysize is 1[(‘Bob’,)]>>> MyCursor.arraysize=5 # get up to 5 rows at once>>> MyCursor.fetchmany() # (only 4 left, so I don’t get 5)[(‘Sarah’,), (‘Sandy’,), (‘Pat’,), (‘Larry’,)]
The cursor methods setinputsizes(size) and setoutputsize(size[,columnindex]) let you set an “expected size” for columns before executing a
SQL statement. These methods are optional, and exist to improve performance and
memory usage.
The size parameter for setinputsizes is a sequence. Each entry in size should
specify the maximum length for each parameter. If an entry in size is None, then no
block of memory will be set aside for the corresponding parameter value (this is
the default behavior).
The method setoutputsize sets a maximum buffer size for data read from large
columns (LONG or BLOB). If columnindex is not specified, the buffer size is set for
all large columns in the result sequence. For example, the following code limits the
data read from the long DESCRIPTION column to 50 characters:
>>> MyCursor.setoutputsizes(1,50)>>> MyCursor.execute(“select GAME_NAME, DESCRIPTION from GAME”)>>> MyCursor.fetchone()(‘005’, ‘ You play a spy who must take a briefcase and suc’)
4807-7 ch14.F 5/24/01 8:59 AM Page 241

242 Part II ✦ Files, Data Storage, and Operating System Services
Reusable SQL statementsBefore a SQL statement can be executed, it must be parsed. Vendors such as Oracle
cache recently parsed SQL commands so that the commands need not be re-parsed
if they are used again. Therefore, you should build re-usable SQL statements with
marked parameters, instead of hard-coded values. This way, the parameters can be
passed into the execute method. The following example re-uses the same SQL
statement to query a video game database twice:
>>> SQLQuery = “select GAME_NAME from GAME where GAME_ID = ?”>>> MyCursor.execute(SQLQuery,(60,)) # tuple provides ID of 60>>> MyCursor.fetchall()[(‘Air Combat 22’,)]>>> MyCursor.execute(SQLQuery,(200,)) # no need to re-parse SQL>>> MC.fetchall()[(‘Badlands’,)]
The syntax for parameter marking is described by the module variable paramstyle(see the next section, “Database library information”). The cursor method
executemany(command,parametersequence) runs the same SQL statement
command many times, once for each collection of parameters in parametersequence.
Database library informationThe module variable apilevel is a string describing the supported DB API level. It
should be either 1.0 or 2.0; if it is not available, assume the supported API level is 1.0.
The module variable threadsafety describes what level of concurrent access the
module supports:
0 Threads may not share the module
1 Threads may share the module
2 Threads may share connections
3 Threads may share cursors
The module variable paramstyle describes which style of parameter marking the
module expects to see in SQL statements. Following are the legal values of param-
style and an example of such a marked parameter:
qmark WHERE NAME=?
numeric WHERE NAME=.1
named WHERE NAME=.name
format WHERE NAME=%s
pyformat WHERE NAME=%(name)s
4807-7 ch14.F 5/24/01 8:59 AM Page 242

243Chapter 14 ✦ Using Databases
Error hierarchyDatabase warnings and errors are subclasses of the class StandardError from the
module exceptions. You can catch the Error class to do general error handling, or
catch more specific exceptions. Figure 14-1 shows the inheritance hierarchy of
database exceptions. See Table 14-3 for a description of each exception.
Figure 14-1: Database exception class hierarchy
Table 14-3Database Exceptions
Type Meaning
Warning Significant warnings, such as data-value truncation during insertion.
Error Base class for other errors. Not raised directly.
InterfaceError Raised when the database module encounters an internal error.An InterfaceError stems from the database module, not thedatabase itself.
DatabaseError Errors relating to the database itself. Mostly used as a base classfor other errors.
DataError Errors due to invalid data, such as an out-of-range numeric value.
Continued
Database Exceptions
exceptions.StandardError
Error Warning
DatabaseError
NotSupportedError
OperationalError
ProgrammingError
DataError
IntegrityError
InterfaceError
4807-7 ch14.F 5/24/01 8:59 AM Page 243

244 Part II ✦ Files, Data Storage, and Operating System Services
Table 14-3 (continued)
Type Meaning
OperationalError Operational errors, such as a failure to connect to the database.
IntegrityError Data integrity errors, such as a missing foreign key.
InternalError Internal database error, such as a cursor becoming disconnected.
ProgrammingError Invalid call to the database module; for example, trying to use acursor that has been closed, or calling fetch on a cursor beforeexecuting a command that returns data.
NotSupportedError Some portions of the DB API are optional. A module that doesnot implement optional methods may raise NotSupportedError ifyou attempt to call them.
SummaryPython’s standard libraries include powerful tools for handling dictionaries on disk.
Modules implementing the Python Database API permit easy access to relational
databases. In this chapter, you:
✦ Learned about Python’s flavors of dbm.
✦ Stored and retrieved dictionary data on disk.
✦ Looked up employees with a “sounds-like” query.
✦ Used table metadata to easily build new relational tables.
In the next chapter, you learn how to harness Python for networking.
✦ ✦ ✦
4807-7 ch14.F 5/24/01 8:59 AM Page 244

Networking andthe Internet
✦ ✦ ✦ ✦
Chapter 15Networking
Chapter 16Speaking InternetProtocols
Chapter 17Handling InternetData
Chapter 18Parsing XML andOther MarkupLanguages
✦ ✦ ✦ ✦
P A R T
IIIIII
4807-7 PO3.F 5/24/01 8:59 AM Page 245

4807-7 PO3.F 5/24/01 8:59 AM Page 246

Networking
The modules covered in this chapter teach you everything
you need to know to communicate between programs on
a network. The networking topics covered here don’t require
more than one computer, however; you can use networking
for interprocess communication on a single machine.
Networking BackgroundThis section provides a brief introduction to some of the
terms you’ll encounter in the rest of this chapter.
A socket is a network connection endpoint. When your Web
browser requests the main Web page of www.python.org, for
example, your Web browser creates a socket and instructs it
to connect to the Web server hosting the Python Web site,
where the Web server is also listening on a socket for incom-
ing requests. The two sides use the sockets to send messages
and other data back and forth.
When in use, each socket is bound to a particular IP address
and port. An IP address is a sequence of four numbers in the
range of 0 to 255 (for example, 173.15.20.201); port numbers
range from 0 to 65535. Port numbers less than 1024 are
reserved for well-known networking services (a Web server, for
example, uses port 80); the maximum reserved value is stored
in the socket module’s IPPORT_RESERVED variable. You can
use other port numbers for your own programs, although tech-
nically, ports 1024 to 5000 (socket.IPPORT_USERRESERVED)
are used for officially registered applications (although nobody
will yell at you for using them).
Not all IP addresses are visible to the rest of the world. Some,
in fact, are specifically reserved for addresses that are never
public (such as addresses of the form 192.168.y.z or 10.x.y.z).
The address 127.0.0.1 is the localhost address; it always refers
to the current computer. Programs can use this address to
connect to other programs running on the same machine.
1515C H A P T E R
✦ ✦ ✦ ✦
In This Chapter
Networkingbackground
Working withaddresses and hostnames
Communicating withlow-level sockets
Example: a multicastchat application
Using SocketServers
Processing Webbrowser requests
Handling multiplerequests withoutthreads
✦ ✦ ✦ ✦
4807-7 ch15.F 5/24/01 8:59 AM Page 247

248 Part III ✦ Networking and the Internet
Remembering more than a handful of IP addresses can be tedious, so you can also
pay a small fee and register a host name or domain name for a particular address
(not surprisingly, more people visit your Web site if they can point their Web
browser at www.threemeat.com instead of 208.114.27.12). Domain Name Servers(DNS) handle the task of mapping the names to the IP addresses. Every computer
can have a host name, even if it isn’t an officially registered one.
Exactly how messages are transmitted through a network is based on many factors,
one of which is the different protocols that are in use. Many protocols build upon
simpler, lower-level protocols to form a protocol stack. HTTP, for example, is the
protocol used to communicate between Web browsers and Web servers, and it is
built upon the TCP protocol, which is in turn built upon a protocol named IP.
When sending messages between two programs of your own, you usually choose
between the TCP and UDP protocols. TCP creates a persistent connection between
two endpoints, and the messages that you send are guaranteed to arrive at their
destination and to arrive in order. UDP is connectionless, a bit faster, but less reli-
able. Messages you send may or may not make it to the other end; and if they do
make it, they might arrive out of order. Occasionally, more than one copy of a
message makes it to the receiver, even if you sent it only once.
You can find volumes full of additional information on networking; this section
doesn’t even scratch the surface. It does, however, give you a head start on under-
standing the following sections.
Working with Addresses and Host NamesThe socket module provides several functions for working with host names and
addresses.
The socket module is a very close wrapper around the C socket library; and likethe C version, it supports all sorts of options. This chapter covers the mostcommon and useful features of sockets; consult the Winsock help file or theUNIX socket man pages for coverage of more arcane features. In many cases, thesocket module defines variables that map directly to the C equivalent (forexample, socket.IP_MAX_MEMBERSHIPS is equivalent to the C constant of thesame name).
gethostname() returns the host name for the computer on which the program is
running:
>>> import socket>>> socket.gethostname()‘endor’
Note
4807-7 ch15.F 5/24/01 8:59 AM Page 248

249Chapter 15 ✦ Networking
gethostbyname(name) tries to resolve the given host name to an IP address. First
a check is made to determine whether the current computer can do the translation.
If it doesn’t know, a request is sent to a remote DNS server (which in turn may ask
other DNS servers too). gethostbyname returns the name or raises an exception if
the lookup fails:
>>> socket.gethostbyname(‘endor’)‘10.0.0.6’>>> socket.gethostbyname(‘www.python.org’)‘132.151.1.90’
An extended form, gethostbyname_ex(name), returns a 3-tuple consisting of the
primary host name of the given address, a list of alternative host names for the
same IP address, and a list of other IP addresses for the same interface on that
same host (both lists may be empty):
>>> socket.gethostbyname(‘www.yahoo.com’)‘64.58.76.178’>>> socket.gethostbyname_ex(‘www.yahoo.com’)(‘www.yahoo.akadns.net’, [‘www.yahoo.com’], [‘64.58.76.178’, ‘64.58.76.176’, ‘216.32.74.52’,‘216.32.74.50’, ‘64.58.76.179’, ‘216.32.74.53’,‘64.58.76.177’, ‘216.32.74.51’, ‘216.32.74.55’])
The gethostbyaddr(address) function does the same thing, except that you
supply it an IP address string instead of a host name:
>>> socket.gethostbyaddr(‘132.151.1.90’)(‘parrot.python.org’, [‘www.python.org’], [‘132.151.1.90’])
getservbyname(service, protocol) takes a service name (such as ‘telnet’ or
‘ftp’) and a protocol (such as ‘tcp’ or ‘udp’) and returns the port number used by
that service:
>>> socket.getservbyname(‘http’,’tcp’)80>>> socket.getservbyname(‘telnet’,’tcp’)23>>> socket.getservbyname(‘doom’,’udp’)666 # id Software registered this for the game “Doom”
Often, non-Python programs store and use IP addresses in their 32-bit packed form.
The inet_aton(ip_addr) and inet_ntoa(packed) functions convert back and
forth between this form and an IP address string:
>>> socket.inet_aton(‘177.20.1.201’)‘\261\024\001\311’ # A 4-byte string>>> socket.inet_ntoa(‘\x7F\x00\x00\x01’)‘127.0.0.1’
4807-7 ch15.F 5/24/01 8:59 AM Page 249

250 Part III ✦ Networking and the Internet
socket also defines a few variables representing some reserved IP addresses.
INADDR_ANY and INADDR_BROADCAST are reserved IP addresses referring to any IP
address and the broadcast address, respectively; and INADDR_LOOPBACK refers to
the loopback device, always at address 127.0.0.1. These variables are in the
numeric 32-bit form.
The getfqdn([name]) function returns the fully qualified domain name for the given
hostname (if omitted, it returns the fully qualified domain name of the local host):
>>> socket.getfqdn(‘’)‘dialup84.lasal.net’
getfqdn was new in Python 2.0.
Communicating with Low-Level SocketsAlthough Python provides some wrappers that make using sockets easier (you’ll
see them later in this chapter), you can always work with sockets directly too.
Creating and destroying socketsThe socket(family, type[, proto]) function in the socket module creates a
new socket object. The family is usually AF_INET, although others such as AF_IPXare sometimes available, depending on the platform. The type is most often
SOCK_STREAM (for connection-oriented, reliable TCP connections) or SOCK_DGRAM(for connectionless UDP messages):
>>> from socket import *>>> s = socket(AF_INET,SOCK_STREAM)
The combination of family and type usually implies a protocol, but you can specify
it using the optional third parameter to socket using values such as IPPROTO_TCPor IPPROTO_RAW. Instead of using the IPPROTO_ variables, you can use the
getprotobyname(proto) function:
>>> getprotobyname(‘tcp’)6>>> IPPROTO_TCP6
fromfd(fd, family, type[, proto]) is a rarely used function for creating a
socket object from an open file descriptor (returned from a file’s fileno()method). The descriptor should be connected to a real socket, and not to a file. The
fileno() method of a socket object returns the file descriptor (an integer) for this
socket. See the section “Handling Multiple Requests Without Threads” later in this
chapter for an idea of where this might be useful.
NewFeature
4807-7 ch15.F 5/24/01 8:59 AM Page 250

251Chapter 15 ✦ Networking
When you are finished with a socket object, you call the close() method, after
which no further operation on the object will succeed (sockets are automatically
closed when they are garbage collected, but it’s a good idea to explicitly close them
when possible, both to free up resources sooner and to make your program
clearer). Alternatively, you can use the shutdown(how) method to close one or
both halves of a connection. Passing a value of 0 prevents the socket from receiving
any more data, 1 prevents any additional sends, and 2 prevents additional transmis-
sion in either direction.
Connecting socketsWhen two sockets connect (via TCP, for example), one side listens for and accepts
an incoming connection, and the other side initiates that connection. The listening
side creates a socket, calls bind(address) to bind it to a particular address and
port, calls listen(backlog) to listen for incoming connections, and finally calls
accept() to accept the new, incoming connection:
>>> s = socket(AF_INET,SOCK_STREAM)>>> s.bind((‘127.0.0.1’,44444))>>> s.listen(1)>>> q,v = s.accept() # Returns socket q and address v
Note that the preceding code will block or appear to hang until a connection is pre-
sent to be accepted. No problem; just initiate a connection from another Python
interpreter. The connecting side creates a socket and calls connect(address):
>>> s = socket(AF_INET,SOCK_STREAM)>>> s.connect((‘127.0.0.1’,44444))
At this point, the first side of the connection uses socket q to communicate with the
second side, using socket s. To verify that they are connected, enter the following
line on the first, or server, side:
>>> q.send(‘Hello from Python!’)18 @code:# Number of bytes sent
On the other side, enter the following:
>>> s.recv(1024) # Receive up to 1024 bytes‘Hello from Python!’
The addresses you pass to bind and connect are 2-tuples of (ipAddress,port) for
AF_INET sockets. Instead of connect, you can also call the connect_ex(address)method. If the underlying call to the C connect returns an error, connect_ex will
also return an error (or 0 for success), instead of raising an exception.
4807-7 ch15.F 5/24/01 8:59 AM Page 251

252 Part III ✦ Networking and the Internet
When you call listen, you pass in a number specifying the maximum number of
incoming connections that will be placed in a wait queue. If more connections
arrive when the queue is full, the remote side is informed that the connection was
refused. The SOMAXCONN variable in the socket module indicates the maximum size
the wait queue can be.
The accept() method returns an address of the same form used by bind and
connect, indicating the address of the remote socket. The following uses the
v variable from the preceding example:
>>> v(‘127.0.0.1’, 1039)
UDP sockets are not connection-oriented, but you can still call connect to
associate a socket with a given destination address and port (see the next section
for details).
Sending and receiving datasend(string[, flags]) sends the given string of bytes to the remote socket.
sendto(string[, flags], address) sends the given string to a particular
address. Generally, the send method is used with connection-oriented sockets, and
sendto is used with non-connection–oriented sockets, but if you call connect on a
UDP socket to associate it with a particular destination, you can then call sendinstead of sendto.
Both send and sendto return the number of bytes that were actually sent. When
sending large amounts of data quickly, you may want to ensure that the entire
message was sent, using a function like the following:
def safeSend(sock,msg):sent = 0while msg:
i = sock.send(msg)if i == -1: # Error
return -1sent += imsg = msg[i:]time.sleep(25) # Wait a little while the queue empties
return sent
This keeps resending part of the message as needed until the entire message has
been sent.
An even better solution to this problem is to avoid sending data until you know atleast some if it can be written. See “Handling Multiple Requests Without Threads”later in this chapter for details.
Tip
4807-7 ch15.F 5/24/01 8:59 AM Page 252

253Chapter 15 ✦ Networking
The recv(bufsize[,flags]) method receives an incoming message. If a lot of data
is waiting, it returns only the first bufsize bytes that are waiting. recvfrom(bufsize[,flags]) does the same thing, except that with AF_INET sockets the
return value is (data, (ipAddress,port)) so that you can see from where the
message originated (this is useful for connectionless sockets).
The send, sendto, recv, and recvfrom methods all take an optional flagsparameter that defaults to 0. You can use a bitwise-OR on any of the socket.MSG_*variables to create a value for flags. The values available vary by platform, but
some of the most common are listed in Table 15-1.
Table 15-1Flag Values for send and recv
Flag Description
MSG_OOB Process out-of-band data.
MSG_DONTROUTE Don’t use routing tables; send directly to the interface.
MSG_PEEK Return the waiting data without removing it from the queue.
For example, if you have an open socket that has a message waiting to be received,
you can take a peek at the message without actually removing it from the queue of
incoming data:
>>> q.recv(1024,MSG_PEEK)‘Hello!’>>> q.recv(1024,MSG_PEEK) # You could call this over and over.‘Hello!’
The makefile([mode[, bufsize]]) method returns a file-like object wrapping
this socket, so that you can then pass it to code that expects a file argument (or
maybe you prefer to use file methods instead of send and recv). The optional
mode and bufsize parameters take the same values as the built-in open function.
Chapter 8 explains the use of files and filelike objects.
Using socket optionsA socket object’s getpeername() and getsockname() methods both return a 2-
tuple containing an IP address and a port (just as you’d pass to connect or bind).
getpeername returns the address and port of the remote socket to which it is con-
nected, and getsockname returns the same information for the local socket.
By default, sockets are blocking, which means that socket method calls don’t return
until the action completes. For example, if the outgoing buffer is full and you try to
Cross-Reference
4807-7 ch15.F 5/24/01 8:59 AM Page 253

254 Part III ✦ Networking and the Internet
send more data, the call to send will try to block until it can put more data into the
buffer. You can change this behavior by calling the setblocking(flag) method
with a value of 0. When a socket is nonblocking, it will raise the error exception if
the requested action would cause it to block One useful application of this behavior
is that you can create servers that shut down gracefully:
s = socket(AF_INET,SOCK_STREAM)s.bind((‘10.0.0.6’,55555))s.listen(5)s.setblocking(0)while bKeepGoing:
try:q,v = s.accept()
except error:q = None
if q:processRequest(q,v)
else:time.sleep(0.25)
This server continuously tries to accept a new connection and send it off to the fic-
tional processRequest function. If a new connection isn’t available, it sleeps for a
quarter of a second and tries again. This means that some other part of your pro-
gram can set the bKeepGoing variable to 0, and the preceding loop will exit.
Another approach is to call select or poll on your listen socket to detect whena new connection has arrived. See “Handling Multiple Requests Without Threads”later in this chapter for more information.
Other socket options can be set and retrieved with the setsockopt(level, name,value) and getsockopt(level, name[, buflen]) methods. Sockets represent
several layers of a protocol stack, and the level parameter specifies at what level
the option should be applied. (For example, the option may pertain to the socket
itself, an intermediate protocol such as TCP, or a lower protocol such as IP.) The
values for level start with SOL_ (SOL_SOCKET, SOL_TCP, and so on). The name of
the option identifies exactly which option you’re talking about, and the socketmodule defines whatever option names are available on your platform.
The C version of setsockopt requires that you pass in a buffer for the valueparameter, but in Python you can just pass in a number if that particular option
expects a numeric value. You can also pass in a buffer (a string), but it’s up to you
to make sure you use the proper format. With getsockopt, not specifying the
buflen parameter means you’re expecting a numeric value, and that’s what it
returns. If you do supply buflen, getsockopt returns a string representing a
buffer, and its maximum length will be buflen bytes.
Although there’s a ton of options in existence, Table 15-2 lists some of the more
common ones you’ll need, along with what type of data the value parameter is sup-
posed to be. For example, use the following to set the send buffer size of a socket to
about 64 KB:
Tip
4807-7 ch15.F 5/24/01 8:59 AM Page 254

255Chapter 15 ✦ Networking
>>> s = socket(AF_INET,SOCK_STREAM)>>> s.setsockopt(SOL_SOCKET, SO_SNDBUF, 65535)
To get the time-to-live (TTL) value or number of hops a packet can make before
being discarded by a router, use this:
>>> s.getsockopt(SOL_IP, IP_TTL)32
See the sample chat application in the next section for more examples of using
setsockopt.
Table 15-2Common setsockopt and getsockopt Options
Option Name Value Description
Options for SOL_SOCKET
SO_TYPE (Get only) Socket type (for example, SOCK_STREAM)
SO_ERROR (Get only) Socket’s last error
SO_LINGER Boolean Linger on close if data present
SO_RCVBUF Number Input (receive) buffer size
SO_SNDBUF Number Output (send) buffer size
SO_RCVTIMEO Time struct1 Input (receive) timeout delay
SO_SNDTIMEO Time struct1 Output (send) timeout delay
SO_REUSEADDR Boolean Enable multiple users of a local address/port
Options for SOL_TCP
TCP_NODELAY Boolean Send data immediately instead of waiting forminimum send amount
Options for SOL_IP
IP_TTL 0–255 Maximum number of hops a packet can travel
IP_MULTICAST_TTL 0–255 Maximum number of hops a packet can travel
IP_MULTICAST_IF inet_aton(ip) Select interface over which to transmit
IP_MULTICAST_LOOP Boolean Enable sender to receive a copy of multicastpackets it sends out
IP_ADD_MEMBERSHIP ip_mreq2 Join a multicast group
IP_DROP_MEMBERSHIP ip_mreq2 Leave a multicast group
1 The struct is two C long variables to hold seconds and microseconds.
2 The struct is the concatenation of two calls to inet_aton—one for multicast address and one for local address.
4807-7 ch15.F 5/24/01 8:59 AM Page 255

256 Part III ✦ Networking and the Internet
Converting numbersBecause the byte ordering can vary by platform, a network order specifies a stan-
dard ordering to use when transferring numbers across a network. The nthol(x)and ntohs(x) functions take a network number and convert it to the same number
using the current host’s byte ordering, and the htonl(x) and htons(x) functions
convert in the other direction (if the current host has the same byte ordering as
network order, the functions do nothing):
>>> import socket>>> socket.htons(20000) # Convert a 16-bit value8270>>> socket.htonl(20000) # Convert a 32-bit value541982720>>> socket.ntohl(541982720)20000
Example: A Multicast Chat ApplicationThe example in this section combines material from several chapters to create a
chat application that also enables you to draw on a shared whiteboard, as shown in
Figure 15-1.
Figure 15-1: The chat/whiteboard application in action
Instead of using a client/server model, the program uses multicast sockets for its
communication. When you send a message to a multicast address (those addresses
in the range from 224.0.0.1 to 239.255.255.255, inclusive), the message is sent to all
computers that have joined that particular multicast group. This provides a simple
way to send messages to any number of other computers, without having to keep
4807-7 ch15.F 5/24/01 8:59 AM Page 256
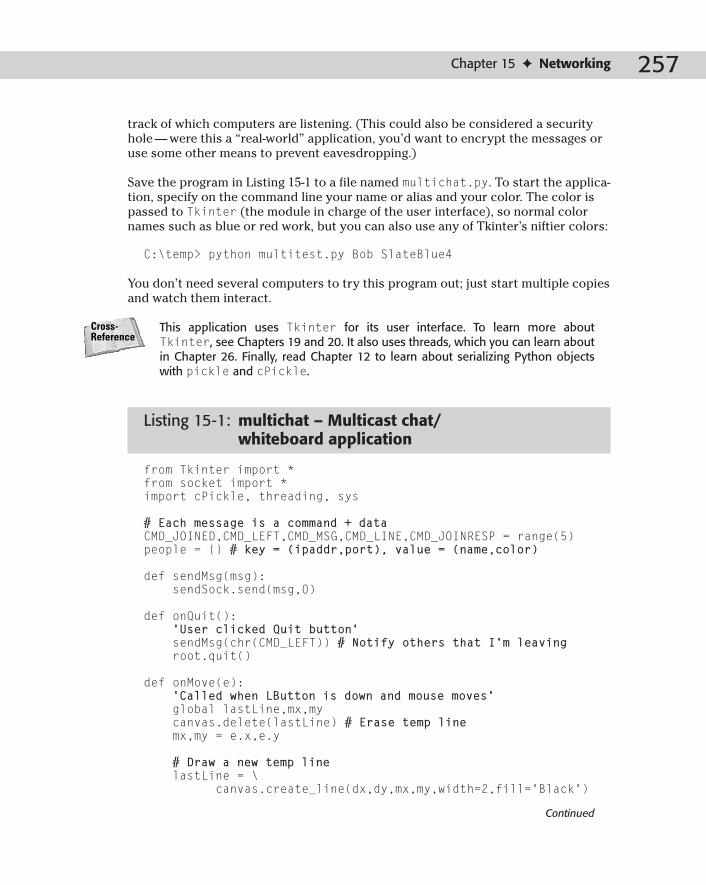
257Chapter 15 ✦ Networking
track of which computers are listening. (This could also be considered a security
hole — were this a “real-world” application, you’d want to encrypt the messages or
use some other means to prevent eavesdropping.)
Save the program in Listing 15-1 to a file named multichat.py. To start the applica-
tion, specify on the command line your name or alias and your color. The color is
passed to Tkinter (the module in charge of the user interface), so normal color
names such as blue or red work, but you can also use any of Tkinter’s niftier colors:
C:\temp> python multitest.py Bob SlateBlue4
You don’t need several computers to try this program out; just start multiple copies
and watch them interact.
This application uses Tkinter for its user interface. To learn more aboutTkinter, see Chapters 19 and 20. It also uses threads, which you can learn aboutin Chapter 26. Finally, read Chapter 12 to learn about serializing Python objectswith pickle and cPickle.
Listing 15-1: multichat – Multicast chat/whiteboard application
from Tkinter import *from socket import *import cPickle, threading, sys
# Each message is a command + dataCMD_JOINED,CMD_LEFT,CMD_MSG,CMD_LINE,CMD_JOINRESP = range(5)people = {} # key = (ipaddr,port), value = (name,color)
def sendMsg(msg):sendSock.send(msg,0)
def onQuit():‘User clicked Quit button’sendMsg(chr(CMD_LEFT)) # Notify others that I’m leavingroot.quit()
def onMove(e):‘Called when LButton is down and mouse moves’global lastLine,mx,mycanvas.delete(lastLine) # Erase temp linemx,my = e.x,e.y
# Draw a new temp line lastLine = \
canvas.create_line(dx,dy,mx,my,width=2,fill=’Black’)
Continued
Cross-Reference
4807-7 ch15.F 5/24/01 8:59 AM Page 257

258 Part III ✦ Networking and the Internet
Listing 15-1 (continued)
def onBDown(e):‘User pressed left mouse button’global lastLine,dx,dy,mx,mycanvas.bind(‘<Motion>’,onMove) # Start receiving move msgsdx,dy = e.x,e.ymx,my = e.x,e.y
# Draw a temporary line lastLine = \
canvas.create_line(dx,dy,mx,my,width=2,fill=’Black’)
def onBUp(e):‘User released left mouse button’canvas.delete(lastLine) # Erase the temporary linecanvas.unbind(‘<Motion>’) # No more move msgs, please!
# Send out the draw-a-line command sendMsg(chr(CMD_LINE)+cPickle.dumps((dx,dy,e.x,e.y),1))
def onEnter(foo):‘User hit the [Enter] key’sendMsg(chr(CMD_MSG)+entry.get())entry.delete(0,END) # Clear the entry widget
def setup(root):‘Creates the user interface’global msgs,entry,canvas
# The big window holding everybody’s messages msgs = Text(root,width=60,height=20)msgs.grid(row=0,col=0,columnspan=3)
# Hook up a scrollbar to see old messagess = Scrollbar(root,orient=VERTICAL)s.config(command=msgs.yview)msgs.config(yscrollcommand=s.set)s.grid(row=0,col=3,sticky=N+S)
# Where you type your message entry = Entry(root)entry.grid(row=1,col=0,columnspan=2,sticky=W+E)entry.bind(‘<Return>’,onEnter)entry.focus_set()
b = Button(root,text=’Quit’,command=onQuit)b.grid(row=1,col=2)
# A place to drawcanvas = Canvas(root,bg=’White’)canvas.grid(row=0,col=5)# Notify me of button press and release messages
4807-7 ch15.F 5/24/01 8:59 AM Page 258

259Chapter 15 ✦ Networking
canvas.bind(‘<ButtonPress-1>’,onBDown) canvas.bind(‘<ButtonRelease-1>’,onBUp)
def msgThread(addr,port,name):‘Listens for and processes messages’
# Create a listen socket s = socket(AF_INET, SOCK_DGRAM)s.setsockopt(SOL_SOCKET,SO_REUSEADDR,1)s.bind((‘’,port))
# Join the multicast group s.setsockopt(SOL_IP,IP_ADD_MEMBERSHIP,\
inet_aton(addr)+inet_aton(‘’))
while 1:# Get a msg and strip off the command bytemsg,msgFrom = s.recvfrom(2048)cmd,msg = ord(msg[0]),msg[1:]
if cmd == CMD_JOINED: # New joinmsgs.insert(END,’(%s joined the chat)\n’ % msg)
# Introduce myself sendMsg(chr(CMD_JOINRESP)+ \
cPickle.dumps((name,myColor),1))
elif cmd == CMD_LEFT: # Somebody leftwho = people[msgFrom][0]if who == name: # Hey, _I_ left, better quit
breakmsgs.insert(END,’(%s left the chat)\n’ % \
who,’color_’+who)
elif cmd == CMD_MSG: # New message to displaywho = people[msgFrom][0]msgs.insert(END,who,’color_%s’ % who)msgs.insert(END,’: %s\n’ % msg)
elif cmd == CMD_LINE: # Draw a linedx,dy,ex,ey = cPickle.loads(msg)canvas.create_line(dx,dy,ex,ey,width=2,\
fill=people[msgFrom][1])
elif cmd == CMD_JOINRESP: # Introducing themselvespeople[msgFrom] = cPickle.loads(msg)who,color = people[msgFrom]
# Create a tag to draw text in their color msgs.tag_configure(‘color_’ + who,foreground=color)
Continued
4807-7 ch15.F 5/24/01 8:59 AM Page 259

260 Part III ✦ Networking and the Internet
Listing 15-1 (continued)
# Leave the multicast group s.setsockopt(SOL_IP,IP_DROP_MEMBERSHIP,\
inet_aton(addr)+inet_aton(‘’))
if __name__ == ‘__main__’:argv = sys.argvif len(argv) < 3:
print ‘Usage:’,argv[0],’<name> <color> ‘\‘[addr=<multicast address>] [port=<port>]’
sys.exit(1)
global name, addr, port, myColoraddr = ‘235.0.50.5’ # Default IP addressport = 54321 # Default portname,myColor = argv[1:3]for arg in argv[3:]:
if arg.startswith(‘addr=’):addr = arg[len(‘addr=’):]
elif arg.startswith(‘port=’):port = int(arg[len(‘port=’):])
# Start up a thread to process messages threading.Thread(target=msgThread,\
args=(addr,port,name)).start()
# This is the socket over which we send out messages global sendSocksendSock = socket(AF_INET,SOCK_DGRAM)sendSock.setsockopt(SOL_SOCKET,SO_REUSEADDR,1)sendSock.connect((addr,port))
# Don’t let the packets die too soon sendSock.setsockopt(SOL_IP,IP_MULTICAST_TTL,2)
# Create a Tk window and create the GUIroot = Tk()root.title(‘%s chatting on channel %s:%d’ % \
(name,addr,port))setup(root)
# Join the chat!sendMsg(chr(CMD_JOINED)+name)root.mainloop()
Although this application will work on a local network, it may have trouble work-ing between computers on the Internet. Some routers are configured to ignoremulticast data packets, and the time-to-live (TTL) setting for the packets must behigh enough to make the necessary number of hops between each computer.
Note
4807-7 ch15.F 5/24/01 8:59 AM Page 260

261Chapter 15 ✦ Networking
As with most Python programs, this one packs a lot of punch in very few lines of
code (it weighs in at about 120 lines, ignoring comments). The first thing to note is
the msgThread function, which creates a socket to listen for incoming multicast
messages. It uses the SO_REUSEADDR socket option to enable you to run multiple
copies on one computer (otherwise, bind would complain that someone else was
already bound to that address and port). It also uses IP_ADD_MEMBERSHIP to join a
multicast group, and IP_DROP_MEMBERSHIP to leave it. The first byte of each mes-
sage is a predefined command character, which msgThread uses to determine what
to do with the message.
When you type a message into the text entry box at the bottom of the dialog box,
onEnter sends the text from the entry box to the multicast channel. Likewise,
pressing the left mouse button, dragging a line, and releasing it causes onBUp to
send the message to draw a new line. Note that neither of these actually displays a
message or draws a line — they just send a message to the multicast group, and all
running copies, including the one that originated the message, receive the message
and process it. The socket that sends these messages doesn’t need to join the mul-
ticast group; anyone can send to a group, but only members can receive messages.
When msgThread calls recvFrom to get a new message, it also gets the IP address
and port of the sender. The program uses this tuple as a dictionary key to map to
the name and color of the sender (each line is drawn in the sender’s color, as is that
user’s name when they send a text message).
One final thing to note is how the listening thread decides when to shut down.
When you click the Quit button, the application notifies everyone that you are
leaving the chat group. Your listener also hears this message, and recognizing that
the sender is itself, it stops waiting for more messages.
Using SocketServersThe SocketServer module defines a base class for a group of socket server
classes — classes that wrap up and hide the details of listening for, accepting, and
handling incoming socket connections.
The SocketServer familyTCPServer and UDPServer are SocketServer subclasses that handle TCP and UDP
messages, respectively.
SocketServer also provides UnixStreamServer (a child class of TCPServer)and UnixDatagramServer (a child of UDPServer), which are the same as theirparent classes except that the listening socket is created with a family of AF_UNIXinstead of AF_INET.
Note
4807-7 ch15.F 5/24/01 8:59 AM Page 261

262 Part III ✦ Networking and the Internet
By default, the socket servers handle connections one at a time, but you can use the
ThreadingMixIn and ForkingMixIn classes to create threading or forking versions
of any SocketServer. In fact, the SocketServer module helpfully provides the fol-
lowing classes to save you the trouble: ForkingUDPServer, ForkingTCPServer,
ThreadingUDPServer, ThreadingTCPServer, ThreadingUnixStreamServer, and
ThreadingUnixDatagramServer. Obviously, the threading versions work only on
platforms that support threads, and the forking versions work on platforms that
support os.fork.
See Chapter 7 for an overview of mix-in classes, Chapter 11 for forking, andChapter 26 for threads.
SocketServers handle incoming connections in a generic way; to make them useful,
you provide your own request handler class to which it passes a socket to handle. The
BaseRequestHandler class in the SocketServer module is the parent class of all
request handlers. Suppose, for example, that you need to write a multithreaded e-mail
server. First you create MailRequestHandler, a subclass of BaseRequestHandler,
and then you pass it to a newly created SocketServer:
import SocketServer
... # Create your MailRequestHandler class here
addr = (‘175.15.30.2’, 25) # Listen address and portserver = SocketServer.ThreadingTCPServer(addr,
MailRequestHandler)server.serve_forever()
Each time a new connection comes in, the server creates a new MailRequestHandlerinstance object and calls its handle() method so it can process the new request.
Because the server is derived from ThreadingTCPServer, with each new request it
starts a separate thread to handle the request, so that multiple requests will be
processed simultaneously. Instead of calling server_forever, you can also call
handle_request(), which waits for, accepts, and processes a single connection.
server_forever merely calls handle_request in an infinite loop.
Don’t worry too much about the details of the request handler just yet; the next
section covers everything you need to know.
Normally, you can use one of the socket servers as is, but if you need to create your
own subclass, you can override any of the following methods to customize it.
When the server is first created, the __init__ function calls the server_bind()method to bind the listen socket (self.socket) to the correct address
(self.server_address). It then calls server_activate() to activate the server
(by default, this calls the listen method of the socket).
The socket server doesn’t do anything until the user calls either of the
handle_request or serve_forever methods. handle_request calls
get_request() to wait for and accept a new socket connection, and then calls
Cross-Reference
4807-7 ch15.F 5/24/01 8:59 AM Page 262

263Chapter 15 ✦ Networking
verify_request(request, client_address) to see if the server should
process the connection (you can use this for access control — by default,
verify_request always returns true). If it’s okay to process the request,
handle_request then calls process_request(request, client_address), and
then handle_error(request, client_address) if process_request raised an
exception. By default, process_request simply calls finish_request(request,client_address); the forking and threading mix-in classes override this behavior
to start a new process or thread, and then call finish_request. finish_requestinstantiates a new request handler, which in turn calls its handle() method. If you
want to subclass a SocketServer, trace through this sequence of calls once or
twice to make sure it makes sense to you, and review the source code of
SocketServer for help.
When a SocketServer creates a new request handler, it passes to the handler’s
__init__ function the self variable, so that the handler can access information
about the server.
The SocketServer’s fileno() method returns the file descriptor of the listen
socket. The address_family member variable specifies the socket family of the
listen socket (for example, AF_INET), and server_address holds the address to
which the listen socket is bound. The socket variable holds the listen socket itself.
Request handlersRequest handlers have setup(), handle(), and finish() methods (none of which
do anything by default) that you can override to add your custom behavior. Normally,
you need to override only the handle method. The BaseRequestHandler’s
__init__ function calls setup() for initialization work, handle() to service the
request, and finish() to perform any cleanup, although finish isn’t called if
handle or setup raise an exception. Keep in mind that a new instance of your
request handler is created for each request.
The request member variable has the newly accepted socket for stream (TCP)
servers; for datagram (UDP) servers, it is a tuple containing the incoming message
and the listen socket. client_address holds the address of the sender, and
server has a reference to the SocketServer (through which you can access its
members, such as server_address).
The following example implements EchoRequestHandler, a handler that repeats
back to the remote side any data it sends:
>>> import SocketServer>>> class EchoRequestHandler(SocketServer.BaseRequestHandler):... def handle(self):... print ‘Got new connection!’... while 1:... msg = self.request.recv(1024)... if not msg:... break
4807-7 ch15.F 5/24/01 8:59 AM Page 263

264 Part III ✦ Networking and the Internet
... print ‘ Received :’,msg
... self.request.send(msg)
... print ‘Done with connection’>>> server = SocketServer.ThreadingTCPServer(\... (‘127.0.0.1’,12321),EchoRequestHandler)>>> server.handle_request() # It’ll wait here for a connectionGot new connection!Received : Hello!Received : I like Tuesdays!
Done with connection
In another Python interpreter, you can connect to the server and try it out:
>>> from socket import *>>> s = socket(AF_INET,SOCK_STREAM)>>> s.connect((‘127.0.0.1’,12321))>>> s.send(‘Hello!’)6>>> print s.recv(1024)Hello!>>> s.send(‘I like Tuesdays!’)16>>> print s.recv(1024)I like Tuesdays!>>> s.close()
The SocketServer module also defines two subclasses of BaseRequestHandler:
StreamRequestHandler and DatagramRequestHandler. These override the setupand finish methods and create two file objects, rfile and wfile, that you can use
for reading and writing data to the client, instead of using the usual socket methods.
Processing Web Browser RequestsNow that you have a SocketServer, what do you do with it? Why, extend it, of
course! The standard Python library comes with BaseHTTPServer,
SimpleHTTPServer, and CGIHTTPServer modules that implement increasingly
complex Web server request handlers.
Most likely, you would use them as starting points on which to build, but to some
extent they do work on their own as well. For example, how many lines does it take
to implement a multithreaded Web server that supports running CGI scripts? Well,
at a bare minimum, it takes the following:
import SocketServer,CGIHTTPServerSocketServer.ThreadingTCPServer((‘127.0.0.1’,80),\
CGIHTTPServer.CGIHTTPRequestHandler).serve_forever()
Point your Web browser to http://127.0.0.1/file (where file is the name of
some text file in your current directory) and verify that it really does work.
4807-7 ch15.F 5/24/01 8:59 AM Page 264

265Chapter 15 ✦ Networking
BaseHTTPRequestHandlerThe starting class for a Web server request handler is BaseHTTPRequestHandler(in the BaseHTTPServer module), a child of StreamRequestHandler. This class
accepts an HTTP connection (usually from a Web browser), reads and extracts the
headers, and calls the appropriate method to handle the request.
Subclasses of BaseHTTPRequestHandler should not override the __init__ or
handle methods, but should instead implement a method for each HTTP command
they need to handle. For each HTTP command (GET, POST, and so on),
BaseHTTPRequestHandler calls its do_<command> method, if present. For
example, if your subclass needs to support the HTTP PUT command, just add a
do_PUT() method to your subclass and it will automatically be called for any
HTTP PUT requests.
The request handler stores the original request line in its raw_request instance
variable, and its parts in command (GET, POST, and so on), path (for example, /
index.html), and request_version (for example, HTTP/1.0). headers is an instance
of mimetools.Message, and contains the parsed version of the request headers.
See Chapter 17 for more information about the mimetools.Message class.Alternatively, you can specify a different class to use for reading and parsing theheaders by changing the value of the BaseHTTPRequestHandler.MessageClass class variable.
Use the rfile and wfile objects to read and write data. If the request has addi-
tional data beyond the request headers, rfile will be positioned at the beginning
of that data by the time the handler calls the appropriate do_<command> method.
BaseHTTPRequestHandler uses the value in server_version when writing out a
Server response header; you can customize this from its default of BaseHTTP/0.x.
Additionally, the protocol_version variable defaults to HTTP/1.0, but you can set
it to a different version if needed.
In your do_<command> method, the first output you send should be via the
send_response(code[, message]) method, where code is an HTTP code (such as
200) and message is an optional text message explaining the code. (If the request is
invalid, you can instead call send_error(code[, message]), and then return from
the command method.) When you call send_response, BaseHTTPRequestHandleradds in Date and Server headers.
After a call to send_response, you can call send_header(key, value) as needed
to write out MIME headers; call end_headers() when you’re done:
def do_GET(self):self.send_response(200)self.send_header(‘Content-type’,’text/html’)self.send_header(‘Content-length’,`len(data)`)self.end_headers()# send the rest of the data
Cross-Reference
4807-7 ch15.F 5/24/01 8:59 AM Page 265

266 Part III ✦ Networking and the Internet
Most Web servers generate logs for later analysis. Call the log_request([code[,size]]) method to log a successful request (including the size, if known, makes
the logs more useful). log_message(format, arg0, arg1, ...) is a general-pur-
pose logging method; the format and arguments are similar to normal Python string
formatting:
self.log_message(‘%s : %d’, ‘Time taken’,425)
Each request is automatically logged to stdout using the NCSA httpd logging
format.
SimpleHTTPRequestHandlerWhereas the BaseHTTPRequestHandler doesn’t actually handle any HTTP com-
mands, SimpleHTTPRequestHandler (in the SimpleHTTPServer module) adds
support for both HEAD and GET commands by sending back to the client requested
files that reside in the current working directory or any of its subdirectories. If the
requested file is actually a directory, SimpleHTTPRequestHandler generates, on
the fly, a Web page containing a directory listing; and sends it back to the client.
Try the following example to see this in action. This code starts a Web server on
port 8000, and then opens a Web browser and begins browsing in the current
working directory. Because the server continuously loops to serve requests, the
example starts the server on a separate thread so you can still launch a Web
browser:
>>> import Webbrowser,threading,SimpleHTTPServer>>> def go():... t = SimpleHTTPServer.test... threading.Thread(target=t).start()... Webbrowser.open(‘http://127.0.0.1:8000’)>>> go() # Below is the output after browsing around a littleServing HTTP on port 8000 ...endor - - [28/Dec/2000 18:00:48] “GET /3dsmax3/ HTTP/1.1” 200 -endor - - [28/Dec/2000 18:00:50] “GET /3dsmax3/Maxsdk/HTTP/1.1” 200 -endor - - [28/Dec/2000 18:00:53] “GET /3dsmax3/Maxsdk/Include/HTTP/1.1” 200 -
The test() function in the SimpleHTTPServer module simply starts a new server
on port 8000.
In addition to the variables inherited from BaseHTTPRequestHandler, this class
has an extensions_map dictionary that maps file extensions to MIME data types,
so that the user’s Web browser will correctly handle the file it receives. You can
expand this list to add new types you want to support.
4807-7 ch15.F 5/24/01 8:59 AM Page 266

267Chapter 15 ✦ Networking
CGIHTTPRequestHandlerThe CGIHTTPRequestHandler (in the CGIHTTPServer module) takes
SimpleHTTPRequestHandler one step further and adds support for executing
CGI scripts. The CGI (Common Gateway Interface) is a standard for executing
server-side programs that can process input from the user’s browser (saving data
they entered in an HTML form, for example).
Before you ever make a Web server open to public use, take the time to learnabout what security risks are involved. This warning is doubly strong for modulessuch as CGIHTTPRequestHandler that can execute arbitrary Python code; eventhe smallest security hole is an invitation for intruders.
For each GET or POST command that comes in, CGIHTTPRequestHandler checks
whether the specified file is actually a CGI program and, if so, launches it as an exter-
nal program. If it is not, the file contents are sent back to the browser normally. Note
that the POST method is supported for CGI programs only.
To decide if a file is a valid CGI program, CGIHTTPRequestHandler checks the file’s
path against the cgi_directories member list, which, by default, contains the
directories /cgi-bin and htbin (you can add other directories if you want). If the file is
in one of those directories or any of their subdirectories and is either a Python mod-
ule or an executable file, the file is executed and its output returned to the client.
Example: form handler CGI scriptThe example in this section shows CGIHTTPRequestHandler at work. Follow these
steps to try it out:
1. Listing 15-2 is a tiny HTML form that asks you to enter your name. Save the file
to disk (anywhere you want) as form.html. I saved it to c:\temp, so in the
following steps, replace c:\temp with the directory you chose.
2. In the same directory, create a subdirectory called cgi-bin:
md c:\temp\cgi-bin (from an MS-DOS prompt)
3. Listing 15-3 is a small CGI script; save it to your new cgi-bin directory as
handleForm.py.
4. Switch to your original directory (c:\temp), start up a Python interpreter, and
enter the following lines to start a Web server:
>>> import CGIHTTPServer>>> CGIHTTPServer.test()
5. Open a Web browser and point it to http://127.0.0.1:8000/form.html to
display the simple Web page shown in Figure 15-2.
Caution
4807-7 ch15.F 5/24/01 8:59 AM Page 267

268 Part III ✦ Networking and the Internet
Figure 15-2: The Python Web server returned this page; clicking Go executes the CGI script.
6. Enter your name in the text box and click Go. The Web server executes the
Python CGI script and displays the results shown in Figure 15-3.
Figure 15-3: The Python Web server ran the CGI script and returned the results.
4807-7 ch15.F 5/24/01 8:59 AM Page 268

269Chapter 15 ✦ Networking
Listing 15-2: form.html – A simple HTML form
<html><body><form method=GET action=”http://127.0.0.1:8000/cgi-bin/handleForm.py”>Your name:<input name=”User”><input type=”Submit” value=”Go!”></form>
</body></html>
Listing 15-3: handleForm.py – A Python CGI script
import osprint “Content-type: text/html\r\n<html><body>”name = os.environ.get(‘QUERY_STRING’,’’)print ‘Hello, %s!<p>’ % name[len(‘User=’):]print ‘</body></html>’
To make use of this functionality, you should read up on CGI (which is certainly not
specific to Python). Although a complete discussion is outside the scope of this
chapter, the following few hints will help get you started:
✦ CGIHTTPRequestHandler stores the user information (including form values)
in environment variables. (Write a simple CGI script to print out all variables
and their values to test this.)
✦ Anything you write to stdout (via print or sys.stdout.write) is returned
to the client, and it can be text or binary data.
✦ CGIHTTPRequestHandler outputs some response headers for you, but you
can add others if needed (such as the Content-type header in the example).
✦ After the headers, you must output a blank line before any data.
✦ On UNIX, external programs run with the nobody user ID.
Handling Multiple Requests Without ThreadsAlthough threads can help the Web servers in the previous sections handle more
than one connection simultaneously, the program usually sits around waiting for
data to be transmitted across the network. (Instead of being CPU bound, the pro-
gram is said to be I/O bound.) In situations where your program is I/O bound, a lot
4807-7 ch15.F 5/24/01 8:59 AM Page 269

270 Part III ✦ Networking and the Internet
of CPU time is wasted switching between threads that are just waiting until they can
read or write more data to a file or socket. In such cases, it may be better to use the
select and asyncore modules. These modules still let you process multiple
requests at a time, but avoid all the senseless thread switching.
The select(inList, outList, errList[, timeout]) function in the selectmodule takes three lists of objects that are waiting to perform input or output (or
want to be notified of errors). select returns three lists, subsets of the originals,
containing only those objects that can now perform I/O without blocking. If the
timeout parameter is given (a floating-point number indicating the number of
seconds to wait) and is non-zero, select returns when an object can perform I/O
or when the time limit is reached (whereupon empty lists are returned). A timeoutvalue of 0 does a quick check without blocking.
The three lists hold input, output, and error objects, respectively (objects that are
interested in reading data, writing data, or in being notified of errors that occurred).
Any of the three lists can be empty, and the objects can be integer file descriptors
or filelike objects with a fileno() method that returns a valid file descriptor.
See “Working with File Descriptors” in Chapter 10 for more information.
By using select, you can start several read or write operations and, instead of
blocking until you can read or write more, you can continue to do other work. This
way, your I/O-bound program spends as much time as possible being driven by its
performance-limiting factor (I/O), instead of a more artificial factor (switching
between threads). With select, it is possible to write reasonably high-performance
servers in Python.
On Windows systems, select() works on socket objects only. On UNIX systems,however, it also works on other file descriptors, such as named pipes.
A slightly more efficient alternative to select is the select.poll() function,
which returns a polling object (available on UNIX platforms). After you create a
polling object, you call the register(fd[, eventmask]) method to register a par-
ticular file descriptor (or object with a fileno() method). The optional eventmaskis constructed by bitwise OR-ing together any of the following: select.POLLIN (for
input), select.POLLPRI (urgent input), select.POLLOUT (for output), or
select.POLLERR.
You can register as many file descriptors as needed, and you can remove them from
the object by calling the polling object’s unregister(fd) method.
Call the polling object’s poll([timeout]) method to see which file descriptors, if
any, are ready to perform I/O without blocking. poll returns a possibly empty list
of tuples of the form (fd, event), an entry for each file descriptor whose state has
changed. The event will be a bitwise-OR of any of the eventmask flags as well as
POLLHUP (hang up) or POLLNVAL (an invalid file descriptor).
Note
Cross-Reference
4807-7 ch15.F 5/24/01 8:59 AM Page 270
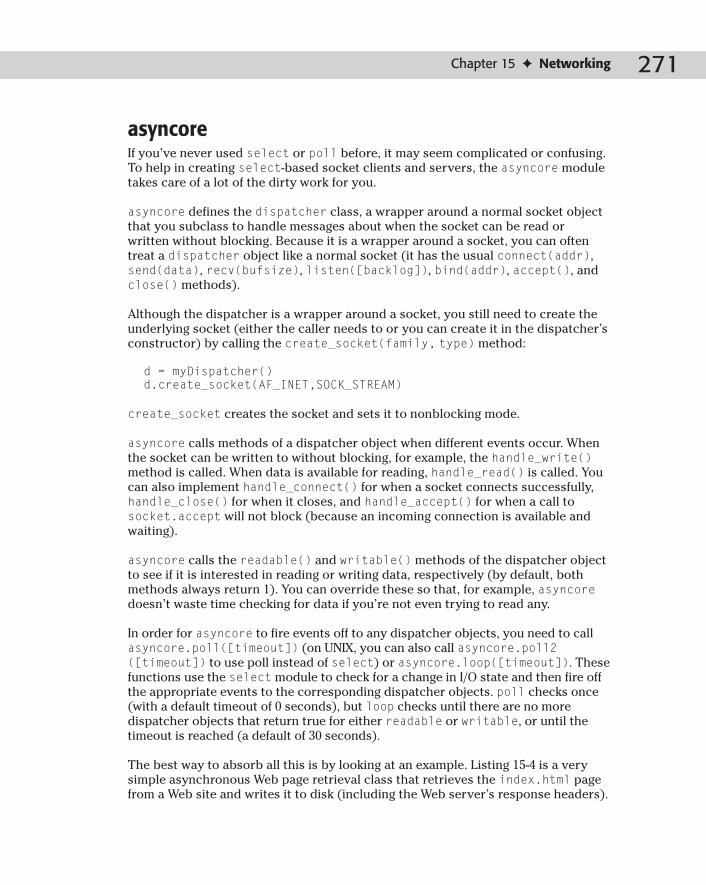
271Chapter 15 ✦ Networking
asyncoreIf you’ve never used select or poll before, it may seem complicated or confusing.
To help in creating select-based socket clients and servers, the asyncore module
takes care of a lot of the dirty work for you.
asyncore defines the dispatcher class, a wrapper around a normal socket object
that you subclass to handle messages about when the socket can be read or
written without blocking. Because it is a wrapper around a socket, you can often
treat a dispatcher object like a normal socket (it has the usual connect(addr),
send(data), recv(bufsize), listen([backlog]), bind(addr), accept(), and
close() methods).
Although the dispatcher is a wrapper around a socket, you still need to create the
underlying socket (either the caller needs to or you can create it in the dispatcher’s
constructor) by calling the create_socket(family, type) method:
d = myDispatcher()d.create_socket(AF_INET,SOCK_STREAM)
create_socket creates the socket and sets it to nonblocking mode.
asyncore calls methods of a dispatcher object when different events occur. When
the socket can be written to without blocking, for example, the handle_write()method is called. When data is available for reading, handle_read() is called. You
can also implement handle_connect() for when a socket connects successfully,
handle_close() for when it closes, and handle_accept() for when a call to
socket.accept will not block (because an incoming connection is available and
waiting).
asyncore calls the readable() and writable() methods of the dispatcher object
to see if it is interested in reading or writing data, respectively (by default, both
methods always return 1). You can override these so that, for example, asyncoredoesn’t waste time checking for data if you’re not even trying to read any.
In order for asyncore to fire events off to any dispatcher objects, you need to call
asyncore.poll([timeout]) (on UNIX, you can also call asyncore.poll2([timeout]) to use poll instead of select) or asyncore.loop([timeout]). These
functions use the select module to check for a change in I/O state and then fire off
the appropriate events to the corresponding dispatcher objects. poll checks once
(with a default timeout of 0 seconds), but loop checks until there are no more
dispatcher objects that return true for either readable or writable, or until the
timeout is reached (a default of 30 seconds).
The best way to absorb all this is by looking at an example. Listing 15-4 is a very
simple asynchronous Web page retrieval class that retrieves the index.html page
from a Web site and writes it to disk (including the Web server’s response headers).
4807-7 ch15.F 5/24/01 8:59 AM Page 271

272 Part III ✦ Networking and the Internet
Listing 15-4: asyncget.py – Asynchronous HTML page retriever
import asyncore, socket
class AsyncGet(asyncore.dispatcher):def __init__(self, host):
asyncore.dispatcher.__init__(self)self.host = host
self.create_socket(socket.AF_INET, socket.SOCK_STREAM)self.connect((host,80))
self.request = ‘GET /index.html HTTP/1.0\r\n\r\n’self.outf = Noneprint ‘Requesting index.html from’,host
def handle_connect(self):print ‘Connect’,self.host
def handle_read(self):if not self.outf:
print ‘Creating’,self.hostself.outf = open(self.host,’wt’)
data = self.recv(8192)if data:
self.outf.write(data)
def writeable(self):return len(self.request) > 0
def handle_write(self):# Not all data might be sent, so track what did make itnum_sent = self.send(self.request)self.request = self.request[num_sent:]
def handle_close(self):asyncore.dispatcher.close(self)print ‘Socket closed for’,self.hostif self.outf:
self.outf.close()
# Now retrieve some pagesAsyncGet(‘www.yahoo.com’)AsyncGet(‘www.cnn.com’)AsyncGet(‘www.python.org’)asyncore.loop() # Wait until all are done
4807-7 ch15.F 5/24/01 8:59 AM Page 272

273Chapter 15 ✦ Networking
Here’s some sample output:
C:\temp>asyncget.pyRequesting index.html from www.yahoo.comRequesting index.html from www.cnn.comRequesting index.html from www.python.orgConnect www.yahoo.comConnect www.cnn.comCreating www.yahoo.comConnect www.python.orgCreating www.cnn.comCreating www.python.orgSocket closed for www.yahoo.comSocket closed for www.python.orgSocket closed for www.cnn.com
Notice that the requests did not all finish in the same order they were started.
Rather, they each made progress according to when data was available. By being
event-driven, the I/O-bound program spends most of its time working on its great-
est performance boundary (I/O), instead of wasting time with needless thread
switching.
SummaryIf you’ve done any networking programming in some other languages, you’ll find
that doing the same thing in Python can be done with a lot less effort and bugs.
Python has full support for standard networking functionality, as well as utility
classes that do much of the work for you. In this chapter, you:
✦ Converted IP addresses to registered names and back.
✦ Created sockets and sent messages between them.
✦ Used SocketServers to quickly build custom servers.
✦ Built a working Web server in only a few lines of Python code.
✦ Used select to process multiple socket requests without threads.
The next chapter looks at more of Python’s higher-level support for Internet proto-
cols, including modules that hide the nasty details of “speaking” protocols such as
HTTP, FTP, and telnet.
✦ ✦ ✦
4807-7 ch15.F 5/24/01 8:59 AM Page 273

4807-7 ch15.F 5/24/01 8:59 AM Page 274

SpeakingInternetProtocols
On the Internet, people use various protocols to transfer
files, send e-mail, and request resources from the World
Wide Web. Python provides libraries to help work with
Internet protocols. This chapter shows how you can write
Internet programs without having to handle lower-level
TCP/IP details such as sockets. Supported protocols include
HTTP, POP3, SMTP, FTP, and Telnet. Python also provides use-
ful CGI scripting abilities.
Python’s Internet Protocol SupportPython’s standard libraries make it easy to use standard
Internet protocols such as HTTP, FTP, and Telnet. These
libraries are built on top of the socket library, and enable
you to program networked programs with a minimum of
low-level code.
Each Internet protocol is documented in a numbered request forcomment (RFC). The name is a bit misleading for established
protocols such as POP and FTP, as these protocols are widely
implemented, and are no longer under much discussion!
These protocols are quite feature-rich — the RFCs for the
protocols discussed here would fill several hundred printed
pages. The standard Python modules provide a high-level
client for each protocol. However, you may need to know
more about the protocols’ syntax and meaning, and the RFCs
are the best place to learn this information. One good online
RFC repository is at http://www.rfc-editor.org/.
Refer to Chapter 15 for more information about thesocket module and a quick overview of TCP/IP.
Cross-Reference
1616C H A P T E R
✦ ✦ ✦ ✦
In This Chapter
Python’s Internetprotocol support
Retrieving Internetresources
Sending HTTPrequests
Sending andreceiving e-mail
Transferring files viaFTP
Retrieving resourcesusing Gopher
Working withnewsgroups
Using the Telnetprotocol
Writing CGI scripts
✦ ✦ ✦ ✦
4807-7 ch16.F 5/24/01 8:59 AM Page 275

276 Part III ✦ Networking and the Internet
Retrieving Internet ResourcesThe library urllib provides an easy mechanism for grabbing files from the
Internet. It supports HTTP, FTP, and Gopher requests. Resource requests can take a
long time to complete, so you may want to keep them out of the main thread in an
interactive program.
The simplest way to retrieve a URL is with one line:
urlretrieve(url[,filename[,callback[,data]]])
The function urlretrieve retrieves the resource located at the address url and
writes it to a file with name filename. For example:
>>> MyURL=”http://www.pythonapocrypha.com”>>> urllib.urlretrieve(MyURL, “pample2.swf”)>>> urllib.urlcleanup() # clean the cache!
If you do not pass a filename to urlretrieve, a temporary filename will be magi-
cally generated for you. The function urlcleanup frees up resources used in calls
to urlretrieve.
The optional parameter callback is a function to call after retrieving each block of a
file. For example, you could use a callback function to update a progress bar show-
ing download progress. The callback receives three arguments: the number of
blocks already transferred, the size of each block (in bytes), and the total size of
the file (in bytes). Some FTP servers do not return a file size; in this case, the third
parameter is -1.
Normally, HTTP requests are sent as GET requests. To send a POST request, pass
a value for the optional parameter data. This string should be encoded using
urlencode.
To use a proxy on Windows or UNIX, set the environment variables http_proxy,
ftp_proxy, and/or gopher_proxy to the URL of the proxy server. On a Macintosh,
proxy information from Internet Config is used.
Manipulating URLsSpecial characters are encoded in URLs to ensure they can be passed around easily.
Encoded characters take the form %##, where ## is the ASCII value of the character
in hexadecimal. Use the function quote to encode a string, and unquote to trans-
late it back to normal, human-readable form:
>>> print urllib.quote(“human:nature”)human%3anature>>> print urllib.unquote(“cello%23music”)cello#music
4807-7 ch16.F 5/24/01 8:59 AM Page 276

277Chapter 16 ✦ Speaking Internet Protocols
The function quote_plus does the encoding of quote, but also replaces spaces
with plus signs, as required for form values. The corresponding function
unquote_plus decodes such a string:
>>> print urllib.quote_plus(“bob+alice forever”)bob%2balice+forever>>> print urllib.unquote_plus(“where+are+my+keys?”)where are my keys?
Data for an HTTP POST request must be encoded in this way. The function
urlencode takes a dictionary of names and values, and returns a properly encoded
string, suitable for HTTP requests:
>>> print urllib.urlencode({“name”:”Eric”,”species”:”sea bass”})
species=sea+bass&name=Eric
See the module urlparse, covered in Chapter 17, for more functions to parseand process URLs.
Treating a URL as a fileThe function urlopen(url[,data]) creates and returns a filelike object for the
corresponding address url. The source can be read like an ordinary file. For exam-
ple, the following code reads a Web page and checks the length of the file (the full
HTML text of the page):
>>> Page=urllib.urlopen(“http://www.python.org”)>>> print len(Page.read())339
The data parameter, as for urlretrieve, is used to pass urlencoded data for a
POST request.
The filelike object returned by urlopen provides two bonus methods. The method
geturl returns the real URL — usually the same as the URL you passed in, but
possibly different if a Web page redirected you to another URL. The method inforeturns a mimetools.Message object describing the file.
Refer to Chapter 17 for more information about mimetools.
URLopeners The classes URLopener and FancyURLopener are what you actually build and use
with calls to urlopen and urlretrieve. You may want to subclass them to handle
new addressing schemes. You will probably always use FancyURLopener. It is a
Cross-Reference
Cross-Reference
4807-7 ch16.F 5/24/01 8:59 AM Page 277

278 Part III ✦ Networking and the Internet
subclass of URLopener that handles HTTP redirections (response code 301 and
302) and basic authentication (response code 401).
The opener constructor takes, as its first argument, a mapping of schemes (such as
HTTP) to proxies. It also takes the keyword arguments key_file and cert_file,
which, if supplied, allow you to request secure Web pages (using the HTTPS scheme).
The default Python build does not currently include SSL support. You must editModules/Setup to include SSL, and then rebuild Python, in order to open https://addresses with urllib.
Openers provide a method, open(url[,data]), that opens the resource with
address url. The data parameter works as in urllib.urlopen. To open new url
types, override the method open_unknown(url[,data]) in your subclass. By
default, this method returns an “unknown url type” IOError.
Openers also provide a method retrieve(url[,filename[,hook[,data]]]),
which functions like urllib.urlretrieve.
The HTTP header user-agent identifies a piece of client software to a Web server.
Normally, urllib tells the server that it is Python-urllib/1.13 (where 1.13 is the
current version of urllib). If you subclass the openers, you can override this by
setting the version attribute before calling the parent class’s constructor.
Extended URL openingThe module urllib2 is a new and improved version of urllib. urllib2 provides a
wider array of features, and is easier to extend. The syntax for opening a URL is the
same: urlopen(url[,data]). Here, url can be a string or a Request object.
The Request class gathers HTTP request information (it is very similar to the class
httplib.HTTP). Its constructor has syntax Request(url[,data[,headers]]).
Here, headers must be a dictionary. After constructing a Request, you can call
add_header(name,value) to send additional headers, and add_data(data) to
send data for a POST request. For example:
>>> # Request constructor is picky: “http://” and the >>> # trailing slash are both required here:>>> MyRequest=urllib2.Request(“http://www.python.org/”)>>> MyRequest.add_header(“user-agent”,”Testing 1 2 3”)>>> URL=urllib2.urlopen(MyRequest)>>> print URL.readline() # read just a little bit<HTML>
The module urllib2 can handle some fancier HTTP requests, such as basic
authentication. For further details, consult the module documentation.
The module urllib2 is new in Python Version 2.1.NewFeature
Note
4807-7 ch16.F 5/24/01 8:59 AM Page 278

279Chapter 16 ✦ Speaking Internet Protocols
Sending HTTP RequestsHyperText Transfer Protocol (HTTP) is a format for requests that a client (usually a
browser) sends to a server on the World Wide Web. An HTTP request includes vari-
ous headers. Headers include information such as the URL of a requested resource,
file formats accepted by the client, and cookies, parameters used to cache user-
specific information (see RFC 2616 for details).
The httplib module lets you build and send HTTP requests and receive server
responses. Normally, you retrieve Web pages using the urllib module, which is
simpler. However, httplib enables you to control headers, and it can handle POST
requests.
Building and using request objectsThe module method HTTP([host[,port]]) constructs and returns an HTTP
request object. The parameter host is the name of a host (such as www.yahoo.com).
The port number can be passed via the port parameter, or parsed from the host
name; otherwise, it defaults to 80. If you construct an HTTP object without provid-
ing a host, you must call its connect(host[,port]) method to connect to a server
before sending a request.
To start a Web request, call the method putrequest(action,URL). Here, actionis the request method, such as GET or POST, and URL is the requested resource,
such as /stuff/junk/index.html.
After starting the request, you can (and usually will) send one or more headers, by
calling putheader(name, value[, anothervalue,...]). Then, whether you sent
headers or not, you call the endheaders method. For example, the following code
informs the server that HTML files are accepted (something most Web servers will
assume anyway), and then finishes off the headers:
MyHTTP.putheader(‘Accept’, ‘text/html’)MyHTTP.endheaders()
You can pass multiple values for a header in one call to putheader.
After setting up any headers, you may (usually on a POST request) send additional
data to the server by calling send(data).
Now that you have built the request, you can get the server’s reply. The method
getreply returns the server’s response in a 3-tuple: (replycode, message,headers). Here, replycode is the HTTP status code (200 for success, or perhaps the
infamous 404 for “resource not found”).
The body of the server’s reply is returned (as a file object with read and closemethods) by the method getfile. This is where the request object finally receives
what it asks for.
4807-7 ch16.F 5/24/01 8:59 AM Page 279

280 Part III ✦ Networking and the Internet
For example, the following code retrieves the front page from www.yahoo.com:
>>> Request=httplib.HTTP(“www.yahoo.com”)>>> Request.putrequest(“GET”,”/”)>>> Request.endheaders()>>> Request.getreply()(200, ‘OK’, <mimetools.Message instance at 0085EBD4>)>>> ThePage=Request.getfile()>>> print ThePage.readline()[:50]<html><head><title>Yahoo!</title><base href=http:/
This example performs a Web search by sending a POST request. Data in a POST
request must be properly encoded using urllib.urlencode (see Listing 16-1).
This code uses an HTMLParser (from htmllib) to extract all links from the search
results.
See Chapter 18 for complete information about htmllib.
Listing 16-1: WebSearch.py
import httplibimport htmllibimport urllibimport formatter# Encode our search terms as a URL, by# passing a dictionary to urlencodeSearchDict={“q”:”Charles Dikkins”,
“kl”:”XX”,”pg”:”q”,”Translate”:”on”}SearchString=urllib.urlencode(SearchDict)print “search:”,SearchStringRequest=httplib.HTTP(“www.altavista.com”)Request.putrequest(“POST”,”/cgi-bin/query”)Request.putheader(‘Accept’, ‘text/plain’)Request.putheader(‘Accept’, ‘text/html’)Request.putheader(‘Host’, ‘www.alta-vista.com’)Request.putheader(“Content-length”,`len(SearchString)`)Request.endheaders()Request.send(SearchString)print Request.getreply()# Read and parse the resulting HTMLHTML=Request.getfile().read()MyParser=htmllib.HTMLParser(formatter.NullFormatter())MyParser.feed(HTML)# Print all the anchors from the results pageprint MyParser.anchorlist
Cross-Reference
4807-7 ch16.F 5/24/01 8:59 AM Page 280

281Chapter 16 ✦ Speaking Internet Protocols
Sending and Receiving E-MailPython provides libraries that receive mail from, and send mail to, a mail server.
Electronic mail is transmitted via various protocols. The most common mail proto-
cols are POP3 (for receiving mail), SMTP (for sending mail), and IMAP4 (for reading
mail and managing mail folders). They are supported by the Python modules
poplib, smtplib, and imaplib, respectively.
Accessing POP3 accountsTo access a POP3 mail account, you construct a POP3 object. The POP3 object
offers various methods to send and retrieve mail. It raises the exception
poplib.error_proto if it encounters problems. See RFC 1939 for the full POP3
protocol.
Many of its methods return output as a 3-tuple: a server response string, response
lines (as a list), and total response length (in bytes). In general, you can access the
second tuple element and ignore the others.
Connecting and logging inThe POP3 constructor takes two arguments: host and port number. The port param-
eter is optional, and defaults to 110. For example:
Mailbox=poplib.POP3(“mail.gianth.com”) # connect to mail server
After connecting, you can access the mail server’s greeting by calling getwelcome.
You normally sign in by calling user(name) and then pass(password). To sign on
using APOP authentication, call apop(username, secret). To sign in using RPOP,
call rpop(username). (Currently, rpop is not supported.)
Once you log in, the mailbox is locked until you call quit (or the session times
out). To keep a session from timing out, you can call the method noop, which
simply keeps the session alive.
Checking mailThe method stat checks the mailbox’s status. It returns a tuple of two numbers:
the number of messages and the total size of your messages (in bytes).
The method list([index]) lists the messages in your inbox. It returns a 3-tuple,
where the second element is a list of message entries. A message entry is the mes-
sage number, followed by its size in bytes. Passing a message index to list makes
it return just that message’s entry:
>>> Mailbox.list()(‘+OK 2 messages (10012 octets)’, [‘1 9003’, ‘2 1009’], 16) >>> Mailbox.list(2)+OK 2 1009
4807-7 ch16.F 5/24/01 8:59 AM Page 281

282 Part III ✦ Networking and the Internet
The method uidl([index]) retrieves unique identifiers for the messages in a mail-
box. Unique identifiers are unchanged by the addition and deletion of messages,
and they are unique across sessions. The method returns a list of message indexes
and corresponding unique IDs:
>>> Mailbox.uidl()(‘+OK 2 messages (10012 octets)’, [‘1 2’, ‘2 3’], 10)>>> Mailbox.uidl(2)+OK 2 3
Retrieving mailThe method retr(index) retrieves and returns message number index from your
mailbox. What you get back is actually a tuple: the server response, a list of mes-
sage lines (including headers), and the total response length (in bytes). To retrieve
part of a message, call the method top(index, lines)—top is the same as retr,
but stops after lines lines.
Deleting mailUse the method dele(index) to delete message number index. If you change your
mind, use the method rset to cancel all deletions you have done in the current
session.
Signing offWhen you finish accessing a mailbox, call the quit method to sign off.
Example: retrieving mailThe code in Listing 16-2 signs on to a mail server and retrieves the full text of the
first message in the mailbox. It does no fancy error handling. It strips off all the
message headers, printing only the body of the message.
Listing 16-2: popmail.py
import poplib# Replace server, user, and password with your# mail server, user name, and password!Mailbox=poplib.POP3(“mail.seanbaby.com”)Mailbox.user(“[email protected]”)Mailbox.pass_(“secretpassword”)MyMessage=Mailbox.retr(1)FullText=”” # Build up the message body in FullTextPastHeaders=0
4807-7 ch16.F 5/24/01 8:59 AM Page 282

283Chapter 16 ✦ Speaking Internet Protocols
for MessageLine in MyMessage[1]:if PastHeaders==0:
# A blank line marks the end of headers:if (len(MessageLine)==0):
PastHeaders=1else:
FullText+=MessageLine+”\n”Mailbox.quit()print FullText
Accessing SMTP accountsThe module smtplib defines an object, SMTP, that you use to send mail using the
Simple Mail Transport Protocol (SMTP). An enhanced version of SMTP, called
ESMTP, is also supported. See RFC 821 for the SMTP protocol, and RFC 1869 for
information about extensions.
Connecting and disconnectingYou can pass a host name and a port number to the SMTP constructor. This con-
nects you to the server immediately. The port number defaults to 25:
Outbox=smtplib.SMTP(“mail.gianth.com”)
If you do not supply a host name when you construct an SMTP object, you must call
its connect method, passing it a host name and (optionally) a port number. The
host name can specify a port number after a colon:
Outbox=smtplib.SMTP()Outbox.connect(“mail.gianth.com:25”)
After you finish sending mail, you should call the quit method to close the
connection.
Sending mailThe method sendmail(sender, recipients, message[,options,rcpt_options]) sends e-mail. The parameter sender is the message author (usu-
ally your e-mail address!). The parameter recipients is a list of addresses that should
receive the message. The parameter message is the message as one long string,
including all its headers. For example:
>>> [email protected]>>> TargetAddress=”[email protected]”>>> HeaderText=”From: “+MyAddress+”\r\n”>>> HeaderText+=”To: “+TargetAddress+”\r\n\r\n”>>> Outbox.sendmail(MyAddress,[TargetAddress],HeaderText+”Hi!”)
4807-7 ch16.F 5/24/01 8:59 AM Page 283
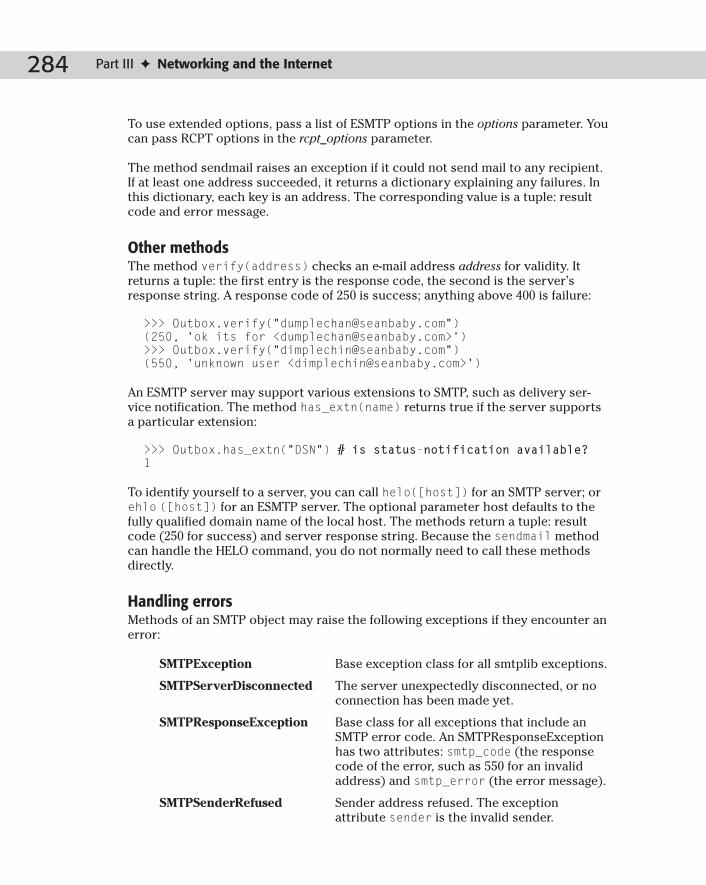
284 Part III ✦ Networking and the Internet
To use extended options, pass a list of ESMTP options in the options parameter. You
can pass RCPT options in the rcpt_options parameter.
The method sendmail raises an exception if it could not send mail to any recipient.
If at least one address succeeded, it returns a dictionary explaining any failures. In
this dictionary, each key is an address. The corresponding value is a tuple: result
code and error message.
Other methodsThe method verify(address) checks an e-mail address address for validity. It
returns a tuple: the first entry is the response code, the second is the server’s
response string. A response code of 250 is success; anything above 400 is failure:
>>> Outbox.verify(“[email protected]”)(250, ‘ok its for <[email protected]>’)>>> Outbox.verify(“[email protected]”)(550, ‘unknown user <[email protected]>’)
An ESMTP server may support various extensions to SMTP, such as delivery ser-
vice notification. The method has_extn(name) returns true if the server supports
a particular extension:
>>> Outbox.has_extn(“DSN”) # is status-notification available?1
To identify yourself to a server, you can call helo([host]) for an SMTP server; or
ehlo ([host]) for an ESMTP server. The optional parameter host defaults to the
fully qualified domain name of the local host. The methods return a tuple: result
code (250 for success) and server response string. Because the sendmail method
can handle the HELO command, you do not normally need to call these methods
directly.
Handling errorsMethods of an SMTP object may raise the following exceptions if they encounter an
error:
SMTPException Base exception class for all smtplib exceptions.
SMTPServerDisconnected The server unexpectedly disconnected, or no
connection has been made yet.
SMTPResponseException Base class for all exceptions that include an
SMTP error code. An SMTPResponseException
has two attributes: smtp_code (the response
code of the error, such as 550 for an invalid
address) and smtp_error (the error message).
SMTPSenderRefused Sender address refused. The exception
attribute sender is the invalid sender.
4807-7 ch16.F 5/24/01 8:59 AM Page 284

285Chapter 16 ✦ Speaking Internet Protocols
SMTPRecipientsRefused All recipient addresses refused. The errors for
each recipient are accessible through the
attribute recipients, which is a dictionary of
exactly the same sort as SMTP.sendmail()returns.
SMTPDataError The SMTP server refused to accept the mes-
sage data.
SMTPConnectError An error occurred during establishment of a
connection with the server.
SMTPHeloError The server refused a “HELO” message.
Accessing IMAP accountsIMAP is a protocol for accessing mail. Like POP, it enables you to read and delete
messages. IMAP offers additional features, such as searching for message text and
organizing messages in separate mailboxes. However, IMAP is harder to use than
POP, and is far less commonly used.
See RFC 2060 for the full description of IMAP4rev1.
The module imaplib provides a class, IMAP4, to serve as an IMAP client. The
names of IMAP4 methods correspond to the commands of the IMAP protocol. Most
methods return a tuple (code, data), where code is “OK” (good) or “NO” (bad), and
data is the text of the server response.
The IMAP protocol includes various magical behaviors. For example, you can move
all the messages from INBOX into a new mailbox by attempting to rename INBOX.
(The INBOX folder isn’t actually renamed, but its contents are moved to the other
mailbox!) Not all the features of the protocol are covered here; consult RFC 2060 for
more information.
Connection, logon, and logoffThe IMAP4 constructor takes host and port arguments, which function here just as
they do for a POP3 object. If you construct an IMAP4 object without specifying a
host, you must call open(host,port) to connect to a server before you can use
other methods. The port number defaults to 143.
To log in, call the method login(user,password). Call logout to log off. The
method noop keeps an existing session alive. For example:
>>> imap=imaplib.IMAP4(“mail.mundomail.net”)>>> imap.login(“dumplechan”,”tacos”)(‘OK’, [‘LOGIN completed’])>>> imap.noop()(‘OK’, [‘NOOP completed’])
Cross-Reference
4807-7 ch16.F 5/24/01 8:59 AM Page 285

286 Part III ✦ Networking and the Internet
An IMAP server may use more advanced authentication methods. To authenticate
in fancier ways, call the method authenticate(machanism,handler). Here, mech-anism is the name of the authentication mechanism, and handler is a function that
receives challenge strings from the server and returns response strings. (Base64
encoding is handled internally.)
Checking, reading, and deleting mailBefore you can do anything with messages, you must choose a mailbox. The mailbox
INBOX is always available. To select a mailbox, call select([mailbox[,readonly]]). The parameter mailbox is the mailbox name, which defaults to
INBOX. If readonly is present and true, then modifications to the mailbox are forbid-
den. The return value includes the number of messages in the mailbox. For example:
>>> imap.select(“INBOX”)(‘OK’, [‘2’])
When finished with a mailbox, call close to close it.
The method search(charset,criteria...) searches the current mailbox for
messages satisfying one or more criteria. The parameter charset, if not None,
specifies a particular character set to use. One or more values can be passed as
criteria; these are concatenated into one search string. A list of matching message
indexes is returned. Note that text (other than keywords) in criteria should be
quoted. For example, the following code checks for messages from the president
(none today), and then checks for messages whose subject contains “Howdy!” (and
finds message number 2):
>>> imap.search(None,”ALL”,”FROM”,’”[email protected]”’)(‘OK’, [None])>>> imap.search(None,”ALL”,”SUBJECT”,’”Howdy!”’)(‘OK’, [‘2’])
To retrieve a message, call fetch(messages,parts). Here, messages is a string
listing messages, such as “2”, or “2,7”, or “3:5” (for messages 3 through 5). The
parameter parts should be a parenthesized list of what parts of the message(s) to
retrieve — for instance, FULL for the entire message, BODY for just the body. For
example:
>>> imap.fetch(“2”,”(BODY[text])”)(‘OK’, [(‘2 (BODY[text] {13}’, ‘Howdy cowboy!’), ‘)’, ‘2 (FLAGS(\\SEEN))’])
To change a message’s status, call store(messages,command,flags). Here, com-mand is the command to perform, such as “+FLAGS” or “-FLAGS”. The parameter
flags is a list of flags to set or remove. For example, the following line of code
deletes message 2:
>>> imap.store(“2”,”+FLAGS”,[“\Deleted”])(‘OK’, [‘2 (FLAGS (\\SEEN \\DELETED))’])
4807-7 ch16.F 5/24/01 8:59 AM Page 286

287Chapter 16 ✦ Speaking Internet Protocols
The method expunge permanently removes all messages marked as deleted by a
\Deleted flag. Such messages are automatically expunged when you close the
current mailbox.
The method copy(messages,newmailbox) copies a set of messages to the mail-
box named newmailbox.
The method check does a mailbox “checkpoint” operation; what this means
depends on the server.
You normally operate on messages by index number. However, messages also have
a unique identifier, or uid. To use uids to name messages, call the method uid(commandname, [args...]). This carries out the command commandname using
uids instead of message indices.
Administering mailboxesTo create a new mailbox, call create(name). To delete a mailbox, call delete(name).
Call rename(oldname,newname) to rename mailbox oldname to the name newname.
Mailboxes can contain other mailboxes. For example, the name “nudgenudge/
winkwink” indicates a sub-box named “winkwink” inside a master mailbox “nudge-
nudge.” The hierarchy separator character varies by server; some servers would
name the mailbox “nudgenudge.winkwink.”
A mailbox can be marked as subscribed. The effects of subscribing vary by server,
but generally subscriptions are a way of flagging mailboxes of particular interest.
Use subscribe(name) and unsubscribe(name) to toggle subscription status for
the mailbox name.
The command list([root[,pattern]]) finds mailbox names. The parameter rootis the base of a mailbox hierarchy to list. It defaults to “”(not a blank string, but a
string of two double-quotes) for the root level. The parameter pattern is a string to
search for; pattern may contain the wildcards * (matching anything) and % (match-
ing anything but a hierarchy delimiter). The output of list is a list of 3-tuples. Each
tuple corresponds to a mailbox. The first element is a list of flags, such as \Noselect.
The second element is the server’s hierarchy separator character. The third is the
mailbox name.
To list only subscribed mailboxes, use the command lsub([root[,pattern]]).
For example, the following code creates and lists some mailboxes:
>>> print imap.list()(‘OK’, [‘() “/” “INBOX”’])>>> imap.create(“x1”)(‘OK’, [‘CREATE completed’])>>> imap.create(“x1/y1”)(‘OK’, [‘CREATE completed’])
4807-7 ch16.F 5/24/01 8:59 AM Page 287

288 Part III ✦ Networking and the Internet
>>> imap.create(“x1/y2”)(‘OK’, [‘CREATE completed’])>>> imap.rename(“x1/y2”,”x1/y3”)(‘OK’, [‘RENAME completed’])>>> imap.list()(‘OK’, [‘() “/” “INBOX”’, ‘() “/” “x1”’, ‘() “/” “x1/y1”’, ‘()“/” “x1/y3”’])>>> print imap.list(‘“”’,”*y*”) # string “” for root(‘OK’, [‘() “/” “x1/y1”’, ‘() “/” “x1/y3”’])>>> imap.list(‘“”’,”*foo*”) # Nothing found: get list of “None” (‘OK’, [None])>>> imap.list(“x1”,”*3”)(‘OK’, [‘() “/” “x1/y3”’])
You can check the status of a mailbox by calling status(mailbox,names). The
parameter mailbox is the name of a mailbox. The parameter names is a parenthe-
sized string of status items to check. For example:
>>> imap.status(“INBOX”,”(MESSAGES UIDNEXT)”)(‘OK’, [‘“INBOX” (MESSAGES 1 UIDNEXT 3)’])
Other functionsYou can add a message to a mailbox by calling the method append(mailbox,flags, datetime, message). Here, mailbox is the name of the mailbox, flags is an
optional list of message flags, datetime is a timestamp for the message, and messageis the message text, including headers.
IMAP uses an INTERNALDATE representation for dates and times. Use the module
function Internaldate2tuple(date) to translate an INTERNALDATE to a
TimeTuple, and the function Time2Internaldate(tuple) to go from TimeTuple to
INTERNALDATE.
See Chapter 13 for more information about the time module’s tuple representationof time.
The function ParseFlags(str) splits an IMAP4 FLAGS response into a tuple of flags.
Handling errorsThe class IMAP4.error is the exception raised by any errors using an IMAP4 object.
The error argument is an error message string. It has subclasses IMAP4.abort (raised
for server errors) and IMAP4.readonly (raised if the server changed a mailbox
while you were reading mail, and you must re-open the mailbox).
Cross-Reference
4807-7 ch16.F 5/24/01 8:59 AM Page 288

289Chapter 16 ✦ Speaking Internet Protocols
Transferring Files via FTPThe module ftplib provides the class FTP, which serves as an FTP client. The
Python source distribution includes a script, Tools/script/ftpmirror.py, that
uses ftplib to mirror an FTP site.
See RFC 959 for more on the FTP protocol.
Logging in and outThe FTP constructor takes several optional parameters. A call to FTP([host[,user[,password[,acct]]]]) constructs and returns an FTP object. The con-
structor also connects to the specified host if host is supplied. If user is supplied,
the constructor logs in using the user user, the password password, and the
account acct.
You can also connect to a host by calling the FTP method connect(hostname[,port]). The port number defaults to 21; you will probably never need to set it
manually. You can log in by calling login([user[,password[,acct]]]). If user is
not specified, anonymous login is performed. The following two examples demon-
strate the long and short way to log on to a server:
>>> # long way:>>> session=ftplib.FTP()>>> session.connect(“gianth.com”)‘220 gianth Microsoft FTP Service (Version 5.0).’>>> session.login() # anonymous login (login string returned)‘230-Niao! Greetings from Giant H Laboratories!\015\012230Anonymous user logged in.’>>> # short way:>>> session2=ftplib.FTP(“gianth.com”,”anonymous”,”[email protected]”)
The method getwelcome returns the server welcome string (the same string
returned by connect).
When finished with an FTP connection, call quit or close. (The only difference
between the two is that quit sends a “polite” response to the server.)
NavigatingThe method pwd returns the current path on the server. The method cwd(path)sets the path on the server. You can call mkd(path) to create a new directory; call
rmd(dirname) to delete an empty directory.
Cross-Reference
4807-7 ch16.F 5/24/01 8:59 AM Page 289

290 Part III ✦ Networking and the Internet
The method nlst([dir[,args]]) returns directory contents as a list of file
names. By default, both functions list the current directory; pass a different path in
dir to list a different one. Extra string arguments are passed along to the server. The
function dir([dir[,args]]) gets a list of files for processing. If the last argument
to dir is a function, that function is used as a callback when retrieving each line
(see retrlines, in the next section); the default processor simply prints each line.
The method size(filename) returns the size of a particular file. You can delete a
file with delete(filename), and rename a file by calling rename(oldname,newname).
Transferring filesTo store (upload) a file, call storbinary(command,file,blocksize) for binary
files, or storlines(command,file) for plain text files. The parameter command is
the command passed to the server. The parameter file should be an opened file
object. The storbinary parameter blocksize is the block size for data transfer. For
example, the following code uploads a sound file to a server in 8K blocks, and then
verifies that the file exists on the server:
>>> Source=open(“c:\\SummerRain.mp3”)>>> Session.storbinary(“STOR SummerRain.mp3”,Source,8192)‘226 Transfer complete.’>>> Session.nlst().index(“SummerRain.mp3”)
To retrieve (download) a file, call retrbinary(command,callback[,blocksize[,rest]]) or retrlines(command[,callback]). The parameter command is the
command passed to the server. The parameter callback is a function to be called
once for each block of data received. Python passes the block of data to the call-
back function. (The default callback for retrlines simply prints each line.) The
parameter blocksize is the maximum size of each block. Supply a byte position for
rest to continue a download part way through a file. For example, the following code
retrieves a file from the server to a file:
>>> destination=open(“foo.mp3”,”w”)>>> session.retrbinary(“RETR SummerRain.mp3”,dest.write)‘226 Transfer complete.’>>> destination.close()
A lower-level method for file transfer is ntransfercmd(command[,rest]), which
returns a 2-tuple: a socket object and the expected file size in bytes. The method
transfercmd(command[,rest]) is the same as ntransfercmd, but returns only a
socket object.
The method abort cancels a transfer in progress.
Other methodsThe method set_pasv(value) sets passive mode to value. If value is true, the
PASV command is sent to the server for file transfers; otherwise, the PORT
4807-7 ch16.F 5/24/01 8:59 AM Page 290

291Chapter 16 ✦ Speaking Internet Protocols
command is used. (As of Python Version 2.1, passive mode is on by default; in previ-
ous versions, passive mode was not on by default.)
The method set_debuglevel(level) sets the level of debug output from ftplib —
0 (the default level) produces no debug output; 2 is the most verbose.
Handling errorsThe module defines several exceptions: error_reply is raised when the server
unexpectedly sends a response; error_temp is raised for “temporary errors” (with
error codes in the range 400–499); error_perm is raised for “permanent errors”
(with error codes in the range 500–599); and error_proto is raised for errors with
unknown error codes.
Using netrc filesThe supporting module netrc is used to parse .netrc files. These files cache user
information for various FTP servers, so that you don’t need to send it to the host by
hand each time. They can also store macros.
The module provides a class, netrc, for accessing netrc contents. The constructor
netrc([filename]) builds a netrc object by parsing the specified file. If filenameis not provided, it defaults to the file .netrc in your home directory.
The attribute hosts is a dictionary mapping from host names to authentication
information of the form (username, account, password). If the parsed .netrc file
includes a default entry, it is stored in hosts[“default”]. The attribute macros is
a dictionary, mapping macro names to string lists. The method
authenticators(hostname) returns either the authentication tuple for hostname,
the default tuple (if there is no tuple for hostname), or (if there is no default either)
None.
The netrc class implements a __retr__ method that returns .netrc file contents.
This means that you can edit an existing file. For example, the following code adds
(or overrides) an entry on disk:
MyNetrc=netrc.netrc(“.netrc”)MyNetrc.hosts[“ftp.oracle.com”]=(“stanner”,””,”weeble”)NetrcFile=open(“.netrc”)NetrcFile.write(repr(MyNetrc))NetrcFile.close()
Retrieving Resources Using GopherGopher is a protocol for transferring hypertext and multimedia over the Internet.
With the rise of the World Wide Web, Gopher is no longer widely used. However, the
urllib module supports it, and the gopherlib module supports gopher requests.
4807-7 ch16.F 5/24/01 8:59 AM Page 291

292 Part III ✦ Networking and the Internet
See RFC 1436 for the definition of the Gopher protocol.
The function send_selector(selector,host[,port]) sends a selector (analo-
gous to a URL) to the specified host. It returns an open file object that you can read
from. The port-number parameter, port, defaults to 70. For example, the following
code retrieves and prints the Gopher Manifesto:
Manifesto=gopherlib.send_selector(“0/the gopher manifesto.txt”,”gopher.heatdeath.org”)print Manifesto.read()
The function send_query(selector,query,host[,port]) is similar to
send_selector, but sends the query string query to the server along with the selector.
Working with NewsgroupsNetwork News Transport Protocol, or NNTP, is used to carry the traffic of newsgroupssuch as comp.lang.python. The module nntplib provides a class, NNTP, which is a
simple NNTP client. It can connect to a news server and search, retrieve, and post
articles.
See RFC 977 for the full definition of NNTP.
Most methods of an NNTP object return a tuple, of which the first element is the
server response string. The string begins with a three-digit status code.
Dates in nntplib are handled as strings of the form yymmdd, and times are han-
dled as strings of the form hhmmss. The two-digit year is assumed to be the year
closest to the present, and the time zone assumed is that of the news server.
Articles are identified in two ways. Articles are assigned numeric article numberswithin a group in ascending order. Each article also has a unique message-id, a
magic bracketed string unique across all articles in all newsgroups. For instance:
An article cross-posted to rec.org.mensa and alt.religion.kibology might be article
number 200 in rec.org.mensa, article number 500 in alt.religion.kibology, and have
message-id <[email protected]>.
Some methods are not available on all news servers — the names of these methods
begin with x (for “extension”).
Connecting and logging inThe constructor syntax is NNTP(host[,port[,user[,password[,readermode]]]]). Here, host is the news server’s host name. The port number,
port, defaults to 119. If the server requires authentication, pass a username and
Cross-Reference
Cross-Reference
4807-7 ch16.F 5/24/01 8:59 AM Page 292

293Chapter 16 ✦ Speaking Internet Protocols
password in the user and password parameters. If you are connecting to a news
server on the local host, pass a non-null value for readermode.
Once connected, the getwelcome method returns the server’s welcome message.
When you are finished with the connection, call the quit method to disconnect
from the server.
Browsing groupsTo select a particular newsgroup, call the method group(name). The method
returns a tuple of strings (response,count,first,last,name). Here, count is the approx-
imate number of messages in the group, first and last are the first and last article
numbers, and name is the group name.
The method list examines the newsgroups available on the server. It returns a tuple
(response,grouplist), where response is the server response. The list grouplist has one
element per newsgroup. Each entry is a tuple of the form (name,last,first,postable).
Here, name is the name of the newsgroup, last is the last article number, and first is
the first article number. The flag postable is either “y” if posting is allowed, “n” if post-
ing is forbidden, or “m” if the group is moderated.
There are thousands of newsgroups out there. Retrieving a list usually takes sev-eral minutes. You may want to take a snack break when you call the listmethod!
The following code finds all newsgroups with “fish” in their name:
GroupList=news.list()[1]print filter(lambda x:x[0].find(“fish”)!=-1,GroupList)
New newsgroups appear on USENET constantly. The method newgroups(date,time) returns all newsgroups created since the specified date and time, in
the same format as the listing from list.
Browsing articlesNew news is good news. The method newnews(name,date,time) finds articles
posted after the specified moment on the group name. It returns a tuple of the form
(response, idlist), where idlist is a list of message-ids.
Once you have entered a group by calling group, you are “pointing at” the first arti-
cle. You can move through the articles in the group by calling the methods nextand last. These navigate to the next and the previous article, respectively. They
then return a tuple of the form (response,number,id), where number is the current
article number, and id is its message-id.
The method stat(id) checks the status of an article. Here, id is either an article
number (as a string) or a message-id. It returns the same output as next or last.
Caution
4807-7 ch16.F 5/24/01 8:59 AM Page 293

294 Part III ✦ Networking and the Internet
On most news servers, you can scan article headers to find the messages you want.
Call the method xhdr(header, articles) to retrieve the values of a header speci-
fied by header. The parameter articles should specify an article range of the form
first-last. The returned value is a tuple (response, headerlist). The entries in header-list have the form (id, text), where id is the message-id of an article, and text is its
value for the specified header. For instance, the following code retrieves subjects
for articles 319000 through 319005, inclusive:
>>> news.xhdr(“subject”,”319000-319005”)(‘221 subject fields follow’, [(‘319000’, ‘Re: I heartilyendorse: Sinfest!’), (‘319001’, ‘Re: Dr. Teg’), (‘319002’, ‘Re:If you be my bodyguard’), (‘319003’, ‘Re: Culture shock’),(‘319004’, ‘Re: Dr. Teg’), (‘319005’, ‘Todays lesson’)])
The method xover(start,end) gathers more detailed header information for
articles in the range [start,end]. It returns a tuple of the form (response, articlelist).
There is one element in the list articlelist for each article. Each such entry contains
header values in a tuple of the form (article number, subject, poster, date, message-
id, references, size, lines).
The method xgtitle(name) finds all the newsgroups matching the specified name
name, which can include wildcards. It returns a tuple of the form (response, grou-
plist). Each element of grouplist takes the form (name, description). For example,
here is another (much faster) way to search for groups that talk about fish:
print news.xgtitle(“*fish*”)
Reading articlesThe method article(id) retrieves the article with the specified id. It returns a
tuple of the form (response, number, id, linelist), where number is the article num-
ber, id is its message-id, and linelist is a list whose elements are the lines of text of
the article. The text in linelist includes all its headers. The method head(id) and
body(id) retrieve head and body, respectively.
For example, the simple code in Listing 16-3 dumps all articles by a particular
poster on a newsgroup into one long file:
Listing 16-3: NewsSlurp.py
import nntplibimport sysdef dump_articles(news,TargetGroup,TargetPoster):
GroupInfo=news.group(TargetGroup) ArticleList=news.xhdr(“from”,GroupInfo[2]+”-”+GroupInfo[3])
dumpfile = open(“newsfeed.txt”,”w”)for ArticleTuple in ArticleList:
(MessageID,Poster)=ArticleTuple
4807-7 ch16.F 5/24/01 8:59 AM Page 294

295Chapter 16 ✦ Speaking Internet Protocols
if (Poster.find(TargetPoster)!=-1):ArticleText=news.body(MessageID)[3]for ArticleLine in ArticleText:
dumpfile.write(ArticleLine+”\n”)dumpfile.flush()
dumpfile.close()
news=nntplib.NNTP(“news.fastpointcom.com”)dump_articles(news,”alt.religion.kibology”,”[email protected]”)
Posting articlesThe method post(file) posts, as a new article, the text read from the file object
file. The file text should include the appropriate headers.
The method ihave(id,file) informs the server that you have an article whose
message-id is id. If the server requests the article, it is posted from the specified file.
Other functionsThe helper method date returns a tuple of the form (response, date, time), where
date and time are of the form yymmdd and mmhhss, respectively. It is not available
on all news servers.
Call set_debug(level) to set the logging level for an NNTP object. The default, 0,
is silent; 2 is the most verbose.
The method help returns a tuple of the form (response, helplines), where helplinesis the server help text in the form of a list of strings. Server help is generally not
especially helpful, but may list the extended commands that are available.
Call the slave method to inform the news server that your session is a helper
(or “slave”) news server, and return the response. This notification generally has no
special effect.
Handling errorsAn NNTP object raises various exceptions when things go horribly wrong. NNTPErroris the base class for all exceptions raised by nntplib. NNTPReply is raised if the server
unexpectedly sends a reply. For error codes in the range of 400–499 (for example,
calling next without selecting a newsgroup), NNTPTemporaryError is raised. For
error codes in the range of 500–599 (for example, passing a bogus header to xhdr),
NNTPPermanentError is raised. For unknown error codes, NNTPProtocolError is
raised. Finally, NNTPDataError is raised for bogus response data.
4807-7 ch16.F 5/24/01 8:59 AM Page 295

296 Part III ✦ Networking and the Internet
Using the Telnet ProtocolThe Telnet protocol is used for remote access to a server. Telnet is quite low-level,
only a little more abstract than using socket directly. For example, you can (if you
are a masochistic) read USENET by telnetting to port 119 and entering NNTP com-
mands by hand.
See RFC 854 for a definition of the Telnet protocol.
The module telnetlib defines a class, Telnet, which you can use to handle a Telnet
connection to a remote host.
ConnectingThe Telnet constructor has the syntax Telnet([host[,port]]). If you pass a host
name in the parameter host, a session will be opened to the host. The port number,
optionally passed via the parameter port, defaults to 23. If you don’t connect when
constructing the object, you can connect by calling open(host[,port]). Once you
are finished with a session, call the close method to terminate it.
After establishing a connection, do not call the open method again for the sameTelnet object.
Reading and writingYou can run a simple Telnet client (reading from stdin and printing server
responses to stdout) by calling the interact method. The method mtinteract is
a multithreaded version of interact. For example, the following lines would con-
nect you to an online MUD (Multi-User Dungeon) game:
>>> link=telnetlib.Telnet(“materiamagica.com”,4000)>>> link.interact()
Writing data is simple: To send data to the server, call the method write(string).
Special IAC (Interpret As Command) characters such as chr(255) are escaped
(doubled).
Reading data from the server is a bit more complicated. The Telnet object keeps a
buffer of data read so far from the server; each read method accesses buffered (or
“cooked”) data before reading more from the server. Each returns data read as a
(possibly empty) string. The following read methods are available:
✦ read_all — Read until EOF. Block until the server closes the connection.
✦ read_some — Read at least one character (unless EOF is reached). Block if
data is not immediately available.
Note
Cross-Reference
4807-7 ch16.F 5/24/01 8:59 AM Page 296

297Chapter 16 ✦ Speaking Internet Protocols
✦ read_very_eager — Read all available data, without blocking unless in the mid-
dle of a command sequence.
✦ read_eager — Same as read_very_eager, but does not read more from the
server if cooked data is available.
✦ read_lazy — Reads all cooked data. Does not block unless in the middle of a
command sequence.
✦ read_very_lazy — Reads all cooked data. Never blocks.
The read methods, except read_all and read_some, raise an EOFError if the con-
nection is closed and no data is buffered. For example, if you use read_very_lazy
exclusively for reading, the only way to be certain the server is finished is if an
EOFError is raised. For most purposes, you can just call read_some and ignore the
other methods.
For example, the following code connects to port 7 (the echo port) and talks to
itself:
echo=telnetlib.Telnet(“gianth.com”,7)echo.write(“Hello!”)print echo.read_very_eager()
Watching and waitingThe method read_until(expected[,timeout]) reads from the server until it
encounters the string expected, or until timeout seconds have passed. If timeout is
not supplied, it waits indefinitely. The method returns whatever data was read, pos-
sibly the empty string. It raises EOFError if the connection is closed and no data is
buffered.
A more powerful method expect(targets[,timeout]) watches for a list of
strings or regular expression objects, provided in the parameter targets. It returns
a tuple of the form (matchindex, match, text), where matchindex is the index (in
targets) of the first matched item, match is a match object, and text is the text read
up to and including the match. If no match was found, matchindex is -1, match is
None, and text is the text read, if any.
Other methodsThe method set_debug(level) sets the level of debug logging. A level of 0 (the
default) is silent; level 2 is the most verbose.
The method get_socket returns the socket object used internally by a Telnet
object. The method fileno returns the file descriptor of the socket object.
4807-7 ch16.F 5/24/01 8:59 AM Page 297

298 Part III ✦ Networking and the Internet
Writing CGI ScriptsMany Web pages respond to input from the user — these pages range from simple
feedback forms to sophisticated shopping Web sites. Common Gateway Interface(CGI) is a standard way for the Web server to pass user input into a script. The
module cgi enables you to build Python modules to handle user requests to your
Web site.
Your CGI script should output headers, a blank line, and then content. The one
required header is Content-type, and its usual value is “text/html.” For example,
Listing 16-4 is a very simple CGI script, which returns a static Web page:
Listing 16-4: HelloWorld.py
# (add #! line here under UNIX, or if using Apache on Windows)import cgi# Part 1: Content-Type header, followed by a blank line# to indicate the end of the headers. print “Content-Type: text/html\n”# Part 2: A simple HTML pageprint “<title>Gumby</title>”print “<html><body>My brain hurts!</body></html>
Setting up CGI scriptsMaking your Web server run a script is half the battle. In general, you must do the
following:
1. Put the script in the right place.
2. Make it executable.
3. Make it execute properly.
Configuration details vary by Web server and operating system, but the following
sections provide information for some common cases.
Windows Internet Information Server (IIS)First, create a directory (below your root Web directory) for CGI files. A common
name is cgi-bin.
Next, bring up the Internet Services Manager — in Windows 2000, go to Start ➪Control Panel ➪ Administrative Tools ➪ Internet Services Manager.
In Internet Services Manager, edit the properties of the CGI directory. In the
Application section, click Configuration... (if Configuration is disabled, click
4807-7 ch16.F 5/24/01 8:59 AM Page 298

299Chapter 16 ✦ Speaking Internet Protocols
Add first). This brings up the Application Configuration dialog. On the App
Mappings tab, add an entry mapping the extension .py to python.exe -u %s %s.
The -u setting makes Python run in unbuffered binary mode. The %s %s ensures that
IIS runs your script (and not just an instance of the interpreter!).
UNIXPut your scripts in the appropriate CGI directory, probably cgi-bin. Make sure the
script is executable by everyone (chmod 077 script.py). In addition, make sure any
files it reads or writes are accessible by everyone. To make sure the script is executed
as a python script, add a “pound-bang” line to the very top of the script, as follows:
#!/usr/local/bin/python
Apache (any operating system)To set up a CGI directory under Apache, add a ScriptAlias line to httpd.conf that
points at the directory. In addition, make sure there is a <Directory> entry for that
folder, and that it permits execution. For example, my configuration file includes the
following lines:
ScriptAlias /cgi-bin/ “C:/Webroot/cgi-bin/”<Directory “C:/Webroot/cgi-bin”>
AllowOverride NoneOptions None
</Directory>
Apache uses the “pound-bang hack” to decide how to execute CGI scripts, even on
Windows. For example, I use the following simple test script to test CGI under
Apache:
#!pythonimport cgicgi.test() # the test function exercises many CGI features
Accessing form fieldsTo access form fields, instantiate one (and only one) cgi.FieldStorage object.
The master FieldStorage object can be used like a dictionary. Its keys are the sub-
mitted field names. Its values are also FieldStorage objects. (Actually, if there are
multiple values for a field, then its corresponding value is a list of FieldStorage
objects.)
The FieldStorage object for an individual field has a value attribute containing the
field’s value as a string. It also has a name attribute containing the field name (pos-
sibly None).
For example, the script in Listing 16-5 (and its corresponding Web page) gathers
and e-mails site feedback. Listing 16-6 is a Web page that uses the script to handle
form input.
4807-7 ch16.F 5/24/01 8:59 AM Page 299

300 Part III ✦ Networking and the Internet
Listing 16-5: Feedback.py
#!pythonimport cgiimport smtplibimport sysimport traceback
# Set these e-mail addresses appropriatelySOURCE_ADDRESS=”[email protected]”FEEDBACK_ADDRESS=”[email protected]”
sys.stderr = sys.stdout print “Content-Type: text/html\n” try:
fields=cgi.FieldStorage() if (fields.has_key(“name”) and fields.has_key(“comments”)):
UserName=fields[“name”].valueComments=fields[“comments”].value# Mail the feedback:Mailbox=smtplib.SMTP(“mail.seanbaby.com”)MessageText=”From: <”+SOURCE_ADDRESS+”>\r\n”MessageText+=”To: “+FEEDBACK_ADDRESS+”\r\n”MessageText+=”Subject: Feedback\r\n\r\n”MessageText+=”Feedback from “+UserName+”:\r\n”+CommentsMailbox.sendmail(SOURCE_ADDRESS, FEEDBACK_ADDRESS,
MessageText)# Print a simple thank-you page:print “<h1>Thanks!</h1>Thank you for your feedback!”
else:# They must have left “name” and/or “comments” blank:print “<h1>Sorry...</h1>”print “You must provide a name and some comments too!”
except:# Print the traceback to the response page, for debugging!print “\n\n<PRE>”traceback.print_exc()
Listing 16-6: Feedback.html
<html><title>Feedback form</title><h1>Submit your comments</h1><form action=”cgi-bin/Feedback.py” method=”POST”>Your name: <input type=”text” size=”35” name=”name”><br>
4807-7 ch16.F 5/24/01 8:59 AM Page 300

301Chapter 16 ✦ Speaking Internet Protocols
Comments: <br><textarea name=”comments” rows=”5” cols=”35”></textarea><input type=”submit” value=”Send!”><form></html>
Advanced CGI functionsYou can retrieve field values directly from the master FieldStorage object by calling
the method getvalue(fieldname[,default]). It returns the value of field field-name, or (if no value is available) the value default. If not supplied, default is None. If
there are multiple values for a field, getvalue returns a list of strings.
If a field value is actually a file, accessing the value attribute of the corresponding
FieldStorage object returns the file’s contents as one long string. In this case, the
filename attribute is set to the file’s name (as given by the client), and the fileattribute is an opened file object.
A FieldStorage object provides some other attributes:
✦ type— Content-type as a string (or None if unspecified)
✦ type_options— Dictionary of options passed with the content-type header
✦ disposition— Content-disposition as a string (or None if unspecified)
✦ disposition_options— Dictionary of options passed with the content-
disposition header
✦ headers— Map of all headers and their values
A note on debuggingDebugging CGI scripts can be difficult, because the traceback from a crashed script
may be buried deep in the bowels of the Web server’s logging. Listing 16-7 uses a
trick to make debugging easier.
Listing 16-7: CGIDebug.py
import sysimport tracebacksys.stderr = sys.stdout print “Content-Type: text/html\n” try:
# The script body goes here!except:
print “\n\n<PRE>”traceback.print_exc()
4807-7 ch16.F 5/24/01 8:59 AM Page 301

302 Part III ✦ Networking and the Internet
Pointing stderr at stdout means that the output of print_exc goes to the resulting
Web page. The <PRE> tag ensures that the text is shown exactly as printed.
A note on securityInternet security is crucial, even for casual users and simple sites. A common
vulnerability is a CGI script that executes a command string passed from a Web
request. Therefore, avoid passing user-supplied values to os.system, or accessing
file names derived from user data. Remember that hidden fields on forms are hid-
den for presentation purposes only — enterprising users can see and manipulate
their values.
For a good introduction to Web security, see the World Wide Web Consortium’s
security FAQ at http://www.w3.org/Security/Faq/www-security-faq.html.
SummaryPython provides simple client implementations of many Internet protocols. Python
also makes a great CGI scripting language. In this chapter, you:
✦ Sent and received e-mail.
✦ Retrieved Web pages and files in various ways.
✦ Created a Web page with a simple feedback form.
In the next chapter, you will meet various modules that help handle many flavors of
Internet data.
✦ ✦ ✦
4807-7 ch16.F 5/24/01 8:59 AM Page 302

HandlingInternet Data
Internet data takes many forms. You may find yourself
working with e-mail messages, mailboxes, cookies, URLs,
and more. Python’s libraries include helper modules for han-
dling this data. This chapter introduces modules to help han-
dle several common tasks in Internet programming —
handling URLs, sending e-mail, handling cookies from the
World Wide Web, and more.
Manipulating URLsA Uniform Resource Locator (URL) is a string that serves as the
address of a resource on the Internet. The module urlparseprovides functions to make it easier to manipulate URLs.
The function
urlparse(url[,default_scheme[,allow_fragments]])parses the string url, splitting the URL into a tuple of the form
(scheme, host, path, parameters, query, fragment). For example:
>>> URLString=”http://finance.yahoo.com/q?s=MWT&d=v1”>>> print urlparse.urlparse(URLString)(‘http’, ‘finance.yahoo.com’, ‘/q’, ‘’, ‘s=MWT&d=v1’, ‘’)
The optional parameter default_scheme specifies an address-
ing scheme to use if none is specified. For example, the follow-
ing code parses a URL with and without a default scheme:
>>> URLString=”//gianth.com/stuff/junk/DestroyTheWorld.exe”>>> print urlparse.urlparse(URLString) # no scheme!(‘’, ‘gianth.com’, ‘ /stuff/junk/DestroyTheWorld.exe’, ‘’, ‘’, ‘’)>>> print urlparse.urlparse(URLString,”ftp”)(‘ftp’, ‘gianth.com’, ‘/stuff/junk/DestroyTheWorld.exe’, ‘’, ‘’, ‘’)
1717C H A P T E R
✦ ✦ ✦ ✦
In This Chapter
Manipulating URLs
Formatting text
Reading Web spiderrobot files
Viewing files in aWeb browser
Dissecting e-mailmessages
Working with MIMEencoding
Encoding anddecoding messagedata
Working with UNIXmailboxes
Using Web cookies
✦ ✦ ✦ ✦
4807-7 ch17.F 5/24/01 8:59 AM Page 303

304 Part III ✦ Networking and the Internet
The parameter allow_fragments defaults to true. If set to false, no fragments are
permitted in the parsed URL:
>>> URLString=”http://www.penny-arcade.com/#food”>>> print urlparse.urlparse(“URLString”)(‘http’, ‘www.penny-arcade.com’, ‘/’, ‘’, ‘’, ‘food’)>>> print urlparse.urlparse(“URLString”,None,0)(‘http’, ‘www.penny-arcade.com’, ‘/#food’, ‘’, ‘’, ‘’)
The function urlunparse(tuple) unparses a tuple back into a URL string.
Parsing and then unparsing yields a URL string that is equivalent (and quite pos-
sibly identical) to the original.
The function urljoin(base, url[,allow_fragments]) merges a base URL (base)
with a new URL (url) to create a new URL string. It is useful for processing anchors
when parsing HTML. For example:
>>> CurrentPage=”http://gianth.com/stuff/junk/index.html”>>> print urlparse.urljoin(CurrentPage,”../../foo.html”)http://gianth.com/foo.html
The parameter allow_fragments has the same usage as urlparse.
The module urllib includes functions to encode strings as valid URL components.See “Manipulating URLs” in Chapter 16.
Formatting TextThe formatter module defines interfaces for formatters and writers. A formatterhandles requests for various kinds of text formatting, such as fonts and margins. It
passes formatting requests along to a writer. In particular, it keeps a stack of fonts
and margins, so that they know which settings to revert to after turning off the “cur-
rent” font or margins. Formatters and writers are useful for translating text between
formats, or for displaying formatted text. They are used by htmllib.HTMLParser.
Formatter interfaceThe formatter attribute writer is the writer object corresponding to the formatter.
Writing textThe methods add_flowing_data(text) and add_literal_data(text) both
send text to the writer. The difference between the two is that add_flowing_datacollapses extra whitespace; whitespace is held in the formatter before being passed
to the writer. The method flush_softspace clears buffered whitespace from the
formatter.
Cross-Reference
4807-7 ch17.F 5/24/01 8:59 AM Page 304

305Chapter 17 ✦ Handling Internet Data
The method add_label_data(format, counter) sends label text (as used in a
list) to the writer. If format is a string, it is used to format the numeric value counter(in a numbered list). Otherwise, format is passed along to the writer directly.
If you manipulate the writer directly, call flush_softspace beforehand, and call
assert_line_data([flag]) after adding any text. The parameter flag, which
defaults to 1, should be true if the added data finished with a line break.
Spacing, margins, and alignmentThe method set_spacing(spaces) sets the desired line spacing to lines.
The methods push_alignment(align) and pop_alignment set and restore
alignment. Here, align is normally left, right, center, justify (full), or None (default).
The methods push_margin(name) and pop_margin increase and decrease the
current level of indentation; the parameter name is a name for the new indentation
level. The initial margin level is 0; all other margin levels must have names that eval-
uate to true.
The method add_line_break adds a line break (at most, one in succession), but
does not finish the current paragraph. The method end_paragraph(lines) ends
the current paragraph and inserts at least lines blank lines. Finally, the method
add_hor_rule adds a horizontal rule; its parameters are formatter- and writer-
dependent, and are passed along to the writer’s method send_line_break.
Fonts and stylesThe method push_font(font) pushes a new font definition, font, of the form
(size,italics,bold,teletype). Values set to formatter.AS_IS are left unchanged. The
new font is passed to the writer’s new_font method. The method pop_fontrestores the previous font.
The method push_style(*styles) passes any number of style definitions. A tuple
of all style definitions is passed to the writer’s method new_styles. The method
pop_style([count]) pops count styles (by default, 1), and passes the revised
stack to new_styles.
Writer interfaceWriters provide various methods to print or display text. Normally, the formatter
calls these methods, but a caller can access the writer directly.
Writing textThe methods send_flowing_data(text) and send_literal_data(text) both
output text. The difference between the two is that send_literal_data sends
4807-7 ch17.F 5/24/01 8:59 AM Page 305

306 Part III ✦ Networking and the Internet
pre-formatted text, whereas send_flowing_data sends text with redundant
whitespace collapsed. The method send_label_data(text) sends text intended
for a list label; it is called only at the beginning of a line.
The method flush is called to flush any buffered output.
Spacing, margins, and alignmentThe method send_line_break breaks the current line. The method send_paragraph(lines) is called to end the current paragraph and send at least linesblank lines. The method set_spacing(lines) sets the level of line spacing to
lines. The method send_hor_rule is called to add a horizontal rule; its arguments
are formatter- and writer-dependent.
The method new_margin(name,level) sets the margin level to level, where the
indentation level’s name is name.
The method new_alignment(align) sets line alignment. Here, align is normally
left, right, center, justify (full), or None (default).
Fonts and stylesThe method new_font(font) sets the current font to font, where font is either None(indicating default font), or a tuple of the form (size,italic,bold,teletype).
The method new_styles(styles) is called to set new style(s); pass a tuple of new
style values in styles.
Other module resourcesThe AbstractFormatter is a simple formatter that you can use for most applica-
tions. The NullFormatter is a trivial implementation of the formatter interface — it
has all the available methods, but they do nothing. It is useful for creating an
HTTPParser that does not format Web pages.
The NullWriter is a writer that does nothing. The AbstractWriter is useful for
debugging formatters; method calls are simply logged. The DumbWriter is a simple
writer that outputs word-wrapped text. Its constructor has the syntax DumbWriter([file[,maxcol]]). Here, file is an open filelike object for output (if none is
specified, text is written to standard output); and maxcol (which defaults to 72) is
the maximum width, in characters, of a line. For example, this function prints a
text-only version of a Web page:
import htmllibimport urllibimport formatter
def PrintTextPage(URL):URLFile = urllib.urlopen(URL)HTML = URLFile.read()
4807-7 ch17.F 5/24/01 8:59 AM Page 306

307Chapter 17 ✦ Handling Internet Data
URLFile.close()parser=htmllib.HTMLParser(formatter.AbstractFormatter(formatter.DumbWriter()))
parser.feed(HTML)
Reading Web Spider Robot FilesA robot is a program that automatically browses the Web. For example, a script
could programmatically check CD prices at several online sites in order to find the
best price. Some Webmasters would prefer that robots not visit their systems.
Therefore, a well-behaved robot should check a host’s Web root for a file named
robots.txt, which specifies any URLs that are off-limits.
The module robotparser provides a class, RobotFileParser, which makes it easy
to parse robots.txt. Once you instantiate a RobotFileParser, call its
set_url(url) to point it at the robots.txt file at the specified URL url. Then,
call its read method to parse the file. Before retrieving a URL, call
can_fetch(useragent, url) to determine whether the specified URL is allowed.
The parameter useragent should be the name of your robot program. For example,
Listing 17-1 tests a “polite get” of a URL:
Listing 17-1: PoliteGet.py
import robotparserimport urlparseimport urllib
def PoliteGet(url):“””Return an open url-file, or None if URL is forbidden”””RoboBuddy=robotparser.RobotFileParser()# Grab the host-name from the URL:URLTuple=urlparse.urlparse(url)RobotURL=”http://”+URLTuple[1]+”/robots.txt”RoboBuddy.set_url(RobotURL)RoboBuddy.read()if RoboBuddy.can_fetch(“I,Robot”,url):
return urllib.urlopen(url)else:
return None
if (__name__==”__main__”):URL=”http://www.nexor.com/cgi-bin/rfcsearch/location?2449”print “Forbidden:”,(PoliteGet(URL)==None)URL=”http://www.yahoo.com/r/sq”print “Allowed:”,(PoliteGet(URL)==None)
4807-7 ch17.F 5/24/01 8:59 AM Page 307

308 Part III ✦ Networking and the Internet
You can manually pass a list of robots.txt lines to a RobotFileParser by calling
the method parse(lines).
If your parser runs for many days or weeks, you may want to re-read robots.txtperiodically. RobotFileParser keeps a “last updated” timestamp. Call the method
modified to set the timestamp to the current time. (This is done automatically
when you call read or parse.) Call mtime to retrieve the timestamp, in ticks.
Viewing Files in a Web BrowserThe module webbrowser provides a handy interface for opening URLs in a browser.
The function open(url[,new]) opens the specified URL using the default browser.
If the parameter new is true, a new browser window is opened if possible. The func-
tion open_new(url) is a synonym for open(url,1).
Normally, pages are displayed in their own window. However, on UNIX systems for
which no graphical browser is available, a text browser will be opened (and the
program will block until the browser session is closed).
If you want to open a particular browser, call the function register(name,class[,instance]). Here, name is one of the names shown in Table 17-1, and either
class is the corresponding class, or instance is an instance of the corresponding class.
Table 17-1Available Browsers
Name Class Platform
netscape Netscape All
kfm Konquerer UNIX
grail Grail All
windows-default WindowsDefault Windows
internet-config InternetConfig Macintosh
command-line CommandLineBrowser All
Once a browser is registered, you can call get(name) to retrieve a controller for it.
The controller provides open and open_new methods similar to the functions of
the same names. For example, the following code asks for the Grail browser by
name, and then uses it to view a page:
>>> Webbrowser.register(“grail”,Webbrowser.Grail)>>> Controller=Webbrowser.get(“grail”)>>> Controller.open(“www.python.org”)
4807-7 ch17.F 5/24/01 8:59 AM Page 308

309Chapter 17 ✦ Handling Internet Data
Dissecting E-Mail MessagesE-mail messages have headers with a standard syntax. The syntax, described in RFC
822, is a bit complicated. Fortunately, the module rfc822 can parse these headers
for you. It also provides a class to help handle lists of addresses.
Parsing a messageTo parse a message, call the constructor Message(file[,seekable]). Here, file is
an open file. The file is parsed, and all headers are matched case-insensitively.
The file parameter can be any filelike object with a readlines method; it must also
have seek and tell methods in order for Message.rewindbody to work. If file is
unseekable (for example, it wraps a socket), set seekable to 0 for maximum portability.
Retrieving header valuesThe method get(name[,default]) returns the last value of header name, or default(by default, None) if no value was found. Leading and trailing whitespace is trimmed
from the header; newlines are removed if the header takes up multiple lines. The
method getheader is a synonym for get. The method getrawheader(name)returns the first header name with whitespace (including trailing linefeed) intact, or
None if the header was not found.
If a header can have multiple values, you can use getallmatchingheaders(name)to retrieve a (raw) list of all header lines matching name. The method
getfirstmatchingheader(name) returns a list of lines for the first match:
>>> MessageFile=open(“msg1.txt”)>>> msg=rfc822.Message(MessageFile)>>> msg.get(“received”) # The last value‘from 216.20.160.186 by lw8fd.law8.hotmail.msn.com withHTTP;\011Thu, 28 Dec 2000 23:37:18 GMT’>>> msg.getrawheader(“RECEIVED”) # the first value:‘ from hotmail.com [216.33.241.22] by mail3.oldmanmurray.comwith ESMTP\012 (SMTPD32-6.05) id AB8884C01EE; Thu, 28 Dec 200018:23:52 -0500\012’>>> msg.getallmatchingheaders(“Received”) # ALL values:[‘Received: from hotmail.com [216.33.241.22] bymail3.oldmanmurray.com with ESMTP\012’, ‘ (SMTPD32-6.05) idAB8884C01EE; Thu, 28 Dec 2000 18:23:52 -0500\012’, ‘Received:from mail pickup service by hotmail.com with MicrosoftSMTPSVC;\012’, ‘\011 Thu, 28 Dec 2000 15:37:19 -0800\012’,‘Received: from 216.20.160.186 by lw8fd.law8.hotmail.msn.comwith HTTP;\011Thu, 28 Dec 2000 23:37:18 GMT\012’]
4807-7 ch17.F 5/24/01 8:59 AM Page 309

310 Part III ✦ Networking and the Internet
Some headers are dates. Call getdate(name) to retrieve the value of header name
as a TimeTuple. Alternatively, call getdate_tz(name) to retrieve a 10-tuple; its first
nine entries form a TimeTuple, and the tenth is the time zone’s offset (in ticks) from
UTC. (Entries 6, 7, and 8 are unusable in each case.) For example:
>>> msg.getdate(“date”)(2000, 12, 28, 16, 37, 18, 0, 0, 0)>>> msg.getdate_tz(“date”)(2000, 12, 28, 16, 37, 18, 0, 0, 0, -25200)
The method getaddr(name) helps parse To: and From: headers, returning their
values in the form (full name, e-mail address). If the header name is not found, it
returns (None,None). For example:
>>> msg.getaddr(“From”)(‘Stephen Tanner’, ‘[email protected]’)>>> msg.getaddr(“PurpleHairySpiders”)(None, None)
Other membersThe method rewindbody seeks to the start of the message body (if the filelike
object parsed supports seeking).
A Message object supports the methods of a dictionary — for example, keysreturns a list of headers found. The attribute fp is the original file parsed, and the
attribute headers is a list of all header lines.
If you need to subclass Message, you may want to override some of its parsing
methods. The method islast(line) returns true if line marks the end of header
lines. By default, islast returns true when passed a blank line. The method
iscomment(line) returns true if line is a comment that should be skipped. Finally,
the method isheader(line) returns the header name if line is a valid header line,
or None if it is not.
Address listsThe class AddressList holds a list of e-mail addresses. Its constructor takes a list
of address strings; passing None results in an AddressList with no entries.
You can take the length of an AddressList, add (merge) two AddressLists, remove
(subtract) one of AddressList’s elements from another AddressList, and retrieve a
canonical string representation:
>>> List1=rfc822.AddressList(msg.getheader(“To”))>>> List2=rfc822.AddressList(msg.getheader(“From”))>>> MergedList=List1+List2 # Merge lists>>> len(MergedList) # access list length2
4807-7 ch17.F 5/24/01 8:59 AM Page 310
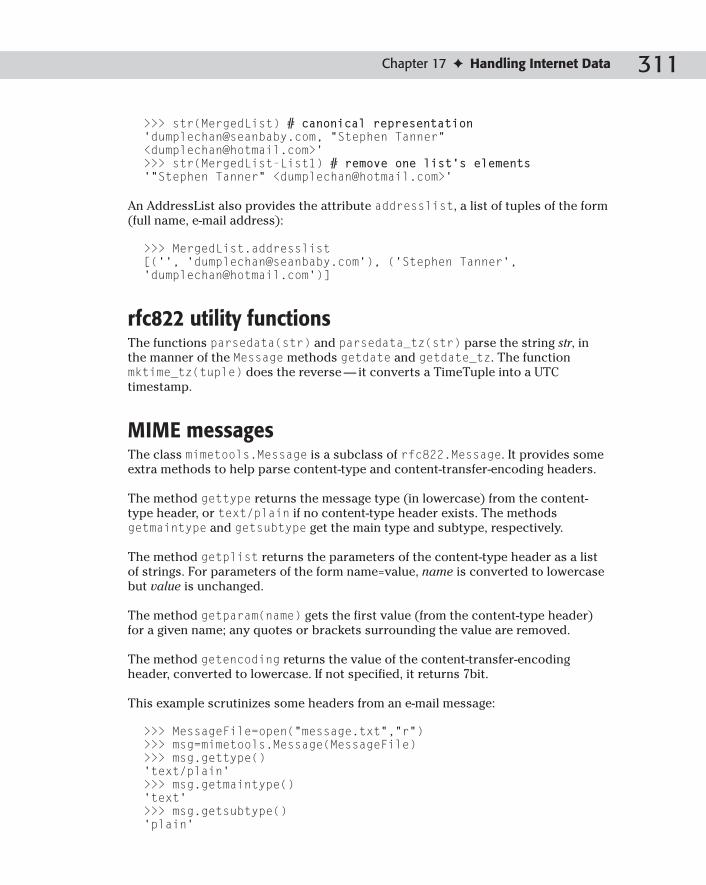
311Chapter 17 ✦ Handling Internet Data
>>> str(MergedList) # canonical representation‘[email protected], “Stephen Tanner”<[email protected]>’>>> str(MergedList-List1) # remove one list’s elements ‘“Stephen Tanner” <[email protected]>’
An AddressList also provides the attribute addresslist, a list of tuples of the form
(full name, e-mail address):
>>> MergedList.addresslist[(‘’, ‘[email protected]’), (‘Stephen Tanner’,‘[email protected]’)]
rfc822 utility functionsThe functions parsedata(str) and parsedata_tz(str) parse the string str, inthe manner of the Message methods getdate and getdate_tz. The function
mktime_tz(tuple) does the reverse — it converts a TimeTuple into a UTC
timestamp.
MIME messagesThe class mimetools.Message is a subclass of rfc822.Message. It provides some
extra methods to help parse content-type and content-transfer-encoding headers.
The method gettype returns the message type (in lowercase) from the content-
type header, or text/plain if no content-type header exists. The methods
getmaintype and getsubtype get the main type and subtype, respectively.
The method getplist returns the parameters of the content-type header as a list
of strings. For parameters of the form name=value, name is converted to lowercase
but value is unchanged.
The method getparam(name) gets the first value (from the content-type header)
for a given name; any quotes or brackets surrounding the value are removed.
The method getencoding returns the value of the content-transfer-encoding
header, converted to lowercase. If not specified, it returns 7bit.
This example scrutinizes some headers from an e-mail message:
>>> MessageFile=open(“message.txt”,”r”)>>> msg=mimetools.Message(MessageFile)>>> msg.gettype()‘text/plain’>>> msg.getmaintype()‘text’>>> msg.getsubtype()‘plain’
4807-7 ch17.F 5/24/01 8:59 AM Page 311

312 Part III ✦ Networking and the Internet
>>> msg.getplist()[‘format=flowed’]>>> msg.get(“content-type”)‘text/plain; format=flowed’>>> msg.getparam(“format”)‘flowed’>>> msg.getencoding()‘7bit’
Working with MIME EncodingMultipurpose Internet Mail Extensions (MIME) are a mechanism for tagging the doc-
ument type of a message — or for several parts of one message. (See RFC 1521 for a
full description of MIME.) Several Python modules help handle MIME messages —
most functions you need are there, though they may be spread across libraries.
The module mimetools provides functions to handle MIME encoding. The function
decode(input,output,encoding) decodes from the filelike object input to output,using the specified encoding. The function encode(input,output,encoding)encodes. Legal values for encoding are base64, quoted-printable, and uuencode.
These encodings use the modules base64, quopri, and uu, discussed in the section
“Encoding and Decoding Message Data.”
The function choose_boundary returns a unique string for use as a boundary
between MIME message parts.
Encoding and decoding MIME messagesThe module mimify provides functions to encode and decode messages in MIME
format. The function mimify(input, output) encodes from the filelike object
input into output. Non-ASCII characters are encoded using quoted-printable encod-
ing, and MIME headers are added as necessary. The function unmimify(input,output[,decode_base64) decodes from input into output; if decode_base64 is
true, then any portions of input encoded using base64 are also decoded. You can
pass file names (instead of files) for input and output.
The functions mime_encode_header(line) and mime_decode_header(line)encode and decode a single string.
The mimify module assumes that any line longer than mimify.MAXLEN (by default,
200) characters needs to be encoded. Also, the variable mimify.CHARSET is a
default character set to fill in if not specified in the content-type header; it defaults
to ISO-8859-1 (Latin1).
4807-7 ch17.F 5/24/01 8:59 AM Page 312

313Chapter 17 ✦ Handling Internet Data
Parsing multipart MIME messagesA MIME message can have several sections, each with a different content-type. The
sections of a MIME message, in turn, can be divided into smaller subsections. The
multifile module provides a class, MultiFile, to wrap multi-part messages. A
MultiFile behaves like a file, and can treat section boundaries like an EOF.
The constructor has syntax MultiFile(file[,seekable]). Here, file is a filelike
object, and seekable should be set to false for nonseekable objects such as sockets.
Call the method push(str) to set str as the current boundary string; call pop to
remove the current boundary string from the stack. The MultiFile will raise an
error if it encounters an invalid section boundary — for example, if you call
push(X), and then push(Y), and the MultiFile encounters the string X before
seeing Y. A call to next jumps to the next occurrence of the current boundary
string. The attribute level is the current nesting depth.
The read, readline, readlines, seek, and tell methods of a MultiFile operate
on only the current section. For example, seek indices are relative to the start of
the current section, and readlines returns only the lines in the current section.
When you read to the end of a section, the attribute last is set to 1. At this point, it
is not possible to read further, unless you call next or pop.
The method is_data(str) returns false if str might be a section boundary. It is used
as a fast test for section boundaries. The method section_divider(str) converts
str into a section-divider line, by prepending “--”. The method end_marker(str)converts str into an end-marker line, by adding “--” at the beginning and end of str.
Writing out multipart MIME messagesThe module MimeWriter provides the class MimeWriter to help write multipart
MIME messages. The constructor takes one argument, an open file (or filelike
object) to write the message to.
To add headers, call addheader(header, value[,prefix]). Here, header is the
header to add, and value is its value. Set the parameter prefix to true to add the new
header at the beginning of the message headers, or false (the default) to append it to
the end. The method flushheaders writes out all accumulated headers; you should
only call it for message parts with an empty body (which, in turn, shouldn’t happen).
To write a single-part message, call startbody(content[,plist[,prefix]]) to
construct a filelike object to hold the message body. Here, content is a value for the
content-type header, and plist is a list of additional content-type parameter tuples of
the form (name,value). The parameter prefix defaults to true, and functions as in
addheader.
4807-7 ch17.F 5/24/01 8:59 AM Page 313

314 Part III ✦ Networking and the Internet
To write a multipart message, first call startmultipartbody(subtype[,boundary[,plist[,prefix]]]). The content-type header has main type
“multipart,” subtype subtype, and any extra parameters you pass in plist. For each
part of the message, call nextpart to get a MimeWriter for that part. After finishing
each part of the message, call lastpart to finish the message off. The call to
startmultipartbody also returns a filelike object; it can be used to store a
message for non-MIME-capable software.
You should not close the filelike objects provided by the MimeWriter, as eachone is a wrapper for the same file.
For example, Listing 17-2 writes out a multipart message and then parses it back
again.
Listing 17-2: MimeTest.py
import MimeWriterimport mimetoolsimport base64import multifile
def TestWriting():# Write out a multi-part MIME message. The first part is# some plain text. The second part is an embedded# multi-part message; its two parts are an HTML document# and an image.MessageFile=open(“BigMessage.txt”,”w”)msg=MimeWriter.MimeWriter(MessageFile)msg.addheader(“From”,”[email protected]”)msg.addheader(“To”,”[email protected]”)msg.addheader(“Subject”,”Pen-pal greetings (good times!)”)# Generate a unique section boundary:OuterBoundary=mimetools.choose_boundary()# Start the main message body. Write a brief message# for non-MIME-capable readers:DummyFile=msg.startmultipartbody(“mixed”,OuterBoundary)DummyFile.write(“If you can read this, your mailreader\n”)DummyFile.write(“can’t handle multi-part messages!\n”)# Sub-part 1: Simple plain-text messagesubmsg=msg.nextpart()FirstPartFile=submsg.startbody(“text/plain”)FirstPartFile.write(“Hello!\nThis is a text part.\n”)FirstPartFile.write(“It was a dark and stormy night...\n”)FirstPartFile.write(“ * * TO BE CONTINUED * *\n”)# Sub-part 2: Message with parallel html and image submsg2=msg.nextpart()# Generate boundary for sub-parts:InnerBoundary=mimetools.choose_boundary()submsg2.startmultipartbody(“mixed”,InnerBoundary)
Note
4807-7 ch17.F 5/24/01 8:59 AM Page 314

315Chapter 17 ✦ Handling Internet Data
submsg2part1=submsg2.nextpart()# Sub-part 2.1: HTML pageSubTextFile=submsg2part1.startbody(“text/html”)SubTextFile.write(“<html><title>Hello!</title>\n”)SubTextFile.write(“<body>Hello world!</body></html>\n”)# Sub-part 2.2: Picture, encoded with base64 encodingsubmsg2part2=submsg2.nextpart()submsg2part2.addheader(“Content-Transfer-Encoding”,
“base64”)ImageFile=submsg2part2.startbody(“image/gif”)SourceImage=open(“pic.gif”,”rb”)base64.encode(SourceImage,ImageFile)# Finish off the sub-message and the main message:submsg2.lastpart()msg.lastpart()MessageFile.close() # all done!
def TestReading():MessageFile=open(“BigMessage.txt”,”r”)# Parse the message boundary using mimetools:msg=mimetools.Message(MessageFile)OuterBoundary=msg.getparam(“boundary”)reader=multifile.MultiFile(MessageFile)reader.push(OuterBoundary)print “**Text for non-MIME-capable readers:”print reader.read()reader.next()print “**Text message:”print reader.read()reader.next()# Parse the inner boundary:msg=mimetools.Message(reader)InnerBoundary=msg.getparam(“boundary”)reader.seek(0) # rewind!reader.push(InnerBoundary)reader.next() # seek to part 2.1print “**HTML page:”print reader.read()reader.next()print “**Writing image to pic2.gif...”# seek to start of (encoded) body:msg=mimetools.Message(reader)msg.rewindbody()# decode the image:ImageFile=open(“pic2.gif”,”wb”)base64.decode(reader,ImageFile)
if (__name__==”__main__”):TestWriting()TestReading()
4807-7 ch17.F 5/24/01 8:59 AM Page 315

316 Part III ✦ Networking and the Internet
Handling document typesThere is no official mapping between MIME types and file extensions. However, the
module mimetypes can make reasonable guesses. The function guess_extension(type) returns a reasonable extension for files of content-type type, or None if it
has no idea.
The function guess_type(filename) returns a tuple of the form (type, encoding).
Here, type is a content-type that is probably valid, based on the file’s extension. If
guess_type doesn’t have a good guess for type, it returns None. The value encod-ing is the name of the encoding program used on the file, or None:
>>> mimetypes.guess_extension(“text/plain”)‘.txt’>>> mimetypes.guess_type(“fred.txt”)(‘text/plain’, None)>>> mimetypes.guess_type(“Spam.mp3”)(None, None)
You can customize the mapping between extensions and types. Many systems store
files named mime.types to hold this mapping; the mimetools module keeps a list of
common UNIX paths to such files in knownfiles. The function read_mime_types(filename) reads mappings from the specified file. Each line of the file should
include a mime-type and then one or more extensions, separated by whitespace.
Listing 17-3 shows a sample mime.types file:
Listing 17-3: sample mime.types file
plain/text txt application/mp3 mp3 mp2
The function init([files]) reads mappings from the files in the list files, which
defaults to knownfiles. Files later in the list override earlier files in the case of a
conflict. The module variable inited is true if init has been called; calling initmultiple times is allowed. The following shows an easy way to customize the
mapping:
>>> MyPath=”c:\\python20\\mime.types” # (customize this) >>> mimetools.init([MyPath]) # old settings may be overridden
You can also directly access the mapping from extensions to encodings
(encodings_map), and the mapping from extensions to MIME-types (types_map).
The mapping suffix_map is used to map the extensions .tgz, .taz, and .tz to
.tar.gz.
4807-7 ch17.F 5/24/01 8:59 AM Page 316

317Chapter 17 ✦ Handling Internet Data
Parsing mailcap filesA mailcap (for “mail capability”) file maps document MIME-types to commands
appropriate for each type of document. Mailcap files are commonly used on UNIX
systems. (On Windows, file associations are normally stored in the registry.)
See RFC 1524 for a definition of the file format.
The module mailcap provides functions to help retrieve information from mailcap
files. The function getcaps returns a dictionary of mailcap information. You use it
by passing it to findmatch(caps,MIMEType[,key[,filename[,plist]]]). Here,
caps is the dictionary returned by getcaps, and MIMEType is the type of document
to access. The parameter key is the type of access (such as view, compose, or edit);
it defaults to view. The return value of findmatch is the command line to execute
(through os.system, for example). You can pass a list of extra parameters in plist.Each entry should take the form name=value — for example, colors=256.
The function getcaps parses /etc/mailcap, /usr/etc/mailcap, /usr/local/etc/mailcap,
and $HOME/mailcap. The user mailcap file, if any, overrides the system mailcap
settings.
Encoding and Decoding Message DataE-mail messages must pass through various systems on their way from one person
to another. Different computers handle data in different (sometimes incompatible)
ways. Therefore, most e-mail programs encode binary data as 7-bit ASCII text. The
encoded file is larger than the original, but is less likely to be mangled in transit.
Python provides modules to help use three such encoding schemes — uuencode,
base64, and quoted-printable.
UuencodeThe module uu provides functions to encode (binary-to-ASCII) and decode
(ASCII-to-binary) binary files using uuencoding. The function encode(input,output[,name[,mode]]) uuencodes the file input, writing the resulting output to
the file output. If passed, name and mode are put into the file header as the file name
and permissions.
The function decode(input,output) decodes from the file input to the file output.
For example, the following lines encode a Flash animationfile.>>> source=open(“pample2.swf”,”rb”)>>> destination=open(“pample2.uu”,”w”)>>> uu.encode(source,destination)
Cross-Reference
4807-7 ch17.F 5/24/01 8:59 AM Page 317

318 Part III ✦ Networking and the Internet
In this case, the file must be opened in binary mode (“rb”) under Windows orMacintosh; this is not necessary on UNIX.
These lines decode the file, and then launch it in a browser window:
>>> source=open(“pample2.uu”,”r”)>>> destination=open(“pample.swf”,”wb”)>>> uu.decode(source,destination)>>> destination.close()>>> Webbrowser.open(“pample.swf”)
It is possible to pass file names (instead of open files) to encode or decode.However, this usage is deprecated.
Base64Base64 is another algorithm for encoding binary data as ASCII. The module base64provides functions for working with MIME base64 encoding.
The function encodestring(data) encodes a string of binary data, data, and
returns a string of base64-encoded data. The function encode(input, output)reads data from the filelike object input, and writes an encoded base64 string to the
filelike object output.
To decode a base64 string, call decodestring(data). To decode from one filelike
object to another, call decode(input,output).
Base64 is sometimes used to hide data from prying eyes. It is no substitute for
encryption, but is better than nothing. The code in Listing 17-4 uses base64 to hide
the files from one directory in another directory:
Listing 17-4: Conceal.py
import base64import stringimport os“”” Hide files by base64-encoding them. Use Conceal to hidefiles, and Reveal to un-hide them. “””
# not ok for filenames:EvilChars=”/\n”# not Base64 characters, ok for filenames:GoodChars=”_ “TranslateEvil = string.maketrans(EvilChars,GoodChars)UnTranslateEvil = string.maketrans(GoodChars,EvilChars)
Note
Note
4807-7 ch17.F 5/24/01 8:59 AM Page 318

319Chapter 17 ✦ Handling Internet Data
def GetEncodedName(OldName):MagicName = base64.encodestring(OldName)MagicName = string.translate(MagicName,TranslateEvil)return MagicName
def GetDecodedName(OldName):MagicName = string.translate(OldName,UnTranslateEvil)MagicName = base64.decodestring(OldName)return MagicName
def Conceal(SourceDir,DestDir):“”” Encode the files in sourcedir as files in destdir “””for FileName in os.listdir(SourceDir):
FilePath = os.path.join(SourceDir,FileName)# Note: need “rb” here! (on UNIX, just “r” is ok)InFile=open(FilePath,”rb”)OutputFilePath=os.path.join(
DestDir,GetEncodedName(FileName))OutFile=open(OutputFilePath,”w”)base64.encode(InFile,OutFile)InFile.close()OutFile.close()
def Reveal(SourceDir,DestDir):“”” Decode the files in sourcedir into destdir “””for FileName in os.listdir(SourceDir):
FilePath = os.path.join(SourceDir,FileName)InFile=open(FilePath,”r”)
OutputFilePath=os.path.join(DestDir,GetDecodedName(FileName))OutFile=open(OutputFilePath,”wb”)base64.decode(InFile,OutFile)InFile.close()OutFile.close()
Quoted-printableQuoted-printable encoding is another scheme for encoding binary data as ASCII
text. It works best for strings with relatively few non-ASCII characters (such as
German text, with occasional umlauts); for binary files such as images, base64 is
more appropriate.
The module quopri provides functions to handle quoted-printable encoding. The
function decode(input,output) decodes from the filelike object input to the file-
like object output. The function encode(input,output,quotetabs) encodes from
input to output. The parameter quotetabs indicates whether tabs should be quoted.
4807-7 ch17.F 5/24/01 8:59 AM Page 319

320 Part III ✦ Networking and the Internet
Working with UNIX MailboxesMany UNIX mail programs store all e-mail in one file or directory called a mailbox.
The module mailbox provides utility classes for parsing such a mailbox. Each class
provides a single method, next, which returns the next rfc822.Message object.
Mailbox parser constructors each take either a file object or directory name as
their only argument. Table 17-2 lists the available mailbox parser classes.
Table 17-2Mailbox Parsers
Class Mailbox Type
UnixMailbox Classic UNIX-style mailbox, as used by elm or pine
MmdfMailbox MMDF mailbox
MHMailbox MH mailbox (directory)
Maildir Qmail mailbox (directory)
BabylMailbox Babyl mailbox
Working with MH mailboxesThe module mhlib provides advanced features for managing MH mailboxes. It
includes three classes: MH represents a collection of mail folders, Folder represents
a single mail folder, and Message represents a single message.
MH objectsThe constructor has the syntax MH([path[,profile]]). You can pass path and/or
profile to override the default mailbox directory and profile.
The method openfolder(name) returns a Folder object for the folder name. The
method setcontext(name) sets the current folder to name; getcontext retrieves
the current folder (initially “inbox”).
The method listfolders returns a sorted list of top-level folder names;
listallfolders returns a list of all folder names. listsubfolders(name) returns
a list of immediate child folders of the folder name; listallsubfolders(name)returns a list of all subfolders of the folder name.
The methods makefolder(name) and deletefolder(name) create and destroy a
folder with the given name.
4807-7 ch17.F 5/24/01 8:59 AM Page 320

321Chapter 17 ✦ Handling Internet Data
The method getpath returns the path to the mailbox. The method
getprofile(key) returns the profile entry for key (or None, if none is set). And
the method error(format,arguments) prints the error message (format %arguments) to stderr.
Folder objectsThe methods getcurrent and setcurrent(index) are accessors for the current
message number. getlast returns the index of the last message (or 0 if there are no
messages). listmessages returns a list of message indices.
The method getsequences returns a dictionary of sequences, where each key is a
sequence name and the corresponding value is a list of the sequence’s message
numbers. putsequences(dict) writes such a dictionary of sequences back to the
sequence files. The method parsesequence(str) parses the string str into a list of
message numbers.
You can delete messages with removemessages(list), or move them to a new
folder with refilemessages(list, newfolder). Here, list is a list of message
numbers on which to operate. You can move one message by calling
movemessage(index, newfolder,newindex), or copy one message by calling
copymessage(index,newfolder,newindex). Here, newindex is the desired
message number in the new folder newfolder.
The path to the folder is accessible through getfullname, while
getsequencesfilename returns the path to the sequences file, and
getmessagefilename(index) returns the full path to message index. The
method error(format,arguments) prints the error message (format %arguments) to stderr.
Message objectsThe class mh.Message is a subclass of mimetools.Message. It provides one extra
method, openmessage(index), which returns a new Message object for message
number index.
Using Web CookiesA cookie is a token used to manage sessions on the World Wide Web. Web servers
send cookie values to a browser; the browser then regurgitates cookie values when
it sends a Web request. The module Cookie provides classes to handle cookies. It is
especially useful for making a robot, as many Web sites require cookies to function
properly.
4807-7 ch17.F 5/24/01 8:59 AM Page 321

322 Part III ✦ Networking and the Internet
CookiesThe class SimpleCookie is a dictionary mapping cookie names to cookie values.
Each cookie value is stored as a Cookie.Morsel. You can pass a cookie string (as
received from the Web server) to SimpleCookie’s constructor, or to its loadmethod.
To retrieve cookie values in a format suitable for inclusion in an HTTP request, call
the method output([attributes[,header[,separator]]]). To retrieve only
some cookie attributes, pass a list of desired attributes in attributes. The parameter
header is the header to use (by default, “Set-Cookie:”). Finally, separator is the
separator to place between cookies (by default, a newline).
For example, the following lines capture cookies as returned from a Web request:
>>> Request=httplib.HTTP(“www.mp3.com”)>>> Request.putrequest(“GET”,URLString)>>> Request.endheaders()>>> Response=Request.getreply()>>> # Response[2] is the header dictionary>>> CookieString=Response[2][“set-cookie”]>>> print CookieStringLANG=eng; path=/; domain=.mp3.com>>> CookieJar=Cookie.SimpleCookie()>>> CookieJar.load(CookieString)>>> print CookieJar.output()‘Set-Cookie: LANG=eng; Path=/; Domain=.mp3.com;’>>> print CookieJar.output([“domain”])‘Set-Cookie: LANG=eng; Domain=.mp3.com;’
The method js_output([attributes]) also outputs cookies, this time in the
form of a JavaScript snippet to set their values.
MorselsA morsel stores a cookie name in the attribute key, its value in the attribute value,
and its coded value (suitable for sending) in the attribute coded_value. The conve-
nience function set(key, value, coded_value) sets all three attributes.
Morsels provide output and js_output methods mirroring those of their owning
cookie; they also provide an OutputString([attributes]) method that returns
the morsel as a human-readable string.
A morsel also functions as a dictionary, whose keys are cookie attributes (expires,
path, comment, domain, max-age, secure, and version). The method
isReservedKey(key) tests whether key is one of the reserved cookie attributes.
4807-7 ch17.F 5/24/01 8:59 AM Page 322

323Chapter 17 ✦ Handling Internet Data
When sending cookies in an HTTP request, you should only send cookies whosedomain is a substring of the host’s name. Otherwise, you might confuse the host.Or, you may send it information it shouldn’t know about, such as passwords for anunrelated site. Moreover, be aware that the Cookie class only handles one valuefor a given name; setting a new value for that name overwrites the old one.
Example: a cookie importerThe code in Listing 17-5 provides functions to import cookies from Internet
Explorer 5.0 or Netscape.
Listing 17-5: CookieMonster.py
import Cookieimport os
def AddMorsel(CookieJar,CookieName,CookieValue,HostString):# Cookie set expects a string, so CookieJar[“name”]=”value”# is ok, but CookieJar[“name”]=Morsel is not ok.# But, cookie get returns a Morsel:CookieJar[CookieName]=CookieValueCookieJar[CookieName][“domain”]=HostString
def ParseNetscapeCookies(filename):# Netscape stores cookies in one tab-delimited file,# starting on the fourth lineCookieFile=open(filename)CookieLines=CookieFile.readlines()[4:]CookieFile.close()CookieJar=Cookie.SimpleCookie()for CookieLine in CookieLines:
CookieParts = CookieLine.strip().split(‘\t’)AddMorsel(CookieJar,CookieParts[-2],
CookieParts[-1],CookieParts[0])return CookieJar
def ParseIECookies(dir):CookieJar=Cookie.SimpleCookie()for FileName in os.listdir(dir):
# Skip non-cookie files:if len(FileName)<3 or FileName[-3:].upper()!=”TXT”:
continueCookieFile=open(os.path.join(dir,FileName))CookieLines=CookieFile.readlines()CookieFile.close()LineIndex=0
Continued
Caution
4807-7 ch17.F 5/24/01 8:59 AM Page 323

324 Part III ✦ Networking and the Internet
Listing 17-5 (continued)
while (LineIndex+2)<len(CookieLines):# :-1 removes trailing newlineCookieName=CookieLines[LineIndex][:-1]CookieValue=CookieLines[LineIndex+1][:-1]HostString=CookieLines[LineIndex+2][:-1]AddMorsel(CookieJar,CookieName,
CookieValue,HostString)LineIndex+=9
return CookieJar
def OutputForHost(CookieJar,Host,attr=None,header=”Set-Cookie:”,sep=”\n”):
# Return only cookie values matching the specified host.CookieHeader=””for OneMorsel in CookieJar.values():
MorselHost=OneMorsel.get(“domain”,None)if (MorselHost==None or Host.find(MorselHost)!=-1):
CookieHeader+=OneMorsel.output(attr,header)+sepreturn CookieHeader
if (__name__==”__main__”):Cookies=ParseIECookies(
“C:\\Documents and Settings\\Administrator\\Cookies\\”)print OutputForHost(Cookies,”www.thestreet.com/”)
SummaryPython’s standard libraries help with many common tasks in Internet programming.
In this chapter, you:
✦ Parsed robots.txt to create a well-behaved robo-browser.
✦ Handled various e-mail headers.
✦ Imported cookies from a browser cache.
In the next chapter, you learn simple, powerful ways to make your Python programs
parse HTML and XML.
✦ ✦ ✦
4807-7 ch17.F 5/24/01 8:59 AM Page 324

Parsing XMLand OtherMarkupLanguages
Markup languages are a powerful way to store text,
complete with formatting and metadata. HTML is the
format for about half a billion pages on the World Wide Web.
Extensible Markup Language (XML) promises to facilitate data
exchange of all types.
Python includes standard libraries to parse HTML and XML.
This chapter shows you how to use these libraries to create a
Web robot, a data importer/exporter, and more.
Markup Language BasicsHyperText Markup Language, or HTML, is used for nearly all
the pages on the World Wide Web. It defines tags to control
the formatting of text, graphics, and so forth, by a browser.
Extensible Markup Language, or XML, is a tool for data
exchange. It includes metadata tags to explain what text items
mean. For instance, a person (or program) reading the
number “120/80” might not know that it represents a blood
pressure, but XML can include tags to make this clear:
<blood-pressure>120/80</blood-pressure>
Standard general markup language, or SGML, is very general
and rarely used.
1818C H A P T E R
✦ ✦ ✦ ✦
In This Chapter
Markup languagebasics
Parsing HTML files
Example: bold only
Example: Web robot
Parsing XML withSAX
Parsing XML withDOM
Parsing XML withxmllib
✦ ✦ ✦ ✦
4807-7 ch18.F 5/24/01 8:59 AM Page 325

326 Part III ✦ Networking and the Internet
Tags are for metatextMarkup languages are a way to store text together with tags. Tags are metatext that
govern the text’s formatting or describe its meaning. Tags are enclosed in brackets
<like this>. An opening tag has a corresponding closing tag, which includes a back-
slash </like this>. The text between (inside) the tags is the text they describe or
modify. For example, the following HTML fragment formats a sentence:
Presentation tags can set <b>bold</b> type or <i>italics</i>
Tags may have attributes to refine their meanings. For example, in HTML, the fonttag sets the font, and the color attribute specifies the desired font color:
<FONT COLOR=#FFFFFF>white text</FONT>
In XML, the information contained between a start tag and its end tag is called an
element. Elements store data, and may contain sub-elements. Start and end tags
may be collapsed into a single tag for the element:
<blood type=”A” color=”red” />
XML data can be stored in the element attributes, or in text. For example, these
lines are both reasonable ways to store a person’s name:
<Person name=”Bob Hope” /><Person>Bob Hope</Person>
Tag rulesIn XML, each start tag must have a corresponding end tag. This is a good idea in
HTML as well. Many HTML documents do not close all their tags; however, the
World Wide Web Consortium (W3C) has proposed a new standard, XHTML, that
requires an end tag for each start tag.
Tags may be nested within other tags. It is best to close a child tag before closing
its parent tag. This is mandatory in XML. It is recommended in HTML, as bad test-
ing may make a Web page render badly:
<b>I’m not dead <i>yet</b></i> Bad!<b>I’m not dead <i>yet</i></b> Good!
The available tags in HTML are described in the HTML standard. The available tags
in XML vary from file to file — because XML is Extensible Markup Language, one
extends it by adding new tags. A Document Type Descriptor, or DTD, lists available
tags for an XML document. A DTD also includes rules for tag placement — which
tags are parents of other tags, and so on.
4807-7 ch18.F 5/24/01 8:59 AM Page 326

327Chapter 18 ✦ Parsing XML and Other Markup Languages
NamespacesXML files can organize tag and attribute names into namespaces. A name within a
namespace takes the form NamespacePrefix:Name. For example, this tag’s local
name is Name, and its namespace prefix is Patient:
<Patient:Name>Alfred</Patient:Name>
A namespace prefix maps to a particular URI, which is often the URL of a Web page
explaining the namespace. In general, when parsing XML, you can ignore names-
paces. But, they are a handy tool for designing a good XML DTD.
Processing XMLThere are two main ways of processing XML. You can parse the entire document
into memory, and navigate the tree of tags and attributes at your leisure. The
Document Object Model (DOM) API is an interface for such a parser. Or, you can
perform event-driven parsing, handling each tag as you read it from the file. The
Simple API for XML (SAX) is an interface for such a parser. (The module xmllib is
also an event-driven parser.)
Of the two interfaces, I find DOM to be the easiest. Also, DOM can change an XML
file without doing direct string manipulation, which gives it big points in my book.
One disadvantage of DOM is that it must read the entire XML file into memory
upfront, so SAX may be a better choice if you must parse mammoth XML files. Both
interfaces are very rich, offering more features than you are likely to need or want;
this chapter covers only the core of the two parsing APIs.
In order to process XML with Python, you will need a third-party XML parser. The
Python distribution for Windows currently includes the Expat non-validating parser.
But on UNIX, you will need to build the Expat library, and make sure that the pyex-
pat module is built as well.
Parsing HTML FilesThe module htmllib defines the HTMLParser class. You create a subclass of
HTMLParser to build your own HTML parser. The HTMLParser class is itself a
subclass of sgmllib.SGMLParser, but you will probably never use the superclass
directly.
The HTMLParser constructor takes a formatter, as defined in the formatter mod-
ule. (See Chapter 17 for information about formatter.) The formatter is used to
output the text in the HTML stream. The member formatter is a reference to the
parser’s formatter. If you don’t need to use a formatter, you can use a null formatter,
as the following subclass does:
4807-7 ch18.F 5/24/01 8:59 AM Page 327

328 Part III ✦ Networking and the Internet
class SimpleHTMLParser(htmllib.HTMLParser):def __init__(self):
# initialize the superclasshtmllib.HTMLParser.__init__(self,
formatter.NullFormatter()) # ... override other methods here ...
HTMLParser methodsCall the method feed(text) to send the HTML string text into the parser. You can
feed the parser an entire file at one time, or one piece at a time; its behavior is the
same. The reset method causes the parser to forget everything it was doing and
start over. The close method finishes off the current file; it has the same effect as
feeding an end-of-file marker to the parser. If you override close, your subclass’s
close method should call the close method of the superclass.
The method get_starttag_text returns the text of the most recently opened tag.
The method setnomoretags tells the parser to stop processing tags. Similarly, the
method setliteral tells the parser to treat the following text literally (ignoring tags).
Handling tagsTo handle a particular tag, define start_xxx and end_xxx methods in your class,
where xxx is the tag (in lowercase). A start_xxx method takes one parameter — a
list of name-value pairs corresponding to the HTML tag’s arguments. An end_xxxmethod takes no arguments.
You can also handle a tag with a method of the form do_xxx(arguments). The domethod is called only if start and end methods are not defined.
For example, the following method prints the name of any background image for
the page, as defined in a <BODY> tag:
def do_body(self,args): for ValTuple in args:
# convert arg-name to upper-caseif string.upper(ValTuple[0])==”BACKGROUND”:
print “Page background image:”,ValTuple[1]
Other parsing methodsThe method handle_data(data) is called to handle standard text that is not part
of a tag. Note that handle_data may be called one or several times for one contigu-
ous “block” of data.
The method anchor_bgn(href, name, type) is called for the start of an anchor
tag, <a>. The method anchor_end is called at the end of an anchor. By default,
these methods build up a list of links in the member anchorlist.
4807-7 ch18.F 5/24/01 8:59 AM Page 328

329Chapter 18 ✦ Parsing XML and Other Markup Languages
The method handle_image(source,alt[,ismap[,align[,width[,height]]]])is called when an image is encountered. The default implementation simply hands
the string alt over to handle_data.
The method save_bgn starts storing data, instead of sending it to the formatter via
handle_data. The method save_end returns all the data buffered since the call to
save_bgn. These calls may not be nested, and save_end may not be called before
save_bgn.
If a tag handler (of the form start_xxx or do_xxx) is defined for a tag, the method
handle_starttag(tag,method,arguments) is called. The parameter tag is the
tag name (in lowercase), and method is the start or do method for the tag. By
default, handle_starttag calls method, passing arguments.
Similarly, the method handle_endtag(tag,method) is called for a tag if you have
defined an end method for that tag.
The method handle_charref(ref) processes character references of the form
&#ref. By default, ref is interpreted as an ASCII character value from 0 to 255, and
handed over to handle_data.
The method handle_entityref(ref) processes entity references of the form
&ref. By default, it looks at the attribute entitydefs, which should be a dictionary
mapping from entity names to meanings. The variable htmlentitydefs.entitydefs defines the default entity definitions for HTMLParser. For example,
the codes &, &apos, >, <, and " translate into the characters & ‘ > < “.
The method handle_comment(commenttext) is called when a comment of the
form <!-commenttext-> is encountered.
The attribute nofill is a flag governing the handling of whitespace. Normally, nofill
is false, which causes whitespace to be collapsed. It affects the behavior of han-dle_data and save_end.
Handling unknown or bogus elementsThe HTMLParser defines methods to handle unknown HTML elements. By default,
these methods do nothing; you may want to override them (to report an error, for
example).
The method unknown_starttag(tag, attributes) is called when a tag with no
start method is encountered. (For a given tag, either handle_starttag or
unknown_starttag is called.) The method unknown_endtag(tag) is called for
unknown end tags. The methods unknown_charref(ref) and unknown_enti-tyref(ref) handle unknown character and entity references, respectively.
The method report_unbalanced(tag) is called if the parser encounters a closing
tag tag with no corresponding opening tag.
4807-7 ch18.F 5/24/01 8:59 AM Page 329

330 Part III ✦ Networking and the Internet
Example: Bold OnlyListing 18-1 illustrates a simple subclass of HTMLParser that filters out only bold
text from an HTML stream. Listing 18-2 shows sample output from the parser.
Listing 18-1: BoldOnly.py
import htmllibimport formatter
TEST_HMTL_STRING=”””<html><title>A poem</title>There once was a <b>poet named Dan</b><br>Who could not make <b>limericks</b> scan<br>He’d be doing just fine<br>Till the <b>very last line</b>Then he’d squeeze in <b>too many syllables</b> and it wouldn’t even rhyme<br></html>”””
class PrintBoldOnly(htmllib.HTMLParser):def __init__(self):
## AAbbssttrraaccttFFoorrmmaatttteerr hhaannddss ooffff tteexxtt ttoo tthhee wwrriitteerr.. htmllib.HTMLParser.__init__(self,
formatter.AbstractFormatter(formatter.DumbWriter()))self.Printing=0 ## ddoonn’’tt pprriinntt uunnttiill wwee sseeee bboolldd## NNoottee:: TThhee bboolldd ttaagg <<bb>> ttaakkeess nnoo aattttrriibbuutteess,, ssoo tthhee## aattttrriibbuutteess ppaarraammeetteerr ffoorr ssttaarrtt__bb wwiillll aallwwaayyss bbee aann ## eemmppttyy lliisstt))
def start_b(self,attributes):self.Printing=1
def end_b(self):self.Printing=0
def handle_data(self,text):if (self.Printing):
## CCaallll ssuuppeerrccllaassss mmeetthhoodd,, ppaassss tteexxtt ttoo ffoorrmmaatttteerr::htmllib.HTMLParser.handle_data(self,text)
if (__name__==”__main__”):Test=PrintBoldOnly()Test.feed(TEST_HMTL_STRING)Test.close()
4807-7 ch18.F 5/24/01 8:59 AM Page 330

331Chapter 18 ✦ Parsing XML and Other Markup Languages
Listing 18-2: BoldOnly output
poet named Danlimericksvery last line too many syllables
Example: Web RobotA robot is a program that browses the World Wide Web automatically. Listing 18-3 is
a simple robot. It follows links between pages, and saves pages to the local disk. It
overrides several methods of the HTMLParser in order to follow various links.
Listing 18-3: Robot.py
import htmllibimport formatterimport urlparseimport reimport osimport stringimport urllib
# Redefine this to a directory where you want to put filesROOT_DIR = “c:\\python20\\robotfiles\\”
# Web page file extensions that usually return HTMLHTML_EXTENSION_DICT={“”:1,”HTM”:1,”HTML”:1,”PHTML”:1,”SHTML”:1,”PHP”:1,”PHP3”:1,”HTS”:1,”ASP”:1,”PL”:1,”JSP”:1,”CGI”:1}
# Use this string to limit the robot to one site—only URLs# that contain this string will be retrieved. If this is null,# the robot will attempt to pull down the whole WWW.REQUIRED_URL_STRING=”kibo.com”# Compile a regular expression for case-insensitive matching of # the required stringRequiredUrlRE = re.compile(re.escape(REQUIRED_URL_STRING),
re.IGNORECASE)
# Keep track of all the pages we have visited in a dictionary,# so that we don’t hit the same page repeatedly.VisitedURLs={}
# Queue of target URLsTargetURLList=[“http://www.kibo.com/index.html”]
Continued
4807-7 ch18.F 5/24/01 8:59 AM Page 331

332 Part III ✦ Networking and the Internet
Listing 18-3 (continued)
def AddURLToList(NewURL):# Skip duplicate URLsif (VisitedURLs.has_key(NewURL)): return# Skip URLs that don’t contain the proper substringif (not RequiredUrlRE.search(NewURL)): return# Add URL to the target listTargetURLList.append(NewURL)
# Chop file-extension from the end of a URLdef GetExtensionFromString(FileString):
DotChunks=string.split(FileString,”.”)if len(DotChunks)==1: return “” LastBlock=DotChunks[-1] # Take stuff after the last .if string.find(LastBlock,”/”)!=-1:
return “”if string.find(LastBlock,”\\”)!=-1:
return “” return string.upper(LastBlock)
class HTMLRobot(htmllib.HTMLParser):def StartNewPage(self,BaseURL):
self.BaseURL=BaseURLdef __init__(self):
# Initialize the master classhtmllib.HTMLParser.__init__(
self,formatter.NullFormatter())def do_body(self,args):
# Retrieve background image, if anyfor ValTuple in args:
if string.upper(ValTuple[0])==”BACKGROUND”:ImageURL = urlparse.urljoin(self.BaseURL, ValTuple[1])
AddURLToList(ImageURL) def do_embed(self,args):
# Handle embedded contentfor ValTuple in args:
if string.upper(ValTuple[0])==”SRC”:self.HandleAnchor(ValTuple[1])
def do_area(self,args):# Handle areas inside an imagemapfor ValTuple in args:
if string.upper(ValTuple[0])==”HREF”:self.HandleAnchor(ValTuple[1])
def handle_image(self, source, alt, ismap, align, width, height):
# Retrieve imagesImageURL = urlparse.urljoin(self.BaseURL, source) AddURLToList(ImageURL)
def anchor_bgn(self,TempURL,name,type):# Anchors (links). Skip mailto links.
4807-7 ch18.F 5/24/01 8:59 AM Page 332

333Chapter 18 ✦ Parsing XML and Other Markup Languages
if TempURL[0:7].upper() == “MAILTO:”: returnNewURL=urlparse.urljoin(self.BaseURL,TempURL)AddURLToList(NewURL)
def do_frame(self,args):# Handle a sub-frame as a linkfor ValTuple in args:
if string.upper(ValTuple[0])==”SRC”:self.anchor_bgn(ValTuple[1],””,””)
def do_option(self,args):for ValTuple in args:
if string.upper(ValTuple[0])==”VALUE”:# This might be a Webpage...
TheExtension = \GetExtensionFromString(ValTuple[1])
if HTML_EXTENSION_DICT.has_key(TheExtension):self.anchor_bgn(ValTuple[1],””,””)
if (__name__==”__main__”):Parser = HTMLRobot()while (len(TargetURLList)>0):
# Take the next URL off the listNextURL = TargetURLList[0]del TargetURLList[0]VisitedURLs[NextURL]=1 # flag as visitedprint “Retrieving:”,NextURL# Parse the URL, and decide whether# we think it’s HTML or not:URLTuple=urlparse.urlparse(NextURL,”http”,0)TheExtension=GetExtensionFromString(URLTuple[2])# Get a local filename; make directories as neededTargetPath=os.path.normpath(ROOT_DIR+URLTuple[2])# If no extension, assume it’s a directory and # retrieve index.html. if (TheExtension==””):
TargetDir=TargetPathTargetPath=os.path.normpath(TargetPath+”/index.html”)
else:(TargetDir,TargetFile)=os.path.split(TargetPath)
try:os.makedirs(TargetDir)
except:pass # Ignore exception if directory exists
if HTML_EXTENSION_DICT.has_key(TheExtension):# This is HTML - retrieve it to disk and then# feed it to the parserURLFile=urllib.urlopen(NextURL)HTMLText = URLFile.read()URLFile.close()HTMLFile=open(TargetPath,”w”)HTMLFile.write(HTMLText)
Continued
4807-7 ch18.F 5/24/01 8:59 AM Page 333

334 Part III ✦ Networking and the Internet
Listing 18-3 (continued)
HTMLFile.close()Parser.StartNewPage(NextURL)Parser.feed(HTMLText)Parser.close()
else:# This isn’t HTML - save to diskurllib.urlretrieve(NextURL,TargetPath)
Parsing XML with SAXSAX is a standard interface for event-driven XML parsing. Parsers that implement
SAX are available in Java, C++, and (of course) Python. The module xml.sax is the
overseer of SAX parsers.
The method xml.sax.parse(xmlfile,contenthandler[,errorhandler])creates a SAX parser and parses the specified XML. The parameter xmlfile can be
either a file or the name of a file to read from. The parameter contenthandler must
be a ContentHandler object. If specified, errorhandler must be a SAX ErrorHandler
object. If no error handler is provided and an error occurs, the parser will
raise a SAXParseException if it encounters errors. Similarly, the method
parseString(xmlstring,contenthandler[,errorhandler]) parses XML
from the supplied string xmlstring.
Parsing XML with SAX generally requires you to create your own ContentHandler,
by subclassing xml.sax.ContentHandler. Your ContentHandler handles the par-
ticular tags and attributes of your flavor(s) of XML.
Using a ContentHandlerA ContentHandler object provides methods to handle various parsing events. Its
owning parser calls ContentHandler methods as it parses the XML file. The method
setDocumentLocator(locator) is normally called first. The methods
startDocument and endDocument are called at the start and the end of the XML
file. The method characters(text) is passed character data of the XML file via
the parameter text.
The ContentHandler is called at the start and end of each element. If the parser is
not in namespace mode, the methods startElement(tag, attributes) and
endElement(tag) are called; otherwise, the corresponding methods
startElementNS and endElementNS are called. Here, tag is the element tag, and
attributes is an Attributes object.
4807-7 ch18.F 5/24/01 8:59 AM Page 334

335Chapter 18 ✦ Parsing XML and Other Markup Languages
The methods startPrefixMapping(prefix,URI) and endPrefixMapping(pre-fix) are called for each namespace mapping; normally, namespace processing is
handled by the XMLReader itself. For a given prefix, endPrefixMethod will be
called after the corresponding call to startPrefixMapping, but otherwise the
order of calls is not guaranteed.
The method ignorableWhitespace(spaces) is called for a string spaces of
whitespace. The method processingInstruction(target,text) is called when
a processing instruction (other than an XML declaration) is encountered. The
method skippedEntity(entityname) is called when the parser skips any entity.
A ContentHandler receives an Attributes object in calls to the startElementmethod. The Attributes object wraps a dictionary of attributes (keys) and their val-
ues. The method getLength returns the number of attributes. The methods items,
keys, kas_key, and values wrap the corresponding dictionary methods. The
method getValue(name) returns the value for an attribute name; if namespaces
are active, the method getValueByQName(name) returns the value for a qualified
attribute name.
Example: blood-type extractorListing 18-4 uses a SAX parser to extract a patient’s blood type from the same exam
data XML uses in Listing 18-5 and Listing 18-6.
Listing 18-4: BloodTypeSax.py
import xml.saximport cStringIO
SAMPLE_DATA = “””<?xml version=”1.0”?><exam date=”12/11/99”><patient>Pat</patient><bloodtype>B</bloodtype></exam >”””
class ExamHandler(xml.sax.ContentHandler):def __init__(self):
self.CurrentData=””self.BloodType=””
def characters(self,text):if self.CurrentData==”bloodtype”:
self.BloodType+=text# We use the non-namespace-aware element handlers:def startElement(self,tag,attributes):
self.CurrentData=tagdef endElement(self,tag):
Continued
4807-7 ch18.F 5/24/01 8:59 AM Page 335

336 Part III ✦ Networking and the Internet
Listing 18-4 (continued)
if self.CurrentData==”bloodtype”:print “Blood type:”,self.BloodType
self.CurrentData=””
if (__name__==”__main__”):# create an XMLReaderMyParser = xml.sax.make_parser()# turn off namepsacesMyParser.setFeature(xml.sax.handler.feature_namespaces, 0)# override the default ContextHandlerHandler=ExamHandler() MyParser.setContentHandler(Handler)# Build and parse an InputSourceStringFile=cStringIO.StringIO(SAMPLE_DATA)MySource = xml.sax.InputSource(“1”)MySource.setByteStream(StringFile)MyParser.parse(MySource)
Using parser (XMLReader) objects The base parser class is xml.sax.xmlreader.XMLReader. It is normally not
necessary to instantiate parser objects directly. However, you can access a parser
to exercise tighter control on XML parsing.
The method xml.sax.make_parser([parserlist]) creates and returns an XML
parser. If you want to use a specific SAX parser (such as Expat), pass the name of its
module in the parserlist sequence. The module in question must define a
create_parser function.
Once you have an XML parser, you can call its method parse(source), where
source is a filelike object, a URL, or a file name.
An XML parser has properties and features, which can be set and queried by name.
For example, the following lines check and toggle namespace mode for a parser:
>>> MyParser=xml.sax.make_parser()>>> MyParser.getFeature(\
“http://xml.org/sax/features/namespaces”)0>>> # Activate namespace processing>>> MyParser.setFeature(\
“http://xml.org/sax/features/namespaces”,1)
The features and properties available vary from parser to parser.
4807-7 ch18.F 5/24/01 8:59 AM Page 336

337Chapter 18 ✦ Parsing XML and Other Markup Languages
An XMLReader has several helper classes. You can access the parser’s
ContentHandler with the methods getContentHandler and
setContentHandler(Handler). Similarly, you can access the parser’s
ErrorHandler (with getErrorHandler and setErrorHandler), its EntityResolver,
and its DTDHandler. The helper classes let you customize the parser’s behavior
further.
ErrorHandlerAn ErrorHandler implements three methods to handle errors: error, fatalError,
and warning. Each method takes a SAXParseException as its single parameter.
DTDHandlerA DTDHandler handles only notation declarations and unparsed entity declara-
tions. The method notationDecl(name,PublicID,SystemID) is called when a
notation declaration is encountered. The method
unparsedEntityDecl(name,PublicID,SystemID,text) is called when an
unparsed entity declaration is encountered.
EntityResolverThe XMLReader calls the EntityResolver to handle external entity references. The
method resolveEntity(PublicID,SystemID) is called for each such reference —
it returns either the system identifier (as a string), or an InputSource.
LocatorMost XMLReaders supply a locator to their ContentHandler by calling its
setDocumentLocator method. The locator should only be called by the
ContentHandler in the context of a parsing method (such as characters). The
locator provides the current location, via methods getColumnNumber,
getLineNumber, getPublicId, and getSystemId.
SAX exceptionsThe base exception is SAXException. It is extended by SAXParseException,
SAXNotRecognizedException, and SAXNotSupportedException. The construc-
tors for SAXNotSupportedException and SAXNotRecognizedException take two
parameters: an error string and (optionally) an additional exception object. The
SAXParseException constructor requires these parameters, as well as a locator.
The message and exception associated with a SAXException can be retrieved by
the methods getMessage and getException, respectively.
4807-7 ch18.F 5/24/01 8:59 AM Page 337

338 Part III ✦ Networking and the Internet
Parsing XML with DOMThe DOM API parses an entire XML document, and stores a DOM (a tree representa-
tion of the document) in memory. It is a very convenient way to parse, although it
does require more memory than SAX. In addition, you can manipulate the DOM
itself, and then write out the new XML document. This is a relatively painless way
to make changes to XML documents.
A DOM is made up of nodes. Each element, each attribute, and even each comment
is a node. The most important node is the document node, which represents the
document as a whole.
The module xml.dom.minidom provides a simple version of the DOM interface. It
provides two functions, parse(file[,parser]) or
parseString(XML[,parser]), to parse XML and return a DOM. (Here parser, ifsupplied, must be a SAX parser object —minidom uses SAX internally to generate
its DOM.)
DOM nodesA node object has a type, represented by the integer attribute nodeType. The valid
node types are available as members of xml.dom.minidom.Node, and include
DOCUMENT_NODE, ELEMENT_NODE, ATTRIBUTE_NODE, and TEXT_NODE.
A node can have a parent (given by its parentNode member), and a list of children
(stored in its childNodes member). You can add child nodes by calling
appendChild(NewChild), or insertBefore(NewChild,OldChild). You can also
remove children by calling removeChild(OldChild). For example:
>>> DOM=xml.dom.minidom.parse(“Mystic Mafia.xml”) # Build DOM>>> print DOM.parentNode # The document node has no parentNone>>> print DOM.childNodes[<DOM Element: rdf at 10070740>]>>> print DOM.childNodes[0].childNodes[<DOM Text node “\n”>, <DOM Text node “\n”>, <DOM Text node ““>, <DOM Element: rdf:Description at 10052084>, <DOM Text node“\n”>]
Elements, attributes, and textAn element has a name, given by its member tagName. If the element is part of a
namespace, prefix holds its namespace’s name, localName within the namespace,
and namespaceURI is the URL of the namespace definition. You can retrieve an
4807-7 ch18.F 5/24/01 8:59 AM Page 338

339Chapter 18 ✦ Parsing XML and Other Markup Languages
element’s attribute values with the method getAttribute(AttributeName), set
attribute values with setAttribute(AttributeName, Value), and remove
attributes with the method removeAttribute(AttributeName).
The text of an element is stored in a child node of type TEXT_NODE. A text node has
an attribute, data, containing its text as a string.
For example, this code examines and edits an element:
>>> print TagNode.tagName,TagNode.prefixrdf:Description rdf>>> print TagNode.localName,TagNode.namespaceURIDescription http://www.w3.org/1999/02/22-rdf-syntax-ns#>>> TagNode.getAttribute(“type”) # Value is Unicodeu’catalog’>>> CNode.setAttribute(“arglebargle”,”test”)>>> CNode.getAttribute(“arglebargle”)‘test’>>> CNode.removeAttribute(“arglebargle”)>>> # Getting a nonexistent attribute returns “”>>> CNode.getAttribute(“arglebargle”) ‘’
The document node (DOM)A document node, or DOM, provides a handy method,
getElementsByTagName(Name), which returns a list of all the element nodes with
the specified name. This is a quick way to find the elements you care about, with-
out ever iterating through the other nodes in the document.
A DOM also provides methods to create new nodes. The method
createElement(TagName) creates a new element node, createTextNode(Text)creates a new text node, etc. The method toxml returns the DOM as an XML string.
When you are finished with a DOM, call its method unlink to clean it up.
Otherwise, the memory used by the DOM may not get garbage-collected until your
program terminates.
Example: data import and export with DOMXML is great for data interchange. Listing 18-5 is an example of XML’s power: It
exports data from a relational database to an XML file, and imports XML back into
the database. It uses the mxODBC module for database access. This test code
assumes the existence of an EMPLOYEE table (see Chapter 14 for the table’s
definition, and more information on the Python DB API).
4807-7 ch18.F 5/24/01 8:59 AM Page 339

340 Part III ✦ Networking and the Internet
Listing 18-5: XMLDB.py
import xml.dom.minidomimport ODBC.Windows # Replace for your OS as neededimport sysimport tracebackIMPORTABLE_XML = “””<?xml version=”1.0”?><tabledata><row><EMPLOYEE_ID>55</EMPLOYEE_ID><FIRST_NAME>Bertie</FIRST_NAME><LAST_NAME>Jenkins</LAST_NAME><MANAGER_ID></MANAGER_ID></row></tabledata>”””
def ExportXMLFromTable(Cursor):# We build up a DOM tree programatically, then# convert the DOM to XML. We never have to process# the XML string directly (Hooray for DOM!)DOM=xml.dom.minidom.Document()TableElement=DOM.createElement(“tabledata”)DOM.appendChild(TableElement)while (1):
DataRow=Cursor.fetchone()if DataRow==None: break # There is no more dataRowElement=DOM.createElement(“row”)TableElement.appendChild(RowElement)for Index in range(len(Cursor.description)):
ColumnName=Cursor.description[Index][0]ColumnElement=DOM.createElement(ColumnName)RowElement.appendChild(ColumnElement)ColumnValue=DataRow[Index]if (ColumnValue):
TextNode=DOM.createTextNode(\str(DataRow[Index]))
ColumnElement.appendChild(TextNode)print DOM.toxml()
def ImportXMLToTable(Cursor,XML,TableName):# Build up the SQL statement corresponding to the XMLDOM=xml.dom.minidom.parseString(XML)DataRows=DOM.getElementsByTagName(“row”)for RowElement in DataRows:
InsertSQL=”INSERT INTO %s (“%TableNamefor ChildNode in RowElement.childNodes:
if ChildNode.nodeType==\xml.dom.minidom.Node.ELEMENT_NODE:InsertSQL+=”%s,”%ChildNode.tagName
InsertSQL=InsertSQL[:-1] # Remove trailing commaInsertSQL+=”) values (“for ChildNode in RowElement.childNodes:
if ChildNode.nodeType==\xml.dom.minidom.Node.ELEMENT_NODE:ColumnValue=GetNodeText(ChildNode)InsertSQL+=”%s,”%SQLEscape(ColumnValue)
4807-7 ch18.F 5/24/01 8:59 AM Page 340

341Chapter 18 ✦ Parsing XML and Other Markup Languages
InsertSQL=InsertSQL[:-1] # Remove trailing commaInsertSQL+=”)” Cursor.execute(str(InsertSQL))
def SQLEscape(Value): if (Value in [None,””]):
return “Null”else:
return “‘%s’”%Value.replace(“‘“,”’’”)
def GetNodeText(ElementNode):# Concatenate all text child-nodes into one large string.# (The normalize() method, available in version 2.1, makes# this a little easier by conglomerating adjacent # text nodes for us)NodeText=””for ChildNode in ElementNode.childNodes:
if ChildNode.nodeType==xml.dom.minidom.Node.TEXT_NODE:NodeText+=ChildNode.data
return NodeText
if (__name__==”__main__”):print “Testing XML export...”# Replace this line with your database connection info:Conn=ODBC.Windows.connect(“AQUA”,”aqua”,”aqua”)Cursor=Conn.cursor() Cursor.execute(“select * from EMPLOYEE”)print ExportXMLFromTable(Cursor)# Delete employee 55 so that we can import him againCursor.execute(“DELETE FROM EMPLOYEE WHERE\
EMPLOYEE_ID = 55”)print “Testing XML import...”ImportXMLToTable(Cursor,IMPORTABLE_XML,”EMPLOYEE”)# Remove this line if your database does not have # transaction support:Conn.commit()
Parsing XML with xmllibThe module xmllib defines a single class, XMLParser, whose methods are similar
to that of htmllib.HTMLParser. You can define start and end handlers for any tag.
Listing 18-6 is a simple example that parses a patient’s blood type from examination
data.
Unlike xml.sax and xml.dom, xmllib doesn’t require any extra modules to be built.Also, it is quite simple, and similar to htmllib. However, it is not a fast parser, andis deprecated as of Version 2.0.
Caution
4807-7 ch18.F 5/24/01 8:59 AM Page 341

342 Part III ✦ Networking and the Internet
This example stores the blood type using one or more calls to handle_data.Strings may be passed to handle_data all at once or in several pieces.
Listing 18-6: BloodType.py
import xmllibSAMPLE_DATA = “””<?xml version=”1.0”?><exam date=”5/13/99”><patient>Pat</patient><bloodtype>B</bloodtype></exam >”””
class ExamParser(xmllib.XMLParser):def __init__(self):
xmllib.XMLParser.__init__(self)self.CurrentData=”” # Track current data itemself.BloodType=””
def start_bloodtype(self,args):self.CurrentData=”blood”
def end_bloodtype(self):if (self.CurrentData==”blood”):
print “Blood type:”,self.BloodTypeself.CurrentData=””
def handle_data(self,text):if (self.CurrentData==”blood”):
self.BloodType+=text
if (__name__==”__main__”):MyParser = ExamParser()MyParser.feed(SAMPLE_DATA)MyParser.close()
Elements and attributesThe XMLParser attribute elements is a dictionary of known tags. If you subclass
XMLParser with a parser that handles a particular tag, then that tag should exist as
a key in elements. The corresponding value is a tuple (StartHandler,EndHandler),
where StartHandler and EndHandler are functions for handling the start and end of
that tag. Normally, you don’t need to access elements directly, as handlers of the
form start_xxx and end_xxx are inserted automatically.
The attribute attributes is a dictionary tracking the valid attributes for tags. The
keys in attributes are known tags. The values are dictionaries that map all valid
attributes for the tag to a default value (or to None, if there is no default value). If
any other attribute is encountered in parsing, the method syntax_error is called.
By default, attributes is an empty dictionary, and any attributes are permitted for
any tag.
Note
4807-7 ch18.F 5/24/01 8:59 AM Page 342

343Chapter 18 ✦ Parsing XML and Other Markup Languages
XML handlersXMLParser defines various methods to handle XML elements. These methods do
nothing by default, and are intended to be overridden in a subclass.
The method handle_xml(encoding,standalone) is called when the <?xml?> tag
is parsed. The parameters encoding and standalone equal the corresponding
attributes in the tag.
The method handle_doctype(root_tag,public_id,sys_id,data) is called
when the <!DOCTYPE> tag is parsed. The parameters root_tag, public_id, sys_id, and
data are the root tag name, the DTD public identifier, the system identifier, and the
unparsed DTD contents, respectively.
The method handle_cdata(text) is called when a CDATA tag of the form
<!CDATA[text]> is encountered. (Normal data is passed to handle_data.)
The method handle_proc(name,text) is called when a processing instruction of
the form <?name text?> is encountered.
The method handle_special(text) is called for declarations of the form <!text>.
Other XMLParser membersThe method syntax_error(errormessage) is called when unparsable XML is
encountered. By default, this method raises a RuntimeError exception.
The method translate_references(text) translates all entity and character
references in text, and returns the resulting string.
The method getnamespace returns a dictionary mapping abbreviation from the
current namespace to URIs.
SummaryYou can easily parse HTML by subclassing the standard parser. There are several
varieties of parsers for XML, which you can customize to handle any kind of docu-
ment. In this chapter, you:
✦ Parsed HTML with and without an output-formatter.
✦ Built a robot to automatically retrieve Web pages.
✦ Parsed and generated XML files for data exchange.
In the next chapter, you’ll meet Tkinter, Python’s de facto standard library for user
interfaces.
✦ ✦ ✦
4807-7 ch18.F 5/24/01 8:59 AM Page 343

4807-7 ch18.F 5/24/01 8:59 AM Page 344

User Interfacesand Multimedia
✦ ✦ ✦ ✦
Chapter 19Tinkering with Tkinter
Chapter 20Using AdvancedTkinter Widgets
Chapter 21Building UserInterfaces withwxPython
Chapter 22Using Curses
Chapter 23Building SimpleCommandInterpreters
Chapter 24Playing Sound
✦ ✦ ✦ ✦
P A R T
IVIV
4807-7 PO4.F 5/24/01 9:00 AM Page 345

4807-7 PO4.F 5/24/01 9:00 AM Page 346

Tinkering withTkinter
Tkinter is a package used for building a graphical user inter-
face (GUI) in Python. It runs on many operating systems,
including UNIX, Windows, and Macintosh. Tkinter is the de-facto
standard GUI library for Python, and is often bundled with it.
Tkinter is very easy to use; it is built on top of the high-level
scripting language Tcl.
Getting Your Feet WetIf you’re dying to see Tkinter in action, the program shown in
Listing 19-1 should provide some instant gratification. It
displays some text in a window. Notice how little code it
takes — such are the joys of Tkinter!
Listing 19-1: HelloWorld.py
import Tkinter# Create the root window:root=Tkinter.Tk() # Put a label widget in the window:LabelText=”Ekky-ekky-ekky-ekky-z’Bang, zoom-Boing,\z’nourrrwringmm”LabelWidget=Tkinter.Label(RootWindow,text=LabelText)# Pack the label (position and display it):LabelWidget.pack()# Start the event loop. This call won’t return # until the program ends:RootWindow.mainloop()
Run the code, and you’ll see something resembling the screen-
shot shown in Figure 19-1.
1919C H A P T E R
✦ ✦ ✦ ✦
In This Chapter
Creating a GUI
Using commonoptions
Gathering user input
Using text widgets
Building menus
Using Tkinter dialogs
Handling colors andfonts
Drawing graphics
Using timers
✦ ✦ ✦ ✦
4807-7 ch19.F 5/24/01 9:00 AM Page 347

348 Part IV ✦ User Interfaces and Multimedia
Figure 19-1: Greetings from Tkinter
On Windows, Tkinter applications look more professional when you run them withpythonw.exe instead of python.exe. Giving a script a .pyw extension sends it topythonw instead of python. Pythonw does not create a console window; the dis-advantage of this is that you can’t see anything printed to sys.stdout andsys.stderr.
Creating a GUITo use Tkinter, import the Tkinter module. Many programmers import it into the
local namespace (from Tkinter import *); this is less explicit, but it does save
some typing. This chapter’s examples don’t import Tkinter into the local names-
pace, in order to make it obvious when they use Tkinter.
Building an interface with widgetsA user interface contains various widgets. A widget is an object displayed onscreen
with which the user can interact. (Java calls such things components, and Microsoft
calls them controls.) Tkinter provides a button widget (Tkinter.Button), a label
widget (Tkinter.Label), and so on. Most widgets are displayed on a parent wid-
get, or owner. The first argument to a widget’s constructor is its parent widget.
Note
4807-7 ch19.F 5/24/01 9:00 AM Page 348
349Chapter 19 ✦ Tinkering with Tkinter
A Toplevel widget is a special widget with no parent; it is a top-level window in its
own right. Most applications need only one Toplevel widget — the root widget
created when you call Tkinter.Tk().
For example, a frame is a widget whose purpose in life is to contain other widgets.
Putting related widgets in one frame is a great way to group them onscreen:
MainWindow=Tkinter.Tk() # Create a top-level windowUpperFrame=Tkinter.Frame(MainWindow)# The label and the button both live inside UpperFrame: UpperLabel=Tkinter.Label(Frame) UpperButton=Tkinter.Button(Frame)
Widget optionsWidgets have options (or attributes) that control their look and behavior. Some
options are used by many widgets. For example, most widgets have a backgroundoption, specifying the widget’s normal background color. Other options are specific
to a particular kind of widget. For example, a button widget has a command option,
whose value is a function to call (without arguments) when the button is clicked.
You can access options in various ways:
# You can set options in the constructor:NewLabel=Tkinter.Label(ParentFrame,background=”gray50”)# You can access options dictionary-style (my favorite!)NewLabel[“background”]=”#FFFFFF” # You can set options with the config method:NewLabel.config(background=”blue”)# You can retrieve an option’s current value:CurrentColor=NewLabel[“background”]# Another way to get the current value:CurrentColor=NewLabel.cget(“background”)
A few option names are, coincidentally, reserved words in Python. When necessary,
append an underscore to such option names:
# “from” is a reserved word. Use from_ in code: VolumeWidget=Tkinter.Scale(ParentFrame,from_=0,to=200)# Use “from” when passing the option name as a string:VolumeWidget[“from”]=20 # “from_” is *not* ok here
See “Using Common Options” for an overview of the most useful widget options.
Laying Out WidgetsThe geometry manager is responsible for positioning widgets onscreen. The sim-
plest geometry manager is the packer. The packer can position a widget on the left
4807-7 ch19.F 5/24/01 9:00 AM Page 349

350 Part IV ✦ User Interfaces and Multimedia
(Tkinter.LEFT), right, top, or bottom side of its parents. You invoke the packer by
calling the pack method on a widget.
The grid geometry manager divides the parent widget into a grid, and places each
child widget on a square of the grid. You invoke the grid geometry manager by
calling the grid(row=x,column=y) method on a widget. Grid square numbering
starts with 0.
You can also position a widget precisely using place. However, using place is
recommended only for perfectionists and masochists! If you use the placer, then
whenever you add a widget to your design, you’ll need to reposition all the other
widgets.
Different geometry managers don’t get along well — if you pack one child widget
and grid another, Tkinter may enter a catatonic state. You can use pack and gridin the same program, but not within the same parent widget!
Remember to call pack, grid, or place on every widget. Otherwise, the widgetwill never be displayed, making it rather difficult to click on!
Packer optionsFollowing are options you can pass to the pack method. These options override the
default packing. The default packing lays widgets out from top to bottom within
their parent (side=TOP). Each widget is centered within the available space
(anchor=CENTER). It does not expand to fill its space (expand=NO), and it has no
extra padding on the sides (padx=pady=0).
side Passing a side option to pack places the widget on the specified side of its parent.
Valid values are LEFT, RIGHT, TOP, and BOTTOM. The default is TOP. If two widgets are
both packed on one side of a parent, the first widget packed is the closest to the edge:
Label1=Tkinter.Label(root,text=”PackedLast”)Label2=Tkinter.Label(root,text=”PackedFirst”)Label2.pack(side=Tkinter.LEFT) # leftmost!Label1.pack(side=Tkinter.LEFT) # Placed to the right of label2
Mixing LEFT/RIGHT with TOP/BOTTOM in one parent widget often yields creepy-
looking results. When packing many widgets, it’s generally best to use intermediate
frame widgets, or use the grid geometry manager.
fill, expandPass a value of YES for expand to let a widget expand to fill all available space. Pass
either X, Y, or BOTH for fill to specify which dimensions will expand. These options
are especially useful when a user resizes the window. For example, the following
code creates a canvas that stretches to the edges of the window, and a status bar
(at the bottom) that stretches horizontally:
Note
4807-7 ch19.F 5/24/01 9:00 AM Page 350

351Chapter 19 ✦ Tinkering with Tkinter
DrawingArea=Tkinter.Canvas(root) DrawingArea.pack(expand=Tkinter.YES,fill=Tkinter.BOTH)StatusBar=Tkinter.Label(root,text=”Ready.”)StatusBar.pack(side=Tkinter.BOTTOM,expand=\
Tkinter.YES,fill=Tkinter.X)
anchorIf the widget has more screen space than it needs, the anchor option determines
where the widget sits, within its allotted space. This does not affect widgets with
fill=BOTH. Valid values are compass directions (N, NW, W, SW, S, SE, E, NE) and
CENTER.
padx,padyThese options give a widget some additional horizontal or vertical “elbow room.”
Putting a little space between buttons makes them more readable, and makes it
harder to click the wrong one:
Button1=Tkinter.Button(root,text=”Fire death ray”, command=FireDeathRay)
# 10 empty pixels on both sides:Button1.pack(side=Tkinter.LEFT,padx=10)Button2=Tkinter.Button(root,text=”Send flowers”,
command=PatTheBunny)# 10+10=20 pixels between buttons:Button2.pack(side=Tkinter.LEFT,padx=10)
Grid optionsFollowing are options to pass to the grid method. You should specify a row and a
column for every widget; otherwise, things get confusing.
row, columnPass row and column options to specify which grid square your widget should live
in. The numbering starts at 0; you can always add new rows and columns. For exam-
ple, the following code lays out some buttons to look like a telephone’s dial pad:
for Digit in range(9):Tkinter.Button(root,text= Digit+1).grid(row=Digit/3,\
column=Digit%3)
stickyThis option specifies which side of the square the widget should “stick to.” It is sim-
ilar to anchor (for the packer). Valid values are compass directions and CENTER. You
can combine values to stretch the widget within its cell. For example, the following
button fills its grid cell:
4807-7 ch19.F 5/24/01 9:00 AM Page 351

352 Part IV ✦ User Interfaces and Multimedia
BigButton=Tkinter.Button(root,text=”X”)# Using “from Tkinter import *” would let this next line# be much less messy:BigButton.grid(row=0,column=0,sticky=Tkinter.W+Tkinter.E+\
Tkinter.N+Tkinter.S)
columnspan,rowspanThese options let you create a big widget (one that spans multiple rows or
columns).
Example: Breakfast ButtonsListing 19-2 presents a beefier Tkinter program. It provides a food menu, with
several buttons you can click to build up a complete breakfast. Your selection is
displayed on a multiline label. Figure 19-2 shows the resulting user interface.
This example initializes widgets in several different ways. In practice, you’ll want to
do it the same way every time. (Personally, I like the pattern for the “Spam” button,
and I hate the pattern for the “Beans” button.)
Listing 19-2: FoodChoice.py
import Tkinter
# In Tkinter, a common practice is to subclass Tkinter.Frame, and make# the subclass represent “the application itself”. This is# convenient (although, in some cases, the separation# between logic and UI should be clearer). FoodWindow is our application:class FoodWindow(Tkinter.Frame):
def __init__(self):# Call the superclass constructor explicitly:Tkinter.Frame.__init__(self)self.FoodItems=[] self.CreateChildWidgets()
def CreateChildWidgets(self): ButtonFrame=Tkinter.Frame(self) # The fill parameter tells the Packer that this widget should# stretch horizontally to fill its parent widget:ButtonFrame.pack(side=Tkinter.TOP,fill=Tkinter.X)
# Create a button, on the button frame:SpamButton=Tkinter.Button(ButtonFrame)# Button[“text”] is the button label:SpamButton[“text”]=”Spam”# Button[“command”] is the function to execute (without arguments)# when someone clicks the button:SpamButton[“command”]=self.BuildButtonAction(“Spam”)SpamButton.pack(side=Tkinter.LEFT)
4807-7 ch19.F 5/24/01 9:00 AM Page 352

353Chapter 19 ✦ Tinkering with Tkinter
# You can specify most options by passing keyword-arguments# to the widget’s constructor:EggsAction=self.BuildButtonAction(“Eggs”)EggsButton=Tkinter.Button(ButtonFrame,text=”Eggs”,command=EggsAction)# This is the second widget packed on the LEFT side of ButtonFrame, so # it goes to the right of the “Spam” button:EggsButton.pack(side=Tkinter.LEFT)
# Some people like to do everything all in one go:Tkinter.Button(ButtonFrame,text=”Beans”,\
command=self.BuildButtonAction(“Beans”)).pack(side=Tkinter.LEFT)
# You can also set widget options with the “config” method:SausageButton=Tkinter.Button(ButtonFrame)SausageAction=self.BuildButtonAction(“Sausage”)SausageButton.config(text=”Sausage”,command=SausageAction)SausageButton.pack(side=Tkinter.LEFT)
# It’s often good for parent widgets to keep references to their# children. Here, we keep a reference (self.FoodLabel) to the label, so # we can change it later:self.FoodLabel=Tkinter.Label(self, wraplength=190,\
relief=Tkinter.SUNKEN,borderwidth=2,text=””)self.FoodLabel.pack(side=Tkinter.BOTTOM,pady=10,fill=Tkinter.X)
# Packing top-level widgets last often saves some repainting:self.pack()
def ChooseFood(self,FoodItem):# Add FoodItem to our list of foods, and build a nice# string listing all the food choices:self.FoodItems.append(FoodItem)LabelText=””TotalItems=len(self.FoodItems)for Index in range(TotalItems):
if (Index>0):LabelText+=”, “
if (TotalItems>1 and Index==TotalItems-1):LabelText+=”and “
LabelText+=self.FoodItems[Index]self.FoodLabel[“text”]=LabelText
# Lambda forms are a convenient way to define commands, especially when# several buttons do similar things. I put the lambda-construction in its# own function, to prevent duplicated code for each button:def BuildButtonAction(self,Label):
# Note: Inside a lambda definition, you can’t see any names# from the enclosing scope. So, we must pass in self and Label:Action=lambda Food=self,Text=Label: Food.ChooseFood(Text)return Action
if (__name__==”__main__”):MainWindow=FoodWindow()MainWindow.mainloop()
4807-7 ch19.F 5/24/01 9:00 AM Page 353

354 Part IV ✦ User Interfaces and Multimedia
Figure 19-2: Responding to buttons
Using Common OptionsThe following sections provide an overview of the most commonly used widget
options, organized by category. Those options that apply to button widgets also
apply to check button and radio button widgets.
Color optionsThe following options control the colors of a widget:
background, foreground Background and foreground colors. A synonym for
background is bg; a synonym for foreground is fg.
activebackground, For a button or menu, these options provide
activeforeground colors used when the widget is active.
disabledforeground Alternative foreground color for a disabled button
or menu.
selectforeground, Alternative colors for the selected element(s) of a
selectbackground Canvas, Entry, Text, or Listbox widget.
highlightcolor, Colors for the rectangle around a menu.
highlightbackground
4807-7 ch19.F 5/24/01 9:00 AM Page 354

355Chapter 19 ✦ Tinkering with Tkinter
Size optionsThe following options govern the size and shape of a widget.
width Widget width, as measured in average-sized characters of the
widget’s font. A value of 0 (the default) makes the widget just
large enough to hold its current text.
height Widget height, as measured in average-sized characters.
padx, pady Amount of extra internal horizontal or vertical padding, in
pixels. Generally ignored if the widget is displaying a bitmap
or image.
Appearance optionsThe following options, together with the color and size options, control a widget’s
appearance:
text Text to display in the widget.
image Image for display in a button or label. If an image is supplied,
any text option is ignored. Pass an empty string for image to
remove an image.
relief Specifies a 3-D border for the widget. Valid values are FLAT,
GROOVE, RAISED, RIDGED, SOLID, and SUNKEN.
borderwidth Width of the widget’s 3-D border, in pixels.
font The font to use for text drawn inside the widget.
Behavior optionsThe following options affect the behavior of a widget:
command Specifies a function to be called, without parameters, when
the widget is clicked. Applies to buttons, scales, and scroll-
bars.
state Sets a widget state to NORMAL, ACTIVE, or DISABLED. A DIS-ABLED widget ignores user input, and (usually) appears
grayed-out. The ACTIVE state changes the widget’s color
(using the activebackground and activeforeground colors).
underline Widgets can use keyboard shortcuts. The underline option
is the index of a letter in the widget’s text; this letter becomes
the “hot key” for using the widget.
takefocus If true, the widget is part of the “tab order” — when you cycle
through widgets by hitting Tab, this widget will get the focus.
4807-7 ch19.F 5/24/01 9:00 AM Page 355

356 Part IV ✦ User Interfaces and Multimedia
Gathering User InputMany widgets collect input from the user. For example, the Entry widget enables
the user to enter a line of text and the Checkbox widget can be switched on and off.
Most such widgets store their value in a Tkinter variable. Tkinter variable classes
include StringVar, IntVar, DoubleVar, and BooleanVar. Each Tkinter variable
class provides set and get methods to access its value:
>>> Text=Tkinter.StringVar()>>> Text.get()‘’>>> Text.set(“Howdy!”)>>> Text.get()‘Howdy!’
You hook a widget to a variable by setting one of the widget’s options. A check but-
ton generally uses a BooleanVar, attached using the variable option:
SmokingFlag=BooleanVar()B1=Checkbutton(ParentFrame,text=”Smoking”,variable=SmokingFlag)# This line sets the variable *and* checks the Checkbutton:SmokingFlag.set(1)
The Entry and OptionMenu widgets generally use a StringVar, attached using a
textvariable option:
# PetBunnyName.get() and NameEntry.get() will both# return the contents of the entry widget:PetBunnyName=StringVar()NameEntry=Entry(ParentFrame,text=”Bubbles”,
textvariable=PetBunnyName)ChocolateName=StringVar()FoodChoice=OptionMenu(ParentFrame,ChocolateName,
“Crunchy Frog”,”Spring Surprise”,”Anthrax Ripple”)
Several Radiobutton widgets can share one variable, attached to the variableoption. The value option stores that button’s value; I like to make the value the
same as the radio button’s label:
Flavor=StringVar()Chocolate=Radiobutton(ParentFrame,variable=Flavor,
text=”Chocolate”,value=”Chocolate”)Strawberry=Radiobutton(ParentFrame,variable=Flavor,
text=”Strawberry”,value=”Strawberry”)Albatross=Radiobutton(ParentFrame,variable=Flavor,
text=”Albatross”,value=”Albatross”)
4807-7 ch19.F 5/24/01 9:00 AM Page 356

357Chapter 19 ✦ Tinkering with Tkinter
Some widgets, such as Listbox and Text, use custom methods (not Tkinter vari-
ables) to access their contents. Accessors for these widgets are described together
with the widgets.
Example: Printing Fancy TextThe program in Listing 19-3 can print text in various colors and sizes. It uses vari-
ous widgets, attached to Tkinter variables, to collect user input. Figure 19-3 shows
the program in action.
Listing 19-3: UserInput.py
import Tkinterimport tkFont # the Font class lives here!
class MainWindow(Tkinter.Frame):def __init__(self):
Tkinter.Frame.__init__(self)# Use Tkinter variables to hold user input:self.Text=Tkinter.StringVar()self.ColorName=Tkinter.StringVar()self.BoldFlag=Tkinter.BooleanVar()self.UnderlineFlag=Tkinter.BooleanVar() self.FontSize=Tkinter.IntVar()# Set some default values:self.Text.set(“Ni! Ni! Ni!”)self.FontSize.set(12)self.ColorName.set(“black”)self.TextItem=None # Create all the widgets: self.CreateWidgets()
def CreateWidgets(self):# Let the user specify text:TextFrame=Tkinter.Frame(self)Tkinter.Label(TextFrame,text=”Text:”).pack(side=Tkinter.LEFT)Tkinter.Entry(TextFrame,textvariable=self.Text).pack(side=Tkinter.LEFT)TextFrame.pack()# Let the user select a color:ColorFrame=Tkinter.Frame(self)Colors=[“black”,”red”,”green”,”blue”,”deeppink”]Tkinter.Label(ColorFrame,text=”Color:”).pack(side=Tkinter.LEFT)Tkinter.OptionMenu(ColorFrame,self.ColorName,”white”,*Colors).pack(\
side=Tkinter.LEFT)ColorFrame.pack()
Continued
4807-7 ch19.F 5/24/01 9:00 AM Page 357

358 Part IV ✦ User Interfaces and Multimedia
Listing 19-3 (continued)
# Let the user select a font size:SizeFrame=Tkinter.Frame(self)Tkinter.Radiobutton(SizeFrame,text=”Small”,variable=self.FontSize,
value=12).pack(side=Tkinter.LEFT)Tkinter.Radiobutton(SizeFrame,text=”Medium”,variable=self.FontSize,
value=24).pack(side=Tkinter.LEFT)Tkinter.Radiobutton(SizeFrame,text=”Large”,variable=self.FontSize,
value=48).pack(side=Tkinter.LEFT)SizeFrame.pack() # Let the user turn Bold and Underline on and off:StyleFrame=Tkinter.Frame(self)Tkinter.Checkbutton(StyleFrame,text=”Bold”,variable=\
self.BoldFlag).pack(side=Tkinter.LEFT)Tkinter.Checkbutton(StyleFrame,text=”Underline”,variable=\
self.UnderlineFlag).pack(side=Tkinter.LEFT)StyleFrame.pack()# Add a button to repaint the text:GoFrame=Tkinter.Frame(self)Tkinter.Button(GoFrame,text=”Go!”,command=self.PaintText).pack()GoFrame.pack(anchor=Tkinter.W,fill=Tkinter.X)# Add a canvas to display the text:self.TextCanvas=Tkinter.Canvas(self,height=100,width=300)self.TextCanvas.pack(side=Tkinter.BOTTOM)# Pack parent-most widget last:self.pack()
def PaintText(self):# Erase the old text, if any:if (self.TextItem!=None):
self.TextCanvas.delete(self.TextItem)# Set font weight:if (self.BoldFlag.get()):
FontWeight=tkFont.BOLDelse:
FontWeight=tkFont.NORMAL# Create and configure a Font object.# (Use tkFont.families(self) to get a list of available font-families)TextFont=tkFont.Font(self,”Courier”) TextFont.configure(size=self.FontSize.get(),
underline=self.UnderlineFlag.get(), weight=FontWeight)
self.TextItem=self.TextCanvas.create_text(5,5,anchor=Tkinter.NW,text=self.Text.get(),fill=self.ColorName.get(),font=TextFont)
if (__name__==”__main__”):App=MainWindow()App.mainloop()
4807-7 ch19.F 5/24/01 9:00 AM Page 358
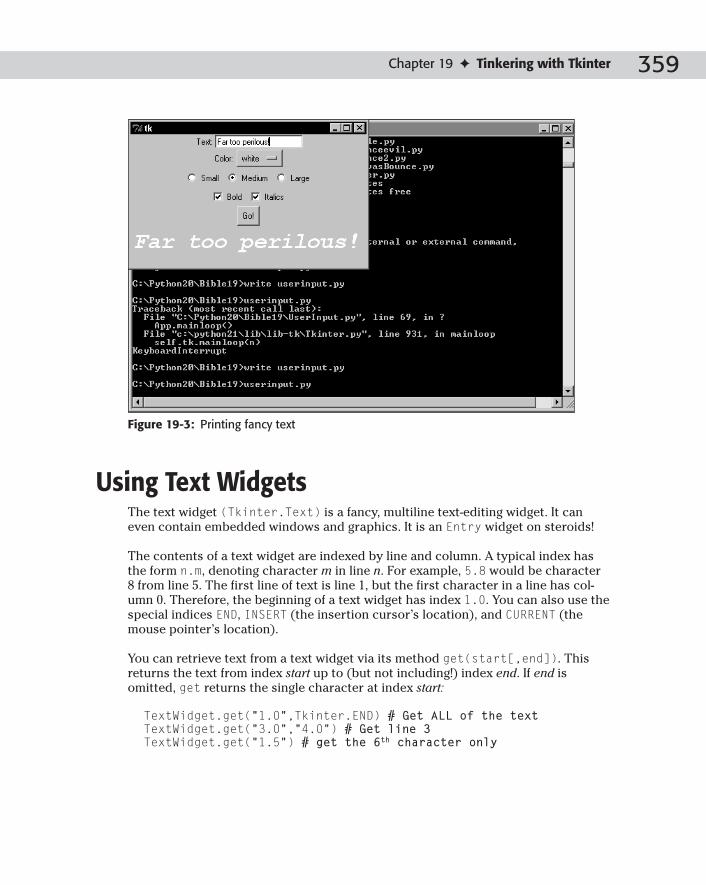
359Chapter 19 ✦ Tinkering with Tkinter
Figure 19-3: Printing fancy text
Using Text WidgetsThe text widget (Tkinter.Text) is a fancy, multiline text-editing widget. It can
even contain embedded windows and graphics. It is an Entry widget on steroids!
The contents of a text widget are indexed by line and column. A typical index has
the form n.m, denoting character m in line n. For example, 5.8 would be character
8 from line 5. The first line of text is line 1, but the first character in a line has col-
umn 0. Therefore, the beginning of a text widget has index 1.0. You can also use the
special indices END, INSERT (the insertion cursor’s location), and CURRENT (the
mouse pointer’s location).
You can retrieve text from a text widget via its method get(start[,end]). This
returns the text from index start up to (but not including!) index end. If end is
omitted, get returns the single character at index start:
TextWidget.get(“1.0”,Tkinter.END) # Get ALL of the textTextWidget.get(“3.0”,”4.0”) # Get line 3TextWidget.get(“1.5”) # get the 6th character only
4807-7 ch19.F 5/24/01 9:00 AM Page 359

360 Part IV ✦ User Interfaces and Multimedia
The method delete(start[,end]) deletes text from the widget. The indexes startand end function as they do for the get method. The method insert(pos,str)inserts the string str just before the index pos:
TextWidget.insert(“1.0”,”Bob”) # Prepend Bob to the textTextWidget.insert(Tkinter.END,”Bob”) # Append Bob to the text# insert Bob wherever the mouse is pointing:TextWidget.insert(Tkinter.CURRENT,”Bob”) # Clear the widget (remove all text):TextWidget.delete(“1.0”,Tkinter.END)
Building MenusTo build a menu in Tkinter, you use a menu widget (Tkinter.Menu). You then flesh
out the menu by adding entries. The method add_command(label=?,command=?)adds a menu line with the specified label. When the user chooses the menu line, the
specified command is executed. add_separator adds a separator line to a menu,
suitable for grouping commands.
A call to add_cascade(label=?,menu=?) attaches the specified menu as a sub-
menu of the current menu. And add_checkbutton(label=?[,...]) adds a check
button to the menu. You can pass other options for the new Checkbutton widget
(such as variable) to add_checkbutton.
Create one instance of Menu to represent the menu bar itself, and then create one
Menu instance for each “real” menu. Unlike most widgets, a menu is never packed.
Instead, you attach it to a window using the menu option of a TopLevel widget, as
shown in the following example:
root=Tkinter.Tk()MenuBar=Tkinter.Menu(root) # Menu bar must be child of Toplevelroot[“menu”]=MenuBar # attach menubar to window!FileMenu=Tkinter.Menu(MenuBar) # Submenu is child of menubarFileMenu.add_command(label=”Load”,command=LoadFile)FileMenu.add_command(label=”Save”,command=SaveFile)HelpMenu=Tkinter.Menu(MenuBar)HelpMenu.add_command(label=”Contents”,command=HelpIndex)# Attach menus to menubar:MenuBar.add_cascade(label=”File”,menu=FileMenu)MenuBar.add_cascade(label=”Help”,menu=HelpMenu)
You can create pop-up menus in Tkinter. Call the menu method
tk_popup(x,y[,default]) to bring a menu up as a pop-up. The pop-up is posi-
tioned at (x,y). If default is supplied, the pop-up menu starts with the specified label
selected, as shown in Listing 19-4:
4807-7 ch19.F 5/24/01 9:00 AM Page 360

361Chapter 19 ✦ Tinkering with Tkinter
Listing 19-4: Popup.py
import Tkinterdef MenuCommand():
print “Howdy!”def ShowMenu():
PopupMenu.tk_popup(*root.winfo_pointerxy())root=Tkinter.Tk()PopupMenu=Tkinter.Menu(root)PopupMenu.add_command(label=”X”,command=MenuCommand)PopupMenu.add_command(label=”Y”,command=MenuCommand)Tkinter.Button(root,text=”Popup”,command=ShowMenu).pack()root.mainloop()
Using Tkinter DialogsThe module tkMessageBox provides several functions that display a pop-up
message box. Each takes title and message parameters to control the window’s
title and the message displayed.
Table 19-1Message Boxes
Function Description
showinfo Shows an informational message.
showwarning Displays a warning message.
showerror Displays an error message.
Askyesno Displays Yes and No buttons. Returns true if the user chose Yes.
Askokcancel Displays OK and Cancel buttons. Returns true if the user chose OK.
Askretrycancel Displays Retry and Cancel buttons. Returns true if the user chose Retry.
Askquestion Same as askyesno, but returns Yes or No as a string.
This snippet of code uses tkMessageBox to get user confirmation before quitting:
def Quit(self):if self.FileModified:
if (not tkMessageBox.askyesno(“Confirm”,\“File modified. Really quit?”):
return # don’t quit!sys.exit()
4807-7 ch19.F 5/24/01 9:00 AM Page 361

362 Part IV ✦ User Interfaces and Multimedia
File dialogsThe module tkFileDialog provides functions to bring up file-selection dialogs.
The function askopenfile lets the user choose an existing file. The function
asksaveasfilename lets the user choose an existing file or provide a new file
name. Both functions return the full path to the selected file (or an empty string, if
the user cancels out).
Optionally, pass a filetypes parameter to either function, to limit the search to par-
ticular file types. The parameter should be a list of tuples, where each tuple has the
form (description,extension):
MusicFileName=tkFileDialog.askopenfilename(filetypes=[(“Music files”,”mp3”)])
Example: Text EditorThe example in Listing 19-5 is a simple text editor. With it, you can open, save, and
edit text files. The code illustrates the use of the text widget, Tkinter menus, and
some of Tkinter’s standard dialog boxes. Figure 19-4 shows what the text editor
looks like.
Listing 19-5: TextEditor.py
import Tkinterimport tkFileDialogimport tkMessageBoximport osimport sys
# Filetype selections for askopenfilename and asksaveasfilename:TEXT_FILE_TYPES=[(“Text files”,”txt”),(“All files”,”*”)]
class TextEditor:def __init__(self):
self.FileName=Noneself.CreateWidgets()
def CreateWidgets(self):self.root=Tkinter.Tk()self.root.title(“New file”)MainFrame=Tkinter.Frame(self.root) # Create the File menu:MenuFrame=Tkinter.Frame(self.root)
4807-7 ch19.F 5/24/01 9:00 AM Page 362

363Chapter 19 ✦ Tinkering with Tkinter
MenuFrame.pack(side=Tkinter.TOP,fill=Tkinter.X)FileMenuButton=Tkinter.Menubutton(MenuFrame,
text=”File”,underline=0)FileMenuButton.pack(side=Tkinter.LEFT,anchor=Tkinter.W)FileMenu=Tkinter.Menu(FileMenuButton,tearoff=0)FileMenu.add_command(label=”New”,underline=0,
command=self.ClearText) FileMenu.add_command(label=”Open”,underline=0,command=self.Open)FileMenu.add_command(label=”Save”,underline=0,command=self.Save)FileMenu.add_command(label=”Save as...”,underline=5,
command=self.SaveAs)FileMenu.add_separator()self.FixedWidthFlag=Tkinter.BooleanVar()FileMenu.add_checkbutton(label=”Fixed-width”,
variable=self.FixedWidthFlag,command=self.SetFont)FileMenu.add_separator()
FileMenu.add_command(label=”Exit”,underline=1,command=sys.exit)FileMenuButton[“menu”]=FileMenu# Create Help menu:HelpMenuButton=Tkinter.Menubutton(MenuFrame,text=”Help”,underline=0)HelpMenu=Tkinter.Menu(HelpMenuButton,tearoff=0)HelpMenu.add_command(label=”About”,underline=0,command=self.About)HelpMenuButton[“menu”]=HelpMenuHelpMenuButton.pack(side=Tkinter.LEFT,anchor=Tkinter.W)# Create the main text field:self.TextBox=Tkinter.Text(MainFrame)self.TextBox.pack(fill=Tkinter.BOTH,expand=Tkinter.YES)# Pack the top-level widget:MainFrame.pack(fill=Tkinter.BOTH,expand=Tkinter.YES)
def SetFont(self):if (self.FixedWidthFlag.get()):
self.TextBox[“font”]=”Courier”else:
self.TextBox[“font”]=”Helvetica”def About(self):
tkMessageBox.showinfo(“About textpad...”,”Hi, I’m a textpad!”)def ClearText(self):
self.TextBox.delete(“1.0”,Tkinter.END) def Open(self):
FileName=tkFileDialog.askopenfilename(filetypes=TEXT_FILE_TYPES)if (FileName==None or FileName==””):
returntry:
File=open(FileName,”r”)NewText=File.read()File.close()self.FileName=FileNameself.root.title(FileName)
Continued
4807-7 ch19.F 5/24/01 9:00 AM Page 363

364 Part IV ✦ User Interfaces and Multimedia
Listing 19-5 (continued)
except IOError:tkMessageBox.showerror(“Read error...”,
“Could not read from ‘%s’”%FileName) return
self.ClearText()self.TextBox.insert(Tkinter.END,NewText)
def Save(self):if (self.FileName==None or self.FileName==””):
self.SaveAs()else:
self.SaveToFile(self.FileName)def SaveAs(self):
FileName=tkFileDialog.asksaveasfilename(filetypes=TEXT_FILE_TYPES)if (FileName==None or FileName==””):
return self.SaveToFile(FileName)
def SaveToFile(self,FileName):try:
File=open(FileName,”w”)NewText=self.TextBox.get(“1.0”,Tkinter.END)File.write(NewText)File.close()self.FileName=FileNameself.root.title(FileName)
except IOError:tkMessageBox.showerror(“Save error...”,
“Could not save to ‘%s’”%FileName) return
def Run(self):self.root.mainloop()
if (__name__==”__main__”):TextEditor().Run()
4807-7 ch19.F 5/24/01 9:00 AM Page 364

365Chapter 19 ✦ Tinkering with Tkinter
Figure 19-4: A text editor with dialogs
Handling Colors and FontsYou can customize the color (or colors) of your widgets, as well as the font used to
paint widget text.
ColorsColors are defined using three numbers. The three numbers specify the intensity of
red, green, and blue. Tkinter accepts colors in the form of a string of the form #RGB,
or #RRGGBB, or #RRRGGGBBB. For example, #FFFFFF is white, #000000 is black, and
#FF00FF is purple. The longer the string, the more precisely one can specify colors.
Tkinter also provides many predefined colors — for example, red and green are
valid color names. The list also includes some exotic colors, such as thistle3 and
burlywood2.
4807-7 ch19.F 5/24/01 9:00 AM Page 365

366 Part IV ✦ User Interfaces and Multimedia
FontsFont descriptors are tuples of the form (family,size[,styles]). For example,
the following lines display a button whose label is in Helvetica 24-point italics:
root=Tkinter.Tk()Tkinter.Button(root,text=”Fancy”,
font=(“Helvetica”,24,”italic”)).pack()
If the name of a font family does not contain spaces, a string of the form “familysize styles” is an equivalent font descriptor. You can also use X font descriptors:
Tkinter.Button(root,text=”Fixed-width”,font=”-*-Courier-bold-r-*-*-12-*-*-*-*-*-*-*’).pack()
Drawing GraphicsThe PhotoImage class enables you to add images to your user interface. Images in
GIF, PPM, and PGM format are supported. The constructor enables you (optionally)
to name the image. You can also specify a file to read the image from, or pass in raw
image data:
MisterT=PhotoImage(“Mr. T”,file=”mrt.gif”)# Another way to get the same image:ImageFile=open(“mrt.gif”)ImageData=ImageFile.read()ImageFile.close()MisterT=PhotoImage(data=ImageData) # no name
Once you have a PhotoImage object, you can attach it to a label or button using the
image option:
MisterT=Tkinter.PhotoImage(file=”mrt.gif”)Tkinter.Button(root,image=MisterT).pack()
You can query the size of a PhotoImage using the width and height methods.
You can construct PhotoImage objects only after you instantiate a TopLevelinstance.
The canvas widgetThe canvas widget (Tkinter.Canvas) is a window in which you can programmati-
cally draw ovals, rectangles, lines, and so on. For example, the following code
draws a smiley-face:
Figure=Tkinter.Canvas(root,width=50,height=50)Figure.pack()
Note
4807-7 ch19.F 5/24/01 9:00 AM Page 366

367Chapter 19 ✦ Tinkering with Tkinter
Figure.create_line(10,10,10,20)Figure.create_line(40,10,40,20)Figure.create_arc(5,15,45,45,start=200,extent=140,
style=Tkinter.ARC)
Several different canvas items are available for your drawing pleasure:
create_line(x1,y1,x2, Draws lines connecting the points (x1,y1)
y2,...,xn,yn) through (xn,yn), in order. The lines are nor-
mally straight; set the smooth option to true
to draw smooth lines.
create_polygon(x1,y2, Similar to create_line. Fills the area
x2,y2,...,xn,yn) spanned by the lines with the color supplied
for the fill option (by default, “transparent”).
Pass a color for the outline option to control
the line color. Set the smooth option to true
to draw smooth lines.
create_image(x,y, Draw the specified image on the canvas at
image=?[,anchor=?]) (x,y). The image option can be either a
PhotoImage instance or the name of a previ-
ously created PhotoImage. The anchoroption, which defaults to CENTER, specifies
which portion of the image lies at (x,y).
create_oval(x1,y1,x2,y2) Draw an oval inside the rectangle defined by
the points (x1,y1) and (x2,y2). Pass a color
in the outline option to control the outline’s
color. Pass a color in the fill option to fill the
oval with that color. You can control the out-
line’s width (in pixels) with the width option.
create_rectangle Draw a rectangle. The fill, outline, and
(x1,y2,x2,y2) width options have the same effect as for
create_oval.
create_text(x,y,text=? Draw the specified text on the canvas. Uses
[,font=?]) the supplied font, if any.
Manipulating canvas itemsThe items drawn on a canvas are widgets in their own right — they can be moved
around, have events bound to them, and so on. The create_* methods return an ID
for the canvas item. You can use that ID to manipulate the canvas item, using the
canvas’s methods. For example, the canvas method delete(ID) deletes the
specified item. The method move(ID, DeltaX, DeltaY) moves the canvas item
horizontally by DeltaX units, and vertically by DeltaY units.
4807-7 ch19.F 5/24/01 9:00 AM Page 367

368 Part IV ✦ User Interfaces and Multimedia
Using TimersTkinter also provides a timer mechanism. Call the method after(wait,function)on a TopLevel widget to make the specified function execute after wait millisec-
onds. To make a timed action recur (for example, once every five minutes), make
another call to after at the end of function. For example, the code in Listing 19-6
calls a function every ten seconds:
Listing 19-6: Timer.py
import Tkinter
def MinuteElapsed():print “Ding!”root.after(1000*60,MinuteElapsed)
root=Tkinter.Tk()root.after(10000,MinuteElapsed)root.mainloop()
Example: A Bouncing PictureThe program in Listing 19-7 displays a picture that moves around, bouncing off the
sides of the window, as shown in Figure 19-5. It uses a PhotoImage object and a
canvas to handle the display and the TopLevel after method to schedule calls to
MoveImage.
Listing 19-7: CanvasBounce.py
import Tkinterclass Bouncer:
def __init__(self,Master):self.Master=Masterself.X=0self.Y=0self.DeltaX=5self.DeltaY=5self.Figure=Tkinter.Canvas(self.Master) self.GrailWidth=GrailPicture.width()self.GrailHeight=GrailPicture.height()self.GrailID=self.Figure.create_image(
0,0,anchor=Tkinter.NW,image=GrailPicture)self.Figure.pack(fill=Tkinter.BOTH,expand=Tkinter.YES)# Move the image after 100 milliseconds:root.after(100,self.MoveImage)
4807-7 ch19.F 5/24/01 9:00 AM Page 368

369Chapter 19 ✦ Tinkering with Tkinter
def MoveImage(self):# Move the image:self.X+=self.DeltaXself.Y+=self.DeltaYself.Figure.coords(self.GrailID,self.X,self.Y)# Bounce off the sides:if (self.X<0):
self.DeltaX=abs(self.DeltaX)if (self.Y<0):
self.DeltaY=abs(self.DeltaY)if (self.X+self.GrailWidth>self.Figure.winfo_width()):
self.DeltaX=-abs(self.DeltaX)if (self.Y+self.GrailHeight >\
self.Figure.winfo_height()):self.DeltaY=-abs(self.DeltaY)
# Do it again after 100 milliseconds:self.Master.after(100,self.MoveImage)
if (__name__==”__main__”):root=Tkinter.Tk()GrailPicture=Tkinter.PhotoImage(file=”HolyGrail.gif”)Bouncer(root)root.mainloop()
Figure 19-5: A bouncing picture
4807-7 ch19.F 5/24/01 9:00 AM Page 369

370 Part IV ✦ User Interfaces and Multimedia
SummaryAfter working with Tkinter, you will understand why it is so popular. Creating and
customizing an interface is simple. In this chapter, you:
✦ Created a GUI with buttons, labels, menus, and other Tkinter widgets.
✦ Used Tkinter’s standard dialogs.
✦ Set up timers.
✦ Drew pictures on a canvas.
The next chapter delves into Tkinter in more detail. It covers events, drag-and-drop
operations, and some more widgets.
✦ ✦ ✦
4807-7 ch19.F 5/24/01 9:00 AM Page 370

Using AdvancedTkinter Widgets
This chapter introduces some of Tkinter’s fancier features —
custom event handlers, advanced widgets, and more.
Tkinter scales up painlessly from quick-and-dirty interfaces to
sophisticated, full-featured applications.
Handling EventsA GUI program spends most of its time waiting for something
to happen. When something does happen — the user clicking
the mouse, for example — events are sent to the affected wid-
get(s). Events are sometimes called messages or notifications.
A widget responds to an event using a function called an eventhandler.
Creating event handlersOften, Tkinter’s standard event handlers are good enough. As
you saw in the last chapter, you can create an interesting UI
without ever writing event handlers. However, you can
always define a custom event handler for a widget. To define
a custom handler, call the widget method bind(EventCode,Handler[,Add=None]). Here, EventCode is a string identify-
ing the event, and Handler is a function to handle the event.
Passing a value of + for Add causes the new handler to be
added to any existing event binding.
You can also bind event handlers for a particular widget class
with a call to bind_class(ClassName,EventCode,Handler[,Add]), or bind event handlers for application-level
events with bind_all(EventCode,Handler[,Add]).
When the widget receives a matching event, Handler is called,
and passed one argument — an event object. For example, the
following code creates a label that beeps when you click it:
2020C H A P T E R
✦ ✦ ✦ ✦
In This Chapter
Handling events
Advanced widgets
Creating dialogs
Supporting drag-and-drop operations
Using cursors
Designing newwidgets
Further Tkinteradventures
✦ ✦ ✦ ✦
4807-7 ch20.F 5/24/01 9:00 AM Page 371

372 Part IV ✦ User Interfaces and Multimedia
BeepLabel=Tkinter.Label(root,text=”Click me!”)BeepHandler=lambda Event,Root=root:Root.bell()BeepLabel.bind(“<Button-1>”,BeepHandler)BeepLabel.pack()
Binding mouse eventsMouse buttons are numbered — 1 is the left button, 2 is the middle button (if any),
and 3 is the right button. Table 20-1 lists the available mouse event codes.
Table 20-1Mouse Events
Event code Description
<Button-1> Button 1 was pressed on the widget. Similarly for <Button-2>and <Button-3>.
<B1-Motion> The mouse pointer was dragged over the widget, with button 1pressed.
<ButtonRelease-1> Button 1 was released over the widget.
<Double-Button-1> Button 1 was double-clicked over the widget.
Binding keyboard eventsThe event code <Key> matches any keypress. You can also match a particular key,
generally by using that key’s character as an event code. For example, the event
code x matches a press of the x key. Some keystrokes have special event codes.
Table 20-2 lists the event codes for some of the most common special keystrokes.
Table 20-2Common Special Keystrokes
Event code Keystroke
<Up> Up arrow key
<Down> Down arrow key
<Left> Left arrow key
<Right> Right arrow key
4807-7 ch20.F 5/24/01 9:00 AM Page 372

373Chapter 20 ✦ Using Advanced Tkinter Widgets
Event code Keystroke
<F1> Function key 1
<Shift_L>,<Shift_R> Left and right Shift key
<Control_L>,<Control_R> Left and right Control key
<space> Spacebar
Event objectsAn event object, as passed to an event handler, has various attributes that specify
just what happened. The attribute widget is a reference to the affected widget.
For mouse events, the attributes x and y are the coordinates of the mouse pointer,
in pixels, as measured from the top-left corner of the widget. The attributes x_rootand y_root are mouse pointer coordinates, as measured from the top-left corner of
the screen.
For keyboard events, the attribute char is the character code, as a string.
Example: A Drawing CanvasThe program in Listing 20-1 provides a canvas on which you can draw shapes by
left- and right-clicking. In addition, you can move the Quit button around by using
the arrow keys. Figure 20-1 shows the program in action.
Listing 20-1: Events.py
import Tkinterimport sys
def DrawOval(Event):# Event.widget will be the main canvas:Event.widget.create_oval(Event.x-5,Event.y-5,
Event.x+5,Event.y+5)def DrawRectangle(Event):
Event.widget.create_rectangle(Event.x-5,Event.y-5,Event.x+5,Event.y+5)
def MoveButton(Side):# The methods pack_forget() and grid_forget() unpack# a widget, but (unlike the destroy() method)
Continued
4807-7 ch20.F 5/24/01 9:00 AM Page 373

374 Part IV ✦ User Interfaces and Multimedia
Listing 20-1 (continued)
# do not destroy it; it can be re-displayed later.QuitButton.pack_forget()QuitButton.pack(side=Side)
root=Tkinter.Tk()MainCanvas=Tkinter.Canvas(root)MainCanvas.bind(“<Button-1>”,DrawOval)MainCanvas.bind(“<Button-3>”,DrawRectangle)MainCanvas.pack(fill=Tkinter.BOTH,expand=Tkinter.YES)QuitButton=Tkinter.Button(MainCanvas,text=”Quit”,
command=sys.exit)QuitButton.pack(side=Tkinter.BOTTOM)root.bind(“<Up>”,lambda e:MoveButton(Tkinter.TOP))root.bind(“<Down>”,lambda e:MoveButton(Tkinter.BOTTOM))root.bind(“<Left>”,lambda e:MoveButton(Tkinter.LEFT))root.bind(“<Right>”,lambda e:MoveButton(Tkinter.RIGHT))root.geometry(“300x300”) # Set minimum window sizeroot.mainloop()
Figure 20-1: A canvas with custom mouse and keyboard event handlers
4807-7 ch20.F 5/24/01 9:00 AM Page 374

375Chapter 20 ✦ Using Advanced Tkinter Widgets
Advanced WidgetsThis section introduces three more widgets for your Tkinter widget toolbox: list-
box, scale, and scrollbar.
ListboxA listbox (Tkinter.Listbox) displays a list of options. Each option is a string, and
each takes up one row in the listbox. Each item is assigned an index (starting from 0).
The option selectmode governs what kind of selections the user can make. SINGLEallows one row to be selected at a time; MULTIPLE permits the user to select many
rows at once. BROWSE (the default) is similar to SINGLE, but allows the user to drag
the mouse cursor across rows. EXTENDED is similar to MULTIPLE, but allows fancier
selections to be made by Control- and Shift-clicking.
The option height, which defaults to 10, specifies how many rows a listbox displays
at once. If a listbox contains more rows than it can display at once, you should
attach a scrollbar — see the section “Scrollbar” for details.
Editing listbox contentsTo populate the listbox, call the method insert(before,element[,...]). This
inserts one or more elements (which must be strings!) prior to index before. Use the
special index Tkinter.END to append the new item(s) to the end of the listbox.
The method delete(first[,last]) deletes all items from index first to index last,inclusive. If last is not specified, the single item with index first is deleted.
Checking listbox contents The method size returns the number of items in the listbox.
The method get(first[,last]) retrieves the items from index first to index last,inclusive. Normally, get returns a list of strings; if last is omitted, the single item
with index first is returned.
The method nearest(y) returns the index of the row closest to the specified
y-coordinate. This is useful for determining what row a user is clicking.
Checking and changing the selectionThe method curselection returns the current selection, in the form of a list of
indices. If no row is selected, curselection returns an empty string. The method
selection_includes(index) returns true if the item with the specified index is
selected.
4807-7 ch20.F 5/24/01 9:00 AM Page 375

376 Part IV ✦ User Interfaces and Multimedia
The method selection_set(first[,last]) selects the items from index first to
index last, inclusive. The method selection_clear(first[,last]) deselects the
specified items.
When you specify a range of listbox indices, the list is inclusive, not exclusive. Forexample, MyList.selection_set(2,3) selects the items with index 2 and 3.
ScaleA scale widget (Tkinter.Scale) looks like a sliding knob. The user drags the
slider to set a numeric value. You can attach a scale to a Tkinter variable (using the
variable option), or use its get and set methods to access its value directly.
Range and precisionThe options from and to specify the numeric range available; the default is the
range from 0 to 100. The option resolution is the smallest possible change the user
can make in the numeric value. By default, resolution is 1 (so that the scale’s value
is always an integer).
Remember to use from_ , not from, when passing the “from” option as a keywordargument.
Widget sizeThe option orient determines the direction in which the scale is laid out; valid val-
ues are HORIZONTAL and VERTICAL. The option length specifies the length (in pix-
els) of the scale; it defaults to 100. The option sliderlength determines the length of
the sliding knob; it defaults to 30.
LabelingBy default, a scale displays the current numeric value above (or to the left of) the
sliding scale. Set the showvalue option to false to disable this display.
You can label the axis with several tick-marks. To do so, pass the distance between
ticks in the option tickinterval.
ScrollbarA scrollbar widget (Tkinter.Scrollbar) is used in conjunction with another wid-
get when that widget has more to show than it can display all at once. The scrollbar
enables the user to scroll through the available information.
The orient option determines the scrollbar’s orientation; valid values are VERTICAL
and HORIZONTAL.
Note
Note
4807-7 ch20.F 5/24/01 9:00 AM Page 376

377Chapter 20 ✦ Using Advanced Tkinter Widgets
To attach a vertical scrollbar to a Listbox, Canvas, or Text widget, set the scroll-
bar’s command option to the yview method of the widget. Then, set the widget’s
yscrollcommand option to the scrollbar’s set method. (To attach a horizontal
scrollbar, perform a similar procedure, but use xview and xscrollcommand.)
For example, the following two lines “hook together” a scrollbar (MyScrollbar) and
a listbox (MyListbox):
MyScrollbar[“command”]= MyListbox.yviewMyListbox[“yscrollcommand”]= MyScrollbar.set
Example: Color Scheme CustomizerTkinter allows you to use a predefined color scheme. These colors are used as
defaults for the foreground and background options of widgets. The TopLevel
method option_readfile(filename) reads in default colors and fonts from a file.
You should call option_readfile as early in your program as possible, because it
doesn’t affect any widgets already displayed onscreen.
A typical line in the file has the form *Widget*foreground: Color, where Widgetis a widget class and Color is the default color for that sort of widget. The line
*foreground: Color sets a default foreground for all other widgets. Similar lines
set the default background colors.
The example shown in Listing 20-2 lets you define a new color scheme. It uses a list-
box, a scrollbar, and three sliding scales (for setting red, green, and blue levels). See
Figure 20-2 for an example.
Listing 20-2: ColorChooser.py
import Tkinterimport osimport sys
WIDGET_NAMES = [“Entry”,”Label”,”Menu”,”Text”,”Button”,”Listbox”,”Scale”,“Scrollbar”,”Canvas”]
OPTION_FILE_NAME=”TkinterColors.ini”COLOR_COMPONENTS=[“Red”,”Green”,”Blue”]
class ColorChooser:def __init__(self):
self.root = Tkinter.Tk()# Dictionary of options and values - corresponds to# the option database (TkinterColors.ini):self.Options={}
Continued
4807-7 ch20.F 5/24/01 9:00 AM Page 377

378 Part IV ✦ User Interfaces and Multimedia
Listing 20-2 (continued)
# Flag linked to the “Option set?” checkbox:self.OptionSetFlag=Tkinter.BooleanVar() self.GetOptionsFromFile()self.BuildWidgets()self.SelectedColorItem=Noneself.SelectNewColorItem(0)
def SaveCurrentColorValues(self):“Use Scale-widget values to set internal color value”if (self.SelectedColorItem!=None):
if (self.OptionSetFlag.get()):ColorString=”#”for ColorComponent in COLOR_COMPONENTS:
ColorString+=”%02X”%self.ColorValues[ColorComponent].get()self.Options[self.SelectedColorItem]=ColorString
else:# The user un-checked the “option set” box:if (self.Options.has_key(self.SelectedColorItem)):
del self.Options[self.SelectedColorItem]def UpdateControlsFromColorValue(self):
“Use internal color value to update Scale widgets”if (self.SelectedColorItem!=None and self.OptionSetFlag.get()):
ColorString=self.Options.get(self.SelectedColorItem,””)if len(ColorString)!=7:
ColorString=”#000000” # defaultelse:
ColorString=”#000000”RedValue=int(ColorString[1:3],16)self.ColorValues[“Red”].set(RedValue)GreenValue=int(ColorString[3:5],16)self.ColorValues[“Green”].set(GreenValue)BlueValue=int(ColorString[5:],16)self.ColorValues[“Blue”].set(BlueValue)
def OptionChecked(self):“””Callback for clicking the “Option set” checkbox”””if (self.OptionSetFlag.get()):
self.EnableColorScales()else:
self.DisableColorScales()def EnableColorScales(self):
for ColorComponent in COLOR_COMPONENTS:self.ColorScales[ColorComponent][“state”]=Tkinter.NORMAL
def DisableColorScales(self):for ColorComponent in COLOR_COMPONENTS:
self.ColorScales[ColorComponent][“state”]=Tkinter.DISABLEDdef SelectNewColorItem(self,NewIndex):
“””Choose a new color item - save the current item, select thenew entry in the listbox, and update the scale-widgets from thenew entry”””
4807-7 ch20.F 5/24/01 9:00 AM Page 378

379Chapter 20 ✦ Using Advanced Tkinter Widgets
self.SaveCurrentColorValues()self.SelectedColorItem=self.ItemList.get(NewIndex)self.ItemList.activate(NewIndex)self.ItemList.selection_set(NewIndex)print “sel:”,self.SelectedColorItemprint self.Options.has_key(self.SelectedColorItem)self.OptionSetFlag.set(self.Options.has_key(self.SelectedColorItem))print self.OptionSetFlag.get()self.OptionChecked()self.UpdateControlsFromColorValue()
def ListboxClicked(self,ClickEvent):“Event handler for choosing a new Listbox entry” NewIndex=self.ItemList.nearest(ClickEvent.y)self.SelectNewColorItem(NewIndex)
def BuildWidgets(self):“””Set up all the application widgets”””self.LeftPane=Tkinter.Frame(self.root)self.RightPane=Tkinter.Frame(self.root)self.ItemList=Tkinter.Listbox(self.LeftPane,
selectmode=Tkinter.SINGLE)self.ItemList.pack(side=Tkinter.LEFT,expand=Tkinter.YES,
fill=Tkinter.Y)self.ListBoxScroller=Tkinter.Scrollbar(self.LeftPane)self.ListBoxScroller.pack(side=Tkinter.RIGHT,expand=Tkinter.YES,
fill=Tkinter.Y)# Add entries to listbox: self.ItemList.insert(Tkinter.END,”*foreground”)self.ItemList.insert(Tkinter.END,”*background”)for WidgetName in WIDGET_NAMES:
self.ItemList.insert(Tkinter.END,”*%s*foreground”%WidgetName)self.ItemList.insert(Tkinter.END,”*%s*background”%WidgetName)
# Attach scrollbar to listbox:self.ListBoxScroller[“command”]=self.ItemList.yviewself.ItemList[“yscrollcommand”]=self.ListBoxScroller.set# Handle listbox selection events specially:self.ItemList.bind(“<Button-1>”,self.ListboxClicked)# Add checkbox for setting and un-setting the option:ColorSetCheck=Tkinter.Checkbutton(self.RightPane,
text=”Option set”, variable=self.OptionSetFlag,command=self.OptionChecked)
ColorSetCheck.pack(side=Tkinter.TOP,anchor=Tkinter.W)# Build red, green, and blue scales for setting colors:self.ColorValues={}self.ColorScales={}for ColorComponent in COLOR_COMPONENTS:
ColorValue=Tkinter.IntVar()self.ColorValues[ColorComponent]=ColorValueNewScale=Tkinter.Scale(self.RightPane,
orient=Tkinter.HORIZONTAL,from_=0,to=255,variable=ColorValue)
self.ColorScales[ColorComponent]=NewScale
Continued
4807-7 ch20.F 5/24/01 9:00 AM Page 379

380 Part IV ✦ User Interfaces and Multimedia
Listing 20-2 (continued)
Tkinter.Label(self.RightPane,text=ColorComponent).pack\(side=Tkinter.TOP)
NewScale.pack(side=Tkinter.TOP,pady=10)# Add “SAVE” and “QUIT” buttons:ButtonFrame=Tkinter.Frame(self.RightPane)ButtonFrame.pack()Tkinter.Button(ButtonFrame,text=”Save”,
command=self.SaveOptionsToFile).pack(side=Tkinter.LEFT)Tkinter.Button(ButtonFrame,text=”Quit”,
command=sys.exit).pack(side=Tkinter.LEFT)# Pack the parentmost widgets:self.LeftPane.pack(side=Tkinter.LEFT,expand=Tkinter.YES,
fill=Tkinter.BOTH)self.RightPane.pack(side=Tkinter.RIGHT,expand=Tkinter.YES,
fill=Tkinter.BOTH)def Run(self):
self.root.mainloop()def SaveOptionsToFile(self):
# Update internal color-settings from scale-widgets:self.SaveCurrentColorValues()File=open(OPTION_FILE_NAME,”w”)# Save *foreground and *background first:if self.Options.has_key(“*foreground”):
File.write(“*foreground: %s\n”%self.Options[“*foreground”]) del self.Options[“*foreground”]
if self.Options.has_key(“*background”):File.write(“*background: %s\n”%self.Options[“*background”]) del self.Options[“*background”]
for Key in self.Options.keys():File.write(“%s: %s\n”%(Key,self.Options[Key]))
File.close()print “Saved!”
def GetOptionsFromFile(self):if os.path.exists(OPTION_FILE_NAME):
# Read the colors in:File=open(OPTION_FILE_NAME,”r”)for Line in File.readlines():
LineHalves=Line.split(“:”)if len(LineHalves)!=2:
# Not a proper settingcontinue
Value = LineHalves[1].strip()Index = LineHalves[0].strip()self.Options[Index] = Value
File.close()# Tell Tkinter to use these colors, too!self.root.option_readfile(OPTION_FILE_NAME)
if (__name__==”__main__”):ColorChooser().Run()
4807-7 ch20.F 5/24/01 9:00 AM Page 380
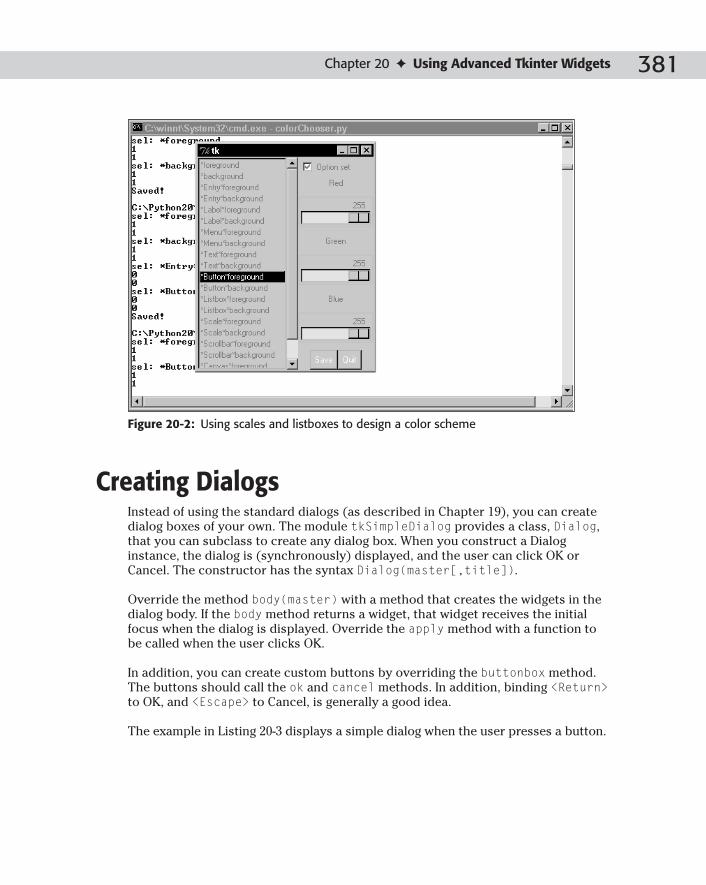
381Chapter 20 ✦ Using Advanced Tkinter Widgets
Figure 20-2: Using scales and listboxes to design a color scheme
Creating DialogsInstead of using the standard dialogs (as described in Chapter 19), you can create
dialog boxes of your own. The module tkSimpleDialog provides a class, Dialog,
that you can subclass to create any dialog box. When you construct a Dialog
instance, the dialog is (synchronously) displayed, and the user can click OK or
Cancel. The constructor has the syntax Dialog(master[,title]).
Override the method body(master) with a method that creates the widgets in the
dialog body. If the body method returns a widget, that widget receives the initial
focus when the dialog is displayed. Override the apply method with a function to
be called when the user clicks OK.
In addition, you can create custom buttons by overriding the buttonbox method.
The buttons should call the ok and cancel methods. In addition, binding <Return>to OK, and <Escape> to Cancel, is generally a good idea.
The example in Listing 20-3 displays a simple dialog when the user presses a button.
4807-7 ch20.F 5/24/01 9:00 AM Page 381
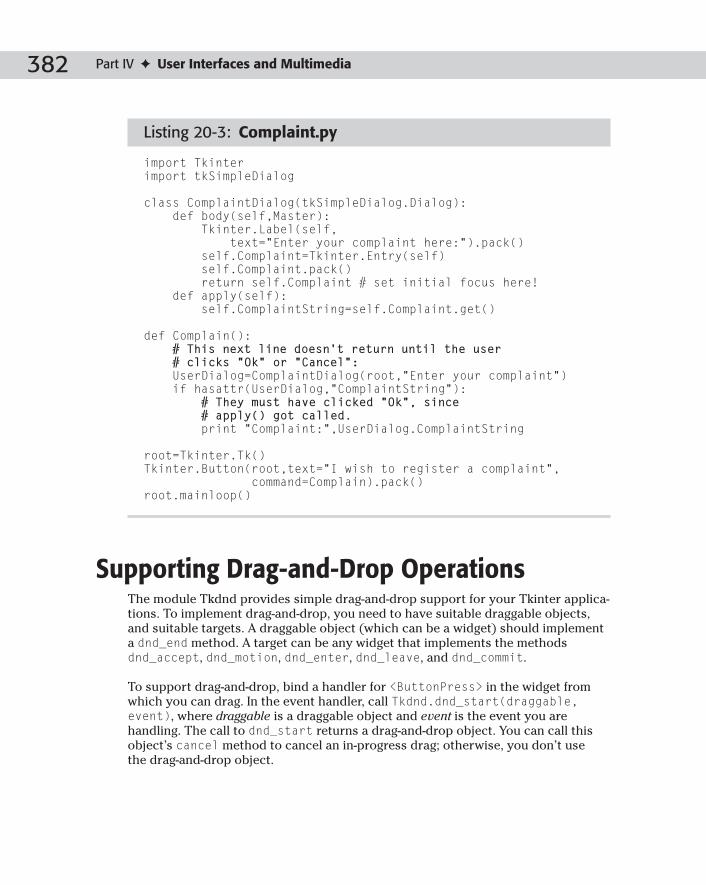
382 Part IV ✦ User Interfaces and Multimedia
Listing 20-3: Complaint.py
import Tkinterimport tkSimpleDialog
class ComplaintDialog(tkSimpleDialog.Dialog):def body(self,Master):
Tkinter.Label(self,text=”Enter your complaint here:”).pack()
self.Complaint=Tkinter.Entry(self)self.Complaint.pack()return self.Complaint # set initial focus here!
def apply(self):self.ComplaintString=self.Complaint.get()
def Complain():# This next line doesn’t return until the user # clicks “Ok” or “Cancel”:UserDialog=ComplaintDialog(root,”Enter your complaint”)if hasattr(UserDialog,”ComplaintString”):
# They must have clicked “Ok”, since # apply() got called.print “Complaint:”,UserDialog.ComplaintString
root=Tkinter.Tk()Tkinter.Button(root,text=”I wish to register a complaint”,
command=Complain).pack()root.mainloop()
Supporting Drag-and-Drop OperationsThe module Tkdnd provides simple drag-and-drop support for your Tkinter applica-
tions. To implement drag-and-drop, you need to have suitable draggable objects,
and suitable targets. A draggable object (which can be a widget) should implement
a dnd_end method. A target can be any widget that implements the methods
dnd_accept, dnd_motion, dnd_enter, dnd_leave, and dnd_commit.
To support drag-and-drop, bind a handler for <ButtonPress> in the widget from
which you can drag. In the event handler, call Tkdnd.dnd_start(draggable,event), where draggable is a draggable object and event is the event you are
handling. The call to dnd_start returns a drag-and-drop object. You can call this
object’s cancel method to cancel an in-progress drag; otherwise, you don’t use
the drag-and-drop object.
4807-7 ch20.F 5/24/01 9:00 AM Page 382

383Chapter 20 ✦ Using Advanced Tkinter Widgets
As the user drags the object around, Tkdnd constantly looks for a new target widget.
It checks the widget under the mouse cursor, then that parent’s widget, and so on.
When it sees a widget with a dnd_accept method, it calls dnd_accept(draggable,event), where draggable is the object being dragged. If the call to dnd_acceptreturns anything but None, that widget becomes the new target.
Whenever the dragged object moves, one of the following happens:
✦ If the old target and the new target are both None, nothing happens.
✦ If the old and new targets are the same widget, its method dnd_motion(draggable,event) is called.
✦ If the old target is None and the new target is not, its method
dnd_enter(draggable,event) is called.
✦ If the new target is None and the old target is not, its method
dnd_leave(draggable, event) is called.
✦ If the old and new targets are not None and are different, dnd_leave is called
on the old one and then dnd_enter is called on the new one.
If the draggable object is dropped on a valid target, dnd_commit(draggable,event)is called on that target. If the draggable object is not dropped on a valid target,
dnd_leave is called on the previous target (if any). In either case, a call to
dnd_end(target,event) is made on the draggable object when the user drops it.
The program in Listing 20-4 illustrates drag-and-drop through the use of two custom
listboxes. Entries can be dragged around within a listbox, or dragged between list-
boxes. Figure 20-3 shows what the program looks like.
Listing 20-4: DragAndDrop.py
import Tkinterimport Tkdnd
class DraggableRow:def __init__(self,Index,ItemStr,Widget):
self.Index=Indexself.ItemStr=ItemStrself.Widget=Widgetself.PreviousWidget=Widget
def dnd_end(self,Target,Event):if Target==None:
# Put the item back in its original widget!self.PreviousWidget.insert(Tkinter.END,
self.ItemStr)
Continued
4807-7 ch20.F 5/24/01 9:00 AM Page 383

384 Part IV ✦ User Interfaces and Multimedia
Listing 20-4 (continued)
class DragAndDropListbox(Tkinter.Listbox):def __init__(self,Master,cnf={},**kw):
Tkinter.Listbox.__init__(self,Master,cnf)self.bind(“<ButtonPress>”,self.StartDrag)
def StartDrag(self,Event):Index=self.nearest(Event.y)ItemStr=self.get(Index)Tkdnd.dnd_start(DraggableRow(Index,ItemStr,self),Event)
def dnd_accept(self,Item,Event):return self
def dnd_leave(self,Item,Event):self.delete(Item.Index)Item.PreviousWidget=selfItem.Widget=NoneItem.Index=None
def dnd_enter(self,Item,Event):if (Item.Widget==self and Item.Index!=None):
self.delete(Item.Index)Item.Widget=selfNewIndex=self.nearest(Event.y)NewIndex=max(NewIndex,0)self.insert(NewIndex,Item.ItemStr)Item.Index=NewIndex
def dnd_commit(self,Item,Event):pass
def dnd_motion(self,Item,Event):if (Item.Index!=None):
self.delete(Item.Index)NewIndex=self.nearest(Event.y)NewIndex=max(NewIndex,0)Item.Index=NewIndexself.insert(NewIndex,Item.ItemStr)
root=Tkinter.Tk()LeftList=DragAndDropListbox(root)LeftList.pack(side=Tkinter.LEFT,fill=Tkinter.BOTH,
expand=Tkinter.YES)RightList=DragAndDropListbox(root)RightList.pack(side=Tkinter.RIGHT,fill=Tkinter.BOTH,
expand=Tkinter.YES)# Add some elements to the listbox, for testing:for Name in [“Nene”,”Syvia”,”Linna”,”Priscilla”]:
LeftList.insert(Tkinter.END,Name)root.mainloop()
4807-7 ch20.F 5/24/01 9:00 AM Page 384

385Chapter 20 ✦ Using Advanced Tkinter Widgets
Figure 20-3: Dragging and dropping elements between two listboxes
Using CursorsThe standard widget option cursor specifies the name of a cursor image to use when
the mouse is positioned over the widget. Setting cursor to an empty string uses the
standard system cursor. For example, the following code creates a Quit button, and
changes the cursor to a skull-and-crossbones when it is positioned over the button:
Tkinter.Button(root,text=”Quit”,command=sys.exit,cursor=”pirate”).pack()
Many cursors are available, which range from the useful to the silly. Table 20-3
describes some useful cursors.
4807-7 ch20.F 5/24/01 9:00 AM Page 385

386 Part IV ✦ User Interfaces and Multimedia
Table 20-3Cursors
Name Description
left_ptr Pointer arrow; a good default cursor
watch Stopwatch; used to tell the user to wait while someoperation finishes
pencil Pencil; good for drawing
xterm Insertion cursor; the default for Text and Entry widgets
trek, gumby, box_spiral Some cute, silly cursors
The TopLevel method after executes a function after a specified amount of
time has passed. (See “Using Timers” in Chapter 19). The related method
after_idle(function) executes a specified function as soon as Tkinter
empties its event queue and becomes idle. It is a handy way for restoring the
cursor to normal after an operation has finished.
The example in Listing 20-5 finds .mp3 files in the current directory and all its
subdirectories, and adds them to a playlist. It displays a busy cursor while it is
searching the directories. (A fancier approach would be to spawn a child thread to
do the search.)
Listing 20-5: WaitCursor.py
import Tkinterimport osOldCursor=””def DoStuff():
# Save the old cursor, so we can restore it later.# (In this example, we know the old cursor is just “”)OldCursor=root[“cursor”]# Change the cursor:root[“cursor”]=”watch”# Wait for Tkinter to empty the event loop. We must do# this, in order to see the new cursor:root.update()# Tell Tkinter to RestoreCursor the next time it’s idle:root.after_idle(RestoreCursor)File=open(“PlayList.m3u”,”w”)os.path.walk(os.path.abspath(os.curdir),CheckDir,File)File.close()
def CheckDir(File,DirName,FileNames):# Write all the MP3 files in the directory to our playlist:for FileName in FileNames:
4807-7 ch20.F 5/24/01 9:00 AM Page 386

387Chapter 20 ✦ Using Advanced Tkinter Widgets
if os.path.splitext(FileName)[1].upper()==”.MP3”:File.write(os.path.join(DirName,FileName)+”\n”)
def RestoreCursor():root[“cursor”]=OldCursor
root=Tkinter.Tk()Tkinter.Button(text=”Find files!”,command=DoStuff).pack()root.mainloop()
Designing New WidgetsYou can create new widgets by combining or subclassing existing ones. However,
before you do, do a quick search online — any widget you can imagine has probably
been created already!
Listing 20-6 shows a simple example — a progress bar, which keeps track of
progress as a percentage from 0 to 100. Figure 20-4 shows the program partway
through its run.
Listing 20-6: ProgressBar.py
import Tkinterimport timeimport sys
class ProgressBar:def __init__(self, Parent, Height=10, Width=100,
ForegroundColor=None,BackgroundColor=None,Progress=0):self.Height=Heightself.Width=Widthself.BarCanvas = Tkinter.Canvas(Parent,
width=Width,height=Height,background=BackgroundColor,borderwidth=1,relief=Tkinter.SUNKEN)
if (BackgroundColor):self.BarCanvas[“backgroundcolor”]=BackgroundColor
self.BarCanvas.pack(padx=5,pady=2)self.RectangleID=self.BarCanvas.create_rectangle(\
0,0,0,Height)if (ForegroundColor==None):
ForegroundColor=”black”self.BarCanvas.itemconfigure(\
self.RectangleID,fill=ForegroundColor)self.SetProgressPercent(Progress)
def SetProgressPercent(self,NewLevel):
Continued
4807-7 ch20.F 5/24/01 9:00 AM Page 387

388 Part IV ✦ User Interfaces and Multimedia
Listing 20-6 (continued)
self.Progress=NewLevelself.Progress=min(100,self.Progress)self.Progress=max(0,self.Progress) self.DrawProgress()
def DrawProgress(self):ProgressPixel=(self.Progress/100.0)*self.Widthself.BarCanvas.coords(self.RectangleID,
0,0,ProgressPixel,self.Height)def GetProgressPercent(self):
return self.Progress
# Simple demonstration:def IncrememtProgress():
OldLevel=Bar.GetProgressPercent()if (OldLevel>99): sys.exit() Bar.SetProgressPercent(OldLevel+1)root.after(20,IncrememtProgress)
root=Tkinter.Tk()root.title(“Progress bar!”)Bar=ProgressBar(root)root.after(20,IncrememtProgress)root.mainloop()
Figure 20-4: A custom widget for displaying a progress bar
4807-7 ch20.F 5/24/01 9:00 AM Page 388

389Chapter 20 ✦ Using Advanced Tkinter Widgets
Further Tkinter AdventuresThere are many more widgets, options, and tricks in Tkinter than are covered here.
Following are some places to learn more.
Additional widgetsPython MegaWidgets (Pmw) is a large collection of Tkinter widgets. Examples
include Notebook (a tabbed display) and Balloon (a class for adding popup help).
Pmw is a nice way to develop fancier interfaces without becoming a Tk Jedi Master.
Visit http://www.dscpl.com.au/pmw/ to check it out.
There are other collections of Tk widgets — such as Tix and BLT — that may help
you save time developing a GUI.
Learning moreThe Tkinter distribution is lacking in documentation, but there are several good
Tkinter references out there:
✦ An Introduction to Tkinter, by Fredrik Lundh. Comprehensive, with many good
examples.
http://www.pythonware.com/library/tkinter/introduction/index.htm
✦ Python and Tkinter Programming, by John E. Grayson. Many interesting exam-
ples. Covers Pmw in great detail. The book’s Web site is at
http://www.manning.com/Grayson/
✦ The Tkinter topic guide — a good starting point for all things Tkinter.
http://www.python.org/topics/tkinter/doc.html
✦ The Tkinter Life Preserver, by Matt Conway.
http://www.python.org/doc/life-preserver/index.html
When all else fails, read up on Tk. The correspondence between Tkinter and Tk is
straightforward, so anything you learn about Tk will carry over to Tkinter too.
4807-7 ch20.F 5/24/01 9:00 AM Page 389

390 Part IV ✦ User Interfaces and Multimedia
SummaryTkinter can handle sophisticated GUIs without much trouble. You can use the lay-
out managers and event handler to get your program’s appearance and behavior
just right. In this chapter, you:
✦ Handled various events.
✦ Created advanced widgets and dialogs.
✦ Used custom mouse cursors.
In the next chapter, you learn all about the Curses module — a good user interface
choice for terminals on which graphics (and hence Tkinter) aren’t available.
✦ ✦ ✦
4807-7 ch20.F 5/24/01 9:00 AM Page 390
Building UserInterfaces withwxPython
Although it is not Python’s official user interface library,
wxPython is becoming an increasingly popular set of
tools for building graphical user interfaces. Like Tkinter, it is
powerful, easy to use, and works on several platforms. This
chapter gives you a jump start on using wxPython in your
own applications.
Introducing wxPythonwxPython (http://wxpython.org) is an extension module
that wraps a C++ framework called wxWindows
(http://wxwindows.org). Both wxPython and wxWindows
provide cross-platform support and are free for private as well
as commercial use. This chapter focuses on the cross-plat-
form GUI support provided by wxPython, but wxWindows also
gives you cross-platform APIs for multithreading, database
access, and so on.
Visit the wxPython Web site for straightforward download-ing and installing instructions, as well as the latest newsand support. You can also join the wxPython communityby subscribing to a free mailing list for questions, answers,and announcements. Visit http://wxpros.com for infor-mation about professional support and training.
The full feature set of wxPython deserves an entire book of its
own, and a single chapter will all but scratch the surface. The
purpose of this chapter, therefore, is to give you a high-level
picture of what it supports, and to get you started on writing
some wxPython programs of your own. You’ll still want to
Tip
2121C H A P T E R
✦ ✦ ✦ ✦
In This Chapter
Introducing wxPython
Creating simplewxPython programs
Choosing differentwindow types
Using wxPythoncontrols
Controlling layout
Using built-in dialogs
Drawing with devicecontexts
Adding menus andkeyboard shortcuts
Accessing mouse andkeyboard input
Other wxPythonfeatures
✦ ✦ ✦ ✦
4807-7 ch21.F 5/24/01 9:00 AM Page 391

392 Part IV ✦ User Interfaces and Multimedia
later sift through the documentation for additional options and features. Because
wxPython is so easy to use, however, by the end of this chapter you’ll be able to
write some very functional programs, and with very little effort.
In addition to its built-in features, wxPython can also detect and use some popular
Python extension modules such as Numerical Python (NumPy) and PyOpenGL, the
OpenGL bindings for Python.
See Chapter 32 for an introduction to NumPy.
wxPython often outperforms Tkinter, both with large amounts of data and overall
responsiveness; it comes with a good set of high-level controls and dialogs; and it
does a pretty good job of giving applications a native look and feel (which isn’t nec-
essarily a goal of Tkinter anyway). For these reasons, and because I find using
wxPython very straightforward and intuitive, I personally prefer wxPython over
Tkinter even though it doesn’t ship as a standard part of the Python distribution.
Creating Simple wxPython ProgramsMost wxPython programs have a similar structure, so once you have that under
your belt, you can quickly move on to programs that are more complex. Listing 21-1
is a simple program that opens up a main window with a giant button in it. Clicking
the button pops up a dialog box, as shown in Figure 21-1.
Listing 21-1: wxclickme.py — A wxPython application with buttons
from wxPython.wx import *
class ButtonFrame(wxFrame):‘Creates a frame with a single button in the center’def __init__(self):
wxFrame.__init__(self, NULL, -1, ‘wxPython’,wxDefaultPosition, (200, 100))
button = wxButton(self, 111, ‘Click Me!’)EVT_BUTTON(self, 111, self.onButton)
def onButton(self, event):‘Create a message dialog when the button is clicked’dlg = wxMessageDialog(self, ‘Ow, quit it.’, \
‘Whine’, wxOK)dlg.ShowModal()dlg.Destroy()
Cross-Reference
4807-7 ch21.F 5/24/01 9:00 AM Page 392

393Chapter 21 ✦ Building User Interfaces with wxPython
class App(wxApp):def OnInit(self):
‘Create the main window and insert the custom frame’frame = ButtonFrame()frame.Show(true)return true # Yes, continue processing
# Create the app and start processing messagesapp = App(0)app.MainLoop()
Figure 21-1: The program in Listing 21-1 opensthe dialog box on the button click event.
To understand this program, start at the end and work your way back. All wxPython
programs instantiate a wxApp (or subclass) object and call its MainLoop method to
start the message handling (MainLoop doesn’t return until the application window
is closed). The wxApp subclass in the example, App, overloads the OnInit method
that is called during initialization. OnInit creates a custom frame, ButtonFrame,
makes it visible, and returns true (actually, wx.true) to signal success. These lines
of code will be nearly identical for almost all your wxPython programs; for each
new program, I usually cut and paste them from the previous program I wrote,
changing only the name of the frame class to use.
A frame is a top-level window like the main window in most applications (it usually
has a title bar, is resizable, and so forth). The __init__ method of the
ButtonFrame class calls the parent (wxFrame) constructor to set the title to
“wxPython” and the size to 200 pixels wide and 100 tall. It adds a button with the
label Click Me!, and tells wxPython to route button-click messages for that button to
ButtonFrame’s onButton method. Notice how trivial it is to set up event routing.
The line
EVT_BUTTON(self, 111, self.onButton)
tells wxPython to take all button-click events generated in the current window
(self) with an ID of 111 (a random number I chose and assigned to the button) and
send them to the onButton method. The only requirement for the onButtonmethod is that it take an event argument. You can use a method such as onButtonas the handler for many different events (if it makes sense to do so) because it
receives as an argument the event to process. Each event is derived from the
4807-7 ch21.F 5/24/01 9:00 AM Page 393

394 Part IV ✦ User Interfaces and Multimedia
wxEvent class and has methods that identify the event source, type, and so on. For
example, if you registered onButton to handle events from several different but-
tons, onButton could call the event’s GetId() method to determine which button
was clicked.
Use the wxNewId() function to generate unique ID numbers.
The onButton method pops open a standard message dialog, waits for you to click
OK, and closes it.
Fiddle around with the program until the basic structure makes sense and you’re
comfortable with what’s happening. Conceptually, that’s the bulk of programming in
wxPython — now you can just learn about other widgets besides buttons, and other
events besides button-clicks. There’s plenty more to learn, of course, but the
designers of wxPython have done an excellent job of insulating us from a lot of
nasty details.
Choosing Different Window TypesThe wxWindow class is the base class of all other windows (everything from the
main application window to a button or a text label is considered a window). Of the
window types that can contain child windows, there are two types: managed and
nonmanaged.
Repeat ten times out loud: “A button is a window.” Nearly everything is a descen-dent of wxWindow; therefore, for example, if the documentation tells you that youcan call some method to add a child window to a parent, bear in mind that thechild window can be a panel, a button, a scrollbar, and so on.
Managed windowsA managed window is one that is directly controlled by the operating system’s win-
dow manager. The first type is one you’ve already seen, wxFrame, which often has a
title bar, menus, and a status bar, and is usually resizable and movable by the user.
wxMiniFrame is a wxFrame subclass that creates a tiny frame suitable for floating
toolbars.
A wxDialog window is similar to a wxFrame window and is usually used to request
input or display a message. When created with the wxDIALOG_MODAL style, the
calling program can’t receive any user input until the dialog box is closed.
Managed window constructors are generally like wxWindow(parent, id, title[,position][, size][, style]), where parent can be None for managed windows,
id can be –1 for a default ID, and style is a bitwise OR combination of several
class-specific flags:
Tip
Tip
4807-7 ch21.F 5/24/01 9:00 AM Page 394

395Chapter 21 ✦ Building User Interfaces with wxPython
>>> from wxPython.wx import *>>> f = wxFrame(None,-1,’’, size=(200,100),
style=wxRESIZE_BORDER)>>> f.Center(); f.Show(1) # Later, use f.Show(0) to kill it
Nonmanaged windowsNonmanaged windows are controlled by wxPython, and you use them by placing
them inside other windows. For example, the following creates a window with a
resizable vertical split like the one shown in Figure 21-2:
>>> f = wxFrame(None,-1,’SplitterWindow’,size=(200,100))>>> s = wxSplitterWindow(f,-1)>>> s.SplitVertically(wxWindow(s,-1),wxWindow(s,-1))1>>> f.Show(1)1
Figure 21-2: A user-resizable splitter window
Notice that wxSplitterWindow’s SplitVertically method takes as parameters
the two windows it splits; for simplicity, I just created two plain windows. A
wxPanel window is like a dialog box in that you place controls (buttons, text entry
fields, and so on) in it, except that a panel lives inside another window such as a
frame. The wxHtmlWindow class displays HTML files; you can even embed any
wxPython widget within an HTML page and have it respond to events normally.
Consult demo.py in the wxPython distribution for information about embeddingwidgets in HTML pages. The demo also contains terrific examples of many otherwxPython features.
You can add scrolling to any window by first placing it inside a wxScrolledWindowinstance. Be sure to call its SetScrollBars method to initialize the size of the
scrollbars. Some windows, such as wxHtmlWindow, are derived from
wxScrolledWindow, or already have scrolling support to save you the trouble.
The wxGrid class gives your application a spreadsheet-like table with rows and
columns. It has plenty of standard helpers for controlling user input or displaying
data in certain ways, or you can implement your own grid cell renderers.
The wxStatusBar and wxToolBar classes enable you to add a status bar and a
toolbar to any frame (call the frame’s SetStatusBar and SetToolBar methods,
respectively). In the wxPython.lib.floatbar module, you’ll find wxFloatBar, a
Tip
4807-7 ch21.F 5/24/01 9:00 AM Page 395

396 Part IV ✦ User Interfaces and Multimedia
wxToolBar subclass implemented in Python that provides “dockable” toolbars that
users can pull out of the frame and move elsewhere.
Applications such as Microsoft Visual Studio enable you to open several files at a
time, each in a separate child window that can’t leave the boundaries of a single
parent window. wxPython enables you to create applications with this style of inter-
face using the wxMDIChildFrame, wxMDIClientWindow, and wxMDIParentFrameclasses.
The program in Listing 21-2 creates a viewer for HTML files stored locally. Notice in
Figure 21-3 that it uses a wxNotebook window to enable you to open several HTML
files simultaneously, and the toolbar has buttons for adding and removing pages as
well as quitting the application.
Listing 21-2: grayul.py — A local HTML file viewer
from wxPython.wx import *from wxPython.html import *from wxPython.lib.floatbar import *import time,os
class BrowserFrame(wxFrame):‘Creates a multi-pane viewer for local HTML files’ID_ADD = 5000ID_REMOVE = 5001ID_QUIT = 5002
# Load support for viewing GIF files wxImage_AddHandler(wxGIFHandler())
def __init__(self):wxFrame.__init__(self, NULL, -1, ‘Grayul’)
# Create a toolbar with Add, Remove, and Quit buttonstb = wxFloatBar(self,-1)addWin = wxButton(tb,self.ID_ADD,’Add new window’)removeWin = wxButton(tb,self.ID_REMOVE,
‘Remove current window’)quit = wxButton(tb,self.ID_QUIT,’Quit’)
# Tie button clicks to some event handlers EVT_BUTTON(tb,self.ID_ADD,self.OnAdd)EVT_BUTTON(tb,self.ID_REMOVE,self.OnRemove)EVT_BUTTON(tb,self.ID_QUIT,self.OnQuit)
# Add the buttons to the toolbar tb.AddControl(addWin)
4807-7 ch21.F 5/24/01 9:00 AM Page 396

397Chapter 21 ✦ Building User Interfaces with wxPython
tb.AddControl(removeWin)tb.AddSeparator()tb.AddControl(quit)tb.Realize()
self.SetToolBar(tb)tb.SetFloatable(1)
# Create a notebook to hold each windowself.note = wxNotebook(self,-1)
def GetFileName(self):‘Gets the name of an HTML file from the user’types = ‘HTML files|*.html;*.htm’ # Limit types to viewdlg = wxFileDialog(self,style=wxOPEN|wxFILE_MUST_EXIST,
wildcard=types)dlg.ShowModal()file = dlg.GetFilename()dlg.Destroy()return file
def OnAdd(self,event):‘Adds a new HTML window’file = self.GetFileName()if file:
newWin = wxHtmlWindow(self.note,-1)self.note.AddPage(newWin,os.path.split(file)[1],1)newWin.LoadPage(file)
def OnRemove(self,event):‘Removes the current HTML window’page = self.note.GetSelection()if page != -1:
self.note.DeletePage(page)self.note.AdvanceSelection()
def OnQuit(self,event):self.Destroy()
class App(wxApp):def OnInit(self):
‘Create the main window and insert the custom frame’frame = BrowserFrame()frame.Show(true)return true
# Create an app and go!app = App(0)app.MainLoop()
4807-7 ch21.F 5/24/01 9:00 AM Page 397

398 Part IV ✦ User Interfaces and Multimedia
Figure 21-3: Build this simple viewer to display the documentation that ships with Python.
This application uses an instance of the wxFloatBar class (a wxToolbar child) to
create a floating toolbar. (Try it out — click on the toolbar and drag it around the
screen. Close it or move it back over its original location to dock it.) Although I just
added some normal buttons, you can use the AddTool method to add icons like the
ones you find on toolbars in many applications.
Using the wxNotebook class is straightforward; for each tab, create a new window
that is a child of the notebook, and add it with a call to AddPage or InsertPage.
Likewise, the wxHtmlWindow class is an easy way to display HTML pages. The
BrowserFrame class definition contains a call to wxImage_AddHandler so that it
can view CompuServe GIF files.
A PyShellWindow enables users to access a Python interpreter running in interac-
tive mode:
from wxPython.wx import *from wxPython.lib.pyshell import PyShellWindow
class App(wxApp):def OnInit(self):
frame = wxFrame(None,-1,’MyPyShell’)PyShellWindow(frame,-1)frame.Show(true)return true
app = App(0)app.MainLoop()
4807-7 ch21.F 5/24/01 9:00 AM Page 398

399Chapter 21 ✦ Building User Interfaces with wxPython
Using wxPython ControlswxPython ships with a comprehensive set of high-level controls, or widgets. Most
often, you place them in a wxPanel or wxDialog, but they can be used elsewhere,
such as in a status bar or toolbar. This section shows you what controls are avail-
able and how to use some of them; the process of controlling their layout is cov-
ered in the Controlling Layout section.
Common controlsFigure 21-4 shows most of the common controls available to you in wxPython.
Figure 21-4: Names and examples of the common wxPython controls
You can use wxButton and wxBitmapButton to trigger an event; use the
EVT_BUTTON(id, func) function to link a button ID and an event handler. The
FileBrowseButton button combines a button, a file dialog, and a text entry widget
so that when clicked, the user browses for a file and the chosen file name ends up
in the text entry field. FileBrowseButtonWithHistory’s text entry field has a
drop-down list in which you can store previous choices. The wxGenButton class is
a button class that is implemented by wxPython (and not natively) so that you can
customize how the button behaves and how it looks when pressed. See the
wxGenBitmapButton, wxGenToggleButton, and wxGenBitmapToggleButton for
additional variations.
Most controls let you attach event handlers when the user modifies the control’s
state. For example, by using the EVT_CHECKBOX(id, func) function, your handler
function will be called anytime the checkbox is toggled.
4807-7 ch21.F 5/24/01 9:00 AM Page 399
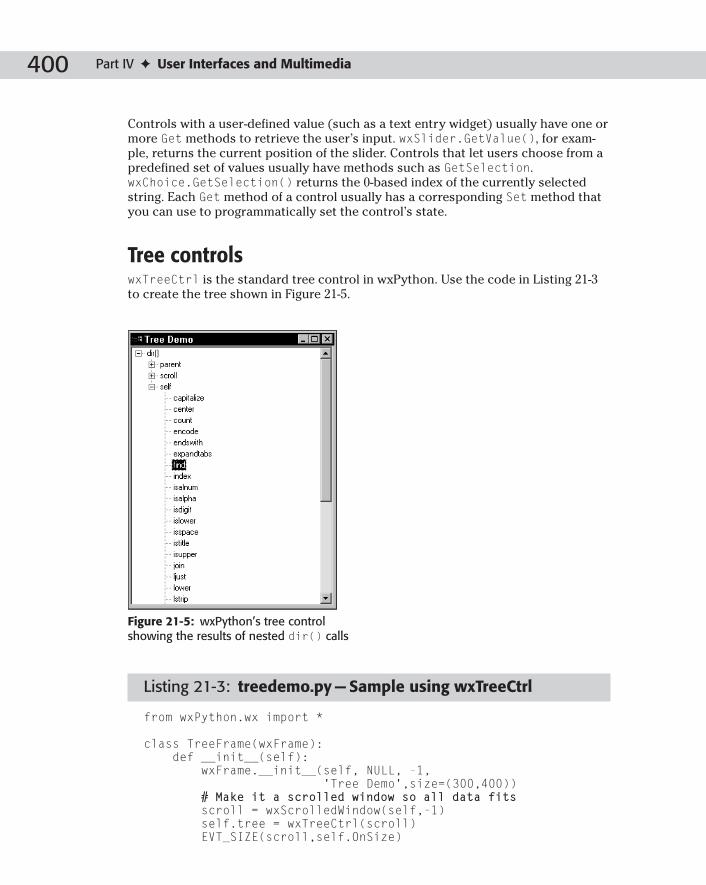
400 Part IV ✦ User Interfaces and Multimedia
Controls with a user-defined value (such as a text entry widget) usually have one or
more Get methods to retrieve the user’s input. wxSlider.GetValue(), for exam-
ple, returns the current position of the slider. Controls that let users choose from a
predefined set of values usually have methods such as GetSelection.
wxChoice.GetSelection() returns the 0-based index of the currently selected
string. Each Get method of a control usually has a corresponding Set method that
you can use to programmatically set the control’s state.
Tree controlswxTreeCtrl is the standard tree control in wxPython. Use the code in Listing 21-3
to create the tree shown in Figure 21-5.
Figure 21-5: wxPython’s tree control showing the results of nested dir() calls
Listing 21-3: treedemo.py — Sample using wxTreeCtrl
from wxPython.wx import *
class TreeFrame(wxFrame):def __init__(self):
wxFrame.__init__(self, NULL, -1, ‘Tree Demo’,size=(300,400))
# Make it a scrolled window so all data fitsscroll = wxScrolledWindow(self,-1)self.tree = wxTreeCtrl(scroll)EVT_SIZE(scroll,self.OnSize)
4807-7 ch21.F 5/24/01 9:00 AM Page 400

401Chapter 21 ✦ Building User Interfaces with wxPython
# Populate a small treeparent = self.tree.AddRoot(‘dir()’)for i in dir():
child = self.tree.AppendItem(parent,i)for j in dir(i):
grandchild = self.tree.AppendItem(child,j)
def OnSize(self, event):# Make the tree control the size of the client areaself.tree.SetSize(self.GetClientSizeTuple())
class App(wxApp):def OnInit(self):
‘Create the main window and insert the custom frame’frame = TreeFrame()frame.Show(true)return true
app = App(0)app.MainLoop()
Apart from the usual initialization work, there is code to populate the tree and to
ensure that the tree control fills the entire client area of the frame (using the
EVT_SIZE event function). You create a root node with a call to AddRoot, and then
add children with AppendItem calls. Refer to the documentation for information
about other features, including support for event notification, editing items, and
using icons in the tree.
wxPython.lib.mvctree has the wxMVCTree class, which is a tree control that uses
a model-view-control architecture in which code to display the information is
largely independent of the code to store the data. Such a model enables you to
change one with little or no change to the other.
Editor controlsThe wxEditor and wxPyEditor classes (in wxPython.lib.editor) are rudimen-
tary text editor controls (wxPyEditor is a wxEditor subclass that adds syntax
highlighting). A more heavyweight and advanced edit control is wxStyledTextCtrl(in wxPython.stc). It enables you to mix different fonts and font attributes much
like a word processor, and it has built-in syntax highlighting for a few languages,
including Python.
Controlling LayoutWhen you put more than one control into a panel, dialog box, or other container,
you have to decide how you want to lay out, or organize, them. In some cases, you
4807-7 ch21.F 5/24/01 9:00 AM Page 401

402 Part IV ✦ User Interfaces and Multimedia
can get by with specifying exact x and y coordinates for the controls. Other times,
you need to correctly handle layout if there is a change in window size, default font
(vision-impaired users often use a larger default font, for example), or platform (this
is Python, after all). wxPython gives you several mechanisms to control the layout.
It’s important to learn what layout options are available to you, but if you plan tobuild a lot of user interfaces, consider acquiring a tool such as wxDesigner, BoaConstructor, or wxStudio to help you out.
As you learn about the different types of layout mechanisms, don’t be fooled into
thinking that you always have to choose one to the exclusion of another. You
should use whatever works best for your particular situation, and that may mean
mixing them together. You can’t combine them within the same container (a panel,
window, and so on), but you can have child containers use different methods. For
example, your GUI could have two panels, one that uses sizers and one that uses
layout constraints; and then you can lay them both out in the main window using
hard-coded coordinates.
Specifying coordinatesThe simplest way is occasionally the best. The constructor for every control takes
two optional parameters, size and pos, that specify the control’s size and position,
respectively:
>>> from wxPython.wx import *>>> dlg = wxDialog(None,-1,’Hey’,size=(200,200))>>> dlg.Show(1)1>>> dlg.SetSize((200,200))>>> wxButton(dlg,-1,’Quit’,pos=(10,100),size=(100,25))
Using size and pos, you can manually control the exact size and position of each
control. It can be pretty tedious, however, so if this is the route you choose, build
your GUI in an interactive Python session so that you can fine-tune it without hav-
ing to re-run your program.
After you’ve added a control to a container, you can adjust its size and position bycalling its SetSize and SetPosition methods:
myButton.SetSize((200,100)) # Both methods take a tuple
wxWindows ships with a simple dialog editor (and documentation) that creates a
WXR file describing the layout of your dialog box, and you can use WXR files in
wxWindows or wxPython programs. For example, if you have a file called
sample.wxr and it contains the definition for a dialog box named ‘myDialog’, you
could open the dialog as follows:
...wxResourceParseFile(‘sample.wxr’)dlg = wxDialog(parent, -1, ‘’)
Tip
Tip
4807-7 ch21.F 5/24/01 9:00 AM Page 402

403Chapter 21 ✦ Building User Interfaces with wxPython
dlg.LoadFromResource(parent,’MyDialog’)dlg.ShowModal()...
The call to wxResourceParseFile needs to happen only once, so you could call it
during initialization.
If your dialog box looks great in wxPython’s dialog editor, but looks compressed orotherwise messed up in your program, toggle the useDialogUnits flag in thedialog box’s properties in the editor.
The downside to using fixed coordinates is that, well, they’re fixed. A well-organized
dialog box on one platform may look lousy on another, and if you have to change
something later, you might end up doing a lot of extra work. One alternative is to
create a different version of the resource file for each platform, and load the appro-
priate one on startup. Despite these potential problems, precise widget layout
sometimes requires less effort than wxPython’s other layout mechanisms, so you’ll
have to judge for yourself. One approach that has helped me is to sketch out on
paper the GUI I plan to build and then divide it up into small groups of controls.
Implement each group with a wxPanel that has its controls laid out at specific
coordinates, and then use sizers (see the next section) to add the different groups
to the window.
SizersSizers are objects that help control window layout by dividing a window into sub-
windows that are laid out according to sizer rules. A sizer talks to all of its child
objects to determine its own minimum size, which it reports to its parent. You can
nest sizers inside other sizers to form an arbitrarily complex and deep nesting. The
sizers you’ll use are children classes of wxSizer, but if you want to create your own
sizer type, you should derive it from wxPySizer.
Box sizerswxBoxSizer and wxStaticBoxSizer are the simplest forms of sizers, and the two
are the same except that wxStaticBoxSizer includes a wxStaticBox control
around the outside of all of its children objects. A box sizer lays out controls to
form either a row or a column, which you choose when you create the sizer:
sizer = wxBoxSizer(wxVERTICAL) # A sizer that creates a column
box = wxStaticBox(myFrame, -1, ‘Stuff’)sizer = wxStaticBoxSizer(box, wxHORIZONTAL) # A row with border
The direction you choose is called its primary orientation, so a wxBoxSizer with
wxVERTICAL has a vertical primary orientation. Once you have your sizer, you add
objects to it using its Add or Prepend methods (Add puts the new object at the end
of the group, Prepend at the beginning), which have the following forms:
Tip
4807-7 ch21.F 5/24/01 9:00 AM Page 403

404 Part IV ✦ User Interfaces and Multimedia
sizer.Add(window, option, flag, border) # Add window or widgetsizer.Add(sizer, option, flag, border) # Add a child sizersizer.Add(w, h, option, flag, border) # Add a spacer
When you add a window or control, keep in mind that when you create the control,
it is still a child of a window, not a sizer (so don’t try to use the sizer as the parentargument in the control’s constructor). You can pass to Add (or Prepend) a control
or window, a child sizer (which may in turn contain other sizers), or the width and
height of an invisible spacer object to pad between two items.
When the sizer is laying out its items and has extra space along its primary orienta-
tion, it looks at the option argument to determine how much extra space to give to
each one. A value of 0 means that that item does not change size. If one item has an
option value of 1 and another has a value of 2, the second item will get twice as
much space as the first.
The flag argument is a bitwise OR of several values that tell the sizer the border
type to use around the item and what it should do with extra space along the
opposite, or secondary, orientation. The border can be any combination of wxTOP,
wxBOTTOM, wxLEFT, or wxRIGHT (wxALL puts them all together for you). For exam-
ple, if you want a blank border around the top and left sides of your widget, you
could use a flag of wxTOP | wxLEFT.
If the flag value contains wxGROW (or wxEXPAND), the item will grow to fill the avail-
able extra space. A value of wxSHAPED means that it will grow proportionally so that
it always maintains the original aspect (width-to-height) ratio. Instead of growing,
the item can remain aligned against a side (by using wxALIGN_LEFT, wxALIGN_CENTER, wxALIGN_RIGHT, wxALIGN_TOP, or wxALIGN_BOTTOM).
The border argument is the number of pixels of padding around the item, and it
makes sense only if the flag argument specifies one or more borders (such as
wxTOP).
The sizers also have an AddMany method that you can use to combine multipleAdd calls.
Call the parent window’s SetSizer(sizer) method to tell it to use your new sizer.
When the window’s Layout() method is called, the window will lay out its contents
with help from the sizer. An alternative is to call the window’s SetAutoLayout(1)method so that it automatically calls Layout anytime the window size changes.
The sizer.Fit(window) method resizes the parent window to the minimum
acceptable size of its contents. If you then call sizer.SetSizeHints(window), the
sizer will remember the current size as the minimum and prevent the user from
ever making the window smaller than that minimum.
Before all of this seeps out of your brain, try the following code so you can see a
wxBoxSizer in action:
Tip
4807-7 ch21.F 5/24/01 9:00 AM Page 404

405Chapter 21 ✦ Building User Interfaces with wxPython
>>> from wxPython.wx import *>>> f = wxFrame(None,-1,’Sizer Test’)>>> f.Show(1)>>> sizer = wxBoxSizer(wxVERTICAL)>>> sizer.Add(wxButton(f,-1,’One’),1,wxALL|wxALIGN_LEFT,3)>>> sizer.Add(wxButton(f,-1,’Two’),2,wxALIGN_RIGHT)>>> sizer.Add(wxButton(f,-1,’Three’),2,wxALL|wxALIGN_CENTER,3)>>> sizer.Add(10,10,2,wxALL,3)>>> sizer.Add(wxButton(f,-1,’Four’),4,wxALL|wxGROW,3)>>> sizer.Add(wxButton(f,-1,’Five’),4,wxALL,3)>>> f.SetAutoLayout(1)>>> f.SetSizer(sizer)>>> sizer.Fit(f)>>> sizer.SetSizeHints(f)
Resize the window in each direction, and once you’re done playing, use f.Show(0) to
make the window go away. As shown in Figure 21-6, vertically (the primary orienta-
tion) the buttons grow according to the option value used (for example, button Five
is four times as tall as button One). Most of the buttons have a three-pixel border on
all sides, and their horizontal alignment, or stretching, follows the flag values.
Figure 21-6: Buttons resize and align according tothe rules of the box sizer.
A good exercise for you to try now would be to replace one of the buttons with a
horizontal wxBoxSizer that also contains buttons of its own. This forms a row of
buttons that are treated as a single unit by the parent sizer, but are laid out individ-
ually by the child sizer. This will help you see how you can use a hierarchy of
nested sizers to achieve a complex layout.
Grid sizerswxGridSizer lays out objects in a table. The width of each column is the width of
the widest item in the grid; and the height of each row is that of the tallest item. You
4807-7 ch21.F 5/24/01 9:00 AM Page 405

406 Part IV ✦ User Interfaces and Multimedia
create this sizer by calling wxGridSizer([rows|cols]=n), where n is the number
of rows or columns you want. You choose either rows or cols to limit the number
of rows or columns, and wxGridSizer figures out the correct value for the other
dimension. For example, if you set a limit of two rows and then added seven but-
tons to the sizer, the first row would have the first four buttons, and then second
row would have the last three buttons.
wxFlexGridSizer is like wxGridSizer except that instead of having uniform
column and row sizes, each column is the width of the widest item in that column
only; and the height of each row is that of the tallest item in that row only.
Layout constraintsLayout constraints define the size and position of an item in terms of its siblings or
parents. Each item has eight constraints that you can define: four for the edges
(left, right, top, and bottom), two for the size (width and height), and two for its
center (x, y). For example, you might constrain a button by specifying that its
height should be left unchanged, its left edge should be aligned with that of some
other button, its width should be half that of the parent panel, and its center ycoordinate should match that of some other widget’s top:
wc = wxLayoutConstraints()wc.height.AsIs() # “Don’t change it”wc.left.SameAs(someButton, wxLeft)wc.width.PercentOf(parentPanel, 50)wc.centerY.SameAs(someOtherWidget, wxTop)myButton.SetConstraints(wc)
You usually have to specify four of the eight constraints in order for the widget to
be fully constrained. Once it is fully constrained, the layout algorithm can deduce
the remaining constraints on its own.
The constraint names are left, right, top, bottom, width, height, centerX, and
centerY. You can call the following methods for each constraint:
Above(win[, margin]), Sets the constraint to be above, below, to the
Below(win[, margin]), left of, or to the right of the window win, with
LeftOf(win[, margin]), an optional marginRightOf(win[,margin])
Absolute(value) Sets the constraint to this value. For example,
wc.left.Absolute(10) gives the left edge an
x coordinate of 10.
AsIs() Does not change the constraint’s current value
Unconstrained() Returns this constraint to its default state
4807-7 ch21.F 5/24/01 9:00 AM Page 406

407Chapter 21 ✦ Building User Interfaces with wxPython
PercentOf Makes the current constraint a percentage of
(win,edge,percent) the given edge of the given window
SameAs Makes the current constraint the same as the
(win, edge[, margin]) given edge of the given window
As with sizers, you can call a window’s Layout() method to perform the layout, or
you can call SetAutoLayout(1) so that Layout is called each time the parent win-
dow is resized.
Layout algorithmsFor MDI or SDI applications, you can use the wxLayoutAlgorithm class to lay out
subwindows. Study the wxLayoutAlgorithm and wxSashLayoutWindow documen-
tation for more information.
Using Built-in DialogsOne of wxPython’s strengths is its rich set of built-in dialogs that you can use to get
user input. In general, the way you use each dialog follows this pattern (the exam-
ple here uses a dialog that has the user choose a directory name):
dlg = wxDirDialog(None) # Create itif dlg.ShowModal() == wxID_OK: # Check the return code
path = dlg.GetPath() # Read user’s inputdlg.Destroy() # Destroy it
The dialog’s ShowModal method usually returns wxID_OK or wxID_CANCEL, and
each dialog has its own set of methods you use to retrieve the user’s input.
Table 21-1 describes some of wxPython’s useful built-in dialogs.
Table 21-1Useful wxPython Dialogs
Class Use the Dialog To
wxDirDialog Browse for a directory name
wxFileDialog Browse for a file name
wxFontDialog Choose a font, point size, color, and so on
wxColourDialog Choose a color
wxPrintDialog Select a printer
Continued
4807-7 ch21.F 5/24/01 9:00 AM Page 407

408 Part IV ✦ User Interfaces and Multimedia
Table 21-1 (continued)
Class Use the Dialog To
wxPageSetupDialog Modify page orientation and margins
wxProgressDialog Display a moving progress meter
wxMessageDialog Display a simple message
wxScrolledMessageDialog Display a longer message in a scrollable window
wxSingleChoiceDialog Choose an item from a list
wxMultipleChoiceDialog Choose one or more items from a list
wxTextEntryDialog Enter a line of text
wxBusyInfo Notify the user that the program is temporarily busy
The wxBusyInfo dialog is unique in that the dialog appears as soon as you create
it, and it disappears when the object goes out of scope:
def rollbackChanges(self):wxBusyInfo(‘Reverting to previous state...’)# Do some work, dialog destroyed automagically when done
Drawing with Device ContextsLike some other GUI frameworks, wxPython uses device contexts as an abstraction
for displaying information on some output device. All device contexts are descen-
dents of the wxDC class, so code that outputs to a device context automatically
works whether the output device is the screen, a printer, or just a file. Table 21-2
lists some common device context classes.
Table 21-2wxPython Device Context Classes
Class Outputs To
wxWindowDC An entire window, including title bars and borders
wxClientDC Window client area outside of the OnPaint method
wxPaintDC Window client area during a call to OnPaint
wxPrinterDC A Microsoft Windows printer
wxPostScriptDC A PostScript file or printer
wxMemoryDC A bitmap
wxMetaFileDC A Microsoft Windows metafile
4807-7 ch21.F 5/24/01 9:00 AM Page 408

409Chapter 21 ✦ Building User Interfaces with wxPython
Device contexts give you a large number of methods to perform all sorts of actions,
including clipping; writing text; converting between different units; and drawing
graphics primitives, including lines, arcs, and splines.
To ensure that your programs work on Microsoft Windows, before drawing, call thedevice context’s BeginDrawing() method; and call its EndDrawing() methodwhen you’re done.
The device context uses the current pen to draw lines and outlines; pens (wxPen)
have attributes such as line thickness and color. Text color is not affected by pen
color. To fill in regions, it uses the current brush (wxBrush), which can have both a
color and a pattern that it uses when filling.
The program in Listing 21-6 shows you how to use a device context to paint on the
screen, and generates output as shown in Figure 21-7.
Listing 21-6: wxcanvas.py – An example of drawing with device contexts
from wxPython.wx import *import whrandom
class CanvasFrame(wxFrame):# A list of stock brushes we can use instead of# creating our ownbrushes = [wxBLACK_BRUSH,wxBLUE_BRUSH,
wxCYAN_BRUSH,wxGREEN_BRUSH,wxGREY_BRUSH,wxRED_BRUSH,wxWHITE_BRUSH]
def __init__(self):wxFrame.__init__(self,None,-1,
‘CanvasFrame’,size=(550,350))self.SetBackgroundColour (wxNamedColor(“WHITE”))
# Capture the paint message EVT_PAINT(self, self.OnPaint)
def OnPaint(self, event):dc = wxPaintDC(self)dc.BeginDrawing()
# Draw a grid of randomly colored boxesfor y in range(15):
for x in range(10):dc.SetBrush(whrandom.choice(self.brushes))dc.DrawRectangle(x*20,y*20,20,20)
# Draw a random polygon over the boxes# (Outline is in blue, but fill color is that
Continued
Tip
4807-7 ch21.F 5/24/01 9:00 AM Page 409

410 Part IV ✦ User Interfaces and Multimedia
Listing 21-6 (continued)
# of the last box it drew)dc.SetPen(wxPen(wxNamedColour (‘BLUE’)))pts = []for i in range(20):
pts.append((whrandom.randint(0,200),whrandom.randint(0,300)))
dc.DrawPolygon(pts)
# Draw some rotated textfont = wxFont(20, wxNORMAL, wxNORMAL, wxNORMAL)font.SetFaceName(‘Jokerman LET’)dc.SetFont(font)for a in range(0, 360, 20):
c = a * 0.71 # 360/255, fit angle into color rangedc.SetTextForeground(wxColour (c,c,c))dc.DrawRotatedText(“ wxPython”, 350, 150, a)
dc.EndDrawing()
class App(wxApp):def OnInit(self):
‘Create the main window and insert the custom frame’frame = CanvasFrame()frame.Show(true)return true
app = App(0)app.MainLoop()
Figure 21-7: Using device contexts to draw graphics
4807-7 ch21.F 5/24/01 9:00 AM Page 410

411Chapter 21 ✦ Building User Interfaces with wxPython
The __init__ function calls EVT_PAINT so that the OnPaint method will be called
each time the screen needs to be redrawn. Notice that OnPaint creates a
wxPaintDC for drawing, and that it begins and ends with calls to BeginDrawingand EndDrawing.
Adding Menus and Keyboard ShortcutsYour wxPython application can have popup menus or groups of menus on a menu
bar at the top of a frame. Individual menu items can be disabled or grayed out, and
each can have an associated line of help text.
A menu consists of one or more menu items, each of which has a unique numerical
identifier. Create a menu by calling wxMenu([title]), and add items with its
Append(id, name) method:
menu = wxMenu()menu.Append(10, ‘Load’)menu.Append(11, ‘Save’)menu.Append(12, ‘Quit’)
The menu title is displayed as part of the menu’s contents. Create a menu bar by
calling wxMenuBar(). Attach a menu to a menu bar by calling the menu bar’s
Append(menu, title) method:
mb = wxMenuBar()mb.Append(menu, ‘File’)
Finally, call a frame’s SetMenuBar(bar) method to attach the menu bar to the
frame:
frame.SetMenuBar(mb)
By creating menu items separately as wxMenuItems, you can create more power-ful menu items, such as menu items with bitmaps.
Accelerators are keyboard shortcuts for commands users would normally have to
generate with the mouse (clicking a menu item, for example). By calling a window’s
SetAcceleratorTable(table) method, you can assign a group of shortcuts to
that window. You create an accelerator table by calling the
wxAcceleratorTable(list) constructor, where list is a list of accelerator entry
tuples of the form (flag, code, command). flag is a bitwise-OR combination of
keypress modifiers such as wxACCEL_ALT and wxACCEL_SHIFT, and code is the
ASCII code of the keypress or one of wxPython’s many special key variables, such
as WXF_10 (for the F10 key) or WXK_END (the End key). command is the menu item
identifier. For example:
Tip
4807-7 ch21.F 5/24/01 9:00 AM Page 411

412 Part IV ✦ User Interfaces and Multimedia
accel = [(wxACCEL_CTRL,WXK_ESCAPE,10),(wxACCEL_NORMAL,WXK_ESCAPE,11),(wxACCEL_CTRL|wxACCEL_SHIFT,WXK_F1,12)]
frame.SetAcceleratorTable(wxAcceleratorTable(accel))
enables Ctrl-Esc, Esc, and Ctrl-Shift-F1 as accelerators for menu commands 10
through 12.
Accessing Mouse and Keyboard InputMost input events are handled by wxPython directly. When a user clicks a button,
for example, the window automatically processes the clicking and releasing of the
mouse button. If necessary, however, you can intercept and handle this lower-level
input.
When you call EVT_CHAR(win, func), future keystrokes (“normal” keys, but not
modifiers such as Ctrl or Shift) directed to win will cause wxKeyEvents to be sent
to func. Use EVT_CHAR_HOOK to catch modifier keypresses, and EVT_KEY_UP and
EVT_KEY_DOWN to be notified when keys are pressed or released.
Only one window has keyboard focus at any time, so your window will receivekeystroke notifications only if it has the focus. Use the window’s SetFocus()method to acquire keyboard focus.
If you want only to intercept some input but let wxPython handle the rest, your han-
dler function can pass the input on to the window’s normal handler. For example, if
you want a keypress to be interpreted using the normal behavior, your handler
should call the window’s OnChar method.
For catching mouse button click events, use EVT_LEFT_DOWN, EVT_LEFT_UP, and
EVT_DCLICK to capture mouse left button presses, releases, and double-clicks, respec-
tively. There are corresponding functions for the middle and right buttons as well.
EVT_MOTION causes each mouse movement to be reported, and use
EVT_ENTER_WINDOW and EVT_LEAVE_WINDOW to be notified when the window has
mouse focus. If you want to process all mouse events, just use EVT_MOUSE_EVENTSto capture them all.
Other wxPython FeaturesAs mentioned before, wxPython has far more features than can adequately be cov-
ered in one chapter. This final section is here to pique your interest enough to do
some investigating on your own, and to ensure that you don’t invest a lot of time
implementing something that wxPython already has.
Tip
4807-7 ch21.F 5/24/01 9:00 AM Page 412

413Chapter 21 ✦ Building User Interfaces with wxPython
Clipboard, drag and drop, and cursorsYou can create and change mouse cursors and tool tips with the wxCursor and
wxToolTip classes and their children.
The wxClipboard, wxDataFormat, and wxDataObject class hierarchies implement
support for transferring data to and from the clipboard and converting it between
different formats. The wxDragImage class is useful for implementing your own
visual representation of dragging a file or other object in your application. See the
wxDropSource and wxDropTarget classes too.
By calling a window’s SetCursor(cursor) method, the mouse cursor will change
to the given cursor any time it enters the window. You can create your own cursor
or use one of the built-in cursors:
myFrame.SetCursor(wxStockCursor(wxCURSOR_BULLSEYE))
GraphicsThe Object Graphics Library (OGL) is a library for creating and easily manipulating
flowcharts and other graphs. See the wxShapeCanvas, wxShape, and wxDiagramclasses for more information.
wxBitmap, wxImage, and wxIcon all deal with loading and displaying images in dif-
ferent ways. For each file type you use, you must load a wxImageHandler instance
that handles decoding the image data (wxPython comes with several, such as
wxJPEGHandler and wxGIFHandler). See also the wxMask and wxPalette classes.
If you have installed the PyOpenGL extension module, you can use wxGLCanvas to
include an OpenGL window in your application.
Date and timewxPython has powerful date and time support (covering dates even hundreds of
millions of years in the future). wxDateTime represents a specific point in time,
whereas wxDateSpan and wxTimeSpan represent intervals.
The wxCalendarCtrl is a control that looks like a wall calendar and is useful for
both displaying and inputting dates.
FontswxFont objects hold information about fonts, and wxFontData objects hold infor-
mation about the dialogs users use to choose fonts and set font properties.
4807-7 ch21.F 5/24/01 9:00 AM Page 413

414 Part IV ✦ User Interfaces and Multimedia
HTMLThe wxPython.html module contains classes for parsing, printing, and displaying
HTML pages in a window or a device context.
PrintingwxPrintDialog and wxPageSetupDialog wrap two dialogs used for configuring
the printer and page in preparation for printing, and wxPrinter and wxPrintouttake care of the actual printing. There are also the wxPrintPreview and
wxPreviewFrames classes for supporting print preview.
OtherFinally, if you’re using Windows and want to use COM, you can dynamically create a
wxWindows-like class to embed any ActiveX control in your application by using
wxPython.lib.activexwrapper.MakeActiveXClass.
SummarywxPython is a powerful library for creating cross-platform GUI applications. It has a
full set of simple and high-level controls, including built-in support for trees and
tables; and it is very easy to use. In this chapter you:
✦ Learned the basic structure of most wxPython applications.
✦ Created powerful and functional GUI-based applications in very few lines of
code.
✦ Used wxPython’s built-in dialogs for browsing for files, choosing colors, and
so on.
✦ Reviewed the different types of windows, controls, and features that
wxPython provides.
The next chapter shows you how to use the curses (not the spoken kind) library to
create text-based user interfaces.
✦ ✦ ✦
4807-7 ch21.F 5/24/01 9:00 AM Page 414

Using Curses
Curses is a library for handling a text-based display termi-
nal. It is widely used on UNIX. It can handle text windows,
colors, and keyboard input. Moreover, it saves you the trouble
of learning the control codes for every kind of terminal.
A Curses OverviewIn ancient days of yore, there was not a computer in every
office. People used terminals like the VT100 to connect to a
central system. These terminals displayed a grid on which
each square contained a text character. Sending control codes
to the terminal could change the color, move the cursor, and
so on. However, the magical control codes varied between
systems. Therefore, a program that produced cute output on a
Tektronix 4105 terminal might have produced bizarre symbol
salad on a VT230.
The curses library was born as a portable tool for text display.
It has been eclipsed by ncurses, which adds some features.
The Python module curses is a thin wrapper for the ncurses
API. The various functions in the curses API have some over-
lap — for example, the window methods addch, addstr, and
addnstr all print text. For purposes of brevity, this chapter
omits many redundant items.
Curses provides a class, WindowObject, for display. You can
use one or more windows, resize them, move them, and so
forth.
In curses, the top-left corner square of the screen has coor-dinates (0,0). Screen coordinates in curses are given withvertical position first — (y, x). This is the opposite of theusual ordering, so be careful not to get your coordinatesreversed!
Listing 22-1 provides a simple curses program. Run it to get
some quick gratification (and to make sure that curses is
installed on your system!)
Note
2222C H A P T E R
✦ ✦ ✦ ✦
In This Chapter
A Curses overview
Starting up andshutting down
Displaying anderasing text
Moving the cursor
Getting user input
Managing windows
Editing text
Using color
Example: a simplemaze game
✦ ✦ ✦ ✦
4807-7 ch22.F 5/24/01 9:00 AM Page 415

416 Part IV ✦ User Interfaces and Multimedia
Listing 22-1: CurseWorld.py
import cursestry:
MainWindow=curses.initscr() # initialize cursesMainWindow.addstr(“Hello, damn it!”)MainWindow.refresh()MainWindow.getch() # Read a keystroke
finally:curses.endwin() # de-initialize curses
Starting Up and Shutting DownThe function initscr initializes curses and returns a Window object representing
the whole screen. The function endwin de-initializes curses. The function isendwinreturns true if endwin has been called.
The module function wrapper(mainfunc,*args) handles typical setup and
shutdown for you. Calling wrapper sets up curses, creates a window, and calls
mainfunc(window,*args). It also restores the terminal to normal when your main
function completes, even if it terminates abnormally. This is important, because a
curses program that doesn’t call endwin may leave the shell in a highly weird state!
For reference, wrapper does (and later undoes) the following things:
✦ Creates a window (curses.initscr())
✦ Turns off echo (curses.noecho())
✦ Turns off keyboard buffering (curses.cbreak())
✦ Activates color, where available (curses.start_color())
The functions filter and use_env, which must be called before initscr, donot work (as of Python 2.0 and 2.1).
Displaying and Erasing TextThe window method addstr([y,x,]text[,attributes]) prints the string text at
screen position (y, x) — by default, at the current cursor position. You can specify
attributes to control the appearance of the text. Attributes can be combined by bit-
wise-OR. See Table 22-1 for a list of available text attributes:
Caution
4807-7 ch22.F 5/24/01 9:00 AM Page 416

417Chapter 22 ✦ Using Curses
Table 22-1Text Attributes
Attribute Meaning
A_BLINK Blinking text
A_BOLD Bold text
A_DIM Dim text
A_NORMAL Ordinary text
A_STANDOUT Highlighted text
A_UNDERLINE Underlined text
For example, the following code prints a bold, blinking “Howdy!” at column 50 of
row 5:
MainWindow.addstr(5,50,”Howdy!”,curses.A_BLINK | curses.A_BOLD)
Insertingaddstr overwrites any text that was already on the window. To insert text, call
insstr([y,x,]str[,attributes]). Any characters on the line are moved to the
right; characters moved off the right edge of the screen are lost. A call to insertlninserts a blank row under the cursor; all following rows move down by one.
Default attributesThe method attrset(attributes) sets the default attributes for all subsequent
calls to addstr. The methods attron(attribute) and attroff(attribute) tog-
gle one default attribute.
Reading from the window (screen-scraping)The method inch(y,x) returns the character at the given window position.
Actually, it returns the character as a number in the lower eight bits, and the
attributes in the upper twenty-four bits. Therefore, the following code would check
for a bold X at row 3, column 10:
Character= MainWindow.inch(3,10)Letter = chr(Character & 0xFF)Attributes = Character & (~0xFF)return ((Attributes & curses.A_BOLD) and (Letter==”X”))
The method instr([y,x,]n) returns a string of n characters, extracted from the
specified screen position. It ignores attribute information.
4807-7 ch22.F 5/24/01 9:00 AM Page 417

418 Part IV ✦ User Interfaces and Multimedia
ErasingThe method erase clears the window. clrtoeol erases from the current cursor
position to the end of the line; clrtobot also clears all lines below the cursor. The
method delch([y,x]) erases a single character (by default, the one under the cur-
sor) — characters to its right move left by one square. deleteln deletes the line
under the cursor — any following lines move up by one row.
RefreshingAfter changing the contents of a window, call its refresh method to repaint the
actual screen. If you get tired of calling refresh, call immedok(flag) to set the
“immediate refresh” flag — if the flag is set, the window will be repainted after every
change. However, note that this can result in reduced speed and/or flickering.
If you are using several windows at once, the most efficient way to repaint is to call
the noutrefresh method of a window (instead of refresh), and then call the
doupdate function.
You can flag a window as “dirty” to ensure that it will be redrawn at the next refresh
call. The methods touchwin and untouchwin mark the entire window as dirty or
clean, respectively. touchline(y,count) marks count lines as dirty, starting with
line y. The methods is_linetouched(y) and is_wintouched return true if the
specified line, or the window itself, is dirty.
Boxes and linesThe method border draws a border around the window’s edges. The border is
made up of individual characters. If you like, you can specify the characters to dis-
play, by passing them (as integers) to border(W,E,N,S,NW,NE,SW,SE). Here, S is
the character to use for the bottom edge, NE is the character to use for the top-
right corner, and so forth. Pass 0 as a character to use the default.
You can draw an arbitrary box by calling
curses.textpad.rectangle(window,Top,Left,Bottom,Right). The box uses
line-drawing characters where available. Otherwise, it will fall back to standard
ASCII-art pluses, pipes, and dashes.
The window backgroundWindows have a background. The method bkgdset(character[,attributes])changes the window’s background. When the window (or a portion of it) is erased,
it is painted with character, with the specified attributes. Furthermore, the specified
attributes are combined with any nonblank characters drawn on the window. The
similar method bkgd(character[,attributes]) immediately paints blank
squares of the window with character.
4807-7 ch22.F 5/24/01 9:00 AM Page 418

419Chapter 22 ✦ Using Curses
Example: masking a boxListing 22-2 illustrates a simple Mask class, for temporarily covering a part of the
screen. A mask can cover a rectangular block of a window with a call to cover, and
then restore the original text with a call to reveal.
Listing 22-2: Mask.py
import cursesclass Mask:
def __init__(self,Window,Top,Bottom,Left,Right):self.Window=Windowself.Top=Topself.Bottom=Bottomself.Left=Leftself.Right=Rightself.OldText=None
def Cover(self,Character=”X”,Attributes=curses.A_DIM):# Cover the current screen contents. Store # them in OldText[RowIndex][ColumnIndex] for later:self.OldText=[]for Row in range(self.Top,self.Bottom+1):
self.OldText.append([])for Col in range(self.Left, self.Right+1):
self.OldText[-1].append(\self.Window.inch(Row,Col))
self.Window.addstr(Row,Col, Character,Attributes)
def Reveal(self):if (self.OldText==None): returnfor Row in range(self.Top,self.Bottom+1):
CurrentLine=self.OldText[Row-self.Top] for Col in range(self.Left, self.Right+1):
CurrentCol=(Col-self.Left)Character=chr(CurrentLine[CurrentCol] & 0xFF)Attributes=CurrentLine[CurrentCol] & (~0xFF)self.Window.addstr(Row,Col,
Character,Attributes)
def Main(MainWindow):MainWindow.addstr(10,10,”Yes it is!”)MainWindow.addstr(11,10,”No it isn’t!”,curses.A_BOLD)MainWindow.addstr(12,10,”Yes it is!”,curses.A_UNDERLINE)MainWindow.addstr(13,10,”No it isn’t!”,curses.A_STANDOUT)MainWindow.addstr(14,10,”YES IT IS!”,curses.A_BOLD)MyMask=Mask(MainWindow,10,20,10,40)MainWindow.refresh()MainWindow.getch()
Continued
4807-7 ch22.F 5/24/01 9:00 AM Page 419

420 Part IV ✦ User Interfaces and Multimedia
Listing 22-2 (continued)
MyMask.Cover()MainWindow.refresh()MainWindow.getch() MyMask.Reveal()MainWindow.refresh()MainWindow.getch()
if (__name__==”__main__”):curses.wrapper(Main)
Moving the CursorThe function getsyx returns the cursor’s screen position in the form of a tuple (y,
x). The function setsyx(y,x) moves the cursor to the specified position.
The window methods getyx and move(y,x) check and set the cursor position
within a window. If the window fills the screen (as the window returned by a call to
initscr does), window positioning is the same as screen positioning.
The window method getparyx returns the window’s coordinates relative to its
parent window. These coordinates are the location (in the parent) of the window’s
top-left corner. If the window has no parent, getparyx returns (-1, -1). Note that
cursor position is tracked independently by every window.
The window method getmaxyx returns the size of the window in a tuple of the form
(height, width). Note that getmaxyx()[0] is not a valid y-coordinate, as row num-
bering is 0-based; the last row of the screen has y-coordinate getmaxyx()[0]-1.
The same is true for x-coordinates.
The window method leaveok (flag) toggles the “Leave-the-cursor-where-it-is-
after-repainting-the screen” flag. Calling leaveok(1) is a good idea if a blinking
cursor won’t convey useful information to the user. If the flag is set, getsyx returns
(-1, -1); calling setsyx(-1,-1) sets the flag to true.
The function curs_set(visibility) sets the cursor visibility to 0 (invisible); 1
(visible — often an underline); or 2 (very visible — often a block). The return value
of curs_set is the old visibility level.
Listing 22-3 paints a spiral pattern on the window, using cursor positioning.
4807-7 ch22.F 5/24/01 9:00 AM Page 420

421Chapter 22 ✦ Using Curses
Listing 22-3: Spiral.py
import cursesimport math
def DrawSpiral(Window,CenterY,CenterX,Height,Width):ScalingFactor=1.0Angle=0HalfHeight = float(Height)/2HalfWidth = float(Width)/2while (ScalingFactor>0):
Y = CenterY + (HalfHeight*math.sin(Angle)*ScalingFactor)
X = CenterX + (HalfWidth*math.cos(Angle)*ScalingFactor)Window.move(int(Y),int(X))Window.addstr(“*”)Angle+=0.05 ScalingFactor=ScalingFactor - 0.001Window.refresh()
def Main(Window):(Height,Width)=Window.getmaxyx()Height-=1 # Don’t make the spiral too bigWidth-=1CenterY=Height/2CenterX=Width/2DrawSpiral(Window,CenterY,CenterX,Height,Width)Window.getch()
if __name__==”__main__”:curses.wrapper(Main)
Getting User InputCurses starts out in cooked mode — the user’s keyboard input is buffered and pro-
cessed one line at a time. In raw mode, buffering is turned off, and keys are pro-
cessed as they are pressed. Call the functions raw and noraw to toggle between
modes.
In addition, you can call cbreak and nocbreak to switch cbreak mode (also known
as “rare” mode) on and off. The difference between cbreak and raw is that special
characters (such as suspend) lose their normal effects in raw mode. The four
modes (raw, noraw, cbreak, and nocbreak) are mutually exclusive.
The window method keypad(flag) toggles keypad mode for a window. If keypad
mode is not set, special character codes are not interpreted by curses. This means
that special keystrokes such as function keys will put several special characters
4807-7 ch22.F 5/24/01 9:00 AM Page 421

422 Part IV ✦ User Interfaces and Multimedia
into the keyboard buffer, extended keystrokes will not be available, and mouse
events will not be available. In general, you want keypad mode on!
Call echo and noecho to toggle the automatic echoing of user input to the screen.
By default, echoing is on; curses.wrapper turns echoing off and switches to
cbreak mode.
Reading keysThe window method getch reads a character and returns it as an integer. For an
ASCII character, the value returned is the character’s ASCII value (as returned by
ord); other characters (such as function keys) may return non-ASCII values. The
method getkey reads a character, returning it as a string.
Both getch and getkey are normally synchronous; they wait until the user presses
a key. The method nodelay(flag) makes them synchronous if flag is true. In
synchronous mode, if no keypress is available, the methods return getch and
getkey which return -1 and “-1”, respectively.
The method getstr reads a string from the user, handling things such as backspac-
ing in the process. Note that getstr doesn’t play well with nodelay or noecho. In
fact, getstr is quite primitive; see “Editing Text” for a more pleasant way to extract
input from your users.
Other keyboard-related functionsYou can throw a character onto the keyboard buffer by calling the function
ungetch(character). The next call to getch will return character. You can only
“un-get” one character at a time.
A call to the function flushinp clears out the input buffers, throwing away any
pending input that you haven’t processed yet.
Fancy charactersWhen keypad mode is active, control characters are interpreted for you by curses.
Most of these characters have corresponding constants. For example, the following
code fragment checks whether the user pressed F5:
Char=Window.getch()if Char==curses.KEY_F5:
# do stuff!
Arrow keys (where available) are represented by KEY_UP, KEY_LEFT, KEY_RIGHT,
and KEY_DOWN. See the curses documentation for a complete list of these con-
stants.
4807-7 ch22.F 5/24/01 9:00 AM Page 422

423Chapter 22 ✦ Using Curses
In addition, the module curses.ascii provides constants and functions for cleanly
handling ASCII characters. For example, curses.ascii.SP is equal to 32 (the ASCII
value for a space); curses.ascii.BEL is 7 (the bell-character; Ctrl-G on most systems).
Reading mouse inputIn order to detect mouse events, you must call the function mousemask(mask),
where mask represents the mouse events you want to see. The return value has the
form (available,old). Here, available is a mask of the events that will be
reported (hopefully, the same as mask), and old is the old event mask. For example,
the following code tries to watch for clicks and double-clicks of button 1 (the left
button):
(available,old) = curses.mousemask(curses.BUTTON1_PRESSED |curses.BUTTON2_PRESSED)
if (available & curses.BUTTON1_PRESSED):CanSeeClick=1
else:CanSeeClick=0
You also need to turn keypad mode on; otherwise, mouse events are not visible.
Mouse events are first signaled by a value of KEY_MOUSE passed to getch. At this
point, you can examine the mouse input with a call to the function getmouse. The
return value is a tuple of the form (id, x, y, z, state). Here, x and y are the coordi-
nates of the mouse click, state is the event type, and id and z can be safely ignored.
Table 22-2 describes all the available mouse events. A particular event (or event
mask) may be a bitwise-OR or several of them. The pound sign (#) represents a
number from 1 to 4.
Table 22-2Mouse Events
Name Meaning
BUTTON#_PRESSED Button # was pressed
BUTTON#_RELEASED Button # was released
BUTTON#_CLICKED Button # was clicked
BUTTON#_DOUBLE_CLICKED Button # was double-clicked
BUTTON#_TRIPLE_CLICKED Button # was triple-clicked
BUTTON_SHIFT Button was Shift-clicked
BUTTON_CTRL Button was Control-clicked
BUTTON_ALT Button was Alt-clicked
4807-7 ch22.F 5/24/01 9:00 AM Page 423

424 Part IV ✦ User Interfaces and Multimedia
The function ungetmouse(id,x,y,z,state), similar to ungetch, pushes a mouse
event back onto the buffer.
Example: yes, no, or maybeThe program shown in Listing 22-4 provides three options, and lets the user choose
one either by clicking it or by pressing a key.
Listing 22-4: Deathray.py
import cursesimport curses.textpadimport whrandom
class CursesButton:def __init__(self,Window,Y,X,Label,Hotkey=0):
self.Y=Yself.X=Xself.Label=Labelself.Width=len(Label)+2 # label, plus lines on sideself.Underline=Underline# Draw the button:curses.textpad.rectangle(Window,Y,X,Y+2,X+self.Width)# Draw the button label:Window.addstr(Y+1,X+1,Label,curses.A_BOLD)# Make the hotkey stand out:Window.addstr(Y+1,X+Underline+1,Label[Underline]
,curses.A_REVERSE)Window.refresh()
def KeyPressed(self,Char):if (Char>255): return 0 # skip control-charactersif chr(Char).upper()==self.Label[self.Underline]:
return 1else:
return 0def MouseClicked(self,MouseEvent):
(id,x,y,z,event)=MouseEventif (self.Y <= y <= self.Y+2) and \
(self.X <= x < self.X+self.Width):return 1
else:return 0
def ShowDialog(Window):curses.mousemask(curses.BUTTON1_PRESSED)Window.addstr(5,0,”Really, REALLY fire death ray?”)YesButton=CursesButton(Window,8,10,”Yes”)NoButton=CursesButton(Window,8,20,”No”)MaybeButton=CursesButton(Window,8,30,”Maybe”)Buttons=[YesButton,NoButton,MaybeButton]Window.nodelay(1)
4807-7 ch22.F 5/24/01 9:00 AM Page 424

425Chapter 22 ✦ Using Curses
Action=””while 1:
Key=Window.getch()if (Key==-1):
continuefor Button in Buttons:
if Button.KeyPressed(Key):Action=Button.Label
# Handle mouse-events:if (Key==curses.KEY_MOUSE):
MouseEvent=curses.getmouse()for Button in Buttons:
if Button.MouseClicked(MouseEvent):Action=Button.Label
if Action!=””: break# Handle the actionsif (Action==”Yes”):
FireDeathRay(Window)if (Action==”No”):
passif (Action==”Maybe” and whrandom.random() > 0.5):
FireDeathRay(Window)
def FireDeathRay(Window):Window.clear()# Kra-ppoowwww! Frrrraapppp!!Window.bkgd(“X”)Window.nodelay(0)Window.getch()
if __name__==”__main__”:curses.wrapper(ShowDialog)
Managing WindowsYou can create a new, parentless window by calling the function
newwin([lines,columns,]y,x). The new window’s top-left corner will be at
(y, x). It will have height lines and width columns — by default, it will stretch to the
bottom-right edge of the screen. Similarly, you can create a subwindow within an
existing window by calling the method subwin([lines,columns,]y,x).
The method mvwin(y,x) moves a window so that its upper-left corner is at (y, x).
PadsA pad is similar to a window, except that it can be larger than the screen. It is a con-
venient way to make more data available than you can show all at once. It supports
all the methods of a window, but has a different refresh method.
4807-7 ch22.F 5/24/01 9:00 AM Page 425

426 Part IV ✦ User Interfaces and Multimedia
The function newpad(rows, columns) creates a pad of the given size. To draw the
pad’s contents, call refresh(screenY,screenX,padTop,padLeft,padBottom,padRight). A region within the pad will be displayed, with its top-left corner at
(screenY,screenX). The pad contents displayed lie in the rectangle with corners
(padTop,padLeft) and (padBottom,padRight).
Stacking windowsThe module curses.panel allows you to cleanly “stack” windows on top of each
other so that only the visible portion of each window is displayed. The function
new_panel(Window) returns a panel that wraps the specified window. You can
change the panel’s stacking position by calling its methods bottom and top. You
can hide and reveal panels by calling hide and show. After changing patterns, call
the function update_panels to update the virtual screen, then curses.doupdateto repaint the screen. The function bottom_panel returns the bottom-most panel,
and top_panel returns the topmost panel.
Editing TextThe module curses.textpad provides a class, Textbox, for convenient text edit-
ing. The constructor takes one argument: the window in which to place the
Textbox.
Once you have a Textbox, you can call edit([validator]) to let the user enter
data, and call gather to retrieve the Textbox’s contents (as a string). The user can
type text, scroll around the Textbox, and finish input by pressing Ctrl-G (or Enter, if
the window has only one line). Because gather returns the entire window’s con-
tents, you generally want to create a special window for use by only your Textbox.
Table 22-3 describes the commands available within a Textbox.
Table 22-3Textbox Commands
Keystroke Action
Ctrl-A Go to left edge of window
Ctrl-B Cursor left, wrapping to previous line if appropriate
Ctrl-D Delete character under cursor
Ctrl-E Go to right edge (stripspaces off) or end of line (stripspaces on)
Ctrl-F Cursor right, wrapping to next line when appropriate
4807-7 ch22.F 5/24/01 9:00 AM Page 426

427Chapter 22 ✦ Using Curses
Keystroke Action
Ctrl-G Terminate, returning the window contents
Ctrl-H Delete character backward
Ctrl-J Terminate if the window is one line; otherwise, insert newline
Ctrl-K If line is blank, delete it; otherwise, clear to end of line
Ctrl-L Refresh screen
Ctrl-N Cursor down; move down one line
Ctrl-O Insert a blank line at cursor location
Ctrl-P Cursor up; move up one line
You can, optionally, pass a callback function to edit([validator]). This function
is called whenever the user presses a key, and the keystroke is passed as a parame-
ter. The return value of validator, if any, is passed along to the Textbox. For instance,
use the following if you want Esc to finish input in your Textbox:
def Validator(Ch):if Ch==curses.ascii.ESC:
return curses.ascii.BELelse:
return Ch
Using ColorThe function has_colors returns true if the terminal can display colors. The method
start_color initializes color display; it should be called immediately after initscr.
NumberingColors come in two forms: color numbers and color pairs. Color numbers range
from 0 to COLORS; they identify a color in the curses palette. Color pairs are valid
attributes to pass to Window.addstr; they identify a foreground color number and
a background color number. Therefore, each color pair is basically a pair of color
numbers.
Just to make things more interesting, color pairs are also numbered. Try not to
confuse pair numbers with color numbers. (Go on, I dare you — try! Actually, the
whole system starts to make sense after a while.)
4807-7 ch22.F 5/24/01 9:00 AM Page 427

428 Part IV ✦ User Interfaces and Multimedia
The function color_pair(number) returns the color pair corresponding to the
given pair number; the opposite function, pair_number(pair), returns the pair
number of a color pair.
Setting colorsColor pair 0 is always white on black. You can change the colors of the other pairs by
calling init_pair(pair_number, foreground, background). Here background and
foreground are color numbers. The function pair_content(pair_number) returns
the pair’s current colors as a tuple of the form (foreground,background).
The constants COLOR_BLACK, COLOR_RED, COLOR_GREEN, COLOR_YELLOW,
COLOR_BLUE, COLOR_MAGENTA, COLOR_CYAN and COLOR_WHITE are available
to denote the corresponding color numbers. For example, the following code draws
a simple German flag:
# In the next line, 1 is the number of a # color-pair, while curses.WHITE is a # color-number:curses.init_pair(1,curses.WHITE,curses.BLACK)curses.init_pair(2,curses.WHITE,curses.RED)curses.init_pair(3,curses.WHITE,curses.YELLOW)Window.addstr(0,0,” “*10,curses.color_pair(1))Window.addstr(1,0,” “*10,curses.color_pair(2))Window.addstr(2,0,” “*10,curses.color_pair(3))
Tweaking the colorsDefining colors is not possible on most terminals. The function can_change_colorreturns true on those terminals where it is. A call to init_color(number, red,green, blue) redefines color number to have the specified intensities of red,
green, and blue. Intensity ranges from 0 to 1,000. The function
color_content(number) returns the current definition of color number as a tuple
of the form (red, green, blue).
Example: A Simple Maze GameI have a soft spot in my heart for curses because I have spent more time than I care
to admit playing ASCII-based games such as Angband and Nethack. The program
shown in Listing 22-5 is far simpler, but it does use several curses features. It uses a
pad to hold a large maze, which the user can move around in.
4807-7 ch22.F 5/24/01 9:00 AM Page 428

429Chapter 22 ✦ Using Curses
Listing 22-5: Maze.py
import cursesimport curses.asciiimport whrandom# Possible contents of maze-squares:MAZE_WALL=”X”MAZE_ENTRANCE=”*”MAZE_HALLWAY=”.”# Attributes for displaying maze squares:MAZE_ATTRIBUTE={MAZE_WALL:curses.A_NORMAL,
MAZE_ENTRANCE:curses.A_BOLD,MAZE_HALLWAY:curses.A_DIM,}
# Simple class representing a compass direction:class Direction:
def __init__(self,Name,XDelta,YDelta):self.Name=Nameself.XDelta=XDeltaself.YDelta=YDeltaself.Marker=Name[0]
def SetOpposite(self,Dir):self.Opposite=DirDir.Opposite=self
NORTH=Direction(“North”,0,-1)SOUTH=Direction(“South”,0,1)EAST=Direction(“East”,1,0)WEST=Direction(“West”,-1,0)NORTH.SetOpposite(SOUTH)EAST.SetOpposite(WEST)VALID_DIRECTIONS=[NORTH,SOUTH,EAST,WEST]# Maze creation uses direction “markers” to indicate how we got# to a square, so that we can (later) backtrack:MARKED_DIRECTIONS={NORTH.Marker:NORTH,SOUTH.Marker:SOUTH,
EAST.Marker:EAST,WEST.Marker:WEST}# Map keystrokes to compass directions:KEY_DIRECTIONS={curses.KEY_UP:NORTH,curses.KEY_DOWN:SOUTH,
curses.KEY_LEFT:WEST,curses.KEY_RIGHT:EAST}class Maze:
def __init__(self,Size=11):# Maze size must be an odd number:if (Size%2==0):
Size+=1self.Size=Sizeself.Pad=curses.newpad(self.Size+1,self.Size+1)self.FillWithWalls()
def FillWithWalls(self):for Y in range(0,self.Size):
self.Pad.addstr(Y,0,MAZE_WALL*self.Size,MAZE_ATTRIBUTE[MAZE_WALL])def Set(self,X,Y,Char):
self.Pad.addstr(Y,X,Char,MAZE_ATTRIBUTE.get(Char,curses.A_NORMAL))
Continued
4807-7 ch22.F 5/24/01 9:00 AM Page 429

430 Part IV ✦ User Interfaces and Multimedia
Listing 22-5 (continued)
def Get(self,X,Y):return self.Pad.instr(Y,X,1)
def BuildRandomMaze(self):self.FillWithWalls()CurrentX=1CurrentY=1self.Set(CurrentX,CurrentY,MAZE_ENTRANCE)while (1):
Direction=self.GetValidDirection(CurrentX,CurrentY)if (Direction!=None):
# Take one step forwardself.Set(CurrentX+Direction.XDelta,
CurrentY+Direction.YDelta,MAZE_HALLWAY)CurrentX+=Direction.XDelta*2CurrentY+=Direction.YDelta*2self.Set(CurrentX,CurrentY,Direction.Marker)
else:# Backtrack one stepBackDirectionMarker=self.Get(CurrentX,CurrentY)BackDirection=MARKED_DIRECTIONS[BackDirectionMarker].OppositeCurrentX+=BackDirection.XDelta*2CurrentY+=BackDirection.YDelta*2# If we backtracked to the entrance, the maze is done!if self.Get(CurrentX,CurrentY)==MAZE_ENTRANCE:
break# Fix up the maze:for X in range(0,self.Size):
for Y in range(0,self.Size):if self.Get(X,Y) not in [MAZE_HALLWAY,MAZE_WALL, MAZE_ENTRANCE]:
self.Set(X,Y,MAZE_HALLWAY)def GetValidDirection(self,X,Y):
DirectionIndex=whrandom.randint(0,len(VALID_DIRECTIONS)-1)FirstIndex=DirectionIndexwhile (1):
Direction=VALID_DIRECTIONS[DirectionIndex]NextSquare=(X+Direction.XDelta*2,Y+Direction.YDelta*2)if ((0 < NextSquare[0] < self.Size) and
(0 < NextSquare[1] < self.Size) andself.Get(NextSquare[0],NextSquare[1])==MAZE_WALL):
return DirectionDirectionIndex+=1if (DirectionIndex>=len(VALID_DIRECTIONS)):
DirectionIndex=0if (DirectionIndex==FirstIndex):
return Nonedef ShowSelf(self,ScreenLeft,ScreenTop,PlayerX,PlayerY,Radius):
Top=PlayerY-RadiusBottom=PlayerY+RadiusLeft=PlayerX-Radius
4807-7 ch22.F 5/24/01 9:00 AM Page 430

431Chapter 22 ✦ Using Curses
Right=PlayerX+RadiusScreenRight=ScreenLeft+Radius*2+1ScreenBottom=ScreenTop+Radius*2+1if (Top<0):
ScreenTop -= TopTop=0
if (Left<0):ScreenLeft -= LeftLeft=0
if (Right>self.Size-1):ScreenRight-=(self.Size-1-Right)Right=self.Size-1
if (Bottom>self.Size-1):ScreenBottom-=(self.Size-1-Bottom)Bottom=self.Size-1
self.Pad.refresh(Top,Left,ScreenTop,ScreenLeft,ScreenBottom,ScreenRight)
def Main(Window):# Set up colors:curses.init_pair(1,curses.COLOR_GREEN,curses.COLOR_BLACK)curses.init_pair(2,curses.COLOR_BLUE,curses.COLOR_BLACK)curses.init_pair(3,curses.COLOR_RED,curses.COLOR_BLACK)MAZE_ATTRIBUTE[MAZE_HALLWAY] |= curses.color_pair(1)MAZE_ATTRIBUTE[MAZE_ENTRANCE] |= curses.color_pair(2)MAZE_ATTRIBUTE[MAZE_WALL] |= curses.color_pair(3)curses.curs_set(0) # invisible cursorMyMaze=Maze(20)MyMaze.BuildRandomMaze()PlayerX=19PlayerY=19LightRadius=3MazeWindow=curses.newwin(10,10,10+LightRadius*2+1,10+LightRadius*2+1)while 1:
MazeWindow.erase()MyMaze.ShowSelf(10,10,PlayerX,PlayerY,LightRadius)Window.addch(10+LightRadius,10+LightRadius,”@”,
curses.color_pair(2) & curses.A_STANDOUT)Window.refresh()Key=Window.getch()if (Key==ord(‘q’) or Key==curses.ascii.ESC):
breakDirection=KEY_DIRECTIONS.get(Key,None)if (Direction):
TargetSquare=MyMaze.Get(PlayerX+Direction.XDelta,PlayerY+Direction.YDelta)
if TargetSquare==MAZE_ENTRANCE:MazeFinished(Window)break
if TargetSquare==MAZE_HALLWAY:PlayerX += Direction.XDeltaPlayerY += Direction.YDelta
Continued
4807-7 ch22.F 5/24/01 9:00 AM Page 431
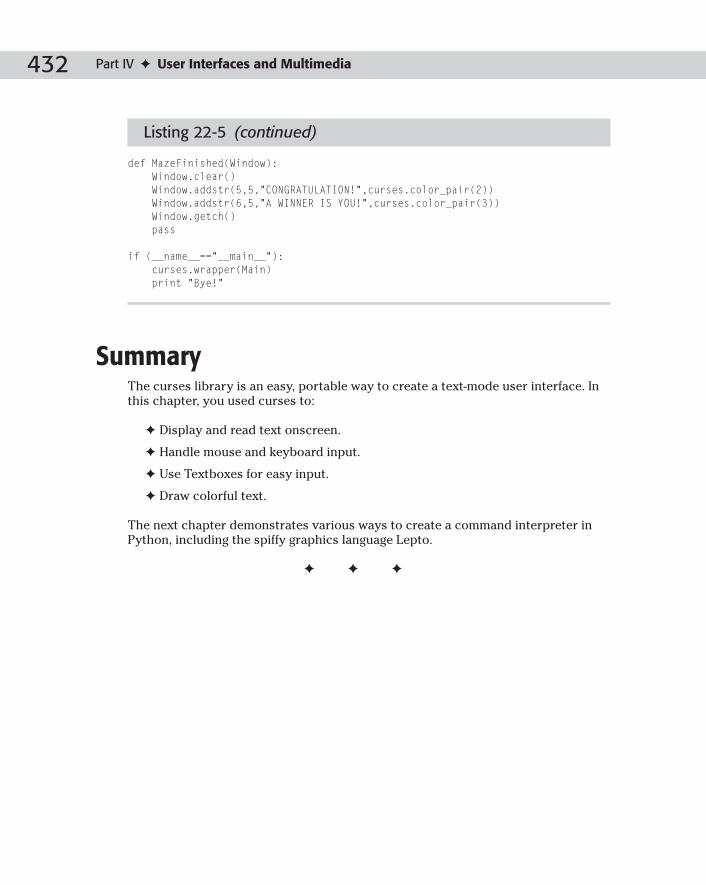
432 Part IV ✦ User Interfaces and Multimedia
Listing 22-5 (continued)
def MazeFinished(Window):Window.clear()Window.addstr(5,5,”CONGRATULATION!”,curses.color_pair(2))Window.addstr(6,5,”A WINNER IS YOU!”,curses.color_pair(3))Window.getch()pass
if (__name__==”__main__”):curses.wrapper(Main)print “Bye!”
SummaryThe curses library is an easy, portable way to create a text-mode user interface. In
this chapter, you used curses to:
✦ Display and read text onscreen.
✦ Handle mouse and keyboard input.
✦ Use Textboxes for easy input.
✦ Draw colorful text.
The next chapter demonstrates various ways to create a command interpreter in
Python, including the spiffy graphics language Lepto.
✦ ✦ ✦
4807-7 ch22.F 5/24/01 9:00 AM Page 432

Building SimpleCommandInterpreters
When someone says “user interface,” I usually think of
a GUI with nice buttons and menus, but sometimes a
more appropriate and powerful interface uses a custom mini-
language in which your users write small programs or scripts.
This chapter introduces Python’s support for such a user
interface and walks you through the process of creating a
graphical plotting application that is driven by a small, cus-
tom scripting language called Lepto.
Beginning with the End in MindThe Python libraries covered in this chapter are the shlexand cmd modules. The nature of these two modules makes it
difficult to cover each feature in isolation, so each section of
this chapter builds a portion of a single application. Once
you’ve seen the modules in that larger context, rereading the
explanations of the modules’ features will make more sense.
The application that you will build is a simple plotter (sort of
like the turtle graphics you find in languages like LOGO). It is
controlled by user-provided scripts, and the scripting lan-
guage provides basic movement commands and support for
creating subroutines (procedures).
If you imagine a spectrum on which you position program-
ming languages according to their power and flexibility, the
high end would contain Python, and the low end would con-
tain this chapter’s language. Because one of the world’s
largest snakes is a type of Python (around 10 meters long), I
named this new language Lepto, short for Leptotyphlopidae, a
type of blind snake that ranks as one of the world’s smallest,
around 13 centimeters.
2323C H A P T E R
✦ ✦ ✦ ✦
In This Chapter
Beginning with theend in mind
Understanding theLepto language
Creating a LeptoLexical analyzer
Adding interactive-mode features
Executing Leptocommands
✦ ✦ ✦ ✦
4807-7 ch23.F 5/24/01 9:00 AM Page 433

434 Part IV ✦ User Interfaces and Multimedia
The following is a sample Lepto program, and Figure 23-1 shows the result of run-
ning it through the finished application from this chapter:
Listing 23-1: leptogui.py – A sample Lepto program
C:\temp>leptogui.pyWelcome to Lepto!Enter a command or type ‘help’: color blue: scale 30: sub kochedge # A subroutine to draw an edge.. f 1 l 60 # f = forward.. f 1 r 120 # l and r = turn.. f 1 l 60.. f 1.. r 120.. end: repeat 3 kochedge: scale 0.5: repeat 3 kochedge: scale 0.5: repeat 3 kochedge: scale 0.5: repeat 3 kochedge
Figure 23-1: The result of running a simple Lepto program
4807-7 ch23.F 5/24/01 9:00 AM Page 434

435Chapter 23 ✦ Building Simple Command Interpreters
Understanding the Lepto LanguageLepto programs are very simple; each line of a Lepto script contains one or more
complete statements. Blank lines and other whitespace are ignored, and comments
will be like Python’s and consist of a pound symbol (#) and everything after it on
the same line.
Table 23-1 explains the statements Lepto supports.
Table 23-1Valid Lepto Statements
Statement Description
f amnt Move forward (in the current direction) amnt units
b amnt Move backward (away from the current direction) amnt units
l amnt Turn left amnt degrees
r amnt Turn right amnt degrees
scale amnt Multiply the current scale by amnt. Initially the scale is 1, meaningone pixel for each unit of movement.
color name Change the current drawing color to name. A color name is anyvalid Tkinter color.
push arg Save a state attribute to its own stack for later retrieval. arg canbe one of color, direction, scale, or position.
pop arg Restore a previously saved state attribute. arg is one of color,direction, scale, or position. No effect results if the stack isempty.
reset arg Restore a state attribute to its original value. arg can be one ofdirection, color, screen, scale, position, or all.
include file Read and execute the contents of the file named file as if thecontents had been entered from the console.
sub name Begin the creation of a new subroutine called name. Overwritesany previous subroutine of the same name.
end Finish creating a new subroutine
call name Execute the subroutine called name
repeat count sub Repeatedly execute the subroutine called sub count times
The features of this language are obviously limited so that the example isn’t too
cumbersome, but it has enough functionality to be interesting.
4807-7 ch23.F 5/24/01 9:00 AM Page 435

436 Part IV ✦ User Interfaces and Multimedia
Creating a Lepto Lexical AnalyzerUsers will create Lepto programs using a text editor or by entering them in via an
interactive console. Either way, their input will be plain text, so the first step
toward a finished application is parsing the text input and spitting out Lepto com-
mands in some internal format that the rest of the program can understand. During
this conversion, the parser will also verify that the Lepto commands are valid
according to the simple grammar explained in the previous section.
The shlex modulePython’s shlex module provides basic lexical analysis for simple shell-like lan-
guages. It defines the shlex class, which you can use as is or through your own
subclass. You create a shlex object by calling shlex([instream[, infile]]),
where instream is an open filelike object and infile is the file’s name (printed
with error messages). If you provide neither, then shlex uses stdin. shlex breaks
the input down into individual words, or tokens.
A shlex object has several members, which you can modify to affect how it inter-
prets the input stream. The commenters member is a string of all valid comment
characters (defaulting to ‘#’), and quotes is a string with all valid quote characters
(defaulting to single and double quotes). If a comment character is in the middle of
a token (with no surrounding whitespace), it counts as a single token that just so
happens to contain the comment character.
The whitespace member is a string of token separators (by default, whitespace is
any combination of tabs, spaces, carriage returns, and linefeeds). wordcharsdefaults to alphanumeric characters (letters and numbers) and the underscore; it
represents all valid token characters. Any character not in whitespace,
wordchars, quotes, or commenters is returned as a single-character token.
source is a string holding the keyword shlex uses as the “import” or “include”
equivalent found in Python or C, telling shlex to read and parse the contents of a
file. Setting it to a value of beable, for example, means a user can use the following
command to include the contents of the file foofoo.txt:
beable “foofoo.txt”
infile is the name of the current file (the original input file name, or the name of
the file currently being included), and instream has the filelike object from which
data is being read. The lineno member is the current source line number. For
debugging purposes, you can set the debug member to 1 or more to have shlexgenerate more verbose output.
With your shlex object configured the way you want, all you need to do is repeat-
edly call its get_token() method to retrieve the next token from the stream. When
all the input has been read, get_token returns an empty string. push_token(str)pushes str onto the token stack (so that the next call to get_token returns str).
4807-7 ch23.F 5/24/01 9:00 AM Page 436

437Chapter 23 ✦ Building Simple Command Interpreters
When a user includes a file’s contents (using the keyword stored in source), the
sourcehook(path) method is called to locate and open the file called path. You
can override this method to implement your own file location algorithm; source-hook returns a 2-tuple (file name, open file object).
If you need to print out an error message, prefix your message with the string
returned from the object’s error_leader([file[, line]]) method. Unless you
indicate otherwise, it uses the current file name and line number to return a mes-
sage header string that is friendly to editors such as Emacs. For example:
>>> print s.error_leader()+’Expected a number’“foofoo.txt”, line 17: Expected a number
Putting shlex to workThe parser in Listing 23-2 understands the simple Lepto language as described ear-
lier in this chapter. At the highest level, it repeatedly calls shlex.get_token to get
a command and then calls a corresponding parse_<command> method to read and
verify that command’s arguments. Each finished command is stored in a LeptoCmdobject (a simple container), all of which are buffered and eventually returned as a
list of commands.
Listing 23-2: leptoparser.py – Coverts tokensto LeptoCmd objects
import shlex,sys
class LeptoCmd:‘Simple container class’def __init__(self,cmd,**kwargs):
self.cmd = cmdself.__dict__.update(kwargs)
def __repr__(self):s = ‘LeptoCmd %s(‘ % self.cmdfor item in self.__dict__.items():
if item[0] != ‘cmd’:s += ‘ %s=%s’ % item
return s + ‘ )’class LeptoParser:
def __init__(self,stopOnError=1):self.stopOnError = stopOnError
def err(self,msg,dest=sys.stderr):dest.write(self.lexer.error_leader()+msg+’\n’)
Continued
4807-7 ch23.F 5/24/01 9:00 AM Page 437

438 Part IV ✦ User Interfaces and Multimedia
Listing 23-2 (continued)
def next_token(self):‘Returns the next token or None on error’tok = self.lexer.get_token()if tok == ‘’:
self.err(‘Unexpected end of file’)return tok
def next_number(self,func=float):‘Returns the next token as a number’tok = self.next_token()if tok:
try: tok = func(tok)except ValueError:
return self.err(‘Expected a number, not ‘+tok)return tok
def parse_reset(self):tok = self.next_token()if tok:
if not tok in [‘all’,’direction’,’color’,\‘screen’,’scale’,’position’,\‘stacks’]:
return self.err(‘Invalid reset argument’)return LeptoCmd(‘reset’,arg=tok)
def parse_push(self):tok = self.next_token()if tok:
if not tok in [‘color’,’direction’,\‘scale’,’position’]:
return self.err(‘Invalid push argument’)return LeptoCmd(‘push’,arg=tok)
def parse_pop(self):tok = self.next_token()if tok:
if not tok in [‘color’,’direction’,\‘scale’,’position’]:
return self.err(‘Invalid push argument’)return LeptoCmd(‘pop’,arg=tok)
def amntcmd(self,cmd):‘Util for commands with a single numerical arg’num = self.next_number()if num: return LeptoCmd(cmd,amnt=num)
# These are all nearly identical def parse_f(self): return self.amntcmd(‘f’)def parse_b(self): return self.amntcmd(‘b’)def parse_l(self): return self.amntcmd(‘l’)
4807-7 ch23.F 5/24/01 9:00 AM Page 438

439Chapter 23 ✦ Building Simple Command Interpreters
def parse_r(self): return self.amntcmd(‘r’)def parse_scale(self): return self.amntcmd(‘scale’)
def namecmd(self,cmd):‘Util for commands with a single string arg’tok = self.next_token()if tok: return LeptoCmd(cmd,name=tok)
# More nearly identical stuff def parse_color(self): return self.namecmd(‘color’)def parse_sub(self): return self.namecmd(‘sub’)def parse_call(self): return self.namecmd(‘call’)
def parse_end(self): return LeptoCmd(‘end’)
def parse_repeat(self):num = self.next_number()if num:
n = self.next_token()if n:
return LeptoCmd(‘repeat’,count=num,name=n)
def parse(self, stream=None, name=None):‘Returns a list of LeptoCmd objects’lexer = shlex.shlex(stream,name)lexer.source = ‘include’lexer.wordchars += ‘.,-’ # For numbersself.lexer = lexercmds = []while 1:
tok = lexer.get_token()if tok == ‘’: # End of the file
break
# See if there’s a parser for this token parser = ‘parse_’+tok if not hasattr(self,parser):
self.err(‘Unknown command: ‘+tok)if self.stopOnError:
breakelse:
continue
# Call the parser to convert to a LeptoCmd objectcmd = getattr(self,parser)()if cmd is None:
if self.stopOnError: breakelse: continue
cmds.append(cmd)
return cmds
4807-7 ch23.F 5/24/01 9:00 AM Page 439
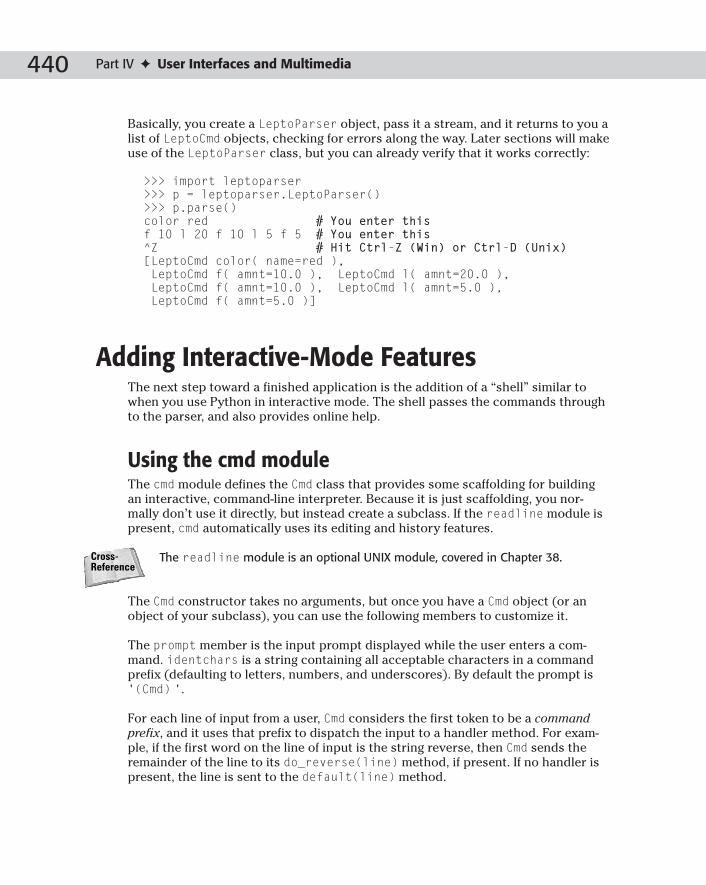
440 Part IV ✦ User Interfaces and Multimedia
Basically, you create a LeptoParser object, pass it a stream, and it returns to you a
list of LeptoCmd objects, checking for errors along the way. Later sections will make
use of the LeptoParser class, but you can already verify that it works correctly:
>>> import leptoparser>>> p = leptoparser.LeptoParser()>>> p.parse()color red # You enter thisf 10 l 20 f 10 l 5 f 5 # You enter this^Z # Hit Ctrl-Z (Win) or Ctrl-D (Unix)[LeptoCmd color( name=red ), LeptoCmd f( amnt=10.0 ), LeptoCmd l( amnt=20.0 ),LeptoCmd f( amnt=10.0 ), LeptoCmd l( amnt=5.0 ), LeptoCmd f( amnt=5.0 )]
Adding Interactive-Mode FeaturesThe next step toward a finished application is the addition of a “shell” similar to
when you use Python in interactive mode. The shell passes the commands through
to the parser, and also provides online help.
Using the cmd moduleThe cmd module defines the Cmd class that provides some scaffolding for building
an interactive, command-line interpreter. Because it is just scaffolding, you nor-
mally don’t use it directly, but instead create a subclass. If the readline module is
present, cmd automatically uses its editing and history features.
The readline module is an optional UNIX module, covered in Chapter 38.
The Cmd constructor takes no arguments, but once you have a Cmd object (or an
object of your subclass), you can use the following members to customize it.
The prompt member is the input prompt displayed while the user enters a com-
mand. identchars is a string containing all acceptable characters in a command
prefix (defaulting to letters, numbers, and underscores). By default the prompt is
‘(Cmd) ‘.
For each line of input from a user, Cmd considers the first token to be a commandprefix, and it uses that prefix to dispatch the input to a handler method. For exam-
ple, if the first word on the line of input is the string reverse, then Cmd sends the
remainder of the line to its do_reverse(line) method, if present. If no handler is
present, the line is sent to the default(line) method.
Cross-Reference
4807-7 ch23.F 5/24/01 9:00 AM Page 440

441Chapter 23 ✦ Building Simple Command Interpreters
Cmd comes with a few special commands. If a user enters help reverse or just ?
reverse, a built-in do_help method calls help_reverse(), if present, which you
can implement to print online help (just print it to stdout using one or more printstatements). A command prefix of just an exclamation point sends the remaining
arguments to a do_shell(line) method if it exists. If the input is just a blank line,
the emptyline() method is called, which by default repeats the previous input (by
calling self.onecmd(self.lastcmd)). Finally, when the end of user input is
reached, the do_EOF() method is called.
onecmd(line) takes an entire line of input and processes it as if it had been
entered by the user.
The cmdloop([intro]) method makes Cmd repeatedly prompt the user for input
and then dispatches it. intro is a message to display before entering the loop; if
omitted, Cmd displays the message in self.intro, which is empty by default. You
can implement the preloop() and postloop() methods to do work immediately
before and after Cmd goes into its loop (i.e., they will both be called once per call to
the cmdloop method).
For each line of input, Cmd performs a series of calls like the following:
stop = Noneline = raw_input(self.prompt)line = self.precmd(line)stop = self.onecmd(line)stop = self.postcmd(stop, line)
It receives user input, sends it to precmd (where you can modify it if you want), and
then passes it off to onecmd, where the correct do_<command> method is called. If,
at the end of the loop, stop has a value besides None, cmdloop calls postloop and
then returns.
If a user enters help with no other argument, do_help displays a sort of table of
contents of available help topics:
print self.doc_headerprint self.ruler * len(self.doc_header)print <all do_ methods that have a help_ method>print self.misc_headerprint self.ruler * len(self.misc_header)print <all help_ methods that don’t have a do_ method>print self.undoc_headerprint self.ruler * self.undoc_headerprint <all do_ methods without a help_ method>
4807-7 ch23.F 5/24/01 9:00 AM Page 441
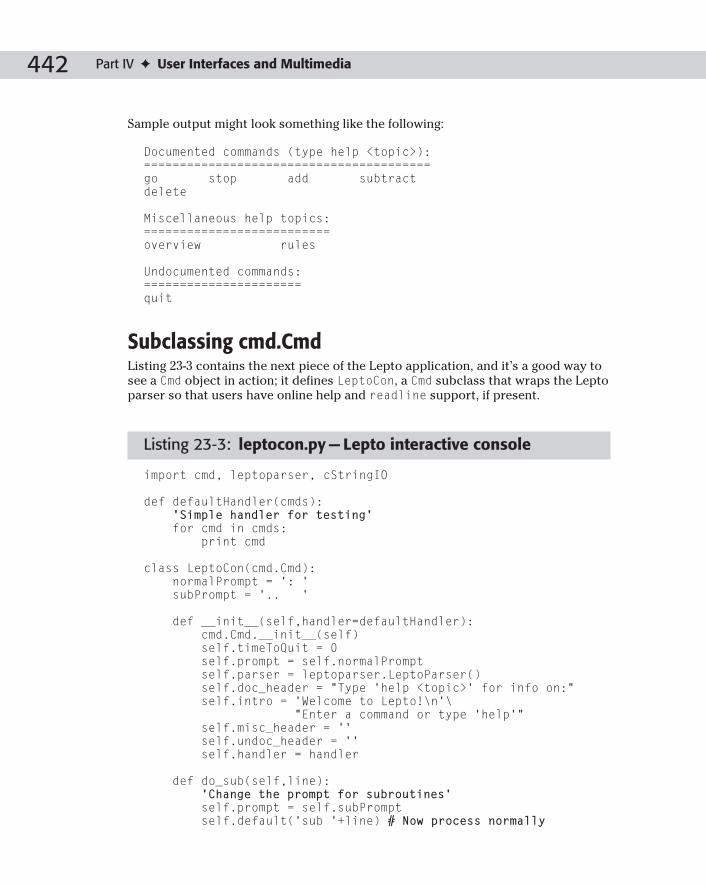
442 Part IV ✦ User Interfaces and Multimedia
Sample output might look something like the following:
Documented commands (type help <topic>):========================================go stop add subtractdelete
Miscellaneous help topics:==========================overview rules
Undocumented commands:======================quit
Subclassing cmd.CmdListing 23-3 contains the next piece of the Lepto application, and it’s a good way to
see a Cmd object in action; it defines LeptoCon, a Cmd subclass that wraps the Lepto
parser so that users have online help and readline support, if present.
Listing 23-3: leptocon.py — Lepto interactive console
import cmd, leptoparser, cStringIO
def defaultHandler(cmds):‘Simple handler for testing’for cmd in cmds:
print cmd
class LeptoCon(cmd.Cmd):normalPrompt = ‘: ‘subPrompt = ‘.. ‘
def __init__(self,handler=defaultHandler):cmd.Cmd.__init__(self)self.timeToQuit = 0self.prompt = self.normalPromptself.parser = leptoparser.LeptoParser()self.doc_header = “Type ‘help <topic>’ for info on:”self.intro = ‘Welcome to Lepto!\n’\
“Enter a command or type ‘help’”self.misc_header = ‘’self.undoc_header = ‘’self.handler = handler
def do_sub(self,line):‘Change the prompt for subroutines’self.prompt = self.subPromptself.default(‘sub ‘+line) # Now process normally
4807-7 ch23.F 5/24/01 9:00 AM Page 442

443Chapter 23 ✦ Building Simple Command Interpreters
def do_end(self,line):‘Change the prompt back after subroutines’self.prompt = self.normalPromptself.default(‘end ‘+line) # Now process normally
def default(self,line):‘Called on normal commands’sio = cStringIO.StringIO(line)cmds = self.parser.parse(sio,’Console’)self.handler(cmds)
def do_quit(self,line):self.timeToQuit = 1
def postcmd(self,stop,line):if self.timeToQuit:
return 1return stop
# Now come all the online documentation functionsdef help_help(self): print ‘I need help!’ def help_quit(self): print ‘Duh.’
def help_reset(self):print ‘reset <all | direction | color | ‘\
‘screen | scale | position | stacks>’print ‘Reverts to default settings’
def help_color(self):print ‘color <name | None>’print ‘Changes current color to <name> or no color’\
‘ for invisible movement’
def help_push(self):print ‘push <color | direction | scale | position>’print ‘Saves an attribute to its own stack’
def help_pop(self):print ‘pop <color | direction | scale | position>’print ‘Retrieves a previously pushed attribute’
def help_f(self):print ‘f <amnt>’print ‘Moves forward in the current direction’
def help_b(self):print ‘b <amnt>’print ‘Moves opposite of the current direction’
def help_l(self):print ‘l <amnt>’print ‘Turns left the specified number of degrees’
Continued
4807-7 ch23.F 5/24/01 9:00 AM Page 443

444 Part IV ✦ User Interfaces and Multimedia
Listing 23-3 (continued)
def help_r(self):print ‘r <amnt>’print ‘Turns right the specified number of degrees’
def help_scale(self):print ‘scale <amnt>’print ‘Multiplies the current scaling factor by amnt’
def help_sub(self):print ‘sub <name>’print ‘Creates a new subroutine called name’print ‘Be sure to terminate it using the end command’
def help_end(self):print ‘end\nEnds a subroutine definition’
def help_call(self):print ‘call <name>\nCalls a subroutine’
def help_include(self):print ‘include “file”\nExecutes the contents of a file’
def help_repeat(self):print ‘repeat <count> <name>’print ‘Calls a subroutine several times’
if __name__ == ‘__main__’:c = LeptoCon()c.cmdloop()
Because the parser handles entire commands, most commands are routed to the
default method, which passes the whole line on to the parser. Once again, this is
part of a still larger program, but you can test this portion of it to make sure every-
thing’s working. Here’s an example session from a Windows command line (text in
bold is what I typed):
C:\temp>python leptocon.pyWelcome to Lepto!Enter a command or type ‘help’: help
Type ‘help <topic>’ for info on:================================help quitsub include b r pushpop l scale color fend repeat call reset
4807-7 ch23.F 5/24/01 9:00 AM Page 444

445Chapter 23 ✦ Building Simple Command Interpreters
: help callcall <name>Calls a subroutine: color redLeptoCmd color( name=red ): f 10 r 20 f 10LeptoCmd f( amnt=10.0 )LeptoCmd r( amnt=20.0 )LeptoCmd f( amnt=10.0 ): quit
C:\temp>
Notice that you can enter more than one command per line as long as the entire
command is on that line. The default command handler does nothing but print the
commands to stdout, but it at least lets you see what’s happening.
It may seem like overkill to use both shlex and cmd because there is some overlap
in what they do (I could have just implemented methods such as do_color,
do_reset, and so on, for example). But as you’ve seen, using both made it easy to
test these first two parts independently, which could be important for languages
with more complex grammars. It also makes it easy to later re-use LeptoParser for
handling input directly from a file. Furthermore, it enables you to easily add interac-
tive-mode features (such as online help and using a different prompt when the user
is defining a subroutine) without cluttering the parsing code.
Executing Lepto CommandsNow that you have a Lepto parser and a user-friendly interface, all you need is some-
thing to act on those commands. The code in Listing 23-4 builds upon the previous
two sections and creates a graphical display showing the results of the Lepto scripts
(the display is nothing more than a Tkinter window with a single canvas widget).
Listing 23-4: leptgui.py – Plots Lepto commands
from Tkinter import *import leptocon, threading, math
deg2rad = math.pi * 2.0 / 360.0
class LeptoGUI:def __init__(self,canvas):
self.canvas = canvasself.subs = {}self.newSub = Noneself.firstCmd = 1
Continued
4807-7 ch23.F 5/24/01 9:00 AM Page 445

446 Part IV ✦ User Interfaces and Multimedia
Listing 23-4 (continued)
def do_reset_direction(self): self.direction = 0def do_reset_color(self): self.color = ‘black’def do_reset_scale(self): self.scale = 1.0
def do_reset_position(self):# Move to center of canvasx = self.canvas.winfo_width() / 2y = self.canvas.winfo_height() / 2self.position = (x,y)
def do_reset_screen(self):ids = self.canvas.find_all()self.canvas.delete(*ids)
def do_reset_stacks(self):self.direction_stk = []self.color_stk = []self.scale_stk = []self.position_stk = []
def do_reset_all(self):self.do_reset_direction()self.do_reset_color()self.do_reset_scale()self.do_reset_position()self.do_reset_screen()self.do_reset_stacks()
def do_reset(self,cmd):‘Reset color, position, etc’getattr(self,’do_reset_’+cmd.arg)()
def do_color(self,cmd):‘Change color’self.color = Noneif cmd.name.lower() != ‘none’:
self.color = cmd.name
def do_push(self,cmd):‘Push a color, position, etc’arg = cmd.arggetattr(self,arg+’_stk’).append(getattr(self,arg))
def do_pop(self,cmd):‘Pop a color, position, etc’stk = getattr(self,cmd.arg+’_stk’)if len(stk):
setattr(self,cmd.arg,stk.pop())
4807-7 ch23.F 5/24/01 9:00 AM Page 446

447Chapter 23 ✦ Building Simple Command Interpreters
def do_f(self,cmd):‘Move forward’x,y = self.positiondir = self.direction * deg2radamnt = self.scale * cmd.amntnx = x + amnt * math.cos(dir)ny = y - amnt * math.sin(dir)if self.color:
self.canvas.create_line(x, y, nx, ny, width=1,\fill=self.color)
self.position = (nx,ny)
def do_b(self,cmd):‘Move backward’self.direction = (self.direction + 180) % 360self.do_f(cmd)self.direction = (self.direction - 180) % 360
def do_l(self,cmd):‘Turn left’self.direction = (self.direction + cmd.amnt) % 360
def do_r(self,cmd):‘Turn right’self.direction = (self.direction - cmd.amnt) % 360
def do_scale(self,cmd):‘Change scale’self.scale *= cmd.amnt
def do_sub(self,cmd):‘Create a new subroutine’if self.newSub:
print “Can’t create nested subroutines”return
self.newSub = cmd.nameself.subs[cmd.name] = []
def do_end(self,cmd):‘Finish creating a subroutine’if not self.newSub:
print ‘No subroutine to end’return
self.newSub = None
def do_call(self,cmd):‘Invoke a subroutine’sub = cmd.nameif self.subs.has_key(sub):
self.cmdHandler(self.subs[sub])else:
print ‘Unknown subroutine’,sub
Continued
4807-7 ch23.F 5/24/01 9:00 AM Page 447

448 Part IV ✦ User Interfaces and Multimedia
Listing 23-4 (continued)
def do_repeat(self,cmd):‘repeat - Just do_call <count> times’c = leptocon.leptoparser.LeptoCmd(‘call’,name=cmd.name)for i in range(cmd.count):
self.do_call(c)
def cmdHandler(self,cmds):‘Called for each command object’if self.firstCmd:
# Widget info (w,h) won’t be ready in the # constructor, but it will be ready by nowself.firstCmd = 0self.do_reset_all()
for cmd in cmds: if self.newSub and cmd.cmd != ‘end’:
self.subs[self.newSub].append(cmd)else:
getattr(self,’do_’+cmd.cmd)(cmd)
if __name__ == ‘__main__’:# Create a Tk window with a canvasroot = Tk()root.title(‘LeptoGUI’)canvas = Canvas(root,bg=’White’)canvas.pack()
gui = LeptoGUI(canvas)
# Let Tkinter run in the background threading.Thread(target=root.mainloop).start()
# Repeatedly get commands and process them c = leptocon.LeptoCon(gui.cmdHandler)c.cmdloop()root.quit()
leptogui.py uses the usual trick of dispatching commands by taking a command
name (such as scale), converting it to a method name (do_scale), and then invok-
ing it. Because so much work was taken care of by the parser, the final pieces of the
graphical application ended up being quite simple and straightforward.
Launch leptogui.py to give Lepto a try. Following is a sample session; the result-
ing output is shown in Figure 23-2.
4807-7 ch23.F 5/24/01 9:00 AM Page 448
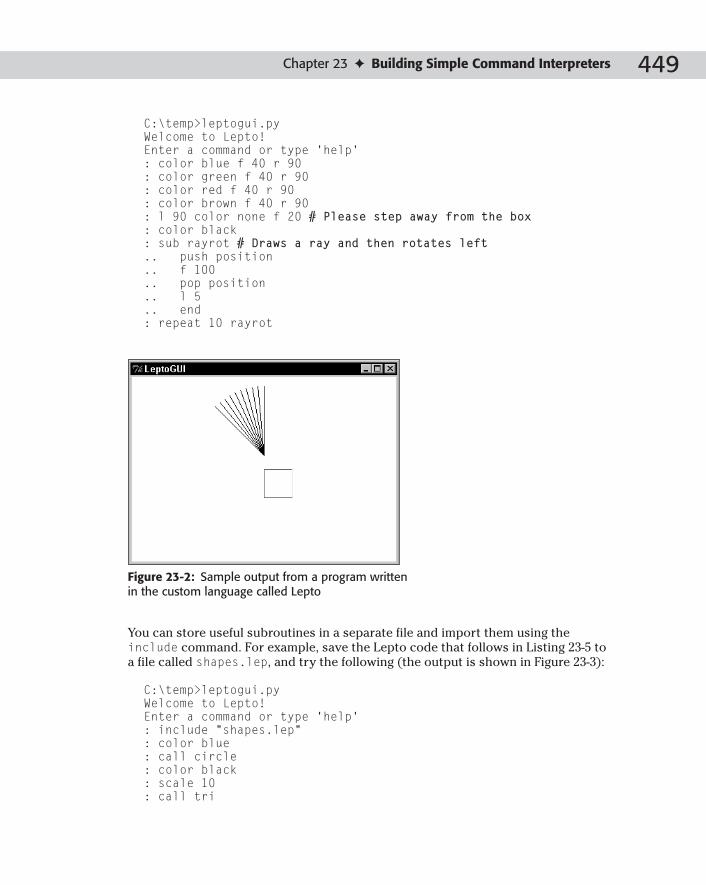
449Chapter 23 ✦ Building Simple Command Interpreters
C:\temp>leptogui.pyWelcome to Lepto!Enter a command or type ‘help’: color blue f 40 r 90: color green f 40 r 90: color red f 40 r 90: color brown f 40 r 90: l 90 color none f 20 # Please step away from the box: color black: sub rayrot # Draws a ray and then rotates left.. push position.. f 100.. pop position.. l 5.. end: repeat 10 rayrot
Figure 23-2: Sample output from a program written in the custom language called Lepto
You can store useful subroutines in a separate file and import them using the
include command. For example, save the Lepto code that follows in Listing 23-5 to
a file called shapes.lep, and try the following (the output is shown in Figure 23-3):
C:\temp>leptogui.pyWelcome to Lepto!Enter a command or type ‘help’: include “shapes.lep”: color blue: call circle: color black: scale 10: call tri
4807-7 ch23.F 5/24/01 9:00 AM Page 449

450 Part IV ✦ User Interfaces and Multimedia
: r 180: color green: call box: sub cirrot # draw a circle and rotate a little.. push color push position.. color none.. f 50.. pop color.. call circle.. pop position.. r 20.. end: reset scale reset position reset color: repeat 18 cirrot
Listing 23-5: shapes.lep – Sample Lepto include file
sub circedge f 10 r 15 endsub circle repeat 24 circedge endsub box f 10 r 90 f 10 r 90 f 10 r 90 f 10 r 90 endsub tri f 10 r 120 f 10 r 120 f 10 r 120 end
Figure 23-3: Lepto program using subroutines stored in a separate file
Lepto is a simple, yet realistic, example of how you can benefit from the shlex and
cmd modules. A good exercise to try now would be to expand the grammar of Lepto
to make it more powerful. For example, you could add support for variables and
expressions (let Python do the work of evaluation via the eval function), or you
could let the repeat statement accept a sequence of commands instead of forcing
users to define a subroutine first.
4807-7 ch23.F 5/24/01 9:00 AM Page 450

451Chapter 23 ✦ Building Simple Command Interpreters
SummaryA scripting interface to a program gives your users powerful tools to work with.
Python’s shlex module makes lexical analysis a lot less tedious, and cmd gives
you a base upon which you can build a flexible command-line interface. In this
chapter, you:
✦ Created a parser for a simple scripting language.
✦ Wrapped the parser in a command-line interface complete with built-in online
help.
✦ Built an interpreter for the parser output that plots drawings graphically.
The next chapter covers Python’s support for processing and playing sound files in
various formats.
✦ ✦ ✦
4807-7 ch23.F 5/24/01 9:00 AM Page 451

4807-7 ch23.F 5/24/01 9:00 AM Page 452

Playing Sound
Sound is stored in a bewildering range of formats.
Fortunately, Python’s standard libraries can read, write,
and convert a wide range of audio files. You can also play
back sounds on a variety of platforms.
Sound File BasicsSound is basically vibration in the air. The louder the sound,
the more forceful the vibration. The higher the sound, the
faster the vibration.
To store sound digitally, a microphone or other recorder mea-
sures (or samples) the analog sound waveform many times
per second. Each sample takes the form of a number, and this
number measures the amplitude of the sound waves at an
instant in time. A speaker can later translate digitized sound
(this long list of integers) back into sound waves.
There are many, many ways to digitize and store sound. They
can differ in several ways:
✦ Sample rate — How many times per second the ampli-
tude of the sound waves is measured. A common sample
rate is 44100 Hz (samples per second), the rate used on
audio compact discs.
✦ Sample encoding — The simplest (and most common) is
linear encoding, where each sample is a linear measure-
ment of amplitude. Other encoding types include u-LAW,
in which measurement is performed on a logarithmic
scale.
✦ Sample width — A sample can be an 8-bit, 16-bit, or 32-
bit integer.
✦ Channels — Sound can be recorded with one, two, or
more channels. This boils down to the storage of one or
more audio streams together in one file. The corre-
sponding samples from each channel are normally
stored together in one frame.
2424C H A P T E R
✦ ✦ ✦ ✦
In This Chapter
Sound file basics
Playing sounds
Examining audio files
Reading and writingaudio files
Handling raw audiodata
✦ ✦ ✦ ✦
4807-7 ch24.F 5/24/01 9:00 AM Page 453

454 Part IV ✦ User Interfaces and Multimedia
All sound formats make some trade-offs between sound quality (how much informa-
tion is lost in digitizing the sound) and file size (the better the sound quality, the
more data needs to be stored). For example, one second of sound could be stored
in 8-bit mono at a sample rate of 22050; the total space used would be 22050 bytes.
Storing the same sound in 16-bit stereo at a sampling rate of 44100 would require
44100 frames at 4 bytes per frame, for a total of 176400 bytes (8 times as much
space).
Playing SoundsBecause playing sound is tied to the operating system (OS), the libraries for playing
sound are also OS-specific.
Playing sound on WindowsThe module winsound plays sound on a Windows system. The function
Beep(frequency,duration) uses the computer’s internal speaker to play a
sound at pitch frequency for duration milliseconds. The frequency can range from
37 to 32767. If Beep can’t play the sound, it raises a RuntimeError. For example,
the following code plays a tinny-sounding major scale, starting from middle C.
Each note lasts half a second:
ScalePitches=[262,294,330,349,392,440,494,523]for Pitch in ScalePitches:
winsound.Beep(Pitch,500)
The function PlaySound(sound,flags) plays a WAV file, using any available sound
card. The parameter sound can be a file name, an alias, an audio stream, or None.
The parameter flags should equal one or more constants, combined using
bitwise-OR.
Specify one (and only one) flag to indicate where the sound should come from:
✦ SND_FILENAME indicates that the sound is the path to a WAV file.
✦ SND_ALIAS indicates that sound is the name of a control panel sound-
association.
✦ SND_MEMORY indicates that sound is the contents of a WAV file.
For example:
# Play a sound file from disk:SoundFileName=”JudyGarlandKraftCheese.wav”winsound.PlaySound(SoundFileName,winsound.SND_FILENAME)
4807-7 ch24.F 5/24/01 9:00 AM Page 454

455Chapter 24 ✦ Playing Sound
# Play the “Exclamation” sound, as set up in Control Panel:winsound.PlaySound(“Exclamation”,winsound.SND_ALIAS)# Read sound file from disk, then play it:SoundFile=open(SoundFileName,”rb”)winsound.PlaySound(SoundFile.read(),winsound.SND_MEMORY)
Other flags let you tweak behavior:
SND_ASYNC Start playing the sound and return immediately.
Otherwise, the call to PlaySound doesn’t return until the
sound has finished playing.
SND_LOOP Keep playing the sound indefinitely. (This flag should be
combined with SND_ASYNC.)
SND_PURGE Stop the specified sound.
SND_NOSTOP Don’t stop currently playing sounds. (Raise RuntimeError
if a sound is playing.)
SND_NOWAIT Return immediately if the sound driver is busy.
SND_NODEFAULT If the sound is not found, don’t play a default beep.
Playing and recording sound on SunOSThe Sun audio hardware can play audio data in u-LAW format, with a sample rate of
8000 Hz. The module sunaudiodev enables you to manipulate the Sun audio hard-
ware using a filelike object. The related module SUNAUDIODEV provides various con-
stants for use with sunaudiodev.
The function open(mode) returns an audio device object. The parameter mode can
be r for recording, w for playback, rw for both, or control for control access.
Playing soundThe method write(samples) plays sound, where samples is audio data as a string.
A call to write adds the audio data into the audio device’s buffer. If the buffer
doesn’t have enough room to contain samples, write will not return immediately.
The method obufcount returns the number of samples currently buffered for
playback.
The method flush stops any currently playing sound, and clears the audio output
buffer. The method drain waits until playback is complete, and then returns.
Recording soundThe method read(size) reads exactly size samples from the audio input, and
returns them as a string. It blocks until enough data is available.
4807-7 ch24.F 5/24/01 9:00 AM Page 455

456 Part IV ✦ User Interfaces and Multimedia
The method ibufcount returns the number of samples buffered for recording; you
can read up to this many samples without blocking.
Controlling the audio deviceThe audio device provides a status object. The object has no methods, but has
attributes as described in the audio man page. The device object provides acces-
sors getinfo and setinfo for the status object.
The method fileno returns the file descriptor for the audio device.
Examining Audio FilesBecause there are so many file formats for storing sound, it is sometimes difficult to
know which format a particular file uses. The module sndhdr provides a function,
what(filename), that examines the file filename and returns its storage format.
(The function whathdr is a synonym for what.)
The return value of what is a 5-tuple of the form (type, SampleRate, channels,
frames, BitsPerSample). Here, type is the data type; its possible values are aifc, aiff,
au, hcom, sndr, sndt, voc, wav, 8svx, sb, ub, and ul. The value BitsPerSample is A for
A-LAW encoding, U for u-LAW encoding, or the number of bits for standard encoding.
The values SampleRate and channels are 0 if they cannot be determined. The value
frames is -1 if it cannot be determined. If what is completely stumped (for example,
if the file isn’t a sound file at all), it returns None.
For example, the following code examines a .wav file. The file has a sampling rate of
11024. It is in mono, and uses 8 bits per sample:
>>> print sndhdr.what(“bond.wav”)(‘wav’, 11025, 1, -1, 8)
This file is in SunAudio format, in mono, with 188874 frames in all:
>>> params=sndhdr.what(“fallofthephoton.au”)>>> params(‘au’, 8012, 1, 188874, ‘U’)>>> float(params[3])/params[1] # sound length (in seconds)23.573889166250623
Reading and Writing Audio FilesThe modules aifc, wave, and sunau handle AIFF, WAV, and AU files, respectively.
The interfaces for the modules are almost identical. The aifc module is docu-
mented first, followed by an accounting of the differences.
4807-7 ch24.F 5/24/01 9:00 AM Page 456

457Chapter 24 ✦ Playing Sound
Reading and writing AIFF files with aifcThe method open(file[, mode]) returns an audiofile object. The parameter file is
either a file name or an open filelike object. If file is a file name, use the modeparameter to control how the file is opened.
File formatAn audiofile object provides accessors for the file format. You can access each com-
ponent of the file format on any audiofile. You can also set the file format on a new
audiofile, but only before writing any frames:
✦ getnchannels, setnchannels(channels)— Access the number of channels.
✦ getsampwidth, setsampwidth(size)— Access the size, in bytes, of each
sample.
✦ getframerate,setframerate(frames)— Access the number of frames per
second.
✦ getnframes, setnframes(frames)— Access the number of frames in the
entire file.
✦ getcomptype, getcompname, setcomptype(type,name)— Access the com-
pression scheme. getcomptype returns the compression scheme as a code:
NONE, ALAW, ULAW, or G722. getcompname returns the compression scheme
as a human-readable string. Of the parameters to setcomptype, type should
be a code (as returned by getcomptype), and name should be a human-
readable name (as returned by getcompname).
The method setparams sets all five components at once. Its argument is a tuple of
the form (Channels,SampleWidth,FrameRate,CompType,CompName). The method
getparams returns the parameters in the same order.
Usually, you need not call setnframes to write out a new file, because the number of frames is written to the file’s header when you call close. However, ifyou open a filelike object that does not support seeking, then you must call setnframes before writing out audio data.
InputThe method readframes(count) reads count frames of audio data from the file,
returning them (decompressed) in a string.
OutputThe method writeframes(data) writes the audio data data to the file. The method
writeframesraw(data) writes audio data without updating the header; it is useful
for writing to a filelike object with no seek method.
Note
4807-7 ch24.F 5/24/01 9:00 AM Page 457

458 Part IV ✦ User Interfaces and Multimedia
Frame numbersWhen reading, the method setpos(framenumber) jumps to frame framenumber,and the method rewind jumps to the beginning of the file (frame 0).
When writing, the method tell returns the current frame number.
Using markersAn AIFF file can have one or more markers. A marker has an id number, a position
(frame number), and a name. To create a marker when writing a file, call
setmark(id,position,name). When reading a file, you can access a list of
markers by calling getmarkers. Each list element is a tuple of the form
(id,position,name). You can also access a particular marker with getmark(id).
Reading and writing AU files with sunauThe interface of the sunau module is basically the same as that of aifc, with the
following two exceptions:
✦ The available compression types are limited to ALAW, ULAW, and NONE.
✦ Markers are not available. Stub marker methods are provided for compatibil-
ity with aifc.
Reading and writing WAV files with waveThe interface of the wave module is basically the same as that of aifc, with these
two exceptions:
✦ Compression is not available; the only supported scheme is NONE.
✦ Markers are not available. Stub marker methods are provided for compatibil-
ity with aifc.
Example: Reversing an audio fileListing 24-1 reads in an audio file, and then writes out the same sound played back-
wards. Note that this could also be accomplished by one call to audioop.reverse(see “Handling Raw Audio Data,” later in this chapter). This example does things
the long way for purposes of exposition.
4807-7 ch24.F 5/24/01 9:00 AM Page 458

459Chapter 24 ✦ Playing Sound
Listing 24-1: ReverseSound.py
“””Reverse a sound file. Handy for finding subliminalmessages.”””import sndhdrimport aifcimport sunauimport wave
def ReverseAudioStream(AudioFileIn,AudioFileOut):“””Reverse an audio file (takes two opened audiofiles as arguments)“””# Get header info from the input file; write it out to# the output file. Params=AudioFileIn.getparams()AudioFileOut.setparams(Params)# Collect all the frames into a list, then write them out# in reversed order:FrameCount=AudioFileIn.getnframes()FrameDataList=[]for FrameIndex in range(FrameCount):
FrameDataList.append(AudioFileIn.readframes(1))for FrameIndex in range(FrameCount-1,-1,-1):
AudioFileOut.writeframes(FrameDataList[FrameIndex])# We’re done! Close the files.AudioFileIn.close()AudioFileOut.close()
def ReverseAudioFile(InputFileName,OutputFileName):“””Reverse an audio file (takes two file names as arguments)“””# First, check to see what kind of file it is:FileInfo=sndhdr.what(InputFileName)if (FileInfo==None):
print “Unkown sound format - can’t reverse:”, InputFileName
returnFileType=FileInfo[0]try:
if FileType==”aifc” or FileType==”aiff”:# aiff/aifc: use aifc moduleInFile=aifc.open(InputFileName,”rb”)OutFile=aifc.open(OutputFileName,”wb”)
elif FileType==”au”:# Sun Audio format: use sunau moduleInFile=sunau.open(InputFileName,”rb”)OutFile=sunau.open(OutputFileName,”wb”)
Continued
4807-7 ch24.F 5/24/01 9:00 AM Page 459

460 Part IV ✦ User Interfaces and Multimedia
Listing 24-1 (continued)
elif FileType==”wav”:# Wave format: use wave moduleInFile=wave.open(InputFileName,”rb”)OutFile=wave.open(OutputFileName,”wb”)
else:print “Sorry, can’t reverse type”,FileTypereturn
ReverseAudioStream(InFile,OutFile)except IOError:
print “Unable to open file!” return
if (__name__==”__main__”):# Reverse a file. Then reverse it again, to get# (hopefully) the same thing we started with:ReverseAudioFile(“test.wav”,”backwards.wav”)ReverseAudioFile(“backwards.wav”,”forwards.wav”)# Try another audio format, too:ReverseAudioFile(“test.au”,”backwards.au”)ReverseAudioFile(“backwards.au”,”forwards.au”)
Reading IFF chunked dataSome sound files are divided into chunks, including AIFF files and Real Media File
Format (RMFF) files. The chunk module provides a class, Chunk, to make it easier to
read these files.
Each chunk consists of an ID (4 bytes), a length (4 bytes), data (many bytes), and
possibly one byte of padding to make the next chunk start on a 2-byte boundary.
The length generally does not include the 8 header bytes. The length is normally
stored in big-endian format (most-significant bit first).
The constructor has the following syntax:
Chunk(file[,align[,bigendian[,inclheader]]]). Here, file is an opened file-
like object that contains chunked data. The flag align indicates whether chunks are
aligned. The flag bigendian indicates whether the chunk length is a big-endian num-
ber. And the flag inclheader indicates whether the length includes the 8 header
bytes. Parameters align and bigendian default to true; inclheader defaults to false.
The methods getname and getsize return the ID and the size of the chunk, respec-
tively. The method close skips to the end of the current chunk, but does not close
the underlying file. After calling close on a chunk, you can no longer read or
seek it.
4807-7 ch24.F 5/24/01 9:00 AM Page 460

461Chapter 24 ✦ Playing Sound
The method read([size]) reads up to size bytes of data from the chunk, and
returns them as a string. If size is omitted or is negative, it reads the entire chunk. If
no data is left in the chunk, it returns a blank string.
The method tell returns the current offset into the chunk. The method skipjumps to the end of the current chunk. And the method seek(pos[,whence])jumps to the position pos. If whence is 0 (the default), pos is measured from the
start of the file. If whence is 1, pos is measured relative to the current file position.
And if whence is 2, pos is measured relative to the start of the chunk. In addition,
the method isatty is defined and returns 0 (for compatibility with normal file
objects).
Normally, one iterates over chunks of a file by creating, reading, and closing several
chunk instances, as follows:
def PrintChunkInfo(ChunkedFile):try:
while (1):CurrentChunk=Chunk(ChunkedFile)print “ID:”,CurrentChunk.getname()print “Size:”,CurrentChunk.getsize()Chunk.close()
except EOFError:# Constructing a chunk failed, because we# finished reading the file. Exit loop:break
Handling Raw Audio DataThe module audioop is a big box of handy functions for working with audio data. It
is implemented in C, for speed. Each function takes audio data as a fragment, a
sequence of linear-encoded samples, stored as a string. Most functions can handle
1-byte, 2-byte, or 4-byte sample widths, and they take the sample width as an argu-
ment; a few can only handle 2-byte samples.
Examining a fragmentThese following functions each take two arguments — a fragment and a sample
width:
avg returns the average of all the samples in the fragment. avgpp returns the aver-
age peak-peak (with no filtering done). max returns the largest sample value. maxppreturns the largest peak-peak value. minmax returns a tuple of the minimum and
maximum samples. cross returns the number of zero-crossings in the fragment. To
measure the power of the fragment audio signal, call rms (root-mean-square).
4807-7 ch24.F 5/24/01 9:00 AM Page 461

462 Part IV ✦ User Interfaces and Multimedia
The function getsample(fragment,width,n) returns the nth sample from a frag-
ment. The sample is frame number index if fragment is in mono.
Searching and matchingThe function findfactor(target,fragment) attempts to match fragment with tar-get. It returns a float X such that fragment multiplied by X is as similar to target as
possible. The samples target and fragment should be 2-byte samples of the same
length:
>>> QuietData=audioop.mul(Data,2,0.5) # half as loud>>> audioop.findfactor(Data,QuietData)2.0001516619075197
The function findfit(target,fragment) searches for fragment in target. Itreturns a tuple of the form (offset,X). The closest match found starts at frame offset,and is scaled by a factor of X. Here, target and fragment are 2-byte samples, where
fragment is no longer than target.
The function findmax(fragment,length) looks for the loudest part of a sound. It
finds a slice length samples long for which the audio signal (as measured by rms) is
as large as possible. It returns the offset of the start of the slice.
Translating between storage formatsThe audioop module can handle linear encoding, u-LAW, and Intel/DVI ADPCM. It
provides several functions for converting between these schemes, as shown in
Table 24-1.
Table 24-1Audio Format Conversion Functions
Function Effect
lin2lin(fragment, Converts a linear-encoded sample to a new sample width; width, NewWidth) returns the converted sample. Decreasing sample width
lowers sound quality but saves space; increasing samplewidth just uses up more space.
lin2adpcm(fragment, Converts a linear-encoded sample to 4-bit ADPCM encoding. width,state) The value state represents the encoder’s internal state. The
return value is (newfragment,newstate), where newstateshould be passed for state to the next call to lin2adpcm.Pass None for state in the first call. lin2adpcm3 is a variantof lin2adpcm, using only 3 (not 4) bits per sample-difference.
4807-7 ch24.F 5/24/01 9:00 AM Page 462

463Chapter 24 ✦ Playing Sound
Function Effect
adpcm2lin(fragment, Converts an ADPCM-encoded fragment to linear encoding. width,state) Returns a tuple of the form (NewFragment,NewState).
adpcm32lin is a variant of adpcm2lin, for conversion from 3-bit ADPCM.
lin2ulaw Converts a linear-encoded sound fragment to u-LAW (fragment,width) encoding
ulaw2lin Converts a u-LAW encoded fragment to linear encoding. (fragment,width) (u-LAW encoding always uses 1-byte samples, so width
affects only the output fragment.)
In addition, you can convert linear-encoded fragments between mono and stereo.
tomono(fragment,width,lfactor,rfactor) converts a stereo fragment to a
mono fragment by multiplying the left channel by lfactor, the right channel by rfactor,and adding the two channels. tostereo(fragment,width,lfactor,rfactor)converts a mono fragment to stereo. The left channel of the new fragment is the
original fragment multiplied by lfactor, and similarly on the right.
Most audioop functions do not differentiate between the left and right channels of
stereo audio. Consider using tostereo and tomono:
>>> audioop.max(Data,2) # max over both channels26155>>> LeftChannel=audioop.tomono(Data,2,1,0) # left*1,right*0>>> RightChannel=audioop.tomono(Data,2,0,1)>>> audioop.max(RightChannel,2)26155>>> audioop.max(LeftChannel,2)25556>>> LoudLeftChannel=audioop.mul(LeftChannel,2,2)>>> QuietRightChannel=audioop.mul(RightChannel,2,0.5)>>> # Add the two channels back together:>>> NewData=audioop.add(audioop.tostereo(LeftChannel,2,1,0),
audioop.tostereo(RightChannel,2,0,1),2)
Manipulating fragmentsThe function add(fragment1, fragment2, width) combines two fragments of the
same length and sample width by adding each pair of samples.
The function reverse(fragment,width) reverses a sound fragment.
The function mul(fragment,width,factor) multiplies each sample in fragment by
factor, truncating any overflow. This has the effect of making the sound louder or
softer.
4807-7 ch24.F 5/24/01 9:00 AM Page 463

464 Part IV ✦ User Interfaces and Multimedia
The function bias(fragment,width,bias) adds bias to each sample in fragmentand returns the result.
You can speed up or slow down a fragment by calling
ratecv(fragment,width,channels,inrate,outrate,state[,weightA[,weightB]]). Here, inrate and outrate are the frame rates of the input and output
fragments; what is important is the ratio between inrate and outrate. The parameter
state represents the internal state of the converter. ratecv returns a tuple of the
form (fragment,newstate), where the value newstate should be passed in as state for
the next call to ratecv. You can pass None for state in your first call. Finally, the val-
ues weightA and weightB are used for a simple audio filter; weightA (which must
be at least 1) is a weight for the current sample, and weightB (which must be at
least 0) is a weight for the previous sample.
For example, the following code reads an audio file and slows it down to half-speed:
>>> WavFile=wave.open(“green1.wav”,”rb”)>>> Params=WavFile.getparams()>>> Data=WavFile.readframes(Params[3]) # Params[3]=framecount>>> # outrate=2*inrate; twice as many frames per second means>>> # the sound is half as fast:>>> NewData=audioop.ratecv(Data,Params[1],Params[0],1,2,None)>>> NewFile=wave.open(“green2.wav”,”wb”)>>> (NewData,State)=audioop.ratecv(
Data,Params[1],Params[0],1,2,None)>>> NewFile.setparams(Params) >>> NewFile.writeframes(NewData)>>> NewFile.close()>>> winsound.PlaySound(“green2.wav”,winsound.SND_FILENAME)
SummarySound can be stored in many file formats. Python’s standard libraries can read and
write most sound files, and perform low-level manipulation of audio data. They also
enable you to play sound on many operating systems. In this chapter, you:
✦ Played a musical scale on a PC speaker.
✦ Parsed sound files in various formats, and stored sounds in reverse.
✦ Manipulated raw audio data.
In the next chapter, you learn how to create and manage multiple threads in your
Python programs.
✦ ✦ ✦
4807-7 ch24.F 5/24/01 9:00 AM Page 464

AdvancedPythonProgramming
✦ ✦ ✦ ✦
Chapter 25Processing Images
Chapter 26Multithreading
Chapter 27Debugging, Profiling,and Optimization
Chapter 28Security andEncryption
Chapter 29Writing ExtensionModules
Chapter 30Embedding thePython Interpreter
Chapter 31Number Crunching
Chapter 32Using NumPy
Chapter 33Parsing andInterpretingPython Code
✦ ✦ ✦ ✦
P A R T
VV
4807-7 PO5.F 5/24/01 9:00 AM Page 465

4807-7 PO5.F 5/24/01 9:00 AM Page 466

ProcessingImages
This chapter describes the modules that help you work
with graphics files. Python comes with modules that help
you identify image file types, convert between different color
systems, and handle raw image data.
Image BasicsComputer images are made up of a group of pixels, or picture
elements, and an image’s size is usually specified by its width
and height in pixels.
There is a mind-boggling number of file formats that you can
use to store images; fortunately, however, a few (such as GIF,
JPEG, and PNG) are popular enough to be considered stan-
dard. Some image file formats limit the number of different
colors you can have in the image (GIFs, for example, can be
any 256 out of 16,777,217 different colors), and some repre-
sent each pixel by its index in a palette of color definitions.
Image file formats store the data in either raw, or uncom-
pressed, form, or they apply some sort of compression to
make the date smaller. Compression techniques fall into two
categories: Lossless compression (as is used by GIF files)
means that no data is lost and that when a viewer decom-
presses the image and displays it, it is identical to the original.
Lossy compression (as is used by JPEG files) means some
detail is thrown away in order to achieve better compression.
Some image file formats also support transparency, so that if
you display the image over another image, the parts that were
marked as transparent leave that part of the original image
visible. Index-based formats tag a particular color as the
transparent color (so that pixels having that index value are
completely transparent), and other formats include an alphachannel that tells the degree of transparency of each pixel.
2525C H A P T E R
✦ ✦ ✦ ✦
In This Chapter
Image basics
Identifying image filetypes
Converting betweencolor systems
Handling raw imagedata
Using the Pythonimaging library
✦ ✦ ✦ ✦
4807-7 ch25.F 5/24/01 9:00 AM Page 467

468 Part V ✦ Advanced Python Programming
Identifying Image File TypesThe imghdr module makes an educated guess as to the type of image stored in a
file:
>>> import imghdr>>> imghdr.what(‘c:\\temp\\jacobSwingSleep.jpg’)‘jpeg’
It looks at the first few bytes of the header, not the entire file, so it doesn’t guaran-
tee file integrity, but it does serve to differentiate between valid types. Instead of
passing in a file name, you can pass in a string that contains the first few bytes of a
file:
>>> hdr = open(‘snake.bmp’,’rb’).read(50) # Read a little>>> imghdr.what(‘’,h=hdr)‘bmp’
Table 25-1 lists the values that the what function returns and the different file types
that imghdr recognizes.
Table 25-1Image Types Recognized by imghdr
Image Type Value Returned
CompuServe Graphics Interchange gif
JFIF Compliant JPEG jpeg
Windows or OS/2 Bitmap bmp
Portable Network Graphics png
SGI Image Library (RGB) rgb
Tagged Image File Format tiff
Portable Bitmap pbm
Portable Pixmap ppm
Portable Graymap pgm
Sun Raster Image rast
X11 Bitmap xbm
4807-7 ch25.F 5/24/01 9:00 AM Page 468

469Chapter 25 ✦ Processing Images
By adding to imghdr’s tests list of functions, you can have it check for additional
file types. The module is just testing for known file types; it is not doing anything
specific to images. The following example looks for the special prefix at the begin-
ning of all bytecode-compiled Python (.pyc) files:
>>> def test_pyc(h,f):... import imp... if h.startswith(imp.get_magic()):... return ‘pyc’>>> imghdr.tests.append(test_pyc)>>> imghdr.what(‘leptolex.pyc’)‘pyc’
Custom test functions like the one shown in the preceding example take two param-
eters. The first contains a string of bytes representing either the first few bytes of
the file (if what was called with a file name) or the string of bytes the user passed in
to what. If the user called what with a file name, the f parameter is an open filelike
object positioned just past the read to retrieve the bytes for the h parameter.
Converting Between Color SystemsA color system is a model that represents the different colors that exist; color sys-
tems make it possible to refer to colors numerically. By converting a color to a num-
ber, things like television signals and computer graphics become possible. Each
color system has its own set of advantages, and the colorsys module helps you
convert colors from one system to another.
Color systemscolorsys supports conversion between four of the most popular color systems;
and in each, a color is represented by a 3-tuple of numbers from 0.0 to 1.0.
RGBIf you’ve worked with computer graphics, then the RGB or red-green-blue color sys-
tem is probably somewhat familiar; it’s the color system used by most computer
software and hardware. This model is derived from the tristimulus theory of vision,which states that there are three visual pigments in the cones in the retinas of our
eyes. When they are stimulated, we perceive color. The pigments are red, green,
and blue.
4807-7 ch25.F 5/24/01 9:00 AM Page 469
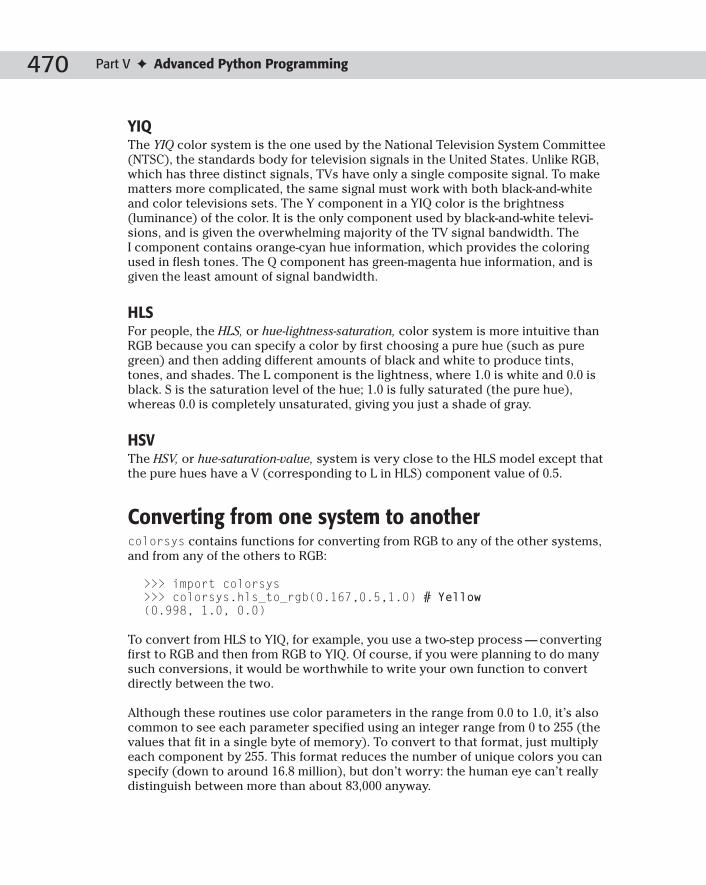
470 Part V ✦ Advanced Python Programming
YIQThe YIQ color system is the one used by the National Television System Committee
(NTSC), the standards body for television signals in the United States. Unlike RGB,
which has three distinct signals, TVs have only a single composite signal. To make
matters more complicated, the same signal must work with both black-and-white
and color televisions sets. The Y component in a YIQ color is the brightness
(luminance) of the color. It is the only component used by black-and-white televi-
sions, and is given the overwhelming majority of the TV signal bandwidth. The
I component contains orange-cyan hue information, which provides the coloring
used in flesh tones. The Q component has green-magenta hue information, and is
given the least amount of signal bandwidth.
HLSFor people, the HLS, or hue-lightness-saturation, color system is more intuitive than
RGB because you can specify a color by first choosing a pure hue (such as pure
green) and then adding different amounts of black and white to produce tints,
tones, and shades. The L component is the lightness, where 1.0 is white and 0.0 is
black. S is the saturation level of the hue; 1.0 is fully saturated (the pure hue),
whereas 0.0 is completely unsaturated, giving you just a shade of gray.
HSVThe HSV, or hue-saturation-value, system is very close to the HLS model except that
the pure hues have a V (corresponding to L in HLS) component value of 0.5.
Converting from one system to anothercolorsys contains functions for converting from RGB to any of the other systems,
and from any of the others to RGB:
>>> import colorsys>>> colorsys.hls_to_rgb(0.167,0.5,1.0) # Yellow(0.998, 1.0, 0.0)
To convert from HLS to YIQ, for example, you use a two-step process — converting
first to RGB and then from RGB to YIQ. Of course, if you were planning to do many
such conversions, it would be worthwhile to write your own function to convert
directly between the two.
Although these routines use color parameters in the range from 0.0 to 1.0, it’s also
common to see each parameter specified using an integer range from 0 to 255 (the
values that fit in a single byte of memory). To convert to that format, just multiply
each component by 255. This format reduces the number of unique colors you can
specify (down to around 16.8 million), but don’t worry: the human eye can’t really
distinguish between more than about 83,000 anyway.
4807-7 ch25.F 5/24/01 9:00 AM Page 470
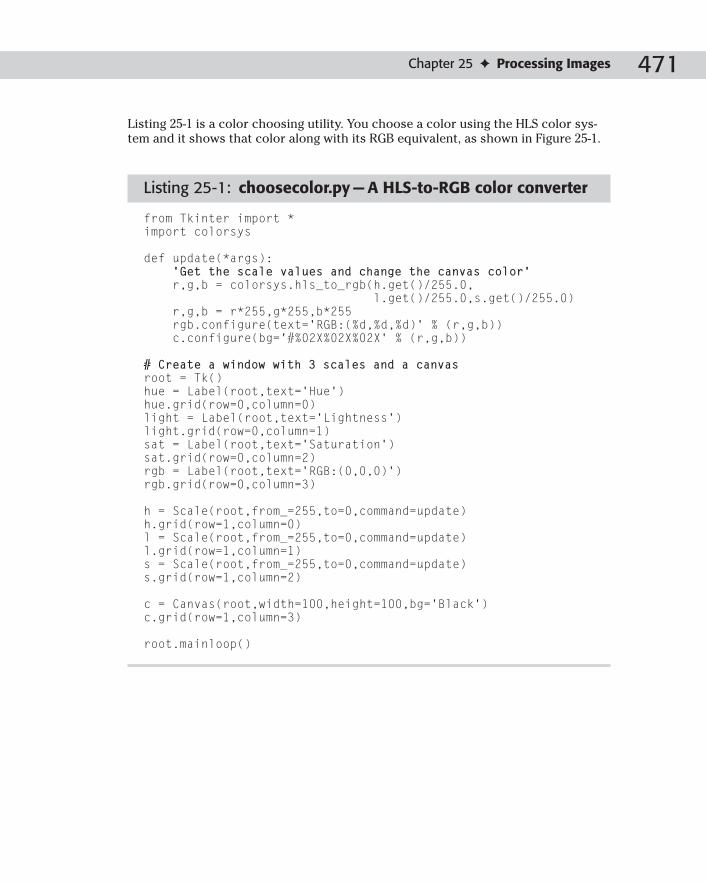
471Chapter 25 ✦ Processing Images
Listing 25-1 is a color choosing utility. You choose a color using the HLS color sys-
tem and it shows that color along with its RGB equivalent, as shown in Figure 25-1.
Listing 25-1: choosecolor.py — A HLS-to-RGB color converter
from Tkinter import *import colorsys
def update(*args):‘Get the scale values and change the canvas color’r,g,b = colorsys.hls_to_rgb(h.get()/255.0,
l.get()/255.0,s.get()/255.0)r,g,b = r*255,g*255,b*255rgb.configure(text=’RGB:(%d,%d,%d)’ % (r,g,b))c.configure(bg=’#%02X%02X%02X’ % (r,g,b))
# Create a window with 3 scales and a canvasroot = Tk()hue = Label(root,text=’Hue’)hue.grid(row=0,column=0)light = Label(root,text=’Lightness’)light.grid(row=0,column=1)sat = Label(root,text=’Saturation’)sat.grid(row=0,column=2)rgb = Label(root,text=’RGB:(0,0,0)’)rgb.grid(row=0,column=3)
h = Scale(root,from_=255,to=0,command=update)h.grid(row=1,column=0)l = Scale(root,from_=255,to=0,command=update)l.grid(row=1,column=1)s = Scale(root,from_=255,to=0,command=update)s.grid(row=1,column=2)
c = Canvas(root,width=100,height=100,bg=’Black’)c.grid(row=1,column=3)
root.mainloop()
4807-7 ch25.F 5/24/01 9:00 AM Page 471

472 Part V ✦ Advanced Python Programming
Figure 25-1: This utility converts colors from the HLS system to the RGB system.
Handling Raw Image DataPython works well as a general-purpose programming language, and often leaves
special-purpose functionality up to third-party developers. As such, Python’s built-
in support for handling raw image data is meager at best.
The imageop module manipulates raw image data that you pass it as a Python
string of bytes. The data must be either 8-bit (each pixel is represented by one char-
acter in the string) or 32-bit (4 characters per pixel; each group of 4 characters rep-
resents red, green, blue, and alpha or transparency components for that pixel). How
you go about obtaining data in that format is up to you, but if you’re on an SGI com-
puter, you can use the imgfile module. In addition, if you have an SGI RGB file, you
can load it using the rgbimg module, and then pass its contents to imageop.
imageop has a few functions for cropping and scaling images, but the bulk of its
functions have to do with converting between grayscale images of different color
depths (for example, converting from a 2-bit grayscale image to an 8-bit grayscale
image).
For real image processing, see the next section for information about available
third-party modules.
Using the Python Imaging LibraryIf you plan to do a lot of image processing, check out the Python Imaging Library
(PIL) from Pythonware (www.pythonware.com). It is free for both private and com-
mercial use, and Pythonware also has commercial support plans available. It’s pain-
less to install and is well worth the download.
PIL is fast, and its wide range of features enables you to perform a number of image
processing tasks, including converting between different file formats; processing
images (cropping, resizing, and so forth); annotating existing images with text; and
creating new images from scratch with its drawing functions.
4807-7 ch25.F 5/24/01 9:00 AM Page 472

473Chapter 25 ✦ Processing Images
The next few sections show you how to get started with PIL; consult its online doc-
umentation for even more features.
Visit the Graphics section in the Vaults of Parnassus (www.vex.net/parnassus/)for plenty of other graphics and image processing utilities.
Retrieving image informationThe main module in PIL is Image, and you use it to open and create images:
>>> import Image>>> i = Image.open(‘shadowtest.bmp’)>>> i.mode‘RGB’>>> i.size(320, 240)>>> i.format‘BMP’>>> i.getbands()(‘R’, ‘G’, ‘B’)>>> i.show() # Displays the image
An image’s mode specifies its color depth and storage; some of the common values
are listed in Table 25-2.
Table 25-2PIL Mode Values
Mode Description
1 1-bit pixels, black and white
L 8-bit pixels, black and white
P 8-bit pixels, using a 256-color palette
RGB 3 bytes per pixel, true color
RGBA 4 bytes per pixel, true color with alpha (transparency) band
I 32-bit integer pixels
F 32-bit floating point pixels
Images have one or more bands, or components, of data. For example, each pixel in
an RGB image has a red, green, and blue component; that image is said to have
three bands.
Tip
4807-7 ch25.F 5/24/01 9:00 AM Page 473

474 Part V ✦ Advanced Python Programming
An image’s show() method is a debugging facility that saves the image to a tempo-
rary file and launches the default viewer for that file type.
Sometimes the show() command has trouble working from inside IDEs such asPythonWin.
One nice feature about PIL is that it waits to read and decode file data until it really
needs to. This means, for example, that you can open an enormous image and read
its size and type information very quickly.
Copying and converting imagesThe copy() method returns a new image object identical to the old one, so that
you can make changes without modifying the original.
convert(mode) returns a new image in the given mode (there are also variations
on this method that let you pass in a palette or even a conversion matrix). The fol-
lowing example loads a full-color JPEG image, converts it to a 1-bit black-and-white
image, and displays it as shown in Figure 25-2:
>>> img = Image.open(‘binky.jpg’)>>> img.show() # Show the original>>> img.convert(‘1’).show() # Show the new version
The save(filename) method writes the contents of the current image to a file. PIL
looks at the extension you give the file name, and converts it to the appropriate for-
mat. For example, if you have an image file named test.jpg, you can convert it to
a GIF as follows:
>>> Image.open(‘test.jpg’).save(‘test.gif’)
Because JPEG files are true color, but GIF uses a 256-color palette, PIL takes care of
the necessary conversion as it saves the file.
As mentioned earlier, PIL waits as long as possible before loading and decoding file
data, so even if you open an image, its pixel data isn’t read until you display it or
apply some conversion. Therefore, you can use the draft(mode, (w,h)) method
to instruct the image loader to convert the image as it is loaded. For example, if you
have a huge 5,000 × 5,000–pixel, full-color image and you only want to work on a
smaller, 256-color copy of it, you can use something like the following:
img = Image.open(‘huge.jpg’).draft(‘P’,(250,250))
Note
4807-7 ch25.F 5/24/01 9:00 AM Page 474

475Chapter 25 ✦ Processing Images
Figure 25-2: A true color image (on the left) and a 1-bit version (on the right) after usingthe convert() method
Using PIL with TkinterThe ImageTk module provides two classes, BitmapImage and PhotoImage, that
create Tkinter-compatible bitmaps and images that can be used anywhere Tkinter
expects a bitmap (black-and-white image) or image (color image). Not only can you
then use PIL’s image processing features in any Tkinter program, you can also use it
to load image formats that Tkinter doesn’t understand.
Refer to Chapters 19 and 20 for coverage of Tkinter.
PIL also has functions for creating a Windows-compatible bitmap (DIB) that canbe drawn into a Windows device context, and functionality for writing images outto PostScript files or printers.
Note
Cross-Reference
4807-7 ch25.F 5/24/01 9:00 AM Page 475

476 Part V ✦ Advanced Python Programming
Cropping and resizing imagesThe crop((left, top, right, bottom)) method returns a rectangle portion of an
image.
resize((w, h)[, filter) returns a resized copy of an image. The filter argu-
ment controls what sort of sampling is used against the original image, and can be
one of BILINEAR, BICUBIC, or NEAREST (the default).
One other useful method is thumbnail((w, h)), which resizes the object in place
while maintaining the original aspect (width-to-height) ratio. Because of this, it may
not use the exact size you pass in.
Modifying pixel dataYou can access and change the value of any image pixel by its (x,y) coordinates,
with (0,0) being the upper-left corner. Like Python slices, coordinates refer to the
spaces between pixels, so a rectangle with its upper-left and lower-right corners at
(0,0) and (20,10) would be 20 pixels wide and 10 tall.
The getpixel((x, y)) and putpixel((x, y), value) methods get and set indi-
vidual pixels, where value is in the appropriate form for the image’s mode. The fol-
lowing code opens an image, paints a black band across it, and displays the results
(shown in Figure 25-3):
>>> i = Image.open(‘shadowtest.bmp’)>>> i.getpixel((10,25))(156, 111, 56)>>> for y in xrange(50,60):... for x in xrange(i.size[0]):... i.putpixel((x,y), (0,0,0))>>> i.show()
Figure 25-3: Use getpixel and putpixelto operate on individual pixel values.
4807-7 ch25.F 5/24/01 9:00 AM Page 476

477Chapter 25 ✦ Processing Images
getdata() returns a list of tuples representing each pixel in the image, and
putdata(data, [,scale][, offset]) places a sequence of tuples into the image
(the offset defaults to the beginning of the image, and the scale defaults to 1.0).
PIL’s ImageDraw module provides Draw objects that let you draw shapes and text
on an image. The following example displays the image shown in Figure 25-4:
>>> import Image, ImageDraw>>> from whrandom import randrange>>> img = Image.open(‘happy.jpg’)>>> draw = ImageDraw.Draw(img)>>> points = [] # Create a list of random points>>> for i in xrange(10):... points.append((randrange(img.size[0]), # x
randrange(img.size[1]))) # y>>> draw.line(points)>>> img.show()
Figure 25-4: The ImageDraw module lets you draw shapes and text on images.
Listing 25-2 takes the current time and creates a GIF file containing an analog clock
face image, as shown in Figure 25-5. On-the-fly image generation is often useful in
creating dynamic content for Web pages (and if there’s anything the world needs,
it’s yet another time display on a Web page).
4807-7 ch25.F 5/24/01 9:00 AM Page 477

478 Part V ✦ Advanced Python Programming
Listing 25-2: clockgif.py — Generates a clockface showing the current time
import time,Image,ImageDraw
def centerbox(rmax,perc):‘Returns a coordinate box perc % of rmax’sub = rmax*perc/100.0return (rmax-sub,rmax-sub,rmax+sub,rmax+sub)
r = 100 # clock face radiusimg = Image.new(‘RGB’,(r*2,r*2),color=(128,128,128))draw = ImageDraw.Draw(img)
# Make the clock bodydraw.pieslice(centerbox(r,100),0,360,fill=(0,0,0))draw.pieslice(centerbox(r,98),0,360,fill=(80,80,255))draw.pieslice(centerbox(r,94),0,360,fill=(0,0,0))draw.pieslice(centerbox(r,93),0,360,fill=(255,255,255))
# Draw the tick marksfor i in range(12):
deg = i * 30draw.pieslice(centerbox(r,90),deg-1,deg+1,fill=(0,0,0))
draw.pieslice(centerbox(r,75),0,360,fill=(255,255,255))# Get the current timenow = time.localtime(time.time())hour = now[3] % 12minute = now[4]
# Draw the handshdeg = hour * 30 + minute / 2mdeg = minute * 6draw.pieslice(centerbox(r,50),hdeg-4,hdeg+4,fill=(100,100,100))draw.pieslice(centerbox(r,85),mdeg-2,mdeg+2,fill=(100,100,100))
#img.rotate(90).show() # For debuggingimg.rotate(90).save(‘currenttime.gif’)
4807-7 ch25.F 5/24/01 9:00 AM Page 478

479Chapter 25 ✦ Processing Images
Figure 25-5: With PIL, it’s easy to create on-the-fly images.
As you may have noticed, this example makes heavy use of Draw’s
pieslice((left, top, right, bottom, startangle, stopangle[, fill][,outline]) method. In order to make it easy to use a different size clock, all mea-
surements are calculated as percentages of the radius (therefore, changing the
value of r is all you need to do). The centerbox function is a helper function that
returns a square enclosing a circle of the right size.
One other thing to notice is that an angle of zero is directly to the right of center,
and angle measurements are clockwise from there. Instead of working around that
in the calculations for the placement of the clock hands, it was easier to just draw
them as if the clock were on its side, and then rotate the entire image by 90 degrees
(note that image rotation degrees are counterclockwise).
The following list contains the more common methods of a Draw object:
setink(ink)
setfill(onoff)
setfont(font)
arc((x1, y1, x2, y2), start, end[, fill])
bitmap((x, y), bitmap[, fill])
chord((x1, y1, x2, y2), start, end[, fill][, outline])
ellipse((x1, y1, x2, y2)[, fill][, outline])
line((x, y)[, fill])
pieslice((x1, y1, x2, y2), start, end[, fill][, outline])
point((x, y)[, fill])
polygon((x, y)[, fill][, outline])
rectangle((x1, y1, x2, y2)[, fill][, outline])
text((x, y), text[, fill][, font][, anchor])
4807-7 ch25.F 5/24/01 9:00 AM Page 479

480 Part V ✦ Advanced Python Programming
Other PIL featuresNew versions of PIL continue to add powerful new features; check the Pythonware
Web site (www.pythonware.com) for new versions and more documentation. Other
interesting PIL modules and features include:
✦ ImageEnhance— Contains classes for adjusting the color, brightness, con-
trast, and sharpness of an image
✦ ImageChops— Provides arithmetic image operations (adding and subtracting
images) as well as functions for lightening, darkening, and inverting images
✦ Support for creating animated (multiframe) GIF and FLI/FLC images
✦ Transformations, including rotating at arbitrary angles and applying a Python
function to each pixel
✦ Image filters for blurring images or finding edges
✦ The capability to add your own decoders for new image types
SummaryPython offers helpful support for processing images, such as modules for identify-
ing image file types. In this chapter, you:
✦ Learned about the information commonly stored in image files.
✦ Identified file types using the imghdr module.
✦ Converted colors between different color systems such as RGB and HLS.
✦ Modified images using the Python Imaging Library.
The next chapter shows you how to create multithreaded applications so that your
programs can work on more than one task at a time.
✦ ✦ ✦
4807-7 ch25.F 5/24/01 9:00 AM Page 480

Multithreading
Running several threads is similar to running several
different programs concurrently, but with the following
benefits:
✦ Threads can easily share data, so writing threads that
cooperate is simpler than making different programs
work together.
✦ Threads do not require much memory overhead; they
are cheaper than processes. (In the UNIX world, threads
are often called light-weight processes.)
Understanding Threads Threads are useful in many situations where your program
needs to perform several tasks that aren’t necessarily interde-
pendent. Programs with a GUI, for example, often use two
threads: one to handle user interface jobs such as repainting
the window, and one to handle the “heavy lifting,” such as
talking to a database. Other times, threads are useful because
it’s more logical to divide work into distinct parts. For exam-
ple, a game might have a separate thread for each computer-
controlled player or object.
A thread may be interrupted by another thread at any time.
After any line of code, the Python interpreter may switch to
another thread.
Some programmers call this interruption timeslicing.However, strictly speaking, timeslicing refers to the vaguelyCommunist notion of giving every thread equal amounts ofCPU time.
The interpreter checks for thread switching once every few
bytecode instructions; sys.setcheckinterval (which
defaults to 10) is the number of bytecodes between switches.
Note
2626C H A P T E R
✦ ✦ ✦ ✦
In This Chapter
Understandingthreads
Spawning, tracking,and killing threads
Avoiding concurrencyissues
Preventing deadlock
Example:downloading frommultiple URLs
Porting threadedcode
Weaving threadstogether with Queue
✦ ✦ ✦ ✦
4807-7 ch26.F 5/24/01 9:01 AM Page 481

482 Part V ✦ Advanced Python Programming
The switching is transparent to you, and exactly when the switch happens is up to
the Python interpreter, the operating system, and the phase of the moon: In a multi-
threaded program, the order of execution may change from one run to the next.
This unpredictability is the reason why multithreading can be trickier than single-
threaded programming: A buggy program might work nine times out of ten, and
then crash the tenth time because the order of execution was different.
In general, you create all threads (other than the main thread) yourself. However, a
C extension may create dummy threads to do its work. Talking to these threads from
Python is difficult, so be forewarned if you want to communicate with dummy
threads. A long-running calculation in an extension module effectively counts as
one instruction, so be aware that other threads may have to wait a while for a
dummy thread to take its turn!
Spawning, Tracking, and Killing Threads Python features two multithreading modules, thread and threading. The modules
overlap enough that you can choose the one you like best and use it exclusively.
threading is a high-level module that calls thread for lower-level operations.
threading includes a Thread class similar to Java’s thread class, so it is a good
choice for Java veterans. We included two versions of this chapter’s example — one
using thread and one using threading— to illustrate the workings of both.
Creating threads with the thread moduleTo spawn another thread, call
start_new_thread (function, args[, kwargs])
The function call returns immediately and the child thread starts and calls function;
when function returns, the thread terminates. function can be an object method. argsis a tuple of arguments; use an empty tuple to call function without passing any
arguments. kwargs is an optional dictionary of keyword arguments.
Here are two ways of starting a new thread:
thread.start_new_thread(NewThread.run,())thread.start_new_thread(CalcDigitsOfPi,(StartDigit,NumDigits))
Each thread has an ID number, which you can see by calling thread.get_ident().
The ID is unique at any given time, but if a thread dies, a new thread may re-use
its ID.
If several threads print log messages, it can become hard to determine which
thread said what; something like a party where everyone talks at once. The follow-
ing example uses thread identifiers to indicate which thread is talking:
4807-7 ch26.F 5/24/01 9:01 AM Page 482

483Chapter 26 ✦ Multithreading
def PrintDebugMessage(ThreadNameDict,Message):CurrentThreadID = thread.get_ident()# Look up the thread name in the name dictionary. If# there is no name entry for this ID, use the ID.CurrentThreadName = ThreadNameDict.get(\
CurrentThreadID, `CurrentThreadID`)print CurrentThreadName,Message
A thread terminates when its target function terminates, when it calls
thread.exit(), or when an unhandled SystemExit exception is raised.
Python raises the exception thread.error if a threading error occurs.
Starting and stopping threads with the threadingmodulethreading defines a Thread class to handle threads. To spawn a new thread, you
first create a Thread object and then call its start() method. start() creates the
actual thread and starts the target function; you should call start only once per
thread.
The Thread constructor takes several keyword arguments, all of which are
optional:
✦ target — Function to call when you start() the thread. Defaults to None. You
should pass a value for target unless you override the run() method of
Thread in a subclass; otherwise, your thread will not do anything.
✦ name — String name of this thread. The default name is of the form “Thread-
n,” where n is a small decimal number.
✦ args — A tuple of arguments to pass to the target function. Empty by default.
✦ kwargs — Keyword argument dictionary to pass to the target function. Empty
by default.
✦ group — Currently unused. In the future, it will designate a thread group.
This code uses a Thread object to run the function CalcDigitsOfPi in a new thread:
PiThread = \Thread(target=CalcDigitsOfPi,args=(StartDigit,NumDigits))
PiThread.start()
You can create a subclass of the Thread class, and override the run() method to
do what you want. This is a good approach if you are tracking thread-specific data.
You should not override methods other than __init__() and run(). If you
override __init__, you should call the __init__ method of the parent class in
your constructor:
4807-7 ch26.F 5/24/01 9:01 AM Page 483

484 Part V ✦ Advanced Python Programming
class SearchThread(threading.Thread):def __init__(self):
threading.Thread.__init__(self)# Now carry on constructing...self.Matches={}
Threads can be flagged as daemon threads. The main thread (and therefore, your
Python program) keeps running as long as there are non-daemon threads running; if
only daemonic threads are running, the script exits. You set daemon status with
setDaemon(boolean) and check it with isDaemon(). You must set a thread’s dae-
mon status before calling start(). Child threads inherit their daemonic status
from their parents.
In a programming context, a daemon is a process or thread that silently handlessome ongoing, invisible task. If you should encounter a daemon outside a pro-gramming context, we recommend you avoid signing anything.
Thread status and information under threadingYou can check whether a Thread object is running with the method isAlive().
isAlive() returns true if someone has called start(), and the run() method has
not returned yet.
Each thread has a name, an arbitrary string which you can access by getName()and setName(newName).
Finding threads under threadingthreading.enumerate() returns a list of all active Thread objects. This includes
dummy threads, daemon threads, and the main thread. Because the list contains
the main thread, it is never empty. threading.activeCount() returns the number
of active threads; this number is equal to the length of the list returned by thread-ing.enumerate().
A call to threading.currentThread() returns an object corresponding to the cur-
rent thread of control. (Even the main thread has a corresponding Thread object.)
Waiting for a thread to finishTo wait for a Thread to terminate, call its join method. join blocks until the
thread dies; it returns immediately if the thread has not started, or has already
terminated.
For example, the following lines of code (executed in the main thread) wait until all
the other currently active threads have terminated:
ThisThread = threading.currentThread()
Note
4807-7 ch26.F 5/24/01 9:01 AM Page 484

485Chapter 26 ✦ Multithreading
while (threading.activeCount()>1):CurrentActiveThreads = threading.enumerate()for WaitThread in CurrentActiveThreads:
# Don’t wait for myself:if (WaitThread != ThisThread):
WaitThread.join() # Now all those threads have finished. We are now the # only running thread, unless someone spawned new threads # while we were waiting. If that happened, we make # another pass through the while loop. (If that can’t # happen, the whiling is superfluous)
Avoiding Concurrency Issues“Oh, what a tangled web we weave, when first we practice to...implement multi-threaded database access.”
— Sir Walter Scott, as reinterpreted by an unnamed programmer at 2 a.m.
Imagine a chalkboard on which three professors are each writing some information.
The professors are so deep in thought that they are blissfully unaware of one
another’s presence. Each professor erases some chalk marks, writes on the board,
pauses to think, and then continues. In the process, the professors erase bits of
each other’s writings, and the resulting blackboard is a mess of unrelated word
salad.
Threads run in the same address space, so they can access the same data.
Unfortunately, threads can also break other thread’s data if they do not cooperate.
The professors and the chalkboard illustrate what can go wrong. The phrase concur-rency issues is a catchall term for all the ways in which two threads, working
together, may put data into an unusable form. A program or object free of concur-
rency issues is called thread-safe.
Returning to the chalkboard example: Everything would have been fine if the pro-
fessors had taken turns, and the second professor had waited until the first was
done with the chalkboard. You can solve most concurrency issues by restricting
data access to one thread at a time. A lock, or mutex (from “mutually exclusive”), is
the way you make your threads take turns. A lock has two states: acquired and
released. A thread must acquire the lock before it is allowed to access the data.
When the thread is done, it releases the lock. If a lock has been acquired, other
threads must wait, or block, until the lock is released before they can acquire it.
Locking with threadTo create a new lock, call thread.allocate_lock(), which returns a lock object.
4807-7 ch26.F 5/24/01 9:01 AM Page 485

486 Part V ✦ Advanced Python Programming
To acquire the lock, call the method acquire([waitflag]). Call acquire(1) to wait
for the lock as long as necessary. Call acquire(0) to return immediately if the lock
isn’t available. If you pass a value for waitflag, acquire() returns 1 if it acquired
the lock, 0 if it didn’t. If you don’t pass a waitflag, acquire() waits for the lock, and
returns None.
This code snippet uses locks to access some data in a thread-safe way:
# Acquire the employee lock. Block until acquired.EmployeeLock.acquire(1) # Try to acquire the Company lock, and return immediately.if (CompanyLock.acquire(0)):
# Do stuff with the company object, then release itelse:
# Don’t do stuff with the company object, because # you don’t have its lock!
To release a lock, call its release() method. You can release a lock that was
acquired by another thread. If you release a lock that isn’t currently acquired, the
exception thread.error is raised.
You can check whether a lock is acquired with the locked() method. When first
created, the object is in its released state.
Use acquire(0), and not just a call to locked() if you don’t want your code to
wait for a lock. For example, the following code may block if another thread grabs
the lock between our call to locked() and our call to acquire():
if (not RecordLock.locked()):RecordLock.acquire() # We may be here a while!
Locking with threadingThe threading module offers several flavors of concurrency control. The Lockclass is a simple wrapper for the lock class of the thread module; most of the other
concurrency-control classes are variations on the Lock class.
Lock — simple lockingWhen you create a Lock object, it starts in the released state. The Lock object has
two methods: acquire() and release(). These methods are wrappers for the
acquire() and release() methods in the thread module; see the previous sec-
tions for details.
RLock — reentrant lockingRLock (“reentrant lock”) is a variation on Lock, and its acquire() and release()methods have the same syntax. An RLock may be acquired multiple times by the
same thread. The RLock keeps track of how many times it has been acquired. Other
4807-7 ch26.F 5/24/01 9:01 AM Page 486
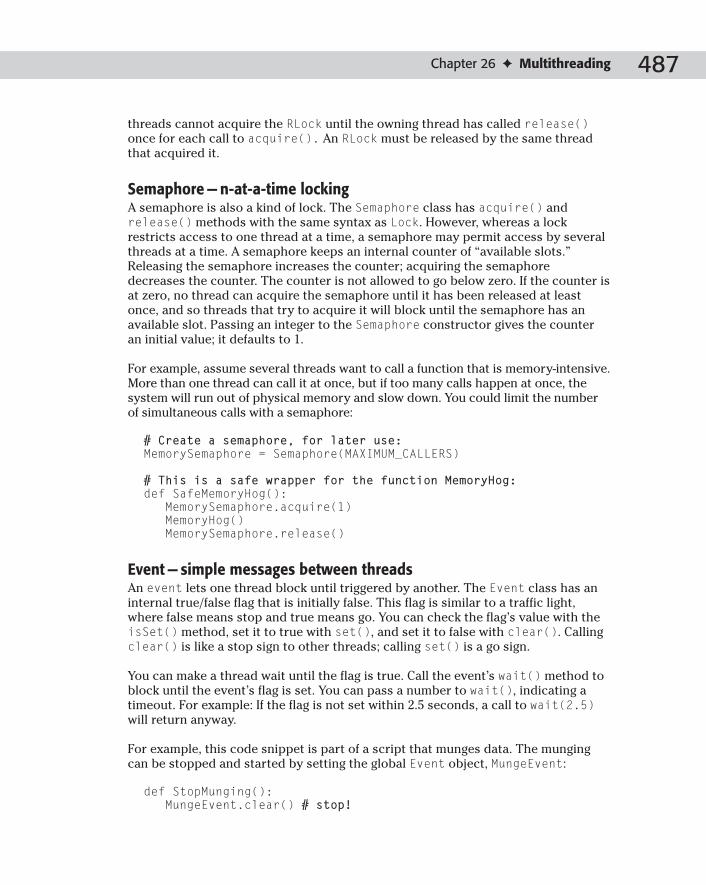
487Chapter 26 ✦ Multithreading
threads cannot acquire the RLock until the owning thread has called release()once for each call to acquire(). An RLock must be released by the same thread
that acquired it.
Semaphore — n-at-a-time lockingA semaphore is also a kind of lock. The Semaphore class has acquire() and
release() methods with the same syntax as Lock. However, whereas a lock
restricts access to one thread at a time, a semaphore may permit access by several
threads at a time. A semaphore keeps an internal counter of “available slots.”
Releasing the semaphore increases the counter; acquiring the semaphore
decreases the counter. The counter is not allowed to go below zero. If the counter is
at zero, no thread can acquire the semaphore until it has been released at least
once, and so threads that try to acquire it will block until the semaphore has an
available slot. Passing an integer to the Semaphore constructor gives the counter
an initial value; it defaults to 1.
For example, assume several threads want to call a function that is memory-intensive.
More than one thread can call it at once, but if too many calls happen at once, the
system will run out of physical memory and slow down. You could limit the number
of simultaneous calls with a semaphore:
# Create a semaphore, for later use:MemorySemaphore = Semaphore(MAXIMUM_CALLERS)
# This is a safe wrapper for the function MemoryHog:def SafeMemoryHog():
MemorySemaphore.acquire(1)MemoryHog()MemorySemaphore.release()
Event — simple messages between threadsAn event lets one thread block until triggered by another. The Event class has an
internal true/false flag that is initially false. This flag is similar to a traffic light,
where false means stop and true means go. You can check the flag’s value with the
isSet() method, set it to true with set(), and set it to false with clear(). Calling
clear() is like a stop sign to other threads; calling set() is a go sign.
You can make a thread wait until the flag is true. Call the event’s wait() method to
block until the event’s flag is set. You can pass a number to wait(), indicating a
timeout. For example: If the flag is not set within 2.5 seconds, a call to wait(2.5)will return anyway.
For example, this code snippet is part of a script that munges data. The munging
can be stopped and started by setting the global Event object, MungeEvent:
def StopMunging():MungeEvent.clear() # stop!
4807-7 ch26.F 5/24/01 9:01 AM Page 487

488 Part V ✦ Advanced Python Programming
def StartMunging():MungeEvent.set() # go!
def MungeData():while (1):
MungeEvent.wait() # wait until we get the green lightMungeOneRecord()
Condition — wrapper for a lockThe Condition class wraps a lock. You can pass a Lock object to the Conditionconstructor; if not, it creates an RLock internally. A condition object has acquire()and release() methods, which wrap those of the underlying lock object.
Condition objects have other methods: wait([timeout]), notify(), and
notifyAll(). A thread should acquire the lock before calling these methods.
A call to the wait([timeout]) method immediately releases the lock, blocks until
notification is received (when another thread calls notify() or notifyAll()),
acquires the lock again, and then returns. If you supply a value for timeout, the call
will return after that many seconds have passed, whether or not it was notified or
reacquired the lock.
You call notify to wake up other threads that have called wait on the condition. If
there are waiting threads, notify awakens at least one of them. (Currently, notifynever awakens more than one, but this is not guaranteed for future versions.)
notifyAll wakes up all the waiting threads.
A word of warningWhen threads share data, examine every piece of data to ensure that thread inter-
action can’t put the data into an invalid state. A program that is not thread-safe may
work for months, waiting for a dramatic time to fail. Eternal vigilance is the price of
multithreading!
Preventing DeadlockAssume one thread acquires a lock, but hangs without releasing it. Now, no other
threads can acquire that lock. If another thread waits for the lock (by calling the
acquire(1) method), it will be frozen, waiting for the lock forever. This state is
called deadlock. Deadlock is not as sneaky a bug as some concurrency issues, but
it’s definitely not good!
The section of code between acquiring a lock and releasing it is called a critical sec-tion. To guard against deadlock, there should be only one code path into the critical
section, and only one way out. The critical section should be as short as possible,
to prevent deadlock bugs from creeping in. In addition, the critical section should
4807-7 ch26.F 5/24/01 9:01 AM Page 488

489Chapter 26 ✦ Multithreading
execute as quickly as possible — other threads may be waiting for the lock, and if
they spend a long time waiting, nothing happens in parallel and the benefits of mul-
tithreading evaporate.
It is generally good practice to put a try...finally clause in a critical section,
where the finally clause releases the lock. For example, here is a short function
that tags a string with the current thread ID and writes the string to a file:
def LogThreadMessage(LogFile,Message):LogFileLock.acquire(1)try:
LogFile.write(`thread.get_ident()`+Message+”\n”)finally:
# If we do not release the lock, then another thread# might wait forever to acquire it:LogFileLock.release()
Example: Downloading from Multiple URLsThe following code is a more complex example of some of the features covered in
this chapter. The script retrieves files from a list of target URLs. It spawns several
threads, each of which retrieves one file at once. Multithreading makes the whole
process faster, because thread A can receive data while thread B is waiting for a
response from the server.
See “Multitasking Without Threads” in Chapter 13 for an alternate solution to thisproblem using the asyncore and select modules.
We wrote two versions of the URLGrabber script — one using the threading mod-
ule (see Listing 26-1), and one using thread (see Listing 26-2). Most of the code is
the same; unique code is bolded in the source listing.
Listing 26-1: URLGrabber — threading version
# URLGrabber retrieves a list of target files from the network to# the local disk. Each file has a particular URL, indicating where# and how we should request it. ## This version of URLGrabber uses the threading module. It uses# a Lock object to limit access to the URLList. (Without this lock,# two threads might both grab the same URL)
import threadingimport urllibimport urlparseimport os
Continued
Cross-Reference
4807-7 ch26.F 5/24/01 9:01 AM Page 489

490 Part V ✦ Advanced Python Programming
Listing 26-1 (continued)
import sysimport traceback
# The optimal number of worker threads depends on one’s bandwidthWORKER_COUNT = 4
# Default filename of our url listURL_FILE_NAME = “MyURLList.txt”
“”” A WorkerThread downloads files from URLs to disk. EachWorkerThread object corresponds to a single flow of control.WorkerThread is a subclass of Thread, overriding the run()and __init__() methods. (Thread’s other methods shouldnot be overridden!) “””
class WorkerThread(threading.Thread):def __init__(self, URLList, URLListLock):
# Call the Thread constructor (Python subclasses do *not*# automatically invoke parent class constructors)threading.Thread.__init__(self)# Cache references...self.URLList=URLListself.URLListLock = URLListLock
“”” Acquire the URLList lock, grab the first URL from the list,cross the URL off the list, and release the URLList lock.(This code could be part of run(), but it’s good to put criticalsections in their own function) “””def GrabNextURL(self):
self.URLListLock.acquire(1) # 1 means we blockif (len(self.URLList)<1):
NextURL=Noneelse:
NextURL=self.URLList[0]del self.URLList[0]
self.URLListLock.release()return NextURL
“”” We override Thread’s run() method with one that doeswhat we want. Namely: Take URLs from the list, and retrieve them.When we run out of URLs, the function returns, and the thread dies. “””def run(self):
while (1):NextURL = self.GrabNextURL()if (NextURL==None):
# The URL list is empty! Exit the loop. break
try:self.RetrieveURL(NextURL)
except:self.LogError(NextURL)
def RetrieveURL(self,NextURL):# urlparse splits a URL into pieces;# piece #2 is the file path
4807-7 ch26.F 5/24/01 9:01 AM Page 490

491Chapter 26 ✦ Multithreading
FilePath=urlparse.urlparse(NextURL)[2]FilePath = FilePath[1:] # strip leading slash# If file name is blank, invent a nameif (FilePath==””): FilePath=”index.html” # Strip trailing newline, if we have oneif (FilePath[-1]==”\n”): FilePath=FilePath[:-1]# Create subdirectories as necessary. (Directory,FileName)=os.path.split(FilePath)try:
os.makedirs(Directory) # make directories as neededexcept:
# os.makedirs raises an exception if the directory exists.# We ignore the exception.pass
LocalPath = os.path.normpath(FilePath)urllib.urlretrieve(NextURL,FilePath)
def LogError(self,URL):print “Error retrieving URL:”,URL# Quick-and-dirty error logging: This code prints the# stack-trace that you see normally when an unhandled# exception crashes your script.(ErrorType,ErrorValue,ErrorTB)=sys.exc_info()print “\n\n***ERROR:”print sys.exc_info()traceback.print_exc(ErrorTB)
# Main functionif __name__ == ‘__main__’:
# Open the URL-list file. Take the first command-line# argument, or just use the hard-coded name.if (len(sys.argv)>=2):
URLFileName = sys.argv[1]else:
URLFileName=URL_FILE_NAMEtry:
URLFile = open(URLFileName)URLList = URLFile.readlines()URLFile.close()
except:print “Error reading URLs from:”,URLFileNamesys.exit()
# Create some worker threads, and start them runningURLListLock = threading.Lock()WorkerThreadList = []for X in range(0,WORKER_COUNT):
NewThread = WorkerThread(URLList,URLListLock)NewThread.setName(`X`)WorkerThreadList.append(NewThread)# call start() to spawn a new thread (not run()!)NewThread.start()
# Wait for each worker in turn, then exit.# join() is the “vulture method” - it waits until the thread diesfor X in range(0,WORKER_COUNT):
WorkerThreadList[X].join()
4807-7 ch26.F 5/24/01 9:01 AM Page 491

492 Part V ✦ Advanced Python Programming
Listing 26-2: URLGrabber — thread version
# URLGrabber retrieves a list of target files from the network to# the local disk. Each file has a particular URL, indicating where# and how we should request it. Several threads run in parallel,# each downloading one file at once. Multithreading makes the# whole process faster, since thread A can receive data while# thread B is waiting on the server. ## This version of URLGrabber uses the thread module. It uses# a lock to limit access to the URLList. (Without this lock,# two threads might both grab the same URL)
import threadimport urllibimport urlparseimport osimport sysimport traceback
# The optimal number of worker threads depends on one’s bandwidthWORKER_COUNT = 4
# Default filename of our url listURL_FILE_NAME = “MyURLList.txt”
“”” A WorkerThread downloads files from URLs to disk. EachWorkerThread object corresponds to a single flow of control. “””
class WorkerThread:def __init__(self, URLList, URLListLock):
# Cache references...self.URLList=URLListself.URLListLock = URLListLock
“”” Acquire the URLList lock, grab the first URL from the list,cross the URL off the list, and release the URLList lock.(This code could be part of run(), but it’s good to put criticalsections in their own function) “””def GrabNextURL(self):
self.URLListLock.acquire(1) # 1 means we blockif (len(self.URLList)<1):
NextURL=Noneelse:
NextURL=self.URLList[0]del self.URLList[0]
self.URLListLock.release()return NextURL
“”” run() is the target-function of our worker threads “””def run(self):
IncrementThreadCount() while (1):
NextURL = self.GrabNextURL()
4807-7 ch26.F 5/24/01 9:01 AM Page 492

493Chapter 26 ✦ Multithreading
if (NextURL==None):# The URL list is empty! Exit the loop. break
try:self.RetrieveURL(NextURL)
except:self.LogError(NextURL)
DecrementThreadCount()def StartFirstWorker(self):
MainThreadLock.acquire(1)self.run()
def RetrieveURL(self,NextURL):# urlparse splits a URL into pieces;# piece #2 is the file path FilePath=urlparse.urlparse(NextURL)[2]FilePath=FilePath[1:] # strip leading slash# If file name is blank, invent a nameif (FilePath==””): FilePath=”index.html” # Strip trailing newline, if we have oneif (FilePath[-1]==”\n”): FilePath=FilePath[:-1]# Create subdirectories as necessary. (Directory,FileName)=os.path.split(FilePath)try:
os.makedirs(Directory) # make directories as neededexcept:
# os.makedirs raises an exception if the directory exists.# We ignore the exception.pass
LocalPath = os.path.normpath(FilePath)urllib.urlretrieve(NextURL,FilePath)
def LogError(self,URL):print “Error retrieving URL:”,URL# Quick-and-dirty error logging: This code prints the# stack-trace that you see normally when an unhandled# exception crashes your script.(ErrorType,ErrorValue,ErrorTB)=sys.exc_info()print “\n\n***ERROR:”print sys.exc_info()traceback.print_exc(ErrorTB)
def DecrementThreadCount():ThreadCountLock.acquire()global WorkerThreadCountWorkerThreadCount = WorkerThreadCount - 1if (WorkerThreadCount<1):
MainThreadLock.release()ThreadCountLock.release()
def IncrementThreadCount():ThreadCountLock.acquire()global WorkerThreadCountWorkerThreadCount = WorkerThreadCount + 1
Continued
4807-7 ch26.F 5/24/01 9:01 AM Page 493

494 Part V ✦ Advanced Python Programming
Listing 26-2 (continued)
ThreadCountLock.release()
# Main functionif __name__ == ‘__main__’:
# Open the URL-list file. Take the first command-line# argument, or just use the hard-coded name.if (len(sys.argv)>=2):
URLFileName = sys.argv[1]else:
URLFileName=URL_FILE_NAMEtry:
URLFile = open(URLFileName)URLList = URLFile.readlines()URLFile.close()
except:print “Error reading URLs from:”,URLFileNamesys.exit()
# Create some worker threads, and start them runningURLListLock = thread.allocate_lock()ThreadCountLock = thread.allocate_lock()# We acquire the MainThreadLock. The last worker thread to exit# releases the lock, so that we can acquire it again (and exit)MainThreadLock = thread.allocate_lock()MainThreadLock.acquire() WorkerThreadCount = 0for X in range(0,WORKER_COUNT):
NewThread = WorkerThread(URLList,URLListLock)thread.start_new_thread(NewThread.run,())
# This call will block until the last thread releases the main# thread lock in DecrementThreadCount().MainThreadLock.acquire()
Porting Threaded CodeNot all operating systems include support for multithreading — an OS may multi-
task without including native thread support. Note some minor differences in how
threading works on different platforms:
✦ On most platforms, child threads are immediately killed (without executing
object destructors or try...finally clauses) when the main thread exits.
However, child threads keep running on SGI IRIX. We recommend terminating
all threads before the main thread exits anyway, to ensure proper cleanup.
✦ Signals generally go to the main thread. Therefore, if your script handles sig-
nals, the main thread should not block. In particular, if you are using Tkinter,
you should run mainloop() from the main thread. However, on platforms
where the signal module is not available, signals go to an arbitrary thread.
4807-7 ch26.F 5/24/01 9:01 AM Page 494

495Chapter 26 ✦ Multithreading
Weaving Threads Together with QueuesThe Queue module defines a thread-safe queue class (Queue.Queue). A queue is
similar to a list. A queue handles concurrency control internally, which saves you
the bother of handling it in your code.
Call the constructor Queue.Queue(maxsize) to create a queue. If maxsize is
greater than zero, the queue will be limited to that many elements; otherwise, the
length of the queue is unlimited.
To add an item to the queue, call put(item, block). The method get(block),
returns the next item in the queue. Setting block to 1 makes these methods wait
until they can successfully add or retrieve an item.
Setting block to 0 causes get and put to return immediately. You can also use the
synonym methods get_nowait(item) and put_nowait(item). A nonblocking call
to put raises the exception Queue.Full if the queue is full. (If the queue’s length is
not limited, put will always succeed.) A nonblocking call to get raises the excep-
tion Queue.Empty if no items are on the queue.
The Queue class includes some methods to inspect the queue. qsize() returns the
queue length. isEmpty() returns 1 if the queue is empty, and 0 otherwise.
isFull() returns 1 if the queue is full, and 0 if the queue is empty. Be careful: other
threads may have touched the queue while you were inspecting it! Therefore, you
must take the output of these methods with a grain of salt. For instance, the follow-
ing code may raise a Queue.Empty exception:
if (not MyQueue.isEmpty()): FirstItem = MyQueue.get() # unsafe!
To safely modify a queue synchronously, use get_nowait() and put_nowait(),
and catch any Full or Empty exceptions.
Technical Note: How Simultaneous IsSimultaneous?
A CPU can only handle one flow of control at a time. Computers switch between
processes quickly, so in a single second, a processor may execute some instruc-
tions for thread A and thread B. To the user, the threads appear to run at the same
time. We say that these programs are “simultaneous,” although they are actually
taking turns. On a multiprocessor machine, threads can be literally simultaneous —
CPU 1 is running program A at the same instant that CPU 2 is running program B.
4807-7 ch26.F 5/24/01 9:01 AM Page 495

496 Part V ✦ Advanced Python Programming
Currently, Python maintains a global interpreter lock, so that it executes only one
Python thread at once. The disadvantage here is that a multiprocessor machine can
devote only one processor to a particular Python program. This limitation doesn’t
matter much (especially if you’re using a single processor machine!), but you may
want to work around it for performance reasons. A C extension can create parallel
dummy threads, as long as those threads do not manipulate Python objects
directly. Alternatively, you can run separate processes if your program’s work can
be cleanly split.
For More InformationThe Python threading SIG is a group working to document and improve the state of
threading in Python; mailing list archives are available. See the Python SIG page at
http://www.python.org/sigs/.
Stackless Python is an alternate implementation of the Python interpreter that sup-
ports, among other things, microthreads, or ultra-lightweight processes, which
enables your program to handle hundreds or even thousands of threads without
getting bogged down just switching between them. Visit www.stackless.org for
more information.
SummaryThreads enable your programs to perform multiple tasks at once. Untamed threads
can break one another’s data, but Python’s locking mechanisms let you direct
threads to work together. In this chapter, you:
✦ Created threads with the thread and threading modules.
✦ Controlled data access with locks and semaphores.
✦ Built easy thread-safe code with the Queue class.
In the next chapter, you’ll learn tools and techniques to help you debug and profile
your Python applications.
✦ ✦ ✦
4807-7 ch26.F 5/24/01 9:01 AM Page 496

Debugging,Profiling, andOptimization
Bugs can surface in the best of code — often at the worst
possible times. Fortunately, Python features a debugger
to help squash bugs. You can also use Python’s profiler to
identify bottlenecks in your code. A few optimization tricks
can go a long way toward speeding up a sluggish script.
Debugging Python CodeAdding print statements is no substitute for stepping
through code. The Python debugger, pdb, lets you set break-
points, examine and set variables, and view source code. pdb
is similar to the C/C++ debugger gdb (which, in turn, was
based on xdb), so the gdb veterans in the audience will recog-
nize most commands. Most commands can be written in a
long way or a short way. For reference, this chapter lists them
in the following form: Long way (abbreviation). For exam-
ple: continue (c). A list of commands is also available within
pdb by typing help (h).
See Appendix B for a guide to debugging under IDLE andPythonWin. Both provide excellent debuggers that aremore powerful than pdb.
Starting and stopping the debuggerTo use the debugger, import the module pdb. Then, you can
start the debugger by calling pdb.run(statement[,glob-als[,locals]]). Here, statement is code to execute (as a
string). You can run in a particular context by passing global
and local namespace-dictionaries for globals and locals. The
debugger will stop and wait for input before actually running
the code; this is a handy time to set breakpoints:
Cross-Reference
2727C H A P T E R
✦ ✦ ✦ ✦
In This Chapter
Debugging Pythoncode
Working withdocstrings
Automating tests
Finding bottlenecks
Commonoptimization tricks
Taking out thetrash — the GarbageCollector
✦ ✦ ✦ ✦
4807-7 ch27.F 5/24/01 9:01 AM Page 497

498 Part V ✦ Advanced Python Programming
>>> import pdb>>> pdb.run(“import DebugMe”)> C:\PYTHON20\<string>(0)?()(Pdb) print “I can execute arbitrary commands at this prompt!”I can execute arbitrary commands at this prompt!(Pdb) fred=25(Pdb) fred25
You can do whatever you want from the pdb prompt. However, it provides some
useful special commands, described next.
The function runeval is the same as run, except that runeval returns the value of
the statement executed in the debugger. The function runcall(function[,arguments...]) executes the function function in the debugger, passing along
any arguments to the function. It returns the return-value of function.
The function post_mortem(traceback) enters post-mortem debugging of a partic-
ular traceback. The function pm starts debugging the most recent traceback; it is a
synonym for post_mortem(sys.last_traceback).
The function set_trace enters the debugger immediately. It is a useful function to
put in code that encounters (or raises) an AssertionError.
To get back out of the debugger, use the command quit (q).
Examining the state of thingsThe all-important command list (l) shows the source code you are debugging.
Use list FirstLine LastLine to list a range of lines (by default, pdb shows up to
five lines above and five lines below the current line).
The command where (w) shows the current stack trace, while up (u) and down (d)
move through the stack. (Note that running w under an IDLE shell shows about 10
extra stack frames, because IDLE is running above your code.)
You can display a variable’s value with print (p).
For example, here is a simple debugging session. Looking at the code, plus some
variables in context, gives me a pretty good idea what went wrong:
>>> FancyPrimeFinder.FindPrimes(100)Traceback (innermost last):File “<pyshell#19>”, line 1, in ?FancyPrimeFinder.FindPrimes(100)
File “C:\PYTHON20\FancyPrimeFinder.py”, line 9, in FindPrimesNumList=filter(lambda y,x=NumList[Index]:
4807-7 ch27.F 5/24/01 9:01 AM Page 498
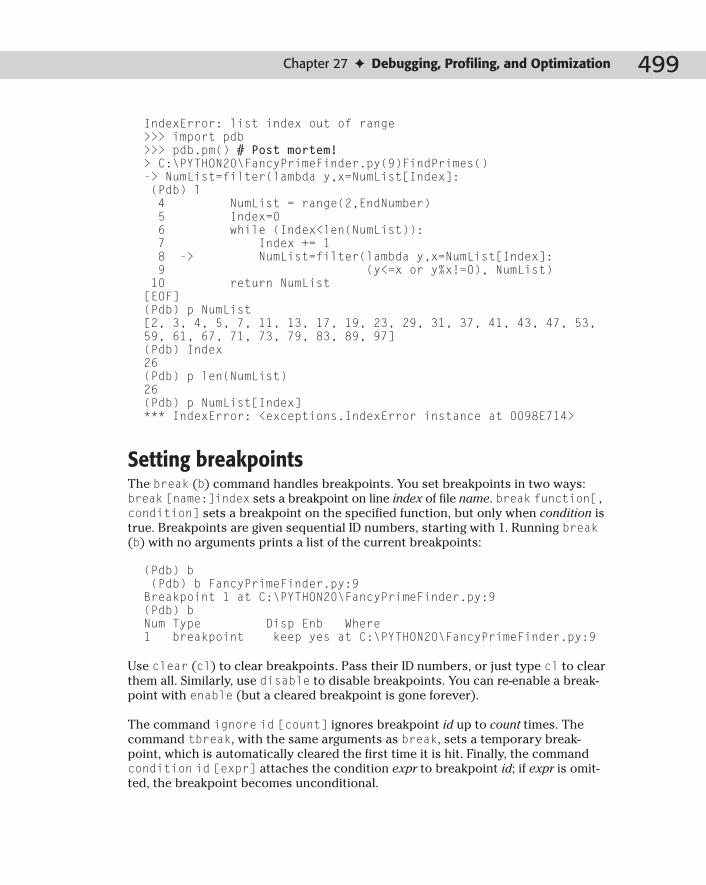
499Chapter 27 ✦ Debugging, Profiling, and Optimization
IndexError: list index out of range>>> import pdb>>> pdb.pm() # Post mortem!> C:\PYTHON20\FancyPrimeFinder.py(9)FindPrimes()-> NumList=filter(lambda y,x=NumList[Index]:(Pdb) l4 NumList = range(2,EndNumber)5 Index=06 while (Index<len(NumList)):7 Index += 18 -> NumList=filter(lambda y,x=NumList[Index]:9 (y<=x or y%x!=0), NumList)10 return NumList[EOF](Pdb) p NumList[2, 3, 4, 5, 7, 11, 13, 17, 19, 23, 29, 31, 37, 41, 43, 47, 53,59, 61, 67, 71, 73, 79, 83, 89, 97](Pdb) Index26(Pdb) p len(NumList)26(Pdb) p NumList[Index]*** IndexError: <exceptions.IndexError instance at 0098E714>
Setting breakpointsThe break (b) command handles breakpoints. You set breakpoints in two ways:
break [name:]index sets a breakpoint on line index of file name. break function[,condition] sets a breakpoint on the specified function, but only when condition is
true. Breakpoints are given sequential ID numbers, starting with 1. Running break(b) with no arguments prints a list of the current breakpoints:
(Pdb) b(Pdb) b FancyPrimeFinder.py:9Breakpoint 1 at C:\PYTHON20\FancyPrimeFinder.py:9(Pdb) bNum Type Disp Enb Where1 breakpoint keep yes at C:\PYTHON20\FancyPrimeFinder.py:9
Use clear (cl) to clear breakpoints. Pass their ID numbers, or just type cl to clear
them all. Similarly, use disable to disable breakpoints. You can re-enable a break-
point with enable (but a cleared breakpoint is gone forever).
The command ignore id [count] ignores breakpoint id up to count times. The
command tbreak, with the same arguments as break, sets a temporary break-
point, which is automatically cleared the first time it is hit. Finally, the command
condition id [expr] attaches the condition expr to breakpoint id; if expr is omit-
ted, the breakpoint becomes unconditional.
4807-7 ch27.F 5/24/01 9:01 AM Page 499

500 Part V ✦ Advanced Python Programming
RunningThe command continue (c) tells pdb to start running the program again. The com-
mand return (r) keeps running until the current function returns. The commands
next (n) and step (s) execute only the current statement. The difference between
the two is that step “steps into” functions (it breaks inside the function call), and
next “steps over” function calls (it runs the whole function call, and then breaks on
the next line of the current source file).
AliasesThe command alias [name [command]] creates an alias, name, which executes
command. The alias can take arguments. These arguments replace %1, %2, and so
on, in command, while %* is replaced by all the arguments. Calling alias without
passing a command shows the current command for name; calling alias with no
arguments lists the current aliases. Aliases can be nested. They only apply to the
first word typed at the pdb command line.
For example, here is an alias to print an object’s members, and a shortcut for print-
ing the members of self:
(Pdb) alias pi for k in %1.__dict__.keys(): print “%1.”+k+”=”+%1.__dict__[k](Pdb) alias ps pi self(Pdb) pi TempFileTempFile.BackupFileName=C:\DOCUME~1\ADMINI~1\LOCALS~1\Temp\~3400-1TempFile.File=<open file ‘fred.txt’, mode ‘w’ at 008053D8>TempFile.FileName=fred.txt
You can put alias definitions (or any other pdb commands) into a file named .pdbrc
in your home directory or the current directory. pdb will execute the commands
from .pdbrc on startup. If .pdbrc files exist in your home directory and the current
directory, the home directory’s .pdbrc executes first, followed by the local file.
Debugging tipsBugs in destructors can be especially hard to track down. Any exceptions thrown in
a destructor are spewed to stderr and ignored. Therefore, destructors are a great
place to call pdb.set_trace:
def __del__(self):try:
self.cleanup()except:
# If we don’t catch it, NO ONE CAN!pdb.set_trace()
4807-7 ch27.F 5/24/01 9:01 AM Page 500

501Chapter 27 ✦ Debugging, Profiling, and Optimization
If an object is still around when the program finishes running, its destructor may
execute after the Python interpreter has freed any imported modules. Therefore, an
innocent-looking call to os.remove may result in the error “‘None’ object has no
attribute ‘remove’”. A trick that sometimes works is to prefix a module-level vari-
able with an underscore; such items are destroyed before other members. Safest of
all is not to do anything too clever in destructors, unless you carefully get rid of
objects as you go.
Working with docstringsDocumentation helps people use each other’s Python modules. But documentation
often becomes out-of-date, which is sometimes worse than no documentation at all!
By using docstrings, you can maintain code and documentation in one place. You
can also use the pydoc module to extract your code’s docstrings into professional-
looking text or HTML documentation, so that people can use your modules without
ever needing to read code.
You can use pydoc interactively. Call pydoc.help(object) to view Python docu-
mentation for an object. This can be much more convenient than leaving the inter-
preter to read documentation. For example:
>>> pydoc.help(string.strip)Help on function strip in module string:
strip(s)strip(s) -> string
Return a copy of the string s with leading and trailingwhitespace removed.
You can also use pydoc from the command line. To view module documentation as
text, pass the module name as an argument, like this:
python pydoc.py urllib
Or, use the -w argument to write out documentation to an HTML file. For example,
this commend writes HTML documentation of urllib to the file urllib.html:
python pydoc.py -w urllib
The pydoc module has one more trick up its sleeve: Run it with no command line
arguments, and it will run as a documentation Web server. You can read documenta-
tion for all the modules in your PYTHONPATH, all from the comfort of your browser!
The pydoc module is new in Python 2.1. (However, it runs on versions 1.5 andup.)
NewFeature
4807-7 ch27.F 5/24/01 9:01 AM Page 501

502 Part V ✦ Advanced Python Programming
Automating TestsTesting code is not as fun as writing code. But testing is essential to avoid poor-
quality code. Luckily, Python comes with tools to help you build automated tests.
The unittest module (also known as PyUnit) is a framework for testing your code.
The doctest module helps you keep documentation and code in synch.
Both doctest and unittest are new in Python 2.1.
Synching docstrings with codeThe doctest module helps you defend against out-of-date documentation. To use
doctest, copy the text of a successful interpreter session and then paste it into
your code’s docstrings. Later, run doctest.testmod(module) to re-run that inter-
preter session, and make sure that the output is the same.
For example, suppose I am parsing some comma-delimited files that I exported from
Microsoft Excel. Normally, I could use string.split to split a line into fields. But
Excel uses some special rules to deal with commas within data. So, I write a func-
tion called SplitCommaFields to split fields, and test it in the interpreter. It
works — so far, so good. To make sure my code’s documentation doesn’t become
out-of-date, I copy my interpreter session into the docstring. Listing 27-1 shows the
resulting file:
Listing 27-1: CSV.py
import doctestimport CSV # Import ourselves!def SplitCommaFields(Line):
“””SplitCommaFields breaks up a comma-delimited .csv file intofields:>>> SplitCommaFields(‘a,b,c’)[‘a’, ‘b’, ‘c’]
It handles commas within fields:>>> SplitCommaFields(‘Atlas shrugged,”Rand,Ayn”,1957’)[‘Atlas shrugged’, ‘Rand,Ayn’, ‘1957’]
Also, it handles double-quotes within fields:>>> SplitCommaFields(‘“Are “”you”” happy?”,”Stuff,is,fun”’)[‘Are “you” happy?’, ‘Stuff,is,fun’]“”” Fields=Line.split(“,”)RealFields=[]InsideQuotes=0BigField=””
NewFeature
4807-7 ch27.F 5/24/01 9:01 AM Page 502

503Chapter 27 ✦ Debugging, Profiling, and Optimization
for Field in Fields:if InsideQuotes:
BigField+=”,”+Fieldif BigField[-1]==’”’:
BigField=BigField[:-1] # kill trailing “RealFields.append(BigField)InsideQuotes=0
elif len(Field)==0 or Field[0]!=’”’:RealFields.append(Field)
else: # we saw a start-quoteif (Field[-1]==’”’):
RealFields.append(Field[1:-1])else:
BigField=Field[1:]InsideQuotes=1
return map(lambda x:x.replace(‘“”’,’”’), RealFields)
if __name__==”__main__”:doctest.testmod(CSV) # Test this module
When I run CSV.py from the command line, I get no output, indicating that my func-
tion still runs as documented. As a sanity check, I can pass the -v argument to see
doctest do its work:
C:\source\test>python CSV.py -vRunning CSV.__doc__0 of 0 examples failed in CSV.__doc__Running CSV.SplitCommaFields.__doc__Trying: SplitCommaFields(‘Atlas shrugged,”Rand,Ayn”,1957’)Expecting: [‘Atlas shrugged’, ‘Rand,Ayn’, ‘1957’]ok[...deleted for brevity...]3 passed and 0 failed.Test passed.
Unit testingThe unittest module is a Python version of Kent Beck’s unit testing framework. It
belongs to the same illustrious lineage as JUnit and CppUnit. You can use it to build
one or more test cases for a class or module and group test cases into test suites.
To build an automated test, create a subclass of unittest.TestCase. Your class
should override the runTest method to perform some test, using the assert to
flag errors. For example, this class tests the SplitCommaFields function defined
earlier:
4807-7 ch27.F 5/24/01 9:01 AM Page 503

504 Part V ✦ Advanced Python Programming
class CommaContentsTestCase(unittest.TestCase):def runTest(self):
Line=’one,two,”three,three,thr,ee”,”fo,ur”,five’assert SplitCommaFields(Line)==\
[‘one’,’two’,’three,three,thr,ee’,’fo,ur’,’five’]
You can run the test interactively by calling the run method of a TestRunnerobject, such as the TextTestRunner:
>>> TestRunner=unittest.TextTestRunner()>>> TestRunner.run(CSV.CommaContentsTestCase()).---------------------------------------------------------------Ran 1 tests in 0.000s
OK<unittest._TextTestResult run=1 errors=0 failures=0>
You can also run tests from the command line. One method is to change your script
to call unittest.main():
if __name__==”__main__”:unittest.main()
Then, calling your script from the command line will run all its test cases.
Test suitesThe TestSuite class is a handy way to group related test cases. It provides a
method, addTest(TestCase), for adding test cases to a list. For example, this func-
tion returns a suite of test cases:
def CSVSuite():Suite=unittest.TestSuite()Suite.add(CommaContentsTestCase())Suite.add(QuoteCommentsTestCase())return Suite
If you define a function (such as CSVSuite previously) to return a TestCase or
TestSuite object, you can invoke your unit test(s) from the command line like
this:
python unittest.py CSV.CSVSuite
Repeated testing tasksThe TestCase class provides setUp and tearDown methods, called before and after
the main runTest method. These methods help you build test cases without
repeating the same setup and cleanup steps in your test code. For example, sup-
pose you have several tests that must create a temporary file. This base class takes
4807-7 ch27.F 5/24/01 9:01 AM Page 504

505Chapter 27 ✦ Debugging, Profiling, and Optimization
care of file creation and cleanup, so that your test cases can freely write to
self.File in the runTest method:
class FileTestCase(unittest.TestCase):def setUp(self):
self.FileName=tempfile.mktemp()self.File=open(self.FileName,”w”)
def tearDown(self):self.File.close()os.remove(self.FileName)
Finding BottlenecksPython is a high-level language, often used in situations where speed is not crucial.
Programmer time is usually more expensive than processor time. However, it is
sometimes important to optimize your Python program — to make them conserve
time, memory, or some other resource, such as database cursors.
Note some rules of thumb for optimization:
1. Optimize last. Life is too short to spend time optimizing code that may be
rewritten or scrapped.
2. Test your optimizations by timing them on realistic runs. Optimization often
means some sacrifice of simplicity, readability, or maintainability; it’s best to
make sure the sacrifice is worth the gains.
3. Comment all but the most glaringly obvious optimizations. This helps inno-
cent bystanders understand your code, and (it is hoped) ensures that no one
will undo the optimizations for the sake of readability.
Profiling codeTo quickly profile a statement, import the profile module, and then call
profile.run(statement). For example, the following code profiles a script that
sorts MP3 files by artist:
>>> profile.run(“SortMP3s()”)
30289 function calls (30166 primitive calls) in 10.560 CPU seconds
Ordered by: standard name
ncalls tottime percall cumtime percall filename:lineno(function)1 0.029 0.029 9.685 9.685 <string>:1(?)
271 0.020 0.000 0.020 0.000 ID3Tag.py:105(__init__)
4807-7 ch27.F 5/24/01 9:01 AM Page 505

506 Part V ✦ Advanced Python Programming
9 0.000 0.000 0.000 0.000 ID3Tag.py:130(theTitle)9 0.000 0.000 0.000 0.000 ID3Tag.py:137(theArtist)1 0.292 0.292 0.704 0.704 ID3Tag.py:20(?)1 0.000 0.000 0.000 0.000 ID3Tag.py:23(ID3Tag)
271 0.151 0.001 0.168 0.001 ID3Tag.py:304(Read)45 0.016 0.000 0.016 0.000 ID3Tag.py:333(RemovePadding)
[...truncated for brevity...]
Each line of the output corresponds to a function. The columns show the following:
✦ ncalls — How many times the function was called. If a function recurses, two
numbers are shown: total calls, and then total primitive calls. For instance,
the script made one call to os.path.walk, which resulted in 123 other calls:
124/1 0.500 0.004 8.862 8.862 ntpath.py:255(walk)
✦ tottime — Total CPU time spent in the function.
✦ percall — Average CPU time. Equal to tottime divided by ncalls.
✦ cumtime — Cumulative CPU time spent in the function and its subfunctions.
✦ percall — Average cumulative time. Equal to cumtime divided by ncalls.
✦ filename:lineno(function) — Source file name, line number, and function name.
The first line of output corresponds to the code passed to run; its filename is
listed as “<string>”.
When profiling from a Python shell window in IDLE or PythonWin, any code thatprints to stdout will trigger function calls within the IDE’s framework. These func-tion calls will show up in the profiler’s output! Running Python from the commandline works around this problem.
Using Profile objectsThe Profile class provides a run(command) method to profile the specified command.
Normally, the command runs in the current namespace. To run the command in a
particular namespace context, pass the global and local dictionaries (as returned by
built-in functions globals and locals) to runctx(command, globals, locals). To
profile a function call, you can call runcall(functionname[,arguments...]).
After running a command, call the print_stats method to print statistics, or the
dump_stats(filename) to write out stats (in nonreadable format) to the specified
file.
A call to profile.run(command[,filename]) creates a Profile object, calls
run(command), and then calls either print_stats or dump_stats(filename).
The Profile class can be subclassed. For example, the class HotProfile is a sub-
class of Profile. It calculates less data (ignores caller-callee relationships), but
runs faster.
Note
4807-7 ch27.F 5/24/01 9:01 AM Page 506

507Chapter 27 ✦ Debugging, Profiling, and Optimization
Calibrating the profilerThere is a small time lag between the time that an event happens and the time that
profiler records. The call to time.clock is not free. This lag adds up over the course
of many function calls, and can make timing information less accurate.
Calibrating the profiler compensates for this lag by adding a “fudge factor.” This
makes the profiler’s statistics more accurate. To calibrate the profiler, call its
calibrate method:
>>> import profile>>> Prof=profile.Profile()>>> “%f” % Prof.calibrate(100000)‘0.000017’
The number returned is your fudge factor. To use it, you must edit the library code
(in lib\profile.py). In the trace_dispatch method, replace the line
t = t[0] + t[1] - self.t # No Calibration constant
with this line:
t = t[0] + t[1] - self.t - (your calibration constant)
Profiling with calibration is more accurate overall. However, the profiler may occa-sionally report that a negative amount of time was spent in a function. This resultsfrom the imperfection of the fudge factor, and is not a cause for panic.
Customizing statisticsThe module pstats provides a class, Stats, for storing and printing statistics gath-
ered in a profiling run.
The Stats constructor takes either a file name or a Profile object. You can either
pass in a Profile object (after calling run), or pass the name of a stats file created
by the profiler. You can also pass one (or more) file names or Profile instances to
Stats.add.
For example, the following code runs the same command several times, and com-
bines the statistics, on the assumption that behavior may vary from one run to the
next:
def ProfileSeveralRuns(Command,Times):if (Times<1): returnStatsFiles=[]for RunIndex in range(Times):
FileName=”stats%d”%(RunIndex) profile.run(Command, FileName)
Note
4807-7 ch27.F 5/24/01 9:01 AM Page 507

508 Part V ✦ Advanced Python Programming
StatsFiles.append(FileName)# Pass one filename to the constructor:AggregateStats=pstats.Stats(StatsFiles[0])# Pass along all other filenames:if len(StatsFiles)>1:
AggregateStats.add(*(StatsFiles[1:]))AggregateStats.print_stats()
It is generally a good idea to call strip_dirs to trim the path to each function’s file
name.
You can change the ordering of statistics by calling the method sort_stats(field[,...]). Here, field is the name of a field to sort on. You can pass several
field names. In this case, subsequent fields are used to sort if values of the first field
are equal. Alphabetic fields are sorted in ascending order; numeric fields are sorted
in descending order. (The method reverse_order reverses the ordering.) Table
27-1 lists the available fields.
Table 27-1Stats Field Names
Name Meaning
cumulative Cumulative time spent in a function
calls Total calls to a function
time Time spent in a function (not including subfunctions)
name Function name
file Source filename
module Source filename (same meaning as file)
line Source line number
nfl Name/File/Line. sort_stats(“nfl”) is the same assort_stats(“name”,”file”,”line”)
pcalls Total primitive (nonrecursive) calls to a function
stdname Standard name
The method print_stats([restrictions...]) prints the statistics. You can
pass one or more arguments to filter which lines are printed. Pass an integer, n, to
print only the first n lines. Pass a decimal between 0 and 1 to print that percentage
of the lines. Or, pass a regular expression (as a string) to print only lines whose file
name matches the regular expression.
4807-7 ch27.F 5/24/01 9:01 AM Page 508

509Chapter 27 ✦ Debugging, Profiling, and Optimization
This example runs some code and then prints statistics for the most time-
consuming functions:
>>> Prof=profile.Profile()>>> Prof.run(“import FancyPrimeFinder”)<profile.Profile instance at 00854E54>>>> MyStats=pstats.Stats(Prof)>>> MyStats.sort_stats(“time”) # expensive functions first<pstats.Stats instance at 007E48DC>>>> MyStats.strip_dirs().print_Stats(10) # top 10 only
Note that most methods of Profile and Stats return the object itself; this makes
it easy to chain several method calls in one line, as the last line of the preceding
code does.
The method print_callers([restrictions...]) shows all the callers for each
function. On the left is the called function; on the right is its caller, with the number
of calls in parentheses. Similarly, print_callees([restrictions...]) shows
each function on the left column; functions it called are on the right.
Common Optimization TricksThe following sections outline some ways to speed up Python code. Use these on
bottleneck code, after you have identified the bottlenecks using the profile mod-
ule. Keep in mind that sometimes the best way to speed up a function is simply to
write it as an extension module in C.
See Chapter 29 for more information about how you can create C libraries usablefrom your Python programs.
SortingSorting a sequence with the sort method is very fast for numbers and strings. If
you need to perform custom sorting (e.g., a comparison of two objects), you can
pass a comparison function to sort. You can also customize sorting for a class by
defining a __cmp__ method. However, passing a function to sort is faster than
implicit use of the __cmp__ method. Compare the following two lines:
PointList.sort(Point) # Uses Point.__cmp__ implicitly PointList.sort(Point.__cmp__) # Trickier, but faster!
When sorting a list of objects, one trick is to find a “key” that you can sort on. The
key values should be an easy-to-sort type (for example, numbers); and they should
be mostly unique across list entries. The following function provides an example:
Cross-Reference
4807-7 ch27.F 5/24/01 9:01 AM Page 509

510 Part V ✦ Advanced Python Programming
def SortByKey(List,KeyMaker):“””Sort a list. The parameter KeyMaker is a function thatreturns a key for the list element. The keys are used sort the list.””” # Replace each element x with (KeyMaker(x),x):TempList=map(lambda x,f=KeyMaker: (f(x),x), List)# Tuples sorted by comparing just the first elements:# If the first elements match, the second elements# are compared; so if KeyMaker(x)==KeyMaker(y), then we# *will* end up comparing x and y directly. TempList.sort()# Get rid of the keys - replace (KeyMaker(x),x) with x:return map(lambda(key,x):x, TempList)
For instance, I wrote code to sort a list of points according to their distance from
the origin. Using SortByKey (instead of passing a function to sort) made the code
roughly three times faster.
LoopingUse xrange for looping across long ranges; it uses much less memory than range,
and may save time as well. Both versions are likely to be faster than a while loop:
for x in range(10000): pass # memory hogfor x in xrange(10000): pass # good!
You can often eliminate a loop by calling map instead.
I/OEach call to a file’s readline method is quite slow. It is much faster to read the
entire file into memory by calling readlines; however, this uses up a lot of RAM.
Another approach is to read blocks of lines. Best of all — in Python 2.1 — is to use
the xreadlines method of a file:
# 1 - Slow:while 1:
FileLine=file.readline()if (FileLine==””): break # EOFDoStuff(FileLine)
# 2 - Fast, but possibly memory-intensive:FileLines=file.readlines()for FileLine in FileLines:
DoStuff(FileLine)# 3 - Faster than 1, without hogging too much memory:# (Use this for filelike objects without an# xreadlines() method)while 1:
FileLines=file.readlines(100)
4807-7 ch27.F 5/24/01 9:01 AM Page 510
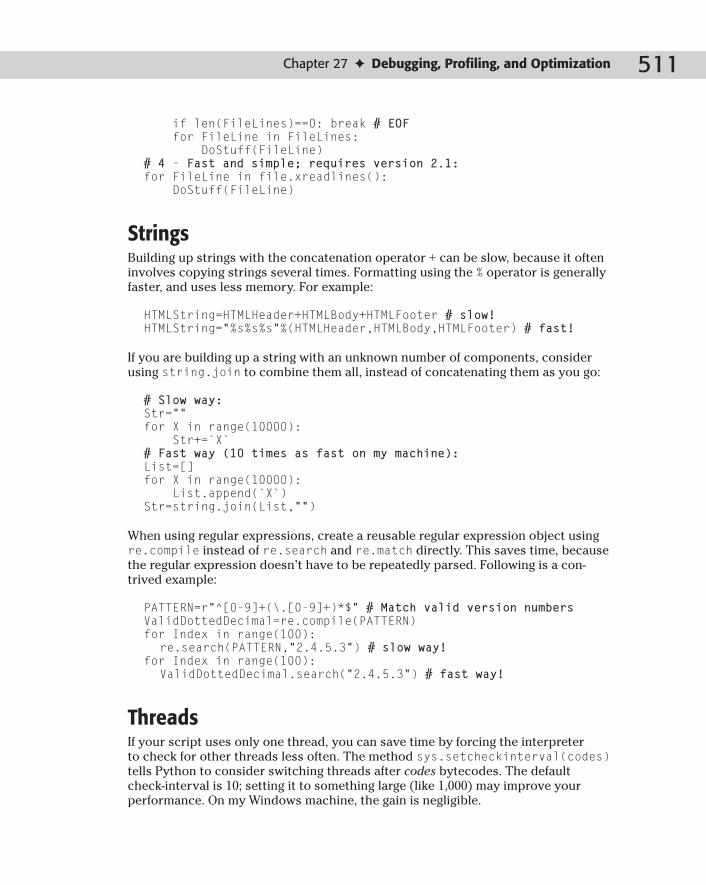
511Chapter 27 ✦ Debugging, Profiling, and Optimization
if len(FileLines)==0: break # EOFfor FileLine in FileLines:
DoStuff(FileLine)# 4 - Fast and simple; requires version 2.1:for FileLine in file.xreadlines():
DoStuff(FileLine)
StringsBuilding up strings with the concatenation operator + can be slow, because it often
involves copying strings several times. Formatting using the % operator is generally
faster, and uses less memory. For example:
HTMLString=HTMLHeader+HTMLBody+HTMLFooter # slow!HTMLString=”%s%s%s”%(HTMLHeader,HTMLBody,HTMLFooter) # fast!
If you are building up a string with an unknown number of components, consider
using string.join to combine them all, instead of concatenating them as you go:
# Slow way:Str=””for X in range(10000):
Str+=`X`# Fast way (10 times as fast on my machine):List=[]for X in range(10000):
List.append(`X`)Str=string.join(List,””)
When using regular expressions, create a reusable regular expression object using
re.compile instead of re.search and re.match directly. This saves time, because
the regular expression doesn’t have to be repeatedly parsed. Following is a con-
trived example:
PATTERN=r”^[0-9]+(\.[0-9]+)*$” # Match valid version numbersValidDottedDecimal=re.compile(PATTERN)for Index in range(100):
re.search(PATTERN,”2.4.5.3”) # slow way!for Index in range(100):
ValidDottedDecimal.search(“2.4.5.3”) # fast way!
ThreadsIf your script uses only one thread, you can save time by forcing the interpreter
to check for other threads less often. The method sys.setcheckinterval(codes)tells Python to consider switching threads after codes bytecodes. The default
check-interval is 10; setting it to something large (like 1,000) may improve your
performance. On my Windows machine, the gain is negligible.
4807-7 ch27.F 5/24/01 9:01 AM Page 511

512 Part V ✦ Advanced Python Programming
Taking out the Trash — the Garbage CollectorPython doesn’t require you to explicitly allocate and free memory. When you need
more memory to hold some data, the Python interpreter allocates it for you. When
you are finished with data, the interpreter usually gets rid of it.
Python cleans up memory by using reference counting: For each chunk of memory
you use, Python keeps track of how many references to the object exist. When you
assign a reference to an object, its reference count increases; when you get rid of a
reference, the object’s reference count decreases. When there are no more refer-
ences to an object, Python frees the object’s memory:
>>> class Thingy:... def __init__(self,Name):... self.Name=Name... def __del__(self):... print “Deleting:”,self.Name...>>> A=Thingy(“X”) # The variable A holds only reference>>> A=”Crunchy frog” # Refcount goes to 0 -> object is freed!Deleting: X>>> A=Thingy(“X”)>>> B=Thingy(“Y”)>>> A.ref=B # Y’s Refcount goes from 1 to 2>>> B=None # Y’s Refcount goes from 2 to 1>>> # This takes X’s refcount to 0, so X is deleted. Deleting>>> # X takes Y’s refcount to 0, so Y is deleted too:>>> A=None Deleting: XDeleting: Y
Note that the built-in function del does not (necessarily) delete an object; it deletes
a variable (and thus decrements the object’s reference count):
>>> A=Thingy(“X”)>>> B=Thingy(“Y”)>>> A.ref=B>>> del B # Variable B is gone, but object Y still exists>>> A. ref.Name # See! Object Y is still there!‘Y’
Reference counts and Python codeReference counting is different from automatic garbage collection (as seen in Java).
For example, as long as two objects hold references to each other, Python won’t
free them. If an object is no longer usable by a program, but its memory is not
freed, the object is leaked. Leaked memory normally gets cleaned up when the pro-
gram terminates. However, a program that runs for a long time can leak many
4807-7 ch27.F 5/24/01 9:01 AM Page 512

513Chapter 27 ✦ Debugging, Profiling, and Optimization
megabytes of memory, a few bytes at a time. For example, after you run the follow-
ing statements, the two objects each have a reference count of 1, and so will stick
around until you exit the interpreter:
>>> A=Thingy(“X”)>>> B=Thingy(“Y”)>>> A.ref=B # Y’s refcount is now 2>>> B.ref=A # X’s refcount is now 2>>> del A >>> del B >>> # Congratulations! You just leaked memory!
Normally, these memory leaks are not big or common enough to worry about. If you
find yourself running low on memory, however, you may need to start worrying. In
order to rid yourself of an object, you must get rid of all references to it — and to do
that, you must keep track of all the references.
Reference counts and C/C++ codeShooting yourself in the foot is downright difficult in Python, but very easy in C.
When writing C extensions, you must keep track of the reference counts of each
Python object. Losing track of reference counts can lead to memory hemorrhaging
(as opposed to mere memory leaks), and even core dumps.
The macros Py_INCREF(x) and Py_DECREF(x) increment and decrement the refer-
ence counts of a Python object x. At any given time, each reference is considered to
be owned by some function. When that function exits, it must transfer ownership of
the reference, or else get rid of the reference with a call to Py_DECREF. A function
can also borrow a reference — the borrower uses the reference, never touches the
reference count, and lets go of the reference before the owner does. Owning and
borrowing are not explicit in the code, but the comments generally indicate to
whom a reference belongs.
When writing C extensions, it is important to track reference counts properly.
Linking Python with Py_REF_DEBUG and Py_TRACE_REFS turned on provides extra
information for debugging reference counts. In addition, you can call
_Py_PrintReferences to print out all the objects and their refcounts.
SummaryDebugging is never a painless process, but pdb helps make it as easy as possible. In
addition, IDEs like PythonWin provide debugging with a snappier interface. The
Python profiler helps you find bottlenecks in your code. In addition, a review of
Python’s garbage collector can save a lot of memory. In this chapter, you:
4807-7 ch27.F 5/24/01 9:01 AM Page 513

514 Part V ✦ Advanced Python Programming
✦ Debugged Python programs using pdb.
✦ Profiled code to find the most expensive functions.
✦ Optimized various types of code.
✦ Learned how to leak memory (and how not to leak memory).
In the next chapter, you learn how to combine the speed of C with the power of
Python by writing C extensions.
✦ ✦ ✦
4807-7 ch27.F 5/24/01 9:01 AM Page 514

Security andEncryption
With the explosive growth of the Internet and with
countries shifting to more global economies, the
issue of security is increasingly important. Banks, businesses,
governments, and consumers routinely transfer sensitive
information; and computers attached to the Internet are
potentially accessible by anyone. This chapter describes
Python’s modules for creating digital fingerprints of messages,
running Python code in a safe sandbox, and using basic
encryption and decryption. Online, you can also find strong
encryption extension modules for triple DES, Blowfish, and
the like.
Checking PasswordsThe most basic and common form of security is restricting
access until the user enters a valid username and password.
When you prompt a user for his or her password, however,
you don’t want the password to be displayed on the screen,
lest a “neighbor” with wandering eyes sees the password too.
For these situations, use the getpass module.
There really isn’t a safe and platform-independent way to have
the user enter a password, so getpass has a different imple-
mentation for UNIX, Windows, and Macintosh systems. If for
some reason it can’t use any of the special implementations, it
will at least warn the user that the password might acciden-
tally be displayed on the screen.
The Windows version uses getch() in the msvcrt mod-ule, which doesn’t behave quite how you’d expect in someIDEs, such as IDLE or PythonWin, so if you want to try getpass out, run it in an interpreter started on the com-mand line.
Caution
2828C H A P T E R
✦ ✦ ✦ ✦
In This Chapter
Checking passwords
Running in arestricted environment
Creating messagefingerprints
Using 1940s-eraencryption
✦ ✦ ✦ ✦
4807-7 ch28.F 5/24/01 9:01 AM Page 515

516 Part V ✦ Advanced Python Programming
Use the getpass([prompt]) function to request the user’s password. The follow-
ing function queries the user for a name and password and then returns them as a
tuple:
>>> import getpass>>> def getLogin():... name = raw_input(‘Name:’)... passwd = getpass.getpass(‘Password:’)... return name,passwd...>>> getLogin()Name:robinhoodPassword: # Characters typed are not echoed(‘robinhood’, ‘littlejohn’)
getpass also has the getuser() function, which returns the login name of the
user:
>>> getpass.getuser()‘dave’
getuser checks the values of the LOGNAME, USER, LNAME, and USERNAME environ-
ment variables, returning the value of the first one that is present and not empty. If
all fail and the system has the pwd module (UNIX), then that is used; otherwise, an
exception is raised.
Chapter 38 provides the pwd module, which you can use for accessing the UNIXuser account database. You can also use the crypt module to check whether thepassword a user entered is correct (i.e., matches their login password).
Most GUI toolkits have their own method for prompting a user for a password. For
example, in wxPython, you can set a flag in the text entry field that holds a pass-
word, so that anything typed is displayed with asterisks.
UNIX users that have the readline module activated need not worry that afterentering their password it will show up in the command history. getpass uses itsown implementation of raw_input in order to avoid that security hole.
Running in a Restricted EnvironmentImagine that you decided to create an online game in which players from all over
the world would upload virtual robots to traverse a maze and destroy one another.
Not only did you decide to implement most of the game in Python, you chose to let
the players program their robots using Python too. One problem, though, is that a
malicious entrant could include code to erase files on your computer, install a
Trojan horse, or cause damage in any number of other ways. How could you deal
with that danger?
Note
Cross-Reference
4807-7 ch28.F 5/24/01 9:01 AM Page 516

517Chapter 28 ✦ Security and Encryption
The rexec sandboxThe rexec module helps prevent such a scenario. It enables you to run Python
code in a sandbox, a restricted environment in which you control what resources it
can access — just as a child in a sandbox imagines it to be the entire world when in
reality it’s quite isolated and small. You can, for example, enable Python programs
to do whatever they want as long as they don’t try to create any socket connec-
tions, or enable them to create files only in a particular directory. With rexec, you
can more safely run Python programs that didn’t necessarily come from a trusted
source.
To create an execution sandbox, you call RExec([hooks][verbose]) to create an
RExec object (or call the constructor of a subclass you’ve created in order to over-
ride or add to its access policies). hooks is an instance of the RHooks class (or a
subclass), which is itself a subclass of the Hooks class in the ihooks module; and is
what is called when it’s time to import a module. By providing your own import
hooks, you can monitor or log what modules are loaded, or even load them from a
different source. The verbose argument is passed to the Hooks constructor and,
if 1, prints extra debugging information.
Refer to Chapter 34 for information about the ihooks module and implementingyour own module import behavior.
Before creating your RExec instance object, you can change some of its class vari-
ables to tailor what modules and functions will be available to the executing code.
(Changing these class variables does not affect instances already created — only
those subsequent to your changes will see the effects.) For security reasons, you
should be careful about what values you change. If you want to change the list of
prohibited built-in functions, for example, consider adding to the list instead of
completely replacing it, so that you don’t inadvertently create a security hole.
ok_path is a tuple containing the paths to search when importing a module. By
default, it matches the value of sys.path.
ok_builtin_modules is a tuple of built-in (not implemented in Python) modules
that are safe to import. The default value contains the names of the following
modules:
audioop imageop parser stroparray marshal regex structbinascii math pcre timecmath md5 rotorerrno operator select
ok_posix_names is a tuple of allowed functions from the os module (if present in
the current platform’s implementation of os). The default value contains the names
of the following modules:
Cross-Reference
4807-7 ch28.F 5/24/01 9:01 AM Page 517

518 Part V ✦ Advanced Python Programming
error readlink getpid getgidfstat stat getppid geteuidlistdir times getcwd getegidlstat uname getuid
ok_sys_names is a tuple of variables and functions from the sys module that
restricted access programs can use. The default value contains the following:
ps1 copyright platform maxintps2 version exit
nok_builtin_names is a tuple of built-in function names that programs are notallowed to use. By default, the list contains ‘open’, ‘reload’, and ‘__import__’,
so functions such as map are still allowed (most built-in functions are relatively
safe).
RExec intercepts calls from the restricted program to import, reload, and unloadand routes the calls through the internal module loader and importer (which makes
use of the custom import hooks). You can override RExec’s r_reload(module),
r_unload(module), and r_import(modulename[, globals[, locals], from-list]]]) methods to provide custom behavior. If a module isn’t safe to be loaded,
r_import should raise in ImportError exception.
Calls to open are sent to RExec’s r_open(filename[, mode[, bufsize]]). By
default, files can be opened for reading only, but you can override this with differ-
ent behavior if needed.
Once you (finally!) have your RExec object, you can actually execute Python code
in a restricted object by calling its r_eval(code), r_exec(code), or r_exec-file(filename) methods, all of which run the code in the __main__ module of
your new sandbox. r_eval takes as an argument either a Python expression as a
string or a compiled code object, and returns the value of the expression:
>>> import rexec>>> r = rexec.RExec()>>> r.r_eval(‘2 + 2’)4
r_exec can take a string containing one or more lines of Python code or a compiled
code object:
>>> s = “””... print ‘My name is George’... q = range(10)... print q... “””>>> r.r_exec(s)My name is George[0, 1, 2, 3, 4, 5, 6, 7, 8, 9]
4807-7 ch28.F 5/24/01 9:01 AM Page 518

519Chapter 28 ✦ Security and Encryption
Chapter 33 has information about code objects and Python introspection capabilities.
r_execfile executes the contents of a Python file in the restricted environment.
For example, first save the code in Listing 28-1 to a file called bad.py.
Listing 28-1: bad.py — “Untrusted” code to test in the rexecsandbox
SECRET_VIRUS_CODES = ‘...<bad stuff here>...’f = open(‘cmd.exe’,’w+b’) # This will failf.write(SECRET_VIRUS_CODES)f.close()
RExec halts as soon as the program tries to do something illegal (in this case, open
a file for writing).
The RExec’s add_module(modulename) method returns a module object existing in
the restricted environment (loading it first if necessary). Because __main__ is also
a module, you can use this as a gateway between the normal and restricted environ-
ments. For example, you can have some variables already present when the
restricted code runs:
>>> r = rexec.RExec()>>> rmain = r.add_module(‘__main__’)>>> rmain.happyFactor = 10>>> r.r_eval(‘happyFactor * 2’)20
You can also use it to retrieve values after the code has finished. Continuing the
previous example:
>>> r.r_exec(‘sadFactor = happyFactor / 2’)>>> rmain.sadFactor5
For each r_<func> method (such as r_eval and r_exec), RExec also has a corre-
sponding s_<func> method that behaves similarly except that the s_<func> ver-
sion will have access to restricted versions of stdin, stdout, and stderr. The
restricted versions have the following methods:
fileno read seek writelinesflush readline tellisatty readlines write
Cross-Reference
4807-7 ch28.F 5/24/01 9:01 AM Page 519

520 Part V ✦ Advanced Python Programming
RExec handles some security problems for you, but there are other things to con-sider too. For example, nothing in RExec protects against code with an infinite loop,or even one that rapidly creates objects until it consumes all available memory.
Using a class fortressMost classes were not designed with restricted execution in mind. By using the
Bastion module, you can create wrappers for objects that are suitable for use with
rexec. The wrapped version of the object has the same attributes as the original,
but code in a restricted environment can access the attributes only if the wrapper
allows it.
Call Bastion(object[, filter[, name[, bastionclass]]]) to create a wrap-
per, where object is the object you wish to wrap. filter is a function that accepts
an argument name and returns true if that attribute can be used (the default filter
grants access to all attributes that do not start with an underscore). If the function
returns 0, the wrapper will raise an AttributeError. The name argument is the
name to use when printing the object; bastionclass is an alternate wrapper class
to use, although you would rarely need to supply your own.
As an example, suppose your robot game provides each robot with a reference to
an Environment object through which the robot can query information about the
“world” in which it is running (for example, number of robots still alive, amount of
time left in the current round, and so on). The robots call different get methods,
but outside the restricted environment, the rest of your program can set various
world attributes via some set methods:
class Environment:def __init__(self):
self._robots = 0self._timeLeft = 0
def SetNumRobots(self, num):self._robots = num
def GetNumRobots(self):return self._robots
def SetTimeLeft(self, left):self._timeLeft = left
def GetTimeLeft(self):return self._timeLeft
In order to make sure a player doesn’t fiddle with the time left in the game, for
example, you can give the robots a “bastionified” version of the environment, one
that doesn’t grant access to the ‘set’ methods:
Caution
4807-7 ch28.F 5/24/01 9:01 AM Page 520

521Chapter 28 ✦ Security and Encryption
def noPrivateOrSet(name):if name[:1] == ‘_’:
return 0if name[:3] == ‘set’:
return 0return 1
import Bastion, rexece = Environment()be = Bastion.Bastion(e,noPrivateOrSet)
Now your main code could make calls like the following:
e.SetNumRobots(5)
Code running in the restricted environment, however, could not. This next call
would raise an AttributeError exception:
r.r_exec(‘environment.SetTimeLeft(100)’)
As with access policies in rexec, the planning and consideration you use whendesigning a Bastion filter should be proportional to the damage that could occurif you leave a security hole open. It’s best to err on the side of being overly restric-tive so that later you’re not sorry.
Creating Message FingerprintsA message digest is like a digital fingerprint or hash that can be used in security and
data integrity checks. For any string of bytes, the corresponding fingerprint will
change if the original string of bytes changes.
One common use for these types of digests is to verify that a file transferred cor-
rectly across an unreliable network connection. For example, a Web site with down-
loadable ZIP files might list the digital fingerprints next to each file. After
downloading a file, you compute the fingerprint of what you downloaded, and if the
two match, you know the file transferred without errors.
It’s mathematically infeasible to create a file whose fingerprint has a chosen value.
That is to say, if someone knows the fingerprint of a file, for example, and wants to
create another file with the same fingerprint, they aren’t going to succeed. In the
example just described, this property of message digests verifies that what you
download truly matches what is on that remote Web server (and that someone
along the network route didn’t slip you a different version of the file that contains a
virus or something).
Caution
4807-7 ch28.F 5/24/01 9:01 AM Page 521

522 Part V ✦ Advanced Python Programming
MD5The md5 module implements the MD5 message digest algorithm (developed by MIT
and RSA Data Security, Inc.) to generate 128-bit message digests for arbitrarily long
strings of bytes. Create a new md5 object by calling the new([msg]) function. You
then repeatedly call the object’s update(msg) method until you have passed it all
your data. At any time, you can call the digest() method to get the md5 checksum
at that point in time:
>>> import md5>>> m = md5.new()>>> data = open(‘c:\\temp\\skeleton.exe’,’rb’).read()>>> m.update(data)>>> m.digest()‘\252\221\205\274\015\317\032\304\207\266\312~$\032\204 ‘
Using the optional argument to the new function is the same as calling new without
any arguments and then passing msg to update:
>>> m = md5.new(‘The quick brown fox’)>>> m.digest()‘\242\000O7s\013\224Eg\012s\217\240\374\236\345’>>> m = md5.new()>>> m.update(‘The quick brown fox’)>>> m.digest()‘\242\000O7s\013\224Eg\012s\217\240\374\236\345’
The digest is in binary form, so md5’s hexdigest() method returns a printable hex-
adecimal version of the current digest (this is the text you’d display next to the file
on the Web site, for example):
>>> m.hexdigest()‘a2004f37730b9445670a738fa0fc9ee5’
If two strings share a common initial substring, you can process the common por-
tion of the two strings first and then create a copy of the object using its copy()method, after which you’d use the two copies to continue computing the digest.
SHAThe sha module implements the National Institute of Standards and Technology’s
Secure Hash Algorithm. It is slightly slower than MD5, but the digest it produces is
larger (160 bits). Therefore, it is more secure against brute force–style attacks.
You use the sha module just as you do the md5 module:
>>> import sha>>> s = sha.new()>>> s.update(‘Python’)
4807-7 ch28.F 5/24/01 9:01 AM Page 522

523Chapter 28 ✦ Security and Encryption
>>> s.hexdigest()‘6e3604888c4b4ec08e2837913d012fe2834ffa83’
Like md5, a sha object has update(msg), digest(), hexdigest(), and copy()methods.
Other usesOne nice property of message fingerprints is that the slightest change in the mes-
sage results in a very different fingerprint:
>>> sha.new(‘Star wars’).hexdigest()‘7dede4f3d3fa32215aad874a34225a9a159addfe’>>> sha.new(‘Star wart’).hexdigest()‘4d87932ef50601c54a4e83182a92063302ccfe31’
In the preceding example, out of the entire string only one byte changed; its value
was incremented by 1. Despite the tiny change, the digest is completely different.
This makes it nearly impossible to hide or mistakenly overlook even small changes
to a message or file.
Message digests can also be useful for performing rapid comparisons of large
objects. If you have a list or tree of large images, for example, you could compute
the checksum of each image as it is added to the list. When it comes time to add a
new image, you compute its checksum value and then rapidly compare it against
the other checksums to make sure it is not already in the list (comparing a 128-bit
MD5 digest is a lot cheaper than comparing two images).
Using 1940s-Era EncryptionThe rotor module implements a basic encryption scheme using groups of permu-
tations or rotors that map one character to another. Each character of a message is
encrypted using the rotor, and the initial rotor positions are the “key” that can be
used to decrypt the message.
The most famous use of rotor-based encryption was by the German military during
World War II. They used Enigma (a typewriter-like machine originally built for use
by businesses) to transmit orders and allied ship coordinates without having to
worry about the messages being understood by others. Fortunately for the allied
troops, a few Enigma machines were captured, and a team of British geniuses
cracked the codes. (You can see an entertaining but historically inaccurate version
of this story in the movie U-571.)
To create a new rotor object, call newrotor(key[, numrotors]). Like the message
you intend to encrypt, key can contain binary and not just printable text charac-
ters. numrotors defaults to 6; using more rotors is more secure, but more costly to
encrypt and decrypt:
4807-7 ch28.F 5/24/01 9:01 AM Page 523

524 Part V ✦ Advanced Python Programming
>>> import rotor>>> r = rotor.newrotor(‘Will I ever tire of spam?’, 10)>>> msg = r.encrypt(‘Move into position at midnight’)>>> msg‘5\232\001A\267\312\375d\340I\375\201\315}\324\214\311...>>> r.decrypt(msg)‘Move into position at midnight’
Obviously, both the sender and the receiver need the key. One way to handle this is
to have a predefined set of keys such that each party knows when to use which one
(for example, on Tuesdays use key #12). Another way is to transfer the key to your
partner without letting others realize that it’s a key (work it into a casual conversa-
tion about the surprise of the Spanish Inquisition, for example).
Calls to encrypt(msg) and decrypt(msg) reset the rotors to their initial state and
encrypt or decrypt the message. If the message is in more than one part, however,
you can subsequently call encryptmore(msg) and decryptmore(msg) instead;
these methods do the same thing without first resetting the rotors:
>>> msg1 = r.encrypt(‘The ATM PIN is 1234’)>>> msg2 = r.encryptmore(‘My lucky number is 15’)>>> r.decrypt(msg1)‘The ATM PIN is 1234’>>> r.decryptmore(msg2)‘My lucky number is 15’
You may think that using such old encryption technology is a waste because it is
relatively “easy” to crack (although still relatively difficult for most people).
Consider the security differences between a wooden fence and a ten-foot tall elec-
tric fence covered in razor wire. Although both can be circumvented by a deter-
mined enough intruder, one is definitely stronger than the other. Likewise, a
completely foolproof encryption scheme does not exist, and probably never will.
Even the most basic encryption scheme will ward off 99 percent of potential intrud-
ers simply because it’s not worth the effort to crack, especially if you don’t adver-
tise the type of encryption you use. Depending on your situation, something as
simple as rotor may be suitable (kind of like a chain-link fence with a “Beware of
Dog” sign).
Many modern encryption schemes use public-key encryption, in which each party
has a public and private key. Everyone has access to public keys; if someone wants
to send you a message, they encrypt their message using your public key. The keys
are generated in such a way, however, that only the person with the matching pri-
vate key can decrypt the message.
4807-7 ch28.F 5/24/01 9:01 AM Page 524

525Chapter 28 ✦ Security and Encryption
SummaryYou can protect sensitive information and ensure message integrity using some of
the modules covered in this chapter. For example, in this chapter, you:
✦ Used getpass to safely request the user to enter a password.
✦ Executed Python code in an environment with restricted access to different
resources.
✦ Calculated unique digital “fingerprints” for checking message integrity.
✦ Encrypted and decrypted messages using the rotor module.
In the next chapter, you learn how to add new functionality by writing your own
extension modules.
✦ ✦ ✦
4807-7 ch28.F 5/24/01 9:01 AM Page 525

4807-7 ch28.F 5/24/01 9:01 AM Page 526

WritingExtensionModules
While Python excels as a stand-alone language, it also
shines as a glue language, a language that combines or
ties together “chunks” of functionality from other languages or
third-party libraries. After reading this chapter you’ll be able to
extend Python by writing your own C modules, and you’ll be
able to embed a Python interpreter in a C program.
This chapter is closely tied to the next chapter; together, the
two chapters cover most of what you need to know to use the
Python/C API.
Extending and EmbeddingOverview
A Python extension is an external module written in C that
behaves as if it were just another Python module. In fact, to
most Python programs, an extension module is indistinguish-
able from a “normal” module written in Python.
Python can interface with both C and C++ programs, butfor conciseness, they are lumped together here andreferred to as C programs.
Why would you want to write an extension module? The most
common reason is to make available to Python programs a
third-party library written in some other language. It’s these
wrapper modules that enable Python programs to use
OpenGL, GUI toolkits such as wxWindows and Qt, and com-
pression libraries such as zlib. Why create something from
Note
2929C H A P T E R
✦ ✦ ✦ ✦
In This Chapter
Extending andembedding overview
Writing a simpleextension module
Building and linking
Converting Pythondata to C
Converting C data toPython
Embedding theinterpreter
Running Python codefrom C
Using extension tools
✦ ✦ ✦ ✦
4807-7 ch29.F 5/24/01 9:01 AM Page 527

528 Part V ✦ Advanced Python Programming
scratch if you can write a quick extension module around an existing C library?
Along the same lines, through an extension module, your Python programs can
access platform-specific functionality such as the Win32 APIs on Windows, or low-
level resources such as network sockets.
Another benefit of extension modules is that they run at the speed of compiled
code, rather than the slower speed of interpreted Python code. Python is often fast
enough “as is” even though it is an interpreted language, but if you do have special
performance requirements, you can move CPU-intensive operations into an exten-
sion module. The approach I take is to first build my entire application in Python,
profile it, and then move performance bottlenecks into C as needed. This lets me
use Python as a rapid prototyping language in which I can still make changes
cheaply (when compared to C) without having to rewrite the entire program if a few
parts end up being too slow.
Proprietary information or algorithms locked away in an extension module are
more difficult to reverse engineer; and extension modules can significantly extend
the Python language itself by introducing new built-in data types.
The opposite of writing an extension module is embedding the Python interpreter
in a C program. This is useful if you have a lot of functionality that is just plain eas-
ier to do in Python (what isn’t?), or when you have an existing application to which
you want to add Python power.
Embedded Python is great as an internal control language, or even as a sort of
macro language to customize the behavior of your application.
Because this chapter deals with combining C and Python, you do need a workingC compiler; and actually knowing how to program in C wouldn’t hurt. If you don’thave a commercial compiler, compilers such as gcc are available free on all majorplatforms, including Windows. If you have Microsoft Visual Studio, use that,because Python comes with all the workspace and project files you need.
It is also a good idea to download and build Python from the source code. Thisensures that your setup is correct and also makes it possible for you to debug yourmodules during development.
Writing a Simple Extension ModuleThe best way to understand extension modules is to look at a simple one. Listing
29-1 is a C program that creates a Python module called simple, which contains the
add and count functions. The Python documentation and the next section describe
compiling and linking extension modules, so for now, just examine the source code.
Note
4807-7 ch29.F 5/24/01 9:01 AM Page 528

529Chapter 29 ✦ Writing Extension Modules
Listing 29-1: simple.c — A basic Python extension module
#include “Python.h”
// Add two arbitrary objectsstatic PyObject *simple_add(PyObject *pSelf, PyObject *pArgs){PyObject *pX, *pY;
if (!PyArg_ParseTuple(pArgs,”OO”, &pX, &pY))return NULL;
return PyNumber_Add(pX,pY);}
// A doc stringstatic char count_doc[] = “Returns the number of argumentspassed in”;
static PyObject *simple_count(PyObject *pSelf, PyObject *pArgs){long count = PyTuple_Size(pArgs);return PyInt_FromLong(count);
}
// Map of function names to functionsstatic PyMethodDef simple_methods[] ={{“add”, simple_add, METH_VARARGS, NULL},{“count”, simple_count, METH_VARARGS, count_doc},{NULL, NULL} // End of functions
};
// For C++, initsimple should be declared ‘extern “C”’DL_EXPORT(void) initsimple(){Py_InitModule(“simple”, simple_methods);
}
The following example uses the preceding module after compiling and linking:
>>> import simple>>> simple.add(5,2.5) # Add two numbers7.5>>> simple.add([‘a’,’b’],[‘c’,’d’,’e’]) # Add other types[‘a’, ‘b’, ‘c’, ‘d’, ‘e’]>>> simple.count.__doc__‘Returns the number of arguments passed in’>>> simple.count(‘hello’,’there’,5,6) # Count args4
4807-7 ch29.F 5/24/01 9:01 AM Page 529

530 Part V ✦ Advanced Python Programming
Familiarize yourself with the pattern of the example C file because most extension
modules follow this basic form. After including the appropriate headers, it creates
two functions and a doc string.
Notice that each function is declared static, which means that they are not visible
outside this file. The functions are made visible to Python because each is listed in
the simple_methods table. When the module is imported, its initsimple function
is called, which in turn calls Py_InitModule to inform Python of a new module
called “simple” whose function pointers are in simple_methods. The file name of
the module should match its name used in the code, so the compiled form of this
module would probably be in simple.dll or simple.so, depending on the plat-
form. If Python can’t find an init<name> function (where <name> is the name of the
module), it will be unable to import the module.
Each module function takes two arguments and returns one, all of which are
PyObject pointers. The self argument is NULL unless the function is actually a
method for a Python class you’ve implemented in C; and args is a Python tuple
containing the arguments passed in.
The simple_add function calls PyArg_ParseTuple (a function discussed in detail
in “Converting Python Data to C” in this chapter) to break args into the objects in
the tuple; it takes a format string and pointers to receive the object references. In
this case, the format string “OO” is saying that the function is expecting any two
Python objects. simple_add takes the two objects and returns a new object by call-
ing PyNumber_Add. As shown in the example usage of this module, the object can
be numbers, strings, and so on. PyNumber_Add is part of the Python/C API’s high-
level abstract object layer.
Chapter 30 covers both the abstract and concrete object layers that enable you towork with either general or very specific types of Python objects.
The simple_count function has its own doc string in count_doc, and it just
returns the number of arguments contained in args. Keep in mind that in Python,
even plain old numbers are actually objects. Therefore, before returning, the func-
tion has to convert from the C long variable called count to an actual Python
object.
The source code for Python includes the files that create the standard built-inmodules. These modules are a great source of examples of using the Python/CAPI because these modules are guaranteed to work; and more than likely, you’refamiliar with what they do.
You can create a module doc string by calling Py_InitModule3 instead of
Py_InitModule:
static char simple_doc [] = “This is an example of a C extension module.\n\Programming in C is great because\n\
Tip
Cross-Reference
4807-7 ch29.F 5/24/01 9:01 AM Page 530

531Chapter 29 ✦ Writing Extension Modules
it reminds me of how much fun Python is\n\by comparison.”;
DL_EXPORT(void) initsimple(){Py_InitModule3(“simple”, simple_methods, simple_doc);
}
The initsimple() function must be visible outside the library; on Windows, that
means using _declspec(dllexport) or a .DEF file to export a function from a DLL.
Building and LinkingBefore proceeding, you should download the Python source distribution and build
a debug version of at least the main executable and the runtime library. The source
comes with excellent build instructions (including an example project that you can
use as a template), so this section provides only a brief overview and a few tips.
You can now find debug Windows builds on the Python Web site(www.python.org).
With an extension module, you have two options: It can be statically linked into
Python, or your module can be dynamically loaded at run time when the user
imports it. The latter option is easier if you want to distribute your module to other
people, and it gives Python a smaller initial memory footprint.
To statically link your module into Python for a UNIX build, you add it to the list of
modules to build in the Modules/Setup file; for Windows, add it to the PC\config.c
file; and then rebuild Python.
For dynamic linking, building the module is straightforward:
1. Create a project (Makefile, IDE project file, and so on) that builds a shared
object. This varies by platform, but for gcc you can use the link option
–shared; for Windows, you create a DLL project.
2. Add to the include search path the directory containing Python.h.
3. Add to the link search path the directory containing the Python library (for
example, pythonxx_d.lib or libpythonxx_d.a) and include the library in your
list of files to link.
4. Compile and link.
If you’re using Visual Studio, under the C/CC++ tab in the Project Settings for yourmodule, be sure to choose the Code Generation category; and then choose DebugMultithreaded under Use Run-time Library.
Note
Tip
4807-7 ch29.F 5/24/01 9:01 AM Page 531

532 Part V ✦ Advanced Python Programming
The name of your module should match the name used in the source code.
When you create a debug build of Python, files have a _d appended to the end (for
example, the executable is named python_d); and when loading extension mod-
ules, Python looks for the same suffix, so debug versions of your module should
have that suffix as well. For example, if your module is named junk, normally your
extension would be built as junk.so, and the debug version should be named
junk_d.so.
You can also name the debug and release versions of your module as <module>_d.pyd and <module>.pyd, and Python will load them correctly. The.pyd extension is preferable to the system default (usually .so or .dll) becauseyour module may be a wrapper for an existing library of the same name (for exam-ple, there already exists an opengl.dll file, so it’s less confusing if the Python wrap-per module for it is named opengl.pyd).
The Python maintainers have done a lot of work to ensure that building extension
modules and Python itself go as smoothly as possible. If your extension refuses to
build, don’t get discouraged: it’s probably something minor. Try starting with one of
the example modules and adding to it.
If you install a compiler just so you can build Python extension modules, it’ll saveyou a lot of frustration if you take your time and make sure everything is set upproperly before attempting to build your module. First, build a stand-alone C pro-gram (such as Hello World or something equally simple). Next, build Python fromthe sources. If these two steps are successful, then proceed to build your exten-sion module.
Converting Python Data to CWhen a C extension function is called, it needs to unpack the arguments before it
can operate on them.
Unpacking normal argumentsIn the example extension module earlier in this chapter, the simple_add function
called the PyArg_ParseTuple function to unpack the Python function arguments.
The format string tells the type of objects your function expects; the different types
are listed in Table 29-1, along with the type of C pointers to use. A pointer variable
follows the format string, to hold the address of each object after it is unpacked.
Tip
Tip
4807-7 ch29.F 5/24/01 9:01 AM Page 532
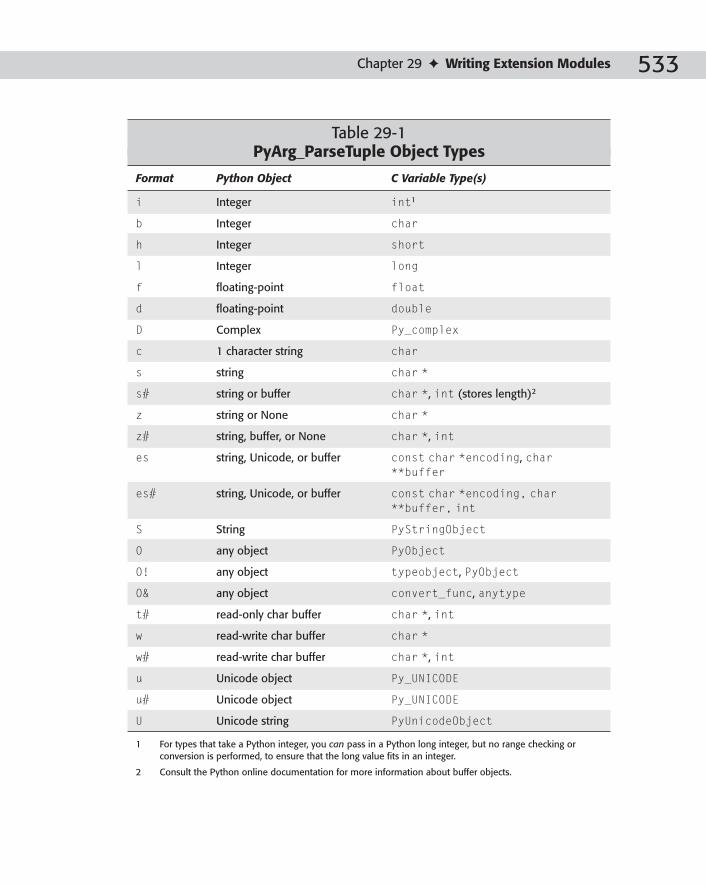
533Chapter 29 ✦ Writing Extension Modules
Table 29-1PyArg_ParseTuple Object Types
Format Python Object C Variable Type(s)
i Integer int1
b Integer char
h Integer short
l Integer long
f floating-point float
d floating-point double
D Complex Py_complex
c 1 character string char
s string char *
s# string or buffer char *, int (stores length)2
z string or None char *
z# string, buffer, or None char *, int
es string, Unicode, or buffer const char *encoding, char**buffer
es# string, Unicode, or buffer const char *encoding, char**buffer, int
S String PyStringObject
O any object PyObject
O! any object typeobject, PyObject
O& any object convert_func, anytype
t# read-only char buffer char *, int
w read-write char buffer char *
w# read-write char buffer char *, int
u Unicode object Py_UNICODE
u# Unicode object Py_UNICODE
U Unicode string PyUnicodeObject
1 For types that take a Python integer, you can pass in a Python long integer, but no range checking orconversion is performed, to ensure that the long value fits in an integer.
2 Consult the Python online documentation for more information about buffer objects.
4807-7 ch29.F 5/24/01 9:01 AM Page 533

534 Part V ✦ Advanced Python Programming
For the D format type, the complex number is stored in a C structure that has two
double members: real and imag.
Many format characters have a similar form, differing with an appended pound sign
(for example, s and s#). The second version of these formats works the same
except that you supply two C variables, one to receive a pointer to the value and
another to receive the length of the string:
char * pStr;int len;
if (!PyArg_ParseTuple(pArgs,”s#”, &pStr, &len))return NULL;
As shown in this example, you do not provide the storage for formats that give you
a string value; PyArg_ParseTuple just gives you a pointer to the string. The only
exception to this rule is with es and es#, which convert values to Unicode using the
encoding you provide (or the default encoding if encoding is NULL). For es, Python
allocates a buffer for the encoded value, and it is your responsibility to free it (with
PyMem_Free) when you’re finished. The es# format behaves a little differently if
buffer is not initially NULL: You can create your own buffer and pass it in along
with its maximum length. In both cases, the returned length will be the length of the
encoded value.
With the s format, the string passed to your function is NULL-terminated, so it obvi-
ously can’t contain embedded NULL characters. With the s# format, however, any
Python string can be used. The z and z# formats work the same way except that the
entire string may legally be None in Python, in which case your C pointer will be set
to NULL.
You can use the O format to get a pointer to a Python object instead of converting it
to a C data type. The O! format works the same except that you also supply a type
argument so that your function receives objects only of a certain type (a
TypeError is raised if the caller uses an incorrect type):
PyObject * pObject;
if (!PyArg_ParseTuple(pArgs,”O!”, &PyList_Type, &pObject))return NULL;
The type names all follow the Py<Name>_Type convention; for example,
PyInt_Type, PyDict_Type, and so on. The S and U formats are shortcuts for O!
that ensure that the argument is a string or Unicode string.
By using the O& format, you can supply a conversion function for an object (which
can be useful if you have to perform the same conversion in many places):
4807-7 ch29.F 5/24/01 9:01 AM Page 534

535Chapter 29 ✦ Writing Extension Modules
typedef struct // An internally-used structure{char * pIP;unsigned short port;
} Addr;
// Converts an IP address and port to an Addr structint addr_converter(PyObject *pObj, Addr *pAddr){ return PyArg_ParseTuple(pObj, “sh”, &pAddr->pIP,
&pAddr->port);}
static PyObject *simple_addhost(PyObject *pSelf, PyObject *pArgs)
{char * pName;Addr newA;
if (!PyArg_ParseTuple(pArgs,”sO&”, &pName,addr_converter,&newA))
return NULL;
printf(“Added host %s (%s:%d)\n”,pName,newA.pIP,newA.port);return Py_BuildValue(“”);
}
Here’s the output of a call to simple_addhost:
>>> simple.addhost(‘Foo Corp.’,(‘176.201.15.5’,1234))Added host Foo Corp. (176.201.15.5:1234)
The conversion function should return 1 for success and 0 for failure, and should
also raise an exception if conversion fails.
Chapter 30 covers raising and handling Python exceptions in C.
Python doesn’t increment an object’s reference count when it gives it to you via the
O formats, but very often in C extension modules, you will have to keep track of ref-
erence counts. The next chapter covers this in more detail.
Using special format charactersPyArg_ParseTuple accepts a few special characters in its format string. The fol-
lowing sections show you how to handle sequences and a variable number of argu-
ments, and how to generate error messages when callers supply incorrect
parameters.
Cross-Reference
4807-7 ch29.F 5/24/01 9:01 AM Page 535

536 Part V ✦ Advanced Python Programming
Sequence unpackingInstead of calling a conversion function, you can use parentheses in your format
string and PyArg_ParseTuple unpacks sequence arguments on the fly:
int a,b,c,d;if (!PyArg_ParseTuple(pArgs, “i(ii)i”, &a, &b, &c, &d))
return NULL;
The Python call to this function would take three arguments, the second of which is
a sequence:
simple.somefunc(5, (10,20), 8)simple.somefunc(0, [1,2], 3)
You can also nest sequences:
char *a, *b, *c, *d;if (!PyArg_ParseTuple(pArgs, “(((ss)s)s)”, &a, &b, &c, &d))
return NULL;
The corresponding Python call would be as follows:
simple.somefunc((((‘This’,’is’),’really’),’ugly’))
Optional and variable number argumentsA pipe (|) character in the format list means that the remaining arguments to the
function are optional. You should initialize the corresponding C variables to their
default values:
int i, j=15, k=20;
if (!PyArg_ParseTuple(pArgs, “i|ii”, &i, &j, &k))return NULL;
From Python, you could call this function in any of the following ways:
simple.myfunc(10)simple.myfunc(10,15)simple.myfunc(10,15,20)
You can use this method to create functions that handle a variable number of argu-
ments, but you do have to supply an upper bound on how many arguments the
user can pass in. If you truly need to handle a varying number of arguments, you
can avoid calling PyArg_ParseTuple altogether and process the pArg variable
using the abstract and concrete object layers described in the next chapter.
4807-7 ch29.F 5/24/01 9:01 AM Page 536

537Chapter 29 ✦ Writing Extension Modules
Error messagesAt the end of the format list, you can add a colon followed by a string to change the
function name used if PyArg_ParseTuple raises an exception:
if (!PyArg_ParseTuple(pArgs, “iii:bleh”, &i, &j, &k))return NULL;
Calling this function with the wrong number of arguments results in the following
exception:
myFunc(1,2,3,4)Traceback (most recent call last):File “<stdin>”, line 1, in ?
TypeError: bleh() takes at most 3 arguments (4 given)
Instead of a colon, you can use a semicolon followed by a string to be used as the
error message:
if (!PyArg_ParseTuple(pArgs, “iii;Doh!”, &i, &j, &k))return NULL;
Now a call with the wrong number of arguments yields the following:
myFunc(1,2,[5])Traceback (most recent call last):File “<stdin>”, line 1, in ?
TypeError: Doh!
Unpacking keyword argumentsIn order to handle keyword arguments, you first need to change the function’s entry in
the module function table from METH_VARARGS to METH_VARARGS | METH_KEYWORDS:
static PyMethodDef mymodule_methods[] ={...{“func”, mymodule_func, METH_VARARGS | METH_KEYWORDS},...{NULL, NULL} // End of functions
};
The C function takes a third parameter to hold the keyword arguments, and you call
PyArg_ParseTupleAndKeywords to unpack the arguments, passing in a list contain-
ing the names of the arguments. The following example accepts three keyword argu-
ments, one of which is optional:
// Argument namesstatic char *ppNames[] = {“name”,”age”,”weight”,NULL};
4807-7 ch29.F 5/24/01 9:01 AM Page 537

538 Part V ✦ Advanced Python Programming
static PyObject *simple_kwd(PyObject *pSelf, PyObject *pArgs,PyObject *pKwds){char * pName;int age;int weight = -1; // weight is optional, so set a default
if (!PyArg_ParseTupleAndKeywords(pArgs, pKwds, “si|i”,ppNames, &pName, &age, &weight))
return NULL;
printf(“Name: %s Age: %d Weight: %d\n”, pName, age, weight);
return Py_BuildValue(“”);}
The format string must have an entry for each entry in the list of names (ppNames),
and the list of names must end with a NULL member. Following are some sample
calls to this function:
>>> simple.kwd(‘Bob’,5)Name: Bob Age: 5 Weight: -1>>> simple.kwd(age=10,name=’Beable’)Name: Beable Age: 10 Weight: -1>>> simple.kwd(‘Fred’,weight=150,age=25)Name: Fred Age: 25 Weight: 150
Unpacking zero argumentsIf your C function takes no arguments, you should still call PyArg_ParseTuple with
an empty format string to make sure no one calls your function incorrectly:
if (!PyArg_ParseTuple(pArgs, “”))return NULL;
There is also a utility macro, PyArg_NoArgs(pArgs), that does the same thing,but as of Python 2.1, it requires that the function’s entry in the module functiontable use an obsolete form of argument passing, METH_OLDARGS.
Converting C Data to PythonThe Py_BuildValue(format, ...) function does the opposite of
PyArg_ParseTuple, creating a Python object from C values. It is very common to
use a call to this function when returning to Python from your C function. The fol-
lowing example uses Py_BuildValue to create a function that takes no parameters
and returns a Python string object with the value ‘Hello’:
Note
4807-7 ch29.F 5/24/01 9:01 AM Page 538

539Chapter 29 ✦ Writing Extension Modules
static PyObject *simple_hello(PyObject *pSelf, PyObject *pArgs){if (!PyArg_ParseTuple(pArgs,””))return NULL;
return Py_BuildValue(“s”,”Hello!”);}
Besides Py_BuildValue, you can use functions in the concrete object layer toconvert from C data types. Chapter 30 covers functions such asPyInt_FromLong, which creates a Python integer object from a C long value.
Creating simple Python objectsPy_BuildValue takes a format string and the necessary C values to populate the
Python object. Table 29-2 lists the characters you can use in the format string.
Table 29-2Py_BuildValue Object Types
Format C Type Python Object
i Int integer
b Char integer
h Short integer
l Long integer
f Float floating-point number
d Double floating-point number
c Char 1-character string
s or z char * string
s# or z# char*, int string
S PyStringObject * new string object
O PyObject * object with reference count incremented
O& converter, any new object passed through converter function
N PyObject * object with reference count unchanged
u Py_UNICODE * new Unicode object
u# Py_UNICODE *, int new Unicode object
U PyUnicodeObject * new Unicode object
Cross-Reference
4807-7 ch29.F 5/24/01 9:01 AM Page 539

540 Part V ✦ Advanced Python Programming
s, z, and u take NULL-terminated strings and convert them to Python strings; the
forms that also take a length parameter can have embedded NULLs.
With string conversion (for example, -s, s#, u), empty C strings convert to empty
Python strings, and NULL pointers in C are returned as None in Python. Any time
you pass a string or memory buffer to Py_BuildValue, it copies the data passed in,
so it’s immediately safe to destroy whatever buffers you were using to hold your
original copy of the data.
Py_BuildValue raises PyExc_SystemError and returns NULL if any problems
occur during conversion. Likewise, a conversion function used with the O& format
should return a new Python object if possible, or raise an exception and return
NULL on error.
Unlike PyArg_ParseTuple, you can add whitespace, colons, and commas to theformat string for Py_BuildValue. They do not affect the value returned, but helpimprove C code readability.
With an empty format string, Py_BuildValue returns the None object; with a single
format specifier, it returns an object of that type; and with two or more, it returns a
tuple containing the Python objects (this matches the behavior of normal Python).
In order to force Py_BuildValue to return a tuple containing 0 or 1 objects, wrap
the formats in parentheses:
Py_BuildValue(“()”); // Creates an empty tuplePy_BuildValue(“(i)”,5); // Creates the tuple (5,)
A slightly more efficient idiom for returning None is
Py_INCREF(Py_None);return Py_None;
Creating complex Python objectsIn addition to atomic Python objects, you can use Py_BuildValue to create
sequence and mapping objects too. This function call creates a tuple containing a
list and another tuple:
// Creates ([5, 6, 7], (‘a’, ‘b’))Py_BuildValue(“[iii](cc)”,5,6,7,’a’,’b’);
You can nest sequences to create complex objects as needed:
// Creates ([(1,), (2,), [3, 4]], (5, [6]))Py_BuildValue(“[(i)(i)[ii]](i[i])”,1,2,3,4,5,6);
Dictionaries are simple to make; each pair of C values form a key-value pair:
// Creates {2: 2.5, 1: ‘one’}Py_BuildValue(“{i:s,i:f}”,1,”one”,2,2.5);
Tip
Tip
4807-7 ch29.F 5/24/01 9:01 AM Page 540

541Chapter 29 ✦ Writing Extension Modules
Embedding the InterpreterInstead of extending Python with C, sometimes it’s advantageous to extend a C pro-
gram with Python.
A simple exampleOnce you have extension modules under your belt, embedding the Python inter-
preter in a C program is a cinch:
#include “Python.h”
int main(int argc, char ** argv){Py_Initialize(); // Prepare the interpreterPyRun_SimpleString(“print ‘Hello from Python!’\n”);Py_Finalize(); // Clean up resources usedreturn 0;
}
The build steps are similar to those for extension modules: Modify the include and
link paths to get the Python files, and link in Python’s library. Instead of creating a
shared library, of course, your project or Makefile should create a stand-alone
executable.
With the exception of a few setup and threading functions, Py_Initialize() is the
first Python API function that your program should use as it prepares the inter-
preter for operation, which includes setting up built-in modules such as
__builtin__ and __main__. Call Py_Finalize() to free the resources used by the
Python subsystem; after Py_Finalize has been called, you need to call
Py_Initialize again if you want to run more Python code without restarting your
program. If your program is unsure of the current state, it can at any time call
Py_IsInitialized() to check.
PyRun_SimpleString is one of many functions you can use to actually execute
the Python code; “Running Python Code from C,” later in this chapter, has more
information.
Py_Finalize does not unload dynamically loaded extension modules; thosestay around until your program terminates.
Shutting downAt any time, you can call Py_FatalError(char *message) to print an error mes-
sage to stderr and kill the current process without performing any cleanup. The
process exits with a call to the abort() function in the standard C library, so on
UNIX systems it will attempt to create a core file.
Caution
4807-7 ch29.F 5/24/01 9:01 AM Page 541
542 Part V ✦ Advanced Python Programming
For normal exiting, call Py_Exit(int code) to gracefully shut down the current
process. Py_Exit calls Py_Finalize first, and then calls the C exit(code) func-
tion using the exit code you supply.
Use Py_AtExit(func) to register a shutdown function that will be called by
Py_Finalize. Your shutdown function should take no arguments and return no
value. Py_AtExit returns 0 if successful, or –1 if you try to register more than 32
functions. Each shutdown function is called only once per call to Py_Finalize, and
they are called in the opposite order in which they were registered (LIFO).
Py_Finalize does all of its own cleanup work before calling the shutdown func-
tions, so your functions should not use Python/C API calls.
Other setup functionsBy default, the program’s name (the value of argv[0]) is ‘Python’, but you can
change that with a call to Py_SetProgramName(char *name), which must be called
before Py_Initialize. The program’s name is used internally to help locate run-
time libraries. Py_SetProgramName does not copy the string but keeps a pointer to
it. You can call Py_GetProgramName() to get this value.
Use PySys_SetArgv(int argc, char **argv) to set the command-line parameters
for the Python interpreter (sys.argv). This call must follow Py_Initialize, and
in current versions, if you don’t call PySys_SetArgv, the sys module will not have
an argv member at all.
Py_SetPythonHome(char *) lets you programmatically override or set the value of
the PYTHONHOME environment variable. Use Py_GetPythonHome() to retrieve the
current value, which is empty by default.
System information functionsMany functions return information about the program’s operating environment; this
section describes the more useful ones. Note that these are not specific to embed-
ded interpreters but can also be used from extension modules.
Py_GetProgramFullPath() returns a pointer to a string representing the complete
path to the currently running executable (either the normal Python interpreter or
an application that embeds the interpreter).
To access the default module search path, call Py_GetPath(). The returned
pointer refers to a list of paths from sys.path, separated by the system path delim-
iter character (for example,:on UNIX). Although you can modify the list from Python
via sys.path, do not modify the value returned from Py_GetPath.
Py_GetVersion() returns a pointer to a string showing the version of the Python
interpreter:
4807-7 ch29.F 5/24/01 9:01 AM Page 542

543Chapter 29 ✦ Writing Extension Modules
2.1 (#9, Jan 1 2001, 02:49:28) [MSC 32 bit (Intel)]
This is the same string displayed when starting an interactive Python session, and
is accessible from Python as sys.version.
Py_GetPlatform() returns a platform identifier string such as win32 or freebsd4. If
Python can’t determine the platform name, this function returns the string
“unknown.” Python code accesses this value as sys.platform.
Py_GetPrefix() returns the path prefix for installed platform-independent files,
and Py_GetExecPrefix() returns the path prefix for installed platform-dependentfiles. For example, if the program name is /usr/local/bin/python, the prefix is
/usr/local, although the values are actually calculated based on the program
name and environment variables. These values are available from Python as
sys.prefix and sys.exec_prefix. On UNIX, they refer to the --prefix and --exec-prefix Makefile settings; on Windows, they are empty.
Running Python Code from CThe abstract object layer covered in the next chapter has functions, such as
PyObject_CallFunction, that let C extension functions call Python functions
directly, just like a normal function call in a Python program. In some cases, how-
ever, you might not need such direct, low-level communication between Python and
C. If your C program just needs to execute some Python code without much interac-
tion with the Python interpreter, you can use the functions listed in this section
instead.
As shown in the previous section’s example, PyRun_SimpleString(char *com-mand) executes a string containing one or more lines of Python code. The function
returns 0 if successful and –1 if an unhandled exception was raised, although
there’s no way to retrieve information about what exception it was.
PyRun_SimpleString runs the code in the __main__ module, creating the module
first if needed.
PyRun_SimpleFile(FILE *f, char *fname) works just like
PyRun_SimpleString, except that it uses the contents of the file f as the code to
execute. fname is the name of the file being use.
PyRun_InteractiveOne(FILE *f, char *fname) waits for and then executes a
single statement from f, which is a file representing an interactive device. fname is a
name to be used when printing out error messages.
PyRun_InteractiveLoop(FILE *f, char *fname) repeatedly calls
PyRun_InteractiveOne until the end of file is reached. The following code creates
an interactive interpreter, somewhat similar to the one you get when you load the
Python executable in interactive mode:
4807-7 ch29.F 5/24/01 9:01 AM Page 543

544 Part V ✦ Advanced Python Programming
#include “Python.h”
int main(int argc, char ** argv){Py_Initialize();Py_Exit(PyRun_InteractiveLoop(stdin,”<stdin>”));
}
PyRun_AnyFile(FILE *f, char *fname) is a utility function that calls
PyRun_InteractiveLoop if f is attached to an interactive device, and
PyRun_SimpleFile if it is not. This function uses Py_FdIsInteractive(FILE *f,char *fname) to decide which to call.
If you have a block of code that you intend to execute many times, you can parse it
a single time and create a code object that stores the code in its ready-to-execute
form so that later executions will be quicker. PyParser_SimpleParseString(char*command, int start) parses code from a string in memory, and
PyParser_SimpleParseFile(FILE *f, char *fname, int start) parses code
from the file you provide. The start parameter is used to tell what sort of code it’ll
be parsing; legal values are described in Table 29-3.
Table 29-3Grammar start Codes
Code Use if the Python code to parse is... Example
Py_eval_input an isolated expression x * 6
Py_single_input a single statement print blue
Py_file_input a sequence of statements (an entire program)
Both of these functions return a pointer to a newly allocated node structure, which
you can then convert into a code object:
#include “Python.h”#include “compile.h”#include “node.h”...
PyCodeObject *co;node * n;
n = PyParser_SimpleParseString(“print ‘Hello’”,Py_single_input);
co = PyNode_Compile(n, “<stdin>”);PyNode_Free(n);if (co)
4807-7 ch29.F 5/24/01 9:01 AM Page 544

545Chapter 29 ✦ Writing Extension Modules
{... // Do some work herePy_DECREF(co);
}
For a shortcut that does the same thing, call Py_CompileString(char *cmd, char*fname, int start), which returns a new reference to a code object. This example
creates a code object that prints ‘Hello’, and then executes the code object 10 times
(it uses functions you won’t learn until the next chapter, so don’t worry if it looks a
little strange):
#include “Python.h”#include “compile.h”#include “eval.h”
int main(int argc, char ** argv){PyObject *co, *m;
Py_Initialize(); // Setupm = PyImport_AddModule(“__main__”); // Force creation of mainco = Py_CompileString(“print ‘Hello’”, “<stdin>”,
Py_single_input);if (co && m){int i;PyObject *d = PyModule_GetDict(m); // Get main dictionary// Repeatedly execute the code objectfor (i = 0; i < 10; i++){PyObject * res = PyEval_EvalCode((PyCodeObject *)co,
d, d);Py_XDECREF(res);
}
Py_DECREF(co); // We’re done with this object!}
Py_Exit(0);}
If you only need to evaluate a string, use the PyRun_String(char *cmd, intstart, PyObject *globals, PyObject *locals) function, which returns a new
reference to a Python object containing the result of running the code. globals and
locals are Python objects that reference the global and local dictionaries in which
to run the code. The following example takes a Python expression as a string, evalu-
ates it, and converts the result to a C integer:
#include “Python.h”
int main(int argc, char ** argv){
4807-7 ch29.F 5/24/01 9:01 AM Page 545

546 Part V ✦ Advanced Python Programming
PyObject *m, *d, *result;char * cmd = “2 * 11”;
Py_Initialize(); // Set upm = PyImport_AddModule(“__main__”);d = PyModule_GetDict(m); // Get dictionary to use
// Evaluate it and get a PyObject backresult = PyRun_String(cmd, Py_eval_input, d, d);
// Convert the PyObject to something chicken and print itprintf(“%s is %d\n”,cmd,(int)PyInt_AsLong(result));
Py_Exit(0);}
The result is printed on stdout:
2 * 11 is 22
Finally, if your input is coming from a file, you can do the same thing with PyRun_File(FILE *f, char *fname, int start, PyObject *globals, PyObject *locals).
PyRun_AnyFile, PyRun_SimpleFile, and PyRun_File all have extended ver-sions (for example, PyRun_AnyFileEx) that take an integer third parameter,which, if non-zero, tells the function to close the file descriptor when finished.
Using Extension ToolsWriting code to create the interface between Python and C is generally very
straightforward and, therefore, often boring. After you’ve been spoiled by develop-
ment in Python, you may find that your extension modules have bugs because you
have to manually manage object reference counts. Fortunately, several popular
tools are available to help you automate these tasks.
In addition to the tools mentioned here, the Vaults of Parnassus have others thatyou can try too. Visit the Python Tools/Extensions section at http://www.vex.net/parnassus.
SWIGThe Simplified Wrapper and Interface Generator (SWIG) is a development tool
designed to connect C and C++ programs with high-level languages, including, but
not limited to, Python, Perl, and Tcl/Tk. It is especially useful for creating an exten-
sion module from an existing C or C++ library. In some cases, it can generate all the
interface code automatically. SWIG is free for commercial and private use and is
available from www.swig.org.
Tip
Tip
4807-7 ch29.F 5/24/01 9:01 AM Page 546

547Chapter 29 ✦ Writing Extension Modules
Some areas in which SWIG shines include the following:
✦ Wrapping existing libraries (your own or third-party libraries)
✦ Rapid prototyping and application development
✦ Interactive debugging (use your library in an interactive Python session)
✦ Regression testing (Python scripts that test your C/C++ code)
✦ Creating a GUI front-end in Python for an underlying C program
Using SWIGTo use SWIG, you create an interface file that lists the variables and functions you
want to be available to Python. The format of the file is very C-like (it’s read by a C
preprocessor), and in some cases you can even use your source code as the inter-
face file itself.
Once the interface file is ready, you run SWIG to generate the wrapper code. You
then compile the wrapper code and link in your original C code, and you end up
with a ready-to-use Python module.
A SWIG exampleSWIG has many features, but the following simple example gives you an idea of
what it does. Suppose I want to create (or have already created) a C library called
useless and I want to be able to access its powerful features from Python. The
source code is in useless.c:
#include “stdio.h”
int getnum(){return 42;
}
void message(){printf(“Hello, SWIG!\n”);
}
int addem(int j, int k){return j + k;
}
The next step is to create the interface file called useless.i:
%module useless%include useless.c
4807-7 ch29.F 5/24/01 9:01 AM Page 547

548 Part V ✦ Advanced Python Programming
The %module directive says that the finished module will be called useless. The rest
of the file contains C variable and function declarations; because the original
source code is clean, I decide to pass it all to SWIG verbatim. Alternatively, I could
have used the following:
%module uselessint getnum();void message();int addem(int j, int k);
Often, the second form is what you’ll use, because you might not want every library
function exported to Python, and the interface file lets you add features specific to
the Python version of your library.
The next step is to run SWIG and generate the wrappers:
/home/dave/swig> swig –python useless.iGenerating wrappers for Python
SWIG creates useless_wrap.c and useless_wrap.doc (a documentation file). The
–python argument selects Python as the output language. Now it’s time to build the
module:
home/dave/swig> gcc –shared useless.c useless_wrap.c –o \uselessmodule.so –I/usr/local/include/python2.0 \–DHAVE_CONFIG –I/usr/local/lib/python2.0/config
If you do this more than once, you’ll obviously want to wrap this into a Makefile.
The SWIG Web site also has instructions for using Microsoft Developer Studio.
The new module is complete. Here’s a test:
>>> import useless>>> dir(useless)[‘__doc__’, ‘__file__’, ‘__name__’, ‘addem’, ‘getnum’, ‘message’]>>> useless.addem(10,5)15>>> useless.message()Hello, SWIG!>>> useless.getnum()42
Other nifty featuresSWIG works with both C++ classes and templates; but for some C++ features, you
have to put forth a little extra effort to get them to work (it’s all well documented,
but a little less intuitive). SWIG does a great job of making the common case fast
(the creators of SWIG cite the example of creating a Python module for OpenGL in
15 minutes or so); more complex C++ features require more work to make them
callable from Python.
4807-7 ch29.F 5/24/01 9:01 AM Page 548

549Chapter 29 ✦ Writing Extension Modules
With structures and classes, the Python equivalents become Classname_method-name. The print(msg) method in a List class would be List_print(instance,msg), which is sort of klunky, but SWIG’s –shadow command line option has it cre-
ate a shadow class that makes the Python version easier to use; for example,
myList.print(msg).
Your interface file can also implement the special methods that Python classes use.
For example, you could implement in C a __getitem__ method to handle attribute
access.
One final feature worth mentioning here is a typemap, which automatically handles
conversion to and from Python data types when calling your C functions. For exam-
ple, if you have a C writeToFile function that takes a C FILE pointer, you can cre-
ate a typemap that converts to and from FILE pointers and Python file objects.
Then, without changing the original C code, Python routines can pass in file objects
to any C functions that expect FILEs.
CXXCXX is a set of C++ facilities that helps you write Python extensions easily and with
fewer bugs. You can download CXX from http://cxx.sourceforge.net. CXX has
two main parts: CXX_Objects and CXX_Extensions.
SCXX (Simplified CXX) is another Python/C++ API library that is also free to use forcommercial and private applications. Its main purpose is to wrap Python objectsand manage reference counts, and it stays away from C++ features found only innewer compilers. Visit http://www.mcmillan-inc.com for more information.
CXX_ObjectsThe main idea behind CXX_Objects is that too much of the work of writing Python
extension modules deals with checking return codes for errors and managing refer-
ence counts, and that using the standard Python/C API is too low-level.
CXX_Objects is a set of high-level C++ classes (named Float, Tuple, String, Dict, and
so on) that wrap their Python counterparts. Their constructors and destructors
keep track of reference count details; and as a group, they use C++ exceptions to
signify error conditions and as a cleanup mechanism. In short, it makes writing C++
extension modules cleaner by using the features that make C++ a higher-level lan-
guage than C.
Because you rarely use PyObject pointers directly, and instead use high-level wrap-
per objects, your extension module code is more “Pythonic,” less buggy, and easier
to maintain.
Unhandled Python API errors or uncaught CXX exceptions are automatically con-
verted to Python exceptions and passed back to the caller, although you always
have the option of handling the exceptions yourself.
Note
4807-7 ch29.F 5/24/01 9:01 AM Page 549
550 Part V ✦ Advanced Python Programming
CXX_ExtensionsCXX_Extensions is a more recent addition to CXX. As with CXX_Objects, the motiva-
tion behind it is that the Python/C API way of doing things can be improved upon
by using the features of C++.
A garden-variety C extension module has numerous static functions and a single
public initialization function that is called when the module is imported. The initfunction passes back to Python a table that has pointers to the various functions
implemented by the module.
The CXX_Extensions approach is that all extension modules are actually C++
classes that are derived from ExtensionModule (a base class template). Each func-
tion in your module is implemented as a method of that class.
CXX_Extensions also includes PythonExtension, a C++ class from which you derive
new Python extension types. Unlike other objects, PythonExtension objects can be
created either on the Python heap or in automatic (stack) storage. Creating and
destroying objects on the heap can be relatively expensive, so programs that
can create and use PythonExtension objects created on the stack enjoy better
performance.
Extension classesAlthough you can create new Python types in a C extension module, Python types
in general aren’t very object-oriented (you can’t directly subclass floating point
numbers, for example). Digital Creations (the maker of Zope) has created extensionclasses, which are Python extension types that look and act as if they were really
classes.
With extension classes, you can create an extension base class in C or C++ and then
subclass it in Python. As with normal classes, it is trivial to create new instances of
them, and they even work with multiple inheritance (for example, a Python sub-
class is derived from both a C extension class and a Python class).
One advantage of extension classes is that instance data can be stored in a dictio-
nary as usual, as instance data in a C++ object, or some combination of the two. You
could have a few special members stored in a C struct for performance reasons, for
example, and let the other object attributes remain in the instance dictionary.
Extension classes also enable you to invoke unbound methods (unlike normal
Python classes, for which you need an instance object in order to use them).
You can download extension classes from www.digicool.com.
4807-7 ch29.F 5/24/01 9:01 AM Page 550

551Chapter 29 ✦ Writing Extension Modules
SummaryThis chapter introduced what you need to know to begin using Python with C. By
reading this chapter, you learned how to:
✦ Write a complete C extension module.
✦ Pass data from Python and convert it to C data types.
✦ Return data from a C extension to a Python program.
✦ Use popular third-party packages to automatically generate Python-C inter-
face code.
✦ Embed the interpreter in a C program.
Chapter 30 finishes our coverage of the Python/C API. In it, you’ll learn about the
different object layers available and how you can properly handle and report errors
from C.
✦ ✦ ✦
4807-7 ch29.F 5/24/01 9:01 AM Page 551

4807-7 ch29.F 5/24/01 9:01 AM Page 552

Embedding thePythonInterpreter
This chapter is the second of a two-part look at the
Python/C API. Whereas the previous chapter introduced
the concepts of using Python and C/C++ together, this chapter
is a reference for the functions used to manipulate Python
objects from C. It also deals with other issues, such as error
handling and C memory management.
Tracking Reference Counts Each Python object always knows how many variables refer-
ence it; and when there are no remaining variables, the object
magically goes away. To remind you how much you enjoy pro-
gramming in Python, when using the C API, you have to do
some of the reference counting yourself. Each time you use a
PyObject pointer (or one of its subtypes), you need to track
the type of reference ownership that goes along with that
object pointer. There’s nothing in the code itself that contains
this information; the Python/C API has a few documented
terms and conventions that act as guidelines.
Types of reference ownershipSuppose you have a PyObject pointer named x. You use the
Py_INCREF(x) macro to tell Python, “Hey, I’m using the
object pointed to by x; I need a new reference to it”; and you
use Py_DECREF(x) to say, “I’m done with (my reference to) x.”
If you don’t do this, it’s quite possible that somewhere else
the last reference to x is released, the object is cleaned up,
and you’re left with a pointer to memory that has already
been freed. Your well-behaved C extension module suddenly
becomes the cause of strange crashes and other evils.
3030C H A P T E R
✦ ✦ ✦ ✦
In This Chapter
Tracking referencecounts
Using the abstractand concrete objectlayers
Working with numberobjects
Working withsequence objects
Working withmapping objects
Using other objecttypes
Creating threads andsub-interpreters
Handling errors andexceptions
Managing memory
✦ ✦ ✦ ✦
4807-7 ch30.F 5/24/01 9:01 AM Page 553

554 Part V ✦ Advanced Python Programming
The first type of reference is an owned reference. If your block of code owns a refer-
ence to an object, then it’s safe to store the object pointer, for example, because the
object won’t be destroyed at least until you release your reference to it. One way to
gain a reference is to call Py_INCREF, another is when a function returns to you a
new reference.
You can cease to own a reference by calling Py_DECREF or by transferring the refer-
ence to someone else. When you own a reference and call a function that assumes
ownership of that reference, that function is said to steal the reference from you.
The second type of reference is a borrowed reference. Because you’re using C point-
ers to Python objects, it’s possible to pass objects to another function that doesn’t
modify the reference counts at all. If this is intentional, such a function is said to
borrow references to objects (otherwise, it’s a bug). One case in which this is safe is
in a function that uses the object pointer to perform some operation and then
returns control to the caller without storing the pointer or modifying the reference
count. If the caller owns a reference, then the object is guaranteed to exist until pro-
gram control is returned to the caller. The rule here is that the borrower can’t use
the reference any longer than the true owner does. To change a borrowed reference
to an owned reference, simply call Py_INCREF.
Although these references are called borrowed references, they aren’t really bor-rowed at all, as the caller still owns the reference. Another way to think of it is thatthe reference owner gives permission to another function to access the objecttemporarily.
To sum it up, you become an owner of a reference by calling Py_INCREF or by
receiving a new reference from someone else. There are two legal ways to rid your-
self of an owned reference: decrease the reference count or give the reference to
someone else. Anything else is a reference leak and, in turn, a memory leak (and
potentially a leak of other resources).
Py_XINCREF and Py_XDECREF modify reference counts, but first check to makesure the object is non-NULL.
Reference conventionsThe Python/C API documentation specifies whether references are borrowed or
owned (although occasionally it doesn’t hurt to look at the function source code
just to convince yourself).
As a general rule of thumb, the API functions that return some type of PyObjectpointer return a new reference to that Python object. For example, many C exten-
sion functions return with a call to Py_BuildValue; it returns a new reference to
you, which you pass on to the caller of your function. The main exceptions to this
rule (we’ll remind you again later) are PyTuple_GetItem and PyList_GetItem,
which return borrowed references to tuple and list items.
Tip
Note
4807-7 ch30.F 5/24/01 9:01 AM Page 554

555Chapter 30 ✦ Embedding the Python Interpreter
When you pass object references to functions, those functions generally borrow the
references (if they want a reference, they’ll call Py_INCREF). The main exceptions
are PyTuple_SetItem and PyList_SetItem, which steal references from their
callers.
Along the same lines, C functions called from Python borrow references to their
arguments because the objects are basically guaranteed to exist until the function
returns. If you need to store a pointer to an object, however, be sure to grab your
own reference to it.
Common pitfallsUsually, tracking reference counts isn’t too much hassle, but two very common but
subtle bugs are confusing enough to warrant mention here. Don’t be surprised if
you run into these exact bugs or close variants.
One common mistake occurs in multithreaded programs. There is a global lock (dis-
cussed in the “Creating Threads and Sub-Interpreters” section later in this chapter)
that the current thread must hold in order to operate on Python objects. Before
potentially long operations (a blocking socket call, for example), it is customary to
release this lock so that other threads can do work. Problems arise if the other
threads end up deleting the last reference to an object to which you have only a
borrowed reference. In this case, when you regain control of the global lock, your
once valid object has now been deleted. The solution is to increment the reference
count before releasing the lock and decrement it on return — even if no other refer-
ences remain, your owned reference will still exist.
A similar problem occurs when an object’s reference count is implicitly decre-
mented. Calling PyList_SetItem, for example, puts an object in a list (such as the
Python code a[5] = ‘hello’). The object originally in that position is replaced, its
reference count is decremented by 1, and, if that was the last reference, the object
is deleted. Any borrowed references you have to that object (perhaps from a call to
PyList_GetItem) may now be bogus. Again, the solution is to explicitly get a new
reference to the object so that you can guarantee that it is not destroyed too soon.
Using the Abstract and Concrete ObjectLayers
The Python/C API contains functions to perform all possible operations on Python
objects. The functions used to manipulate objects are organized hierarchically
according to object type, and it has two main layers: abstract and concrete.
4807-7 ch30.F 5/24/01 9:01 AM Page 555

556 Part V ✦ Advanced Python Programming
Object layersThe abstract object layer is an API layer that enables you to work with general cate-
gories of objects. For example, you can call PyNumber_Add to add two numbers
without worrying too much about their exact type. The abstract layer also has func-
tions for dealing with sequence types and mapping types.
The concrete object layer has functions specific to each type of object. PyFloat_Checkchecks to see if an object is a floating-point number, for example; and
PyComplex_FromDoubles creates a complex number object from two C numbers.
In general, API functions that return a pointer use NULL to denote an error, andthose that return an integer use –1 for errors. In both cases, the functions also setan error condition so that the Python caller ends up with an exception. See“Handling Errors and Exceptions” later in this chapter for more information abouterror handling.
If you have a choice between functions in the abstract and concrete object layers,
use the more general abstract functions, for greater flexibility.
Working with generic objectsAt the top of the hierarchy is a group of general-purpose functions for working with
any Python object. Table 30-1 lists common object operations in Python and their
corresponding C function call. Calls that return PyObject pointers return a new ref-
erence unless otherwise noted.
Table 30-1General Object Functions
Python Equivalent C Function Call
repr(o) or `o` PyObject *PyObject_Repr(PyObject *o)
str(o) PyObject *PyObject_Str(PyObject *o)
PyObject *PyObject_Unicode(PyObject *o)
len(o) int PyObject_Length(PyObject *o)
hasattr(o, name) int PyObject_HasAttrString(PyObject *o, char *name)
int PyObject_HasAttr(PyObject *o, PyObject *name)
getattr(o, name) PyObject *PyObject_GetAttrString(PyObject *o, char*name)
PyObject *PyObject_GetAttr(PyObject *o, PyObject*name)
Cross-Reference
4807-7 ch30.F 5/24/01 9:01 AM Page 556

557Chapter 30 ✦ Embedding the Python Interpreter
Python Equivalent C Function Call
o.name = v int PyObject_SetAttrString(PyObject *o, char*name,PyObject *v)
int PyObject_SetAttr(PyObject *o, PyObject *name,PyObject *v)
del o.name int PyObject_DelAttrStr(PyObject *o, char *name)
int PyObject_DelAttr(PyObject *o, PyObject *name)
cmp(o1, o2) int PyObject_Compare(PyObject *o1, PyObject *o2)
int PyObject_Cmp(PyObject *o1, PyObject *o2, int*result)
int PyObject_RichCompare(PyObject *o1, PyObject *o2,int op)
o[key] PyObject *PyObject_GetItem(PyObject *o, PyObject*key)
o[key] = val int PyObject_SetItem(PyObject *o, PyObject *key,PyObject *val)
del o[key] int PyObject_DelItem(PyObject *o, PyObject *key)
print >> fp, `o` int PyObject_Print(PyObject *o, FILE *fp, 0)
print >> fp, o int PyObject_Print(PyObject *o, FILE *fp,Py_PRINT_RAW)
type(o) PyObject *PyObject_Type(PyObject *o)
hash(o) int PyObject_Hash(PyObject *o)
not not o (is o true?) int PyObject_IsTrue(PyObject *o)
callable(o) int PyCallable_Check(PyObject *o)
The PyObject_RichCompare function compares two objects using the comparison
you specify in the op parameter. If neither object supports the necessary compari-
son function, Python compares them using its own methods. The op parameter can
be any of the following global variables that correspond to the rich comparison
function names:
Py_LTPy_LEPy_EQPy_NEPy_GTPy_GE
4807-7 ch30.F 5/24/01 9:01 AM Page 557

558 Part V ✦ Advanced Python Programming
To compare using an object’s __lt__ function, for example, you’d call
PyObject_RichCompare with an op of Py_LT. As of Python 2.1, the
PyObject_Compare function checks for the presence of rich comparison functions
before using Python’s default comparison functionality.
PyObject_RichCompare is new in Python 2.1.
You can read more about the rich comparison functions in Chapter 7.
The equivalent of apply(o, args) or o(*args) is PyObject_CallObject(PyObject *o, PyObject *args), where args can be NULL if a function takes no
arguments. PyObject_CallObject returns a new reference to an object containing
the function call result.
PyObject_CallFunction(PyObject *o, char *format, ...) works the same
way except that you use a Py_BuildValue-like format string to specify the argu-
ment types, or a NULL format string to denote no arguments. When calling methods
of instance objects, use PyObject_CallMethod(PyObject *o, char *method,char *format, ...). Note that you can’t call special methods (for example,
__add__) this way; the API provides individual functions for calling those methods
(for example, PyNumber_Add).
Even if there isn’t a public C API for a particular Python method, you can still call itusing these functions. For example, mapping objects (for example, dictionaries)have an items() method to return a list of key-value pairs, so you could invoke itas follows:
PyObject_CallMethod(O,”items”,NULL)
PyObject_AsFileDescriptor(PyObject *o) is a utility function for getting an
integer file descriptor from an object. If the Python object is an integer or long num-
ber, it returns its value. Otherwise, it returns the result from calling the object’s
fileno() method, if present.
Working with Number ObjectsThe abstract object layer has the PyNumber family of functions for dealing with any
numerical object; and the concrete layer has functions specific to integers, long
integers, floating-point numbers, and complex numbers.
Any numerical typeUse PyNumber_Check(PyObject *o) to determine whether a particular Python
object supports numerical operations.
Tip
Cross-Reference
NewFeature
4807-7 ch30.F 5/24/01 9:01 AM Page 558
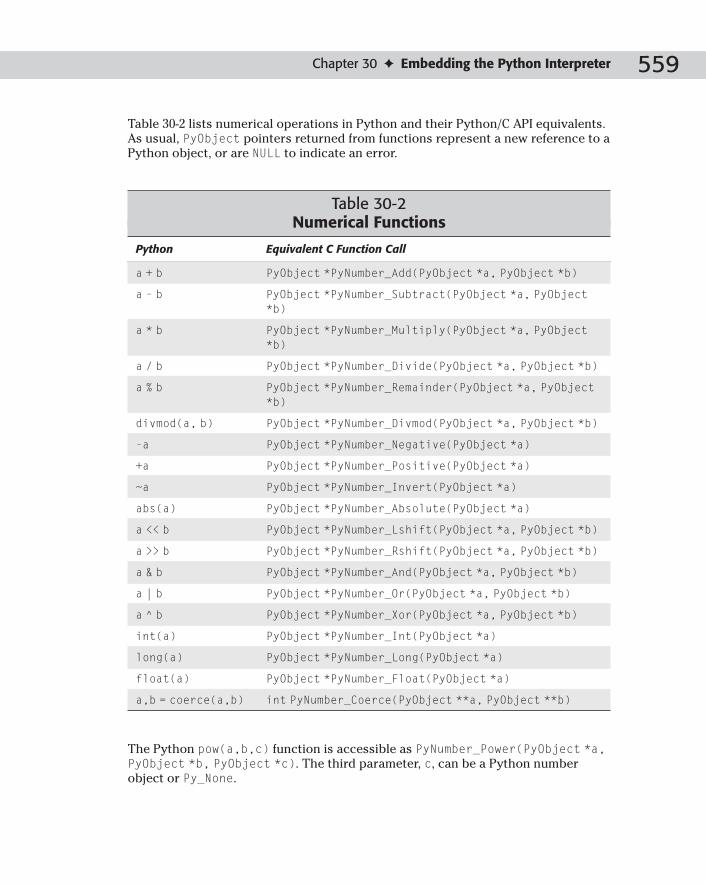
559Chapter 30 ✦ Embedding the Python Interpreter
Table 30-2 lists numerical operations in Python and their Python/C API equivalents.
As usual, PyObject pointers returned from functions represent a new reference to a
Python object, or are NULL to indicate an error.
Table 30-2Numerical Functions
Python Equivalent C Function Call
a + b PyObject *PyNumber_Add(PyObject *a, PyObject *b)
a – b PyObject *PyNumber_Subtract(PyObject *a, PyObject*b)
a * b PyObject *PyNumber_Multiply(PyObject *a, PyObject*b)
a / b PyObject *PyNumber_Divide(PyObject *a, PyObject *b)
a % b PyObject *PyNumber_Remainder(PyObject *a, PyObject*b)
divmod(a, b) PyObject *PyNumber_Divmod(PyObject *a, PyObject *b)
-a PyObject *PyNumber_Negative(PyObject *a)
+a PyObject *PyNumber_Positive(PyObject *a)
~a PyObject *PyNumber_Invert(PyObject *a)
abs(a) PyObject *PyNumber_Absolute(PyObject *a)
a << b PyObject *PyNumber_Lshift(PyObject *a, PyObject *b)
a >> b PyObject *PyNumber_Rshift(PyObject *a, PyObject *b)
a & b PyObject *PyNumber_And(PyObject *a, PyObject *b)
a | b PyObject *PyNumber_Or(PyObject *a, PyObject *b)
a ^ b PyObject *PyNumber_Xor(PyObject *a, PyObject *b)
int(a) PyObject *PyNumber_Int(PyObject *a)
long(a) PyObject *PyNumber_Long(PyObject *a)
float(a) PyObject *PyNumber_Float(PyObject *a)
a,b = coerce(a,b) int PyNumber_Coerce(PyObject **a, PyObject **b)
The Python pow(a,b,c) function is accessible as PyNumber_Power(PyObject *a,PyObject *b, PyObject *c). The third parameter, c, can be a Python number
object or Py_None.
4807-7 ch30.F 5/24/01 9:01 AM Page 559

560 Part V ✦ Advanced Python Programming
For many of the functions in Table 30-2, there are corresponding functions for the
in-place version of the same operation. For example, PyObject*PyNumber_InPlaceLshift (PyObject *a, PyObject *b) is the C way of doing a<<= b in Python.
IntegersPython integer objects are represented in C by the PyIntObject structure.
PyInt_Check(PyObject *o) returns 1 if the given object is an integer object (it
has the type PyInt_Type).
PyInt_FromLong(long val) takes a C long integer and returns a new reference to
a Python integer object. PyInt_AsLong(PyObject *o) converts an integer object
back to a C long, coercing the object to a Python integer object first if needed. If
you already know that it is an integer, you can use the PyInt_AS_LONG(PyOBject*o) macro to do the same thing, but without coercion and error checking.
The largest value that can be stored in an integer object is defined as LONG_MAX in
the header files; you can use PyInt_GetMax() to retrieve this value.
LongsPython long integers are stored in PyLongObject structures, their type is
PyLong_Type (this is the same as types.LongType in Python), and you can call
PyLong_Check(PyObject *o) to test whether an object is a long number object.
PyLong_FromLong(long val), PyLong_FromUnsignedLong(unsigned long val),
and PyLong_FromDouble(double val) return a new reference to a long integer
object having the given value.
One other way to create a new Python long object is by passing a character string
to PyLong_FromString(char *str, char **end, int base). The base or radix of
the number is specified by the base argument; values can be in the range from 2 to
36, or 0, which means that the function should look at the string itself to determine
the base. It will use base 16 if the string starts with 0x or 0X, base 8 if it starts with
0, and base 10 otherwise. PyLong_FromString ignores leading spaces, and stores
the position of the first character after the end of the number in end if it is not
NULL.
PyLong_AsLong(PyObject *o) and PyLong_AsUnsignedLong(PyObject *o) con-
vert long integer objects to C long and unsigned long variables. Because Python
long integers can be any size, values that cannot be converted to C cause an
OverflowError exception to be raised. PyLong_AsDouble(PyObject *o) returns
the value of a long integer in a C double.
4807-7 ch30.F 5/24/01 9:01 AM Page 560

561Chapter 30 ✦ Embedding the Python Interpreter
Floating-point numbersFloating-point numbers are stored in PyFloatObject structures; their type is
PyFloat_Type and you can ensure that an object is a floating-point number by call-
ing PyFloat_Check(PyObject *o).
PyFloat_FromDouble(double val) returns a new reference to a Python floating-
point number object.
Given a Python floating-point number, you can convert it to a C double by calling
PyFloat_AsDouble(PyObject *o). This function has some overhead due to error
checking, so if you are already sure your object is a floating-point number, you can
just call PyFloat_AS_DOUBLE(PyObject *o).
Complex numbersPython complex numbers live in PyComplexObject structures and have the type
PyComplex_Type (equivalent to types.ComplexType in Python).
PyComplex_Check(PyObject *o) returns 1 if the given object is a Python complex
number.
To create a complex number object, call PyComplex_FromDoubles(double real,double imag) to specify its real and imaginary components. You can also use
PyComplex_FromCComplex(Py_complex *c). Py_complex is a C structure
declared as follows:
typedef struct {double real;double imag;
} Py_complex;
Given a Python complex number object, you can extract its real and imaginary
parts by calling PyComplex_RealAsDouble(PyObject *o) and
PyComplex_ImagAsDouble(PyComplex *o). Both functions return a C double. You
can also call PyComplex_AsCComplex(PyObject *o) to place the values into a
Py_complex structure.
Working with Sequence ObjectsThe functions in this section enable you to manipulate Python objects that are lists,
tuples, and strings.
When using functions that return slices, keep in mind that generally what is
returned to you is a new reference, and that each item in it had its reference count
incremented before it was sent back to you.
4807-7 ch30.F 5/24/01 9:01 AM Page 561

562 Part V ✦ Advanced Python Programming
Any sequence typeThese functions are part of Python’s abstract object layer and work on any
sequence object. PySequence_Check(PyObject *o) returns a nonzero value if the
object supports sequence functions.
Table 30-3 lists C function calls for corresponding sequence operations in Python.
Functions that return a PyObject pointer return a new reference of that object or
NULL if an error occurs. Those that return integers use a value of -1 to denote failure.
Table 30-3C Sequence Functions
Python Equivalent C Function Call
len(s) int PySequence_Length(PyObject *s)
s[i] PyObject *PySequence_GetItem(PyObject *s, int i)
s[a:b] PyObject *PySequence_GetSlice(PyObject *s, int a, int b)
s[i] = v int PySequence_SetItem(PyObject *s, int i, PyObject *v)
s[a:b] = v int PySequence_SetSlice(PyObject *s, int a, int b,PyObject *v)
del s[i] int PySequence_DelItem(PyObject *s, int i)
del s[a:b] int PySequence_DelSlice(PyObject *s, int a, int b)
s1 + s2 PyObject *PySequence_Concat(PyObject *s1, PyObject *s2)
s1 += s2 PyObject *PySequence_InPlaceConcat(PyObject *s1,PyObject *s2)
s * count PyObject *PySequence_Repeat(PyObject *s, int count)
s *= count PyObject *PySequence_InPlaceRepeat(PyOBject *s, intcount)
s.count(v) int PySequence_Count(PyObject *s, PyObject *v)
v in s int PySequence_Contains(PyObject *s, PyObject *v)
s.index(v) int PySequence_Index(PyObject *s, PyObject *v)
tuple(s) PyObject *PySequence_Tuple(PyObject *s)
list(s) PyObject *PySequence_List(PyObject *s)
Two sequence functions perform less error checking to increase performance.
PySequence_Fast (PyObject *o, const char *m) returns a new reference to oafter converting it to a tuple, leaving it unchanged (except for the reference count)
4807-7 ch30.F 5/24/01 9:01 AM Page 562

563Chapter 30 ✦ Embedding the Python Interpreter
if it is already a tuple or a list. If the object o can’t be converted to a sequence, the
function returns NULL and raises a TypeError with m as the message text. You can
then pass the returned object to PySequence_Fast_GET_ITEM(PyObject *o, intindex) to get borrowed references to sequence members.
PySequence_Fast_GET_ITEM assumes that the index values you pass in arevalid and doesn’t check for errors.
StringsA PyStringObject is a specific type of sequence used to hold Python strings.
PyString_Check(PyObject *o) returns 1 if the given object is a string object; it
verifies that o’s type is PyString_Type (equivalent to types.StringType in
Python).
You create a new string object from a null-terminated C string by calling
PyString_FromString(const char *s). It returns a PyObject pointer that is a new
reference to a string object of that value. For strings that might have embedded null
characters, use PyString_FromStringAndSize(const char *s, int len).
PyString_Format(PyObject *format, PyObject *args) returns a new reference
to a string object created using a format string and a tuple of arguments, equivalent
to the Python format % args.
After creating a new string object, you can call PyString_Resize(PyObject **s,int newsize) to change its size to newsize. To Python, strings are immutable, so it
is safe to call this function only if no other part of the program knows about the
string yet (for example, when you just created it).
Going the other direction, PyString_AsString(PyObject *s) returns a charpointer to the string data, converting the object to a string first if needed.
PyString_AsStringAndSize(PyObject *s, char **buffer, int *len) sets
buffer to point at a string representation of the object, returns the string length in
len (len can be NULL as long as the string has no embedded null characters), and
returns -1 on failure. Both functions return pointers to internal buffers that you
shouldn’t modify or de-allocate.
PyString_AsStringAndSize works on both string and Unicode string objects.
PyString_Size(PyObject *s) returns the length of the string. If the object is not
already a string, the function first calls PyString_AsStringAndSize and then
returns the size.
In cases where you know the object really is a string object, you can call
PyString_AS_STRING(PyObject *s) and PyString_GET_SIZE(PyObject *s) for
better performance.
Tip
Caution
4807-7 ch30.F 5/24/01 9:01 AM Page 563

564 Part V ✦ Advanced Python Programming
PyString_Concat(PyObject **s, PyObject *new) concatenates new onto the
end of s. The function itself returns no value; s contains a new reference to the con-
catenated string object, or NULL on failure. PyString_Concat calls Py_DECREF on
the s object you pass in; in effect, you are transferring your reference to it and it
gives you a new reference back. PyString_ConcatAndDel(PyObject **s,PyObject *new) is a utility function that calls PyString_Concat and then calls
Py_XDECREF on new so you don’t have to.
PyString_InternInPlace(PyObject **s) is equivalent to the Python intern func-
tion. When you call this function, you transfer ownership of the reference and receive
back a new reference. The object that you receive will be either the original object or a
previously interned string of the same value. PyString_InternFromString(const char *s) is a utility function that converts a C string to a Python string
object, interns it, and returns to you a new reference of the result.
PyString_Encode(Py_UNICODE *s, int size, char *encoding, char *errors)returns a new reference to an encoded string object. The encoding and errorsarguments are the same as those for the encode Python function (for example,
errors can have values strict, ignore, and replace).
PyString_AsEncodedString (PyObject *unicode, const char *encoding,const char *errors) works the same way, but takes a PyUnicodeObject.
PyString_Decode(char *s, int size, char *encoding, char *errors) returns
a new reference to a decoded string object, like the Python unicode function.
See “Unicode strings” later in this chapter for more functions to handle Unicodeobjects.
ListsA PyListObject holds a Python list; it has the type PyList_Type (equivalent to
Python’s types.ListType). PyList_Check(PyObject *p) returns 1 if the given
object is a list.
Table 30-4 lists Python list operations and their equivalent C function calls. Unless
returning an actual numeric value, functions returning integers return 0 to denote
success.
Table 30-4C List Functions
Python Equivalent C Function Call
len(t) int PyList_Size(PyObject *t)
t[i] PyObject *PyList_GetItem(PyObject *t, int i)
t[i] = o int PyList_SetItem(PyObject *t, int i, PyObject *o)
Cross-Reference
4807-7 ch30.F 5/24/01 9:01 AM Page 564

565Chapter 30 ✦ Embedding the Python Interpreter
Python Equivalent C Function Call
t.insert(i, o) int PyList_Insert(PyObject *t, int i, PyObject *o)
t.append(o) int PyList_Append(PyObject *t, PyObject *o)
t[a:b] PyObject *PyList_GetSlice(PyObject *t, int a, int b)
t[a:b] = t2 int PyList_SetSlice(PyObject *t, int a, int b, PyObject*t2)
t.sort() int PyList_Srt(PyObject *t)
t.reverse() int PyList_Reverse(PyObject *t)
tuple(t) PyObject *PyList_AsTuple(PyObject *t)
The list functions that take an index parameter assume that the index you supply is
valid. PyList_GetItem returns a borrowed reference to an item; and with
PyList_SetItem, you give up (transfer) ownership of the reference, but
PyList_Insert behaves “normally” (it increments the reference count of the
object passed in). Don’t forget that setting a list item replaces another item, causing
its reference count to be decremented (which could in turn call its destructor).
PyList_GetSlice returns a new reference to a list object containing the requested
objects; those objects are also new references to the originals. PyList_SetSlicerequires that both arguments (t and t2) be list objects. PyList_AsTuple returns a
new reference to a tuple object, and each member of the tuple is a new reference as
well.
PyList_New(int len) returns a new reference to a list object that has an initial
length of len.
PyList_GET_SIZE(PyObject *t) is a slightly faster way to retrieve a list’s size; it
doesn’t verify that the object t is really a list. The same is true for
PyList_GET_ITEM(PyObject *t, int i) and PyList_SET_ITEM(PyObject *t,int i, PyObject *o).
TuplesA PyTupleObject is the C version of a Python tuple; it has the type PyTuple_Type,
which is the same as Python’s types.TupleType. Call PyTuple_Check(PyObject*o) to determine whether an object is a tuple.
PyTuple_New(int len) returns a new reference to a tuple object of length len.
PyTuple_Resize(PyObject *o, int newsize, 0) resizes a given tuple; as with
the list resize function, it is safe to call only if no other references to this object
exist. This function returns 0 on success.
Table 30-5 lists the C function calls for common tuple operations.
4807-7 ch30.F 5/24/01 9:01 AM Page 565

566 Part V ✦ Advanced Python Programming
Table 30-5C Tuple Functions
Python Equivalent C Function Call
len(t) int PyTuple_Size(PyObject *t)
t[i] PyObject *PyTuple_GetItem(PyObject *t, int i)
t[i] = o int PyTuple_SetItem(PyObject *t, int i, PyObject *o)
t[a:b] PyObject *PyTuple_GetSlice(PyObject *t, int a, int b)
PyTuple_GET_ITEM(PyObject *t, int i) and PyTuple_SET_ITEM(PyObject *t,int i, PyObject *o) are faster versions of PyTuple_GetItem and
PyTuple_SetItem; they assume you’re honest and pass in tuple objects.
The same rules apply here as for lists: index values are assumed to be valid,
PyTuple_GetItem returns a borrowed reference, and PyTuple_GetSlice incre-
ments the reference count for each object in the slice. In addition,
PyTuple_SetItem transfers ownership of the reference to the tuple, and the refer-
ence count of the item being replaced is decremented by 1.
BuffersPython objects in C can implement a buffer interface, which is a group of functions
that let an object expose the memory where it stores its data. Buffer interfaces are
often low-level or performance-conscious functions that want to access data in its
raw byte format without having to copy the data.
The C PyBufferObject structure is used to represent a Python buffer. These
objects have a type of PyBuffer_Type. As usual, you can call
PyBuffer_Check(PyObject *o) to determine whether an object is a buffer.
Given an object that has an internal buffer, PyBuffer_FromObject(PyObject *o,int offset, int size) creates a read-only buffer object to access the data start-
ing at the given offset. If the object allows reading and writing of its buffer data,
using PyBuffer_FromReadWriteObject(PyOBject *o, int offset, int size)creates a buffer object that supports writing too. Both functions return a new refer-
ence to a buffer object, and for size you can use the constant Py_END_OF_BUFFERto include all data from the given offset to the end of the object.
You can wrap a block of memory into a read-only buffer object by calling
PyBuffer_FromMemory(void *p, int size). Py_Buffer_FromReadWriteMemory(void *p, int size) does the same thing but allows writing to the buffer as well.
Of course, for both of these functions you need to ensure the block of memory is
valid for as long as the buffer object exists. An alternative is to let the buffer own
4807-7 ch30.F 5/24/01 9:01 AM Page 566

567Chapter 30 ✦ Embedding the Python Interpreter
and manage the block of memory itself; call PyBuffer_New(int size) to create a
memory buffer of the given size.
PyObject_AsReadBuffer(PyObject *o, const void **buffer, int *size)returns a pointer and a size value for a given object’s internal buffer. For objects
that support it, PyObject_AsWriteBuffer(PyObject *o, void **buffer, int*size) returns the same information for a writeable buffer.
Unicode stringsUnicode strings have the type PyUnicode_Type and are stored in a
PyUnicodeObject structure. Call PyUnicode_Check(PyObject *o) to determine
whether an object is a Unicode string. The actual characters of the string are stored
in a member of this structure having the type Py_UNICODE, which is a C typedef for
16-bit values.
On platforms such as Windows, which provide a usable wide character type(wchar_t), Python uses this type and its supporting functions for better perfor-mance and compatibility.
PyUnicode_GET_SIZE(PyObject *o) returns the number of characters in the
string, and PyUnicode_GET_DATA_SIZE(PyObject *o) returns the number of
bytes used to store the string (string length * size of each character).
PyUnicode_GetSize(PyObject *o) returns the string’s length after verifying that
the object is a Unicode string.
Converting to and from UnicodePyUnicode_AS_UNICODE(PyObject *o) returns a read-only pointer to the struc-
ture’s internal Py_UNICODE member, and PyUnicode_AS_DATA(PyObject *o) does
the same but casts the return pointer to char *. PyUnicode_AsUnicode(PyObject*o) returns a pointer to the internal data but first ensures that the object really is a
Unicode string. PyUnicode_AsWideChar(PyUnicodeObject *o, wchar_t *buff,int length) copies the Unicode string into the given buffer, copying at most
length characters, and returns the number of characters copied.
PyUnicode_FromUnicode(const Py_UNICODE *buff, int length) returns a new
reference to a Unicode string object of the given length whose contents were
copied from buff if it was not NULL. PyUnicode_FromWideChar(const wchar_t*buff, int length) does the same but copies from a wide character buffer
pointer that must not be NULL.
PyUnicode_FromEncodedObject(PyObject *obj, const char *encoding,const char *errors) uses encoding and errors to coerce an encoded object to a
Unicode object if needed, and returns a new reference to the Unicode object. Set
encoding and errors to NULL to use the defaults.
Note
4807-7 ch30.F 5/24/01 9:01 AM Page 567

568 Part V ✦ Advanced Python Programming
PyUnicode_FromObject(PyObject *obj) is a utility function that calls
PyUnicode_FromEncodedObject with encoding set to NULL, and errors set to
“strict”.
PyUnicode_Decode(const char *s, int length, const char *encoding, constchar *errors) takes a string length bytes long that uses the given encoding and
converts it to Unicode, returning to you a new reference to the Unicode object.
PyUnicode_Encode (const Py_UNICODE *s, int length, const char *encoding, const char *errors) encodes a Py_UNICODE buffer and returns a
Python string object.
The API also provides shortcut routines for encoding and decoding strings usingstandard encodings such as 7-bit ASCII, UTF8, UTF16, Latin-1, and so on. See uni-codeobject.h for details.
Checking and converting individual charactersPy_UNICODE_ISSPACE(Py_UNICODE ch) returns 1 if the given Unicode character is
whitespace. Additionally, you can use the following to perform other similar checks:
Py_UNICODE_ISLOWER Py_UNICODE_ISUPPERPy_UNICODE_ISTITLE Py_UNICODE_ISLINEBREAKPy_UNICODE_ISDECIMAL Py_UNICODE_ISDIGITPy_UNICODE_ISNUMERIC Py_UNICODE_ISALPHAPy_UNICODE_ISALNUM
Py_UNICODE_TOLOWER(Py_UNICODE ch), Py_UNICODE_TOUPPER, and Py_UNI-CODE_TOTITLE return the given character converted to lowercase, uppercase, and
titlecase, respectively.
Py_UNICODE_TODECIMAL(Py_UNICODE ch) and Py_UNICODE_TODIGIT return the
given character converted to an integer decimal and an integer digit (usually the
same thing). Py_UNICODE_TONUMERIC(Py_UNICODE ch) returns a double holding
the numeric value of the given character (for example, given the single-character
symbol for one-half, it would return the number 0.5).
Using string manipulation functionsThe following PyUnicode functions work like their PySequence and PyStringcounterparts:
PyObject *PyUnicode_Concat(PyObject *a, PyObject *b)PyObject *PyUnicode_Split(PyObject *s, PyObject *sep, int
maxsplit)PyObject *PyUnicode_Join(PyObject *sep, PyObject *sequence)int PyUnicode_Count(PyObject *str, PyObject *substr, int
start, int end)
Note
4807-7 ch30.F 5/24/01 9:01 AM Page 568

569Chapter 30 ✦ Embedding the Python Interpreter
int PyUnicode_Contains(PyObject *container, PyObject *element)int PyUnicode_Compare(PyObject *left, PyObject *right)PyObject* PyUnicode_Format(PyObject *format, PyObject *args)
PyUnicode_Replace(PyObject *str, PyObject *substr, PyObject *replstr,int maxcount) works like the normal string replace function; maxcount is the max-
imum number of replacements to perform.
PyUnicode_Find(PyObject *str, PyObject *substr, int start, int end, intdirection) returns the index of the first match of substr in str[start:end],
searching left-to-right if direction is 1, and right-to-left if direction is -1.
PyUnicode_Splitlines (PyObject *s, int maxsplit) returns a list of strings
split at line breaks (the line break characters are removed), stopping after all text
has been processed or maxsplit splits have occurred.
PyUnicode_Tailmatch (PyObject *str, PyObject *substr, int start, intend, int direction) checks whether substr matches a portion of str. If direc-tion is -1, the function returns 1 if str[start:end] starts with substr. If direc-tion is greater than or equal to 0, the function returns 1 if str[start:end] ends
with substr.
PyUnicode_Translate (PyObject *str, PyObject *table, const char*errors) maps characters to new values using a lookup table. The table object
can be a dictionary or sequence (or anything that has a __getitem__ method). For
each character in str, the function looks up its entry in table and inserts the new
value in the result (a Unicode object returned to you as a new reference). If the
character’s entry in the table has a value of None, the character is deleted in the
result (not copied); and if there is no entry in the table (the lookup causes a
LookupError), the character is copied as is.
Working with Mapping ObjectsAlthough Python currently has only one mapping object type, the Python/C API still
makes a distinction between the abstract and concrete object layers.
Functions for any mapping typePyMapping_Check(PyObject *o) returns 1 if the object is a mapping object. Table
30-6 lists Python code for common mapping object operations and the correspond-
ing C function calls.
4807-7 ch30.F 5/24/01 9:01 AM Page 569

570 Part V ✦ Advanced Python Programming
Table 30-6C Mapping Functions
Python Equivalent C Function Call
len(o) PyMapping_Length(PyObject *o)
o[key] PyMapping_GetItemString(PyObject *o, char *key)
o[key]=val PyMapping_SetItemString(PyObject *o, char *key,PyObject *val)
del o[key] PyMapping_DelItem(PyObject *o, PyObject *key)
PyMapping_DelItemString(PyObject *o, char *key)
o.has_key(k) PyMapping_HasKey(PyObject *o, PyObject *k)
PyMapping_HasKeyString(PyObject *o, char *key)
o.keys() PyMapping_Keys(PyObject *o)
o.values() PyMapping_Values(PyObject *o)
o.items() PyMapping_Items(PyObject *o)
DictionariesDictionaries are represented by PyDictObject structures, and they have the type
PyDict_Type (types.DictionaryType in Python). PyDict_Check(PyObject *o)returns 1 if the given object is a dictionary.
Table 30-7 lists dictionary operations in Python and C.
Table 30-7C Dictionary Functions
Python Equivalent C Function Call
d = {} PyDict_New()
d.clear() PyDict_Clear(PyObject *d)
len(d) PyDict_Size(PyObject *d)
d[key] PyDict_GetItem(PyObject *d, PyObject *key) ¥
PyDict_GetItemString(PyObject *d, char *key) ¥
d[key] = val PyDict_SetItem(PyObject *d, PyObject *key, PyObject *val)PyDict_SetItemString(PyObject *d, char *key, PyObject *val)
4807-7 ch30.F 5/24/01 9:01 AM Page 570

571Chapter 30 ✦ Embedding the Python Interpreter
Python Equivalent C Function Call
del d[key] PyDict_DelItem(PyObject *d, PyObject *key)PyDict_DelItemString(PyObject *d, char *key)
d.keys() PyDict_Keys(PyObject *d)
d.values() PyDict_Values(PyObject *d)
d.items() PyDict_Items(PyObject *d)
d.copy() PyDict_Copy(PyObject *d)
¥ Returns a borrowed reference to the value object
Using Other Object TypesThe following sections describe a few other miscellaneous object types available in
the Python/C API.
TypePyTypeObject structures describe Python’s built-in types. These objects have the
type PyTypeObject, and PyType_Check(PyObject *o) returns 1 if the given
object is a type object.
NonePy_None is the C equivalent of Python’s None. Use this anyplace to denote a lack of
value instead of using NULL, because the Python/C API uses NULL to indicate an
error.
Py_None is an actual object, so treat it like any other with respect to referencecounting. For example, when a C extension module function has no return value,it should use the following idiom:
Py_INCREF(Py_None);return Py_None;
FilePython file objects are thin wrappers around FILE objects in the standard C
libraries. The Python/C API uses a PyFileObject structure to represent a file
object; these structures have the type PyFile_Type, and you can call
PyFile_Check(PyObject *o) to verify that an object is a file.
Note
4807-7 ch30.F 5/24/01 9:01 AM Page 571

572 Part V ✦ Advanced Python Programming
PyFile_FromFile(FILE *f, char *name, char *mode, int (close*)(FILE*))creates a Python file object from a C file of the given name and mode. The file
pointer f must be an already open file or NULL (although you should fill in a valid
FILE structure before letting any other code use it). The close argument is the
function to call to close the file; you can pass in the standard C fclose function if
you don’t need anything special.
PyFile_FromString(char *fname, char *mode) uses mode to open (or create,
depending on the mode) a file named fname. Like PyFile_FromFile, it returns a
new reference to a Python file object.
You can access the FILE pointer of a Python file object using
PyFile_AsFile(PyObject *f), and PyFile_Name(PyObject *f) returns a bor-
rowed reference to a string object containing the file’s name.
To simulate f.readline(n), call PyFile_GetLine (PyObject *f, int n). If the
end of file has been reached, the function still returns a string object (but of length
0). If n is 0, the function reads one line, and if n is greater than 0, the function will
read up to n bytes. If n is less than 0, the function reads one line of data but raises
EOFError if the end of file has been reached already.
You can set or clear the softspace flag of a file or filelike object by calling
PyFile_SoftSpace(PyObject *f, int flag). A value of 1 means that a space will
be output before the next data is written to the file.
PyFile_WriteString(char *s, PyObject *f) writes a string to an open file.
PyFile_WriteObject(PyObject *o, PyObject *f, int flags) writes a string
representation of the given object o to the file f. By default, it gets the output by
calling repr; use a flags value of Py_PRINT_RAW to have it call str instead.
ModuleThe Python/C API has functions for working with module objects and importing
them, as described in the following sections.
Module objectsPyModuleObject structures have the type PyModule_Type, and
PyModule_Check(PyObject *o) returns 1 if the object o is a module.
PyModule_New(char *name) returns a new reference to a new module object and
creates the module’s namespace dictionary. The module’s __name__ member is set
to name, and its __doc__ member is set to an empty string. Before letting other parts
of the program use the new module, you should at least set its __file__ member.
PyModule_GetDict(PyObject *m) returns a borrowed reference to the module’s
dictionary (__dict__). PyModule_GetName(PyObject *m) returns a char pointer
4807-7 ch30.F 5/24/01 9:01 AM Page 572

573Chapter 30 ✦ Embedding the Python Interpreter
to the value of the module’s __name__ member, and
PyModule_GetFilename(PyObject *m) returns a char pointer to the value of its
__file__ member.
The following functions were introduced in Python 2.0.
PyModule_AddObject(PyObject *m, char *name, PyObject *value) adds the
object value to the module m. This function steals a reference to value.
PyModule_AddIntConstant(PyObject *m, char *name, int value) is a utility
function that creates an integer object with the given value and adds it to the mod-
ule. PyModule_AddStringConstant(PyObject *m, char *name, char *value)does the same for a string variable.
Importing modulesPyImport_ImportModule(char *name) loads the requested module and returns a
new reference to it. Internally, PyImport_ImportModule calls
PyImport_ImportModuleEx (char *name, PyObject *globals, PyObject*locals, PyObject *fromlist), which loads a module with the given global and
local dictionaries, which may be NULL. Python’s __import__ function calls
PyImport_ImportModuleEx.
PyImport_Import(PyObject *name) also loads a module, but it uses the current
import hooks to do the loading.
Chapter 35 shows you how to override importing behavior using import hooks.
PyImport_ReloadModule (PyObject *m) reloads the given module (just like the
Python reload() function) and returns a new reference to it.
PyImport_AddModule(char *name) returns a borrowed reference to a module
called name, creating an empty module object if necessary.
PyImport_GetModuleDict() returns a borrowed reference to the module dictio-
nary (stored in sys.modules).
PyImport_ExecCodeModule(char *name, PyObject *co) returns a new reference
to a module object. The module is created and imported using co, which is a code
object (obtained from a call to compile or read in from a .pyc file). If the module
already exists, it is reloaded using the given code object.
PyImport_GetMagicNumber() returns a C long containing the little-endian, 4-byte
magic number at the start of all .pyc and .pyo files.
Before a call to Py_Initialize, you can add your module to the list of built-in mod-
ules by calling PyImport_AppendInittab(char *name, void (*initfunc)(void)), passing in the module name and initialization function to call. To add
Cross-Reference
NewFeature
4807-7 ch30.F 5/24/01 9:01 AM Page 573

574 Part V ✦ Advanced Python Programming
several modules, call PyImport_ExtendInittab(struct _inittab *newtab),
where newtab is an array of entries for each module, with an extra entry on the end
with a NULL name to denote the end of the list. The _inittab structure has the fol-
lowing format:
struct _inittab {char *name;void (*initfunc)(void);
};
PyImport_ImportFrozenModule(char *name) loads a frozen module (created
with the Freeze utility). This function only loads the module; you still need to call
PyImport_ImportModule to import it.
The Freeze utility is covered in Chapter 36.
CObjectsOccasionally, it’s necessary to pass a C object (well, a pointer) from a function
through Python code and back into C again. The PyCObject structure is the
Python/C API equivalent of a void pointer for just this purpose. Your code can call
PyCObject_Check(PyObject *o) to determine whether an object is of this type.
To create a PyCObject, call PyCObject_FromVoidPtr (void* cobj, void(*destr)(void *)), which returns a new reference to the object. destr is a func-
tion that will be called when Python is about to destroy the object. If you don’t
need to do any cleanup, this argument can be NULL.
PyCObjects can also contain some extra information called a description. Call
PyCObject_FromVoidPtrAndDesc (void* cobj, void* desc, void(*destr)(void *, void *)) to create an object with a description. Note that the
destructor function receives both the object and its description when called.
PyCObject_GetDesc(PyObject *o) returns a pointer to the description data, and
PyCObjcet_AsVoidPtr(PyObject *o) returns the original C pointer used to create
the PyCObject.
Creating Threads and Sub-InterpretersOne application can have multiple interpreters running, and each interpreter can
have multiple threads, but they all share the Global Interpreter Lock (GIL). In order
to operate on a Python object, a thread must have control of the GIL or it risks cor-
rupting memory.
Cross-Reference
4807-7 ch30.F 5/24/01 9:01 AM Page 574

575Chapter 30 ✦ Embedding the Python Interpreter
The interpreter releases and reacquires the lock often to ensure that each thread
gets a chance to run; you can set how many bytecode instructions it processes
before releasing the lock by calling sys.setcheckinterval(n); the current default
is 10 instructions.
Before potentially blocking I/O routines or long computations that don’t require
working with Python objects, your code should manually release the lock and then
reacquire it when the work is complete.
ThreadsEach thread has some state information stored in a PyThreadState structure, and
a global variable holds a pointer to the current thread’s state. To release and reac-
quire the GIL, use the standard Python macros:
Py_BEGIN_ALLOW_THREADS... // Some workPy_END_ALLOW_THREADS
Among other things, these macros call PyEval_ReleaseLock and
PyEval_AcquireLock on the global lock.
When working with the global interpreter lock, pay close attention to when yourelease it and acquire it. Trying to acquire it once you already have it (through arecursive call, for example) is an excellent way to cause deadlock and bring yourprogram to a screeching halt.
PyEval_InitThreads() initializes the thread subsystem and acquires the GIL (cre-
ating it if necessary). It’s safe to call this before Py_Initialize, although this is
normally called automatically so that you don’t need to.
Before a new thread created in C can access Python objects, it has to manually cre-
ate its own thread state, acquire the GIL, and then set the current thread state to
point to the new thread’s state. When finished, it needs to reset the old thread state
and release the lock. The Python/C API has several pairs of functions for working
with the GIL and the current thread state.
PyThreadState_New(PyInterpreterState *interp) creates a new thread state
structure. The interp argument is the current interpreter’s state, which is accessi-
ble as the interp variable of any thread state structure. Call
PyThreadState_Get() to get a pointer to the current thread state. Although you
must have the GIL to get the current state, you do not need to have it to create a
new thread state structure.
Call PyThreadState_Clear(PyThreadState *state) to clear a thread’s state
before calling PyThreadState_Delete(PythreadState *state) to free the thread
state memory. You must have the GIL to clear a thread state structure, but not to
delete it.
Caution
4807-7 ch30.F 5/24/01 9:01 AM Page 575

576 Part V ✦ Advanced Python Programming
PyEval_AcquireLock() and PyEvalReleaseLock() acquire and release the
global interpreter lock, respectively.
PyEval_AcquireThread(PyThreadState *state) acquires the GIL and sets the
current state to state. PyEval_ReleaseThread(PyThreadState *state) sets the
current thread state to NULL and releases the GIL. You have to pass in your thread
state as a safety check to ensure that the correct thread is releasing the lock.
PyThreadState_Swap(PyThreadState *state) swaps the current thread state
with state, which can be NULL (leaving the thread state selection up to the inter-
preter). You must have the GIL to call this function.
Sub-interpretersThe global state for the interpreter is stored in a PyInterpreterState structure.
PyInterpreterState_New() creates a new state structure,
PyInterpreterState_Clear(PyInterpreterState *state) clears it before you
release it, and PyInterpreterState_Delete(PyInterpreterState *state)frees its associated memory. You don’t need to have the GIL to create or destroy an
interpreter state structure, but you do need to hold it to clear one.
Py_NewInterpreter() creates a new sub-interpreter that is almost completely
independent of other interpreters (it still shares the global interpreter lock, how-
ever). The function returns a PyThreadState pointer that represents the now-cur-
rent thread state in the new interpreter. Do not call this function until after you’ve
called Py_Initialize and you have the GIL. Although the thread state has been
created, you still need to create a new thread.
Py_EndInterpreter(PyThreadState *state) destroys the sub-interpreter to
which the given thread state belongs. All thread states for that interpreter are also
destroyed; and on return, the current thread state is NULL. You must hold the global
lock to call this function.
Py_Finalize automatically destroys all sub-interpreters.
Handling Errors and ExceptionsThe general error convention used in the Python/C API is that when a function fails,
it returns an error value (usually NULL) and sets an error flag to indicate that an
exception has been raised. Other functions shouldn’t also raise an exception, only
the “source” of the problem.
Tip
4807-7 ch30.F 5/24/01 9:01 AM Page 576

577Chapter 30 ✦ Embedding the Python Interpreter
Checking for errorsIn addition to checking return codes, you can call PyErr_Occurred(). If an excep-
tion has been raised, this function returns a borrowed reference to the exception
object, and NULL otherwise. PyErr_Print() prints the stack traceback for the
exception that was raised and then clears the error flag. You can also call
PyErr_Clear() to clear the error flag; use this if you don’t want a raised exception
to make it back to the rest of the program.
After an error occurs, you can see if it matches a specific type by calling
PyErr_ExceptionMatches(PyObject *e), which returns 1 to indicate a match.
The value e is a pointer to an exception object. Exceptions in C are named the same
as in Python, but with a “PyExc_” prefix. For example, if a function returned NULLto indicate an error and you want to see if it was an ImportError, you’d use some-
thing like the following:
if (PyErr_ExceptionMatches(PyExc_MemoryError))...
PyErr_GivenExceptionMatches(PyObject *given, PyObject *e) returns 1 if
the two exceptions match.
Both of these functions let you perform multiple checks with a single call. Theobject e can be a Python tuple containing a sequence of exceptions (or othertuples too) to compare against.
Signaling error conditionsPyErr_SetString(PyExc *e, char *info) signals that the exception e has
occurred (where e is one of Python’s exception objects as explained above). infois an extra message to be displayed with the exception name.
PyErr_Format(PyObject *e, const char *format, ...) sets the error indicator
and displays a formatted message using printf-style formatting. The recognized for-
mat codes are c (character), d (decimal), x (hex), and s (string).
Instead of a string, you can set the extra information to be any Python object with
PyErr_SetObject(PyObject *e, PyObject *value). If you don’t want to provide
any extra information with your error, just call PyErr_SetNone(PyObjcet *e).
Many C library calls fail and set the per-thread error variable errno. Use
PyErr_SetFromErrno() to raise an exception, and use the value in errno to come
up with an appropriate informational message.
You do not need to increment reference counts on any of the Python objectspassed to the error functions listed above.
Note
Tip
4807-7 ch30.F 5/24/01 9:01 AM Page 577

578 Part V ✦ Advanced Python Programming
If you need to temporarily save and restore the current error state, call
PyErr_Fetch(PyObject **type, PyObject **value, PyObject **traceback)to save it, and call PyErr_Restore(PyOBject *type, PyObject *value,PyObject *traceback) to restore it.
Several functions raise exceptions for common problems. For example, if a direct
call to one of Python’s memory manager routines fails, you should call
PyErr_NoMemory(). If one of your functions is called with a wrong argument type,
call PyErr_BadArgument() to raise a TypeError.
Sometimes an error occurs but an exception cannot be raised (inside an object
destructor, for example). In this case, PyErr_WriteUnraisable(PyObject *obj)can be called to write a warning to stderr. It also prints the repr representation
of obj.
When an error occurs, don’t forget to release owned references before your func-tion exits. In addition, when raising exceptions, use the exception type that bestmatches the type of error that occurred.
Creating custom exceptionsIt’s pretty easy to create a new exception type in C. For example, suppose you are
writing a caching extension module called cache and need to create an exception
that will be known in Python as cache.error. Use the following steps to create an
exception type:
1. Declare a static PyObject pointer for the error:
static PyObject *Cache_Error;
2. In the module’s initialization function, create the error object:
Cache_Error = PyErr_NewException(“cache.error”, NULL, NULL);
3. Using the module’s dictionary object, add the exception to its namespace:
PyDict_SetItemString(d, “error”, Cache_Error);
Raising warningsThe PyErr_Warn(PyObject *category, char *message) function sends the warn-
ing pointed to by message to the user, which Python by default displays on stan-
dard error. The category parameter can be any of the following global warning
variables:
PyExc_WarningPyExc_DeprecationWarning
Tip
4807-7 ch30.F 5/24/01 9:01 AM Page 578

579Chapter 30 ✦ Embedding the Python Interpreter
PyExc_RuntimeWarningPyExc_SyntaxWarningPyExc_UserWarning
Under normal circumstances PyErr_Warn returns 0, but if the user configures
Python to escalate warnings to errors, then the function returns -1 to indicate that
it raised an exception. If it does raise an exception, be sure to treat it like any other
exception by releasing owned references and returning an error code from the cur-
rent function.
Warnings are new in Python 2.1.
PyErr_WarnExplicit(PyObject *category, char *message, char *filename,int lineno, char *module, PyObject *registry) lets you raise a warning and
have complete control over all warning attributes. This function calls the
warn_explicit function in the Python warnings module.
Chapter 5 covers the warning module through which you can control howPython handles warning messages.
Managing MemoryPython has its own private memory pool, or heap, in which it stores all Python
objects and their data. Because it has its own memory allocation and de-allocation
routines, you shouldn’t use malloc, free, new, and delete on Python objects. In
fact, although it’s safe for you to use the normal C memory allocators for your own
private memory usage, it doesn’t hurt to always use the Python memory manager.
PyMem_MALLOC(size_t n) returns a void pointer to a block of memory, and
PyMem_FREE(void *p) frees a pointer p if it is not NULL.
PyMem_NEW(TYPE, size_t n) allocates enough memory to store n items of type
TYPE, where TYPE is any C data type (that is, it allocates sizeof(TYPE) * n bytes of
memory). It returns a pointer of the same type. PyMem_DEL(p) frees the memory
associated with p.
PyObject_NEW(TYPE, PyTypeObject *t) creates a new Python object using the
given C structure type and its corresponding Python type object:
PyObject_NEW(dictobject, &PyDict_Type) // Create a dictionary
PyObject_DEL(p) frees an object’s memory.
Cross-Reference
NewFeature
4807-7 ch30.F 5/24/01 9:01 AM Page 579

580 Part V ✦ Advanced Python Programming
SummaryThe Python/C API must be full-featured because it’s the same set of functions used
to create the built-in modules and much of the interpreter itself. While not as easy
to use as Python, the API makes working with Python objects in C at least tolerable.
In this chapter, you learned about:
✦ Tracking the reference counts of Python objects.
✦ Using the abstract and concrete object layers to manipulate objects.
✦ Raising and handling Python exceptions in C.
✦ Managing memory using Python’s memory heap functions.
In the next chapter, you learn to use NumPy, a set of numerical extensions for
Python that let you do things such as efficiently handle large arrays of data.
✦ ✦ ✦
4807-7 ch30.F 5/24/01 9:01 AM Page 580

NumberCrunching
Python can crunch numbers with the best of them. It
offers built-in complex numbers, functions to handle
advanced mathematics, random number generators, and more.
This chapter covers Python’s number-crunching abilities.
Using Math RoutinesThe math module provides various higher-math functions.
The functions raise a ValueError if passed an input not in
their domain.
The math module also provides constants pi and e:
def Circumference(Radius):return Radius*2*math.pi
defContinuousCompounding(Principal,InterestRate,Years):
# Find the balance in a bank account,after some time
# earning the specified interest rate (forexample, .05),
# compounded continuously.return Principal * math.pow(math.e,
InterestRate*Years)
Rounding and fractional partsThe function ceil(x) returns the smallest integer >=x.
floor(x) returns the largest integer <=x. To round to the
nearest integer, use the built-in function round. For instance:
>>> math.ceil(2.2),math.floor(2.2),round(2.5)(3.0, 2.0, 3.0)>>> math.ceil(-2.5),math.floor(-3)(-2.0, -3.0)
3131C H A P T E R
✦ ✦ ✦ ✦
In This Chapter
Using math routines
Computing withcomplex numbers
Generating randomnumbers
Using arbitrary-precision integers
✦ ✦ ✦ ✦
4807-7 ch31.F 5/24/01 9:01 AM Page 581

582 Part V ✦ Advanced Python Programming
The function modf(x) returns a tuple of the form (Frac,Int), where Int is the integral
part of x, and Frac is the fractional part:
>>> math.modf(3)(0.0, 3.0)>>> math.modf(-2.22)(-0.2200000000000002, -2.0)
General math routinesThe function sqrt(x) returns the square root of a non-negative number x.
The function hypot(x,y) returns the hypotenuse of a triangle with sides of length
x and y — that is, it returns math.sqrt(x*x + y*y).
The function fmod(x,y) returns the remainder when x is divided by y. It uses the
platform C library, which normally (but not always) returns the same answer as x%y.
Logarithms and exponentiationThe function exp(x) returns e to the power of x, while log(x) returns the natural
logarithm of x. The function log10(x) returns the base-10 logarithm of x. The func-
tion pow(x,y) returns x raised to the power of y.
Note that 5**-1 (an integer to a negative power) is illegal, but math.pow(5,-1) is
legal (and equals 0.2, as you would expect). math.pow(-5,0.5) is still illegal — for
that, you need to use the cmath module. (See “Computing with Complex Numbers”
later in this chapter.)
The function ldexp(x,y) (short for “load exponent”) returns x * (2**y). The func-
tion frexp(x) returns the mantissa and exponent of x — a tuple (a,b) such that x== a * (2**b). The exponent, b, is an integer. The mantissa, a, is such that
0.5<=a<1, unless x is 0, in which case, frexp(x)==(0.0,0).
Trigonometric functionsThe functions sin(x), cos(x), and tan(x) return the sine, cosine, and tangent
(respectively) of an angle x, measured in radians:
>>> math.cos(math.pi)-1.0>>> DEGREES_TO_RADIANS = math.pi/180 >>> math.tan(45*DEGREES_TO_RADIANS) #Convert degrees to radians0.99999999999999989
The functions sinh(x), cosh(x), and tanh(x) compute hyperbolic sine, cosine,
and tangent, respectively.
4807-7 ch31.F 5/24/01 9:01 AM Page 582

583Chapter 31 ✦ Number Crunching
The inverse trigonometric functions asin(x), acos(x), and atan(x) return the arc
sine, arc cosine, and arc tangent of x, respectively. The values of asin(x) and
atan(x) are chosen between -pi/2 and pi/2. The value of acos(x) is chosen
between 0 and pi.
Computing with Complex NumbersRecall that in Python, the imaginary part of a complex number is indicated by a j
(not an i). The function complex(real[,imag]) creates a complex number. The
attributes real and imag of a complex number return its real and imaginary part,
respectively; and the conjugate method returns its complex conjugate, as shown
in the following example:
>>> (1 - 1j) * (1 + 1j)(2+0j) >>> complex(-5) + 3J # j or J, case doesn’t matter(-5+3j)>>> x = (2+3j)>>> x.real,x.imag,x.conjugate()(2.0, 3.0, (2-3j))>>> abs(x) # magnitude of x = hypot(x.real,x.imag)3.6055512754639896
The math functions operate only on real numbers; for instance, math.sqrt(-4)raises a ValueError exception, because -4 has no real roots. math’s sister-module,
cmath, provides functions for working with complex numbers. These cmath func-
tions accept complex input, but are otherwise the same as the corresponding math
functions: acos, asin, atan, cos, exp, log, log10, sin, sinh, tan, and tanh.
In addition, cmath provides the inverse hyperbolic trigonometric functions:
asinh(x), acosh(x), and atanh(x).
Generating Random NumbersThe random module provides a pseudo-random number generator.
Random numbersSeveral functions are available to produce random numbers; you can also instanti-
ate your own random number generator.
Prior to Version 2.1, the random module used the whrandom module — whichprovides much of the same functionality — however, the whrandom module is nowdeprecated.
Note
4807-7 ch31.F 5/24/01 9:01 AM Page 583

584 Part V ✦ Advanced Python Programming
Random integersThe function randrange([start,]stop[,step]) provides a random number cho-
sen from the corresponding range. randrange is now the preferred way to get a
random integer, but you can also call randint(min,max).
Random floating-point numbersThe function random provides a floating-point number x such that 0<=x<1. The func-
tion uniform(a,b) provides a floating-point number x such that a<=x<b.
Random selectionsThe function choice(sequence) returns a randomly selected element of the speci-
fied sequence. The function shuffle(sequence) shuffles a sequence in place.
(Note that the sequence must be mutable — to shuffle a tuple or string, first convert
it to a list.)
Seeding the RNGThe random number generator is not actually random, merely hard to predict. It is
deterministic, and its output is determined by its seed values. By default, randomseeds the generator with numbers derived from the current system time. But you
can seed it yourself by calling seed(x), where x is a hashable object. This example
seeds and re-seeds the generator:
>>> random.seed(123)>>> random.random()0.54140954469092906>>> random.seed(123) # do it again!>>> random.random()0.54140954469092906
The functions in random are actually methods of the class random.Random. The
module automatically creates one instance of the class for you. If you like, you can
instantiate one or more Random instances yourself, to produce independent
streams of pseudo-random numbers. This is highly recommended for multi-
threaded programs, as two threads using the same random number generator may
receive the same numbers.
Generator stateThe random number generator keeps an internal state, which changes each time it
supplies a new random number. The function getstate returns a snapshot of its
current state, which you can restore using setstate(state). You can also call
jumpahead(n) to skip forward n steps in the stream of random numbers.
The methods getstate, setstate, and jumpahead are new in Version 2.1.NewFeature
4807-7 ch31.F 5/24/01 9:01 AM Page 584

585Chapter 31 ✦ Number Crunching
Example: shuffling a deckThe example shown in Listing 31-1 prints out a deck of playing cards in random
order.
Listing 31-1: Cards.py
import random
# Represent a card as a tuple of the form (Value,Suit):CARD_VALUES=[“A”,2,3,4,5,6,7,8,9,10,”J”,”Q”,”K”]CARD_SUITS=[“Clubs”,”Hearts”,”Diamonds”,”Spades”]
Cards=[]for Suit in CARD_SUITS:
for Value in CARD_VALUES:NewCard=tuple((Value,Suit))Cards.append(NewCard)
random.shuffle(Cards)
for Card in Cards:print Card
Random distributionsThen random module provides functions to provide random numbers distributed
according to various formulae, such as the normal distribution. The following
statistics functions are available:
✦ betavariable(a,b) — The beta distribution. Probability density is xa-1(1 - x)b-1 /
B(α,b), where B(a, b) = Γ(a) Γ(b) / Γ(a+b). Both a and b must be greater
than -1.
✦ cunifvariate(mean,arc) — Circular uniform distribution. Both mean and arc
must be an angle (in radians) from 0 to pi.
✦ expovariate(lambda) — The exponential distribution. Probability density is
λe-λx .
✦ gammavariate(a,lambda) — The gamma distribution. Probability density is
λα x(α -1) e-x/b / Γ(α). must be larger than -1, and b must be larger than 0.
✦ gauss(mu,sigma) — The Gaussian (normal) distribution with mean mu and
standard deviation sigma. This is slightly faster than normalvariate.
✦ lognormvariate(mu,sigma) — The log normal distribution. The natural loga-
rithm of this distribution has mean mu and standard deviation sigma.
4807-7 ch31.F 5/24/01 9:01 AM Page 585

586 Part V ✦ Advanced Python Programming
✦ normalvariate(mu,sigma) — The normal distribution. Mean is mu, and the
standard deviation is sigma.
✦ paretovariate(a) — The Pareto distribution. Probability density is a / xa + 1 for
x >=1
✦ vonmisesvariate(mu,kappa) — The Von Mises distribution. Mean angle (in
radians) is mu, and kappa is the concentration parameter.
✦ weibullvariate(a,b) — The Weibull distribution. Probability density is
αβxβ-1esp(-αxβ-1) . a must be greater than 0; b must be at least 1. Same as the
exponential distribution if b=1.
Example: plotting distributions using Monte CarlosamplingListing 31-2 plots different random distribution with a text graph. It uses a trick
called Monte Carlo sampling: It samples the distribution many times, and graphs the
sample results. These results approximate the actual random distribution.
Listing 31-2: Plotter.py
import random
def MonteCarloSampler(DistributionFunction,Min,Max,Step,Times=1000):
“””Call the Distribution function the specified number of times. Divide the range [Min,Max] into intervals (buckets), each with width Step. Keep track of how many values fall into each bucket.“””Buckets=[]BucketLeft=Minwhile BucketLeft<Max:
Buckets.append(0)BucketLeft+=Step
for Sample in range(Times):Value=DistributionFunction()BucketIndex = int((Value-Min)/Step)if (BucketIndex>0 and BucketIndex<len(Buckets)):
Buckets[BucketIndex]+=1return Buckets
def PlotValues(Buckets, Height):“””Plot a collection of values, scaling them to the specifiedheight (in rows).“””
4807-7 ch31.F 5/24/01 9:01 AM Page 586

587Chapter 31 ✦ Number Crunching
MaxValue = max(Buckets)ScaledBuckets=[]for Value in Buckets:
ScaledBuckets.append(Value*Height/MaxValue)for RowNumber in range(Height,0,-1):
for Value in ScaledBuckets:if Value>=RowNumber:
print “*”,else:
print “ “,print
NormalCaller = lambda : random.normalvariate(100,5)Values=MonteCarloSampler(NormalCaller,80,120,1)PlotValues(Values,20)
GammaCaller = lambda : random.gammavariate(0.5,5)Values=MonteCarloSampler(GammaCaller,0,5,0.15)PlotValues(Values,20)
Using Arbitrary-Precision NumbersThe mpz module provides an interface to the integer functionality of the GNU
Multiple Precision Arithmetic Library (GMP). mpz is an optional module, and
requires GMP to work. Visit GMP’s homepage at http://www.swox.com/gmp to
learn about installing and building GMP.
The mpz module enables you to do arithmetic using high-precision integers, or
mpz-numbers. You can construct an mpz-number with the function mpz(Number),
where Number is an integer, a long, another mpz-number, or an mpz-string. An mpz-
string is a binary representation of an mpz-number; it consists of an array of radix-
256 digits, with the least significant digit first. The method binary returns an
mpz-string for an mpz-number:
>>> SmallNumber = mpz.mpz(5)>>> SmallNumber # string representation has form mpz(#):mpz(5)>>> BigNumber = mpz.mpz(50000L)>>> BigNumber.binary()‘P\303’>>> BigNumber % 256 # should equal ord(P), or 80:80>>> type(BigNumber)==mpz.MPZType # MPZType is for type-checking1
4807-7 ch31.F 5/24/01 9:01 AM Page 587

588 Part V ✦ Advanced Python Programming
An mpz-number has no other methods. It supports all the usual arithmetic opera-
tors, as well as built-in functions such as abs, int, and so on.
The mpz module provides several extra functions for manipulating mpz-numbers.
Each function takes mpz-number for its argument(s), converting ints and longs if
necessary.
The function gcd(X,Y) returns the greatest common divisor of X and Y. The func-
tion gcdext(X,Y) provides a tuple of the form (GCD, S,T) such that X*S + Y*T ==GCD, and GCD is the greatest common divisor of X and Y.
The function sqrt(X) returns the square root of X, rounding the result (if neces-
sary) toward zero. The function sqrtrem(X) returns a tuple (Root,Remainder) such
that Root*Root + Remainder == X; the tuple is chosen such that Remainder is as
small as possible.
The function powm(Base,Exponent,Modulus) raises Base to the power Exponent,and then returns the result modulo Modulus. It is a shortcut for
(Base**Exponent)%Modulus.
The function divm(Numerator,Denominator,Modulus) computes the quotient of
Numerator and Denominator modulo Modulus — a number Q such that
(Q*Denominator)%Modulus == Numerator. Modulus and Denominator must be rela-
tively prime, as shown here:
>>> mpz.divm(10,20,99) # 10/20 is equal to 50, modulo 99.mpz(50)
SummaryPython can do complex arithmetic, trigonometric functions, and even some statis-
tics. Moreover, it can do it all very precisely. In this chapter, you:
✦ Did complex arithmetic and some simple trigonometry.
✦ Shuffled a deck of cards, with the help of random.
✦ Did high-precision integer arithmetic.
In the next chapter, you’ll learn all about Numeric Python — NumPy: powerful
extension modules for fast computation matrix arithmetic and much more.
✦ ✦ ✦
4807-7 ch31.F 5/24/01 9:01 AM Page 588

Using NumPy
The NumPy extension modules introduce a new sequence
type: the array. Arrays are fast — much faster than lists
or tuples for “heavy lifting” such as image processing. Arrays
also have many powerful methods and functions associated
with them, so they are often handy, even when speed isn’t an
issue.
Introducing Numeric PythonNumeric Python (also known as NumPy) is a collection of
extension modules for number crunching. The core module,
Numeric, defines the array class and various helper functions.
This chapter focuses on the Numeric module. NumPy’s other
optional modules include the following:
✦ MA — Masked arrays. These are arrays that may have
some missing or invalid elements.
✦ FFT — Fast Fourier transforms
✦ LinearAlgebra — Linear algebra routines (calculation of
determinants, eigenvalues, and so on)
✦ RandomArray, RNG — Interface to random number gen-
erators. These may be useful if the random module
doesn’t have what you need.
Installing NumPyBecause NumPy is not part of the standard Python distribu-
tion, the first order of business is to install it. The NumPy pro-
ject is hosted at SourceForge (http://sourceforge.net/projects/numpy). Here, you can download the NumPy source
code, or (for Windows) a binary distribution. I recommend
downloading the source tarball, in any case, as it includes a
nice tutorial (in Demo\NumTut) and some examples.
3232C H A P T E R
✦ ✦ ✦ ✦
In This Chapter
Introducing NumericPython
Accessing and slicingarrays
Calling universalfunctions
Creating arrays
Using element types
Reshaping andresizing arrays
Using other arrayfunctions
Array example:analyzing pricetrends
✦ ✦ ✦ ✦
4807-7 ch32.F 5/24/01 9:01 AM Page 589

590 Part V ✦ Advanced Python Programming
Some quick definitionsAn array is a sequence — a collection of elements all of a particular type (usually
numeric). A universal function, or ufunc, is a function that takes an array (or other
sequence), acts on each element individually, and returns an array of results. The size
of an array (the total number of elements) is fixed. However, its shape may vary
freely; for example, a linear array of 12 elements may be reshaped into a 3 × 4 grid, a
2 × 2 × 3 cube, and so on. These shapes can be represented in Python as tuples of the
form (12,), (3,4), or (2,2,3). An array can have several dimensions, or axes.
Meet the arrayYou can construct an array by calling array(sequence). Here, sequence is a collec-
tion of values for the array. For example:
>>> import Numeric>>> Sample=Numeric.array([1,2,3,4,5])>>> Sample # Print the array:array([1, 2, 3, 4, 5])>>> # Remember not to do this:>>> BadSample=Numeric.array(1,2,3,4,5) # Too many arguments!Traceback (innermost last):File “<pyshell#236>”, line 1, in ?BadSample=Numeric.array(1,2,3,4,5)
TypeError: function requires at most 4 arguments; 5 given
A nested sequence results in a multi-dimensional array. However, note that the
source sequence must form a valid shape:
>>> Numeric.array([[1,2],[3,4],[5,6]]) # 3x2 arrayarray([[1, 2],
[3, 4],[5, 6]])
>>> Numeric.array([[1,2],[3,4,5]]) # Not rectangular!Traceback (innermost last):File “<pyshell#14>”, line 1, in ?Numeric.array([[1,2],[3,4,5]]) # not rectangular!
TypeError: an integer is required
Accessing and Slicing ArraysYou can access an array’s elements by index or by slice:
>>> Fibonacci=Numeric.array((1,1,2,3,5,8,13))>>> Fibonacci[4] # An element5>>> Fibonacci[:-1] # A slice (giving a sub-array)array([1, 1, 2, 3, 5, 8])
4807-7 ch32.F 5/24/01 9:01 AM Page 590

591Chapter 32 ✦ Using NumPy
>>> Fibonacci[0]=44 # Arrays are mutable (but not resizable)>>> Fibonacci # (We broke the Fibonacci series)array([44, 1, 2, 3, 5, 8, 13])>>> MagicSquare=Numeric.array([[6,1,8],[7,5,3],[2,9,4]])>>> MagicSquare[0] # The first row array([6, 1, 8])>>> MagicSquare[0][2] # A single element8
Arrays can be sliced along any axis, or along multiple axes at once. You provide the
slicing information for each axis, one by one. For example, following are some slices
on a 4 × 4 array:
>>> # Produce an array of the numbers 0 to 15:>>> Sixteen=Numeric.arrayrange(16) >>> # Re-shape the array into a 4x4 grid:>>> FourByFour=Numeric.reshape(Sixteen,(4,4)) >>> FourByFour[[ 0, 1, 2, 3,][ 4, 5, 6, 7,][ 8, 9,10,11,][12,13,14,15,]]>>> FourByFour[1:3,1:3] # rows 1 and 2, columns 1 and 2[[ 5, 6,][ 9,10,]]>>> FourByFour[:,0] # Every row, but only the first column[ 0, 4, 8,12,]
The array returned by a slice is not a copy of the old array, but a reference to the
old array’s data. Note that this is different from the behavior of the slice operator
on lists. Compare the results of the following two operations:
>>> FirstList=[1,2,3,4,5]>>> SecondList=FirstList[1:4] # Normal slice copies data>>> SecondList[0]=25 # FirstList is unchanged!>>> FirstList[1, 2, 3, 4, 5]>>> FirstArray=Numeric.array(FirstList)>>> SecondArray=FirstArray[1:4] # Array slice doesn’t copy data>>> SecondArray[0]=25 # FirstArray is changed!>>> FirstArray[ 1,25, 3, 4, 5,]
Some array manipulations make a copy of array data, while others provide a newreference to the same data. Make sure that you know which you are doing—otherwise, you may end up with two array variables that “step on each others’ toes”!
Optionally, you can provide a third “step” parameter for an array slice. This enables
you to take every nth element within a slice, or to reverse the order of a slice:
>>> Sixteen[1:10:2] # Every other element from the slice[1,3,5,7,9,]
Note
4807-7 ch32.F 5/24/01 9:01 AM Page 591
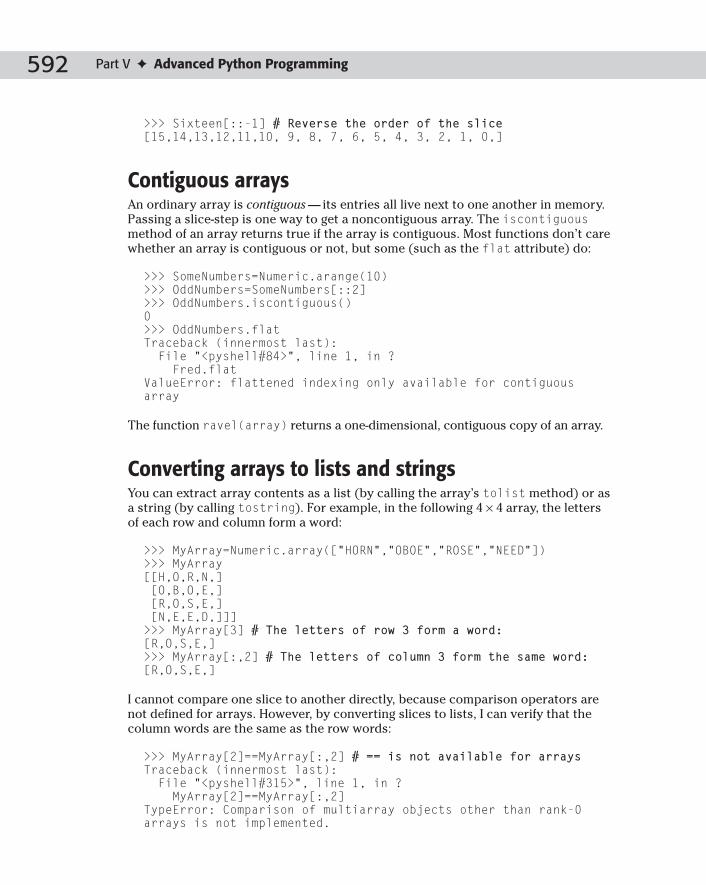
592 Part V ✦ Advanced Python Programming
>>> Sixteen[::-1] # Reverse the order of the slice[15,14,13,12,11,10, 9, 8, 7, 6, 5, 4, 3, 2, 1, 0,]
Contiguous arraysAn ordinary array is contiguous — its entries all live next to one another in memory.
Passing a slice-step is one way to get a noncontiguous array. The iscontiguousmethod of an array returns true if the array is contiguous. Most functions don’t care
whether an array is contiguous or not, but some (such as the flat attribute) do:
>>> SomeNumbers=Numeric.arange(10)>>> OddNumbers=SomeNumbers[::2]>>> OddNumbers.iscontiguous()0>>> OddNumbers.flatTraceback (innermost last):File “<pyshell#84>”, line 1, in ?Fred.flat
ValueError: flattened indexing only available for contiguousarray
The function ravel(array) returns a one-dimensional, contiguous copy of an array.
Converting arrays to lists and stringsYou can extract array contents as a list (by calling the array’s tolist method) or as
a string (by calling tostring). For example, in the following 4 × 4 array, the letters
of each row and column form a word:
>>> MyArray=Numeric.array([“HORN”,”OBOE”,”ROSE”,”NEED”])>>> MyArray[[H,O,R,N,][O,B,O,E,][R,O,S,E,][N,E,E,D,]]]>>> MyArray[3] # The letters of row 3 form a word:[R,O,S,E,]>>> MyArray[:,2] # The letters of column 3 form the same word:[R,O,S,E,]
I cannot compare one slice to another directly, because comparison operators are
not defined for arrays. However, by converting slices to lists, I can verify that the
column words are the same as the row words:
>>> MyArray[2]==MyArray[:,2] # == is not available for arraysTraceback (innermost last):File “<pyshell#315>”, line 1, in ?MyArray[2]==MyArray[:,2]
TypeError: Comparison of multiarray objects other than rank-0arrays is not implemented.
4807-7 ch32.F 5/24/01 9:01 AM Page 592

593Chapter 32 ✦ Using NumPy
>>> MyArray[2].tolist()==MyArray[:,2].tolist()1
Calling Universal FunctionsUniversal functions, or ufuncs, are performed elementwise — they affect each ele-
ment individually:
>>> A=Numeric.array([[1,2],[3,4]]) # 2x2 array>>> Numeric.add(A,5) # Add 5 to each elementarray([[6, 7],
[8, 9]])>>> A+5 # Operators are overloaded to ufuncsarray([[6, 7],
[8, 9]])
Two arrays of compatible shape and size can be added, multiplied, and so on.
These operations are also done element by element; therefore, multiplying two
arrays does not perform the matrix multiplication of linear algebra. (For that, call
the matrixmultiply function, or use the Matrix module.) For instance:
>>> B=Numeric.array([[5,6],[7,8]])>>> A*B # Elementwise multiplicationarray([[ 5, 12],
[21, 32]])
A ufunc can operate on any sequence, not just an array. However, its output is
always an array. The Numeric module provides many ufuncs, whose names are
fairly self-explanatory (see Table 32-1):
Table 32-1Universal Functions
Category Ufuncs
Arithmetic add, subtract, multiply, divide, remainder
Powers and Logs power, exp, log
Comparison equal, not_equal, greater, greater_equal, less, less_equal, minimum,maximum
Logic logical_and, logical_or, logical_xor, logical_not
Trigonometry sin, cos, tan, sinh, cosh, tanh, arcsin, arccos, arctan, arcsinh, arccosh,arctanh
Bitwise bitwise_and, bitwise_or, bitwise_xor, bitwise_not
4807-7 ch32.F 5/24/01 9:01 AM Page 593

594 Part V ✦ Advanced Python Programming
Ufunc destinationsBy default, a ufunc creates a brand-new array to store its results. An optional last
argument to a ufunc is the destination array. The output of a ufunc can be stored in
any appropriately sized array with compatible typecode. If the destination is the
same as the source array, an operation can be performed in place, as it is here:
>>> Numbers=Numeric.array((4,9,16),Numeric.Float) >>> Numeric.sqrt(Numbers) # Elementwise square-rootarray([ 2., 3., 4.])>>> Numbers # Original array is unchangedarray([ 4., 9., 16.])>>> Numeric.sqrt(Numbers,Numbers) # Take roots in placearray([ 2., 3., 4.])>>> Numbers # The original array WAS changed!array([ 2., 3., 4.])
Performing operations in place is more efficient than creating new arrays left and
right. However, the destination must be compatible with the ufunc’s output, both in
size and in typecode. For instance, the preceding square root example used a float
array, because an in-place square root operation is not allowed on an int array:
>>> Numbers=Numeric.array((4,9,16)) # (NOT a float array)>>> Numeric.sqrt(Numbers,Numbers)Traceback (innermost last):File “<pyshell#33>”, line 1, in ?Numeric.sqrt(Numbers,Numbers)
TypeError: return array has incorrect type
Example: editing an audio streamListing 32-1 provides an example of the power of the array class. We read in a
stream of audio data as an array of numbers. The left and right channels of the
stereo sound are mixed together — every other number represents sound on the
left channel. We shrink the numbers corresponding to the left channel, and thereby
make the left channel quieter without affecting the right channel.
See Chapter 24 for more information on audio operations in Python, including anexplanation of the wave module.
Listing 32-1: Quiet.py
import Numericimport wave
BUFFER_SIZE=5000# NB: This is an 8-bit stereo .wav file. If it had a different
Cross-Reference
4807-7 ch32.F 5/24/01 9:01 AM Page 594

595Chapter 32 ✦ Using NumPy
# sample size, such as 16-bits, we would need to convert the # sequence of bytes into an array of 16-bit integers by # calling Numeric.fromstring(Data,Numeric.Int16)InFile=wave.open(“LoudLeft.wav”,”rb”) OutFile=wave.open(“QuietLeft.wav”,”wb”)OutFile.setparams(InFile.getparams())while 1:
# Read audio data as a string of bytes:Data=InFile.readframes(BUFFER_SIZE)if len(Data)==0:
break# Create an array based on the string:Frames=Numeric.array(Data,
typecode=Numeric.UnsignedInt8,savespace=1)# Take every other frame to get just the left side. And,# divide each one by 2. (We would like to use# Numeric.divide(Frames[::2],2), but we can’t,# because the returned array would have float type). Frames[::2] = Frames[::2]/2OutFile.writeframes(Frames.tostring())
InFile.close()OutFile.close()
Repeating ufuncsEach binary ufunc provides a reduce method. The reduce method of a ufunc is
similar to the built-in function reduce. It iterates over a sequence of array ele-
ments. At each stage, it passes in (as arguments) the new value and the most recent
output. For example, multiply.reduce multiplies a sequence of numbers:
>>> Factors=Numeric.array((2,2,3,5))>>> Numeric.multiply.reduce(Factors)60
The reduce method takes a second, optional parameter — the axis to reduce over.
(By default, reduce combines values along the first axis.) For instance, suppose I
want to test whether a matrix is a magic square, wherein each row and column of
numbers has the same sum. I can call add.reduce to calculate all these sums:
>>> Square=Numeric.array([[1,15,14,4],[12,6,7,9],[8,10,11,5],[13,3,2,16]])
>>> Numeric.add.reduce(Square) # Sum over each columnarray([34, 34, 34, 34])>>> Numeric.add.reduce(Square,1) # Sum over each rowarray([34, 34, 34, 34])
I can verify that the sums are all the same by checking whether minimum.reduceand maximum.reduce give the same value, as that can only happen if the sequence
elements are all identical. With a few more lines of code, I have a function to find
4807-7 ch32.F 5/24/01 9:01 AM Page 595

596 Part V ✦ Advanced Python Programming
magic squares, magic rectangles, magic cubes, or even magic hypercubes, as shown
in Listing 32-2:
Listing 32-2: MagicSquare.py
import Numeric
def IsMagic(Array):TargetSum=None for Axis in range(len(Array.shape)):
AxisSums=Numeric.add.reduce(Array,Axis)MinEntry=Numeric.minimum.reduce(AxisSums)MaxEntry=Numeric.maximum.reduce(AxisSums)# For 3 dimensions and up, MinEntry and MaxEntry # are still arrays, so keep taking minima and maxima# until they become ordinals:while type(MinEntry)==Numeric.ArrayType:
MinEntry=Numeric.minimum.reduce(MinEntry)MaxEntry=Numeric.maximum.reduce(MaxEntry)
if (MinEntry!=MaxEntry):return 0
if (TargetSum==None):TargetSum=MinEntry
elif TargetSum!=MinEntry:return 0
return 1
if __name__==”__main__”:Square=Numeric.array([[1,15,14,4],[12,6,7,9],
[8,10,11,5],[13,3,2,16]])print IsMagic(Square)
Cube=Numeric.array([[[10,26,6],[24,1,17],[8,15,19]],[[23,3,16],[7,14,21],[12,25,5]],[[9,13,20],[11,27,4],[22,2,18]]])
print IsMagic(Cube)
In addition to reduce, each binary ufunc has an accumulate method. A call to
accumulate retains all the intermediate results of the function. For example, I
could determine where a running total became negative:
>>> Numbers=Numeric.array((5,10,20,-4,-2,-10,-5,-3,-10,-2))>>> Numeric.add.accumulate(Numbers)array([ 5, 15, 35, 31, 29, 19, 14, 11, 1, -1])
Finally, each binary ufunc has an outer method. This method calls the ufunc many
times — once for each pair of elements from the two arrays. If A is an n-dimensional
array and B is an m-dimensional array, then outer(A,B) is an (n+m)-dimensional
4807-7 ch32.F 5/24/01 9:01 AM Page 596

597Chapter 32 ✦ Using NumPy
array, where the element with coordinates (a1,a2,...,an,b1,b2,...,bm) is the output of
ufunc(A[a1][a2]...[an],B[b1][b2]...[bm]). For example, here is the effect of
outer multiplication:
>>> Numeric.multiply.outer([1,2,3],[4,5,6])array([[ 4, 5, 6],
[ 8, 10, 12],[12, 15, 18]])
>>> Numeric.multiply.outer([[1,2,3],[4,5,6]],(1,2))array([[[ 1, 2],
[ 2, 4],[ 3, 6]],[[ 4, 8],[ 5, 10],[ 6, 12]]])
Creating ArraysThe array constructor has syntax array(sequence[,typecode[,copy=1[,savespace=0]]]). Here, sequence is (as you have seen) a source of data for the
array. The element typecode is an element type (as described in the next section). If
savespace is true, the array element’s type will not increase in precision:
>>> Squares=Numeric.array((4,9,16))>>> SpaceSaverSquares=Numeric.array((4,9,16),savespace=1)>>> Squares/float(5) # elements are all upcast to float[ 0.8, 1.8, 3.2,]>>> SpaceSaverSquares/float(5) # elements are NOT upcast![0,1,3,]
If CopyFlag is false and sequence is an array, the new array will be a reference into
the old array. This saves space and processing time, but remember that altering
either array will affect the other! This code creates two arrays that point to the
same block of memory:
>>> Array1=Numeric.array((1,2,3,4,5))>>> # Next line has same effect as Array2=Array1[:]>>> Array2=Numeric.array(Array1,copy=0) >>> Array2[2]=0>>> Array1[1,2,0,4,5,]
Array creation functionsThe function arrayrange([start,]stop[,step]) returns an array consisting of a
range of numbers; it is a shortcut for calling array(range(...)). The function
zeros(shape[,typecode[,savespace=0]]) creates a zero-filled matrix with the
specified shape. The function ones is similar:
4807-7 ch32.F 5/24/01 9:01 AM Page 597

598 Part V ✦ Advanced Python Programming
>>> Numeric.zeros(5)[0,0,0,0,0,]>>> Numeric.ones((3,3))[[1,1,1,][1,1,1,][1,1,1,]]
You may encounter the word zeros if you create an empty array. For example, if I
take an empty slice of an array, the result is a 0-dimensional array of zeroes:
>>> bob=Numeric.array((1,2,3))>>> bob[2:2] # Empty slicezeros((0,), ‘l’)
The function identity(n) returns the identity matrix with rank n as an array:
>>> identity(3)[[1,0,0,][0,1,0,][0,0,1,]]
You can combine several arrays into one big array with a call to concatenate((arrays)[,glueaxis=0]). The arrays provided are “glued together” along the
specified axis. The arrays can have any size along axis glueaxis, but their sizes
along all other axes must match.
The function indices(shape) provides a tuple of “index arrays” of the given shape.
The tuple has one element for each axis of shape, and the nth tuple corresponds to
the nth axis. Each tuple element is an array of the specified shape, such that each
entry’s value is equal to the index of its nth element. Confused? Here is an example:
>>> Coords=Numeric.indices(2,3) # a 2x3 box>>> Coords[0] # First coordinates for each element[[0,0,0,][1,1,1,]]>>> Coords[1] # Second coordinates for each element[[0,1,2,][0,1,2,]]>>> Coords[0][1][2] # What’s the first coordinate of (1,2)?1>>> Coords[1][1][2] # What’s the second coordinate of (1,2)?2
Seeding arrays with functionsYou can create an array from the output of an arbitrary function. The function
fromfunction(Generator,Shape) creates an array of the specified shape. The
value stored in each array element is produced by a single call to Generator. The
arguments passed to Generator are the contents of indices(Shape), as shown in
the following example:
4807-7 ch32.F 5/24/01 9:01 AM Page 598

599Chapter 32 ✦ Using NumPy
>>> Numeric.fromfunction(lambda X,Y: X+Y, (3,3))[[0,1,2,][1,2,3,][2,3,4,]]
When coding a call to fromfunction, one can often ignore the fact that Generator is
acting on arrays, and rely on elementwise array operations to do the work.
However, keep in mind that some operations (such as comparison) do not work
well with arrays. The example shown in Listing 32-3 calls the universal function
Numeric.minimum, because the built-in function min does not work on arrays. This
example prints, for each array entry, the remainder obtained by dividing the entry’s
two coordinates. Listing 32-4 shows the script’s output.
Listing 32-3: Remainder.py
import Numeric
def Remainder(X,Y):# Avoid division by 0 by adding 1 to the coordinates:X=X+1Y=Y+1Small=Numeric.minimum(X,Y) Large=Numeric.maximum(X,Y)return (Large%Small)
print Numeric.fromfunction(Remainder,(25,25))
Listing 32-4: Remainder.py output
[[ 0 0 0 0 0 0 0 0 0 0 0 0 0 0 0 0 0 0 0 0 0 0 0 0 0][ 0 0 1 0 1 0 1 0 1 0 1 0 1 0 1 0 1 0 1 0 1 0 1 0 1][ 0 1 0 1 2 0 1 2 0 1 2 0 1 2 0 1 2 0 1 2 0 1 2 0 1][ 0 0 1 0 1 2 3 0 1 2 3 0 1 2 3 0 1 2 3 0 1 2 3 0 1][ 0 1 2 1 0 1 2 3 4 0 1 2 3 4 0 1 2 3 4 0 1 2 3 4 0][ 0 0 0 2 1 0 1 2 3 4 5 0 1 2 3 4 5 0 1 2 3 4 5 0 1][ 0 1 1 3 2 1 0 1 2 3 4 5 6 0 1 2 3 4 5 6 0 1 2 3 4][ 0 0 2 0 3 2 1 0 1 2 3 4 5 6 7 0 1 2 3 4 5 6 7 0 1][ 0 1 0 1 4 3 2 1 0 1 2 3 4 5 6 7 8 0 1 2 3 4 5 6 7][ 0 0 1 2 0 4 3 2 1 0 1 2 3 4 5 6 7 8 9 0 1 2 3 4 5][ 0 1 2 3 1 5 4 3 2 1 0 1 2 3 4 5 6 7 8 9 10 0 1 2 3][ 0 0 0 0 2 0 5 4 3 2 1 0 1 2 3 4 5 6 7 8 9 10 11 0 1][ 0 1 1 1 3 1 6 5 4 3 2 1 0 1 2 3 4 5 6 7 8 9 10 11 12][ 0 0 2 2 4 2 0 6 5 4 3 2 1 0 1 2 3 4 5 6 7 8 9 10 11][ 0 1 0 3 0 3 1 7 6 5 4 3 2 1 0 1 2 3 4 5 6 7 8 9 10][ 0 0 1 0 1 4 2 0 7 6 5 4 3 2 1 0 1 2 3 4 5 6 7 8 9][ 0 1 2 1 2 5 3 1 8 7 6 5 4 3 2 1 0 1 2 3 4 5 6 7 8][ 0 0 0 2 3 0 4 2 0 8 7 6 5 4 3 2 1 0 1 2 3 4 5 6 7]
Contined
4807-7 ch32.F 5/24/01 9:01 AM Page 599

600 Part V ✦ Advanced Python Programming
Listing 32-4 (continued)
[ 0 1 1 3 4 1 5 3 1 9 8 7 6 5 4 3 2 1 0 1 2 3 4 5 6][ 0 0 2 0 0 2 6 4 2 0 9 8 7 6 5 4 3 2 1 0 1 2 3 4 5][ 0 1 0 1 1 3 0 5 3 1 10 9 8 7 6 5 4 3 2 1 0 1 2 3 4][ 0 0 1 2 2 4 1 6 4 2 0 10 9 8 7 6 5 4 3 2 1 0 1 2 3][ 0 1 2 3 3 5 2 7 5 3 1 11 10 9 8 7 6 5 4 3 2 1 0 1 2][ 0 0 0 0 4 0 3 0 6 4 2 0 11 10 9 8 7 6 5 4 3 2 1 0 1][ 0 1 1 1 0 1 4 1 7 5 3 1 12 11 10 9 8 7 6 5 4 3 2 1 0]]
Using Element TypesArray elements can have one of several types. Each type has a type code, a single
character that uniquely identifies it. The Numeric module provides constants for
most type codes. These constants do not vary by platform, although the corre-
sponding character may.
Type codes can be used as arguments to the array constructor; they can also be
retrieved from an array by calling its typecode method, as shown in the following
example:
>>> Word=Numeric.array(“Blancmange”) # An array of characters>>> Word[B,l,a,n,c,m,a,n,g,e,]>>> Word.typecode() # Characters have typecode “c”‘c’>>> Word=Numeric.array(“Blancmange”,Numeric.Int)>>> Word # By overriding typecode, we made an array of ints:[ 66,108, 97,110, 99,109, 97,110,103,101,]
The most common typecodes are the numeric ones: Int, Float, and Complex. In
addition, these numeric typecodes have sized variants. For example, Int16 is (usu-
ally) a 16-bit integer. If the operating system does not provide 16-bit integers, then
Int16 is the smallest integer type whose size is at least 16 bits. The typecodes
Int0, Int8, Int16, Int32, and (on some platforms) Int64 and Int128 are all avail-
able. Analogous typecodes exist for Float and Complex (for example, Float32).
The other available typecodes are UnsignedInt8 (for numbers between 0 and 255),
and PyObject (for arrays of Python objects).
Reshaping and Resizing ArraysThe array attribute shape holds an array’s current shape as a tuple. The function
reshape(OldArray,Shape) returns an array with the specified shape. No data is
4807-7 ch32.F 5/24/01 9:01 AM Page 600

601Chapter 32 ✦ Using NumPy
copied — the new array holds references to the values in OldArray. The new shape
must have the same size as the old:
>>> Shapely=Numeric.array((1,2,3,4,5,6))>>> Shapely.shape(6,)>>> Numeric.reshape(Shapely,(2,3))[[1,2,3,][4,5,6,]]
A one-dimensional version of any contiguous array is always available as the mem-
ber flat; an array’s total size is always equal to len(ArrayName.flat).
The function resize(OldArray,Shape) also returns an array with a new shape —
however, the new shape need not be the same size as the old. The old array will be
repeated or truncated as necessary to fill the new shape. The new array is a copy; it
does not hold references to the original data:
>>> Numeric.resize(Shapely,(3,3))[[1,2,3,][4,5,6,][1,2,3,]]>>> Numeric.resize(Shapely,(2,2))[[1,2,][3,4,]]
Using Other Array FunctionsIn addition to the universal functions previously described, the Numeric module
provides several other array-manipulation functions. The following sections
describe some of the most useful ones.
sort(array,[axis=-1])This function returns a copy of the given array, sorted along the given axis:
>>> Peoplearray([[6, 7, 2],
[8, 3, 5],[1, 9, 4]])
>>> Numeric.sort(People,0)array([[1, 3, 2],
[6, 7, 4],[8, 9, 5]])
>>> Numeric.sort(People,1)array([[2, 6, 7],
[3, 5, 8],[1, 4, 9]])
4807-7 ch32.F 5/24/01 9:01 AM Page 601

602 Part V ✦ Advanced Python Programming
where(condition,X,Y)The where function treats the array condition as a mask for creating a new array. It
returns an array of the same shape and size as condition. Each element of the new
array is either X or Y. The new array element is X if the corresponding element of
condition is true; it is Y if the corresponding element of condition is false:
>>> Checkerboard=Numeric.resize((0,1),(5,5))>>> Checkerboardarray([[0, 1, 0, 1, 0],
[1, 0, 1, 0, 1],[0, 1, 0, 1, 0],[1, 0, 1, 0, 1],[0, 1, 0, 1, 0]])
>>> Numeric.where(Checkerboard,”Y”,”N”)array([[N, Y, N, Y, N],
[Y, N, Y, N, Y],[N, Y, N, Y, N],[Y, N, Y, N, Y],[N, Y, N, Y, N]],’c’)
swapaxes(array,axis1,axis2)This returns a new array that shares the data of the old, but with the specified axes
swapped. This is different from a call to reshape— it actually transposes an array:
>>> TwoByThree=Numeric.array([[1,2,3],[4,5,6]])>>> ThreeByTwo=Numeric.swapaxes(TwoByThree,0,1)>>> ThreeByTwoarray([[1, 4],
[2, 5],[3, 6]])
>>> ThreeByTwo[2][1]==TwoByThree[1][2]1>>> Numeric.reshape(TwoByThree,(3,2)) # Different!array([[1, 2],
[3, 4],[5, 6]])
Matrix operationsThe function matrixmultiply(A,B) performs matrix (not elementwise!) multipli-
cation on A and B and returns the result. The function dotm(A,B) returns the dot
product of two arrays.
The optional LinearAlgebra module provides several linear algebra functions that
operate on arrays. These include determinant(a), inverse(a), eigenvalues(a),
and solve_linear_equations(a,b). This example multiplies two matrices:
4807-7 ch32.F 5/24/01 9:01 AM Page 602

603Chapter 32 ✦ Using NumPy
>>> Matrix=Numeric.array([[1,2,3],[4,5,6],[7,8,10]])>>> Inv=LinearAlgebra.inverse(Matrix)>>> Numeric.matrixmultiply(Matrix,Inv)array([[ 1.00000000e+000, 8.88178420e-016, -4.44089210e-016],
[ 0.00000000e+000, 1.00000000e+000, -1.77635684e-015],[ 0.00000000e+000, 0.00000000e+000, 1.00000000e+000]])
Because LinearAlgebra does its work using floating-point numbers, multiplying the
matrix by its inverse does not yield the identity matrix exactly; however, the error
is extremely tiny. Note that LinearAlgebra.inverse will happily try (and fail!) to
provide an inverse for a non-invertible matrix.
Array Example: Analyzing Price TrendsThe script in Listing 32-5 uses an array of imaginary stock prices to compute mov-ing averages. A moving average is a computation, for each day, of the average stock
price for the last few days. The moving average can “smooth out” volatile changes
in a stock price to a greater or lesser extent. For example, a five-day moving average
is a relatively short-term measurement, whereas a 200-day moving average takes a
more long-term view.
Technical analysts use moving averages to help decide how to trade everything
from stocks to pork bellies. This script will probably never beat the market, but it
illustrates how easy it is to do number crunching with array functions. Listing 32-6
shows the script’s output.
Listing 32-5: MovingAverage.py
import Numeric
Prices=Numeric.array([10,12,15,18,20,22,22,19,20,23,24,28,30,25,23,20,18,15,13,8,7,7,8,])
# NB: The MA (Masked Array) provides an average function.# Since it’s a one-liner, we define it ourselves here:def Average(Array):
return Numeric.add.reduce(Array)/float(len(Array.flat))
def ProduceMovingAverage(StockPrices,Days):Slices=[]for LastDay in range(1,len(StockPrices)):
SliceStart=max(0,LastDay-Days)Slices.append(StockPrices[SliceStart:LastDay])
return map(Average, Slices)
Continued
4807-7 ch32.F 5/24/01 9:01 AM Page 603
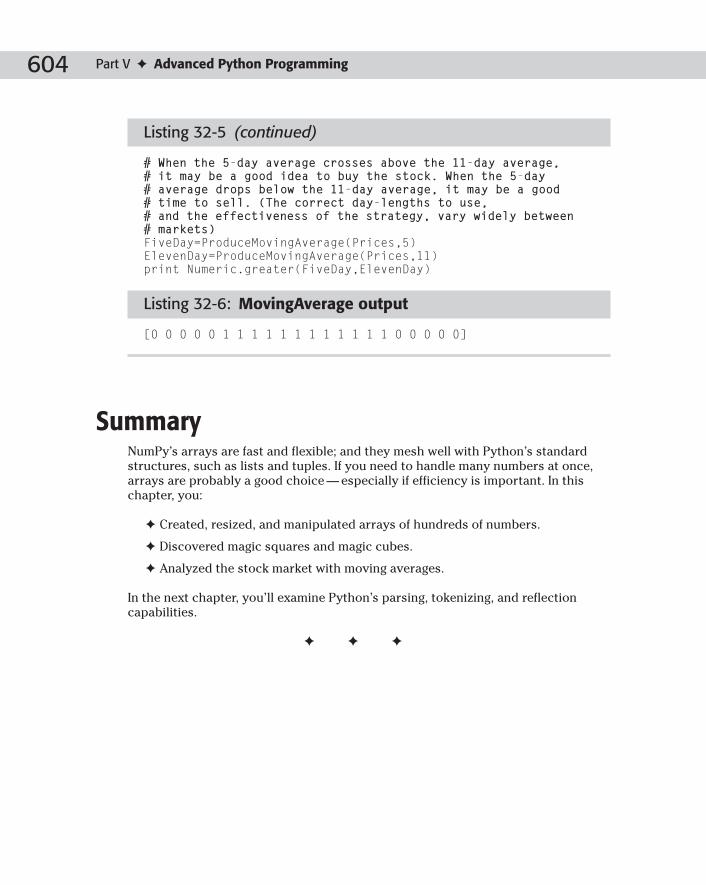
604 Part V ✦ Advanced Python Programming
Listing 32-5 (continued)
# When the 5-day average crosses above the 11-day average,# it may be a good idea to buy the stock. When the 5-day# average drops below the 11-day average, it may be a good# time to sell. (The correct day-lengths to use, # and the effectiveness of the strategy, vary widely between # markets) FiveDay=ProduceMovingAverage(Prices,5)ElevenDay=ProduceMovingAverage(Prices,11)print Numeric.greater(FiveDay,ElevenDay)
Listing 32-6: MovingAverage output
[0 0 0 0 0 1 1 1 1 1 1 1 1 1 1 1 1 0 0 0 0 0]
SummaryNumPy’s arrays are fast and flexible; and they mesh well with Python’s standard
structures, such as lists and tuples. If you need to handle many numbers at once,
arrays are probably a good choice — especially if efficiency is important. In this
chapter, you:
✦ Created, resized, and manipulated arrays of hundreds of numbers.
✦ Discovered magic squares and magic cubes.
✦ Analyzed the stock market with moving averages.
In the next chapter, you’ll examine Python’s parsing, tokenizing, and reflection
capabilities.
✦ ✦ ✦
4807-7 ch32.F 5/24/01 9:01 AM Page 604

Parsing andInterpretingPython Code
Python provides powerful introspection features — even
more powerful with the addition of function attributes
in Version 2.1. With programmatic access to the Python inter-
preter’s parser and disassembler, documentation, debugging,
and development become much easier.
Examining TracebacksIf your program throws an uncaught exception, it exits, and
the Python interpreter prints a traceback, or stack trace.
However, your program need not crash to use traceback
objects — the traceback module provides a suite of functions
to work with them.
One usually grabs a traceback with a call to sys.exc_info(),
which returns a tuple of the form (Exception,Exception,
Traceback). In an interactive session, meeting an unhandled
exception populates the values sys.last_type,
sys.last_value, and sys.last_traceback; one often
makes use of these with a call to pdb.pm().
See Chapter 27, on debugging, for more information abouthow to use tracebacks with pdb.
Printing a traceback — print_exc andfriendsThe function print_exc([limit[,file]]) prints a trace-
back for the most recent exception (as stored in
sys.exc_info()). The optional parameter limit provides an
upper limit on how many stack frames to print. Normally, the
Cross-Reference
3333C H A P T E R
✦ ✦ ✦ ✦
In This Chapter
Examiningtracebacks
Introspection
Checking indentation
Tokenizing Pythoncode
Example: syntax-highlighting printer
Inspecting Pythonparse trees
Low-level objectcreation
Disassembling Pythoncode
✦ ✦ ✦ ✦
4807-7 ch33.F 5/24/01 9:01 AM Page 605

606 Part V ✦ Advanced Python Programming
exception is printed to sys.stderr. Passing a file parameter causes the exception
to be printed to a file.
You can also call print_last([,limit[,file]]) to print the traceback for the
last uncaught exception in an interpreter session. A more general function is
print_exception(type, value, traceback[,limit[,file]]), which prints the
specified traceback for the specified exception. A call to print_tb(traceback[,limit[,file]]) prints just a traceback (without exception info).
Extracting and formatting exceptionsThe function extract_stack grabs a stack trace from the current stack frame. The
function extract_tb(traceback[,limit]) grabs a stack trace from the specified
traceback. The return value of each function takes the form of a list of tuples. Each
element corresponds to a stack frame — the last element is the current stack frame.
Each element is a 4-tuple of the form (Filename, LineNumber, FunctionName,
LineText). For instance, this (excessively) recursive code (Listings 33-1 and 33-2)
prints a stack trace:
Listing 33-1: StackPrint.py
import traceback
def Factorial(n):if (n<2):
print traceback.extract_stack()return 1
return n*Factorial(n-1)
print Factorial(3)
Listing 33-2: Output of StackPrint.py
[(‘C:\\StackPrint.py’, 9, ‘?’, ‘print Factorial(3)’),(‘C:\\StackPrint.py’,7, ‘Factorial’, ‘return n*Factorial(n-1)’), (‘C:\\StackPrint.py’, 7, ‘Factorial’, ‘return n*Factorial(n-1)’), (‘C:\\StackPrint.py’, 5, ‘Factorial’, ‘printtraceback.extract_stack()’)]6
You can format traceback tuples however you want. To use the standard format-
ting, call format_exception(Type,Value,StackTrace[,limit]). A formatted
exception is a list of one or more newline-terminated strings. You can format just a
4807-7 ch33.F 5/24/01 9:01 AM Page 606

607Chapter 33 ✦ Parsing and Interpreting Python Code
stack trace with format_list(StackTrace), or just an exception with
format_exception_only(Type,Value). As a shortcut, call format_tb(traceback[,limit]) to format a traceback directly, or call format_stack to
format the current call stack.
If optimization (the -O switch) is active, the line numbers reported by a tracebackmay be slightly off. The function tb_lineno(Traceback) computes the actualline number for a traceback.
Example: reporting exceptions in a GUINormally, printing tracebacks to a log file is sufficient. However, when debugging a
GUI, it can be nice to see the traceback onscreen. The code in Listing 33-3 shows a
simple way to report exceptions in a Tkinter window.
Listing 33-3: GUIErrors.py
import Tkinterimport tracebackimport sys
def LogError():TBStrings=traceback.format_exception(*sys.exc_info())for Line in TBStrings:
TraceText.insert(Tkinter.END,Line)
def DoBadThings():try:
smurflicious # bogus nameexcept:
LogError()
root=Tkinter.Tk()TraceText=Tkinter.Text(root)TraceText.pack()BadButton=Tkinter.Button(root,text=”DoBadThings”,
command=DoBadThings)BadButton.pack()root.mainloop()
Eating arbitrary exceptions is bad for youCode that catches an exception and does nothing (the except: pass pattern) is
sometimes said to “swallow” the exception. This is often sensible. For example, a
call to os.mkdirs raises an exception if the directory already exists. This OSErroris eminently edible. On the other hand, when one catches an arbitrary exception,
it’s best not to swallow it. Unforeseen problems may remain lurking in the program.
Caution
4807-7 ch33.F 5/24/01 9:01 AM Page 607

608 Part V ✦ Advanced Python Programming
For instance, the exception could be a NameError due to a typo in your code.
Perform some minimal error handling, even in a quick-and-dirty script such as the
following:
try: DoLotsOfStuff() # This should never fail.
except: # Oh no! I don’t know what to do. But I’d better# not just pass, or debugging will hurt.traceback.print_exc()
The time you spend typing that last line is your insurance against long, distracting
interludes spent debugging.
IntrospectionOmphaloskepsis is a fancy word meaning “contemplating one’s navel.” The pro-
gramming equivalent, introspection (also called reflection), is a fancy word for code
that can examine itself. With Python, you can programmatically browse information
such as function and class definitions. It is a handy way to generate documentation,
perform type checking, and more.
Review: basic introspectionThe built-in function hasattr(Object, MemberName) returns true if an object has
a member with the specified name. The function
getattr(Object,AttributeName[,Default]) returns the specified object mem-
ber, or Default if the object has no such member. And the function dir(Object)returns a list of member names for an arbitrary object.
For example, suppose the Master object has various members. Some of the mem-
bers should be explicitly cleaned up (with a call to the cleanup method). The fol-
lowing code would clean up each member:
for Entry in dir(MainApp):if hasattr(Entry,”cleanup”):
getattr(Entry,”cleanup”)()
The built-in function issubclass(Child,Parent) returns true if Child is a sub-
class of Parent. A class is considered a subclass of itself. The function
isinstance(Object,ClassOrType) returns true if the specified object is an
instance of the specified class, or has the specified type.
For example, a commonly used pattern is to check whether a variable X is a string
by testing type(X)==type(“”). The problem with this is that X may be a unicode
string! The following function is a better test for most purposes:
4807-7 ch33.F 5/24/01 9:01 AM Page 608

609Chapter 33 ✦ Parsing and Interpreting Python Code
def IsString(X):return (isinstance(X,types.StringType) or
isinstance(X,types.UnicodeType))
Browsing classesThe module pyclbr provides a PYthon CLass BRowser (hence the name). It
browses Python source code directly — therefore, it can browse a module without
importing it, but it can’t browse a C extension module. The main function
readmodule(ModuleName[,Path]) parses the classes in the specified module file.
The optional parameter Path is a list of directories to add to the module search
path sys.path. The return value of readmodule is a dictionary, where each key is a
class name, and each value is a class descriptor.
A class descriptor has several data members. The members name, module, file,
and lineno provide the class name, module name, module file name, and definition
line number, respectively. The following examines the FTP class from ftplib:
>>> FTPDescriptor=pyclbr.readmodule(“ftplib”)[“FTP”]>>> FTPDescriptor.name‘FTP’>>> FTPDescriptor.lineno75
The member methods is a dictionary, mapping the name of each method to the line
number on which it is defined. The member super is a list of class descriptors for
the class’s base classes; super has length 1 for single inheritance. If readmoduledoesn’t have a class descriptor for a base class, the corresponding entry in superis the base class name (as a string) instead.
Browsing function informationA function (or method) has attributes. Several built-in attributes are available for
every function, as shown in Table 33-1.
Table 33-1Built-in Function Attributes
Name Description
func_name Function name (as a string)
func_doc Function’s docstring; same as the __doc__ member
func_dict Dictionary of user-defined attribute names and values
func_globals Global namespace of the function; same as m.__dict__, where m is themodule defining the function
Continued
4807-7 ch33.F 5/24/01 9:01 AM Page 609

610 Part V ✦ Advanced Python Programming
Table 33-1 (continued)
Name Description
func_defaults Default function parameters, as a tuple
func_code The function, as a code object; suitable for passing to exec or eval
func_defaults Default parameters
You can also set arbitrary attributes on any Python function (but not on a built-in
function).
Function attributes are a new feature in Python 2.1
For example, the function in Listing 33-4 checks a software version number (as a
string) to ensure that it is a valid dotted-decimal. It uses function attributes to track
the number of calls and the number of successes. Listing 33-5 shows the output.
Listing 33-4: FunctionAttributes.py
import reDottedDecimalRegExp=re.compile(r”^[0-9]+(\.[0-9]+)*$”)
def CheckVersionNumber(Str):# One way to handle function attributes is to assume# they are uninitialized until proven otherwise:OldCount = getattr(CheckVersionNumber,”CallCount”,0)CheckVersionNumber.CallCount = OldCount+1if (DottedDecimalRegExp.search(Str)):
CheckVersionNumber.SuccessCount+=1return 1
return 0# One way to handle function attributes is to# initialize them up-front. (Unlike this example, # you will want to choose one pattern and stick with it)CheckVersionNumber.SuccessCount=1
print CheckVersionNumber(“3.5”)print CheckVersionNumber(“2”)print CheckVersionNumber(“3.4.5.”)print CheckVersionNumber(“35.”)
print “Total calls:”,CheckVersionNumber.CallCountprint “Valid version numbers:”,CheckVersionNumber.SuccessCount
NewFeature
4807-7 ch33.F 5/24/01 9:01 AM Page 610

611Chapter 33 ✦ Parsing and Interpreting Python Code
Listing 33-5: Output of FunctionAttributes.py
0001Total calls: 4Valid version numbers: 2
Checking IndentationThe module tabnanny is a safeguard against ambiguous indentation in Python
code. To quote the docstring: “The Tab Nanny despises ambiguous indentation.
She knows no mercy.” Run the module from the command line to check a file. For
example, suppose you created a source file in which one line is indented with tabs,
and another is indented with spaces. (This sort of mismatched whitespace usually
happens when people with different text editors are sharing and editing the same
source files.) The Tab Nanny will not be pleased:
> tabnanny.py -v parsing.py‘parsing.py’: *** Line 8: trouble in tab city! ***offending line: ‘ print “testing!”\012’indent not equal e.g. at tab sizes 1, 2, 3, 4, 5, 6, 7
Tokenizing Python CodeParsing source code can be a bit of a chore. Fortunately, Python’s standard libraries
can parse code for you.
The function tokenize.tokenize(Readline[,Processor]) reads from an input
stream, tokenizes code, and passes each token along to a processor. The Readlineparameter is generally the readline method of a filelike object. It should return
one line of input per call, and return an empty string when no data remains. The
Processor parameter is called once for each token, and passed a tuple of the form
(TokenType, TokenString, (StartRow,StartColumn), (EndRow,EndColumn),
LineNumber). Here, TokenType is a numeric code, and TokenString is the token
itself. LineNumber is the logical line where the token began. The default processor
prints out the token information:
>>> Code=StringIO.StringIO(“str = ‘hi there’”)>>> tokenize.tokenize(Code.readline)1,0-1,3: NAME ‘str’1,3-1,4: OP ‘=’1,4-1,14: STRING “‘hi there’”2,0-2,0: ENDMARKER ‘’
4807-7 ch33.F 5/24/01 9:01 AM Page 611

612 Part V ✦ Advanced Python Programming
The token module provides various token-type constants (such as STRING and
ENDMARKER, as shown in the preceding printout). It provides a dictionary,
tok_name, which maps from token types to token-name strings. It also provides the
function ISEOF(TokenType), which returns true if the token is an end-of-file
marker. The tokenize module exports all of the TokenType constants of token, as
well as one additional one: COMMENT (the TokenType of a Python comment).
A useful parsing-related module is keyword. It provides one function,
iskeyword(str), which returns true if str is a Python keyword.
Example: Syntax-Highlighting PrinterListing 33-6 uses the tokenizer to provide a syntax-highlighted HTML version of
Python source code. It uses the keyword module to look up Python keywords.
Listing 33-6: SyntaxHighlighter.py
import tokenizeimport cgiimport keyword
KEYWORD=”Keyword”
# Use a dictionary to keep track of what HTML tags we# will put before and after each token. TOKEN_START_HTML={tokenize.NAME:”<font color=BLUE>”,
tokenize.COMMENT:”<font color=RED>”,tokenize.STRING:”<font color=GREEN>”,KEYWORD:”<font color=ORANGE>”,}
TOKEN_END_HTML={tokenize.NAME:”</font>”,tokenize.COMMENT:”</font>”,tokenize.STRING:”</font>”,KEYWORD:”</font>”,}
class SyntaxHighlighter:def __init__(self,Input,Output):
self.Input=Inputself.Output=Outputself.OldColumn=0self.OldRow=0
def ProcessToken(self,TokenType,TokenString,StartTuple,EndTuple,LineNumber):
# If this token starts after the last one ended,# then maintain the whitespace:if StartTuple[0]>self.OldRow:
self.OldColumn=0
4807-7 ch33.F 5/24/01 9:01 AM Page 612

613Chapter 33 ✦ Parsing and Interpreting Python Code
Whitespace = “ “*(StartTuple[1]-self.OldColumn)self.Output.write(Whitespace)# Special case: Variable names and Python keywords# both have token type NAME, but we’d like the keywords# to show up in a different color. So, we switch the# token type to suit our needs:if (TokenType==tokenize.NAME and
keyword.iskeyword(TokenString)):TokenType=KEYWORD
# Pre-token tags:PreToken = TOKEN_START_HTML.get(TokenType,””)self.Output.write(PreToken)# The token itself:self.Output.write(cgi.escape(TokenString))# Post-token tags:PostToken = TOKEN_END_HTML.get(TokenType,””)self.Output.write(PostToken)# Track where this token ended: self.OldRow=EndTuple[0]self.OldColumn=EndTuple[1]
def PrintHighlightedCode(self):self.Output.write(“<HTML><PRE>”)tokenize.tokenize(self.Input.readline,
self.ProcessToken)self.Output.write(“</PRE></HTML>”)
Input=open(“SyntaxHighlight.py”,”r”) # highlight ourself!Output=open(“SyntaxHighlight.html”,”w”)Highlighter=SyntaxHighlighter(Input, Output)Highlighter.PrintHighlightedCode()
Inspecting Python Parse TreesWhen Python code is parsed, it is stored internally in an Abstract Syntax Tree
(AST). The parser module provides you with access to AST objects. You can con-
vert back and forth between sequences and AST objects, in order to manipulate an
expression.
Manipulating ASTs is not for the faint of heart — they are low-level beasts that mayvary from one release of Python to the next.
Creating an ASTThe function parser.expr(source) parses the provided expression, and returns
the resulting AST. It parses a single expression, in the same way that
compile(source, “file.py”, “eval”) would. The function
parser.suite(source) parses a suite of statements, in the same way that
Caution
4807-7 ch33.F 5/24/01 9:01 AM Page 613

614 Part V ✦ Advanced Python Programming
compile(source, “file.py”, “exec”) would. Both functions raise a
ParserError if they cannot parse the code.
ASTs and sequencesThe AST method totuple([LineInfo]) returns a tuple representation of the AST.
The tuple contains many deeply nested subtuples. Each tuple is either a terminal
element (a token) or a nonterminal element (a symbol).
Each terminal element of the source is represented by a tuple of the form
(TokenType,TokenString[,LineNumber]). Here, LineNumber is provided only if the
LineInfo parameter (passed to totuple) was true. The constants in the token mod-
ule provide readable names for terminal element types.
Each nonterminal element of the source is represented by a tuple of the form
(SymbolType,SubElement[,SubElement...]). Here, SymbolType is one of the symbol
constants provided in the symbol module, and each SubElement is a child element
(either terminal or nonterminal).
Similarly, the AST method tolist([LineInfo]) returns a list representation of the
AST. You can produce an AST from a sequence by calling the function
sequence2ast(Sequence).
Using ASTsAn AST object has several methods. The method isexpr returns true if the AST
corresponds to a single expression; conversely, issuite returns true if the AST
corresponds to a block of code. The member compile([filename]) compiles the
AST into a code object, suitable for passing to exec (if issuite is true) or to eval(if isexpr is true). The dummy file name defaults to <ast>.
Low-Level Object CreationThe new module provides functions to create a new instance, class, function, mod-
ule, or method.
The function instance(Class,Members) creates and returns an instance of Classwith the specified member dictionary (i.e., the new object’s __dict__ attribute will
be Members).
The function instancemethod(function,instance,class) returns a new
method object. If instance is none, the new method is an unbound (class) method.
The function function(code, globals[,name[,defaults]]) creates a function
with the specified code (as a code object) and the specified globals (as a dictionary).
If specified, defaults should be a tuple of default arguments for the function.
4807-7 ch33.F 5/24/01 9:01 AM Page 614

615Chapter 33 ✦ Parsing and Interpreting Python Code
The function module(name) creates a new module with the specified name.
The function classobj(name,BaseClasses,NameSpace) creates a new class with
the specified name. BaseClasses is a tuple (possibly empty) of base classes, and
NameSpace is the class’s namespace dictionary.
The normal way of creating things is usually the right way, but occasionally the low-
level power of new is useful. For example, suppose that Employee and Person are
classes with similar data members. You could create a Person from an Employee by
using new, as shown in Listing 33-7:
Listing 33-7: UsingNew.py
import new
class Employee:pass
class Person:pass
Bob=Employee()Bob.Name=”Bob”Bob.SSN=”123-45-6789”Bob.ManagerName=”Earl”# Passing Bob.__dict__ gives rise to some unnatural behavior# later on; passing Bob.__dict__.copy() would be healthier!BobThePerson=new.instance(Person,Bob.__dict__)print BobThePerson.NameBobThePerson.SSN=”987-65-4321”print Bob.SSN # It has changed!!!
Disassembling Python CodePython code is compiled into byte code before execution, for improved efficiency.
This byte-compiled code is stored on disk in .pyc files. The dis module enables you
to disassemble and examine this byte code. The main function, dis([Source]),
disassembles byte code and prints the results. The parameter Source may be a
function or method, a code object, or a class. The function distb([tb]) disassem-
bles the top function of a traceback object. By default, both dis and distb disas-
semble the last traceback.
Each line of output contains the instruction address, the opcode name, the opera-
tion parameters, and the interpretation of the operation parameters:
4807-7 ch33.F 5/24/01 9:01 AM Page 615

616 Part V ✦ Advanced Python Programming
>>> def Tip(Bill):return Bill * 0.15
>>> dis.dis(Tip)0 SET_LINENO 1
3 SET_LINENO 26 LOAD_FAST 0 (Bill)9 LOAD_CONST 1 (0.14999999999999999)12 BINARY_MULTIPLY 13 RETURN_VALUE 14 LOAD_CONST 0 (None)17 RETURN_VALUE
The instructions at 6 and 9 push the two values onto the stack; the instructions at
12 and 13 multiply them and return the result. Notice that the instructions at 14 and
17 (which return None) will never actually execute. (Experiments have been done
with an optimizing Python compiler; such a compiler might well omit these extrane-
ous instructions!)
The attribute dis.opname is a sequence of operation code names; the index of each
opcode is its byte code. The dis module provides several sequences for keeping
track of the available opcodes. For example, haslocal is a sequence of byte codes
that accesses a local variable:
>>> dis.haslocal[124, 125, 126]>>> dis.opname[125] # Look up the opcode for this byte code‘STORE_FAST’
Consult the Python documentation for a full list of the operation codes and their
behavior.
SummaryWhen it is feeling introspective, Python can parse itself, compile itself, tokenize
itself, and even disassemble itself. All this flexibility makes programming Python
easier. In this chapter, you:
✦ Reported errors in a graphical user interface.
✦ Used function attributes to track some simple statistics.
✦ Created an HTML page of Python code, complete with syntax highlighting.
✦ Parsed and disassembled source code.
The next chapter deals with internationalizing applications. This is where Unicode
starts to really come in handy!
✦ ✦ ✦
4807-7 ch33.F 5/24/01 9:01 AM Page 616

DeployingPythonApplications
✦ ✦ ✦ ✦
Chapter 34Creating WorldwideApplications
Chapter 35Customizing ImportBehavior
Chapter 36Distributing Modulesand Applications
✦ ✦ ✦ ✦
P A R T
VIVI
4807-7 PO6.F 5/24/01 9:01 AM Page 617

4807-7 PO6.F 5/24/01 9:01 AM Page 618

CreatingWorldwideApplications
The modules covered in this chapter help you create pro-
grams that are easily adaptable to different languages
and countries. These tools extract language- and region-
specific information so that, without additional programming,
your program will work well with users who speak different
languages or have different local customs than your own.
Internationalization andLocalization
Internationalization is the process by which a program is pre-
pared for using a different language than that of the program-
mer. Localization is the process by which an internationalized
program is adapted to the end-user’s choice of language and
customs. Together they make up what is known as native lan-guage support, or NLS.
Due to the annoying length of the words internationaliza-tion and localization, a popular abbreviated form is to writethe first and last letters and place between them the num-ber of remaining letters. Thus internationalization becomesi18n and localization becomes l10n.
Internationalization isn’t usually difficult. If you write your
program with the idea that you will be running it in different
languages, then adding internationalization support requires
little effort. If you are retrofitting an existing application, the
work isn’t hard but merely tedious. The internationalization
techniques in this chapter deal with marking strings in your
application as ones that need to be translated. Special tools
then extract these strings and lump them together in a
human-readable file that you pass to a translator.
Note
3434C H A P T E R
✦ ✦ ✦ ✦
In This Chapter
Internationalizationand localization
Preparingapplications formultiple languages
Formatting locale-specific output
✦ ✦ ✦ ✦
4807-7 ch34.F 5/24/01 9:01 AM Page 619

620 Part VI ✦ Deploying Python Applications
With a little effort, localization can happen almost automatically. Given the file con-
taining translations for the marked strings in your program, Python’s tools will look
up the translated version before displaying textual messages to the user.
Additionally, there are functions that help you format numbers, currencies, dates,
and so forth, without requiring you to know the different formats for every single
region in the world. Each set of region-specific settings is known as a locale, and
there are pre-built libraries of common locales throughout the world.
Python’s native language support routines are largely based on GNU’s native lan-guage support project. Visit the gettext section on www.gnu.org for interestinglinks and more information.
Preparing Applications for MultipleLanguages
This section walks you through the process of preparing a tiny program for using
different languages. For a real application, you’ll follow these steps in a different
order, but the order given here is better for a first-time look at the process. At first,
it may seem like a lot of work, but after you’ve been through it all once, you’ll see
that it’s actually quite simple.
An NLS exampleNot all strings in an application need to be localizable (translatable). File names,
development error messages, and other strings that aren’t visible to the user can
remain in your native language. Mark the strings that do need to be translated by
sending them to a dummy function named _(s):
def _(s): return sprint _(‘What do you want to do today?’)print ‘1 -’, _(‘Bake something’)print ‘2 -’, _(‘Play with food’)i = raw_input( _(‘Enter 1 or 2: ‘))if i == ‘1’:print _(‘Oh boy! Baking!’)
else:print _(‘Food is fun!’)
The function name can be anything, but the single underscore character is the con-
ventional choice because it doesn’t pollute your source code too much, it doesn’t
take too much extra effort to include it, and it’s very unlikely that you’re already
using a function of the same name. Moreover, some processing tools may be expect-
ing that you follow the herd and use the same convention.
Note
4807-7 ch34.F 5/24/01 9:01 AM Page 620
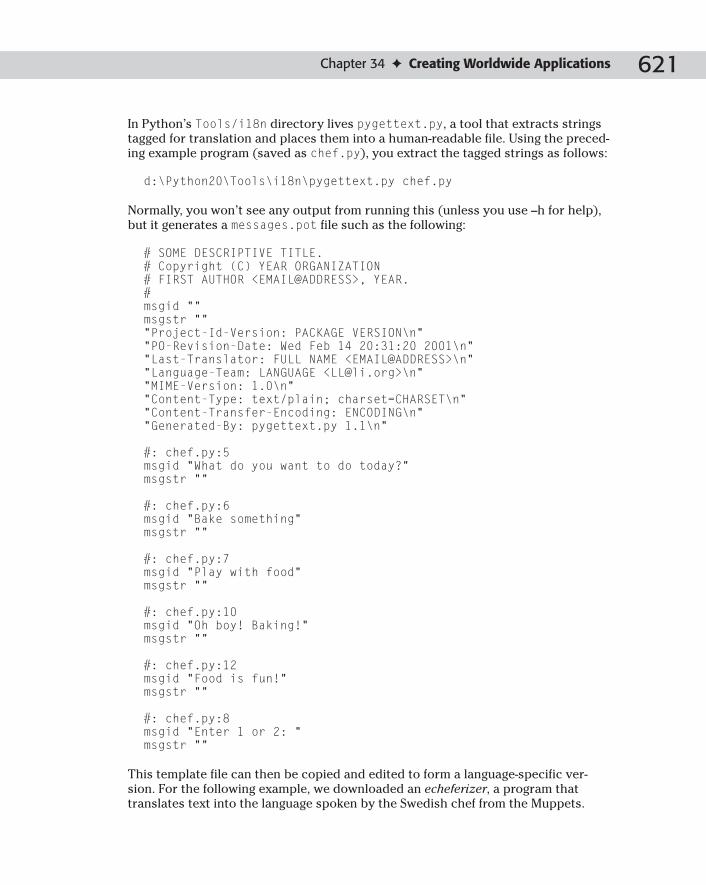
621Chapter 34 ✦ Creating Worldwide Applications
In Python’s Tools/i18n directory lives pygettext.py, a tool that extracts strings
tagged for translation and places them into a human-readable file. Using the preced-
ing example program (saved as chef.py), you extract the tagged strings as follows:
d:\Python20\Tools\i18n\pygettext.py chef.py
Normally, you won’t see any output from running this (unless you use –h for help),
but it generates a messages.pot file such as the following:
# SOME DESCRIPTIVE TITLE.# Copyright (C) YEAR ORGANIZATION# FIRST AUTHOR <EMAIL@ADDRESS>, YEAR.#msgid “”msgstr “”“Project-Id-Version: PACKAGE VERSION\n”“PO-Revision-Date: Wed Feb 14 20:31:20 2001\n”“Last-Translator: FULL NAME <EMAIL@ADDRESS>\n”“Language-Team: LANGUAGE <[email protected]>\n”“MIME-Version: 1.0\n”“Content-Type: text/plain; charset=CHARSET\n”“Content-Transfer-Encoding: ENCODING\n”“Generated-By: pygettext.py 1.1\n”
#: chef.py:5msgid “What do you want to do today?”msgstr “”
#: chef.py:6msgid “Bake something”msgstr “”
#: chef.py:7msgid “Play with food”msgstr “”
#: chef.py:10msgid “Oh boy! Baking!”msgstr “”
#: chef.py:12msgid “Food is fun!”msgstr “”
#: chef.py:8msgid “Enter 1 or 2: “msgstr “”
This template file can then be copied and edited to form a language-specific ver-
sion. For the following example, we downloaded an echeferizer, a program that
translates text into the language spoken by the Swedish chef from the Muppets.
4807-7 ch34.F 5/24/01 9:01 AM Page 621

622 Part VI ✦ Deploying Python Applications
I took messages.pot, added translations, and saved it as messages.po (the follow-
ing text shows only the lines that changed):
#: chef.py:5msgid “What do you want to do today?”msgstr “Vhet du yuoo vunt tu du tudey?”
#: chef.py:6msgid “Bake something”msgstr “Beke-a sumetheeng”
#: chef.py:7msgid “Play with food”msgstr “Pley veet fuud”
#: chef.py:10msgid “Oh boy! Baking!”msgstr “Ooh buy! Bekeeng!”
#: chef.py:12msgid “Food is fun!”msgstr “Fuud is foon!”
#: chef.py:8msgid “Enter 1 or 2: “msgstr “Inter 1 oor 2: “
The gettext module understands translation files in the .mo format, so use the
msgfmt.py tool (also in Python’s Tools/i18n directory) to convert from the .poformat:
d:\Python20\Tools\i18n\msgfmt.py messages.po
Once again, no output message means success, although you should now find a
messages.mo file in the current directory. Make a directory off your current direc-
tory called chef, and in it create another directory called LC_MESSAGES. Now move
messages.po into that LC_MESSAGES directory (I’ll explain why in a minute).
The final step is to replace the underscore function with a translator function from
Python’s gettext module. (Of course, you could have skipped using the dummy
function altogether and used gettext from the get-go, but I wanted to keep it sim-
ple.) Replace the old underscore function with the following:
import gettext_ = gettext.translation(‘messages’,’.’).gettext
Instead of using the translation object’s gettext method, you can use ugettextto have it return the string as a Unicode string.
Back on the command line, set the environment variable LANGUAGE to chef and run
the program:
Tip
4807-7 ch34.F 5/24/01 9:01 AM Page 622

623Chapter 34 ✦ Creating Worldwide Applications
C:\temp>set LANGUAGE=chefC:\temp>chef.pyVhet du yuoo vunt tu du tudey?1 - Beke-a sumetheeng2 - Pley veet fuudInter 1 oor 2: 1Ooh buy! Bekeeng!
What it all meansNow that you’ve seen an example, you can better understand the process. The
underscore function acts as a lookup function that receives an original string and
returns a translated string. The work of extracting the strings, translating them, and
converting the file to the .po format is pretty straightforward. (Python uses the .poformat because that’s what GNU uses and there are third-party tools that use the
same format.)
The gettext.translation(domain[, localdir[, languages[, class]]])function returns an instance of the Translation class that handles lookups for
you. domain is useful if you want to group strings by module or category, and
localdir is the base path from which to search for translation files (if omitted, it
looks in the default system locale directory). If the languages parameter is omit-
ted, the function searches through the environment variables LANGUAGE, LC_ALL,
LC_MESSAGES, and LANG to decide which language to use. class lets you supply
your own class to parse the translation file; if omitted, the GNUTranslations class
is used.
gettext.install(domain[, localdir[, unicode]])) installs the under-score function in Python’s built-in namespace so that all modules will be able toaccess it. Use this only when you want to force the entire application to use thesame language.
Based on the argument and environment information, gettext looks in
localdir/language/LC_MESSAGES/domain.mo for a translation file, and opens
and processes it, although it first passes the language to gettext._expand_langto get a list of directory names it will check for:
>>> import gettext>>> gettext._expand_lang(‘french’)[‘fr_FR.ISO8859-1’, ‘fr_FR’, ‘fr.ISO8859-1’, ‘fr’]>>> gettext._expand_lang(‘american’)[‘en_US.ISO8859-1’, ‘en_US’, ‘en.ISO8859-1’, ‘en’]>>> gettext._expand_lang(‘chef’)[‘chef’] # Unknown locale returned as-is
You could place a single English translation in an en directory so that all English-
speaking users would get that one translation; or you could provide translations
that differ for Australia and the United States, for example.
Tip
4807-7 ch34.F 5/24/01 9:01 AM Page 623

624 Part VI ✦ Deploying Python Applications
When you ship your program, you would include .mo files for each language you
wish to support. Based on the user’s environment variables, your program automat-
ically displays itself in the correct language.
The gettext module also has a set of APIs that closely mirror the GNU C APIs,but using the class-based APIs discussed in this section is the method of choice;it’s flexible and much more Pythonic. For example, you can create your own trans-lation class, and you can localize each module separately, instead of the entireapplication.
Formatting Locale-Specific OutputThe locale module helps you localize program output by formatting numbers and
strings according to the rules of an end-user’s locale. The following sections show
you how to query and set various properties of the current locale.
Changing the localeThe default locale is called the C locale, but you can change the locale with
setlocale(category[, value]). Each locale is a set of rules for formatting cur-
rencies, dates, and so on, and you can use the category argument to specify what
part of the locale you want to switch. Table 34-1 lists the different categories you
can use. If value is omitted, the current locale for the given category is returned.
Table 34-1Locale Categories
Category Affects rules dealing with . . .
LC_ALL All subcategories
LC_TIME Time formatting
LC_MESSAGES Operating system-generated messages
LC_NUMERIC Number formatting
LC_MONETARY Currency formatting
LC_COLLATE String sorting
LC_CTYPE Character functions
Note
4807-7 ch34.F 5/24/01 9:01 AM Page 624

625Chapter 34 ✦ Creating Worldwide Applications
In general, you switch all categories at the same time:
>>> import locale>>> locale.setlocale(locale.LC_ALL,’german’)‘German_Germany.1252’
Calling setlocale with an empty string for the value argument switches to the
user’s default locale (which is discovered by looking in environment variables such
as LANGUAGE, LC_ALL, LC_CTYPE, and LANG or by querying the operating system).
Many users set their locale in site.py, which is loaded when Python starts up, sobefore setting the locale, you should first verify that it isn’t already something otherthan the default C locale.
setlocale is not generally thread-safe, so if you do call it, be sure to do so near the
beginning of the program if possible. Programs running in embedded Python inter-
preters should not set the locale, but if the embedding application sets the locale
before the interpreter starts, Python will use the new locale setting.
Locale-specific formattingstr(f) formats a floating-point number using the user’s locale settings to decide
what decimal character to use:
>>> import locale>>> locale.setlocale(locale.LC_ALL,’german’)‘German_Germany.1252’>>> locale.str(5.21)‘5,21’
The format(format, val[, grouping]) function formats a number just as the
normal % operator would, except that it also takes into account the user’s numeri-
cal separator characters. If grouping is 1 instead of the default of 0, a grouping
character (such as a thousand’s separator) is used:
>>> locale.format(‘%5.2f’,12345.23)‘12345,23’>>> locale.format(‘%5.2f’,12345.23,1)‘12.345,23’
atof(str) and atoi(str) convert a string to a floating-point number or integer,
taking into account the user’s grouping and decimal characters. The following uses
the preceding locale settings:
>>> locale.atof(‘1.000.002,5’)1000002.5
strcoll(s1, s2) compares two strings using the lexicographic rules of the user’s
locale:
Note
4807-7 ch34.F 5/24/01 9:01 AM Page 625

626 Part VI ✦ Deploying Python Applications
>>> locale.setlocale(locale.LC_ALL,’us’)‘English_United States.1252’>>> locale.strcoll(‘chump’,’coward’) # ‘ch’ < ‘co’ in English-1>>> locale.setlocale(locale.LC_ALL,’sp’)‘Spanish_Spain.1252’>>> locale.strcoll(‘chump’,’coward’) # In Spanish, ‘ch’ > ‘c’1
In order to compare strings using non-native lexicographic rules, strcoll first
transforms the strings in such a way that a normal string compare yields the cor-
rect result. If you will be performing many comparisons of the same string (sorting,
for example), you can instead call strxfrm(s) to get the transformed format. This
would calculate it only once, after which you can use Python’s normal compar-
isons, such as cmp and the equality operators.
Properties of localesEach locale has a set of attributes describing its various rules. The localeconv()function returns a dictionary containing the rules for the current locale. The keys of
this dictionary and their meanings are listed in Table 34-2.
Table 34-2Keys for the localeconv Dictionary
Key Meaning U.S. English Example
decimal_point Decimal-point character .
mon_decimal_point Monetary decimal point .
thousands_sep Number grouping character ,
mon_thousands_sep Monetary grouping character ,
currency_symbol Local currency symbol $
int_curr_symbol International currency symbol USD
positive_sign Sign for positive money values <blank>
negative_sign Sign for negative money values -
frac_digits Number of fractional digits used in local 2monetary values
int_frac_digits Number of fractional digits used in 2international values
p_cs_precedes 1 if currency symbol precedes value for 1positive monetary values
4807-7 ch34.F 5/24/01 9:01 AM Page 626

627Chapter 34 ✦ Creating Worldwide Applications
Key Meaning U.S. English Example
n_cs_precedes 1 if currency symbol precedes value for 1negative values
p_sep_by_space 1 if space between positive value and 0currency symbol
n_sep_by_space 1 if space between positive value and currency 0symbol for negative values
p_sign_posn Sign position, positive money values 3
n_sign_posn Sign position, negative money values 0
grouping List of separator positions [3, 0]
mon_grouping List of separator positions, for monetary values [3, 0]
For p_sign_posn and n_sign_posn, a value of 0 means that the currency and the
value are enclosed in parentheses; 1 means that the sign comes before the value
and the currency symbol; and 2 means that the sign follows the value and the cur-
rency symbol. A value of 3 means that the sign immediately precedes the value, and
4 means that the sign immediately follows the value. A value of LC_MAX means noth-
ing is specified for this locale.
The grouping and mon_grouping attributes have lists of numbers specifying the
positions where “thousands” (numerical grouping) separators should be put. If the
last entry is CHAR_MAX, no further grouping is performed after the next-to-last posi-
tion has been used. If the last entry is 0, the last group is repeated, so [3, 0] means
place the separator character every three digits.
SummaryAdding native language support to your application makes it possible for your pro-
grams to adapt themselves to the locale of the end-user, without requiring you to
know the customs of every single region in the world. In this chapter, you:
✦ Flagged translatable strings in your program and extracted them with
Python’s tools.
✦ Created a translation table for your application and ran it in a different language.
✦ Formatted numeric output according to the rules of the end-user’s locale.
The next chapter shows you how to take control of and modify the standard mod-
ule import behavior.
✦ ✦ ✦
4807-7 ch34.F 5/24/01 9:01 AM Page 627

4807-7 ch34.F 5/24/01 9:01 AM Page 628

CustomizingImport Behavior
In most cases, the normal behavior for importing modules
is just what you need: You give Python a module name and
it finds and loads the module code and adds a new module
object to the current namespace. Occasionally, however, you
may need to change the way the import process works. This
chapter covers the several mechanisms Python provides for
easily creating custom module import behavior.
Understanding Module ImportingWhen the Python interpreter processes the import state-
ment, it calls the function __import__(name[, globals[,locals[, fromlist]]]), which in turn locates the module
called name, retrieving its byte code so that a new module
object can be created. The globals and locals parameters
hold the global and local dictionaries so that __import__ can
determine the context in which the import is taking place.
fromlist is a list of items to import from the module when
the from x import y form of import is used.
Chapter 6 describes modules, packages, and the importstatement.
The primary reason __import__ exists in Python (as opposed
to being accessible only via the Python/C API) is so that you
can modify or track module imports. For example, the follow-
ing code replaces the normal importer with a function that
informs you of each module being loaded:
oldimp = __import__ # Save a reference to theoriginal
Cross-Reference
3535C H A P T E R
✦ ✦ ✦ ✦
In This Chapter
Understandingmodule importing
Finding and loadingmodules with imp
Importing encryptedmodules
Retrieving modulesfrom a remote source
✦ ✦ ✦ ✦
4807-7 ch35.F 5/24/01 9:02 AM Page 629

630 Part VI ✦ Deploying Python Applications
def newimp(name, globals=None, locals=None, fromlist=None):# Display info about the import requestif not fromlist:
print ‘:: import’,nameelse:
print ‘:: from’,name,’import’,’, ‘.join(fromlist)
# Now call the original functionreturn oldimp(name,globals,locals,fromlist)
__builtins__.__import__ = newimp
After running the preceding code, you can see that import calls are indeed routed
to the new function, including imports that other modules request on their own:
>>> import os:: import os>>> os = reload(os):: import sys:: from nt import *:: from nt import _exit:: import ntpath:: import UserDict
The knee module in the standard Python distribution is an example of replacingthe built-in __import__ function. It doesn’t add new functionality, but it is usefulfor seeing how things work.
Another use of __import__ is to modify the module before returning it to the caller.
For example, the following code adds a timestamp to each module, marking when it
was originally loaded:
import sys, time
oldimp = __import__
def newimp(name, globals=None, locals=None, fromlist=None):try:
mod = sys.modules[name]first_load = mod.first_load
except (AttributeError, KeyError):first_load = time.time()
mod = oldimp(name,globals,locals,fromlist)mod.first_load = first_loadreturn mod
__builtins__.__import__ = newimp
Tip
4807-7 ch35.F 5/24/01 9:02 AM Page 630

631Chapter 35 ✦ Customizing Import Behavior
The module maintains its original timestamp, even if reloaded:
>>> import md5>>> md5.first_load982444108.24399996>>> md5 = reload(md5)>>> md5.first_load982444108.24399996
Some modules will have already been loaded by the time your import hook iscalled, so they won’t have a timestamp unless they are loaded again later.
Instead of completely replacing Python’s import behavior, other modules let you
replace or extend only parts of it. The following sections cover the imp and
imputil modules.
The ihooks module is another way to modify module import behavior; it is cur-rently used by rexec (restricted execution). New programs should avoid usingihooks, and use imp and imputil instead.
Finding and Loading Modules with impThe imp module gives you access to some of the behind-the-scenes functionality
associated with module importing. It’s useful if you’re creating your own module
importer or working with Python module files.
Each byte-compiled (.pyc) file has a special header identifying it as Python byte-
code; this header can vary from one version of Python to the next to signify a
change in bytecode format. get_magic() returns the header for the current
version:
>>> import imp>>> imp.get_magic()‘\207\306\015\012’
get_suffixes() returns a list of module suffixes that Python uses when searching
for modules. The list contains tuples of the form (suffix, mode, type):
>>> imp.get_suffixes()[(‘.pyd’, ‘rb’, 3), (‘.dll’, ‘rb’, 3), (‘.py’, ‘r’, 1), (‘.pyc’, ‘rb’, 2)]
The mode tells what mode should be passed to the open function to read the file
contents, and type tells the type of the module. imp defines a variable to name
each type, as listed in Table 35-1.
Note
Note
4807-7 ch35.F 5/24/01 9:02 AM Page 631
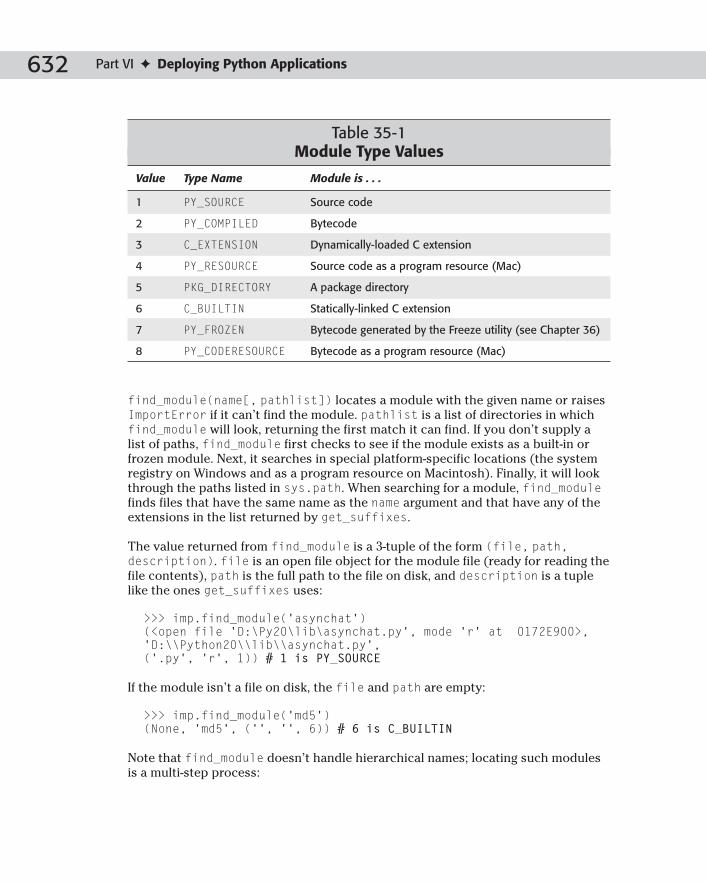
632 Part VI ✦ Deploying Python Applications
Table 35-1Module Type Values
Value Type Name Module is . . .
1 PY_SOURCE Source code
2 PY_COMPILED Bytecode
3 C_EXTENSION Dynamically-loaded C extension
4 PY_RESOURCE Source code as a program resource (Mac)
5 PKG_DIRECTORY A package directory
6 C_BUILTIN Statically-linked C extension
7 PY_FROZEN Bytecode generated by the Freeze utility (see Chapter 36)
8 PY_CODERESOURCE Bytecode as a program resource (Mac)
find_module(name[, pathlist]) locates a module with the given name or raises
ImportError if it can’t find the module. pathlist is a list of directories in which
find_module will look, returning the first match it can find. If you don’t supply a
list of paths, find_module first checks to see if the module exists as a built-in or
frozen module. Next, it searches in special platform-specific locations (the system
registry on Windows and as a program resource on Macintosh). Finally, it will look
through the paths listed in sys.path. When searching for a module, find_modulefinds files that have the same name as the name argument and that have any of the
extensions in the list returned by get_suffixes.
The value returned from find_module is a 3-tuple of the form (file, path,description). file is an open file object for the module file (ready for reading the
file contents), path is the full path to the file on disk, and description is a tuple
like the ones get_suffixes uses:
>>> imp.find_module(‘asynchat’)(<open file ‘D:\Py20\lib\asynchat.py’, mode ‘r’ at 0172E900>,‘D:\\Python20\\lib\\asynchat.py’,(‘.py’, ‘r’, 1)) # 1 is PY_SOURCE
If the module isn’t a file on disk, the file and path are empty:
>>> imp.find_module(‘md5’)(None, ‘md5’, (‘’, ‘’, 6)) # 6 is C_BUILTIN
Note that find_module doesn’t handle hierarchical names; locating such modules
is a multi-step process:
4807-7 ch35.F 5/24/01 9:02 AM Page 632
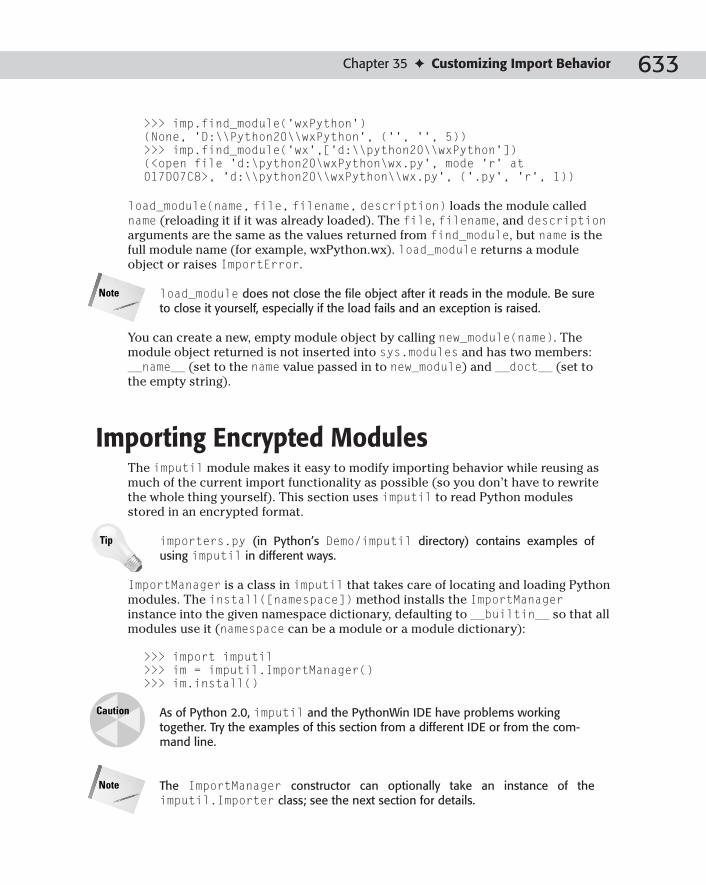
633Chapter 35 ✦ Customizing Import Behavior
>>> imp.find_module(‘wxPython’)(None, ‘D:\\Python20\\wxPython’, (‘’, ‘’, 5))>>> imp.find_module(‘wx’,[‘d:\\python20\\wxPython’])(<open file ‘d:\python20\wxPython\wx.py’, mode ‘r’ at017D07C8>, ‘d:\\python20\\wxPython\\wx.py’, (‘.py’, ‘r’, 1))
load_module(name, file, filename, description) loads the module called
name (reloading it if it was already loaded). The file, filename, and descriptionarguments are the same as the values returned from find_module, but name is the
full module name (for example, wxPython.wx). load_module returns a module
object or raises ImportError.
load_module does not close the file object after it reads in the module. Be sureto close it yourself, especially if the load fails and an exception is raised.
You can create a new, empty module object by calling new_module(name). The
module object returned is not inserted into sys.modules and has two members:
__name__ (set to the name value passed in to new_module) and __doct__ (set to
the empty string).
Importing Encrypted ModulesThe imputil module makes it easy to modify importing behavior while reusing as
much of the current import functionality as possible (so you don’t have to rewrite
the whole thing yourself). This section uses imputil to read Python modules
stored in an encrypted format.
importers.py (in Python’s Demo/imputil directory) contains examples ofusing imputil in different ways.
ImportManager is a class in imputil that takes care of locating and loading Python
modules. The install([namespace]) method installs the ImportManagerinstance into the given namespace dictionary, defaulting to __builtin__ so that all
modules use it (namespace can be a module or a module dictionary):
>>> import imputil>>> im = imputil.ImportManager()>>> im.install()
As of Python 2.0, imputil and the PythonWin IDE have problems workingtogether. Try the examples of this section from a different IDE or from the com-mand line.
The ImportManager constructor can optionally take an instance of theimputil.Importer class; see the next section for details.
Note
Caution
Tip
Note
4807-7 ch35.F 5/24/01 9:02 AM Page 633

634 Part VI ✦ Deploying Python Applications
Once the ImportManager is installed, you can add to its list of recognized suffixes
for Python modules by calling its add_suffix(suffix, importFunc) method.
When the import statement is used, the ImportManager searches through known
module locations (for example, sys.path) for files that have the requested module
name and an extension that matches one in ImportManager’s internal suffix list.
When found, it calls the importFunc to import that module.
The code in Listing 35-1 puts the ImportManager to work by adding the new file
suffix.pye, which for now will contain only normal Python source code (in a later
example, it will contain encrypted bytecode). Basically, no functionality is added,
except that you can now store Python code in .pye files.
Listing 35-1: importpye.py – Adds.pye as valid Pythonmodule files
import imputil
def handle_pye(fullpath, fileinfo, name):# Print a debugging messageprint ‘Importing “%s” from “%s”’ % (name,fullpath)
data = open(fullpath).read()return 0, compile(data,fullpath,’exec’),{}
im = imputil.ImportManager()im.add_suffix(‘.pye’,handle_pye)im.install()
Now create a .pye Python module. For example, save the following code to a file
called stuff.pye:
print ‘I am being imported!’a = 10b = ‘Hello’
After importing importpye, any other module can automatically import .pyemodules:
>>> import stuff # This fails – doesn’t check .pye files yetTraceback (most recent call last):File “<stdin>”, line 1, in ?
ImportError: No module named stuff>>> import importpye>>> import stuff # Now .pye files are checked and loadedImporting “stuff” from “stuff.pye”I am being imported!>>> stuff.a, stuff.b(10, ‘Hello’)
4807-7 ch35.F 5/24/01 9:02 AM Page 634

635Chapter 35 ✦ Customizing Import Behavior
The importFunc passed to add_suffix takes three arguments: the full path to the
module file, a file information tuple (from a call to os.stat), and the name of the
module being imported. If the function doesn’t return a value, ImportManager con-
tinues looking in other locations and with other suffixes until it loads a module,
finally raising ImportError if unsuccessful, so your importFunc could choose to
ignore some import requests because the ImportManager will continue looking if
needed.
Your importFunc should either not return anything or return a 3-tuple (isPkg,code, initialDict). isPkg is 1 if the module is actually a package directory, codeis a code object for the module (which will be executed in the namespace of the
new module), and initialDict is a dictionary containing any initial values you
want present in the new module’s dictionary before the code object is executed.
With the import hook working, you can add in support to decrypt the module as it
is being imported. Listing 35-2 expands the previous version of importpye.py to
decrypt the file contents before returning it to the ImportManager. It also adds a
utility function, encrypt, to take a .py file and create a .pye file containing com-
piled and encrypted bytecode.
Listing 35-2: importpye.py – Imports-encrypted Pythonmodules
import imputil, rotor, os, marshal
SECRET_CODE = ‘bitakhon’rot = rotor.newrotor(SECRET_CODE)
def encrypt(name):# Compiles and encrypts a Python filedata = compile(open(name).read(), name, ‘exec’)
base, ext = os.path.splitext(name)data = rot.encrypt(marshal.dumps(data))open(base+’.pye’, ‘wb’).write(data)
def handle_pye(fullpath, fileinfo, name):# Print a debugging messageprint ‘Importing “%s” from “%s”’ % (name,fullpath)
data = marshal.load(fullpath)return 0, rot.decrypt(data),{}
im = imputil.ImportManager()im.add_suffix(‘.pye’,handle_pye)im.install()
4807-7 ch35.F 5/24/01 9:02 AM Page 635

636 Part VI ✦ Deploying Python Applications
To test it, rename stuff.pye to just stuff.py (or use any other Python source
file) and use the encrypt function to create a .pye file:
>>> import importpye>>> importpye.encrypt(‘stuff.py’)
Now you can distribute the stuff.pye file, and programs can load it without need-
ing to handle the details of decryption:
>>> import importpye>>> import stuffI am being imported!>>> stuff.a, stuff.b(10, ‘Hello’)
With a little extra work, you can use this method to distribute Python modules
whose contents are relatively secure. Using the Python/C API, you can create a
small C program that embeds the Python interpreter and takes care of setting up
the rotor (or whatever other decryption engine you use) so that it’s not overly triv-
ial for someone else to decrypt the files. Furthermore, by not advertising the fact
that your program is actually Python, and by grouping all the modules together into
a single archive file (perhaps as a pickled dictionary), you can prevent all but the
nosiest of people from obtaining your program source.
Chapters 29 and 30 cover extending and embedding Python with C, and Chapter12 teaches you how to serialize Python objects using the pickle and marshalmodules.
Retrieving Modules from a Remote SourceThe imputil.Importer class is a base class from which you derive custom import
subclasses. In this section, you’ll create a subclass that retrieves Python modules
from a remote module repository.
Subclassing ImporterMost subclasses of Importer override only one method, get_code(parent,name, fqname). If not None, parent is a parent module in a module hierarchy. nameis the name of the module, and fqname is the fully qualified name (from the root of
the module namespace down to this module).
If get_code can’t find the module or doesn’t want to handle the request, it shouldn’t
return anything. If it does load the module, the return value should be a 3-tuple of
the form (isPkg, code, initialDict), as with the importFunc in the previous
section.
Cross-Reference
4807-7 ch35.F 5/24/01 9:02 AM Page 636

637Chapter 35 ✦ Customizing Import Behavior
The easiest way to use an Importer is to add it to sys.path. Normally, sys.pathholds directory names, but with the ImportManager installed, it can contain direc-
tory names or Importers. Listing 35-3 creates a dummy Importer and installs it.
Listing 35-3: dumbimp.py – A dummy custom Importer
import imputil, sys
# Create an install the ImportManagerier = imputil.ImportManager()ier.install()
class DummyImp(imputil.Importer):def get_code(self, *args):
print ‘Importing’,args
# Install at the front of the listsys.path.insert(0,imputil.BuiltinImporter())sys.path.insert(0,DummyImp())
# Test itimport Tkinter
Running the program yields the following output:
C:\temp>dumbimp.pyImporting (None, ‘Tkinter’, ‘Tkinter’)Importing (None, ‘FixTk’, ‘FixTk’) # Indirect importsImporting (None, ‘_tkinter’, ‘_tkinter’)Importing (None, ‘types’, ‘types’)Importing (None, ‘Tkconstants’, ‘Tkconstants’)Importing (None, ‘string’, ‘string’)Importing (None, ‘MacOS’, ‘MacOS’)
Right behind the new importer is also an instance of BuiltinImporter to handle
normal imports. When downloading modules from a remote source, the custom
importer should probably come last in the list so that all other importing tech-
niques are exhausted before an attempt is made to download it over the relatively
slow network connection.
Creating the remote ImporterThe server side of the network connection is as simple as possible: it accepts
incoming connections, reads a request for a single module, and returns the Python
source code or an empty string if the module doesn’t exist on the remote side. In
real-world applications, it’s a good idea to add security, message compression, the
ability to handle multiple requests on a single socket, and lots of error checking.
4807-7 ch35.F 5/24/01 9:02 AM Page 637

638 Part VI ✦ Deploying Python Applications
Listing 35-4 shows the remote importer implementation.
Listing 35-4: rimp.py – Remote module importer
import struct, SocketServer, imp, imputilfrom socket import *
# Simple message layer - adds length prefix to each# message so remote side knows how much data to readMSG_HDR = ‘!I’MSG_HDR_LEN = struct.calcsize(MSG_HDR)
def MsgSend(sock, msg):‘Sends a message with a length prefix’
# Add length prefixmsg = struct.pack(MSG_HDR, len(msg)) + msg
# Send until all is sentwhile msg:
count = sock.send(msg)if count > 0:
msg = msg[count:]
def MsgRecv(sock):‘Reads and returns a message’
# Read the prefixpre = sock.recv(MSG_HDR_LEN)if not pre:
returncount = struct.unpack(MSG_HDR, pre)[0]
# Read the message msg = ‘’while 1:
leftToRead = count - len(msg)if not leftToRead:
breakmsg += sock.recv(leftToRead)
return msg
# Server sidePORT = 55555ADDRESS = ‘127.0.0.1’
class ImportHandler(SocketServer.BaseRequestHandler):def handle(self):
print ‘Received new connection’msg = MsgRecv(self.request)print ‘Remote side requests module’,msg
4807-7 ch35.F 5/24/01 9:02 AM Page 638

639Chapter 35 ✦ Customizing Import Behavior
file = Nonetry:
file, name, info = imp.find_module(msg)source = file.read()
except ImportError:source = ‘’
if file:file.close()
print ‘Sending %d bytes’ % len(source)MsgSend(self.request, source)print ‘Done’
def StartServer():print ‘[Starting server]’serverClass = SocketServer.ThreadingTCPServerlistenAddress = (ADDRESS, PORT)serverClass(listenAddress, ImportHandler).serve_forever()
# Client sideclass RemoteImporter(imputil.Importer):
def get_code(self, parent, name, fqname):print ‘Checking remote host for module’,names = socket(AF_INET, SOCK_STREAM)s.connect((ADDRESS, PORT))MsgSend(s, name)code = MsgRecv(s)if not code:
return
# Save the module for next timeopen(name+’.py’,’wt’).write(code)print ‘Saved %s.py to disk’ % name
# Now return the code for this timereturn 0, compile(code, name+’.py’, ‘exec’), {}
if __name__ == ‘__main__’:StartServer()
else:# The module is being imported, so install the# custom importerimport imputil, sys
# Install an ImportManager only if one has not# already been installed globallyif __import__.__name__ != ‘_import_hook’:
ier = imputil.ImportManager()ier.install()sys.path.append(imputil.BuiltinImporter())
# Install it at the end of the listsys.path.append(RemoteImporter())
4807-7 ch35.F 5/24/01 9:02 AM Page 639

640 Part VI ✦ Deploying Python Applications
Chapter 15 covers sockets and SocketServers.
The first part of the program creates a simple messaging layer that adds a message
length prefix to messages so that the receiving side knows how many bytes to read.
The server side of the importer subclasses SocketServer.BaseRequestHandlerto repeatedly receive a request, find it with imp.find_module, and send back the
Python source code (because bytecode might be incompatible if the client and
server sides have different versions of Python). The server listens on a local
address so that you can run both sides of the example on a single computer.
The client side connects to the server, sends a request, and reads a response. If the
server sends back an empty string, it couldn’t find the module either, but if found,
the client side writes the module to disk so that future imports won’t require the
network transfer.
Depending on how the module is loaded (as a standalone program or imported by
another module), the rimp module starts the listening server or installs the custom
importer.
Testing the remote ImporterTo see the remote importer work, first run it as a standalone program in a directory
that contains at least one other module (I ran it in the directory that had the
stuff.py module from previous sections.):
C:\temp>rimp.py[Starting server]
Now copy rimp.py to another directory (so that the “client” side doesn’t have
access to the same modules) and start up a Python interpreter. Import rimp and
then import the module that the server side has:
>>> import rimp>>> import stuffChecking remote host for module stuffSaved stuff.py to diskI am being imported!
The server side shows that it processed the request successfully:
Cross-Reference
4807-7 ch35.F 5/24/01 9:02 AM Page 640

641Chapter 35 ✦ Customizing Import Behavior
Received new connectionRemote side requests module stuffSending 49 bytesDone
Now try a module that doesn’t exist anywhere:
>>> import borkborkborkChecking remote host for module borkborkborkTraceback (most recent call last):File “<stdin>”, line 1, in ?File “D:\Python20\lib\imputil.py”, line 91, in _import_hookraise ImportError, ‘No module named ‘ + fqname
ImportError: No module named borkborkbork
The normal (and correct!) ImportError is raised, even though the server tried to
locate the module on its side:
Received new connectionRemote side requests module borkborkborkSending 0 bytesDone
Finally, look in the client-side directory and note that the module that was trans-
ferred successfully has been cached so that next time no network transfer will be
needed:
C:\temp\t>dir /brimp.pyrimp.pycstuff.py # Yay!
In addition to the enhancements mentioned earlier, a more useful solution might
include versioning information so that the client automatically gets newer versions
from the server as needed.
The nicest part about the import hooks discussed in this chapter is that nothing
needs to change in any other modules in order for them to work. Only the initial
startup module needs to install the hooks; all other modules are completely
unaware that a module is being decrypted or transferred halfway around the world
via the Internet.
4807-7 ch35.F 5/24/01 9:02 AM Page 641

642 Part VI ✦ Deploying Python Applications
SummaryIn this chapter, you:
✦ Learned how to replace the normal Python import function with a custom
function.
✦ Created an import function to handle encrypted modules.
✦ Retrieved Python modules from a remote server via a network connection.
The next chapter covers Python’s module and application distribution tools and
describes how you can bundle your entire program into a standalone executable
that works even if users don’t already have Python installed.
✦ ✦ ✦
4807-7 ch35.F 5/24/01 9:02 AM Page 642

DistributingModules andApplications
Once you’ve created your Python masterpiece, how do
you get it into users’ hands? This chapter answers that
question by introducing distutils— the tools you use to
distribute individual modules or entire applications.
Instead of providing an exhaustive and tedious review of the
distutils package, in writing this chapter I tried to focus on
what you need to know for 95 percent of the situations you
might encounter when distributing Python applications. Rest
assured, however, that the standard Python documentation
probably lists a special option or feature to cover each case in
the obscure 5 percent, and if anything is missing beyond that,
you can customize and extend the tools even further.
Understanding distutilsThe distutils package was introduced in Python 1.6 to stan-
dardize the process of building and installing third-party
Python libraries.
The main work when using distutils is creating the setup
script, which, by convention, is called setup.py. This small
Python program describes to distutils the files that need to
be in the distribution and gives additional information like
version numbers, author name, and so on.
The setup script tells distutils to bundle the necessary files
(which might be Python code, C source files, or other data
files) and generate whatever kind of distribution package you
want. Your distribution type can range from an ordinary ZIP
file to a full-blown Linux RPM or Windows installer.
3636C H A P T E R
✦ ✦ ✦ ✦
In This Chapter
Understandingdistutils
Other distutilsfeatures
Distributing extensionmodules
Creating source andbinary distributions
Building standaloneexecutables
✦ ✦ ✦ ✦
4807-7 ch36.F 5/24/01 9:02 AM Page 643

644 Part VI ✦ Deploying Python Applications
Creating a simple distributionThe following is a simple example so you can see distutils in action. Listing 36-1
shows a small example library that I want to make available to other people.
Listing 36-1: timeutil.py – Time Utilities toBe Packaged by distutils
import time as _time
def _getnow():‘Returns current time tuple’return _time.localtime(_time.time())
def time():‘Returns current time as string’return _time.strftime(‘%I:%M %p’,_getnow())
def date():‘Returns current date as string’return _time.strftime(‘%b %d, %Y’,_getnow())
With my application ready, it’s time to create the setup script, shown in Listing 36-2.
Listing 36-2: setup.py – Setup Script for timeutil Distribution
from distutils.core import setup
setup(name=’timeutil’,version=’0.9’,author = ‘pokey’,author_email = ‘[email protected]’,url = ‘www.yellow5.com/pokey’,py_modules = [‘timeutil’])
4807-7 ch36.F 5/24/01 9:02 AM Page 644

645Chapter 36 ✦ Distributing Modules and Applications
The setup script is very simple — it imports distutils and calls the setup func-
tion with a bunch of keyword arguments that give basic information about your
software (other standard arguments you can use include maintainer,
maintainer_email, license, description, and long_description).
The py_modules argument names a list of Python modules to include in the distri-
bution; this simple example has only one. You can specify modules that are part of
a package as ‘packagename.modulename’ (this assumes that
packagename/__init__.py really exists) or as files in other directories as
‘directory/modulename’.
The setup script is meant to be cross-platform compatible, so always use forward(UNIX-style) slashes in directory names —distutils takes care of convertingthem as needed on each different platform.
Keep in mind that the setup script is just a Python program, so any valid Python
code works in your setup script. When you run the setup script you supply a com-
mand argument telling distutils what you want it to do. In this case I want to cre-
ate a Windows installer, so I run the command like this:
C:\temp>setup.py bdist_wininst
This command and others are covered in “Creating Source and Binary
Distributions” later in this chapter. Assuming all went well, in the dist directory
you will find a file called timeutil-0.9.win32.exe (Version 0.9 was the version I
chose in the setup script). Because I chose a platform-specific distribution format,
the file name also includes the platform required to run it (Win32).
That’s it! My module is now ready for distribution.
Installing the simple distributionNow imagine that you’re one of the lucky few to have gained possession of the pow-
erful timeutil library and that you want to install and begin using it. Running the
program displays a screen like the one shown in Figure 36-1.
Note
4807-7 ch36.F 5/24/01 9:02 AM Page 645

646 Part VI ✦ Deploying Python Applications
Figure 36-1: The main screen of the distutils-generated installer for Windows
To install the timeutil module, click Next a few times; now the module is in a loca-
tion on your system where all Python programs can find it. For example, after start-
ing up a Python interpreter from any directory:
>>> import timeutil>>> timeutil.time(), timeutil.date()(‘02:07 PM’, ‘Feb 19, 2001’)
The distutils package chooses the correct default location for third-party mod-ules based on the current platform. On UNIX, for example, the default directory isusually /usr/local/lib/pythonx.y/site-packages and on Windows, it’sc:\pythonxy, where x and y are major and minor version numbers.
Another distribution method is to give the source files and the setup script to the
user as-is (or in a ZIP file or compressed tarball from which the user first extracts
the files). The setup script also acts as the installation script. To install the
timeutil module, you simply run:
setup.py install
Tip
4807-7 ch36.F 5/24/01 9:02 AM Page 646

647Chapter 36 ✦ Distributing Modules and Applications
Once again, distutils installs the module where all programs can find it.
You should also create a file called README or README.txt that gives a briefdescription of your distribution and maybe a little help on how to install it. distutils automatically includes these README files in the distribution, if present.
The –home=<dir> command-line argument tells the install command toplace the modules in a different directory than the default. This option can be use-ful on systems where normal users don’t have write access to the default directory.
Other distutils FeaturesAs I mentioned before, distutils has features to handle just about any sort of situ-
ation you might encounter. In this section I cover a few of the most useful features.
Distributing packagesIf you install more than one or two modules in the default directory, that directory
starts to become pretty cluttered. Worse, if you want to uninstall a particular distri-
bution, you have a tough time determining which files go with which third-party
library (because, by default, they all end up in the same directory).
A better approach is to distribute your modules as a package (which in turn could
include other packages too). This method is much more organized and requires
very little extra work from you. It is also less prone to errors: distutils automati-
cally includes all the Python files that are part of a package so you don’t have to list
each file individually.
So, as an advocate of clean directory structures, suppose I decide to go back and
distribute my timeutil module as a package. In fact, envisioning it to be part of
some future suite of utilities, I rename it to be the datetime module in the
daveutil package. The conversion is easy: create a daveutil directory and copy
timeutil.py into it, renaming it to datetime.py. Inside the daveutil directory, I
create a __init__.py file (which can simply be empty or contain a comment) to
identify daveutil as a package.
Listing 36-3 shows the slightly modified setup script that uses the packages key-
word argument to list the packages it will include. (Once again, like py_modules,
this is a list, so it could include several package names.)
Tip
Tip
4807-7 ch36.F 5/24/01 9:02 AM Page 647

648 Part VI ✦ Deploying Python Applications
Listing 36-3: setup.py – A Setup Script ThatDistributes an Entire Package
from distutils.core import setup
setup(name=’daveutil’,version=’0.9’,author = ‘pokey’,author_email = ‘[email protected]’,url = ‘www.yellow5.com/pokey’,packages = [‘daveutil’])
Now the resulting distribution from setup.py installs the daveutil package, leav-
ing the main default install directory clutter free. Users can still access the new
daveutil.datetime module from any program:
>>> from daveutil import datetime>>> datetime.date()‘Feb 19, 2001’
The package_dir keyword argument enables you to use a different directory
scheme if you don’t want to use the default one. Its value is a dictionary whose keys
are package names and whose values are directory names. To change the directory
for modules that aren’t part of any package, use a key of an empty string. For exam-
ple, if src is the base directory of all your source code, you could use the following
portion of a setup script:
package_dir = {‘’ : ‘src’}py_modules = [‘mod1’, ‘mod2’]
This code causes distutils to look for the modules src/mod1.py and
src/mod2.py.
Including other filesIf you need to include additional, non-Python files in your distribution, you can use
the data_files keyword argument to setup:
...data_files = [‘dialog.res’, ‘splash.jpg’],...
4807-7 ch36.F 5/24/01 9:02 AM Page 648

649Chapter 36 ✦ Distributing Modules and Applications
Each item in the list can also be a tuple containing a destination directory name
and a list of files. For example, to have the installer put dialog.res and
splash.jpg into the resource directory, use:
...data_files = [(‘resource’, [‘dialog.res’, ‘splash.jpg’])],...
If you want total control over which files end up in a source distribution, create a
file called MANIFEST in the same directory as your setup script. The file should con-
tain one file name per line. If specifying each file is too much of a pain, create a man-ifest template file (call it MANIFEST.in) that distutils uses to generate the list of
files to include. Each line of the file contains a rule describing a group of files. For
example, to include any text files in the current directory and any Python files in
the current or child subdirectories that start with ‘d’, the MANIFEST.in file looks
like:
include *.txtrecursive-include d*.py
Table 36-1 lists the rules you can use in the manifest template file.
Table 36-1Manifest Template File Rules
Rule Description
Include p1 p2 ... Include any files matching any of the patterns.
Recursive-include p1 p2 ... Same, but search only in child directories.
Global-include p1 p2 ... Same, but search current and child directories.
Graft dir Include all files in dir and its children.
Exclude p1 p2 ... Exclude any files matching any of the patterns.
Recursive-exclude p1 p2 ... Same, but search only in child directories.
Global-exclude p1 p2 ... Same, but search current and child directories.
Prune dir Exclude all files in dir and its children.
Python applies the rules in order, so you can arrange them to specify any list of
files. In addition to valid file name characters, patterns can include asterisks (*) to
match any sequence of characters, question marks (?) to match any single charac-
ter, and [range] to match a range of characters, like [a-f0-9] and [b-f].
4807-7 ch36.F 5/24/01 9:02 AM Page 649

650 Part VI ✦ Deploying Python Applications
As of Python 2.0, the data_files argument works only with binary distributionsand source distributions that have a manifest file.
Customizing setupPython checks for a file called setup.cfg for additional configuration options.
These options override any corresponding settings from the setup script, but they
themselves are overridden by corresponding settings specified on the command
line. This configuration file is useful if you need to let users customize setup or if
there are some settings you always need to specify.
The format of the configuration file is
[command]variable=value
where command is one of the standard commands like bdist (for a complete list,
run setup.py --help-commands). Each variable is a setting for that command
(you can get a list of settings for a command by running setup.py <command> --help). To continue a value onto the next line, just indent the next line’s value.
If the command-line version of a setting has a dash in it, use an underscore char-acter in the configuration file instead. Also, if a setting is normally an “on-off” typeflag (for example, --quiet), write it as setting=1 in the configuration file.
Some settings you may wish to always use, even across all projects. In this case you
can create a pydistutils.cfg file in the directory specified by sys.prefix, and
distutils will read settings from it before reading from a project’s setup.cfg,
if any.
On UNIX systems, each user can also create a .pydistutils.cfg file in his orher home directory for user-specific custom settings.
Distributing Extension ModulesThe distutils package doesn’t just work with Python files: it is quite happy to dis-
tribute C extension modules too. Pass the ext_modules keyword argument to the
setup function to specify which extensions to include, for example:
...ext_modules = [ext1, ext2]...
Tip
Note
Note
4807-7 ch36.F 5/24/01 9:02 AM Page 650

651Chapter 36 ✦ Distributing Modules and Applications
Each extension you list is actually an instance of the Extension class. Here’s a
more complete setup script that includes one extension module called trade that
is built from two source files, stock.c and option.c:
from distutils.core import setup, Extension # nota bene!
trade_ext = Extension(‘trade’, [‘stock.c’, ‘option.c’])
setup(name = ‘trader’, ext_modules = [trade_ext])
The first argument to the Extension constructor is the module name including the
package name, if any. If you plan on listing several extensions belonging to the same
package, you can use the ext_package keyword argument before ext_modules.
The Extension constructor also takes some optional keyword arguments of its
own. include_dirs is a list of directories in which the compiler should look for
include files, and library_dirs is a list of directories to include as link paths.
libraries is a list of files to include in the link.
The define_macros and undef_macros keyword arguments are lists of preproces-
sor definitions to use when compiling:
trade_ext = Extension(‘trade’, [‘stock.c’, ‘option.c’],define_macros=[(‘DEBUG_LOGGING’,None),
(‘MAX_COUNT’,’100’)]undef_macros=[‘TRACE’])
The preceding code is equivalent to having the following code at the top of every
source file:
#define DEBUG_LOGGING#define MAX_COUNT 100#undef TRACE
See the following section for information on how C extension modules are handled
with different distribution types.
Creating Source and Binary DistributionsYou can create distributions containing just source code or binary distributions
too. In this section I show you how to generate each type of distribution using the
same setup script so you can easily compare the results. The setup script is as
follows:
from distutils.core import setup, Extension
4807-7 ch36.F 5/24/01 9:02 AM Page 651

652 Part VI ✦ Deploying Python Applications
ext = Extension(‘ext’,[‘extension.c’])
setup(name=’daveutil’,version=’0.9’,author = ‘pokey’,author_email = ‘[email protected]’,url = ‘www.yellow5.com/pokey’,py_modules = [‘pymod’],ext_modules = [ext])
In the preceding example, extension.c is a simple C extension module and
pymod.py is a small Python file with a single function in it; both files are in the same
directory as the setup.py listed above.
Chapters 29 and 30 show you how to create C extension modules in Python.
Source distributionsA source distribution contains Python and C source files (no bytecode or compiled
C files). This type of distribution is the quickest to generate and you can use it on
any platform. The following command creates a source distribution:
python setup.py sdist
The output file ends up in the dist directory, and its default type depends on your
platform (for example, a ZIP file on Windows). On my machine, the finished file was
daveutil-0.9.zip and it contained these files:
extension.c pymod.py README.txt
You can choose the output file type with the –formats=f1, f2, ... argument. Use
the following command to see the output formats available:
C:\temp>setup.py sdist --help-formatsList of available source distribution formats:--formats=bztar bzip2’ed tar-file--formats=gztar gzip’ed tar-file--formats=tar uncompressed tar file--formats=zip ZIP file--formats=ztar compressed tar file
The availability of different formats also depends on other libraries you haveinstalled (such as zlib for compression).
Users who download your distribution archive use a command similar to the fol-
lowing to install it:
setup.py install
Note
Cross-Reference
4807-7 ch36.F 5/24/01 9:02 AM Page 652

653Chapter 36 ✦ Distributing Modules and Applications
The setup script installs the files in the correct place for the end user’s machine,
and it builds extension modules automatically. Of course, if the user doesn’t have a
compiler installed, he or she can’t build the C extension modules using this kind of
distribution.
Binary distributionsBinary distributions include the Python source code, byte-compiled versions of
each file, and the compiled versions of any C extension modules. The C source code
is not included, making binary distributions suitable for users who don’t have com-
pilers or in cases where you don’t want to distribute the C source. The drawback is
that C extension modules you provide in the distribution work only on compatible
platforms, so if you want to make it available on both Windows and Linux plat-
forms, for example, you need to create two different distribution packages.
Use the following command to create a binary distribution:
setup.py bdist
distutils kindly builds your extension modules for you and places the compiled
modules into the archive. On my machine, the finished file was
daveutil.0.9.win32.zip and it contained these files:
pymod.pyc ext.pyd pymod.py
Once again, you can use the --formats and --help-formats commands to
choose and list output formats. Users install your distribution the same way as
before, only this time they don’t need a compiler.
InstallersOne other form of binary distribution is an installer, like the one I used in the first
section of this chapter. These work the same way as normal binary distributions
except that they have an installation program familiar to users of the target system.
Most Windows users are familiar with downloading an executable program that
they run to install the program for them. To create such an executable, run this
command:
setup.py bdist_wininst
On my computer, this command created the file daveutil-0.9.win32-py2.0.exe.
When you run it, you see a few dialogs letting you know what it’s going to install
and where.
4807-7 ch36.F 5/24/01 9:02 AM Page 653

654 Part VI ✦ Deploying Python Applications
Linux folk are used to downloading and installing RPM files, which perform essen-
tially the same function but without the glitzy user interface. To generate an RPM
file, use:
setup.py bdist_rpm
You can optionally add a --source-only parameter to build just a source RPM or
--binary-only to build only a binary RPM. RPMs also have a .spec file that
describes them; distutils generates this file automatically for you using the infor-
mation from the setup script, command-line, and configuration files. You can spec-
ify other .spec options that aren’t part of a normal Python distribution using the
parameters listed in Table 36-2.
Table 36-2Linux RPM SPEC Options
Option Meaning
--distribution-name Name of the Linux distribution for this RPM
--release RPM release number
--serial RPM serial number
--vendor Vendor or author (defaults to author or maintainer insetup.py)
--packager RPM packager (defaults to vendor)
--group Package classification (defaults to Development/Libraries)
--icon Icon file to use
--doc-files Comma-separated list of documentation files
--changelog Path to RPM change log
--provides Capabilities provided by this RPM
--requires Capabilities required by this RPM (dependencies)
--build-requires Capabilities required to build the RPM
--conflicts Capabilities that conflict with this RPM
--obsoletes Capabilities made obsolete by this RPM
The type of distribution you choose to create depends on who you think will use it.
When possible, it doesn’t hurt to create several different types so that users can
choose whichever they find most convenient.
4807-7 ch36.F 5/24/01 9:02 AM Page 654

655Chapter 36 ✦ Distributing Modules and Applications
Building Standalone ExecutablesDespite all the wonderful things about Python, most people do not have it installed
on their computers. Worse, those that do have it may have a version that conflicts
with the version you used to create your program. The tools in this section show
you how to create a self-contained executable that has the Python interpreter, your
Python modules, and everything else needed to run your program with no other
dependencies.
py2exeMy favorite tool for building standalone Windows applications is Thomas Heller’s
py2exe (available at http://py2exe.sourceforge.net). It extends the distutilspackage so it fits in nicely with the topics covered so far in this chapter, and it is very
simple to use.
For an example, I’ll use this small program saved as hello.py:
import sys
print sys.versionprint ‘Hello!’
Here’s the setup script, setup.py:
from distutils.core import setupimport py2exe
setup(name=’hello’, scripts = [‘hello.py’])
The differences are in italic bold: import py2exe before calling setup, list your
module name in the scripts list, and include the extension. The command to use
with the setup script is py2exe:
setup.py py2exe
The preceding command creates hello.exe in dist\hello. Also in that directory
is python20.dll and msvcrt.dll (a supporting library). The program runs like
any other executable:
C:\temp\dist\hello>hello2.0 (#8, Oct 19 2000, 11:30:05) [MSC 32 bit (Intel)]Hello!
4807-7 ch36.F 5/24/01 9:02 AM Page 655

656 Part VI ✦ Deploying Python Applications
The py2exe program figures out what other libraries and files it needs to include in
order to make your program truly self-contained; you can create executables even
for something complex like a GUI application using wxPython.
You may be alarmed at the size of the files for the simple hello program (about1 MB). Don’t worry — most of that is fixed-sized overhead, so a program with 10times as many lines of Python code is still very small.
Use setup.py py2exe --help to see a list of optional arguments you can use on
the command line or in the setup configuration file. For example, --debug gener-
ates an executable with debug information and --icon enables you to specify an
icon file that the application should use. --includes lets you add other modules to
those that py2exe detects that it should include, and --force-imports adds the
given modules to sys.modules before your script begins to run.
The current version of py2exe can’t detect imports made by calls to the__import__ function (as opposed to the import statement), toPyImport_ImportModule (instead of PyImport_Import), or to moduleswhose names aren’t known until runtime. Force py2exe to include these modulesby using the --includes option. For PyImport_ImportModule calls, youshould use --force-imports so that the modules will already be in sys.modules by the time the C code calls for them.
FreezeThe freeze utility is a nice alternative for creating standalone programs because it
comes as part of the standard Python distribution, and it is not limited to Windows
computers. You do, however, need to have a compiler installed. freeze determines
the modules your program needs, compiles them to bytecode, and stores
(“freezes”) the bytecode in huge C byte arrays. A small embedding application
starts up a Python interpreter and notifies the import mechanisms of the frozen
modules it has so that imports don’t require external Python files to be present.
The freeze utility predates Python’s distutils, so you don’t write a setup script
like you do for py2exe. Instead, just type:
python freeze.py hello.py
Of course, you may have to specify the location of freeze.py. On my FreeBSD sys-
tem, it lives in /usr/local/lib/python2.0/Tools/freeze. freeze creates a
bunch of C files and a Makefile; usually all you need to do now is type make to
build the executable.
In order to use freeze, you need to have built Python from the sourcedistribution.
Note
Tip
Note
4807-7 ch36.F 5/24/01 9:02 AM Page 656

657Chapter 36 ✦ Distributing Modules and Applications
Other toolsGordon McMillan has developed a small suite of tools for creating standalone exe-
cutables for Windows and Linux; you can download them from http://mcmillan-inc.com.
ArchivesArchives work like the freeze utility except that archives store the bytecode in a
compressed archive to take up less space. One nice side effect that archives and
freeze executables enjoy is reduced disk I/O because all the modules are in a sin-
gle compressed file; these applications tend to load up quicker because the inter-
preter doesn’t have to hunt through sys.path to locate the modules to load.
StandalonesStandalones store the compressed bytecode in an embedding application, but also
link in as many of the binary dependencies as possible so that the result is a single
executable that users can easily run, copy, or delete.
InstallerGordon’s tools also come with a simple installer that generates self-extracting (and
self-cleaning when finished) installation programs. Once nice feature is that they
can even detect if they are being run from a read-only media source such as a
CD-ROM and still run correctly (using an alternate location for temporary decom-
pression storage).
This set of tools is very flexible and has many options to customize its behavior. Its
different pieces are kept as separate as possible while still remaining interoperable
so that you can mix and match (or extend) different pieces to suit your specific
needs.
SummaryOnce you’ve written your program, you still have the task of delivering it to your
users. Fortunately, Python’s distutils package makes this process relatively pain-
less. In this chapter you:
✦ Created distribution packages that automatically install files in the correct
place on end users’ computers.
✦ Built distributions that included just the source code.
✦ Built distributions that included precompiled C extension modules.
4807-7 ch36.F 5/24/01 9:02 AM Page 657

658 Part VI ✦ Deploying Python Applications
✦ Wrapped your application in an easy-to-use installer for Windows or Linux.
✦ Created self-contained Windows applications that don’t require a preexisting
Python installation, or don’t conflict with other versions of Python.
The next chapter shows you how to make the most of the Windows-specific mod-
ules that come with Python.
✦ ✦ ✦
4807-7 ch36.F 5/24/01 9:02 AM Page 658

Platform-Specific Support
✦ ✦ ✦ ✦
Chapter 37Windows
Chapter 38UNIX-CompatibleModules
✦ ✦ ✦ ✦
P A R T
VIIVII
4807-7 PO7.F 5/24/01 9:02 AM Page 659

4807-7 PO7.F 5/24/01 9:02 AM Page 660

Windows
Most of Python’s libraries are portable. However, some-
times the need arises to take advantage of OS-specific
services, such as the Windows registry. Accordingly, Python’s
standard libraries provide some Windows-specific support. In
addition, the Python Extensions for Windows (win32all) wrap
most of the Win32 API, so you can do plenty of Windows pro-
gramming without even having to write a C extension.
Using win32allThe Python Extensions for Windows, also known as win32all,
include wrappers for much of the Windows API. If you’ve done
Windows programming before, you should feel right at home
with win32all! Currently, win32all is hosted at ActiveState
(www.activestate.com), and is part of the ActivePython
distribution.
I keep a copy of Visual Studio running when I program with
win32all so that I can consult MSDN as needed. The win32all
package includes some documentation, but at some point
you’ll probably want to have a comprehensive reference on
the win32 API.
Data typesIn places where the Windows API would use a struct, win32all
often uses a dictionary. The dictionary’s keys are the names of
the struct’s data members; its values are the corresponding
values. For example, the Windows API NetUserGetInfo can
return information about a user in the form of a struct:
typedef struct _USER_INFO_10 {LPWSTR usri10_name;LPWSTR usri10_comment;LPWSTR usri10_usr_comment;LPWSTR usri10_full_name;
} USER_INFO_10;
3737C H A P T E R
✦ ✦ ✦ ✦
In This Chapter
Using win32all
Example: using someWindows APIs
Accessing theWindows registry
Using msvcrt goodies
✦ ✦ ✦ ✦
4807-7 ch37.F 5/24/01 9:02 AM Page 661
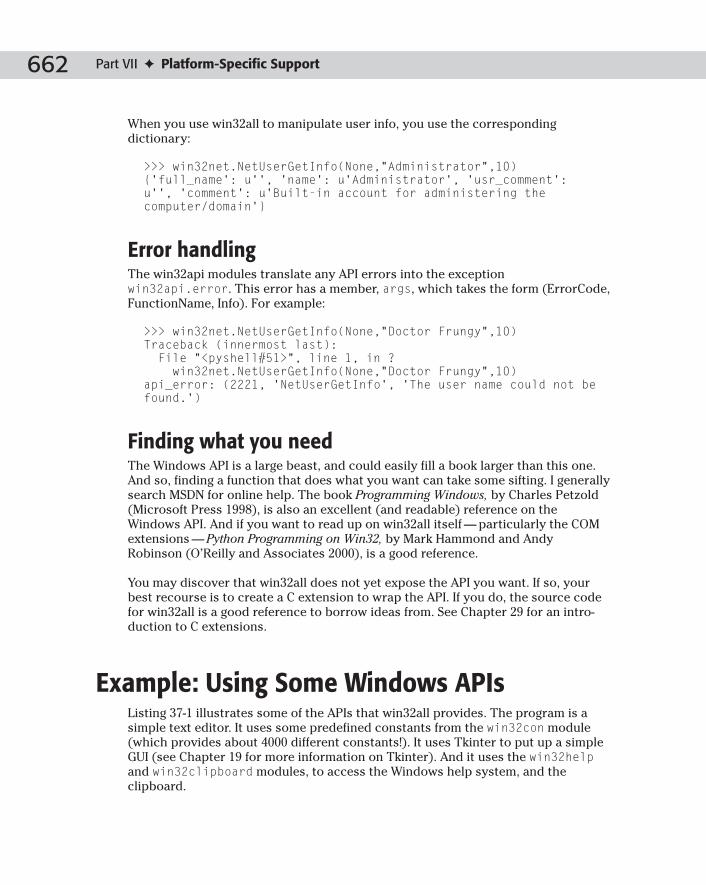
662 Part VII ✦ Platform-Specific Support
When you use win32all to manipulate user info, you use the corresponding
dictionary:
>>> win32net.NetUserGetInfo(None,”Administrator”,10){‘full_name’: u’’, ‘name’: u’Administrator’, ‘usr_comment’:u’’, ‘comment’: u’Built-in account for administering thecomputer/domain’}
Error handlingThe win32api modules translate any API errors into the exception
win32api.error. This error has a member, args, which takes the form (ErrorCode,
FunctionName, Info). For example:
>>> win32net.NetUserGetInfo(None,”Doctor Frungy”,10)Traceback (innermost last):File “<pyshell#51>”, line 1, in ?win32net.NetUserGetInfo(None,”Doctor Frungy”,10)
api_error: (2221, ‘NetUserGetInfo’, ‘The user name could not befound.’)
Finding what you needThe Windows API is a large beast, and could easily fill a book larger than this one.
And so, finding a function that does what you want can take some sifting. I generally
search MSDN for online help. The book Programming Windows, by Charles Petzold
(Microsoft Press 1998), is also an excellent (and readable) reference on the
Windows API. And if you want to read up on win32all itself — particularly the COM
extensions — Python Programming on Win32, by Mark Hammond and Andy
Robinson (O’Reilly and Associates 2000), is a good reference.
You may discover that win32all does not yet expose the API you want. If so, your
best recourse is to create a C extension to wrap the API. If you do, the source code
for win32all is a good reference to borrow ideas from. See Chapter 29 for an intro-
duction to C extensions.
Example: Using Some Windows APIsListing 37-1 illustrates some of the APIs that win32all provides. The program is a
simple text editor. It uses some predefined constants from the win32con module
(which provides about 4000 different constants!). It uses Tkinter to put up a simple
GUI (see Chapter 19 for more information on Tkinter). And it uses the win32helpand win32clipboard modules, to access the Windows help system, and the
clipboard.
4807-7 ch37.F 5/24/01 9:02 AM Page 662

663Chapter 37 ✦ Windows
Listing 37-1: TextEditor.py
import Tkinterimport sysimport win32help # Launching .hlp filesimport win32con # Constants used by the other win32 modulesimport win32clipboard # Clipboard APIs
class TextEditor:def __init__(self,root):
self.root=root# Create the menus:MenuBar=Tkinter.Menu(root)FileMenu=Tkinter.Menu(MenuBar,tearoff=0)FileMenu.add_command(label=”Quit”,command=sys.exit)MenuBar.add_cascade(label=”File”,menu=FileMenu)EditMenu=Tkinter.Menu(MenuBar,tearoff=0)EditMenu.add_command(label=”Copy”,command=self.DoCopy)EditMenu.add_command(label=”Paste”,
command=self.DoPaste)MenuBar.add_cascade(label=”Edit”,menu=EditMenu)HelpMenu=Tkinter.Menu(MenuBar,tearoff=0)HelpMenu.add_command(label=”Index”,command=self.DoHelp)MenuBar.add_cascade(label=”Help”,menu=HelpMenu)root.config(menu=MenuBar)# Create the main text window:self.TextWindow=Tkinter.Text(root)self.TextWindow.pack(expand=Tkinter.YES,
fill=Tkinter.BOTH)def DoCopy(self):
Selection=self.TextWindow.tag_ranges(Tkinter.SEL)if len(Selection)>0:
SelectedText =\self.TextWindow.get(Selection[0],Selection[1])
# One must open (and lock) the clipboard before # using it, then close (and lock) the clipboard # afterwards:win32clipboard.OpenClipboard(0)# SetClipboardText is a shortcut for # SetClipboardData(test, CF_TEXT):win32clipboard.SetClipboardText(SelectedText)win32clipboard.CloseClipboard()
def DoPaste(self):win32clipboard.OpenClipboard(0) PasteText=win32clipboard.GetClipboardData(\
win32con.CF_TEXT)win32clipboard.CloseClipboard() self.TextWindow.insert(Tkinter.INSERT,PasteText)
def DoHelp(self):
Continued
4807-7 ch37.F 5/24/01 9:02 AM Page 663

664 Part VII ✦ Platform-Specific Support
Listing 37-1 (continued)
# win32help includes a single function, WinHelp, that # wraps the WinHelp API. Here, we open the help file # “Editor.hlp” to its index.win32help.WinHelp(0,”Editor.hlp”,win32con.HELP_INDEX)
# Main code: root=Tkinter.Tk()TextEditor(root)root.mainloop()
Accessing the Windows RegistryThe Windows registry is a repository of system information. It keeps track of users,
program settings, port information, and more. The registry takes the form of a tree,
where each node of the tree is called a key. Each key can have one or more named
values. Each top-level key is called a hive. The usual way to access the registry by
hand is by running the program regedit; another good registry browser is
regedt32.exe.
For example, Windows stores your system’s Internet Explorer version number in
the value Version in the key Software\Microsoft\Internet Explorer in the
HKEY_LOCAL_MACHINE hive.
Breaking the registry can have very weird, very bad effects. Always back up the reg-istry before running any code that tweaks it. Otherwise, a single typo might breakyour system!
Accessing the registry with win32allTo examine an existing key, call win32api.RegOpenKeyEx(Hive,Subkey,0[,Sam]). Here Hive is the key to open; it is generally one of the win32con constants
HKEY_CLASSES_ROOT, HKEY_CURRENT_USER, HKEY_LOCAL_MACHINE, or
HKEY_USERS. Subkey is the subkey to open, as a string. And Sam is a combination of
flags indicating the level of key access we want. I generally use
win32con.KEY_ALL_ACCESS, but KEY_READ (the default value) is safer if you don’t
want to risk breaking the registry. Table 37-1 lists the available access levels.
Caution
4807-7 ch37.F 5/24/01 9:02 AM Page 664

665Chapter 37 ✦ Windows
The first argument to RegOpenKeyEx need not be a hive; it can be any registry keyhandle. In this case, the subkey name should be the path to the subkey from thespecified key, instead of from the hive.
Table 37-1Registry Access Constants (from win32con)
Constant Ability Granted
KEY_ALL_ACCESS Full access
KEY_READ Read access
KEY_WRITE Write access
KEY_CREATE_LINK Create symbolic links
KEY_CREATE_SUB_KEY Create Subkeys (included in KEY_WRITE)
KEY_ENUMERATE_SUB_KEYS Iterate over subkeys (included in KEY_READ)
KEY_EXECUTE Read access
KEY_NOTIFY Change notification (included in KEY_READ)
KEY_QUERY_VALUE Subkey read access (included in KEY_READ)
KEY_SET_VALUE Modify subkey values (included in KEY_WRITE)
A call to RegOpenKeyEx returns a key handle. Once you have this handle, you can
call RegQueryValueEx(KeyHandle, Name) to retrieve a key value. Here Name is
the name of the value (or “”, to query the key’s default/unnamed value).
RegQueryValueEx returns a tuple of the form (Value,ValueType). You can also set
values by calling RegSetValueEx(KeyHandle,Name,0,ValueType,Value). Here
ValueType is a constant, indicating the data type of Value. Table 37-2 shows the
most common value types.
When you are finished with a registry key, you should close it, with a call to
RegCloseKey(KeyHandle).
You can access the registry on a remote Windows system, if that system’s security
settings permit this. To obtain a key handle for the remote registry, call
RegConnectRegistry(SystemName, Hive). Here Hive is one of the hive constants
from win32con, except for HKEY_CLASSES_ROOT or HKEY_CURRENT_USER. The
parameter SystemName is a string of the form \\computername.
Note
4807-7 ch37.F 5/24/01 9:02 AM Page 665

666 Part VII ✦ Platform-Specific Support
Table 37-2Common Registry Value Types (from win32con)
Constant Meaning
REG_SZ String
REG_DWORD A 32-bit integer
REG_BINARY Binary data
REG_MULTI_SZ Array of strings
Example: setting the Internet Explorer home pageInternet Explorer has a home page, or “start page,” that appears when you start the
application. Windows stores the URL of the home page in the registry. Listing 37-2
examines, and then tweaks, the home page URL:
Listing 37-2: HomePage.py
import win32apiimport win32con
SubKey=”SOFTWARE\\Microsoft\\Internet Explorer\\Main”StartPageKey=win32api.RegOpenKeyEx(win32con.HKEY_CURRENT_USER,
SubKey,0,win32con.KEY_ALL_ACCESS)(OldURL, ValueType)=win32api.RegQueryValueEx(StartPageKey,
“Start Page”)print OldURLNewURL=”http://www.google.com”win32api.RegSetValueEx(StartPageKey,”Start Page”,0,
win32con.REG_SZ,NewURL)win32api.RegCloseKey(StartPageKey)
Creating, deleting, and navigating keysThe win32api function RegCreateKey(Hive,Subkey) creates a subkey in the spec-
ified hive, and returns a handle to the new key. The function RegDeleteKey(Hive,SubkeyName) deletes the specified key, and RegDeleteValue(KeyHandle,Name)deletes the specified value from a key. Note that RegDeleteKey cannot delete a key
that has any subkeys.
4807-7 ch37.F 5/24/01 9:02 AM Page 666

667Chapter 37 ✦ Windows
The function RegEnumKey(KeyHandle, Index) retrieves the names of the subkeys
of the specified key. It raises an exception (win32api.error) if the key has no sub-
key with the specified Index. For example, this code prints the immediate subkeys
of the HKEY_LOCAL_MACHINE hive:
try:SubKeyIndex=0while 1:
print win32api.RegEnumKey(win32con.HKEY_LOCAL_MACHINE, SubKeyIndex)
SubKeyIndex += 1except win32api.error:
pass # (We ran out of subkeys.)
The function RegEnumValue(KeyHandle,Index) retrieves values for the specified
key. Its return value is a tuple of the form (ValueName, Value, ValueType).
Often programmers keep calling the enumerator functions until they raise an excep-
tion. However, one can also call RegQueryInfoKey (see “Other registry functions”
later in this chapter), and iterate over subkeys and values without ever triggering
exceptions.
Example: recursive deletion of a keyListing 37-3 provides a function to delete a registry key. Unlike RegDeleteKey, it
can kill off a key with subkeys.
Listing 37-3: KillKey.py
import win32apiimport win32con
def KillKey(ParentKeyHandle,KeyName):KeyHandle = win32api.RegOpenKeyEx(ParentKeyHandle,KeyName,
win32con.KEY_ALL_ACCESS)while 1:
try:# We always retrieve subkey number 0, because# when we delete a subkey, the old subkey #1# becomes #0:SubKeyName = win32api.RegEnumKey(KeyHandle,0)
except:break
KillKey(KeyHandle,SubKeyName)print “Deleting”,KeyNamewin32api.RegDeleteKey(ParentKeyHandle, KeyName)
Continued
4807-7 ch37.F 5/24/01 9:02 AM Page 667

668 Part VII ✦ Platform-Specific Support
Listing 37-3 (continued)
# Create some keys:RootKey=win32api.RegOpenKeyEx(win32con.HKEY_LOCAL_MACHINE,
“SYSTEM”,win32con.KEY_ALL_ACCESS)win32api.RegCreateKey(RootKey,”Junk”)win32api.RegCreateKey(RootKey,”Junk\\Stuff”)win32api.RegCreateKey(RootKey,”Junk\\Stuff\\Wooble”)win32api.RegCreateKey(RootKey,”Junk\\Stuff\\Weeble”)win32api.RegCreateKey(RootKey,”Junk\\More stuff”)# Delete all the keys:KillKey(RootKey,”Junk”)
Other registry functionsThe function RegQueryInfoKey(KeyHandle) returns key metadata, in a tuple of
the form (SubKeyCount, ValueCount, ModifiedTime). Here SubKeyCount and
ValueCount are the key’s total subkeys and values, respectively. ModifiedTime, if
nonzero, is the key’s last modification date, in 100’s of nanoseconds since 1/1/1600.
Changes made to the registry do not take effect immediately — they take effect
sometime soon after you close the registry key handle. You can commit registry
changes immediately with a call to RegFlushKey(KeyHandle).
You can save a registry key (and all its subkeys) to a file by calling
RegSaveKey(KeyHandle,FileName). Later, you can restore registry settings from
disk with a call to RegLoadKey(Hive,Subkey,FileName). These operations
require special privileges that you must activate programmatically; see the
win32security API documentation for details.
Accessing the registry with _winregThe standard library _winreg also exposes the Windows registry API. Since the
underlying API is the same, the functions in _winreg are very similar to the registry
API in win32api. Table 37-3 shows the correspondence:
Table 37-3_winreg and win32api Functions
_winreg Function win32api Function
CloseKey RegCloseKey
ConnectRegistry RegConnectRegistry
4807-7 ch37.F 5/24/01 9:02 AM Page 668

669Chapter 37 ✦ Windows
_winreg Function win32api Function
CreateKey RegCreateKeyEx
DeleteKey RegDeleteKey
DeleteValue RegDeleteValue
EnumKey RegEnumKey
EnumValue RegEnumValue
FlushKey RegFlushKey
LoadKey RegLoadKey
OpenKey RegOpenKeyEx
QueryInfoKey RegQueryInfoKey
QueryValueEx RegQueryValueEx
SaveKey RegSaveKey
SetValueEx RegSetValueEx
Using msvcrt GoodiesThe msvcrt module, part of the Python distribution on Windows, exposes some
useful Windows-specific services from the VC++ runtime library.
Console I/OYou can read a line of input from the user with a call to sys.stdin.readline, and
you can handle single-character input with Curses, available on most UNIX systems.
But what if you want to handle one character at a time on Windows? msvcrt pro-
vides the functions you need.
The function getch reads one keystroke from the user, and returns the resulting
character. The call to getch is synchronous: it does not return until the user hits a
key. For example, this code prints the characters you type until you press Control-
Break (which is not handled by getch):
import msvcrtwhile 1:
print msvcrt.getch()
Hitting a special key (such as F1) puts two characters on the keystroke buffer. The
first is an escape character (either chr(0) or chr(224)). The two characters,
together, encode the special key.
4807-7 ch37.F 5/24/01 9:02 AM Page 669

670 Part VII ✦ Platform-Specific Support
The function ungetch(char) is the opposite of getch; it puts a character back
onto the keystroke buffer. You can only un-get one character at a time. The function
kbhit() returns true if any characters are waiting on the keystroke buffer. And the
function putch(char) writes the specified character to the console without buffer-
ing. For example, this code writes out some text s-l-o-w-l-y:
for Char in “Hello there!”:time.sleep(0.1)msvcrt.putch(Char)
Other functionsThe function setmode(FileDescriptor, Flag) sets the line-end translation mode
for the specified file. Here FileDescriptor is the file’s descriptor (as returned by
os.open), and Flag should be os.O_TEXT or os.O_BINARY.
The function locking(FileDescriptor, Mode, Bytes) wraps the C runtime
function _locking, enabling you to lock specified bytes of a file.
You can translate between file handles and file descriptors. The function
open_osfhandle(File, Flags) produces a file descriptor for the specified file
handle. The available flags to set are os.O_TEXT, os.O_APPEND, and os.O_RDONLY.
The function get_osfhandle(FileDescriptor) provides a file handle for the
specified file descriptor.
The function heapmin tidies up the heap, freeing unused blocks for use. It is avail-
able on Windows NT/2000, but not 95 or 98.
SummaryIf you’re like me (and I know I am), you use Windows systems often. So it’s a good
thing that Python supports Windows programming. In this chapter, you:
✦ Tried out the Python Extensions for Windows (win32all).
✦ Tweaked the Windows registry.
✦ Handled single-character input with msvcrt.
The next chapter moves from the Windows side of the fence to UNIX.
✦ ✦ ✦
4807-7 ch37.F 5/24/01 9:02 AM Page 670

UNIX-CompatibleModules
Most Python programs you write automatically work
on any platform that supports Python. Sometimes,
however, you need to write a platform-specific program but
still want to use Python because of its easier maintenance,
quicker development time, and so on.
This chapter shows you the modules that come with Python
that are specific to UNIX-compatible platforms. Many of the
functions are nearly identical to similarly named functions in
C; although I try to give an introductory explanation to all of
them, some are complex or system-dependent enough that
you need to spend time reading through their UNIX man
pages.
Checking UNIX Passwordsand Groups
The pwd module has functions for retrieving entries from the
UNIX account and password database (usually stored in
/etc/passwd). getpwnam(name) returns the entry for the
person with the given login name, and getpwuid(uid) returns
the same information but instead you provide the user’s
unique ID:
>>> import pwd>>> pwd.getpwnam(‘dave’)(‘dave’, ‘*’, 1000, 1000, ‘Dave Brueck’,‘/home/dave’, ‘/usr/local/bin/tcsh’)>>> pwd.getpwuid(1000)(‘dave’, ‘*’, 1000, 1000, ‘Dave Brueck’,‘/home/dave’, ‘/usr/local/bin/tcsh’)
3838C H A P T E R
✦ ✦ ✦ ✦
In This Chapter
Checking UNIXpasswords andgroups
Accessing the systemlogger
Calling sharedlibrary functions
Providing identifierand keywordcompletion
Retrieving file systemand resourceinformation
Controlling filedescriptors
Handling terminalsand pseudo-terminals
Interfacing with Sun’sNIS “Yellow Pages”
✦ ✦ ✦ ✦
4807-7 ch38.F 5/24/01 9:02 AM Page 671

672 Part VII ✦ Platform-Specific Support
Both functions return a seven-tuple of the form
(name, password, user ID, group ID, fullname, home path, shell)
The password field is encrypted and contains just an asterisk or ‘x’ if the actualencrypted password is in the shadow password file (/etc/shadow).
The getpwall() function returns a list (in random order) of all entries in the user
database.
You can use the crypt module to see if a password value is correct for a given user
(if your program requires that a user “sign in,” for example):
import crypt, pwddef checkPass(username, password):
‘returns 1 if the password is correct’try:
epass = pwd.getpwnam(username)[1]except KeyError:
epass = ‘BLAH’return epass == crypt.crypt(password, epass)
For non-GUI programs, the getpass() function in the getpass module is a safeway to request that the user input his or her password because it returns the stringthe user enters without echoing the characters to the screen. Most GUI toolkitssuch as wxPython have similar functions for safely requesting passwords.
The grp module is similar to pwd except that it returns entries from the groups
database. getgrnam(name) returns the entry for the group of the given name and
getgrgid(gid) returns the same information except that you supply the group ID:
>>> import grp>>> grp.getgrnam(‘operator’)(‘operator’, ‘*’, 5, [‘root’])>>> grp.getgrgid(5)(‘operator’, ‘*’, 5, [‘root’])
The information returned is a four-tuple of the form
(group name, group password, group ID, list of group members)
The group password is often blank (or an asterisk), and the member list usuallydoesn’t include the group entries from the password database (so you need tolook in both databases for a complete list of group members).
The getgrall() function returns an unordered list containing all entries in the
groups database.
Note
Tip
Note
4807-7 ch38.F 5/24/01 9:02 AM Page 672

673Chapter 38 ✦ UNIX-Compatible Modules
Accessing the System LoggerUNIX systems have a systemwide logging facility for programs to use. Various set-
tings in syslog module let you send messages and alter their priorities and
destinations.
In the simplest case, you can send a message to the system logging daemon by call-
ing syslog([priority], message). The optional priority can be any of the val-
ues listed in Table 38-1 (listed from highest to lowest).
>>> import syslog>>> syslog.syslog(syslog.LOG_EMERG,
‘UPS loses power in 2 minutes!’)
After the above call, all users on my FreeBSD machine see:
Message from syslogd@ at Wed Dec 6 02:50:43 2000 ...python: UPS loses power in 2 minutes!
Table 38-1syslog Priority Values
Value Meaning
LOG_EMERG Panic condition (normally sent to all users)
LOG_ALERT Condition that needs immediate correction
LOG_CRIT Critical conditions like hard device errors
LOG_ERR Errors
LOG_WARNING Warnings
LOG_NOTICE Nonerrors that might still warrant special handling
LOG_INFO Informational messages (this is the default priority)
LOG_DEBUG Debugging messages
The system logger maintains an internal mask of message priorities that it should
log; it ignores messages with priorities that are not in its mask. setlogmask(mask)sets the internal mask to mask and returns the previous value. LOG_MASK(pri) cal-
culates the mask value for the given priority, and LOG_UPTO(pri) calculates a log
mask that includes priorities from LOG_EMERG down to (and including) the
priority pri:
>>> from syslog import *>>> setlogmask(LOG_ALERT) # Only LOG_ALERT messages get logged.>>> setlogmask(LOG_UPTO(LOG_ALERT)) # Allows EMERG and ALERT.
4807-7 ch38.F 5/24/01 9:02 AM Page 673

674 Part VII ✦ Platform-Specific Support
For greater control over message logging, call openlog(ident[, logopt[,facility]]). ident is an identifier prefix to include in every message, and logoptis a bit field that chooses one or more options from Table 38-2.
Table 38-2openlog Logging Option Flags
Flag Meaning
LOG_CONS Messages go to the console if sending to logging daemon fails.
LOG_NDELAY Connect to the logging daemon immediately (instead of waiting untilyou log the first message).
LOG_PERROR Write the message to stderr as well as the system log.
LOG_PID Include the process ID with the log message.
The facility parameter to openlog is to assign a default facility or classification
to messages that don’t have a facility due to their priority. Table 38-3 lists the pos-
sible values.
Table 38-3openlog Facility Values
Value Meaning
LOG_AUTH Authorization system (from login, su, and so forth)
LOG_AUTHPRIV Same, but logged to a nonworld readable file
LOG_CRON From the cron daemon
LOG_DAEMON System daemons
LOG_FTP The ftp daemons
LOG_KERN Kernel-generated messages
LOG_LPR The line printer spooling system
LOG_MAIL Mail system
LOG_NEWS Network news system
LOG_SYSLOG Internal syslog messages
LOG_USER Messages from any user process (this facility is the default)
LOG_UUCP The UUCP system
LOG_LOCAL0 Reserved for local use (also LOG_LOCAL1 through 7)
4807-7 ch38.F 5/24/01 9:02 AM Page 674

675Chapter 38 ✦ UNIX-Compatible Modules
The closelog() function closes the log file.
Calling Shared Library FunctionsThe dl module lets you dynamically load and call functions that exist in C shared
libraries.
As much as possible, avoid using this module. It is inherently platform-specific,and makes it much easier to crash your programs.
Before you can call a shared library function, you have to open the library by call-
ing open(name[, mode]). The mode can be RTLD_LAZY (the default) or RTLD_NOWto denote late or immediate binding, although some platforms do not provide
RTLD_NOW (in which case the module won’t even have RTLD_NOW).
Upon success, open returns a dl object. To see if the object has a specific function,
call its sym(name) method:
>>> import dl>>> dlo = dl.open(‘/usr/lib/libc.so’)>>> dlo.sym(‘getpid’)673070304>>> dlo.sym(‘destroyworld’)>>>
A dl object’s call(name[, arg1, args...]) calls a function in the library. You
can pass in up to 10 arguments; they can be integers, strings, or None for NULL. The
function you call should return no value or an integer:
>>> import dl, os>>> dlo = dl.open(‘/usr/lib/libc.so’)>>> dlo.call(‘getpid’)3539 # The “bad” way>>> os.getpid()3539 # The “good” way>>> dlo.call(‘daemon’,1,0) # Make the process a daemon process.
When you’re finished with a dl object, call its close() method to free its
resources. On most systems, however, the memory taken up by the library won’t be
freed until the main program shuts down.
Providing Identifier and Keyword CompletionThe readline and rlcompleter modules work together to add useful editing func-
tionality to Python’s user input routines (including how the interpreter works in
interactive mode).
Caution
4807-7 ch38.F 5/24/01 9:02 AM Page 675

676 Part VII ✦ Platform-Specific Support
The Python readline module calls the rather large GNU readline library. This sec-tion covers only some of its features; for a complete list of the features availablethrough the readline module, you should visit the readline section of the GNUWeb site (www.gnu.org).
Use the following code to try out tab-completion support:
>>> import rlcompleter>>> import readline>>> readline.parse_and_bind(‘tab: complete’)>>> rea # Now hit the tab key!
Pressing the tab key completes the impartial identifier. If there exists more than one
completion possibility, you’ll hear a beep. Pressing tab a second time lists the pos-
sible completions:
>>> r # Press tab twice!raise raw_input reduce repr rlcompleterrange readline reload return round
With readline installed, you can use the keys listed in Table 38-4 for cursor naviga-
tion and editing.
C-x means press and hold Ctrl while you press x. M-x means the same but withthe Meta key. On systems that do not have a Meta key, the Esc key works bydefault instead, although you should not press and hold Esc. In this case, M-xmeans press and release Esc, then press and release x.
Table 38-4readline Key Bindings
Key Sequence Action
C-b Move back one character
M-b Move back one word
C-f Move forward one character
M-f Move forward one word
C-a Move to the start of the line
C-e Move to the end of the line
DEL Delete the character to the left of the cursor
C-d Delete the character under the cursor
C-_ Undo
C-l Clear the screen, reprinting current line at top
Note
Note
4807-7 ch38.F 5/24/01 9:02 AM Page 676

677Chapter 38 ✦ UNIX-Compatible Modules
In readline terms, cutting and pasting text are killing and yanking, respectively.
Cutting, or killing, text saves it to a kill-ring from which it can later be “yanked
back.” Consecutive kills get saved to the same buffer (so that a single yank brings it
all back at once). Table 38-5 lists the kill and yank keystrokes.
Table 38-5readline Kill and Yank Key Bindings
Key Sequence Action
C-k Kill to end of line
M-d Kill to end of word
M-DEL Kill to start of word
C-w Kill to previous whitespace
C-y Yank most recently killed text
M-y Rotate the kill ring buffer and yank the new top
You can use M-y only right after you yank text (with C-y). It cycles through the kill
ring buffer, showing you the available text.
The readline module also lets you save keystrokes as a macro that you can later
play back as if you had retyped them. C-x ( (left parentheses) starts recording
keystrokes and C-x ) (right parentheses) stops. From then on you can use C-x e to
replay the saved keystrokes.
The command history stores each command you type. C-p and C-n cycle through
the previous and next entries in the history (these functions are often bound to the
up and down arrow keys too). Call readline’s get_history_length() function to
see how many commands the list can hold (a negative value means an unlimited
number) and set_history_length(newlen) to set the maximum history length.
write_history_file([file]) writes the history to a file and
read_history_file([file]) reads a previously saved file (both use ~/.historyif you don’t supply a file).
Retrieving File System andResource Information
The os module contains two functions for retrieving file system information:
statvfs(path) returns information for the file system that contains the given
path, and fstatvfs(fd) does the same thing except that you provide a file
descriptor.
4807-7 ch38.F 5/24/01 9:02 AM Page 677

678 Part VII ✦ Platform-Specific Support
File system informationThe statvfs module contains constants for interpreting the tuples returned by the
statvfs and fstatvfs functions. Table 38-6 describes the different values
available.
Table 38-6statvfs Identifiers
Identifier Meaning
F_FILES Total number of file nodes
F_FFREE Total number of free file nodes
F_FAVAIL Number of free nodes available to nonsuper users
F_NAME_MAX Maximum file name length
F_BLOCKS Total number of blocks
F_BFREE Total number of free blocks
F_BAVAIL Number of free blocks available to nonsuper users
F_BSIZE Preferred file system block size
F_FRSIZE Fundamental file system block size
F_FLAG System dependent flags
For example, the following code calculates what percentage of file blocks are not
in use:
>>> import os, statvfs>>> info = os.statvfs(‘/tmp’)>>> print ‘%.2f %% of blocks are free’ % \
(info[statvfs.F_BFREE] * 1.0/ info[statvfs.F_BLOCKS])0.94 % of blocks are free
Resource usageThe resource module is useful for tracking resource usage. getrusage(who)returns a tuple of values described in Table 38-7. The who parameter can be
RUSAGE_SELF (to request information about the current process only),
RUSAGE_CHILDREN (for information about child processes), or RUSAGE_BOTH (for
information about the current process and its children).
4807-7 ch38.F 5/24/01 9:02 AM Page 678

679Chapter 38 ✦ UNIX-Compatible Modules
Table 38-7getrusage Tuple Values
Index Value
0 Time spent executing in user mode
1 Time spent in the system executing on behalf of the process(es)
2 Maximum resident set size used
3 Shared memory used in the text segment
4 Unshared memory used in the data segment
5 Unshared memory in the stack segment
6 Page faults serviced without any I/O activity
7 Page faults serviced that required I/O activity
8 Times the process was swapped out of main memory
9 Times the file system had to perform input
10 Times the file system had to perform output
11 Number of IPC messages sent
12 Number of IPC messages received
13 Number of signals delivered
14 Number of voluntary (early) context switches
15 Number of forced context switches
>>> import resource>>> resource.getrusage(resource.RUSAGE_SELF)(0.077617, 0.181107, 1588, 3300, 2292, 1280, 140, 0, 0, 0, 0, 0, 0, 0, 50, 3)
The resource.getpagesize() function returns the system page size (thenumber of bytes in a memory page). Multiply this value by the number of pages inuse to get how many bytes of memory a process is using. Note that the systempage size is not necessarily the same as the underlying hardware’s page size.
Resource limitsYou can also use the resource module to get and set resource limits. Each control-
lable resource has a soft limit and a hard limit. When a process’s resource usage
crosses a soft limit, it receives a signal indicating that it has crossed that boundary.
A process can never exceed a hard limit, however. Attempting to do so usually
results in the termination of the process.
Tip
4807-7 ch38.F 5/24/01 9:02 AM Page 679

680 Part VII ✦ Platform-Specific Support
Only superusers can alter the hard limits.
The getrlimit(resource) function returns a tuple (soft, hard) containing the
limit values for that resource. setrlimit(resource, (soft, hard)) sets new lim-
its for resource (you can use limit values of -1 to specify the maximum allowable
value). Table 38-8 lists the resource names and their meanings (sizes are in bytes);
if a particular platform does not support a resource then it will not be in the
resource module.
Table 38-8Resource Names and Meanings
Name Maximum Value of
RLIMIT_AS Address space area
RLIMIT_CORE Size that a core file can have
RLIMIT_CPU Number of seconds to be used by each process
RLIMIT_DATA Size of a process’s data segment
RLIMIT_FSIZE File size
RLIMIT_MEMLOCK Address space you can lock into memory
RLIMIT_NOFILE Number of open files per process
RLIMIT_NPROC Number of simultaneous processes for this user
RLIMIT_RSS Resident set size
RLIMIT_STACK Stack segment size
RLIMIT_VMEM Mapped memory occupied by the process
To see the soft and hard limits on the maximum number of open files per process,
for example, you can use the following code:
>>> import resource>>> resource.getrlimit(resource.RLIMIT_NOFILE)(1064L, 1064L)
Controlling File DescriptorsThe functions in the fcntl module operate on file descriptors, which you can
access by calling a file or socket object’s fileno() method. The options for these
functions vary by platform; see your system’s man pages for details.
Note
4807-7 ch38.F 5/24/01 9:02 AM Page 680

681Chapter 38 ✦ UNIX-Compatible Modules
The fcntl(fd, op[, arg]) and ioctl(fd, op[, arg]) functions perform the
operation op on the file descriptor fd. If arg is an integer, the functions return inte-
gers. If the particular operation requires a C structure, you can pass in a string
object created using struct.pack; in this case the functions return a string repre-
senting the modified buffer you passed in.
The FCNTL module defines names for many of the operations you’d pass tofcntl. For example, fcntl.fcntl(file.fileno(), FCNTL.F_GETFD)returns the close-on-exec flag for the given file descriptor.
The flock(fd, op) function performs a locking operation on a file descriptor. This
operation lets multiple processes cooperatively have simultaneous access to an
open file (although some other rogue process might still access the file without
using locks — see the flock man pages for details). Valid operations are LOCK_SH(shared lock), LOCK_EX (exclusive lock), LOCK_NB (don’t block when locking), and
LOCK_UN (release a lock).
Handling Terminals and Pseudo-TerminalsThe termios and TERMIOS modules implement POSIX-style terminal (tty) control.
termios defines a few functions to use, and TERMIOS defines “constants” (equiva-
lent to their C counterparts) that you pass to those functions.
The tcgetattr(fd) function gets the terminal state referenced by the file descrip-
tor fd and returns it in a list defined as:
[input flags, output flags, control flags, localflags, input speed, output speed, control characters]
The control characters entry is a list of one-character strings. You can set a tty’s
attributes using tcsetattr(fd, when, attributes). attributes is in the same
form as returned by tcgetattr, and when tells you when the attribute changes
should take place. It can be any of the following constants (defined in TERMIOS):
TCSANOW (make the changes immediately), TCSADRAIN (wait for the system to trans-
mit to the terminal all data you’ve written to fd and then make the changes), or
TCSAFLUSH (same, but also discard any unread input).
The tcdrain(fd) function waits for the system to transmit to the terminal the out-
put you’ve written to fd. tcflush(fd, queue) discards queued data on fd. If
queue is TCIFLUSH, it discards the input queue data; if TCOFLUSH, it flushes the out-
put queue; and if TCIOFLUSH, it flushes both queues.
The tcflow(fd, action) function suspends or resumes I/O on fd. Actions TCIOFFand TCION suspend and resume input, and TCOOFF and TCOON suspend and resume
output.
Tip
4807-7 ch38.F 5/24/01 9:02 AM Page 681

682 Part VII ✦ Platform-Specific Support
The tcsendbreak(fd, duration) function sends a stream of 0 (break) bytes on
fd. If duration is 0, it sends the bytes for about half a second; the behavior of
nonzero values varies by platform (many systems ignore the value anyway).
The tty module has two convenience functions for controlling terminals; internally
they call tcsetattr. Its setraw(fd[, when]) function changes fd into raw mode
(the system performs no I/O processing so I/O data is “raw”). when can be any of
the same values you pass to tcsetattr (for example, TCSANOW). setcbreak(fd[,when]) switches the terminal to a cbreak mode.
The pty module enables you to create and control pseudo-terminals: you create a
separate process but can read and write to the process’s controlling terminal pro-
grammatically. This module works on at least Linux; but it hasn’t had as much test-
ing on other platforms.
The pty’s spawn(argv) function spawns a child process and connects its control-
ling terminal to the parent process’s standard I/O. openpty() creates and returns a
pseudo-terminal pair of file descriptors in a two-tuple of the form (master,slave). fork() forks the current process and connects the child’s controlling ter-
minal to a pseudo-terminal. The return value from fork is a two-tuple of the form
(pid, fd). On the parent side, pid is the child’s process ID and fd is a file descrip-
tor for the pseudo-terminal. In the child process, pid is 0.
The os module has forkpty and openpty functions that do the same thing, butthe pty version is the preferred one because it uses a more platform-independentimplementation.
Interfacing with Sun’s NIS “Yellow Pages”NIS is an RPC-based client/server service that allows a group of computers to share
a set of configuration files. It helps system administrators by enabling them to
update information in a central location (the NIS master server) and have that infor-
mation get propagated automatically to all NIS clients that are part of the same
group or domain.
Sun Microsystems originally designed NIS, but implementations are now available
on just about every UNIX derivative. Python’s nis module wraps a few of the more
useful NIS functions, but this module is really useful only if you already know some-
thing about NIS and have it up and running on your system.
The NIS master server maintains databases of information called maps; they basi-
cally map keys to values much like a Python dictionary. The maps() function
returns a list of all map names in the domain, and match(key, mapname) returns
the value associated with the given key in the map called mapname. cat(mapname)returns a dictionary of key-value mappings for the given map.
Note
4807-7 ch38.F 5/24/01 9:02 AM Page 682

683Chapter 38 ✦ UNIX-Compatible Modules
NIS keys and values are arbitrary strings of bytes and not limited to just normalASCII characters.
SummaryThis chapter covered the standard Python modules that work only on UNIX-specific
platforms. In this chapter you learned to:
✦ Access the UNIX password and group databases.
✦ Write messages to the system-wide logger.
✦ Control file descriptors and pseudo-terminals.
✦ Call shared library functions and retrieve system information.
This chapter concludes the “Platform-Specific Support” part of the book. The
appendixes that follow cover some of the online resources available and show you
how to use popular Python development environments.
✦ ✦ ✦
Note
4807-7 ch38.F 5/24/01 9:02 AM Page 683

4807-7 ch38.F 5/24/01 9:02 AM Page 684

OnlineResources
The Internet holds a wealth of information about Python,
as well as Python programs to do all sorts of things. This
appendix covers some of the key Internet resources for
Python.
Visiting This Book’s Web SiteWe, the authors, maintain the Python Bible’s Web site at
www.pythonapocrypha.com. The site includes source code
printed in this book, extras that were too big to fit in, and
errata for any problems that (heaven forbid) made their way
into print. It also includes updated links to other Python stuff.
We hope that you find it a useful companion to the book itself.
Installing SoftwareYou can download the standard Python distribution from the
Python Language Web site (www.python.org), or directly
from SourceForge (http://sourceforge.net/projects/python/). SourceForge is also the place to report bugs in
Python itself. (SourceForge is a good place to search for open-
source software in general, whether Python-related or not.)
You may prefer to download ActivePython, the Python distri-
bution by ActiveState. It is available for Linux, Solaris, and
Windows. ActivePython includes extras such as the Python
extensions for windows. Visit www.activestate.com/Products/ActivePython/ to check it out.
AAA P P E N D I X
✦ ✦ ✦ ✦
4807-7 AppA.F 5/24/01 9:02 AM Page 685

686 Appendixes
PythonWare publishes another Python distribution. It extends the standard distri-
bution with the PythonWare Image Library (PIL), PythonWare Sound Toolkit, and
support for the commercial IDE PythonWorks.
If you often glue Python to Java, you may prefer JPython, an implementation of
Python written entirely in Java. Visit www.jpython.org for more information.
The Vaults of Parnassus (http://www.vex.net/parnassus/) are a general reposi-
tory of Python programs, organized by topic.
The Python Extensions for Windows, also known as win32all, are great resources
if you want to call the Windows API from Python. win32all also includes
PythonWin, a free Windows IDE for Python. Mark Hammond maintains win32all at
starship.python.net/crew/mhammond/.
If you plan to use Python for Web development, consider downloading Zope
(www.zope.org). Zope has a steep learning curve, but is a powerful program, com-
parable in abilities to most commercial application servers.
Finding Answers to QuestionsThe Python FAQ is a good place for general questions — it lives at www.python.org/doc/FAQ.html.
The FAQTs knowledge base includes a large, searchable collection of Python ques-
tions and answers. It covers a much broader range of topics than the main Python
FAQ. Visit python.faqts.com to check it out.
The main Python Web site includes topic guides — good starting places for tackling
specialized areas like databases, plotting, and so on (http://www.python.org/topics/). Also available are HOWTOs — detailed guides to very specific topics, like
configuring your favorite editor for Python (http://www.python.org/doc/howto/).
Also, the archives of the Special Interest Group (SIG) mailing lists or the Python
newsgroups (see below) may be a good place to search for specific topics.
4807-7 AppA.F 5/24/01 9:02 AM Page 686

687Appendix A ✦ Online Resources
Subscribing to Newsgroups and Mailing ListsTwo USENET newsgroups are of interest to Python users: comp.lang.python is an
open newsgroup for Python-related discussions. It is a fairly high-volume group,
carrying dozens of new posts each day. The summary group comp.lang.python.announce is a moderated, low-volume newsgroup (about a dozen posts a week)
providing announcements of general interest. It is available as a mailing list — visit
http://mail.python.org/mailman/listinfo/python-announce-list to
sign up.
Archives of old USENET posts are often a good place to search for information,
although you’ll have to sift through some noise. One searchable archive of old
newsgroup postings lives at http://groups.google.com/.
Python users have formed several Special Interest Groups to discuss various
Python topics. For example, you can find an XML processing SIG, an international-
ization SIG, and a threading SIG. Visit http://www.python.org/sigs/ to sub-
scribe to the SIG mailing lists or view the archives.
Understanding PEPs: PythonEnhancement Proposals
New features for Python are first proposed in PEPs (Python Enhancement
Proposals). To get an idea of what new features are coming to Python, you can
browse the list of PEPs online at http://python.sourceforge.net/peps/. In par-
ticular, PEP number 1 is a description of PEPs, and how to go about creating and
submitting them.
✦ ✦ ✦
4807-7 AppA.F 5/24/01 9:02 AM Page 687

4807-7 AppA.F 5/24/01 9:02 AM Page 688

PythonDevelopmentEnvironments
Several good editors are available for writing Python pro-
grams. In addition, you can find some integrated devel-
opment environments (IDEs) for Python that combine an
editor with a debugger, a class browser, and more. This
appendix provides an overview of some of the available soft-
ware, plus a detailed look at IDLE.
Overview of Python IDEsInteractive DeveLopment Environment (IDLE) is a free develop-
ment environment for Python, written in Python. It includes a
syntax-highlighting editor, a debugger, and a class browser. It
is part of the standard Python distribution, and uses Tkinter
for its user-interface.
Home page: http://www.python.org/idle/
Pros: Comes with Python; runs on many
operating systems
Cons: No layout designer for GUI programs
PythonWin is a free Python IDE for Windows. It offers the same
features of IDLE, with somewhat spiffier packaging.
PythonWin is part of the Python extensions for Windows
(win32all), which are included in the ActivePython distribu-
tion. It can integrate with Microsoft Visual Source Safe (VSS).
BBA P P E N D I X
✦ ✦ ✦ ✦
4807-7 AppB.F 5/24/01 9:02 AM Page 689

690 Appendixes
Home page: http://www.activestate.com/Products/ActivePython/win32all.html
Pros: Excellent for COM applications; very easy to learn if you
know Microsoft Visual Studio
Cons: Platform-specific
PythonWorks is a commercial Python IDE for Windows, Linux, and Solaris. It
includes a layout editor for graphical development of Tkinter GUIs. It includes a
deployment tool, which packages projects for distribution. In addition, it integrates
with the Perforce version control system.
Home page: http://www.pythonware.com/products/works/
Pros: Easy to create Tkinter layouts; version control integration;
slick-looking
Cons: The price tag — currently around $400 for an individual
license
Wing IDE is a commercial Python IDE for Linux. It provides a customizable graphical
interface for development.
Home page: http://archaeopteryx.com/wingide
Pros: Ease of customization — Wing IDE can behave like Emacs or
more like a standard Windows application
Cons: Currently platform-specific
Boa Constructor is a free IDE for building GUI programs using the wxPython toolkit.
Home page: http://boa-constructor.sourceforge.net/
Pros: Fast and precise GUI layout
Cons: Debugger not fully implemented
BlackAdder is a commercial Python IDE for Linux and Windows. It includes support
for the Qt windowing toolkit, a library similar to wxWindows.
Home page: http://www.thekompany.com/products/blackadder/
Pros: Nice Qt support
Cons: Still in beta; requires a Qt installation
4807-7 AppB.F 5/24/01 9:02 AM Page 690

691Appendix B ✦ Python Development Environments
Configuring Editors for Python SourceNote: In the following section, C-X means “Hold down the Control key and press X”
and M-X means “Hold down the Meta (or Alt) key and press X.” The notation may
string keystrokes together — for example, C-X C-B means “Type Control-X and then
Control-B.” (This is the usual notation for Emacs commands.)
A Python mode for Emacs is available — it makes editing Python code in Emacs
much easier. Your copy of Emacs may already have Python mode available. If not,
first visit http://www.python.org/emacs/python-mode/ to download it. Install
python-mode.el into the correct directory (probably lisp/progmodes, below the
main emacs directory).
Next, for improved speed, byte-compile the file. Within Emacs, type M-X, and then
byte-compile-file. Then give the full path to python-mode.el. Emacs will create
python-mode.elc, and spit up some warnings that you can ignore.
Next, add some lines to the bottom of your .emacs file, to ensure that files with a
.py extension are opened in Python mode. If you don’t have an .emacs file, create a
new file named “.emacs” in your home directory, and paste the following lines into
it (Emacs executes the Lisp code from the .emacs file when it starts up. You can put
all sorts of stuff into the .emacs file, to customize Emacs behavior.):
(setq auto-mode-alist(cons ‘(“\\.py$” . python-mode) auto-mode-alist))
(setq interpreter-mode-alist(cons ‘(“python” . python-mode)
interpreter-mode-alist))
Now, open up some Python source code in Emacs. (Type C-X C-F, and then type the
path to the source file.) The file should show up in color — one color for identifiers,
another for comments, and so on. If not, you need to turn on syntax highlighting (or
font-lock, as Emacs calls it). Put the following lines at the bottom of your .emacs file
to activate global font-lock:
(cond ((fboundp ‘global-font-lock-mode)(global-font-lock-mode t)(setq font-lock-maximum-decoration t)))
Start Emacs again, load the file, and enjoy the pretty colors.
Using Python modeYou (probably) have two new menus available when you open a Python source file.
The Python menu enables access to all the Python-mode commands. The IM-Python
menu lets you jump to any class, function, or method definition (very useful!). If
you don’t have these menus, you can get them by installing the easymenu.el pack-
age. Or just install a newer version of Emacs that includes easymenu.
4807-7 AppB.F 5/24/01 9:02 AM Page 691

692 Appendixes
From a buffer in Python mode, type C-X m. The online help for Python mode
appears. Plenty of commands are available; following are some of the most useful
ones to get you started.
Type C-c ! to open a Python shell. Type C-c C-c to execute the current buffer.
You can indent and un-indent a region with C-C > and C-C <. (You can mark a region
with the mouse, or press C-<space> to start marking a region and move the cursor
around.) Type C-c # to comment out a region. Python mode doesn’t have a key-
board command to uncomment a region (although it is available in the menu).
Therefore, you may want to use the “delete rectangle” command. Consider the start
and end of the current selection as two corners of a rectangle; typing C-X R D will
delete that rectangle.
Pythonizing other editorsPython syntax-highlighting is available for Vim (VI iMproved). See
http://www.vim.org/syntax/python.vim for one specification file. In addition, if
you compile Vim with the +python feature, you can execute Python statements
from within Vim. See http://www.vim.org/html/if_python.html for an
explanation.
If you have another favorite source-code editor, you may be able to make it
“Python-aware” with proper indentation rules, syntax highlighting, and so forth.
The editor HOWTO (http://www.python.org/doc/howto/editor/editor.html) offers some useful pointers.
Editing with IDLEI use IDLE for much of my Python development, and I’ve been quite happy with it.
This tutorial will get you up and running with most of IDLE’s features. If you like, fol-
low along in IDLE as you read to get a feel for the available editor commands. (I
know that I always need to try out new commands, to teach them to my fingers.)
Exploring the IDLE Python shellThe first window IDLE opens is a Python shell. Here, you can explore Python com-
mands interactively, just as if you had run Python from the command line. IDLE also
provides some shortcuts to make your work easier.
4807-7 AppB.F 5/24/01 9:02 AM Page 692

693Appendix B ✦ Python Development Environments
For example, suppose I am writing code to retrieve Web pages, and I decide to try
out some functions from urllib. First I press Alt-F2, to make the IDLE window
expand (vertically) to fill the screen. Next, from within the shell, I import the
urllib module. To remind myself what the function urllib.urlopen does, I print
its docstring — but make a typo. Oops! IDLE won’t force me to retype the command,
though. To repeat the last command, I press Alt-P. Pressing Alt-P repeatedly cycles
through older commands; pressing Alt-N cycles through newer commands (useful if
you press Alt-P too many times!). Next, to scroll back to the typo quickly, I can
press Ctrl-Left-Arrow to move the cursor back, one word at a time.
Next, I start to call the function. Once I type the open-paren, IDLE pops up balloon
help to show the function signature and docstring. Figure B-1 shows my current
situation.
Figure B-1: IDLE with function signature displayed
At this point, I remember there was another function in urllib, one that grabbed a
Web page to disk in one line. What was it called? Something starting with url . . . I’m
feeling too lazy to look it up in the documentation. I could always type print dir
(urllib) (or urllib.__dict__.keys ()) to jog my memory, but instead I type urllib.url
and press Alt-/. The Alt-/ command completes typing half-finished names — when I
press it more than once, it cycles through each possibility. In this case, it takes me
to urllib.urllib, urllib.urlopen, urllib.urlretrieve— ah, yes, that’s the
function I want!
By the way, if IDLE ever finds itself without a Python shell open, you can summon a
new one by choosing Python Shell from the File menu.
4807-7 AppB.F 5/24/01 9:02 AM Page 693

694 Appendixes
Navigating source codeYou can cruise around in the source code with the arrow keys (or the mouse), Page
Up, and Page Down. You can move to the start of the line with Home (or Ctrl-A), or
the end of the line with End (or Ctrl-E). Ctrl-Home and Ctrl-End take you to the top
and bottom of the file, respectively. To jump to a line, press Alt-G and type the line
number.
Ctrl-Left and Ctrl-Right move around the file one word at a time. Ctrl-Up and Ctrl-
Down move up and down one paragraph at a time. In addition, you can hold down
the Shift key while moving around to select a block of source.
Block commandsOnce you select a block of text, you can copy (Ctrl-C), cut (Ctrl-X), and later paste it
(Ctrl-V).
Select a block of code and press Alt-3 to comment it out; press Alt-4 to uncomment
it again. Note that comment lines do not count as un-indented lines for purposes of
control block structure.
You can indent and un-indent (outdent) a block of code with Ctrl-] and Ctrl-[,
respectively. You can also tabify and untabify a block with Alt-5 and Alt-6, respec-
tively. I prefer to untabify (convert tabs to spaces) code mercilessly, and turn Tab
mode off with Alt-T, because different editors treat tabs differently.
Searching and replacingPress Ctrl-F to search for text in a file, and F3 to repeat a search. Press Ctrl-H to
search and replace. Alt-F3 lets you search for text in files (such as running the UNIX
utility grep). The output goes to its own window. In that window, right-click a line,
and choose “Go to file/line” to jump to the file from which the line came.
More IDLE shortcutsIDLE’s class browser lets you jump to a class or function definition with minimal
legwork. Press Alt-C to bring it up, poke around in the tree-browser of the current
module’s members, and double-click on an entry to jump to that line of code.
(You’ll probably want to keep the class browser’s window handy, as pressing Alt-C
repeatedly can leave numerous orphaned class browsers lying around.)
4807-7 AppB.F 5/24/01 9:02 AM Page 694

695Appendix B ✦ Python Development Environments
The Help menu includes a very useful link to the local Python documentation.
The path browser enables you to easily browse all the directories in your Python
path. I don’t use it often, but if (for example) you ever find yourself importing the
wrong copy of a module or .pyd file, the path browser can show you where the
bogus one is coming from.
Debugging with IDLESuppose you want to test some code. First do a quick save (Ctrl-S), and then press
F5 to run the program within IDLE. Listing B-1 illustrates some buggy code, for
practice:
Listing B-1: Buggy.py
import os
def FindSourceFiles(Directory,Results=[]): # Bug 2for FileName in os.listdir(Directory):
Extension=os.path.splitextension(FileName) # Bug 1if Extension==”.py”:
Results.append(FileName)return Results
print FindSourceFiles(os.curdir)Path=os.path.join(os.curdir,”Lib”)print FindSourceFiles(Path)
When I run the program, Python quickly complains (and rightly so!) that there is no
such thing as os.splitextension. I bring up IDLE’s stack viewer by choosing
Stack Viewer from the Debug window. (Actually, I cheated — I checked the Auto-
Open Stack Viewer button in the Debug window, to save myself some time.) Note
that the Debug window is available on the Python shell window, and not on source
listing windows. From the stack viewer, I can jump to a source-code line by double-
clicking it. I can right-click a stack-trace line in the shell, and choose Go to File/line.
Figure B-2 shows IDLE’s stack viewer.
4807-7 AppB.F 5/24/01 9:02 AM Page 695

696 Appendixes
Figure B-2: Examining a call stack in IDLE
I replace os.splitextension with os.splitext. One bug squashed [cue victory
chord]. But there’s another bug in this code — it runs (as long as the current direc-
tory has a subdirectory named lib), but it doesn’t give me what I want. I have three
files in the current directory, and another file in the Lib subdirectory. My program’s
second list of source files seems to include all the entries from the first list, as seen
in Listing B-2:
Listing B-2: Sample Buggy Output
[‘Buggy.py’, ‘LessBuggy.py’, ‘NotBuggy.py’][‘Buggy.py’, ‘LessBuggy.py’, ‘NotBuggy.py’,‘FancyPrimeFinder.py’]
How did those extra file names get in there? This looks like a job for the IDLE
debugger. From the Debug menu, I choose Debugger, to open the debugger window.
This time, when I press F5 to run my script, execution pauses, and I can step
through it more carefully. (See Figure B-3.) The Step button executes the current
4807-7 AppB.F 5/24/01 9:02 AM Page 696

697Appendix B ✦ Python Development Environments
source line, stepping into any Python function calls. The Over button executes the
source line without stepping into subfunctions. The Out button keeps executing
until the current stack frame finishes. The Go button keeps executing until the pro-
gram finishes (or crashes), and the Quit button stops the program.
Figure B-3: Interactive debugging with IDLE
In this case, I notice that in my second function call, Results, is full of data right
from the start. How did this happen? Ah, yes — the local variable Results is still a
reference to the same old list, and the list still has data in it! I print out
id(Results) within the function. The same object ID each time — the villainous
bug is exposed, as seen in Listings B-3 and B-4:
Listing B-3: LessBuggy.py
import os
def FindSourceFiles(Directory,Results=[]): # Bug 2print id(Results)for FileName in os.listdir(Directory):
(Name,Extension)=os.path.splitext(FileName)if Extension==”.py”:
Results.append(FileName)return Results
print FindSourceFiles(os.curdir)Path=os.path.join(os.curdir,”Lib”)print FindSourceFiles(Path)
4807-7 AppB.F 5/24/01 9:02 AM Page 697

698 Appendixes
Listing B-4: Less buggy output
9747060[‘Buggy.py’, ‘NotBuggy.py’, ‘LessBuggy.py’]9747060[‘Buggy.py’, ‘NotBuggy.py’, ‘LessBuggy.py’,‘FancyPrimeFinder.py’]
I’ve learned my lesson — be careful when passing a list (or any other mutable
object) as a default parameter value! A safer alternative is to make None the default
value, and set Results to an empty list within the function:
def FindSourceFiles(Directory,Results=None): if (Results==None):
Results=[]
You can break the currently executing program with Ctrl-C . . . usually. Sometimes,there is no way to stop a program running under IDLE without stopping IDLE. Besure to save your work in every window before using IDLE to debug!
Editing with PythonWinThe Python shell in PythonWin behaves much like it does in IDLE. Use Ctrl-Up and
Ctrl-Down to cycle through old commands. Use Ctrl-Space to prompt PythonWin to
suggest completions for names. In addition, PythonWin provides a list of available
members when you type an object’s name; use the arrow keys (or the mouse) to
scroll through the possibilities, and then press Tab (or double-click a member
name) to insert the name.
To toggle between source code and the Python shell, press Alt-I. You can also cycle
through windows with Ctrl-F6 and Shift-Ctrl-F6.
Editing source in PythonWinPythonWin can collapse blocks of code into a single line. This is a nice way to focus
on the code you’re interested in. Use the + and - from the numeric keypad to
expand and collapse a block; use the * from the numeric keypad to expand and col-
lapse the whole file at once. A block’s status is indicated to the left of the source
line with a + or -; you can also click these to open and close the block. I recommend
turning Num-Lock off, and using the keypad arrows to scroll — this keeps your hand
right next to the “tree-keys.”
Caution
4807-7 AppB.F 5/24/01 9:02 AM Page 698
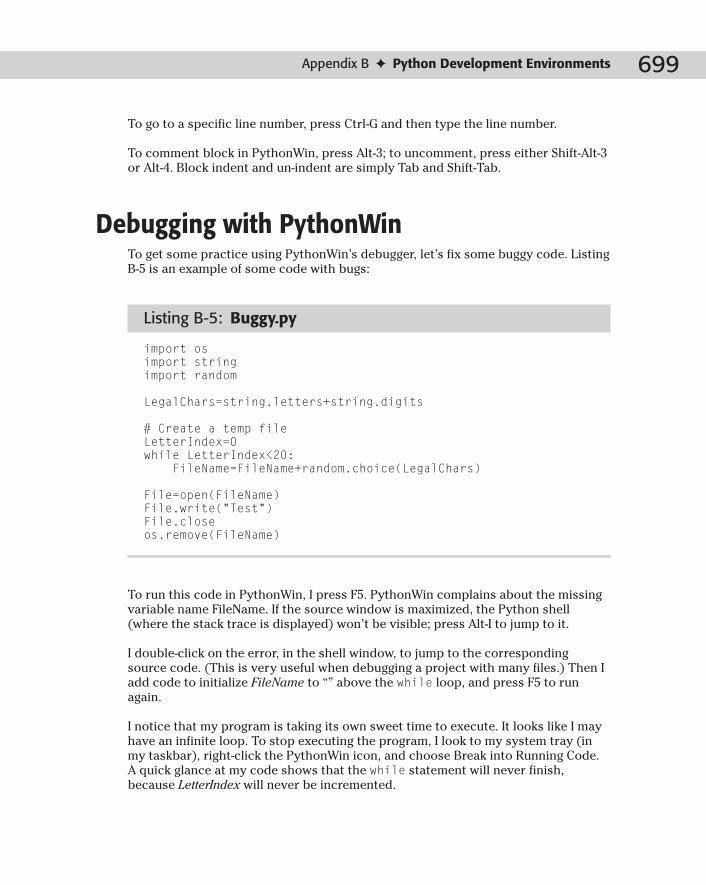
699Appendix B ✦ Python Development Environments
To go to a specific line number, press Ctrl-G and then type the line number.
To comment block in PythonWin, press Alt-3; to uncomment, press either Shift-Alt-3
or Alt-4. Block indent and un-indent are simply Tab and Shift-Tab.
Debugging with PythonWinTo get some practice using PythonWin’s debugger, let’s fix some buggy code. Listing
B-5 is an example of some code with bugs:
Listing B-5: Buggy.py
import osimport stringimport random
LegalChars=string.letters+string.digits
# Create a temp fileLetterIndex=0while LetterIndex<20:
FileName=FileName+random.choice(LegalChars)
File=open(FileName)File.write(“Test”)File.closeos.remove(FileName)
To run this code in PythonWin, I press F5. PythonWin complains about the missing
variable name FileName. If the source window is maximized, the Python shell
(where the stack trace is displayed) won’t be visible; press Alt-I to jump to it.
I double-click on the error, in the shell window, to jump to the corresponding
source code. (This is very useful when debugging a project with many files.) Then I
add code to initialize FileName to “” above the while loop, and press F5 to run
again.
I notice that my program is taking its own sweet time to execute. It looks like I may
have an infinite loop. To stop executing the program, I look to my system tray (in
my taskbar), right-click the PythonWin icon, and choose Break into Running Code.
A quick glance at my code shows that the while statement will never finish,
because LetterIndex will never be incremented.
4807-7 AppB.F 5/24/01 9:02 AM Page 699

700 Appendixes
Now the code runs, but the line os.remove(FileName) raises an IOError with the
message “Permission denied.” It seems there is another bug in the code. (You’ve
probably spotted it by now, but bear with me.)
To prepare for my debugging session, I set a breakpoint on the line that tries to
remove the file. To set a breakpoint, press F9, or click the breakpoint hand icon on
the toolbar. Next, I press F5 to run. When execution stops, I go to the Watch window
(if it’s not showing, I click the glasses icon on the debugging toolbar to bring it up).
I watch the expression FileName, and I watch the expression File. (See Figure B-4.)
Figure B-4: Debugging within PythonWin
The line highlighted in Figure B-4 ought to delete the file. Aha! My file is still open —
no wonder I can’t delete it! The statement File.close is simply a reference to the
close method of my file. I need to call File.close().
Following are some other keys to keep in mind when debugging in PythonWin:
F5 Continue running
F11 Execute the next statement, stepping into any subfunctions
F10 Execute the next statement, without stepping into subfunctions
Shift-F11 Finish executing the current stack frame
✦ ✦ ✦
4807-7 AppB.F 5/24/01 9:02 AM Page 700

Symbols & Numbers– character, 23
in string formatting, 41
! character, 141
!= characters, 30
# characters, 5
$ character, 141
% character, 7, 23
in division operations, 7
in string formatting, 40–41
() characters
in calculations, 4
in complex expressions, 32–33
in regular expressions, 141
* character, 23
with fnmatch() function, 164
in regular expressions, 140
repeating strings using, 37–38
in string width fields, 42
** characters, 23
character
in regular expressions, 140
in string formatting, 42
/ character, 23
? character, 141
[] characters, 30
in regular expressions, 140
\ character
in regular expressions, 141–143
in string literals, 35
^ character, 23
in regular expressions, 141
_ character, 20
{} characters, 141
| character, 23, 32
~ character, 23
+ character
as arithmetic operator, 23
concatenating strings using, 37
overloading, 108
in regular expressions, 141
in string formatting, 41
< character, 30
<< characters, 24
<= characters, 30
== characters, 30
> character, 30
>= characters, 30
Aabort() function, 184
abs() function, 24
_abs_() method, 112
absolute paths, 155
absolute value, calculating, 24
abspath() function, 162
abstract object layer (Python/C API), 556
Abstract Syntax Trees (ASTs), 613–614
AbstractFormatter, 306
accelerators (wxPython), 411–412
accept() method, 252
access() function, 156
acquire() method, locking using, 485–486
ActiveX controls, embedding in xwPython, 414
_add_() method, 112
addheader() method, 313
adding attributes, 101–102
addition operator (+), 23
addresses, e-mail, 310–311
AddressList class, 310
addstr() method (curses module), 416–417
adler32() function, 211
after() function, 368
after() method, with Tkinter, 386
aifc module, 456
AIFF sound files
handling chunked data, 460–461
reading/writing, 456-461
reversing (reverseSound.py), 459-460
alarm() function, 192
alias command (pdb module), 500
alignment modifiers (struct module), 206
allocate_lock() method, 485–486
alpha channels, in graphics files, 467
Index
4807-7 Index.F 5/24/01 9:02 AM Page 701

702 Index ✦ A–B
Alpha.py (module-tester), 93
_and_() method, 114
AND operator (&), 23, 31–32
anonymous (lambda) functions, defining, 90–91
anydbm dictionary, 229–230
Apache server CGI scripts, 299
appearance options (Tkinter widgets), 354
append() method, 58
with arrays, 71
with IMAP mailboxes, 288
with wxPython, 411–412
apply() function, 90
arbitrary precision numbers, 587–588
archives utility, 657
arguments
in exceptions, 81–82
in functions/tuples, 89–90
arithmetic operators, 4
date arithmetic, 220
joins using, 52–53
arrays (array objects), 68–71
array elements, 600
attribute options, 600–601
audio-editing program (quiet.py), 594–595
converting to lists/strings, 592–593
managing using Numeric Python, 597–600
matrix arithmetic using (MovingAverage.py),
603–604
article() method, 294
articles, in newsgroups, 293–295
ASCII values
encoding binary data as, 317–319
encoding in URLs, 276–277
asctime() function, 222
assert() function, 83
assertions, 83–84
assignment statements, 26–28
using with lists, 57–58
AST objects, 613–614
asterisk character (*)
with fnmatch() function, 164
in regular expressions, 140
in string width fields, 42
asynchronous HTML page retriever
(asyncget.py), 272–273
asynchronous signals, handling, functions
for, 191–193
asyncore module, 271–273
atexit module, 184
atof()/atoi()/atol() functions, 139
attributes. See also values
in classes, managing, 101–102
of functions, built in, 609–611
of markup language tags, 326
attron()/attroff() methods (curses), 417
attrset() method (curses), 417
AU sound files
reading/writing, 458
reversing (ReverseSound.py), 459–460
audio files. See sound files
audio streams, editing (Quiet.py), 594–595
audioop module, handling audio fragments,
461–464
auditing tables, 238–240
augmented assignment statements, 38
authentication, 278
avg() function (audioop module), 461–462
Bb amnt statement (Lepto), 435
backgrounds, terminal displays, creating, 418–419
backslash character (\)
in regular expressions, 141–143
in string literals, 35
bad.py_ (security test code), 519
base classes
extending, 104–106
overloading, 109
Base64 encoding (e-mail), 318–319
BaseHTTPRequestHandler, 264–265
BaseHTTPServer module, 264
Bastion module/object, 520–521
BeginDrawing() method, 409
behavior options (Tkinter widgets), 354
bkgd()/bkgdset() methods (curses module), 418
bidirectional() function, 153
binary data
encoding as ASCII, 317–319
reading/writing (struct module), 207
storing, 195
binary distributions/installers, 653–654
4807-7 Index.F 5/24/01 9:02 AM Page 702

703Index ✦ B–C
binary mode data storage, 195
binary operations, 23
bind() method, 251
with widgets, 372
bisect module, with sorted lists, 60
BitmapImage class (Tkinter module), using with
Python Imaging Library, 475–476
bitwise operators, 114–115
BlackAdder development program, 690
blocking, by sockets, 253–254
BloodType.py, 342
BloodTypeSax.py (Sax module), 335–336
Boa Constructor development program, 690
body() method, overriding in Tkinter dialogs, 381
BoldOnly.py, 329–330
Boolean operators, 31–32
border() method (curses module), 418
bottlenecks, locating, 505–509
box sizers (wxPython), 403–405
boxes/borders (curses module), 418
brackets ([]), 30
in regular expressions, 140
break statements, 8
with looping statements, 77–79
breakfast buttons (FoodChoice.py), 352–354
breakpoints, setting (pdb module), 499
browsing, newsgroups, 293. See also Web browsers
BSD data objects, 233–234
bsddb module, 233–234
buffer interface, 566–567
buffer_info() method, 71
Buggy.py (error-filled code), 695
built-in data types/sequences, 49
built-in functions
attributes (table), 609–611
globals, 96
locals, 96
open(), 122
in Python/C API, 571
buttonbox() method, 381
byte orders, 196
converting, 71
byteswap() method, 71
CC/C++ code. See also Python/C API
converting from Python code, 538–541
converting Python data to, 532–538
dictionary functions, 570–571
embedding Python in, 541–543
file objects, 571–572
general object functions, 559
handling empty values, 571
handling Unicode strings, 567–569
list functions, 564–565
mapping functions, 569–570
module objects, 572–574
number functions, 559
Python extension modules, 527–531
reference counting, 513
running Python code, 543–546
sequence functions, 562
tuple functions, 565–566
type object function, 571
C locale. See localization
C socket library, 248
C structures, converting to/from, 204–207
calculations. See operators
calendar() function, 225
calendar module, 224
_call_() method, 109–110
call name statement (Lepto), 435
callability, testing for, 110
call-by-values, 88
can_change_color() function (curses module), 428
canvas widgets (Tkinter module), 366–367.
See also widgets
capitalization, methods for, 134–135
capwords() function, 139
cards.py (random number generator), 585
caret symbol (^), 23
in regular expressions, 141
case-sensitivity, 5
of identifiers, 19
category() function, 153
center() method, 134
cgi module, 298–302
CGI scripts
Python support for, 267–269
writing/managing, 298–302
CGIDebug.py, 301–302
CGIHTTPRequestHandler class, 267
CGIHTTPServer module, 264
channels (sound files), 453
character categories (string module), 138–139
character data type, 40
4807-7 Index.F 5/24/01 9:02 AM Page 703

704 Index ✦ C
character groups, in regular expressions, 143
character sets, 150
characters
accessing in strings, 38–40
reading individual characters, 121
special, in terminal displays, 422–423
chdir() function, 165
check() method (IMAP4), 287
checksum, computing, 211
child classes, 14, 102–104
child processes, running, 181–183
chmod() function, 157
choosecolor.py (color system conversions),
471–472
chr() function, 45
chunked data, reading/handling in sound files,
460–461
circular references, 65
class data type, 107
classes, class objects. See also specific classes and
objects
accessing members of, 15–16
base, extending, 104–106
base, overloading methods, 109
browsing, 609
child classes, 102–103
class data type, 107
class statements, 100
class variables, 100
creating, 100–101
customizing/extending, 104–106
defining, 15, 100, 107
as exceptions, 82
hiding data in, 106–107
instance objects, 101
managing attributes in, 101–102
parent/child classes, 14
protecting, 520–521
retrieving string name, 108
special members, 101
variables, 100
ClassType data type, 68
clearcache() function, 174–175
clipboard, with wxPython, 413
clock() function, 220–221
clockgif.py (PIL Draw object), 478–479
close(), 123
with child processes, 181
with file descriptors, 173
with GzipFile, 215
with mmap objects, 176
with shelve object, 203
ClosestPoint.py, 77–78
closing. See also exiting
file objects, 123
processes, 183–185
sockets, 251
Cmd class, 440
cmd module, 433, 440–445
cmdloop() method (cmd module)
cmp() function, 109
with file comparisons, 171–172
with string comparisons, 43
_cmp_() method, 109–111
CObjects, 574
code, debugging, 497–501
code testing tools, 502–505
error tracebacks, 605–608
exceptions, 81–83
Interactive DeveLopment Environment for,
695–698
locating bottlenecks, 505–509
pdb for, 497–501
code, executing
assertions, 83–84
exec statement, 97
flow control (if-statements), 73–74
for-statements, 74–75
Game of Life example, 84–86
looping statements, 74–79
performance statistics for, 507–508
reference counting, 512–513
running from C, 543–546
self-examining code (introspection), 608–611
while-statements, 79
code, imported, setting aside, 14
code, Python
browsing classes/functions, 609
browsing functions, 609–611
checking indentation, 611
converting to C, 531–532
disassembling, 615–616
4807-7 Index.F 5/24/01 9:02 AM Page 704

705Index ✦ C
editing tools, 692–699
tokenizing, 611–613
codec module, 151–152
coerce function(), 25
_coerce_ method, 115
coercing numbers, 24–26, 115
color name statement (Lepto), 435
color options
curses module, 427–428
Tkinket widgets, 354, 365
color pairs (curses module), 427–428
color palettes, 467
color_pair() function (curses module), 428
color scheme customizer (ColorChooser.py),
377–381
color system conversions, 469–472
ColorChooser.py, 377–381
colorsys module, 470–471
column types, in databases, 240–241
combining() function, with Unicode strings, 153
command-line interpreter, creating, 440–442
command-line parameters, viewing, 166
command prompt, 4
running programs, 6
Common Gateway Interface. See CGI scripts
commonprefix() function, 164
communications, multicasting (multitest.py),
257–261. See also e-mail; Internet
communications
comparing
comparison functions, 30–31
comparison operators, 29–30
files, 171–172
identity references, 63–64
rich comparison methods, 110–111
sequence data types, 53
strings, 42–43
compile() function, 97
compiling
modules, 95
regular expressions, 144–146
Complaint.py, 382
complex expressions, 32–33
complex() function, 45
_complex_() method, 115
complex numbers
combining, 24
in math module functions, 583
components. See widgets
compound expressions, 31–32
compress() function, 211
compressing data, 196
graphics files, 467
gzip module, 213–214
PyZipFile class, 216
zipfile module, 214–215
ZipInfo class, 215–216
zlip module, 211–213
concatenating
data types, 52–53
strings, 37
Conceal.py (file-hiding program), 318–319
concurrency control (thread module/threading
module), 485–488
Condition class (concurrency control), 488
conditional statements, 7–8
ConfigParser module/object, 188–190
configuration files, managing, 188–190
connect() method, 234, 251
connection() method, 289
connection objects, in databases, 234
constraints, layout (wxPyton), 406–407
constructors, 15
containers, pickling, 198
_contains_() method, 113
ContentHandler object, 334–335
contiguous arrays, identifying, 592
continue statements, with loooping statements,
77–79
control blocks, 6
control flow using if statements, 73–74
controls (wxPython module), 399–401.
See also widgets
convert() method, with graphics, 474–475
cooked mode (curses module), 421
cookie dictionary, creating (httpreq.py), 149–150
cookies (cookie module)
importer for (CookieMonster.py), 323–324
managing/storing, 322-324
coordinates, in wxPython, 402–403
copy(), 63
copying objects, 65–67
with IMAP4 objects, 287
path management, 168
in Python Imaging Library, 474
copy module, 66–67
4807-7 Index.F 5/24/01 9:02 AM Page 705

706 Index ✦ C–D
copyfile() function, 168
copyfileobj() functions, 168
copying, graphics/images, 474
copymode() function, 168
copytree() function, 168
count() method, 136
with arrays, 71
with lists, 58–59
counting references, object, 64–65
cPickle module, 198
crc32() function, 211
create() method, for mailboxes, 287
crop() method, resizing images using, 476
CSV.py (testing example), 502–503
curly brackets ({}), in regular expressions, 141
curselection() method, 375
curses module, 121
color options, 427–428
cursor options, 420–421
handling terminal displays, 415–416
managing text, 416–417
maze game (maze.py), 429–432
starting up/shutting down, 416
text editing options, 426–427
user input options, 421–425
window/screen displays, 417–420
windows management, 425–426
CurseWorld.py, 416
cursors
on curse-based terminal displays, 420–421
in databases, 235
Tkinter module options, 385–387
with wxPython, 413
customized exceptions (Pyton/C API), 578
CXX, SCXX (Simplified CXX), 549–550
Ddata
audio. 460–464
graphics, 472
hiding, 106–107
data storage
byte order (endianness), 196
compressing data, 196, 210-216
destination issues, 196
end user issues, 196
object state, 196
saving objects to disk (pickling), 197–200
text versus binary mode, 196
in XML, 195
data types
adding pickling support, 199
built-in, 67–68
class, 107
dictionaries for (win32all), 661–662
instance, 107
packing/unpacking, 208–210
printing listing of, 67–68
sequence, 49
in win32all, 661–662
data types, numeric
combining, 24
comparison functions, 30–31
comparison operators, 29–30
converting from string data type, 44–45
converting to string data type, 45–47
floating point numbers, 22
functions for, 24–26
imaginary numbers, 22
integers, 21
long integers, 21–22
using operators with, 23–24
data types, string
accessing characters/substrings, 38–40
character data type, 40
converting from numeric data type, 45–47
converting to numeric data types, 44–45
formatting, 40–42
length, 35
string comparisons, 42–43
string literals, 35
databases, relational
accessing, concurrency issues, 485
auditing tables, 238–240
column types, 240–241
connection objects, 234
cursor objects, 235
database libraries, viewing information
about, 242
dbm objects, 229–231
error hierarchies/exceptions, 243–244
input/output sizes, 241
metadata, 237–240
4807-7 Index.F 5/24/01 9:02 AM Page 706

707Index ✦ D
saving objects into, 203–204
SQL statement parsers, 242
transactions, 234–235
viewing information about, 242
DatagramRequestHandler, 264
date arithmetic, 219–220
dates
formatting, 222–223
handling in wxPython, 413
searching for, 225
daylight savings time, handling, 226
DB API. See Python Database API
dbhash module, 229, 233
dbm module/dbm objects, 229–232
deadlock, preventing, 488–489
deathray.py (curses module), 424–425
debugging. See also error handling
destructors, 500–501
Interactive DeveLopment Environment for,
695–698
Python code, 497–501
decimal() function, 153
decode() function, 312
uuencode algorithm, 317–318
DecoderRing.py, 75–76
decomposition() function, 153
decompress() function, 211
deepcopy() function, 66–67
deep copying, 66
def FunctionName statements, 6
def statements, 87–88
defaults() method, 189
defining
exceptions, 82
functions, 5–6, 87–91
new classes, 15
del() method/function
with dictionaries, 61
limitations of, 512
with list items/slices, 58
with object references, 65
_del_() method, 109–110
with widget listboxes, 375
deleting. See also removing
file contents, 124–125
list items or slices, 58
_delitem_()/_delslice_() methods, 113
derived classes. See child classes
destructors, finding errors in, 500–501
development tools
BlackAdder, 690
Boa Constructor, 690
Emacs editing tools, 691–692
Interactive DeveLopment Environment (IDLE),
689–690, 692–695
PythonWorks, 690
WingIDE, 690
device context classes (wxPython), 408–411
dialog/message boxes (Tkinter module), 361
customizing, 381–382
text editor example, 362–365
dialogs, built-in (xwPython), 407–408
dictionaries, 10–11
accessing, 61
adding to/replacing, 61
disk-based, 229–231
environ, 165
formatting strings using, 41
namespaces, 95, 97
pickling, 198
updating, 62
dictionary objects (Python/C API), 570–571
dictionary operators, overloading, 112–113
digests, message fingerprints, 521–523
digit() function, 153
dir() function, viewing module contents, 92
dircmp class, 171–172
directories (os/os.path modules)
changing, 165–166
creating, 169–170
functions for, 163–164
viewing working directory, 165
dis() function, 616
dis module, 615–616
disassembling Python code, 615–616
disk-based dictionaries, 229–231
dispatcher class, 271–273
displays, terminal, handling (curses module),
415–432
distributing applications
binary distributions, 653
controlling files in, 648–649
customizing setups, 650
non-Python files in, 648–650
Continued
4807-7 Index.F 5/24/01 9:02 AM Page 707

708 Index ✦ D–E
distributing applications (continued)
package distributions, 647–648
simple distributions, 643–647
source distributions, 648–653
standalone executables, 655–657
disutils module
distributing extension modules, 650–651
package distributions, 647–648
simple distributions (timeutil.py/setup.py),
643–647
source/binary distributions, 651–653
_div_() methods, 112
division calculations
modulo operator (%) in, 7
function for, 23, 25
division operator (/), 23
divmod() function, 25
divmod() method, 112
dl module, with C shared libraries, 675
DNS (Domain Name System), 248
docstrings, 87, 501
doctest module, 502
Document Object Model API. See DOM API
Document Type Descriptors (XML format), 326
documentation, creating and maintaining, 501
eo_EOF() method (cmd module), 441
do_help() method (cmd module), 441
do_shell() method (cmd mdoule), 441
dollar sign ($), in expressions, 141
DOM (Document Object Model) API, 338
data exchange using (XMLDB.py), 340–341
DOM nodes, 338–339
elements, attributes, text, 338–339
parsing XML files, 327, 338
Domain Name Servers (DNS), 248
domain names, 248
host name, address functions, 248–250
dotted notation, accessing packaged modules, 96
downloading files using FTP, 290–291
drag-and-drop operations
Tkinter support, 382–385
with wxPython, 413
drawing. See also graphics/image files
boxes, in curses module, 418
Draw objects, 477–479
Tkinter module widgets, 366–367
xwPython device contexts, 409–411
drawing canvas, creating (Events.py), 373–374
DTDHandler class (XMLReader), 337
DTDs (Document Type Descriptors), 326.
See also XML format
dumbdbm module, 229–230
dumpimp.py (dummy Importer), 637
dumps() function, 197
dup() function, 173
dup2() function, 173
dynamic extension module linking, 531–532
Ee constant, in math module, 581
encoding/decoding, 317–319
IMAP protocol for, 285–288
parsing messages, 309–310
POP3 protocol for, 281–283
SMTP protocol for, 283–285
viewing/storing addresses, 310–311
echo/no echo functions (curses module), 422
editing text
curses module options, 426–427
wxPython controls, 401
elements, in XML, 326
else-blocks (elif-blocks)
with except clauses, 81
with if statements, 73–74
else-clauses, else-statements, 8
with for-loops, 77-78
with while-loops, 79
embedded Python, 528
embedding in C/C++ programs, 541–543
empty values, in Python/C API, 571
encode() function, 317–318
EncodedFile() function, with non-ASCII strings, 152
encoding
e-mail messages, 317–318
sound files, 453
text files, 150
encrypted modules, importing, 633–636
encryption tools, 523–524
end() method, 148
end statement (Lepto), 435
EndDrawing() method, 409
endianness. See byte orders
endswith() method, 136
4807-7 Index.F 5/24/01 9:02 AM Page 708
709Index ✦ E–F
EntityResolver class (XMLReader), 337
environ dictionary, 165
environmental variables
PythonPath, 94
viewing, 165
epochs, 219
EpochSeconds, converting from/to, 221
_eq_() method, 109
equality operator (==), 30
erase() method (curses module), 418
errno module/error messages, 190–191
error handling
assertions for, 83–86
code debugging tools, 695–698, 699–700
ConfigParser object, 189
debugging CGI scripts, 301
debugging code using pdb, 497–501
exceptions, 81–83
locating bottlenecks, 505–509
ZipFile objects, 215
error messages (exceptions), 5, 80–82
in C/C++ conversions, 537
with ConfigParser object, 189
databases, 243–244
formatting, viewing, 606–607
FTP object, 291
handling in Python/C API, 576–579
IMAP object, 288
I/OErrors, 81–82
NNTP object, 295
os module errors, 190
PicklingErrors, 200
raising, 82
SAX exceptions, 337
shlex module, 437
SMTP objects, 284
socket connections, 251–252, 254
swallowing, 607–608
with syntax errors, 97
tracebacks, 605–608
in win32all, 662
ErrorHandler class (XMLReader), 337
escape() function, 147
escape sequences, in strings
formatting strings using, 36–37
valid, listing of, 36
eval() function, 97
Event class (concurrency control), 487–488
event handlers/objects, 371–373
for curse-based terminal displays, 423–424
except clauses, 81
exceptions. See error messages
exclamation point (!) character, in regular
expressions, 141
exec() functions, 180–181
exec statement, 97
executemany() method, 242
executing code. See code, executing
exiting
from functions, 88
from processes, 183–185
from Python, 4
expandtab() method, 134
expanduser()/expandvars() functions, 163
exponentiation, functions for, 582
expressions, 29–33
expunge() method, 287
extend() method
with arrays, 71
with lists, 58
Extensible Markup Language. See XML format
extension classes, 550, 650–651
extension modules, 527–528
add/count functions, 529–530
distributing, 650–651
linking into Python, 531–532
Numeric Python (NumPy), 589
extension tools, Python-C interfaces
CXX, SCXX (Simplified CXX), 549–550
SWIG, 546–549
extensions, for regular expressions, 143–144
Ff amnt statement (Lepto), 435
FancyURLopener, 277–278
FAQs, answers to, 686
fcntl module for UNIX file descriptors, 680–681
fdopen() function, 173
feedback.py (CGI feedback form), 300–303
fetch() method, for IMAP4, 286
FieldStorage objects (CGI), 299–299
file descriptors, 173–174
4807-7 Index.F 5/24/01 9:02 AM Page 709

710 Index ✦ F
file formats, 467
converting between, 208–210
of databases, incompatibility, 232
graphics file, 467–469
mapping to MIME types, 316
.pyc files, 631
sound files, 456–463
file systems (UNIX), viewing information about,
677–678
file viewer, creating (wxPython), 396–398
filecmp module, 171–172
FileInput class, 176–177
filelike objects, 126–127
fileno() method, 123
with sunaudiodev module, 455
files (file objects)
closing, 123
comparing, 171–172
compiling, 95
configuration files, 188–190
creating/opening, 11
filelike objects, 127–129
hiding, 318–319
navigating, 123–124
non-Python, including in distributions, 648–650
opening, 122
printing to file, 120
in Python/C API, 571–572
reading contents of, 125–126
softspace attribute, 124
transferring using FTP, 290–291
viewing filenames, 163
viewing current positions in, 123
writing to, 124–125
files, managing
file descriptor functions, 173–174
file input class, 176–177
filecmp module functions, 171–172
fnmatch module functions for, 164
glob module functions, 165
mmap objects, 175–176
os/os.path modules functions, 163–164, 168–169
tempfile module functions, 170–171
viewing information about, 159–161
finally clauses, raising exceptions using, 82–83
find() methods, 136
with mmap objects, 176
findall() method/function, 145, 147
findfactor() method (audioop module), 462
fingerprints, for messages, 521–523
finish() method, 263
fire() method, 103–104
fix() function, 153
flags, for file descriptors, 173
float class, 7
float() function, 7, 44
_float_() method, 115
floating point (decimal) numbers, 7, 22, 24
managing, 154
flush() function, 176
flush() method, 125
in curses module, 422
with sunaudiodev module, 455
fnmatch module, file/directory management
functions, 164
fnmatchcase() function, 164
Folder objects, 320–321
fonts
Internet text options, 305–306
Tkinket options, 366
wxPython options, 413–414
FoodChoice.py, 352–354
for-statements, 8, 74–77. See also looping
with list comprehension, 51
with lists or tuples, 55
form fields, accessing, 299–300
form() function, 182–183
formatter module, 304–306, 327
formatting
Internet text, 305–306
locale-specific formatting, 625–626
time, syntax for, 222
using user input, 357–359
formatting strings
escape sequences for, 36–37
formatting characters (tables), 40
methods for, 134–135
preserving formatting in, 35
struct module format characters, 204
fpformat module (floating point numbers), 154
fragments, audio (audioop module)
converting between formats, 463
managing, 463–464
frames, 349. 393
audio, managing, 457
freeze utility, 656
4807-7 Index.F 5/24/01 9:02 AM Page 710

711Index ✦ F–G
from function, 250–251
from() methods 70
fromlist() method, 70
fromstring() method, 70
fstat() function, with file descriptors, 173
FTP object, creating/using, 289–291
ftplib module, 289–291
ftruncate() function, with file descriptors, 173
fully qualified domain names, retrieving, 250
func() function, 164
FunctionAttributes.py (checking version numbers),
610–611
functions. See also specific classes and objects
arguments in, 89–90
array objects, 68
browsing attributes, 609–611
defining in code, 5–6
overloading, 108–111
pickling, 198
seeding arrays with, 598–599
testing, 502–503
writing in C/C++, 527–531
GGame of Life example (LifeGame.py), 84–86
gdbm module, 229, 232
geometry managers, widget layout, 349–350
get() methods
accessing dictionary mappings, 61
with ConfigParser object, 189–190
with e-mail messages, 309
opening Web browsers using, 308
with Telnet object, 297
with widget listboxes, 375
with wxPython controls, 400
get_() methods, 297
with curse module cursors, 420–421
getatime() function, 158
getattr() function, 102
_getattr_() method, 109–110
getch()/ungetch() functions, 121, 669–670
getch() method (curses module), 422
getcwd() function, 165
getfqdn() function, 248–250
gethostbyaddr(), 248–259
gethostbyname() function, 248
gethostname() function, 248–250
_getitem_() method, 113
getkey() method, 422
getline() function, 174–175
getmtime() function, 158
getname() method, 460
getpass module/getpass() function, 516–517
getpeername() method, 253
getsample() method 9audioop module), 462
GetSelection() method, 400
getservbyname () function, 248–250
getsignal() function, 192
getsize() method, 460
getSocket() function, 117
getsockname() method, 253
getsockopt() methods, 254–255
getstr() method, 422
getuser() function, 516
getweakrefs() function, 116
getweakrefscount() function, 116
getwelcome() method, 289
glob() function, 165
glob module, 165
global interpreter lock, 496
global namespaces, 95
GlobalDict, 97
globals built-in function, 96
gmtime() function, 221
Gopher protocol, 291–292
gopherlib module, 291–292
graphical user interfaces. See GUIs
graphics/image files. See also drawing
animating (CanvasBounce.py), 368–369
converting to bitmaps, 475–476
creating GIF images (clockgif.py), 477–479
file formats for, 467, 474-475
with GUIs, 366–367
handling using Python Imaging Library, 472–475
handling in wxPython, 413
identifying file types, 468–469
modifying pixel data in, 476–477
resizing, 476
grayul.py (HTML file viewer), 396–398
greater than operator (>), 30
greater than, equal to operator (>=), 30
grid method options, 351–352
grid sizers (wxPython), 405–406
group(), 148
accessing newsgroups using, 293
groups, checking in UNIX systems, 671–672
4807-7 Index.F 5/24/01 9:02 AM Page 711

712 Index ✦ G–I
groups() method, 148
grp module, in UNIX systems, 672
_gt_() method, 109–110
guessing game program (NumberGuess.py), 73–74
guess_type() function, 316
GUI-based applications, file-like objecs in, 128–129
GUIs (graphical user interfaces). See also Tkinter;
wxPython
appearance/behavior options, 354
color options, 354, 365
color scheme customizer (ColorChooser.py),
377–381
dialog/message boxes in, 361–365
event handlers, 371–372
font options, 366
graphics/images in, 366–369
incorporating user input, 356–359
Lepto-based interfaces, 433–450
menu widgets, 360–361
printing exception tracebacks (GUIErrors.py),
607
size options, 354
text widgets, 359–360
GUIErrors.py, 606–607
gunzip module, 213
gzip module, 213–214
Hhandle() method, 263
HandleForm.py (CGI script), 267
handlers, for asynchronous signals, customizing,
191
hasattr() function, introspection using, 608–609
has_colors function (curses module), 427
hash() function, 62
hash() method, 109–110
_hash_() method, 110
hashablity, 62
has_key() method, 61
header values, e-mail message, retrieving, 309–310
HelloWorld.py (CGI script), 298–302
help systems
in cmd module, 441–442
newsgroups, 687
technical assistance Web sites, 686
tutorials, 17
_hex_() method, 115
hexadecimal values, converting strings to, 75–76
hives, in Windows registry, 664
HLS (hue-lightness-saturation) color system, 470
converting to RGB color system
(ChooseColor.py), 471-472
HomePage.py, 666
host names, 248
HSV (hue-saturation-value) color system, 470
HTML files
converting Python code to, 612–613
filtering text in, 329–330
handling in wxPython, 414
parsing, 327–329
viewing in wxPython (grayul.py), 396–398
HTML markup language, 325
html module (wxPython), 414
htmllib module, 327
HTMLParser class
filtering HTML text (BoldOnly.py), 329–330
handling bogus/unknown elements, 329
parsing methods, 327–329
Web Robot (Robot.py), 331–334
HTTP() method, 279
HTTP request file (httpreq.py), 149–150
HTTP requests, sending/receiving, 279–280
httplib module, 278
Hypertext Markup Language. See HTML files
hypotenuse, calculating, 582
I_iadd_() method, 112
id() function, 64
identifiers
reserved words, 20
valid versus invalid identifiers, 19–20
identity references, comparing, 63–64
_idiv_() method, 112
IDLE. See Interactive DeveLopment Environment
if blocks, setting aside code using, 14
if-statements, 8
else-blocks (elif-blocks) with, 73
with list comprehension, 51
ignore() function, 172
ihave() method, 295
_ilshift_() method, 114
4807-7 Index.F 5/24/01 9:02 AM Page 712

713Index ✦ I
ImageDraw module (Python Imaging Library),
477–479
images, adding to GUIs, 366–367. See also
graphics/images
ImageTk module (Tkinter module), using with
Python Image Library, 475–476
imaginary numbers, 22
IMAP4 objects, 285–288
imaplib module, 285–288
imghdr module, identifying image types, 468–469
immutable data types, 10
strings as, 38, 133
_imod_() method, 112
imp module, 629–631
importing Python modules, 631–633
_import_() function
overrriding, 94
using, 629–631
import statements, 14, 93, 629
Importer class, dummy custom Importer
(dumbimp.py), 637
importing
encrypted modules, 633–636
Python modules, 14, 92–93, 629–631
importpye.py (importing modules), 634–636
imputil module
with encrypted modules, 633–636
Importer class, 636–637
_imul_() method, 112
in operator (string comparisons), 43
inch() method (curses), 417
include file statement (Lepto), 435
indenting
code, conventions for, 6
function definitions, 611
index() method
with arrays, 71
with lists, 58
with strings, 136
index names, stat module, 160
indexes
accessing sublists using, 9–10
with lists, 9
support for by sequence types, 9–10
indexing, array elements, 590–592
inequality operator (!=), 30
inheritance
child classes, 102–103
multiple inheritance, 14, 103–104
initialization methods, 100, 109
initscr() function, 416
inodes, 158
input() function, 120
with FileInput objects, 176
input. See also GUIs; user input
audio files, reading, 457
functions for, reading, 120–121
redirected, detecting, 128
wxPython module options, 411–412
input/output sizes, in databases, 242
insert() method, 59
with arrays, 71
with widget listboxes, 375
installers, 653–654
for standalone applications, 657
instance data type, 107
instance variables, 101
instances of classes, 14
InstanceType data type, 68
instr() method (curses module)
int() function, 44
_int_() method, 115
integers, 21
interact() method, 296
Interactive DeveLopment Environment (IDLE), 4,
689–690
debugging using pdb, 695–698
editing code using, 692–695
interfaces. See also GUIs
to GNU Multiple Precision Arithmetic Library,
587–588
with NIS “Yellow Pages,” 682–683
Python - C/C++, 546–550
internationalization, 619-624
Internet Explorer, as home page, 666
Internet communications
formatting text, 304–307
managing URLs, 303–304
protocols for, 275, 303-307
interweaving threads, 495
introspection, 608–611
invalid identifiers, examples of, 19
4807-7 Index.F 5/24/01 9:02 AM Page 713

714 Index ✦ I–L
inversion operator (~), 23
_invert_() method, 112
I/O (input/output) calls, optimizing, 510–511
I/O sizes, in databases, 242
IOError exceptions, 81–82
IP addresses, 247
is operator, in reference comparisons, 64
isabs() function, 157–158
isalnum() method, 135
isalpha() method, 135
isatty() function, with file descriptors, 173
isatty() method, 123, 128
isdigit() method, 135
isdir() function, 158
isfile() function, 158
isinstance() function, 68, 107
isleap() function, 225–226
islink() function, 158
islower() method, 135
isspace() method, 135
_issub_() method, 112
issubclass() function, 68, 107–108
istitle() method, 135
isupper() method, 135
Jjoin() function, building paths, 161–162
join() method, 138
joinfields() function, 140
joining sequences, 52–53
KKey Bindings (readline module), 676
key names, in string formatting, 41
key-value pairs, 10–11
keyboard event bindings, 371–372
keyboard input
accessing, 120–121
with curse-based terminal displays, 421–422
in wxPython, 412
keyboard shortcuts, in xwPython, 411–412
keypad() method (curses module), 421
keys, 10–11
in Windows registry, 664
keyword arguments, unpacking in C/C++
conversions, 537–538
Kill and Yank Key Bindings, 677
killing (readline module), 677
KillKey.py, 667–668
Ll amnt statement (Lepto), 435
lambda (anonymous) functions, 90–91
languages, Lepto, 435. See also C/C++
last item on list, accessing, 9
layout (wxPython)
algorithms, 407
constraints on, 406–407
options for, 401–406
_le_() method, 109
leap years, 226
left bit-shift operator (<<), 24
len() function, 35
with arrays, 71
with dictionaries, 62
len()method, 110, 113
Lepto-based interfaces
graphical interface for, 445–450
interactive console for (leptocon.py), 442–445
Lepto language basics, 435
Lepto Lexical Analyzer, 436–440
parser for (leptoparser.py), 437–440
simple example of (leptogui.py), 445–450
LeptoCon class (cmd module), 442–445
leptogui.py, 445-50
Leptoparser.py, 437–440
less than operator (<), 30
less than or equal to operator (<=), 30
LessBuggy.py, 697–698
lexical analyses, shlex module for, 436–440
libraries, C shared, using in UNIX systems, 675. See
also specific classes and objects
limits, UNIX system resources, 679–680
linear encoding (sound files), 453
linecache module, 174–175
lineno() function, 177
link() function, 168–169
links
for extension modules, 531–532
managing, functions for, 158
symbolic/hard system links, 168
Linux RPM SPEC options, 654
list command (pdb module), 498
list comprehensions, 51
4807-7 Index.F 5/24/01 9:02 AM Page 714

715Index ✦ L–M
list() function, 50
list() method, 10
with e-mail, 281
listbox widget, 375–376
listdir() function, 163–164
listen() method, 251–252
listenThread() function, 203
lists (list objects)
accessing last item on, 9
C functions for, 563–564
converting arrays to, 69–70, 592–593
creating, functions for, 50–52
in dbhash module, 233
deleting items or slices from, 58
for. . .in-statements with, 55
index numbers for, 9
methods for, 58–60
performance issues, 68
pickling, 198
processing functions, 55–57
replacing values in, 57
sorted, managing items in, 60
switching to tuples from, 10
ljust() method, 134
loads() function, 197
local namespaces, 95
LocalDict, 97
locale module
formatting options, 625–626
locale categories, 624–625
locale properties, 626–627
locale-specific formatting. See localization
localhost addresses, 247
localization, 619, 624-625
time formats, 221, 223–224
locals built-in function, 96
Locator class (XMLReader), 337
Lock class (concurrency control), 486
locking, global interpreter lock, 496
locking threads, 485–488
preventing deadlock, 488–489
logarithms, calculating, 582
login()/logout() methods (IMAP), 285–288
long() function, 44
_long_() method, 115
long integers, 21–22, 24
looping statements, 7
break-statements with, 77–78
breaking out from, 8
changing reference sequences in, 78–79
continue-statements with, 77–78
else-clauses with, 77–78
optimizing, 510
while-statements with, 8, 79
loose typing, 4–5
lossless compression, 467
lossy compression, 467
lower() method, 134
lseek() function, with file descriptors, 173
_lshift_() method, 114
lstat() function, 161
lstrig() method, 134
_lt_() method, 109–110
MMagicSquare.py (using ufuncs), 596
MainLoop() method, 393
mailbox module, 320–321
mailboxes
administering, 287–288
managing/searching, 285–286
MH, managing, 320–321
UNIX, parsers for, 320
mailcap files, parsing, 317
mailcap module, 317
maillists about Python, joining, 687
makedirs() function, 169–170
maketrans() function, 139
managed windows (wxPython), 394–395
mapping() function, 117
mapping objects (Python/C API), 569–570
mappings, dictionary
accessing, 61
adding to/replacing, 61
updating, 62
mappings, of MIME type file extensions, 316
marked parameters (SQL statements), 242
markup languages, 325. See also HTML files;
XML format
marshal module, 200
Mask class (curses module), 419–420
masked arrays, 589
mask.py (terminal display screen mask), 419–420
4807-7 Index.F 5/24/01 9:02 AM Page 715

716 Index ✦ M
match() function, with regular expressions, 147
match() method, 145
match objects, methods for, 148
matching
nongreedy, 143
regular expressions, 145
math module
exponent calculations, 582
logarithm calculations, 582
rounding, 581–582
trigonometric functions, 582–583
matrix operations, with arrays, 603–604
max() function, 31, 55
with string comparisons, 43
maze game (maze.py, curses module), 429–432
MD5 message digits algorithm, 522
membership testing, sequence data types, 53
memory, managing, 512, 579
memory-mapped files, 175–176
menu widgets, 360–361
menus, adding to xwPython, 411–412
message fingerprints, 521–523
Message objects, 309, 320–321
messages, adding to mailboxes, 288. See also
e-mail; networking
metadata
auditing table example (mirrormaker.py),
238–240
sequence pieces (table), 238
metatext, 326
methods. See also functions and specific classes
and objects
for array objects, summary of, 71
base methods, 109
initialization methods, 100
overloading (table), 111–112
self referencing, 15
MH mailboxes (MH objects), 320–321
MIME messages
encoding/decoding, 312
mailcap files, parsing, 317
mapping to file extensions, 316
multipart messages, 313–314
parsing, 311–313
testing, example file (MimeTest.py), 314–315
mimetools module, 312
mime.types file, 316
mimetypes module, 316–317
MimeWriter module, 313
mimify() function, 312
mimify module, 312
min() function, 31, 43, 55
minimum field width number (string
formatting), 41
minus operator (–), 23
in string formatting, 41
mirrored() function, 153
mirrormaker.py (audit tool), 238–240
mix-ins, multiple inheritance with, 104
mkdir() function, 169
mktemp() function, 170
mktime() function, 221
mmap module/objects, 175–176
_mod_() method, 112
mode method, values, 122–123
mode values, open() function, 122
modes, for paths, setting, 157
modifying attributes, 101–102
module objects (Python/C API), 572–574
module type values, 632
modules. See also specific modules
compiling/storing, 95
copying, 66
customizing using mix-ins, 104
distributing/installing, 644–647
encrypted, importing, 633–636
extension, distributing, 650–651
grouping into packages, 96–97
importing, 14, 92–93, 629–631
layout, 91–92
locating, 94
reading lines from, 175
reimporting, 93–94
retrieving from remote locations, 636–641
modulo operator (%), 7, 23
in string formatting, 40–41
Monkeys.py, 96
Monte Carlo sampling (Plotter.py), 586–587
month() function, 224–225
monthcalendar() function, 224
monthrange() function, 225
Morsel object, 322–323
morsels, storing cookies as, 322–323
mouse buttons, binding, 372
4807-7 Index.F 5/24/01 9:02 AM Page 716
717Index ✦ M–N
mouse cursors, customizing (wxPython), 413
mouse input, mouse events
detecting in curses module, 423–425
terminal displays, 423–424
in wxPython, 412
mousemask() function (curses module), 423–424
using (Deathray.py), 424—425
MovingAverage.py (matrix arithmetic), 603–604
mpz module, 586–587
msvcrt module, 121
Windows-specific services, 669–670
_mul_() method, 112
multi-process socket server classes, 104
multi-threaded socket server classes, 104
multicast communications, example code for,
256–261
MultiFile class, 313
multiple assignment statements, 27
multiple inheritance, 14, 103–104
multiplication operator (*), 23
repeating strings using, 37–38
multiplying array matrices, 602–604
Multipurpose Internet Mail Extensions. See MIME
messages
multitest.py (multicasting), 257–260
multithreading. See threading
MutableString class, 105
mxODBC module, database searching using,
235–237
Nname() method/function, 123, 187
namelist() method, 215
names, of variables, 19–20
namespaces, 95, 97
lambda (anonymous) functions, 91
objects, 63
in XML, 327
native language support (NLS), 619–620
adding to applications, 620–624
ncurses API. See curses module
ndiff utility, 172
_ne_(), 109
_neg_() method, 112
nearest() method, 375
netrc files, handling, methods for, 291
Network News Transport Protocol (NNTP) object,
292–295
network orders, 256
networking, 247–248, 267
byte ordering settings, 256
CGI script handlers, 267–269
connection objects, 251–252
HTTP servers, 264–267
multicast communications, 256–261
non-threaded communications, 269–273
sending/receiving data, 251–252
socket module functions, 248–250
socket servers, 261–263
networks, moving objects between, 200–203
new module, 614–615
newnews() method, 293–294
NewObject statement, 15
newpad() function (curses module), 426
new_panel() function (curses module), 426
newsgroups
accessing, 292
browsing, 293
managing, methods for, 292–295
NewsSlurp.py, 294–295
nextfile() function, 177
NIS (Sun System) “Yellow Pages,” UNIX interface
with, 682–683
NLS. See native language support
NNTP object, 292–295
nntplib module, 292–295
non-ASCII strings, 150
non-managed windows (wxPython), 395–396
None value, 11
nonprintable characters, 34
_nonzero_() function, 109
noraw() function (curses module), 421
normcase() function, 162
normpath() function, 162
not in operator, 43
not operator, 32
NullWriter, 306–307
NumberGuess.py (exception handling script),
73–74
NumberGuess2.py, 80–81
numbers, pickling, 198
4807-7 Index.F 5/24/01 9:02 AM Page 717

718 Index ✦ N–O
numeric data types
combining, 24
comparison functions, 23–24
comparison operators, 29–31
converting to/from string data type, 43–47
floating point numbers, 22
functions for, 24–26
imaginary numbers, 22
integers, 21
long integers, 21–22
numeric() function, 153
numeric operators, 111–112
Numeric Python (NumPy), 589
array elements, 600
array-handling functions, 590–593, 597–601
array matrices, 602–604
universal functions, 593–596
OObject Graphics Library (OGL), accessing in
wxPython, 413
object-oriented programming (OOP), 15
classes, creating, 100–101
Python support for, 99
object references
passing, 88
variables as, 88
object state, 196
objects, 14. See also specific classes and objects
class definitions, 100
class variables, 100
classes, 100–101
copying, 65–67
creating from C/C++ code, 539–540
creating new objects, 15
identify references, 63–65
instance objects, 101
instance variables, 101
keys, 10–11
low-level, creating, 614–615
managing attributes in, 101–102
moving across networks, 200–203
pickling, 198–200
proxy objects, 117–118
sys module, 126–127
values, 10–11
weak references with, 115–116
objects, in Python/C API
buffer interface, 566–567
built-in types, 571
dictionary functions, 570–571
file objects, 571–572
generic objects, 556–558
list functions, 564–565
mapping objects, 569–570
module objects, 572–574
number objects, 558–561
tuple functions, 565–566
obufcount() method (sunaudiodev module), 455
oct() function, 46
_oct_() method, 115
OGL (Object Graphics Library), accessing in
wxPython, 413
onButton() method, 393–394
onecomd() method (cmd module), 441
OOP. See object oriented programming
open() function, 11
with arrays, 203–204
with audio files, 457
creating file descriptors, 173
gzip module, 215
with non-ASCII strings, 152
opening files, 121–122
with sunaudiodev module, 455
with URLs, 278
openlog()/closelog() functions, 674–675
openpty() function, 173
operator module, overloadable functions, 108–111
operators
arithmetic operators, 4
augmented assignments, 28
Boolean operators, 31–32
comparison operators, 29–30
listing of, 20
modulo operator (%), 7
with numeric data types, 23–24
overloading, 111–114
precedence rules for, 4, 33–34
reference comparisons, 64
string comparisons, 43
optimizing. See performance, optimizing
_or_() method, 114
OR operator (|), 23, 32
ord() function, 45
4807-7 Index.F 5/24/01 9:02 AM Page 718

719Index ✦ O–P
order modifiers, in struct module, 206
orientation, of controls, in wxPython, 403–404
os module, 156
error exceptions, 190–191
executing shell commands, 179–181
exiting from processes, 183–184
file descriptor functions, 173–174
file management functions, 163–164, 168–169
file-opening functions, 122
path management functions, 156–160
process information functions, 185–186
running child processes, 181–183
viewing environmental variables, 165
viewing system information, 187
OSError class, 190–191
os.path module
building/vreaking up pths, 161–162
comparison with os.module, 156
file/directory management, 164
path management functions, 157–162
output. See also I/O; printing
audio files, 457–458
print statement, 119–120
WordCount.py, 13
overloading
bitwise operators, 114–115
dictionary operators, 112–113
functions, 108–111
numeric operators, 111–112
sequence operators, 112–113
type conversion operators, 115
Ppack() methods, 208–209
widget layout, 350–351
packages
distributing/installing, 647–648
grouping modules into, 96–97
Packer objects, creating, 208–209
packing data types, 208–209
pads (curses module), 425–426
palettes, 467
parameters, in functions, 88–89
parent classes, 14
child classes from, 102–103
multiple inheritance, 103–104
parentheses (( ))
in calculations, 4
in complex expressions, 32–33
in regular expressions, 141
parsing
HTML files, 327–329
Lepto programs, 436–440
Python data, 531–537
Python code, parse trees for, 613–614
XML documents, 327
passwords
managing, 516–517
in UNIX systems, 671–672
path type test function, 160
paths, 155
accessing, 156–157
locating, for modules, 94
managing , 156–161, 168–169
paths. managing
os module functions for, 156–157, 168–169
os.path module functions for, 157–159, 161–163
stat module functions for, 160–161
statcache module functions for, 161
pause() function, 192
pdb module (debugger), 497–498
performance, optimizing
I/O calls, 510–511
locating bottlenecks, 505–509
looping, 510
managing memory, 512
organizing if-statements, 74
performance statistics, 507–508
“simultaneous” code, 495–496
sorting, 509
sound files, 454
string-handling, 511
thread-handling, 511
periods (.)
in regular expressions, 140
in string formatting, 42
permissions, 157
phone list (database), 231–232
PhotoImage class (Tkinter module), 366–367
with Python Imaging Library, 475–476
pi constant, in math module, 581
4807-7 Index.F 5/24/01 9:02 AM Page 719
720 Index ✦ P
pickling, 197–198
classes, 199–200
swap module example, 200–203
pipe() function, 173
pipes, 173
pixel data, modifying, 476–477
playing/recording sound files
SunOS, 455–456
Windows systems, 454–455
PlaySound() function (winsound), 454–455
plotter program, creating using shlex module, 433
plus operator (+), 23
concatenating strings using, 37
overloading, 108
in regular expressions, 141
in string formatting, 41
pocket calculator, Python as, 4
point class (Point.py), 15–16
PoliteGet.py, 307
poll() function, 270
polling objects, 270
_pos_() method, 112
_pow_() method, 112
pop() method, 59–60
with arrays, 71
pop arg statement (Lepto), 435
POP3 accounts, accessing, 281–283
popen() functions, 181–182
popitem() method, 63
poplib module, 281–283
popmail.py, 281–282
Popup.py (menu widget), 361
porting threaded code, 494
_pos_() method, 112
post() method, 295
POST requests, 280
pow() function, 25–26
_pow_() method, 112
power operator (**), 23
precedence rules, operators, 4, 33–34
primary orientations, in wxPython, 403–404
PrimeFinder.py (looping statements), 7–8
print statement/command
in pdb module, 498
printing to file, 120
printing, 119–120
calendars, functions for, 224–225
tracebacks, 605–607
with wxPython, 414
prmonth() function, 225
processes
handling, functions for, 181–185
viewing information about, 185–186
profile module/Profile class, 506–507
programs, running, 6, 179–181. See also code,
executing
progress bar, creating, 387–388
properties, of locales, 626–627
protocols, communications, 248, 275
proxy objects, 117–118
proxy servers, 276
pseudoterminals (UNIX systems), 681–682
pstats module/Stats class, 507–508
public access, versus private, 15–16
push() method, 313
push arg statement (Lepto), 435
pwd() method (FTP server), 289–290
pwd module, using with UNIX systems, 671–672
py2exe utility, 655–657
PyArg_ParseTuple object types, 533
Py_BuildValue object types, 539–540
.pyc files, 631
pyclbr module, browsing classes, 609
pydoc module, 501
PyInterpreterState objects, 576
.pyo files, 95
PyObject pointer, 553
PyShellWindow module (wxPython), 398
Python/C API
built-in types, 571
C list functions, 564–565
CObjects, 574
dictionary functions, 570–571
empty values, 571
error messages/exceptions, 576–579
extension tools, 546–550
file objects, 571–572
generic objects, 556–558
managing memory, 579
mapping functions, 569–570
module objects, 572–574
number objects, 558–561
object layers, 556
reference conventions, 554–555
4807-7 Index.F 5/24/01 9:02 AM Page 720

721Index ✦ P–R
reference ownership, 553–555
sequence objects, 561
sub-interpreters, 576
threads, 574–576
tuple functions, 564–565
Unicode strings, 567–569
Python Database API, 234–244
Python distribution downloads, 685–686
Python Enhancement Proposals (PEPs), 687
Python Extensions for Window. See win32all
Python Imaging Library (PIL)
features, 472–475
image formatting, 480
Python interpreter, starting and exiting from, 3–4
Python MegaWidgets (Pmw), 389
Python mode for Emacs, 692–669
Python Threading SIG, 496
PythonPath variable, 94
PythonWin, 698–699
PythonWorks, 690
PyZipFile class, 216
Qquerying relational databases (soundex.py),
235–237
question mark (?), in expressions, 141
Queue module/Queue class, interweaving threads
using, 495
Quiet.py (audio editor), 594–595
quote() function, 276
quoted-printable encoding, 319
quotes, in string literals, 35
Rr amnt statement (Lepto), 435
_radd_() method, 112
raising exceptions, 82
random numbers, generating, 583–587
deck shuffling example, 585
distributions for, 585
Monte Carlo sampler (Plotter.py), 586–587
range() function, 8, 50–51
with looping statements, 76–77
ranges, in lists, managing, 50–51
raw() function, 421
raw mode (curses module), 421
raw_input() function, 120–121
_rdiv_() method, 112
_rduvmod_() method, 112
re module. See regular expressions
read() methods, 125
with audio files, 461
with ConfigParser object, 188
with file descriptors, 173
with mmap objects, 176
with sunaudiodev module, 455
with Telnet objects, 297
with ZipFile objects, 215
read_byte() method, 176
readframes() method, with audio files, 457.
See also chunked data
reading file contents
chunked audio files, 460-461
nonchunked audio files, 457
text files, 125–126
readline() method, 125–126
with mmap objects, 176
readline module, 121
in UNIX systems, 675–678
readlines() methods, 126
Real Media File Format (RMFF) files, reading,
460–461
recursive grep utility (rgrep.py), 166–167
recv()/recvfrom() methods. See networking
redirected input, detecting, 128
ref() function, weak referencing, 116
references, object
comparing, 63–64
counting, 64–65
and memory management, 512–513
tracking ownership of, 553-555
weak references, 115–116
refresh() method (curses module)
with pads, 426
with windows, 418
register() function, 184
with Web browsers, 308
regular expressions
character groups, 142–143
creating, 144–145
extensions, 143–144
nongreedy matching, 143
syntax, 140–141
using, 145–147
reimporting modules, 93–94
4807-7 Index.F 5/24/01 9:02 AM Page 721

722 Index ✦ R–S
relational databases
accessing, 234–235
auditing tables, 238–240
column types, 240–241
database libraries, 242
error hierarchies/exceptions, 243–244
input/output sizes, 241
metadata, 237–240
SQL statement parsers, 242
relative paths, 155
reload() function, 93–94
Remainder.py, 599–600
remainders, calculating, 7
remote importer, 637–640
remote server access, 296–298
remove() function, 168–169
remove() method, 59
with arrays, 71
removedirs() function, 170
removing. See also deleting; exiting
attributes, 101–102
files, 169
rename()/renames() function, 168–169
renaming paths, 168–169
repeat statement (Lepto), 450
repeat count sub statement (Lepto), 435
repeating sequences, 52–53
repeating strings, 37
replace() method, 137
replacing, substrings, 137
report() method, 172
repr() function, 46–47
_repr_() method, 109
request handlers, 262–264
Request objects, managing HTTP files/URLs using,
278–279
reserved words, 19
reset arg statement (Lepto), 435
reshaping, array objects, 600–601
resizing objects, 476, 600-601
resource module
resource limit settings, 679–680
UNIX system usage information, 678–679
resource usage (UNIX systems), 677–678
retr() method, 281
retrieve() method, 278
return-statements, 88
reverse() method, 60
with arrays, 71
ReverseSound.py, 459–460
rexec module/RExec object, 517–520
rfc822 module (e-mail handling)
e-mail address lists, 310–311
handling MIME messages, 311–312
parsing e-mail headers, 309–310
RFCs (requests for comments), 275
rfind() method, 136
RGB (red-green-blue) color system, 469–470
converting HLS system to (choosecolor.py),
471–472
rgrep.py, 166–167
rich comparison methods, 110
right bit-shift operator (>), 24
rindex() method, 136
rjust() method, 134
rlcompleter module, 675–678
RLock class, concurrency control, 486–487
_rlshift_() method, 114
RMFF (Real Media Format) sound files, handling,
460
_rmod_() method, 112
rmtree() function, 169
_rmul_() method, 112
robot programs, 307–308
Web robot example (Robot.py), 331–334
RobotFileParser object, 307–308
robotparser module, 3–7-308
rotor module/rotor objects, 523–524
round() function, 26, 45
rounding, 7, 581–582
_rpow_() method, 112
_rshift_()/_rrshift_() methods, 114
rstrip() method, 134
_rsub_() method, 112
ruimp.py (remote Importer), 638–640
run() method, 483–484
running programs, 6, 500. See also code, executing
Ssample rates/widths (sound files), 453
sandboxes, 517–520
saving objects into databases, 203–203
SAX (Simple API for XML), using, 327, 334–337
scale amnt statement (Lepto), 435
4807-7 Index.F 5/24/01 9:02 AM Page 722

723Index ✦ S
scale widget, 376
sci() function, 153
scope rules, 95–96
screen-scraping (curses module), 417–418
scripting languages (Lepto), 433–450
scrollbars
with widgets, 376–377
with xwPython windows, 396
search() method, 145, 147, 286
searching
databases, 235–237
dates, calendars, 225–226
files, grep utility for, 166–167
match objects, 147–148
newsgroup articles, 293–294
regular expressions, 145
robot programs for, 331–334
sound fragments, 462
strings, methods for, 135–136
Web searches, 280
secondary orientations, in wxPython, 404
Secure Hash Algorithm (SHA), 522–523
security issues, CGI scripts, 302
security tools
encryption, 523–524
message fingerprints, 521–523
passwords, 516–517
restricted environments, 516–521
seek() method
changing current position within file, 123–124
with mmap objects, 176
select() method (IMAP4), 286
select module, non-threaded communications,
270–273
selection_set() method, 376
self-examining code (introspection), 608–611
self references, 15, 100
Semaphore class (concurrency control), 487
send() method/function, 203, 252
sending/receiving e-mail, 291–285
sendmail() method, 283
sendto() method, 252
sequence data types, 9–10, 49
accessing portions of using slices, 54
accessing portions of using subscription, 53
comparing, 53
joining/repeating, 52–53
membership testing, 53
processing functions, 55–57
unpacking, 54
sequence operators, overloading, methods for,
112–113
set_() methods
with Telnet object, 297
with wxPython controls. 402, 411
SetAcceleratorTable() method, 411
setattr() function, 102
_setattr_() method, 109–110
setblocking() method, 253–254
SetCursor() method, 413
setdefault() method, 61
setfirstweekday() function, 225–226
setinputsizes()/setoutputsizes() methods, 241
_setitem_()/_setslice_() methods, 113
setparams() method, using with audio files, 457
SetPosition() method, 402
SetScrollBars() method, 395
SetSize() method, 402
setsockopt() method, 254–255
SetStatusBar() method, 395
SetToolbar() method, 395
setup functions, embedding, 542–543
setup() method, 263
setup.py
customizing, 650
for package distributions, 648
for simple distributions, 644
SGML (Standard General Markup Language), 325
shallow copies, 65–67
shared libraries (UNIX systems), 675
shell commands, executing, 179–181
shelve module storage functions, 203–204
shlex module/shlex class, 433, 436–437, 522–523
Lepto parser program (leptoparser.py), 437–440
shutdown() method, 251
shutil module
file management functions, 169
path management functions, 168
signal handlers, customizing, 191–193
signal module, asynchronous signal handling,
191–193
sig.py (signal handler), 192–193
Simple API for XML. See SAX
simple.c extension program, 529–530
SimpleCookie class, 322
SimpleHTTPRequestHandler class, 266
4807-7 Index.F 5/24/01 9:02 AM Page 723

724 Index ✦ S
SimpleHTTPServer module, 264
Simplified Wrapper and Interface Generator. See
SWIG
single underscore (_) character, 20
size() function, 176
size() method, with widget listboxes, 375
size modifiers, struct module, 206
size options (Tkinter widgets), 354
sizers (wxPython), 403
box sizers, 403–405
grid sizers, 405-406
sleep() function, 221
slice operators (slicing)
with array elements, 590–592
copying objects using, 65–66
with sequence data types, 54
with strings, 39–40
SMTP accounts, 283–285
smtplib module, 283–285
sndhdr module, 456
socket module/socket objects, 248–250
asynchronous dispatcher class, 271–273
binding/connecting, 251–252
calling, 117
communications options, 254–255
copying, 66
creating, 250–251
message handling, 251–253
managing, 250–251
open sockets, viewing, 247
ports/IP addresses for, 253–254
socket function(), 250–252
socket servers, 261–263
SocketServer module
modifying using mix-ins, 104
TCP/UDP subclasses, 261–263
softspace attribute, in file objects, 124
sorting
array objects, 601
lists, managing items in, 60
optimizing, 509–510
sound files
AIFF files, 456–458
AU files, 458
components/features of, 453–454
converting formats, 462–463
managing sound in, 463–464
playing/recording, 454–456
reading/writing, 456–461
reversing sound on, 459–460
storing, 456
WAV files, 458
soundex.py (database query), 235–237
source code editors, 691-695
Emacs editing tools, 691–692
Interactive DeveLopment Environment (IDLE),
692–695
making Python-aware, 692
source distributions
controlling files in, 648–649
creating, 651–653
span() method, 148
spawn() functions, 182–183
special characters, unpacking in C/C++
conversions, 536
spiral.py, 421
splitfields() function, 140
splitlines() method, 137–138
splitting
paths, 162
regular expressions, 146–147
substrings, 137–138, 140
windows in wxPython, 395–396
SplitVertically() method, 395
SQL statement parsers, 242
square roots, calculating, 582
stack traces, printing, 606–607
stacking windows (curses module), 426
StackPrint.py, 606–607
standalone applications, building tools
archives and standalones, 657
freeze, 656
py2exe, 655–656
standard I/O, accessing, 126–127
start() method, 148
with Thread object, 483–484
startbody()method, 313
startfile() function, 180
starting Python interpreter, 3
startwith() method, 136
stat() function, 159–160
stat module, index names (table), 160
4807-7 Index.F 5/24/01 9:02 AM Page 724

725Index ✦ S
statcache module, 161
statements. See also specific types of statements
class definitions, 15
function definitions, 5–6
grouping by indentation level, 6–7
Lepto-supported, 435
types of, 6–8
statements, assignment
augmented, 27–28
multiple, 27
simple, 26–27
static extension module linking, 531
statistics, code performance, 507–508
status bars, adding to windows (wxPyton), 395–396
status() method (IMAP), 288
statvfs module (UNIX system information), 678–679
stderr/stdin/stdout objects, 126–128
store() method (IMAP4), 286–287
storing
modules, 95
objects, 203–204
sound files, 456
ufuncs output, 594
str() function, 46
_str() method, 109
StreamRequestHandler, 264
strerror() function, 190
strftime() function, 222
string class, customizing, 105
string data type, 34
accessing characters/substrings, 38–40
converting from numeric data type, 45–47
converting to numeric data types, 44–45
escape sequences with, 36–37
formatting, 40–42
length, 35
string comparisons, 42–43
string literals, 35
escape sequences in, 36–37
raw strings, 37
Unicode strings, 43
string module, 133
atof() function, 139
atoi() function, 139
atol() function, 139
capwords() function, 139
character categories, 138–139
join() function, 138
joinfields() function, 140
maketrans() function, 139
splitfields() function, 140
StringIO class, 149–150
strings (string objects)
C functions for, 563–564
characters/substrings in, 38–40
comparing, 42–43
concatenating, 37
converting arrays to, 592–593
converting to hexadecimal values, 75–76
formatting, 40–42, 134–135
handling as files, 149–150
immutability of, 133
non-ASCII, 151–152
optimizing, 511
pickling, 198
regular expressions, 140–147
repeating, 37–38
searching, 135–136
Unicode strings, 150
strip() method, 134
strptime() function, 222–223
struct module
converting to/from C structures, 204–207
format characters, 204
order, alignment and size modifiers, 206
styles, with Internet text, 305–306
sub-interpreters, 576
sub() method/function, 146–147
_sub_() method, 112
sub name statement (Lepto), 435
sublists, accessing, 9–10
subn() method, 146
subscribe() method, 287
subscription operators, 38
with sequence dta types, 53–54
substituting in expressions, 146
substrings, 9–10
accessing, 38–40
managing/editing, 137–138
searching for, 136
subtraction operator (-), 23
sunau module, 456–458
sunaudiodev module, 455–456
SunOS, using sound files in, 455–456
4807-7 Index.F 5/24/01 9:02 AM Page 725

726 Index ✦ S–T
swapaxes() function, with arrays, 603
swapcase() method, 135
swap.py (swap module), 200–203
SWIG (Simplified Wrapper and Interface
Generator), 546–549
symlink() function, 168–169
syntax. See also specific classes, functions, objects,
and statements
case-sensitivity, 5
class definitions, 15
creating new objects, 15
regular expressions, 140–141
simple assignments, 26–27
variables and expressions, 4–6
SyntaxHighlighter.py, 612–613
sys module
stderr (standard error) object, 126
stdin (standard input) object, 126
stdout (standard output) object, 126
sys.argv variable, 166
sys.getrefcount() function, 64–65
syslog module
openlog()/closelog() functions, 674–675
priority values, 673
system() function, 179–181
system information
functions for, embedding, 542
viewing, 187
system logger (UNIX systems), 673–675
SystemExit exception, 184
Ttags, in markup language, 325–326. See also
XML format
HTML methods, 328–329
rules for, 326–327
TCPServer class, 104, 261–263
technical assistance Web sites, 686
tell() method, 123, 176
with mmap objects, 176
Telnet protocol/Telnet class, 296–298
telnetlib module, 296–298
tempfile module, 170–171
template file rules, adding, 648–649
tempnam() function, 171
temporary files, creating, 169–170
TemporaryFile class, 170
terminal displays
curses module functions, 415–432
screen masks for (mask.py), 419–420
in UNIX systems, 681–682
termios/TERMIOS modules, 681–682
TestCase class, 504–505
testing code, tools for
automating, tools for, 502
doctest modules, 502–503
rexec security access (bad.py_), 519
unittest module, 503–505
testing, remote Importer, 640–641
TestSuite class, 504
testzip() method, 215
text
displaying on terminals, 415–432
editing, 426–427
encoding, 150
formatting, user input for (UserInput.py),
357–359
Internet, formatting, 304–307
string data type for, 34
text editors
Tkinter module example, 362–365
Windows API example, 663–664
in wxPython, 401
text files, accessing lines in, 174–175
text mode
data storage, 195
opening files in, 123–124
text widgets, 359–360
TextBox class (curses module), commends for
(table), 426–427
TextEditor.py, 362–365
win32all example, 663–664
textpad module (curses module), 426–427
thread module
creating new threads, 482–483
locking using, 485–486
URLGrabber script example, 492–494
threading module/Thread object, 482–491
checking thread status, 484
locating threads, 484–485
locking using, 486–488
starting/stopping threats, 483–484
URLGrabber script example, 489–491
4807-7 Index.F 5/24/01 9:02 AM Page 726

727Index ✦ T
threading process, 481–482
concurrency issues, 484
interweaving threads, 495
optimizing, 511
porting threaded code, 494
preventing deadlock, 488–489
threading example, 489–494
ticks
in calendar module, 224
converting from/to, 221
telling time using, 219
tilde (~) character (inversion operator), 23
time
formats for, 221
formatting, functions for, 222–223
handling in wxPython, 413
localizing, 223–224
parsing, 222–223
time module/time() function, 159, 219
date/time formatting, 222–224
handling time zones, 226
stopwatch functions, 220–221
Timer.py, 367–369
timestamps, creating, 222
TimeTuples, converting, 221, 223
timeutil module, setting up, 644–647
title() method, 135
titlecase, converting strings to, 135
Tkdnd module, 382–385
Tkinter module, 347–348, 354
adding widgets, 387–388
breakfast buttons example (FoodChoice.py),
352–354
color options, 354, 365
color scheme customizer, 377–381
cursor options, 385–387
dialog/message boxes, 361–365, 381–382
drag-and-drop support, 382–385
drawing canvas, 373–374
font options, 366
geometry manager, 349–350
graphics images in, 366–367
interface-building widgets, 348–349
in Lepto-based GUI, 445–450
listbox widget, 375–376
menu widgets, 360–361
moving images, 368–369
with Python Imaging Library, 475–476
scale widget, 376
scrollbar widget, 376–377
size options, 354
text editor example, 362–365
text widgets, 359–360
timers with, 367–369
user input with, 356–359
tkMessageBox, 361–362
TkSimpleDialog module, 381–382
tmpfile() function, 171
tmpnam() function, 171
tofile() method, 70
tokenize module/function, 611–613
tolist() method, 69
viewing contents of range objects, 77
toolbars, adding to windows (wxPyton), 395–396
tostring() method, 70
traceback module, 603–604
printing GUI exceptions, 607
printing stack traces, 606–607
printing tracebacks, 605–606
transactions, in databases, 234–235
translating substrings, 137
maketrans() function, 139
string module functions, 139–140
tree controls (wxPython), 400–401
treedemo.py (wxPython module), 400–401
trigonometric functions, 582–583
truncate() method, 124–125
ttyname() function, 173
tuples, 9
ASTs, 614
C functions for, 565–566
creating, 52
for. . .in-statements with, 55
passing arguments from, 90
pickling, 198
processing functions, 55–57
switching to lists from, 10
TimeTuple, 220
unpacking, 40
two-digit years, enabling, 227
type codes (array objects), 69
type conversion operators, 115
types module/type() function, 67–68
types, sequence vs. immutable, 9–10
4807-7 Index.F 5/24/01 9:02 AM Page 727

728 Index ✦ U–W
UUDPServer, 261–263
ufuncs (universal functions), in NumPy, 593–597
audio editing program, 594–595
repeating/iterating, 595–597
uid() method, 287
uidl() method, 281
unary operations, 23
Unicode strings, 43, 150
managing, 153
in Python/C API, 567–569
Uniform Resource Locators. See URLs
unittest module, 503–505
UNIX mailboxes, 320–321
UNIX systems
accessing Python, 3–4
accessing system logger, 673–675
CGI scripts for, 299
child processes, 183
controlling resource use, 679–680
epochs, 219
exiting from processes, 184–185
file descriptors, 680–681
inodes, 158
passwords, groups, 671–672
proxy servers in, 276
PythonPath variable, 94
reading individual characters, 121
running Python programs, 6
signal handlers, 192
system information, viewing, 187, 677–679
temporary files, managing, 171
terminals, pseudoterminals in, 173, 681–682
wildcards in, 167
UnixDatagramServer, 261
UnixStreamServer, 261
unpacking data types, 54, 210
unquote() function, 276
unsubscribe() method, 287
uploading files (FTP), 290–291
upper() method, 134
urlcleanup() function, 276
URLGrabber scripts (threading), 489–494
urljoin() function, 303–304
urllib library, 276
urllib2 library, 278
URLopener, 277–278
urlparse module/function, 277, 303–304
urlretrieve() function, 276
URLs (Uniform Resource Locators)
handling as files, 277
managing, 276–277, 303–304
opening/accessing, 277–278, 308
retrieving, 276
user input
in curse terminal displays, 421–425
in GUIs, 356–359
reading, 120–121
user interfaces. See also GUIs
Internet formatter interface, 304–305
Lepto-based, 433–450
UserDict module/UserDict class, 106
UserInput.py, 357–359
UserList module/class, 104–105
UserString module
MutableString class, 105
UserString class, 105
UsingNew.py, 615
utime() function, 159
uu module/uuencoding algorithm, 317–318
Vvalid identifiers, examples of, 19
values, 10–11, 14
built-in, 11
hash values, retrieving, 62
referencing in variables, 5
in Windows registry, 664
variables, 88
assignment statements, 26–28
class variables, 100
creating, 26
defining, scope rules, 95–96
environmental, 94
instance variables, 101
naming, 19–20
value references in, 5
vectors, adding, 108
verify() method, 284
version numbers, of software, checking, 610–611
vertical slash [|], 141
Wwait status interpretation functions, 184–185
WaitCursor.py (Tkinter module), 386–387
4807-7 Index.F 5/24/01 9:02 AM Page 728

729Index ✦ W
walk() function, 164
warnings, in Python/C API, 578–579
WAV files
reading/writing, 458
reversing (ReverseSound.py), 459–460
weak references, handling, 65, 115–117
weakref module
creating weak references, 116
getweakrefcount() function, 116
getweakrefs() function, 116
mapping() function, 117
proxy() function, 117
Web browsers
creating/managing, 264–269
viewing files in, 308
Web requests, sending/receiving, 279–280
Web Robot, 331–334
Web servers
cookies, 321–323
creating/managing, 264–269
documentation Web server, 501
Web sites
extension classes, 550
Python MegaWidgets, 389
Python downloads, 685–686
Python Enhancement Proposals (PEPs), 687
Python Imaging Library, 472, 480
tutorials, 17
wxPython for, 391
WebSearch.py, 280
weekday() function, 225
where command (pdb module), 498
where() function, with arrays, 602
while-statements, 79
in looping statements, 8
widgets (Tkinter module), 349
appearance options, 355
behavior options, 355
building GUI with, 348–349
color options, 354, 365
color scheme customizer , 377–381
creating drawing canvas, 373–374
cursor options, 385–387
designing/customizing, 387–388
dialog/message boxes, 361–365
event handlers/objects, 371–373
font options, 366
geometry managers, 349–350
grid method options, 351–352
graphics handling, 366–367
layout constraints, 406–407
listbox widget, 375–376
MegaWidgets Web site, 389
menu widgets, 360–361
packer methods, 350–351
scale widgets, 376
scrollbar widgets, 376–377
size options, 355
text widgets, 359–360
timers with, 367–369
user input, incorporating, 356–359
width fields, 42
_winreg functions, 668–669
win32all (Python Extensions for Windows)
accessing Windows registry, 664–669
data type dictionaries, 661–662
error messages (exceptions), 662
setting Internet Explorer home page, 666
text editor, 663–664
win32api functions, 668–669
WindowObject class, 415
Windows API wrappers, 661–664
Windows Internet Information Server (IIS), CGI
scripts for, 298–299
windows (curses module)
managing, 425–426
refreshing, 418
Windows registry, 661
access constants (table), 665
accessing, 664–669
killing keys in (KillKey.py), 667–668
Windows systems
accessing Python from, 3–4
epochs, 219
opening text mode files, 123–124
playing sound files, 454–455
proxy servers in, 276
PythonPath variable, 94
reading individual characters, 121
running Python programs, 6, 180
WingIDE, 690
winsound module, 454–455
WordCount.py, 12–13
working directory, viewing, 165
4807-7 Index.F 5/24/01 9:02 AM Page 729

730 Index ✦ W–X
wrapper() function (curses module), 416
write() method/function, 124
with ConfigParser object, 190
with file descriptors, 173
with mmap objects, 176
with sunaudiodev module, 455
ZipInfo object, 215
write_byte() method, 176
writeframes() method, with audio files, 457
writelines() method, 124
writepy() method, 216
writing to files, methods for, 124
wxAcceleratorTalbe class
wxApp object, 393
wxBitmap class, 413
wxBoxSizer classes, 403
wxButton classes, 399
wxcanvas.py, 409–411
wxCalendar class, 413
wxChoice class, 400
wxClipboard class, 413
wxDataFormat/DataObject classes, 413
wxDate/wxDateTime classes, 413
wxDialog class, 394, 399
wxDragImage class, 413
wxDropSource/DropTarget classes, 413
wxEditor class, 401
wxEvent class, 394
wxFloatBar clas, 398
wxFont/wxFontData classes, 413–414
wxFrame class, 394
wxGrid class, 395
wxGridSizer class, 405–406
wxHTMLWindow class, 395
wxIcon class, 413
wxImage/wxImageHandler classes, 413
wxMask class, 413
wxMDIChildFrame/ParentFrame classes, 396
wxMDIClientWindow class, 396
wxMenu class, 411
wxMVCTree class, 401
wxNewId() function, 394
wxNotebook clas, 398
wxPalette class, 413
wxPanel class, 399
wxPrintDialog/wxPageSetUpDialog classes, 414
wxPrintPreview class, 414
wxPyEditor class, 401
wxPython module, 391–392
built-in dialogs, 407–408
common controls, 399–400
cursors, drag-and-drop, 413
device context classes, 408–411
drawing in, 409–411
editor controls, 401
example program, 392–394
formatting options, 413–414
HTML handling options, 414
keyboard input options, 412
layout options, 401–407
menus, keyboard features, 411–412
mouse options, 412
printing options, 414
tree controls, 400–401
window options, 394–398
wxResourceParseFile object, 403
wxScrolledWindow object, 395
wxSplitterWindow class, 395
wxStatusBar class, 395
wxTimeSpan class, 413
wxToolbar class, 395
wxWindow class options, 394–398
XXDR (eXternal Data Representation) format,
converting to/from, 208
xdrlib module, 208
xgtitle() method, 294
xhdr() method, , 294
XML format, 325
DTDs, 326
namespaces, 327
parsing, 334–343
processing functions, 327
saving XML files, 210
XML handlers, 343
xmllib module, 327
features, 341–342
parsing XML, example (BloodType.py), 342
XMLParser class, 341–343
XMLReader class, 336–337
xml.sax module, 334
4807-7 Index.F 5/24/01 9:02 AM Page 730

731Index ✦ X–Z
XOR (exclusive-or) operator (^), 23
_xor_() method, 114
xover() method, 294
xrange() function, 51
xrange objects, 77
xreadlines() function, 126
Yyanking, 677
years, two-digit, enabling, 227
YIQ color system, 470
Zzero arguments, unpacking in C/C++
conversions, 538
zeros, leading, in strings, 41
zfill() function, 140
zipfile module, 214–215
ZipInfo class, 215–216
zlip module
zones, time, handling, 226
4807-7 Index.F 5/24/01 9:02 AM Page 731

4807-7 Index.F 5/24/01 9:02 AM Page 732