psr530e.pdf - Midimanuals
130
-
Upload
khangminh22 -
Category
Documents
-
view
0 -
download
0
Transcript of psr530e.pdf - Midimanuals


IMPORTANT NOTICE: DO NOT MODIFY THIS UNIT!This product, when installed as indicated in the instructions contained inthis manual, meets FCC requirements. Modifications not expressly ap-proved by Yamaha may void your authority, granted by the FCC, to usethe product.
IMPORTANT:When connecting this product to accessories and/or another product useonly high quality shielded cables. Cable/s supplied with this productMUST be used. Follow all installation instructions. Failure to follow in-structions could void your FCC authorization to use this product in theUSA.
NOTE:This product has been tested and found to comply with the requirementslisted in FCC Regulations, Part 15 for Class “B” digital devices. Compli-ance with these requirements provides a reasonable level of assurancethat your use of this product in a residential environment will not result inharmful interference with other electronic devices. This equipment gener-ates/uses radio frequencies and, if not installed and used according to
the instructions found in the users manual, may cause interferenceharmful to the operation of other electronic devices. Compliance withFCC regulations does not guarantee that interference will not occur inall installations. If this product is found to be the source of interference,which can be determined by turning the unit “OFF” and “ON”, please tryto eliminate the problem by using one of the following measures:
• Relocate either this product or the device that is being affected by theinterference.
• Utilize power outlets that are on different branch (circuit breaker orfuse) circuits or install AC line filter/s.
• In the case of radio or TV interference, relocate/reorient the antenna.If the antenna lead-in is 300 ohm ribbon lead, change the lead-in toco-axial type cable.
If these corrective measures do not produce satisfactory results, pleasecontact the local retailer authorized to distribute this type of product. Ifyou can not locate the appropriate retailer, please contact YamahaCorporation of America, Electronic Service Division, 6600Orangethorpe Ave, Buena Park, CA90620
FCC INFORMATION (U.S.A.)
• This applies only to products distributed by Yamaha Corporation of America.
This product utilizes batteries or an external power supply (adapter). DONOT connect this product to any power supply or adapter other thanone described in the manual, on the name plate, or specifically recom-mended by Yamaha.
This product should be used only with the components supplied or; acart, rack, or stand that is recommended by Yamaha. If a cart, etc., isused, please observe all safety markings and instructions that accom-pany the accessory product.
SPECIFICATIONS SUBJECT TO CHANGE:The information contained in this manual is believed to be correct at thetime of printing. However, Yamaha reserves the right to change ormodify any of the specifications without notice or obligation to updateexisting units.
This product, either alone or in combination with an amplifier and head-phones or speaker/s, may be capable of producing sound levels thatcould cause permanent hearing loss. DO NOT operate for long periodsof time at a high volume level or at a level that is uncomfortable. If youexperience any hearing loss or ringing in the ears, you should consultan audiologist.IMPORTANT: The louder the sound, the shorter the time period beforedamage occurs.
NOTICE:Service charges incurred due to a lack of knowledge relating to how afunction or effect works (when the unit is operating as designed) are notcovered by the manufacturer’s warranty, and are therefore the ownersresponsibility. Please study this manual carefully and consult yourdealer before requesting service.
ENVIRONMENTAL ISSUES:Yamaha strives to produce products that are both user safe and envi-ronmentally friendly. We sincerely believe that our products and theproduction methods used to produce them, meet these goals. In keep-ing with both the letter and the spirit of the law, we want you to beaware of the following:
Battery Notice:This product MAY contain a small non-rechargeable battery which (ifapplicable) is soldered in place. The average life span of this type of
battery is approximately five years. When replacement becomes nec-essary, contact a qualified service representative to perform the re-placement.
This product may also use “household” type batteries. Some of thesemay be rechargeable. Make sure that the battery being charged is arechargeable type and that the charger is intended for the batterybeing charged.
When installing batteries, do not mix batteries with new, or with batter-ies of a different type. Batteries MUST be installed correctly. Mis-matches or incorrect installation may result in overheating and batterycase rupture.
Warning:Do not attempt to disassemble, or incinerate any battery. Keep allbatteries away from children. Dispose of used batteries promptly andas regulated by the laws in your area. Note: Check with any retailer ofhousehold type batteries in your area for battery disposal information.
Disposal Notice:Should this product become damaged beyond repair, or for somereason its useful life is considered to be at an end, please observe alllocal, state, and federal regulations that relate to the disposal of prod-ucts that contain lead, batteries, plastics, etc. If your dealer is unableto assist you, please contact Yamaha directly.
NAME PLATE LOCATION:The name plate is located on the bottom of the product. The modelnumber, serial number, power requirements, etc., are located on thisplate. You should record the model number, serial number, and thedate of purchase in the spaces provided below and retain this manualas a permanent record of your purchase.
Model
Serial No.
Purchase Date
SPECIAL MESSAGE SECTION
PLEASE KEEP THIS MANUAL92-BP

1
• Do not use the instrument near other electrical products such as televi-sions, radios, or speakers, since this might cause interference which canaffect proper operation of the other products.
• Do not place the instrument in an unstable position where it might acciden-tally fall over.
• Before moving the instrument, remove all connected adaptor and othercables.
• When cleaning the instrument, use a soft, dry cloth. Do not use paintthinners, solvents, cleaning fluids, or chemical-impregnated wiping cloths.Also, do not place vinyl or plastic objects on the instrument, since this mightdiscolor the panel or keyboard.
• Do not rest your weight on, or place heavy objects on the instrument, anddo not use excessive force on the buttons, switches or connectors.
• Use only the stand specified for the instrument. When attaching the stand,use the provided screws only. Failure to do so could cause damage to theinternal components or result in the instrument falling over.
• Do not operate the instrument for a long period of time at a high or uncom-fortable volume level, since this can cause permanent hearing loss. If youexperience any hearing loss or ringing in the ears, consult a physician.
■ SAVING USER DATA• Save all data to an external device such as the Yamaha MIDI Data Filer
MDF2, in order to help prevent the loss of important data due to a malfunc-tion or user operating error.
Yamaha cannot be held responsible for damage caused by improper use or modifi-cations to the instrument, or data that is lost or destroyed.
Always turn the power off when the instrument is not in use.
Make sure to discard used batteries according to local regulations.
PRECAUTIONSPLEASE READ CAREFULLY BEFORE PROCEEDING
* Please keep these precautions in a safe place for future reference.
• Do not open the instrument or attempt to disassemble the internal parts ormodify them in any way. The instrument contains no user-serviceable parts.If it should appear to be malfunctioning, discontinue use immediately andhave it inspected by qualified Yamaha service personnel.
• Do not expose the instrument to rain, use it near water or in damp or wetconditions, or place containers on it containing liquids which might spill intoany openings.
• If the AC adaptor cord or plug becomes frayed or damaged, or if there is asudden loss of sound during use of the instrument, or if any unusual smellsor smoke should appear to be caused by it, immediately turn off the power
switch, disconnect the adaptor plug from the outlet, and have the instru-ment inspected by qualified Yamaha service personnel.
• Use the specified adaptor (PA-6 or an equivalent recommended by Yamaha)only. Using the wrong adaptor can result in damage to the instrument oroverheating.
• Before cleaning the instrument, always remove the electric plug from theoutlet. Never insert or remove an electric plug with wet hands.
• Check the electric plug periodically and remove any dirt or dust which mayhave accumulated on it.
CAUTIONAlways follow the basic precautions listed below to avoid the possibility of physical injury to you or others, or damage to theinstrument or other property. These precautions include, but are not limited to, the following:
• Do not place the AC adaptor cord near heat sources such as heaters orradiators, and do not excessively bend or otherwise damage the cord, placeheavy objects on it, or place it in a position where anyone could walk on,trip over, or roll anything over it.
• When removing the electric plug from the instrument or an outlet, alwayshold the plug itself and not the cord.
• Do not connect the instrument to an electrical outlet using a multiple-con-nector. Doing so can result in lower sound quality, or possibly cause over-heating in the outlet.
• Unplug the AC power adaptor when not using the instrument, or duringelectrical storms.
• Always make sure all batteries are inserted in conformity with the +/–polarity markings. Failure to do so might result in overheating, fire, or bat-tery fluid leakage.
• Always replace all batteries at the same time. Do not use new batteriestogether with old ones. Also, do not mix battery types, such as alkalinebatteries with manganese batteries, or batteries from different makers, ordifferent types of batteries from the same maker, since this can cause over-heating, fire, or battery fluid leakage.
• Do not dispose of batteries in fire.
• Do not attempt to recharge batteries that are not intended to be charged.
• If the instrument is not to be in use for a long time, remove the batteriesfrom it, in order to prevent possible fluid leakage from the battery.
• Keep batteries away from children.
• Before connecting the instrument to other electronic components, turn offthe power for all components. Before turning the power on or off for all com-ponents, set all volume levels to minimum.
• Do not expose the instrument to excessive dust or vibrations, or extremecold or heat (such as in direct sunlight, near a heater, or in a car during theday) to prevent the possibility of panel disfiguration or damage to the inter-nal components.
WARNINGAlways follow the basic precautions listed below to avoid the possibility of serious injury or even death from electrical shock,short-circuiting, damages, fire or other hazards. These precautions include, but are not limited to, the following:
(4)

2
Congratulations!
VOICE R2VOICE R1
511andPno
REGISTRATION
Important Features
Touch-sensitive 61-key keyboard for a widerange of dynamic musical expression.
An outstanding range of 200 panel voicesand 12 drum kits, plus a full set of 480 XG voices.
Voice set feature automaticaly selects theappropriate voice parameter settings for the panelvoices.
Advanced auto-accompaniment technol-ogy gives you 100 fully-orchestrated accompani-ment “styles” to back up what you play on thekeyboard.
One Touch Setting feature automaticallyselects appropriate voice, effect, and other set-tings for the selected accompaniment style — allyou have to do is select a style and play.
Large multi-function LCD display panelmakes it easy to select and edit parameters.
Registration Memory saves your favoritepanel settings for instant recall when needed.
Digital effects add depth and ambience toyour sound.
Minus-one and Repeat functions are idealfor learning new songs and polishing your key-board technique.
You are the proud owner of a fine electronic keyboard. The Yamaha PSR-530 PortaTonecombines the most advanced tone generation technology with state-of-the-art digital electronicsand features to give you stunning sound quality with maximum musical enjoyment. A large graphicdisplay and easy-to-use interface also greatly enhance the operability of this advanced instrument.
In order to make the most of your PortaTone’s features and extensive performance potential,we urge you to read the manual thoroughly while trying out the various features described. Keepthe manual in a safe place for later reference.
Virtual Arranger feature lets you add chordprogressions to any of the auto-accompanimentstyles for more musical, refined accompaniment.

3
MULTI PAD
Song recording feature lets you recordfour melody tracks with an accompaniment track.
Multi Pads record and play short rhythmicand melodic sequences that can be used to addimpact and variety to your performances.
Optional Yamaha Music Cartridges can beplugged in for enjoyable automated performance,keyboard practice, and extra accompanimentstyles.
Built-in amplifier and speaker system de-livers top-quality sound without the need for ex-ternal equipment.
A range of MIDI functions for expandedmusical enjoyment (General MIDI System Level1 and Yamaha XG compatible).
◆ Packing List
Create original accmpaniment styles withthe User Style feature.
• PSR-530
• Music Stand
• Music Cartridge
• Owner’s manual
XG
XG is a new MIDI format created by Yamaha whichsignificantly improves and expands upon the “GM Sys-tem Level 1” standard by providing a greater variety ofhigh-quality voices plus considerably enhanced effectoperation while being fully compatible with GM.
PSR-530 supports the XG format.
GM System Level 1
“GM System Level 1” is an addition to the MIDIstandard which ensures that any GM-compatible musicdata can be accurately played by any GM-compatibletone generator, regardless of manufacturer. The GMmark is affixed to all software and hardware products thatsupport the “GM System Level 1”.
PSR-530 supports GM System Level 1.

4
Contents
Panel Controls 6
The Music Stand.................................................... 7
Basic Display Operation 8
The Display Icons ............................................................ 8
The Menus ..................................................................... 10
Shortcuts............................................................. 11
Setting Up 12
Power Supply ................................................................. 12
Using An Optional AC Power Adaptor ................... 12
Using Batteries ...................................................... 12
Connections .................................................................. 13
The PHONES Jack ................................................ 13SUSTAIN Jack ....................................................... 13
The AUX OUT R and L/L+R Jacks ........................ 13
MIDI IN/OUT and TO HOST Connectors............... 13
The Demonstration 14
Playing the PSR-530 16
The PSR-530 Voices ...................................................... 16
A Word About the “R1”, “R2”, and “L” Voices.......... 16
Selecting & Playing Voices ........................................... 17
Keyboard Percussion............................................ 19The Dual Voice Mode ..................................................... 19
The Split Voice Mode ..................................................... 20
Changing the SPLIT VOICE Split Point ....................... 21
Auto Accompaniment 22
Using Auto Accompaniment ........................................ 22
The Synchro Stop Function................................... 26Using Virtual Arranger .................................................. 27
Accompaniment Track Muting ..................................... 27
Muting Individual Tracks ........................................ 28
Accompaniment Volume Control ................................. 28
Changing the Accompaniment Split Point .................. 29Interaction Between the AUTO ACCOMPANIMENT
and SPLIT VOICE Split Points.......................... 30
The Auto Accompaniment Fingering Modes .............. 30
The Stop Accompaniment Function....................... 34
One Touch Setting ......................................................... 34
Digital Effects 36
Reverb ............................................................................36
Turning the Reverb Effect On or Off ............................36
Selecting a Reverb Type ..............................................37Reverb Return Level ....................................................38
Chorus ............................................................................38
Turning the Chorus Effect On or Off ............................38
Selecting a Chorus Effect ............................................39
Chorus Return Level ...................................................39DSP .................................................................................40
Turning the DSP Effect On or Off ................................41
Selecting a DSP Effect ................................................41
DSP Return Level ........................................................42
Harmony .........................................................................42Turning the Harmony Effect On or Off .........................43
Selecting a Harmony Type ..........................................43
Adjusting the Harmony Volume ...................................44
The Pitch Bend Wheel 45
Setting the Pitch Bend Range ......................................45
Transpose 46
Setting Transposition ....................................................46
Registration Memory 47
Registering the Panel Settings ....................................47
Recall the Registered Panel Settings ..........................48The Accompaniment Freeze Function ........................48
The Multi Pads 49
Selecting a MULTI PAD Set ...........................................49
Playing the MULTI PADs ...............................................50
Turning the CHORD MATCH Function On/Off ............51
Song Playback 52
Song Playback Procedure ............................................52
Song Volume Control ....................................................53Play from a Specified Measure ....................................54
Minus-one Practice .......................................................55
Minus-one Track Assignment ......................................55
Repeat Play ....................................................................57

5
Song Recording 58
Song Recording Procedure .......................................... 59
About the Recording withthe Digital Effects Applied................................ 62
Clearing Song Data ....................................................... 63Clearing an Entire Song .............................................. 63
Clearing Selected Melody Tracks ................................ 63
Style Recording 64
Style Recording Procedure .......................................... 64
Drum Cancel ............................................................... 68
Quantize ...................................................................... 69
Clearing User Style Data .............................................. 70Clearing an Entire Style .............................................. 70
Clearing Selected Style Tracks .................................... 70
Multi Pad Recording 71
MUTI PAD Recording Procedure .................................. 71
Clearing MULTI PAD Data ............................................. 74
Clearing an Entire Pad Set .......................................... 74
Clearing Selected MULTI PADs ................................... 74
Using Music Cartridges 75
Inserting a Music Cartridge................................... 75
Music Cartridge Handling Precautions................... 75
Cartridge Songs ............................................................ 76
Cartridge Song Playback ............................................ 76
Cartridge Accompaniment Styles ............................... 77
Revoicing 78
Revoicing the R1, R2, and L Voices ............................. 78Revoicing a Style ........................................................... 80
Revoicing a User Song ................................................. 81
Overall Functions 83
Touch Sensitivity .................................................... 84
Pitch Bend Range ................................................. 84
Master Tuning ........................................................ 84Scale Tuning .......................................................... 84
Song Transpose ..................................................... 85
Metronome ............................................................ 85
Split Voice Split Point ............................................. 85
Accompaniment Split Point .................................... 85Fingering Mode ..................................................... 85
Voice Set ............................................................... 85
MIDI Functions 86
What’s MIDI? .................................................................. 86
MIDI Terminal/TO HOST Terminal....................... 88
What You Can Do with MIDI .......................................... 88Connecting to a Personal Computer
(TO HOST Terminal/HOST SELECT Switch) ............ 90
Connect using the PSR-530 MIDI terminals .......... 90
Connect using the TO HOST terminal ................... 91
The PSR-530 MIDI Functions ....................................... 92
Transmit Channel & Transmit Track........................ 92Receive Channel & Receive Mode ....................... 93
Local Control ......................................................... 94
Clock...................................................................... 94
Bulk Data Send...................................................... 95
Initial Data Send .................................................... 95
AppendixPSR-530 Display MENU/SUB MENU Structure ........... 96
Data Backup & Initialization ......................................... 98
Data Backup .......................................................... 98
Data Initialization ................................................... 98Voice List ....................................................................... 99
Maximum Polyphony ............................................. 99
Drum Kit List ................................................................ 104
About Digital Effects (Reverb/Chorus/DSP) ............. 106
When DSP type IsSelected as a System Effect ............................ 106
When DSP type IsSelected as a Insertion Effect .......................... 107
Troubleshooting .......................................................... 109
MIDI Data Format ......................................................... 110
MIDI Implementation Chart ........................................ 122
Specifications .............................................................. 124Index ............................................................................. 125

6
��������������������������������QQQQQQQQQQQQQQQQQQQQQQQQQQQQQQQQ¢¢¢¢¢¢¢¢¢¢¢¢¢¢¢¢¢¢¢¢¢¢¢¢¢¢¢¢¢¢¢¢
CLICK 36 37C1
T S 39 R 41F1
4238D1
40E1
L 43G1
45A1
47B1
48C2
50D2
52E2
53F2
55G2
L 46 M 51 H44 M H 49 L H54
MIN MAX
ONSTAND BY
MASTERVOLUME
ACCOMPANIMENT/SONG VOLUME
TEMPO
TRANSPOSE
ON/OFF
AUTOACCOMPANIMENT
MAIN/AUTO FILLINTRO
A B
SYNCSTOP
SYNCSTART
8BEAT1 8BEAT POP 12 8BEAT POP 23 8BT UPTEMPO4 8BT STANDARD5 FOLKROCK6 POP ROCK 17 POP ROCK 28 8BEAT MEDIUM9 8BEAT BALLAD10 EPIC BALLAD11 PIANO BALLAD
16BEAT12 16BEAT POP13 16BT SHUFFLE 114 16BT SHUFFLE 215 16BT BALLAD 116 16BT BALLAD 217 16BT BALLAD 318 FUNK 119 SOUL BALLAD20 FUSION BALLAD
6/8 BALLAD21 SLOW ROCK 1
22 SLOW ROCK 223 6/8 BALLAD
DANCE24 DANCE POP 125 DANCE POP 226 TECHNO27 EUROBEAT28 EURO HOUSE29 HIP HOP30 SYNTH BOOGIE
DISCO31 70S DISCO32 DISCO TROP33 POLKA POP
ROCK34 8BT ROCK BLD35 16BT ROCK BLD36 HARD ROCK37 ROCK SHUFFLE38 6/8HVY ROCK39 US ROCK40 16BEAT ROCK
RHYTHM & BLUES41 R&B
42 FUNK 243 SOUL44 GOSPEL SHUFFLE45 6/8 GOSPEL46 4/4 BLUES
ROCK & ROLL47 ROCK&ROLL 148 ROCK&ROLL 249 BOOGIE50 TWIST
C & W51 BLUEGRASS 152 BLUEGRASS 253 COUNTRY 2/454 8BT COUNTRY55 COUNTRY ROCK56 COWBOY BOOG57 C BALLAD58 C SHUFFLE59 C WALTZ
AMERICAS60 CAJUN61 BANDA
62 MARIACHI63 TEJANO64 CUMBIA
TRAD JAZZ65 SWING66 B B SWING67 B B BALLAD68 JAZZ QUARTET69 DIXIELAND
CONTEMP JAZZ70 COOL JAZZ71 JAZZ BALLAD72 JAZZ WALTZ73 FUSION
LATIN74 BOSSA NOVA 175 BOSSA NOVA 276 BOSSA NOVA 377 SALSA78 SAMBA79 MAMBO80 BEGUINE81 MERENGUE
REVERB
HACHORUS
DIGITAL EFF
DSP
Panel Controls
■ Top Panel Controls
q STAND BY/ON Switch ................................. page 14
w MASTER VOLUME Control ......................... page 14
e DEMO Button ............................................... page 14
r TEMPO Buttons ........................................... page 23
t TRANSPOSE Buttons.................................. page 46
y ACCOMPANIMENT/SONG VOLUMEButtons ................................................. pages 28, 53
u AUTO ACCOMPANIMENT SECTION
• AUTO ACCOMPANIMENTON/OFF Button ......................................... page 23
• SYNC STOP Button .................................. page 26
• SYNC START Button ................................ page 24
• INTRO Button ........................................... page 24• MAIN/AUTO FILL A & B Buttons ............... page 24
• ENDING Button......................................... page 26
i RECORD Button ............................ pages 59, 65, 71
o START/STOP Button...................... pages 15, 24, 26
!0 DIGITAL EFFECT SECTION
• REVERB Button ........................................ page 36• CHORUS Button ....................................... page 38
• DSP Button ............................................... page 41
• VARIATION Button .................................... page 41
• HARMONY Button .................................... page 43
!1 DISPLAY & RELATED CONTROLS• DISPLAY ..................................................... page 8
• MENU Buttons .......................................... page 10
• SUB MENU Buttons .................................. page 10
• VOICE Button ........................................... page 10
• STYLE Button ........................................... page 10• SONG Button ............................................ page 10
• CARTRIDGE Button ................................. page 10
• REVOICE Button ...................................... page 78
• TRACK Buttons............... pages 19, 20, 28, 60, 79
!2 REGISTRATION MEMORY SECTION• MEMORY Button....................................... page 48
• 1, 2, 3, 4 Buttons ....................................... page 48
• FREEZE Button ........................................ page 48
!3 ONE TOUCH SETTING Button .................... page 35
!4 NUMBER Buttons ........................................ page 17!5 + and – Buttons .................................... pages 15, 17
!6 Data Dial ...................................................... page 18
q
w
e r
ty
!0
!7 MUSIC CARTRIDGE Slot ............................ page 75
!8 KEYBOARD SECTION
• DUAL VOICE Button ................................. page 19• SPLIT VOICE Button ................................ page 20
!9 MULTI PAD SECTION
• STOP Button ............................................. page 50
• 1, 2, 3, 4 Buttons ............................... pages 50, 72
@0 Keyboard ...................................................... page 18@1 PITCH BEND Wheel .................................... page 45
@2 PHONES Jack ............................................. page 13
@2
TO HOST
u
@1
@3

7
��������������������������������QQQQQQQQQQQQQQQQQQQQQQQQQQQQQQQQ¢¢¢¢¢¢¢¢¢¢¢¢¢¢¢¢¢¢¢¢¢¢¢¢¢¢¢¢¢¢¢¢
57A2
59B2
60C3
62D3
64E3
65F3
67G3
69A3
71B3
72C4
74D4
76E4
77F4
79G4
81A4
83B4
84C5
86D5
88E5
89F5
91G5
93A5
95B5
96C6
L 5856 H R SML
MH
C1
61 C2
70R1
63 R2
66 H68 L 73 H 75 L H L 78 H L 80 H82 L 85 H87 L 90 9492
KEYBOARD
DUAL VOICE
SPLIT VOICE
1 2 3
4 5 6
7 8
0
9
NO YES
START/STOP /
ENDING
PSR-530
REGISTRATION MEMORY
4321
FREEZE STOP
21
MUTLI PAD
43
SPLIT VOICEDUAL VOICE
HARMONY
REVERB
MULTI PAD STOP
REGIST MEMORY REGIST BANK
ACMP ON / OFF
SHORTCUT
MULTI PAD SET
REVERB TYPE
HARMONY TYPE
FINGERING
REVOICE R2REVOICE L
CHORUS TYPE
DSP TYPEDSP TYPE
PRESS AND HOLD FOR A WHILE.
PANEL VOICE
58 ~ 73
1 ~ 1819 ~ 3031 ~ 57
PIANOCHROMATIC PERCUSSIONORGANGUITAR
127 ~ 140
74 ~ 8889 ~ 100
119 ~ 126101 ~ 118
BASSSOLO STRINGSENSEMBLESOLO BRASSBRASS ENSEMBLE
201 ~ 212
141 ~ 155156 ~ 163
182 ~ 200164 ~ 181
REEDPIPESYNTH LEADSYNTH PAD
DRUM KITS
XG VOICE
308 ~ 336337 ~ 378
213 ~ 251252 ~ 271272 ~ 307
PIANOCHROMATIC PERCUSSIONORGANGUITARBASS
478 ~ 513 SYNTH LEAD
652 ~ 692 SFX
470 ~ 477
379 ~ 390391 ~ 424
457 ~ 469425 ~ 456
STRINGSENSEMBLEBRASSREEDPIPE
643 ~ 651
514 ~ 542543 ~ 598
620 ~ 642599 ~ 619
SYNTH PADSYNTH EFFECTSETHNICPERCUSSIVESOUND EFFECTS
CHORUS
DSPVARIATION
82 BOLERO LENTO83 ESPAGNOLE
CARIBBEAN84 REGGAE 1285 POP REGGAE
BALLROOM LATIN86 CHA CHA87 RHUMBA88 PASODOBLE89 TANGO
BALLROOM STD90 FOXTROT91 JIVE
MARCH & WALTZ92 MARCH 193 MARCH 294 6/8 MARCH95 POLKA96 STANDARD WALTZ97 POP WALTZ98 GERMAN WALTZ99 VIEN WALTZ100 MUSETTE
ARMONY
FECTMELODY
1 2 3 4MELODY MELODY MELODY ACCOM-
PANIMENTVOICE VOICE VOICE
RHYTHM1
BASS CHORD1
CHORD2
PAD PHRASE1
PHRASE2
FINGERING
REGISTRATION1 2 3 4
MULTI PAD1 2 3 4
RHYTHM2
FREEZE
L R2 R1
mM7
001VOICE L VOICE R2 VOICE R176 101 1
GrandPno
REVERB TRANSPOSE0
A BREPEAT ONE TOUCH
SETTING 1MEASURE
HARMONY TEMPO116
SYNCSTOP
MINUS ONE SPLIT DUAL
CHORUS DSP VARIATION
OVERALL
REGISTMEMORY
DIGITALEFFECT
MIDI
MULTI PAD
VOICE
STYLE
SONG
REVOICE TRACK
Panel Controls
◆ The Music Stand
DC IN 10-12VINHOST SELECT
PC-1 PC-2Mac MIDI
• • • • • • • • • • • • • • • • • • • • • • • • • • • • • • • •MIDIOUT R
• • • • • • • • • • • • • • • • • •AUX OUTL/L+RSUSTAIN
!1
!2
!4!6
@0
■ Rear Panel Controls
@3 TO HOST Connector .................................... page 88
@4 HOST SELECT Switch ................................. page 90
@5 MIDI IN and OUT Connectors ...................... page 88
@6 SUSTAIN Jack ............................................. page 13
@7 AUX OUT R, L/L+R Jacks ............................ page 13
@8 DC IN 10-12V Jack ...................................... page 12The PSR-530 is supplied with a music stand
that can be attached to the instrument by insert-ing it into the slot at the rear of the control panel.
!3
o
!9
i
!5
!7
!8
@4 @5 @6 @7 @8

8
��������������������������������QQQQQQQQQQQQQQQQQQQQQQQQQQQQQQQQ¢¢¢¢¢¢¢¢¢¢¢¢¢¢¢¢¢¢¢¢¢¢¢¢¢¢¢¢¢¢¢¢
MELODY1 2 3 4
MELODY MELODY MELODY ACCOM-PANIMENT
VOICE VOICE VOICE
RHYTHM1
BASS CHORD1
CHORD2
PAD PHRASE1
PHRASE2
FINGERING
REGISTRATION1 2 3 4
MULTI PAD1 2 3 4
RHYTHM2
FREEZE
L R2 R1
mM7
001VOICE L VOICE R2 VOICE R176 101 1
GrandPno
REVERB TRANSPOSE0
A BREPEAT ONE TOUCH
SETTING 1MEASURE
HARMONY TEMPO116
SYNCSTOP
MINUS ONE SPLIT DUAL
CHORUS DSP VARIATION
Basic Display Operation
The PSR-530 LCD panel is a large multi-function type that simultaneously displays andprovides access to a number of important parameters. Basic operation of the display as wellas the MENU and SUB MENU buttons, and the meaning of the icons which appear in thedisplay, are summarized briefly below.
The Display Icons
REVERBAppears when the REVERB ef-fect is turned on (page 36).
HARMONYAppears when the HARMONYeffect is turned on (page 43).
CHORUSAppears when the CHORUS ef-fect is turned on (page 38).
TRANSPOSEThe current transpose value(page 46).
TEMPOShows the current tempo of ac-companiment/song playback(page 23).
DSPAppears when the DSP effect isturned on (page 41).
DSP VARIATIONAppears when the DSP ef-fect variation is turned on(page 41).
CART (Cartridge)Appears when a Music Cartridge song orstyle is selected (page 76).
XGAppears when one of the PSR-530’s XGvoices is selected (page 16).
VOICE L, VOICE R2, and VOICE R1The currently selected L (Left-hand), R2 (Right-hand2) and R1 (Right-hand 1) voice numbers are dis-played in these display locations (page 16).
VOICE L VOICE R2 VOICE R176 101 1
0
116
DSP VARIATION

9
��������������������������������QQQQQQQQQQQQQQQQQQQQQQQQQQQQQQQQ¢¢¢¢¢¢¢¢¢¢¢¢¢¢¢¢¢¢¢¢¢¢¢¢¢¢¢¢¢¢¢¢Basic Display Operation
ACCOMPANIMENT TRACKSThe top row of 8 icons light to indicate which of the 8 possibleaccompaniment tracks are being used for accompaniment play-back. They are also used to specify tracks when using theREVOICE function (page 27).
REPEATIndicates the “A” and “B” repeat pointswhen programming a repeat section,and whether REPEAT PLAY is on oroff (page 57).
ONE TOUCH SETTINGAppears when the ONE TOUCH SET-TING feature is engaged (page 34).
REGISTRATION 1 … 4(Registration Memory)Indicates the currently selected REG-ISTRATION MEMORY or ONETOUCH SETTING number (page 47).
FREEZEAppears when the REGISTRATIONMEMORY “FREEZE” function is on(page 48).
MULTI PAD 1 … 4Indicates the currently playing MULTIPAD number (page 50).
BEATFlashes at the current tempo andindicates the current beat duringaccompaniment and song playback.(page 25)
MEASUREIndicates the current measure num-ber during song recording and play-back (page 54).
SYNC STOPAppears when the AUTO ACCOM-PANIMENT SYNC STOP functionis engaged (page 26).
FINGERINGShows the currently selected fin-gering mode (page 30).
CHORDDisplays the current chord nameduring AUTO ACCOMPANIMENTplayback or SONG recording/play-back (page 25).
MELODY TRACKS 1 … 4, ACCOMPANIMENT TRACKThese icons indicate the playback on/off status of each songtrack, and are used to specify tracks for song recording (page 60).They are also used to specify tracks when using the REVOICEfunction (page 81).
VOICE L, VOICE R2, VOICE R1These icons indicate the on/off status of the L, R2, and R1 voiceswhen the DUAL VOICE and/or SPLIT VOICE functions are used(page 16). They are also used to specify tracks when using theREVOICE function (page 79).
VOLUMEThese icons show the volume (actually velocity) of each accom-paniment track during accompaniment playback, the volume ofthe melody and accompaniment tracks during song playback, andthe volume of the R1, R2 and L voices (page 16).
MELODY1 2 3 4
MELODY MELODY MELODY ACCOM-PANIMENT
VOICE VOICE VOICE
RHYTHM1
BASS CHORD1
CHORD2
PAD PHRASE1
PHRASE2
RHYTHM2
L R2 R1
MINUS ONE SPLIT DUAL
MELODY1 2 3 4
MELODY MELODY MELODY ACCOM-PANIMENT
VOICE VOICE VOICE
RHYTHM1
BASS CHORD1
CHORD2
PAD PHRASE1
PHRASE2
RHYTHM2
L R2 R1
MINUS ONE SPLIT DUAL
A B
ONE TOUCHSETTING
1 2 3 4
FREEZE
1
mM7
1 2 3 4

10
��������������������������������QQQQQQQQQQQQQQQQQQQQQQQQQQQQQQQQ¢¢¢¢¢¢¢¢¢¢¢¢¢¢¢¢¢¢¢¢¢¢¢¢¢¢¢¢¢¢¢¢
OVERALL
REGISTMEMORY
DIGITALEFFECT
MIDI
MULTI PAD
VOICE
STYLE
SONG
MELODY1 2 3 4
MELODY MELODY MELODY ACCOM-PANIMENT
VOICE VOICE VOICE
RHYTHM1
BASS CHORD1
CHORD2
PAD PHRASE1
PHRASE2
FINGERING
REGISTRATION1 2 3 4
MULTI PAD1 2 3 4
RHYTHM2
FREEZE
L R2 R1
mM7
001VOICE L VOICE R2 VOICE R176 101 1
GrandPno
REVERB TRANSPOSE0
A BREPEAT ONE TOUCH
SETTING 1MEASURE
HARMONY TEMPO116
SYNCSTOP
MINUS ONE SPLIT DUAL
CHORUS DSP VARIATION
Basic Display Operation
The Menus
The buttons to the right of the display directly select one of the PSR-530’sfour main function menus: VOICE, STYLE, SONG, and CARTRIDGE. Thecurrently selected menu is indicated by a triangular indicator in the displaynext to the menu list printed immediately to the right of the display panel.In addition to the menus and functions which are available directly via thePSR-530 panel controls, there is also a range of important “background”functions which can be selected via the MENU and SUB MENU [▲] and[▼] buttons.
The MENU [▲] and [▼] buttons are used to select the menu: REGISTRA-TION MEMORY, MULTI PAD, MIDI, DIGITAL EFFECT, or OVERALL. Thecurrently selected MENU category is indicated by a triangular indicator inthe display next to the menu list printed immediately to the left of thedisplay panel. All of the listed menu categories can be selected bypressing either the MENU [▲] or [▼] button as many times as necessaryuntil the triangular indicator in the display appears next to the name of thedesired category. Once a MENU has been selected, the SUB MENU [▲]and [▼] buttons can be used to select the desired function. The SUBMENU functions will be described in detail in the appropriate chaptersthroughout this manual.

11
��������������������������������QQQQQQQQQQQQQQQQQQQQQQQQQQQQQQQQ¢¢¢¢¢¢¢¢¢¢¢¢¢¢¢¢¢¢¢¢¢¢¢¢¢¢¢¢¢¢¢¢
Shortcuts
To make operation as easy and as efficient as possible, the PSR-530 features anumber of “shortcuts” which allow you to jump directly to certain functions withouthaving to use the MENU and SUB MENU buttons. All of these shortcuts work in thesame way: press and hold a panel button for a few seconds to go to the related function.For example, if you press and hold the [REVERB] button for a few seconds, you willgo directly to the REVERB type selection function. The shortcut buttons and thefunctions they access are listed on the PSR-530 panel, near the upper left corner of thedisplay. The shorcuts will also be described where appropriate throughout this manual.
Reverb
REVERB
Basic Display Operation

12
��������������������������������QQQQQQQQQQQQQQQQQQQQQQQQQQQQQQQQ¢¢¢¢¢¢¢¢¢¢¢¢¢¢¢¢¢¢¢¢¢¢¢¢¢¢¢¢¢¢¢¢Setting Up
This section contains information about setting up your PSR-530 and preparing to play. Besure to go through this section carefully before using your PSR-530.
Power Supply
Although the PSR-530 will run either from an optional AC adaptor or batteries,Yamaha recommends use of the more environmentally safe AC adaptor. Followthe instructions below according to the power source you intend to use.
■ Using An Optional AC Power Adaptor
z Plug an optional Yamaha PA-6 Power Adaptor into a wall AC outlet.
x Then plug the DC output cable from the PA-6 into the DC IN 10-12V jack onthe rear panel of the PSR-530. The internal batteries are automaticallydisconnected when an AC Power Adaptor is used.
■ Using Batteries
For battery operation the PSR-530 requires six 1.5V SUM-1, “D” size, R-20 orequivalent batteries.
When the batteries need to be replaced “LoBattry” may appear on top of thedisplay, the volume may be reduced, the sound may be distorted, and otherproblems may occur. When this happens, turn the power off and replace thebatteries.
Replace the batteries as follows:
z Open the battery compartment cover located on the instrument’s bottom panel.
x Insert the six new batteries, being careful to follow the polarity markings onthe inside of the compartment.
c Replace the compartment cover, making sure that it locks firmly in place.
DC IN 10-12V
PA-6
• When the batteries rundown, replace them with acomplete set of six newbatteries. NEVER mix oldand new batteries.
• Do not use different kindsof batteries (e.g. alkalineand manganese) at thesame time.
• If the instrument is not tobe in use for a long time,remove the batteries fromit, in order to prevent pos-sible fluid leakage fromthe battery.
• Plugging or unpluggingthe AC power adaptorwhile the batteries are in-stalled will reset the PSR-530 to the defaults.
When turning the power OFF, simply reverse the procedure.
• Use ONLY a Yamaha PA-6AC Power Adaptor (orother adaptor specificallyrecommended byYamaha) to power yourinstrument from the ACmains. The use of otheradaptors may result in ir-reparable damage to boththe adaptor and the PSR-530.
• Unplug the AC PowerAdaptor when not usingthe PSR-530, or duringelectrical storms.
• Never interrupt the powersupply (e.g. remove thebatteries or unplug theAC adaptor) during anyPSR-530 record opera-tion! Doing so can resultin a loss of data.

13
��������������������������������QQQQQQQQQQQQQQQQQQQQQQQQQQQQQQQQ¢¢¢¢¢¢¢¢¢¢¢¢¢¢¢¢¢¢¢¢¢¢¢¢¢¢¢¢¢¢¢¢Setting Up
Connections
■ The PHONES Jack
A standard pair of stereo headphones can be plugged in here for private practice orlate-night playing. The internal stereo speaker system is automatically shut off whena pair of headphones is plugged into the PHONES jack.
■ SUSTAIN Jack
An optional Yamaha FC4 or FC5 footswitch can be plugged into the rear-panelSUSTAIN jack for sustain control. The footswitch functions like the damper pedal ona piano — press for sustain, release for normal sound.
• Be sure that you donot press the foot-switch while turningthe power on. If youdo, the ON/OFF statusof the footswitch willbe reversed.
• Some voices maysound continuously orhave a long decay af-ter the notes havebeen released whilethe sustain pedal(footswitch) is held.
■ MIDI IN/OUT and TO HOST Connectors
See page 88.
SUSTAIN
R• • • • • • • • • • • • • • • • • •AUX OUT
L/L+R
StereoSystem
■ The AUX OUT R and L/L+R Jacks
The rear-panel AUX OUT R and L/L+R jacks deliver the output of the PSR-530for connection to a keyboard amplifier, stereo sound system, a mixing console, or taperecorder. If you will be connecting the PSR-530 to a monaural sound system, use onlythe L/L+R jack. When a plug is inserted into the L/L+R jack only, the left- and right-channel signals are combined and delivered via the L/L+R jack so you don’t lose anyof the PSR-530 sound.

14
��������������������������������QQQQQQQQQQQQQQQQQQQQQQQQQQQQQQQQ¢¢¢¢¢¢¢¢¢¢¢¢¢¢¢¢¢¢¢¢¢¢¢¢¢¢¢¢¢¢¢¢The Demonstration
Once you’ve set up your PSR-530, try listening to the pre-programmed demonstration songs.A total of 12 demo songs are provided.
1 Switch ON
Turn the power ON by pressing the [STAND BY/ON] switch.
2 Set an Initial Volume Level
Turn the [MASTER VOLUME] control up (clockwise) about a quarter-turnfrom its minimum position. You can re-adjust the [MASTER VOLUME]control for the most comfortable overall volume level after playback begins.
3 Press the [DEMO] Button
Press the [DEMO] button to start demo playback. The PSR-530 SONGmenu will automatically be selected and the number and name of the first demosong will appear on the top line of the display. The demo will begin playingautomatically. The demo songs will play in sequence, and the sequence willrepeat until stopped.
01 PeterGun
MIN MAX
MASTERVOLUME
ONSTAND BY
• If you play the PSR-530 withthe volume at its maximumlevel when the batteries areused, the life of the batterieswill be shorter.
• You can play along on thePSR-530 keyboard while thedemonstration is playing.
• The volume icons will move inresponse to the data in eachtrack while the demonstrationplays.
• Even when the switch is inthe “STAND BY” position,electricity is still flowing tothe instrument at the mini-mum level. When you are notusing the PSR-530 for a longtime, make sure you unplugthe AC power adoptor fromthe wall AC outlet, and/or re-move the batteries from theinstrument.

15
��������������������������������QQQQQQQQQQQQQQQQQQQQQQQQQQQQQQQQ¢¢¢¢¢¢¢¢¢¢¢¢¢¢¢¢¢¢¢¢¢¢¢¢¢¢¢¢¢¢¢¢
4 Skip to the Beginning Of a Different Demo Song
While the demonstration is playing you can select any of the demo songs byusing the [–] and [+] buttons. Playback will skip to the beginning of the selectedsong.
5 Stop When Done
Press the [DEMO] button or the [START/STOP] button to stop demo playback.
02 R&B
1 2 3
4 5 6
7 8
0
9
NO YES
START/STOP /
• Demo playback can be re-started after it has beenstopped by pressing the[START/STOP] button. Inthis case the selecteddemo song will playthrough to the end andthen playback will stop au-tomatically.
• Since playing the demoautomatically selects theSONG menu, the SONGmenu will remain activewhen demo playback isstopped. To select andplay voices after stoppingthe demo, for example,you will have to press the[VOICE] button to go tothe VOICE menu. Thesame applies for othermenus.
The Demonstration

16
��������������������������������QQQQQQQQQQQQQQQQQQQQQQQQQQQQQQQQ¢¢¢¢¢¢¢¢¢¢¢¢¢¢¢¢¢¢¢¢¢¢¢¢¢¢¢¢¢¢¢¢Playing the PSR-530
The PSR-530 Voices
The PSR-530 actually includes two voice sets: the “panel” voices and percussionkits, and the XG voices. The panel voices include 200 “pitched” voices (voicenumbers 1 through 200) and 12 percussion kits (numbers 201 through 212), while theXG voice set includes 480 voices (voice numbers 213 through 692).
Panel voices 1 … 200
Panel drum kits 201 … 212
XG voices 213 … 692
The R2 and L voices will be discussed in more detail in the DUAL VOICE andSPLIT VOICE sections. For now we’ll describe how to select and play the main R1voice.
VOICE VOICE VOICEL R2 R1
SPLIT DUAL
VOICE VOICE VOICEL R2 R1
SPLIT DUAL
VOICE VOICE VOICEL R2 R1
SPLIT DUAL
VOICE VOICE VOICEL R2 R1
SPLIT DUAL
R1 Voice
R1 Voice + R2 Voice
R1 VoiceL Voice
R1 Voice + R2 VoiceL Voice(Split Voice Mode + Dual Voice Mode)
VOICE L VOICE R2 VOICE R176 101 1
■ A Word About the “R1”, “R2”, and “L” Voices
The PSR-530 allows up to three voices to be selected at the same time: “R1” (Right-hand 1), “R2”, (Right-hand 2) and “L” (Left-hand). Only the “R1” voice is used whenyou’re playing a single voice over the entire range of the keyboard. When you’re usingthe DUAL VOICE and/or SPLIT VOICE modes (decribed on pages 19 and 20),however, the “R2” and/or “L” voice will be used as well. The numbers of the currentlyselected R1, R2, and L voices are all shown on the display panel.
See the “Voice List” on page 99.

17
��������������������������������QQQQQQQQQQQQQQQQQQQQQQQQQQQQQQQQ¢¢¢¢¢¢¢¢¢¢¢¢¢¢¢¢¢¢¢¢¢¢¢¢¢¢¢¢¢¢¢¢Playing the PSR-530
Selecting & Playing Voices
Here’s how you can select and play the panel voices.
1 Select the VOICE Menu
Press the [VOICE] button so that the triangular indicator appears in the display nextto “VOICE” to the right of the display. The number and name of the currently selected“R1” voice appears on the top line of the display panel when the VOICE menu isselected.
2 Select a Panel Voice
The PSR-530 voices can be selected by using the [–] and [+] buttons, the numberbuttons, the data dial, or the [VOICE] button.
001VOICE R1 1
GrandPnoVOICE
● The [–] and [+] ButtonsWhen the VOICE menu is selected these buttons step up or down through the PSR-530’s voices. Press either button briefly to step to the next voice in the correspond-ing direction, or hold the button to scroll rapidly through the voices in thecorresponding direction.
● The Number ButtonsThe number buttons can be used to directly enter the number of the desired voice,thereby immediately selecting that voice without having to step through a numberof other voices. To select voice number 109 (TremoloStrs), for example, press the[1] , [0] , and [9] number buttons in sequence.
1 2 3
4 5 6
7 8
0
9
NO YES
109 Trem.StrVOICE R1109
7 8
0
9
NO YES
002 BritePnoVOICE R1 2

18
��������������������������������QQQQQQQQQQQQQQQQQQQQQQQQQQQQQQQQ¢¢¢¢¢¢¢¢¢¢¢¢¢¢¢¢¢¢¢¢¢¢¢¢¢¢¢¢¢¢¢¢Playing the PSR-530
One- or two-digit voice numbers can be entered without leading zeros. To selectvoice number “23” (SteelDrums), for example, simply press the [2] button and thenthe [3] button. The bars below the voice number on the display will flash for a fewseconds, and then disappear when the selected voice number has been recognizedby the PSR-530.
One- or two-digit voice numbers can also be entered with leading zeroes: e.g. “23”can be entered as “023” by pressing the [0] , [2] , and [3] buttons. In this case thespecified voice number will be immediately recognized by the PSR-530.
1 2 3
4 5 6
7 8
0
9
NO YES
023 SteelDrmVOICE R1 23
● The [VOICE] ButtonPressing the [VOICE] button increments the voice number. Press briefly toincrement by one, or hold for continuous incrementing.
VOICE
3 Play & Adjust Volume
You can now play the selected voice on the PSR-530 keyboard. Use the [MASTERVOLUME] control to adjust the overall volume level.
If the Voice Set function (page 85) is turned “on”, whenever a panel voice is selectedappropriate “R2” and “L” voices (i.e. DUAL VOICE and SPLIT VOICE modes) aswell as digital effects, etc., will be automatically selected at the same time.
MIN MAX
MASTERVOLUME
• The PSR-530’s XGvoices are selected inthe same way as thepanel voices, as de-scribed above.
• When a XG voice isselected the XG iconwill appear below thevoice number.
• Refer to page 99 for acomplete list of thepanel and XG voices.
● The Data DialSimply rotate the dial clockwise to increment the voice number, or counter-clockwise to decrement the voice number.

19
��������������������������������QQQQQQQQQQQQQQQQQQQQQQQQQQQQQQQQ¢¢¢¢¢¢¢¢¢¢¢¢¢¢¢¢¢¢¢¢¢¢¢¢¢¢¢¢¢¢¢¢Playing the PSR-530
◆ Keyboard Percussion
When one of the 12 panel DRUM KIT voices are selected (voice numbers 201through 212) you can play different drums and percussion instruments on thekeyboard. The drums and percussion instruments played by the various keys aremarked by symbols above the keys.
● The Drum Kits
201 Standard Kit1
202 Standard Kit2
203 Room Kit
204 Rock Kit
205 Electronic Kit
206 Analog Kit
The Dual Voice Mode
When the DUAL VOICE mode is engaged you can play two voices (the R1 and R2voices) simultaneously across the entire keyboard.
The DUAL VOICE mode is turned on and off by pressing the [DUAL VOICE]button. When the DUAL VOICE mode is turned on both R1 and R2 icons in the displaywill light. Press the [DUAL VOICE] button a second time to turn the DUAL VOICEmode off: the R2 icon in the display will go out leaving only the R1 icon lit.
The R2 TRACK button below the display can also be used to turn the R2 voice onor off, only when a frame appears around the voice icons, or in the Song modeincluding the Demo song playback.
MELODY1 2 3 4
MELODY MELODY MELODY ACCOM-PANIMENT
VOICE VOICE VOICEL R2 R1
DUAL
TRACK
MINUS ONE
• The HARMONY effect(page 42) cannot beturned on while adrum kit is selectedfor the “R1” voice, andwill automatically beturned off if a drum kitis selected whileHARMONY is on.
• The TRANSPOSE pa-rameter (page 46) hasno effect on the drumkit voices.
• See page 104 for acomplete listing of thekeyboard percussiondrum instrument as-signments.
• The R1/R2 voice set-tings can be changedas required by usingthe REVOICE func-tion, described onpage 78.
• The R1 voice cannotbe turned off.
• The DUAL VOICEmode can be used atthe same time as theSPLIT VOICE mode,described below. Inthis case the L voiceis played on the left-hand section of thekeyboard while boththe R1 and R2 voicesare played on theright-hand section ofthe keyboard. See the“The Split VoiceMode” section, below,for more information.
201VOICE R1201
Std.Kit1VOICE
VOICE VOICE VOICEL R2 R1
DUAL
DUAL VOICE
207 Dance Kit
208 Jazz Kit
209 Brush Kit
210 Classic Kit
211 SFX Kit 1
212 SFX Kit 2

20
��������������������������������QQQQQQQQQQQQQQQQQQQQQQQQQQQQQQQQ¢¢¢¢¢¢¢¢¢¢¢¢¢¢¢¢¢¢¢¢¢¢¢¢¢¢¢¢¢¢¢¢Playing the PSR-530
The Split Voice Mode
The SPLIT VOICE mode lets you play different voices with the left and right hands.You could, for example, play bass with the left hand (the L voice) while playing pianowith the right (the R1 or R1 and R2 voices). The “split point” is initially set at B2 (notenumber 59), but it can be set at any key on the keyboard.
• The L/R1/R2 voicesettings can bechanged as requiredby using the RE-VOICE function, de-scribed on page 78.
• The split point can bechanged as requiredas described below.
• The SPLIT VOICEmode can be used atthe same time as theDUAL VOICE mode,described above. Inthis case the L voiceis played on the left-hand section of thekeyboard while boththe R1 and R2 voicesare played on theright-hand section ofthe keyboard. See the“The Dual VoiceMode” section, above,for more information.
Split Point (59)
The L TRACK button below the display can also be used to turn the L voice on oroff, only when a frame appears around the voice icons, or in the Song mode includingthe Demo song playback.
MELODY1 2 3 4
MELODY MELODY MELODY ACCOM-PANIMENT
VOICE VOICE VOICEL R2 R1
TRACK
SPLITMINUS ONE
VOICE VOICE VOICEL R2 R1
SPLIT
SPLIT VOICE
The SPLIT VOICE mode is engaged by pressing the [SPLIT VOICE] button.When turned on, the L icon in the display will light in addition to the R1 or R1 and R2icons. Press the [SPLIT VOICE] button a second time to disengage the SPLITVOICE mode: the L icon will go out leaving only the R voice.

21
��������������������������������QQQQQQQQQQQQQQQQQQQQQQQQQQQQQQQQ¢¢¢¢¢¢¢¢¢¢¢¢¢¢¢¢¢¢¢¢¢¢¢¢¢¢¢¢¢¢¢¢Playing the PSR-530
Then use the SUB MENU [▲] and [▼] buttons to select the “S.Split” function fromwithin the OVERALL menu . The MIDI note number corresponding to the currentsplit point will appear to the left of “S.Split” on the top line of the display.
059 S.Split
2 Set As Required
Simply press the key you want to assign as the split point. The key number of thekey you press will appear to the left of “S.Split” on the top line of the display. You canalso use the [–] and [+] buttons, number buttons, or data dial to enter the split pointkey number. The lowest key on the keyboard (C1) is key number “36”, middle C (C3)is “60”, and the highest key (C5) is 96. The split point can be set at any key numberfrom 0 through 127, allowing the split point to be set outside the range of the PSR-530keyboard for MIDI applications.
1 2 3
4 5 6
7 8
0
9
Changing the SPLIT VOICE Split PointThe SPLIT VOICE split point can be set to any key on the PSR-530 keyboard to
match your individual playing requirements.
1 Select the SPLIT VOICE Split Point Function
Use the MENU [▲] and [▼] buttons to the left of the display to move the triangularindicator next to “OVERALL” on the left side of the display.
OVERALL
DIGITALEFFECT
MIDI
• The split point key be-comes the highestkey in the left-handsection of the key-board.
• The default split point(59) can be instantlyrecalled by pressingthe [–] and [+] buttonsat the same time.
• For the relationshipbetween the SPLITVOICE split point andthe AUTO ACCOM-PANIMENT splitpoint, see page 30.
• When setting the splitpoint, that is, the submenu “S.Split” isshown on the display,pressing the key onthe keyboard doesn’teither produce notesor detect chords in theaccompaniment sec-tion, but only desig-nates the split point.

22
��������������������������������QQQQQQQQQQQQQQQQQQQQQQQQQQQQQQQQ¢¢¢¢¢¢¢¢¢¢¢¢¢¢¢¢¢¢¢¢¢¢¢¢¢¢¢¢¢¢¢¢Auto Accompaniment
The PSR-530 has 100 different accompaniment “styles” that can be used to provide fully-orchestrated or rhythm-only accompaniment. The PSR-530’s sophisticated AUTO ACCOM-PANIMENT system can provide automated bass and chord backing that is perfectly matchedto the selected accompaniment style.
When Auto-Accompaniment is turned on, the specified left-hand section of the keyboardbecomes the “auto accompaniment” section, and chords played in this section are automati-cally detected and used as a basis for fully automatic accompaniment with the selected style.
Using Auto Accompaniment
MELODY1 2 3 4
MELODY MELODY MELODY ACCOM-PANIMENT
VOICE VOICE VOICE
BASS CHORD1
CHORD2
PAD PHRASE1
PHRASE2
FINGERING
REGISTRATION1
MULTI PAD
RHYTHM2
RHYTHM1
L R2 R1
001VOICE L VOICE R2 VOICE R176 101 1
8BtPop1
REVERB TRANSPOSE0 REPEAT
1MEASURE
HARMONY TEMPO116
SYNCSTOP
DUAL
VOICE
STYLE
SONG
CHORUS DSP
1 Select the Style Menu
Press the [STYLE] button to select the STYLE menu (the triangular indicator willappear next to “STYLE” to the right of the display). The number and name of thecurrently selected style will appear on the top line of the display, and the accompani-ment track and volume icons in the display will appear framed.
AUTO ACCOMPANIMENTsplit point (54)
“auto accompaniment”section

23
��������������������������������QQQQQQQQQQQQQQQQQQQQQQQQQQQQQQQQ¢¢¢¢¢¢¢¢¢¢¢¢¢¢¢¢¢¢¢¢¢¢¢¢¢¢¢¢¢¢¢¢
STYLE
1 2 3
4 5 6
7 8
0
9
4 Set the Tempo
When you select a different style while the accompaniment is not playing, the“default” tempo for that style is also selected, and the tempo is displayed immediatelyabove “TEMPO” in the display in quarter-note beats per minute. If the accompani-ment is playing, the same tempo is maintained even if you select a different style.
You can change the tempo to any value between 32 and 280 beats per minute,however, by using the TEMPO [▼] and [▲] buttons. Press either button briefly todecrement or increment the tempo value by one, or hold the button for continuousdecrementing or incrementing.
When either of the TEMPO buttons is pressed the current tempo value will appearon the top line of the display for a few seconds — during this time the [–] and [+]buttons, number buttons, or data dial can also be used to set the tempo. The defaulttempo for the selected style can be recalled at any time by pressing both the TEMPO[▼] and [▲] buttons simultaneously (or by pressing the [–] and [+] buttons simulta-neously while the tempo value is showing on the top line of the display).
TEMPO
REGISTRATION1
MULTI PAD
120VOICE L VOICE R2 VOICE R176 101 1
Tempo
REVERB TRANSPOSE0 REPEAT
MEASURE
HARMONY TEMPO120
Auto Accompaniment
ON/OFF
AUTOACCOMPANIMENT
2 Select a Style
The PSR-530 has 100 styles that can be selected by using the [–] and [+] buttons,the number buttons, the data dial, or the [STYLE] button (these controls function inthe same way as for voice selection — see page 17). The styles are listed in the STYLElist printed at the top of the instrument’s control panel.
• See page 77 for de-tails on selecting car-tridge styles.
3 Turn AUTO ACCOMPANIMENT On
Press the AUTO ACCOMPANIMENT [ON/OFF] so that its indicator lights.
• If AUTO ACCOMPA-NIMENT is off, onlyrhythm (drums andpercussion) accompa-niment will be pro-duced.

24
��������������������������������QQQQQQQQQQQQQQQQQQQQQQQQQQQQQQQQ¢¢¢¢¢¢¢¢¢¢¢¢¢¢¢¢¢¢¢¢¢¢¢¢¢¢¢¢¢¢¢¢
5 Start the Accompaniment
There are several ways to start the accompaniment:
• It is possible to select theMAIN A or B section prior toa straight start — refer to“7. Select the MAIN A andB Sections as Required,”below.
● Straight startPress the [START/STOP] button. The rhythm will begin playing immediatelywithout bass and chord accompaniment. The currently selected MAIN [A] or[B] section will play.
● Start with an introduction followed by the MAIN A sectionPress the [INTRO] button so that its indicator lights, press the MAIN/AUTOFILL [A] button (not necessary if its indicator is already flashing), then press[START/STOP].
● Start with an introduction followed by the MAIN B sectionPress the [INTRO] button so that its indicator lights, press the MAIN/AUTOFILL [B] button (not necessary if its indicator is already flashing), then press[START/STOP].
● Synchronized startAny of the above start types can be synchronized to the first note or chordplayed on the left-hand section of the keyboard (i.e. keys to the left of andincluding the split-point key — normally 54) by first pressing the [SYNCSTART] button.
• If you press the [SYNCSTART] button while theaccompaniment is playing,the accompaniment willstop and the synchro startmode will be engaged.
• The [INTRO] button can beused to select the INTROsection even while the ac-companiment is playing.
• The accompaniment splitpoint can be changed viathe “Accompaniment SplitPoint” function in theOVERALL menu — seepage 29.
START/STOP / MAIN/AUTO FILL ENDINGINTRO
A B
SYNCSTOP
SYNCSTART
MAIN/AUTO FILL ENDINGINTRO
A B
START/STOP /SYNC
STOPSYNC
START
MAIN/AUTO FILL ENDINGINTRO
A B
START/STOP /SYNC
STOPSYNC
START
MAIN/AUTO FILL ENDINGINTRO
A B
SYNCSTOP
SYNCSTART
Auto Accompaniment

25
��������������������������������QQQQQQQQQQQQQQQQQQQQQQQQQQQQQQQQ¢¢¢¢¢¢¢¢¢¢¢¢¢¢¢¢¢¢¢¢¢¢¢¢¢¢¢¢¢¢¢¢
Pressing the [SYNC START] button alone causes a straight start to occurwhen the first note or chord is played. Press the [SYNC START] button andthen the appropriate [INTRO] and [MAIN/AUTO FILL] buttons for asynchronized introduction start. The BEAT indicator will flash at the currenttempo when a synchronized start mode has been selected. The synchro startmode can be disengaged prior to actually starting the accompaniment bypressing the [SYNC START] button a second time.
Auto Accompaniment
• When the AUTO ACCOM-PANIMENT split point andSPLIT VOICE split point areset at different keys, the Lvoice can be played be-tween the AUTO ACCOM-PANIMENT split point andSPLIT VOICE split pointwhen the AUTO ACCOM-PANIMENT function is on.
• When the AUTO ACCOM-PANIMENT split point andSPLIT VOICE split point areset to the same key, the Lvoice can be played any-where to the left of theAUTO ACCOMPANIMENTsplit point and SPLITVOICE split point whileAUTO ACCOMPANIMENTis not playing.
6 Play On the Auto-accompaniment Section Of the Keyboard
● The Beat IndicatorThe four dots of the BEAT indicator provide a visual indication of the selectedtempo as shown below.
• The PSR-530 has severalfingering modes which al-low you to play chords indifferent ways. See “TheAuto Accompaniment Fin-gering Modes” on page 30for details.
FINGERING
RATION MULTI PAD
mM7
4/4 time 3/4 time1st beat
2nd beat
3rd beat
4th beat
As soon as you play any chord that the PSR-530 can “recognize” on the left-hand section of the keyboard, the PSR-530 will automatically begin to play thechord along with the selected rhythm and an appropriate bass line. The name ofthe current chord will appear on the display. The accompaniment will continueplaying even if you release the keys (unless the Synchro Stop function is engaged— page 26).
7 Select the MAIN A and B Sections as Required
The MAIN A and MAIN B sections can be selected at any time during playbackby pressing the corresponding button. Whenever you press the MAIN/AUTOFILL [A] or [B] button during playback, the PSR-530 will generate an appropriate“fill-in” (one of four types: AA, AB, BA, and BB) which will smoothly connectthe current section to the selected section — even if it is the same section. Forexample, if you press the MAIN/AUTO FILL [A] button while the MAIN Asection is playing, a fill-in will be produced, then the MAIN A section willcontinue playing. When you select a different section, the fill-in will beginimmediately and the new section will actually begin playing from the top of thenext measure unless the MAIN/AUTO FILL [A] or [B] button is pressed during
SYNCSTOP
SYNCSTART
MAIN/AUTO FILL ENDINGINTRO
A B
• The MAIN A section is auto-matically selected when-ever the PSR-530 power isinitially turned on.
• The indicator of the destina-tion section (MAIN A or B)will flash while the corre-sponding fill-in is playing.During this time you canchange the destination sec-tion by pressing the appro-priate MAIN/AUTO FILL [A]or [B] button.

26
��������������������������������QQQQQQQQQQQQQQQQQQQQQQQQQQQQQQQQ¢¢¢¢¢¢¢¢¢¢¢¢¢¢¢¢¢¢¢¢¢¢¢¢¢¢¢¢¢¢¢¢
the last half beat of the measure, in which case the fill-in will begin from thefirst beat of the next measure.
Auto Accompaniment
8 Stop the Accompaniment
The accompaniment can be stopped at any time by pressing the [START/STOP] button. Press the [ENDING] button if you want to go to the endingsection and then stop.
MAIN/AUTO FILL ENDINGINTRO
A B
SYNCSTOP
SYNCSTART
MAIN/AUTO FILL ENDINGINTRO
A B
START/STOP / SYNC
STOPSYNC
START
◆ The Synchro Stop Function
When the Synchro Stop function is engaged, accompaniment playbackwill stop completely when all keys in the auto-accompaniment section of thekeyboard are released. Accompaniment playback will start again as soon asa chord is played. The BEAT indicators in the display will flash while theaccompaneiment is stopped.
The Synchro Stop function is engaged by pressing the [SYNC STOP]button so that the SYNC STOP icon in the display appears. Press the [SYNCSTOP] button again so that the icon disappears to turn the Synchro Stopfunction off.
FINGERING
EGISTRATION MULTI PAD
REPEAT
1MEASURE
SYNCSTOP
SYNCSTOP
• The Synchro Stop functioncan not be turned on whenthe FULL KEYBOARD AUTOACCOMPANIMENT fingeringmode is selected. The Syn-chro Stop function will be au-tomatically turned off if theFULL KEYBOARD fingeringmode is selected while theSynchro Stop function is on.
• The ending will begin playing im-mediately when you press the[ENDING] button while the accom-paniment is playing the first beatof the measure.The ending will begin playing fromthe next measure when you pressthe button while the accompani-ment is playing the second orlarger numbered beat.
• If you press the [INTRO] buttonwhile the ending is playing, theintro section will begin playing af-ter the ending is finished.
• Some INTRO and ENDING sec-tions have their own chord pro-gressions which play in the currentaccompaniment key.
• If the MAIN/AUTO FILL [A] or [B]button is pressed while the END-ING section is playing, an appro-priate fill-in will be played, followedby a return to the MAIN A or Bsection.
• The accompaniment volume canbe adjusted independently of thekeyboard volume via the ACCOM-PANIMENT/SONG VOLUME [▼]and [▲] buttons (page 28).
• Pressing the [ENDING] button dur-ing the Ending playback deceler-ate its tempo (ritardando).

27
��������������������������������QQQQQQQQQQQQQQQQQQQQQQQQQQQQQQQQ¢¢¢¢¢¢¢¢¢¢¢¢¢¢¢¢¢¢¢¢¢¢¢¢¢¢¢¢¢¢¢¢Auto Accompaniment
Accompaniment Track Muting
The PSR-530 has eight accompaniment tracks — RHYTHM 1, RHYTHM 2,BASS, CHORD 1, CHORD 2, PAD, PHRASE 1, and PHRASE 2 — that you cancontrol to modify the “orchestration” and therefore the overall sound of the accom-paniment. When a style is selected the icons corresponding to the tracks which containdata for any section of that style will light.
• Individual track voic-es, volume, and otherparameters can bechanged by using theREVOICE function —page 80.
● What’s in the Tracks
RHYTHM 1 & 2 These are the main rhythm tracks. The RHYTHM tracks produce thedrum and percussion sounds.
BASS The BASS track always plays a bass line, but the voice will change tofit the selected style … acoustic bass, synth bass, tuba, etc.
CHORD 1 & 2 These tracks provide the rhythmic chordal accompaniment required byeach style. You’ll find guitar, piano, and other chordal instruments here.
PAD This track plays long chords where necessary, using sustained instru-ments such as strings, organ, choir.
PHRASE 1 & 2 This is where the musical embellishments reside. The PHRASE tracksare used for punchy brass stabs, arpeggiated chords, and other extrasthat make the accompaniment more interesting.
Using Virtual Arranger
Simply pressing chords causes the Auto Accompaniment automatically plays theslightly different chord variations and becomes livelier and more melodic when youturn on the Virtual Arranger function while the Auto Accompaniment is active.
1 Select the Style Menu
Press the [STYLE] button to select the STYLE menu (the triangular indicator willappear next to “STYLE” to the right of the display).
2 Select the Virtual Arranger Function
Use the SUB MENU [▲] and [▼] buttons to select the “VirtArng” function. Thecurrent on/off status will be shown at the top left of the display.
Then use the [–] and [+] buttons or the Dial to select “on” or “off.”
STYLE
on VirtArng
• Simultaneously press-ing the [SYNC STOP]and [SYNC START]buttons causes theVirtual Arranger toswitch between offand on. The currenton/off status will beshown at the top leftof the display. (Theon/off display will re-turn to its original con-dition after a few sec-onds.)

28
��������������������������������QQQQQQQQQQQQQQQQQQQQQQQQQQQQQQQQ¢¢¢¢¢¢¢¢¢¢¢¢¢¢¢¢¢¢¢¢¢¢¢¢¢¢¢¢¢¢¢¢Auto Accompaniment
Accompaniment Volume Control
When the STYLE menu is selected (i.e. the accompaniment track and volume iconsare framed) the volume of the accompaniment in relation to the keyboard can beadjusted for the best overall balance by using the ACCOMPANIMENT/SONGVOLUME [▼] and [▲] buttons. When either button is pressed the current accompa-niment volume setting will appear on the top line of the display for a few seconds. Theaccompaniment volume range is from “0” (no sound) to “127” (maximum volume).The default setting is “100”. Press the ACCOMPANIMENT/SONG VOLUME [▼]button to decrease the volume or the [▲] button to increase the volume. Pressingbriefly to single step, or hold for continuous decrementing/incrementing.
MELODY1 2 3 4
MELODY MELODY MELODY ACCOM-PANIMENT
VOICE VOICE VOICE
BASS CHORD1
CHORD2
PAD PHRASE1
PHRASE2
FINGERING
REGISTRATION1
MULTI PAD
RHYTHM2
RHYTHM1
L R2 R1
100VOICE L VOICE R2 VOICE R176 101 1
AccVol
REVERB TRANSPOSE0 REPEAT
1MEASURE
HARMONY TEMPO116
SYNCSTOP
DUAL
ACCOMPANIMENT/SONG VOLUME
CHORUS DSP
While the accompaniment volume setting appears on the top line of the display the[–] and [+] buttons, number buttons, or data dial can also be used to set theaccompaniment volume.
■ Muting Individual Tracks
Individual accompaniment tracks can be turned OFF (muted) or ON by using theTRACK buttons corresponding to the target tracks. The track icon will disappearwhen a track is muted.
MELODY1 2 3 4
MELODY MELODY MELODY ACCOM-PANIMENT
VOICE VOICE VOICE
RHYTHM1
BASS CHORD1
CHORD2
PAD PHRASE1
PHRASE2
RHYTHM2
L R2 R1
TRACK
DUAL

29
��������������������������������QQQQQQQQQQQQQQQQQQQQQQQQQQQQQQQQ¢¢¢¢¢¢¢¢¢¢¢¢¢¢¢¢¢¢¢¢¢¢¢¢¢¢¢¢¢¢¢¢Auto Accompaniment
Changing the Accompaniment Split Point
The AUTO ACCOMPANIMENT split point can be set to any key on the PSR-530keyboard to match your individual playing requirements.
OVERALL
DIGITALEFFECT
MIDI
1 2 3
4 5 6
7 8
0
9
1 Select the Accompaniment Split Point Function
Use the MENU [▲] and [▼] buttons to the left of the display to move the triangularindicator next to “OVERALL” on the left side of the display.
Then use the SUB MENU [▲] and [▼] buttons to select the “AccSpPnt” functionfrom within the OVERALL menu . The MIDI note number corresponding to thecurrent split point will appear to the left of “AccSpPnt” on the top line of the display.
054 AccSpPnt
2 Set As Required
Simply press the key you want to assign as the split point. The key number of thekey you press will appear to the left of “AccSpPnt” on the top line of the display. Youcan also use the [–] and [+] buttons, number buttons, or data dial to enter the split pointkey number. The lowest key on the keyboard (C1) is key number “36”, middle C (C3)is “60”, and the highest key (C5) is 96. The split point can be set at any key numberfrom 0 through 127, allowing the split point to be set outside the range of the PSR-530keyboard for MIDI applications.
• The split point key be-comes the highestkey in the Auto Ac-companiment sectionof the keyboard.
• The default split point(54) can be instantlyrecalled by pressingthe [–] and [+] buttonsat the same time.
• When setting the splitpoint, that is, the submenu “AccSpPnt” isshown on the display,pressing the key onthe keyboard doesn’teither produce notesor detect chords in theaccompaniment sec-tion, but only desig-nates the split point.

30
��������������������������������QQQQQQQQQQQQQQQQQQQQQQQQQQQQQQQQ¢¢¢¢¢¢¢¢¢¢¢¢¢¢¢¢¢¢¢¢¢¢¢¢¢¢¢¢¢¢¢¢Auto Accompaniment
◆ Interaction Between the AUTO ACCOMPANIMENT andSPLIT VOICE Split Points
The SPLIT VOICE split point (page 21) and AUTO ACCOMPANIMENT split pointcan be independently specified, with the following limitations. The SPLIT VOICEsplit point cannot be set at a lower key than the AUTO ACCOMPANIMENT split point(if you attempt to do this the AUTO ACCOMPANIMENT split point will be set to thesame key as the SPLIT VOICE split point). Conversely, the AUTO ACCOMPANI-MENT split point cannot be set at a higher key than the SPLIT VOICE split point (ifyou attempt to do this the SPLIT VOICE split point will be set to the same key as theAUTO ACCOMPANIMENT split point).
AUTO ACCOMPANIMENTsplit point
SPLIT VOICEsplit point
R VoiceL VoiceAccompaniment
AUTO ACCOMPANIMENT split point/SPLIT VOICE split point
R VoiceAccompaniment/
L Voice
The Auto Accompaniment Fingering Modes
The PSR-530 AUTO ACCOMPANIMENT feature has five different fingeringmodes which can be selected as follows.
1 Select the Fingering Mode Function
Use the MENU [▲] and [▼] buttons to the left of the display to move the triangularindicator next to “OVERALL” on the left side of the display.
• You can jump directlyto the “FngrngMd”function by pressingand holding the AUTOACCOMPANIMENT[ON/OFF] button for afew seconds.
OVERALL
DIGITALEFFECT
MIDI

31
��������������������������������QQQQQQQQQQQQQQQQQQQQQQQQQQQQQQQQ¢¢¢¢¢¢¢¢¢¢¢¢¢¢¢¢¢¢¢¢¢¢¢¢¢¢¢¢¢¢¢¢Auto Accompaniment
Then use the SUB MENU [▲] and [▼] buttons to select the “FngrngMd” functionfrom within the OVERALL menu. The abbreviated name of the current fingeringmode will appear to the left of “FngrngMd” on the top line of the display.
2 Select the Required Fingering Mode
Use the [–] and [+] buttons or data dial to select the desired fingering mode:
● SF: The SINGLE FINGER Mode
SF Single Finger
F1 Fingered 1
F2 Fingered 2
FuL Full Keyboard
MuL Multi-finger
■ For a major chord, press the root key only.
■ For a minor chord, simultaneously press the root key and ablack key to its left.
■ For a seventh chord, simultaneously press the root key and awhite key to its left.
■ For a minor-seventh chord, simultaneously press the root keyand both a white and black key to its left.
Cm7
C7
Cm
C
Single-finger accompaniment makes it simple to produce beautifully orchestratedaccompaniment using major, seventh, minor and minor-seventh chords by press-ing a minimum number of keys on the AUTO ACCOMPANIMENT section of thekeyboard. The abbreviated chord fingerings described below are used:
SF FngrngMd
SF FngrngMd

32
��������������������������������QQQQQQQQQQQQQQQQQQQQQQQQQQQQQQQQ¢¢¢¢¢¢¢¢¢¢¢¢¢¢¢¢¢¢¢¢¢¢¢¢¢¢¢¢¢¢¢¢Auto Accompaniment
● F1: The FINGERED 1 Mode
The Fingered 1 mode lets you finger your own chords on the AUTO ACCOMPA-NIMENT section of the keyboard (i.e. all keys to the left of and including the split-point key — normally 54) while the PSR-530 supplies appropriately orchestratedrhythm, bass, and chord accompaniment in the selected style.The FINGERED 1 mode recognizes the following chords:
F1 FngrngMd
• Notes in parenthesescan be omitted.
• If you play any threeadjacent keys (includ-ing black keys), thechord sound will becancelled and onlythe rhythm instru-ments will continueplaying (CHORDCANCEL function).
• Playing a single keyor two same root keysin the adjacent oc-taves produces ac-companiment basedonly on the root.
• A perfect fifth (1 + 5)produces accompani-ment based only onthe root and fifthwhich can be usedwith both major andminor chords.
• The chord fingeringslisted are all in “root”position, but other in-versions can be used— with the followingexceptions:
m7, m7b5, 6, m6,sus4, aug, dim7,7b5, 6(9), m7(11),1+2+5.
• Inversion of the 7sus4chord are not recog-nized if the 5th isomitted.
• The AUTO ACCOM-PANIMENT will some-times not changewhen related chordsare played in se-quence (e.g. someminor chords followedby the minor seventh).
• Two-note fingeringswill produce a chordbased on the previ-ously played chord.
Chord Name/[Abbreviation] Normal Voicing
Major [M] 1 - 3 - 5
Add ninth [(9)] 1 - 2 - 3 - 5
Sixth [6] 1 - (3) - 5 - 6
Sixth ninth [6(9)] 1 - 2 - 3 - (5) - 6
Major seventh [M7] 1 - 3 - (5) - 7 or1 - (3) - 5 - 7
Major seventh ninth [M7(9)] 1 - 2 - 3 - (5) - 7
Major seventh add sharp eleventh [M7(#11)] 1 - (2) - 3 - #4 - 5 - 7 or1 - 2 - 3 - #4 - (5) - 7
Flatted fifth [(b5)] 1 - 3 - b5
Major seventh flatted fifth [M7b5] 1 - 3 - b5 - 7
Suspended fourth [sus4] 1 - 4 - 5
Augmented [aug] 1 - 3 - #5
Major seventh augmented [M7aug] 1 - (3) - #5 - 7
Minor [m] 1 - b3 - 5
Minor add ninth [m(9)] 1 - 2 - b3 - 5
Minor sixth [m6] 1 - b3 - 5 - 6
Minor seventh [m7] 1 - b3 - (5) - b7
Minor seventh ninth [m7(9)] 1 - 2 - b3 - (5) - b7
Minor seventh add eleventh [m7(11)] 1 - (2) - b3 - 4 - 5 - (b7)
Minor major seventh [mM7] 1 - b3 - (5) - 7
Minor major seventh ninth [mM7(9)] 1 - 2 - b3 - (5) - 7
Minor seventh flatted fifth [m7b5] 1 - b3 - b5 - b7
Minor major seventh flatted fifth [mM7b5] 1 - b3 - b5 - 7
Diminished [dim] 1 - b3 - b5
Diminished seventh [dim7] 1 - b3 - b5 - 6
Seventh [7] 1 - 3 - (5) - b7 or1 - (3) - 5 - b7
Seventh flatted ninth [7(b9)] 1 - b2 - 3 - (5) - b7
Seventh add flatted thirteenth [7(b13)] 1 - 3 - 5 - b6 - b7
Seventh ninth [7(9)] 1 - 2 - 3 - (5) - b7
Seventh add sharp eleventh [7(#11)] 1 - (2) - 3 - #4 - 5 - b7 or1 - 2 - 3 - #4 - (5) - b7
Seventh add thirteenth [7(13)] 1 - 3 - (5) - 6 - b7
Seventh sharp ninth [7(#9)] 1 - #2 - 3 - (5) - b7
Seventh flatted fifth [7b5] 1 - 3 - b5 - b7
Seventh augmented [7aug] 1 - 3 - #5 - b7
Seventh suspended fourth [7sus4] 1 - 4 - (5) - b7
One plus two plus five [1+2+5] 1 - 2 - 5
Chord (C) Display
C C
C(9) C(9)
C6 C6
C6(9) C6(9)
CM7 CM7
CM7(9) CM7(9)
CM7(#11) CM7(#11)
C(b5) C(b5)
CM7b5 CM7b5
Csus4 Csus4
Caug Caug
CM7aug CM7aug
Cm Cm
Cm(9) Cm(9)
Cm6 Cm6
Cm7 Cm7
Cm7(9) Cm7(9)
Cm7(11) Cm7(11)
CmM7 CmM7
CmM7(9) CmM7(9)
Cm7b5 Cm7b5
CmM7b5 CmM7b5
Cdim Cdim
Cdim7 Cdim7
C7 C7
C7(b9) C7(b9)
C7(b13) C7(b13)
C7(9) C7(9)
C7(#11) C7(#11)
C7(13) C7(13)
C7(#9) C7(#9)
C7b5 C7b5
C7aug C7aug
C7sus4 C7sus4
C1+2+5 C

33
��������������������������������QQQQQQQQQQQQQQQQQQQQQQQQQQQQQQQQ¢¢¢¢¢¢¢¢¢¢¢¢¢¢¢¢¢¢¢¢¢¢¢¢¢¢¢¢¢¢¢¢Auto Accompaniment
C
Cm
7C
(
)
CM
(
)
7C (9) C
(
)
(9)6
Caug Cm6 Cm7
(
)
Cm b57 CmM b57
Cm
(
)
(9)7Cm(9)
CmM7
(
)
CmM (9)7
(
)
Cdim Cdim7
C (9)7
(
)
C (13)7
(
)
C (b9)7
(
)
C (b13)7
Csus4
C1+2+5C b57
C6
(
)
(
)
CM7(9) 7CM (#11)
(
)
7CM b5C(b5)
(
)
C (#11)7 C (#9)7
(
)
C aug7
Cm7(11)
(
)
(
)
CM aug7
(
)
C sus47
(
)
● F2: The FINGERED 2 Mode
This is essentially the same as the FINGERED 1 mode, described above, exceptthat the FINGERED 2 mode additionally allows you to specify the lowest note ofeach chord — simply, the lowest note played in the AUTO ACCOMPANIMENTsection of the keyboard is used as the accompaniment bass note. This means youcan specify “on-bass” chords in which the main bass note for the chord is not theroot of the chord. For a C major chord, for example, you could use E (the third) orG (the fifth) as the bass note rather than C.
F2 FngrngMd
C C on E C on G
Example for “C” chords
FuL FngrngMd
● FuL: The FULL KEYBOARD Mode
When the FULL KEYBOARD mode is selected, the PSR-530 will automaticallycreate appropriate accompaniment while you play just about anything using bothhands, anywhere on the keyboard. You do not have to worry about specifying theaccompaniment chords. The name of the detected chord will appear in the display.
• When the FULL KEY-BOARD mode is se-lected, the split pointsetting (see page 29)for the auto accompa-niment will be ig-nored.
• Chord detection oc-curs at approximately8th-note intervals. Ex-tremely short chords— less than an 8thnote in length — maynot be detected.

34
��������������������������������QQQQQQQQQQQQQQQQQQQQQQQQQQQQQQQQ¢¢¢¢¢¢¢¢¢¢¢¢¢¢¢¢¢¢¢¢¢¢¢¢¢¢¢¢¢¢¢¢Auto Accompaniment
◆ The Stop Accompaniment Function
While the SINGLE FINGER, FINGERED 1, FINGERED 2, or MULTI-FIN-GER mode is selected chords played in the AUTO ACCOMPNIMENT section ofthe keyboard are also detected and played by the PSR-530 Auto Accompanimentsystem when the accompaniment is stopped (except when the FULL KEYBOARDmode is engaged). In this case the bass note and chord voices are selectedautomatically.
One Touch Setting
The PSR-530’s 100 internal styles each have four recommended “panel setups”that can be instantly selected via the [ONE TOUCH SETTING] and REGISTRA-TION MEMORY [1] … [4] buttons. The One Touch Setting feature automaticallysets the following parameters:
● One Touch Setting Parameter List
• R1 Voice(Voice number, volume, octave, pan, reverb level,chorus send level, DSP send level)
• Dual Voice ON/OFF
• R2 Voice(Voice number, volume, octave, pan, reverb level,chorus send level, DSP send level)
• Split Voice ON/OFF
• L Voice(Voice number, volume, octave, pan, reverb level,chorus send level, DSP send level)
• Split Point : Split Voice=59: Auto Accompaniment=54
• Auto Accompaniment=ON
• When the AUTO AC-COMPANIMENT splitpoint and SPLITVOICE split point areset to the same key,the L voice and theautomatically selectedbass note will sound.
● MuL: The MULTI-FINGER Mode
This is the default accompaniment mode. The MULTI-FINGER mode automati-cally detects SINGLE FINGER or FINGERED 1 chord fingerings, so you canuse either type of fingering without having to switch fingering modes.
muL FngrngMd
• Main A/B section
• Accompaniment Track data(Style parameters=default, Track ON/OFF)
• Synchro start=ON
• Accompaniment volume=100
• Harmony ON/OFF, type, volume
• Reverb ON/OFF
• Chorus ON/OFF
• DSP ON/OFF, type, variation ON/OFF
• Multi Pad Set number
• Chord Match ON/OFF=Default (Multi Pad1…4)
• If you want to play mi-nor, seventh or minorseventh chords usingthe SINGLE FINGERoperation in the MULTI-FINGER Mode, alwayspress the closest white/black key(s) to the rootof the chord.

35
��������������������������������QQQQQQQQQQQQQQQQQQQQQQQQQQQQQQQQ¢¢¢¢¢¢¢¢¢¢¢¢¢¢¢¢¢¢¢¢¢¢¢¢¢¢¢¢¢¢¢¢Auto Accompaniment
1 Select a Style
Select the STYLE menu and select an accompaniment style as described on page22.
2 Press the [ONE TOUCH SETTING] Button
Press the [ONE TOUCH SETTING] button. The ONE TOUCH SETTING andREGIST [1] icons will appear in the display, and the ONE TOUCH SETTING type 1panel settings will be recalled. At the same, AUTO ACCOMPANIMENT willautomatically be turned on if it was off, and the SYNC START mode will be engaged.
4 Turn ONE TOUCH SETTING Off When Done
Press the [ONE TOUCH SETTING] button so that the ONE TOUCH SETTINGicon in the display disappears to turn the ONE TOUCH SETTING feature off.
REGISTRATION1 2 3 4
MULTI PAD
REPEAT ONE TOUCHSETTING 1MEASURE
REGISTRATION MEMORY
4321REGISTRATION
1 2 3 4MULTI PAD
REPEAT ONE TOUCHSETTING 1MEASURE
• “No OTS” will appearon the display if anoptional cartridgestyle which has noONE TOUCH SET-TING data is selected.
3 Select a ONE TOUCH SETTING Type, as Required
If you want to select a different REGISTRATION MEMORY, use the REGISTRA-TION MEMORY buttons to select the desired ONE TOUCH SETTING type. Thecorresponding number will appear in the display, and all setting will change accordingto the recalled data.

��������������������������������QQQQQQQQQQQQQQQQQQQQQQQQQQQQQQQQ¢¢¢¢¢¢¢¢¢¢¢¢¢¢¢¢¢¢¢¢¢¢¢¢¢¢¢¢¢¢¢¢
36
Digital Effects
Reverb
The REVERB effect applies only to the R1. Reverb can be turned completely offby selecting the “off” reverb type as described below.
Turning the Reverb Effect On or OffPress the [REVERB] button so that the REVERB icon appears in the display to turn
the selected REVERB effect on. Press [REVERB] a second time so that the REVERBicon disappears to turn the REVERB effect off.
• The REVERB effectwill be turned on or offaccording to the se-lected R1 panel voice.
REVERB TRANSPOSE0
HARMONY TEMPO116
REVERB
The PSR-530 has 12 digital reverb effects that simulate the natural reverberation ofa range of acoustic environments. See “The Digital Effect List” on page 108. There’salso an “Off” setting:
With the digital effects built into the PSR-530 you can add ambiance and depth to your musicin a variety of ways—such as adding reverb that makes you sound like you are playing in aconcert hall or adding harmony notes for a full, rich sound.
Digital Effects
REVERB Button You can create a reverb effect that makes you sound like youare playing in places like a concert hall, or live in a club.
CHORUS Button You can add a chorus effect that makes your playing soundas though multiple parts were being played together at thesame time.
DSP Button In addition to the reverb and chorus types, the effects usuallyused to a specific part, such as the distortion and tremolo,can be selected.
HARMONY Button You can add a variety of harmony notes to the R1 voice, orto your playing in the right-hand section, as well as addingan tremolo or other effect.
• For details about using Digital Effects (Reverb, Chorus, DSP) see page 106.
REVERB
CHORUS
DSP
HARMONY

��������������������������������QQQQQQQQQQQQQQQQQQQQQQQQQQQQQQQQ¢¢¢¢¢¢¢¢¢¢¢¢¢¢¢¢¢¢¢¢¢¢¢¢¢¢¢¢¢¢¢¢
37
OVERALL
DIGITALEFFECT
MIDI
Then use the SUB MENU [▲] and [▼] buttons to select “Reverb”. After a fewseconds the name of the currently selected REVERB type will appear on top lineof the display.
Reverb
Hall 101
Digital Effects
Selecting a Reverb Type
1 Select the Digital Effect “Reverb” Function
Use the MENU [▲] and [▼] buttons to move the triangular indicator in thedisplay next to “DIGITAL EFFECT”. • You can also jump directly to
the DIGITAL EFFECT RE-VERB TYPE function bypressing and holding the[REVERB] button for a fewseconds.
2 Select a Reverb Effect
Use the [–] and [+] buttons, number buttons, or data dial to select the desiredREVERB effect (the name of the selected REVERB effect will appear on the topline of the display). Select “OFF” if you want no REVERB effect on any part ofthe PSR-530 sound.
1 2 3
4 5 6
7 8
0
9
NO YES
• When you select a differentStyle, the appropriate Re-verb type will be selectedaccordingly. Some of theStyles contain Reverb typeswhich cannot be selected onthe PSR-530. In this case “ –:XG Rev.” will be displayedwhen you select the SUBMENU Reverb of the DIGI-TAL EFFECT.
• If you don’t want to apply theReverb effect to Styles orSongs, select “13: OFF”from the Reverb types, orset the Reverb Return Levelto its minimum. In this caseno Reverb is applied to theentire system. If you use theRevoice function, you canset the Reverb Send Levelfor each track of the Style/User Song independently(see page 78).

��������������������������������QQQQQQQQQQQQQQQQQQQQQQQQQQQQQQQQ¢¢¢¢¢¢¢¢¢¢¢¢¢¢¢¢¢¢¢¢¢¢¢¢¢¢¢¢¢¢¢¢
38
Digital Effects
Chorus
The PSR-530’s 9 chorus effects can be used to give your sound extra life andanimation. See “The Digital Effect List” on page 108.
The CHORUS effect applies only to the R1. Chorus can be turned completely offby selecting the “Off” chorus type as described below.
HARMONY TEMPO116
CHORUS DSP
CHORUS
Turning the Chorus Effect On or OffPress the [CHORUS] button so that the CHORUS icon appears in the display to turn
the selected chorus effect on. Press [CHORUS] a second time so that the CHORUSicon disappears to turn the CHORUS effect off.
• The CHORUS effectwill be turned on or offaccording to the se-lected R1 panel voice.
064 RevRtnLv
Reverb Return LevelThe RevRtnLv (Reverb Return Level) parameter sets the amount of reverb effect
returned from the reverb effect stage, thus making it possible to adjust the degree ofreverb effect applied to the overall sound.
1 Select the Digital Effect “RevRtnLv” Function
Use the MENU [▲] and [▼] buttons to move the triangular indicator in the displaynext to “DIGITAL EFFECT”, then use the SUB MENU [▲] and [▼] buttons to select“RevRtnLvl”.
2 Set the Reverb Return Level
Use the [–] and [+] buttons, number buttons, or data dial to set the desired reverbreturn level (the current return level value appears to the left of “RevRtnLv” on thedisplay). The range is from “0” to “127”. The higher the value the greater the returnlevel.

��������������������������������QQQQQQQQQQQQQQQQQQQQQQQQQQQQQQQQ¢¢¢¢¢¢¢¢¢¢¢¢¢¢¢¢¢¢¢¢¢¢¢¢¢¢¢¢¢¢¢¢
39
Digital Effects
OVERALL
DIGITALEFFECT
MIDI
Chorus
Flanger106
Selecting a Chorus Effect
1 Select the Digital Effect “Chorus” Function
Use the MENU [▲] and [▼] buttons to move the triangular indicator in thedisplay next to “DIGITAL EFFECT”.
2 Select a Chorus Effect
Use the [–] and [+] buttons, number buttons, or data dial to select the desiredchorus effect (the name of the selected chorus effect will appear on the top lineof the display). Select “Off” if you want no chorus effect on any part of the PSR-530 sound.
Then use the SUB MENU [▲] and [▼] buttons to select “Chorus”. After a fewseconds the name of the currently selected chorus effect will appear on the topline of the display.
• When you select a differentStyle, the appropriate Cho-rus type will be selected ac-cordingly. Some of theStyles contain Chorus typeswhich cannot be selected onthe PSR-530. In this case “ –:XG Cho.” will be displayedwhen you select the SUBMENU Chorus of the DIGI-TAL EFFECT.
• If you don’t want to apply theChorus effect to Styles orSongs, select “10: OFF”from the Chorus types, orset the Chorus Return Levelto its minimum. In this caseno Chorus is applied to theentire system. If you use theRevoice function, you canset the Chorus Send Levelfor each track of the Style/User Song independently(see page 78).
Chorus Return LevelThe ChoRtnLv (Chorus Return Level) parameter sets the amount of chorus
effect returned from the chorus effect stage, thus making it possible to adjust thedegree of chorus effect applied to the overall sound.
1 Select the Digital Effect “ChoRtnLv” Function
Use the MENU [▲] and [▼] buttons to move the triangular indicator in thedisplay next to “DIGITAL EFFECT”, then use the SUB MENU [▲] and [▼]buttons to select “ChoRtnLvl”.
ChoRtnLv064
• You can also jump directly tothe DIGITAL EFFECT Cho-rus function by pressing andholding the [CHORUS] but-ton for a few seconds.

��������������������������������QQQQQQQQQQQQQQQQQQQQQQQQQQQQQQQQ¢¢¢¢¢¢¢¢¢¢¢¢¢¢¢¢¢¢¢¢¢¢¢¢¢¢¢¢¢¢¢¢
40
Digital Effects
DSP
RETURNSEND
The PSR-530 features an extensive range of 45 DSP (Digital Signal Processor)effects. There are two types of digital effects, system effects and insertion effects. Theillustration below will give you an idea of how DSP effects work, centering on themixer. See “The Digital Effect List” on page 108.
● System Effect:Applies to all of the parts input to the mixer. You can set the Effect Send Level andEffect Return Level. The System Effect includes Reverb and Chorus types.
● Insertion Effect:Applies only to a designated part before inputting the signal to the mixer. You caneffectively use the digital effects by applying the effect to the specific part. Withthe Insertion Effect, you can only designate the Effect Send Level. The InsertionEffect includes Distortion and Tremolo.
Insertion Effect
System Effect
Amp
Mixer
Speaker
2 Set the Chorus Return Level
Use the [–] and [+] buttons, number buttons, or data dial to set the desired chorusreturn level (the current return level value appears to the left of “ChoRtnLv” on thedisplay). The range is from “0” to “127”. The higher the value the greater the returnlevel.
• DSP send level can-not be modified forsome Insertion ef-fects. In this case thedisplay shows “- - -”,indicating that it’s notaccessible.
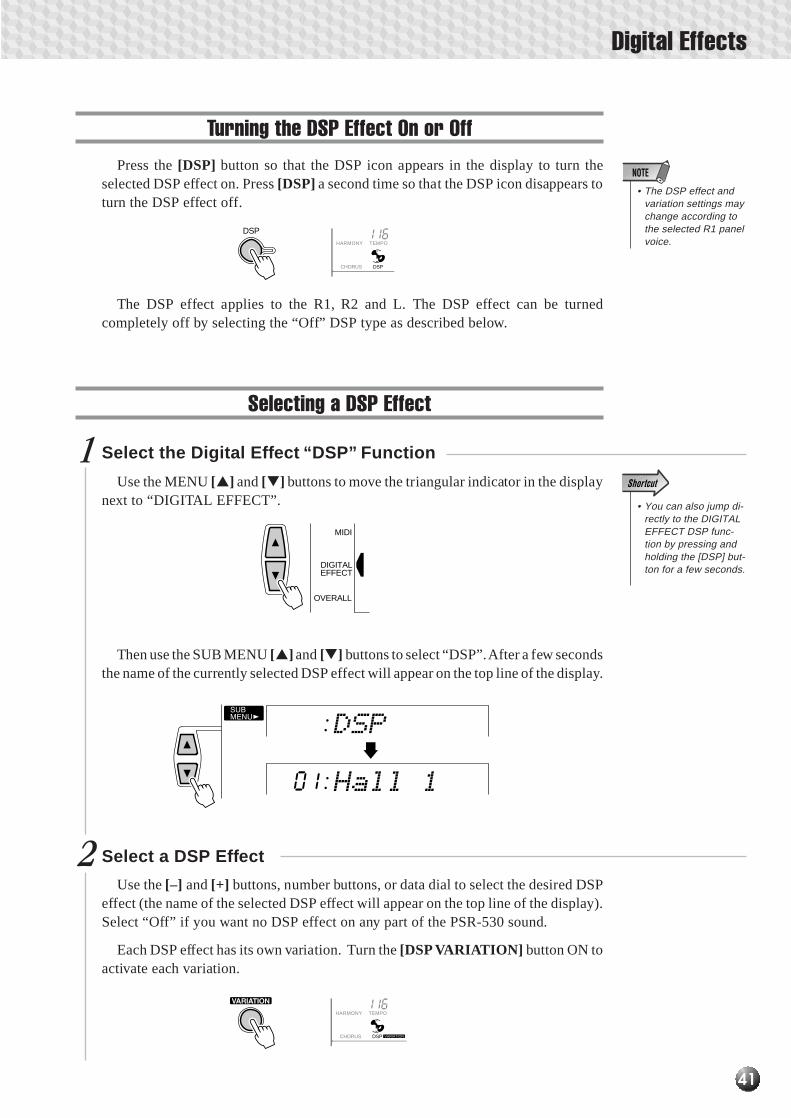
��������������������������������QQQQQQQQQQQQQQQQQQQQQQQQQQQQQQQQ¢¢¢¢¢¢¢¢¢¢¢¢¢¢¢¢¢¢¢¢¢¢¢¢¢¢¢¢¢¢¢¢
41
Digital Effects
The DSP effect applies to the R1, R2 and L. The DSP effect can be turnedcompletely off by selecting the “Off” DSP type as described below.
HARMONY TEMPO116
CHORUS DSP
DSP
Turning the DSP Effect On or OffPress the [DSP] button so that the DSP icon appears in the display to turn the
selected DSP effect on. Press [DSP] a second time so that the DSP icon disappears toturn the DSP effect off.
• The DSP effect andvariation settings maychange according tothe selected R1 panelvoice.
OVERALL
DIGITALEFFECT
MIDI
Selecting a DSP Effect
1 Select the Digital Effect “DSP” Function
Use the MENU [▲] and [▼] buttons to move the triangular indicator in the displaynext to “DIGITAL EFFECT”. • You can also jump di-
rectly to the DIGITALEFFECT DSP func-tion by pressing andholding the [DSP] but-ton for a few seconds.
2 Select a DSP Effect
Use the [–] and [+] buttons, number buttons, or data dial to select the desired DSPeffect (the name of the selected DSP effect will appear on the top line of the display).Select “Off” if you want no DSP effect on any part of the PSR-530 sound.
Each DSP effect has its own variation. Turn the [DSP VARIATION] button ON toactivate each variation.
DSP
Hall 101
Then use the SUB MENU [▲] and [▼] buttons to select “DSP”. After a few secondsthe name of the currently selected DSP effect will appear on the top line of the display.
HARMONY TEMPO116
CHORUS DSP VARIATION

��������������������������������QQQQQQQQQQQQQQQQQQQQQQQQQQQQQQQQ¢¢¢¢¢¢¢¢¢¢¢¢¢¢¢¢¢¢¢¢¢¢¢¢¢¢¢¢¢¢¢¢
42
Digital Effects
Harmony
When HARMONY is on, playing single notes or chords on the right-hand sectionof the keyboard produces automatic harmony matched to the accompaniment chords(AUTO ACCOMPANIMENT must be on). Harmony is applied to the R1 voice. Whenchords are played the harmony is based on the last note played (i.e. last-note priority).
The PSR-530 has 16 different harmony types, as listed below.
2 Set the DSP Return Level
Use the [–] and [+] buttons, number buttons, or data dial to set the desired DSPreturn level (the current return level value appears to the left of “DspRtnLv” on thedisplay). The range is from “0” to “127”. The higher the value the greater the returnlevel.
DspRtnLv064
No. Type Description
1 Duet This harmony type produces a duophonic melody with the second voice below the melodyline.
2 Trio This harmony type generates two voices in addition to the melody voice.
3 4 Part Three harmony notes are generated to produce a four-note chord.
4 4 Part Jazz Similar to the preceding type, but depending on the chords played this type willsometimes produce a more colorful sound.
5 Country Similar to Duet, but the second voice is above the melody line.
6 Octave One note is added an octave below the melody.
7 Tremolo The note(s) pressed and held is(are) repeatedly played at the preset tempo.
8 Tremolo Duet Combination of Tremolo and Duet; produces a duophonic melody with two voices playedalternately.
DSP Return LevelThe DspRtnLv (DSP Return Level) parameter sets the amount of DSP effect
returned from the DSP effect stage, thus making it possible to adjust the degree of DSPeffect applied to the overall sound.
1 Select the Digital Effect “DspRtnLv” Function
Use the MENU [▲] and [▼] buttons to move the triangular indicator in the displaynext to “DIGITAL EFFECT”, then use the SUB MENU [▲] and [▼] buttons to select“DspRtnLv”.

��������������������������������QQQQQQQQQQQQQQQQQQQQQQQQQQQQQQQQ¢¢¢¢¢¢¢¢¢¢¢¢¢¢¢¢¢¢¢¢¢¢¢¢¢¢¢¢¢¢¢¢
43
Digital Effects
REVERB TRANSPOSE0
HARMONY TEMPO116
HARMONY
OVERALL
DIGITALEFFECT
MIDI
Selecting a Harmony Type
1 Select the Digital Effect “Harmony” Function
Use the MENU [▲] and [▼] buttons to move the triangular indicator in the displaynext to “DIGITAL EFFECT”.
No. Type Description
9 Tremolo Octave Combination of Tremolo and Octave; produces a duophonic melody with two voicesplayed alternately (the second voice is an octave below the melody).
10 Strumming This type adds arpeggiated pattern to the melody.
11 Trio Delay Two notes slightly below the melody are added to create three parts. Additional notes aredelayed slightly.
12 Vibraphone & Two voices, Vibraphone and Jazz Guitar, below the melody are added to create three parts.Jazz Guitar
13 Trumpet & Sax Two voices, Trumpet and Saxophone, below the melody are added to create three parts.
14 Back Vocal “Vocal” voice is added to the melody to get a vocal part in the background.
15 Strings “Strings” voice is added to the melody to create an orchestral atmosphere.
16 Forest “Twitterings” of a bird are added to the melody to create an effect as if you were playingoutside.
• The Harmonies except for the types 6,7 and 9are applied to the R1 voice according to thechords detected in the Accompaniment sec-tion.
Turning the Harmony Effect On or OffPress the [HARMONY] button so that the HARMONY icon appears in the display
to turn the selected HARMONY effect on. Press [HARMONY] a second time so thatthe HARMONY icon disappears to turn the HARMONY effect off.
• HARMONY can notbe turned on when adrum kit is selectedfor the R1 voice.
• HARMONY can notbe turned on whenthe FULL KEYBOARDAUTO ACCOMPANI-MENT fingering modeis selected even ifAUTO ACCOMPANI-MENT is on. HAR-MONY will be auto-matically turned off ifthe FULL KEYBOARDfingering mode is se-lected while the HAR-MONY effect is on.
• When the Voice Setfunction is ON (Page85), the HARMONYeffect settings maychange according tothe selected R1 panelvoice.

��������������������������������QQQQQQQQQQQQQQQQQQQQQQQQQQQQQQQQ¢¢¢¢¢¢¢¢¢¢¢¢¢¢¢¢¢¢¢¢¢¢¢¢¢¢¢¢¢¢¢¢
44
Digital Effects
Then use the SUB MENU [▲] and [▼] buttons to select “Harmony”. After a fewseconds the name of the currently selected HARMONY type will appear on top lineof the display.
• You can also jump di-rectly to the DIGITALEFFECT HARMONYTYPE function bypressing and holdingthe [HARMONY] but-ton for a few seconds.
Harmony
Duet01
2 Select a Harmony Type
Use the [–] and [+] buttons, number buttons, or data dial to select the desiredHARMONY type (the name of the selected HARMONY type will appear on the topline of the display).
Adjusting the Harmony VolumeThe volume of the harmony sound in relation to the keyboard sound can be adjusted
for HARMONY types 1 through 10 as follows (HARMONY types 11 through 22 arenot affected):
1 Select the Digital Effect “HarmVol” Function
Use the MENU [▲] and [▼] buttons to move the triangular indicator in the displaynext to “DIGITAL EFFECT”, then use the SUB MENU [▲] and [▼] buttons to select“HarmVol”. The current harmony volume setting will appear to the left of “HarmVol”on the display.
100 HarmVol
2 Adjust the Harmony Volume
Use the [–] and [+] buttons, number buttons, or data dial to adjust the harmonyvolume as required. The range is from “0” to “127” — “0” is minimum (no sound) and“127” is maximum volume.
• When the Voice Setfunction is ON (page85), the Harmony Vol-ume may change ac-cording to the se-lected R1 panel voice.

��������������������������������QQQQQQQQQQQQQQQQQQQQQQQQQQQQQQQQ¢¢¢¢¢¢¢¢¢¢¢¢¢¢¢¢¢¢¢¢¢¢¢¢¢¢¢¢¢¢¢¢
45
Use the PSR-530 pitch bend wheel to bend notes up (roll the wheel away from you) or down(roll the wheel toward you) while playing the keyboard. The pitch bend wheel is self-centeringand will automatically return to nornal pitch when released.
The maximum pitch bend range can be set via the PITCH BEND RANGE functionin the OVERALL function group. Use the MENU [▲] and [▼] buttons to move thetriangular indicator in the display next to “OVERALL”.
The Pitch Bend Wheel
OVERALL
DIGITALEFFECT
MIDI
Then use the SUB MENU [▲] and [▼] buttons to select “PBRange”. The currentpitch bend range setting will appear to the left of the function name on the top line ofthe display. Use the [–] and [+] buttons, number buttons, or data dial to set the pitchbend range from “01” to “12” as required. Each increment corresponds to onesemitone.
02 PBRange
A setting of “02”, for example, will result in a maximum pitch bend range of plusand minus a whole note.
• When the Voice Setfunction is ON (page85), the Pitch BendRange will bechanged according tothe selected R1 panelvoice.
• The default pitch bendrange can be instantlyrecalled by pressingthe [+] and [–] buttonssimultaneously.
Setting the Pitch Bend Range

��������������������������������QQQQQQQQQQQQQQQQQQQQQQQQQQQQQQQQ¢¢¢¢¢¢¢¢¢¢¢¢¢¢¢¢¢¢¢¢¢¢¢¢¢¢¢¢¢¢¢¢
46
Transpose
This functions allow the overall pitch of the PSR-530 to be transposed up or down by amaximum of one octave in semitone increments.
Setting Transposition
Use the TRANSPOSE [▼] and [▲] buttons to set the desired degree of transposi-tion. Press either button briefly to decrement or increment by one, or hold forcontinuous decrementing or incrementing. The current transpose value will appear onthe top line of the display for a few seconds whenever one of the TRANSPOSE buttonsis pressed — during this time the [–] and [+] buttons, number buttons, or data dial canalso be used to set the transpose value (the transpose value also appears continuouslyabove “TRANSPOSE” in the display).
• Press the TRANS-POSE [▼] and [▲]buttons simulta-neously to instantlyreset the transposevalue to “0”.
• The new TRANS-POSE value will takeeffect from the nextkey played.
The transpose range is from –12 to +12. Each step corresponds to one semitone,allowing a maximum upward or downward transposition of 1-octave. A setting of “0”produces the normal pitch.
-02VOICE L VOICE R2 VOICE R176 101 1
Transpos
REVERB TRANSPOSE2- REPEAT
TRANSPOSE

��������������������������������QQQQQQQQQQQQQQQQQQQQQQQQQQQQQQQQ¢¢¢¢¢¢¢¢¢¢¢¢¢¢¢¢¢¢¢¢¢¢¢¢¢¢¢¢¢¢¢¢
47
Registration Memory
The PSR-530 Registration Memory feature can be used to memorize 128 complete control-panel setups (32 banks, 4 setups each) that you can recall whenever needed.
1 Set Up the Controls as Required
Make the desired control settings. The following settings are memorized by theRegistration Memory function:
Registering the Panel Settings
VOICE PARAMETERS• Split Point (Split Voice)
• Touch Sensitivity
• Reverb ON/OFF
• Chorus ON/OFF
• DSP ON/OFF, variation ON/OFF
• DSP type
• Harmony ON/OFF, type,volume
• Pitch bend range
• Scale Tuning
● Data Stored By the Registration Memory
ACCOMPANIMENT PARAMETERS
• R1 Voice (Voice number,volume, octave, pan, reverbsend level, chorus send level,DSP send level)
• Dual Voice ON/OFF
• R2 Voice (Voice number,volume, octave, pan, reverbsend level, chorus send level,DSP send level)
• Split Voice ON/OFF
• L Voice (Voice number,volume, octave, pan, reverbsend level, chorus send level,DSP send level)
01 Bank 1
1 2 3
4 5 6
7 8
0
9
NO YES
• Auto Accompaniment ON/OFF
• Style number
• Fingering mode
• Tempo
• Split point(Auto Accompaniment)
• Accompaniment volume
• Track data (Track ON/OFF, voice, volume,pan, reverb send level, chorus send level)
• Accompaniment section (Main A/B)
• Multi Pad Set number
• Chord Match ON/OFF (Multi Pad1…4)
• Transpose
• Reverb type
• Chorus type
• Press and hold theREGISTRATIONMEMORY [MEMORY]button for a few sec-onds to go directly tothe REGISTRATIONBANK display.
2 Select a Registration Bank (if necessary)
Any of the eight Registration Memory banks can be selected via the REGISTRA-TION MEMORY menu. Use the MENU [▲] and [▼] buttons to move the triangularindicator next to “REGISTRATION MEMORY “ in the menu list to the left of thedisplay — the currently selected registration bank number and name will appear onthe top line of the display. Then use the [–] and [+] buttons, number buttons, or datadial to select the desired bank (1 through 32).

��������������������������������QQQQQQQQQQQQQQQQQQQQQQQQQQQQQQQQ¢¢¢¢¢¢¢¢¢¢¢¢¢¢¢¢¢¢¢¢¢¢¢¢¢¢¢¢¢¢¢¢
48
Registration Memory
3 Register the Settings
While holding the [MEMORY] button, press one of the REGISTRATIONMEMORY buttons — [1] through [4]. Any data that was previously in the selectedlocation is erased and replaced by the new settings. The corresponding REGISTRA-TION MEMORY number will appear below “REGISTRATION” in the display.
Recall the Registered Panel Settings
Simply select the appropriate bank as described above, then press the desiredREGISTRATION MEMORY button at any time to recall the memorized settings. Thecorresponding Registration Memory number will appear below “REGISTRATION”in the display, and the appropriate setting changes will appear in the display.
• REGISTRATIONMEMORY data can-not be recalled whenthe ONE TOUCHSETTING feature ison.
• No REGISTRATIONMEMORY indicatorwill be showing whenthe PSR-530 is ini-tially turned on orwhen a bank is se-lected prior to actuallyselecting a REGIS-TRATION MEMORYnumber.
The Accompaniment Freeze Function
When the FREEZE function is engaged, the accompaniment parameters listedabove will not be changed when a REGISTRATION MEMORY is recalled. Thisallows you to recall different REGISTRATION MEMORY settings while using AutoAccompaniment, without suddenly disturbing the flow of the accompaniment. TheFREEZE function is turned on and off by pressing the [FREEZE] button. The“FREEZE” icon appears in the display when it is turned on.
• FREEZE remains oneven if a different reg-istration bank is se-lected.
• The Freeze functionwill automatically beturned on when oneof the followingmodes, Song, Recordor Style Revoice, isengaged.
REGISTRATION MEMORY
4321REGISTRATION
1 2 3 4MULTI PAD
REPEAT
1MEASURE
REGISTRATION MEMORY
4321REGISTRATION
1 2 3 4MULTI PAD
REPEAT
1MEASURE
GISTRATION MEMORY
43
FREEZE
REGISTRATION1 2 3 4
MULTI PADFREEZE
REPEAT
1MEASURE
• The REGISTRATIONMEMORY contentswill be retained evenafter turning thepower off. See page98 for the details.

��������������������������������QQQQQQQQQQQQQQQQQQQQQQQQQQQQQQQQ¢¢¢¢¢¢¢¢¢¢¢¢¢¢¢¢¢¢¢¢¢¢¢¢¢¢¢¢¢¢¢¢
49
The Multi Pads
Selecting a MULTI PAD Set
The PSR-530 has 36 multi pad sets, each containing a complete set of 4 MULTIPAD phrases — 144 phrases in all. Before using the MULTI PADS, select the MULTIPAD set containing the phrases you want to use as follows:
1 Select the Multi Pad Function
To select a multi pad set first use the MENU [▲] and [▼] buttons to select theMULTI PAD function so that the triangular indicator in the display appears next to“MULTI PAD” to the left of the display.
2 Select a Multi Pad Set Number
If necessary use the SUB MENU [▲] and [▼] buttons so that the name of thecurrently selected MULTI PAD set appears on the display (see list on page 50), thenuse the [–] and [+] , number buttons, or data dial to select the MULTI PAD set you wantto use.
• Press and hold theMULTI PAD [STOP]button for a few sec-onds to go directly tothe MULTI PAD SETdisplay.
The PSR-530 MULTI PADS can be used to play a number of short pre-recorded rhythmic andmelodic sequences that can be used to add impact and variety to your keyboard perfor-mances. You can also record your own MULTI PAD phrases as described in “MULTI PADRecording” on page 71.Some pad phrases simply play back as programmed, while others are “chord match” typeswhich, if the CHORD MATCH function is turned on, are automatically transposed to matchchords played using the PSR-530 Auto Accompaniment feature.
01 Fanfare1
OVERALL
DIGITALEFFECT
MIDI
MULTI PAD

��������������������������������QQQQQQQQQQQQQQQQQQQQQQQQQQQQQQQQ¢¢¢¢¢¢¢¢¢¢¢¢¢¢¢¢¢¢¢¢¢¢¢¢¢¢¢¢¢¢¢¢
50
The Multi Pads
Playing the MULTI PADs
Simply tap any of the MULTI PADs at any time to play back the correspondingphrase at the currently set tempo. MULTI PAD playback begins as soon as the buttonis pressed. You can even play two, three, or four MULTI PADs at the same time. Also,you can create “retriggered sample” effects by repeatedly pressing a pad before itscontents are completely played back.
The MULTI PAD voices are indepedent from the voices you have currently selectedfor keyboard performance. You could, for example, play piano on the keyboard whilea MULTI PAD plays a brass chord stab.
When the CHORD MATCH function (see page 51) for a pad is turned on, thecorresponding phrase will be automatically transposed to match chords played usingthe PSR-530 Auto-accompaniment feature.
MULTI PAD playback can be terminated by pressing the MULTI PAD [STOP]button.
STOP
21
MUTLI PAD
431 2 3 4
MULTI PAD1MEASURE
STOP
21
MUTLI PAD
43
● The Multi Pad Sets
Chord Match
Set Pad 1 Pad 2 Pad 3 Pad 4
1 Fanfare1 O O O —
2 Fanfare2 O O O —
3 Brassy1 O O O O4 Brassy2 O O O O5 Synth Brass O O O O6 Guitar Play1 O O O O7 Guitar Play2 O O O O8 Guitar Play3 O O O O9 Guitar Play4 O O O O
10 Techno Synth1 O O O O11 Techno Synth2 O O O O12 Arpeggio O O O O13 Crystal O O O O14 Twinkle O O O O15 Magical O O O O16 Piano Sequence O O O O17 Banjo Sequence O O O O18 Gothic O O O O
Chord Match
Set Pad 1 Pad 2 Pad 3 Pad 4
19 Classic O O O O20 Jingle O O O O21 Horror SE — — — —
22 Racing SE — — — —
23 Stormy SE — — — —
24 Water SE — — — —
25 Dog SE — — — —
26 Haha SE — — — —
27 Rock Kit — — — —
28 Techno Kit — — — —
29 Analog Kit — — — —
30 Tom Flam — — — —
31 Latin Percusion1 — — — —
32 Latin Percussion2 — — — —
33 Timbales — — — —
34 Analog Sequence — — — —
35 Conga Sequence — — — —
36 Techno Sequence — — — —

��������������������������������QQQQQQQQQQQQQQQQQQQQQQQQQQQQQQQQ¢¢¢¢¢¢¢¢¢¢¢¢¢¢¢¢¢¢¢¢¢¢¢¢¢¢¢¢¢¢¢¢
51
The Multi Pads
Turning the CHORD MATCH Function On/Off
• The chord matchfunction has no effectwith pads that containpercussion phrases.
2 Select a CHORD MATCH Function
Use the SUB MENU [▲] and [▼] buttons to select “Pad1Chd”, “Pad2Chd”,“Pad3Chd”, or “Pad4Chd”, depending on the pad for which you want to turn theCHORD MATCH function on or off.
3 Turn the CHORD MATCH Function On or Off
Use the [–] and [+] buttons or data dial to turn the CHORD MATCH function forthe selected pad “on” or “off” as required.
OVERALL
DIGITALEFFECT
MIDI
MULTI PAD
on Pad1Chd
• The CHORD MATCHON/OFF setting is re-stored to its originalstatus whenever apreset MULTI PADset is selected.
• When the CHORDMATCH ON/OFF sta-tus of a user MULTIPAD (see page 71)set is changed, thenew status is re-corded with theMULTI PAD data.
4 5 6
7 8
0
9
NO YES
1 2 3
• The chord match on/off status depends onthe selected MultiPad.
The CHORD MATCH function can be individually turned on or off for each of theMULTI PADs, as described below.
1 Select the MULTI PAD Function
Use the MENU [▲] and [▼] buttons to select the MULTI PAD function so that thetriangular indicator in the display appears next to “MULTI PAD” to the left of thedisplay.

��������������������������������QQQQQQQQQQQQQQQQQQQQQQQQQQQQQQQQ¢¢¢¢¢¢¢¢¢¢¢¢¢¢¢¢¢¢¢¢¢¢¢¢¢¢¢¢¢¢¢¢
52
Song Playback
Use the following procedure to play back the PSR-530’s internal demonstration songs as wellas songs you record yourself (see “Song Recording”, page 58).
1 Select the Song Menu
Press the [SONG] button to select the SONG menu (the triangular indicator willappear next to “SONG” to the right of the display). The number and name of thecurrently selected song will appear on the top line of the display, and the song trackand volume icons near the bottom of the display will appear framed.
Song Playback Procedure
2 Select a SONG Number
If necessary, use the [–] and [+] buttons, the number buttons, or the data dial to selectthe SONG number you want to play. The SONG number can also be incremented bypressing the [SONG] button: press briefly to increment by one, or hold for continuousincrementing.
1
MELODY1 2 3 4
MELODY MELODY MELODY ACCOM-PANIMENT
VOICE VOICE VOICE
RHYTHM1
BASS CHORD1
CHORD2
PAD PHRASE1
PHRASE2
FINGERING
REGISTRATION MULTI PAD
RHYTHM2
L R2 R1
01VOICE L VOICE R2 VOICE R176 101 1
PeterGun
REVERB TRANSPOSE0 REPEAT
1MEASURE
HARMONY TEMPO116
SYNCSTOP
MINUS ONE
VOICE
STYLE
SONG
CHORUS DSP
02 R&B
1 2 3
4 5 6
7 8
0
9
NO YES

��������������������������������QQQQQQQQQQQQQQQQQQQQQQQQQQQQQQQQ¢¢¢¢¢¢¢¢¢¢¢¢¢¢¢¢¢¢¢¢¢¢¢¢¢¢¢¢¢¢¢¢
53
3 Start Playback
Playback will begin as soon as the [START/STOP] button is pressed. You can turnthe MELODY and ACCOMPANIMENT tracks on and off during playback as requiredby using the TRACK buttons.
• You can also startplayback from anyspecified measure(see page 54).
START/STOP /
Song Playback
4 Play Along If You Like
Play along on the keyboard if you like. You can also change the tempo duringplayback.
5 Stop Playback
SONG playback will stop automatically when the entire SONG has been playedback. You can also stop playback at any time by pressing the [START/STOP] button.
Song Volume Control
When the SONG menu is selected (i.e. the song track and volume icons near thebottom of the display are framed) the volume of SONG playback in relation to thekeyboard can be adjusted for the best overall balance by using the ACCOMPANI-MENT/SONG VOLUME [▼] and [▲] buttons. When either button is pressed thecurrent song volume setting will appear on the top line of the display for a few seconds.The song volume range is from “0” (no sound) to “127” (maximum volume). Thedefault setting is “100”. Press the ACCOMPANIMENT/SONG VOLUME [▼] buttonto decrease the volume or the [▲] button to increase the volume. Pressing briefly tosingle step, or hold for continuous decrementing/incrementing.
While the song volume setting appears on the top line of the display the [–] and [+]buttons, number buttons, or data dial can also be used to set the song volume.
ACCOMPANIMENT/SONG VOLUME 1
MELODY1 2 3 4
MELODY MELODY MELODY ACCOM-PANIMENT
VOICE VOICE VOICE
RHYTHM1
BASS CHORD1
CHORD2
PAD PHRASE1
PHRASE2
FINGERING
REGISTRATION MULTI PAD
RHYTHM2
L R2 R1
100VOICE L VOICE R2 VOICE R176 101 1
SongVol
REVERB TRANSPOSE0 REPEAT
1MEASURE
HARMONY TEMPO116
SYNCSTOP
MINUS ONE
CHORUS DSP

��������������������������������QQQQQQQQQQQQQQQQQQQQQQQQQQQQQQQQ¢¢¢¢¢¢¢¢¢¢¢¢¢¢¢¢¢¢¢¢¢¢¢¢¢¢¢¢¢¢¢¢
54
Song Playback
Play from a Specified Measure
You can start SONG playback from any specified measure, as long as the specifiedmeasure is within the range of measures that has already been recorded:
1 Select the Measure Parameter
While the SONG menu is selected, but no playback or recording is in progress, usethe SUB MENU [▲] and [▼] buttons to select the “Measure” parameter in the display.The current measure number will appear to the left of “Measure” on the top line of thedisplay (the current measure number is also continuously displayed next to “MEA-SURE” in the display).
2 Enter the Desired Measure Number
Use the [–] and [+] buttons, number buttons, or data dial to enter the desired measurenumber.
3 Start Playback
You can now start playback from the specified measure number by pressing the[START/STOP] button.
001VOICE L VOICE R2 VOICE R176 101 1
Measure
REVERB TRANSPOSE0 REPEAT
1MEASURE
START/STOP /
009VOICE L VOICE R2 VOICE R176 101 1
Measure
REVERB TRANSPOSE0 REPEAT
9MEASURE
1 2 3
4 5 6
7 8
0
9
NO YES
• You can move themeasure number forplayback back andforth even during thesong playback.

��������������������������������QQQQQQQQQQQQQQQQQQQQQQQQQQQQQQQQ¢¢¢¢¢¢¢¢¢¢¢¢¢¢¢¢¢¢¢¢¢¢¢¢¢¢¢¢¢¢¢¢
55
Song Playback
Minus-one Practice
Minus-one playback lets you turn off specific parts of a song so you can practicethem on the PSR-530 keyboard while the other parts play automatically. Any of thePSR-530’s four MELODY tracks and/or the ACCOMPANIMENT track can be turnedon or off as required. Individual SONG tracks can be turned OFF (muted) or ON byusing the TRACK buttons corresponding to the target MELODY or ACCOMPANI-MENT tracks. The track icon will disappear when a track is muted.
Minus-one Track AssignmentMany of the PSR-530 demonstration songs, and songs provided on Music Car-
tridges (see “Using Music Cartridges”, page 75) have more than 4 channels — as manyas 16, in fact. This function lets you assign any of the song’s channels to the PSR-530’sMELODY tracks so they can be turned on or off for minus-one practice.
1 Select the MinusOne Parameter
While the SONG menu is selected, but no recording is in progress, use the SUBMENU [▲] and [▼] buttons to select the “MinusOne” parameter in the display. Aftera few seconds “MinusOne” will change to “MinusCh”, the number of the currentminus-one channel will appear to the left of “MinusCh”, and a frame will appeararound the MELODY 1 song track icon.
MINUS ONE SPLIT DUAL
MELODY1 2 3 4
MELODY MELODY MELODY ACCOM-PANIMENT
VOICE VOICE VOICEL R2 R1
MINUS ONE
11
MELODY1 2 3 4
MELODY MELODY MELODY ACCOM-PANIMENT
VOICE VOICE VOICE
RHYTHM1
BASS CHORD1
CHORD2
PAD PHRASE1
PHRASE2
FINGERING
REGISTRATION MULTI PAD
RHYTHM2
L R2 R1
VOICE L VOICE R2 VOICE R176 101 1
MinusOne
REVERB TRANSPOSE0 REPEAT
1MEASURE
HARMONY TEMPO116
SYNCSTOP
MINUS ONE
MELODY1 2 3 4
MELODY MELODY MELODY ACCOM-PANIMENT
VOICE VOICE VOICE
RHYTHM1
BASS CHORD1
CHORD2
PAD PHRASE1
PHRASE2
FINGERING
REGISTRATION MULTI PAD
RHYTHM2
L R2 R1
01VOICE L VOICE R2 VOICE R176 101 1
MinusCh
REVERB TRANSPOSE0 REPEAT
1MEASURE
HARMONY TEMPO116
SYNCSTOP
MINUS ONE
CHORUS DSP CHORUS DSP

��������������������������������QQQQQQQQQQQQQQQQQQQQQQQQQQQQQQQQ¢¢¢¢¢¢¢¢¢¢¢¢¢¢¢¢¢¢¢¢¢¢¢¢¢¢¢¢¢¢¢¢
56
Song Playback
2 Select a MELODY Track
Use the TRACK buttons to select the song MELODY track (1…4) to which aminus-one channel is to be assigned. A frame will appear around the selected trackicon.
MINUS ONE
MELODY1 2 3 4
MELODY MELODY MELODY ACCOM-PANIMENT
VOICE VOICE VOICEL R2 R1
MINUS ONE
3 Assign a Channel to the Selected Track
Use the [–] and [+] buttons, number buttoms, or data dial to assign the desiredminus-one channel (1…16) to the selected MELODY track. The number of theassigned channel will appear to the left of “MinusCh” on the top line of the display.
1 2 3
4 5 6
7 8
0
9
NO YES
05 MinusCh
• Press the [–] and [+]buttons simulta-neously to recall thesong’s initial channelassignment for the se-lected track.
• Minus-one channelassignments do notapply to songs yourecord yourself.
• If a selected song in-cludes minus-onechannel settings,those channels willautomatically be as-signed to the appro-priate tracks.

��������������������������������QQQQQQQQQQQQQQQQQQQQQQQQQQQQQQQQ¢¢¢¢¢¢¢¢¢¢¢¢¢¢¢¢¢¢¢¢¢¢¢¢¢¢¢¢¢¢¢¢
57
Song Playback
Repeat Play
This function allows you to specify any section of a song — internal or cartridge —for continuous repeat playback.
1 Select the A-b Repeat Parameter
While the SONG menu is selected, but no recording is in progress, use the SUBMENU [▲] and [▼] buttons to select the “A-b Repeat” parameter in the display. TheMAIN/AUTO FILL [A] and [B] button indicators will flash.
2 Start Playback
Press the [START/STOP] button to start song playback.
3 Specify the Repeat “A” and “B” Points
While the song is playing, press the MAIN/AUTO FILL [A] button at the beginningof the section to be repeated (the [A] button indicator will light continuously, and the“A” repeat icon will appear in the display), then press the MAIN/AUTO FILL [B]button at the end of the section to be repeated (the [B] button indicator will lightcontinuously, and the “B” repeat icon will appear in the display). Repeat playback willbegin automatically from the A point as soon as the B point has been specified, andwill continue until either the MAIN/AUTO FILL [A] button is pressed again to cancelthe repeat function, or until song playback is stopped.
• If only the “A” repeatpoint is specified, re-peat playback will oc-cur between the “A”point and the end ofthe song.
• If the MAIN/AUTOFILL [B] button ispressed during repeatplayback, the previ-ously specified “B”point will be cancelledand a new “B” pointcan be specified asrequired.
• Repeat playback willcontinue even if a dif-ferent menu is se-lected during repeatplayback.
• Repeat playback willbe cancelled if a dif-ferent SONG numberselected or the recordmode is engaged orthe revoice mode isengaged.
A-b Repeat A B
START/STOP /
MAIN/AUTO FILL
A BFREEZE
A BREPEAT ONE TOUCH
SETTING 1MEASURE
MAIN/AUTO FILL
A BFREEZE
A BREPEAT ONE TOUCH
SETTING 1MEASURE

58
��������������������������������QQQQQQQQQQQQQQQQQQQQQQQQQQQQQQQQ¢¢¢¢¢¢¢¢¢¢¢¢¢¢¢¢¢¢¢¢¢¢¢¢¢¢¢¢¢¢¢¢Song Recording
The PSR-530 SONG tracks allows you to record and play back complete songs includingchord sequences created using the AUTO ACCOMPANIMENT feature and a melody linesyou play on the keyboard. The SONG tracks include one ACCOMPANIMENT track and fourMELODY tracks.The PSR-530 can retain up to 4 complete songs in internal memory, and these can beselected and played back as described in the preceding section.
• Material recorded on the SONG tracks will be retained even after turning the poweroff. See page 98 for the details.
• The recorded data will be lost if the power is turned off, the AC adaptor is unplugged,or the batteries fail during recording.
• The Shortcut functions are not available when one of the Record modes is engaged.
● The SONG MELODY tracks record the following operations anddata:
• Up to approximately4500 notes can be re-corded in the PSR-530 MELODY tracks.
• Only harmony appliedto the last track re-corded will be in-cluded in the recordedsong data (see page42 for details on theHARMONY effect).
● The SONG ACCOMPANIMENT track records the following opera-tions and data:
• Note on/off.
• Velocity.
• R1 and R2 voice number, volume,octave, pan, reverb send level,chorus send level, DSP send level.
• Dual voice on/off.
• Reverb on/off.
• Reverb type.
• Chorus on/off.
• Chorus type.
• DSP on/off, variation on/off.
• Harmony on/off, type.**
• Sustain pedal on/off.
• Pitch bend, pitch bend range.
• Section changes.
• Style number.*
• Accompaniment track changes*(8 tracks: track on/off, voicenumber, volume, pan, reverb sendlevel, chorus send level, DSP sendlevel).
• Accompaniment volume.*
• Chord changes, timing.
• Reverb type.
• Chorus type.
• Tempo and time signature(common to the ACCOMPANI-MENT and MELODY tracks).*
* Recorded only at the beginning of a song; changes cannot be made during recording.
** Recorded only at the beginning of a song; changes cannot be made during recording. Only onemelody track can be recorded with harmony. The harmony data for the last track recorded withharmony will be retained (last priority).
• Up to approximately3500 chords can berecorded in the AC-COMPANIMENTtrack, when the VirtualArranger is OFF.

59
��������������������������������QQQQQQQQQQQQQQQQQQQQQQQQQQQQQQQQ¢¢¢¢¢¢¢¢¢¢¢¢¢¢¢¢¢¢¢¢¢¢¢¢¢¢¢¢¢¢¢¢Song Recording
1 Set Up to Record
Before recording set up the PSR-530 as required: e.g. select the requiredvoice(s), effects, accompaniment style, accompaniment fingering mode, etc.
Song Recording Procedure
3 Select the SONG Record Mode
Press the [SONG] button to select the SONG record mode. The SONG menuwill automatically be selected and a SONG number will appear on the top line ofthe display. The beat indicator dots will flash at the currently set tempo, indicatingthat the record ready (synchro-start) mode is engaged. Also, the frame surroundingthe song MELODY and ACCOMPANIMENT track icons will flash, indicating thata MELODY and/or ACCOMPANIMENT track must be selected before recordingcan begin.
• If the [RECORD] button ispressed while a demon-stration song or cartridgesong is selected, the low-est-numbered user songwhich does not containany recorded data will au-tomatically be selected. Ifother user songs alreadycontain data, however,user song number 13 willbe selected.
• The following panel set-ting changes will occurwhen the record readymode is engaged:
• The measure number willbe reset to “1”.
• If the Metronome functionis on (page 85), the metro-nome will sound at the cur-rent tempo.
• The REGISTRATIONMEMORY FREEZE func-tion will be turned on (itcannot be turned off whilethe record mode is en-gaged).
• The SYNCHRO STOPfunction wil be turned off.
1
MELODY1 2 3 4
MELODY MELODY MELODY ACCOM-PANIMENT
VOICE VOICE VOICE
RHYTHM1
BASS CHORD1
CHORD2
PAD PHRASE1
PHRASE2
FINGERING
REGISTRATION MULTI PAD
RHYTHM2
L R2 R1
13VOICE L VOICE R276 101
UserSng1
REVERB TRANSPOSE0 REPEAT
1MEASURE
HARMONY TEMPO116
SYNCSTOP
MINUS ONE
VOICE
STYLE
SONG
CHORUS DSP
2 Engage the Record Ready Mode
Press the [RECORD] button to engage the record-ready mode. The [RECORD]button indicator will light, and the SONG, STYLE, and MULTI PAD [1] … [4]icons will flash, indicating that you must select one of the corresponding recordmodes.
1
MELODY1 2 3 4
MELODY MELODY MELODY ACCOM-PANIMENT
VOICE VOICE VOICE
RHYTHM1
BASS CHORD1
CHORD2
PAD PHRASE1
PHRASE2
FINGERING
REGISTRATION MULTI PAD
RHYTHM2
L R2 R1
13VOICE L VOICE R276 101
UserSng1
REVERB TRANSPOSE0 REPEAT
1
HARMONY TEMPO116
SYNCSTOP
MINUS ONE
VOICE
STYLE
SONG
CHORUS DSP
1 2 3 4

60
��������������������������������QQQQQQQQQQQQQQQQQQQQQQQQQQQQQQQQ¢¢¢¢¢¢¢¢¢¢¢¢¢¢¢¢¢¢¢¢¢¢¢¢¢¢¢¢¢¢¢¢
4 If Necessary, Select a User Song Number
If the desired user song is not already selected, use the [–] and [+] buttons, numberbuttons, or data dial to select as required.
Song Recording
5 Select the Track(s) to be Recorded
Use the TRACK buttons to select a SONG MELODY track to record (only oneMELODY track can be recorded at a time). A frame appears continuously around theicon of the MELODY track selected for recording.
• The R1 and R2 voicescan be simultaneouslyrecorded on a singletrack. The L voice can-not be recorded.
• If you start recordingwithout selecting a spe-cific track while thepanel AUTO ACCOM-PANIMENT button is on,the MELODY 1 andACCOMP tracks will au-tomatically be selectedfor recording.
The ACCOMPANIMENT track can be recorded alone or at the same time as oneMELODY track. If you intend to record accompaniment use the appropriateTRACK button to select the ACCOMPANIMENT track (a frame will appearcontinuously around the ACCOMPANIMENT track icon).
• The panel AUTO AC-COMPANIMENT [ON/OFF] button is automati-cally turned off when theACCOMPANIMENTtrack is turned off.
• AUTO ACCOMPANI-MENT will automaticallybe turned on if it is offwhen the ACCOMPANI-MENT track is selectedfor recording. Con-versely, the ACCOMPA-NIMENT track will auto-matically be selected forrecording if the AUTOACCOMPANIMENT[ON/OFF] button isturned on.
• AUTO ACCOMPANI-MENT cannot be turnedon or off during record-ing.
MINUS ONE
MELODY1 2 3 4
MELODY MELODY MELODY ACCOM-PANIMENT
VOICE VOICE VOICEL R2 R1
MINUS ONE
MELODY1 2 3 4
MELODY MELODY MELODY ACCOM-PANIMENT
VOICE VOICE VOICEL R2 R1
MINUS ONE
6 Record
Recording will begin as soon as you play a note on the keyboard or press the[START/STOP] button, and the BEAT indicator dots will begin to indicate thecurrent beat as in the Auto Accompaniment mode. The MEASURE parameter willalso show the current measure number during recording.
START/STOP /
MULTI PAD
ONE TOUCHSETTING 9MEASURE
ATION

61
��������������������������������QQQQQQQQQQQQQQQQQQQQQQQQQQQQQQQQ¢¢¢¢¢¢¢¢¢¢¢¢¢¢¢¢¢¢¢¢¢¢¢¢¢¢¢¢¢¢¢¢Song Recording
• Before actually starting to record you can try playing thePSR-530 the way it is set up by using the “Rehearsal Mode”:press the [SYNC START] button to temporarily disengagethe record ready mode, rehearse as necessary, then pressthe [SYNC START] button again to return to the record readymode.
• Whenever you record using a SONG, any previously re-corded material in the same track will be erased.
• If the SONG memory becomes full while recording, “FULL”will appear on the display and recording will stop (the “Re-hearsal Mode” will be engaged).
• If you start recording by pressing the [START/STOP] button,nothing will be recording on a MELODY track until you beginplaying on the keyboard. Only rhythm accompaniment will berecorded on the ACCOMPANIMENT track until you play achord in the auto accompaniment section of the keyboard.
• During recording you can use the TRACK buttons to turnplayback of previously-recorded MELODY tracks or the AC-COMPANIMENT track on or off as required.
7 Stop Recording
Stop recording by pressing the [START/STOP] button. If you press the[ENDING] button while recording the ACCOMPANIMENT track, recording willstop automatically after the ending section has finished. When recording is stoppedthe MEASURE number on the display will return to “1” and the record-ready modewill be engaged.
ENDINGSTART/STOP
/
8 Record Additional Tracks as Required
By repeating steps 5 through 7, above, you can select and record additionaltracks as required.
9 Exit From the Record Mode
When you’re finished recording a song, press the [RECORD] button so that itsindicator goes out to exit from the record mode. The recorded user song can nowbe played back in the same way as the demonstration songs (page 52).
• Many types of data re-corded in user songs canbe re-written (“revoiced”)as described on page 81.
● Recording from the Middle of the SongIt is possible initiate recording from the middle of the song. If you want tochange the latter half of the song (track), select the Measure number (page 54)from which you want to record and start recording.
017 Measure
• You can also press the[SYNC START] button tostop recording and returnto the record ready mode.
• While the record readymode is engaged you canpress the [VOICE] buttonto go to the VOICE menuand change the R1 voiceas required. The R2 voice,however, cannot bechanged (If the Voice Setfunction is on — page 85— the R2 voice will auto-matically be changedwhen an R1 panel voice isselected). The record-ready mode must be dis-engaged in order tochange the R2 voice andother settings.
• When you select one ofthe Accompanimenttracks for recording, thedisplay shows “- - -:Mea-sure” indicating that re-cording from the middle ofthe song is not possible.

62
��������������������������������QQQQQQQQQQQQQQQQQQQQQQQQQQQQQQQQ¢¢¢¢¢¢¢¢¢¢¢¢¢¢¢¢¢¢¢¢¢¢¢¢¢¢¢¢¢¢¢¢Song Recording
◆ About the Recording with the Digital Effects Applied
You can use three Digital Effects, Reverb, Chorus and DSP, at one time. However,two or more types from the same group cannot be selected at the same time. Be awarethe following facts especially when recording a song with the different effects appliedto the different tracks.
A The Reverb type and Chorus type effects can be set and recorded independentlyfor each track. However, only the latest settings (one each) will be effective ifseveral effects are used in a song (the latest setting priority).
[EX.] While the panel REVERB button is turned on:
1. Select the Hall 1 (Reverb) for the Accompaniment track, and record the Accompa-niment track for ten measures from the beginning.
2. Start recording on the Melody 1 track with the Hall 1 (Reverb) selected from thebeginning and then change the effect type to Room 1 (Reverb) respectively fromthe fifth measure through the end.
When you play back the song recorded with the above condition, the first fourmeasures will be played back with the Hall 1 applied to both the Accompanimentand Melody 1 tracks, and the rest six measures, from fifth through the end, withthe Room 1 applied to both tracks. The effect types set for the Accompanimenttrack are replaced with the latest settings. Only the Send Levels for each trackremains the same.
B The DSP type effects can be set and recorded only for the Melody tracks regardlessof the current effect, insertion or System. Only the latest setting will be effectiveif several types are used in a song (the latest setting priority).
[EX.]
1. Turn on the panel DSP button, and start recording on the Melody 1 track with theDistortion (DSP No.42 Hard) selected for ten measures from the beginning.
2. Turn off the panel DSP button, and start recording on the Melody 2 track without anyeffect from the beginning. Then turn on the panel DSP button again at the fifthmeasure, and continue recording to the end with the Rotary Speaker1 (DSP No.28Rotary1) selected.
When you play back the song recorded with the above condition, the first fourmeasures will be played back with the Distortion applied only to the Melody 1track, and the rest six measures, from fifth through the end, with the RotarySpeaker applied only to the Melody 2 track. The DSP type set for the Melody 1track is taken over by the one set for the Melody 2 track.

63
��������������������������������QQQQQQQQQQQQQQQQQQQQQQQQQQQQQQQQ¢¢¢¢¢¢¢¢¢¢¢¢¢¢¢¢¢¢¢¢¢¢¢¢¢¢¢¢¢¢¢¢Song Recording
Clearing Song Data
This function makes it possible to clear unneeded data from the PSR-530 SONGmemory.
Clearing an Entire SongWhile the SONG record-ready or rehearsal mode is engaged use the SUB MENU
[▲] and [▼] buttons to select the “SongClr?” function, then press the [+] (YES)button: “Sure?” will appear on the display. Press the [+] (YES) button a second timeto actually clear the currently selected user song (the demonstration songs andcartridge songs cannot be cleared). Press [–] (NO) if you want to abort the clearoperation.
Clearing Selected Melody TracksWhile the SONG record-ready or rehearsal mode is engaged use the SUB MENU
[▲] and [▼] buttons to select the “TrkClr?” function. The SONG tracks iconscorresponding to MELODY tracks which contain data will flash (the ACCOMPANI-MENT track cannot be cleared — neither can tracks in demonstration or cartridgesongs). Use the TRACK buttons to select track you want to clear (frame will appearcontinuously around the selected track.) Once the desired track has been selected,“Sure?” will appear on the display. Press the [+] (YES) button to actually clear thecurrently selected track. Press [–] (NO) if you want to abort the clear operation.
YEs SongClr? Sure?7 8
0
9
MELODY1 2 3 4
MELODY MELODY MELODY ACCOM-PANIMENT
VOICE VOICE VOICE
RHYTHM1
BASS CHORD1
CHORD2
PAD PHRASE1
PHRASE2
FINGERING
REGISTRATION MULTI PAD
RHYTHM2
L R2 R1
VOICE L VOICE R276 101
TrkClr?
REVERB TRANSPOSE0 REPEAT
1MEASURE
HARMONY TEMPO116
SYNCSTOP
MINUS ONE
OVERALL
REGISTMEMORY
DIGITALEFFECT
MIDI
MULTI PAD1
MINUS ONE
MELODY1 2 3 4
MELODY MELODY MELODY ACCOM-PANIMENT
VOICE VOICE VOICEL R2 R1
MINUS ONE
CHORUS DSP

64
��������������������������������QQQQQQQQQQQQQQQQQQQQQQQQQQQQQQQQ¢¢¢¢¢¢¢¢¢¢¢¢¢¢¢¢¢¢¢¢¢¢¢¢¢¢¢¢¢¢¢¢Style Recording
The PSR-530 lets you record up to three original “user styles” which can be used for auto-accompaniment in the same way as the preset styles. The user styles are recorded as stylenumbers 101, 102, and 103, and each style can be recorded with the full complement of 8tracks (RHYTHM 1, RHYTHM 2, BASS, CHORD 1, CHORD 2, PAD, PHRASE 1, PHRASE2) and 5 sections (INTRO, MAIN A, MAIN B, ENDING, FILL).
• Material recorded on the STYLE tracks will be retained even after turning the poweroff. See page 98 for the details.
• The recorded data will be lost if the power is turned off, the AC adaptor is unplugged,or the batteries fail during recording.
• The REGISTRATION MEMORY cannot be recalled during style recording.
• The Shortcut functions are not available when one of the Record modes is engaged.
● The STYLE tracks record the following operations and data:
• Note on/off.
• Velocity.
• Voice number (drum kit number)*
• Pitch bend.
Only one event of the item marked with * can be recorded for each track of the sections.
• Up to approximately1,980 notes for a sec-tion (totally ca. 3,960notes) can be re-corded in the PSR-530 STYLE tracks.
1 Select a Style To Begin With
Select a style from one of the 100 presets that is close to the type of style youwant to create.
Style Recording Procedure
• If none of the preset stylesis appropriate, select onethat has the same time sig-nature and number of mea-sures as the one you wantto create, then use the “AllClear” function (page 70) toclear all preset data beforeentering your own.
• If you select a blank userstyle to begin with (101 …103), the style will be in 4/4time and all sections exceptFILL will be 2 measureslong. FILL will be 1 mea-sure long.

65
��������������������������������QQQQQQQQQQQQQQQQQQQQQQQQQQQQQQQQ¢¢¢¢¢¢¢¢¢¢¢¢¢¢¢¢¢¢¢¢¢¢¢¢¢¢¢¢¢¢¢¢Style Recording
3 Select the STYLE Record mode
Press the [STYLE] button to select the STYLE record mode. The STYLE menuwill automatically be selected and a user style number will appear on the top lineof the display. The beat indicator dots will flash at the currently set tempo,indicating that the record ready (synchro-start) mode is engaged. Also, the framesurrounding the style track icons and the auto-accompaniment section button(INTRO, MAIN A, MAIN B, and ENDING) indicators will flash, indicating thata section and track must be selected before recording can begin.
• The icons of tracks whichalready contain data willappear continuouslyrather than flashing whenthe STYLE record mode isselcted.
• If the STYLE record modeis selectd while a presetstyle or cartridge style isselected, the lowest-num-bered user style whichdoes not contain any re-corded data will automati-cally be selected. If alluser styles already con-tain data, however, userstyle number 101 will beselected.
• If the STYLE record modeis selectd while a userstyle is selected, that userstyle will be selected forrecording.
• The following panel set-ting changes will occurwhen the STYLE recordmode is engaged:
• The measure number willbe reset to “1”.
• If the Metronome functionis on (page 85), the metro-nome will sound at the cur-rent tempo.
• The SYNCHRO STOPfunction wil be turned off.
1
MELODY1 2 3 4
MELODY MELODY MELODY ACCOM-PANIMENT
VOICE VOICE VOICE
RHYTHM1
BASS CHORD1
CHORD2
PAD PHRASE1
PHRASE2
REGISTRATION MULTI PAD
RHYTHM2
L R1
101VOICE L VOICE R276 101
UserSty1
REVERB TRANSPOSE0 REPEAT
1MEASURE
HARMONY TEMPO116
MINUS ONE
VOICE
STYLE
SONG
MAIN/AUTO FILL ENDINGINTRO
A B
2 Engage the Record Ready Mode
Press the [RECORD] button to engage the record-ready mode. The [RECORD]button indicator will light, and the SONG, STYLE, and MULTI PAD [1] … [4]icons will flash, indicating that you must select one of the corresponding recordmodes.
1
MELODY1 2 3 4
MELODY MELODY MELODY ACCOM-PANIMENT
VOICE VOICE VOICE
RHYTHM1
BASS CHORD1
CHORD2
PAD PHRASE1
PHRASE2
FINGERING
REGISTRATION MULTI PAD
RHYTHM2
L R2 R1
13VOICE L VOICE R276 101
UserSng1
REVERB TRANSPOSE0 REPEAT
1
HARMONY TEMPO116
SYNCSTOP
MINUS ONE
VOICE
STYLE
SONG
CHORUS DSP
1 2 3 4

66
��������������������������������QQQQQQQQQQQQQQQQQQQQQQQQQQQQQQQQ¢¢¢¢¢¢¢¢¢¢¢¢¢¢¢¢¢¢¢¢¢¢¢¢¢¢¢¢¢¢¢¢Style Recording
4 If Necessary, Select a User Style Number
If the desired user style is not already selected, use the [–] and [+] buttons, numberbuttons, or data dial to select as required.
5 Select a Section to Record
Press the auto-accompaniment section button corresponding to the section youwant to record. Press the MAIN A or MAIN B button twice to record a FILL. Theindicator of the selected section button will light continuously and the others will goout. (The MAIN A or MAIN B indicator will flash when you designate FILLrecording.)
• If you don’t specifi-cally select a section,the MAIN A sectionwill automatically beselected for recording.
• Although the presetFILL sections have 4variations (refer topage 25), user-styleFILL sections canhave only 1. Whenusing a preset styleas a basis for a userstyle, the AA FILLvariation is used.
MAIN/AUTO FILL ENDINGINTRO
A B
In this case the RHYTHM 1 track will automatically be selected for recording asthe default.
MELODY1 2 3 4
MELODY MELODY MELODY ACCOM-PANIMENT
VOICE VOICE VOICE
RHYTHM1
BASS CHORD1
CHORD2
PAD PHRASE1
PHRASE2
RHYTHM2
L R2 R1
MINUS ONE
6 Select a Track to Record
When using a preset style as a basis for a user style, the BASS, CHORD 1, CHORD2, PAD, PHRASE 1, and PHRASE 2 tracks must be cleared before they can be selectedfor recording (see page 70). The RHYTHM 1 and RHYTHM 2 tracks can be“overdubbed” — i.e. new notes can be added without erasing the original data.
Use the TRACK buttons to select the style track you want to record. A frameappears continuously around the icon of the track selected for recording, and theframes surrounding the remaining tracks will disappear.
• Only one track can berecorded at a time.
• If you don’t specifi-cally select a track,the RHYTHM 1 trackwill automatically beselected when youstart recording.
MELODY1 2 3 4
MELODY MELODY MELODY ACCOM-PANIMENT
VOICE VOICE VOICE
RHYTHM1
BASS CHORD1
CHORD2
PAD PHRASE1
PHRASE2
RHYTHM2
L R2 R1
MINUS ONE

67
��������������������������������QQQQQQQQQQQQQQQQQQQQQQQQQQQQQQQQ¢¢¢¢¢¢¢¢¢¢¢¢¢¢¢¢¢¢¢¢¢¢¢¢¢¢¢¢¢¢¢¢
7 Select a Voice, If Necessary
If necessary, select a voice for the track to be recorded by pressing the [VOICE]button and selecting in the normal way.
8 Record
Recording will begin as soon as you play a note on the keyboard or press the[START/STOP] button. The BEAT indicator dots will begin to indicate thecurrent beat, and the MEASURE parameter will show the current measurenumber during recording.
The style will repeat continuously when recording is started, so you cancontinue to add (“overdub”) notes until the current track is complete. The styleshould be recorded based on a CM7 chord (C Major Seven) in order for it tofunction properly when used for auto-accompaniment.
START/STOP /
MULTI PAD
ONE TOUCHSETTING 9MEASURE
ATION
Observe the following rules when recording the MAIN and FILL sections:
• Use only the CM7 scale tones when recording the BASS, and PHRASEtracks (i.e. C, D, E, G, A, and B).
• Use only the chord tones when recording the CHORD and PAD tracks (i.e. C,E, G, and B).
Any appropriate chord or chord progression can be used for the INTRO andENDING sections.
C S C C S CC = chord toneC, S = scale tones
• Before actually starting torecord you can try playingthe PSR-530 the way it isset up by using the “Re-hearsal Mode”: press the[SYNC START] button totemporarily disengage therecord ready mode, re-hearse as necessary, thenpress the [SYNC START]button again to return to therecord ready mode.
• If the memory becomes fullwhile recording, “Full” willappear on the display andrecording will stop (the re-hearsal mode will be en-gaged).
• Even though you can startrecording with the user stylememory space thoroughlyconsumed, “Full” will beshown on the display andthe recording will forcibly bestopped. In this case, firstexit from the record mode,next select the unnecessaryuser style, and then enterthe record mode again andexecute the Clear function(see page 70) to secure thefree space to record.
• For recording the RHYTHM1/2 tracks, the instrumentsymbols printed on the frontedge of the panel show youthe instrument assignmentsto each key. See KeyboardPercussion on page 19 forplaying each drum/percus-sion sound.
9 Stop Recording
Stop recording by pressing the [START/STOP] button. When recording isstopped the MEASURE number on the display will return to “1”. • You can also press the
[SYNC START] button tostop recording and return tothe record ready mode.START/STOP
/
Style Recording
• The Registration Memorybuttons will be disabled inthe style record mode.

68
��������������������������������QQQQQQQQQQQQQQQQQQQQQQQQQQQQQQQQ¢¢¢¢¢¢¢¢¢¢¢¢¢¢¢¢¢¢¢¢¢¢¢¢¢¢¢¢¢¢¢¢Style Recording
10 Record Additional Sections & Tracks as Required
By repeating steps 5 through 9, above, you can select and record additional sectionsand tracks as required.
11 Exit From the Record Mode
When you’re finished recording a style, press the [RECORD] button so that itsindicator goes out to exit from the record mode. The recorded user style can now beused in the same way as the preset styles (page 22).
• The voice data in spe-cific user style trackscan be “revoiced” inthe same way as thepreset styles, as de-scribed on page 80.This, however, doesnot actually rewritethe user style data. Inorder to actuallychange the user styledata first use therevoice function, thenimmediately engageand disengage thestyle record modewithout recording anydata.
Drum CancelThis function makes it possible to erase specific drum instruments from the
RHYTHM 1 and RHYTHM 2 tracks.While recording either the RHYTHM 1 or RHYTHM 2 track, use the SUB MENU
[▲] and [▼] buttons to select the “:Cancel”.
Then press the key on the key board corresponding to the instrument you want tocancel.
Cancel

69
��������������������������������QQQQQQQQQQQQQQQQQQQQQQQQQQQQQQQQ¢¢¢¢¢¢¢¢¢¢¢¢¢¢¢¢¢¢¢¢¢¢¢¢¢¢¢¢¢¢¢¢
QuantizeQuantization can be used to align notes to the nearest specified beat to tighten up
loose timing.
1 With the style record ready mode (or rehearsal mode) engaged and the tartget styleand its section selected, use the SUB MENU [▲] and [▼] buttons to select the“YES:Quantiz?”.
Quantize Value Note
4 Quarter note
6 Quarter note triplet
8 Eighth note
12 Eighth note triplet
16 Sixteenth note
24 Sixteenth note triplet
32 Thirty-second note
3 Press the SUB MENU [▼] button once so that “ : Execute?” appears on the display.Then press the [+] (YES) button to execute the quantize function, or the [–] (NO)button to cancel.
2 Press the [+] (YES) button to engage the quantize function (or [–] to abort). Thecurrent quantize value will appear to the left of “Quantize” on the top line of thedisplay. Use the [–] and [+] buttons, or data dial to select the desired quantize value(see the chart below). When the quantize function is executed, all notes in the targettrack will be aligned with the nearest note of the corresponding value.
YES Quantiz?
4 Quantize
Execute?
One measure of 8th notes before quantization
After quantization
Style Recording

70
��������������������������������QQQQQQQQQQQQQQQQQQQQQQQQQQQQQQQQ¢¢¢¢¢¢¢¢¢¢¢¢¢¢¢¢¢¢¢¢¢¢¢¢¢¢¢¢¢¢¢¢Style Recording
Clearing User Style Data
This function makes it possible to clear unneeded data from the PSR-530 User Styletracks.
Clearing an Entire StyleWhile the STYLE record-ready or rehearsal mode is engaged use the SUB MENU
[▲] and [▼] buttons to select the “All Clr?” function, then press the [+] (YES) button:“Sure?” will appear on the display. Press the [+] (YES) button a second time toactually clear the currently selected user style (the preset styles and cartridge stylescannot be cleared). Press [–] (NO) if you want to abort the clear operation.
Clearing Selected Style TracksWhile the STYLE record-ready or rehearsal mode is engaged and a section is
selected, use the SUB MENU [▲] and [▼] buttons to select the “TrkClr” function. Thestyle track icons corresponding to tracks which contain data will flash. Use theTRACK buttons to select track(s) you want to clear (frames will appear continuouslyaround the selected tracks).
REGISTRATION MULTI PAD
VOICE L VOICE R276 101
TrkClr?
REVERB TRANSPOSE0 REPEAT
1MEASURE
HARMONY TEMPO116
OVERALL
REGISTMEMORY
DIGITALEFFECT
MIDI
MULTI PAD1
MELODY1 2 3 4
MELODY MELODY MELODY ACCOM-PANIMENT
VOICE VOICE VOICE
RHYTHM1
BASS CHORD1
CHORD2
PAD PHRASE1
PHRASE2
RHYTHM2
L R2 R1
MINUS ONE
MELODY1 2 3 4
MELODY MELODY MELODY ACCOM-PANIMENT
VOICE VOICE VOICE
RHYTHM1
BASS CHORD1
CHORD2
PAD PHRASE1
PHRASE2
RHYTHM2
L R2 R1
MINUS ONE
YEs All Clr? Sure?7 8
0
9
Sure?
7 8
0
9
Once the desired tracks have been selected, “Sure?” will appear on the display.Press the [+] (YES) button to actually clear the currently selected track(s). Press [–](NO) if you want to abort the clear operation.

71
��������������������������������QQQQQQQQQQQQQQQQQQQQQQQQQQQQQQQQ¢¢¢¢¢¢¢¢¢¢¢¢¢¢¢¢¢¢¢¢¢¢¢¢¢¢¢¢¢¢¢¢
In addition to the preset MULTI PAD sets, the PSR-530 has 4 user-recordable sets that youcan use to store your own creations.
• Material recorded in the MULTI PADs will be retained even after turning the poweroff. See page 98 for the details.
• The recorded data will be lost if the power is turned off, the AC adaptor is unplugged,or the batteries fail during recording.
• The Shortcut functions are not available when one of the Record modes is engaged.
● The MULTI PADs record the following operations and data:
• Note on/off.
• Velocity.
• R1 voice (voice number, volume, reverb send level, chorus send level,octave, pan).
• Chord match on/off (pad 1…4).
• Pitch bend, pitch bend range.
• Sustain on/off.
• Up to approximately100 notes for eachpad can be recordedin the PSR-530MULTI PADs.
1 Engage the Record Ready Mode
Press the [RECORD] button to engage the record-ready mode. The [RECORD]button indicator will light, and the SONG, STYLE, and MULTI PAD [1] … [4] iconswill flash, indicating that you must select one of the corresponding record modes.
MUTI PAD Recording Procedure
1
MELODY1 2 3 4
MELODY MELODY MELODY ACCOM-PANIMENT
VOICE VOICE VOICE
RHYTHM1
BASS CHORD1
CHORD2
PAD PHRASE1
PHRASE2
FINGERING
REGISTRATION MULTI PAD
RHYTHM2
L R2 R1
13VOICE L VOICE R276 101
UserSng1
REVERB TRANSPOSE0 REPEAT
1
HARMONY TEMPO116
SYNCSTOP
MINUS ONE
VOICE
STYLE
SONG
CHORUS DSP
1 2 3 4
Multi Pad Recording

72
��������������������������������QQQQQQQQQQQQQQQQQQQQQQQQQQQQQQQQ¢¢¢¢¢¢¢¢¢¢¢¢¢¢¢¢¢¢¢¢¢¢¢¢¢¢¢¢¢¢¢¢Multi Pad Recording
2 Select the MULTI PAD Record Mode
Press any MULTI PAD button ([1] … [4]) to select the MULTI PAD record mode(the MULTI PAD button you press will be selected for recording). The MULTI PADmenu will automatically be selected and a user pad set number will appear on the topline of the display. The beat indicator dots will flash at the currently set tempo,indicating that the record ready (synchro-start) mode is engaged.
• If the [RECORD] but-ton is pressed while apreset pad set is se-lected, the lowest-numbered user padset which does notcontain any recordeddata will automaticallybe selected. If otheruser pad sets alreadycontain data, how-ever, user pad num-ber 1 will be selected.
• The DSP effect can-not be turned on dur-ing MULTI PAD re-cording or the MULTIPAD record standbymode. If the DSP ef-fect is on when theMULTI PAD recordmode is engaged, itwill automatically beturned off.
• If the Metronomefunction is on (page85), the metronomewill sound at the cur-rent tempo.
1
MELODY1 2 3 4
MELODY MELODY MELODY ACCOM-PANIMENT
VOICE VOICE VOICE
RHYTHM1
BASS CHORD1
CHORD2
PAD PHRASE1
PHRASE2
FINGERING
REGISTRATION MULTI PAD
RHYTHM2
L R2 R1
007VOICE L VOICE R276 101
UserPad1
REVERB TRANSPOSE0 REPEAT
1MEASURE
HARMONY TEMPO116
SYNCSTOP
MINUS ONE
CHORUS DSP
21
MUTLI PAD
43
1 2 3 4
OVERALL
REGISTMEMORY
DIGITALEFFECT
MIDI
MULTI PAD
3 If Necessary, Select a User Pad Set Number
If the desired user pad set is not already selected, use the [–] and [+] buttons, thenumber buttons, or the data dial to select as required.
37 UserPad1
4 If Necessary, Select a MULTI PAD to Record
If the MULTI PAD you pressed in step 2, above, is not the one you want to record,you can select any other pad at this point simply pressing the appropriate MULTI PADbutton. The selected MULTI PAD icon will appear in the display.
21
MUTLI PAD
43ONE TOUCH
SETTING
MULTI PAD1MEASURE
1 2 3 44

73
��������������������������������QQQQQQQQQQQQQQQQQQQQQQQQQQQQQQQQ¢¢¢¢¢¢¢¢¢¢¢¢¢¢¢¢¢¢¢¢¢¢¢¢¢¢¢¢¢¢¢¢
5 Specify Chord Match if Required
If you record a MULTI PAD with a pitched voice, the Chord Match function(see page 51) can be specified for that pad by using the SUB MENU buttons toselect the Chord Match function for the corresponding pad (“Pad1Chd” …“Pad4Chd”) while in the record standby or rehearsal mode, and then using the[+] button to turn it “On” or “Off” as you like.
on Pad1Chd
6 Record
Recording will begin as soon as you play a note on the keyboard or press the[START/STOP] button, and the BEAT indicator dots will begin to indicate thecurrent beat as in the Auto Accompaniment mode. If you are recording a ChordMatch phrase, be sure to base your phrase on a CM7 chord to ensure properChord Match operation. See page 67 for more details on recording around aCM7 chord.
7 Stop Recording
Stop recording by pressing the [START/STOP] button.
START/STOP /
MULTI PAD
ONE TOUCHSETTING 9MEASURE
ATION
START/STOP /
• Before actually starting torecord you can try playing thePSR-530 the way it is set upby using the “RehearsalMode”: press the [SYNCSTART] button to temporarilydisengage the record readymode, rehearse as necessary,then press the [SYNC START]button again to return to therecord ready mode.
• Whenever you record aMULTI PAD, any previouslyrecorded material in the sameMULTI PAD will be erased.
• If the memory becomes fullwhile recording, “Full” will ap-pear on the display and re-cording will stop (the record-ready mode will be engaged).
• The Chord Match on/off statuscan be changed in the SUBMENU “MULTI PAD” even af-ter exiting the recording mode.
Multi Pad Recording
8 Record Additional Pads as Required
By repeating steps 3 through 7, above, you can select and record additionalpads as required.
9 Exit From the Record Mode
When you’re finished recording pads, press the [RECORD] button so that itsindicator goes out to exit from the record mode. The recorded user pads can nowbe played back in the same way as the preset pads (page 49).

74
��������������������������������QQQQQQQQQQQQQQQQQQQQQQQQQQQQQQQQ¢¢¢¢¢¢¢¢¢¢¢¢¢¢¢¢¢¢¢¢¢¢¢¢¢¢¢¢¢¢¢¢
Clearing MULTI PAD Data
This function makes it possible to clear unneeded data from the PSR-530 MULTIPADs.
Clearing an Entire Pad SetWhile the MULTI PAD record-ready or rehearsal mode is engaged use the SUB
MENU [▲] and [▼] buttons to select the “BankClr” function, then press the [+] (YES)button: “Sure?” will appear on the display. Press the [+] (YES) button a second timeto actually clear the currently selected pad set (the preset pad sets cannot be cleared).Press [–] (NO) if you want to abort the clear operation.
YEs BankClr? Sure?7 8
0
9
Clearing Selected MULTI PADsWhile the MULTI PAD record-ready or rehearsal mode is engaged use the SUB
MENU [▲] and [▼] buttons to select the “PadClr” function. The MULTI PAD iconscorresponding to pads which contain data will flash (preset pad set data cannot becleared).
REGISTRATION
VOICE L VOICE R276 101
PadClr?
REVERB TRANSPOSE0 REPEAT
HARMONY TEMPO116
REGISTMEMORY
MULTI PAD1
MULTI PAD1 2 3 4
Use the MULTI PAD buttons to select the pad you want to clear (the iconcorresponding to the selected pad will flash). “Sure?” will appear on the display. Pressthe [+] (YES) button to actually clear the currently selected pad. Press [–] (NO) if youwant to abort the clear operation.
21
MUTLI PAD
43 MULTI PAD1MEASURE
1 2 3 4
Multi Pad Recording
• If the pad you se-lected has alreadybeen cleared, “- - - :PadClr?” will appearon the display.
• “- - -: PadClr?” will beshown on the displayif all the pads for theselected set arecleared.

75
��������������������������������QQQQQQQQQQQQQQQQQQQQQQQQQQQQQQQQ¢¢¢¢¢¢¢¢¢¢¢¢¢¢¢¢¢¢¢¢¢¢¢¢¢¢¢¢¢¢¢¢
The PSR-530 features a cartridge slot which accepts pre-programmed Yamaha MusicCartridges containing style and/or song data. One sample Music Cartridge containing songdata is supplied with the PSR-530. Others are available from your Yamaha dealer.
For Cartridges without the mark, thebottom of the serrated edges of theCartridge should be even with the paneledge (not above it).
The triangular mark on the front of the Cartridgeshould be completely below the panel edge whenthe Cartridge is properly seated.
◆ Inserting a Music Cartridge
With the power OFF, insert the Music Cartridge into the cartridge slot as shown,and press down firmly until the Cartridge is seated properly (as shown in theillustration). The Cartridge is shaped so that it will only fit in the slot one way -don’t try to force it in the wrong way. Turn the power back ON again after inserting.
◆ Music Cartridge Handling Precautions
• Do not leave Music Cartridges in lo-cations which are subject to exces-sive heat or humidity.
• Do not drop Music Cartridges or sub-ject them to strong shock.
• Do not disassemble Music Cartridges.• Do not directly touch the Music
Cartridge’s electrical contacts. Per-sistently touching it may cause tobreak electrical contacts or generatestatic electricity. Static electriccharges can cause loss of data andunreliable operation.
• Do not insert objects or cartridgesother than Yamaha Music Cartridgesin the PortaTone cartridge slot. Doingso can result in serious damage to theinstrument.
• Never attempt to insert or remove acartridge when the STAND BY/ONswitch is ON. Doing so can result inloss of the PSR-530 memory data(song data/registration memorydata) or complete lack of control.
• The Music Cartridge data may not beselected or played back correctly, ifthe electrical contacts on the MusicCartridge are affected with dust. Ifthis happens, insert and remove theMusic Cartridge several times. Thismay solve the problem. If the prob-lem still happens, wipe and clean theelectrical contacts on the Music Car-tridge with a dry soft cloth.
• Be sure to insert theMusic Cartridge whenyou recall the registra-tion settings based onthe cartridge data orplayback the songbased on the cartridgedata. Otherwise, “NoCart (Cartridge)” willappear on the display.
Using Music Cartridges

76
��������������������������������QQQQQQQQQQQQQQQQQQQQQQQQQQQQQQQQ¢¢¢¢¢¢¢¢¢¢¢¢¢¢¢¢¢¢¢¢¢¢¢¢¢¢¢¢¢¢¢¢Using Music Cartridges
Cartridge Songs
Using Yamaha Music Cartridges (the one supplied with the PSR-530 includes 7songs, others are available from your Yamaha dealer), the PSR-530 will let you enjoylistening to automated performances, or function as your “private music tutor,”allowing you to practice various parts of a piece while the others are playedautomatically.
Cartridge Song Playback
1 Select the Cartridge Menu
Press the [CARTRIDGE] button to select the CARTRIDGE menu (the triangularindicator will appear next to “CARTRIDGE” to the right of the display). The numberand name of the currently selected cartridge song will appear on the top line of thedisplay, the CART icon will appear in the upper left corner of the display, and the songtrack and volume icons near the bottom of the display will appear framed. The[START/STOP] indicator will flash.
01VOICE L VOICE R2 VOICE R176 101 1
530XGVOICE
STYLE
SONG
START/STOP /
2 Select a Cartridge Song Number
Use the [–] and [+] buttons, number buttons, or data dial to select the cartridge songnumber you want to play. The song number can also be incremented by pressing the[CARTRIDGE] button: press briefly to increment by one, or hold for continuousincrementing.
• Cartridge song num-bers can also be se-lected from the SONGmenu as follows:press and hold thenumber [3] button un-til the cartridge iconappears in the dis-play, then enter thenumber of the car-tridge song you wantto select via the num-ber buttons in the nor-mal way.
• The cartridge songscan also be selectedfrom the SONG menuby using the [–] and[+] buttons or datadial to go beyond thehighest or lowest in-ternal song numbers— e.g. pressing the[+] button while inter-nal song number 16 isselected will selectcartridge song num-ber 1 (the cartridgeicon will appear).
1 2 3
4 5 6
7 8
0
9
NO YES
• The included musiccartridge is made ex-clusively for the PSR-530. The data on thecartridge may not beplayed back properlywith the other models.

77
��������������������������������QQQQQQQQQQQQQQQQQQQQQQQQQQQQQQQQ¢¢¢¢¢¢¢¢¢¢¢¢¢¢¢¢¢¢¢¢¢¢¢¢¢¢¢¢¢¢¢¢
3 Start Playback
Playback will begin as soon as the [START/STOP] button is pressed. You can turnthe MELODY and ACCOMPANIMENT tracks on and off during playback as requiredby using the TRACK buttons.
• Playback can bestarted from any mea-sure — page 54.
• The playback tempocan be changed freelyas required.
• Cartridge song datacannot be revoiced.
• You may not be ableto play back the car-tridge songs properlyjust after turning thepower on since ittakes for a while forthe PSR-530 to readthe cartridge data.
START/STOP /
Cartridge Accompaniment Styles
Optional Style Music Cartridges provides extra accompaniment styles that can beused in the same way as the internal accompaniment styles after pressing the [STYLE]button to select the STYLE menu.
Cartridges which contain both song and style data require a slightly different styleselection procedure: Press and hold the number [3] button until the cartridge iconappears to the left of the style name in the display, then enter the number of thecartridge style you want to select via the number buttons or data dial in the normal way.The cartridge styles can also be selected by using the [–] and [+] buttons or data dialto go beyond the highest or lowest internal style numbers — e.g. pressing the [+]button while internal style number 100 is selected will select cartridge style number01 (the cartridge icon will appear).
The cartridge styles are used in exactly the same way as the internal accompanimentstyles (page 22).
1 2 3
4 5 6
7 8
0
9
NO YES
VOICE
STYLE
SONG
• Some cartridge styles,for example, have Aand B intro and end-ing sections as wellas A and B main sec-tions. In such a case,if the [INTRO] andMAIN/AUTO FILL [A]buttons are pressed inorder to start the ac-companiment with anintroduction and thengo to the main A sec-tion, the intro A sec-tion will play. If the[INTRO] and MAIN/AUTO FILL [B] but-tons are pressed, theintro B section willplay. A similar situa-tion applies to end-ings: if the main A orB section is playingand the [ENDING]button is pressed, theending A or B sectionwill play accordingly.
• You may not be ableto select the cartridgestyles just after turn-ing the power onsince it takes for awhile for the PSR-530to read the cartridgestyle data.
Using Music Cartridges

78
��������������������������������QQQQQQQQQQQQQQQQQQQQQQQQQQQQQQQQ¢¢¢¢¢¢¢¢¢¢¢¢¢¢¢¢¢¢¢¢¢¢¢¢¢¢¢¢¢¢¢¢
The PSR-530 REVOICE function lets you change the following parameters for the R1, R2and L voices, the AUTO ACCOMPANIMENT tracks, and the user SONG tracks.
● Revoice Parameters
Parameter Display Range Comments
Voice Voice Name 1 … 692 Assigns a voice number to the specified PSR-530 voice or track.
Volume Volume 0 … 127 Sets the volume of the specified PSR-530 voice or track.
Octave Octave –2 … 2 Shifts the pitch of the specified voice or track up or down by oneor two octaves. A setting of “0” produces normal pitch.
Pan Pan –7 … 7 Positions the sound of the specified voice or track from left to rightin the stereo sound field. “–7” is full left, “7” is full right, “0” is center,and all other settings are corresponding positions in between.
Reverb Send Level RevSndLv 0 … 127 Sets the reverb send level for the specified voice or track, andthus the amount of reverb effect applied to that voice or track.
Chorus Send Level ChoSndLv 0 … 127 Sets the chorus send level for the specified voice or track, andthus the amount of chorus effect applied to that voice or track.
DSP Send Level DspSndLv 0 … 127 Sets the DSP send level for the specified voice or track, and thusthe amount of DSP effect applied to that voice or track.
1 Select the VOICE REVOICE Mode
While the VOICE menu is selected, press the [REVOICE] button (actually, theorder here is not important: you can also press the [VOICE] button after pressing the[REVOICE] button). The [REVOICE] button indicator will light and a frame willappear around the R1 voice icon in the display (i.e. the R1 voice is initially selectedfor revoicing).
• The VOICE REVOICEmode will automati-cally be selected if the[REVOICE] button ispressed while anymenu other thanSTYLE or SONG isselected.
• The VOICE REVOICEmode cannot be se-lected while one ofthe record modes isengaged.
Revoicing the R1, R2, and L Voices
MELODY1 2 3 4
MELODY MELODY MELODY ACCOM-PANIMENT
VOICE VOICE VOICE
RHYTHM1
BASS CHORD1
CHORD2
PAD PHRASE1
PHRASE2
FINGERING
REGISTRATION MULTI PAD
RHYTHM2
L R2 R1
001VOICE L VOICE R2 VOICE R176 101 1
GrandPno
REVERB TRANSPOSE0 REPEAT
1MEASURE
HARMONY TEMPO116
SYNCSTOP
VOICE
STYLE
SONG
1
REVOICE
CHORUS DSP
Revoicing

79
��������������������������������QQQQQQQQQQQQQQQQQQQQQQQQQQQQQQQQ¢¢¢¢¢¢¢¢¢¢¢¢¢¢¢¢¢¢¢¢¢¢¢¢¢¢¢¢¢¢¢¢Revoicing
2 If Necessary Select a Voice to Revoice
Use the three rightmost TRACK buttons to select the voice you want torevoice: L, R2, or R1. A frame will appear around the icon of the selected voice.• The TRACK button below
the selected voice can beused to turn the voice on oroff. Make sure that thevoice is turned on if youwant to monitor the soundwhile revoicing (the R1voice cannot be turned off).
MELODY1 2 3 4
MELODY MELODY MELODY ACCOM-PANIMENT
VOICE VOICE VOICEL R2 R1
TRACK
3 Select and Edit the Revoice Parameters
Use the SUB MENU [▲] and [▼] buttons to select the desired parameter. Thename of the selected parameter will appear on the top line of the display to theright of the parameter’s current value. Use the [–] and [+] buttons, the numberbuttons, or the data dial to set the parameter’s value as required. Refer to the“Revoice Parameters” chart on page 78.
• You can jump directly to theREVOICE R2 VOICE dis-play by pressing and hold-ing the [DUAL VOICE] but-ton for a few seconds.
• You can jump directly to theREVOICE L VOICE displayby pressing and holding the[SPLIT VOICE] button for afew seconds.
100 RevSndLv
100 ChoSndLv
100 DspSndLv
0 Pan
0 Octave
100 Volume
001 GrandPno
4 Repeat as Required and Exit When Done
Repeat steps 2 and 3, above, to revoice the voices as required, then press the[REVOICE] button so that its indicator goes out to exit from the REVOICEmode.
REVOICE
• Minus settings for the Oc-tave and Pan parameterscan be directly entered bypressing the appropriatenumber button while hold-ing the [–] button.
• When the DSP type is setas insertion, the DSP depthparameter cannot bechanged.
• The REVOICE mode willautomatically be exited ifthe MENU [▲] and [▼] but-tons are used to select anyof the menus to the left ofthe display, or if the [CAR-TRIDGE] button is pressed.
• Save any revoice settingsyou want to keep to thePSR-530 REGISTRATIONMEMORY (page 47). Therevoice setting are tempo-rary and will be lost if thepower is turned off, a differ-ent R1 panel voice is se-lected while the Voice Setfunction is on, or a REGIS-TRATION MEMORY is re-called.

80
��������������������������������QQQQQQQQQQQQQQQQQQQQQQQQQQQQQQQQ¢¢¢¢¢¢¢¢¢¢¢¢¢¢¢¢¢¢¢¢¢¢¢¢¢¢¢¢¢¢¢¢Revoicing
1 Select the STYLE REVOICE Mode
While the STYLE menu and the style you want to revoice are selected, press the[REVOICE] button (actually, the order here is not important: you can also pressthe [STYLE] button after pressing the [REVOICE] button). The [REVOICE]button indicator will light and a frame will appear around the RHYTHM 1 trackicon in the display (i.e. the RHYTHM 1 track is initially selected for revoicing).
Revoicing a Style
1
MELODY1 2 3 4
MELODY MELODY MELODY ACCOM-PANIMENT
VOICE VOICE VOICE
RHYTHM1
BASS CHORD1
CHORD2
PAD PHRASE1
PHRASE2
FINGERING
REGISTRATION MULTI PAD
RHYTHM2
L R2 R1
201VOICE L VOICE R2 VOICE R176 101 1
Std.Kit1
REVERB TRANSPOSE0 REPEAT
1MEASURE
HARMONY TEMPO116
SYNCSTOP
VOICE
STYLE
SONG
REVOICE
CHORUS DSP
MELODY1 2 3 4
MELODY MELODY MELODY ACCOM-PANIMENT
VOICE VOICE VOICE
RHYTHM1
BASS CHORD1
CHORD2
PAD PHRASE1
PHRASE2
RHYTHM2
L R2 R1
TRACK
3 If Necessary Select a Track to Revoice
Use the TRACK buttons to select the accompaniment track you want to revoice:RHYTHM 1, RHYTHM 2, BASS, CHORD 1, CHORD 2, PAD, PHRASE 1, orPHRASE 2. A frame will appear around the icon of the selected track.
2 Select the Section(s) to be Revoiced
Press INTRO , MAIN A/B or ENDING button(s) to select the section(s).
• The TRACK button belowthe selected track can beused to turn the track onor off. Make sure that thetrack is turned on if youwant to monitor the soundwhile revoicing.
• Only drum kits (voicenumbers 127 … 136) canbe selected for theRHYTHM 1 track.
• Any voice can be selectedfor the RHYTHM 2 track,but please note that theRHYTHM 2 track is not af-fected by the AUTO AC-COMPANIMENT feature.
• The OCTAVE parameterand the DSP send levelcannot be edited in theSTYLE REVOICE mode.
• The STYLE REVOICEmode can even be se-lected by pressing the[REVOICE] button whilean accompaniment isplaying.
• The STYLE REVOICEmode cannot be selectedwhile one of the recordmodes is engaged.
• The STYLE REVOICEmode cannot be selectedwhile a song or voice isbeing revoiced duringsong playback.
• The Registration MemoryFreeze function will auto-matically be turned onwhen entering the StyleRevoice Mode.
• Style revoicing affects allsections of the selectedstyle.

81
��������������������������������QQQQQQQQQQQQQQQQQQQQQQQQQQQQQQQQ¢¢¢¢¢¢¢¢¢¢¢¢¢¢¢¢¢¢¢¢¢¢¢¢¢¢¢¢¢¢¢¢
5 Repeat as Required and Exit When Done
Repeat steps 2 and 4, above, to revoice the tracks as required, then press the[REVOICE] button so that its indicator goes out to exit from the REVOICEmode.
REVOICE
1 Select the SONG REVOICE Mode
While the SONG menu and the user song you want to revoice are selected, pressthe [REVOICE] button (actually, the order here is not important: you can alsopress the [SONG] button after pressing the [REVOICE] button). The [RE-VOICE] button indicator will light and a frame will appear around the MELODY1 track icon in the display (i.e. the MELODY 1 track is initially selected forrevoicing).
Revoicing a User Song
MELODY1 2 3 4
MELODY MELODY MELODY ACCOM-PANIMENT
VOICE VOICE VOICEL R2 R1
MINUS ONE
SONG
REVOICE
4 Select and Edit the Revoice Parameters
Use the SUB MENU [▲] and [▼] buttons to select the desired parameter. Thename of the selected parameter will appear on the top line of the display to theright of the parameter’s current value. Use the [–] and [+] buttons, the numberbuttons, or the data dial to set the parameter’s value as required. Refer to the“Revoice Parameters” chart on page 78.
• Revoicing a user song actu-ally rewrites the recordedsong data, so the originaldata will be lost.
• The pre-programmed inter-nal songs and cartridgesongs cannot be revoiced.
• The SONG REVOICE modecannot be selected whileone of the record modes isengaged.
• The SONG REVOICE modecannot be selected while astyle or voice is beingrevoiced during accompani-ment style playback.
Revoicing
• “- - -” will appear on the topline of the display if you se-lect an accompanimenttrack which contains nodata for revoicing, andrevoicing will not be pos-sible.
• Minus settings for the Oc-tave and Pan parameterscan be directly entered bypressing the appropriatenumber button while hold-ing the [–] button.
• When a voice (especiallybass voices) used for aStyle is changed from theXG Voice to the PanelVoice using the Revoicefunction, the octave playedfor the voice may change.
• The REVOICE mode willautomatically be exited ifthe MENU [▲] and [▼] but-tons are used to select anyof the menus to the left ofthe display, or if the [CAR-TRIDGE] button is pressed.
• Save any revoice settingsyou want to keep to thePSR-530 REGISTRATIONMEMORY (page 47). Therevoice setting are tempo-rary and will be lost if thepower is turned off, a differ-ent style is selected, or aREGISTRATION MEMORYis recalled.

82
��������������������������������QQQQQQQQQQQQQQQQQQQQQQQQQQQQQQQQ¢¢¢¢¢¢¢¢¢¢¢¢¢¢¢¢¢¢¢¢¢¢¢¢¢¢¢¢¢¢¢¢
3 Select and Edit the Revoice Parameters
Use the SUB MENU [▲] and [▼] buttons to select the desired parameter.The name of the selected parameter will appear on the top line of the displayto the right of the parameter’s current value.
4 Repeat as Required and Exit When Done
Repeat steps 2 and 3, above, to revoice the tracks as required, then press the[REVOICE] button so that its indicator goes out to exit from the REVOICEmode.
Use the [–] and [+] buttons, the number buttons, or the data dial to set theparameter’s value as required. Refer to the “Revoice Parameters” chart onpage 78.
100 RevSndLv
70 RevSndLv
1 2 3
4 5 6
7 8
0
9
NO YES
• “- - -” will appear on the top lineof the display if you select asong track which contains nodata for revoicing, and revoicingwill not be possible.
• Only the Volume parameter canbe revoiced for the ACCOMPA-NIMENT track. If you attempt tochange any other parameter “- --” will appear on the top line ofthe display and revoicing willnot be possible.
• If the R1 and R2 voices havebeen recorded to a single track,only the R1 voice can berevoiced.
• Minus settings for the Octaveand Pan paraneters can be di-rectly entered by pressing theappropriate number buttonwhile holding the [–] button.
• Only one song revoice param-eter can be recorded per track.If you revoice a song while play-ing back the song, only the last-entered data will be recorded.
• The REVOICE mode will auto-matically be exited if the MENU[▲] and [▼] buttons are used toselect any of the menus to theleft of the display, or if the[CARTRIDGE] button ispressed.
• Since revoicing a user song ac-tually rewrites the song data,the revoiced song will remain inmemory as long as a workingset of batteries is installed in thePSR-530, or the AC adapter isconnected.
REVOICE
Revoicing
2 If Necessary Select a Track to Revoice
Use the TRACK buttons to select the SONG track you want to revoice:MELODY 1 … MELODY 4, or ACCOMP. A frame will appear around the iconof the selected track.
MINUS ONE
MELODY1 2 3 4
MELODY MELODY MELODY ACCOM-PANIMENT
VOICE VOICE VOICEL R2 R1
MINUS ONE
• The TRACK button below theselected track can be used toturn the track on or off. Makesure that the track is turned on ifyou want to monitor the soundwhile revoicing.
• The revoicing cannot be ex-ecuted when the memory spaceis almost full with the usersongs.
• When you revoice the user songdata during its playback and exitfrom the REVOICE mode, thesong will automatically bestopped.

83
��������������������������������QQQQQQQQQQQQQQQQQQQQQQQQQQQQQQQQ¢¢¢¢¢¢¢¢¢¢¢¢¢¢¢¢¢¢¢¢¢¢¢¢¢¢¢¢¢¢¢¢
Some of the functions in the OVERALL function group have already been described inappropriate sections of this manual. Others will be introduced for the first time in this section.Refer to the chart below for the page numbers on which each function is described. The chartalso lists the full name of each function, the abbreviated name which appears on the display,and the available settings or range of settings. Ranges are indicated by two or more valuesseparated by ellipsis (…).
Function Display Settings Page
Touch Sensitivity TouchSns 0 … 127 84
Pitch Bend Range PBRange 01 … 12 45
Master Tuning Tuning~~ –50 … +50 84
Scale Tuning Note SC.Note~ C … b 84
Scale Tuning SC.Tune~ –64 … 63 84
Song Transpose SongTrns –12 … +12 85
Metronome Metronom oFF, on 85
Split Voice Split Point S.Split~ 0 … 127 21
Accompaniment Split Point AccSpPnt 0 … 127 29
Fingering Mode FngrngMd SF, F1, F2, FuL, MuL 30
Voice Set VoiceSet oFF, on 85
To access an OVERALL function first use the MENU [▲] and [▼] buttons to movethe triangular indicator in the display next to “OVERALL”.
Then use the SUB MENU [▲] and [▼] buttons to select the desired function fromwithin the OVERALL menu. When a function is selected the current setting willappear to the left of the function name on the top line of the display. Once the functionhas been selected, use the [–] and [+] buttons or data dial (or number buttons, whereapplicable) to set the function as required.
OVERALL
DIGITALEFFECT
MIDI
Overall Functions
100 TouchSns

84
��������������������������������QQQQQQQQQQQQQQQQQQQQQQQQQQQQQQQQ¢¢¢¢¢¢¢¢¢¢¢¢¢¢¢¢¢¢¢¢¢¢¢¢¢¢¢¢¢¢¢¢Overall Functions
■ Touch Sensitivity
This function sets the keyboard touch sensitivity. The range is from “0” to “127”.The higher the value the higher the sensitivity. When the touch sensitivity value is setto “0”, “oFF” appears in the display and the same volume is produced no matter howhard you play the keys. — this setting can produce a more realistic effect with voicesthat normally do not have touch response: e.g. organ and harpsichord.
■ Master Tuning
The Tuning function sets the overall pitch of the PSR-530 over a ±100 cent range(from –100 to +100) in 1-cent increments. Since 1 cent is 1/100th of a semitone, thetotal tuning range is from a semitone below normal pitch to a semitone above normalpitch.
100 TouchSns
• The “normal” tuningvalue (“0”) can be re-called by simulta-neously pressing the[–] and [+] buttons.
• Minus values can beentered by using thenumber buttons whileholding the [–] button.
■ Scale Tuning
Scale tuning allows each individual note of the octave to be tuned over range from–64 to +63 cents in 1-cent increments (1 cent = 1/100th of a semitone). This makes itpossible to produce subtle tuning variations, or tune the instrument to totally differentscales (e.g. classic or Arabic scales).
First use the SC.Note function to select the note to be tuned. The range is from Cto b: C, db, d, Eb, E, F, Gb, G, Ab, A, bb, b.
000 Tuning
• The scale tuning set-tings are common toeach octave on thekeyboard.
• The Accompanimentand Multi Pad soundis affected by ScaleTuning.
• The “normal” tuningvalue (“0”) can be re-called by simulta-neously pressing the[–] and [+] buttons.
• Minus values can beentered by using thenumber buttons whileholding the [–] button.
Then use the SC.Tune function to tune the selected note as required.
C SC.Note
-50 SC.Tune
Db EbC# D#
Gb Ab BbF# G# A#
C D E F G A B
db Gb Ab
C d E F G A b
Eb bbnote
note
■ Pitch Bend Range
See page 45.

85
��������������������������������QQQQQQQQQQQQQQQQQQQQQQQQQQQQQQQQ¢¢¢¢¢¢¢¢¢¢¢¢¢¢¢¢¢¢¢¢¢¢¢¢¢¢¢¢¢¢¢¢
■ Metronome
When turned “on” the PSR-530 metronome will sound during AUTO ACCOMPA-NIMENT playback as well as SONG playback and recording.
■ Split Voice Split Point
See page 21.
■ Accompaniment Split Point
See page 29.
■ Fingering Mode
See page 30.
■ Voice Set
The VOICE SET feature brings out the best in each individual voice by automati-cally setting a range of important voice-related parameters whenever an R1 panelvoice (voice numbers 1 … 200) is selected. The parameters that may be set by theVOICE SET feature are listed below. This function lets you turn VOICE SET on or off,as required.
on Metronom
on VoiceSet
● Voice Set parameter list
■ Song Transpose
This function allows you to transpose only the song to be played back. That meansyou can play along with your desired song (Minus-one function) in the desired keywithout affecting your performance.
• Since the Transposefunction (page 46)sets the overall trans-pose value, if it ischanged, the SongTranspose value willbe changed by thesame amount at thesame time.
• The “normal” trans-pose value (“00”) canbe recalled by simul-taneously pressingthe [–] and [+] but-tons.
• Minus values can beentered by using thenumber buttons whileholding the [–] button.
• The Song Transposevalue is automaticallyset to “00” when therecord mode is en-gaged.
02 SongTrns
• R1 Voice (Volume, Pan)
• R2 Voice (Voice number, volume, octave, pan, reverbsend level, chorus send level, DSP send level)
• DSP return level
• Harmony type, volume
• Pitch Bend Range
Overall Functions
The parameter below is set whether or not the voice setfunction is on or off.
• R1 Voice (Octave, reverb send level, chorus send level,DSP send level)
• Reverb ON/OFF
• Chorus ON/OFF
• DSP ON/OFF, variation ON/OFF
• DSP type
• The Voice Set func-tion is on by defaultwhen the power is ini-tially turned on.

86
��������������������������������QQQQQQQQQQQQQQQQQQQQQQQQQQQQQQQQ¢¢¢¢¢¢¢¢¢¢¢¢¢¢¢¢¢¢¢¢¢¢¢¢¢¢¢¢¢¢¢¢
In the rear panel of your PSR-530, there are MIDI terminals (MIDI IN, MIDI OUT), a TO HOSTterminal, and a HOST SELECT switch. By using the MIDI functions you can expand yourmusical possibilities. This section explains what MIDI is, and what it can do, as well as howyou can use MIDI on your PSR-530.
MIDI Functions
What’s MIDI?No doubt you have heard the terms “acoustic instrument” and “digital instrument.”
In the world today, these are the two main categories of instruments. Let’s consider anacoustic piano and a classical guitar as representative acoustic instruments. They areeasy to understand. With the piano, you strike a key, and a hammer inside hits somestrings and plays a note. With the guitar, you directly pluck a string and the notesounds. But how does a digital instrument go about playing a note?
As shown in the illustration above, in an electronic instrument the sampling note(previously recorded note) stored in the tone generator section (electronic circuit) isplayed based on information received from the keyboard. So then what is theinformation from the keyboard that becomes the basis for note production?
For example, let’s say you play a “C” quarter note using the grand piano sound onthe PSR-530 keyboard. Unlike an acoustic instrument that puts out a resonated note,the electronic instrument puts out information from the keyboard such as “with whatvoice,” “with which key,” “about how strong,” “when was it pressed,” and “when wasit released.” Then each piece of information is changed into a number value and sentto the tone generator. Using these numbers as a basis, the tone generator plays thestored sampling note.
● Acoustic guitar note production ● Digital instrument note production
Pluck a string and the body resonates thesound.
Based on playing information from the keyboard, asampling note stored in the tone generator is playedthrough the speakers.
Example of Keyboard Information
Voice number (with what voice) 01 (grand piano)Note number (with which key) 60 (C3)Note on (when was it pressed) and Timing expressed numerically (quarter note)note off (when was it released)Velocity (about how strong) 120 (strong)
Tone Generator(Electronic circuit)L R
Playing the keyboard
SamplingNote
SamplingNote

87
��������������������������������QQQQQQQQQQQQQQQQQQQQQQQQQQQQQQQQ¢¢¢¢¢¢¢¢¢¢¢¢¢¢¢¢¢¢¢¢¢¢¢¢¢¢¢¢¢¢¢¢MIDI Functions
MIDI is an acronym that stands for Musical Instrument Digital Interface, whichallows electronic musical instruments to communicate with each other, by sendingand receiving compatible Note, Control Change, Program Change and various othertypes of MIDI data, or messages.
The PSR-530 can control a MIDI device by transmitting note related data andvarious types of controller data. The PSR-530 can be controlled by the incoming MIDImessages which automatically determine tone generator mode, select MIDI channels,voices and effects, change parameter values and of course play the voices specified forthe various parts.
MIDI messages can be divided into two groups: Channel messages and Systemmessages. Below is an explanation of the various types of MIDI messages which thePSR-530 can receive/transmit.
● System MessagesThis is data that is used in common by the entire MIDI system. System messagesinclude messages like Exclusive Messages that transmit data unique to eachinstrument manufacturer and Realtime Messages that control the MIDI device.
The messages transmitted/received by the PSR-530 are shown in the MIDI DataFormat and MIDI Implementation Chart on pages 110 and 122.
Message Name PSR-530 Operation/Panel Setting
Note ON/OFF Messages which are generated when the keyboard is played.Each message includes a specific note number which corre-sponds to the key which is pressed, plus a velocity value basedon how hard the key is stuck.
Program Change Voice setting (control change bank select MSB/LSB setting)
Control Change Revoice setting(volume, pan pot, etc.)
Message Name PSR-530 Operation/Panel Setting
Exclusive Message Reverb/chorus/DSP settings, etc.
Realtime Messages Clock settingStart/stop operation
● Channel MessagesThe PSR-530 is an electronic instrument that can handle 16 channels. This isusually expressed as “it can play 16 instruments at the same time.” Channelmessages transmit information such as Note ON/OFF, Program Change, for eachof the 16 channels.

88
��������������������������������QQQQQQQQQQQQQQQQQQQQQQQQQQQQQQQQ¢¢¢¢¢¢¢¢¢¢¢¢¢¢¢¢¢¢¢¢¢¢¢¢¢¢¢¢¢¢¢¢
● Remotely play another PSR-530
MIDI Functions
• When using the TO HOSTterminal to connect to apersonal computer usingWindows, a Yamaha MIDIdriver must be installed inthe personal computer.The Yamaha MIDI drivercan be obtained atYamaha’s home page onthe World Wide Web,<http://www.yamaha.co.jp/english/xg/>.
• Special MIDI cables (soldseparately) must be usedfor connecting to MIDI de-vices. They can be boughtat music stores, etc.
• Never use MIDI cableslonger than about 15meters. Cables longerthan this can pick upnoise which can causedata errors.
What You Can Do with MIDI
MIDI transmit
MIDI receive
INTO HOST• • • • • • • • • • • • • • • • • • • • • • • • • • • • • • • •MIDI
OUT
◆ MIDI Terminal/TO HOST Terminal
In order to exchange MIDI data between multiple devices, each device mustbe connected by a cable.
There are two ways to connect: from the MIDI terminals of the PSR-530 to theMIDI terminals of an external device using a MIDI cable, or from the TO HOSTport of the PSR-530 to the serial port of a personal computer using a special cable.
If you connect from the PSR-530 TO HOST terminal to a personal computer,the PSR-530 will be used as a MIDI interface device, meaning that a specializedMIDI interface device is not necessary.
In the rear panel of the PSR-530, there are two kinds of terminals, the MIDIterminals and the TO HOST terminal.
• MIDI IN ......... Receives MIDI data from another MIDI device.
• MIDI OUT ..... Transmits the PSR-530’s keyboard information as MIDI data to anotherMIDI device.
• TO HOST ...... Transmits and receives MIDI data to and from a personal computer.
PSR-530 PSR-530MIDI INMIDI OUT
MIDI OUTMIDI IN
Bulk send/receive (page 95).
Bulk send/receive (page 95).
● Save/load song and registration memory data to/from the MDF2
PSR-530MIDI INMIDI OUT
MIDI OUTMIDI IN
Save/load data
MDF2
MIDI transmit
MIDI receive

89
��������������������������������QQQQQQQQQQQQQQQQQQQQQQQQQQQQQQQQ¢¢¢¢¢¢¢¢¢¢¢¢¢¢¢¢¢¢¢¢¢¢¢¢¢¢¢¢¢¢¢¢
MIDI OUTMIDI INPSR-530
MIDI Functions
MIDI receive settings (page 93).
Receive mode for all channelsset to “normal.”
● Use the PSR-530 as a multi tone generator (playing 16 channels at one time).
● Play music from another keyboard (no tone generator) using the PSR-530 XG tonegenerator.
MIDI receive settings (page 93).Clock settings (page 94).
● Record performance data (1-16 channels) using the PSR-530 Auto Accompanimentand Multi Pad features on a external sequencer (such as a personal computer). Afterrecording, edit the data with the sequencer, then play it again on the PSR-530(playback).
MIDI transmit setting (page 92).Initial send (page 95).
• When using a per-sonal computer, spe-cial software (se-quencer software) isneeded.
PSR-530
MIDI OUTMIDI IN
MIDI receive[ex.] XG songfloppy disks
Available disks
MIDI receiveMIDI keyboard with no
tone generator
PSR-530MIDI INMIDI OUT
MIDI OUTMIDI IN
MIDI transmit
MIDI receive(playback)
Can be used to edit and arrangeafter recording
Personal computer,MDF2, QY700, etc.
MDF2, QY700,Personal com-puter, etc.

90
��������������������������������QQQQQQQQQQQQQQQQQQQQQQQQQQQQQQQQ¢¢¢¢¢¢¢¢¢¢¢¢¢¢¢¢¢¢¢¢¢¢¢¢¢¢¢¢¢¢¢¢
● When using a MIDI interface with a Macintosh series computer, connect the RS-422 terminal of the computer (modem or printer terminal) to the MIDI interface,then connect the MIDI OUT terminal on the MIDI interface to the MIDI INterminal of the PSR-530, as show in the diagram below.Set the HOST SELECT switch on the PSR-530 to “MIDI.”
PSR-530MIDI INMIDI OUT
MIDI OUTMIDI IN
PC-1 PC-2Mac MIDI
PSR-530MIDI IN
RS-422
MIDI OUT
PC-1 PC-2Mac MIDI
MIDI interface
■ Connect using the PSR-530 MIDI terminals
Using a MIDI interface device installed in the personal computer, connect the MIDIterminals of the personal computer and the PSR-530.
For the connection cable, use a special MIDI cable.
● When the computer has a MIDI interface installed, connect the MIDI OUTterminal of the personal computer to the MIDI IN terminal of the PSR-530. Set theHOST SELECT switch to “MIDI.”
Computer (sequencer software)
Computer (sequencer software)
MIDI Functions
You can enjoy using personal computer music software when you connect yourPSR-530’s TO HOST terminal or MIDI terminals to a personal computer.
There are two ways to connect.
● Connect using the PSR-530 MIDI terminals.● Connect using the TO HOST terminal.
Connecting to a Personal Computer(TO HOST Terminal/HOST SELECT Switch)

91
��������������������������������QQQQQQQQQQQQQQQQQQQQQQQQQQQQQQQQ¢¢¢¢¢¢¢¢¢¢¢¢¢¢¢¢¢¢¢¢¢¢¢¢¢¢¢¢¢¢¢¢
• When the HOST SELECT switch is set in the “MIDI” position, input and output in the TO HOSTswitch is ignored.
• When using a Macintosh series computer, set the MIDI interface clock setting in theapplication software to match the setting of the MIDI interface you are using. For details,carefully read the owner’s manual for the software you are using.
MIDI Functions
■ Connect using the TO HOST terminal
Connect the serial port of the personal computer (RS-232C terminal or RS-422terminal) to the TO HOST terminal of the PSR-530.
For the connection cable, use the cable below (sold separately) that matches thepersonal computer type.
• If you connect fromthe PSR-530 TOHOST terminal to apersonal computer,the PSR-530 will beused as a MIDI inter-face device, meaningthat a specializedMIDI interface deviceis not necessary.
• When the HOST SE-LECT switch is set to“MAC,” “PC-1,” or“PC-2,” don’t use theMIDI IN/OUT termi-nals. (MIDI data can-not be sent or re-ceived through theMIDI terminals).
• “Host is Offline!!” willbe shown on the dis-play, when the HostSelect switch is setappropriately and theserial cable is con-nected to the PSR-530 TO HOST but notto the PC’s serial port(or the cable is prop-erly connected to thePC which is currentlyturned off).
Macintosh SeriesConnect the RS-422 terminal (modem or printer terminal) on the computer to the TO HOST terminalon the PSR-530 using a serial cable (system peripheral cable, 8 bit). Set the PSR-530 HOSTSELECT switch in the “MAC” position.
• Set the MIDI interface clock in the sequencer software you are using to 1 MHz. For details, carefully readthe owner’s manual for the software you are using.
IBM-PC/AT Series
Connect the RS-232C terminal on the computer to the TO HOST terminal on the PSR-530 usinga serial cable (D-SUB 9P —> MINI DIN 8P cross cable). Set the PSR-530 HOST SELECT switchin the “PC-2” position.
mini DIN 8-pin mini DIN 8-pinPC-1 PC-2
Mac MIDI
• When using a D-SUB 25P —> MINI DIN 8P cross cable, connect using a D-SUB 9P plug adaptor on thecomputer side of the cable.
For details about the necessary MIDI settings for computer and sequence softwareyou are using, see the owner’s manuals for each of them.
mini DIN 8-pin
D-SUB 9-pin
mini DIN 8-pin
D-SUB 25-pin D-SUB 9-pin
PC-1 PC-2Mac MIDI
Macintosh is a registered trademark of Apple Computer, Inc.IBM PC/AT is a trademark of International Business Machines Corp.
Other company names and product names, etc. in this manual are registered trademarks or trademarks ofthose companies.

92
��������������������������������QQQQQQQQQQQQQQQQQQQQQQQQQQQQQQQQ¢¢¢¢¢¢¢¢¢¢¢¢¢¢¢¢¢¢¢¢¢¢¢¢¢¢¢¢¢¢¢¢
The PSR-530 MIDI Functions
The PSR-530 has the following MIDI functions.
To access a MIDI function first use the MENU [▲] and [▼] buttons to move thetriangular indicator in the display next to “MIDI”, then use the SUB MENU [▲] and[▼] buttons to select the desired function from within the MIDI menu. When afunction is selected the current setting will appear on the top line of the display. Oncethe function has been selected, use the [–] and [+] buttons or data dial (or numberbuttons, where applicable) to set the function as required.
01 Tr.Ch
OVERALL
DIGITALEFFECT
MIDI
Function Display Settings Page
Transmit Channel Tr.Ch~~~ 1 … 16 92
Transmit Track Tr.Trk~~
r1, r2, L, H1, H2, H3, rH2, rH1,bAS, CH1, CH2, Pad, PH1, PH2,S1, S1d, S2, S2d, S3, S3d, S4,S4d, oFF
93
Receive Channel Rcv.Ch~~ 1 … 16 93
Receive Mode Rcv.Mod~ nor, oFF, rE 94
Local Control Local~~~ oFF, on 94
External Clock ExtClock oFF, on 94
Bulk Data Send BlkSnd?~ None 95
Initial Data Send InitSnd? None 95
MIDI Functions
■ Transmit Channel & Transmit Track
The PSR-530 can simultaneously transmit data on all 16 MIDI channels. TheTransmit Channel and Transmit Track functions determine what PSR-530 data istransmitted via which MIDI channels.
● Transmit Channel
The “Tr.Ch” function selects a MIDI channel to which a PSR-530 track can beassigned via the Transmit Track function, below. First select a transmit channel,then the transmit track for that channel. Different tracks can be assigned to each ofthe 16 MIDI channels. Any of the standard MIDI channels - 1 through 16 — canbe specified.
01 Tr.Ch

93
��������������������������������QQQQQQQQQQQQQQQQQQQQQQQQQQQQQQQQ¢¢¢¢¢¢¢¢¢¢¢¢¢¢¢¢¢¢¢¢¢¢¢¢¢¢¢¢¢¢¢¢MIDI Functions
● Transmit Track
The “Tr.Trk” function selects the track to be transmitted via the transmitchannel specified by the Transmit Channel function, above. The availablesettings are as follows:
r1 Tr.Trk
~r1 R1 keyboard voice.
~r2 R2 keyboard voice
~~L L keyboard voice.
~H1 Harmony note 1.
~H2 Harmony note 2.
~H3 Harmony note 3.
rH2 Auto accompaniment rhythm 2 track data.
rH1 Auto accompaniment rhythm 1 track data.
bAS Auto accompaniment bass track data.
CH1 Auto accompaniment chord 1 track data.
CH2 Auto accompaniment chord 2 track data.
Pad Auto accompaniment pad track data.
PH1 Auto accompaniment phrase 1 track data.
PH2 Auto accompaniment phrase 2 track data.
S1 User song melody track 1 data (R1 voice).
S1d User song melody track 1 data (R2 voice).
S2 User song melody track 2 data (R1 voice).
S2d User song melody track 2 data (R2 voice).
S3 User song melody track 3 data (R1 voice).
S3d User song melody track 3 data (R2 voice).
S4 User song melody track 4 data (R1 voice).
S4d User song melody track 4 data (R2 voice).
oFF No data transmitted.
• The initial default channel/tracksettings are:Channel 1 = R1 voiceChannel 2 = L voiceChannel 3 = Bass / Track3Channel 4 = Chord1 / Track4Channel 5 = Chord2 / Track5Channel 6 = Pad / Track6Channel 7 = Phrase1 / Track7Channel 8 = Phrase2 / Track8Channel 9 = Rhythm2 / Track2Channel 10 = Rhythm1 / Track1Channel 11 = R2 voiceChannel 12 = Harmony1Channel 13 = Harmony2Channel 14 = Harmony3Channel 15 = OffChannel 16 = Off
• When a track is assigned tomore than one MIDI channel,the data from that track is trans-mitted via the lowest-numberedchannel.
• To avoid MIDI loops which cancause operational errors, checkthe PSR-530 Local Control set-ting (page 94), and the MIDITHRU settings of any externalMIDI devices.
• MIDI transmit track settings willbe retained even after turningthe power off. See page 98 forthe details.
■ Receive Channel & Receive Mode
The PSR-530 can simultaneously receive data on all 16 MIDI channels,allowing it to function as a 16-channel multi-timbral tone generator. TheReceive Channel and Receive Mode functions determine how each channelwill respond to received MIDI data.
● Receive Channel
The “Rcv.Ch” function selects a MIDI channel to which a receive mode isto be assigned via the Receive Mode function, below. First select a receivechannel, then the receive mode for that channel. Any of the standard MIDIchannels — 1 through 16 — can be specified.
01 Rcv.Ch

94
��������������������������������QQQQQQQQQQQQQQQQQQQQQQQQQQQQQQQQ¢¢¢¢¢¢¢¢¢¢¢¢¢¢¢¢¢¢¢¢¢¢¢¢¢¢¢¢¢¢¢¢MIDI Functions
● Receive Mode
The “Rcv.Mod” function specifies the receive mode for the channel selectedvia the Receive Channel function, above. The receive mode settings are asfollows:
• MIDI receive mode settingswill be retained even afterturning the power off. Seepage 98 for the details.
• The initial default setting for allchannels is “nor.”
• In the Record mode, the Re-ceive mode settings cannot beset.
nor Rcv.Mod
nor “Normal”. Received MIDI data is sent directly to the PSR-530tone generator. If all channels are set to “nor”, the PSR-530functions as a 16-channel multi-timbral tone generator.
oFF No MIDI data is received on channels set to “oFF”.
~rE “Remote”. Received MIDI data is handled in the same way asdata generated by the PSR-530’s own keyboard. In other words,a remote keyboard could be used to control the PSR-530 AUTOACCOMPANIMENT functions, etc.
■ Local Control
“Local Control” refers to the fact that, normally, the PSR-530 keyboardcontrols the internal tone generator, allowing the internal voices to be playeddirectly from the keyboard. This situation is “Local Control on” since theinternal tone generator is controlled locally by its own keyboard. Local controlcan be turned off, however, so that the keyboard does not play the internalvoices, but the appropriate MIDI information is still transmitted via the MIDIOUT connector when notes are played on the keyboard. At the same time, theinternal tone generator can respond to MIDI information received on channelsset to the “nor” (normal) mode via the MIDI IN connector. This means thatwhile an external MIDI sequencer, for example, plays the PSR-530 internalvoices, an external tone generator can be played from the PSR-530 keyboard.The default Local Control setting is “on”.
■ Clock
Reception of an external MIDI clock signal can be enabled or disabled asrequired. When disabled (“off”), all of the time-based functions (Auto Accom-paniment, SONG recording and playback, etc.) are controlled by its owninternal clock. When MIDI clock reception is enabled (“on”), however, alltiming is controlled by an external MIDI clock signal received via the MIDI INterminal (in this case the PSR-530 TEMPO setting has no effect). The defaultsetting is “off”.
on Local
oFF ExtClock
• Clock is “off” be default whenthe power is initially turnd on.
• When Clock is turned “on”,AUTO ACCOMPANIMENTplayback cannot be started viathe panel [START/STOP] but-ton, or started via the synchrostart function. Also, the MULTIPAD playback cannot be initi-ated by pressing the MULTPADs.
• When External Clock is turned“On”, “EC” will appear on theTEMPO display, and tempocannot be changed with thepanel button.

95
��������������������������������QQQQQQQQQQQQQQQQQQQQQQQQQQQQQQQQ¢¢¢¢¢¢¢¢¢¢¢¢¢¢¢¢¢¢¢¢¢¢¢¢¢¢¢¢¢¢¢¢MIDI Functions
■ Bulk Data Send
This function causes the contents of the registration, user song, user style anduser pad memory to be transmitted via the MIDI OUT connector. This data canbe saved to memory or disk via a MIDI sequence recorder or MIDI datarecorder, and then reloaded when required. The bulk data can also be sentdirectly to a second PSR-530.
To send the bulk data select the “BlkSnd?” function, then press the [+] (YES)button. “Sure?” will appear on the display. Press [+] (YES) again to begintransmission of the bulk data. “BkSnd:Rg” (registration data), “BkSnd:Sg”(user song data), “BkSnd:Pd” (user pad data) and then “BkSnd:Cs” (user styledata) will appear on the display during transmission. “End” will appear on thedisplay briefly when the transmission has finished.
• A bulk dump transmission canbe stopped at any time bypressing the [–] (NO) button.
• No other operations can beperformed during bulk dumptransmission.
• During Style/Song/Multi Padplayback or in one of theRecord modes, the displayshows “- - -: BlkSnd” indicatingthat you cannot execute theBulk Data send operation.
YES BlkSnd? Sure?7 8
0
9
• No other operations can beperformed during bulk dumpreception.
• If an error is encountered dur-ing bulk data reception, “BlkErr” will appear on the display,and registration, user song,user style and user padmemory will be cleared.
• When a bulk dump is re-ceived, the received data re-places any data that was pre-viously in the PSR-530memory.
• The bulk receive messagesare rejected during playback/recording.
BkRcv
End
■ Initial Data Send
Transmits all current panel settings to a second PSR-530 or a MIDI datastorage device. To send the initial data, select the “InitSnd?” function. Press the[+] (YES) to begin transmission of the initial data.
YES InitSnd?
● Receiving Bulk Data
The PSR-530 will automatically receive compatible bulk data from anexternal MIDI device as long as no auto accompaniment, multi pad, or songrecording/playback operation is in progress. “BkRcv” will appear on thedisplay during reception, then “End” will appear briefly when all data hasbeen received.
If you want to have the song play back with the panel settings used forrecording, execute the Initial Data Send function before recording the perfor-mance on the PSR-530 to an external sequencer.
• During Style/Song/Multi Padpalyback or in one of theRecord modes, the displayshows “- - -: InitSnd?” indicat-ing that you cannot executethe initial data send operation.

96
��������������QQQQQQQQQQQQQQ¢¢¢¢¢¢¢¢¢¢¢¢¢¢Appendix PSR-530 Display MENU/SUB MENU Structure
MENU SUB MENU FUNCTION PAGE
VOICE GrandPno (R1 voice name) ...................................... R1 voice selection. ......................................... 17
STYLE 8BtPop1 (Style name) ............................................... Accompaniment style selection. ..................... 22
VirtArng ✩ .............................................................. Virtual Arranger on/off selection. .................... 27
Quantiz? * ............................................................... Quantize. ........................................................ 69
AllClr? * .................................................................. User style clear (All). ...................................... 70
TrkClr? * .................................................................. User style clear (Track). ................................. 70
Cancel * .................................................................... Drum cancel. .................................................. 68
SONG PeterGun (Song name) ............................................ Song selection. ............................................... 52
Measure .................................................................... Measure from which to start playback. ........... 54
MinusCh [MinusOne] ✩ .............................................. Minus-one channel setting. ............................ 55
A-b: Repeat ✩ ..........................................................Repeat playback setting. ................................ 57
SongClr? * ............................................................... Song clear. ..................................................... 63
TrkClr? * .................................................................. Track clear. ..................................................... 63
CARTRIDGE 530XG (Song name) .................................................... Cartridge song selection. ................................ 76
REGISTRATION MEMORY Bank 1 (Bank name) ...................................................Registration bank selection. ........................... 47 REGISTRATION MEMORY Button
MULTI PAD Fanfare1 (Multi Pad set name) ...............................Multi Pad set selection. .................................. 49 MULTI PAD STOP Button
Pad1Chd .................................................................... Chord match on/off selection (pad 1). ............ 51
Pad2Chd .................................................................... Chord match on/off selection (pad 2). ............ 51
Pad3Chd .................................................................... Chord match on/off selection (pad 3). ............ 51
Pad4Chd .................................................................... Chord match on/off selection (pad 4). ............ 51
BankClr? * ............................................................... Bank clear. ..................................................... 74
PadClr? * .................................................................. Pad clear. ....................................................... 74
MIDI Tr.Ch .......................................................................... Transmit channel selection. ............................ 92
Tr.Trk ....................................................................... Transmit track selection. ................................ 93
Rcv.Ch .......................................................................Receive channel selection. ............................. 93
Rcv.Mod .................................................................... Receive mode selection. ................................ 94
Local .......................................................................... Local on/off selection. ..................................... 94
ExtClock ................................................................. External/internal clock selection. .................... 94
BlkSnd? .................................................................... Bulk dump transmission. ................................ 95
InitSnd? ................................................................. Initial panel setting transmission. ................... 95
ex
ex
ex
ex
ex

97
��������������QQQQQQQQQQQQQQ¢¢¢¢¢¢¢¢¢¢¢¢¢¢
• Sub-menu items with a “ * ” appear only when the record mode is engaged.
• Sub-menu items with a “ ✩ ” appear only when the record mode is not engaged.
• Sub-menu items with “ ” have shortcut access (press and hold the specified button for a few seconds tojump directly to the associated sub-menu function). In addition to the shortuts listed above, the [DUAL VOICE]button can be held to jump to the R2 voice revoice function, and the [SPLIT VOICE] button can be held to jumpto the L voice revoice function.
PSR-530 Display MENU/SUB MENU Structure
MENU SUB MENU FUNCTION PAGE
DIGITAL EFFECT Hall 1 [Reverb] (Reverb type name) ......................... Reverb type selection. .................................... 37 REVERB Button
RevRtnLv ................................................................. Reverb return level setting. ............................ 38
Chorus1 [Chorus] (Chorus type name) ..................... Chorus type selection. .................................... 39 CHORUS Button
ChoRtnLv ................................................................. Chorus return level setting. ............................ 39
Hall 1 [DSP] (DSP type name) .................................. DSP type selection. ........................................ 41 DSP Button
DspRtnLv ................................................................. DSP return level setting. ................................. 42
Duet [Harmony] (Harmony type name) ....................... Harmony type selection. ................................. 43 HARMONY Button
HarmVol .................................................................... Harmony volume setting. ................................ 44
OVERALL TouchSns ................................................................. Touch sensitivity setting. ................................ 84
PBRange .................................................................... Pitch bend range setting. ................................ 45
Tuning ....................................................................... Overall tuning. ................................................ 84
SC.Note .................................................................... Scale tuning (note) setting. ............................. 84
SC.Tune .................................................................... Scale tuning (tune) setting. ............................. 84
SongTrns ................................................................. Song transpose setting. .................................. 85
Metronom ................................................................. Metronome on/off selection. ........................... 85
S.Split .................................................................... Split mode split point selection. ...................... 21
AccSpPnt ................................................................. Auto accompaniment split point selection. ..... 29
FngrngMd AUTO ACCOMPANIMENT ......... Fingering mode selection. .............................. 30ON/OFF Button
VoiceSet ................................................................. Voice set on/off selection. .............................. 85
ex
ex
ex
ex

�������������QQQQQQQQQQQQQ¢¢¢¢¢¢¢¢¢¢¢¢¢
98
Data Backup & Initialization
■ Data Backup
Except for the data listed below, all PSR-530 panel settings are reset to their initialsettings whenever the power is turned on.
• Registration Memory• User Song Data• User Style Data• User Pad Data• MIDI Transmit Settings• MIDI Receive Settings
The data listed above can be backed up — i.e. retained in memory — as long as aworking set of batteries is installed and you keep the following Off/On procedure.
z Turn the power OFF by pressing the [STAND BY/ON] switch.
x Unplug the DC output cable of the PA-6 from the DC IN 10-12V jack on the rearpanel of the PSR-530.
c Then unplug the PA-6 Power Adaptor from the wall AC outlet.
When turning the power ON, simply reverse the procedure.
■ Data Initialization
All data can be initialized and restored to the factory preset condition by turning on thepower while holding the highest (rightmost) white key on the keyboard. “CLr:Back up”will appear briefly on the display. • All registration and
song memory data,plus the other set-tings listed above,will be erased and/orchanged when thedata initializationprocedure is carriedout.
• Carrying out thedata initializationprocedure will usu-ally restore normaloperation if the PSR-530 freezes or be-gins to act errati-cally for any reason.
ONSTAND BY
CLr Back up

99
�������������QQQQQQQQQQQQQ¢¢¢¢¢¢¢¢¢¢¢¢¢Voice List
■ Maximum Polyphony
The PSR-530 has 32-note maximum polyphony. This means that it play amaximum of up to 32 notes at once, regardless of what functions are used.Auto Accompaniment uses a number of the available notes, so when AutoAccompaniment is used the total number of notes that can be played on thekeyboard is correspondingly reduced. The same applies to the Dual Voice,Split Voice, Multi Pad, and Song functions.
• The Voice List includes MIDI programchange numbers for each voice. Usethese program change numbers whenplaying the PSR-530 via MIDI from anexternal device.
• Some voices may sound continuouslyor have a long decay after the noteshave been released while the sustainpedal (footswitch) is held.
[Panel Voice List]
Piano1 0 112 0 Grand Piano2 0 112 1 BrightPiano3 0 112 3 Honky Tonk4 0 112 2 Midi Grand5 0 113 2 CP 806 0 114 4 Galaxy EP7 0 112 5 DX Modern8 0 112 4 Funk EP9 0 115 5 Modern EP
10 0 113 5 Hyper Tines11 0 116 5 New Tines12 0 114 5 Venus EP13 0 113 4 Tremolo EP14 0 114 2 Rock Piano15 0 112 7 Clavi16 0 113 7 Wah Clavi17 0 112 6 Harpsichord18 0 113 6 GrandHarpsi
Chromatic Percussion19 0 112 11 Vibraphone20 0 113 11 Jazz Vibes21 0 112 12 Marimba22 0 112 13 Xylophone23 0 112 114 Steel Drums24 0 112 8 Celesta25 0 112 9 Glocken26 0 112 10 Music Box27 0 112 14 TubularBells28 0 112 108 Kalimba29 0 112 47 Timpani30 0 112 15 Dulcimer
Organ31 0 112 16 Jazz Organ132 0 113 16 Jazz Organ233 0 112 17 Click Organ34 0 113 17 Dance Organ35 0 115 16 Drawbar Org36 0 115 17 Mellow Draw37 0 116 16 Bright Draw38 0 112 18 Rock Organ139 0 113 18 Rock Organ240 0 114 18 Purple Org41 0 116 17 60’s Organ42 0 117 17 Blues Organ43 0 117 16 16+1 Organ44 0 118 16 16+2 Organ45 0 119 16 16+4 Organ46 0 118 17 Elec.Organ
47 0 114 16 TheatreOrg148 0 114 17 TheatreOrg249 0 112 19 Pipe Organ50 0 113 19 ChapelOrgan51 0 112 20 Reed Organ52 0 113 21 Trad. Accrd53 0 112 21 Musette54 0 112 23 Tango Accrd55 0 113 23 Bandoneon56 0 114 21 Soft Accrd57 0 112 22 Harmonica
Guitar58 0 112 24 Classic Gtr59 0 113 24 Spanish Gtr60 0 112 25 Folk Guitar61 0 113 25 12StrGuitar62 0 112 26 Jazz Guitar63 0 113 26 Octave Gtr64 0 114 26 HawaiianGtr65 0 112 27 CleanGuitar66 0 113 27 Tremolo Gtr67 0 114 27 Slap Guitar68 0 113 28 Funk Guitar69 0 112 28 MutedGuitar70 0 113 29 FeedbackGtr71 0 112 29 Overdrive72 0 112 30 Distortion73 0 115 27 PedalSteel
Bass74 0 112 32 Aco.Bass75 0 114 32 Bass&Cymbal76 0 112 33 FingerBass77 0 112 34 Pick Bass78 0 112 35 Fretless79 0 113 35 Jaco Bass80 0 119 17 Organ Bass81 0 112 36 Slap Bass82 0 112 37 Funk Bass83 0 113 36 Fusion Bass84 0 112 38 Synth Bass85 0 112 39 Analog Bass86 0 113 39 Dance Bass87 0 113 38 Hi Q Bass88 0 114 38 Rave Bass
Solo Strings89 0 112 40 Solo Violin90 0 113 40 Soft Violin91 0 112 110 Fiddle92 0 112 41 Viola
Voice Bank Select MIDIVoice Name
Number MSB LSBProgramChangeNumber
Voice Bank Select MIDIVoice Name
Number MSB LSBProgramChangeNumber

100
��������������QQQQQQQQQQQQQQ¢¢¢¢¢¢¢¢¢¢¢¢¢¢Voice List
93 0 112 42 Cello94 0 112 43 Contrabass95 0 112 46 Harp96 0 113 46 Hackbrett97 0 112 106 Shamisen98 0 112 107 Koto99 0 112 104 Sitar100 0 112 105 Banjo
Ensemble101 0 112 48 Strings102 0 113 48 OrchStrings103 0 114 48 Symphon. Str104 0 113 49 SlowStrings105 0 114 49 Str.Quartet106 0 115 48 ConcertoStr107 0 115 49 MarcatoStrs108 0 112 49 ChamberStrs109 0 112 44 TremoloStrs110 0 112 45 PizzStrings111 0 112 50 Syn Strings112 0 112 51 Analog Strs113 0 112 52 Choir114 0 112 54 Air Choir115 0 113 52 Vocal Ensbl116 0 112 53 Vox Humana117 0 113 53 Gothic Vox118 0 112 55 Orch.Hit
Solo Brass119 0 112 56 SoloTrumpet120 0 114 56 SoftTrumpet121 0 113 56 Flugel Horn122 0 112 59 Muted Trp123 0 112 57 Trombone124 0 114 57 MelTrombone125 0 112 60 French Horn126 0 112 58 Tuba
Brass Ensemble127 0 113 61 BigBandBrs128 0 112 61 BrasSection129 0 116 61 MellowBrass130 0 117 61 Small Brass131 0 118 61 Pop Brass132 0 119 61 MellowHorns133 0 113 59 BallroomBrs134 0 114 61 Full Horns135 0 115 61 High Brass136 0 113 57 Trb.Section137 0 112 62 Synth Brass138 0 112 63 Analog Brs139 0 113 62 Jump Brass140 0 114 62 TechnoBrass
Reed141 0 112 64 Soprano Sax142 0 112 65 Alto Sax143 0 113 65 BreathyAlto144 0 112 66 Tenor Sax145 0 114 66 BreathTenor146 0 112 67 BaritoneSax147 0 116 66 Sax Section148 0 112 71 Clarinet149 0 113 71 MelClarinet150 0 113 66 WoodwindEns151 0 115 66 Brass Combo152 0 112 68 Oboe153 0 112 69 EnglishHorn
Voice Bank Select MIDIVoice Name
Number MSB LSBProgramChangeNumber
154 0 112 70 Bassoon155 0 112 109 Bagpipe
Pipe156 0 112 73 Flute157 0 112 75 Pan Flute158 0 112 72 Piccolo159 0 113 73 EthnicFlute160 0 112 77 Shakuhachi161 0 112 78 Whistle162 0 112 74 Recorder163 0 112 79 Ocarina
Synth Lead164 0 112 80 Square Lead165 0 112 81 Saw.Lead166 0 113 81 Big Lead167 0 112 98 Stardust168 0 114 81 Blaster169 0 115 81 Analogon170 0 113 80 Vintage Ld171 0 113 98 Sun Bell172 0 112 83 Aero Lead173 0 116 81 Fire Wire174 0 114 80 Mini Lead175 0 115 80 Vinylead176 0 117 81 Warp177 0 116 80 Hi Bias178 0 117 80 Meta Wood179 0 118 80 Tiny Lead180 0 118 81 Sub Aqua181 0 119 81 Fargo
Synth Pad182 0 113 94 Insomnia183 0 112 90 Krypton184 0 113 99 Cyber Pad185 0 112 95 Wave 2001186 0 112 94 Equinox187 0 114 88 Stargate188 0 112 92 DX Pad189 0 112 93 Loch Ness190 0 112 88 Fantasia191 0 115 88 Golden Age192 0 112 91 Xenon Pad193 0 112 89 Area 51194 0 112 99 Atmosphere195 0 113 89 Dark Moon196 0 115 94 Ionosphere197 0 113 93 Phase IV198 0 113 88 Symbiont199 0 114 94 Solaris200 0 113 95 Transform
Drum Kits201 127 0 0 Std.Kit1202 127 0 1 Std.Kit2203 127 0 8 Room Kit204 127 0 16 Rock Kit205 127 0 24 Electro Kit206 127 0 25 Analog Kit207 127 0 27 Dance Kit208 127 0 32 Jazz Kit209 127 0 40 Brush Kit210 127 0 48 Classic Kit211 126 0 0 SFX Kit1212 126 0 1 SFX Kit2
Voice Bank Select MIDIVoice Name
Number MSB LSBProgramChangeNumber

101
��������������QQQQQQQQQQQQQQ¢¢¢¢¢¢¢¢¢¢¢¢¢¢[XG Voice List]
Piano213 0 0 0 GrandPno214 0 1 0 GrndPnoK215 0 18 0 MelloGrP216 0 40 0 PianoStr217 0 41 0 Dream218 0 0 1 BritePno219 0 1 1 BritPnoK220 0 0 2 E.Grand221 0 1 2 ElGrPnoK222 0 32 2 Det.CP80223 0 40 2 ElGrPno1224 0 41 2 ElGrPno2225 0 0 3 HnkyTonk226 0 1 3 HnkyTnkK227 0 0 4 E.Piano1228 0 1 4 El.Pno1K229 0 18 4 MelloEP1230 0 32 4 Chor.EP1231 0 40 4 HardEl.P232 0 45 4 VX El.P1233 0 64 4 60sEl.P234 0 0 5 E.Piano2235 0 1 5 El.Pno2K236 0 32 5 Chor.EP2237 0 33 5 DX Hard238 0 34 5 DXLegend239 0 40 5 DX Phase240 0 41 5 DX+Analg241 0 42 5 DXKotoEP242 0 45 5 VX El.P2243 0 0 6 Harpsi.244 0 1 6 Harpsi.K245 0 25 6 Harpsi.2246 0 35 6 Harpsi.3247 0 0 7 Clavi.248 0 1 7 Clavi. K249 0 27 7 ClaviWah250 0 64 7 PulseClv251 0 65 7 PierceCl
Chromatic Percussion252 0 0 8 Celesta253 0 0 9 Glocken254 0 0 10 MusicBox255 0 64 10 Orgel256 0 0 11 Vibes257 0 1 11 VibesK258 0 45 11 HardVibe259 0 0 12 Marimba260 0 1 12 MarimbaK261 0 64 12 SineMrmb262 0 97 12 Balafon2263 0 98 12 Log Drum264 0 0 13 Xylophon265 0 0 14 TubulBel266 0 96 14 ChrchBel267 0 97 14 Carillon268 0 0 15 Dulcimer269 0 35 15 Dulcimr2270 0 96 15 Cimbalom271 0 97 15 Santur
Organ272 0 0 16 DrawOrgn
273 0 32 16 DetDrwOr274 0 33 16 60sDrOr1275 0 34 16 60sDrOr2276 0 35 16 70sDrOr1277 0 36 16 DrawOrg2278 0 37 16 60sDrOr3279 0 38 16 EvenBar280 0 40 16 16+2’2/3281 0 64 16 Organ Ba282 0 65 16 70sDrOr2283 0 66 16 CheezOrg284 0 67 16 DrawOrg3285 0 0 17 PercOrgn286 0 24 17 70sPcOr1287 0 32 17 DetPrcOr288 0 33 17 LiteOrg289 0 37 17 PercOrg2290 0 0 18 RockOrgn291 0 64 18 RotaryOr292 0 65 18 SloRotar293 0 66 18 FstRotar294 0 0 19 ChrchOrg295 0 32 19 ChurOrg3296 0 35 19 ChurOrg2297 0 40 19 NotreDam298 0 64 19 OrgFlute299 0 65 19 TrmOrgFl300 0 0 20 ReedOrgn301 0 40 20 Puff Org302 0 0 21 Acordion303 0 32 21 AccordIt304 0 0 22 Harmnica305 0 32 22 Harmo 2306 0 0 23 TangoAcd307 0 64 23 TngoAcd2
Guitar308 0 0 24 NylonGtr309 0 16 24 NylonGt2310 0 25 24 NylonGt3311 0 43 24 VelGtHrm312 0 96 24 Ukulele313 0 0 25 SteelGtr314 0 16 25 SteelGt2315 0 35 25 12StrGtr316 0 40 25 Nyln&Stl317 0 41 25 Stl&Body318 0 96 25 Mandolin319 0 0 26 Jazz Gtr320 0 18 26 MelloGtr321 0 32 26 JazzAmp322 0 0 27 CleanGtr323 0 32 27 ChorusGt324 0 0 28 Mute.Gtr325 0 40 28 FunkGtr1326 0 41 28 MuteStlG327 0 43 28 FunkGtr2328 0 45 28 Jazz Man329 0 0 29 Ovrdrive330 0 43 29 Gt.Pinch331 0 0 30 Dist.Gtr332 0 40 30 FeedbkGt333 0 41 30 FeedbGt2334 0 0 31 GtrHarmo
335 0 65 31 GtFeedbk336 0 66 31 GtrHrmo2
Bass337 0 0 32 Aco.Bass338 0 40 32 JazzRthm339 0 45 32 VXUprght340 0 0 33 FngrBass341 0 18 33 FingrDrk342 0 27 33 FlangeBa343 0 40 33 Ba&DstEG344 0 43 33 FngrSlap345 0 45 33 FngBass2346 0 65 33 ModAlem347 0 0 34 PickBass348 0 28 34 MutePkBa349 0 0 35 Fretless350 0 32 35 Fretles2351 0 33 35 Fretles3352 0 34 35 Fretles4353 0 96 35 SynFretl354 0 97 35 Smooth355 0 0 36 SlapBas1356 0 27 36 ResoSlap357 0 32 36 PunchThm358 0 0 37 SlapBas2359 0 43 37 VeloSlap360 0 0 38 SynBass1361 0 18 38 SynBa1Dk362 0 20 38 FastResB363 0 24 38 AcidBass364 0 35 38 Clv Bass365 0 40 38 TeknoBa366 0 64 38 Oscar367 0 65 38 SqrBass368 0 66 38 RubberBa369 0 96 38 Hammer370 0 0 39 SynBass2371 0 6 39 MelloSB1372 0 12 39 Seq Bass373 0 18 39 ClkSynBa374 0 19 39 SynBa2Dk375 0 32 39 SmthBa 2376 0 40 39 ModulrBa377 0 41 39 DX Bass378 0 64 39 X WireBa
Strings379 0 0 40 Violin380 0 8 40 SlowVln381 0 0 41 Viola382 0 0 42 Cello383 0 0 43 Contrabs384 0 0 44 Trem.Str385 0 8 44 SlowTrStr386 0 40 44 Susp Str387 0 0 45 Pizz.Str388 0 0 46 Harp389 0 40 46 YangChin390 0 0 47 Timpani
Ensemble391 0 0 48 Strings1392 0 3 48 S.Strngs393 0 8 48 SlowStr394 0 24 48 ArcoStr
Voice Bank Select MIDIVoice Name
Number MSB LSBProgramChangeNumber
Voice Bank Select MIDIVoice Name
Number MSB LSBProgramChangeNumber
Voice Bank Select MIDIVoice Name
Number MSB LSBProgramChangeNumber
Voice List

102
��������������QQQQQQQQQQQQQQ¢¢¢¢¢¢¢¢¢¢¢¢¢¢Voice List
395 0 35 48 60sStrng396 0 40 48 Orchestr397 0 41 48 Orchstr2398 0 42 48 TremOrch399 0 45 48 VeloStr400 0 0 49 Strings2401 0 3 49 S.SlwStr402 0 8 49 LegatoSt403 0 40 49 Warm Str404 0 41 49 Kingdom405 0 64 49 70s Str406 0 65 49 Str Ens3407 0 0 50 Syn.Str1408 0 27 50 ResoStr409 0 64 50 Syn Str4410 0 65 50 SS Str411 0 0 51 Syn.Str2412 0 0 52 ChoirAah413 0 3 52 S.Choir414 0 16 52 Ch.Aahs2415 0 32 52 MelChoir416 0 40 52 ChoirStr417 0 0 53 VoiceOoh418 0 0 54 SynVoice419 0 40 54 SynVox2420 0 41 54 Choral421 0 64 54 AnaVoice422 0 0 55 Orch.Hit423 0 35 55 OrchHit2424 0 64 55 Impact
Brass425 0 0 56 Trumpet426 0 16 56 Trumpet2427 0 17 56 BriteTrp428 0 32 56 WarmTrp429 0 0 57 Trombone430 0 18 57 Trmbone2431 0 0 58 Tuba432 0 16 58 Tuba 2433 0 0 59 Mute.Trp434 0 0 60 Fr.Horn435 0 6 60 FrHrSolo436 0 32 60 FrHorn2437 0 37 60 HornOrch438 0 0 61 BrasSect439 0 35 61 Tp&TbSec440 0 40 61 BrssSec2441 0 41 61 HiBrass442 0 42 61 MelloBrs443 0 0 62 SynBras1444 0 12 62 QuackBr445 0 20 62 RezSynBr446 0 24 62 PolyBrss447 0 27 62 SynBras3448 0 32 62 JumpBrss449 0 45 62 AnaVelBr450 0 64 62 AnaBrss1451 0 0 63 SynBras2452 0 18 63 Soft Brs453 0 40 63 SynBrss4454 0 41 63 ChoirBrs455 0 45 63 VelBrss2456 0 64 63 AnaBrss2
Reed457 0 0 64 SprnoSax458 0 0 65 Alto Sax459 0 40 65 Sax Sect460 0 43 65 HyprAlto461 0 0 66 TenorSax462 0 40 66 BrthTnSx463 0 41 66 SoftTenr464 0 64 66 TnrSax 2465 0 0 67 Bari.Sax466 0 0 68 Oboe467 0 0 69 Eng.Horn468 0 0 70 Bassoon469 0 0 71 Clarinet
Pipe470 0 0 72 Piccolo471 0 0 73 Flute472 0 0 74 Recorder473 0 0 75 PanFlute474 0 0 76 Bottle475 0 0 77 Shakhchi476 0 0 78 Whistle477 0 0 79 Ocarina
Synth Lead478 0 0 80 SquareLd479 0 6 80 Square 2480 0 8 80 LMSquare481 0 18 80 Hollow482 0 19 80 Shmoog483 0 64 80 Mellow484 0 65 80 SoloSine485 0 66 80 SineLead486 0 0 81 Saw.Lead487 0 6 81 Saw 2488 0 8 81 ThickSaw489 0 18 81 DynaSaw490 0 19 81 DigiSaw491 0 20 81 Big Lead492 0 24 81 HeavySyn493 0 25 81 WaspySyn494 0 40 81 PulseSaw495 0 41 81 Dr. Lead496 0 45 81 VeloLead497 0 96 81 Seq Ana498 0 0 82 CaliopLd499 0 65 82 Pure Pad500 0 0 83 Chiff Ld501 0 64 83 Rubby502 0 0 84 CharanLd503 0 64 84 DistLead504 0 65 84 WireLead505 0 0 85 Voice Ld506 0 24 85 SynthAah507 0 64 85 VoxLead508 0 0 86 Fifth Ld509 0 35 86 Big Five510 0 0 87 Bass &Ld511 0 16 87 Big&Low512 0 64 87 Fat&Prky513 0 65 87 SoftWurl
Synth Pad514 0 0 88 NewAgePd515 0 64 88 Fantasy2
516 0 0 89 Warm Pad517 0 16 89 ThickPad518 0 17 89 Soft Pad519 0 18 89 SinePad520 0 64 89 Horn Pad521 0 65 89 RotarStr522 0 0 90 PolySyPd523 0 64 90 PolyPd80524 0 65 90 ClickPad525 0 66 90 Ana Pad526 0 67 90 SquarPad527 0 0 91 ChoirPad528 0 64 91 Heaven2529 0 66 91 Itopia530 0 67 91 CC Pad531 0 0 92 BowedPad532 0 64 92 Glacier533 0 65 92 GlassPad534 0 0 93 MetalPad535 0 64 93 Tine Pad536 0 65 93 Pan Pad537 0 0 94 Halo Pad538 0 0 95 SweepPad539 0 20 95 Shwimmer540 0 27 95 Converge541 0 64 95 PolarPad542 0 66 95 Celstial
Synth Effects543 0 0 96 Rain544 0 45 96 ClaviPad545 0 64 96 HrmoRain546 0 65 96 AfrcnWnd547 0 66 96 Caribean548 0 0 97 SoundTrk549 0 27 97 Prologue550 0 64 97 Ancestrl551 0 0 98 Crystal552 0 12 98 SynDrCmp553 0 14 98 Popcorn554 0 18 98 TinyBell555 0 35 98 RndGlock556 0 40 98 GlockChi557 0 41 98 ClearBel558 0 42 98 ChorBell559 0 64 98 SynMalet560 0 65 98 SftCryst561 0 66 98 LoudGlok562 0 67 98 XmasBell563 0 68 98 VibeBell564 0 69 98 DigiBell565 0 70 98 AirBells566 0 71 98 BellHarp567 0 72 98 Gamelmba568 0 0 99 Atmosphr569 0 18 99 WarmAtms570 0 19 99 HollwRls571 0 40 99 NylonEP572 0 64 99 NylnHarp573 0 65 99 Harp Vox574 0 66 99 AtmosPad575 0 67 99 Planet576 0 0 100 Bright577 0 64 100 FantaBel
Voice Bank Select MIDIVoice Name
Number MSB LSBProgramChangeNumber
Voice Bank Select MIDIVoice Name
Number MSB LSBProgramChangeNumber
Voice Bank Select MIDIVoice Name
Number MSB LSBProgramChangeNumber

103
��������������QQQQQQQQQQQQQQ¢¢¢¢¢¢¢¢¢¢¢¢¢¢
578 0 96 100 Smokey579 0 0 101 Goblins580 0 64 101 GobSyn581 0 65 101 50sSciFi582 0 66 101 Ring Pad583 0 67 101 Ritual584 0 68 101 ToHeaven585 0 70 101 Night586 0 71 101 Glisten587 0 96 101 BelChoir588 0 0 102 Echoes589 0 8 102 EchoPad2590 0 14 102 Echo Pan591 0 64 102 EchoBell592 0 65 102 Big Pan593 0 66 102 SynPiano594 0 67 102 Creation595 0 68 102 Stardust596 0 69 102 Reso Pan597 0 0 103 Sci-Fi598 0 64 103 Starz
Ethnic599 0 0 104 Sitar600 0 32 104 DetSitar601 0 35 104 Sitar 2602 0 96 104 Tambra603 0 97 104 Tamboura604 0 0 105 Banjo605 0 28 105 MuteBnjo606 0 96 105 Rabab607 0 97 105 Gopichnt608 0 98 105 Oud609 0 0 106 Shamisen610 0 0 107 Koto611 0 96 107 T. Koto612 0 97 107 Kanoon613 0 0 108 Kalimba614 0 0 109 Bagpipe615 0 0 110 Fiddle616 0 0 111 Shanai617 0 64 111 Shanai2618 0 96 111 Pungi619 0 97 111 Hichriki
Percussive620 0 0 112 TnklBell621 0 96 112 Bonang622 0 97 112 Gender623 0 98 112 Gamelan624 0 99 112 S.Gamlan625 0 100 112 Rama Cym626 0 101 112 AsianBel627 0 0 113 Agogo628 0 0 114 SteelDrm629 0 97 114 GlasPerc630 0 98 114 ThaiBell631 0 0 115 WoodBlok632 0 96 115 Castanet633 0 0 116 TaikoDrm634 0 96 116 Gr.Cassa635 0 0 117 MelodTom636 0 64 117 Mel Tom2637 0 65 117 Real Tom638 0 66 117 Rock Tom
639 0 0 118 Syn.Drum640 0 64 118 Ana Tom641 0 65 118 ElecPerc642 0 0 119 RevCymbl
Sound Effects643 0 0 120 FretNoiz644 0 0 121 BrthNoiz645 0 0 122 Seashore646 0 0 123 Tweet647 0 0 124 Telphone648 0 0 125 Helicptr649 0 0 126 Applause650 0 0 127 Gunshot
SFX651 64 0 0 CuttngNz652 64 0 1 CttngNz2653 64 0 3 Str Slap654 64 0 16 Fl.KClik655 64 0 32 Rain656 64 0 33 Thunder657 64 0 34 Wind658 64 0 35 Stream659 64 0 36 Bubble660 64 0 37 Feed661 64 0 48 Dog662 64 0 49 Horse663 64 0 50 Bird 2664 64 0 54 Ghost665 64 0 55 Maou666 64 0 64 Tel.Dial667 64 0 65 DoorSqek668 64 0 66 Door Slam669 64 0 67 Scratch670 64 0 68 Scratch 2671 64 0 69 WindChm672 64 0 70 Telphon2673 64 0 80 CarEngin674 64 0 81 Car Stop675 64 0 82 Car Pass676 64 0 83 CarCrash677 64 0 84 Siren678 64 0 85 Train679 64 0 86 Jetplane680 64 0 87 Starship681 64 0 88 Burst682 64 0 89 Coaster683 64 0 90 SbMarine684 64 0 96 Laughing685 64 0 97 Scream686 64 0 98 Punch687 64 0 99 Heart688 64 0 100 FootStep689 64 0 112 MchinGun690 64 0 113 LaserGun691 64 0 114 Xplosion692 64 0 115 FireWork
Voice Bank Select MIDIVoice Name
Number MSB LSBProgramChangeNumber
Voice Bank Select MIDIVoice Name
Number MSB LSBProgramChangeNumber
Voice List

104
��������������QQQQQQQQQQQQQQ¢¢¢¢¢¢¢¢¢¢¢¢¢¢Drum Kit List
• “<——” indicates that the drum kit is the same as “Standard Kit1”.• Each percussion voice uses one note.• The note numbers and note names printed on the keyboard are one octave higher than
the MIDI note numbers and note names shown in the list. For example, the note numberand note name, #36 and C1, on the keyboard correspond to the MIDI note number andnote name, #24 and C0, shown in the list.
• Voices with the same Alternate Note Number (*1 … 4) cannot be played simultaneously.
13 C#-1 *3 Surdo Mute <—— <—— <—— <—— <——14 D-1 *3 Surdo Open <—— <—— <—— <—— <——15 D#-1 Hi Q <—— <—— <—— <—— <——16 E-1 Whip Slap <—— <—— <—— <—— <——17 F-1 *4 Scratch Push <—— <—— <—— <—— <——18 F#-1 *4 Scratch Pull <—— <—— <—— <—— <——19 G-1 Finger Snap <—— <—— <—— <—— <——20 G#-1 Click Noise <—— <—— <—— <—— <——21 A-1 Metronome Click <—— <—— <—— <—— <——22 A#-1 Metronome Bell <—— <—— <—— <—— <——23 B-1 Seq Click L <—— <—— <—— <—— <——24 C0 Seq Click H <—— <—— <—— <—— <——25 C#0 Brush Tap <—— <—— <—— <—— <——26 D0 Brush Swirl L <—— <—— <—— <—— <——27 D#0 Brush Slap <—— <—— <—— <—— <——28 E0 Brush Swirl H <—— <—— <—— Reverse Cymbal Reverse Cymbal29 F0 Snare Roll Snare Roll 2 <—— <—— <—— <——30 F#0 Castanet <—— <—— <—— Hi Q Hi Q31 G0 Snare L Snare L 2 <—— SD Rock M Snare M SD Rock H32 G#0 Sticks <—— <—— <—— <—— <——33 A0 Bass Drum L <—— <—— Bass Drum M Bass Drum H 4 Bass Drum M34 A#0 Open Rim Shot Open Rim Shot 2 <—— <—— <—— <——35 B0 Bass Drum M Bass Drum M 2 <—— Bass Drum H 3 BD Rock BD Analog L36 C1 Bass Drum H Bass Drum H 2 BD Room BD Rock BD Gate BD Analog H37 C#1 Side Stick <—— <—— <—— <—— Analog Side Stick38 D1 Snare M Snare M 2 SD Room L SD Rock SD Rock L Analog Snare L39 D#1 Hand Clap <—— <—— <—— <—— <——40 E1 Snare H Snare H 2 SD Room H SD Rock Rim SD Rock H Analog Snare H41 F1 Floor Tom L <—— Room Tom 1 Rock Tom 1 E Tom 1 Analog Tom 142 F#1 *1 Hi-Hat Closed <—— <—— <—— <—— Analog HH Closed 143 G1 Floor Tom H <—— Room Tom 2 Rock Tom 2 E Tom 2 Analog Tom 244 G#1 *1 Hi-Hat Pedal <—— <—— <—— <—— Analog HH Closed 245 A1 Low Tom <—— Room Tom 3 Rock Tom 3 E Tom 3 Analog Tom 346 A#1 *1 Hi-Hat Open <—— <—— <—— <—— Analog HH Open47 B1 Mid Tom L <—— Room Tom 4 Rock Tom 4 E Tom 4 Analog Tom 448 C2 Mid Tom H <—— Room Tom 5 Rock Tom 5 E Tom 5 Analog Tom 549 C#2 Crash Cymbal 1 <—— <—— <—— <—— Analog Cymbal50 D2 High Tom <—— Room Tom 6 Rock Tom 6 E Tom 6 Analog Tom 651 D#2 Ride Cymbal 1 <—— <—— <—— <—— <——52 E2 Chinese Cymbal <—— <—— <—— <—— <——53 F2 Ride Cymbal Cup <—— <—— <—— <—— <——54 F#2 Tambourine <—— <—— <—— <—— <——55 G2 Splash Cymbal <—— <—— <—— <—— <——56 G#2 Cowbell <—— <—— <—— <—— Analog Cowbell57 A2 Crash Cymbal 2 <—— <—— <—— <—— <——58 A#2 Vibraslap <—— <—— <—— <—— <——59 B2 Ride Cymbal 2 <—— <—— <—— <—— <——60 C3 Bongo H <—— <—— <—— <—— <——61 C#3 Bongo L <—— <—— <—— <—— <——62 D3 Conga H Mute <—— <—— <—— <—— Analog Conga H63 D#3 Conga H Open <—— <—— <—— <—— Analog Conga M64 E3 Conga L <—— <—— <—— <—— Analog Conga L65 F3 Timbale H <—— <—— <—— <—— <——66 F#3 Timbale L <—— <—— <—— <—— <——67 G3 Agogo H <—— <—— <—— <—— <——68 G#3 Agogo L <—— <—— <—— <—— <——69 A3 Cabasa <—— <—— <—— <—— <——70 A#3 Maracas <—— <—— <—— <—— Analog Maracas71 B3 Samba Whistle H <—— <—— <—— <—— <——72 C4 Samba Whistle L <—— <—— <—— <—— <——73 C#4 Guiro Short <—— <—— <—— <—— <——74 D4 Guiro Long <—— <—— <—— <—— <——75 D#4 Claves <—— <—— <—— <—— Analog Claves76 E4 Wood Block H <—— <—— <—— <—— <——77 F4 Wood Block L <—— <—— <—— <—— <——78 F#4 Cuica Mute <—— <—— <—— Scratch Push Scratch Push79 G4 Cuica Open <—— <—— <—— Scratch Pull Scratch Pull80 G#4 *2 Triangle Mute <—— <—— <—— <—— <——81 A4 *2 Triangle Open <—— <—— <—— <—— <——82 A#4 Shaker <—— <—— <—— <—— <——83 B4 Jingle Bell <—— <—— <—— <—— <——84 C5 Bell Tree <—— <—— <—— <—— <——85 C#586 D587 D#588 E589 F590 F#591 G5
Voice # 201 202 203 204 205 206Bank MSB# 127 127 127 127 127 127Bank LSB# 0 0 0 0 0 0
Program Change# 0 1 8 16 24 25MIDI
Standard Kit 1 Standard Kit 2 Room Kit Rock Kit Electronic Kit Analog KitNote# Note

105
��������������QQQQQQQQQQQQQQ¢¢¢¢¢¢¢¢¢¢¢¢¢¢Drum Kit List
13 C#-1 *3 <—— <—— <—— <——14 D-1 *3 <—— <—— <—— <——15 D#-1 <—— <—— <—— <——16 E-1 <—— <—— <—— <——17 F-1 *4 <—— <—— <—— <——18 F#-1 *4 <—— <—— <—— <——19 G-1 <—— <—— <—— <——20 G#-1 <—— <—— <—— <——21 A-1 <—— <—— <—— <——22 A#-1 <—— <—— <—— <——23 B-1 <—— <—— <—— <——24 C0 <—— <—— <—— <——25 C#0 <—— <—— <—— <——26 D0 <—— <—— <—— <——27 D#0 <—— <—— <—— <——28 E0 Reverse Cymbal <—— <—— <——29 F0 <—— <—— <—— <——30 F#0 Hi Q <—— <—— <——31 G0 AnSD Snappy <—— Brush Slap L <——32 G#0 <—— <—— <—— <——33 A0 AnBD Dance-1 <—— <—— Bass Drum L234 A#0 AnSD OpenRim <—— <—— <——35 B0 AnBD Dance-2 <—— <—— Gran Casa36 C1 AnBD Dance-3 BD Jazz BD Soft Gran Casa Mute Guitar Cutting Noise Dial Tone37 C#1 Analog Side Stick <—— <—— <—— Guitar Cutting Noise 2 Door Creaking38 D1 AnSD Q SD Jazz L Brush Slap Marching Sn M Door Slam39 D#1 <—— <—— <—— <—— String Slap Scratch40 E1 AnSD Ana+Acoustic SD Jazz H Brush Tap Marching Sn H Scratch 241 F1 Analog Tom 1 Jazz Tom 1 Brush Tom 1 Jazz Tom 1 Windchime42 F#1 *1 AnHH Closed-3 <—— <—— <—— Telephone Ring243 G1 Analog Tom 2 Jazz Tom 2 Brush Tom 2 Jazz Tom 244 G#1 *1 Analog HH Closed 2 <—— <—— <——45 A1 Analog Tom 3 Jazz Tom 3 Brush Tom 3 Jazz Tom 346 A#1 *1 AnHH Open-2 <—— <—— <——47 B1 Analog Tom 4 Jazz Tom 4 Brush Tom 4 Jazz Tom 448 C2 Analog Tom 5 Jazz Tom 5 Brush Tom 5 Jazz Tom 549 C#2 Analog Cymbal <—— <—— Hand Cym.Open L50 D2 Analog Tom 6 Jazz Tom 6 Brush Tom 6 Jazz Tom 651 D#2 <—— <—— <—— Hand Cym.Closed L52 E2 <—— <—— <—— <—— FL.Key Click Engine Start53 F2 <—— <—— <—— <—— Tire Screech54 F#2 <—— <—— <—— <—— Car Passing55 G2 <—— <—— <—— <—— Crash56 G#2 Analog Cowbell <—— <—— <—— Siren57 A2 <—— <—— <—— Hand Cym.Open H Train58 A#2 <—— <—— <—— <—— Jetplane59 B2 <—— <—— <—— Hand Cym.Closed H Starship60 C3 <—— <—— <—— <—— Burst Noise61 C#3 <—— <—— <—— <—— Coaster62 D3 Analog Conga H <—— <—— <—— SvMarine63 D#3 Analog Conga M <—— <—— <——64 E3 Analog Conga L <—— <—— <——65 F3 <—— <—— <—— <——66 F#3 <—— <—— <—— <——67 G3 <—— <—— <—— <——68 G#3 <—— <—— <—— <—— Rain Laughing69 A3 <—— <—— <—— <—— Thunder Screaming70 A#3 Analog Maracas <—— <—— <—— Wind Punch71 B3 <—— <—— <—— <—— Stream Heartbeat72 C4 <—— <—— <—— <—— Bubble Footsteps73 C#4 <—— <—— <—— <—— Feed74 D4 <—— <—— <—— <——75 D#4 Analog Claves <—— <—— <——76 E4 <—— <—— <—— <——77 F4 <—— <—— <—— <——78 F#4 Scratch Push <—— <—— <——79 G4 Scratch Pull <—— <—— <——80 G#4 *2 <—— <—— <—— <——81 A4 *2 <—— <—— <—— <——82 A#4 <—— <—— <—— <——83 B4 <—— <—— <—— <——84 C5 <—— <—— <—— <—— Dog Machine Gun85 C#5 Horse Gallop Laser Gun86 D5 Bird 2 Explosion87 D#5 FireWork88 E589 F590 F#5 Ghost91 G5 Maou
Voice # 207 208 209 210 211 212Bank MSB# 127 127 127 127 126 126Bank LSB# 0 0 0 0 0 0
Program Change# 27 32 40 48 0 1MIDI
Dance Kit Jazz Kit Brush Kit Classic Kit SFX 1 SFX 2Note# Note

106
��������������QQQQQQQQQQQQQQ¢¢¢¢¢¢¢¢¢¢¢¢¢¢There are three types of digital effects installed in the PSR-530: the reverb effect (system
effect), the chorus effect (system effect) and the DSP effect (can be set as either as a system effector insertion effect).
There are basically two ways to use the effects: with the DSP effect set as a system effect oras a insertion effect. Each different way will be explained here.
Although not all the effect settings cannot be made by operating the PSR-530 panel manually,some of them may be accessible through MIDI.
■ When DSP type Is Selected as a System Effect
DSP(VARIATION)
REVERB
send chorus to reverb
send variation to chorus
send variation to reverb
DRY LINE
PANreverb return
reverb pan
OUTPUT
The bold lines are stereo lines.
CHORUS
chorus return
chorus pan
DSP return
variation pan
DSP send
DSP send
DSP send
rev send
rev send
rev send
cho send
cho send
cho send
dry level
dry level
dry level
dry level
DSP send
rev send
cho send
PAN
PAN
PAN
volume expression
PAN
volume expression
PAN
volume expression
PAN
volume expression
L Voice
All tracks that can be revoiced.
R1 Voice
R2 Voice
MIDI Channel 1
MIDI Channel 16
• The three PSR-530 effects will be connected as shown below.
• The signal will enter reverb/chorus/DSP according to the send level set for each, and the signal with the effectapplied will be output according to the return level that is set. The reverb/chorus/DSP send levels are set foreach part (track) with the Revoice mode. The reverb/chorus/DSP return levels value are set in common forall the parts.
• The stereo panning is available for each of the reverb, chorus and DSP at the output for their signals. UsingMIDI, the panning position for the effect can be set (page 115).
• If a “Send Chorus to Reverb” (page 115) signal is transmitted to the PSR-530 from an external MIDI device,a signal can be sent from the chorus to the reverb (connected in series). Also, if a “Send Variation (DSP) toReverb” (page 116) signal is transmitted, a signal can be sent from the DSP to the reverb and in the sameway if a “Send Variation (DSP) to Chorus” signal (page 116) is transmitted a signal can be sent from DSP tothe chorus. If these signals are used, the three effects can be connected in series, or used separately, anda lot of different effects can be produced.
About Digital Effects (Reverb/Chorus/DSP)

107
��������������QQQQQQQQQQQQQQ¢¢¢¢¢¢¢¢¢¢¢¢¢¢About Digital Effects (Reverb/Chorus/DSP)
■ When DSP type Is Selected as a Insertion Effect
• The three PSR-530 effects will be connected as shown below.
• The signal will enter reverb and chorus according to the send level set for each, and the signal with the effectapplied will be output according to the return level that is set. The reverb and chorus send levels are set foreach part (track) with the Revoice mode. The reverb and chorus return level value is set in common for all theparts.
• The stereo panning is available for each of the reverb and chorus at the output for their signals. Using MIDI,the panning position for the effect can be set (page 115).
• If a “Send Chorus to Reverb” (page 115) signal is transmitted to the PSR-530 from an external MIDI device,a signal can be sent from the chorus to the reverb (connected in series).
• The signal will enter DSP with the Dry/Wet (send level) that is set, and a signal with the effect applied will beoutput. The DSP Dry/Wet (send level) is set for only R1 voice with the Revoice mode. The DSP return levelcannot be set.
rev send
cho send
dry
reverb return
chorus return
send chorus to reverb
DRY LINE
PAN
reverb pan
chorus pan
OUTPUT
The bold lines are stereo lines.
rev send
cho send
dry
rev send
cho send
dry
rev send
cho send
dry
variation part
L Voice
All tracks that can be revoiced.
Variation is valid for only one part.
R1 Voice
R2 Voice
DSP
DSP
variation on/off
DSP on/offPAN
volume expression
PAN
volume expression
PAN
volume expression
PAN
volume expression
REVERB
CHORUSPAN
DSP Dry/Wet
MIDI Channel 1
MIDI Channel 16

�������������QQQQQQQQQQQQQ¢¢¢¢¢¢¢¢¢¢¢¢¢
108
About Digital Effects (Reverb/Chorus/DSP)
The Digital Effect List
No. Effect Type Features
REVERB
01~04 Hall1~4 System Concert hall reverb.
05~08 Room1~4 System Small room reverb.
09, 10 Stage1, 2 System Reverb for solo instruments.
11, 12 Plate1, 2 System Simulated steel plate reverb.
13 OFF — No effect.
CHORUS
01~05 Chorus1~5 System Conventional chorus program with rich, warm chorusing.
06~09 Flanger1~4 System Pronounced three-phase modulation with a slight metallic sound.
10 OFF — No effect.
DSP
01~04 Hall1~4 System Concert hall reverb.
05~08 Room1~4 System Small room reverb.
09, 10 Stage1, 2 System Reverb for solo instruments.
11, 12 Plate1, 2 System Simulated steel plate reverb.
13, 14 Early Reflection1, 2 System Early reflections only.
15 Gate Reverb System Gated reverb effect, in which the reverberation is quickly cut off for specialeffects.
16 Reverse Gate System Similar to Gate Reverb, but with a reverse increase in reverb.
17~21 Chorus1~5 System Conventional chorus program with rich, warm chorusing.
22~25 Flanger1~4 System Pronounced three-phase modulation with slight metallic sound.
26 Symphonic System Exceptionally rich & deep chorusing.
27 Phaser System Pronounced, metallic modulation with periodic phase change.
28~32 Rotary Speaker 1~5 Insertion Rotary speaker simulation.
33, 34 Tremolo 1, 2 Insertion Rich Tremolo effect with both volume and pitch modulation.
35 Guitar Tremolo Insertion Simulated electric guitar tremolo.
36 Auto Pan Insertion Several panning effects that automatically shift the sound position (left, right,front, back).
37 Auto Wah Insertion Repeating filter sweep “wah” effect.
38 Delay L, C, R System Three independent delays, for the left, right and center stereo positions.
39 Delay L, R System Initial delay for each stereo channel, and two separate feedback delays.
40 Echo System Stereo delay, with independent Feedback Level controls for each channel.
41 Cross Delay System Complex effect that sends the delayed repeats “bouncing” between the left andright channels.
42 Distortion Hard Insertion Hard-edge distortion.
43 Distortion Soft Insertion This type is not so hard compared with Distortion Hard.
44 EQ Disco Insertion Discotype equalizer program to boost high and low frequencies.
45 EQ Telephone Insertion Equalizer program which eliminates higher and lower frequencies to simulatethe sounds through telephone.
46 OFF — No effect.

109
�������������QQQQQQQQQQQQQ¢¢¢¢¢¢¢¢¢¢¢¢¢Troubleshooting
Something not working as it should? In many cases what appears to be a malfunction canbe traced to a simple error that can be remedied immediately. Before assuming that your PSR-530 is faulty, please check the following points.
PROBLEM POSSIBLE CAUSE/SOLUTION
The speakers produce a “pop” sound whenever the power isturned ON or OFF.
This is normal and is no cause for alarm.
The volume is reduced or the sound is distorted.
The registration memory doesn’t work properly.
Recorded song data will not play back properly.
The display goes bland and all panel controls are reset.
The batteries probably need to be replaced. Either replace all sixbatteries, or use an AC power adaptor.
No sound when the keyboard is played.
The R1/R2/L voice volume settings could be set too low. Make surethe voice volumes are set at appropriate levels (pages 14, 79).
The Local Control function could be turned off. Make sure LocalControl is turned on (page 94).
Not all simultaneously-played notes sound.
Auto Accompaniment seems to “skip” when the keyboard isplayed.
You are probably exceeding the maximum polyphony of thePSR-530. The PSR-530 can play up to 32 notes at the same time— including split, dual, auto-accompaniment, song, and multipad notes. Notes exceeding this limit will not sound.
Auto Accompaniment doesn’t sound when started.The MIDI Clock mode may be set to “on”. Make sure it is turned“off” (page 94).
Auto accompaniment won’t function properly. No lower key-board sound.
Make sure that all accompaniment tracks are turned on, and thatthe they are all set to appropriate volume levels.
Make sure you are using fingerings recognized by the selectedfingering mode, and are playing in the Auto Accompanimentsection of the keyboard.
Are you sure you’re playing in the Auto-Accompaniment sectionof the keyboard? Make sure that the Auto Accompaniment splitpoint is set appropriately (page 29).
Are you playing chords that the PSR-530 can recognize (seechord types on page 30)?
The Harmony function will not turn on.Harmony cannot be turned on when the FULL KEYBOARDfingering mode is selected or if a percussion kit voice is selected.Select an appropriate fingering mode or voice.
A cartridge style or song cannot be selected or will not playproperly.
Make sure that an appropriate Yamaha Music Cartridge isproperly plugged into the cartridge slot (page 75), or thecartridge contacts are dirty. Try re-inserting the cartridge. If thecontacts are dirty removing and inserting the cartridge severaltimes will sometimes solve the problem. If this doesn’t work, trywiping the cartridge connectors carefully with a soft, dry cloth.
Operation of the sustain pedal is reversed.
Sustain pedal operation will be reversed if you turn on the poweror plug in the pedal while pressing the pedal. For normaloperation turn off the power then turn it back on while the pedalis not pressed.
Individual registration or song memory data transmitted via bulkdump from an external sequencer or other device is not receivedby the PSR-530.
Transmit the data with no more than a 2-second break betweenblocks, or transmit as entirely separate data.
Certain notes sound at the wrong pitch.Make sure that the scale tuning value for those notes is set to “0”(page 84).

110
��������������QQQQQQQQQQQQQQ¢¢¢¢¢¢¢¢¢¢¢¢¢¢(1) TRANSMIT FLOW
MIDI ← NOTE ON/OFF 9nHOUT
CONTROL CHANGE BnHBANK SELECT MSB BnH,00HBANK SELECT LSB BnH,20HDATA ENTRY MSB BnH,06HDATA ENTRY LSB BnH,26HMAIN VOLUME BnH,07HPANPOT BnH,0AHEXPRESSION BnH,0BHSUSTAIN BnH,40HSOSTENUTE BnH,42HSOFT PEDAL BnH,43HREVERB SEND LEVEL BnH,5BHVARIATION SEND LEVEL BnH,5EHRPN LSB BnH, 64HRPN MSB BnH, 65H
PITCH BEND SENS BnH, 65H, 00H, 64H, 00H, 06H, mmH
PROGRAM CHANGE CnHPITCH BEND EnH
SYSTEM EXCLUSIVE MESSAGE<YAMAHA MIDI FORMAT><UNIVERSAL>
UNIVERSAL REALTIME F0H 7FH.....F7HUNIVERSAL NON-REALTIME F0H 7EH.....F7H
<XG STANDARD>XG PARAMETER CHANGE F0H 43H 1nH 4CH aaH aaH aaH ddH
.....ddH F7HXG BULK DUMP F0H 43H 0nH 4CH bbH bbH aaH aaH
aaH ddH.....ddH ccH F7HSPECIAL OPERATORS
SYSTEM REALTIME MESSAGEMIDI CLOCK F8HSTART FAHSTOP FCHACTIVE SENSING FEH
MIDI Data Format
(2) RECEIVE FLOWMIDI → NOTE OFF 8nHIN
NOTE ON/OFF 9nH
CONTROL CHANGEBANK SELECT MSB BnH,00HBANK SELECT LSB BnH,20HMODULATION BnH,01HPORTAMENTO TIME BnH,05HDATA ENTRY MSB BnH,06HDATA ENTRY LSB BnH,26HMAIN VOLUME BnH,07HPANPOT BnH,0AHEXPRESSION BnH,0BHSUSTAIN BnH,40HPORTAMENTO BnH,41HSOSTENUTO BnH,42HSOFT PEDAL BnH,43HHARMONIC CONTENT BnH,47HRELEASE TIME BnH,48HATTACK TIME BnH,49HBRIGHTNESS BnH,4AHPORTAMENTO CONTROL BnH,54HREVERB SEND LEVEL BnH,5BHCHORUS SEND LEVEL BnH,5DHVARIATION SEND LEVEL BnH,5EHDATA INCREMENT BnH,60HDATA DECREMENT BnH,61HNRPN LSB BnH,62HNRPN MSB BnH,63H
VIBRATO RATE BnH,63H,01H,62H,08H,06H,mmHVIBRATO DEPTH BnH,63H,01H,62H,09H,06H,mmHVIBRATO DELAY BnH,63H,01H,62H,0AH,06H,mmHFILTER CUTOFF FREQ. BnH,63H,01H,62H,20H,06H,mmHFILTER RESONANCE BnH,63H,01H,62H,21H,06H,mmHAEG ATTACK TIME BnH,63H,01H,62H,63H,06H,mmHAEG DECAY TIME BnH,63H,01H,62H,64H,06H,mmHAEG RELEASE BnH,63H,01H,62H,66H,06H,mmHDRUM INST
CUTOFF FREQ. BnH,63H,14H,62H,rrH,06H,mmHFILTER RESONANCE BnH,63H,15H,62H,rrH,06H,mmHAEG ATTACK RATE BnH,63H,16H,62H,rrH,06H,mmHAEG DECAY RATE BnH,63H,17H,62H,rrH,06H,mmHPITCH COARSE BnH,63H,18H,62H,rrH,06H,mmH
Many MIDI messages listed in the MIDI Data Format are expressed in decimalnumbers, binary numbers and hexadecimal numbers. Hexadecimal numbersmay include the letter “H” as a suffix. Also, “n” can freely be defined as anywhole number.To enter data/values, refer to the table below.
• Except the table above, for example 144-159 (decimal)/9nH/1001 0000-10011111 (binary) displays the Note On Message for each channel (1-16). 176-191/BnH/1011 0000-1011 1111 displays the Control Change Message foreach channel (1-16). 192-207/CnH/1100 0000-1100 1111 displays theProgram Change Message for each channel (1-16). 240/FOH/1111 0000denotes the start of a System Exclusive Message. 247/F7H/1111 0111denotes the end of a System Exclusive Message.
• aaH (hexidecimal)/0aaaaaaa (binary) denotes the data address. The addresscontains High, Mid, and Low.
• bbH/0bbbbbbb denotes the byte count.
• ccH/0ccccccc denotes the check sum.
• ddH/0ddddddd denotes the data/value.
Decimal Hexadecimal Binary
0 00 0000 0000
1 01 0000 0001
2 02 0000 0010
3 03 0000 0011
4 04 0000 0100
5 05 0000 0101
6 06 0000 0110
7 07 0000 0111
8 08 0000 1000
9 09 0000 1001
10 0A 0000 1010
11 0B 0000 1011
12 0C 0000 1100
13 0D 0000 1101
14 0E 0000 1110
15 0F 0000 1111
16 10 0001 0000
17 11 0001 0001
18 12 0001 0010
19 13 0001 0011
20 14 0001 0100
21 15 0001 0101
22 16 0001 0110
23 17 0001 0111
24 18 0001 1000
25 19 0001 1001
26 1A 0001 1010
27 1B 0001 1011
28 1C 0001 1100
29 1D 0001 1101
30 1E 0001 1110
31 1F 0001 1111
32 20 0010 0000
33 21 0010 0001
34 22 0010 0010
35 23 0010 0011
36 24 0010 0100
37 25 0010 0101
38 26 0010 0110
39 27 0010 0111
40 28 0010 1000
41 29 0010 1001
42 2A 0010 1010
43 2B 0010 1011
44 2C 0010 1100
45 2D 0010 1101
46 2E 0010 1110
47 2F 0010 1111
48 30 0011 0000
49 31 0011 0001
50 32 0011 0010
51 33 0011 0011
52 34 0011 0100
53 35 0011 0101
54 36 0011 0110
55 37 0011 0111
56 38 0011 1000
57 39 0011 1001
58 3A 0011 1010
59 3B 0011 1011
60 3C 0011 1100
61 3D 0011 1101
62 3E 0011 1110
63 3F 0011 1111
Decimal Hexadecimal Binary
64 40 0100 0000
65 41 0100 0001
66 42 0100 0010
67 43 0100 0011
68 44 0100 0100
69 45 0100 0101
70 46 0100 0110
71 47 0100 0111
72 48 0100 1000
73 49 0100 1001
74 4A 0100 1010
75 4B 0100 1011
76 4C 0100 1100
77 4D 0100 1101
78 4E 0100 1110
79 4F 0100 1111
80 50 0101 0000
81 51 0101 0001
82 52 0101 0010
83 53 0101 0011
84 54 0101 0100
85 55 0101 0101
86 56 0101 0110
87 57 0101 0111
88 58 0101 1000
89 59 0101 1001
90 5A 0101 1010
91 5B 0101 1011
92 5C 0101 1100
93 5D 0101 1101
94 5E 0101 1110
95 5F 0101 1111
96 60 0110 0000
97 61 0110 0001
98 62 0110 0010
99 63 0110 0011
100 64 0110 0100
101 65 0110 0101
102 66 0110 0110
103 67 0110 0111
104 68 0110 1000
105 69 0110 1001
106 6A 0110 1010
107 6B 0110 1011
108 6C 0110 1100
109 6D 0110 1101
110 6E 0110 1110
111 6F 0110 1111
112 70 0111 0000
113 71 0111 0001
114 72 0111 0010
115 73 0111 0011
116 74 0111 0100
117 75 0111 0101
118 76 0111 0110
119 77 0111 0111
120 78 0111 1000
121 79 0111 1001
122 7A 0111 1010
123 7B 0111 1011
124 7C 0111 1100
125 7D 0111 1101
126 7E 0111 1110
127 7F 0111 1111

111
��������������QQQQQQQQQQQQQQ¢¢¢¢¢¢¢¢¢¢¢¢¢¢PITCH FINE BnH,63H,19H,62H,rrH,06H,mmHLEVEL BnH,63H,1AH,62H,rrH,06H,mmHPANPOT BnH,63H,1CH,62H,rrH,06H,mmHREVERB SEND BnH,63H,1DH,62H,rrH,06H,mmHCHORUS SEND BnH,63H,1EH,62H,rrH,06H,mmHVARIATION SEND BnH,63H,1FH,62H,rrH,06H,mmH
RPN LSB BnH,64HRPN MSB BnH,65H
PITCH BEND SENS. BnH,65H,00H,64H,00H,06H,mmHFINE TUNING BnH,65H,00H,64H,01H,06H,mmH,
26H,llHCOARSE TUNING BnH,65H,00H,64H,02H,06H,mmHNULL BnH,65H,7FH,64H,7FH
ALL SOUND OFF BnH,78H,00HRESET ALL CONTROLLERS BnH,79H,00HALL NOTES OFF BnH,7BHOMNI OFF BnH,7CHOMNI ON BnH,7DHMONO BnH,7EHPOLY BnH,7FH
PROGRAM CHANGE CnH
CHANNEL AFTER TOUCH DnH
PITCH BEND CHANGE EnH
SYSTEM EXCLUSIVE MESSAGE<YAMAHA MIDI FORMAT><UNIVERSAL>
UNIVERSAL REALTIME F0H 7FH.....F7HUNIVERSAL NON-REALTIME F0H 4EH.....F7H
<XG STANDARD>XG PARAMETER CHANGE F0H 43H 1nH 4CH aaH aaH aaH ddH
.....ddH F7HXG BULK DUMP F0H 43H 0nH 4CH bbH bbH aaH aaH
aaH ddH.....ddH ccH F7HPARAMETER REQUEST F0H 43H 3nH 4CH aaH aaH aaH F7HDUMP REQUEST F0H 43H 2nH 4CH aaH aaH aaH F7HSPECIAL OPERATORSOthers
SYSTEM REALTIME MESSAGEMIDI CLOCK F8HSTART FAHSTOP FCHACTIVE SENSING FEH
(3) TRANSMIT/RECEIVE DATA
(3-1) CHANNEL VOICE MESSAGES
(3-1-1) NOTE OFF (Recive only)STATUS 1000nnnn (8nH) n = 0 - 15 VOICE CHANNEL NUMBERNOTE NUMBER 0kkkkkkk k = 0 (C-2) - 127 (G8)VELOCITY 0vvvvvvv v: ignored
(3-1-2) NOTE ON/OFFSTATUS 1001nnnn (9nH) n = 0 - 15 VOICE CHANNEL NUMBERNOTE NUMBER 0kkkkkkk k = 0 (C-2) - 127 (G8)VELOCITY 0vvvvvvv (v ≠ 0) NOTE ON
00000000 (v = 0) NOTE OFF
(3-1-3) PROGRAM CHANGESTATUS 1100nnnn (CnH) n = 0 - 15 VOICE CHANNEL NUMBERPROGRAM NUMBER 0ppppppp p = 0 - 127
* PROGRAM NUMBER: XG DRUM VOICE number correspondenceP = 0 Standard KitP = 1 Standard2 KitP = 8 Room KitP = 16 Rock KitP = 24 Elctrnic KitP = 25 Analog KitP = 27 Dance KitP = 32 Jazz KitP = 40 Brush KitP = 48 Classic Kit
* PROGRAM NUMBER: XG SFX KIT number correspondenceP = 1 SFX1 KitP = 2 SFX2 Kit
When DRUM VOICE is selected and program change data for a different DRUMVOICE is received, the currently selected DRUM VOICE will be replaced with thenew DRUM VOICE.
(3-1-4) CHANNEL AFTER TOUCH (Recive only)STATUS 1101nnnn (DnH) n = 0 - 15 VOICE CHANNEL NUMBERVALUE 0vvvvvvv v = 0 - 127 AFTER TOUCH VALUE
(3-1-5) PITCH BEND CHANGESTATUS 1110nnnn (EnH) n = 0 - 15 VOICE CHANNEL NUMBERLSB 0vvvvvvv PITCH BEND CHANGE LSBMSB 0vvvvvvv PITCH BEND CHANGE MSB
(3-1-6) CONTROL CHANGESTATUS 1011nnnn (BnH) n = 0 - 15 VOICE CHANNEL NUMBERCONTROL NUMBER 0cccccccCONTROL VALUE 0vvvvvvv
* Transmit CONTROL NUMBER.c = 0 BANK SELECT MSB ; v = 0:XG NORMAL,
64:SFX NORMAL,126:XG SFX KIT,127:XG DRUM
c = 32 BANK SELECT LSB ; v = 0 - 127 *3c = 6 DATA ENTRY MSB ; v = 0 - 127 *1c = 38 DATA ENTRY LSB ; v = 0 - 127 *1c = 7 MAIN VOLUME ; v = 0 - 127c = 10 PANPOT ; v = 0 - 127c = 11 EXPRESSION ; v = 0 - 127c = 64 SUSTAIN ; v = 0-63:OFF , 64-127:ON *2c = 66 SOSTENUTO ; v = 0-63:OFF , 64-127:ON *2c = 67 SOFT PEDAL ; v = 0-63:OFF , 64-127:ON *2c = 91 REVERB SEND LEVEL ; v = 0 - 127c = 94 VARIATION SEND LEVEL ; v = 0 - 127
* Receive CONTROL NUMBER.c = 0 BANK SELECT MSB ; v = 0:XG NORMAL,
64:SFX NORMAL,126:XG SFX KIT,127:XG DRUM
c = 32 BANK SELECT LSB ; v = 0 - 127 *3c = 1 MODULATION ; v = 0 - 127 *2c = 5 PORTAMENTO TIME ; v = 0 - 127 *2c = 6 DATA ENTRY MSB ; v = 0 - 127 *1c = 38 DATA ENTRY LSB ; v = 0 - 127 *1c = 7 MAIN VOLUME ; v = 0 - 127c = 10 PANPOT ; v = 0 - 127c = 11 EXPRESSION ; v = 0 - 127c = 64 SUSTAIN ; v = 0-63:OFF , 64-127:ON *2c = 65 PORTAMENTO ; v = 0-63:OFF , 64-127:ON *2c = 66 SOSTENUTO ; v = 0-63:OFF , 64-127:ON *2c = 67 SOFT PEDAL ; v = 0-63:OFF , 64-127:ON *2c = 71 HARMONIC CONTENT ; v = 0:-64 - 64:0 - 127:+63 *2c = 72 RELEASE TIME ; v = 0:-64 - 64:0 - 127:+63 *2c = 73 ATTACK TIME ; v = 0:-64 - 64:0 - 127:+63 *2c = 74 BRIGHTNESS ; v = 0:-64 - 64:0 - 127:+63 *2c = 84 PORTAMENT CONTROL ; v = 0 - 127 *2c = 91 REVERB SEND LEVEL ; v = 0 - 127c = 93 CHORUS SEND LEVEL ; v = 0 - 127c = 94 VARIATION SEND LEVEL ; v = 0 - 127
(When only Connection = 1[System])c = 96 DATA INCREMENT ; v = 127 *1c = 97 DATA DECREMENT ; v = 127 *1
*1 Only when setting the appointed parameter with RPN, NRPN.*2 Does not effect Rhythm Voice.*3 MSB=0, anything other than 63 is 0.
• Until a PROGRAM CHANGE message is received, the BANK SELECToperation will be suspended. When a Voice, including VOICE BANK, ischanged, set the BANK SELECT and Program Change Message, andtransmit in the following order, BANK SELECT MSB, LSB, PROGRAMCHANGE.
• MODULATION controls the Vibrato Depth.
• PORTAMENTO TIME controls the Pitch Change Speed when thePortamento Switch = ON. 0 being the shortest time, and 127 being thelongest.
• PANPOT changes the value for the melody voice and rhythm voice inrelation to the preset value.
• Portamento time is fixed to 0 when the PORTAMENTO CONTROL isused.
• HARMONIC CONTENT applies adjustment to the resonance value thatis set by the voice. This parameter specifies relative change with thevalue of 64 producing 0 adjustment. As values get higher the soundbecomes increasingly eccentric. Note that for some voices the effectiveparameter range is narrower than the legal parameter range.
• RELEASE TIME applies adjustment to the envelope release time set bythe voice. This parameter specifies relative change with the value of 64producing 0 adjustment.
MIDI Data Format

112
��������������QQQQQQQQQQQQQQ¢¢¢¢¢¢¢¢¢¢¢¢¢¢MIDI Data Format
• ATTACK TIME applies adjustment to the envelope attack time set by thevoice. This parameter specifies relative change with the value of 64producing 0 adjustment.
• BRIGHTNESS applies adjustment to the cut-off frequency set by thevoice. This parameter specifies relative change with the value of 64producing 0 adjustment. Lower voices produce a softer sound. For somevoices the effective parameter range is narrower than the legalparameter range.
(3-2) CHANNEL MODE MESSAGESSTATUS 1011nnnn (BnH) n = 0 - 15 VOICE CHANNEL NUMBERCONTROL NUMBER 0ccccccc c = CONTROL NUMBERCONTROL VALUE 0vvvvvvv v = DATA VALUE
(3-2-1) ALL SOUND OFF (Recive only)(CONTROL NUMBER = 78H , DATA VALUE = 0)
Switches off all sound from the channel. Does not reset Note On and Hold Onconditions established by Channel Messages.
(3-2-2) RESET ALL CONTROLLERS (Recive only)(CONTROL NUMBER = 79H , DATA VALUE = 0)
Resets controllers as follows.
PITCH BEND CHANGE 0 (Center)AFTER TOUCH 0 (min.)MODULATION 0 (min.)EXPRESSION 127 (max.)SUSTAIN 0 (off)SOSTENUTO 0 (off)SOFT PEDAL 0 (off)NRPN Sets number to null. (Internal data remains unchanged)RPN Sets number to null. (Internal data remains unchanged)PORTAMENT CONTROL Resets portamento source note numberPORTAMENTO 0 (off)
(3-2-3) ALL NOTES OFF (Recive only) (CONTROL NUMBER = 7BH , DATA VALUE = 0)
Switches off all of the channel’s “on” notes. However, any notes being held bySUSTAIN or SOSTENUTO continue to sound until SUSTAIN/SOSTENUTO goes off.
(3-2-4) OMNI OFF (Recive only) (CONTROL NUMBER = 7CH , DATA VALUE = 0)Same processing as for All Notes Off.
(3-2-5) OMNI ON (Recive only) (CONTROL NUMBER = 7DH , DATA VALUE = 0)Same processing as for All Notes Off. Omni On is not executed.
(3-2-6) MONO (Recive only) (CONTROL NUMBER = 7EH , DATA VALUE = 0-16)Same processing as for All Notes Off. If the 3rd byte is in a range of 0-16 thecorresponding channel will be changed to Mode 4 (m=1).
(3-2-7) POLY (Recive only) (CONTROL NUMBER = 7FH , DATA VALUE = 0)Same processing as for All Sounds Off and the corresponding channel will bechanged to Mode 3.
(3-3) REGISTERED PARAMETER NUMBER (RPN)STATUS 1011nnnn (BnH) n = 0 - 15 VOICE CHANNEL NUMBERRPN LSB 01100100 (64H)RPN LSB NUMBER 0ppppppp p = RPN LSB (refer to the list below)RPN MSB 01100101 (65H)RPN MSB NUMBER 0qqqqqqq q = RPN MSB (refer to the list below)DATA ENTRY MSB 00000110 (06H)DATA VALUE 0mmmmmmm m = Data ValueDATA ENTRY LSB 00100110 (26H)DATA VALUE 0lllllll l = Data Value
First appoints the parameter for RPN MSB/LSB, then sets the parameter value fordata entry MSB/LSB.
RPN D.ENTRYLSB MSB MSB LSB PARAMETER NAME DATA RANGE00H 00H mmH — PITCH BEND SENSITIVITY 00H - 18H (0 - 24 semitones)01H 00H mmH llH FINE TUNE {mmH,llH} = {00H,00H} - {40H,00H} - {7FH,7FH}
(-8192*100/8192) - 0 - (+8192*100/8192)02H 00H mmH — COARSE TUNE 28H - 40H - 58H (-24 - 0 - +24 semitones)7FH 7FH — — NULL
Clears the current RPN number setting. Does not change the internal parameter settings.
(3-4) NON-REGISTERED PARAMETER NUMBER (NRPN) (Recive only)STATUS 1011nnnn (BnH) n = 0 - 15 VOICE CHANNEL NUMBERNRPN LSB 01100010 (62H)NRPN LSB NUMBER 0ppppppp p = NRPN LSB (refer to the list below)NRPN MSB 01100011 (63H)NRPN MSB NUMBER 0qqqqqqq q = NRPN MSB (refer to the list below)DATA ENTRY MSB 00000110 (06H)DATA VALUE 0mmmmmmm m = Data Value
First appoints the parameter for NRPN MSB/LSB, then sets the parameter value for dataentry MSB/LSB.
NRPN D.ENTRYMSB LSB MSB LSB PARAMETER NAME DATA RANGE01H 08H mmH — VIBRATO RATE 00H - 40H - 7FH (-64 - 0 - +63)01H 09H mmH — VIBRATO DEPTH 00H - 40H - 7FH (-64 - 0 - +63)01H 0AH mmH — VIBRATO DELAY 00H - 40H - 7FH (-64 - 0 - +63)01H 20H mmH — FILTER CUTOFF FREQUENCY00H - 40H - 7FH (-64 - 0 - +63)01H 21H mmH — FILTER RESONANCE 00H - 40H - 7FH (-64 - 0 - +63)01H 63H mmH — EG ATTACK TIME 00H - 40H - 7FH (-64 - 0 - +63)01H 64H mmH — EG DECAY TIME 00H - 40H - 7FH (-64 - 0 - +63)01H 66H mmH — EG RELEASE 00H - 40H - 7FH (-64 - 0 - +63)14H rrH mmH — DRUM FILTER CUTOFF FREQ.00H - 40H - 7FH (-64 - 0 - +63)15H rrH mmH — DRUM FILTER RESONANCE 00H - 40H - 7FH (-64 - 0 - +63)16H rrH mmH — DRUM AEG ATTACK RATE 00H - 40H - 7FH (-64 - 0 - +63)17H rrH mmH — DRUM AEG DECAY RATE 00H - 40H - 7FH (-64 - 0 - +63)18H rrH mmH — DRUM PITCH COARSE 00H - 40H - 7FH (-64 - 0 - +63)19H rrH mmH — DRUM PITCH FINE 00H - 40H - 7FH (-64 - 0 - +63)1AH rrH mmH — DRUM LEVEL 00H - 7FH (0 - max.)1CH rrH mmH — DRUM PANPOT 00H ,01H - 40H - 7FH
(random,left - center - right)1DH rrH mmH — DRUM REVERB SEND LEVEL 00H - 7FH (0 - max.)1EH rrH mmH — DRUM CHORUS SEND LEVEL 00H - 7FH (0 - max.)1FH rrH mmH — DRUM VARIATION SEND LEVEL 00H - 7FH (0 - max.)
The MSG14H-1FH (for drums) message is accepted as long as the channel is setwith a drum voice.rrH : drum instrument note number
(3-5) SYSTEM REALTIME MESSAGES
(3-5-1) MIDI CLOCKSTATUS 11111000 (F8H)
Transmission: 96 clocks per measure are transmitted.Reception: If the instrument’s clock is set to external, after FAH is received from theexternal device the instrument’s clock will sync with the 96 beats per measurereceived from the external device.Decides whether the internal clock, or Timing Clocks received via the MIDI IN willbe used.
(3-5-2) STARTSTATUS 11111010 (FAH)
Transmission: Transmitted when instrument’s Auto accompaniment or Songplayback is started.Reception: Depending upon the condition, Auto accompaniment, Song Playback, orSong Rec will start. FAH can only be received when External Clock is ON.
(3-5-3) STOPSTATUS 11111100 (FCH)
Transmission: Transmitted when instrument’s Rhythm or Song playback is stopped.Reception: Depending upon the condition, Rhythm, Song Playback, or Song Rec willstop.
(3-5-4) ACTIVE SENSINGSTATUS 11111110 (FEH)
Transmission: Transmitted approximately once every 200msec.Reception: Sensing is started once this Code is received. If Status or Data is notreceived within 400ms, the MIDI Receive Buffer will be cleared, and all notes,including those being sustained, will be cut OFF. Also, all control values will be resetto their factory defaults.
(3-6) SYSTEM EXCLUSIVE MESSAGE
(3-6-1) YAMAHA MIDI FORMAT
(3-6-1-1) SECTION CONTROLbinary hexadecimal11110000 F0 Exclusive status01000011 43 YAMAHA ID01111110 7E Style00000000 000sssssss SS Switch No.
00H : INTRO A01H~07H : INTRO B08H : MAIN A09H~0FH : MAIN B10H : FILL IN AA11H~17H : FILL IN BB18H : FILL IN AB19H~1FH : FILL IN BA20H : ENDING A21H~27H : ENDING B
0ddddddd DD Switch On/Off : 00H (Off),7FH (On)11110111 F7 End of Exclusive
When an ON code is received, the appointed section will be changed.

113
��������������QQQQQQQQQQQQQQ¢¢¢¢¢¢¢¢¢¢¢¢¢¢(3-6-3-1-2) XG PARMETER CHANGEbinary hexadecimal11110000 F0 Exclusive status01000011 43 YAMAHA ID0001nnnn 1N Device Number01001100 4C Model ID0aaaaaaa AA Address High0aaaaaaa AA Address Mid0aaaaaaa AA Address Low0ddddddd DD Data
| |11110111 F7 End of Exclusive
For parameters with data size of 2 or 4, transmit the appropriate number of data bytes.For more information on Address and Parameters, refer to < Table 1-2 > ~ < Table 1-6 >(pages 115 ~ 118).The 4 data types listed below are transmitted and received.
(These are transmitted only after a Parameter change request is received.)XG System DataMulti Effect DataMulti Part DataDrums Setup Data
(3-6-3-2) XG BULK DUMPbinary hexadecimal11110000 F0 Exclusive status01000011 43 YAMAHA ID0000nnnn 0N Device Number01001100 4C Model ID0bbbbbbb BB ByteCount0bbbbbbb BB ByteCount0aaaaaaa AA Address High0aaaaaaa AA Address Mid0aaaaaaa AA Address Low0ddddddd DD Data
| |0ccccccc CC Check sum11110111 F7 End of Exclusive
For more information on Address and Byte Count, refer to < Table 1-2 > ~ < Table 1-6 >(pages 115 ~ 118).The Check Sum value is set such that the sum of Byte Count, Address, Data, andCheck Sum has value zero in its seven least significant bits.If the top of the block is appointed to the Address the XG Bulk Dump, Bulk Requestwill be received.The Block is a unit that consists of the data, arranged in the list, as the Total Size.
The 5 data types listed below are transmitted and received.(These are transmitted only after a Bulk Dump request is received.)
System DataMulti Effect Data (Individual effect unit)Multi Part Data (Individual part unit)Drums Setup Data (Individual note unit)System Information (Individual only)
(3-6-3-3) XG PARAMETER REQUEST (Recive only)binary hexadecimal11110000 F0 Exclusive status01000011 43 YAMAHA ID0011nnnn 3n Device Number01001100 4C Model ID0aaaaaaa AA Address High0aaaaaaa AA Address Mid0aaaaaaa AA Address Low11110111 F7 End of Exclusive
For more information on Address and Byte Count refer to < Table 1-2 > ~ < Table 1-6 >(pages 115 ~ 118).The 4 data types listed below are received.
System DataMulti Effect DataMulti Part DataDrums Setup Data
(3-6-3-4) XG DUMP REQUEST (Recive only)binary hexadecimal11110000 F0 Exclusive status01000011 43 YAMAHA ID0010nnnn 2n Device Number01001100 4C Model ID0aaaaaaa AA Address High0aaaaaaa AA Address Mid0aaaaaaa AA Address Low11110111 F7 End of Exclusive
For more information on Address and Byte Count refer to < Table 1-2 > ~ < Table 1-6 >(pages 115 ~ 118).
(3-6-1-2) TEMPO CONTROLbinary hexadecimal11110000 F0 Exclusive status01000011 43 YAMAHA ID01111110 7E Style00000000 010ttttttt TT Tempo40ttttttt TT Tempo30ttttttt TT Tempo20ttttttt TT Tempo111110111 F7 End of Exclusive
The internal clock will be set to the received Tempo value.Tempo Meta Event is a large data block (24-bit), it is divided into 4 groups with 7-bitsgoing into each of the Tempos 1-4 (4 receives the remaining 3 bits).
(3-6-2) UNIVERSAL SYSTEM EXCLUSIVE
(3-6-2-1) UNIVERSAL REALTIME MESSAGE
(3-6-2-1-1) MIDI MASTER VOLUME (Recive only)binary hexadecimal11110000 F0 Exclusive status01111110 7F Universal Realtime01111111 7F ID of target Device00001001 04 Sub-ID #1=Device Control Message00000001 01 Sub-ID #2=Master Volume0sssssss SS Volume LSB0ttttttt TT Volume MSB11110111 F7 End of Exclusive or11110000 F0 Exclusive status01111110 7F Universal Realtime0xxxnnnn XN When N is received N=0-F, whichever is received.
When N is transmitted N always=0.X = don’t care
00001001 04 Sub-ID #1=Device Control Message00000001 01 Sub-ID #2=Master Volume0sssssss SS Volume LSB0ttttttt TT Volume MSB11110111 F7 End of Exclusive
The volume for all channels will be changed simultaneously.The TT value is used as the MIDI Master Volume value. (the ss value is ignored.)
(3-6-2-2) UNIVERSAL NON REALTIME MESSAGE
(3-6-2-2-1) GENERAL MIDI SYSTEM ONbinary hexadecimal11110000 F0 Exclusive status01111110 7E Universal Non-Realtime01111111 7F ID of target Device00001001 09 Sub-ID #1=General MIDI Message00000001 01 Sub-ID #2=General MIDI On11110111 F7 End of Exclusive or11110000 F0 Exclusive status01111110 7E Universal Non-Realtime0xxxnnnn XN When N is received N=0-F, whichever is received.
When N is transmitted N always=0.X = don’t care
00001001 09 Sub-ID #1=General MIDI Message00000001 01 Sub-ID #2=General MIDI On11110111 F7 End of Exclusive
Depending upon the received ON message, the System Mode will be changed to XG.Except MIDI Master Tuning, all control data be reset to default values.This message requires approximately 50ms to execute, so sufficient time should beallowed before the next message is sent.The bank select message for the channel 10 and the NRPN messages are not receivedin the GM mode.
(3-6-3) XG STANDARD
(3-6-3-1) XG PARAMETER CHANGE
(3-6-3-1-1) XG SYSTEM ONbinary hexadecimal11110000 F0 Exclusive status01000011 43 YAMAHA ID0001nnnn 1N Device Number01001100 4C Model ID00000000 00 Address High00000000 00 Address Mid01111110 7E Address Low00000000 00 Data11110111 F7 End of Exclusive
Depending upon the received ON message, the SYSTEM MODE will be changed toXG.Controllers will be reset, all values of Multi Part and Effect, and All System valuesdenoted by “XG” data within All System will be reset to default values in the table.This message requires approximately 50ms to execute, so sufficient time should beallowed before the next message is sent.
MIDI Data Format

114
��������������QQQQQQQQQQQQQQ¢¢¢¢¢¢¢¢¢¢¢¢¢¢MIDI Data Format
The 5 data types listed below are received.System DataMulti Effect Data (Individual module unit)Multi Part Data (Individual part unit)Drums Setup Data (Individual note unit)System Information
(3-6-4) SPECIAL OPERATORS
(3-6-4-1) VOLUME ,EXPRESSION AND PAN REALTIME CONTROL OFFbinary hexadecimal11110000 F0 Exclusive status01000011 43 YAMAHA ID01110011 73 Clavinova ID01000101 45 CVP-98/96/94/92 ID00010001 11 Sub ID0000nnnn 0N N = MIDI Channel01001001 45 Volume and Expression Realtime Control Off0vvvvvvv VV Value VV: 00H=on, 7FH=off11110111 F7 End of Exclusive
When “On” is received, subsequent volume, expression, and PAN changes are onlyvalid after the reception of the next key on. Normal operation resumes when “Off” isreceived.
(3-6-5) Others
(3-6-5-1) MIDI MASTER TUNING (Recive only)binary hexadecimal11110000 F0 Exclusive status01000011 43 YAMAHA ID0001nnnn 1N When N is received N=0-F, whichever is received.00100111 27 Model ID00110000 30 Sub ID00000000 0000000000 000mmmmmmm MM Master Tune MSB0lllllll LL Master Tune LSB0ccccccc CC don’t care11110111 F7 End of Exclusive
Changes tuning of all channels.MM, LL values are used to define the MIDI Master Tuning value.
T = M-128
T : Tuning value (-100cent - +100cent)M : A single byte value (28-228) consists of bytes 0-3 of MM = MSB, bytes 0-3 of LL = LSB.
In this setting, GM System ON, XG System ON will not be reset.
(3-6-5-2) Bulk DumpUser Song, User Stylebinary hexadecimal11110000 F0 Exclusive status01000011 43 YAMAHA ID01110011 73 Clavinova ID01001011 4B Model ID (PSR-530)00110000 06 Bulk ID0kkkkkkk KK Bulk No. (0AH;User Song, 07H;User Style)0000llll 0L Data Length0000llll 0L Data Length0000llll 0L Data Length0000llll 0L Data Length0000llll 0L Data Length0000llll 0L Data Length (Date Length=LLLLLL HByte0ddddddd DD Bulk Data
: :0ccccccc CC Check Sum11110111 F7 End of Exclusive
Multi Pad, Registration Memorybinary hexadecimal11110000 F0 Exclusive status01000011 43 YAMAHA ID01110011 73 Clavinova ID01001011 4B Model ID (PSR-530)00110000 06 Bulk ID0kkkkkkk KK Bulk No.(08H;Multi Pad, 09H;Registration Memory)0000llll 0L Data Length0000llll 0L Data Length0000llll 0L Data Length0000llll 0L Data Length (Date Length=LLLL HByte)0ddddddd DD Bulk Data
: :0ccccccc CC Check Sum11110111 F7 End of Exclusive
Bulk data cannot be sent when:• in the Record Modes (Song, Style, Pad).• song playback.• accompaniment playback.• multi pad playback.• changing the registration number.
Bulk data cannot be received when:• in the Record Modes (Song, Style, Pad).• a frame appears around the voice icons and an user song is selected.• song playback.• accompaniment playback.• multi pad playback.• changing the registration number.
< Table 1-1> Parmeter Basic Address
Parameter ChangeAddress(H) (M) (L) Description
SYSTEM 00 00 00 System00 00 7D Drum Setup Reset00 00 7E XG System On00 00 7F All Parameter Reset
INFORMATION 01 00 00 System Information
EFFECT 1 02 01 00 Effect1 (Reverb,Chorus,Variation)
MULTI PART 08 00 00 Multi Part 1:
08 0F 00 Multi Part 16
08 10 00 Reserved: : : :
DRUM 30 0B 00 Drum Setup 1 → Address Parameter31 0B 00 Drum Setup 2 : :
3n 0B 00 note number 133n 0C 00 note number 14: :
3n 5B 00 note number 91

115
��������������QQQQQQQQQQQQQQ¢¢¢¢¢¢¢¢¢¢¢¢¢¢MIDI Data Format
< Table 1-2 > MIDI Parameter Change table (SYSTEM) (With XG, GM On, it will not reset.)
Address Size Data Parameter Name Description Default(H) (H) (H) Value (H)00 00 00 4 0000 Master Tune -102.4..+102.3[cent] 00 04 00 00
01 ..07FF 1st bit3-0 -> bit15-12 (0400)02 2nd bit3-0 -> bit11-8 (With XG, GM On, it will not reset.)03 3rd bit3-0 -> bit7-4
4th bit3-0 -> bit3-004 1 00..7F Master Volume 0..127 7F05 1 Not Used06 1 28..58 Transpose -24..+24[semitones] 407D n Drum Setup Reset n=Drum Setup Number7E 00 XG System On 00=XG Sytem on7F 00 All Parameter Reset 00=on (receive only)
TOTAL SIZE 6
< Table 1-3 > MIDI Parameter table (System information) (Transmitted by Dump Request. Not received. Bulk Dump Only)
Address Size Data Parameter Name Description (H) (H) (H)01 00 00 E 20..7F Model Name 32..127 (ASCII)
:0D0E 1 000F 1 00
TOTAL SIZE 10(Transmitted by Dump Request. Not received. Bulk Dump Only)
< Table 1-4 > MIDI Parameter Change table (EFFECT 1)
Address Size Data Parameter Name Description Default(H) (H) (H) Value (H)02 01 00 2 00..7F Reverb Type MSB Refer to the Effect Type List 01 (=HALL1)
00..7F Reverb Type LSB : basic type 0002 1 00..7F Reverb Parameter 1 Refer to the Effect Parameter List Depend on Reverb type03 1 00..7F Reverb Parameter 2 Refer to the Effect Parameter List Depend on Reverb type04 1 00..7F Reverb Parameter 3 Refer to the Effect Parameter List Depend on Reverb type05 1 00..7F Reverb Parameter 4 Refer to the Effect Parameter List Depend on Reverb type06 1 00..7F Reverb Parameter 5 Refer to the Effect Parameter List Depend on Reverb type07 1 00..7F Reverb Parameter 6 Refer to the Effect Parameter List Depend on Reverb type08 1 00..7F Reverb Parameter 7 Refer to the Effect Parameter List Depend on Reverb type09 1 00..7F Reverb Parameter 8 Refer to the Effect Parameter List Depend on Reverb type0A 1 00..7F Reverb Parameter 9 Refer to the Effect Parameter List Depend on Reverb type0B 1 00..7F Reverb Parameter 10 Refer to the Effect Parameter List Depend on Reverb type0C 1 00..7F Reverb Return -∞..0..+6dB (0..96..127) 600D 1 01..7F Reverb Pan L63..C..R63 (1..64..127) 40
TOTAL SIZE 0E
02 01 10 1 00..7F Reverb Parameter 11 Refer to the Effect Parameter List Depend on Reverb type11 1 00..7F Reverb Parameter 12 Refer to the Effect Parameter List Depend on Reverb type12 1 00..7F Reverb Parameter 13 Refer to the Effect Parameter List Depend on Reverb type13 1 00..7F Reverb Parameter 14 Refer to the Effect Parameter List Depend on Reverb type14 1 00..7F Reverb Parameter 15 Refer to the Effect Parameter List Depend on Reverb type15 1 00..7F Reverb Parameter 16 Refer to the Effect Parameter List Depend on Reverb type
TOTAL SIZE 6
02 01 20 2 00..7F Chorus Type MSB Refer to the Effect Type List00..7F Chorus Type LSB : basic type 00
22 1 00..7F Chorus Parameter 1 Refer to the Effect Parameter List Depend on Chorus Type23 1 00..7F Chorus Parameter 2 Refer to the Effect Parameter List Depend on Chorus Type24 1 00..7F Chorus Parameter 3 Refer to the Effect Parameter List Depend on Chorus Type25 1 00..7F Chorus Parameter 4 Refer to the Effect Parameter List Depend on Chorus Type26 1 00..7F Chorus Parameter 5 Refer to the Effect Parameter List Depend on Chorus Type27 1 00..7F Chorus Parameter 6 Refer to the Effect Parameter List Depend on Chorus Type28 1 00..7F Chorus Parameter 7 Refer to the Effect Parameter List Depend on Chorus Type29 1 00..7F Chorus Parameter 8 Refer to the Effect Parameter List Depend on Chorus Type2A 1 00..7F Chorus Parameter 9 Refer to the Effect Parameter List Depend on Chorus Type2B 1 00..7F Chorus Parameter 10 Refer to the Effect Parameter List Depend on Chorus Type2C 1 00..7F Chorus Return -∞..0..+6dB (0..96..127) 602D 1 01..7F Chorus Pan L63..C..R63 (1..64..127) 402E 1 00..7F Send Chorus To Reverb -∞..0..+6dB (0..96..127) 00
TOTAL SIZE 0F

116
��������������QQQQQQQQQQQQQQ¢¢¢¢¢¢¢¢¢¢¢¢¢¢MIDI Data Format
Address Size Data Parameter Name Description Default(H) (H) (H) Value (H)02 01 30 1 00..7F Chorus Parameter 11 Refer to the Effect Parameter List Depend on Chorus Type
31 1 00..7F Chorus Parameter 12 Refer to the Effect Parameter List Depend on Chorus Type32 1 00..7F Chorus Parameter 13 Refer to the Effect Parameter List Depend on Chorus Type33 1 00..7F Chorus Parameter 14 Refer to the Effect Parameter List Depend on Chorus Type34 1 00..7F Chorus Parameter 15 Refer to the Effect Parameter List Depend on Chorus Type35 1 00..7F Chorus Parameter 16 Refer to the Effect Parameter List Depend on Chorus Type
TOTAL SIZE 6
02 01 40 2 00..7F Variation Type MSB Refer to the Effect Type List00..7F Variation Type LSB : basic type 00
42 2 00..7F Vari. Param. 1 MSB Refer to the Effect Parameter List Depend on Vari. Type00..7F Vari. Param. 1 LSB Refer to the Effect Parameter List Depend on Vari. Type
44 2 00..7F Vari. Param. 2 MSB Refer to the Effect Parameter List Depend on Vari. Type00..7F Vari. Param. 2 LSB Refer to the Effect Parameter List Depend on Vari. Type
46 2 00..7F Vari. Param. 3 MSB Refer to the Effect Parameter List Depend on Vari. Type00..7F Vari. Param. 3 LSB Refer to the Effect Parameter List Depend on Vari. Type
48 2 00..7F Vari. Param. 4 MSB Refer to the Effect Parameter List Depend on Vari. Type00..7F Vari. Param. 4 LSB Refer to the Effect Parameter List Depend on Vari. Type
4A 2 00..7F Vari. Param. 5 MSB Refer to the Effect Parameter List Depend on Vari. Type00..7F Vari. Param. 5 LSB Refer to the Effect Parameter List Depend on Vari. Type
4C 2 00..7F Vari. Param. 6 MSB Refer to the Effect Parameter List Depend on Vari. Type00..7F Vari. Param. 6 LSB Refer to the Effect Parameter List Depend on Vari. Type
4E 2 00..7F Vari. Param. 7 MSB Refer to the Effect Parameter List Depend on Vari. Type00..7F Vari. Param. 7 LSB Refer to the Effect Parameter List Depend on Vari. Type
50 2 00..7F Vari. Param. 8 MSB Refer to the Effect Parameter List Depend on Vari. Type00..7F Vari. Param. 8 LSB Refer to the Effect Parameter List Depend on Vari. Type
52 2 00..7F Vari. Param. 9 MSB Refer to the Effect Parameter List Depend on Vari. Type00..7F Vari. Param. 9 LSB Refer to the Effect Parameter List Depend on Vari. Type
54 2 00..7F Vari. Param. 10 MSB Refer to the Effect Parameter List Depend on Vari. Type00..7F Vari. Param. 10 LSB Refer to the Effect Parameter List Depend on Vari. Type
56 1 00..7F Variation Return -∞..0..+6dB (0..96..127) 6057 1 01..7F Variation Pan L63..C..R63 (1..64..127) 4058 1 00..7F Send Vari. To Reverb -∞..0..+6dB (0..96..127) 0059 1 00..7F Send Vari. To Chorus -∞..0..+6dB (0..96..127) 005A 1 00..01 Variation Connection 0:insertion,1:system 005B 1 00..1F Variation Part part1..32 (0..31),off (127) 7F5C 1 01..7F MW Vari. Ctrl Depth -63..+63 405D 1 01..7F PB Vari. Ctrl Depth -63..+63 405E 1 01..7F CAT Vari. Ctrl Depth -63..+63 405F 1 01..7F Not Used60 1 01..7F Not Used
TOTAL SIZE 21
02 01 70 1 00..7F Variation Parameter 11 option Parameter Depend on Variation Type71 1 00..7F Variation Parameter 12 option Parameter Depend on Variation Type72 1 00..7F Variation Parameter 13 option Parameter Depend on Variation Type73 1 00..7F Variation Parameter 14 option Parameter Depend on Variation Type74 1 00..7F Variation Parameter 15 option Parameter Depend on Variation Type75 1 00..7F Variation Parameter 16 option Parameter Depend on Variation Type
TOTAL SIZE 6
< Table 1-5 > MIDI Parameter Change table (MULTI PART)
Address Size Data Parameter Name Description Default(H) (H) (H) Value (H)08 nn 00 1 00..20 Element Reserve 0..32 0 (Part10),2 (Others)
nn 01 1 00..7F Bank Select MSB 0..127 7F (Part10),00 (Others)nn 02 1 00..7F Bank Select LSB 0..127 00nn 03 1 00..7F Program Number 1..128 00nn 04 1 00..0F, Rcv Channel 0..16;1..16,127;off Part No.
7Fnn 05 1 00..01 Mono/Poly Mode 0:mono,1:poly 01nn 06 1 00..02 Same Note Number 0:single 00
Key On Assign 1:multi2:inst (for DRUM)
nn 07 1 00..02 Part Mode 0:normal 00 (Except Part 10.)1:drum,drumS1..2 02 (Part10)
nn 08 1 28..58 Note Shift -24..+24[semitones] 40nn 09 2 00..FF Detune -12.8..+12.7[Hz] 08 00nn 0A 1st bit3..0 -> bit7..4 (80)
2nd bit3..0 -> bit3..0nn 0B 1 00..7F Volume 0..127 64nn 0C 1 00..7F Velocity Sense Depth 0..127 40nn 0D 1 00..7F Velocity Sense Offset 0..127 40nn 0E 1 00..7F Pan 0:random 40
L63..C..R63 (1..64..127)

117
��������������QQQQQQQQQQQQQQ¢¢¢¢¢¢¢¢¢¢¢¢¢¢MIDI Data Format
Address Size Data Parameter Name Description Default(H) (H) (H) Value (H)
nn 0F 1 00..7F Note Limit Low C-2..G8 00nn 10 1 00..7F Note Limit High C-2..G8 7Fnn 11 1 00..7F Dry Level 0..127 7Fnn 12 1 00..7F Chorus Send 0..127 00nn 13 1 00..7F Reverb Send 0..127 28nn 14 1 00..7F Variation Send 0..127 00
nn 15 1 00..7F Vibrato Rate -64..+63 40nn 16 1 00..7F Vibrato Depth -64..+63 40nn 17 1 00..7F Vibrato Delay -64..+63 40nn 18 1 00..7F Filter Cutoff Freq. -64..+63 40nn 19 1 00..7F Filter Resonance -64..+63 40nn 1A 1 00..7F EG Attack Time -64..+63 40nn 1B 1 00..7F EG Decay Time -64..+63 40nn 1C 1 00..7F EG Release Time -64..+63 40
nn 1D 1 28..58 MW Pitch Control -24..+24[semitones] 40nn 1E 1 00..7F MW Filter Control -9600..+9450[cent] 40nn 1F 1 00..7F MW Amp. Control -100..+100[%] 40nn 20 1 00..7F MW LFO PMod Depth 0..127 0Ann 21 1 00..7F MW LFO FMod Depth 0..127 00nn 22 1 00..7F MW LFO AMod Depth 0..127 00
nn 23 1 28..58 Bend Pitch Control -24..+24[semitones] 42nn 24 1 00..7F Bend Filter Control -9600..+9450[cent] 40nn 25 1 00..7F Bend Amp. Control -100..+100[%] 40nn 26 1 00..7F Bend LFO PMod Depth 0..127 00nn 27 1 00..7F Bend LFO FMod Depth 0..127 00nn 28 1 00..7F Bend LFO AMod Depth 0..127 00
TOTAL SIZE 29
nn 30 Not Used: :
nn 40 Not Used
nn 41 1 00..7F Scale Tuning C -64..+63[cent] 40nn 42 1 00..7F Scale Tuning C# -64..+63[cent] 40nn 43 1 00..7F Scale Tuning D -64..+63[cent] 40nn 44 1 00..7F Scale Tuning D# -64..+63[cent] 40nn 45 1 00..7F Scale Tuning E -64..+63[cent] 40nn 46 1 00..7F Scale Tuning F -64..+63[cent] 40nn 47 1 00..7F Scale Tuning F# -64..+63[cent] 40nn 48 1 00..7F Scale Tuning G -64..+63[cent] 40nn 49 1 00..7F Scale Tuning G# -64..+63[cent] 40nn 4A 1 00..7F Scale Tuning A -64..+63[cent] 40nn 4B 1 00..7F Scale Tuning A# -64..+63[cent] 40nn 4C 1 00..7F Scale Tuning B -64..+63[cent] 40
nn 4D 1 28..58 CAT Pitch Control -24..+24[semitones] 40nn 4E 1 00..7F CAT Filter Control -9600..+9450[cent] 40nn 4F 1 00..7F CAT Amplitude Control -100..+100[%] 40nn 50 1 00..7F CAT LFO PMod Depth 0..127 00nn 51 1 00..7F CAT LFO FMod Depth 0..127 00nn 52 1 00..7F CAT LFO AMod Depth 0..127 00
nn 53 Not Used: :
66 Not Used
nn 67 1 00..01 Portamento Switch off/on 00nn 68 1 00..7F Portamento Time 0..127 00
nn 69 Not Used: :
6E Not UsedTOTAL SIZE 3F
nn = PartNumber
If there is a Drum Voice assigned to the Part, the following parameters are ineffective.• Bank Select LSB• Amp EG• Portamento• Soft Pedal• Mono/Poly• Scale Tuning

118
��������������QQQQQQQQQQQQQQ¢¢¢¢¢¢¢¢¢¢¢¢¢¢
XG ESSENTIAL EFFECTSame as LSB=0XG OPTION EFFECT
REVERB TYPE
* If the received value does not contain an effect type in the TYPE LSB, the LSB will be directed to TYPE 0.* Panel Effects are based on the “[Number] Effect Name”.* Using an external sequencer, capable of editing and transmitting the system exclusive messages and parameter changes, allows you to select the reverb, chorus and DSP effect types
which are not accessible from the PSR-530 panel operation. When one of the effects is selected by the external sequencer, “XG Rev.,” “XG Cho.” or “XG Eff.” will be shown on thedisplay.
< Table 1-7 > Effect Type List
TYPE TYPE LSBMSB 00 01 02 03...07 08 09...15 16 17 18 19 20 21...
000 NO EFFECT001 [1]HALL1 HALL2 [2]HALL2 [3]HALL3 [4]HALL4002 ROOM1 ROOM2 ROOM3 [5]ROOM1 [6]ROOM2 [7]ROOM3 [8]ROOM4003 STAGE1 STAGE2 [9]STAGE1 [10]STAGE2004 PLATE [11]PLATE1 [12]PLATE2005...015 NO EFFECT016 WHITE ROOM017 TUNNEL018 CANYON019 BASEMENT020...127 NO EFFECT
CHORUS TYPETYPE TYPE LSBMSB 00 01 02 03...07 08 09...15 16 17 18 19 20 21...
000 NO EFFECT001...064 NO EFFECT065 CHORUS1 CHORUS2 [5]CHORUS5 CHORUS4066 CELESTE1 [4]CHORUS4 CELESTE3 [2]CHORUS2 [3]CHORUS3 [1]CHORUS1067 FLANGER 1 [9]FLANGER 4 [6]FLANGER1 [7]FLANGER2 [8]FLANGER3068...127 NO EFFECT
MIDI Data Format
< Table 1-6 > MIDI Parameter Change table (DRUM SETUP)
Address Size Data Parameter Name Description Default(H) (H) (H) Value (H)3n rr 00 1 00..7F Pitch Coarse -64..+63 403n rr 01 1 00..7F Pitch Fine -64..+63[cent] 403n rr 02 1 00..7F Level 0..127 Depend on the Note3n rr 03 1 00..7F Alternate Group 0:off,1..127 Depend on the Note3n rr 04 1 00..7F Pan 0:random Depend on the Note
L63..C..R63 (1..64..127)3n rr 05 1 00..7F Reverb Send Level 0..127 Depend on the Note3n rr 06 1 00..7F Chorus Send Level 0..127 Depend on the Note3n rr 07 1 00..7F Variation Send Level 0..127 7F3n rr 08 1 00..01 Key Assign 0:single,1:multi 003n rr 09 1 00..01 Rcv Note Off off/on Depend on the Note3n rr 0A 1 00..01 Rcv Note On off/on 013n rr 0B 1 00..7F Filter Cutoff Freq. -64..63 403n rr 0C 1 00..7F Filter Resonance -64..63 403n rr 0D 1 00..7F EG Attack Rate -64..63 403n rr 0E 1 00..7F EG Decay1 Rate -64..63 403n rr 0F 1 00..7F EG Decay2 Rate -64..63 40
TOTAL SIZE 10
n:Drum Setup Number (0 - 1)rr:note number (0DH - 5BH)If XG SYSTEM ON and/or GM On message is received, all Drum Setup Parameter will be reset to default values.According to the Drum Setup Reset message, individual Drum Setup Parameters can be reset to default values.

119
��������������QQQQQQQQQQQQQQ¢¢¢¢¢¢¢¢¢¢¢¢¢¢DSP TYPE (0 — 63)
TYPE TYPE LSBMSB 00 01 02 03...07 08 09...15 16 17 18 19 20 21...
000 NO EFFECT001 [1]HALL1 HALL2 [2]HALL2 [3]HALL3 [4]HALL4002 ROOM1 ROOM2 ROOM3 [5]ROOM1 [6]ROOM2 [7]ROOM3 [8]ROOM4003 STAGE1 STAGE2 [9]STAGE1 [10]STAGE2004 PLATE [11]PLATE1 [12]PLATE2005 “DELAY L,C,R” [38]Delay LCR006 “[39]DELAY L,R”007 [40]ECHO008 [41]CROSS DELAY009 [13]ER1 [14]ER2010 [15]GATE REVERB011 [16]REVERS GATE012...019 NO EFFECT or
THRU020 KARAOKE 1 KARAOKE 2 KARAOKE 3021...063 NO EFFECT or
THRU*
DSP TYPE (64 — 127)TYPE TYPE LSBMSB 00 01 02 03...07 08 09...15 16 17 18 19 20 21...
064 THRU065 CHORUS1 CHORUS2 [21]CHORUS5 CHORUS4066 CELESTE1 [20]CHORUS4 CELESTE3 [18]CHORUS2 [19]CHORUS3 [17]CHORUS1 [32]Rotary Sp5067 FLANGER 1 [25]FLANGER 4 [22]FLANGER1 [23]FLANGER2 [24]FLANGER3068 SYMPHONIC [26]Symphonic069 ROTARY SP. [28]Rotary Sp1070 TREMOLO [33]Tremolo1 [31]Rotary Sp4071 AUTO PAN [36]AutoPan [29]Rotary Sp2 [30]Rotary Sp3 [34]Tremolo2 [35]Gtr Tremolo072 [27]PHASER PHASER 2073 DISTORTION074 OVER DRIVE075 AMP SIM. [42]DIST.HARD [43]DIST.SOFT076 3BAND EQ [44]EQ DISCO [45]EQ TEL077 2BAND EQ078 AUTO WAH [37]Auto Wah079...127 THRU
< Table 1-8 > Effect Parameter List
HALL1,HALL2, ROOM1,ROOM2,ROOM3, STAGE1,STAGE2, PLATE (reverb, variation block)
No. Parameter Value1 Reverb Time 0.3 — 30.0s 0-692 Diffusion 0 — 10 0-103 Initial Delay 0 — 63 0-634 HPF Cutoff Thru — 8.0kHz 0-525 LPF Cutoff 1.0k — Thru 34-60678910 Dry/Wet D63 > W — D=W — D<W63 1-127
11 Rev Delay 0 — 63 0-6312 Density 0 — 3 0-313 Er/Rev Balance E63 > R — E=R — E<R63 1-1271415 Feedback Level -63 — +63 1-12716
WHITE ROOM, TUNNEL, CANYON, BASEMENT (reverb)
No. Parameter Value1 Reverb Time 0.3 — 30.0s 0-692 Diffusion 0 — 10 0-103 Initial Delay 0 — 63 0-634 HPF Cutoff Thru — 8.0kHz 0-525 LPF Cutoff 1.0k — Thru 34-606 Width 0.5 — 10.2m 0-377 Heigt 0.5 — 20.2m 0-738 Depth 0.5 — 30.2m 0-1049 Wall Vary 0 — 30 0-30
10 Dry/Wet D63 > W — D=W — D<W63 1-127
11 Rev Delay 0 — 63 0-6312 Density 0 — 3 0-313 Er/Rev Balance E63 > R — E=R — E<R63 1-1271415 Feedback Level -63 — +63 1-12716
MIDI Data Format

120
��������������QQQQQQQQQQQQQQ¢¢¢¢¢¢¢¢¢¢¢¢¢¢MIDI Data Format
DELAY L,C,R (variation block)
No. Parameter Value1 Lch Delay 0.1 — 715.0ms 1-71502 Rch Delay 0.1 — 715.0ms 1-71503 Cch Delay 0.1 — 715.0ms 1-71504 Feedback Delay 0.1 — 715.0ms 1-71505 Feedback Level -63 — +63 1-1276 Cch Level 0 — 127 0-1277 High Damp 0.1 — 1.0 1-1089
10 Dry/Wet D63 > W — D=W — D<W63 1-127
111213 EQ Low Frequency 50Hz — 2.0kHz 8-4014 EQ Low Gain –12 — +12dB 52-7615 EQ High Frequency 500Hz — 16.0kHz 28-5816 EQ High Gain –12 — +12dB 52-76
DELAY L,R (variation block)
No. Parameter Value1 Lch Delay 0.1 — 715.0ms 1-71502 Rch Delay 0.1 — 715.0ms 1-71503 Feedback Delay 1 0.1 — 715.0ms 1-71504 Feedback Delay 2 0.1 — 715.0ms 1-71505 Feedback Level -63 — +63 1-1276 High Damp 0.1 — 1.0 1-10789
10 Dry/Wet D63 > W — D=W — D<W63 1-127
111213 EQ Low Frequency 50Hz — 2.0kHz 8-4014 EQ Low Gain –12 — +12dB 52-7615 EQ High Frequency 500Hz — 16.0kHz 28-5816 EQ High Gain –12 — +12dB 52-76
ECHO (variation block)
No. Parameter Value1 Lch Delay1 0.1 — 355.0ms 1-35502 Lch Feedback Level -63 — +63 1-1273 Rch Delay1 0.1 — 355.0ms 1-35504 Rch Feedback Level -63 — +63 1-1275 High Damp 0.1 — 1.0 1-106 Lch Delay2 0.1 — 355.0ms 1-35507 Rch Delay2 0.1 — 355.0ms 1-35508 Delay2 Level 0 — 127 0-1279
10 Dry/Wet D63 > W — D=W — D<W63 1-127
111213 EQ Low Frequency 50Hz — 2.0kHz 8-4014 EQ Low Gain –12 — +12dB 52-7615 EQ High Frequency 500Hz — 16.0kHz 28-5816 EQ High Gain –12 — +12dB 52-76
CROSS DELAY (variation block)
No. Parameter Value1 L -> R Delay 0.1 — 355.0ms 1-35502 R -> L Delay 0.1 — 355.0ms 1-35503 Feedback Level -63 — +63 1-1274 Input Select “L,R,L&R” 0-25 High Damp 0.1 — 1.0 1-106789
10 Dry/Wet D63 > W — D=W — D<W63 1-127
111213 EQ Low Frequency 50Hz — 2.0kHz 8-4014 EQ Low Gain –12 — +12dB 52-7615 EQ High Frequency 500Hz — 16.0kHz 28-5816 EQ High Gain –12 — +12dB 52-76
EARLY REF1,EARLY REF2(variation block)
No. Parameter Value1 Type “S-H, L-H, Rdm, Rvs, Plt, Spr” 0-52 Room Size 0.1 — 7.0 0-443 Diffusion 0 — 10 0-104 Initial Delay 0 — 63 0-635 Feedback Level -63 — +63 1-1276 HPF Cutoff Thru — 8.0kHz 0-527 LPF Cutoff 1.0k — Thru 34-6089
10 Dry/Wet D63 > W — D=W — D<W63 1-127
11 Liveness 0 — 10 0-1012 Density 0 — 3 0-313 High Damp 0.1 — 1.0 1-10141516
GATE REVERB, REVERSE GATE (variation block)
No. Parameter Value1 Type “TypeA,TypeB” 0-12 Room Size 0.1 — 7.0 0-443 Diffusion 0 — 10 0-104 Initial Delay 0 — 63 0-635 Feedback Level -63 — +63 1-1276 HPF Cutoff Thru — 8.0kHz 0-527 LPF Cutoff 1.0k — Thru 34-608910 Dry/Wet D63 > W — D=W — D<W63 1-127
11 Liveness 0 — 10 0-1012 Density 0 — 3 0-313 High Damp 0.1 — 1.0 1-10141516
KARAOKE1,2,3 (variation block)
No. Parameter Value1 Delay Time 0 — 127 0-1272 Feedback Level -63 — +63 1-1273 HPF Cutoff Thru — 8.0kHz 0-524 LPF Cutoff 1.0k — Thru 34-605678910 Dry/Wet D63 > W — D=W — D<W63 1-127
111213141516
CHORUS1,2,3,4, CELESTE1,2,3,4 (chorus, variation block)
No. Parameter Value1 LFO Frequency 0.00Hz — 39.7Hz 0-1272 LFO Depth 0 — 127 0-1273 Feedback Level -63 — +63 1-1274 Delay Offset 0 — 127 0-12756 EQ Low Frequency 50Hz — 2.0kHz 8-407 EQ Low Gain –12 — +12dB 52-768 EQ High Frequency 500Hz — 16.0kHz 28-589 EQ High Gain –12 — +12dB 52-7610 Dry/Wet D63 > W — D=W — D<W63 1-127
1112131415 Input Mode mono/stereo 0-116
FLANGER1,2,3 (chorus, variation block)
No. Parameter Value1 LFO Frequency 0.00Hz — 39.7Hz 0-1272 LFO Depth 0 — 127 0-1273 Feedback Level -63 — +63 1-1274 Delay Offset 0 — 63 0-6356 EQ Low Frequency 50Hz — 2.0kHz 8-407 EQ Low Gain –12 — +12dB 52-768 EQ High Frequency 500Hz — 16.0kHz 28-589 EQ High Gain –12 — +12dB 52-7610 Dry/Wet D63 > W — D=W — D<W63 1-127
11121314 LFO Phase Difference -180 — +180deg(resolution=3deg.) 4-1241516
SYMPHONIC (variation block)
No. Parameter Value1 LFO Frequency 0.00Hz — 39.7Hz 0-1272 LFO Depth 0 — 127 0-1273 Delay Offset 0 — 127 0-127456 EQ Low Frequency 50Hz — 2.0kHz 8-407 EQ Low Gain –12 — +12dB 52-768 EQ High Frequency 500Hz — 16.0kHz 28-589 EQ High Gain –12 — +12dB 52-7610 Dry/Wet D63 > W — D=W — D<W63 1-127
111213141516

121
��������������QQQQQQQQQQQQQQ¢¢¢¢¢¢¢¢¢¢¢¢¢¢MIDI Data Format
ROTARY SPEAKER (variation block)
No. Parameter Value1 LFO Frequency 0.00Hz — 39.7Hz 0-1272 LFO Depth 0 — 127 0-1273456 EQ Low Frequency 50Hz — 2.0kHz 8-407 EQ Low Gain –12 — +12dB 52-768 EQ High Frequency 500Hz — 16.0kHz 28-589 EQ High Gain –12 — +12dB 52-7610 Dry/Wet D63 > W — D=W — D<W63 1-127
111213141516
TREMOLO (variation block)
No. Parameter Value1 LFO Frequency 0.00Hz — 39.7Hz 0-1272 AM Depth 0 — 127 0-1273 PM Depth 0 — 127 0-127456 EQ Low Frequency 50Hz — 2.0kHz 8-407 EQ Low Gain –12 — +12dB 52-768 EQ High Frequency 500Hz — 16.0kHz 28-589 EQ High Gain –12 — +12dB 52-7610
11121314 LFO Phase Difference -180 — +180deg(resolution=3deg.) 4-12415 Input Mode mono/stereo 0-116
AUTO PAN (variation block)
No. Parameter Value1 LFO Frequency 0.00Hz — 39.7Hz 0-1272 L/R Depth 0 — 127 0-1273 F/R Depth 0 — 127 0-1274 PAN Direction “L <-> R,L -> R,L <- R,Lturn,Rturn,L/R” 0-556 EQ Low Frequency 50Hz — 2.0kHz 8-407 EQ Low Gain –12 — +12dB 52-768 EQ High Frequency 500Hz — 16.0kHz 28-589 EQ High Gain –12 — +12dB 52-7610
111213141516
PHASER 1,2 (variation block)
No. Parameter Value1 LFO Frequency 0.00Hz — 39.7Hz 0-1272 LFO Depth 0 — 127 0-1273 Phase Shift Offset 0 — 127 0-1274 Feedback Level -63 — +63 1-12756 EQ Low Frequency 50Hz — 2.0kHz 8-407 EQ Low Gain –12 — +12dB 52-768 EQ High Frequency 500Hz — 16.0kHz 28-589 EQ High Gain –12 — +12dB 52-7610 Dry/Wet D63 > W — D=W — D<W63 1-127
11 Stage 6 — 10(phaser1) / 3 — 5(phaser2) 3-1012 Diffusion mono/stereo 0-113 LFO Phase Difference -180 — +180deg.(resolution=3deg.) 4-124141516
DISTORTION, OVERDRIVE (variation block)
No. Parameter Value1 Drive 0 — 127 0-1272 EQ Low Frequency 50Hz — 2.0kHz 8-403 EQ Low Gain –12 — +12dB 52-764 LPF Cutoff 1.0k — Thru 34-605 Output Level 0 — 127 0-12767 EQ Mid Frequency 100Hz — 10.0kHz 23-548 EQ Mid Gain –12 — +12dB 52-769 EQ Mid Width 1.0 — 12.0 10-12010 Dry/Wet D63 > W — D=W — D<W63 1-127
11 Edge(Clip Curve) 0 — 127 0-1271213141516
AMP SIMULATOR (variation block)
No. Parameter Value1 Drive 0 — 127 0-1272 AMP Type “Off,Stack,Combo,Tube” 0-33 LPF Cutoff 1.0k — Thru 34-604 Output Level 0 — 127 0-12756789
10 Dry/Wet D63 > W — D=W — D<W63 1-127
11 Edge(Clip Curve) 0 — 127 0-1271213141516
3BAND EQ(MONO) (variation block)
No. Parameter Value1 EQ Low Gain –12 — +12dB 52-762 EQ Mid Frequency 100Hz — 10.0kHz 23-543 EQ Mid Gain –12 — +12dB 52-764 EQ Mid Width 1.0 — 12.0 10-1205 EQ High Gain –12 — +12dB 52-766 EQ Low Frequency 50Hz — 2.0kHz 8-407 EQ High Frequency 500Hz — 16.0kHz 28-5889
10
111213141516
2BAND EQ(STEREO) (variation block)
No. Parameter Value1 EQ Low Frequency 50Hz — 2.0kHz 8-402 EQ Low Gain –12 — +12dB 52-763 EQ High Frequency 500Hz — 16.0kHz 28-584 EQ High Gain –12 — +12dB 52-7656789
10
111213141516
AUTO WAH (variation block)
No. Parameter Value1 LFO Frequency 0.00Hz — 39.7Hz 0-1272 LFO Depth 0 — 127 0-1273 Cutoff Frequency Offset 0 — 127 0-1274 Resonance 1.0 — 12.0 10-12056 EQ Low Frequency 50Hz — 2.0kHz 8-407 EQ Low Gain –12 — +12dB 52-768 EQ High Frequency 500Hz — 16.0kHz 28-589 EQ High Gain –12 — +12dB 52-76
10 Dry/Wet D63 > W — D=W — D<W63 1-127
111213141516

122
��������������QQQQQQQQQQQQQQ¢¢¢¢¢¢¢¢¢¢¢¢¢¢MIDI Implementation Chart
[Portable Keyboard] Date: 1997. 4. 14Model: PSR-530 MIDI Implementation Chart Version: 1.0
Function Transmitted Recognized Remarks
Basic Default 1~16 CH (*1) 1~16 CH (*2)Channel Changed 1~16 CH (*1) 1~16 CH (*2)
Default Mode 3 Mode 3Mode Messages X X
Altered ***** X
Note 0~127 0~127Number : True voice ***** 0~127
Velocity Note on O 9nH, v=1~127 O 9nH, v=1~127Note off X 9nH, v=0 X
After key’s X XTouch Ch’s X O
Pitch Bender O O
Control Change 0, 32 O O Bank select1 X (*3) O Modulation5 X O Portament time
7, 10, 11 O O6, 38 X (*3) O Data entry
64, 65 O O66, 67 X O
71 — 74 X (*3) O Sound controller84 X (*3) O Portament control
91, 93, 94 O O Effect depth96, 97 X O RPN increment, decrement98, 99 X (*3) O NRPN LSB, MSB
100, 101 O O RPN LSB, MSB120 X O All sound off121 X O Reset all controllers
Program O 0~127 O 0~127Change : True # *****
System Exclusive O O
System : Song Position X X: Song Select X X
Common : Tune X X
System : Clock O OReal Time : Commands O O
Aux : Local ON/OFF X X: All Notes Off X O 123~127
Messages : Active Sense O O: Reset X X
Mode 1 : OMNI ON, POLY Mode 2 : OMNI ON, MONO O : YesMode 3 : OMNI OFF, POLY Mode 4 : OMNI OFF, MONO X : No

123
��������������QQQQQQQQQQQQQQ¢¢¢¢¢¢¢¢¢¢¢¢¢¢MIDI Implementation Chart
* 1 The tracks for each channel can be selected on the panel.See page 92 for more information.
* 2 Incoming MIDI messages control the PSR-530 as 16 chan-nel multi timbral tone generator when initially shipped(factory set). The MIDI messages don’t affect the panelcontrols including the Panel Voice selection since they aredirectly sent to the tone generator of the PSR-530. However,the following MIDI messages affects the panel controlssuch as Panel Voice, Style, Multi Pad and Song settings:
• MIDI MASTER TUNE, MASTER TUNE (XG SystemParameter).
• TRANSPOSE (XG System Parameter).• System Exclusive Messages related to the REVERB,
CHORUS and DSP EFFECT settings.
Also, the MIDI messages affect the panel settings when oneof the folowing MIDI reception modes is selected.These modes can be selected on the panel (see page 94).
rE (Remote): The Note On/Off messages received at thedesignated Remote (receive) channel areprocessed the same as the notes normallyplayed on the keyboard.
In this mode, only the following channel mes-sages will be recognized:
• Note On/Off• Control Changes
Bank Select (R1 voice only)ModulationVolumeExpressionSustainSostenuteSoft PedalAll Notes Off
• Program Change (R1 voice only)• Pitch Bend
Off: The MIDI channel messages will not be received at thedesignated channel.
* 3 Though these messages will not output by playing thekeyboard and changing the panel settings, they may beincluded in the Song or Style data and output.

�������������QQQQQQQQQQQQQ¢¢¢¢¢¢¢¢¢¢¢¢¢
124
Specifications
Song• Song Volume• Minus One Practice (Minus One Channel Setting)• Repeat Play• Revoice (User song only) : Volume, Octove, Pan, Reverb Send Level,
Chorus Send Level, DSP Send Level
Song Recording• User Song : 4 Songs• Recording Tracks : ACCOMPANIMENT, MELODY 1 — 4• Song Clear, Track Clear
Style Recording• User Style : 3 Styles• Recording Tracks : 5 Sections x 8 Tracks• Drum Cancel• Quantize• All Clear, Track Clear
Multi Pad Recording• User Pad : 4 Pad Sets• Chord Match• Pad Clear, Bank Clear
MIDI• Transmit Settings• Receive Settings• Local Control• Clock• Bulk Data Send/Receive• Initial Data Send
Auxiliary Jacks• DC IN 10-12V, PHONES, SUSTAIN, AUX OUT R, L/L+R,
MIDI IN/OUT, TO HOST
Amplifiers• 6 W + 6 W (when using PA-6 power adaptor)• 4 W + 4 W (when using batteries)
Speakers• 12cm (4-3/4”) x 2
Power Consumption• 22 W (when using PA-6 AC power adaptor)
Batteries• Six SUM-1, “D” size, R-20 or equivalent batteries
Rated Voltage• DC 10-12V
Dimensions (W x D x H)• 952 x 387 x 147 mm
Weight• 8.0 kg (13 lbs.) excluding batteries
Supplied Accessories• Music Cartridge• Music Stand• Owner’s Manual
Optional Accessories• Headphones : HPE-150• AC Power Adaptor : PA-6• Foot Switch : FC4, FC5• Keyboard Stand : L-6• Music Cartridge
* Specifications subject to change without notice.
Keyboards• 61 standard-size keys (C1 — C6) with touch response.
Display• Large multi-function LCD display
Setup• Stand by/ON• Master Volume : MIN — MAX
Control & Number Buttons• MENU ▲▼, VOICE, STYLE, SONG, CARTRIDGE,
SUB MENU ▲▼, [1] — [0], [+] (YES), [–] (NO)
Cartridge Slot
Demo• 12 Songs
Voice• 200 Panel Voices +12 Drum Kits + 480 XG Voices• Polyphony : 32• Voice Set
• R1/R2/L Voices• Revoice : Volume, Octave, Pan, Reverb Send Level, Chorus Send
Level, DSP Send Level
• Split Voice Mode• Dual Voice Mode
Auto Accompaniment• 100 Styles• Auto Accompaniment ON/OFF• Accompaniment Track : RHYTHM1/2, BASS, CHORD1/2, PAD,
PHRASE1/2• Accompaniment Track Settings : ON/OFF• Accompaniment Control :SYNC START, SYNC STOP,
START/STOP, INTRO,MAIN A/B (AUTO FILL), ENDING
• Beat Indicator• Virtual Arranger ON/OFF• Accompaniment Volume• Revoice : Volume, Pan, Reverb Send Level, Chorus Send Level• Virtual Arranger
One Touch Setting
Overall Controls• Tempo : 32 — 280• Pitch Bend Range• Transpose• Touch Sensitivity• Master Tuning• Scale Tuning• Song Transpose• Metronome• Split Voice Split Point• Accompaniment Split Point• Fingering Mode : SINGLE FINGER/FINGERED 1/FINGERED 2/
FULL KEYBOARD/MULTI-FINGER• Voice Set
Digital Effect• Reverb : 13 types• Chorus : 10 types• DSP (system/insertion) : 46 types• Harmony : 16 types
Registration Memory• 32 Regist Bank : 1 — 4• Accompaniment Freeze
Multi Pads• 36 Multi Pad Sets• 4 Pads + STOP• Chord Match

125
�������������QQQQQQQQQQQQQ¢¢¢¢¢¢¢¢¢¢¢¢¢Index
A AC power adaptor ............................................................ 12Accompaniment styles, cartridge ..................................... 77Accompaniment tracks, song ........................................... 58Auto accompaniment ....................................................... 22Auto accompaniment on/off ............................................. 23Auto Fill ............................................................................ 25
B Bank, registration ............................................................. 47Batteries ........................................................................... 12Beat indicator ................................................................... 25Bulk data receive ............................................................. 95Bulk data send ................................................................. 95
C Cartridge accompaniment styles ..................................... 77Cartridge song playback .................................................. 76Chord Match function ....................................................... 51Chord types, auto accompaniment .................................. 32Chorus ............................................................................. 38Clock ................................................................................ 94Connectors ...................................................................... 13Contents ............................................................................ 4
D Data Dial .......................................................................... 18Demonstration playback .................................................. 14Digital Effect ..................................................................... 36Display operation ............................................................... 8Drum kit list .................................................................... 104DSP ................................................................................. 40Dual voice mode .............................................................. 19
E Effects .............................................................................. 36Ending, accompaniment .................................................. 26
F Features .............................................................................2Fill-in ................................................................................ 25Fingered 1 fingering mode ............................................... 32Fingered 2 fingering mode ............................................... 33Fingering modes, accompaniment ................................... 31Freeze (Accompaniment Freeze function) ....................... 48Full Keyboard fingering mode .......................................... 33
G GM System Level 1 ............................................................ 3
H Harmony .......................................................................... 42
I Icons .................................................................................. 8Initial data send ................................................................ 95Initialization (data backup) ............................................... 98Insertion Effect ......................................................... 40, 107Intro, accompaniment ...................................................... 24
K Keyboard percussion ....................................................... 19
L Local control .................................................................... 94
M Main A & Main B sections ................................................ 25Master tuning ................................................................... 84Measure, song play from specified .................................. 54Melody tracks, clearing .................................................... 63Melody tracks, song ......................................................... 58Menu structure ................................................................. 96Menus .............................................................................. 10Metronome ....................................................................... 85MIDI connectors ............................................................... 88MIDI data format ............................................................ 110MIDI functions .................................................................. 92MIDI implementation chart ............................................. 122
Minus-one practice .......................................................... 55Multi pad set selection ..................................................... 49Multi Pads, playing ........................................................... 50Multi-finger fingering mode .............................................. 34Music cartridges, handling ............................................... 75Music stand ........................................................................ 7
O One touch setting ............................................................. 34Overall functions .............................................................. 83
P Panel controls .................................................................... 6Phones jack ..................................................................... 13Pitch Bend ....................................................................... 45Polyphony ........................................................................ 99Power supply ................................................................... 12Precautions ........................................................................ 1
R R1, R2, & L voices ........................................................... 16Receive channel & mode ................................................. 93Record Ready Mode ............................................ 59, 65, 71Registration memory........................................................ 47Rehearsal mode .................................................. 61, 67, 73Repeat play ...................................................................... 57Reverb ............................................................................. 36Revoicing ......................................................................... 78
S Scale tuning ..................................................................... 84Shortcuts ......................................................................... 11Single Finger fingering mode ........................................... 31Song clear ........................................................................ 63Song playback ................................................................. 52Song playback, cartridge ................................................. 76Song recording ................................................................ 58Song, revoice ................................................................... 81Specifications ................................................................. 124Split point, auto accompaniment ...................................... 29Split point, split voice ....................................................... 21Split voice mode .............................................................. 20Start modes, accompaniment .......................................... 24Stop Accompaniment function ......................................... 34Style selection .................................................................. 22Style, revoice ................................................................... 80Sustain jack ..................................................................... 13Synchro Stop function ...................................................... 26Synchronized start ........................................................... 24System Effect ........................................................... 40, 106
T Tempo, accompaniment ................................................... 23To Host ............................................................................. 88Touch sensitivity ............................................................... 84Track assignment, minus-one .......................................... 55Track muting, accompaniment ......................................... 27Transmit channel & track .................................................. 92Transposition .................................................................... 46Troubleshooting ............................................................. 109
V Virtual Arranger ............................................................... 27Voice list ........................................................................... 99Voice set .......................................................................... 85Voice, revoice ................................................................... 80Voices, about the ............................................................. 16Voices, selecting & playing .............................................. 17Volume control, accompaniment ...................................... 28Volume control, song ....................................................... 53Volume, harmony ............................................................. 44
X XG ................................................................................ 3, 16

Limited Warranty90 DAYS LABOR 1 YEAR PARTS
Yamaha Corporation of America, hereafter referred to as Yamaha, warrants to the original consumer of a product included in the categories listed below,that the product will be free of defects in materials and/or workmanship for the periods indicated. This warranty is applicable to all models included inthe following series of products:
PSR SERIES OF PORTATONE ELECTRONIC KEYBOARDS
If during the first 90 days that immediately follows the purchase date, your new Yamaha product covered by this warranty is found to have a defect inmaterial and/or workmanship, Yamaha and/or its authorized representative will repair such defect without charge for parts or labor.
If parts should be required after this 90 day period but within the one year period that immediately follows the purchase date, Yamaha will, subject tothe terms of this warranty, supply these parts without charge. However, charges for labor, and/or any miscellaneous expenses incurred are the consumersresponsibility. Yamaha reserves the right to utilize reconditioned parts in repairing these products and/or to use reconditioned units as warrantyreplacements.
THIS WARRANTY IS THE ONLY EXPRESS WARRANTY WHICH YAMAHA MAKES IN CONNECTION WITH THESE PRODUCTS.ANY IMPLIED WARRANTY APPLICABLE TO THE PRODUCT, INCLUDING THE WARRANTY OF MERCHANT ABILITY ISLIMITED TO THE DURATION OF THE EXPRESS WARRANTY. YAMAHA EXCLUDES AND SHALL NOT BE LIABLE IN ANYEVENT FOR INCIDENTAL OR CONSEQUENTIAL DAMAGES.
Some states do not allow limitations that relate to implied warranties and/or the exclusion of incidental or consequential damages. Therefore, theselimitations and exclusions may not apply to you.
This warranty gives you specific legal rights. You may also have other rights which vary from state to state.
CONSUMERS RESPONSIBILITIESIf warranty service should be required, it is necessary that the consumer assume certain responsibilities:
1. Contact the Customer Service Department of the retailer selling the product, or any retail outlet authorized by Yamaha to sell the product for assistance.You may also contact Yamaha directly at the address provided below.
2. Deliver the unit to be serviced under warranty to: the retailer selling the product, an authorized service center, or to Yamaha with an explanation ofthe problem. Please be prepared to provide proof purchase date (sales receipt, credit card copy, etc.) when requesting service and/or parts underwarranty.
3. Shipping and/or insurance costs are the consumers responsibility.* Units shipped for service should be packed securely.
*Repaired units will be returned PREPAID if warranty service is required within the first 90 days.
IMPORTANT: Do NOT ship anything to ANY location without prior authorization. A Return Authorization (RA) will be issued that has atracking number assigned that will expedite the servicing of your unit and provide a tracking system if needed.
4. Your owners manual contains important safety and operating instructions. It is your responsibility to be aware of the contents of this manual and tofollow all safety precautions.
EXCLUSIONSThis warranty does not apply to units whose trade name, trademark, and/or ID numbers have been altered, defaced, exchanged removed, or to failuresand/or damages that may occur as a result of:
1. Neglect, abuse, abnormal strain, modification or exposure to extremes in temperature or humidity.
2. Improper repair or maintenance by any person who is not a service representative of a retail outlet authorized by Yamaha to sell the product, anauthorized service center, or an authorized service representative of Yamaha.
3. This warranty is applicable only to units sold by retailers authorized by Yamaha to sell these products in the U.S.A., the District of Columbia, andPuerto Rico. This warranty is not applicable in other possessions or territories of the U.S.A. or in any other country.
Please record the model and serial number of the product you have purchased in the spaces provided below.
Model___________________________ Serial #________________________________ Sales Slip #________________________________
Purchased from____________________________________________________________ Date______________________________________(Retailer)
YAMAHA CORPORATION OF AMERICAElectronic Service Division6600 Orangethorpe Avenue
Buena Park, CA 90620
KEEP THIS DOCUMENT FOR YOUR RECORDS. DO NOT MAIL!

For details of products, please contact your nearest Yamaha or theauthorized distributor listed below.
Pour plus de détails sur les produits, veuillez-vous adresser à Yamahaou au distributeur le plus proche de vous figurant dans la liste suivante.
Die Einzelheiten zu Produkten sind bei Ihrer unten aufgeführten Nie-derlassung und bei Yamaha Vertragshändlern in den jeweiligenBestimmungsländern erhältlich.
Para detalles sobre productos, contacte su tienda Yamaha más cercanao el distribuidor autorizado que se lista debajo.
NORTH AMERICACANADA
Yamaha Canada Music Ltd.135 Milner Avenue, Scarborough, Ontario,M1S 3R1, CanadaTel: 416-298-1311
U.S.A.Yamaha Corporation of America6600 Orangethorpe Ave., Buena Park, Calif. 90620,U.S.A.Tel: 714-522-9011
CENTRAL & SOUTH AMERICAMEXICO
Yamaha de Mexico S.A. De C.V.,Departamento de ventasJavier Rojo Gomez No.1149, Col. Gpe DelMoral, Deleg. Iztapalapa, 09300 Mexico, D.F.Tel: 686-00-33
BRAZILYamaha Musical do Brasil LTDA.Av. Rebouças 2636, São Paulo, BrasilTel: 011-853-1377
ARGENTINAYamaha Music Argentina S.A.Viamonte 1145 Piso2-B 1053,Buenos Aires, ArgentinaTel: 1-371-7021
EUROPETHE UNITED KINGDOM
Yamaha-Kemble Music (U.K.) Ltd.Sherbourne Drive, Tilbrook, Milton Keynes,MK7 8BL, EnglandTel: 01908-366700
IRELANDDanfay Ltd.61D, Sallynoggin Road, Dun Laoghaire, Co. DublinTel: 01-2859177
GERMANY/SWITZERLANDYamaha Europa GmbH.Siemensstraße 22-34, 25462 Rellingen,F.R. of GermanyTel: 04101-3030
AUSTRIAYamaha Music AustriaSchleiergasse 20, A-1100 Wien AustriaTel: 01-60203900
THE NETHERLANDSYamaha Music NederlandKanaalweg 18G, 3526KL, Utrecht, The NetherlandsTel: 030-2828411
BELGIUMYamaha Music BelgiumKeiberg Imperiastraat 8, 1930 Zaventem, BelgiumTel: 02-7258220
FRANCEYamaha Musique France,Division ClaviersBP 70-77312 Marne-la-Vallée Cedex 2, FranceTel: 01-64-61-4000
AFRICAYamaha Corporation,International Marketing DivisionNakazawa-cho 10-1, Hamamatsu, Japan 430-8650Tel: 053-460-2312
MIDDLE EASTTURKEY/CYPRUS
Yamaha Europa GmbH.Siemensstraße 22-34, 25462 Rellingen,F.R. of GermanyTel: 04101-3030
OTHER COUNTRIESYamaha Corporation,International Marketing DivisionNakazawa-cho 10-1, Hamamatsu, Japan 430-8650Tel: 053-460-2312
ASIAHONG KONG
Tom Lee Music Co., Ltd.11/F., Silvercord Tower 1, 30 Canton Road,Tsimshatsui, Kowloon, Hong KongTel: 2737-7688
INDONESIAPT. Yamaha Music Indonesia (Distributor)PT. NusantikGedung Yamaha Music Center, Jalan Jend. GatotSubroto Kav. 4, Jakarta 12930, IndonesiaTel: 21-520-2577
KOREACosmos Corporation#131-31, Neung-Dong, Sungdong-Ku, SeoulKoreaTel: 02-466-0021~5
MALAYSIAYamaha Music Malaysia, Sdn., Bhd.16-28, Jalan SS 2/72, Petaling Jaya, Selangor,MalaysiaTel: 3-717-8977
PHILIPPINESYupangco Music Corporation339 Gil J. Puyat Avenue, P.O. Box 885 MCPO,Makati, Metro Manila, PhilippinesTel: 819-7551
SINGAPOREYamaha Music Asia Pte., Ltd.Blk 202 Hougang, Street 21 #02-01,Singapore 530202Tel: 747-4374
TAIWANYamaha KHS Music Co., Ltd.10F, 150, Tun-Hwa Northroad,Taipei, Taiwan, R.O.C.Tel: 02-2713-8999
THAILANDSiam Music Yamaha Co., Ltd.121/60-61 RS Tower 17th Floor,Ratchadaphisek RD., Dindaeng,Bangkok 10320, ThailandTel: 02-641-2951
THE PEOPLE’S REPUBLIC OF CHINAAND OTHER ASIAN COUNTRIES
Yamaha Corporation,International Marketing DivisionNakazawa-cho 10-1, Hamamatsu, Japan 430-8650Tel: 053-460-2317
OCEANIAAUSTRALIA
Yamaha Music Australia Pty. Ltd.17-33 Market Street, South Melbourne, Vic. 3205,AustraliaTel: 3-699-2388
NEW ZEALANDMusic Houses of N.Z. Ltd.146/148 Captain Springs Road, Te Papapa,Auckland, New ZealandTel: 9-634-0099
COUNTRIES AND TRUSTTERRITORIES IN PACIFIC OCEAN
Yamaha Corporation,International Marketing DivisionNakazawa-cho 10-1, Hamamatsu, Japan 430-8650Tel: 053-460-2317
HEAD OFFICE Yamaha Corporation, Electronic Musical Instrument DivisionNakazawa-cho 10-1, Hamamatsu, Japan 430-8650Tel: 053-460-3273[PK] 13
ITALYYamaha Musica Italia S.P.A.,Home Keyboard DivisionViale Italia 88, 20020 Lainate (Milano), ItalyTel: 02-935-771
SPAINYamaha-Hazen Electronica Musical, S.A.Jorge Juan 30, 28001, Madrid, SpainTel: 91-577-7270
PORTUGALValentim de Carvalho CI SAEstrada de Porto Salvo, Paço de Arcos 2780 Oeiras,PortugalTel: 01-443-3398/4030/1823
GREECEPhilippe Nakas S.A.Navarinou Street 13, P.Code 10680, Athens, GreeceTel: 01-364-7111
SWEDENYamaha Scandinavia ABJ. A. Wettergrens Gata 1Box 30053S-400 43 Göteborg, SwedenTel: 031 89 34 00
DENMARKYS Copenhagen Liaison OfficeGeneratorvej 8BDK-2730 Herlev, DenmarkTel: 44 92 49 00
FINLANDWarner Music Finland OY/Fazer MusicAleksanterinkatu 11, P.O. Box 260SF-00101 Helsinki, FinlandTel: 0435 011
NORWAYNorsk filial av Yamaha Scandinavia ABGrini Næringspark 1N-1345 Østerås, NorwayTel: 67 16 77 70
ICELANDSkifan HFSkeifan 17 P.O. Box 8120IS-128 Reykjavik, IcelandTel: 525 5000
OTHER EUROPEAN COUNTRIESYamaha Europa GmbH.Siemensstraße 22-34, 25462 Rellingen, F.R. ofGermanyTel: 04101-3030
PANAMA AND OTHER LATINAMERICAN COUNTRIES/CARIBBEAN COUNTRIES
Yamaha de Panama S.A.Torre Banco General, Piso 7, Urbanización Marbella,Calle 47 y Aquilino de la Guardia,Ciudad de Panamá, PanamáTel: 507-269-5311

M.D.G., EMI Division © 1997 Yamaha Corporation
VV67140 808POCP5.3-06F0 Printed in Japan