PlanetPress Workflow User Guide - Resource Center
684
User Guide Version: 8.5
-
Upload
khangminh22 -
Category
Documents
-
view
0 -
download
0
Transcript of PlanetPress Workflow User Guide - Resource Center
User GuideVersion: 8.5


User GuideVersion 8.5Last Revision: 7/6/2017
Objectif Lune, Inc.2030 Pie-IX, Suite 500Montréal, QC, Canada, H1V 2C8
+1 (514) 875-5863www.objectiflune.com
All trademarks displayed are the property of their respective owners.
© Objectif Lune, Inc. 1994-2017. All rights reserved. No part of this documentation may bereproduced, transmitted or distributed outside of Objectif Lune Inc. by any means whatsoeverwithout the express written permission of Objectif Lune Inc. Inc. Objectif Lune Inc. Inc. disclaimsresponsibility for any errors and omissions in this documentation and accepts no responsibilityfor damages arising from such inconsistencies or their further consequences of any kind.Objectif Lune Inc. Inc reserves the right to alter the information contained in this documentationwithout notice.
Table of ContentsTable of Contents 4
Welcome to PlanetPress Workflow 8.5 7
Icons used in this guide 7
System Requirements 9
Operating System (64-bit only) 9
Minimum Hardware Requirements 9
Basics 10
Setting Up the Working Environment 10
Setting Up Preferences 10
Create a New Process 10
Send your Configuration 11
Features 13
The Nature of PlanetPress Workflow 13
About Branches and Conditions 13
Configuration Components 14
Connect Resources 14
About Data 16
Page 4
About Documents 44
Debugging and Error Handling 46
The Plug-in Bar 56
About Printing 58
About Processes and Subprocesses 71
Using Scripts 81
Special Workflow Types 127
About Tasks 172
Task Properties 173
Variable Properties 174
Working With Variables 535
About Configurations 544
About Related Programs and Services 548
The Interface 553
Customizing the Workspace 554
PlanetPress Workflow Button 563
The Configuration Components Pane 564
Other Dialogs 591
The Debug Information Pane 616
Page 5

The Message Area Pane 617
The Object Inspector Pane 619
The Plug-in Bar 620
Preferences 621
The Process Area 662
The Quick Access Toolbar 673
The PlanetPress Workflow Ribbon 674
The Task Comments Pane 677
Copyright Information 678
Legal Notices and Acknowledgements 679
Page 6

Welcome to PlanetPress Workflow8.5This PDF documentation covers version 8.5. To view the documentation of previous versionsplease refer to the PDF files available in the Downloads section of our website:http://www.objectiflune.com/OL/Download/DownloadCenter.
Workflow is the heart of all of our solutions. Working in conjunction with PlanetPress Connect,PlanetPress Capture, CaptureOnTheGO, PlanetPress Imaging, PlanetPress Fax, and a varietyof plug-ins, it helps improve your communications processes. Processes such ascommunication creation, interaction, distribution and even maintenance.
Workflow is the "super dispatcher". It caters for inputs from a huge variety of sources, such asemail, web pages, databases, individual files (PDF, csv, XML, etc), print streams, FTP, Telnetand even ERP systems! This data can then be analysed, modified, stored, verified, routed andused as triggers for other processes from entirely within Workflow. Finally it is passed to one ofour other products (or not) to be outputted in multiple ways (printed, emailed, posted, archived,sent to third party solutions, etc..).
Consider Workflow as a set of buildings blocks that enable you to build your own customisedautomated processes which will fit your environment and not the other way around. Createprocesses that will save you time and money!
Icons used in this guideIcons are used throughout this guide to point your attention to certain information.
Note
Complementary information that is not critical, but may help you better use PlanetPress Workflow.
Tip
Information that is useful or suggests an easier method.
Page 7

Technical
Information that may require specific knowledge to understand.
Warning
Information that is potentially critical to using PlanetPress Workflow. Pay close attention.
Page 8

System RequirementsThese are the system requirements for PlanetPress Workflow 8.5.
Operating System (64-bit only)l Microsoft Windows 2008/2008 R2 Serverl Microsoft Windows 2012/2012 R2 Serverl Microsoft Windows Vistal Microsoft Windows 7l Microsoft Windows 8.1l Microsoft Windows 10
Note
Windows XP, Windows 2003 and older versions of Windows are not supported by PlanetPressWorkflow.
Minimum Hardware Requirementsl NTFS Filesystem (FAT32 is not supported)l CPU Intel Core i7-4770 Haswell (4 Core)l 8GB RAM (16GB Recommended)l Disk Space: At least 10GB (20GB recommended)
Page 9

BasicsPlanetPress Workflow is a tool for the automation of the processing, the distribution and theprinting of your business documents. Once installed on the server, it can be set up to automateall tasks related to document processing.
Setting Up the Working EnvironmentSetting up the working environment has to be done the first time you start PlanetPressWorkflow.
1. Defining the printer (see Activate Your Printers).2. Configure PlanetPress Workflow Services (see Workflow Services).
Setting Up PreferencesPlanetPress Workflow Configuration program lets you configure a variety of options, from howthe application itself looks or behaves, to plugin specific options. For more information aboutpreferences accessible through the Preferences button in the PlanetPress Workflow Button,please refer to Preferences.
Create a New ProcessYou can create a new process in a two different ways:
l In the Ribbon, go to the Home tab and click the Process button in the Processes group.l In the Configuration Components pane, right-click on any process or the Processesfolder and select Insert Process.
Regardless of the method, a new process is created with a default name (Process1, Process2,etc), Input Task and Output Task. The defaults are configurable in the "Default ConfigurationBehavior Preferences" on page 625 screen. The same methods can be used to create a newStartup process.
Page 10

To add a PlanetPressWorkflow startup process:
l In the Ribbon, go to the Home tab and click the Startup Process button in theProcesses group.
l In the Configuration Components pane, right-click on any process or the Processesfolder and select Insert Startup Process.
Note
You can only have one Startup Process in any given configuration and cannot add more.
Considerationsl While your configuration is limited to a maximum of 512 processes, any given processcan have as many tasks as necessary.
l A given process may include output tasks that generate files used by input tasks fromother processes.
l When you send a configuration to your PlanetPress Workflow service, all its activeprocesses are applied.
l Each process’ schedule determines when its initial input task can be performed.l Other tasks included in the process are performed regardless of schedule, granted thatthe previous task was performed.
Send your ConfigurationPlanetPress Workflow Configuration saves entire configurations in the form of a single file. Likeany other file, configuration files may be saved and reopened, as well as rename as desired.Simply saving a configuration has no effect on the configuration actually used by thePlanetPress Workflow when it is started. To change any currently active configuration, youmust use the Send Configuration command.
When you use the Send command, the PlanetPress Workflow Configuration program uses thecurrently opened configuration (Any_name.pw7) to overwrite PlanetPress Workflow service'scurrent configuration (ppwatch.cfg).
Page 11

If PlanetPress Workflow service is running when you send a new configuration, it stops andrestarts automatically with the new configuration. If the service is stopped, it will not startautomatically.
To send a Configuration to the local server:
1. Open the configuration you want to use as a new configuration.2. Edit the configuration, if required.3. When the configuration is ready to be used, from the PlanetPress Workflow button,
choose Send Configuration, then Send Local.
To send a Configuration to a remote server:
1. Open the configuration you want to use as a new configuration.2. Edit the configuration, if required.3. When the configuration is ready to be used, from the PlanetPress Workflow button,
choose Send Configuration, then Send Remote.A list of available servers on the local network appears.
4. Put a checkmark next to each server where the configuration should be sent.5. Click OK.
If a server is grayed out, this may mean you do not have access to send a configurationremotely to it. For more information, please see "Access Manager" on page 599.
Note
If PlanetPress Workflow service is paused when you send a new configuration, it will notstop and restart. Since PlanetPress Workflow service reads its configuration file when itstarts up, when you resume processing, PlanetPress Workflow service will continueusing the old configuration.
Page 12

FeaturesPlanetPress Workflow are input driven applications designed to output data in a variety of waysthrough diverse means to various applications and devices. PlanetPress Workflowcan be usedas simple go between, passing along input data to output devices, but it can also performvarious types of data processing. You can combine the various PlanetPress Workflow servicesto set up versatile automated processes to print jobs as well as generate other types of output.
The Nature of PlanetPress WorkflowPlanetPress Workflow act as sorts of dispatchers. On the one hand, they retrieves data andcontrols plugins that retrieve data from watched locations, and on the other hand they send dataand controls plugins that send data to various devices, for printing or to generate documentsthat can then be emailed or faxed. PlanetPress Workflow can also perform a variety ofoperations on the data using its action plugins.
In fact, the PlanetPress Workflow plugin based architecture enables almost limitlesscustomization. You can create or purchase compatible plugins, drop them in any ofPlanetPress Workflow plugin folder and use them to perform other operations. You can evenfind free unsupported plugins on the Objectif Lune Web site.
PlanetPress Workflow are service applications, or if you will, applications that continuously runon a given computer and that perform actions automatically. Those actions are defined in aPlanetPress Workflow configuration. A given computer can only run one PlanetPress Workflowconfiguration at a time. The PlanetPress Workflow Service Console may be used to monitor theservices running on a given computer.
About Branches and ConditionsWhile some processes can simply start with an input task, manipulate the data with a few actiontasks and finish with an output task, in some cases you may want to have more control over theflow of your process. For example, you may want multiple outputs, such as printing to multipleprinters as well as generating a PDF and emailing it. To do this, you will need branches. Youmay also want to detect certain criteria in your data and act differently depending on that data,such as sending a fax only when a fax number is found, or printing to a different printerdepending on who send you a print job. To do this, conditions are used.
Page 13

BranchesA branch is effectively a doubling of your job file. As your job file goes down the process, whenit encounters a branch it will go in that branch, process all tasks up to the output, and return tothe main trunk to continue processes. You can have branches within branches, and allbranches must have an output. For more information on branches, see Branch.
A branch is represented as a crossing .
ConditionsA condition will either execute the branch it creates or the main trunk, but never both. As yourjob file goes down the process, when it encounters a condition it will verify whether thatcondition results in a "true" or "false" value. If the result is true, it goes in the branch, processesall tasks up to the output, and the process finishes. If the result is false, it goes down the maintrunk and continues processing until the process finishes.
A conditional branch (or condition) is shown as a crossing with a red diamond over it .
For the list of operations you can perform on Branches and Conditions, please refer to TheProcess Area.
Configuration ComponentsThe Configuration Components items displayed in the pane are processes, subprocesses,variables, documents and printer queues. For more information on operations that you canperform on each component, please refer to The Configuration Components pane.
Connect ResourcesConnect resources are visible in The Configuration Components pane and are added byusing the Send to Workflow option from the PlanetPress 's File menu.
Page 14

Available Resourcesl Data Mapping Configurations: Displays a list of data mapping configurations used withthe Execute Data Mapping task. Each of the templates have been sent from PlanetPressConnect using the Send to Workflow tool. For each template in the list, the following twoitems appear within them:
l Data Model: Displays the data model used in the data mapping configuration.Double-click on the data model to view it in your default XML viewer (generally,Internet Explorer).
l Sample Data File(s): Displays a list of sample files that are included in the datamapping configuration. Double-click on a file to use it as a sample data file for theactive process.
l Document Templates: Displays a list of templates that can be used in content creationtasks: "Create Email Content Set" on page 479, "Create Web Content" on page 493 and"Create Print Content" on page 490.
l Job Presets: Displays a list of Job Presets that can be used in the "Create Job" onpage 482 task.
l Output Presets: Displays a list of Output Presets that can be used in the "Create Output"on page 485 task.
Resource Save LocationAny resource sent to PlanetPress Workflow from PlanetPress Connect is saved locally at thefollowing location: %PROGRAMDATA%\Objectif Lune\PlanetPress Workflow 8\PlanetPressWatch\OLConnect
Resources are saved in their appropriate folder:
l DataMapper contains the data mapping configurations (.OL-datamapper)l JobCreation contains the Job Presets (.OL-jobpreset)l OutputCreation contains the Output Presets (.OL-outputpreset)l Template contains the templates (.OL-template)
Page 15
Note
Package Files are not saved anywhere. The individual resources contained within thepackage are extracted and placed in the folders noted above.
Resource ArchivesFrom version 8.2, PlanetPress Workflow maintains an archive of previous versions ofresources, in the following location: %PROGRAMDATA%\Objectif Lune\PlanetPress Workflow8\PlanetPress Watch\OLConnect\Archive , each in their own folder:
l datamapper contains archives of the data mapping configurations (.OL-datamapper)l jobcreation contains archives of the Job Presets (.OL-jobpreset)l outputcreation contains archives of the Output Presets (.OL-outputpreset)l template contains archives of the templates (.OL-template)l workflow contains archives of Workflow configurations received by the server.
The archives are saved using the template named followed by a timestamp. A maximum of 30of each instance of a resource is kept (meaning if you have 10 different templates, a maximumof 300 files will be present in the archive\template folder). Older archives are deletedautomatically as new archives are created.
About DataData is what drives your business, and our software. We define data as anything that isobtained through an Input Task and used within the process itself. Once the data is obtained, itbecomes the job file that is passed from one task to another and generally used to generateoutput.
Data can be manipulated using the tasks in the process, used as comparison for conditions andloops, complemented with data from other sources, and used to generate your output. Itoriginates from many different sources (as many as the input tasks support), parts of it can bestored in variables, and is always accessible by the task that currently handles it.
Data is referred to using Data Selections either from PlanetPress Workflow or a PlanetPressDesign Document that is being merged with the data (for example in a printed output).
Page 16
For more information about Data, please refer to "Sample Data" on page 29.
Note
Null characters present in the data may not be displayed properly when usingPlanetPress Workflow Configuration program, and that they may also be printeddifferently by different printers. To ensure consistency, you should consider filtering outsuch characters.
Data File and Job FileWhichever source it may come from, a serial port, an e-mail message, or an LPR request, forinstance, and whatever its format, data entering a PlanetPress Workflow process via an inputtask is always referred to as a data file. Job file is a more general term, that can refer to datafiles as well as other types of files traveling through a process. Image files, for example, can bepassed from task to task in order to be downloaded to a printer. So files traveling within aprocess are mostly referred to as job files.
By default, job file names are generated using the %f variable. You may change theway PlanetPress Workflow names job files by using any combination of static characters,variables and Job info variables. You could for instance enter Process_%w_Job_%f in theFile name box to add the process name in the name generated by the PlanetPress WorkflowTools.
A single job file can be the source of multiple job files. This is the case, for example, when aprocess includes multiple branches, as each branch is given a duplicate copy of the job file.This is also the case when a job file is split into multiple smaller files by a Splitter action task,for instance (See "Data Splitters" on page 326).
It is important to note that job files may be used as a helpful debugging resource (See"Debugging and Error Handling" on page 46).
Actual Data and Sample Data
The actual data is the dynamic data captured by PlanetPress Workflow at run-time. The sampledata file is a static sampling of the run-time data.
Page 17

In the PlanetPress Workflow Configuration program, you use sample data files to create andedit PlanetPress Workflow configurations.
Job File Names and Output File NamesWhen an input task sends a new data file down a process, it gives it an internal file namereferred to as the job file name (associated with the %f variable). The new job file typicallykeeps the same name until the end of the process.
l If the job file comes to a branch in the process, PlanetPress Workflow makes a copy of thejob file and give the new file a new job file name.
l If the job file is processed by a splitter action task, the task typically creates a number ofnew files which are all given new job file names.
Since these files are generated and managed by PlanetPress Workflow, you should notactually pay too much attention to their names.
Many output tasks, on the other hand, let you determine exactly how you want the files theygenerate to be named. In the case of Send to Folder output tasks, for example, output files aresaved under their job file names by default (using the variable %f), but you may use a static(MyOutput.txt, for example) or variable name (%O_Invoices, for instance) of your choosing.
Variables such as %o (original file name) bring up the issue of file overwriting. If the processreceives two source files with the same name, the second output file may overwrite the first one.This may be what you want, but otherwise you may consider using another variable, such as in%u (unique 13-character string).
When choosing naming schemes for output files, consider the following:
l For the benefit of users who must identify files, be it in a folder or on a printer queue,consider using names that are as meaningful and precise as possible.
l Some devices or applications may use file name extensions to know what to do withincoming files.
Since variable properties can be entered in the boxes where you specify the folder and filenames, you can use variables, data selections and static text. You could, for example, use thefollowing: ClientID_@(1,1,1,1,14,KeepCase,Trim)_StatMonth_%m.
Page 18
One last consideration regarding output file names has to do with standard JPEG and TIFF filesgenerated by PlanetPress Image. When an output job contains multiple pages, multiple JPEGor TIFF files are generated (one image per file), each one identified by a sequence numberappended to its name (this is managed by your PlanetPress Workflow). A three page job to becalled Invoice, for example, will generate three JPEGs or TIFFs called Invoice0, Invoice1 andInvoice2. Note that this does not apply to multiple TIFFs, which can include multiple images ina single file.
Note
You can change the name of a previously named file using a Rename action task (see "Rename"on page 298).
About Data SelectionsA data selection could be compared to an address. It indicates a location within a data fileusing coordinates. PlanetPress Workflow includes a tool called the Data Selector that helpsyou make data selections. The Data Selector does two things:
l It uses the current emulation (either the emulation chosen when the sample data file wasselected, or the one chosen in the last Change Emulation action task appearing abovethe current task) to format the data.
l It displays the formatted data to let you make selections easily using the mouse pointer.
The Data Selector is essentially the same as the one used in PlanetPress Design.
Data Selections
A data selection is simply a reference to a given location within the job file or metadata file,using the current emulation. Data selections are always evaluated at run-time so they arealways dynamic and depend on the job file that is currently being processed. When you make adata selection, the PlanetPress Workflow Configuration program converts it to text form, usingcoordinates to reference the selected location.
There are three types of data selections you can use in PlanetPress Workflow. The availabletype of data selection depends on which emulation you are using and whether or not you havecreated Metadata.
Page 19

You can add data selections to variable properties of your tasks either automatically using thedata selector (See "The Data Selector" on page 24) or manually by typing in the data selection.
Note
It is strongly recommended to use the automatic method, as it returns precisely the sameselections but is generally more reliable
Text-Based Data Selections
These selections are used for text data files such as Line Printer, ASCII and Channel Skipemulations. The selection refers to a rectangular selection that may contain multiple lines, rows,columns on a given page.
Syntax
@(page number, from line, to line, from column, to column, case option, trimoption)
Here is a breakdown of the syntax (all options are mandatory):
l @(): Always surrounds a data selection.l Page Number: The data page number from which you want the data selection to grab thedata. If you want to get data from each page individually, this has to be done after asplitter.
l From Line: The starting line of the data selection.l To Line: the last line of the data selection.l From Column: the leftmost character position of the data selection.l To Column: the rightmost character position of the data selection.l Case Options: This can be one of three options:
l KeepCase: Keeps the current uppercase and lowercase letters as they are.l UpperCase: Converts all letters to their uppercase equivalent.l LowerCase: Converts all letters to their lowercase equivalent.
l Trim Option: Can either be "Trim" if you want to trim empty spaces before and after thedata selection or "NoTrim" if you want to retain the extra spaces.
Page 20
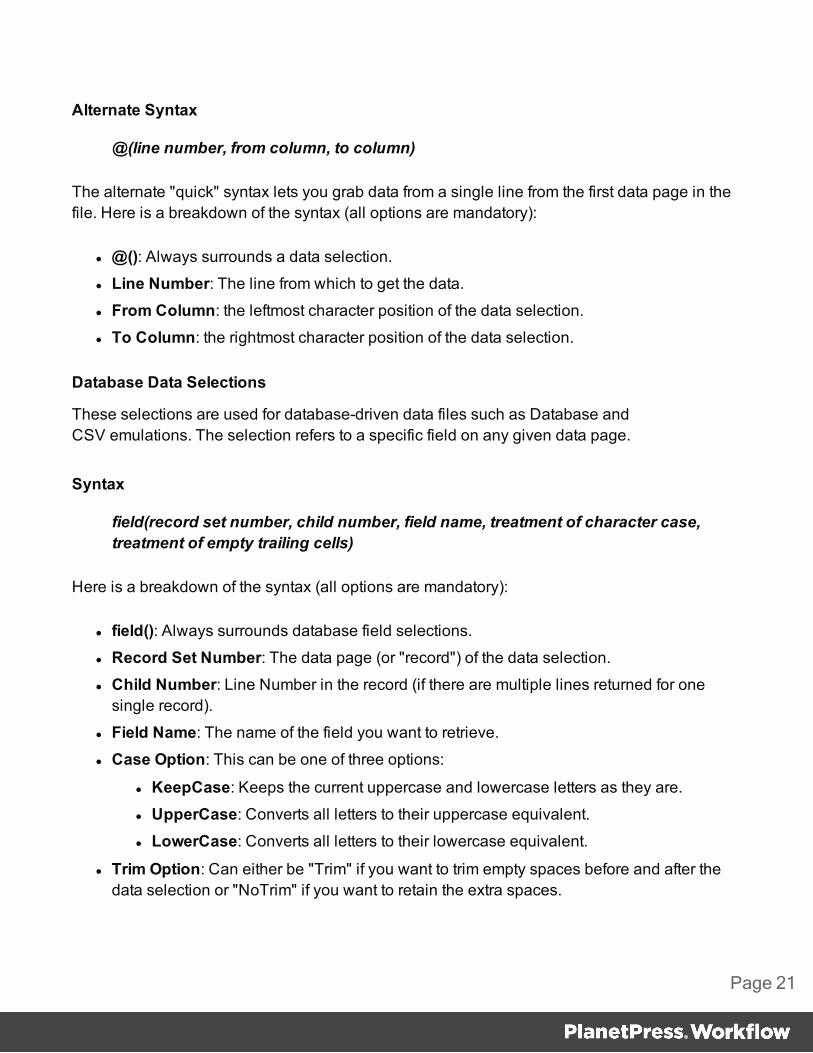
Alternate Syntax
@(line number, from column, to column)
The alternate "quick" syntax lets you grab data from a single line from the first data page in thefile. Here is a breakdown of the syntax (all options are mandatory):
l @(): Always surrounds a data selection.l Line Number: The line from which to get the data.l From Column: the leftmost character position of the data selection.l To Column: the rightmost character position of the data selection.
Database Data Selections
These selections are used for database-driven data files such as Database andCSV emulations. The selection refers to a specific field on any given data page.
Syntax
field(record set number, child number, field name, treatment of character case,treatment of empty trailing cells)
Here is a breakdown of the syntax (all options are mandatory):
l field(): Always surrounds database field selections.l Record Set Number: The data page (or "record") of the data selection.l Child Number: Line Number in the record (if there are multiple lines returned for onesingle record).
l Field Name: The name of the field you want to retrieve.l Case Option: This can be one of three options:
l KeepCase: Keeps the current uppercase and lowercase letters as they are.l UpperCase: Converts all letters to their uppercase equivalent.l LowerCase: Converts all letters to their lowercase equivalent.
l Trim Option: Can either be "Trim" if you want to trim empty spaces before and after thedata selection or "NoTrim" if you want to retain the extra spaces.
Page 21
Data Repository Lookups
The Data Repository selections are made through the lookup function. Selections are donefrom the data located in the "Data Repository Manager" on page 613. The lookup functionreturns the value of a single key, which is always a string.
Syntax
lookup(group, return key, lookup key, lookup value)
Here is a breakdown of the syntax (all arguments are mandatory):
l group: The name of the group in which to retrieve the value. Does not need to besurrounded by quotes.
l return key: The name of the key where the information you want to retrieve is located.Does not need to be surrounded by quotes.
l lookup key: The name of the key in the group with which to look up the value. The returnkey of the KeySet in which the lookup key's value matches the lookup value will bereturned.
l lookup value: A string surrounded by quotes which will be used in the lookup.
PDF Data Selections
These selections are used for PDF data files. The selection refers to a specific area of anygiven page of the PDF by using precise region coordinates (in inches).
Syntax
region(page, left, top, right, bottom, case option, trim option)
Here is a breakdown of the syntax (all options are mandatory):
l region(): Always surrounds PDF data selections.l Page: The page of the PDF from which to retrieve the data.l Left: Exact horizontal position (in inches) that defines the left of the selection region.l Top: Exact vertical position (in inches) that defines the top of the selection region.l Right: Exact horizontal position (in inches) that defines the right of the selection region.l Bottom: Exact vertical position (in inches) that defines the bottom of the selection region.
Page 22

l Case Option: This can be one of three options:l KeepCase: Keeps the current uppercase and lowercase letters as they are.l UpperCase: Converts all letters to their uppercase equivalent.l LowerCase: Converts all letters to their lowercase equivalent.
l Trim Option: Can either be "Trim" if you want to trim empty spaces before and after thedata selection or "NoTrim" if you want to retain the extra spaces.
Metadata Selections
These selections are used with any type of file, as long as a metadata file was created by aprevious task.
Syntax
GetMeta(Field Name [, Option Flags, Metadata Path])
Here is a breakdown of the syntax:
l GetMeta(): Always surrounds metadata selections.l Field/Attribute Name: specifies the name of the field (or attribute, if the GetAttributeoption flag is set) to retrieve.
l Option Flag (optional): Sets the options for the selection (see table below)l Metadata Path (optional): Defines the precise path where the Metadata Field is located.
Option Flags
Name Value Behavior
GetAttribute 1 Search for the name argument in the attribute collectioninstead of the default field collection.
NoCascade 2 Search only the level specified by the path argument(defaults to Page level when path argument is empty),instead of default behavior, going from the Page level tothe Job level.
Page 23

Name Value Behavior
FailIfNotFound 4 Raise an error and crash the job is the specified name isnot found instead of returning an empty string.
SelectedNodesOnly 8 Returns values from the selected nodes only.
The Data SelectorThe Data Selector is the tool you use to choose your sample data and metadata files, to selectthe appropriate emulation, make data selections, and to stabilize your data.
The Data Selector is divided in two tabs: Data and Metadata. The Data tab contains the DataOptions, which let you select your emulation, and the Selector Options, which lets youpersonalize the data selector's display options (see Data Selector Display Preferences)
Page 24

Depending on the chosen emulation and data file, the options in the data selector, the Sampledata file section and the Data pane itself may change to accommodate your choice. The LinePrinter, Ascii, Channel Skip and User-Defined emulations will display the default options (seethe Emulation section) and a grid-like display of each character on each line. The followingemulations however, will be slightly different.
Database Emulation
l The Database emulation changes the Browse button ( ) for the Database EmulationConfiguration button ( ), which displays the Database Emulation Configuration (seeDatabase Emulation).
l Once a database has been opened and query entered, the Data pane displays the resultsof the SQL Query in a grid format, which each line representing a single returned row from
Page 25

the database. Each column represents a field returned by the query, with its field name asa row header.
XML Emulation
l XML data is represented in a tree structure which corresponds to the data in the XML file.Each node of the XML can be expanded to see the nodes under it. See XML DataEmulations.
PDF Emulation
l If you use a PDF emulation, the Data pane displays the data as you would see it in anyPDF reader.
l A new zoom drop-down list is displayed to let you set the zoom in percentage or fit thePDF to the window or the width of the window.
l A new status bar, displaying the (Left, Top) and (Right, Bottom) coordinate pairs, is shownunder the Data pane.
Page 26

Metadata tab
The Metadata tab allows users to either generate the metadata file for their active sample datafile, or to associate an existing metadata file to their document.
The Sample Metadata file name is the path to the metadata file describing the current sampledata file. Buttons on the right can be used to load metadata from a file or to save the currentmetadata to a file.
The Generated PressTalk Expression is a PlanetPress Talk command corresponding to thecurrent attribute or field being selected. Its value is editable, which allows the user to customizethe string returned by the metadata selector.
Page 27

The Search options defines how to retrieve the value of a given metadata element (attribute orfield) when it is not present at the current metadata level. The possible search options are:
l Search from a specific location only.l Search from level X to Job, where X can be any metadata level (Job, Group, Document,Datapage, Page). With this search option, if the selected metadata element does not existat the specified level, then it will be searched for, starting at the lowest metadata level asspecified in the search option, then one level up until the element is found.
The Raise an error if the field does not exist option allows to control what to do when a givenmetadata element is not found, regardless of the search option.
The Data page box lets the user choose which data page metadata elements to be displayed.
The Metadata level is a tree view allowing users to select the metadata level from which todisplay or select metadata elements.
The Attributes list displays all metadata attributes describing the current metadata level, asselected in the Metadata Level tree view, for the current data page, as selected in the DataPage control.
The Production information list displays all metadata fields describing the currentmetadata level, as selected in the Metadata Level tree view, for the current data page, asselected in the Data page box.
About Data EmulationEmulations are like filters that can be used to read the data. When you create a document inPlanetPress Design, you choose a sample data file and specify the emulation to use for thechosen data. The emulation setting you choose will typically always be associated with thatdocument. If you choose a CSV (comma separated values) file and specify the correspondingemulation, for instance, commas encountered in the data will typically be considered as valueseparators.
Within PlanetPress Workflow, the same emulation tools as PlanetPress Design are availablethroughout your process, using the Data Selector. One notable exception however is that User-Defined Emulation is not available because it uses PlanetPress Talk code, which is notavailable within PlanetPress Workflow Configuration Program.
Page 28

The emulation that is used in your process can change during the process, and can be differentthan the one used in any PlanetPress Design document used in your process. PlanetPressDesign documents use their own emulations, as defined in the document itself fromPlanetPress Design.
Emulations in PlanetPress Workflow:
l Line Printerl ASCIIl CSVl Channel Skipl Databasel XMLl PDF
Warning
PDF Emulation, also called Document Input, is only available in PlanetPress Workflow.
For more information about each emulation and how to use them, please refer to PlanetPressDesign User Guide.
Using the File ViewerThe File Viewer is like a Data Selector without any data related options, such as emulationsettings. It is displayed when doing a data selection from the Generic Splitter task (see"Generic Splitter" on page 335) with the Use Emulation option unchecked. The only dataformatting codes to which the File Viewer responds are line breaks.
For more information on the selecting data, see "The Data Selector" on page 24.
Sample DataPlanetPress Workflow is a versatile tool that can capture various types of data files anddispatch this data to various PlanetPress Design documents. To fully understand PlanetPress
Page 29

Workflow and how it treats data, you must understand how it is integrated into PlanetPressDesign.
This section covers issues relating to the sample data used to create your PlanetPressWorkflow configuration and to the actual data that PlanetPress Workflow will send toPlanetPress Design documents. It is an important section which you should fully understandbefore you start creating your configuration. Also included in this section are procedures that letyou make data selections as well as get data from the sample data file.
Since many of the concepts and explanations included in this chapter are closely related toconcepts and explanations found in the PlanetPress Design User Guide, we suggest that youreview this document, especially the Selecting an Emulation section.
Choosing a Database Type Sample Data File
The procedure for selecting a sample data file that is in fact a database is the same as doing soin PlanetPress Design. For more information, please see the relevant page in the PlanetPressDesign User Guide.
Note
You can also use the PlanetPress Workflow Database action task to get data form adatabase, and output in multiple different formats such as CSV. See "Database Query"on page 265.
Choosing a Sample Data File
In order to create your PlanetPress Workflow Process, the sample data you are going to usehas to correspond precisely to the job files that will be treated by that process, at least in termsof structure.
The sample data file should have a relatively small number of pages (generally less than ahundred) in order to be processed quickly, while your actual data may be much larger and takemore time to process. The sample data file should also contain at least one of every exceptionyou may want to detect, or data used for a specific condition. For example if you wanted to filterout any data for clients in Canada, you would want to use a data file that has at least one userfrom Canada, to test whether your condition removes it.
Page 30

To choose a sample data file:
1. Click the Debug tab in the PlanetPress Workflow Ribbon.
2. Click on Select in the Data group.3. Use the Data Selector to choose your sample data file and emulation options.4. Click OK on the Data Selector.
PlanetPress Workflow also keeps the last 9 used data files in memory, which you can reopen touse in the same process, or a different one.
To reopen a sample data file used previously:
1. Click the Debug tab in the PlanetPress Workflow Ribbon.2. Click on Reopen Data File in the Data group.3. Click on one of the data files in the list.4. Use the Data Selector to change the emulation options if necessary.5. Click OK on the Data Selector.
MetadataSimply put, metadata is data about data or, in other words, information tagged to data. Metadataincludes information about the data file itself, the document, page properties, page counts andcustom user fields.
Note
Applications or plug-ins created in PlanetPress Suite 6 and using Metadata will need tobe updated for use in version 8.5. No backward compatibility mode is available.
Warning
When a user-defined emulation is used with metadata, results and behavior are unknownand unsupported. For instance, refreshing the metadata file may cause the document tocrash and/or corrupt. For this reason, it is strongly advised to create backup copies of
Page 31

your documents beforehand.
Metadata structure
Metadata in PlanetPress Workflow introduces the following concepts for adding information to ajob:
l Page: 1 side of a physical paper sheet.l Datapage: 1 atomic unit of content that produces zero, one or more pages.l Document: group of 1 or more ordered datapages intended to the same recipient from thesame source (ex: invoice).
l Group: a logical and ordered group of documents (ex: all invoices for a specific customernumber; all documents going to the same address, etc.)
l Job: file that contains 1 or more groups.
When Metadata is produced for a given job, a hierarchical (i.e. tree-like) structure is created,composed of the above elements in the following order: Job->Group(s)->Document(s)->Datapage(s)->Page(s). Any operation that modifies the data with regards to this structure (ex:remove pages, alter the data, etc.) makes the metadata obsolete and so it must be recreated orrefreshed.
As an example, consider the typical case of a PlanetPress Design document which uses a LinePrinter datafile of transactional data in order to generate PDF invoices for a series of clients. Byusing the Metadata tools available in PlanetPress Workflow, we can add the followinginformation to the datafile:
l The job contains only invoices for clients located in Montreal.l Since more than one invoice can go to the same recipient, invoices are grouped bycustomer.
l Each invoice is a document resulting from the execution of a PlanetPress Designdocument over one or more datapages, which results in zero or more physical pagesbeing output.
Page 32

A single JOB can be composed of GROUPS of DOCUMENTS, which themselves arecomposed of physical PAGES produced by executing a PlanetPress Design document on oneor more DATAPAGES.
Metadata Elements
Each metadata node (i.e. Job, Group, Document, etc.) is described with a series of elements,that is, system-defined attributes or user-defined fields holding static or dynamic informationabout the node they are attached to. Each element has a name and a value. More specifically,here is a definition of these 2 types of elements:
l Attribute: A read-only, system-defined element which holds a certain information about acertain node from the Metadata structure. This information can be static (e.g. the size of aphysical page) or evaluated on-the-fly (e.g. the number of documents in a group).Attributes are non-repetitive (i.e. name is unique) and does not persist through metadatarecreation.
l Field: A read-write, user-defined element which hold custom information about a certainnode from the metadata structure. Fields are repetitive (i.e. the same field may appearmultiple times) and persist through metadata recreation.
Page 33

In addition to attributes and fields, each node of type group, document or datapage have aBoolean property called selected that indicates whether or not to produce the pages under thatnode. By default, this property is set to true for all nodes.
Metadata Attributes Reference
Here is a description of the Metadata attributes. The attributes are categorized as eitherProduction, Finishing or Index/Count.
Production attributes describe the production of the job and/or metadata (e.g. path and name ofthe datafile, date at which metadata was created, etc.)
Finishing attributes describe the finishing intent (e.g. page dimensions, page orientation,duplex mode, etc.).
Note
The presence of some finishing attributes depends on the PlanetPress Design document and targetdevice used when producing the job.
Index/Count attributes are not part of the original metadata file. They are evaluated live basedon the content of the metadata.
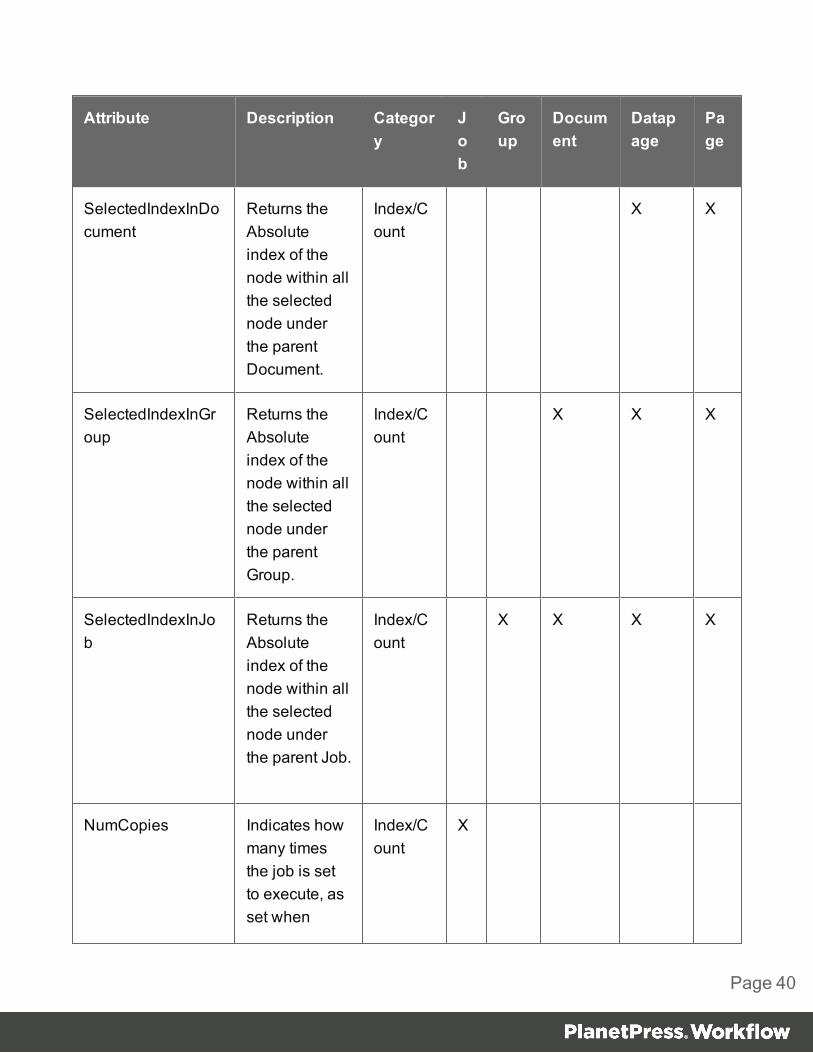
In the following table, the last 5 columns indicate at which level the corresponding attribute isavailable.
Attribute Description Category
Job
Group
Document
Datapage
Page
DataEncoding (optional)Name of thecharacterencoding.
Production
X X X
DataFile (optional) Pathand name of
Production
X X X
Page 34

Attribute Description Category
Job
Group
Document
Datapage
Page
the data fileused by thePlanetPressDesignDocument.
Date Date themetadata wascreated in ISOformat.
Production
X X X
Time Time themetadata wascreated in ISOformat.
Production
X X X
Title Title of thesourcedocument.
Production
X X X
Producer Name of thesoftware thatcreated themetadata.
Production
X X X
Creator Name of thesoftware thatcreated thesource of themetadata.
Production
X X X
TargetDevice Name of the Producti X X X
Page 35

Attribute Description Category
Job
Group
Document
Datapage
Page
device forwhich themetadata andassociateddata isintended.
on
Dimension Two floatsseparated by acolonindicating themedia size intypographicalpoints (ex:612:792).
Finishing
X X X X X
Orientation "Rotate0","Rotate90","Rotate180" or"Rotate270",indicatingrespectivelyportrait,landscape,rotated portraitand rotatedlandscape.
Finishing
X X X X X
Side "Front" or"Back";indicatewhether the
Finishing
X
Page 36

Attribute Description Category
Job
Group
Document
Datapage
Page
page is on thefront or theback of thepaper sheet.This attributeis a "besteffort" and isdevice-dependent.
Duplex "None","DuplexTumble" or"DuplexNoTumble"; indicatea change ofthe duplexstatus.
Finishing
X X X X X
InputSlot Device-dependentidentifier of themedia source.
Finishing
X X X X X
OutputBin Device-dependentidentifier of themediadestination.
Finishing
X X X X X
Weight Device-dependent
Finishing
X X X X X
Page 37

Attribute Description Category
Job
Group
Document
Datapage
Page
weight of themedia.
MediaColor Device-depedentcolor of themedia.
Finishing
X X X X X
MediaType Device-dependenttype of themedia.
Finishing
X X X X X
Index Index/Count
X X X X
IndexInDocument Returns theAbsoluteindex of thenode within allthe nodeunder theparentDocument.
Index/Count
X X
IndexInGroup Returns theAbsoluteindex of thenode within allthe nodeunder theparent Group.
Index/Count
X X X
Page 38
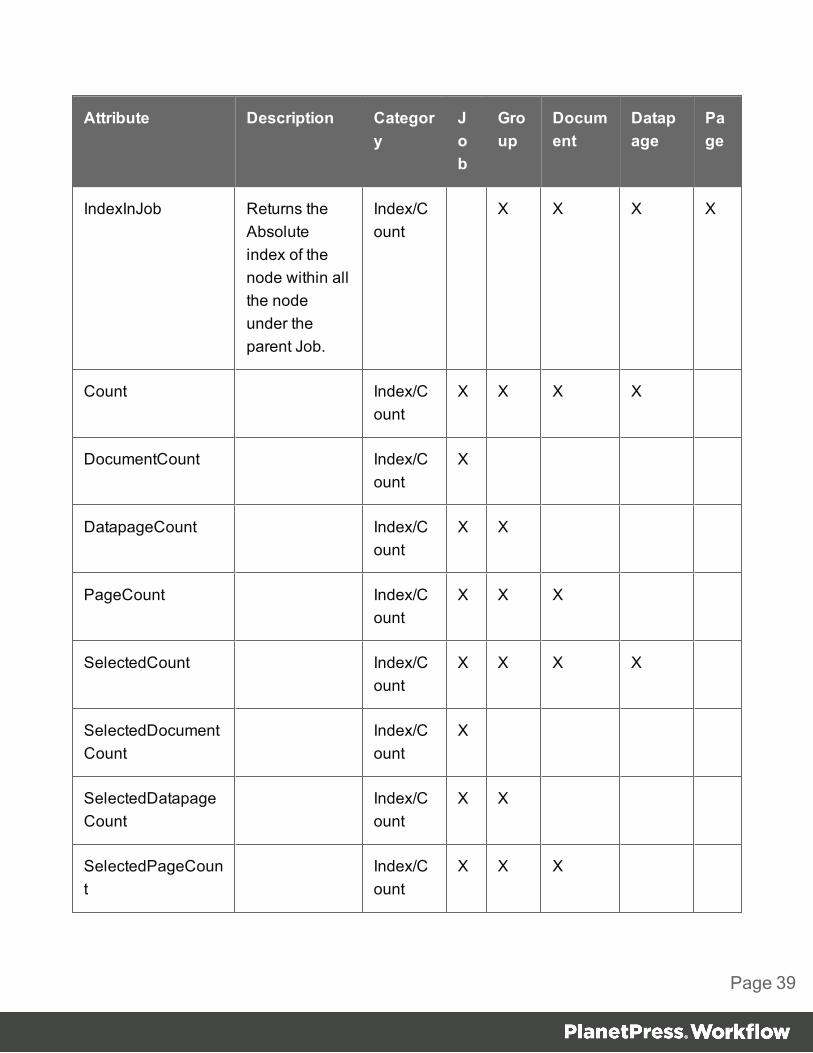
Attribute Description Category
Job
Group
Document
Datapage
Page
IndexInJob Returns theAbsoluteindex of thenode within allthe nodeunder theparent Job.
Index/Count
X X X X
Count Index/Count
X X X X
DocumentCount Index/Count
X
DatapageCount Index/Count
X X
PageCount Index/Count
X X X
SelectedCount Index/Count
X X X X
SelectedDocumentCount
Index/Count
X
SelectedDatapageCount
Index/Count
X X
SelectedPageCount
Index/Count
X X X
Page 39
Attribute Description Category
Job
Group
Document
Datapage
Page
SelectedIndexInDocument
Returns theAbsoluteindex of thenode within allthe selectednode underthe parentDocument.
Index/Count
X X
SelectedIndexInGroup
Returns theAbsoluteindex of thenode within allthe selectednode underthe parentGroup.
Index/Count
X X X
SelectedIndexInJob
Returns theAbsoluteindex of thenode within allthe selectednode underthe parent Job.
Index/Count
X X X X
NumCopies Indicates howmany timesthe job is setto execute, asset when
Index/Count
X
Page 40

Attribute Description Category
Job
Group
Document
Datapage
Page
printing usinga Windowsdriver.
Author Name of theuser whoprinted the jobinitially, asavailable inthe spool file,and as the firstjob info of theWindowscapture input.
Production
X
Metadata Tools
PlanetPress Workflow includes a complete set of metadata-related functionality, which can bereferred to as Metadata Tools. These tools can be used to generate metadata, retrieve or definemetadata elements, and build the metadata structure.
Metadata Tools
Using PlanetPress Design, one can:
l Generate metadata for any given sample datafile.l Graphically retrieve the value of a metadata attribute or field for use in any design object.l Define documents and groups using any condition.l Define custom metadata fields.l Manipulate Metadata with PlanetPress Talk commands.
Following is a description of the Metadata tools which allows to perform the above tasks:
Page 41

Metadata Generation using Data Capture with PlanetPress Printer
The Objectif Lune Printer Driver (PS) allows end-users to print directly to PlanetPress Designfrom any Windows application, by using the familiar File|Print option. At the other end,PlanetPress Design can capture the incoming stream and convert it internally into a PDF filealong with its metadata. By default, capturing a document input using a PlanetPress Printer willgenerate a PDF along with its metadata.
Metadata Generation and Refresh without using PlanetPressPrinter
It is possible to generate or refresh metadata for any given sample datafile by using the RefreshMetadata option available when right-clicking on the Metadata Fields folder found in theDocument Structure Window. For example, metadata can be generated this way for a LinePrinter sample datafile captured using an LPD Queue Input.
Metadata Selector
PlanetPress Workflow's Data Selector window is accessible by double clicking inside theSample Data window or by clicking on the Open Active Data button available in the ribbon. TheData Selector is equipped with a new tab labeled Metadata.
Firstly, two buttons at the top right corner of this tab allows to load or save a metadata filegenerated for the current sample datafile.
Secondly, the metadata tab graphically displays all elements (i.e. attributes and fields)available at the current level (i.e. Page, Datapage, Document, etc.). More importantly, theseelements are graphically selectable, like any other part of the sample datafile when using the'Select Data' option inside a Text object, for example.
Page 42

The Metadata Selector allows to view and select metadata elements.
Metadata in Document Properties
Page 43

Metadata tab in the properties of a PlanetPress Design document allows to easily definedocuments or groups.
Metadata Fields
Metadata Fields in the properties of a PlanetPress Design document allows to easily definedocuments or groups.
About DocumentsA Document is a file sent to PlanetPress Workflow by PlanetPress Design and is used toproduce an output when merged with data. A Document can be an invoice, a report, a receipt oranything else, but by itself it is empty and without any variable data.
Document are typically selected in Output Tasks, but can also appear in other tasks thatproduce formatted data such as the Digital Action task and the Add Document task.
Documents contain static data such as logos, addresses and graphic formatting, as well asplaceholders for data. Documents can also contain conditions and programming logic. Formore information about PlanetPress Design documents, please see the PlanetPress DesignUser Guide.
Page 44

Import DocumentsThis procedure describes how to import variable content documents created in PlanetPressDesign. Importing documents can be useful when transferring configurations betweenPlanetPress Workflow installations.
To import documents into PlanetPress Workflow:
1. Choose File | Import Documents. The Import PlanetPress Design Document dialogbox appears.
2. In the File type box, select the desired file type.3. Navigate to the document you want to import, select it and click Open.
The document is imported and displayed in the Configuration Components pane. Thisphysically installs the documents to the Documents folder relative to the install folder ofPlanetPress Workflow.
Import PrintShop Mail DocumentsThis procedure describes how to import variable content documents created in PrintShop Mail.Importing documents can be useful when transferring configurations between PlanetPressWorkflow installations.
To import documents into PlanetPress Workflow:
1. Click the PlanetPress Workflow button. The Import PrintShop Mail Document dialogbox appears.
2. Choose Import, then PrintShop Mail Documents.3. Navigate to the document you want to import, select it and click Open. The document is
imported and displayed in the Configuration Components pane. This physically installsthe documents to the Documents folder relative to the install folder of PlanetPressWorkflow.
Page 45

Debugging and Error HandlingThis chapter touches on two subjects that are intrinsically linked, though their use is different.Debugging is the act of running through your process, either step by step or as a whole, directlyfrom the PlanetPress Workflow Configuration Tool, in order to detect and resolve issues withyour process.
Error Handling, on the other hand, occurs when your configuration has been sent toPlanetPress Workflow services, and are running in "production" mode. On one hand themanual task is critical when creating a process, on the other the automated handling of errorswithin your processes will have a large impact on recovering from errors as they happen duringproduction.
About Error HandlingWhen your process is running, or during debugging, it may happen that the task that is currentlyrunning causes an error, and the task fails. For example, when trying to save to a folder thatdoes not exist, or printing to a printer that cannot be found.
When such an error occurs, in most cases you would want to be aware of it and to take certainactions in order to correct or report the error. This is where our error handling features come inhandy.
Most of the tasks, branches and conditions included in your process can have their own errorhandling behavior, with the exception of Comments, the Input Error bin task, and older legacytasks from previous versions of PlanetPress Workflow that did not have error handling.
By default, when an error occurs, the task is skipped and the unmodified job file is passed on tothe next task. You can overwrite this behavior by changing the options of the On Error tab ofthe task.
Using the On Error tabWhenever an error is triggered either during debugging or when a process runs in production,the settings specified in the On Error tab of the task that generated the error will be used todetermine a course of action.
Page 46

On Error Tab
The On Error tab is common to all tasks. Details can be found in the" Task Properties Dialog"on page 666.
By default, any action task, branch, splitter or condition that generates an error will simply beignored, and the task just under it (not within a branch) will be given control of the job filewithout any modification. Any initial input task that generates an error will stop the process fromrunning as a whole, and output tasks will not generate output. The On Error tab can be used tooverwrite the default behaviors.
l Send to Process: Check this option to send the job file to an error management process.l Error Process drop-down: Enabled only when the Send to Process option is checked.Lists any process of which the initial input task is the Input Error Bin task.
l Action Group: This group is disabled in the initial input tasks and defaults to StopProcess. In all other tasks where the On Error tab is present, the following options areavailable:
l Ignore: The task is ignored as if it did not exist, and the job file is passed on to thenext task in the process.
l Stop Branch: If the task is in a branch of the process, the branch is stopped and thejob file is returned to the process after the branch. The branch will not produce anyoutput.
l Stop Process: The process is stopped and no more processing is done. No furtheroutput is produced.
l Log Message: Check this option to enable logging a custom error message in thePlanetPress Suite Workflow Tools' log file.
l Message: Enabled only when the Log Message option is checked. Enter a message thatwill be logged in the PlanetPress Suite Workflow Tools' log file. You can use anyvariables available in PlanetPress Workflow to customize the message.
l Store the message in variable: Select in which jobinfo, local or global variable youwant to store the message content.
l ID: Enter an error ID. This ID will be visible in theWindows Event Viewer. However, theID is not visible in the PlanetPress Suite Workflow Tools' log file.
l Store the ID in variable: Select in which jobinfo, local or global variable you want tostore the error ID.
l Reset to defaults: Resets all options in this tab to their default values.
Page 47
If storing the message or ID, if they are store in a jobinfo they will be available in any errorhandling process where errors are being forwarded. In all cases, if your process continues afterthe error, the contents of the variables selected in this window will be available for the rest ofyour process, or whenever they are overwritten.
Common Errors
Though some error messages are specific to a task in particular, others may apply to any andall tasks because they are related more to the system than to PlanetPress itself. Someexamples would be W3813, W3830, W3991, W4005. These correspond to issues such as nothaving any space to write files, permission errors on folders or files, etc.
Creating and Using Error ProcessesAn Error Process is a special type of process that never runs on its own, and cannot be calledusing the GoSub or Send to Process tasks. It can only be used in the On Error tab of a task inyour process, and will be triggered if the Send to Process option is checked in that tab and anerror process is selected in the drop-down list.
To create an error process, simply replace the initial input task by the InputErrorBin input task,and that process automatically becomes able to handle error jobs sent to it. It is up to you,however, to decide how that error job will be handled.
For example, you could place the job file in a specific folder, then send an email to a supervisorindicating that a job has failed. Or you could update a database with an error status so that itappears on a customer's online order. You could also zip the order up and send it to anadministrator, while simultaneously advising the person that sent the job that it failed.
You can have as many error processes as you can normal processes - that is, you are limited to512 processes, subprocesses, startup processes and error processes combined.
The following information is available from within your information process when it is
triggered:
l Job Information variables (%1 to %9)l The data file as it was before starting the taskl Global variables (which are, of course, available anywhere)
Page 48
l A series of variables containing information about the error, the task that triggered it andthe process that contained it. See "Standard Variables" on page 537
Note
Local variables in the process are not sent to error processes, even if the error process has a variableof the same name.
Accessing the LogsIf your process is running live in PlanetPress Workflow service, you have two ways of seeingwhat is happening, now or in the past.
To view what processes are running and processing data as it happens:
1. In the PlanetPress Workflow Ribbon, click on the Tools tab, then select Service Consolein the Services group. The PlanetPress Workflow Service Console opens.
2. Click on the service you want to check, including:
l PlanetPress Workflowl LPD Serverl Telnet Capturel Serial Capturel HTTP/SOAP Serverl LPR Clientl FTP Clientl PlanetPress Imagel PlanetPress Faxl PlanetPress Messenger
3. When any job or file is processed by the selected service, the processing logs will bedisplayed in the window on the right.
Page 49
Note
The information that is displayed here is the same as in PlanetPress Workflow logs anddepends on the logging level that you set in the "General Plug-In Preferences" onpage 641.
To view logs for jobs that have already processed
By default, the logs are available in the following folder:
C:\Documents and Settings\All Users\Application Data\Objectif Lune\PlanetPress7\PlanetPress Watch\Log
You can access this folder more quickly by using this procedure:
1. From PlanetPress Workflow Configuration software, press CTRL+SHIFT+ALT+F4simultaneously. The PlanetPress Workflow working folders are opened.
2. Double-click on the folder called Log.3. There are multiple logs displayed here, including:
l ppwYYYYMMDD.log - PlanetPress Workflow logs, including the year, month andday of the log (from midnight to midnight).
l FTP, LPD, LPR, ??? (to be verified)
Note
The PlanetPress Image and PlanetPress Fax logs are available in different folders. FromtheWatch folder, go up one level then go in either folders, under which you will find theLog folder for that specific software within the suite.
Resubmit Backed Up Input Files to a ProcessEach input task includes an option that lets you back up input files. This options is not selectedby default, since it has the potential to generate a very large number of back up files. To turn onthe backup option of an input task, simply open its properties, go to the Other tab and check the
Page 50

Backup input files option, then type in a unique file name for the backup file (this should bevariable).
But if, for a given input task, you did select this option and something goes wrong and anoriginal input file is lost or corrupted, you will have the option to use the Resubmit Jobcommand to pull the backed up input file into the process.
Granted that you have back up copies of the files polled by an input task, you may resubmitthem as required. The PlanetPress Workflow Configuration gives you the option to resubmitthem as they were submitted originally (polled by the initial input task) or to submit them tothose tasks located on the index you select.
The numbers on the left indicate the task index, the folder capture being level 1 and the Textcondition being on level 4.
To resubmit backed up input data files:
1. In the PlanetPress Workflow Ribbon, go to the Tools tab then click Resubmit Job in theServices group. The File Resubmission dialog box is displayed.
2. From the Process box, select the process for which you want to resubmit the backed upinput files.
Page 51

3. From the Task index box, select the index level to which you want the data to be sent.The index is the position in the process where you want to submit the job file.
4. In the list of backed up input files, select the file you want to resubmit.5. Using the From page and To page boxes, select the data pages that you want to
resubmit. If you want to resubmit all the data pages from the selected input file, enter 0 inboth boxes.
6. Click Send to resubmit the data.7. To resubmit backed up input files for the same process or for a different one, repeat step 2
to step 6.8. To close the File Resubmission dialog box, click Close.
Warning
The From page and To page boxes are only useful for printer queue (or printercapture) inputs. They will not function for other types of inputs. In these cases, thecomplete backup job is submitted.
KnowingWhat to ResubmitWhen something goes wrong with an output job, a print job for instance, and printouts are lost,you usually need to know the following information in order to resubmit the input:
l The name of the job. This refers to the name used internally by PlanetPress Workflow.This name is generated by the input task using parameters defined within the task. Tosimplify file identification, you should consider using names that include both the name ofthe original input file (if any) plus some details such as the current date and time.
l The number of each failed page. If a job contains 1000 pages and if pages 1 to 950 wereprinted correctly, you need not resubmit the entire job, but only the 50 last pages.
But finding this information often poses a problem. A good way to find this information easily isto print it using small characters at the bottom of every page. To do this, you have to do thefollowing.
Page 52

In PlanetPress Design:
1. Use a Set Job Info action task and associate a variable with the job’s name.2. In the output task, make sure to select the option that adds the job information to the
document.
In PlanetPress Connect:
l Somewhere at the bottom of each document page, add a Data Selection object definedas a custom data selection that contains a reference to the job info variable sent fromPlanetPress Workflow and a current page marker.You can use, for example, =&watch.jobinfos[6] + '-'+intostr(¤t.datapage)'
Debugging your PlanetPress Workflow ProcessDebugging a process is separated in two parts. The first part is designing the process, which isto add the different tasks, branches and conditions to the process and configuring them. Thesecond step is testing whether or not the process and configuration actually work.
Before debugging begins, the following prerequisites must be completed:
l There must not be any Unknown Tasks in the process.l A sample data file must be selected. To choose a sample data file, click the Select buttonin the PlanetPress Workflow Ribbon's Debug tab and browse to a valid sample datafile. Alternatively, if a document present in the configuration contains the necessary datafile, it can be attached to the process easily. See Use Data and Metadata Files Attachedto Documents.
When debugging your process, it is important to keep in mind that:
l The Initial Input task is never executed. The sample data file is used instead of the initialrun. This is to prevent "live" data from being retrieved by the initial input task whiledebugging is being done. If, however, the initial task is critical to the process, it can beexecuted by copying the initial input task and pasting it as a secondary input task (the firstaction task to actually run in the process). Do not forget, however, to remove this duplicatetask before saving the configuration!
Page 53

l Since the initial input task is not performed, there is no actual job information to be addedat the beginning of a data file. Note that you can use the Object Inspector on yourprocess to enter sample job information as required.
l If any task makes an operation on the system (for example, capturing files, sending data,printing, etc), it is actually executed, not simulated.
l Any task is executed with the permissions of the user that is currently running thePlanetPress Workflow Configuration Tool. When running in service mode, the userconfigured in the Configure Services dialog is used instead and this may lead tounexpected behaviors. Please See "Workflow Services" on page 592 for more details.
Note
The sample job file should generally be the exact same format as the data that you willreceive when PlanetPress Workflow is processing the job at run-time. For moreinformation on how to capture your sample data file properly, please refer to thePlanetPress Trigger and Data Capture Guide.
Debugging can be run in different ways:
l From the Debug tab, click on Step. This executes only the first task in the process andwaits for further action.
l From the Debug tab, click on Run. This executes the complete process, step by step,until it is completed.
l Right-click on any task in the process and click Run from Here or Step from Here.These actions are the same as using the debug Step and Run buttons, but will executethe process only starting from that task forward.
While stepping through a process (using Step, not Run):
l Double-click on any task to change its properties. If you change the properties of a taskbefore you step through it, those new properties will be used when the task is executed.Note that you cannot modify the process itself while in debug mode (you cannot add,delete or move tasks, change branches and conditions, etc).
l Click on Skip to ignore the next task or branch and go to the next one. The job file is notmodified in any way.
Page 54

l Click on View as Text in the Data group of the Debug tab to view the current job fileusing a text editor (Notepad by default).
l Click on View as PDF to view the current job file in Adobe Acrobat if it is present (this willwork only for PDF job files).
l Click on View Metadata to open the data selector and see the current state of theprocess' Metadata.
l Click on View as Hex to view the current job file in the internal Hex editor.l Click on the Stop button to stop the debugging process. If you use Run, Step or Skipafter stopping the process, debugging starts over from the top.
l Use the Set Breakpoint button to tag the currently selected task, branch or condition as abreakpoint. When you click Run in your process, the process will execute every task untilit reaches a breakpoint and will stop just before the task that is set as a breakpoint.
l Use the Ignore button to disable the task, branch or condition that is currently selected. Ifyou disable a branch or condition, all tasks inside that branch or condition are ignoredincluding the output. Note that if you set a task, branch or condition to be ignored, it willalso be ignored at run-time, providing you sent the configuration to the service.
l Look at the Messages Area pane to see any message generated by the tasks that run(See " The Message Area Pane" on page 617).
l Use the Debug Information pane to see the current value of any variable in your processor globally, or to evaluate custom expression. See "The Debug Information Pane" onpage 616.
Debugging and Emulation changes
One of the most useful case where debugging is crucial is whenever the job file is converted toanother type of emulation, or if a new data file of a different emulation is used within theprocess. For example, if a process starts with a Line Printer data file and the converts it into aPDF, it is not possible to do any data selection on the PDF because the Line Printer emulationis active by default. The debugging features can easily resolve this limitation.
The first method is used if your process has all the required tasks, but data selections after anemulation change are necessary.
l Step through the process until you have reached the point after the emulation or datachange.
l Any data selection used in task properties after this point will use the new emulation.l Continue stepping through each task until the end of the process to debug it.
Page 55
This method does not allow you to add, remove or move tasks, however. The second methodcan be used when that is required.
l Step through the process in debug mode until you reach the emulation or data change.l Click on View as Text (or View as PDF if your data is PDF at this point) in the Data groupof the Debug tab.
l In the viewer that appears, save the file to a location on your hard drive.l Stop the process, and select the file you saved as your process' data file.l If you need to continue debugging your process after the emulation change, you can stilldo it by using Skip on all the tasks until the emulation change, inclusively. Then use Stepor Run to continue debugging.
Lastly, PlanetPress Workflow 7.4 and higher also has a new option that can be used inconjunction with the previous to avoid skipping through large processes:
l Step through the process until the emulation or data change, as in the first method.l Save the data file locally and then select it as your sample data file, as with the secondmethod.
l Instead of skipping through each task, use the Run from here or Step from here options,either from the Debug tab or by right-clicking on the task where you want to start theprocess.
Once you have created and fully debugged all your processes, you will be ready to send it toPlanetPress Workflow service. See "Saving and Sending" on page 546.
The Plug-in BarPlanetPress Workflow offer a constantly increasing number of plugins, while always allowingthird party plug-ins to be installed and set up to be used by PlanetPress Workflow. ThePlanetPress Workflow Plug-in Bar lists the available plugin in any of PlanetPress Workflow,and is divided into categories, which users can customize at will.
A "Plug-In" is normally something that is added to a software and, while most of thePlanetPress Plug-ins are installed by default, some may be added so the term is correct.However, because the plug-ins are always expected to execute some sort of task, they arealways referred to, in this documentation, as "tasks", except in the specific case of importing anew plug-in or customizing the Plug-in bar.
Page 56

Categories
The default categories lists plug-ins according to what type of task each achieve. Therefore,when first starting your PlanetPress Workflow Configuration program, the following categoriesare used:
l Inputsl Actionsl Outputsl Data splittersl Metadata Relatedl Process logicl Connectors
Note
An Uncategorized category is dynamically created if your PlanetPress Workflow finds any plug-inthat would not be part of the existing Plug-in bar. User-defined plug-ins and third party applicationplug-ins falls into such a category.
Settings & CustomizationThe Plug-in bar can be customized according to your needs and the plug-ins you mostfrequently used.
You can use the horizontal dark blue bar separating the plug-in area and the list of categoriesto change how many plug-in categories are displayed as the full-width bar with the title, andhow much are displayed as the icon only. Move the bar up to display more full-width categories,down to display them more as icons.
Furthermore, the Plug-in bar can be customized using the Popup indicator control ( ).Customizing the Plug-in bar is mostly for third party or legacy plug-ins.
Page 57
Using the contextual menu displayed by the pop-up indicator, you can:
l Insert, delete and rename custom categories.l Move categories up or down.l Import third party or legacy plug-ins.l Move plug-ins from one custom category to another (that you cannot move default plug-ins from the default categories, you can only copy them)
l Copy plug-ins from one custom category to another by holding the CTRL key.l Delete plug-ins from any custom category by using the Delete key.l Revert to default Plug-in bar by selecting Reset to default.
To import a plugin:
1. Click on the Popup control ( )
2. Click on Import Plugin3. Browse to the location of the plugin DLL file4. Click on Open.5. New plugins appear in the Uncategorized category.
About PrintingTo print a document using PlanetPress Workflow, you can either use the Print using a WindowsDriver output task, or use a combination of a printer queue and a Printer Queue output task.These tasks are created and defined using PlanetPress Workflow Configuration program.
The following types of printer outputs are available in PlanetPress Workflow Configurationprogram:
l Local printing:l Windows output queues let you send jobs to a local printer. See "Windows OutputPrinter Queue" on page 62.
l Send to Folder output queues let you save jobs to a local or network folder fromwhich they can be picked up and printed. See "Send to Folder Printer Queue" onpage 66.
Page 58

l Remote printing:l FTP output queues let you upload jobs to an FTP site from which they can bepicked up and printed. See "FTP Output Printer Queue" on page 65.
l LPR output queues let you send print jobs to remote printers via TCP/IP using theLPR/LPD protocol. See "LPR Output Printer Queue" on page 63.
l Windows Driver Printing:l The Print using a Windows Driver output task lets you send a job to any printerinstalled on the computer, using its own drivers. In this particular case, the printerdoes not need to be a PostScript printer. See "Print Using a Windows Driver" onpage 521.
PlanetPress Workflow provides you with three main printing scenarios:
l Send output data to be printed as is: PlanetPress Workflow sends a file containing onlythe data to the selected queue.
l Send output data to be merged with a document on the printer: PlanetPressWorkflow sends one of two things:
l A file that contains only the data to the selected printer queue. The document withwhich the data must be merged must be present on the printer’s hard disk,otherwise printing will fail.
l A file that contains the data and the document to the selected printer queue. Sincethe data and the document with which it must be merged are both sent to the printer,printing should never fail.
l In both cases, the document+data merging process takes place inside the printer.
l Send output data already merged with a document: PlanetPress Workflow sends a filethat contains the document already merged with the data to the selected printer queue.The document+data merging process therefore never takes place inside the printer.
Technical
In PlanetPress Workflow Configuration, you may associate a single Printer Queueoutput task with multiple Printer Queues. If you do so, you have the option of using loadbalancing or not (See "Load Balancing" on page 68).
Page 59

PlanetPress Workflow Printer QueuesThe printer queues displayed in the Configuration Components pane of the PlanetPressWorkflow Configuration program are not to be confused with Windows printer queues. Whenyou start building a PlanetPress Workflow configuration it contains no printer queues so youhave to create queues and set each one’s properties.
The PlanetPress Workflow Configuration program lets you create four types of printer queues:
l Windows Output printer queues are used to send print jobs to local or network printers.See "Windows Output Printer Queue" on page 62.
l LPR Output printer queues are used to send print jobs to printers via the LPR/LPDprotocol. See "LPR Output Printer Queue" on page 63.
l FTP Output printer queues are typically used to send print jobs to FTP sites. See "FTPOutput Printer Queue" on page 65.
l Send to Folder printer queues are typically used to send print jobs to local or networkfolders. See "Send to Folder Printer Queue" on page 66.
The properties associated with each queue will differ depending on the queue type. In the caseof an FTP Output printer queue, for example, the properties include the IP address of the FTPserver. In the case of a Windows Output printer queue, on the other hand, you will find the nameof a local or shared Windows printer queue.
To send print jobs to any of those PlanetPress Workflow printer queues, you must use a PrinterQueue output task. Note that with a single task, you can send print jobs to multiple printerqueues, regardless queue types.
Shared Printer Queue PropertiesA printer queue’s advanced properties includes the printer’s speed and any special pre- orpost-job commands required for printer specific reasons. Pre-job commands are added rightbefore the data in the data file, while post-job commands are placed at the end of the data file.
Page 60

Properties
Advanced tab
l Print speed: Enter the speed, in pages per minute (PPM), of the printer associated withthe printer queue. This value is used to determine how to divide jobs when you use theQueue Balancing option for load balancing.
l Commands: The list of available commands appears in this box. Select either Pre-jobcommands or Post-job commands in the Selected box, and double-click a commandfrom this list to add it to the appropriate list.
l Selected: Select either Pre-job commands or Post-job commands to add newcommands to the appropriate list and to see those commands that have already selected.Double-click a command to remove it from the selected list.
l Add: Click to add a new command to the list displayed in the Commands box. You mustthen edit the new command’s description and value. Note that new commands are sharedby all printer queues.
l Delete: Click to remove a command from the Commands box.l Command description: Use this box to edit the description of the command currentlyselected in the Commands box.
l Command value: Use this box to edit the code of the command currently selected in theCommands box. Use the right-click menu for a list of standard printer control characters.
Frequently Used Printer Control Characters
Character name: Charactercode:
Typical use in printing context:
End-Of-Job \004 Indicates the end of a print job
Backspace \b Moves a character space backwards
Horizontal Tab \t Adds a horizontal tab
Line Feed \012 Moves to the next line
Form Feed \f Moves to the next page
Page 61

Character name: Charactercode:
Typical use in printing context:
Carriage Return \r Moves to the beginning of the current line
DOS End-Of-File \032 Indicates the end of a print job in a DOSenvironment
Escape \033 Adds an escape character
New Line(CRLF)
\n Goes to a new line
Windows Output Printer QueueWindows output printer queues send print jobs to local or network printer queues set up in theWindows session in which PlanetPress Workflow is running. The corresponding Windowsprinter driver is used in the printing process.
This type of printer queue does not support the transparency and duo-tone features, so youshould not use it with PlanetPress Design documents that use those features.
Properties
General tab
l Printer queue: Select the Windows printer queue to which you want to send print jobs.
l Job name: Enter the job’s file name. By default, the variable %f (Job File Name) is used.You may use a different variable, but you may not use a data selection. This informationmay be used for the printer’s banner page.
l Job owner name: Enter the job owner name. You may use a PlanetPress Workflowvariable. The field is empty by default, which is equivalent to use the default print jobowner name, i.e. the current logged in user name.
Page 62

Advanced tab
l Print speed: Enter the speed, in pages per minute (PPM), of the printer associated withthe printer queue. This value is used to determine how to divide jobs when you use theQueue Balancing option for load balancing.
l Commands: The list of available commands appears in this box. Select either Pre-jobcommands or Post-job commands in the Selected box, and double-click a commandfrom this list to add it to the appropriate list.
l Selected: Select either Pre-job commands or Post-job commands to add newcommands to the appropriate list and to see those commands that have already selected.Double-click a command to remove it from the selected list.
l Add: Click to add a new command to the list displayed in the Commands box. You mustthen edit the new command’s description and value. Note that new commands are sharedby all printer queues.
l Delete: Click to remove a command from the Commands box.l Command description: Use this box to edit the description of the command currentlyselected in the Commands box.
l Command value: Use this box to edit the code of the command currently selected in theCommands box. Use the right-click menu for a list of standard printer control characters.
LPR Output Printer QueueLPR output printer queues send print jobs to LPD-compatible printers using the LPD/LPRprotocol. Note that most of the settings associated with LPR output are configured via thePlanetPress Workflow user options (See "LPR Output User Options" on page 656).
Properties
General tab
l Printer address: Enter the IP address or host name of the printer receiving LPR jobs.
l Queue name: Enter the printer queue name. Based on printer and network requirements,this property may not be required.
l Data type: Select the proper data type. Select (l) Binary data if the job file is a standardbinary file. Select (f) Formatted text to interpret the first character of each line of text as astandard FORTRAN carriage control character. Select (d) DVI file if the job file contains
Page 63

data in the TeX DVI format. Select (o) PostScript file if the job file is a PostScript file.Select (n) Ditroff format if the job file contains data in device independent troff. Select (t)Troff format if the job file contains data in troff. Select (v) Sun raster file if the job filecontains raster images. This ensures that the printer uses the correct filter to interpret thedata.
l Job name: Enter the job’s file name. By default, the variable %f (Job File Name) is used.You may use a different variable, but you may not use a data selection. This informationmay be used for the printer’s banner page.
l Job owner name: Enter the job owner name. You may use a PlanetPress Workflowvariable.
Advanced tab
l Print speed: Enter the speed, in pages per minute (PPM), of the printer associated withthe printer queue. This value is used to determine how to divide jobs when you use theQueue Balancing option for load balancing.
l Commands: The list of available commands appears in this box. Select either Pre-jobcommands or Post-job commands in the Selected box, and double-click a commandfrom this list to add it to the appropriate list.
l Selected: Select either Pre-job commands or Post-job commands to add newcommands to the appropriate list and to see those commands that have already selected.Double-click a command to remove it from the selected list.
l Add: Click to add a new command to the list displayed in the Commands box. You mustthen edit the new command’s description and value. Note that new commands are sharedby all printer queues.
l Delete: Click to remove a command from the Commands box.l Command description: Use this box to edit the description of the command currentlyselected in the Commands box.
l Command value: Use this box to edit the code of the command currently selected in theCommands box. Use the right-click menu for a list of standard printer control characters.
Note
If you plan to use an LPR output printer queue to send PlanetPress Design documents generatedusing the Optimized PostScript Stream option, you should not enter data selections in the Printer
Page 64
address and Queue name variable property boxes. If you do need to use information stored in thedata to configure the LPR output printer queue, you should first use Job info variables to store theinformation, and then use these variables in the Printer address and Queue name variable propertyboxes.
FTP Output Printer QueueUnlike FTP output tasks, which are typically used to send data files to FTP sites, FTP outputprinter queues are mostly used to send print jobs to FTP sites.
FTP output printer queue properties are as follows:
General tab
l FTP Server: Enter the IP address or host name of the FTP server.
l User name: Enter an FTP server user name.
l Password: Enter a password associated with the FTP server user name entered above.
l Use FTP Client default port number: Forces the FTP connection on port 21, the defaultFTP port.
l FTP Port: Enter the FTP port to use. This option is disabled if Use FTP Client default portnumber is checked. The port should always correspond with the server's port number.
l Directory: Enter the directory to which the print jobs are to be uploaded. If you leave thisbox empty, the job files are sent to the root directory of the FTP server.
l File name: Enter the name under which the print jobs will be saved. Consider using adynamic name, since if you use a static name every new file will overwrite the previousone.
l Connection mode groupl Active: Select to prompt the ftp client to use the active mode when sending files tothe FTP server.
l Passive: Select to prompt the ftp client to use the passive mode when sending filesto the FTP server.
Page 65

Advanced tab
l Print speed: Enter the speed, in pages per minute (PPM), of the printer associated withthe printer queue. This value is used to determine how to divide jobs when you use theQueue Balancing option for load balancing.
l Commands: The list of available commands appears in this box. Select either Pre-jobcommands or Post-job commands in the Selected box, and double-click a commandfrom this list to add it to the appropriate list.
l Selected: Select either Pre-job commands or Post-job commands to add newcommands to the appropriate list and to see those commands that have already selected.Double-click a command to remove it from the selected list.
l Add: Click to add a new command to the list displayed in the Commands box. You mustthen edit the new command’s description and value. Note that new commands are sharedby all printer queues.
l Delete: Click to remove a command from the Commands box.l Command description: Use this box to edit the description of the command currentlyselected in the Commands box.
l Command value: Use this box to edit the code of the command currently selected in theCommands box. Use the right-click menu for a list of standard printer control characters.
Send to Folder Printer QueueUnlike Send to Folder output tasks, which are typically used to send data files to local ornetwork folders, Send to Folder output printer queues are mostly used to send print jobs. Thefiles generated will always be PostScript files.
Properties
General tab
l Folder: Enter the path of the folder to which the print jobs are to be saved.l File name: Enter the name of the print jobs sent to this queue. To prevent each new filefrom overwriting the previous one, you should use variable names. This variable propertybox lets you use a combination of text, variables and data selections.
Page 66

l Concatenate files: If this option is selected, when PlanetPress Workflow tries to save theprint job under an existing name, it appends the content of the new print job file to that ofthe existing file, instead of overwriting it.
l Separator string: This option is used to add a separator string between the content ofeach file when the Concatenate files option is selected.
Advanced tab
l Print speed: Enter the speed, in pages per minute (PPM), of the printer associated withthe printer queue. This value is used to determine how to divide jobs when you use theQueue Balancing option for load balancing.
l Commands: The list of available commands appears in this box. Select either Pre-jobcommands or Post-job commands in the Selected box, and double-click a commandfrom this list to add it to the appropriate list.
l Selected: Select either Pre-job commands or Post-job commands to add newcommands to the appropriate list and to see those commands that have already selected.Double-click a command to remove it from the selected list.
l Add: Click to add a new command to the list displayed in the Commands box. You mustthen edit the new command’s description and value. Note that new commands are sharedby all printer queues.
l Delete: Click to remove a command from the Commands box.l Command description: Use this box to edit the description of the command currentlyselected in the Commands box.
l Command value: Use this box to edit the code of the command currently selected in theCommands box. Use the right-click menu for a list of standard printer control characters.
TriggersIn PlanetPress Workflow, a trigger is typically a two line piece of PostScript code placed justbefore the data. Triggers tell the printer to turn on PostScript mode and specify which documentshould be used in the merging process (PlanetPress Design document+data).
Triggers are used in two situations:
l When the server running PlanetPress Workflow sends a PlanetPress Design documentalong with the data to the printer, it adds a trigger before the document
Page 67

(trigger+document+data).l When the server running PlanetPress Workflow only sends the data to the printer,because the document is already present on the printer, it adds a trigger before the data(trigger+data).
PlanetPress Workflow adds the trigger code automatically, but you may want to use customtriggers. You would do this, for example, to use special printer functions. For more on customtriggers, see the Data Capture and Trigger Implementation Guide as well as the PlanetPressDesign User Guide.
Load BalancingPlanetPress Workflow offers various load balancing options to distribute the printing load andto make the process faster and more efficient. Print jobs may, for example, be split equallyamong several printers, or they may be split according to each printer’s capacity and speed.
Load balancing can only be used for jobs sent to Printer Queue output tasks and it onlyapplies when multiple queues are selected.
In the General tab of the Printer Queue Output Properties dialog box, you may select multipleprinters, and in the Advanced tab, you can set the load balancing options for the selectedprinters.
Objectif Lune Printer Driver (PS)Introduction
The Objectif Lune Printer Driver (PS) allows end-users to print directly to PlanetPress Workflowfrom any Windows application, by using the familiar File|Print option. At the other end,PlanetPress Workflow specifically can capture the incoming stream and convert it internally intoa PDF file along with its metadata.
Although it is available with every PlanetPress Workflow, this feature becomes even moreuseful in environments where the Document Input emulation is available (with PlanetPressWorkflow).
Page 68
Install a Objectif Lune Printer Driver (PS)
The Objectif Lune Printer Driver (PS) is automatically installed during the PlanetPressWorkflow setup, along with a default Windows Printer Queue called PlanetPress Printer.
Install a Windows Printer Queue using the Objectif Lune Printer Driver (PS)
A Windows Printer Queue using the Objectif Lune Printer Driver (PS) can be installed fromPlanetPress Workflow WinQueue Input plugin properties.
Creating a new Windows printer queue from any PlanetPress Workflow:
1. Start your PlanetPress Workflow Configuration program.2. Insert a WinQueue Input plugin.3. In the WinQueue Input plugin properties, click New.4. Enter a Name for the printer queue.5. Click OK.
Every new Windows printer queue using the Objectif Lune Printer Driver (PS) is shared bydefault. Once such a shared queue is created, end-users can install it on their own computer bygoing through the same steps they would when installing a new remote printer in theirOperating System. By default, connecting to a shared printer will automatically result in theObjectif Lune Printer Driver being downloaded to the connecting host.
Printer Properties setup
PlanetPress WorkflowWinQueue Input task can be configured to set a Windows printer queueusing Objectif Lune Printer Driver (PS) to produce one of 3 different types of data files: EMF,PostScript, or PDF. Note that PlanetPress Workflow can only produce EMF or PostScript files.
Possible printer properties settings, along with the data file type it will produce:
Spool Print Jobs in EMF Format:
l This will create an EMF data file.l This format is usually reserved for use with the Windows Print Converter action plugin.l This format can be obtained using PlanetPress Workflow.
Spool Print Jobs in RAW Format:
Page 69

l This will create a PostScript data file when the option Create Composed DocumentStream (with Medatada) is unchecked.
l This format can be obtained using PlanetPress Workflow.
l This will create a PDF data file when the option Create Composed Document Stream(with Medatada) is checked.
l This format can be obtained using PlanetPress Workflow.
By default, the Create Composed Document Stream option is:
l Checked if the incoming stream has been produced with the Objectif Lune Printer Driver.l Unchecked if the incoming stream comes from some other PostScript Driver.l Grayed out and unchecked if the incoming stream is not PostScript.
Data Capture from PlanetPress Workflow
Once a shared Windows printer queue using Objectif Lune Printer Driver (PS) is installed onboth the server and the client sides, data capture can be achieved the same way as with anyother Windows printer queues.
1. Open your PlanetPress Workflow Configuration program.2. Insert a new process.3. Select WinQueue Input from the Plugin Bar and insert it in the new process.4. In the WinQueue Input properties, select a Windows print queue using the Objectif Lune
Printer Driver (PS) from the drop-down list.5. Click OK.6. Send the configuration and start your PlanetPress Workflow service.7. Start the windows application from which you want to capture data.8. Open your selected document.9. Click File | Print.10. Choose the same Windows print queue as in step 4.
Note
Steps 6-8 can be performed at any time, even if PlanetPress Workflow is not yet started. This isbecause every Windows printer queue using Objectif Lune Printer Driver (PS) is paused by default.
Page 70

Once the service has started, it captures every queued job.
PDF Creation Parameters
PDF files retrieved from a Windows print queue using Objectif Lune Printer Driver (PS)
have the following properties:
l PDF 1.4l Optimized PDF (subject to change)l No down-sampling of images
These settings are pre-configured and cannot be changed by the user.
About Metadata
Metadata files are files containing information on the job itself rather than containing the job perse. A job sent to the Objectif Lune Printer Driver (PS) creates its own metadata, allowing usersto retrieve relevant information, such as, for instance, the time and date the print request wassent. For more on this, see the Metadata documentation pages.
About Processes and SubprocessesProcessesA process is a single workflow within the configuration. A process begins with a single inputtask, contains one or more tasks and/or branches, and terminates with one or more outputtasks. In its simplest form, a process can simply retrieve data from a given folder and save it in adifferent folder. In most cases, though, processes are more elaborate and configurations, whichmay include many processes, can be extremely complex.
The available processes in your PlanetPress Workflow Configuration are listed in the "TheConfiguration Components Pane" on page 564. Processes in a configuration will always runconcurrently. You can schedule processes to run only at certain times or intervals (see "Process Properties" on page 594).
There are three types of processes available to you:
Page 71

l A Normal process will run as soon as an input file is available through its input task or, ifit is scheduled not to run at that time, will start processing as soon as the schedulepermits it.
l Startup processes are processes that run only once before every other process in agiven configuration. They can be used to perform operations that need to be completedonce before the configuration can actually be run, such as to map network drives. Youmay only have one single startup process in your configuration.
l Subprocesses are processes which can be called by any other process from any actiontask. They can be used to perform and reuse redundant operations that may need to beexecuted numerous times.
Regular and startup processes can be set to be Active (process runs normally) or Inactive(process will not run at all). An inactive process will display in the Configuration components asred and strike-through. Inactive processes can be useful for designing new processes in a liveconfiguration, since the process does not execute there is no danger is submitting it to aPlanetPress Workflow Service.
SubprocessesSubprocesses are special processes that can be called by any other process. These actexactly as subroutines in programming languages, allowing users to reuse existing processesby sharing them to the whole configuration file. They can thus be used to perform redundantoperations that may need to be executed numerous times; for instance, archiving a copy of azipped file received as the input job file, then decompressing it before sending the unzippedversion of it back to the calling process .
Whenever a process calls a subprocess, the main process (the caller) will wait for the calledsubprocess to finish its execution before carrying on with its own. This means the subprocessfeature is synchronous with the main process. This also means the calling process actuallyappends the subprocess to its own workflow.
Process PropertiesTo have access to the properties of a process or subprocess:
l Right-Click on the Process in the Configuration Components Area.l Select Properties.
You can also double-click on the process to show its options.
Page 72
Note
Subprocesses do not have the "General Tab" which is only used for scheduling, but theydo have the Information Tab.
Options
General tab
l Active: Select to make the process active. Clear to prevent this process from runningwhen you send the configuration to PlanetPress Workflow.
l Startup process: Select to make this process a startup process.l Self-Replicating Process: Check this if you want the process to replicate itself in thebackground when multiple input files are received simultaneously. When this is checked,the input task polls its source once, determines the number of files to process, thenreplicates itself up to the maximum allowed and treats the files simultaneously. The initialprocess runs again once it has completed itself and replicates again as necessary, untilall files have been processed.
l Max percentage of threading (%): Determines how many processes you may haverunning at the same time. This is a percentage of the maximum number of threadsspecified in the "Messenger Plug-In Preferences" on page 642. For example if themaximum number of thread is 10 and you specify 50% here, a maximum of 5 replicationswill occur (the original process + 4 copies).
l As soon as possible: Select to have the process run continuously. Clear to enable theTime Grid to fine-tune the schedule of the process.
l Day(s) to keep backup: Indicate the number of days to keep backups of jobs processedby input tasks. Note that backups will only be kept for those input tasks that have theKeep backup file option selected and that they are required to resubmit input files.
l Polling interval: Enter the frequency (in seconds) at which the process should verify ifthere are new jobs to process. The polling interval also applies to scheduled tasks thatonly run on certain times. For example, if your process polls every 30 seconds on a taskthat's only scheduled to run one hour per week, it will capture the input 120 times duringthat period. Note that the polling interval is ignored when multiple files are present in theinput and will be used only when there are no longer any files to process.
l Month: Select the month of the year when the process should be run or select All monthsto have the process run all year long. This option is disabled when "As soon aspossible" is checked.
Page 73

l Week of month / by date: Select the desired option for the time grid. Note that anyselection you make in this box will be interpreted based on the selection made in theMonth box. If you chose All months in the Month box and Last in the Week of month / bydate box, then the process will run on the last week of every month. If you chose Januaryin the Month box and First in the Week of month / by date box, then the process will runonly on the first week of January.
l Select Date to display dates on the grid’s top ruler.l Select any of the other options to display days on the top ruler.l Select All weeks to have the process run every week.l Select First, Second, Third or Fourth to have the process run on the first, second,third or fourth week.
l Select Last to have the process run only on the last week.
l Time division: Select the duration of each daily segment in the time grid. If you select00:15, each segment will represent only 15 minutes and each day will be made up of 96blocks (4 blocks per hour times 24 hours). If you select 24:00, each segment willrepresent an entire day.
l Poll once per activity period: Select to perform this process’ initial input task no morethan once for each set of contiguous blocks (blocks that are on the top of one another).Choosing this option overrides the polling interval option. By default since the Time Gridblocks are divided by hours, this option will make your polling happen once every hour.
The Time Grid
The PlanetPress Workflow Process Options dialog box includes a time grid that lets you setexactly when you want a process to run. The grid is composed of blocks that represent timeperiods on a given day. To activate the Time Grid, the "As soon as possible" option must beunchecked.
In the Time Grid, a blue block will indicate that the process is active within that time block.While blocks mean the process will not be active.
Page 74

l Click on any block to select / deselect it.l Click and drag from one block to another to toggle all blocks between the two.l Shift-click on any block to toggle all blocks from the top-left corner of the grid to the blockyou click.
Page 75

l To select all of the time segments for a given day or date, click the day or date on the topgrid ruler. To deselect all of the time segments for a given day or date, CTRL+click theday or date on the top grid ruler.
l To select all the days or dates for a given time segment, click the time segment on the leftgrid ruler. To deselect all the days or dates for a given time segment, CTRL+click the timesegment on the left grid ruler.
l To select the entire grid, use the Select All button located below the grid. To deselect theentire grid, use the Clear All button located below the grid.
Note
"Toggle" means turn on when it's off and vice-versa, when selecting multiple blocks inone command. This means if you select a certain number of blocks in the Time Grid andthen use the shift+click or drag method, blocks that are on will turn off.
Technical
Changes made to the system time can have adverse effects on the processes managedby PlanetPress Workflow. When changing from daylight saving time to standard time, forexample, if PlanetPress Workflow starts a given process at 2:00 AM, and if the systemtime is then taken back to 1:00AM, the application will start a new instance of the sameprocess when the system time reaches 2:00 AM for a second time. So, when youmanually change the system time, be aware that it may have an effect on PlanetPressWorkflow and its processes. And for those cases when you know the system time willchange automatically, you may consider creating special schedules.
Information Tab
The Information tab lets you enter information that is not critical to your process but may helpothers (or yourself in the future) to understand what the process does. It offers two boxes:
l Description: A one-line box to give a title or short description to your process.l Comments: A multi-line box to give more detailed information, for example the file formatexpected, explanation of the system in general.
Page 76
Activate or Deactivate a ProcessAll processes are Active by default, but you may make any PlanetPress Workflow processInactive as required. Because making a process active or inactive is a change in theconfiguration, to make the change effective you will have to send the edited configuration toyour PlanetPress Workflow service (See "Send your Configuration" on page 11).
To activate or deactivate a process:
1. Right-click the process in question in the Configuration Components pane2. Click Active to disable or enable the process.3. Send your configuration.
Note
If you try to send a configuration that contains only inactive processes, the PlanetPressWorkflow Configuration program will ask you to confirm the operation (this can bechanged in the Notification User Options).
Convert a Branch to a SubprocessTo allow for maximum flexibility and backward compatibility with the subprocess feature, theConvert to subprocess option lets users transform existing processes easily. This option isavailable whenever a Branch task is selected; right-clicking on it will display the contextualmenu, which holds the Convert to subprocess option.
Selecting this option automatically creates a new subprocess, takes the branch and all of itschildren tasks and inserts it in the new subprocess, including the branch task itself. In the mainprocess, the branch is removed and replaced with a GoSub action task referring to the newlycreated subprocess.
Note
The Branch tasks options Backup job file, Backup job information and Backup emulation, arealso automatically passed to the subprocess, which means that, if the subprocess needs to use adifferent emulation than the calling process, a Change Emulation task is required.
Page 77
If any task converted into a subprocess was previously using local variables, these variablesmust be removed or transferred to global variables or job information to be usable in the newlycreated subprocess.
Import Processes from Another Configuration FileYou can import individual processes or groups of processes from a PlanetPress Workflowconfiguration file without having to import the contents of the entire configuration file.PlanetPress Workflow Configuration imports everything necessary to run the processes,including configured tasks and configuration components.
To import components from another configuration file:
1. From the PlanetPress Workflow Button, choose Import | Configuration Components.The Import dialog appears.
2. Navigate to the PlanetPress Workflow configuration file containing the processes orgroups of processes you want to import.
3. Select the file, then click Open. The Import Configuration dialog appears displaying allthe processes and/or process groups, as well as the Subprocesses, Global Variables,PlanetPress Design documents and Printer Queues in the selected configuration file.
4. In the list, select the components you want to import. The PlanetPress WorkflowConfiguration program lets you open and import any of the following:
l Complete PlanetPress Watch 4 to 6 configurations, as well as PlanetPressWorkflow 7 configurations.
l Specific processes from Version 6 and 7 configurations, including their localvariables.
l Specific subprocesses from any PlanetPress Workflow 7 Tools configurations.l Specific global variables from PlanetPress Workflow 7 Tools configurations.l Specific PlanetPress or PrintShop Mail documents.l Specific Printer Queues.
5. Check "Overwrite existing components with same name" if you want processes withexisting names to be overwritten by those in the imported configuration, or uncheck it toduplicate those processes under a new dynamic name.
6. Click OK to start the import.PlanetPress Workflow Configuration imports the selected objects and automaticallyrenames duplicate items in the imported configuration. If the current and imported
Page 78
configurations both include a startup process, the one in the imported configuration willbecome a standard process.
Important considerations
l When importing a PlanetPress Workflow configuration file, your PlanetPress Design andPrintShop Mail document are not physically imported as they are not part of theconfiguration file itself. In order for the documents to be available, you will need to sendeach document from PlanetPress Design and PrintShop Mail (see their respectivedocumentation for details).
l If you import a PlanetPress Workflow configuration that contains a PlanetPress Faxoutput task, you must update the task’s properties and refresh the host name. Otherwise,when PlanetPress Workflow will attempt to output the file, an error will be generated.
Toggle the Run on Desktop PropertySince PlanetPress Workflow configurations are typically meant to run without user interaction,all of their processes are set to run in the background by default. In some cases, such as whena dialog box must appear or user input is required, you may make any process run on yourdesktop instead of as a service.
Generally this will happen only when calling a third-party software using the Run ExternalProgram plugin, but is also valid if using a Script that generates a dialog that someone mustclick or interact with.
Note
The term "Desktop" is defined as the desktop of the user logged on to the computerwhere PlanetPress Workflow is installed. These dialogs cannot be displayed on anyother computer.
To toggle a process’ Run on Desktop property:
1. Select an active process in the Configuration Components pane.2. In the Object Inspector Pane, change the Run on desktop property from False to True,
or vice versa.
Page 79


Using ScriptsScripts can be used to perform various operations, such as to manipulate data, for example. PlanetPressWorkflow can perform scripts written in four different scripting languages and also provides an interface forediting scripts.
Warning
While this chapter provides some very useful and detailed information about scripting withinPlanetPress Workflow, its focus is to inform you about the features, variables and functions unique tothis environment. This chapter assumes that you have a working knowledge of the scripting languageyou wish to use and does not purport to teaching you anything about this language that you don'talready know. Learning any of these language is beyond the scope of this documentation.
There are four scripting languages available through the Run Script task: JavaScript, VBScript, Python andPerl. Each language has its own strengths and weaknesses which we will not cover in this documentation.While VBScript is the most used language at the moment, the examples provided in this chapter arepresented in all supported languages.
Note
While JavaScript and VBScript are natively available on Windows operating systems. Python and Perlrequire third-party tools to be functional. For Perl, ActivePerl can be installed. For PythonActivePython (version 2.7.13 ) can be installed.
When using the Run Script as a condition, you need a way to tell your process whether the result is true orfalse. The condition result is returned by the "Script.ReturnValue" on page 108 variable. If the return value iszero (the default), the condition is false. Otherwise, it is true.
When using the Run Script as an action task, the job file going out of the Run Script action task will be thesame as the one coming in, unless you have specifically changed it within your script by writing to the filethat is the target of the "Watch.GetJobFileName" on page 99 function. The same goes for any job info, localor global variables, unless you use the "Watch.SetJobInfo" on page 103 or "Watch.SetVariable" onpage 105 functions to modify them.

Multiple APIs (methods of communicating with PlanetPress Workflow scripting tools) are available throughthe scripting engine, in all languages.
l The Watch object is used to communicate with your current process and configuration. See "TheWatch Object" on page 95.
l You can manipulate PDF files using the PlanetPress Alambic API. See AlambicEdit LibraryReference. Note that the PlanetPress Alambic API is part of the PDF Tools.
l You can manipulate the metadata in your process using the Metadata API. See Metadata APIReference.
l You can communicate with a SOAP server using the SOAP API. See "SOAP Server API Reference"on page 88.
l You can communicate with the PlanetPress Capture Database using the Capture API. See CaptureAPI Reference.
The Script Editor and XSLT EditorHow can I edit scripts and XSLT code?
Scripts can be edited in the Script Editor and the XSLT Editor. Both editors are visually identical and sharealmost exactly the same commands. They let you import and export scripts, perform common editingfunction, such as search and replace, and feature syntax highlighting and formatting.
You can use the Script Editor to edit scripts written in VBScript, JavaScript, Perl and Python (note that thecorresponding interpreter must be locally available). You can use the XSLT Editor to edit scripts written inXSLT 1.0 and 2.0.
For information on how to use both editors, or for a complete description of the Script or XSLT Editor useroptions, refer to the Reference Help (English only).
Use the Editor
The Script Editor and XSLT Editor share most of the same commands and functions. You can open theScript Editor using the Open Editor button both from the Run Script Properties dialog box and from theOpen XSLT Properties dialog box. When you do so, the script currently displayed in the dialog box ispasted to the editor’s scripting box.
For information on the available editor options, refer to "Editor Options" on page 658.
Import and Export Scripts
Both the Script Editor and XSLT Editor let you import and export scripts.
Note
When you import a script, it replaces any script currently displayed in the editor.
To import a script:
1. In the editor, choose File | Import. The Open dialog box appears.2. To import a script that uses a different scripting language or that was saved under a different file
format, make a selection in the Files of type drop-down list.3. Navigate to the script you want to import and select it.4. Click OK. The script is imported, displayed and formatted according to the syntax of the language
selected in the editor. If the imported file had the extension of a recognized scripting language (.vbs or.js, for example), the editor language is automatically changed.
To export a script:
1. In the editor, choose File | Export. The Save As dialog box appears.2. To save the script using a different scripting language or under a different file format, make a selection
in the Save as type drop-down list.3. Navigate to the location where you want to save the exported script.4. Enter the name of the script in the File name box.5. To save the script using a different scripting language or under a different file format, make a selection
in the Save as type drop-down list.6. Click OK.
Find Strings in a Script
The Find Text dialog box allows you to search for text strings in the editor. The available options help youlimit the search, making searches quicker and easier.

To find strings in a script:
Note
If you only want to search a particular section of the script, you should select it before performing the followingprocedure.
1. Choose Search | Find, or press CTRL+F. The Find Text dialog box appears. The last used string isdisplayed in the Text to find drop-down list box.
2. Set the search settings and options.
l Text to find: Enter a new search string or select a previous search from the drop-down list.
l Case sensitive: Select to limit the search to instances of text with the same case as the text inthe Text to find box.
l Whole words only: Select to limit the search to complete words matching the text in the Text tofind box. Whole words are defined as strings that have a space or punctuation before and afterthe word.
l Regular expressions: Select to treat the regular expressions of the scripting language as text tosearch. If you clear this option, the regular expressions of the language are not included in thesearch.
l Global: Select to search the entire content of the script.l Selected text: Select to find matching text within the text block you select. A portion of text mustbe selected before you run the search.
l Forward: Select to search the script forward, from the location of the cursor or from the beginningof the script, depending on what you choose as the origin (From cursor begins where the cursoris currently located in the script, Entire scope begins from the beginning of the script or beginningof script selection). If you limit the scope to selected text, you move forward only within theselection. When the search reaches the end of the script or script selection, the search finishes. Itdoes not loop back to the beginning.
l Backward: Select to search the script backward, from the location of the cursor or from the end ofthe script, depending on what you choose for the origin (From cursor begins where the cursor iscurrently located in the script, Entire scope begins from the beginning of the script or beginning ofscript selection). If you limit the scope to selected text, you move backward only within the script

selection. When the search reaches the beginning of the script or script selection, the searchfinishes. It does not loop back to the beginning.
l From cursor: Select to start the search from the position of the cursor.
l Entire scope: Select to search the entire script or a script selection. The scope croplands to ascript selection if you make a selection before executing the Find.
3. Click OK. The first matching string is highlighted in the script.4. To find the next matching string, choose Search | Find Again or press F3.
Find and Replace Strings in a Script
The Replace With dialog box lets you search for and replace text strings in the editor. The available optionshelp you limit the search, making replacements quicker and easier.
To find and replace strings in a script:
1. Choose Search | Replace, or press CTRL+R. The Replace With dialog box appears. The last usedstrings are displayed in the Text to find and Replace with boxes.
2. Set the replacement settings and options.
l Text to find: Enter a new search string or select a previous search from the drop-down list.
l Replace with: Enter the string that will replace the string displayed in the Text to find box.l Case sensitive: Select to limit the search to instances of text with the same case as the text inthe Text to find box.
l Whole words only: Select to limit the search to complete words that match the text in the Text tofind box. Whole words are defined as strings that have a space or punctuation before and afterthe word.
l Regular expressions: Select to treat the regular expressions of the scripting language as text. Ifyou clear this option, the regular expressions of the language are blocked from the search.
l Prompt on replace: Select to have PlanetPress Workflow display a prompt before it replacestext. When you use the Replace All function, you are prompted each time matching text is found.The prompt includes an All button for replacing all matching text. This suppresses any furtherprompting.
l Global: Select to search the entire content of the script.

l Selected text: Select to find matching text only within a text block you select. The text must beselected before you run the search.
l Forward: Select to search the script forward, from the location of the cursor or from the beginningof the script, depending on what you choose as the origin (From cursor begins where the cursoris currently located in the script, Entire scope begins from the beginning of the script or beginningof script selection). If you limit the scope to selected text, you move forward only within theselection. When the search reaches the end of the script or script selection, the search finishes. Itdoes not loop back to the beginning.
l Backward: Select to search the script backward, from the location of the cursor or from the end ofthe script, depending on what you choose for the origin (From cursor begins where the cursor iscurrently located in the script, Entire scope begins from the beginning of the script or beginning ofscript selection). If you limit the scope to selected text, you move backward only within the scriptselection. When the search reaches the beginning of the script or script selection, the searchfinishes. It does not loop back to the beginning.
l From cursor: Select to start the search from the position of the cursor.
l Entire scope: Select to search either the entire script, or a script selection. The scopecorresponds to a script selection if you make a selection before executing the Find.
3. Do one of the following:
l Click OK to replace the first string encountered. If you selected Prompt on replace, a dialog boxopens to ask you whether to proceed with the replacement. You can OK to replace the first stringonly, or you can click All to replace that string as well as every other string that matches thereplacement settings.
l Click Replace All to replace all the strings that match the replacement settings.
4. To find and replace the next matching string, choose Search | Find Again or press F3. Once again, ifyou selected Prompt on replace, a dialog box opens to ask you whether to proceed with thereplacement. You can OK to replace that string only, or you can click All to replace that string as wellas every other string that matches the replacement settings.
Go to a Line in a Script
The Go To Line dialog box lets you jump to a specific line within your script. It works whether or not the linenumber are displayed on the left side of the editor window (to know how to toggle the line number displaysettings, See "Editor Options" on page 658).

To go to a line in a script:
1. Click anywhere in the Script Editor, then choose Search | Go To Line, or press Alt+G. The Go ToLine dialog box appears. The last used line numbers are displayed in the Enter new line numberdrop-down list box.
2. Enter a new line number in the Enter new line number box or select one from drop-down list.
3. Click OK.
Toggle Bookmarks
Bookmarks help you identify and jump to specific places within your script (see "Jump to Bookmarks"below).
Bookmarks are displayed in the editor’s gutter, so you will not be able to see them unless the gutter is bothvisible and sufficiently wide. If line numbers are also displayed in the gutter, bookmarks may be harder tosee. To control line number and gutter display, see "Editor Options" on page 658.
Note
Bookmarks are not preserved when you close the editor.
To toggle bookmarks:
l Place the cursor on a line in your script and, from the editor’s pop-up menu, choose ToggleBookmark and a given bookmark number.
If the bookmark you selected was not displayed on any line, it is added to the line where you placed thecursor. If the bookmark you selected was displayed on the line where you placed the cursor, it is removed. Ifthe bookmark you selected was displayed on a different line, it is moved to the line where you placed thecursor.
Jump to Bookmarks
Before you can jump to bookmarks, you must add bookmarks to specific lines in your script (See "ToggleBookmarks" above).
To jump to a bookmark:
l From the editor’s pop-up menu, choose Go To Bookmark and a given bookmark number.
If the bookmark you selected was displayed on a line, the cursor jumps to that line.
SOAP Server API ReferencePlanetPress Workflow offers a SOAP server API Reference allowing jobs to be submitted from third partyapplication using the SOAP protocol. Remember that SOAP stands for Simple Object Access Protocol.
While there are multiple possibilities for solutions using a SOAP server implementation, the SOAP ServerAPI Reference is specifically for submitting jobs from a SOAP client. It implements five methods that willallow SOAP clients to submit jobs and get information from PlanetPress Workflow executing them.
Note
PlanetPress Workflow already come with a SOAP Client Plug-in, which can be used as an input, action oroutput; this task was renamed Legacy SOAP Client.
Since the SOAP Server API Reference is primarily targeted at programmers or systems engineers, it israther technical.
SOAP API - SubmitJob
Syntax
SubmitJob (File, SubmitJobInfStruc , ReturnJobFile, user name, Password) :SubmitJobResult
Description
The SubmitJob method allows users to remotely submit files to their PlanetPress Workflow from a SOAPclient. The SOAP client has the option to wait for a response file from PlanetPress Workflow SOAP server.

Arguments
l File – base64Binary. This is an array of byte base64 encoded (seehttp://en.wikipedia.org/wiki/Base64).
l SubmitJobInfStruc – Structure containing any required information to prepare the file for a validinsertion into a PlanetPress Workflow process.
l ReturnJobFile – Boolean value. When true, PlanetPress Workflow SOAP server returns the job file.When false, there no file is returned to the SOAP client. (For example: when submitting a job for print,there is no need to return a file)
l user name – String containing the user name.l Password – String containing the password. This value is case sensitive.
Return Value
l SubmitJobResult - Structure containing the following information:l Success – Integer indicating the Success/Error level of the operation. A result of 0 means theoperation was successful.
l Message – String containing text information about the Success/Failure status.l SubmitJobInfStruc – See point SubmitJobInfStruc for details.l ResultFile – base64Binary. If Success is different than 0 or the ReturnJobFile was set to False in theinitial call, no file is returned. Otherwise, ResultFile contains the job file, as it existed at the completionof the PlanetPress Workflow process (for instance, if the process creates a PDF and sets it as thecurrent job file, the PDF is the file that gets returned to the calling SOAP client).
Note
The SubmitJob method only returns a file if the PlanetPress Workflow process contains a SOAP Input task.
Note
If ReturnJobFile is set to true, the schedule options of the process should be set to a pooling lower than fourseconds, so the client application gets a timely response.

Note
To return the file, the process must be completed before the timeout of the server occurs. The Timeout option canbe set in your PlanetPress Workflow preferences.
SOAP API - PostJob
Syntax
PostJob (File, PostJobInfStruc , user name, Password) : PostJobResult
Description
The PostJob method allows users to remotely submit files to PlanetPress Workflow by using the Resubmitfrom here feature. The main advantage of this feature is that it allows a user to specify a starting task indexfrom which the File is to be processed.
Parameters
l File – base64Binary. This is an array of byte base64 encoded (seehttp://en.wikipedia.org/wiki/Base64).
l PostJobInfStruc – Structure containing any required information to prepare the file for resubmissioninto a PlanetPress Workflow process.
l user name – String containing the user name.l Password – String containing the password. This value is case sensitive.
Return Value
l PostjobResult - Structure containing the following information:l Success – Integer indicating the Success/Error level of the operation. A result of 0 means that theoperation was successful.
l Message – String containing text information about the Success status.l PostjobInfStruc – See point PostJobInfoStruct for details.

Note
The task index can be retrieved by using the GetProcessTaskList method. See point GetProcessTaskList fordetails.
Note
The PostJob method can never return a file to the calling application.
SOAP API - GetProcessList
Syntax
GetProcessList (user name, Password) : GetProcessListResult
Description
The GetProcessList function allows SOAP clients to request the list of available PlanetPress Workflowprocesses, based on their authentication credentials.
Parameters
l user name – String containing the user name.l Password – String containing the password. This value is case sensitive.
Return Value
l GetProcessListResult - Structure containing the following information:l Success – Integer indicating the system-defined Success/Error level of the operation. A result of 0means that the operation was successful.
l Message – String containing text information about the Success status.l ProcessList – Structure containing the following information details.l ProcessName – String containing the process namel Active – Boolean value specifying whether the process is currently active.

Note
To obtain access to the complete list of processes for all users, the end-user must have administrator privileges.
SOAP API - GetProcessTaskList
Syntax
GetProcessTaskList (ProcessName, user name, Password) :GetProcessTaskListResult
Description
The GetProcessTaskList function will allow a user to remotely request the tasks list of a process. This will beuseful with the PostJob API since it needs a TaskIndex.
Parameters
l ProcessName – The Name of the PlanetPress Workflow process.
l user name – String containing the user name.l Password – String containing the password. This is case sensitive.
Return Value
l GetProcessTaskListResult – Structure containing the following information:l Success – Integer indicating the system-defined Success/Error level of the operation. A result of 0means that the operation was successful.
l Message – String containing text information about the Success status.l TaskNames – Structure containing the following information details.l TaskName – String containing the name of the taskl TaskIndex – Integer : 1 based index of the task.l TaskDepth – Integer : 1 based depth of the task.
Note
The TaskNames array will be sorted by the execution order of the process with the primary input of the processhaving an index of 1.
SOAP API - GetSOAPProcessList
Syntax
GetSOAPProcessList (user name, Password) : GetSOAPProcessListResult
Description
The GetSOAPProcessList function will allow users to request the list of PlanetPress Workflow processesthat contain a SOAP Input plug-in with the SOAP action name. This is useful when working with theSubmitJob API since it requires a SOAPActionName.
Parameters
l user name – String containing the user name.l Password – String containing the password. This is case sensitive.
Return Value
l GetSOAPProcessListResult – Structure containing the following information:l Success – Integer indicating the system-defined Success/Error level of the operation. A result of 0means that the operation was successful.
l Message – String containing text information about the Success status.l ProcessList – Structure containing the following information details.l SOAPActionName – String containing the name of the process as seen in your PlanetPressWorkflow.
l Active – Boolean value indicating if the process is active in your PlanetPress Workflow.
Note
If a user has administrator privilege, he will have access to all processes and therefore he will see all the processes.
SOAP API - PostJobInfoStruc
PostJobInfStruc
Structure containing any required information to prepare the file for resubmission into a PlanetPressWorkflow process.
l VariableList – Array of complex type, containing pairs of variable names and variables value. The listalso contains the JobInfo variables.
l VariableName – String
l VariableValue – String
l ProcessName – String - Name of the PlanetPress Workflow process.
l TaskIndex – Integer - 1 based index of the task where the resubmission should start.l FirstPage – Integer - First page of data to process.l LastPage – Integer - Last page of data to process.
Note
If both FirstPage and LastPage are set to 0, the entire data file is used.
SOAP API - SubmitJobInfStruc
SubmitJobInfStruc
Structure containing any required information to prepare the file for a valid insertion into a PlanetPressWorkflow process.
l VariableList – Array of complex type, containing pairs of variable name and variable value. The listalso contains the JobInfo variables

l VariableName – String
l VariableValue – String
l OAPActionName – String containing the name of the Input SOAP task’s action name.
TheWatch ObjectPlanetPress Workflow scripting offers a number of methods of communicating with your process by meansof PlanetPress Workflow automation object's methods and functions. The automation object is available inall 4 languages through their own syntax - the examples provided here are for VBScript.
Note
While the functions here are in mixed case to simplify reading, it's important to note that somelanguages (especially JavaScript) are case-sensitive and will require the proper case. Examples inthis chapter will always use the proper case when relevant.
Here is a list of the methods and functions that are available to you through the automation object (or"Watch" object). While these examples are all in VBScript, you can click on any variable name to open apage to see examples for each supported language.
Variable Name Description
Example Usage (VBScript)
"Watch.GetJobFileName" onpage 99
Retrieves a string containing the job path and file name located inthe job spool folder.
Example Usage: str = Watch.getjobfilename
"Watch.GetOriginalFileName" onpage 100
Retrieves a string containing the job's original path and filename.Note: this filename is generally no longer available if it has beencaptured by Watch.
Example Usage: str = Watch.getoriginalfilename

Variable Name Description
Example Usage (VBScript)
"Watch.GetMetadataFilename"on page 101
Retrieves a string containing the job's metadata path and filename.This is useful when using the Metadata API in your script.
Example Usage: str = Watch.getmetadatafilename
"Watch.GetJobInfo" on page 102 Retrieves the content of a numbered job info (%1 to %9).
Example Usage: str = Watch.getjobinfo(9)
"Watch.GetVariable" on page 104 Retrieves the content of a local or global variable by name.
Example Usage: str = Watch.getvariable("Varname")
"Watch.ExpandString" onpage 105
Retrieves the content of any Workflow string, containing anyvariable available to Watch, including data selections.
Example Usage: watchDate = Watch.expandstring("%y-%m-%d")
"Watch.Log" on page 106 Writes to the Workflow log file, or the message window when indebug - can accept multiple log levels from 1 (red) to 4 (gray).
Example Usage: Watch.log "Hello, World!",1
"Watch.ShowMessage" on thenext page
Displays a popup dialog box to the user (user has to be logged on).
Example Usage: Watch.showmessage("Hello, World!")
"Watch.InputBox" on page 101 Prompts the user for a string and returns the value (will not workwhen running as a service)
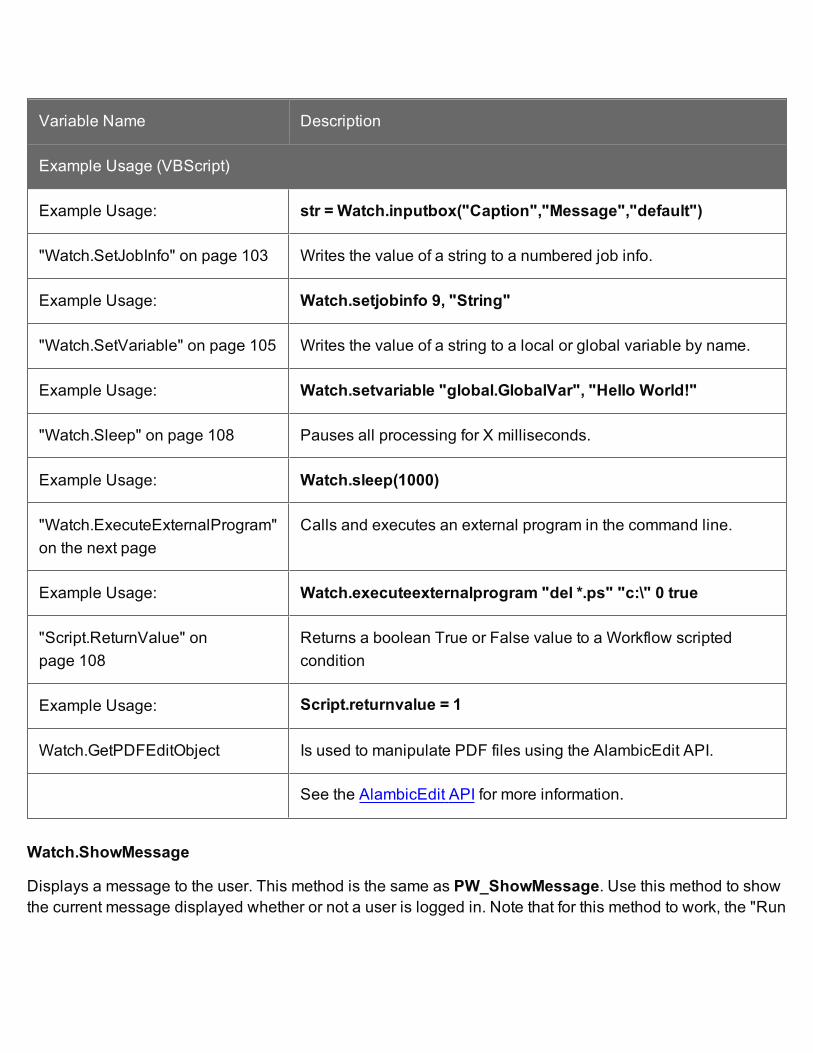
Variable Name Description
Example Usage (VBScript)
Example Usage: str = Watch.inputbox("Caption","Message","default")
"Watch.SetJobInfo" on page 103 Writes the value of a string to a numbered job info.
Example Usage: Watch.setjobinfo 9, "String"
"Watch.SetVariable" on page 105 Writes the value of a string to a local or global variable by name.
Example Usage: Watch.setvariable "global.GlobalVar", "Hello World!"
"Watch.Sleep" on page 108 Pauses all processing for X milliseconds.
Example Usage: Watch.sleep(1000)
"Watch.ExecuteExternalProgram"on the next page
Calls and executes an external program in the command line.
Example Usage: Watch.executeexternalprogram "del *.ps" "c:\" 0 true
"Script.ReturnValue" onpage 108
Returns a boolean True or False value to a Workflow scriptedcondition
Example Usage: Script.returnvalue = 1
Watch.GetPDFEditObject Is used to manipulate PDF files using the AlambicEdit API.
See the AlambicEdit API for more information.
Watch.ShowMessage
Displays a message to the user. This method is the same as PW_ShowMessage. Use this method to showthe current message displayed whether or not a user is logged in. Note that for this method to work, the "Run
on Desktop" option must be enabled and you must be logged on as the same user as the PlanetPressWatch Service.
Examples
In the following example, showmessage() displays a dialog box saying “test message”.
VBScript
Watch.ShowMessage("test message")
JavaScript
Watch.ShowMessage("test message");
Python
Watch.ShowMessage("test message")
Perl
$Watch->ShowMessage("test message");
Watch.ExecuteExternalProgram
Calls and executes an external program through a specified command line. The program's execution will bedirected by the appropriate flags specified as this method's parameters.
Syntax
Watch.ExecuteExternalProgram const CommandLine: WideString; const WorkingDir: WideString;ShowFlags: Integer;WaitForTerminate: WordBool: integer;
const CommandLine: The command line to execute as a widestring.
const WorkingDir: The working directory for the execution of the command line as a widestring.
ShowFlags: Integer value representing the flag to use during the execution of the command line. Theseflags have an effect on the execution window opened by the ExecuteExternalProgram procedure.

Flag Effect
0 Hide the execution window.
1 Display the window normally.
2 Display the window minimized.
3 Display the window maximized.
4 Makes the window visible and brings it to the top, but does not make it the active window.
WaitForTerminate : A Boolean value that, if true, pauses the script until the command line has been fullyexecuted.
Examples
VBScript
Watch.ExecuteExternalProgram "lpr -S 192.168.100.001 -P auto c:\myfile.ps","c:\", 0, true
JavaScript
Watch.ExecuteExternalProgram("lpr -S 192.168.100.001 -P auto c:\\myfile.ps","c:\\", 0, true);
Python
Watch.ExecuteExternalProgram("lpr -S 192.168.100.001 -P auto c:\\myfile.ps","c:\\", 0, True)
Perl
$Watch->ExecuteExternalProgram("lpr -S 192.168.100.001 -P autoc:\myfile.ps", "c:\", 0, true);
Watch.GetJobFileName
Returns the complete path and file name of the job. This method is the same as PW_GetJobFileName.getjobfilename() obtains the file name of a PlanetPress Workflow process. This is useful for manipulating

the job file, for example to replace data within it. If your script writes to this file, the modified contents will beused by the next plugin in your process.
Example
In the following example, GetJobFileName() retrieves the name of the job file, which is then logged using"Watch.Log" on page 106.
VBScript
Dim ss = Watch.GetJobFileNameWatch.Log "The job filename is: " + s, 3
JavaScript
var s;s = Watch.GetJobFilename();Watch.Log("The job filename is: " + s, 3);
Python
s = Watch.GetJobFileName()Watch.Log("The job filename is: " + s, 3)
Perl
$s = $Watch->GetJobFileName;$Watch->Log("The job filename is: " + $s, 3);
Watch.GetOriginalFileName
Returns the original name of the file, when it was captured. This method is the same as PW_GetOriginalFileName.
Example
VBScript
Watch.GetOriginalFileName
JavaScript
Watch.GetOriginalFileName();

Python
Watch.GetOriginalFileName()
Perl
$Watch->GetOriginalFileName();
Watch.GetMetadataFilename
Returns the complete path and file name of the metadata file associated with the current job file.
Example
VBScript
Watch.GetMetadataFileName
JavaScript
Watch.GetMetadataFileName();
Python
Watch.GetMetadataFileName()
Perl
$Watch->GetMetadataFileName();
Watch.InputBox
Warning
Starting version 7.0, the Watch.InputBox function is deprecated and may no longer work due tochanges in the way in which the Watch Service functions. This function is completely disabled inPlanetPress Workflow 7.3 and higher.
Prompts the user to enter a string. The string is displayed as the window caption. You can specify amessage that is displayed above the text box. This method is the same as PW_InputBox.
Clicking OK returns the value entered by the user. If no value was entered the default value is returned.Clicking Cancel returns the default value.
You must enable the “Run on desktop” option for the PlanetPress Workflow process whose script callsWatch.InputBox. Otherwise PlanetPress Workflow application may stop working and require a reboot.
Example
s = watch.inputbox("caption", "message", "default")
watch.showmessage(s)
Examples
In the following example,Watch.InputBox requires the user to enter a line of text. The script the displays apop-up of the message contents using "Watch.ShowMessage" on page 97.
VBScript
s = Watch.InputBox("Your Name", "Please enter your name", "John Doe")Watch.ShowMessage("Will the real " + s + " please stand up?")
JavaScript
s = Watch.InputBox("Your Name", "Please enter your name", "John Doe");Watch.ShowMessage("Will the real " + s + " please stand up?");
Python
s = Watch.InputBox("Your Name", "Please enter your name", "John Doe")Watch.ShowMessage("Will the real " + s + " please stand up?")
Perl
s = Watch->InputBox("Your Name", "Please enter your name", "John Doe");Watch->ShowMessage("Will the real " + $s + " please stand up?");
Watch.GetJobInfo
Returns job information corresponding to the specified index. Index is an integer from 1 to 9.

Syntax
Watch.GetJobInfo(Index: integer): string
Example
VBScript
Dim ss = Watch.GetJobInfo(3)Watch.Log "Jobinfo 3's value is: " + s, 2
JavaScript
var s;s = Watch.GetJobInfo(3);Watch.Log("Jobinfo 3's value is: " + s, 2);
Python
s = Watch.GetJobInfo(3)Watch.Log("Jobinfo 3's value is: " + s, 2)
Perl
$s = $Watch->GetJobInfo(3);$Watch->ShowMessage("Jobinfo 3's value is: " . $s, 2);
Watch.SetJobInfo
Sets the job information index to a specified string value.
Syntax
Watch.SetJobInfo(Index: Integer; Value: String)
Example
VBScript
Watch.SetJobInfo 3, "Job info 3 Value"
JavaScript
Watch.SetJobInfo(3, "Job info 3 Value");
Python
Watch.SetJobInfo(3, "Job info 3 Value")
Perl
$Watch->SetJobInfo(3, "Job info 3 Value");
Watch.GetVariable
Returns the string value of the corresponding variable name. Note that if an undeclared variable is calledusing this method, an error will be generated.
Syntax
Watch.GetVariable(Name: String): String
Example
VBScript
Dim ss = Watch.GetVariable("MyVariable")Watch.Log "MyVariable's value is: " + s, 2s = Watch.GetVariable("global.MyVariable")Watch.Log "global.MyVariable's value is: " + s, 2
JavaScript
var s;s = Watch.GetVariable("MyVariable");Watch.Log("MyVariable's value is: " + s, 2);s = Watch.GetVariable("global.MyVariable");Watch.Log("Jobinfo 3's value is: " + s, 2);
Python
s = Watch.GetVariable("MyVariable")Watch.Log("global.MyVariable's value is: " + s, 2)
Perl
$s = $Watch->GetJobInfo(3);$Watch->ShowMessage("global.MyVariable's value is: " . $s, 2);

Watch.SetVariable
Sets the variable to a specified string value. Note that if an undeclared variable is called using this method,an error will be generated.
Syntax
Watch.SetVariable Name: String; Value: String
Example
VBScript
Watch.SetVariable "MyVariable", "Desired value"Watch.SetVariable "global.MyVariable", "Desired value"/
JavaScript
Watch.SetVariable("MyVariable", "Desired value");Watch.SetVariable("global.MyVariable", "Desired value");
Python
Watch.SetVariable("MyVariable", "Desired value")Watch.SetVariable("global.MyVariable", "Desired value")
Perl
$Watch->SetVariable("MyVariable", "Desired value");$Watch->SetVariable("global.MyVariable", "Desired value");
Watch.ExpandString
Provides access to the emulated job file and to all variables. This function returns a string that is theexpanded version of the input string.
Syntax
Watch.ExpandString(StringToExpand) -> string

Arguments
StringToExpand —A regular parseable string that may contain system variables (%u, %f), user variables(%1 to %9), octal codes, and data selections.
Example
This example results in expanding the string of the variables to the date value in the following format:“YYYY-MM-DD”.
VBScript
Dim ss= Watch.ExpandString("%y-%m-%d")Watch.Log "Current Date is: " + s, 2
JavaScript
var s;s= Watch.ExpandString("%y-%m-%d");Watch.Log("Current Date is: " + s, 2);
Python
s= Watch.ExpandString("%y-%m-%d")Watch.Log("Current Date is: " + s, 2)
Perl
$s = $Watch->ExpandString("%y-%m-%d");$Watch->Log("Current Date is: " . $s,2);
Watch.Log
Creates messages that are added to PlanetPress Workflowwatch.log file. PlanetPress Workflow watch.logfile is located in ...\Program Files\PlanetPress Workflow 7\PlanetPress Watch\Log\ppw[log date].log.
View error messages in the Services Console while PlanetPress Workflow is in Run mode by choosingTools | Services | Service Console. In the Service Console, error messages appear with colors thatcorrespond to the message level.

Level Type Text Color in Service Console
1 Error Red
2 Warning Orange
3 Information Black
4 Debug Grey
Arguments
Message—A string representing the message that is logged in the log file. Note that the text of the messagemust use the locale encoding of the system where the PlanetPress Workflow software will be running,otherwise it will be unreadable.
Level—An integer between 1 and 4, specifying the severity level of the error message. Set message levelsas follows:
Level Description
1 The message is logged as an Error in the log file.
2 The message is logged as a Warning in the log file.
3 The message is logged as Information in the log file.
4 The message only appears when the application runs in Debug mode.
Examples
In the following example, log() will write an information entry in the watch log that says "this is a log"
VBScript
Watch.Log "this is a log", 3
JavaScript
Watch.Log("this is a log", 3);
Python
Watch.Log("this is a log",3)
Perl
$Watch->Log("this is a log",3);
Watch.Sleep
Pauses the process for the specified number of milliseconds. This can be used while waiting for somethingelse to happen when the delay is known.
Syntax
Watch.Sleep Milliseconds: integer
Example
In the following example, sleep() pauses the process for 1 second (1000 milliseconds)
VBScript
Watch.Sleep 1000
JavaScript
Watch.Sleep(1000);
Python
Watch.Sleep(1000)
Perl
$Watch->Sleep(1000);
Script.ReturnValue
Set this variable to 1 (true) or 0 (false) in order to return a true or false status to PlanetPress Workflow, whenusing your script as a conditional branch. This variable will have no effect if the script is run as an action.

Example
This example will always return true, as the condition is static. It is, after all, simply an example. You get theidea.
VBScript
Dim everythingOKeverythingOK = trueif (everythingOK = true) thenScript.ReturnValue = 1
elseScript.ReturnValue = 0
end if
JavaScript
var everythingOK;everythingOK = true;if(everythingOK = true){Script.ReturnValue = 1;
} else {Script.ReturnValue = 0
}
Python
everythingOK = Trueif everythingOK == True:Script.ReturnValue = 1
else:Script.ReturnValue = 0
Perl
$everythingOK = true;if (everythingOK = true) {$Script->{ReturnValue} = 1;
} else {$Script->{ReturnValue} = 0;
}
Stopping ExecutionWhen using a script, you may come to a point where you'd like the task to fail (raise an error) and triggeryourOn Error tab under certain conditions. This can be done by using the scripting language's built-in errorfeatures, described here.
Note that the value or description of the error will not be available to your error process if one is used.However, when available, a description of the error message will be logged in the Watch log.
VBScript
In VBSCript, the Err.Raisemethod will halt the execution of the script and trigger the On Error tab. Whenusing On Error Resume Next, raising an error will not stop execution. See MSDN for the Raise methodproperties and this page for a list of available errors to raise. In the case of VBScript, the error number usedwill determine the message shown in the log.
Dim ss = Watch.GetJobInfo(9)If (s = "") Then
Err.Raise 449 ' Raises Error #449: "Argument is not optional"Else
' Do somethign with Job Info 9!Watch.Log "Job Info 9's value is: " + s, 4
End If
JavaScript
JavaScript uses the throw statement within try to create an exception which, if not caught using catch() ,will cause the script execution to stop and the On Error tab to be triggered. See this page on W3Schools.
var s;s = Watch.GetJobInfo(9);if (s == "") {
throw "Value Cannot be empty";} else {
// Do something with Job Info 9!Watch.Log("Job Info 9's value is: " + s,4);
}

Python
In Python, the raise statement is similar to JavaScript and will stop processing unless an except statementis used. See the python documentation.
s = Watch.GetJobInfo(9)if not s:
raise NameError('Value cannot be empty')else:
# Do something with Job Info 9!Watch.Log("Job Info 9's value is: " + s,5)
Perl
In PERL, die() raises an exception and triggers the On Error tab, unless the unless command is used. Seethe perl documentation.
$s = $Watch->GetJobInfo(9);if (s = "") {die "Value cannot be empty";
} else {# Do something with Job Info 9!$Watch->Log("Job Info 9's value is: " . $s,4);
}
Data repository APIIntroduction
The Data Repository is accessed via a COM object that exposes methods to store and retrieve data withinthe Repository. All operations on the Repository must be performed through this API - rather than directlyaccessing the physical file - since the Repository's underlying file media may change over time. Note thatthis API is used by all stock tasks dealing with the Repository.
The table below lists the different levels in the repository and what their names corresponds to:
The term ... ... is the same as an Excel ... ... is the same as a Database ...
Group Sheet Table

The term ... ... is the same as an Excel ... ... is the same as a Database ...
Key Column Field
KeySet Row Record
Note
Group and key names are case-insensitive.
API Reference
Obtaining an instance of the Repository Object
JavaScript
var repoObject = new ActiveXObject("RepositoryLib.WorkflowRepository");
VB Script
set repoObject = CreateObject("RepositoryLib.WorkflowRepository")
In each example in this documentation, the object repoObject is deemed having been obtained through theabove call to the COM object.
Using JSON
Whenever a parameter or return value is defined as a JSONStringArray type, that JSON array is itself astring. Since a JSON array internally defines double quotes as the delimiter for each element, you mustenclose the entire string in single quotes. Alternatively, you can escape the double quotes inside the JSONArray.
For instance, the following calls to AddGroup() are correct:
RepoObject.AddGroup("MyGroup",'["FirstKey", "SecondKey"]');RepoObject.AddGroup("MyGroup","[\"FirstKey\", \"SecondKey\"]");
But the following is incorrect:

RepoObject.AddGroup("MyGroup","['FirstKey', 'SecondKey']");
Many methods require using the JSONStringArray type but JSON is not natively supported in VB Script.Therefore, for those methods, only JavaScript sample code is provided. There are many resources on theWeb that propose ways of implementing JSON parsing in VB Script so you can implement whichever yousee fit. However, using JavaScript is highly recommended.
Group methods
Name Description
AddGroup Creates a group named GroupName and optionally creates keyslisted in keyNames. The keyNames parameter may be empty.
RemoveGroup Deletes the group named GroupName, along with all its keysetsand keys.
ListGroups Retrieves the list of all group names in the Repository, stored in aJSONStringArray..
RenameGroup Renames group oldName to newName. While this operation has noimpact on the data stored in the specified group, it does require anyplugin and/or script that uses oldName to be modified to refer tonewName.
Key Methods
Name Description
AddKey Adds key KeyName to group GroupName. KeyName must notalready exist in the specified group. Note that this method only adds akey name to the group, not a key value. See AddValue() forinformation on how to set a value for a key.
RemoveKey Removes existing key KeyName from group GroupName. The keyto remove must exist in the group, otherwise an error is raised. All

Name Description
values for the key, in all keysets for the group, are removed. Note thatwhen the Group contains a large number of KeySets, this operationmay take a while.
ListKeys Retrieves the list of all Key names and data types in GroupGroupName, stored in a JSONStringObject. You should useJSON.Parse() to convert the string into an actual JavaScript object.You can then use the for…in construct to list the different propertiesfor that object (i.e. the keys in the group).
RenameKey Renames key oldName to newName in group GroupName. Whilethis operation has no impact on the data stored in that Group, it doesrequire any plugin and/or script that uses oldName to be modified torefer to newName.
Value Methods
Name Description
GetValue Performs a lookup in group GroupName and retrieves the first valuefor key KeyName that matches Condition. The condition is specifiedusing basic SQL WHERE syntax. The Condition may be left empty inwhich case the very first value found for the specified KeyName isreturned.
AddValue Creates a new KeySet by assigning Value to the key KeyName inGroup GroupName. Note that KeyName must exist in GroupName,otherwise an error is raised. See AddKey() for information on addinga key to a group. Upon successful completion, the method returns theID of the newly created KeySet.
SetValue Updates multiple keysets in group GroupName by setting the key

Name Description
KeyName to Value for all keysets that match Condition. Thecondition is specified using basic SQL WHERE syntax. TheCondition may be left empty in which case all keysets in GroupNameare updated. Note that KeyName must exist in GroupName,otherwise an error is raised. The method returns an array of thekeyset ID's that were updated ( [1,2] ), or an empty array ( [] ) if nokeysets were updated.
SetValueByID Updates KeyName with Value in group GroupName, where thekeyset's ID matches the ID parameter. KeyName must exist inGroupName, otherwise an error is raised. The method returns the IDof the keyset that was updated or -1 if the keyset was not updated.
Note that this method is functionally equivalent to using SetValue()with its Condition parameter set to "ID=ID".
KeySet methods
Name Description
GetKeySets Retrieves Keys values in GroupName for keysets that matchCondition. When Keys is left empty, all keys are retrieved. WhenCondition is left empty, all keysets are retrieved.
AddKeySets Inserts a new keyset inside GroupName and assigns values tokeys as specified in KeyValues. Every key specified inKeyValues must exist otherwise an error is raised. However, it isnot required to specify all available keys in KeyValues. Only thekeys specified are updated in GroupName while unspecifiedkeys are set to an empty string.
RemoveKeySets Deletes all keysets in GroupName that match Condition. Thecondition is specified using basic SQL WHERE syntax.

Name Description
Condition may be left empty, in which case all keysets inGroupName are deleted. The method returns the number ofkeysets that were deleted.
RemoveKeySetByID Deletes the keyset whose ID equals ID fromGroupName.Returns 1 if successful, 0 otherwise.
Note that this method is functionally equivalent to usingRemoveKeySets() with its Condition parameter set to "ID=ID".
Repository management methods
Name Description
ClearRepository Deletes all groups, keys and keysets from the repository, returningit to a blank state. Use with caution!
ClearGroupData Deletes all keysets inside GroupName while retaining the existingkey structure.
ClearAllData Delete all keysets in all groups, while retaining the existing keystructure.
CheckRepository Verifies the integrity of the repository and recovers unused spaceleft by deleted keysets. Similar to packing a database, theoperation is non-destructive but it does require exclusive access tothe Repository. You should therefore only perform this operationwhen you know for sure no other process is accessing the DataRepository.
Version Returns the version of the DLL library used by the Repository.

AddGroup
Creates a group named GroupName and optionally creates keys listed in keyNames. The keyNamesparameter may be empty.
Syntax
AddGroup(GroupName: string, keyNames: JSONStringArray)
Examples
JavaScript
repoObject.AddGroup("Users", '["FirstName", "LastName"]');repoObject.AddGroup("Users", '');
VB Script
repoObject.AddGroup "Users", "[""FirstName"", ""LastName""]"repoObject.AddGroup "Users", ""
AddKey
Adds key KeyName to group GroupName. KeyName must not already exist in the specified group. Notethat this method only adds a key name to the group, not a key value. See AddValue() for information on howto set a value for a key.
Syntax
AddKey(GroupName: string, KeyName: string)
Examples
JavaScript
repoObject.AddKey("Users", "email");
VB Script
repoObject.AddKey "Users", "email"

AddKeySets
Inserts a new keyset inside GroupName and assigns values to keys as specified in KeyValues. Every keyspecified in KeyValues must exist otherwise an error is raised. However, it is not required to specify allavailable keys in KeyValues. Only the keys specified are updated in GroupName while unspecified keysare set to an empty string.
Syntax
AddKeySets(GroupName: string, KeyValues: JSONObjectArray): JSONIntegerArray
Examples
JavaScript
repoObject.AddKeySets("Users", '[{"FirstName": "John","LastName": "Smith"},{"FirstName": "Richard", "LastName": "Doe"}]');
VB Script
repoObject.AddKeySets "Users","[{""FirstName"":""John"",""LastName"":""Smith""},{""FirstName"":""Richard"",""LastName"": ""Doe""}]"
Sample return value
The method returns a JSONIntegerArray containing the ID's of all keysets inserted into GroupName:
'[131,132]'
AddValue
Creates a new KeySet by assigning Value to the key KeyName in Group GroupName. Note thatKeyName must exist in GroupName, otherwise an error is raised. See AddKey() for information on addinga key to a group. Upon successful completion, the method returns the ID of the newly created KeySet.
Syntax
AddValue(GroupName: string, KeyName: string, Value: string): integer64
Examples
JavaScript

repoObject.AddValue("Users", "LastName", "Smith");
VB Script
repoObject.RenameGroup "Users", "LastName", "Smith"
CheckRepository
Verifies the integrity of the repository and recovers unused space left by deleted keysets. Similar to packinga database, the operation is non-destructive but it does require exclusive access to the Repository. Youshould therefore only perform this operation when you know for sure no other process is accessing the DataRepository.
Syntax
CheckRepository()
ClearAllData
Delete all keysets in all groups, while retaining the existing key structure.
Syntax
ClearAllData()
ClearGroupData
Deletes all keysets inside GroupName while retaining the existing key structure.
Syntax
ClearGroupData(GroupName: string)
ClearRepository
Deletes all groups, keys and keysets from the repository, returning it to a blank state. Use with caution!
Syntax
ClearRepository()

GetKeySets
Retrieves Keys values in GroupName for keysets that match Condition. When Keys is left empty, all keysare retrieved. When Condition is left empty, all keysets are retrieved.
Syntax
GetKeySets(GroupName: string, Keys: JSONStringArray, Condition: string):JSONStringArray
Examples
JavaScript
repoObject.GetKeySets("Users", '["FirstName","LastName"]', "Gender='M'");
VB Script
repoObject.GetKeySets "Users", "[""FirstName"",""LastName""]", "Gender='M'"
Sample return value
The method returns a JSONStringArray of key-value pairs.
'[{"FirstName": "John","LastName": "Smith"},{"FirstName": "Richard","LastName": "Doe"}]'
GetValue
Performs a lookup in group GroupName and retrieves the first value for key KeyName that matchesCondition. The condition is specified using basic SQL WHERE syntax. The Condition may be left empty inwhich case the very first value found for the specified KeyName is returned.
Syntax
GetValue(GroupName: string, KeyName: string, Condition: string)
Examples
JavaScript
repoObject.GetValue("Users", "email", " LastName='Smith' ANDFirstName='John' ");// retrieves email for John SmithrepoObject.GetValue("Users", "email", " LastName='Smith' "); // retrieves
email for first user named SmithrepoObject.GetValue("Users", "email", ""); // retrieves email for first user
VB Script
repoObject.GetValue "Users", "email", " LastName=""Smith"" ANDFirstName=""John"" " // retrieves email for John SmithrepoObject.GetValue "Users", "email", " LastName=""Smith"" " // retrievesemail for first user named SmithrepoObject.GetValue "Users", "email", "" //retrieves email for first user
ListGroups
Retrieves the list of all group names in the Repository, stored in a JSONStringArray.
Syntax
ListGroups(): JSONStringArray
Example
JavaScript
var repoObject = new ActiveXObject("RepositoryLib.WorkflowRepository");var myList = JSON.parse(repoObject.ListGroups());for (var i=0; i<myList.length; i++) {// Log all group names to the consoleWatch.Log(myList[i],2);
}
Sample return value
'["Users","Cart","Orders"]'
ListKeys
Retrieves the list of all Key names and data types in Group GroupName, stored in a JSONStringObject.You should use JSON.Parse() to convert the string into an actual JavaScript object. You can then use thefor…in construct to list the different properties for that object (i.e. the keys in the group).
Syntax
ListKeys(GroupName: string):JSONStringArray
Examples
JavaScript
var repoObject = new ActiveXObject("RepositoryLib.WorkflowRepository");
var myList = JSON.parse(repoObject.ListKeys("Internal"));for (var Property in myList) {// Log all key names for group Users to the consoleWatch.Log(Property,2);}
Sample return value
'{"ID": "meta", "FirstName": "string", "LastName": "string", "email": "string", "DateC": "meta", "DateM":"meta"}'
As shown in the sample, the value associated with each key name is actually the data type for that key. Onlytwo values are currently possible: string and meta, where meta denotes an internally generated key.
RemoveGroup
Deletes the group named GroupName, along with all its keysets and keys.
Syntax
RemoveGroup(GroupName: string)
Examples
JavaScript
repoObject.RemoveGroup("Users");
VB Script
repoObject.RemoveGroup "Users"
RemoveKey
Removes existing key KeyName from group GroupName. The key to remove must exist in the group,otherwise an error is raised. All values for the key, in all keysets for the group, are removed. Note that whenthe Group contains a large number of KeySets, this operation may take a while.

Syntax
RemoveKey(GroupName: string, KeyName: string)
Examples
JavaScript
repoObject.RemoveKey("Users", "email");
VB Script
repoObject.RemoveKey "Users", "email"
RemoveKeySetByID
Deletes the keyset whose ID equals ID fromGroupName. Returns 1 if successful, 0 otherwise.
Note
This method is functionally equivalent to using "RemoveKeySets" on the next page with its Conditionparameter set to "ID=ID".
Syntax
RemoveKeySetByID(GroupName: string, ID: integer): integer
Examples
JavaScript
repoObject.RemoveKeySetByID("Users", 10); // both methods performrepoObject.RemoveKeySets( "Users", "ID=10" ); // the same task
VB Script
repoObject.RemoveKeySetByID "Users", 10 '' both methods performrepoObject.RemoveKeySets "Users", "ID=10" '' the same task
RemoveKeySets
Deletes all keysets in GroupName that match Condition. The condition is specified using basic SQLWHERE syntax. Condition may be left empty, in which case all keysets in GroupName are deleted. Themethod returns the number of keysets that were deleted.
Syntax
RemoveKeySets(GroupName: string, Condition: string): integer
Examples
JavaScript
repoObject.RemoveKeySets("Users", 'Gender="M"');
VB Script
repoObject.RemoveKeySets "Users", "Gender='M'"
RenameGroup
Renames group oldName to newName. While this operation has no impact on the data stored in thespecified group, it does require any plugin and/or script that uses oldName to be modified to refer tonewName.
Syntax
RenameGroup(oldName, newName: string)
Examples
JavaScript
repoObject.RenameGroup("Users", "Customers");
VB Script
repoObject.RenameGroup "Users", "Customers"
RenameKey
Renames key oldName to newName in group GroupName. While this operation has no impact on the datastored in that Group, it does require any plugin and/or script that uses oldName to be modified to refer to

newName.
Syntax
RenameKey(GroupName: string, oldName: string, newName: string)
Examples
JavaScript
repoObject.RenameKey("Users", "LastName", "SurName");
VB Script
repoObject.RenameGroup "Users", "LastName", "SurName"
SetValue
Updates multiple keysets in group GroupName by setting the key KeyName to Value for all keysets thatmatch Condition. The condition is specified using basic SQL WHERE syntax. The Condition may be leftempty in which case all keysets in GroupName are updated. Note that KeyName must exist in GroupName,otherwise an error is raised. The method returns an array of the keyset ID's that were updated ( [1,2] ), or anempty array ( [] ) if no keysets were updated.
Syntax
SetValue(GroupName: string, KeyName: string, Value: string, Condition:string): string
Examples
JavaScript
repoObject.SetValue("Users", "FormOfAddress", "Mr.", "Gender='M'" );repoObject.SetValue("Users", "FormOfAddress", "Ms.", "Gender='F' ANDMaritalStatus='Married'" );repoObject.SetValue("Users", "FormOfAddress", "Miss", "Gender='F' ANDMaritalStatus=''" );
VB Script
repoObject.SetValue "Users", "FormOfAddress", "Mr.", " Gender=""M"" "repoObject.SetValue "Users", "FormOfAddress", "Ms.", " Gender=""F"" AND
MaritalStatus=""Married"" "repoObject.SetValue "Users", "FormOfAddress", "Miss", " Gender=""F"" ANDMaritalStatus="""" "
SetValueByID
Updates KeyName with Value in group GroupName, where the keyset's ID matches the ID parameter.KeyName must exist in GroupName, otherwise an error is raised. The method returns the ID of the keysetthat was updated or -1 if the keyset was not updated.
Syntax
SetValueByID(GroupName: string, KeyName: string, Value: string, ID:integer): integer64
Note
This method is functionally equivalent to using "SetValue" on the previous page with its Condition parameter setto "ID=ID".
Examples
JavaScript
repoObject.SetValueByID("Users", "FormOfAddress", "Mr.", 10); // bothmethods performrepoObject.SetValue( "Users", "FormOfAddress", "Mr.", "ID=10" ); // thesame task
VB Script
repoObject.SetValueByID "Users", "FormOfAddress", "Mr.", 10 '' bothmethods performrepoObject.SetValue "Users", "FormOfAddress", "Mr.", "ID=10" '' the sametask
Version
Returns the version of the DLL library used by the Repository.
Syntax
Version(): string
Special Workflow TypesPlanetPress Workflow supports multiple input and output types, in so many different combinations that itwould be hard to give example processes for each possibility. However, some types of processes like PDF,HTTP and SOAP are important enough to pay some attention to them.
This chapter will describe each of these special workflow types and give at least one example of animplementation that uses them.
Special WorkflowsPDF Workflow
A PDF workflow uses a PDF as it's job file and manipulations are generally made in the Metadata instead ofthe PDF itself, since PDF files are much larger than most other data files compatible with PlanetPress Suite.The Metadata Tools are extensively used in the example presented, which is a weekly sales report sent toall the sales associates of a particular company branch. See the "PDF Workflow" on page 169 for moredetails.
PlanetPress Capture Workflow
A Capture workflow is divided in two steps: Creating an output of documents containing the PlanetPressCapture Fields, and retrieving the information from the Anoto Digital Pen to merge it with the originaldocuments. See "PlanetPress Capture Workflow" on the next page for more details.
HTTP Server workflow
An HTTP workflow receives requests from a client via a GET or POST request, sometimes only withinformation, sometimes with attached files. An HTTP workflow is basically an XML workflow since that is thetype of file created by the HTTP Server Input action task. See the "HTTP Server Workflow" on page 162page for more details.

SOAP Workflow
As SOAP can be either a client or a server, two workflows will be presented. The SOAP Client workflowpresents PlanetPress Workflow as the client and will explore how to retrieve WSDL information and how tomake a SOAP request as a client. The SOAP Server workflow will show how to create a process thatresponds to SOAP requests, and where our own WSDL is located.
PlanetPress CaptureWorkflowPlanetPress Capture, introduced in PlanetPress 7.2 and enhanced ever since, is a set of tools that is usedto simplify digital archiving processes by capturing information from a special pen which records everythingit writes on paper, as long as this paper contains special Anoto Patterns.
Warning
There are important considerations to keep in mind when dealing with PlanetPress Capture. Pleasereview them in "PlanetPress Capture Implementation Restrictions" on page 144.
In order to properly build a PlanetPress Capture workflow, it is very important to understand the terminology,implications and limitations of the technology. This is the first part of this section:
l "Capture Information" on page 130l "General Considerations" on page 133l "Security Considerations" on page 136l "20,000 Patterns" on page 137l "PlanetPress Capture Implementation Restrictions" on page 144
There are also 2 external tools that are used to communicate the pen's data to PlanetPress Workflow:
l "Anoto penDirector" on page 142l "PlanetPress Mobile Application" on page 144
Creating a Capture-Ready document
This is done when creating your PlanetPress Design document. Adding one or more PlanetPress Capturefields to a PlanetPress Design document creates a capture-ready document, which can be used in the

workflow. For more information, see the PlanetPress Design User Guide.
Generating the Capture Patterns
Once your document is created, the Capture Fields Generator action task is used to apply the capturepatterns to each of your documents and send them to the printer. This printing process will consist of:
l Retrieving your data file.l Creating metadata (See "Create Metadata" on page 447).l Separating each individual document in the metadata (this can be done in your Design document orthrough the "Metadata Level Creation" on page 461 action task).
l Using the "Capture Fields Generator" on page 422 action task to generate the capture patternsl Printing your documents.
Capturing and Archiving
After the printed documents have been inked with the Anoto Digital Pen, the PGC files from the pen must beprocessed and merged with the appropriate documents in the PlanetPress Capture Database. A workflowprocess that receives PGC files and reads them in turn consists of the following actions:
l An "HTTP Server Input" on page 202 task or "Folder Capture" on page 189 task that receives thePGC.
l The "Capture Fields Processor" on page 426, which converts each PGC in an EPS layer, adds thislayer to the PDF in the database, releases patterns and closes documents.
l Optionally, a "Capture Condition" on page 416 task to do post-processing using the Capture Fieldsdata.
l A "Get Capture Document" on page 441 action task to retrieve each document in the database andoutput a PDF file
l Any existing output such as Output to Folder, email, ftp, etc.
Technical
Because of timeout limitations, it is generally a good idea to use the Send immediate response toclient option of the HTTP Server Input task, especially when processing a large amount ofdocuments from the pen. Additionally, HTTP Server Processes should always be self-replicating and

have a short polling interval set in their properties.
Managing and Post-Processing
There are a couple of things that can be done even after documents have been inked. As long as adocument remains open, it is still present in the Capture database and be used in a process:
l The "Find Capture Documents" on page 436 input task is used to retrieve a list of documents underspecific criteria.
l The Capture Condition and Get Capture Document tasks are used to effect post-processing andretrieve document from the Capture database.
Error Handling
Whenever an error occurs during the Capture Field Processor phase, it is of course important to be able tohandles these errors. For this purpose, the "PGC to PDF Converter" on page 444 task was added withPlanetPress 7.4, adding the ability to quickly and directly convert a PGC file to a blank PDF file containingthe ink data as an EPS layer. This is useful when, for example, data is received for a document that'salready been closed.
l The "Input Error Bin" on page 207 input task is triggered when the process sends data to the errorprocess.
l A "PGC to PDF Converter" on page 444 task converts the PGC to a PDFl Any existing output is used here, for example an email notification.
The Examples
l "Basic Functional Capture Workflow" on page 156l "Capture Post Processing Workflow" on page 158l "Capture Web Manager Workflow" on page 161
Capture Information
PlanetPress Capture Glossary
This topic describes the specific terms used in the PlanetPress Capture set of tools within PlanetPressWorkflow.

Anoto Digital Pen
A digital pen compatible with the Anoto system. These pens contain a camera, processor and memory chipwhich record each stroke of the pen on a printed Anoto Pattern, and are able to send this information back toPlanetPress Workflow. This document specifically refers to the Anoto DP-201 Digital Pen, not otherequipment has been tested.
Anoto Functionality Statement
Statement ('Paper featuring Anoto functionnality') that is automatically placed on the page when aPlanetPress Capture field is present. The statement can also include the Trace Code
Anoto Pattern
A series of dots placed in a pattern that is unique to each page where the pattern is printed. The AnotoDigital Pen identifies this pattern and its location on the page. PlanetPress Capture contains 20,000 patterns(8 in demo mode, See "PlanetPress Capture License Management" on page 637) which can be used togenerate documents.
Capture Condition
PlanetPress Workflow task that is used for post-processing of documents after they have been processed bythe Capture Fields Processor. Conditions can be made on the document status or the presence (orabsence) of ink on any of the Capture Fields on the document.
Capture-Ready Document
A PlanetPress Connect document (*.pp7) that contains at least one Capture Field on at least one page.
Capture Document Manager
A tool that lets a user search through the available documents in the Capture Database. The documents canbe search through a few different criteria and can be displayed as PDF files, individually or as a group.Documents can also be closed or deleted from this interface.
Capture Field
The PlanetPress Connect object that acts as a placeholder for the Anoto Pattern. The pattern is only appliedwhen using the Capture Field Generator in Workflow.
Client/Server Architecture
A multi-server setup where more then one PlanetPress Workflow server are connected as clients to a singlePlanetPress Workflow server which has a Capture Database. In this architecture, the Server contains thelicenses for the pens, however the Client contains the database of documents and patterns. The Clientscommunicate with the server to authenticate pens. This architecture is only provided to simplify penlicensing for users with a large number of pens.
Closed Document
A document still within the PlanetPress Capture Database of which all the required fields have been filledby the Capture Field Processor from a PGC. A closed document will only remain in the database until it isretrieved with the Get Capture Document task, after which it is deleted.
Contamination
The act of writing on a "wrong" document, aka one that has a Pattern Sequence different that the one forwhich it was produced.. This can happen in architectures with more than one sequence being used such aswhen a pen is docked in the wrong location or if two pens are swapped.
ICR (Intelligent Character Recognition)
Recognizing text that has been hand-written with the Anoto Digital Pen. This feature is currently notimplemented in PlanetPress Capture, but will be in the (near) future.
Ink Data
The pen stroke information contained within the PGC file. This is the actual data applied to the document(lines, signatures, text, etc).
Open Document
A document in the Capture Database that does not yet have any ink data on it, or of which not all mandatoryfields (or final field) have ink present on them. Such a document is waiting for a new PGC file to complete itso it can be closed.
Pattern ID
The ID of the Anoto pattern. Represents the pattern on the page. Can be used to retrace the document towhich the pattern belong.
Pattern Sequence
Pattern Sequences enable the multiplication of the number of available pattern by adding an extraidentification to the document. A Pattern Sequence is also attributed to each Anoto Digital Pen, such as anincoming PGC file will contain the Pattern, on which the Pattern Sequence is added from the pen database.The pattern and pattern sequence refer to a specific document in the database. Signing a document with apen of which the Pattern Sequence does not match that of the document causes Contamination, which cancause errors or ink to be placed on the wrong document.
Pen ID
The serial number of the Anoto Digital Pen. It is registered in the PlanetPress Capture database and ispresent in each PGC file.
PGC File
Pen Generated Coordinates; PGC File containing all ink processed while the pen was undocked along withthe Pen ID. It is possible that a single document requires multiple PGC, just as it is possible that a singlePGC have multiple documents.
Pidget
Type of PlanetPress Capture object. Page element used to give instructions to the Anoto pen, as opposed torecording ink.
PlanetPress Capture Database
A database containing the list of patterns, sequences, registered pens and documents. The CaptureDatabase can be used by a single server, or by multiple servers in a Client/Server architecture.
Session
The time spent by the pen between events that trigger a new session. Generally a session refers to any inkin a single page containing a Capture Pattern. A session can contain ink from multiple fields in any order. Anew session starts whenever a PGC is sent for processing (which erases the data from the pen).
General Considerations
Here are some general considerations in regards to PlanetPress Capture, its environment, the hardwareand the software that interacts with it. Please review these considerations carefully as they may impact
PlanetPress Capture and its functionality.
Warning
PlanetPress Capture Fields cannot simply be inserted into an existing document as-is and expectedto work properly, efficiently or consistently. In order to design a document with Capture Fields, youmust review and understand the Critical PlanetPress Capture Implementation Restrictions.
Database Considerations (ODBC)
Technical
On 64-bit operating systems, the ODBC Data Sources created by the Data Source (ODBC) icon in theAdministrative Tools will not appear here, as PlanetPress Suite is 32-bit and cannot access the 64-bitdata sources. In order to create an ODBC connection visible by PlanetPress, you will need to accessthe 32-bit version of the ODBC manager, available in C:\Windows\SysWOW64\odbcad32.exe .
The following considerations should be kept in mind while working with ODBC Databases in PlanetPressSuite.
l All databasesl User Rights: During normal operation, Read/Write to tables should be sufficient. However,during the initial setup, the Create/Drop tables rights is necessary.
l Minimum 100MB of database size is required as a minimum, but the space requirement dependson the implementation. The more active documents in the database, the more space is used -note that this progression is rather linear.
l Regular database maintenance is required, such as database compacting, is required by asystem administrator.
l It is recommended to create an IT process that backs up the database regularly.l The recommended ideal setup is a dedicated SQL Server PC, accessed by PlanetPressWorkflow through an ODBC connection on the local network.

l Microsoft Accessl Database file (mdb) must be local to the PlanetPress Workflow computer. It cannot be located ona network drive or another server.
l Total database size is limited to 4GB of data.l Total size of a single table is 2GB.l May be unstable in large implementations.
l MySQLl Database can be in any location, but performance will depend on the speed of the connectionbetween PlanetPress and the MySQL server.
l MySQL's performance has been slower than SQL Server and SQL Server Express during ourtests.
l By default, MySQL is configured not to allow any SQL request larger than 16 megs.l In the event where 2 requests are made simultaneously on the same record, MySQL will queueone of the requests and execute it once the first one is done. In extremely rare cases this maycause a timeout on very large requests.
l MSSQL (Microsoft SQL Server)l All versions of the SQL Server are supported, including all Express versions.l Database can be in any location, but performance will depend on the speed of the connectionbetween PlanetPress Production and the SQL server.
l In the event where 2 requests are made simultaneously on the same record, SQL Server willdrop the most complex request. Resubmitting the PGC for processing should resolve this issue.This, however, should happen only rarely.
l When configuring the ODBC connection, your must use the Microsoft version of the driver, andnot the Native SQL version of the driver. This is due to a technical limitation of the native driverthat interferes with the PlanetPress Suite database requests.
Specifically for PlanetPress Capture, these considerations mean the following:
l In Microsoft Access, the total size of stored document cannot be larger than 2GB and this databasewill be very unstable in implementation with more than a few thousand pattern sequences being usedsimultaneously. It is only suggested for small implementation with less than 10 pens, or for demos.
l In MySQL, the 16 megs packet size limit can be an issue if the PDFs created by Capture are largerthan this size; An error saying "MySQL Server has gone away" would appear in this case. This can befixed by configuring the max_allowed_packet setting in the MySQL Configuration (Reference).
l Also in MySQL, if a timeout occurs on simultaneous record access, resubmitting the PGC forprocessing should resolve the issue.
l In SQL Server, if one of your requests is dropped because of simultaneous accesses, resubmitting thePGC should resolve the issue.
Security Considerations
PlanetPress Capture introduces new and efficient methods for digitally capturing the contents of ink ladedout on physical paper. However, because of its nature, some end users may voice concerns about securityand privacy. Are signatures secure? Could their transmission be intercepted? How can the contents of theAnoto digital pen be protected from malicious users?
Before addressing these concerns, it must be pointed out that these security issues are not introduced bythis new technology. In fact, they are essentially the same concerns that arise with plain pen and paper: ifthe signed document can be scanned, then any markings on the page can be extracted and reused byanyone with even limited technical skills. In addition, the signed document has, by definition, a longer lifespan than the temporary storage location of the digital pen. Consequently, it is still the most vulnerable pieceof the workflow and as such, it should be the first objective of any security effort.
In other words, as long as the physical piece of paper bearing markings is accessible to malicious users, noamount of security protocols can protect the signed contents. It is only after the paper trail has been securedthat the security and privacy issues specific to PlanetPress Capture should be addressed.
Because PlanetPress Capture relies on external data and communication and because it may be used toprocess sensitive and legal information, it is important to understand the security implications of anyPlanetPress Capture implementation. Most of the security concerns regarding Capture are external to it.This means the security that is implemented both on your network and physical premises are critical to thesecurity of your PlanetPress Workflow implementation.
Here are a few notable points with the security of PlanetPress Capture on a network:
l PGC Files, while not written in plain text, are not encrypted and are readable through eitherPlanetPress Workflow (even a server that did not generate the document associated with it), or throughthird-party applications using the Anoto SDK. This means if someone gains access to your PGCstorage folder, they may be able to read the signatures, checkmarks and other information contained init and reproduce them on a document of their choice. It is always better to secure this folder properly.You could also use third-party encryption software to secure the files, and decrypt them as necessaryfor reprocessing.
l The transfer between the Anoto penDirector and PlanetPress Workflow is not encrypted due to alimitation of penDirector which does not support SSL connections. This means someone locatedanywhere between penDirector and PlanetPress Workflow could use software such as a packet snifferto retrieve its parts and recreate the PGC files. This may be resolvable by create a secure VPN tunnelfor each location where penDirector is installed instead of going through regular remote HTTP server.
l The PlanetPress Capture database, since it can be external to PlanetPress Workflow such as on aMySQL server, will be dependent on your own database security.
l The Anoto Digital Pens, since they may contain critical information, are just like physical sheets ofsigned paper and must be kept secured. This is best done through training employees handling thepens to be aware of its value and contents and act accordingly. This means that the security of the penis just as important as the security of any existing physical documents you may handle at the moment.
l The same rules apply to PDF files as with PGC files, especially when they contain a signature fromthe pen. If you are already securing digital scanned copies of signed documents, the PDFs should besecured in similar ways.
However, remember that as with most security concerns, in order to be a “threat”, someone would have tohave a high level or working knowledge of either the Anoto SDK (which is not easily obtainable) orPlanetPress Workflow and PlanetPress Capture. In some situations this may be enough (security throughobscurity) but we always recommend having the same level of security for Capture files and documents asyou would the rest of your sensitive information. In most cases, the procedures in place are enough for thispurpose.
20,000 Patterns
When reading or learning about PlanetPress Capture, you may have seen a number pop up here and there:"20,000 Patterns". In order to better understand what this number means and what it entails for you, the user,this document will first present an overview of a typical PlanetPress Capture implementation and thenexplain how the 20,000 patterns limitation can be circumvented in some cases. We will also touch upon thepotential pitfalls of these workarounds as they are used.
The Numbers
First and foremost, the 20,000 patterns is a fixed number - PlanetPress can only generate 20,000 uniquepatterns as this is the number of patterns that we license through Anoto.
The 20,000 patterns are, however, not all available when generating documents. There are 8"demo" patterns that are used to generate documents when PlanetPress Capture is in demo mode (nolicense activated), and react the same way that the bulk of the 20,000 patterns. Another single pattern isused to register pens in the database, and one last single pattern is used when printing a "Preview" from
PlanetPress Design. So in reality, the number of available patterns for document generation is 19990, but forsimplicity's sake this FAQ uses the round number "20,000".
In a typical PlanetPress Capture implementation, a process in PlanetPress Workflow generates output(generally, this output is directly printed) and, at the same time, will "lock" one pattern for each page that itgenerates, if that page contains a pattern. PlanetPress Workflow also stores a copy of each document in theCapture Database, in PDF format.
While a document is printed, and while this printed document has not received any ink or signature, thedocument is deemed "open", the pattern it uses remains locked in the database and cannot be re-used.Then, when someone writes on the document and sends the pen data to PlanetPress Workflow (through adocking station or through Bluetooth), if the required conditions have been met, the document will be"closed", its pattern released and available to be used immediately.
An open document can also be called a "live" document, in the sense that it is only active between the timewhere it is printed and the time where ink from the Anoto Digital Pen is processed and the document isclosed. This duration is called "time to live" or "TTL", and it is the second very important number: how long isthe pattern actually needed.
The third important number is based on your actual output needs. In other words, how many documents doyou intend to print on a regular basis that will contain a pattern?
These three numbers, together, represent an easy way to determine if the 20,000 patterns are actuallyenough for you. Basically, if you generate X documents within a specific time frame but N of thesedocuments are closed through regular process (writing on them with a pen and docking it) during that period,does the difference between both ever reach 20,000?
Example
Say you print 19,000 pages containing a pattern, every day. You may think you'll "run out of patterns" after asingle day. But if 18,900 of these documents are being written to and processed within the day, at the end ofthe day you only have a 100 page difference, possibly due to mistakes, lost pages, or errors duringprocessing. In this specific example, you would run out of patterns only after 10 days, assuming the numbersremained completely static. Since there are easy ways to deal with these remainders (a simple automatedprocess that, once a day, closes any document that is older than 48 hours, for example), a correctimplementation like this one would be perfectly functional and not be affected by the 20,000 page limit.Remember however that this means that 19,000 physical sheets of paper are printed every day, and those19,000 documents are written on using one or more Anoto Digital Pens, which are then processed back intothe system.

The example above actually uses numbers that are much higher than our typical PlanetPress Capture user.That is to say, a vast majority of our users will never have to worry about reaching the pattern limitation,unless their implementation is missing important parts, such as the "cleanup" process. But this also means asmaller minority of our users may require more than 20,000 patterns, so let's deal with this now.
Extending
There are actually 2 ways of dealing with extending the number of patterns using the currently availabletools, each with its own advantages and disadvantages.
Using separate PlanetPress Workflow servers and licenses.
In a scenario where there are multiple locations that use PlanetPress Capture and where neither pen norpaper has any risk of being moved from one location to another, the easiest (but costlier) solution is to havea separate installation of PlanetPress Workflow in each location. Each installation would be responsible forits own documents and pens. The limitation here is that it would not be directly possible to send a page withan existing pattern to another location (either via email in PDF or via courier), sign it there and send it back -this would cause errors that would be hard to prevent and correct. In this scenario however, it's possible tocentralize the activation of pen licenses to one server, while keeping the pattern generation systemsseparate.
Using Pattern Sequences
In the event where a single location generates all the patterns and this output *can* be split into multiplelogical zones, Pattern Sequences can be used. A Pattern Sequence is basically a "tag" that is added afterthe pattern's identification (Pattern ID). When a Pattern Sequence is used, each Pattern Sequence can re-use each of the 20,000 available patterns. "Zones", in this case, could refer to a specific region within a city,or a whole city or a province, whatever fits your needs.
Pattern Sequences can be handled in 2 different ways: by attaching a Pattern Sequence to a specific pen, orby attaching it to a specific PlanetPress Workflow process. Here is an example for each cases, using atypical situation of a shipping company that uses PlanetPress Capture to simplify the archiving of the client'ssignature on a "Confirmation of Reception" slip.
l Pen-Based Sequences: In this case, each pen is attributed a specific pattern sequence. Whendocuments are printed, they are set to attribute a pattern sequence to each document in relation towhich pen it will be signed on. For example, the shipping company may have decided to print each"route" using the route number as a pattern sequence, and each pen is tagged (with a label) as beingfor use with a specific pattern sequence also. Each morning, as drivers are attributed a route, they pickup the correct pen and stack of paper that belong to their route before leaving.
Note
It's very important to note here that the Anoto Digital Pen has absolutely no concept of Pattern Sequences. When"attributing" a sequence to a pen, this is fully on the PlanetPress Workflow side, in the Capture Database. Thismeans that if a pen is mislabeled or someone picks up the wrong pen, this pen has absolutely no way to know thatit is writing on the wrong paper. more about this in the Contamination section below.
l Process-Based Sequences: In this case, while documents are still printed and their route numberattributed to their pattern sequence, the pens do not have this distinction. However, the docking stationwhere the pens are placed at the end of the day are set to send the pen's data to a specific processwhich will only handle processing for that specific route number. In this case, one physical computer(and, presumably, printer) is used for each route, and the driver must dock the pen in the properdocking station which corresponds to his router number, at the end of the day.
As you may have figured out by now, we are still not actually printing more than 20,000 patterns. The onlydistinction here is that we are re-using patterns in separate "zones" (or, well, sequences) and as long aspens and pages using capture patterns are not exchanged between these zones, they act independentlywith their own 20,000 pattern limitation.
Note
The mobile phone application, "PlanetPress Mobile", which uses Bluetooth communication to receive pen dataand transmit it to PlanetPress Workflow, can still be used with both pattern sequence methods, as it is theequivalent of a docking station on the web. PlanetPress Mobile was added to PlanetPress Capture in version 7.4.
Contamination
The single but critical danger with any implementation that deals with PlanetPress Capture is"Contamination". Basically, contamination happens when an Anoto Digital Pen writes on a "wrong"document or is docked in the wrong location. This can happen any number of ways and in differentsituations, and can have devastating effects in some of those cases so please pay special attention to thissection.
First, contamination is not limited to implementations that extend their patterns through methods 1) and 2)above. Any time that a pen writes on a "wrong" document, it is considered contamination. A simple examplein a basic implementation would be to print a document with a pattern on it, put this paper aside (or lose it ona desk somewhere) and forget about it. Assuming proper processes were put in place, this document would
eventually be closed by a manual or automatic procedure. However, the physical document with the patternstill exists even if it is closed in regards to the PlanetPress Capture database. Contamination would happenif a new document is printed with the same pattern, but somehow the "old" document re-surfaces andsomeone writes ink on it and docks the pen. When this happens, neither the pen nor PlanetPress Workflowcan understand that the data does not belong on that document and will happily update the "current"document, possibly closing it. Because the "old" document relates (presumably) to a different client, thismeans the "current" document has invalid information.
This can be prevented through simple methods such as printing a date on each sheet and ensuring thatusers never sign a document that is older than a certain time, for example 48 hours. These sheets shouldsimply be destroyed.
Second, contamination can happen in method 1) above if a pen or paper is moved from one location toanother. Similarly to the previous contamination example, if there exists a document in the CaptureDatabase where the "wrong" data is processed, it will update a document where it does not belong. Again,neither the pen nor PlanetPress Workflow have any idea that this causes an error until it's too late.
Third, contamination (the most common one) can happen if pattern sequences get mixed up, if pens orpaper gets swapped between users, etc. For example, again using a shipping company (with example 2-A),if two of the drivers were to meet for a coffee and exchange their pens inadvertently (we hope, anyways), thepens would be signing the "wrong" documents all day and, when docked, would update the wrongdocuments in the database.
In all of these cases, the errors often do not appear when the wrong document is updated - it actually occurswhen the "right" data is processed. This happens precisely because the Pen and Production have no ideathat the wrong data is received and will generally close the document after that "wrong" data has beenprocessed - this often works with no error. However, when the "right" data is processed, then it tries toupdate a document that has already been closed by the "wrong" data, and thus fails.
Safeguards
There are certain safeguards against contamination:
l PlanetPress Capture checks for pattern size and placement. If the data contains ink for a specificpattern but the ink location does not correspond to the Capture Fields of the document it's updating, itwill fail.
l Errors can be set to stop and revert the whole current batch. If a single error occurs during the pen dataprocessing, it is possible for this processing to be stopped and all changes the Capture Database

reverted. In implementations where the pen signs high number of documents, this can especially be aneasy way to do this, as chances are the data will not match in at least one case.
Conclusion
l PlanetPress Workflow can only generate 20,000 unique patternsl One pattern is used (locked) for each page containing a pattern.l Processing the ink data from a pen and closing the document releases the patternl Most implementations will not need more than 20,000 patternsl When necessary, patterns can be extended using multiple servers or Pattern Sequences (as long asthese are used in separate physical locations).
l It is extremely critical that contamination be avoided at all costs.l Whenever possible, always avoid using pattern sequences unless it is absolutely necessary to do so.
Anoto penDirector
The Anoto penDirector is a software driver provided as a download by Objectif Lune Inc. The penDirectorcreates a bridge between the Anoto Digital Pen and a PlanetPress Capture workflow in PlanetPressWorkflow.
In order to use penDirector, it needs to be downloaded from the Objectif Lune website, on this page. Thissoftwaremust be installed after PlanetPress Workflow. The setup will install a pre-configured version ofpenDirector which can be immediately used with PlanetPress Capture.
The communication between penDirector and PlanetPress Workflow is either through a folder transfer orHTTP Post communication.
To configure this communication:
1. Open penDirector setup by right-clicking on its icon in the Windows System Tray, and selectingpenDispatcher.
2. Double-click on the PlanetPress Capture entry.3. Change the PGC Storage folder or PGC POST URL settings to your liking.4. Click OK, then OK again.
The PGC POST URL should correspond to your server name or IP, Port and the HTTP Action task of yourHTTP Input, if that is what you are using.
Example: http://127.0.0.1:8080/ProcessPGC
Bluetooth Connectivity
The Anoto penDirector program can also connect directly to the pen via wireless Bluetooth and receivePGC files directly through the Bluetooth link, without needing to dock the pen.
To pair penDirector with an Anoto Digital Pen:
1. Make sure that a Bluetooth dongle is present and enabled on the computer where penDirector isinstalled.
2. Note down the PIN of the Anoto Digital Pen, by docking the pen and going in the Pen settings tab ofpenDirector and looking at the Pen access group at the bottom of the dialog. The default PIN is 0000.
3. Undock the pen, or remove its protective cap if it is not docked. Make sure the power light on the pen isturned on and green in color.
4. Go in the Bluetooth tab of penDirector and click on Add Pen.5. Click on Search while the cap is off on the pen.6. When the pen is found, click on it and then click Add.7. When asked for the PIN, enter the one noted above.8. Click OK to save the settings.
The settings for Bluetooth PGC handling are separate from the ones used when docking. ThroughBluetooth, only a single storage and PGC Post URL location can be set for all PGCs.
Warning
Because the Bluetooth configuration only handles a single route, it is not possible to use the Designpreview patter, or the special registration pattern, using Bluetooth connectivity. To use the previewPattern in PlanetPress Design or use the special registration pattern, the pen's docking station mustbe used.
To specify where to send the PGC files received through Bluetooth:

1. Open penDirector.2. Go to the Bluetooth tab3. Click on the paired pen that you want to configure4. Specify a PGC Storage folder5. Check the PGC POST URL option6. Enter the URL of your PGC handling process in the box7. Click OK to save.
PlanetPress Mobile ApplicationThe PlanetPress Mobile application can be installed on some mobile phones and enable fast and directconnectivity between the Anoto Digital Pen and PlanetPress Workflow. The connectivity between the penand the mobile phone is done through Bluetooth, while the connectivity between the mobile phone andPlanetPress Workflow is through the currently active data plan (either wifi or the cell phone company's dataplan, such as 3G).
PlanetPress Capture Implementation Restrictions
This document describes the limitations of the Anoto Digital Pen & Paper Technology, especially in regardsto using it within a PlanetPress Workflow implementation. Note that these limitations apply to any Anototechnology implementation and not just our own.
Printer limitations
Any document printed with Capture Fields (aka Anoto Patterns) must be sent through a Laser printer.Bubble jet printers are not supported and will most likely cause reading errors with Anoto Digital Pens.Thermal printers will not work either due to the low quality printout and the absence of actual blank ink onthe paper.
Black ink close to patterns
Because the Anoto Pen & Paper technology relies on infrared to read pure-black dots on the paper, it isimperative that no other black ink interfere with this reading. Though it is possible to print Capturedocuments on a black & white laser printer as long as there is no other ink on top of, or close to, the patterns,this is not recommended. A color laser printer should be used, and any elements placed close to, or on topof, the Capture Patterns should be printed in color. Black ink can be simulated using composite colors, butshould never be pure black.

Paper quality
The PlanetPress Capture technology, when generating the Anoto Pattern, already accounts for inkdispersion on laser printers and on general-use laser paper. Therefore, using paper that is not of the samequality (for example, one where the dispersion rate is much higher) or the same type (reflective paper) maynot permit the pen's camera to read the pattern properly.
Pattern sizes
The absolute minimum required for an Anoto Digital Pen to read the pattern and know it's position on thepage is 7mm (1/4"). Any pattern smaller than this will not be readable. However, at 7mm width and height,the pen can only recognize a single dot within that pattern, at the top of the field.
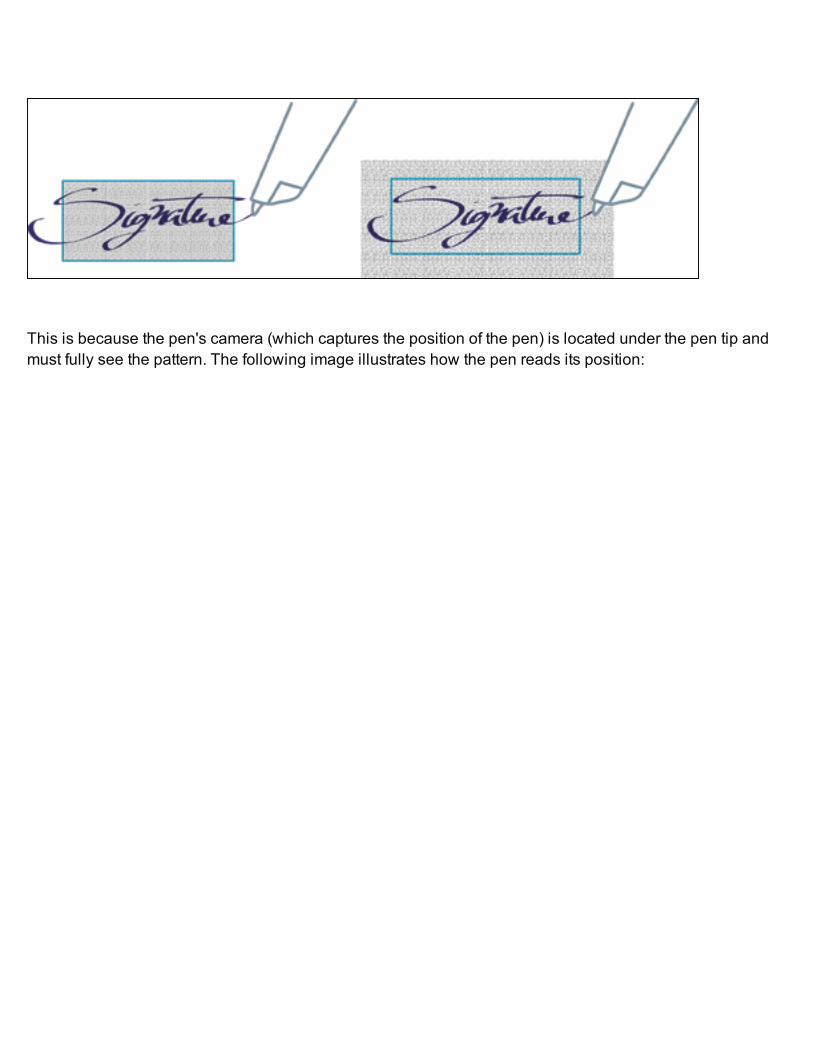
This is because the pen's camera (which captures the position of the pen) is located under the pen tip andmust fully see the pattern. The following image illustrates how the pen reads its position:

Knowing this, the best practice when creating fields is that they have, at the very least, a 7mmmargin oneach size of the actual area you want to capture from. For example, an effective 30mm wide pattern willactually be 44mm wide using these margins. The margin should be for both the vertical size and thehorizontal size.
Distance between patterns
In implementations where a lot of patterns need to be close together (a questionnaire, multiple choicequestion, checkmarks, etc) it is important to understand the risk of then pen writing across multiple fields onthe paper. People using the pen may, for example, make a very broad checkmark which would bleed over to

the next field. This can cause PlanetPress Capture to detect the ink as being present, and thus triggerwhatever that field does.
PlanetPress Capture ICR
The term "ICR", which means "Intelligent Character Recognition" is an evolution on the popularly-known"OCR", which is "Optical Character Recognition". The difference between the two is easily explained: WhileOCR can only recognize characters using the finished shape (for example, in scanned documents andpictures), ICR relies on much more data which is provided by the Anoto Digital Pen: the path that the pentakes, the exact timing of this path, start and stop points, etc. This extra information boosts the recognitionrates of characters by a wide margin.
It's important to note that both OCR and ICR are relatively loose terms - that is to say, they can have differentspecific meanings depending on the technology used, but in their general sense mean the same thing.When using the term ICR, we use the above definition for convenience.
Note
The PlanetPress Capture ICR engine is only available with PlanetPress Workflow version 7.5 andhigher.
An ICR Workflow
The ICR engine in PlanetPress Workflow is used in conjunction with PlanetPress Capture, translating theink from the Anoto Digital Pen into separate characters, or text, that is readable by the suite. Multiplecomponents are required in order for the ICR to work:
l In PlanetPress Design, a Capture Field Objectmust be added and the Perform ICR option must beactivated (See the Capture Field page in the PlanetPress Design User Guide). This must be either aMulti-Area Field or a Text Field.
l The Capture Fields Processor must have the Perform ICR Recognition option checked, and languageneeds to be selected.
l Once the ICR data is available, do something with it. This is done by reading the ICR data that isavailable in the metadata generated by the Get Capture Document task.
l The metadata is also readable by the Capture Condition task, including the captured text and thereliability of this text.
The Workflow as such is the following:
l A Capture field is setup for ICR in a PlanetPress Design document.l The document is sent to PlanetPress Productionl The Capture Field Generator is used to produce one or more print-outs using this document.l The physical sheets are written on using an Anoto Digital Penl The pen is docked and the data is sent to PlanetPress Productionl The pen data goes through the Capture Field Processor, where the Capture Field ink is sent throughthe ICR engine.
l The captured ICR data is retrieved with the document using the Get Capture Document task.l Conditions are applied if necessary with the Capture Condition task.
Warning
ICR, just like OCR, has its limitations. Please refer to the PlanetPress Capture ICR Best Practicespage for more information.

Terminology and Definitions
In regards to our ICR technology specifically, the following terminology applies:
l ICR: "Intelligent Character Recognition", or the engine that will read the pen data and attempt torecognize the text written using the pen itself. The ICR engine uses the path of the pen, its movementspeed as well as the overall shape of each character to determine which character was written.
l ICR Value: The alpha, numeric or alphanumeric value that was determined by the ICR engine.l ICR Confidence: A percentage value that the ICR engine gives to any specific value, whencomparing the pen data with it's character database.
l ICR Resemblance: A percentage value that defines how closely the value resembles the"average" character shape. Both the Confidence and Resemblance can be used together to make aninformed decision on the contents received by ICR.
PlanetPress Capture ICR Best Practices
The latest version of PlanetPress Workflow (7.5) now gives PlanetPress Capture the capability of doing theIntelligent Character Recognition (ICR). However, this technology comes with certain limitations. Asuccessful integration of ICR within a business requires the application of best practices by all partiesinvolved: Form designer, Workflow designer and User.
The present document gives a list of recommended best practices. Each of these guidelines aim atmaximizing the likelihood that the characters are recognized; and minimize the risk of errors due to anincorrect analysis.
You will find the following information, when applicable, for each best practice:
l Target: The targeted audience. There are 3 possibilities: Form designer, Workflow designer and User.l What: A brief description of the best practice. This could include an explanation of the concepts thatare addressed.
l Why: A brief explanation of the reasoning behind the relevance of this guideline.l How: How to apply this best practice.
This section describes a list of the best practices to implement. They are listed in no particular order ofimportance. Pay attention to the targeted audience to know if this rule applies to you.

Using the Most Restrictive Mask
l Target: Form designer.l What: In the Capture Options tab of a Capture object, the mask type indicates the type of character tobe recognized. There are 3 possible selections: numeric, alphabet and alphanumeric. The alphabeticmask type allows you to select the letter case.
The following guidelines are applicable when configuring a PlanetPress Capture object that utilizes
ICR:
l The collected data is expected to be a number, therefore the numeric mask type must be selected, orl The collected data is expected to be a letter, therefore the alphabet mask type must be selected,l If upper case letters are expected, select Upper case in the Case option menu. The capturedcharacters would be immediately converted to capital letter i.e. the ICR engine will recognize a lowercase a but will display it in upper case.
l If lower case letters are expected, select Lower case in the Case option menu. Same as for uppercase letters, the captured characters would be converted to lower case and displayed as such.
l If proper names or nouns are expected (i.e. only the first letter must be a capital letter), selectCapitalization in the Case option menu. Only the first letter would be converted to a capital letter.
l If no specific format is expected, select None in the Case option menu. The letters will be interpretedas written, no conversion will be done i.e. characters in lower case will be displayed as such.
l The collected data is expected to be a combination of numbers and letters, therefore the alphanumericmask type must be selected.
Why: Reducing the number of expected characters increases the probability that the correct one is matched.This allows us to avoid that the letter l (a lowercase L) is not recognized as the numeric value 1 (one) andvice versa. Or, if the mask type is identified as alphanumeric, there’s a possibility that the letter a isrecognized as 2; since Capture will also interpret how the movement was traced.
How: Use the following options from the Capture options tab underMask Type and Case option to filterthe expected data.
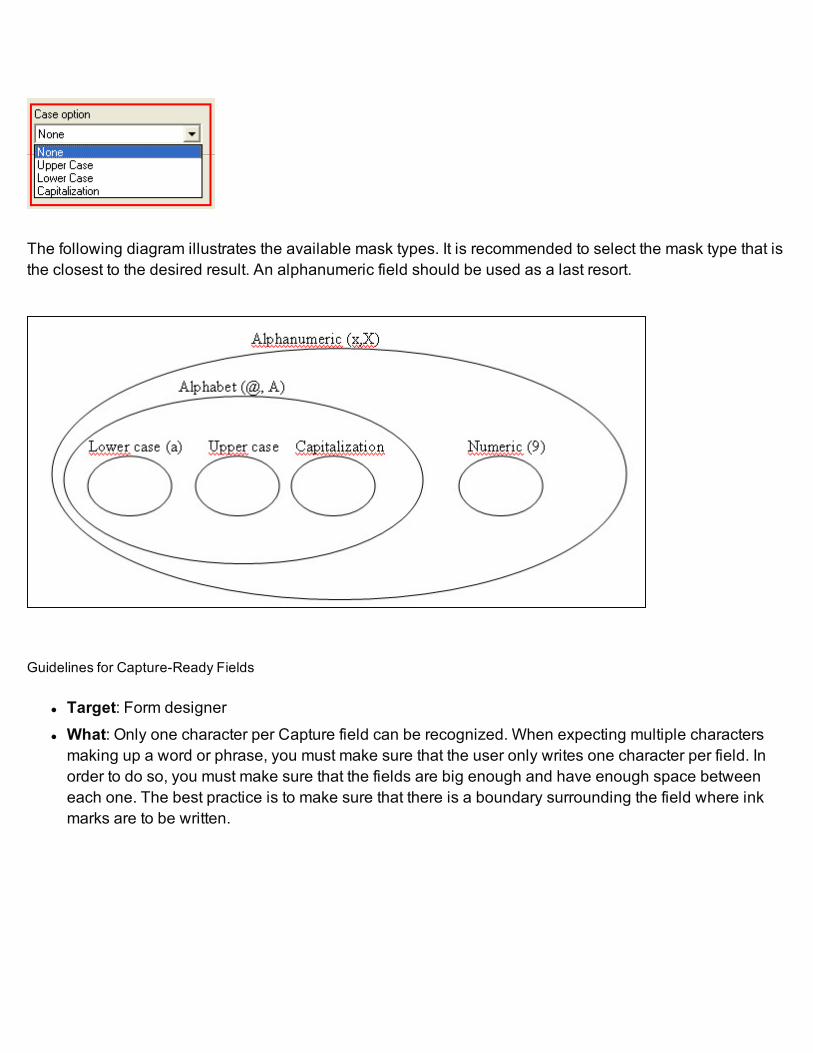
The following diagram illustrates the available mask types. It is recommended to select the mask type that isthe closest to the desired result. An alphanumeric field should be used as a last resort.
Guidelines for Capture-Ready Fields
l Target: Form designerl What: Only one character per Capture field can be recognized. When expecting multiple charactersmaking up a word or phrase, you must make sure that the user only writes one character per field. Inorder to do so, you must make sure that the fields are big enough and have enough space betweeneach one. The best practice is to make sure that there is a boundary surrounding the field where inkmarks are to be written.

Why: To avoid any ink marks that would spill over from one field to another. If both fields A and B are toclose in proximity and the ink marks from field A spill over to field B, then the marks captured on field Bwould be considered as being part of a character written on field B. For example, if a number spills over andis written over two fields like numbers 9, 1 or 7; then the bottom tip of these numbers could be considered asnumber 1 in the second field. (Refer to the example below)
How: Make sure there’s enough space between each field. You must re-design the document if that’s thecase. There’s no minimum value that is required as the distance between 2 fields, except for the 7mm borderthat is required in order for the Anoto digital pen to recognize the pattern being used.
Writing in a Legible Way
l Target: User.l What: It is important to write in a legible way i.e. applying yourself by writing well defined numbers andletter that are easily interpreted.
Warning
You must write on a flat and smooth surface i.e. a delivery person should use a clipboard.
Why: Some numbers can create some confusion, like numbers 7 and 1. 7 can be interpreted as a 1 and viceversa. The letter i, where the dot on top is a circle, can possibly cause a conflict because the dot can beconsidered as an o.
How:
l Write an additional line under the number 1.l Write an additional line across the number 7.l The ICR functionality of PlanetPress Capture cannot recognize dotted letters where there are circlesinstead of dots (like i , j). This would be analyzed as an i AND o. Therefore, dots should be as suchand not circles.
l In French, the ç is somewhat sensitive. You must apply yourself and draw the letter carefully. In mostcases, it is recognized, but attention must be paid.
l Number 8 is also sensitive. It is recommended that the number is traced as one movement instead ofdrawing 2 circles on top of each other.
Selecting the Correct Language When Using the Capture Field Processor Task
l Target: Workflow designer.l What: It is crucial that the correct language is selected when using the ICR recognition option. Thiswill affect how the captured data is interpreted.
Why: The available filters to interpret the ink marks done with the Anoto digital pen, allow you to select theengine language to be used. Doing so will give you results that are the closest match to the captured data.Multiple cultural characters can be interpreted with ICR once the correct language is selected such as û, à,é, etc.
How: This option is available from the Capture Fields Processor task.

Possibility of Interpretation Error in an Automated Process
l Target: Workflow designerl What: We cannot be 100% sure that a character would be recognized by PlanetPress Capture as itshould. Therefore, the analysis of a value interpreted with ICR should only occur if the level ofconfidence is superior to a determined level.
Why: An automated process can treat the characters incorrectly due to an incorrect interpretation of a value.This occurrence should be minimized as much as possible.
How: Allow for a special process (possibly manual handling) in the case the automated process didn’t reacha high confidence level in its analysis of the ink marks. Use the plugin Capture condition that includes theICRContent option. This can be configured to be a true condition if the confidence level is greater than acertain value.
Basic Functional Capture Workflow
This workflow is the most basic and simple workflow that you can use with PlanetPress Capture. In smallimplementations with only one simple document, this may be the only thing required for a functionalworkflow since, even in this simple state, it can be enough to automate the archive of your digitaldocuments.
Generator Process
The workflow requires two separate processes that will be triggered at different times. The first process, thegenerator process, produces printable output by merging a data file with a Capture-Ready PlanetPressDesign document. For each document page produced, an Anoto Pattern is assigned to the document andlocked, and a page is produced in the output. Depending on the setup used, this may produce on or moreprint jobs or PDFs as an output.

l Any input taskl "Create Metadata" on page 447l "Capture Fields Generator" on page 422l Print output
PGC Handling Process
The second process is the PGC Handling process. It receives data from the Anoto Digital pen, updates theCapture database and releases patterns as appropriate.
l "HTTP Server Input" on page 202 or "Folder Capture" on page 189 input taskl "Capture Fields Processor" on page 426

l "Get Capture Document" on page 441l Archive or Print output
Capture Post Processing Workflow
Though the "Basic Functional Capture Workflow" on page 156 is minimal functional one, it will most likelynot be enough for most actual implementations. The goal with PlanetPress Capture (and PlanetPressWorkflow in general) being to automate as much as possible, there are some tools within the PlanetPressCapture tasks that can greatly help with this goal.
There are two places where post-processing can happen: after the "Capture Fields Processor" on page 426while handling incoming ink data, or after the "Find Capture Documents" on page 436 task that is part of anautomated process or after a user request.
Post-Processing is generally done using the "Capture Condition" on page 416 task, which verifies thepresence or state of the ink on the document or on specific fields.
After PGC Handling
Here is an example of a process that receives ink data, updates the database, and then verifies whether ornot a field that indicates manager attention is required (for example, a box noting the wrong number of itemsin a delivery slip). If attention is required, the document is sent via email to the manager. Otherwise, thedocument is simply archived.

Task Breakdown:
l The HTTP Server Input receives a POST request sent either by the Anoto penDirector or thePlanetPress Mobile Application. This requests contains information sent by the pen as well as aPGC file as an attachment. Because we're only concerned about the PGC, the task is configured toignore the XML envelope as well as loop through each attachments (of which there is only one). So,the output of the task is the PGC file alone.
l The Capture Fields Processor then uses the PGC file to update any documents in the database thatthe pen wrote on, and closes those documents in the database when they are complete.
l Capture Condition is where we can check whether a specific field (a "RequireManager" field) has inkcontained in it, and if it does, the branch on the right is triggered.
l In the branch, Get Capture Document retrieves a PDF version of the document and sends it asan attachment to an email sent directly to a manager using Send Email.
l Otherwise, Get Capture Document is used again, but this time the PDF is stored in a SharePointServer using the Output to SharePoint connector.

After Retrieving Information from the Capture Database
There are two basic ways in which the Find Capture Document task can be used. First, in an automatedprocess that runs at specified intervals. For example, the following process which sends a daily report of allincomplete and "in error" documents to an agent who would presumably take action on each documentthrough the document manager.

Task Breakdown
l The Find Capture Documents task queries the Capture database for documents that correspond tocertain specific conditions. For example, here we would look for all documents that are either in an"Error" or a "Partial" state, which means they received ink but are not completed correctly. To do this,the "Content Status" filter and setting it "Equal to" those states. Two conditions are necessary, and the"Condition is true when" is set to "all items are met".
l With this list of documents in the metadata, we Branch off. This is done because we need to build areport that will be sent to an administrator, and only one email should be sent.
l To build the report, inside of the branch we use the Metadata Sequencer to create one sequencefor each document, by splitting at the Document level, by 1 occurrence of the level for eachsequence.
l The Capture Condition task then
Capture Web Manager Workflow
This example is both a more involved workflow for Capture, and an interesting implementation of anHTTP Workflow. Before looking at this example, it would be best to become familiar with both "PlanetPressCapture Workflow" on page 128 and "HTTP Server Workflow" on the next page.
The example is too complex to display as images in this guide, so it is rather available for download. It inferstwo different files:
l Capture Web Manager Workflow Configuration (PW7)l Capture Web Manager PlanetPress Design Document (PP7)
Technical
This example is compatible with PlanetPress Workflow 7.4 and higher and will not work in olderversions.
Installation
1. Download both resource files2. Create a folder on your disk called c:\PlanetPress
3. Open the invoice.pp7 document and send it towards your local PlanetPress Workflow server(localhost or 127.0.0.1)
4. Open the configuration file CaptureExampleProcess.pw75. Click the PlanetPress Workflow button (File menu) and go in Preferences.6. In the HTTP Server Input 2 section, check the Serve HTTP resources option, change the Resource
action name box to static , and the Resource folder to c:\PlanetPress\http . Then, click OK.7. Send the configuration to your local PlanetPress Workflow server.8. Start PlanetPress Workflow services (see "Start and Stop PlanetPress Workflow Service" on
page 550).9. Open your browser and point it to http://127.0.0.1:8080/documentlist , assuming you have not changed
the default HTTP port in the HTTP Server Input 2 section.
Explanation
You can follow along the process by looking at the comments available in each process of the workflow file.Each comment explains both what the following plugins do, but also how it integrates into the workflow ingeneral and what to keep in mind when doing an actual implementation of such a process.
Considerations
l The workflow itself is a standalone system that does not interact with any third-party systems, which ofcourse does not correspond to real customer implementation. A client will most likely need tocommunicate with both an ERP system that generates documents as well as an archive software tostore completed documents.
l The HTML, CSS and data file are generated whenever the process starts, in a specified location, inorder to avoid having to distribute multiple static files which would need to be extracted and moved toa specific folder. In an actual implementation, these files would probably be edited externally andloaded from a location on the hard drive. However, the method of using a template to generate outputis not so alien to PlanetPress Workflow so it is not condemned to do so.
l The example doesn't use any advanced coding such as JavaScript, Ajax and caching. It's easier tofollow, but is less optimized in its use than a complex workflow that would use such features.
HTTP Server WorkflowAn HTTP Server workflow is one that has one or more processes that always start with the HTTP ServerInput task and returns something to a client using a web browser. Each process would have a specific task

referred to as an "action", called from the browser itself.
HTTP Server Input tasks are typically used in one of the two following situations:
l HTML Form Action: An HTML Form in the browser that may contain text and attached files can befilled and sent to a process with the HTTP Server Input task.
l HTTP Data Submission: A custom application or a server sends the request to PlanetPress Workflowusing either a POST or GET command. The application or server then waits for a response fromPlanetPress Workflow Tools.
PlanetPress Workflow can serve both static and dynamic resources to a web browser, however it is notmeant to be used as a fully featured web server, as it is not built for responsiveness nor guaranteed uptime.It is much better to have a common web server (for example, IIS or Apache) to serve your contents and tohave PlanetPress Workflow available only to process things only it can do.
Note
You can control access to the PlanetPress Workflow Tools HTTP Server via the Access Manager.
Important Configuration, Setup and Options
Before starting to work with HTTP workflows, there are few key points to keep in mind in terms ofconfiguration. First of all, the following options are available in PlanetPress Workflow Preference screen,under the HTTP Server Input 1 and HTTP Server Input 2 sections:
l Port (default value: 8080 recommended): The port number is the one in which a browser needs tomake a request to PlanetPress Workflow. By default in most web server, port 80 is used and, when thisis the case, it is not necessary to include it. For example, if I type http://www.objectiflune.com/ in mybrowser, it is actually accessing the address http://www.objectiflune.com:80/ , but port 80 is alwayshidden. The reason port 8080 is used by default is to prevent any interference with existing webservers installed or activated on the same server as PlanetPress Workflow.
l Time-out (seconds): This determines how long the HTTP Server service will wait for the process tofinish, before returning a time out error back to the client browser. This means that if a process takesmore than 120 seconds (by default) to complete, the browser will time out. While you can change thisvalue, it is recommended to always keep your processing to a minimum, since both browsers and

users generally frown upon being stopped for more than a minute, unless they are well aware of thisprocessing time (and even then...)
l Enable server for SSL requests: This enables secure communication between the browser and theserver via HTTPS. By enabling this option, you will need to provide for the proper certificates, key andpassword. While this configuration is beyond the scope of this document, there are plenty of resourceson the Internet to explain these systems.
l Serve HTTP resources: This is where you enable static resources in PlanetPress Workflow. Whenenabling this option, the HTTP server will always look in the Resource Folder for files requestedinside of the Resource action name as a folder. This means that, if your Resource folder isc:\PlanetPress\http and your Resource action name is static, pointing your browser tohttp://127.0.0.1:8080/static/css/style.css will immediately load and return the filec:\PlanetPress\http\css\style.css . This does not require any process to work -everything is handled directly by the HTTP Server Input and files are returned immediately. Thisfeature is very useful when dealing with stylesheets, images, browser JavaScript, or static html filesthat do not require any processing.
Technical
As of PlanetPress Workflow 8.1, it is now possible to serve a default HTML file when no action isspecified, for example http://localhost:8080/ . This is done by creating an index.html file in theResource Folder defined above. However, resources called by this index.htmlmust still use theResource action name, for example a stylesheet would still point tohttp://127.0.0.1:8080/static/css/style.css or more simply static/css/style.css.
You also need to take into consideration the options inside each of your processes that start with theHTTP Server Input task, as they will greatly impact how this process responds. In the process' properties,the following options will modify HTTP behavior:
l Self-Replicating Process: This option is critically important when dealing with HTTP processes, socheck it now. Basically, this means that when HTTP requests are received, the process will duplicateitself up to the specified maximum number, in order to simultaneously (and asynchronously) handlemultiple requests. See " Process Properties" on page 594 for more details.
l As soon as possible: This option needs to be checked, otherwise requests will not be handled asthey come in (this option is meant to be used on scheduled processes that run at intervals).

l Polling Interval (sec): This option determines how much time the HTTP Server Input waits betweenthe moment it finishes processing a request and the moment it picks up a new request. This should beput at 0 in order to process requests as soon as possible, meaning immediately.
And finally, the HTTP Server Input task properties. While these are described in the "HTTP Server Input"on page 202 task properties page, here are a few considerations to keep in mind when using this task:
l The HTTP Action corresponds precisely to the name immediately following the first slash of youraddress. That is to say, placing the action myaction here means the process would be triggered byopening http://127.0.0.1:8080/myaction in your browser.
l The HTTP service accepts both POST and GET requests. Other than the presence of file attachments,there is little difference in how these are handled. This means that visiting/myaction?id=12345&q=test would be the same as having a form with two <input> fieldsnamed, respectively, id and q, and submitting them with the information "12345" and "test". In bothcases, this information is located in the XML envelope that is the original input file.
l When doing POST requests and uploading files, always make sure to include the "multipart" option inthe <form> tag: <form action="http://127.0.0.1:8080/myaction" method="POST" enctype="multipart/form-data">Otherwise, file attachments will not be received, only their file names.
l The Mime Type option is better left at Auto-Detect unless the process requires it to be forced to aspecific type. This means that if a process can either return a PDF when successful or an HTML pagewith an error message, it will not attempt to send an HTML with a PDF mime type (which, obviously,would cause confusion).
l There is no HTTP Server Output task (see below on how to end your process)
Request/Process/Response cycle
Once a process using the HTTP Server Input task is created, it is important to understand the cycle that istriggered when such a process runs. Note that this is the process when the default HTTP Server Input taskoptions are used (more on how that behavior changes later):
1. A request is received by the HTTP service.2. This request is converted into an XML request file along with one or more attachments when present.3. The XML request file and attachments are saved in a local folder, if the HTTP Action is a valid one
(otherwise, the files are deleted).4. The HTTP service keeps the request from the client open (it does not yet respond ot it), and waits.
5. The HTTP process corresponding to the HTTP Action captures the XML file and attachments and theprocess begins.
6. The process runs its course just like any other process would (including subprocesses, send toprocess, etc).
7. The very last file that is active when the process finishes is then returned to the HTTP service.8. The HTTP service returns the file to the client and then closes the connection.9. If, during this time, the timeout has expired (if the process takes more than 120 seconds), the
HTTP service returns a "timeout" to the client, but the process stills finishes on its own. When theprocess finishes, the return file is ignored by the HTTP service.
Point 7 is critical to understand, as it has an impact on what the client receives. If a process receives a filethat is split into multiple parts and each of these parts generates and output, the last split's output will be sentto the client. If the last output task generates a PostScript file for printing, this PostScript is returned to theclient.
In most cases, what is returned is what remains after the last task, but only if this task's processing is done inPlanetPress Workflow. For example, if the data file is a text file and this file is sent to PlanetPress Imageusing the Image connector, it is a text file that is returned, not the output of the Imaging. Similarly, ending aprocess with the Delete task does not return an empty file, it returns the actual data file.
This is actually the most used way of returning a response: Generate an HTML file using either Create Fileor Load External File, then delete the file as a last output. The HTML is thus returned to the client.
Example HTTP Workflows
l "HTTP PDF Invoice Request" below (GET)l "HTTP Brochure Request" on page 168 (Customer Information+ POST)l "Capture Web Manager Workflow" on page 161 (Capture + HTTP)
HTTP PDF Invoice Request
This straightforward workflow simply receives a GET request from a browser, loads an existing PDF invoicefrom a folder on the hard drive, and returns it to the browser. To do this, a client (or a web service) wouldrequest the following page:
http://ppworkflowserver:8080/getinvoice?in=INV999999

Breakdown of this URL:
l http:// : transfer protocol. This could be HTTPS if the SSL certificates are activated in the preferences.l ppworkflowserver : name of the machine. This could also be an IP (192.168.1.123) or a full domainname (www.myserver.com), depending on the connectivity between the client and PlanetPressWorkflow Server.
l :8080 : The default PlanetPress Workflow HTTP Port, set in the preferences.l /getinvoice : The HTTP Action Name, as set in the HTTP Server Input task.l ?in=INV999999 : A GET Variable, specifying that the variable named invoicenum (invoicenumber) would have a value of INV999999 , or any other "valid" invoice number.
Process Illustration
Task Breakdown
l The HTTP Server Input task receives a request through the /getinvoice HTTP Action. Because thistask either returns an HTML page with an error message or a PDF, the MIME type is Auto-Detect.
l It checks whether the invoice request exists by checking if the size of the file is less than 1kb using"File Size Condition" on page 358. The condition returns "true" if the file is not found:c:\PlanetPress\archives\pdf\invoices\xmlget('/request[1]/values[1]/invoicenum[1]',Value,KeepCase,NoTrim).pdfHere, the xmlget() function grabs the invoicenum variable from the GET request, which would beINV999999.pdf in the specified folder.
l If the file is not found, then a simple, basic HTML page is created indicating the invoice was not found.For this, a "Create File" on page 181 task will suffice, followed by the Delete output task. As we'vealready mentioned in "HTTP Server Workflow" on page 162, deleting the data file only means you arenot doing anything with it locally - it is still returned to the client.
l If, however, the file is found, then it is loaded with the "Load External File" on page 289 task, and thendeleted (for the same reasons).
HTTP Brochure Request
This workflow builds on the knowledge acquired in "HTTP PDF Invoice Request" on page 166 and uses asingle process, but in this case it also uses a PlanetPress Design document which merges the datareceived from a browser form with the document to generate a PDF brochure, which is sent via email.
Resources
l HTTPBrochureRequest.pw7 (PlanetPress Workflow Configuration)l InformationBrochure.pp7 (PlanetPress Design Document)
Installation
l Download both filesl Open InformationBrochure.pp7 and send it to PlanetPress Workflow.l Open HTTPBrochureRequest.pw7 and send the configuration to your local PlanetPress Workflowservice.
l Open your browser to http://localhost:8080/generatebrochure

Task Breakdown
l The HTTP Server Input receives the initial request from the browser.l Because this is a demonstration, a backup is made of the XML request. It's not suggested to do thisevery time, especially on servers receiving a large number of requests, as these files do take someamount of space for each request.
l A condition checks whether the form has been submitted, by verifying that one of the required fields isempty. If it is, it means this is the initial request, so the condition becomes true.
l If this is the initial request, an HTML page is created which contains a form asking the client for arequired full name and email, and optional company name. A checkmark also offers to subscribeto a newsletter (it is unchecked by default!). The form submits back to the same URL, meaning itis handled by the same process.
l The file is renamed with the .html extension, so that both the HTTP service and the browser willrecognize it as an HTML page. And then, as usual, it is deleted (but still returned to the browser).
l When the condition is false, it means that there is something in the Full Name field. In this case, weknow that the form was filled and submitted back to the process, and we handle the request as such.
l First, we add the full name, email and company information to job informations, in order for them to beavailable for the rest of the process.
l Then, we have a small condition that verifies if the user checked the "Newsletter" box. If so, theconditional branch is triggered. Note that this condition is put inside its own branch because otherwise,the rest of the process would not run when the newsletter is selected. Since we want both to happen,the branch is there with a "stub" if the condition is false.
PDFWorkflowA PDF workflow, in essence, is one that does not contain any PlanetPress Design document and only usesPDF files as data files. In most cases, this also implies the use of Metadata, as Metadata is used to establishboundaries between document, sort and sequence (split) the PDF data into different parts.
The idea is that a PDF file, because it is a formatted document in and of itself, doesn't absolutely need to gothrough PlanetPress Design to be processed and printed. Additionally, because of the PDF tools inPlanetPress Workflow, you can easily merge, split, print and take parts of the PDF file as required.
Because we are using Metadata, however, here are a few ground rules to keep in mind while working withsuch workflows (these rules also apply to Metadata use in general):

l Modifying Metadata does not immediately modify the data. This is one of the benefits of Metadatabecause you can sort it, filter it, sequence it, add data to it, without ever modifying the data file itself.This is important because if you, for instance, filter out certain data pages from the metadata and thensave your data file with the Send to Folder task, the full data file is saved, not the filtered one. This isresolved through different methods, used in the different examples below.
l Modifying data does not immediately modify the Metadata. So, if you have a PDF file withmetadata and you use a PDF splitter, the metadata information would still reflect the original data, notthe split. This can generally be resolved by using the Create Metadata plugin again.
l Branches, Loops and Conditions do not reset the metadata. This is important in some casesbecause the metadata does affect your output (see next point) and can cause confusion if not handledproperly. For example, if you were to split a data file and, under a specific condition, create metadataon the file and generate a PDF, other wise print the file, you would run into this issue. When themetadata is created in the condition, it stays "active" even on the next split. If that split actually prints,it's using the metadata from the previous split, and will attempt to print the number of pages specified inthe metadata. So, it may print 3 pages instead of 40, or 25 pages, the last 5 of which would be blank.The only way to get around this is to either regenerate your metadata when possible, or to use the"Metadata File Management" on page 456 to delete the active metadata file. When doing this,metadata is ignored so the data file itself properly determines the number of pages to print.
l As a general rule, only input tasks and Metadata related tasks modify Metadata. There are, however, afew notable exceptions:
l "Create PDF" on page 260 has the option to reset your metadata according to the new PDF file.In reality, Create PDF is one of the most useful tasks in PDF workflows, since it is the easiestway to make your PDF file conform to the metadata without using a PlanetPress Designdocument. See the "Create PDF" on page 260 page for more information.
l "Run Script" on page 364 tasks can also modify metadata using the Metadata API (See "UsingScripts" on page 81).
l The "Barcode Scan" on page 251 task can add information to the existing metadata, and createsit if there is none.
l The "Capture Fields Generator" on page 422, "Capture Fields Processor" on page 426, "GetCapture Document" on page 441 and "Find Capture Documents" on page 436 tasks generatetheir own metadata.
l The "Lookup in Microsoft® Excel® Documents" on page 391 enhances metadata fields withinformation from an Excel spreadsheet, but does not otherwise change its structure.
Examples
l "Daily Sales Report from PDF Files" on the next page

Daily Sales Report from PDF Files
This workflow makes heavy use of both PDF Tools and Metadata, and assume that you are usingPlanetPress Workflow version 7.3 or higher.
This single process workflow generates a daily sales report for any sales rep inside of a company whichmade at least one sale. It does this by capturing the invoices generated within a specific day, putting all theinvoices for each sales rep in a single PDF and then sending it to the sales rep. It does this using severalspecific metadata tasks as well as a quick lookup in an external Excel spreadsheet.
Resources
l PDF-DailySalesReport-Workflow.zip
Task Breakdown
l The initial input is the "Merge PDF Files" on page 216, which retrieves and merges all the PDF filesinside of the specified folder. Once a single PDF is created, the task also optimizes the PDF (to avoidduplicating images and font definitions for each page) as well as generates a basic Metadata structurecontaining a single document with one Data Page per captured PDF.
l The "Metadata Level Creation" on page 461 creates the Document level of the metadata by placingeach PDF data file in its own Document level. It does this by detecting when the Address in thedocument changes.
l Then, the "Metadata Fields Management" on page 452 adds a few fields at the Document level inorder to properly tag each document with the appropriate information, in this case the Customer ID,Country and Rep ID. These fields are identical to ones that would have been added in PlanetPressDesign, and are used for the following metadata tasks.
l The "Metadata Filter" on page 458 follows by removing any invoice that is not in the US. Note that theMetadata filter is an *inclusive* filter, meaning that the filter includes the parts of the metadata wherethe result of the filter is true, and filters out anything else.
l The "Metadata Sorter" on page 466 then re-orders the metadata documents by Rep ID, so that all ofthe invoices for any particular sales representative are all together.
l "Lookup in Microsoft® Excel® Documents" on page 391 then uses the Rep ID field to retrieve eachsales rep's email from a specific Excel spreadsheet.

l The "Metadata Sequencer" on page 465 acts like a splitter, where the separation happens wheneverthe Rep ID changes. Since documents are sorted with that field, each sequence can contain one ormore document, but they will all be for the same Rep ID.
l "Create PDF" on page 260 is then used to generate a single PDF for each sales rep. Because CreatePDF works in conjunction with Metadata and because it can be used in pass-through mode, in thisinstance it will only take the relevant PDF pages from the original data file in order to create a singlePDF file. Other than the extraction of these pages, the original concatenated data file is untouched.
l Finally, the output is done using a "Send to Folder" on page 532 in this case. Obviously, this should bea "Send Email" on page 528 output, but since we don't want to spam anyone, instead we place thePDF in a folder with the rep id's email as a folder name.
Capture OnTheGoWorkflowCapture OnTheGo is a web-based form system that can be sent to a mobile device such as a phone ortablet, utilizing the device's native features (such as the camera, GPS, touch-screen, etc) to provideenhanced forms.
Note
For more information, take a look at the Capture OnTheGo Website, which also contains thedocumentation. For support please see the Capture OnTheGo Q&A Forums.
This section describes the implementation details for a Capture OnTheGo process, including how to create,send and submit COTG documents to the Mobile application.
Capture OnTheGo Glossary
This topic describes different terms used in the Capture OnTheGo application and other implementationlocations.
About TasksA task is a plug-in or a block that is used to build PlanetPress Workflow processes. Tasks can do multiplethings depending on the type of task and where they are placed. You can add as many tasks as you like toyour processes and order them in any way you can.

There are different types of tasks:
l Input Task: Will either capture data from a specific location, or wait for input from a service or othercomputer to start processing.
l Action Task: Will manipulate the data in any number of ways. An action task is any task that is not aninput or output task or a branch or condition.
l Output Task: Will output data to a specific location or send to a different service or computer.
Some tasks have a multipurpose and can be used as either an input, action or output task or anycombination. These multipurpose tasks are indicated as such in the task description and can be found in themost relevant section of the available tasks.
For more information on the tasks available to you in PlanetPress Workflow, see the following pages:
l "Input Tasks" on page 179l Action Tasksl "Process Logic Tasks" on page 352l "Metadata Tasks" on page 447l "Output Tasks" on page 512l About Faxl About Image
Note
Completely empty files (0 bytes) cannot be processed by Workflow.
Task PropertiesAny task you add to your PlanetPress Workflowprocess must be configured using its properties dialog box.Each task's Properties dialog will give you the options to configure that specific, individual task. Propertiesof one task do not directly affect the properties of another task, however there are some software preferencesthat may affect tasks in one way or another (See "Preferences" on page 621)

Variable PropertiesWhen you edit tasks, you may notice that some of the properties that you can modify have a red (or moreprecisely, a maroon) title. This means that the property can be dynamically determined whenever yourprocess runs, that is to say it will not remain static. This can be extremely useful when, for example, youwant to determine how many copies you will print out depending on your data, or what document will beused in the printout depending on the department it came from.
Variable properties may include:
l Static data.l Standard Variables. See "Standard Variables" on page 537.l Local and Global Variables. See "Manipulate Local Variables" on page 573.l Job Infos. See "Job Info Variables" on page 536.l Data and Metadata Selections. See "Data Selections " on page 19.l Printer Control Characters. See "Shared Printer Queue Properties" on page 60. These are normallyonly used in printer outputs.
Variable properties can also be used in these special locations:
l In the Set Job Infos and Variables Action Task. See "Set Job Infos and Variables" on page 312.l In Scripts. See the chapter on "Using Scripts" on page 81.l In the Create File Input Task. See "Create File" on page 181.l Within a PlanetPress Design Document, using the ExpandString() function. See the PlanetPressDesign User Guide and PlanetPress Talk Reference Guide.
Variable properties can also be mixed, meaning you can combine, within a single variable property box, anynumber and order of variable types. You can, for example, do the following for an output file name:%O_@(1,1,1,30, KeepCase,Trim)_%y-%m-%d.txt. This would translate in the original file name, followed by part ofthe first line of a text data file, then the current date.
Contextual MenuIn any variable properties box, you may use the contextual (right-click) menu to add variables and controlcharacters, as well as to get data and make data selections. The lower part of the contextual menu is divided

into 4 items that provide variable properties:
l Variablesl System: Contains system variables, also called "Standard Variables" on page 537.l Job Info: Contains Job Info variables from%1 to %9l Local Variables: Contains a list of local variables in this process. If no local variables exist, thisitem is disabled.
l Global Variables: Contains a list of global variables in this configuration. If no global variablesexist, this item is disabled.
l Control Characters: Contains a list of control characters that can be used in printers.l Get Data Value: Brings up the Data Selector, retrieves the value you select and places it in thevariable properties box. This information becomes static and does not change between each datapageand job file.
l Get Data Location: Brings up the Data Selector and records your selection. The data selection isdynamic, meaning it will get the data located in the area you choose, every time a new data file passesthrough it. This is indicated by a data selection (see "Data Selections " on page 19).
l Get Metadata Value: Brings up the Data Selector with only the Metadata tab visible and lets youselect the value (contents) of a Metadata attribute or field. The result is static and does not changebetween jobs.
l Get Metadata Location: Brings up the Data Selector with only the Metadata tab visible and lets youselect the location of the data. The result is variable and changes between jobs.
l Get Repository Value: Brings up the "Data Repository Manager" on page 613 dialog to select thevalue (contents) of a specific key. The result of the lookup is static.
l Get Repository Location: Brings up the Data Repository Manager dialog to select the location ofthe key to lookup every time this task is executed.
You can quickly identify variable information that is already present in your variable properties as such:
l A percentage sign identifies standard variables, as well as standard and custom job info variables —%f, for example.
l A backslash indicates a control character — \004, for example.l An at sign (@) indicates a data selection for emulations other than database —@(1,1,1,1,17,KeepCase,Trim), for example.

l Field indicates a data selection for a database emulation — field(1,0,0,'Billing_Email',KeepCase,NoTrim), for example.
l The lookup() function indicates a lookup in the "Data Repository Manager" on page 613.
Unknown TasksAn unknown task is a task location that is not linked to any existing known task. Unknown tasks can havemultiple causes:
l Cutting an input or output task will replace it with an unknown task. See Cutting, Copying and PastingTasks and Branches
l Creating a new branch will create an unknown output task in that branch. See Adding Branches.l Using Branch From Here... will create an unknown output task below that branch. See AddingBranches.
l Opening a configuration that contains additional plug-ins that are not installed on that system willcause these plug-ins to be replaced by unknown tasks. Installing the additional plug-ins and re-opening the configuration will restore the plug-ins and their properties.
l Opening a configuration that contains plug-ins only available in PlanetPress Workflow (such as CreatePDF) from a PlanetPress Watch installation will cause these plug-ins to be replaced by unknowntasks. Opening the configuration in a PlanetPress Production or Office installation up upgradingPlanetPress Watch to PlanetPress Production or Office and re-opening the configuration will restorethe plug-ins and their properties.
MasksA file name that includes characters meant to be replaced at run-time is referred to as a mask. Masks can beused in many edit boxes and can be used, for instance, to select multiple files. File selection is typicallylimited by fixed characters or special wildcard characters. If you create a Folder Capture input task andenter *.* in the Masks box, the input task will grab all the files that are put in the source folder. If you enter*.mdb instead, the task will only take the those database files that have an mdb extension. You can use anystandard wildcard character in PlanetPress Workflow.
Technical
Masks are case-insensitive, since the Windows platform does not support case-sensitive file names
(yes, you can have mixed case in a file name but that's visual fluff - the OS itself does not care).
Mask Format
Here are the different mask formats available:
l Literal characters: Any alphanumerical character is considered literal character and must appear. Forexample, a mask of "trigger.txt" will not capture any other files than that name.
l Wildcards: Two wildcards are available in masks.l Asterisk (*): Supports any number of characters. *.txt would pick up any text file, file*.txt wouldpick up any file starting with file and any characters: file1.txt, filetest.txt.
l Question Mark (?): Supports a single character. file?.txt would pick up File1.txt or filea.txt , butnot file13.txt or filetest.txt.
l Brackets: Specifies a set of supported characters, or range of characters. Only one character from therange is accepted, making this a subset of the ? wildcard.
l Sets: [13ab] defines support for one of these 4 characters. file[13ab].txt would pick up file1.txt ,filea.txt , but not file13.txt or filea3.txt.
l Negative Sets: [!13ab] indicates the character should NOT be part of the set. file[!13ab].txtwould pick up file2.txt and filec.txt but not file1.txt or fileb.txt (nor would it pick up file13.txt orfilea3.txt).
l Ranges: [1-5] , [a-d] define ranges between the characters. file[1-5].txt would pick up file1.txtand file4.txt but not file6.txt or file13.txt.
l Negative Ranges: Negative ranges such as [!2-4] are also possible.
Technical
Filename containing brackets can be a hassle when attempting to capture them with a mask andusing sets or ranges. You can capture a set that contains an opening bracket ( [[] ) , but not a closingbracket as the closing bracket always ends the set or range. There is no escape character available inmasks.
Date and Time FormatTo simplify things and to prevent errors, date and time formats have been standardized.

l Date are entered and displayed as yyyy/MM/dd (2007/06/13, for example).l Times are entered and displayed using the 24 hour format as HH:mm:ss (3:38:54 PM, for example, isentered and displayed as 15:38:54).

Input TasksInput tasks are the starting point to any process and determine what file this process will being with. Eachprocess must begin with an input tasks, and although a given process may have multiple input tasks, no taskcan have more than one initial input task.
Initial Input Tasks
Initial input tasks are always at the beginning of a process and are always triggered when the process starts.The process itself may start on a schedule or poll at regular intervals, which means the initial input task onlyruns whenever the process is set to run. For more information about what happens outside of the processscheduled times and to learn how to set the schedule, See " Process Properties" on page 594.
Technical
If an error occurs during an initial input task, the On Error tab is never triggered. See "Using the OnError tab" on page 46.
Input tasks may either poll a specific location, or await for jobs to be sent to a specific PlanetPress WorkflowService. It is not recommended to have two initial input tasks capturing the same input location, for thefollowing reasons:
l It is a "hit and miss" to know which of the two tasks will pick up the file. This is an issue if the twoprocesses are different.
l One of the processes may process a file quicker than another and finish first, which may be an issue ifthe processing relies on FIFO (First In, First Out).
l One process may error out as it's trying to capture an input that's currently being read by another one.This causes issues if the process is on a schedule and only runs once per period.
It is important to note that initial input tasks processes files one at a time, and will return to the input taskonce the current file has finished processing. Each time it returns to the input task, it again only captures onesingle file. It does this until there are no more files in the folder and will also capture any new file that wereadded during the time it processed other files. Once no more files are found, it stops processing until it isscheduled to run again.
This is an important consideration when scheduling a task, as the Folder Capture will keep capturing filesas long as new files are added, even if it means continuing to capture and process outside its scheduled

time. It is also important that while the Folder Capture input task is processing files it keeps a copy of eachfile in a temporary folder, and will not delete any of these files until it has finished processing all of them.This may cause issues with running out of disk space.
Secondary Input Tasks
Secondary input tasks are placed in the process like an action task would and will replace the job file in theprocess with the file they retrieve. Since they are part of the process, they can use data from previous tasksto pull data from a variable location. Secondary inputs do not follow a separate schedule from the process -they are automatically run when the process triggers them.
Secondary Input Task Considerations:
l If your initial input task does not start, either because there is no data to capture or because theprocess is out of its schedule, any secondary input task will not run either.
l Secondary input tasks replace both the job file and the job info variables. They do not change localand global variables.
l If your secondary input task creates a job file using a different emulation, you will need to use a"Change Emulation" on page 258 task after the secondary input task to correctly change to thatemulation.
Properties common to all input tasks
The Other tab is common to all input tasks and are available in the Properties of all input tasks.
"Other" Tab
l Job Information groupl Information elements: indicates what job infos are automatically created by the input task.l Add lines before first data page: Using the arrows keys you can add any job informationdirectly at the beginning of your data file.
l Backup input files: Check this to save a copy of each data file that is captured by your input. Thesefiles are saved in the PlanetPress Suite Workflow Tools working folders under the "Backup" folder.
l Backup filename: Enter the filename that you wish the input data file backup to be saved under.l Delete Existing Metadata: Check to remove any metadata from memory. This option is disabled oninitial input tasks, and is checked by default on secondary input tasks.

Create File
Create File input tasks are different from other input tasks in that they do not pull in data from a sourcelocation. The data that this task passes along to other task is its own: text or values from variables enteredwhen the task was created or last edited.
Since Create File input tasks are not dependent on data from external sources, they are performed at everypolling interval and the process is thus started every time.
Input
Create File does not capture any file and, if it is a secondary input task, discards the current data file.
Processing
Create File generates a job file with the contents of it's text. If variables and control characters are present,they are evaluated at run-time when the task is executed.
Output
The output is the job file. No metadata is generated by the task itself, however if metadata is present in thejob and it is not deleted (in the "Other" tab), it will remain active.
Properties
General Tab
l Create File: Enter the text to use as the data. The Create File box is a Variables Properties box, so youcan use any of the variables, control characters or data selections as noted in Variable Properties.
l Add CRLF after last line: Check if you want the plugin to automatically add a new line at the end ofthe file. Remove the checkmark to leave the file as-is, useful in the creation of CSV files for example.
l Delete Metadata: Check to delete any metadata attached to your data file.

"Other" Tab
l Job Information groupl Information elements: indicates what job infos are automatically created by the input task.l Add lines before first data page: Using the arrows keys you can add any job informationdirectly at the beginning of your data file.
l Backup input files: Check this to save a copy of each data file that is captured by your input. Thesefiles are saved in the PlanetPress Suite Workflow Tools working folders under the "Backup" folder.
l Backup filename: Enter the filename that you wish the input data file backup to be saved under.l Delete Existing Metadata: Check to remove any metadata from memory. This option is disabled oninitial input tasks, and is checked by default on secondary input tasks.
Job Information definitions
l This task does not generate any job information.
Examples & Use Cases
This task is put into effect in the following use cases and example processes:
l HTTP PDF Invoice Requestl HTTP Brochure Requestl Capture Web Manager Workflow
On Error Tab
The On Error tab is common to all tasks. Details can be found in the" Task Properties Dialog" on page 666.
By default, any action task, branch, splitter or condition that generates an error will simply be ignored, andthe task just under it (not within a branch) will be given control of the job file without any modification. Anyinitial input task that generates an error will stop the process from running as a whole, and output tasks willnot generate output. The On Error tab can be used to overwrite the default behaviors.

l Send to Process: Check this option to send the job file to an error management process.l Error Process drop-down: Enabled only when the Send to Process option is checked. Lists anyprocess of which the initial input task is the Input Error Bin task.
l Action Group: This group is disabled in the initial input tasks and defaults to Stop Process. In allother tasks where the On Error tab is present, the following options are available:
l Ignore: The task is ignored as if it did not exist, and the job file is passed on to the next task inthe process.
l Stop Branch: If the task is in a branch of the process, the branch is stopped and the job file isreturned to the process after the branch. The branch will not produce any output.
l Stop Process: The process is stopped and no more processing is done. No further output isproduced.
l Log Message: Check this option to enable logging a custom error message in the PlanetPress SuiteWorkflow Tools' log file.
l Message: Enabled only when the Log Message option is checked. Enter a message that will belogged in the PlanetPress Suite Workflow Tools' log file. You can use any variables available inPlanetPress Workflow to customize the message.
l Store the message in variable: Select in which jobinfo, local or global variable you want to store themessage content.
l ID: Enter an error ID. This ID will be visible in theWindows Event Viewer. However, the ID is notvisible in the PlanetPress Suite Workflow Tools' log file.
l Store the ID in variable: Select in which jobinfo, local or global variable you want to store the errorID.
l Reset to defaults: Resets all options in this tab to their default values.
If storing the message or ID, if they are store in a jobinfo they will be available in any error handling processwhere errors are being forwarded. In all cases, if your process continues after the error, the contents of thevariables selected in this window will be available for the rest of your process, or whenever they areoverwritten.
Common Errors
Though some error messages are specific to a task in particular, others may apply to any and all tasksbecause they are related more to the system than to PlanetPress itself. Some examples would be W3813,W3830, W3991, W4005. These correspond to issues such as not having any space to write files, permissionerrors on folders or files, etc.

Comments Tab
The Comments tab is common to all tasks. It contains a single text area (Task comments) that lets youwrite comments about the task. These comments are saved when the dialog is closed with the OK button,and are displayed in the Task Comments Pane.
Email Input
Email Input retrieves email data through a Microsoft Outlook or POP3 connection.
Note
If Microsoft Outlook connection is used, Microsoft Outlook 2000 or higher must be installed on thecomputer where PlanetPress Workflow is located.
Input
Email Input captures all emails and their attachments from the selected inbox, when those emailscorrespond to the rules defined in the General tab. If no rule is defined, all emails in the inbox are retrieved.Emails retrieved using POP3 are deleted from the server, emails retrieved from an Outlook inbox are movedto the Deleted Items folder by default.
Processing
Depending on the options selected below, each email is converted into a text-only data file, and eachattachment is separated from the email.
Output
Depending on the options, each email is sent as a data file, followed by each of its attachments sequentially.
Technical
If you use Email input tasks to capture data encoded using a Double-Byte character set (such asthose used for Japanese or Chinese, for instance), it is preferable to use attachments rather than theemail body to carry the data from its source to the input task, as data corruption is less likely to occur

using this method.
Properties
General tab
l Data Location group
l Message body: Select to use the data found in the body of the email.l Attached file: Select to use the data found in the email’s attachment. If both the Message bodyand Attached files options are selected, the message’s body and the message’s attachment aretreated as separate data files and processed one after the other.
l Unzip attached file: Select to unzip the attached files.
l Zip password: Enter the password required to unzip the attached files (if any). Note thatyou can use variables and data selections.
l Conditions group
l “Subject” contains: Select to limit those messages used by this task to those with a specificsubject. The subject you enter in the box below can include variables.
Note
Since characters '?' and '*' are considered valid to define the subject of an email, their useas wildcards is not supported .
l Nothing: Select to limit those messages used by this task to those that do not specify anysubject.
l “From” contains: Select to limit those messages used by this task to those that are sent from aspecific address. The address you enter in the box below can include variables.
l “To” contains: Select to limit those messages used by this task to those that are sent to aspecific address. The address you enter in the box below can include variables.
Login Tab
l Use Microsoft Outlook: Select to use the Microsoft Outlook email account of the current user toreceive emails. The current user is the one defined in PlanetPress Workflow Service Logon.
l Move message after processing to folder: Enter the name of an Outlook Folder to keep copiesof the emails taken by this email input task. You should enter only the name of the folder as itappears in Outlook’s Folder List area, regardless of whether it is a child of another folder. Forexample, if you want to use a folder named Bills that is listed under another folder namedPassedDue, only enter Bills in the text box. Make sure no two folders have the same name, evenif they are under different parent folders, as this could generate errors. Consider creating aspecial folder in Outlook (perhaps a child of the Deleted Items folder named Watch) and thenusing that folder as your backup folder.
l Use POP3 mail group
l Select this option to use a POP3 mail server and to activate this group. Note that emails retrievedvia POP3 are always deleted from the server.
l Incoming mail (POP3): Enter the address of the incoming POP3 mail server. This box is onlyenabled when the Use POP3 mail option is selected.
l Account name: Enter the email account name on the POP3 mail server. This box is onlyenabled when the Use POP3 mail option is selected.
l Password: Enter the password required to unlock the selected account on the POP3 mailserver. This box is only enabled when the Use POP3 mail option is selected.
"Other" Tab
l Job Information groupl Information elements: indicates what job infos are automatically created by the input task.l Add lines before first data page: Using the arrows keys you can add any job informationdirectly at the beginning of your data file.
l Backup input files: Check this to save a copy of each data file that is captured by your input. Thesefiles are saved in the PlanetPress Suite Workflow Tools working folders under the "Backup" folder.
l Backup filename: Enter the filename that you wish the input data file backup to be saved under.l Delete Existing Metadata: Check to remove any metadata from memory. This option is disabled oninitial input tasks, and is checked by default on secondary input tasks.
Job Information definitions
l %1 - Date received. Contains the date of the reception of the email (and not the date of retrieval byPlanetPress Workflow). The format is YYYY/MM/DD HH:MM:SS.
l %2 - Sender's name: Contains the name of the sender as defined by the sender himself (or, if thesender is using Exchange, by the name defined in his Exchange server).
l %3 - Sender's address: Contains the email address of the sender as defined by the sender himself.l %4 - Subject: Contains the subject of the received email (may be blank).l %5 - Recipients:Contains a list of the names of all the recipients of the email, separated by asemicolon (;).
Technical
Because of the way Microsoft Exchange works, when receiving an email from a user on the samelocal Exchange server, the email address may not be available. See FAQ-1509 in the KnowledgeBase for details.
On Error Tab
The On Error tab is common to all tasks. Details can be found in the" Task Properties Dialog" on page 666.
By default, any action task, branch, splitter or condition that generates an error will simply be ignored, andthe task just under it (not within a branch) will be given control of the job file without any modification. Anyinitial input task that generates an error will stop the process from running as a whole, and output tasks willnot generate output. The On Error tab can be used to overwrite the default behaviors.
l Send to Process: Check this option to send the job file to an error management process.l Error Process drop-down: Enabled only when the Send to Process option is checked. Lists anyprocess of which the initial input task is the Input Error Bin task.
l Action Group: This group is disabled in the initial input tasks and defaults to Stop Process. In allother tasks where the On Error tab is present, the following options are available:
l Ignore: The task is ignored as if it did not exist, and the job file is passed on to the next task inthe process.

l Stop Branch: If the task is in a branch of the process, the branch is stopped and the job file isreturned to the process after the branch. The branch will not produce any output.
l Stop Process: The process is stopped and no more processing is done. No further output isproduced.
l Log Message: Check this option to enable logging a custom error message in the PlanetPress SuiteWorkflow Tools' log file.
l Message: Enabled only when the Log Message option is checked. Enter a message that will belogged in the PlanetPress Suite Workflow Tools' log file. You can use any variables available inPlanetPress Workflow to customize the message.
l Store the message in variable: Select in which jobinfo, local or global variable you want to store themessage content.
l ID: Enter an error ID. This ID will be visible in theWindows Event Viewer. However, the ID is notvisible in the PlanetPress Suite Workflow Tools' log file.
l Store the ID in variable: Select in which jobinfo, local or global variable you want to store the errorID.
l Reset to defaults: Resets all options in this tab to their default values.
If storing the message or ID, if they are store in a jobinfo they will be available in any error handling processwhere errors are being forwarded. In all cases, if your process continues after the error, the contents of thevariables selected in this window will be available for the rest of your process, or whenever they areoverwritten.
Common Errors
Though some error messages are specific to a task in particular, others may apply to any and all tasksbecause they are related more to the system than to PlanetPress itself. Some examples would be W3813,W3830, W3991, W4005. These correspond to issues such as not having any space to write files, permissionerrors on folders or files, etc.
Comments Tab
The Comments tab is common to all tasks. It contains a single text area (Task comments) that lets youwrite comments about the task. These comments are saved when the dialog is closed with the OK button,and are displayed in the Task Comments Pane.

Folder Capture
Folder Capture input tasks retrieve files corresponding to a specified file mask, from a specified folder.
Input
Folder Capture retrieves all files corresponding to the specified mask. These files may be of any format,even formats that are not readable by PlanetPress Workflow.
Processing
Each file capture by the input is sent down through the process, one at a time. When the file is finished, theprocess goes back to the input which feeds another file down, as long as there are files in the queue. Onceall the files are gone, the task polls the input folder again to see if new files are present and, if so, theprocess continues with these files. Otherwise, the process ends.
Output
The output to this task is a series of individual files, one after the other. These files are not modified in anyway from when they are captured from the source folder.
Note
As with any task that can refer to network resources, it is important to understand the considerationsinvolved with paths and permissions of these resources. Please refer to the Network Considerationspage in the Advanced Configuration and Options chapter (Reference Guide, in English only).
Warning
If you create a Folder Capture input task that takes any file it finds in the root folder of one of your harddisks, then PlanetPress Workflow will try to remove all the files located in that folder, including all thesystem and hidden files. So when using a Folder Capture, be aware of where you are capturing.

General Tab
l Folder list: Enter the full path of the folder from which the input files are to be taken.
l Masks: Enter a single or multiple file names or use file name masks. See Masks.
l Treat as regular expressions: When ticked, the contents of the Mask field are deemed to be aregular expression. The checkbox is not ticked by default. Please refer to Regular Expressionsfor more information.
Note
No Variable Data can be used inside this field if the Treat as regular expressions option isticked. The percent sign, the curly brackets and the period are all key elements of the RegExsyntax, therefore they cannot be mixed and matched with Workflow variable data syntax (e.g.%1, ${global.myvar}, etc.). Also, there is no validation of the RegEx being specified.
l Sort files by: Select a given sorting method to prompt PlanetPress Workflow to sort the files in thesource folder before taking them (and thus to take them in a specific order). Select None to letPlanetPress Workflow take the files without sorting them first.
l Sort order: If you selected a sorting method in the Sort files by box, select the order in which you wantthe files to be sorted.
l Use archive attribute: Select to turn on the archive attribute of the data files found in the source folderand to leave them in their original location (i.e. to take copies of the source files). Note thatPlanetPress Workflow never takes source files that have their archive attribute turned on (so thesource files will not be taken again and again). When this option is turned off, PlanetPress Workflowremoves data files from the source location.
l Capture files in subfolders: Select to capture files from child folders of the source folder as well.
l Sort directories first: If you selected a sorting method in the Sort files by box, and if you want thefolders present in the source folder to be sorted first, select this option. When this option is selected,the chosen Sort order is applied to each separate folder, not across folders. The subfoldersthemselves are always processed in alphabetical order, regardless of the sort order.
l Include hidden files: Select if you want any hidden folders or files present in the source folder to betaken as well.
l Include empty files: Select if you want any empty folders or files present in the source folder to betaken as well.
"Other" Tab
l Job Information groupl Information elements: indicates what job infos are automatically created by the input task.l Add lines before first data page: Using the arrows keys you can add any job informationdirectly at the beginning of your data file.
l Backup input files: Check this to save a copy of each data file that is captured by your input. Thesefiles are saved in the PlanetPress Suite Workflow Tools working folders under the "Backup" folder.
l Backup filename: Enter the filename that you wish the input data file backup to be saved under.l Delete Existing Metadata: Check to remove any metadata from memory. This option is disabled oninitial input tasks, and is checked by default on secondary input tasks.
Job Information definitions
l %1 - Source File Name. Contains the file name (excluding path but including extension) of the filename that is captured. Equivalent to using the %o system variable.
l %2 - Folder: Contains the folder from which the data was captured.
On Error Tab
The On Error tab is common to all tasks. Details can be found in the" Task Properties Dialog" on page 666.
By default, any action task, branch, splitter or condition that generates an error will simply be ignored, andthe task just under it (not within a branch) will be given control of the job file without any modification. Anyinitial input task that generates an error will stop the process from running as a whole, and output tasks willnot generate output. The On Error tab can be used to overwrite the default behaviors.
l Send to Process: Check this option to send the job file to an error management process.l Error Process drop-down: Enabled only when the Send to Process option is checked. Lists anyprocess of which the initial input task is the Input Error Bin task.
l Action Group: This group is disabled in the initial input tasks and defaults to Stop Process. In allother tasks where the On Error tab is present, the following options are available:
l Ignore: The task is ignored as if it did not exist, and the job file is passed on to the next task inthe process.
l Stop Branch: If the task is in a branch of the process, the branch is stopped and the job file isreturned to the process after the branch. The branch will not produce any output.
l Stop Process: The process is stopped and no more processing is done. No further output isproduced.
l Log Message: Check this option to enable logging a custom error message in the PlanetPress SuiteWorkflow Tools' log file.
l Message: Enabled only when the Log Message option is checked. Enter a message that will belogged in the PlanetPress Suite Workflow Tools' log file. You can use any variables available inPlanetPress Workflow to customize the message.
l Store the message in variable: Select in which jobinfo, local or global variable you want to store themessage content.
l ID: Enter an error ID. This ID will be visible in theWindows Event Viewer. However, the ID is notvisible in the PlanetPress Suite Workflow Tools' log file.
l Store the ID in variable: Select in which jobinfo, local or global variable you want to store the errorID.
l Reset to defaults: Resets all options in this tab to their default values.
If storing the message or ID, if they are store in a jobinfo they will be available in any error handling processwhere errors are being forwarded. In all cases, if your process continues after the error, the contents of thevariables selected in this window will be available for the rest of your process, or whenever they areoverwritten.
Common Errors
Though some error messages are specific to a task in particular, others may apply to any and all tasksbecause they are related more to the system than to PlanetPress itself. Some examples would be W3813,W3830, W3991, W4005. These correspond to issues such as not having any space to write files, permissionerrors on folders or files, etc.
Comments Tab
The Comments tab is common to all tasks. It contains a single text area (Task comments) that lets youwrite comments about the task. These comments are saved when the dialog is closed with the OK button,and are displayed in the Task Comments Pane.
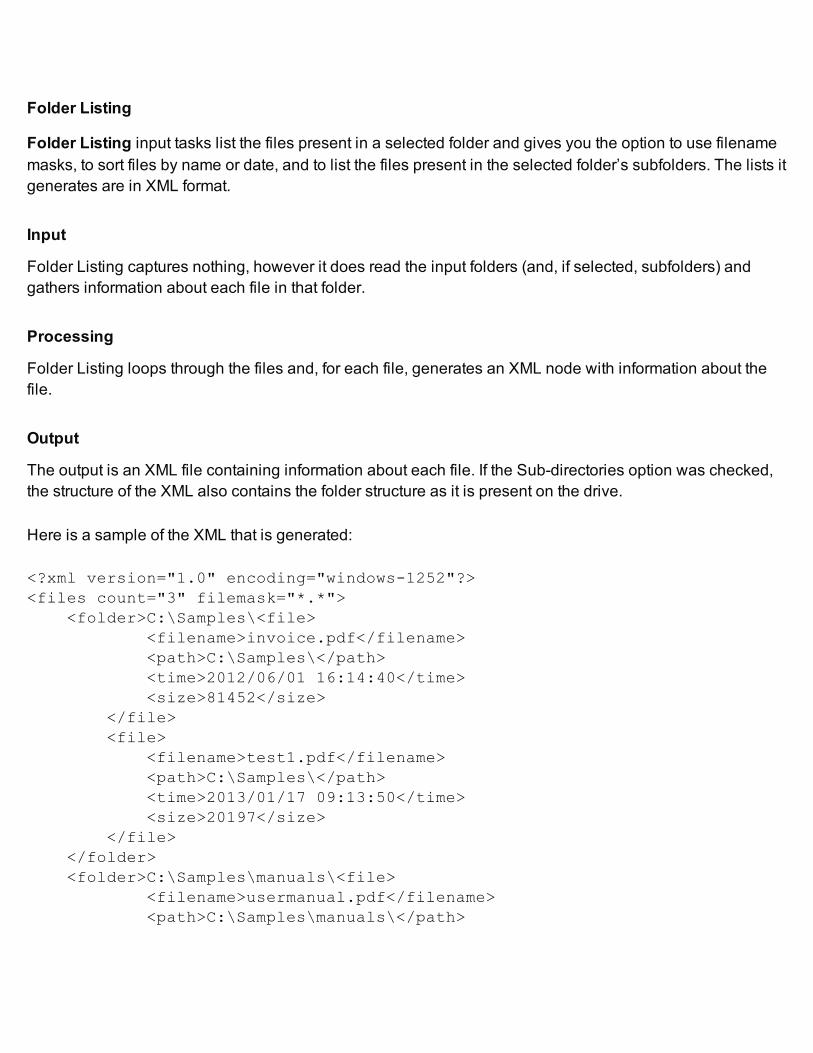
Folder Listing
Folder Listing input tasks list the files present in a selected folder and gives you the option to use filenamemasks, to sort files by name or date, and to list the files present in the selected folder’s subfolders. The lists itgenerates are in XML format.
Input
Folder Listing captures nothing, however it does read the input folders (and, if selected, subfolders) andgathers information about each file in that folder.
Processing
Folder Listing loops through the files and, for each file, generates an XML node with information about thefile.
Output
The output is an XML file containing information about each file. If the Sub-directories option was checked,the structure of the XML also contains the folder structure as it is present on the drive.
Here is a sample of the XML that is generated:
<?xml version="1.0" encoding="windows-1252"?><files count="3" filemask="*.*">
<folder>C:\Samples\<file><filename>invoice.pdf</filename><path>C:\Samples\</path><time>2012/06/01 16:14:40</time><size>81452</size>
</file><file>
<filename>test1.pdf</filename><path>C:\Samples\</path><time>2013/01/17 09:13:50</time><size>20197</size>
</file></folder><folder>C:\Samples\manuals\<file>
<filename>usermanual.pdf</filename><path>C:\Samples\manuals\</path>

<time>1999/10/06 09:52:04</time><size>644037</size>
</file></folder>
</files>
Note
The <time> tag is independent of the OS locale, language or settings. The format is always YYYY/MM/DD23:59:59.
Properties
General Tab
l Input folder: Enter the path of the folder that contains the files you want listed.l Sorted by: Select either Name or Modified date, depending on how you want the list top be sorted.
l File mask: Edit the default file name mask (*.*) if you want only some of the files present in the folder toappear in the list.
l List files in sub-directories also: Select this option if you want the task to list any files present insubfolders of the selected input folder.
"Other" Tab
l Job Information groupl Information elements: indicates what job infos are automatically created by the input task.l Add lines before first data page: Using the arrows keys you can add any job informationdirectly at the beginning of your data file.
l Backup input files: Check this to save a copy of each data file that is captured by your input. Thesefiles are saved in the PlanetPress Suite Workflow Tools working folders under the "Backup" folder.
l Backup filename: Enter the filename that you wish the input data file backup to be saved under.l Delete Existing Metadata: Check to remove any metadata from memory. This option is disabled oninitial input tasks, and is checked by default on secondary input tasks.

Job Information definitions
l %1 - Folder: Contains the full path of the base folder from which the files are listed.
On Error Tab
The On Error tab is common to all tasks. Details can be found in the" Task Properties Dialog" on page 666.
By default, any action task, branch, splitter or condition that generates an error will simply be ignored, andthe task just under it (not within a branch) will be given control of the job file without any modification. Anyinitial input task that generates an error will stop the process from running as a whole, and output tasks willnot generate output. The On Error tab can be used to overwrite the default behaviors.
l Send to Process: Check this option to send the job file to an error management process.l Error Process drop-down: Enabled only when the Send to Process option is checked. Lists anyprocess of which the initial input task is the Input Error Bin task.
l Action Group: This group is disabled in the initial input tasks and defaults to Stop Process. In allother tasks where the On Error tab is present, the following options are available:
l Ignore: The task is ignored as if it did not exist, and the job file is passed on to the next task inthe process.
l Stop Branch: If the task is in a branch of the process, the branch is stopped and the job file isreturned to the process after the branch. The branch will not produce any output.
l Stop Process: The process is stopped and no more processing is done. No further output isproduced.
l Log Message: Check this option to enable logging a custom error message in the PlanetPress SuiteWorkflow Tools' log file.
l Message: Enabled only when the Log Message option is checked. Enter a message that will belogged in the PlanetPress Suite Workflow Tools' log file. You can use any variables available inPlanetPress Workflow to customize the message.
l Store the message in variable: Select in which jobinfo, local or global variable you want to store themessage content.
l ID: Enter an error ID. This ID will be visible in theWindows Event Viewer. However, the ID is notvisible in the PlanetPress Suite Workflow Tools' log file.

l Store the ID in variable: Select in which jobinfo, local or global variable you want to store the errorID.
l Reset to defaults: Resets all options in this tab to their default values.
If storing the message or ID, if they are store in a jobinfo they will be available in any error handling processwhere errors are being forwarded. In all cases, if your process continues after the error, the contents of thevariables selected in this window will be available for the rest of your process, or whenever they areoverwritten.
Common Errors
Though some error messages are specific to a task in particular, others may apply to any and all tasksbecause they are related more to the system than to PlanetPress itself. Some examples would be W3813,W3830, W3991, W4005. These correspond to issues such as not having any space to write files, permissionerrors on folders or files, etc.
Comments Tab
The Comments tab is common to all tasks. It contains a single text area (Task comments) that lets youwrite comments about the task. These comments are saved when the dialog is closed with the OK button,and are displayed in the Task Comments Pane.
FTP Input
FTP Input tasks retrieve files from FTP sites using the FTP protocol. Masks are typically used to selectmultiple files to be retrieved from the server.
Input
FTP Input connects to the specified FTP server and path, and retrieves all files corresponding to thespecified mask. These files may be of any format, even formats that are not readable by PlanetPressWorkflow.
Processing
Each file capture by the input is sent down through the process, one at a time. When the file is finished, theprocess goes back to the input which feeds another file down, as long as there are files in the queue. Onceall the files are gone, the task polls the FTP folder again to see if new files are present and, if so, the processcontinues with these files. Otherwise, the process ends.

Output
The output to this task is a series of individual files, one after the other. These files are not modified in anyway from when they are captured from the source FTP server.
Properties
General tab
l FTP Server: Enter the IP address or host name of the FTP server to poll.
l User name: Enter the name of a user account on the FTP server.
l Password: If account named in the User name box is password protected, enter the password here.l Port number: Set to use a specific port number. Note: There is no validation to ensure the port isavailable. It is the user's responsibility to ensure the selected port is available and not being monitoredby another application or another PlanetPress Workflow task.
l Directory: Enter the path of the folder to poll on the FTP server. If this box is left empty, PlanetPressWorkflow will poll the root directory.
l Masks: Enter a single file name mask. Multiple entries are not allowed in this box.l Connection mode group
l Active: Select to prompt the ftp client to use the active mode when retrieving files from the FTPserver.
l Passive: Select to prompt the ftp client to use the passive mode when retrieving files from theFTP server.
"Other" Tab
l Job Information groupl Information elements: indicates what job infos are automatically created by the input task.l Add lines before first data page: Using the arrows keys you can add any job informationdirectly at the beginning of your data file.
l Backup input files: Check this to save a copy of each data file that is captured by your input. Thesefiles are saved in the PlanetPress Suite Workflow Tools working folders under the "Backup" folder.
l Backup filename: Enter the filename that you wish the input data file backup to be saved under.

l Delete Existing Metadata: Check to remove any metadata from memory. This option is disabled oninitial input tasks, and is checked by default on secondary input tasks.
Job Information definitions
l %1 - User name: Contains the user name that was used to connect to the FTP server. This is useful ifthis task is used as a secondary input and the information is defined dynamically.
l %2 - FTP Server: Contains the FTP address of the server from which the files were retrieved.l %3 - Source file name: Contains the name of the current file that was retrieved from the server.l %4 - Folder: Contains the FTP folder from which the current file was retrieved. This may differ from
On Error Tab
The On Error tab is common to all tasks. Details can be found in the" Task Properties Dialog" on page 666.
By default, any action task, branch, splitter or condition that generates an error will simply be ignored, andthe task just under it (not within a branch) will be given control of the job file without any modification. Anyinitial input task that generates an error will stop the process from running as a whole, and output tasks willnot generate output. The On Error tab can be used to overwrite the default behaviors.
l Send to Process: Check this option to send the job file to an error management process.l Error Process drop-down: Enabled only when the Send to Process option is checked. Lists anyprocess of which the initial input task is the Input Error Bin task.
l Action Group: This group is disabled in the initial input tasks and defaults to Stop Process. In allother tasks where the On Error tab is present, the following options are available:
l Ignore: The task is ignored as if it did not exist, and the job file is passed on to the next task inthe process.
l Stop Branch: If the task is in a branch of the process, the branch is stopped and the job file isreturned to the process after the branch. The branch will not produce any output.
l Stop Process: The process is stopped and no more processing is done. No further output isproduced.
l Log Message: Check this option to enable logging a custom error message in the PlanetPress SuiteWorkflow Tools' log file.
l Message: Enabled only when the Log Message option is checked. Enter a message that will belogged in the PlanetPress Suite Workflow Tools' log file. You can use any variables available inPlanetPress Workflow to customize the message.
l Store the message in variable: Select in which jobinfo, local or global variable you want to store themessage content.
l ID: Enter an error ID. This ID will be visible in theWindows Event Viewer. However, the ID is notvisible in the PlanetPress Suite Workflow Tools' log file.
l Store the ID in variable: Select in which jobinfo, local or global variable you want to store the errorID.
l Reset to defaults: Resets all options in this tab to their default values.
If storing the message or ID, if they are store in a jobinfo they will be available in any error handling processwhere errors are being forwarded. In all cases, if your process continues after the error, the contents of thevariables selected in this window will be available for the rest of your process, or whenever they areoverwritten.
Common Errors
Though some error messages are specific to a task in particular, others may apply to any and all tasksbecause they are related more to the system than to PlanetPress itself. Some examples would be W3813,W3830, W3991, W4005. These correspond to issues such as not having any space to write files, permissionerrors on folders or files, etc.
Comments Tab
The Comments tab is common to all tasks. It contains a single text area (Task comments) that lets youwrite comments about the task. These comments are saved when the dialog is closed with the OK button,and are displayed in the Task Comments Pane.
HTTP Client Input
HTTP Client Input tasks use the HTTP protocol to issue HTTP GET commands (queries) to HTTP servers.Replies received from the HTTP servers are used as jobfiles and are thus passed on to following tasks.
Input
This initial input task retrieves a single file as specified in the URL option. This file may be of any format,even formats that are not readable by PlanetPress Workflow.
Processing
No processing is done by this task. The file retrieved is not changed in any way.
Output
HTTP Client Input will output a single file which was retrieved from the web. Metadata is not generated bythis task.
HTTP Client Input task properties are as follows:
General tab
l URL: Enter the URL of the HTTP server from which the file must be downloaded. Since this is avariable property box, variables may be used, as well as the Get Data and Select Data commands.Note that when PlanetPress Workflow connects to a secure page, an SSL (Secure Socket Layer)connection is automatically used.
l Server requires authentication: Check this option if the HTTP server requires user authentication.This enables the following options.
l user name: A user name known to the Web server.
l Password: The password associated with the user name entered above.
"Other" Tab
l Job Information groupl Information elements: indicates what job infos are automatically created by the input task.l Add lines before first data page: Using the arrows keys you can add any job informationdirectly at the beginning of your data file.
l Backup input files: Check this to save a copy of each data file that is captured by your input. Thesefiles are saved in the PlanetPress Suite Workflow Tools working folders under the "Backup" folder.
l Backup filename: Enter the filename that you wish the input data file backup to be saved under.

l Delete Existing Metadata: Check to remove any metadata from memory. This option is disabled oninitial input tasks, and is checked by default on secondary input tasks.
Job Information definitions
l %1 - URL address: Contains the full URL that was requested by the task. This includes anyGET variables in the URL.
On Error Tab
The On Error tab is common to all tasks. Details can be found in the" Task Properties Dialog" on page 666.
By default, any action task, branch, splitter or condition that generates an error will simply be ignored, andthe task just under it (not within a branch) will be given control of the job file without any modification. Anyinitial input task that generates an error will stop the process from running as a whole, and output tasks willnot generate output. The On Error tab can be used to overwrite the default behaviors.
l Send to Process: Check this option to send the job file to an error management process.l Error Process drop-down: Enabled only when the Send to Process option is checked. Lists anyprocess of which the initial input task is the Input Error Bin task.
l Action Group: This group is disabled in the initial input tasks and defaults to Stop Process. In allother tasks where the On Error tab is present, the following options are available:
l Ignore: The task is ignored as if it did not exist, and the job file is passed on to the next task inthe process.
l Stop Branch: If the task is in a branch of the process, the branch is stopped and the job file isreturned to the process after the branch. The branch will not produce any output.
l Stop Process: The process is stopped and no more processing is done. No further output isproduced.
l Log Message: Check this option to enable logging a custom error message in the PlanetPress SuiteWorkflow Tools' log file.
l Message: Enabled only when the Log Message option is checked. Enter a message that will belogged in the PlanetPress Suite Workflow Tools' log file. You can use any variables available inPlanetPress Workflow to customize the message.
l Store the message in variable: Select in which jobinfo, local or global variable you want to store themessage content.

l ID: Enter an error ID. This ID will be visible in theWindows Event Viewer. However, the ID is notvisible in the PlanetPress Suite Workflow Tools' log file.
l Store the ID in variable: Select in which jobinfo, local or global variable you want to store the errorID.
l Reset to defaults: Resets all options in this tab to their default values.
If storing the message or ID, if they are store in a jobinfo they will be available in any error handling processwhere errors are being forwarded. In all cases, if your process continues after the error, the contents of thevariables selected in this window will be available for the rest of your process, or whenever they areoverwritten.
Common Errors
Though some error messages are specific to a task in particular, others may apply to any and all tasksbecause they are related more to the system than to PlanetPress itself. Some examples would be W3813,W3830, W3991, W4005. These correspond to issues such as not having any space to write files, permissionerrors on folders or files, etc.
Comments Tab
The Comments tab is common to all tasks. It contains a single text area (Task comments) that lets youwrite comments about the task. These comments are saved when the dialog is closed with the OK button,and are displayed in the Task Comments Pane.
HTTP Server Input
HTTP Server Input tasks are used to receive HTTP requests made via GET or POST commands and tosend replies to the servers from which the requests were made. The HTTP server supports both http and e.For HTTPS Support information, see HTTP Server Input User Options.
Note
While you can insert the HTTP Server Input task anywhere in your process as a secondary inputtask, in reality the HTTP Server Input task will only function when used as the initial input, as it istriggered when PlanetPress Workflow HTTP Server receives a request and passes it on to the correcttask.

Warning
It is highly recommended to make all processes using the HTTP Server Input task self-replicating andto reduce their polling interval in the Process Properties.
Input
The HTTP Server Input task does not, by itself, capture any files. Neither does it directly wait for requests tobe received. Actually, it is the HTTP service that receives the requests and places them in a specific locationon the drive. When a request is received, the HTTP Server Input polls that location and finds the requestsand all attachments. It will always pick up the "oldest" request received.
The request can contain one or more files, one being an XML file containing the request information as wellas any GET or POST variables that were received within this request. Other files are POST attachments.
Technical
By default, the request XML also contains a CDATA section which contains the raw input data,effectively doubling the size of the incoming file. Due to technical restrictions, the incoming XML filecannot be more than 400MB, which because of CDATA is reduced to around 200MB. To help in thissituation, you may elect to omit CDATA from the attachment, which can be changed in HTTP ServerInput User Options. Please note that this limitation also affects incoming binary files (sent through fileupload in a form), regardless of CDATA settings.
Processing
Depending on the options chosen in the HTTP Server Input task properties, the task may choose to ignoresome of the files. For example, using the "Do not include XML envelope" means that only thePOST attachments will be used in the process, the XML file will be discarded. Attachments are alwayssaved on disk in a specific location, which is accessible either directly in the XML or directly as a data filethrough the "Loop each attachment as data file" option.
Output
First, the output inside the process itself is, depending on the selected options, an XML request files,POST Attachments files, either one or both.

If the Send Immediate Response to client option is selected, the response file is sent back right away andthe involvement of the input task ends then. However, if this option is not checked, it means there is asecond output that comes out of the HTTP Server Input task: The last output generated by PlanetPressWorkflow is sent back to the initial input, which is returned back to the client.
Note
Starting in version 7.2 of PlanetPress Workflow, you can now serve static resources throughPlanetPress, which is especially useful for images, CSS and JavaScript files. See "HTTP Server Input2 User Options" on page 645.
HTTP Server input task properties are as follows:
l HTTP action: Enter the name of the action requested of PlanetPress Workflow by the client. Thisname corresponds to the URL that the client will be accessing. For example, if you enter "MakePDF"here, you could trigger the process by accessing http://127.0.0.1:8080/MakePDF . This is also whatyour HTML Form's action should be.
l MIME Type: Select the MIME type that best suits the files PlanetPress Workflow will be receiving asinput.
l Loop each attachment as a data file: When receiving attachments through a POST request(HTML Form), this option will make the HTTP Server Input task loop through each attachment. Eachdata file is an XML with the accompanied file.
l Do not include XML envelope: Only active when the previous Loop option is checked. Whenchecked, the XML file containing the request data will not be available. Only the attachment itselfis sent as a data file.
l Respond on error: Enter a message to be sent to the client as the output file if the process encountersan error and is unable to send a reply that includes the actual output file. The information can be in anydesired format such as HTML or plain text, but most browsers will interpret it as plain text.
l Send immediate response to client: Do not wait for the process to finish and send a static HTML orText file back to the client instead. This prevents any timeout from occurring. When checking thisoption, the field under the option is used to select which file to return.
l Use custom HTTP server response code: When the process ends and a response is sent to therequesting client, a custom response code can be specified depending on how the process goes.While in previous versions the "200 OK" code was always used, this option overrides it to, for

example, "404 Not Found" or "401 Unauthorized".
l Variable containing the response code: The contents of the job information or local variableselected in this drop-down, presumed to be a valid response code, will be returned in theresponse header. This is the value that is present at the end of the process, not the beginning.
"Other" Tab
l Job Information groupl Information elements: indicates what job infos are automatically created by the input task.l Add lines before first data page: Using the arrows keys you can add any job informationdirectly at the beginning of your data file.
l Backup input files: Check this to save a copy of each data file that is captured by your input. Thesefiles are saved in the PlanetPress Suite Workflow Tools working folders under the "Backup" folder.
l Backup filename: Enter the filename that you wish the input data file backup to be saved under.l Delete Existing Metadata: Check to remove any metadata from memory. This option is disabled oninitial input tasks, and is checked by default on secondary input tasks.
Job Information definitions
l %1 - Client IP address: Contains the IP address of the HTTP client requesting a response.l %2 - Request header: Contains the headers of the request, which can contain information such as theBrowser and Operating System, languages, etc.
l %3 - Filename: Contains the local file name of the job file created by this task (and XML file). This isequivalent to %o.
Examples & Use Cases
This task is put into effect in the following use cases and example processes:
l HTTP PDF Invoice Requestl HTTP Brochure Requestl Capture Web Manager Workflow
On Error Tab
The On Error tab is common to all tasks. Details can be found in the" Task Properties Dialog" on page 666.

By default, any action task, branch, splitter or condition that generates an error will simply be ignored, andthe task just under it (not within a branch) will be given control of the job file without any modification. Anyinitial input task that generates an error will stop the process from running as a whole, and output tasks willnot generate output. The On Error tab can be used to overwrite the default behaviors.
l Send to Process: Check this option to send the job file to an error management process.l Error Process drop-down: Enabled only when the Send to Process option is checked. Lists anyprocess of which the initial input task is the Input Error Bin task.
l Action Group: This group is disabled in the initial input tasks and defaults to Stop Process. In allother tasks where the On Error tab is present, the following options are available:
l Ignore: The task is ignored as if it did not exist, and the job file is passed on to the next task inthe process.
l Stop Branch: If the task is in a branch of the process, the branch is stopped and the job file isreturned to the process after the branch. The branch will not produce any output.
l Stop Process: The process is stopped and no more processing is done. No further output isproduced.
l Log Message: Check this option to enable logging a custom error message in the PlanetPress SuiteWorkflow Tools' log file.
l Message: Enabled only when the Log Message option is checked. Enter a message that will belogged in the PlanetPress Suite Workflow Tools' log file. You can use any variables available inPlanetPress Workflow to customize the message.
l Store the message in variable: Select in which jobinfo, local or global variable you want to store themessage content.
l ID: Enter an error ID. This ID will be visible in theWindows Event Viewer. However, the ID is notvisible in the PlanetPress Suite Workflow Tools' log file.
l Store the ID in variable: Select in which jobinfo, local or global variable you want to store the errorID.
l Reset to defaults: Resets all options in this tab to their default values.
If storing the message or ID, if they are store in a jobinfo they will be available in any error handling processwhere errors are being forwarded. In all cases, if your process continues after the error, the contents of thevariables selected in this window will be available for the rest of your process, or whenever they areoverwritten.

Common Errors
Though some error messages are specific to a task in particular, others may apply to any and all tasksbecause they are related more to the system than to PlanetPress itself. Some examples would be W3813,W3830, W3991, W4005. These correspond to issues such as not having any space to write files, permissionerrors on folders or files, etc.
Comments Tab
The Comments tab is common to all tasks. It contains a single text area (Task comments) that lets youwrite comments about the task. These comments are saved when the dialog is closed with the OK button,and are displayed in the Task Comments Pane.
Input Error Bin
The Input Error Bin Task is used specifically and only to create error management processes. Theseprocesses do not run on their own but are rather triggered by the On Error tab of tasks in other processes,when that task fails.
Input
This task receives a data file from a task that generated an error. Accompanying this data file is the currentJob Infos of the process that triggered the error. This means that this input does not generate its own jobinfos!
No Metadata is received by this task, and none is generated.
The following error information is generated by the Input Error Bin starting version 7.5, and is accessiblethroughout the process:
l %{error.process}: the process name where the error occurred.l %{error.tasktype}: the type of the failed task, can be Action, Input, Output, Printer, Comment andBranch.
l %{error.taskname}: the name of the plugin (the Display Name as seen in the plugin bar).l %{error.taskindex}: the index of the task in the process (its position in the process).l %{error.errormsg}: the "Message" specified on the OnError tab of the failed task.l %{error.errorid}: the error "ID" specified on the OnError tab of the failed task.

Processing
No processing is done by this task.
Output
The output of this task is the same as the input - a data file and job infos that are sent from a task thatgenerated an error.
General Tab
l The Input Error Bin task does not have any specific properties unique to it, since it only receives inputdirectly from tasks in other processes when an error is generated. For more information, see thechapter on "Debugging and Error Handling" on page 46.
"Other" Tab
l Job Information groupl Information elements: indicates what job infos are automatically created by the input task.l Add lines before first data page: Using the arrows keys you can add any job informationdirectly at the beginning of your data file.
l Backup input files: Check this to save a copy of each data file that is captured by your input. Thesefiles are saved in the PlanetPress Suite Workflow Tools working folders under the "Backup" folder.
l Backup filename: Enter the filename that you wish the input data file backup to be saved under.l Delete Existing Metadata: Check to remove any metadata from memory. This option is disabled oninitial input tasks, and is checked by default on secondary input tasks.
Job Information definitions
l This task does not generate any job information.
On Error Tab
The On Error tab is common to all tasks. Details can be found in the" Task Properties Dialog" on page 666.
By default, any action task, branch, splitter or condition that generates an error will simply be ignored, and

the task just under it (not within a branch) will be given control of the job file without any modification. Anyinitial input task that generates an error will stop the process from running as a whole, and output tasks willnot generate output. The On Error tab can be used to overwrite the default behaviors.
l Send to Process: Check this option to send the job file to an error management process.l Error Process drop-down: Enabled only when the Send to Process option is checked. Lists anyprocess of which the initial input task is the Input Error Bin task.
l Action Group: This group is disabled in the initial input tasks and defaults to Stop Process. In allother tasks where the On Error tab is present, the following options are available:
l Ignore: The task is ignored as if it did not exist, and the job file is passed on to the next task inthe process.
l Stop Branch: If the task is in a branch of the process, the branch is stopped and the job file isreturned to the process after the branch. The branch will not produce any output.
l Stop Process: The process is stopped and no more processing is done. No further output isproduced.
l Log Message: Check this option to enable logging a custom error message in the PlanetPress SuiteWorkflow Tools' log file.
l Message: Enabled only when the Log Message option is checked. Enter a message that will belogged in the PlanetPress Suite Workflow Tools' log file. You can use any variables available inPlanetPress Workflow to customize the message.
l Store the message in variable: Select in which jobinfo, local or global variable you want to store themessage content.
l ID: Enter an error ID. This ID will be visible in theWindows Event Viewer. However, the ID is notvisible in the PlanetPress Suite Workflow Tools' log file.
l Store the ID in variable: Select in which jobinfo, local or global variable you want to store the errorID.
l Reset to defaults: Resets all options in this tab to their default values.
If storing the message or ID, if they are store in a jobinfo they will be available in any error handling processwhere errors are being forwarded. In all cases, if your process continues after the error, the contents of thevariables selected in this window will be available for the rest of your process, or whenever they areoverwritten.
Common Errors
Though some error messages are specific to a task in particular, others may apply to any and all tasksbecause they are related more to the system than to PlanetPress itself. Some examples would be W3813,W3830, W3991, W4005. These correspond to issues such as not having any space to write files, permissionerrors on folders or files, etc.
Comments Tab
The Comments tab is common to all tasks. It contains a single text area (Task comments) that lets youwrite comments about the task. These comments are saved when the dialog is closed with the OK button,and are displayed in the Task Comments Pane.
Input SOAP
The Input SOAP task is used to answer calls from a remote SOAP client and to return a response to thatrequest. It is similar in functionality to the "HTTP Server Input" on page 202 task.
Input
This task does not poll any location by itself. It sits there waiting for requests coming in through WSDL (SOAP communication) and, when it receives a request, runs the process and returns the last outputgenerated by the process to the client.
Processing
No processing is done. The request that is received by this task is XML and it is maintained as such.
Output
As with the HTTP Server Input, this task has a dual-output purpose. First, when the initial input task is run,the XML request is output onto the process. Then, when the process is finished, the last job file generated bythe process is returned to the requesting client.
Technical
SOAP communication is non-trivial and requires a certain understanding of XML and the

SOAP protocol. Using the SOAP tasks pre-supposes this knowledge and this documentation does notattempt to provide it.
The Input SOAP Task only responds to a single SOAP action by the client: SubmitJob. Within this requesthowever, a secondary action (SubmitSOAPActionName) can be specified - this is what the SOAP Actioncorresponds to in this task's properties.
General Tab
l SOAP Action: The SOAP action is used with the SubmitJob action. It’s the equivalent of the processname. The difference is that more than one processes can share the same SOAP action. That waymore than 1 CPU can be used to process all the incoming requests however this means that allprocess sharing the same SOAP action must be identical because there is no way to decide theexecution order of all the process.
"Other" Tab
l Job Information groupl Information elements: indicates what job infos are automatically created by the input task.l Add lines before first data page: Using the arrows keys you can add any job informationdirectly at the beginning of your data file.
l Backup input files: Check this to save a copy of each data file that is captured by your input. Thesefiles are saved in the PlanetPress Suite Workflow Tools working folders under the "Backup" folder.
l Backup filename: Enter the filename that you wish the input data file backup to be saved under.l Delete Existing Metadata: Check to remove any metadata from memory. This option is disabled oninitial input tasks, and is checked by default on secondary input tasks.
Job Information definitions
l This task does not generate any job information.
On Error Tab
The On Error tab is common to all tasks. Details can be found in the" Task Properties Dialog" on page 666.

By default, any action task, branch, splitter or condition that generates an error will simply be ignored, andthe task just under it (not within a branch) will be given control of the job file without any modification. Anyinitial input task that generates an error will stop the process from running as a whole, and output tasks willnot generate output. The On Error tab can be used to overwrite the default behaviors.
l Send to Process: Check this option to send the job file to an error management process.l Error Process drop-down: Enabled only when the Send to Process option is checked. Lists anyprocess of which the initial input task is the Input Error Bin task.
l Action Group: This group is disabled in the initial input tasks and defaults to Stop Process. In allother tasks where the On Error tab is present, the following options are available:
l Ignore: The task is ignored as if it did not exist, and the job file is passed on to the next task inthe process.
l Stop Branch: If the task is in a branch of the process, the branch is stopped and the job file isreturned to the process after the branch. The branch will not produce any output.
l Stop Process: The process is stopped and no more processing is done. No further output isproduced.
l Log Message: Check this option to enable logging a custom error message in the PlanetPress SuiteWorkflow Tools' log file.
l Message: Enabled only when the Log Message option is checked. Enter a message that will belogged in the PlanetPress Suite Workflow Tools' log file. You can use any variables available inPlanetPress Workflow to customize the message.
l Store the message in variable: Select in which jobinfo, local or global variable you want to store themessage content.
l ID: Enter an error ID. This ID will be visible in theWindows Event Viewer. However, the ID is notvisible in the PlanetPress Suite Workflow Tools' log file.
l Store the ID in variable: Select in which jobinfo, local or global variable you want to store the errorID.
l Reset to defaults: Resets all options in this tab to their default values.
If storing the message or ID, if they are store in a jobinfo they will be available in any error handling processwhere errors are being forwarded. In all cases, if your process continues after the error, the contents of thevariables selected in this window will be available for the rest of your process, or whenever they areoverwritten.
Common Errors
Though some error messages are specific to a task in particular, others may apply to any and all tasksbecause they are related more to the system than to PlanetPress itself. Some examples would be W3813,W3830, W3991, W4005. These correspond to issues such as not having any space to write files, permissionerrors on folders or files, etc.
Comments Tab
The Comments tab is common to all tasks. It contains a single text area (Task comments) that lets youwrite comments about the task. These comments are saved when the dialog is closed with the OK button,and are displayed in the Task Comments Pane.
LPD Input
LPD (Line Printer Daemon) input tasks retrieve data in the form of print files sent from remote computersusing the LPD/LPR protocol. The PlanetPress Workflow LPD server starts automatically when aconfiguration that includes at least one active LPD Input task is started.
To prevent conflicts between competing LPD servers, you must not run any other LPD server than thePlanetPress Workflow LPD server on PlanetPress Workflow workstation.
LPD tasks are configured primarily through user options (See "LPD Input Plug-In Preferences" onpage 646). The only LDP information you enter in each LPD task is the queue name.
Input
This task does not poll an input, it sits there and waits for a job file to be sent through the LPR port.
Processing
When the job is received through LPR, it is saved as a job file. No further processing is done on the file.
Output
The task outputs the job file as is, with no evaluation or modification.

Properties
General tab
l LPD queue name: Enter the queue name specified in the printer queue on the remote computer orcomputers.
"Other" Tab
l Job Information groupl Information elements: indicates what job infos are automatically created by the input task.l Add lines before first data page: Using the arrows keys you can add any job informationdirectly at the beginning of your data file.
l Backup input files: Check this to save a copy of each data file that is captured by your input. Thesefiles are saved in the PlanetPress Suite Workflow Tools working folders under the "Backup" folder.
l Backup filename: Enter the filename that you wish the input data file backup to be saved under.l Delete Existing Metadata: Check to remove any metadata from memory. This option is disabled oninitial input tasks, and is checked by default on secondary input tasks.
Job Information definitions
l %1 - User name: Contains the user name of the user who sent the job to the printer, or the user forwhich a software sending the job was logged in under.
l %2 - Host computer: Contains the name of the computer from which the job was sent.l %3 - Job name: Contains the name of the job as specified by the software that sent the job.l %4 - Source file name: Contains the name of the job file as specified by the software that sent the job.l %5 - Sender's IP address: Contains the IP address from which the job was sent.
On Error Tab
The On Error tab is common to all tasks. Details can be found in the" Task Properties Dialog" on page 666.
By default, any action task, branch, splitter or condition that generates an error will simply be ignored, andthe task just under it (not within a branch) will be given control of the job file without any modification. Anyinitial input task that generates an error will stop the process from running as a whole, and output tasks will

not generate output. The On Error tab can be used to overwrite the default behaviors.
l Send to Process: Check this option to send the job file to an error management process.l Error Process drop-down: Enabled only when the Send to Process option is checked. Lists anyprocess of which the initial input task is the Input Error Bin task.
l Action Group: This group is disabled in the initial input tasks and defaults to Stop Process. In allother tasks where the On Error tab is present, the following options are available:
l Ignore: The task is ignored as if it did not exist, and the job file is passed on to the next task inthe process.
l Stop Branch: If the task is in a branch of the process, the branch is stopped and the job file isreturned to the process after the branch. The branch will not produce any output.
l Stop Process: The process is stopped and no more processing is done. No further output isproduced.
l Log Message: Check this option to enable logging a custom error message in the PlanetPress SuiteWorkflow Tools' log file.
l Message: Enabled only when the Log Message option is checked. Enter a message that will belogged in the PlanetPress Suite Workflow Tools' log file. You can use any variables available inPlanetPress Workflow to customize the message.
l Store the message in variable: Select in which jobinfo, local or global variable you want to store themessage content.
l ID: Enter an error ID. This ID will be visible in theWindows Event Viewer. However, the ID is notvisible in the PlanetPress Suite Workflow Tools' log file.
l Store the ID in variable: Select in which jobinfo, local or global variable you want to store the errorID.
l Reset to defaults: Resets all options in this tab to their default values.
If storing the message or ID, if they are store in a jobinfo they will be available in any error handling processwhere errors are being forwarded. In all cases, if your process continues after the error, the contents of thevariables selected in this window will be available for the rest of your process, or whenever they areoverwritten.

Common Errors
Though some error messages are specific to a task in particular, others may apply to any and all tasksbecause they are related more to the system than to PlanetPress itself. Some examples would be W3813,W3830, W3991, W4005. These correspond to issues such as not having any space to write files, permissionerrors on folders or files, etc.
Comments Tab
The Comments tab is common to all tasks. It contains a single text area (Task comments) that lets youwrite comments about the task. These comments are saved when the dialog is closed with the OK button,and are displayed in the Task Comments Pane.
Merge PDF Files
The Merge PDF Files input task (previously named "Concatenate PDF Files") captures all PDF files in agiven folder and merges them into a single PDF file.
Note
This feature is part of the PDF Tools, which is only available in PlanetPress Workflow.
Input
This task captures all of the PDF files present in a specific folder, in one operation.
The Merge PDF Files input task performs just like any other input: once the process has completed, controlis transferred back to the input one last time to check if new files meeting the mask have come in. Thismeans that the merging of PDF files that are not all present at the start of the process may take severalpasses, which may have an adverse effect on the overall performance and the size of the resulting PDF.
Processing
Once all PDF files are captured, their original copies are deleted from the input folder (or tagged as Archiveif this option is selected) and they are merged into a single PDF. This is done in a single operation, notincrementally, meaning the file is built once and, if the option is chosen, optimized once.

Output
A single PDF containing as many pages as all the combined input PDFs is generated. If the option isselected, this PDF is optimized. An optional metadata file is also created, containing information about thePDFs. This metadata is divided such that each PDF file is its own document, which can contain multipledata pages.
General tab
l Folder: Enter the full path of the folder from which the input files are to be taken.
l Masks: Enter a single or multiple file names or use file name masks. See Masks. Since this task onlysupports PDF files, make sure your extension remains .PDF for all your masks.
l Sort files by: Select a given sorting method to prompt PlanetPress Workflow to sort the files in thesource folder before taking them (and thus to take them in a specific order). Select None to letPlanetPress Workflow take the files without sorting them first.
l Sort order: If you selected a sorting method in the Sort files by box, select the order in which you wantthe files to be sorted.
l Use archive attribute: Select to turn on the archive attribute of the data files found in the source folderand to leave them in their original location (i.e. to take copies of the source files). Note thatPlanetPress Workflow never takes source files that have their archive attribute turned on (so thesource files will not be taken again and again). When this option is turned off, PlanetPress Workflowremoves data files from the source location.
l Capture files in sub-directories also: Select to capture files from child folders of the source folder aswell. When this option is selected, the chosen Sort order is applied to each separate folder, not acrossfolders. The subfolders themselves are always processed in alphabetical order, regardless of the sortorder.
l Sort directories first: If you selected a sorting method in the Sort files by box, and if you want thefolders present in the source folder to be sorted first, select this option.
l Optimize resulting PDF: Select to specify whether the resulting PDF should be optimized.Optimization can lead to a significant reduction in the size of the PDF, but it may also add a certainamount of time to the process. This option should only be unchecked if the timing of the process iscritical and needs to be done quickly, but keep in mind that the resulting PDF may be much larger thanit should be and may even be too large for PlanetPress Workflow to handle.
l Create Metadata: Select to specify that a basic metadata structure should be created for the resultingPDF file. The metadata structure created will contain a single Job separated by one Document per

captured PDF file. Within each Document, one Data Page containing a single Page is created for eachpage of the PDF file.
Note
Metadata can be manipulated with the Metadata Tasks, See "Metadata Tasks" on page 447.
"Other" Tab
l Job Information groupl Information elements: indicates what job infos are automatically created by the input task.l Add lines before first data page: Using the arrows keys you can add any job informationdirectly at the beginning of your data file.
l Backup input files: Check this to save a copy of each data file that is captured by your input. Thesefiles are saved in the PlanetPress Suite Workflow Tools working folders under the "Backup" folder.
l Backup filename: Enter the filename that you wish the input data file backup to be saved under.l Delete Existing Metadata: Check to remove any metadata from memory. This option is disabled oninitial input tasks, and is checked by default on secondary input tasks.
Job Information definitions
l %1 - PDF Directory: Contains the folder from which the data was captured.
Examples & Use Cases
This task is put into effect in the following use cases and example processes:
l Daily Sales Report from PDF Files
On Error Tab
The On Error tab is common to all tasks. Details can be found in the" Task Properties Dialog" on page 666.
By default, any action task, branch, splitter or condition that generates an error will simply be ignored, andthe task just under it (not within a branch) will be given control of the job file without any modification. Any

initial input task that generates an error will stop the process from running as a whole, and output tasks willnot generate output. The On Error tab can be used to overwrite the default behaviors.
l Send to Process: Check this option to send the job file to an error management process.l Error Process drop-down: Enabled only when the Send to Process option is checked. Lists anyprocess of which the initial input task is the Input Error Bin task.
l Action Group: This group is disabled in the initial input tasks and defaults to Stop Process. In allother tasks where the On Error tab is present, the following options are available:
l Ignore: The task is ignored as if it did not exist, and the job file is passed on to the next task inthe process.
l Stop Branch: If the task is in a branch of the process, the branch is stopped and the job file isreturned to the process after the branch. The branch will not produce any output.
l Stop Process: The process is stopped and no more processing is done. No further output isproduced.
l Log Message: Check this option to enable logging a custom error message in the PlanetPress SuiteWorkflow Tools' log file.
l Message: Enabled only when the Log Message option is checked. Enter a message that will belogged in the PlanetPress Suite Workflow Tools' log file. You can use any variables available inPlanetPress Workflow to customize the message.
l Store the message in variable: Select in which jobinfo, local or global variable you want to store themessage content.
l ID: Enter an error ID. This ID will be visible in theWindows Event Viewer. However, the ID is notvisible in the PlanetPress Suite Workflow Tools' log file.
l Store the ID in variable: Select in which jobinfo, local or global variable you want to store the errorID.
l Reset to defaults: Resets all options in this tab to their default values.
If storing the message or ID, if they are store in a jobinfo they will be available in any error handling processwhere errors are being forwarded. In all cases, if your process continues after the error, the contents of thevariables selected in this window will be available for the rest of your process, or whenever they areoverwritten.

Common Errors
Though some error messages are specific to a task in particular, others may apply to any and all tasksbecause they are related more to the system than to PlanetPress itself. Some examples would be W3813,W3830, W3991, W4005. These correspond to issues such as not having any space to write files, permissionerrors on folders or files, etc.
Comments Tab
The Comments tab is common to all tasks. It contains a single text area (Task comments) that lets youwrite comments about the task. These comments are saved when the dialog is closed with the OK button,and are displayed in the Task Comments Pane.
Serial Input
Serial Input tasks receive files sent to a serial port on the computer running PlanetPress Workflow. All theSerial Input tasks in a PlanetPress Workflow configuration share the same general properties, which areconfigured through user options (see "Serial Input Plug-In Preferences" on page 647). Only the propertiesset in the Other and Error tabs are specific to individual tasks.
Input
This task does not poll an input, it sits there and waits for a job file to be sent through the Serial connection.
Processing
When the job is received through the Serial connection, it is saved as a job file. No further processing isdone on the file.
Output
The task outputs the job file as is, with no evaluation or modification.
General Tab
l Since Serial Input tasks have no specific task configurable properties, this section contains noproperty information.

"Other" Tab
l Job Information groupl Information elements: indicates what job infos are automatically created by the input task.l Add lines before first data page: Using the arrows keys you can add any job informationdirectly at the beginning of your data file.
l Backup input files: Check this to save a copy of each data file that is captured by your input. Thesefiles are saved in the PlanetPress Suite Workflow Tools working folders under the "Backup" folder.
l Backup filename: Enter the filename that you wish the input data file backup to be saved under.l Delete Existing Metadata: Check to remove any metadata from memory. This option is disabled oninitial input tasks, and is checked by default on secondary input tasks.
Job Information definitions
l %1 - Source file name: Contains the name of the job file as specified by the software that sent the job.
On Error Tab
The On Error tab is common to all tasks. Details can be found in the" Task Properties Dialog" on page 666.
By default, any action task, branch, splitter or condition that generates an error will simply be ignored, andthe task just under it (not within a branch) will be given control of the job file without any modification. Anyinitial input task that generates an error will stop the process from running as a whole, and output tasks willnot generate output. The On Error tab can be used to overwrite the default behaviors.
l Send to Process: Check this option to send the job file to an error management process.l Error Process drop-down: Enabled only when the Send to Process option is checked. Lists anyprocess of which the initial input task is the Input Error Bin task.
l Action Group: This group is disabled in the initial input tasks and defaults to Stop Process. In allother tasks where the On Error tab is present, the following options are available:
l Ignore: The task is ignored as if it did not exist, and the job file is passed on to the next task inthe process.
l Stop Branch: If the task is in a branch of the process, the branch is stopped and the job file isreturned to the process after the branch. The branch will not produce any output.

l Stop Process: The process is stopped and no more processing is done. No further output isproduced.
l Log Message: Check this option to enable logging a custom error message in the PlanetPress SuiteWorkflow Tools' log file.
l Message: Enabled only when the Log Message option is checked. Enter a message that will belogged in the PlanetPress Suite Workflow Tools' log file. You can use any variables available inPlanetPress Workflow to customize the message.
l Store the message in variable: Select in which jobinfo, local or global variable you want to store themessage content.
l ID: Enter an error ID. This ID will be visible in theWindows Event Viewer. However, the ID is notvisible in the PlanetPress Suite Workflow Tools' log file.
l Store the ID in variable: Select in which jobinfo, local or global variable you want to store the errorID.
l Reset to defaults: Resets all options in this tab to their default values.
If storing the message or ID, if they are store in a jobinfo they will be available in any error handling processwhere errors are being forwarded. In all cases, if your process continues after the error, the contents of thevariables selected in this window will be available for the rest of your process, or whenever they areoverwritten.
Common Errors
Though some error messages are specific to a task in particular, others may apply to any and all tasksbecause they are related more to the system than to PlanetPress itself. Some examples would be W3813,W3830, W3991, W4005. These correspond to issues such as not having any space to write files, permissionerrors on folders or files, etc.
Comments Tab
The Comments tab is common to all tasks. It contains a single text area (Task comments) that lets youwrite comments about the task. These comments are saved when the dialog is closed with the OK button,and are displayed in the Task Comments Pane.

SFTP Input
The SFTP Input task retrieves files from a secure FTP site through an encrypted connection. Masks aretypically used to select multiple files to be retrieved from the server.
Input
The SFTP Input connects to the specified FTP server and path, and retrieves a list of all files correspondingto the specified mask. These files may be of any format, even formats that are not readable by PlanetPressWorkflow. The files are not deleted from the server when they are downloaded. They are added to a list ofprocessed files for this server. These lists are located under C:\ProgramData\Objectif Lune\.
Processing
Each file capture by the input is sent down through the process, one at a time. When the file is finished, theprocess goes back to the input which feeds another file down, as long as there are files in the queue. Onceall the files are gone, the task polls the FTP folder again to see if new files are present and, if so, the processcontinues with these files. Otherwise, the process ends.
Output
The output to this task is a series of individual files, one after the other. These files are not modified in anyway from when they are captured from the source FTP server.
Properties
General tab
l Server Settings group
l FTP Server: Enter the IP address or host name of the FTP server to poll.
l User name: Enter the name of a user account on the FTP server.
l Password: If account named in the User name box is password protected, enter the passwordhere.
l Protocol group
l SFTP: Select if the FTP server uses SFTP (SSH).l FTPS: Select if the FTP server uses FTPS (SSL/TSL)

l Port Number Group
l Use default port: Check to use the default port used by the protocol selected above.l Port number: Set to use a specific port number. Note: There is no validation to ensure the port isavailable. It is the user's responsibility to ensure the selected port is available and not beingmonitored by another application or another PlanetPress Workflow task.
l File Options group
l Directory: Enter the path of the folder to poll on the FTP server. If this box is left empty,PlanetPress Workflow will poll the root directory.
Note
The given directory will be looked up from the user's home directory. Such a home directory isusually under the server main user directory and generally includes the user’s name. Forexample, if "/tmp/temp/copy_pending" is entered, it does not point to the "/tmp/temp/copy_pending" directory but to the "/users/support/tmp/temp/copy_pending" directory.
l Masks: Enter a single file name mask. Multiple entries are not allowed in this box.l Delete remote file: Check this option to delete the file after it has been retrieved by Workflow.
l Connection mode group: This group is only relevant to the FTPS protocol and appears when it isselected. SFTP uses a single connection to download all files.
l Active: Select to prompt the ftp client to use the active mode when retrieving files from the FTPserver.
l Passive: Select to prompt the ftp client to use the passive mode when retrieving files from theFTP server.
l Reset Download List:
Security Tab
This tab defines the certificates used to connect to the secured FTP servers.
l Accept all certificates: Check this option to automatically accept the certificates returned by theFTP server. Otherwise, in order for a connection to work, you have to establish a connection first andthen accept a certificate from the List of known servers up to the Approved server list.

l Approved Server list: Displays a list of servers that were approved for connection:l Server: The name of the server the certificate belongs to.l Fingerprint: The RSA fingerprint of the server.l Remove: Click to remove the server from the approved list.
l List of known servers: Displays a list of servers that were connected to, whether they are approved ornot.
l Server: The name of the server the certificate belongs to.l Fingerprint: The RSA fingerprint of the server.l Approve: Click to add the server to the list of approved servers.
l Refresh: Click to refresh the list of known servers
"Other" Tab
l Job Information groupl Information elements: indicates what job infos are automatically created by the input task.l Add lines before first data page: Using the arrows keys you can add any job informationdirectly at the beginning of your data file.
l Backup input files: Check this to save a copy of each data file that is captured by your input. Thesefiles are saved in the PlanetPress Suite Workflow Tools working folders under the "Backup" folder.
l Backup filename: Enter the filename that you wish the input data file backup to be saved under.l Delete Existing Metadata: Check to remove any metadata from memory. This option is disabled oninitial input tasks, and is checked by default on secondary input tasks.
Job Information definitions
l %1 - User name: Contains the user name that was used to connect to the FTP server. This is useful ifthis task is used as a secondary input and the information is defined dynamically.
l %2 - FTP Server: Contains the FTP address of the server from which the files were retrieved.l %3 - Source file name: Contains the name of the current file that was retrieved from the server.l %4 - Folder: Contains the FTP folder from which the current file was retrieved. This may differ from
On Error Tab
The On Error tab is common to all tasks. Details can be found in the" Task Properties Dialog" on page 666.

By default, any action task, branch, splitter or condition that generates an error will simply be ignored, andthe task just under it (not within a branch) will be given control of the job file without any modification. Anyinitial input task that generates an error will stop the process from running as a whole, and output tasks willnot generate output. The On Error tab can be used to overwrite the default behaviors.
l Send to Process: Check this option to send the job file to an error management process.l Error Process drop-down: Enabled only when the Send to Process option is checked. Lists anyprocess of which the initial input task is the Input Error Bin task.
l Action Group: This group is disabled in the initial input tasks and defaults to Stop Process. In allother tasks where the On Error tab is present, the following options are available:
l Ignore: The task is ignored as if it did not exist, and the job file is passed on to the next task inthe process.
l Stop Branch: If the task is in a branch of the process, the branch is stopped and the job file isreturned to the process after the branch. The branch will not produce any output.
l Stop Process: The process is stopped and no more processing is done. No further output isproduced.
l Log Message: Check this option to enable logging a custom error message in the PlanetPress SuiteWorkflow Tools' log file.
l Message: Enabled only when the Log Message option is checked. Enter a message that will belogged in the PlanetPress Suite Workflow Tools' log file. You can use any variables available inPlanetPress Workflow to customize the message.
l Store the message in variable: Select in which jobinfo, local or global variable you want to store themessage content.
l ID: Enter an error ID. This ID will be visible in theWindows Event Viewer. However, the ID is notvisible in the PlanetPress Suite Workflow Tools' log file.
l Store the ID in variable: Select in which jobinfo, local or global variable you want to store the errorID.
l Reset to defaults: Resets all options in this tab to their default values.
If storing the message or ID, if they are store in a jobinfo they will be available in any error handling processwhere errors are being forwarded. In all cases, if your process continues after the error, the contents of thevariables selected in this window will be available for the rest of your process, or whenever they areoverwritten.
Common Errors
Though some error messages are specific to a task in particular, others may apply to any and all tasksbecause they are related more to the system than to PlanetPress itself. Some examples would be W3813,W3830, W3991, W4005. These correspond to issues such as not having any space to write files, permissionerrors on folders or files, etc.
Comments Tab
The Comments tab is common to all tasks. It contains a single text area (Task comments) that lets youwrite comments about the task. These comments are saved when the dialog is closed with the OK button,and are displayed in the Task Comments Pane.
SMTP Input
SMTP input tasks are used to receive SMTP requests made by any email client or other SMTP commandsand can act as an SMTP proxy, processing emails before they are sent to another SMTP server. In order forthis task to receive files, the SMTP Server (also called "Outgoing Email Server") in the email client mustpoint to PlanetPress Workflow server's IP or hostname.
Warning
Emails received through this task will not reach their intended destination if the process does not endwith a Send Email Output Task, or contain the PlanetPress Connect "Create Email Content Set" onpage 479 task.
Input
The SMTP Input task does not, by itself, capture any files. Neither does it directly wait for requests to bereceived. Actually, it is the SMTP Server service that receives the requests and places them in a specificlocation on the drive. When a request is received, the SMTP Input polls that location and finds the requestsand all attachments. It will always pick up the "oldest" request received.
Warning
In its initial implementation, the SMTP Input task will NOT receive the BCC addresses from most

emails sent to it. This is due to a technical limitation that will be resolved in a future version.
Processing
The task reads the incoming SMTP request and provides the data within its body.
Output
Depending on the Data Location option, the output is different:
l Envelope: The request file in XML format, including all email fields (from, to, cc, bcc, subject, body) aswell as additional header fields (email client information, attachments, etc). The message body andattachments are available through specific XML attributes. These files do not have the full path, butyou can use the %t variable to get the current temporary folder where they are located.
l Attachments: The input task loops through each attachment and sends them down through theprocess. While the Envelope is not available, the Job Infos contain pretty much all of the informationyou would get from it.
SMTP Input task properties are as follows:
l Data location: Determines what files are sent into the process:l Envelope: Only the request envelope is sent to the process (see above).l Attachments: Each attachment is sent down the process (see above).
l Unzip attached file: Select to unzip the attached files.
l Zip password: Enter the password required to unzip the attached files (if any). Note that you canuse variables and data selections.
l Conditions: Defines a filter on capturing files from the SMTP Service's hotfolder. When a condition isadded, only files that match this filter are captured, the rest remain untouched.
l “Subject” contains: Select to limit those messages used by this task to those with a specificsubject. The subject you enter in the box below can include variables and wildcards.
l Nothing: Select to limit those messages used by this task to those that do not specify anysubject.

l “From” contains: Select to limit those messages used by this task to those that are sent from aspecific address. The address you enter in the box below can include variables and wildcards.
l “To” contains: Select to limit those messages used by this task to those that are sent to aspecific address. The address you enter in the box below can include variables and wildcards.
"Other" Tab
l Job Information groupl Information elements: indicates what job infos are automatically created by the input task.l Add lines before first data page: Using the arrows keys you can add any job informationdirectly at the beginning of your data file.
l Backup input files: Check this to save a copy of each data file that is captured by your input. Thesefiles are saved in the PlanetPress Suite Workflow Tools working folders under the "Backup" folder.
l Backup filename: Enter the filename that you wish the input data file backup to be saved under.l Delete Existing Metadata: Check to remove any metadata from memory. This option is disabled oninitial input tasks, and is checked by default on secondary input tasks.
Job Information definitions
l %1 - Date Received: Contains the date and time at which the email was received.l %2 - Originator Name: Contains the Name of the sender (in the from field).l %3 - Originator Address: Contains the Email address of the sender (in the from field).l %4 - Recipients: Contains the recipient(s) of the email (in the to field).l %5 - CC: Contains the Carbon Copy recipient if there is one (in the cc field).l %6 - BCC: Contains the Blind Carbon Copy recipient if there is one (in the bcc field).l %7 - Subject: Contains the subject line of the email.l %8 - Header: Contains the headers of the message (in multiple lines separated by a line return).l %9 - Body: Contains the body text of the message.
On Error Tab
The On Error tab is common to all tasks. Details can be found in the" Task Properties Dialog" on page 666.
By default, any action task, branch, splitter or condition that generates an error will simply be ignored, and

the task just under it (not within a branch) will be given control of the job file without any modification. Anyinitial input task that generates an error will stop the process from running as a whole, and output tasks willnot generate output. The On Error tab can be used to overwrite the default behaviors.
l Send to Process: Check this option to send the job file to an error management process.l Error Process drop-down: Enabled only when the Send to Process option is checked. Lists anyprocess of which the initial input task is the Input Error Bin task.
l Action Group: This group is disabled in the initial input tasks and defaults to Stop Process. In allother tasks where the On Error tab is present, the following options are available:
l Ignore: The task is ignored as if it did not exist, and the job file is passed on to the next task inthe process.
l Stop Branch: If the task is in a branch of the process, the branch is stopped and the job file isreturned to the process after the branch. The branch will not produce any output.
l Stop Process: The process is stopped and no more processing is done. No further output isproduced.
l Log Message: Check this option to enable logging a custom error message in the PlanetPress SuiteWorkflow Tools' log file.
l Message: Enabled only when the Log Message option is checked. Enter a message that will belogged in the PlanetPress Suite Workflow Tools' log file. You can use any variables available inPlanetPress Workflow to customize the message.
l Store the message in variable: Select in which jobinfo, local or global variable you want to store themessage content.
l ID: Enter an error ID. This ID will be visible in theWindows Event Viewer. However, the ID is notvisible in the PlanetPress Suite Workflow Tools' log file.
l Store the ID in variable: Select in which jobinfo, local or global variable you want to store the errorID.
l Reset to defaults: Resets all options in this tab to their default values.
If storing the message or ID, if they are store in a jobinfo they will be available in any error handling processwhere errors are being forwarded. In all cases, if your process continues after the error, the contents of thevariables selected in this window will be available for the rest of your process, or whenever they areoverwritten.

Common Errors
Though some error messages are specific to a task in particular, others may apply to any and all tasksbecause they are related more to the system than to PlanetPress itself. Some examples would be W3813,W3830, W3991, W4005. These correspond to issues such as not having any space to write files, permissionerrors on folders or files, etc.
Comments Tab
The Comments tab is common to all tasks. It contains a single text area (Task comments) that lets youwrite comments about the task. These comments are saved when the dialog is closed with the OK button,and are displayed in the Task Comments Pane.
Telnet Input
The Telnet Input Task (also known as the Raw Socket Printing Input) receives files sent to a specific port. Ifyou want PlanetPress Workflow to receive data using multiple ports, you must use multiple Telnet inputtasks. To turn on or off the Telnet logging option, see the user options (see "Telnet Input Plug-InPreferences" on page 648).
Input
This task does not poll an input, it sits there and waits for a job file to be sent through the Telnet port.
Processing
When the job is received through Telnet, it is saved as a job file. No further processing is done on the file.
Output
The task outputs the job file as is, with no evaluation or modification.
Properties
General tab
l Port: Enter the number of the port on which PlanetPress Workflow is to listen for Raw Socketcommunications. The default port number is 9100. Bear in mind that no two input tasks, whatever theirtype (Telnet, serial, LDP, etc.), should be listening to the same port.

l Description: PlanetPress Workflow displays the name of the service or process assigned to the portnumber entered in the Port box. Note that these are standard Internet Assigned Numbers Authority(IANA) descriptions.
"Other" Tab
l Job Information groupl Information elements: indicates what job infos are automatically created by the input task.l Add lines before first data page: Using the arrows keys you can add any job informationdirectly at the beginning of your data file.
l Backup input files: Check this to save a copy of each data file that is captured by your input. Thesefiles are saved in the PlanetPress Suite Workflow Tools working folders under the "Backup" folder.
l Backup filename: Enter the filename that you wish the input data file backup to be saved under.l Delete Existing Metadata: Check to remove any metadata from memory. This option is disabled oninitial input tasks, and is checked by default on secondary input tasks.
Job Information definitions
l This task does not generate any job information.
On Error Tab
The On Error tab is common to all tasks. Details can be found in the" Task Properties Dialog" on page 666.
By default, any action task, branch, splitter or condition that generates an error will simply be ignored, andthe task just under it (not within a branch) will be given control of the job file without any modification. Anyinitial input task that generates an error will stop the process from running as a whole, and output tasks willnot generate output. The On Error tab can be used to overwrite the default behaviors.
l Send to Process: Check this option to send the job file to an error management process.l Error Process drop-down: Enabled only when the Send to Process option is checked. Lists anyprocess of which the initial input task is the Input Error Bin task.
l Action Group: This group is disabled in the initial input tasks and defaults to Stop Process. In allother tasks where the On Error tab is present, the following options are available:

l Ignore: The task is ignored as if it did not exist, and the job file is passed on to the next task inthe process.
l Stop Branch: If the task is in a branch of the process, the branch is stopped and the job file isreturned to the process after the branch. The branch will not produce any output.
l Stop Process: The process is stopped and no more processing is done. No further output isproduced.
l Log Message: Check this option to enable logging a custom error message in the PlanetPress SuiteWorkflow Tools' log file.
l Message: Enabled only when the Log Message option is checked. Enter a message that will belogged in the PlanetPress Suite Workflow Tools' log file. You can use any variables available inPlanetPress Workflow to customize the message.
l Store the message in variable: Select in which jobinfo, local or global variable you want to store themessage content.
l ID: Enter an error ID. This ID will be visible in theWindows Event Viewer. However, the ID is notvisible in the PlanetPress Suite Workflow Tools' log file.
l Store the ID in variable: Select in which jobinfo, local or global variable you want to store the errorID.
l Reset to defaults: Resets all options in this tab to their default values.
If storing the message or ID, if they are store in a jobinfo they will be available in any error handling processwhere errors are being forwarded. In all cases, if your process continues after the error, the contents of thevariables selected in this window will be available for the rest of your process, or whenever they areoverwritten.
Common Errors
Though some error messages are specific to a task in particular, others may apply to any and all tasksbecause they are related more to the system than to PlanetPress itself. Some examples would be W3813,W3830, W3991, W4005. These correspond to issues such as not having any space to write files, permissionerrors on folders or files, etc.
Comments Tab
The Comments tab is common to all tasks. It contains a single text area (Task comments) that lets youwrite comments about the task. These comments are saved when the dialog is closed with the OK button,and are displayed in the Task Comments Pane.

WinQueue Input
WinQueue input tasks capture print jobs received by a Windows printer queue.
Note
Before you go through the following procedure, on the computer running PlanetPress Workflow youwill need to create a local printer queue that will be used to receive data files in the form of print jobs.This queue can be shared, so as to be able to receive jobs sent from local as well as remote users.
To ensure that the spooled files created by PlanetPress Workflow queue remain in the spool folder, theprinter queue must be paused.
Input
The WinQueue input regularly polls the selected printer queue for new jobs. When a new job is available, itis captured automatically by this task.
Processing
The print job, by default, is in EMF format. If this option is selected, no action is taken on the data file.However, if the RAW format is selected, the job is converted to RAW. Furthermore, if the Create PDF optionis selected, the file is converted to a PDF, including metadata.
Output
Either one of 3 formats is output from this task:
l An EMF job formatl A RAW job formatl A PDF with attached metadata.

Properties
General tab
l Printer queue: Select the PlanetPress Workflow printer queue (the one to which data files are going tobe sent).
l Printer properties groupl Spool Print Job ins EMF Format (Advanced printing features): Select to create EMF files forWindows Print Converter action tasks (see "Windows Print Converter" on page 323). Note thatthis option must not be selected when capturing generic text type data.
l Spool Print Jobs in RAW Format: Select to output in RAW format, which is the exactly the datathat the computer receives (and is not converted in any way).
l Create PDF (With Metadata): Select to output a PDF which can be used by the DocumentInput (PDF Input) feature in PlanetPress Workflow.
l Optimize Resulting PDF: The resulting PDF is optimized for size and cachingoptions are enabled. This reduces the size of the PDFs (depending on some factors),but may take more time to output the PDF.
l Include empty files: Check to process empty incoming jobs. The output will be empty, the job isdeleted from the print queue, and the job information is available in the process (sending computerand user name, etc).
"Other" Tab
l Job Information groupl Information elements: indicates what job infos are automatically created by the input task.l Add lines before first data page: Using the arrows keys you can add any job informationdirectly at the beginning of your data file.
l Backup input files: Check this to save a copy of each data file that is captured by your input. Thesefiles are saved in the PlanetPress Suite Workflow Tools working folders under the "Backup" folder.
l Backup filename: Enter the filename that you wish the input data file backup to be saved under.l Delete Existing Metadata: Check to remove any metadata from memory. This option is disabled oninitial input tasks, and is checked by default on secondary input tasks.

Job Information definitions
l %1 - User name: Contains the user name of the user who sent the job to the printer, or the user unwhich a software sending the job was logged in under.
l %2 - Host computer: Contains the name of the computer from which the job was sent.l %3 - Printer name: Contains the name of the printer in which the job was received. Is the same for alljobs received on any given printer.
l %4 - Document name: Contains the name of the job as seen in the printer queue from which it iscaptured. This name is defined by the software that creates the print job.
On Error Tab
The On Error tab is common to all tasks. Details can be found in the" Task Properties Dialog" on page 666.
By default, any action task, branch, splitter or condition that generates an error will simply be ignored, andthe task just under it (not within a branch) will be given control of the job file without any modification. Anyinitial input task that generates an error will stop the process from running as a whole, and output tasks willnot generate output. The On Error tab can be used to overwrite the default behaviors.
l Send to Process: Check this option to send the job file to an error management process.l Error Process drop-down: Enabled only when the Send to Process option is checked. Lists anyprocess of which the initial input task is the Input Error Bin task.
l Action Group: This group is disabled in the initial input tasks and defaults to Stop Process. In allother tasks where the On Error tab is present, the following options are available:
l Ignore: The task is ignored as if it did not exist, and the job file is passed on to the next task inthe process.
l Stop Branch: If the task is in a branch of the process, the branch is stopped and the job file isreturned to the process after the branch. The branch will not produce any output.
l Stop Process: The process is stopped and no more processing is done. No further output isproduced.
l Log Message: Check this option to enable logging a custom error message in the PlanetPress SuiteWorkflow Tools' log file.
l Message: Enabled only when the Log Message option is checked. Enter a message that will belogged in the PlanetPress Suite Workflow Tools' log file. You can use any variables available inPlanetPress Workflow to customize the message.
l Store the message in variable: Select in which jobinfo, local or global variable you want to store themessage content.
l ID: Enter an error ID. This ID will be visible in theWindows Event Viewer. However, the ID is notvisible in the PlanetPress Suite Workflow Tools' log file.
l Store the ID in variable: Select in which jobinfo, local or global variable you want to store the errorID.
l Reset to defaults: Resets all options in this tab to their default values.
If storing the message or ID, if they are store in a jobinfo they will be available in any error handling processwhere errors are being forwarded. In all cases, if your process continues after the error, the contents of thevariables selected in this window will be available for the rest of your process, or whenever they areoverwritten.
Common Errors
Though some error messages are specific to a task in particular, others may apply to any and all tasksbecause they are related more to the system than to PlanetPress itself. Some examples would be W3813,W3830, W3991, W4005. These correspond to issues such as not having any space to write files, permissionerrors on folders or files, etc.
Comments Tab
The Comments tab is common to all tasks. It contains a single text area (Task comments) that lets youwrite comments about the task. These comments are saved when the dialog is closed with the OK button,and are displayed in the Task Comments Pane.
Task PropertiesAny task you add to your PlanetPress Workflowprocess must be configured using its properties dialog box.Each task's Properties dialog will give you the options to configure that specific, individual task. Propertiesof one task do not directly affect the properties of another task, however there are some software preferencesthat may affect tasks in one way or another (See "Preferences" on page 621)
Variable PropertiesWhen you edit tasks, you may notice that some of the properties that you can modify have a red (or moreprecisely, a maroon) title. This means that the property can be dynamically determined whenever your

process runs, that is to say it will not remain static. This can be extremely useful when, for example, youwant to determine how many copies you will print out depending on your data, or what document will beused in the printout depending on the department it came from.
Variable properties may include:
l Static data.l Standard Variables. See "Standard Variables" on page 537.l Local and Global Variables. See "Manipulate Local Variables" on page 573.l Job Infos. See "Job Info Variables" on page 536.l Data and Metadata Selections. See "Data Selections " on page 19.l Printer Control Characters. See "Shared Printer Queue Properties" on page 60. These are normallyonly used in printer outputs.
Variable properties can also be used in these special locations:
l In the Set Job Infos and Variables Action Task. See "Set Job Infos and Variables" on page 312.l In Scripts. See the chapter on "Using Scripts" on page 81.l In the Create File Input Task. See "Create File" on page 181.l Within a PlanetPress Design Document, using the ExpandString() function. See the PlanetPressDesign User Guide and PlanetPress Talk Reference Guide.
Variable properties can also be mixed, meaning you can combine, within a single variable property box, anynumber and order of variable types. You can, for example, do the following for an output file name:%O_@(1,1,1,30, KeepCase,Trim)_%y-%m-%d.txt. This would translate in the original file name, followed by part ofthe first line of a text data file, then the current date.
Contextual Menu
In any variable properties box, you may use the contextual (right-click) menu to add variables and controlcharacters, as well as to get data and make data selections. The lower part of the contextual menu is dividedinto 4 items that provide variable properties:

l Variablesl System: Contains system variables, also called "Standard Variables" on page 537.l Job Info: Contains Job Info variables from%1 to %9l Local Variables: Contains a list of local variables in this process. If no local variables exist, thisitem is disabled.
l Global Variables: Contains a list of global variables in this configuration. If no global variablesexist, this item is disabled.
l Control Characters: Contains a list of control characters that can be used in printers.l Get Data Value: Brings up the Data Selector, retrieves the value you select and places it in thevariable properties box. This information becomes static and does not change between each datapageand job file.
l Get Data Location: Brings up the Data Selector and records your selection. The data selection isdynamic, meaning it will get the data located in the area you choose, every time a new data file passesthrough it. This is indicated by a data selection (see "Data Selections " on page 19).
l Get Metadata Value: Brings up the Data Selector with only the Metadata tab visible and lets youselect the value (contents) of a Metadata attribute or field. The result is static and does not changebetween jobs.
l Get Metadata Location: Brings up the Data Selector with only the Metadata tab visible and lets youselect the location of the data. The result is variable and changes between jobs.
l Get Repository Value: Brings up the "Data Repository Manager" on page 613 dialog to select thevalue (contents) of a specific key. The result of the lookup is static.
l Get Repository Location: Brings up the Data Repository Manager dialog to select the location ofthe key to lookup every time this task is executed.
You can quickly identify variable information that is already present in your variable properties as such:
l A percentage sign identifies standard variables, as well as standard and custom job info variables —%f, for example.
l A backslash indicates a control character — \004, for example.l An at sign (@) indicates a data selection for emulations other than database —@(1,1,1,1,17,KeepCase,Trim), for example.
l Field indicates a data selection for a database emulation — field(1,0,0,'Billing_Email',KeepCase,NoTrim), for example.
l The lookup() function indicates a lookup in the "Data Repository Manager" on page 613.
Unknown Tasks
An unknown task is a task location that is not linked to any existing known task. Unknown tasks can havemultiple causes:
l Cutting an input or output task will replace it with an unknown task. See Cutting, Copying and PastingTasks and Branches
l Creating a new branch will create an unknown output task in that branch. See Adding Branches.l Using Branch From Here... will create an unknown output task below that branch. See AddingBranches.
l Opening a configuration that contains additional plug-ins that are not installed on that system willcause these plug-ins to be replaced by unknown tasks. Installing the additional plug-ins and re-opening the configuration will restore the plug-ins and their properties.
l Opening a configuration that contains plug-ins only available in PlanetPress Workflow (such as CreatePDF) from a PlanetPress Watch installation will cause these plug-ins to be replaced by unknowntasks. Opening the configuration in a PlanetPress Production or Office installation up upgradingPlanetPress Watch to PlanetPress Production or Office and re-opening the configuration will restorethe plug-ins and their properties.
Masks
A file name that includes characters meant to be replaced at run-time is referred to as a mask. Masks can beused in many edit boxes and can be used, for instance, to select multiple files. File selection is typicallylimited by fixed characters or special wildcard characters. If you create a Folder Capture input task andenter *.* in the Masks box, the input task will grab all the files that are put in the source folder. If you enter*.mdb instead, the task will only take the those database files that have an mdb extension. You can use anystandard wildcard character in PlanetPress Workflow.
Technical
Masks are case-insensitive, since the Windows platform does not support case-sensitive file names(yes, you can have mixed case in a file name but that's visual fluff - the OS itself does not care).
Mask Format
Here are the different mask formats available:

l Literal characters: Any alphanumerical character is considered literal character and must appear. Forexample, a mask of "trigger.txt" will not capture any other files than that name.
l Wildcards: Two wildcards are available in masks.l Asterisk (*): Supports any number of characters. *.txt would pick up any text file, file*.txt wouldpick up any file starting with file and any characters: file1.txt, filetest.txt.
l Question Mark (?): Supports a single character. file?.txt would pick up File1.txt or filea.txt , butnot file13.txt or filetest.txt.
l Brackets: Specifies a set of supported characters, or range of characters. Only one character from therange is accepted, making this a subset of the ? wildcard.
l Sets: [13ab] defines support for one of these 4 characters. file[13ab].txt would pick up file1.txt ,filea.txt , but not file13.txt or filea3.txt.
l Negative Sets: [!13ab] indicates the character should NOT be part of the set. file[!13ab].txtwould pick up file2.txt and filec.txt but not file1.txt or fileb.txt (nor would it pick up file13.txt orfilea3.txt).
l Ranges: [1-5] , [a-d] define ranges between the characters. file[1-5].txt would pick up file1.txtand file4.txt but not file6.txt or file13.txt.
l Negative Ranges: Negative ranges such as [!2-4] are also possible.
Technical
Filename containing brackets can be a hassle when attempting to capture them with a mask andusing sets or ranges. You can capture a set that contains an opening bracket ( [[] ) , but not a closingbracket as the closing bracket always ends the set or range. There is no escape character available inmasks.
Date and Time Format
To simplify things and to prevent errors, date and time formats have been standardized.
l Date are entered and displayed as yyyy/MM/dd (2007/06/13, for example).l Times are entered and displayed using the 24 hour format as HH:mm:ss (3:38:54 PM, for example, isentered and displayed as 15:38:54).

Add Document
The Add Document action task prepares a printer-centric PostScript job by adding a PostScript version of aselected PlanetPress Connect document and the trigger to execute it before the active data file.
Input
This task can support files in any emulation, however, the actual file that should be used is one that iscompatible with the selected PlanetPress Design document.
Processing
This task takes the PostScript version of the document (.ps7), ads the trigger and then the active data file toit. If metadata is present, the output is based on this metadata (unselected data pages will not generateoutput, the sort order will be respected, etc). Otherwise the complete data file is merged.
Output
The output is an PostScript job that can be sent to any output task in "passthrough" mode, for exampleCreate PDF, PlanetPress Image, etc. Metadata is not generated by this task.
Properties
General tab
l Documents: Select a specific PlanetPress Design document if you want all the jobs to be mergedwith that document.
l Add job information to the document: Select to prompt your PlanetPress Workflow to add theavailable job information elements in the header of the generated file. Note that this option is onlyenabled if a document was selected.
On Error Tab
The On Error tab is common to all tasks. Details can be found in the" Task Properties Dialog" on page 666.
By default, any action task, branch, splitter or condition that generates an error will simply be ignored, andthe task just under it (not within a branch) will be given control of the job file without any modification. Anyinitial input task that generates an error will stop the process from running as a whole, and output tasks willnot generate output. The On Error tab can be used to overwrite the default behaviors.

l Send to Process: Check this option to send the job file to an error management process.l Error Process drop-down: Enabled only when the Send to Process option is checked. Lists anyprocess of which the initial input task is the Input Error Bin task.
l Action Group: This group is disabled in the initial input tasks and defaults to Stop Process. In allother tasks where the On Error tab is present, the following options are available:
l Ignore: The task is ignored as if it did not exist, and the job file is passed on to the next task inthe process.
l Stop Branch: If the task is in a branch of the process, the branch is stopped and the job file isreturned to the process after the branch. The branch will not produce any output.
l Stop Process: The process is stopped and no more processing is done. No further output isproduced.
l Log Message: Check this option to enable logging a custom error message in the PlanetPress SuiteWorkflow Tools' log file.
l Message: Enabled only when the Log Message option is checked. Enter a message that will belogged in the PlanetPress Suite Workflow Tools' log file. You can use any variables available inPlanetPress Workflow to customize the message.
l Store the message in variable: Select in which jobinfo, local or global variable you want to store themessage content.
l ID: Enter an error ID. This ID will be visible in theWindows Event Viewer. However, the ID is notvisible in the PlanetPress Suite Workflow Tools' log file.
l Store the ID in variable: Select in which jobinfo, local or global variable you want to store the errorID.
l Reset to defaults: Resets all options in this tab to their default values.
If storing the message or ID, if they are store in a jobinfo they will be available in any error handling processwhere errors are being forwarded. In all cases, if your process continues after the error, the contents of thevariables selected in this window will be available for the rest of your process, or whenever they areoverwritten.
Common Errors
Though some error messages are specific to a task in particular, others may apply to any and all tasksbecause they are related more to the system than to PlanetPress itself. Some examples would be W3813,W3830, W3991, W4005. These correspond to issues such as not having any space to write files, permissionerrors on folders or files, etc.

Comments Tab
The Comments tab is common to all tasks. It contains a single text area (Task comments) that lets youwrite comments about the task. These comments are saved when the dialog is closed with the OK button,and are displayed in the Task Comments Pane.
Add/Remove Text
Add/Remove Text action tasks can be used to perform the following actions on the data file they receive:
l To add or remove characters.l To add or remove lines of data.l To add the content of a text file.
Note that the content must be located at the beginning or the end of the data file.
Input
Any text-based file can be used in this task, even formats that are not directly compatible with PlanetPress.As long as the text is visible in a text-based editor (such as Notepad), it is readable and supported by thistask.
Processing
The selected operation (adding or removing lines, text or pages) is made on the data file.
Output
The modified data file is output from this task. Metadata is not modified in any way if it is present.
Task Properties
General tab
l Action group
l Add: Select if you want the task to add content to the job file.l Remove: Select if you want the task to remove content from the job file.
l Content: Select what the task will actually add or remove. Select Text file to add the whole content ofa text file to the beginning or end of the job file. Select Characters to add the string of charactersentered in the Characters box to the beginning or end of the job file, or to remove a given number ofcharacters from the beginning or end of the job file. Select Lines to add the lines of text entered in theLines box to the beginning or end of the job file, or to remove a given number of lines from thebeginning or end of the job file.
l Position: Select whether you want the task to add or remove content from the beginning or end of thejob file.
l Add CRLF after last line: Select if you want to add a CRLF (carriage return/line feed) character afterthe last line of text added to the job file. This option is only available when you choose to add lines oftext to the job file.
l ASCII file: Enter the path and name of the text file to be added to the job file, or use the Browse buttonto navigate to this file. This box is only displayed when the Text file option is selected in the Contentbox.
l Characters: Enter the string of characters to be added to the job file. This box is only displayed whenthe Characters option is selected in the Content box.
l Lines: Enter the lines of text to be added to the job file. This box is only displayed when the Linesoption is selected in the Content box.
l Remove: Enter the number of characters or lines to be removed from the job file. This box is onlydisplayed when Remove is selected in the Action group and when the Characters or Lines option isselected in the Content box.
On Error Tab
The On Error tab is common to all tasks. Details can be found in the" Task Properties Dialog" on page 666.
By default, any action task, branch, splitter or condition that generates an error will simply be ignored, andthe task just under it (not within a branch) will be given control of the job file without any modification. Anyinitial input task that generates an error will stop the process from running as a whole, and output tasks willnot generate output. The On Error tab can be used to overwrite the default behaviors.
l Send to Process: Check this option to send the job file to an error management process.l Error Process drop-down: Enabled only when the Send to Process option is checked. Lists anyprocess of which the initial input task is the Input Error Bin task.

l Action Group: This group is disabled in the initial input tasks and defaults to Stop Process. In allother tasks where the On Error tab is present, the following options are available:
l Ignore: The task is ignored as if it did not exist, and the job file is passed on to the next task inthe process.
l Stop Branch: If the task is in a branch of the process, the branch is stopped and the job file isreturned to the process after the branch. The branch will not produce any output.
l Stop Process: The process is stopped and no more processing is done. No further output isproduced.
l Log Message: Check this option to enable logging a custom error message in the PlanetPress SuiteWorkflow Tools' log file.
l Message: Enabled only when the Log Message option is checked. Enter a message that will belogged in the PlanetPress Suite Workflow Tools' log file. You can use any variables available inPlanetPress Workflow to customize the message.
l Store the message in variable: Select in which jobinfo, local or global variable you want to store themessage content.
l ID: Enter an error ID. This ID will be visible in theWindows Event Viewer. However, the ID is notvisible in the PlanetPress Suite Workflow Tools' log file.
l Store the ID in variable: Select in which jobinfo, local or global variable you want to store the errorID.
l Reset to defaults: Resets all options in this tab to their default values.
If storing the message or ID, if they are store in a jobinfo they will be available in any error handling processwhere errors are being forwarded. In all cases, if your process continues after the error, the contents of thevariables selected in this window will be available for the rest of your process, or whenever they areoverwritten.
Common Errors
Though some error messages are specific to a task in particular, others may apply to any and all tasksbecause they are related more to the system than to PlanetPress itself. Some examples would be W3813,W3830, W3991, W4005. These correspond to issues such as not having any space to write files, permissionerrors on folders or files, etc.

Comments Tab
The Comments tab is common to all tasks. It contains a single text area (Task comments) that lets youwrite comments about the task. These comments are saved when the dialog is closed with the OK button,and are displayed in the Task Comments Pane.
Advanced Search and Replace
Advanced Search and Replace action tasks are used to locate and replace strings of data within the jobfile and to replace them with other strings of data. Contrary to Search and Replace action tasks, they allowthe use of regular expressions.
Using regular expressions, it is possible to search for patterns rather than specific strings. For instance, apattern can be specified to find all valid email addresses or phone numbers within the data stream.
Input
Any text-based file can be used in this task, even formats that are not directly compatible with PlanetPressWorkflow. As long as the text is visible in a text-based editor (such as Notepad), it is readable and supportedby this task.
Processing
The appropriate changes are made to the data file (replacing text).
Output
The modified data file is output from this task. Metadata is not modified in any way if it is present.
Task Properties
General tab
l Search mode group: Select your chosen search mode within this group.
l Search line by line: Select if you want each line in the data stream to be searched separately.When this option is selected, PlanetPress Workflow considers each line as an individual datastream (lines are separated by Line Feed characters). It minimizes memory requirements butmay also limit hits, since lines are considered separately. Note that it is not possible to use

search expressions that specify multiple data lines when this option is selected.l Search whole file: Select if you want the entire data stream to be searched as if it were a singlestring of text. When this option is selected, PlanetPress Workflow loads the entire file in memory.It offers more flexibility, since search expressions may span across multiple lines and may resultin more successful hits. Note that since this option uses more memory, it may affect performance.
l String to search: Enter your search string or regular expression in this variable property box. Toenter multiple strings or expressions, press Enter after each one (note that only one string can beentered in the Replace with box).
l Treat as regular expression: Select to specify that the string or strings entered above are to beinterpreted as regular expressions rather than ordinary text strings. This option disables all positionoptions as well as theWhole words only option.
l Search options group
l Case sensitive: Select to force the plugin to match the character casing of the search stringabove with the characters found in the file. If this option is selected, “DAY” and “Day” will not beconsidered as matching the search string “day”.
l Whole word only: Select force the plugin to search only for strings that match the search stringfrom beginning to end (cannot be used with regular expressions). If this option is selected, “DAY”and “DAYS” will not be considered as matching strings.
l Position options group: Specify the location where the string must be found using this group. Notethat this whole group is disabled when the Treat as regular expression option is selected.
l Anywhere on the line: Select to indicate that the search string can be anywhere on the line.l At the beginning of a line: Select to indicate that the search string must be the first string on theline.
l At the end of a line: Select to indicate that the search string must be the last string on the line.l At column: Select to indicate that the search string must be in a specific column. Specify thecolumn number (the value must be greater then 0) in the Column value box below.
l Between specific words: Select to indicate that the search string must be between specificwords. Specify these words in theWord before andWord after boxes below.
l Occurrence related: Select to indicate that the search string must be found a specific number oftimes before a string replacement is performed. If the Search line by line option is selected inthe Search mode group, the search counter is reset for every line. If the Search whole fileoption is selected in the Search mode group, the search counter is not reset before the end of

the file. Select one of the occurrence options (described below) in the list box below and enter avalue in the Occurrence value box besides it.
l At occurrence: The replacement will take place only when the specified number ofoccurrences has been reached. Specifying 2 occurrences, for instance, means that only thesecond occurrence will be replaced.
l At every specified occurrence: The replacement will take place every time the specifiednumber of occurrences is reached. Specifying 2 occurrences, for instance, means that thesecond, the fourth and the sixth (and so on) occurrence will be replaced.
l All after occurrence: All occurrences of the search string will be replaced once thespecified number of occurrences has been reached. Specifying 2 occurrences, forinstance, means that all occurrences after the second one will be replaced.
l All before occurrence: All occurrences of the search string will be replaced until thespecified number of occurrences has been reached. Specifying 5 occurrences, forinstance, means that the four first occurrences will be replaced.
l Replace with: Enter the string that must be used as the replacement sting when a match is found.
On Error Tab
The On Error tab is common to all tasks. Details can be found in the" Task Properties Dialog" on page 666.
By default, any action task, branch, splitter or condition that generates an error will simply be ignored, andthe task just under it (not within a branch) will be given control of the job file without any modification. Anyinitial input task that generates an error will stop the process from running as a whole, and output tasks willnot generate output. The On Error tab can be used to overwrite the default behaviors.
l Send to Process: Check this option to send the job file to an error management process.l Error Process drop-down: Enabled only when the Send to Process option is checked. Lists anyprocess of which the initial input task is the Input Error Bin task.
l Action Group: This group is disabled in the initial input tasks and defaults to Stop Process. In allother tasks where the On Error tab is present, the following options are available:
l Ignore: The task is ignored as if it did not exist, and the job file is passed on to the next task inthe process.
l Stop Branch: If the task is in a branch of the process, the branch is stopped and the job file isreturned to the process after the branch. The branch will not produce any output.

l Stop Process: The process is stopped and no more processing is done. No further output isproduced.
l Log Message: Check this option to enable logging a custom error message in the PlanetPress SuiteWorkflow Tools' log file.
l Message: Enabled only when the Log Message option is checked. Enter a message that will belogged in the PlanetPress Suite Workflow Tools' log file. You can use any variables available inPlanetPress Workflow to customize the message.
l Store the message in variable: Select in which jobinfo, local or global variable you want to store themessage content.
l ID: Enter an error ID. This ID will be visible in theWindows Event Viewer. However, the ID is notvisible in the PlanetPress Suite Workflow Tools' log file.
l Store the ID in variable: Select in which jobinfo, local or global variable you want to store the errorID.
l Reset to defaults: Resets all options in this tab to their default values.
If storing the message or ID, if they are store in a jobinfo they will be available in any error handling processwhere errors are being forwarded. In all cases, if your process continues after the error, the contents of thevariables selected in this window will be available for the rest of your process, or whenever they areoverwritten.
Common Errors
Though some error messages are specific to a task in particular, others may apply to any and all tasksbecause they are related more to the system than to PlanetPress itself. Some examples would be W3813,W3830, W3991, W4005. These correspond to issues such as not having any space to write files, permissionerrors on folders or files, etc.
Comments Tab
The Comments tab is common to all tasks. It contains a single text area (Task comments) that lets youwrite comments about the task. These comments are saved when the dialog is closed with the OK button,and are displayed in the Task Comments Pane.

Barcode Scan
The Barcode Scan task is used to convert barcode data from multiple image formats into text-readableinformation. This information is placed in the metadata and can be used by the rest of the process.
Input
Image formats supported by the Barcode Scan task are:
l Tag Image File Format (TIFF)l Portable Document Format (PDF)l Joint Photographic Experts Group (JPEG and JPG)l Portable Network Graphics (PNG)l Bitmap (BMP)
Processing
The task reads the image and detects the presence of the selected supported barcode types. When abarcode is detected, the data it contains is read and added to the Data Page level of the metadata.
Technical
This task does not recognize more than one level of the metadata Document. This means that if youare intending to define separate documents, you should use the Metadata Level Creation task afterthe Barcode Scan.
Output
This task outputs the original data file but with modified (or created) metadata. The format should be thesame as the input.
Supported Barcode Types
The following types of barcodes are supported:

Barcodetypes
Description
EAN13 EAN13 symbology. Used with consumer products internationally, 13 characters.
EAN8 EAN8 symbology. Short version of EAN-13, 8 characters.
UPCA UPCA symbology. Used with consumer products in U.S., 12 characters.
UPCE UPCE symbology. Short version of UPC symbol, 6 characters.
Code11 Code 11 symbology. Used to identify telecommunications equipment
Code39 Code 39 symbology. U.S. Government and military use, required for DoD applications
Code93 Code 93 symbology. Compressed form of Code 39.
Code128 Code128 symbology. Very dense code, used extensively worldwide.
Codabar Codabar symbology. Used in libraries and blood banks.
Inter2of5 Interleaved 2 of 5 symbology. Used in warehouse, industrial applications.
Add2 2 additional digits code for UPC-based symbologies. Used to indicate magazines andnewspaper issue numbers.
Add5 5 additional digits code for UPC-based symbologies. Used to mark suggested retail priceof books.
PDF417 Portable Data File is a 2-dimensional barcode (also known as matrix code) used in avariety of applications, including Transport, Identification cards, and Inventorymanagement. It is best suited for cases where information needs to move with an item ordocument.
DataMatrix DataMatrix is a two-dimensional barcode which can store from 1 to about 2,000 characters.DataMatrix is being used to encode product and serial number information on electricalrating plates; to mark of surgical instruments in Japan; to identify lenses, circuit boards, andother items during manufacturing.
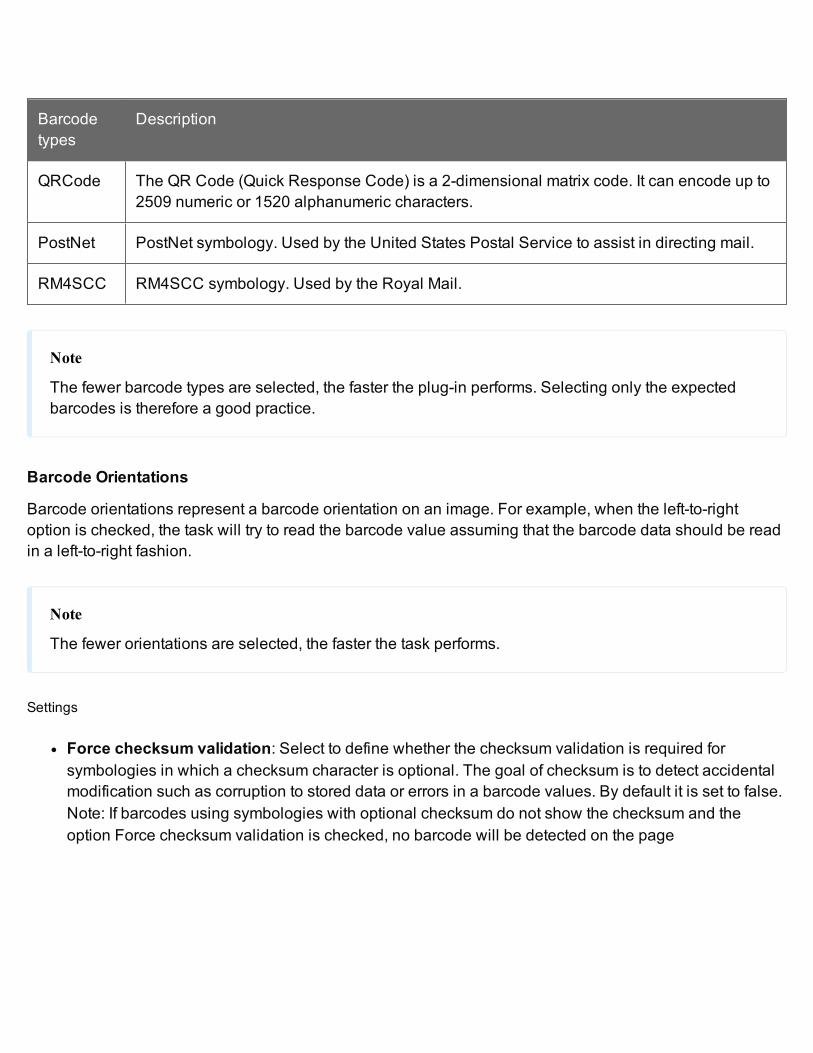
Barcodetypes
Description
QRCode The QR Code (Quick Response Code) is a 2-dimensional matrix code. It can encode up to2509 numeric or 1520 alphanumeric characters.
PostNet PostNet symbology. Used by the United States Postal Service to assist in directing mail.
RM4SCC RM4SCC symbology. Used by the Royal Mail.
Note
The fewer barcode types are selected, the faster the plug-in performs. Selecting only the expectedbarcodes is therefore a good practice.
Barcode Orientations
Barcode orientations represent a barcode orientation on an image. For example, when the left-to-rightoption is checked, the task will try to read the barcode value assuming that the barcode data should be readin a left-to-right fashion.
Note
The fewer orientations are selected, the faster the task performs.
Settings
l Force checksum validation: Select to define whether the checksum validation is required forsymbologies in which a checksum character is optional. The goal of checksum is to detect accidentalmodification such as corruption to stored data or errors in a barcode values. By default it is set to false.Note: If barcodes using symbologies with optional checksum do not show the checksum and theoption Force checksum validation is checked, no barcode will be detected on the page

l Process by: Select to define whether to process the image by page or by file:
l Process by Page: The task is able to handle single or multiple page files (Tiff and PDF) and actas a loop to process each page independently and sequentially. The metadata file will becreated separately for each page if it does not exist or will be enhanced with the values onprocessed Datapage level if it already exists. All supported images will be converted to tiffformat.
l Process by File: The task will process the file once and will insert the barcode information inone metadata file. Metadata will be created if it does not exist or will be enhanced with the valuesif it already exists.
l Replace non-printable character with: Enter a character that will be used as a replacement for allnon-printable characters read from the barcode. Some barcode types like Data Matrix can store non-printable characters that metadata does not support. The Barcode Scan task character replacementoption will allow successful barcode reading of all non-printable characters in a given barcode. Thevalue specified in the Replace non-printable character with option will be found in place of any non-printable character in the BarcodeValue and Barcode_x_Value metadata fields, while the originalbarcode value (i.e. with non-printable characters) will be available in the BarcodeBase64_x_valuemetadata field. This option allows only one printable replacement character. By default, this characteris an empty space. Note: Non-printable characters are the first 32 characters in ASCII character table(Ex.: form-feed, newline, carriage return characters)
l Scan Interval: Set a scan interval in pixels of image scanning. This property directly affects theperformance and quality of the recognition. A greater interval value means better performance, but alower recognition confidence level, and vice versa. For example, a value of 1 means that every imageline will be scanned. By default, the Scan Interval is set to 1.
l Threshold level [0..255]: Set to represent the color threshold level in order to distinguish foregroundpixels from background pixels in color or gray scale images. Value can be between 0 and 255,corresponding to the pixel intensity value, from 0 (black) to 255 (white). Therefore, defining a thresholdvalue of 128 means that the pixels with an intensity greater than 128 will be considered as white, whilethose less than 128 will be considered black. The value 0 means that the color threshold level will becalculated automatically depending on the image. By default Threshold level [0..255] is 0. Thisparameter is ignored with binary images (black and white images).
On Error Tab
The On Error tab is common to all tasks. Details can be found in the" Task Properties Dialog" on page 666.
By default, any action task, branch, splitter or condition that generates an error will simply be ignored, andthe task just under it (not within a branch) will be given control of the job file without any modification. Any
initial input task that generates an error will stop the process from running as a whole, and output tasks willnot generate output. The On Error tab can be used to overwrite the default behaviors.
l Send to Process: Check this option to send the job file to an error management process.l Error Process drop-down: Enabled only when the Send to Process option is checked. Lists anyprocess of which the initial input task is the Input Error Bin task.
l Action Group: This group is disabled in the initial input tasks and defaults to Stop Process. In allother tasks where the On Error tab is present, the following options are available:
l Ignore: The task is ignored as if it did not exist, and the job file is passed on to the next task inthe process.
l Stop Branch: If the task is in a branch of the process, the branch is stopped and the job file isreturned to the process after the branch. The branch will not produce any output.
l Stop Process: The process is stopped and no more processing is done. No further output isproduced.
l Log Message: Check this option to enable logging a custom error message in the PlanetPress SuiteWorkflow Tools' log file.
l Message: Enabled only when the Log Message option is checked. Enter a message that will belogged in the PlanetPress Suite Workflow Tools' log file. You can use any variables available inPlanetPress Workflow to customize the message.
l Store the message in variable: Select in which jobinfo, local or global variable you want to store themessage content.
l ID: Enter an error ID. This ID will be visible in theWindows Event Viewer. However, the ID is notvisible in the PlanetPress Suite Workflow Tools' log file.
l Store the ID in variable: Select in which jobinfo, local or global variable you want to store the errorID.
l Reset to defaults: Resets all options in this tab to their default values.
If storing the message or ID, if they are store in a jobinfo they will be available in any error handling processwhere errors are being forwarded. In all cases, if your process continues after the error, the contents of thevariables selected in this window will be available for the rest of your process, or whenever they areoverwritten.

Common Errors
Though some error messages are specific to a task in particular, others may apply to any and all tasksbecause they are related more to the system than to PlanetPress itself. Some examples would be W3813,W3830, W3991, W4005. These correspond to issues such as not having any space to write files, permissionerrors on folders or files, etc.
Comments Tab
The Comments tab is common to all tasks. It contains a single text area (Task comments) that lets youwrite comments about the task. These comments are saved when the dialog is closed with the OK button,and are displayed in the Task Comments Pane.
Metadata Implementation
The Barcode Scan task reads each scanned file and outputs the values read from barcode(s) on the page(s) into metadata depending of the selected Process by option:
l If the selected option is process by page, then the metadata file is created and overwritten for eachnew scanned page.
l If the selected option is process by file, then only one metadata file will be created (or updated).
Note
If metadata was created previously in the process, the task only adds new fields to the existing metadata at thedatapage level.
Metadata Fields
The barcode values are stored at the datapage level of the metadata. In the following defintions, the first 2metadata fields are for standard use, while the next 8 fields contain '_1_' in their name. This numberrepresents the barcode index on the page. If there is more than one barcode on the same page, thesemetadata fields will be defined as many times as there are barcodes on the page, except that the middlenumber (..._X_...) will increment according to the barcode index (e.g. Barcode_2_Value, Barcode_3_Value,etc.).

l BarcodeValue: Metadata field representing the value of the barcode. When multiple barcodes arepresent on the page, this field is present multiple times.
l BarcodeCount:: Metadata field representing the number of barcodes on the page.l Barcode_1_Value: Metadata field representing the value of the first barcode on the page. Note thatthis field (Barcode_1_Value) contains the same value as the first occurrence of BarcodeValue.
l BarcodeBase64_1_Value: Metadata field containing the value of the first barcode, encoded inBase64.
l Barcode_1_Type: Metadata field containing the type of the first barcode (ex. EAN13, UPCA …).
l Barcode_1_Orientation: Metadata field containing the orientation of the first barcode.l Barcode_1_Top: Metadata field providing the distance (in pixels) from the top of the page to the top ofthe first barcode.
l Barcode_1_Bottom: Metadata field providing the distance (in pixels) from the top of the page to thebottom of the first barcode.
l Barcode_1_Left: Metadata field providing the distance (in pixels) from the left of the page to the leftside part of the first barcode.
l Barcode_1_Right: Metadata field providing the distance (in pixels) from the left of the page to the rightside part of the first barcode.
Accessing Barcode Value From a Workflow Tool
One method is to use a VBScript with the Open Script task, using the Watch.ExpandString command with ametadata command as its input parameter, in between double quotes. For example, the following script linegives the value of the first BarcodeValue metadata field of the first datapage:
watch.expandstring("GetMeta(BarcodeValue[0],0,Job.Group[0].Document[0].Datapage[0])")
Another method is to use a Set Job Infos and Variables task to copy a metadata field into a Workflowvariable.
Limitations
l Some barcodes created with PlanetPress 5 could not be read by the Barcode Scan task, so pleaseuse PlanetPress version 6 or 7 to create barcoded documents.

l When using a secondary input, a known issue of the Workflow Tool can cause some unexpectedbehavior, like having the same metadata file reused instead of a new one being created for each datafile captured. To work around this issue, simply add a Rename action task to set a unique file name(Ex. %u) to each new file before the Barcode Scan task, after each secondary input.
Change Emulation
Change Emulation action tasks are used to tell the tasks that follow them to use a different emulation toformat the data they receive. So these tasks do not perform any operation as such on the data, but ratherthey modify the way subsequent tasks process the data they receive.
Change Emulation action tasks are typically used when a secondary input task brings new data that is notstructured like the initial data into the process. By default, every task included in a process uses theemulation associated with the sample data file to structure the data before it processes it. Any task that mustuse a different emulation must be preceded by a Change Emulation action task. All the tasks that follow onthe same branch will use the emulation chosen in the Change Emulation task.
Input
Any data file.
Processing
The emulation for the following tasks is changed to the selected emulation.
Output
The original data file, metadata and job infos are not modified. Only the emulation is changed.
General Tab
l The options of this task are basically the same as the Data Selector in PlanetPress Design. Pleaserefer to the PlanetPress Design User Guide for information on how to use the Data Selector.
Examples & Use Cases
This task is put into effect in the following use cases and example processes:
l Capture Web Manager Workflow

On Error Tab
The On Error tab is common to all tasks. Details can be found in the" Task Properties Dialog" on page 666.
By default, any action task, branch, splitter or condition that generates an error will simply be ignored, andthe task just under it (not within a branch) will be given control of the job file without any modification. Anyinitial input task that generates an error will stop the process from running as a whole, and output tasks willnot generate output. The On Error tab can be used to overwrite the default behaviors.
l Send to Process: Check this option to send the job file to an error management process.l Error Process drop-down: Enabled only when the Send to Process option is checked. Lists anyprocess of which the initial input task is the Input Error Bin task.
l Action Group: This group is disabled in the initial input tasks and defaults to Stop Process. In allother tasks where the On Error tab is present, the following options are available:
l Ignore: The task is ignored as if it did not exist, and the job file is passed on to the next task inthe process.
l Stop Branch: If the task is in a branch of the process, the branch is stopped and the job file isreturned to the process after the branch. The branch will not produce any output.
l Stop Process: The process is stopped and no more processing is done. No further output isproduced.
l Log Message: Check this option to enable logging a custom error message in the PlanetPress SuiteWorkflow Tools' log file.
l Message: Enabled only when the Log Message option is checked. Enter a message that will belogged in the PlanetPress Suite Workflow Tools' log file. You can use any variables available inPlanetPress Workflow to customize the message.
l Store the message in variable: Select in which jobinfo, local or global variable you want to store themessage content.
l ID: Enter an error ID. This ID will be visible in theWindows Event Viewer. However, the ID is notvisible in the PlanetPress Suite Workflow Tools' log file.
l Store the ID in variable: Select in which jobinfo, local or global variable you want to store the errorID.
l Reset to defaults: Resets all options in this tab to their default values.

If storing the message or ID, if they are store in a jobinfo they will be available in any error handling processwhere errors are being forwarded. In all cases, if your process continues after the error, the contents of thevariables selected in this window will be available for the rest of your process, or whenever they areoverwritten.
Common Errors
Though some error messages are specific to a task in particular, others may apply to any and all tasksbecause they are related more to the system than to PlanetPress itself. Some examples would be W3813,W3830, W3991, W4005. These correspond to issues such as not having any space to write files, permissionerrors on folders or files, etc.
Comments Tab
The Comments tab is common to all tasks. It contains a single text area (Task comments) that lets youwrite comments about the task. These comments are saved when the dialog is closed with the OK button,and are displayed in the Task Comments Pane.
Create PDF
The Create PDF action task allows users running PlanetPress Workflow to create native PDF outputswithout an active PlanetPress Image license. It very similar to the Digital Action task (See "Digital Action"on page 274) but is more limited. It does not contain the advanced PDF options that are offered by thePlanetPress Image solution, but is useful for creating simple PDF files using the default quality.
Note
This feature is part of the PDF Tools, which is only available in PlanetPress Workflow.
PDFs created with the new Create PDF action task will effectively replace the current data file in any givenprocess using such a task.
Input
Any data file supported by PlanetPress Workflow.
Processing
In the case of regular data files, these files will need to be merged with a PlanetPress Design document.
In the case of a PDF data file, two things can happen. The PDF can be used as a data file for a Designdocument, or it can be part of a straight PDF workflow. When this is the case, this task will rather apply theactive metadata to the PDF data file (see "PDF Workflow" on page 169 for more information on this).
Output
The output of this task is always, exclusively, a PDF file, optionally optimized and optionally with freshmetadata.
General tab
l Documents: Select a specific PlanetPress Design document if you want all the jobs to be generatedwith that document. The None option is available to create or update a PDF without using aPlanetPress Design document, in a Metadata-based workflow.
l Run mode group
l Printer centric: Select to send the document along with the trigger and data to the PDF RIP.l Optimized PostScript Stream: Select to merge the selected document with the data received bythis task before sending it to the PDF RIP. Note that some features, such as the Time and Daterequire that this option be selected.
l Options group
l Add job information to the document: Select to add the available job info variables in the“header” of the generated output file.
l Optimize resulting PDF: Select to specify whether the resulting PDF should be optimized.Optimization can lead to a significant reduction in the size of the PDF, but it may also add acertain amount of time to the process. This option should only be unchecked if the timing of theprocess is critical and needs to be done quickly, but keep in mind that the resulting PDF may bemuch larger than it should be and may even be too large for PlanetPress Workflow to handle.
l Reset Metadata according to new PDF: The metadata is updated to included only the selectednodes from the current metadata, and sequential indexes are re-created.
ll Security group

l Set document permissions: Select to enter the Permissions password.
l Permissions password: Enter a password in this box only if you want to prevent userswho does not have this password from changing the security options of the generated PDFfiles.
l Allow printing: Select to let users print the generated PDF files.l Allow changing the document: Select to let users edit the generated PDF files.l Allow content copying: Select to let users copy content from the generated PDF files.
l Allow form filling: Select to let users enter information in the form fields included in thegenerated PDF files.
ll PDF open password: Enter a password in this box only if you want to prevent users who doesnot have this password from opening the generated PDF files.
l Security Level: The password protection for PDF can be encrypted using one of the availableencryption methods (RC4, AES-256 and AES-128). It gives the task the ability to take an existingPDF in input and apply the selected password to the PDF without any change to the quality levelof the original PDF.
l Font group
l Embed all: Select to embed the entire font of all fonts used in the variable content documentwithin the generated PDFs. Using this option may result in large PDFs, especially if many fontsare used. Note that those fonts installed by default with the Adobe Acrobat and Adobe Readerare never embedded. If a font is not embedded in your PDF, opening it on another computer orprinting it may cause it to be substituted by another default font.
l Subset: Select to embed only a subset of the Type 1 and TrueType fonts used in the document.A font subset is in fact composed of only those characters that are actually used in the document.This option can only be used if the Embed all fonts option is selected. Note that if more than 35%of the characters included in a font are used in the document, the entire font is embedded. Thisoption often produces smaller PDF files and ensures proper PDF display.
l Initial view group
l Zoom factor: Select the magnification at which you want Adobe Acrobat or Adobe Reader (orother PDF viewer) to open the generated PDF. Choose the Fit in window option to display theentire page using the available screen space, or choose a percentage of the actual documentsize.
l Show: Select the information you want Adobe Acrobat or Adobe Reader (or other PDF viewer) todisplay with the generated PDF. Select Page only to leave the tabs area to the left of the PDF

pages empty. Select Bookmarks and page to display the contents of the Bookmarks tab (youuse data selection objects to create bookmarks in PlanetPress) alongside the PDF pages. SelectPage tab and Page to display the content of the Pages tab (thumbnails of each PDF pages)alongside the PDF pages. Select Full screen to hide all screen contents except the PDF page,and expand the PDF page to the maximum size it can occupy onscreen.
On Error Tab
The On Error tab is common to all tasks. Details can be found in the" Task Properties Dialog" on page 666.
By default, any action task, branch, splitter or condition that generates an error will simply be ignored, andthe task just under it (not within a branch) will be given control of the job file without any modification. Anyinitial input task that generates an error will stop the process from running as a whole, and output tasks willnot generate output. The On Error tab can be used to overwrite the default behaviors.
l Send to Process: Check this option to send the job file to an error management process.l Error Process drop-down: Enabled only when the Send to Process option is checked. Lists anyprocess of which the initial input task is the Input Error Bin task.
l Action Group: This group is disabled in the initial input tasks and defaults to Stop Process. In allother tasks where the On Error tab is present, the following options are available:
l Ignore: The task is ignored as if it did not exist, and the job file is passed on to the next task inthe process.
l Stop Branch: If the task is in a branch of the process, the branch is stopped and the job file isreturned to the process after the branch. The branch will not produce any output.
l Stop Process: The process is stopped and no more processing is done. No further output isproduced.
l Log Message: Check this option to enable logging a custom error message in the PlanetPress SuiteWorkflow Tools' log file.
l Message: Enabled only when the Log Message option is checked. Enter a message that will belogged in the PlanetPress Suite Workflow Tools' log file. You can use any variables available inPlanetPress Workflow to customize the message.
l Store the message in variable: Select in which jobinfo, local or global variable you want to store themessage content.
l ID: Enter an error ID. This ID will be visible in theWindows Event Viewer. However, the ID is notvisible in the PlanetPress Suite Workflow Tools' log file.

l Store the ID in variable: Select in which jobinfo, local or global variable you want to store the errorID.
l Reset to defaults: Resets all options in this tab to their default values.
If storing the message or ID, if they are store in a jobinfo they will be available in any error handling processwhere errors are being forwarded. In all cases, if your process continues after the error, the contents of thevariables selected in this window will be available for the rest of your process, or whenever they areoverwritten.
Common Errors
Though some error messages are specific to a task in particular, others may apply to any and all tasksbecause they are related more to the system than to PlanetPress itself. Some examples would be W3813,W3830, W3991, W4005. These correspond to issues such as not having any space to write files, permissionerrors on folders or files, etc.
Comments Tab
The Comments tab is common to all tasks. It contains a single text area (Task comments) that lets youwrite comments about the task. These comments are saved when the dialog is closed with the OK button,and are displayed in the Task Comments Pane.
Other Notes
Here's a list of the hard-coded PDF values for files generated with this new plugin. Basically, these settingscorrespond to Digital Action and PlanetPress Image settings for Standard Quality:
l PDF version : 1.4l Job option : Standard qualityl General:
l Compress text and line artl Auto-rotate pagesl Optimize for fast web view
l Author: PlanetPressl Keywords: PlanetPress; Create PDF Plug-in

l Monochrome images :
l Compression: CCITTl Pixels per inch: 1200
l Grayscale images :
l Compression: Autol down sampling : Bicubicl Pixels per inch: 300
l Color images :
l Compression: Autol down sampling : Bicubicl Pixels per inch: 150
l Security :
l Allow printingl Allow changing the documentl Allow content copyingl Allow form filling
l Font :
l Embed all fontsl Subset embedded fonts
l Open options :
l Zoom factor: Fit in windowl Default view: Page only
Database Query
Database Query action task retrieves data from various databases to use as input data. The data receivedby the task may be kept as is or converted to the CSV, Fixed Length Columns or XML format.
Database Query action tasks are not considered input tasks as such, because they cannot be used to starta process. Although they cannot be used to get the process’ initial input, they can be used to gathersecondary input (see "Input Tasks" on page 179). In cases where all your data comes from databases, you
can use a Create File input task as a dummy task at the beginning of your process, and then use aPlanetPress Workflow Database action task to gather your actual data.
Technical
Database Query action tasks require version 2.5 or higher of the Microsoft Data Access Components(MDAC), including JET 4.0.
When adding a Database Query action task, you have two options:
l You can use static properties (properties that will remain the same regardless of the data processed atrun-time). This option lets you use an Open DataBase Connectivity (ODCB) compliant data source.You can also edit the SQL statement that assembles the database table. Note that you can import adatabase connection configuration that you previously exported from PlanetPress Design (when youcreated a document) or from PlanetPress Workflow (when you set up a sample data file for a process).
l You can use dynamic properties (properties that include variables or data available at run-time). Thisoption lets you create a dynamic database connection string as well as an SQL statement thatchanges based on the data processed by PlanetPress Workflow. Note that this option will not let youtest the query performed by this task before it is performed with actual data.
Input
Any data file. The data file will be discarded by the task.
Processing
A connection to the selected database is made, the data is retrieved, and an output in the selectedemulation format is generated.
Output
The result of the query is output in the selected data format. The current emulation is changed to theselected format. Metadata and jobinfos are not modified in any way.

Properties
Database Connection tab
l Database groupl Location: Enter either the path and name of the database or a database connection string in thisbox. You may click to navigate to the database and paste the database path and nameautomatically to this box. You may also click create an ODBC connection string to the datasource and paste the string automatically to this box. If a login name and password are requiredto connect to the database, a dialog box is displayed and the information you enter is saved inthe configuration of the PlanetPress Workflow Database action task.
l Table/Query: Select the table or query containing the information you need as your input data.l Range group
l All: Select this option use all the records included in the database.l Records: Select this option use only some of the records in the database. Indicate the range byentering the number of the first record followed by a dash and the number of the last record. Touse records 50 to 75, for example, enter 50-75. Note that this option is intended mostly for testingpurposes, since in real life scenarios, you typically want to use all the records stored in adatabase.
l Emulation group: Use options from this group to customize the data file generated by thePlanetPress Workflow Database action task.
l Output file emulation: Select the emulation corresponding to the type of output file you want thePlanetPress Workflow Database action task to generate.
l CR-LF replacement: If you want CR-LF (Carriage Return-Line Feed) characters within the datafile to be replaced by another character, use this box to indicate which character to use. You mayselect the replacement character from the list or type your own.
l Emulation options group: Options from this group change based on the selected output fileemulation.
l PlanetPress Workflow Database Emulation: If you selected PlanetPress Workflow Databasein the Output file emulation box, the following options are available:
l Create data pages as follows: Select the option that will be used to generate the datapages. Each data page created using the table or query selected above (Table/Query box)can contain a single record, a fixed number of records, or a variable number of records. Tochoose the last option, select one of the When [field name] changes listed in this box.

l Sort on conditional field: Select this option if you want the table to be sorted using thefield selected in the Create data pages as follows box before the data page creationprocess is started.
l Maximum number of records per page: For data pages that contain multiple records (afixed or variable number of records), enter a maximum number of records per page in thisbox. Note that this value cannot exceed 4,000.
l CSV Emulation: If you selected CSV in the Output file emulation box, the following options areavailable:
l Sort on field: If you want the table to be sorted before the data page creation process isstarted, select the sort field from this box.
l Text delimiter: Select the text delimiter to be used in the generated file.l Field separator: Select the field separator to be used in the generated file.l Add a header record with field names: Select this option if you want the generated file tohave a header record (a record that includes the field names only).
l Fixed Length Columns Emulation: If you selected Fixed length columns in the Output fileemulation box, the following options are available:
l Sort on field: If you want the table to be sorted before the data page creation process isstarted, select the sort field from this box.
l Default width: This box is used to set the default width for all fields. It is set to 60 bydefault, but can be set to any value between 1 and 65535. This value is applied to all thefields in the generated file. To set different widths for each field, use the Configure Widthbutton. Doing this disables the Default width box.
l Configure Width: Click to set the width of each field in the generated file. The displayedConfigure Width dialog box lists all the fields in the file that will be generated andindicates their widths. To change the indicated widths, simply click the values displayed inthe Width column and enter new values. Click OK when you are done to close the dialogbox. You will then no longer be able to use the Default width box.
l XML Emulation: If you selected XML in the Output file emulation box, the following options areavailable:
l Create data pages as follows: Select the option used to generate the data pages. Eachdata page created using the table or query selected above (Table/Query box) can contain asingle record, a fixed number of records, or a variable number of records. To choose thelast option, select one of the When [field name] changes listed in this box.
l Sort on conditional field: Select this option if you want the table to be sorted using thefield selected in the Create data pages as follows box before the data page creationprocess is started.
l Data encoding: Select the encoding used in the generated XML file. By default, this optionis set to the default encoding of the computer used to create or edit the configuration. Youmay choose any encoding listed in the drop-down list or enter your own.
l Maximum records per page: Select this option if you want to limit the number of recordsper page. This option is only available if you indicated that you wanted each data page tocontain several records in the Create data pages as follows box.
l XML for PrintShop Mail: This emulation is specifically for use with merging your data with aPrintShop Mail document, using the PrintShop Mail task (see PrintShop Mail). No options areoffered, as this format is static and should not be modified.
l Alternate syntax: Select to prevent automatically enclosing the names of any database tables andfields that appear in the SQL query in square brackets when it exits the Advanced SQL Statementdialog box. The alternate syntax may be required for some database types.
l Edit SQL: Click to create and test an advanced SQL query.l Import Config: If you previously created and exported a PlanetPress Workflow Database Connectionconfiguration, click this button to import it. This saves you the trouble of configuring the connectionevery time.
l Client-side Cursor: When this option is enabled, the complete result set is downloaded beforeprocessing starts, and changing records is done by PlanetPress Workflow. This is generally faster forqueries returning a small number of results ; otherwise the start of the record processing can bedelayed since the whole record set must be downloaded.
Note
MySQL, using ODBC 5.0, must be set to use a client-side cursor.Microsoft Access will always work better when using a Server-Side cursor.
l Include password in config: Select to save an encrypted version of the database password (if any)within the exported configuration.
l Export Config: Click to export the currently displayed properties of the PlanetPress Workflow actiontask. The exported configuration can then be reused on other PlanetPress Workflow workstations.
Dynamic SQL tab
l Use dynamic values at run-time: Select to use a dynamic database connection string and / or SQLstatement at run-time. Check this box to enable the options included in this group (this disables thecorresponding options in the General tab).
l Parse normally: Select to interpret any backslashes included in the database connection stringas backslashes. If this option is not selected, any backslash that is not doubled will bedisregarded.
l Expect record set: Check if you are expecting a result from the database after executing theSQL query. If the query is expecting a record set in return and does not return one, the task willtrigger an error.
l Database connection string: Enter a variable connection string in this box. To do this you maybegin by clicking to create an ODBC connection string to the data source and paste the stringautomatically to this box. Note that if a login name and password are required to connect to thedatabase, a dialog box is displayed and the information you enter is saved in the configuration ofthe PlanetPress Workflow Database action task. Another option, if a database connectionstring (not a database path and name) was already entered in the Database Connection tab, is tisimply copy and paste it to this box. Bear in mind that if the Parse normally option is not selected,any backslashes included in the connection string that is not doubled will be disregarded. Onceyour connection string is displayed in this box, you can edit it by adding variables or dataselections.
l SQL statement: Enter your SQL statement. Remember that you may use variables and dataselections in your statement.
On Error Tab
The On Error tab is common to all tasks. Details can be found in the" Task Properties Dialog" on page 666.
By default, any action task, branch, splitter or condition that generates an error will simply be ignored, andthe task just under it (not within a branch) will be given control of the job file without any modification. Anyinitial input task that generates an error will stop the process from running as a whole, and output tasks willnot generate output. The On Error tab can be used to overwrite the default behaviors.
l Send to Process: Check this option to send the job file to an error management process.l Error Process drop-down: Enabled only when the Send to Process option is checked. Lists anyprocess of which the initial input task is the Input Error Bin task.

l Action Group: This group is disabled in the initial input tasks and defaults to Stop Process. In allother tasks where the On Error tab is present, the following options are available:
l Ignore: The task is ignored as if it did not exist, and the job file is passed on to the next task inthe process.
l Stop Branch: If the task is in a branch of the process, the branch is stopped and the job file isreturned to the process after the branch. The branch will not produce any output.
l Stop Process: The process is stopped and no more processing is done. No further output isproduced.
l Log Message: Check this option to enable logging a custom error message in the PlanetPress SuiteWorkflow Tools' log file.
l Message: Enabled only when the Log Message option is checked. Enter a message that will belogged in the PlanetPress Suite Workflow Tools' log file. You can use any variables available inPlanetPress Workflow to customize the message.
l Store the message in variable: Select in which jobinfo, local or global variable you want to store themessage content.
l ID: Enter an error ID. This ID will be visible in theWindows Event Viewer. However, the ID is notvisible in the PlanetPress Suite Workflow Tools' log file.
l Store the ID in variable: Select in which jobinfo, local or global variable you want to store the errorID.
l Reset to defaults: Resets all options in this tab to their default values.
If storing the message or ID, if they are store in a jobinfo they will be available in any error handling processwhere errors are being forwarded. In all cases, if your process continues after the error, the contents of thevariables selected in this window will be available for the rest of your process, or whenever they areoverwritten.
Common Errors
Though some error messages are specific to a task in particular, others may apply to any and all tasksbecause they are related more to the system than to PlanetPress itself. Some examples would be W3813,W3830, W3991, W4005. These correspond to issues such as not having any space to write files, permissionerrors on folders or files, etc.
Comments Tab
The Comments tab is common to all tasks. It contains a single text area (Task comments) that lets youwrite comments about the task. These comments are saved when the dialog is closed with the OK button,and are displayed in the Task Comments Pane.
Decompress File(s)
Decompress file action tasks decompress zipped job files (files compressed as zip files).
Input
This task only accepts ZIP Files, however it is not necessary that the job file be the ZIP, since this file pathand name can be specified in the task itself.
Processing
Every file in the ZIP is extracted to the specified location. If a folder structure exists in the ZIP, it is respectedin the output folder.
Output
This task outputs the data file it received with no modification. Metadata and job files are not touched either.
Properties
General Tab
l Zip file name: Enter the name of the zipped file. In this variable property box, you may enter staticcharacters, variables, job information elements, data selections, or any combination of these.
l Output folder: Enter the name of the folder in which you want the decompressed files to be stored.l File mask: Enter a file name mask to specify which files must be decompressed. Leave the defaultvalue of *.* to decompress all the files found within the zip.
l Password: Enter a password if the zip file is password protected.l Restore path structure: Select if you want the complete file structure to be rebuilt from the outputfolder to the decompressed files.

l Force directories: Select if you want to allow the system to create new folders when required. If thisoption is not select and the Decompress file action task tries to save a file to a folder that does notexist, the task will fail.
l Overwrite existing files: Select if you want decompressed files that have the same name as existingfiles to overwrite the existing files.
On Error Tab
The On Error tab is common to all tasks. Details can be found in the" Task Properties Dialog" on page 666.
By default, any action task, branch, splitter or condition that generates an error will simply be ignored, andthe task just under it (not within a branch) will be given control of the job file without any modification. Anyinitial input task that generates an error will stop the process from running as a whole, and output tasks willnot generate output. The On Error tab can be used to overwrite the default behaviors.
l Send to Process: Check this option to send the job file to an error management process.l Error Process drop-down: Enabled only when the Send to Process option is checked. Lists anyprocess of which the initial input task is the Input Error Bin task.
l Action Group: This group is disabled in the initial input tasks and defaults to Stop Process. In allother tasks where the On Error tab is present, the following options are available:
l Ignore: The task is ignored as if it did not exist, and the job file is passed on to the next task inthe process.
l Stop Branch: If the task is in a branch of the process, the branch is stopped and the job file isreturned to the process after the branch. The branch will not produce any output.
l Stop Process: The process is stopped and no more processing is done. No further output isproduced.
l Log Message: Check this option to enable logging a custom error message in the PlanetPress SuiteWorkflow Tools' log file.
l Message: Enabled only when the Log Message option is checked. Enter a message that will belogged in the PlanetPress Suite Workflow Tools' log file. You can use any variables available inPlanetPress Workflow to customize the message.
l Store the message in variable: Select in which jobinfo, local or global variable you want to store themessage content.

l ID: Enter an error ID. This ID will be visible in theWindows Event Viewer. However, the ID is notvisible in the PlanetPress Suite Workflow Tools' log file.
l Store the ID in variable: Select in which jobinfo, local or global variable you want to store the errorID.
l Reset to defaults: Resets all options in this tab to their default values.
If storing the message or ID, if they are store in a jobinfo they will be available in any error handling processwhere errors are being forwarded. In all cases, if your process continues after the error, the contents of thevariables selected in this window will be available for the rest of your process, or whenever they areoverwritten.
Common Errors
Though some error messages are specific to a task in particular, others may apply to any and all tasksbecause they are related more to the system than to PlanetPress itself. Some examples would be W3813,W3830, W3991, W4005. These correspond to issues such as not having any space to write files, permissionerrors on folders or files, etc.
Comments Tab
The Comments tab is common to all tasks. It contains a single text area (Task comments) that lets youwrite comments about the task. These comments are saved when the dialog is closed with the OK button,and are displayed in the Task Comments Pane.
Digital Action
Digital Action action tasks generates the same types of documents generated by PlanetPress Imageoutput tasks. Since Digital Action tasks are not output tasks, the documents they create are typically passedon to the following task. The image files they generate are always saved, along with their index files (if any),to an archive folder.
Technical
The Digital Action task requires a PlanetPress Image license to be present on the same IP Subnetas PlanetPress Workflow, either on the same server or a different one with PlanetPress Imageinstalled and activated.

Differences between Digital Action and Image tasks:
l Digital Action is an action task and cannot be the last task in a branch or process. Image is an outputtask, and has to be placed at the end of a process or branch.
l In PlanetPress Workflow 7.2.4 and older, Digital Action does not update the PlanetPress SearchDatabase, even if a PDI is generated and even if the option is checked in the preferences. Thisbehavior was changed starting in PlanetPress Workflow 7.3.
l Digital Action can accept PostScript (.ps) files as an input, even if they are not generated by anyPlanetPress Workflow tools.
Task Properties
General tab
l Host: Select the IP address of the PlanetPress Image host to which you want the request to be sent.
l Refresh: Click to update the list of IP addresses displayed in the Host drop-down list box.
l Documents: Select a specific PlanetPress Design document if you want all the jobs to be generatedwith that document. To use a document chosen at run-time for each job, enter a dynamic documentname using a combination of text, variables and data selections. To enable the dynamic documentname box, click inside it. To disable it, press Enter. Note that in the later case, you must be certain thatthe documents that will be chosen at run-time will in fact be available locally or at the selected host.
Note
While the Do not use a document (passthrough) is visible in this list, it is not compatible withthe PlanetPress Image output if the PostScript was not generated by merging a designdocument with data in PlanetPress Workflow. In order to generate an image in passthroughmode with external PostScript, please use the Digital Action task.
l List only documents using VDX compilation: Check to ensure that only documents that arecompatible with the VDX compilation method are shown in the list, if producing VDX output.
l Run mode group
l Printer centric: Select to send the document along with the trigger and data to PlanetPressImage.

l Optimized PostScript Stream: Select to merge the selected document with the data received bythis task before sending it to PlanetPress Image. Note that some features, such as the Time andDate require that this option be selected.
l Add job information to the document: Select to add the available job info variables in the “header”of the generated output file.
l Output type: Select the output file type that you want.
l PDF: The output will be a PDF file. If you select PDF, the DPI and Color Depth options (seebelow) are disabled and the options available in the PDF tab are enabled.
l JPEG: The output will be a JPEG file. JPEG is a lossy compression image format that createssmall files, compressing continuous tone images (such as scanned photographs) well.
l TIFF: The output will be a TIFF file. TIFF is a higher quality format that is one of the standards fordocument exchange, useful for eventual printing or archiving. You have a choice of the followingcompressed TIFF formats: TIFF Group 3, TIFF Group 4, and TIFF Packed bits. You can also usethe uncompressed TIFF format, which produces the largest files with the highest quality. TIFF isa versatile and platform-independent format. It is used in many digitizing projects as the format ofchoice for the digital masters. The TIFF Group 3 and Group 4 formats are efficient for documentstorage.
l The AutoStore, DocAccel and KYOcapture formats also generate TIFF files along with specialXML that are meant for these specialized systems.
l DPI: Enter the dots per inch (dpi) resolution of the output image. This property is enabled for all outputtypes except PDF.
l Color depth: Enter the color depth of the output image in bits per pixel (bpp). The color depth ismeasured in bits, because each pixel of the output image can be described with a varied number ofbits. A higher bit number allows for more colors. It also increases the image file size. A 1-bit colordepth produces monochrome images. 8-bits produce grayscale images (in PlanetPress Design youcan have 8-bit color images, but these are reduced to grayscale if you select 8-bit here), while 24-bitsproduce full color images. For JPEG output, you cannot select a monochrome (1 bpp) color depth. ForTIFF G3 and TIFF G4, monochrome (1 bpp) is the only Color depth option you can select. Thisproperty is enabled for all output types except PDF.
l Multi-page: Select to generate a single file containing multiple pages. When this option is notselected, PlanetPress Image creates a file for each page included in the output file. This property isenabled for all output types except PDF and JPEG.Add page number: Select to put a page number on each page included in the output file. This option

goes with the Multiple TIFF option and is only visible if either the AutoStore, DocAccel or KYOcaptureformat is selected.
l Data Stream group: Determines what is output by the Digital Action task:
l Use Digital as new data stream: Use the file generated by the task for the rest of the process.l Use original data stream (without document): Use the same data file as what was input to thistask.
l Use original data stream (with document): Uses the PostScript data generated before image iscreated.
l Save a copy: Optional when the "Use Digital as the new data stream" option is checked, otherwise isalways checked. Keeps a copy of the digital output onto the specified folder.
l Folder and filename: Enter the path of the folder to which output files generated by this task are to bearchived. PDF index files (PDI and XML) are also put in this folder. This edit box is enabled when theSave a copy option is selected. To prevent each new file from overwriting the previous one, youshould use variable names. As with any variable property box, you can use any combination of text,variables and data selections. When multiple files are generated for a single job (such as for multipleTIFFs), each file name includes a sequence number, such as in Invoice0, Invoice1, Invoice2. If youuse file name masks that include dots, such as Statement.%y.@(1,1,1,1,25,KeepCase,Trim) or Job.%f,for example, you must add quotation marks at the beginning and end of the file name(“Statement.%y.%m.@(1,1,1,1,25,KeepCase,Trim)” or ”Job.%f”). Otherwise, when the file is saved,anything appearing after the last dot is replaced by the file’s extension characters (and the file namethus becomes Statement.2005.pdf instead of Statement.2005.255842.pdf, or Job.tif instead ofJob.544872.tif). Failing to add the quotation marks may result in files being overwritten.
l Automatically Add Extension: Check if you want the correct extension for the image type to beappended to the filename automatically, rather than having to add it in the Filename box. The OutputType determines the extension to be used.
l Add PDF to PlanetPress Search database: Check to update the PlanetPress Search database witheach new PDF generated.
l Index group: This group lets you specify which type of index must be created for each documentgenerated by this task. PDI files are used by PlanetPress Search as indexing information.
l None: Select if you do not want this task to add an index file to the generated document.l PDI: Select if you want this task to add a PDI index file to the generated document.l XML and PDI: Select if you want this task to add both an XML and a PDI index file to thegenerated document.
Job Options tab
If you chose PDF as the output type in the General tab, use this tab to choose the appropriate PDF options.Note that all the options available in this tab are only used with PDF files.
l Job options: Select the PDF output option that best describes your needs. This loads all the standardsettings for the selected usage scenario. These settings can be changed as required. Note that if youmake changes and then select a different output option, your changes will be lost. PlanetPress Imagesupports numerous PDF standards: Standard, High Quality, Custom, and a variety of PDF/VT, PDF/Aand PDF/X formats.
l General group
l ASCII format: Select to create the PDF file using ASCII characters (instead of the usual 8-bitbinary format). This option produces a file suitable for transmission over a 7-bit ASCII link. Thisoption is useful if the PDFs need to be opened in a text editor, sent across networks, or sent viaemail using a program that does not support binary files. This option also generates smaller files.
l Compress text and line art: Select to compress the text and line work in the file using the Flatecompression filter. Flate is a compression method that works well on elements with large areasof single colors or repeating patterns, as well as on black-and-white elements that containrepeating patterns.
l Auto-rotate pages: Select to automatically rotate pages based on the orientation of the text orDSC comments.
l Optimize for fast web view: Select to minimize file size and facilitate page downloading.l Title: Enter a title for the document. If you leave this box empty, the document’s name will beused as the document’s title. Since this is a variable property box, you may use variables anddata selections and let PlanetPress Workflow interpret this information at run-time.
l Author: You may enter the name of the author of the document. Since this is a variable propertybox, you may use variables and data selections and let PlanetPress Workflow interpret thisinformation at run-time.
l Subject: You may enter the subject of the document. Since this is a variable property box, youmay use variables and data selections and let PlanetPress Workflow interpret this information atrun-time. Note that if you use a data selection in this box, you must be sure that the data that willbe selected at run-time will not contain any parentheses, as this would cause the task to fail. Ifyou suspect that the data may contain parentheses, you should use a Run script action task(see Run Script Action Task Property) with a Strip() function to strip them out.

l Keywords: You may enter keywords for the document. Since this is a variable property box, youmay use variables and data selections and let PlanetPress Workflow interpret this information atrun-time.
l Monochrome images group
l Monochrome compression: Select the compression to use for the monochrome images. Flatecompression is lossless, so no data is lost during compression. Flate Mono works well onimages with large areas of solid shades or repeating patterns, such as screen shots and simpleimages created with paint or drawing programs. CCITT typically yields the best compression ofmonochrome images. It is the compression method developed for fax transmissions. Note thatconfigurations that were created with an earlier version of PlanetPress Workflow and thatincluded tasks set not to use any compression will by default be set to use the Flat compressionmethod.
l Monochrome resolution: Select the resolution to use for monochrome images.
l Grayscale images group
l Grayscale compression: Select the compression to use for the grayscale images. Flate is alossless compression method, so no data is lost in the process. It works well on images withlarge areas of single shades or repeating patterns, such as screen shots and simple imagescreated with paint or drawing programs. JPEG removes image data and may reduce imagequality, but may be suitable for continuous-tone photographs containing more detail than can bereproduced onscreen or in print. Since JPEG eliminates data, it can achieve much smaller filesizes than Flate compression. Select Auto to let the application choose the best compressionmethod automatically. Note that configurations that were created with an earlier version ofPlanetPress Workflow and that included tasks set not to use any compression will by default beset to use the Flate compression method.
l Grayscale down sampling: Select the down sampling option. down sampling reduces imagesize by breaking images down into small areas in which multiple pixels are replaced by singlepixels. The Grayscale resolution you enter in the following box is used to control the downsampling process. Select None to prevent grayscale down sampling . Select Average to averagepixel shades in each sample area and to replace the entire area with a pixel of the averageshade. Select Subsample to use a pixel in the center of the sample area and replace the entirearea with that pixel value. This method is significantly faster, but results in images that are lesssmooth. Select Bicubic to use a weighted average to determine pixel shades. This method is theslowest but most precise and results in the smoothest tonal gradations.
l Grayscale resolution: Select the resolution to use for grayscale images. Note that this settinghas an impact on the grayscale down sampling process.

l Color images group
l Color compression: Select the compression to use for the color images. Flate is a losslesscompression method, so no data is lost in the process. It works well on images with large areasof single shades or repeating patterns, such as screen shots and simple images created withpaint or drawing programs. JPEG removes image data and may reduce image quality, but maybe suitable for continuous-tone photographs containing more detail than can be reproducedonscreen or in print. Since JPEG eliminates data, it can achieve much smaller file sizes thanFlate compression. Select Auto to let the application choose the best compression methodautomatically. Note that configurations that were created with an earlier version of PlanetPressWorkflow and that included tasks set not to use any compression will by default be set to use theFlate compression method.
l Color down sampling: Select the down sampling option. down sampling reduces image size bybreaking images down into small areas in which multiple pixels are replaced by single pixels.The Color resolution you enter in the following box is used to control the down sampling process.Select None to prevent grayscale down sampling. Select Average to average pixel color in eachsample area and to replace the entire area with a pixel of the average color. Select Subsample touse a pixel in the center of the sample area and replace the entire area with that pixel value. Thismethod is significantly faster, but results in images that are less smooth. Select Bicubic to use aweighted average to determine pixel shades. This method is the slowest but most precise andresults in the smoothest tonal gradations.
l Color resolution: Select the resolution to use for color images. Note that this setting has animpact on the color down sampling process.
ll Security group
l Set document permissions: Select to enter the Permissions password.
l Permissions password: Enter a password in this box only if you want to prevent userswho does not have this password from changing the security options of the generated PDFfiles.
l Allow printing: Select to let users print the generated PDF files.l Allow changing the document: Select to let users edit the generated PDF files.l Allow content copying: Select to let users copy content from the generated PDF files.
l Allow form filling: Select to let users enter information in the form fields included in thegenerated PDF files.
ll PDF open password: Enter a password in this box only if you want to prevent users who does

not have this password from opening the generated PDF files.l Security Level: The password protection for PDF can be encrypted using one of the availableencryption methods (RC4, AES-256 and AES-128). It gives the task the ability to take an existingPDF in input and apply the selected password to the PDF without any change to the quality levelof the original PDF.
l Font group
l Embed all: Select to embed the entire font of all fonts used in the variable content documentwithin the generated PDFs. Using this option may result in large PDFs, especially if many fontsare used. Note that those fonts installed by default with the Adobe Acrobat and Adobe Readerare never embedded. If a font is not embedded in your PDF, opening it on another computer orprinting it may cause it to be substituted by another default font.
l Subset: Select to embed only a subset of the Type 1 and TrueType fonts used in the document.A font subset is in fact composed of only those characters that are actually used in the document.This option can only be used if the Embed all fonts option is selected. Note that if more than 35%of the characters included in a font are used in the document, the entire font is embedded. Thisoption often produces smaller PDF files and ensures proper PDF display.
l Initial view group
l Zoom factor: Select the magnification at which you want Adobe Acrobat or Adobe Reader (orother PDF viewer) to open the generated PDF. Choose the Fit in window option to display theentire page using the available screen space, or choose a percentage of the actual documentsize.
l Show: Select the information you want Adobe Acrobat or Adobe Reader (or other PDF viewer) todisplay with the generated PDF. Select Page only to leave the tabs area to the left of the PDFpages empty. Select Bookmarks and page to display the contents of the Bookmarks tab (youuse data selection objects to create bookmarks in PlanetPress) alongside the PDF pages. SelectPage tab and Page to display the content of the Pages tab (thumbnails of each PDF pages)alongside the PDF pages. Select Full screen to hide all screen contents except the PDF page,and expand the PDF page to the maximum size it can occupy onscreen.
l Font group
l Embed all: Select to embed the entire font of all fonts used in the variable content documentwithin the generated PDFs. Using this option may result in large PDFs, especially if many fontsare used. Note that those fonts installed by default with the Adobe Acrobat and Adobe Readerare never embedded. If a font is not embedded in your PDF, opening it on another computer orprinting it may cause it to be substituted by another default font.

l Subset: Select to embed only a subset of the Type 1 and TrueType fonts used in the document.A font subset is in fact composed of only those characters that are actually used in the document.This option can only be used if the Embed all fonts option is selected. Note that if more than 35%of the characters included in a font are used in the document, the entire font is embedded. Thisoption often produces smaller PDF files and ensures proper PDF display.
l Initial view group
l Zoom factor: Select the magnification at which you want Adobe Acrobat or Adobe Reader (orother PDF viewer) to open the generated PDF. Choose the Fit in window option to display theentire page using the available screen space, or choose a percentage of the actual documentsize.
l Show: Select the information you want Adobe Acrobat or Adobe Reader (or other PDF viewer) todisplay with the generated PDF. Select Page only to leave the tabs area to the left of the PDFpages empty. Select Bookmarks and page to display the contents of the Bookmarks tab (youuse data selection objects to create bookmarks in PlanetPress) alongside the PDF pages. SelectPage tab and Page to display the content of the Pages tab (thumbnails of each PDF pages)alongside the PDF pages. Select Full screen to hide all screen contents except the PDF page,and expand the PDF page to the maximum size it can occupy onscreen.
PlanetPress Search Database tab
If PlanetPress Workflow is configured to automatically update a PlanetPress Search database (See"PlanetPress Image User Options" on page 653), this tab can be used to override the global settings so thatthe task updates a different database than the one set in that global configuration. In order for the settings towork, the Add PDF to PlanetPress Search database must be checked. However, you can override whichdatabase will be updating using the option in this window, Override global PlanetPress Search Databasesettings. The database options then activate.
l Database type: Select the type of the database in which you want to create a table (Access, or SQLServer).
l Connection time-out: Enter the time, in seconds, that the connection to the database is maintainedwhile no action is taking place before the connection is severed.
l Database directory: Enter the path of the directory in which the Access database is located, or usethe Browse button to navigate to, and select, the directory. This option is available only when youselect Access database in the Database type box.
l Data source name: Enter the name of the computer on which the database runs. This option isavailable only when you select SQL Server database or Oracle database in the Database type box.

l Use default database: Select to use the default database associated with your user profile on thatSQL Server or Oracle database. Clear to enter the name of the database in the box that appears.
l Use Windows NT Integrated security: Select to use your Windows user name and password to logonto the SQL database.
l User ID: Enter the user id required to access the database to which you are adding new PDI files fromthe generated PDF files. If you are using an SQL database, enter the login name you chose when youconfigured the SQL database (refer to the “Using PlanetPressSearch with an SQL Server Database”section of the PlanetPress Search User Guide).
l Password: Enter the password required to access the database.l Test Connection: Click to verify that PlanetPressImage can connect to the specified database.l Enforce global table creation: Select this option, as it ensures that all database users are grantedaccess to the database. This option is available only when you select SQL database in the Databasetype box.
Download to Printer
Download to Printer action tasks are used to warn printers that the files that will be sent to them are to bestored to a specific location rather than printed. Note that each Download to Printer action task must befollowed by a Printer Queue output task set to "pass-through", in order for it to be sent to the printer and notmerged with a document.
You can use Download to Printer action tasks to send various types of files, such as attachments,documents and fonts that are used in PlanetPress Design documents that are executed directly on theprinters.
For images you should rather use Send Images to Printer action tasks (See "Send Images to Printer" onpage 306), as they provide image quality and conversion options.
Input
Any file that you wish to upload to the printer. Note that this task does not attempt to verify that the type of filebeing sent is compatible with the printer, or is in a supported file format.
Processing
The currently active data file is converted into postscript.

Output
A postscript file containing the necessary code to save the data file on the hard drive.
Properties
General tab
l Hard disk name and path (as required): Enter the name and path of the hard disk to which the file isto be saved (enter “%disk0%/PPFiles/Resources”, for example, to save the file to the folder[ROOT]/PPFiles/Resources located on a hard disk identified internally as “disk0”). Leave blank to savethe printer’s default hard disk and path.
l File name: Enter the name under which you want the file to be saved. By default, this property is set to“%o”, so the file is saved under its original name (this is often the best choice, for items such as fontfiles, for instance).
l File name case:
l Do not modify: keeps the character casing of the file name as is.l All uppercase: changes all characters to upper case (README.TXT, for example).l All lower case: changes all characters to lowercase (readme.txt, for example).
l Keep file extension: Select to use extensions when saving files. When this option is selected, if thetask receives a file with the “txt” extension, for example, it will keep this extension even if it renamesthe file (as specified in the File name box).
l Print confirmation page: Select to print the Variable content document download confirmation pagewhen the download is successful.
On Error Tab
The On Error tab is common to all tasks. Details can be found in the" Task Properties Dialog" on page 666.
By default, any action task, branch, splitter or condition that generates an error will simply be ignored, andthe task just under it (not within a branch) will be given control of the job file without any modification. Anyinitial input task that generates an error will stop the process from running as a whole, and output tasks willnot generate output. The On Error tab can be used to overwrite the default behaviors.

l Send to Process: Check this option to send the job file to an error management process.l Error Process drop-down: Enabled only when the Send to Process option is checked. Lists anyprocess of which the initial input task is the Input Error Bin task.
l Action Group: This group is disabled in the initial input tasks and defaults to Stop Process. In allother tasks where the On Error tab is present, the following options are available:
l Ignore: The task is ignored as if it did not exist, and the job file is passed on to the next task inthe process.
l Stop Branch: If the task is in a branch of the process, the branch is stopped and the job file isreturned to the process after the branch. The branch will not produce any output.
l Stop Process: The process is stopped and no more processing is done. No further output isproduced.
l Log Message: Check this option to enable logging a custom error message in the PlanetPress SuiteWorkflow Tools' log file.
l Message: Enabled only when the Log Message option is checked. Enter a message that will belogged in the PlanetPress Suite Workflow Tools' log file. You can use any variables available inPlanetPress Workflow to customize the message.
l Store the message in variable: Select in which jobinfo, local or global variable you want to store themessage content.
l ID: Enter an error ID. This ID will be visible in theWindows Event Viewer. However, the ID is notvisible in the PlanetPress Suite Workflow Tools' log file.
l Store the ID in variable: Select in which jobinfo, local or global variable you want to store the errorID.
l Reset to defaults: Resets all options in this tab to their default values.
If storing the message or ID, if they are store in a jobinfo they will be available in any error handling processwhere errors are being forwarded. In all cases, if your process continues after the error, the contents of thevariables selected in this window will be available for the rest of your process, or whenever they areoverwritten.
Common Errors
Though some error messages are specific to a task in particular, others may apply to any and all tasksbecause they are related more to the system than to PlanetPress itself. Some examples would be W3813,W3830, W3991, W4005. These correspond to issues such as not having any space to write files, permissionerrors on folders or files, etc.

Comments Tab
The Comments tab is common to all tasks. It contains a single text area (Task comments) that lets youwrite comments about the task. These comments are saved when the dialog is closed with the OK button,and are displayed in the Task Comments Pane.
External Program
External Program action tasks are used to launch and execute other programs, which can be useful whenyou wish to process your job file in a way that is not possible with the standard PlanetPress Workflow tasks.
Note
As with any task that can refer to network resources, it is important to understand the considerationsinvolved with paths and permissions of these resources. Please refer to the Network Considerationspage in the Advanced Configuration and Options chapter (Reference Guide, in English only).
There are some important things to consider when using the External Program task:
l The executable filemust accept so-called "command-line options" and be able to run without any sortof user interaction. Only certain programs are able to do this and may refer to it as "command-line" or"automation" features.
l The process will always wait for the executable file to finish before it continues to the next task, anddoes not have any timeout setting. This mean that if your program fails to exit for any reason, yourprocess will hang.
Input
Any active data file, in any format.
Processing
The external program is executed using the parameters provided. Note that the current data file is not"sent" to the executable file, however you can refer to the full path of the data file using %F.

Output
If the external program modifies the job file using the full path, the modified file is the output of this software.Otherwise, the output is the same as the input. Metadata is not modified in any way. Job Infos may bemodified, depending on the options set in the task's properties.
Properties
General tab
l Program group
l Executable file: Enter the name and path of an executable file (exe or com extension), batch file(bat extension), or command script (cmd extension) that can run in command mode. Note that theprogram will be run without user interaction. Although it may display progress information, it isbetter if the application has no user interface.
l Parameters: Enter parameters that will be passed to the external program when it is launched.Each parameter should be enclosed in quotation marks and separated by a space("Param1" "Param2" "Param3") except command line options (such as -f, /n). The exactparameters accepted are unique to the executable and defined in its documentation if it exists.
l Start in: Enter the folder in which the external program is to run. This is important, for example, ifthe program is to generate files that are to be picked up in a specific location for furtherprocessing, or if it requires resources that are located in a specific folder. Leave blank to run theprogram in the folder of the executable file.
l Run minimized: Select to prevent a window (a DOS box, for instance) from being displayed onthe desktop. When selected, the program runs in a background window.
l Program output capture groupl Log the program output: Check to store the program output (messages generated by theexecution of the external program) inside of a job info or variable.
l Store the program output in variable: Use the drop-down to select which variable or job info towill be used to store the program output.
l Exit Code groupl Store the exit code in job info: Use the drop-down to select which variable or job info will beused to store the program's exit code. The exit code is a numerical value generated by theprogram which will indicate whether its execution was a success or if errors were encountered.
l Verify return value: Check to enable the group and react whenever specific exit codes arereturned by the software.
l If exit code is: Use the drop-down to select how to compare to the exit code. This numericalcomparison is either equal, greater than or lower than.
l Value: The numerical exit code that will be verified.l Return: Use the drop-down to select whether this exit code should define a success or a failureof the external program. If "Failure" is chosen, exit codes that match the condition set will causethe On Error tab to be triggered and any other exit code will be considered a success. Inversily,if Success is chosen, exit codes that match the condition set will cause be considered a successand any other exit code will cause the On Error tab to be triggered.
On Error Tab
The On Error tab is common to all tasks. Details can be found in the" Task Properties Dialog" on page 666.
By default, any action task, branch, splitter or condition that generates an error will simply be ignored, andthe task just under it (not within a branch) will be given control of the job file without any modification. Anyinitial input task that generates an error will stop the process from running as a whole, and output tasks willnot generate output. The On Error tab can be used to overwrite the default behaviors.
l Send to Process: Check this option to send the job file to an error management process.l Error Process drop-down: Enabled only when the Send to Process option is checked. Lists anyprocess of which the initial input task is the Input Error Bin task.
l Action Group: This group is disabled in the initial input tasks and defaults to Stop Process. In allother tasks where the On Error tab is present, the following options are available:
l Ignore: The task is ignored as if it did not exist, and the job file is passed on to the next task inthe process.
l Stop Branch: If the task is in a branch of the process, the branch is stopped and the job file isreturned to the process after the branch. The branch will not produce any output.
l Stop Process: The process is stopped and no more processing is done. No further output isproduced.
l Log Message: Check this option to enable logging a custom error message in the PlanetPress SuiteWorkflow Tools' log file.

l Message: Enabled only when the Log Message option is checked. Enter a message that will belogged in the PlanetPress Suite Workflow Tools' log file. You can use any variables available inPlanetPress Workflow to customize the message.
l Store the message in variable: Select in which jobinfo, local or global variable you want to store themessage content.
l ID: Enter an error ID. This ID will be visible in theWindows Event Viewer. However, the ID is notvisible in the PlanetPress Suite Workflow Tools' log file.
l Store the ID in variable: Select in which jobinfo, local or global variable you want to store the errorID.
l Reset to defaults: Resets all options in this tab to their default values.
If storing the message or ID, if they are store in a jobinfo they will be available in any error handling processwhere errors are being forwarded. In all cases, if your process continues after the error, the contents of thevariables selected in this window will be available for the rest of your process, or whenever they areoverwritten.
Common Errors
Though some error messages are specific to a task in particular, others may apply to any and all tasksbecause they are related more to the system than to PlanetPress itself. Some examples would be W3813,W3830, W3991, W4005. These correspond to issues such as not having any space to write files, permissionerrors on folders or files, etc.
Comments Tab
The Comments tab is common to all tasks. It contains a single text area (Task comments) that lets youwrite comments about the task. These comments are saved when the dialog is closed with the OK button,and are displayed in the Task Comments Pane.
Load External File
Load External File action tasks are used to replace the current job file by the designated text file. Loadingan external file does not delete the original file or modify it in any way.
Input
The current data file in the process will be discarded.

Processing
The external file specified in the task's properties is loaded and replaces the current data file.
Output
The loaded file is output. Metadata is not modified in any way, neither are job infos.
Properties
General tab
l External file: The path to the file you want the job file to be replaced with. You may browse to the fileusing the browse button on the right of the field.
Examples & Use Cases
This task is put into effect in the following use cases and example processes:
l HTTP PDF Invoice Request
On Error Tab
The On Error tab is common to all tasks. Details can be found in the" Task Properties Dialog" on page 666.
By default, any action task, branch, splitter or condition that generates an error will simply be ignored, andthe task just under it (not within a branch) will be given control of the job file without any modification. Anyinitial input task that generates an error will stop the process from running as a whole, and output tasks willnot generate output. The On Error tab can be used to overwrite the default behaviors.
l Send to Process: Check this option to send the job file to an error management process.l Error Process drop-down: Enabled only when the Send to Process option is checked. Lists anyprocess of which the initial input task is the Input Error Bin task.
l Action Group: This group is disabled in the initial input tasks and defaults to Stop Process. In allother tasks where the On Error tab is present, the following options are available:
l Ignore: The task is ignored as if it did not exist, and the job file is passed on to the next task inthe process.

l Stop Branch: If the task is in a branch of the process, the branch is stopped and the job file isreturned to the process after the branch. The branch will not produce any output.
l Stop Process: The process is stopped and no more processing is done. No further output isproduced.
l Log Message: Check this option to enable logging a custom error message in the PlanetPress SuiteWorkflow Tools' log file.
l Message: Enabled only when the Log Message option is checked. Enter a message that will belogged in the PlanetPress Suite Workflow Tools' log file. You can use any variables available inPlanetPress Workflow to customize the message.
l Store the message in variable: Select in which jobinfo, local or global variable you want to store themessage content.
l ID: Enter an error ID. This ID will be visible in theWindows Event Viewer. However, the ID is notvisible in the PlanetPress Suite Workflow Tools' log file.
l Store the ID in variable: Select in which jobinfo, local or global variable you want to store the errorID.
l Reset to defaults: Resets all options in this tab to their default values.
If storing the message or ID, if they are store in a jobinfo they will be available in any error handling processwhere errors are being forwarded. In all cases, if your process continues after the error, the contents of thevariables selected in this window will be available for the rest of your process, or whenever they areoverwritten.
Common Errors
Though some error messages are specific to a task in particular, others may apply to any and all tasksbecause they are related more to the system than to PlanetPress itself. Some examples would be W3813,W3830, W3991, W4005. These correspond to issues such as not having any space to write files, permissionerrors on folders or files, etc.
Comments Tab
The Comments tab is common to all tasks. It contains a single text area (Task comments) that lets youwrite comments about the task. These comments are saved when the dialog is closed with the OK button,and are displayed in the Task Comments Pane.

Mathematical Operations
The Mathematical Operations action task resolves a mathematical expression and stores the result in anexisting job information or variable.
Note
When adding this task to your process, you will be asked if you want to add the task as an Action or aCondition. This task should only be used as an Action. If used as a condition, it will always returnFalse.
The task does not modify the job file in any way, its only output is the change in the specified variable wherethe result is stored.
Technical
The expression itself must be written in a format understood by the VBSCript scripting language. Formore information, please see Mathematical Functions in VBSCript and VBSCript Math Operators.
Input
Any active data file, in any format. This data file is ignored by the task and is not modified in any way.
Processing
The task executes the mathematical operation and stores the result in the selected job info or variable.
Output
The input data file is returned with no modifications. Metadata is not modified. A single job info or variable ismodified by this task.

Properties
General Tab
l Mathematical Expression: Variable data field containing the expression to be evaluated. Thisexpression may combine any combination of standard PlanetPress Workflow variables and VBScriptmathematical expressions. For example, to multiply Job Info 9 by 2, the expression would be %9*2 .
l Store result in: Variable data field containing the job information, local or global variable in which tostore the result. For job information use %1 through %9, for local variables use %{variable} and forglobal variables use %{global.variable}.
l Use value of Variable/JobInfo # expression: Use the contents of the variable entered in Store resultin:, which is assumed to be a digit between 1 and 9. This digit determines in which job info the result ofthe mathematical expression is store. For example, if %{myvariable} is equal to 9, job information 9 willstore the result of the mathematical operation.
Note
This task was built using a custom plugin system and does not display the On Error tab in the regularview. To access the On Error tab, right-click on the task and select "Advanced Properties...".
Open XSLT
The Open XSLT action task takes an XML file as input and executes the XSLT code as parameter torearranges the content of the XML file.
XSLT (or XSL Transformation) is a style sheet that describes how an XML document is to be transformedinto another XML document. The reason to transform an XML document into another XML document issimply to rearrange the information it contains in order to make the data structure more convenient for yourneeds.
Input
A valid XML file.
Processing
The XSLT is applied to the XML data file.

Output
The modified XML data file is output. Metadata and jobinfos are not modified.
l Filel Import: Lets you open an existing XSLT script from an XSL, XSLT or TXT file.l Export: Lets you save the current XSLT script as a file.l Print: Prints the current XSLT script.
l Editl Undo: Undo the last edit.l Cut: Cut the current selection (only available if there is selected text in the editor).l Copy: Copy the current selection (only available if there is selected text in the editor).l Paste: Paste the last selection that was cut or copied in the location of the cursor in the texteditor.
l Delete: Delete the current selection (only available if there is selected text in the editor).l Select All: Select all of the contents of the editor.
l Searchl Find: Brings up the Find dialog.l Find Again: Repeats the previous search and finds the next occurrence.l Replace: Brings up the Replace dialog.l Go To Line: Brings up the Go To Line dialog where you can enter a line number and jumpdirectly to that line.
l XSLT Versionl XSLT 1.0: Select if you will be entering or pasting XSLT version 1.0 code.l XSLT 2.0: Select if you will be entering or pasting XSLT version 2.0 code.
l Toolsl Editor Options...: Opens the "Editor Options" on page 658.
l Helpl Contents and Indexes: Opens the Editor Help (this page)
The other options of the window are:

l The script editor text box: This is where you enter your XSLT Script that will be used. If you use anexternal script file, this will display the content of the file (note however that modifying the script in thiscase does not modify the external file and changes are not saved).
l Script running from: Choose if the script should be run from the editor text box, or from an externalscript file.
l Script filename and path: Either enter the full path of the XSLT Script, or click the Browse button tonavigate to the file. This option is only available if you choose external script file in the Scriptrunning from option.
Push to Repository
The Push to Repository Action Task adds data to the PlanetPress Workflow data repository. The task mayonly add one KeySet per action. If more than one insert is needed, a loop must be established first.
The Push to Repository task can also be used to update an existing KeySet if a lookup is provided.
Input
Any data file, in any format.
Processing
A new KeySet is added to the Data Repository, or updated, using the data provided.
Output
The unmodified input file. This task does not change the data file in any way. The only modification is asingle variable or job info, if the "Store Result" option is selected.
Properties
The Push to Repository task options are as follows:
General tab
l Group: Use the drop-down to select into which group the KeySet is inserted, or in which group theKeySet should be updated.
l Key set: Displays a list of keys for the selected group.l Key: Displays the key name in the group.l Value: Enter a value for the key, which will be inserted in the KeySet. This value can bedynamic, including data selections, metadata selections, variables and other data.
l Update: Check to update the key with new data. For the Update column to be active, the Updatebase on option must be checked. Key values will only change in the KeySet if the Updatecheckmark is checked for that key, otherwise it is left unchanged.
l Create Group and Key(s) if they don't exist: Check this option to force the creation of a new groupand/or keys, if they do not exist. This is useful for portability: if a configuration with this task is sent to anew Workflow server that does not contain this group or is missing keys, the task will create themautomatically.
l Update based on: Check this option to update an existing KeySet instead of creating a new one. Thevalue of the Condition field is used to filter the KeySets to only obtain one or more. Here are somevalid conditions:
l last_name = 'Jones'l id = 237l age IS NOT NULLl last_name LIKE 'La%'l province IN ('QC', 'ON', 'AB')
l Add KeySet when condition is false: If the update condition above is false, a new KeySet is addedto the group. If unchecked, no data is changed in the repository.
l Store the result ID in variable: Select a variable or Job Info in which an array of inserted or updatedIDs will be placed. The array of IDs in the form of [1, 2, 3, 4, 2443, 532, 5457, ...]
On Error Tab
The On Error tab is common to all tasks. Details can be found in the" Task Properties Dialog" on page 666.
By default, any action task, branch, splitter or condition that generates an error will simply be ignored, andthe task just under it (not within a branch) will be given control of the job file without any modification. Anyinitial input task that generates an error will stop the process from running as a whole, and output tasks willnot generate output. The On Error tab can be used to overwrite the default behaviors.

l Send to Process: Check this option to send the job file to an error management process.l Error Process drop-down: Enabled only when the Send to Process option is checked. Lists anyprocess of which the initial input task is the Input Error Bin task.
l Action Group: This group is disabled in the initial input tasks and defaults to Stop Process. In allother tasks where the On Error tab is present, the following options are available:
l Ignore: The task is ignored as if it did not exist, and the job file is passed on to the next task inthe process.
l Stop Branch: If the task is in a branch of the process, the branch is stopped and the job file isreturned to the process after the branch. The branch will not produce any output.
l Stop Process: The process is stopped and no more processing is done. No further output isproduced.
l Log Message: Check this option to enable logging a custom error message in the PlanetPress SuiteWorkflow Tools' log file.
l Message: Enabled only when the Log Message option is checked. Enter a message that will belogged in the PlanetPress Suite Workflow Tools' log file. You can use any variables available inPlanetPress Workflow to customize the message.
l Store the message in variable: Select in which jobinfo, local or global variable you want to store themessage content.
l ID: Enter an error ID. This ID will be visible in theWindows Event Viewer. However, the ID is notvisible in the PlanetPress Suite Workflow Tools' log file.
l Store the ID in variable: Select in which jobinfo, local or global variable you want to store the errorID.
l Reset to defaults: Resets all options in this tab to their default values.
If storing the message or ID, if they are store in a jobinfo they will be available in any error handling processwhere errors are being forwarded. In all cases, if your process continues after the error, the contents of thevariables selected in this window will be available for the rest of your process, or whenever they areoverwritten.
Common Errors
Though some error messages are specific to a task in particular, others may apply to any and all tasksbecause they are related more to the system than to PlanetPress itself. Some examples would be W3813,W3830, W3991, W4005. These correspond to issues such as not having any space to write files, permissionerrors on folders or files, etc.

Comments Tab
The Comments tab is common to all tasks. It contains a single text area (Task comments) that lets youwrite comments about the task. These comments are saved when the dialog is closed with the OK button,and are displayed in the Task Comments Pane.
Rename
Rename action tasks are used to rename the job files they receive. Note that you can see how each file isrenamed via the Object Inspector when stepping through a process in Debug mode.
Input
Any job file, in any format.
Processing
The task renames the job file to the desired name, and changes the value of %f and %F to reflect the newname.
Output
The input data file is output, with the new name.
Properties
General tab
l New file name: Enter the job file’s new name. In this variable property box, you may enter staticcharacters, variables, job information elements, data selections, or any combination of these.
On Error Tab
The On Error tab is common to all tasks. Details can be found in the" Task Properties Dialog" on page 666.
By default, any action task, branch, splitter or condition that generates an error will simply be ignored, andthe task just under it (not within a branch) will be given control of the job file without any modification. Anyinitial input task that generates an error will stop the process from running as a whole, and output tasks willnot generate output. The On Error tab can be used to overwrite the default behaviors.

l Send to Process: Check this option to send the job file to an error management process.l Error Process drop-down: Enabled only when the Send to Process option is checked. Lists anyprocess of which the initial input task is the Input Error Bin task.
l Action Group: This group is disabled in the initial input tasks and defaults to Stop Process. In allother tasks where the On Error tab is present, the following options are available:
l Ignore: The task is ignored as if it did not exist, and the job file is passed on to the next task inthe process.
l Stop Branch: If the task is in a branch of the process, the branch is stopped and the job file isreturned to the process after the branch. The branch will not produce any output.
l Stop Process: The process is stopped and no more processing is done. No further output isproduced.
l Log Message: Check this option to enable logging a custom error message in the PlanetPress SuiteWorkflow Tools' log file.
l Message: Enabled only when the Log Message option is checked. Enter a message that will belogged in the PlanetPress Suite Workflow Tools' log file. You can use any variables available inPlanetPress Workflow to customize the message.
l Store the message in variable: Select in which jobinfo, local or global variable you want to store themessage content.
l ID: Enter an error ID. This ID will be visible in theWindows Event Viewer. However, the ID is notvisible in the PlanetPress Suite Workflow Tools' log file.
l Store the ID in variable: Select in which jobinfo, local or global variable you want to store the errorID.
l Reset to defaults: Resets all options in this tab to their default values.
If storing the message or ID, if they are store in a jobinfo they will be available in any error handling processwhere errors are being forwarded. In all cases, if your process continues after the error, the contents of thevariables selected in this window will be available for the rest of your process, or whenever they areoverwritten.
Common Errors
Though some error messages are specific to a task in particular, others may apply to any and all tasksbecause they are related more to the system than to PlanetPress itself. Some examples would be W3813,W3830, W3991, W4005. These correspond to issues such as not having any space to write files, permissionerrors on folders or files, etc.
Comments Tab
The Comments tab is common to all tasks. It contains a single text area (Task comments) that lets youwrite comments about the task. These comments are saved when the dialog is closed with the OK button,and are displayed in the Task Comments Pane.
Run Script
Run Script tasks are used to run scripts that typically perform some kind of processing on the job filereceived by the task. Scripts are often simpler to write than programs added with the External Programaction (see "External Program" on page 286). However, they can be slower to execute.
The Run Script action task can be used either as an action or a condition. When dragging and dropping aRun Script action task on a given process, you select whether to use this task as an action or a conditionfrom a contextual menu.
For more information on scripts, what languages are supported and how to write scripts and conditions,please see the related chapter, "Using Scripts" on page 81.
Input
Any data file, in any format.
Processing
The script is executed. The script can modify anything such as the data file, job infos, metadata, or evenother files on the operating system.
Output
Whatever file the Run Script action generates, metadata it modifies or creates, etc.
Technical
Note about conditions: When using Run Script as a condition, the output of the task can be within thebranch or on the main trunk. To control the output, use the "Script.ReturnValue" on page 108 variablein your script.

Properties
The Script Editormenu options are as followed:
l Filel Import: Lets you open an existing script from an external file. This file can be in .vbs, .js, .pl or .pyfor language-specific scripts, or .txt for any of them.
l Export: Lets you save the current script as a file.l Print: Prints the current script.
l Editl Undo: Undo the last edit.l Cut: Cut the current selection (only available if there is selected text in the editor).l Copy: Copy the current selection (only available if there is selected text in the editor).l Paste: Paste the last selection that was cut or copied in the location of the cursor in the texteditor.
l Delete: Delete the current selection (only available if there is selected text in the editor).l Select All: Select all of the contents of the editor.
l Searchl Find: Brings up the Find dialog.l Find Again: Repeats the previous search and finds the next occurrence.l Replace: Brings up the Replace dialog.l Go To Line: Brings up the Go To Line dialog where you can enter a line number and jumpdirectly to that line.
l Languagel VBScript: Select if your script is written in VBScript.l JavaScript: Select if your script is written in JavaScript.l Perl: Select if your script is written in Perl.l Python: Select if your script is written in Pyton.
l Toolsl Editor Options...: Opens the "Editor Options" on page 658.

l Helpl Contents and Indexes: Opens the Editor Help (this page)
The other options of the window are:
l The script editor text box: This is where you enter your XSLT Script that will be used. If you use anexternal script file, this will display the content of the file (note however that modifying the script in thiscase does not modify the external file and changes are not saved).
l Script running from: Choose if the script should be run from the editor text box, or from an externalscript file.
l Script filename and path: Either enter the full path of the XLST Script, or click the Browse button tonavigate to the file. This option is only available if you choose external script file in the Scriptrunning from option.
Warning
With the Run Script action, the On Error tab is accessible by right-clicking on the action in yourprocess and clicking Advanced Properties.
The On Error tab will be triggered if your script has an execution error (such as syntax error, etc) aswell as when raising an error from within your script. For more information, see
On Error Tab
The On Error tab is common to all tasks. Details can be found in the" Task Properties Dialog" on page 666.
By default, any action task, branch, splitter or condition that generates an error will simply be ignored, andthe task just under it (not within a branch) will be given control of the job file without any modification. Anyinitial input task that generates an error will stop the process from running as a whole, and output tasks willnot generate output. The On Error tab can be used to overwrite the default behaviors.
l Send to Process: Check this option to send the job file to an error management process.l Error Process drop-down: Enabled only when the Send to Process option is checked. Lists anyprocess of which the initial input task is the Input Error Bin task.
l Action Group: This group is disabled in the initial input tasks and defaults to Stop Process. In allother tasks where the On Error tab is present, the following options are available:

l Ignore: The task is ignored as if it did not exist, and the job file is passed on to the next task inthe process.
l Stop Branch: If the task is in a branch of the process, the branch is stopped and the job file isreturned to the process after the branch. The branch will not produce any output.
l Stop Process: The process is stopped and no more processing is done. No further output isproduced.
l Log Message: Check this option to enable logging a custom error message in the PlanetPress SuiteWorkflow Tools' log file.
l Message: Enabled only when the Log Message option is checked. Enter a message that will belogged in the PlanetPress Suite Workflow Tools' log file. You can use any variables available inPlanetPress Workflow to customize the message.
l Store the message in variable: Select in which jobinfo, local or global variable you want to store themessage content.
l ID: Enter an error ID. This ID will be visible in theWindows Event Viewer. However, the ID is notvisible in the PlanetPress Suite Workflow Tools' log file.
l Store the ID in variable: Select in which jobinfo, local or global variable you want to store the errorID.
l Reset to defaults: Resets all options in this tab to their default values.
If storing the message or ID, if they are store in a jobinfo they will be available in any error handling processwhere errors are being forwarded. In all cases, if your process continues after the error, the contents of thevariables selected in this window will be available for the rest of your process, or whenever they areoverwritten.
Common Errors
Though some error messages are specific to a task in particular, others may apply to any and all tasksbecause they are related more to the system than to PlanetPress itself. Some examples would be W3813,W3830, W3991, W4005. These correspond to issues such as not having any space to write files, permissionerrors on folders or files, etc.
Comments Tab
The Comments tab is common to all tasks. It contains a single text area (Task comments) that lets youwrite comments about the task. These comments are saved when the dialog is closed with the OK button,and are displayed in the Task Comments Pane.

Search and Replace
Search and Replace action tasks are used to locate and replace strings of data within the job file and toreplace them with other strings of data. Note that this action task cannot be used with binary files.
For more advanced search and replace functionality, you can also see "Advanced Search and Replace" onpage 247.
Input
Any text-based file can be used in this task, even formats that are not directly compatible with PlanetPress.As long as the text is visible in a text-based editor (such as Notepad), it is readable and supported by thistask.
Processing
The appropriate changes are made to the data file (replacing text).
Output
The modified data file is output from this task. Metadata is not modified in any way if it is present.
Properties
General Tab
l Find: Enter the string of data for which to search. In this variable property box, you may enter staticcharacters, variables, job information elements, data selections, or any combination of these.
l Replace with: Enter the string of data to use as a replacement. Since this is also a variable propertybox, the same as above applies.
l List of words to find and replace: Lists each string to find, and its replacement. These are executedin order, from top to bottom.
l Find: Enter the string of data for which to search. In this variable property box, you may enterstatic characters, variables, job information elements, data selections, or any combination ofthese.
l Replace with: Enter the string of data to use as a replacement. Since this is also a variableproperty box, the same as above applies.

l button: Click to add a new line to the list of words to find and replace.
l button: Click to remove the currently selected line from the list.
l button: Move the currently selected line up one position.
l button: Move the currently selected line down one position.
On Error Tab
The On Error tab is common to all tasks. Details can be found in the" Task Properties Dialog" on page 666.
By default, any action task, branch, splitter or condition that generates an error will simply be ignored, andthe task just under it (not within a branch) will be given control of the job file without any modification. Anyinitial input task that generates an error will stop the process from running as a whole, and output tasks willnot generate output. The On Error tab can be used to overwrite the default behaviors.
l Send to Process: Check this option to send the job file to an error management process.l Error Process drop-down: Enabled only when the Send to Process option is checked. Lists anyprocess of which the initial input task is the Input Error Bin task.
l Action Group: This group is disabled in the initial input tasks and defaults to Stop Process. In allother tasks where the On Error tab is present, the following options are available:
l Ignore: The task is ignored as if it did not exist, and the job file is passed on to the next task inthe process.
l Stop Branch: If the task is in a branch of the process, the branch is stopped and the job file isreturned to the process after the branch. The branch will not produce any output.
l Stop Process: The process is stopped and no more processing is done. No further output isproduced.
l Log Message: Check this option to enable logging a custom error message in the PlanetPress SuiteWorkflow Tools' log file.
l Message: Enabled only when the Log Message option is checked. Enter a message that will belogged in the PlanetPress Suite Workflow Tools' log file. You can use any variables available inPlanetPress Workflow to customize the message.
l Store the message in variable: Select in which jobinfo, local or global variable you want to store themessage content.
l ID: Enter an error ID. This ID will be visible in theWindows Event Viewer. However, the ID is notvisible in the PlanetPress Suite Workflow Tools' log file.
l Store the ID in variable: Select in which jobinfo, local or global variable you want to store the errorID.
l Reset to defaults: Resets all options in this tab to their default values.
If storing the message or ID, if they are store in a jobinfo they will be available in any error handling processwhere errors are being forwarded. In all cases, if your process continues after the error, the contents of thevariables selected in this window will be available for the rest of your process, or whenever they areoverwritten.
Common Errors
Though some error messages are specific to a task in particular, others may apply to any and all tasksbecause they are related more to the system than to PlanetPress itself. Some examples would be W3813,W3830, W3991, W4005. These correspond to issues such as not having any space to write files, permissionerrors on folders or files, etc.
Comments Tab
The Comments tab is common to all tasks. It contains a single text area (Task comments) that lets youwrite comments about the task. These comments are saved when the dialog is closed with the OK button,and are displayed in the Task Comments Pane.
Send Images to Printer
The Send Images to Printer action task is used to (obviously) send images to the printer so they can beused as resources by documents run on the printer. They are comparable to Download to Printer actiontasks (see "Download to Printer" on page 283), but they include image specific options. Furthermore, theycan be used to send images not only to printers, but also to the virtual drive of other computers runningPlanetPress Workflow applications. Note that each Sent Images to Printer action task must be followed bya Printer Queue Output task set to "passthrough", in order for the images to be actually sent to that printer.
Note
Images sent to a printer are stored in the root folder of the printer’s hard disk, while images sent to thevirtual drive of another computer are stored in a sub-folder of the PlanetPress Workflow folder.

Input
Any image file that you wish to upload to the printer.
Processing
The currently active image data file converted to postscript. The image's resolution, scan orientation, andquality can be modified, depending on the selected option. All files are converted into PostScript format forstorage on the printer. If a virtual drive, the file is automatically sent to it.
Output
A postscript file containing the necessary code to save the data file on the hard drive.
Properties
General tab
l Scan orientation: Select Side to side for images that will be printed in their original orientation on aportrait oriented page, or in a rotated orientation on a landscape page. Select Top to bottom for imagesthat will be printed in a rotated orientation on a portrait oriented page, or in a rotated orientation on aportrait oriented page. Note that images that are meant to be printed in various ways can be storedtwice on the printer as two identical copies of the same file that bear different names (Image_Original.tif and Image_Rotated.tif, for example). The first copy can be processed using a Send Imagesto Printer action task with the scan orientation set to Side to side, the second one with a differentSend Images to Printer action task with the scan orientation set to Top to bottom, each one typicallybeing included on two different branches of the same process.
l Color conversion: Select As is to keep the color information included in the images. Select Grayscaleto convert color images to gray scale.
l Naming convention: Select ’File name, original’ to store the file under its original file name. Select’File name, no extension’ to store the file without its original file name extension. Note that allcharacters are converted to uppercase and that extended characters (characters, such as é, forexample) are not recommended in image file names.
l Image quality: Select the same image quality chosen in the PlanetPress Design documents thatreference the image files you are sending. In PlanetPress Design, this setting is included in thedocument’s resource options.

l Image compression level: Select the level at which you want images to be compressed. Values canrange from 1 (compress up to 1% of the image’s original size) to 100 (do not compress). For example ifyou set this box to 75, the Image Downloader compresses all images by 75% when it converts thoseimage to PostScript. The default compression level is 70%.
l Send to Virtual Drive of: Select the computers and / or printers to which the images are to be sent.l Refresh: Click to prompt PlanetPress Workflow to look again for available printers and computers.
l Hard disk name and path: You may enter the name and path of the hard disk to which you want tosend the images. Needless to say that this option is used if the device to which you are sending theimages has multiple hard drives.
l Print confirmation page: Select to print a confirmation page on each one of the selected printers afteran image has been successfully received.
On Error Tab
The On Error tab is common to all tasks. Details can be found in the" Task Properties Dialog" on page 666.
By default, any action task, branch, splitter or condition that generates an error will simply be ignored, andthe task just under it (not within a branch) will be given control of the job file without any modification. Anyinitial input task that generates an error will stop the process from running as a whole, and output tasks willnot generate output. The On Error tab can be used to overwrite the default behaviors.
l Send to Process: Check this option to send the job file to an error management process.l Error Process drop-down: Enabled only when the Send to Process option is checked. Lists anyprocess of which the initial input task is the Input Error Bin task.
l Action Group: This group is disabled in the initial input tasks and defaults to Stop Process. In allother tasks where the On Error tab is present, the following options are available:
l Ignore: The task is ignored as if it did not exist, and the job file is passed on to the next task inthe process.
l Stop Branch: If the task is in a branch of the process, the branch is stopped and the job file isreturned to the process after the branch. The branch will not produce any output.
l Stop Process: The process is stopped and no more processing is done. No further output isproduced.
l Log Message: Check this option to enable logging a custom error message in the PlanetPress SuiteWorkflow Tools' log file.

l Message: Enabled only when the Log Message option is checked. Enter a message that will belogged in the PlanetPress Suite Workflow Tools' log file. You can use any variables available inPlanetPress Workflow to customize the message.
l Store the message in variable: Select in which jobinfo, local or global variable you want to store themessage content.
l ID: Enter an error ID. This ID will be visible in theWindows Event Viewer. However, the ID is notvisible in the PlanetPress Suite Workflow Tools' log file.
l Store the ID in variable: Select in which jobinfo, local or global variable you want to store the errorID.
l Reset to defaults: Resets all options in this tab to their default values.
If storing the message or ID, if they are store in a jobinfo they will be available in any error handling processwhere errors are being forwarded. In all cases, if your process continues after the error, the contents of thevariables selected in this window will be available for the rest of your process, or whenever they areoverwritten.
Common Errors
Though some error messages are specific to a task in particular, others may apply to any and all tasksbecause they are related more to the system than to PlanetPress itself. Some examples would be W3813,W3830, W3991, W4005. These correspond to issues such as not having any space to write files, permissionerrors on folders or files, etc.
Comments Tab
The Comments tab is common to all tasks. It contains a single text area (Task comments) that lets youwrite comments about the task. These comments are saved when the dialog is closed with the OK button,and are displayed in the Task Comments Pane.
Send to Folder
Send to Folder action tasks send the files they receive to a local folder. They perform the same function asSend to Folder output tasks, with the only difference being that in this case PlanetPress Workflow will waitfor the task to be completed before going on to the next task in the configuration.

Note
As with any task that can refer to network resources, it is important to understand the considerationsinvolved with paths and permissions of these resources. Please refer to the Network Considerationspage in the Advanced Configuration and Options chapter (Reference Guide, in English only).
Input
Any data file in any format.
Processing
A copy of the data file is saved on the hard drive at the specified location.
Output
The original data file, metadata and job infos are not modified, they are passed on to the next task.
Properties
General tab
l Folder: Enter the path of the folder to which the files are to be saved.l File name: Enter the name of the output files generated by this task. To prevent each new file fromoverwriting the previous one, you should use variable names. As with any variable property box, youcan use any combination of text, variables and data selections.
l Concatenate files: If this option is selected, when PlanetPress Workflow tries to save a file under agiven name, if a file under that same name already exists, instead of overwriting it, PlanetPressWorkflow will append the content of the new file to that of the existing file. This appending process willgo on until the file is removed from the folder.
l Separator string: This option is used to add a separator string between the content of each file whenthe Concatenate files option is selected.
On Error Tab
The On Error tab is common to all tasks. Details can be found in the" Task Properties Dialog" on page 666.
By default, any action task, branch, splitter or condition that generates an error will simply be ignored, and

the task just under it (not within a branch) will be given control of the job file without any modification. Anyinitial input task that generates an error will stop the process from running as a whole, and output tasks willnot generate output. The On Error tab can be used to overwrite the default behaviors.
l Send to Process: Check this option to send the job file to an error management process.l Error Process drop-down: Enabled only when the Send to Process option is checked. Lists anyprocess of which the initial input task is the Input Error Bin task.
l Action Group: This group is disabled in the initial input tasks and defaults to Stop Process. In allother tasks where the On Error tab is present, the following options are available:
l Ignore: The task is ignored as if it did not exist, and the job file is passed on to the next task inthe process.
l Stop Branch: If the task is in a branch of the process, the branch is stopped and the job file isreturned to the process after the branch. The branch will not produce any output.
l Stop Process: The process is stopped and no more processing is done. No further output isproduced.
l Log Message: Check this option to enable logging a custom error message in the PlanetPress SuiteWorkflow Tools' log file.
l Message: Enabled only when the Log Message option is checked. Enter a message that will belogged in the PlanetPress Suite Workflow Tools' log file. You can use any variables available inPlanetPress Workflow to customize the message.
l Store the message in variable: Select in which jobinfo, local or global variable you want to store themessage content.
l ID: Enter an error ID. This ID will be visible in theWindows Event Viewer. However, the ID is notvisible in the PlanetPress Suite Workflow Tools' log file.
l Store the ID in variable: Select in which jobinfo, local or global variable you want to store the errorID.
l Reset to defaults: Resets all options in this tab to their default values.
If storing the message or ID, if they are store in a jobinfo they will be available in any error handling processwhere errors are being forwarded. In all cases, if your process continues after the error, the contents of thevariables selected in this window will be available for the rest of your process, or whenever they areoverwritten.

Common Errors
Though some error messages are specific to a task in particular, others may apply to any and all tasksbecause they are related more to the system than to PlanetPress itself. Some examples would be W3813,W3830, W3991, W4005. These correspond to issues such as not having any space to write files, permissionerrors on folders or files, etc.
Comments Tab
The Comments tab is common to all tasks. It contains a single text area (Task comments) that lets youwrite comments about the task. These comments are saved when the dialog is closed with the OK button,and are displayed in the Task Comments Pane.
Set Job Infos and Variables
Add Set Job Infos and Variables action tasks to set job info elements as well as custom variables. You canset multiple variables and job info values in a single task. Be aware that lines are processed from top tobottom.
Input
Any data file in any format.
Processing
This task assigns the defined values to each local or global variables or job information. It does not modifythe data file nor the metadata.
Output
The original data file, metadata and job infos are not modified, they are passed on to the next task. Set JobInfos and Variables action task properties are as follows:
General tab
l Var/Info#: Lists all job infos, local variables in the current process and global variables in theconfiguration. Click on the variable you want to change.
l Value: Enter the value that you want to associate with the selected job information element or customvariable.
l button: Adds a new line and lets you define the variable and value to set.
l button: Removes the line that is currently selected (highlighted).
l button: Moves the line up so it is processed before.
l button: Moves the line down so it is processed after.
On Error Tab
The On Error tab is common to all tasks. Details can be found in the" Task Properties Dialog" on page 666.
By default, any action task, branch, splitter or condition that generates an error will simply be ignored, andthe task just under it (not within a branch) will be given control of the job file without any modification. Anyinitial input task that generates an error will stop the process from running as a whole, and output tasks willnot generate output. The On Error tab can be used to overwrite the default behaviors.
l Send to Process: Check this option to send the job file to an error management process.l Error Process drop-down: Enabled only when the Send to Process option is checked. Lists anyprocess of which the initial input task is the Input Error Bin task.
l Action Group: This group is disabled in the initial input tasks and defaults to Stop Process. In allother tasks where the On Error tab is present, the following options are available:
l Ignore: The task is ignored as if it did not exist, and the job file is passed on to the next task inthe process.
l Stop Branch: If the task is in a branch of the process, the branch is stopped and the job file isreturned to the process after the branch. The branch will not produce any output.
l Stop Process: The process is stopped and no more processing is done. No further output isproduced.
l Log Message: Check this option to enable logging a custom error message in the PlanetPress SuiteWorkflow Tools' log file.
l Message: Enabled only when the Log Message option is checked. Enter a message that will belogged in the PlanetPress Suite Workflow Tools' log file. You can use any variables available inPlanetPress Workflow to customize the message.
l Store the message in variable: Select in which jobinfo, local or global variable you want to store themessage content.
l ID: Enter an error ID. This ID will be visible in theWindows Event Viewer. However, the ID is notvisible in the PlanetPress Suite Workflow Tools' log file.
l Store the ID in variable: Select in which jobinfo, local or global variable you want to store the errorID.
l Reset to defaults: Resets all options in this tab to their default values.
If storing the message or ID, if they are store in a jobinfo they will be available in any error handling processwhere errors are being forwarded. In all cases, if your process continues after the error, the contents of thevariables selected in this window will be available for the rest of your process, or whenever they areoverwritten.
Common Errors
Though some error messages are specific to a task in particular, others may apply to any and all tasksbecause they are related more to the system than to PlanetPress itself. Some examples would be W3813,W3830, W3991, W4005. These correspond to issues such as not having any space to write files, permissionerrors on folders or files, etc.
Comments Tab
The Comments tab is common to all tasks. It contains a single text area (Task comments) that lets youwrite comments about the task. These comments are saved when the dialog is closed with the OK button,and are displayed in the Task Comments Pane.
SOAP Client Plug-In
SOAP Client Plug-In tasks can be used as input, output and action tasks, although their basic function is togenerate output. SOAP (Simple Object Access Protocol) is a light protocol that defines a standard XMLformat used to communicate among systems across different architectures, languages, and operatingsystems.
A SOAP request is an XML-based Remote Procedure Call (RPC) sent using the HTTP transport protocol.The payload of the SOAP packet is an XML document that specifies the call being made and the parametersbeing passed.
Web services, a SOAP class of applications, expose their services via the Internet in a manner that letsother applications access them, as well as use and combine them as required.

In order to access and successfully use Web services, client applications must know how to get them, whatoperations they support, what parameters they expect, as well as what they return. SOAP servers make thisinformation available via WSDL (Web Service Description Language) files.
To configure a given SOAP Client Plug-In task in the PlanetPress Workflow Configuration program, youmust first get its WSDL file (note that you cannot download the WSDL file over an HTTPS connection, soyou should use an HTTP connection to get the file and then switch back to a secure connection). This letsyou know which services the SOAP server provides, as well as each service’s methods and name spaces.
If firewalls control communication between the SOAP client and the Web servers, they must be configuredso as not to block client-server communication.
In the case of "string" type data, SOAP Client Plug-In tasks normalize all line endings to a single line feedcharacter.
Properties
General tab
l WSDL address: Enter the URL address of the WSDL file, or choose a previously selected addressfrom the drop-down list.
Note
The WSDL Address of a PlanetPress Workflow SOAP server is the following:http://127.0.0.1:8080/wsdl/isoapact (assuming you are on the same machine and did notchange the default HTTP port).
l Get: Click to get the WSDL file from the SOAP server and populate the Service box below.
l Service: Choose an available Web service from this drop-down list to populate the Method box below.You may also enter the service name directly if the WSDL file cannot be found.
l Method: Choose an available method from this drop-down list. This populates the Namespace boxbelow. You may also enter the method name directly.
l Namespace: You may choose an available namespace to prevent ambiguity between identicallynamed elements or attributes. You may also enter a namespace directly.

l Resolve: Click to apply the options you chose above and to display the arguments of the chosenmethod in the Arguments box below.
l As script: Click to apply the options you chose above and to display information on the chosen Webservice in JavaScript format in a script viewer. You should use this option if the Web service is toocomplex to be interpreted correctly by the SOAP Client plugin.
l Name: Displays the name of the arguments associated with the selected method. Note that you mayalso manually enter new arguments, change or delete existing ones, as well as change their order ifneeded.
l Type: Displays the argument type.l Value: Lets you enter fixed or variable values. To exchange variable information between the Webservice and PlanetPress Workflow, you must use job information variables %1 to %9 or variable %c(which contains the entire job file). Note that return values (arguments which are used to returninformation to the SOAP Client) are displayed in bold font.
l Namespace: Displays the namespace of the arguments associated with the selected method.l Use returned raw SOAP packet as new data file: Check to use the complete SOAP packet(including the passed parameters) instead of the parameters only. This option overrides any returnvalue set to %c in the Arguments box. You should use this option when the SOAP Client plugin is notable to fully support the syntax of the response.
Advanced tab
l Domain: Enter the domain for the authentication on the SOAP server. The Domain is optional evenwhen authentication is used.
l user name: Enter the user name for the authentication, if required.l Password: Enter the password for the above user name.l Allow invalid security certificate: Check to ignore SSL certificates that are invalid.
On Error Tab
The On Error tab is common to all tasks. Details can be found in the" Task Properties Dialog" on page 666.
By default, any action task, branch, splitter or condition that generates an error will simply be ignored, andthe task just under it (not within a branch) will be given control of the job file without any modification. Anyinitial input task that generates an error will stop the process from running as a whole, and output tasks willnot generate output. The On Error tab can be used to overwrite the default behaviors.

l Send to Process: Check this option to send the job file to an error management process.l Error Process drop-down: Enabled only when the Send to Process option is checked. Lists anyprocess of which the initial input task is the Input Error Bin task.
l Action Group: This group is disabled in the initial input tasks and defaults to Stop Process. In allother tasks where the On Error tab is present, the following options are available:
l Ignore: The task is ignored as if it did not exist, and the job file is passed on to the next task inthe process.
l Stop Branch: If the task is in a branch of the process, the branch is stopped and the job file isreturned to the process after the branch. The branch will not produce any output.
l Stop Process: The process is stopped and no more processing is done. No further output isproduced.
l Log Message: Check this option to enable logging a custom error message in the PlanetPress SuiteWorkflow Tools' log file.
l Message: Enabled only when the Log Message option is checked. Enter a message that will belogged in the PlanetPress Suite Workflow Tools' log file. You can use any variables available inPlanetPress Workflow to customize the message.
l Store the message in variable: Select in which jobinfo, local or global variable you want to store themessage content.
l ID: Enter an error ID. This ID will be visible in theWindows Event Viewer. However, the ID is notvisible in the PlanetPress Suite Workflow Tools' log file.
l Store the ID in variable: Select in which jobinfo, local or global variable you want to store the errorID.
l Reset to defaults: Resets all options in this tab to their default values.
If storing the message or ID, if they are store in a jobinfo they will be available in any error handling processwhere errors are being forwarded. In all cases, if your process continues after the error, the contents of thevariables selected in this window will be available for the rest of your process, or whenever they areoverwritten.
Common Errors
Though some error messages are specific to a task in particular, others may apply to any and all tasksbecause they are related more to the system than to PlanetPress itself. Some examples would be W3813,W3830, W3991, W4005. These correspond to issues such as not having any space to write files, permissionerrors on folders or files, etc.

Comments Tab
The Comments tab is common to all tasks. It contains a single text area (Task comments) that lets youwrite comments about the task. These comments are saved when the dialog is closed with the OK button,and are displayed in the Task Comments Pane.
Standard Filter
Standard Filter action tasks can be used to remove HP Escape characters from data files, as well as toeliminate spacing problems caused by LF-CR end-of-line sequences.
HP escape characters are used in the Hewlett Packard Printer Control Language (HP PCL) to communicatebasic page formatting and font selection information from print jobs to HP or HP-compatible printers.
These characters, like other printer control characters that control how printers interpret and print jobs, arenot meant to be printed.
If your print job is bound for an HP compatible printer, it may include these characters even when printing toa PostScript printer that does not recognize them. PlanetPress Workflow provides an easy way toautomatically filter these characters through its Standard Filter action.
Input
Text-based data files such as Line Printer Emulation and ASCII Emulation data files, which containHP PCL control characters.
Processing
All HP PCL characters are removed from the data file. Note that these characters are not interpreted, onlystripped out.
Output
The modified data file, with stripped characters, is output from this task. Metadata, job infos and variablesare not modified.

Properties
General tab
l Process job using ASCII emulation: Select to use the ASCII emulation to process the job file. Thisreverses LF-CR end-of-line sequences that may result in unwanted double-spacing.
l Remove and convert HP escape characters: Select to filter HP escape character sequences fromthe job file.
On Error Tab
The On Error tab is common to all tasks. Details can be found in the" Task Properties Dialog" on page 666.
By default, any action task, branch, splitter or condition that generates an error will simply be ignored, andthe task just under it (not within a branch) will be given control of the job file without any modification. Anyinitial input task that generates an error will stop the process from running as a whole, and output tasks willnot generate output. The On Error tab can be used to overwrite the default behaviors.
l Send to Process: Check this option to send the job file to an error management process.l Error Process drop-down: Enabled only when the Send to Process option is checked. Lists anyprocess of which the initial input task is the Input Error Bin task.
l Action Group: This group is disabled in the initial input tasks and defaults to Stop Process. In allother tasks where the On Error tab is present, the following options are available:
l Ignore: The task is ignored as if it did not exist, and the job file is passed on to the next task inthe process.
l Stop Branch: If the task is in a branch of the process, the branch is stopped and the job file isreturned to the process after the branch. The branch will not produce any output.
l Stop Process: The process is stopped and no more processing is done. No further output isproduced.
l Log Message: Check this option to enable logging a custom error message in the PlanetPress SuiteWorkflow Tools' log file.
l Message: Enabled only when the Log Message option is checked. Enter a message that will belogged in the PlanetPress Suite Workflow Tools' log file. You can use any variables available inPlanetPress Workflow to customize the message.

l Store the message in variable: Select in which jobinfo, local or global variable you want to store themessage content.
l ID: Enter an error ID. This ID will be visible in theWindows Event Viewer. However, the ID is notvisible in the PlanetPress Suite Workflow Tools' log file.
l Store the ID in variable: Select in which jobinfo, local or global variable you want to store the errorID.
l Reset to defaults: Resets all options in this tab to their default values.
If storing the message or ID, if they are store in a jobinfo they will be available in any error handling processwhere errors are being forwarded. In all cases, if your process continues after the error, the contents of thevariables selected in this window will be available for the rest of your process, or whenever they areoverwritten.
Common Errors
Though some error messages are specific to a task in particular, others may apply to any and all tasksbecause they are related more to the system than to PlanetPress itself. Some examples would be W3813,W3830, W3991, W4005. These correspond to issues such as not having any space to write files, permissionerrors on folders or files, etc.
Comments Tab
The Comments tab is common to all tasks. It contains a single text area (Task comments) that lets youwrite comments about the task. These comments are saved when the dialog is closed with the OK button,and are displayed in the Task Comments Pane.
Translator
PlanetPress Workflow Translator action tasks can convert your data from its current encoding to a number ofdifferent encoding. The same data may be converted back and forth as required.
The Translator Action Task is useful for data file using foreign languages, as well as to convert Unicodedata file (which are not supported by PlanetPress Workflow).

Technical
You can create your own translation matrix files for the Translation Action Task by adding them to thefollowing folder: %CommonProgramFiles%\Objectif Lune\PlanetPress Workflow 7\Plugins\TranslatorTwo examples are already present, converting ASCII to and from IBMEBCDIC.
Codepage 1252 (ANSI - Latin 1) is used for many Latin language documents, since it can be used forAfrikaans, Basque, Catalan, Danish, Dutch, English, Faroese, Finnish, French, Galician, German, Icelandic,Indonesian, Italian, Malay, Norwegian, Portuguese, Spanish, Swahili and Swedish. Codepage 932 is oftenused for Japanese.
Input
Any text-based data file.
Processing
The characters in the data file are converted from the old encoding to the new one.
Output
The data file in its new encoding format. Metadata, job info and variables are unchanged.
Properties
General tab
l Source encoding: Select the current data encoding. Note that the source encoding is not selectedautomatically and you must therefore select the proper encoding from this list in order for theconversion process to be performed successfully.
l Target encoding: Select the encoding to which you want the data to be converted.l Include target encoding signature: This option is only available when converting to UTF-8(Windows code page 65001) or UCS-4 (code page 12000 or 12001). Select to include the characterencoding signature—also known as the byte order mark—at the beginning of the target string.

l Default character on translation: You may enter a character to be used to replace all thosecharacters that cannot be found in the source encoding. If you leave this box empty, they will be simplystripped from the data, so you may consider using a space as a place holder for unidentifiedcharacters.
On Error Tab
The On Error tab is common to all tasks. Details can be found in the" Task Properties Dialog" on page 666.
By default, any action task, branch, splitter or condition that generates an error will simply be ignored, andthe task just under it (not within a branch) will be given control of the job file without any modification. Anyinitial input task that generates an error will stop the process from running as a whole, and output tasks willnot generate output. The On Error tab can be used to overwrite the default behaviors.
l Send to Process: Check this option to send the job file to an error management process.l Error Process drop-down: Enabled only when the Send to Process option is checked. Lists anyprocess of which the initial input task is the Input Error Bin task.
l Action Group: This group is disabled in the initial input tasks and defaults to Stop Process. In allother tasks where the On Error tab is present, the following options are available:
l Ignore: The task is ignored as if it did not exist, and the job file is passed on to the next task inthe process.
l Stop Branch: If the task is in a branch of the process, the branch is stopped and the job file isreturned to the process after the branch. The branch will not produce any output.
l Stop Process: The process is stopped and no more processing is done. No further output isproduced.
l Log Message: Check this option to enable logging a custom error message in the PlanetPress SuiteWorkflow Tools' log file.
l Message: Enabled only when the Log Message option is checked. Enter a message that will belogged in the PlanetPress Suite Workflow Tools' log file. You can use any variables available inPlanetPress Workflow to customize the message.
l Store the message in variable: Select in which jobinfo, local or global variable you want to store themessage content.
l ID: Enter an error ID. This ID will be visible in theWindows Event Viewer. However, the ID is notvisible in the PlanetPress Suite Workflow Tools' log file.

l Store the ID in variable: Select in which jobinfo, local or global variable you want to store the errorID.
l Reset to defaults: Resets all options in this tab to their default values.
If storing the message or ID, if they are store in a jobinfo they will be available in any error handling processwhere errors are being forwarded. In all cases, if your process continues after the error, the contents of thevariables selected in this window will be available for the rest of your process, or whenever they areoverwritten.
Common Errors
Though some error messages are specific to a task in particular, others may apply to any and all tasksbecause they are related more to the system than to PlanetPress itself. Some examples would be W3813,W3830, W3991, W4005. These correspond to issues such as not having any space to write files, permissionerrors on folders or files, etc.
Comments Tab
The Comments tab is common to all tasks. It contains a single text area (Task comments) that lets youwrite comments about the task. These comments are saved when the dialog is closed with the OK button,and are displayed in the Task Comments Pane.
Windows Print Converter
Windows Print Converter action tasks are designed to convert Windows print files into Line Printer files, thatcan then be used in a variety of other PlanetPress Workflow tasks. Typically, Windows Print Converteraction tasks are located below WinQueue input tasks (note that the latter include options specific toWindows Print Converter action tasks).
The full conversion process is performed in two phases:
l The Windows print file is first converted into an XML file in which each printable character appearswith its horizontal and vertical coordinates.
l The XML file is then converted into a standard Line Printer file.
Note
Although it is more common to perform both phases in a single pass, each phase can be performed selectively, asrequired.
Input
A print job in EMF format, generally captured from a WinQueue input task.
Processing
The EMF job is converted into a text-only, Line Printer Emulation data file.
Output
A Line Printer file. Metadata, job infos and variables are not changed.
Properties
General tab
l EMF to XY group: Select this option if the file received by this task is a Windows print file. This willprompt the task to perform the first phase of the process, and thus convert the file to an XML file. If thisoption is not selected, the input file will not be converted to an XML file (note that the task will fail if thefile it receives is not an XML file). The settings included in this group fine tune the process. They letyou control precisely which text blocks are recognized as belonging together in one line. This hasparticular affect when dealing with font size differences between consecutive passages of text, thedistance from one text passage to another (word distance) as well as the base line offset (verticaldistance). To find out if one text passage belongs to the one found before it, first the vertical distance,second the horizontal distance and finally, the font size difference are checked. Only if all three valueslie within the tolerance are the two blocks recognized as belonging together. Additionally, you cancontrol text passages whose horizontal distance has been recognized as out of the tolerance, butwhose type size difference and vertical distance lie within the tolerance, outputting it in one line. At theoutput, these text passages are separated by a tabulator (ASCII code 9).
l Font size difference: Indicates the smallest acceptable factor between maximum and minimumfont size within one line. A value of 0.60 means that with a ratio from maximum to minimum fontsize (in points), that is less than 0.60, two text passages are not recognized as belonging

together. For example, if two text passages are formatted with different font sizes. Passage 1 with10, passage 2 with 18 point. The ratio 0.56 is smaller than the adjusted value 0.60. Thereforethose two text passages are recognized as not belonging together.
l Word distance: Indicates the largest acceptable distance between two text passages, so thatthey are still recognized as belonging together. This the factor the font's mean character width ismultiplied with. The value for the mean character width is taken from the corresponding font'sattributes (for texts which are printed justified, it is suggested to raise this value up to about 2).For example, if the mean character width of the font example shown here corresponds to thewidth of the blank character (for other fonts it may be another sign). There is another text passagefound whose horizontal distance is even bigger than the first one's mean character width,multiplied by factor 1.0. The two text passages are found to not belong together.
l Vertical distance: Indicates the biggest acceptable vertical distance between two text passagesso that they're still recognized as belonging together. This is the factor the font's height and sizeis multiplied with. The value for the font's height therefore is taken from the corresponding font's

attributes. For example, if the height of that font example in 10 point size is 0.32 cm. There is apassage found that is positioned 0.15 cm above - which means 0.15/0.31 = 0.48 < 0.50 - theprevious text passage. So the two passages are not recognized as belonging together.
l Windows Print Converter: Select this option if the task is to generate a Line Printer file. This willprompt the task to perform the second phase of the process, and thus convert the XML file to a LinePrinter file. If this option is not selected, the output file will thus be an XML file. The settings included inthis group determine the format settings of the generated Line Printer file.
l Character per inch (CPI): The number of individual characters per inch on a line of text.l Line per inch (LPI): The number of lines of text per inch.
Data SplittersSplitter action tasks are used to single data files into multiple data files. You can use such tasks, forexample, to split files that contain statements for multiple clients into smaller files that each contain a singleclient statement. Each statement can then be printed and sent by snail mail, or even emailed directly fromPlanetPress Workflow, to each individual client.
Splitters initiate a recurring cycle that stops only when the original file has been completely processed.When a given splitter creates a file, it hands it down to the task that follows, and all the tasks on the samebranch are performed until the output task. Then the splitter task creates yet another file that is again handeddown to the next task, and so forth until the cycle ends (when there is no more data in the original file).
If the process merges the split data with a document, the splitter must not alter the structure of the data file. Inother words, each split file must have the same structure as the original files, otherwise the PlanetPressDesign documents to which they will be sent will not be able to extract the data correctly and the mergingprocess will fail.

Warning
Splitters do not modify the metadata that is currently active within your process. This means that, if youare intending to use metadata along with a process using splitters, you can either use the "MetadataSequencer" on page 465 instead of a splitter, or (re)create the metadata after the splitter.
About Using Emulations with Splitters
When an emulation is used with a splitter action task, the job file is emulated, cut to pieces and de-emulated.Most times, the emulation/de-emulation process is completely transparent. However, in some cases, theremay be minute differences.
When using the ASCII or Channel Skip emulation, if there are missing line feed characters (when lines endwith a single carriage return in ASCII, or when lines start with a No line feed channel in Channel Skip), theoutput data will be different from the input data, but the change will not be significant.
Let us imagine that a splitter action task processes the following data file using the ASCII emulation:
Data line1 of page 1<cr><lf>Data line2 of page 1<cr>Last data line of page 1<cr><lf>Data line1 of page 2<cr><lf>
...and so forth...
Once split, the first file generated by the action task would look like this:
Data line1 of page 1<cr><lf>Data line2 of page 1<cr>Data line2 of page 1<cr><lf>Last data line of page 1<cr>
But when opened with PlanetPress Design or a PlanetPress Workflow using the ASCII emulation, the datain the generated file would look exactly like the data in the original. The same would hold true for theChannel Skip emulation.
Note the following details about emulations and their options:

l With most emulations, if a file is split on a form feed, the form feed will not be appended to the outputfile.
l With the ASCII emulation, tabs within the input data file are replaced by spaces (the number of spacesis determined within the configuration of the emulation).
l With the ASCII emulation, if the Remove HP PCL Escapes option is selected, the data coming out ofthe splitter will have no escape sequences.
l The Goto column option of Channel Skip emulation is not supported.
Database Splitter
Database Splitter is used to split database files into multiple data files that are passed to subsequent tasksin the process.
Input
A Database Emulation data file.
Processing
The file is separated into multiple chunks according to the rules set in the task's properties.
Output
Multiple data files, sent one after the other to the rest of the tasks in the process. Metadata, job infos and uservariables are not modified by this task.
Properties
General tab
l Split group: Use this group to indicate how you want the file to be split.
l Field value change: Select if you want the file to be split based on changes in the values of a selecteddatabase field (the value in the ClientID field changes, for example).
l Field value condition: Select if you want the file to be split based on a condition set for the values of aselected database field (the value in the Order field equals 1, for example).
l Field count: Select if you want the file to be split whenever a given number of pages or data pageshas been reached.
The following options are only displayed when the Field value change or the Field value conditionoption has been selected at the top of the dialog box.
l Field: Enter the name of the field upon which to base the splitter condition. Note that you can use thepopup menu's Get Data command to select the field and populate this box automatically.The following options are only displayed when the Field value condition option has been selected atthe top of the dialog box.
l Operator: Select the condition to fulfill for the condition to be true and thus for the splitting process totake place.
l Value: Enter the condition value. Note that you can use the popup menu's Get Data command toselect the value and populate this box automatically
l Match case: Select to force the splitter to match the character casing when resolving the Field valuechange or Field value condition. If this option is selected, a change from “DAY” to “Day” will beconsidered as a valid field value change, and “DAY” and “Day” will not be considered as equal values.
l Where to split group: Options from this group are used to define a number of pages or records beforeor after which the file is to be split.
l Pages or records: Enter the number of pages or records before or after which the file is to be split.Enter 0 if you want the file to be split right before or after the page or record that matches the setcondition.
l Before or after: Options from this list box are used to define exactly how the file is to be split. SelectRecords before if you want the file to be split a given number of records before the field that matchesthe set condition. Select Records after if you want the file to be split a given number of records after thefield that matches the set condition. Select Pages before if you want the file to be split a given numberof pages before the field that matches the set condition. Select Pages after if you want the file to besplit a given number of pages after the field that matches the set condition.
l Split when condition is found group: Use this group if you want the condition to be met a multiplenumber of times before splitting the file. Leave the default value of 1 in the Times box if you want tosplit the file every time the condition is met, but enter a value of 2, for example, if you want to split thefile every second time the condition is met.
l Time(s): Enter the number of times the condition must be met before the file is to be split.The following options are only displayed when the Field count option has been selected at the top ofthe dialog box.
l Maximum records per file: Enter the maximum number of records to include in each file. Enter 0 forno limit.

l Maximum pages per file: Enter the maximum number of pages to include in each file. Enter 0 for nolimit.
On Error Tab
The On Error tab is common to all tasks. Details can be found in the" Task Properties Dialog" on page 666.
By default, any action task, branch, splitter or condition that generates an error will simply be ignored, andthe task just under it (not within a branch) will be given control of the job file without any modification. Anyinitial input task that generates an error will stop the process from running as a whole, and output tasks willnot generate output. The On Error tab can be used to overwrite the default behaviors.
l Send to Process: Check this option to send the job file to an error management process.l Error Process drop-down: Enabled only when the Send to Process option is checked. Lists anyprocess of which the initial input task is the Input Error Bin task.
l Action Group: This group is disabled in the initial input tasks and defaults to Stop Process. In allother tasks where the On Error tab is present, the following options are available:
l Ignore: The task is ignored as if it did not exist, and the job file is passed on to the next task inthe process.
l Stop Branch: If the task is in a branch of the process, the branch is stopped and the job file isreturned to the process after the branch. The branch will not produce any output.
l Stop Process: The process is stopped and no more processing is done. No further output isproduced.
l Log Message: Check this option to enable logging a custom error message in the PlanetPress SuiteWorkflow Tools' log file.
l Message: Enabled only when the Log Message option is checked. Enter a message that will belogged in the PlanetPress Suite Workflow Tools' log file. You can use any variables available inPlanetPress Workflow to customize the message.
l Store the message in variable: Select in which jobinfo, local or global variable you want to store themessage content.
l ID: Enter an error ID. This ID will be visible in theWindows Event Viewer. However, the ID is notvisible in the PlanetPress Suite Workflow Tools' log file.
l Store the ID in variable: Select in which jobinfo, local or global variable you want to store the errorID.
l Reset to defaults: Resets all options in this tab to their default values.
If storing the message or ID, if they are store in a jobinfo they will be available in any error handling processwhere errors are being forwarded. In all cases, if your process continues after the error, the contents of thevariables selected in this window will be available for the rest of your process, or whenever they areoverwritten.
Common Errors
Though some error messages are specific to a task in particular, others may apply to any and all tasksbecause they are related more to the system than to PlanetPress itself. Some examples would be W3813,W3830, W3991, W4005. These correspond to issues such as not having any space to write files, permissionerrors on folders or files, etc.
Comments Tab
The Comments tab is common to all tasks. It contains a single text area (Task comments) that lets youwrite comments about the task. These comments are saved when the dialog is closed with the OK button,and are displayed in the Task Comments Pane.
Emulated Data Splitter
Emulated Data Splitter action tasks are used to split emulated data files (with the exception of XML anddatabase data files - refer to "XML Splitter" on page 348 or "Database Splitter" on page 328) into multipledata files that are passed to subsequent tasks in the process.
The data received by the process is typically prepared for a given output device using a pre-set emulation. Insome cases, the data’s original emulation may also have been changed by a Change Emulation actiontask (See "Change Emulation" on page 258).
Using an emulation to format the data before splitting provides the most splitting options, but slows down theprocess. Splitting a data file containing a few hundred thousand pages may take several hours. So you maychoose to use non-emulated data to speed up the splitting process (See "In-Stream Splitter" on page 341).
Input
Any emulated data file.
Processing
The file is separated into multiple chunks according to the rules set in the task's properties.

Output
Multiple data files, sent one after the other to the rest of the tasks in the process. Metadata, job infos and uservariables are not modified by this task.
Properties
General tab
l Split data file on emulated page group: Select to split the data file based on pages (rather than on aword found within the emulated data) and to activate the option from this group, which is used to tailorexactly how you want the page based splitting process to take place.
l Page(s) per output: Enter the number of pages to include in the file generated by the splitter inthis edit box below or use the spin buttons.
l Split data file on a word group: Select to split the data file whenever a given word is found within theemulated data file (rather than on based on pages), or whenever the word found at a given locationchanges, and to activate the options from this group, which are used to tailor exactly how you want theword based splitting process to take place.
l Word change: Select if you want the data file to be split when the word found at a given locationchanges.
l Get: Click to go to the Data Selector and select the location associated with the Word changeoption.
l Specific word: Enter the word to use as the splitting criteria. In this variable property box, youmay enter static characters, variables, job information elements or any combination of these. Youmay also use the Get Data button to get a static string of characters from the sample data file. Ifyou use this option, the coordinates of the data you will select will be added to the From line, Toline, From column and To column boxes below.
l From line: Enter a value corresponding to the first line on which the splitter must start searchingfor the word.
l To line: Enter a value corresponding to the last line on which the splitter must start searching forthe word.
l From column: Enter a value corresponding to the first column in which the splitter must startsearching for the word.
l To column: Enter a value corresponding to the last column in which the splitter must startsearching for the word.

l Match case: Select to force the splitter to match the character casing. Note that this settingapplies both to the Specific Word and Word change options. If this option is selected, “DAY” and“Day” will not be considered as matching the search string “day”.
l Trim selection: Select to force the splitter to strip empty trailing characters. When this option isnot selected, blank trailing characters, if any, are considered in the matching process, so theword “DAY” will not be considered as matching the word “DAY”. Note that this setting appliesonly to the Word change option.
l Where to split: By default, the task splits the file at the beginning of the line on which thecondition is met (the default value is 0). If you want the task to split the file a certain number oflines before or after that line, enter a value other than 0 in this box. Enter 1, for example, to splitthe file at the beginning of the line that precedes the line on which the condition is met.
l Before: If you entered a value other than 0 in the Where to split box, select this option if youwant to split the file a given number of lines before the line on which the condition is met.
l After: If you entered a value other than 0 in the Where to split box, select this option if youwant to split the file a given number of lines after the line on which the condition is met.
l When condition is found: By default, the task splits the file every time the condition is met (thedefault value is 1). If you want the task to split the file only when the condition has been mettwice, for example, enter the number 2 in this box.
l CSV Emulation Group
l Add header to each output file: This option should only be checked if you are usingCSV emulation, and will copy the first line of your data file as the first line of each split fileafterward. This is useful only if your first line is a Header line that contains your field names.
Examples & Use Cases
This task is put into effect in the following use cases and example processes:
l Capture Web Manager Workflow
On Error Tab
The On Error tab is common to all tasks. Details can be found in the" Task Properties Dialog" on page 666.
By default, any action task, branch, splitter or condition that generates an error will simply be ignored, andthe task just under it (not within a branch) will be given control of the job file without any modification. Anyinitial input task that generates an error will stop the process from running as a whole, and output tasks will

not generate output. The On Error tab can be used to overwrite the default behaviors.
l Send to Process: Check this option to send the job file to an error management process.l Error Process drop-down: Enabled only when the Send to Process option is checked. Lists anyprocess of which the initial input task is the Input Error Bin task.
l Action Group: This group is disabled in the initial input tasks and defaults to Stop Process. In allother tasks where the On Error tab is present, the following options are available:
l Ignore: The task is ignored as if it did not exist, and the job file is passed on to the next task inthe process.
l Stop Branch: If the task is in a branch of the process, the branch is stopped and the job file isreturned to the process after the branch. The branch will not produce any output.
l Stop Process: The process is stopped and no more processing is done. No further output isproduced.
l Log Message: Check this option to enable logging a custom error message in the PlanetPress SuiteWorkflow Tools' log file.
l Message: Enabled only when the Log Message option is checked. Enter a message that will belogged in the PlanetPress Suite Workflow Tools' log file. You can use any variables available inPlanetPress Workflow to customize the message.
l Store the message in variable: Select in which jobinfo, local or global variable you want to store themessage content.
l ID: Enter an error ID. This ID will be visible in theWindows Event Viewer. However, the ID is notvisible in the PlanetPress Suite Workflow Tools' log file.
l Store the ID in variable: Select in which jobinfo, local or global variable you want to store the errorID.
l Reset to defaults: Resets all options in this tab to their default values.
If storing the message or ID, if they are store in a jobinfo they will be available in any error handling processwhere errors are being forwarded. In all cases, if your process continues after the error, the contents of thevariables selected in this window will be available for the rest of your process, or whenever they areoverwritten.

Common Errors
Though some error messages are specific to a task in particular, others may apply to any and all tasksbecause they are related more to the system than to PlanetPress itself. Some examples would be W3813,W3830, W3991, W4005. These correspond to issues such as not having any space to write files, permissionerrors on folders or files, etc.
Comments Tab
The Comments tab is common to all tasks. It contains a single text area (Task comments) that lets youwrite comments about the task. These comments are saved when the dialog is closed with the OK button,and are displayed in the Task Comments Pane.
Generic Splitter
The Generic Splitter is a legacy task which is kept for backwards compatibility purpose. In previousversions of PlanetPress Workflow, it was the only splitter available. While this splitter seems to have moreoptions than the other ones, this is only because it contains combined features from these other splitters.
Warning
The Generic Splitter, while seemingly more feature-rich, is slower than the other splitters by an orderof magnitude. Whenever encountering the Generic Splitter, it is always recommended to replace itwith a more appropriate splitter instead.
Input
Any data file.
Processing
The file is separated into multiple chunks according to the rules set in the task's properties.
Output
Multiple data files, sent one after the other to the rest of the tasks in the process. Metadata, job infos and uservariables are not modified by this task.
Properties
General Tab
l Split data file on: Use this box to choose the item on which top split the file. The options availabledepend on whether or not the Use emulation box is checked (see below).
l Use emulation: Check to emulate the data before splitting the file. This lets you split the file on a word,a word change, a page number, a database field value or a database field change. When this option isnot checked, you can only split the file on a form feed, a specific number of lines, or a chain ofcharacters. See below for detailed information on any of these splitting methods.
l A word: If you choose “A word” in the Split data file on list box (the Use emulation option must beselected), the following boxes are displayed.
l Word: Enter the string of characters to search for as the splitting criteria. In this variable property box,you may enter static characters, variables, job information elements or any combination of these.
l Get: Click to get a static string of characters from the sample data file. If you use this button, thecoordinates of the data you will select will be added to the Word is between lines and Word is betweencolumns groups below.
l Word is between lines group
l From and To: Enter a vertical search region defined as starting from a given line and ending at agiven line. If you enter 1 in the From box and 1 in the To box, the Generic Splitter will search forthe string of characters entered above only in the first line of every page. If you enter 1 in theFrom box and 10 in the To box, the Generic Splitter will search in the ten first lines of every page.Note that the actual search region is a combination of the vertical and horizontal search regions.
l Word is between columns group
l From and To: Enter a horizontal search region defined as starting from a given column andending at a given column. If you enter 1 in the From box and 5 in the To box, the Generic Splitterwill search for the string of characters only in the first five column (five first characters of everyline selected above).
l Consider case: Select to force the Generic Splitter to match the character casing of the string ofcharacters entered above with the characters found in the file. If this option is selected, “DAY”and “Day” will not be considered as matching the search string “day”.
l Where to split group
l Pages: Enter exactly where to split the file. Enter 1 to split the file 1 page before or after thestring, 2 to split the file 2 pages before or after the string, or 0 to split the file immediately before or

after the string.l Before or after: In the previous box, you entered exactly where you wanted to split the file, hereis where you specify whether you want the split before or after.
l Split when word found: You may not want to split the file every time the string of characters enteredabove is found, but only every other time, or every third time. If so, enter the number of times in thisbox.
l A Word change: If you choose A word change in the Split data file on list box (the Use emulationoption must be selected), the following boxes are displayed.
l Get: Click to select a search region. The coordinates of the selected region will be added to theWord is in line box and the Word is between columns group below. The Generic Splitter will lookfor changes in the string of characters appearing in that region.
l Word is in line: Enter the line on which to search for the word change. If you enter 1, the GenericSplitter will consider only in the first line of every page. Note that the actual search region is acombination of the vertical and horizontal search regions.
l Word is between columns group
l From and To: Enter a horizontal search region defined as starting from a given columnand ending at a given column. If you enter 1 in the From box and 1 in the To box, theGeneric Splitter will search for the string of characters entered above only in the firstcolumn of the line selected above. If you enter 1 in the From box and 10 in the To box, theGeneric Splitter will search in the ten first columns of the line selected above.
l Consider case: Select to force the Generic Splitter to consider a change in charactercasing as a word change. If this option is selected, “DAY” will be considered as differentfrom “day”.
l Trim selection: Select to force the Generic Splitter to trim empty characters at thebeginning and end of the data found in the search region. If this option is not selected,“DAY” will be considered as different from “DAY”.
l Where to split group
l Pages: Enter exactly where to split the file. Enter 1 to split the file 1 page before or after thestring, 2 to split the file 2 pages before or after the string, or 0 to split the file immediatelybefore or after the string.
l Before or after: In the previous box, you entered exactly where you wanted to split the file,here is where you specify whether you want the split before or after.

l Split when word changed: You may not want to split the file every time the string of charactersentered above changes, but only every other time, or every third time. If so, enter the number oftimes in this box.
l A Page Number: If you choose A page number in the Split data file on list box (the Use emulationoption must be selected), the following boxes are displayed.
l Pages per output file: Enter a number of pages after which to split the file. If you enter 3, forexample, the Generic Splitter will split the file every time it has counted three pages. A 10 pagefile would be split in 4 files, the first three being three pages long and the last one only 1 pagelong.
l View data file: Click to view the sample data file and to cycle through the pages.
l A Database Field Value: If you choose A database value in the Split data file on list box (the Useemulation option must be selected), the following box is displayed.
l Field: Enter the name of the field that the Generic Splitter must check (only alphanumeric fieldscan be used—selecting a binary field, for instance, will cause the job to fail). If you enter “ID”, forexample, the Generic Splitter will only look in the field named “ID” for the value entered below. Inthis variable property box, you may enter static characters, variables, job information elements orany combination of these.
l Operator: Select the appropriate comparison operator. If you select Equals, the Generic Splitterwill only consider that the condition is met when it finds a perfect match (“day“ and “day“, forexample). If you select Contains, the Generic Splitter will consider that the condition is metwhenever it finds the string of characters entered in the Value box, even if the database fieldcontains additional characters (“day“ and “days“, for example, would be considered a match).
l Value: Enter the string of characters to search for as the splitting criteria. Like the Field box, thisis also a variable property box.
l Consider case: Select to force the Generic Splitter to match the character casing of the string ofcharacters entered in the Value box with the characters found in the file. If this option is selected,“DAY” and “Day” will not be considered as matching the search string “day”.
l Where to split group
l Pages or records: Enter exactly where to split the file. Enter 1 to split the file 1 page orrecord before or after the string, 2 to split the file 2 pages or records before or after thestring, or 0 to split the file immediately before or after the string.
l Before or after: In the previous box, you entered where you wanted to split the file. Here iswhere you specify whether you want the Generic Splitter to split the file X number of pages

or records before or after the string. Choose 5 in the Pages or records box and “Recordsafter” in this box, for example, to split the file 5 records after the record that matches thecondition.
l Split when condition found: You may not want to split the file every time the string of charactersentered in the Value box is found, but only every other time, or every third time. If so, enter thenumber of times in this box.
l A Database Field Change: If you choose A database field change in the Split data file on list box(the Use emulation option must be selected), the following box is displayed.
l Field name: Enter the name of the field that the Generic Splitter must check. If you enter “ID”, forexample, the Generic Splitter will only look in the field named “ID” for the value entered below. Inthis variable property box, you may enter static characters, variables, job information elements orany combination of these.
l Consider case: Select to force the Generic Splitter to match the character casing of the string ofthe values appearing in the selected database field. If this option is selected, “DAY” and “Day”will not be considered as matching the search string “day”.
l Where to split group
l Pages or records: Enter exactly where to split the file. Enter 1 to split the file 1 page orrecord before or after the string, 2 to split the file 2 pages or records before or after thestring, or 0 to split the file immediately before or after the string.
l Before or after: In the previous box, you entered where you wanted to split the file. Here iswhere you specify whether you want the Generic Splitter to split the file X number of pagesor records before or after the string. Choose 5 in the Pages or records box and “Recordsafter” in this box, for example, to split the file 5 records after the record that matches thecondition.
l Split when condition found: You may not want to split the file every time the string of characterschanges, but only every other time, or every third time. If so, enter the number of times in this box.
On Error Tab
The On Error tab is common to all tasks. Details can be found in the" Task Properties Dialog" on page 666.
By default, any action task, branch, splitter or condition that generates an error will simply be ignored, andthe task just under it (not within a branch) will be given control of the job file without any modification. Anyinitial input task that generates an error will stop the process from running as a whole, and output tasks willnot generate output. The On Error tab can be used to overwrite the default behaviors.

l Send to Process: Check this option to send the job file to an error management process.l Error Process drop-down: Enabled only when the Send to Process option is checked. Lists anyprocess of which the initial input task is the Input Error Bin task.
l Action Group: This group is disabled in the initial input tasks and defaults to Stop Process. In allother tasks where the On Error tab is present, the following options are available:
l Ignore: The task is ignored as if it did not exist, and the job file is passed on to the next task inthe process.
l Stop Branch: If the task is in a branch of the process, the branch is stopped and the job file isreturned to the process after the branch. The branch will not produce any output.
l Stop Process: The process is stopped and no more processing is done. No further output isproduced.
l Log Message: Check this option to enable logging a custom error message in the PlanetPress SuiteWorkflow Tools' log file.
l Message: Enabled only when the Log Message option is checked. Enter a message that will belogged in the PlanetPress Suite Workflow Tools' log file. You can use any variables available inPlanetPress Workflow to customize the message.
l Store the message in variable: Select in which jobinfo, local or global variable you want to store themessage content.
l ID: Enter an error ID. This ID will be visible in theWindows Event Viewer. However, the ID is notvisible in the PlanetPress Suite Workflow Tools' log file.
l Store the ID in variable: Select in which jobinfo, local or global variable you want to store the errorID.
l Reset to defaults: Resets all options in this tab to their default values.
If storing the message or ID, if they are store in a jobinfo they will be available in any error handling processwhere errors are being forwarded. In all cases, if your process continues after the error, the contents of thevariables selected in this window will be available for the rest of your process, or whenever they areoverwritten.
Common Errors
Though some error messages are specific to a task in particular, others may apply to any and all tasksbecause they are related more to the system than to PlanetPress itself. Some examples would be W3813,W3830, W3991, W4005. These correspond to issues such as not having any space to write files, permissionerrors on folders or files, etc.
Comments Tab
The Comments tab is common to all tasks. It contains a single text area (Task comments) that lets youwrite comments about the task. These comments are saved when the dialog is closed with the OK button,and are displayed in the Task Comments Pane.
In-Stream Splitter
In-Stream Splitter action tasks are used to split non-emulated data files into multiple data files that arepassed to subsequent tasks in the process.
Note
Performing the splitting process on raw, non-emulated data speeds up the splitting process.
Properties
General tab
l Split data file on page group: Select to split the data file based on pages (rather than on a wordfound within the data stream) and to activate the options from this group, which are used to tailorexactly how you want the page based splitting process to take place.
l Page breaks on form feed: Select if you want to start a new data page whenever a form feedcharacter is found.
l Page breaks on a number of lines: Select if you want start a new data page whenever a givennumber of lines has been counted. Enter the number of lines in the edit box below or use thespin buttons.
l Page(s) per output: Select if you want the file generated by the splitter to include multiple datapages. Enter the number of pages in the edit box below or use the spin buttons.
l Split data file on a word group: Select to split the data file based on a word found within the datastream (rather than on based on pages) and to activate the options from this group, which are used totailor exactly how you want the word based splitting process to take place.
l Word: Enter the word to use as the splitting criteria. In this variable property box, you may enterstatic characters, variables, job information elements or any combination of these. You may alsouse the Get Data button to get a static string of characters from the sample data file. If you use

this option, the coordinates of the data you will select will be added to the From column and Tocolumn boxes below.
l From column: Enter a value corresponding to the first column in which the splitter must startsearching for the word.
l To column: Enter a value corresponding to the last column in which the splitter must startsearching for the word.
l Match case: Select to force the splitter to match the character casing of the string of charactersentered above with the characters found in the file. If this option is selected, “DAY” and “Day” willnot be considered as matching the search string “day”.
l Where to split: By default, the task splits the file at the beginning of the line on which the searchword is found (the default value is 0). If you want the task to split the file a certain number of linesbefore or after that line, enter a value other than 0 in this box. Enter 1, for example, to split the fileat the beginning of the line that precedes the line on which the search word is found.
l Before: If you entered a value other than 0 in the Where to split box, select this option if you wantto split the file a given number of lines before the search word.
l After: If you entered a value other than 0 in the Where to split box, select this option if you wantto split the file a given number of lines after the search word.
l When word is found: By default, the task splits the file every time the search word is found (thedefault value is 1). If you want the task to split the file only when the search word has been foundtwice, for example, enter the number 2 in this box.
On Error Tab
The On Error tab is common to all tasks. Details can be found in the" Task Properties Dialog" on page 666.
By default, any action task, branch, splitter or condition that generates an error will simply be ignored, andthe task just under it (not within a branch) will be given control of the job file without any modification. Anyinitial input task that generates an error will stop the process from running as a whole, and output tasks willnot generate output. The On Error tab can be used to overwrite the default behaviors.
l Send to Process: Check this option to send the job file to an error management process.l Error Process drop-down: Enabled only when the Send to Process option is checked. Lists anyprocess of which the initial input task is the Input Error Bin task.
l Action Group: This group is disabled in the initial input tasks and defaults to Stop Process. In allother tasks where the On Error tab is present, the following options are available:

l Ignore: The task is ignored as if it did not exist, and the job file is passed on to the next task inthe process.
l Stop Branch: If the task is in a branch of the process, the branch is stopped and the job file isreturned to the process after the branch. The branch will not produce any output.
l Stop Process: The process is stopped and no more processing is done. No further output isproduced.
l Log Message: Check this option to enable logging a custom error message in the PlanetPress SuiteWorkflow Tools' log file.
l Message: Enabled only when the Log Message option is checked. Enter a message that will belogged in the PlanetPress Suite Workflow Tools' log file. You can use any variables available inPlanetPress Workflow to customize the message.
l Store the message in variable: Select in which jobinfo, local or global variable you want to store themessage content.
l ID: Enter an error ID. This ID will be visible in theWindows Event Viewer. However, the ID is notvisible in the PlanetPress Suite Workflow Tools' log file.
l Store the ID in variable: Select in which jobinfo, local or global variable you want to store the errorID.
l Reset to defaults: Resets all options in this tab to their default values.
If storing the message or ID, if they are store in a jobinfo they will be available in any error handling processwhere errors are being forwarded. In all cases, if your process continues after the error, the contents of thevariables selected in this window will be available for the rest of your process, or whenever they areoverwritten.
Common Errors
Though some error messages are specific to a task in particular, others may apply to any and all tasksbecause they are related more to the system than to PlanetPress itself. Some examples would be W3813,W3830, W3991, W4005. These correspond to issues such as not having any space to write files, permissionerrors on folders or files, etc.
Comments Tab
The Comments tab is common to all tasks. It contains a single text area (Task comments) that lets youwrite comments about the task. These comments are saved when the dialog is closed with the OK button,and are displayed in the Task Comments Pane.
PDF Splitter
PDF Splitter action tasks are used to split emulated PDF data files into multiple data files that are passed tosubsequent tasks in the process.
Note
This feature is part of the PDF Tools, which is only available in PlanetPress Workflow.
Input
A PDF Emulation data file.
Processing
The file is separated into multiple chunks according to the rules set in the task's properties.
Output
Multiple data files, sent one after the other to the rest of the tasks in the process. Metadata, job infos and uservariables are not modified by this task.
Properties
General Tab
l Split on page: Select to split the data file based on pages (rather than on a word found within the PDFdata) and to activate the option from this group, which is used to tailor exactly how you want the pagebased splitting process to take place.
l Page(s) per output: Enter the number of pages to include in the file generated by the splitter inthis edit box below or use the spin buttons.
l Split PDF file on a word: Select to split the data file whenever a given region is found within the PDFdata file (rather than on based on pages), or whenever the region found at a given location changes,and to activate the options from this group, which are used to tailor exactly how you want the regionbased splitting process to take place.

l On region content change: Select if you want the data file to be split when the word found at agiven location changes.
l Get button: Click to go to the Data Selector and select the location associated with the On regionchange option.
l Specific word: Enter the word to use as the splitting criteria. In this variable property box, youmay enter static characters, variables, job information elements or any combination of these. Youmay also use the Get Data button to get a static string of characters from the sample data file. Ifyou use this option, the coordinates of the data you will select will be added to the Left, Right,Top and Bottom boxes below.
l Left: Enter a value corresponding to the left coordinate on which the splitter must start searchingfor the region.
l Right: Enter a value corresponding to the right coordinate on which the splitter must startsearching for the region.
l Top: Enter a value corresponding to the top coordinate on which the splitter must start searchingfor the region.
l Bottom: Enter a value corresponding to the bottom coordinate on which the splitter must startsearching for the region.
l Match case: Select to force the splitter to match the character casing. Note that this settingapplies both to the On region change and Specific word options. If this option is selected, “DAY”and “Day” will not be considered as matching the search string “day”.
l Trim selection: Select to force the splitter to strip empty trailing characters. When this option isnot selected, blank trailing characters, if any, are considered in the matching process, so theword “DAY” will not be considered as matching the word “DAY”. Note that this setting appliesonly to the On region change option.
l Where to split: By default, the task splits the file at the beginning of the line on which thecondition is met (the default value is 0). If you want the task to split the file a certain number oflines before or after that line, enter a value other than 0 in this box. Enter 1, for example, to splitthe file at the beginning of the line that precedes the line on which the condition is met.
l Before: If you entered a value other than 0 in the Where to split box, select this option if you wantto split the file a given number of lines before the line on which the condition is met.
l After: If you entered a value other than 0 in the Where to split box, select this option if you wantto split the file a given number of lines after the line on which the condition is met.

l When condition is found: By default, the task splits the file every time the condition is met (thedefault value is 1). If you want the task to split the file only when the condition has been mettwice, for example, enter the number 2 in this box.
l Split PDF file based on Metadata group:l Metadata Level: Determines on which level of the metadata the split occurs. This can be Group,Document to Data page.
l Sequencing based on:
l The following number of occurrences of the level: Determine a sequence based on thenumber of instances found for the metadata level currently processed. For example, if theMetadata level is set to Group, and this value is set to 3, each sequence contains 3 groups(except, possibly, the last one, depending on the number of groups left in the lastsequence). The next loop starts with the next group after this sequence.
l The following number of sequences in the job: Divides the metadata into a set numberof sequences and equally distributes the number of levels between the sequences. Forexample, it the Metadata level is set to Document, and this value is set to 5, a 100document job file will be divided into 5 sequences of 20 documents each.
l The following rule: Determine if a new sequence starts or if the current one ends. For eachmetadata level, the current value of the specified metadata attribute / field is compared withthe one in memory. If they are different, either a new sequence starts or the currentsequence is ended. The next sequence starts with the next metadata level beingprocessed. For details see the Rule Interface.
l Optimize resulting PDF: Select to specify whether the resulting PDF should be optimized.Optimization can lead to a significant reduction in the size of the PDF, but it may also add a certainamount of time to the process. This option should only be unchecked if the timing of the process iscritical and needs to be done quickly, but keep in mind that the resulting PDF may be much larger thanit should be and may even be too large for PlanetPress Workflow to handle.
l Reset Metadata according to new PDF: Metadata will be recreated according to the new PDF thatwas created, including page numbering, etc.
On Error Tab
The On Error tab is common to all tasks. Details can be found in the" Task Properties Dialog" on page 666.
By default, any action task, branch, splitter or condition that generates an error will simply be ignored, andthe task just under it (not within a branch) will be given control of the job file without any modification. Anyinitial input task that generates an error will stop the process from running as a whole, and output tasks will

not generate output. The On Error tab can be used to overwrite the default behaviors.
l Send to Process: Check this option to send the job file to an error management process.l Error Process drop-down: Enabled only when the Send to Process option is checked. Lists anyprocess of which the initial input task is the Input Error Bin task.
l Action Group: This group is disabled in the initial input tasks and defaults to Stop Process. In allother tasks where the On Error tab is present, the following options are available:
l Ignore: The task is ignored as if it did not exist, and the job file is passed on to the next task inthe process.
l Stop Branch: If the task is in a branch of the process, the branch is stopped and the job file isreturned to the process after the branch. The branch will not produce any output.
l Stop Process: The process is stopped and no more processing is done. No further output isproduced.
l Log Message: Check this option to enable logging a custom error message in the PlanetPress SuiteWorkflow Tools' log file.
l Message: Enabled only when the Log Message option is checked. Enter a message that will belogged in the PlanetPress Suite Workflow Tools' log file. You can use any variables available inPlanetPress Workflow to customize the message.
l Store the message in variable: Select in which jobinfo, local or global variable you want to store themessage content.
l ID: Enter an error ID. This ID will be visible in theWindows Event Viewer. However, the ID is notvisible in the PlanetPress Suite Workflow Tools' log file.
l Store the ID in variable: Select in which jobinfo, local or global variable you want to store the errorID.
l Reset to defaults: Resets all options in this tab to their default values.
If storing the message or ID, if they are store in a jobinfo they will be available in any error handling processwhere errors are being forwarded. In all cases, if your process continues after the error, the contents of thevariables selected in this window will be available for the rest of your process, or whenever they areoverwritten.

Common Errors
Though some error messages are specific to a task in particular, others may apply to any and all tasksbecause they are related more to the system than to PlanetPress itself. Some examples would be W3813,W3830, W3991, W4005. These correspond to issues such as not having any space to write files, permissionerrors on folders or files, etc.
Comments Tab
The Comments tab is common to all tasks. It contains a single text area (Task comments) that lets youwrite comments about the task. These comments are saved when the dialog is closed with the OK button,and are displayed in the Task Comments Pane.
XML Splitter
XML Splitter action tasks use the XSLT language to split XML data files into multiple XML data files that arepassed to subsequent tasks in the process. The XML splitter includes options to add a new root node withinthe generated files, as well as to change the original file’s encoding to UTF8. Note that the XML Splittercannot process files larger than 30 megabytes.
Input
A XML Emulation data file.
Processing
The file is separated into multiple chunks according to the rules set in the task's properties.
Output
Multiple data files, sent one after the other to the rest of the tasks in the process. Metadata, job infos and uservariables are not modified by this task.
Properties
General Tab
This tab lets you choose the splitter settings for default PlanetPress Workflow XSLT engine. If you want touse your own XSLT engine, click the Alternate XSLT Engine tab.

l Split method: Use this box only if you want to edit the standard XSLT script that will be used to splitthe XML file. First use the Standard XML splitter option to define the standard settings. Then, tochange the standard XSLT script, select Advanced XML splitter and edit the script as required.
l Standard XML splitterThe following options are only displayed when the Standard XML splitter option is selected inthe Split method box.
l Condition node path: In the tree view, select the XML node to consider to determine whento split the file. To indicate whether you want the file to be split whenever this node isencountered or whenever the information in this node changes, see the Condition groupbelow.
l Condition group: Use this group to indicate whether you want the file to be split wheneverthis node is encountered or whenever the information in this node changes.
l When condition node is found: Select if you want the file to be split whenever the nodeselected in the Condition node path box is encountered.
l When condition node content changes: Select if you want the file to be split wheneverthe information stored in node selected in the Condition node path box changes. When thisoption is selected, the split files typically contain more information (all the orders for a givencustomer, for example).
l New file root structure group: Use this group to tailor the structure of the generated XMLfiles.
l Keep XML structure: Select if you want the generated files to have the exact samestructure as the original XML file (all the way to the root node).
l Add new root node: Select this option and enter a root node name in the box to the right, ifyou want the generated files to have a structure that begins with a new root name and thatthen goes directly to the node on which the file was split, as indicated in the Split on nodebox below.
l Encoding group: This group lets you indicate whether you want the splitter to use thefile’s own encoding or the universal encoding UTF8 to process the file. Note that if the filecontains no indication as to which encoding should be used, the default system encodingwill be used. This may result in errors being generated or split files that contain bad data.Using the UTF8 encoding can prevent such errors.
l Use UTF8 encoding: Select if you want to use the UTF8 encoding to process the file.

l Use file’s encoding: Select if you want to use the XML file’s own encoding to process thefile.
l Advanced XML splitter: The following options and buttons are only displayed when theAdvanced XML splitter option is selected in the Split method box. Note that you should not usethis option before you have completed all the required settings using the Standard XML splitteroption.
l Refresh XSLT button: Once you have made all the required settings using the Standard XML splitteroption, click this button to display the XML code generated by the XML splitter. You can then use thebox below to edit the code as required.
l {WATCHTEMPFOLDER} file separator: Use this box to edit the default XML file separator (/).
Alternate XSLT Engine tab
This tab lets you choose the splitter settings for your own XSLT engine. If you want to use the defaultPlanetPress Workflow XSLT engine, click the General tab.
l Use alternate XSLT engine group: Select this option to enable the box and the buttons included inthis group.
l Path and parameters for the alternate engine: Enter your XSLT engine’s absolute path (use quotesfor non DOS 8.3 compliant paths) followed by its required operators and parameters (you must knowexactly which operators and parameters your XSLT engine requires and in which order they mustappear in the command prompt used to launch the engine). Note that you should not enter fixed valuesfor the following parameters: the XSLT stylesheet parameter, the source XML data file parameter or theoutput file parameter. When you click the buttons below, the corresponding parameters areautomatically added at the current cursor position. These variables will be replaced by the correctinformation at run-time.
l XSLT file button: Click to add the {XSLTFILE} variable to the command prompt displayed in the boxabove.
l Data file button: Click to add the {DATAFILE} variable to the command prompt displayed in the boxabove.
l Output file(s) button: Click to add the {OUTPUTFILE} variable to the command prompt displayed inthe box above.
l Browse button: Click this button and browse to select the XSLT engine you want the XML splitter touse.

On Error Tab
The On Error tab is common to all tasks. Details can be found in the" Task Properties Dialog" on page 666.
By default, any action task, branch, splitter or condition that generates an error will simply be ignored, andthe task just under it (not within a branch) will be given control of the job file without any modification. Anyinitial input task that generates an error will stop the process from running as a whole, and output tasks willnot generate output. The On Error tab can be used to overwrite the default behaviors.
l Send to Process: Check this option to send the job file to an error management process.l Error Process drop-down: Enabled only when the Send to Process option is checked. Lists anyprocess of which the initial input task is the Input Error Bin task.
l Action Group: This group is disabled in the initial input tasks and defaults to Stop Process. In allother tasks where the On Error tab is present, the following options are available:
l Ignore: The task is ignored as if it did not exist, and the job file is passed on to the next task inthe process.
l Stop Branch: If the task is in a branch of the process, the branch is stopped and the job file isreturned to the process after the branch. The branch will not produce any output.
l Stop Process: The process is stopped and no more processing is done. No further output isproduced.
l Log Message: Check this option to enable logging a custom error message in the PlanetPress SuiteWorkflow Tools' log file.
l Message: Enabled only when the Log Message option is checked. Enter a message that will belogged in the PlanetPress Suite Workflow Tools' log file. You can use any variables available inPlanetPress Workflow to customize the message.
l Store the message in variable: Select in which jobinfo, local or global variable you want to store themessage content.
l ID: Enter an error ID. This ID will be visible in theWindows Event Viewer. However, the ID is notvisible in the PlanetPress Suite Workflow Tools' log file.
l Store the ID in variable: Select in which jobinfo, local or global variable you want to store the errorID.
l Reset to defaults: Resets all options in this tab to their default values.

If storing the message or ID, if they are store in a jobinfo they will be available in any error handling processwhere errors are being forwarded. In all cases, if your process continues after the error, the contents of thevariables selected in this window will be available for the rest of your process, or whenever they areoverwritten.
Common Errors
Though some error messages are specific to a task in particular, others may apply to any and all tasksbecause they are related more to the system than to PlanetPress itself. Some examples would be W3813,W3830, W3991, W4005. These correspond to issues such as not having any space to write files, permissionerrors on folders or files, etc.
Comments Tab
The Comments tab is common to all tasks. It contains a single text area (Task comments) that lets youwrite comments about the task. These comments are saved when the dialog is closed with the OK button,and are displayed in the Task Comments Pane.
Process Logic TasksA process is like a flowchart. The data files captured by the input tasks become job files (see "Data File andJob File" on page 17) that travel down the process. Many processes include multiple process logic tasks.
In the Process area, conditional branches appear with their associated condition, allowing you tounderstand the logic of the whole process at a glance. When PlanetPress Workflow comes to a condition, ittests the condition and sends the job file down one of the two branches based on the test result. So everytime a job file travels down the process, it is either routed down the True or False branch.
Technical
Branches, Loops and other process logic tasks do not generally modify the job file, though some maychange system variables. The only exception is the Run Script action, which can be a condition thatalso modifies the data.
Warning
Branches, loops and conditions do NOT modify metadata in any way. Furthermore, even if a branchdoes a backup of jobinfos and the data file, it does not back up the metadata. Keep this in mind whendesigning a process.
A Branch is effectively a doubling of your job file. As your job file goes down the process, when itencounters a branch it will go in that branch, process all tasks up to the output, and return to the main trunkto continue processes. You can have branches within branches, and all branches must have an output. Formore information on branches, see "Branch" below.
A Loop is a task that will cause anything after it to repeat a certain number of times. You can indicate astatic number of loops or dynamically determine the number via a variable or information from your job file,and store the iteration of the loop in a job info. See "Loop" on page 362.
The Send to Process action and Go Sub Action are used to send the job file to another process orsubprocess and, in the case of the GoSub, to get information back from the subprocess. See "Send toProcess" on page 368 and "Go Sub" on page 360.
Branch
A Branch duplicates your job file along with accompanying information. Branches do not execute in parallel- the branch is executed, and then the trunk (or the following branch) continues.
Properties
Backup Tab
l Backup job file: Select if you want PlanetPress Workflow to use identical copies of the job file for themain and secondary branches. When this option is not selected, the file generated by the output tasklocated at the end of the secondary branch is used as the job file for the main branch. Note that if thesecondary branch ends with a Delete output task, the main branch will not receive any job file. If thesecondary branch includes a splitter task, the main branch will receive the last part of the job file (assplit by the splitter task). If the secondary branch ends with a PlanetPress Fax or PlanetPress Imageoutput task, the main branch will receive a PostScript file.

l Backup job information: Select if you want PlanetPress Workflow to use identical copies of the jobfile information for the main and secondary branches. When this option is not selected, the job fileinformation that reaches the output task located at the end of the secondary branch is used for themain branch. Any modification performed on the secondary branch thus has an impact on the mainbranch.
l Backup emulation: Select if you want PlanetPress Workflow to use the emulation selected when thejob file reaches the secondary branch for the main branch as well. When this option is not selected, theemulation selected when the job file reaches the output task located at the end of the secondarybranch is used for the main branch. If the secondary branch includes a secondary input task or aChange Emulation action task, then the last emulation selected in the secondary branch will be theone used for the main branch.
l Backup local variables: Select if you want PlanetPress Workflow to use identical copies of the localvariables for the main and secondary branches. When this option is not selected, the local variablesthat reaches the output task located at the end of the secondary branch is used for the main branch.Any modification performed on the secondary branch thus has an impact on the main branch.
In case of the failure of a Branch task (the branch itself, not the other tasks contained within), by default theprocess will ignore the branch and simply go down the main trunk. You can overwrite this in the On Errortab.
On Error Tab
The On Error tab is common to all tasks. Details can be found in the" Task Properties Dialog" on page 666.
By default, any action task, branch, splitter or condition that generates an error will simply be ignored, andthe task just under it (not within a branch) will be given control of the job file without any modification. Anyinitial input task that generates an error will stop the process from running as a whole, and output tasks willnot generate output. The On Error tab can be used to overwrite the default behaviors.
l Send to Process: Check this option to send the job file to an error management process.l Error Process drop-down: Enabled only when the Send to Process option is checked. Lists anyprocess of which the initial input task is the Input Error Bin task.
l Action Group: This group is disabled in the initial input tasks and defaults to Stop Process. In allother tasks where the On Error tab is present, the following options are available:
l Ignore: The task is ignored as if it did not exist, and the job file is passed on to the next task inthe process.

l Stop Branch: If the task is in a branch of the process, the branch is stopped and the job file isreturned to the process after the branch. The branch will not produce any output.
l Stop Process: The process is stopped and no more processing is done. No further output isproduced.
l Log Message: Check this option to enable logging a custom error message in the PlanetPress SuiteWorkflow Tools' log file.
l Message: Enabled only when the Log Message option is checked. Enter a message that will belogged in the PlanetPress Suite Workflow Tools' log file. You can use any variables available inPlanetPress Workflow to customize the message.
l Store the message in variable: Select in which jobinfo, local or global variable you want to store themessage content.
l ID: Enter an error ID. This ID will be visible in theWindows Event Viewer. However, the ID is notvisible in the PlanetPress Suite Workflow Tools' log file.
l Store the ID in variable: Select in which jobinfo, local or global variable you want to store the errorID.
l Reset to defaults: Resets all options in this tab to their default values.
If storing the message or ID, if they are store in a jobinfo they will be available in any error handling processwhere errors are being forwarded. In all cases, if your process continues after the error, the contents of thevariables selected in this window will be available for the rest of your process, or whenever they areoverwritten.
Common Errors
Though some error messages are specific to a task in particular, others may apply to any and all tasksbecause they are related more to the system than to PlanetPress itself. Some examples would be W3813,W3830, W3991, W4005. These correspond to issues such as not having any space to write files, permissionerrors on folders or files, etc.
Comments Tab
The Comments tab is common to all tasks. It contains a single text area (Task comments) that lets youwrite comments about the task. These comments are saved when the dialog is closed with the OK button,and are displayed in the Task Comments Pane.

Comment
Comments can be used to clarify your process either for yourself or others, to explain branches and scripts,or add information for anyone editing the configuration in the future.
Comments do not open, modify or otherwise process the job file in any way, and are simply ignored at run-time. They do not have an On Error tab because of this, since they cannot generate an error in any situation.
Comments have a single property in the General tab, which is the box where you enter the comment itself.This box does not process variables (it is not a "variable property"), since that would be of no use at run-time.
File Name Condition
File Name conditions test the original name of the job file traveling down the process branch, or in otherwords, the name of the file received by the last input task appearing above the condition.
Properties
General tab
l File name mask: Enter one file name mask or multiple masks separated by a semicolon (;). SeeMasks. The condition will be tested True only in the case of an exact match, so consider usingwildcard characters.
l Invert condition result: Select to toggle the result of the condition (true becomes false and viceversa).
On Error Tab
The On Error tab is common to all tasks. Details can be found in the" Task Properties Dialog" on page 666.
By default, any action task, branch, splitter or condition that generates an error will simply be ignored, andthe task just under it (not within a branch) will be given control of the job file without any modification. Anyinitial input task that generates an error will stop the process from running as a whole, and output tasks willnot generate output. The On Error tab can be used to overwrite the default behaviors.

l Send to Process: Check this option to send the job file to an error management process.l Error Process drop-down: Enabled only when the Send to Process option is checked. Lists anyprocess of which the initial input task is the Input Error Bin task.
l Action Group: This group is disabled in the initial input tasks and defaults to Stop Process. In allother tasks where the On Error tab is present, the following options are available:
l Ignore: The task is ignored as if it did not exist, and the job file is passed on to the next task inthe process.
l Stop Branch: If the task is in a branch of the process, the branch is stopped and the job file isreturned to the process after the branch. The branch will not produce any output.
l Stop Process: The process is stopped and no more processing is done. No further output isproduced.
l Log Message: Check this option to enable logging a custom error message in the PlanetPress SuiteWorkflow Tools' log file.
l Message: Enabled only when the Log Message option is checked. Enter a message that will belogged in the PlanetPress Suite Workflow Tools' log file. You can use any variables available inPlanetPress Workflow to customize the message.
l Store the message in variable: Select in which jobinfo, local or global variable you want to store themessage content.
l ID: Enter an error ID. This ID will be visible in theWindows Event Viewer. However, the ID is notvisible in the PlanetPress Suite Workflow Tools' log file.
l Store the ID in variable: Select in which jobinfo, local or global variable you want to store the errorID.
l Reset to defaults: Resets all options in this tab to their default values.
If storing the message or ID, if they are store in a jobinfo they will be available in any error handling processwhere errors are being forwarded. In all cases, if your process continues after the error, the contents of thevariables selected in this window will be available for the rest of your process, or whenever they areoverwritten.
Common Errors
Though some error messages are specific to a task in particular, others may apply to any and all tasksbecause they are related more to the system than to PlanetPress itself. Some examples would be W3813,W3830, W3991, W4005. These correspond to issues such as not having any space to write files, permissionerrors on folders or files, etc.

Comments Tab
The Comments tab is common to all tasks. It contains a single text area (Task comments) that lets youwrite comments about the task. These comments are saved when the dialog is closed with the OK button,and are displayed in the Task Comments Pane.
File Size Condition
File Size conditions test the size of the job file they receive. Note that the job file may include dataselections, attachments and documents that were added by other tasks. If a file does not exist, it's file sizewill be 0kb.
Properties
General tab
l File size is: Select whether the condition is to check if the job file is smaller (less than) or larger (morethan) then the specified value.
l Kbytes: Enter the minimum (more than) or maximum (less than) size setting in kilobytes.l Invert condition result: Select to toggle the result of the condition (true becomes false and viceversa).
Examples & Use Cases
This task is put into effect in the following use cases and example processes:
l HTTP PDF Invoice Request
On Error Tab
The On Error tab is common to all tasks. Details can be found in the" Task Properties Dialog" on page 666.
By default, any action task, branch, splitter or condition that generates an error will simply be ignored, andthe task just under it (not within a branch) will be given control of the job file without any modification. Anyinitial input task that generates an error will stop the process from running as a whole, and output tasks willnot generate output. The On Error tab can be used to overwrite the default behaviors.

l Send to Process: Check this option to send the job file to an error management process.l Error Process drop-down: Enabled only when the Send to Process option is checked. Lists anyprocess of which the initial input task is the Input Error Bin task.
l Action Group: This group is disabled in the initial input tasks and defaults to Stop Process. In allother tasks where the On Error tab is present, the following options are available:
l Ignore: The task is ignored as if it did not exist, and the job file is passed on to the next task inthe process.
l Stop Branch: If the task is in a branch of the process, the branch is stopped and the job file isreturned to the process after the branch. The branch will not produce any output.
l Stop Process: The process is stopped and no more processing is done. No further output isproduced.
l Log Message: Check this option to enable logging a custom error message in the PlanetPress SuiteWorkflow Tools' log file.
l Message: Enabled only when the Log Message option is checked. Enter a message that will belogged in the PlanetPress Suite Workflow Tools' log file. You can use any variables available inPlanetPress Workflow to customize the message.
l Store the message in variable: Select in which jobinfo, local or global variable you want to store themessage content.
l ID: Enter an error ID. This ID will be visible in theWindows Event Viewer. However, the ID is notvisible in the PlanetPress Suite Workflow Tools' log file.
l Store the ID in variable: Select in which jobinfo, local or global variable you want to store the errorID.
l Reset to defaults: Resets all options in this tab to their default values.
If storing the message or ID, if they are store in a jobinfo they will be available in any error handling processwhere errors are being forwarded. In all cases, if your process continues after the error, the contents of thevariables selected in this window will be available for the rest of your process, or whenever they areoverwritten.
Common Errors
Though some error messages are specific to a task in particular, others may apply to any and all tasksbecause they are related more to the system than to PlanetPress itself. Some examples would be W3813,W3830, W3991, W4005. These correspond to issues such as not having any space to write files, permissionerrors on folders or files, etc.
Comments Tab
The Comments tab is common to all tasks. It contains a single text area (Task comments) that lets youwrite comments about the task. These comments are saved when the dialog is closed with the OK button,and are displayed in the Task Comments Pane.
Go Sub
The GoSub action task transfers the execution of the calling process to the specified subprocess. When aprocess encounters a GoSub action, it halts its own execution, start the subprocess and waits for it tocomplete before resuming its workflow with the next task.
Every subprocess starts with a BeginSub input task and ends with a EndSub output task, both of whichhave nothing to configure and cannot be replaced or deleted. The simply represents entry and exit points forthe subprocess.
Note
While it is possible to place a GoSub action within a subprocess, doing so will hide the subprocessfrom any GoSub action, in order to avoid circular referencing (aka an infinite loop).
General tab
l Subprocess: Drop down list containing all the available subprocesses in the current configuration.l Backup job file: Select if you want to use identical copies of the job file for the main process and thesubprocess.
l Backup job information: Select if you want to use identical copies of the job file information for themain process and subprocess. Once the subprocess completes its execution, the main process willretrieve the original job information values.
l Backup emulation: Select if you want to use the emulation selected when the job file reaches thesubprocess for the main process as well. Note that the emulation is not passed from a main process toa subprocess or vice versa.
l Retrieve subprocess error: Select if you want to receive error(s) from the subprocess in order tohandle them on its own.

On Error Tab
The On Error tab is common to all tasks. Details can be found in the" Task Properties Dialog" on page 666.
By default, any action task, branch, splitter or condition that generates an error will simply be ignored, andthe task just under it (not within a branch) will be given control of the job file without any modification. Anyinitial input task that generates an error will stop the process from running as a whole, and output tasks willnot generate output. The On Error tab can be used to overwrite the default behaviors.
l Send to Process: Check this option to send the job file to an error management process.l Error Process drop-down: Enabled only when the Send to Process option is checked. Lists anyprocess of which the initial input task is the Input Error Bin task.
l Action Group: This group is disabled in the initial input tasks and defaults to Stop Process. In allother tasks where the On Error tab is present, the following options are available:
l Ignore: The task is ignored as if it did not exist, and the job file is passed on to the next task inthe process.
l Stop Branch: If the task is in a branch of the process, the branch is stopped and the job file isreturned to the process after the branch. The branch will not produce any output.
l Stop Process: The process is stopped and no more processing is done. No further output isproduced.
l Log Message: Check this option to enable logging a custom error message in the PlanetPress SuiteWorkflow Tools' log file.
l Message: Enabled only when the Log Message option is checked. Enter a message that will belogged in the PlanetPress Suite Workflow Tools' log file. You can use any variables available inPlanetPress Workflow to customize the message.
l Store the message in variable: Select in which jobinfo, local or global variable you want to store themessage content.
l ID: Enter an error ID. This ID will be visible in theWindows Event Viewer. However, the ID is notvisible in the PlanetPress Suite Workflow Tools' log file.
l Store the ID in variable: Select in which jobinfo, local or global variable you want to store the errorID.
l Reset to defaults: Resets all options in this tab to their default values.
If storing the message or ID, if they are store in a jobinfo they will be available in any error handling processwhere errors are being forwarded. In all cases, if your process continues after the error, the contents of thevariables selected in this window will be available for the rest of your process, or whenever they areoverwritten.
Common Errors
Though some error messages are specific to a task in particular, others may apply to any and all tasksbecause they are related more to the system than to PlanetPress itself. Some examples would be W3813,W3830, W3991, W4005. These correspond to issues such as not having any space to write files, permissionerrors on folders or files, etc.
Comments Tab
The Comments tab is common to all tasks. It contains a single text area (Task comments) that lets youwrite comments about the task. These comments are saved when the dialog is closed with the OK button,and are displayed in the Task Comments Pane.
Loop
Loop action tasks are used to repeat those tasks that are located after it on a given process branch. Thenumber of repeats can be fixed or variable, as required.
Properties
General tab
l Number of iterations: The number of times the loop should be repeated. Every task after the Loopaction task will be repeated this number of times. The number may be static, or use a variables (SeeVariable Properties).
l Store current iteration in Job Info #: The Job Info in which the loop's iteration should be stored.Useful for sequential file names or conditions based on the iteration. The value of this VariableProperties box should be a digit between 1 and 9.
l Use value of Variable/JobInfo # expression: If the contents of the previous option is a variable, it'scontent (which is assumed to be a number between 1 and 9) will be used to determine which job infonumber to use for the iteration number. For example if %{myvariable} is used and contains the value 9,then Job Info 9 will store the value of the loop's iteration.

l Use original Data Stream every time: Select to reuse the original job file received by the Loop actiontask at every iteration. If this option is not selected and if the process ends with Printer Queue Outputtask, for example, the second time the Loop action task will be performed, it will use the PostScript filegenerated by the output task.
On Error Tab
The On Error tab is common to all tasks. Details can be found in the" Task Properties Dialog" on page 666.
By default, any action task, branch, splitter or condition that generates an error will simply be ignored, andthe task just under it (not within a branch) will be given control of the job file without any modification. Anyinitial input task that generates an error will stop the process from running as a whole, and output tasks willnot generate output. The On Error tab can be used to overwrite the default behaviors.
l Send to Process: Check this option to send the job file to an error management process.l Error Process drop-down: Enabled only when the Send to Process option is checked. Lists anyprocess of which the initial input task is the Input Error Bin task.
l Action Group: This group is disabled in the initial input tasks and defaults to Stop Process. In allother tasks where the On Error tab is present, the following options are available:
l Ignore: The task is ignored as if it did not exist, and the job file is passed on to the next task inthe process.
l Stop Branch: If the task is in a branch of the process, the branch is stopped and the job file isreturned to the process after the branch. The branch will not produce any output.
l Stop Process: The process is stopped and no more processing is done. No further output isproduced.
l Log Message: Check this option to enable logging a custom error message in the PlanetPress SuiteWorkflow Tools' log file.
l Message: Enabled only when the Log Message option is checked. Enter a message that will belogged in the PlanetPress Suite Workflow Tools' log file. You can use any variables available inPlanetPress Workflow to customize the message.
l Store the message in variable: Select in which jobinfo, local or global variable you want to store themessage content.
l ID: Enter an error ID. This ID will be visible in theWindows Event Viewer. However, the ID is notvisible in the PlanetPress Suite Workflow Tools' log file.
l Store the ID in variable: Select in which jobinfo, local or global variable you want to store the errorID.
l Reset to defaults: Resets all options in this tab to their default values.
If storing the message or ID, if they are store in a jobinfo they will be available in any error handling processwhere errors are being forwarded. In all cases, if your process continues after the error, the contents of thevariables selected in this window will be available for the rest of your process, or whenever they areoverwritten.
Common Errors
Though some error messages are specific to a task in particular, others may apply to any and all tasksbecause they are related more to the system than to PlanetPress itself. Some examples would be W3813,W3830, W3991, W4005. These correspond to issues such as not having any space to write files, permissionerrors on folders or files, etc.
Comments Tab
The Comments tab is common to all tasks. It contains a single text area (Task comments) that lets youwrite comments about the task. These comments are saved when the dialog is closed with the OK button,and are displayed in the Task Comments Pane.
Run Script
Run Script tasks are used to run scripts that typically perform some kind of processing on the job filereceived by the task. Scripts are often simpler to write than programs added with the External Programaction (see "External Program" on page 286). However, they can be slower to execute.
The Run Script action task can be used either as an action or a condition. When dragging and dropping aRun Script action task on a given process, you select whether to use this task as an action or a conditionfrom a contextual menu.
For more information on scripts, what languages are supported and how to write scripts and conditions,please see the related chapter, "Using Scripts" on page 81.
Input
Any data file, in any format.

Processing
The script is executed. The script can modify anything such as the data file, job infos, metadata, or evenother files on the operating system.
Output
Whatever file the Run Script action generates, metadata it modifies or creates, etc.
Technical
Note about conditions: When using Run Script as a condition, the output of the task can be within thebranch or on the main trunk. To control the output, use the "Script.ReturnValue" on page 108 variablein your script.
Properties
The Script Editormenu options are as followed:
l Filel Import: Lets you open an existing script from an external file. This file can be in .vbs, .js, .pl or .pyfor language-specific scripts, or .txt for any of them.
l Export: Lets you save the current script as a file.l Print: Prints the current script.
l Editl Undo: Undo the last edit.l Cut: Cut the current selection (only available if there is selected text in the editor).l Copy: Copy the current selection (only available if there is selected text in the editor).l Paste: Paste the last selection that was cut or copied in the location of the cursor in the texteditor.
l Delete: Delete the current selection (only available if there is selected text in the editor).l Select All: Select all of the contents of the editor.
l Searchl Find: Brings up the Find dialog.l Find Again: Repeats the previous search and finds the next occurrence.l Replace: Brings up the Replace dialog.l Go To Line: Brings up the Go To Line dialog where you can enter a line number and jumpdirectly to that line.
l Languagel VBScript: Select if your script is written in VBScript.l JavaScript: Select if your script is written in JavaScript.l Perl: Select if your script is written in Perl.l Python: Select if your script is written in Pyton.
l Toolsl Editor Options...: Opens the "Editor Options" on page 658.
l Helpl Contents and Indexes: Opens the Editor Help (this page)
The other options of the window are:
l The script editor text box: This is where you enter your XSLT Script that will be used. If you use anexternal script file, this will display the content of the file (note however that modifying the script in thiscase does not modify the external file and changes are not saved).
l Script running from: Choose if the script should be run from the editor text box, or from an externalscript file.
l Script filename and path: Either enter the full path of the XLST Script, or click the Browse button tonavigate to the file. This option is only available if you choose external script file in the Scriptrunning from option.
Warning
With the Run Script action, the On Error tab is accessible by right-clicking on the action in yourprocess and clicking Advanced Properties.

The On Error tab will be triggered if your script has an execution error (such as syntax error, etc) aswell as when raising an error from within your script. For more information, see
On Error Tab
The On Error tab is common to all tasks. Details can be found in the" Task Properties Dialog" on page 666.
By default, any action task, branch, splitter or condition that generates an error will simply be ignored, andthe task just under it (not within a branch) will be given control of the job file without any modification. Anyinitial input task that generates an error will stop the process from running as a whole, and output tasks willnot generate output. The On Error tab can be used to overwrite the default behaviors.
l Send to Process: Check this option to send the job file to an error management process.l Error Process drop-down: Enabled only when the Send to Process option is checked. Lists anyprocess of which the initial input task is the Input Error Bin task.
l Action Group: This group is disabled in the initial input tasks and defaults to Stop Process. In allother tasks where the On Error tab is present, the following options are available:
l Ignore: The task is ignored as if it did not exist, and the job file is passed on to the next task inthe process.
l Stop Branch: If the task is in a branch of the process, the branch is stopped and the job file isreturned to the process after the branch. The branch will not produce any output.
l Stop Process: The process is stopped and no more processing is done. No further output isproduced.
l Log Message: Check this option to enable logging a custom error message in the PlanetPress SuiteWorkflow Tools' log file.
l Message: Enabled only when the Log Message option is checked. Enter a message that will belogged in the PlanetPress Suite Workflow Tools' log file. You can use any variables available inPlanetPress Workflow to customize the message.
l Store the message in variable: Select in which jobinfo, local or global variable you want to store themessage content.
l ID: Enter an error ID. This ID will be visible in theWindows Event Viewer. However, the ID is notvisible in the PlanetPress Suite Workflow Tools' log file.

l Store the ID in variable: Select in which jobinfo, local or global variable you want to store the errorID.
l Reset to defaults: Resets all options in this tab to their default values.
If storing the message or ID, if they are store in a jobinfo they will be available in any error handling processwhere errors are being forwarded. In all cases, if your process continues after the error, the contents of thevariables selected in this window will be available for the rest of your process, or whenever they areoverwritten.
Common Errors
Though some error messages are specific to a task in particular, others may apply to any and all tasksbecause they are related more to the system than to PlanetPress itself. Some examples would be W3813,W3830, W3991, W4005. These correspond to issues such as not having any space to write files, permissionerrors on folders or files, etc.
Comments Tab
The Comments tab is common to all tasks. It contains a single text area (Task comments) that lets youwrite comments about the task. These comments are saved when the dialog is closed with the OK button,and are displayed in the Task Comments Pane.
Send to Process
The Send to Process task transfers job file(s), job information and all related files (metadata, sortedmetadata, etc.) to a selected process. This action task is asynchronous, meaning the current process willcontinue running in parallel to the process chosen in this task and will not wait for it to finish.
This task is dual-purpose: It can be used either as an Action task, or as an Output task. In either case, it doesnot directly produce an output, though the process it calls may produce one or more outputs.
In either case, the called process will ignore the input task along with its job infos and schedule, and use thejob file, job infos, metadata and variables from the current process.
General tab
l Process: The name of the target process to send current job to. Note that startup and subprocessesare not available. You can either enter the name of a process (or use variable properties) or use the
drop-down to list existing processes.
On Error Tab
The On Error tab is common to all tasks. Details can be found in the" Task Properties Dialog" on page 666.
By default, any action task, branch, splitter or condition that generates an error will simply be ignored, andthe task just under it (not within a branch) will be given control of the job file without any modification. Anyinitial input task that generates an error will stop the process from running as a whole, and output tasks willnot generate output. The On Error tab can be used to overwrite the default behaviors.
l Send to Process: Check this option to send the job file to an error management process.l Error Process drop-down: Enabled only when the Send to Process option is checked. Lists anyprocess of which the initial input task is the Input Error Bin task.
l Action Group: This group is disabled in the initial input tasks and defaults to Stop Process. In allother tasks where the On Error tab is present, the following options are available:
l Ignore: The task is ignored as if it did not exist, and the job file is passed on to the next task inthe process.
l Stop Branch: If the task is in a branch of the process, the branch is stopped and the job file isreturned to the process after the branch. The branch will not produce any output.
l Stop Process: The process is stopped and no more processing is done. No further output isproduced.
l Log Message: Check this option to enable logging a custom error message in the PlanetPress SuiteWorkflow Tools' log file.
l Message: Enabled only when the Log Message option is checked. Enter a message that will belogged in the PlanetPress Suite Workflow Tools' log file. You can use any variables available inPlanetPress Workflow to customize the message.
l Store the message in variable: Select in which jobinfo, local or global variable you want to store themessage content.
l ID: Enter an error ID. This ID will be visible in theWindows Event Viewer. However, the ID is notvisible in the PlanetPress Suite Workflow Tools' log file.
l Store the ID in variable: Select in which jobinfo, local or global variable you want to store the errorID.
l Reset to defaults: Resets all options in this tab to their default values.

If storing the message or ID, if they are store in a jobinfo they will be available in any error handling processwhere errors are being forwarded. In all cases, if your process continues after the error, the contents of thevariables selected in this window will be available for the rest of your process, or whenever they areoverwritten.
Common Errors
Though some error messages are specific to a task in particular, others may apply to any and all tasksbecause they are related more to the system than to PlanetPress itself. Some examples would be W3813,W3830, W3991, W4005. These correspond to issues such as not having any space to write files, permissionerrors on folders or files, etc.
Comments Tab
The Comments tab is common to all tasks. It contains a single text area (Task comments) that lets youwrite comments about the task. These comments are saved when the dialog is closed with the OK button,and are displayed in the Task Comments Pane.
SNMP Condition
SNMP is a communication protocol for helping network administrators manage devices and peripherals ontheir network. It is useful for verifying the status of network printers, as you can retrieve error and other statusmessages that printers send out, such as being out of paper or having low toner.
PlanetPress Workflow uses the SNMP protocol in the form of an SNMP Condition, in to ways:
l To check the status of printers on your network against values you set in a condition, and to return atrue or false value. This is called setting a Printer condition in the SNMP condition's Properties dialogbox.
l To check different values of printers or other SNMP compatible devices against conditions you set, toreturn a true or false value. This is called setting a User defined condition in the SNMP condition'sProperties dialog box. You indicate what is called management information bases (MIB) and objectidentifiers (OID) that are extensible and can be vendor specific.

Properties
General tab
l Parameters groupl Community: Enter the community name for the printer or other SNMP compliant device youwant to monitor. A community acts like a combination of a user and password granting youaccess to an SNMP device. Depending on the community name, the device knows what rights togrant, for example, read-only or read-write. Community names serve as a form of organizationand security used with SNMP. The community name must allow sufficient access to theSNMP device to monitor it with the condition. Most SNMP devices come with a public communityname that usually gives you read-only and/or read-write access. It is recommended to increasesecurity on your network by entering community names allowing varying levels of accessdepending on the particular device, its users, etc. The community name tells the device whichrights to grant PlanetPress Workflow (required to perform the test).
l IP address: Enter the IP address of the network printer (or other device) whose status is to bechecked via SNMP.
l Get info: Click to retrieve information corresponding to the IP address you entered. If theinformation is successfully retrieved and it corresponds to a printer, the Host name andDescription of the printer (or other device) appears in the corresponding boxes.
l Host name: When you click Get info, if PlanetPress Workflow is able to communicate with thedevice, it displays its name here.
l Description: When you click Get info, if PlanetPress Workflow is able to communicate with thedevice, it displays its description here.
l Condition type: Select Printer Queue to test a standard printer status condition or User Definedto test a status identified using a printer specific identification code. Bear in mind that the failureto comply with any of the test conditions selected below will make the whole condition False.
l Printer Queue group (displayed when Printer Queue is selected in the Condition Type box)l Printer status: Select Idle or Printing to test whether the printer is currently idle or printing.Select Do not test if you only want to test the printer’s alert status (below).
l Alert status: Select No alert to make the condition False whenever an alert situation is detected,regardless of its type or severity. Select No critical alert to make the condition False whenever acritical alert is detected, regardless of its type. Select Non-critical alert to choose a specific non-critical alert in the Detected error box. Select Critical alert to choose a specific critical alert in theDetected error box. Select Do not test if you only want to test the printer status (above).
l Detected error: Select a specific non-critical or critical alert. Note that this box is only displayedif you selected either Non-critical alert or Critical alert in the Alert Status box.
l User Defined (displayed when User Defined is selected in the Condition Type box)l MIB OID number: Enter the Management Information Base Object Identifier corresponding to theobject you want to test. Vendors of SNMP compliant devices sometimes list MIB OIDs in theirdocumentation.
l Test: Click to test communication with the device and the MIB OID number.
l Operator: Select the operator used to test the condition.l Value: Enter a specific object status. Vendors of SNMP compliant devices sometimes listpossible object states in their documentation.
l Invert condition result: Select to toggle the result of the whole SNMP condition (true becomesfalse and vice versa).
Management Information Base Object Identifiers
A Management Information Base (MIB) is a database of Object Identifiers (OIDs) that can be used to monitordevice objects using SNMP. An MIB OID can point be a printer tray, cartridge or hard disk, or to modemmode. Using an SNMP condition, PlanetPress Workflow can communicate with a device located at a givenIP address and request the status of the object identified by a given MIB OID number. Object Identifiers aretypically assigned and registered by device manufacturers. They are based on a standard known asAbstract Syntax Notation One (often referred to as the ASN.1 standard).
On Error Tab
The On Error tab is common to all tasks. Details can be found in the" Task Properties Dialog" on page 666.
By default, any action task, branch, splitter or condition that generates an error will simply be ignored, andthe task just under it (not within a branch) will be given control of the job file without any modification. Anyinitial input task that generates an error will stop the process from running as a whole, and output tasks willnot generate output. The On Error tab can be used to overwrite the default behaviors.
l Send to Process: Check this option to send the job file to an error management process.l Error Process drop-down: Enabled only when the Send to Process option is checked. Lists anyprocess of which the initial input task is the Input Error Bin task.

l Action Group: This group is disabled in the initial input tasks and defaults to Stop Process. In allother tasks where the On Error tab is present, the following options are available:
l Ignore: The task is ignored as if it did not exist, and the job file is passed on to the next task inthe process.
l Stop Branch: If the task is in a branch of the process, the branch is stopped and the job file isreturned to the process after the branch. The branch will not produce any output.
l Stop Process: The process is stopped and no more processing is done. No further output isproduced.
l Log Message: Check this option to enable logging a custom error message in the PlanetPress SuiteWorkflow Tools' log file.
l Message: Enabled only when the Log Message option is checked. Enter a message that will belogged in the PlanetPress Suite Workflow Tools' log file. You can use any variables available inPlanetPress Workflow to customize the message.
l Store the message in variable: Select in which jobinfo, local or global variable you want to store themessage content.
l ID: Enter an error ID. This ID will be visible in theWindows Event Viewer. However, the ID is notvisible in the PlanetPress Suite Workflow Tools' log file.
l Store the ID in variable: Select in which jobinfo, local or global variable you want to store the errorID.
l Reset to defaults: Resets all options in this tab to their default values.
If storing the message or ID, if they are store in a jobinfo they will be available in any error handling processwhere errors are being forwarded. In all cases, if your process continues after the error, the contents of thevariables selected in this window will be available for the rest of your process, or whenever they areoverwritten.
Common Errors
Though some error messages are specific to a task in particular, others may apply to any and all tasksbecause they are related more to the system than to PlanetPress itself. Some examples would be W3813,W3830, W3991, W4005. These correspond to issues such as not having any space to write files, permissionerrors on folders or files, etc.
Comments Tab
The Comments tab is common to all tasks. It contains a single text area (Task comments) that lets youwrite comments about the task. These comments are saved when the dialog is closed with the OK button,and are displayed in the Task Comments Pane.
Text Condition
Text conditions can be used to perform two different types of tests:
l To test the presence of a string within the job file. You can, for example, search for the string “Goldmember” on the first line of the job file. As another example, you could search for a variable stringretrieved via a job info variable or a data selection in a given location in the job file.
l To compare two strings. As with the test above, this test can also be used to search for a string in agiven location. The difference with this test is that it gives you comparison options. Using the“Contains” operator, you can test the presence of the string “Gold member” at a given location in thejob file (using a data selection), but the other operators can be used to test whether or not the firststring is equal to the second one, whether it is equal or lower than the second one, etc.
The logic of text conditions can sometimes be tricky, especially if it includes variable strings, so you shouldtest it thoroughly.
Properties
General tab
l String: If you want to test the presence of a given string at a given location, enter the string in this box.If you want to compare two strings or perform a numeric comparison, enter the first string in this box.Note that you can enter either a static string, a variable or a data selection in this box. If you enter avariable, PlanetPress Workflow will retrieve the string from the variable before performing thecomparison. If you enter a data selection, PlanetPress Workflow will search the job file and retrieve thestring found at the referenced location before performing the comparison.
l Operator: Select the desired operator. Note that neither the “Is found” nor the “Is not found” operatorcan be used to test XML data.
l Convert data to uppercase before comparison: This option is only displayed when either “Is found”or “Is not found” is selected in the Operator box. Select to prompt PlanetPress Workflow to convert thestring to uppercase before performing the comparison.
l Numeric comparison: This option is not displayed when either “Is found” or “Is not found” is selectedin the Operator box. Select to convert the strings from the String and Comparison string boxes to theircorresponding numeric values before performing the comparison. If you chose an operator thatcompares numeric values, you should select this option.
l On numeric error: This option is only available when the Numeric comparison option is selected.Select the behavior you prefer when PlanetPress Workflow is unable to successfully perform anumeric comparison. Select ”Return the error”, if you want the Text condition to fail altogether. Select”Return true”, if you want the condition to be considered True. Select ”Return false”, if you want thecondition to be considered False.
l Location: You can only enter a location when either ”Is found” or ”Is not found” is selected in theOperator box. If you select “at”, you also have to enter a specific line and column. If you select “on line”,you have to enter a given line. If you select “in area”, you have to enter a range of lines and columns. Ifyou select “on the page”, the search area will cover the whole data page (as defined below).
l Compare to string: You cannot enter a comparison string when either “Is found” or “Is not found” isselected in the Operator box. Enter the second string of the comparison in this box. As with the Stringbox, you can enter a static string, a variable or a data selection in this box.
l Page range: Select Any page if you do not want to specify a precise data page. Select Pages tospecify individual pages or page ranges. The page range setting is only considered when either ”Isfound” or ”Is not found” is selected in the Operator box.
l Range: Entries must be separated by commas. Page ranges are entered using a starting page and anending page, separated by a dash. For pages 1, 3 and 5 to 7, you would enter the following: 1,3,5-7.
l Invert condition result: Select to toggle the result of the condition (true becomes false and viceversa).
On Error Tab
The On Error tab is common to all tasks. Details can be found in the" Task Properties Dialog" on page 666.
By default, any action task, branch, splitter or condition that generates an error will simply be ignored, andthe task just under it (not within a branch) will be given control of the job file without any modification. Anyinitial input task that generates an error will stop the process from running as a whole, and output tasks willnot generate output. The On Error tab can be used to overwrite the default behaviors.
l Send to Process: Check this option to send the job file to an error management process.l Error Process drop-down: Enabled only when the Send to Process option is checked. Lists anyprocess of which the initial input task is the Input Error Bin task.

l Action Group: This group is disabled in the initial input tasks and defaults to Stop Process. In allother tasks where the On Error tab is present, the following options are available:
l Ignore: The task is ignored as if it did not exist, and the job file is passed on to the next task inthe process.
l Stop Branch: If the task is in a branch of the process, the branch is stopped and the job file isreturned to the process after the branch. The branch will not produce any output.
l Stop Process: The process is stopped and no more processing is done. No further output isproduced.
l Log Message: Check this option to enable logging a custom error message in the PlanetPress SuiteWorkflow Tools' log file.
l Message: Enabled only when the Log Message option is checked. Enter a message that will belogged in the PlanetPress Suite Workflow Tools' log file. You can use any variables available inPlanetPress Workflow to customize the message.
l Store the message in variable: Select in which jobinfo, local or global variable you want to store themessage content.
l ID: Enter an error ID. This ID will be visible in theWindows Event Viewer. However, the ID is notvisible in the PlanetPress Suite Workflow Tools' log file.
l Store the ID in variable: Select in which jobinfo, local or global variable you want to store the errorID.
l Reset to defaults: Resets all options in this tab to their default values.
If storing the message or ID, if they are store in a jobinfo they will be available in any error handling processwhere errors are being forwarded. In all cases, if your process continues after the error, the contents of thevariables selected in this window will be available for the rest of your process, or whenever they areoverwritten.
Common Errors
Though some error messages are specific to a task in particular, others may apply to any and all tasksbecause they are related more to the system than to PlanetPress itself. Some examples would be W3813,W3830, W3991, W4005. These correspond to issues such as not having any space to write files, permissionerrors on folders or files, etc.
On Error Tab
The On Error tab is common to all tasks. Details can be found in the" Task Properties Dialog" on page 666.

By default, any action task, branch, splitter or condition that generates an error will simply be ignored, andthe task just under it (not within a branch) will be given control of the job file without any modification. Anyinitial input task that generates an error will stop the process from running as a whole, and output tasks willnot generate output. The On Error tab can be used to overwrite the default behaviors.
l Send to Process: Check this option to send the job file to an error management process.l Error Process drop-down: Enabled only when the Send to Process option is checked. Lists anyprocess of which the initial input task is the Input Error Bin task.
l Action Group: This group is disabled in the initial input tasks and defaults to Stop Process. In allother tasks where the On Error tab is present, the following options are available:
l Ignore: The task is ignored as if it did not exist, and the job file is passed on to the next task inthe process.
l Stop Branch: If the task is in a branch of the process, the branch is stopped and the job file isreturned to the process after the branch. The branch will not produce any output.
l Stop Process: The process is stopped and no more processing is done. No further output isproduced.
l Log Message: Check this option to enable logging a custom error message in the PlanetPress SuiteWorkflow Tools' log file.
l Message: Enabled only when the Log Message option is checked. Enter a message that will belogged in the PlanetPress Suite Workflow Tools' log file. You can use any variables available inPlanetPress Workflow to customize the message.
l Store the message in variable: Select in which jobinfo, local or global variable you want to store themessage content.
l ID: Enter an error ID. This ID will be visible in theWindows Event Viewer. However, the ID is notvisible in the PlanetPress Suite Workflow Tools' log file.
l Store the ID in variable: Select in which jobinfo, local or global variable you want to store the errorID.
l Reset to defaults: Resets all options in this tab to their default values.
If storing the message or ID, if they are store in a jobinfo they will be available in any error handling processwhere errors are being forwarded. In all cases, if your process continues after the error, the contents of thevariables selected in this window will be available for the rest of your process, or whenever they areoverwritten.

Common Errors
Though some error messages are specific to a task in particular, others may apply to any and all tasksbecause they are related more to the system than to PlanetPress itself. Some examples would be W3813,W3830, W3991, W4005. These correspond to issues such as not having any space to write files, permissionerrors on folders or files, etc.
Comments Tab
The Comments tab is common to all tasks. It contains a single text area (Task comments) that lets youwrite comments about the task. These comments are saved when the dialog is closed with the OK button,and are displayed in the Task Comments Pane.
Time of Day Condition
Time of Day conditions test the current time and day. Using a time and day grid, you can select blocks thatcorrespond to time and day coordinates. Various settings can be used to change time intervals, for instance,that range from 15 minutes to 24 hours. You may choose to use days or dates, and you may also selectspecific weeks or months.
The Time of Day condition differs from the process schedule in the fact that you could put this condition aftergenerating some output, and you can also run tasks when the condition itself is false, which is not the casefor a process outside of schedule.
You can choose contiguous as well as separate time blocks as required. The condition is tested True everytime the current time and date corresponds to a selected time block.
Properties
General tab
l Month: Select “All months” if you want the selected time blocks to be valid every month of the year.Select a specific month if you want the selected time blocks to be valid only on that month.
l Week of month / by date: Select “Date” if you want the selected time blocks to be valid only onspecific dates. Select “All weeks” if you want the selected time blocks to be valid every week of themonth. Select a specific week of the month if you want the selected time blocks to be valid only on thatweek (the first, second or last week of the month, for instance).

l Time division: Select the desired time interval. Each block in the grid corresponds to the selected timeinterval.
l Invert condition result: Select to toggle the result of the condition (true becomes false and viceversa).
l Grid: Select separate or contiguous time blocks. Click a block to toggle it on or off. Click and drag totoggle multiple blocks on or off. Click date or day at the top of the grid to toggle the whole date or dayon or off. Click a time interval on the left margin of the grid to toggle the whole time interval on or off.
l Select All: Click to toggle all the time blocks on.l Clear: Click to toggle all the time blocks off.
On Error Tab
The On Error tab is common to all tasks. Details can be found in the" Task Properties Dialog" on page 666.
By default, any action task, branch, splitter or condition that generates an error will simply be ignored, andthe task just under it (not within a branch) will be given control of the job file without any modification. Anyinitial input task that generates an error will stop the process from running as a whole, and output tasks willnot generate output. The On Error tab can be used to overwrite the default behaviors.
l Send to Process: Check this option to send the job file to an error management process.l Error Process drop-down: Enabled only when the Send to Process option is checked. Lists anyprocess of which the initial input task is the Input Error Bin task.
l Action Group: This group is disabled in the initial input tasks and defaults to Stop Process. In allother tasks where the On Error tab is present, the following options are available:
l Ignore: The task is ignored as if it did not exist, and the job file is passed on to the next task inthe process.
l Stop Branch: If the task is in a branch of the process, the branch is stopped and the job file isreturned to the process after the branch. The branch will not produce any output.
l Stop Process: The process is stopped and no more processing is done. No further output isproduced.
l Log Message: Check this option to enable logging a custom error message in the PlanetPress SuiteWorkflow Tools' log file.
l Message: Enabled only when the Log Message option is checked. Enter a message that will belogged in the PlanetPress Suite Workflow Tools' log file. You can use any variables available inPlanetPress Workflow to customize the message.

l Store the message in variable: Select in which jobinfo, local or global variable you want to store themessage content.
l ID: Enter an error ID. This ID will be visible in theWindows Event Viewer. However, the ID is notvisible in the PlanetPress Suite Workflow Tools' log file.
l Store the ID in variable: Select in which jobinfo, local or global variable you want to store the errorID.
l Reset to defaults: Resets all options in this tab to their default values.
If storing the message or ID, if they are store in a jobinfo they will be available in any error handling processwhere errors are being forwarded. In all cases, if your process continues after the error, the contents of thevariables selected in this window will be available for the rest of your process, or whenever they areoverwritten.
Common Errors
Though some error messages are specific to a task in particular, others may apply to any and all tasksbecause they are related more to the system than to PlanetPress itself. Some examples would be W3813,W3830, W3991, W4005. These correspond to issues such as not having any space to write files, permissionerrors on folders or files, etc.
Comments Tab
The Comments tab is common to all tasks. It contains a single text area (Task comments) that lets youwrite comments about the task. These comments are saved when the dialog is closed with the OK button,and are displayed in the Task Comments Pane.
Connector TasksA Connector, as the name implies, is a task that connects to something outside of PlanetPress Workflowitself. In some cases those are other parts of the PlanetPress Workflow, but in other cases we offerconnectors for third-party applications or systems.
Create MRDX
The Create MRDX action task is used to register a job on a Suretrac server using an MRDX file. TheMRDX contains information about the job and its finishing, as well as integrity features use by SureTrac.This task requires a PDF file as an input, along with metadata generated through a document that containsPitneyBowes Scan Codes.

Properties
General Tab
l Register Job to the SureTrac Server group: Check this option to enable the group.l Server Name: The complete URL of the SureTrac server.l Process Verification Job Name: The SureTrac job that this PDF should fall under. Use thebutton next to the list to retrieve a list of available SureTrac jobs from the server.
l Mailrun ID: A unique identification for the current job. This ID must never be the same betweentwo mail runs - we suggest using either %f or %u , which are both always unique as they arebased on date and time.
l Use Job ID: Check to send the Job ID chosen in the PitneyBowes Scan Code utility along withthe job.
l Use External MRDX and PDF: Check this option to ignore the MRDX creation and use an existingPDF and MRDX instead.
l Files Location: Enter the path and file name (without extension) of the PDF and MRDX file, oruse the Browse button to select either. The PDF and MRDX file must have the exact same nameapart from the extension.
l Use MRDX as new data file: Ignore the PDF file and use the MRDX as a job file after this task. ThePDF is discarded. If this is unchecked, the PDF and metadata are used.
On Error Tab
The On Error tab is common to all tasks. Details can be found in the" Task Properties Dialog" on page 666.
By default, any action task, branch, splitter or condition that generates an error will simply be ignored, andthe task just under it (not within a branch) will be given control of the job file without any modification. Anyinitial input task that generates an error will stop the process from running as a whole, and output tasks willnot generate output. The On Error tab can be used to overwrite the default behaviors.
l Send to Process: Check this option to send the job file to an error management process.l Error Process drop-down: Enabled only when the Send to Process option is checked. Lists anyprocess of which the initial input task is the Input Error Bin task.
l Action Group: This group is disabled in the initial input tasks and defaults to Stop Process. In allother tasks where the On Error tab is present, the following options are available:

l Ignore: The task is ignored as if it did not exist, and the job file is passed on to the next task inthe process.
l Stop Branch: If the task is in a branch of the process, the branch is stopped and the job file isreturned to the process after the branch. The branch will not produce any output.
l Stop Process: The process is stopped and no more processing is done. No further output isproduced.
l Log Message: Check this option to enable logging a custom error message in the PlanetPress SuiteWorkflow Tools' log file.
l Message: Enabled only when the Log Message option is checked. Enter a message that will belogged in the PlanetPress Suite Workflow Tools' log file. You can use any variables available inPlanetPress Workflow to customize the message.
l Store the message in variable: Select in which jobinfo, local or global variable you want to store themessage content.
l ID: Enter an error ID. This ID will be visible in theWindows Event Viewer. However, the ID is notvisible in the PlanetPress Suite Workflow Tools' log file.
l Store the ID in variable: Select in which jobinfo, local or global variable you want to store the errorID.
l Reset to defaults: Resets all options in this tab to their default values.
If storing the message or ID, if they are store in a jobinfo they will be available in any error handling processwhere errors are being forwarded. In all cases, if your process continues after the error, the contents of thevariables selected in this window will be available for the rest of your process, or whenever they areoverwritten.
Common Errors
Though some error messages are specific to a task in particular, others may apply to any and all tasksbecause they are related more to the system than to PlanetPress itself. Some examples would be W3813,W3830, W3991, W4005. These correspond to issues such as not having any space to write files, permissionerrors on folders or files, etc.
Comments Tab
The Comments tab is common to all tasks. It contains a single text area (Task comments) that lets youwrite comments about the task. These comments are saved when the dialog is closed with the OK button,and are displayed in the Task Comments Pane.

Input from SharePoint
The Input from SharePoint task can be used to retrieve files from a SharePoint server on your network,filtering on your template fields and creating metadata to use in your process.
When the Input from SharePoint task runs, it first lists all of the files to download then runs the processonce for each file in the list. If any new files are added during the process, they will not be touched until thenext time the process is scheduled.
This task can work with many of the available SharePoint servers:
l Microsoft SharePoint 2007l Microsoft SharePoint 2010l Windows SharePoint Services 3.0 SP2l SharePoint Foundation 2010
Technical
Document libraries using the Content Type system in SharePoint 2007 and higher (as well asWindows SharePoint Services 3.0 and higher) are supported in PlanetPress 7.5 and higher only.
Input
Any data file present on a SharePoint document store, even those not compatible with PlanetPressWorkflow emulations, and the properties of these files.
Processing
The task connects to the selected Document store and retrieves a copy of files according to the specifiedrules. The files may be deleted or marked as checked out depending on the options selected, otherwise theyare untouched.
Output
The output to this task is a series of individual files, one after the other.
Properties
General Tab
Note
For this tab to work, you must have entered your SharePoint Connection information in the ConnectionTab.
l SharePoint Site: The name of the SharePoint site from where you want to retrieve documents. Youcan click on the Refresh button to display a list of sites on your SharePoint server.
l Document Library: The document library where you want to retrieve the files. You can click on theRefresh button to display a list of libraries on the SharePoint site selected previously.
l Folder: The folder in the document library where your files are located. You can click the Browsebutton to display your folder structure. In the Browse Folders dialog, click on the folder you want touse and click OK.
l Input Rule: Lets you define rules to filter incoming files on certain variables, for example the file name,size, etc. Clicking the ... button brings up the Rule Interface.
l Download files from sub-directories also: Check to also look into subdirectories of the specifiedFolder.
l Do not download checked out documents: If the document is set as "Checked Out" in SharePoint, itwill be ignored.
l Action Groupl Download the document: Simply download the document and do not modify it in SharePoint.l Download the document and mark it as checked out in SharePoint: Download the documentand mark it as Checked Out in SharePoint. This is useful for preventing files to be downloadedmore than once.
l Download the document and delete it from SharePoint: Download the document and delete itfrom the SharePoint server.
Connection Tab
l Server Name: The name of the SharePoint server. This can either be a server name (e.g.http://SharePoint2003 ) or an IP address (e.g. http://192.168.1.123 ). Both http:// and https:// (secure)connections are accepted.
l Domain: The active directory domain for the logon credentials. This is not necessary if the SharePointserver is not part of a domain.
l User Name: A valid user name that has access to the SharePoint site and is able to read and write todocument libraries.
l Password: The correct password for the user name.
"Other" Tab
l Job Information groupl Information elements: indicates what job infos are automatically created by the input task.l Add lines before first data page: Using the arrows keys you can add any job informationdirectly at the beginning of your data file.
l Backup input files: Check this to save a copy of each data file that is captured by your input. Thesefiles are saved in the PlanetPress Suite Workflow Tools working folders under the "Backup" folder.
l Backup filename: Enter the filename that you wish the input data file backup to be saved under.l Delete Existing Metadata: Check to remove any metadata from memory. This option is disabled oninitial input tasks, and is checked by default on secondary input tasks.
Job Information definitions
l %1 - Source file name: Contains the name of the current captured file.l %2 - Directory: Contains the name of the SharePoint director from which the current file was captured.
On Error Tab
The On Error tab is common to all tasks. Details can be found in the" Task Properties Dialog" on page 666.
By default, any action task, branch, splitter or condition that generates an error will simply be ignored, andthe task just under it (not within a branch) will be given control of the job file without any modification. Anyinitial input task that generates an error will stop the process from running as a whole, and output tasks will

not generate output. The On Error tab can be used to overwrite the default behaviors.
l Send to Process: Check this option to send the job file to an error management process.l Error Process drop-down: Enabled only when the Send to Process option is checked. Lists anyprocess of which the initial input task is the Input Error Bin task.
l Action Group: This group is disabled in the initial input tasks and defaults to Stop Process. In allother tasks where the On Error tab is present, the following options are available:
l Ignore: The task is ignored as if it did not exist, and the job file is passed on to the next task inthe process.
l Stop Branch: If the task is in a branch of the process, the branch is stopped and the job file isreturned to the process after the branch. The branch will not produce any output.
l Stop Process: The process is stopped and no more processing is done. No further output isproduced.
l Log Message: Check this option to enable logging a custom error message in the PlanetPress SuiteWorkflow Tools' log file.
l Message: Enabled only when the Log Message option is checked. Enter a message that will belogged in the PlanetPress Suite Workflow Tools' log file. You can use any variables available inPlanetPress Workflow to customize the message.
l Store the message in variable: Select in which jobinfo, local or global variable you want to store themessage content.
l ID: Enter an error ID. This ID will be visible in theWindows Event Viewer. However, the ID is notvisible in the PlanetPress Suite Workflow Tools' log file.
l Store the ID in variable: Select in which jobinfo, local or global variable you want to store the errorID.
l Reset to defaults: Resets all options in this tab to their default values.
If storing the message or ID, if they are store in a jobinfo they will be available in any error handling processwhere errors are being forwarded. In all cases, if your process continues after the error, the contents of thevariables selected in this window will be available for the rest of your process, or whenever they areoverwritten.

Common Errors
Though some error messages are specific to a task in particular, others may apply to any and all tasksbecause they are related more to the system than to PlanetPress itself. Some examples would be W3813,W3830, W3991, W4005. These correspond to issues such as not having any space to write files, permissionerrors on folders or files, etc.
Laserfiche Repository Output
Laserfiche Repository Output task publishes files - and optionally sets index values - into a Laserficheserver. This task uploads any documents in a Laserfiche repository, optionally filling the index informationon the Laserfiche server with dynamic information that can be taken from PlanetPress Workflow PDI files (forPlanetPress Workflow archives only).
Note
The Laserfiche Repository Output requires the Laserfiche run-time version 8.1 or higher and will notwork with previous versions. It also requires a valid PlanetPress license.
Laserfiche is a provider of digital document and records management systems. Laserfiche has twocomponents: the Laserfiche server, which hosts the repository, and the Laserfiche client, which serves asthe user’s interface with the repository.
Input
Any file that is compatible with Laserfiche (see the Laserfiche user manual for more information onsupported files types)
Processing
A connection is established with the Laserfiche server, the file is uploaded and the metadata in theLaserfiche server is generated correctly.
Output
The output from this task is the specified file along with the metadata within the Laserfiche server. The file isnot directly modified by this task.
Task Properties
General Tab
l Laserfiche configuration group
l Folder: Enter the Laserfiche client repository folder where the documents will be exported. Theuser can specify the remote folder by clicking the Browse… button. Note: If the Folder field isempty, the documents will be exported by default to the root folder
l Import Format groupl Laserfiche Pages: Converts all images files (*.bmp, *.gif, *.jpeg, *.pcx, *.png, *.tif, *.tiff, *.txt)into the Laserfiche internal TIFF format on the server. When double-clicking on thedocument in Laserfiche the image will be opened in the Laserfiche Image Viewer.
l Electronic files: All files will be stored in their original format in Laserfiche. When double-clicking on the document in Laserfiche the native Windows application associated with thefile extension of the archive will be opened.
l Force folder creation: Select to force the folder creation if it does not already exist on theLaserfiche server.
l Volume: A list allowing to choose among available Laserfiche volumes.
l Configure Tags: Click to open the Configure Tags dialog. See LaserFiche Repository Output -Configure Tags.
l Configure Templates: Click to open the Configure Templates dialog. See LaserFicheRepository Output - Configure Templates.
l PlanetPress archive folder: Folder path of the folder capture of the current process. This field isoptional and should only be set when publishing PlanetPress Workflow archives that have PDI files.
l If the PlanetPress Image archive folder field is empty and the option “Use PlanetPress PDF/A” isselected, a warning message will be displayed: "You should insert PlanetPress Image archivefolder source".
l The indexes in the PlanetPress Design document must match the ones in the Laserfiche server.
Connection Tab
l Server Name: The server name or IP address of the server you wish to connect to.l Repository: The name of the repository you wish to send the files to.l user name: A user name in Laserfiche that has access to the above repository.

l Password: The password for the above user name.l Test Connection: Click to verify that the information entered in this tab is correct and the serveraccepts it.
On Error Tab
The On Error tab is common to all tasks. Details can be found in the" Task Properties Dialog" on page 666.
By default, any action task, branch, splitter or condition that generates an error will simply be ignored, andthe task just under it (not within a branch) will be given control of the job file without any modification. Anyinitial input task that generates an error will stop the process from running as a whole, and output tasks willnot generate output. The On Error tab can be used to overwrite the default behaviors.
l Send to Process: Check this option to send the job file to an error management process.l Error Process drop-down: Enabled only when the Send to Process option is checked. Lists anyprocess of which the initial input task is the Input Error Bin task.
l Action Group: This group is disabled in the initial input tasks and defaults to Stop Process. In allother tasks where the On Error tab is present, the following options are available:
l Ignore: The task is ignored as if it did not exist, and the job file is passed on to the next task inthe process.
l Stop Branch: If the task is in a branch of the process, the branch is stopped and the job file isreturned to the process after the branch. The branch will not produce any output.
l Stop Process: The process is stopped and no more processing is done. No further output isproduced.
l Log Message: Check this option to enable logging a custom error message in the PlanetPress SuiteWorkflow Tools' log file.
l Message: Enabled only when the Log Message option is checked. Enter a message that will belogged in the PlanetPress Suite Workflow Tools' log file. You can use any variables available inPlanetPress Workflow to customize the message.
l Store the message in variable: Select in which jobinfo, local or global variable you want to store themessage content.
l ID: Enter an error ID. This ID will be visible in theWindows Event Viewer. However, the ID is notvisible in the PlanetPress Suite Workflow Tools' log file.

l Store the ID in variable: Select in which jobinfo, local or global variable you want to store the errorID.
l Reset to defaults: Resets all options in this tab to their default values.
If storing the message or ID, if they are store in a jobinfo they will be available in any error handling processwhere errors are being forwarded. In all cases, if your process continues after the error, the contents of thevariables selected in this window will be available for the rest of your process, or whenever they areoverwritten.
Common Errors
Though some error messages are specific to a task in particular, others may apply to any and all tasksbecause they are related more to the system than to PlanetPress itself. Some examples would be W3813,W3830, W3991, W4005. These correspond to issues such as not having any space to write files, permissionerrors on folders or files, etc.
Restrictions
l Each Laserfiche Repository Output task uses a connection to Laserfiche. You can use as manyLaserfiche Repository Output tasks at the same time as your Laserfiche license allows. If you seethe error message ‘The session number was exceeded’ in the PlanetPress Workflow Service Console,it means you have exceeded your allowed number of connections.
l To use the “Use PlanetPress PDF/A archives” option, make sure to:
l Check the field as Multiple, select CHAR type and enter the width fields in Laserficheadministration console as long as your PlanetPress fields.
l Insert a folder path to your PDI source files in the PlanetPress Image archive folder.
l If a field is checked as Required in Laserfiche administration console, fill the field value.l If you want to assign an Informational Tag, do not check the Security tag option in the Laserficheadministration console.
l If the output repository folder does not have access rights to read and create documents, the task willnot be able to export documents to the selected Laserfiche folder.
l If you intend to use PDI for number type, your decimal separator in both your Regional and LanguageOptions and in PlanetPress Index (PDI) numbers should be a dot (".").
l The Laserfiche output task will only work if an activated PlanetPress Image is found, either locally oron the network.

Lookup in Microsoft® Excel® Documents
The Lookup in Microsoft® Excel® Documents action task is used to complement your job file's metadataby retrieving data from a Microsoft® Excel® spreadsheet on your system. The data retrieved is based onexisting data in your metadata, and it will either be added to your metadata or will append or replace yourexisting metadata if it exists.
Fields on any level (Page, Datapage, Document, Group, Job) can be used, and the result field will be addedon the same level as the lookup field.
Note
This task will automatically "loop" through the metadata and repeat its action for each of yourmetadata's data pages. This task should not be placed after a Metadata Sequencer task, otherwise itwill run as many times as there are metadata sequences, which will result in decreased performance.
Input
Any compatible data file, requires metadata to be present.
Processing
The task parses each level of the metadata and, for each field of the specified name it finds, a lookup ismade. If a field of the same name appears on multiple levels, the lookup will happen for all fields, on alllevels, individually.
Output
The original data file is unchanged. Metadata is updated according to the specified criteria.
Properties
General Tab
l Excel groupl Excel workbook: The full path and file name of a Microsoft® Excel® workbook (.xls or .xslx file).You can use the Browse button on the right to browse to the file on your computer.

l Excel worksheet: The name of the worksheet you want to use. Once a workbook is open, thisdrop-down will automatically list all the available worksheets.
l Refresh button: If you have modified the original Microsoft® Excel® workbook to add a sheet,click this button to refresh the list of worksheets.
l Metadata groupl Lookup Field: The name of the metadata field that will be used to determine which row shouldbe returned. The Metadata field can be on any level.
l Lookup Column: The name of the column in the Microsoft® Excel® worksheet that correspondsto the contents of the Lookup Field.
l Action: What to do with the resulting data from the Microsoft® Excel® worksheet. This can be:
l Add Field: Creates a new field with the data. This may cause multiple fields to be created.l Replace field value: Replaces any existing field with the new content. Only the last resultwill be displayed. If the field does not exist, it will create it.
l Append field value: Ads the data to the existing field within the same one. No"separator" is added. If the field does not exist, it will create it.
l Result Field: The metadata field name in which the result should be stored. This field willappear in the same metadata level as the Lookup Field.
l Result Column: The name of the column where the information you want to retrieve is located.For example, this could be a client email or full name.
l button: Ads a new lookup line. You can have as many lines as you want. The lines will beexecuted in order from top to bottom, so you can rely on a previous line to bring additionalinformation.
l button: Removes the currently selected (highlighted) line.
l button: Moves the currently selected line up one place.
l button: Moves the currently selected line down one place.
l Search option groupl Match case: Will force the lookup column names to be in exactly the same case as the Lookupcolumn name. This means if you type in "CustomerID" in the lookup column and the actualcolumn is named "customerid", it would not return any result.
On Error Tab
The On Error tab is common to all tasks. Details can be found in the" Task Properties Dialog" on page 666.
By default, any action task, branch, splitter or condition that generates an error will simply be ignored, andthe task just under it (not within a branch) will be given control of the job file without any modification. Anyinitial input task that generates an error will stop the process from running as a whole, and output tasks willnot generate output. The On Error tab can be used to overwrite the default behaviors.
l Send to Process: Check this option to send the job file to an error management process.l Error Process drop-down: Enabled only when the Send to Process option is checked. Lists anyprocess of which the initial input task is the Input Error Bin task.
l Action Group: This group is disabled in the initial input tasks and defaults to Stop Process. In allother tasks where the On Error tab is present, the following options are available:
l Ignore: The task is ignored as if it did not exist, and the job file is passed on to the next task inthe process.
l Stop Branch: If the task is in a branch of the process, the branch is stopped and the job file isreturned to the process after the branch. The branch will not produce any output.
l Stop Process: The process is stopped and no more processing is done. No further output isproduced.
l Log Message: Check this option to enable logging a custom error message in the PlanetPress SuiteWorkflow Tools' log file.
l Message: Enabled only when the Log Message option is checked. Enter a message that will belogged in the PlanetPress Suite Workflow Tools' log file. You can use any variables available inPlanetPress Workflow to customize the message.
l Store the message in variable: Select in which jobinfo, local or global variable you want to store themessage content.
l ID: Enter an error ID. This ID will be visible in theWindows Event Viewer. However, the ID is notvisible in the PlanetPress Suite Workflow Tools' log file.
l Store the ID in variable: Select in which jobinfo, local or global variable you want to store the errorID.
l Reset to defaults: Resets all options in this tab to their default values.
If storing the message or ID, if they are store in a jobinfo they will be available in any error handling processwhere errors are being forwarded. In all cases, if your process continues after the error, the contents of thevariables selected in this window will be available for the rest of your process, or whenever they areoverwritten.

Common Errors
Though some error messages are specific to a task in particular, others may apply to any and all tasksbecause they are related more to the system than to PlanetPress itself. Some examples would be W3813,W3830, W3991, W4005. These correspond to issues such as not having any space to write files, permissionerrors on folders or files, etc.
Comments Tab
The Comments tab is common to all tasks. It contains a single text area (Task comments) that lets youwrite comments about the task. These comments are saved when the dialog is closed with the OK button,and are displayed in the Task Comments Pane.
Use Cases
Use Case 1: Send Personalized Emails with Promotional Document Attached
A PlanetPress Design document takes as input a PDF file as the input data file, and reproduces it exactly asit enters. The document also contains a custom data selection set to hold an email address. The dataselection's value is given by a Metadata Field called 'Email'. The value of this Email metadata field is aregion from the sample data file representing the customer number. At production time, the Lookup inMicrosoft® Excel® Documents action task will replace the value of this metadata field with thecorresponding customer email.
Use Case 2: Translate a list of line items descriptions into a given language
A PlanetPress Design document takes as input a transactional PDF file, and reproduces it exactly as itenters. Metadata fields called ItemDesc are created, one for each line item description, at the datapagelevel. Each ItemDesc metadata field is given the value of a line item description as found on a region of thecurrent data page. The line item descriptions appearing on the resulting page produced by the design toolare custom data selections whose value come from the corresponding ItemDesc metadata fields. TheLookup in Microsoft® Excel® Documents action task updates the value of all 'ItemDesc' metadata fieldswith their corresponding foreign language descriptions.
Microsoft® Word® Documents To PDF Conversion
The Microsoft® Word® to PDF action task can be used to convert a Word® document into a PDF file thatcan be used in your PlanetPress Workflow process. It can also do a Mail Merge as it runs the task.

Note
Microsoft® Word® needs to be installed for this task to be functional and to test the connection.
Input
A compatible Microsoft Word Document (see notes).
Processing
The Word document is converted into a PDF file. If a Mail Merge is made, the mail merge is done in thedocument before the document is converted into a PDF file. The conversion is done through the use of aprinter queue - the document is printed to this queue and the print job is converted to PDF. This is the sametechnique used in the "WinQueue Input" on page 234 when generating PDF files.
Output
One of:
l By default, a PDF file accompanied with basic PDF metadata. The Metadata contains one "Document"level, and one data page (and page) level for each PDF page generated by the document. When MailMerge is not selected, this is the only available choice.
Technical
In current versions, the Objectif Lune Printer Driver will naturally add a margin to the PDFgenerated by this task. While this will be fixed in future versions, if your PDF is full bleed you willnot get the desired results using this option.
l A DOC (Word Document) file which is the result of the mail merge. This output is only available whendoing a mail merge.

Properties
General tab
l Microsoft Word Document: Enter a Microsoft® Word® document or template, or click the browsebutton to navigate to the location of the document. The supported extensions are: *.doc, *.docx, *.dotand *.dotx.
l Perform Mail Merge: Check when providing a Microsoft® Word® document or template configured formail merge.
l Use settings specified in document: Selected to instruct the task to use the connection stringand SQL statements stored in the DOC file. There is no guarantee that the database, connectionstring or statement are still valid, especially if the DOC file was moved or sent to someone else.
l Use custom settings: Override the mail merge settings in the Microsoft® Word® document andlets you specify your own.
l Connection String: The connection string to any ODBC database supported by PlanetPressWorkflow. You can use the Browse button to open an existing File DSN, or use the DatabaseButton to open the ODBC connection interface.
l SQL Statement: An SQL statement that is understood by the database you are using and thatwill return a series of records that the Microsoft® Word® template is expecting. Note that novalidation is made on SQL statements except if they are for Microsoft Access and Excel datafiles. You can use the Test Connection button to test the SQL and connection string.
l Test connection: Checks if the Connection String and SQL Statement are valid, and if theresulting recordset is understood by the Microsoft® Word® document. This is optional, thoughhighly recommended.
l Output Type:l .PDF File (with metadata): The result will be a PDF file with the number of pages generated bythe combination of the template and record set. Metadata is also included that complement thePDF.
l .DOC file: The result is a Microsoft® Word® document in .doc format. Note that this format is notsupported by PlanetPress Workflow as a data file or job file, so this option is only useful if youare simply planning to save the Word document in a specific location.
On Error Tab
The On Error tab is common to all tasks. Details can be found in the" Task Properties Dialog" on page 666.
By default, any action task, branch, splitter or condition that generates an error will simply be ignored, and

the task just under it (not within a branch) will be given control of the job file without any modification. Anyinitial input task that generates an error will stop the process from running as a whole, and output tasks willnot generate output. The On Error tab can be used to overwrite the default behaviors.
l Send to Process: Check this option to send the job file to an error management process.l Error Process drop-down: Enabled only when the Send to Process option is checked. Lists anyprocess of which the initial input task is the Input Error Bin task.
l Action Group: This group is disabled in the initial input tasks and defaults to Stop Process. In allother tasks where the On Error tab is present, the following options are available:
l Ignore: The task is ignored as if it did not exist, and the job file is passed on to the next task inthe process.
l Stop Branch: If the task is in a branch of the process, the branch is stopped and the job file isreturned to the process after the branch. The branch will not produce any output.
l Stop Process: The process is stopped and no more processing is done. No further output isproduced.
l Log Message: Check this option to enable logging a custom error message in the PlanetPress SuiteWorkflow Tools' log file.
l Message: Enabled only when the Log Message option is checked. Enter a message that will belogged in the PlanetPress Suite Workflow Tools' log file. You can use any variables available inPlanetPress Workflow to customize the message.
l Store the message in variable: Select in which jobinfo, local or global variable you want to store themessage content.
l ID: Enter an error ID. This ID will be visible in theWindows Event Viewer. However, the ID is notvisible in the PlanetPress Suite Workflow Tools' log file.
l Store the ID in variable: Select in which jobinfo, local or global variable you want to store the errorID.
l Reset to defaults: Resets all options in this tab to their default values.
If storing the message or ID, if they are store in a jobinfo they will be available in any error handling processwhere errors are being forwarded. In all cases, if your process continues after the error, the contents of thevariables selected in this window will be available for the rest of your process, or whenever they areoverwritten.

Common Errors
Though some error messages are specific to a task in particular, others may apply to any and all tasksbecause they are related more to the system than to PlanetPress itself. Some examples would be W3813,W3830, W3991, W4005. These correspond to issues such as not having any space to write files, permissionerrors on folders or files, etc.
Comments Tab
The Comments tab is common to all tasks. It contains a single text area (Task comments) that lets youwrite comments about the task. These comments are saved when the dialog is closed with the OK button,and are displayed in the Task Comments Pane.
Notes
l Microsoft Word must be installed on PlanetPress Workflow system.l Microsoft Word must not be currently opened when the automation task runs.l Microsoft Word 2003 and up are supported.l The task uses a printer queue set with the “PlanetPress Word to PDF Printer” driver, which is createdand set by default on-the-fly the first time a Microsoft® Word® Document to PDF action task is run.This printer cannot be shared on the network in order to avoid confusion from network users, howeverit is shared between all Microsoft® Word® Document to PDF action tasks on the same system.
l While debugging this task, the printer shows the message that the document can not be printed. Thismessage is normal and will not appear when running a live configuration.
l If using a Microsoft® database such as Access® or Excel®, each software must be installed in thesame version. For example, using Microsoft® Word® 2007 with a Microsoft® Access® 2003 databasewill cause the task to fail.
l If the database path is specified in the Microsoft® Word® document, the mail merge has to beperformed with the settings specified in the document, otherwise the database path provided in thetask is ignored and can cause different conflicts. To use custom settings, the Microsoft® Word®document should contain only mail merge fields with no database path entered. The Microsoft®Word® to PDF action task allows specifying the path of the database and the query to use. The Usecustom settings option is very usefully for using different databases and queries in a single process.
l If the database is the same for 2 processes, one of two processes aborts. Each process has to usedifferent databases, or no more than one process with a Microsoft® Word® to PDF task.

Output to Capture OnTheGo
The Output to Capture OnTheGo task sends document information to the Capture OnTheGo onlinerepository. These documents can then be retrieved by the Capture OnTheGo mobile application.
Input
This task ignores the input data file and any metadata it unless data selections are used in the variable datafields.
Processing
This task does not process the data or metadata file. The information entered in the Deposit tab of this taskis sent to the repository configured in the Repository tab.
Output
This task produces no output, other than the information sent to the Capture OnTheGo online repository.
Properties
Repository Tab
The Repository tab is where you enter the connection information necessary to create the link between OLConnect or PlanetPress and CaptureOnTheGo.
l Store ID: Enter a valid Capture OnTheGo Server user name (mandatory).l Password: Enter the password (mandatory) that corresponds to the Store ID entered above.l Show password: Check this box if you want to see the password you type in the Password box.
Deposit Tab
In the Deposit tab, you enter information regarding the document you are making available to CaptureOnTheGo users.
l Document to Publish group: This is where you specify the document location and type. It ismandatory to enter valid information in all the boxes included in this group.
l USE URL: Enter a URL corresponding to the document location and name (note that the URLmust begin with either HTTP: // or HTTPS: //). The document would typically be available from

the PlanetPress HTTP Server or a regular Web server.l File Type: Select the appropriate document type. HTML for forms that users can fill out, and PDFfor documents users can read.
l Cover Image: Enter the path to a cover image that is shown in the repository and library list, aswell as the document property. The recommended image size is 512x512 px and is required tobe in JPG or PNG format. Use the Browse button to locate an image on the local drive. TheCover Image is optional and, if omitted, displays a default image based on the file type.
l Document Information group: In this group, you enter information that will help users identify thedocument. It is mandatory to enter valid information in all the boxes included in this group.
l Title: Enter the document name that Capture OnTheGo users will see on their device. Choose aname that will let users clearly identify the document.
l Author(s): Enter a name identifying the document’s creator(s).l Description: Enter a description helping users identify the document.
l Metadata group: This group lets you determine which Capture OnTheGo users can see the documentand where they will see it.
l Recipients: Enter valid Capture OnTheGo user group names or individual user names in thisbox. These names determine which users can have access to the document. Click the buttonmarked with a plus sign to add groups of users or individual users to this list box. The list mustinclude at least one entry (otherwise, no one will be able to see the document). Note that youmay enter multiple names on a single line, granted that you use a semi-colon to separate eachone. Also note that there cannot be any spaces before or after each group or user name and thatthe names are case insensitive. Click any given line to edit the information appearing on thisline. To remove a group of users or a single user, make a selection in the list and then click thebutton marked with an X.
l Categories: Enter at least one valid Capture OnTheGo document category in this box. CaptureOnTheGo documents are listed by categories (Reference, Delivery bills, Satisfaction Polls, forinstance) on Capture OnTheGo app. These categories are typically managed via the CaptureOnTheGo Repository Management page. Note that there cannot be any spaces before or aftereach category name and that the names are case insensitive. Click the button marked with aplus sign to add a category to this list box. To remove a category, make a selection in the list andthen click the button marked with an X.
l Fail process if any of the categories does not exist: Check this box if you want the process tofail if any of the categories listed above does not exist on the Capture OnTheGo Server. If thisoption is not selected, and if some of the listed categories are not present on the Capture

OnTheGo Server, the process will go through and the listed categories will be added to theServer.
Advanced Tab
The Advanced tab is where you specify the document's time to live either in the repository or the user'sdevice.
l Document Handling Options group: l Customize: You must check this box if you want the options included in this group to be used.When this option is not checked, the other boxes included in this group are faded.
l Auto-Download: This option determines whether the document is to be automaticallydownloaded to the users’ devices (documents that are not automatically downloaded are firstlisted on users’ devices – users must then tap the Download button, if they want to have thedocument on their device). You may enter ‘Yes’, ‘No’, or a variable. The document will beautomatically downloaded if the value is ‘Yes’ (whether entered manually or returned by thevariable) and if the recipients list includes only individual user names. In any other case, thedocument will need to be manually downloaded by the users.
l Stored on a User Device for: Enter the number of days for which the document is to remain ona user’s device once downloaded. If you leave this box empty or enter a value of 0, the documentwill never automatically expire on the devices.
l Keep in repository group: The boxes found in this group let you specify how long the documentis to remain in the repository (even if they are not downloaded to the user's device).
l For: If you want the document to remain in the repository for a given number of days, selectthis option and enter the number of days in the corresponding box. If you leave the boxempty or enter a value of 0, the document will not be removed from the repository based onthis setting. Note that any positive number you enter will automatically be reflected in theUntil box below.
l Until: If you want the document to remain in the repository until a given date, select thisoption and enter a date in the corresponding box (the date format must be “YYYY-MM-DD”- note that you can use the date picker). The date entered corresponds to the last day ofvalidity (the document is valid until 11:59:59 PM on the date you entered). If you leave thebox empty, the document will not be removed from the repository based on this setting.Note that the date you enter will automatically be reflected in the For box above.
l Time zone: When you enter a number of days in the For box or a date in the Until boxabove, the computer’s time zone appears in this box. You may select a different time zoneif required.
l Track documents sent: Check this option to track documents sent to the Capture OnTheGoServer. This tracking is done through the COTGDefaul.mdb database located in%ProgramData%\Objectif Lune\PlanetPress Workflow 8\PlanetPress Watch\COTG , andincludes most of the information set in this task, as well as information returned from the server.
Output to SharePoint
The Output to SharePoint action task can be used to send files to an existing Microsoft SharePoint server.
Input
Any data file, with optional metadata.
Processing
The task connects to the selected Document store and uploads the current data file. If the file already exists,it will be overwritten and, if this option is selected, marked as "checked in". The information accompanyingthe file (the SharePoint metadata) is either updated or created.
Output
The output of this task is the original data file.
Properties
General Tab
l SharePoint Site: The name of the SharePoint site where you want to send the files. You can click onthe Refresh button to display a list of sites on your SharePoint server.
l Document Library: The document library where you want to send the files. You can click on theRefresh button to display a list of libraries on the SharePoint site selected previously.
l Folder: The folder location in the document library where your files will be sent. You can click theBrowse button to display your folder structure. In the Browse Folders dialog, click on the folder youwant to use and click OK.
l Force folder creation: If the folder does not exist, it will be created.l Error if the file name exists: Task will generate an error if the file name is already there.

l Mark the document as checked in: Sets the "Checked in" property of the document on theSharePoint server.
l Configure Fields: Opens the Configure SharePoint Metadata Fields dialog.
Configure SharePoint Metadata Fields dialog
This dialog lets you setup the information you want to assign to the SharePoint Metadata information. Itcontains one line for each field present in the SharePoint document library.
l Field Name: Name of the field as set in SharePoint Document Library.l Field Information: The information to enter in the SharePoint Document's Metadata for this field.l Use PDF/A: Check to use the information contained within an PDF. This PDF must have been createdwith PlanetPress Image and contain an Index field (data selection) of which the name correspondsexactly to the Field Name in the SharePoint Document Library. If this option is checked, the FieldInformation will change to "Use PlanetPress Index (PDF/A)".
l Field Type: The type of field as set in the SharePoint Document Library. The following SharePointfield types are supported by the SharePoint output task:
l Single line of text: This type may contain a string of any type of characters. This is the mostflexible type of field. Use this type when you are not sure if the constraints of the other types offields will be appropriate.
l Multiple line of text: This type may contain multiple lines of text.l Choice: This type contains the menu to choose from.l Number: This type may contain a number (1, 1.0, 100). The decimal separator is “.” in the plug-in.
l Currency: This type contains the currency ($ …).l Date/Time: Date/Time fields contain a date and timel Yes/No: Yes/No (menu to choose from). If passing a variable, has to be either "Yes" or "No".l Hyperlink or Picture: This type contains an html hyperlink or picture.
Technical
Document libraries using the Content Type system in SharePoint 2007 and higher (as well asWindows SharePoint Services 3.0 and higher) are supported in PlanetPress Workflow 7.4 and higher

only.
Connection Tab
l Server Name: The name of the SharePoint server. This can either be a server name (e.g.http://SharePoint2003 ) or an IP address (e.g. http://192.168.1.123 ). Both http:// and https:// (secure)connections are accepted.
l Domain: The active directory domain for the log-on credentials. This is not necessary if the SharePointserver is not part of a domain.
l User Name: A valid user name that has access to the SharePoint site and is able to read and write todocument libraries.
l Password: The correct password for the user name.
Examples & Use Cases
This task is put into effect in the following use cases and example processes:
l Capture Post Processing Workflow
On Error Tab
The On Error tab is common to all tasks. Details can be found in the" Task Properties Dialog" on page 666.
By default, any action task, branch, splitter or condition that generates an error will simply be ignored, andthe task just under it (not within a branch) will be given control of the job file without any modification. Anyinitial input task that generates an error will stop the process from running as a whole, and output tasks willnot generate output. The On Error tab can be used to overwrite the default behaviors.
l Send to Process: Check this option to send the job file to an error management process.l Error Process drop-down: Enabled only when the Send to Process option is checked. Lists anyprocess of which the initial input task is the Input Error Bin task.
l Action Group: This group is disabled in the initial input tasks and defaults to Stop Process. In allother tasks where the On Error tab is present, the following options are available:
l Ignore: The task is ignored as if it did not exist, and the job file is passed on to the next task inthe process.

l Stop Branch: If the task is in a branch of the process, the branch is stopped and the job file isreturned to the process after the branch. The branch will not produce any output.
l Stop Process: The process is stopped and no more processing is done. No further output isproduced.
l Log Message: Check this option to enable logging a custom error message in the PlanetPress SuiteWorkflow Tools' log file.
l Message: Enabled only when the Log Message option is checked. Enter a message that will belogged in the PlanetPress Suite Workflow Tools' log file. You can use any variables available inPlanetPress Workflow to customize the message.
l Store the message in variable: Select in which jobinfo, local or global variable you want to store themessage content.
l ID: Enter an error ID. This ID will be visible in theWindows Event Viewer. However, the ID is notvisible in the PlanetPress Suite Workflow Tools' log file.
l Store the ID in variable: Select in which jobinfo, local or global variable you want to store the errorID.
l Reset to defaults: Resets all options in this tab to their default values.
If storing the message or ID, if they are store in a jobinfo they will be available in any error handling processwhere errors are being forwarded. In all cases, if your process continues after the error, the contents of thevariables selected in this window will be available for the rest of your process, or whenever they areoverwritten.
Common Errors
Though some error messages are specific to a task in particular, others may apply to any and all tasksbecause they are related more to the system than to PlanetPress itself. Some examples would be W3813,W3830, W3991, W4005. These correspond to issues such as not having any space to write files, permissionerrors on folders or files, etc.
Comments Tab
The Comments tab is common to all tasks. It contains a single text area (Task comments) that lets youwrite comments about the task. These comments are saved when the dialog is closed with the OK button,and are displayed in the Task Comments Pane.

PlanetPress Fax
PlanetPress Fax output tasks are used to make request to PlanetPress Fax, which creates faxes andsends them to a faxing program.
In addition to the job-specific PlanetPress Fax properties you configure in the task’s Properties dialog box,there are configurable options common to all PlanetPress Fax outputs processed by a given computer (See"PlanetPress Fax Plug-In Preferences" on page 649). Note that those options are specific to eachPlanetPress Fax installation and that they are immediately applied.
Input
Any data file with a valid Emulation. Metadata is optional and can be used to specify the fax number andinformation to send the file. Alternatively, a TIFF file in the proper page size and compression (CCITT Group4) can be used.
Processing
If a data file with metadata is used, the data file is merged with the selected PlanetPress Design document,converted into a multi-page TIFF file with CCITT Group 4 compression, and sent to the PlanetPress Faxhost specified in the properties. If the file is a TIFF file in the proper format and the "Pass-through" option isselected, no processing is done, the file is sent as-is.
Output
A TIFF in the CCITT Group 4 compression, and information for the FAX server to know where to send thefile.
Task Properties
General tab
l Host: Select the IP address of the PlanetPress Fax host to which you want the request to be sent. TheFax configuration is set in the PlanetPress Fax User Options on the target host.
l Refresh: Click to update the list of IP addresses displayed in the Host drop-down list box.
l Documents: Select a specific PlanetPress Design document if you want all the jobs to be faxed withthat document. You must select a document, pass-troughs are not available.

l Add job information to the document: Select to add the available job info variables in the “header”of the generated output file.
l Run mode group
l Printer centric: Select to send the document along with the trigger and data to the componentthat generates fax documents.
l Optimized PostScript Stream: Select to merge the selected document with the data received bythis task before sending it to the component that generates fax documents. Some PlanetPressDesign features, such as the Time and Date functions, require that this option be selected.
PlanetPress Image
PlanetPress Image output tasks are used to make request to PlanetPress Image, which creates image fileswhich it then archives or emails. Since this task is an output, it is not possible to immediately act on thegenerated image before continuing. When necessary to immediately retrieve the generated file, "DigitalAction" on page 274 should be used instead.
In addition to the job-specific PlanetPress Image properties you configure in the task’s Properties dialogbox, there are configurable options common to all PlanetPress Image outputs processed by a givencomputer (see "PlanetPress Image User Options" on page 653). Note that those options are specific to eachPlanetPress Image installation and that they are immediately applied.
The following describes the properties specific to PlanetPress Image output tasks. For information on thoseproperties shared by various types of tasks, such as Other and On error properties, refer to Configurations,Processes and Tasks.
Technical
In some combinations of Microsoft Outlook and Windows versions, it is not possible for Outlook to beopened while PlanetPress Workflow is running, so emails are not sent out automatically. To correctthis, make sure to logon to Windows on the PlanetPress Workflow server using the same login thatPlanetPress Workflow is using, and open Outlook before starting the PlanetPress Workflow services.You could also use a startup process to start Outlook before the rest of the services.

Input
Any data file with a valid Emulation, or an Optimized PostScript Stream file (.ps) generated by PlanetPressWorkflow itself.
The .ps file must be the result of the merge between a PlanetPress Design document and a data file, andcan be generated either with the use of "Add Document" on page 242, or a printer queue using a "Send toFolder Printer Queue" on page 66. Postscript generated using any other way will fail, as PlanetPress Imagerequires knowledge of the number of pages in the document, which is not available in output generatedusing any other means. Note however that "Digital Action" on page 274 does have the ability, in most cases,to generate output using third-party postscript files.
Processing & Output
Multiple things can happen, depending on the options chosen and the type of data this task receives:
l If the data file and a document are selected, and Printer Centric mode is used, the data file is sent tothe PlanetPress Image host which merges the data and document to produce output.
l If the data file and a document are selected, and Optimized PostScript Stream mode is used, thedata file is merged with the document and the resulting OPS job is sent to the PlanetPress Image hostto produce output.
l If the data file is a postscript file and either mode is used, the postscript file is sent to the PlanetPressImage host which generates output (since this is already Optimized PostScript, it is not regenerated).
Properties
General tab
l Host: Select the IP address of the PlanetPress Image host to which you want the request to be sent.
l Refresh: Click to update the list of IP addresses displayed in the Host drop-down list box.
l Documents: Select a specific PlanetPress Design document if you want all the jobs to be generatedwith that document. To use a document chosen at run-time for each job, enter a dynamic documentname using a combination of text, variables and data selections. To enable the dynamic documentname box, click inside it. To disable it, press Enter. Note that in the later case, you must be certain thatthe documents that will be chosen at run-time will in fact be available locally or at the selected host.

Note
While the Do not use a document (passthrough) is visible in this list, it is not compatible with thePlanetPress Image output if the PostScript was not generated by merging a design documentwith data in PlanetPress Workflow. In order to generate an image in passthrough mode withexternal PostScript, please use the Digital Action task.
l List only documents using VDX compilation: Check to ensure that only documents that arecompatible with the VDX compilation method are shown in the list, if producing VDX output.
l Run mode group
l Printer centric: Select to send the document along with the trigger and data to PlanetPressImage.
l Optimized PostScript Stream: Select to merge the selected document with the data received bythis task before sending it to PlanetPress Image. Note that some features, such as the Time andDate functions, require that this option be selected.
l Add job information to the document: Select to add the available job info variables in the “header”of the generated output file.
l Output type: Select the output file type that you want.
l PDF: The output will be a PDF file. If you select PDF, the DPI and Color Depth options (seebelow) are disabled and the options available in the PDF tab are enabled.
l JPEG: The output will be a JPEG file. JPEG is a lossy compression image format that createssmall files, compressing continuous tone images (such as scanned photographs) well.
l TIFF: The output will be a TIFF file. TIFF is a higher quality format that is one of the standards fordocument exchange, useful for eventual printing or archiving. You have a choice of the followingcompressed TIFF formats: TIFF Group 3, TIFF Group 4, and TIFF Packed bits. You can also usethe uncompressed TIFF format, which produces the largest files with the highest quality. TIFF isa versatile and platform-independent format. It is used in many digitizing projects as the format ofchoice for the digital masters. The TIFF Group 3 and Group 4 formats are efficient for documentstorage.
l The AutoStore, DocAccel and KYOcapture formats also generate TIFF files along with specialXML that are meant for these specialized systems.

l DPI: Enter the dots per inch (dpi) resolution of the output image. This property is enabled for all outputtypes except PDF.
l Color depth: Enter the color depth of the output image in bits per pixel (bpp). The color depth ismeasured in bits, because each pixel of the output image can be described with a varied number ofbits. A higher bit number allows for more colors. It also increases the image file size. A 1-bit colordepth produces monochrome images. 8-bits produce grayscale images (in PlanetPress Design youcan have 8-bit color images, but these are reduced to grayscale if you select 8-bit here), while 24-bitsproduce full color images. For JPEG output, you cannot select a monochrome (1 bpp) color depth. ForTIFF G3 and TIFF G4, monochrome (1 bpp) is the only Color depth option you can select. Thisproperty is enabled for all output types except PDF.
l Multi-page: Select to generate a single file containing multiple pages. When this option is notselected, PlanetPress Image creates a file for each page included in the output file. This property isenabled for all output types except PDF and JPEG.
l Add page number: Select to put a page number on each page included in the output file. This optiongoes with the Multiple TIFF option and is only visible if either the AutoStore, DocAccel or KYOcaptureformat is selected.
l Archive output: Select to archive generated files. If you select this option, you must enter a folder pathin the Archive folder box and a name in the File name box.
l Send Email: Select to send the generated file via email. You enter the emailing properties in theLogin, Recipients, and Attachment(s) tabs. Note that the generated file will only be sent if you selectthe Attach output file(s) option in the Attachment(s) tab.
l Archive folder: Enter the path of the folder to which output files generated by this task are to bearchived. PDF index files (PDI and XML) are also put in this folder. This edit box is enabled when theArchive output option is selected.
l Filename : Enter the name of the output files generated by this task. To prevent each new file fromoverwriting the previous one, you should use variable names. As with any variable property box, youcan use any combination of text, variables and data selections. When multiple files are generated for asingle job (such as for multiple TIFFs), each file name includes a sequence number, such as inInvoice0, Invoice1, Invoice2. If you use file name masks that include dots, such as Statement.%y.@(1,1,1,1,25,KeepCase,Trim) or Job.%f, for example, you must add quotation marks at the beginningand end of the file name (“Statement.%y.%m.@(1,1,1,1,25,KeepCase,Trim)” or ”Job.%f”). Otherwise,when the file is saved, anything appearing after the last dot is replaced by the file’s extensioncharacters (and the file name thus becomes Statement.2005.pdf instead ofStatement.2005.255842.pdf, or Job.tif instead of Job.544872.tif). Failing to add the quotation marksmay result in files being overwritten.

l Automatically Add Extension: Check if you want the correct extension for the image type to beappended to the file name automatically, rather than having to add it in the Filename box. The OutputType determines the extension to be used.
l Index group: This group lets you specify which type of index must be created for each documentgenerated by this task. PDI files are used by PlanetPress Search as indexing information.
l None: Select if you do not want this task to add an index file to the generated document.l PDI: Select if you want this task to add a PDI index file to the generated document.l XML and PDI: Select if you want this task to add both an XML and a PDI index file to thegenerated document.
Job Options tab
If you chose PDF as the output type in the General tab, use this tab to choose the appropriate PDF options.Note that all the options available in this tab are only used with PDF files.
l Job options: Select the PDF output option that best describes your needs. This loads all the standardsettings for the selected usage scenario. These settings can be changed as required. Note that if youmake changes and then select a different output option, your changes will be lost. PlanetPress Imagesupports numerous PDF standards: Standard, High Quality, Custom, and a variety of PDF/VT, PDF/Aand PDF/X formats.
l General group
l ASCII format: Select to create the PDF file using ASCII characters (instead of the usual 8-bitbinary format). This option produces a file suitable for transmission over a 7-bit ASCII link. Thisoption is useful if the PDFs need to be opened in a text editor, sent across networks, or sent viaemail using a program that does not support binary files. This option also generates smaller files.
l Compress text and line art: Select to compress the text and line work in the file using the Flatecompression filter. Flate is a compression method that works well on elements with large areasof single colors or repeating patterns, as well as on black-and-white elements that containrepeating patterns.
l Auto-rotate pages: Select to automatically rotate pages based on the orientation of the text orDSC comments.
l Optimize for fast web view: Select to minimize file size and facilitate page downloading.l Title: Enter a title for the document. If you leave this box empty, the document’s name will beused as the document’s title. Since this is a variable property box, you may use variables anddata selections and let PlanetPress Workflow interpret this information at run-time.

l Author: You may enter the name of the author of the document. Since this is a variable propertybox, you may use variables and data selections and let PlanetPress Workflow interpret thisinformation at run-time.
l Subject: You may enter the subject of the document. Since this is a variable property box, youmay use variables and data selections and let PlanetPress Workflow interpret this information atrun-time. Note that if you use a data selection in this box, you must be sure that the data that willbe selected at run-time will not contain any parentheses, as this would cause the task to fail. Ifyou suspect that the data may contain parentheses, you should use a Run Script action task(see Run Script Action Task Property) with a Strip() function to strip them out.
l Keywords: You may enter keywords for the document. Since this is a variable property box, youmay use variables and data selections and let PlanetPress Workflow interpret this information atrun-time.
l Monochrome images group
l Compression: Select the compression to use for the monochrome images. Flate compression islossless, so no data is lost during compression. Flate Mono works well on images with largeareas of solid shades or repeating patterns, such as screen shots and simple images createdwith paint or drawing programs. CCITT typically yields the best compression of monochromeimages. It is the compression method developed for fax transmissions. Note that configurationsthat were created with an earlier version of PlanetPress Workflow and that included tasks set notto use any compression will by default be set to use the Flate compression method.
l Resolution: Select the resolution to use for monochrome images.
l Grayscale images group
l Compression: Select the compression to use for the grayscale images. Flate is a losslesscompression method, so no data is lost in the process. It works well on images with large areasof single shades or repeating patterns, such as screen shots and simple images created withpaint or drawing programs. JPEG removes image data and may reduce image quality, but maybe suitable for continuous-tone photographs containing more detail than can be reproducedonscreen or in print. Since JPEG eliminates data, it can achieve much smaller file sizes thanFlate compression. Select Auto to let the application choose the best compression methodautomatically. Note that configurations that were created with an earlier version of PlanetPressWorkflow and that included tasks set not to use any compression will by default be set to use theFlate compression method.
l Downsampling: Select the down sampling option. Down sampling reduces image size bybreaking images down into small areas in which multiple pixels are replaced by single pixels.

The Grayscale resolution you enter in the following box is used to control the down samplingprocess. Select None to prevent grayscale down sampling. Select Average to average pixelshades in each sample area and to replace the entire area with a pixel of the average shade.Select Subsample to use a pixel in the center of the sample area and replace the entire area withthat pixel value. This method is significantly faster, but results in images that are less smooth.Select Bicubic to use a weighted average to determine pixel shades. This method is the slowestbut most precise and results in the smoothest tonal gradations.
l Resolution: Select the resolution to use for grayscale images. Note that this setting has animpact on the grayscale down sampling process.
l Color images group
l Compression: Select the compression to use for the color images. Flate is a losslesscompression method, so no data is lost in the process. It works well on images with large areasof single shades or repeating patterns, such as screen shots and simple images created withpaint or drawing programs. JPEG removes image data and may reduce image quality, but maybe suitable for continuous-tone photographs containing more detail than can be reproducedonscreen or in print. Since JPEG eliminates data, it can achieve much smaller file sizes thanFlate compression. Select Auto to let the application choose the best compression methodautomatically. Note that configurations that were created with an earlier version of PlanetPressWorkflow and that included tasks set not to use any compression will by default be set to use theFlate compression method.
l Downsampling: Select the down sampling option. Down sampling reduces image size bybreaking images down into small areas in which multiple pixels are replaced by single pixels.The Color resolution you enter in the following box is used to control the down sampling process.Select None to prevent grayscale down sampling. Select Average to average pixel color in eachsample area and to replace the entire area with a pixel of the average color. Select Subsample touse a pixel in the center of the sample area and replace the entire area with that pixel value. Thismethod is significantly faster, but results in images that are less smooth. Select Bicubic to use aweighted average to determine pixel shades. This method is the slowest but most precise andresults in the smoothest tonal gradations.
l Resolution: Select the resolution to use for color images. Note that this setting has an impact onthe color down-sampling process.
ll Security group
l Set document permissions: Select to enter the Permissions password.
l Permissions password: Enter a password in this box only if you want to prevent userswho does not have this password from changing the security options of the generated PDF

files.
l Allow printing: Select to let users print the generated PDF files.l Allow changing the document: Select to let users edit the generated PDF files.l Allow content copying: Select to let users copy content from the generated PDF files.
l Allow form filling: Select to let users enter information in the form fields included in thegenerated PDF files.
ll PDF open password: Enter a password in this box only if you want to prevent users who doesnot have this password from opening the generated PDF files.
l Security Level: The password protection for PDF can be encrypted using one of the availableencryption methods (RC4, AES-256 and AES-128). It gives the task the ability to take an existingPDF in input and apply the selected password to the PDF without any change to the quality levelof the original PDF.
l Font group
l Embed all: Select to embed the entire font of all fonts used in the variable content documentwithin the generated PDFs. Using this option may result in large PDFs, especially if many fontsare used. Note that those fonts installed by default with the Adobe Acrobat and Adobe Readerare never embedded. If a font is not embedded in your PDF, opening it on another computer orprinting it may cause it to be substituted by another default font.
l Subset: Select to embed only a subset of the Type 1 and TrueType fonts used in the document.A font subset is in fact composed of only those characters that are actually used in the document.This option can only be used if the Embed all fonts option is selected. Note that if more than 35%of the characters included in a font are used in the document, the entire font is embedded. Thisoption often produces smaller PDF files and ensures proper PDF display.
l Initial view group
l Zoom factor: Select the magnification at which you want Adobe Acrobat or Adobe Reader (orother PDF viewer) to open the generated PDF. Choose the Fit in window option to display theentire page using the available screen space, or choose a percentage of the actual documentsize.
l Show: Select the information you want Adobe Acrobat or Adobe Reader (or other PDF viewer) todisplay with the generated PDF. Select Page only to leave the tabs area to the left of the PDFpages empty. Select Bookmarks and page to display the contents of the Bookmarks tab (youuse data selection objects to create bookmarks in PlanetPress) alongside the PDF pages. SelectPage tab and Page to display the content of the Pages tab (thumbnails of each PDF pages)

alongside the PDF pages. Select Full screen to hide all screen contents except the PDF page,and expand the PDF page to the maximum size it can occupy onscreen.
PlanetPress Search Database tab
If PlanetPress Workflow is configured to automatically update a PlanetPress Search database (See"PlanetPress Image User Options" on page 653), this tab can be used to override the global settings so thatthe task updates a different database than the one set in that global configuration. In order for the settings towork, the Add PDF to PlanetPress Search database must be checked. However, you can override whichdatabase will be updating using the option in this window, Override global PlanetPress Search Databasesettings. The database options then activate.
l Database type: Select the type of the database in which you want to create a table (Access, or SQLServer).
l Connection time-out: Enter the time, in seconds, that the connection to the database is maintainedwhile no action is taking place before the connection is severed.
l Database directory: Enter the path of the directory in which the Access database is located, or usethe Browse button to navigate to, and select, the directory. This option is available only when youselect Access database in the Database type box.
l Data source name: Enter the name of the computer on which the database runs. This option isavailable only when you select SQL Server database or Oracle database in the Database type box.
l Use default database: Select to use the default database associated with your user profile on thatSQL Server or Oracle database. Clear to enter the name of the database in the box that appears.
l Use Windows NT Integrated security: Select to use your Windows user name and password to logonto the SQL database.
l User ID: Enter the user id required to access the database to which you are adding new PDI files fromthe generated PDF files. If you are using an SQL database, enter the login name you chose when youconfigured the SQL database (refer to the “Using PlanetPressSearch with an SQL Server Database”section of the PlanetPress Search User Guide).
l Password: Enter the password required to access the database.l Test Connection: Click to verify that PlanetPressImage can connect to the specified database.l Enforce global table creation: Select this option, as it ensures that all database users are grantedaccess to the database. This option is available only when you select SQL database in the Databasetype box.

Login, Recipient, Attachments
l For the Login, Recipient and Attachment tabs, please see the "Send Email" on page 528 taskproperties.
PlanetPress Capture
Note
PlanetPress Capture is only available in version 7.2 and higher of PlanetPress Workflow. It is notavailable in older versions nor is it available in PlanetPress Office and PlanetPress Watch.
PlanetPress Capture is a set of tools available in PlanetPress Workflow that enable output and input forinteraction with an Anoto Digital Pen. Anoto Digital Pens are electronic devices containing a camera,processor, memory and communication capabilities and they can recognize their location on any paperwhere a special Anoto pattern is printed.
For more information on building and using PlanetPress Capture processes, please See "PlanetPressCapture Workflow" on page 128.
"Anoto" and the Anoto logotype are trademarks owned by Anoto AB. PLANETPRESS CAPTURE isbased on Anoto Digital Pen and Paper Technology, which is covered by over 200 patents worldwide,including but not limited to US6663008, US7172131, US7248250, US7281668, JP3872498,JP3842283, CN1595440, SE517445, RU2256225, and AU773011.
Capture Condition
The Capture Condition checks the status or field contents of a capture document that has been processedby the Capture Field Processor action task.
Input
A data file in PGC or PDF format that is accompanied by valid Metadata. This metadata must containCapture information and is generally available after a "Capture Fields Processor" on page 426 or "FindCapture Documents" on page 436 task. However, it is also possible to directly retrieve the required

information from a specific Document ID. When a specific ID is used, the data file and metadata arecompletely ignored by this task's condition rules, and the database information is used instead.
Processing
The condition is evaluated using the specified rules, combination (condition is true when...) and scope (condition scope).
Output
The original data file and metadata is output by this task. If the rules used in the condition return True, thedata and metadata is sent down in the condition's branch. Otherwise, this same information is sent in thetrunk.
Task Properties
General Tab
l Document Origin:l Document to process: Determines where the document information is read
l From Metadata: Select to use the current document available in the metadata generatedby the Capture Field Processor.
l From Specific ID: Select to specify an exact Document ID from the database. Thisdocument does not need to be loaded as a data file or its metadata manually obtained, asthis task simply looks up the information directly in the PlanetPress Capture database.
l Condition based on Document Status: Select this to base the condition on the state of the documentl Document is open: Condition will be true if the document is open (not all Capture fields arefilled).
l Document is closed: Condition will be true if the document is closed (all relevant CaptureFields are filled).
l Document is complete: Condition will be true if the document is still open, but all appropriateCapture Fields are filled.
l Document is partial: Condition will be true if the document is still open but only part of theappropriate Capture Fields are filled.
l Document is empty: Condition will be true if the document is open but no Capture Field is filled.

l Document is on error: Condition will be true if a logical error was triggered while processing thePGC. This can happen, for example, if a field was re-written when it should not, a List Field set toonly accept one option contains ink in both options, etc.
l Condition based on Pattern Availability : Select to base the condition on the availability or nonavailability of patterns in a specific pattern sequence.
l For Pattern Sequence: The name or identification of the pattern sequence to check. Leaveblank if no pattern sequence is used.
l Number of Patterns available are: The operator for the comparison. Numeric comparison withthe number of available patterns in the specified pattern sequence.
l This number of Patterns: The number to use as a comparison to the available number ofpatterns in the pattern sequence.
l Capture Field-based condition: Select to base the condition on the state of one or more fields of yourdocument.
l Field Name: The name of the field on which to base your condition. This is equivalent to thename of the Capture Field Object in PlanetPress Design.
Technical
In this field in particular, the right-click menu displays a unique option, 'Open DocumentPreview'. This option displays a list of existing documents. When clicking on a document,the "PDF Viewer" on page 606 appears and displays all of the capture fields. Double-clickon a Capture field to automatically add its name to the Field Name box.
l Condition: Defines what should trigger the condition:l Ink is Present: Triggered by the presence or absence of ink in the field.
l None: No ink should be present in any field with this name.l Any: Ink should be present in at least one field of this name in your document.l All: Ink should be present in all fields of this name in your document.l Index: The specified index of the capture field of this name should contain ink. TheIndex property is generated when a Capture Field object is repeated or is part of arunpage. This index is 1-based.

l Pidget setting: Triggered by specific pidget settings.l Every pidget setting (such as stroke color and stroke thickness) is listed here. If thespecific pidget was triggered before ink was applied to the Capture Field, theconditions becomes true.
l Start timestamp: Triggered when the first ink is applied in the field.l Before: If the first stroke found in the Capture Field was made earlier than thespecified date and time, the condition becomes true.
l After: If the first stroke found in the Capture Field was made later than the specifieddate and time, the condition becomes true.
l In the last: If the first stroke found in the Capture Field was made within the specifiednumber of Hour(s), Day(s) or Week(s) counting backwards from the moment thePGC is received, the condition becomes true.
l End timestamp: Triggered when the last stroke finishes in the field. (see Start Timestampfor detailed options)
l Pen Id: Triggered by the ID (serial number) of the pen. A box provides a way to specifywhich Pen ID will trigger this condition to be true.
l Field List Value: Triggered only on Field List Capture Fields. A box provides a way tospecify which value will trigger this condition to be true.
l Content Status: Triggered when the field is in a specific status. A Drop-down provides away to select which status will trigger this condition to be true.
l Complete: The field contains ink and no error was detected.l Empty: No ink was found in the field.l Error: A logical error was detected in the field. This can happen, for example, if a fieldwas re-written when it should not, a List Field set to only accept one option containsink in both options, etc.
l ICR Value: Triggered when the value given by the ICR engine compares with the specifiedvalue. Operators are available for the comparison (such as Equal, Not Equal, Lower orHigher Than, Contains and etc). It is also possible to select which Index of the field to use(See Ink is Present" above).
l ICR Confidence: Triggered when the confidence percentage the ICR engine gave to theICR value compares with the value determined in the "Confidence" box, using the chosencomparison operator.

l ICR Resemblance: Triggered then the resemblance percentage the ICR engine gave tothe ICR value in relation to its recognition database compares with the value determined inthe "Resemblance" box, using the chosen comparison operator. For more information onICR, see PlanetPress Capture ICR.
l button: Add a new field and action line.
l button: Remove the currently selected line.l The condition is true when: Specifies how to react when more than one Capture Field basedcondition is present
l All items are met: The task will return true if ALL the combined conditions are true.l At least one item is met: The task will return true if ANY of the combined conditions is true.
l Condition Scope: Determines whether the conditions need to be true for all the pages of thedocument, or any one of them.
l In the document (occurrence): The task will return true if the condition set it true for any page ofthe document.
l On each pages: The task will return true only if the condition set is true for all of the pages of thedocument.
l Invert condition: Inverts the result of the task.
Examples & Use Cases
This task is put into effect in the following use cases and example processes:
l Capture Post Processing Workflowl Capture Web Manager Workflow
On Error Tab
The On Error tab is common to all tasks. Details can be found in the" Task Properties Dialog" on page 666.
By default, any action task, branch, splitter or condition that generates an error will simply be ignored, andthe task just under it (not within a branch) will be given control of the job file without any modification. Anyinitial input task that generates an error will stop the process from running as a whole, and output tasks willnot generate output. The On Error tab can be used to overwrite the default behaviors.

l Send to Process: Check this option to send the job file to an error management process.l Error Process drop-down: Enabled only when the Send to Process option is checked. Lists anyprocess of which the initial input task is the Input Error Bin task.
l Action Group: This group is disabled in the initial input tasks and defaults to Stop Process. In allother tasks where the On Error tab is present, the following options are available:
l Ignore: The task is ignored as if it did not exist, and the job file is passed on to the next task inthe process.
l Stop Branch: If the task is in a branch of the process, the branch is stopped and the job file isreturned to the process after the branch. The branch will not produce any output.
l Stop Process: The process is stopped and no more processing is done. No further output isproduced.
l Log Message: Check this option to enable logging a custom error message in the PlanetPress SuiteWorkflow Tools' log file.
l Message: Enabled only when the Log Message option is checked. Enter a message that will belogged in the PlanetPress Suite Workflow Tools' log file. You can use any variables available inPlanetPress Workflow to customize the message.
l Store the message in variable: Select in which jobinfo, local or global variable you want to store themessage content.
l ID: Enter an error ID. This ID will be visible in theWindows Event Viewer. However, the ID is notvisible in the PlanetPress Suite Workflow Tools' log file.
l Store the ID in variable: Select in which jobinfo, local or global variable you want to store the errorID.
l Reset to defaults: Resets all options in this tab to their default values.
If storing the message or ID, if they are store in a jobinfo they will be available in any error handling processwhere errors are being forwarded. In all cases, if your process continues after the error, the contents of thevariables selected in this window will be available for the rest of your process, or whenever they areoverwritten.
Common Errors
Though some error messages are specific to a task in particular, others may apply to any and all tasksbecause they are related more to the system than to PlanetPress itself. Some examples would be W3813,W3830, W3991, W4005. These correspond to issues such as not having any space to write files, permissionerrors on folders or files, etc.
Comments Tab
The Comments tab is common to all tasks. It contains a single text area (Task comments) that lets youwrite comments about the task. These comments are saved when the dialog is closed with the OK button,and are displayed in the Task Comments Pane.
Capture Fields Generator
The Capture Fields Generator action task is used to generate Capture patterns in your job, which will thenbe printed for use with an Anoto Digital Pen. It also interacts with the Capture database and does someoperations.
Warning
PlanetPress Capture Fields cannot simply be inserted into an existing document as-is and expectedto work properly, efficiently or consistently. In order to design a document with Capture Fields, youmust review and understand the Critical PlanetPress Capture Implementation Restrictions.
Input
The Capture Field Generator action task expects to receive a regular data file that corresponds to theCapture-Ready document that uses it, along with Metadata generated using the same data file anddocument. This means that this task must be preceded by at least the Create Metadata task.
This metadata must also be correctly separated at the documents level, either in the Capture-Readydocument's properties or through the Metadata Level Creation task.
You may also use a Metadata Sequencer task in order to split the job into multiple parts. This both createsmultiple smaller outputs, as well as multiple smaller PDFs in the Capture database. While it is notrecommended to separate each document on its own as it removes all optimization and makes the databasemuch larger, you may split into document batches such as 250, 1000 or 2500 documents.
If using the Metadata Sequencer it is generally recommended to place the Sequencer and the CaptureFields Generator tasks within a branch and, within the Capture Field Generator's On Error properties tab, toset it to stop the branch if any errors occur. This is to ensure that if such an error occurs most of yourdocument sequences will get generated and you will not have to start the job over from the beginning.

Processing
The Capture Fields Generator action task uses an existing PlanetPress Design document containingCapture fields and assigns a unique Capture pattern to each printed page. The task then locks each patternthat it used so it cannot be reassigned to any other document.
The whole job is then converted into a PDF file which is stored, without the patterns, in the CaptureDatabase. This PDF file is later used by the "Capture Fields Processor" on page 426 to be merged with inkfrom the pen. At the same time the output is generated, either as a PDF (including the patterns) or anOptimized PostScript Stream file. This means that regardless of the output, a PDF is always generated inthe database.
Note
If any error occurs during processing, such as running out of patterns while generating the job, everyaction made by this task will be rolled back as if they hadn't happened.
Output
The Capture fields Generator action task will output either a PDF and Metadata, or an OptimizedPostScript Stream file without Metadata.
Properties
Pattern Generator action task properties are as follows:
l Capture Document: Choose the PlanetPress Design capture ready document that will be used togenerate the output including the capture fields.
l Document Title: Enter a name for the document that will be saved inside the PlanetPress CaptureDatabase. This name should be unique and recognizable and will be used later to retrieve thedocument form using the Get Capture Document action task.
l Document Title group: Determines a Title for the document. This title is accessible in the CaptureDatabase and can be used to search for a document or retrieve a list of document using other tasks.
l Frommetadata: Use the Document Title property as set in the PlanetPress Capture section ofa PlanetPress Design document's properties.

l Custom: Use the title in the input field as set by the user. The field is variable so the title can beset on a per-document basis using data or metadata selections.
l Output Format groupl Continue process with optimized postscript (no metadata): The job file coming out of thetask will be a PostScript file that can be sent to any postscript printer or saved locally.
l Continue process with PDF (with newmetadata): The job file coming out of the task will be aPDF with accompanying metadata for that PDF (previous metadata is lost).
l Override document pattern sequence: Check to override the pattern sequence as entered in yourPlanetPress Design document properties. Once checked, enter a new pattern sequence in the PatternSequence box.
l Fail if document doesn't contain at least one capture field: If the static or dynamic document thattries to pass through this task does not contain any capture fields, an error will be generated.
l Simulate pattern area on final document: When retrieving the document from the database with theGet Capture Document, each Capture Field is simulated using a grey box. This box is not a patternand cannot be used with the Anoto Digital Pen, however this option can be used to keep the sameoverall design of your document.
Examples & Use Cases
This task is put into effect in the following use cases and example processes:
l Basic Functional Capture Workflowl Capture Web Manager Workflow
On Error Tab
The On Error tab is common to all tasks. Details can be found in the" Task Properties Dialog" on page 666.
By default, any action task, branch, splitter or condition that generates an error will simply be ignored, andthe task just under it (not within a branch) will be given control of the job file without any modification. Anyinitial input task that generates an error will stop the process from running as a whole, and output tasks willnot generate output. The On Error tab can be used to overwrite the default behaviors.
l Send to Process: Check this option to send the job file to an error management process.l Error Process drop-down: Enabled only when the Send to Process option is checked. Lists anyprocess of which the initial input task is the Input Error Bin task.
l Action Group: This group is disabled in the initial input tasks and defaults to Stop Process. In allother tasks where the On Error tab is present, the following options are available:
l Ignore: The task is ignored as if it did not exist, and the job file is passed on to the next task inthe process.
l Stop Branch: If the task is in a branch of the process, the branch is stopped and the job file isreturned to the process after the branch. The branch will not produce any output.
l Stop Process: The process is stopped and no more processing is done. No further output isproduced.
l Log Message: Check this option to enable logging a custom error message in the PlanetPress SuiteWorkflow Tools' log file.
l Message: Enabled only when the Log Message option is checked. Enter a message that will belogged in the PlanetPress Suite Workflow Tools' log file. You can use any variables available inPlanetPress Workflow to customize the message.
l Store the message in variable: Select in which jobinfo, local or global variable you want to store themessage content.
l ID: Enter an error ID. This ID will be visible in theWindows Event Viewer. However, the ID is notvisible in the PlanetPress Suite Workflow Tools' log file.
l Store the ID in variable: Select in which jobinfo, local or global variable you want to store the errorID.
l Reset to defaults: Resets all options in this tab to their default values.
If storing the message or ID, if they are store in a jobinfo they will be available in any error handling processwhere errors are being forwarded. In all cases, if your process continues after the error, the contents of thevariables selected in this window will be available for the rest of your process, or whenever they areoverwritten.
Common Errors
Though some error messages are specific to a task in particular, others may apply to any and all tasksbecause they are related more to the system than to PlanetPress itself. Some examples would be W3813,W3830, W3991, W4005. These correspond to issues such as not having any space to write files, permissionerrors on folders or files, etc.

Comments Tab
The Comments tab is common to all tasks. It contains a single text area (Task comments) that lets youwrite comments about the task. These comments are saved when the dialog is closed with the OK button,and are displayed in the Task Comments Pane.
"Anoto" and the Anoto logotype are trademarks owned by Anoto AB. PLANETPRESS CAPTURE isbased on Anoto Digital Pen and Paper Technology, which is covered by over 200 patents worldwide,including but not limited to US6663008, US7172131, US7248250, US7281668, JP3872498,JP3842283, CN1595440, SE517445, RU2256225, and AU773011.
Capture Fields Processor
The Capture Fields Processor action task is used to update the Capture database using informationreceived from an incoming PGC file, which generally originates from a communication by the AnotopenDirector.
Input
This task requires a PGC file that has been obtained from an Anoto Digital Pen that was used to write ondocuments generated from the same PlanetPress Workflow installation.
Processing
The PlanetPress Capture Fields Processor action task receives and processes the information sent by theAnoto digital pen and updates all the documents in the PlanetPress Capture Database using the informationfrom the pen. Any ink in the pen is added as an EPS (image) layer on the PDF inside the Capture Database.If a specific document needs to be closed to release its pattern, this task does so.
During processing, ink is always applied to the document first and then the logic is applied for releasingpatterns. This means that even if a document is closed by a field set as Final that was checked first, inkpresent in other fields will still be applied to the document.
From version 7.5 and onwards, ICR is done on the ink, if the "Perform ICR Recognition" option is checked.
Error Handling
If the Capture Fields Processor generates a critical error during the processing of any document in thePGC file, all of its actions will be reverted. If your PGC file contains multiple documents, even thosedocuments that were processed before will revert. It is strongly suggested to backup your PGC file beforeusing this task and to create an error handling process to capture these errors.
Logical errors do not cause this task to exit. For example, if a List Item Capture Field is set to only accept asingle option but contains ink in more than one option, or if a Capture Field that does not accept re-writingreceives more ink, the task will still complete. The inks that are relevant to logical errors are still added to thePDF document, but they are added on a separate "error" layer.
Output
This task outputs the PGC file it received along with metadata that contains the documents that have beenupdated by this task. The metadata can be used to do post-processing of the file using Capture Conditions,or directly through other metadata tools. The structure of the output metadata added by Capture is thefollowing:
l Document Levell CapCloseDate: Date at which the document was closed by Capture Field Generator. Blank ifthe document is still open.
l CapDocID: The database ID of the document. This field is useful especially if using the CaptureAPI since the ID corresponds to the itembyID function.
l CapDocName: The name of the document as specified in the Capture Field Generator.l CapOpenDate: The date at which the document was created by the Capture Field Generator.l CapPatternSequence: The value of the pattern sequence assigned to the document.l CapPGCName: The name of each PGC file that was used to update this document (will repeatfor each PGC file)
l CapStatus: Current status of the document:l 0: Openl 1: Closed by an optional fieldl 2: Closed by a mandatory fieldl 3: Closed by a final field

l CapTemplateName: Name of the PlanetPress Connect document used to generate thedocument.
l Page Level:l CaptureField: Information on each capture field on the page. Repeated for each capture fieldthat is present.
Technical
There is currently no method of obtaining the information from a PGC except through a successfulprocessing of this task, or via the use of the PlanetPress Capture API within a Script (see "UsingScripts" on page 81)
Properties
Capture Fields Processor action task properties are as follows:
l PGC Name: This value will be added to the output metadata, as well as the Capture Database, to linkthe PGC to the document it updates.
l Pattern sequence groupl Type: Specify from where the Pattern Sequence should be taken.
l None: Do not use a Pattern Sequence.l Pen Information: Use the Pattern Sequence assigned to the pen in the PlanetPressCapture Database.
l Custom: Overwrite the pen's information and specify a Pattern Sequence manually or usea data selection.
l Custom Pattern Sequence: If you choose Custom in the Type drop-down, enter a manualPattern Sequence or a data selection that contains the Pattern Sequence to be used.
l ICR Settings groupl Perform ICR Recognition: Triggers the PlanetPress Capture ICR engine. For more information,see PlanetPress Capture ICR.
l Engine Language: Define the language the ICR engine will use for text recognition. This has amajor effect on the way text is recognized, as different languages use different databases to

recognize letters, numbers and characters. For example, accented letters are not correctlyrecognized in the English ICR database.
l Fail if new ink is found on non-rewritable fields: Check to trigger the On Error tab if and when afield set as Disable Rewriting receives ink in a new session.
l Ignore out of bounds ink data: Check to continue processing even if receiving a PGC that causesink to be outside of any Capture Field to appear. This may happen if updating the wrong document.When out of bounds ink is found, the document will be set in the "Error" status. (see note below)
l Split PGC by document: Check to treat each document as a separate PGC file. This removes theneed to use a Capture PGC splitter before this task, however the PGC Splitter remains useful whenusing self-replicating processes to accelerate PGC processing.
l Add pattern information to the metadata: Adds advanced information in the Metadata for post-processing:
l At the Document node, timestamp information such as ink start/end timel At the Page node, information about each Capture Field such as its name, dimensions, style,index, mask, timestamp and content status.
Technical
When the "ignore out of bounds ink data" option is checked, this option modifies the way that the OnError tab reacts. When a single split is processed and generates an error, only that split triggers theOn Error tab. The other splits continue processing as usual. If another split generates an error, it alsotriggers the On Error tab.
Examples & Use Cases
This task is put into effect in the following use cases and example processes:
l Basic Functional Capture Workflowl Capture Web Manager Workflow
On Error Tab
The On Error tab is common to all tasks. Details can be found in the" Task Properties Dialog" on page 666.
By default, any action task, branch, splitter or condition that generates an error will simply be ignored, and
the task just under it (not within a branch) will be given control of the job file without any modification. Anyinitial input task that generates an error will stop the process from running as a whole, and output tasks willnot generate output. The On Error tab can be used to overwrite the default behaviors.
l Send to Process: Check this option to send the job file to an error management process.l Error Process drop-down: Enabled only when the Send to Process option is checked. Lists anyprocess of which the initial input task is the Input Error Bin task.
l Action Group: This group is disabled in the initial input tasks and defaults to Stop Process. In allother tasks where the On Error tab is present, the following options are available:
l Ignore: The task is ignored as if it did not exist, and the job file is passed on to the next task inthe process.
l Stop Branch: If the task is in a branch of the process, the branch is stopped and the job file isreturned to the process after the branch. The branch will not produce any output.
l Stop Process: The process is stopped and no more processing is done. No further output isproduced.
l Log Message: Check this option to enable logging a custom error message in the PlanetPress SuiteWorkflow Tools' log file.
l Message: Enabled only when the Log Message option is checked. Enter a message that will belogged in the PlanetPress Suite Workflow Tools' log file. You can use any variables available inPlanetPress Workflow to customize the message.
l Store the message in variable: Select in which jobinfo, local or global variable you want to store themessage content.
l ID: Enter an error ID. This ID will be visible in theWindows Event Viewer. However, the ID is notvisible in the PlanetPress Suite Workflow Tools' log file.
l Store the ID in variable: Select in which jobinfo, local or global variable you want to store the errorID.
l Reset to defaults: Resets all options in this tab to their default values.
If storing the message or ID, if they are store in a jobinfo they will be available in any error handling processwhere errors are being forwarded. In all cases, if your process continues after the error, the contents of thevariables selected in this window will be available for the rest of your process, or whenever they areoverwritten.

Common Errors
Though some error messages are specific to a task in particular, others may apply to any and all tasksbecause they are related more to the system than to PlanetPress itself. Some examples would be W3813,W3830, W3991, W4005. These correspond to issues such as not having any space to write files, permissionerrors on folders or files, etc.
Comments Tab
The Comments tab is common to all tasks. It contains a single text area (Task comments) that lets youwrite comments about the task. These comments are saved when the dialog is closed with the OK button,and are displayed in the Task Comments Pane.
Capture PGC Splitter
The Capture PGC Splitter task can be used to separate each document into its own PGC file so they canbe processed separately. The splitter then sends each document PGC to the next action, which should bethe Capture Fields Processor task. Note that using the Capture PGC Splitter will cause your process totake more time, since each PGC must pass through the Capture Fields Processor and then the GetCapture Document task.
Technical
Due to the fact that the Capture PGC Splitter task modifies the original PGC, in some cases thelegality of the PGC signature may be compromised. This depends on your country or region's laws, soif your implementation of Capture requires signatures to be authenticated please consult a legaladvisor for more details.
Input
A PGC file received from an Anoto digital pen.
Processing
The PGC file is split by document, if a document can be matched for each pattern ID found in the PGC. Thematch is made by comparing each Pattern ID with the information found in the Capture database. If morethan one pattern is used in a document (pattern on multiple pages of the document), all of the information for

this document (more than one Pattern ID) is sent down as a split. Patterns that do not match any documentare sent individually, one Pattern ID per split.
Output
One or more PGC file, separated as described above.
Task Properties
General tab
l Pattern sequence group: Determines what Pattern Sequence will be assigned to each PGC file.l Type: Specify from where the Pattern Sequence should be taken.
l None: Do not use a Pattern Sequence.l Pen Information: Use the Pattern Sequence assigned to the pen in the PlanetPressCapture Database.
l Custom: Overwrite the pen's information and specify a Pattern Sequence manually or usea data selection.
l Custom Pattern Sequence: If you choose Custom in the Type drop-down, enter a manualPattern Sequence or a data selection that contains the pattern sequence to be used.
On Error Tab
The On Error tab is common to all tasks. Details can be found in the" Task Properties Dialog" on page 666.
By default, any action task, branch, splitter or condition that generates an error will simply be ignored, andthe task just under it (not within a branch) will be given control of the job file without any modification. Anyinitial input task that generates an error will stop the process from running as a whole, and output tasks willnot generate output. The On Error tab can be used to overwrite the default behaviors.
l Send to Process: Check this option to send the job file to an error management process.l Error Process drop-down: Enabled only when the Send to Process option is checked. Lists anyprocess of which the initial input task is the Input Error Bin task.
l Action Group: This group is disabled in the initial input tasks and defaults to Stop Process. In allother tasks where the On Error tab is present, the following options are available:
l Ignore: The task is ignored as if it did not exist, and the job file is passed on to the next task inthe process.
l Stop Branch: If the task is in a branch of the process, the branch is stopped and the job file isreturned to the process after the branch. The branch will not produce any output.
l Stop Process: The process is stopped and no more processing is done. No further output isproduced.
l Log Message: Check this option to enable logging a custom error message in the PlanetPress SuiteWorkflow Tools' log file.
l Message: Enabled only when the Log Message option is checked. Enter a message that will belogged in the PlanetPress Suite Workflow Tools' log file. You can use any variables available inPlanetPress Workflow to customize the message.
l Store the message in variable: Select in which jobinfo, local or global variable you want to store themessage content.
l ID: Enter an error ID. This ID will be visible in theWindows Event Viewer. However, the ID is notvisible in the PlanetPress Suite Workflow Tools' log file.
l Store the ID in variable: Select in which jobinfo, local or global variable you want to store the errorID.
l Reset to defaults: Resets all options in this tab to their default values.
If storing the message or ID, if they are store in a jobinfo they will be available in any error handling processwhere errors are being forwarded. In all cases, if your process continues after the error, the contents of thevariables selected in this window will be available for the rest of your process, or whenever they areoverwritten.
Common Errors
Though some error messages are specific to a task in particular, others may apply to any and all tasksbecause they are related more to the system than to PlanetPress itself. Some examples would be W3813,W3830, W3991, W4005. These correspond to issues such as not having any space to write files, permissionerrors on folders or files, etc.
Comments Tab
The Comments tab is common to all tasks. It contains a single text area (Task comments) that lets youwrite comments about the task. These comments are saved when the dialog is closed with the OK button,and are displayed in the Task Comments Pane.

"Anoto" and the Anoto logotype are trademarks owned by Anoto AB. PLANETPRESS CAPTURE isbased on Anoto Digital Pen and Paper Technology, which is covered by over 200 patents worldwide,including but not limited to US6663008, US7172131, US7248250, US7281668, JP3872498,JP3842283, CN1595440, SE517445, RU2256225, and AU773011.
Extract ICR Data
The Extract ICR Data task retrieves the ICR data from the specified document ID from the CaptureDatabase and adds this information to the current Metadata in the process, at the specified level.
Input
Any data file, but generally one associated with the document in question (either a PGC or a PDF), alongwith an associated metadata file.
Processing
A query is made to the Capture database and the ICR data is retrieved. The document that is queried mustbe available in the database (must not have been closed and retrieved previously).
Output
The original data file is output by this task, along with the original Metadata file that has been enhanced withthe ICR data at the selected level.
Properties
General Tab
l Document ID: A variable data field that corresponds to the database ID of the document from whichyou want to retrieve ICR data. The Document ID is generated by the system through the CaptureFields Generator. The ID must correspond to a document in the Capture database, or the task will failwith an error.
l Metadata Level: A drop-down list containing all of the levels of Metadata. Choose the one where theICR data will be added.
On Error Tab
The On Error tab is common to all tasks. Details can be found in the" Task Properties Dialog" on page 666.

By default, any action task, branch, splitter or condition that generates an error will simply be ignored, andthe task just under it (not within a branch) will be given control of the job file without any modification. Anyinitial input task that generates an error will stop the process from running as a whole, and output tasks willnot generate output. The On Error tab can be used to overwrite the default behaviors.
l Send to Process: Check this option to send the job file to an error management process.l Error Process drop-down: Enabled only when the Send to Process option is checked. Lists anyprocess of which the initial input task is the Input Error Bin task.
l Action Group: This group is disabled in the initial input tasks and defaults to Stop Process. In allother tasks where the On Error tab is present, the following options are available:
l Ignore: The task is ignored as if it did not exist, and the job file is passed on to the next task inthe process.
l Stop Branch: If the task is in a branch of the process, the branch is stopped and the job file isreturned to the process after the branch. The branch will not produce any output.
l Stop Process: The process is stopped and no more processing is done. No further output isproduced.
l Log Message: Check this option to enable logging a custom error message in the PlanetPress SuiteWorkflow Tools' log file.
l Message: Enabled only when the Log Message option is checked. Enter a message that will belogged in the PlanetPress Suite Workflow Tools' log file. You can use any variables available inPlanetPress Workflow to customize the message.
l Store the message in variable: Select in which jobinfo, local or global variable you want to store themessage content.
l ID: Enter an error ID. This ID will be visible in theWindows Event Viewer. However, the ID is notvisible in the PlanetPress Suite Workflow Tools' log file.
l Store the ID in variable: Select in which jobinfo, local or global variable you want to store the errorID.
l Reset to defaults: Resets all options in this tab to their default values.
If storing the message or ID, if they are store in a jobinfo they will be available in any error handling processwhere errors are being forwarded. In all cases, if your process continues after the error, the contents of thevariables selected in this window will be available for the rest of your process, or whenever they areoverwritten.
Common Errors
Though some error messages are specific to a task in particular, others may apply to any and all tasksbecause they are related more to the system than to PlanetPress itself. Some examples would be W3813,W3830, W3991, W4005. These correspond to issues such as not having any space to write files, permissionerrors on folders or files, etc.
Comments Tab
The Comments tab is common to all tasks. It contains a single text area (Task comments) that lets youwrite comments about the task. These comments are saved when the dialog is closed with the OK button,and are displayed in the Task Comments Pane.
Find Capture Documents
The Find Capture Document task retrieves a list of pertinent information about Capture documents presentin the Capture database according to a specified set of rules.
This task is most often useful as the beginning of an automated process using a series of Capturedocuments, for example one that removes old documents to unlock patterns. However, it can also be usedas a secondary input in order to retrieve one or more documents after some operations.
Technical
The Find Capture Document task makes multiple simultaneous statements to the database whenrequesting a list of documents. For this task to work, the option "Allow multiple statements" must bechecked in the ODBC connection setup done in the control panel.
Input
Because this task in an input task, it does not use the current job file in your process, even when used as asecondary input task.
Processing
This task connects to the Capture database and looks up all available documents that meet the criteriaspecified in the plugin. Then it does further processing to retrieve relevant information about each documentand places the information in the data file it generates.
Output
The data file generated by this task is an XML structure containing the data about each document. It alsogenerates metadata that is compatible with post-processing tasks such as the "Capture Condition" onpage 416 and "Get Capture Document" on page 441 tasks.
Properties
General Tab
l Document-ID Based Condition: Select this option for this task to filter its results using a specificDocument ID.
l Document ID: Enter the ID on which you want to filter. The Document ID is a unique identifier ofthe document when it is stored in the database. It is attributed to the job metadata when the"Capture Fields Generator" on page 422 ads it to the Capture database.
l Document-Based Condition: Select this option to set up an advanced filter containing one or moreconditions.
l Condition Grid: Displays the list of current condition criteria that were set for document retrieval.l Filter: The selected filter type. This can be any of the following:
l Document Name: The name of the document, as specified in the Document Nameproperty of the "Capture Fields Generator" on page 422.
l Date Generated: The date, in YYYY-MM-DD format, when the document wasgenerated through the Capture Field Generator.
l Date Closed: The date, in YYYY-MM-DD format, when the document was closed bythe Capture Field Processor orGet Capture Document tasks. This field is empty indocuments that are still open.
l Pen user (by description): The description of the pen, as entered in the"PlanetPress Capture Pen Management Tool" on page 636. Generally, this is thename of the owner of the pen.
l Pen user (by serial number): The serial number of the pen (aka Pen ID)l Pattern Sequence: The Pattern Sequence in which a document is entered.l Template name: The name of the PlanetPress Design document used to generatethe Capture document. This is set in the document's properties, in PlanetPressDesign.

l Pattern ID: The exact ID of the Anoto Pattern used. This is also called "Pattern TraceCode".
l Content Status: The status of the document as a whole. A document can be Empty(no ink), Partial (some ink but still open), Complete (all mandatory ink is present) or inError (logical or process error).
l Operator: The choice of the condition operator. The available choices are variabledepending on the filter but will be part of the following choices:
l Equal: Inclusive filter, where anything equal (either by string or numericcomparison) is included in the results.
l Not Equal: Exclusive filter, where anything not equal to the condition is included inthe results.
l Less Than: Numerical comparison, where anything lower than the specified value isincluded.
l Greater Than: Numerical comparison, where anything higher than the specifiedvalue is included.
l Less than or equal to: Numerical comparison, where anything lower or equal to thanthe specified value is included.
l Greater than or equal to: Numerical comparison, where anything higher or equal tothan the specified value is included.
l Contains: Inclusive string comparison, documents where the specified value ispresent within the chosen filter are included.
l Does not contain: Exclusive string comparison, documents where the specifiedvalue is not present within the chosen filter are included.
l Before: Date comparison, documents of which the date is previous to the specifiedvalue are included (Date Generated and Date Closed filters only).
l After: Date comparison, documents of which the date is closer than the specifiedvalue are included (Date Generated and Date Closed filters only).
l Last: Date comparison, documents of which the date is within the specified intervalare included (Date Generated and Date Closed filters only).
l Older than: Date comparison, documents of which the date is older than thespecified interval are included (Date Generated and Date Closed filters only).

l Condition: The condition or value the document needs to meet. The condition is variabledependent on the chosen filter. It can be a drop-down of values, an alphanumerical ornumerical value.
l Add button: Click to add a condition row to the grid.
l Remove button: Click to remove the currently selected condition from the grid. To select a row,simply click on any of its 3 components.
l Condition Operator: Select either "All items are met" to force all conditions to be true for adocument to be included, or "At least one item is met" to include documents where a minimum of1 condition is true.
l Create Advanced Data File: Click to retrieve additional information about each document in the resultlist. These information include each field, the presence of ink on each of them, time stamps, etc.Please refer to Find Capture Document for an example of the XML file.
Warning
The Advanced Data File option will generate a high number of queries into the Capture Database,and will be slower than a regular data file by orders of magnitude. Do not use this option unless youare aware of the loss of performance and actually need to access each field's properties individually!
Examples & Use Cases
This task is put into effect in the following use cases and example processes:
l Capture Post Processing Workflowl Capture Web Manager Workflow
On Error Tab
The On Error tab is common to all tasks. Details can be found in the" Task Properties Dialog" on page 666.
By default, any action task, branch, splitter or condition that generates an error will simply be ignored, andthe task just under it (not within a branch) will be given control of the job file without any modification. Anyinitial input task that generates an error will stop the process from running as a whole, and output tasks willnot generate output. The On Error tab can be used to overwrite the default behaviors.

l Send to Process: Check this option to send the job file to an error management process.l Error Process drop-down: Enabled only when the Send to Process option is checked. Lists anyprocess of which the initial input task is the Input Error Bin task.
l Action Group: This group is disabled in the initial input tasks and defaults to Stop Process. In allother tasks where the On Error tab is present, the following options are available:
l Ignore: The task is ignored as if it did not exist, and the job file is passed on to the next task inthe process.
l Stop Branch: If the task is in a branch of the process, the branch is stopped and the job file isreturned to the process after the branch. The branch will not produce any output.
l Stop Process: The process is stopped and no more processing is done. No further output isproduced.
l Log Message: Check this option to enable logging a custom error message in the PlanetPress SuiteWorkflow Tools' log file.
l Message: Enabled only when the Log Message option is checked. Enter a message that will belogged in the PlanetPress Suite Workflow Tools' log file. You can use any variables available inPlanetPress Workflow to customize the message.
l Store the message in variable: Select in which jobinfo, local or global variable you want to store themessage content.
l ID: Enter an error ID. This ID will be visible in theWindows Event Viewer. However, the ID is notvisible in the PlanetPress Suite Workflow Tools' log file.
l Store the ID in variable: Select in which jobinfo, local or global variable you want to store the errorID.
l Reset to defaults: Resets all options in this tab to their default values.
If storing the message or ID, if they are store in a jobinfo they will be available in any error handling processwhere errors are being forwarded. In all cases, if your process continues after the error, the contents of thevariables selected in this window will be available for the rest of your process, or whenever they areoverwritten.
Common Errors
Though some error messages are specific to a task in particular, others may apply to any and all tasksbecause they are related more to the system than to PlanetPress itself. Some examples would be W3813,W3830, W3991, W4005. These correspond to issues such as not having any space to write files, permissionerrors on folders or files, etc.
Comments Tab
The Comments tab is common to all tasks. It contains a single text area (Task comments) that lets youwrite comments about the task. These comments are saved when the dialog is closed with the OK button,and are displayed in the Task Comments Pane.
Get Capture Document
The Get Capture Document action task is used after the Capture Fields Processor to retrieve alldocuments that have been updated.
Input
A data file in PGC or PDF format that is accompanied by valid Metadata. This metadata must containCapture information and is generally available after a "Capture Fields Processor" on page 426 or "FindCapture Documents" on page 436 task. However, it is also possible to directly retrieve the requiredinformation from a specific Document ID. When a specific ID is used, the data file and metadata arecompletely ignored by this task's condition rules, and the database information is used instead.
Processing
One PDF, corresponding to the information present either in the metadata or specified in the task, isextracted from the Capture database.
When retrieving documents from the database, the PDF from which the document is obtained will remain inthe database until each document contained in it is retrieved from it. For example, if a 10-page PDF contains5 documents, the 10 pages remain in that PDF until all 5 documents have received ink, been closed andretrieved from the database. This may mean space issues if too many PDF files remain in your database.
Technical
Performance-wise, when this plugin retrieves a document from a 10,000 page PDF in the database, itwill take more time then if it retrieved it from a 100 page PDF.
Output
The Get Capture Document action task is a loop that outputs a PDF version of the Capture Document. ThePDF contains the original document, any ink added by the "Capture Fields Processor" on page 426 action

task.
In addition, any ICR information available (when using PlanetPress Capture ICR) will be placed at the PageLevel, as follows:
l ICR_[FieldName]_Val : The value of the text that was recognized by the ICR engine, for the fieldnamed [FieldName]. If the field is not and ICR field or if that field contains no ink, the value will beempty.
l ICR_[FieldName]_Cfd : The confidence value (in percentage) of the engine for the value provided.
Properties
General Tab
l Document Origin group:l Document to process: Determines where the document information is read
l From Metadata: Select to use the current document available in the metadata generatedby the Capture Field Processor.
l From Specific ID: Select to specify an exact Document ID from the database. Thisdocument does not need to be loaded as a data file or its metadata manually obtained, asthis task simply looks up the information directly in the PlanetPress Capture database.
l Document Type groupl Get all documents: Get all the documents that have been updated, according to the metadata.l Get closed documents only: Get only the documents that have been closed in this process,according to the metadata.
l Close document after retrieval: Once the task has retrieved the document from the Capturedatabase, the document will be closed even if it is incomplete.
l Annotate PDF: Add annotations to the PDF that describe each Capture field and the ink that isincluded in those fields. Note that not all PDF readers support annotations.
Examples & Use Cases
This task is put into effect in the following use cases and example processes:
l Basic Functional Capture Workflowl Capture Post Processing Workflow

l Capture Web Manager Workflow
On Error Tab
The On Error tab is common to all tasks. Details can be found in the" Task Properties Dialog" on page 666.
By default, any action task, branch, splitter or condition that generates an error will simply be ignored, andthe task just under it (not within a branch) will be given control of the job file without any modification. Anyinitial input task that generates an error will stop the process from running as a whole, and output tasks willnot generate output. The On Error tab can be used to overwrite the default behaviors.
l Send to Process: Check this option to send the job file to an error management process.l Error Process drop-down: Enabled only when the Send to Process option is checked. Lists anyprocess of which the initial input task is the Input Error Bin task.
l Action Group: This group is disabled in the initial input tasks and defaults to Stop Process. In allother tasks where the On Error tab is present, the following options are available:
l Ignore: The task is ignored as if it did not exist, and the job file is passed on to the next task inthe process.
l Stop Branch: If the task is in a branch of the process, the branch is stopped and the job file isreturned to the process after the branch. The branch will not produce any output.
l Stop Process: The process is stopped and no more processing is done. No further output isproduced.
l Log Message: Check this option to enable logging a custom error message in the PlanetPress SuiteWorkflow Tools' log file.
l Message: Enabled only when the Log Message option is checked. Enter a message that will belogged in the PlanetPress Suite Workflow Tools' log file. You can use any variables available inPlanetPress Workflow to customize the message.
l Store the message in variable: Select in which jobinfo, local or global variable you want to store themessage content.
l ID: Enter an error ID. This ID will be visible in theWindows Event Viewer. However, the ID is notvisible in the PlanetPress Suite Workflow Tools' log file.
l Store the ID in variable: Select in which jobinfo, local or global variable you want to store the errorID.
l Reset to defaults: Resets all options in this tab to their default values.

If storing the message or ID, if they are store in a jobinfo they will be available in any error handling processwhere errors are being forwarded. In all cases, if your process continues after the error, the contents of thevariables selected in this window will be available for the rest of your process, or whenever they areoverwritten.
Common Errors
Though some error messages are specific to a task in particular, others may apply to any and all tasksbecause they are related more to the system than to PlanetPress itself. Some examples would be W3813,W3830, W3991, W4005. These correspond to issues such as not having any space to write files, permissionerrors on folders or files, etc.
Comments Tab
The Comments tab is common to all tasks. It contains a single text area (Task comments) that lets youwrite comments about the task. These comments are saved when the dialog is closed with the OK button,and are displayed in the Task Comments Pane.
PGC to PDF Converter
The PGC to PDF Converter tasks extracts the digital ink located in a PGC file and adds it to a blank PDF,creating one page per document in the PGC. It's main use is to process PGCs that generated errors whenprocessing them, as part of an Error Handling process.
Note
When adding this task to your process, you will be asked if you want to add the task as an Action or aCondition. This task should only be used as an Action. If used as a condition, it will always returnFalse.
Input
A PGC file received from an Anoto digital pen.
Processing
The ink contained in the PGC file is converted into an EPS layer, which is then applied on an blank, emptyPDF file of the size specified in the task's properties. If more than one Pattern ID is found in the PGC file,

each separate Pattern ID will generate a new page on which its ink is applied.
Output
A PDF file with a blank background and only the ink data found in the PGC file.
Properties
General Tab
l PDF page size: Choose the page size of the output PDF. The default size is A2, and changing theformat does not scale the digital ink. Ink appearing outsize of the selected page size will not be visible.
Note
This task was built using a custom plugin system and does not display the On Error tab in the regularview. To access the On Error tab, right-click on the task and select "Advanced Properties...".
Examples & Use Cases
This task is put into effect in the following use cases and example processes:
l PlanetPress Capture Workflow
On Error Tab
The On Error tab is common to all tasks. Details can be found in the" Task Properties Dialog" on page 666.
By default, any action task, branch, splitter or condition that generates an error will simply be ignored, andthe task just under it (not within a branch) will be given control of the job file without any modification. Anyinitial input task that generates an error will stop the process from running as a whole, and output tasks willnot generate output. The On Error tab can be used to overwrite the default behaviors.
l Send to Process: Check this option to send the job file to an error management process.l Error Process drop-down: Enabled only when the Send to Process option is checked. Lists anyprocess of which the initial input task is the Input Error Bin task.

l Action Group: This group is disabled in the initial input tasks and defaults to Stop Process. In allother tasks where the On Error tab is present, the following options are available:
l Ignore: The task is ignored as if it did not exist, and the job file is passed on to the next task inthe process.
l Stop Branch: If the task is in a branch of the process, the branch is stopped and the job file isreturned to the process after the branch. The branch will not produce any output.
l Stop Process: The process is stopped and no more processing is done. No further output isproduced.
l Log Message: Check this option to enable logging a custom error message in the PlanetPress SuiteWorkflow Tools' log file.
l Message: Enabled only when the Log Message option is checked. Enter a message that will belogged in the PlanetPress Suite Workflow Tools' log file. You can use any variables available inPlanetPress Workflow to customize the message.
l Store the message in variable: Select in which jobinfo, local or global variable you want to store themessage content.
l ID: Enter an error ID. This ID will be visible in theWindows Event Viewer. However, the ID is notvisible in the PlanetPress Suite Workflow Tools' log file.
l Store the ID in variable: Select in which jobinfo, local or global variable you want to store the errorID.
l Reset to defaults: Resets all options in this tab to their default values.
If storing the message or ID, if they are store in a jobinfo they will be available in any error handling processwhere errors are being forwarded. In all cases, if your process continues after the error, the contents of thevariables selected in this window will be available for the rest of your process, or whenever they areoverwritten.
Common Errors
Though some error messages are specific to a task in particular, others may apply to any and all tasksbecause they are related more to the system than to PlanetPress itself. Some examples would be W3813,W3830, W3991, W4005. These correspond to issues such as not having any space to write files, permissionerrors on folders or files, etc.

Comments Tab
The Comments tab is common to all tasks. It contains a single text area (Task comments) that lets youwrite comments about the task. These comments are saved when the dialog is closed with the OK button,and are displayed in the Task Comments Pane.
Metadata TasksMetadata tasks regroups plug-ins that can create or update metadata for a job file. Metadata is a hierarchicalstructure describing a print job. It is composed of 5 basic levels, from outer to inner: Job, Set, Document,Datapage, and Page.
Create Metadata
Creates all the metadata that is either the result of the merging between a data file and a PlanetPressDesign document, or the information about a PDF File.
Input
Either a data file in any supported Emulation, or a PDF File.
Processing
If a data file and document are selected, the metadata is generated by merging the data file and documentand retrieving only the metadata generated by this merge. The Metadata levels will reflect those defined inthe document, including separation for Group and Document, metadata fields, etc.
l In PDF emulation, the size and orientation attributes for each page are set in the metadata. In all otheremulations, those attributes remain blank.
l In XML emulation, the metadata file is always created as if the user had specified the "Second Level" parameter in PlanetPress Design.
If the "Do not use document (passthrough)" option is used, no PlanetPress Design document is used. Themetadata will contain a single Job, Group and Document level, as many data page levels as there arerecords (pages in a PDF, XML levels, etc) in the file, and one page level per data page.

Technical
In PlanetPress Design, this step is equivalent to a &metamode variable value of 1.
Output
The original data file is output, along with the newly generated metadata file. Job infos are not changed.
Properties
General Tab
l Documents: Select a specific PlanetPress Design document you want all the jobs metadatainformation generated for.
l Add job information to the document: Select to prompt your PlanetPress Workflow to add theavailable job information elements in the header of the generated file. Note that this option is onlyenabled if a document was selected.
Examples & Use Cases
This task is put into effect in the following use cases and example processes:
l Basic Functional Capture Workflowl Capture Web Manager Workflowl Daily Sales Report from PDF Files
On Error Tab
The On Error tab is common to all tasks. Details can be found in the" Task Properties Dialog" on page 666.
By default, any action task, branch, splitter or condition that generates an error will simply be ignored, andthe task just under it (not within a branch) will be given control of the job file without any modification. Anyinitial input task that generates an error will stop the process from running as a whole, and output tasks willnot generate output. The On Error tab can be used to overwrite the default behaviors.

l Send to Process: Check this option to send the job file to an error management process.l Error Process drop-down: Enabled only when the Send to Process option is checked. Lists anyprocess of which the initial input task is the Input Error Bin task.
l Action Group: This group is disabled in the initial input tasks and defaults to Stop Process. In allother tasks where the On Error tab is present, the following options are available:
l Ignore: The task is ignored as if it did not exist, and the job file is passed on to the next task inthe process.
l Stop Branch: If the task is in a branch of the process, the branch is stopped and the job file isreturned to the process after the branch. The branch will not produce any output.
l Stop Process: The process is stopped and no more processing is done. No further output isproduced.
l Log Message: Check this option to enable logging a custom error message in the PlanetPress SuiteWorkflow Tools' log file.
l Message: Enabled only when the Log Message option is checked. Enter a message that will belogged in the PlanetPress Suite Workflow Tools' log file. You can use any variables available inPlanetPress Workflow to customize the message.
l Store the message in variable: Select in which jobinfo, local or global variable you want to store themessage content.
l ID: Enter an error ID. This ID will be visible in theWindows Event Viewer. However, the ID is notvisible in the PlanetPress Suite Workflow Tools' log file.
l Store the ID in variable: Select in which jobinfo, local or global variable you want to store the errorID.
l Reset to defaults: Resets all options in this tab to their default values.
If storing the message or ID, if they are store in a jobinfo they will be available in any error handling processwhere errors are being forwarded. In all cases, if your process continues after the error, the contents of thevariables selected in this window will be available for the rest of your process, or whenever they areoverwritten.
Common Errors
Though some error messages are specific to a task in particular, others may apply to any and all tasksbecause they are related more to the system than to PlanetPress itself. Some examples would be W3813,

W3830, W3991, W4005. These correspond to issues such as not having any space to write files, permissionerrors on folders or files, etc.
Embed/Extract PlanetPress Workflow Metadata
Embed the current PlanetPress Workflow metadata inside the current data file in a PDF emulation. It canalso extract PlanetPress Workflow metadata from the current data file and make the extracted file the newcurrent metadata file.
Input
A PDF File, either with no metadata and along with metadata that presumably corresponds to the PDF file,or a PDF file with embedded metadata.
Processing
If the Embed option is used, the metadata information is embedded directly into the PDF File as binary data.This does not change the way the PDF is viewed by any PDF viewer.
If the Extract option is used, metadata present inside of the PDF file is extracted from it. If no metadata isembedded, the task generates an error W3976.
Output
The PDF file with embedded metadata (the metadata is not deleted from the PDF File on extraction, so thistask will always output a PDF with embedded metadata).
Properties
General Tab
l Extract metadata into PDF job file: the metadata is extracted from the current data file (which isassumed to be a PDF file in which metadata has been previously embedded), and it becomes thecurrent metadata from this point on, overwriting any current metadata file that may already be set.
l Embed metadata from PDF job file: the current metadata file is inserted in the current data file, whichis assumed to be a PDF file. If the original PDF is PDF/X or PDF/A compliant, the resulting PDFfile will also be compliant.

On Error Tab
The On Error tab is common to all tasks. Details can be found in the" Task Properties Dialog" on page 666.
By default, any action task, branch, splitter or condition that generates an error will simply be ignored, andthe task just under it (not within a branch) will be given control of the job file without any modification. Anyinitial input task that generates an error will stop the process from running as a whole, and output tasks willnot generate output. The On Error tab can be used to overwrite the default behaviors.
l Send to Process: Check this option to send the job file to an error management process.l Error Process drop-down: Enabled only when the Send to Process option is checked. Lists anyprocess of which the initial input task is the Input Error Bin task.
l Action Group: This group is disabled in the initial input tasks and defaults to Stop Process. In allother tasks where the On Error tab is present, the following options are available:
l Ignore: The task is ignored as if it did not exist, and the job file is passed on to the next task inthe process.
l Stop Branch: If the task is in a branch of the process, the branch is stopped and the job file isreturned to the process after the branch. The branch will not produce any output.
l Stop Process: The process is stopped and no more processing is done. No further output isproduced.
l Log Message: Check this option to enable logging a custom error message in the PlanetPress SuiteWorkflow Tools' log file.
l Message: Enabled only when the Log Message option is checked. Enter a message that will belogged in the PlanetPress Suite Workflow Tools' log file. You can use any variables available inPlanetPress Workflow to customize the message.
l Store the message in variable: Select in which jobinfo, local or global variable you want to store themessage content.
l ID: Enter an error ID. This ID will be visible in theWindows Event Viewer. However, the ID is notvisible in the PlanetPress Suite Workflow Tools' log file.
l Store the ID in variable: Select in which jobinfo, local or global variable you want to store the errorID.
l Reset to defaults: Resets all options in this tab to their default values.

If storing the message or ID, if they are store in a jobinfo they will be available in any error handling processwhere errors are being forwarded. In all cases, if your process continues after the error, the contents of thevariables selected in this window will be available for the rest of your process, or whenever they areoverwritten.
Common Errors
Though some error messages are specific to a task in particular, others may apply to any and all tasksbecause they are related more to the system than to PlanetPress itself. Some examples would be W3813,W3830, W3991, W4005. These correspond to issues such as not having any space to write files, permissionerrors on folders or files, etc.
Comments Tab
The Comments tab is common to all tasks. It contains a single text area (Task comments) that lets youwrite comments about the task. These comments are saved when the dialog is closed with the OK button,and are displayed in the Task Comments Pane.
Metadata Fields Management
The Metadata Fields Management task can be used to add new fields into your metadata, either for everyelement or through conditions.
Note
This task will automatically "loop" through the metadata and repeat its action for each of yourmetadata's datapage. This task should not be placed after a Metadata Sequencer.
Input
Any data file with accompanying metadata.
Processing
Fields are added, removed, modified, etc, according to the actions defined in the task properties. If the fieldis present in a level that repeats (for example, the data page level), this task loops so that the action maytake place on each of the occurrence of that level.
Output
The original data file is output, along with the modified metadata.
Properties
General tab
l Action: Select the type of Metadata Field Management action to perform. 5 action types are available:
l Add/Replace: Create a new metadata field. If the name already exists, the value is overwrittenwith the new one.
l Duplicate: Create a new metadata field. If the fields already exist, a new instance is created.
l Append: Append the new value at the end of the current one. If no field with that name exists, anew one is created.
l Sum: Calculate the sum of all values found in all fields of a given name, at a given level. Theresulting number is formatted by default with the dot decimal separator.
l Delete: Delete the metadata field if it exists and disables the Field information column's Fieldvalue option.
l Field Information: Specify the metadata node level, field name and field value of the specified action.
l Level: Choose between Job, Group, Document, Datapage. The task will loop through eachselected node of the chosen metadata level.
l Job: Apply the action on the specified field at the Job level.l Group: Apply the action on the specified field at the Group level.l Document: Apply the action on the specified field at the Document level.l Data page: Apply the action on the specified field at the Data page level.
l Field Name: Enter the metadata field name on which the task will operate.l Field Value: Enter the metadata field value. Note that if the chosen action is Delete, thisparameter is disabled. For other action types, in order to set the field value, click the [...] button.This button opens the Data Selector, which allows to specify a data selection as the field's value.
l Decimal Separator: Set the decimal separator for the Sum option. 3 possible modes are offered:
l Auto-detect: Interpret automatically the value. This option is ideal for documents usingmixed decimal separators. Note that the auto-detect option encountering the value 1,000
(with a comma separator), interprets it as a thousand while interpreting 1.000 (with a dotseparator), as one.
l .: Treat every value with the dot (".") decimal separator. Commas (",") are treated asthousand separator.
l ,: Treat every value with the comma (",") decimal separator. Dots (".") are treated asthousand separator.
l Condition: Define criteria for the Metadata Field Management action execution. The condition must beTRUE for the action to execute. To set up conditions, the Rule Interface is displayed, allowing to editthe condition for the given action. See the Rule Interface page for more details.
On Error Tab
The On Error tab is common to all tasks. Details can be found in the" Task Properties Dialog" on page 666.
By default, any action task, branch, splitter or condition that generates an error will simply be ignored, andthe task just under it (not within a branch) will be given control of the job file without any modification. Anyinitial input task that generates an error will stop the process from running as a whole, and output tasks willnot generate output. The On Error tab can be used to overwrite the default behaviors.
l Send to Process: Check this option to send the job file to an error management process.l Error Process drop-down: Enabled only when the Send to Process option is checked. Lists anyprocess of which the initial input task is the Input Error Bin task.
l Action Group: This group is disabled in the initial input tasks and defaults to Stop Process. In allother tasks where the On Error tab is present, the following options are available:
l Ignore: The task is ignored as if it did not exist, and the job file is passed on to the next task inthe process.
l Stop Branch: If the task is in a branch of the process, the branch is stopped and the job file isreturned to the process after the branch. The branch will not produce any output.
l Stop Process: The process is stopped and no more processing is done. No further output isproduced.
l Log Message: Check this option to enable logging a custom error message in the PlanetPress SuiteWorkflow Tools' log file.
l Message: Enabled only when the Log Message option is checked. Enter a message that will belogged in the PlanetPress Suite Workflow Tools' log file. You can use any variables available inPlanetPress Workflow to customize the message.
l Store the message in variable: Select in which jobinfo, local or global variable you want to store themessage content.
l ID: Enter an error ID. This ID will be visible in theWindows Event Viewer. However, the ID is notvisible in the PlanetPress Suite Workflow Tools' log file.
l Store the ID in variable: Select in which jobinfo, local or global variable you want to store the errorID.
l Reset to defaults: Resets all options in this tab to their default values.
If storing the message or ID, if they are store in a jobinfo they will be available in any error handling processwhere errors are being forwarded. In all cases, if your process continues after the error, the contents of thevariables selected in this window will be available for the rest of your process, or whenever they areoverwritten.
Common Errors
Though some error messages are specific to a task in particular, others may apply to any and all tasksbecause they are related more to the system than to PlanetPress itself. Some examples would be W3813,W3830, W3991, W4005. These correspond to issues such as not having any space to write files, permissionerrors on folders or files, etc.
Comments Tab
The Comments tab is common to all tasks. It contains a single text area (Task comments) that lets youwrite comments about the task. These comments are saved when the dialog is closed with the OK button,and are displayed in the Task Comments Pane.
New Wild Card
For a given Metadata Field Management action, all nodes of a given level might be updated with a newField Value. To accommodate this, metadata/data selection functions have been modified to accept a wildcard parameter "?", indicating the function operates on all nodes (not just one) of a given level. For example,in a PDF emulation, the format of a selected region is:
region(?,0.59375,2.21875,1.85416,2.51041,KeepCase,NoTrim)
where “?” represents the current physical data page processed by the task.

Limitations
l The name of the metadata field to add must adhere to these syntax rules: start with a letter, followed byzero or more letters, numbers, underscore or dash. The name is not case-sensitive.
l Metadata Fields Management actions on the page level are not possible since the entire taskexecution is based on the data page node.
l The task raises an error if the selected Metadata Fields Management action is Sum and if one of thefield values is not numeric. The task supports approximately 15 digits of precision in a range from 2.23x 10-308 to 1.79 x 10308.
Metadata File Management
The Metadata File Management action task is used to execute actions on Metadata files. This task doesnot modify the data, job infos, variables or any other part of your process.
Input
This task takes any file as input and does not modify it.
Process
This task does not execute any change to the process, its files or variables. It only executes the selectedaction on Metadata.
Output
This task outputs the exact same data that was given to it. Its metadata will either be missing (DeleteMetadata), Changed (Load Metadata) or the same (Save Metadata).
Properties
l Chose an action groupl Load metadata file: Loads an external metadata file that was previously saved. This can beuseful in Error processes if you have previously saved the Metadata to file (ErrorBin outputs donot transfer Metadata).
l Save the current metadata file: Saves the current metadata to a specified location. Useful as abackup or for use in Error processes.

l Delete the current metadata file: Removes the active metadata from the process. Useful whenusing a secondary input task that does not automatically regenerates metadata. No metadata willbe available until another task generates it.
l Metadata Folder: Use Browse to find the location of the folder where to save the files or enter a pathusing variables. Not active when the delete action is chosen.
l Metadata Filename: Enter a static or variable name for the metadata file to load. Not active when thedelete action is chosen.
On Error Tab
The On Error tab is common to all tasks. Details can be found in the" Task Properties Dialog" on page 666.
By default, any action task, branch, splitter or condition that generates an error will simply be ignored, andthe task just under it (not within a branch) will be given control of the job file without any modification. Anyinitial input task that generates an error will stop the process from running as a whole, and output tasks willnot generate output. The On Error tab can be used to overwrite the default behaviors.
l Send to Process: Check this option to send the job file to an error management process.l Error Process drop-down: Enabled only when the Send to Process option is checked. Lists anyprocess of which the initial input task is the Input Error Bin task.
l Action Group: This group is disabled in the initial input tasks and defaults to Stop Process. In allother tasks where the On Error tab is present, the following options are available:
l Ignore: The task is ignored as if it did not exist, and the job file is passed on to the next task inthe process.
l Stop Branch: If the task is in a branch of the process, the branch is stopped and the job file isreturned to the process after the branch. The branch will not produce any output.
l Stop Process: The process is stopped and no more processing is done. No further output isproduced.
l Log Message: Check this option to enable logging a custom error message in the PlanetPress SuiteWorkflow Tools' log file.
l Message: Enabled only when the Log Message option is checked. Enter a message that will belogged in the PlanetPress Suite Workflow Tools' log file. You can use any variables available inPlanetPress Workflow to customize the message.
l Store the message in variable: Select in which jobinfo, local or global variable you want to store themessage content.

l ID: Enter an error ID. This ID will be visible in theWindows Event Viewer. However, the ID is notvisible in the PlanetPress Suite Workflow Tools' log file.
l Store the ID in variable: Select in which jobinfo, local or global variable you want to store the errorID.
l Reset to defaults: Resets all options in this tab to their default values.
If storing the message or ID, if they are store in a jobinfo they will be available in any error handling processwhere errors are being forwarded. In all cases, if your process continues after the error, the contents of thevariables selected in this window will be available for the rest of your process, or whenever they areoverwritten.
Common Errors
Though some error messages are specific to a task in particular, others may apply to any and all tasksbecause they are related more to the system than to PlanetPress itself. Some examples would be W3813,W3830, W3991, W4005. These correspond to issues such as not having any space to write files, permissionerrors on folders or files, etc.
Comments Tab
The Comments tab is common to all tasks. It contains a single text area (Task comments) that lets youwrite comments about the task. These comments are saved when the dialog is closed with the OK button,and are displayed in the Task Comments Pane.
Metadata Filter
The task allows specifying the Level (Group, Document and Datapage) on which to perform the action andunder which condition. At least one level must have the condition set. The action will be performedsequentially beginning with the rule on the Group level, Document level and Data page level. The selectionis performed on the node only.
Input
Any data file with accompanying metadata.

Processing
Any metadata that does not correspond to the rules set forth by the filter are removed from the activemetadata. Note that the metadata is still "present", but is disabled and ignored on all tasks that usesmetadata afterward.
Output
The original data file is output, along with the modified metadata.
Properties
General Tab
l Filter levels: Rules for deselecting nodes at the Group, Document or Data page level. Note thatcurrently unselected nodes are ignored.
l Group: Select the metadata Group nodes (the nodes only) based on the specified rule(s).l Document: Select the metadata Document nodes (the nodes only) based on the specified rule(s).
l Datapage: Select the metadata Datapage nodes (the nodes only) based on the specified rule(s).
l Rules: Define according to which criteria the action must to be performed. The condition must beTRUE to execute the action. All nodes on a specific level with false condition become Unselected.The task effectively both selects and deselects nodes based on the condition. To set up conditions, theRule Interface is displayed, allowing to edit the condition for the given action. See the Rule Interfacepage for more details.
l Select all metadata nodes: Check to reset the Selection status of all nodes before performing thefiltering, effectively selecting all metadata nodes. This basically undoes the work of any previousMetadata Filter or Metadata Sequencer, so please be careful when using this option.
On Error Tab
The On Error tab is common to all tasks. Details can be found in the" Task Properties Dialog" on page 666.
By default, any action task, branch, splitter or condition that generates an error will simply be ignored, andthe task just under it (not within a branch) will be given control of the job file without any modification. Anyinitial input task that generates an error will stop the process from running as a whole, and output tasks willnot generate output. The On Error tab can be used to overwrite the default behaviors.

l Send to Process: Check this option to send the job file to an error management process.l Error Process drop-down: Enabled only when the Send to Process option is checked. Lists anyprocess of which the initial input task is the Input Error Bin task.
l Action Group: This group is disabled in the initial input tasks and defaults to Stop Process. In allother tasks where the On Error tab is present, the following options are available:
l Ignore: The task is ignored as if it did not exist, and the job file is passed on to the next task inthe process.
l Stop Branch: If the task is in a branch of the process, the branch is stopped and the job file isreturned to the process after the branch. The branch will not produce any output.
l Stop Process: The process is stopped and no more processing is done. No further output isproduced.
l Log Message: Check this option to enable logging a custom error message in the PlanetPress SuiteWorkflow Tools' log file.
l Message: Enabled only when the Log Message option is checked. Enter a message that will belogged in the PlanetPress Suite Workflow Tools' log file. You can use any variables available inPlanetPress Workflow to customize the message.
l Store the message in variable: Select in which jobinfo, local or global variable you want to store themessage content.
l ID: Enter an error ID. This ID will be visible in theWindows Event Viewer. However, the ID is notvisible in the PlanetPress Suite Workflow Tools' log file.
l Store the ID in variable: Select in which jobinfo, local or global variable you want to store the errorID.
l Reset to defaults: Resets all options in this tab to their default values.
If storing the message or ID, if they are store in a jobinfo they will be available in any error handling processwhere errors are being forwarded. In all cases, if your process continues after the error, the contents of thevariables selected in this window will be available for the rest of your process, or whenever they areoverwritten.
Common Errors
Though some error messages are specific to a task in particular, others may apply to any and all tasksbecause they are related more to the system than to PlanetPress itself. Some examples would be W3813,W3830, W3991, W4005. These correspond to issues such as not having any space to write files, permissionerrors on folders or files, etc.

Comments Tab
The Comments tab is common to all tasks. It contains a single text area (Task comments) that lets youwrite comments about the task. These comments are saved when the dialog is closed with the OK button,and are displayed in the Task Comments Pane.
Special Considerations
l The task CANNOT re-select unselected nodes if the condition is false for those nodes.l Filter rules cannot be based on the following metadata attributes: SelectedIndexInJob,SelectedIndexInGroup, SelectedIndexInDocument and SelectedIndex.
Metadata Level Creation
Conditionally create new metadata groups or documents. This task is only functional if metadata alreadyexists for the current job.
The task enables users to merge data pages into Documents and/or merge Documents into Groups, basedon conditions. Unselected Data pages are ignored, but are moved with others Data pages if the action isapplied to the current parent node.
Input
Any data file with accompanying metadata.
Processing
The metadata file is split on the selected level.
Output
The original data file is output, along with the modified metadata.

Properties
General Tab
l Document: Create a new Document level. Note: Attributes and Fields are deleted for all newDocument levels created as well as existing Groups.
l Group: Create a new Group level.
Note
Attributes and Fields are deleted for all new Group levels created.
ll Delimiter defines if the Condition parameter is triggering the beginning or the end of a Group orDocument. If the delimiter option is set to None, the action is not performed.
l Rules enable the user to define on which criteria the action must to be performed. The condition mustbe TRUE to execute the action. If the condition is not met at least once, the rule is not applied. To setup conditions, the Rule Interface is displayed, allowing to edit the condition for the given action. Seethe Rule Interface page for more details.
On Error Tab
The On Error tab is common to all tasks. Details can be found in the" Task Properties Dialog" on page 666.
By default, any action task, branch, splitter or condition that generates an error will simply be ignored, andthe task just under it (not within a branch) will be given control of the job file without any modification. Anyinitial input task that generates an error will stop the process from running as a whole, and output tasks willnot generate output. The On Error tab can be used to overwrite the default behaviors.
l Send to Process: Check this option to send the job file to an error management process.l Error Process drop-down: Enabled only when the Send to Process option is checked. Lists anyprocess of which the initial input task is the Input Error Bin task.
l Action Group: This group is disabled in the initial input tasks and defaults to Stop Process. In allother tasks where the On Error tab is present, the following options are available:
l Ignore: The task is ignored as if it did not exist, and the job file is passed on to the next task inthe process.

l Stop Branch: If the task is in a branch of the process, the branch is stopped and the job file isreturned to the process after the branch. The branch will not produce any output.
l Stop Process: The process is stopped and no more processing is done. No further output isproduced.
l Log Message: Check this option to enable logging a custom error message in the PlanetPress SuiteWorkflow Tools' log file.
l Message: Enabled only when the Log Message option is checked. Enter a message that will belogged in the PlanetPress Suite Workflow Tools' log file. You can use any variables available inPlanetPress Workflow to customize the message.
l Store the message in variable: Select in which jobinfo, local or global variable you want to store themessage content.
l ID: Enter an error ID. This ID will be visible in theWindows Event Viewer. However, the ID is notvisible in the PlanetPress Suite Workflow Tools' log file.
l Store the ID in variable: Select in which jobinfo, local or global variable you want to store the errorID.
l Reset to defaults: Resets all options in this tab to their default values.
If storing the message or ID, if they are store in a jobinfo they will be available in any error handling processwhere errors are being forwarded. In all cases, if your process continues after the error, the contents of thevariables selected in this window will be available for the rest of your process, or whenever they areoverwritten.
Common Errors
Though some error messages are specific to a task in particular, others may apply to any and all tasksbecause they are related more to the system than to PlanetPress itself. Some examples would be W3813,W3830, W3991, W4005. These correspond to issues such as not having any space to write files, permissionerrors on folders or files, etc.
Comments Tab
The Comments tab is common to all tasks. It contains a single text area (Task comments) that lets youwrite comments about the task. These comments are saved when the dialog is closed with the OK button,and are displayed in the Task Comments Pane.

NewWild Card
Since all metadata data pages, and possibly all physical data pages, are treated by the task at run-time inorder to evaluate the condition at each level, it is necessary to dynamically define metadata as well as dataselections to check all occurrences instead of a fixed one. To accommodate this requirement, a syntaxmodification is introduced in all current data and metadata functions (region(), @(), field(), xmlget()). Theparameter identifying the data page or the level can now be replaced with a question mark (“?”), indicatingthat a dynamic update of the current data page or level is required before evaluating the condition.
For example, in a PDF emulation, the format of a selected region would look like this:
region(?,0.59375,2.21875,1.85416,2.51041,KeepCase,NoTrim)
where "?" represents the current page. Using this expression, if the metadata structure has 3 data pages,then the task will proceed 3 times sequentially, with ?=1 for the first data page, ?=2 for the second and ?=3for the third and last data page index from the metadata structure.
In the Metadata tab of the Data Selector, the syntax of the selection is:
GetMeta(ItemDesc[?], 2, Job.Group[?].Document[?].Datapage[?])
where "?" is replaced with the current level index.
Note: For a relative position, the string has to be edited manually.
Use Case
Given a document input (created with metadata), this task can be used to regroup the PDF pages of thereceived print stream in logical (metadata) documents, based on the keyword “Page 1 of” printed on thepages, and then, treat each newly created document individually in the rest of the process
The process begins with the following tasks:
1. WinQueue Input: Intercepts a printed data file sent to a Windows printer queue.2. Metadata Level Creation:Begins a new document node when “Page 1 of” is found on a data page.
l Action:Documentl Delimiter:Begins when

l Rule:(@(?,1,1,1,9,KeepCase,NoTrim) IS EQUAL TO Page 1 of)
3. Metadata Sequencer: Splits the data file on each metadata document node level.
With this example, before the Metadata Level Creation task, the metadata structure contains one groupcontaining one document (containing multiple data pages). After the Metadata Level Creation task, themetadata structure contains one group containing multiple documents.
Metadata Sequencer
Although the Metadata Sequencer acts as a splitter, the data file itself remains untouched, as neither thedata nor the metadata are actually being split through this task. With each sequence, the entire data file stillgets carried from one task to another. Metadata records are simply selected / deselected, which has thesame effect.
Input
Any data file with accompanying metadata.
Processing
A loop is established and the metadata is separated into chunks, as defined in the rules set forth in the taskproperties.
Output
The original data file is output once per chunk, along with this chunk's metadata. Note that *all* the metadatais in each of the sequence, but anything not part of the sequence is disabled and is ignored by all tasksusing metadata afterwards.
Properties
General Tab
l Metadata level: Select the metadata level to process.l Sequencing is based on
l The following number of occurrences of the level: Determine a sequence based on thenumber of instances found for the metadata level currently processed. For example, if theMetadata level is set to Group, and this value is set to 3, each sequence contains 3 groups

(except, possibly, the last one, depending on the number of groups left in the last sequence). Thenext loop starts with the next group after this sequence.
l The following number of sequences in the job: Divides the metadata into a set number ofsequences and equally distributes the number of levels between the sequences. For example, itthe Metadata level is set to Document, and this value is set to 5, a 100 document job file will bedivided into 5 sequences of 20 documents each.
l The following rule: Determine if a new sequence starts or if the current one ends. For eachmetadata level, the current value of the specified metadata attribute / field is compared with theone in memory. If they are different, either a new sequence starts or the current sequence isended. The next sequence starts with the next metadata level being processed. For details seethe Rule Interface.
Metadata Sorter
The Metadata Sorter action task allows metadata to be sorted sequentially on three different levels,alphabetically or numerically. It also allows sorting in ascending and descending order.
Input
Any data file with accompanying metadata.
Processing
The order of the metadata is changed in accordance with the rules set forth in the task's properties.
Output
The original data file is output, along with the modified metadata.
General Tab
l Group: Sorts the metadata by group.l Document: Sorts the metadata by document.l Data page: Sorts the metadata by data page.
For each parameter, three columns are available: Sort By, Then by, Then by (again). This lets you sort yourdocument level in three different orders sequentially. Sorts are always done from left to right, top to bottom,giving you a total of 9 sorting possibilities.

When you click on either of the sort boxes, a small popup displays the following options:
l Sort by: The drop down displays a list of available fields and attributes in that level, letting you selecton which to sort. The field or attributes must be present for every instance of the level you aresearching on, or the task raises an error.
l Order: Choose Ascending (orders like a,b,c, or 1,2,3) or Descending (orders like 3,2,1 or c,b,a)order. If the Numeric sorting option is not checked, numbers are sorted like this: "1, 10, 11, 12, 2, 3, 4,5, 6, 7, 8, 9".
l Numeric Sorting: Check to sort numerically instead of alphabetically (only supports whole numbers.Currency with thousands separator and decimal points will not work). If any non-numeric value isfound in the field or attribute, in any instance of the level, the task raises an error.
On Error Tab
The On Error tab is common to all tasks. Details can be found in the" Task Properties Dialog" on page 666.
By default, any action task, branch, splitter or condition that generates an error will simply be ignored, andthe task just under it (not within a branch) will be given control of the job file without any modification. Anyinitial input task that generates an error will stop the process from running as a whole, and output tasks willnot generate output. The On Error tab can be used to overwrite the default behaviors.
l Send to Process: Check this option to send the job file to an error management process.l Error Process drop-down: Enabled only when the Send to Process option is checked. Lists anyprocess of which the initial input task is the Input Error Bin task.
l Action Group: This group is disabled in the initial input tasks and defaults to Stop Process. In allother tasks where the On Error tab is present, the following options are available:
l Ignore: The task is ignored as if it did not exist, and the job file is passed on to the next task inthe process.
l Stop Branch: If the task is in a branch of the process, the branch is stopped and the job file isreturned to the process after the branch. The branch will not produce any output.
l Stop Process: The process is stopped and no more processing is done. No further output isproduced.
l Log Message: Check this option to enable logging a custom error message in the PlanetPress SuiteWorkflow Tools' log file.

l Message: Enabled only when the Log Message option is checked. Enter a message that will belogged in the PlanetPress Suite Workflow Tools' log file. You can use any variables available inPlanetPress Workflow to customize the message.
l Store the message in variable: Select in which jobinfo, local or global variable you want to store themessage content.
l ID: Enter an error ID. This ID will be visible in theWindows Event Viewer. However, the ID is notvisible in the PlanetPress Suite Workflow Tools' log file.
l Store the ID in variable: Select in which jobinfo, local or global variable you want to store the errorID.
l Reset to defaults: Resets all options in this tab to their default values.
If storing the message or ID, if they are store in a jobinfo they will be available in any error handling processwhere errors are being forwarded. In all cases, if your process continues after the error, the contents of thevariables selected in this window will be available for the rest of your process, or whenever they areoverwritten.
Common Errors
Though some error messages are specific to a task in particular, others may apply to any and all tasksbecause they are related more to the system than to PlanetPress itself. Some examples would be W3813,W3830, W3991, W4005. These correspond to issues such as not having any space to write files, permissionerrors on folders or files, etc.
Comments Tab
The Comments tab is common to all tasks. It contains a single text area (Task comments) that lets youwrite comments about the task. These comments are saved when the dialog is closed with the OK button,and are displayed in the Task Comments Pane.
Metadata to PDI
The Metadata to PDI task takes the active metadata and generates a PDI using the information in thatmetadata. It is generally used in conjunction with a PDF data file and is used to generate the PDI file whichis used by PlanetPress Search when building, refreshing or rebuilding its database.

Input
This task can use any data file, as long as it is accompanied by metadata. This metadata may have beendirectly generated or could be extracted from a PDF using the Embed and Extract PlanetPress WorkflowMetadata task.
Processing
The metadata is read and PDF indexes are located. These indexes are defined in the PlanetPress Designdocument as data selections, in which the Archive / Email / Fax properties define the data as an index with aname.
When all the indexes are collected, a PDI file is generated with those indexes.
Output
The output is the same as the input, no modification is done to either the data file or the metadata. However,a PDI file is generated and saved in the location specified in the task.
Metadata to PDI Task Properties are as such:
l Archive Folder: Specifies where the PDI file should be saved. This should be the same location asthe PDF file that the PDI refers to.
l Filename: The file name for the PDI. This name should correspond exactly with the name of thePDF that the PDI file refers to.
l Index Group:l PDI: Only generate a PDI file.l PDI and XML: Generate both the PDI and an XML equivalent (not used by PlanetPress Search).
On Error Tab
The On Error tab is common to all tasks. Details can be found in the" Task Properties Dialog" on page 666.
By default, any action task, branch, splitter or condition that generates an error will simply be ignored, andthe task just under it (not within a branch) will be given control of the job file without any modification. Anyinitial input task that generates an error will stop the process from running as a whole, and output tasks willnot generate output. The On Error tab can be used to overwrite the default behaviors.

l Send to Process: Check this option to send the job file to an error management process.l Error Process drop-down: Enabled only when the Send to Process option is checked. Lists anyprocess of which the initial input task is the Input Error Bin task.
l Action Group: This group is disabled in the initial input tasks and defaults to Stop Process. In allother tasks where the On Error tab is present, the following options are available:
l Ignore: The task is ignored as if it did not exist, and the job file is passed on to the next task inthe process.
l Stop Branch: If the task is in a branch of the process, the branch is stopped and the job file isreturned to the process after the branch. The branch will not produce any output.
l Stop Process: The process is stopped and no more processing is done. No further output isproduced.
l Log Message: Check this option to enable logging a custom error message in the PlanetPress SuiteWorkflow Tools' log file.
l Message: Enabled only when the Log Message option is checked. Enter a message that will belogged in the PlanetPress Suite Workflow Tools' log file. You can use any variables available inPlanetPress Workflow to customize the message.
l Store the message in variable: Select in which jobinfo, local or global variable you want to store themessage content.
l ID: Enter an error ID. This ID will be visible in theWindows Event Viewer. However, the ID is notvisible in the PlanetPress Suite Workflow Tools' log file.
l Store the ID in variable: Select in which jobinfo, local or global variable you want to store the errorID.
l Reset to defaults: Resets all options in this tab to their default values.
If storing the message or ID, if they are store in a jobinfo they will be available in any error handling processwhere errors are being forwarded. In all cases, if your process continues after the error, the contents of thevariables selected in this window will be available for the rest of your process, or whenever they areoverwritten.
Common Errors
Though some error messages are specific to a task in particular, others may apply to any and all tasksbecause they are related more to the system than to PlanetPress itself. Some examples would be W3813,W3830, W3991, W4005. These correspond to issues such as not having any space to write files, permissionerrors on folders or files, etc.

Comments Tab
The Comments tab is common to all tasks. It contains a single text area (Task comments) that lets youwrite comments about the task. These comments are saved when the dialog is closed with the OK button,and are displayed in the Task Comments Pane.
Metadata-Based N-Up
The Metadata-based N-Up action task works in conjunction with the PlanetPress Design tool's N-Upfunctionality. It allows to specify how many virtual pages will appear on each physical page of thePlanetPress Design template to be used with the current data file. The task rearranges the metadataaccordingly, which greatly facilitates the set up of the N-Up functionality in the design tool, especially whenthe solution includes duplex printing with variable data on both sides.
The PlanetPress Design document needs to be properly set up with the N-Up object and proper virtualpages in order to correctly use this task:
l All PlanetPress Design document templates must use the n-up object on both the front and the backpages of the duplex document.
l Each instance of the n-up object must have the “change data page with each repeat” option checked.l The total number of repeats on each page (vertical X horizontal) must correspond to the numberspecified in the Number of virtual pages per physical page option..
l The Alignment setting of each n-up object must be set according to the device’s duplicatingcapabilities (long-edge or short edge binding).
Input
Any data file with accompanying metadata.
Processing
The metadata is re-arranged and/or duplicated in order to correspond to the options set forth in this task'sproperties.
Output
The original data file is output, along with the modified metadata.

General Tab
l Number of virtual pages that appear on each physical page: This is equivalent to the N in N-Up.This number should be equal to the total number of virtual pages in your PlanetPress Designdocument. For example, a 2 horizontal x 3 vertical is 6-up, so this number should be 6.
l Number of data pages that make up a single duplex virtual document: Either 1 if your document isduplex (has a front and back), whether the back has variable data or not, or 2 if your document issimplex or the data is already properly duplicated so the front and back already match.
On Error Tab
The On Error tab is common to all tasks. Details can be found in the" Task Properties Dialog" on page 666.
By default, any action task, branch, splitter or condition that generates an error will simply be ignored, andthe task just under it (not within a branch) will be given control of the job file without any modification. Anyinitial input task that generates an error will stop the process from running as a whole, and output tasks willnot generate output. The On Error tab can be used to overwrite the default behaviors.
l Send to Process: Check this option to send the job file to an error management process.l Error Process drop-down: Enabled only when the Send to Process option is checked. Lists anyprocess of which the initial input task is the Input Error Bin task.
l Action Group: This group is disabled in the initial input tasks and defaults to Stop Process. In allother tasks where the On Error tab is present, the following options are available:
l Ignore: The task is ignored as if it did not exist, and the job file is passed on to the next task inthe process.
l Stop Branch: If the task is in a branch of the process, the branch is stopped and the job file isreturned to the process after the branch. The branch will not produce any output.
l Stop Process: The process is stopped and no more processing is done. No further output isproduced.
l Log Message: Check this option to enable logging a custom error message in the PlanetPress SuiteWorkflow Tools' log file.
l Message: Enabled only when the Log Message option is checked. Enter a message that will belogged in the PlanetPress Suite Workflow Tools' log file. You can use any variables available inPlanetPress Workflow to customize the message.

l Store the message in variable: Select in which jobinfo, local or global variable you want to store themessage content.
l ID: Enter an error ID. This ID will be visible in theWindows Event Viewer. However, the ID is notvisible in the PlanetPress Suite Workflow Tools' log file.
l Store the ID in variable: Select in which jobinfo, local or global variable you want to store the errorID.
l Reset to defaults: Resets all options in this tab to their default values.
If storing the message or ID, if they are store in a jobinfo they will be available in any error handling processwhere errors are being forwarded. In all cases, if your process continues after the error, the contents of thevariables selected in this window will be available for the rest of your process, or whenever they areoverwritten.
Common Errors
Though some error messages are specific to a task in particular, others may apply to any and all tasksbecause they are related more to the system than to PlanetPress itself. Some examples would be W3813,W3830, W3991, W4005. These correspond to issues such as not having any space to write files, permissionerrors on folders or files, etc.
Comments Tab
The Comments tab is common to all tasks. It contains a single text area (Task comments) that lets youwrite comments about the task. These comments are saved when the dialog is closed with the OK button,and are displayed in the Task Comments Pane.
OL Connect Tasks
Note
OL Connect Tasks are available in PlanetPress Workflow 8.0 and up, and are used specifically tocommunicate with the Server component of PlanetPress Connect or PReS Connect.
OL Connect includes a set of automation tasks to communicate with the Server component and automatecertain tasks such as creating record sets, generating contents and generating output.

All In One
The All In One action task is a combination of 4 different OL Connect tasks within a single one. This makescreating Print content faster and more easily, as the task is optimized for this specific purpose with less dataexchanged with the server as well as multi-threading support.
The task is build with 3 tabs that represent the 3 main steps of the creation of a Print Output: Data Mapping,Content Creation and Output Creation. In this case, Job Creation is implied and equivalent to a singlecreated job.
Data Mapper Tab
The Data Mapper tab generates a Record Set from a specific source: data mapping on the appropriatesource (Current Data File, Database or PDF/VT data file), Retrieving items from the Connect Database (filtersetting) or uses the current job Metadata. The resulting Record Set is given to the Content Creation part ofthe task. In order to optimize the process, blocks of 100 records are sent sequentially to the Content Creationin parallel, instead of waiting for the whole record set to be created.
l Source: Indicates the source of the Record Set metadata:l Data Mapping Configuration: Executes data mapping on the appropriate source. Select theappropriate data mapping configuration in the list:
l "None" filename: Select to execute default, basic data mapping on the input PDV/VT file.l "%o": Select to use a dynamic data mapping configuration name. Click on %o to changethe expression that determines the name of the data mapping configuration to use.
l Configuration Names: Select the appropriate data mapping configuration. Addingconfigurations is done through the Send to Workflow option in the DataMapper Module.
l Open data model of selected configuration: Click to view the data model attached to theconfiguration in the Data Mapper module, to verity that the right one is used. Only works forconfigurations listed (will not work for "None" or "Dynamic" options).
l Filter: Retrieves records from the Connect Database. This is identical to using the RetrieveEntities task.
l Filter type: Determines at which level to retrieve the records:l Record: Retrieves one or more Records, whether or not they are part of a RecordSet. Output similar to the Create Record Set task.
l Record Set: Retrieves one or more Record Sets, including all their records. Outputsimilar to the Create Record Set task.

l Filter: l Add a condition: Click to add a new condition line. This adds the line to the currentcondition level, by default with an AND operator.
l Switch conditions: Click to swap two conditions on the same level, or two groups ofconditions.
l Delete the selected condition: Click to delete the currently selected conditions inthe list.
l Clear the rule: Click to delete all rules in the list. Note: This cannot be undone.l Import a rule: Click to open the Browse dialog and load a Rules file. This will loadits rules into the list.
l Export the rule: Click to open a Save dialog and save the Rules file to disk.
l Rule Viewer: Displays a text-based view of the condition using operators and parentheses.l Sort contents: Defines how records are sorted.
l Sort items based on: Displays the current sorting method. To modify the sortingmethod, click on the [...] button at the right of the box to open the Sort Parametersdialog.
l Metadata: Uses existing metadata, generally the output of a Create Record Set or a RetrieveEntities task set to retrieve Records or Record Sets. This source has no options as it expectsvalid metadata.
l PDF/VT with Content Creation: Expects a PDF/VT file as an input and executes basic datamapping on the file. This is the same as using the passthrough option in the Create Record Settask. Content Items are created automatically. When this source is selected, the ContentCreation tab is disabled.
Content Creation Tab
The Content Creation tab generates Content Items either by merging a Record Set with a Template, or byprocessing a PDF/VT file into individual content items.
l Template: Select the appropriate template or option to execute it:l "None" filename: Select to skip Content Creation completely.l "%o": Select to use a dynamic template name. Click on %o to change the expression thatdetermines the name of the template to use.

l Template Names: Select the appropriate template name from the list. Adding templates is donefrom the Send to Workflow option in the Designer Module.
l Preview: Displays a preview of the output generated by the Print context of the selected Template. Notavailable for the PDF/VT or dynamic template names.
l Section: Use the drop-down or type in a variable name to execute a specific section.
Output Creation Tab
The Output Creation tab generates the output for the current job, using the selected Output Creation Preset.Note that the Job Creation task normally necessary when using the individual tasks is implicitly executedbefore output creation.
l Output Preset: Select the appropriate Output Creation Preset to use:l "None": Select to prevent the execution of Output Creation.l "%o": Select to use a dynamic Preset name. Click on %o to change the expression thatdetermines the name of the Preset to use.
l Preset Name: Select the appropriate Preset to create output with. Adding Output CreationPresets is done from the Sent to Workflow option in the Designer Module.
Connect Proxy Tab
This tab is common to all OL Connect tasks and defines where to process the jobs send through thesetasks. When these fields are empty, they use the defaults set in the OL Connect User Options page of thepreferences.
Note
Defaults are not used unless the configuration is sent to the Workflow service.
l OL Connect Proxy Address: Enter the machine name or IP Address where the OL Connect Serverresides.
l Port: Enter the port to use to communicate with the OL Connect Server. Default: 9340l User name: Enter the user name expected by the OL Connect Server.l Password: Enter the password expected by the OL Connect Server for the above user name.
On Error Tab
The On Error tab is common to all tasks. Details can be found in the" Task Properties Dialog" on page 666.
By default, any action task, branch, splitter or condition that generates an error will simply be ignored, andthe task just under it (not within a branch) will be given control of the job file without any modification. Anyinitial input task that generates an error will stop the process from running as a whole, and output tasks willnot generate output. The On Error tab can be used to overwrite the default behaviors.
l Send to Process: Check this option to send the job file to an error management process.l Error Process drop-down: Enabled only when the Send to Process option is checked. Lists anyprocess of which the initial input task is the Input Error Bin task.
l Action Group: This group is disabled in the initial input tasks and defaults to Stop Process. In allother tasks where the On Error tab is present, the following options are available:
l Ignore: The task is ignored as if it did not exist, and the job file is passed on to the next task inthe process.
l Stop Branch: If the task is in a branch of the process, the branch is stopped and the job file isreturned to the process after the branch. The branch will not produce any output.
l Stop Process: The process is stopped and no more processing is done. No further output isproduced.
l Log Message: Check this option to enable logging a custom error message in the PlanetPress SuiteWorkflow Tools' log file.
l Message: Enabled only when the Log Message option is checked. Enter a message that will belogged in the PlanetPress Suite Workflow Tools' log file. You can use any variables available inPlanetPress Workflow to customize the message.
l Store the message in variable: Select in which jobinfo, local or global variable you want to store themessage content.
l ID: Enter an error ID. This ID will be visible in theWindows Event Viewer. However, the ID is notvisible in the PlanetPress Suite Workflow Tools' log file.
l Store the ID in variable: Select in which jobinfo, local or global variable you want to store the errorID.
l Reset to defaults: Resets all options in this tab to their default values.

If storing the message or ID, if they are store in a jobinfo they will be available in any error handling processwhere errors are being forwarded. In all cases, if your process continues after the error, the contents of thevariables selected in this window will be available for the rest of your process, or whenever they areoverwritten.
Common Errors
Though some error messages are specific to a task in particular, others may apply to any and all tasksbecause they are related more to the system than to PlanetPress itself. Some examples would be W3813,W3830, W3991, W4005. These correspond to issues such as not having any space to write files, permissionerrors on folders or files, etc.
Comments Tab
The Comments tab is common to all tasks. It contains a single text area (Task comments) that lets youwrite comments about the task. These comments are saved when the dialog is closed with the OK button,and are displayed in the Task Comments Pane.
Sort Parameters
The Search Parameters define how to sort the entities retrieved from the Connect Database using either theRetrieve Items task, or the Filter source in the All in One Action Task's Data Mapper task.
l Sort items based on: Lists the different sorts to apply to the entities.l Name: Click and enter the name for the Value or the Property to sort on.l Type: Select whether the Name option refers to a Property or a Value within the entity.l Order: Select how to sort, either Ascending or Descending alphabetical order.
l Add: Click to add a new line to the sort list.l Remove: Click to remove the currently selected line in the sort list.l Move Up: Click to move the currently selected line up one position in the sort list.l Move Down: Click to move the currently selected line down one position in the sort list.l Validate Names: Click to check the each of line in the sort list against the currently active Metadata.Metadata must be loaded in the Data Selector or through the use of the Debugging feature.
Create Email Content Set
The Create Email Content task generates a set of email content items from a template's Email Context,which are then sent directly to the recipient set in each record.
Input
This task must receive the information regarding a valid Record Set. This can be the output of the CreateRecord Set task, or a Record Set retrieved using the Retrieve Entities task.
Processing
This task loops through each record in the Record Set. For each record, an HTML Email is generated usingthe record's data. The output generated is then sent via an SMTP server to the email set by the template.
Output
Within the workflow, the output to this task is only modified metadata indicating the task is complete. It is theServer component that outputs the emails themselves and sends them to each recipient.
Properties
General Tab
l Templatel "%o": Select to use a dynamic template name. Click on %o to change the expression thatdetermines the name of the template to use.
l Template Names: Select the appropriate template. Adding template is done through the Send toWorkflow option in the Designer Module.
l Update Records from Metadata: If the process metadata has been modified by any Metadata relatedtask, check to use the updated metadata. Otherwise, only the ID of the current job is sent, and themetadata on the Server is used.
l Section: Enter the section name that will generate output. Only one section can be output. If no sectionis defined or if the section name is invalid, the default section will be output.
l Email information group:l Sender Address: Enter the email address that appears in the "From" field of the email.l Mail host: Enter the address of the SMTP server through which emails should be routed. Thisinformation should be available from your IT staff.
l Send emails to sender (test mode): Check to ignore the email address from each record andsend all emails to the address entered in the Sender Address field instead.
l Attach PDF to Email: Check to generate the Print Context in the template as a PDF and send itwith the email as an attachment.
l Use Authentication group: Check to enable authentication to the SMTP server.l user name: Enter a user name that has permission to send email through theSMTP server.
l Password: Enter the password for the above user name.l Start TLS: Check to send connect to the SMTP server using TLS (also called "SSL").
Connect Proxy Tab
This tab is common to all OL Connect tasks and defines where to process the jobs send through thesetasks. When these fields are empty, they use the defaults set in the OL Connect User Options page of thepreferences.
Note
Defaults are not used unless the configuration is sent to the Workflow service.
l OL Connect Proxy Address: Enter the machine name or IP Address where the OL Connect Serverresides.
l Port: Enter the port to use to communicate with the OL Connect Server. Default: 9340l User name: Enter the user name expected by the OL Connect Server.l Password: Enter the password expected by the OL Connect Server for the above user name.
On Error Tab
The On Error tab is common to all tasks. Details can be found in the" Task Properties Dialog" on page 666.
By default, any action task, branch, splitter or condition that generates an error will simply be ignored, and

the task just under it (not within a branch) will be given control of the job file without any modification. Anyinitial input task that generates an error will stop the process from running as a whole, and output tasks willnot generate output. The On Error tab can be used to overwrite the default behaviors.
l Send to Process: Check this option to send the job file to an error management process.l Error Process drop-down: Enabled only when the Send to Process option is checked. Lists anyprocess of which the initial input task is the Input Error Bin task.
l Action Group: This group is disabled in the initial input tasks and defaults to Stop Process. In allother tasks where the On Error tab is present, the following options are available:
l Ignore: The task is ignored as if it did not exist, and the job file is passed on to the next task inthe process.
l Stop Branch: If the task is in a branch of the process, the branch is stopped and the job file isreturned to the process after the branch. The branch will not produce any output.
l Stop Process: The process is stopped and no more processing is done. No further output isproduced.
l Log Message: Check this option to enable logging a custom error message in the PlanetPress SuiteWorkflow Tools' log file.
l Message: Enabled only when the Log Message option is checked. Enter a message that will belogged in the PlanetPress Suite Workflow Tools' log file. You can use any variables available inPlanetPress Workflow to customize the message.
l Store the message in variable: Select in which jobinfo, local or global variable you want to store themessage content.
l ID: Enter an error ID. This ID will be visible in theWindows Event Viewer. However, the ID is notvisible in the PlanetPress Suite Workflow Tools' log file.
l Store the ID in variable: Select in which jobinfo, local or global variable you want to store the errorID.
l Reset to defaults: Resets all options in this tab to their default values.
If storing the message or ID, if they are store in a jobinfo they will be available in any error handling processwhere errors are being forwarded. In all cases, if your process continues after the error, the contents of thevariables selected in this window will be available for the rest of your process, or whenever they areoverwritten.

Common Errors
Though some error messages are specific to a task in particular, others may apply to any and all tasksbecause they are related more to the system than to PlanetPress itself. Some examples would be W3813,W3830, W3991, W4005. These correspond to issues such as not having any space to write files, permissionerrors on folders or files, etc.
Comments Tab
The Comments tab is common to all tasks. It contains a single text area (Task comments) that lets youwrite comments about the task. These comments are saved when the dialog is closed with the OK button,and are displayed in the Task Comments Pane.
Create Job
The Create Job action task prepares a series of print content items for output generation. A Job is not actualcontents but simply a collection of content items ready to be printed.
Input
The task expects to have a valid Print Content Set, output from the "Create Print Content" on page 490 task,or the result of the "Retrieve Items" on page 504 task set to retrieve either Content Items or Content Set.
Note
The result of a Retrieve Items task cannot be used with a Job Creation Preset. Use the IDs in the metadata instead(see the Properties below).
Processing
The task prepares the content items or content sets for printing, tagging them as printable. Only the contentitems that are part of the job will generate output.
Output
The task outputs a Print Job ready to be sent to the Create Output task for printing.

Properties
General Tab
l Job Preset file: Select which Job Preset to use to generate the job. To be used in this dialog, a presetmust have been sent to PlanetPress Workflow using the Package File function in PlanetPressConnect.
l Default: The IDs in the metadata are used instead of a job preset file. Select this option if thePrint Content Set is the result of the "Retrieve Items" on page 504 task.
l "%o": Select to use a dynamic preset name. Click on %o to change the expression thatdetermines the name of the preset to use. The preset name must be available in the list below.
l Preset Names: Select the appropriate preset to generate output.
Connect Proxy Tab
This tab is common to all OL Connect tasks and defines where to process the jobs send through thesetasks. When these fields are empty, they use the defaults set in the OL Connect User Options page of thepreferences.
Note
Defaults are not used unless the configuration is sent to the Workflow service.
l OL Connect Proxy Address: Enter the machine name or IP Address where the OL Connect Serverresides.
l Port: Enter the port to use to communicate with the OL Connect Server. Default: 9340l User name: Enter the user name expected by the OL Connect Server.l Password: Enter the password expected by the OL Connect Server for the above user name.
On Error Tab
The On Error tab is common to all tasks. Details can be found in the" Task Properties Dialog" on page 666.
By default, any action task, branch, splitter or condition that generates an error will simply be ignored, andthe task just under it (not within a branch) will be given control of the job file without any modification. Anyinitial input task that generates an error will stop the process from running as a whole, and output tasks will

not generate output. The On Error tab can be used to overwrite the default behaviors.
l Send to Process: Check this option to send the job file to an error management process.l Error Process drop-down: Enabled only when the Send to Process option is checked. Lists anyprocess of which the initial input task is the Input Error Bin task.
l Action Group: This group is disabled in the initial input tasks and defaults to Stop Process. In allother tasks where the On Error tab is present, the following options are available:
l Ignore: The task is ignored as if it did not exist, and the job file is passed on to the next task inthe process.
l Stop Branch: If the task is in a branch of the process, the branch is stopped and the job file isreturned to the process after the branch. The branch will not produce any output.
l Stop Process: The process is stopped and no more processing is done. No further output isproduced.
l Log Message: Check this option to enable logging a custom error message in the PlanetPress SuiteWorkflow Tools' log file.
l Message: Enabled only when the Log Message option is checked. Enter a message that will belogged in the PlanetPress Suite Workflow Tools' log file. You can use any variables available inPlanetPress Workflow to customize the message.
l Store the message in variable: Select in which jobinfo, local or global variable you want to store themessage content.
l ID: Enter an error ID. This ID will be visible in theWindows Event Viewer. However, the ID is notvisible in the PlanetPress Suite Workflow Tools' log file.
l Store the ID in variable: Select in which jobinfo, local or global variable you want to store the errorID.
l Reset to defaults: Resets all options in this tab to their default values.
If storing the message or ID, if they are store in a jobinfo they will be available in any error handling processwhere errors are being forwarded. In all cases, if your process continues after the error, the contents of thevariables selected in this window will be available for the rest of your process, or whenever they areoverwritten.
Common Errors
Though some error messages are specific to a task in particular, others may apply to any and all tasksbecause they are related more to the system than to PlanetPress itself. Some examples would be W3813,W3830, W3991, W4005. These correspond to issues such as not having any space to write files, permissionerrors on folders or files, etc.
Comments Tab
The Comments tab is common to all tasks. It contains a single text area (Task comments) that lets youwrite comments about the task. These comments are saved when the dialog is closed with the OK button,and are displayed in the Task Comments Pane.
Create Output
The Create Output action task generates Print output in a format specified by a Connect Print Preset andsends this output to the appropriate target location.
Input
The task requires a valid Job Metadata file, normally output from a Create Job or Merge Jobs task.
Processing
The job is sent to the OL Connect Server for processing.
Output
Depending on the options set, either a simple metadata file with information about processing is returned, orthe actual output file created by the server.
Properties
The Create Output action task properties are as follows:
General Tab
l Output Preset file: Select which Output Preset to use to generate the output. To be used in this dialog,a preset must have been sent to PlanetPress Workflow using the Package File function in PlanetPress

Connect.
l "%o": Select to use a dynamic preset name. Click on %o to change the expression thatdetermines the name of the preset to use. The preset name must be available in the list below.
l Preset Names: Select the appropriate preset to generate output.l Output Management group:
l As defined by Output Preset: Select to send the output of the job to the location set in the PrintPreset (file, printer, etc).
l Through Workflow: Select to replace the current job file with the output produced by the server.Every option in the Output Preset is still used, except for the output location.
Connect Proxy Tab
This tab is common to all OL Connect tasks and defines where to process the jobs send through thesetasks. When these fields are empty, they use the defaults set in the OL Connect User Options page of thepreferences.
Note
Defaults are not used unless the configuration is sent to the Workflow service.
l OL Connect Proxy Address: Enter the machine name or IP Address where the OL Connect Serverresides.
l Port: Enter the port to use to communicate with the OL Connect Server. Default: 9340l User name: Enter the user name expected by the OL Connect Server.l Password: Enter the password expected by the OL Connect Server for the above user name.
On Error Tab
The On Error tab is common to all tasks. Details can be found in the" Task Properties Dialog" on page 666.
By default, any action task, branch, splitter or condition that generates an error will simply be ignored, andthe task just under it (not within a branch) will be given control of the job file without any modification. Anyinitial input task that generates an error will stop the process from running as a whole, and output tasks willnot generate output. The On Error tab can be used to overwrite the default behaviors.

l Send to Process: Check this option to send the job file to an error management process.l Error Process drop-down: Enabled only when the Send to Process option is checked. Lists anyprocess of which the initial input task is the Input Error Bin task.
l Action Group: This group is disabled in the initial input tasks and defaults to Stop Process. In allother tasks where the On Error tab is present, the following options are available:
l Ignore: The task is ignored as if it did not exist, and the job file is passed on to the next task inthe process.
l Stop Branch: If the task is in a branch of the process, the branch is stopped and the job file isreturned to the process after the branch. The branch will not produce any output.
l Stop Process: The process is stopped and no more processing is done. No further output isproduced.
l Log Message: Check this option to enable logging a custom error message in the PlanetPress SuiteWorkflow Tools' log file.
l Message: Enabled only when the Log Message option is checked. Enter a message that will belogged in the PlanetPress Suite Workflow Tools' log file. You can use any variables available inPlanetPress Workflow to customize the message.
l Store the message in variable: Select in which jobinfo, local or global variable you want to store themessage content.
l ID: Enter an error ID. This ID will be visible in theWindows Event Viewer. However, the ID is notvisible in the PlanetPress Suite Workflow Tools' log file.
l Store the ID in variable: Select in which jobinfo, local or global variable you want to store the errorID.
l Reset to defaults: Resets all options in this tab to their default values.
If storing the message or ID, if they are store in a jobinfo they will be available in any error handling processwhere errors are being forwarded. In all cases, if your process continues after the error, the contents of thevariables selected in this window will be available for the rest of your process, or whenever they areoverwritten.
Common Errors
Though some error messages are specific to a task in particular, others may apply to any and all tasksbecause they are related more to the system than to PlanetPress itself. Some examples would be W3813,W3830, W3991, W4005. These correspond to issues such as not having any space to write files, permissionerrors on folders or files, etc.

Comments Tab
The Comments tab is common to all tasks. It contains a single text area (Task comments) that lets youwrite comments about the task. These comments are saved when the dialog is closed with the OK button,and are displayed in the Task Comments Pane.
Create PDF/VT
The Create PDF/VT, similar to the Create PDF task, creates PDF/VT files from a PlanetPress Document.This PDF/VT is compatible with the Create Print Content directly without the use of a Connect Template(PDF/VT mode).
Input
Any data file supported by the selected PlanetPress Document.
Processing
The input data file is merged with the selected PlanetPress Document.
Output
The output is a PDF/VT with default quality settings. The metadata embedded within the PDF/VT is the onegenerated by the PlanetPress Document.
Properties
The Create PDF/VT action task properties are as follows (note that the Connect Proxy tab is not present asthis task does not communicate with the OL Connect Server module):
General Tab
l Documents: Select a specific PlanetPress Design document if you want all the jobs to be generatedwith that document.
l Recipient Node: Use the drop-down to select which level of the metadata is used as the "Recipient"node. The Recipient node defines each Record in the output when used with the Create Print Content.
l Add job information to document: Check to add the 9 jobinfo variables to the PDF/VT metadata atthe root level.

On Error Tab
The On Error tab is common to all tasks. Details can be found in the" Task Properties Dialog" on page 666.
By default, any action task, branch, splitter or condition that generates an error will simply be ignored, andthe task just under it (not within a branch) will be given control of the job file without any modification. Anyinitial input task that generates an error will stop the process from running as a whole, and output tasks willnot generate output. The On Error tab can be used to overwrite the default behaviors.
l Send to Process: Check this option to send the job file to an error management process.l Error Process drop-down: Enabled only when the Send to Process option is checked. Lists anyprocess of which the initial input task is the Input Error Bin task.
l Action Group: This group is disabled in the initial input tasks and defaults to Stop Process. In allother tasks where the On Error tab is present, the following options are available:
l Ignore: The task is ignored as if it did not exist, and the job file is passed on to the next task inthe process.
l Stop Branch: If the task is in a branch of the process, the branch is stopped and the job file isreturned to the process after the branch. The branch will not produce any output.
l Stop Process: The process is stopped and no more processing is done. No further output isproduced.
l Log Message: Check this option to enable logging a custom error message in the PlanetPress SuiteWorkflow Tools' log file.
l Message: Enabled only when the Log Message option is checked. Enter a message that will belogged in the PlanetPress Suite Workflow Tools' log file. You can use any variables available inPlanetPress Workflow to customize the message.
l Store the message in variable: Select in which jobinfo, local or global variable you want to store themessage content.
l ID: Enter an error ID. This ID will be visible in theWindows Event Viewer. However, the ID is notvisible in the PlanetPress Suite Workflow Tools' log file.
l Store the ID in variable: Select in which jobinfo, local or global variable you want to store the errorID.
l Reset to defaults: Resets all options in this tab to their default values.

If storing the message or ID, if they are store in a jobinfo they will be available in any error handling processwhere errors are being forwarded. In all cases, if your process continues after the error, the contents of thevariables selected in this window will be available for the rest of your process, or whenever they areoverwritten.
Common Errors
Though some error messages are specific to a task in particular, others may apply to any and all tasksbecause they are related more to the system than to PlanetPress itself. Some examples would be W3813,W3830, W3991, W4005. These correspond to issues such as not having any space to write files, permissionerrors on folders or files, etc.
Comments Tab
The Comments tab is common to all tasks. It contains a single text area (Task comments) that lets youwrite comments about the task. These comments are saved when the dialog is closed with the OK button,and are displayed in the Task Comments Pane.
Create Print Content
The Create Print Content task generates a set of printable content items from a template's Print Context,and saves those content items in the database until output creation is requested.
Input
This task can receive either the information regarding a valid Record Set (which can be the output of theCreate Record Set task, or a Record Set retrieved using the Retrieve Entities task) or a PDF/VT File.
Processing
In the case of a record set and template, this task loops through each record in the Record Set. For eachrecord, an one or more pages are generated using the record's data and these pages are saved as a contentitem in the database. In the case of a PDF/VT file, content items are created based on the structure of thePDF/VT metadata and content items are stored using the data for each of those metadata records.
Output
The output of this task is modified metadata with information about the job processing and each createdcontent item. No content item is actually output from the task, they are only saved in the OL Connect

Database.
Properties
General Tab
l Template File:l "None" File name: Select to accept a PDF/VT file as an input and automatically create contentitems based on the PDF/VT.
l "%o": Select to use a dynamic template name. Click on %o to change the expression thatdetermines the name of the template to use.
l Template Names: Select the appropriate template. Adding template is done through the Send toWorkflow option in the Designer Module.
l Record ID: Enter a valid ID for a record. This record must be valid for the template used.l Update Records from Metadata: If the process metadata has been modified by any Metadata relatedtask, check to use the updated metadata. Otherwise, only the ID of the current job is sent, and themetadata on the Server is used.
Connect Proxy Tab
This tab is common to all OL Connect tasks and defines where to process the jobs send through thesetasks. When these fields are empty, they use the defaults set in the OL Connect User Options page of thepreferences.
Note
Defaults are not used unless the configuration is sent to the Workflow service.
l OL Connect Proxy Address: Enter the machine name or IP Address where the OL Connect Serverresides.
l Port: Enter the port to use to communicate with the OL Connect Server. Default: 9340l User name: Enter the user name expected by the OL Connect Server.l Password: Enter the password expected by the OL Connect Server for the above user name.

On Error Tab
The On Error tab is common to all tasks. Details can be found in the" Task Properties Dialog" on page 666.
By default, any action task, branch, splitter or condition that generates an error will simply be ignored, andthe task just under it (not within a branch) will be given control of the job file without any modification. Anyinitial input task that generates an error will stop the process from running as a whole, and output tasks willnot generate output. The On Error tab can be used to overwrite the default behaviors.
l Send to Process: Check this option to send the job file to an error management process.l Error Process drop-down: Enabled only when the Send to Process option is checked. Lists anyprocess of which the initial input task is the Input Error Bin task.
l Action Group: This group is disabled in the initial input tasks and defaults to Stop Process. In allother tasks where the On Error tab is present, the following options are available:
l Ignore: The task is ignored as if it did not exist, and the job file is passed on to the next task inthe process.
l Stop Branch: If the task is in a branch of the process, the branch is stopped and the job file isreturned to the process after the branch. The branch will not produce any output.
l Stop Process: The process is stopped and no more processing is done. No further output isproduced.
l Log Message: Check this option to enable logging a custom error message in the PlanetPress SuiteWorkflow Tools' log file.
l Message: Enabled only when the Log Message option is checked. Enter a message that will belogged in the PlanetPress Suite Workflow Tools' log file. You can use any variables available inPlanetPress Workflow to customize the message.
l Store the message in variable: Select in which jobinfo, local or global variable you want to store themessage content.
l ID: Enter an error ID. This ID will be visible in theWindows Event Viewer. However, the ID is notvisible in the PlanetPress Suite Workflow Tools' log file.
l Store the ID in variable: Select in which jobinfo, local or global variable you want to store the errorID.
l Reset to defaults: Resets all options in this tab to their default values.
If storing the message or ID, if they are store in a jobinfo they will be available in any error handling processwhere errors are being forwarded. In all cases, if your process continues after the error, the contents of thevariables selected in this window will be available for the rest of your process, or whenever they areoverwritten.
Common Errors
Though some error messages are specific to a task in particular, others may apply to any and all tasksbecause they are related more to the system than to PlanetPress itself. Some examples would be W3813,W3830, W3991, W4005. These correspond to issues such as not having any space to write files, permissionerrors on folders or files, etc.
Comments Tab
The Comments tab is common to all tasks. It contains a single text area (Task comments) that lets youwrite comments about the task. These comments are saved when the dialog is closed with the OK button,and are displayed in the Task Comments Pane.
Create Web Content
The Create Web Content action task generates the output of the HTML Context of a specified template andreturns the HTML code to PlanetPress Workflow for further processing and return to the requester.Generally, this task is placed within an HTTP Server Workflow.
Input
This task must receive the information regarding a valid Record Set. This can be the output of the CreateRecord Set task, or a Record Set retrieved using the Retrieve Entities task.
Processing
For a single record, this task generates the output for the HTML Context of the specified template. Anyexternal resources such as images, css stylesheets or JavaScript files, are also produced and put aside onthe OL Connect Server component.
Output
The task outputs HTML code as a job file. Within this HTML code, references to external resources point tothe local OL Connect Server and are served to the requester directly when the HTML file is opened in a

browser.
Properties
General Tab
l Template File:l "%o": Select to use a dynamic template name. Click on %o to change the expression thatdetermines the name of the template to use.
l Template Names: Select the appropriate template. Adding template is done through the Send toWorkflow option in the Designer Module.
l Record ID: Enter a valid ID for a record. This record must be valid for the template used. By default,the record ID is pre-filled with the first record in the metadata, since the task can only generate a singlerecord.
l Section: Enter the section name that will generate output. Only one section can be output. If no sectionis defined or if the section name is invalid, the default section will be output.
l Update Records from Metadata: If the process metadata has been modified by any Metadata relatedtask, check to use the updated metadata. Otherwise, only the ID of the current job is sent, and themetadata on the Server is used.
Connect Proxy Tab
This tab is common to all OL Connect tasks and defines where to process the jobs send through thesetasks. When these fields are empty, they use the defaults set in the OL Connect User Options page of thepreferences.
Note
Defaults are not used unless the configuration is sent to the Workflow service.
l OL Connect Proxy Address: Enter the machine name or IP Address where the OL Connect Serverresides.
l Port: Enter the port to use to communicate with the OL Connect Server. Default: 9340l User name: Enter the user name expected by the OL Connect Server.l Password: Enter the password expected by the OL Connect Server for the above user name.

On Error Tab
The On Error tab is common to all tasks. Details can be found in the" Task Properties Dialog" on page 666.
By default, any action task, branch, splitter or condition that generates an error will simply be ignored, andthe task just under it (not within a branch) will be given control of the job file without any modification. Anyinitial input task that generates an error will stop the process from running as a whole, and output tasks willnot generate output. The On Error tab can be used to overwrite the default behaviors.
l Send to Process: Check this option to send the job file to an error management process.l Error Process drop-down: Enabled only when the Send to Process option is checked. Lists anyprocess of which the initial input task is the Input Error Bin task.
l Action Group: This group is disabled in the initial input tasks and defaults to Stop Process. In allother tasks where the On Error tab is present, the following options are available:
l Ignore: The task is ignored as if it did not exist, and the job file is passed on to the next task inthe process.
l Stop Branch: If the task is in a branch of the process, the branch is stopped and the job file isreturned to the process after the branch. The branch will not produce any output.
l Stop Process: The process is stopped and no more processing is done. No further output isproduced.
l Log Message: Check this option to enable logging a custom error message in the PlanetPress SuiteWorkflow Tools' log file.
l Message: Enabled only when the Log Message option is checked. Enter a message that will belogged in the PlanetPress Suite Workflow Tools' log file. You can use any variables available inPlanetPress Workflow to customize the message.
l Store the message in variable: Select in which jobinfo, local or global variable you want to store themessage content.
l ID: Enter an error ID. This ID will be visible in theWindows Event Viewer. However, the ID is notvisible in the PlanetPress Suite Workflow Tools' log file.
l Store the ID in variable: Select in which jobinfo, local or global variable you want to store the errorID.
l Reset to defaults: Resets all options in this tab to their default values.
If storing the message or ID, if they are store in a jobinfo they will be available in any error handling processwhere errors are being forwarded. In all cases, if your process continues after the error, the contents of thevariables selected in this window will be available for the rest of your process, or whenever they areoverwritten.
Common Errors
Though some error messages are specific to a task in particular, others may apply to any and all tasksbecause they are related more to the system than to PlanetPress itself. Some examples would be W3813,W3830, W3991, W4005. These correspond to issues such as not having any space to write files, permissionerrors on folders or files, etc.
Comments Tab
The Comments tab is common to all tasks. It contains a single text area (Task comments) that lets youwrite comments about the task. These comments are saved when the dialog is closed with the OK button,and are displayed in the Task Comments Pane.
Execute Data Mapping
The Execute Data Mapping action task generates a record set by executing a data mapping configurationon a data source. It can also automatically create a record set from a PDF/VT file without using a datamapping configuration.
Input
Optional. Both main options can refer to external files, but either one can be the active data file using %F. Bydefault the Data Source is set to use the active data file as input.
Processing
The task executes the selected data mapping configuration on the appropriate data source, or converts thePDF/VT into a Record Set directly.
If the data mapping configuration expects a database data source, the Data Source option is ignored and thedatabase is accessed instead. If a PDF/VT file is used, the data mapping configuration option is optional - ifone is present, it must be able to read the PDF/VT.
Output
The output to this task is twofold. On the OL Connect Server side, a Record Set containing multiple recordsis created and saved. On PlanetPress Workflow side, metadata is returned with information about eachrecord set.
Alternatively, it is possible to ignore creation of the Record Set on the OL Connect Server and simply returnan XML file containing the full Record Set structure.
Properties
General Tab
l Data mapping configuration: Enter the full path to a valid data mapping configuration(.oldatamapper) file, or use the Browse button to find the path.
l Data Source or PDF/VT file: Enter the full path to a valid data source compatible with the above datamapping configuration or a PDF/VT file, or use the Browse button to find the path.
l Output Type group:l Output IDs in Metadata: Select to only output the Record and Job IDs in the metadata. Thisdoes not permit sorting and filtering, but it enhances performance since only minimal data isexchanged between the OL Connect Server and PlanetPress Workflow.
l Output records in Metadata: Select to output the full Record table (no Details table) asmetadata in the task. It is then possible to sort and filter the metadata using the regular metadatatools, as long as the Update Records from Metadata option is used in further tasks to use themodified metadata.
l Output results in XML data file: Select to output an XML structure containing the full Record Setincluding all details table. When this option is used, the Record Set is not saved on theOL Connect Server, the data is simply returned and processing stops on the server side. Thisoption cannot be used with other OL Connect tasks.
Connect Proxy Tab
This tab is common to all OL Connect tasks and defines where to process the jobs send through thesetasks. When these fields are empty, they use the defaults set in the OL Connect User Options page of thepreferences.

Note
Defaults are not used unless the configuration is sent to the Workflow service.
l OL Connect Proxy Address: Enter the machine name or IP Address where the OL Connect Serverresides.
l Port: Enter the port to use to communicate with the OL Connect Server. Default: 9340l User name: Enter the user name expected by the OL Connect Server.l Password: Enter the password expected by the OL Connect Server for the above user name.
On Error Tab
The On Error tab is common to all tasks. Details can be found in the" Task Properties Dialog" on page 666.
By default, any action task, branch, splitter or condition that generates an error will simply be ignored, andthe task just under it (not within a branch) will be given control of the job file without any modification. Anyinitial input task that generates an error will stop the process from running as a whole, and output tasks willnot generate output. The On Error tab can be used to overwrite the default behaviors.
l Send to Process: Check this option to send the job file to an error management process.l Error Process drop-down: Enabled only when the Send to Process option is checked. Lists anyprocess of which the initial input task is the Input Error Bin task.
l Action Group: This group is disabled in the initial input tasks and defaults to Stop Process. In allother tasks where the On Error tab is present, the following options are available:
l Ignore: The task is ignored as if it did not exist, and the job file is passed on to the next task inthe process.
l Stop Branch: If the task is in a branch of the process, the branch is stopped and the job file isreturned to the process after the branch. The branch will not produce any output.
l Stop Process: The process is stopped and no more processing is done. No further output isproduced.
l Log Message: Check this option to enable logging a custom error message in the PlanetPress SuiteWorkflow Tools' log file.

l Message: Enabled only when the Log Message option is checked. Enter a message that will belogged in the PlanetPress Suite Workflow Tools' log file. You can use any variables available inPlanetPress Workflow to customize the message.
l Store the message in variable: Select in which jobinfo, local or global variable you want to store themessage content.
l ID: Enter an error ID. This ID will be visible in theWindows Event Viewer. However, the ID is notvisible in the PlanetPress Suite Workflow Tools' log file.
l Store the ID in variable: Select in which jobinfo, local or global variable you want to store the errorID.
l Reset to defaults: Resets all options in this tab to their default values.
If storing the message or ID, if they are store in a jobinfo they will be available in any error handling processwhere errors are being forwarded. In all cases, if your process continues after the error, the contents of thevariables selected in this window will be available for the rest of your process, or whenever they areoverwritten.
Common Errors
Though some error messages are specific to a task in particular, others may apply to any and all tasksbecause they are related more to the system than to PlanetPress itself. Some examples would be W3813,W3830, W3991, W4005. These correspond to issues such as not having any space to write files, permissionerrors on folders or files, etc.
Comments Tab
The Comments tab is common to all tasks. It contains a single text area (Task comments) that lets youwrite comments about the task. These comments are saved when the dialog is closed with the OK button,and are displayed in the Task Comments Pane.
Mark Connect Sets for Deletion
The Mark Connect Sets for Deletion task indicates that an item in the Connect Database should bedeleted the next time the Database Cleanup runs. This means that whatever item is set for deletion will nolonger be available from the database.
Input
The task requires a valid metadata file containing items for deletion, including Job Sets, Content Sets andData Sets. These can be created by the Execute Data Mapping, Create Print Content and Create Job tasks.Job Sets, Content Sets and Data Sets are also valid when obtained using the Retrieve Items task.
Processing
All sets currently active in the metadata are set for deletion.
Output
The same metadata that is input.
Properties
l Set types to mark for deletion based on metadata content:l Job Set: Tag any Job set created by the Create Job task or the Retrieve Items task set to retrieveJob Sets.
l Content Set: Tag any Content set created by the Create Print Content task or the Retrieve Itemstask set to retrieve Content Sets.
l Record Set: Tag any Record set created by the Execute Data Mapping task or the RetrieveItems task set to retrieve Record Sets.
Connect Proxy Tab
This tab is common to all OL Connect tasks and defines where to process the jobs send through thesetasks. When these fields are empty, they use the defaults set in the OL Connect User Options page of thepreferences.
Note
Defaults are not used unless the configuration is sent to the Workflow service.
l OL Connect Proxy Address: Enter the machine name or IP Address where the OL Connect Serverresides.
l Port: Enter the port to use to communicate with the OL Connect Server. Default: 9340

l User name: Enter the user name expected by the OL Connect Server.l Password: Enter the password expected by the OL Connect Server for the above user name.
On Error Tab
The On Error tab is common to all tasks. Details can be found in the" Task Properties Dialog" on page 666.
By default, any action task, branch, splitter or condition that generates an error will simply be ignored, andthe task just under it (not within a branch) will be given control of the job file without any modification. Anyinitial input task that generates an error will stop the process from running as a whole, and output tasks willnot generate output. The On Error tab can be used to overwrite the default behaviors.
l Send to Process: Check this option to send the job file to an error management process.l Error Process drop-down: Enabled only when the Send to Process option is checked. Lists anyprocess of which the initial input task is the Input Error Bin task.
l Action Group: This group is disabled in the initial input tasks and defaults to Stop Process. In allother tasks where the On Error tab is present, the following options are available:
l Ignore: The task is ignored as if it did not exist, and the job file is passed on to the next task inthe process.
l Stop Branch: If the task is in a branch of the process, the branch is stopped and the job file isreturned to the process after the branch. The branch will not produce any output.
l Stop Process: The process is stopped and no more processing is done. No further output isproduced.
l Log Message: Check this option to enable logging a custom error message in the PlanetPress SuiteWorkflow Tools' log file.
l Message: Enabled only when the Log Message option is checked. Enter a message that will belogged in the PlanetPress Suite Workflow Tools' log file. You can use any variables available inPlanetPress Workflow to customize the message.
l Store the message in variable: Select in which jobinfo, local or global variable you want to store themessage content.
l ID: Enter an error ID. This ID will be visible in theWindows Event Viewer. However, the ID is notvisible in the PlanetPress Suite Workflow Tools' log file.
l Store the ID in variable: Select in which jobinfo, local or global variable you want to store the error

ID.l Reset to defaults: Resets all options in this tab to their default values.
If storing the message or ID, if they are store in a jobinfo they will be available in any error handling processwhere errors are being forwarded. In all cases, if your process continues after the error, the contents of thevariables selected in this window will be available for the rest of your process, or whenever they areoverwritten.
Common Errors
Though some error messages are specific to a task in particular, others may apply to any and all tasksbecause they are related more to the system than to PlanetPress itself. Some examples would be W3813,W3830, W3991, W4005. These correspond to issues such as not having any space to write files, permissionerrors on folders or files, etc.
Comments Tab
The Comments tab is common to all tasks. It contains a single text area (Task comments) that lets youwrite comments about the task. These comments are saved when the dialog is closed with the OK button,and are displayed in the Task Comments Pane.
Merge Jobs
The Merge Jobs action task merges an external metadata file containing an OL Connect Job with thecurrent job file.
Input
The task must receive a Job metadata file, which is output from the Create Job task. The selected metadatafile must also be the output of a Create Job task.
Processing
The current metadata file is merged with the selected external metadata file.
Output
The task outputs a merged Job metadata file which can be used in the Create Output task.

Properties
General Tab
l Metadata file: Enter the full path to a valid Job Metadata file, or use the Browse button to browse to avalid location.
On Error Tab
The On Error tab is common to all tasks. Details can be found in the" Task Properties Dialog" on page 666.
By default, any action task, branch, splitter or condition that generates an error will simply be ignored, andthe task just under it (not within a branch) will be given control of the job file without any modification. Anyinitial input task that generates an error will stop the process from running as a whole, and output tasks willnot generate output. The On Error tab can be used to overwrite the default behaviors.
l Send to Process: Check this option to send the job file to an error management process.l Error Process drop-down: Enabled only when the Send to Process option is checked. Lists anyprocess of which the initial input task is the Input Error Bin task.
l Action Group: This group is disabled in the initial input tasks and defaults to Stop Process. In allother tasks where the On Error tab is present, the following options are available:
l Ignore: The task is ignored as if it did not exist, and the job file is passed on to the next task inthe process.
l Stop Branch: If the task is in a branch of the process, the branch is stopped and the job file isreturned to the process after the branch. The branch will not produce any output.
l Stop Process: The process is stopped and no more processing is done. No further output isproduced.
l Log Message: Check this option to enable logging a custom error message in the PlanetPress SuiteWorkflow Tools' log file.
l Message: Enabled only when the Log Message option is checked. Enter a message that will belogged in the PlanetPress Suite Workflow Tools' log file. You can use any variables available inPlanetPress Workflow to customize the message.
l Store the message in variable: Select in which jobinfo, local or global variable you want to store themessage content.

l ID: Enter an error ID. This ID will be visible in theWindows Event Viewer. However, the ID is notvisible in the PlanetPress Suite Workflow Tools' log file.
l Store the ID in variable: Select in which jobinfo, local or global variable you want to store the errorID.
l Reset to defaults: Resets all options in this tab to their default values.
If storing the message or ID, if they are store in a jobinfo they will be available in any error handling processwhere errors are being forwarded. In all cases, if your process continues after the error, the contents of thevariables selected in this window will be available for the rest of your process, or whenever they areoverwritten.
Common Errors
Though some error messages are specific to a task in particular, others may apply to any and all tasksbecause they are related more to the system than to PlanetPress itself. Some examples would be W3813,W3830, W3991, W4005. These correspond to issues such as not having any space to write files, permissionerrors on folders or files, etc.
Comments Tab
The Comments tab is common to all tasks. It contains a single text area (Task comments) that lets youwrite comments about the task. These comments are saved when the dialog is closed with the OK button,and are displayed in the Task Comments Pane.
Retrieve Items
The Retrieve Items action task locates and extracts items from the OL Connect Database so they can beused with further tasks. The items are retrieved using a set of conditions working together. Since this taskcan retrieve items at any level, it can be used to generate metadata used in multiple tasks.
Input
The task requires no input file, but any input information such as metadata, job information or data file canbe used to specify which items to retrieve.

Processing
The task requests the items on the OL Connect Server using the conditions set in the task properties. Onlythe condition information and the return metadata are exchanged.
Output
The task outputs metadata that is equivalent to the appropriate task that would normally create the items(see the task properties for the list).
Properties
General Tab
l Entity to retrieve: Use the drop-down to select which items to retrieve.l Record: Retrieves one or more Records, whether or not they are part of a Record Set. Outputsimilar to the Create Record Set task.
l Record Set: Retrieves one or more Record Sets, including all their records. Output similar to theCreate Record Set task.
l Content Item: Retrieves one or more Content Items, whether or not they are part of a ContentSet. Output similar to the Create Print Content or Create HTML Content Set tasks.
l Content Set: Retrieves one or more Content Sets, including all their content items. Outputsimilar to the Create Print Content task.
l Job: Retrieves one or more Jobs, including all their content items ready to be printed. Outputsimilar to the Create Job task.
l Conditions: l Add a condition: Click to add a new condition line. This adds the line to the current conditionlevel, by default with an AND operator.
l Switch conditions: Click to swap two conditions on the same level, or two groups of conditions.l Delete the selected condition: Click to delete the currently selected conditions in the list.l Clear the rule: Click to delete all rules in the list. Note: This cannot be undone.l Import a rule: Click to open the Browse dialog and load a Rules file. This will load its rules intothe list.
l Export the rule: Click to open a Save dialog and save the Rules file to disk.
l Rule Viewer: Displays a text-based view of the condition using operators and parentheses.
l Output Type group:l Output IDs in Metadata: Select to only output minimal metadata containing the entity IDs.l Output records in Metadata: Select to output IDs as well as record details in the metadata,useful for further sorting and filtering of the metadata.
Commingling/Batching Tab
Commingling (available only with the appropriate license) is a method by which Print Content Items aremerged together to create mail pieces going to each recipient. For instance, retrieving a letter, an invoiceand a notice within the same mail piece, which presumably could be added within the same envelope.Batching is the same principle when all the Print Content Items are generated using the same Template file.This tab is only available if the "Content Item" option is selected in the General Tab's "Entity toretrieve" drop-down. To modify any of the following options, click in the Parameters box and then click the[...] button that appears.
l Document contents: Defines the Document ("Mail Piece") level and how they are built.
l Pick items based on: Use the [...] to open the Pick Parameters dialog and define how to pickwhich items will be placed in each document. Content items picked using this method will bepart of the same mail piece.
l Sort items based on: Use the [...] to open the Sort Parameters dialog and define how ContentItems are sorted within the mail piece.
l Group contents: Define the Group level (for example, a Mail Route), or how to group mail piecestogether in groups.
l Pick items based on: Use the [...] to open the Pick Parameters dialog and define how to pickwhich documents will be placed in each Document group. groups are often used to separatemail routes, provinces, or cities.
l Sort items based on: Use the [...] to open the Sort Parameters dialog and define howdocuments are sorted within the group, for example by Zip Code.
Connect Proxy Tab
This tab is common to all OL Connect tasks and defines where to process the jobs send through thesetasks. When these fields are empty, they use the defaults set in the OL Connect User Options page of thepreferences.

Note
Defaults are not used unless the configuration is sent to the Workflow service.
l OL Connect Proxy Address: Enter the machine name or IP Address where the OL Connect Serverresides.
l Port: Enter the port to use to communicate with the OL Connect Server. Default: 9340l User name: Enter the user name expected by the OL Connect Server.l Password: Enter the password expected by the OL Connect Server for the above user name.
On Error Tab
The On Error tab is common to all tasks. Details can be found in the" Task Properties Dialog" on page 666.
By default, any action task, branch, splitter or condition that generates an error will simply be ignored, andthe task just under it (not within a branch) will be given control of the job file without any modification. Anyinitial input task that generates an error will stop the process from running as a whole, and output tasks willnot generate output. The On Error tab can be used to overwrite the default behaviors.
l Send to Process: Check this option to send the job file to an error management process.l Error Process drop-down: Enabled only when the Send to Process option is checked. Lists anyprocess of which the initial input task is the Input Error Bin task.
l Action Group: This group is disabled in the initial input tasks and defaults to Stop Process. In allother tasks where the On Error tab is present, the following options are available:
l Ignore: The task is ignored as if it did not exist, and the job file is passed on to the next task inthe process.
l Stop Branch: If the task is in a branch of the process, the branch is stopped and the job file isreturned to the process after the branch. The branch will not produce any output.
l Stop Process: The process is stopped and no more processing is done. No further output isproduced.
l Log Message: Check this option to enable logging a custom error message in the PlanetPress SuiteWorkflow Tools' log file.

l Message: Enabled only when the Log Message option is checked. Enter a message that will belogged in the PlanetPress Suite Workflow Tools' log file. You can use any variables available inPlanetPress Workflow to customize the message.
l Store the message in variable: Select in which jobinfo, local or global variable you want to store themessage content.
l ID: Enter an error ID. This ID will be visible in theWindows Event Viewer. However, the ID is notvisible in the PlanetPress Suite Workflow Tools' log file.
l Store the ID in variable: Select in which jobinfo, local or global variable you want to store the errorID.
l Reset to defaults: Resets all options in this tab to their default values.
If storing the message or ID, if they are store in a jobinfo they will be available in any error handling processwhere errors are being forwarded. In all cases, if your process continues after the error, the contents of thevariables selected in this window will be available for the rest of your process, or whenever they areoverwritten.
Common Errors
Though some error messages are specific to a task in particular, others may apply to any and all tasksbecause they are related more to the system than to PlanetPress itself. Some examples would be W3813,W3830, W3991, W4005. These correspond to issues such as not having any space to write files, permissionerrors on folders or files, etc.
Comments Tab
The Comments tab is common to all tasks. It contains a single text area (Task comments) that lets youwrite comments about the task. These comments are saved when the dialog is closed with the OK button,and are displayed in the Task Comments Pane.
Pick Parameters
The Search Parameters define how the to pick entities retrieved from the Connect Database using theRetrieve Items task and place them together in Documents or Groups. Items are picked using eitherProperties or Values.
l Name: Enter the name of the Property or Value that will be used to pick items.l Type: Use the drop-down to select whether the name refers to a Property or a Value.
l Add: Click to add a new line to the list.l Remove: Click to remove the currently selected line in the list.l Move Up: Click to move the currently selected line up one position in the list.l Move Down: Click to move the currently selected line down one position in the list.l Validate Names: Click to check the each of line in the list against the currently active Metadata.Metadata must be loaded in the Data Selector or through the use of the Debugging feature.
Set Properties
The Set Properties action task defines properties for entities saved in the OL Connect Database (Records,Content, and Jobs). These properties are applied to the entities and can then be used to retrieve them usingthe Retrieve Entities task.
Input
The task must receive metadata that contains appropriate entities, generally from the Create Record Set,Create Print Content, Create HTML Content Set or the Create Job tasks.
Processing
The task sets the chosen properties to all entities present in the metadata. These properties are added to theentities on the OL Connect Server. Note that the properties are calculated only once, and are appliedidentically to all entities. If each entity should have different properties (such as record-level properties), theMetadata should be split using the Metadata Sequencer task first.
Output
The task outputs metadata that is identical to the input Metadata. Only the entries on the OL Connect Serverside.
Properties
General Tab
l Entity: Use the drop-down to select the entity type of which to set the properties. This task does notauto-detect entities, and so the appropriate selection must be made: Record, Record Set, ContentItem, Content Set, Job

l Properties: Add all the properties to be addedl Name: The name of the property.l Value: The value to apply to the property.
l Add entry: Click to add another line to the Properties list.l Remove entry: Click to delete the currently selected line in the Properties list.l Move entry up: Click to move the currently selected line up in the Properties list.l Move entry down: Click to move the currently selected line down in the Properties list.
Connect Proxy Tab
This tab is common to all OL Connect tasks and defines where to process the jobs send through thesetasks. When these fields are empty, they use the defaults set in the OL Connect User Options page of thepreferences.
Note
Defaults are not used unless the configuration is sent to the Workflow service.
l OL Connect Proxy Address: Enter the machine name or IP Address where the OL Connect Serverresides.
l Port: Enter the port to use to communicate with the OL Connect Server. Default: 9340l User name: Enter the user name expected by the OL Connect Server.l Password: Enter the password expected by the OL Connect Server for the above user name.
On Error Tab
The On Error tab is common to all tasks. Details can be found in the" Task Properties Dialog" on page 666.
By default, any action task, branch, splitter or condition that generates an error will simply be ignored, andthe task just under it (not within a branch) will be given control of the job file without any modification. Anyinitial input task that generates an error will stop the process from running as a whole, and output tasks willnot generate output. The On Error tab can be used to overwrite the default behaviors.
l Send to Process: Check this option to send the job file to an error management process.l Error Process drop-down: Enabled only when the Send to Process option is checked. Lists anyprocess of which the initial input task is the Input Error Bin task.
l Action Group: This group is disabled in the initial input tasks and defaults to Stop Process. In allother tasks where the On Error tab is present, the following options are available:
l Ignore: The task is ignored as if it did not exist, and the job file is passed on to the next task inthe process.
l Stop Branch: If the task is in a branch of the process, the branch is stopped and the job file isreturned to the process after the branch. The branch will not produce any output.
l Stop Process: The process is stopped and no more processing is done. No further output isproduced.
l Log Message: Check this option to enable logging a custom error message in the PlanetPress SuiteWorkflow Tools' log file.
l Message: Enabled only when the Log Message option is checked. Enter a message that will belogged in the PlanetPress Suite Workflow Tools' log file. You can use any variables available inPlanetPress Workflow to customize the message.
l Store the message in variable: Select in which jobinfo, local or global variable you want to store themessage content.
l ID: Enter an error ID. This ID will be visible in theWindows Event Viewer. However, the ID is notvisible in the PlanetPress Suite Workflow Tools' log file.
l Store the ID in variable: Select in which jobinfo, local or global variable you want to store the errorID.
l Reset to defaults: Resets all options in this tab to their default values.
If storing the message or ID, if they are store in a jobinfo they will be available in any error handling processwhere errors are being forwarded. In all cases, if your process continues after the error, the contents of thevariables selected in this window will be available for the rest of your process, or whenever they areoverwritten.
Common Errors
Though some error messages are specific to a task in particular, others may apply to any and all tasksbecause they are related more to the system than to PlanetPress itself. Some examples would be W3813,W3830, W3991, W4005. These correspond to issues such as not having any space to write files, permissionerrors on folders or files, etc.

Comments Tab
The Comments tab is common to all tasks. It contains a single text area (Task comments) that lets youwrite comments about the task. These comments are saved when the dialog is closed with the OK button,and are displayed in the Task Comments Pane.
Output TasksOutput tasks are exits from PlanetPress Workflow processes. They can be used to send data to specificdevices, such as printers, applications, such as email software, or locations, such as folders. A singleprocess can include multiple branches, each one terminated by an output task, and so a single process maygenerate output via a variety of output tasks.
Typically, whenever PlanetPress Workflow sends an output task to an output device, application or location,it considers its job finished. When it sends data to a printer, for example, it does not wait for the document tohave finished printing to consider its job done. In the same fashion, an email output task is completed oncePlanetPress Workflow has sent its message to the email software, not when the email has actually beensent from the software. And in the case of a PlanetPress Image output task, PlanetPress Workflowconsiders its job done once it has sent its request to PlanetPress Image, not once PlanetPress Image hasfinished generating the actual image file.
Other tasks available in PlanetPress Workflow can be used to generate output, such as Digital Action,Create VDX and PrintForm action tasks. Unlike output tasks, action tasks are only considered completedonce the output file has been generated. In the case of a Digital Action action task, for example,PlanetPress Workflow will consider the task completed only once the image file has actually been created.This means that no other task from the same process can be performed in the meantime. For moreinformation on those tasks, refer to Action Tasks.
Send to Folder tasks, which are considered as action and output tasks, are documented in the currentchapter.
Delete
Delete output tasks simply delete the job files they receive. They are often used after conditions to get rid ofthose files that did not meet the requirements of the condition.
Input
Any data file, with optional metadata.

Processing
The data file is either deleted directly or sent to the Windows Recycle Bin.
Properties
General tab
l Move to recycle bin: Select to send the deleted files to the Windows recycle bin. When this option isnot selected, files are deleted permanently.
Examples & Use Cases
This task is put into effect in the following use cases and example processes:
l HTTP PDF Invoice Requestl HTTP Brochure Requestl Capture Web Manager Workflow
On Error Tab
The On Error tab is common to all tasks. Details can be found in the" Task Properties Dialog" on page 666.
By default, any action task, branch, splitter or condition that generates an error will simply be ignored, andthe task just under it (not within a branch) will be given control of the job file without any modification. Anyinitial input task that generates an error will stop the process from running as a whole, and output tasks willnot generate output. The On Error tab can be used to overwrite the default behaviors.
l Send to Process: Check this option to send the job file to an error management process.l Error Process drop-down: Enabled only when the Send to Process option is checked. Lists anyprocess of which the initial input task is the Input Error Bin task.
l Action Group: This group is disabled in the initial input tasks and defaults to Stop Process. In allother tasks where the On Error tab is present, the following options are available:
l Ignore: The task is ignored as if it did not exist, and the job file is passed on to the next task inthe process.
l Stop Branch: If the task is in a branch of the process, the branch is stopped and the job file isreturned to the process after the branch. The branch will not produce any output.
l Stop Process: The process is stopped and no more processing is done. No further output isproduced.
l Log Message: Check this option to enable logging a custom error message in the PlanetPress SuiteWorkflow Tools' log file.
l Message: Enabled only when the Log Message option is checked. Enter a message that will belogged in the PlanetPress Suite Workflow Tools' log file. You can use any variables available inPlanetPress Workflow to customize the message.
l Store the message in variable: Select in which jobinfo, local or global variable you want to store themessage content.
l ID: Enter an error ID. This ID will be visible in theWindows Event Viewer. However, the ID is notvisible in the PlanetPress Suite Workflow Tools' log file.
l Store the ID in variable: Select in which jobinfo, local or global variable you want to store the errorID.
l Reset to defaults: Resets all options in this tab to their default values.
If storing the message or ID, if they are store in a jobinfo they will be available in any error handling processwhere errors are being forwarded. In all cases, if your process continues after the error, the contents of thevariables selected in this window will be available for the rest of your process, or whenever they areoverwritten.
Common Errors
Though some error messages are specific to a task in particular, others may apply to any and all tasksbecause they are related more to the system than to PlanetPress itself. Some examples would be W3813,W3830, W3991, W4005. These correspond to issues such as not having any space to write files, permissionerrors on folders or files, etc.
Comments Tab
The Comments tab is common to all tasks. It contains a single text area (Task comments) that lets youwrite comments about the task. These comments are saved when the dialog is closed with the OK button,and are displayed in the Task Comments Pane.

FTP Output
FTP Output tasks send job files to other computers using the FTP protocol. It is similar to the Sent ToFolder output task but sends to an FTP connection instead of a local drive.
The following describes the properties specific to FTP Output tasks. Note that some FTP settings used forall FTP Output tasks are available via the PlanetPress Workflow user options (See "FTP Output ServiceUser Options" on page 652).
Input
Any data file.
Processing
The file is sent to the FTP Server and location defined in the task' properties.
Properties
General tab
l FTP Server: Enter the IP address or host name of the FTP server.
l Port number: Set the plug-in to use a specific port number.
l Use FTP Client default port number: Use the value as specified in the Preferences (port 21 isthe default value).
l FTP Port: Enter the specific port number to use when Use FTP Client default port number isunchecked. Enter a value between 1 and 9999. Note: There is no validation to ensure the port isavailable. It is the user's responsibility to ensure the selected port is available and not beingmonitored by another application or PlanetPress Workflow task.
l User name: Enter an FTP server user name.
l Password: Enter a password associated with the FTP server user name entered above.
l Directory: Enter the directory to which the job files are to be uploaded. If you leave this box empty, thejob files are sent to the root directory of the FTP server.
l File name: Enter the name under which the output job file will be saved. Consider using a dynamicname, since if you use a static name every new file will overwrite the previous one.

l Connection mode group
l Active: Select to prompt PlanetPress Workflow to use the active mode when sending files to theFTP server.
l Passive: Select to prompt PlanetPress Workflow to use the passive mode when sending files tothe FTP server.
On Error Tab
The On Error tab is common to all tasks. Details can be found in the" Task Properties Dialog" on page 666.
By default, any action task, branch, splitter or condition that generates an error will simply be ignored, andthe task just under it (not within a branch) will be given control of the job file without any modification. Anyinitial input task that generates an error will stop the process from running as a whole, and output tasks willnot generate output. The On Error tab can be used to overwrite the default behaviors.
l Send to Process: Check this option to send the job file to an error management process.l Error Process drop-down: Enabled only when the Send to Process option is checked. Lists anyprocess of which the initial input task is the Input Error Bin task.
l Action Group: This group is disabled in the initial input tasks and defaults to Stop Process. In allother tasks where the On Error tab is present, the following options are available:
l Ignore: The task is ignored as if it did not exist, and the job file is passed on to the next task inthe process.
l Stop Branch: If the task is in a branch of the process, the branch is stopped and the job file isreturned to the process after the branch. The branch will not produce any output.
l Stop Process: The process is stopped and no more processing is done. No further output isproduced.
l Log Message: Check this option to enable logging a custom error message in the PlanetPress SuiteWorkflow Tools' log file.
l Message: Enabled only when the Log Message option is checked. Enter a message that will belogged in the PlanetPress Suite Workflow Tools' log file. You can use any variables available inPlanetPress Workflow to customize the message.
l Store the message in variable: Select in which jobinfo, local or global variable you want to store themessage content.

l ID: Enter an error ID. This ID will be visible in theWindows Event Viewer. However, the ID is notvisible in the PlanetPress Suite Workflow Tools' log file.
l Store the ID in variable: Select in which jobinfo, local or global variable you want to store the errorID.
l Reset to defaults: Resets all options in this tab to their default values.
If storing the message or ID, if they are store in a jobinfo they will be available in any error handling processwhere errors are being forwarded. In all cases, if your process continues after the error, the contents of thevariables selected in this window will be available for the rest of your process, or whenever they areoverwritten.
Common Errors
Though some error messages are specific to a task in particular, others may apply to any and all tasksbecause they are related more to the system than to PlanetPress itself. Some examples would be W3813,W3830, W3991, W4005. These correspond to issues such as not having any space to write files, permissionerrors on folders or files, etc.
Comments Tab
The Comments tab is common to all tasks. It contains a single text area (Task comments) that lets youwrite comments about the task. These comments are saved when the dialog is closed with the OK button,and are displayed in the Task Comments Pane.
SOAP Client Plug-In
SOAP Client Plug-In tasks can be used as input, output and action tasks, although their basic function is togenerate output. SOAP (Simple Object Access Protocol) is a light protocol that defines a standard XMLformat used to communicate among systems across different architectures, languages, and operatingsystems.
A SOAP request is an XML-based Remote Procedure Call (RPC) sent using the HTTP transport protocol.The payload of the SOAP packet is an XML document that specifies the call being made and the parametersbeing passed.
Web services, a SOAP class of applications, expose their services via the Internet in a manner that letsother applications access them, as well as use and combine them as required.
In order to access and successfully use Web services, client applications must know how to get them, whatoperations they support, what parameters they expect, as well as what they return. SOAP servers make thisinformation available via WSDL (Web Service Description Language) files.
To configure a given SOAP Client Plug-In task in the PlanetPress Workflow Configuration program, youmust first get its WSDL file (note that you cannot download the WSDL file over an HTTPS connection, soyou should use an HTTP connection to get the file and then switch back to a secure connection). This letsyou know which services the SOAP server provides, as well as each service’s methods and name spaces.
If firewalls control communication between the SOAP client and the Web servers, they must be configuredso as not to block client-server communication.
In the case of "string" type data, SOAP Client Plug-In tasks normalize all line endings to a single line feedcharacter.
Properties
General tab
l WSDL address: Enter the URL address of the WSDL file, or choose a previously selected addressfrom the drop-down list.
Note
The WSDL Address of a PlanetPress Workflow SOAP server is the following:http://127.0.0.1:8080/wsdl/isoapact (assuming you are on the same machine and did notchange the default HTTP port).
l Get: Click to get the WSDL file from the SOAP server and populate the Service box below.
l Service: Choose an available Web service from this drop-down list to populate the Method box below.You may also enter the service name directly if the WSDL file cannot be found.
l Method: Choose an available method from this drop-down list. This populates the Namespace boxbelow. You may also enter the method name directly.
l Namespace: You may choose an available namespace to prevent ambiguity between identicallynamed elements or attributes. You may also enter a namespace directly.

l Resolve: Click to apply the options you chose above and to display the arguments of the chosenmethod in the Arguments box below.
l As script: Click to apply the options you chose above and to display information on the chosen Webservice in JavaScript format in a script viewer. You should use this option if the Web service is toocomplex to be interpreted correctly by the SOAP Client plugin.
l Name: Displays the name of the arguments associated with the selected method. Note that you mayalso manually enter new arguments, change or delete existing ones, as well as change their order ifneeded.
l Type: Displays the argument type.l Value: Lets you enter fixed or variable values. To exchange variable information between the Webservice and PlanetPress Workflow, you must use job information variables %1 to %9 or variable %c(which contains the entire job file). Note that return values (arguments which are used to returninformation to the SOAP Client) are displayed in bold font.
l Namespace: Displays the namespace of the arguments associated with the selected method.l Use returned raw SOAP packet as new data file: Check to use the complete SOAP packet(including the passed parameters) instead of the parameters only. This option overrides any returnvalue set to %c in the Arguments box. You should use this option when the SOAP Client plugin is notable to fully support the syntax of the response.
Advanced tab
l Domain: Enter the domain for the authentication on the SOAP server. The Domain is optional evenwhen authentication is used.
l user name: Enter the user name for the authentication, if required.l Password: Enter the password for the above user name.l Allow invalid security certificate: Check to ignore SSL certificates that are invalid.
On Error Tab
The On Error tab is common to all tasks. Details can be found in the" Task Properties Dialog" on page 666.
By default, any action task, branch, splitter or condition that generates an error will simply be ignored, andthe task just under it (not within a branch) will be given control of the job file without any modification. Anyinitial input task that generates an error will stop the process from running as a whole, and output tasks willnot generate output. The On Error tab can be used to overwrite the default behaviors.

l Send to Process: Check this option to send the job file to an error management process.l Error Process drop-down: Enabled only when the Send to Process option is checked. Lists anyprocess of which the initial input task is the Input Error Bin task.
l Action Group: This group is disabled in the initial input tasks and defaults to Stop Process. In allother tasks where the On Error tab is present, the following options are available:
l Ignore: The task is ignored as if it did not exist, and the job file is passed on to the next task inthe process.
l Stop Branch: If the task is in a branch of the process, the branch is stopped and the job file isreturned to the process after the branch. The branch will not produce any output.
l Stop Process: The process is stopped and no more processing is done. No further output isproduced.
l Log Message: Check this option to enable logging a custom error message in the PlanetPress SuiteWorkflow Tools' log file.
l Message: Enabled only when the Log Message option is checked. Enter a message that will belogged in the PlanetPress Suite Workflow Tools' log file. You can use any variables available inPlanetPress Workflow to customize the message.
l Store the message in variable: Select in which jobinfo, local or global variable you want to store themessage content.
l ID: Enter an error ID. This ID will be visible in theWindows Event Viewer. However, the ID is notvisible in the PlanetPress Suite Workflow Tools' log file.
l Store the ID in variable: Select in which jobinfo, local or global variable you want to store the errorID.
l Reset to defaults: Resets all options in this tab to their default values.
If storing the message or ID, if they are store in a jobinfo they will be available in any error handling processwhere errors are being forwarded. In all cases, if your process continues after the error, the contents of thevariables selected in this window will be available for the rest of your process, or whenever they areoverwritten.
Common Errors
Though some error messages are specific to a task in particular, others may apply to any and all tasksbecause they are related more to the system than to PlanetPress itself. Some examples would be W3813,W3830, W3991, W4005. These correspond to issues such as not having any space to write files, permissionerrors on folders or files, etc.
Comments Tab
The Comments tab is common to all tasks. It contains a single text area (Task comments) that lets youwrite comments about the task. These comments are saved when the dialog is closed with the OK button,and are displayed in the Task Comments Pane.
Print Using a Windows Driver
Printing Using a Windows Driver output tasks are used to send jobs to a local or network printer withoutgoing through a PlanetPress Workflow printer queue. Since the printer driver itself is not necessarilypostscript, we cannot optimize the print file, so using a Windows Driver Output will always generate a largerand slower print job. However, this output can work with non-postscript printers such as HP PCL printers.
The Print Using a Windows Driver output task requires a PlanetPress Workflow license, otherwise thisplugin will cause a watermark.
Note
This type of output task does not support PDF transparency and duo-tone features, so you should notuse it with PlanetPress Design documents that use those features.
Input
This task can accept either a data file with a correct Emulation, which is then merged to a PlanetPressDesign document, or a PDF file which is to be printed natively.
Processing
Either the data file is merged with the document if one is selected, or the PDF File is printed natively throughthe PlanetPress Printer driver (which prints the same as if one were to open the PDF in a PDF reader andprint it).
Properties
General Tab
l Printer queue: Select the queues to which you want to send the output. Note that this is a variableproperty box, so you can use various schemes to use printer queue names that change with each jobat run-time.
l Properties: Click to change the current printer queue properties. Note that PlanetPress Workflowgenerate the job file and hands it over with the available print options to the Windows print driver,which takes the relay for the actual printing part, so there is no way for your PlanetPress Workflow Toolto ensure that all the settings you make will be applied to the printed document.
l Job name: Enter the job’s file name. By default, the variable %f (Job File Name) is used. You may usea different variable, but you may not use a data selection. This information may be used for theprinter’s banner page.
l Job owner name: Enter the job owner name. You may use a PlanetPress Workflow variable.
Note
This option is not functional when natively printing PDFs (without a document).
l Documents: Select a specific PlanetPress Design document if you want all the jobs to be printed withthat document.
l Natively print PDF file: This special option can be used if your job file is a PDF. The job will .l Add job information to the document: Select to prompt your PlanetPress Workflow to add theavailable job information elements in the header of the file that will be sent to the selected printerqueues.
Metadata
If no metadata file is found, the from / to page settings from the job and the printer's properties from the taskconfiguration are used, with the job's settings overriding those of the printer where applicable. If a metadatafile is found, it is used to indicate which pages are printed and in which order. Any other metadata is ignored.

Note
Known issue: If a data file with metadata is resubmitted to such a process, the from / to page values set by the userin the Resubmit interface are ignored.
On Error Tab
The On Error tab is common to all tasks. Details can be found in the" Task Properties Dialog" on page 666.
By default, any action task, branch, splitter or condition that generates an error will simply be ignored, andthe task just under it (not within a branch) will be given control of the job file without any modification. Anyinitial input task that generates an error will stop the process from running as a whole, and output tasks willnot generate output. The On Error tab can be used to overwrite the default behaviors.
l Send to Process: Check this option to send the job file to an error management process.l Error Process drop-down: Enabled only when the Send to Process option is checked. Lists anyprocess of which the initial input task is the Input Error Bin task.
l Action Group: This group is disabled in the initial input tasks and defaults to Stop Process. In allother tasks where the On Error tab is present, the following options are available:
l Ignore: The task is ignored as if it did not exist, and the job file is passed on to the next task inthe process.
l Stop Branch: If the task is in a branch of the process, the branch is stopped and the job file isreturned to the process after the branch. The branch will not produce any output.
l Stop Process: The process is stopped and no more processing is done. No further output isproduced.
l Log Message: Check this option to enable logging a custom error message in the PlanetPress SuiteWorkflow Tools' log file.
l Message: Enabled only when the Log Message option is checked. Enter a message that will belogged in the PlanetPress Suite Workflow Tools' log file. You can use any variables available inPlanetPress Workflow to customize the message.
l Store the message in variable: Select in which jobinfo, local or global variable you want to store themessage content.
l ID: Enter an error ID. This ID will be visible in theWindows Event Viewer. However, the ID is notvisible in the PlanetPress Suite Workflow Tools' log file.

l Store the ID in variable: Select in which jobinfo, local or global variable you want to store the errorID.
l Reset to defaults: Resets all options in this tab to their default values.
If storing the message or ID, if they are store in a jobinfo they will be available in any error handling processwhere errors are being forwarded. In all cases, if your process continues after the error, the contents of thevariables selected in this window will be available for the rest of your process, or whenever they areoverwritten.
Common Errors
Though some error messages are specific to a task in particular, others may apply to any and all tasksbecause they are related more to the system than to PlanetPress itself. Some examples would be W3813,W3830, W3991, W4005. These correspond to issues such as not having any space to write files, permissionerrors on folders or files, etc.
Comments Tab
The Comments tab is common to all tasks. It contains a single text area (Task comments) that lets youwrite comments about the task. These comments are saved when the dialog is closed with the OK button,and are displayed in the Task Comments Pane.
Printer Queue Output
Printer Queue Output tasks dispatch jobs to selected printer queues. Note that you must have created atleast one printer queue before you can add your first Printer Queue Output task. Furthermore, to print thedata file with a PlanetPress Design document, you must have associated at least one document with aprinter queue.
You can select multiple queues in a Printer Queue Output tasks and choose exactly how your jobs will bedispatched to the selected printers.
Input
Any data file.

Processing
If the data file is in a valid Emulation and a document is selected, the data file and document are merged toproduce a PostScript output. The output may be an Optimized PostScript Stream or a Printer Centric stream(data file + trigger).
If the data file is any file and the Pass-through option is selected, the file is sent as-is to the selected printerqueue. Whether the queue will properly output depends on the capabilities of the queue and its target. Forexample, sending a JPG file in pass-through to an FTP or Send to Folder output will simply place the file inthe destination. Sending this same file to an LPR or WinQueue output will produce no output as thesequeues expect valid PostScript.
Properties
General tab
l Queues: Select the queues to which you want to send the output.l Documents: Select None if you want the data to print as is. Select a specific PlanetPress Designdocument if you want all the jobs to be printed with that document. To use a document chosen at run-time for each job, enter a dynamic document name using a combination of text, variables and dataselections. To enable the dynamic document name box, click inside it. To disable it, press Enter. Notethat in the later case, you must be certain that the documents that will be chosen at run-time will in factbe available locally or at all the selected printer. Note that PlanetPress Workflow will not specify agiven document version number, so the latest version will be used by default. To specify a givendocument version number, you can use an Add Document action task instead of a Printer Queueoutput, and then use an Add / Remove Text action task to add a version number in the documenttrigger (for more information, refer to the Control Versions of a Document section of the PlanetPressDesign User Guide).
Advanced tab
l Copies: Enter the number of copies to be printed outputs. Since this is a variable property box, youmay enter a fixed value or use a data selection. Note that load balancing options have an impact onhow copies are printed as well as on the total number of printed copies.
l Load balancing group (Options from this group are only valid if multiple printer queues wereselected.)

l No balancing: No load balancing means that all the selected printer queues get everything.l Split job: Split job means that jobs will be split according to the criteria set in the Page delimitergroup (see below) and that an equal share of the job file will be sent to each one of the selectedprinter queues. For a hundred page job, for example, if two queues were selected, each one willget 50 pages.
l Queue balancing: Queue balancing means that jobs will be split according to the criteria set inthe Page delimiter group (see below) and that a share of the job file corresponding to eachprinter’s capacity (as set in the PlanetPress Workflow Printer Queue Options dialog box—See"Print Using a Windows Driver" on page 521) will be sent to each one of the selected printerqueues. If two queues were selected, the first one sending jobs to a printer that prints 500 pagesa minute, and the second one sending jobs to a smaller printer printing 50 pages a minute, thefirst queue will receive roughly ten times more pages than the second one.
l Round robin: Round robin means that complete jobs will be sent in turn to each one of theselected printer queues. For example, Queue_1 will get the first job, Queue_2 will get the secondjob, and so forth.
l Page delimiter group: These options are enabled when you choose Split job orQueue balancingload balancing options. They are used to determine how each job is to be split before being sent to theprinter queues.
l Form feed: Cuts the job file at every form feed character.
l Lines per page: Cuts the job file after the specified number of lines.l Keyword: Cuts the job file after each occurrence of the specified keyword (string of characters).
l Custom Trigger: Enter the code of the trigger that will be sent with the data to the selected printerqueues. Note that this box is only enabled if None was selected in the General tab.
l Add job information to the document: Includes the current JobInfos to the job output. This option isonly available if a document was selected in the General tab.
l Use job name as Title: Uses the Job Name set in the Printer Queue's General tab, as the job's title,set as %%Title in the postscript's job.
On Error Tab
The On Error tab is common to all tasks. Details can be found in the" Task Properties Dialog" on page 666.
By default, any action task, branch, splitter or condition that generates an error will simply be ignored, andthe task just under it (not within a branch) will be given control of the job file without any modification. Anyinitial input task that generates an error will stop the process from running as a whole, and output tasks will

not generate output. The On Error tab can be used to overwrite the default behaviors.
l Send to Process: Check this option to send the job file to an error management process.l Error Process drop-down: Enabled only when the Send to Process option is checked. Lists anyprocess of which the initial input task is the Input Error Bin task.
l Action Group: This group is disabled in the initial input tasks and defaults to Stop Process. In allother tasks where the On Error tab is present, the following options are available:
l Ignore: The task is ignored as if it did not exist, and the job file is passed on to the next task inthe process.
l Stop Branch: If the task is in a branch of the process, the branch is stopped and the job file isreturned to the process after the branch. The branch will not produce any output.
l Stop Process: The process is stopped and no more processing is done. No further output isproduced.
l Log Message: Check this option to enable logging a custom error message in the PlanetPress SuiteWorkflow Tools' log file.
l Message: Enabled only when the Log Message option is checked. Enter a message that will belogged in the PlanetPress Suite Workflow Tools' log file. You can use any variables available inPlanetPress Workflow to customize the message.
l Store the message in variable: Select in which jobinfo, local or global variable you want to store themessage content.
l ID: Enter an error ID. This ID will be visible in theWindows Event Viewer. However, the ID is notvisible in the PlanetPress Suite Workflow Tools' log file.
l Store the ID in variable: Select in which jobinfo, local or global variable you want to store the errorID.
l Reset to defaults: Resets all options in this tab to their default values.
If storing the message or ID, if they are store in a jobinfo they will be available in any error handling processwhere errors are being forwarded. In all cases, if your process continues after the error, the contents of thevariables selected in this window will be available for the rest of your process, or whenever they areoverwritten.

Common Errors
Though some error messages are specific to a task in particular, others may apply to any and all tasksbecause they are related more to the system than to PlanetPress itself. Some examples would be W3813,W3830, W3991, W4005. These correspond to issues such as not having any space to write files, permissionerrors on folders or files, etc.
Comments Tab
The Comments tab is common to all tasks. It contains a single text area (Task comments) that lets youwrite comments about the task. These comments are saved when the dialog is closed with the OK button,and are displayed in the Task Comments Pane.
Send Email
The Send Email output task send the data files it receives via email.
Technical
In some combinations of Microsoft Outlook and Windows versions, it is not possible for Outlook to beopened while PlanetPress Workflow is running, so emails are not sent out automatically. To correctthis, make sure to logon to Windows on the PlanetPress Workflow server using the same login thatPlanetPress Workflow is using, and open Outlook before starting the PlanetPress Workflow services.You could also use a startup process to start Outlook before the rest of the services.
Input
Any data file.
Processing
While an email is always sent by this task (or at least attempted to be sent), the contents of the file andpresence of attachments depends on the selected option. Refer to the properties' descriptions below toknow what each option does.
Once the contents of the file and attachments is determined, the email (and attachments) is either sentdirectly to the selected SMTP server, or is deposited in the "Outbox" folder of the local Microsoft Outlookaccount.

Properties
Recipients tab
l To: Enter the email address(es) of the recipient(s). Remember this is a variable property box and youcan therefore use various schemes to use email addresses that change with each job at run-time.
l Cc: Specify addresses to which copies of the generated emails are to be sent.l Bcc: Specify discreet addresses (other recipients will not be able to see these addresses) to whichcopies of the generated emails are to be sent.
l Subject: Enter the subject of the emails generated by PlanetPress Image for this task. Note that if youuse a data selection in this box, you must be sure that the data that will be selected at run-time will notcontain any parentheses, as this would cause the task to fail. If you suspect that the data may containparentheses, you should use a Run Script action task (see "Run Script" on page 364) with a Strip()function to strip them out.
l Message: Enter the content of the email message. Since this is a variable property box, the text maybe personalized using variables and data selections. Note that since this is a variable property box, itscontent is parsed at run-time. If HTML code is entered or pasted in this box, percent (%) and backslash(/) HTML characters must be doubled otherwise they will be disregarded.
Note
Different email clients have different support for various features, especially with HTML emails. In mostcases, if you want to send your email as an HTML message, your very first line should start with<html> or <!doctype html>. It should not be any other character). Also note that it is not currentlypossible to send both an HTML and plain-text version of your message.
Attachments tab
Use this tab to add the files received by this task (plus any other file that you may choose to attach) to theemails sent by PlanetPress.
l Attach input job files: Select to attach the file received by this task to the emails it will generate. If thisoption is not selected, the recipients will not receive any of the data file.
l File: Select additional files to include as attachments. You may enter the file name directly and usetext, variables and data selections. You may also use the Browse button to navigate and select the file.
To add the file to list displayed in the Attach box, you must the click the downward pointing arrowbutton.
l Attach: Lists the files that will be attached to the messages sent from PlanetPress Workflow for thistask. Selecting the Attach output file(s) option adds these files at the top of the list. Any other file thatmay have been added using the File box (above) is also listed here.
l Zip mode: Select how you want the files checked in the Attach box to be zipped. Select Zipindividually to have PlanetPress Workflow create a zip file for each file. Select Archive and Zip if youprefer to have one zip file that contains all the attached files.
l Zip file name: Enter the name of the one zip file that will be created if the Archive and Zip option wasselected in the Attach box (this box is otherwise not enabled).
l Password protect Zip file(s): Select to force recipients to use a password to open the attached zipfiles. Note that users will be required to use this password open each one of the generated zip files.
l Password: Enter the zip file password.
Login tab
l Use Microsoft Outlook: Select to use Microsoft Outlook to send emails (and attachments). The hostcomputer must be running Outlook, and PlanetPress must have access to Outlook. Emails generatedby PlanetPress Workflow appear in the outbox before being sent by Outlook whenever it is set to sendemails.
l Use SMTP mail: Select to use Simple Mail Transfer Protocol (SMTP) to send the emails (andattachments). To use SMTP you must enter information in the Name, Email Address and OutgoingMail (SMTP) boxes below.
l Name: Enter the sender’s name that will be used in emails sent by PlanetPress Workflow for this task.
l Organization: Enter the organization name that will be used in emails sent by PlanetPress Workflowfor this task (this is optional).
l Email address: Enter the sender’s email address that will be used in emails sent by PlanetPressWorkflow for this task.
l Reply address: Enter the reply address that will be used in emails sent by PlanetPress Workflow forthis task (this is optional).
l Outgoing mail (SMTP): Enter the IP address of the mail server PlanetPress Workflow is to use to sendemails via SMTP.
l Port: Specify the outgoing SMTP Port if it is different from the default port (25).

l Server requires authentication: Select if the outgoing server mentioned above requiresauthentication. To use authentication you must enter information in the Account name and Passwordboxes below.
l Account name: Enter the name of the account that PlanetPress Workflow is to use to send emails viathe mail server.
l Password: Enter the password associated with the account name entered above.
Examples & Use Cases
This task is put into effect in the following use cases and example processes:
l Capture Post Processing Workflow
On Error Tab
The On Error tab is common to all tasks. Details can be found in the" Task Properties Dialog" on page 666.
By default, any action task, branch, splitter or condition that generates an error will simply be ignored, andthe task just under it (not within a branch) will be given control of the job file without any modification. Anyinitial input task that generates an error will stop the process from running as a whole, and output tasks willnot generate output. The On Error tab can be used to overwrite the default behaviors.
l Send to Process: Check this option to send the job file to an error management process.l Error Process drop-down: Enabled only when the Send to Process option is checked. Lists anyprocess of which the initial input task is the Input Error Bin task.
l Action Group: This group is disabled in the initial input tasks and defaults to Stop Process. In allother tasks where the On Error tab is present, the following options are available:
l Ignore: The task is ignored as if it did not exist, and the job file is passed on to the next task inthe process.
l Stop Branch: If the task is in a branch of the process, the branch is stopped and the job file isreturned to the process after the branch. The branch will not produce any output.
l Stop Process: The process is stopped and no more processing is done. No further output isproduced.
l Log Message: Check this option to enable logging a custom error message in the PlanetPress SuiteWorkflow Tools' log file.

l Message: Enabled only when the Log Message option is checked. Enter a message that will belogged in the PlanetPress Suite Workflow Tools' log file. You can use any variables available inPlanetPress Workflow to customize the message.
l Store the message in variable: Select in which jobinfo, local or global variable you want to store themessage content.
l ID: Enter an error ID. This ID will be visible in theWindows Event Viewer. However, the ID is notvisible in the PlanetPress Suite Workflow Tools' log file.
l Store the ID in variable: Select in which jobinfo, local or global variable you want to store the errorID.
l Reset to defaults: Resets all options in this tab to their default values.
If storing the message or ID, if they are store in a jobinfo they will be available in any error handling processwhere errors are being forwarded. In all cases, if your process continues after the error, the contents of thevariables selected in this window will be available for the rest of your process, or whenever they areoverwritten.
Common Errors
Though some error messages are specific to a task in particular, others may apply to any and all tasksbecause they are related more to the system than to PlanetPress itself. Some examples would be W3813,W3830, W3991, W4005. These correspond to issues such as not having any space to write files, permissionerrors on folders or files, etc.
Comments Tab
The Comments tab is common to all tasks. It contains a single text area (Task comments) that lets youwrite comments about the task. These comments are saved when the dialog is closed with the OK button,and are displayed in the Task Comments Pane.
Send to Folder
Send to Folder output tasks send the files they receive to a local folder. They perform the same function asSend to Folder action tasks, with the only difference being that in this case, PlanetPress Workflow will notwait for the task to be completed before going on to the next task in the configuration.

The following describes the properties specific to Send to Folder output tasks. For information on thoseproperties shared by various types of tasks, such as Other and On error properties, refer toConfigurations,Processes and Tasks.
Input
Any data file.
Processing
The file is saved in the location specified, as the file name specified.
Properties
General tab
l Folder: Enter the path of the folder to which the files are to be saved.l File name: Enter the name of the output files generated by this task. To prevent each new file fromoverwriting the previous one, you should use variable names. As with any variable property box, youcan use any combination of text, variables and data selections.
l Concatenate files: If this option is selected, when PlanetPress Workflow tries to save the job fileunder an existing name, it appends the content of the new job file to that of the existing file, instead ofoverwriting it.
l In the case of a PDF, this will act like the "Merge PDF Files" on page 216 input task, merging thePDF logically.
Note
This feature is part of the PDF Tools, which is only available in PlanetPress Workflow.
l Separator string: This option is used to add a separator string between the content of each file whenthe Concatenate files option is selected.
On Error Tab
The On Error tab is common to all tasks. Details can be found in the" Task Properties Dialog" on page 666.

By default, any action task, branch, splitter or condition that generates an error will simply be ignored, andthe task just under it (not within a branch) will be given control of the job file without any modification. Anyinitial input task that generates an error will stop the process from running as a whole, and output tasks willnot generate output. The On Error tab can be used to overwrite the default behaviors.
l Send to Process: Check this option to send the job file to an error management process.l Error Process drop-down: Enabled only when the Send to Process option is checked. Lists anyprocess of which the initial input task is the Input Error Bin task.
l Action Group: This group is disabled in the initial input tasks and defaults to Stop Process. In allother tasks where the On Error tab is present, the following options are available:
l Ignore: The task is ignored as if it did not exist, and the job file is passed on to the next task inthe process.
l Stop Branch: If the task is in a branch of the process, the branch is stopped and the job file isreturned to the process after the branch. The branch will not produce any output.
l Stop Process: The process is stopped and no more processing is done. No further output isproduced.
l Log Message: Check this option to enable logging a custom error message in the PlanetPress SuiteWorkflow Tools' log file.
l Message: Enabled only when the Log Message option is checked. Enter a message that will belogged in the PlanetPress Suite Workflow Tools' log file. You can use any variables available inPlanetPress Workflow to customize the message.
l Store the message in variable: Select in which jobinfo, local or global variable you want to store themessage content.
l ID: Enter an error ID. This ID will be visible in theWindows Event Viewer. However, the ID is notvisible in the PlanetPress Suite Workflow Tools' log file.
l Store the ID in variable: Select in which jobinfo, local or global variable you want to store the errorID.
l Reset to defaults: Resets all options in this tab to their default values.
If storing the message or ID, if they are store in a jobinfo they will be available in any error handling processwhere errors are being forwarded. In all cases, if your process continues after the error, the contents of thevariables selected in this window will be available for the rest of your process, or whenever they areoverwritten.

Common Errors
Though some error messages are specific to a task in particular, others may apply to any and all tasksbecause they are related more to the system than to PlanetPress itself. Some examples would be W3813,W3830, W3991, W4005. These correspond to issues such as not having any space to write files, permissionerrors on folders or files, etc.
Comments Tab
The Comments tab is common to all tasks. It contains a single text area (Task comments) that lets youwrite comments about the task. These comments are saved when the dialog is closed with the OK button,and are displayed in the Task Comments Pane.
Working With VariablesA Variable is basically a keyword that points to specific location in your computer's memory. This locationcontains data that you decide to place in it, by assigning that data to the variable name. This chapter willhelp you learn about these variables and how you can use them.
Types of VariablesThere are 3 types of variables that can be used in PlanetPress Workflow:
l Global Variables are available by all processes and tasks within the configuration, and anymodification made to them affects all tasks and configurations. For more information see "ManipulateGlobal Variables" on page 575.
l Local Variables are specific to an instance of a process. That is to say, when a process changes theinformation in a local variable, it changes it only for that process and only for that specific instance ofthe process. For more information see "Manipulate Local Variables" on page 573.
l Job Infos are also specific to an instance of a process, however their use is different. Just after aninitial or secondary input task, Job Infos contain information about the job file itself. Job Infos are also,by default, accessible by PlanetPress Design documents used throughout your process. They aregenerally used to gather information from the input task, or transfer information to your PlanetPressDesign document.
All the variables in PlanetPress Workflow are considered strings, even if the information itself can be anumber. There are no other types of variables (such as arrays, floating point numerical values or Boolean) inPlanetPress Workflow.
Job Info VariablesJob Infos have two main uses. First, they contain information on any job file that comes out of the initial inputtask or any secondary input tasks. The number of job infos as well as their definition can be seen in theOther tab of any input task. Secondly, they are transmitted, unless otherwise configured, directly to anyPlanetPress Design document used within your process and can be directly accessed by that document, sothey can be used to transfer complementary information to your document that is not contained within yourdata file.
Note
You can also access global and local variables from your document using the ExpandString() function. For more information, please see the PlanetPress Design User Guide.
There are only 9 Job Infos available numbered from 1 to 9. They can be accessed directly anywhere thataccepts variable properties by using the number of the variable preceded by a percent sign (For example,%2 or %9).
You can set the value of a job info within your process in two ways:
l Use the Set Job Info and Variable action task. See "Set Job Infos and Variables" on page 312.l You can use Scripts. See the chapter "Using Scripts" on page 81.
Considerations on Job Infos:
l While the initial job infos are created by the input task, they can be overwritten by the Set Job Info andVariables Action Task, by a Script, or by any secondary input task in the process. Whenever you use ajob info in your process, make sure it contains the value that you want, and not one that has beenoverwritten by another task.

l Job infos sent to the document are global to that document, meaning the values do not changebetween data files. This means that if your data file contains multiple data pages for different clients,your job infos cannot be used to send information to the document.
l Job infos are in limited quantity and are slowly being deprecated when transferring data to yourdocument. You should probably consider using Metadata, or Local Variables.
Standard VariablesStandard Variables, also known as "system variables", are variables that are created and managed directlyby PlanetPress Workflow. Those variables are read-only and cannot be modified. They provide informationabout the job, process, and PlanetPress Workflow environment.
Available Standard Variables
Variable Name Example value when interpreted
%c Content of your jobfile in its originalformat.
n/a
%F Job File Path andName
C:\Program Files\PlanetPress Workflow 7\PlanetPressWatch\Spool\job1D80328.dat
%f Job File Nameincluding the fileextension.
job1D80328.dat
%z Job File Size in bytes. 34134
%o Original File Name invoice_june2nd.txt
%O Original File NameWithout Extension
invoice_june2nd
%y Current Year 2010
%m Current Month(numeric)
06

Variable Name Example value when interpreted
%M Current Month (text) June
%L Current Month (shorttext)
JUN
%d Current Day (numeric) 16
%D Current Day (text) Monday
%l Current Day (shorttext)
MON
%h Current Hour 18
%n Current Minute 03
%s Current Second 41
%v Current Millisecond 24
%u Unique 13-char string(will be different everytime it is used)
0ZIS4CW8U47VI00
%t Current TemporaryFolder
C:\Documents and Settings\All Users\Application Data\ObjectifLune\PlanetPress Workflow 7\PlanetPress Watch\Spool\6.tmp\
%e Current MetadataFilename
job00ZAIZ2C4FXON16CE6C566.dat.meta
%E Current MetadataPath and Filename
C:\Documents and Settings\All Users\Application Data\ObjectifLune\PlanetPress Workflow 7\PlanetPressWatch\Spool\5.tmp\job00ZAIZ2C4FXON16CE6C566.dat.meta
%w Current process My Process

Variable Name Example value when interpreted
name.
%i Current Loop IterationIndex (always theinnermost loop)
2
The %i Loop Count Variable
In version 7.4, the %i variable is introduced. Its value is equivalent to the current iteration of loops inside of aprocess. It always contains the value of the innermost loop, and only certain tasks trigger the counter to start.Here is an example process and the value of %i during this process:
Initial input tasks do not modify the value of %i. However, the following tasks do trigger the variable:
l Barcode scanl Capture Field Processor
l All Splitters (Including the Metadata Sequencer)l Get Capture Documentl Loopl Capture PGC Splitterl PrintShop Mail
Error Handling Variables
The following variables are available in error-handling tasks (that start with the Error Bin Input task). Notethat these are new in PlanetPress Workflow 7.4 and are not available in previous versions.
Variable Name Example valuewheninterpreted
%{error.process}
Name of the process where the error was triggered
%{error.tasktype}
The type of task that triggered the error
%{error.taskname}
The name of the task that triggered the error
%{error.taskindex}
The position of the task in the process
%{error.errormsg}
The error message, as entered in the OnError tab of the task. Thisis the same message as appears in PlanetPress Workflow Logfile.
%{error.errorid} The error ID, as entered in the OnError tab of the task. This is thesame ID that appears in the Windows Event Viewer.
Manipulate Local Variables
Note
For information about Global Variables see Global Variables.
Local Variables are set at the level of the Process and are not shared with any other process or instance ofthat process. Local variables can be used anywhere that accepts variables by using it's namee, surroundedby curly brackets and preceded by a percent sign (for example: %{myLocalVariable}).
When the process ends, the local variable forgets whatever value was given to it by the process and goesback to its default value. Local variables are generally used to keep information that is useful for the processitself but not to any other process or instance of the process. For example, you could store the current orderID for the process, a name or an email. You can have as many local variables as you want in any givenprocess.
To add a local variable, you can use one of two methods:
l Select the process where you want to add the variable.l Click on the Home tab of the PlanetPress Workflow Ribbon, then click Local Variable in theVariables group.
l Right-click on the process in the Configuration Components area, then click on Insert LocalVariable.
Shared tasks
These procedures can be used on both local and global variables.
To delete a variable
l Right-click on the variable name in the Configuration Components Area and click Delete.
To rename a variable:
l Right-click on the variable name in the Configuration Components Area.l Click Rename

l Type in the new name of the variable, then press Enter on your keyboard.
While renaming a variable will correctly rename all references to it in task properties or wherever else it isused in a task, it will not change the references in any script within a Run Script task. Deleting a variable,on the other hand, does not delete any reference to it. In both the case where a script refers to a variable andit is renamed, or in the case of deleting a variable, any task or script that refers to it will cease to function andwill generate an error.
You can set the value of a variable within your process in two ways:
l Use the Set Job Info and Variable action task. See "Set Job Infos and Variables" on page 312.l You can use Scripts. See the chapter "Using Scripts" on page 81.
Variables may be used as variable properties in variable property boxes (see Variable Properties).
Manipulate Global Variables
Note
For information about Local Variables see Local Variables.
Global Variables are set at the level of the configuration file and are shared between all processes andtasks. Global variables can be used anywhere that accepts variables by using it's name preceded by"global." and surrounded by curly brackets (for example: %{global.myGlobalVariable}).
Global variables are generally used to keep information that applies to multiple locations but need to bechanged easily. For example, a lot of uses use them to set a server's IP, a printer name, or folder locationthat is used by multiple processes. This is useful when moving the configuration file to another installation ofthe Workflow Tools where this information is different, or to quickly modify specific information if somethingchanges on the server. You can have as many global variable as you want in any given configuration.
To add a global variable from the Configuration Components pane:
1. Right-Click on Global Variables.

2. Click Insert, then Insert Global Variable.The new variable will appear as GlobalVar or GlobalVarX (the name is automaticallyincremented).
To add a global variable from the Ribbon:
1. Click on the Home tab of the PlanetPress Workflow Ribbon.2. Click Global Variable in the Variables group.
The new variable will appear as GlobalVar or GlobalVarX (the name is automaticallyincremented).
To set the value of a global variable from the Configuration Components pane:
1. Double-click on the global variable in the Configuration Components pane.(Right-clicking then clicking Properties also works)
2. Enter the new value for your global variable.3. Click OK to save the new value.
Shared tasks
These procedures can be used on both local and global variables.
To delete a variable
l Right-click on the variable name in the Configuration Components Area and click Delete.
To rename a variable:
l Right-click on the variable name in the Configuration Components Area.l Click Renamel Type in the new name of the variable, then press Enter on your keyboard.
While renaming a variable will correctly rename all references to it in task properties or wherever else it isused in a task, it will not change the references in any script within a Run Script task. Deleting a variable,on the other hand, does not delete any reference to it. In both the case where a script refers to a variable andit is renamed, or in the case of deleting a variable, any task or script that refers to it will cease to function andwill generate an error.

You can set the value of a variable within your process in two ways:
l Use the Set Job Info and Variable action task. See "Set Job Infos and Variables" on page 312.l You can use Scripts. See the chapter "Using Scripts" on page 81.
Variables may be used as variable properties in variable property boxes (see Variable Properties).
About ConfigurationsPlanetPress Workflow configuration files are defined as a set of processes, subprocesses, variables,documents and printer queues, that work together within PlanetPress Workflow Service.
PlanetPress Workflow cannot work without a valid configuration and a PlanetPress Workflow sessionrunning on a given computer can only use one configuration at a time. Once you have created aconfiguration, you must “send” it to the PlanetPress Workflow Service. When you do this, your PlanetPressWorkflow forgets its previous configuration and starts executing the tasks included in the new configuration.
Note
A PlanetPress Workflow configuration must be composed of at least one process, but it may includeas many as 512.
For a configuration created in PlanetPress Workflow Configuration to actually be executed by PlanetPressWorkflow, it must be sent to its PlanetPress Workflow service.
See the following pages for information on different parts of PlanetPress Workflow Configuration:
l For information about Processes and Subprocesses, see "About Processes and Subprocesses" onpage 71.
l For information about Global Variables, see "Working With Variables" on page 535.
Create a New ConfigurationWhen you start PlanetPress Workflow, it always opens the configuration file that is active on thePlanetPress Watch service. If you create a new configuration, PlanetPress Workflow automatically creates a

process that includes a "Folder Capture" on page 189 initial input task and a "Send to Folder" on page 532output task. You can then edit and save your new configuration.
To create a new configuration, choose New from the PlanetPress button.
If the active watch file is currently opened, and if it includes unsaved modifications, PlanetPress Workflowasks you whether to send the configuration to the PlanetPress Watch service before creating the newconfiguration. Select the Always send without prompting for confirmation option to automatically send theedited version of the configuration.
If a file different from the default configuration file is currently opened, and if it includes unsavedmodifications, PlanetPress Workflow asks you whether to save the configuration before creating the newconfiguration. Select the Always save without prompting for confirmation option to automatically save anyunsaved work.
Open a PlanetPress Workflow Configuration FileWhile PlanetPress Workflow Configuration program always loads the default and current configuration, youmay sometimes need to open a Workflow Tool configuration file that is not the current one, for example toload a previous backup or a configuration file saved from another computer. This procedure will show youhow.
1. From the PlanetPress Workflow button, choose Open. The Open dialog box appears.2. Navigate to the configuration file you want to open, select it and click Open.
If the default configuration file is currently opened, and if it includes unsaved modifications, the PlanetPressWorkflow Configuration program asks you whether to send the configuration to the PlanetPressWorkflowservice before opening the selected configuration. Select the Always send without prompting forconfirmation option to automatically send the edited version of the configuration before opening any otherconfiguration (See "Saving and Sending" on the next page).
Note
You can also open a configuration file from a previous version of PlanetPress Workflow by changingthe File Type selector to the desired version (for example, .pw6 for PlanetPress Watch /Serverconfigurations from Version 6)

Saving and SendingSaving and Sending a Configuration
The core of the PlanetPress Suite workflow tools is the PlanetPress Watch service which, once started,constantly runs in the background to perform the tasks included in its current configuration file. PlanetPressWorkflow lets you create, edit and save configuration files.
As you are working on your configuration, you can save that configuration file as a file on your local harddrive.
Saving a configuration file never replaces the current PlanetPress Watch service configuration. To do this,you must use the Send Configuration command.
Saving a Configuration
Files created and edited using PlanetPress Workflow can be saved as PlanetPress Workflow configurationfiles anywhere on your computer or even a network location.
To save the current configuration:
l From the PlanetPress button, choose Save.l If you were editing the current PlanetPress Watch service configuration or if you were editing a newconfiguration file, you are prompted with the Save As dialog instead.
To save the current configuration under a new name:
l From the PlanetPress button, choose Save As.l Browse to the location where you wanted to save the file, enter the new name of the configuration inthe File name box and click Save.
Sending a Configuration
PlanetPress Workflow Configuration saves entire configurations in the form of a single file. Like any otherfile, configuration files may be saved and reopened, as well as rename as desired. Simply saving aconfiguration has no effect on the configuration actually used by the PlanetPress Workflowwhen it is started.To change any currently active configuration, you must use the Send Configuration command.

When you use the Send command, the PlanetPress Workflow Configuration program uses the currentlyopened configuration to overwrite PlanetPress Workflow service's current configuration.
If PlanetPress Workflow service is running when you send a new configuration, it stops and restartsautomatically with the new configuration. If the service is stopped, it will not start automatically.
To send a PlanetPress Workflow Configuration to the local server:
1. Open the configuration you want to use as PlanetPress Workflow’s new configuration.2. Edit the configuration, if required.3. When the configuration is ready to be used, from the PlanetPress Workflow button, choose Send
Configuration, then Send Local.
To send a PlanetPress Workflow Configuration to a remote server:
1. Open the configuration you want to use as PlanetPress Workflow’s new configuration.2. Edit the configuration, if required.3. When the configuration is ready to be used, from the PlanetPress Workflow button, choose Send
Configuration, then Send Remote.A list of available PlanetPress Workflow servers on the local network appears.
4. Put a checkmark next to each server where the configuration should be sent.5. Click OK.
If a server is grayed out, this may mean you do not have access to send a configuration remotely to it. Formore information, please see "Access Manager" on page 599.
Note
If PlanetPress Workflow service is paused when you send a new configuration, it will not stop andrestart. Since PlanetPress Workflow service reads its configuration file when it starts up, when youresume processing, PlanetPress Workflow service will continue using the old configuration.

Exit PlanetPress Workflow Configuration ProgramOnce you are done using PlanetPress Workflow, you can close the configuration program. It is important tonote that closing PlanetPress Workflow Configuration Program does not stop any of PlanetPress Workflowservices or stop processing.
You may exit PlanetPress Workflow Configuration Program in any of the following ways:
l From the PlanetPress Workflow button, choose Exit.l Click the X at the top-right corner of PlanetPress Workflow Configuration Programl Press ALT+F4 on your keyboard.l Right-click on PlanetPress Workflow Configuration Program button in your task bar, and selectClose.
If the default configuration file is currently opened, and if it includes unsaved modifications, the PlanetPressWorkflow Configuration program asks you whether to send the configuration to the PlanetPress Workflowservice before exiting. Select the Always send without prompting for confirmation option to automaticallysend the edited version of the configuration before exiting.
If the default configuration does not include any active process, the PlanetPress Workflow Configurationprogram asks you whether to continue.
When the PlanetPress Workflow Configuration program sends a configuration, the PlanetPress Workflowservice is stopped and restarted, if it is currently running, and the new configuration starts being appliedimmediately.
If a file different from the default configuration file is currently opened, and if it includes unsavedmodifications, the PlanetPress Workflow Configuration program asks you whether to save the configurationbefore exiting. Select the Always save without prompting for confirmation option to automatically save anyunsaved work before exiting.
About Related Programs and ServicesServices are programs that run in the background and automatically perform tasks that often do not requireany user interaction. With the exception of PlanetPress Workflow Configuration, all the programs used by

PlanetPress Workflow are run as service applications. PlanetPress Workflow can thus use them as requiredwithout the need for any user interaction.
Although you can manually start and stop any service running on your computer, most of the basic servicesused by the system are started and stopped automatically. In the case of PlanetPress Workflow and theirrelated services, you typically use a command included in your PlanetPress Workflow Configurationprogram to start and stop most services. Opening and closing your PlanetPress Workflow Configurationprogram has no effect on these services.
Available Input ServicesInput services are used to pull in data files. The input services used by PlanetPress Workflow are:
l LPD (Line Printer Daemon) Input service: Inputs data sent from an LPR client. The LPD/LPRprinting protocol is a common way to send print jobs that, in turn, use the TCP/IP protocol tocommunicate through the network.
l PrintShop Mail Web Capture service: Monitors print requests from a PrintShop Web server.l Serial Input service: Monitors a single serial port for incoming data. Note that all Serial input tasksuse the same serial port (set in the user options of the PlanetPress Workflow Configuration program).
l Telnet Input service: Monitors multiple telnet ports for incoming data. Note that each Telnet input taskhas its own telnet port number (set in each task).
l HTTP/SOAP Server service: Monitors web pages and web sites as well as SOAP servers.
Available Output ServicesOutput services are used to output jobs. The output services used by PlanetPress Workflow are:
l FTP Output service: Places output jobs on a server via the FTP protocol.l LPR (Line Printer Requester) Output service: Sends jobs to an LPD server or LPD compatibleprinters. The LPD/LPR printing protocol is a common way to send print jobs that, in turn, use theTCP/IP protocol to communicate through the network.
l PlanetPress Image: Outputs jobs as PDF files or in a variety of image formats. You can also usePlanetPress Image to archive and/or email the files it creates. You can use PlanetPress Search tosearch the PDF files PlanetPress Image creates. You can install multiple instances of the PlanetPressImage service on your network, and have PlanetPress Workflowsend jobs to one or more of these

instances. Each instance of PlanetPress Image can generate PDFs or images and dispatch them fromthe host on which it runs. See About Image.
l PlanetPress Fax: Outputs jobs as faxes. You use PlanetPress Fax as an interface to WinFax PRO orWindows Fax, to send faxes you create from documents. You can install multiple instances of thePlanetPress Fax service on your network, and have PlanetPress Workflowsend jobs to one or more ofthese instances. Each instance of PlanetPress Fax can generate faxes and dispatch them from thehost on which it runs, using a local faxing program, such as WinFax PRO, Captaris RightFax orWindows Fax. See About Fax.
l PrintShop Mail: Used to generate documents using PrintShop Mail databases and documents.Communicate with it through the PrintShop Mail and PrintShop Mail 7 Connector Tasks. SeePrintShop Mail.
l Laserfiche: Used as a repository for electronic documents. Communicate with it through theLaserfiche Repository Output Task. See "Laserfiche Repository Output" on page 387.
l PlanetPress Capture: Used to generate and process files using Anoto patterns. Communicate with itthrough the PlanetPress Capture tasks such as the Anoto Ink Processor and the Anoto Patternplugins.
Services must use an account to be granted the permission to use the system’s resources and objects. Thisinformation is included in the service's configuration and most services use the Local System Account,which is granted access to all the system’s resources. All input and output services used by PlanetPressWorkflow run under the same account. For more information on services and system permissions, refer toWindows documentation. For more information on how to configure the account used by the services, See"Workflow Services" on page 592.
The PlanetPress Workflow Service Console, included in the PlanetPress Workflow Workflow ToolsConfiguration program, can be used to monitor, start and stop PlanetPress Workflow services (See Usersand Configurations and "The PlanetPress Workflow Service Console" on page 610).
Start and Stop PlanetPress Workflow ServiceAs with most Windows services, PlanetPress Workflow can be started and stopped automatically when aWindows session is opened and closed. The other option is to start, stop or pause PlanetPress Workflowmanually using the PlanetPress Workflow Configuration program.

Note
The current PlanetPress Workflow status is always displayed in the lower-right corner of thePlanetPress Workflow Configuration program window.
To start PlanetPress Workflow services via PlanetPress Workflow Configuration program:
1. Click Tools in the PlanetPress Workflow Ribbon.2. Click Start Service in the Services Status group. A progress bar is displayed while your PlanetPress
Workflow is being started.
To stop your PlanetPress Workflow services via PlanetPress Workflow Configuration program:
1. Click Tools in the PlanetPress Workflow Ribbon.2. Click Stop Service in the Services Status group.
When you stop or pause PlanetPress Workflow, it immediately stops bringing new files into itsprocesses, but it keeps on performing tasks until all the files which are currently under process havebeen completely processed.
To pause your PlanetPress WorkflowWorkflow Tools service via the PlanetPress Workflow
Configuration program:
1. Click Tools in the PlanetPress Workflow Ribbon.2. Click Pause in the Services Status group. The PlanetPress Workflow service temporarily stops
performing jobs.
Note
If you send a new configuration when PlanetPress Workflow is paused, it will continue using the oldconfiguration when you resume processing until you stop and restart it.

To resume your PlanetPress Workflow service after pausing it:
1. Click Tools in the PlanetPress Workflow Ribbon.2. Click Resume in the Services Status group. The PlanetPress Workflow Tool service starts
performing jobs again.

The InterfaceThis chapter centers on the PlanetPress Workflow Configuration program, which you use to create and edityour configurations.
The basic user interface elements are as follows:
1. The PlanetPress Workflow button. See "PlanetPress Workflow Button" on page 563.
2. The Quick Access Toolbar. See " The Quick Access Toolbar" on page 673.

3. The Ribbon Tabs. See "The PlanetPress Workflow Ribbon" on page 674.4. A Group within the Ribbon5. The Process area. See " The Process Area" on page 662.6. A specific link (aka a "component", "button" or "link").7. The Dockable panels including "The Plug-in Bar" on page 620, " The Object Inspector Pane" on
page 619 and "The Debug Information Pane" on page 616.8. The status bar. This displays your current software version and status of the PlanetPress Service.9. The Configuration Components pane. See "The Configuration Components Pane" on page 564.10. The Messages Pane. See " The Message Area Pane" on page 617.
You can customize the appearance of PlanetPress Workflow Configuration programs to your needs. See"Customizing the Workspace" below.
Customizing the WorkspaceYou can combine and attach the Configuration Components pane,Messages area and Object Inspectorinto a single secondary window that can be docked to and undocked from the main PlanetPress WorkflowConfiguration program window.
Combining and attaching areas can facilitate the management of your screen real estate. It lets youreposition multiple areas in a single operation.
Note
Since the Process area must remain in the main PlanetPress Workflow Tools Configuration Program window, itcannot be combined and attached in this fashion.
Dock and Undock Areas of the Program WindowThe Configuration Components pane, the Object Inspector, and the Messages area can be displayed inwindows that are attached to the Program window (docked position) or that float above it (undockedposition). You dock a window when you attach it to the Program window, and you undock it when youdetach it from the Program window.
The Configuration Components pane, the Object Inspector and the Messages area can each bedisplayed inside its own window, whether docked or undocked, but they can also be displayed attached orcombined inside the same window.
l When separate areas are displayed simultaneously, they appear in different sections of the Programwindow.
l When attached areas are displayed simultaneously, they appear side-by-side or above one anotherinside sub-windows.
l When combined areas are displayed simultaneously, they overlap one another inside the samewindow. Tabs let you switch from one area to the other.
To undock an area of the Program window, do one of the following:
l Click either a title bar (separate or attached areas) or a tab (combined areas) displaying the name ofthe Configuration Components pane, the Object Inspector or the Messages area and move themouse pointer so as to drag the area away from its docked position. As you drag, a rectangle isdisplayed to show the landing position. Release the mouse button when the rectangle is in a floatingposition (not attached to the Program window).
l Double-click either a title bar (separate or attached areas) or a tab (combined areas) displaying thename of the Configuration Components pane, the Object Inspector or the Messages area. Thearea will jump from a docked to an undocked position and vice-versa.
To dock an area of the Program window, do one of the following:
l Click either a title bar (separate or attached areas) or a tab (combined areas) displaying the name ofthe Configuration Components pane, the Object Inspector or the Messages area and move themouse pointer so as to drag the area away from its current undocked position. As you drag, a rectangleis displayed to show the landing position. Release the mouse button when the rectangle is in a dockedposition (attached to the Program window).
l Double-click either a title bar (separate or attached areas) or a tab (combined areas) displaying thename of the Configuration Components pane, the Object Inspector or the Messages area. Thearea will jump from an undocked to a docked position and vice-versa.

Show or Hide Areas of the Program WindowYou can choose to hide or display any of the customizable areas in PlanetPress Workflow program. Hiddenareas will still contain the same information but will not be visible.
To show or hide a Program window area:
l In the PlanetPress Workflow Ribbon, click the View tab.
l From the Show/Hide group, click on any area name to hide or display it.
A "highlighted" (orange) button means the area is displayed somewhere on your screen(s). A dim(blue) button means the area is hidden.
Note
The Process Area is always visible and cannot be hidden.
Combine and Attach AreasThe Configuration Components pane, the Object Inspector, and the Messages area can be attached orcombined to one another and share the same space. However they are displayed, you can always drag,dock, or undock any area as desired. You can also switch among areas when they are combined, as well asmaximize or minimize areas when they are attached. For more information, refer to "Customizing theWorkspace" on page 554.
The following procedures will show a number of things you can do to change the way information isdisplayed by PlanetPress Workflow Configuration program.
To combine areas:
l Click either a title bar (separate or attached areas) or a tab (combined areas) displaying the name ofthe Configuration Components pane, the Object Inspector or the Messages area and move themouse pointer. As you drag, a rectangle is displayed to show the landing position. Drag the rectangledirectly over another area and release the mouse button when the shape of a tab appears at the

bottom of the rectangle.
To switch between combined area:
l At the bottom of the combined area, click the tab of the area you want to bring to the top. If all the tabsare not displayed, use the left and right arrows to navigate between them.
The left and right arrows lets you show hidden tabs.
To reorder tabs in a combined area:
l At the bottom of the combined area, click the tab of the area you want to move, drag it to the left or rightand drop it at the desired position.
Dragging a combined area to new position.

To take an area out of a combined area, do one of the following:
l Click the tab displaying the name of the area you want to take out and move the mouse pointer so asto drag the area away from the combined area. As you drag, a rectangle is displayed to show thelanding position. Release the mouse button when the rectangle is away from the combined area.
l Double-click the tab of the area you want to take out of the combined area. The area will jump outsideof the combined area.
To attach areas:
1. Click either a title bar (separate areas) or a tab (combined areas) displaying the name of theConfiguration Components pane, the Object Inspector or the Messages area and move the mousepointer. As you drag, a rectangle is displayed to show the landing position.
2. Drag around to the edges of another area and release the mouse button when the rectangle appearsto the left or right, or above or below the other area. The rectangle should not display a tab at itsbottom, otherwise the areas will not be attached but rather combined.
Note
Note that you can attach an area to a group of combined areas, as well as change combined areas into attachedareas. When attaching previously combined areas, you may find it easier to do it in two steps: begin by taking thearea out of the combined area and then try attaching it.

3. Resize each part of the new group as desired.
Attaching an area to a group of combined areas. The rectangle showing the landing position is not tabbedand the area will therefore be moved next to the combined area.
To maximize or restore attached areas, do one of the following:
l To maximize a vertically attached area, click the upward pointing arrow on its title bar.l To restore a vertically attached area, click the downward pointing arrow on its title bar.l To maximize a horizontally attached area, click the left pointing arrow on its title bar.l To restore a horizontally attached area, click the right pointing arrow on its title bar.


A) Click to maximize this area.
B) Click to restore this currently maximized area.
C) Click to maximize this area.
D) Click to restore this currently maximized area.
To take an attached area out of a group, do one of the following:
l Click the title bar displaying the name of the attached area you want to take out and move the mousepointer so as to drag the area away from the group. As you drag, a rectangle is displayed to show thelanding position. Release the mouse button when the rectangle is away from the group.
l Double-click the title bar of the area you want to take out. The area will jump outside of the group.

Resize the Program Window AreasYou can adjust the layout of the Program window by resizing one of the Program window areas.
This also applies to resizing a combined area (see "Combine and Attach Areas" on page 556).
To resize a Program window area:
l Move the pointer to the edge of an area you want to resize to display the resize pointer, then click anddrag to resize the area.
Change the Interface LanguagePlanetPress Workflow can be used in multiple languages, and the list of available languages grows as wetranslate the software. The first time you use PlanetPress Workflow, it starts in the language used for theinstallation. You may change this setting as often as you like, but you need to restart the application everytime you do so.
To change the language used by the PlanetPress Workflow Configuration program:
1. Click the PlanetPress Workflow button, then click Select Language.The Select Language dialog box appears. This box lists all the languages that can be used byPlanetPress Workflow as well as the Use System Default Locale check box.
2. Select the desired language.3. Use System Default Locale: Select to mirror your language settings, as defined in the Regional and
Language Options of the Windows Control Panel. This option is typically used to enter and processinformation in non-European languages. It is only enabled when English is selected as the programlanguage.
4. Click OK.
Technical
If you plan to enter and process information in non-European languages, you should know thatPlanetPress Workflow uses codepages when storing and retrieving information (a codepage is a

mapping used to convert back and forth the letters and numbers used by humans to the numericcharacters used by computers). By default, codepage 1252 is used for Latin languages (good forAfrikaans, Basque, Catalan, Danish, Dutch, English, Faroese, Finnish, French, Galician, German,Icelandic, Indonesian, Italian, Malay, Norwegian, Portuguese, Spanish, Swahili and Swedish) andcodepage 932 is used for Japanese.
PlanetPress Workflow ButtonThe PlanetPress Workflow button replaces the File menu from previous versions, and provides access tothe File menu options.
Optionsl New: Closes the configuration that is currently opened and creates a new configuration, with a singleexample process and no printer queues. See "Create a New Configuration" on page 544.
l Open: Displays the dialog to open an existing configuration file.l Save: Saves the current configuration. If the file is new and has not yet been saved, or if theconfiguration is the loaded directly from the service, the Save As dialog is displayed instead. See"Saving and Sending" on page 546.
l Save As: Saves the current configuration under a new name. It does not overwrite any existingconfiguration file, unless an existing file is selected and overwritten manually by the user.
l Import: l Configuration Components: Displays the Import Processes dialog, letting you importprocesses and other components from other existing configuration files. See "Import Processesfrom Another Configuration File" on page 78.
l PlanetPress Document: Displays the dialog to import a PlanetPress Connect Document to beadded to the list in the components area.
l PrintShop Mail Document: Displays the dialog to import a PrintShop Mail Document to beadded to the list in the components area.
l Connect Content: Displays the dialog to import Connect files including templates, datamapping configurations, presets and packages.

l Send Configuration: Sends the current configuration to the PlanetPress Watch service. See "Savingand Sending" on page 546.
l Close: Closes the configuration that is currently opened and creates a new configuration, with a singleexample process and no printer queues. Closing the current configuration is the same as creating anew one.
l Recent Documents: Displays a list of the 9 most recently opened configuration files. Click on any ofthem to open it.
l Select Language: Click to display the language selection dialog, which changes PlanetPressWorkflow interface language. See " Change the Interface Language" on page 562.
l Preferences: Displays the Options dialog. See "Preferences" on page 621.l Exit: Closes PlanetPress Workflow. See " Exit PlanetPress Workflow Configuration Program" onpage 548.
When using the New,Open, Close, Recent Documents and Exitmenu options, if your currentconfiguration has not been saved after modifications, a dialog will open asking if you want to save, not save,or cancel the action and return to the current configuration.
The Configuration Components PaneThe Configuration Components pane displays processes, subprocesses, variables, documents andprinter queues. It also lets you add any of these components using the right-click menu.
Components Area Sectionsl Processes: Displays a list of processes in your configuration. Right-click on a process to access adrop-down menu that offers these choices:
l Insert Process: Inserts a new process with a default input and output task.l Insert Startup Process: Inserts a new process as a Startup Process. This option is onlyavailable if there is no existing startup process in your configuration.
l Insert Local Variable: Inserts a new local variable.l Cut, Copy, Paste: Controls the clipboard.l Delete: Deletes the process from the configuration.l Rename: Renames the process.

l Active: Triggers whether the process is active (runs in service mode) or inactive (does not run inservice mode). Inactive processes never trigger their input task or any other tasks.
l Startup: Triggers whether the process is a startup process (runs before any other process). Thisoption is only available if there is no existing startup process in your configuration.
l Group, Ungroup: Triggers grouping functionality.l Properties...: Displays the process' properties, for scheduling and error handling.
l Subprocesses: Displays a list of subprocesses in your configuration. Right-click on a subprocess toaccess a drop-down menu that offers these choices:
l Insert Subprocess: Inserts a new process with a default input and output task.l Insert Local Variable: Inserts a new local variable.l Cut, Copy, Paste: Controls the clipboard.l Delete: Deletes the subprocess from the configuration.l Rename: Renames the subprocess.l Group, Ungroup: Triggers grouping functionality.l Properties...: Displays the process' properties for error handling.
l Global Variables: Displays a list of variables that are shared between all your processes. Right-clickon a Global Variable to access a drop-down menu that offers these choices:
l Insert Global Variable: Creates a new global variablel Cut, Copy, Paste: Controls the clipboard.l Delete: Deletes the global variable from the configuration.l Rename: Renames the global variable.l Reset: Resets the global variable to its default value. Useful if one of your process is modifyingthe global variable's value and you want to return it to its original default value.
l Group, Ungroup: Triggers grouping functionality.l Properties...: Displays the properties, which lets you set a default value for the global variable.
l Connect Resources: Displays a list of PlanetPress Design resources that can be used in processes.Different resources are divided into subfolders:
l Data Mapping Configurations: Displays a list of data mapping configurations used with theExecute Data Mapping task. Each of the templates have been sent from PlanetPress Connectusing the Send to Workflow tool. For each template in the list, the following two items appearwithin them:

l Data Model: Displays the data model used in the data mapping configuration. Double-clickon the data model to view it in your default XML viewer (generally, Internet Explorer).
l Sample Data File(s): Displays a list of sample files that are included in the data mappingconfiguration. Double-click on a file to use it as a sample data file for the active process.
l Document Templates: Displays a list of templates that can be used in content creationtasks: Create Email Content Set, Create Web Content and Create Print Content.
l Job Presets: Displays a list of Job Presets that can be used in the "Create Job" on page 482task.
l Output Presets: Displays a list ofOutput Presets that can be used in the Create Output task.
l PPS/PSM Documents: Displays a list of PlanetPress Connect and PrintShop Mail Design documentthat have been imported into PlanetPress Workflow. Right-click on a document to access a drop-downmenu that offers these choices:
l Insert Resident Document: Inserts a new Resident Document, which is a placeholder for aPlanetPress Design document that resides exclusively on the printer.
l Cut, Copy, Paste: Controls the clipboard.l Delete: Deletes the document from the configuration, as well as the Workflow Tools WorkingFolders.
l Refresh: Regenerates a PostScript Cache from the original document's PTK file.l Group, Ungroup: Triggers grouping functionality.l Properties...: Displays the properties, which lets you see the form information and select itsdefault printing behaviors.
l Printer Queues: Displays a list of printer queues in your configuration. Right-Click on a printer queueto access a drop-down menu that offers these choices:
l Insert Printer Queue: Creates a new printer queue in your configuration.l Replace Printer Queue By: Replaces the currently selected printer queue with a new one.l Cut, Copy, Paste: Controls the clipboard.l Delete: Deletes the printer queue from the configuration.l Rename: Renames the printer queue.l Group, Ungroup: Triggers grouping functionality.l PS Test Page: Prints a test page in PostScript format. Useful for validating whether the printersupports PostScript.

l Text Test Page: Prints a text-only test page on the printer.l Properties...: Displays the printer queue properties.
Note
Deleting a component that is currently used by a process will cause this process to stop working andtrigger an error, until the task that causes the error is removed, or changed to point to another existingcomponent.
Processes and SubprocessesThe Processes component displays a list of processes in your configuration while theSubprocesses component displays a list of subprocesses.
Process Properties
To have access to the properties of a process or subprocess:
l Right-Click on the Process in the Configuration Components Area.l Select Properties.
You can also double-click on the process to show its options.
Note
Subprocesses do not have the "General Tab" which is only used for scheduling, but they do have theInformation Tab.
Options
General tab
l Active: Select to make the process active. Clear to prevent this process from running when you sendthe configuration to PlanetPress Workflow.
l Startup process: Select to make this process a startup process.

l Self-Replicating Process: Check this if you want the process to replicate itself in the backgroundwhen multiple input files are received simultaneously. When this is checked, the input task polls itssource once, determines the number of files to process, then replicates itself up to the maximumallowed and treats the files simultaneously. The initial process runs again once it has completed itselfand replicates again as necessary, until all files have been processed.
l Max percentage of threading (%): Determines how many processes you may have running at thesame time. This is a percentage of the maximum number of threads specified in the "Messenger Plug-In Preferences" on page 642. For example if the maximum number of thread is 10 and you specify50% here, a maximum of 5 replications will occur (the original process + 4 copies).
l As soon as possible: Select to have the process run continuously. Clear to enable the Time Grid tofine-tune the schedule of the process.
l Day(s) to keep backup: Indicate the number of days to keep backups of jobs processed by inputtasks. Note that backups will only be kept for those input tasks that have the Keep backup file optionselected and that they are required to resubmit input files.
l Polling interval: Enter the frequency (in seconds) at which the process should verify if there are newjobs to process. The polling interval also applies to scheduled tasks that only run on certain times. Forexample, if your process polls every 30 seconds on a task that's only scheduled to run one hour perweek, it will capture the input 120 times during that period. Note that the polling interval is ignoredwhen multiple files are present in the input and will be used only when there are no longer any files toprocess.
l Month: Select the month of the year when the process should be run or select All months to have theprocess run all year long. This option is disabled when "As soon as possible" is checked.
l Week of month / by date: Select the desired option for the time grid. Note that any selection you makein this box will be interpreted based on the selection made in the Month box. If you chose All months inthe Month box and Last in the Week of month / by date box, then the process will run on the last weekof every month. If you chose January in the Month box and First in the Week of month / by date box,then the process will run only on the first week of January.
l Select Date to display dates on the grid’s top ruler.l Select any of the other options to display days on the top ruler.l Select All weeks to have the process run every week.l Select First, Second, Third or Fourth to have the process run on the first, second, third or fourthweek.
l Select Last to have the process run only on the last week.

l Time division: Select the duration of each daily segment in the time grid. If you select 00:15, eachsegment will represent only 15 minutes and each day will be made up of 96 blocks (4 blocks per hourtimes 24 hours). If you select 24:00, each segment will represent an entire day.
l Poll once per activity period: Select to perform this process’ initial input task no more than once foreach set of contiguous blocks (blocks that are on the top of one another). Choosing this optionoverrides the polling interval option. By default since the Time Grid blocks are divided by hours, thisoption will make your polling happen once every hour.
The Time Grid
The PlanetPress Workflow Process Options dialog box includes a time grid that lets you set exactly whenyou want a process to run. The grid is composed of blocks that represent time periods on a given day. Toactivate the Time Grid, the "As soon as possible" option must be unchecked.
In the Time Grid, a blue block will indicate that the process is active within that time block. While blocksmean the process will not be active.

l Click on any block to select / deselect it.l Click and drag from one block to another to toggle all blocks between the two.l Shift-click on any block to toggle all blocks from the top-left corner of the grid to the block you click.

l To select all of the time segments for a given day or date, click the day or date on the top grid ruler. Todeselect all of the time segments for a given day or date, CTRL+click the day or date on the top gridruler.
l To select all the days or dates for a given time segment, click the time segment on the left grid ruler. Todeselect all the days or dates for a given time segment, CTRL+click the time segment on the left gridruler.
l To select the entire grid, use the Select All button located below the grid. To deselect the entire grid,use the Clear All button located below the grid.
Note
"Toggle" means turn on when it's off and vice-versa, when selecting multiple blocks in one command.This means if you select a certain number of blocks in the Time Grid and then use the shift+click ordrag method, blocks that are on will turn off.
Technical
Changes made to the system time can have adverse effects on the processes managed byPlanetPress Workflow. When changing from daylight saving time to standard time, for example, ifPlanetPress Workflow starts a given process at 2:00 AM, and if the system time is then taken back to1:00AM, the application will start a new instance of the same process when the system time reaches2:00 AM for a second time. So, when you manually change the system time, be aware that it may havean effect on PlanetPress Workflow and its processes. And for those cases when you know the systemtime will change automatically, you may consider creating special schedules.
Information Tab
The Information tab lets you enter information that is not critical to your process but may help others (oryourself in the future) to understand what the process does. It offers two boxes:
l Description: A one-line box to give a title or short description to your process.l Comments: A multi-line box to give more detailed information, for example the file format expected,explanation of the system in general.

Create a New Process
You can create a new process in a two different ways:
l In the Ribbon, go to the Home tab and click the Process button in the Processes group.l In the Configuration Components pane, right-click on any process or the Processes folder andselect Insert Process.
Regardless of the method, a new process is created with a default name (Process1, Process2, etc), InputTask and Output Task. The defaults are configurable in the "Default Configuration Behavior Preferences"on page 625 screen. The same methods can be used to create a new Startup process.
To add a PlanetPress Workflow startup process:
l In the Ribbon, go to the Home tab and click the Startup Process button in the Processes group.l In the Configuration Components pane, right-click on any process or the Processes folder andselect Insert Startup Process.
Note
You can only have one Startup Process in any given configuration and cannot add more.
Considerations
l While your configuration is limited to a maximum of 512 processes, any given process can have asmany tasks as necessary.
l A given process may include output tasks that generate files used by input tasks from other processes.l When you send a configuration to your PlanetPress Workflow service, all its active processes areapplied.
l Each process’ schedule determines when its initial input task can be performed.l Other tasks included in the process are performed regardless of schedule, granted that the previoustask was performed.

Manipulate Local Variables
Note
For information about Global Variables see Global Variables.
Local Variables are set at the level of the Process and are not shared with any other process or instance ofthat process. Local variables can be used anywhere that accepts variables by using it's namee, surroundedby curly brackets and preceded by a percent sign (for example: %{myLocalVariable}).
When the process ends, the local variable forgets whatever value was given to it by the process and goesback to its default value. Local variables are generally used to keep information that is useful for the processitself but not to any other process or instance of the process. For example, you could store the current orderID for the process, a name or an email. You can have as many local variables as you want in any givenprocess.
To add a local variable, you can use one of two methods:
l Select the process where you want to add the variable.l Click on the Home tab of the PlanetPress Workflow Ribbon, then click Local Variable in theVariables group.
l Right-click on the process in the Configuration Components area, then click on Insert LocalVariable.
Shared tasks
These procedures can be used on both local and global variables.
To delete a variable
l Right-click on the variable name in the Configuration Components Area and click Delete.
To rename a variable:
l Right-click on the variable name in the Configuration Components Area.l Click Rename

l Type in the new name of the variable, then press Enter on your keyboard.
While renaming a variable will correctly rename all references to it in task properties or wherever else it isused in a task, it will not change the references in any script within a Run Script task. Deleting a variable,on the other hand, does not delete any reference to it. In both the case where a script refers to a variable andit is renamed, or in the case of deleting a variable, any task or script that refers to it will cease to function andwill generate an error.
You can set the value of a variable within your process in two ways:
l Use the Set Job Info and Variable action task. See "Set Job Infos and Variables" on page 312.l You can use Scripts. See the chapter "Using Scripts" on page 81.
Variables may be used as variable properties in variable property boxes (see Variable Properties).
Activate or Deactivate a Process
All processes are Active by default, but you may make any PlanetPress Workflow process Inactive asrequired. Because making a process active or inactive is a change in the configuration, to make the changeeffective you will have to send the edited configuration to your PlanetPress Workflow service (See "Sendyour Configuration" on page 11).
To activate or deactivate a process:
1. Right-click the process in question in the Configuration Components pane2. Click Active to disable or enable the process.3. Send your configuration.
Note
If you try to send a configuration that contains only inactive processes, the PlanetPress WorkflowConfiguration program will ask you to confirm the operation (this can be changed in the NotificationUser Options).
Convert a Branch to a Subprocess
To allow for maximum flexibility and backward compatibility with the subprocess feature, the Convert tosubprocess option lets users transform existing processes easily. This option is available whenever aBranch task is selected; right-clicking on it will display the contextual menu, which holds the Convert tosubprocess option.
Selecting this option automatically creates a new subprocess, takes the branch and all of its children tasksand inserts it in the new subprocess, including the branch task itself. In the main process, the branch isremoved and replaced with a GoSub action task referring to the newly created subprocess.
Note
The Branch tasks options Backup job file, Backup job information and Backup emulation, are also automaticallypassed to the subprocess, which means that, if the subprocess needs to use a different emulation than the callingprocess, a Change Emulation task is required.
If any task converted into a subprocess was previously using local variables, these variables must beremoved or transferred to global variables or job information to be usable in the newly created subprocess.
Update Printer Information
To have update the printer information of a process or subprocess:
1. Right-Click on the Process in the Configuration Components Area.2. Select Update Printer Information.
Manipulate Global Variables
Note
For information about Local Variables see Local Variables.
Global Variables are set at the level of the configuration file and are shared between all processes andtasks. Global variables can be used anywhere that accepts variables by using it's name preceded by"global." and surrounded by curly brackets (for example: %{global.myGlobalVariable}).
Global variables are generally used to keep information that applies to multiple locations but need to bechanged easily. For example, a lot of uses use them to set a server's IP, a printer name, or folder locationthat is used by multiple processes. This is useful when moving the configuration file to another installation ofthe Workflow Tools where this information is different, or to quickly modify specific information if somethingchanges on the server. You can have as many global variable as you want in any given configuration.
To add a global variable from the Configuration Components pane:
1. Right-Click on Global Variables.2. Click Insert, then Insert Global Variable.
The new variable will appear as GlobalVar or GlobalVarX (the name is automaticallyincremented).
To add a global variable from the Ribbon:
1. Click on the Home tab of the PlanetPress Workflow Ribbon.2. Click Global Variable in the Variables group.
The new variable will appear as GlobalVar or GlobalVarX (the name is automaticallyincremented).
To set the value of a global variable from the Configuration Components pane:
1. Double-click on the global variable in the Configuration Components pane.(Right-clicking then clicking Properties also works)
2. Enter the new value for your global variable.3. Click OK to save the new value.
Shared tasks
These procedures can be used on both local and global variables.
To delete a variable
l Right-click on the variable name in the Configuration Components Area and click Delete.
To rename a variable:
l Right-click on the variable name in the Configuration Components Area.l Click Renamel Type in the new name of the variable, then press Enter on your keyboard.
While renaming a variable will correctly rename all references to it in task properties or wherever else it isused in a task, it will not change the references in any script within a Run Script task. Deleting a variable,on the other hand, does not delete any reference to it. In both the case where a script refers to a variable andit is renamed, or in the case of deleting a variable, any task or script that refers to it will cease to function andwill generate an error.
You can set the value of a variable within your process in two ways:
l Use the Set Job Info and Variable action task. See "Set Job Infos and Variables" on page 312.l You can use Scripts. See the chapter "Using Scripts" on page 81.
Variables may be used as variable properties in variable property boxes (see Variable Properties).
Connect ResourcesConnect resources are visible in The Configuration Components pane and are added by using the Sendto Workflow option from the PlanetPress 's File menu.
Available Resources
l Data Mapping Configurations: Displays a list of data mapping configurations used with the ExecuteData Mapping task. Each of the templates have been sent from PlanetPress Connect using the Sendto Workflow tool. For each template in the list, the following two items appear within them:
l Data Model: Displays the data model used in the data mapping configuration. Double-click onthe data model to view it in your default XML viewer (generally, Internet Explorer).
l Sample Data File(s): Displays a list of sample files that are included in the data mappingconfiguration. Double-click on a file to use it as a sample data file for the active process.

l Document Templates: Displays a list of templates that can be used in content creation tasks: "CreateEmail Content Set" on page 479, "Create Web Content" on page 493 and "Create Print Content" onpage 490.
l Job Presets: Displays a list of Job Presets that can be used in the "Create Job" on page 482 task.l Output Presets: Displays a list of Output Presets that can be used in the "Create Output" on page 485task.
Resource Save Location
Any resource sent to PlanetPress Workflow from PlanetPress Connect is saved locally at the followinglocation: %PROGRAMDATA%\Objectif Lune\PlanetPress Workflow 8\PlanetPress Watch\OLConnect
Resources are saved in their appropriate folder:
l DataMapper contains the data mapping configurations (.OL-datamapper)l JobCreation contains the Job Presets (.OL-jobpreset)l OutputCreation contains the Output Presets (.OL-outputpreset)l Template contains the templates (.OL-template)
Note
Package Files are not saved anywhere. The individual resources contained within the package areextracted and placed in the folders noted above.
Resource Archives
From version 8.2, PlanetPress Workflow maintains an archive of previous versions of resources, in thefollowing location: %PROGRAMDATA%\Objectif Lune\PlanetPress Workflow 8\PlanetPressWatch\OLConnect\Archive , each in their own folder:
l datamapper contains archives of the data mapping configurations (.OL-datamapper)l jobcreation contains archives of the Job Presets (.OL-jobpreset)l outputcreation contains archives of the Output Presets (.OL-outputpreset)l template contains archives of the templates (.OL-template)l workflow contains archives of Workflow configurations received by the server.

The archives are saved using the template named followed by a timestamp. A maximum of 30 of eachinstance of a resource is kept (meaning if you have 10 different templates, a maximum of 300 files will bepresent in the archive\template folder). Older archives are deleted automatically as new archives arecreated.
PPS/PSM DocumentsPPS/PSM Documents displays a list of PlanetPress Design and PrintShop Mail Design document thathave been imported into PlanetPress Workflow.
View Document Properties
PlanetPress Workflow Configuration programs let you view a number of the properties associated with thePlanetPress Design documents you use, but most of those properties are set in PlanetPress Design andcannot be edited using PlanetPress Workflow Configuration program.
The Document name of printer-resident documents can be changed using PlanetPress WorkflowConfiguration program simply because it is initially set using that program.
The properties available via the Printer Settings tab define how documents are printed. They are also setusing PlanetPress Workflow Configuration program and are retained when documents are assigned toprinter queues. They can be edited by selecting documents within the Documents category, which changesthe document’s default printer settings, or within the Printer Queues category, which changes the documentproperties on the selected queue .
To view the properties of a document, do one of the following:
l Click any document to display its properties in the Object Inspector.l Double-click any document to display its properties in the PlanetPress Design Document Optionsdialog box.
Document Properties Options
Identification Tab
The information here is read-only and gives you information on the document.
l Document: The file name of the document, as entered in PlanetPress Design. This is the name of thefile saved in PlanetPress Design, or the name you give it when you add a printer-resident document inyour PlanetPress Workflow Configuration. It may have a PTK extension (if it has been sent toPlanetPress Workflow from PlanetPress Design), or a PS extension (if it is printer-resident).
l Version: The version of PlanetPress Workflow in which the document was originally created. Printer-resident documents are identified as such.
l Document name: The name of the document as entered in PlanetPress Design. You can enter aname for printer-resident document here; the name does not have to match the name given it inPlanetPress Design. Since this property is used in the trigger to identify the document whenPlanetPress Workflow sends a job to be merged on a printer, the document name must exactly matchthe name of the document installed on the printer.
l Description: The description of the document as entered in PlanetPress Design.l Last modified: The date and time the document was last uploaded to PlanetPress Workflow.
Printer Settings Tab
l Trigger Type: Select whether you want a normal trigger configuration to be used, or a custom triggerthat you manually enter.
l Custom Trigger Box (appears only when Custom Trigger is selected in Trigger type): Lets you enterthe exact trigger you want to use. This trigger must absolutely be in standard postscript language.
l Run mode groupl Printer centric: Select to send the document along with the trigger and data to the componentthat generates fax documents.
l Optimized PostScript Stream: Select to merge the selected document with the data received bythis task before sending it to the component that generates fax documents. Some PlanetPressDesign features, such as the Time and Date PlanetPress Talk functions, require that this optionbe selected.
l Document location group (enabled only when using Printer-Centric mode)l PlanetPress Workflow-based: Select if the PlanetPress Design document is in PlanetPressWorkflow. This option should be selected if your document is updated often and you are sendingit to the Workflow Tools instead of the printer directly.
l On printer hard disk: Select if the PlanetPress Design document is on the printer's hard drive.l In printer flash memory: Select if the PlanetPress Design document is on the printer's flashmemory.
l RAM: Select if the PlanetPress Design document is on the printer's RAM (RandomAccess Memory).
l Document Update group (enabled only when using printer-centric mode and the document is on theprinter)
l Automatically update: PlanetPress Workflow will send a new version of the document to theprinter automatically if the document has been changed since it was last used. If unchecked, youwill have to manually update the document on the printer from the Update Instances button orby sending the document to the printer from PlanetPress Design.
l Confirm Update: Check if you want a confirmation page to be printed stating the document hasbeen updated, when it happens. This options is disabled if Automatically update is not selected.
l Update Instances: Clicking this button brings up a dialog box that lets you manually update anydocument on any printer.
l Printer-Specific folder: This option lets you enter a manual location where the documents shouldreside in the printer's memory. This option is only available if the document is Printer Centric, and theDocument location is eitherOn printer hard disk or In printer flash memory.
Use Data and Metadata Files Attached to Documents
Note
This feature was introduced in PlanetPress Workflow 7.3.
Data Files
When sending a PlanetPress Design Document from PlanetPress Design to PlanetPress Workflow, all datafiles used in the document are automatically sent to PlanetPress Workflow along with the Design Document.These data files appear under the Documents section of the Configuration Components.
To set an attached data file as a sample data file in a process:
1. Make sure the Documents section is visible by clicking the button if it appears.
2. Expand the document (name.ptk) by clicking the button.3. Right-click on the data file, then click Set as sample data file.

To view an attached data file:
1. Make sure the Documents section is visible by clicking the button if it appears.
2. Expand the document (name.ptk) by clicking the button.3. Double-click on the data file to open the data selector.
Note
Double-clicking on the data file does the same thing as right-clicking on it an then selecting Set assample data file. Clicking Cancel instead of OK after viewing will prevent this action from beingtaken.
To save an attached data file to disk:
1. Make sure the Documents section is visible by clicking the button if it appears.
2. Expand the document (name.ptk) by clicking the button.3. Right-click on the data file, then click Save sample data file.
Metadata
When a Design Document uses Metadata, it can also be attached with the document. One Metadata file isgenerated for each data file attached to the Design Document. Metadata does not appear in theConfiguration Components but it follows the data file and can be viewed from the Metadata tab wheneverthe data file is viewed through the Data Selector.
Use Attached Document Preview
When sending a PlanetPress Design Document from PlanetPress Design to PlanetPress Workflow, aPDF Preview of the job's output is automatically sent to PlanetPress Workflow along with the DesignDocument. This preview appears under the Documents section of the Configuration Components.
The PDF contains the result of a preview with the active data file (for all data pages) run as an OptimizedPostScript Stream.

To view the Document Preview:
1. Make sure the Documents section is visible by clicking the button if it appears.
2. Expand the document (name.ptk) by clicking the button. The Document Preview has the samename as the document but with a PDF extension.
3. Right-click on the Document Preview, then click Open in PDF Viewer.
To save the Document Preview to disk:
1. Make sure the Documents section is visible by clicking the button if it appears.
2. Expand the document (name.ptk) by clicking the button. The Document Preview has the samename as the document but with a PDF extension.
3. Right-click on the Document Preview, then click Save PDF File.
Add Resident Documents in the Configuration Components Pane
By default, the Documents group displayed in Configuration Components pane of the PlanetPressWorkflow Configuration program includes all those documents that are available on your local PlanetPressWorkflow server. Those documents that are not available on your local PlanetPress Workflow server, butthat are either available on printers or on other PlanetPress Workflow servers must added to the list,otherwise you will not be able to use them in your PlanetPress Workflow configuration.
To add a resident document in the Configuration Components pane:
1. In the PlanetPress Workflow Configuration Components pane, click the Documents button andchoose Insert | Resident Document. The Add Resident Document dialog box is displayed.
2. Enter the document’s name. Note that the name you enter must exactly match the actual documentname or PlanetPress Workflow will not be able to use it on the printer or remote PlanetPress Workflowserver.
3. Click OK.
Associate Documents and PlanetPress Printer QueuesOne of the basic information stored in a PlanetPress Workflow printer queue is the list of documentsassociated with the printer queue. Also stored in the printer queue are the properties of each document

associated with the queue.
To assign documents to PlanetPress Workflow printer queues:
1. In the Documents group of the Configuration Components pane, select either a single document ora group of documents.
2. Drag the selected documents over a PlanetPress Workflow printer queue. The selected document orthe group of documents is associated with the printer queue. Each document keeps its defaultproperties.
To break the association between a document and a given printer queue:
l Select the document as displayed under the printer queue in question and press Delete.
To break the association between a document and multiple printer queues:
1. Select the document as displayed under one of the printer queues in question and from the right-clickmenu choose Delete Instances.The Delete Document Instances dialog box appears.
2. In the Printer Queue list, select all those printer queues for which you want the printer queue—document association to be broken.
3. Click OK.
To modify the settings of a document assigned to a printer queue:
The settings available in this window are the same as the Printer Settings dialog of a document propertiesin the Documents list of the Configuration Components Area, but they are specifically for this document onthis printer queue. See " View Document Properties" on page 579 for more details.
l Double-click on the document located within a printer queue. The Document Properties dialogappears.
Using the Clipboard and Drag & DropMoving configuration components in the Configuration Components pane is very easy and can either bedone with the mouse (drag & drop), the Ribbon menus (clipboard buttons) or the keyboard (clipboard
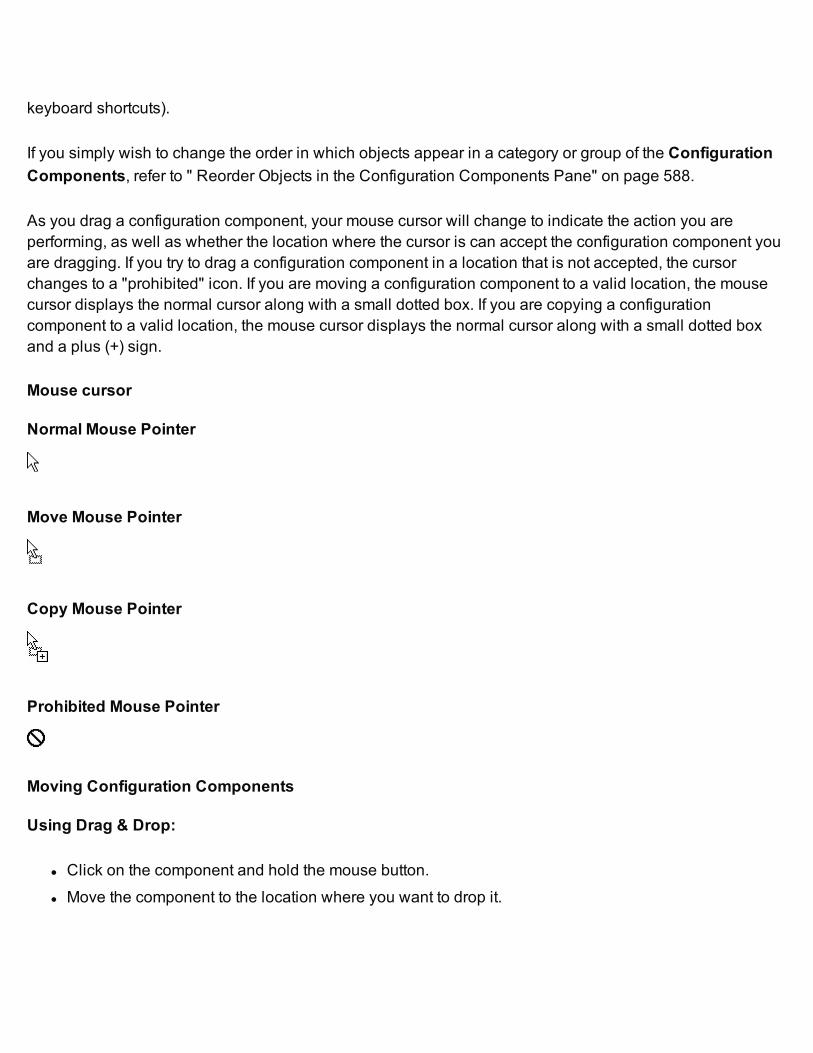
keyboard shortcuts).
If you simply wish to change the order in which objects appear in a category or group of the ConfigurationComponents, refer to " Reorder Objects in the Configuration Components Pane" on page 588.
As you drag a configuration component, your mouse cursor will change to indicate the action you areperforming, as well as whether the location where the cursor is can accept the configuration component youare dragging. If you try to drag a configuration component in a location that is not accepted, the cursorchanges to a "prohibited" icon. If you are moving a configuration component to a valid location, the mousecursor displays the normal cursor along with a small dotted box. If you are copying a configurationcomponent to a valid location, the mouse cursor displays the normal cursor along with a small dotted boxand a plus (+) sign.
Mouse cursor
Normal Mouse Pointer
Move Mouse Pointer
Copy Mouse Pointer
Prohibited Mouse Pointer
Moving Configuration Components
Using Drag & Drop:
l Click on the component and hold the mouse button.l Move the component to the location where you want to drop it.

l Let go of the mouse button.
Using the clipboard buttons:
l Click on the component you want to move.l Go to the Home tab of the ribbon.l Click the Cut button in the Clipboard group.l Click on the new location where you want the component.l Click the Paste button in the Clipboard group.
Using the mouse contextual menu:
l Right-click on the component you want to move.l Click on Cut in the contextual menu.l Right-click on the new location where you want the component.l Click on Cut in the contextual menu.
Using the keyboard shortcuts:
l Click on the component you want to move.l Do CTRL+X (cut) on your keyboard.l Click on the new location where you want the component.l Do CTRL+V (paste) on your keyboard.
Copying components
You can make a copy of any component in the Configuration Components pane, with the only exceptionbeing Documents (of which you can only have one copy). Copying components is done using the samemethods as moving them, with the following differences:
l To move components using the clipboard buttons and contextual menu, replace "Cut" by "Copy".Otherwise the methods are the same.
l To move components using the keyboard shortcuts, replace "CTRL+X" by "CTRL+C". Otherwise themethod is the same.

Moving and Copying Details:
l When moving configuration components, a horizontal line appears where the component will bedropped if the location is valid. At the end of this line will be small "dents". If these dents are on top ofthe line, the component will be placed at the same level (group) as the component before it. If the dentsare at the bottom, the component will be placed at the same level (group) as the component after it.
l If you move an object in the Configuration Components pane on top of a group, the group nameturns maroon (in the default color scheme) to indicate the object will be moved in the group after all theexisting objects currently in that group.
l Moving a configuration component does not change the order in which the components are used.However they can affect your process if, for example, you move a local variable from one process toanother and the local variable is still used in the first process.
l You can also copy multiple components by selecting more than one then using the methods describedabove. However, you can only select multiple components from within the same folder. You cannot, forexample, select a subprocess along with a Process and move them together. Also, you cannot selectmultiple components if they are not in the same group or if one is in a group and the other is not.
l You can also copy and move groups that have been created in the Configuration Componentspane.
l Dropping documents onto printer queues does not move the documents, but rather assigns them tothese queues (see "PlanetPress Workflow Printer Queues" on page 60).
Rename Objects in the Configuration Components PaneYou can rename processes, groups, and printer queues in the Configuration Components pane.PlanetPress Design Documents (ptk/ptz files) are different and cannot be renamed or modified usingPlanetPress Workflow. You can, on the other hand, change the name of printer-resident documents.
Note
Names cannot begin with a number. They can only contain the following ASCII characters: underscore, upperand lower case letters of the alphabet, all digits 0 through 9. If you enter an invalid name, you will be prompted tocorrect it (unless if the corresponding option has been turned off).

To rename a process, printer queue or group in the Configuration Components pane:
1. In the Configuration Components pane, right-click the name of an object or group and chooseRename from the pop-up menu. The name of the object or group is highlighted and ready to be edited.
2. Type the new name over the existing name and press ENTER. PlanetPress Workflow Configurationrenames the object or group.
To rename a resident document:
1. In the Documents section of the Configuration Components pane, double-click a printer-residentdocument.The PlanetPress Design Document Options dialog box is opened.
2. In the Document name box, enter the new document name and click OK. PlanetPress WorkflowTools rename the resident document.
Reorder Objects in the Configuration Components PaneThere are multiple ways you can reorder objects in the Configuration Components pane. Commandsavailable from the right-click menu let you reorder selected objects, as well as alphabetically reorder objectslisted directly under a category or appearing within a group. You can also use the clipboard controls anddrag & drop methods described in " Using the Clipboard and Drag & Drop" on page 584 to copy and moveobjects and tasks.
To reorder selected objects in the Configuration Components pane:
1. Click an object or group.2. In the PlanetPress Workflow ribbon, go to the View tab then click Order in the Arrange group, then
select one of the following:
l Up One Level to move the item one level up in the hierarchy. If the item is already the top objectin the category, or within a group, this command has no effect.
l Down One Level to move the item one level down in the hierarchy. If the item is already thebottom object in the category, or within a group, this command has no effect.
l To Top Level to move the item to the top level in the hierarchy. This moves the item to the top ofthe category or to the top of the group. If the item is already the top object in the category, or

within a group, this command has no effect.l To Bottom Level to move the item to the bottom level in the hierarchy.
To alphabetically reorder objects in the Configuration Components pane:
l Click the either a category (Processes, Global Variables, Documents, or Printer Queues) or a groupl In the PlanetPress Workflow ribbon, go to the View tab.l In the Arrange group, select Sort by Name.
Grouping Configuration ComponentsGroups help you organize processes, documents, and printer queues. For example, you may create theInvoices, Checks and Reports groups in the Processes section and associate individual processes witheach one of these groups.
You group items only within their own category. Thus you can only group processes with other processes,documents with other documents, and printer queues with other printer queues. In the documents category,you can only group documents with others of the same version and type. For example, you can only groupdocuments from PlanetPress Design (files with a PTK extension) with other PTK files, not with printer-resident documents.
You can also use groups to quickly assign multiple documents to multiple printer queues. By dragging agroup of documents to a printer queue, you assign all the documents in the group to that queue.
To add a group in the Configuration Components pane:
l In the Configuration Components pane, click a category and choose View | Arrange | Group. Anew group is added at the end of the category.
To add objects to an existing group:
l Drag-and-drop the objects onto the group. The objects are added as the last objects in the group.

To remove objects from a group:
l Drag-and-drop the objects out of the group. The objects are removed from the group. If the groupbecomes empty, you are prompted to confirm the deletion of the group.
To add selected objects to a new group:
1. Select multiple objects that are not part of a group. Press CTRL+G. A new group is added and theselected items are moved to that new group.
To ungroup selected objects:
1. Select objects in a group.2. Press CTRL+U.
Expand and Collapse Categories and Groups in the ConfigurationComponents PaneYou can expand and collapse the Processes, Global Variables, Documents and Printers Queuescategories, and groups, in the Configuration Components pane.
To expand or collapse categories or groups in the Configuration Components pane:
l Click the Expand / Collapse button to the left of the item.
Delete Objects and Groups from the Configuration ComponentsPaneTo delete a process, document, or printer queue:
l Click a process, document, or printer queue, then press DELETE.
In the case of processes and printer queues, the object is deleted. If there is only one process in theconfiguration, you cannot delete it; there must be at least one process in the configuration. If you delete thelast configured process, a process with two unknown tasks remains.

In the case of documents, you are first prompted to confirm the deletion. You can turn off this prompt in theNotification Messages User Options.
To delete a group of processes, documents, or printer queues:
l Click a process group, documents group, or printer queue group, then press the DELETE key.
In the case of process groups and printer queue groups, the group and all its members are deleted. In thecase of documents, you are first prompted to confirm the deletion of each member of the group. You can turnoff this prompt in the Notification Messages User Options.
Other DialogsThese dialogs are either accessible from the preferences or from different parts of PlanetPress Workflow.
Activate Your PrintersThe Activate a Printer dialog lists the existing activated printers on the system and lets you add newactivations.
Note
Printer activations are normally given to you by the activations department electronically, including afile that will automatically add all your printers in this dialog.
To display the Activate a Printer dialog, click the button from the Help menu.

The printer list displays the following information
l License Number: Reference number of the activation, linked to your customer account.l Magic Number: The magic number generated by the printer. If the magic number is incorrect, yourjobs will output with a watermark on that printer.
l Activation Code: The activation code generated by your license number and magic number. If theactivation code is incorrect, your jobs will output with a watermark on that printer.
l Printer Name (Optional): Name and/or model of the printer.l Comments (Optional): Comments about the printer.
The following buttons are available in this dialog:
l Add: Brings up the Printer Activation dialog. This dialog lets you enter the information for the printer(see previous section), then click OK to save the new activation.
l Delete: Removes the currently selected activation from the list.l Web Activation: Click to access the online activation manager on our website.l OK: Save changes and exit.l Cancel: Exit without saving changes.
You can also double-click on any existing activation to edit it.
Workflow ServicesTo be able to run and to have access to local files as well as to files available on other computers in yournetwork, PlanetPress Workflow applications and services must identify themselves using a local or networkaccount.
The first time you start the PlanetPress Workflow Configuration program, the application automatically asksyou to choose an account (see procedure below).
You can also manually start this procedure from the PlanetPress Workflow Tools by following thisprocedure:

1. Click on the Tools tab in PlanetPress Workflow Ribbon, then click Configure Services.2. Set the PlanetPress Workflow applications permissions as required:
l Local System account: Select to run all the PlanetPress Workflow Services (includingPlanetPress Workflow, PlanetPress Fax, and PlanetPress Image) under the Local Systemaccount. The Local System account is distinct from the Administrator account. It requires no username or password, and its privileges may exceed those of the user currently logged in. Runningunder this account rather than a user account prevents problems that may arise if the user lacksa permission the service requires. If a configuration relies on any resources mapped to aparticular user, such as mapped network drives or shared printers, they are unavailable. It isrecommended that you create a configuration for a particular user. Clear the Local Systemaccount checkbox to run all the PlanetPress Workflow Services under the account you specify.Use the options that become available when you clear Local System account to enter theaccount information—you must enter a valid user name and password to use Microsoft Outlookas your email client for Email input and Send email output tasks.
l Display network domains and user names: Select to have PlanetPress WorkflowConfiguration search for existing domains and display the domains it find in the Domain box, andthe user names in those domains in the Username box. Although this is useful if you do not knowthe domain name and user name of the account you want to specify, it can also be very time-consuming if there are many domains.
l Domain: Select the domain in which the user account resides, or enter the name of the domainmanually.
l Username: Enter the name of the user account.l Password: Enter the password for the user account you specified in the user name box.l Confirm password: Enter the password you entered in the Password box.l Services start automatically: Select to start the required PlanetPress Workflow automatically.
3. Click OK.
PlanetPress Workflow applies the user account information to all the services (PlanetPress Workflow,PlanetPress Fax, PlanetPress Image, LPD input, Serial input, Telnet input, FTP output, LPR output), that runon this computer (with the exception of PlanetPress Messenger, which always runs under the Local Systemaccount).
The PlanetPress Workflow Configuration program does not test user names and passwords, but merelyassociates them with the services that require them. If you enter a bad user name or password, theseservices will be denied access to the selected account.
The account you choose will be used by PlanetPress Workflow and all its services, as well as byPlanetPress Fax and PlanetPress Image (only PlanetPress Messenger is not affected, since it always usesthe Local System account). If you install PlanetPress Fax or PlanetPress Image on the same computer afterperforming this procedure, you will have to perform it once again, so as to choose the same account for allthe installed applications.
Process PropertiesTo have access to the properties of a process or subprocess:
l Right-Click on the Process in the Configuration Components Area.l Select Properties.
You can also double-click on the process to show its options.
Note
Subprocesses do not have the "General Tab" which is only used for scheduling, but they do have theInformation Tab.
Options
General tab
l Active: Select to make the process active. Clear to prevent this process from running when you sendthe configuration to PlanetPress Workflow.
l Startup process: Select to make this process a startup process.l Self-Replicating Process: Check this if you want the process to replicate itself in the backgroundwhen multiple input files are received simultaneously. When this is checked, the input task polls itssource once, determines the number of files to process, then replicates itself up to the maximumallowed and treats the files simultaneously. The initial process runs again once it has completed itselfand replicates again as necessary, until all files have been processed.
l Max percentage of threading (%): Determines how many processes you may have running at thesame time. This is a percentage of the maximum number of threads specified in the "Messenger Plug-In Preferences" on page 642. For example if the maximum number of thread is 10 and you specify50% here, a maximum of 5 replications will occur (the original process + 4 copies).

l As soon as possible: Select to have the process run continuously. Clear to enable the Time Grid tofine-tune the schedule of the process.
l Day(s) to keep backup: Indicate the number of days to keep backups of jobs processed by inputtasks. Note that backups will only be kept for those input tasks that have the Keep backup file optionselected and that they are required to resubmit input files.
l Polling interval: Enter the frequency (in seconds) at which the process should verify if there are newjobs to process. The polling interval also applies to scheduled tasks that only run on certain times. Forexample, if your process polls every 30 seconds on a task that's only scheduled to run one hour perweek, it will capture the input 120 times during that period. Note that the polling interval is ignoredwhen multiple files are present in the input and will be used only when there are no longer any files toprocess.
l Month: Select the month of the year when the process should be run or select All months to have theprocess run all year long. This option is disabled when "As soon as possible" is checked.
l Week of month / by date: Select the desired option for the time grid. Note that any selection you makein this box will be interpreted based on the selection made in the Month box. If you chose All months inthe Month box and Last in the Week of month / by date box, then the process will run on the last weekof every month. If you chose January in the Month box and First in the Week of month / by date box,then the process will run only on the first week of January.
l Select Date to display dates on the grid’s top ruler.l Select any of the other options to display days on the top ruler.l Select All weeks to have the process run every week.l Select First, Second, Third or Fourth to have the process run on the first, second, third or fourthweek.
l Select Last to have the process run only on the last week.
l Time division: Select the duration of each daily segment in the time grid. If you select 00:15, eachsegment will represent only 15 minutes and each day will be made up of 96 blocks (4 blocks per hourtimes 24 hours). If you select 24:00, each segment will represent an entire day.
l Poll once per activity period: Select to perform this process’ initial input task no more than once foreach set of contiguous blocks (blocks that are on the top of one another). Choosing this optionoverrides the polling interval option. By default since the Time Grid blocks are divided by hours, thisoption will make your polling happen once every hour.
The Time Grid
The PlanetPress Workflow Process Options dialog box includes a time grid that lets you set exactly whenyou want a process to run. The grid is composed of blocks that represent time periods on a given day. To

activate the Time Grid, the "As soon as possible" option must be unchecked.
In the Time Grid, a blue block will indicate that the process is active within that time block. While blocksmean the process will not be active.
l Click on any block to select / deselect it.l Click and drag from one block to another to toggle all blocks between the two.l Shift-click on any block to toggle all blocks from the top-left corner of the grid to the block you click.l To select all of the time segments for a given day or date, click the day or date on the top grid ruler. Todeselect all of the time segments for a given day or date, CTRL+click the day or date on the top gridruler.
l To select all the days or dates for a given time segment, click the time segment on the left grid ruler. Todeselect all the days or dates for a given time segment, CTRL+click the time segment on the left gridruler.
l To select the entire grid, use the Select All button located below the grid. To deselect the entire grid,use the Clear All button located below the grid.
Note
"Toggle" means turn on when it's off and vice-versa, when selecting multiple blocks in one command.This means if you select a certain number of blocks in the Time Grid and then use the shift+click ordrag method, blocks that are on will turn off.
Technical
Changes made to the system time can have adverse effects on the processes managed byPlanetPress Workflow. When changing from daylight saving time to standard time, for example, ifPlanetPress Workflow starts a given process at 2:00 AM, and if the system time is then taken back to1:00AM, the application will start a new instance of the same process when the system time reaches2:00 AM for a second time. So, when you manually change the system time, be aware that it may havean effect on PlanetPress Workflow and its processes. And for those cases when you know the systemtime will change automatically, you may consider creating special schedules.
Information Tab
The Information tab lets you enter information that is not critical to your process but may help others (oryourself in the future) to understand what the process does. It offers two boxes:

l Description: A one-line box to give a title or short description to your process.l Comments: A multi-line box to give more detailed information, for example the file format expected,explanation of the system in general.
Advanced SQL Statement DialogThe Advanced SQL Statement dialog is available by clicking the Edit SQL button from the DatabaseQuery action task. You can enter a custom SQL query in this dialog, using the language supported by thedatabase you select in the Database Query action task.
The dialog is separated in two parts:
l The left part displays the available tables in your database. Click the Show Tables button to displaythem.
l The right part displays a default SQL statement which you can modify at your leisure.l The bottom part displays the following options:
l Alternate syntax: Select to prevent automatically enclosing the names of any database tablesand fields that appear in the SQL query in square brackets when it exits the Advanced SQLStatement dialog box. The alternate syntax may be required for some database types.
l Client-side Cursor: When this option is enabled, the complete result set is downloaded beforeprocessing starts, and changing records is done by PlanetPress. This is generally faster forqueries returning a small number of results ; otherwise the start of the record processing can bedelayed since the whole record set must be downloaded.
Note
MySQL, using ODBC 5.0, must be set to use a client-side cursor.Microsoft Access will always work better when using a Server-Side cursor.
l Expect record set: Check if you are expecting a result from the database after executing theSQL query. If the query is expecting a record set in return and does not return one, the task willtrigger an error.
l Test SQL button: Verify the SQL statement's validity.

Access ManagerThe Access Manager controls what rights are granted to other machines (clients and servers) on the samenetwork. It grants access to functions such as sending documents and jobs to the server.
Technical
Messenger communications (between different part of the PlanetPress Workflow) is limited to withinthe same Class C subnet. This means that PlanetPress Workflow on 192.168.1.23 cannot send a jobto a PlanetPress Image on 192.168.100.54. This limitation has been removed in PlanetPressWorkflow 7.3 and higher.
To open the Access Manager
1. Open PlanetPress Design.2. In the Ribbon, go in Tools | Managers | Access Manager.
The Access Manager dialog box is displayed. It lists all IP and IP ranges that have PlanetPress Design,PlanetPress Workflow, PlanetPress Fax or PlanetPress Image installed in the same network.


To manually add a new entry in the list
l Open the Access Managerl Make sure you are in the Messenger tab.l In the IP address box, enter the IP address of the remote machine.l Click on the button.
l Add the necessary permissionsl Click OKl Restart the Messenger service.

Technical
The format of the IP address must be one of the following:
l 127.0.0.1: The local computer. Typically this IP should have all the accesses checked.l 255.255.255.255: Everyone on the same subnet. This is equivalent to hard-coding the currentsubnet, such as 192.168.1.255 or 10.0.0.255.
l 192.168.0.42 : A single IP address. This can be any valid address on the same subnet.l 10.0.255.255: Any IP in the 10.0.X.X range.
To automatically detect machines on the network and add them
1. Make sure the machine you want to detect is turned on and the Messenger service is started2. Click on the Refresh button under the list3. Add the necessary permissions to the detected machines4. Click OK5. Restart the Messenger service.
To remove an entry in the list
1. Remove all checkmarks from the entry2. Click OK3. Restart the Messenger service
Warning
The following considerations are to be understood when using the Access Manager to configureIP limitations:
l Each permission type (column) is evaluated from top to bottom (column per column) in the orderthey are visible in the Access Manager window. This means that wide ranges should always beat the top to increase performance. For example, if you accept HTTP connections from any IP,

the first entry should be 255.255.255.255 with the Allow checkmark in the HTTP Input box.PlanetPress does not continue processing after it has found an "Allow" checkmark. There is noconcept of "Deny", meaning if any "Allow" permission is given, there is no way to later remove itfor certain IPs or IP ranges.
l The configuration of the Access Manager is saved in a file on the hard drive which can be editedmanually. See Access Manager hosts.allow File.
l HTTP, FTP and SOAP communication is not limited to the local subnet on any version wherethese plugins appear.
l Any change to the Access Manager requires a restart of the Messenger server which can bedone in The PlanetPress Workflow Service Console.
To modify permissions
Permissions are given simply by adding and removing options in the permission grid. Access to the servicesinstalled on this computer is granted or denied by checking the corresponding boxes next to the listed IPranges. For each IP range, the following information is displayed:
l Host name: The name of those computers on which PlanetPress Workflow software are currentlyinstalled or which have been manually added.
l IP address: The IP address or IP address range to give permission to.l Permissions
l HTTP Input: Grants access to send HTTP Requests to this server.
l LPD Input: Grants access to send LPD Queue jobs to this server.
l Send Job: Grants access to the selected computer or server to send jobs to PlanetPress Faxand PlanetPress Image installed on this server.
l Send Document: Grants access to the remote computer to send new or updated PlanetPressDesign Documents to this server.
l Send Config:Grants access to the remote computer to overwrite the configuration on the localPlanetPress Workflow service

Note
In order for the changes made here to be effective, you will need to restart the PlanetPress Messengerservice. This can be done via the PlanetPress Workflow Service Console.
SOAP Access
The SOAP tab of the Access Manager controls access from SOAP clients to local processes andSOAP processes. Each user name entered in this dialog can have access to one or more processes.

To add a new SOAP user
1. Click on the button.
2. Enter the following information under the Username column for the new entry that was created:
l User name: An alphanumerical user name for the user.l Password: A password to protect the user. Note that the password will always revert to ******** (8stars) when clicking outside of this box - that is normal and is meant to protect the length of thepassword as much as its contents.
l Administrator: Choose the permission typel User: Can access none, some, or all of the processes, selected individually in thePermissions section.
l Admin: Has access to all processes and features. When this option is selected, thePermissions section is grayed out an all options are selected in it.
l Disabled: Has access to nothing. The result is the same as not having this user defined atall, but has the advantage that a disabled user can be reactivated with a simple click.
3. Define the permissions for the user (see below).4. Click OK to save the changes.
To define or change the permissions for a SOAP User
The Permissions section of the SOAP tab displays all of the processes that are available in the liveconfiguration (the one that the PlanetPress service uses). To change or define the permissions:
1. In the top Username section, click on the user name of which to modify permissions.2. Place a checkmark in each process that the user should have access to.3. Check Monitoring(read) to give permission to the GetProcessList and GetProcessTaskList actions for
SOAP.4. Monitoring(write) is currently not implemented.5. Click OK to save the changes.
Note
In order for the changes made here to be effective, you will need to restart the PlanetPress Messenger

service. This can be done via the PlanetPress Workflow Service Console.
PDF ViewerThe PDF Viewer, introduced in PlanetPress Tools 7.3 in some areas and expanded for use throughout theconfiguration tool, displays any PDF used in the configuration or process. Because this PDF viewer isintegrated with the suite, it is not necessary to have any third-party tools such as Adobe Acrobat installed onthe operating system.
Technical
The PDF Viewer is not currently standalone and cannot be used to display PDFs outside ofPlanetPress Workflow.
The PDF Viewer

To open the PDF Viewer: In the Documents section of the Configuration Components pane, expand adocument present in the list. Then, right-click on the document's Preview, and click Open in PDF Viewer.
The PDF Viewer is accessible through one of the following methods:
l In the Documents section of the Configuration Components pane, expand a document present inthe list. Then, right-click on the document's Preview, and click Open in PDF Viewer.
l Click View as PDF in the Debug toolbar. This will show the current data file in the viewer (assuming itis a PDF). If the viewer is opened during debugging, the current state of the PDF will be displayed(instead of the original data file).
l In the PlanetPress Capture Document Manager dialog, select at least one document from thedatabase and click on View Documents.
The top area of the PDF Viewer displays the PDF, while the bottom area contains a few controls:
l Open: Click to browse for a PDF to open in the PDF Viewer. Note that this will not change the data fileused in the process.
l Save: Click to browse for a location and name to save the currently active PDF in the viewer.l Right Arrow: Click to view the next page of the PDF.l Left Arrow: Click to view the previous page of the PDF.l Page Selection: Type a page number and hit Enter on your keyboard to jump to that page.l Zoom: Click to view a drop-down list of pre-set zoom percentage, or automatic zoom fit options. Or,type in a zoom percentage and hig Enter on your keyboard to set the zoom level. Note that you canalso use CTRL+Scroll Wheel (on your mouse) to zoom in and out, SHIFT+Scroll Wheel to scroll leftand right, and Scroll Wheel to scroll up and down.
The PlanetPress Workflow Service ConsoleThe PlanetPress Workflow Services Console lets you view the logging information generated byPlanetPress Workflow as well as the services used by PlanetPress Workflow. When the number ofdisplayed messages reaches 2000, the first 1000 are removed from the display (this has no effect on theactual log files).
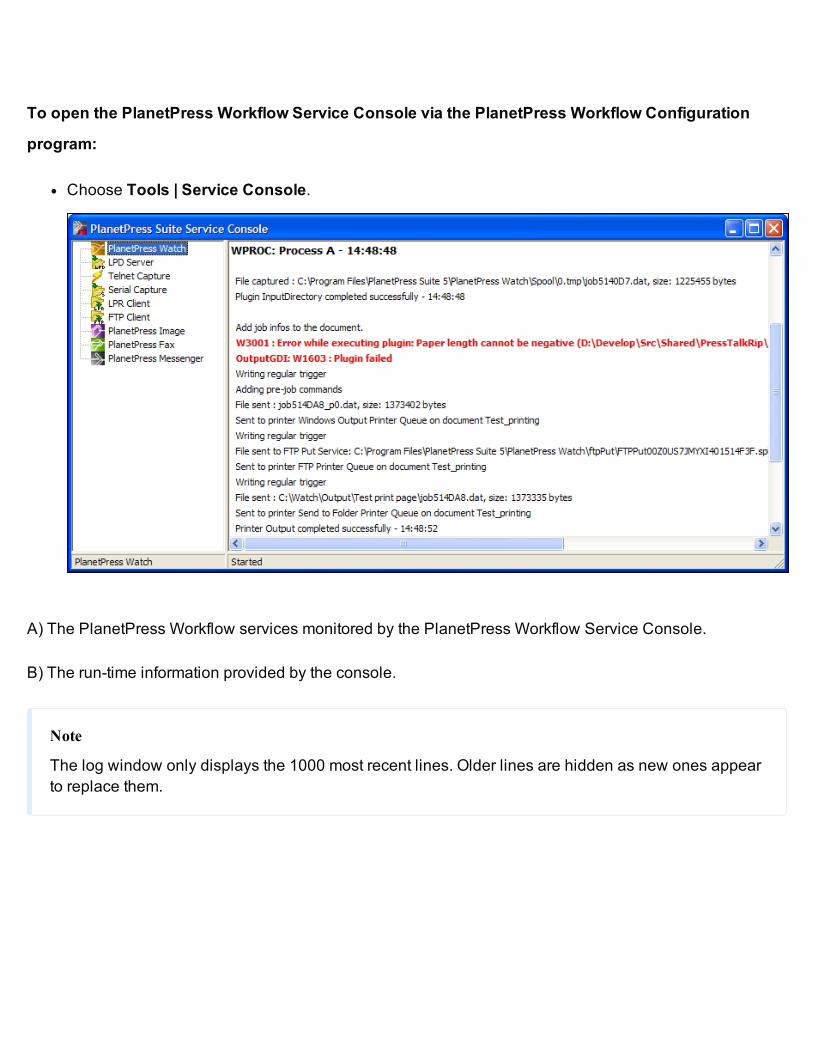
To open the PlanetPress Workflow Service Console via the PlanetPress Workflow Configuration
program:
l Choose Tools | Service Console.
A) The PlanetPress Workflow services monitored by the PlanetPress Workflow Service Console.
B) The run-time information provided by the console.
Note
The log window only displays the 1000 most recent lines. Older lines are hidden as new ones appearto replace them.

To view the log messages generated by a service:
l Click the service in question in Services pane, on the left hand side.A line appears to separate each log, and information from the newly selected service is displayed.
To clear the Messages area of the PlanetPress Workflow Service Console:
l Click in the Messages area of the Service Console, and from the right-click menu choose Clear.
To save the information from the Messages area of the PlanetPress Workflow Service Console:
1. Click in the Messages area of the Service Console, and from the right-click menu choose Save to file.The Save As dialog box appears.
2. Navigate to a location, enter a file name, then click OK. The complete content of the Messages area issaved.
The PlanetPress Workflow Service ConsoleThe PlanetPress Workflow Services Console lets you view the logging information generated byPlanetPress Workflow as well as the services used by PlanetPress Workflow. When the number ofdisplayed messages reaches 2000, the first 1000 are removed from the display (this has no effect on theactual log files).

To open the PlanetPress Workflow Service Console via the PlanetPress Workflow Configuration
program:
l Choose Tools | Service Console.
A) The PlanetPress Workflow services monitored by the PlanetPress Workflow Service Console.
B) The run-time information provided by the console.
Note
The log window only displays the 1000 most recent lines. Older lines are hidden as new ones appearto replace them.
To view the log messages generated by a service:
l Click the service in question in Services pane, on the left hand side.A line appears to separate each log, and information from the newly selected service is displayed.
To clear the Messages area of the PlanetPress Workflow Service Console:
l Click in the Messages area of the Service Console, and from the right-click menu choose Clear.
To save the information from the Messages area of the PlanetPress Workflow Service Console:
1. Click in the Messages area of the Service Console, and from the right-click menu choose Save to file.The Save As dialog box appears.
2. Navigate to a location, enter a file name, then click OK. The complete content of the Messages area issaved.
Update documentThe Update Document dialog lets you update your PlanetPress Design documents on your printers wherethose documents are used in Printer-Centric mode. It displays the following information in the list of installedprinter documents:
l Printer Queue: Displays in which printer queue the document is presentl Printer Group: If available, displays in which printer group the document is located.l Document: Displays the name of the documentl Location: Displays the location (printer or workflow) of the document
Select any document in the list (use CTRL+Click or SHIFT+Click to select multiple document or use theSelect All button) and click OK to update these documents.
To add any document to this list, you need to assign them to a printer queue. See " Associate Documentsand PlanetPress Printer Queues" on page 583.

Data Repository ManagerThe Data Repository Manager is an interface that managers the PlanetPress Workflow data repository. Thisfeature, introduced in version 8.5, is a persistent data store used to save any sort of textual data in a tableformat.
FeatureName
Database TerminologyEquivalent
Description
Group Table A Group is defined by its Keys (columns), and maycontain 0 or more KeySets (rows) within it.
Key Column/Field A Key is defined only by its name. DataRepositories only support STRING values and anydata inserted into it is converted to stringautomatically. The maximum size of a single key is1 billion bytes.
KeySet Row/Record A group may contain as many KeySets (rows),which contain variable data, and is inserted usingthe "Push to Repository" on page 295 task.
Lookup Query A method of retrieving one or more KeySets from agroup in the data repository.
Accessing the Data Repository Manager
To access the Data Repository Manager:
l Open PlanetPress Workflowl Go to the Tools tab.l Click the Data Repository Manager button in the Managers group.
Warning
Any change made within the Date Repository Manager is Immediate, and Irreversible. Deleting datafrom this interface may impact running processes if such processes access the data saved in therepository. This includes clearing a group, or clearing the repository.
Toolbar Buttons
l Group sectionl Add Group: Click to create a new group. Enter the group name and click OK.l Delete Group: Click to delete the currently selected group.Warning: This action cannot beundone.
l Key sectionl Add Key: Click to add a key to the currently selected group. Enter a key name and click OK. Ifadding a key to a group with existing data, the key will be empty for all existing KeyGroups.
l Delete Key: Click to remove the currently selected key in the group. This will remove the key andall the data for this key in each existing KeySet.Warning: This action cannot be undone.
l KeySet sectionl Add KeySet: Click to add a new KeySet to the currently selected group. Displays a dialog withall the Keys in the group, asking for a value for each of the keys. Enter the values then click OK.The KeySet will display in the right part of the repository manager.
l Delete KeySet: Click to delete the currently selected KeySet in the Group.Warning: Thisaction cannot be undone.
l Update sectionl Edit KeySet: Click to edit the currently selected KeySet. Opens a dialog which each key andtheir value, which can be edited. Double-clicking a row has the same effect as clicking the EditKeySet button.
l Refresh: Click to load any changes made to the repository since it was last opened or refreshed.l Management section
l Check Repository: Click to verify the integrity of the database, as well as reclaim any diskspace from
l Clear Group Data: Click to delete all the KeySets in the currently selected group, leaving thekey definitions intact.Warning: This action cannot be undone.
l Clear All Data: Click to delete every KeySet of every group in the Repository.Warning: Thisaction deletes all your data and cannot be undone.
l Clear Repository: Click to delete every group in the repository, including all their data.Warning: This action deletes all your data and cannot be undone.
l Show/Hide System Keys: Click to show or hide the ID, DateC and DateM keys which are systemkeys used by the repository function.
Repository Structure Pane
This section of the Data Repository display a tree view of all groups in the data repository as well as all thekeys under each of those groups.
Group KeySets Pane
This section of the Data Repository displays the current KeySets in the group. Each horizontal row is aKeySet, and each vertical row is a key defined in the group.
l To edit a KeySet, double-click on it.l To delete a KeySet, press the Del key.l To add a new KeySet, press CTRL+N.
Navigating with the Keyboard
Though of course the mouse is the easiest way to navigate through the Data Repository, the keyboard canbe used also.
l Press Tab to switch between the Repository Structure,Group Key Sets, Lookup Function Syntaxand the Close and Help buttons.
l Press CTRL+N to add a new item:
l If a group is selected, will create a new group.l If a key is selected, will create a new key within the selected group.l If in the Group Key Sets, will create a new keyset.
l Press F2 to rename a group or a keyl Press Delete to remove Group or Key from the Repository, or a KeySet.

Tip
You can look up those shortcuts by right-clicking the item you want to interact with, and looking at thecontextual menu.
Virtual Drive ManagerWhen you use the Send images to printer action in a given process, you have the option of, at the sametime, sending the images to the virtual drive (a local storage folder used by PlanetPress Workflowapplications) of any computer included in your network. You need to do this, for instance, if you plan to rundocuments that contain dynamic images on those computers (using the Optimized PostScript Streamoption). You can then use the Virtual Drive Manager to see the images that were downloaded to yourcomputer as well as to delete them from your virtual drive.
To add images to the virtual drive, use either of the following methods:
l Send a single resource file to the printer: see "Download to Printer" on page 283.l Send one or more images to the printer: see "Send Images to Printer" on page 306.l Use PlanetPress Design: see the PlanetPress Design User Guide.
To delete images from your virtual drive:
1. In the PlanetPress Workflow Ribbon, Go to the Tools tab, then click on Virtual Drive Manager.The Virtual Drive Manager dialog box is displayed. It lists all the images currently stored in yourcomputer’s virtual drive.
2. Select the images you want to delete.3. Press the Delete key.
The Debug Information PaneThe Debug Information pane displays the current values of variables and other information useful indebugging processes (see "Debugging and Error Handling" on page 46). It is divided in 4 sections:

l Job Information: Displays the Job Info variables, as well as the job's file name, size, last edit dateand presence of metadata (see "Job Info Variables" on page 536).
l Local Variables: Displays all the variables local to this process (see "Manipulate Local Variables" onpage 573).
l Global Variables: Displays all the variables global to this configuration (see "Manipulate LocalVariables" on page 573).
l Evaluate Expression: Lets you enter a custom expression and displays its value at run-time.
You can use the Evaluate Expression section to see the result of any combination of variable properties(see Variable Properties). To add a new expression, simply right-click in the window and select AddExpression.
Click in the box on the left to edit the expression and add any variable properties or static text you want, andclick outside of the box to save it. Once saved, the Value column displays the expression's result.
The contextual (right-click) menu displays the following items when at least one expression is present:
l Copy Value (only when right-clicking an existing expression): Places the resulting value of theexpression in your clipboard.
l Revalue all: Refreshes the value of all the expressions.l Add Expression: Creates a new expression.l Delete Expression (only when right-clicking an existing expression): Remove the selectedexpression.
l Clear Expression List: Removes all expressions.
Warning
Deleting an expression or clearing the expression list cannot be undone!
The Message Area PaneThe Messages area is used in Debug mode to indicate the status of your PlanetPress Workflow process asthe sample data file is processed and used to generate output. When your PlanetPress Workflow runs in
Debug mode, the Messages area displays useful processing and error information.
Messages are displayed in different colors (debug levels) in the Message area.
l Messages in Red are critical and are normally critical errors in the plugin.l Messages in Orange are warnings.l Messages in Gray are job info and variable changes.l Messages in Black are debug information and processing information.
There are various actions you can execute in the Message area. Here they are:
l Click any line to select it.l While a line is selected, press Delete on your keyboard or right-click on the line and select Delete todelete the line.
l While a line is selected, press CTRL+X on your keyboard or right-click on the line and select Cut toplace the line in the clipboard.
l Press CTRL+C on your keyboard or right-click on the line and select Copy to place a copy of the linein the clipboard.
l Press CTRL+A on your keyboard or right-click on any line and select Select All to select all the linesin the Message Area.
l Right-click anywhere in the Message Area and select Clear Messages to clear the contents of theMessage Area.
l Right-click anywhere in the Message Area and select Save to File to display a dialog box that letsyou save a copy of the Message Area content to a text file.
The Message Area will only display information while running in Debug mode. It does not displayinformation from other running services, and will not display the log of any process running in a liveconfiguration (submitted to PlanetPress Workflow Service).
To learn more about debugging a process, refer to "Debugging and Error Handling" on page 46.

The Object Inspector PaneThe Object Inspector displays the properties of the object selected in the Configuration Components pane(not the Process Area, however). You can edit some of these properties directly from the Object Inspector,simply by clicking on the property.
To edit properties of processes, documents, and printers in the Object Inspector:
l In the Configuration Components pane, select a process, a document (either a document in theDocuments category or a document assigned to a printer queue) or a printer queue. The selectedobject’s properties appear in the Object Inspector.
l In the Object Inspector, click an editable property.l Depending on the values that can be entered for the selected property, edit the value by typing a oneor by selecting a new one from the drop-down list.
Note
If you select multiple objects in the Configuration Components window, some properties that areshared between those objects can be changed in the Object Inspector. Changing a property changesit for all the selected objects.
The Object Inspector also displays information about the Job File while it is being processed in Debugmode. Seeing how files change as they travel down a process can provide valuable debugging information.You can even change some of the job information from the Object Inspector (such as Job Infos) while indebugging.
Note
When you select a group (folder), no information is displayed in the Object Inspector, because what is reallyselected is the group heading and not the items included in the group.

The Plug-in BarPlanetPress Workflow offer a constantly increasing number of plugins, while always allowing third partyplug-ins to be installed and set up to be used by PlanetPress Workflow. The PlanetPress Workflow Plug-inBar lists the available plugin in any of PlanetPress Workflow, and is divided into categories, which userscan customize at will.
A "Plug-In" is normally something that is added to a software and, while most of the PlanetPress Plug-insare installed by default, some may be added so the term is correct. However, because the plug-ins arealways expected to execute some sort of task, they are always referred to, in this documentation, as "tasks",except in the specific case of importing a new plug-in or customizing the Plug-in bar.
Categories
The default categories lists plug-ins according to what type of task each achieve. Therefore, when firststarting your PlanetPress Workflow Configuration program, the following categories are used:
l Inputsl Actionsl Outputsl Data splittersl Metadata Relatedl Process logicl Connectors
Note
An Uncategorized category is dynamically created if your PlanetPress Workflow finds any plug-in that would notbe part of the existing Plug-in bar. User-defined plug-ins and third party application plug-ins falls into such acategory.

Settings & CustomizationThe Plug-in bar can be customized according to your needs and the plug-ins you most frequently used.
You can use the horizontal dark blue bar separating the plug-in area and the list of categories to changehow many plug-in categories are displayed as the full-width bar with the title, and how much are displayedas the icon only. Move the bar up to display more full-width categories, down to display them more as icons.
Furthermore, the Plug-in bar can be customized using the Popup indicator control ( ). Customizing the Plug-in bar is mostly for third party or legacy plug-ins.
Using the contextual menu displayed by the pop-up indicator, you can:
l Insert, delete and rename custom categories.l Move categories up or down.l Import third party or legacy plug-ins.l Move plug-ins from one custom category to another (that you cannot move default plug-ins from thedefault categories, you can only copy them)
l Copy plug-ins from one custom category to another by holding the CTRL key.l Delete plug-ins from any custom category by using the Delete key.l Revert to default Plug-in bar by selecting Reset to default.
To import a plugin:
1. Click on the Popup control ( )
2. Click on Import Plugin3. Browse to the location of the plugin DLL file4. Click on Open.5. New plugins appear in the Uncategorized category.
PreferencesPlanetPress Workflow Configuration program lets you configure a variety of options, from how theapplication itself looks or behaves, to plugin specific options.

Most of PlanetPress Workflow preferences are located in the PlanetPress Workflow Preferences window,accessible through the Preferences button in the PlanetPress Workflow button. Those preferences are:
l Appearance:
l "General Appearance Preferences" on the next pagel "Object Inspector Appearance Preferences" on page 624l "Configuration Components Pane Appearance Preferences" on page 624
l Behavior:
l "Default Configuration Behavior Preferences" on page 625l "Notification Messages Behavior Preferences" on page 626l "Sample Data Behavior Preferences" on page 628l "Network Behavior Preferences" on page 629l PlanetPress Capturel OL Connectl PDF Text Extractor
l Plug-in:
l "General Plug-In Preferences" on page 641l "Messenger Plug-In Preferences" on page 642l "HTTP Server Input 1 Plug-In Preferences" on page 642l HTTP Server Input 2l "LPD Input Plug-In Preferences" on page 646l "Serial Input Plug-In Preferences" on page 647l SMTP Inputl "Telnet Input Plug-In Preferences" on page 648l "PlanetPress Fax Plug-In Preferences" on page 649l "FTP Output Service User Options" on page 652l "PlanetPress Image User Options" on page 653l "LPR Output User Options" on page 656l "PrintShop Web Connect Service User Options" on page 657
Note
Preferences are saved automatically and applied immediately.
Other Preferences and Settingsl The PlanetPress Workflow Services dialog lets you select the account that PlanetPress WorkflowService uses to communicate on the server and the network. See "Workflow Services" on page 592.
l You can change the appearance of the Run Script and XSLT Editor through the Editor Optionsdialog.
General Appearance PreferencesRibbon Color Scheme
l Blue: Sets the general interface color scheme to a blue color.l Silver: Sets the general interface color scheme to a silver (gray) color.l Black: Sets the general interface color scheme to a black (coal) color.
Colors
l Variable properties: Select a color for the labels identifying variable property boxes.l Debug: Select the color applied to the PlanetPress Workflow Process area background when indebug mode.
l Highlighted tasks and branches: Select the background color for highlighted tasks and branches inthe Process Area’s invisible grid.
l Disabled tasks and branches: Select the background color for disabled tasks and branches in theProcess Area’s invisible grid.
Inactive process
l Color: Select the color to use to identify inactive processes in the Configuration Components pane.l Bold: Select to use a bold font to display inactive processes.

l Underline: Select to use an underlined font to display inactive processes.l Italic: Select to use an italic font to display inactive processes.l Strikethrough: Select to use a strikethrough font to display inactive processes.
Object Inspector Appearance PreferencesColors
l This window lets you set the color of individual Object Inspector elements. To change the color of agiven element, select it in the list box above and then choose a color from the drop-down list below.
Options
l Vertical line 3D: Select to display the vertical line between property names and their values using a 3-dimensional effect.
l Use groups: Select to organize the display of properties into groups. Clear the selection to displayproperties in alphabetical order. When the Object Inspector displays properties in groups, it displaysan expand/collapse button to the left of the name of the group for expanding or collapsing the group.
l Sunken active property: Select to use a recessed effect to display the currently selected property.l Border active property: Select to display a border around the currently selected property.l Show lines: Select to display lines between elements.l Line style: Select a style for the lines.l Reset to default button: Click to reset all the Object Inspector options to their default values.
Configuration Components Pane Appearance PreferencesColors
l This window lets you set the color of individual Configuration Components pane elements. Tochange the color of a given element, select it in the list box above and then choose a color from thedrop-down list below.

Options
l Line Style: Select the style (dotted or solid) of the line that connects the different objects in theConfiguration Components pane.
l Selection rectangle: Select whether your selection rectangle (used to select multiple objects bydragging a rectangle around multiple objects) will be displayed as a dotted line rectangle, or a blendedrectangle (normally a blue rectangle with darker blue border).
l Button Style: Select whether to show the expansion links as either an arrow (points right for a closedtree, down for an open tree) or a square (shows a minus symbol for an open tree, plus symbol for aclosed tree).
l Show Tree Lines: Check to choose whether or not to display the lines that connect the differentobjects in the Configuration Components pane.
l Show Grid Lines: Check to choose whether or not to display grid lines between each object in theConfiguration Components pane.
l Hot track: Check to choose whether or not to display the object in the Configuration Componentspane under the mouse cursor as being underlined.
l Reset To Defaults button: Click to reset all the Configuration Components pane appearanceoptions to their default values.
Default Configuration Behavior Preferencesl Use default configuration: Check to use default input and output tasks when you create a newprocess. If this group is not selected, each new process you will add will begin and end with unknowntasks.
l Default input task: Select an input task to use as the default input task when you add a new process.Click the Configure button located to the right of this box to set the properties of the selected inputtask.
l Default output task: Select an output task to use as the default output task when you add a newprocess. Click the Configure button located to the right of this box to set the properties of the selectedoutput task.
l Enable Undo/Redo functionality: Select this option to enable or disable the Undo functionality.Disabling the Undo/Redo functionality frees up a lot of memory and may thus speed up your system.The maximum number of steps performed is set in the box below.
l Auto Save every: Select to enable the Auto Save functionality. The auto save delay is set in the boxbelow (in minutes).

Notification Messages Behavior PreferencesNotification Messages behavior preferences control the display of certain messages and prompts withinPlanetPress Workflow.
Preferences
l User mismatch: Select to have PlanetPress Workflow display a prompt when a different user opensthe application.
l Task deletion: Select to prompt for confirmation when deleting a task.l Document deletion: Select to have PlanetPress Workflow prompt for confirmation when deleting adocument.
l Prompt on Document deletion when service is running:l Group of documents deletion: Select to have PlanetPress Workflow prompt for confirmation whendeleting a group of documents from the Configuration Components pane.
l Empty group deletion: Select to have PlanetPress Workflow prompt for confirmation to delete agroup when you remove the last of its member objects. If you clear this option, groups areautomatically deleted when their last members are removed.
l Invalid name: Select to have PlanetPress Workflow warn you when you try to rename an object in theConfiguration Components incorrectly. Names can include letters, numbers, and underscores; the firstcharacter of a name cannot be a number.
l Printer queues update: Select to have PlanetPress Workflow prompt you when adding a document toa group under the Documents category in the Configuration Components pane. You are onlyprompted if the group of documents is assigned to one or more printer queues. PlanetPress Workflowcan add the new document to all assigned groups under the Printer Queues category automatically.
l Configuration save with wrong user: Select to have PlanetPress Workflow prompt for confirmationwhen you are saving a configuration while logged onto the computer as a user other than the oneassociated with the PlanetPress Workflow service.
l Configuration save: Select to have PlanetPress Workflow prompt to save the current configurationwhen exiting the software or before opening another configuration file.
l Configuration send: Select to have PlanetPress Workflow prompt to send the current configuration torun in the PlanetPress Workflow service when exiting software or before opening anotherconfiguration file.

l Nothing to configure: Select to have PlanetPress Workflow notify you when you try to set propertiesfor a task that does not have any properties. For example, the Error Bin input has no propertiesbecause it only inputs jobs sent to it through On Error properties of tasks in other processes. When youattempt to edit its properties, it displays the "nothing to configure" message when this option isselected.
l No registry: Select to have PlanetPress Workflow notify you if it cannot find an install location in theregistry. In such cases, the path of the currently running software executable is used as the install path.
l PlanetPress Watch 3 documents and job commands transfer: Select to have PlanetPressWorkflow display a prompt when you import a configuration from PlanetPress Watch 3 that allows youto transfer documents and job commands.
l Plugin not found: Select to have PlanetPress Workflow display a prompt when you import aconfiguration, and one or more of the plugins used in the configuration are not found on the computerrunning the software.
l Prompt on configuration overwrite: Select to have PlanetPress Workflow prompt for confirmationwhen a configuration is about to overwrite a file with the same name.
l Prompt on no active process to send: Select to have PlanetPress Workflow prompt for confirmationwhen attempting to send a configuration although no processes are active.
l Prompt on overwrite of a document: Select to have PlanetPress Workflow prompt for confirmationwhen a document that is being imported using File | Import Document is about to overwrite an existingdocument.
l Prompt on Document overwrite when service is running: Select to have PlanetPress Workflowprompt for confirmation when a document that is being imported using File | Import Document is aboutto overwrite an existing document. The only difference between this option and the previous one is thatthis option will warn the user that the document about to be overwritten may currently be used by thePlanetPress Watch service.
l Prompt on Importing a non PlanetPress Document: Select to have PlanetPress Workflow promptfor confirmation when a document that is not a valid PlanetPress Connect document is about to beimported. This may occur if a non-PlanetPress Connect document will inadvertently have a PPX orPSI file extension.
l Prompt on Resetting Document Attributes: Select to have PlanetPress Workflow prompt forconfirmation when importing a hidden or read-only document using the File | Import documentcommand. By confirming the import, you allow PlanetPress Workflowto reset the document’s attributesto ’Visible’ and ’Read and Write’.
l Prompt on Document Instance Deletion:

l Prompt on Emulation Change: Select to have PlanetPress Workflow prompt when the defaultprocess emulation is being changed. The last emulation selected when debugging a process is theone the process begins with.
l Prompt on Form Refresh: Select to have PlanetPress Workflow prompt for confirmation whenrecompiling the PostScript (PSx) version of a PlanetPress Connect Document. RefreshingPlanetPress Connect Documents that are currently in use can lead to unexpected results.
l Prompt on Saving with Unknown Task: Select to have PlanetPress Workflow prompt forconfirmation when saving a configuration file or sending the configuration to the PlanetPress Watchservice, when any process contains Unknown Tasks. If an Unknown Task is present, such as when aprocess was created with a PlanetPress Workflow license that is not the same as the current one, thesettings for this task will be lost when saving or sending to the service.
l Display Generic Splitter Found Message: Select to have PlanetPress Workflow prompt when aGeneric Splitter task is found in any of the configuration's processes. The Generic Splitter task ismaintained because of its historical purpose but should no longer be used since it can almost alwaysbe replaced by more specialized and efficient splitters.
l Warn on Component Rename: Select to have PlanetPress Workflow prompt for action whenconfiguration components, such as processes, are imported from an external configuration file.Imported components can overwrite existing components, or be renamed automatically with uniquenames.
Sample Data Behavior PreferencesSample Data behavior Preferences control the way the Data Selector displays the sample data file.
Preferences
l Select Font button: Click to access the Font dialog box to select the font in which the Data Selectordisplays the sample data file.
l Default text editor: Contains the complete path and name of the executable file of the applicationused as the default text editor. For Windows Notepad, only the executable name (Notepad.exe) isrequired.
l Browse button: Click the Browse button to navigate to your executable instead of typing the path andexecutable name, then click OK.

Network Behavior PreferencesNetwork behavior preferences let you Configure NetWare® Login user options, so that PlanetPressWorkflow can access your Novell® NetWare network. The following procedure also lets you choose theUniversal Naming Convention (UNC), which removes inconsistencies when accessing paths on Novell andother networks.
Preferences
l NetWare Login: Check to enable the options PlanetPress Workflow requires to access NetWareresources. When you select this option, you must enter values in the Username and Password fields,and in the NDS options group (these properties are optional) below to properly log in to NetWare.
l Username: Enter your NetWare user name. This is the user the PlanetPress Workflow serviceuses to log in to NetWare at run-time. The service accesses resources as configured for thisuser.
l Password: Enter the NetWare password corresponding to the user name you entered in theprevious text box.
l Tree: Enter the NetWare Directory Services (NDS) tree where the user resides. This is the useryou entered in the user name text box. Click Trees to navigate to the desired tree. You must entera value for the Tree text box.
l Context: Enter the context on the NDS tree where the user you enter in the user name text boxresides.
l Server: Enter the server where the NDS tree you entered in the Tree text box resides. You do nothave to specify a server if there is only a single configured server on your network. Click Serversto navigate to the desired server on which the NDS tree containing the user resides.
Expand folder paths in UNC (Universal Naming Convention) format: Select to expand all paths used inthe configuration to UNC. This converts map drives such as “f:\, to absolute paths referenced from a server inthe format “\\server-name\shared-resource-pathname”. When you select this option, the next time youconfigure a task after editing properties and clicking OK in its properties dialog box, entered paths areexpanded to UNC format.
Note
You can leave the Context box empty if there is a single root context on your NDS tree, if you can

perform a context-free log in, or if you enter a server name in the Server box. PlanetPress Workflowand PlanetPress Image use the same security context when connected to a NetWare server and theyeach use one connection. Also note that using erroneous Tree or Context information may causePlanetPress Workflow and its services to crash.
PlanetPress Capture User OptionsPlanetPress Capture User Options lets you change the PlanetPress Capture options relative to yourWorkflow server. This is where you set up your server and database and is also where you manage pens,documents and licenses.
The available PlanetPress Capture user options are:
l Mode: Choose between Server and Clientmode. Client and Server mode are used for multi-serverarchitectures. See PlanetPress Capture Server/Client.
l Port: Select the port used to connect two servers together. The default value is 5864.l Document and Pattern Database group
l Status: Displays the status of the database.l Use ODBC Database: Check to ignore the default location for the Microsoft Access database(MDB) and use an ODBC connection to your own database location instead.
l ODBC Settings: Click to open the "PlanetPress Capture ODBC Settings" on page 633dialog.
l Test Connection: Click to verify the connection to the ODBC Database.l Reset Database: Click to reset the database to its original status.l Manage Documents...: Click to open the " PlanetPress Document Manager" on the next page.
l Pen Database groupl Register pens on first use: Check if you want any new pen that sends a PGC to be added tothe pen database. Newly registered pens will not have any Pattern Sequence or ownerinformation.
l Manage Pens...: Click to open the "PlanetPress Capture Pen Management Tool" on page 636dialog.

l License Manager...: Click to open the "PlanetPress Capture License Management" onpage 637 dialog.
PlanetPress Capture Server/Client
PlanetPress Capture can be set to be either in Server or Client mode from the PlanetPress Capture UserOptions.
In Server mode, all pen licenses are stored locally. Other clients can connect to this server to validate pens.This allows all pen licenses to be managed locally.
In client mode, no pen license information is stored locally. All pens are therefore validated against theserver specified in the Host address field displayed when the Client option is selected. Note that thisvalidation occurs for every ink file (i.e. PGC file) the local system processes, which may cause a slight delayfor the operation depending on the connection speed and latency between the two systems.
Note
The Server/Client mode is only used for managing pen licenses and has no impact on the Capture Database itself.The database can be stored locally or remotely, regardless of the Server/Client mode specified.
PlanetPress Document Manager
The PlanetPress Capture Document Manager dialog is used to manage all the documents present in thePlanetPress Capture database that are currently open.
Options and Controls
Documents Lookup Group
ll Filter by: Select what information you want to look for in the documents database.l Document ID: Search using the Document ID, a unique and automatic identifier attributed toeach document by the Capture Field Generator task.
l Document Title: Search in document title as specified in the Capture Field Generator task.l Production date (YYYY-DD-MM): Search using the date at which the document was generatedusing the Capture Field Generator task.

l Pen user (by description): Search using the description field in the Pen Database.l Pen user (by serial number): Search using the pen's serial number in the Pen Database.l Pattern Sequence: Search using the Pattern Sequence in the Document Database.l Template Name: The name of the document, corresponding to the name entered in thePlanetPress Design document properties.
l Pattern ID: Search using the pattern's identification number. This can be printed on eachdocument next to the Anoto Statement (see PlanetPress Design User Guide).
l Content Status: Search using the status of the document, whether it is Open, Closed, Complete,Partial or in Error.
l Operator: Select how to do the comparison
l Equal: The mask and database information are exactly the same.l Not equal: The mask and database information are different.l Less than: If the mask and database information are both numbers, the mask will be a smallernumber.
l Greater than: If the mask and database information are both numbers, the mask will be a largernumber.
l Less than or equal to: If the mask and database information are both numbers, the mask willeither be smaller or equal to the database information.
l Greater than or equal to: If the mask and database information are both numbers, the mask willeither be larger or equal to the database information.
l Contains: The mask is contained within the database information, at any location within theinformation.
l Does not contain: The mask is not contained within the database information.l Mask: Enter the text or number to compare with the database information.l Search: Click to start the search.
Manage Documents Group
ll Document list: Displays the results from the search in 3 columns:
l Document Title: Displays the title of the document as specified in the Capture Field Generatortask
l Production date: Displays the date and time on which the document was added to the CaptureDatabase.

l More info: A variable column that displays additional information about the search results, suchas the Pen ID or Pattern ID.
l Select all: Click to select all the documents in the list.l Select none: Click to deselect all of the documents in the list.l View documents: Click to view all the documents along with any ink already present on them. EachPDF is opened, in sequence, in the "PDF Viewer.
l Close documents: Click to close the document and release the pattern it uses.
Warning
This will prevent the document to be further updated, may cause errors when docking any penthat signed the printed version of the document. This cannot be undone.
PlanetPress Capture ODBC Settings
This dialog is used to set up the connection to a PlanetPress Capture Database through anODBC connection.
To access this dialog, See "PlanetPress Capture User Options" on page 630.

Settings
l Name: Click to displays and choose from a drop-down of each DSN (Data Source Name) available onthe system, along with it's source (User DSN or System DSN) and the driver it uses (database type).
l Type: Click to display a drop-down of supported database types. This must correspond to thedatabase type of the DSN chosen in the previous option.
l user name: If the database is secured with a user name and password, enter the user name here.l Password: If the database is secured with a user name and password, enter the password here.
Note
In order for the database connection to be functional, you must ensure that the database Typecorrespond exactly to the one used by the DSN, and is part of the supported database types.
Database Considerations (ODBC)
Technical
On 64-bit operating systems, the ODBC Data Sources created by the Data Source (ODBC) icon in theAdministrative Tools will not appear here, as PlanetPress Suite is 32-bit and cannot access the 64-bitdata sources. In order to create an ODBC connection visible by PlanetPress, you will need to accessthe 32-bit version of the ODBC manager, available in C:\Windows\SysWOW64\odbcad32.exe .
The following considerations should be kept in mind while working with ODBC Databases in PlanetPressSuite.
l All databasesl User Rights: During normal operation, Read/Write to tables should be sufficient. However,during the initial setup, the Create/Drop tables rights is necessary.
l Minimum 100MB of database size is required as a minimum, but the space requirement dependson the implementation. The more active documents in the database, the more space is used -note that this progression is rather linear.

l Regular database maintenance is required, such as database compacting, is required by asystem administrator.
l It is recommended to create an IT process that backs up the database regularly.l The recommended ideal setup is a dedicated SQL Server PC, accessed by PlanetPressWorkflow through an ODBC connection on the local network.
l Microsoft Accessl Database file (mdb) must be local to the PlanetPress Workflow computer. It cannot be located ona network drive or another server.
l Total database size is limited to 4GB of data.l Total size of a single table is 2GB.l May be unstable in large implementations.
l MySQLl Database can be in any location, but performance will depend on the speed of the connectionbetween PlanetPress and the MySQL server.
l MySQL's performance has been slower than SQL Server and SQL Server Express during ourtests.
l By default, MySQL is configured not to allow any SQL request larger than 16 megs.l In the event where 2 requests are made simultaneously on the same record, MySQL will queueone of the requests and execute it once the first one is done. In extremely rare cases this maycause a timeout on very large requests.
l MSSQL (Microsoft SQL Server)l All versions of the SQL Server are supported, including all Express versions.l Database can be in any location, but performance will depend on the speed of the connectionbetween PlanetPress Production and the SQL server.
l In the event where 2 requests are made simultaneously on the same record, SQL Server willdrop the most complex request. Resubmitting the PGC for processing should resolve this issue.This, however, should happen only rarely.
l When configuring the ODBC connection, your must use the Microsoft version of the driver, andnot the Native SQL version of the driver. This is due to a technical limitation of the native driverthat interferes with the PlanetPress Suite database requests.

PlanetPress Capture Pen Management Tool
The Pen Management Tool screen is used to manage the pens that are registered in the PlanetPressCapture Database. The number of Anoto Digital Pens you may register on this screen depends on thelicenses available within your PlanetPress Capture License.
Options and Controls
Top Toolbar
ll Read PGC File: Click to display a File Open dialog. Browse to an existing PGC file, and open it.PlanetPress Capture will read the serial number from the PGC file and register the pen.
l Print Pen Activation File: Click to print a page containing a special pattern. Any pen that writes onthis pattern and is then docked will be registered in the database.
l Save Pen Data into Database: Once all your pens are entered in this window, click to save the list ofpens in the database.
Pen Data List: Displays a list of registered pens and those pens you just added.
ll Pen ID: The serial number of pen, as written on the Anoto Digital Pen. You can double-click this areato edit the Pen ID if necessary.
l Pattern Sequence: The pattern sequence the pen is assigned to. You can double-click this area andedit the pattern sequence as required.
l User ID: The name of the user assigned to this pen. You can double-click this area to edit the user ID.This can also be custom information.
Bottom Toolbar
ll Button: Click to add a new line in the Pen Data List, then edit the information on this new line.
l Button: Place a checkmark on the line of any pen you wish to remove from the database, then clickthis button.
l Search in column Pen ID: Enter a search term for a Pen ID, then click the Search button. The PenData List will highlight any pen containing your search term.

To register a new pen manually
1. Click on the icon
2. Enter the Pen ID (located on the pen after the word "Serial: ")3. If necessary, enter an optional pattern sequence and User ID (identifier of who will use the pen).
To register a pen using the registration pattern
1. Click on the Print pen activation file button in the top toolbar of this dialog.2. Use theWindows Print dialog to print to the desired printer.3. Write or make a line on the printed pattern.4. Dock the pen in its cradle.5. Click on the Read PGC File button in the top toolbar of this dialog.6. If necessary, enter an optional pattern sequence and User ID for each pen.
Multiple pens can be registered at once simply by writing on the registration pattern and then docking eachpen before clicking the Read PGC File button.
If the pen that is being registered already exists in the pen database, the Replace User ID (Description)dialog appears, with the following options:
l Pen ID: Displays the Pen ID (serial number) to identify the penl Old desc.: Displays the content of the User ID field for the pen as it is now.l New desc.: Type the new description to identify the penl Replace: Click to save the modification to the descriptionl No Change: Click to save the registration without modifying the description.l Modify: Click to enable edits in the Old desc. field. The current information can then be modified. Aftermodifications, click Apply to save the changes and exit the dialog.
l Cancel: Click to cancel any modifications to the pen registration.
PlanetPress Capture License Management
The PlanetPress Capture License Management window is used to manage the pen pack available in theinstallation of PlanetPress Capture. Each Pen Pack contains a limited number of pens that can be

registered in the Capture Database. When the number of pens have been reached, new pens can no longerbe registered.
If no pen pack is available, PlanetPress Capture functions in Demo Mode. In Demo mode, only one (1) pencan be registered in the pen management window. Also, the "Capture Fields Generator" on page 422 will beunable to produce more than 8 documents with a pattern instead of the full 20,000 patterns.
Technical
To add a pen pack, PlanetPress must be activated using a PlanetPress Production license. ifPlanetPress Production is in trial mode, no pen pack can be added because the Pen Pack uses theserial number.
Options and Controls
PlanetPress Capture Pen Licenses Group
ll Import License...: Click to open the Import License dialog. Browse to a PPLIC (PlanetPress License)file on your computer and open it to import the license. The PPLIC overwrites your current license,however it may contain more than one Pen Pack (your previous one and one you just purchased) andwill display them individually.
l License List: Displays the licenses that have been added to this system.l Pen License: The identification of the Pen Pack.l Quantity Of Pens: The number of pens that can be registered with this pack.
PlanetPress Production Group
ll Server Type: The type of server installed, normally PlanetPress Production Server.l Total pens: The total number of available pens on this server, each Pen Pack being added together.
PDF Text Extraction Tolerance FactorsWhen extracting text from a PDF (for example, through a data selection), a lot more happens in thebackground than what can be seen on the surface. Reading a PDF file for text will generally return text

fragments, separated by a certain amount of space. Sometimes the text will be shifted up or down, spacingwill be different, etc. In some cases, every letter is considered to be a different fragment.
Text formatting features such as kerning, bold, exponential, etc, may cause these fragments to beconsidered as separate even if, to the naked eye, they obviously belong together.
The PDF Text Extraction Tolerance Factors is used to modify the behavior of data selections made fromPDF data files from within PlanetPress Workflow. Each factor available in this window will determine if twofragments of text in the PDF should be part of the same data selection or not.
Warning
The default values are generally correct for the greatest majority of PDF data files. Only change thesevalues if you understand what they are for.
Delta Width
Defines the tolerance for the distance between two text fragments, either positive (space betweenfragments) or negative (kerning text where letters overlap). When this value is at 0, the two fragments willneed to be exactly one beside the other with no space or overlap between them.
When this value is at 1, a very large space or overlap will be accepted. This may case "false positives" andseparate words and text blocks may be considered as a single word if the value is too high.
Accepted values range from 0 to 1. The default value is 0.3, recommended values are between 0.05 and0.30.
Delta Height
Defines the tolerance for the height and position difference between two target fragments. The higher thenumber, the more difference between the fragment's height (the tallest font character's height) will beaccepted and the more vertical distance between fragments are accepted. Exponents, for example, arehigher and lower.
When this value is 0, no vertical shift is accepted between two fragments. When the value is 1, the secondtext fragment can be shifted by as much as the height of the first fragment.
Accepted values range from 0 to 1. The default value is 0.15, recommended values are between 0.00 and0.50.
Font Delta Height
Defines the tolerance for the difference in average height of fonts in the two target fragments. The higher thenumber, the more difference in average font heights will be accepted. The average font height is bigger intext written in uppercase than text written in lowercase.
At 0, the font size must be exactly the same between two fragments. At 1, a greater variance in font size isaccepted.
Accepted values range from 0 to 1. The default value is 0.65, recommended values are between 0.60 and1.00.
Gap
Defines how spaces between two fragments are processed. If the space between two fragments is too small,the text extraction will sometimes eliminate that space and count the two fragments as a single word. Toresolve this, the Gap setting can be changed. The lower this value, the higher the chance of a space beingadded between two characters. A value too low may add spaces where they do not belong.
Accepted values range from 0 to 0.5. The default value is 0.3, recommended values are between 0.25 and0.40.
OL Connect User OptionsThese options control some of the features in the OL Connect Tasks. This is valid both for PlanetPress®Connect and PReS® Connect.
Warning
OL Connect User Options are not applied immediately. In order for these changes to be applied, theWorkflow Configuration must be submitted to the Workflow Service. Otherwise, these options will notbe accounted for in Debug mode.

The available OL Connect user options define the default behavior ofOL Connect tasks' OL ConnectProxy tab. These values are used unless they are overwritten in a task's properties:
l Server Connect Settingsl Connect Proxy Address: Enter the machine name or IP Address where the OL Connect Serverresides.
l Port: Enter the port to use to communicate with the OL Connect Server. Default: 9340l user name: Enter the user name expected by the OL Connect Server.l Password: Enter the password expected by the OL Connect Server for the above user name.
l Email Creation Settingsl Mail Host: Enter the default SMTP Server host or IP Address.l Sender address: Enter the default email address used as the sender (FROM) address.l user name: Enter the default user name for the SMTP Server if it requires it.l Password: Enter the password for the above user name.
General Plug-In PreferencesGeneral Plug-In preferences control the level of detail added to the PlanetPress Workflow log file. Since logfiles cover 24 hours of operation, choosing to log every task performed by PlanetPress Workflow may resultin the creation of excessively large files.
Changing the Plug-In preferences also affects the logs displayed in the PlanetPress Workflow ServiceConsole.
l Log level group
l Startup and shutdown: Select to only track when the PlanetPress Workflow service is startedand stopped.
l Task failure: Select to only track when tasks in the processes running in a PlanetPressWorkflow configuration fail.
l Task success and failure with details: Select to track when the tasks in processes running inPlanetPress Workflow succeed and fail, with details. Details can include why tasks fail and howsuccessful tasks are executed.

l All events with details: Select to log everything that happens in PlanetPress Workflow. Thisincludes when it starts and stops, the success and failure of tasks, and details on the successand failure of tasks.
l Add time stamp to all processes events:l Delete log files after: Select how many days log files are kept before being deleted.
l Maximum numbers of replicated processes:
Messenger Plug-In PreferencesApart from enabling communication between the various parts of PlanetPress Workflow, the PlanetPressWorkflow Messenger also manages local instances of the PlanetPress Workflow Alambic.
Preferences
l PlanetPress Alambic options group
l Let me set up howmany instances to run: Select this option if you want to limit the number ofinstances of the Alambic that PlanetPress Workflow can run. Then enter the number ofinstances, a value ranging from 1 to 32, in the box below. When this option is not selected,PlanetPress Workflow starts a minimum of three instances and a maximum of eight, based onthe number of CPUs available on the server. Note that this does affects self-replicatingprocesses. Self-replicating processes will create threads in PlanetPress Workflow service, whileAlambic threads are under the PlanetPress Messenger service.
l Close inactive instances after: If you want the PlanetPress Workflow Messenger to closeinactive instances of the Alambic after a given number of minutes, enter a value in this box. Entera value of ”0” if you do not want the Messenger to terminate idle instances of the Alambic.
l Logging options group
l Delete log files after: Enter the number of days after which to delete the Messenger service logs.Each log covers a 24-hour period and is kept in the Log folder, which is located in the installationfolder.
l Verbose log: Select this option if you want the log to contain a maximum amount of information.
HTTP Server Input 1 Plug-In PreferencesHTTP server input 1 plug-In preferences control the server protocol aspects of the PlanetPressWorkflowHTTP Server Input tasks. This is where you enable and configure secure communication for the

HTTP Server.
Technical
By default, the request XML also contains a CDATA section which contains the raw input data,effectively doubling the size of the incoming file. Due to technical restrictions, the incoming XML filecannot be more than 400MB, which because of CDATA is reduced to around 200MB. To help in thissituation, you may elect to omit CDATA from the attachment in this dialog. Please note that thislimitation also affects incoming binary files (sent through file upload in a form), regardless of CDATAsettings.
Preferences
l Port: Select the TCP port to use. The default port is 8080, the official HTTP alternate port, so as not tointerfere with the standard HTTP port (80). To block any regular HTTP traffic (for example if only usingHTTPS connections) the port can be set to 0.
l Time out: Set the timeout period in seconds. The default value is 120 seconds.l Enable server for SSL requests: Check this option to enable secure data exchange over the Web.This enables the boxes below and lets you specify your secure communication settings.
l Root certificate: Enter the absolute path to the Root Certificate. The file generally ends with a.crt extension and is obtained from a Certificate Provider such as Thawte or Verisign. If the RootCertificate and Certificate file are identical, this is considered a self-signed certificate, which isconsidered unsecured by most browsers.
l Certificate: Enter the absolute path to the site Certificate. The file generally ends with a .crtextension and is provided by a certificate provider, or through the use of certificate generatorssuch as openssl or makecert.com.
l Key: Enter the absolute path to the Private Key File. This file generally ends with a .keyextension.
l Password: Enter the password (or passkey) for the Private Key File. Please note that thispassword is encrypted within PlanetPress Workflow server and is not saved in plain text.
l Encryption protocol: Choose your cryptographic protocol (SSL or TSL). This is determined bythe software that generated the keys.
l Disable SOAP Server: Check to disable all SOAP Server functionality.

l Verbose log: Select to enable to keep a verbose log. Note that a communication log is generatedwhether or not this option is selected. If you use a secure connection, the log will contain extrainformation.
l Use PHP Arrays: Select to process incoming POST request with input arrays correctly. In the sourceHTML, input elements with names such as name="chat[input][name]" or name="items[][partnum]" willbe correctly split as a single XML node along with each part of the array as children.
l Omit attachments as CDATA node in the XML envelope: Select to remove any attachments fromthe actual XML data file. Generally the attachments are both saved on disk and included within theXML envelope. This option removes them from the envelope, but they remain accessible through theirdirect path. This option has no incidence on any other option of this task.
Technical
PHP Arrays
This is an example of the new "Use PHP Arrays" option introduced in Workflow 8.5.
HTML Example:
<input type="hidden" name="user_account" value="[email protected]"><input type="text" name="name" value="Peter Parker"><input type="text" name="company" value="Objectif Lune">
<input type="text" name="pinElm1[pin_0][left]" value="122"><input type="text" name="pinElm1[pin_0][top]" value="253"><input type="text" name="pinElm1[pin_0][type]" value="dent">
<input type="text" name="pinElm1[pin_1][left]" value="361"><input type="text" name="pinElm1[pin_1][top]" value="341"><input type="text" name="pinElm1[pin_1][type]" value="dent">
Resulting XML Structure in HTTP Request Envelope
<values count="4"><user_account>[email protected]</user_account><name>Peter Parker</name><company>Objectif Lune</company><pinElm1>
<pin_0><left>122</left>

<top>253</top><type>dent</type>
</pin_0><pin_1>
<left>361</left><top>341</top><type>dent</type>
</pin_1></pinElm1>
</values>
Note
SSL is used to accept secured, encrypted requests from web clients and requires a certificate delivered by anapproved authority. SSL can also be called HTTPS, though that is a misnomer. For more information on SSL andhow to purchase a certificate, please see Q10694 on SSL.com.
Note
When SSL is enabled and a user sends a query prefixed with https://, then this specific communication will besent through port 443, which cannot be changed in Workflow. However, http:// requests will still be received onthe port specified in http server preferences.
HTTP Server Input 2 User OptionsThe HTTP Server Input 2 user options are used to enable serving static HTTP resources, as part of anHTTP Server workflow. These resources are referred to within the HTML response file and do not passthrough a process to get served so the process is very quick. Static resources are especially useful foradditional formatting of HTML files such as JS (JavaScript) scripts, CSS files and images, since they are notdynamic and generally shared between multiple dynamic files.

The available HTTP Server 2 user options are as follows:
l Serve HTTP resource: Check to activate static resource serving.l Resource action name: Enter a name that will be simulated as a folder in your HTTP structure.For example, if you enter images in this box, you would refer to any files in this folder ashref="images/file.ext" .
l Resource folder: Type it the path of the folder where your resources are located, or click theBrowse button and choose the folder in the browse dialog.
Note
Subfolders are accepted in the structure, so if your resource folder contains a folder called faces, youcould refer to a file in this folder as href="images/faces/johnsmith.jpg".
l Capture OnTheGo groupl Authentication Key: Enter the authentication key for the COTG repository. This key can befound in the Settings section of the COTG Web Administration Panel.
LPD Input Plug-In PreferencesLPD input plug-in preferences control certain functions of the PlanetPress Workflow LPD Server service,which in turn has an impact on LDP input tasks performed by PlanetPress Workflow on a given computer.The LPD Server service receives jobs using TCP/IP from LPD servers.
For information on the preferences set in individual LDP input tasks, refer to LPD Input Task Properties.
Preferences
l Protocol options group
l Log all Winsock and network messages: Select to have PlanetPress Workflow keep a log ofall Winsock and other network messages that occur through the LPD service. These aremessages related to jobs being sent from other systems through LPR, and being received byPlanetPress Workflow via LPD. Since these messages can accumulate, you have the option ofnot logging them. Log files are kept in the Log folder, which is located in the PlanetPress

Workflow installation folder. They are named lpddate.log, where date is the current date in theyyyymmdd numerical format. Note that changing this option also affects the log displayed in thePlanetPress Workflow Service Console.
l No source port range restriction: Select to remove any restrictions on the port of the LPR clientcomputer that PlanetPress Workflow accepts data files from. Clear to have PlanetPressWorkflow only accept data files sent from ports ranging between 721 and 731 on the LPR clientcomputer.
l Strict RFC 1179 control file: Select to disable control file extensions the LPD serviceimplements for some flavors of UNIX and LPR. This enforces the basic Line Printer Daemonprotocol.
l Enable BSD compatibility mode: Select to have the LPD service emulate a BSD UNIX server.Although RFC 1179 is supposed to describe the BSD LPD/LPR protocol, and the LPD input inPlanetPress Workflow is RFC1179-compliant, there are some incompatibilities between theRFC and the BSD implementation. This option compensates for some of these incompatibilities.If you are not sure about the source of your output, clear this option.
l LDP settings group
l Time-out (sec): Set the time in seconds the process waits for the transfer of bytes in the data filebefore ending the transfer of this file. The default value for the Time-out property is 7200 seconds(2 hours). On a time-out, partially received data files are not passed to the rest of the process; theLPD input resets and is ready to receive further data files. Log messages include the time-outduration.
Serial Input Plug-In PreferencesSerial input plug-in preferences control certain functions of the PlanetPress Serial Capture service, which inturn has a direct impact on all Serial input tasks performed by PlanetPress Workflow on a given computer.
Preferences
l Serial settings group
l Serial port: Select the port of the computer where the Serial input is connected to (COM1through COM8).
l Baud rate: Select the baud rate of the Serial input. The baud rate is the number of bitstransferred per second. The transferred bits include the start bit, the data bits, the parity bit (ifdefined), and the stop bits.
l Data bits: Select the number of data bits defining the incoming data file on this serial port. Thedata bits transferred through a serial port represent the data content. This excludes the start,parity, and stop bits: these are bits defining the beginning and end of each unit of transferreddata, as well as error detection provided by the parity bit. The majority of serial ports usebetween five and eight data bits. Binary data is typically transmitted as eight bits. Text-baseddata is transmitted as seven bits or eight bits. If the data is based on the ASCII character set, aminimum of seven bits is required. If an eighth bit is used, it must have a value of 0. If the data isbased on the extended ASCII character set, eight bits must be used.
l Parity: Select the type of parity used for error detection. The parity transfers through the serialconnection as a single bit. It is used to verify that each set of data bits transfers correctly. It is thenstripped away before the data file passes through the rest of the PlanetPress Workflow process.Select None to ignore all parity bits; no error detection occurs.
l Stop bits: Since most serial ports operate asynchronously, the transmitted byte must beidentified by start and stop bits. The start bit indicates when the data byte is about to begin andthe stop bit(s) indicates when the data byte was transferred. The start bit is always 0 to mark thebeginning of the byte, but the stop bit can be a single 1, or two bits each with a value of 1.
l Time-out: Set the time in seconds the PlanetPress Workflow process waits for the transfer ofbytes in the data file before ending the transfer of this file. On a time-out, partially received datafiles are not passed to the rest of the process; the Serial input resets, ready to receive further datafiles.
l Job delimiters: Enter the strings that tell PlanetPress Workflow the data file being retrieved throughthe Serial input is complete. Each line in the Job delimiters text box is a different delimiter. You canenter as many delimiters as you want, one per line. The three default delimiters that appear are threeof the most commonly recognized end of a file delimiters.
l Log (verbose): Select to keep a log of errors and other information related to the Serial input. Sincethese messages can accumulate, you have the option of not logging them.
Telnet Input Plug-In PreferencesThe Telnet input plug-in preferences controls the log of the PlanetPress Workflow Telnet Capture service.Since PlanetPress Workflow lets you monitor multiple Telnet inputs simultaneously, the port setting for allTelnet input tasks cannot be set in the Preferences.

Preferences
l Log all Winsock and network messages (very verbose): Select to have PlanetPress Workflowkeep a log of all Winsock and other network messages that occur from the Telnet input. Thesemessages are related to files sent from other systems using a telnet connection. Since thesemessages can accumulate, you have the option of not logging them.
l Use Job Delimiters: Check this option if your Telnet input is a single stream that can contain multiplejobs. The box lets you enter one or more possible delimiters (separated by a line return), either a directstring (such as %%EOJOB) or an ASCII character (\001). For a list of ASCII characters, seehttp://www.asciitable.com/.
PlanetPress Fax Plug-In PreferencesPlanetPress Workflow Fax plug-in preferences control certain functions of the PlanetPress Fax service,which in turn has a direct impact on all PlanetPress Workflow Fax output tasks performed on a givencomputer. Bear in mind that PlanetPress Workflow Fax output tasks included in a given PlanetPressWorkflow configuration can be performed by a PlanetPress Fax installation running on a different computer,typically one that runs only PlanetPress Fax and the faxing application that actually sends the fax. Whenyou change the user options on a given computer, only that computer is affected. So you should considerchanging the PlanetPress Fax user options on the computer that actually performs the PlanetPressWorkflow Fax output tasks.
The changes you make to the PlanetPress Workflow Fax plug-in preferences are stored in the PlanetPressFax configuration file. They will be applied when PlanetPress Fax is started.
Preferences
l Delete log after: Enter the number of days after which to delete the PlanetPress Fax service log. Eachlog covers a 24-hour period and is kept in the Log folder, which is located in the PlanetPress Workflowinstallation folder (on the computer that actually performs the PlanetPress Fax output tasks).
l Fax service: Select the faxing program to which PlanetPress Fax sends its documents for faxing.Each faxing program has its own options and changing this option also changes the options below toreflect the following:
l WinFax Pro
ll Dialing format: Select how you want PlanetPress Fax to read the fax number in the dataselection and send it to WinFax PRO. The dialing format you select here must be identical
to the one you set in WinFax PRO; a discrepancy between the two may result in WinFaxPRO dialing incorrect fax numbers. Select Default to have PlanetPress Fax set the dialprefix, long distance prefix, area code, and fax number according to the content of the dataselection, and send the result to WinFax PRO. WinFax PRO sets the dial prefix, longdistance, prefix, and area code, and fax number to the ones it receives from PlanetPressFax. If any of the values it receives from PlanetPress Fax are empty, it uses its own defaultvalues. For example, if the data selection did not contain a dialing prefix, WinFax PROuses its default dialing prefix. Select Dial as entered to limit PlanetPress Fax to removingany spaces or parentheses that appear in the data selection, and sending the result toWinFax PRO. WinFax PRO dials the result exactly as it receives it from PlanetPress Fax.
Note
WinFax Pro scales fax pages with the following minimum settings: - Raster width: 1728 dpi- Raster height: 2158 dpi- Raster resolution: 196 dpi
l Windows Fax Service
l Report Failures: Select to have PlanetPress Fax generate a report whenever themaximum number of retries for a single fax is exceeded. The error generated by theWindows Fax Service is also logged in the report. Note that when PlanetPress Fax isunable to send a fax because an empty fax number is used as the only recipient for adocument, a failure will not be reported but an error will be logged.
l Report Successes: Select to have PlanetPress Fax generate a report whenever one ofthe faxes in the PlanetPress Fax Job reaches its destination successfully or at least as faras the Windows Fax service is concerned.
l Folder: Enter or select the location of the report file. PlanetPress Fax generates report filenames automatically with the file name extension PFX. The report file is copied to thespecified Report folder only after all fax transmissions in a PlanetPress Fax job arecompleted or have exceeded the maximum number of retries. This folder can then be usedas an input for a PlanetPress Workflow process for monitoring the status of PlanetPressFax jobs. The postscript (PS) file for the job is also copied with the report file and can beprinted, sent by e-mail, or archived as specified by the PlanetPress Workflow process.

l Expand folder paths in UNC (Universal Naming Conventions) format: Select to havePlanetPress Fax use complete network server path names(\\servername\sharename\path\filename). This naming convention works well withWindows operating systems, Novell NetWare, and other operating systems when using alocal naming system (such as the DOS naming system in Windows) would result in “Filenot found” error messages.
l Dialing options button: Click to set the appropriate options as required. Since theseoptions are specific to the faxing program, refer to the faxing program’s documentation formore information.
l Captaris RightFax
l Report Failures: Select to have PlanetPress Fax generate a report whenever themaximum number of retries for a single fax is exceeded. The error generated by theWindows Fax Service is also logged in the report. Note that when PlanetPress Fax isunable to send a fax because an empty fax number is used as the only recipient for adocument, a failure will not be reported but an error will be logged.
l Report Successes: Select to have PlanetPress Fax generate a report whenever one ofthe faxes in the PlanetPress Fax Job reaches its destination successfully or at least as faras the Windows Fax service is concerned.
l Folder: Enter or select the location of the report file. PlanetPress Fax generates report filenames automatically with the file name extension PFX. The report file is copied to thespecified Report folder only after all fax transmissions in a PlanetPress Fax job arecompleted or have exceeded the maximum number of retries. This folder can then be usedas an input for a PlanetPress Workflow process for monitoring the status of PlanetPressFax jobs. The postscript (PS) file for the job is also copied with the report file and can beprinted, sent by e-mail, or archived as specified by the PlanetPress Workflow process.
l Expand folder paths in UNC (Universal Naming Conventions) format: Select to havePlanetPress Fax use complete network server path names(\\servername\sharename\path\filename). This naming convention works well withWindows operating systems, Novell NetWare, and other operating systems when using alocal naming system (such as the DOS naming system in Windows) would result in “Filenot found” error messages.
l Dialing options button: Click to set the appropriate options as required. Since theseoptions are specific to the faxing program, refer to the faxing program’s documentation formore information.

Captaris RightFax options
l RightFax Printer: Select a RightFax printer. A RightFax printer is a fax driver that makes it possible tosend faxes automatically. This printer will output faxes without prompting the user for fax addressinginformation. For more information, refer to Captaris RightFax documentation.
l Activation: Click to enter activation codes for the PlanetPress Image service installed on the samecomputer as PlanetPress Workflow. If you have already activated the PlanetPress Image service fromits Control Panel applet, this is reflected when you open the Activation dialog box by clicking thisbutton.
l Check for updates: Click to access the Objectif Lune website to search for updates to PlanetPressImage. You are guided through the updating process with the PlanetPress Workflow Update Servicewizard.
l About: Click to display an About dialog box for PlanetPress Fax. This dialog box contains informationsuch as the version number, whether the software is activated or the number of days remaining in thetrial.
l Select Language: Click to select a different interface language for the PlanetPress Fax Configurationapplet. Note that this button is not displayed if you edit the PlanetPress Fax options directly (not viaPlanetPress Workflow Configuration program).
FTP Output Service User OptionsFTP output user options control certain functions of the FTP Client service, which in turn has a direct impacton all FTP output tasks performed by PlanetPress Workflow on a given computer.
Options
l Protocol Options Group
l Log all Winsock and network messages: Select to have PlanetPress Workflow keep a log ofall Winsock and other network messages that occur through the FTP output. These messagesare related to jobs sent from PlanetPress Workflow to a server via an FTP output, which in turnuses the FTP output service. Log files are kept in the Log folder, which is located in thePlanetPress Workflow installation folder. They are named ftpdate.log, where date is the currentdate in yyyymmdd numerical format. Note that changing this option also affects the log displayedin the PlanetPress Workflow Service Console.
l Interval: Select the interval (in seconds) at which the FTP service is to dispatch jobs from theftpPut folder to the FTP sites.
l Back up job on error: Select to move the job file to a local folder ftpPut\error if an error occurswhile sending a job via the FTP output. This folder is relative to your install folder.
l FTP Port: Select the port number that you want PlanetPress Workflow to use for all FTP outputtasks. The recommended port is 21 (the default setting).
PlanetPress Image User OptionsPlanetPress Image user options control certain functions of the PlanetPress Image service, which in turnhas a direct impact on all PlanetPress Image output tasks performed on a given computer. These includeerror and logging options, PlanetPress Search database options, as well as networking and email options.
Bear in mind that PlanetPress Image output tasks included in a given PlanetPress Workflow configurationcan be performed by a PlanetPress Image installation running on a different computer, typically one thatruns only PlanetPress Image. When you change the user options on a given computer, only that computeris affected. So you should consider changing the PlanetPress Image user options on the computer thatactually performs the PlanetPress Image output tasks.
The changes you make to the PlanetPress Image user options are stored in the PlanetPress Imageconfiguration file (ppimage.cfg). They will be applied when PlanetPress Image is started.
The available PlanetPress Image user options are separated in four different sections:
PlanetPress Image 1 or logging tab
l Administrator’s address(es): Enter one or more system administrator email addresses to which errorand other messages related to the creation of PDFs/images by PlanetPress Image are sent. Separatemultiple email addresses with semi-colons (;).
l Send to the administrator groupl Daily log: Select to send an email to the administrator every day at midnight (according to thelocal system clock) reporting the daily activity of PlanetPress Image. The log is sent to alladdresses you enter in the Administrator’s address(es) text box.
l Error Log: Select to send an email that includes the current error log to the administrator whenan error occurs. The error log is sent to all addresses you enter in the Administrator’s address(es)text box.

l Error file: When enabled, sends an e-mail with an attachment of the offending file when an erroroccurs in the PlanetPress Image output task. Additionally, a backup of the job is created in theError folder, which is located in the PlanetPress Workflow installation folder.
l Name or address not resolved: Select to send an email to the administrator when a name or addressin the document selected to be used in PlanetPress Image cannot be resolved.
l Delete log after: Enter the number of days to wait before deleting the log of the generatedPlanetPress Image output. Each log file covers a single 24-hour period and is kept in the Log folder,which is located in the PlanetPress Workflow installation folder. This log may be on the local computerrunning PlanetPress Workflow or on another computer on your network.
l Activation: Click to enter activation codes for the PlanetPress Image service installed on the samecomputer as PlanetPress Workflow. If you have already activated the PlanetPress Image service fromits Control Panel applet, this is reflected when you open the Activation dialog box by clicking thisbutton.
l Check for updates: Click to access the Objectif Lune website to search for updates to PlanetPressImage. You are guided through the updating process with the PlanetPress Workflow UpdateService wizard.
l About: Click to display an About dialog box for PlanetPress Image. This dialog box containsinformation such as the version number, whether the software is activated or the number of daysremaining in the trial.
l Select Language: Click to select a different interface language for the PlanetPress ImageConfiguration applet. Note that this button is not displayed if you edit the PlanetPress Image optionsdirectly (not via PlanetPress Workflow Configuration program).
PlanetPress Image 2 or database tab
Add PDF to PlanetPress Search database group: Select to populate a PlanetPress Search databaseusing the documents created by PlanetPress Image and to activate the related options. Refer to thePlanetPress Search User Guide for more information on this PlanetPress Workflow software.
l Database type: Select the type of the database in which you want to create a table (Access, or SQLServer).
l Connection time-out: Enter the time, in seconds, that the connection to the database is maintainedwhile no action is taking place before the connection is severed.
l Database directory: Enter the path of the directory in which the Access database is located, or usethe Browse button to navigate to, and select, the directory. This option is available only when youselect Access database in the Database type box.
l Data source name: Enter the name of the computer on which the database runs. This option isavailable only when you select SQL Server database or Oracle database in the Database type box.
l Use default database: Select to use the default database associated with your user profile on thatSQL Server or Oracle database. Clear to enter the name of the database in the box that appears.
l Use Windows NT Integrated security: Select to use your Windows user name and password to logonto the SQL database.
l User ID: Enter the user id required to access the database to which you are adding new PDI files fromthe generated PDF files. If you are using an SQL database, enter the login name you chose when youconfigured the SQL database (refer to the “Using PlanetPressSearch with an SQL Server Database”section of the PlanetPress Search User Guide).
l Password: Enter the password required to access the database.l Test Connection: Click to verify that PlanetPressImage can connect to the specified database.l Enforce global table creation: Select this option, as it ensures that all database users are grantedaccess to the database. This option is available only when you select SQL database in the Databasetype box.
PlanetPress Image 3 or network tab
The options in this section are identical to the ones in the Network User Options section. However, theydetermine how PlanetPress Image will interact with your Novell NetWare system, not PlanetPressWorkflow Service.
PlanetPress Image 4 or login tab
l Use Microsoft Outlook: Select to use Microsoft Outlook on the host computer running PlanetPressImage to send the error messages to the administrators. The host computer must be running Outlook,and PlanetPress Workflow must have access to Outlook. Outgoing emails appear in the outbox ofOutlook, and is sent whenever Outlook is set to send email.
l Use SMTP mail group: Check to activate this group’s options and to use Simple Mail TransferProtocol (SMTP) to send the error messages to the administrators. Note that if you select this option,you will be required to enter information in the Name, Email address and Outgoing mail (SMTP)boxes.

l Name: Enter the name of the user sending the error messages to the administrators.l Organization: Enter the name of the organization of the user sending the error messages to theadministrators.
l Email address: Enter the email address of the user sending the error messages to theadministrators.
l Reply address: Enter the reply address that recipients use to reply to the error messages.l Outgoing mail (SMTP): Enter the IP address of the server that PlanetPress Workflow uses tosend the emails via SMTP.
l Server requires authentication: Select if the outgoing server used to send the emails via SMTPrequires authentication. Note that if you select this option, you will be required to enterinformation in the Account name and Password boxes below.
l Account name: Enter the account name of the user on the server to be able to send emailsvia SMTP. You must select Server requires authentication to enable this field.
l Password: Enter the password corresponding to the Account name of the user on theserver to be able to send email via SMTP. You must select Server requires authenticationto enable this field.
LPR Output User OptionsLPR output user options control certain functions of the LPR Client service, which in turn has a direct impacton all LPR output tasks performed by PlanetPress Workflow on a given computer.
Options
l Protocol options groupl Log all Winsock and network messages: Select to have PlanetPress Workflow keep a log ofall Winsock and other network messages that occur through the LPR output. These messagesare related to jobs being sent from PlanetPress Workflow to an LPD or LPD-compatible printer.Logs are kept in a Log folder relative to your install folder. They are named lprdate.log, wheredate is the current date in yyyymmdd numerical format. Note that changing this option alsoaffects the log displayed in the PlanetPress Workflow Service Console.
l Print banner pages between jobs: Select to print banner pages between each job processedand output from the LPR output. The banner page includes details of the job being printed,including the job file name and the user name on the host computer running the LPR outputclient.
l No source port range restriction: Select to remove any restrictions on the port PlanetPressWorkflow uses to send the job file via the LPR/LPD protocol. Clear to restrict the port used tosend the job to one in the range between 721 and 731.
l Print up to: Select the maximum number of files that can be simultaneously sent to print by theLPR output service.
l Error handling groupl Max. retry period: Select the maximum time period, in hours, within which PlanetPressWorkflow attempts to dispatch the job using the LPR output before giving up. Note that entering amaximum retry period of 0 hours disables retries altogether.
l Retry interval: Select the interval, in seconds, at which time PlanetPress Workflow attempts todispatch the job using the LPR output. This takes place only within the Max. retry period, afterwhich the attempt ends.
l Keep a backup when error occurs: Select to move the job file to a local folder relative to yourinstall folder called pplpr\error in the case of an error.
l LPR settings groupl Time-out: Set the time in seconds the PlanetPress Workflow process waits when it sends jobsusing the LPR protocol. The default value for the Time-out property is 7200 seconds (2 hours).On a time-out, partially sent data files are not passed to the rest of the process; the LPR outputresets and is ready to send further data files. Log messages include the time-out duration.
l Polling interval (seconds): Select the period of time—the default is 4 seconds—for whichPlanetPress Workflow is to wait when it finishes dispatching jobs to the LPR printer queuesbefore polling the LPR output folder again.
PrintShopWeb Connect Service User OptionsPrintShop Web Connect service preferences control the credentials to log into the PrintShop Web server.
The available preferences are as follows:
l User name: Enter the user name of a valid PrintShop Web user, mostly operators.l Password: Enter the password associated with the user name on the PrintShop Web server.

Note
It is also mandatory to send your configuration to your PlanetPress Workflow service since thePrintShop Web credentials are included in the *.cfg file (See "Send your Configuration" on page 11),which is updated every time the configuration is sent to the service via the Send Configurationbutton.
Editor OptionsThe Script Editor is used to edit scripts used in Run Script and the XSLT Editor is used to edit scripts used inOpen XSLT action tasks. Most of the options listed below are valid for both editors. Those options which areonly valid for a specific editor are identified as such.
The available Script Editor and XSLT Editor options are as follows:
l Editor
l Auto indent mode: Select to automatically position the insertion pointer under the first non-blank character of the preceding line when you press ENTER.
l Insert mode: Select to use Insert mode and clear to use Overwrite mode. In Insert mode, whenyou enter text, existing text shifts to accommodate it. In Overwrite mode, text you enter overwritesexisting text. You can also press INSERT to toggle between the two modes.
l Use tab character: Select to use the tab character instead of spaces to represent tabs in theprogram file. Clear to use spaces to represent tabs. You must clear the Smart tab option to usethis option.
l Smart tab: Select to use smart tabs. A smart tab advances with reference to the preceding line. Itadvances to align with the first non-blank character it encounters on the preceding line, from itscurrent position forward. You must clear the Use tab character option to use Smart tabs.
l Optimal fill: Select to optimize the indent of every auto-indented line by minimizing the number ofspace and/or tab characters it uses. You must select both Auto indent mode and use tabcharacter to use this option.
l Backspace unindents: Select to move the insertion pointer to the previous indentation levelwhen you press BACKSPACE. This is useful when you enter a block of code such as a for loop;you enter the for statement, advance one indentation level to enter the body of the for loop, then

press BACKSPACE to enter the end for statement. You must select Auto indent mode to use thisoption.
l Cursor through tabs: Select to move one by one through the spaces of tabs using the left orright arrow keys. Clear to have the arrow keys treat the tab as a single character. You must selectUse tab character to use this option.
l Group undo: Select to set the undo feature of the Editor to undo the last group of editingcommands entered. An editing command is defined as a mouse click, a press on ENTER, or apress on any other key. A group of editing commands is a sequence of a single type of editingcommand. Clear to set the undo feature to undo only the last command entered.
l Cursor beyond EOF: Select to make it possible to position the pointer beyond the end of theprogram file. Clear to prevent this. If you clear Insert mode and select Cursor beyond EOF, youcan only overwrite the existing lines of the program; you cannot add lines to it.
l Cursor beyond EOL: Select to make it possible to position the pointer beyond the end of theline. Clear to prevent this.
l Keep trailing blanks: Select to preserve any blank spaces occurring at the end of a line. Clearto remove those blank spaces.
l Persistent blocks: Select to have any text you enter immediately after selecting a block of codeappended to that block of code as part of the selection. When you select this option, you can alsouse the arrow keys to move within the code without affecting the selected code. You must selectthe Enable selection option to use the Persistent blocks option.
l Overwrite blocks: Select to have any text you enter immediately after selecting a block of codereplace that block of code. You must clear Persistent blocks and select Enable selection forthis option to have an effect.
l Enable selection: Select to permit the creation of selections in the Code area. If selected, youcan create a selection by clicking and dragging the pointer over a portion of code, or by double-clicking to highlight the word or line under the pointer (the Double click line option determineswhether a word or line highlights). You can cut, copy, paste, and print selections. If you alsoselect Enable dragging, you can drag selections to reposition them in the code.
l Enable dragging: Select to permit dragging and dropping a selection to reposition it in theprogram. This option works only if you also select Enable selection.
l Enable search highlight: Select to highlight the search term match found in the code when youperform a search. Clear to prevent the highlighting. In both cases, the pointer appears after thelast character of the search term match.
l Double click line: Select to highlight the complete line of code when you double-click that line.Clear to highlight only the word under the pointer.
l Find text at cursor: Use to set the behavior of the Find dialog box. Select to automatically copythe word under the pointer into the Text to find box when you open the Find dialog box. Clear toprevent the copy. If no previous search terms appear in the Text to find drop-down list, the Editorperforms the copy regardless of whether this option is selected or cleared.
l Block indent: Enter the number of spaces to jump for each block indent. The default is 2 and themaximum is 16. The Block indent typically should agree with the tab stops in the Tab stopsoption. Perform a block indent by selecting a region of code and pressing CTRL+SHIFT+I (toindent the code to the right) or CTRL+SHIFT+U (to move the code to the left).
l Tab stops: Use to set the number of spaces to advance when you enter a tab character or to seta series of tab stops. Enter a single integer to set the number of spaces to advance with each tab.Enter a sequence of two or more integers, each separated by a space, to specify tab stops. Thesequence must be in ascending order. Tab stops are measured in number of space characters.For example, a value of 20 places the tab stop at the 20th space character. You can also use thedrop-down list to select a previously entered value.
l Display
l Display Options Group
l Editor font: Use to select the font the Editor uses to display the program code. Select theUse monospace fonts only option to restrict the fonts available to fixed width fonts. Apreview of the selected font, at the selected Size, appears in the Sample box.
l Size: Use to select the font size the Editor uses to display the program code. A preview ofthe selected font, at the selected size, appears in the Sample box.
l Use monospace fonts only: Select to display only fixed width fonts in the Editor font drop-down list. Every character in a fixed width font occupies the same amount of space.
l Sample: Displays a preview of the font selected in the Editor font option, at the sizeselected in the Size option.
l Margin and Gutter Group
l Right margin: Select to display a vertical gray bar as a right margin indicator. Use theRight margin position drop-down list to set the position of this indicator. This indicator is anon-screen visual reference only. It does not print, and does not enforce word wrap on linesthat exceed the number of characters set for it. It can be useful to indicate the right marginof the printed page, making it easy to determine whether a line of code extends beyond the
printable area of the page.l Right margin position: Enter the position of the right margin indicator, in number ofcharacters, relative to the left margin. For example, if you enter 80, the distance from the leftmargin to the right margin indicator is 80 characters. Use the drop-down list to select apreviously-entered margin position.
l Gutter: Select to have the Editor display a gutter between the Commands and Code areas.Use the Gutter width option to set the width of the gutter. Select the Line numbers on gutteroption to display line numbers in this area.
l Gutter width: Enter the width, in pixels, of the gutter. Use the drop-down list to select apreviously-entered gutter width.
l Line numbers on page: Select to display code line numbers at the left edge of the Codearea. If you clear both this and the Line numbers on gutter option, no line numbers appearalongside the lines of code.
l Line numbers on gutter: Select to display code line numbers in the gutter between theCommands and Code areas. Selecting this option has effect only if you selected the Gutteroption. If you clear both this and the Line numbers on gutter option, no line numbers appearalongside the lines of code.
l Color
l Mapping: Select a mapping for the content of the script in the script editor—the mapping is usedas well when the script appears in the text box of the Run Script Actions Properties dialog.Each mapping (Default, Classic, Ocean, Twilight) includes pre-set color values and attributes foreach script element as listed in the Elements list box. After selecting a mapping, you can editindividual elements to change their pre-sets by selecting them in the Element list box and editingtheir values.
l Element list box: Select a script element in the Element list box, then edit the background andforeground color with which it is displayed, and/or its formatting attributes. Each elementrecognized for each scripting language, for example, a URL in a JavaScript script, is displayedwith the properties you set.
l Foreground: Select the color that the element highlighted in the Element list box is displayedwith in the Script Editor.
l Background: Select the background color that the element highlighted in the Element list box isdisplayed with in the Script Editor. The color is used to highlight the element as if it was selectedwith the cursor.

l Attributes Group
l Bold: Select to bold the element highlighted in the Element list box when it is displayed inthe Script Editor.
l Italic: Select to italicize the element highlighted in the Element list box when it is displayedin the Script Editor.
l Underline: Select to underline the element highlighted in the Element list box when it isdisplayed in the Script Editor.
The Process AreaThe Process area, which is always available and visible, holds all the tasks, branches, conditions andcomments that make up the selected process. The Process area is built like an invisible grid divided by rows(horizontal) and columns (vertical). When adding a new Action task, a new row is added. When adding aBranch or Condition, a new column appears (unless there is already a column at that level).
The first task of any process, also called the initial input task, always appears in the first box in the upper leftcorner. When you create a new process, this first task is always followed by the default output task in thefollowing box. You will find below the list of operations you can perform in the Process Area:
l " Zoom In or Out within Process Area" on the next pagel " Adding Tasks" on the next pagel " Adding Branches" on page 664l " Edit a Task" on page 664l " Replacing Tasks, Conditions or Branches" on page 665l " Remove Tasks or Branches" on page 665l " Task Properties Dialog" on page 666l " Cutting, Copying and Pasting Tasks and Branches" on page 667l " Moving a Task or Branch Using Drag-and-Drop" on page 669l " Ignoring Tasks and Branches" on page 670l " Resize Rows and Columns of the Process Area" on page 671l " Selecting Documents in Tasks Links" on page 671l " Highlight a Task or Branch" on page 672

l " Undo a Command" on page 672l " Redo a Command" on page 673
Zoom In or Out within Process AreaYou can do a zoom out in the PlanetPress Workflow Process area to see more tasks at the same time. Inzoom out mode, you can perform the exact same functions as in normal view mode.
To zoom in or out on the PlanetPress Workflow Process Area:
1. Click on the View tab of the Ribbon.
2. Click on Zoom Out in the Navigate group to zoom out, and Zoom In to zoom in.
Adding TasksYou can add as many tasks as you want to your process by using the Plug-in Bar in PlanetPress Workflowprogram.
To insert a task:
1. Open the Plug-in Bar by clicking on its tab. If you can't see the Plug-in Bar tab, click on the View tab inthe Ribbon and make sure the Plug-in Bar is highlighted in the Show/Hide section.
2. Locate the task you want to add to your process. You can navigate between the different taskcategories by clicking the icons at the bottom of the Plug-in Bar.
3. Using your mouse, click and drag the task in your process at the place you want to insert it.4. Depending on where you place your mouse, you may see that you can replace or insert existing tasks,
or not place it at that location at all.5. When you drop the task in the desired location, a dialog box containing the available task properties is
displayed.6. Set the task properties as required and click OK to close the dialog box.

There are a few things to keep in mind when dropping tasks:
l You can insert input tasks anywhere in the process except in output task locations.l When you add an output task, a new branch leading to that new task is added above the selected taskor branch, except when replacing an existing output task.
l Dropping a task on top of another one replaces it.l Dropping a task between two tasks will insert it at that location.l You cannot add a task above the initial input task of a process, since new tasks are always addedabove a selected task or branch.
Adding BranchesThe PlanetPress Workflow Configuration program offers two different commands when it comes to addingnew branches to a process:
You can add a new branch, by dragging and dropping a branch, from the Process Logic category of thePlug-in Bar, into your process. Branches can be added using the Adding Tasks method.
You can add a new branch that contains all of the tasks below the point where you insert the branch. To dothis, right-click on the first task that you want to include in the branch, and select Branch From Here.... Anunknown task will be created as an output below the branch.
Edit a TaskTo edit a task, you simply need to access and change its properties. You may even do it while your processis in Debug mode (See About the Debug Mode).
To edit a task:
1. In the PlanetPress Workflow Process area, double-click the Task icon. A dialog box containing theavailable task properties is displayed.
2. Edit the task properties as required. Click specific tabs to see all the properties associated with thetask.
3. Click OK to close the dialog box and save the new properties.

Replacing Tasks, Conditions or BranchesYou can replace existing tasks either by dropping a new task on it, or by pasting another task over it.
To replace an existing task with a new task, see Adding Tasks.
To replace an existing task with another existing task or its properties, see Cutting, Copying and PastingTasks and Branches.
Note
You cannot replace a task by a branch or a condition. Trying to paste or drop a branch or conditionover a task will insert it before the task instead. The contrary is also true, you cannot replace a branchor condition with a task.
Warning
When you replace a task, you lose all the properties you set in this task.
Remove Tasks or BranchesTo remove any task or branch (except input and output tasks), use one of the following methods:
l Click on the task or branch you want to delete, go to the Home tab of PlanetPress Workflow Ribbonand click on the Delete button in the Clipboard group.
l Click on the task or branch you want to delete, and press the Delete (or "Del") key on your keyboard.l Right-click on the task or branch you want to delete, and select Delete from the menu.
When you remove a branch, all the tasks located in that branch are also deleted. When you delete a task,only that task is deleted.
Note
You cannot use the Delete option to remove an input or output task, but you can right-click on themand click Cut instead. This replaces the task with an unknown task (see Unknown Tasks)
To delete the path below a branch crossing (instead of the path to the right of the branch):
l Press Shift+CTRL+Delete.l From the right-click menu, choose Edit | Delete| Delete Below the Branch.
Task Properties DialogAny task you add to your PlanetPress Workflow process must be configured using its Properties dialog box.Each task's Properties Dialog will give you the options to configure that specific, individual task. Propertiesof one task do not directly affect the properties of another task, however there are some software preferencesthat may affect tasks in one way or another (see "Preferences" on page 621).
l Each task has its own set of tabs available, though some tabs are common to most tasks.l Most tasks have the General tab which lets you configure the main task properties for that specifictask.
l All tasks except for the InputErrorBin, Run Script,Open XLST and Comment tasks have an OnError tab that lets you manage errors generated by the task.
l All initial Input tasks have the Other tab which lists job infos and lets you back up the job file.
The "On Error" tab that is common to almost all tasks contain the following options:
l Send to Process: Check this option to send the job file to an error management process.l Error Process drop-down: Enabled only when the Send to Process option is checked. Lists anyprocess of which the initial input task is the Input Error Bin task.
l Action Group: This group is disabled in the initial input tasks and defaults to Stop Process. In allother tasks where the On Error tab is present, the following options are available:
l Ignore: The task is ignored as if it did not exist, and the job file is passed on to the next task inthe process.
l Stop Branch: If the task is in a branch of the process, the branch is stopped and the job file isreturned to the process after the branch. The branch will not produce any output.
l Stop Process: The process is stopped and no more processing is done. No further output isproduced.
l Log Message: Check this option to enable logging a custom error message in PlanetPress Workflow'log file.
l Message: Enabled only when the Log Message option is checked. Enter a message that will belogged in the PlanetPress Workflow' log file. You can use any variables available in PlanetPressWorkflow to customize the message.
l ID: Select the error ID you want to attribute to the error log.l Reset to defaults: Resets all options in this tab to their default values.
The error management system (the On error tab and the Error Bin Input task), however, are only triggeredwhen there is an error within the task functionality - that is, a plugin error. These kinds of errors are triggers ifthe plugin cannot communicate with a service, another task, if the plugin crashes, etc.
Cutting, Copying and Pasting Tasks and BranchesUsing cut and paste, and copy and paste, you can move as well as duplicate tasks and branches within agiven process as well as between different processes.
To cut and paste tasks or branches:
1. In PlanetPress Workflow Process area, select the task or branch you want to cut and paste.2. From the Home tab in the Ribbon, choose Cut (or right-click and select Cut from the drop-down
menu).3. To paste the task or branch to a different process, select that process.4. Select the task or branch crossing above which you want the task or branch to be pasted.5. From the Home tab in the Ribbon, choose Paste (or right-click and select Paste from the drop-down
menu).
To copy and paste tasks or branches:
1. In PlanetPress Workflow Process area, select the task or branch you want to copy and paste.2. From the Home tab in the Ribbon, choose Copy (or right-click and select Copy from the drop-down
menu).3. To paste the task or branch to a different process, select that process.4. Select the task or branch crossing above which you want the task or branch to be pasted.5. From the Home tab in the Ribbon, choose Paste (or right-click and select Paste from the drop-down
menu).
There are a few things to keep in mind when pasting tasks:
l When you cut a task or branch, it disappears from the Process Area but is kept in your clipboard until itis pasted somewhere else.
l You can cut or copy a task or branch from one process and paste it in another process or subprocess.l When you cut an input or output task, it is replaced with an Unknown Task, that you will need toreplace with another task for the process to be functional.
l If you cut one task or branch, then cut another one, the first one is lost and replaced by the second.Remember however that you can always undo the command to retrieve it (see Undo a Command).
l Tasks and branches will always appear on top (in other words, before) the task or branch where youpaste it. The only exceptions are input and output tasks which can only be pasted on top of UnknownTask.
Note
Instead of pasting the actual task or branch, you can simply paste the properties of the task or branch.
To copy and paste Properties of a task or branch:
1. Copy or Cut a task or branch of which you want to have the properties.2. Select the task or branch where you want to paste the properties3. From the Home tab in the Ribbon, choose Paste Properties (or right-click and select Paste
Properties from the drop-down menu).

Note
You can only paste the properties of an input task on the initial input task of your process. Similarlyyou can only paste the properties of an output task on another output task. Also, you cannot paste theproperties of a task on a branch and vice-versa.
Note
You can paste only the properties of the On Error tab of any task or branch on another one.
To copy and paste the On Error properties of a task or branch:
1. Copy or cut a task or branch from which you want the On Error properties.2. Select the task or branch where you want to paste the On Error properties.3. From the Home tab in the Ribbon, choose Paste On Error (or right-click and select Paste On Error
from the drop-down menu).
Moving a Task or Branch Using Drag-and-DropWhen you want to move a given task or branch, the simplest way is to use drag-and-drop. Using the mouse,you can drag and drop tasks and branches only within a given process. To move tasks and branchesbetween different processes, see Cutting, Copying and Pasting Tasks and Branches.
When you move a task or branch using drag and drop, it typically moves from its original location to aposition immediately preceding the target onto which you dropped it. But if you drop an input task over anunknown input task, the moved task will replace the unknown task. The same will happen if you drag anoutput task over an unknown output task. Note that it is impossible to drag-and-drop any task over aconfigured initial input or output task.
To move a task or branch using drag and drop:
1. In PlanetPress Workflow Process area, click the icon of the task or branch you want to move.2. While holding down the mouse button, drag the icon task or branch over another task or branch.

3. Release the mouse button to drop the dragged item. The dropped task or branch is moved above theitem over which it was dropped.
To duplicate a task or branch, the same method applies but with a slight difference:
1. In PlanetPress Workflow Process area, click the icon of the task or branch you want to duplicate.2. While holding down the mouse button, press and hold down the CTRL key and drag the icon task or
branch over another task or branch.3. Release the mouse button to drop the dragged item and release the CTRL key. The dropped task or
branch is copied above the item over which it was dropped.
When you move a branch, all its tasks are also moved. When you move a conditional branch, all the tasksappearing on the True side of the condition are also moved.
Note
You cannot drag a task or branch over an initial input task. Any input task that is dragged and dropped over anunknown initial input task will replace it. The same is true of an output task that is dragged and dropped over anunknown output task.
Ignoring Tasks and BranchesPlanetPress Workflow lets you ignore individual tasks, branches or conditions.
l When a task is disabled, it is not executed when the process is run in debug mode (see About theDebug Mode) or by PlanetPress Workflow Service.
l When a branch is disabled, the whole branch including the tasks inside that branch are ignored andnot executed. In the case of conditional branches, this means that the tasks appearing on the True sideare not executed.
A task, branch or condition that was previously disabled out can be re-enabled at any time.

To disable or enable a task or branch:
1. In the PlanetPress Workflow Process area, click the icon of a task or branch.2. From the Debug tab in the Ribbon, click Ignore. If the task or branch was enabled, it is now disabled,
and vice versa.
Resize Rows and Columns of the Process AreaResize the rows and columns of PlanetPress Workflow Process area in which tasks are located to bettervisualize the organization of your process.
To resize rows and columns of the PlanetPress Workflow Tools Process area:
1. In the PlanetPress Workflow Tools Process area, place your cursor over the separator line dividingeach section of row or column rulers.
2. When the cursor changes appearance, click and drag up or down to resize rows, or left or right toresize columns.
A dashed line appears as you drag indicating the new separation. The row or column, with all its tasks,moves accordingly.
Selecting Documents in Tasks LinksThe Properties dialog box of some action and output tasks let you select documents. Depending on wherethe document selection list appears you will have access to all the documents or only the documentsinstalled on a printer queue.
In most cases, you have three options:
l You can choose not to use any document (only in certain cases). This means no document is mergedwith the data and the job file is sent as is.
l You can choose a specific document from the list of installed documents. The document is mergedwith the data to generate output.
l You can choose a variable document (see below)

Variable Document Name
The Variable Document feature is used to dynamically determine which document is merged with the datain your output. The document name can come from any of the variable properties (see Variable Properties).
Note
If the data contains an extension, it will be replaced by .ptk.
To use a variable document:
1. Click on the %o entry in the document list2. Type the variable properties or use the right-click menu to insert the correct variable properties.3. Click OK on the dialog.
At run-time, if PlanetPress Workflow cannot find the document name generated by those variables, the taskwill fail.
Highlight a Task or BranchThe Highlight command lets you toggle the background color of selected tasks and branches. Note that thehighlight color may be changed via the PlanetPress Workflow Configuration preferences.
To highlight a Process Area square:
l Use the mouse pointer to select a given square.l In the PlanetPress Workflow button, click the View tab.
l Select Highlight from the Navigate group.
To remove the highlight, repeat the procedure.
Undo a CommandThe undo command lets you undo most commands performed with the PlanetPress Workflow Configurationprogram.

To undo a command:
l From the Quick Access Toolbar, choose Undo.
Redo a CommandThe Redo command can be used to redo commands that were just undone using the Undo command. Forexample, if you used the Undo command three times in a row and immediately thereafter decided to redothose commands, you could use the Redo command three times in a row to redo those commands. Notethat all commands in PlanetPress Workflow Configuration can be redone.
To redo a command:
l From the Quick Access Toolbar, choose Redo.
The Quick Access ToolbarPlanetPress Workflow Quick Access Toolbar is displayed, by default, on the right side of the PlanetPressWorkflow button and provides one-click shortcuts to commonly used functions and features. You can addas many buttons as you want to the Quick Access Toolbar and remove them at will.
To add a new button to the Quick Access Toolbar:
1. Locate the button you want to add in one of the tabs of the Ribbon.2. Right-Click on the button.3. Select Add to Quick Access toolbar.
To remove a button from the Quick Access Toolbar:
1. Locate the button you want to remove in the Quick Access Toolbar.2. Right-click on the button.3. Select Remove From Quick Access toolbar.

To move the Quick Access Toolbar below or above the Ribbon:
1. Right-click on the Quick Access Toolbar, or click on the downwards arrow at the rightmost end of theQuick Access Toolbar.
2. Click on Show Quick Access Toolbar Below the Ribbon or Show Quick Access Toolbar Abovethe Ribbon, depending on where you want it.
Note
The Quick Access Toolbar buttons cannot be moved or re-ordered. If you wish to re-order them, youwill need to remove all the buttons and re-add them in the desired order.
The PlanetPress Workflow RibbonThe PlanetPress Workflow Ribbon centralizes commands, organizing them into a set of Tabs, each tabcontaining groups of controls. Each tab on the Ribbon displays the commands that are most relevant to agiven feature set. The built-in Ribbon and Quick Access Toolbar contain commands that are frequently usedand convenient to keep close at hand. You can minimize the Ribbon, and choose the position of the QuickAccess Toolbar, as well as the commands it displays.
l You can minimize the Ribbon by right-clicking on it and selecting Minimize the Ribbon.l You can also customize the Ribbon's color scheme in the Preferences window.
The PlanetPress Workflow Ribbon has five tabs: the Home tab, the View tab, the Debug tab, the Tools taband the Help tab. Each one of these tabs contains a series of groups, each group holding a number ofcontrols.
l The Home tab includes the Clipboard, Processes, Variables, Documents and Printer Queuesgroups.
l The Clipboard group contains the typical Windows-based editing controls: Cut, Copy, Paste,Select All, Delete.
l The Processes group contains workflow controls, allowing to insert new processes of any typeas well as controls to converts, activate or branches processes.

l The Variables group contains two controls to insert either a Global variables availablethroughout the entire configuration, or Local variables available to the current process only.
l The Documents group contains the document controls, used to insert, refresh, update or deletedocuments and document instances.
l The Printer Queues group contains controls to set up printer queues of any type, as well asreplace any existing queues.
l The View tab includes the Arrange, Navigate and Show/Hide groups.
l The Arrange group contains the Group/Ungroup, Sort by Name and Order controls, allowingto reorder objects in the Configuration Components pane. It also includes the Undo/Redocontrols, as well as a Rename control, to modify a given component's name.
l The Navigate group contains a Processes control to select any existing process of the currentlyloaded configuration, as well as a Highlight control to mark a given node, a Zoom Out for aquick overview of the currently selected process, and Go to Child/Go to Parent to move arounda given process logical nodes (branches or conditions).
l The Show/Hide group contains four controls to display or hide any of the four panes; theConfiguration Components pane, the Object Inspector pane, the Message pane, the DebugInfo pane and the Plug-in Bar.
l The Debug tab includes the Data, Debug and Debug Messages groups.
l The Data group allows to associate a sample data file to the currently selected process, as wellas update or replace it, and display it in its text/PDF or Hexadecimal format.
l The Debug group contains the debugger's controls, allowing to execute a process step by step,skipping over or ignoring certain tasks, as well as setting up breakpoints and resetting variablesvalues. This group also includes the Send Configuration button, necessary to push the currentconfiguration to PlanetPress Workflow service.
l The Debug Messages group contains two controls to either clear or save the contents of theMessages pane.
l The Tools tab includes the Managers, Services and Test Page groups.
l The Managers group contains:
l The Install PostScript Font control allows to install a PostScript font into your PlanetPressWorkflow installation.
l The Virtual Drive Manager control loads the Virtual Drive Manager.
l The Access Manager control loads the Access Manager, allowing to grant/removepermissions to hosts.
l The Check for updates control, used to update the current PlanetPress Workflow version.
l The Launch Upgrade Wizard control, used when migrating from a previous PlanetPressWorkflow version.
l The Services group contains:
l The Services Status control allows to start, pause and stop PlanetPress Workflow service.
l The Configure Services control loads the PlanetPress Workflow Services dialog toconfigure the user account PlanetPress Workflow should use.
l The Service Console button opens the The PlanetPress Workflow Service Console,allowing to monitor real-time information on the configuration execution.
l The PlanetPress Capture group contains:l The Document Manager button opens the PlanetPress Capture Document Manager.l The Pen Manager button opens the PlanetPress Capture Pen Management Tool.
l The Test Page group contains:
l The PS Test Page control allows to print a Status Page for the selected Printer Queue.Note that if no printer queue is selected in the Configuration Components pane, thecontrol is disabled.
l The Text Test Page control allows to print a raw text test page for the selected PrinterQueue. Note that if no printer queue is selected in the Configuration Components pane,the control is disabled.
l The Help tab includes the Help, Activation and License groups.
l The Help group contains the User Guide, the Reference Guide and the About controls, used toaccess online documentation and version information.
l The Activation group contains the Software Activation and Printer Activation controls, usedto enter activation codes for either the software or a given device.
l The License group contains a link to the "PlanetPress Capture License Management" onpage 637.

The Task Comments PaneThe Task Comments pane displays comments relevant to the currently selected items, such as thecontents of the Comments tab of any task in the currently selected process.
The Task Comments pane cannot be used to edit the comments themselves - only to see them. to edit thecomments, the properties of the task must be opened, and the comments changed in the Comments tab.

Copyright InformationCopyright © 1994-2017 Objectif Lune Inc. All Rights Reserved.
No part of this publication may be reproduced, transmitted, transcribed, stored in a retrieval system, ortranslated into any other language or computer language in whole or in part, in any form or by any means,whether it be electronic, mechanical, magnetic, optical, manual or otherwise, without prior written consent ofObjectif Lune Inc.
Objectif Lune Inc.disclaims all warranties as to this software, whether expressed or implied, includingwithout limitation any implied warranties of merchantability, fitness for a particular purpose, functionality,data integrity or protection.
PlanetPress, PReS and PrintShop Mail are registered trademarks of Objectif Lune Inc.

Legal Notices and AcknowledgementsPlanetPress Workflow, Copyright © 2017, Objectif Lune Inc. All rights reserved.
The license agreements for the associated open source third party components can be downloaded here.
This application uses the following third party components:
l Apache Javascript Support (Rhino) version 1.7.3 which is licensed under the terms of the MozillaLicense Version 1.1. The source code can be obtained from the following location:https://developer.mozilla.org/en-US/docs/RhinoDownload?redirect=no
l Adobe PDF Library which is either a registered trademark or trademark of Adobe SystemsIncorporated in the United States and\or other countries.
l Adobe XMP Core Copyright © 1999 - 2010, Adobe Systems Incorporated. All rights reserved.
l Eclipse Persistence Services Project (EclipseLink), Copyright © 2007, Eclipse Foundation, Inc.and its licensors. All rights reserved. This is distributed under the terms of the Eclipse Public LicenseVersion 1.0 and Eclipse Distribution License Version 1.0.
l Fugue Icons by Yusuke Kamiyamane which are distributed under the terms of the Creative CommonsAttribution 3.0 License.
l Gecko which is distributed under the terms of the Mozilla Public License Version 2.0. Information onobtaining Gecko can be found on the following page: https://wiki.mozilla.org/Gecko:Getting_Started
l Glassfish Java Mail which is licensed under the terms of the Common Development and DistributionLicense (CDDL) Version 1.0. Information on how to download the Glassfish source can be obtainedfrom here: https://wikis.oracle.com/display/GlassFish/Java+EE+7+Maven+Coordinates
l Hamcrest Matchers Copyright © 2000-2006, www.hamcrest.org. All rights reserved.
l HyperSQL, Copyright © 2001-2010, The HSQL Development Group. All rights reserved.
l ICU4J 4.4.2 Copyright © 1995-2013 International Business Machines Corporation and others. Allrights reserved.
l Jacob Java Com Bridge which is licensed under the terms of the GNU Lesser General PublicLicense Version 2. The source code for this can be obtained from the following location:http://sourceforge.net/projects/jacob-project/files/jacob-project/
l JavaCraft JSch Copyright © 2002 - 2012 Atsuhiko Yamanaka, JCraft Inc. All rights reserved.
l JavaSysMon Copyright © 2009 ThoughtWorks, Inc. All rights reserved.

l JavaX Mail which is distributed under the terms of the Common Development and Distribution License(CDDL) Version 1.1. The source code for this can be obtained from the following location:https://java.net/projects/javamail/downloads/directory/source
l Jersey which is distributed under the terms of the Common Development and Distribution License(CDDL) Version 1.1. Information on how to obtain the source code can be found at the followinglocation: http://repo1.maven.org/maven2/org/glassfish/jersey/jersey-bom
l jersey-json-1.13 which is licensed under the terms of the Common Development and DistributionLicense (CDDL) Version 1.1. Information on how to obtain the source code can be found at thefollowing location: http://mvnrepository.com/artifact/com.sun.jersey/jersey-json/1.13-b01
l Jersey Multipart which is distributed under the terms of the Common Development and DistributionLicense (CDDL) Version 1.1. Information on how to obtain the source code can be found at thefollowing location: http://repo1.maven.org/maven2/org/glassfish/jersey/jersey-bom
l JGoodies Forms, JGoodies Binding and JGoodies Looks, Copyright © 2002-2013 JGoodiesSoftware GmbH. All rights reserved.
l JNA Version 3.5.1 which is distributed under the terms of the GNU Lesser General Public LicenseVersion 2.1. The source code for this can be obtained from the following location:https://github.com/twall/jna/releases
l Junit which is distributed under the terms of the Eclipse Public License Version 1.0. The source codefor Junit can be obtained from the following location: https://github.com/junit-team/junit/tree/master/src
l Mimepull which is distributed under the terms of the Common Development and Distribution License(CDDL) Version 1.1. The source code for this can be obtained from the following location:https://maven.java.net/content/repositories/releases/org/jvnet/mimepull/mimepull/
l Objectweb ASM, Copyright © 2000-2011 INRIA, France Telecom. All rights reserved.
l Relique CSV Driver which is licensed under the terms of the Lesser General Public License Version2.0. This can be obtained from the following location:http://sourceforge.net/p/csvjdbc/code/ci/master/tree/
l Rhino 1.6R7 and 1.7R2 which are licensed under the terms of the Mozilla License Version 1.1. Thesource code for this can be obtained from the following location: https://developer.mozilla.org/en-US/docs/RhinoDownload?redirect=no
l Saxon which is distributed under the terms of the Mozilla Public License Version 2.0. The source codefor this can be obtained from the following location: http://sourceforge.net/projects/saxon/files/Saxon-HE/9.6/
l Servlet API developed by Sun as part of the Glassfish project and licensed under the terms of theCommon Development and Distribution License (CDDL) Version 1.0. Information on how to downloadthe Glassfish source (as part of Java EE platform) can be obtained from here:https://wikis.oracle.com/display/GlassFish/Java+EE+7+Maven+Coordinates
l Spring Framework which is distributed under the terms of the Apache Software License Version 2.0.This product includes subcomponents with separate copyright notices and license terms.
l Springsource JavaX Mail which is distributed under the terms of the Common Development andDistribution License (CDDL) Version 1.0. The source code for this can be obtained from the followinglocation:http://ebr.springsource.com/repository/app/bundle/version/detail?name=com.springsource.javax.mail&version=1.4.5&searchType=bundlesByName&searchQuery=mail
l Springsource SLF4J 1.6.1, Copyright © 2004-2008 QOS.ch. All rights reserved.
l Web Services Description Language for Java which is distributed under the terms of the CommonPublic License v 1.0. The source code for this can be obtained from the following location:http://wsdl4j.cvs.sourceforge.net/viewvc/wsdl4j/
l XULRunner which is distributed under the terms of the Mozilla Public License Version 2.0. Thesource code for this can be obtained from the following location:http://ftp.mozilla.org/pub/mozilla.org/xulrunner/releases/latest/source/
l zziplib which is licensed under the terms of the Mozilla License Version 1.1. The source code for thiscan be obtained from the following location: http://sourceforge.net/projects/zziplib/files/zziplib13/
l 7-Zip SFX which is licensed under the terms of the GNU Lesser General Public License Version 2.1.The source code for this can be obtained from the following location: http://www.7zsfx.info/files/7zsd_src_160_2712.7z
Portions of certain libraries included in this application which are distributed under the terms of the MozillaPublic License have been modified. To obtain copies of the modified libraries please contact your localObjective Lune Support team.
This application also uses the following components which are distributed under the terms of the ApacheSoftware License Version 2.0:
l Apache Antl Apache Axisl Apache CFXl Apache Commons Beanutils

l Apache Commons CLIl Apache Commons Codecl Apache Commons Collectionsl Apache Commons Configurationl Apache Commons DBCPl Apache Commons Discoveryl Apache Commons FileUploadl Apache Commons Imagingl Apache Commons IOl Apache Commons Langl Apache Commons Loggingl Apache Commons Netl Apache Commons Pooll Apache Commons VFSl Apache Derbyl Apache Felix and dependenciesl Apache Geronimol Apache Jakarta HttpClientl Apache Log4jl Apache Neethil Apache OpenCMISl Apache POIl Apache ServiceMixl Apache Tomcatl Apache WSS4Jl Apache Xalanl Apache Xerces2 Java Parserl Apache XMLGraphicsl Apache XML-RPCl Barcode4j

l Google Collectionsl Google GSONl Jettyl LMAX Disruptorl OPS4J Pax Webl org.json.simplel Spring Dynamic Modulesl StAXl XMLBeans
Eclipse Technology:
This Software includes unmodified Eclipse redistributables, which are available at www.eclipse.org. TheEclipse redistributables are distributed under the terms of the Eclipse Public License - v 1.0 that can befound at https://www.eclipse.org/legal/epl-v10.html.
VSS Java FreeMarker:
This product includes software developed by the Visigoth Software Society (http://www.visigoths.org/).
This includes the following subcomponents that are licensed by the Apache Software Foundation under theApache License, Version 2.0:
l freemarker/ext/jsp/web-app_2_2.dtdl freemarker/ext/jsp/web-app_2_3.dtdl freemarker/ext/jsp/web-app_2_4.xsdl freemarker/ext/jsp/web-app_2_5.xsdl freemarker/ext/jsp/web-jsptaglibrary_1_1.dtdl freemarker/ext/jsp/web-jsptaglibrary_1_2.dtdl freemarker/ext/jsp/web-jsptaglibrary_2_0.xsdl freemarker/ext/jsp/web-jsptaglibrary_2_1.xsd
Java Advanced Imaging:
This application uses Java Advanced Imaging which is part of the Java SE framework and platform andwhich is distributed under the terms of the Oracle Binary Code License Agreement for the Java SE PlatformProducts and Java FX. Copyright 2013, Oracle America ,Inc. All rights reserved. Use is subject to licenseterms. ORACLE and JAVA trademarks and all ORACLE- and JAVA-related trademarks, service marks,logos and other brand designations are trademarks or registered trademarks of Oracle in the U.S. and othercountries.
Further Components:
l This product includes software developed by the JDOM Project (http://www.jdom.org/).l Portions of this software are copyright © 2010 The FreeType Project (www.freetype.org). All rightsreserved.
l This product includes software developed by JSON.org (http://www.json.org/java/index.html).
Click to download the EULA as PDF