PeopleSoft HCM 9.2: PeopleSoft Global Payroll for Switzerland
Upload
khangminh22Category
view
2download
0
PeopleSoft Enterprise HumanResources 8.9 PeopleBook:Administer Workforce
April 2005

PeopleSoft Enterprise Human Resources 8.9 PeopleBook: Administer WorkforceSKU HRCS89MP1HAW-B 0405Copyright © 1988-2005 PeopleSoft, Inc. All rights reserved.
All material contained in this documentation is proprietary and confidential to PeopleSoft, Inc. (“PeopleSoft”),protected by copyright laws and subject to the nondisclosure provisions of the applicable PeopleSoft agreement. Nopart of this documentationmay be reproduced, stored in a retrieval system, or transmitted in any form or by anymeans, including, but not limited to, electronic, graphic, mechanical, photocopying, recording, or otherwise withoutthe prior written permission of PeopleSoft.
This documentation is subject to change without notice, and PeopleSoft does not warrant that the material containedin this documentation is free of errors. Any errors found in this document should be reported to PeopleSoft in writing.
The copyrighted software that accompanies this document is licensed for use only in strict accordance with theapplicable license agreement which should be read carefully as it governs the terms of use of the software and thisdocument, including the disclosure thereof.PeopleSoft, PeopleTools, PS/nVision, PeopleCode, PeopleBooks, PeopleTalk, and Vantive are registeredtrademarks, and Pure Internet Architecture, Intelligent ContextManager, and The Real-Time Enterprise aretrademarks of PeopleSoft, Inc. All other company and product namesmay be trademarks of their respective owners.The information contained herein is subject to change without notice.
Open Source DisclosurePeopleSoft takes no responsibility for its use or distribution of any open source or shareware software ordocumentation and disclaims any and all liability or damages resulting from use of said software or documentation.The following open source software may be used in PeopleSoft products and the following disclaimers are provided.Apache Software FoundationThis product includes software developed by the Apache Software Foundation (http://www.apache.org/). Copyright© 1999-2000 The Apache Software Foundation. All rights reserved.THIS SOFTWARE IS PROVIDED “AS IS” ANDANYEXPRESSEDOR IMPLIEDWARRANTIES,INCLUDING, BUTNOTLIMITEDTO, THE IMPLIEDWARRANTIESOFMERCHANTABILITYANDFITNESS FORAPARTICULAR PURPOSEAREDISCLAIMED. INNOEVENT SHALL THEAPACHESOFTWAREFOUNDATIONOR ITSCONTRIBUTORSBELIABLE FORANYDIRECT, INDIRECT,INCIDENTAL, SPECIAL, EXEMPLARY, ORCONSEQUENTIALDAMAGES (INCLUDING, BUTNOTLIMITEDTO, PROCUREMENTOF SUBSTITUTEGOODSOR SERVICES; LOSSOFUSE, DATA, ORPROFITS; ORBUSINESS INTERRUPTION)HOWEVERCAUSEDANDONANYTHEORYOFLIABILITY,WHETHER INCONTRACT, STRICT LIABILITY, OR TORT (INCLUDINGNEGLIGENCEOROTHERWISE)ARISING INANYWAYOUTOF THEUSEOFTHIS SOFTWARE, EVEN IFADVISEDOFTHE POSSIBILITYOF SUCHDAMAGE.OpenSSLCopyright © 1998-2003 The OpenSSL Project. All rights reserved.This product includes software developed by the OpenSSL Project for use in the OpenSSL Toolkit(http://www.openssl.org/).THIS SOFTWARE IS PROVIDEDBYTHEOpenSSL PROJECT “AS IS”ANDANYEXPRESSEDORIMPLIEDWARRANTIES, INCLUDING, BUTNOTLIMITEDTO, THE IMPLIEDWARRANTIESOFMERCHANTABILITYANDFITNESS FORAPARTICULAR PURPOSEAREDISCLAIMED. INNOEVENTSHALLTHEOpenSSL PROJECTOR ITS CONTRIBUTORSBELIABLE FORANYDIRECT, INDIRECT,INCIDENTAL, SPECIAL, EXEMPLARY, ORCONSEQUENTIALDAMAGES (INCLUDING, BUTNOTLIMITEDTO, PROCUREMENTOF SUBSTITUTEGOODSOR SERVICES; LOSSOFUSE, DATA, ORPROFITS; ORBUSINESS INTERRUPTION)HOWEVERCAUSEDANDONANYTHEORYOFLIABILITY,WHETHER INCONTRACT, STRICT LIABILITY, OR TORT (INCLUDINGNEGLIGENCEOROTHERWISE)ARISING INANYWAYOUTOF THEUSEOFTHIS SOFTWARE, EVEN IFADVISEDOFTHE POSSIBILITYOF SUCHDAMAGE.SSLeay

Copyright © 1995-1998 Eric Young. All rights reserved.This product includes cryptographic software written by Eric Young ([email protected]). This productincludes software written by TimHudson ([email protected]). Copyright © 1995-1998 Eric Young. Allrights reserved. THIS SOFTWARE IS PROVIDEDBYERICYOUNG “AS IS”ANDANYEXPRESSORIMPLIEDWARRANTIES, INCLUDING, BUTNOTLIMITEDTO, THE IMPLIEDWARRANTIESOFMERCHANTABILITYANDFITNESS FORAPARTICULAR PURPOSEAREDISCLAIMED. INNOEVENTSHALLTHEAUTHORORCONTRIBUTORSBELIABLE FORANYDIRECT, INDIRECT, INCIDENTAL,SPECIAL, EXEMPLARY, ORCONSEQUENTIALDAMAGES (INCLUDING, BUTNOTLIMITEDTO,PROCUREMENTOF SUBSTITUTEGOODSOR SERVICES; LOSSOFUSE, DATA, OR PROFITS; ORBUSINESS INTERRUPTION) HOWEVERCAUSEDANDONANYTHEORYOF LIABILITY,WHETHER INCONTRACT, STRICT LIABILITY, OR TORT (INCLUDINGNEGLIGENCEOROTHERWISE) ARISING INANYWAYOUTOFTHEUSEOFTHIS SOFTWARE, EVEN IFADVISEDOFTHE POSSIBILITYOF SUCHDAMAGE.Loki LibraryCopyright © 2001 byAndrei Alexandrescu. This code accompanies the book:Alexandrescu, Andrei. “Modern C++Design: Generic Programming and Design Patterns Applied.” Copyright ©2001Addison-Wesley. Permission to use, copy, modify, distribute and sell this software for any purpose is herebygranted without fee, provided that the above copyright notice appear in all copies and that both that copyright noticeand this permission notice appear in supporting documentation.Helma ProjectCopyright © 1999-2004 Helma Project. All rights reserved.THIS SOFTWARE IS PROVIDED “AS IS” ANDANYEXPRESSEDOR IMPLIEDWARRANTIES,INCLUDING, BUTNOTLIMITEDTO, THE IMPLIEDWARRANTIESOFMERCHANTABILITYANDFITNESS FORAPARTICULAR PURPOSEAREDISCLAIMED. INNOEVENT SHALL THEHELMAPROJECTOR ITSCONTRIBUTORSBELIABLE FORANYDIRECT, INDIRECT, INCIDENTAL,SPECIAL, EXEMPLARY, ORCONSEQUENTIALDAMAGES (INCLUDING, BUTNOTLIMITEDTO,PROCUREMENTOF SUBSTITUTEGOODSOR SERVICES; LOSSOFUSE, DATA, OR PROFITS; ORBUSINESS INTERRUPTION) HOWEVERCAUSEDANDONANYTHEORYOF LIABILITY,WHETHER INCONTRACT, STRICT LIABILITY, OR TORT (INCLUDINGNEGLIGENCEOROTHERWISE) ARISING INANYWAYOUTOFTHEUSEOFTHIS SOFTWARE, EVEN IFADVISEDOFTHE POSSIBILITYOF SUCHDAMAGE.Helma includes third party software released under different specific license terms. See the licenses directory in theHelma distribution for a list of these license.SarissaCopyright © 2004Manos Batsis.This library is free software; you can redistribute it and/or modify it under the terms of the GNULesser GeneralPublic License as published by the Free Software Foundation; either version 2.1 of the License, or (at your option)any later version.This library is distributed in the hope that it will be useful, butWITHOUTANYWARRANTY; without even theimplied warranty ofMERCHANTABILITY or FITNESS FORAPARTICULARPURPOSE. See the GNULesserGeneral Public License for more details.You should have received a copy of the GNULesser General Public License along with this library; if not, write tothe Free Software Foundation, Inc., 59 Temple Place, Suite 330, Boston,MA 02111-1307 USA.


Contents
General PrefaceAbout This PeopleBook Preface .... .. . . . . . . . . . . . . . . . . . .. . . . . . . . . . . . . . .. . . . . . . . . . . . .. . . . . . . . . . . . . . . . . . . . .xxiPeopleSoft Application Prerequisites.. . . . . . . . . . . . . . . . . . . . . . . . . . . . . . . . . . . . . . . . . . . . . . . . . . . . . . . . . . . . . . . . . . . . . . . . . . . . . . .xxiPeopleSoft Application Fundamentals.. . . . . . . . . . . . . . . . . . . . . . . . . . . . . . . . . . . . . . . . . . . . . . . . . . . . . . . . . . . . . . . . . . . . . . . . . . . . . .xxiDocumentation Updates and Printed Documentation.. . . . . . . . . . . . . . . . . . . . . . . . . . . . . . . . . . . . . . . . . . . . . . . . . . . . . . . . . . .xxii
Obtaining Documentation Updates.. . . . . . . . . . . . . . . . . . . . . . . . . . . . . . . . . . . . . . . . . . . . . . . . . . . . . . . . . . . . . . . . . . . . . .. . . . . . .xxiiOrdering Printed Documentation.. . . . . . . . . . . . . . . . . . . . . . . . . . . . . . . . . . . . . . . . . . . . . . . . . . . . . . . . . . . . . . . . . . . . . . . .. . . . . . .xxii
Additional Resources.. . . . . . . . . . . . . . . . . . . . . . . . . . . . . . . . . . . . . . . . . . . . . . . . . . . . . . . . . . . . . . . . . . . . . . . . . . . . . . . . . . . . . . . . . . . . . . . .xxiiiTypographical Conventions and Visual Cues.. . . . . . . . . . . . . . . . . . . . . . . . . . . . . . . . . . . . . . . . . . . . . . . . . . . . . . . . . . . . . . . . . . . .xxiv
Typographical Conventions.. . . . . . . . . . . . . . . . . . . . . . . . . . . . . . . . . . . . . . . . . . . . . . . . . . . . . . . . . . . . . . . . . . . . . . . . . . . . . .. . . . . .xxivVisual Cues.. . . . . . . . . . . . . . . . . . . . . . . . . . . . . . . . . . . . . . . . . . . . . . . . . . . . . . . . . . . . . . . . . . . . . . . . . . . . . . . . . . . . . . . . . . . . . . . . .. . . . . . .xxvCountry, Region, and Industry Identifiers.. . . . . . . . . . . . . . . . . . . . . . . . . . . . . . . . . . . . . . . . . . . . . . . . . . . . . . . . . . . . . . .. . . . . .xxviCurrency Codes.. . . . . . . . . . . . . . . . . . . . . . . . . . . . . . . . . . . . . . . . . . . . . . . . . . . . . . . . . . . . . . . . . . . . . . . . . . . . . . . . . . . . . . . . . . . .. . . . . .xxvi
Comments and Suggestions.. . . . . . . . . . . . . . . . . . . . . . . . . . . . . . . . . . . . . . . . . . . . . . . . . . . . . . . . . . . . . . . . . . . . . . . . . . . . . . . . . . . . . . .xxviCommon Elements Used in PeopleBooks.. . . . . . . . . . . . . . . . . . . . . . . . . . . . . . . . . . . . . . . . . . . . . . . . . . . . . . . . . . . . . . . . . . . . . . .xxvii
PrefacePeopleSoft Enterprise Human Resources Administer Workforce Preface.. . . . . . . . . . . . . . . . . . .xxixPeopleSoft Products.. . . . . . . . . . . . . . . . . . . . . . . . . . . . . . . . . . . . . . . . . . . . . . . . . . . . . . . . . . . . . . . . . . . . . . . . . . . . . . . . . . . . . . . . . . . . . . . .xxixPeopleSoft Enterprise HRMS Application Fundamentals.. . . . . . . . . . . . . . . . . . . . . . . . . . . . . . . . . . . . . . . . . . . . . . . . . . . . . .xxixPeopleBook Structure.. . . . . . . . . . . . . . . . . . . . . . . . . . . . . . . . . . . . . . . . . . . . . . . . . . . . . . . . . . . . . . . . . . . . . . . . . . . . . . . . . . . . . . . . . . . . . . .xxix
Chapter 1Getting Started with Administer Workforce..... . . . . . . . . . . . . . . . . . . . . . . . . . . . . . . . . . . . . . . . . . . . . . . . . . . . . . . . . . .1Human Resources Administer Workforce Overview... . . . . . . . . . . . . . . . . . . . . . . . . . . . . . . . . . . . . . . . . . . . . . . . . . . . . . . . . . . . . . .1Human Resources Administer Workforce Business Processes.. . . . . . . . . . . . . . . . . . . . . . . . . . . . . . . . . . . . . . . . . . . . . . . . . . .2Human Resources Administer Workforce Integrations.. . . . . . . . . . . . . . . . . . . . . . . . . . . . . . . . . . . . . . . . . . . . . . . . . . . . . . . . . . . . .3Human Resources Administer Workforce Implementation.. . . . . . . . . . . . . . . . . . . . . . . . . . . . . . . . . . . . . . . . . . . . . . . . . . . . . . . . .3
Chapter 2Setting Up the Administer Workforce Business Process... . . . . . . . . . . . . . . . . . . . . . . . . . . . . . . . . . . . . . . . . . .5Defining Personnel Actions and Reasons.. . . . . . . . . . . . . . . . . . . . . . . . . . . . . . . . . . . . . . . . . . . . . . . . . . . . . . . . . . . . . . . . . . . . . . . . . . . .5
Understanding Personnel Action Reasons.. . . . . . . . . . . . . . . . . . . . . . . . . . . . . . . . . . . . . . . . . . . . . . . . . . . . . . . . . . . . .. . . . . . . . . .5
PeopleSoft Proprietary and Confidential v

Contents
Pages Used to Define Personnel Actions and Personnel Action Reasons. . . . . . . . . . . . . . . . . . . . . . . . .. . . . . . . . . .7Defining Personnel Actions... . . . . . . . . . . . . . . . . . . . . . . . . . . . . . . . . . . . . . . . . . . . . . . . . . . . . . . . . . . . . . . . . . . . . . . . . . . . . .. . . . . . . . . .7Defining Personnel Action Reasons.. . . . . . . . . . . . . . . . . . . . . . . . . . . . . . . . . . . . . . . . . . . . . . . . . . . . . . . . . . . . . . . . . . . .. . . . . . . .10
(USF) Defining Award Actions.. . . . . . . . . . . . . . . . . . . . . . . . . . . . . . . . . . . . . . . . . . . . . . . . . . . . . . . . . . . . . . . . . . . . . . . . . . . . . . . . . . . . . . .12Pages Used to Define Award Actions.. . . . . . . . . . . . . . . . . . . . . . . . . . . . . . . . . . . . . . . . . . . . . . . . . . . . . . . . . . . . . . . . . . .. . . . . . . .13Defining Award Codes.. . . . . . . . . . . . . . . . . . . . . . . . . . . . . . . . . . . . . . . . . . . . . . . . . . . . . . . . . . . . . . . . . . . . . . . . . . . . . . . . . . . .. . . . . . . .13
Defining Employee Identification.. . . . . . . . . . . . . . . . . . . . . . . . . . . . . . . . . . . . . . . . . . . . . . . . . . . . . . . . . . . . . . . . . . . . . . . . . . . . . . . . . . . .14Pages Used to Define Employee Identification.. . . . . . . . . . . . . . . . . . . . . . . . . . . . . . . . . . . . . . . . . . . . . . . . . . . . . . . .. . . . . . . .14Defining Visas and Work Permits.. . . . . . . . . . . . . . . . . . . . . . . . . . . . . . . . . . . . . . . . . . . . . . . . . . . . . . . . . . . . . . . . . . . . . . . .. . . . . . . .14
Defining Additional Employment Setup Data.. . . . . . . . . . . . . . . . . . . . . . . . . . . . . . . . . . . . . . . . . . . . . . . . . . . . . . . . . . . . . . . . . . . . . .15Pages Used to Define Additional Employment Data.. . . . . . . . . . . . . . . . . . . . . . . . . . . . . . . . . . . . . . . . . . . . . . . . . .. . . . . . . .16Defining Ethnic Groups.. . . . . . . . . . . . . . . . . . . . . . . . . . . . . . . . . . . . . . . . . . . . . . . . . . . . . . . . . . . . . . . . . . . . . . . . . . . . . . . . . . .. . . . . . . .17
Creating Checklists... . . . . . . . . . . . . . . . . . . . . . . . . . . . . . . . . . . . . . . . . . . . . . . . . . . . . . . . . . . . . . . . . . . . . . . . . . . . . . . . . . . . . . . . . . . . . . . . . . .18Understanding Checklists.. . . . . . . . . . . . . . . . . . . . . . . . . . . . . . . . . . . . . . . . . . . . . . . . . . . . . . . . . . . . . . . . . . . . . . . . . . . . . . . .. . . . . . . .18Pages Used to Create Checklists. . . . . . . . . . . . . . . . . . . . . . . . . . . . . . . . . . . . . . . . . . . . . . . . . . . . . . . . . . . . . . . . . . . . . . . .. . . . . . . .18Setting Up Standard Checklists.. . . . . . . . . . . . . . . . . . . . . . . . . . . . . . . . . . . . . . . . . . . . . . . . . . . . . . . . . . . . . . . . . . . . . . . . . .. . . . . . . .18
Chapter 3Setting Up Country-Specific Tables.. . . . . . . . . . . . . . . . . . . . . . . . . . . . . . . . . . . . . . . . . . . . . . . . . . . . . . . . . . . . . . . . . . . . .21Understanding Country-Specific Table Setup.. . . . . . . . . . . . . . . . . . . . . . . . . . . . . . . . . . . . . . . . . . . . . . . . . . . . . . . . . . . . . . . . . . . . . .21(FRA) Setting Up French Workforce Tables. . . . . . . . . . . . . . . . . . . . . . . . . . . . . . . . . . . . . . . . . . . . . . . . . . . . . . . . . . . . . . . . . . . . . . . .21
Understanding French Social Security Tracking Code Maintenance.. . . . . . . . . . . . . . . . . . . . . . . . . . . . . . .. . . . . . . .22Pages Used to Set Up French Workforce Tables.. . . . . . . . . . . . . . . . . . . . . . . . . . . . . . . . . . . . . . . . . . . . . . . . . . . . .. . . . . . . .22Defining Hours Type Codes.. . . . . . . . . . . . . . . . . . . . . . . . . . . . . . . . . . . . . . . . . . . . . . . . . . . . . . . . . . . . . . . . . . . . . . . . . . . . . .. . . . . . . .22Entering French Occupational Illness Codes.. . . . . . . . . . . . . . . . . . . . . . . . . . . . . . . . . . . . . . . . . . . . . . . . . . . . . . . . . .. . . . . . . .23
(DEU) Setting Up German Workforce Tables.. . . . . . . . . . . . . . . . . . . . . . . . . . . . . . . . . . . . . . . . . . . . . . . . . . . . . . . . . . . . . . . . . . . . . .24Understanding Accident Insurance.. . . . . . . . . . . . . . . . . . . . . . . . . . . . . . . . . . . . . . . . . . . . . . . . . . . . . . . . . . . . . . . . . . . . . .. . . . . . . .25Pages Used to Set Up German Workforce Tables.. . . . . . . . . . . . . . . . . . . . . . . . . . . . . . . . . . . . . . . . . . . . . . . . . . . .. . . . . . . .25Defining Accident Insurance Codes.. . . . . . . . . . . . . . . . . . . . . . . . . . . . . . . . . . . . . . . . . . . . . . . . . . . . . . . . . . . . . . . . . . . . .. . . . . . . .26Entering German Nation DEUEV Codes.. . . . . . . . . . . . . . . . . . . . . . . . . . . . . . . . . . . . . . . . . . . . . . . . . . . . . . . . . . . . . . .. . . . . . . .27
(NLD) Setting Up Dutch SAMEN Countries.. . . . . . . . . . . . . . . . . . . . . . . . . . . . . . . . . . . . . . . . . . . . . . . . . . . . . . . . . . . . . . . . . . . . . . . .28Understanding SAMEN Country Setup.. . . . . . . . . . . . . . . . . . . . . . . . . . . . . . . . . . . . . . . . . . . . . . . . . . . . . . . . . . . . . . . . .. . . . . . . .28Page Used to Set Up Dutch SAMEN Country Table. . . . . . . . . . . . . . . . . . . . . . . . . . . . . . . . . . . . . . . . . . . . . . . . . . .. . . . . . . .29Updating the List of SAMEN Countries.. . . . . . . . . . . . . . . . . . . . . . . . . . . . . . . . . . . . . . . . . . . . . . . . . . . . . . . . . . . . . . . . .. . . . . . . .29
(ITA) Setting Up Italian Workforce Tables. . . . . . . . . . . . . . . . . . . . . . . . . . . . . . . . . . . . . . . . . . . . . . . . . . . . . . . . . . . . . . . . . . . . . . . . . . .29Pages Used to Set Up Italian Workforce Tables.. . . . . . . . . . . . . . . . . . . . . . . . . . . . . . . . . . . . . . . . . . . . . . . . . . . . . . .. . . . . . . .30Defining INPS Codes... . . . . . . . . . . . . . . . . . . . . . . . . . . . . . . . . . . . . . . . . . . . . . . . . . . . . . . . . . . . . . . . . . . . . . . . . . . . . . . . . . . . .. . . . . . . .32Defining Seniority Notification Periods.. . . . . . . . . . . . . . . . . . . . . . . . . . . . . . . . . . . . . . . . . . . . . . . . . . . . . . . . . . . . . . . . . .. . . . . . . .34
(JPN) Setting Up Intercompany Transfer Company Data.. . . . . . . . . . . . . . . . . . . . . . . . . . . . . . . . . . . . . . . . . . . . . . . . . . . . . . . .34
vi PeopleSoft Proprietary and Confidential

Contents
Understanding Setup of Company Data for Intercompany Transfers.. . . . . . . . . . . . . . . . . . . . . . . . . . . . . . .. . . . . . . .35Pages Used to Set Up Intercompany Transfer Company Data.. . . . . . . . . . . . . . . . . . . . . . . . . . . . . . . . . . . . . .. . . . . . . .35
(JPN) Setting Up Japanese Supervisor Levels.. . . . . . . . . . . . . . . . . . . . . . . . . . . . . . . . . . . . . . . . . . . . . . . . . . . . . . . . . . . . . . . . . . . .35Page Used to Set Up Japanese Supervisor Levels. . . . . . . . . . . . . . . . . . . . . . . . . . . . . . . . . . . . . . . . . . . . . . . . . . . .. . . . . . . .37
(MYS and SGP) Setting Up Festive Advance Religions Tables for Singapore and Malaysia. . . . . . . . . . . . . . . .37Page Used to Set Up Festive Advance Religions for Singapore and Malaysia. . . . . . . . . . . . . . . . . . . .. . . . . . . .37
(NZL) Setting Up New Zealand Disability Codes.. . . . . . . . . . . . . . . . . . . . . . . . . . . . . . . . . . . . . . . . . . . . . . . . . . . . . . . . . . . . . . . . . .37Page Used to Set Up New Zealand Disability Codes.. . . . . . . . . . . . . . . . . . . . . . . . . . . . . . . . . . . . . . . . . . . . . . . . .. . . . . . . .37
(ESP) Setting Up Spanish Workforce Tables.. . . . . . . . . . . . . . . . . . . . . . . . . . . . . . . . . . . . . . . . . . . . . . . . . . . . . . . . . . . . . . . . . . . . . .38Pages Used for Spanish Workforce Tables.. . . . . . . . . . . . . . . . . . . . . . . . . . . . . . . . . . . . . . . . . . . . . . . . . . . . . . . . . . . .. . . . . . . .38Entering Country Codes for Social Security Reporting.. . . . . . . . . . . . . . . . . . . . . . . . . . . . . . . . . . . . . . . . . . . . . . .. . . . . . . .39Entering Insurance Company Descriptions and Address Information.. . . . . . . . . . . . . . . . . . . . . . . . . . . . . .. . . . . . . .40Viewing Risk Codes.. . . . . . . . . . . . . . . . . . . . . . . . . . . . . . . . . . . . . . . . . . . . . . . . . . . . . . . . . . . . . . . . . . . . . . . . . . . . . . . . . . . . . . .. . . . . . . .40Defining Maximum and Minimum Social Security Ceilings.. . . . . . . . . . . . . . . . . . . . . . . . . . . . . . . . . . . . . . . . . . .. . . . . . . .41Defining Maximum and Minimum Social Security Bases by Work Group.. . . . . . . . . . . . . . . . . . . . . . . . . .. . . . . . . .42Defining Contribution Rates and Percentages.. . . . . . . . . . . . . . . . . . . . . . . . . . . . . . . . . . . . . . . . . . . . . . . . . . . . . . . . .. . . . . . . .44Entering Company Information.. . . . . . . . . . . . . . . . . . . . . . . . . . . . . . . . . . . . . . . . . . . . . . . . . . . . . . . . . . . . . . . . . . . . . . . . . .. . . . . . . .46Defining Spanish Hiring Centers.. . . . . . . . . . . . . . . . . . . . . . . . . . . . . . . . . . . . . . . . . . . . . . . . . . . . . . . . . . . . . . . . . . . . . . . . .. . . . . . . .47
(BRA) Setting Up Brazilian Establishments.. . . . . . . . . . . . . . . . . . . . . . . . . . . . . . . . . . . . . . . . . . . . . . . . . . . . . . . . . . . . . . . . . . . . . . . .47Pages Used to Set Up Establishments.. . . . . . . . . . . . . . . . . . . . . . . . . . . . . . . . . . . . . . . . . . . . . . . . . . . . . . . . . . . . . . . . .. . . . . . . .48Enter Types of Establishment ID Codes.. . . . . . . . . . . . . . . . . . . . . . . . . . . . . . . . . . . . . . . . . . . . . . . . . . . . . . . . . . . . . . . .. . . . . . . .48Setting Up Establishments.. . . . . . . . . . . . . . . . . . . . . . . . . . . . . . . . . . . . . . . . . . . . . . . . . . . . . . . . . . . . . . . . . . . . . . . . . . . . . . .. . . . . . . .49Grouping Establishments for Centralized Data.. . . . . . . . . . . . . . . . . . . . . . . . . . . . . . . . . . . . . . . . . . . . . . . . . . . . . . . .. . . . . . . .53
Chapter 4Adding a Person in PeopleSoft Human Resources... . . . . . . . . . . . . . . . . . . . . . . . . . . . . . . . . . . . . . . . . . . . . . . . .55Adding a Person.. . . . . . . . . . . . . . . . . . . . . . . . . . . . . . . . . . . . . . . . . . . . . . . . . . . . . . . . . . . . . . . . . . . . . . . . . . . . . . . . . . . . . . . . . . . . . . . . . . . . . . .55
Understanding Identification Assignment.. . . . . . . . . . . . . . . . . . . . . . . . . . . . . . . . . . . . . . . . . . . . . . . . . . . . . . . . . . . . . . .. . . . . . . .55Common Elements Used in This Component. . . . . . . . . . . . . . . . . . . . . . . . . . . . . . . . . . . . . . . . . . . . . . . . . . . . . . . . . .. . . . . . . .56Pages Used to Add a Person.. . . . . . . . . . . . . . . . . . . . . . . . . . . . . . . . . . . . . . . . . . . . . . . . . . . . . . . . . . . . . . . . . . . . . . . . . . . .. . . . . . . .56Entering Name and Biographical Data.. . . . . . . . . . . . . . . . . . . . . . . . . . . . . . . . . . . . . . . . . . . . . . . . . . . . . . . . . . . . . . . . . .. . . . . . . .57Entering Contact Information.. . . . . . . . . . . . . . . . . . . . . . . . . . . . . . . . . . . . . . . . . . . . . . . . . . . . . . . . . . . . . . . . . . . . . . . . . . . . .. . . . . . . .61Entering Country-Specific Person Data.. . . . . . . . . . . . . . . . . . . . . . . . . . . . . . . . . . . . . . . . . . . . . . . . . . . . . . . . . . . . . . . . .. . . . . . . .62Creating Organizational Relationships and Maintaining Checklists.. . . . . . . . . . . . . . . . . . . . . . . . . . . . . . . . .. . . . . . . .71
Controlling Data Access for POIs Without Jobs.. . . . . . . . . . . . . . . . . . . . . . . . . . . . . . . . . . . . . . . . . . . . . . . . . . . . . . . . . . . . . . . . . . .73Understanding Security for POIs Without Jobs.. . . . . . . . . . . . . . . . . . . . . . . . . . . . . . . . . . . . . . . . . . . . . . . . . . . . . . . .. . . . . . . .73Pages Used to Control Access to the Data of POIs Without Jobs.. . . . . . . . . . . . . . . . . . . . . . . . . . . . . . . . . .. . . . . . . .74Adding and Maintaining POI Types.. . . . . . . . . . . . . . . . . . . . . . . . . . . . . . . . . . . . . . . . . . . . . . . . . . . . . . . . . . . . . . . . . . . . .. . . . . . . .74
PeopleSoft Proprietary and Confidential vii

Contents
Chapter 5Increasing the Workforce... . . . . . . . . . . . . . . . . . . . . . . . . . . . . . . . . . . . . . . . . . . . . . . . . . . . . . . . . . . . . . . . . . . . . . . . . . . . . . . . .77Understanding Job Data... . . . . . . . . . . . . . . . . . . . . . . . . . . . . . . . . . . . . . . . . . . . . . . . . . . . . . . . . . . . . . . . . . . . . . . . . . . . . . . . . . . . . . . . . . . . .77
Prerequisites.. . . . . . . . . . . . . . . . . . . . . . . . . . . . . . . . . . . . . . . . . . . . . . . . . . . . . . . . . . . . . . . . . . . . . . . . . . . . . . . . . . . . . . . . . . . . . . .. . . . . . . .82Adding Organizational Instances for Employees, Contingent Workers, and POIs.. . . . . . . . . . . . . . . . . . . . . . . . . . . .83
Common Elements Used in this Section.. . . . . . . . . . . . . . . . . . . . . . . . . . . . . . . . . . . . . . . . . . . . . . . . . . . . . . . . . . . . . . .. . . . . . . .83Pages Used to Add Organizational Instances for Employees, Contingent Workers, and POIs. .. . . . . . . .84Entering Employee Job Location and Position Information.. . . . . . . . . . . . . . . . . . . . . . . . . . . . . . . . . . . . . . . . . .. . . . . . . .89Entering Job Information.. . . . . . . . . . . . . . . . . . . . . . . . . . . . . . . . . . . . . . . . . . . . . . . . . . . . . . . . . . . . . . . . . . . . . . . . . . . . . . . . . .. . . . . . . .94Entering National Labor Agreement Data.. . . . . . . . . . . . . . . . . . . . . . . . . . . . . . . . . . . . . . . . . . . . . . . . . . . . . . . . . . . . . .. . . . . . .105Entering Payroll Processing Data.. . . . . . . . . . . . . . . . . . . . . . . . . . . . . . . . . . . . . . . . . . . . . . . . . . . . . . . . . . . . . . . . . . . . . . .. . . . . . .109Entering Salary Plan Information.. . . . . . . . . . . . . . . . . . . . . . . . . . . . . . . . . . . . . . . . . . . . . . . . . . . . . . . . . . . . . . . . . . . . . . . .. . . . . . .113Entering Compensation Information.. . . . . . . . . . . . . . . . . . . . . . . . . . . . . . . . . . . . . . . . . . . . . . . . . . . . . . . . . . . . . . . . . . . .. . . . . . .114Entering Optional Employment-Related Data.. . . . . . . . . . . . . . . . . . . . . . . . . . . . . . . . . . . . . . . . . . . . . . . . . . . . . . . . . .. . . . . . .119Distributing Job Earnings.. . . . . . . . . . . . . . . . . . . . . . . . . . . . . . . . . . . . . . . . . . . . . . . . . . . . . . . . . . . . . . . . . . . . . . . . . . . . . . . . .. . . . . . .125Specifying Benefit Program Enrollment.. . . . . . . . . . . . . . . . . . . . . . . . . . . . . . . . . . . . . . . . . . . . . . . . . . . . . . . . . . . . . . . . .. . . . . . .128Creating a Checklist. . . . . . . . . . . . . . . . . . . . . . . . . . . . . . . . . . . . . . . . . . . . . . . . . . . . . . . . . . . . . . . . . . . . . . . . . . . . . . . . . . . . . . . .. . . . . . .129
Adding Additional Assignments... . . . . . . . . . . . . . . . . . . . . . . . . . . . . . . . . . . . . . . . . . . . . . . . . . . . . . . . . . . . . . . . . . . . . . . . . . . . . . . . . . . .130Understanding the Process of Adding Additional Jobs.. . . . . . . . . . . . . . . . . . . . . . . . . . . . . . . . . . . . . . . . . . . . . . .. . . . . . .130Working with Multiple Benefit Record Numbers. . . . . . . . . . . . . . . . . . . . . . . . . . . . . . . . . . . . . . . . . . . . . . . . . . . . . . . .. . . . . . .131Prerequisites.. . . . . . . . . . . . . . . . . . . . . . . . . . . . . . . . . . . . . . . . . . . . . . . . . . . . . . . . . . . . . . . . . . . . . . . . . . . . . . . . . . . . . . . . . . . . . . .. . . . . . .132Pages Used to Add Concurrent Jobs.. . . . . . . . . . . . . . . . . . . . . . . . . . . . . . . . . . . . . . . . . . . . . . . . . . . . . . . . . . . . . . . . . . .. . . . . . .132Entering Additional Assignments. . . . . . . . . . . . . . . . . . . . . . . . . . . . . . . . . . . . . . . . . . . . . . . . . . . . . . . . . . . . . . . . . . . . . . . . .. . . . . . .133
Adding Job Applicants.. . . . . . . . . . . . . . . . . . . . . . . . . . . . . . . . . . . . . . . . . . . . . . . . . . . . . . . . . . . . . . . . . . . . . . . . . . . . . . . . . . . . . . . . . . . . . . .134Page Used to Add Job Applicants.. . . . . . . . . . . . . . . . . . . . . . . . . . . . . . . . . . . . . . . . . . . . . . . . . . . . . . . . . . . . . . . . . . . . . . .. . . . . . .135Managing Hires.. . . . . . . . . . . . . . . . . . . . . . . . . . . . . . . . . . . . . . . . . . . . . . . . . . . . . . . . . . . . . . . . . . . . . . . . . . . . . . . . . . . . . . . . . . . .. . . . . . .135
Reviewing Organizational Relationships.. . . . . . . . . . . . . . . . . . . . . . . . . . . . . . . . . . . . . . . . . . . . . . . . . . . . . . . . . . . . . . . . . . . . . . . . . .136Page Used to View a Person’s Organizational Relationships. . . . . . . . . . . . . . . . . . . . . . . . . . . . . . . . . . . . . . . .. . . . . . .136Viewing a Person’s Organizational Relationships.. . . . . . . . . . . . . . . . . . . . . . . . . . . . . . . . . . . . . . . . . . . . . . . . . . . . .. . . . . . .136
(BRA) Running Brazil Employment Reports.. . . . . . . . . . . . . . . . . . . . . . . . . . . . . . . . . . . . . . . . . . . . . . . . . . . . . . . . . . . . . . . . . . . . . .137Understanding the CAGED Report. . . . . . . . . . . . . . . . . . . . . . . . . . . . . . . . . . . . . . . . . . . . . . . . . . . . . . . . . . . . . . . . . . . . . . .. . . . . . .137Understanding Employee Registration.. . . . . . . . . . . . . . . . . . . . . . . . . . . . . . . . . . . . . . . . . . . . . . . . . . . . . . . . . . . . . . . . .. . . . . . .137Pages Used to Run Brazil Employment Reports.. . . . . . . . . . . . . . . . . . . . . . . . . . . . . . . . . . . . . . . . . . . . . . . . . . . . . .. . . . . . .138Generating CAGED Reports.. . . . . . . . . . . . . . . . . . . . . . . . . . . . . . . . . . . . . . . . . . . . . . . . . . . . . . . . . . . . . . . . . . . . . . . . . . . . .. . . . . . .138Generating Employee Registry Reports.. . . . . . . . . . . . . . . . . . . . . . . . . . . . . . . . . . . . . . . . . . . . . . . . . . . . . . . . . . . . . . . .. . . . . . .139
(CAN) Running the Canadian Hire List Report. . . . . . . . . . . . . . . . . . . . . . . . . . . . . . . . . . . . . . . . . . . . . . . . . . . . . . . . . . . . . . . . . . . .140Page Used to Run the Canadian Hire List Report.. . . . . . . . . . . . . . . . . . . . . . . . . . . . . . . . . . . . . . . . . . . . . . . . . . . . .. . . . . . .140
viii PeopleSoft Proprietary and Confidential

Contents
Chapter 6(USF) Hiring Employees.... . . . . . .. . . . . . . . . . . . . . . . . . . .. . . . . . . . . . . . . . . . . . . . .. . . . . . . . . . . . . . . . . . . .. . . . . . . . . . . . .141Common Elements Used in This Chapter.. . . . . . . . . . . . . . . . . . . . . . . . . . . . . . . . . . . . . . . . . . . . . . . . . . . . . . . . . . . . . . . . . . . . . . . . .141Using the PAR Process to Hire Employees.. . . . . . . . . . . . . . . . . . . . . . . . . . . . . . . . . . . . . . . . . . . . . . . . . . . . . . . . . . . . . . . . . . . . . . .141
Understanding the PAR Process to Hire Employees.. . . . . . . . . . . . . . . . . . . . . . . . . . . . . . . . . . . . . . . . . . . . . . . . .. . . . . . .142Pages Used to Hire Employees.. . . . . . . . . . . . . . . . . . . . . . . . . . . . . . . . . . . . . . . . . . . . . . . . . . . . . . . . . . . . . . . . . . . . . . . . .. . . . . . .143Entering Information for the Hiring Process.. . . . . . . . . . . . . . . . . . . . . . . . . . . . . . . . . . . . . . . . . . . . . . . . . . . . . . . . . . . .. . . . . . .146Entering PAR Remarks.. . . . . . . . . . . . . . . . . . . . . . . . . . . . . . . . . . . . . . . . . . . . . . . . . . . . . . . . . . . . . . . . . . . . . . . . . . . . . . . . . . .. . . . . . .147Entering Job Tracking Information.. . . . . . . . . . . . . . . . . . . . . . . . . . . . . . . . . . . . . . . . . . . . . . . . . . . . . . . . . . . . . . . . . . . . . . .. . . . . . .148Entering Employee Personal Information.. . . . . . . . . . . . . . . . . . . . . . . . . . . . . . . . . . . . . . . . . . . . . . . . . . . . . . . . . . . . . .. . . . . . .149Entering Birth Information.. . . . . . . . . . . . . . . . . . . . . . . . . . . . . . . . . . . . . . . . . . . . . . . . . . . . . . . . . . . . . . . . . . . . . . . . . . . . . . . .. . . . . . .150Entering Address Information.. . . . . . . . . . . . . . . . . . . . . . . . . . . . . . . . . . . . . . . . . . . . . . . . . . . . . . . . . . . . . . . . . . . . . . . . . . . .. . . . . . .151Entering Veteran Information... . . . . . . . . . . . . . . . . . . . . . . . . . . . . . . . . . . . . . . . . . . . . . . . . . . . . . . . . . . . . . . . . . . . . . . . . . . .. . . . . . .152Entering Marital Information.. . . . . . . . . . . . . . . . . . . . . . . . . . . . . . . . . . . . . . . . . . . . . . . . . . . . . . . . . . . . . . . . . . . . . . . . . . . . . .. . . . . . .153Entering Education Details. . . . . . . . . . . . . . . . . . . . . . . . . . . . . . . . . . . . . . . . . . . . . . . . . . . . . . . . . . . . . . . . . . . . . . . . . . . . . . . .. . . . . . .153Entering Job Information.. . . . . . . . . . . . . . . . . . . . . . . . . . . . . . . . . . . . . . . . . . . . . . . . . . . . . . . . . . . . . . . . . . . . . . . . . . . . . . . . . .. . . . . . .154Specifying Benefit Programs... . . . . . . . . . . . . . . . . . . . . . . . . . . . . . . . . . . . . . . . . . . . . . . . . . . . . . . . . . . . . . . . . . . . . . . . . . . .. . . . . . .156Entering Retirement Data.. . . . . . . . . . . . . . . . . . . . . . . . . . . . . . . . . . . . . . . . . . . . . . . . . . . . . . . . . . . . . . . . . . . . . . . . . . . . . . . . .. . . . . . .157Tracking Information for Employees on Assignment.. . . . . . . . . . . . . . . . . . . . . . . . . . . . . . . . . . . . . . . . . . . . . . . . . .. . . . . . .160Entering Position Information.. . . . . . . . . . . . . . . . . . . . . . . . . . . . . . . . . . . . . . . . . . . . . . . . . . . . . . . . . . . . . . . . . . . . . . . . . . . .. . . . . . .160Entering Employee Compensation Information.. . . . . . . . . . . . . . . . . . . . . . . . . . . . . . . . . . . . . . . . . . . . . . . . . . . . . . . .. . . . . . .162Entering Additional Compensation Information.. . . . . . . . . . . . . . . . . . . . . . . . . . . . . . . . . . . . . . . . . . . . . . . . . . . . . . . .. . . . . . .164Viewing Pay Rate and Compensation Calculations.. . . . . . . . . . . . . . . . . . . . . . . . . . . . . . . . . . . . . . . . . . . . . . . . . . .. . . . . . .164Viewing Job Earnings Distributions.. . . . . . . . . . . . . . . . . . . . . . . . . . . . . . . . . . . . . . . . . . . . . . . . . . . . . . . . . . . . . . . . . . . . .. . . . . . .166Entering Current and Historical Employment Information.. . . . . . . . . . . . . . . . . . . . . . . . . . . . . . . . . . . . . . . . . . . .. . . . . . .168Entering Expiration Dates.. . . . . . . . . . . . . . . . . . . . . . . . . . . . . . . . . . . . . . . . . . . . . . . . . . . . . . . . . . . . . . . . . . . . . . . . . . . . . . . .. . . . . . .170Entering Appointment Limits.. . . . . . . . . . . . . . . . . . . . . . . . . . . . . . . . . . . . . . . . . . . . . . . . . . . . . . . . . . . . . . . . . . . . . . . . . . . . .. . . . . . .170Entering Additional Employment Information.. . . . . . . . . . . . . . . . . . . . . . . . . . . . . . . . . . . . . . . . . . . . . . . . . . . . . . . . . .. . . . . . .171Tracking Nonpay Status Information.. . . . . . . . . . . . . . . . . . . . . . . . . . . . . . . . . . . . . . . . . . . . . . . . . . . . . . . . . . . . . . . . . . . .. . . . . . .173Entering Employee Security and Financial Disclosure Information.. . . . . . . . . . . . . . . . . . . . . . . . . . . . . . . . .. . . . . . .173Viewing Component Interface Exceptions.. . . . . . . . . . . . . . . . . . . . . . . . . . . . . . . . . . . . . . . . . . . . . . . . . . . . . . . . . . . . . .. . . . . . .174
Entering Education Information.. . . . . . . . . . . . . . . . . . . . . . . . . . . . . . . . . . . . . . . . . . . . . . . . . . . . . . . . . . . . . . . . . . . . . . . . . . . . . . . . . . . . .175Assigning Employees to Positions.. . . . . . . . . . . . . . . . . . . . . . . . . . . . . . . . . . . . . . . . . . . . . . . . . . . . . . . . . . . . . . . . . . . . . . . . . . . . . . . . .176
Hiring Employees into Positions.. . . . . . . . . . . . . . . . . . . . . . . . . . . . . . . . . . . . . . . . . . . . . . . . . . . . . . . . . . . . . . . . . . . . . . . . .. . . . . . .176Hiring Job Applicants.. . . . . . . . . . . . . . . . . . . . . . . . . . . . . . . . . . . . . . . . . . . . . . . . . . . . . . . . . . . . . . . . . . . . . . . . . . . . . . . . . . . . . . . . . . . . . . . . .177Adding Concurrent Jobs.. . . . . . . . . . . . . . . . . . . . . . . . . . . . . . . . . . . . . . . . . . . . . . . . . . . . . . . . . . . . . . . . . . . . . . . . . . . . . . . . . . . . . . . . . . . . .177
Prerequisites.. . . . . . . . . . . . . . . . . . . . . . . . . . . . . . . . . . . . . . . . . . . . . . . . . . . . . . . . . . . . . . . . . . . . . . . . . . . . . . . . . . . . . . . . . . . . . . .. . . . . . .177Printing Appointment Affidavits and Preliminary Employment Data Forms... . . . . . . . . . . . . . . . . . . . . . . . . . . . . . . . . .177
Pages Used to Print the Forms... . . . . . . . . . . . . . . . . . . . . . . . . . . . . . . . . . . . . . . . . . . . . . . . . . . . . . . . . . . . . . . . . . . . . . . . .. . . . . . .178
PeopleSoft Proprietary and Confidential ix

Contents
Chapter 7Entering Additional Data in Human Resources Records... . . . . . . . . . . . . . . . . . . . . . . . . . . . . . . . . . . . . . . . .179Understanding Additional Worker Data.. . . . . . . . . . . . . . . . . . . . . . . . . . . . . . . . . . . . . . . . . . . . . . . . . . . . . . . . . . . . . . . . . . . . . . . . . . . .179Locating Personnel Records.. . . . . . . . . . . . . . . . . . . . . . . . . . . . . . . . . . . . . . . . . . . . . . . . . . . . . . . . . . . . . . . . . . . . . . . . . . . . . . . . . . . . . . . .179
Page Used to Locate Personnel Records. . . . . . . . . . . . . . . . . . . . . . . . . . . . . . . . . . . . . . . . . . . . . . . . . . . . . . . . . . . . . . .. . . . . . .180Searching with the Search Dialogue.. . . . . . . . . . . . . . . . . . . . . . . . . . . . . . . . . . . . . . . . . . . . . . . . . . . . . . . . . . . . . . . . . . . .. . . . . . .180Searching for Person Information.. . . . . . . . . . . . . . . . . . . . . . . . . . . . . . . . . . . . . . . . . . . . . . . . . . . . . . . . . . . . . . . . . . . . . . .. . . . . . .181Searching by National ID.. . . . . . . . . . . . . . . . . . . . . . . . . . . . . . . . . . . . . . . . . . . . . . . . . . . . . . . . . . . . . . . . . . . . . . . . . . . . . . . . .. . . . . . .182
Setting Up and Tracking Workforce Contracts.. . . . . . . . . . . . . . . . . . . . . . . . . . . . . . . . . . . . . . . . . . . . . . . . . . . . . . . . . . . . . . . . . . . .182Pages Used to Set Up and Track Employment Contracts. . . . . . . . . . . . . . . . . . . . . . . . . . . . . . . . . . . . . . . . . . . .. . . . . . .183Defining Different Types of Contracts.. . . . . . . . . . . . . . . . . . . . . . . . . . . . . . . . . . . . . . . . . . . . . . . . . . . . . . . . . . . . . . . . . . .. . . . . . .184Adding Basic Contract Information.. . . . . . . . . . . . . . . . . . . . . . . . . . . . . . . . . . . . . . . . . . . . . . . . . . . . . . . . . . . . . . . . . . . . . .. . . . . . .185Adding Special Contract Clause Information... . . . . . . . . . . . . . . . . . . . . . . . . . . . . . . . . . . . . . . . . . . . . . . . . . . . . . . . . .. . . . . . .189Adding Signature Date, Responsible Party, and Probation Information.. . . . . . . . . . . . . . . . . . . . . . . . . . . .. . . . . . .192Generating the Contract Information Report. . . . . . . . . . . . . . . . . . . . . . . . . . . . . . . . . . . . . . . . . . . . . . . . . . . . . . . . . . . .. . . . . . .193
Entering Temporary Assignments.. . . . . . . . . . . . . . . . . . . . . . . . . . . . . . . . . . . . . . . . . . . . . . . . . . . . . . . . . . . . . . . . . . . . . . . . . . . . . . . . . .194Understanding Temporary Assignments and Substantive Jobs.. . . . . . . . . . . . . . . . . . . . . . . . . . . . . . . . . . . . .. . . . . . .194Pages Used to Process Temporary Assignments. . . . . . . . . . . . . . . . . . . . . . . . . . . . . . . . . . . . . . . . . . . . . . . . . . . . . .. . . . . . .195Entering a Temporary Assignment.. . . . . . . . . . . . . . . . . . . . . . . . . . . . . . . . . . . . . . . . . . . . . . . . . . . . . . . . . . . . . . . . . . . . . .. . . . . . .195Running the Temporary Assignment Termination and Substantive Job Reactivation Process. . .. . . . . . .196Adding a Partial Temporary Assignment.. . . . . . . . . . . . . . . . . . . . . . . . . . . . . . . . . . . . . . . . . . . . . . . . . . . . . . . . . . . . . . . .. . . . . . .196
Tracking Disabilities.. . . . . . . . . . . . . . . . . . . . . . . . . . . . . . . . . . . . . . . . . . . . . . . . . . . . . . . . . . . . . . . . . . . . . . . . . . . . . . . . . . . . . . . . . . . . . . . . . .197Pages Used to Track Disabilities.. . . . . . . . . . . . . . . . . . . . . . . . . . . . . . . . . . . . . . . . . . . . . . . . . . . . . . . . . . . . . . . . . . . . . . . .. . . . . . .197Entering Disability Information.. . . . . . . . . . . . . . . . . . . . . . . . . . . . . . . . . . . . . . . . . . . . . . . . . . . . . . . . . . . . . . . . . . . . . . . . . . .. . . . . . .198Documenting Disability Accommodations.. . . . . . . . . . . . . . . . . . . . . . . . . . . . . . . . . . . . . . . . . . . . . . . . . . . . . . . . . . . . . .. . . . . . .205(ITA) Running the ITA Disability Report. . . . . . . . . . . . . . . . . . . . . . . . . . . . . . . . . . . . . . . . . . . . . . . . . . . . . . . . . . . . . . . . . .. . . . . . .205
Handling Company Credit Cards.. . . . . . . . . . . . . . . . . . . . . . . . . . . . . . . . . . . . . . . . . . . . . . . . . . . . . . . . . . . . . . . . . . . . . . . . . . . . . . . . . . .206Prerequisite... . . . . . . . . . . . . . . . . . . . . . . . . . . . . . . . . . . . . . . . . . . . . . . . . . . . . . . . . . . . . . . . . . . . . . . . . . . . . . . . . . . . . . . . . . . . . . . .. . . . . . .206Pages Used to Handle Company Credit Cards.. . . . . . . . . . . . . . . . . . . . . . . . . . . . . . . . . . . . . . . . . . . . . . . . . . . . . . . .. . . . . . .206Entering Credit Card Vendors... . . . . . . . . . . . . . . . . . . . . . . . . . . . . . . . . . . . . . . . . . . . . . . . . . . . . . . . . . . . . . . . . . . . . . . . . . .. . . . . . .206Assigning Cards to Workers.. . . . . . . . . . . . . . . . . . . . . . . . . . . . . . . . . . . . . . . . . . . . . . . . . . . . . . . . . . . . . . . . . . . . . . . . . . . . . .. . . . . . .207
Handling Company Property.. . . . . . . . . . . . . . . . . . . . . . . . . . . . . . . . . . . . . . . . . . . . . . . . . . . . . . . . . . . . . . . . . . . . . . . . . . . . . . . . . . . . . . . .208Pages Used to Handle Company Property.. . . . . . . . . . . . . . . . . . . . . . . . . . . . . . . . . . . . . . . . . . . . . . . . . . . . . . . . . . . . .. . . . . . .208Identifying Company Property. . . . . . . . . . . . . . . . . . . . . . . . . . . . . . . . . . . . . . . . . . . . . . . . . . . . . . . . . . . . . . . . . . . . . . . . . . . .. . . . . . .208Assigning Values to Company Property. . . . . . . . . . . . . . . . . . . . . . . . . . . . . . . . . . . . . . . . . . . . . . . . . . . . . . . . . . . . . . . . .. . . . . . .209Assigning Company Property to Workers.. . . . . . . . . . . . . . . . . . . . . . . . . . . . . . . . . . . . . . . . . . . . . . . . . . . . . . . . . . . . . .. . . . . . .210
Tracking Dependent and Beneficiary Data... . . . . . . . . . . . . . . . . . . . . . . . . . . . . . . . . . . . . . . . . . . . . . . . . . . . . . . . . . . . . . . . . . . . . . .211Understanding Dependent and Beneficiary Data.. . . . . . . . . . . . . . . . . . . . . . . . . . . . . . . . . . . . . . . . . . . . . . . . . . . . . .. . . . . . .211Pages Used to Track Dependent Identification Data.. . . . . . . . . . . . . . . . . . . . . . . . . . . . . . . . . . . . . . . . . . . . . . . . .. . . . . . .212Entering Dependent and Beneficiary Name Information.. . . . . . . . . . . . . . . . . . . . . . . . . . . . . . . . . . . . . . . . . . . . .. . . . . . .213
x PeopleSoft Proprietary and Confidential

Contents
Entering Dependent Address Information.. . . . . . . . . . . . . . . . . . . . . . . . . . . . . . . . . . . . . . . . . . . . . . . . . . . . . . . . . . . . . .. . . . . . .214Entering Dependent and Beneficiary Information.. . . . . . . . . . . . . . . . . . . . . . . . . . . . . . . . . . . . . . . . . . . . . . . . . . . . .. . . . . . .215Entering Information About Court-Ordered Benefits for Dependents.. . . . . . . . . . . . . . . . . . . . . . . . . . . . . . .. . . . . . .221(NLD) Viewing an Employee’s Dependents and Beneficiaries. . . . . . . . . . . . . . . . . . . . . . . . . . . . . . . . . . . . . . .. . . . . . .222Entering Dependent Citizenship and Passport Information.. . . . . . . . . . . . . . . . . . . . . . . . . . . . . . . . . . . . . . . . . .. . . . . . .223Entering Dependent Visa and Permit Data.. . . . . . . . . . . . . . . . . . . . . . . . . . . . . . . . . . . . . . . . . . . . . . . . . . . . . . . . . . . . .. . . . . . .224
Tracking Emergency Contacts.. . . . . . . . . . . . . . . . . . . . . . . . . . . . . . . . . . . . . . . . . . . . . . . . . . . . . . . . . . . . . . . . . . . . . . . . . . . . . . . . . . . . . .224Pages Used to Track Emergency Contacts.. . . . . . . . . . . . . . . . . . . . . . . . . . . . . . . . . . . . . . . . . . . . . . . . . . . . . . . . . . . .. . . . . . .224Entering Primary Address and Phone Information for Emergency Contacts. . . . . . . . . . . . . . . . . . . . . . .. . . . . . .225
Managing Citizenship and Visa or Permit Information.. . . . . . . . . . . . . . . . . . . . . . . . . . . . . . . . . . . . . . . . . . . . . . . . . . . . . . . . . . .226Common Elements Used to Manage Citizenship and Visa or Permit Information. . . . . . . . . . . . . . . . .. . . . . . .226Pages Used to Manage Citizenship and Visa or Permit Information. . . . . . . . . . . . . . . . . . . . . . . . . . . . . . . .. . . . . . .227Tracking Employee Passport and Citizenship Information.. . . . . . . . . . . . . . . . . . . . . . . . . . . . . . . . . . . . . . . . . . .. . . . . . .228Entering an Employee’s Visa or Permit Information.. . . . . . . . . . . . . . . . . . . . . . . . . . . . . . . . . . . . . . . . . . . . . . . . . .. . . . . . .229
Managing Driver’s License Information.. . . . . . . . . . . . . . . . . . . . . . . . . . . . . . . . . . . . . . . . . . . . . . . . . . . . . . . . . . . . . . . . . . . . . . . . . . . .230Page Used to Manage Driver’s License Information.. . . . . . . . . . . . . . . . . . . . . . . . . . . . . . . . . . . . . . . . . . . . . . . . . .. . . . . . .230Entering License Numbers and Other Driving Record Information.. . . . . . . . . . . . . . . . . . . . . . . . . . . . . . . . .. . . . . . .231
Entering Bank Account Information.. . . . . . . . . . . . . . . . . . . . . . . . . . . . . . . . . . . . . . . . . . . . . . . . . . . . . . . . . . . . . . . . . . . . . . . . . . . . . . . .231Pages Used to Enter Bank Account Information.. . . . . . . . . . . . . . . . . . . . . . . . . . . . . . . . . . . . . . . . . . . . . . . . . . . . . .. . . . . . .232Recording Employee Bank Account Information.. . . . . . . . . . . . . . . . . . . . . . . . . . . . . . . . . . . . . . . . . . . . . . . . . . . . . .. . . . . . .232(GBR) Entering a Worker’s Building Society Roll Number and Name... . . . . . . . . . . . . . . . . . . . . . . . . . . . .. . . . . . .235
Tracking Volunteer Activity. . . . . . . . . . . . . . . . . . . . . . . . . . . . . . . . . . . . . . . . . . . . . . . . . . . . . . . . . . . . . . . . . . . . . . . . . . . . . . . . . . . . . . . . . . .235Page Used to Track Volunteer Activity. . . . . . . . . . . . . . . . . . . . . . . . . . . . . . . . . . . . . . . . . . . . . . . . . . . . . . . . . . . . . . . . . . .. . . . . . .235Entering Information on Worker Volunteer Activities. . . . . . . . . . . . . . . . . . . . . . . . . . . . . . . . . . . . . . . . . . . . . . . . . . .. . . . . . .235
Entering and Tracking Additional Workforce Data.. . . . . . . . . . . . . . . . . . . . . . . . . . . . . . . . . . . . . . . . . . . . . . . . . . . . . . . . . . . . . . .236Pages Used to Enter and Track Additional Workforce Data.. . . . . . . . . . . . . . . . . . . . . . . . . . . . . . . . . . . . . . . . .. . . . . . .237Recording Badge Numbers.. . . . . . . . . . . . . . . . . . . . . . . . . . . . . . . . . . . . . . . . . . . . . . . . . . . . . . . . . . . . . . . . . . . . . . . . . . . . . .. . . . . . .237Tracking a Worker’s Business Expenses... . . . . . . . . . . . . . . . . . . . . . . . . . . . . . . . . . . . . . . . . . . . . . . . . . . . . . . . . . . . . .. . . . . . .238Tracking Prior Work Experience.. . . . . . . . . . . . . . . . . . . . . . . . . . . . . . . . . . . . . . . . . . . . . . . . . . . . . . . . . . . . . . . . . . . . . . . . .. . . . . . .239Entering Worker Images.. . . . . . . . . . . . . . . . . . . . . . . . . . . . . . . . . . . . . . . . . . . . . . . . . . . . . . . . . . . . . . . . . . . . . . . . . . . . . . . . . .. . . . . . .241
Chapter 8(BEL) Entering Additional Data for Belgian Workers... . . . . . . . . . . . . . . . . . . . . . . . . . . . . . . . . . . . . . . . . . . . . .243Tracking Claeys Formula Calculations.. . . . . . . . . . . . . . . . . . . . . . . . . . . . . . . . . . . . . . . . . . . . . . . . . . . . . . . . . . . . . . . . . . . . . . . . . . . .243
Pages Used to Track Claeys Formula Calculations.. . . . . . . . . . . . . . . . . . . . . . . . . . . . . . . . . . . . . . . . . . . . . . . . . . .. . . . . . .244Entering Codes for Events and Conditions that Result in Terminating Employment Contracts. .. . . . . . .245Defining Reason Codes for Ending Employment Contracts. . . . . . . . . . . . . . . . . . . . . . . . . . . . . . . . . . . . . . . . . .. . . . . . .245Setting Up Belgian Employment Contract Statutes for Claeys Calculations.. . . . . . . . . . . . . . . . . . . . . . .. . . . . . .246Linking Contract Statutes to RSZ Categories.. . . . . . . . . . . . . . . . . . . . . . . . . . . . . . . . . . . . . . . . . . . . . . . . . . . . . . . . . .. . . . . . .247
PeopleSoft Proprietary and Confidential xi

Contents
Recording Information that Is Necessary for Terminating a Belgian Worker.. . . . . . . . . . . . . . . . . . . . . . .. . . . . . .248Entering a Replacement Worker for the Employment Contract. . . . . . . . . . . . . . . . . . . . . . . . . . . . . . . . . . . . . .. . . . . . .249
Preparing for Severance Calculations.. . . . . . . . . . . . . . . . . . . . . . . . . . . . . . . . . . . . . . . . . . . . . . . . . . . . . . . . . . . . . . . . . . . . . . . . . . . . .251Pages Used to Prepare for Severance Calculations.. . . . . . . . . . . . . . . . . . . . . . . . . . . . . . . . . . . . . . . . . . . . . . . . . .. . . . . . .252Tracking Additional Seniority. . . . . . . . . . . . . . . . . . . . . . . . . . . . . . . . . . . . . . . . . . . . . . . . . . . . . . . . . . . . . . . . . . . . . . . . . . . . . .. . . . . . .252Entering Protected Job Leave Information.. . . . . . . . . . . . . . . . . . . . . . . . . . . . . . . . . . . . . . . . . . . . . . . . . . . . . . . . . . . . .. . . . . . .253
Performing the Claeys Calculation.. . . . . . . . . . . . . . . . . . . . . . . . . . . . . . . . . . . . . . . . . . . . . . . . . . . . . . . . . . . . . . . . . . . . . . . . . . . . . . . . .254Pages Used to Perform the Claeys Calculation.. . . . . . . . . . . . . . . . . . . . . . . . . . . . . . . . . . . . . . . . . . . . . . . . . . . . . . .. . . . . . .255Reviewing Claeys Calculation Variables.. . . . . . . . . . . . . . . . . . . . . . . . . . . . . . . . . . . . . . . . . . . . . . . . . . . . . . . . . . . . . . . .. . . . . . .255Calculating the Severance Amount. . . . . . . . . . . . . . . . . . . . . . . . . . . . . . . . . . . . . . . . . . . . . . . . . . . . . . . . . . . . . . . . . . . . . .. . . . . . .258Running the Notification Report. . . . . . . . . . . . . . . . . . . . . . . . . . . . . . . . . . . . . . . . . . . . . . . . . . . . . . . . . . . . . . . . . . . . . . . . . .. . . . . . .260
Generating DIMONA Notifications.. . . . . . . . . . . . . . . . . . . . . . . . . . . . . . . . . . . . . . . . . . . . . . . . . . . . . . . . . . . . . . . . . . . . . . . . . . . . . . . . .260Understanding DIMONA Notifications.. . . . . . . . . . . . . . . . . . . . . . . . . . . . . . . . . . . . . . . . . . . . . . . . . . . . . . . . . . . . . . . . . .. . . . . . .260Pages Used to Generate DIMONA Notifications.. . . . . . . . . . . . . . . . . . . . . . . . . . . . . . . . . . . . . . . . . . . . . . . . . . . . . .. . . . . . .261Creating DIMONA Notifications.. . . . . . . . . . . . . . . . . . . . . . . . . . . . . . . . . . . . . . . . . . . . . . . . . . . . . . . . . . . . . . . . . . . . . . . . . .. . . . . . .261Reviewing DIMONA Notifications... . . . . . . . . . . . . . . . . . . . . . . . . . . . . . . . . . . . . . . . . . . . . . . . . . . . . . . . . . . . . . . . . . . . . . .. . . . . . .262
Running the Social Report. . . . . . . . . . . . . . . . . . . . . . . . . . . . . . . . . . . . . . . . . . . . . . . . . . . . . . . . . . . . . . . . . . . . . . . . . . . . . . . . . . . . . . . . . . .263Page Used to Run the Social Report. . . . . . . . . . . . . . . . . . . . . . . . . . . . . . . . . . . . . . . . . . . . . . . . . . . . . . . . . . . . . . . . . . . .. . . . . . .264
Chapter 9Managing Country-Specific Workforce Data.. . . . . . . . . . . . . . . . . . . . . . . . . . . . . . . . . . . . . . . . . . . . . . . . . . . . . . . . .265(CAN) Providing Additional Information for Canadian Employees.. . . . . . . . . . . . . . . . . . . . . . . . . . . . . . . . . . . . . . . . . . . . .265
Pages Used to Provide Additional Information for Canadian Employees.. . . . . . . . . . . . . . . . . . . . . . . . . .. . . . . . .266Entering OEEC Workforce Survey Responses.. . . . . . . . . . . . . . . . . . . . . . . . . . . . . . . . . . . . . . . . . . . . . . . . . . . . . . . .. . . . . . .266Recording Employee-Level Information About Official Language Use.. . . . . . . . . . . . . . . . . . . . . . . . . . . . .. . . . . . .267
(CHE) Running the Company Statistics Report. . . . . . . . . . . . . . . . . . . . . . . . . . . . . . . . . . . . . . . . . . . . . . . . . . . . . . . . . . . . . . . . . . .268Page Used to Run the Company Statistics Report. . . . . . . . . . . . . . . . . . . . . . . . . . . . . . . . . . . . . . . . . . . . . . . . . . . . .. . . . . . .268
(ESP) Generating AFI Flat Files... . . . . . . . . . . . . . . . . . . . . . . . . . . . . . . . . . . . . . . . . . . . . . . . . . . . . . . . . . . . . . . . . . . . . . . . . . . . . . . . . . .268Understanding the AFI Process.. . . . . . . . . . . . . . . . . . . . . . . . . . . . . . . . . . . . . . . . . . . . . . . . . . . . . . . . . . . . . . . . . . . . . . . . .. . . . . . .268Page Used to Generate AFI Flat Files.. . . . . . . . . . . . . . . . . . . . . . . . . . . . . . . . . . . . . . . . . . . . . . . . . . . . . . . . . . . . . . . . . .. . . . . . .269Creating an AFI Flat File... . . . . . . . . . . . . . . . . . . . . . . . . . . . . . . . . . . . . . . . . . . . . . . . . . . . . . . . . . . . . . . . . . . . . . . . . . . . . . . . .. . . . . . .269
(FRA) Providing Additional Information for French Workers.. . . . . . . . . . . . . . . . . . . . . . . . . . . . . . . . . . . . . . . . . . . . . . . . . . . .271Pages Used to Provide Additional Information for French Workers.. . . . . . . . . . . . . . . . . . . . . . . . . . . . . . . . .. . . . . . .272Tracking Mandate Information.. . . . . . . . . . . . . . . . . . . . . . . . . . . . . . . . . . . . . . . . . . . . . . . . . . . . . . . . . . . . . . . . . . . . . . . . . . .. . . . . . .272Entering Worker Military Service Information.. . . . . . . . . . . . . . . . . . . . . . . . . . . . . . . . . . . . . . . . . . . . . . . . . . . . . . . . . .. . . . . . .272
(NLD) Recording and Reporting SAMEN Diversity Information for Dutch Workers. . . . . . . . . . . . . . . . . . . . . . . . . .274Understanding the SAMEN Diversity Law and SAMEN Registration.. . . . . . . . . . . . . . . . . . . . . . . . . . . . . . .. . . . . . .274Pages Used to Record and Report SAMEN Diversity Information for Dutch Workers. . . . . . . . . . . .. . . . . . .274Establishing a Worker’s Ethnic Status. . . . . . . . . . . . . . . . . . . . . . . . . . . . . . . . . . . . . . . . . . . . . . . . . . . . . . . . . . . . . . . . . . .. . . . . . .274
xii PeopleSoft Proprietary and Confidential

Contents
Running the NLD Law SAMEN Statistics Report. . . . . . . . . . . . . . . . . . . . . . . . . . . . . . . . . . . . . . . . . . . . . . . . . . . . . . .. . . . . . .276(ITA) Recording Additional Hiring Data for Italian Workers. . . . . . . . . . . . . . . . . . . . . . . . . . . . . . . . . . . . . . . . . . . . . . . . . . . . . .276
Pages Used to Record Additional Hiring Data for Italian Workers. . . . . . . . . . . . . . . . . . . . . . . . . . . . . . . . . . .. . . . . . .277Running the Matricula Book Calculation Process.. . . . . . . . . . . . . . . . . . . . . . . . . . . . . . . . . . . . . . . . . . . . . . . . . . . . .. . . . . . .277
(ITA) Recording End of Employment Information for Italian Workers.. . . . . . . . . . . . . . . . . . . . . . . . . . . . . . . . . . . . . . . . . .278Page Used to Record End of Employment Information for Italian Workers. . . . . . . . . . . . . . . . . . . . . . . . .. . . . . . .278Recording Employee Resignation Dates and Normal Notice Periods.. . . . . . . . . . . . . . . . . . . . . . . . . . . . . .. . . . . . .279
(ITA) Running the Equal Opportunities Report. . . . . . . . . . . . . . . . . . . . . . . . . . . . . . . . . . . . . . . . . . . . . . . . . . . . . . . . . . . . . . . . . . . .279Page Used to Run the Equal Opportunities Report. . . . . . . . . . . . . . . . . . . . . . . . . . . . . . . . . . . . . . . . . . . . . . . . . . . .. . . . . . .280Running the Equal Opportunities Report. . . . . . . . . . . . . . . . . . . . . . . . . . . . . . . . . . . . . . . . . . . . . . . . . . . . . . . . . . . . . . . .. . . . . . .280
(USA) Determining U.S. Residency Status for Foreign Nationals. . . . . . . . . . . . . . . . . . . . . . . . . . . . . . . . . . . . . . . . . . . . . .282Page Used to Determine U.S. Residency Status for Foreign Nationals.. . . . . . . . . . . . . . . . . . . . . . . . . . . .. . . . . . .282Running the Substantial Presence Test. . . . . . . . . . . . . . . . . . . . . . . . . . . . . . . . . . . . . . . . . . . . . . . . . . . . . . . . . . . . . . . . .. . . . . . .282
Chapter 10(JPN) Tracking Additional Appointments (Kenmu).. . . . . . . . . . . . . . . . . . . . . . . . . . . . . . . . . . . . . . . . . . . . . . . . .285Understanding Additional Appointments.. . . . . . . . . . . . . . . . . . . . . . . . . . . . . . . . . . . . . . . . . . . . . . . . . . . . . . . . . . . . . . . . . . . . . . . . . .285
Internal and External Companies... . . . . . . . . . . . . . . . . . . . . . . . . . . . . . . . . . . . . . . . . . . . . . . . . . . . . . . . . . . . . . . . . . . . . . .. . . . . . .285Setting Up Codes for Tracking Additional Appointments.. . . . . . . . . . . . . . . . . . . . . . . . . . . . . . . . . . . . . . . . . . . . . . . . . . . . . . . .286
Understanding Dummy Codes... . . . . . . . . . . . . . . . . . . . . . . . . . . . . . . . . . . . . . . . . . . . . . . . . . . . . . . . . . . . . . . . . . . . . . . . . .. . . . . . .286Understanding Setup Steps for Additional Appointments.. . . . . . . . . . . . . . . . . . . . . . . . . . . . . . . . . . . . . . . . . . . .. . . . . . .287Prerequisites.. . . . . . . . . . . . . . . . . . . . . . . . . . . . . . . . . . . . . . . . . . . . . . . . . . . . . . . . . . . . . . . . . . . . . . . . . . . . . . . . . . . . . . . . . . . . . . .. . . . . . .288Pages Used to Set Up Codes for Managing Additional Appointments. . . . . . . . . . . . . . . . . . . . . . . . . . . . . .. . . . . . .289Setting Up a Dummy Business Unit, Company, Department, and Location. . . . . . . . . . . . . . . . . . . . . . . .. . . . . . .289Designating Job Record Codes for Additional Appointments.. . . . . . . . . . . . . . . . . . . . . . . . . . . . . . . . . . . . . . . .. . . . . . .290
Setting Up Security for Tracking Additional Appointments.. . . . . . . . . . . . . . . . . . . . . . . . . . . . . . . . . . . . . . . . . . . . . . . . . . . . . .290Understanding Security for Additional Appointments.. . . . . . . . . . . . . . . . . . . . . . . . . . . . . . . . . . . . . . . . . . . . . . . . .. . . . . . .291Pages Used to Set Up Security for Additional Appointments. . . . . . . . . . . . . . . . . . . . . . . . . . . . . . . . . . . . . . . . .. . . . . . .292Setting Up Additional Appointment Security. . . . . . . . . . . . . . . . . . . . . . . . . . . . . . . . . . . . . . . . . . . . . . . . . . . . . . . . . . . .. . . . . . .292Selecting Reports that Use Additional Appointment Security. . . . . . . . . . . . . . . . . . . . . . . . . . . . . . . . . . . . . . . . .. . . . . . .292
Setting Up to Handle Additional Appointment Terminations.. . . . . . . . . . . . . . . . . . . . . . . . . . . . . . . . . . . . . . . . . . . . . . . . . . . .293Recording and Viewing Employee Additional Appointments Data. . . . . . . . . . . . . . . . . . . . . . . . . . . . . . . . . . . . . . . . . . . . . .294
Pages Used to Record and View Employee Additional Appointments Data.. . . . . . . . . . . . . . . . . . . . . . .. . . . . . .294Adding, Changing, or Releasing Additional Appointments.. . . . . . . . . . . . . . . . . . . . . . . . . . . . . . . . . . . . . . . . . . .. . . . . . .295Recording Additional Appointment Details. . . . . . . . . . . . . . . . . . . . . . . . . . . . . . . . . . . . . . . . . . . . . . . . . . . . . . . . . . . . . .. . . . . . .295Distributing Cost. . . . . . . . . . . . . . . . . . . . . . . . . . . . . . . . . . . . . . . . . . . . . . . . . . . . . . . . . . . . . . . . . . . . . . . . . . . . . . . . . . . . . . . . . . . .. . . . . . .297
PeopleSoft Proprietary and Confidential xiii

Contents
Chapter 11(JPN) Tracking Intercompany Transfers (Shukkou)... .. . . . . . . . . . . . . . . . . . . . . . . . . . . . . . . . . . . . . . . . . . . . . .299Understanding the Tracking of Intercompany Transfers. . . . . . . . . . . . . . . . . . . . . . . . . . . . . . . . . . . . . . . . . . . . . . . . . . . . . . . . .299
Summary of Home and Host Data for Intercompany Transfers. . . . . . . . . . . . . . . . . . . . . . . . . . . . . . . . . . . . . .. . . . . . .299Prerequisites.. . . . . . . . . . . . . . . . . . . . . . . . . . . . . . . . . . . . . . . . . . . . . . . . . . . . . . . . . . . . . . . . . . . . . . . . . . . . . . . . . . . . . . . . . . . . . . .. . . . . . .302
Setting Up Employee Data for Intercompany Transfers.. . . . . . . . . . . . . . . . . . . . . . . . . . . . . . . . . . . . . . . . . . . . . . . . . . . . . . . . .303Tracking Intercompany Transfers.. . . . . . . . . . . . . . . . . . . . . . . . . . . . . . . . . . . . . . . . . . . . . . . . . . . . . . . . . . . . . . . . . . . . . . . .. . . . . . .303Indicating the Home or Host Compensation Owner... . . . . . . . . . . . . . . . . . . . . . . . . . . . . . . . . . . . . . . . . . . . . . . . . .. . . . . . .304
Entering and Maintaining Home and Host Data for Intercompany Transfers.. . . . . . . . . . . . . . . . . . . . . . . . . . . . . . . . .304Single Company Using a Single PeopleSoft Enterprise HRMS Database: Scenarios A1-8.. . . . .. . . . . . .305Multiple Companies Using a Single PeopleSoft Enterprise HRMS Database: Scenarios B1-6. .. . . . . . .309Multiple Companies Using a Single HRMS Database: Scenarios C1-6.. . . . . . . . . . . . . . . . . . . . . . . . . . . .. . . . . . .313
Working with Search Page Security.. . . . . . . . . . . . . . . . . . . . . . . . . . . . . . . . . . . . . . . . . . . . . . . . . . . . . . . . . . . . . . . . . . . . . . . . . . . . . . . .316Running the Intercompany Transfer Report. . . . . . . . . . . . . . . . . . . . . . . . . . . . . . . . . . . . . . . . . . . . . . . . . . . . . . . . . . . . . . . . . . . . . . . .318
Page Used to Run the Intercompany Transfer Report. . . . . . . . . . . . . . . . . . . . . . . . . . . . . . . . . . . . . . . . . . . . . . . . .. . . . . . .318
Chapter 12(JPN) Mass Organization Change.... . . . . . . . . .. . . . . . . . . . . . . . . . . . . . . . .. . . . . . . . . . . . . . . . . . . . . . . .. . . . . . . . . . . .319Understanding Mass Organization Change... . . . . . . . . . . . . . . . . . . . . . . . . . . . . . . . . . . . . . . . . . . . . . . . . . . . . . . . . . . . . . . . . . . . . .319Change Plans for Restructuring An Organization.. . . . . . . . . . . . . . . . . . . . . . . . . . . . . . . . . . . . . . . . . . . . . . . . . . . . . . . . . . . . . . . .320
Understanding Change Plans for Restructuring An Organization.. . . . . . . . . . . . . . . . . . . . . . . . . . . . . . . . . . .. . . . . . .320Pages Used For Organizational Structures.. . . . . . . . . . . . . . . . . . . . . . . . . . . . . . . . . . . . . . . . . . . . . . . . . . . . . . . . . . . .. . . . . . .321Organization Plan... . . . . . . . . . . . . . . . . . . . . . . . . . . . . . . . . . . . . . . . . . . . . . . . . . . . . . . . . . . . . . . . . . . . . . . . . . . . . . . . . . . . . . . . .. . . . . . .321Headcount Plan by Department. . . . . . . . . . . . . . . . . . . . . . . . . . . . . . . . . . . . . . . . . . . . . . . . . . . . . . . . . . . . . . . . . . . . . . . . . .. . . . . . .322Headcount Plan Listing.. . . . . . . . . . . . . . . . . . . . . . . . . . . . . . . . . . . . . . . . . . . . . . . . . . . . . . . . . . . . . . . . . . . . . . . . . . . . . . . . . . .. . . . . . .323
Employee Placement Plans With The New Organization Structure.. . . . . . . . . . . . . . . . . . . . . . . . . . . . . . . . . . . . . . . . . . .323Understanding Employee Placement Plans.. . . . . . . . . . . . . . . . . . . . . . . . . . . . . . . . . . . . . . . . . . . . . . . . . . . . . . . . . . . .. . . . . . .324Pages Used For Employee Placement Plans.. . . . . . . . . . . . . . . . . . . . . . . . . . . . . . . . . . . . . . . . . . . . . . . . . . . . . . . . . .. . . . . . .325Ido Candidate Listing.. . . . . . . . . . . . . . . . . . . . . . . . . . . . . . . . . . . . . . . . . . . . . . . . . . . . . . . . . . . . . . . . . . . . . . . . . . . . . . . . . . . . . .. . . . . . .325Transfer Entry by Department... . . . . . . . . . . . . . . . . . . . . . . . . . . . . . . . . . . . . . . . . . . . . . . . . . . . . . . . . . . . . . . . . . . . . . . . . . .. . . . . . .326Transfer Entry with Trees.. . . . . . . . . . . . . . . . . . . . . . . . . . . . . . . . . . . . . . . . . . . . . . . . . . . . . . . . . . . . . . . . . . . . . . . . . . . . . . . . .. . . . . . .328Tamatsuki Transfer Candidates.. . . . . . . . . . . . . . . . . . . . . . . . . . . . . . . . . . . . . . . . . . . . . . . . . . . . . . . . . . . . . . . . . . . . . . . . . .. . . . . . .329Tamatsuki Transfer Entry. . . . . . . . . . . . . . . . . . . . . . . . . . . . . . . . . . . . . . . . . . . . . . . . . . . . . . . . . . . . . . . . . . . . . . . . . . . . . . . . . .. . . . . . .329Tamatsuki Placement Check List. . . . . . . . . . . . . . . . . . . . . . . . . . . . . . . . . . . . . . . . . . . . . . . . . . . . . . . . . . . . . . . . . . . . . . . . .. . . . . . .331Tamatsuki to Transfer Record.. . . . . . . . . . . . . . . . . . . . . . . . . . . . . . . . . . . . . . . . . . . . . . . . . . . . . . . . . . . . . . . . . . . . . . . . . . . .. . . . . . .331Transfer Data Maintenance.. . . . . . . . . . . . . . . . . . . . . . . . . . . . . . . . . . . . . . . . . . . . . . . . . . . . . . . . . . . . . . . . . . . . . . . . . . . . . .. . . . . . .332
Finalizing Organization and Employee Placement Plans.. . . . . . . . . . . . . . . . . . . . . . . . . . . . . . . . . . . . . . . . . . . . . . . . . . . . . . .333Understanding Finalizing Organization and Employee Placement Plans.. . . . . . . . . . . . . . . . . . . . . . . . . .. . . . . . .333Pages Used For Finalizing Organization and Employee Placement Plans.. . . . . . . . . . . . . . . . . . . . . . . .. . . . . . .334
xiv PeopleSoft Proprietary and Confidential

Contents
Organization Plan Checklist. . . . . . . . . . . . . . . . . . . . . . . . . . . . . . . . . . . . . . . . . . . . . . . . . . . . . . . . . . . . . . . . . . . . . . . . . . . . . . .. . . . . . .334Headcount Plan Listing.. . . . . . . . . . . . . . . . . . . . . . . . . . . . . . . . . . . . . . . . . . . . . . . . . . . . . . . . . . . . . . . . . . . . . . . . . . . . . . . . . . .. . . . . . .335Future Employee Assignment List. . . . . . . . . . . . . . . . . . . . . . . . . . . . . . . . . . . . . . . . . . . . . . . . . . . . . . . . . . . . . . . . . . . . . . . .. . . . . . .336Transfers After Organization Change... . . . . . . . . . . . . . . . . . . . . . . . . . . . . . . . . . . . . . . . . . . . . . . . . . . . . . . . . . . . . . . . . .. . . . . . .336Ido Employee Listing.. . . . . . . . . . . . . . . . . . . . . . . . . . . . . . . . . . . . . . . . . . . . . . . . . . . . . . . . . . . . . . . . . . . . . . . . . . . . . . . . . . . . . .. . . . . . .337Mass Employee Transfer. . . . . . . . . . . . . . . . . . . . . . . . . . . . . . . . . . . . . . . . . . . . . . . . . . . . . . . . . . . . . . . . . . . . . . . . . . . . . . . . . .. . . . . . .337Temporary Data Cleanup.. . . . . . . . . . . . . . . . . . . . . . . . . . . . . . . . . . . . . . . . . . . . . . . . . . . . . . . . . . . . . . . . . . . . . . . . . . . . . . . . .. . . . . . .337
Chapter 13Updating Person and Job Information.... . . . . . . . . . . . . . . . . . . . . . . .. . . . . . . . . . . . . . . . . . . . . . . . . . . . . . . . . . . . . . .339Understanding the Process of Updating Person and Job Information.. . . . . . . . . . . . . . . . . . . . . . . . . . . . . . . . . . . . . . . . .339Changing Personal Data.. . . . . . . . . . . . . . . . . . . . . . . . . . . . . . . . . . . . . . . . . . . . . . . . . . . . . . . . . . . . . . . . . . . . . . . . . . . . . . . . . . . . . . . . . . . .340Changing Job Data.. . . . . . . . . . . . . . . . . . . . . . . . . . . . . . . . . . . . . . . . . . . . . . . . . . . . . . . . . . . . . . . . . . . . . . . . . . . . . . . . . . . . . . . . . . . . . . . . . . .340Locating Personnel Records.. . . . . . . . . . . . . . . . . . . . . . . . . . . . . . . . . . . . . . . . . . . . . . . . . . . . . . . . . . . . . . . . . . . . . . . . . . . . . . . . . . . . . . . .342Changing and Deleting IDs.. . . . . . . . . . . . . . . . . . . . . . . . . . . . . . . . . . . . . . . . . . . . . . . . . . . . . . . . . . . . . . . . . . . . . . . . . . . . . . . . . . . . . . . . . .342
Understanding ID Modification.. . . . . . . . . . . . . . . . . . . . . . . . . . . . . . . . . . . . . . . . . . . . . . . . . . . . . . . . . . . . . . . . . . . . . . . . . . .. . . . . . .342Pages Used to Change and Delete Employee IDs.. . . . . . . . . . . . . . . . . . . . . . . . . . . . . . . . . . . . . . . . . . . . . . . . . . . .. . . . . . .343Modifying IDs.. . . . . . . . . . . . . . . . . . . . . . . . . . . . . . . . . . . . . . . . . . . . . . . . . . . . . . . . . . . . . . . . . . . . . . . . . . . . . . . . . . . . . . . . . . . . . . .. . . . . . .343Viewing the ID Change and Delete Process Log.. . . . . . . . . . . . . . . . . . . . . . . . . . . . . . . . . . . . . . . . . . . . . . . . . . . . . .. . . . . . .344
Updating Personal Data.. . . . . . . . . . . . . . . . . . . . . . . . . . . . . . . . . . . . . . . . . . . . . . . . . . . . . . . . . . . . . . . . . . . . . . . . . . . . . . . . . . . . . . . . . . . . .345Understanding Types of Personal Data... . . . . . . . . . . . . . . . . . . . . . . . . . . . . . . . . . . . . . . . . . . . . . . . . . . . . . . . . . . . . . . .. . . . . . .345Pages Used to Update Personal Data. . . . . . . . . . . . . . . . . . . . . . . . . . . . . . . . . . . . . . . . . . . . . . . . . . . . . . . . . . . . . . . . . . .. . . . . . .346Updating Effective-Dated Personal Information.. . . . . . . . . . . . . . . . . . . . . . . . . . . . . . . . . . . . . . . . . . . . . . . . . . . . . . .. . . . . . .347Using Workflow to Update Person Addresses.. . . . . . . . . . . . . . . . . . . . . . . . . . . . . . . . . . . . . . . . . . . . . . . . . . . . . . . . .. . . . . . .348Updating Emergency Contact Information.. . . . . . . . . . . . . . . . . . . . . . . . . . . . . . . . . . . . . . . . . . . . . . . . . . . . . . . . . . . . .. . . . . . .348Modifying Addresses.. . . . . . . . . . . . . . . . . . . . . . . . . . . . . . . . . . . . . . . . . . . . . . . . . . . . . . . . . . . . . . . . . . . . . . . . . . . . . . . . . . . . . .. . . . . . .348
Running Personal Data Reports.. . . . . . . . . . . . . . . . . . . . . . . . . . . . . . . . . . . . . . . . . . . . . . . . . . . . . . . . . . . . . . . . . . . . . . . . . . . . . . . . . . . .349Pages Used to Run Personal Data Reports. . . . . . . . . . . . . . . . . . . . . . . . . . . . . . . . . . . . . . . . . . . . . . . . . . . . . . . . . . . .. . . . . . .350
Updating Job Data... . . . . . . . . . . . . . . . . . . . . . . . . . . . . . . . . . . . . . . . . . . . . . . . . . . . . . . . . . . . . . . . . . . . . . . . . . . . . . . . . . . . . . . . . . . . . . . . . . .350Understanding Updating Effective-Dated Job Data.. . . . . . . . . . . . . . . . . . . . . . . . . . . . . . . . . . . . . . . . . . . . . . . . . . .. . . . . . .351Understanding Security for Updating Job Data.. . . . . . . . . . . . . . . . . . . . . . . . . . . . . . . . . . . . . . . . . . . . . . . . . . . . . . . .. . . . . . .351Understanding Personnel Actions and Human Resources and Payroll Status.. . . . . . . . . . . . . . . . . . . .. . . . . . .352Pages Used to Update Job Data and Salary Data.. . . . . . . . . . . . . . . . . . . . . . . . . . . . . . . . . . . . . . . . . . . . . . . . . . . .. . . . . . .354Updating Effective-Dated Job Data.. . . . . . . . . . . . . . . . . . . . . . . . . . . . . . . . . . . . . . . . . . . . . . . . . . . . . . . . . . . . . . . . . . . . .. . . . . . .356Entering Promotions... . . . . . . . . . . . . . . . . . . . . . . . . . . . . . . . . . . . . . . . . . . . . . . . . . . . . . . . . . . . . . . . . . . . . . . . . . . . . . . . . . . . . .. . . . . . .357Entering Departmental Transfers.. . . . . . . . . . . . . . . . . . . . . . . . . . . . . . . . . . . . . . . . . . . . . . . . . . . . . . . . . . . . . . . . . . . . . . . .. . . . . . .358Entering Pay Rate Changes.. . . . . . . . . . . . . . . . . . . . . . . . . . . . . . . . . . . . . . . . . . . . . . . . . . . . . . . . . . . . . . . . . . . . . . . . . . . . . .. . . . . . .359Tracking Leaves of Absence.. . . . . . . . . . . . . . . . . . . . . . . . . . . . . . . . . . . . . . . . . . . . . . . . . . . . . . . . . . . . . . . . . . . . . . . . . . . . .. . . . . . .361Entering Terminations and Retirements.. . . . . . . . . . . . . . . . . . . . . . . . . . . . . . . . . . . . . . . . . . . . . . . . . . . . . . . . . . . . . . . .. . . . . . .362
PeopleSoft Proprietary and Confidential xv
Contents
Entering Deaths.. . . . . . . . . . . . . . . . . . . . . . . . . . . . . . . . . . . . . . . . . . . . . . . . . . . . . . . . . . . . . . . . . . . . . . . . . . . . . . . . . . . . . . . . . . . .. . . . . . .363Entering Rehires.. . . . . . . . . . . . . . . . . . . . . . . . . . . . . . . . . . . . . . . . . . . . . . . . . . . . . . . . . . . . . . . . . . . . . . . . . . . . . . . . . . . . . . . . . . .. . . . . . .364Assigning Workers to Different Positions.. . . . . . . . . . . . . . . . . . . . . . . . . . . . . . . . . . . . . . . . . . . . . . . . . . . . . . . . . . . . . . .. . . . . . .364Paying Workers on Disability. . . . . . . . . . . . . . . . . . . . . . . . . . . . . . . . . . . . . . . . . . . . . . . . . . . . . . . . . . . . . . . . . . . . . . . . . . . . . .. . . . . . .366
Updating Salary Information.. . . . . . . . . . . . . . . . . . . . . . . . . . . . . . . . . . . . . . . . . . . . . . . . . . . . . . . . . . . . . . . . . . . . . . . . . . . . . . . . . . . . . . . .366Pages Used to Update Salary Information.. . . . . . . . . . . . . . . . . . . . . . . . . . . . . . . . . . . . . . . . . . . . . . . . . . . . . . . . . . . . .. . . . . . .367
Refreshing Compensation.. . . . . . . . . . . . . . . . . . . . . . . . . . . . . . . . . . . . . . . . . . . . . . . . . . . . . . . . . . . . . . . . . . . . . . . . . . . . . . . . . . . . . . . . . . .367Page Used to Refresh Compensation.. . . . . . . . . . . . . . . . . . . . . . . . . . . . . . . . . . . . . . . . . . . . . . . . . . . . . . . . . . . . . . . . . .. . . . . . .367
Running Job Data Reports.. . . . . . . . . . . . . . . . . . . . . . . . . . . . . . . . . . . . . . . . . . . . . . . . . . . . . . . . . . . . . . . . . . . . . . . . . . . . . . . . . . . . . . . . . .367(JPN) Understanding Reporting Appointments for Job Data Changes.. . . . . . . . . . . . . . . . . . . . . . . . . . . . .. . . . . . .368Common Element Used in This Section.. . . . . . . . . . . . . . . . . . . . . . . . . . . . . . . . . . . . . . . . . . . . . . . . . . . . . . . . . . . . . . . .. . . . . . .369Pages Used to Run Job Data Reports.. . . . . . . . . . . . . . . . . . . . . . . . . . . . . . . . . . . . . . . . . . . . . . . . . . . . . . . . . . . . . . . . . .. . . . . . .369(JPN) Running the Appointment Notification Report. . . . . . . . . . . . . . . . . . . . . . . . . . . . . . . . . . . . . . . . . . . . . . . . . . .. . . . . . .372(JPN) Running the Appointment List Report. . . . . . . . . . . . . . . . . . . . . . . . . . . . . . . . . . . . . . . . . . . . . . . . . . . . . . . . . . . .. . . . . . .373(JPN) Running the Employee Assignment List Report. . . . . . . . . . . . . . . . . . . . . . . . . . . . . . . . . . . . . . . . . . . . . . . .. . . . . . .375
Viewing a Summary of All Job Records.. . . . . . . . . . . . . . . . . . . . . . . . . . . . . . . . . . . . . . . . . . . . . . . . . . . . . . . . . . . . . . . . . . . . . . . . . . .376Page Used to View a Summary of All Job Records.. . . . . . . . . . . . . . . . . . . . . . . . . . . . . . . . . . . . . . . . . . . . . . . . . . .. . . . . . .376
Refreshing Tables to Facilitate Reporting.. . . . . . . . . . . . . . . . . . . . . . . . . . . . . . . . . . . . . . . . . . . . . . . . . . . . . . . . . . . . . . . . . . . . . . . . .376Understanding the Process of Refreshing the Employees Table.. . . . . . . . . . . . . . . . . . . . . . . . . . . . . . . . . . . .. . . . . . .376Understanding the Process of Refreshing the Personal Data Table.. . . . . . . . . . . . . . . . . . . . . . . . . . . . . . . .. . . . . . .378Common Element Used in This Section.. . . . . . . . . . . . . . . . . . . . . . . . . . . . . . . . . . . . . . . . . . . . . . . . . . . . . . . . . . . . . . . .. . . . . . .378Pages Used to Refresh Tables to Facilitate Reporting.. . . . . . . . . . . . . . . . . . . . . . . . . . . . . . . . . . . . . . . . . . . . . . .. . . . . . .378
Running Database Audits.. . . . . . . . . . . . . . . . . . . . . . . . . . . . . . . . . . . . . . . . . . . . . . . . . . . . . . . . . . . . . . . . . . . . . . . . . . . . . . . . . . . . . . . . . . .379Page Used to Run Database Audits.. . . . . . . . . . . . . . . . . . . . . . . . . . . . . . . . . . . . . . . . . . . . . . . . . . . . . . . . . . . . . . . . . . . .. . . . . . .379
Chapter 14Viewing Summary Workforce Information... . . . . . . . . . . . . . . . . . . . . . . . . . . . . . . . . . . . . . . . . . . . . . . . . . . . . . . . . . .381Viewing Worker Job History.. . . . . . . . . . . . . . . . . . . . . . . . . . . . . . . . . . . . . . . . . . . . . . . . . . . . . . . . . . . . . . . . . . . . . . . . . . . . . . . . . . . . . . . . .381
Pages Used to View Employee Job History.. . . . . . . . . . . . . . . . . . . . . . . . . . . . . . . . . . . . . . . . . . . . . . . . . . . . . . . . . . . .. . . . . . .381Viewing a Worker’s Job History.. . . . . . . . . . . . . . . . . . . . . . . . . . . . . . . . . . . . . . . . . . . . . . . . . . . . . . . . . . . . . . . . . . . . . . . . . .. . . . . . .382Viewing Compensation Information.. . . . . . . . . . . . . . . . . . . . . . . . . . . . . . . . . . . . . . . . . . . . . . . . . . . . . . . . . . . . . . . . . . . . .. . . . . . .384
(USF) Viewing Employee Personal and Job Data.. . . . . . . . . . . . . . . . . . . . . . . . . . . . . . . . . . . . . . . . . . . . . . . . . . . . . . . . . . . . . . .386Pages Used to View Personal and Job Data.. . . . . . . . . . . . . . . . . . . . . . . . . . . . . . . . . . . . . . . . . . . . . . . . . . . . . . . . . .. . . . . . .387Viewing Employee Personal Data.. . . . . . . . . . . . . . . . . . . . . . . . . . . . . . . . . . . . . . . . . . . . . . . . . . . . . . . . . . . . . . . . . . . . . . .. . . . . . .387Viewing Employee Job Data.. . . . . . . . . . . . . . . . . . . . . . . . . . . . . . . . . . . . . . . . . . . . . . . . . . . . . . . . . . . . . . . . . . . . . . . . . . . . .. . . . . . .388Viewing Employee Benefit Programs... . . . . . . . . . . . . . . . . . . . . . . . . . . . . . . . . . . . . . . . . . . . . . . . . . . . . . . . . . . . . . . . . .. . . . . . .389
Viewing Other Summary Pages in PeopleSoft Enterprise Human Resources.. . . . . . . . . . . . . . . . . . . . . . . . . . . . . . .390
xvi PeopleSoft Proprietary and Confidential

Contents
Chapter 15(USF) Administering Personnel Action Requests... . . . . . . . . . . . . . . . . . . . . . . . . . . . . . . . . . . . . . . . . . . . . . . . . .393Understanding the Administering PAR System... . . . . . . . . . . . . . . . . . . . . . . . . . . . . . . . . . . . . . . . . . . . . . . . . . . . . . . . . . . . . . . . . .393
Common Elements Used in This Chapter. . . . . . . . . . . . . . . . . . . . . . . . . . . . . . . . . . . . . . . . . . . . . . . . . . . . . . . . . . . . . . .. . . . . . .394Prerequisites.. . . . . . . . . . . . . . . . . . . . . . . . . . . . . . . . . . . . . . . . . . . . . . . . . . . . . . . . . . . . . . . . . . . . . . . . . . . . . . . . . . . . . . . . . . . . . . .. . . . . . .394Understanding Workflow... . . . . . . . . . . . . . . . . . . . . . . . . . . . . . . . . . . . . . . . . . . . . . . . . . . . . . . . . . . . . . . . . . . . . . . . . . . . . . . . .. . . . . . .395
Tracking and Routing a PAR Through Reviews and Completion.. . . . . . . . . . . . . . . . . . . . . . . . . . . . . . . . . . . . . . . . . . . . . .395Adding and Updating Data.. . . . . . . . . . . . . . . . . . . . . . . . . . . . . . . . . . . . . . . . . . . . . . . . . . . . . . . . . . . . . . . . . . . . . . . . . . . . . . .. . . . . . .396Processing of PAR Actions.. . . . . . . . . . . . . . . . . . . . . . . . . . . . . . . . . . . . . . . . . . . . . . . . . . . . . . . . . . . . . . . . . . . . . . . . . . . . . . .. . . . . . .400
Initiating and Requesting Personnel Actions... . . . . . . . . . . . . . . . . . . . . . . . . . . . . . . . . . . . . . . . . . . . . . . . . . . . . . . . . . . . . . . . . . . . .400Authorizing and Approving Personnel Actions.. . . . . . . . . . . . . . . . . . . . . . . . . . . . . . . . . . . . . . . . . . . . . . . . . . . . . . . . . . . . . . . . . . . .400Process Human Resources Personnel Actions.. . . . . . . . . . . . . . . . . . . . . . . . . . . . . . . . . . . . . . . . . . . . . . . . . . . . . . . . . . . . . . . . . .401Canceling or Correcting a Personnel Action Request. . . . . . . . . . . . . . . . . . . . . . . . . . . . . . . . . . . . . . . . . . . . . . . . . . . . . . . . . . . .401Printing Request for Personnel Action (SF-52) and Notice of Personnel Action (SF-50) Reports. . . . . . . . . .402
Pages Used to Print a Request for Personnel Action/Notice of Personnel Action. . . . . . . . . . . . . . . . .. . . . . . .403Printing an Action Request (SF-52).. . . . . . . . . . . . . . . . . . . . . . . . . . . . . . . . . . . . . . . . . . . . . . . . . . . . . . . . . . . . . . . . . . . . .. . . . . . .403Running the Personnel Action Report. . . . . . . . . . . . . . . . . . . . . . . . . . . . . . . . . . . . . . . . . . . . . . . . . . . . . . . . . . . . . . . . . . .. . . . . . .404
Viewing Summary Pages... . . . . . . . . . . . . . . . . . . . . . . . . . . . . . . . . . . . . . . . . . . . . . . . . . . . . . . . . . . . . . . . . . . . . . . . . . . . . . . . . . . . . . . . . . .406Generate a Personnel Action History Report. . . . . . . . . . . . . . . . . . . . . . . . . . . . . . . . . . . . . . . . . . . . . . . . . . . . . . . . . . . . . . . . . . . . . .406
Page Used to Run the Personnel Actions History Report. . . . . . . . . . . . . . . . . . . . . . . . . . . . . . . . . . . . . . . . . . . . .. . . . . . .407Generating a Wage and Separation Report. . . . . . . . . . . . . . . . . . . . . . . . . . . . . . . . . . . . . . . . . . . . . . . . . . . . . . . . . . . . . . . . . . . . . . . .407
Pages Used to Set Up and Run the ES-931 Wage and Separation Report. . . . . . . . . . . . . . . . . . . . . . . .. . . . . . .408Entering ES-931 Employee Identification Information.. . . . . . . . . . . . . . . . . . . . . . . . . . . . . . . . . . . . . . . . . . . . . . . .. . . . . . .408Entering ES-931 Annual Leave Information.. . . . . . . . . . . . . . . . . . . . . . . . . . . . . . . . . . . . . . . . . . . . . . . . . . . . . . . . . . . .. . . . . . .409Entering ES-931 Severance Pay Information... . . . . . . . . . . . . . . . . . . . . . . . . . . . . . . . . . . . . . . . . . . . . . . . . . . . . . . . .. . . . . . .410Generating the ES-931 Report. . . . . . . . . . . . . . . . . . . . . . . . . . . . . . . . . . . . . . . . . . . . . . . . . . . . . . . . . . . . . . . . . . . . . . . . . . . .. . . . . . .411
Chapter 16(USF) Processing Personnel Action Requests... .. . . . . . . . . . . . . . . . . . . . . . . . .. . . . . . . . . .. . . . . . . . . . . . . . . . .413Understanding PARs... . . . . . . . . . . . . . . . . . . . . . . . . . . . . . . . . . . . . . . . . . . . . . . . . . . . . . . . . . . . . . . . . . . . . . . . . . . . . . . . . . . . . . . . . . . . . . . .413
Personnel Action Requests.. . . . . . . . . . . . . . . . . . . . . . . . . . . . . . . . . . . . . . . . . . . . . . . . . . . . . . . . . . . . . . . . . . . . . . . . . . . . . .. . . . . . .413Sample Setup of Pages Used by Employees and Supervisors. . . . . . . . . . . . . . . . . . . . . . . . . . . . . . . . . . . . . .. . . . . . .414Personnel Actions and Employee Status.. . . . . . . . . . . . . . . . . . . . . . . . . . . . . . . . . . . . . . . . . . . . . . . . . . . . . . . . . . . . . . .. . . . . . .416Importance of Effective Dates.. . . . . . . . . . . . . . . . . . . . . . . . . . . . . . . . . . . . . . . . . . . . . . . . . . . . . . . . . . . . . . . . . . . . . . . . . . . .. . . . . . .418Multiple Actions With the Same Effective Date.. . . . . . . . . . . . . . . . . . . . . . . . . . . . . . . . . . . . . . . . . . . . . . . . . . . . . . . .. . . . . . .419
Performing Common Personnel Actions.. . . . . . . . . . . . . . . . . . . . . . . . . . . . . . . . . . . . . . . . . . . . . . . . . . . . . . . . . . . . . . . . . . . . . . . . . .420Entering Promotional Information.. . . . . . . . . . . . . . . . . . . . . . . . . . . . . . . . . . . . . . . . . . . . . . . . . . . . . . . . . . . . . . . . . . . . . . .. . . . . . .420Requesting Departmental Reassignments. . . . . . . . . . . . . . . . . . . . . . . . . . . . . . . . . . . . . . . . . . . . . . . . . . . . . . . . . . . . . .. . . . . . .421Requesting Leave of Absence.. . . . . . . . . . . . . . . . . . . . . . . . . . . . . . . . . . . . . . . . . . . . . . . . . . . . . . . . . . . . . . . . . . . . . . . . . . .. . . . . . .422
PeopleSoft Proprietary and Confidential xvii

Contents
Entering Terminations and Retirement Requests.. . . . . . . . . . . . . . . . . . . . . . . . . . . . . . . . . . . . . . . . . . . . . . . . . . . . .. . . . . . .423Requesting a Supplemental or Correction Individual Retirement Record. . . . . . . . . . . . . . . . . . . . . . . . . . .. . . . . . .423Requesting Terminations Due to Death.. . . . . . . . . . . . . . . . . . . . . . . . . . . . . . . . . . . . . . . . . . . . . . . . . . . . . . . . . . . . . . . . .. . . . . . .424Requesting to Rehire an Employee.. . . . . . . . . . . . . . . . . . . . . . . . . . . . . . . . . . . . . . . . . . . . . . . . . . . . . . . . . . . . . . . . . . . . .. . . . . . .424Granting Performance Awards.. . . . . . . . . . . . . . . . . . . . . . . . . . . . . . . . . . . . . . . . . . . . . . . . . . . . . . . . . . . . . . . . . . . . . . . . . . .. . . . . . .424
Chapter 17(USF) Processing Automatic Actions for Probation, Tenure, and WGIs.. . . . . . . . . . . . . . . . . . . . . . .425Understanding Automatic Action Processing.. . . . . . . . . . . . . . . . . . . . . . . . . . . . . . . . . . . . . . . . . . . . . . . . . . . . . . . . . . . . . . . . . . . . .425
Prerequisites.. . . . . . . . . . . . . . . . . . . . . . . . . . . . . . . . . . . . . . . . . . . . . . . . . . . . . . . . . . . . . . . . . . . . . . . . . . . . . . . . . . . . . . . . . . . . . . .. . . . . . .425Processing Automatic Actions.. . . . . . . . . . . . . . . . . . . . . . . . . . . . . . . . . . . . . . . . . . . . . . . . . . . . . . . . . . . . . . . . . . . . . . . . . . .. . . . . . .426
Performing Automatic Actions.. . . . . . . . . . . . . . . . . . . . . . . . . . . . . . . . . . . . . . . . . . . . . . . . . . . . . . . . . . . . . . . . . . . . . . . . . . . . . . . . . . . . . .427Understanding the Menus and Pages Used for Each Automatic Action Process.. . . . . . . . . . . . . . . . .. . . . . . .427Pages Used to Perform Automatic Actions.. . . . . . . . . . . . . . . . . . . . . . . . . . . . . . . . . . . . . . . . . . . . . . . . . . . . . . . . . . . .. . . . . . .429Processing Automatic Actions.. . . . . . . . . . . . . . . . . . . . . . . . . . . . . . . . . . . . . . . . . . . . . . . . . . . . . . . . . . . . . . . . . . . . . . . . . . .. . . . . . .429Running the Load Within Grade Increases Process.. . . . . . . . . . . . . . . . . . . . . . . . . . . . . . . . . . . . . . . . . . . . . . . . . .. . . . . . .430
Administering Probation Termination Automatic Actions.. . . . . . . . . . . . . . . . . . . . . . . . . . . . . . . . . . . . . . . . . . . . . . . . . . . . . . . .430Running the Probation Termination Automatic Action.. . . . . . . . . . . . . . . . . . . . . . . . . . . . . . . . . . . . . . . . . . . . . . . .. . . . . . .430
Administering Tenure Conversion Automatic Actions.. . . . . . . . . . . . . . . . . . . . . . . . . . . . . . . . . . . . . . . . . . . . . . . . . . . . . . . . . . . .431Running the Tenure Conversion Automatic Action.. . . . . . . . . . . . . . . . . . . . . . . . . . . . . . . . . . . . . . . . . . . . . . . . . . . .. . . . . . .432Understanding Changes Made to Employee Records During Tenure Conversion. . . . . . . . . . . . . . . .. . . . . . .433
Administering WGIs.. . . . . . . . . . . . . . . . . . . . . . . . . . . . . . . . . . . . . . . . . . . . . . . . . . . . . . . . . . . . . . . . . . . . . . . . . . . . . . . . . . . . . . . . . . . . . . . . . .434Understanding the 60 Day WGI Notices.. . . . . . . . . . . . . . . . . . . . . . . . . . . . . . . . . . . . . . . . . . . . . . . . . . . . . . . . . . . . . . . .. . . . . . .434Understanding the Load Within Grade Increases Process.. .. . . . . . . . . . . . . . . . . . . . . . . . . . . . . . . . . . . . . . . . .. . . . . . .434Running the WGI Automatic Action.. . . . . . . . . . . . . . . . . . . . . . . . . . . . . . . . . . . . . . . . . . . . . . . . . . . . . . . . . . . . . . . . . . . . .. . . . . . .436Entering Data That Affects WGI Automatic Actions.. . . . . . . . . . . . . . . . . . . . . . . . . . . . . . . . . . . . . . . . . . . . . . . . . . .. . . . . . .437
Chapter 18(USF) Managing Leave.... .. . . . . . . . . . . . . . . . . . . . . . . . . . . . . . . . . . . . . . . . . . . . . . . . . . . . . . . . . . . . . . . . . . . . . . . . . . . . . . . . .439Understanding Leave Administration.. . . . . . . . . . . . . . . . . . . . . . . . . . . . . . . . . . . . . . . . . . . . . . . . . . . . . . . . . . . . . . . . . . . . . . . . . . . . . .439
Prerequisites.. . . . . . . . . . . . . . . . . . . . . . . . . . . . . . . . . . . . . . . . . . . . . . . . . . . . . . . . . . . . . . . . . . . . . . . . . . . . . . . . . . . . . . . . . . . . . . .. . . . . . .439Automatic Leave Enrollment Administration.. . . . . . . . . . . . . . . . . . . . . . . . . . . . . . . . . . . . . . . . . . . . . . . . . . . . . . . . . . .. . . . . . .439Leave Transfer Management.. . . . . . . . . . . . . . . . . . . . . . . . . . . . . . . . . . . . . . . . . . . . . . . . . . . . . . . . . . . . . . . . . . . . . . . . . . . .. . . . . . .440
Administering Automatic Leave Enrollment.. . . . . . . . . . . . . . . . . . . . . . . . . . . . . . . . . . . . . . . . . . . . . . . . . . . . . . . . . . . . . . . . . . . . . . .440Pages Used to Administer Automatic Leave Enrollment.. . . . . . . . . . . . . . . . . . . . . . . . . . . . . . . . . . . . . . . . . . . . .. . . . . . .441Setting Up the Leave Class Rules Template.. . . . . . . . . . . . . . . . . . . . . . . . . . . . . . . . . . . . . . . . . . . . . . . . . . . . . . . . . . .. . . . . . .441Setting Up Leave Class Rule Criteria.. . . . . . . . . . . . . . . . . . . . . . . . . . . . . . . . . . . . . . . . . . . . . . . . . . . . . . . . . . . . . . . . . . .. . . . . . .443Processing Auto Leave Enrollment.. . . . . . . . . . . . . . . . . . . . . . . . . . . . . . . . . . . . . . . . . . . . . . . . . . . . . . . . . . . . . . . . . . . . . .. . . . . . .445
xviii PeopleSoft Proprietary and Confidential

Contents
Reviewing Auto Leave Enrollment.. . . . . . . . . . . . . . . . . . . . . . . . . . . . . . . . . . . . . . . . . . . . . . . . . . . . . . . . . . . . . . . . . . . . . .. . . . . . .445Manually Entering or Adjusting Leave Enrollment.. . . . . . . . . . . . . . . . . . . . . . . . . . . . . . . . . . . . . . . . . . . . . . . . . . . . .. . . . . . .446
Setting Up Leave Transfer Programs... . . . . . . . . . . . . . . . . . . . . . . . . . . . . . . . . . . . . . . . . . . . . . . . . . . . . . . . . . . . . . . . . . . . . . . . . . . . .448Pages Used to Set Up Leave Transfers. . . . . . . . . . . . . . . . . . . . . . . . . . . . . . . . . . . . . . . . . . . . . . . . . . . . . . . . . . . . . . . . .. . . . . . .448Setting Up Denial Codes and Denial Notification Letter Text. . . . . . . . . . . . . . . . . . . . . . . . . . . . . . . . . . . . . . . . .. . . . . . .449Setting Up Leave Transfer Programs... . . . . . . . . . . . . . . . . . . . . . . . . . . . . . . . . . . . . . . . . . . . . . . . . . . . . . . . . . . . . . . . . .. . . . . . .449Setting Up Earnings Codes for Leave Transfer.. . . . . . . . . . . . . . . . . . . . . . . . . . . . . . . . . . . . . . . . . . . . . . . . . . . . . . . .. . . . . . .450Setting Up Earnings Accrual Classes for Leave Transfer. . . . . . . . . . . . . . . . . . . . . . . . . . . . . . . . . . . . . . . . . . . . .. . . . . . .452Setting Up Leave Class Rules for Leave Transfer. . . . . . . . . . . . . . . . . . . . . . . . . . . . . . . . . . . . . . . . . . . . . . . . . . . . .. . . . . . .454
Administering Leave Donations.. . . . . . . . . . . . . . . . . . . . . . . . . . . . . . . . . . . . . . . . . . . . . . . . . . . . . . . . . . . . . . . . . . . . . . . . . . . . . . . . . . . .454Pages Used to Administer Leave Donations.. . . . . . . . . . . . . . . . . . . . . . . . . . . . . . . . . . . . . . . . . . . . . . . . . . . . . . . . . . .. . . . . . .455Entering Employee Requests To Contribute Leave To A Leave Bank Or Emergency LeaveTransfer Program... . . . . . . . . . . . . . . . . . . . . . . . . . . . . . . . . . . . . . . . . . . . . . . . . . . . . . . . . . . . . . . . . . . . . . . . . . . . . . . . . . . . . . . . .. . . . . . .455Entering Employee Donations to Voluntary Leave Transfer Program.. . . . . . . . . . . . . . . . . . . . . . . . . . . . . .. . . . . . .456Entering Employee Requests To Donate To Another Agency’s Leave Transfer Program. . . . . . . .. . . . . . .457Running the Leave Bank and Transfer Process.. . . . . . . . . . . . . . . . . . . . . . . . . . . . . . . . . . . . . . . . . . . . . . . . . . . . . . .. . . . . . .458
Administering Leave Recipients.. . . . . . . . . . . . . . . . . . . . . . . . . . . . . . . . . . . . . . . . . . . . . . . . . . . . . . . . . . . . . . . . . . . . . . . . . . . . . . . . . . . .458Page Used to Administer Leave Recipients... . . . . . . . . . . . . . . . . . . . . . . . . . . . . . . . . . . . . . . . . . . . . . . . . . . . . . . . . . .. . . . . . .459Enter Employee Requests to Receive Hours From Any of the Leave Program Types.. . . . . . . . . . .. . . . . . .459Enrolling Recipients in the Leave Program Accrual Class.. . . . . . . . . . . . . . . . . . . . . . . . . . . . . . . . . . . . . . . . . . .. . . . . . .460Running the Leave Bank and Transfer Process for Approved Recipients. . . . . . . . . . . . . . . . . . . . . . . . . .. . . . . . .460Viewing the Data Entered by the Leave Bank and Transfer Process.. . . . . . . . . . . . . . . . . . . . . . . . . . . . . . .. . . . . . .461Viewing Recipient Accrual Balances.. . . . . . . . . . . . . . . . . . . . . . . . . . . . . . . . . . . . . . . . . . . . . . . . . . . . . . . . . . . . . . . . . . . .. . . . . . .461
Viewing Leave Transfer Data.. . . . . . . . . . . . . . . . . . . . . . . . . . . . . . . . . . . . . . . . . . . . . . . . . . . . . . . . . . . . . . . . . . . . . . . . . . . . . . . . . . . . . . .461Pages Used to View Leave Transfer Data. . . . . . . . . . . . . . . . . . . . . . . . . . . . . . . . . . . . . . . . . . . . . . . . . . . . . . . . . . . . . .. . . . . . .461Viewing Leave Donations to Leave Bank and Emergency Leave Transfer Programs. . . . . . . . . . . .. . . . . . .462Viewing Leave Donations to Voluntary Leave Transfer Programs... . . . . . . . . . . . . . . . . . . . . . . . . . . . . . . . .. . . . . . .463Viewing Donor and Recipient Accrual Summaries. . . . . . . . . . . . . . . . . . . . . . . . . . . . . . . . . . . . . . . . . . . . . . . . . . . . .. . . . . . .463Viewing Donor Contributions or Hours Received by Recipients.. . . . . . . . . . . . . . . . . . . . . . . . . . . . . . . . . . . . .. . . . . . .463Viewing a Summary of Participation in a Leave Transfer Program.. . . . . . . . . . . . . . . . . . . . . . . . . . . . . . . . .. . . . . . .464
Reporting on Leave Transfer Programs... . . . . . . . . . . . . . . . . . . . . . . . . . . . . . . . . . . . . . . . . . . . . . . . . . . . . . . . . . . . . . . . . . . . . . . . . .464
Glossary of PeopleSoft Terms..... . . . . . . . . . . . . . . . . . . . . . . . . . . . . . . . . . . . . . . . . . . . . . . . . . . . . . . . . . . . . . . . . . . . . . . . .467
Index .... . . . . . . . . . . . . . .. . . . . . . . . . . . . . . .. . . . . . . . . . . . . . . . .. . . . . . . . . . . . . . . .. . . . . . . . . . . . . . . .. . . . . . . . . . . . . .. . . . . . . . . . .489
PeopleSoft Proprietary and Confidential xix

Contents
xx PeopleSoft Proprietary and Confidential
About This PeopleBook Preface
PeopleBooks provide you with the information that you need to implement and use PeopleSoft applications.
This preface discusses:
• PeopleSoft application prerequisites.• PeopleSoft application fundamentals.• Documentation updates and printed documentation.• Additional resources.• Typographical conventions and visual cues.• Comments and suggestions.• Common elements in PeopleBooks.
Note. PeopleBooks document only page elements, such as fields and check boxes, that require additionalexplanation. If a page element is not documented with the process or task in which it is used, then eitherit requires no additional explanation or it is documented with common elements for the section, chapter,PeopleBook, or product line. Elements that are common to all PeopleSoft applications are defined in thispreface.
PeopleSoft Application PrerequisitesTo benefit fully from the information that is covered in these books, you should have a basic understandingof how to use PeopleSoft applications.
You might also want to complete at least one PeopleSoft introductory training course, if applicable.
You should be familiar with navigating the system and adding, updating, and deleting information by usingPeopleSoft menus, and pages, forms, or windows. You should also be comfortable using the World Wide Weband the Microsoft Windows or Windows NT graphical user interface.
These books do not review navigation and other basics. They present the information that you need to use thesystem and implement your PeopleSoft applications most effectively.
PeopleSoft Application FundamentalsEach application PeopleBook provides implementation and processing information for your PeopleSoftapplications.
Note. Application fundamentals PeopleBooks are not applicable to the PeopleTools product.
PeopleSoft Proprietary and Confidential xxi

General Preface
For some applications, additional, essential information describing the setup and design of your system appearsin a companion volume of documentation called the application fundamentals PeopleBook. Most PeopleSoftproduct lines have a version of the application fundamentals PeopleBook. The preface of each PeopleBookidentifies the application fundamentals PeopleBooks that are associated with that PeopleBook.
The application fundamentals PeopleBook consists of important topics that apply to many or all PeopleSoftapplications across one or more product lines. Whether you are implementing a single application, somecombination of applications within the product line, or the entire product line, you should be familiar withthe contents of the appropriate application fundamentals PeopleBooks. They provide the starting pointsfor fundamental implementation tasks.
Documentation Updates and Printed DocumentationThis section discusses how to:
• Obtain documentation updates.• Order printed documentation.
Obtaining Documentation UpdatesYou can find updates and additional documentation for this release, as well as previous releases, on thePeopleSoft Customer Connection website. Through the Documentation section of PeopleSoft CustomerConnection, you can download files to add to your PeopleBook Library. You’ll find a variety of useful andtimely materials, including updates to the full PeopleSoft documentation that is delivered on your PeopleBooksCD-ROM.
Important! Before you upgrade, you must check PeopleSoft Customer Connection for updates to the upgradeinstructions. PeopleSoft continually posts updates as the upgrade process is refined.
See AlsoPeopleSoft Customer Connection, https://www.peoplesoft.com/corp/en/login.jsp
Ordering Printed DocumentationYou can order printed, bound volumes of the complete PeopleSoft documentation that is delivered on yourPeopleBooks CD-ROM. PeopleSoft makes printed documentation available for each major release shortlyafter the software is shipped. Customers and partners can order printed PeopleSoft documentation by usingany of these methods:
• Web• Telephone• Email
WebFrom the Documentation section of the PeopleSoft Customer Connection website, access the PeopleBooksPress website under the Ordering PeopleBooks topic. The PeopleBooks Press website is a joint venturebetween PeopleSoft and MMA Partners, the book print vendor. Use a credit card, money order, cashier’scheck, or purchase order to place your order.
xxii PeopleSoft Proprietary and Confidential

General Preface
TelephoneContact MMA Partners at 877 588 2525.
EmailSend email to MMA Partners at [email protected].
See AlsoPeopleSoft Customer Connection, https://www.peoplesoft.com/corp/en/login.jsp
Additional ResourcesThe following resources are located on the PeopleSoft Customer Connection website:
Resource Navigation
Application maintenance information Updates + Fixes
Business process diagrams Support, Documentation, Business Process Maps
Interactive Services Repository Interactive Services Repository
Hardware and software requirements Implement, Optimize + Upgrade, Implementation Guide,Implementation Documentation & Software, Hardware andSoftware Requirements
Installation guides Implement, Optimize + Upgrade, Implementation Guide,Implementation Documentation & Software, InstallationGuides and Notes
Integration information Implement, Optimize + Upgrade, Implementation Guide,Implementation Documentation and Software, Pre-builtIntegrations for PeopleSoft Enterprise and PeopleSoftEnterpriseOne Applications
Minimum technical requirements (MTRs) (EnterpriseOneonly)
Implement, Optimize + Upgrade, Implementation Guide,Supported Platforms
PeopleBook documentation updates Support, Documentation, Documentation Updates
PeopleSoft support policy Support, Support Policy
Prerelease notes Support, Documentation, Documentation Updates,Category, Prerelease Notes
Product release roadmap Support, Roadmaps + Schedules
Release notes Support, Documentation, Documentation Updates,Category, Release Notes
PeopleSoft Proprietary and Confidential xxiii

General Preface
Resource Navigation
Release value proposition Support, Documentation, Documentation Updates,Category, Release Value Proposition
Statement of direction Support, Documentation, Documentation Updates,Category, Statement of Direction
Troubleshooting information Support, Troubleshooting
Upgrade documentation Support, Documentation, Upgrade Documentation andScripts
Typographical Conventions and Visual CuesThis section discusses:
• Typographical conventions.• Visual cues.• Country, region, and industry identifiers.• Currency codes.
Typographical ConventionsThis table contains the typographical conventions that are used in PeopleBooks:
Typographical Convention or Visual Cue Description
Bold Indicates PeopleCode function names, business functionnames, event names, system function names, methodnames, language constructs, and PeopleCode reservedwords that must be included literally in the function call.
Italics Indicates field values, emphasis, and PeopleSoft or otherbook-length publication titles. In PeopleCode syntax,italic items are placeholders for arguments that yourprogram must supply.
We also use italics when we refer to words as words orletters as letters, as in the following: Enter the letterO.
KEY+KEY Indicates a key combination action. For example, a plussign (+) between keys means that you must hold downthe first key while you press the second key. For ALT+W,hold down the ALT key while you press the W key.
Monospace font Indicates a PeopleCode program or other code example.
xxiv PeopleSoft Proprietary and Confidential

General Preface
Typographical Convention or Visual Cue Description
“ ” (quotation marks) Indicate chapter titles in cross-references and words thatare used differently from their intended meanings.
. . . (ellipses) Indicate that the preceding item or series can be repeatedany number of times in PeopleCode syntax.
{ } (curly braces) Indicate a choice between two options in PeopleCodesyntax. Options are separated by a pipe ( | ).
[ ] (square brackets) Indicate optional items in PeopleCode syntax.
& (ampersand) When placed before a parameter in PeopleCode syntax,an ampersand indicates that the parameter is an alreadyinstantiated object.
Ampersands also precede all PeopleCode variables.
Visual CuesPeopleBooks contain the following visual cues.
NotesNotes indicate information that you should pay particular attention to as you work with the PeopleSoft system.
Note. Example of a note.
If the note is preceded by Important!, the note is crucial and includes information that concerns what you mustdo for the system to function properly.
Important! Example of an important note.
WarningsWarnings indicate crucial configuration considerations. Pay close attention to warning messages.
Warning! Example of a warning.
Cross-ReferencesPeopleBooks provide cross-references either under the heading “See Also” or on a separate line preceded bythe word See. Cross-references lead to other documentation that is pertinent to the immediately precedingdocumentation.
PeopleSoft Proprietary and Confidential xxv

General Preface
Country, Region, and Industry IdentifiersInformation that applies only to a specific country, region, or industry is preceded by a standard identifier inparentheses. This identifier typically appears at the beginning of a section heading, but it may also appearat the beginning of a note or other text.
Example of a country-specific heading: “(FRA) Hiring an Employee”
Example of a region-specific heading: “(Latin America) Setting Up Depreciation”
Country IdentifiersCountries are identified with the International Organization for Standardization (ISO) country code.
Region IdentifiersRegions are identified by the region name. The following region identifiers may appear in PeopleBooks:
• Asia Pacific• Europe• Latin America• North America
Industry IdentifiersIndustries are identified by the industry name or by an abbreviation for that industry. The following industryidentifiers may appear in PeopleBooks:
• USF (U.S. Federal)• E&G (Education and Government)
Currency CodesMonetary amounts are identified by the ISO currency code.
Comments and SuggestionsYour comments are important to us. We encourage you to tell us what you like, or what you would like tosee changed about PeopleBooks and other PeopleSoft reference and training materials. Please send yoursuggestions to:
PeopleSoft Product Documentation Manager PeopleSoft, Inc. 4460 Hacienda Drive Pleasanton, CA 94588
Or send email comments to [email protected].
While we cannot guarantee to answer every email message, we will pay careful attention to your commentsand suggestions.
xxvi PeopleSoft Proprietary and Confidential

General Preface
Common Elements Used in PeopleBooksAs of Date The last date for which a report or process includes data.
Business Unit An ID that represents a high-level organization of business information. Youcan use a business unit to define regional or departmental units within alarger organization.
Description Enter up to 30 characters of text.
Effective Date The date on which a table row becomes effective; the date that an actionbegins. For example, to close out a ledger on June 30, the effective date for theledger closing would be July 1. This date also determines when you can viewand change the information. Pages or panels and batch processes that use theinformation use the current row.
Once, Always, and Don’tRun
Select Once to run the request the next time the batch process runs. After thebatch process runs, the process frequency is automatically set to Don’t Run.Select Always to run the request every time the batch process runs.Select Don’t Run to ignore the request when the batch process runs.
Process Monitor Click to access the Process List page, where you can view the status ofsubmitted process requests.
Report Manager Click to access the Report List page, where you can view report content, checkthe status of a report, and see content detail messages (which show you adescription of the report and the distribution list).
Request ID An ID that represents a set of selection criteria for a report or process.
Run Click to access the Process Scheduler request page, where you can specify thelocation where a process or job runs and the process output format.
SetID An ID that represents a set of control table information, or TableSets.TableSets enable you to share control table information and processing optionsamong business units. The goal is to minimize redundant data and systemmaintenance tasks. When you assign a setID to a record group in a businessunit, you indicate that all of the tables in the record group are shared betweenthat business unit and any other business unit that also assigns that setID tothat record group. For example, you can define a group of common job codesthat are shared between several business units. Each business unit that sharesthe job codes is assigned the same setID for that record group.
Short Description Enter up to 15 characters of text.
User ID An ID that represents the person who generates a transaction.
PeopleSoft Proprietary and Confidential xxvii

General Preface
xxviii PeopleSoft Proprietary and Confidential

PeopleSoft Enterprise Human ResourcesAdminister Workforce Preface
This preface discusses:
• PeopleSoft Products.• PeopleSoft Enterprise Human Resources application fundamentals.• PeopleBook structure.
Note. This PeopleBook documents only page elements that require additional explanation. If a page element isnot documented with the process or task in which it is used, then either it requires no additional explanation orit is documented with common elements for the section, chapter, PeopleBook, or product line.
PeopleSoft ProductsThis PeopleBook refers to the following PeopleSoft product: PeopleSoft Enterprise Human ResourcesAdminister Workforce.
PeopleSoft Enterprise HRMS Application FundamentalsThe PeopleSoft Enterprise Human Resources: Administer Workforce PeopleBook provides you withimplementation and processing information for your PeopleSoft Human Resources Administer Workforcesystem.
Additional, essential information describing the setup and design of your system appears in a companionvolume of documentation called PeopleSoft Enterprise HRMS 8.9 Application Fundamentals PeopleBook.Each PeopleSoft product line has its own version of this documentation.
PeopleSoft Enterprise Application Fundamentals for HRMS PeopleBook consists of important topics that applyto many or all PeopleSoft applications across the PeopleSoft HRMS product line. No matter which PeopleSoftHRMS products you are implementing, you should be familiar with the contents of this central PeopleBook. Itis the starting point for fundamentals, such as setting up control tables and administering security.
See AlsoPeopleSoft Enterprise HRMS 8.9 Application Fundamentals PeopleBook, “PeopleSoft Enterprise HRMS8.9 Application Fundamentals Preface”
PeopleBook StructurePeopleSoft PeopleBooks follow a common structure. By understanding this structure, you can use thisPeopleBook more efficiently.
PeopleSoft Proprietary and Confidential xxix

Preface
The PeopleBooks structure conveys a task-based hierarchy of information. Each chapter describes a processthat is required to set up or use the application. Chapter sections describe each task in the process. Subsectionswithin a section describe a single step in the process task.
Some PeopleBooks may also be divided into parts. PeopleBook parts can group together similarimplementation or business process chapters within an application or group together two or more applicationsthat integrate into one overall business solution. When a book is divided into parts, each part is dividedinto chapters.
The following table provides the order and descriptions of chapters in a PeopleBook
Chapters Description
Preface This is the chapter you’re reading now. It explains:
• How to use the Application Fundamentals book.
• How PeopleBooks are structured.
• Common elements used in the PeopleBook, ifnecessary.
Getting Started With… This chapter discusses product implementationguidelines. It explains:
• The business processes documented within the book.
• Integrations between the product and other products.
• A high-level documentation to how our documentationmaps to the overall implementation process; it doesn’toffer step-by-step guidance on how to perform anactual implementation.
Navigation (Optional) Some PeopleSoft applications provide customnavigation pages that contain groupings of folders thatsupport a specific business process, task, or user role.When an application contains custom navigation pages,this chapter provides basic navigation information forthese pages.
Note. Not all applications have delivered customnavigation pages.
Understanding… (Optional) This is an introductory chapter that broadlyexplains the product and the functionality within theproduct.
xxx PeopleSoft Proprietary and Confidential

Preface
Chapters Description
Setup and Implementation This can be one or more chapters. These chapterscontain documentation to assist you in setting up andimplementing the product. For example, if functionalityX is part of a product, this chapter would be devoted toexplaining how to set up functionality X, not necessarilyhow to use functionality X. You would look to thecorresponding business process chapter to learn how touse the functionality.
Note. There may be times when a small amount ofbusiness process information is included in a setupchapter if the amount of business process documentationwas insufficient to create a separate section in the book.
Business Process This can be one or more chapters. These chapters containdocumentation that addresses specific business processeswith each chapter generally devoted to a specificfunctional area. For example, if functionality X is partof a product, this chapter would be devoted to explainhow the functionality works, not necessarily how to setup functionality X. You would look to the correspondingsetup and implementation chapter to learn how to set upthe functionality.
Note. There may be times when a small amount ofsetup and implementation information is included ina business process chapter if the amount of setup andimplementation documentation was insufficient to createa separate chapter in the book.
Appendixes (Optional) If the book requires it, one or more appendixesmight be included in the book. Appendixes containinformation considered supplemental to the primarydocumentation.
DeliveredWorkflow Appendix (Optional) The delivered workflow appendix describesall of the workflows that are delivered for the application.
Note. Not all applications have delivered workflows.
Reports Appendix (Optional) This appendix contains an abbreviated list ofall of the product’s reports. The detailed documentationon the use of these reports is usually included in therelated business process chapter.
PeopleSoft Proprietary and Confidential xxxi

Preface
xxxii PeopleSoft Proprietary and Confidential

CHAPTER 1
Getting Started with Administer Workforce
This chapter discusses:
• Human Resources Administer Workforce overview.• Human Resources Administer Workforce business processes.• Human Resources Administer Workforce integrations.• Human Resources Administer Workforce implementation.
Human Resources Administer Workforce OverviewPeopleSoft Enterprise Human Resources Administer Workforce provides the foundation for your humanresource management system. The data entered into the Administer Workforce business process is available toall of the Human Resources business processes as well as the other applications in the PeopleSoft EnterpriseHRMS suite.
The Administer Workforce business process includes five basic steps:
1. Setting up the basic codes and formats needed for the business process.Before you begin tracking worker data, it’s helpful to set up codes to help you streamline human resourceprocesses for such areas as visas and permits, salary classifications, unions, banking, employment contracts,and checklists. Setting up these codes simplifies data entry and helps ensure that you have consistentinformation in records across all functions of your human resources system—from recruitment to benefits.If you’re managing a workforce in Australia, Belgium, Canada, France, Germany, Hong Kong, Italy, Japan,Malaysia, Mexico, The Netherlands, New Zealand, Singapore, Spain, Switzerland, the United Kingdom, orthe United States, you’ll also set up any codes necessary for administering your workers in those countries.
2. Adding a person’s human resources record into the system.When you bring a new person into your organization, create a record that includes this information:• Personal data, such as name, address, personal relationships, and organizational relationships, such asemployee or contingent worker.
• Job data, such as supervisor, department, job code, and compensation details.3. Entering additional data into the record.In addition to the data that you enter when you add a new record, the data you can track includes:• Tenure with your organization.• Prior work experience.• Company property and credit cards issued to the employee.• Business expenses.
PeopleSoft Proprietary and Confidential 1
Getting Started with Administer Workforce Chapter 1
• Emergency contact information.• Visas, passports, and other identification data.• Driver’s license information.• Bank accounts.• Volunteer activities.• Employee membership in unions, works councils, or labor agreements.• Country-specific information for workers in Australia, Belgium, Brazil, Canada, France, Germany,Hong Kong, India, Italy, Japan, Malaysia, Mexico, The Netherlands, New Zealand, Singapore, Spain,Switzerland, the United Kingdom, or the United States.
4. Updating the record.Over time, you’ll need to enter changes to a person’s human resources record, such as changes of name,address, marital status, and organizational status; promotions; transfers; and leaves of absence. You canalso track employee grievances and disciplinary actions imposed on employees by your organization.
5. Viewing and reporting on worker data.You can view summary information about your workers and run a variety of different reports to reviewand analyze your workforce.
See AlsoPeopleSoft Enterprise Human Resources 8.9 PeopleBook: Manage Labor Administration, “Getting Startedwith Manage Labor Administration”
PeopleSoft Enterprise Human Resources 8.9 PeopleBook: Manage Base Compensation and Budgeting,“Understanding Base Compensation and Budgeting”
PeopleSoft Enterprise Human Resources 8.9 PeopleBook: Meet Regulatory Requirements
Human Resources AdministerWorkforce Business ProcessesPeopleSoft Enterprise Human Resources Administer Workforce provides these business processes:
• Administer adding a person to the workforce.• Manage workforce data.• Administer country-specific functionality.• Manage country-specific workforce data.• (USF) Administer Personnel Action Requests and automatic actions.• (USF) Manage leave.• Manage workforce reporting.
We discuss these business processes in the business process chapters in this PeopleBook.
2 PeopleSoft Proprietary and Confidential

Chapter 1 Getting Started with Administer Workforce
Human Resources Administer Workforce IntegrationsPeopleSoft Enterprise Human Resources Administer Workforce integrates with these PeopleSoft applications:
• All PeopleSoft Enterprise HRMS applications.
• Other PeopleSoft applications.
• Other third-party applications.
We discuss integration considerations in the implementation chapters in this PeopleBook.
Supplemental information about third-party application integrations is located on the PeopleSoft CustomerConnection website.
Human Resources Administer Workforce ImplementationPeopleSoft Setup Manager enables you to generate a list of setup tasks for your organization based on thefeatures that you are implementing. The setup tasks include the components that you must set up, listed in theorder in which you must enter data into the component tables, and links to the corresponding PeopleBookdocumentation.
PeopleSoft Enterprise Human Resources Administer Workforce also provides component interfaces to helpyou load data from your existing system into the Administer Workforce business process tables. Use the Excelto Component Interface utility with the component interfaces to populate the tables.
This table lists all of the components that have component interfaces:
Component Component Interface References
CHKLST_ITEM_TBL CI_CHKLST_ITEM_TBL See Chapter 2, “Setting Up theAdminister Workforce BusinessProcess,” Creating Checklists, page18.
CNT_CLAUSE_TABLE CNT_CLAUSE_TABLE See Chapter 7, “Entering AdditionalData in Human Resources Records,”Pages Used to Set Up and TrackEmployment Contracts, page 183.
SALARY_PLAN_TABLE SALARY_PLAN See Chapter 5, “Increasing theWorkforce,” Common Elements Usedin this Section, page 83.
Other Sources of InformationIn the planning phase of your implementation, take advantage of all PeopleSoft sources of information,including the installation guides, table-loading sequences, data models, and business process maps. A completelist of these resources appears in the preface in the PeopleSoft Enterprise HRMS 8.9 Application FundamentalsPeopleBook, with information about where to find the most current version of each.
PeopleSoft Proprietary and Confidential 3

Getting Started with Administer Workforce Chapter 1
See AlsoPeopleSoft Enterprise HRMS 8.9 Application Fundamentals PeopleBook, “PeopleSoft Enterprise HRMS8.9 Application Fundamentals Preface”
PeopleSoft Setup Manager for PeopleSoft Enterprise HRMS and Campus Solutions 8.9 PeopleBook
Enterprise PeopleTools 8.45 PeopleBook: PeopleSoft Component Interfaces
4 PeopleSoft Proprietary and Confidential

CHAPTER 2
Setting Up the Administer WorkforceBusiness Process
This chapter discusses how to:
• Define personnel actions and reasons.
• (USF) Define award actions.
• Define employee identification.
• Define additional employment data.
• Create checklists.
Defining Personnel Actions and ReasonsTo set up the Personnel Actions and Reasons tables, use the Actions (ACTION_TBL), Reason Summary(ACTION_TBL), FPS Action (FPMACTION_PNL2), Action Reasons (ACTION_REASON_TBL), andAction Reason Table (RUN_PER710) components.
This section provides an overview of personnel action reasons and discusses how to:
• Define personnel actions.• Define personnel action reasons.
Understanding Personnel Action ReasonsIn the course of maintaining information in the Administer Workforce business process, you’ll enter changes toworker data resulting from such activities as promotions, transfers, terminations, salary increases, and leaves ofabsence. Each of these activities is called a personnel action, and you use them to enter and update employeedata on the Job Data - Work Location page and the Data Control page. The codes classifying the types ofpersonnel actions that you’ll perform are stored in the Translate table.
You’ll often have different reasons for performing the same type of personnel action for workers. For example,you could enter the action leave of absence for one person for maternity or paternity leave, for another personbecause of military service obligations, and for yet another person for health reasons.
So that you can easily identify the causes of changes made to worker data, you can designate reasons for takingpersonnel actions. The Human Resources system already contains some reasons for actions, but you’ll probablywant to add others that apply specifically to your company. To do so, use the Action Reason Table page.
Note. To view a complete list of all actions and reasons already defined within the system, generate theAction Reason Table report (PER710).
PeopleSoft Proprietary and Confidential 5

Setting Up the Administer Workforce Business Process Chapter 2
Positions and Action ReasonsIf you’re driving part or all of PeopleSoft Human Resources by position, you’ll want to enter reasons forchanges to position data also (on the Position Data 1 page). For example, you might enter a personnel action ofPosition Change because of a reorganization of your company; a change in position title; a job reclassification;or, when you transfer employees to other positions, you need to change the position numbers (and relateddata) assigned to them.
To add action reasons pertaining to position change actions, use the action code POS (position change).
Global Assignments and Action ReasonsIf you send workers on global assignments, you’ll probably want to identify reasons for the assignments (onthe Home/Host Data page). For example, you might process some assignments that are due to a transfer ofskills and others due to a local shortage of skilled personnel. To track assignment types more easily, you’ll findit helpful to specify reasons for them.
To set up reasons specific to global assignments, use the action codes ASG (assignment) and ASC (assignmentcompletion).
6 PeopleSoft Proprietary and Confidential

Chapter 2 Setting Up the Administer Workforce Business Process
Pages Used to Define Personnel Actions andPersonnel Action Reasons
Page Name Object Name Navigation UsageActions ACTION_TBL_GBL Set Up HRMS, Product
Related, WorkforceAdministration, Actions
Define or review an actioncode and its values
Reason Summary ACTION_TBL2 Set Up HRMS, ProductRelated, WorkforceAdministration, Actions,Reason Summary
Display the list of reasons fora specific action code
FPS Action FPMACTION_PNL2 Set Up HRMS, ProductRelated, WorkforceAdministration, Actions,FPS Action
(French Public Sector). Thispage is displayed if youhave French Public Sectorselected on the Installationtable. Use this page to assignthe FPS components thatcan use the action code.This page is discussed inthe PeopleSoft EnterpriseHuman ResourcesPeopleBook: ManageFrench Public Sector.
See PeopleSoft EnterpriseHuman Resources 8.9PeopleBook: ManageFrench Public Sector,“Setting Up French PublicSector Tables,” AssigningFPS Components That CanUse the Action.
Action Reason ACTION_REASON_TBL Set Up HRMS, ProductRelated, WorkforceAdministration, ActionReasons
Define or modify personnelaction reasons.
Action Reason Table RUN_PER710 Set Up HRMS, ProductRelated, WorkforceAdministration, ActionReason Report
Run the Action Reason Tablereport (PER710). This reportlists the reason codes foreach personnel actioncode and arranges themalphabetically by action.
See AlsoChapter 7, “Entering Additional Data in Human Resources Records,” Entering Temporary Assignments,page 194
Defining Personnel ActionsAccess the Actions page.
PeopleSoft Proprietary and Confidential 7

Setting Up the Administer Workforce Business Process Chapter 2
Actions page
Set Status Fields
Action sets Status Fields Select this check box to identify actions that cause changes to Status and Datefields for the person receiving this action. When this check box is selected, theSet Organizational Instance Dt and Set Assignment Dates regions, as well asthe other fields in the Set Status Fields region, are displayed.
Payroll Status Select the payroll status (EMPL_STATUS) of the person receiving thisaction. Values are: Active, Deceased, Leave With Pay, Leave of Absence,Retired, Retired With Pay, Retired-Pension Administration, Short Work Break,Suspended, Terminated, Terminated Pension Pay Out, and Terminated WithPay.
HR Status Identifies the status of the person receiving this action for HR purposes.
Set Organizational Instance Dt (Set Organizational Instance Date)
First Start Date and LatestStart Date
Select the action table value to use when this action causes the job record for aperson to be updated. The First Start Date is the first date that this instance
8 PeopleSoft Proprietary and Confidential

Chapter 2 Setting Up the Administer Workforce Business Process
is active for a person receiving this action. For example, in an employeerelationship, this is the Hire Date. The Latest Start Date is the latest date thatthis instance was renewed. For example, in an employee relationship, thisis the re-hire date. The HIR or ADD actions modifies both the First StartDateand the Latest Start Date to the effective date of the Job row. On a Rehireor Renew action, only the Latest Start Date is changed. These dates are onlycaptured on the organizational instance level, not for additional assignments.The values are: JOB.EFFDTand No Action
Termination Date Select the action table value used to determine how to set the termination datefor an assignment. The values are: Clear, JOB.EFFDT-1, and No Action.
Set Assignment Dates
Start Date Select the action table value used to determine how to set the date on which anindividual assignment starts. the Hire, Rehire, Add, and Renew actions, as wellas the Additional Assignments and Host Assignments actions set this value
The values are: JOB.EFFDT and No Action.
Latest Start Date Select the action table value used to determine how to set the date on which anindividual assignment is restarted.The values are: JOB.EFFDT and No Action.
End Date Select the action table value used to determine when an assignment is stopped.The values are: Clear, JOB.EFFDT-1, and No Action.
Last Date Worked Select the action table value used to determine the last date that the personwas actively working prior to a termination or a leave action. The values are:Clear, JOB.EFFDT-1, and No Action.
Expected End Select whether or not to clear the expected end date on the job record. Thevalues are: Clear and No Action.
Expected Return Date Select whether or not to clear the expected return date on the job record.For example, when a person goes on temporary leave. When the personreturns from leave, the expected return date should be cleared. The valuesare: Clear and No Action.
Organizational Relationship
Valid if PER_ORG is Indicate whether this action is valid only for certain organizationalrelationships. Values are: Contingent Worker Only, Contingent Worker orPOI, EMP, CWR, or POI, Employee Only, Employee or Contingent Worker,or Person of Interest Only.
Valid if Previous HRStatus is:
Indicate that this action is only valid if the job assignment is in the selectedHR status. For example, an action of HIR cannot be entered if the prior HRStatus is Active. The values are: Activeand Inactive.
Valid if Prev Pay Statusis (Valid if Previous PayStatus is):
Indicate that this action is only valid if the job assignment is in the selectedstatus. For example, a return from leave action can only be entered if theprevious pay status in a Leave status. The values are: Any Leave, DisabilityLeave, Suspended,and Short Work Break.
PeopleSoft Proprietary and Confidential 9

Setting Up the Administer Workforce Business Process Chapter 2
Message Set/Number Choose the Message Set Numberand Message Number to determine the errormessage used for the Valid if Previous HR Status is or Valid if Prev PayStatus is settings.
Defining Personnel Action ReasonsAccess the Action Reason page.
Action Reason page (1 of 2)
10 PeopleSoft Proprietary and Confidential
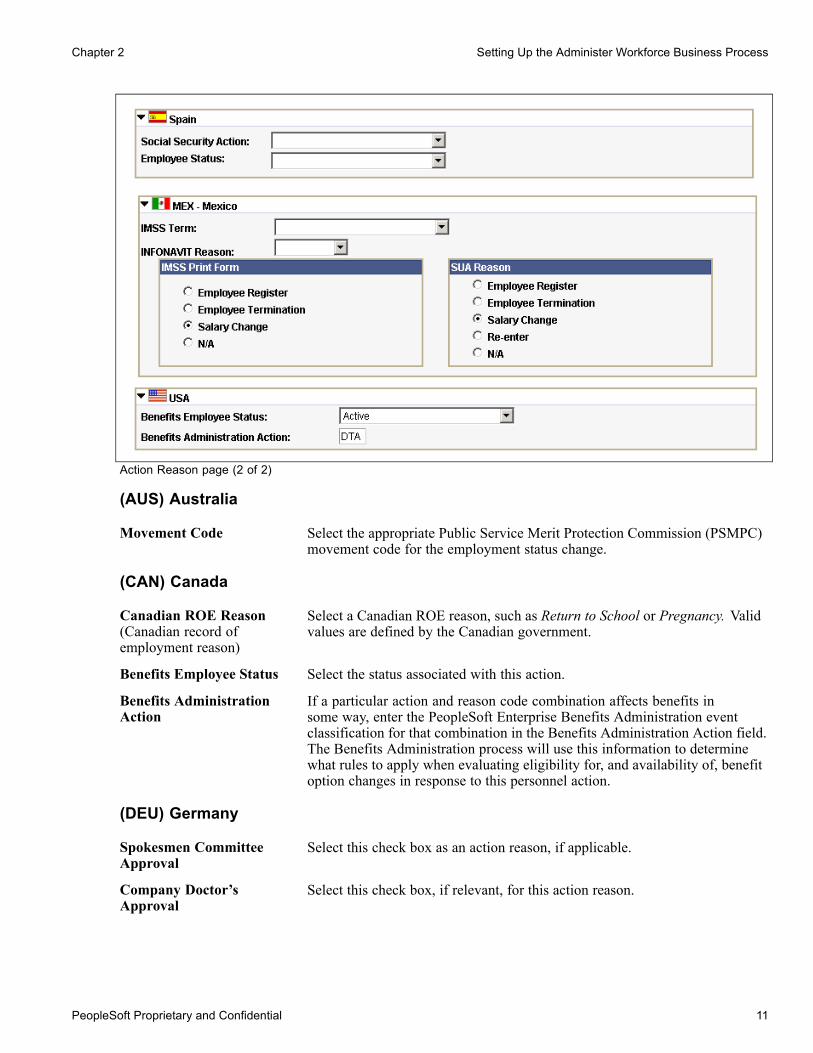
Chapter 2 Setting Up the Administer Workforce Business Process
Action Reason page (2 of 2)
(AUS) Australia
Movement Code Select the appropriate Public Service Merit Protection Commission (PSMPC)movement code for the employment status change.
(CAN) Canada
Canadian ROE Reason(Canadian record ofemployment reason)
Select a Canadian ROE reason, such as Return to School or Pregnancy. Validvalues are defined by the Canadian government.
Benefits Employee Status Select the status associated with this action.
Benefits AdministrationAction
If a particular action and reason code combination affects benefits insome way, enter the PeopleSoft Enterprise Benefits Administration eventclassification for that combination in the Benefits Administration Action field.The Benefits Administration process will use this information to determinewhat rules to apply when evaluating eligibility for, and availability of, benefitoption changes in response to this personnel action.
(DEU) Germany
Spokesmen CommitteeApproval
Select this check box as an action reason, if applicable.
Company Doctor’sApproval
Select this check box, if relevant, for this action reason.
PeopleSoft Proprietary and Confidential 11

Setting Up the Administer Workforce Business Process Chapter 2
(ESP) Spain
Social Security Action Select the social security action associated with this action reason.
Employee Status Select the employee status associated with this action reason.
(MEX) MexicoIMSS requires a notification for every hire, termination, and salary rate change. Once you’ve defined thedetails, these notifications are generated automatically by the system.
IMSS Term Select the reason for termination. Values are: Agreement, CollectiveTermination, Employee Death, Employee Transfer, Inability, Lay-off, Leave,Mental or Physical Disability, N/A, Pension-Off, Retirement, VoluntaryRenounce, and Work Risk Disability.
INFONAVIT Reason Select a reason to indicate to INFONAVIT why the INFONAVIT loanpayments will stop. Values are: Death, Disability, Disengage, Never Work,Other, Retirement, and Transfer.
IMSS Print Form Select the reason for a change in a worker’s information This is done to notifyIMSS when an person is hired, rehired, terminated, or has a salary change.Values are: Employee Register, Employee Termination, Salary Change,and N/A.
SUA Reason Select the reason that gets printed on the SUA notification. Values are:Employee Register, Employee Termination, Salary Change, Re-enter, and N/A.
(USA) United States
Benefits Employee Status Select the status associated with this action.
Benefits AdministrationAction
If a particular action and reason code combination affects benefits insome way, enter the PeopleSoft Enterprise Benefits Administration eventclassification for that combination in the Benefits Administration Action field.The Benefits Administration process will use this information to determinewhat rules to apply when evaluating eligibility for, and availability of, benefitoption changes in response to this personnel action.
See AlsoPeopleSoft Enterprise Human Resources 8.9 PeopleBook: Manage Labor Administration, “Setting Up LaborAdministration Data”
(USF) Defining Award ActionsTo set up the (USF) Award Actions tables, use the Award Action Data (GVT_AWD_ACTN), and Award TypeTable (RUN_FGPER810) components.
This section discusses how to set up award actions.
12 PeopleSoft Proprietary and Confidential

Chapter 2 Setting Up the Administer Workforce Business Process
Pages Used to Define Award ActionsPage Name Object Name Navigation Usage
Award Action Data GVT_AWD_ACTN Set Up HRMS, ProductRelated, WorkforceAdministration, WorkforceData USF, Award Actions
Define monetary andnonmonetary awards types.
Award Type Table PRCSRUNCNTL Workforce Administration,Job Information, Reports,Award Action (USF)
Run the Award Type tablereport (FGPER810).
Defining Award CodesAccess the Award Action Data page.
Award Action Data page
Nature of Action Code Enter the reason associated with this award action.
Award Classification Select the award classification, either Award or Bonus.
Earnings Code Select an earnings code to associate with this award action.
Account Code Select an account code to associate with this award action.
GL Pay Type (generalledger pay type)
Select the pay type to associate with this award action.
Pay in Separate Paycheck? Select if this award action should be paid in a separate check.
Gross-Up Select to indicate the award or bonus amount must be grossed-up for payrollpurposes.
See AlsoChapter 16, “(USF) Processing Personnel Action Requests,” Granting Performance Awards, page 424
PeopleSoft Proprietary and Confidential 13

Setting Up the Administer Workforce Business Process Chapter 2
Defining Employee IdentificationTo set up the Employee Identification tables, use the Visa/Permit Table (VISA_PERMIT_TABLE), SupportingDocuments Table (SUPPORT_DOC_TABLE), and Drivers License Type Tbl (DRIVE_LIC_TBL) components.
This section discusses how to:
• Define visas and work permits.• Define driver’s license data.
Pages Used to Define Employee IdentificationPage Name Object Name Navigation Usage
Visa/Permit Table VISA_PERMIT_TABLE Set Up HRMS, ProductRelated, WorkforceAdministration,Visas/Permits
Define visas, permits, andassociated supportingdocuments that governmentsrequire for noncitizens towork in the countries whereyour organization doesbusiness.
Supporting DocumentsTable
SUPPORT_DOC_TABLE Set Up HRMS, CommonDefinitions, SupportingDocuments
Set up codes for the typesof documents required toobtain visas and permitsfor employees and theirdependents, such as birthcertificates, letters ofemployment, and marriagecertificates.
Drivers License Type Tbl(driver’s license type table)
DRIVE_LIC_TBL Set Up HRMS, ProductRelated, WorkforceAdministration, Driver’sLicense Type
Enter the types of licensesthat you are tracking.
Defining Visas and Work PermitsAccess the Visa/Permit Table page.
14 PeopleSoft Proprietary and Confidential

Chapter 2 Setting Up the Administer Workforce Business Process
Visa/Permit Table page
You must have previously defined the visa or permit classifications on the Supporting Documents Table page.
Visa/Permit Classification Select the appropriate visa or permit classification, if applicable.
Supporting DocumentsNeeded
Select the appropriate supporting documents needed to obtain the visaor permit.
Defining Additional Employment Setup DataTo set up the additional employment setup data tables, use the Ethnic Groups (ETHNIC_GROUP_TBL),Religions (RELIGION_TBL_GBL), Volunteer Organization Table (VOLUNTEER_ORG_TABL),Provider Info (NEE_PROVIDER_TBL), Empl Class Table (EMPL_CLASS_TABLE), and Duties Type(TEMP_DUTIES_TBL) components.
This section lists the pages used to define additional employment data.
PeopleSoft Proprietary and Confidential 15
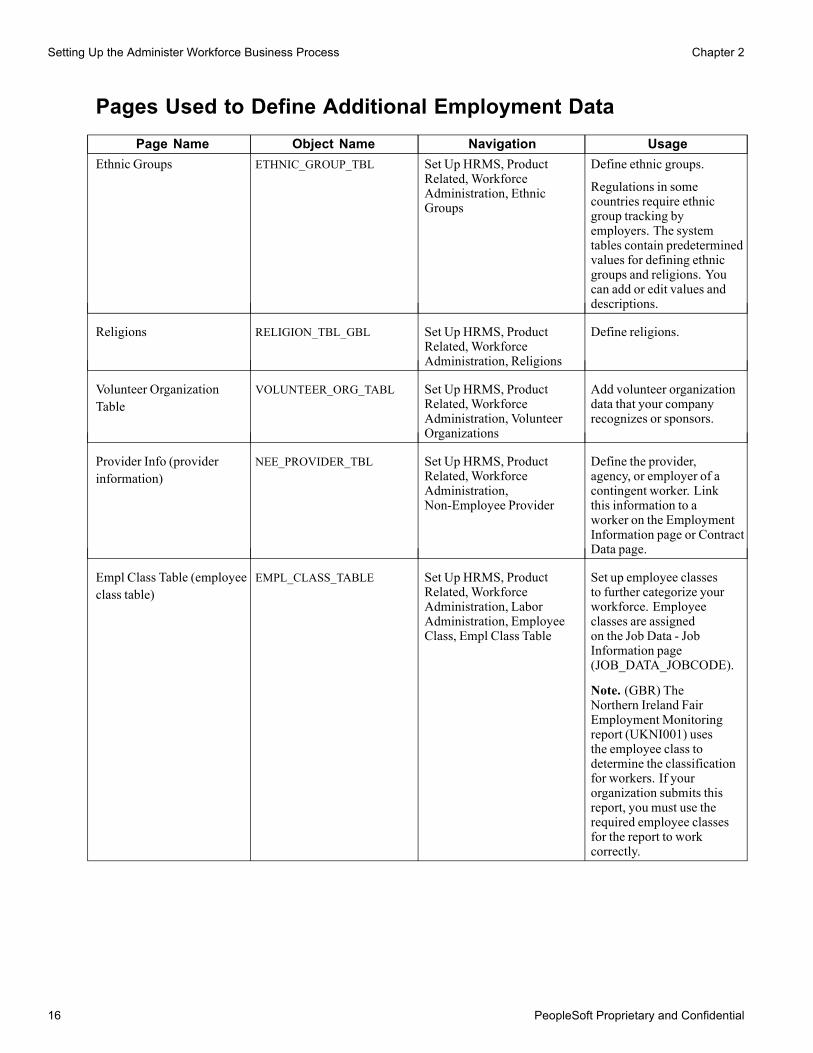
Setting Up the Administer Workforce Business Process Chapter 2
Pages Used to Define Additional Employment DataPage Name Object Name Navigation Usage
Ethnic Groups ETHNIC_GROUP_TBL Set Up HRMS, ProductRelated, WorkforceAdministration, EthnicGroups
Define ethnic groups.
Regulations in somecountries require ethnicgroup tracking byemployers. The systemtables contain predeterminedvalues for defining ethnicgroups and religions. Youcan add or edit values anddescriptions.
Religions RELIGION_TBL_GBL Set Up HRMS, ProductRelated, WorkforceAdministration, Religions
Define religions.
Volunteer OrganizationTable
VOLUNTEER_ORG_TABL Set Up HRMS, ProductRelated, WorkforceAdministration, VolunteerOrganizations
Add volunteer organizationdata that your companyrecognizes or sponsors.
Provider Info (providerinformation)
NEE_PROVIDER_TBL Set Up HRMS, ProductRelated, WorkforceAdministration,Non-Employee Provider
Define the provider,agency, or employer of acontingent worker. Linkthis information to aworker on the EmploymentInformation page or ContractData page.
Empl Class Table (employeeclass table)
EMPL_CLASS_TABLE Set Up HRMS, ProductRelated, WorkforceAdministration, LaborAdministration, EmployeeClass, Empl Class Table
Set up employee classesto further categorize yourworkforce. Employeeclasses are assignedon the Job Data - JobInformation page(JOB_DATA_JOBCODE).
Note. (GBR) TheNorthern Ireland FairEmployment Monitoringreport (UKNI001) usesthe employee class todetermine the classificationfor workers. If yourorganization submits thisreport, you must use therequired employee classesfor the report to workcorrectly.
16 PeopleSoft Proprietary and Confidential

Chapter 2 Setting Up the Administer Workforce Business Process
Page Name Object Name Navigation UsageDuties Type TEMP_DUTIES_TBL Set Up HRMS, Product
Related, WorkforceAdministration, TemporaryDuties
Define or modify duty typesfor temporary assignments.This field only appearson the Job Code page ofJob Data when the actionis Temporary Assignment(TAS) and the Installationtable has Auto Job Suspendselected. The value canindicate what type ofduties are included in theassignment.
See PeopleSoft EnterpriseHuman Resources 8.9PeopleBook: MeetRegulatory Requirements,“(GBR) Meeting RegulatoryRequirements for the UnitedKingdom,” Running theNorthern Ireland Report.
Defining Ethnic GroupsAccess the Ethnic Groups page.
Ethnic Groups page
Regulatory Region Enter the country or region used to monitor diversity reporting for thisethnic group.
Ethnic Category (USA) Select the category for this ethnic group. You may select one or morecategories for each ethnic group.Values include:
• American Indian/Alaska Native
• Asian
PeopleSoft Proprietary and Confidential 17
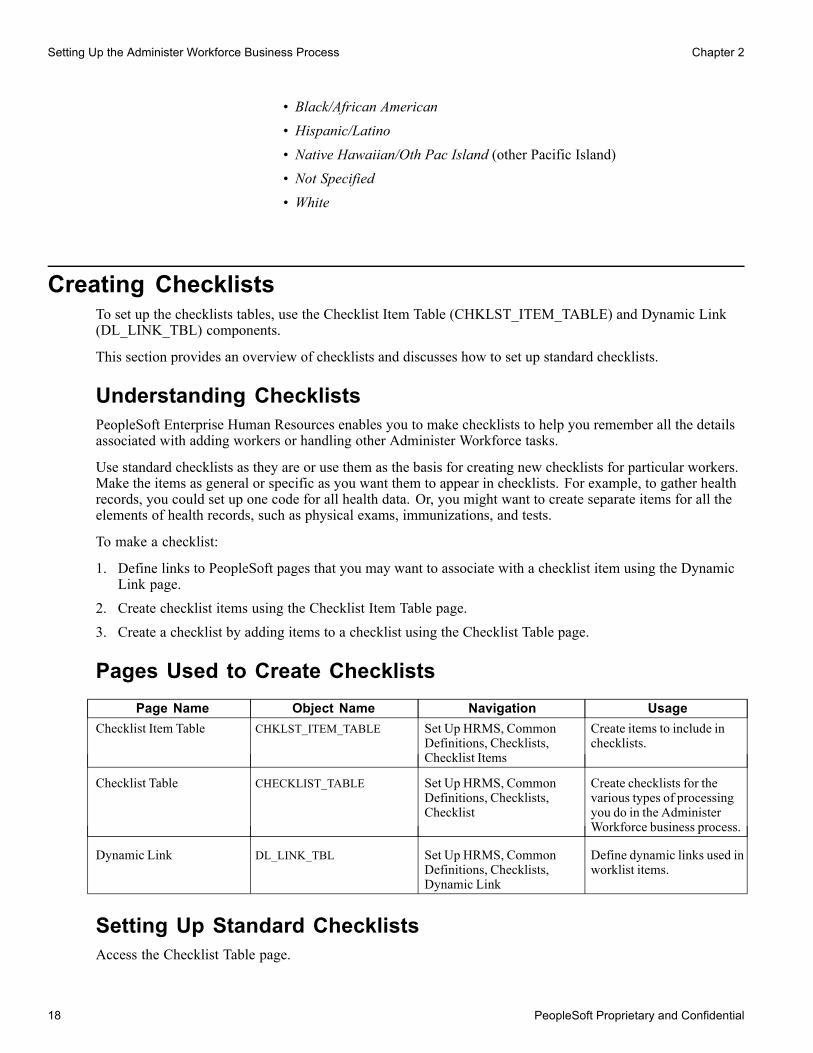
Setting Up the Administer Workforce Business Process Chapter 2
• Black/African American• Hispanic/Latino• Native Hawaiian/Oth Pac Island (other Pacific Island)• Not Specified• White
Creating ChecklistsTo set up the checklists tables, use the Checklist Item Table (CHKLST_ITEM_TABLE) and Dynamic Link(DL_LINK_TBL) components.
This section provides an overview of checklists and discusses how to set up standard checklists.
Understanding ChecklistsPeopleSoft Enterprise Human Resources enables you to make checklists to help you remember all the detailsassociated with adding workers or handling other Administer Workforce tasks.
Use standard checklists as they are or use them as the basis for creating new checklists for particular workers.Make the items as general or specific as you want them to appear in checklists. For example, to gather healthrecords, you could set up one code for all health data. Or, you might want to create separate items for all theelements of health records, such as physical exams, immunizations, and tests.
To make a checklist:
1. Define links to PeopleSoft pages that you may want to associate with a checklist item using the DynamicLink page.
2. Create checklist items using the Checklist Item Table page.
3. Create a checklist by adding items to a checklist using the Checklist Table page.
Pages Used to Create ChecklistsPage Name Object Name Navigation Usage
Checklist Item Table CHKLST_ITEM_TABLE Set Up HRMS, CommonDefinitions, Checklists,Checklist Items
Create items to include inchecklists.
Checklist Table CHECKLIST_TABLE Set Up HRMS, CommonDefinitions, Checklists,Checklist
Create checklists for thevarious types of processingyou do in the AdministerWorkforce business process.
Dynamic Link DL_LINK_TBL Set Up HRMS, CommonDefinitions, Checklists,Dynamic Link
Define dynamic links used inworklist items.
Setting Up Standard ChecklistsAccess the Checklist Table page.
18 PeopleSoft Proprietary and Confidential

Chapter 2 Setting Up the Administer Workforce Business Process
Checklist Table page
Checklist Type Select the type of checklist that you want to create. Values include Hiring,Transfer, Terminate, Org Instance, Training, Medical, and Other.
Sequence and Item Code The system automatically sequences the item codes in multiples of 100. Whenyou insert a data row for a new item, the system automatically assigns thenext multiple of 100, such as 400.To rearrange the order in which the items appear, change the sequence numbersto the numerical order you want. For example, to reverse the order of OutlineOffice hours/holidays (100) and Outline job responsibilities (200), assign alower number to Outline job responsibilities (such as 150) and a highernumber to Outline Office hours/holidays (such as 175). When you save yourchanges, the system automatically displays the items in the new order.
PeopleSoft Proprietary and Confidential 19

Setting Up the Administer Workforce Business Process Chapter 2
20 PeopleSoft Proprietary and Confidential

CHAPTER 3
Setting Up Country-Specific Tables
This chapter provides an overview of country-specific table setup and discusses how to:
• (FRA) Set up French workforce tables.• (DEU) Set up German workforce tables.• (NLD) Set up Dutch SAMEN countries.• (ITA) Set up Italian workforce tables.• (JPN) Set up intercompany transfer company data.• (JPN) Set up Japanese supervisor levels.• (MYS and SGP) Set up festive advance religions tables for the Singapore and Malaysia.• (NZL) Set up New Zealand disability codes.• (ESP) Set up Spanish workforce tables.• (BRA) Set up Brazilian establishments.
Understanding Country-Specific Table SetupOnce you’ve set up the tables that you’ll use to administer your core workforce functionality in PeopleSoftEnterprise Human Resources, you may also need to set up additional tables to manage the AdministerWorkforce business process for specific countries.
You need to set up only the tables that are relevant to your organization’s business needs.
See AlsoChapter 2, “Setting Up the Administer Workforce Business Process,” page 5
(FRA) Setting Up French Workforce TablesTo set up the French workforce tables, use the FRA CPAM Table (CPAM_TABLE_FRA), FRACRAM table (CRAM_TBL_FRA), Hour Type table (HOURS_TYPE_FRA), and Occupational Illness(OCC_ILLNESS_FRA) components.
This section provides an overview of maintaining French social security tracking codes and discusses how to:
• Define hours type codes.• Enter French occupational illness codes.
PeopleSoft Proprietary and Confidential 21

Setting Up Country-Specific Tables Chapter 3
Understanding French Social Security TrackingCode MaintenanceIn France, CPAMs are the local social security offices that manage health coverage for French workers. TheFrench government establishes and regulates CPAMs. If you’re managing a French workforce, you’ll need toidentify and track the CPAM offices that impact your enterprise.
The CRAM is the regional social security body that oversees the running of CPAMs. CRAM offices work withcompanies to both prevent and compensate workers for vocational or personal injuries.
Use the French setup tables to maintain Caisse Primaire d’Assurance Maladie (CPAM) and Caisse Regionaled’Assurance Maladie (CRAM) codes for compliance with French social insurance regulations.
Track and report on occupational injuries for French workers using the Monitor Health/Safety application inPeopleSoft Human Resources.
See AlsoPeopleSoft Enterprise Human Resources 8.9 PeopleBook: Monitor Health and Safety, “Creating and TrackingIncidents”
Pages Used to Set Up French Workforce TablesPage Name Object Name Navigation Usage
FRA CPAM Table CPAM_TABLE_FRA Set Up HRMS, ProductRelated, WorkforceAdministration, WorkforceData FRA, CPAM Table
Modify or add a CPAM IDto your human resourcessystem.
FRA CRAM Table CRAM_TBL_FRA Set Up HRMS, ProductRelated, WorkforceAdministration, WorkforceData FRA, CRAM Table
Modify or add a CRAM codeto your human resourcessystem.
Hour Type Table HOURS_TYPE_FRA Set Up HRMS, ProductRelated, WorkforceAdministration, WorkforceData FRA, Hours Type
Define hours type codesthat you’ll use to track jobhours information for Frenchworkers.
Occupational Illness OCC_ILLNESS_FRA Set Up HRMS, ProductRelated, WorkforceMonitoring, Health andSafety, Occupational IllnessTbl - FRA
Enter French occupationalillness codes.
Defining Hours Type CodesAccess the Hour Type Table page.
22 PeopleSoft Proprietary and Confidential
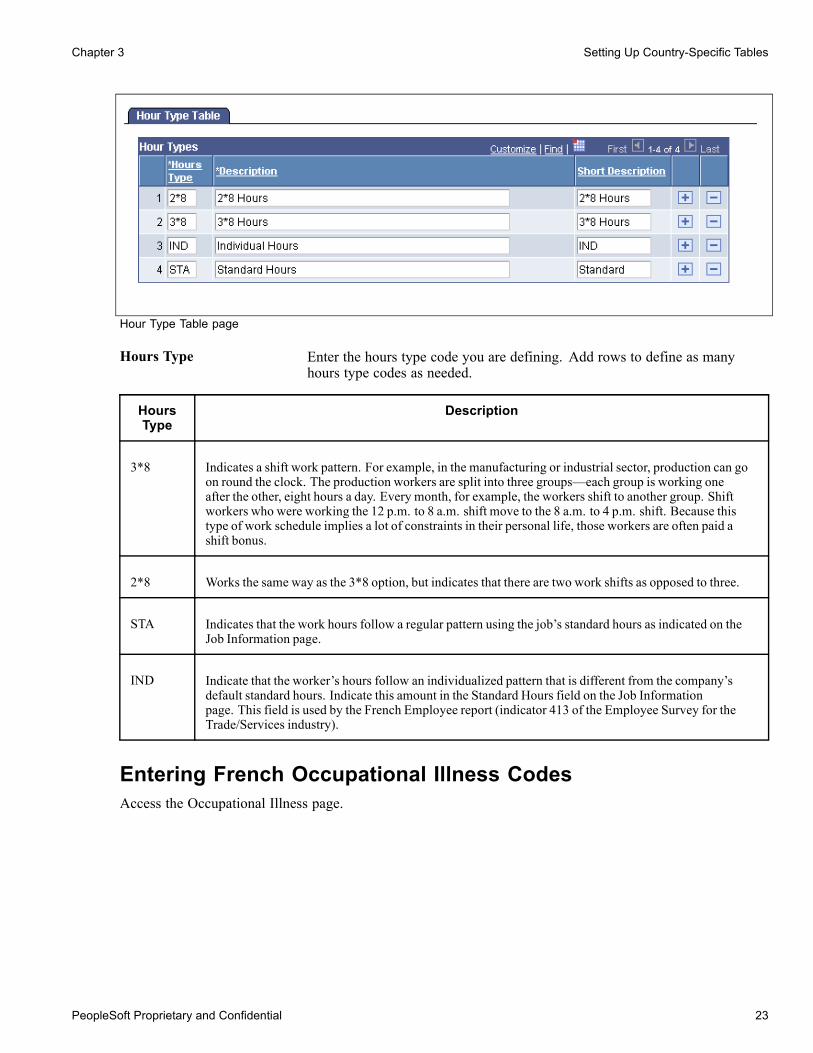
Chapter 3 Setting Up Country-Specific Tables
Hour Type Table page
Hours Type Enter the hours type code you are defining. Add rows to define as manyhours type codes as needed.
HoursType
Description
3*8 Indicates a shift work pattern. For example, in the manufacturing or industrial sector, production can goon round the clock. The production workers are split into three groups—each group is working oneafter the other, eight hours a day. Every month, for example, the workers shift to another group. Shiftworkers who were working the 12 p.m. to 8 a.m. shift move to the 8 a.m. to 4 p.m. shift. Because thistype of work schedule implies a lot of constraints in their personal life, those workers are often paid ashift bonus.
2*8 Works the same way as the 3*8 option, but indicates that there are two work shifts as opposed to three.
STA Indicates that the work hours follow a regular pattern using the job’s standard hours as indicated on theJob Information page.
IND Indicate that the worker’s hours follow an individualized pattern that is different from the company’sdefault standard hours. Indicate this amount in the Standard Hours field on the Job Informationpage. This field is used by the French Employee report (indicator 413 of the Employee Survey for theTrade/Services industry).
Entering French Occupational Illness CodesAccess the Occupational Illness page.
PeopleSoft Proprietary and Confidential 23

Setting Up Country-Specific Tables Chapter 3
Occupational Illness page
Use this page to define occupational illness categories for French workers. Use the categories when youenter information on the Disability page.
Note. The French Occupational Illness table (OCC_ILLNESS_FRA) is used as a prompt table on the Prof.Dis(Professional Disease) field for the Disability page. While there is another Occupation Illness table(OCC_ILLNESS_TBL) used in the Monitor Health and Safety business process, they aren’t the same page.If you’re entering information about disabilities for French employees on the French Disability page, youmust complete this table.
Professional Disability Enter codes for the occupational illnesses that you want to track in your system.
(DEU) Setting Up German Workforce TablesTo set up the German workforce tables, use the Accident Insurance table (ACCDT_INS_TABLE),BA Cd table (BA_CD_TABLE), Function Code Table (FUNCTION_CD_TBL), Nation Duvo table(NATION_DUVO_TABLE), Industrial Inspection (INDUST_INSP_GER), and SI Unit (SI_UNIT_GER)components.
This section provides an overview of social insurance in Germany and discusses how to:
• Define accident insurance codes.
• Enter German national DEUEV codes.
24 PeopleSoft Proprietary and Confidential

Chapter 3 Setting Up Country-Specific Tables
Understanding Accident InsuranceAccident insurance in Germany is maintained and administered by private organizations(Berufsgenossenschaften) that act as employer’s liability insurance associations. Employers pay out a certainamount in the form of premiums to these associations, who administer and pay out funds to workers injured onthe job. To manage the amount your company contributes to the fund, set up information regarding accidentinsurance codes and accident insurance hazard codes. The insurance associations usually determine thesecodes.
To determine your premium, track the number of employees who belong to a hazard class. This number ismultiplied by a hazard factor, and the results are supplied to the social insurance provider, which determines therequired premium for your organization. These contribution amounts are based on the number of organizationsthat the provider serves; for example, if one of the companies in the group goes bankrupt, the other membercompanies may have to pay higher premiums.
Pages Used to Set Up German Workforce TablesPage Name Object Name Navigation Usage
Accident Insurance -Accident Insurance Table
ACCDT_INS_TABLE Set Up HRMS, ProductRelated, WorkforceAdministration, WorkforceData DEU, AccidentInsurance, AccidentInsurance Table
Define accident insurancecodes for Germanemployees.
Accident Insurance -Accident Insurance Address
ACCDT_INS2_TABLE Set Up HRMS, ProductRelated, WorkforceAdministration, WorkforceData DEU, AccidentInsurance, AccidentInsurance Address
Enter address informationfor this accident insuranceprovider.
BA Cd Table (Bundesanstaltfur Arbeit Code Table)
BA_CD_TABLE Set Up HRMS, ProductRelated, WorkforceAdministration, WorkforceData DEU, BA Codes
Add or update Bundesanstaltfur Arbeit job codes.
PeopleSoft maintains theBA Code table so that youcan add or update it. Alljob codes are published bythe German Federal LaborOffice (Bundesanstalt furArbeit) in Verzeichnis derBerufsbezeichnungen andare required on reports tothe German Federal LaborOffice.
PeopleSoft Proprietary and Confidential 25

Setting Up Country-Specific Tables Chapter 3
Page Name Object Name Navigation UsageFunction Code Table FUNCTION_CD_TABLE Set Up HRMS, Product
Related, WorkforceAdministration, WorkforceData DEU, Function Code
Add or maintain job codesfor conducting statisticalanalyses of your workforcein Germany. For example,you can use the codesthat you establish hereto examine howmanyconsultants, administrators,support staff, or salesrepresentatives make upyour workforce.
Nation Duvo Table NATION_DUVO_TABLE Set Up HRMS, ProductRelated, WorkforceAdministration, WorkforceData DEU, Nation Duvo
Add or update nationDEUEV information.
Industrial Inspection INDUST_INSP_GER Set Up HRMS, ProductRelated, WorkforceAdministration, WorkforceData DEU, IndustrialInspection
Set up German industrialinspection codes that youassociate with locations inyour organization.
Note. Industrial inspectioncodes are not effective-datedand have no status.
SI Unit (social insuranceunit)
SI_UNIT_GER Set Up HRMS, ProductRelated, WorkforceAdministration, WorkforceData DEU, Social InsuranceUnit
Set up German socialinsurance unit codes that youassociate with locations inyour organization.
Defining Accident Insurance CodesAccess Accident Insurance - Accident Insurance Table page.
Accident Insurance - Accident Insurance Table page
26 PeopleSoft Proprietary and Confidential

Chapter 3 Setting Up Country-Specific Tables
Hazard Enter the code for the hazard type.
Note. German hazard codes are regulated and standardized by the Germangovernment.
Hazard Class Enter the class, or degree, of the covered hazard.
Entering German Nation DEUEV CodesThe Nation DEUEV table is maintained by PeopleSoft and stores nationality codes specified by the GermanDEUEV Directive that regulates how data is to be provided to the German social insurance administrationby companies doing business in Germany. Using these codes is required for compliance with the GermanDEUEV (data transmission/transfer) Directive.
Note. The nation codes on the Nation DEUEV table are different from the country codes on the Country table.Nation DEUEV codes are specific to the German DEUEV Directive and are not based on ISO.
Access the Nation Duvo Table page.
Nation Duvo Table page
Note. The DEUEV Directive specifies the nationality key for each DEUEV country. Don’t change it hereunless the DEUEV Directive changes the nationality key.
Nationality Enter the nationality associated with this country. For example, the nationalityassociated with The Netherlands is Dutch.
Nationality Code The DEUEV Directive specifies a unique two-character nationality codefor each nationality key. These nationality codes are different from thethree-character ISO country codes stored on the Country table.
Country Indicate an ISO country code to be associated with the DEUEV Directivenationality key.
PeopleSoft Proprietary and Confidential 27

Setting Up Country-Specific Tables Chapter 3
OECD Country(Organization of EconomicCooperation andDevelopment country)
Select to indicate the nationality key is for an OECD country. Germanycarefully regulates the types of industries in which citizens of non-OECDcountries, like Iraq, can work. For example, non-OECD nationals are restrictedfrom working in defense-related industries or for companies that produceproducts involving protected trade technologies.
Note. There isn’t always a one-to-one correspondence between ISO countrieson the Country table and the nationality keys on the Nation DEUEV table. TheGerman DEUEV Directive makes nationality distinctions that have no directrelationship to ISO country standards.
EU-Land (European Unioncountry)
Select to indicate this is European Union country. Workers from EuropeanUnion nations are tracked for purposes of reporting to the German SocialInsurance administration.
Note. Nationality keys are attached to an employee’s job data on the Job Data Identity/Diversity page. Ifyou’re entering information for German workers, the system prompts for the worker’s nationality code usingthe DEUEV nations on the Nation DEUEV table.
(NLD) Setting Up Dutch SAMEN CountriesThis section provides an overview of SAMEN (Wet Stimulering Arbeidsdeelname Minderheden) country setupand discusses how to update the list of SAMEN countries.
To set up the Dutch SAMEN Country tables, use the SAMEN Country Table (SAMEN_CNTRY_NLD)component.
Understanding SAMEN Country SetupIf you’re administering a Dutch workforce, you’ll need to track information on the national origin of anemployee. Employee national origin is based on either their birthplace or their parent’s birthplace. Establishingthe ethnic status of workers complies with the SAMEN diversity law or the “law to promote equal laborparticipation for persons of a different ethnic origin” in The Netherlands.
The SAMEN law provides for equal employment opportunities for immigrant workers and their children.Children of immigrant workers are subject to this law as well, even if they were born in The Netherlands,and even if the parents have been naturalized, as long as one of the parents was born in one of the SAMENcountries. Every two years, the Dutch Ministry of Social Affairs reviews the list of countries that aredesignated as SAMEN countries. This decision mainly depends on employment statistics for immigrantworkers and their children from certain countries.
Note. NATO countries (except Turkey) and EEC countries can’t, by law, be included on the list of SAMENcountries.
28 PeopleSoft Proprietary and Confidential

Chapter 3 Setting Up Country-Specific Tables
Page Used to Set Up Dutch SAMEN Country TablePage Name Object Name Navigation Usage
SAMEN Country Table SAMEN_CNTRY_NLD Set Up HRMS, ProductRelated, WorkforceAdministration, SAMENCountry NLD
Update the current list ofSAMEN countries.
Updating the List of SAMEN CountriesAccess the SAMEN Country Table page.
SAMEN Country Table page
To add or update countries for SAMEN reporting purposes, either add or delete a country from the list.
If a country code isn’t listed among your SAMEN countries on the SAMEN Country Table page, the systemdoesn’t include this country in the target group for the SAMEN law when you indicate the national origin of aDutch worker’s birth parents on the NLD SAMEN Registration page. However, employees have the right toobject to this registration, in which case they aren’t included in the SAMEN reporting.
(ITA) Setting Up Italian Workforce TablesTo set up the Italian Workforce tables, use the ITA C.I.A. table (CIA_TBL_ITA), Cities table(CITY_TABLE_ITA), ITA INAIL table (INAIL_TBL_ITA), ITA INPDAI table (INPDAI_TBL_ITA), ITAINPS table (INPS_TBL_ITA), ITA PREV table (PREV_TBL_ITA), Company Codes (COMP_CD_ITA),Company/Estab Codes (COMP_ESTAB_CD_ITA), IT Country FCode (COUNTRY_TABLE_ITA), ITASeniority Notification (SENIORIT_NOTIF_ITA), Turnover Action (TRV_ACTREAS_ITA), and ProductiveUnit (UNITA_PROD_TBL) components.
This section discusses setting up Italian workforce tables and how to:
• Define Istituto Nazionale per la Previdenza Sociale (INPS) codes.
PeopleSoft Proprietary and Confidential 29

Setting Up Country-Specific Tables Chapter 3
• Define seniority notification periods.
Pages Used to Set Up Italian Workforce TablesPage Name Object Name Navigation Usage
ITA C.I.A. Table (ContrattoIntergrativo Aziendale)
CIA_TBL_ITA Set Up HRMS, ProductRelated, WorkforceAdministration, WorkforceData ITA, C.I.A., ITAC.I.A. Table
Enter company integrativecontract information.
ITA City Table CITY_TABLE_ITA Set Up HRMS, ProductRelated, WorkforceAdministration, WorkforceData ITA, Cities, ITA CityTable
Use the Italian City Tablepage to maintain the citydata. Update the tableby downloading the filesupplied annually from theMinistero delle Finanzewebsite and the running theItalian City Update process.You can enter the postalcodes for cities to expeditedata entry during the hiringprocess
ITA INAIL Table INAIL_TBL_ITA Set Up HRMS, ProductRelated, WorkforceAdministration, WorkforceData ITA, INAIL Codes,ITA INAIL Table
Define the INAIL(Instituto Nazionale perl’Assicurazione degliIncidenti sul Lavoro)position code and rate forINAIL contribution.
ITA INPDAI Table INPDAI_TBL_ITA Set Up HRMS, ProductRelated, WorkforceAdministration, WorkforceData ITA, INPDAI Codes,ITA INPDAI Table
Define the INPDAI (IstitutoNazionale di Previdenzaper I Dirigenti di AziendeIndustriali) position codesfor pension funds.
ITA INPS Table INPS_TBL_ITA Set Up HRMS, ProductRelated, WorkforceAdministration, WorkforceData ITA, INPS Codes, ITAINPS Table
Define INPS (IstitutoNazionale per la PrevidenzaSociale) data for socialsecurity contributions andinformation needed forsocial security reporting(DM10).
ITA PREV Table PREV_TBL_ITA Set Up HRMS, ProductRelated, WorkforceAdministration, WorkforceData ITA, PREV Codes,ITA PREV Table
Define PREVINDAIcodes, descriptions, andPREVINDAI position codes.
Company Codes - INPSCodes
COMP_INPS_ITA Set Up HRMS, ProductRelated, WorkforceAdministration, WorkforceData ITA, Company Codes,INPS Codes
Link the company withINPS codes.
30 PeopleSoft Proprietary and Confidential

Chapter 3 Setting Up Country-Specific Tables
Page Name Object Name Navigation UsageCompany Codes - INAILCodes
COMP_INAIL_ITA Set Up HRMS, ProductRelated, WorkforceAdministration, WorkforceData ITA, Company Codes,INAIL Codes
Link the company withINAIL codes.
Company Codes - INPDAICodes
COMP_INPDAI_ITA Set Up HRMS, ProductRelated, WorkforceAdministration, WorkforceData ITA, Company Codes,INPDAI Codes
Link the company withINPDAI codes.
Company Codes - PREVCodes
COMP_PREV_ITA Set Up HRMS, ProductRelated, WorkforceAdministration, WorkforceData ITA, Company Codes,PREV Codes
Link the company withPREV codes.
Company Codes - C.I.A.Codes
COMP_CIA_ITA Set Up HRMS, ProductRelated, WorkforceAdministration, WorkforceData ITA, Company Codes,C.I.A. Codes
Link the company withC.I.A. codes.
Company/Estab Codes -INPS Codes
EST_INPS_ITA Set Up HRMS, ProductRelated, WorkforceAdministration, WorkforceData ITA, Company/EstabCodes, INPS Codes
Link the company andestablishment with INPScodes.
Company/Estab Codes -INAIL Codes
EST_INAIL_ITA Set Up HRMS, ProductRelated, WorkforceAdministration, WorkforceData ITA, Company/EstabCodes, INAIL Codes
Link the company andestablishment with INAILcodes.
Company/Estab Codes -INPDAI Codes
EST_INPDAI_ITA Set Up HRMS, ProductRelated, WorkforceAdministration, WorkforceData ITA, Company/EstabCodes, INPDAI Codes
Link the company andestablishment with INPDAIcodes.
Company/Estab Codes -PREV Codes
EST_PREV_ITA Set Up HRMS, ProductRelated, WorkforceAdministration, WorkforceData ITA, Company/EstabCodes, PREV Codes
Link the company andestablishment with PREVcodes.
Company/Estab Codes -C.I.A. Codes
EST_CIA_ITA Set Up HRMS, ProductRelated, WorkforceAdministration, WorkforceData ITA, Company/EstabCodes, C.I.A. Codes
Link the company andestablishment with C.I.A.(Contratto IntergrativoAziendale) codes.
PeopleSoft Proprietary and Confidential 31

Setting Up Country-Specific Tables Chapter 3
Page Name Object Name Navigation UsageIT Country FCode COUNTRY_DEFN_ITA Set Up HRMS, Product
Related, WorkforceAdministration, WorkforceData ITA, Country FiscalCodes, ITA Country FCode
Define the city fiscal code.
ITA Seniority Notification SENIORIT_NOTIF_ITA Set Up HRMS, ProductRelated, WorkforceAdministration, WorkforceData ITA, SeniorityNotification Periods, ITASeniority Notification
Define seniority terminationnotification periods foremployment categories.
Turnover Action TRV_ACT_REAS_ITA Set Up HRMS, ProductRelated, WorkforceAdministration, WorkforceData ITA, Turnover Reasons,Turnover Action
Setup action reasons for jobturnover actions.
Productive Unit UNITA_PROD_TBL Set Up HRMS, ProductRelated, WorkforceAdministration, WorkforceData ITA, Production Unit,Productive Unit
Define production unitsbased on your company’sagreements with the unions.
Defining INPS CodesAccess the ITA INPS Table page.
32 PeopleSoft Proprietary and Confidential

Chapter 3 Setting Up Country-Specific Tables
ITA INPS Table page
INPS Activity Desc (INPSactivity description)
Enter company activity description to be reported on the INPS declarations.
INPS Position Code Enter company INPS position codes.
INPS Site Enter INPS sites to which the company must send the declarations.
Stat Contr Code(statisticalcontribution code)
Enter the statistical contribution code to be reported on the INPS declarations.
INPS Fiscal Code Enter the company fiscal code.
Authorization Number Enter the authorization codes to be reported on the INPS declarations.
Istat Code Enter the Istat code to be reported on the INPS declarations.
PeopleSoft Proprietary and Confidential 33

Setting Up Country-Specific Tables Chapter 3
Defining Seniority Notification PeriodsAccess the ITA Seniority Notification page.
ITA Seniority Notification page
Category Select the job category to which this labor agreement notification applies.
Subcategory Select the job subcategory to which this labor agreement notification applies.
Subcategory 2 Select the job subcategory 2 to which this labor agreement notification applies.
From Seniority Enter the beginning of the seniority period to which this labor agreementnotification applies. The seniority must be entered in month units.
To Seniority Enter the end of the seniority period to which this labor agreement notificationapplies. The seniority must be entered in month units.
Notif. Days (notificationdays)
Enter, in days, the seniority applicable to this period. For example, a laboragreement might require that employees employed for more than 6 months butless than 12 months have a notification period of 30 calendar days.
Type of Day Indicate whether the notification uses working days or calendar days.
(JPN) Setting Up Intercompany Transfer Company DataTo set up intercompany transfer company data, use the IC Trans External Company/Dept (INTCPX_CPY_JPN)and IC Trans External Superv Lvl (INTCPX_SPV_JPN) components.
This section provides an overview of the setup of company data for intercompany transfers and describes howto set up company data for intercompany transfers.
34 PeopleSoft Proprietary and Confidential

Chapter 3 Setting Up Country-Specific Tables
Understanding Setup of Company Data forIntercompany TransfersIn any intercompany transfer, one of the companies is outside of the PeopleSoft database in which yourorganization’s company data has been set up. Therefore it is necessary to create data in the database for thosecompanies. These setup steps are for that purpose.
To set up company data for intercompany transfers for Japan:
• Set up a “dummy” paygroup to use as the compensation indicator if you create intercompany transfers inwhich the host company is responsible for paying the employee.
• Set up company and department codes to use for companies outside of the database.
• Set up supervisor level codes to use for companies outside of the database.
See AlsoPeopleSoft Enterprise Global Payroll 8.9 PeopleBook, “Working with Payee Data”
Chapter 11, “(JPN) Tracking Intercompany Transfers (Shukkou),” Indicating the Home or Host CompensationOwner, page 304
Pages Used to Set Up Intercompany Transfer Company DataPage Name Object Name Navigation Usage
IC Trans ExternalCompany/Dept (internalcompany transfer externalcompany/department)
INTCPX_CPY_JPN Set Up HRMS, ProductRelated, WorkforceAdministration, WorkforceData JPN, IC Trans ExternalCompany/Dept
Set up company anddepartment codes forcompanies outside thedatabase to use forintercompany transfers.
IC Trans External SupervLvl (intercompany transferexternal supervisor level)
INTCPX_SPV_JPN Set Up HRMS, ProductRelated, WorkforceAdministration, WorkforceData JPN, IC Trans ExternalSuperv Lvl
Set up supervisor level codesfor companies outsidethe database to use forintercompany transfers.
(JPN) Setting Up Japanese Supervisor LevelsSupervisor levels are a class of position such as Division Manager and Section Chief. They represent levels ofsome managerial or supervisory significance that bear responsibility for work above a certain level in orderto achieve the organization’s management goals.
The concept of employees’ supervisor level is a central one in Japanese companies’ human resourcesmanagement. It may or may not be related to an employee’s “job.” Companies usually use supervisor levelas another type of employee identifier. Companies that do not use capability grades (or Job Management)may still require the tracking of supervisor levels. Many companies pay employees a component of payrelated to their supervisor level.
Supervisor levels usually combine with departments to define positions or posts within an organization, asshown in this sequence of three tables:
PeopleSoft Proprietary and Confidential 35

Setting Up Country-Specific Tables Chapter 3
Table 1: Supervisor Levels
Supervisor Level Description
01 Director
02 Senior Manager
Table 2: Departments
Department ID Description
100 Development
102 Development Section One
200 Sales
210 Sales - West Division
Table 3: Position, Supervisor Level, and Departments
Position or Post Supervisor Level Department ID
Director of Development 01 100
Senior Manager of DevelopmentSection One
02 102
Director of Sales 01 200
Senior Manager of Sales - WestDivision
02 210
When you create or update employee Job records, you can enter the supervisor levels that you set up in theSupervisor Level table on the Job Information page. And, because supervisor level is an employee identifierjust like job code, position, or manager level, it appears throughout the system. You can view it or enter it onmany of the pages on which you can also view or enter job codes, positions, and manager levels. You can alsoview it on Job Summary and throughout the Plan Careers and Successions and Track Global Assignmentsbusiness processes.
36 PeopleSoft Proprietary and Confidential

Chapter 3 Setting Up Country-Specific Tables
Page Used to Set Up Japanese Supervisor LevelsPage Name Object Name Navigation Usage
IC Trans External SupervLvl (intercompany transferexternal supervisor level)
INTCPX_SPV_JPN Set Up HRMS, ProductRelated, WorkforceAdministration, WorkforceData JPN, IC Trans ExternalSuperv Lvl
Add and modify supervisorlevel data.
Note. This table has SetID asits key.
(MYS and SGP) Setting Up Festive Advance ReligionsTables for Singapore and Malaysia
To set up festive advance religions, use the Religions MYS/SGP (RELIGION_TBL_FA) component.
Regulations in some countries require ethnic group tracking by employers. The system tables containpredetermined values for defining ethnic groups and religions. You can add or edit values and descriptions.
This section lists the pages used to set up festive advance religions for Singapore and Malaysia.
Page Used to Set Up Festive Advance Religions forSingapore and Malaysia
Page Name Object Name Navigation UsageReligions MYS/SGP RELIGION_TBL_FA Set Up HRMS, Product
Related, WorkforceAdministration, ReligionsMYS/SGP
Define religions and festiveadvance types for Malaysiaand Singapore. Select theappropriate festive advancetype from the FA HolidayType field associated withthis religion
(NZL) Setting Up New Zealand Disability CodesTo set up New Zealand disability codes, use the Disability Codes (DISABILITY_TBL_NZL) component.
This section discusses how to define disability codes used to track employee disabilities for New Zealand.
Page Used to Set Up New Zealand Disability CodesPage Name Object Name Navigation Usage
Disability Codes DISABILITY_TBL_NZL Set Up HRMS, ProductRelated, WorkforceAdministration, DisabilitiesNZL
Create new disability typecodes or modify existingcodes.
PeopleSoft Proprietary and Confidential 37

Setting Up Country-Specific Tables Chapter 3
(ESP) Setting Up Spanish Workforce TablesTo set up Spanish workforce tables, use the Social Security Country Code (SOCS_CNTRY_ESP), IndustryActivity (INDUSTRY_ACT_ESP), Insurance Company (INSUR_COMPANY_ESP), Social Security RiskCode (SOCS_RISKCD_ESP), Social Security Scheme (SOCS_SCHEME_ESP), Social Security CompanySetup (SOCS_SETUP_ESP), and Hiring Center Table (HIRING_CENTER_ESP) components.
If your organization does business in Spain, you must set up several tables to track information requiredby the Spanish government for Spanish workers.
This section discusses how to:
• View country codes for social security reporting.• Enter Industry Activity codes.• Enter insurance company descriptions and address information.• View risk codes.• Define maximum and minimum social security ceilings.• Define maximum and minimum social security bases by work group.• Define contribution rates and percentages.• Enter company information.• Define Spanish hiring centers.
Pages Used for Spanish Workforce TablesPage Name Object Name Navigation Usage
Social Security CountryCodes
SOCS_CNTRY_ESP Set Up HRMS, ProductRelated, WorkforceAdministration, WorkforceData ESP, Country CodesTable
Enter country codes valid forsocial security reportingpurposes.
Industry Activity INDUSTRY_ACT_ESP Set Up HRMS, ProductRelated, WorkforceAdministration, WorkforceData ESP, Industry ActivityTable
Enter industry activity codesand descriptions. Theindustry activity code helpsdetermine the employersocial security number.
Insurance Company INSUR_COMPANY_ESP Set Up HRMS, ProductRelated, WorkforceAdministration, WorkforceData ESP, InsuranceCompany Table
Enter insurance companydescriptions and addressinformation.
Social Security Risk Code SOCS_RISKCD_ESP Set Up HRMS, ProductRelated, WorkforceAdministration, WorkforceData ESP, Soc. Sec. RiskCode Table
View the risk codes thatcan apply to employees inyour organization.
38 PeopleSoft Proprietary and Confidential

Chapter 3 Setting Up Country-Specific Tables
Page Name Object Name Navigation UsageScheme SOCS_SCHEME_ESP Set Up HRMS, Product
Related, WorkforceAdministration, WorkforceData ESP, Soc. Sec. SchemeTable, Scheme
Review or define maximumand minimum social securityceilings, as well as review ordefine the minimum hourlyrate for each social securityscheme.
Work Group SOCS_WRKGRP_ESP Set Up HRMS, ProductRelated, WorkforceAdministration, WorkforceData ESP, Soc. Sec. SchemeTable, Work Group
Define maximum andminimum social securitybases by work group, as wellas the minimum hourly rateused to calculate the base forpart-time employees.
Contribution SOCS_CONTRIB_ESP Set Up HRMS, ProductRelated, WorkforceAdministration, WorkforceData ESP, Soc. Sec. SchemeTable, Contribution
Define the contribution ratesand percentages for bothemployees and employersused in the social securitycalculation.
Company Setup SOCS_SETUP_ESP Set Up HRMS, ProductRelated, WorkforceAdministration, WorkforceData ESP, Soc. Sec.Company Setup
Enter specific companyinformation, including dataneeded for social securitypurposes.
Hiring Center HIRING_CENTER_ESP Set Up HRMS, ProductRelated, WorkforceAdministration, WorkforceData ESP, Hiring CenterTable
Define the hiring centersyou will attach to employeepersonnel records on theContract Data page.
You connect every Spanishemployee with a hiringcenter.
Entering Country Codes for Social Security ReportingAccess the Social Security Country Codes page.
PeopleSoft Proprietary and Confidential 39

Setting Up Country-Specific Tables Chapter 3
Social Security Country Codes page
Country Enter the standard ISO country code.
Social Security CountryCode
Enter the country code used for social security processing.
Entering Insurance Company Descriptions andAddress InformationAccess the Insurance Company page.
Edit Address Click to enter or modify address information.
Viewing Risk CodesAccess the Social Security Risk Code page.
40 PeopleSoft Proprietary and Confidential

Chapter 3 Setting Up Country-Specific Tables
Social Security Risk Code page
Note. The Spanish government requires employers to assign jobs a social security risk code that rates the riskof illness, accident, or death connected with that type of job.
The PeopleSoft system delivers all social security risk codes as system data.
Social Security Risk Code The code that you entered to access this page. This is the code defined onthis page.
IMS Risk Rate (Riesgode Invalidez/Muerte/Supervivencia)
Displays the IMS risk rate that applies to this social security risk code. TheSpanish government assigns IMS risk rate codes that assess the risk ofwork-related disability, death, or survival.
IT Risk Rate (Riesgo deIncapacidad Temporal)
Displays the IT risk rate that applies to this social security risk code.The Spanish government assigns IT risk rate codes to assess the risk ofwork-related temporary disability, such as respiratory problems for miners orinjuries for construction workers.
Total Rate The system automatically calculates the total rate, the sum of the IMS riskrate, and the IT risk rate.
Defining Maximum and Minimum Social Security CeilingsAccess the Scheme page.
PeopleSoft Proprietary and Confidential 41

Setting Up Country-Specific Tables Chapter 3
Scheme page
Lower Ceiling Enter the lower ceiling amount used to calculate the professional contingenciesfunding base.
Upper Ceiling Enter the upper ceiling amount used to calculate the professional contingenciesfunding base.
Minimum Hourly Rate Enter the amount used to calculate the professional contingencies fundingbase in the case of employees working part-time.
Important! To trigger the correct part-time calculation of the base, you mustspecify whether the employee is working on a full or part-time basis in theFull/Part field on the Job Information page.
Defining Maximum and Minimum Social SecurityBases by Work GroupAccess the Work Group page.
42 PeopleSoft Proprietary and Confidential
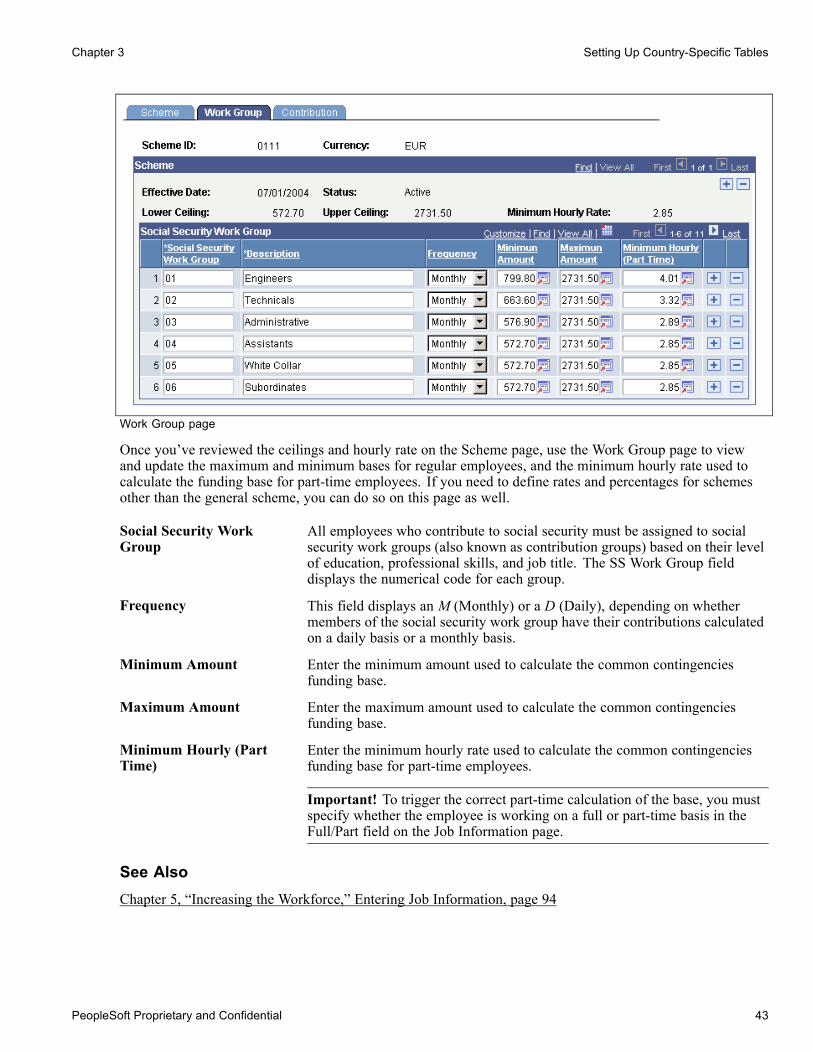
Chapter 3 Setting Up Country-Specific Tables
Work Group page
Once you’ve reviewed the ceilings and hourly rate on the Scheme page, use the Work Group page to viewand update the maximum and minimum bases for regular employees, and the minimum hourly rate used tocalculate the funding base for part-time employees. If you need to define rates and percentages for schemesother than the general scheme, you can do so on this page as well.
Social Security WorkGroup
All employees who contribute to social security must be assigned to socialsecurity work groups (also known as contribution groups) based on their levelof education, professional skills, and job title. The SS Work Group fielddisplays the numerical code for each group.
Frequency This field displays an M (Monthly) or a D (Daily), depending on whethermembers of the social security work group have their contributions calculatedon a daily basis or a monthly basis.
Minimum Amount Enter the minimum amount used to calculate the common contingenciesfunding base.
Maximum Amount Enter the maximum amount used to calculate the common contingenciesfunding base.
Minimum Hourly (PartTime)
Enter the minimum hourly rate used to calculate the common contingenciesfunding base for part-time employees.
Important! To trigger the correct part-time calculation of the base, you mustspecify whether the employee is working on a full or part-time basis in theFull/Part field on the Job Information page.
See AlsoChapter 5, “Increasing the Workforce,” Entering Job Information, page 94
PeopleSoft Proprietary and Confidential 43

Setting Up Country-Specific Tables Chapter 3
Defining Contribution Rates and PercentagesAccess the Contribution page.
Contribution page
If you need to define rates and percentages for schemes other than the general scheme, you can do so onthis page.
Contribution ID In PeopleSoft Enterprise Global Payroll for Spain, there are multiplecontribution IDs for each scheme ID, and each contribution ID is associatedwith its own rates and percentages. To view the different contribution IDclasses and their corresponding rates or percentages, use the scroll arrows inthe Contribution and Contribution-Concepts scroll areas.
Possible values for the contribution ID are:
• General Empleado Regular (general regular employee)• Empleado Regular Tiemp Completo (full-time regular employee)• Empleado Reg Tiempo Parcial (part-time regular employee)• Empleado Regular E.T.T. (E.T.T. regular employee)• Training Contracts• Apprenticeship Contract
Note. You must associate individual employees with a Scheme and SSContribution ID on the Contract Data page.
44 PeopleSoft Proprietary and Confidential
Chapter 3 Setting Up Country-Specific Tables
Social Security NumberType
Select one of the following values:
• Regular: Select to define the percentages used to calculate the contributionsof employees with regular contracts.
• Apprentice: Select to define rates used to calculate the contributions ofapprentices.
• Training: Select to define rates used to calculate the contributions ofemployees with training contracts.
Contribution Type Select Percentage if you will be entering percentages in the EmployerPercentage or Employee Percentage fields. If you select Percentage, theEmployer and Employee Rate fields become unavailable for data entry.
Select Rate if you will be entering rates in the Employer or Employee Ratefields. If you select Rate, the Employer and Employee Percentage fieldsbecome unavailable for data entry.
Important! You should always select Percentage for regular employees, andRate for apprentices and trainees.
Concept Indicates the type of contributions for which the system displayscorresponding employee or employer contribution rates or percentages in theContribution-Concepts grid. Possible values are:
• Common Contingency
• FOGASA• Non Structural Overtime
• Permanent Disability D & S
• Professional Training
• Structural Overtime
• Temporary Disability
• Unemployment
Employer Rate Displays the employer contribution rate associated with the concept listedin the left-hand column of the grid. If you are defining a new rate, enterthe rate in this field.
Note. Only contributions of apprentices and trainees are based on fixed rates.
Employer Percentage Displays the employer contribution percentage associated with the conceptlisted in the left-hand column of the grid. Social security contributions ofregular employees are calculated as percentages of a funding base. If you aredefining a new percentage, enter the percentage in this field.
Employee Rate Displays the employee contribution rate associated with the concept listedin the left-hand column of the grid. If you are defining a new rate, enterthe rate in this field.
Employee Percentage Displays the employee contribution percentage associated with the conceptlisted in the left-hand column of the grid. Social security contributions of
PeopleSoft Proprietary and Confidential 45

Setting Up Country-Specific Tables Chapter 3
regular employees are calculated as percentages of a funding base. If you aredefining a new percentage, enter the percentage in this field.
Entering Company InformationAccess the Company Setup page.
Company Setup page
Social Security CountryCode
Enter the social security country code for the company.
Silcon Key Enter the key provided by the Social Security General Treasury to identifyyour company during electronic file transfers and to access the shared network.
Deliver Process Code Select how the company submits social security reports to the Social SecurityGeneral Treasury. Values include MS DOS, Magnetic D, or Winsuite. Winsuiteis the official system for sending flat files containing monthly reports andhuman resource changes using software provided by the Social SecurityGeneral Treasury and payroll flat files (like those generated by PeopleSoftEnterprise Global Payroll).
Authorization Key Enter the authorization code to access Winsuite provided by the SocialSecurity General Treasury.
Source Bank ID Enter the name of the bank the company uses.
Holder Name Enter the name the company uses at the bank.
46 PeopleSoft Proprietary and Confidential

Chapter 3 Setting Up Country-Specific Tables
Defining Spanish Hiring CentersAccess the Hiring Center page.
Hiring Center page
Hiring Center Code The hiring center code that you entered to access this page.
Responsible ID Select the employee ID of the person in your organization who is responsiblefor signing employment contracts at this hiring center.
Responsible Role Enter a description of the job responsibilities of the person who you designatedin the Responsible ID field.
Unemployment Office Enter a description of the unemployment office for this hiring center.
Signature City Spanish contracts must be stamped with the date and the name of the citywhere the contract was signed. Enter the city’s name here.
See AlsoPeopleSoft Enterprise HRMS 8.9 Application Fundamentals PeopleBook, “Working with System DataRegulation in HRMS”
(BRA) Setting Up Brazilian EstablishmentsTo set up Brazilian establishments, use the Establishment ID Type (ESTAB_TYPE_BRA), Establishment BRA(ESTAB_TBL_BRA), and Centralization Data BRA (CENTRALIZATION_BRA) components.
A company may have several establishments. You must enter data required for reporting purposes for eachestablishment, such as different ID types.
Note. All Brazilian establishments must belong to a company.
This section discusses how to:
• Enter types of establishment ID codes.
PeopleSoft Proprietary and Confidential 47
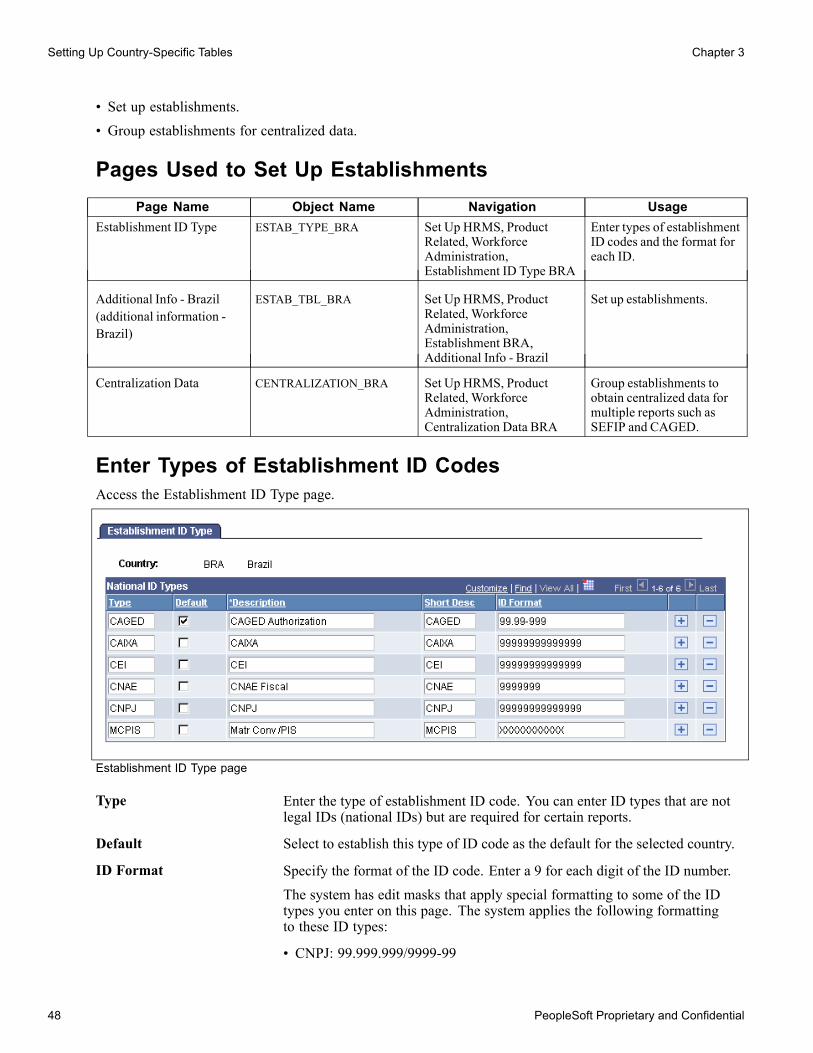
Setting Up Country-Specific Tables Chapter 3
• Set up establishments.• Group establishments for centralized data.
Pages Used to Set Up EstablishmentsPage Name Object Name Navigation Usage
Establishment ID Type ESTAB_TYPE_BRA Set Up HRMS, ProductRelated, WorkforceAdministration,Establishment ID Type BRA
Enter types of establishmentID codes and the format foreach ID.
Additional Info - Brazil(additional information -Brazil)
ESTAB_TBL_BRA Set Up HRMS, ProductRelated, WorkforceAdministration,Establishment BRA,Additional Info - Brazil
Set up establishments.
Centralization Data CENTRALIZATION_BRA Set Up HRMS, ProductRelated, WorkforceAdministration,Centralization Data BRA
Group establishments toobtain centralized data formultiple reports such asSEFIP and CAGED.
Enter Types of Establishment ID CodesAccess the Establishment ID Type page.
Establishment ID Type page
Type Enter the type of establishment ID code. You can enter ID types that are notlegal IDs (national IDs) but are required for certain reports.
Default Select to establish this type of ID code as the default for the selected country.
ID Format Specify the format of the ID code. Enter a 9 for each digit of the ID number.The system has edit masks that apply special formatting to some of the IDtypes you enter on this page. The system applies the following formattingto these ID types:
• CNPJ: 99.999.999/9999-99
48 PeopleSoft Proprietary and Confidential

Chapter 3 Setting Up Country-Specific Tables
• CNAE: 99.99-9
Setting Up EstablishmentsAccess the Additional Info - Brazil page.
Additional Info - Brazil page (1 of 3)
PeopleSoft Proprietary and Confidential 49

Setting Up Country-Specific Tables Chapter 3
Additional Info - Brazil page (2 of 3)
Additional Info - Brazil page (3 of 3)
County Code Enter the county code.
Inscr. Type (inscriptiontype)
Select the company inscription type. Values are: CNPJ or CEI.
Estab Type Cd(establishment type code)
Select the establishment type code, which is based on the size of theestablishment. Values are: Micro, Other, and Small.
50 PeopleSoft Proprietary and Confidential

Chapter 3 Setting Up Country-Specific Tables
Note. The following sections contain setup data for various reports. PeopleSoft delivers only the GPS, SEFIP,and CAGED reports. The other reports will be delivered later.
PIS DataEnter information used to generate the Programa de Integração Social (PIS) report.
PV Adm (PV administration) Enter the number of the Caixa Economica Federal (Federal Saving Bank)branch that generates the file with the issued resources for the PIS paymentof employees (TSO file).
Date The date the Federal Saving Bank generated the TSO file.
RAIS DataEnter information used to generate the Relação Anual de Informações Sociais (RAIS) report.
RAIS Estab Pref (RAISestablishment prefix)
Enter the prefix only if the establishment register appears for RAIS as a keydifferentiation. RAIS assigns the establishment prefix.
# of Owners (number ofowners)
Enter the number of owners working in the establishment.
Own Serv % (owner servicepercentage)
Enter the owner service percentage.
Kit Admin % (kitchenadministration percentage)
Enter the kitchen administration percentage.
Meals Agr % (mealsagreement percentage)
Enter the meals agreement percentage.
Trans Meals % (transportedmeals percentage)
Enter the transported meals percentage.
Food Basket % (food basketpercentage)
Enter the food basket percentage.
Feeding Agr % (feedingtickets agreementpercentage)
Enter the feeding tickets agreement percentage.
Closing Activities RAIS Select to indicate that the establishment closed its activities during the baseyear (the year for which you are currently reporting). A RAIS report uses thisinformation.
PAT Participation Option(Programa de Alimentaçãodo Trabalhador participationoption)
Select to indicate the establishment participates in PAT.
GPS/SEFIP DataEnter information used to generate the Guia de Recolhimento da Previdência Social/ Sistema Empresa deRecolhimento do FGTS e Informações à Previdência Social(GPS/SEFIP) report.
PeopleSoft Proprietary and Confidential 51

Setting Up Country-Specific Tables Chapter 3
GPS Pay Code Enter the company’s social security contribution code.
SAT Code Enter the work accident insurance code.
FPAS Code Enter the FPAS (Fundo de Previdência e Assistência Social) social assistanceand pension fund code. The activity type of the company determines this code.The system identifies all third parties and their respective percentages assignedto this code and generates a total percentage of collection for the establishment.
Third Party Code Enter the code of the third-party that collected service from the establishment.The system uses these codes to identify the third parties involved in aspecific collection.
The SEFIP report uses this code to get the GFIP value.
SS 3th Party % (socialsecurity third-partypercentage)
Enter the total percentage of social security contributed by a third-party for aspecific collection. The system uses this value to obtain the Other EntitiesAmount on the social security payment form (GPS).
SAT % 15 Years (SATpercentage up to 15 years),SAT % 20 Years (SATpercentage up to 20 years),and SAT % 25 Years (SATpercentage up to 25 years)
Enter the percentages that apply to only the eligible employees for each caseof special retirement (with 15, 20, and 25 years of service). The systemuses this percentage to obtain the special retirement component of the INSStotal amount for collection.
Worth Risk % Enter the establishment’s identified predominant worth risk percentage. Thesystem uses this percentage to obtain worth risk component of the INSStotal amount for collection.
Company % Enter the percentage to use to obtain the company component of the INSStotal amount for collection.
Independent % Enter the percentage to use to obtain the independent component of theINSS total amount for collection.
Philant. Exemp %(philanthropy exemptionpercentage)
Enter the percentage to use to obtain the philanthropy exemption component ofthe INSS total amount for collection.
DIRF ResponsibleComplete this group box only for Declaração de Informações à Receita Federal (DIRF) centralizingestablishments.
DIRF Rep Type (DIRFrepresentative type)
Select whether the party responsible for generating the DIRF file is aCompany, Employee, or Non Empl (non-employee).
DIRF Resp ID (DIRFresponsible ID)
Enter the company code or employee ID of the party responsible forgenerating the DIRF file.
SEFIP Responsible
SEFIP Rep Type (SEFIPrepresentative type)
Select whether the party responsible for generating the SEFIP file is aCompany, Employee, or Non Empl (non-employee).
52 PeopleSoft Proprietary and Confidential

Chapter 3 Setting Up Country-Specific Tables
SEFIP Resp ID (SEFIPresponsible ID)
Enter the company code or employee ID of the party responsible forgenerating the SEFIP file.
RAIS ResponsibleComplete this group box only for RAIS centralizing establishments.
RAIS Rep Type (RAISrepresentative type)
Select whether the party responsible for generating the RAIS file is aCompany, Employee, or Non Empl (non-employee).
RAIS Resp ID (RAISresponsible ID)
Enter the company code or employee ID of the party responsible forgenerating the RAIS file.
Establishment ID
Type Enter an establishment ID type.
ID Enter the establishment’s ID.
Grouping Establishments for Centralized DataAccess the Centralization Data page.
Centralization Data page
Process Type When you add a record, select the type of data that you want to centralize,such as SEFIP or CAGED.
Centralizer Enter the name of the establishment that creates centralized data for reportingpurposes.
Establishment ID Enter the IDs of all establishments whose data the centralizer collects.
PeopleSoft Proprietary and Confidential 53

Setting Up Country-Specific Tables Chapter 3
54 PeopleSoft Proprietary and Confidential

CHAPTER 4
Adding a Person in PeopleSoft Human Resources
This chapter discusses how to:
• Add a person in PeopleSoft Enterprise Human Resources.• Control data access for persons of interest (POIs) without jobs.
Adding a PersonTo create a person record, use the Add a Person component (PERSONAL_DATA_ADD). Use the(CI_PERSONAL_DATA) component interface to load the data into the table for this component.
This section provides an overview of identification assignment, lists common elements, and discusses how to:
• Enter name and biographical data.• Enter contract information.• Enter country-specific person data.• Create organizational relationships and maintain checklists.
Note. You should create and save either a Job Data or a Person of Interest (POI) Relationship record for anew person at the time you create the new person.
See AlsoPeopleSoft Enterprise HRMS 8.9 Application Fundamentals PeopleBook, “Setting Up and AdministeringHRMS Security”
Understanding Identification AssignmentWhen you open the Add a Person component, the system requests a person ID. There are two ways toassign IDs:
• AutomaticallyIf you use automatic ID assignment, the system adds IDs sequentially as you add new people.The system maintains the last assigned ID on the Installation Table - Last ID Assigned page.
See PeopleSoft Enterprise HRMS 8.9 Application Fundamentals PeopleBook, “Setting Up and InstallingPeopleSoft HRMS,” Specifying the Starting Number for System-Assigned Numbers.
• Manually
PeopleSoft Proprietary and Confidential 55

Adding a Person in PeopleSoft Human Resources Chapter 4
You enter the IDs, using any system that you choose for the organization. With manual entry, you don’tneed to assign IDs sequentially.Assigning IDs manually is the only way that you can include alphabetical characters in the IDs.
Note. To avoid maintaining two different sets of IDs, it is recommended that you use only one method toassign them: either always assign them manually or always let the system assign them.
Common Elements Used in This ComponentSmoker and As of Indicate if the person is a smoker and enter the date on which the person
started smoking. A person’s smoker status affects benefits eligibility and ratedetermination in PeopleSoft Enterprise Human Resources Manage BaseBenefits and is required for regulatory reporting.
Ethnic Group Select an ethnic group. You set up ethnic groups on the Ethnic Groups page.(AUS) Affirmative action reports and the ATSI (Aboriginal and Torres StraitIslander) code come from this page.(USA) Values are based on U.S. Federal Equal Employment Opportunitiesethnic categories. Use ethnic group information to compile the establishment’saffirmative action plan and to generate several equal employment opportunity(EEO) reports.(GBR) Values are based on U.K. equal opportunity ethnic categories.
Military Status Enter the person’s military status.
Preferred Select the person’s preferred email address or phone number.
Pages Used to Add a PersonPage Name Object Name Navigation Usage
Biographical Details PERSONAL_DATA1 Workforce Administration,Personal Information,Biographical, Add a Person,Biographical Details
Enter name and otherbiographical information.
Edit Name NAME_DFT_SEC Workforce Administration,Personal Information,Biographical, Add a Person,Biographical Details
Click the Add Name link onthe Biographical Detailspage.
Edit and refresh nameinformation.
Contact Information PERSONAL_DATA2 Workforce Administration,Personal Information,Biographical, Add a Person,Contact Information
Enter or edit a person’scontact information.
56 PeopleSoft Proprietary and Confidential

Chapter 4 Adding a Person in PeopleSoft Human Resources
Page Name Object Name Navigation UsageAddress History ADDR_HISTORY_SEC Workforce Administration,
Personal Information,Biographical, Add a Person,Contact Information
Click the Add Address linkon the Contact Informationpage.
Enter the effective date,country, and status for theaddress and refresh theaddress data when you makechanges.
Edit Address EO_ADDR_SEC Workforce Administration,Personal Information,Biographical, Add a Person,Contact Information
Click the Add Address linkon the Contact Informationpage and then click UpdateAddresses on the AddressHistory page.
Edit address information.
Regional PERSONAL_DATA3 Workforce Administration,Personal Information,Biographical, Add a Person,Regional
Enter country-specificpersonal information.
OrganizationalRelationships
PERSONAL_DATA4 Workforce Administration,Personal Information,Biographical, Add a Person,Organizational Relationships
Select an organizationalrelationship and checklist tocreate for this person.
Update PersonalData-Future
PRCSRUNCNTL Set Up HRMS, SystemAdministration, DatabaseProcesses, Update PersonalData-Future
Run this process shortlyafter midnight to update thePersonal Data component.The process will updatedata with new, effectiveinformation that is notcurrently in the component.
The Update PersonalData-Future process runs theHR_PERSDATA applicationengine program.
Entering Name and Biographical DataAccess the Biographical Details page.
PeopleSoft Proprietary and Confidential 57

Adding a Person in PeopleSoft Human Resources Chapter 4
Biographical Details page
Person ID If you are adding a new person and are using system-assigned IDs, the fielddisplays the value NEW until you save this record. Otherwise, the systemdisplays the value that you enter to access the page.
Primary Name
Display Name Click to add or edit a name.
Biographical Information
Date of Birth Enter the person’s date of birth. If you leave this field blank, a warningmessage appears when you save the record. You can continue enteringinformation after you acknowledge the message. Though the birth date isn’trequired for the Administer Workforce business process, the system uses it to
58 PeopleSoft Proprietary and Confidential
Chapter 4 Adding a Person in PeopleSoft Human Resources
calculate a person’s age in some benefit and payroll tasks. It also calculatesdates, such as the U.K. expected retirement date, based on the person’s age.
Birth Country Select a country. Based on the selected country, the system might displayadditional fields.
Birth Location Usually a city, town, or village.
Date of Death This field does not appear during the hiring process. Use this field whenupdating a person’s records.
Waive Data Protection European community employment and personal privacy legislation specifiesthat personnel information can’t be passed across countries in the EuropeanUnion without authorization from the employee. Select this check box if youobtain the employee’s consent to share personal data with users in otherEuropean Union member nations.
Biographical History
Highest Education Level Select a value.
Note. (JPN) For Japanese education-level age-related pay calculations,a form of seniority pay, these values are linked to an education-level agebasis as of hire.
Marital Status and As of Select the person’s marital status. Values are: Common Law, Divorced,Head of Household, Married, Separated, Single, Unknown, and Widowed.When a marital status is changed, the default as of date is the same as thebiographical history effective date.PeopleSoft Enterprise Payroll doesn’t use the marital status that is entered onthis page for tax calculations. For U.S. employees, you enter that informationin Maintain Payroll Data on the Federal, State, and Local Tax pages. Taxes forCanadian employees are based on net claim amount, which varies dependingon the employee status.
Note. Laws in the Netherlands require tracking effective-dated marital statusinformation for employees.
Language Code Select the person’s native or preferred language. Although tracking official orpreferred languages is required in some countries in PeopleSoft EnterpriseHuman Resources, the system also uses the preferred language when youcommunicate with people with a relationship to the organization. For example,PeopleSoft Enterprise Global Payroll for Germany and Switzerland use thelanguage code to print paychecks in the payee’s preferred language. Othertypes of communication also use this as the default language for writtencommunication.
Note. Don’t use this field to record the organization’s official language or torate a worker’s proficiency in speaking, reading, or writing various languages.Use the Location Table to track the organization’s official language. Use theLanguages table to record a worker’s language proficiency.
Alternate ID To use a second type of ID for a person, enter the ID.
PeopleSoft Proprietary and Confidential 59

Adding a Person in PeopleSoft Human Resources Chapter 4
Full-Time Student Select if the person is a full-time student.
National ID
Country Select the country that issued the worker’s national ID.
National ID Type The system enters the value that you establish for this country on the NationalID Type Table page. You can override this default.
Note. (BRA) Add rows to enter one or more of the following IDs forthe person: RG number, voter registration card, PIS/PASEP number, andreserve certificate.
National ID Enter the worker’s national ID number. The system checks the format ofthe entry against the default format that you enter on the National ID TypeTable page.
Primary ID Select if the national ID is the person’s primary ID. If this is the only data rowfor this person, the system selects the check box by default. You can clear it.(GBR) For the U.K. the normal format of two letters followed by six digits andthen one letter for National Insurance identification appears by default. Otheroptions that are dependent on employee status are available.
Tax Ref (SGP) Select if the worker’s national registration ID is used as the person’semployer tax reference number. This field is for information only.
National ID Expiry Date (CAN) Enter the expiration date for this National ID.
(CAN) Verifying Social Insurance Numbers for Canadian EmployeesInvoke a modulus 10-check digit formula to verify an employee’s social insurance number (SIN), if needed.The formula follows federal standards for using the ninth digit in an employee SIN to verify the number.
If you enter an employee SIN that doesn’t match the check digit that is calculated by the formula, an errormessage appears.
(NLD) Verifying Social Security IDs for Dutch EmployeesThe Dutch national ID is commonly called the SoFi (Social/Fiscal) number. You can invoke the 11-check digitformula to verify a Dutch employee’s SoFi number. The 11-check formula is a mathematical formula thatevaluates the entry for the employee’s social security ID and verifies that the result of the calculation is 11, todetermine whether the national insurance/social security ID has a valid format.
(USA) Reporting to Government Agencies When the Social Security Number IsUnknownWhen the social security number (SSN) is missing, the system enters the default number that is defined on theNational ID Type table, usually all 9s. However, reports and files that are created by PeopleSoft EnterprisePayroll for North America for submission to government agencies, such as the IRS or Social SecurityAdministration, convert missing or unknown SSNs to the specific format that is required by the governmentagency. For example, a missing or unknown SSN is reported to the IRS using all zeros on the W-2 file.
60 PeopleSoft Proprietary and Confidential

Chapter 4 Adding a Person in PeopleSoft Human Resources
See AlsoPeopleSoft Enterprise Human Resources 8.9 PeopleBook: Monitor Health and Safety, “ProcessingRehabilitation, Claims, and Examination Data,” Tracking Employee Medical Exam Results
Chapter 7, “Entering Additional Data in Human Resources Records,” page 179
Entering Contact InformationAccess the Contact Information page.
Contact Information page
Current Address
Address Type Select the type of address that appears in this row. The system automaticallydisplaysHome for the first address that you enter.
Note. You must have one address with a type of Home in order for the systemto successfully calculate taxes for this person in PeopleSoft Enterprise HRMS:North American Payroll.
Add Address Click to add an address and access the Edit Address page to edit addresses.
Note. (ITA) When entering Italian addresses, use the Address Search link onthe Edit Address page to locate valid cities based on province.
Note. Laws in Belgium, the Netherlands, and Japan require maintaining effective-dated address informationfor employees.
PeopleSoft Proprietary and Confidential 61

Adding a Person in PeopleSoft Human Resources Chapter 4
Phone Information
Phone Type and Telephone Select the phone type and enter the phone number. The system formats thenumber based on the standard phone number format for the person’s countryas indicated in the address. If no special formatting is specified for the selectedaddress country, the format is 000/000-0000.Select Main to designate a phone number as the individual’s primary contactnumber.
Note. (JPN) Phone numbers are custom format fields. If you enter a phone number without any hyphenation(such as 9256944023), the system reformats the number into the standard format for the selected country (forexample, the U.S. format: 925/694-4023). Because a 10-digit phone number in Japan can be formatted inseveral ways (03-1234-5670, 045-123-4567, or 0567-21-1234), this automatic formatting doesn’t work forJapanese phone numbers. Japanese customers who want to store telephone numbers exactly as they areentered, without automatic formatting, should modify the Telephone field manually by using PeopleSoftApplication Designer.
Email Addresses
Email Type and EmailAddress
Select an email type and enter the employee’s email address.
Note. If an employee has more than one address, click the Add (+) button afterselecting the address type.
Entering Country-Specific Person DataAccess the Regional page.
Regional page (1 of 10)
62 PeopleSoft Proprietary and Confidential
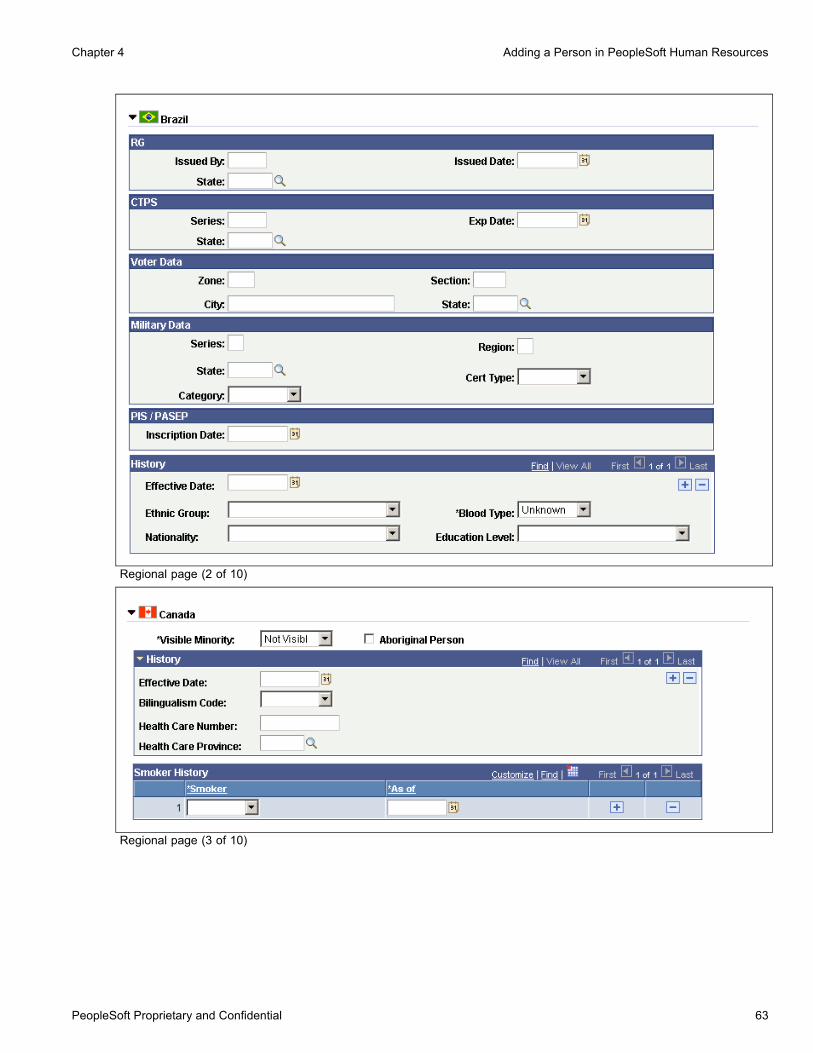
Chapter 4 Adding a Person in PeopleSoft Human Resources
Regional page (2 of 10)
Regional page (3 of 10)
PeopleSoft Proprietary and Confidential 63
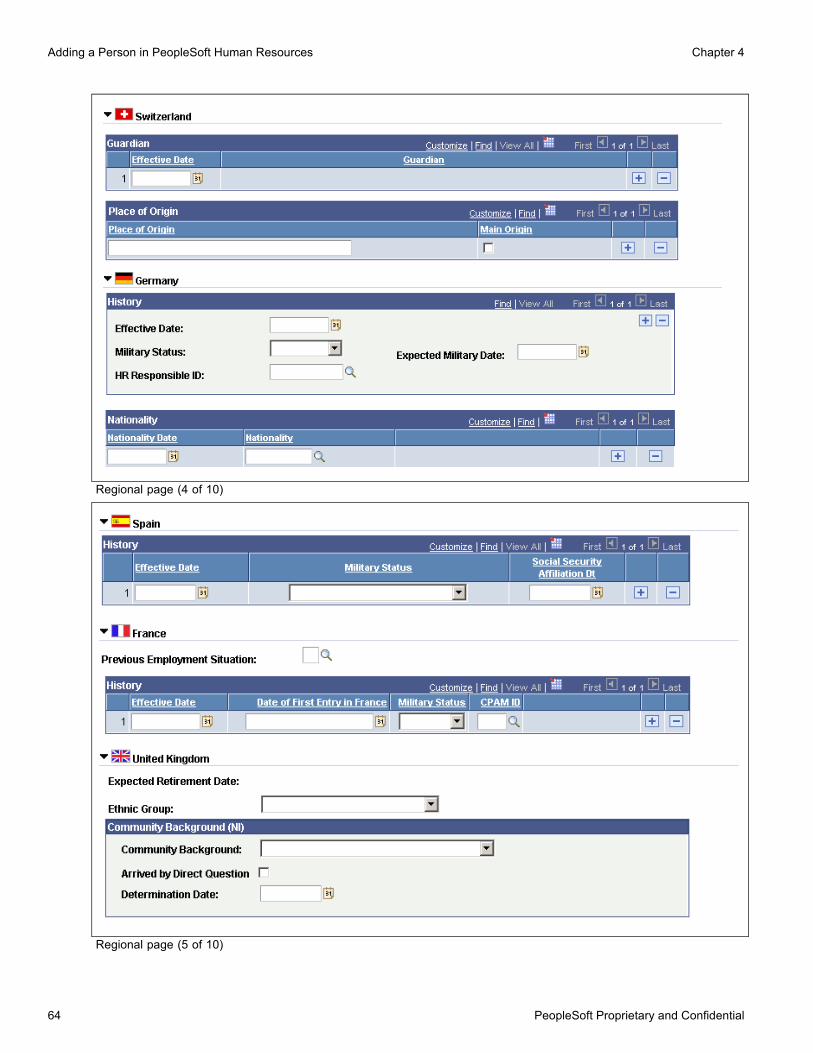
Adding a Person in PeopleSoft Human Resources Chapter 4
Regional page (4 of 10)
Regional page (5 of 10)
64 PeopleSoft Proprietary and Confidential

Chapter 4 Adding a Person in PeopleSoft Human Resources
Regional page (6 of 10)
Regional page (7 of 10)
PeopleSoft Proprietary and Confidential 65

Adding a Person in PeopleSoft Human Resources Chapter 4
Regional page (8 of 10)
Regional page (9 of 10)
66 PeopleSoft Proprietary and Confidential

Chapter 4 Adding a Person in PeopleSoft Human Resources
Regional page (10 of 10)
Local country laws that require employers to verify a person’s nationality and eligibility to work in that countrymight require information that you enter here. Much of the data that you enter is required for regulatoryreporting in PeopleSoft Enterprise Human Resources.
(BRA) Brazil
Issued By Enter the Registro Geral (RG) issuing entity. This information is required ifyou enter the individual’s RG number in the National ID group box.
Issued Date and State Enter this information, which is required if you enter the individual’s RGnumber.
Series Enter the work card number.
Exp Date (expiration date) Enter the work card’s expiration date. This information is required if aCarteira de Trabalho e Previdência Social (CTPS) number is provided.
State Enter the political subdivision of the CTPS issuing agency. This information isrequired if a CTPS number is provided.
Zone, Section, City, andState
Enter this information, which is required if a voter registration card is provided.
Series, Region, andCategory
Enter this information, which is required if a reserve certificate is provided.
State Enter the political subdivision of the issued reserve certificate. Thisinformation is required if a reserve certificate is provided.
Cert Type (certificate type) Enter the type of military service. Values are: Aeronautic, Army, Marine, orOther. This information is required if a reserve certificate is provided.
Inscription Date Enter the date of registration at PIS / PASEP. This information is required ifthe PIS/PASEP number is provided in the National ID group box.
(CAN) Canada
Visible Minority Select a code to indicate if the person’s ethnic background is apparent based onphysical appearance.
PeopleSoft Proprietary and Confidential 67

Adding a Person in PeopleSoft Human Resources Chapter 4
Aboriginal Person Select if the person is a Canadian aboriginal person.
Bilingualism Code Record the appropriate code for the person. If the Official Languages Actapplies to the organization, use the bilingualism code as part of the OfficialLanguages reports (PER102CN and PER108CAN) that you submit to thegovernment.
Health Care Number andHealth Care Province
Enter a number and select the health care province.
(CHE) Switzerland
Guardian Minors who are age 18 or younger or people with mental illness must have aparent or guardian sign employment contracts on their behalf. Enter the nameof the parent or guardian who is authorized to act for this employee.
Place of Origin Enter a place of origin. Every Swiss person has at least one place of origin,usually determined by the father or husband’s birthplace.
Main Origin Select if the place of origin in the Place of Origin field is the person’s mainplace of origin. (A person can have more than one place of origin.)
(DEU) Germany
Expected Military Date If the person hasn’t already completed military service, enter the date whenservice is expected to begin.
HR Responsible ID Select the ID of the human resources representative responsible for this person.
Nationality Date Enter the effective date of the person’s nationality status. If the employee is anative citizen of the country, enter the person’s birth date. If the person is anaturalized citizen, enter the date on which the person became a citizen.
Nationality Enter the person’s nationality by selecting a nationality code.German labor laws require recording an employee’s nationality to determine ifthe employee is eligible to work in certain industries, particularly those thatare related to technology or defense. Use the nationality code to determinethe employee’s eligibility to work in a regulated industry based on theemployee’s country’s participation in OECD or the European Union. Youcan maintain information about whether each nationality code participates inthe OECD and European Union.
Note. Duevo-compliant nationality codes are established by the DuevoDirective and are provided by the PeopleSoft system.
(ESP) Spain
Social Security AffiliationDt (social security affiliationdate)
Enter the date when the person is assigned a Spanish social security number.
(FRA) France
Date of First Entry inFrance
Leave blank if the person is a native-born French citizen. If the person isforeign-born, enter the date on which the person first arrived in France. This
68 PeopleSoft Proprietary and Confidential

Chapter 4 Adding a Person in PeopleSoft Human Resources
data is used to maintain work visa information for foreign workers whoare employed in France.
CPAM ID (Caisse Primaired’Assurance Maladie ID)
Enter the code of the CPAM ID that is assigned to the person. CPAM dependson the person’s home address. The CPAM is the social security body thatcompensates persons for illness and work accidents.
(FPS) French Public SectorThe information that you enter here is mandatory for including an employee in the French Public Sectorsecurity system.
Supporting DocumentRequired
Select to track supporting documents. The system inserts a row in theSupporting Documents group box. The row is identified by the person ID, theaction code, and the effective date and enables you to verify that the personprovided the required documents.
(GBR) United Kingdom
Expected Retirement Date The system calculates and displays this value, based on the system dateand the birth date that you enter on this page. This field is for informationonly; you can’t change it.
A person’s expected retirement date is based on the birth date that you enter on the Name/Location page. Formen in the U.K., the expected retirement date is always the 65th birthday. For women, it is the 60th birthday.The British government is introducing measures to raise the state pension age for women. The retirementage for women will gradually increase to 65 years between 2010 and 2020. This table shows the expectedretirement dates for women in the U.K.:
Birth Date Expected Retirement Age
Before April 6, 1950. 60 years.
After April 6, 1950 and before April 6, 1955. Retirement date is delayed one month for each month thatthe woman is born after April 6, 1950.
After April 6, 1955. 65 years.
The calculation that the system uses to determine the retirement age of U.K. employees is stored inFUNCLIB_HR_UK.EXP_RETIRE_DT.FieldFormula.
(GBR) Community BackgroundThe system displays the following fields only if you’re logged in as an authorized user. Northern Ireland lawrequires that only a designated monitoring officer see community background data for employees. The systemincludes a special user class (UKNIPNLS) and user ID (UKNI) for you to use to enforce these rules.
Community Background Select the person’s community background: Protestant, Catholic, orUndetermined/Other.
Arrived by Direct Question Select if you determine the person’s community background by asking theemployee directly.
PeopleSoft Proprietary and Confidential 69

Adding a Person in PeopleSoft Human Resources Chapter 4
Determination Date Enter the date on which you determine the person’s community backgroundcategory.The data that you enter about a Northern Ireland worker’s communitybackground is required under the Fair Employment Act. Employers mustinclude this information in the Northern Ireland report (UKNI001) that theysubmit to the administrative body that monitors employment in NorthernIreland. This report provides an annual summary of the state of the workforcefor a particular employer and breaks down employees and applicants foremployment into their respective community background categories.
(IND) India
Blood Type Select the person’s blood type or select Unknown. When the blood type isentered on this page at the time that an employee is hired, a componentinterface updates the employee’s blood type on the physical exam record.Thereafter, this field is disabled and displays by default the blood type datafrom the physical exam record.
Caste Select the person’s caste.
(ITA) Italy
Type of Service Select the type of service that the person performed in the military.
Function or Rank Enter the function or rank that was held by the person in the military.
Military End Date Indicate the date on which the person’s military service ended, if applicable.
(JPN) Japan
Honseki Prefecture Select the family prefecture, or place of registration. Tracking a person’sHonseki Prefecture is a matter of custom.
(MEX) Mexico
AFORE (Retirement FundsInstitution Code Mexico)
Enter the AFORE for the employee. Values include: Banamex, Bancomer,Dresdner, GNP, Garante, ING, Inbursa, Principal, Santander, Tepeyac,XXI, and Zurich.
Med Region Code (medicalregion code)
Enter the three-character code for the medical region where the person resides.
(MYS) Malaysia and (SGP) SingaporeIn Malaysia and Singapore, you use the Ethnic Group and Religion fields for eligibility and calculation offestive advances.
(USA) United States
Date Entitled to Medicare (Optional) Enter the date on which this person is entitled to receive Medicarecoverage.
Citizenship (Proof 1) andCitizenship (Proof 2)
Enter two forms of ID (for example, passport and Social Security card) toprove U.S. citizenship (required by U.S. law).
70 PeopleSoft Proprietary and Confidential

Chapter 4 Adding a Person in PeopleSoft Human Resources
Eligible to Work in U.S. Select if the person is eligible to work in the U.S.
See AlsoChapter 3, “Setting Up Country-Specific Tables,” Understanding French Social Security Tracking CodeMaintenance, page 22
PeopleSoft Enterprise Human Resources 8.9 PeopleBook: Meet Regulatory Requirements, “(CAN) MeetingRegulatory Requirements for Canada”
PeopleSoft Enterprise Payroll for North America 8.9 PeopleBook, “Maintaining Payroll Data”
PeopleSoft Enterprise Human Resources 8.9 PeopleBook: Manage Base Benefits, “Setting Up Base BenefitsCore Tables”
PeopleSoft Enterprise HRMS 8.9 Application Fundamentals PeopleBook, “Setting Up Local CountryFunctionality,” (JPN) Setting Up Japanese Control Tables
PeopleSoft Enterprise HRMS 8.9 Application Fundamentals PeopleBook, “Understanding HRMS,” EffectiveDates
PeopleSoft Enterprise HRMS 8.9 Application Fundamentals PeopleBook, “Setting Up and Working withLanguages”
PeopleSoft Enterprise HRMS 8.9 Application Fundamentals PeopleBook, “Working with System DataRegulation in HRMS,” Understanding PeopleSoft HRMS System Data Regulation
PeopleSoft Enterprise Human Resources 8.9 PeopleBook: Manage Base Benefits, “Setting Up Base BenefitsCore Tables”
PeopleSoft Enterprise HRMS 8.9 Application Fundamentals PeopleBook, “PeopleSoft Enterprise HRMS 8.9Application Fundamentals Preface,” Common Elements Used in PeopleSoft HRMS
PeopleSoft Enterprise Human Resources 8.9 PeopleBook: Meet Regulatory Requirements, “(AUS) MeetingRegulatory Requirements for Australia”
PeopleSoft Enterprise Human Resources 8.9 PeopleBook: Meet Regulatory Requirements, “(CAN) MeetingRegulatory Requirements for Canada”
PeopleSoft Enterprise Human Resources 8.9 PeopleBook: Meet Regulatory Requirements, “(FRA) MeetingRegulatory Requirements for France”
PeopleSoft Enterprise Human Resources 8.9 PeopleBook: Manage French Public Sector, “Updating EmployeeRecords,” Tracking Supporting Documents
PeopleSoft Enterprise Human Resources 8.9 PeopleBook: Meet Regulatory Requirements, “(GBR) MeetingRegulatory Requirements for the United Kingdom”
PeopleSoft Enterprise Human Resources 8.9 PeopleBook: Meet Regulatory Requirements, “(USA) MeetingRegulatory Requirements for the United States”
PeopleTools 8.45 PeopleBook: PeopleSoft Process Scheduler
PeopleTools 8.45 PeopleBook: PeopleTools Global Technology
Creating Organizational Relationships andMaintaining ChecklistsAccess the Organizational Relationships page.
PeopleSoft Proprietary and Confidential 71
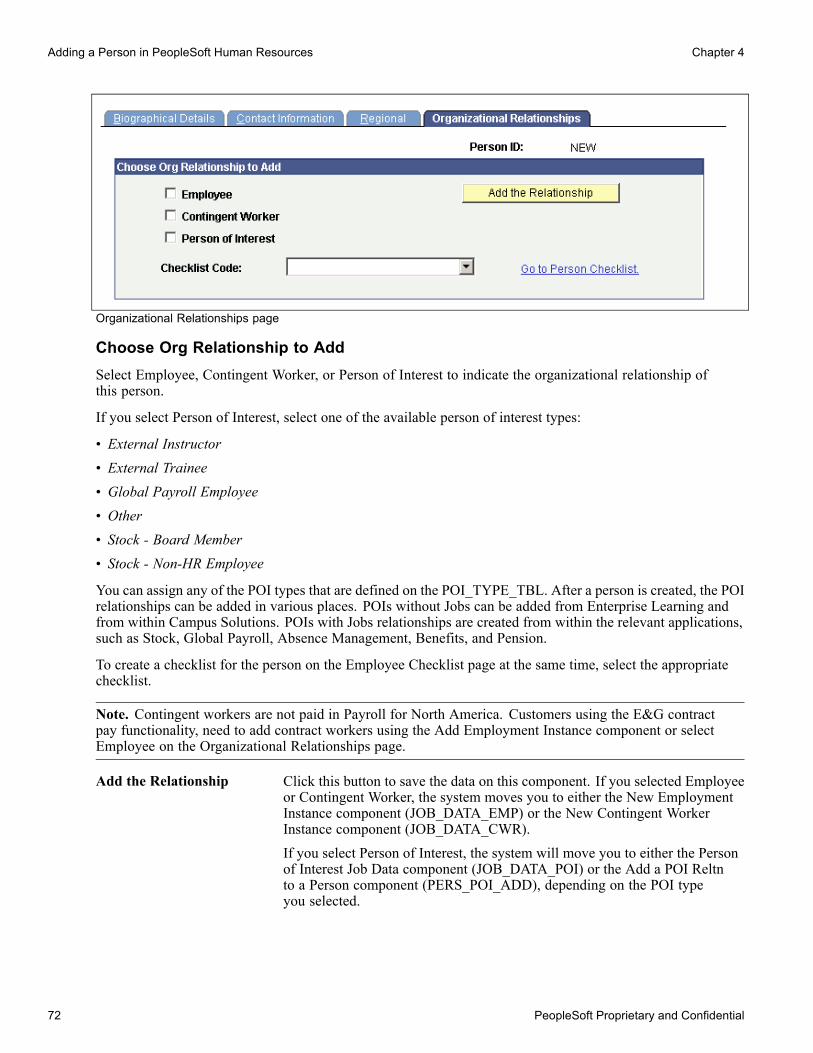
Adding a Person in PeopleSoft Human Resources Chapter 4
Organizational Relationships page
Choose Org Relationship to AddSelect Employee, Contingent Worker, or Person of Interest to indicate the organizational relationship ofthis person.
If you select Person of Interest, select one of the available person of interest types:
• External Instructor
• External Trainee
• Global Payroll Employee
• Other• Stock - Board Member
• Stock - Non-HR Employee
You can assign any of the POI types that are defined on the POI_TYPE_TBL. After a person is created, the POIrelationships can be added in various places. POIs without Jobs can be added from Enterprise Learning andfrom within Campus Solutions. POIs with Jobs relationships are created from within the relevant applications,such as Stock, Global Payroll, Absence Management, Benefits, and Pension.
To create a checklist for the person on the Employee Checklist page at the same time, select the appropriatechecklist.
Note. Contingent workers are not paid in Payroll for North America. Customers using the E&G contractpay functionality, need to add contract workers using the Add Employment Instance component or selectEmployee on the Organizational Relationships page.
Add the Relationship Click this button to save the data on this component. If you selected Employeeor Contingent Worker, the system moves you to either the New EmploymentInstance component (JOB_DATA_EMP) or the New Contingent WorkerInstance component (JOB_DATA_CWR).If you select Person of Interest, the system will move you to either the Personof Interest Job Data component (JOB_DATA_POI) or the Add a POI Reltnto a Person component (PERS_POI_ADD), depending on the POI typeyou selected.
72 PeopleSoft Proprietary and Confidential

Chapter 4 Adding a Person in PeopleSoft Human Resources
Note. You can only select one relationship when you create the Personal Datarecord, but you can create additional relationships directly from the NewEmployment Instance, New Contingent Worker Instance, Add Person ofInterest Job, and Add a POI Type to a Person components.
Note. If you create a person but do not create and save a job data record or POI type record for them, thesystem will save the person as a POI without job with a POI Type of Unknown. When you do create and save arecord for the person on the Add an Employment Instance component, Add a Contingent Worker component,Add a POI Instance component, or Add a POI Reltn. component, the system will delete the Unknown POIwithout job instance for that person.
(FPS) French Public SectorIf you have French Public Sector installed and you select Employee, you select one of these types of employee:
• Commercial Employee
• French Public Sector Employee
If you select French Public Sector Employee, the system displays these fields: Business Unit, Department, andJob Code. Complete these fields for the new employee.
Use the French P Sector Employee checklist for French public sector employees.
See PeopleSoft Enterprise Human Resources 8.9 PeopleBook: Manage French Public Sector, “Hiring FrenchPublic Sector Employees”.
See AlsoChapter 4, “Adding a Person in PeopleSoft Human Resources,” Controlling Data Access for POIs WithoutJobs, page 73
Chapter 5, “Increasing the Workforce,” Adding Organizational Instances for Employees, Contingent Workers,and POIs, page 83
PeopleSoft Enterprise Payroll for North America 8.9 PeopleBook, “(E&G) Administering Contract Pay”
Controlling Data Access for POIs Without JobsThis section provides an overview of security for POIs without jobs and discusses how to add and maintainPOI types.
See AlsoPeopleSoft Enterprise HRMS 8.9 Application Fundamentals PeopleBook, “Setting Up and AdministeringHRMS Security”
Understanding Security for POIs Without JobsWhen a POI does not have a job record you need to enter additional information about them in order tocontrol user access to their data.
PeopleSoft Proprietary and Confidential 73
Adding a Person in PeopleSoft Human Resources Chapter 4
Data access for POIs without jobs is primarily controlled by POI type. Assign the person a POI type inthe Add a POI Relationship component (PERS_POI_ADD) or Maintain a Person’s POI Reltn component(PERS_POI_MAINTAIN).
You can add additional security criteria by assigning the person to one or more business units, locations, orinstitutions.
For example, a person has the POI type of External Instructor and the following security types:
Security Type Security Key
Location CCBC1
Business Unit CFBBU
Institution PSSTA
The following users have access to this person:
• User A, who has access to all External Instructor POIs.• User B, who has access to all External Instructor POIs in the location CCBC1.• User C, who has access to all External Instructor POIs in the business unit CFBBU.• User D, who has access to all External Instructor POIs in the institution PSSTA.
Note. Data permission security for employees, contingent workers, and POIs with jobs is controlled bydata you enter on the person’s job record.
Pages Used to Control Access to the Data of POIs Without JobsPage Name Object Name Navigation Usage
Add Person of Interest, EditPOI Relationship
PER_POI_TRANS • Workforce Administration,Personal Information,OrganizationalRelationships, Add a POIRelationship, Add Personof Interest
• Workforce Administration,Personal Information,OrganizationalRelationships, Maintain aPerson’s POI Reltn, PerPoi Trans
Use these pages to set upand maintain a person ofinterest’s POI type andsecurity access keys.
Adding and Maintaining POI TypesAccess the Add Person of Interest page or the Edit POI Relationship page.
74 PeopleSoft Proprietary and Confidential

Chapter 4 Adding a Person in PeopleSoft Human Resources
Add Person of Interest page
Person of Interest Type Select a person of interest type when you create a record for the person. Youcan create multiple records for a person with different POI types on theAdd New POI Type component.
Security Data
Get Enabled Security Types Click to add a row to the Security Data grid for each security type that hasbeen enabled for the people without jobs.
Security Access Type To restrict user access to this person’s data using values in addition to the POItype, select a security access type.
Security Key 1 and SecurityKey 2
If you select a security access type of Business Unit or Institution, select thebusiness unit or institution associated with this person for security purposes.If you select a security access type of Location, first select the appropriatebusiness unit for the location’s SetID in Security Key 1 and the locationassociated with this person for security purposes in Security Key 2.
Add the SpecificTransaction
Click to move to the component that tracks additional data for this POI type.
You can enter multiple rows in this group box to set up multiple security access types and keys. PeopleSoftincludes the Business Unit, location, and institution security types as part of the system data. You can chooseto disable any of these security types.
Click the Get Enabled Security Types button to find out which security types are enabled. You can enter datafor a type that has not been enabled, allowing you to capture additional data on a POI without a job withouthaving to modify the system. To do this, you must create a new security type on the Security Access Type pagefor the People without Jobs Security Set and enter a new field name. Then use the new field name in thiscomponent and capture the required data for this POI.
PeopleSoft Proprietary and Confidential 75

Adding a Person in PeopleSoft Human Resources Chapter 4
See PeopleSoft Enterprise HRMS 8.9 Application Fundamentals PeopleBook, “Setting Up and AdministeringHRMS Security”.
Person of Interest HistoryMaintain a history of this person of interest type using the effective date field and by adding new rows asnecessary. Make the person inactive if they are not being used in system.
Note. Some of the POI Types without Jobs use application-specific transaction tables to capture the history ofthis relationship. The system makes this table available for External Trainee or Other POIs. You can trackinformation about Students and External Instructor POIs on other system components intended for thispurpose For example, the External Instructor POI Type is tracked in the Enterprise Learning Instructor Tablecomponents. This is defined on the POI Type setup table.
See PeopleSoft Enterprise Human Resources 8.9 PeopleBook: Administer Training, “Defining TrainingCourses and Programs,” Setting Up Course Instructors.
See PeopleSoft Enterprise Learning Management PeopleBook
Planned Exit Select the date the person will exit this person of interest type, if known.This field is for information only.
76 PeopleSoft Proprietary and Confidential

CHAPTER 5
Increasing the Workforce
This chapter provides overviews of job data, user security considerations, and discusses how to:
• Add organizational instances for employees, contingent workers, and persons of interest (POIs).
• Add additional assignments.
• Review organizational relationships.
• (BRA) Run Brazil employment reports.
• (CAN) Run the Canadian Hire List report.
Understanding Job DataYou can add a new job record to the system in several ways. Each way uses its own component. Althoughthe components are made up of the same pages, each one is configured to help you enter the correct datafor a particular situation.
Before you create a job record for a person, you must add them to the system in the Personal Informationcomponent (PERSONAL_DATA_ADD).
See Chapter 4, “Adding a Person in PeopleSoft Human Resources,” page 55.
Component Menu Use To
Add Employment Instance(JOB_DATA_EMP).
• Workforce Administration, JobInformation
• Workforce Administration, PersonalInformation, OrganizationalRelationships
Add a new employment organizationalinstance for a person who doesn’t haveapplicant information in the system.
• (FPS) Hire Employee (EE_HIRE).
• (USF) Hire Employee USF(EE_HIRE).
(FPS)Workforce Administration,Increase Workforce, FPS BusinessRules.
(USF)Workforce Administration,Increase Workforce.
Add a new employee who doesn’t haveapplicant information in the system.
PeopleSoft Proprietary and Confidential 77

Increasing the Workforce Chapter 5
Component Menu Use To
• Hire (ER_APP_HIRE_LAUNCH).
• (AUS) Copy Applicant to EmployeeAUS (PKG_APP_CPY).
• (FPS) Hire.
• (USF) Hire USF (ER_GVT_HIRE_LAUNCH).
Recruiting, Hire Applicants
Recruiting, Hire Applicants, FPSBusiness Rules.
Add a job applicant with informationin the system, added through theRecruit Workforce business process.
When you use these components tohire an applicant, the informationthat you’ve already entered in thesystem becomes part of the worker’srecord, including the referral sourceinformation. You assign IDs to jobapplicants differently than you do topeople who are added to the systemthrough the Personal Data component.All other fields on these pages aredocumented in this chapter.
Note. (USF) Federal users can findinformation on hiring job applicantsin the Recruit Workforce businessprocess.
(FPS) French Public Sector userscan find information on hiring jobapplicants in the Recruit Workforcebusiness process.
(AUS) Australian users can findinformation on hiring job applicantsin the Recruit Workforce businessprocess.
Add Contingent Worker Instance(JOB_DATA_CWR).
• Workforce Administration, JobInformation
• Workforce Administration, PersonalInformation, OrganizationalRelationships
Add a contingent workerorganizational instance.
Add POI Instance (JOB_DATA_POI). • Workforce Administration, JobInformation
• Workforce Administration, PersonalInformation, OrganizationalRelationships
Add a POI organizational instance fora person who does not comprise theworkforce but for whom you require ajob record.
Add Additional Assignment(ADD_PER_ORG_ASGN).
(FPS) Add Concurrent Empl RecordFPS (HIRE_DATA_BIS).
(USF) Concurrent Hire USF(EE_CONC_HIRE).
Workforce Administration, JobInformation
Note. Access the ConcurrentJob component from the AddAdditional Assignment component(ADD_PER_ORG_ASGN).
Add an additional employmentinstance for an employee or contingentworker.
Job Data (JOB_DATA). Workforce Administration, JobInformation
Update (including adding temporaryassignments) the job record of anemployee, contingent worker, or POI.
78 PeopleSoft Proprietary and Confidential

Chapter 5 Increasing the Workforce
Each of these components consist of the same job data pages. The data that you enter on these pages is usedthroughout PeopleSoft Enterprise Human Resources and PeopleSoft Enterprise HCM to manage the people inthe system. The process of entering additional data for employees or contingent workers that is not covered inthe job data pages discussed in this chapter can be found elsewhere in this PeopleBook.
Note. The components that you use to add and update job records are made up of a number of different pages.To navigate through the entire component, click the Job Data, Employment Data, Earnings Distribution, andBenefits Program Participation links at the bottom of the pages.
See Chapter 6, “(USF) Hiring Employees,” page 141.
See Chapter 9, “Managing Country-Specific Workforce Data,” page 265.
See Chapter 13, “Updating Person and Job Information,” page 339.
See PeopleSoft Enterprise Human Resources 8.9 PeopleBook: Manage French Public Sector, “Hiring FrenchPublic Sector Employees”.
Understanding the Job Data PagesThe information that you enter when you add a new employment, contingent worker, or POI instance is thefoundation for most of the business processes that you carry out later. That information includes the following:
• General employment information.Includes business title and work phone. This information is optional, but useful for reporting purposes.
• Specific job data.Includes the person’s department, job code, company, supervisor, and compensation information.
• Earnings data.This information is included if the person’s compensation comes from more than one department or category.You specify how to distribute the person’s earnings among the sponsoring groups.
• Benefits program.
After you enter job information into the system, you can work with it in a variety of ways. For example, youcan generate printed reports, view summary data pages, and perform ad hoc queries online. You can also usejob data as the basis for performing tasks in all other aspects of human resources management, such as salaryadministration, regulatory requirements, payroll, and benefits.
Differences Between the Add Employment Instance, Add Contingent Worker Instance,and Add POI Instance ComponentsThe Add Contingent Worker Instance and Add POI Instance components are almost identical to the AddEmployment Instance component with the following exceptions:
PageAdd EmploymentInstance Fields
Add ContingentWorker Instance Fields
Add POI InstanceFields
Work Location The default value for theAction field isHire
The default value forthe Action field is AddNon-Employee
The default value for theAction field is Add Personof Interest
Work Location Payroll Status Job Status Job Status
PeopleSoft Proprietary and Confidential 79

Increasing the Workforce Chapter 5
PageAdd EmploymentInstance Fields
Add ContingentWorker Instance Fields
Add POI InstanceFields
Payroll Employee Type Pay Type Pay Type
Employment Information Provider ID Provider ID
Security Considerations for Users Managing Employees and Contingent WorkersPeopleSoft Enterprise Human Resources enables human resources administrators to create job records forpeople in departments that they can’t access for updates. This enables them to transfer workers from onedepartment to another.
If you want to prevent administrators from creating job records for people in departments to which they don’thave access, the system contains an optional view (DEPT_TBL_ACCESS) that shows only the departmentIDs. The administrator can access the view based on user security. To use this view, update the JOB record inPeopleSoft Application Designer so that the prompt table for the DEPT_ID field is DEPT_TBL_ACCESS.
Managing Job Data When You Use the Manage Positions Business ProcessIf you drive part or all of PeopleSoft Enterprise Human Resources by position, the process of adding a new jobdata record is somewhat different from the one that is described in this chapter. You still enter some data on thepages that are described in this chapter, but because you’ve already set up most job-related data on the PositionData component (POSITION_DATA), the system inserts default data automatically in many fields.
Full Position Management Partial Position Management
Position-related fields are unavailable for entry in severalAdminister Workforce pages. When you select a positionnumber for the person in the Position Number field,the system updates the position-related fields with thevalues associated with the position in the Position Datacomponent.
The position-related fields are available for entry untilyou enter a position number in the Position Numberfield and move out of the field. The system updates theposition-related fields with the values associated with theposition in the Position Data component and makes themunavailable for entry.
Adding Versus Updating Job RecordsAfter you set up job records for a member of the workforce, you can enter more data, build a comprehensivehistory of the person’s career with the organization, and support workforce-related planning anddecision-making for all areas of the organization.
The pages that you use when you add an organizational instance are the same ones that you use later toupdate existing job data records but are contained on different components. Use the Job Data component toupdate job data information.
Warning! PeopleSoft can’t guarantee the results if you use the Add Employment Instance, Add ContingentWorker Instance, Add POI Instance, or Add Additional Assignment components to modify existing data. Usethese components only when creating a new organizational instance.
See Chapter 13, “Updating Person and Job Information,” page 339.
See Chapter 15, “(USF) Administering Personnel Action Requests,” page 393.
80 PeopleSoft Proprietary and Confidential

Chapter 5 Increasing the Workforce
(JPN) Assigning Internal Identification NumbersThis feature enables you to assign to a person’s job record identification numbers that have some meaning tothe organization . For example, the third digit of an internal ID may indicate employment type; the fifth mightindicate work location; and the sixth, job type. You can store a standard ID, which doesn’t have meaningand is used for keying the database, and an alternative, meaningful ID that can be changed as the person’scircumstances change.
The system assigns IDs to people as you add them to the system in the Personal Information component. Thesystem uses this ID to identify the person in all job records. Enter a meaningful internal ID number for a personin the Internal EmplID field on the Work Location page to capture information about the person’s job situation.
You can update the internal ID each time that you insert a new row into the Job Data component. You cansee those changes at a glance on the employee’s Job Summary page, and you can search employees bytheir internal IDs.
Note. To use an internal emplID as an alternate search key, you modify the search record of each component(such as Personal Data and Job Data) by changing EMPLMT_SRCH_GBL to EMPLMT_SRCH_JPN andPERS_SRCH_GBL to PERS_SRCH_JPN.
The following examples illustrate how a person’s internal emplID changes as their relationship to theorganization changes, while their standard ID remains constant.
Example 1
In the Internal EmplID column of the following table, the first two numbers indicate the year (1994) that theperson is hired as a full-time employee and the 2 in 20091 indicates part-time employment:
Effective Date Action Reason IDInternalEmplID Notes
April 1, 1998 Pay rate change Merit 45883 94010333
April 1, 1994 Rehire New position 45883 94010333 Rehired as full-time employee.
March 31, 1994 Termination 45883 20091
April 1, 1990 Hire Temporaryassignment
45883 20091 Hired ascontingentworker.
Example 2
In the Internal EmplID column of the following table, the first two numbers indicate the year (1990 and 1995)that the person is hired as an employee with the company and the next three numbers indicate the company(014 and 034) that the person is working for:
PeopleSoft Proprietary and Confidential 81

Increasing the Workforce Chapter 5
Effective Date Action Reason IDInternalEmplID Notes
May 31, 1996 Transfer Completion ofintercompanytransfer
64096 90014278 Transferred backto home company.
May 8, 1995 Transfer Intercompanytransfer
64096 95034278 Transferred tohost company.
April 1, 1990 Hire New graduates 64096 90014278 Hired as a fulltime employee.
PrerequisitesBefore you add a new organizational instance:
• Set up the Administer Workforce control tables.
See Chapter 2, “Setting Up the Administer Workforce Business Process,” page 5.• Set up the Administer Workforce country-specific control tables.
See Chapter 3, “Setting Up Country-Specific Tables,” page 21.• Create personal data records for employees, contingent workers, and POIs.
See Chapter 4, “Adding a Person in PeopleSoft Human Resources,” page 55.
See AlsoPeopleSoft Enterprise HRMS 8.9 Application Fundamentals PeopleBook, “Working with Regulatory Regions”
PeopleSoft Enterprise HRMS 8.9 Application Fundamentals PeopleBook, “Setting Up and AdministeringHRMS Security”
PeopleSoft Enterprise HRMS 8.9 Application Fundamentals PeopleBook, “Setting Up and InstallingPeopleSoft HRMS”
PeopleSoft Enterprise HRMS 8.9 Application Fundamentals PeopleBook, “Setting Up and Working withLanguages”
PeopleSoft Enterprise HRMS 8.9 Application Fundamentals PeopleBook, “Setting Up OrganizationFoundation Tables”
PeopleSoft Enterprise HRMS 8.9 Application Fundamentals PeopleBook, “Setting Up Personal InformationFoundation Tables”
PeopleSoft Enterprise HRMS 8.9 Application Fundamentals PeopleBook, “Setting Up Jobs”
PeopleSoft Enterprise HRMS 8.9 Application Fundamentals PeopleBook, “(USF) Setting Up HumanResources Management Tables”
PeopleSoft Enterprise HRMS 8.9 Application Fundamentals PeopleBook, “Setting Up Banks and BankBranches”
PeopleSoft Enterprise HRMS 8.9 Application Fundamentals PeopleBook, “Setting Up Local CountryFunctionality”
82 PeopleSoft Proprietary and Confidential

Chapter 5 Increasing the Workforce
Adding Organizational Instances for Employees,Contingent Workers, and POIs
This section lists common elements and discusses how to:
• Enter employee job location and position information.• Enter job information.• Enter national labor agreement data.• Enter payroll processing data.• Enter salary plan information.• Enter compensation information.• Enter optional employment-related data.• Distribute job earnings.• Specify benefit program enrollment.• Create a checklist.
See Chapter 5, “Increasing the Workforce,” Adding Additional Assignments, page 130.
Common Elements Used in this SectionBenefits ProgramParticipation
Click to Access the Benefit Program Participation page.
Cross Border Worker Select if the person lives in one country and works in another. These peoplehave special tax and social security needs.
Employment Data Click to access the Employee Information page.
Earnings Distribution Click to access the Job Earnings Distribution page.
FA Holiday Type (festiveadvance holiday type)
Select the festive advance holiday type.
Festive Advance EligibleFrom
Select the date on which the person becomes eligible for the selected festiveadvance pay program.
Festive Advance PayProgram
Select the festive advance pay program for the person.
Job Data Click to access the Work Location, Job Information, Job Labor, Payroll,Salary Plan, and Compensation pages.
Military Status Select the person’s current military status.
Owns 5% (Or More) ofCompany
Select if the person owns five percent or more of the company. Thesystem uses this field to identify highly compensated employees for theNon-Discrimination Testing – 401(k)/401(m) report (NDT004) in the ManageBase Benefits business process of PeopleSoft Enterprise Human Resources.
Regulatory Region Select the regulatory region.
PeopleSoft Proprietary and Confidential 83

Increasing the Workforce Chapter 5
Religion Select the religion. You set up religion on the Religions page.
Note. (AUS and NZL) Set this field to Not Applicable.
Security Clearance If the person receives a security clearance, enter the level of clearance:Classified, Secret, or Top Secret.
See AlsoChapter 6, “(USF) Hiring Employees,” page 141
Chapter 7, “Entering Additional Data in Human Resources Records,” page 179
Chapter 13, “Updating Person and Job Information,” page 339
Pages Used to Add Organizational Instances for Employees,Contingent Workers, and POIs
Page Name Object Name Navigation UsageWork Location JOB_DATA1 • Workforce Administration,
Job Information, AddEmployment Instance,Work Location
• Workforce Administration,Personal Information,OrganizationalRelationships, NewEmployment Instance,Work Location
• Workforce Administration,Job Information, AddContingent WorkerInstance, Work Location
• Workforce Administration,Personal Information,OrganizationalRelationships, NewContingent WorkerInstance, Work Location
Enter position andlocation information for aperson’s job, including theregulatory region, company,department, and location.
84 PeopleSoft Proprietary and Confidential

Chapter 5 Increasing the Workforce
Page Name Object Name Navigation UsageJob Information JOB_DATA_JOBCODE • Workforce Administration,
Job Information, AddEmployment Instance,Job Information
• Workforce Administration,Personal Information,OrganizationalRelationships, NewEmployment Instance,Job Information
• Workforce Administration,Job Information, AddContingent WorkerInstance, Job Information
• Workforce Administration,Personal Information,OrganizationalRelationships, NewContingent WorkerInstance, Job Information
Enter information abouta person’s job, includingstatus, employee class, shift,or standard hours.
Job Labor JOB_LABOR • Workforce Administration,Job Information, AddEmployment Instance, JobLabor
• Workforce Administration,Personal Information,OrganizationalRelationships, NewEmployment Instance, JobLabor
• Workforce Administration,Job Information, AddContingent WorkerInstance, Job Labor
• Workforce Administration,Personal Information,OrganizationalRelationships, NewContingent WorkerInstance, Job Labor
Enter National Laboragreement data if theemployee or contingentworker belongs to a NationalLabor agreement.
PeopleSoft Proprietary and Confidential 85

Increasing the Workforce Chapter 5
Page Name Object Name Navigation UsagePayroll JOB_DATA2 • Workforce Administration,
Job Information, AddEmployment Instance,Payroll
• Workforce Administration,Personal Information,OrganizationalRelationships, NewEmployment Instance,Payroll
• Workforce Administration,Job Information, AddContingent WorkerInstance, Payroll
• Workforce Administration,Personal Information,OrganizationalRelationships, NewContingent WorkerInstance, Payroll
Enter payroll processingdata. The payroll systemand pay group informationthat you enter here affectscomponent compensationprocessing on theCompensation page.
Salary Plan JOB_DATA_SALPLAN • Workforce Administration,Job Information, AddEmployment Instance,Salary Plan
• Workforce Administration,Personal Information,OrganizationalRelationships, NewEmployment Instance,Salary Plan
• Workforce Administration,Job Information, AddContingent WorkerInstance, Salary Plan
• Workforce Administration,Personal Information,OrganizationalRelationships, NewContingent WorkerInstance, Salary Plan
Enter information about aperson’s salary plan.
86 PeopleSoft Proprietary and Confidential

Chapter 5 Increasing the Workforce
Page Name Object Name Navigation UsageCompensation JOB_DATA3 • Workforce Administration,
Job Information, AddEmployment Instance,Compensation
• Workforce Administration,Personal Information,OrganizationalRelationships, NewEmployment Instance,Compensation
• Workforce Administration,Job Information, AddContingent WorkerInstance, Compensation
• Workforce Administration,Personal Information,OrganizationalRelationships, NewContingent WorkerInstance, Compensation
Enter compensationinformation.
Employment Information EMPLOYMENT_DTA1 Click the EmploymentData link at the bottom ofthe component.
• Workforce Administration,Job Information, AddEmployment Instance
• Workforce Administration,Personal Information,OrganizationalRelationships, NewEmployment Instance
• Workforce Administration,Job Information, AddContingent WorkerInstance
• Workforce Administration,Personal Information,OrganizationalRelationships, NewContingent WorkerInstance
Enter optional data, such as aworker’s business title.
PeopleSoft Proprietary and Confidential 87

Increasing the Workforce Chapter 5
Page Name Object Name Navigation UsageJob Earnings Distribution JOB_DATA_ERNDIST Click the Earnings
Distribution link at thebottom of the component.
• Workforce Administration,Job Information, AddEmployment Instance
• Workforce Administration,Personal Information,OrganizationalRelationships, NewEmployment Instance
• Workforce Administration,Job Information, AddContingent WorkerInstance
• Workforce Administration,Personal Information,OrganizationalRelationships, NewContingent WorkerInstance
Distribute a person’scompensation for onejob among differentdepartments, job codes,accounts, shifts, positionnumbers, or general ledgerpay types. If the person’spay is regularly charged tomore than one cost center,designate howmuch toallocate to each cost center.
Benefit ProgramParticipation
JOB_DATA_BENPRG Click the Benefits ProgramParticipation link at thebottom of the component.
• Workforce Administration,Job Information, AddEmployment Instance
• Workforce Administration,Personal Information,OrganizationalRelationships, NewEmployment Instance
• Workforce Administration,Job Information, AddContingent WorkerInstance
• Workforce Administration,Personal Information,OrganizationalRelationships, NewContingent WorkerInstance
Specify the benefitprogram in which a personis enrolled for benefits inPeopleSoft EnterpriseHuman Resources orPeopleSoft EnterpriseBenefits Administration.
Person Checklist PERSON_CHECKLIST Workforce Administration,Personal Information,OrganizationalRelationships, PersonChecklist, Person Checklist
To ensure that the humanresources administratorsperform all the requiredadministrative tasks for aperson, create a checklistlisting all the items thatneed to be completed andthe person responsible forcompleting them.
88 PeopleSoft Proprietary and Confidential
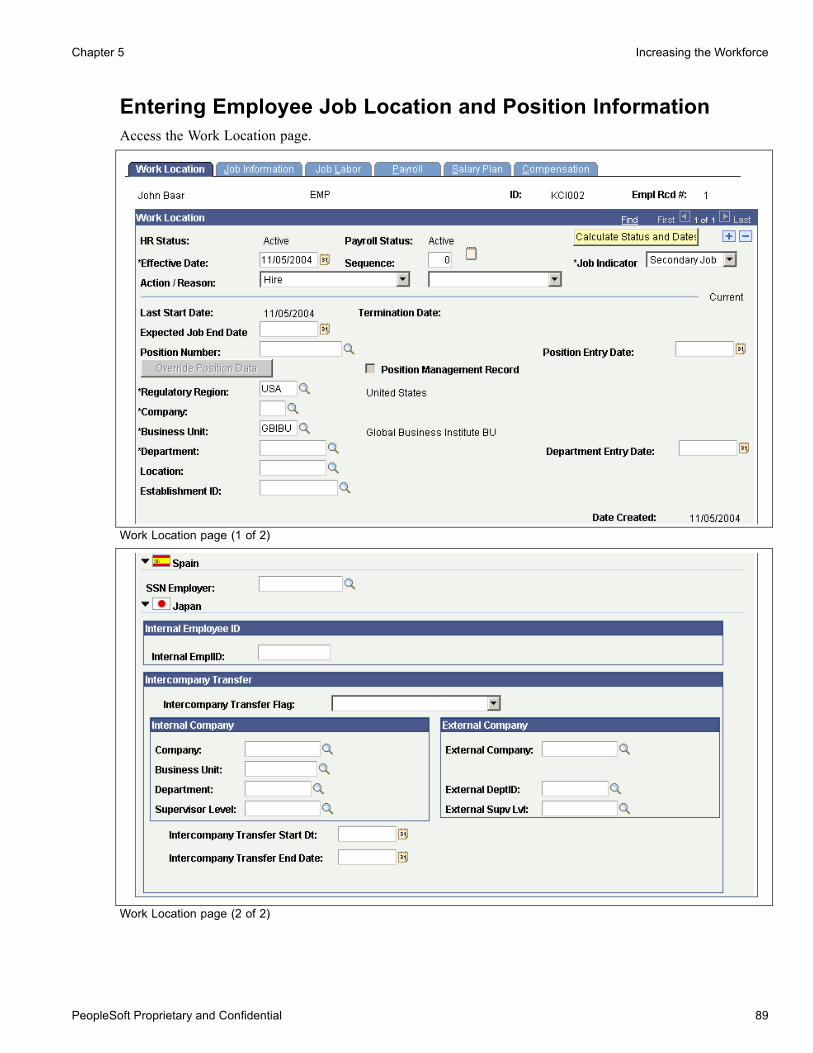
Chapter 5 Increasing the Workforce
Entering Employee Job Location and Position InformationAccess the Work Location page.
Work Location page (1 of 2)
Work Location page (2 of 2)
PeopleSoft Proprietary and Confidential 89

Increasing the Workforce Chapter 5
HR Status Displays the status of the current job record. A person can have an active HRstatus but an inactive job or payroll status.
Job Status For contingent worker or POI instances. Displays the job status of thecurrent job record.
Payroll Status For employment instances. Displays the payroll status of the current jobrecord. Some changes that you make to this field trigger Retro Pay or FinalCheck processing.A Retro Pay Request is triggered by any payroll status change with aneffective date that’s earlier than or equal to the latest pay end date of a checkalready paid to the employee.A Final Check Request is triggered by any payroll status change that’s basedon one of the action or reason codes that are defined in the Final CheckAction/Reason table.
Calculate Status and Dates Click to calculate the person’s HR, job, or payroll status and the employmentdates if you make changes to the job records that make the old values invalid.
Effective Date Enter the effective date. When you add an instance, the effective date that youenter here becomes the hire and original hire date.
Sequence Use this number to track multiple administrative actions that occur on thesame day. The default value is 0, the correct number for new instances.
Job Indicator Indicate whether this is the person’s primary or secondary job for thisorganizational relationship. Select N/A (not applicable) if those selectionsdon’t apply to this job. This field is used to process people with more than oneorganizational instance in a single organizational relationship.
Action/Reason Select the action requiring you to create or modify this record. The systemdisplays a default value when you create a new employment, contingentworker, or POI instance.
Latest Start Enter the most recent start date for this organizational instance.
Expected Job End Date Enter the end date for this job, if known. If you don’t know the end dateinitially, you can enter it later.If this job is a temporary assignment and you do not enter a date here, youcan run the Temporary Assignment w/out End Date report to identify thoseassignments that do not have an end date. This date is necessary if youwant the system to terminate this job and reactivate any substantive jobthat may be on hold.The system displays the day before the termination effective date as thetermination date.
Termination Date, LastDate Worked, and OverrideLast Date Worked
The system displays the day before the termination effective date as thetermination date and the date last worked. If you rehire the person, the systemclears these fields. When a person returns from leave, the system clearsonly the Last Date Worked field. If the date is not accurate, select OverrideLast Date Worked to enter the date.
Position Number If you drive part or all of the system by position, select a position number.Define positions in the Add/Update Position Info component. When you leavethe Position field, the system completes position-related fields in the Job Data
90 PeopleSoft Proprietary and Confidential

Chapter 5 Increasing the Workforce
component with default data from the Add/Update Position Info component,including job code, department, location, and full- or part-time status. Thecorresponding fields become unavailable for entry.PeopleSoft Enterprise Human Resources issues a warning message if youassign a person to a position that is already filled and if the new appointmentexceeds the maximum headcount for that position. The system calculates theheadcount and displays the appropriate indicator in the Open/Filled field in theAdd/Update Position Info component when you change assignments.
Position Entry Date When you leave this field, the system populates it with the effective date. Youcan override the default.
Override Position Data andUse Position Data
Click Override Position Data to enter exceptions to the default position datafor this person. This opens up the unavailable fields, including Job Code andDepartment, and you can override the entries that are in those fields. Forexample, the worker might have a higher salary grade than the standard gradethat is associated with the position. When you click Override Position Data,the button becomes the Use Position Data button.
Note. If you override the defaults for position-related data, you must maintainthe employee data manually; the system doesn’t update the position data onthe Job Data pages with data from the Add/Update Position Info componentunless you click Use Position Data.
Position ManagementRecord
The system selects this check box when you make changes to fields in theAdd/Update Position Info component that initiate a system update of fieldshere. A selected check box indicates that the system inserts a data row onthe Job Data pages.
Company If you assign a company to a department in the Department table, a defaultcompany code appears, and this field becomes unavailable for entry. If youdon’t designate a company in the Department table, select a company here.
Business Unit If you’ve specified a business unit for a position, the system enters a defaultbusiness unit and this field becomes unavailable for entry. If you haven’tassigned the person to a position, then the system populates the field by defaultwith the business unit for the person, based on your user preferences. Youcan override the default.
The business unit that you assign to the person on this page and the setIDfunctionality in PeopleSoft Enterprise Human Resources Management affectthe way that default values work throughout the PeopleSoft EnterpriseHuman Resources system. Your entry in this field controls the departments,locations, job codes, salary plans, and so on that you see on the remainingJob Data component pages.
Department Select the department code for this person.When you leave the field, the system inserts a default supervisor’s ID on theJob Information page if you enter a default supervisor ID for this departmentin the Department table.The system enters default values for the following fields on the Job Data -Payroll page: Employee Type and Pay Group (which you associate with acompany in the Company table). Depending upon other data setup, the systemmight enter a default holiday schedule.
PeopleSoft Proprietary and Confidential 91

Increasing the Workforce Chapter 5
See PeopleSoft Enterprise HRMS 8.9 Application Fundamentals PeopleBook,“Setting Up Organization Foundation Tables,” Setting Up Holiday Schedules.
Note. Because this page can contain multiple data rows, the system doesn’talways warn you that you must complete the Department field. However, ifyou change data in another field on the page, the system issues a warning andwon’t let you leave the field until you select a department code.
Department Entry Date When you leave the Department field, the system displays the date on whichthe person is first assigned to this department.
Location Displays the department location if the default location setID that you definein the Department table matches the control location setID that is defined forthat business unit in the TableSet Control - Record Group table. You canchange the location code.
Note. For workers paid through PeopleSoft Enterprise Payroll for NorthAmerica, the location that appears here does not determine the person’sprimary work state and location that appear on the paysheets. You specify thatinformation by selecting a tax location code on the Job Data - Payroll page.
Reports To Displays the name of the manager of the department to which you assign theperson. You can override the default. Link the manager to the departmentin the Department table.
Establishment ID Identify the person’s establishment. If the person’s department isn’t assignedto an establishment, this field is blank.Establishment IDs are associated primarily with locations. Establishments areused for several countries for local regulatory reporting. These reports requirethat each person be assigned to a single establishment.If the person’s department is not assigned to an establishment, select one of theestablishments that are defined for the company.If the person’s department isn’t assigned to a company, enter a company forthe person and assign that person an establishment ID.
Note. (USA) USA regulatory reports require that you associate anestablishment ID with a person at the job level.
(FRA) For payroll purposes, you must always assign persons to anestablishment.
If a person is assigned to a position, the system enters the establishmentID that is associated with the position’s department and makes the fieldunavailable. If you associate a non-French position with a French person, thefield remains available for entry.
Date Created Displays the date on which you enter this record.
92 PeopleSoft Proprietary and Confidential

Chapter 5 Increasing the Workforce
(ESP) Spain
SSN Employer (socialsecurity number foremployer)
Enter the company SSN, as assigned by the Spanish government, that appliesto this person.
(JPN) Japan
Internal EmplID (internalemployee ID)
Enter the person’s internal ID.You can store an internal emplID if the company uses meaningful employeeIDs, and those IDs themselves need to change with certain employee datachanges such as employment type changes. Internal EmplIDs also appear onthe JPN Job Summary page, and you can search the system by internal EmplID.
See Chapter 4, “Adding a Person in PeopleSoft Human Resources,”Understanding Identification Assignment, page 55.
(JPN) Intercompany TransferThis region enables you to specify intercompany transfer (shukkou) data for Japan. Enter informationabout the company and department that the person is transferring to or from in the appropriate group box,Internal Company or External Company. Values for the External Company group box are set up on the ICTransfer Company/Dept page.
Intercompany TransferFlag
Specify whether the data that you enter on the page is home or host companyinformation. The system uses this value in conjunction with intercompanytransfer-related action or action reason codes to check the validity of theentries. Values are:
• Home Company Information: Select if another company’s worker joins thecompany in an intercompany transfer.
• Host Company Information: Select if one of the workers is on intercompanytransfer to another company.
Select the blank value at the top of the list to remove all entries.
Internal Company andExternal Company
Select the home or host company. Select a value in the Internal Companygroup box if the company is set up in the Company table.
Business Unit Select the home or host business unit for internal company transfers only.
Department and ExternalDeptID (external departmentID)
Select the home or host department ID. The home or host department ID isa prompt value in the Company Table component (for internal companytransfers) for home departments and the IC Transfer Company/Dept page forhost departments (external company transfers).
Supervisor Level andExternal Supv Lvl (externalsupervisor level)
Select the home or host supervisor level of the job at the home company. Thisvalue is a prompt value in the Company Table component for home supervisorlevels (for internal company transfers) and the JPN IC Transfer Supervisor Lvlpage for host supervisor levels (external company transfers).
Intercompany TransferStart Dt (intercompanytransfer start date)
If you enter host data, enter the start date of this intercompany transfer.
Don’t enter a date if the action is RET (retirement) and the reason is PIT(permanent intercompany transfer).
PeopleSoft Proprietary and Confidential 93

Increasing the Workforce Chapter 5
Intercompany TransferEnd Date
If you enter host data, enter the expected end date of this intercompany transfer.Don’t enter a date if the action is RET and the reason is PIT.The end date must be equal to or later than the effective date of the worker’scurrent job record.
See AlsoPeopleSoft Enterprise Payroll for North America 8.9 PeopleBook, “Setting Up the Payroll Process,” Definingthe Final Check Process
Chapter 10, “(JPN) Tracking Additional Appointments (Kenmu),” page 285
Chapter 11, “(JPN) Tracking Intercompany Transfers (Shukkou),” page 299
Chapter 13, “Updating Person and Job Information,” Running Job Data Reports, page 367
PeopleSoft Enterprise HRMS 8.9 Application Fundamentals PeopleBook, “Working with System DataRegulation in HRMS”
PeopleSoft Enterprise HRMS 8.9 Application Fundamentals PeopleBook, “Working with Regulatory Regions”
PeopleSoft Enterprise HRMS 8.9 Application Fundamentals PeopleBook, “Setting Up OrganizationFoundation Tables,” Entering Company Information
PeopleSoft Enterprise Payroll for North America 8.9 PeopleBook, “Processing Retro Pay”
PeopleSoft Enterprise Payroll for North America 8.9 PeopleBook, “Setting Up the Payroll Process,” Definingthe Final Check Process
Entering Job InformationAccess the Job Information page.
94 PeopleSoft Proprietary and Confidential

Chapter 5 Increasing the Workforce
Job Information page (1 of 5)
PeopleSoft Proprietary and Confidential 95
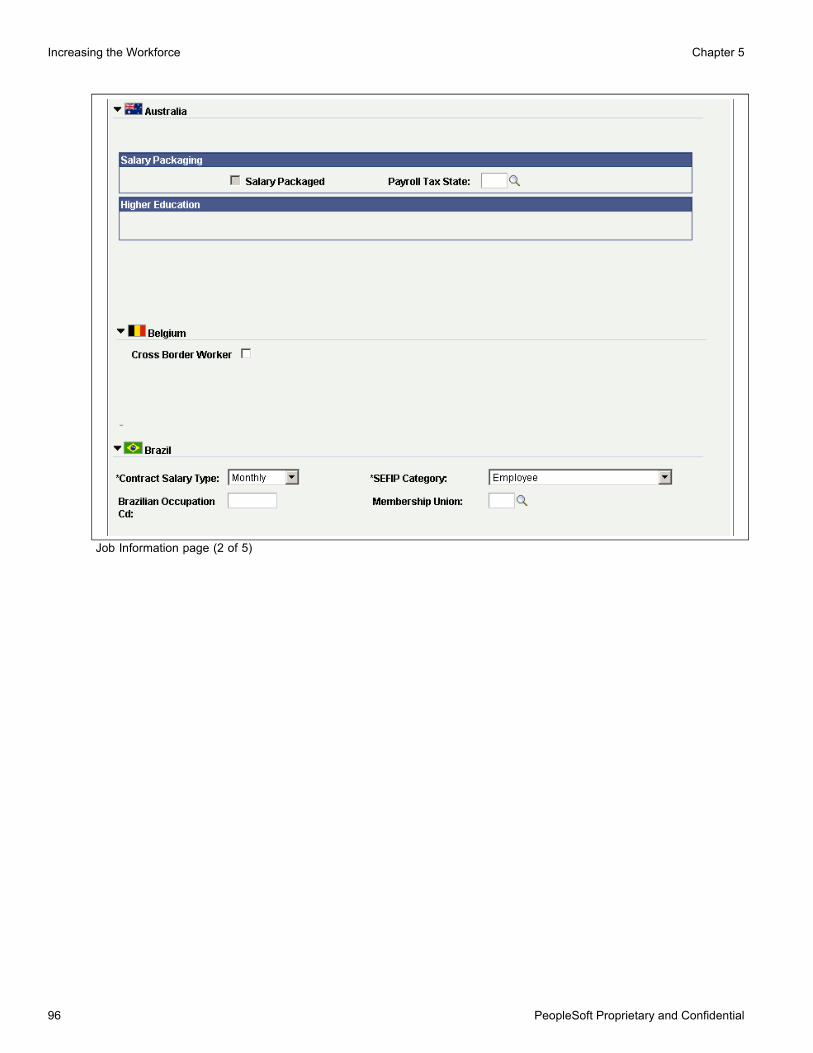
Increasing the Workforce Chapter 5
Job Information page (2 of 5)
96 PeopleSoft Proprietary and Confidential

Chapter 5 Increasing the Workforce
Job Information page (3 of 5)
PeopleSoft Proprietary and Confidential 97

Increasing the Workforce Chapter 5
Job Information page (4 of 5)
Job Information page (5 of 5)
98 PeopleSoft Proprietary and Confidential

Chapter 5 Increasing the Workforce
Note. Many values on this page come from the value that you enter in the Department field on the Job Data -Work Location page. You can override most of these default values.
Job Code Select a code.
Note. If you are attaching this person to a labor agreement on the Job Laborpage and that labor agreement is associated with job codes, you must selecta job code that is valid for the labor agreement.
PeopleSoft Enterprise Payroll for North America uses this field to create a payline on a person’s paysheets. The system creates a pay earnings record for eachactive job code on the person’s employment record.
See PeopleSoft Enterprise Human Resources 8.9 PeopleBook: ManageLabor Administration, “Setting Up Labor Administration Data,” AssigningJob Codes to Labor Agreements.
Entry Date When you leave the Job Code field, the system displays the date on which theperson is first assigned to this job code.
End Job Automatically Select to end the job on the specified date. This stops all related processing forpayroll and benefits for this job. You must run the Reactivate/TerminationUpdate process if the organization uses this feature. You can use this featureonly if the Automatic Job Termination check box is selected on the InstallationTable - Product Specific page.
Supervisor ID Enter a supervisor ID, if applicable.If you use full-position management, don’t use this field. If you usepartial-position management, and you define a value for the Reports Tofield for the position number that you assign to this person, the ID fieldis unavailable.
Note. Specify the person’s department code before you enter a new supervisorID. If you enter a supervisor ID before you select a department code, the systemoverrides the ID each time that you enter or change the person’s department.
Regular/Temporary Indicate whether the person is a regular or temporary worker.
Full/Part Indicate whether the worker is full-time or part-time.
Note. The Manage Base Benefits business process uses the values that youselect in the Regular/Temporary and Full/Part fields to determine eligibilityrequirements.
PeopleSoft Enterprise Payroll for North America uses the full-time or part-timeinformation in conjunction with the holiday schedule. When a holiday fallswithin a pay period, Payroll for North America prorates the holiday hoursfor part-time workers. However, proration is based on the standard hours forthe worker, not for the pay group.
Empl Class (employee class) Select an employee class, which provides another method of groupingworkers. Values include: Assignee, Expatriate, and Intern. Employee
PeopleSoft Proprietary and Confidential 99

Increasing the Workforce Chapter 5
classes are included in the Employee Class table. To override, access thispage in correction mode.The list of values depends on the regulatory region that is specified on theWork Location page.
Note. (GBR) The Northern Ireland Fair Employment Monitoring report(UKNI001) uses the employee class to determine the classification of workers.If the organization submits this report, you must use the required employeeclasses for the report to work correctly.
(JPN) Select Host ICT (Hosting Intercompany Transfer) to flag those workersthat are hired on an intercompany transfer basis when the company is thehost company.
See PeopleSoft Enterprise Human Resources 8.9 PeopleBook: MeetRegulatory Requirements, “(GBR) Meeting Regulatory Requirements for theUnited Kingdom”.
Officer Code Identify highly compensated workers for the Non-Discrimination Testing -401(k)/401(m) report (NDT004). The default value is None.
Regular Shift If the worker is working shifts, select the appropriate shift. If the workerdoesn’t work shifts, leave the Shift Rate and Factor fields blank. The defaultvalue is N/A (not applicable).
Shift Rate Set up a modified shift differential for this worker only. To apply a shiftdifferential to a group of workers who work the same shift, enter shiftinformation in the Shift table in Payroll for North America. These options aremutually exclusive. You can use only one at a time.
Note. Retro Pay functionality in Payroll for North America is triggered by anyworker shift rate and factor change with an effective date that’s earlier than orequal to the latest pay end date of a check that is already paid to the worker.
Duties Type For jobs where the action or reason is temporary assignment, select the type ofduties for the temporary assignment from the Temporary Duties Type table.You can use this feature only if the Automatic Job Suspension check box isselected on the Installation Table - Product Specific page.
Encumbrance Override Select to override encumbrance processing at the job level when you create anew organizational instance or add a concurrent job for a worker.
Standard Hours
Standard Hours Displays by default the standard hours for the worker. Change the defaultvalue, if required.
Work Period Select a standard work period, the time period during which workers mustcomplete the standard hours.The system uses the annualization factor of the standard work period incombination with the standard hours to calculate full-time equivalency.
FTE (full-time equivalency) Displays the percentage of full-time work that the worker should normallywork in this job. The system calculates this value based on the standard hours
100 PeopleSoft Proprietary and Confidential

Chapter 5 Increasing the Workforce
entry for this job and the standard work period. However, you can override thesystem-calculated FTE and enter any value. The system issues a warning ifyou enter a value that is greater than 1.0.
Combined Std Hours/FTE(combined standardhours/full-time equivalent)
Displays the total standard hours that are assigned to the worker for all activejobs combined and the worker’s total FTE status for all active jobs combined.For example, if a worker holds two jobs, one as a professor with an FTE of .5and one as a physician with an FTE of .35, the worker’s combined FTE is .85(.5 + .35). You can’t change or delete this information.
Note. The combined FTE that appears here may be different from the totalFTE that is calculated for benefits administration eligibility. Combined FTEon this page is the sum of a worker’s individual FTEs from active jobs only.
Contract #
Contract Number Select the worker’s contract number, if applicable.
Note. (ESP and FRA) This is a required field when the action is hire, rehire, ortransfer for workers who belong to a Spanish or French regulatory region.View the prompt values in the Contract Number field to view all activecontracts for that worker. If the worker has no active contracts in the system,click the Next Contract Number button; the system assigns a new contractnumber. When you save, the system warns you that you must update thecontract information for the new contract number that is automatically createdfor this worker. Access the Contract Data component using the new contractnumber, and make the necessary updates.
Contract Type Displays the contract type that is associated with the contract number thatyou select.
(AUS) Salary Packaging
Salary Packaged Select to transfer the worker’s salary packaging information into the jobdata component.
Payroll Tax State Enter the code for the state in which the worker is paid and for which theorganization pays the payroll tax.
(AUS) Higher EducationThese fields are required for DETYA reporting and appear only if the Australian Education & Governmentcheck box is selected on the Installation Table - Country Specific page.
Annual Contact Hours Enter the calculated annual contact hours for this worker.
Type of Appointment andAppointment Duration
Select the type of appointment. If you select Limited, enter an appointmentduration.
Teaching Weeks Enter the number of teaching weeks for this worker.
(BRA) Brazil
Contract Salary Type Enter the contractual salary code for RAIS.
PeopleSoft Proprietary and Confidential 101

Increasing the Workforce Chapter 5
SEFIP Category Select the worker category for SEFIP.
Brazilian Occupation Cd(Brazilian occupation code)
Enter an occupation code based on the Brazilian Code of Occupation (CBO).Leave this field blank if the CBO that is associated with the position codeis valid.
Note. Go to www.mte.gov.br to view a list of CBOs.
Membership Union Enter the union code that details how to calculate and pay the worker’smonthly union dues.
(DEU) Germany
Function Code Select the appropriate code for the worker.
(ESP) Spain
Soc. Sec. Risk Code (socialsecurity risk code)
Enter a code. The Spanish government requires employers to assign a socialsecurity risk code that rates the risk of illness, accident, or death that isconnected with each type of job. For example, a coal miner is at higherrisk than an office manager. You maintain risk codes on the Soc Sec RiskCode page.
Matricula Number Enter a matricula number. The Spanish government requires every worker tohave a matricula number. Employers use this number to compile a matriculabook that reports workplace statistics to the government. You maintainmatricula numbers in the Location table.
Substitution Reasons Select the reason why you are making a substitution for this worker. The AFIreport contains this information.
Substitution Emplid Enter the ID of the substitute worker. The AFI report contains this information.
Special Labor Relationship Select to indicate that the job is in a profession considered a special laborrelationship. The AFI report contains this information.
Partial Subrogation Select to indicate that the worker is in partial subrogation. The AFI reportcontains this information.
Inactivity Type If you are making the job data record inactive, select the type of inactivity.
Partial Strike ActivityCoeff
If the inactivity type is partial strike, enter the coeff.
(FRA) France
Hours Type Select the appropriate hours type from the list. Different hours type optionsaffect a worker’s compensation and standard hours.This field is for information only. No payroll calculation is based oninformation in this field.
102 PeopleSoft Proprietary and Confidential

Chapter 5 Increasing the Workforce
HoursType
Description
3 × 8 Indicates a shift work pattern. For example, in the manufacturing or industrial sector, production cancontinue around the clock. The production workers are split into three groups with each group workingone after the other, eight hours a day. Periodically the workers shift to another group. Shift workerswho are working the 12 p.m. to 8 a.m. shift move to the 8 a.m. to 4 p.m. shift. Because this type ofwork schedule implies a lot of constraints to a worker’s personal life, these workers are often paid ashift bonus.
2 × 8 A shift work pattern that is similar to the 3 × 8 option, except that there are two work shifts instead ofthree.
STA Work hours follow a regular pattern using the job’s standard hours as indicated on the Job Date - JobInformation page.
IND Work hours follow a regular pattern that is different from the company’s default standard hours.Indicate the number of hours in the Standard Hours field on the Job Date - Job Information page.
Paid Hours Displays the number of hours for which the worker is paid. The systementers the value that is defined for standard hours (defined for the job codefor this worker) as the default in this field only for workers who are part of aFrench regulatory region.
Paid Work Period Select the period in which the worker should work. If the regulatory region towhich the worker is assigned is French, the system inserts the work periodthat is defined on the Job Code Table - Job Code Profile page as the defaultvalue. Values are:A: AnnualB: BiweeklyC: ContractD: DailyF: Every four weeksM: MonthlyQ: QuarterlyS: SemimonthlyW: Weekly
Paid FTE Displays the ratio of the paid hours to the standard hours reference for workerswhose regulatory region is French. The system calculates and inserts a valuefor this field.
(ITA) Italy
Hiring Category If the worker is hired from a special hiring category, indicate the category here.Values are: CIG, Mobility, Protected, Unemployed, and Weak Wrap.
PeopleSoft Proprietary and Confidential 103

Increasing the Workforce Chapter 5
Type of Part-Time If the worker is part-time, indicate the type. Values are: Cyclic (employedonly for a certain period of the year, either full or reduced hours), Horizontal(employed five days per week with fewer than full-time hours), and Vertical(employed full-time on certain days but fewer than 40 hours per week).
Percentage Define the percentage of part-time.
Turnover - Action Select the turnover action (for example, Layoff or Termination) causing thechange in the worker’s job. The value that you enter appears in the EqualOpportunities reports.
Turnover Action Reason Select the reason for the turnover action. The value that you enter appearsin the Equal Opportunities reports.
Productive Unit Select the worker’s productive unit. You use productive units to group workersbased on agreements between unions and employers.
(MEX) MexicoIt is common in Mexico to have two termination dates: the original termination date and the IMSS terminationdate.
The company must notify IMSS of a worker’s termination date five days after the worker leaves. However,there are some exceptions to this rule, such as when a worker is on disability and does not return to the company.
Worker Type Mex Define the person’s worker type. Values are: Construction Eventual, EventualWorker, and Permanent Worker. This field is used for reporting the type ofworker to the SUA.
Salary Type Select the salary type that the worker receives. Values are: All Salaries, FixedSalary, Mixed Salary, and Variable Salary. This field is used for reportingto the IMSS.
Week/Reduc (reducedweekly schedule)
Specify the reduced work schedule for the worker. Values are: 1 Day perWeek, 2 Days per Week, 3 Days per Week, 4 Days per Week, 5 Days per Week,Complete Week, and Workday Less than 8 Hours.
IMSS Term Dt (IMSStermination date)
Enter the IMSS termination date.
Location Code Specify the location code. This field is used to indicate the location of theworker to the SUA.
(MYS) Malaysia
Work Day Hours Enter the standard workday hours that are used for payroll and leavecalculations.
(NLD) Netherlands
Workdays / week Enter the average number of working days per week for workers to ensure thatthe correct social security premiums are calculated in PeopleSoft EnterpriseGlobal Payroll for The Netherlands. The default value is 5, reflecting afull-time job. Enter 0 for standby workers who are only working on demand.You receive a warning if the number of working days is inconsistent with thefull- or part-time parameter.
104 PeopleSoft Proprietary and Confidential

Chapter 5 Increasing the Workforce
(GBR) UKThe following fields appear only if PeopleSoft Enterprise Global Payroll for the UK is not installed.
Tax Code Enter the worker’s tax code for the current tax year.
Tax Basis Select the basis that is used to calculate the worker’s tax.
(USA) United States
FLSA Status (Fair LaborStandards Act status)
Displays a value based on the job code that you assign to this worker. FLSAstatus indicates whether this job is exempt or nonexempt according to the FairLabor Standards Act. FLSA status also helps determine benefits eligibility inPeopleSoft Enterprise Benefits Administration.
Note. The Retro Pay functionality in PeopleSoft Enterprise Payroll is triggeredby any FLSA status change with an effective date that’s earlier than or equal tothe latest pay end date of a check that is already paid to the worker.
EEO Class (EqualEmployment Opportunityclass)
Displays a regulatory status for this job based on the job code that youassign the worker.
Work Day Hours Enter the workday hours. The workday hours information is used in the FLSAcalculation for the basic rate formula.
See AlsoPeopleSoft Enterprise Global Payroll 8.9 PeopleBook
PeopleSoft Enterprise HRMS 8.9 Application Fundamentals PeopleBook, “Setting Up and Working withFrequencies”
PeopleSoft Enterprise HRMS 8.9 Application Fundamentals PeopleBook, “Setting Up Jobs,” Defining JobFunction Codes
PeopleSoft Enterprise Human Resources 8.9 PeopleBook: Manage Base Benefits, “Setting Up Base BenefitsCore Tables”
Entering National Labor Agreement DataAccess the Job Labor page.
PeopleSoft Proprietary and Confidential 105

Increasing the Workforce Chapter 5
Job Labor page (1 of 3)
Job Labor page (2 of 3)
106 PeopleSoft Proprietary and Confidential

Chapter 5 Increasing the Workforce
Job Labor page (3 of 3)
Labor Agreement Specify which labor agreement applies to this worker.
Employee Category Specify the worker category to which the worker belongs under the laboragreement.
Employee Subcategory If the employee category that you select for this person contains subcategories,this field appears. Select the subcategory that applies to the worker.
Employee Subcategory 2 If the subcategory that you select for this person contains secondarysubcategories, this field appears. Select the secondary subcategory thatapplies to this worker.
Union Code If the worker belongs to a union, enter the code.
Labor Facility ID Select the facility this worker belongs to.
Exempt From Layoff andLayoff Exemption Reasons
Select if the worker is exempt from layoff and select a reason for the layoffexemption.
Labor Agreement Entry Dt(labor agreement entry date)
If this worker is part of a national labor agreement, enter the date on which theworker enters the category or subcategory. Also, use this date to track theworker’s seniority within the category.
Stop Wage Progression If the selected job code is associated with a wage progression salary plan,select to stop wage progression for this worker. The system will notaccumulate hours towards a wage progression step for this worker. To resumewage progression, insert a new Job Data row and clear this check box.
Pay Union Fee Select if a union fee should be paid. The organization can define whetherthe worker or the employer should pay the fee. This field doesn’t affectsystem processing.
Position ManagementRecord
The system selects this check box whenever the system inserts this databy updating the incumbent to reflect user-made changes to the PositionManagement component.
Union Seniority Date Enter the date on which the worker enters the union.
PeopleSoft Proprietary and Confidential 107
Increasing the Workforce Chapter 5
Labor Facility Entry Date Enter the date the worker began in the labor facility.
See PeopleSoft Enterprise Human Resources 8.9 PeopleBook: Manage Labor Administration, “Setting UpLabor Administration Data”.
Assigned Seniority DatesThis grid lists the seniority dates associated with the selected labor agreement.
If the seniority date is set up to default from an existing value, the system will populate them. If the dates areset up to allow overrides, select the Override check box and enter the appropriate date.
If the seniority date is set up for manual entry, enter the appropriate date.
Click the Recalculate Seniority Dates button to recalculate seniority dates as needed.
See PeopleSoft Enterprise Human Resources 8.9 PeopleBook: Manage Labor Administration, “Setting UpLabor Administration Data,” Defining Seniority Dates.
(DEU) GermanyDescribing a German worker’s labor category and role in a company is the third step in the German WorksCouncil business process. Before you complete these fields, you must enter codes and values into the setuptables and create an association between the works council decision groups and the personnel action.
Tariff Displays the tariff, which is a labor contract between the union and theemployers’ association. The default comes from the worker’s location listed inthe Location table. You can override this default.
Tariff Area Displays the tariff area, which is usually associated with geographical regionsin Germany. The tariff area comes from the worker’s location that is listed inthe Location table. You can override this default.
Labor Type Specify if a worker is management or nonmanagement. Depending on wherethis worker belongs, different sets of human resources laws and rules apply.One rule concerns which internal labor committee monitors personnel actions.
Spokesmen Committee ID If you identify a worker as management in the Labor Type field, then theSpokesmen Committee is responsible for the worker, and this field appears.The Spokesmen Committee ID for this worker comes from the worker’slocation in the Location table.
(ESP) Spain
Union Date Enter the date on which the worker joins the union.
Wrk.Cncl.Funct (workscouncil function)
If the worker is a member of the works council for the organization, selectwhich role. Values are: none, Member, President, and Secretary.
InterCtr.Works CnilFunction (intercenter workscouncil function)
Select the role that the worker has in the union group (comite intercentros).Values are: Member 1, Member 2, and Member 3.
Pay Union Fee and UnionFee Amt (union fee amount)
Select if the worker pays a fee to the union and enter the amount and frequencyof the fee.
108 PeopleSoft Proprietary and Confidential

Chapter 5 Increasing the Workforce
Fee Start Dt (fee startdate) and Fee End Dt (feeend date)
Enter the first and last dates on which the union fee should be paid.
Exempted Select if this worker is exempt from a certain amount of work duty to handleworks council duties.
Hrs/Month (hours eachmonth)
This field appears if you select the Exempted check box. Enter the number ofhours each month that the worker is exempted from regular work to handleworks council business.
(FRA) France
Rate Enter the minimum salary calculation rate for this category. The rate is athree-digit number that is used in certain collective agreements to calculatethe minimum salary for the subcategories (number, grade, and step). Asubcategory can be associated with several possible rates, but only one rate isassociated with the worker.
(ITA) ItalyUse this region to enter the union membership details of workers who belong to a union.
Union Date Enter the date on which the worker joins the union.
Union Position Select the position that the worker holds in the union, if applicable.
Participation Indicate the worker’s level of participation in the union.
(IND) India
Membership Status Select whether the worker’s union membership status is active or inactive.
Member Category Enter the member category. For example, Staff, Officer, or Workman Category.
Position Held Enter the position that the worker holds. Some of the members of theunion may hold office in the union as president, vice president, treasurer, orsecretary; you enter this information here.
(CAN, USA) Reviewing Union Membership in Canada and the U.S.If you’re managing a workforce in Canada or the U.S., you might want to review information about eachunion organization that the workers belong to and see a list of workers who are members. Use the UnionMembership report (PER009) for this purpose. That report displays the worker ID, name, date hired, senioritydate, department, location, job title, and shift.
See AlsoPeopleSoft Enterprise Human Resources 8.9 PeopleBook: Manage Positions, “Managing Position Data”
Entering Payroll Processing DataAccess the Payroll page.
PeopleSoft Proprietary and Confidential 109
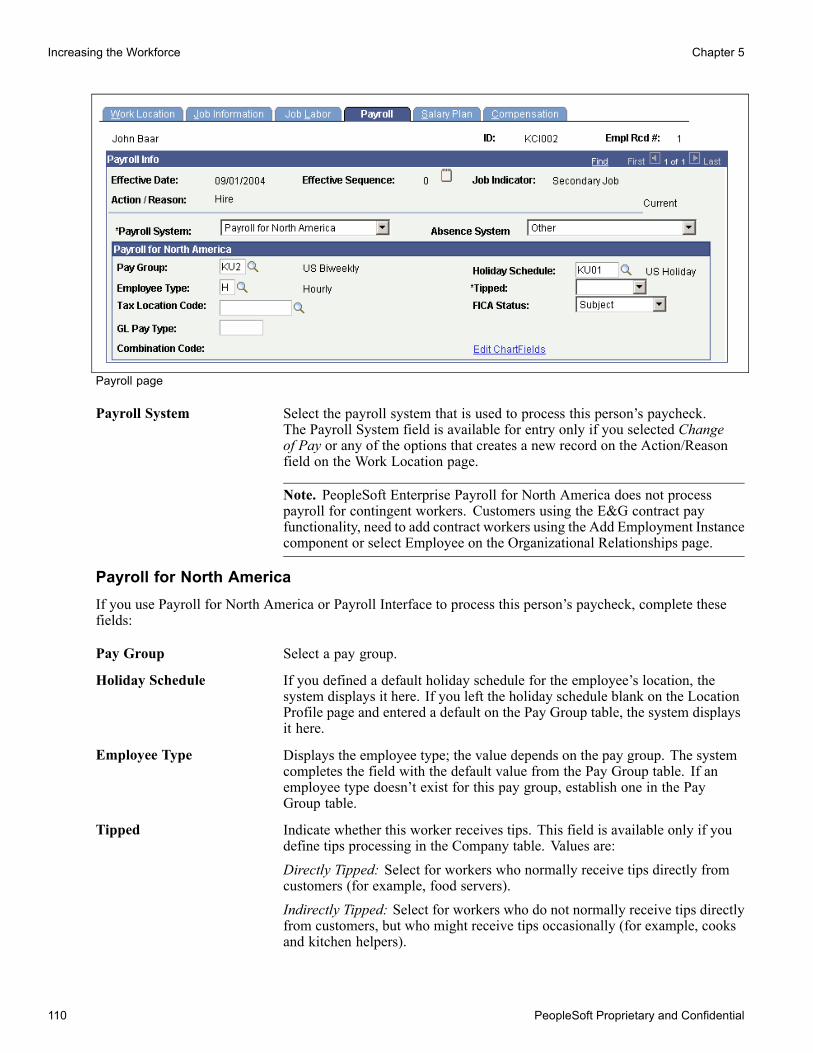
Increasing the Workforce Chapter 5
Payroll page
Payroll System Select the payroll system that is used to process this person’s paycheck.The Payroll System field is available for entry only if you selected Changeof Pay or any of the options that creates a new record on the Action/Reasonfield on the Work Location page.
Note. PeopleSoft Enterprise Payroll for North America does not processpayroll for contingent workers. Customers using the E&G contract payfunctionality, need to add contract workers using the Add Employment Instancecomponent or select Employee on the Organizational Relationships page.
Payroll for North AmericaIf you use Payroll for North America or Payroll Interface to process this person’s paycheck, complete thesefields:
Pay Group Select a pay group.
Holiday Schedule If you defined a default holiday schedule for the employee’s location, thesystem displays it here. If you left the holiday schedule blank on the LocationProfile page and entered a default on the Pay Group table, the system displaysit here.
Employee Type Displays the employee type; the value depends on the pay group. The systemcompletes the field with the default value from the Pay Group table. If anemployee type doesn’t exist for this pay group, establish one in the PayGroup table.
Tipped Indicate whether this worker receives tips. This field is available only if youdefine tips processing in the Company table. Values are:Directly Tipped: Select for workers who normally receive tips directly fromcustomers (for example, food servers).Indirectly Tipped: Select for workers who do not normally receive tips directlyfrom customers, but who might receive tips occasionally (for example, cooksand kitchen helpers).
110 PeopleSoft Proprietary and Confidential

Chapter 5 Increasing the Workforce
Tax Location Code Select a tax location code.
Warning! Do not change a person’s tax location code more than once for thesame effective date (using effective sequence). The system creates tax recordsaccording to the first tax location change only. Tax records for the secondtax location change on the same date are not created; instead, the systemissues an error message.
FICA Status Indicate whether the person status is exempt, subject, or Medicare only.
GL Pay Type (generalledger pay type)
(Optional) Indicate the general ledger account to which to post this person’spay. You can use this field as a way to charge a person’s pay to a particularcost center.
Account Code (Optional) Select the appropriate labor distribution to which to post thehours and earnings for this person. You define labor distribution accounts inthe Account Code table.
Global PayrollIf you use PeopleSoft Enterprise Global Payroll to process this person’s paycheck, complete these fields:
Pay Group Select a pay group.The payroll system that you select on the Installation Table - Products pagedetermines what value appears here. If Global Payroll is selected, the GlobalPayroll pay groups appear.
Note. The Global Payroll Pay Group field is different from the Payroll forNorth America Pay Group field. Pay group is very important in GlobalPayroll. Selecting Global Payroll as your payroll system on the InstallationTable - Products page and selecting a pay group is what helps select a payeeinto the payroll process.
Use Pay Group Value When you select a pay group, the Use Pay Group Value check boxes nextto the Eligibility Group, Exchange Rate Type, and Use Rate As Of fieldsare automatically selected.Leave the check boxes selected to use the default values from the pay groupdefinition. Clear the check boxes to override the default values.
Note. PeopleSoft Enterprise Global Payroll stores the values at the Joblevel only if you override them here. If you add a new effective-dated rowto the job record or change the pay group assignment, the system revertsto the pay group defaults.
Eligibility Group This field is blank if the Use Pay Group Value check box is selected. If youwant to override the pay group default, clear the check box and select aneligibility group which specifies earnings, deduction, and absence elementsthat a payee might be eligible to receive.
Exchange Rate Type This field is blank if the Use Pay Group Value check box is selected. If youwant to override the pay group default, clear the check box and select thecurrency exchange rate type to use when performing currency conversionsfor the payee.
PeopleSoft Proprietary and Confidential 111

Increasing the Workforce Chapter 5
Use Rate As Of This field is blank if the Use Pay Group Value check box is selected. Ifyou want to override the pay group default, clear the check box and selectthe pay calendar date to use when retrieving the effective-dated exchangerate information during currency conversions. The Use Rate As Of fieldworks with the Exchange Rate Type field to determine which effective dateis retrieved to get the appropriate exchange rate for the calendar periodbeing processed. Exchange rate effective dates include: Period Begin Date,Period End Date, and Payment Date.
Holiday Schedule If you leave this field blank, Global Payroll processing uses the holidayschedule assigned to the payee’s pay group, but does not enter that holidayschedule here.
(AUS) Australia
Balance Group No (balancegroup number)
Enter a balance group number. Balance group numbers identify which GlobalPayroll accumulator the system should store tax balances in. Tax accumulatorsare keyed by ID, empl rcd#, pay entity, and balance group number. You usebalance group numbers to combine or separate tax balances for multiplejobs (where different tax rates apply) or to separate balances in the case oftermination and rehire. A balance group ID for each payment summary isrequired at the end of the year. There must be a person tax data record for eachbalance group ID that the person has.
(HKG) Hong Kong
Balance Group No (balancegroup number)
Enter a balance group number. When workers are terminated and subsequentlyrehired in the same or similar position in the same tax year (using the JobData component in Workforce Administration), there is a legislative reportingrequirement in Hong Kong to keep the periods of employment and earningsbalances separately. PeopleSoft Enterprise Global Payroll uses the balancegroup number to ensure that the relevant periods of employment and balancesof a worker in a tax year are stored separately in terms of payroll data. Thisenables a worker to have multiple tax balances if the worker is terminated andrehired in the same financial year.When a worker is rehired in the same tax year, the values that are in thisfield are auto-incremented, and the balance amount is stored in the systemvariable CM VR BAL GRP ID, which is attached to each year-to-date (YTD)accumulator.Every time you run the payroll process, the balance that is stored in the systemvariable CM VR BAL GRP ID is retrieved by the accumulator to resolve theearnings that are generated for each new position.Balance group numbers are used to maintain earnings balances and are used asUser Key 2 for all Hong Kong YTD accumulators.
Note. Before entering information for U.S. foreign nationals, use the Substantial Presence Test. SelectWorkforce Administration, Personal Information, Citizenship, Employee Presence Test USA.
112 PeopleSoft Proprietary and Confidential

Chapter 5 Increasing the Workforce
See AlsoChapter 9, “Managing Country-Specific Workforce Data,” (USA) Determining U.S. Residency Status forForeign Nationals, page 282
PeopleSoft Enterprise Human Resources 8.9 PeopleBook: Administer Compensation, “Getting Started withAdminister Compensation,” Administer Compensation Overview
PeopleSoft Enterprise Payroll for North America 8.9 PeopleBook
PeopleSoft Enterprise HRMS 8.9 Application Fundamentals PeopleBook, “Setting Up OrganizationFoundation Tables,” Setting Up Holiday Schedules
Entering Salary Plan InformationAccess the Salary Plan page.
Salary Plan page
Salary Administration Plan Displays the salary administration plan code. If you associate salaryadministration plans with locations, the value that is in this field comes fromthe Location table based on setID matching. Otherwise, the salary plan comesfrom the Job Code table.If you change the location after hire (and a salary plan is defined in theLocation table), then the system does not automatically display a default valuefor this salary plan. Instead, the system checks if the existing grade and stepare still valid for this new salary plan. The existing grade and step must alsobe defined for the new salary plan. If the grade and step are defined for thisnew salary plan, then the system displays by default from the Location tablethe value for the new salary plan. If the grade and step are not defined forthis new salary plan, then the system does not change to the salary planfrom the Location table.To use auto-calculated premium processing for this person, select a plan thathas Auto Calculated Premium selected and an absorbing or nonabsorbing(or both) premium rate code assigned in the Salary Plan table. The systemdisplays auto-calculated-premium-related fields on the Compensation pageonly if you select an auto-calculated premium plan here.
PeopleSoft Proprietary and Confidential 113

Increasing the Workforce Chapter 5
Note. If this worker has a labor agreement and job code with a wageprogression salary plan, the system populates this field by default and makes itunavailable for entry.
Grade If you associate a grade with the person’s job code, the system displays thedefault value from the Job Code table.
Note. If this worker has a labor agreement and job code with a wageprogression salary plan, the system populates this field by default and makes itunavailable for entry.
Grade Entry Date Displays the date on which the person first joined this grade. You canoverride this value.
Includes Wage ProgressionRule
The system selects this check box if the salary plan includes wage progression.
Step If you associate a step with the person’s job code, the system displays thedefault value from the Job Code table.
Step Entry Date Displays the date on which the person first joined this step. You can overridethis value.
Note. The system verifies the combinations of salary administration plansand grades that you select.
See AlsoPeopleSoft Enterprise HRMS 8.9 Application Fundamentals PeopleBook, “Working with System DataRegulation in HRMS”
Entering Compensation InformationAccess the Compensation page.
114 PeopleSoft Proprietary and Confidential

Chapter 5 Increasing the Workforce
Compensation page
Compensation Rate Displays the compensation rate for the person, which is the sum of all base paysalary components.
Note. The PeopleSoft Enterprise Payroll for North America Calculate Payprocess (PSPPYRUN) uses this value, not the individual base pay componentsthat are in the Pay Components section of the page. The only compensationrates that the system uses from the Pay Components section are the nonbasepay rates.
Frequency Select a compensation frequency.Select Contract for contract persons. The system uses the information that youset up on the Contract Pay page to manage the person’s compensation.
Note. The Retro Pay functionality in PeopleSoft Enterprise Payroll for NorthAmerica and PeopleSoft Enterprise Global Payroll is triggered by anyfrequency or compensation rate change with an effective date that’s earlier thanor equal to the latest pay end date of a check that is already paid to the person.
AutoCalculated Premium
Target Compensation Rate Enter the compensation rate for the person if the person is being compensatedat a rate that exceeds the default salary. Values are:
PeopleSoft Proprietary and Confidential 115

Increasing the Workforce Chapter 5
Absorbing: Premium decreases when the compensation rate increases overtime in order to maintain the target compensation rate.Non-Absorbing: Premium does not change even when the compensationrate increases over time.The system calculates the difference between this amount and the original jobcompensation rate and enters the difference in the premium components (theabsorbing or nonabsorbing or both premium rate codes of the salary plan)of the person’s compensation package. The system then recalculates thecompensation rate with the premium component compensation rate.If both an absorbing rate code and a nonabsorbing rate code are associatedwith the salary plan, the absorbing rate code initially receives the full,calculated amount of the difference between the target compensation rate andthe originally calculated job compensation rate.You can then enter some portion of the total calculated premium in thenonabsorbing rate code (in which case the absorbing rate code amountautomatically decreases by the same amount so that the target compensationrate remains the same) or delete the nonabsorbing rate code. The systemrecalculates the job compensation rate, including the premium componentcompensation rate.You cannot enter a target compensation rate that is less than the original jobcompensation rate without the premium components.This field is available only if the person’s salary plan (on the Salary Plan page)has auto-calculated premium enabled.
Don’t Absorb Change Select to instruct the system to leave absorbable rate codes unchanged if thereis a change in the default salary amount.This option only applies to persons who have a target compensation rate andare assigned to a salary plan with the auto calculated premium functionenabled and an absorbing premium defined.
Comparative Information
Change Amount Displays the change in the amount of compensation for the rate code.
Change Percent Displays the percent of change in the compensation for the rate code.
Compa-Ratio (comparisonratio)
Displays the percent-through-range calculation, based on the salary plan andgrade and the currency that the organization uses.
Job Ratio Displays the percent-through-range calculation, based on the midpoint salaryof the person’s job code.The job ratio is available only if the person’s job code has job ratio information(midpoint salary, currency, and frequency) defined.
Pay RatesThis group box contains pay rates that are calculated by using the default frequencies from the country. Youcan specify the default frequencies by country on the Default Frequencies page.
See PeopleSoft Enterprise HRMS 8.9 Application Fundamentals PeopleBook, “Setting Up and Working withFrequencies,” Setting Country-Specific Frequency Defaults.
116 PeopleSoft Proprietary and Confidential
Chapter 5 Increasing the Workforce
Default Pay Components Click to:
• Carry out rate code defaults (excluding seniority pay) based on the currentvalues of the designated job fields.
• Replace manual updates and old default values with the current defaultvalues.
• Recalculate the compensation package of affected persons, including thecompensation rate, currency, frequency, apply FTE, percent (includingcurrent rate code groups), salary points, automatically calculated premium,and so on.
• Recalculate compensation-related fields, such as annual amounts orcompa-ratio, on the Job Data record.
If you don’t click this button after updating relevant job data fields, the systemissues a warning when you attempt to save the new record. If you click OK,the system displays this page, where you can click this button and make anyrequired changes. If you do not click this button, the component packagedoesn’t appear by default until the next time that the default component logic istriggered (either when you click the button or through a batch update process).
Contract Change ProrationOption
Click to make changes to the person’s contract proration options.Select one of the following options to prorate the earnings change over theremainder of the contract:No Proration of Change Amt. (no proration of change amount): Select if youdo not want the system to prorate the change to the person’s compensationacross the contract.Prorate Over Contract Period: Select to have the system prorate thecompensation change over the contract period (determined by the contractstart and end dates).Prorate over Payment Period: Select to have the system prorate thecompensation change over the payment period (determined by the paymentstart and end dates).Select Lump Sum Retro Payment (lump sum retroactive payment) to enablethe system to process a lump sum payment of retroactive earnings to theperson. You must select one of the contract change proration options that arelisted previously to process the lump sum payment.
Calculate Compensation Click to have the system recalculate the person’s compensation withoutcarrying out any rate code defaults or replacing any default values. You cannotmodify the person’s pay components without recalculating the compensation.
Pay Components - AmountsSelect the Amounts tab.
Rate Code Select a rate code. Rate codes are IDs for pay components. The systeminserts any compensation information that is associated with this rate code inthe pay components grid.
PeopleSoft Proprietary and Confidential 117

Increasing the Workforce Chapter 5
Note. If a seniority rate code, or group-based rate code, is inserted as a default,the values for these rate codes are display-only; you can’t delete them.
Comp Rate (compensationrate)
Displays the compensation rate for the pay component.
Frequency Displays the compensation frequency for the pay component.
Points Displays the salary points that are associated with this rate code, if any. Set thepoints monetary value on the Company Table page. Associate point value(an integer) with rate codes on the Default Compensation and Non-BaseCompensation pages, Salary Step Components page, and Compensation page.To use points, select the Salary Points check box on the Installation Table page.
Percent If the rate type for this rate code is percent, the system displays the percentthat is to be applied to the job compensation rate or to a rate code group (ifyou are using rate code groups).
Rate Code Group Select a rate code group. A rate code group enables you to be morespecific when calculating percentage-based components as part of a personcompensation package.
Pay Components - ChangesSelect the Changes tab.
Manually Updated This flag indicates whether the pay component is manually updated or the paycomponent contains only values that appear by default.
Change Amount Displays the overall change amount in this pay component rate.
Change Points Displays the overall change amount (in points) for this pay component. Thisfield is visible only if Salary Points is selected on the Installation Table page.
Change Percent Displays the overall change amount for this pay component. This field isn’tavailable for rate codes that have a rate code type of percent or points.
Pay Components - ConversionSelect the Conversion tab.
Source Indicates how the pay component gets into the pay components grid. Manualindicates that the pay component is added manually. Salary Step indicatesthat the pay component is retrieved by default from the salary step. JobCode indicates that the pay component is retrieved by default from the jobcode, and so on.
Default without Override Indicates whether you can change the default values of the pay component orthe values for this rate code are default values and display-only.
Apply FTE (apply full-timeequivalent)
Select if you want the value that is associated with the rate code to bemultiplied by the FTE factor for annualization and deannualization. FTE isthe percentage of full-time that the worker should normally work in thecorresponding job. This field isn’t available for rate codes of type percent.
118 PeopleSoft Proprietary and Confidential

Chapter 5 Increasing the Workforce
Converted Comp Rate(converted compensationrate)
Displays the converted compensation rate for this pay component. Thesystem converts all base pay components to the currency and compensationfrequency that you specify.
See AlsoPeopleSoft Enterprise Payroll for North America 8.9 PeopleBook, “(E&G) Administering Contract Pay”
PeopleSoft Enterprise Human Resources 8.9 PeopleBook: Administer Compensation, “Getting Started withAdminister Compensation”
PeopleSoft Enterprise HRMS 8.9 Application Fundamentals PeopleBook, “Setting Up and Working withFrequencies,” Job Data Pay Rate Frequencies
Entering Optional Employment-Related DataAccess the Employment Information page.
Employment Information page (1 of 4)
PeopleSoft Proprietary and Confidential 119

Increasing the Workforce Chapter 5
Employment Information page (2 of 4)
Employment Information page (3 of 4)
120 PeopleSoft Proprietary and Confidential

Chapter 5 Increasing the Workforce
Employment Information page (4 of 4)
This information isn’t effective-dated, so the data that you enter and review here tells you about the worker’scurrent employment information for this employment record number.
This means that if you rehire a worker and enter a future effective date, the system clears the TerminationDate and Date Last Worked fields, and you don’t see the current information. To review information that isin other data rows, use the Job Data component.
After you save the component, the system sets the Company Seniority Date , Service Date, and Seniority PayCalc Date (Seniority Pay Calculation Date) fields on this page to the effective date that you enter on the WorkLocation page. You can override these fields after saving the component. The system calculates and displaysthe worker’s service months and days based on the information that you enter in the Company Seniority date,Service Date, and Seniority Pay Calc Datefields.
Organizational InstanceDisplays the current values from the Job Data component for this organizational instance.
Organizational InstanceRecord
When the organizational instance record is different from the employee recordnumber (Rcd#), the rest of the fields that are in this group box are display only.For example, an employee has Empl Rcd # 0. This is also the OrganizationalInstance Record for this employment and any additional assignments related tothis employment. If the employee is assigned to an additional assignment,the Empl Rcd # is 1. However, the Organizational Instance Record is 0 forthis additional assignment.
Original Start Date Displays the original start date for this organization instance.
Last Start Date Displays the most recent start date for this organization instance. This dateis different from the first start date if this organization instance has beeninactive and then reactivated.
First Start Date Displays the first start date for this organization instance.
Termination Date Displays the worker’s termination date, if applicable.
Org Instance Service Date(organizational instanceservice date)
Displays the organizational instance service date.
Provider ID For contingent workers, displays the ID of the service provider.
PeopleSoft Proprietary and Confidential 121

Increasing the Workforce Chapter 5
Organizational Assignment Data
Last Assignment Start Date Displays the start date of the last assignment under this organizational instance.
First Assignment Start Displays the start date of the first assignment under this organizational instance.
Assignment End Date Displays the end date of the last assignment, if applicable.
Home/Host Classification For workers who are on assignments, this field specifies whether the currentjob is at the worker’s home location or the assignment location. For a newhire, select Home.
Time Reporter Data Click to review the PeopleSoft Time and Labor data for this worker. If youdon’t use PeopleSoft Enterprise Time and Labor, this link is unavailable.
Company Seniority Date Based on the date that you enter here, the system calculates the number ofyears, months, and days of seniority for a worker.
Benefits Service Date Based on the date that you enter here, the system calculates the total years,months, and days of service for a worker, including any credit for militaryleave or the total amount of time that the worker works for multiple companiesin the organization. This date is used to calculate benefits eligibility.The system uses the original start date as the default value.
Seniority Pay Calc Date(seniority pay calculationdate)
Enter the date that the system should use to calculate seniority-based pay.The system uses the original start date as the default value.
Probation Date Enter the date on which the worker is placed on probation.
Professional ExperienceDate
Displays the earliest date on which the worker started working in a job thatrequired skills that are directly related to the worker’s current position.
Last Verification Date Displays the latest date on which the worker verified his or her personaldata in the system.
Business Title Enter the worker’s official title, which might be different from the jobtitle. If you drive part or all of the system by position, the system entersthe default title for the position number that you assign to the worker onthe Work Location page.
Work Phone or PositionPhone
Track the worker’s primary work phone number. You can also update this fieldby using the Manage Positions pages.
If you drive part or all of the system by position, the system enters the defaultphone number for the position number that you assign to the worker onthe Work Location page.
(CAN) Statistics Canada Academic Teaching Employment TableThe fields that are in this table are used in the Canada Academic Teaching Surveys business process, aregulatory requirement for Canadian higher-education, degree-granting institutions. Complete this table forall faculty staff if you are required to submit Academic Teaching Surveys to Statistics Canada. Review theinformation in this table to ensure that it is up-to-date every time that you change a worker’s record.
Teaching Change Date The system adds a new teaching change date row only if you choose to add one.
122 PeopleSoft Proprietary and Confidential

Chapter 5 Increasing the Workforce
Insert a new row for each teaching appointment if the institution uses the sameemployee record number to record successive appointments. For the Part-TimeAcademic Teaching Survey, the system reports the Academic TeachingEmployment record that is effective on the end date of the appointment or atthe end of the period that is being reported.
Survey Report Flag Displays the report flag value, as specified on the Job Code Table - JobCode Profile page. If the value is N/A, this record isn’t reported in academicteaching surveys. You can override this default value.
Duties Displays the duties value, as specified on the Job Code Table - Job CodeProfile page. You can override this default.
Principal Subject Select the principal subject that is taught by the worker.
Teaching Load Enter the worker’s teaching load during the academic teaching employment.For example, if the worker is teaching three full courses, enter 3.0. If theworker is teaching one full course and one-third of another, enter 1.33.
FTTE (full-time teachingequivalency)
Enter the ratio of the teaching load to the full-time teaching equivalency. Forexample, if teaching four courses constitutes full-time and the worker isteaching three courses, enter .75.
Collapse as FT (collapse asfull-time)
Select if the employment can be collapsed into the reportable full-time jobfor the purpose of consolidating salary amounts from jobs that make up afull-time job.Use this field only if the worker:
• Has two or more part-time jobs in different departments that functionas a single full-time job.
• Receives an administrative stipend under another employee record numberthat doesn’t accrue benefits but counts toward the worker’s full-time salary.
Don’t collapse reportable part-time jobs into a reportable full-time job. (Thesystem doesn’t report on the part-time job.) Instead, if you use this field, setup a separate employee record for part-time jobs.
(MYS and SGP) Malaysia and SingaporeAfter you set up festive advance calculation rules and the pay programs, and associated job codes with payprograms, the eligible workers that are in the workforce are granted festive advances. Assigning the festiveadvance type to the worker occurs during the hire process after you assign the ethnic group, religion, and jobcode. However, before you accept those defaults, you might still have some issues to resolve. If you decidethat any of the worker’s festive advance details should be different, change them on this page.
Ethnic Group and Religion Displays the values that you enter on the Personal Data - Regional page.
Festive Advance PayProgram
Displays the value from the Job Code Table - Job Code Profile page. You canchange this default.
FA Holiday Type (festiveadvance holiday type)
Select a festive advance type. Values are: Chinese New Year, Christmas,Deepavali, Hari Raya, and N/A.The default value is the festive holiday that is appropriate to the ethnicity orreligion that you enter for this person on the Personal Data - Regional page.You can change this selection. If a person chooses not to receive a festiveadvance, select N/A.
PeopleSoft Proprietary and Confidential 123
Increasing the Workforce Chapter 5
Festive Advance EligibleFrom
Displays the festive advance eligible from date. If the firm has a probationperiod that must be served before a worker is entitled to a festive advance, theprobation period must be monitored.When you set the probation period in the Festive Advance Pay Program, youset the number of days or months. The system adds this information to theworker’s hire date to determine the festive advance eligible from date; this dateappears as the default on the FA Employee Details page.When you process the festive advances, the system checks the festive advanceeligible from date against the date on which to pay the advance. If thefestive advance eligible from date is not yet passed, the worker is not paida festive advance.
Note. This date is used by the festive advance calculation process and thefestive advance calculation rule to determine if the worker has served enoughtime to be eligible for a festive advance. The date is derived from the jobcommencement date and the probation period in the Festive Advance PayProgram.
(JPN) Japan
Educ Lvl-AdjstedBirth Date(education-level-adjustedbirth date)
Select the worker’s education-level-adjusted birth date. The day and the monthare the organization’s standard calculation birth date (SCB—usually April 1);the year comes from the worker’s education-level-adjusted birth date (ELABi).Although the system calculates this date, you can overwrite it (for example, togive a worker credit for special work experience).
Education Level Age YearsMonths
Displays the worker’s highest education level as specified in the PersonalData component. This education level is the starting point for education-levelage-related calculations.
(BEL) BelgiumThe system displays the official language, based on the company official language, unless the company islocated in Brussels-Capital Region, in which case the preferred language is the default.
Personnel Registr Nbr(personnel registrationnumber)
Enter the number under which the worker is registered in the personnel register.
(NLD) Netherlands
Relation to Owner Select the worker’s relationship to the owner, as appropriate.
(BRA) Brazil
INSS Days, INSS Months,and INSS Years (InstitutoNacional de SecuridadeSocial days, months, andyears)
Enter the number of days, months, and years that the worker makes socialsecurity contributions before being hired by the company.
124 PeopleSoft Proprietary and Confidential

Chapter 5 Increasing the Workforce
See AlsoPeopleSoft Enterprise Human Resources 8.9 PeopleBook: Track Global Assignments, “TrackingAssignments,” Entering Basic Assignment Data
PeopleSoft Enterprise HRMS 8.9 Application Fundamentals PeopleBook, “Setting Up Local CountryFunctionality,” Setting Up Education Level Ages
PeopleSoft Enterprise Human Resources 8.9 PeopleBook: Administer Festive Advance, “Managing FestiveAdvance”
PeopleSoft Enterprise Human Resources 8.9 PeopleBook: Manage Base Benefits, “Setting Up Base BenefitsCore Tables”
PeopleSoft Enterprise Human Resources 8.9 PeopleBook: Manage Positions, “Setting Up Positions”
PeopleSoft Enterprise Time and Labor 8.9 PeopleBook, “Setting Up Basic Tables”
PeopleSoft Enterprise HRMS 8.9 Application Fundamentals PeopleBook, “Setting Up Local CountryFunctionality,” Setting Up the Education Level Age Table
Distributing Job EarningsAccess the Job Earnings Distribution page.
Job Earnings Distribution page
Review these guidelines prior to entering data on the Job Earnings Distribution page:
• Skip this page if you don’t need to distribute standard earnings for the person.Payroll for North America uses the department, job code, account, shift, position number, and general ledgertype that you enter on the Work Information and Payroll pages to calculate pay earnings records.
• The system hides this page when all job rows in the component use PeopleSoft Enterprise Global Payroll.
PeopleSoft Proprietary and Confidential 125

Increasing the Workforce Chapter 5
However, if any job row has another payroll system (for example, PeopleSoft Enterprise Payroll for NorthAmerica or Payroll Interface), then the system displays the page.
• Don’t use this page to distribute special earnings, such as holiday pay or bonuses; instead, use the processesin PeopleSoft Enterprise Payroll for North America for handling special earnings.
• If you enter a parameter such as department on this page, the parameter overrides the same field on thejob record.If you leave a parameter blank, the system uses the field from the job record.
Earnings Distribution Type Select an earnings distribution type. Values are:
• None: Select to indicate that you don’t allocate earnings for this person.The system calculates and charges person compensation according to theinformation that is listed in the Job Data component. If you select thisoption, leave the other fields on this page blank.
Note. You must select None if you want the system to use the proration rulethat you select on the Pay Group Table - Paysheets page when proratingpartial pay.
See PeopleSoft Enterprise HRMS 8.9 Application FundamentalsPeopleBook, “Setting Up Jobs,” Understanding Pay Groups.
• By Amount: Available only for salaried workers. This enables you toapportion the worker’s total earnings for a period on the basis of an amount.Select to instruct the system to total the amounts that are in the distributionlines and check the total against the total in the Compensation Rate field onthe Job Data - Compensation page. The total earnings distribution amountmust equal the compensation rate amount. If the amounts are not the same,the system generates an error when you try to save the record. You will needto resolve the discrepancy to save the Job Data record.For example, to charge 3,000 of a worker’s regular earnings to the worker’sregular department (on the job record), 544 to department 105, and 1,000 todepartment 10503, you set up three distribution lines:- On the first line, leave Department blank (so that the system uses theworker’s regular department from the job record) and enter 3000 inthe Amount field.
- On the second line, enter 105 in the Department field and 544 in theAmount field.
- On the third line, enter 10503 in the Department field and 1000 in theAmount field.
The amounts that are in the distribution lines total 4,544, so the systemchecks that amount in the Compensation Rate field on the worker’s jobrecord equals this total.
• By Hours: Available only for hourly or exception hourly workers. Selectto instruct the system to total the hours that are in the distribution linesand update the total in the Standard Hours field on the Job Data - JobInformation page. The Standard Hours field that appears at the top of thispage also changes.
126 PeopleSoft Proprietary and Confidential

Chapter 5 Increasing the Workforce
Enables you to apportion the worker’s total earnings for a week on an hourlybasis. The system totals the hours in all distribution lines and inserts the totalin the Standard Hours field on the worker’s job record.For example, if a worker works a 40-hour week, and you want to charge 30hours of regular pay to the worker’s regular department (on the job record)and 10 hours to department 103, you set up two distribution lines:- On the first line, leave Department blank (so that the system uses theworker’s regular department (from the job record) and enter 30 in theStandard Hours field.
- On the second line, enter 103 in the Department field and 10 in theStandard Hours field. The hours that are in the distribution lines total 40,so the system inserts 40 in the Standard Hours field on the worker’s jobrecord.
• By Percent: Available to all workers. The sum of the percentages that are inthe distribution lines must equal 100.Enables you to apportion the worker’s total earnings for a period on apercentage basis.For example, to charge 80 percent of regular earnings to the worker’s regulardepartment (on the worker’s job record) and 20 percent to department100, set up two distribution lines:- On the first line, leave Department blank (so that the system uses theworker’s department from the job record) and enter 80 in the Percent field.
- On the second line, enter 100 in the Department field and 20 in thePercent field.
Paying Workers on DisabilitySome workers on disability need to be paid at a given percentage of their regular pay. Handle this situationwithout changing the worker’s salary by setting up a disability plan earnings code in the Earnings table,based on a percentage.
Note. This feature works only for hourly workers, not for salaried workers.
When you enter an action of short-term disability with pay or long-term disability with pay, the system changesthe worker’s status to leave with pay.
To send 100 percent of the worker’s pay to the disability plan earnings code, access the Job Data - JobEarnings Distribution page, select the By Percent option, enter the appropriate disability earnings code, andenter a percent of 100.
Note. When you put a worker on disability, don’t forget to check additional pay records and make anynecessary changes.
See AlsoPeopleSoft Enterprise Payroll for North America 8.9 PeopleBook, “Defining Earnings Codes and EarningsPrograms”
PeopleSoft Proprietary and Confidential 127
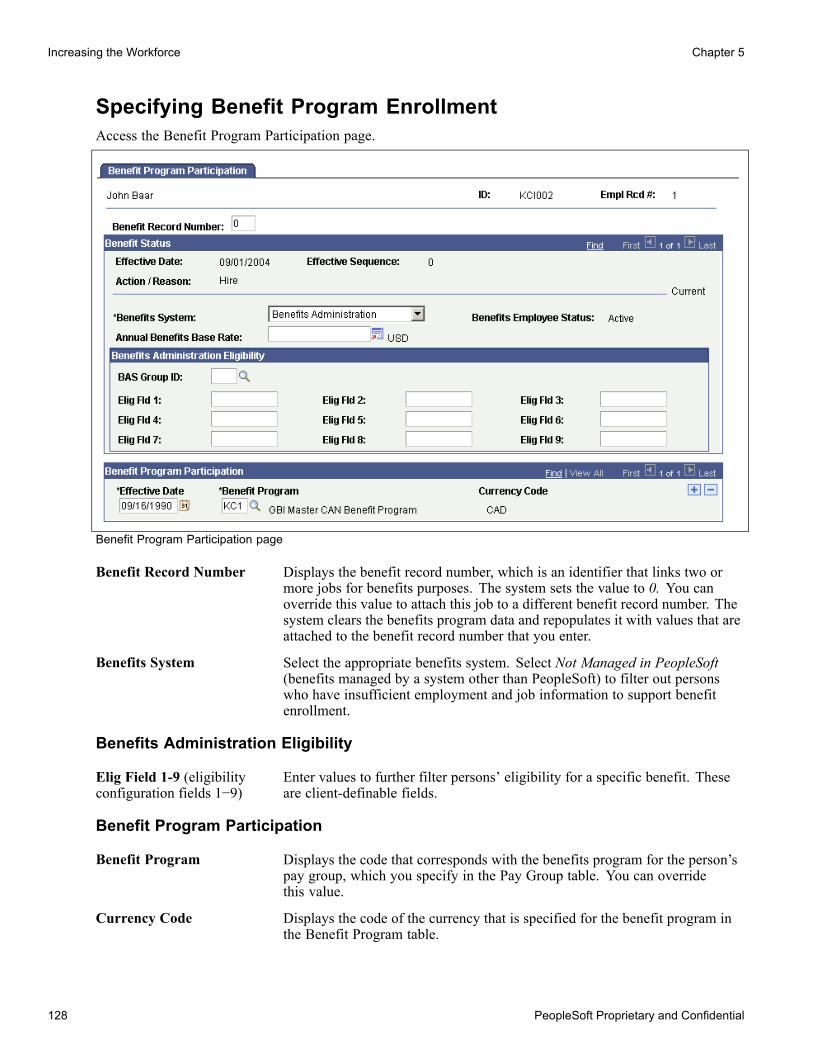
Increasing the Workforce Chapter 5
Specifying Benefit Program EnrollmentAccess the Benefit Program Participation page.
Benefit Program Participation page
Benefit Record Number Displays the benefit record number, which is an identifier that links two ormore jobs for benefits purposes. The system sets the value to 0. You canoverride this value to attach this job to a different benefit record number. Thesystem clears the benefits program data and repopulates it with values that areattached to the benefit record number that you enter.
Benefits System Select the appropriate benefits system. Select Not Managed in PeopleSoft(benefits managed by a system other than PeopleSoft) to filter out personswho have insufficient employment and job information to support benefitenrollment.
Benefits Administration Eligibility
Elig Field 1-9 (eligibilityconfiguration fields 1−9)
Enter values to further filter persons’ eligibility for a specific benefit. Theseare client-definable fields.
Benefit Program Participation
Benefit Program Displays the code that corresponds with the benefits program for the person’spay group, which you specify in the Pay Group table. You can overridethis value.
Currency Code Displays the code of the currency that is specified for the benefit program inthe Benefit Program table.
128 PeopleSoft Proprietary and Confidential
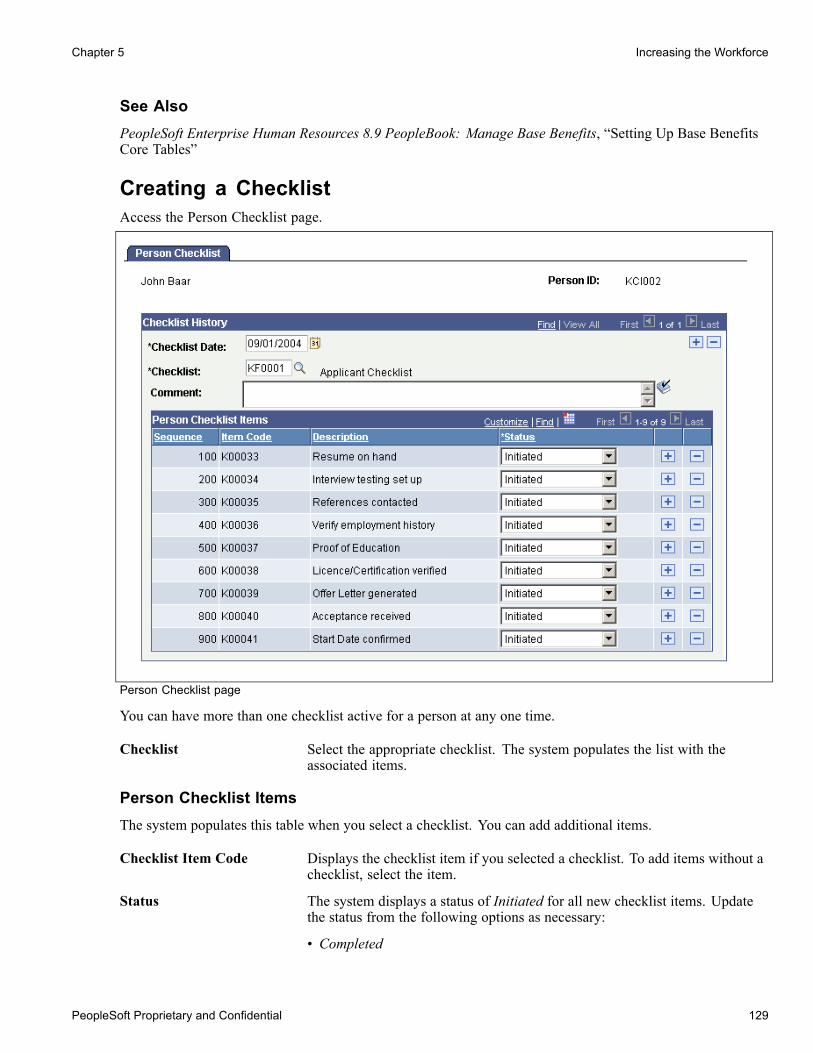
Chapter 5 Increasing the Workforce
See AlsoPeopleSoft Enterprise Human Resources 8.9 PeopleBook: Manage Base Benefits, “Setting Up Base BenefitsCore Tables”
Creating a ChecklistAccess the Person Checklist page.
Person Checklist page
You can have more than one checklist active for a person at any one time.
Checklist Select the appropriate checklist. The system populates the list with theassociated items.
Person Checklist ItemsThe system populates this table when you select a checklist. You can add additional items.
Checklist Item Code Displays the checklist item if you selected a checklist. To add items without achecklist, select the item.
Status The system displays a status of Initiated for all new checklist items. Updatethe status from the following options as necessary:
• Completed
PeopleSoft Proprietary and Confidential 129

Increasing the Workforce Chapter 5
• Notified• Received
Link ID Displays a link to the component used to complete the listed item.For example, the link ID for the item Emergency Contact isEmergency Contact, which links to the Emergency Contact component(EMERGENCY_CONTACT).
Adding Additional AssignmentsThis section provides an overview of the process of adding additional assignments, lists prerequisites, anddiscusses how to:
• Work with multiple benefit record numbers.• Enter additional assignments.
Understanding the Process of Adding Additional JobsPeopleSoft Enterprise Human Resources enables you to keep complete job information about workers whohold more than one job at a time in an organization .
If you set up PeopleSoft Enterprise HRMS security to allow workers to have multiple jobs, you can add anadditional assignment to a worker’s employment record. Use the Assign Additional Assignment component(ADD_PER_ORG_ASGN) in Administer Workforce to add new jobs for workers who already have one ormore jobs. From the Add New Assignment page (PER_ORG_INST_ASGN), access the Concurrent Job Datacomponent (JOB_DATA_CONCUR) to enter data for the new job. The component consists of the same pagesas the Job Data component. If all jobs are within the same company and meet certain criteria, you can combineearnings from multiple jobs on one paycheck if you are using PeopleSoft Enterprise Payroll for North America.
Note. (USF) Use the Concurrent Hire USF component (EE_CONC_HIRE) instead of the Assign AdditionalJob component.
Do not use the Assign Additional Assignment component for adding temporary assignments where thesubstantive job must be suspended for the duration of the temporary assignment. Use the Job Data componentinstead.
Update job data for concurrent jobs on the Job Data component.
See Chapter 5, “Increasing the Workforce,” Adding Organizational Instances for Employees, ContingentWorkers, and POIs, page 83.
See AlsoPeopleSoft Enterprise HRMS 8.9 Application Fundamentals PeopleBook, “Understanding OrganizationalRelationships, Employment Record Numbers, and Multiple Jobs”
Chapter 7, “Entering Additional Data in Human Resources Records,” Entering Temporary Assignments,page 194
130 PeopleSoft Proprietary and Confidential

Chapter 5 Increasing the Workforce
Working with Multiple Benefit Record NumbersIn addition to an employment record number, you assign each concurrent job a benefit record number thattracks the worker’s participation in benefit programs. Jobs that share the same benefit record number alsoshare the same benefit programs.
The following tables show different ways to assign benefit record numbers in a situation where a worker hasthree concurrent jobs:
Apply Job 1’s Benefits to All Jobs
Job Employment Record Number Benefit Record Number
Job 1 0 0
Job 2 1 0
Job 3 2 0
Apply Job 3’s Benefits to All Jobs
Job Employment Record Number Benefit Record Number
Job 1 0 0
Job 2 1 0
Job 3 2 0
Apply Separate Benefits to Each Job
Job Employment Record Number Benefit Record Number
Job 1 0 0
Job 2 1 1
Job 3 2 2
Apply Job 1’s Benefits to Jobs 1 and 2 and Separate Benefits to Job 3
PeopleSoft Proprietary and Confidential 131

Increasing the Workforce Chapter 5
Job Employment Record Number Benefit Record Number
Job 1 0 0
Job 2 1 0
Job 3 2 2
When you add a concurrent job, the system sets the default benefit record number on the Benefit ProgramParticipation page to 0. If you change the benefit record number, the system clears and repopulates theBenefit Program field with the data attached to the benefit record number that you enter. If the benefit recordnumber that you enter doesn’t match any existing benefit record number for the worker, the system populatesthe Effective Date field with the worker’s hire date and the Benefits Program field with the default benefitprogram for the worker’s pay group.
Note. Use the Benefit Program Participation page to maintain benefits program information.
PrerequisitesBefore you can add multiple jobs for the workforce, you must update the user security so that users haveaccess to the menu options that they need.
When a worker has more than one job, you might want to designate one job as primary and the others assecondary. The primary job designation is used for government reporting.
Pages Used to Add Concurrent JobsPage Name Object Name Navigation Usage
Add New Assignment PER_ORG_INST_ASGN Workforce Administration,Job Information, AddAdditional Assignment
Review a worker’sassignments and accessthe Concurrent Job Datacomponent to create newassignments.
Work Location JOB_DATA1 Workforce Administration,Job Information, AddAdditional Assignment
Click the Create Assignmentbutton.
Enter position and locationinformation for a person’sconcurrent job, including theregulatory region, company,department, and location.
Job Information JOB_DATA_JOBCODE Workforce Administration,Job Information, AddAdditional Assignment
Click the Create Assignmentbutton.
Enter information about aperson’s concurrent job,including status, employeeclass, shift, or standardhours.
132 PeopleSoft Proprietary and Confidential
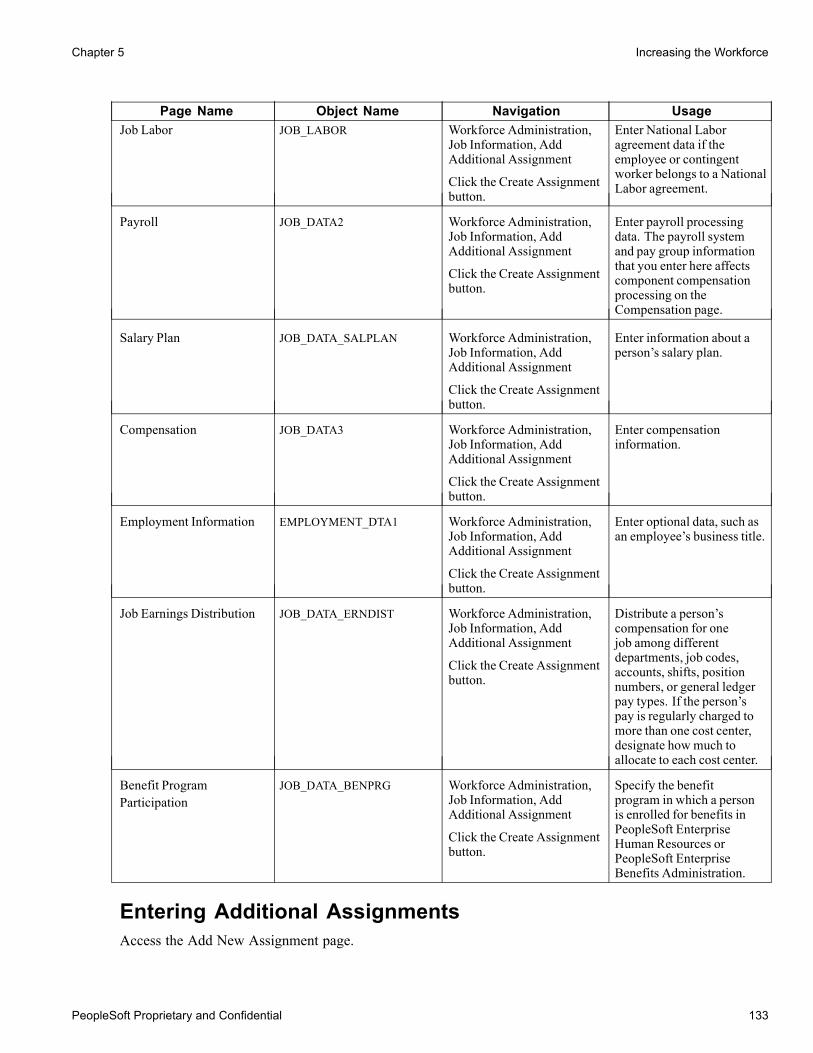
Chapter 5 Increasing the Workforce
Page Name Object Name Navigation UsageJob Labor JOB_LABOR Workforce Administration,
Job Information, AddAdditional Assignment
Click the Create Assignmentbutton.
Enter National Laboragreement data if theemployee or contingentworker belongs to a NationalLabor agreement.
Payroll JOB_DATA2 Workforce Administration,Job Information, AddAdditional Assignment
Click the Create Assignmentbutton.
Enter payroll processingdata. The payroll systemand pay group informationthat you enter here affectscomponent compensationprocessing on theCompensation page.
Salary Plan JOB_DATA_SALPLAN Workforce Administration,Job Information, AddAdditional Assignment
Click the Create Assignmentbutton.
Enter information about aperson’s salary plan.
Compensation JOB_DATA3 Workforce Administration,Job Information, AddAdditional Assignment
Click the Create Assignmentbutton.
Enter compensationinformation.
Employment Information EMPLOYMENT_DTA1 Workforce Administration,Job Information, AddAdditional Assignment
Click the Create Assignmentbutton.
Enter optional data, such asan employee’s business title.
Job Earnings Distribution JOB_DATA_ERNDIST Workforce Administration,Job Information, AddAdditional Assignment
Click the Create Assignmentbutton.
Distribute a person’scompensation for onejob among differentdepartments, job codes,accounts, shifts, positionnumbers, or general ledgerpay types. If the person’spay is regularly charged tomore than one cost center,designate howmuch toallocate to each cost center.
Benefit ProgramParticipation
JOB_DATA_BENPRG Workforce Administration,Job Information, AddAdditional Assignment
Click the Create Assignmentbutton.
Specify the benefitprogram in which a personis enrolled for benefits inPeopleSoft EnterpriseHuman Resources orPeopleSoft EnterpriseBenefits Administration.
Entering Additional AssignmentsAccess the Add New Assignment page.
PeopleSoft Proprietary and Confidential 133

Increasing the Workforce Chapter 5
Add New Assignment page
Org Relation (organizationalrelationship)
Displays the person’s organizational relationship.
Organizational Instance Displays the instance number for this relationship.
Next Empl_Rec (nextemployee record)
Enter the employment record number for the next assignment. This numbershould be unique from all other employment record numbers currently heldby this person.
Assignments Lists the assignments under this organizational instance by employmentrecord number.
Adding Job ApplicantsTo add applicants, use the Manage Hires (HR_MANAGE_HIRES) component.
The Add Employment Instance and Add Contingent Worker components are the most common componentsthat you use to increase your workforce, but they are not the only components. You can also use the ManageHires component, which is designed especially for hiring applicants. The Manage Hire page displays a list ofapplicants that have gone through the recruiting process and are ready to be hired. When you add the applicant,much of the applicant’s information is transferred to the Personal Data page.
Selecting an applicant name on the Manage Hires page opens the Manage Hire Details page.
134 PeopleSoft Proprietary and Confidential
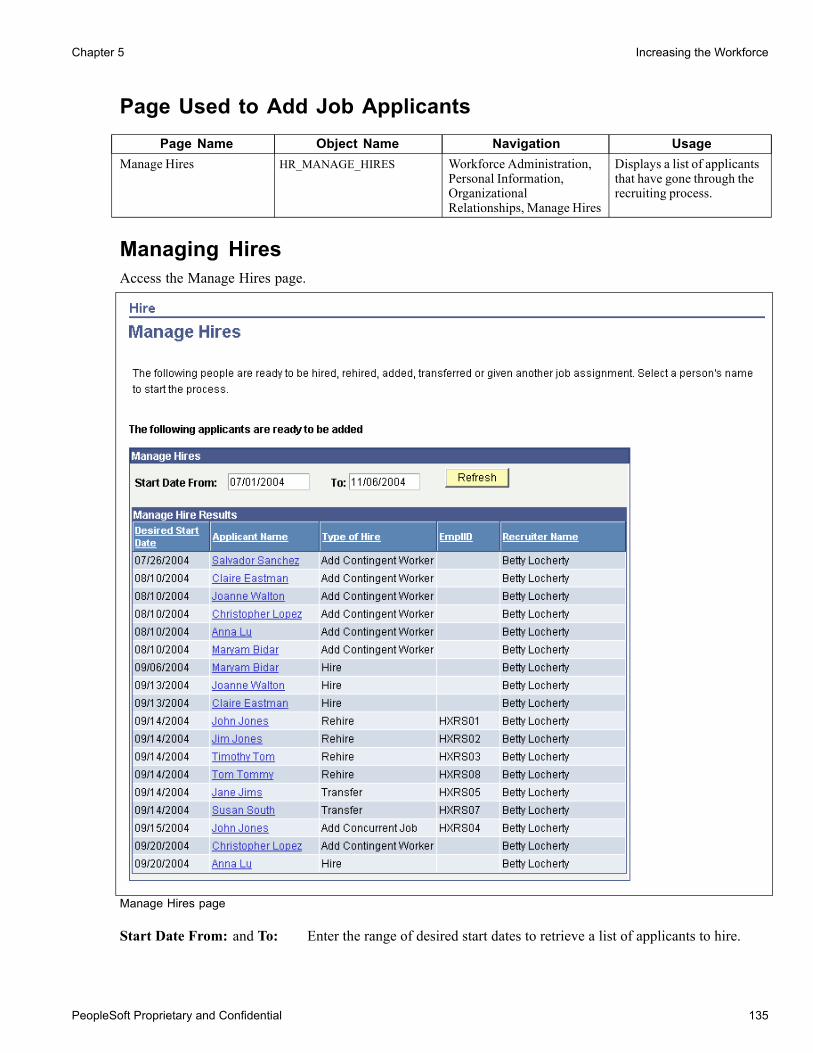
Chapter 5 Increasing the Workforce
Page Used to Add Job ApplicantsPage Name Object Name Navigation Usage
Manage Hires HR_MANAGE_HIRES Workforce Administration,Personal Information,OrganizationalRelationships, Manage Hires
Displays a list of applicantsthat have gone through therecruiting process.
Managing HiresAccess the Manage Hires page.
Manage Hires page
Start Date From: and To: Enter the range of desired start dates to retrieve a list of applicants to hire.
PeopleSoft Proprietary and Confidential 135

Increasing the Workforce Chapter 5
Refresh Click to update the list of applicants in the Manage Hires Results region basedon the range of dates entered in the Start Date From and To fields.
Applicant Name Select an applicant name to review job details and pull this person’s personaldata information from PeopleSoft Enterprise Recruiting Solutions.
Reviewing Organizational RelationshipsThis section discusses how to view a person’s organizational relationships.
Page Used to View a Person’s Organizational RelationshipsPage Name Object Name Navigation Usage
Person Org Summary PERSON_SUMMARY Workforce Administration,Personal Information,OrganizationalRelationships, PersonOrganizational Summary,Person Org, Summary
Review a summary ofa person’s organizationalrelationships.
Viewing a Person’s Organizational RelationshipsAccess the Person Org Summary page.
136 PeopleSoft Proprietary and Confidential

Chapter 5 Increasing the Workforce
Person Org Summary page
(BRA) Running Brazil Employment ReportsThis section provides overviews of the CAGED report and employee registration and discusses how to:
• Generate CAGED reports.• Generate employee registry reports.
Understanding the CAGED ReportThe Cadastro Geral de Empregados e Desempregados – CAGED (General Register of Employed andUnemployed Individuals) is a permanent register of employee hirings and dismissals. Every establishmentthat has had any type of turnover (hiring, dismissing, or transferring employees who have employmentcontracts ruled by the Consolidated Labor Laws) is required to report that turnover to the Ministry of Laborand Employment.
The CAGED report generates a file containing the monthly turnover of employees by establishment.
Understanding Employee RegistrationEmployee registration provides evidence of length of service and length of social security contribution andproves the relationship between employee and employer. This information affects social security pensions.Companies must record their employees’ data in books or cards.
PeopleSoft Proprietary and Confidential 137

Increasing the Workforce Chapter 5
The employee registry report generates a flat file containing information about the employee’s employmentdata (hire date, retirement date) and contributions. Keep the flat file as a record.
Pages Used to Run Brazil Employment ReportsPage Name Object Name Navigation Usage
CAGED File/Report CAGED_RC_BRA Workforce Monitoring, MeetRegulatory Rqmts BRA,CAGED File/Report BRA
Generate CAGED reports.
Employee Registry EMPL_REG_RC_BRA Workforce Monitoring, MeetRegulatory Rqmts BRA,Employee Registry ReportBRA
Generate employee registryreports.
Generating CAGED ReportsAccess the CAGED File/Report page.
CAGED File/Report page
Media Type Indicate how you are sending the file to CAGED. Values are: Diskette (floppydisk), Tape (magnetic tape or cartridge), or Other.
ACERTO File Select to generate an ACERTO (rightness) file. You generate an ACERTO fileto send corrections to a previously sent file; it contains the same information asCAGED.
First Declaration Select to indicate that this is the first statement that the establishment issending to CAGED.
138 PeopleSoft Proprietary and Confidential
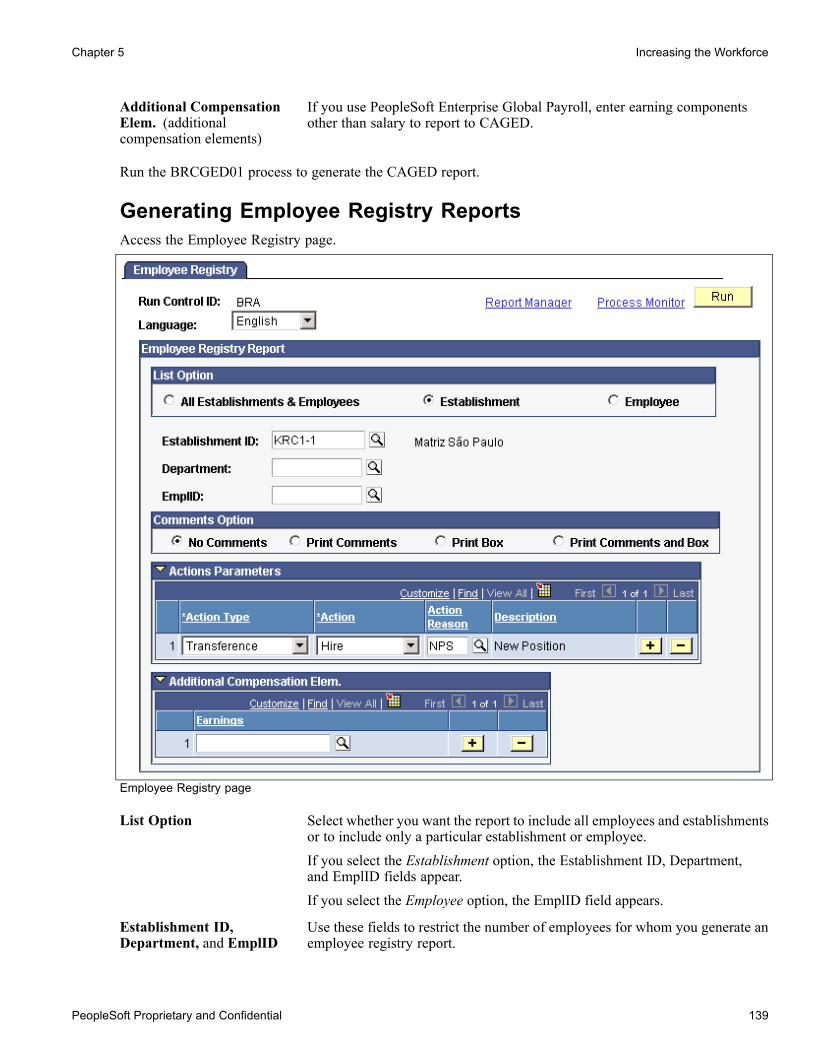
Chapter 5 Increasing the Workforce
Additional CompensationElem. (additionalcompensation elements)
If you use PeopleSoft Enterprise Global Payroll, enter earning componentsother than salary to report to CAGED.
Run the BRCGED01 process to generate the CAGED report.
Generating Employee Registry ReportsAccess the Employee Registry page.
Employee Registry page
List Option Select whether you want the report to include all employees and establishmentsor to include only a particular establishment or employee.If you select the Establishment option, the Establishment ID, Department,and EmplID fields appear.If you select the Employee option, the EmplID field appears.
Establishment ID,Department, and EmplID
Use these fields to restrict the number of employees for whom you generate anemployee registry report.
PeopleSoft Proprietary and Confidential 139

Increasing the Workforce Chapter 5
Action Enter an action reason to generate employee registry reports only foremployees with the specified action reason.
Additional CompensationElem. (additionalcompensation elements)
If you use PeopleSoft Enterprise Global Payroll, you can include payrollinformation in this report. Enter earning components other than salaryto include in this report.
Run the BREREG01 process to generate the Employee Registry report.
(CAN) Running the Canadian Hire List ReportThis section lists the page used to run the Canadian Hire List report.
Page Used to Run the Canadian Hire List ReportPage Name Object Name Navigation Usage
Hire List RUNCTL_FROMTHRU Workforce Administration,Increase Workforce, HireReport CAN
Run the CANHire Listreport (PER100CN). Thisproduces a hire list thatprovides information onsocial insurance numbers,effective dates, and badge orpayroll numbers that arewithin the date range that isprovided.
140 PeopleSoft Proprietary and Confidential

CHAPTER 6
(USF) Hiring Employees
This chapter lists common elements and discusses how to:
• Use the personnel action request (PAR) process to hire employees.• Enter education information.• Assign employees to positions.• Hire job applicants.• Add concurrent jobs.• Print appointment affidavits and preliminary employment data forms.
Common Elements Used in This ChapterTransaction#/Sequence Set by default to 1/1—the correct numbers for new employees. Your agency
can use these numbers to track both the individual transactions for thisemployee and the multiple administrative actions that occur on the same day.This field controls the order in which actions are processed internally and theorder in which they are output across interfaces. After you save a request, thesystem automatically increments it by one for each new action effective on thesame day. If human resources personnel perform a correction of the originalhire request, the correction’s assigned value is 1/2 (1 is the transaction numberfor this particular action for this employee on this day and 2 is the sequencenumber for any correction of this action for this employee on this day).
NOA Code (nature of actioncode)
The reasons for a hire action request.
PAR Status (personnelaction reason status)
References the status of this request within the PAR request/approval process.On the Data Control page, this field is set by default to Processed by HR,which is the correct choice for new employees. The value that remains afteryou leave this page is the default value on other pages within the component.
OK Click to close this page.
Using the PAR Process to Hire EmployeesThis section provides an overview of how to hire employees using the PAR process and discusses how to:
PeopleSoft Proprietary and Confidential 141
(USF) Hiring Employees Chapter 6
• Enter information for the hiring process.• Enter PAR remarks.• Enter job tracking information.• Enter employee personal information.• Enter birth information.• Enter address information.• Enter veteran information.• Enter marital information.• Enter education details.• Enter job information.• Specify benefit programs.• Enter retirement data.• Track information for employees on assignment.• Enter position information.• Enter employee compensation information.• Enter additional compensation information.• View pay rate and compensation calculations.• View job earnings distributions.• Enter current and historical employment information.• Enter expiration dates.• Enter appointment limits.• Enter additional employment information.• Track nonpay status information.• Enter employee security and financial disclosure information.• View Component Interface Exceptions.
Understanding the PAR Process to Hire EmployeesThe PAR process depends on seven common pages that store specific information required for the PAR hiringprocess and contain links to supplemental pages that provide further details for the information entered onthe primary page. To accommodate the different steps in the PAR process, there are eleven components thatcontain these seven common pages. The object names of the seven common pages are the same in all of thecomponents. The following table lists the five components:
Component Navigation Path When to Use
Hire Employee Workforce Administration, JobInformation, Hire Employee USF
Initially hiring employees.
142 PeopleSoft Proprietary and Confidential

Chapter 6 (USF) Hiring Employees
Component Navigation Path When to Use
Concurrent Hire Workforce Administration, JobInformation, Concurrent Hire USF
See Chapter 6, “(USF) HiringEmployees,” Adding ConcurrentJobs, page 177.
Supervisor Request Workforce Administration, JobInformation, Supervisor RequestUSF
See Chapter 15, “(USF)Administering Personnel ActionRequests,” Tracking and Routinga PAR Through Reviews andCompletion, page 395.
Cancel Personnel Action Workforce Administration, JobInformation, Cancel PersonnelAction USF
See Chapter 15, “(USF)Administering Personnel ActionRequests,” Canceling or Correctinga Personnel Action Request, page401.
Correct Personnel Action Workforce Administration, JobInformation, Correct PersonnelAction USF
See Chapter 15, “(USF)Administering Personnel ActionRequests,” Canceling or Correctinga Personnel Action Request, page401.
To request a new hire, use the Hire Employee component. Enter personal information, employmentinformation, job data, job earnings distribution information, and benefit program choices. You must enterthis information before you can perform any other human resource tasks in PeopleSoft Enterprise HumanResources. Because many of the fields on these pages are required, enter information in all the pages beforesaving your entries.
See AlsoChapter 15, “(USF) Administering Personnel Action Requests,” Understanding the Administering PARSystem, page 393
Pages Used to Hire EmployeesPage Name Object Name Navigation Usage
Data Control GVT_JOB0 Workforce Administration,Job Information, HireEmployee USF, Data Control
Enter information for thehiring process, such as theNOA code, approvingauthorities, PAR remarks,and tracking information.
PAR Remarks GVT_PAR_PROCESS_RK Click PAR Remarks on theData Control page.
Enter or look up commentsspecific to this position oremployee situation.
Job Tracking Info GVT_EE_CNTRL_SEC Click Tracking Data on theData Control page.
View or enter job-trackinginformation.
PeopleSoft Proprietary and Confidential 143

(USF) Hiring Employees Chapter 6
Page Name Object Name Navigation UsagePersonal Data GVT_PERS_DATA1 Workforce Administration,
Job Information, HireEmployee USF, PersonalData
Enter the employee’spersonal information, suchas name, address, birthplace,education, military service,citizenship, veteran, maritalstatus, race or origin, andhandicap.
Addl Birth Info (additionalbirth information)
GVT_BRTHINF_SEC Click Additional Birth Infoon the Personal Data page.
Enter birth information.
Address Information GVT_ADDRINF_SEC Click Mailing Address on thePersonal Data page.
Enter contact (home) andmailing address information.
Personal Phone Numbers GVT_PERS_PH_SEC Click Personal PhoneNumbers on the PersonalData page.
Enter employee phone, fax,cellular, and other numbers.
Veterans Info GVT_VETINF_SEC Click Veterans Info on thePersonal Data page.
Enter veteran information.
Marital Status GVT_MARITAL_SEC Click Marital Info on thePersonal Data page.
Enter marital information.
Education Details GVT_EDUCINF_SEC Click Education Details onthe Personal Data page.
Enter education details.
Job GVT_JOB1 Workforce Administration,Job Information, HireEmployee USF, Job
Enter job information,including the employee’sposition, agency, anddepartment.
Benefits/FEHB Data(Benefits / FederalEmployees Health BenefitsData)
GVT_BENDATA_SEC Click Benefits/FEHB Dataon the Job page.
Specify benefit programsin which the employee isenrolled in PeopleSoftEnterprise HumanResources or in PeopleSoftEnterprise BenefitsAdministration.
FEGLI/Retirement/FICA(Federal Employees GroupLife Insurance / Retirement/ Federal InsuranceContributions Act)
GVT_BENDATA1_SEC ClickFEGLI/Retirement/FICAon the Job page.
Enter life insurance andretirement data.
Departmental Hierarchy GVT_DEPTINF_SEC Click DepartmentalHierarchy on the Job page.
View departmental hierarchyfor the position.
Detail Assignment GVT_DETAIL_SEC Click Detail on the Job page. Track information foremployees on assignment.You probably won’t use thispage when first hiring anemployee.
144 PeopleSoft Proprietary and Confidential
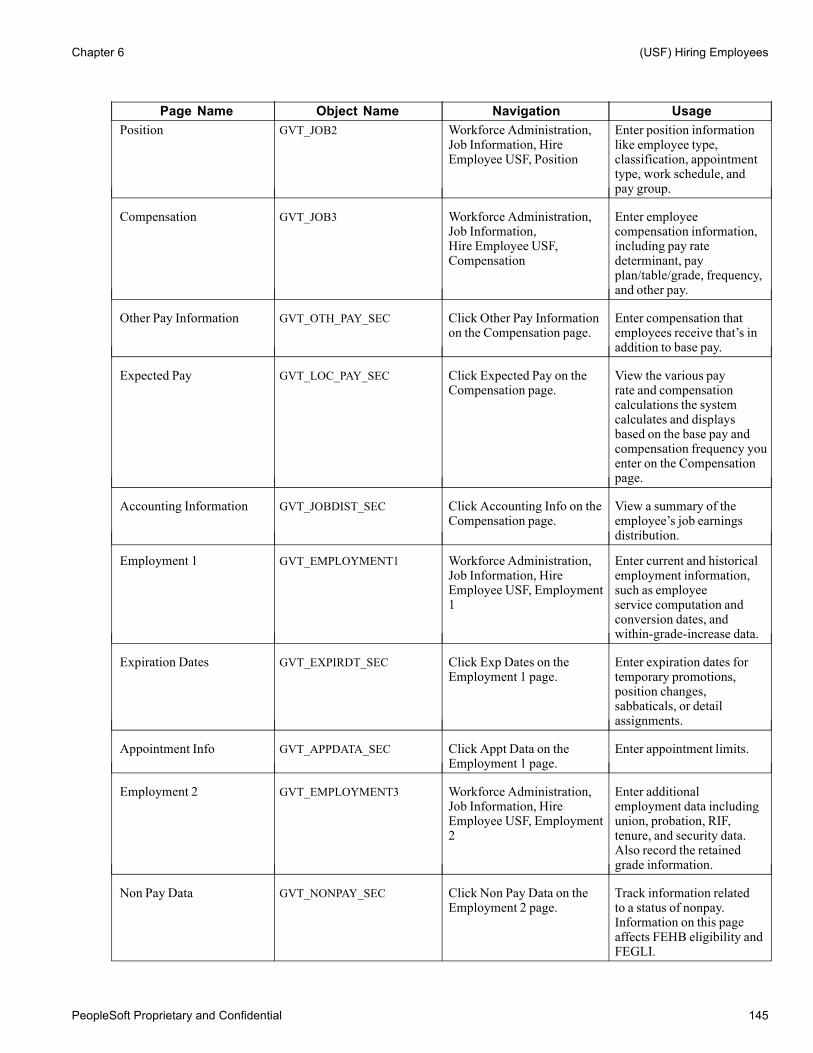
Chapter 6 (USF) Hiring Employees
Page Name Object Name Navigation UsagePosition GVT_JOB2 Workforce Administration,
Job Information, HireEmployee USF, Position
Enter position informationlike employee type,classification, appointmenttype, work schedule, andpay group.
Compensation GVT_JOB3 Workforce Administration,Job Information,Hire Employee USF,Compensation
Enter employeecompensation information,including pay ratedeterminant, payplan/table/grade, frequency,and other pay.
Other Pay Information GVT_OTH_PAY_SEC Click Other Pay Informationon the Compensation page.
Enter compensation thatemployees receive that’s inaddition to base pay.
Expected Pay GVT_LOC_PAY_SEC Click Expected Pay on theCompensation page.
View the various payrate and compensationcalculations the systemcalculates and displaysbased on the base pay andcompensation frequency youenter on the Compensationpage.
Accounting Information GVT_JOBDIST_SEC Click Accounting Info on theCompensation page.
View a summary of theemployee’s job earningsdistribution.
Employment 1 GVT_EMPLOYMENT1 Workforce Administration,Job Information, HireEmployee USF, Employment1
Enter current and historicalemployment information,such as employeeservice computation andconversion dates, andwithin-grade-increase data.
Expiration Dates GVT_EXPIRDT_SEC Click Exp Dates on theEmployment 1 page.
Enter expiration dates fortemporary promotions,position changes,sabbaticals, or detailassignments.
Appointment Info GVT_APPDATA_SEC Click Appt Data on theEmployment 1 page.
Enter appointment limits.
Employment 2 GVT_EMPLOYMENT3 Workforce Administration,Job Information, HireEmployee USF, Employment2
Enter additionalemployment data includingunion, probation, RIF,tenure, and security data.Also record the retainedgrade information.
Non Pay Data GVT_NONPAY_SEC Click Non Pay Data on theEmployment 2 page.
Track information relatedto a status of nonpay.Information on this pageaffects FEHB eligibility andFEGLI.
PeopleSoft Proprietary and Confidential 145

(USF) Hiring Employees Chapter 6
Page Name Object Name Navigation UsageTime and Labor Data TL_EMPL_DATA_FG_S Click Time Reporter Data on
the Employment 2 page.Review PeopleSoft Timeand Labor data for thisemployee.
Security Info GVT_SECURTY_SEC Click Security Info on theEmployment 2 page.
Enter employee securityclearance and financialdisclosure information.
CI Exceptions GVT_PAR_CI_MSG Workforce Administration,Job Information, HireEmployee USF, CIExceptions
Warning messages generatedduring the hire processare displayed on the CIExceptions page afterthe transaction has beensuccessfully saved.
Entering Information for the Hiring ProcessAccess the Data Control page.
Data Control page
Many of the values that you enter on this page become the default source for values on other pages throughoutthe system. If necessary, you can override most of these default entries when you are working on other pages.
After completing this page, you can print out the Personnel Action Request form or print a notice for thisposition.
Actual Effective Date Enter the actual effective date, which is used as the hire action’s effective datedefault value throughout the system. If necessary, change this to reflect thedate on which you hired the employee. When working on other pages, thedates are unavailable, so if you need to change the effective date, you do so byreturning to the Data Control page.
Proposed Effective Date This field is populated by default with the date entered in the Actual EffectiveDate field. Human resources personnel processing a request have final
146 PeopleSoft Proprietary and Confidential

Chapter 6 (USF) Hiring Employees
authority on when the action becomes effective, and they will enter the officialactual effective date, but the proposed effective date will remain unchanged.
Not to Exceed Date (Optional) Enter the ending date of a temporary action (for example, the date atemporary hire expires).
Action The default value is set to Hire, which is the correct value for new employees.
Reason Code Enter the reason code for this hire, such as new position, temporaryassignment, or trainee.
Note. For agency-to-agency transfers, the request may be submitted byboth agencies, and the action and reason for each agency’s request dependson whether the employee is arriving or leaving. If the employee is arriving,process the action as a hire. When an employee transfers in to your agencyfrom another agency, the action is Hire and the reason is Transfer From(another agency). When an employee transfers out of your agency to anotheragency, the action is Terminate and the reason is Transfer To (another agency).
Contact Emplid (contactemployee ID)
Enter the employee ID of the person to contact with any questions regardingthe hire.
Authority (1) and Authority(2)
Select the appropriate legal authority for this NOA code. This field is usuallyreserved for use by human resources specialists. PeopleSoft provides a listof common legal authority codes and descriptions as provided by the USOffice of Personnel Management.
PAR Request # (PARrequest number)
(Optional) Enter a PAR request number for each employee request after yousave this request. This field is for your agency’s information only.
PAR Remarks Click to view or enter comments specific to this position or employee situation.
Tracking Data Click to view or enter job-tracking information.
See AlsoChapter 16, “(USF) Processing Personnel Action Requests,” page 413
Entering PAR RemarksAccess the PAR Remarks page.
PeopleSoft Proprietary and Confidential 147

(USF) Hiring Employees Chapter 6
PAR Remarks page
Remark CD (remark code) Select from the list of descriptions, conditions, and comments about thisposition or employee action. The remarks that you select appear in thecomments box. Edit them as necessary.
Insertion Required If this remark needs employee-specific information, this check box is selected.The default settings for this box are defined with the codes on the PARRemarks Table page.
Entering Job Tracking InformationAccess the Job Tracking Info page.
Job Tracking Info page
Action Taken Displays the date this initial action request was entered.
Action Dt Ovrd (action dateoverride)
Select to make the Action Taken field available for entry so that you canchange the action date.
Override Operator Emplid(override operator employeeID)
(Optional) Select this check box when an administrative assistant, for example,enters data on behalf of a supervisor.
148 PeopleSoft Proprietary and Confidential

Chapter 6 (USF) Hiring Employees
Emplid of Tracking Row(employee ID of trackingrow)
When the Override Operator Emplid check box is selected, this field becomesavailable for entry. Enter the ID of the person actually performing the dataentry.
Entering Employee Personal InformationAccess the Personal Data page.
Personal Data page
EmplID If you instructed the system to assign the employee ID automatically, this fielddisplays NEW. This changes to the next available number after you completeall the Hire pages and click the Save button. If you assigned the ID manually,the number appears immediately.
Effective Date The effective date for all of the pages in this group box is set by default to theeffective date that is entered on the Data Control page. Change the effectivedate by returning to the Data Control page.
Gender Indicate the employee’s gender.
Citizenship Status Select the appropriate citizenship status.
Draft Status (Optional) Select a draft status.
Ethnic Group Select the employee’s ethnic group. Values are based on U.S. federal EqualEmployment Opportunity (EEO) ethnic categories. Use ethnic group
PeopleSoft Proprietary and Confidential 149
(USF) Hiring Employees Chapter 6
information to compile the establishment’s Affirmative Action (AA) plan andto generate several EEO reports.
Date of Birth Enter the employee’s date of birth. If you do not enter a birth date, a warningmessage appears when you save the record. Though this field isn’t required forthe Administering Workforce business process, the system uses the date insome benefit and payroll tasks to calculate an employee’s age. If you do nothave the birth date currently, after you acknowledge the message, you cancontinue entering information. However, PeopleSoft recommends that youenter the information later.
Date of Death Skip this field when hiring a new employee.
Disability Code Select the disability code from the list, or if none, select the value No Handicap.
Date Entitled to Medicare (Optional) Enter the date the employee is entitled to Medicare.
Country Many countries have unique name formats. Select the country with the nameformat you want to use for this person. When you move out of this field, thesystem displays the appropriate fields for the country you entered.
Type/Description Enter the corresponding type/description of the employee’s national ID.
National ID Enter the employee’s Social Security Number.
Additional Birth Info Click to access the Addl Birth Info page and enter the employee’s birthinformation.
Mailing Information Click to access the Address Information page and enter home and mailingaddress information.
Personal Phone Numbers Click to access the Personal Phone Numbers page and enter employee phone,fax, cellular, and other numbers.
Veterans Info (veteransinformation)
Click to access the Veterans Info page and enter veterans information.
Marital Info (maritalinformation)
Click to access the Marital Status page and enter marital information.
Education Details Click to access the Education Details page and enter information aboutthe employee’s education.
See AlsoChapter 16, “(USF) Processing Personnel Action Requests,” Requesting Terminations Due to Death, page 424
PeopleSoft Enterprise Human Resources 8.9 PeopleBook: Meet Regulatory Requirements, “(USA) MeetingRegulatory Requirements for the United States”
PeopleSoft Enterprise Human Resources PeopleBook: Manage Base Benefits
Entering Birth InformationAccess the Addl Birth Info page.
150 PeopleSoft Proprietary and Confidential

Chapter 6 (USF) Hiring Employees
Addl Birth Info page
Birth Location Enter the name of the city.
Birth State Select the birth state.
Birth Country Select the birth country.
Entering Address InformationAccess the Address Information page.
Address Information page
Select the country and then click Edit Address. Fill out the address fields on the page that appears and clickOK. The address information appears in the Address field.
PeopleSoft Proprietary and Confidential 151
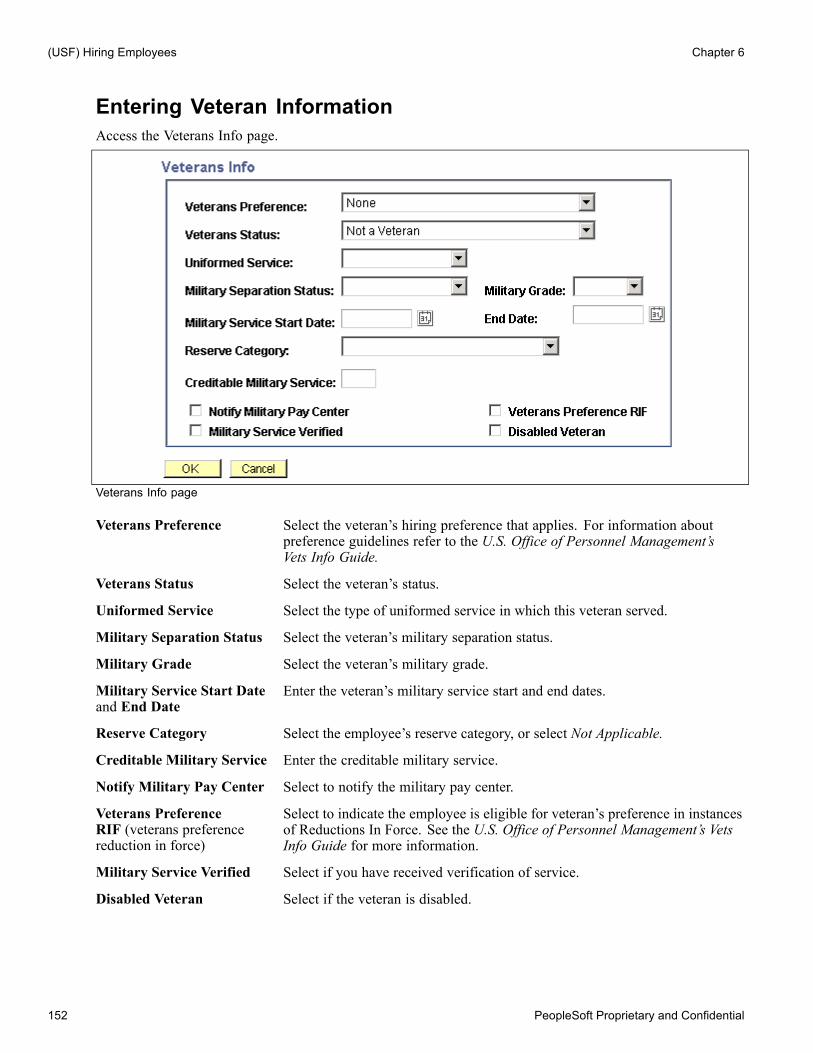
(USF) Hiring Employees Chapter 6
Entering Veteran InformationAccess the Veterans Info page.
Veterans Info page
Veterans Preference Select the veteran’s hiring preference that applies. For information aboutpreference guidelines refer to the U.S. Office of Personnel Management’sVets Info Guide.
Veterans Status Select the veteran’s status.
Uniformed Service Select the type of uniformed service in which this veteran served.
Military Separation Status Select the veteran’s military separation status.
Military Grade Select the veteran’s military grade.
Military Service Start Dateand End Date
Enter the veteran’s military service start and end dates.
Reserve Category Select the employee’s reserve category, or select Not Applicable.
Creditable Military Service Enter the creditable military service.
Notify Military Pay Center Select to notify the military pay center.
Veterans PreferenceRIF (veterans preferencereduction in force)
Select to indicate the employee is eligible for veteran’s preference in instancesof Reductions In Force. See the U.S. Office of Personnel Management’s VetsInfo Guide for more information.
Military Service Verified Select if you have received verification of service.
Disabled Veteran Select if the veteran is disabled.
152 PeopleSoft Proprietary and Confidential

Chapter 6 (USF) Hiring Employees
Entering Marital InformationAccess the Marital Status page.
Marital Status page
Marital Status Select the person’s marital status.
Marital Status Date Enter the date on which this status took effect.
Entering Education DetailsAccess the Education Details page.
Education Details page
Note. The Education Details page link is active only during the hiring process. To update educationinformation on existing employees use the Professional Education and Training page through the WorkforceDevelopment, Competency Management, Track Person Competencies, Education navigation.
Degree Select the degree earned or expected for the employee.
Note. This information must be set up on the Degree Table page in the Set UpHRMS, Common Definitions, School Information menu.
Year Earned/Expected Enter the year the degree was earned or is expected to be earned if theemployee has not graduated.
GPA (grade point average) Enter the employee’s grade point average from the school.
PeopleSoft Proprietary and Confidential 153

(USF) Hiring Employees Chapter 6
Graduated Select if the employee has graduated.
Major Code Select the major code for the degree earned or being earned.
Major Enter a major if there is not a code for it.
School Code Select the code designating the school the employee graduated from orcurrently attends.
School Enter a school if there is not a code for it.
State Enter the state where the school is located.
Country Select the country where the school is located.
Minority Institution Select if the employee attended or attends a designated minority institution.
Credit Hours Enter the credit hours earned either upon completion or to this point if notcomplete.
Hours Type Select the hours type. Values are: Continuing Education, Other Pay, QuarterHours, and Semester Hours.
Entering Job InformationAccess the Job page.
Job page
Many values on this page are set by default from values you entered earlier on the Data Control page. Ifnecessary, you can override most of these defaults.
Act Type (action type) Set by default to Hire, which is the correct choice for new employees.
Position Select a position. When you move out of this field, the system completesposition-related fields with default data from the Add/Update Position Infocomponent if the Manage Positions business process is being used. Job code,
154 PeopleSoft Proprietary and Confidential

Chapter 6 (USF) Hiring Employees
agency, subagency, business unit, department, and location all are set bydefault to position management data.In addition, the system inserts a default value in the Supervisor’s ID andReports to Position fields on the Employment 2 page if these are enteredwhen setting up the position.If you’ve associated agencies with departments on the Department page, thesystem enters the agency code on the Job page and the field is unavailablefor entry. It also enters default values on the Position page for the PayPeriods/Year, Employee Type, Holiday Schedule (which you define in the PayGroup table), and Pay Group fields (which you associate with a position in theAdd/Update Position Info component in the Organizational Development,Position Management, Maintain Positions/Budgets menu). On the Positionpage, the system enters the standard hours that correspond to the job code. Ifyou’ve associated them with the job code on the Job Code page, the systemalso enters the pay plan/table/grade, and compensation frequency on theCompensation page. In addition, on the Compensation page, the system entersthe grade/step entry (date), which is the date the employee was first assigned tothe grade and step. The Position Number, Hire Date, and Position Overridefields are discussed in Hiring Employees Into Positions.
Position ManagementRecord
Indicates whether updates to the Position Management record are nowreflected here. For hiring, the value is N, as the new hire would not haveinformation to update.If your organization uses the Manage Positions business process and thisposition were updated this would be Y. The option then would be to selectthe Position Override check box to make changes to position data that areotherwise locked in by the position data record.
Job Code If you are not using the Manage Positions business process, enter the jobcode. Otherwise, the job code is derived from the value established in theAdd/Update Position Info component.
Position Override Select to change any of the position-related fields, such as the Job Code,Department, Agency, and Sub-agency.PeopleSoft Enterprise Human Resources issues a warning message if youassign an employee to a position that has already been filled by anotheremployee or if a new employee appointment exceeds the maximum headcount for that position.
Note. After you have assigned an employee to a position, you must maintainall employee data manually while the employee is assigned to this positionin the system. The system won’t update position data automatically for theemployee when position information is changed.
Agency, Sub-Agency,Business Unit, Department,and Location
Select the ID types for these fields individually. If the position managementhiring process is used, the system enters default values here when the PositionID is selected.
Transferred From Agency If the reason code entered on the Data Control page was Transfer, select theagency from which the employee is transferring.
PeopleSoft Proprietary and Confidential 155

(USF) Hiring Employees Chapter 6
Transferred To Agency This is not a valid field in the hiring process. This field is used primarily inother types of PAR requests. It becomes active based on the action and reasoncode entered on the Data Control page.
Tax Location Derived from the department-tax location relationship established on theDepartment page.
See AlsoChapter 16, “(USF) Processing Personnel Action Requests,” page 413
Chapter 2, “Setting Up the Administer Workforce Business Process,” Defining Personnel Actions andReasons, page 5
PeopleSoft Enterprise Payroll Interface 8.9 PeopleBook, “Setting Up Payroll Schedules”
PeopleSoft Enterprise Human Resources 8.9 PeopleBook: Manage Positions, “Managing Position Data”
Specifying Benefit ProgramsAccess the Benefits/FEHB Data page.
Benefits/FEHB Data page
156 PeopleSoft Proprietary and Confidential

Chapter 6 (USF) Hiring Employees
Benefit Record Number Benefit record number is used to group several jobs together for benefitpurposes. A benefit record number can be assigned to multiple employeerecord numbers. If the new job entitles the employee to a new set of concurrentbenefits, you should use a new benefit record number. If the job does notentitle the employee to new benefits, you should use an existing benefit recordnumber. Each benefit record number must have a designated primary job. Theprimary job is used to process the benefit information.
BAS Group ID (benefitsadministration systemgroup ID)
(Optional) Enter a BAS group ID.
Benefit Program (Optional) Enter a benefit program.
FEHB Eligibility (federalemployees health benefitseligibility)
Select the appropriate option to indicate the FEHB eligibility. If you selectNot Eligible, the FEHB Date field becomes available for entry. This typicallyapplies to temporary employees.
FEHB Date (federalemployees health benefitsdate)
Enter the date that the employee is eligible for FEHB.
Elig Fld 1 − 9 (eligibilityfield 1 - 9)
These fields further define an employee’s benefits eligibility. Each agencydetermines its own use of these fields. Contact the agency’s Personnel PolicyOfficials for instruction using these fields.
Benefits System Select which PeopleSoft benefits system you are using to administer thisemployee’s benefits: PeopleSoft Enterprise Human Resources Manage BaseBenefits or Benefits Administration.
Entering Retirement DataAccess the FEGLI/Retirement/FICA page.
PeopleSoft Proprietary and Confidential 157

(USF) Hiring Employees Chapter 6
FEGLI/Retirement/FICA page
FEGLI
FEGLI Code (federalemployees group lifeinsurance code)
Enter the FEGLI code.
Post 65 Basic LifeReduction
Select the employee’s post-65 basic life reduction coverage.
Living Benefits andCoverage Amount
Use these fields only when selecting living benefits (not during the hiringprocess).
Retirement
Retirement Plan Select the employee’s retirement plan.In addition to the retirement plans used for submission to Central PersonnelData File (CPDF), PeopleSoft supplies the following codes that you may usefor documentation purposes only:
158 PeopleSoft Proprietary and Confidential

Chapter 6 (USF) Hiring Employees
Code Explanation
7 For foreign national employees exempt from retirement and from social security andMedicare tax deductions.
8 U.S. Court of Veterans Appeals without election of survivor annuity benefits. Code is foruse by the judges of the U.S. Court of Veterans Appeals only.
9 U.S. Court of Veterans Appeals with election of survivor annuity benefits. Code is for useby the judges of the U.S. Court of Veterans Appeals only.
A Article III judges and justices.
B Bankruptcy judges and justices under the Judicial Retirement System.
S U.S. Claims Court Judges Retirement System.
V Clerks/magistrates (CSRS).
U Bankruptcy judges (full FICA/partial CSRS).
Y Bankruptcy judges (full FICA/full CSRS).
FERS Coverage (FederalEmployees RetirementSystem coverage)
Select the employee’s FERS coverage.
Previous RetirementCoverage
Select the employee’s previous retirement coverage.
Annuitant Indicator Select the employee’s annuitant indicator.
Annuity CommencementDate
If the new employee is a reemployed annuitant, enter the annuitycommencement date.
CSRS Frozen Service (CivilService Retirement Systemfrozen service)
Enter the total years and months of civilian and military service that iscreditable in a CSRS component of a FERS employee, or, in the case ofa CSRS offset employee, the service that would be included in a CSRScomponent if the employee ever becomes covered by FERS.
FICA Status-Employee
FICA Status-Employee Indicate whether the employee is exempt, subject, or subject to Medicare only.
See AlsoChapter 16, “(USF) Processing Personnel Action Requests,” Requesting Terminations Due to Death, page 424
PeopleSoft Human Resources PeopleBook: Manage Base Benefits
PeopleSoft Proprietary and Confidential 159

(USF) Hiring Employees Chapter 6
Tracking Information for Employees on AssignmentAccess the Detail Assignment page.
Detail Assignment page
GVT Detail PositionNumber (government detailposition number)
Select the employee’s detail position number.
GVT Detail BargainingUnit (government detailbargaining unit)
Select the employee’s detail bargaining unit.
GVT Detail Union Code(government detail unioncode)
Select the employee’s detail union code.
Entering Position InformationAccess the Position page.
Position page
160 PeopleSoft Proprietary and Confidential
Chapter 6 (USF) Hiring Employees
LEO Position (lawenforcement officer position)
If this is a law enforcement officer position, a value appears from the JobCode page.
SF-113G Ceiling If this position is reportable for the SF-113G ceiling, select this check box.
POI (personnel officeidentifier)
Set by default from the Add/Update Position Info component or the JobCode page.
Regular Shift If the employee is working shifts, select the appropriate shift.
Shift Rate/Factor Define the shift rate/factor only if the shift differential is specified at theemployee level.
Pay Group (Required) A value appears here if you defined one on the Position Datapage. Otherwise, select a pay group.
Pay Frequency Set by default from the Pay Group page.
Work Period Select the time period in which employees must complete the standard hours.The system uses the annualization factor of the standard work period, incombination with the standard hours, to calculate FTE (full-time equivalency).
Holiday Schedule If you linked an established holiday schedule on the Pay Group page, itappears here.
Employee Type Depends on the pay group and is set by default from the Pay Group page.If an employee type doesn’t exist for this pay group, establish one on thePay Group page or enter one here.
Employee Classification Provides another method of grouping employees.
Reg/Temp(regular/temporary)
Indicate whether the new hire is a regular or temporary employee. The ManageBase Benefits business process of PeopleSoft Enterprise Human Resourcesuses this value when determining eligibility requirements.
Supervisor Level If the employee is in a supervisory position, this value is set by default fromthe Position Data page.
Type Appt (type ofappointment)
Enter the employee’s type of appointment, such as Career (CompetitiveService Permanent), Limited, Executive, or Schedule A - C.
Posn Occupied (positionoccupied)
This field identifies the type of appointment which can occupy the position.Values are Competitive, Excepted Senior Executive Service (SES) CareerReserved and SES General. This is a CPDF reported field.
Work Schedule Set by default from the Add/Update Position Info – Description page.
FLSA Status (Fair LaborStandards Act status)
Set by default from the position data on the Job Code page.
Adds to FTE Actual Count(adds to the full-timeequivalency actual count)
Select to include this employee’s job when processing FTE edits for budgetingpurposes.
Standard Hours The field is populated by default with the standard hours for the agency asspecified in the Installation tables. You can change this information manually.
FTE (full-time equivalency) The percentage of full-time the employee should normally work in thisjob. The system calculates this value based on the standard hours entry
PeopleSoft Proprietary and Confidential 161

(USF) Hiring Employees Chapter 6
for this job and the standard work period. However, you can override thesystem-calculated FTE and enter a new value less than 1.0.
See AlsoPeopleSoft Enterprise HRMS 8.9 Application Fundamentals PeopleBook, “Setting Up and Working withFrequencies”
Entering Employee Compensation InformationAccess the Compensation page.
Compensation page
Note. Multiple Components of Pay, Derivation of Rates, and related features are not currently supported byPeopleSoft Enterprise Human Resources USF functionality.
Many values on this page are set by default from values you entered in the Department and Job Code fields onthe Job page. Override these values if necessary.
Pay Rate Determinant Select a pay rate determinant.
Pay Plan/Table/Grade Select the pay plan, table, and grade.
Step Assign the correct step for the employee.
Note. For certain Pay Rate Determinants this is not an option and the fielddoes not accept data.
Step Entry Date The effective date of the request for this action.
If the Multi-Step/Grade check box is selected on the Installation table andyou select a step on this page, the system automatically enters the base payfor that step.
162 PeopleSoft Proprietary and Confidential

Chapter 6 (USF) Hiring Employees
Rtnd PP/Table/Grade(retained payplan/table/grade)
There are several instances where retained grade or pay is authorized based onprior federal experience within the employing agency or at another federalagency. After selecting the appropriate pay rate determinant (for example,Retained Grade-Diff Posn), you can enter information in this field.
Step and Grade Entry Date Enter the step and the date the employee was first assigned to the gradeand step.
Base Pay If you are using partial or full position management, a value is set by defaulthere based on your prior assignment in the Step field.A GM pay plan position is the exception to this rule. Because the GM pay planhas no steps, you must enter the base pay amount.If you selected the Position Override check box on the Job page, you may alsoenter a base pay amount for a position with steps. This is appropriate in caseswhere the base pay amount is beyond the step 10 level.Enter the base pay amount based on the compensation frequency periodindicated. For example, if the frequency period is one month, the base payentered would be the pay earned for one month. The system calculates anddisplays the value in the Loc/LEO Adjustment (if appropriate) and Total Payfields after you have provided the compensation data.
Adjusted Base Pay The system calculates and displays the adjusted base pay by applying theLoc/LEO adjustments to the employee’s base pay. This field is used for paylimits computation of the locality pay.
Compensation Frequency Set by default from the Job Code page; override if necessary.
Annuity Offset Amount If the employee is an annuitant, enter a CSRS annuity offset amount.
FEGLI Base The system calculates the FEGLI base rate. Select the Benefit Base Overridecheck box to override this default and then enter a new amount.
Other Pay Information Click to access the Other Pay Information page and enter compensation thatemployees receive that’s in addition to base pay.
Expected Pay Click to access the Expected Pay page and view the various pay rate andcompensation calculations the system calculates and displays based on thebase pay and compensation frequency that you enter on this page.
Accounting Info Click to access the Accounting Information page and view a summary of theemployee’s job earnings distribution.
If you selected the Multi-currency check box on the Installation table and entered the base pay in a differentcurrency from your base currency, the system converts the rates to the base currency and compares them withthe ranges specified for this salary grade in the Salary Grade table. If the rates exceed the salary range, awarning message appears.
Default Values for Employment DataAfter you enter job and position data, pay information is populated by default on the Compensation page. Ifyou associated pay plans with job codes, the Pay Plan field is populated by default from the data in the JobCode table. The Grade field is populated by default from the Job Code page. After the values in the Pay Planand Grade fields appear, the system also displays the Grade Entry Date field, which is the date the employeefirst joined the grade. When a value is entered in the Step field, the value in the Step Entry Date field populatesby default. You can override these values if you choose.
PeopleSoft Proprietary and Confidential 163
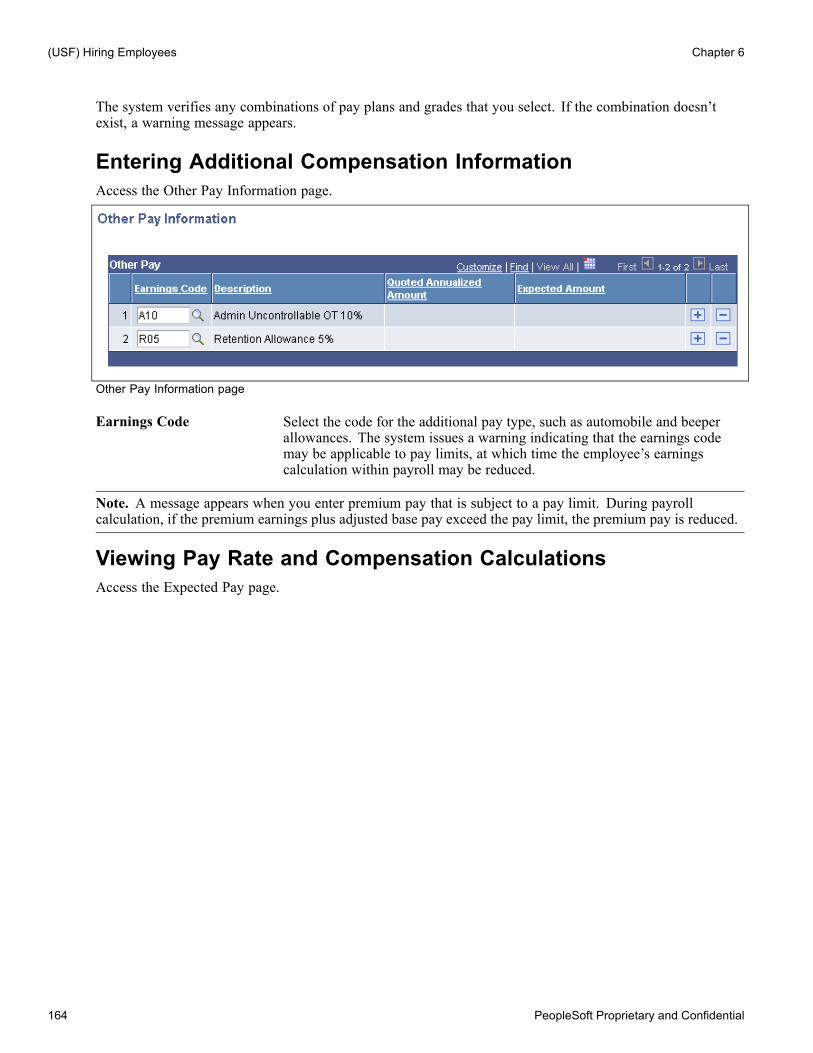
(USF) Hiring Employees Chapter 6
The system verifies any combinations of pay plans and grades that you select. If the combination doesn’texist, a warning message appears.
Entering Additional Compensation InformationAccess the Other Pay Information page.
Other Pay Information page
Earnings Code Select the code for the additional pay type, such as automobile and beeperallowances. The system issues a warning indicating that the earnings codemay be applicable to pay limits, at which time the employee’s earningscalculation within payroll may be reduced.
Note. A message appears when you enter premium pay that is subject to a pay limit. During payrollcalculation, if the premium earnings plus adjusted base pay exceed the pay limit, the premium pay is reduced.
Viewing Pay Rate and Compensation CalculationsAccess the Expected Pay page.
164 PeopleSoft Proprietary and Confidential

Chapter 6 (USF) Hiring Employees
Expected Pay page
Change Percent Displays information regarding a percent change when new rows are insertedthat change the base salary amounts.
Base Pay Based on the base pay and compensation frequency you enter, the systemcalculates and displays the hourly, daily, biweekly, monthly, and annual ratesfor this employee.
With Locality/LEOAdjustment
The system calculates the same base pay figures using the locality/LEOadjustment listed at the top of the page.
Total Other/Premium Pay The total of annual expected pay for the items you entered on the Other PayInformation page.
Total Pay The system calculates total pay by summing the annual pay with thelocality/LEO adjustment and the total other/premium pay contributions.
Note. The Rate Change Amount and Rate Change Percent fields are used when awarding increases (not fornew hires).
If expected pay exceeds the pay cap, a message appears at the bottom of the page warning that the pay caphas been reached and pay was reduced.
Understanding Expected Pay and Quoted Pay Within PeopleSoft Human ResourcesManagement for U.S. Federal GovernmentThe difference between expected pay and quoted pay occurs as a result of the conversion factors usedwhen comparing yearly and hourly pay rates on the Pay Plan page in the Pay Plan Table component andthe Expected Pay Rate page.
PeopleSoft Proprietary and Confidential 165

(USF) Hiring Employees Chapter 6
Rather than using the hourly conversion factor of 2080, as is often used as a business calculation factor,the U.S. federal government uses 2087.
The Expected Pay page calculates the daily, biweekly, monthly, and annual rates using the base pay amountfrom the Compensation page. These figures are based on the hourly conversion factor you set for the pay planon the Pay Plan table, typically 2087.
It also breaks out into separate columns the pay into base pay (no locality, no adjustments), pay with locality,and LEO pay. Total other/premium pay is also calculated based on the amounts entered on the Other PayInformation page. So, as a result of using 2087 in these calculations, the estimated quoted pay on theCompensation page is slightly higher than what the federal employee actually receives in a year.
These two fields for expected and quoted pay may not match. The procedures that the federal government hasfor deannualizing and reannualizing quoted compensation rates are the cause of the difference. To deannualizea quoted rate of pay (convert to hourly), you divide the quoted rate of pay by 2087. To reannualize a quotedrate of pay to determine the expected pay, you multiply the derived hourly rate by the employee’s scheduledweekly tour of duty and then multiply that by 52 weeks.
Following are two examples:
Example 1Full-time employee (40 hours per week) with quoted rate of 41,740 USD per year.
Quoted rate = 41,740 USD.
Hourly rate = quoted rate/2087 hours = 41,740 USD/2087 hours = 20 USD/hour.
Expected pay = hourly rate × standard weekly tour × 52 weeks = 20 USD/hour × 40 hours/week × 52weeks = 41,600 USD.
Difference between quoted and expected pay on an annual basis = 140 USD.
Example 2Part-time Employee (20 hours per week) with quoted rate of 41,740 USD per year
Quoted rate = 41,740 USD.
Hourly rate = quoted rate/2087 hours = 41,740 USD/2087 hours = 20 USD/hour.
Expected pay = hourly rate × standard weekly tour × 52 Weeks = 20 USD/hour × 20 hours/week × 52weeks = 20,800 USD.
Difference between quoted and expected pay on an annual basis = 20,940 USD.
See AlsoChapter 16, “(USF) Processing Personnel Action Requests,” page 413
Viewing Job Earnings DistributionsAccess the Accounting Information page.
166 PeopleSoft Proprietary and Confidential

Chapter 6 (USF) Hiring Employees
Accounting Information page
Job Earnings Distribution Select the appropriate option to indicate the job earnings distributionfrequency: by hours, by percent, or not at all.
When you select the By Hours or By Percent options, the GL Pay Type andAccount Code fields are unavailable for entry. Use the scroll bar to distributeearnings among departments.
If you select the By Hours option, then enter the hours to be distributed to eachdepartment in the Standard Hours field corresponding to each departmententered.
If you select the By Percent option, enter a percentage corresponding to eachdepartment in the Percent of Distribution field. Percentages must total 100percent and must equal the value in the Standard Hours field.
Compensation Rate The annual salary, including the locality and LEO adjustments.
Standard Hours Set by default from the Job Code page.
GL Pay Type (generalledger pay type)
Enter the GL pay type that has been established by your agency.
Account Code Indicate the type of account to which the earnings will be charged.
Business Unit, Department,Job Code, Position, andShift
Select the business unit, department, job code, position, and shift to which tocharge the earnings.
Earn Code (earnings code) Specify the earnings code. This will default to the Regular Earnings codedefined on the Paygroup Table.
Hours If you select the By Hours option, then specify how many hours will becharged to the corresponding earnings code.
PeopleSoft Proprietary and Confidential 167

(USF) Hiring Employees Chapter 6
Percent of Distribution If you select the By Percent option, enter the percent to be charged to thecorresponding earnings code.
Entering Current and Historical Employment InformationAccess the Employment 1 page.
Employment 1 page
Many values on this page are set by default from values entered in the Department and Job Code fields on theJob page. When hiring a new employee, the system populates most of the dates on this page with the effectivedate of the hire action. These dates are used later in various ways to calculate the employee’s service time.Override values as necessary.
If at a later date you change the status of an employee’s employment, depending on the administrative actionyou select in the Job Data pages, the system will display the rehire date.
The Separation Date field is display-only, and shows the date that the employee left employment.
EOD Dt (entered on duty) Reflects the effective date of the hire request after you save the request. Thisdate is distinct from the SCD dates in that it describes when the employeestarted federal employment with the employing agency; it does not reflect totalfederal service involving the employee’s total career.
Hire NTE Dt (hire not toexceed date)
Set by default from the Not to Exceed Date field on the Data Control page. Inthe case of a temporary hire, it designates the length of time the temporaryemployment can last.
Mand Retire Date(mandatory retirement date)
If applicable, enter the employee’s mandatory retirement date.
Exp Dates (expiration dates) Click to access the Expiration Dates page and enter expiration dates fortemporary promotions, position changes, sabbaticals, or detail assignments.
Next Review Dt (nextreview date)
Enter the next review date. This date, while informational only, can serve asa tickler date for employee performance review.
168 PeopleSoft Proprietary and Confidential

Chapter 6 (USF) Hiring Employees
Appt Data (appointmentdata)
Click to access the Appointment Info page and enter appointment limits.
Service Computation Dates
Leave Enter the service computation date for beginning the employee’s leavecomputation.
Retire Enter the service computation date for beginning the employee’s retirementcomputation.
RIF (reduction in force) Enter the computation date for establishing the employee’s RIF position.
TSP (thrift savings plan) Enter the computation date for beginning the employee’s thrift savings planeligibility computation.
LEO (law enforcementofficer)
Enter the computation date for beginning the employee’s law enforcementofficer retirement computation.
Sev Pay (severance pay) Enter the service computation date for establishing the employee’s severancepay computation.
Service Conversion Dates
Conv Begin Date(conversion begin date),Career Conv Date(career conversion date),and Career Cond ConvDate (career-conditionalconversion date)
Enter the conversion begin date, the career conversion date, and thecareer-conditional conversion date. If the employee is hired using acareer-conditional appointment, the conversion begin date is the effective dateof the hire. Upon completion of the three-year period, the personnel officeprocesses a PAR converting the employee to a career appointment and entersthat effective date in the Career Conv Date field. If the employee was hiredunder a temporary appointment, the conversion begin date is the effectivedate of the hire. When the personnel office processes a PAR to convert thetemporary employee to a permanent employee with a conversion to careerconditional competitive appointment, the Career-Cond Conv Dt field is theeffective date for that transaction.
Within-Grade Increase Data
WGI Status (within-gradeincrease status)
Enter the WGI status, such as (none), Approved, Waiting, Denied, N/A, orPostponed. For a new employee, the default value is Waiting. Created is anoption for WGI status, which is reserved for the automatic WGI process. Donot change this online, as the WGI process won’t select it unless the status isWaiting or Approved.
Non Pay Hours WGI andIntermittent Days Worked
Leave these informational fields blank at hire. After running the WGI/TenureUpdate process for leave without pay and processing a PAR, update the NonPay Hours WGI field with nonpay hours from the WGI/Tenure Update report.
Last Increase Dt (lastincrease date),WGI DueDate, and LEI Date(lastequivalent increase date)
The system automatically enters the last increase date, LEI date, and WGI duedate. For certain actions, the WGI Due Date field is set by default to the payperiod begin date based on the pay calendar tables that your organization hasestablished. For WGI due date calculation, it is imperative that you set up yourpay calendars for this year, plus three years in advance of the current year. Forexample, if the current year is 1999, then your pay calendars need to be set upfor 1999, 2000, 2001, and 2002.
PeopleSoft Proprietary and Confidential 169

(USF) Hiring Employees Chapter 6
If you enter a date that isn’t the beginning of a pay calendar, the systemdisplays a message suggesting valid pay calendar begin dates into which yourdate falls. If the system suggests a date of January 1, 1899, this indicates thatyour pay calendars do not exist. See your implementation project managerabout creating additional pay calendars.After running the WGI/Tenure Update process for leave without pay andprocessing a PAR, update the WGI Due Date field with the extended due datefrom the WGI/Tenure Update report.
See AlsoChapter 17, “(USF) Processing Automatic Actions for Probation, Tenure, and WGIs,” page 425
PeopleSoft Enterprise HRMS 8.9 Application Fundamentals PeopleBook, “Setting Up Pay Calendars”
Entering Expiration DatesAccess the Expiration Dates page.
Expiration Dates page
The following fields, which are updated by the user, are informational only.
Temporary Promotion Enter the temporary promotion date.
Temporary PositionChange
Enter the temporary position change expiration date.
Sabbatical Enter the sabbatical expiration date.
Detail Enter the detail assignment expiration date.
Entering Appointment LimitsAccess the Appointment Info page.
170 PeopleSoft Proprietary and Confidential

Chapter 6 (USF) Hiring Employees
Appointment Info page
Nature of Action Code,Current Appointment Auth#1 (current appointmentauthorize #1), and CurrentAppointment Auth #2(current appointmentauthorize #2)
CPDF reportable fields maintained to reflect historic data on the employee’scurrent appointment authority used to authorize the employee’s hire.
Benefit Record Numberand Severance Pay PreviousWeeks
For a new hire, you do not need to enter the benefit record number and thenumber of severance pay previous weeks. If changes occur to the employee’semployment status, you must update these fields (for example, RIF).
Special EmploymentProgram
Indicate the special employment program: Not Applicable, Other, PresidentialManagement Intern, SES Candidate Development, or Veteran’s ReadjustmentProgram.
Appointment Limits
Amount, Hours, and Days Depending on the type of appointment used to hire the employee, enter theappointment limits amount, hours, or days.
Entering Additional Employment InformationAccess the Employment 2 page.
PeopleSoft Proprietary and Confidential 171

(USF) Hiring Employees Chapter 6
Employment 2 page
Bargaining Unit Select a code representing the bargaining unit to which the employee belongs.
Union Code If your new employee belongs to a union, select the appropriate union code.
Union Anniversary Date If the bargaining unit covers the position and the employee has elected to join,enter the date on which the employee’s seniority ranking within the unionis based.
Tenure Indicate the type of tenure.
Probation Dates
Probation Date, SESProbation Date (SeniorExecutive Serviceprobation date), andSupv/Manager ProbationDate (supervisor/managerprobation date)
Enter the applicable probation date, probation, or supervisor/managerprobation date. There are different time frames associated with each probationdate based on different regulatory requirements.
Retained Grade Expires
Begin Date and ExpiresDate
Where appropriate, enter the employee’s retained grade begin date and expiresdate. These are informational fields provided for the agency to track theemployee’s eligibility to maintain retained grade.
Permanent Data-RIFThese informational fields enable the agency to track the employee relative to RIF processing.
Pay Plan/Grade Enter the employee’s pay plan and pay grade.
172 PeopleSoft Proprietary and Confidential

Chapter 6 (USF) Hiring Employees
Comp/Area Level Enter the employee’s compensation area and level.
RIF Series Select the employee’s RIF series.
Links
Non Pay Data Click to access the Non Pay Data page and enter information related to astatus of non-pay.
Time Reporter Data Click to review PeopleSoft time and labor data for this employee. If you aren’tusing PeopleSoft Enterprise Time and Labor, the link is unavailable.
Security Info (securityinformation)
Click to access the Security Info page and enter information related to theemployee’s security clearance and financial disclosure.
See AlsoChapter 17, “(USF) Processing Automatic Actions for Probation, Tenure, and WGIs,” page 425
Tracking Nonpay Status InformationAccess the Non Pay Data page.
Non Pay Data page
NOA Code Indicates the PAR processed to place the employee in a nonpay status.
Expiration Date The nonpay expiration effective date, which reflects the projected expiration ofnonpay status and consequent processing of a PAR to return to pay status.
Last Date Worked Enter the date last worked prior to being placed in a nonpay status.
SCD Hours, ProbationHours, and Career TenureHours
Enter and track SCD hours, probation hours, and career tenure hours inthese informational fields.
Entering Employee Security and FinancialDisclosure InformationAccess the Security Info page.
PeopleSoft Proprietary and Confidential 173

(USF) Hiring Employees Chapter 6
Security Info page
Security Clearance If the employee has received a security clearance, enter the level of securityclearance or select Not Required to indicate that clearance isn’t required.
Status and Status Dt (statusdate)
Enter the status and status date.
Financial DisclosureRequired and Due Date
If a financial disclosure is required, select this check box, and enter thedue date for receipt.
See AlsoPeopleSoft Enterprise Human Resources 8.9 PeopleBook: Manage Positions, “Setting Up Positions,” (USF)Setting Up Position Titles
PeopleSoft Enterprise Human Resources 8.9 PeopleBook: Manage Positions, “Setting Up Positions,”Creating Positions
PeopleSoft Enterprise HRMS 8.9 Application Fundamentals PeopleBook, “Setting Up Jobs,” Classifying Jobs
Viewing Component Interface ExceptionsAccess the CI Exceptions page.
174 PeopleSoft Proprietary and Confidential

Chapter 6 (USF) Hiring Employees
CI Exceptions page
Once you insert your personnel action, set it to Pro for Processed, and click Save, the system will update allthe relevant tables with the new data. The system uses a series of Component Interfaces (CIs) to make theseupdates. Should the CIs encounter an Error, the personnel action update will stop and roll back to the originalstate and thus no updates will be saved until you address the Error and click Save again.
Should the CIs encounter any warning messages, the update will continue while the warning messages aredisplayed for you in the CI Exceptions page after the transaction has been successfully saved. These warningsare relevant to the processed transaction and will be automatically deleted once another personnel action isprocessed. It is good practice to note the warnings and contact your PeopleSoft Technical Administrator tohelp resolve them. The CI Exceptions page displays an auto-generated step-by-step documentation of what theCIs are executing which provides valuable insight into the back-end technology used in the Federal product.
Entering Education InformationTo enter information on the employee’s education, use the School Education page.
When you save the Hire component, the system returns the School Education page for you to complete. Afteryou have completed the page, the save process for the Hire component continues.
See AlsoPeopleSoft Enterprise Human Resources 8.9 PeopleBook: Manage Positions, “Managing Position Data,”Updating Position Data
PeopleSoft Proprietary and Confidential 175

(USF) Hiring Employees Chapter 6
Assigning Employees to PositionsIf you organizing part or all of PeopleSoft Enterprise Human Resources by position (using PeopleSoftEnterprise Human Resources Manage Positions), you can hire some or all new employees into positions onthe Hire Employee pages, accessed from the Workforce Administration, Increase Workforce menu. If you’renot using PeopleSoft Enterprise Human Resources Manage Positions, you can also use position numbersbut the system won’t process position-related data.
Hiring Employees into PositionsWhen you assign an employee to a position, many fields on the Hire pages are set by default fromthe Add/Update Position Info component (Organization Development, Position Management, MaintainPositions/Budgets, Add/Update Position Info).
To take advantage of this feature when hiring employees into positions, follow these steps:
1. Select a hire action on the Data Control page.2. Select a position number on the Job page before entering values in other fields on this page.You define positions and assign position numbers in the Add/Update Position Info component.
3. When you move out of the Position field on the Job page, the system completes the position-related fieldswith default data from the Add/Update Position Info component.These fields include Job Code, Agency, Sub-agency, Department, and Location, which are unavailable forentry. The system completes the Effective Date field using data from the Data Control page.PeopleSoft Enterprise Human Resources issues a warning message if you assign an employee to aposition that has already been filled by another employee and if a new employee appointment exceedsthe maximum head count for that position. The system calculates the current head count and shows theappropriate indicator for open/filled on the Position Data – Description (POSITION_DATA1) page. Thesystem does this when you change employee assignments.
4. Enter exceptions to default position data for this employee by selecting the Position Override check box.You may need to enter exceptions to the default position data for this employee. For example, the employeemay be located in a different location than the standard location associated with the position. Selecting thePosition Override check box causes fields previously unavailable for entry, including the Job Code, Agency,Location, and Department fields, to become available. You can then enter exceptions in these fields.
Note. If you override the defaults for position-related data, you must maintain the employee data manually.The system won’t update position data automatically again until you clear the Position Override check box.
When you are hiring an employee, the Position Management Record field is unavailable. The system uses thisfield to indicate that it has automatically inserted a data row in the Job Data pages due to changes you’ve madeto fields in the Add/Update Position Info component that overlap with fields here.
See AlsoPeopleSoft Enterprise Human Resources 8.9 PeopleBook: Manage Positions, “Setting Up Positions”
176 PeopleSoft Proprietary and Confidential

Chapter 6 (USF) Hiring Employees
Hiring Job ApplicantsUse the Recruit Workforce business process to track information about people who apply for jobs with yourorganization. This business process includes a component called Hire (Recruiting, Hire Applicants, Hire USF)that is designed especially for hiring job applicants. When you use this component to hire an applicant, theinformation you’ve already entered in the system automatically becomes part of the employee’s record.
This component assigns employee IDs to applicants in a slightly different way from new hires. All other fieldson these pages are documented earlier in this chapter.
Note. If you’re using the Recruit Workforce business process in PeopleSoft Enterprise Human Resourcesand hiring an applicant, the system completes the referral source with the information you’ve already enteredfor that applicant.
Adding Concurrent JobsIf your organization allows employees to hold more than one job, use the Concurrent Hire component to enternew jobs for employees who already have one or more jobs. The component consists of the Data Control,Job, Position, Compensation, Employment 1, and Employment 2 pages.
If an employee has more than one job, you may want to designate one job as primary and others as secondary.The primary job designation is used for government reporting.
See AlsoChapter 4, “Adding a Person in PeopleSoft Human Resources,” page 55
PeopleSoft Enterprise HRMS 8.9 Application Fundamentals PeopleBook, “Setting Up and Working withGroups”
PrerequisitesBefore you can add multiple jobs for your workforce, you must:
• Select the Multiple Jobs Allowed check box in PeopleTools.
• Update user security so that users have access to the menu options they’ll need.
Printing Appointment Affidavits and PreliminaryEmployment Data Forms
This section lists the pages used to run the Appointment Affidavits (FGSF61) and Request for Prel EmployData (request for preliminary employment data) (FGSF755) reports.
PeopleSoft Proprietary and Confidential 177

(USF) Hiring Employees Chapter 6
Pages Used to Print the FormsPage Name Object Name Navigation Usage
SF61 Report RUNCTL_FGSF61 Workforce Administration,Job Information, Reports,Appointment Affidavits USF
Produces an AppointmentAffidavit STANDARDFORM 61 form to be signedby an appointee.
SF-75 Run Control RUN_CNTL_FGSF75 Workforce Administration,Job Information, Reports,Request Prelim Empl DataUSF
Produces a Request forPreliminary EmploymentData form.
178 PeopleSoft Proprietary and Confidential

CHAPTER 7
Entering Additional Data in HumanResources Records
This chapter provides an overview of additional worker data and discusses how to:
• Locate personnel records.
• Set up and track workforce contracts.
• Enter temporary assignments.
• Track disabilities.
• Handle company credit cards.
• Handle company property.
• Track dependent and beneficiary data.
• Track emergency contacts.
• Manage citizenship and visa or permit information.
• Manage driver’s license information.
• Enter bank account information.
• Track volunteer activity.
• Enter and track additional workforce data.
Understanding Additional Worker DataAfter you’ve entered a worker’s basic personal information and created one or more organizational instancesfor them, use other pages in the Workforce Administration menu to add and track a broad range of otherinformation for that person.
While many of the pages covered in this chapter are optional, you may find them useful for tracking andreporting, and for maintaining compliance with government regulations. You can also provide other people,such as your employees or industrial relations representatives, with information that helps them perform theirjobs more effectively.
Locating Personnel RecordsWhen you open an additional information page, the system displays the dialog box for you to select the person.If you don’t know the person’s employee ID, there are alternate ways to locate the person’s record:
PeopleSoft Proprietary and Confidential 179

Entering Additional Data in Human Resources Records Chapter 7
• Use the search dialog box to search for the correct record by name or partial last name.Advanced search options may also be available.
• Use the Search for People page to search for a person ID by name, address, city, date of birth, gender, ornational ID.
• Use the Search by National ID page to find a person’s person ID by using a national ID.After you have the person’s employee ID, enter it in the dialog box for the page you are accessing.
This section discusses how to:
• Search with the search dialogue.• Search for person information.• Search by national ID.
Page Used to Locate Personnel RecordsPage Name Object Name Navigation Usage
Search for People HCR_SM_SEARCH Workforce Administration,Personal Information, Searchfor People
Search for and select aperson.
Search by National ID NID_LOOKUP Workforce Administration,Personal Information,Biographical, Search byNational ID
Locate a person’s employeeID by using the nationalID. When you find theperson’s employee ID, use itwhen you move to othersearch pages.
Searching with the Search DialogueUse the following search dialog box to find a person’s information. You encounter this sort of dialog boxwhen you enter most pages in the Workforce Administration menu. You can also enhance the component’sunderlying search record to expose other fields as alternate search criteria or as list box items. These fieldsmay include relevant additional fields such as: alternate character name, department, setID, organizationalrelationship, POI type, and so on.
180 PeopleSoft Proprietary and Confidential
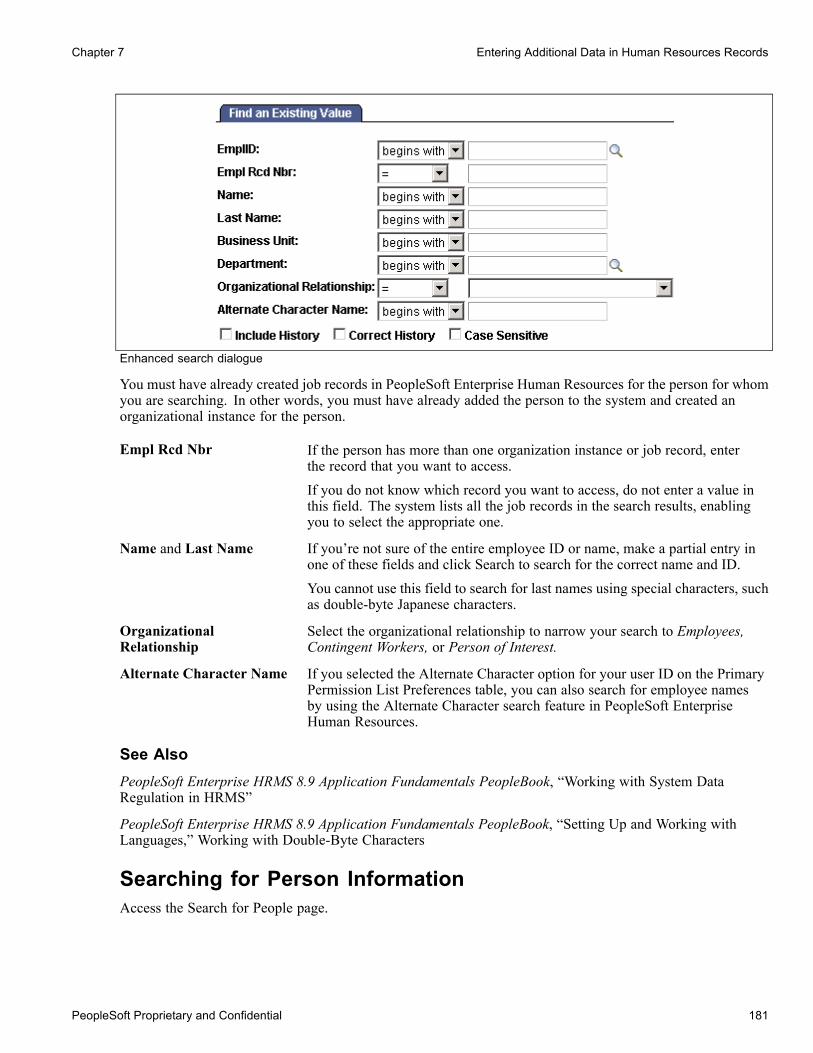
Chapter 7 Entering Additional Data in Human Resources Records
Enhanced search dialogue
You must have already created job records in PeopleSoft Enterprise Human Resources for the person for whomyou are searching. In other words, you must have already added the person to the system and created anorganizational instance for the person.
Empl Rcd Nbr If the person has more than one organization instance or job record, enterthe record that you want to access.
If you do not know which record you want to access, do not enter a value inthis field. The system lists all the job records in the search results, enablingyou to select the appropriate one.
Name and Last Name If you’re not sure of the entire employee ID or name, make a partial entry inone of these fields and click Search to search for the correct name and ID.You cannot use this field to search for last names using special characters, suchas double-byte Japanese characters.
OrganizationalRelationship
Select the organizational relationship to narrow your search to Employees,Contingent Workers, or Person of Interest.
Alternate Character Name If you selected the Alternate Character option for your user ID on the PrimaryPermission List Preferences table, you can also search for employee namesby using the Alternate Character search feature in PeopleSoft EnterpriseHuman Resources.
See AlsoPeopleSoft Enterprise HRMS 8.9 Application Fundamentals PeopleBook, “Working with System DataRegulation in HRMS”
PeopleSoft Enterprise HRMS 8.9 Application Fundamentals PeopleBook, “Setting Up and Working withLanguages,” Working with Double-Byte Characters
Searching for Person InformationAccess the Search for People page.
PeopleSoft Proprietary and Confidential 181

Entering Additional Data in Human Resources Records Chapter 7
This page enables users of an application to search for and select a person to process. Using this system, anapplication can easily render a UI that prompts the user for partial names and displays a list of candidates fromwhich the user can select. Additional features include optional drill-down to additional non-sensitive data.
See PeopleSoft Enterprise HRMS 8.9 Application Fundamentals PeopleBook, “Working with CommonComponents,” Configuring Person Search.
Searching by National IDAccess the Search by National ID page.
Search by National ID page
National ID Enter the national ID of the person whose records you want to view.
Search In Select Employees or Dependents and Beneficiaries to narrow your search.
Note. Employees includes all people who were added to the system on thePersonal Information component, including contingent workers and people ofinterest.
Search Click to have the system display a list of the records that match the ID thatyou entered.
Setting Up and Tracking Workforce ContractsTo set up workforce contracts, use the Contract Type Table (CONTRACT_TYPE_TBL), Contract Clause Table(CNT_CLAUSE_TABLE), Contract Template Table (CNT_TEMPLATE_TABLE), Contract Status/Content(CONTRACT1), Contract Type/Clauses (CONTRACT2), Original Contract Data (CONTRACT_BEL_SEC),and Signature Date/Probation Info (CONTRACT3) components.
Many organizations maintain contracts or other written agreements with their workforce. The PeopleSoftsystem enables you to set up standard contracts for your organization.
This section discusses how to:
• Define different types of contracts.• Add basic contract information.• Add special contract clause information.• Add signature date, responsible party, and probation information.• Generate the Contract Information report.
182 PeopleSoft Proprietary and Confidential

Chapter 7 Entering Additional Data in Human Resources Records
See AlsoPeopleSoft Enterprise Payroll for North America 8.9 PeopleBook, “(E&G) Administering Contract Pay”
PeopleSoft Enterprise Human Resources 8.9 PeopleBook: Manage Labor Administration, “Setting UpContracts and Unions”
Pages Used to Set Up and Track Employment ContractsPage Name Object Name Navigation Usage
Contract Type Table CONTRACT_TYPE_TBL Workforce Administration,Job Information, ContractAdministration, DefineContract Types
Define the different types ofcontracts that your enterpriseadministers.
Contract Clause Table CNT_CLAUSE_TABLE Workforce Administration,Job Information, ContractAdministration, DefineContract Clauses
Define special languagesand riders that can be addedto the main body of aworkforce contract.
Contract Template Table CNT_TEMPLATE_TABLE Workforce Administration,Job Information, ContractAdministration, DefineContract Templates
Set up all of yourorganization’s standardworkforce contracts. Usethe information that youdefine here when you assigncontracts to employees andcontingent workers in yourorganization.
See PeopleSoft EnterpriseHuman Resources 8.9PeopleBook: Manage LaborAdministration, “Setting UpContracts and Unions”.
Contract Status/Content CONTRACT1 Workforce Administration,Job Information, ContractAdministration, UpdateContracts, ContractStatus/Content
Add or update basicinformation about thecontract between yourorganization and a worker,including the contractduration, type, and content.
You must have previouslyset up contract template IDson the Contract TemplateTable page.
Contract Type/Clauses CONTRACT2 Workforce Administration,Job Information, ContractAdministration, UpdateContracts, ContractType/Clauses
Add or update any specialcontract clause informationto the standard contractlanguage for this worker.
Original Contract Data CONTRACT_BEL_SEC Click Original Contract onthe Contract Type/Clausespage.
Enter information about theoriginal contract that the newcontract is replacing.
PeopleSoft Proprietary and Confidential 183

Entering Additional Data in Human Resources Records Chapter 7
Page Name Object Name Navigation UsageSignature Date/ProbationInfo
CONTRACT3 Workforce Administration,Job Information, ContractAdministration, UpdateContracts, SignatureDate/Probation Info
Add or update the signaturedate, responsible party, andprobation information. Viewbasic job data.
Contract Information RUNCTL_CNT001 Workforce Administration,Job Information, ContractAdministration, ContractInformation Report
Generate the ContractInformation report(CNT001) that lists allcontracts for a worker orthe contract history for allworkers within a designatedperiod.
Defining Different Types of ContractsAccess the Contract Type Table page.
Contract Type Table page
(ESP) Spain
Contract Rule Enter the number of the law that governs this kind of contract. A typical lawnumber includes the type of law, law number, and year—for example, RD3290/1997 or Ley 22/1995.The system doesn’t edit your entry.
Allowed Extensions Select to permit extensions to be added to this type of contract.
184 PeopleSoft Proprietary and Confidential

Chapter 7 Entering Additional Data in Human Resources Records
Min. Duration (minimumduration),Max Duration(maximum duration), andUnit
Specify the minimum and maximum length that is allowed for this type ofcontract. Enter a quantity in the Min. Duration and Max Duration fields anduse the Unit field to select a unit of time. For example, if the minimumcontract duration is six months, enter 6 in the Min. Duration field, then selectMonths from the available options in the Unit field.
Reduction ID This field is active only if PeopleSoft Enterprise Global Payroll for Spain isinstalled. Select the reduction ID that corresponds to the contract type. Thereduction ID identifies the specific reduction definition or rule that applies to anemployer. In certain limited cases—such as when a company hires employeeswith disabilities, or hires workers older than 45 years of age—the employermay qualify for a reduction in the amount of social security contributions.
Soc. Sec. Nbr. ForEmployer Type (socialsecurity number foremployer type)
Select a social security number type from the available options: none, PartTime, Regular, and Training.
(ITA) Italy
Applicability Select whether this contract type is applicable to employees, contingentworkers, or both.
Adding Basic Contract InformationAccess the Contract Status/Content page.
PeopleSoft Proprietary and Confidential 185
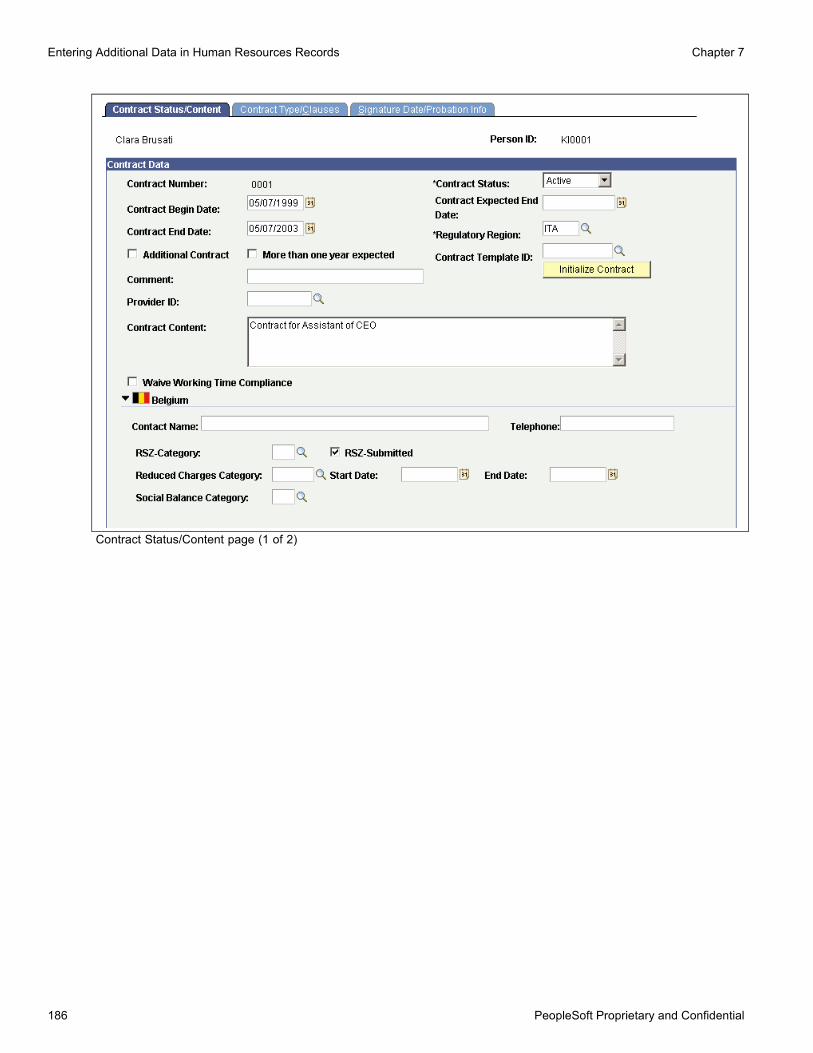
Entering Additional Data in Human Resources Records Chapter 7
Contract Status/Content page (1 of 2)
186 PeopleSoft Proprietary and Confidential

Chapter 7 Entering Additional Data in Human Resources Records
Contract Status/Content page (2 of 2)
Contract Status Indicate whether the contract is Active or Inactive.
Contract Begin Date Enter the date when the contract begins. The current date is the default.
Contract Expected EndDate
Enter the date when you expect the contract will end.
Contract End Date Enter the date when the contract actually ended. This date may differ from thedate that you expect the contract to end.
Regulatory Region Enter a regulatory region.
Additional Contract Select if the worker already has at least one contract. Leave this field blank ifthis is the worker’s only contract.
More than one yearexpected
Select if you expect that this contract will result in more than one year ofemployment for this worker.
Note. This field is required for contracts with Japanese workers.
Contract Template ID andInitialize Contract
If you have defined a template for the contract, select an ID from the list ofvalid templates stored on the Contract Template Table page, and click InitializeContract. The system displays a description of the contract and its defaultcontents.
Provider ID If this contract is with a contingent worker, specify the person’s provider,agency, or employer.
PeopleSoft Proprietary and Confidential 187

Entering Additional Data in Human Resources Records Chapter 7
Contract Content If you entered a contract template code and clicked the Initialize Contractbutton, the system automatically completes this field with the content thatwas entered on the Contract Template Table page. Otherwise, enter thecontract language.
Waive Working TimeCompliance
Select if the contract allows working time compliance to be waived by theworker.
(BEL) Belgium
RSZ-Category If you’re entering a contract and you selected Employment as the contracttype on the Contract Type / Clauses page, choose an RSZ category fromthe valid RSZ category codes stored on the RSZ Category Table page(CNT_RSZ_TBL_BEL).
RSZ-Submitted Select to indicate that social insurance premiums need to be paid by the workerto the Belgian RSZ governing body for this job contract.
Reduced Charges Category Select from among the categories, if appropriate.Employers can lower their RSZ premium contributions if they are offering a jobfor one of the two reduced charges categories. Companies that employ workerswho qualify for the reduced charges category enjoy lower employee costs.
Social Balance Category Select the appropriate social balance category. This information is includedon the BEL Social report.
(ESP) Spain
Probation Period If this worker’s contract includes a probation period, use these two fields tospecify how long it is. Use the first field to enter the appropriate quantity andthe second field to select a unit of time. Units of time are none, Days, Months,or Years. For example, if the probation period is six months, enter 6 in the firstfield, and then select Months in the second field.
Refresh Vacation Click to enter the default value for vacation periods from the Labor Agreementpage in the Vacation Period field.
Vacation Period Use these two fields to specify how much vacation the worker receives peryear. Use the first field to enter the appropriate quantity and the second fieldto select a unit of time. Units of time are none, Months, Natrl Days (naturaldays), Weeks, or Work Days. For example, if the vacation period is 20 workdays, enter 20 in the first field, and then select Work Days from the optionsin the second field.
Begin/End Week Specify the days when the worker’s work week begins and ends. The defaultvalues are Monday and Friday.
Compensation RateDescription
Enter a free-form description of the worker’s compensation rate.
Hiring Center Select the hiring center that is responsible for hiring this person.
Scheme ID Select a scheme ID.
Social SecurityContribution
Select a social security contribution ID for the selected contract and schemeID. The system uses both the scheme ID and the contribution ID for social
188 PeopleSoft Proprietary and Confidential
Chapter 7 Entering Additional Data in Human Resources Records
security calculations, to determine the percentage or fixed amount that isapplied to the calculation of a worker’s contribution.
Unemployment Conditionand Social ExclusionEmployee
The AFI report contains this information.
Re-Joined DisabledEmployee, FirstSelf-Worker Employee,and Active Rent
Select to indicate that the worker has an official certificate and meets theconditions that are required to sign the specific kind of contract. The AFIreport contains this information.
Reduction ID If the worker is entitled to a reduction in social security contributions, selectthe reduction that applies:
• KE4 is the reduction for workers aged 60 and over with a minimum of 5years of seniority.
• KE5 is the reduction for workers aged 65 and over with a minimum of 25years of contributions to social security.
(ESP) Workforce Contracts for Disabled Spanish WorkersIf a Spanish employer hires a disabled person, the workforce contract must be in writing. When you hire adisabled person, you must keep the disabled worker for a minimum of three years. The disabled person has theright to work reduced hours for prorated less pay.
See AlsoChapter 3, “Setting Up Country-Specific Tables,” (ESP) Setting Up Spanish Workforce Tables, page 38
Chapter 3, “Setting Up Country-Specific Tables,” Defining Maximum and Minimum Social Security Ceilings,page 41
Adding Special Contract Clause InformationAccess the Contract Type/Clauses page.
PeopleSoft Proprietary and Confidential 189

Entering Additional Data in Human Resources Records Chapter 7
Contract Type/Clauses page (1 of 2)
Contract Type/Clauses page (2 of 2)
Contract Clauses
Seq# (sequence number) When you add a clause to the contract, the system assigns a sequence numberautomatically.
190 PeopleSoft Proprietary and Confidential

Chapter 7 Entering Additional Data in Human Resources Records
Clause Select a clause.
Clause Status The status that is associated with the clause that you selected appears bydefault.
(BEL) Belgium
Duration Select a duration period for the workforce contract.
Original Contract If Replacement defines the duration period, the Original Contract link appears.Click to access the Contract Replacement page to enter the employee ID andoriginal contract number.
Statute Select a contract statute, or employment category, for this worker.
Indep. Profession(independent profession)
If you selected Self employed as the contract type, provide the worker’sindependent profession here.
Substatute Select a substatute, or employment subcategory. The system displays onlythose substatutes that are associated with the statute code that you selected.
Profession If you selected Member of the Professions as the contract type, indicateadditional profession information here.
(FRA) FranceAny worker who is eligible for an URSSAF contribution must be associated with a contribution class code(social security code or regime).
Category TDS Select a worker category: Apprentice, Executive, and Manager. This field isused to prepare the DADS TDS report.
Multiple Employer Rate Some contracts reduce the earnings ceilings for some contributions (forexample, URSSAF). The reduction appears here as a percentage.If a worker has more than one employer, use the multiple employer rate toindicate the percentage of contributions that should be taken from eachemployer to avoid over-taxing. The earnings ceilings are prorated using thisrate. For example, suppose that a worker has two employers, and he receives40 percent of his salary from employer A and 60 percent of his salary fromemployer B. In the Multiple Employer Rate field, employer A enters 40and employer B enters 60.
Work Contract/ActivityCaract
Used to prepare the DADS TDS report. Values are Full Time, Home, Intermitt.,Part Time, Seasonal W, Temporary, and Wo Ctc Cpl.
Gross ReductionPercentage
The gross reduction percentage is applied to the gross salary for specificjob categories, such as for journalists and artists. These workers do notpay their contributions on their gross salaries. Instead, their gross salariesare reduced by the percentage indicated here. For example, suppose that aworker is entitled to a 30 percent reduction. If he has a salary of 10000 FRF,he contributes for only 7000 FRF. This field has a default value of 0.
Social Security Code Select a social security code. The social security code is the contribution class,or régime, of the worker. Any worker who is eligible for a contribution mustbe associated with a social security code.
PeopleSoft Proprietary and Confidential 191

Entering Additional Data in Human Resources Records Chapter 7
Employee ProfessionalStatus
Select the profession that is designated for this worker.
Category Status Select the category status.
Mandatory Base Scheme Select the base compensation scheme for this workforce contract.
(ITA) Italy
Plan ID If the worker was assigned a contract type of Training and Labor, you mustselect a plan ID.
Reason If the worker was assigned a contract type of 001: Limited Contract, youmust enter a reason for the contract.
Empl ID Replaced If the reason for the determined period contract type is Maternity orReplacement, select the employee ID of the worker who is being temporarilyreplaced by this contract worker.
The following fields appear in the Target Categorization group box only if the contract type is Trainingand Labor.
Labor Agreement Select the labor agreement for this contract and plan ID.
Category Select the labor category for this contract.
Subcategory Select the subcategory for this contract.
Subcategory 2 If the subcategory selected above has further divisions, select the subcategory2 here.
(ESP) Spain
Woman Hired 24 monthsafter M. (woman hired 24months after maternity)
Select to indicate that the worker is a woman hired after 24 months ofmaternity leave. The AFI report contains this information.
Woman Subrepresented Select to indicate that the worker is a woman hired in a company or sectorwhere women are underrepresented.
See AlsoChapter 8, “(BEL) Entering Additional Data for Belgian Workers,” Setting Up Belgian Employment ContractStatutes for Claeys Calculations, page 246
Adding Signature Date, Responsible Party, andProbation InformationAccess the Contract Data - Signature Date/Probation Info page.
192 PeopleSoft Proprietary and Confidential
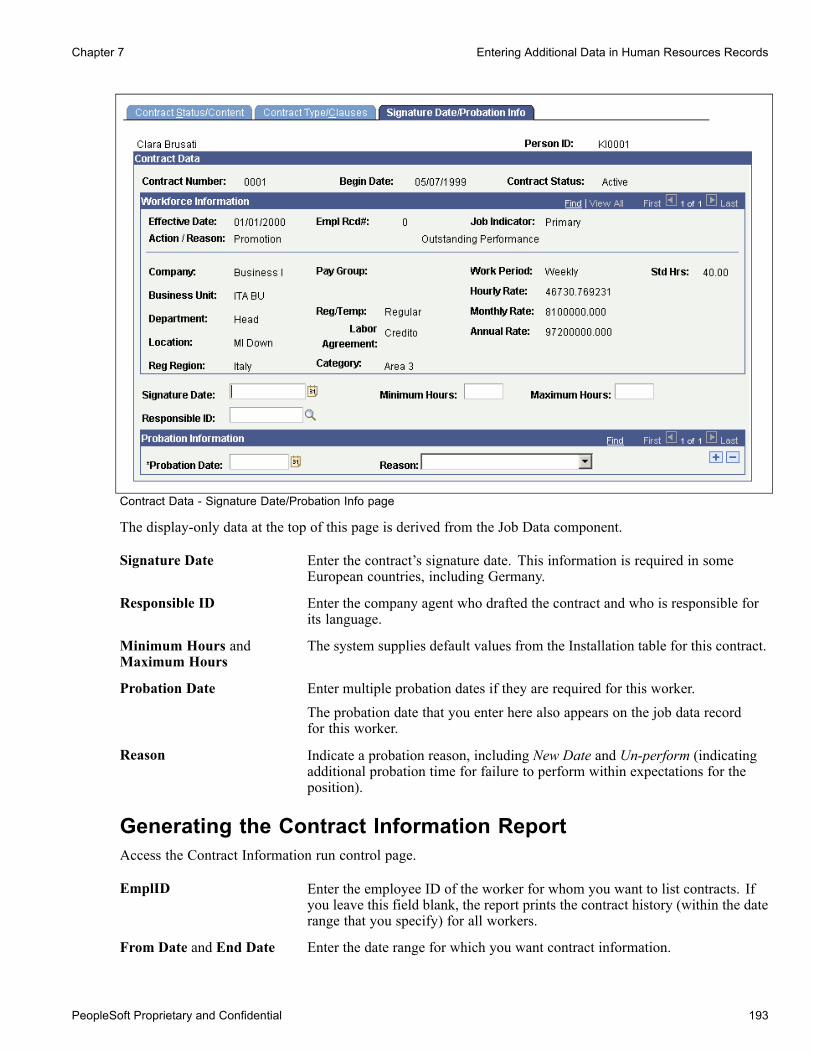
Chapter 7 Entering Additional Data in Human Resources Records
Contract Data - Signature Date/Probation Info page
The display-only data at the top of this page is derived from the Job Data component.
Signature Date Enter the contract’s signature date. This information is required in someEuropean countries, including Germany.
Responsible ID Enter the company agent who drafted the contract and who is responsible forits language.
Minimum Hours andMaximum Hours
The system supplies default values from the Installation table for this contract.
Probation Date Enter multiple probation dates if they are required for this worker.The probation date that you enter here also appears on the job data recordfor this worker.
Reason Indicate a probation reason, including New Date and Un-perform (indicatingadditional probation time for failure to perform within expectations for theposition).
Generating the Contract Information ReportAccess the Contract Information run control page.
EmplID Enter the employee ID of the worker for whom you want to list contracts. Ifyou leave this field blank, the report prints the contract history (within the daterange that you specify) for all workers.
From Date and End Date Enter the date range for which you want contract information.
PeopleSoft Proprietary and Confidential 193

Entering Additional Data in Human Resources Records Chapter 7
Entering Temporary AssignmentsThis section provides an overview of temporary assignments and substantive jobs and discusses how to:
• Enter a temporary assignment.
• Run the temporary assignment termination and substantive job reactivation process.
• Add a partial temporary assignment.
Understanding Temporary Assignments and Substantive JobsThis section discusses:
• Substantive jobs.• Temporary assignments.• Data row impacts.• Additional considerations for temporary assignments and data processing.
Substantive JobsThe substantive job assignment is the worker’s original job, created when the first employment or contingentworker instance was added.
Temporary AssignmentsWhen a worker covers the responsibilities of another job besides the substantive job, the worker works atemporary assignment. Temporary assignment data must be tracked the same way that substantive job datais tracked.
For example, a person hired into a teaching appointment takes this as the substantive job. The person thenreceives a one month temporary assignment as a department head. The original teaching position is suspendedfor the duration of the temporary assignment.
It is also possible that the person takes a temporary assignment on a partial basis. The person might retainthe substantive teaching position for twenty hours a week while also working the temporary assignment asdepartment head for the other twenty hours. The person cannot work beyond the forty-hour workweek, but anycombination of assignments might be entered to fill the forty hours.
Data Row ImpactsThe Temporary Assignments feature requires that the system insert data rows at various stages throughoutthe process. For example, when selecting Temporary Assignment as the action or reason, the system insertsa second data row that puts the substantive job on hold. When a data row has been inserted by the system,the word system appears next to the employment record number (ERN) when viewed later. These data rowsshow an action or reason of SUB (hold substantive job), RFA (return from temporary assignment), or RTS(return to substantive job).
The substantive job retains its ERN while it is suspended and the temporary assignment is identified by anew ERN. This process enables the system to uniquely identify both job data records and maintain themsimultaneously.
Additional Considerations for Temporary Assignments and Data ProcessingReview these additional considerations when creating temporary assignments:
194 PeopleSoft Proprietary and Confidential

Chapter 7 Entering Additional Data in Human Resources Records
• When position data changes, the system updates position data for all workers in the affected positionregardless of whether the assignment is temporary or substantive.This update does not alter the active or inactive status of the workers in the affected position.Similarly, when the substantive position changes, the system does not change the temporary assignmentsfor the worker. The only exception is the unlikely possibility that a worker’s temporary and substantiveassignments are in the same position.
• The worker’s pay rate matches the active assignment.If a worker works multiple assignments beyond the substantive job, the system prorates the pay for eachassignment. For example, if the employee teaches for twenty hours a week and acts as department head fortwenty hours a week, payroll processes each job at 50% of the standard pay. To change the pay rate, youcan override the position data manually on the Compensation page.
Note. Use the Job Data component pages for creating temporary assignments.
Pages Used to Process Temporary AssignmentsPage Name Object Name Navigation Usage
Reactivate/TerminationUpdate
RC_TEMP_ASSGN_UPDT Workforce Administration,Job Information,Temporary Assignments,Reactivate/UpdateTermination
Run the temporaryassignment termination andsubstantive job reactivationprocess.
Temp Assignment w/outEnd Date
RUNCTL_TAS001 Workforce Administration,Job Information, TemporaryAssignments, TempAssignmt w/out End Date
Run the Temp Assignmentw/out End Date report(TAS001). The reportlists workers currently ontemporary assignment whereend dates have not beendefined.
Temp Assignmt Due toComplete
RUNCTL_TAS002 Workforce Administration,Job Information, TemporaryAssignments, TempAssignmt due to Complete
Run the Temp Assignmentdue to Complete report(TAS002). This report listsworkers due to completetemporary assignmentswithin the user specifieddate range.
See AlsoChapter 2, “Setting Up the Administer Workforce Business Process,” Defining Personnel Actions andReasons, page 5
Entering a Temporary AssignmentAccess the Job Data - Work Location page.
To enter a temporary assignment:
1. Locate the substantive job that will be put on hold during the temporary assignment.
2. Insert a new data row with the following parameters:
PeopleSoft Proprietary and Confidential 195
Entering Additional Data in Human Resources Records Chapter 7
• Enter the effective date that the temporary assignment begins.• Enter Temporary Assignment in the Action/Reason field.When you use this value in the Action/Reason field, the system suspends the worker’s substantive job,transferring the substantive job data, including payroll and benefits information, to the next job recordfor this worker. The Reactivation/Termination process reactivates the substantive job upon terminationof the temporary assignment.
• Enter the temporary assignment position number, if applicable.3. (Optional) On the Job Data − Job Information page, enter the termination date for the temporaryassignment in the Planned Exit field.
4. (Optional) Select the End Job Automatically check box to end the job on the termination date.This action also reactivates the substantive job when you run the Reactivation/Termination process.
5. Select the type of duties in the Duties Type field for this temporary assignment.
Note. You must enter the planned exit date and select the End Job Automatically option for theReactivation/Termination process to run automatically for each assignment. If you do not complete these fields,the termination of the temporary assignment and reactivation of the substantive job must be handled manually.
Whereas the previous procedure outlines the required actions for entering temporary assignments, you canalso make other adjustments, as necessary, on any of the pages in the component. For example, it might benecessary to adjust the pay rate on the Compensation page. You should make this adjustment while creatingthe temporary assignment. When you save this information, the system suspends the substantive position.
Running the Temporary Assignment Termination andSubstantive Job Reactivation ProcessAccess the Reactivate/Termination Update page.
Complete the Company and Expected Job End Date up to fields and run the Reactivate/Termination Updateprocess (HR_REACTVTER).
This process must be run periodically to terminate temporary assignments (with job end dates) and to reactivatesubstantive positions. This process inserts new data rows into the job data record. These data rows have reasoncodes of SUB (hold substantive job), RFA (return from temporary assignment) and RTS (return to substantivejob), and the designation system next to the employee record number when viewed later.
Adding a Partial Temporary AssignmentYou can add a temporary assignment that is fewer than 40 hours per week while maintaining the substantivejob that fills the remaining hours. For example, an employee who is assigned to a temporary position thatrequires only 10 hours a week retains the substantive position for the other 30 hours. In this case, bothjobs must remain active.
To allow both jobs to remain active, use the Assign Additional Job component to enter the temporaryassignment. You must then adjust the standard hours of the substantive position so that the hours for bothjobs—substantive and temporary—equal 40 hours. You can still enter an end date for the temporaryassignment and have that job end automatically. However, you must manually readjust the standard hours forthe substantive position after the temporary assignment ends.
196 PeopleSoft Proprietary and Confidential

Chapter 7 Entering Additional Data in Human Resources Records
To replace a substantive job with two or more temporary assignments, choose one of the temporaryassignments to replace the substantive job following the same procedure for assigning one temporary job,adjusting the hours appropriately. Then assign the second temporary position as a concurrent job.
If a worker has multiple substantive positions and is assigned one temporary position, the temporary assignmentcan only be assigned to one of the substantive positions. The other substantive positions must be manuallysuspended and reactivated using Hold Substantive Job and Return to Substantive Job as the action or reason.
Note. When assigning any combination of temporary assignments, you can still select the End JobAutomatically check box on the Job Information page for the temporary assignment. However, if you haveadjusted the standard hours for the substantive position, you must manually set the standard hours to theoriginal setting when the temporary assignment has ended.
See AlsoChapter 5, “Increasing the Workforce,” Adding Additional Assignments, page 130
Tracking DisabilitiesYou can track any disabilities that your workers may have, as well as check your own facilities’ accessibility.Administer Workforce includes a number of reports that list disability information.
This section discusses how to:
• Enter disability information.• Document disability accommodations.• (ITA) Run the ITA Disability report.
Pages Used to Track DisabilitiesPage Name Object Name Navigation Usage
Accommodation Type Table ACCOM_TYPE_TABLE • Set Up HRMS, ProductRelated, WorkforceAdministration, LaborAdministration,Accommodation Type
• Workforce Monitoring,Meet Regulatory Rqmts,Define Regulatory RqmtsData, AccommodationTypes, AccommodationType Table
Define the types ofworkplace accommodationsthat your organization makesfor disabled workers.
Disability DISABILITY Workforce Administration,Personal Information,Disability, Disabilities,Disability
Enter disability information.Indicate if a worker isdisabled and record detailsof the disability.
PeopleSoft Proprietary and Confidential 197

Entering Additional Data in Human Resources Records Chapter 7
Page Name Object Name Navigation UsageAccomm Request ACCOMM_REQUEST Workforce Administration,
Personal Information,Disability, Disabilities,Accomm Request
Enter accommodationrequests that a worker orapplicant makes of yourorganization. You can alsoenter diagnosis codes forworker disabilities.
AccommOption ACCOMM_OPTION Workforce Administration,Personal Information,Disability, Disabilities,AccommOption
Enter the options thatthe organization or theperson with a disability isconsidering to resolve eachaccommodation request.
Accomm Job Task ACCOMM_JOB_TASK Workforce Administration,Personal Information,Disability, Disabilities,Accomm Job Task
Enter the job tasks thatyou are accommodating,classified by job codeand, where necessary, bylocation. If you createessential job tasks in the JobCode Task table, you canenter multiple job tasks foreach accommodation.
(DEU) Heavily Disabled RUNCTL_PER039GR Workforce Administration,Personal Information,Disability, Heavily DisabledGER
Run the Heavily Disabledreport (PER039GR). Thisreport lists heavily disabledworkers and additionalinformation about theirdisabilities.
(DEU) Heavily DisabledEqualiz
RUNCTL_PER040GR Workforce Administration,Personal Information,Disability, Heavily DisablEqualizatn GER
Run the Heavily DisabledEqualization report(PER040GR). This reportcalculates the requirednumber of heavily disabledworkers and the equalizationamount of money if therequired number of heavilydisabled workers is notfulfilled.
(ITA) Disability Report RUNCTL_PER060 Workforce Administration,Personal Information,Disability, Disability ReportITA
Run the Disability Report- ITA (PER060). Thisrun control page runs theAnnual, Name List, orDisability Statistics reports.
See AlsoPeopleSoft Enterprise Human Resources 8.9 PeopleBook: Meet Regulatory Requirements, “(GBR, USA, andUSF) Meeting Disability Regulatory Requirements,” Managing Accommodation Data
Entering Disability InformationAccess the Disability page.
198 PeopleSoft Proprietary and Confidential

Chapter 7 Entering Additional Data in Human Resources Records
Disability page (1 of 4)
PeopleSoft Proprietary and Confidential 199

Entering Additional Data in Human Resources Records Chapter 7
Disability page (2 of 4)
200 PeopleSoft Proprietary and Confidential

Chapter 7 Entering Additional Data in Human Resources Records
Disability page (3 of 4)
Disability page (4 of 4)
Track information regarding worker disabilities using the Disability component, which consists of theDisability page and the three Accommodation Data pages. Using these pages, record information regardingdisabled workers, and the impact on accommodation requirements for your organization. The information canalso be used for regulatory reporting and protecting your organization from claims of disability discrimination.
Disabled Select if the worker is disabled.
PeopleSoft Proprietary and Confidential 201

Entering Additional Data in Human Resources Records Chapter 7
(CHE) Switzerland
Handicap Percent Enter a percentage of disability from 0 to 100.
(DEU) GermanyUse this group box to track worker disability information that your company needs to demonstrate compliancewith the Handicapped Workers Act of 1961. For your company’s purposes, the act defines a handicappedperson as someone who is registered as handicapped and who is disabled to the degree that it impacts earningcapacity. When registered as handicapped, the individual is issued a disability card, and your company musttrack the disability card number, who issued the card, the issue date, and the expiration date.
Disabled Type Identify the worker’s disability type.
Handicap Percent Enter the degree of the disability.
Disabled Position Count Enter the degree to which this worker’s disability can be applied to the totalnumber of positions filled by disabled workers. Not every disabled workermay count as a full disabled position.
Evaluate Enter the date that the person’s disability was evaluated or reviewed. Theevaluation date can be different from the effective date for the disability entry.To maintain a history of evaluation date records, such as past and futureevaluations, insert additional data rows and use the scroll bar to navigatebetween rows.
Card No. Card Issue Date,and Exp. Date (disabilitycard number, card issue date,and card expiration date)
Enter the worker’s disability card number, card issue date, and card expirationdate.
Disability Status Office For each disability card, enter the disability status office that issued the card.
(ESP) Spain
Disability Type Select a disability type:
• Non Disability (none)• Physical Disability• Psychological Disability• Sensorial Disability
Handicap Percent Spanish law requires you to track a disabled worker’s percentage of disability.Enter a percentage from 0 to 100.
Help to Go to Work Select if the worker needs physical assistance to go to work. This check box isavailable only to workers whose disability percentage is between 33% and65%, and is used to calculate a tax deduction for that worker.
Evaluate Enter the date when the disability was evaluated.
Card No. (card number),Card Issue Date, and Exp.Date (expiration date)
The Spanish government issues to people with disabilities a card that certifiestheir percentage of disability. Enter the card number, the date when thedisability card was issued, and the disability card’s expiration date.
Disability Status Office Select the office in charge of monitoring the worker’s disability status.
202 PeopleSoft Proprietary and Confidential

Chapter 7 Entering Additional Data in Human Resources Records
(FRA) FranceUse this group box to track worker disability information that your company needs to demonstrate compliancewith French regulations regarding disability hiring quotas, and to provide notifications to the disabled worker’ssocial security commission, or Commission Technique d’Orientation et de Reclassement Professionnel(COTOREP).
Disability Type Indicate the worker’s disability type, which identifies whether the worker isclassified by COTOREP as disabled, or instead collects a financial stipendfrom the social security commission for some other similar reason. Thesereasons may include widows, orphans, or spouses of a disabled person,and war widows. This information is tracked so that your company cancomplete the required report of this information in a manner similar to theFrench Disability report.
Title Number Enter the worker’s disability number, assigned by COTOREP.
Begin Date Enter the date that the disability started.
End Date If the disability wasn’t permanent, enter the disability end date.
Notification Date Record the date that your company notified the social security commissionthat you hired the worker.
Disability Rate In the specific case of a disability due to a work accident or a professionaldisease, the National Social Security Administration (not COTOREP) assignsa percentage of disability to the worker. The purpose of this percentage isto enable a calculation for an allowance that is paid by the National SocialSecurity Administration. A worker can be recognized as a disabled person byCOTOREP and also be a victim of a work accident or disease.
When applicable, enter the percentage of disability (0 to 100 percent).
(FRA) Known as COTOREPWhen you open the page, the fields in this group box are display-only. If you select COTOREP as thedisability type, the fields become available.
COTOREP Category Enter the level of severity of the worker’s disability, as defined by the socialsecurity commission. Values are:COTOREP A: Light disability.COTOREP B: Medium disability.COTOREP C: Severe disability.
Previous Placement Select to indicate that the worker had a prior disability placement throughCOTOREP.
Previous Placement Type If the worker had a previous placement, indicate the previous placement type.
(FRA) Work Accident/Prof. DiseaseWhen you first open the page, the fields in this group box are display-only. If you select WrkAcc/Dis (workaccident/disabled) as the disability type, the fields become available.
Work Accident and Disease Select whether the disability is the result of a work accident or a disease.
PeopleSoft Proprietary and Confidential 203

Entering Additional Data in Human Resources Records Chapter 7
Prof. Dis. (professionaldisease)
If the disability is the result of a disease, select the type of disease.
(GBR) UKUse this group box to track disability data for United Kingdom (UK) workers and to demonstrate compliancewith the fair hiring and employment provisions of the Disability Discrimination Act of 1995.
Registered DisabledNumber
Enter the worker’s Registered Disabled Number.
Disability Select the worker’s disability type.
(ITA) Italy
Disability Select the worker’s disability type.
Disability Percentage Enter the worker’s disability percentage, as determined by the examiningdoctor.
(JPN) JapanUse this group box to track a worker’s disability category and grades. This information is used for regulatoryand tax reporting purposes.
Disability Code Enter the worker’s disability code (values are legal disability categoriesthat are set by the Ministry of Labor): Disabled, Heavily disabled, Heavymental disorder, and Mental disorder.
Disability Grade Select a value from Grade 1 through Grade 7.
Worker Comp DisabilityGrade (workers’compensation disabilitygrade)
Select a value from Grade 1 through Grade 14.
WC Injury and SicknessGrade (workers’compensation injury andsickness grade)
Select a value from Grade 1 through Grade 3.
(NLD) NetherlandsUse this group box to record disability information for your workforce, and then use this information todocument compliance with regulations under the Disabled Employees Act of 1985 (Wet Arbeid GehandicapteWerknemers).
Handicap Percent Enter the percentage degree to which the worker is handicapped.
Young Handicapped Select to indicate that the worker qualifies for the tax reduction rulefor young handicapped people (Wet arbeidsongeschiktheidsvoorzieningjonggehandicapten, Wajong).
(USA) USA
Disabled Veteran Select only if the worker is a disabled veteran.
204 PeopleSoft Proprietary and Confidential

Chapter 7 Entering Additional Data in Human Resources Records
(NZL) New Zealand
Disability Select the worker’s disability type. These values come from the NZLDisability table.
Disability Program Select if there is an association between the worker and a disability program.
Disability Note Enter additional comments about the disability.
(AUS) Australia
Information Not Given Select if worker disability information is not provided.
Documenting Disability AccommodationsUse the three accommodation data pages—Accomm Request, Accomm Option, and Accomm Job Task—todocument that your company doesn’t have discriminatory practices against people with disabilities. Whenworkers or applicants request that you make accommodations to enable them to perform job tasks, you cantrack all the steps that are involved in resolving those requests.
See AlsoPeopleSoft Enterprise Human Resources 8.9 PeopleBook: Meet Regulatory Requirements, “(GBR, USA, andUSF) Meeting Disability Regulatory Requirements,” Managing Accommodation Data
(ITA) Running the ITA Disability ReportAccess the Disability Report page.
Disability Report page
Annual Select this option if you want to run the annual report, which lists the numberof disabled workers sorted by disability type and gender.
Name List Select this option if you want to run the report that lists the names of disabledworkers by location and gender.
Statistics Select this option if you want to run the report that lists locations and thenumber of disabled and able-bodied workers. Part and full-time disabled
PeopleSoft Proprietary and Confidential 205

Entering Additional Data in Human Resources Records Chapter 7
workers are counted as one. Part-time, able-bodied workers are counted usingtheir full time equivalent (FTE) value. If an able-bodied employee has an FTEvalue of 0.5, then that employee is counted as 0.5 on this report. Full-time,able-bodied workers are counted as 1.
SetID Select the setID of the company for which you are reporting disability statistics.
Location Code Select the location code of the location for which you are reporting disabilitystatistics.
Handling Company Credit CardsIn PeopleSoft Enterprise Human Resources, you can identify company credit cards and then assign thosecards to employees.
This section discusses how to:
1. Enter credit card vendors.2. Assign cards to workers.
PrerequisiteYou must have defined credit card types on the Translate table before entering credit card vendors.
Pages Used to Handle Company Credit CardsPage Name Object Name Navigation Usage
Credit Card Vendor CC_CARD_TBL Set Up HRMS, ProductRelated, WorkforceAdministration, Credit CardVendors
Enter vendors of creditcards that you’ll assign toworkers. A vendor thatyou identify here can belinked to an actual vendorin the Accounts PayableVendor table.
Credit Card Data CC_CARD_DATA Workforce Administration,Job Information, Credit Card
Assign company credit cardsto workers.
Entering Credit Card VendorsAccess the Credit Card Vendor page.
206 PeopleSoft Proprietary and Confidential
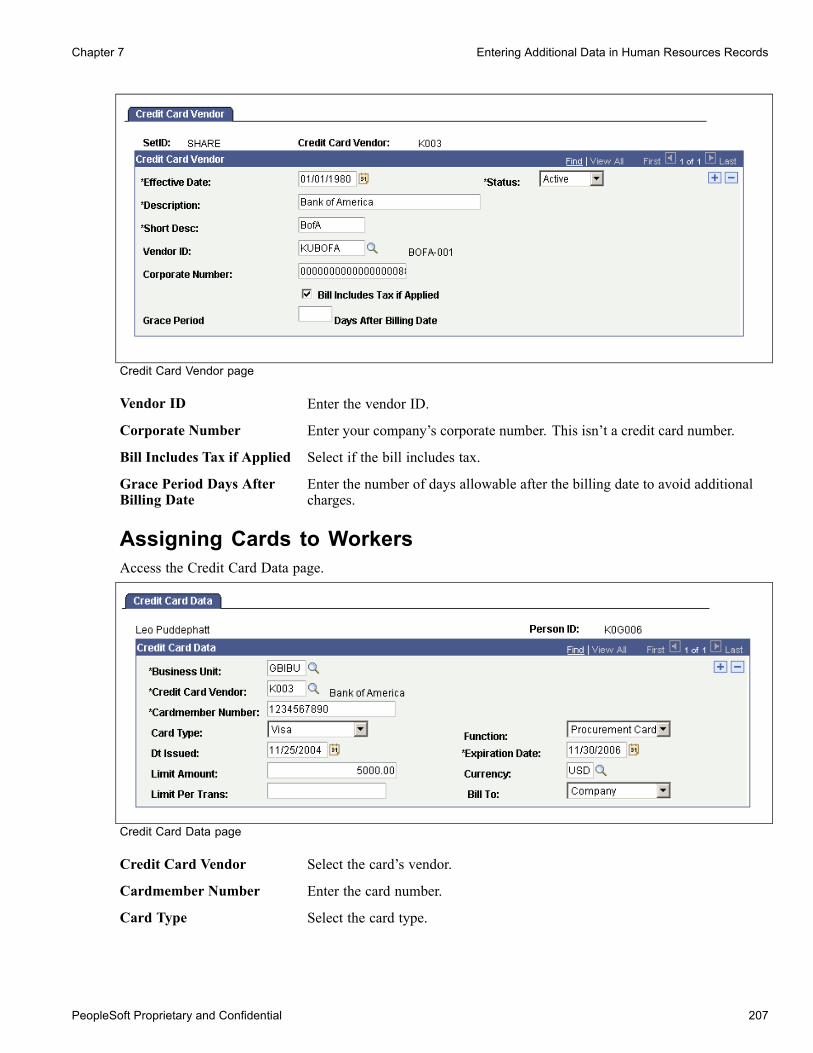
Chapter 7 Entering Additional Data in Human Resources Records
Credit Card Vendor page
Vendor ID Enter the vendor ID.
Corporate Number Enter your company’s corporate number. This isn’t a credit card number.
Bill Includes Tax if Applied Select if the bill includes tax.
Grace Period Days AfterBilling Date
Enter the number of days allowable after the billing date to avoid additionalcharges.
Assigning Cards to WorkersAccess the Credit Card Data page.
Credit Card Data page
Credit Card Vendor Select the card’s vendor.
Cardmember Number Enter the card number.
Card Type Select the card type.
PeopleSoft Proprietary and Confidential 207

Entering Additional Data in Human Resources Records Chapter 7
Function Select the main function for this card (for example, debit card, phone card,or corporate card).
Dt Issued (date issued) Enter the date that the card was issued.
Expiration Date Enter the date that the card expires.
Limit Amount Enter the credit card limit amount.
Limit Per Trans (limit pertransaction)
Enter the limit amount per transaction.
Bill To Select whom to bill for this credit card.
Handling Company PropertyThis section discusses how to:
• Identify company property.
• Assign values to company property.
• Assign company property to workers.
Pages Used to Handle Company PropertyPage Name Object Name Navigation Usage
Company Property -Company Property
COMPANY_PROP_TBL1 Set Up HRMS, ProductRelated, WorkforceAdministration, CompanyProperty, Company Property
Identify company property,such as vehicles, computerequipment, tools, oruniforms.
Property Value COMPANY_PROP_TBL2 Set Up HRMS, ProductRelated, WorkforceAdministration, CompanyProperty, Property Value
Assign values to companyproperty.
Job Information - CompanyProperty
COMPANY_PROPERTY Workforce Administration,Job Information, CompanyProperty
Assign company property toworkers.
Identifying Company PropertyAccess the Company Property - Company Property page.
208 PeopleSoft Proprietary and Confidential

Chapter 7 Entering Additional Data in Human Resources Records
Company Property - Company Property page
Property Code Displays the property code for this item.
Property Type Select a type of property, such as Vehicle or Computer Equipment.
Make/Manufacturer Enter the make and manufacturer for this item.
Model Enter the model.
Car IdentificationIf you select Vehicle as the property type, this group box appears in place of the Make/Manufacturer andModel fields.
Car Identification When you enter a car ID, the system automatically completes the RegistrationNumber, Make/Model, and Color fields based on the values stored for thatcar ID.
Make/Model Enter the make and model for this car.
Model Enter the model.
Registration Number Enter the car’s registration number.
Color Enter the car’s color.
See AlsoPeopleSoft Enterprise Human Resources 8.9 PeopleBook: Administer Company Cars, “Getting Startedwith Administer Company Cars”
PeopleSoft Enterprise Human Resources 8.9 PeopleBook: Monitor Health and Safety, “Tracking PersonalData for People Involved in Incidents,” Entering Non-Employee Data
Assigning Values to Company PropertyAccess the Property Value page.
PeopleSoft Proprietary and Confidential 209

Entering Additional Data in Human Resources Records Chapter 7
Property Value page
Dept ID (Issued To) Enter the identification number of the department to which the propertywas issued.
Serial Number Enter the serial number.
Property Value Enter the value of the property and the currency that you are using.
Asset Number Enter the asset number.
(MAL) Malaysia
Purchase Price Enter the purchase price.
Benefit Value Enter the value of the benefit to be used in calculations
Life Span (years) Enter the number of years expected for the life span of the company property.
Benefit in Kind Select to specify if this property is a Benefit in Kind (BIK)
Assigning Company Property to WorkersAccess the Job Information - Company Property page.
210 PeopleSoft Proprietary and Confidential

Chapter 7 Entering Additional Data in Human Resources Records
Job Information - Company Property page
Property Code Enter the property code for the item that you’ve assigned to the worker.
Issue Date Enter the date that you issued the property to the worker.
Date Returned After the worker returns the property, enter the date that it was returned.
Serial Number The system displays the serial number of the item that you’ve assignedto the worker.
See AlsoPeopleSoft Enterprise Human Resources 8.9 PeopleBook: Monitor Health and Safety, “Tracking PersonalData for People Involved in Incidents,” Entering Non-Employee Data
Tracking Dependent and Beneficiary DataThis section provides an overview of dependent and beneficiary data and discusses how to:
• Enter dependent and beneficiary name information.• Enter dependent address information.• Enter dependent and beneficiary information.• Enter information about court-ordered benefits for dependents.• (NLD) View an employee’s dependents and beneficiaries.• Enter dependent citizenship and passport information.• Enter dependent visa and permit data.
Understanding Dependent and Beneficiary DataUse the Dependent Information component to record important information for dependents that mayaccompany an employee on an international assignment or international travel. You must also have these pagesset up prior to enrolling employees in specific benefit programs.
The Name and Address pages define the relationship of the person to the employee and determine whether theperson is a dependent, beneficiary, or both. This definition affects the person’s eligibility to be enrolled inhealth benefits or to be assigned as a beneficiary in certain benefit plans.
PeopleSoft Proprietary and Confidential 211
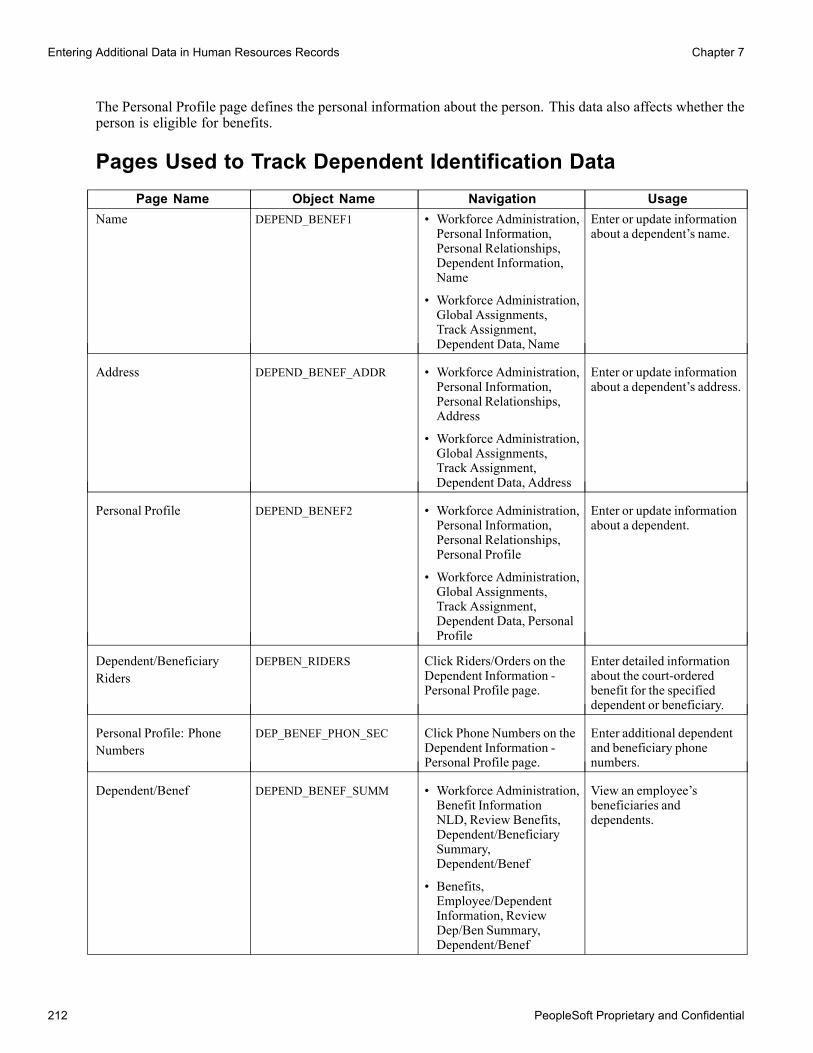
Entering Additional Data in Human Resources Records Chapter 7
The Personal Profile page defines the personal information about the person. This data also affects whether theperson is eligible for benefits.
Pages Used to Track Dependent Identification DataPage Name Object Name Navigation Usage
Name DEPEND_BENEF1 • Workforce Administration,Personal Information,Personal Relationships,Dependent Information,Name
• Workforce Administration,Global Assignments,Track Assignment,Dependent Data, Name
Enter or update informationabout a dependent’s name.
Address DEPEND_BENEF_ADDR • Workforce Administration,Personal Information,Personal Relationships,Address
• Workforce Administration,Global Assignments,Track Assignment,Dependent Data, Address
Enter or update informationabout a dependent’s address.
Personal Profile DEPEND_BENEF2 • Workforce Administration,Personal Information,Personal Relationships,Personal Profile
• Workforce Administration,Global Assignments,Track Assignment,Dependent Data, PersonalProfile
Enter or update informationabout a dependent.
Dependent/BeneficiaryRiders
DEPBEN_RIDERS Click Riders/Orders on theDependent Information -Personal Profile page.
Enter detailed informationabout the court-orderedbenefit for the specifieddependent or beneficiary.
Personal Profile: PhoneNumbers
DEP_BENEF_PHON_SEC Click Phone Numbers on theDependent Information -Personal Profile page.
Enter additional dependentand beneficiary phonenumbers.
Dependent/Benef DEPEND_BENEF_SUMM • Workforce Administration,Benefit InformationNLD, Review Benefits,Dependent/BeneficiarySummary,Dependent/Benef
• Benefits,Employee/DependentInformation, ReviewDep/Ben Summary,Dependent/Benef
View an employee’sbeneficiaries anddependents.
212 PeopleSoft Proprietary and Confidential

Chapter 7 Entering Additional Data in Human Resources Records
Page Name Object Name Navigation UsageDepdnt IdentificationDetails - DepdntCitizenship/Passport
CITIZEN_PP_DEP Workforce Administration,Personal Information,Personal Relationships,Depdnt IdentificationDetails, DepdntCitizenship/Passport
Enter or update dependentcitizenship and passportdata.
Depdnt IdentificationDetails - Depdnt Visa/PermitData
VISA_PERMIT_DEP Workforce Administration,Personal Information,Depdnt IdentificationDetails, Depdnt Visa/PermitData
Enter or update dependentvisa and permit data.
Entering Dependent and Beneficiary Name InformationAccess the Dependent Information - Name page.
Dependent Information - Name page
The system displays the name and the employee ID for the employee.
Dependent/Beneficiary ID The system assigns the dependent or beneficiary ID. You can change it,although you can’t have duplicate IDs for dependents or beneficiaries ofthe same employee. You can, however, use these same IDs for a differentemployee’s dependents and beneficiaries.
Effective Date The system enters the current system date in this field, and this date is carriedthrough to all pages of the component. You can change this date if necessary,however in the first row of data for this dependent/beneficiary, the effectivedate must be the same on all of the pages in this component.
Note. When running a calculation, the system determines if an employee is married by reviewing thedependent and beneficiary table to determine whether there is a dependent identified as the spouse. It ispossible for the dependent and beneficiary pages to show more than one spouse, to show a former spouseas a current spouse, to show no spouse even if the employee’s marital status is married, or to show a spouseeven though the employee’s marital status is single. These and other inconsistencies in the dependent andbeneficiary data can cause problems with pension calculations. It is best to verify dependent and beneficiaryinformation when calculating pension benefits.
PeopleSoft Proprietary and Confidential 213

Entering Additional Data in Human Resources Records Chapter 7
See AlsoPeopleSoft Enterprise Human Resources 8.9 PeopleBook: Manage Base Benefits, “Entering Dependent andBeneficiary Information,” Entering Dependent and Beneficiary Information
Entering Dependent Address InformationAccess the Dependent Information - Address page.
Dependent Information - Address page
The employee’s name and employee ID, as well as this dependent or beneficiary’s ID, relationship to theemployee, and dependent or beneficiary type appear at the top of the page.
Same Address as Employeeand Address Type
Select if the dependent has the same address information as the employee,and then select the employee’s address type that matches the dependentor beneficiary’s address. If selected, you don’t need to complete any ofthe address fields.
Same Phone as Employeeand Phone Type
Select if the dependent has the same phone information as the employee andthen select the employee phone type that is the same as this beneficiary’s. Ifselected, you don’t need to complete any of the phone fields. A beneficiarycan have the same address as the employee but a different phone number.
Edit Address Click to enter or edit the dependent’s contact address information.
Contact Phone Enter the dependent’s contact phone information in this group box.
214 PeopleSoft Proprietary and Confidential
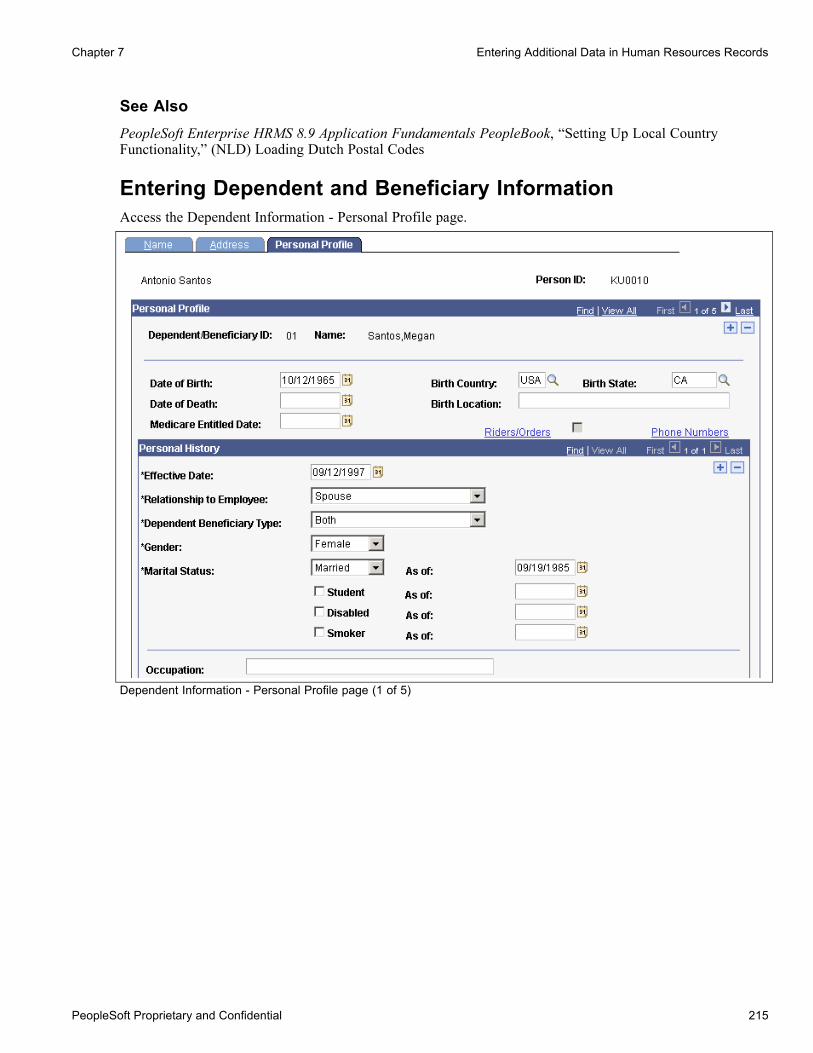
Chapter 7 Entering Additional Data in Human Resources Records
See AlsoPeopleSoft Enterprise HRMS 8.9 Application Fundamentals PeopleBook, “Setting Up Local CountryFunctionality,” (NLD) Loading Dutch Postal Codes
Entering Dependent and Beneficiary InformationAccess the Dependent Information - Personal Profile page.
Dependent Information - Personal Profile page (1 of 5)
PeopleSoft Proprietary and Confidential 215
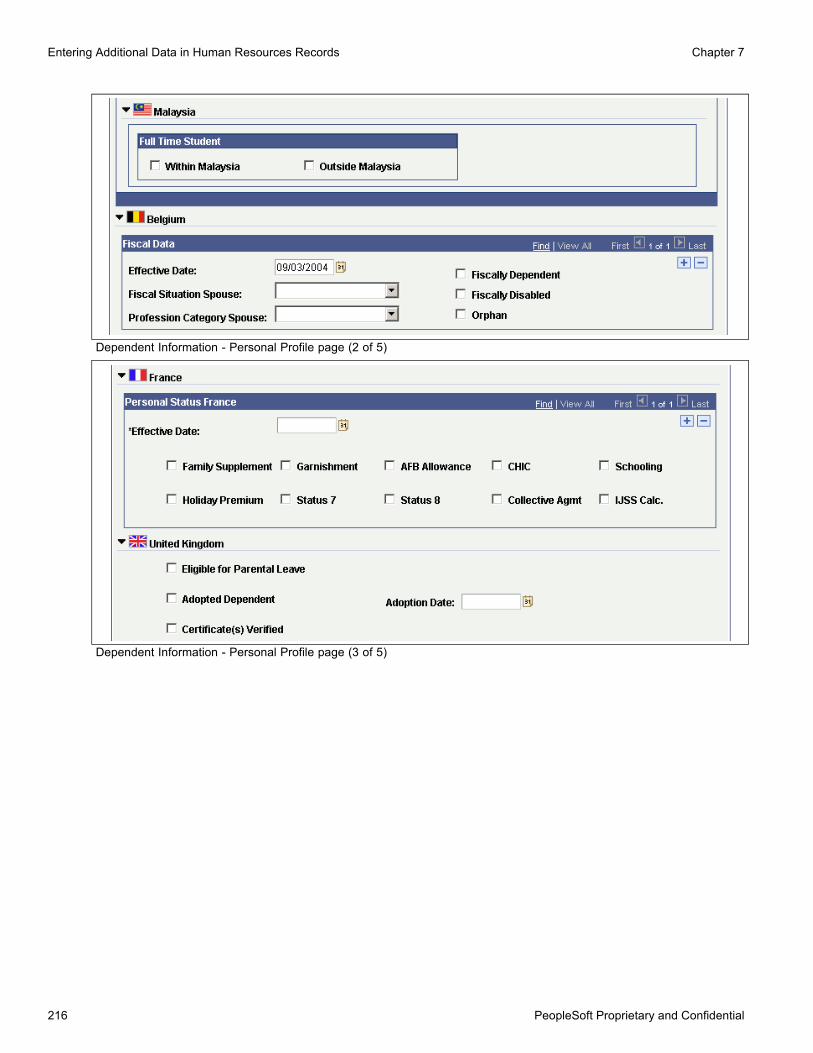
Entering Additional Data in Human Resources Records Chapter 7
Dependent Information - Personal Profile page (2 of 5)
Dependent Information - Personal Profile page (3 of 5)
216 PeopleSoft Proprietary and Confidential

Chapter 7 Entering Additional Data in Human Resources Records
Dependent Information - Personal Profile page (4 of 5)
Dependent Information - Personal Profile page (5 of 5)
Date of Birth Enter the dependent or beneficiary’s birthdate. Certain benefit plans, such aslife insurance, require the birthdate to determine an individual’s eligibility.
Birth Country Enter the country in which the dependent or beneficiary was born. Dependingon the country you enter, additional fields may appear that require moredata entry.
Date of Death When the dependent or beneficiary dies, enter the date of the death.
Birth Location Enter a city, county, or both, to further define the place in which the dependentor beneficiary was born.
Riders/Orders Click to access the Dependent/Beneficiary Riders page.
Phone Numbers Click to access the Dependent Information - Personal Profile: Phone Numberspage.
PeopleSoft Proprietary and Confidential 217

Entering Additional Data in Human Resources Records Chapter 7
Relationship to Employee Enter the dependent or beneficiary’s relationship to the employee. If you’veset up the Dependent Relationship table, the system automatically completesthe Relationship to Employee field according to the relationships in the table.
Dependent BeneficiaryType
Select the type of dependent or beneficiary. Your selection determines whetheryou can enroll this person into a benefit plan as a dependent or assign thisperson as a beneficiary.If you have set up the Dependent Relationship table, the system uses thatinformation to populate and validate this field. Values are:Beneficiary: Beneficiary only.Both: Dependent and beneficiary. If you plan to enroll the person as adependent and assign the person as a beneficiary, you must select this option.COBRA Dependent Only: COBRA dependent or beneficiary only.Dependent: Dependent only.None: The person is neither a dependent nor a beneficiary. This option istypically used when the person is a co-owner of a U.S. savings bond, or tomake a person ineligible to participate in a benefit plan.QDRO Estate: If the beneficiary of a life plan is the estate of an employee,enter this value.QDRO Representative - Employee: Used for PeopleSoft Enterprise PensionAdministration.QDRO Representative - Recipient: Used for PeopleSoft Enterprise PensionAdministration.
Note. (USA) (CAN) The values COBRA Dependent Only, None, QDRORepresentative - Employee, and QDRO Representative - Recipient areCanadian and United States values only.
Marital Status Enter the dependent or beneficiary’s marital status.
Marital Status - As of When adding a new dependent, enter the as of date for marital status.When an individual undergoes a subsequent change in status, the effective datefor the change is recorded and the system no longer uses the as of date. Thisfield is critical for determining eligibility for benefits enrollment.
Student Select if the dependent or beneficiary is a student.
Student - As of When adding a new dependent, enter the as of date for the individual’sstudent status.When an individual undergoes a subsequent change in status, the effective datefor the change is recorded and the system no longer uses the as of date. Thisfield is critical for determining eligibility for benefits enrollment.
Disabled Select if the dependent or beneficiary is disabled.
Disabled - As of When adding a new dependent, enter the as of date for the individual’sdisability status.
218 PeopleSoft Proprietary and Confidential

Chapter 7 Entering Additional Data in Human Resources Records
When an individual undergoes a subsequent change in status, the effective datefor the change is recorded and the system no longer uses the as of date. Thisfield is critical for determining eligibility for benefits enrollment.
Smoker Select if the dependent or beneficiary smokes. The Smoker check box isnecessary for dependents who are enrolled in benefit plans that use calculationrules. The system calculates age-graded rates for individuals differentlydepending on whether they smoke.
Smoker - As of When adding a new dependent, enter the as of date for the individual’ssmoker status.
When an individual undergoes a subsequent change in status, the effective datefor the change is recorded and the system no longer uses the as of date. Thisfield is critical for determining eligibility for benefits enrollment.
Occupation Enter the dependent or beneficiary’s occupation, if known.
National IDUse this group box to enter the dependent or beneficiary’s national identification number. Dependents andbeneficiaries with citizenship in more than one country can have more than one national ID. Add as manyrows as required.
Country Select the country that issued the dependent’s national ID.
National ID Type The system populates this field automatically with the default value that youestablished for this country on the National ID Type Table page. You canselect another valid type.
National ID Enter the dependent’s national ID number. The system automatically checksthe format of your entry against the default format that you entered on theNational ID Type Table page.
Primary ID Select if the national ID is the dependent’s primary ID. If this is the onlydata row for this person, the system selects the check box by default. Youcan override this default.
(BEL) Belgium
Fiscally Dependent Select if the employee is fiscally responsible for the dependent.
Fiscal Situation Spouse Select the appropriate fiscal situation from the list.
Fiscally Disabled Select if applicable.
Profession Category Spouse Select the appropriate category from the list.
Orphan Select if applicable.
(FRA) FranceUse this group box to store information that can be passed to your payroll system for payroll processing.
Family Supplement For numerous families, payroll calculates the family allowance amount thatyour organization gives to an employee based on their family dependents.This calculation is based on the number and type of employee dependents.
PeopleSoft Proprietary and Confidential 219
Entering Additional Data in Human Resources Records Chapter 7
Select this check box to indicate that the corresponding dependent has to beconsidered in the calculation of the supplemental family allowance.
Garnishment This option is for court orders that require that an employee’s wages begarnished. When an employee is under a court order, payroll can calculate thepercentage and amount of the employee’s salary that has to be transferred tothe relevant government agency in each pay period.Depending on the number of dependents, this amount is reduced. Thegreater the number of dependents, the lower the percentage of frozen salary.Select this check box to indicate that the corresponding dependent has to beconsidered in the calculation of the frozen garnishment amount.
AFB Allowance (FrenchBanking Associationallowance)
The French Banking Association delivers a special allowance based on thenumber of dependents. Select to indicate that the corresponding dependent hasto be considered in the calculation of this allowance.
CHIC CHIC is a medical insurance company that employees can opt to use tosupplement their medical insurance coverage. This insurance companydelivers a special allowance based on the number of dependents. Select thischeck box to indicate that the corresponding dependent has to be considered inthe calculation of this allowance.
Schooling See Family Supplement.
Holiday Premium See Family Supplement.
Status 7 and Status 8 Configure these fields to capture additional payroll related status information.
(GBR) United Kingdom
Eligible for Parental Leave Select if the dependent qualifies the employee for parental leave. Select theDisabled check box on the top page if it also applies here.
Adopted Dependent Select if the employee adopted the dependent.
Adoption Date If adopted, enter the adoption date.
Certificate(s) Verified Select to indicate that appropriate certificates have been provided to verifythis dependent information.
(BRA) Brazil
Student Select to indicate that the dependent is a student. Employees receive incometax benefits for all students up to 21 years old. If the dependent is a student andis less than six years old, the employee should provide a vaccination certificateto the company to receive the income tax benefit.
University or TechnicalLevel
Select to indicate that the dependent is a student at the university or technicallevel and the employee can receive the income tax benefit for the dependentfor additional years (for students up to 24 years old).
Vaccination Certificate Select if you have received the dependent’s vaccination certificate. Thisinformation is used for reporting purposes.
Disabled Select to indicate that the dependent is disabled and the employee canreceive the family allowance and income tax benefits for the dependentfor additional years.
220 PeopleSoft Proprietary and Confidential
Chapter 7 Entering Additional Data in Human Resources Records
Termination Cd(termination code)
Enter the reason code for the family allowance termination. Values are:Child Abandonment: Abandonment of child.Dependent exceeds ceiling: Dependent’s age exceeds maximum age.Court Decision: Court decision (in case of divorce or separation).Dependent’s Death: Dependent’s death.End Disability: Disability ended.Child Custody: Custody has been awarded to the other parent.Termination: Termination.
Termination Dt (terminationdate)
Enter the family allowance termination date.
Enter information from the dependent’s birth certificate in the Birth Data group box. This information isused for reporting purposes.
Enter the type of vaccination, the dose, and the date received for each vaccination on the dependent’svaccination certificate in the Vaccination Data group box. This information is used for reporting purposes.
(CAN) Canada
Eligible for CSB If you are entering dependent and beneficiary information for a Canadianemployee, select this check box to indicate that the dependent or beneficiary isan eligible registrant for an employee who is purchasing Canadian SavingsBonds (CSBs). The PeopleSoft Payroll-CSB Registrant page verifies theselection of this check box.
See AlsoPeopleSoft Enterprise Human Resources 8.9 PeopleBook: Manage Base Benefits, “Getting Started WithBase Benefits”
Entering Information About Court-Ordered Benefitsfor DependentsAccess the Dependent/Beneficiary Riders page.
PeopleSoft Proprietary and Confidential 221

Entering Additional Data in Human Resources Records Chapter 7
Dependent/Beneficiary Riders page
The Dependent/Beneficiary Riders page enables you to enter any court-ordered benefits or spousal waivers.This page enables the system to validate any changes or omissions in benefit enrollments with a recorded rider.When an employee enrolls in a benefit plan and there is a court-ordered mandate specifying that a benefit beprovided, the system does not complete the enrollment.
Plan Type Enter the type of plan to which the court order relates.
Start Date Enter the date on which the court order becomes effective.
Sequence Prioritizes court orders when you have more than one that takes effect on thesame day. Enter a number that indicates which court orders take precedenceover others. If there is only one court order, enter a sequence of 1.
Status Select whether the court order is Active or Inactive. This field is typically usedto void a court order before the end date takes effect. If the status is Inactive,the system won’t enforce any validations against this court order.
Exception Type Select whether this is a court order (a legal document that grants a dependentthe right to receive benefit coverage), spousal waiver (document that formallywaives a spouse’s claim to a minimum beneficiary allocation of funds from alife insurance policy or savings plan), or neither.
End Date Enter the date on which the court order ends. When the court order expires, thesystem won’t enforce any validations against this court order.
Court Order Number Enter the official number that is issued by the state for this court order.
(NLD) Viewing an Employee’s Dependents and BeneficiariesAccess the Dependent/Benef page.
222 PeopleSoft Proprietary and Confidential

Chapter 7 Entering Additional Data in Human Resources Records
Dependent/Beneficiary SummaryThis group box displays a summary of all dependent and beneficiary data for an employee.
ID This column displays the ID of the dependent or beneficiary.
Name This column displays the name of the dependent or beneficiary.
Depend/Benef(dependent/beneficiary)
Indicates whether the person is a dependent or beneficiary.
Relationship Describes the relationship of the dependents and beneficiaries to the employee.
Note. Over time, changes occur and you need to terminate dependent enrollments or beneficiary statuses.Remember, you enroll dependents and assign beneficiaries when you enroll employees. As with employees, toterminate a dependent enrollment or beneficiary status, you must enter a row of data with the termination date.Don’t make such a change using the Dependent/Beneficiary Data page. Make the change using the benefitdetail page for the benefit in question.
Warning! If you delete dependent or beneficiary data by using the Dependent/Beneficiary Data pages, youdestroy historical data. When you change enrollment data, it won’t matter that the dependent or beneficiarydata is available here. It must remain if your system is to provide correct historical information.
Entering Dependent Citizenship and Passport InformationAccess the Depdnt Identification Details - Depdnt Citizenship/Passport page.
Depdnt Identification Details - Depdnt Citizenship/Passport page
All fields on these pages are described in your benefits documentation.
PeopleSoft Proprietary and Confidential 223

Entering Additional Data in Human Resources Records Chapter 7
Note. (DEU) If you administer a workforce in Germany, use the Visa/Permit table to record OECD workpermits for OECD nationals who want to work in a protected industry. Because permit types are keyed bycountry, if you track a German employee’s OECD work permit information on the Identification, Visa/Permittable in the Track Global Assignments menu, select DEU as the country code from among your valid OECDpermit types.
Entering Dependent Visa and Permit DataAccess the Depdnt Visa/Permit Data page.
Enter information on this page in the same manner that you enter data on the Visa/Permit Data page.
See Chapter 7, “Entering Additional Data in Human Resources Records,” Entering an Employee’s Visa orPermit Information, page 229.
Tracking Emergency ContactsThis section discusses how to enter primary address and phone information for emergency contacts.
Pages Used to Track Emergency ContactsPage Name Object Name Navigation Usage
Contact Address/Phone EMERGENCY_CONTACT Workforce Administration,Personal Information,Personal Relationships,Emergency Contact, ContactAddress/Phone
Enter names, addresses, andprimary phone informationfor people to contact inthe event of a workeremergency.
Other Phone Numbers EMERGENCY_CONTACT2 Workforce Administration,Personal Information,Personal Relationships,Emergency Contact, OtherPhone Numbers
Record additional phonenumbers at which theemergency contact can bereached, such as a work orcellular phone number.
Emergency Contacts PRCSRUNCNTL Workforce Administration,Personal Information,Personal Relationships,Emergency Contacts Report
Generate the EmergencyContacts report (PER004).This report lists all contactson the Emergency Contacttable. Run the RefreshEmployees Table processbefore running this report.
See AlsoPeopleSoft Enterprise HRMS 8.9 Application Fundamentals PeopleBook, “PeopleSoft ApplicationFundamentals for HRMS Reports”
224 PeopleSoft Proprietary and Confidential
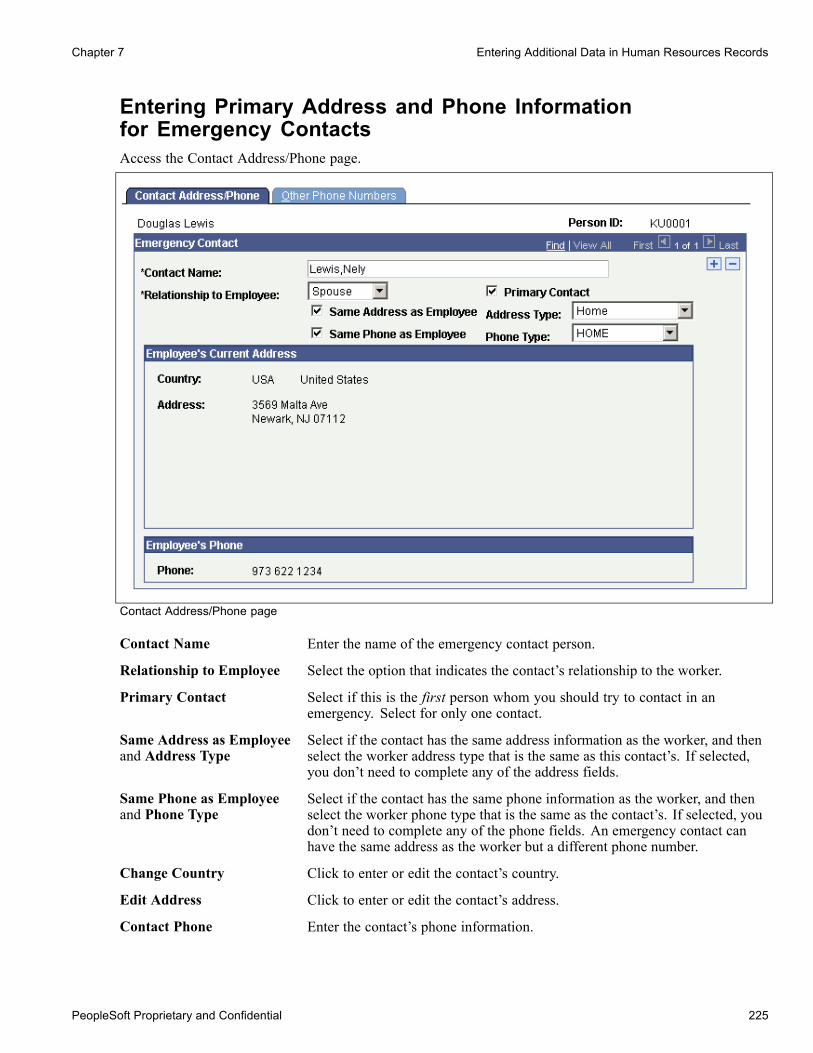
Chapter 7 Entering Additional Data in Human Resources Records
Entering Primary Address and Phone Informationfor Emergency ContactsAccess the Contact Address/Phone page.
Contact Address/Phone page
Contact Name Enter the name of the emergency contact person.
Relationship to Employee Select the option that indicates the contact’s relationship to the worker.
Primary Contact Select if this is the first person whom you should try to contact in anemergency. Select for only one contact.
Same Address as Employeeand Address Type
Select if the contact has the same address information as the worker, and thenselect the worker address type that is the same as this contact’s. If selected,you don’t need to complete any of the address fields.
Same Phone as Employeeand Phone Type
Select if the contact has the same phone information as the worker, and thenselect the worker phone type that is the same as the contact’s. If selected, youdon’t need to complete any of the phone fields. An emergency contact canhave the same address as the worker but a different phone number.
Change Country Click to enter or edit the contact’s country.
Edit Address Click to enter or edit the contact’s address.
Contact Phone Enter the contact’s phone information.
PeopleSoft Proprietary and Confidential 225

Entering Additional Data in Human Resources Records Chapter 7
Managing Citizenship and Visa or Permit InformationThis section provides a list of common elements and discusses how to:
• Track employee passport and citizenship information.
• Enter an employee’s visa and permit information.
Common Elements Used to Manage Citizenship andVisa or Permit InformationExpiration Date Enter the expiration date of the visa or permit.
Issue Date Enter the date on which the visa or permit was issued.
Issue Place Enter the location where the visa or permit was issued.
226 PeopleSoft Proprietary and Confidential

Chapter 7 Entering Additional Data in Human Resources Records
Pages Used to Manage Citizenship and Visa orPermit Information
Page Name Object Name Navigation UsageCitizenship/Passport CITIZEN_PASSPORT Workforce Administration,
Personal Information,Citizenship, IdentificationData, Citizenship/Passport
Track passport andcitizenship information foremployees. Enter multiplecountries of citizenshipand multiple passportsfor employees and theirdependents.
Visa/Permit Data VISA_PERMIT_DATA Workforce Administration,Personal Information,Citizenship, IdentificationData, Visa/Permit Data
Enter an employee’s visa orpermit information.
Passport/Visa Expiration PRCSRUNCNTL Workforce Administration,Personal Information,Citizenship, Passport/VisaExpiration Audit
Generate the Passport/VisaExpiration report (PER032).This report lists employeesand dependents that havepassports, visas, or workpermits on file that expire in90 days of the report rundate. The report is dividedinto two sections. Thefirst section lists passportinformation includingcountry, passport number,issue date, and expirationdate. The second sectionlists visa and work permitinformation includingcountry, visa and workpermit number, type ofpermit, issue date, andexpiration date.
Citizenship / Country / Visa PRCSRUNCNTL Workforce Administration,Personal Information,Citizenship, Citizenship /Country / Visa Audit
Generate theCitizenship/Country/VisaAudit report (PER033). Thisreport lists discrepanciesbetween employeecitizenship countrystatus and visa data. Thereport displays variousdiscrepancies found for theemployee citizenship statusin the Personal Data table.
See AlsoPeopleSoft Enterprise HRMS 8.9 Application Fundamentals PeopleBook, “PeopleSoft ApplicationFundamentals for HRMS Reports”
PeopleSoft Proprietary and Confidential 227

Entering Additional Data in Human Resources Records Chapter 7
Tracking Employee Passport and Citizenship InformationAccess the Citizenship/Passport page.
Citizenship/Passport page
Country Enter the employee’s country of citizenship.
Citizenship Status Indicate the employee’s citizenship status. An employee’s birth country andcountry of citizenship can be different. To track birth country information, usethe Identity/Diversity page.
Note. (DEU) If you’re administering German employees, German law requires you to indicate specialnationality and citizenship information for German workers using nationality codes established by the GermanDEUEV directive. This information is used in DEUEV processing and DEUEV reporting for Germanorganizations or companies doing business in Germany. DEUEV processes and reporting are available only ifyou are using a German compliant payroll system.
Passport Information
Passport Number Enter the passport number.
Country Enter the originating country for this passport.
Authority Enter the issuing authority, such as the U.S. Passport Agency.
228 PeopleSoft Proprietary and Confidential

Chapter 7 Entering Additional Data in Human Resources Records
See AlsoPeopleSoft Enterprise Global Payroll for Germany 8.9 PeopleBook
PeopleSoft Enterprise Human Resources 8.9 PeopleBook: Track Global Assignments, “Setting Up GlobalAssignments”
Entering an Employee’s Visa or Permit InformationAccess the Visa/Permit Data page.
Visa/Permit Data page
Type Select a type of visa or permit. The system prompts you with only types thatare associated with the selected country.
Get Supporting Documents Click to have the system enter a list of the appropriate supporting documentsthat are needed to obtain the visa or permit type that you entered.
Number Enter the visa or permit number.
Status Select the visa or permit status: Applied, Granted, Renewal, and Renewed.
Status Date Enter the date on which the status of the visa or permit changed.
Duration Enter the number of days, months, or years that the employee stayed in thecountry. Select the unit of duration (Days, Months, or Years) in the adjacentfield.
PeopleSoft Proprietary and Confidential 229

Entering Additional Data in Human Resources Records Chapter 7
Date of Entry into Country Enter the date on which the employee entered the country.
Issuing Authority Enter the agency that issued the visa or permit, such as the U.S. Departmentof State or the French Consulate.
Supporting Documents Needed
Sup Doc ID (supportingdocument ID)
If additional documents are required for this employee to obtain the visa orpermit type, select a supporting document ID.
Request Date Enter the date on which the documents were requested.
Date Received Enter the date on which the documents were received.
(CHE) Switzerland
Cross Border ReturnFrequency
Enter the frequency this employee travels to their home outside of Switzerland:D: daily.W: weekly.This is a required field when the type of permit is:G: Cross Border Commuter.PG: Border Crossing Permit.
Cross Border CommuterPermit
Enter the permit number for the Cross Border Commuter Permit.
Note. (DEU) If you’re administering a workforce in Germany, use the Visa/Permit table to record OECDwork permits for OECD nationals who want to work in a protected industry. Because permit types are keyedby country, if you’re tracking a German employee’s OECD work permit information on the Identification -Visa/Permit Table page in the Administer Workforce menus, select DEU as the country code to select fromamong your valid OECD permit types.
See AlsoChapter 3, “Setting Up Country-Specific Tables,” Entering German Nation DEUEV Codes, page 27
Managing Driver’s License InformationThis section discusses how to enter license numbers and other driving record information.
Page Used to Manage Driver’s License InformationPage Name Object Name Navigation Usage
Drivers License DRIVERS_LIC_GBL Workforce Administration,Personal Information,Biographical, Driver’sLicense Data
Enter license numbers orother data from a worker’sdriving record.
230 PeopleSoft Proprietary and Confidential
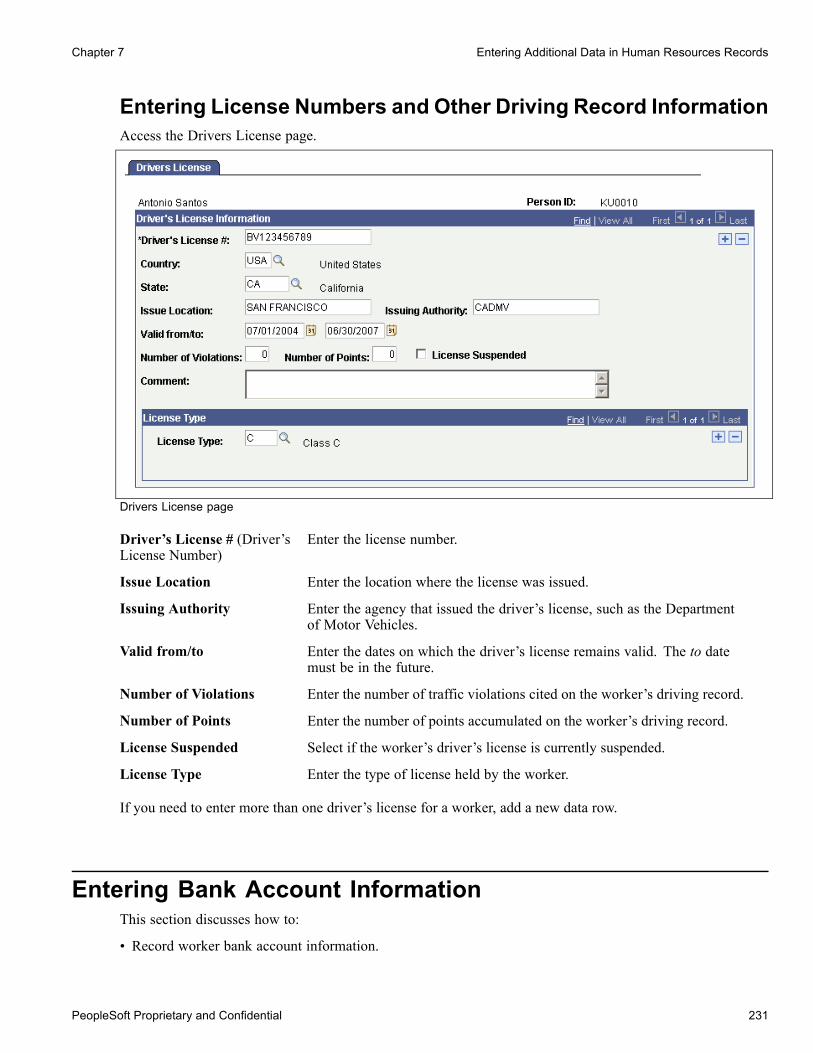
Chapter 7 Entering Additional Data in Human Resources Records
Entering License Numbers and Other Driving Record InformationAccess the Drivers License page.
Drivers License page
Driver’s License # (Driver’sLicense Number)
Enter the license number.
Issue Location Enter the location where the license was issued.
Issuing Authority Enter the agency that issued the driver’s license, such as the Departmentof Motor Vehicles.
Valid from/to Enter the dates on which the driver’s license remains valid. The to datemust be in the future.
Number of Violations Enter the number of traffic violations cited on the worker’s driving record.
Number of Points Enter the number of points accumulated on the worker’s driving record.
License Suspended Select if the worker’s driver’s license is currently suspended.
License Type Enter the type of license held by the worker.
If you need to enter more than one driver’s license for a worker, add a new data row.
Entering Bank Account InformationThis section discusses how to:
• Record worker bank account information.
PeopleSoft Proprietary and Confidential 231

Entering Additional Data in Human Resources Records Chapter 7
• (GBR) Enter a worker’s building society roll number and name.
Pages Used to Enter Bank Account InformationPage Name Object Name Navigation Usage
Maintain Bank Accounts PYE_BANKACCT Workforce Administration,Personal Information,Biographical, Bank Accounts
Record information aboutworker bank accounts.Use this information totrack worker direct depositinformation.
Building Society Details PYE_BS_SP_UK Click the Other RequiredInformation link on the BankAccount Information page.
For this page to appear, thecountry code must beGBRand the building society IDmust have a value.
Enter a worker’s buildingsociety roll number andname.
Bank Prenote InformationUSA
GPUS_PRENOTE Click the PrenoteInformation link on the BankAccount information page.
Indicate whetherprenotification files (usedin Federal ScheduleReconciliation) need to begenerated.
Recording Employee Bank Account InformationAccess the Maintain Bank Accounts page.
Maintain Bank Accounts page
Note. Before you can enter a worker’s bank details, first set up the bank branch or building society on theBank/Branch Table page.
232 PeopleSoft Proprietary and Confidential

Chapter 7 Entering Additional Data in Human Resources Records
Account ID The system creates an account ID when you enter a new bank or buildingsociety account for a worker. This field is for information only.
Type Select the type of account that you are tracking.
Country Code Enter the country where the bank account is located. When you move out ofthis field, the system populates the Currency Code field with the appropriatecurrency.
Bank ID Enter the bank ID.
Bank Branch ID Enter the bank branch ID for the account.
Building Society ID If you entered GBR in the Country Code field, this field replaces the BranchID field. See details below.
Account Number Enter the account number.
Account Name Enter the account name.
Prenote Information (USA) Click this link to access the Bank Prenote Information USA page.
Edit IBAN (GBR) Click this link to access the International Bank Account Number page.
AC Account Name Enter the alternate character account name, if applicable.
Specify Net Pay Elections Click this link to access the Specify Net Pay Elections page.
(GBR) Entering Banking Information for UK WorkersUK customers also use this page to record workers’ building society account information. When you enterGBR in the Country field, the Bank Branch ID field becomes the Bld Soc ID (building society ID) field.
UK customers who enter details of UK bank and building society accounts should enter the followinginformation in the fields on the Bank Account Information page:
Field UK Bank and Building Society Information
Type Select an account type:
Current Account: Select for a bank account.
Building Society Roll Number: Select for a buildingsociety account.
Savings: Not applicable to the UK.
Checking: Not applicable to the UK.
Country Code EnterGBR.
Bank ID If the worker has a bank account, select the bank branchfrom the list of branches set up in the Bank table.
If the worker has a building society account, leave thisfield blank.
PeopleSoft Proprietary and Confidential 233

Entering Additional Data in Human Resources Records Chapter 7
Field UK Bank and Building Society Information
Building Society ID If the worker has a building society account, select thebuilding society from the list of societies set up in theBranch table. When you select a building society, thesystem automatically completes the Bank ID field withthe bank that handles clearing for the selected buildingsociety.
If the worker has a bank account, leave this field blank.
Account Number Enter the worker’s bank account number.
If you selected a building society in the Building SocietyID field, the system automatically completes the AccountNumber field with the building society’s account at theclearing bank and makes the field display-only.
Note. To enter the worker’s building society accountdetails, click Other Required Information.
Account Name Enter the account name.
If you selected a building society in the Building SocietyID field, the system makes this field display-only.
Click Other Required Information to display the BuildingSociety Details page where you enter the account name.
Currency Code The system provides a default value ofGBP (PoundSterling). Override this default if necessary.
Other Required Information Click to display the Building Society Details page, whereyou enter the worker’s building society account details.
The system does not display this link if you select anormal bank branch in the Bank ID field.
Note. For more information about the account number formats for a country, see the corresponding PeopleSoftEnterprise Global Payroll local country documentation.
See AlsoPeopleSoft Enterprise HRMS 8.9 Application Fundamentals PeopleBook, “Setting Up Banks and BankBranches”
PeopleSoft Enterprise Global Payroll for United States 8.9 PeopleBook, “Defining Banking,” Managing thePrenotification Process
PeopleSoft Enterprise Global Payroll 8.9 PeopleBook, “Defining Banking Instructions”
234 PeopleSoft Proprietary and Confidential

Chapter 7 Entering Additional Data in Human Resources Records
(GBR) Entering a Worker’s Building Society RollNumber and NameAccess the Building Society Details page.
Building Society Details page
When you select a building society ID, the Other Required Information link appears on the page.
Roll Name Enter the roll name of the worker’s building society account.
Roll Number Enter the worker’s building society account number.
Tracking Volunteer ActivityThis section discusses how to enter information on worker volunteer activities.
Page Used to Track Volunteer ActivityPage Name Object Name Navigation Usage
Volunteer Activities VOLUNTEER_ACTIVITY Workforce Administration,Personal Information,Biographical, VolunteerActivities
Enter information onworker volunteer activities.Track multiple volunteerorganizations for workersand multiple start dates withthe same organization.
Entering Information on Worker Volunteer ActivitiesAccess the Volunteer Activities page.
PeopleSoft Proprietary and Confidential 235

Entering Additional Data in Human Resources Records Chapter 7
Volunteer Activities page
Volunteer Organization Select a volunteer organization code.
Start Date and End Date Enter the start and end date of the worker participation.
Volunteer Status Select either Part Time or Full Time to indicate the volunteer status.
Type of Volunteer Select the type of volunteer activity in which the worker is participating:Administr, Canvasser, Executive, Fund Raise, or Other.
Is Volunteer on Leave Select if the volunteer is on leave.
Note. This check box is for informational purposes only. If you selectthis check box, you don’t affect any Monitor Absences business processfunctionality.
Note. This information is useful when you need to track workers’ additional skills and knowledge, and whenyou measure the effectiveness of company-sponsored volunteer and charitable programs.
Entering and Tracking Additional Workforce DataThis section discusses how to:
• Record badge numbers.• Track a worker’s business expenses.• Track prior work experience.• Enter worker images.
236 PeopleSoft Proprietary and Confidential

Chapter 7 Entering Additional Data in Human Resources Records
Pages Used to Enter and Track Additional Workforce DataPage Name Object Name Navigation Usage
Badge BADGE Workforce Administration,Job Information, Badge
Record badge numbers thatyou issue to workers.
Business Expenses BUSINESS_EXPENSES Workforce Administration,Job Information, BusinessExpenses
Track a worker’s businessexpenses, such as travel,meals, entertainment, andrelocation costs.
Prior Work Experience PRIOR_WORK_EXPER Workforce Administration,Personal Information,Biographical, Prior WorkExperience
Track prior work experience.Enter the details of aworker’s previous employersand jobs.
Employee Photo EMPLOYEE_PHOTO Workforce Administration,Personal Information,Citizenship, IdentificationData, Employee Photo
Enter a worker image intothe system by copying andpasting images into imagefields.
General Comments GENL_COMMENTS Workforce Administration,Personal Information,Biographical, GeneralComments
Enter a miscellaneouscomment about a worker.
Recording Badge NumbersAccess the Badge page.
Badge page
You must have previously entered Badge Type data on the Translate table before using this page.
Badge Type Select the type of badge number that you want to enter:BA (Building Access).CCA (Computer Center Access).CLK (Clock).GB (General Badge).PA (Parking Access).
PeopleSoft Proprietary and Confidential 237
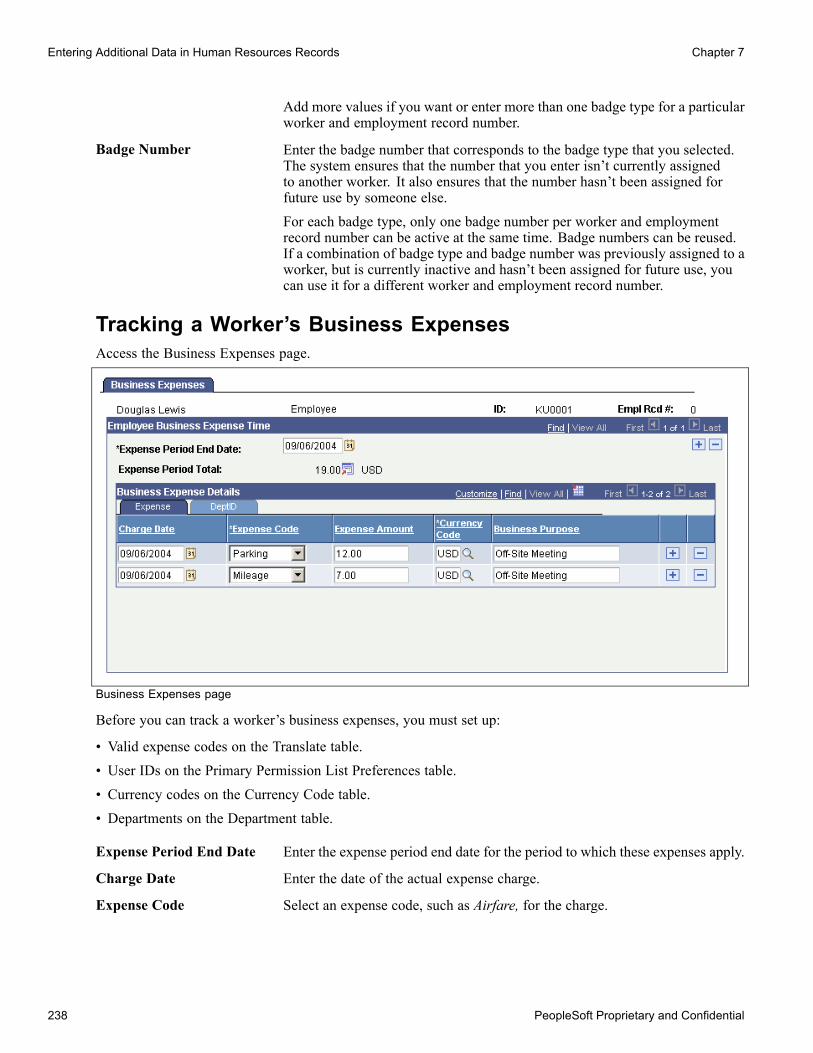
Entering Additional Data in Human Resources Records Chapter 7
Add more values if you want or enter more than one badge type for a particularworker and employment record number.
Badge Number Enter the badge number that corresponds to the badge type that you selected.The system ensures that the number that you enter isn’t currently assignedto another worker. It also ensures that the number hasn’t been assigned forfuture use by someone else.For each badge type, only one badge number per worker and employmentrecord number can be active at the same time. Badge numbers can be reused.If a combination of badge type and badge number was previously assigned to aworker, but is currently inactive and hasn’t been assigned for future use, youcan use it for a different worker and employment record number.
Tracking a Worker’s Business ExpensesAccess the Business Expenses page.
Business Expenses page
Before you can track a worker’s business expenses, you must set up:
• Valid expense codes on the Translate table.• User IDs on the Primary Permission List Preferences table.• Currency codes on the Currency Code table.• Departments on the Department table.
Expense Period End Date Enter the expense period end date for the period to which these expenses apply.
Charge Date Enter the date of the actual expense charge.
Expense Code Select an expense code, such as Airfare, for the charge.
238 PeopleSoft Proprietary and Confidential
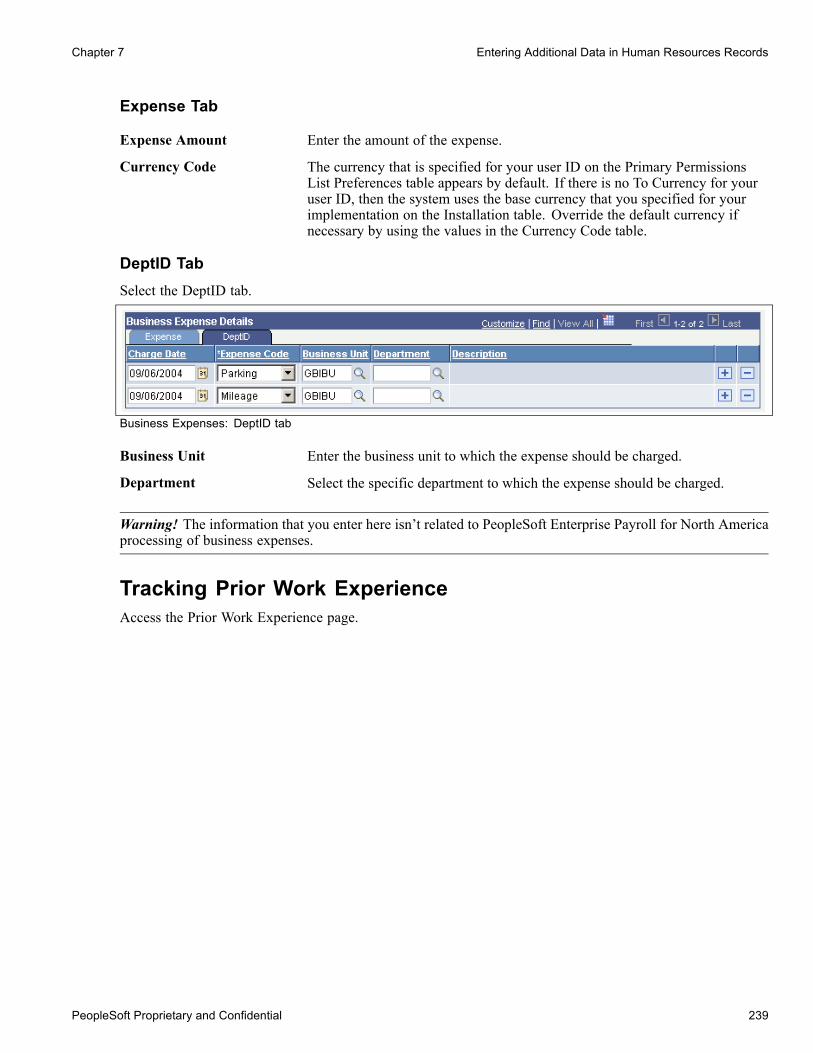
Chapter 7 Entering Additional Data in Human Resources Records
Expense Tab
Expense Amount Enter the amount of the expense.
Currency Code The currency that is specified for your user ID on the Primary PermissionsList Preferences table appears by default. If there is no To Currency for youruser ID, then the system uses the base currency that you specified for yourimplementation on the Installation table. Override the default currency ifnecessary by using the values in the Currency Code table.
DeptID TabSelect the DeptID tab.
Business Expenses: DeptID tab
Business Unit Enter the business unit to which the expense should be charged.
Department Select the specific department to which the expense should be charged.
Warning! The information that you enter here isn’t related to PeopleSoft Enterprise Payroll for North Americaprocessing of business expenses.
Tracking Prior Work ExperienceAccess the Prior Work Experience page.
PeopleSoft Proprietary and Confidential 239

Entering Additional Data in Human Resources Records Chapter 7
Prior Work Experience page
If you’ve tracked an applicant through the Recruiting business process in PeopleSoft Enterprise HumanResources, the information that you entered for an applicant becomes part of the employee record when youhire the person. For other workers, entering prior work experience information helps you establish a completeprofile for reporting purposes. It’s also useful for career and succession planning.
Years of Work Experience The system calculates this value if you select the Relevant Work Experiencecheck box. If so, you must enter a start date and end date.
Sequence Number Enter a sequence number for each prior work experience record.
Start/End Date Enter the beginning and end of the worker’s tenure with the employer.
Relevant Work Experience Select if the experience was relevant to the worker’s responsibilities withyour organization.
Employer Enter the name of the worker’s previous employer.
Ending Job Title Enter the title in which the worker ended employment.
Ending Pay Rate Enter the pay rate at which the worker ended employment.
Frequency The pay Frequency field contains a default value of Month, which you canchange if the pay amount reflects a different frequency.
See AlsoPeopleSoft Enterprise Human Resources 8.9 PeopleBook: Plan Careers and Successions, “Planning Careers”
PeopleSoft Enterprise HRMS 8.9 Application Fundamentals PeopleBook, “PeopleSoft ApplicationFundamentals for HRMS Reports”
240 PeopleSoft Proprietary and Confidential

Chapter 7 Entering Additional Data in Human Resources Records
Entering Worker ImagesAccess the Employee Photo page.
Before you insert an image (such as an employee photograph) in PeopleSoft Enterprise Human Resources,use a Windows-based graphics or drawing program to capture (and edit if necessary) the image or scannedphotograph that you want to insert. Then use the Windows-based program to highlight the image or portion ofit that you want to copy, and copy it to the Microsoft Windows clipboard. In most drawing programs, you cando this by selecting Edit, Copy, or pressing CTRL+C.
Click or tab to the image field and select Edit, Paste, or press CTRL+V to paste the image in the field. Click theAdd button to browse for and upload a picture (such as Bitmap or .bmp files).
Note. Full imaging capabilities may not be supported on all database platforms.
See AlsoPeopleTools 8.45 PeopleBook: PeopleSoft Application Designer
PeopleSoft Proprietary and Confidential 241

Entering Additional Data in Human Resources Records Chapter 7
242 PeopleSoft Proprietary and Confidential

CHAPTER 8
(BEL) Entering Additional Data forBelgian Workers
This chapter discusses how to:
• Track Claeys formula calculations.• Prepare for severance calculations.• Perform the Claeys calculation.• Generate Déclaration Immédiate – Onmiddelijke Aangifte (DIMONA) notifications.• Run the Social Report.
Tracking Claeys Formula CalculationsTo track Claeys formula calculations, use the End Contract Type - BEL (END_CONT_TBL_BEL),End Contract Reason - BEL (REAS_END_TBL_BEL), Statute Table (STATUTE_TBL_BEL), ReducedCharged Table (RED_CHRG_TBL_BEL), RSZ Category Table (CONTR_RSZS_BEL), Contract Ending(CONTRACT_END_BEL), and Contract Replacement (CONTRACT_REPL_BEL) components.
If you’re administering a Belgian workforce, you need to set up codes for events or conditions that may playa role in the termination of a Belgian worker’s employment contract, and for the special reasons that areassociated with those conditions. You also specify employment contract statutes and substatutes, and trackspecial jobs that allow for lower premiums than are normally required by Belgian labor regulations.
Many of the tables that you set up for these purposes contain information that you use when performing Claeysformula calculations. The Claeys formula is used by employers to calculate the cost of terminating a worker’scontract, based on number of service years, salary, age, seniority, type of employment contract, and so on.
This section discusses how to:
• Enter codes for events and conditions that result in terminating employment contracts.• Define reason codes for ending employment contracts.• Set up Belgian employment contract statutes for Claeys calculations.• Link contract statutes to RSZ categories.• Record information that is necessary for terminating a Belgian worker.• Enter a replacement worker for the employment contract.
PeopleSoft Proprietary and Confidential 243

(BEL) Entering Additional Data for Belgian Workers Chapter 8
Pages Used to Track Claeys Formula CalculationsPage Name Object Name Navigation Usage
End Contract Type - BEL END_CONT_TBL_BEL • Set Up HRMS, ProductRelated, WorkforceAdministration, WorkforceData BEL, Contract EndTypes
• Workforce Administration,Job Information, ContractAdministration, DefineContract End BEL
Enter or update codes forevents and conditionsthat could result in thetermination of employmentcontracts.
End Contract Reason - BEL REAS_END_TBL_BEL • Set Up HRMS, ProductRelated, WorkforceAdministration, WorkforceData BEL, Contract EndReasons
• Workforce Administration,Job Information, ContractAdministration, DefineContract End Reason BEL
Define the reasons that areassociated with event codesby adding or updatingemployment terminationreason codes.
First define contracttermination event types.
Statute Table STATUTE_TBL_BEL Set Up HRMS, ProductRelated, WorkforceAdministration, WorkforceData BEL, Statutes
Set up and maintain Belgianemployment contractstatutes and substatutes, andassociate contract types withstatutes.
Reduced Charged Table RED_CHRG_TBL_BEL Set Up HRMS, ProductRelated, WorkforceAdministration, WorkforceData BEL, Reduced Charges
Set up the page that you useto update or add reducedcharges job categories.
Under Belgian employmentlaw, these are job categoriesthat enable you to payreduced taxes and premiumson the compensation toworkers who hold those jobs.
RSZ Category Table CONTR_RSZS_BEL Set Up HRMS, ProductRelated, WorkforceAdministration, WorkforceData BEL, RSZ Categories
Link contract statutesto Rijksdienst SocialeZekerheid (RSZ) categories.
Contract Ending CONTRACT_END_BEL Workforce Administration,Job Information, ContractAdministration, TerminateContract BEL
Record information that isnecessary for terminating aBelgian worker.
Contract Replacement CONTRACT_REPL_BEL Workforce Administration,Job Information, ContractAdministration, ReplaceContract BEL
Enter the person whoreplaces the worker in theemployment contract.
244 PeopleSoft Proprietary and Confidential

Chapter 8 (BEL) Entering Additional Data for Belgian Workers
Entering Codes for Events and Conditions that Resultin Terminating Employment ContractsAccess the End Contract Type - BEL page.
End Contract Type - BEL page
The end contract type codes can cover a wide range of events, including the employee’s death, a voluntary orinvoluntary separation from your organization caused by retirement or relocation, or promotion into anotherjob that has a different employment contract associated with it.
Mandatory Replacement Select if the reason for ending an employment contract with one employeerequires mandatory replacement of the former worker with another workerin the same employment contract.
Number of months If you selected Mandatory Replacement, enter (in months) the period of timerequired to position the replacement.
Note. Belgian employment law mandates these requirements.
Defining Reason Codes for Ending Employment ContractsAccess the End Contract Reason - BEL page.
PeopleSoft Proprietary and Confidential 245
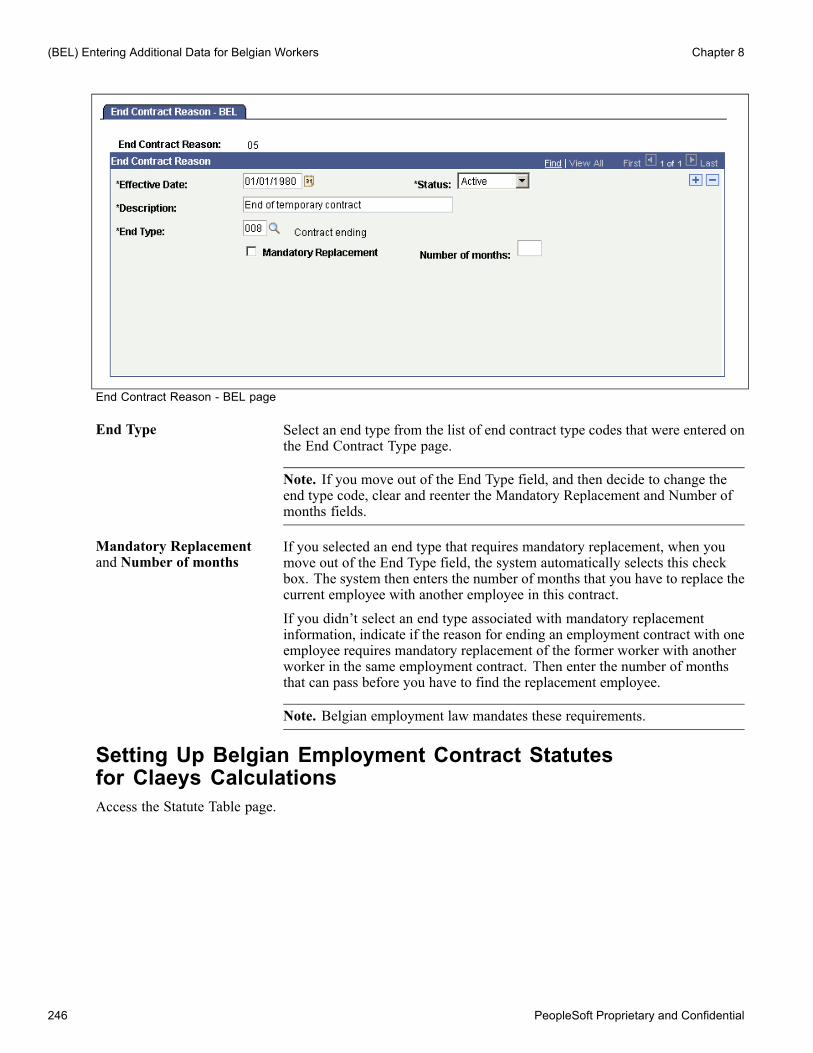
(BEL) Entering Additional Data for Belgian Workers Chapter 8
End Contract Reason - BEL page
End Type Select an end type from the list of end contract type codes that were entered onthe End Contract Type page.
Note. If you move out of the End Type field, and then decide to change theend type code, clear and reenter the Mandatory Replacement and Number ofmonths fields.
Mandatory Replacementand Number of months
If you selected an end type that requires mandatory replacement, when youmove out of the End Type field, the system automatically selects this checkbox. The system then enters the number of months that you have to replace thecurrent employee with another employee in this contract.If you didn’t select an end type associated with mandatory replacementinformation, indicate if the reason for ending an employment contract with oneemployee requires mandatory replacement of the former worker with anotherworker in the same employment contract. Then enter the number of monthsthat can pass before you have to find the replacement employee.
Note. Belgian employment law mandates these requirements.
Setting Up Belgian Employment Contract Statutesfor Claeys CalculationsAccess the Statute Table page.
246 PeopleSoft Proprietary and Confidential

Chapter 8 (BEL) Entering Additional Data for Belgian Workers
Statute Table page
Contract Type Select a contract type for the statute. Values are Employment, Member of theprofessions, Non applicable, and Self Employed.
Substatute Select the statute code with which the system should associate this substatutecode.
Linking Contract Statutes to RSZ CategoriesAccess the RSZ Category Table page.
RSZ Category Table page
Use the government-defined RSZ categories to maintain social security records for your Belgian employees.Associate each combination of contract type, statute, and substatute with an RSZ category for Claeys formulacalculations.
RSZ-Submitted Select to indicate that the contract is subject to RSZ. Before selecting thischeck box, determine whether RSZ premiums have to be paid to the Belgiansocial security system for the pay (wage or reimbursement) that is associatedwith this contract.
PeopleSoft Proprietary and Confidential 247

(BEL) Entering Additional Data for Belgian Workers Chapter 8
RSZ-Category Select an RSZ category from the list.
Recording Information that Is Necessary for Terminatinga Belgian WorkerAccess the Contract Ending page.
Contract Ending page
Use this page to:
• Specify that the worker’s employment contract has ended, and the reason that your organization has chosento end the contract.
• Set up and track the worker’s termination notification period.• Track the worker’s replacement if a replacement is mandatory based on the contract type.
End Contract Type Select a valid end contract type (such as death, disability, or early retirementwith mandatory replacement).
End Contract Reason Select an end contract reason (such as disrupted employee relations, familyreasons, a company specific program, or contract expiration).
Notification Period Months Enter the number of months of notice that the employee must be given priorto the contract end date. The notification period that you enter here impactsClaeys calculations in the Create Notification component. If you enter anamount here and move out of the field, the Notification Period Weeks optionbecomes display-only.
Notification Period Weeks Enter the number of weeks of notice that the employee must be given priorto the contract end date. The notification period that you enter here impactsClaeys calculations in the Create Notification component.
248 PeopleSoft Proprietary and Confidential

Chapter 8 (BEL) Entering Additional Data for Belgian Workers
If you enter an amount here and move out of the field, the system makes theNotification Period Months option display-only.
Start Date and End Date Enter the date that the notification period begins, and the date on which thenotification period ends and the employment contract terminates.
Start Date Worked Record the employee’s start date for this job contract, which should be thesame as the date that you record for a job change in the worker’s job record.
End Date Worked Enter the employee’s last working day on this job contract, which should bethe same as the date that you record for a job change in the worker’s jobrecord—whether the worker is terminating with your company or leaving onejob contract to move into another.
Start Date Payment andEnd Date Payment
Track the start and end payment dates, which the system stores and usesfor payroll.
Mandatory Replacement If the end contract type that you selected requires mandatory replacement,the system automatically selects this check box and makes it display-only.Specify whether an end contract type requires replacement on the EndContract Type - BEL page.
End Date MandatoryReplacement
If the end contract type requires mandatory replacement, the system calculatesthe end date of the mandatory replacement period based on the end date onwhich the employee is terminated. It also calculates the number of months thatyou specified on the End Employment Terms table (CNT_END_TBL_BEL) asthe length of the replacement period.
See AlsoChapter 8, “(BEL) Entering Additional Data for Belgian Workers,” Defining Reason Codes for EndingEmployment Contracts, page 245
Entering a Replacement Worker for the Employment ContractAccess the Contract Replacement page.
PeopleSoft Proprietary and Confidential 249

(BEL) Entering Additional Data for Belgian Workers Chapter 8
Contract Replacement page
Replacing ID Select the ID of the employee who replaces the terminated employee inthis contract. The system displays all employees who have been tagged asreplacement employees for Belgian employment contracts in your humanresources system. Select any applicant or employee with employment terms.If you want to hire someone as a replacing employee, you must createemployment terms for that person first.
Replacing Contract Nbr(replacing contract number)
Select the number for this contract, based on the replacing employee IDthat you selected.
Mandatory Replacement Select to indicate that mandatory replacement is required.
End Replacement If you selected Mandatory Replacement, enter the date for the end replacement.You may want to track this date if you have an earlier than expected end datefor a fixed term employment contract.
End Date MandatoryReplacement
Enter the end date for mandatory replacement.
250 PeopleSoft Proprietary and Confidential

Chapter 8 (BEL) Entering Additional Data for Belgian Workers
Preparing for Severance CalculationsEmployers in Belgium and organizations that employ a Belgian workforce are required to track workerinformation that is used in the Claeys formula calculation. This calculation determines the amount of severancecompensation that your organization must pay a worker if you terminate employment. The formula considersfactors such as the employee’s seniority, age, and annual compensation (including salary, vacation pay, and soon) to determine your organization’s liability to the employee.
This section provides an overview of how Claeys calculates severance and of how to prepare for the Claeyscalculation, and discusses how to:
• Track additional seniority.• Enter protected job leave information.
Understanding How Claeys Calculates SeveranceThe Claeys formula calculates months of severance salary that are owed to an employee as follows:
0.89 × (seniority) + 0.08 × (employee’s age) + 0.0013 × [yearly compensation in EUR divided by 1000 ×(reference index divided by actual index)] - 2 = notification period, or months of severance salary that isowed to the employee.
For example, an employee with 13 years of seniority with a company, who is 38 years of age, and who ismaking 82.500 EUR is entitled to 13 months of severance pay. The calculation works as follows:
0.89 × 13 = 11.57 (seniority factor)
0.08 × 38 = 3.04 (age factor)
0.0013 × (82,500 / 1000) × (125.30 / 126.00) = .1066 (compensation factor)
11.57 (seniority factor) + 3.04 (age factor) + .1066 (compensation factor) - 2 = 13 months of severance
Note. The value for compensation is the employee’s yearly compensation. This amount is based onthe employee’s monthly wage multiplied by the factor that is designated in the company table for yourorganization. The Belgian regulated factor amount is approximately 13.9.
How to Prepare for the Claeys CalculationPreparing for the Claeys employment compensation calculation in PeopleSoft Enterprise Human Resourcesinvolves:
• Establishing default company level information that is used for Claeys formula employee compensationcalculations on the Company table (COMPANY_TBL), including factoring information defaults forcalculating worker seniority, age, compensation, and so on.You can override this data at the employee level in the Create Notification component, where you performthe Claeys calculation for a specific worker.
• Entering and maintaining information about the employee’s:- Seniority with your organization (stored in the PER_ORG_ASGN table).- Age (stored in the PERSON table).- Compensation (stored in the JOB table).
PeopleSoft Proprietary and Confidential 251

(BEL) Entering Additional Data for Belgian Workers Chapter 8
• Entering and maintaining employment contract information for the employee on the Contract Data pages(stored in the CONTRACT_DATA table).
• Entering and maintaining end employment terms information regarding required notification periods forworkers whom your company may terminate (stored in the CNT_END_TBL_BEL table).
• Maintaining additional information that is used to record Belgian seniority, including protected job leaveinformation (stored in the SENIORITY_BEL table).
See AlsoChapter 8, “(BEL) Entering Additional Data for Belgian Workers,” Performing the Claeys Calculation,page 254
Pages Used to Prepare for Severance CalculationsPage Name Object Name Navigation Usage
BEL Seniority SENIORITY_BEL Workforce Administration,Collective Processes,Administration BEL,Identify Seniority
Track additional seniorityfor an employee; theseniority impacts the Claeyscalculation that you performin the Create Notificationcomponent.
Protection PROTECT_BEL Workforce Administration,Collective Processes,Administration BEL, CreateProtection
Enter protected job leaveinformation for a Belgianemployee. You can assignprotection to employees whoare union delegates, whotake part in elections, orwho have other qualifyingcharacteristics.
Tracking Additional SeniorityAccess the BEL Seniority page.
BEL Seniority page
The system uses the seniority information for the employee recorded on this page when performing Claeysformula processing to determine the employee’s months of service. If no information about service monthsis available on the Seniority page for an employee, the system references the employee’s service monthscalculation on the Job Data - Job Information page.
252 PeopleSoft Proprietary and Confidential

Chapter 8 (BEL) Entering Additional Data for Belgian Workers
For example, seniority in another organization may or may not count towards an employee’s companyseniority, depending on your own organization’s business rules, but it does count towards legal seniority thatimpacts the Claeys calculation. This distinction is particularly important in the case of mergers betweenorganizations where you decide if the seniority of employees from one organization is recognized by the otherorganization and, if so, to what extent. Using this page, you can specify the number of months of seniority thatworkers can carry over to your organization from their former companies.
Seniority Type Select the seniority type method that you want to use to determine thisemployee’s seniority in your organization. Values are:Company Seniority: When figuring seniority, this method doesn’t accountfor periods of leave time that employees may use while remaining in a job,pension calculation issues, recognized service time, and so on.The system does not take into account company seniority months whenperforming the Claeys calculation for an employee. If you enter a period forcompany seniority, the Claeys calculation uses only the months of senioritybased on the employee’s service time on their Job Data record.Legal Seniority: The system accounts for this seniority amount whencalculating the Claeys formula, which is used to calculate base pay forBelgian employees.If you enter a period for legal seniority, the Claeys calculation takes thenumber of service months displayed in the Nbr Months field and adds it to themonths of service from the employee’s Job Data record, and displays the sumof the two amounts on the Create Notification - Base page.
Eff Date (effective date) Enter the effective date to record the beginning of the employee’s additionalseniority period. The system supplies a default date, usually today’s date,which you can modify to reflect the additional seniority period.
End Date Enter the end date for the seniority period.
Nbr Months (number ofmonths)
When you move out of the End Date field, the system calculates the numberof months of seniority. The system doesn’t calculate partial months. If anemployee’s seniority period is 100 months and 16 days, the system calculates100 months of seniority.
Included Select to ensure that the system adds the months of seniority that you enteredhere to the employee’s seniority based on their Job record (JOB) when itperforms the Claeys calculation. If you clear this check box and enterLegal Seniority months, the system subtracts the seniority period from theemployee’s seniority when it calculates the Claeys formula.
Remark Enter relevant remarks about the additional seniority that you are tracking.
Entering Protected Job Leave InformationAccess the Protection page.
PeopleSoft Proprietary and Confidential 253

(BEL) Entering Additional Data for Belgian Workers Chapter 8
Protection page
Protection Type Select a protection type to indicate why this leave of absence is protected.
Note. Belgian employment law mandates these protection types.
End Date Enter the date on which the employee will return to work.
Nbr Months (Number ofMonths)
When you move out of the End Date field, the system calculates the durationof the protected absence.
Note. The system calculates only the absence period to the nearest month anddoesn’t allow for partial months. If the protected leave duration period is 45days, the system indicates that the employee’s absence covers one month only.
Note. The system does not take into account protection months when it calculates Claeys formula seniority, inpart because protection isn’t limited to absences from work that might impact seniority months.
Performing the Claeys CalculationAfter you’ve hired a Belgian employee into your human resources system and established employment contractterms, end employment terms, seniority, and protected leave (protection) information, you can perform theClaeys calculation to determine your potential severance pay liability if you were to terminate the employee.
This section discusses how to:
• Review Claeys calculation variables.• Calculate the severance amount.• Run the Notification report.
254 PeopleSoft Proprietary and Confidential
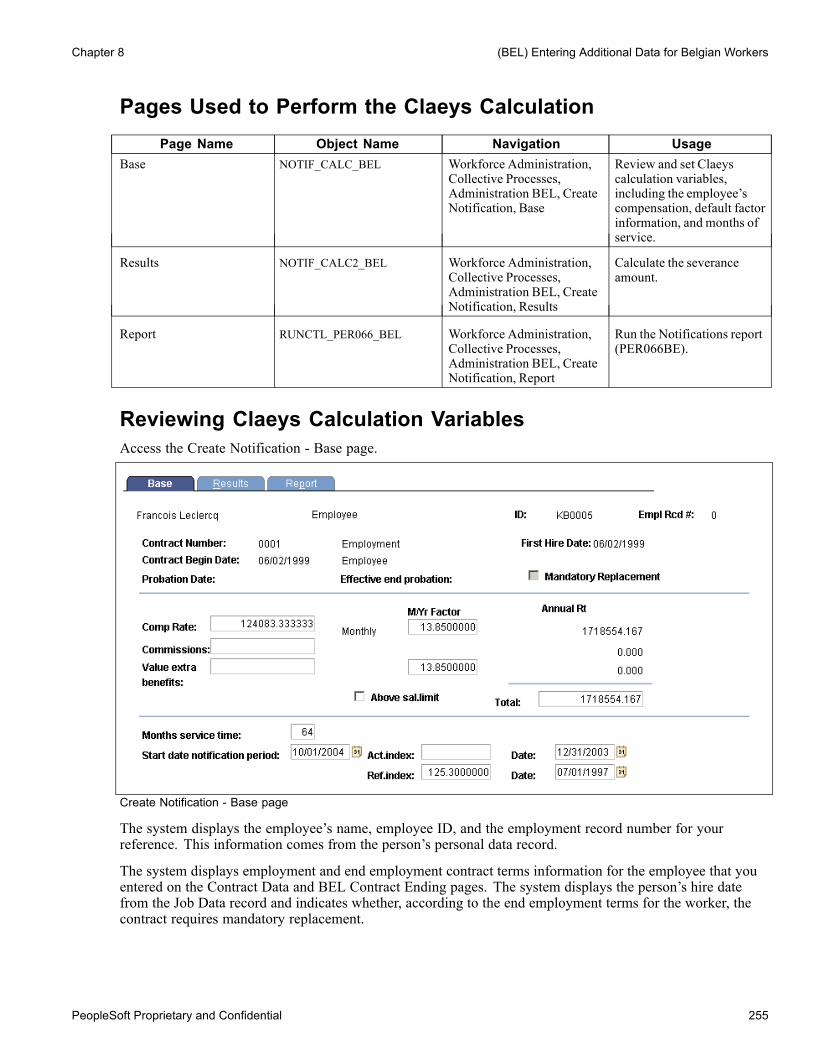
Chapter 8 (BEL) Entering Additional Data for Belgian Workers
Pages Used to Perform the Claeys CalculationPage Name Object Name Navigation Usage
Base NOTIF_CALC_BEL Workforce Administration,Collective Processes,Administration BEL, CreateNotification, Base
Review and set Claeyscalculation variables,including the employee’scompensation, default factorinformation, and months ofservice.
Results NOTIF_CALC2_BEL Workforce Administration,Collective Processes,Administration BEL, CreateNotification, Results
Calculate the severanceamount.
Report RUNCTL_PER066_BEL Workforce Administration,Collective Processes,Administration BEL, CreateNotification, Report
Run the Notifications report(PER066BE).
Reviewing Claeys Calculation VariablesAccess the Create Notification - Base page.
Create Notification - Base page
The system displays the employee’s name, employee ID, and the employment record number for yourreference. This information comes from the person’s personal data record.
The system displays employment and end employment contract terms information for the employee that youentered on the Contract Data and BEL Contract Ending pages. The system displays the person’s hire datefrom the Job Data record and indicates whether, according to the end employment terms for the worker, thecontract requires mandatory replacement.
PeopleSoft Proprietary and Confidential 255

(BEL) Entering Additional Data for Belgian Workers Chapter 8
Determining the Employee’s Base Compensation Amount (Jaarloon)
Comp Rate (compensationrate)
The system calculates the employee’s monthly compensation rate based on theemployee’s compensation rate information on the Job Data - Compensationpage and displays it here. Adjust the rate information as necessary. Thesystem uses this amount when determining the employee’s monthly payvariable for the Claeys calculation.
M/Yr Factor (month/yearfactor)
The system multiplies the month base amount by the month/year factor of13.85000 to calculate a value for the employee’s Annual Rt income amountfield. The default factor displayed here comes from the default employeecompensation factors that you entered on the Company table. The Belgiangovernment determines this factor amount, but you can override the defaulthere if the factor amount changes.
Commissions Enter any commissions amount that the system should add to the employee’smonth base as part of the Claeys calculation income amount.
Value Extra Benefits Add value extra benefits amounts, including other components of nonbase pay,such as any benefits that the employee receives (for example, salary, vacationpay, 13th month, meal checks, and so on). The system multiplies the valueextra benefits amount by the value extra month/year factor of 13.85000 tocalculate the employee’s yearly extra income amount.
Total The system displays the total compensation amount (jaarloon) based on theyear base, the commission, and extra benefit results. Adjust the systemcalculated total as necessary.
Understanding the Above Salary Limit Setting
Above sal. limit (abovesalary limit)
The system also indicates if the employee’s compensation total is above salarylimit by accounting for the contract type. Select this check box to override thefactor values on the Create Notification - Results page.To change the salary limit setting, ensure that the notification period start datefalls after the effective end probation date that appears with the employee’scontract information at the top of the page. In this case, the system fixes thesalary limit for a longer period (the system uses the factors in the ClaeysDefaults group box on the Create Notification - Results page to calculate thenotification period, and makes the factors available for entry).If the date is prior to the effective end probation date, you can’t change thesalary limit setting.
Note. The compensation currency on the Create Notification - Base and Create Notification -Results pages isthe same as the employee’s job currency that is set on the employee’s Job record (JOB).
Determining the Employee’s Seniority
Months service time The system calculates and displays the employee’s number of months servicetime. The system determines service month information by consideringboth the employee’s service months information on the Job Informationpage (JOB_DATA) and the number of months service time on the Senioritypage (SENIORITY_BEL) if the seniority type is set to Legal Seniority. The
256 PeopleSoft Proprietary and Confidential

Chapter 8 (BEL) Entering Additional Data for Belgian Workers
system adds the two seniority amounts and displays them as the monthsservice time amount.The system doesn’t consider partial months in this calculation and doesn’tround up. If the employee’s service time is 9 months, 16 days, the systemdisplays 9 as the employee’s months service time. Adjust the months servicetime as necessary.
Note. If you enter seniority information on the Seniority page for an employee,and the seniority type is set to Company Seniority, the system uses the monthsof seniority calculation on the Job Information page to set the number ofmonths service time on the Create Notification - Base page.
Start date notificationperiod
Set the start date notification period for the employee’s termination notificationto the first day of the next month if you’re not performing the Claeyscalculation for this employee on the first day of the current month. The defaultvalue is the first day of the month following the effective date that appearswith the contract information at the top of the page.For example, if you start your Claeys calculation for an employee on April 14,the system enters a start date for the notification period of May 1. Overridethis date as necessary.
Note. The start date notification period that appears on the Base page affectsthe way the system performs the Claeys calculation on the Results page. If thestart date notification period begins before the effective end probation date onthe Base page, the system uses a notification period ofDays on the Results pagewhen you click the Calculation button. If you enter a start date notificationperiod that begins after the employee’s effective end probation date, the systemuses a notification period of Days, Weeks, or Months, depending on the statuteinformation for that employee on the Contract Data - Contract Type/Clausespage, as follows. If the employee is classified as aWorker on the EmploymentTerms Type page, the notification period appears inWeeks. The classificationof Employee results in a notification period of Months. The classification ofNot Applicable results in a notification period of Days.
Act. Index (actual index) The actual index if one is assigned for this company in the Company table.The actual index is a monthly reference number to be held against thereference index number.The actual index is used in the Claeys calculation to calculate the notificationperiod term that is related to the yearly base on the Create Notification -Results page:(Yearly base salary / 1000) × (factor yearly base / actual index) × correctionfactor)
Date The last day of the year preceding the year in which you’re performing theClaeys calculation for an employee (in this case, December 31, 1997). Thisdate is for your reference only, and isn’t saved when you save the page.
Ref. Index (reference index) You can also update the reference index or accept the system default that isbased on the factor yearly base index that is set up on the Company Table-Default Settings, Claeys Defaults for this company. The reference index is ayearly reference amount to be compared against the actual index amount.
PeopleSoft Proprietary and Confidential 257

(BEL) Entering Additional Data for Belgian Workers Chapter 8
Date The system also displays the reference index date (in this case, July 1, 1997).The system sets this date to the beginning of the last half of the year priorto the year in which you’re performing the Claeys calculation. This date isfor your reference only, and isn’t saved when you save the page. The systemdoesn’t use the reference index as part of the Claeys calculation.
Calculating the Severance AmountAccess the Create Notification - Results page.
Create Notification - Results page
The system displays the Claeys defaults for Factor Seniority, Factor Age, Correction Factor, Term Correction,and Factor Yearly Base from the Company table for this employee’s company. You assigned the companyon the Job Data - Work Location page. Change these factors at the employee level on this page only if youselected the Above sal. limit check box on the Create Notification - Base page.
Note. The system uses these Claeys default factors as part of the Claeys calculation only when the Abovesal. limit check box is selected on the Create Notification - Base page.
When you first open this page, the Notification Period and Calculation group boxes are empty. This is wherethe system displays the results of the Claeys calculation for this employee after you perform the calculation byselecting the Calculation link.
The system displays the calculated notification period for this employee in the Calculation group box andshows how it calculated the notification period in the Notification period group box.
How the System Calculates the Notification PeriodThe system calculates the notification period in one of two ways depending on whether the employee’syearly base salary is above the salary limit:
258 PeopleSoft Proprietary and Confidential

Chapter 8 (BEL) Entering Additional Data for Belgian Workers
• If the employee’s yearly base salary is above the salary limit (Sal limit check box selected), the notificationperiod that appears in the Calculation group box is based on the calculations that appear in the NotificationPeriod group box.The system calculates the notification period based on the employee’s seniority, age, and compensation:Seniority term = (months service time / 12) × factor seniority
Note. For the Seniority Term amount, the system rounds the division by 12 differently for each month.
Age term = employee’s age on notification start date × factor age.Compensation term = (base total / 1000) × (factor yearly base / actual index) × correction factor.Total notification period = seniority term + age term + compensation term - term correction.You can tell if you’re using the above salary limit method by the way the page looks when you performthe calculation. If the system used the above salary limit method to determine the notification period, itdisplays the notification period calculation in the Notification Period group box. The Claeys defaults thatappear on the page are also available for entry, though these come from the company defaults for theemployee’s company and probably shouldn’t be changed.
• If the employee’s base isn’t above the salary limit, (the Above sal. limit check box is cleared), thenotification period amount is based on the statute, service time, probation end date, and notification startdate—without accounting for any of the Claeys defaults factors that appear on the page. In this case, thesystem calculates the employee’s notification period as follows:
If the Statute is "Worker"
if Notification Start Date <= Effective Probation End Date, then Period is "0"
if the Service Time is lower than 240 Months (20 years) the Period is "4"
else the Period is "8"
If the Statute is "Employee"
if Notification Start Date <= Effective Probation End Date, then Period is "7"
else the Period is (((Service Time / 12) / 5) +1) ×3 ⇒(each division is truncated with zero decimals)
Else the Period is "0"
The unit of time for the notification period information is based on the employee’s statute type that youestablished on the Contract Data - Contract Type/Clauses page (CONTRACT2) as defined on the StatuteTable page (STATUTE_TBL_BEL). When the statute type is set to Worker, the period unit is in Weeks.When the statute is for an Employee, then the period unit is in Months. If the statute is anything other thanworker or employee, the period unit is Days. Whenever the notification start date falls within the probationperiod, the unit of time is always Days.
Understanding Protection Period InformationThe system compares the end date for any of this employee’s qualifying protection periods that you recorded onthe Protection table (PROTECTION_BEL) to the notification start date recorded on the Belgian NotificationCalculation table (NOTIF_CALC_BEL) to determine the value for the Protection period field. This method ofcomparison ensures that the employer respects the employee’s protection rights.
Note. The protection period isn’t included in the Claeys calculation process.
The system also displays the Protection End Date field, which is the actual end date of the protection period ifthere is any protected leave time entered for this employee on the Protection page. This is the date that you setas the end date for any qualifying protection period that you specified on the Protection page.
PeopleSoft Proprietary and Confidential 259

(BEL) Entering Additional Data for Belgian Workers Chapter 8
Working with the End Compensation AmountThe End compensation field displays the resulting Claeys calculation amount that you owe this employee asseverance pay, as calculated by the system.
Depending on the notification period unit of time, the system calculates the end compensation by dividing theyearly base total (displayed on the Create Notification, Base page) by 12 if the notification period is months,52 if weeks, or 365 if days. The result is then multiplied by the notification period amount to arrive at the endcompensation amount. For example, the end compensation amount calculation for Josef Timmermans is:
(2391248.62 / 12) × 4 = 797082.87
Any amount that you enter in the Revenue compensation field is added to the total severance amount for theemployee.
If you need to change the notification data and rerun the calculation, make your changes and click theCalculation link again. The system clears the old results and calculates the Claeys amount based on yourchanges.
Warning! The system does not save this data. You must run the Notification report to maintain records foreach calculation.
Running the Notification ReportAccess the Create Notification - Report page.
After completing the Claeys calculation, run the termination notification report. The report page displays theemployee’s ID and record number together with the notification period that is calculated by the Claeys formula.
See AlsoPeopleSoft Enterprise HRMS 8.9 Application Fundamentals PeopleBook, “Setting Up OrganizationFoundation Tables,” (BEL) Entering Default Information and Salary Factors
Generating DIMONA NotificationsThis section provides an overview of DIMONA notifications and discusses how to:
• Create DIMONA notifications.• Review DIMONA notifications.
Understanding DIMONA NotificationsThe Belgian E-government Social Security plan requires companies to report social insurance data for workersemployed under Belgium regulations. DIMONA notifications contain the required data.
The Create DIMONA Notification process (HRBEL_DIM_AE) generates DIMONA notifications as flatfiles. The PeopleSoft system supports employee hire and employee termination DIMONA notifications,including corresponding updates and cancellations. You can generate notifications for a single employee,for a company, or for a business unit.
260 PeopleSoft Proprietary and Confidential

Chapter 8 (BEL) Entering Additional Data for Belgian Workers
After you have generated flat files containing the notifications, you can transfer the flat files to the NationalOffice for Social Security (NOSS), known as RSZ or ONSS in Belgium, using the NOSS file transfer protocolserver. After you transfer data to the NOSS, you can consult and update employee data by using the NOSSdatabase system.
Pages Used to Generate DIMONA NotificationsPage Name Object Name Navigation Usage
DIMONANotification HR_DIMONA_CNTL_BEL Workforce Administration,Collective Processes,Administration BEL, CreateDIMONANotification
Create DIMONAnotifications.
Review Notification HR_DIMONA_RVW_BEL Workforce Administration,Collective Processes,Administration BEL, ReviewDIMONANotification
Review DIMONAnotifications.
Creating DIMONA NotificationsAccess the DIMONA Notification page.
DIMONA Notification page
Report Request Parameters
From Date and End Date Enter begin and end dates for the period to include in the DIMONAnotification.
Version Enter the DIMONA version number (from the first page of the Glossarium)used when creating the DIMONA file.
PeopleSoft Proprietary and Confidential 261

(BEL) Entering Additional Data for Belgian Workers Chapter 8
Company and Business Unit Enter the company or business unit for which to create a DIMONA notification.
Create DIMONA Start File Select to indicate that this is the initial DIMONA creation. When selected, theDIMONA file contains all employees and workers.
Restart Information
Re-start Select to indicate that an existing notification needs to be recreated. Thesystem processes only those notifications that have been reviewed and set toRe-do on the Review Notification page.
Start Date Select the process date of the original notification that needs to be recreated.
Demand InformationEnter information about the person who is sending the notification.
Sender Nr (sender number) Enter the number that the NOSS assigned to the person who is sendingthe notification.
Council Enter the sender’s city.
Country Code Enter the sender’s National Institute for Statistics (Nationaal Instituut voorde Statistiek) (NIS) country code.
Contact
Name, Function, and Tel.(telephone number)
Enter the name, function, and telephone number of the person whom the NOSScan contact in case there is a problem with the file.
HRBEL_DIM_AE ProcessThe HRBEL_DIM_AE process selects all employees that have been hired or terminated, based on personaland job data, and creates a notification for them. The process creates notification flat files according to theNOSS standard, and names the file according to NOSS naming conventions.
Reviewing DIMONA NotificationsAccess the Review Notification page.
Review Notification page
Process Date (Optional) Enter the date that the notification was processed.
262 PeopleSoft Proprietary and Confidential
Chapter 8 (BEL) Entering Additional Data for Belgian Workers
EmplID (Optional) Enter the employee ID of the notification to review.
Hire Date (Optional) Enter the hire date of the notification to review.
NOSS Portal Click to access the NOSS website. From this page, you can log on to theNOSS web server to check the latest information about the DIMONAnotification or other information about Belgian social security.
Status (Optional) Select the status of the notification to review: Cancel, Delete,Done, or Re-do.
Action (Optional) Select the action reported by the notification: Cancel, Hire,Terminate, or Update.
Select with MatchingCriteria
Click to populate the Payees group box with information on the notificationsthat match your criteria.
DIMONA Nr (DIMONAnumber)
Enter the notification number that is assigned by NOSS.
Update and Termination NotificationsUsing this page and the DIMONA Notification page, you can create update and termination notifications.
To create single employee update and termination notifications:
1. Access the Review Notification page.
2. Enter the process date and the employee ID.
3. Click Select with Matching Criteria.
4. Set the notification action to Update or Terminate.
5. Set the notification status to Re-do.
6. Save the page.
7. Access the DIMONA Notification page.
8. Select the Re-start check box and enter the process date in the Start Date field.
9. Run the HRBEL_DIM_AE process.
To create update and termination notifications for more than one employee, follow the same steps as fora single employee notification, except:
• In step 2, enter the process date and any additional criteria.• Perform steps 4 and 5 for all employees to include in the notification.
Running the Social ReportThis section explains how to generate the Belgian Social report.
PeopleSoft Proprietary and Confidential 263

(BEL) Entering Additional Data for Belgian Workers Chapter 8
Page Used to Run the Social ReportPage Name Object Name Navigation Usage
Social Report RUNCTL_PER067_BEL Workforce Administration,Workforce Reports, SocialReport BEL
Run the Social Report(PER067BEL), whichreports a variety of employerand employee informationthat is required by thegovernment.
264 PeopleSoft Proprietary and Confidential
CHAPTER 9
Managing Country-Specific Workforce Data
This chapter discusses how to:
• (CAN) Provide additional information for Canadian employees.• (CHE) Run the Company Statistics report.• (ESP) Generate Affiliation to Social Security (AFI) flat files.• (FRA) Provide additional information for French workers.• (NLD) Record and report Wet Stimulering Arbeidsdeelname (SAMEN) diversity information for Dutchworkers.
• (ITA) Record additional hiring data for Italian workers.• (ITA) Record end of employment information for Italian workers.• (ITA) Run the Equal Opportunities report.• (USA) Determine U.S. residency status for foreign nationals.
(CAN) Providing Additional Information forCanadian Employees
There are a few issues that are unique to a Canadian workforce.
Note. While the Ontario Employment Equity Commission (OEEC) no longer requires employees in Ontario tocomplete workforce surveys, the PeopleSoft system continues to offer Ontario Employment Equity (OEE)reporting functionality.
This section discusses how to:
• Enter OEEC workforce survey responses.• Record employee-level information about official language use.
PeopleSoft Proprietary and Confidential 265

Managing Country-Specific Workforce Data Chapter 9
Pages Used to Provide Additional Information forCanadian Employees
Page Name Object Name Navigation UsageOEEWorkforce Survey CAN_OEE_SURVEY Workforce Administration,
Personal Information, OEEWorkforce Survey CAN,Workforce Survey Result
Enter OEEC workforcesurvey responses.
Official Languages PERS_OFFLNG_CAN Workforce Administration,Personal Information, OEEWorkforce Survey CAN,Official Languages
Record employee-levelinformation about theuse of official languages.The information stored inthis page is used for theOfficial Languages reportsthat you submit to theCanadian government, inaccordance with the OfficialLanguages Act.
OEE Groups by OCCGroup RUNCTL_FTCANAC Workforce Administration,Personal Information, OEEWorkforce Survey CAN,Groups by OCCGroupReport
Generate the OEE Groupsby OCCGroup report(PER103CN). The reportlists the totals of activeemployees, within thedefined area codes,employed within the daterange.
OEE Groups byEmployment Type
RUNCTL_FTCANAC Workforce Administration,Personal Information, OEEWorkforce Survey CAN,Groups by EmplymntType Rpt
Generate the OEE Groups byEmployment Type report(PER104CN).
OEE Groups/JobsFilled/Vacated
RUNCTL_FTCANAC Workforce Administration,Personal Information, OEEWorkforce Survey CAN,Groups/Jobs Filled/Vacated
Generate the OEE Groups byJobs Filled/Vacatd report(PER106CN), which lists thetotals of active employees,within the defined areacodes, employed withinthe date range.
OEEWorkforce SurveyStats
RUNCTL_PER105CN Workforce Administration,Personal Information, OEEWorkforce Survey CAN,Workforce Survey Stats
Run the OEEWork ForceSurvey Stats report(PER105CN). The OEEWork Force Survey Statsreport lists the numberof surveys received andthe numbers that werecompleted.
Entering OEEC Workforce Survey ResponsesAccess the OEE Workforce Survey page.
266 PeopleSoft Proprietary and Confidential
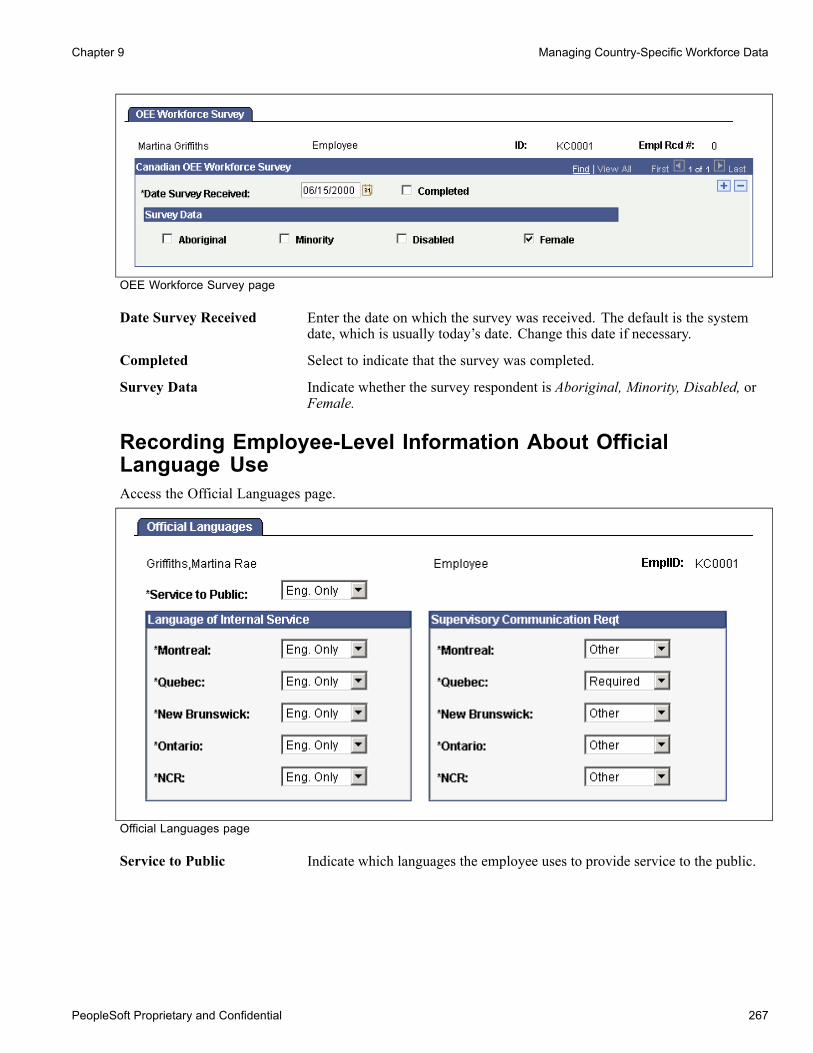
Chapter 9 Managing Country-Specific Workforce Data
OEE Workforce Survey page
Date Survey Received Enter the date on which the survey was received. The default is the systemdate, which is usually today’s date. Change this date if necessary.
Completed Select to indicate that the survey was completed.
Survey Data Indicate whether the survey respondent is Aboriginal, Minority, Disabled, orFemale.
Recording Employee-Level Information About OfficialLanguage UseAccess the Official Languages page.
Official Languages page
Service to Public Indicate which languages the employee uses to provide service to the public.
PeopleSoft Proprietary and Confidential 267

Managing Country-Specific Workforce Data Chapter 9
Language of Internal Service
Montreal, Quebec, NewBrunswick, Ontario, andNCR (National CapitalRegion)
For the locations listed in this group box, indicate which languages theemployee uses to communicate internally. Select N/A (not applicable) forthose locations that don’t apply.
Supervisory Communication Reqt (Supervisory Communication Required)
Montreal, Quebec, NewBrunswick, Ontario, andNCR (National CapitalRegion)
For the locations listed in this group box, indicate which languages theemployee requires for supervisory communication. Select N/A (not applicable)for those locations that don’t apply.
See AlsoPeopleSoft Enterprise Human Resources 8.9 PeopleBook: Meet Regulatory Requirements, “(CAN) MeetingRegulatory Requirements for Canada,” Running Official Languages Reports
(CHE) Running the Company Statistics ReportThe Swiss Federal Department of Statistics requires all Swiss companies to create this report every 10 years.
Page Used to Run the Company Statistics ReportPage Name Object Name Navigation Usage
Company Statistics RUNCTL_PER001_CHE Workforce Monitoring,CHE-Company Statistics
Run the Company Statisticsreport (PER001CH). Thisreport provides informationon employee wages,occupations, and otherdata necessary for theCompany Statistics report(Betriebszaehlung).
(ESP) Generating AFI Flat FilesThis section provides an overview of the AFI process and discusses how to create an AFI flat file.
Understanding the AFI ProcessFor Spanish employers, PeopleSoft Enterprise Human Resources includes an AFI process (SOCS_AFI_ESP)for reporting workforce changes to the Social Security General Treasury. The PeopleSoft process simplifiessubmissions by automatically creating a flat file in the format that is required by the Spanish authorities.
268 PeopleSoft Proprietary and Confidential
Chapter 9 Managing Country-Specific Workforce Data
The AFI process generates a flat file that lists changes in workforce, such as hiring, terminations, personal,or job data changes, for a particular period. You run the process for a selected company and Codigo Cuentade Cotizacion (CCC).
There are two ways to select the employees to include in the AFI file:
• Select the types of changes that you want to report.The system generates a list of employees who match the criteria, and you can select the employees to include.
• Select specific employee IDs.If you know which employees you want to include, enter the employee IDs.
In addition to workforce changes, you can use the AFI process to send information requests to the SocialSecurity General Treasury. Employers use these requests to obtain information about their employees’ socialsecurity contributions.
Page Used to Generate AFI Flat FilesPage Name Object Name Navigation Usage
AFI Generation RC_SOCS_AFI_ESP Workforce Administration,Workforce Reports, AFIReport ESP
Create an AFI flat file foran entire company, fora business unit, or foremployees who meet certaincriteria.
Creating an AFI Flat FileAccess the AFI Generation page.
PeopleSoft Proprietary and Confidential 269

Managing Country-Specific Workforce Data Chapter 9
AFI Generation page
AFI File Name
AFI File Name Enter the name of the file to be created.
Date From and Date To Enter the first and last dates of the period for which you want to generate anAFI file.
Test Select to run the process as a test. The process creates a flat file with a test flagthat the Social Security General Treasury recognizes.
Company Data
Company Select the company for which to report data.
Employer Social SecurityNumber
Select the employer’s social security number for which to report data. If youleave this field blank, the extract file contains data for all of the employer’ssocial security numbers.
Main Indicates whether this is the employer’s primary social security number.
Inquire Company Situation Select to request the information that the Social Security General Treasury hasabout the company.
Inquire Workers Select to request the information that the Social Security General Treasury hasabout current workers in the CCC.
270 PeopleSoft Proprietary and Confidential

Chapter 9 Managing Country-Specific Workforce Data
Inquire Previous Numbers Select to request the information that the Social Security General Treasury hasabout previous movement in the CCC.
Labor Life Select to request the information that the Social Security General Treasury hasabout labor life in the CCC.
Employee ActionsThere are two ways to select employees:
• Select one or more AFI flat file actions and click Select Employees to display a list of employees whohave those actions.
• Enter employees by employee ID.
Hire Select to include employees who were hired.
Termination Select to include employees who were terminated.
Contract Select to include employees whose contracts changed.
Work Group Select to include employees whose work group changed.
Risk Code Select to include employees whose risk code changed.
Select Employees Click to select employees whose actions meet your criteria. The systemautomatically populates the EmplID, Social Security Action, Action, andReason Code fields for these employees.
Employee Record Number Enter the ID of the employee that you want to include in the AFI flat file. Youcan delete an employee from the list that was generated when you clicked theSelect EE button if you do not want to report information for the employee.
Social Security Action Select the AFI flat file action to report for the employee.
Action Select the internal action code to include in the AFI flat file for the employee.
Reason Code Select the action reason to include in the AFI flat file for the employee.
(FRA) Providing Additional Information for French WorkersThis section discusses how to:
• Track mandate information.
• Enter worker military service information.
PeopleSoft Proprietary and Confidential 271

Managing Country-Specific Workforce Data Chapter 9
Pages Used to Provide Additional Information forFrench Workers
Page Name Object Name Navigation UsageMandates MANDATES_FRA Workforce Administration,
Job Information, MandatesFRA
Track mandate informationfor French workers.
Military Situation MILIT_SITUATN_FRA Workforce Administration,Personal Information,Biographical, MilitarySituation FRA
Enter worker militaryservice information,including the branch of thearmed forces in which theworker served, and theworker’s ID number, grade,and reserve status.
Tracking Mandate InformationAccess the Mandates page.
Mandates page
Mandate Type Select a mandate type.
Mandate Begin Date andMandate End Date
Enter the mandate begin and end dates during which the worker was associatedwith the mandate type.
Establishment ID Select an establishment ID.
Hours Indicate the number of hours for the mandate, if appropriate.
Entering Worker Military Service InformationAccess the Military Situation page.
272 PeopleSoft Proprietary and Confidential

Chapter 9 Managing Country-Specific Workforce Data
Military Situation page
Begin Date and To Indicate the begin and end date for the worker’s military service.
Arm Enter the arm of the military in which the worker served.
Rank, Military Number,and Position
Indicate the worker’s rank, military number, and position if known.
Military Appointment,Individual Appointment,and None
Indicate if the service was the result of a military appointment, an individualappointment, or none (to indicate that the worker wasn’t appointed to theposition).
If the worker had a military appointment, enter additional reserve information.
Notify by Military Reserve Enter the appropriate Notify by Military Reserve information.
Date Enter the date of notification.
Arm in the Reserve Enter the worker’s arm in the reserve.
Rank Enter the worker’s rank.
If the worker has an individual appointment, enter additional information.
Notify by IndividualReserve
Enter the appropriate Notify by Individual Reserve information.
Date Enter the date of notification.
Individual Position(Reserve)
Enter the worker’s individual position in the reserve.
PeopleSoft Proprietary and Confidential 273

Managing Country-Specific Workforce Data Chapter 9
(NLD) Recording and Reporting SAMEN DiversityInformation for Dutch Workers
This section provides an overview of the SAMEN diversity law and SAMEN registration and discusses how to:
• Establish a worker’s ethnic status.• Run the NLD Law SAMEN Statistics report.
Understanding the SAMEN Diversity Law andSAMEN RegistrationIf you have a Dutch workforce, you need to track information on the national origin of an employee’s birthparents. This information establishes the ethnic status of workers, which complies with the SAMEN diversitylaw, or the “law to promote equal labor participation for persons of a different ethnic origin” in the Netherlands.
The SAMEN law provides for equal employment opportunities for immigrant workers or their children orboth. The birth country of either the employee or one of the employee’s parents determines whether theemployee qualifies as a SAMEN employee and can be recorded as such for reporting to the Dutch government.Children of immigrant workers are subject to this law as well, even if they were born in the Netherlands, andeven if the parents have been naturalized in the meantime, as long as one of the parents was born in one of theSAMEN countries. Every two years, the Dutch Ministry Of Social Affairs reviews the list of countries thatare designated as SAMEN countries. This decision depends mainly on employment statistics for immigrantworkers (and their children) from certain countries .
If the employee qualifies and has no objection to SAMEN registration, record the birth country of theemployee’s mother and father. When you select a birth country for the employee’s parents, you can chooseonly from among those countries stored in the Country table (COUNTRY_TBL). The system indicates ifthe birth country is one of the SAMEN countries stored in the NLD SAMEN Country table. When theselected country is IDN (Indonesia), an additional category appears, which indicates an additional choice tofulfill SAMEN ID requirements.
Pages Used to Record and Report SAMEN DiversityInformation for Dutch Workers
Page Name Object Name Navigation UsageSAMEN Registration SAMEN_NLD Workforce Administration,
Personal Information,Diversity Compliance NLD,Law SAMENRegistration
Establish worker ethnicstatus to comply with theSAMEN diversity law for aqualifying Dutch worker.
WBEAAData - NLD RUNCTL_PER038_NL Workforce Administration,Personal Information,Diversity Compliance NLD,Law SAMENReport
Run the NLD LawSAMEN Statistics report(PER038NL).
Establishing a Worker’s Ethnic StatusAccess the SAMEN Registration page.
274 PeopleSoft Proprietary and Confidential

Chapter 9 Managing Country-Specific Workforce Data
SAMEN Registration page
Objection Registration Select if the employee objects to being included in the SAMEN reporting tothe Dutch government. If selected, the system won’t include the employeewhen you generate the SAMEN report.
Included in Target Group Select to include the employee in the SAMEN reporting to the Dutchgovernment. This field is available for entry only when one parent comesfrom a target group.
SAMEN Identification
Birth Country Displays the employee’s birth country.
Note. The system always displays the employee’s birth country and indicatesif it is one of the SAMEN countries stored in the NLD SAMEN Country table.
Father’s Birth Country andMother’s Birth Country
Select the birth country of the employee’s father and mother.
Category This field appears if a birth country is IDN (Indonesia). Select one of thesevalues to fulfill SAMEN ID requirements:
• Former Netherlands East Indies: (born in Indonesia before December27, 1949).
• Incl. Law Rietkerk-uitkering: (in Register 1b, Rietkerk-uitkering law).• Indonesia (after 27-12-1949): (born in Indonesia after December 27, 1949).
In Target Group The system automatically selects this check box if the birth country for theemployee, employee’s father, or employee’s mother is one of the countriesstored in the NLD SAMEN Country table.
PeopleSoft Proprietary and Confidential 275

Managing Country-Specific Workforce Data Chapter 9
Running the NLD Law SAMEN Statistics ReportAccess the WBEAA Data - NLD page.
The Law SAMEN Statistics report (PER038NL) produces the required SAMEN statistics information. Thereports lists the number of people in the workforce who were born in a SAMEN country, or one of whoseparents was born in one.
(ITA) Recording Additional Hiring Data for Italian WorkersThis section discusses how to run the Matricula Book Calculation process.
276 PeopleSoft Proprietary and Confidential

Chapter 9 Managing Country-Specific Workforce Data
Pages Used to Record Additional Hiring Data for Italian WorkersPage Name Object Name Navigation Usage
ITA EmployeeDocumentation
EMPL_DOC_ITA Workforce Administration,Job Information,Employment CategorizationITA, Documents
Record an employee’sworkbook code andemployment eligibility, orC1 declaration code andrelease date.
ITA Employee Job Letter EMPL_JOBLTR_ITA Workforce Administration,Job Information,Employment CategorizationITA, Job Letters
Use the ITA Employee JobLetter page to print the hiringletter to be signed by bothemployee and employeron or before the first dayof employment. The pagedisplays company, laboragreement, and employeecategory information. Selectthe Print Letter check boxand enter the date. SelectSave to print the letter.
Empl Comp Cd Ita(employee companycodes, Italy)
EMPL_COMP_CD_ITA Workforce Administration,Job Information,Employment CategorizationITA, Company Codes
Use the Empl Comp Cd Itapage to link employees withcompany INAIL, INPS,PREV, INPDAI, and CIAcodes.
Personal/Job Data EMPL_MATR_BOOK_ITA Workforce Administration,Job Information,Employment CategorizationITA, Matricula Book,Personal/Job Data
View or update data to beincluded in the Matriculabook.
Address Data EMPL_MTRBKADDR_ITA Workforce Administration,Job Information,Employment CategorizationITA, Matricula Book
View or update Matriculabook address data.
ITAMatricula Book Calc RUNCTL_MATRBK_ITA Workforce Administration,Job Information,Employment CategorizationITA, Matricula Calculation
Run the Matricula BookCalc process to update theMatricula table.
Running the Matricula Book Calculation ProcessAccess the ITA Matricula Book Calc page.
PeopleSoft Proprietary and Confidential 277
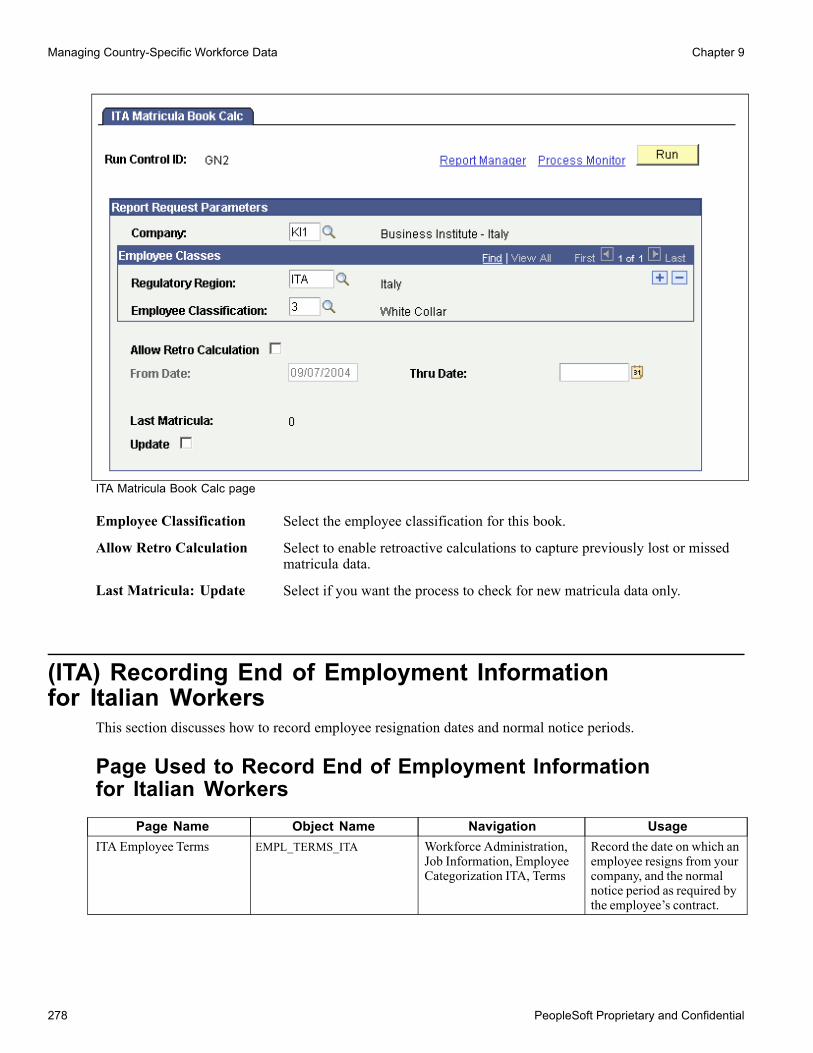
Managing Country-Specific Workforce Data Chapter 9
ITA Matricula Book Calc page
Employee Classification Select the employee classification for this book.
Allow Retro Calculation Select to enable retroactive calculations to capture previously lost or missedmatricula data.
Last Matricula: Update Select if you want the process to check for new matricula data only.
(ITA) Recording End of Employment Informationfor Italian Workers
This section discusses how to record employee resignation dates and normal notice periods.
Page Used to Record End of Employment Informationfor Italian Workers
Page Name Object Name Navigation UsageITA Employee Terms EMPL_TERMS_ITA Workforce Administration,
Job Information, EmployeeCategorization ITA, Terms
Record the date on which anemployee resigns from yourcompany, and the normalnotice period as required bythe employee’s contract.
278 PeopleSoft Proprietary and Confidential

Chapter 9 Managing Country-Specific Workforce Data
Recording Employee Resignation Dates and NormalNotice PeriodsAccess the ITA Employee Terms page.
ITA Employee Terms page
Notification Date Enter the date on which the employee gave notice of intent to end the contract.
Last Day at Work Enter the last day the employee will be at work.
Notification Start Date andNotification End Date
Enter the start and end dates of the notification (preavviso) period, that is, theperiod for which the employer still pays contributions after termination. If theemployment is terminated by the payee and notification is to be withheld, thisis the period for which the amount should be withheld.
Special Termination Bonus Enter any bonus incentive owed to the employee.
Withhold NotificationPeriod
Indicates whether the employee’s salary is to be withheld during the periodbetween the notification start and end dates. This is an information-only field.
Termination CarryoverItem
Enter items that the employee can carry over for a termination. For example,during terminations such as a term for transfer to an affiliate, the employee andthe employer can decide to "freeze" some items that can be transferred to thesame employee for the new hiring process in the new affiliate company.
Termination Payment Item Enter items that should be paid after termination.
(ITA) Running the Equal Opportunities ReportThis section discusses how to run the Equal Opportunities report.
PeopleSoft Proprietary and Confidential 279
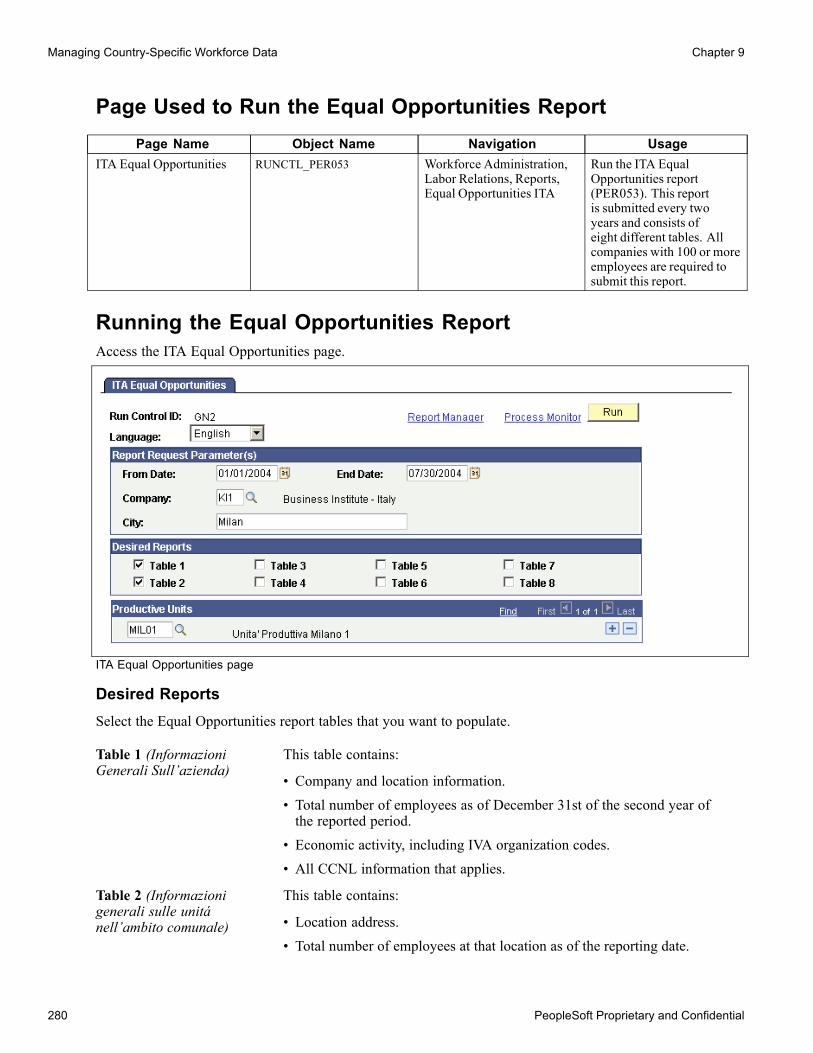
Managing Country-Specific Workforce Data Chapter 9
Page Used to Run the Equal Opportunities ReportPage Name Object Name Navigation Usage
ITA Equal Opportunities RUNCTL_PER053 Workforce Administration,Labor Relations, Reports,Equal Opportunities ITA
Run the ITA EqualOpportunities report(PER053). This reportis submitted every twoyears and consists ofeight different tables. Allcompanies with 100 or moreemployees are required tosubmit this report.
Running the Equal Opportunities ReportAccess the ITA Equal Opportunities page.
ITA Equal Opportunities page
Desired ReportsSelect the Equal Opportunities report tables that you want to populate.
Table 1 (InformazioniGenerali Sull’azienda)
This table contains:
• Company and location information.• Total number of employees as of December 31st of the second year ofthe reported period.
• Economic activity, including IVA organization codes.• All CCNL information that applies.
Table 2 (Informazionigenerali sulle unitánell’ambito comunale)
This table contains:
• Location address.• Total number of employees at that location as of the reporting date.
280 PeopleSoft Proprietary and Confidential

Chapter 9 Managing Country-Specific Workforce Data
• Number of employees as of December 31st of the second year of thereported period.
Table 3 (Entrate e uscite nelbiennio)
This table contains:
• Number of employees as of December 31st of the first year of the reportedperiod.
• The number of hires as of December 31st of the first year of the reportedperiod.
• The number of terminations as of December 31st of the first year of thereported period.
• Number of employees as of December 31st of the second year of thereported period.
Table 4 (Occupati al 31.12del secondo anno del biennioe promozioni e assunzioninell’anno)
Lists the number of employees in each of the following categories: dirigenti,quadri, impiegati, and operai. Within each category, the report lists thenumber of employees per category level.
Table 5 (Occupati al 31.12del secondo anno del biennioper tipo contratto. CIG easpettativa)
Lists, per contract type, the number of employees in each of the followingcategories: dirigenti, quadri, impiegati, and operai.
Table 6 (Elencodelle entrate, uscite etrasformazioni contratto(secondo anno del biennio))
This table contains the following information listed by category (dirigenti,quadri, impiegati, and operai):
• Hires, including employees transferred from another location of thecompany, employees changed from another category, and new hires.
• Terminations, including employees transferred to another location of thecompany or transferred to another category, and termination of the laborrelation (pension, resignation, contract expiration, individual or collectivedismissal, death, and disability).
• Contract changes, including from Determine Period to Undetermined, frompart-time to full-time, and vice versa.
Table 7 (Formazione delpersonale svolta nel corsodel secondo anno delbiennio)
This table contains the following information listed by category (dirigenti,quadri, impiegati, and operai):
• Number of training participants.• Total hours of training participation per category.
Table 8 (Retribuzione annua(secondo anno del biennio)per livello e categoriaprofessionale)
This table contains the annual gross salary amount subdivided by category(dirigenti, quadri, impiegati, and operai) and contractual level.
Productive UnitsSelect the productive units of the employees on whom you’re reporting.
PeopleSoft Proprietary and Confidential 281

Managing Country-Specific Workforce Data Chapter 9
(USA) Determining U.S. Residency Status forForeign Nationals
This section discusses how to run the Substantial Presence test.
Page Used to Determine U.S. Residency Statusfor Foreign Nationals
Page Name Object Name Navigation UsageSubstantial Presence Test PRESENCE_TEST Workforce Administration,
Personal Information,Citizenship, EmployeePresence Test USA
Run the Substantial Presencetest to determine if alienemployees are consideredU.S. residents for taxpurposes for a particularcalendar year.
Running the Substantial Presence TestAccess the Substantial Presence Test page.
Substantial Presence Test page
Under this test, a foreign national is considered a resident for tax purposes if the person is present in the U.S.at least 31 days in the current year and 183 days during the current year and the two preceding years, asdetermined under a weighted formula.
Nonresident aliens may make a special election to be treated as residents for the first year in which they arepresent in the U.S. This election is subject to several restrictions, one of which is that the nonresident alienmust satisfy the Substantial Presence test in the year following the election.
282 PeopleSoft Proprietary and Confidential

Chapter 9 Managing Country-Specific Workforce Data
Rules that govern which days don’t count towards an employee’s Substantial Presence test appear in the Donot count days in which the employee was group box. This test is only valid for current or previous years.
Visa InformationIf the employee has a visa or permit, this group box provides information about the visa or permit.
Calendar Information
Calendar Year Enter the appropriate calendar year.
Days Present in CalendarYear, Days Present inFirst Prior Year, and DaysPresent in Second PriorYear
Enter the number of days present in the current year, the previous year, andthe year previous to that.The actual days present in the first prior year equal 1/3 of 365 minus the valuein the Days Present in First Prior Year field. The actual days present in thesecond prior year equal 1/6 of 365 minus the value in the Days Present inSecond Prior Year field.For example, enter the number of days present in 1998, followed by the numberof days present in 1997, followed by the number of days present in 1996.The Total Days Used in Presence Test field automatically displays the totalnumber of days after all of the previous fields are completed.
Note. If you are entering Substantial Presence test information for multipleyears, the First Prior Year and Second Prior Year fields are based on the prioryear information.
Substantial Presence Test
Alien Registration "Green"Card
Select if the employee has been issued an alien registration card, or green card.If you select this check box, the Substantial Presence test isn’t necessary; theemployee is considered a U.S. resident for tax purposes.
31 Days in Calendar Year This check box is automatically selected if the employee has been present31 days in a calendar year.
Perform Presence Test Click to see if the employee passed the Substantial Presence test. The systemcalculates the total number of days present and selects either the Passed 183Day Test or Did Not Pass 183 Day Test option.In the 183 Day Test calculation, the system uses 100 percent of the dayspresent in the calendar year.
PeopleSoft Proprietary and Confidential 283

Managing Country-Specific Workforce Data Chapter 9
284 PeopleSoft Proprietary and Confidential

CHAPTER 10
(JPN) Tracking Additional Appointments (Kenmu)
This chapter provides an overview of additional appointments (kenmu) and discusses how to:
• Set up codes for tracking additional appointments.• Set up security for tracking additional appointments.• Set up to handle additional appointment terminations.• Record and view employee additional appointments data.
Understanding Additional AppointmentsAdditional appointments are tracked as additional jobs (employment record numbers) in the Job record. TheAdditional Appointment Information page enables tracking of multiple additional appointment rows for eachmain appointment row of the Job record. A separate Enter Cost Rate Information page enables the tracking ofcost rate distribution among a main appointment and its additional appointments.
The system automatically increments employment record numbers, including additional appointments. Thetotal number of additional appointments appears with main appointment data on the employee’s Job SummaryJPN page.
When additional appointments exist in conjunction with intercompany transfers, for example when you serveas a hosting company, you can store information about additional appointments that your transferee may havein the home company, as well as any additional appointment information within your company as host.
On the Employee Assignment List report, you can view employees by department, including an employee’sadditional appointments.
When you terminate a main appointment, the system automatically terminates all additional appointmentsassociated with it.
See AlsoChapter 13, “Updating Person and Job Information,” (JPN) Understanding Reporting Appointments forJob Data Changes, page 368
Internal and External CompaniesSome of the pages used for tracking additional appointments distinguish between internal and externalcompany appointments. Here are the definitions of internal and external companies:
Internal Companies Companies that are internal to your organization’s database. Data for thesecompanies is already set up on the Company table and Department table.
PeopleSoft Proprietary and Confidential 285
(JPN) Tracking Additional Appointments (Kenmu) Chapter 10
External Companies Companies that are external to your organization’s database. You must set updata for these companies on the Intercompany Transfer Company/Departmenttable.
Setting Up Codes for Tracking Additional AppointmentsTo set up the codes for tracking additional appointments, use the IC Trans External Company/Dept(INTCPX_CPY_JPN), IC Trans External Superv Lvl (INTCPX_SPV_JPN), Additional Appointment Setup forExisting Business Units (RC_AA_JOBCODE_JPN), and Additional Appointment Setup (AA_SETUP_JPN)components.
This section provides overviews of dummy codes and setup steps for additional appointments, listsprerequisites, and discusses how to:
• Set up a dummy business unit, company, department, and location.• Designate Job record codes for additional appointments.
Understanding Dummy CodesSetup for additional appointment tracking requires the use of dummy codes.
Dummy Job CodeThe PeopleSoft system provides a dummy job code for use with all additional appointments. The dummyjob code is needed because additional appointment data is held on the Job record, which requires a job code.Because job codes are not tracked as part of additional appointment data, the dummy code is required to beable to save the Job record with additional appointment information. The dummy job code is only used inbackground processing for saving, and is never visible on any page except the Additional AppointmentSetup and Job Code Table pages.
The delivered dummy job code is AADUMY. The system automatically creates this job code for each newbusiness unit that you define. If you have already created business units, the system provides an applicationengine process that creates the dummy job code for each existing business unit. You only have to run theapplication engine one time. Subsequently, the system automatically creates the dummy job code whenyou define a new business unit.
See Chapter 10, “(JPN) Tracking Additional Appointments (Kenmu),” Pages Used to Set Up Codes forManaging Additional Appointments, page 289.
Dummy Business Unit, Company, Department, and Location CodesWhen the additional appointment is in an external company, the business unit, company, department, andlocation codes setup for the external company are on the IC Transfer setup tables only, which are not valuesused in the Job record. Therefore, you must define one dummy code for each of these required fields so thatyou can save Job record information for additional appointments to external companies. Set up and usethe same codes for all additional appointments to external companies. The PeopleSoft system does notdeliver these dummy codes.
The dummy codes are only used in background processing for saving and are never visible on any page exceptthe Additional Appointment Setup page.
286 PeopleSoft Proprietary and Confidential

Chapter 10 (JPN) Tracking Additional Appointments (Kenmu)
Warning! The department code can impact security, so it is important to create a new department code forwhich no one has security access. Anyone who can access the dummy department through security will begranted access to all main appointments that have an external assignment.
See AlsoChapter 10, “(JPN) Tracking Additional Appointments (Kenmu),” Setting Up a Dummy Business Unit,Company, Department, and Location, page 289
Chapter 10, “(JPN) Tracking Additional Appointments (Kenmu),” Designating Job Record Codes forAdditional Appointments, page 290
Understanding Setup Steps for Additional AppointmentsThe setup steps for additional appointment tracking vary slightly depending upon whether you:
• Initially implement PeopleSoft Enterprise Human Resources with additional appointment tracking beforeyou set up business units.
• Add additional appointment tracking after you have already set up business units, such as during upgrade.
Both situations require that you create dummy codes and assign them on the Additional Appointment Setuppage. The details of how to do this are presented in later sections.
When Business Units Have Not Been DefinedHere are the steps for setting up additional appointment tracking when you have not yet defined business units:
1. Select Additional Appointment Enabled in the Japanese Parameters section of the Installation Table −Country Specific page.
2. Set up your organization’s business units on the Business Unit page.
The system automatically creates the dummy job code AADUMY for each business unit that you define.
3. Create a dummy business unit, company, department, and location for use with additional appointmentsto external companies.
4. Assign the dummy codes on the Additional Appointment Setup page.
5. (Optional) Set up additional appointment security.
When Business Units Have Already Been DefinedIf you are setting up additional appointment tracking when you have already defined business units, such aswhen upgrading, the steps are the same as listed in the previous section with the exception of step 2:
1. Select Additional Appointment Enabled in the Japanese Parameters section of the Installation Table −Country Specific page.
2. Run the AA_JOBCODE_JPN Application Engine process to create the dummy job code AADUMYfor each business unit in your system.
You only have to run the application engine process one time. Subsequently, the system automaticallycreates the dummy job code for each business unit that you define.
3. Create a dummy business unit, company, department, and location for use with additional appointmentsin external companies.
4. Enter the dummy codes on the Additional Appointment Setup page.
PeopleSoft Proprietary and Confidential 287

(JPN) Tracking Additional Appointments (Kenmu) Chapter 10
5. (Optional) Set up additional appointment security.
See AlsoChapter 10, “(JPN) Tracking Additional Appointments (Kenmu),” Setting Up Security for Tracking AdditionalAppointments, page 290
PeopleSoft Enterprise HRMS 8.9 Application Fundamentals PeopleBook, “Setting Up and InstallingPeopleSoft HRMS”
PeopleSoft Enterprise HRMS 8.9 Application Fundamentals PeopleBook, “Setting Up OrganizationFoundation Tables,” Defining Business Units
PrerequisitesIf you plan to track additional appointments in external companies, you must set up the following forthe external companies:
• Company and department IDs for external company appointments on the IC Trans External Company/Deptpage.
See Chapter 3, “Setting Up Country-Specific Tables,” (JPN) Setting Up Intercompany Transfer CompanyData, page 34.
• Supervisor levels for external company appointments on the IC Trans External Superv Lvl page.
See Chapter 3, “Setting Up Country-Specific Tables,” (JPN) Setting Up Japanese Supervisor Levels, page 35.
These codes provide the prompt values on the Edit Additional Appointment Information page and are visibleon pages that display employee additional appointment data.
288 PeopleSoft Proprietary and Confidential

Chapter 10 (JPN) Tracking Additional Appointments (Kenmu)
Pages Used to Set Up Codes for Managing AdditionalAppointments
Page Name Object Name Navigation UsageIC Trans ExternalCompany/Dept
INTCPX_CPY_JPN Set Up HRMS, ProductRelated, WorkforceAdministration, WorkforceData JPN, IC Trans ExternalCompany/Dept
Set up company anddepartment codes forintercompany transfers toand additional appointmentsin external companies.
IC Trans External SupervLvl
INTCPX_SPV_JPN Set Up HRMS, ProductRelated, WorkforceAdministration, WorkforceData JPN, IC Trans ExternalSuperv Lvl
Set up supervisor level codesfor intercompany transfers toand additional appointmentsin external companies.
Additional AppointmentSetup for Existing BusinessUnits
RC_AA_JOBCODE_JPN Set Up HRMS, Install,Product and CountrySpecific, AA Setup forExisting BUs JPN
Run theAA_JOBCODE_JPNApplication Engine processto create the dummyAADUMY job code for eachexisting business unit. Runthis process only if businessunits already exist at the timeof implementing additionalappointment tracking.You only run this processone time.
Additional AppointmentSetup
AA_SETUP_JPN Set Up HRMS, ProductRelated, WorkforceAdministration, WorkforceData JPN, AdditionalAppointment Setup
Enter the dummy businessunit, company, department,location, and job codes topopulate required entryfields on the Job record foradditional appointments.
Setting Up a Dummy Business Unit, Company,Department, and LocationSet up one dummy code to be used with all additional appointments for each of the following:
• Business unit
See PeopleSoft Enterprise HRMS 8.9 Application Fundamentals PeopleBook, “Setting Up OrganizationFoundation Tables,” Defining Business Units.
• Company
See PeopleSoft Enterprise HRMS 8.9 Application Fundamentals PeopleBook, “Setting Up OrganizationFoundation Tables,” Entering Company Information.
• Department
See PeopleSoft Enterprise HRMS 8.9 Application Fundamentals PeopleBook, “Setting Up OrganizationFoundation Tables,” Maintaining Departments.
• Location
PeopleSoft Proprietary and Confidential 289

(JPN) Tracking Additional Appointments (Kenmu) Chapter 10
See PeopleSoft Enterprise HRMS 8.9 Application Fundamentals PeopleBook, “Setting Up OrganizationFoundation Tables,” Establishing Locations.
Additional Setup InstructionsThe following are important points to keep in mind when setting up these dummy codes for use with additionalappointments to external companies:
• We recommend that they not be real business unit, company, department, and location codes, becauseof the possible effect on security and reporting.
• You may use a real, existing setID to define the dummy codes.• The dummy department must be excluded from the department tree.Otherwise, anyone who has access to the dummy department has access to all main appointments ofemployees who have an additional appointment in an external company.
Designating Job Record Codes for Additional AppointmentsAccess the Additional Appointment Setup page.
Additional Appointment Setup page
The prompt values for the Business Unit, Company, Department, and Location Code fields are the valid codesset up in the respective setup tables for your PeopleSoft database. In each field, select the single dummy codethat you defined for use with additional appointments.
Job Code AADUMY is the default value.
The system uses the values on this page to populate the Job record so that it can be saved.
Setting Up Security for Tracking Additional AppointmentsTo set up the security for tracking additional appointments, use the Security Install Settings(SCRTY_INSTALL), Security Type Table (SCRTY_TYPE2_TBL), and AA Security JPN(AA_SECURITY_JPN) components.
This section provides an overview of security for additional appointments and discusses how to:
• Set up the security basis for additional appointments.• Select reports that use additional appointment security.
290 PeopleSoft Proprietary and Confidential

Chapter 10 (JPN) Tracking Additional Appointments (Kenmu)
Understanding Security for Additional AppointmentsThe PeopleSoft system provides two security options for accessing additional appointment data, departmentalsecurity and security for additional appointments. If you choose to use the default option, departmentalsecurity, additional appointments do not provide any additional security access. The user must have access tothe department in which the main appointment resides to access an employee’s data. If you set up securityfor additional appointments, then additional appointments do provide additional security access. A usercan view the main appointment if the main appointment or any of its additional appointments resides in adepartment to which the user has access.
Example of Security AccessThis illustration of security access is based on the following department security tree:
Department 100
Department 200 Department 300
EmplID 1000,Empl Rcd # 0(Main Appt.)
EmplID 1000,Empl Rcd # 1
(Additional Appt.)
Sample department security tree
Here is how security works for the two security options:
• If you choose to use the default, departmental security:- If the user has access to department 200, then the user has access to the data for employee ID 1000.- Even if the user has access to department 300, the user does not have any access to the data for employeeID 1000.
• If you choose to set up security for additional appointments:- If the user has access to department 200, then the user has access to the data for employee ID 1000.- If the user has access to department 300 only, then the user can access the data for employee ID 1000because the employee has an additional appointment in department 300.
Note. Security access is dependent on the system date being earlier than the effective date of the release ofthe additional appointment. Security access to the data row ceases with the effective date of the additionalappointment release.
PeopleSoft Proprietary and Confidential 291

(JPN) Tracking Additional Appointments (Kenmu) Chapter 10
Pages Used to Set Up Security for Additional AppointmentsPage Name Object Name Navigation Usage
Security Install Settings SCRTY_INSTALL Set Up HRMS, Security,Core Row Level Security,Security Installation Settings,Security Install Settings
Choose the HRMS securitysettings for your installation.
Security Type Table SCRTY_TYPE2_TBL Set Up HRMS, Security,Core Row Level Security,Security Access Type,Security Type Table
Use to enable existingsecurity access types orcreate new ones.
AA Security JPN AA_SECURITY_JPN Set Up HRMS, Security,Addl Appt Rport SecurityJPN
Select the reports that useadditional appointmentsecurity.
Setting Up Additional Appointment SecurityTo set up security for additional appointments:
1. Select JPN Appointment on the Security Install Settings page.
2. Select JPN Additional Appointment on the Security Type Table page for the PPLJOB security set.
3. Refresh the security join tables using the Refresh SJT_CLASS_ALL component (SCRTY_OPR_RC).
See AlsoPeopleSoft Enterprise HRMS 8.9 Application Fundamentals PeopleBook, “Setting Up and AdministeringHRMS Security”
Selecting Reports that Use Additional Appointment SecurityAccess the AA Security JPN page.
AA Security JPN page
The following table lists the only reports that can be enabled for additional appointment security and thecomponent name to select on this page:
292 PeopleSoft Proprietary and Confidential

Chapter 10 (JPN) Tracking Additional Appointments (Kenmu)
Report ID Report Name Component Name
PER062JP Grade Advance Candidate List RUNCTL_PER062_JPN
PER063JP Appointment Notification JPN RUNCTL_NTF_JPN
PER064JP Appointment List JPN RUNCTL_NTF2_JPN
PER065JP Completion of IC Transfer JPN RUNCTL_PER065_JPN
PER066JP Employee Assignment List JPN EMP_ASN_LST_JPN
PER072JP Future Employee Assignment List RC_IDO_FUT_ASN_JPN
PER074JP Ido Candidate Listing RC_IDO_EE_LIST_JPN
For other reports, the only way to access information on the main appointment is to have access to thedepartment on which the main appointment resides. The department of the additional appointment does notprovide any additional access for any reports other than the five reports listed here, even when additionalappointment security is activated.
The purpose of activating additional appointment security for these reports is to display the main appointmentswhen there is security access to the additional appointment. Activating additional appointment securitydoes not display additional appointments on PER062JP, PER063JP, PER064JP, and PER065JP. PER066JP,PER072JP, and PER074JP display additional appointments.
When additional appointment security is activated for these five reports, the system evaluates only current jobinformation. The system ignores future-dated job rows, such as future-dated hires or terminations. Regardlessof the security option selected, the system uses only the current row to determine security access.
See AlsoPeopleSoft Enterprise HRMS 8.9 Application Fundamentals PeopleBook, “Setting Up and AdministeringHRMS Security”
Setting Up to Handle Additional Appointment TerminationsWhen you terminate a main appointment, the system employs a message subscription that uses a componentinterface to automatically terminate all additional appointments that are associated with the main appointment.
The message subscription is delivered inactive; you must activate it if you use additional appointmentfunctionality. Following are the details you need to activate the subscription:
Message subscription Termination_Add_Appt
Message name WORKFORCE_SYNC
PeopleSoft Proprietary and Confidential 293

(JPN) Tracking Additional Appointments (Kenmu) Chapter 10
Channel PERSON_DATA
Tables written to JOBTermination rows are inserted for all active additional appointments associatedwith the terminated main appointment.
See AlsoPeopleTools 8.45 PeopleBook: PeopleSoft Enterprise Integration
Recording and Viewing Employee AdditionalAppointments Data
This section discusses how to:
• Add, change, or release additional appointments.
• Record additional appointment details.
• Distribute cost.
Note. To access additional appointment data, you must first access the associated main appointment inthe search page.
Pages Used to Record and View Employee AdditionalAppointments Data
Page Name Object Name Navigation UsageAdditional AppointmentInformation
AA_MGMT_JPN Workforce Administration,Job Information, AdditionalAppointment JPN
Add, change, or releaseadditional appointments.
Edit AdditionalAppointment Information
AA_MGMT_JPN_SEC Click the Add or Editbutton on the AdditionalAppointment Informationpage.
Record details of additionalappointments.
Enter Cost Rate Information AA_MGMT_JPN Workforce Administration,Job Information, CostRate JPN
Distribute the cost of a mainappointment among itsadditional appointments.
Job Summary JPN JOB_SUMMARY_JPN Workforce Administration,Job Information, Review JobInformation, Job SummaryJPN
View an employee’sjob history, includingadditional appointment total.Access details of additionalappointments.
Additional AppointmentData
ADD_APPT_SUMM_SEC Click the View link for anadditional appointment onthe Job Summary JPN,WorkLocation page.
View details of additionalappointments.
294 PeopleSoft Proprietary and Confidential

Chapter 10 (JPN) Tracking Additional Appointments (Kenmu)
Adding, Changing, or Releasing Additional AppointmentsAccess the Additional Appointment Information page.
Additional Appointment Information page
Additional AppointmentsThis section of the page displays information about existing additional appointments.
Empl Rcd # (employmentrecord number)
The system assigns this number when you add an additional appointment. Thesystem increments the employment record numbers whether an additionalappointment or a concurrent job is added. (Concurrent jobs may be addedto the system for the purpose of tracking intercompany transfers in amulticompany implementation or for adding a global assignment record.)
Effective Date The effective date of the latest data row for the employment record number.This date might be later than the system date if additional appointmentinformation was entered with an effective date in the future.
Status as of The status of the appointment as of the date in the Effective Date field for thisemployment record number. Values are Active and Inactive.
Edit Click to access the Edit Additional Appointment Information page, where youcan change or release the selected additional appointment.
Add Click this button to add an additional appointment. The system displays theEdit Additional Appointment Information page, where you record the detailsof the new appointment.
Recording Additional Appointment DetailsAccess the Edit Additional Appointment Information page.
PeopleSoft Proprietary and Confidential 295

(JPN) Tracking Additional Appointments (Kenmu) Chapter 10
Edit Additional Appointment Information page
Additional Appointment
Empl Rcd Nbr (employmentrecord number)
The system assigns this number when you add an additional appointment. Thesystem increments the employment record numbers whether an additionalappointment or a concurrent job is added. (Concurrent jobs may be addedto the system for the purpose of tracking intercompany transfers in amulticompany implementation or for adding a global assignment record.)
Action Reason Three action reason codes are valid for additional appointments:Asn Kenmu (assign kenmu): If click the Add button on the AdditionalAppointment Information page to access this page, the system enters AsnKenmu and you cannot change it. If you click the Edit button to access thepage, you cannot save the page if you select Asn Kenmu.Data Chg (data change): Select this value if you are changing (but notreleasing) an additional appointment.Rel Kenmu (release kenmu): Select this value if you are releasing the kenmuassignment.
296 PeopleSoft Proprietary and Confidential

Chapter 10 (JPN) Tracking Additional Appointments (Kenmu)
Note. The codes that you enter on this page are translated into action andreason codes on the Job record as follows:
Asn Kenmu: The Job record action is ADL (additional job) and the reason isAKM (assign kenmu).
Data Chg: The Job record action is DTA (data change) and there is no actionreason associated with it.
Rel Kenmu: The Job record action is TER (termination) and the reasonis RKM (release kenmu).
These Job record rows are not visible to users.
Start Date Enter the date on which this additional appointment starts.
Expected End Date Enter the date on which the additional appointment is expected to end.
End Date Enter the date on which the additional appointment actually ends.
Note. The system displays a warning if the End Date value is later than theEffective Date value of the additional appointment release. Security accessto the data row ceases with the effective date of the additional appointmentrelease.
Note. You can enter information in either the Internal Company Appointment group box or the ExternalCompany Appointment group box. You cannot use both group boxes at the same time.
Internal Company AppointmentUse this group box if the additional appointment is with a company that is included in your organization’sdatabase (internal company).
See Chapter 10, “(JPN) Tracking Additional Appointments (Kenmu),” Internal and External Companies,page 285.
External Company AppointmentUse this group box if the additional appointment is with a company that is outside of your organization’sdatabase (external company). Prompt values come from the data that you set up on the IC Trans ExternalCompany/Dept page and the IC Trans External Superv Lvl page.
See AlsoChapter 10, “(JPN) Tracking Additional Appointments (Kenmu),” Prerequisites, page 288
Distributing CostAccess the Enter Cost Rate Information page.
PeopleSoft Proprietary and Confidential 297

(JPN) Tracking Additional Appointments (Kenmu) Chapter 10
Enter Cost Rate Information page
Effective Date Enter an effective date for when the additional appointment cost rates arebeing distributed or redistributed.
Main and Additional Appointment Cost Rates
Empl Rcd Nbr (employmentrecord number)
Choose the employment record number for each main or additionalappointment that has an associated cost. The only values available in the listare the record numbers of additional appointments associated with the mainappointment that you entered to access the page.When you save the page, the system validates that the employment record isactive as of the selected effective date.
Cost Rate Enter the percentage cost associated with the main appointment and eachadditional appointment.
Total Cost Rate When you save the page, the system validates that the total cost rate for themain appointment and all of its additional appointments equals 100 percent.
298 PeopleSoft Proprietary and Confidential

CHAPTER 11
(JPN) Tracking Intercompany Transfers (Shukkou)
This chapter provides an overview of the tracking of intercompany transfers and discusses how to:
• Set up employee data for intercompany transfers.• Enter and maintain home and host data for intercompany transfers.• Work with search page security.• Run the Intercompany Transfer report.
Understanding the Tracking of Intercompany TransfersWhenever you need to track intercompany transfers (shukkou), whether as a home company or a host company,you enter a new job record with standard actions such as transfer, termination, and hire, but with specific actionreasons that are related to intercompany transfers. You can use the Pay Group field on Job Data - Payroll pageto indicate which company is the compensation owner.
Summary of Home and Host Data for Intercompany TransfersThe tables in the two sections that follow provide summarized data entry obligations and requirements fordifferent intercompany transfer scenarios. The first table addresses only the hosting of intercompany transfers;the second table addresses both temporary and permanent intercompany transfers.
A later section provides details of data entry for a series of scenarios.
See Chapter 11, “(JPN) Tracking Intercompany Transfers (Shukkou),” Entering and Maintaining Home andHost Data for Intercompany Transfers, page 304.
This table explains the abbreviations that are used in the two subsequent tables:
Code Description Action
TICT Temporary Intercompany Transfer Zaiseki-Shukkou
PICT Permanent Intercompany Transfer Tenseki-Shukkou
HICT Hosting Intercompany Transfer Shukkou-Ukeire
HTICT Hosting Temporary IntercompanyTransfer
Zaisekki-Shukkou no Ukeire
PeopleSoft Proprietary and Confidential 299

(JPN) Tracking Intercompany Transfers (Shukkou) Chapter 11
Code Description Action
HPICT Hosting Permanent IntercompanyTransfer
Tenseki-Shukkou no Ukeire
SL Supervisor Level Yakushoku
Hosting Temporary and Permanent Intercompany TransfersThe following table summarizes the information and security requirements for hosting temporary intercompanytransfers from companies within a group that uses PeopleSoft Enterprise HRMS and from other companies thatdon’t use PeopleSoft Enterprise HRMS:
300 PeopleSoft Proprietary and Confidential

Chapter 11 (JPN) Tracking Intercompany Transfers (Shukkou)
ICT Type PA Location
Information and SecurityRequired Within Affiliated
Companies that Use PeopleSoftEnterprise HRMS
Informationand SecurityRequired
for AffiliatedCompaniesthat Do Not
Use PeopleSoftEnterpriseHRMS
1
HTICT
Host (Own Company) • Host company information,using shared codes (in case of PSgroup-Company).
• The owner of payroll.
• ICT period, department, SL, and soon.
• In general, employee information ismaintained at host (own) companywhen PA is moved from PA’s owncompany.
• Host companyinformation, usingIntercompanyTransferCompany/Departmentand IC TransferSupervisor Levelcodes.
• The owner ofpayroll.
• ICT period.
2
HPICT
Host (Own Company) Employee information is maintained athost (own) company only.
Host companyinformation, usingIntercompanyTransfer Company/Department and ICTransfer SupervisorLevel codes.
Temporary and Permanent Intercompany TransfersThis table summarizes the information and security requirements for temporary intercompany transfers tocompanies within a group that uses PeopleSoft Enterprise HRMS and to other companies that don’t usePeopleSoft Enterprise HRMS:
PeopleSoft Proprietary and Confidential 301

(JPN) Tracking Intercompany Transfers (Shukkou) Chapter 11
ICT Type PA LocationAA at HomeCompany?
Informationand SecurityRequired
Within AffiliatedCompanies thatUse PeopleSoftEnterpriseHRMS
Informationand SecurityRequired
for AffiliatedCompaniesthat Do Not
Use PeopleSoftEnterpriseHRMS
TICT Host No • Host companyinformation,using sharedcodes (in caseof PS – usinggroup–company).
• The owner ofpayroll.
• TICT period,department, SL,and so on.
• In general,employeeinformationis maintainedat host (own)company whenPA is movedfrom PA’s owncompany.
• Host companyinformation,usingIntercompanyTransferCompany/Departmentand IC TransferSupervisor Levelcodes.
• The owner ofpayroll.
• TICT period.
PICT N/A Retire N/A Employeeinformation willbe maintained athost company only.
N/A
PrerequisitesBefore you enter intercompany transfers for an employee, you must set up the following intercompanytransfer company data:
• Set up a dummy paygroup to use as the compensation indicator if you track intercompany transfers in whichthe host company (that is, not your company) is responsible for paying the employee.
Note. This setup is reversed if your company is the hosting company, that is, you set up a dummy paygroupto track hosted intercompany transfers where the home company pays the employee.
• Set up company and department codes to use for tracking intercompany transfers to and from companies thatare not registered in the Company table.
• Set up supervisor level and IC Trans External supervisor level codes to use for tracking intercompanytransfers to and from companies that are not registered in the Company table.
302 PeopleSoft Proprietary and Confidential

Chapter 11 (JPN) Tracking Intercompany Transfers (Shukkou)
Note. You can track intercompany transfers (shukkou) as additional appointments (kenmu) if you set upand use the additional appointment functionality.
See AlsoChapter 3, “Setting Up Country-Specific Tables,” (JPN) Setting Up Intercompany Transfer Company Data,page 34
Chapter 3, “Setting Up Country-Specific Tables,” (JPN) Setting Up Japanese Supervisor Levels, page 35
Chapter 10, “(JPN) Tracking Additional Appointments (Kenmu),” page 285
Chapter 11, “(JPN) Tracking Intercompany Transfers (Shukkou),” Indicating the Home or Host CompensationOwner, page 304
Setting Up Employee Data for Intercompany TransfersThis section discusses how to:
• Track intercompany transfers.• Indicate the home or host compensation owner.
Note. This section discusses the basics of how to set up an intercompany transfer. See the next section fordetailed examples of data entry and maintenance.
See AlsoChapter 11, “(JPN) Tracking Intercompany Transfers (Shukkou),” Entering and Maintaining Home andHost Data for Intercompany Transfers, page 304
Tracking Intercompany TransfersWhenever you need to track intercompany transfers, whether as a home company or a host company, setup the employee data:
• Enter a new job record with standard actions such as transfer, termination, and hire, but with specific actionreasons that are related to intercompany transfers.
• Complete the intercompany transfer fields in the Japan section of the Work Location page.
Selecting Actions and Reasons for Intercompany TransfersThese are the actions and reasons that you use on the Administer Workforce pages when you work withintercompany transfers:
Action Reason
Transfer Intercompany transfer.
PeopleSoft Proprietary and Confidential 303
(JPN) Tracking Intercompany Transfers (Shukkou) Chapter 11
Action Reason
Completion of intercompany transfer.
Termination Permanent intercompany transfer.
Completion of (hosted) intercompany transfer.
Hire Temporary intercompany transfer.
Permanent intercompany transfer.
See AlsoChapter 5, “Increasing the Workforce,” Entering Employee Job Location and Position Information, page 89
Indicating the Home or Host Compensation OwnerYou can use the Pay Group field on the Job Data - Payroll page to identify whether the home or the hostcompany is responsible for paying an employee on temporary intercompany transfer. If the home companyis paying, put the employee in a standard pay group with other employees. If the host company is paying,put the employee in a designated dummy pay group that has no payroll processing implications for your(home) company.
Similarly, if you are the host for a temporary intercompany transfer, put the employee in a standard pay groupif you are paying the employee, or into a designated dummy pay group if the home company is paying theemployee.
Note. When the Payroll System field is set to Other on the Job Data - Payroll page, the Pay Group field is not arequired field. You can use the field as described previously whether it is required or not.
See AlsoChapter 5, “Increasing the Workforce,” Entering Payroll Processing Data, page 109
Entering and Maintaining Home and Host Datafor Intercompany Transfers
The following three sets of scenarios detail the data input and maintenance requirements by the home or hostcompany. Sets B and C are similar, but reflect different security conditions.
The sets of scenarios are:
• Set A: Single Company Using a Single PeopleSoft Enterprise HRMS Database.• Set B: Multiple Companies Using a Single PeopleSoft Enterprise HRMSDatabase (with security restrictions).
304 PeopleSoft Proprietary and Confidential

Chapter 11 (JPN) Tracking Intercompany Transfers (Shukkou)
• Set C: Multiple Companies Using a Single PeopleSoft Enterprise HRMS Database (without securityrestrictions).
Single Company Using a Single PeopleSoft EnterpriseHRMS Database: Scenarios A1-8This section discusses several scenarios for a single company that uses a single human resources database.
Note. Additional Employment Instance is not used for any scenarios in set A. The scenarios in set A areapplicable where multiple companies use a single human resources database but the information—for thehome or host company relevant to a particular intercompany transfer—is not stored in that database.
Scenario A1: Temporary Intercompany Transfer (TICT)Home Company Inputs
Table Fields Input
JOB Action Transfer.
Reason Temporary intercompany transfer.
Department ID Department ID that indicates temporary intercompany transfer.
Pay Group If the home company is responsible for compensation, there is nochange to the pay group.
If not, enter a dummy pay group to indicate that the host (other)company is responsible for compensation. There is no processingassociated with dummy pay groups.
JOB_JR Intercompany TransferFlag
Host company information.
Business Unit code If the home company is a normal (internal) company, enter the code.If not, leave this field blank.
Company code If the Host company is a normal (internal) company, enter the code. Ifit is an external company, enter the ICT Company code.
Department code If the host company is a normal (internal) company, enter thedepartment code. If it is an external company, enter the ICTDepartment code.
Sup Lvl ID code If the host company is a normal (internal) company, enter thesupervisor level ID. If it is an external company, enter the ICTsupervisor level ID.
PeopleSoft Proprietary and Confidential 305
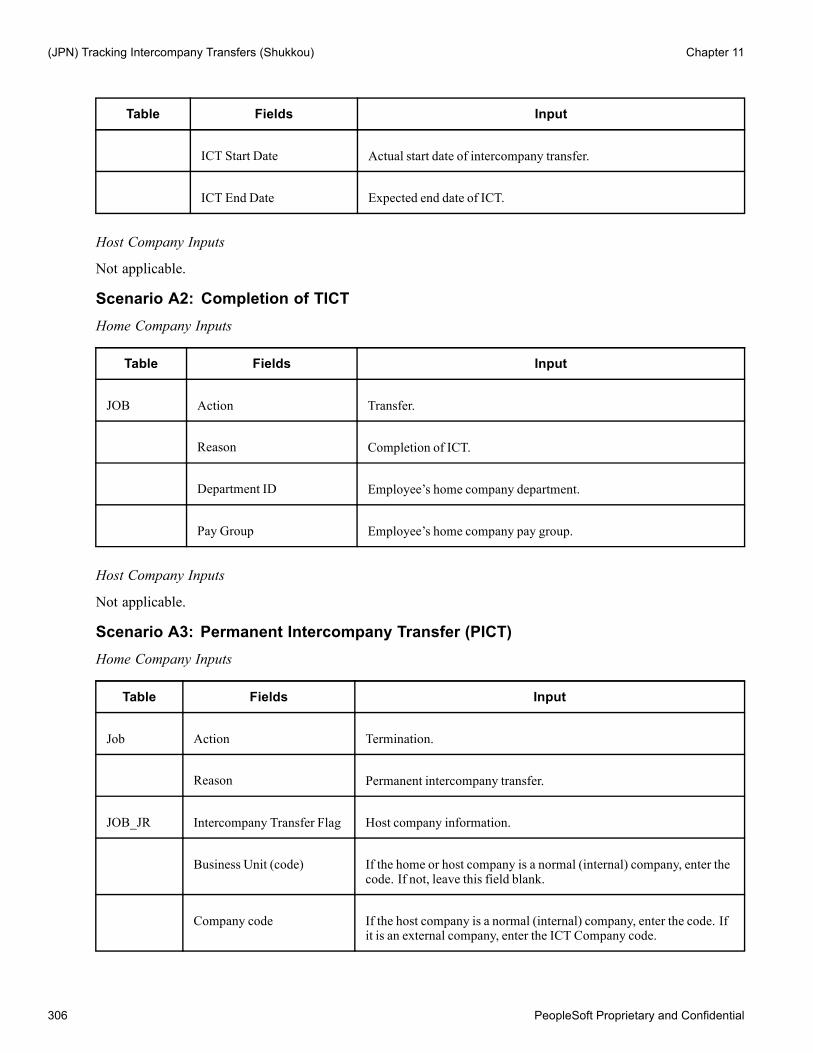
(JPN) Tracking Intercompany Transfers (Shukkou) Chapter 11
Table Fields Input
ICT Start Date Actual start date of intercompany transfer.
ICT End Date Expected end date of ICT.
Host Company Inputs
Not applicable.
Scenario A2: Completion of TICTHome Company Inputs
Table Fields Input
JOB Action Transfer.
Reason Completion of ICT.
Department ID Employee’s home company department.
Pay Group Employee’s home company pay group.
Host Company Inputs
Not applicable.
Scenario A3: Permanent Intercompany Transfer (PICT)Home Company Inputs
Table Fields Input
Job Action Termination.
Reason Permanent intercompany transfer.
JOB_JR Intercompany Transfer Flag Host company information.
Business Unit (code) If the home or host company is a normal (internal) company, enter thecode. If not, leave this field blank.
Company code If the host company is a normal (internal) company, enter the code. Ifit is an external company, enter the ICT Company code.
306 PeopleSoft Proprietary and Confidential
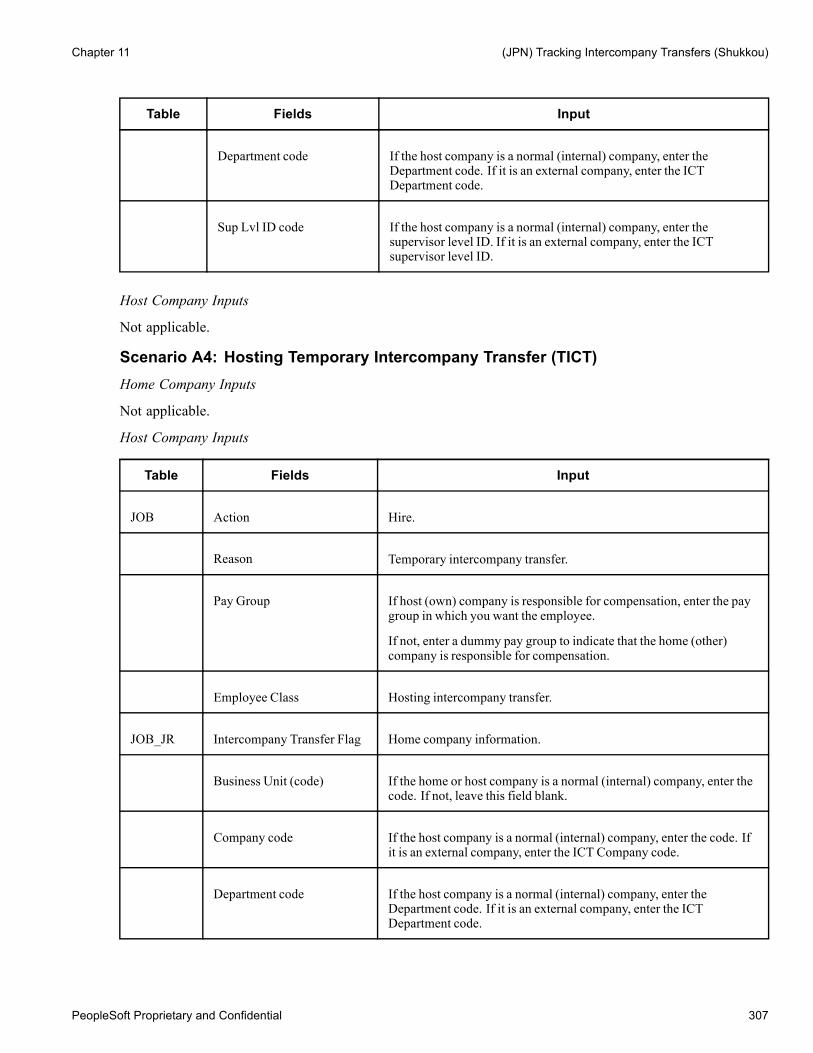
Chapter 11 (JPN) Tracking Intercompany Transfers (Shukkou)
Table Fields Input
Department code If the host company is a normal (internal) company, enter theDepartment code. If it is an external company, enter the ICTDepartment code.
Sup Lvl ID code If the host company is a normal (internal) company, enter thesupervisor level ID. If it is an external company, enter the ICTsupervisor level ID.
Host Company Inputs
Not applicable.
Scenario A4: Hosting Temporary Intercompany Transfer (TICT)Home Company Inputs
Not applicable.
Host Company Inputs
Table Fields Input
JOB Action Hire.
Reason Temporary intercompany transfer.
Pay Group If host (own) company is responsible for compensation, enter the paygroup in which you want the employee.
If not, enter a dummy pay group to indicate that the home (other)company is responsible for compensation.
Employee Class Hosting intercompany transfer.
JOB_JR Intercompany Transfer Flag Home company information.
Business Unit (code) If the home or host company is a normal (internal) company, enter thecode. If not, leave this field blank.
Company code If the host company is a normal (internal) company, enter the code. Ifit is an external company, enter the ICT Company code.
Department code If the host company is a normal (internal) company, enter theDepartment code. If it is an external company, enter the ICTDepartment code.
PeopleSoft Proprietary and Confidential 307

(JPN) Tracking Intercompany Transfers (Shukkou) Chapter 11
Table Fields Input
Sup Lvl ID code If the host company is a normal (internal) company, enter thesupervisor level ID. If it is an external company, enter the ICTsupervisor level ID.
ICT Start Date Actual start date of intercompany transfer.
ICT End Date Expected end date of ICT.
Scenario A5: Completion of Hosting TICTHome Company Inputs
Not applicable.
Host Company Inputs
Table Fields Input
JOB Action Termination.
Reason Completion of TICT.
Scenario A6: Hosting Permanent Intercompany Transfer (PICT)Home Company Inputs
Not applicable.
Host Company Inputs
Table Fields Input
JOB Action Hire.
Reason Permanent intercompany transfer.
Pay Group Pay group in which you want this employee.
Employee Class Hosting intercompany transfer.
JOB_JR Intercompany TransferFlag
Home company information.
308 PeopleSoft Proprietary and Confidential

Chapter 11 (JPN) Tracking Intercompany Transfers (Shukkou)
Table Fields Input
Business unit code If the home or host company is a normal (internal) company, enter thecode. If not, leave this field blank.
Company code If the host company is a normal (internal) company, enter the code. If itis an external company, enter the ICT Company code.
Departmen: code If the host company is a normal (internal) company, enter theDepartment code. If it is an external company, enter the ICTDepartment code.
Sup Lvl ID code If the host company is a normal (internal) company, enter thesupervisor level ID. If it is an external company, enter the ICTsupervisor level ID.
Multiple Companies Using a Single PeopleSoft EnterpriseHRMS Database: Scenarios B1-6This section discusses several scenarios for multiple companies that use a single human resources database.
Conditions:
• Both home and host companies use the same database and business unit, company, department ID, andsupervisor level ID.
• Security settings make it impossible for either company to access the other’s information.
Scenario B1: Temporary Intercompany TransferHome Company Inputs (Temporary Intercompany Transfer - TICT)
Table Fields Input
JOB Action Transfer.
Reason Temporary intercompany transfer.
Department ID Dummy ID that indicates temporary intercompany transfer.
Pay Group If home (own) company is responsible for compensation, there is no changeto the pay group.
If not, enter a dummy pay group to indicate that the host (other) companyis responsible for compensation. There is no processing associated withdummy pay groups.
PeopleSoft Proprietary and Confidential 309

(JPN) Tracking Intercompany Transfers (Shukkou) Chapter 11
Table Fields Input
Job Indicator Because the host company enters information by using concurrent jobsfunctionality, it is Secondary.
JOB_JR IntercompanyTransfer Flag
Host company information.
Business unit code Business unit to which the employee will be sent.
Company code Host company to which the employee will be sent.
Department ID code Host department in which the employee will be.
Sup Lvl ID code Supervisor level that employee will take in host company.
ICT Start Date Actual start date of intercompany transfer.
ICT End Date Expected end date of ICT.
Host Company Inputs (Hosting Temporary Intercompany Transfer - TICT)
Table Fields Input
JOB Employee ID If accessing through Add Employment Instance, use the same employee IDas the home company.
If accessing through the Add a Person page, assign a new ID.
Employee Record # Employee ID is 1 or higher.
Action Hire.
Reason Temporary intercompany transfer.
Company Host company.
Department ID Host department in which the employee will be.
310 PeopleSoft Proprietary and Confidential
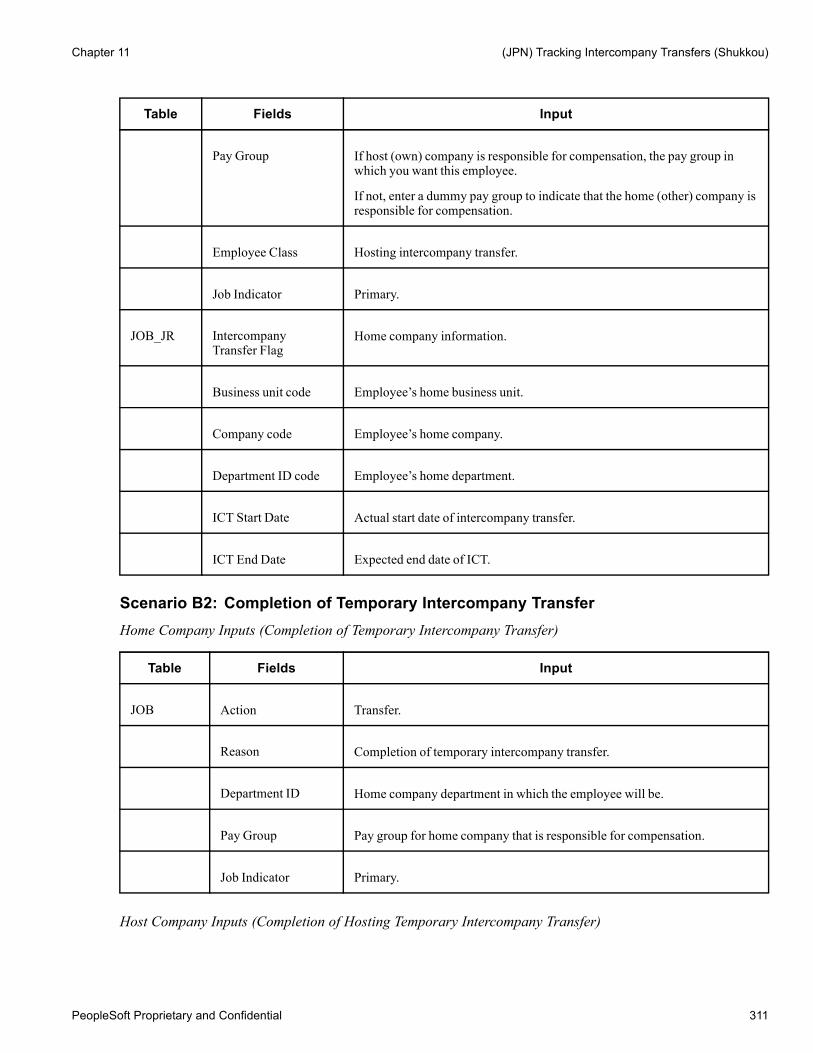
Chapter 11 (JPN) Tracking Intercompany Transfers (Shukkou)
Table Fields Input
Pay Group If host (own) company is responsible for compensation, the pay group inwhich you want this employee.
If not, enter a dummy pay group to indicate that the home (other) company isresponsible for compensation.
Employee Class Hosting intercompany transfer.
Job Indicator Primary.
JOB_JR IntercompanyTransfer Flag
Home company information.
Business unit code Employee’s home business unit.
Company code Employee’s home company.
Department ID code Employee’s home department.
ICT Start Date Actual start date of intercompany transfer.
ICT End Date Expected end date of ICT.
Scenario B2: Completion of Temporary Intercompany TransferHome Company Inputs (Completion of Temporary Intercompany Transfer)
Table Fields Input
JOB Action Transfer.
Reason Completion of temporary intercompany transfer.
Department ID Home company department in which the employee will be.
Pay Group Pay group for home company that is responsible for compensation.
Job Indicator Primary.
Host Company Inputs (Completion of Hosting Temporary Intercompany Transfer)
PeopleSoft Proprietary and Confidential 311

(JPN) Tracking Intercompany Transfers (Shukkou) Chapter 11
Table Fields Input
JOB Action Termination.
Reason Completion of temporary intercompany transfer.
Job Indicator Secondary.
Scenario B3: Permanent Intercompany TransferHome Company Inputs (Permanent Intercompany Transfer − PICT)
Table Fields Input
JOB Action Termination.
Reason Permanent intercompany transfer.
Job Indicator Because the host company entered information by using concurrent jobsfunctionality, it is Secondary.
JOB_JR IntercompanyTransfer Flag
Host company information.
Business unit code Business unit to which the employee is transferring.
Company code Host company to which the employee is transferring.
Department ID code Employee’s host department.
Sup Lvl ID code Supervisor level that employee will have in host company.
Host Company Inputs (Hosting Permanent Intercompany Transfer - PICT)
Table Fields Input
JOB Employee ID If accessing through Add Employment Instance, use the same employee IDas the home company.
If accessing through the Add a Person page, assign a new ID.
Employee Record # If accessing through the Concurrent Jobs page, the employee ID is 1 orhigher.
312 PeopleSoft Proprietary and Confidential
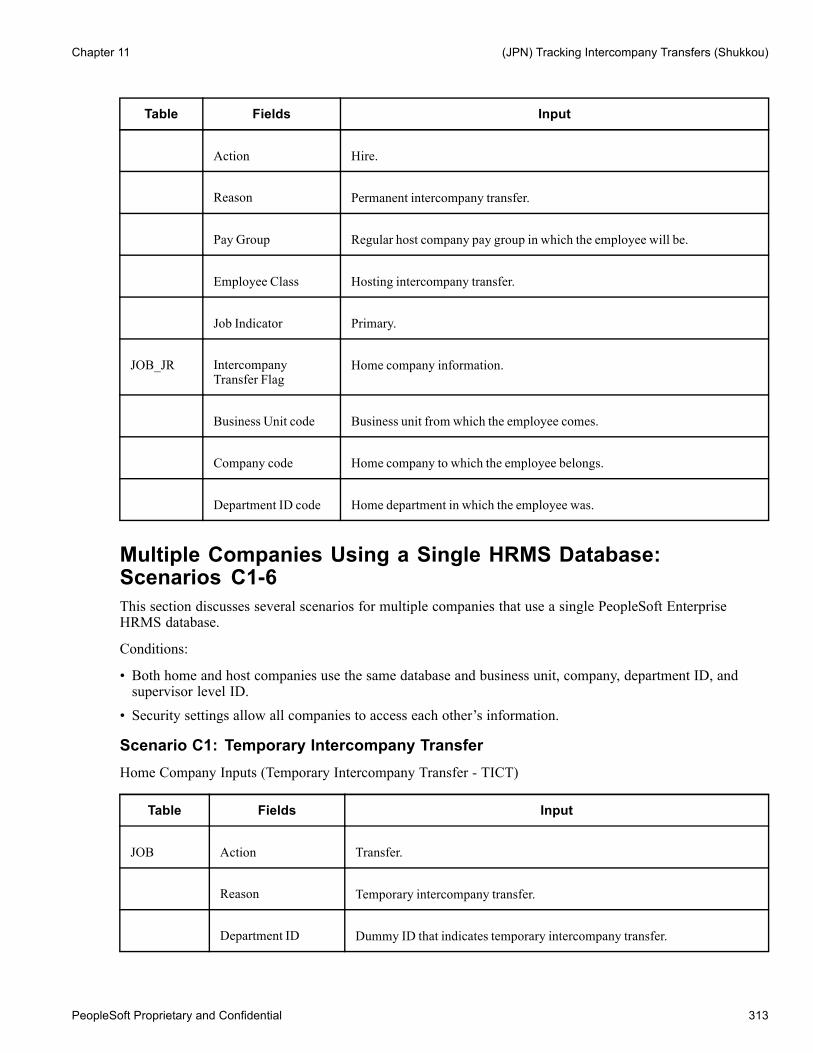
Chapter 11 (JPN) Tracking Intercompany Transfers (Shukkou)
Table Fields Input
Action Hire.
Reason Permanent intercompany transfer.
Pay Group Regular host company pay group in which the employee will be.
Employee Class Hosting intercompany transfer.
Job Indicator Primary.
JOB_JR IntercompanyTransfer Flag
Home company information.
Business Unit code Business unit from which the employee comes.
Company code Home company to which the employee belongs.
Department ID code Home department in which the employee was.
Multiple Companies Using a Single HRMS Database:Scenarios C1-6This section discusses several scenarios for multiple companies that use a single PeopleSoft EnterpriseHRMS database.
Conditions:
• Both home and host companies use the same database and business unit, company, department ID, andsupervisor level ID.
• Security settings allow all companies to access each other’s information.
Scenario C1: Temporary Intercompany TransferHome Company Inputs (Temporary Intercompany Transfer - TICT)
Table Fields Input
JOB Action Transfer.
Reason Temporary intercompany transfer.
Department ID Dummy ID that indicates temporary intercompany transfer.
PeopleSoft Proprietary and Confidential 313

(JPN) Tracking Intercompany Transfers (Shukkou) Chapter 11
Table Fields Input
Pay Group If home (own) company is responsible for compensation, there is no changeto the pay group.
If not, enter a dummy pay group to indicate that the host (other) company isresponsible for compensation.
Job Indicator Because the host company enters information by using concurrent jobsfunctionality, it is Secondary.
JOB_JR IntercompanyTransfer Flag
Host company information.
ICT Start Date Actual start date of intercompany transfer.
ICT End Date Expected end date of ICT.
Host Company Inputs (Hosting Temporary Intercompany Transfer - TICT)
Table Fields Input
JOB Employee ID If accessing through Add Employment Instance, use the same employee IDas the home company.
If accessing through the Add a Person page, assign a new ID.
Employee Record # If accessing through the Concurrent Jobs page, the employee ID is 1 orhigher.
Action Hire.
Reason Temporary intercompany transfer.
Company Host company.
Department ID Host department in which the employee will be.
Pay Group If host (own) company is responsible for compensation, the pay group inwhich you want this employee.
If not, enter a dummy pay group to indicate that the home (other) company isresponsible for compensation.
Employee Class Hosting intercompany transfer.
314 PeopleSoft Proprietary and Confidential

Chapter 11 (JPN) Tracking Intercompany Transfers (Shukkou)
Table Fields Input
Job Indicator Primary.
JOB_JR IntercompanyTransfer Flag
Home company information.
ICT Start Date Actual start date of intercompany transfer.
ICT End Date Expected end date of ICT.
Scenario C2: Completion of Temporary Intercompany TransferSee Scenario B2: Completion of Temporary Intercompany transfer.
Scenario C3: Permanent Intercompany TransferHome Company Inputs (Permanent Intercompany Transfer - PICT)
Table Fields Input
JOB Action Termination.
Reason Permanent intercompany transfer.
Job Indicator Because the host company entered information by using concurrent jobsfunctionality, it is Secondary.
JOB_JR IntercompanyTransfer Flag
Host company information.
Host Company Inputs (Hosting Permanent Intercompany Transfer - PICT)
Table Fields Input
JOB Employee ID If accessing through Add Employment Instance, use the same employee IDas the home company.
If accessing through the Add a Person page, assign a new ID.
Employee Record # If accessing through the Concurrent Jobs page, the employee ID is 1 orhigher.
Action Hire.
PeopleSoft Proprietary and Confidential 315

(JPN) Tracking Intercompany Transfers (Shukkou) Chapter 11
Table Fields Input
Reason Permanent intercompany transfer.
Pay Group Regular host company pay group in which the employee will be.
Employee Class Hosting intercompany transfer.
Job Indicator Primary.
JOB_JR IntercompanyTransfer Flag
Home company information.
Working with Search Page SecurityThis section discusses how department security (Search Page Security on PERS_SRCH_GBL andEMPLMT_SRCH_GBL) works when you use the system’s Multiple Jobs functionality.
Note. There are many different ways to set up this security. Your specific business requirements determinehow you set up yours. This section describes just one example of how you may set up your security.
This information makes the following assumptions:
• You want to manage two companies in one database: company A and company B, where company B isa subsidiary of company A.
• The entire organization of company A belongs to business unit A (BUA) and the entire organization ofcompany B belongs to business unit B (BUB).
• You have defined two setIDs: SIDA and SIDB for companies A and B respectively.
• Neither company’s workers have meaningful employee IDs; that is, the ID does not identify the company.
For example, a person with employee ID 1002 may belong to company B, whereas workers with employeeIDs 1001 and 1003 belong to company A.
• There are two users: USR1 and USR2.
USR1 has the right to access the sales department of company A and USR2 has the right to access thesales department of company B.
Following these assumptions, the next table represents the job rows for the person with employee ID 1001, who:
• Was originally hired by company A.• Went on an temporary intercompany transfer to company B (scenario B1).• Returned to company A (scenario B3).• Went on permanent intercompany transfer to company B (scenario B6).
316 PeopleSoft Proprietary and Confidential
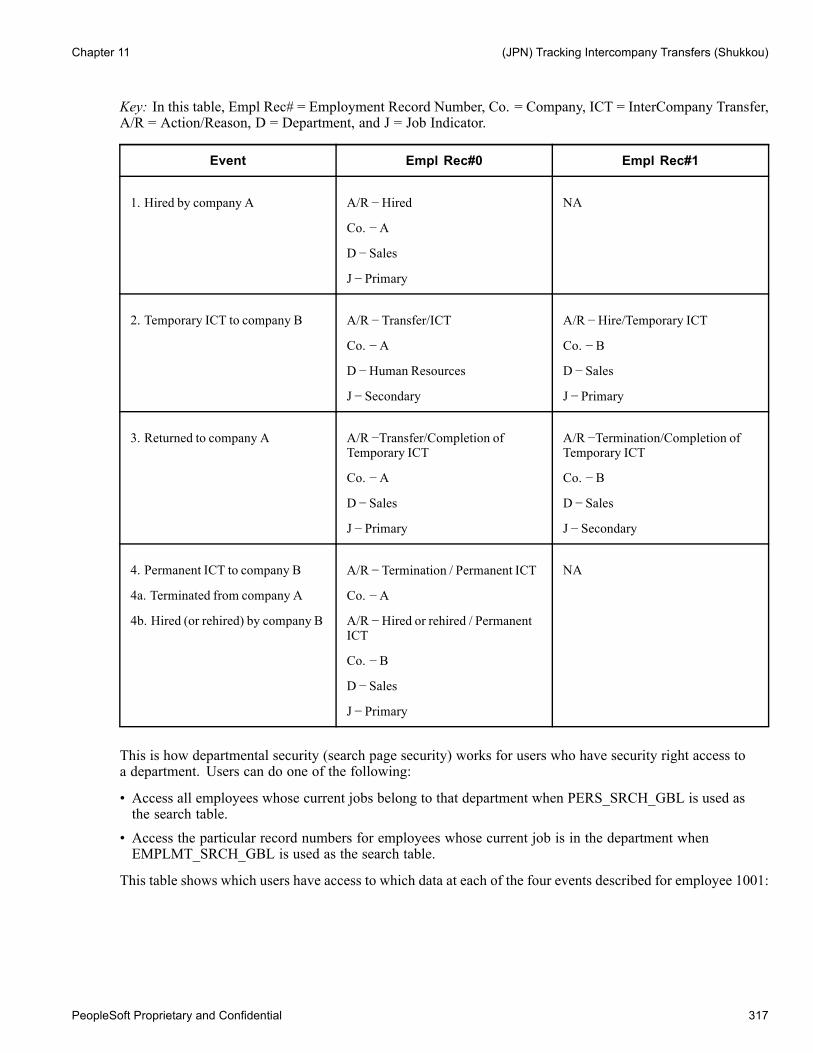
Chapter 11 (JPN) Tracking Intercompany Transfers (Shukkou)
Key: In this table, Empl Rec# = Employment Record Number, Co. = Company, ICT = InterCompany Transfer,A/R = Action/Reason, D = Department, and J = Job Indicator.
Event Empl Rec#0 Empl Rec#1
1. Hired by company A A/R −Hired
Co. −A
D − Sales
J − Primary
NA
2. Temporary ICT to company B A/R − Transfer/ICT
Co. −A
D −Human Resources
J − Secondary
A/R −Hire/Temporary ICT
Co. − B
D − Sales
J − Primary
3. Returned to company A A/R −Transfer/Completion ofTemporary ICT
Co. −A
D − Sales
J − Primary
A/R −Termination/Completion ofTemporary ICT
Co. − B
D − Sales
J − Secondary
4. Permanent ICT to company B
4a. Terminated from company A
4b. Hired (or rehired) by company B
A/R − Termination / Permanent ICT
Co. −A
A/R −Hired or rehired / PermanentICT
Co. − B
D − Sales
J − Primary
NA
This is how departmental security (search page security) works for users who have security right access toa department. Users can do one of the following:
• Access all employees whose current jobs belong to that department when PERS_SRCH_GBL is used asthe search table.
• Access the particular record numbers for employees whose current job is in the department whenEMPLMT_SRCH_GBL is used as the search table.
This table shows which users have access to which data at each of the four events described for employee 1001:
PeopleSoft Proprietary and Confidential 317

(JPN) Tracking Intercompany Transfers (Shukkou) Chapter 11
Event Personal Data Empl Rec#0 Data Empl Rec#1 Data
PERS_SRCH_GBL EMPLMT_SRCH_GBL EMPLMT_SRCH_GBL
1. Hired by company A USR1 USR1 NA
2. Temporary ICT tocompany B
USR1 and USR2 USR1 USR2
3. Returned to company A USR1 and USR2 USR1 USR2
4a. Permanent ICT tocompany B
4b. Hired or rehired bycompany B
USR1 and USR2
USR2
USR1
USR2
USR2
USR2
Running the Intercompany Transfer ReportThis section explains how to run the JPN Completion of IC Transfer report.
Page Used to Run the Intercompany Transfer ReportPage Name Object Name Navigation Usage
JPN Completion of ICTransfer
RUNCTL_PER065_JPN Administer Workforce,Administer Workforce(GBL), Report Lcl, JPNCompletion of IC Transfer
Run the JPN Completionof IC Transfer report(PER065JP), which listsemployees on temporaryintercompany transfer. Thehome company uses thisreport to confirm employeeswho are anticipated toreturn from temporaryintercompany transfer.
318 PeopleSoft Proprietary and Confidential
CHAPTER 12
(JPN) Mass Organization Change
This chapter provides an overview of mass transfers in Japan and discusses how to:
• Change plans for organizational restructure.• Employee placement plans with the new organization structure.• Finalizing organization and employee placement plans.
Understanding Mass Organization ChangeIn Japan, companies periodically change organization structure with the result that employees are transferredto new roles and departments with the revised structure. This is referred to as mass period transfers (Teiki Ido).With rapid changes in the business environment, organization changes and mass transfers play an integral partfor businesses in Japan and take place in shorter cycles.
Many companies in Japan employ a split HR organizational structure made up of division HR and corporateHR. Corporate HR is a human resource department placed in the main company headquarters of a largecompany or group of companies. Division HR departments are HR departments within a business unit ordivision. The division HR department reports to the corporate HR department (and the general manager of thebusiness unit, subsidiary companies and so on). HR business partners are included within this schema.
Division HR formulates and instigates activities such as organizational change strategy, employee placement,employee review at a level within their department. When division HR finishes their part of the work, theyreport to corporate HR. Corporate HR then coordinate and adjust activities and placement among departmentsbased on the company strategy.
In Japan, job rotation is viewed as an integral part of employee development. HR departments intentionallytransfer certain employees to multiple departments over a certain period of time. This practice is aimed atdeveloping generalists who are knowledgeable with several jobs within a company. It is viewed that thiscreates better experience and broader vision of a company. The period of service in a department is often usedas a selection criteria for job rotation.
Employees who are marked as transferable are said to be transfer candidate employees.
When restructuring an organization, Tamatsukiplacement is usually conducted along the same job level.Tamatsuki placement can also occur when an employee has requested a transfer. Job rotation for higher levelmanagement positions are also done across the same job level. This starts a job transfer chain and should beexplained.
PeopleSoft Proprietary and Confidential 319

(JPN) Mass Organization Change Chapter 12
The Japanese word, Tamatsuki, originally means ball (tama) and hit (tsuku) like billiards and also meansbilliards in Japanese. To start tamatsuki placement, a certain employee is assigned to a newly created post(a post is equivalent to a supervisor level role (known as yakushoku) within a department. This term isdifferent to the term position which consists of job within a department.) The existing post is now vacatedand is therefore available to be filled. In the lower part of the graphic, Bunji/Peter, is assigned a new post(New Post), and Post A becomes vacant. Then, other employees are assigned to similar positions at thesame level by the concatenating effect of a person moving from one position to another and leaving theexisting position vacant. In the graphic, Daisuke/John is assigned Post A, and Fusako/Catherine is assignedPost B and Hisao/Robin is assigned Post C. The continuing process, triggered by the new post, is likenedby the Japanese, to hitting billiard balls.
This graphic shows an overview of tamatsuki placement:
Corporate HR Div. (none)
Bunji
Daisuke
Fusako
Bunji
Daisuke
Fusako
#1
Unit Department Svr Lvl
Director
Incumbent Employee Notes
New Post is created. Bunji is placed as mainappointment to the Corporate HR Div - director
HR Div. Recruiting Manager
HR Div. Benefit Manager
HR Div. Benefit None
Daisuke is placed as main appointment to thepost, HR Recruiting - Manager, that Bunji waspreviously placed.
Fusako is placed as main appointment to thepost, Benefit - Manger, that Daisuke waspreviously assigned.
The post, Benefit - No Svr Level, is closed
Tamatsuki placement
Note. This feature does not support transfer between business units as table sets may differ from one businessunit to the next.
Change Plans for Restructuring An OrganizationThis section provides an overview of change plans for restructuring an organization and discusses the pagesused for this functionality.
Understanding Change Plans for Restructuring An OrganizationIn order to plan a new organization, you need to be able to enter information about the new structure into thesystem. The information required is the organization structure with department hierarchy, size by supervisorlevel, job code, grade and so on. The structures can store multiple patterns by changing the name of thestructure. After entering this information for a plan, a visual chart needs to be available for checking.
Organizational StructureThe existing and planned organizational structures are built using PeopleSoft Tree Manager. Tree Manageris the ideal graphical user interface to create organizational structures as they can be seen visually anddepartments can be dragged and dropped. To create a new organizational structure using Tree Manager, theexisting tree for the current organizational structure can be copied and given a different name.
320 PeopleSoft Proprietary and Confidential

Chapter 12 (JPN) Mass Organization Change
Note. In terms of using an initial tree structure, PeopleSoft recommends customers create a tree based on theDEPT_SECURITY tree, but with a different name. Then, after the tree has been approved, rename the treeback to DEPT_SECURITY with a new effective date.
Pages Used For Organizational StructuresPage Name Object Name Navigation Usage
Tree Manager PSTREEMGR Tree Manager, Tree Utilities,Tree Manager
Create a tree for the neworganization structure orbase and copy the new treeon the existing organizationstructure’s tree. Adddepartments using the TreeManager functionality.
Organization Plan IDO_ORG_PLAN_JPN Workforce Administration,Collective Processes, MassOrganization Change JPN,Organization Plan
Set up IDO organizationplans.
Headcount Plan byDepartment
IDO_HC_DEPT_JPN Workforce Administration,Collective Processes, MassOrganization ChangeJPN, Headcount Plan byDepartment
Specify headcount targetsby department.
Headcount Plan Listing RC_IDO_HC_RPT_JPN Workforce Administration,Collective Processes, MassOrganization Change JPN,Headcount Plan Listing
Use this page to run areport that compares theheadcount goals establishedfor departments with thesimulated result of theorganization plan.
Organization PlanAccess the Organization Plan page.
IDO Organization Plan page
PeopleSoft Proprietary and Confidential 321

(JPN) Mass Organization Change Chapter 12
An Organization Plan allows a customer to track several different ways to reorganize the company. Afterrunning reports modeling the different options, the customer can then select one of the Organization Plans tobe the official plan that is used, and use that one to insert into the Job record.
Organization Date Enter the date from which the new organization plan will come into effect.
Headcount Type Choose Job Code, Sal Admin Plan/Grade or Supervisor Level to specifythe Headcount Type.
Headcount Plan by DepartmentAccess the Headcount Plan by Department page.
Headcount Plan by Department page
This page is used to track goals by department. For example, let’s say that currently you have two peoplein department 100. After your reorganization is finished, you want four people in that department. Soyou enter the number 4 for department 100 on this page. You then perform your transfers. After yourreorganization is finished (but before you insert into the Job record), you can then run the Headcount PlanListing (PER071JP.SQR) report to see if your transfers have increased the headcount in the departmentfrom two to four.
Default by ActiveDepartments
Click the Default by Active Department button to fill the Headcount PlanInformation grid with data from the active departments.
As well as using the Default by Active Departments button, users can enter the headcount for each department.
322 PeopleSoft Proprietary and Confidential

Chapter 12 (JPN) Mass Organization Change
Note. This page provides a lower level of detail than the Headcount by Department page. It also breaks itdown by Supervisor Level, Jobcode, or Grade. So you may currently have two headcount in department 100,one with a supervisor level of S10, and one with a supervisor level of S20. You could set it to two for S10,and two for S20, giving a total headcount of four for the department.
Note. If a user does not want to use headcount planning, then they do not enter any data on the page HeadcountPlan by Department page for that organization plan.
Headcount Plan ListingAccess the Headcount Plan Listing page.
Headcount Plan Listing page
Enter values on this page that will be used to compare the headcount goals established for departmentswith the simulated result of the organization plan.
Employee Placement Plans With The NewOrganization Structure
This section provides an overview of employee placement plans with the new organizational structure anddiscusses the pages used for this functionality.
PeopleSoft Proprietary and Confidential 323

(JPN) Mass Organization Change Chapter 12
Understanding Employee Placement PlansThere are multiple ways to create employee placement plans. The first way is to use the Transfer Entry byDepartment page. With this method, users enter the placement by department.
The second method is to use the Transfer Entry with Trees page. Users can see the current organizationstructure and placement, and enter plans.
Methods one and two are similar in that you create an Ido candidate listing, use the Transfer Entry byDepartment or Transfer Entry with Trees pages, and then use the Transfer Data Maintenance page if required.
The third method is the Tamatsuki Transfer method to enter placements, but the data is entered based on theinformation talked of earlier and relies on the placement plan data. The Tamatsuki Transfer is an optional step.
Users can then check, undo, and adjust placements using the Transfer Data Maintenance page.
Using this method you create an Ido candidate listing, use the Transfer Entry by Department or TransferEntry with Trees pages, use the Tamatsuki Transfer Candidate Entry, Tamatsuki Transfer Entry, TamatsukiPlacement Check List and Tamatsuki to Transfer Record pages, and then use the Transfer Data Maintenancepage if required.
Security setup does not prevent users from transferring employees. As a result, it is important to limit access tothe Mass Employee Transfer page to trusted users only.
Security access is invoked whenever a user clicks on the View links on the Transfer Entry by Department andTransfer Entry by Tree pages.
Note. On the Installation Table — Country Specific page, the Additional Appointment Enabled field must beselected, for this and other functionality to be used.
324 PeopleSoft Proprietary and Confidential

Chapter 12 (JPN) Mass Organization Change
Pages Used For Employee Placement PlansPage Name Object Name Navigation Usage
Ido Candidate Listing RC_IDO_EE_LIST_JPN Workforce Administration,Collective Processes, MassOrganization Change JPN,Ido Candidate Listing
Run a report that lists currentinformation for employees.It is used to help plan thefuture organization changes.
Transfer Entry byDepartment
IDO_MASS_TRANS_JPN Workforce Administration,Collective Processes, MassOrganization Change JPN,Transfer Entry by Dept
Allows the mass transferof employees from onedepartment to another.
Transfer Entry with Trees IDO_XFR_TREE_JPN Workforce Administration,Collective Processes, MassOrganization Change JPN,Transfer Entry with Trees
Transfer employees betweendepartments using trees.
Tamatsuki TransferCandidates
IDO_CANDIDATE_JPN Workforce Administration,Collective Processes, MassOrganization ChangeJPN, Tamatsuki TransferCandidates
Specify a list of Tamatsukicandidates.
Tamatsuki Transfer Entry IDO_TAMATSUKI_JPN Workforce Administration,Collective Processes, MassOrganization Change JPN,Tamatsuki Transfer Entry
Assign Tamatsuki candidatesto posts.
Tamatsuki PlacementCheck List
RC_IDO_TAM_CL_JPN Workforce Administration,Collective Processes, MassOrganization Change JPN,Tamatsuki Placement CheckList
This report summarizes theTamatsuki transfers that areplanned.
Tamatsuki to TransferRecord
RC_IDO_TAM_JPN Workforce Administration,Collective Processes, MassOrganization Change JPN,Tamatsuki to TransferRecord
This applicationengine process copiesdata from the recordIDO_TAMATSU_JPNto the recordIDO_FUT_UPD_JPN.
Transfer Data Maintenance IDO_MAINT_JPN Workforce Administration,Collective Processes, MassOrganization Change JPN,Transfer Data Maintenance
Use this page to maintain theFuture Update record.
Ido Candidate ListingAccess the Ido Candidate Listing page.
PeopleSoft Proprietary and Confidential 325

(JPN) Mass Organization Change Chapter 12
Ido Candidate Listing page
Enter the requisite fields to run a report that assists the user to determine which employees should be subject toa reorganization or tamatsuki placement.
Transfer Entry by DepartmentAccess the Transfer Entry by Department page.
326 PeopleSoft Proprietary and Confidential

Chapter 12 (JPN) Mass Organization Change
Transfer Entry by Department (1 of 2)
Transfer Entry by Department (2 of 2)
Use this page to mass transfer employees from one department to another.
Load Click the Load button to list the employees for a particular business unit anddepartment that are available for transfer to another department.
Proc The Proc field defaults to being selected. Select this field to indicate that anemployee will be transferred to another department or have certain informationchanged. When selected, changes are applied to that employee when thepage is saved.For example, department 100 is being closed. Half of the employees in thatdepartment will be assigned to department 110, and the other half will beassigned to department 120. The user enters this page and loads all of theemployee in department 100. They then enter a transfer for department 110 inthe lower group box. The user then deselects the employees in the list whoshould be transferred into department 120 instead. After saving the page, the
PeopleSoft Proprietary and Confidential 327

(JPN) Mass Organization Change Chapter 12
user can then enter a transfer for department 120, deselect the employees in110, and reselect the employees that should be transferred to department 120.
Change the Following Fields
Action Select a value to change.
Reason Select a code to specify why the value is being changed.
Effective Date Enter a date to specify when the change comes into effect.
Business Unit, Department,Location Code, SupervisorLevel, Job Code
Enter values in these fields to specify new information for the employeesselected.
Note. These fields should be left blank if a user does not want to change thatdata for the employees. For example, if you want to move employees fromdepartment 100 to 110, but want them to keep their old jobcode, you wouldleave the jobcode field blank on the page.
On the other hand, if you want to also assign all the employees to jobcode J200as well as change their department, you would enter J200 in the Jobcode field.
Transfer Entry with TreesAccess the Transfer Entry with Trees page.
Transfer Entry with Trees page
If using the Transfer Entry with Trees page, each employee’s transfer should be considered and decidedupon well before using the page. Users have to decide on the location, supervisor level and jobcode aswell as the action and reason.
328 PeopleSoft Proprietary and Confidential
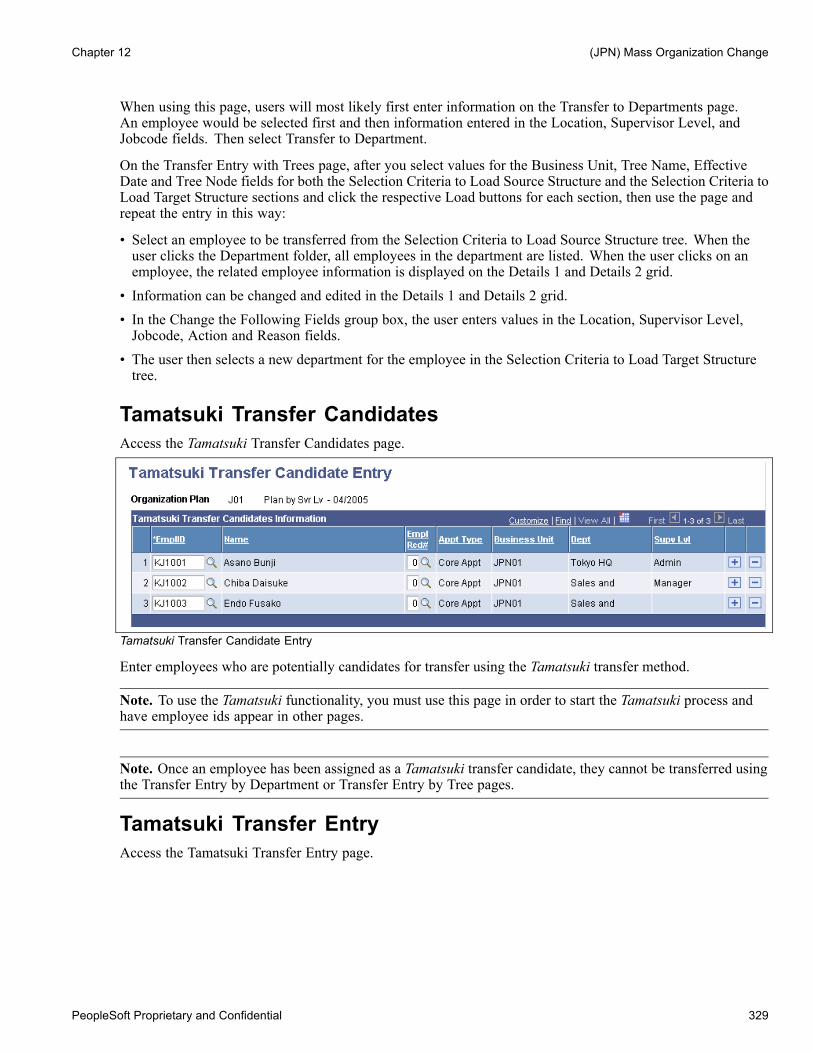
Chapter 12 (JPN) Mass Organization Change
When using this page, users will most likely first enter information on the Transfer to Departments page.An employee would be selected first and then information entered in the Location, Supervisor Level, andJobcode fields. Then select Transfer to Department.
On the Transfer Entry with Trees page, after you select values for the Business Unit, Tree Name, EffectiveDate and Tree Node fields for both the Selection Criteria to Load Source Structure and the Selection Criteria toLoad Target Structure sections and click the respective Load buttons for each section, then use the page andrepeat the entry in this way:
• Select an employee to be transferred from the Selection Criteria to Load Source Structure tree. When theuser clicks the Department folder, all employees in the department are listed. When the user clicks on anemployee, the related employee information is displayed on the Details 1 and Details 2 grid.
• Information can be changed and edited in the Details 1 and Details 2 grid.• In the Change the Following Fields group box, the user enters values in the Location, Supervisor Level,Jobcode, Action and Reason fields.
• The user then selects a new department for the employee in the Selection Criteria to Load Target Structuretree.
Tamatsuki Transfer CandidatesAccess the Tamatsuki Transfer Candidates page.
Tamatsuki Transfer Candidate Entry
Enter employees who are potentially candidates for transfer using the Tamatsuki transfer method.
Note. To use the Tamatsuki functionality, you must use this page in order to start the Tamatsuki process andhave employee ids appear in other pages.
Note. Once an employee has been assigned as a Tamatsuki transfer candidate, they cannot be transferred usingthe Transfer Entry by Department or Transfer Entry by Tree pages.
Tamatsuki Transfer EntryAccess the Tamatsuki Transfer Entry page.
PeopleSoft Proprietary and Confidential 329
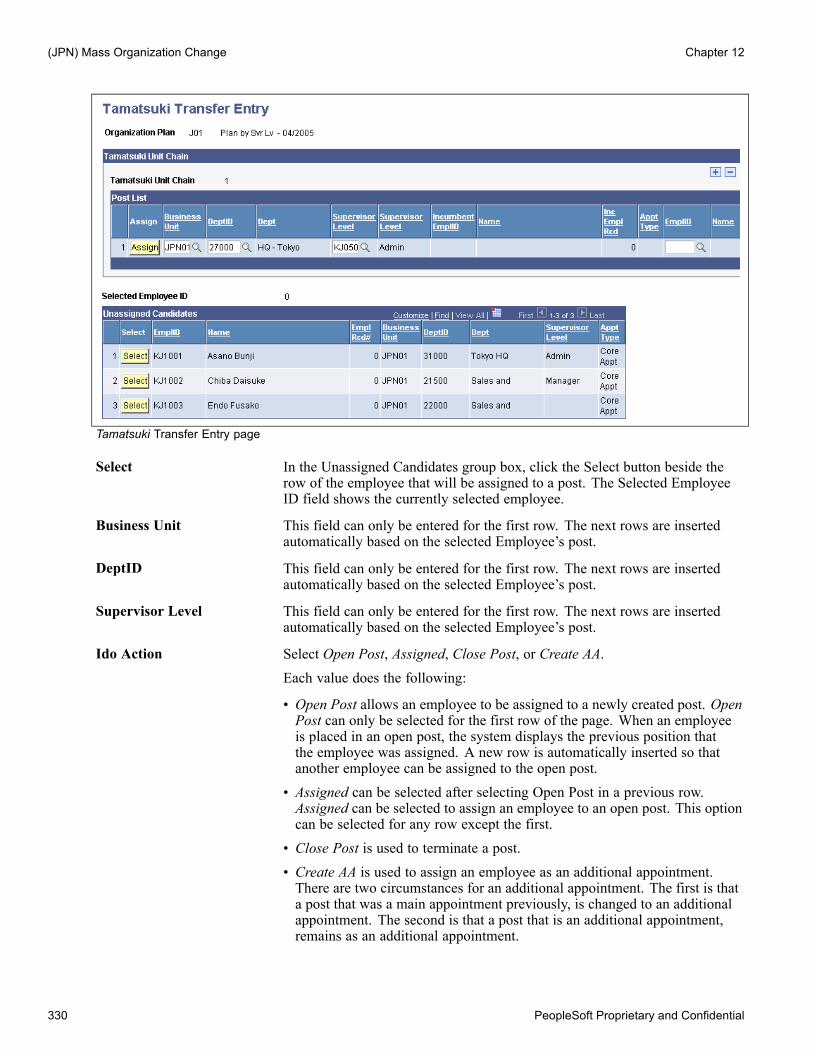
(JPN) Mass Organization Change Chapter 12
Tamatsuki Transfer Entry page
Select In the Unassigned Candidates group box, click the Select button beside therow of the employee that will be assigned to a post. The Selected EmployeeID field shows the currently selected employee.
Business Unit This field can only be entered for the first row. The next rows are insertedautomatically based on the selected Employee’s post.
DeptID This field can only be entered for the first row. The next rows are insertedautomatically based on the selected Employee’s post.
Supervisor Level This field can only be entered for the first row. The next rows are insertedautomatically based on the selected Employee’s post.
Ido Action Select Open Post, Assigned, Close Post, or Create AA.Each value does the following:
• Open Post allows an employee to be assigned to a newly created post. OpenPost can only be selected for the first row of the page. When an employeeis placed in an open post, the system displays the previous position thatthe employee was assigned. A new row is automatically inserted so thatanother employee can be assigned to the open post.
• Assigned can be selected after selecting Open Post in a previous row.Assigned can be selected to assign an employee to an open post. This optioncan be selected for any row except the first.
• Close Post is used to terminate a post.
• Create AA is used to assign an employee as an additional appointment.There are two circumstances for an additional appointment. The first is thata post that was a main appointment previously, is changed to an additionalappointment. The second is that a post that is an additional appointment,remains as an additional appointment.
330 PeopleSoft Proprietary and Confidential

Chapter 12 (JPN) Mass Organization Change
Note. If the Additional Appointment Enabled field on the Installation— Country Specific page is not selected, additional appointment relateddata does not display on this page.
Assign Once all the required fields have entries, click the Assign button to assign thepost to the selected employee. A row is inserted below the original entry andthe Tamatsuki process can continue and another employee can be assigned tothe vacated post or another post.
Note. When the user needs to change the middle of the Tamatsuki Chain (Unit), the user should delete thewhole unit and enter information from the first row.
Note. There are no limitations on where the Business Unit, DeptID, or Supervisor Level can be entered.Normally, the standard process would be to only enter it on the first row, the user is able to enter differentscenarios. For example, when using the Create AA option, the user will probably enter multiple posts andtherefore inserting multiple rows. The Assign button performs two separate actions. If the Business Unit,DeptID, or Supervisor Level are entered for a row, the system assigns the selected employee to that post.However, if the Business Unit, DeptID, or Supervisor Level are left blank and not entered, it assigns theemployee’s current information as the post for that row.
Tamatsuki Placement Check ListAccess the Tamatsuki Placement Check List page.
Tamatsuki Placement Check List page
To confirm placements per organization plan, this report displays a list that is used to ensure candidates havebeen placed in the required posts or conversely that posts have been assigned the correct candidates.
Tamatsuki to Transfer RecordAccess the Tamatsuki to Transfer Record page.
PeopleSoft Proprietary and Confidential 331

(JPN) Mass Organization Change Chapter 12
Tamatsuki to Transfer Record page
The purpose of this page is to prepare the Tamatsuki data to be inserted into Job.
Tamatsuki data is tracked by the IDO_TAMATSU_JPN process. This process moves the data tothe IDO_FUT_UPD_JPN record. The Mass Employee Transfer process takes the data from theIDO_FUT_UPD_JPN record and inserts it into the Job record.
Note. This means that if the Tamatsuki to Transfer Record process is never run, the Mass Employee Transferprocess will not insert the Tamatsuki post changes into the Job record.
Transfer Data MaintenanceAccess the Transfer Data Maintenance page.
Transfer Data Maintenance page
This page allows various employee related information to be maintained and updated.
Note. Care should be taken in using this page. The primary purpose of this page is to delete unwantedtransfers. It is not supposed to be used as a data entry page instead of using the other pages, as it containsfewer validations.
If actions beyond delete are done on this page, the user must be careful to validate their own entry.
332 PeopleSoft Proprietary and Confidential
Chapter 12 (JPN) Mass Organization Change
Finalizing Organization and Employee Placement PlansThis section provides an overview of finalizing organization and employee placement plans and discusses thepages used for this functionality.
Understanding Finalizing Organization and EmployeePlacement PlansIn order to finalize organization and employee placement plans, a number of checks should be run to ensurethat the intended structure is correct. These include checks for organization, employees, and departments.
HR administrators need to review the PER076JP report before the Mass Employee Transfer process is run toconfirm that the changes are acceptable.
An error report can be run that generates a list of errors in employee placement.
PeopleSoft Proprietary and Confidential 333

(JPN) Mass Organization Change Chapter 12
Pages Used For Finalizing Organization and EmployeePlacement Plans
Page Name Object Name Navigation UsageOrg Plan Checklist RC_IDO_AUD1_JPN Workforce Administration,
Collective Processes, MassOrganization Change JPN,Org Plan Checklist
Click the Run button andon the Process SchedulerRequest page select theEmployees in InactiveDepartment link or OpenPost Checklist link.
Run the Employees inInactive Department reportto list employees who will bein inactive departments. Runthe Open Post Checklistreport to list the Open PostChecklist.
Headcount Plan Listing RC_IDO_HC_RPT_JPN Workforce Administration,Collective Processes, MassOrganization Change JPN,Headcount Plan Listing
Select the Actual HeadcountReport to list the headcountof the new organizationstructure.
Future EmployeeAssignment List
RC_IDO_FUT_ASN_JPN Workforce Administration,Collective Processes, MassOrganization ChangeJPN, Future EmployeeAssignment List
Use this report to simulatethe way that the organizationwould look at an employeelevel if the user selectedorganization plan isprocessed.
Query Viewer QUERY_VIEWER Reporting Tools, Query,Query Viewer
Run the HR_TRANSAFTERORGCHGquery to view a list oftransferred employeesthat are effected after theorganization change.
Ido Employee Listing RC_IDO_AUD2_JPN Workforce Administration,Collective Processes, MassOrganization Change JPN,Ido Employee Listing
This report summarizesthe changes that will bemade if the user selectedorganization plan isprocessed.
Mass Employee Transfer RC_IDO_MASS_TR_JPN Workforce Administration,Collective Processes, MassOrganization Change JPN,Mass Employee Transfer
Run this process to copy datafrom the Update TransferData table and insert it intothe Job record.
Temporary Data Cleanup RC_IDO_CLEAN_JPN Workforce Administration,Collective Processes, MassOrganization Change JPN,Temporary Data Cleanup
Run this process to deletedata associated with anorganization plan.
Organization Plan ChecklistAccess the Organization Plan Checklist page.
334 PeopleSoft Proprietary and Confidential
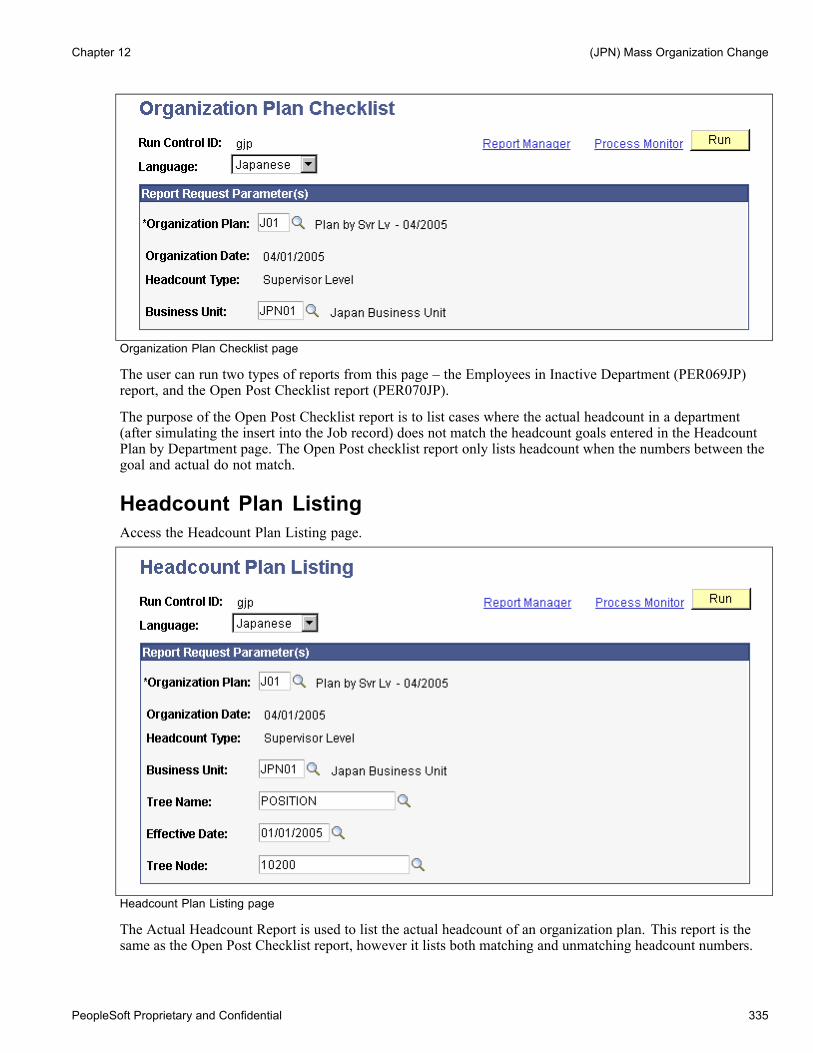
Chapter 12 (JPN) Mass Organization Change
Organization Plan Checklist page
The user can run two types of reports from this page – the Employees in Inactive Department (PER069JP)report, and the Open Post Checklist report (PER070JP).
The purpose of the Open Post Checklist report is to list cases where the actual headcount in a department(after simulating the insert into the Job record) does not match the headcount goals entered in the HeadcountPlan by Department page. The Open Post checklist report only lists headcount when the numbers between thegoal and actual do not match.
Headcount Plan ListingAccess the Headcount Plan Listing page.
Headcount Plan Listing page
The Actual Headcount Report is used to list the actual headcount of an organization plan. This report is thesame as the Open Post Checklist report, however it lists both matching and unmatching headcount numbers.
PeopleSoft Proprietary and Confidential 335
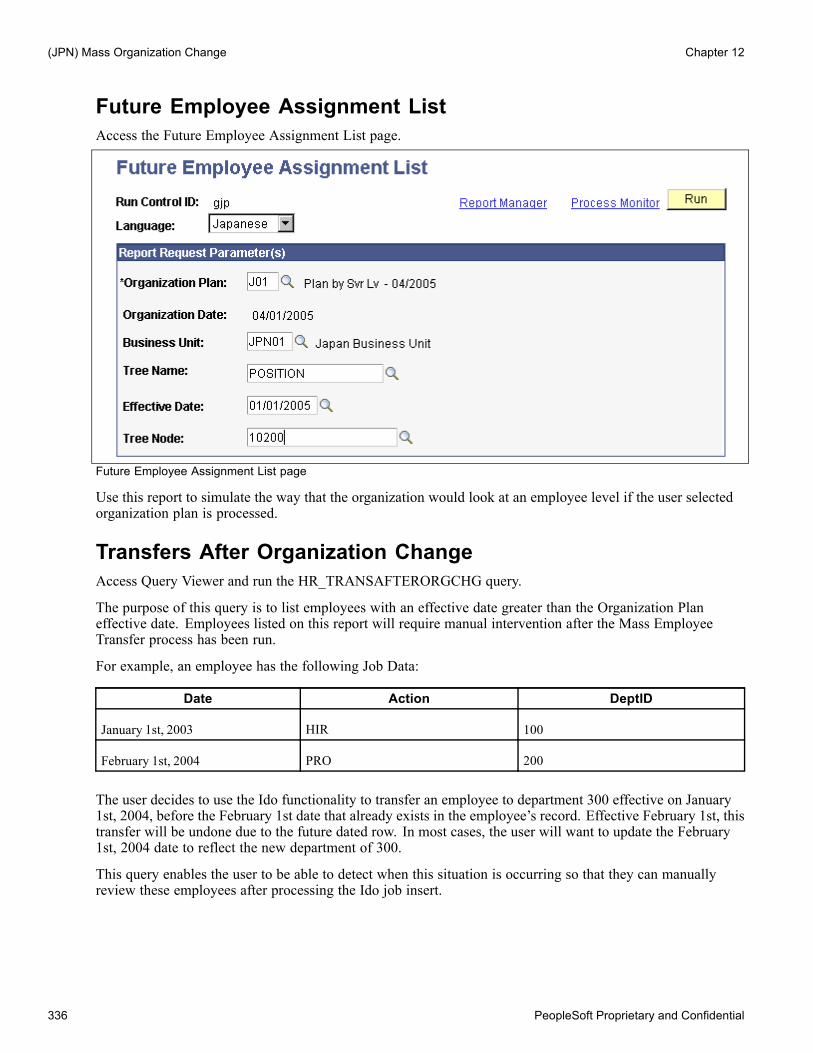
(JPN) Mass Organization Change Chapter 12
Future Employee Assignment ListAccess the Future Employee Assignment List page.
Future Employee Assignment List page
Use this report to simulate the way that the organization would look at an employee level if the user selectedorganization plan is processed.
Transfers After Organization ChangeAccess Query Viewer and run the HR_TRANSAFTERORGCHG query.
The purpose of this query is to list employees with an effective date greater than the Organization Planeffective date. Employees listed on this report will require manual intervention after the Mass EmployeeTransfer process has been run.
For example, an employee has the following Job Data:
Date Action DeptID
January 1st, 2003 HIR 100
February 1st, 2004 PRO 200
The user decides to use the Ido functionality to transfer an employee to department 300 effective on January1st, 2004, before the February 1st date that already exists in the employee’s record. Effective February 1st, thistransfer will be undone due to the future dated row. In most cases, the user will want to update the February1st, 2004 date to reflect the new department of 300.
This query enables the user to be able to detect when this situation is occurring so that they can manuallyreview these employees after processing the Ido job insert.
336 PeopleSoft Proprietary and Confidential

Chapter 12 (JPN) Mass Organization Change
Ido Employee ListingAccess the Ido Employee Listing page.
Ido Employee Listing page
This report summarizes the changes that will be made if the user selected organization plan is processed.
Mass Employee TransferAccess the Mass Employee Transfer page.
Mass Employee Transfer page
After deciding which organization plan is to be used, the batch Mass Employee Transfer process should berun. The process updates the database to reflect the organization plan.
This process copies data from the Update Transfer Data table and inserts it into the Job record.
If there are multiple job rows with the same effective date, the same effective date is used, however theeffective sequence is incremented. For example, if you want to insert a row into the Job table, effective 1stJanuary 2004, but a 1st January 2004 row already exists (with an effective sequence of 0), the process willinsert the new row with an effective sequence of 1.
Temporary Data CleanupAccess the Temporary Data Cleanup page.
PeopleSoft Proprietary and Confidential 337

(JPN) Mass Organization Change Chapter 12
Temporary Data Cleanup page
This process is normally run after the successful completion of the Mass Employee Transfer process. Afterthe employees have been reorganized and their data inserted into the Job record, there is no longer a needto keep the planning information in the database.
For the organization plan selected, this process deletes rows from these tables:
• IDO_FUT_UPD_JPN• IDO_TAMATSU_JPN• IDO_CANDIDT_JPN• IDO_HC_DEPT_JPN
338 PeopleSoft Proprietary and Confidential

CHAPTER 13
Updating Person and Job Information
This chapter provides an overview of the process of updating person and job information and discusses how to:
• Change personal data.
• Change job data.
• Locate personnel records.
• Change and delete IDs.
• Update personal data.
• Run personal data reports.
• Update job data.
• Update salary information.
• Refresh compensation.
• Run job data reports.
• View a summary of all job records.
• Refresh tables to facilitate reporting.
• Run database audits.
See AlsoChapter 5, “Increasing the Workforce,” page 77
Understanding the Process of Updating Personand Job Information
A person’s history with your organization may involve many job changes, such as promotions, leaves ofabsence, layoffs, retirement, pay rate changes, and so on. To maintain a complete history of the person’stenure, enter these changes regularly in PeopleSoft Enterprise Human Resources.
Updating Job Information When You’ve Implemented PeopleSoft Enterprise Payrollfor North AmericaWhen you modify job data that affects payroll, the system marks payline records for recalculation whereneeded. When payroll is recalculated, the payroll system uses the new information.
PeopleSoft Proprietary and Confidential 339
Updating Person and Job Information Chapter 13
Updating Job Information When You’ve Implemented PeopleSoft Enterprise BenefitsAdministrationWhen you modify job or employment data that affects benefits, the system sets the flags that control eventmaintenance to indicate that a change has occurred. Then, during the next event maintenance process, thesystem processes the event.
Changing Personal DataTo update personal information without changing job information, use the Modify a Person component(PERSONAL_DATA), which contains the same pages that you use to add personal data records with theexception of the Organizational Relationship page:
Component Pages in the Group Usage
Personal Data
Workforce Administration, PersonalInformation, Modify a Person
Workforce Administration, PersonalInformation, Biographical, Modifya Person
Stock, Modify a Person
Enterprise Learning, Modify aPerson
Biographical Details(PERSONAL_DATA1)
Contact Information(PERSONAL_DATA2)
Regional (PERSONAL_DATA3)
Update a person’s personalinformation without changingjob information.
See AlsoChapter 13, “Updating Person and Job Information,” Updating Personal Data, page 345
Chapter 4, “Adding a Person in PeopleSoft Human Resources,” page 55
Changing Job DataUse one of the three update components on the Workforce Administration menu to update a person’s job data.These components are configured to simplify updating a person’s record in different business situations. Thefollowing table describes each component and its navigational path:
340 PeopleSoft Proprietary and Confidential

Chapter 13 Updating Person and Job Information
Component Pages in the Component Usage
Job Data
Workforce Administration, JobInformation, Job Data
Work Location (JOB_DATA1)
Job Information (JOB_DATA_JOBCODE)
Job Labor (JOB_LABOR)
Payroll (JOB_DATA2)
Salary Plan (JOB_DATA_SALPLAN)
Compensation (JOB_DATA3)
Employment Information(EMPLOYMENT_DTA1)
Job Earnings Distribution(JOB_DATA_ERNDIST)
Benefit Program Participation(JOB_DATA_BENPRG)
Work with historical effective-datedrows of the person’s job data (workwith past, present, and future jobdata).
Current Job
Workforce Administration, JobInformation, Current Job
Work Location (JOB_DATA1)
Job Information (JOB_DATA_JOBCODE)
Job Labor (JOB_LABOR)
Payroll (JOB_DATA2)
Salary Plan (JOB_DATA_SALPLAN)
Compensation (JOB_DATA3)
Employment Information(EMPLOYMENT_DTA1)
Job Earnings Distribution(JOB_DATA_ERNDIST)
Benefit Program Participation(JOB_DATA_BENPRG)
Update only the person’s currentjob record. Doing so improvesprocessing time and systemperformance. You can add newcurrent effective-dated rows to thejob record, but you cannot see or addhistorical job records.
Pay Rate Change
Workforce Administration, JobInformation, Pay Rate Change
Employee Profile (PAY_RT_CHANGE1)
Salary Plan (JOB_DATA_SALPLAN)
Compensation (JOB_DATA3)
Job Earnings Distribution(JOB_DATA_ERNDIST)
Change the person’s compensationwithout changing job data.
PeopleSoft Proprietary and Confidential 341

Updating Person and Job Information Chapter 13
Updating Compensation Packages Without Using an Update ComponentIf you update job record data without using one of the update components, for example when initially loadingdata or when using your own written processes, the system does not update the calculated fields on the jobrecord. To update the calculated fields, run the Employee Compensation process. If you update job record databy using one of the update components or a component interface built on one of the update components, youdo not need to run the Employee Compensation process because the update components run all PeopleCodethat is run online (including updating calculated fields). Using the update components is the best way to updatethe job table because the system runs all business logic.
See PeopleSoft Enterprise Human Resources 8.9 PeopleBook: Administer Compensation, “Refreshing WorkerCompensation Information”.
See AlsoChapter 5, “Increasing the Workforce,” page 77
Locating Personnel RecordsThe first time that you open an update page, the system displays a search page for you to select the person onwhose records you want to work. If you do not know the person’s ID, use the page to search for the correctrecord by name, partial last name, alternate character name, department, setID, or employment status. If youprefer, use the Search By National ID page to find a person’s record by using a national ID.
Changing and Deleting IDsThis section provides an overview of ID modification and discusses how to:
• Modify IDs.• Delete IDs.• View the ID change and delete process log.
Understanding ID ModificationIDs are the means by which you identify employees, contingent workers, and people of interest throughoutPeopleSoft Enterprise Human Resources. Maintaining a precise roster of IDs is critical to the accuracy ofyour data.
To help you keep accurate records, you can change or delete IDs. Though you rarely need to do this, it isnecessary in cases where you entered an ID in error or where you no longer need an ID.
The ID modification process changes the ID in every record where PeopleSoft Enterprise Human Resourcesuses it, so keep in mind that modifications might affect other functions, such as payroll and benefits processing.Deleting an ID also deletes all security profiles associated with the ID; therefore, it is recommended that youdelegate this responsibility to your system administrator.
342 PeopleSoft Proprietary and Confidential
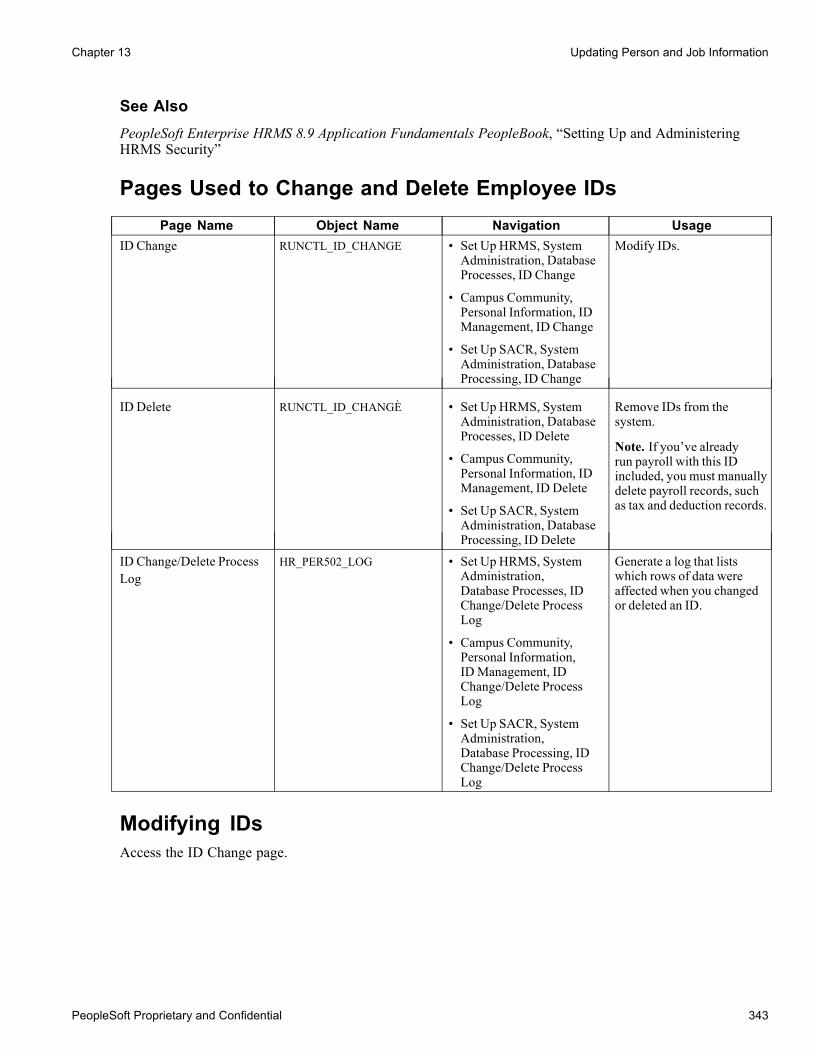
Chapter 13 Updating Person and Job Information
See AlsoPeopleSoft Enterprise HRMS 8.9 Application Fundamentals PeopleBook, “Setting Up and AdministeringHRMS Security”
Pages Used to Change and Delete Employee IDsPage Name Object Name Navigation Usage
ID Change RUNCTL_ID_CHANGE • Set Up HRMS, SystemAdministration, DatabaseProcesses, ID Change
• Campus Community,Personal Information, IDManagement, ID Change
• Set Up SACR, SystemAdministration, DatabaseProcessing, ID Change
Modify IDs.
ID Delete RUNCTL_ID_CHANGÈ • Set Up HRMS, SystemAdministration, DatabaseProcesses, ID Delete
• Campus Community,Personal Information, IDManagement, ID Delete
• Set Up SACR, SystemAdministration, DatabaseProcessing, ID Delete
Remove IDs from thesystem.
Note. If you’ve alreadyrun payroll with this IDincluded, you must manuallydelete payroll records, suchas tax and deduction records.
ID Change/Delete ProcessLog
HR_PER502_LOG • Set Up HRMS, SystemAdministration,Database Processes, IDChange/Delete ProcessLog
• Campus Community,Personal Information,IDManagement, IDChange/Delete ProcessLog
• Set Up SACR, SystemAdministration,Database Processing, IDChange/Delete ProcessLog
Generate a log that listswhich rows of data wereaffected when you changedor deleted an ID.
Modifying IDsAccess the ID Change page.
PeopleSoft Proprietary and Confidential 343

Updating Person and Job Information Chapter 13
ID Change page
Select the current ID of the person that you want to process and enter the new ID. You can see display-onlyinformation on the person to whom the system or you assigned the original ID. Confirm that this is thecorrect person before you process the ID change.
Viewing the ID Change and Delete Process LogAccess the ID Change/Delete Process Log page.
ID Change/Delete Process Log page
This page lists the records and fields that the system modified when you changed or deleted the selected ID.
344 PeopleSoft Proprietary and Confidential
Chapter 13 Updating Person and Job Information
Updating Personal DataUse the Modify a Person component to update a person’s name, address, phone numbers, marital status,education, and other personal information.
This section provides an overview of types of personal data and discusses how to:
• Update effective-dated personal information.• Use workflow to update person addresses.• Update emergency contact information.• Modify addresses.
See AlsoChapter 4, “Adding a Person in PeopleSoft Human Resources,” page 55
Understanding Types of Personal DataThe Personal Data pages include two different types of personal data:
• Effective-dated data.Name, address, biographical (such as education, marital status, and language), checklist, and some regionalfields are effective-dated. Enter current, historical, or future information in these fields. When newinformation takes effect, the system stores the old data so that you can track the changes that occur over time.Effective-dated biographical data is stored in the Personal Data History record (PERS_DATA_EFFDT).Name information is stored in the NAMES record with its own effective date. Address information is storedin the ADDRESSES record with its own effective date.
• Noneffective-dated data.Some personal data fields aren’t linked to an effective date. In these fields, new entries overwrite and deletethe previous entries. This situation means that you can store only current information. The system storesnoneffective-dated data in the Personal Data record (PERSON).
Note. PeopleSoft Enterprise Human Resources also includes a workflow process for updating employeeaddresses.
PeopleSoft Proprietary and Confidential 345

Updating Person and Job Information Chapter 13
Pages Used to Update Personal DataPage Name Object Name Navigation Usage
Biographical Details PERSONAL_DATA1 • Workforce Administration,Personal Information,Modify a Person,Biographical Details
• Workforce Administration,Personal Information,Biographical, Modify aPerson, BiographicalDetails
• Stock, Modify a Person,Biographical Details
• Enterprise Learning,Modify a Person,Biographical Details
• Benefits, AdministerCOBRA Benefits,Maintain COBRANon-Employees, ModifyPersonal Information
• Pension, Payments, PayeePers/Job Data
• Pension, Payments,Update Payee PersonalInfo
Update a person’s personalinformation.
346 PeopleSoft Proprietary and Confidential

Chapter 13 Updating Person and Job Information
Page Name Object Name Navigation UsageContact Information PERSONAL_DATA2 • Workforce Administration,
Personal Information,Modify a Person, ContactInformation
• Workforce Administration,Personal Information,Biographical, Modifya Person, ContactInformation
• Stock, Modify a Person,Contact Information
• Enterprise Learning,Modify a Person, ContactInformation
• Benefits, AdministerCOBRA Benefits,Maintain COBRANon-Employees, ModifyPersonal Information
• Pension, Payments, PayeePers/Job Data
• Pension, Payments,Update Payee PersonalInfo
Update a person’s name,address, phone, and emailinformation.
Regional PERSONAL_DATA3 • Workforce Administration,Personal Information,Modify a Person, Regional
• Workforce Administration,Personal Information,Biographical, Modify aPerson, Regional
• Stock, Modify a Person,Regional
• Enterprise Learning,Modify a Person, Regional
• Pension, Payments, PayeePers/Job Data
• Pension, Payments,Update Payee PersonalInfo
Maintain regionally-requiredinformation about a person.
Updating Effective-Dated Personal InformationTo update effective-dated information on the Personal Data pages:
1. Insert a new data row in the effective-dated group boxes.Each of these group boxes can use different effective dates. They are not related.
2. Enter the date when the new personal data that you’re entering will take effect.
PeopleSoft Proprietary and Confidential 347

Updating Person and Job Information Chapter 13
This date can be current or in the future.3. Enter the new information.4. Save the pages.
See AlsoPeopleSoft Enterprise HRMS 8.9 Application Fundamentals PeopleBook, “Understanding HRMS,” EffectiveDates
Using Workflow to Update Person AddressesKeeping a person’s personal information current can be time-consuming. With workflow, users who donot ordinarily have access to the PeopleSoft Enterprise Human Resources system can update their addressdata by using an email program such as Lotus Notes to send the information to your PeopleSoft EnterpriseHuman Resources system.
Updating Emergency Contact InformationThe system updates a worker’s emergency contact information automatically if you specify that the contactinformation is the same as the worker’s contact information. When the emergency contact information isdifferent from the worker’s contact information, you must maintain the emergency contact informationmanually on the Contact Address/Phone page.
To activate the automatic emergency contact address update:
1. Access the Contact Address/Phone page.
2. Select the Same Address as Employee and Same Phone as Employee check boxes before you updatethe worker’s address.
3. Select the type of address and type of phone number that is the same as the emergency contact.
When you update the worker’s address, the system automatically updates the emergency contact address.It also updates the Dependent/Beneficiary pages in the Benefits menu and the Payroll Data pages in theEmployee Payroll Data menu.
If the emergency contact address changes and is no longer the same as the worker’s, clear the SameAddress as Employee and the Same Phone as Employee check boxes. The system makes the address fieldson the Contact Address/Phone page available, and you can enter a different address. After you clear thecheck box, the system no longer updates the emergency contact address automatically.
Even if the emergency contact address is the same as the worker’s, you can enter a different phone number.
4. Use the Other Phone Numbers page to record emergency contact phone numbers for the emergency contactin addition to the primary number that is recorded on the Contact Address/Phone page.
See AlsoChapter 7, “Entering Additional Data in Human Resources Records,” Tracking Emergency Contacts, page 224
Modifying AddressesTo enter a new address for a worker:
1. Select Workforce Administration, Personal Information, Biographical, Modify a Person, ContactInformation.
348 PeopleSoft Proprietary and Confidential
Chapter 13 Updating Person and Job Information
2. Insert a new data row in the Current Addressesregion.3. Enter a new effective date for the new address information and click the Add Address link.4. Enter the worker’s new address information.
Updating Emergency Contact Address InformationThe system also updates the Dependent/Beneficiary pages in the Benefits menu and the Payroll Data pages inthe Maintain Payroll Data (USF) menu.
Running Personal Data ReportsThis section lists the pages used to run personal data reports.
PeopleSoft Proprietary and Confidential 349

Updating Person and Job Information Chapter 13
Pages Used to Run Personal Data ReportsPage Name Object Name Navigation Usage
Employees Birthday RUNCTL_PER002 Workforce Administration,Personal Information,Biographical, BirthdaysReport
Run the Employee Birthdaysreport (PER002). Thisreport lists employeesand contingent workers,their birthdays, and otheridentifying information.
Note. Run the RefreshEmployees Table processbefore running this report.
Employee Home AddressListing
PRCSRUNCNTL Workforce Administration,Personal Information,Biographical, Home AddressReport
Run the Employee HomeAddress Listing report(PER020), which contains acomplete listing of allemployees and contingentworkers, including addressesand home phone numbers.
Mailing Labels PRCSRUNCNTL Workforce Administration,Personal Information,Biographical, MailingLabels Report
Run the Mailing Labelsreport (PER006), whichproduces a three-acrossset of mailing labelsfor all employees andcontingent workers in yourPeopleSoft EnterpriseHuman Resources database.
Note. Run the RefreshEmployees Table processbefore running this report.
(SGP) Parameters RUNCTL_EMP_LIST Workforce Administration,Job Information, Reports,Employee Listing SGP
Run the Employee Listingreport (PER801SG). Thisreport provides employeeand contingent workerinformation based on therun control selections ofdepartment, employee name,or employee ID.
Updating Job DataUse the Job Data component when you want to work with a person’s historical job data. If you need to workwith a person’s current job only, use the Current Job component for faster system performance. You can workonly with current and future job data on the Current Job pages.
350 PeopleSoft Proprietary and Confidential

Chapter 13 Updating Person and Job Information
Note. The Job Data and Current Job components are made up of the same pages as the Add EmploymentInstance, Add Contingent Worker Instance, and Add Person of Interest components.
If you are using position management, you will want to update most job data on the Position Data pages.
(USF) Update job information using the U.S. Federal pages.
See Chapter 5, “Increasing the Workforce,” page 77.
See PeopleSoft Enterprise Human Resources 8.9 PeopleBook: Manage Positions, “Managing Position Data”.
See Chapter 16, “(USF) Processing Personnel Action Requests,” page 413.
This section provides overviews of updating effective-dated job data, security for updating job data, andpersonnel actions and human resources and payroll status, and discusses how to:
• Update effective-dated job data.• Enter promotions.• Enter departmental transfers.• Enter pay rate changes.• Track leaves of absence.• Enter terminations and retirements.• Enter deaths.• Enter rehires.• Assign workers to different positions.• Pay workers on disability.
Understanding Updating Effective-Dated Job DataYou usually update job data by inserting new effective-dated data rows into an existing employee record.Effective dates enable you to keep a complete chronological history of all your data and tables—whether youchanged them two years ago or want them to go into effect two months into the future. With this information,you can review historical data from a particular time to analyze position data or employee records. Or you canplan ahead and set up tables and data before they take effect.
The system also uses effective dates to compare pages and tables to ensure that the prompt tables that yousee list only data that is valid as of the effective date of the current page. For example, if you create a newdepartment code with an effective date of May 1, 2004 and enter a new data row (or update an existing row) onthe Job Data pages that has an effective date beforeMay 1, 2004, you won’t see the new code as a valid choicewhen you select a department because the new code hasn’t taken effect yet.
When you enter a new data row, the system copies the contents of the previous row into the new row—thusyou do not have to retype any information that stays the same. (Ensure that you position the cursor on thedata row that you want to copy before you insert the new row.) The only new information is the effectivedate, which is set by default to the system date (usually today’s date).
Understanding Security for Updating Job DataWhen you update a job record, keep in mind two special security issues.
PeopleSoft Proprietary and Confidential 351
Updating Person and Job Information Chapter 13
Security and Effective-Dated Sequence NumbersWhen you transfer people from one department to another by using a data row that contains an effective-datedsequence number, the system currently allows users with security access to the old or new department to haveaccess to all the job data. The system is delivered this way because implementing security in system views thatare specific to the function Max (effseq) on PS_JOB would slow down online response time.
For example, when you transfer an employee from department 1 to department 2 and give the employee apromotion on the same day, users with access to either department 1 or 2 have access to the employee’s databecause the transfer data row contains an effective-dated sequence number.
You can prevent this access by changing the security views for the PeopleSoft applications that you use. Keepin mind, however, that making the change affects system performance.
Security for Transfers Between DepartmentsPeopleSoft Enterprise Human Resources enables users to assign people to departments that they cannot accessfor updates. If you want to prevent a user from transferring a person into a department for which the person doesnot have access, use the PeopleSoft Enterprise Human Resources DEPT_TBL_ACCESS view, which showsonly those department IDs that a user can access based on the security permission lists to which they belong.
Note. If you choose to use this view, you must create a permission list for users who have access to alldepartments so that they can perform transfers.
See AlsoPeopleSoft Enterprise HRMS 8.9 Application Fundamentals PeopleBook, “Setting Up and AdministeringHRMS Security”
PeopleSoft Enterprise HRMS 8.9 Application Fundamentals PeopleBook, “Working with System DataRegulation in HRMS”
Understanding Personnel Actions and HumanResources and Payroll StatusWhen you select an action to change a person’s job data, the system may change the person’s HR or payroll, orjob status. For example, when you select Retired, the system changes the HR status from Active to Inactive.
HR status indicates whether the person is still active in the human resources system. The Payroll Status field(for employees) indicates the payroll status or job status of the person. A person can have an active HR recordbut not be currently receiving pay (employee) or holding a job (contingent worker). Conversely, a personcould have an inactive job record but continue to receive pay. For example, if you select retirement with pay,the system changes the HR status to Inactive and changes the payroll status from Active to Retired with Pay.The two status fields enable you to accurately identify the different types of people in your organization.
The statuses are based on either the personnel action or, in a few cases, the reason for the action, such as death.A change in HR status or payroll status can affect PeopleSoft Enterprise Human Resources Manage BaseBenefits, PeopleSoft Enterprise Benefits Administration, PeopleSoft Enterprise Payroll processing, andPeopleSoft Enterprise Pension Administration. For example, a promotion or a job reclassification might affectan employee’s benefit coverage, or you might need to suspend benefit coverage during a leave of absenceor a suspension.
This table explains how the system sets status:
352 PeopleSoft Proprietary and Confidential
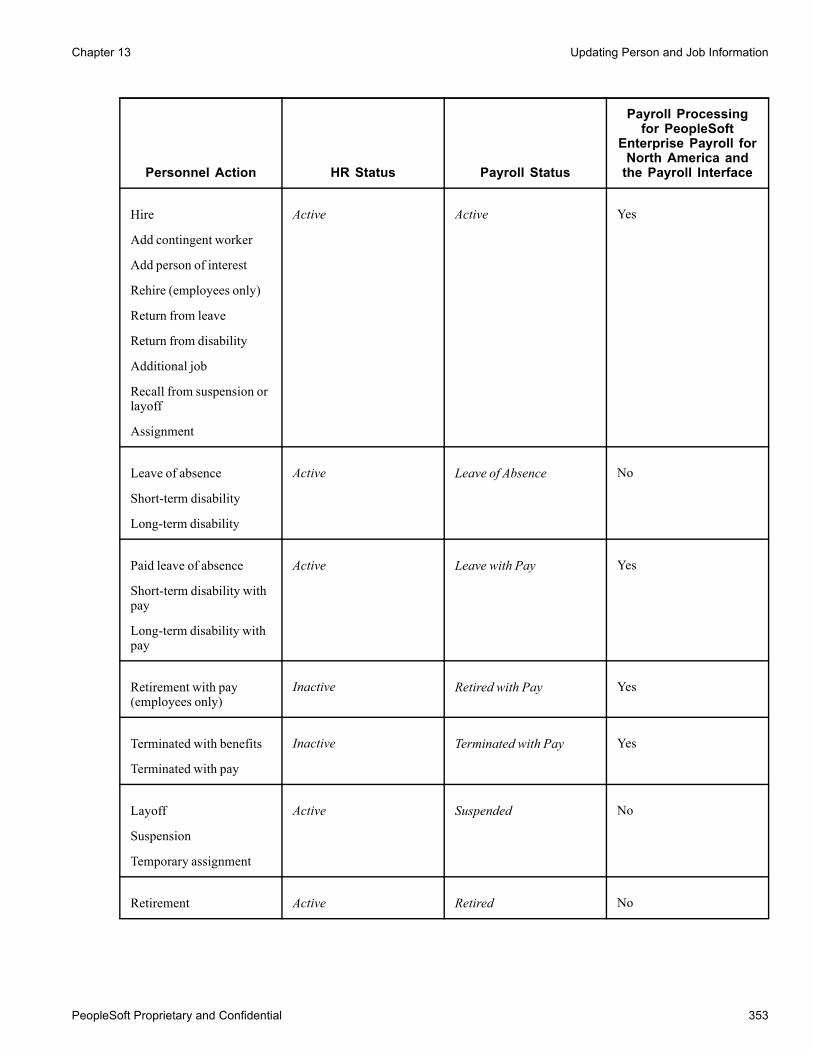
Chapter 13 Updating Person and Job Information
Personnel Action HR Status Payroll Status
Payroll Processingfor PeopleSoft
Enterprise Payroll forNorth America andthe Payroll Interface
Hire
Add contingent worker
Add person of interest
Rehire (employees only)
Return from leave
Return from disability
Additional job
Recall from suspension orlayoff
Assignment
Active Active Yes
Leave of absence
Short-term disability
Long-term disability
Active Leave of Absence No
Paid leave of absence
Short-term disability withpay
Long-term disability withpay
Active Leave with Pay Yes
Retirement with pay(employees only)
Inactive Retired with Pay Yes
Terminated with benefits
Terminated with pay
Inactive Terminated with Pay Yes
Layoff
Suspension
Temporary assignment
Active Suspended No
Retirement Active Retired No
PeopleSoft Proprietary and Confidential 353
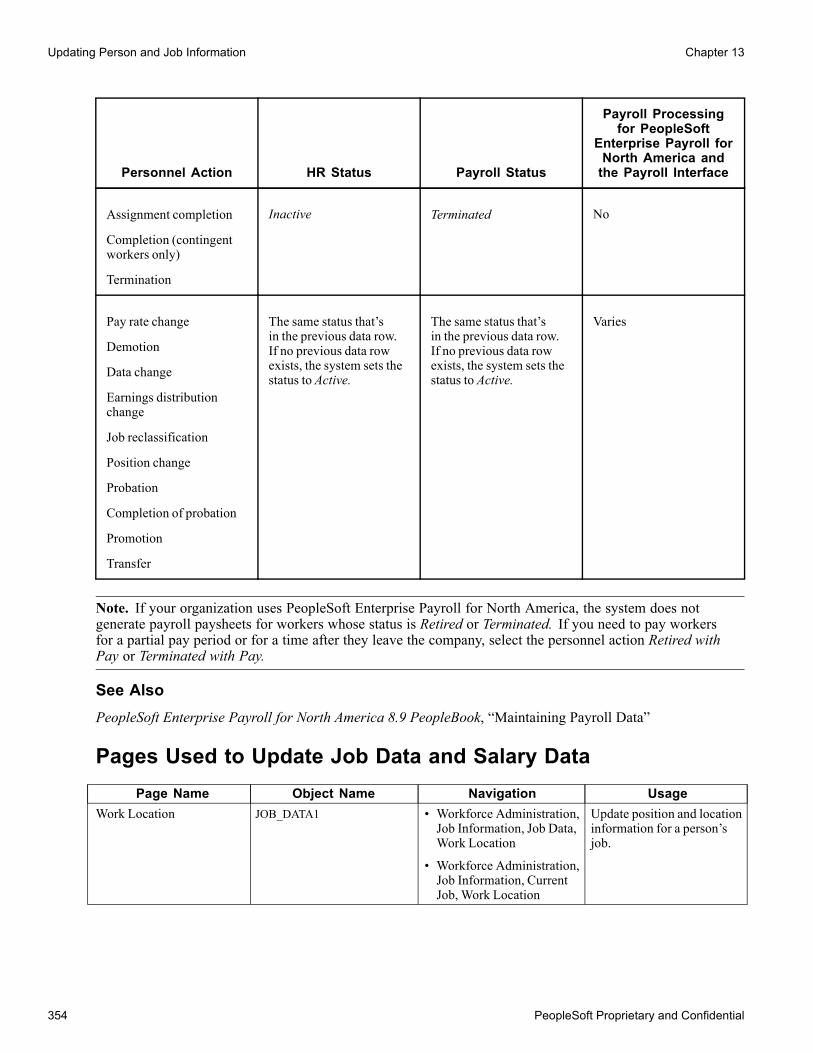
Updating Person and Job Information Chapter 13
Personnel Action HR Status Payroll Status
Payroll Processingfor PeopleSoft
Enterprise Payroll forNorth America andthe Payroll Interface
Assignment completion
Completion (contingentworkers only)
Termination
Inactive Terminated No
Pay rate change
Demotion
Data change
Earnings distributionchange
Job reclassification
Position change
Probation
Completion of probation
Promotion
Transfer
The same status that’sin the previous data row.If no previous data rowexists, the system sets thestatus to Active.
The same status that’sin the previous data row.If no previous data rowexists, the system sets thestatus to Active.
Varies
Note. If your organization uses PeopleSoft Enterprise Payroll for North America, the system does notgenerate payroll paysheets for workers whose status is Retired or Terminated. If you need to pay workersfor a partial pay period or for a time after they leave the company, select the personnel action Retired withPay or Terminated with Pay.
See AlsoPeopleSoft Enterprise Payroll for North America 8.9 PeopleBook, “Maintaining Payroll Data”
Pages Used to Update Job Data and Salary DataPage Name Object Name Navigation Usage
Work Location JOB_DATA1 • Workforce Administration,Job Information, Job Data,Work Location
• Workforce Administration,Job Information, CurrentJob, Work Location
Update position and locationinformation for a person’sjob.
354 PeopleSoft Proprietary and Confidential

Chapter 13 Updating Person and Job Information
Page Name Object Name Navigation UsageJob Information JOB_DATA_JOBCODE • Workforce Administration,
Job Information, Job Data,Job Information
• Workforce Administration,Job Information, CurrentJob, Job Information
Update information abouta person’s job.
Job Labor JOB_LABOR • Workforce Administration,Job Information, Job Data,Job Labor
• Workforce Administration,Job Information, CurrentJob, Job Labor
Update national laboragreement data.
Payroll JOB_DATA2 • Workforce Administration,Job Information, Job Data,Payroll
• Workforce Administration,Job Information, CurrentJob, Payroll
Update payroll processingdata.
Salary Plan JOB_DATA_SALPLAN • Workforce Administration,Job Information, Job Data,Salary Plan
• Workforce Administration,Job Information, CurrentJob, Salary Plan
Update a person’s salaryplan information.
Compensation JOB_DATA3 • Workforce Administration,Job Information, Job Data,Compensation
• Workforce Administration,Job Information, CurrentJob, Compensation
Update a person’scompensation information.
Employment Information EMPLOYMENT_DTA1 Click the Employment Datalink at the bottom of any pagein the Job Data or CurrentJob Data component.
• Workforce Administration,Job Information, Job Data
• Workforce Administration,Job Information, CurrentJob
Update optionalemployment information.
PeopleSoft Proprietary and Confidential 355

Updating Person and Job Information Chapter 13
Page Name Object Name Navigation UsageJob Earnings Distribution JOB_DATA_ERNDIST Click the Earnings
Distribution link at thebottom of any page in the JobData or Current Job Datacomponents.
• Workforce Administration,Job Information, Job Data
• Workforce Administration,Job Information, CurrentJob
Update a person’scompensation information.
Benefit ProgramParticipation
JOB_DATA_BENPRG Click the Benefit ProgramParticipation link at thebottom of any page in the JobData or Current Job Datacomponents.
• Workforce Administration,Job Information, Job Data
• Workforce Administration,Job Information, CurrentJob
Update a person’s benefitenrollment information.
Updating Effective-Dated Job DataAccess the Work Location page.
To update effective-dated job data:
1. Locate the person whose record you want to change.
Always start on the Work Location page because that’s where the Effective Date field is. From there, youmay have to go to other pages to enter more information about the personnel action that you’re taking.
2. Insert a new data row.
3. In the Effective Date field, enter the date when the new action will take effect.
4. Select an action code for the change, such as Transfer or Promotion.
5. If applicable, enter a reason code to explain why this action is occurring.
6. Change any other data needed to complete the new action, either on this page or on other pages in thecomponent.
For example, when you promote an employee, you most likely enter a new job code or a new positionnumber on the Work Location page. You might also select a new salary administration plan, grade,and step, enter a new compensation rate on the Compensation page, and enter a new business title andwork phone on the Employment Information page.
7. Save the pages.
Entering Multiple Actions with the Same Effective DateOn occasion, you may need to enter more than one action that takes effect on the same day. Entering twoactions with the same effective date is especially common when you are tracking compound percentage payincreases that take effect at the same time. Use effective sequence numbers to combine multiple actionsand specify which one to process first.
356 PeopleSoft Proprietary and Confidential

Chapter 13 Updating Person and Job Information
For example, a promotion (which produces a percentage pay increase) and a merit increase may take effecton the same day.
To enter multiple personnel actions with the same effective date:
1. Access the Work Location page for the person whose data you’re updating.2. Insert a new data row for the first action.The effective date is set by default to the system date, usually today’s date, which you can override ifnecessary. Leave the effective sequence number set at 0.
3. Enter any other information that you need to complete the action, either here or in other pages in thesame component.
4. To enter the second action, return to the Work Location page and insert another data row.5. Enter the same effective date as the first action, but enter an effective date sequence number of 1.6. Select the appropriate personnel action and enter any other information required to implement the action,either here or on other pages.
Entering PromotionsA promotion usually involves a change of salary grade and new job code. This table lists the pages and fieldsthat you typically update when you enter a promotion (you may need to update additional pages and fields):
Affected Pages Affected Fields Comments
Work Location Effective Date
Action Code: Promotion
Reason Code (if applicable)
Position Number
All the entries on the page couldchange when you enter a promotion,depending on the data for the formerjob and the new job.
If you’re organizing part or allof PeopleSoft Enterprise HumanResources by position, reviewPeopleSoft Human ResourcesPeopleBook: Manage Positions.
Job Information Job Code
Regular/Temporary
Full/Part
Standard Hours
Work Period
FTE
Shift
Shift Rate
Contract Number
Local country fields
All the entries on the page couldchange when you enter a promotion,depending on the data for the formerjob and the new job.
If you’re organizing part or allof PeopleSoft Enterprise HumanResources by position, reviewPeopleSoft Human ResourcesPeopleBook: Manage Positions.
PeopleSoft Proprietary and Confidential 357
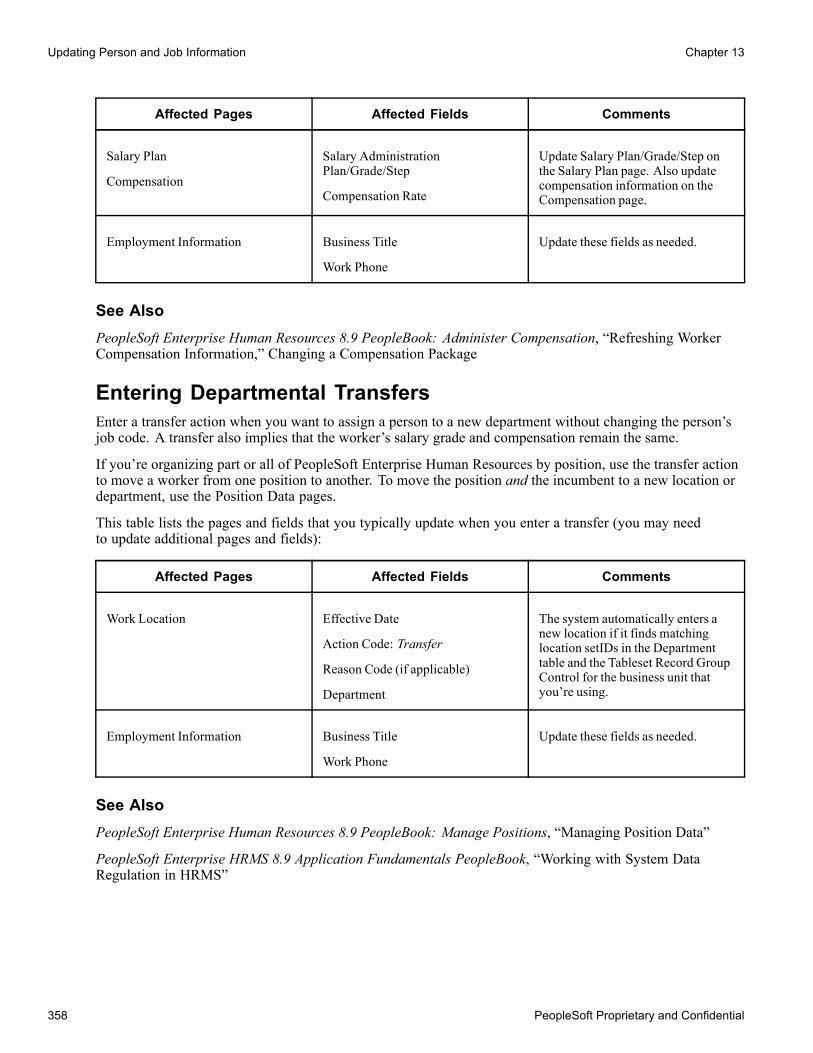
Updating Person and Job Information Chapter 13
Affected Pages Affected Fields Comments
Salary Plan
Compensation
Salary AdministrationPlan/Grade/Step
Compensation Rate
Update Salary Plan/Grade/Step onthe Salary Plan page. Also updatecompensation information on theCompensation page.
Employment Information Business Title
Work Phone
Update these fields as needed.
See AlsoPeopleSoft Enterprise Human Resources 8.9 PeopleBook: Administer Compensation, “Refreshing WorkerCompensation Information,” Changing a Compensation Package
Entering Departmental TransfersEnter a transfer action when you want to assign a person to a new department without changing the person’sjob code. A transfer also implies that the worker’s salary grade and compensation remain the same.
If you’re organizing part or all of PeopleSoft Enterprise Human Resources by position, use the transfer actionto move a worker from one position to another. To move the position and the incumbent to a new location ordepartment, use the Position Data pages.
This table lists the pages and fields that you typically update when you enter a transfer (you may needto update additional pages and fields):
Affected Pages Affected Fields Comments
Work Location Effective Date
Action Code: Transfer
Reason Code (if applicable)
Department
The system automatically enters anew location if it finds matchinglocation setIDs in the Departmenttable and the Tableset Record GroupControl for the business unit thatyou’re using.
Employment Information Business Title
Work Phone
Update these fields as needed.
See AlsoPeopleSoft Enterprise Human Resources 8.9 PeopleBook: Manage Positions, “Managing Position Data”
PeopleSoft Enterprise HRMS 8.9 Application Fundamentals PeopleBook, “Working with System DataRegulation in HRMS”
358 PeopleSoft Proprietary and Confidential
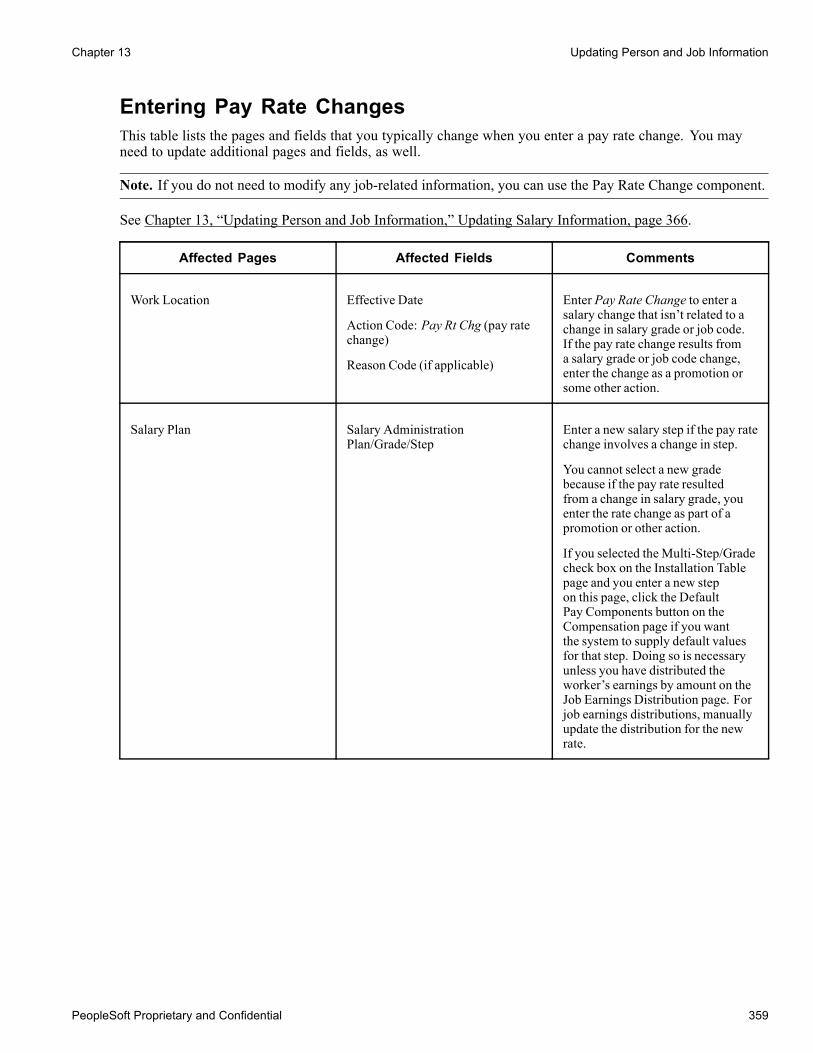
Chapter 13 Updating Person and Job Information
Entering Pay Rate ChangesThis table lists the pages and fields that you typically change when you enter a pay rate change. You mayneed to update additional pages and fields, as well.
Note. If you do not need to modify any job-related information, you can use the Pay Rate Change component.
See Chapter 13, “Updating Person and Job Information,” Updating Salary Information, page 366.
Affected Pages Affected Fields Comments
Work Location Effective Date
Action Code: Pay Rt Chg (pay ratechange)
Reason Code (if applicable)
Enter Pay Rate Change to enter asalary change that isn’t related to achange in salary grade or job code.If the pay rate change results froma salary grade or job code change,enter the change as a promotion orsome other action.
Salary Plan Salary AdministrationPlan/Grade/Step
Enter a new salary step if the pay ratechange involves a change in step.
You cannot select a new gradebecause if the pay rate resultedfrom a change in salary grade, youenter the rate change as part of apromotion or other action.
If you selected the Multi-Step/Gradecheck box on the Installation Tablepage and you enter a new stepon this page, click the DefaultPay Components button on theCompensation page if you wantthe system to supply default valuesfor that step. Doing so is necessaryunless you have distributed theworker’s earnings by amount on theJob Earnings Distribution page. Forjob earnings distributions, manuallyupdate the distribution for the newrate.
PeopleSoft Proprietary and Confidential 359

Updating Person and Job Information Chapter 13
Affected Pages Affected Fields Comments
Compensation All fields To enter a new pay rate, entera new compensation rate, ratechange amount, or rate changepercent. When you enter any oneof these three amounts, the systemautomatically calculates the othertwo.
Based on the compensation rate andfrequency, the system calculates anddisplays the hourly rate, daily rate,monthly rate, and annual rate for thisworker.
If you selected the Multi-currencycheck box on the Installation Tablepage and entered the compensationrate in a different currency from yourbase currency, the system convertsthe rates to the base currency andcompares them with the rangesspecified for this salary grade inthe Salary Grade table. If the ratesexceed the salary range, a warningmessage appears.
If necessary, enter a new annualbenefits base rate for calculating thisemployee’s benefits.
The system calculates thecompa-Ratio (or percent throughrange calculation) based on thesalary plan and grade and in thebase currency that your organizationuses, which you specify on theInstallation Table page. The systemalso calculates the percent throughrange. This figure determines wherea worker falls in the range by takingthe salary minus the minimumdivided by the spread. For example,if an employee has a salary of 26,000USD in a range of 25-30,000 USDfor the salary grade, the percentthrough range is 20 percent.
360 PeopleSoft Proprietary and Confidential

Chapter 13 Updating Person and Job Information
Affected Pages Affected Fields Comments
Compensation (continued) Modify any other information thathas changed because of the pay ratechange, such as holiday schedule,pay group, employee type, standardhours, or work period on the JobData, Payroll, or Job Informationpages.
Job Earnings Distribution Update as needed to distribute theworker’s compensation hours orearnings.
Tracking Leaves of AbsenceMany workers take a leave of absence at some point in their careers. Leaves can occur for any number ofreasons, including sickness, vacation, maternity or paternity leave, jury duty, suspensions, or unpaid leave.
If your company tracks workers’ absence history, you can acknowledge a leave of absence in the MonitoringAbsences pages and Job Data pages.
This table lists the pages and fields that you typically change when you enter a leave of absence (you mayneed to update additional pages and fields, as well):
Affected Pages Affected Fields Comments
Work Location Effective Date
Action: Leave of Absence, Leave ofAbsence with Pay, or Paid Leave ofAbsence
Reason Code (if applicable)
None
Employment Information Expected Return Date Enter the date when you expect theworker to start work again. Whenyou save the pages, the systemdisplays the day before the leave ofabsence date as the date last worked.You can change it if necessary.When the worker returns from leave,the system clears this field.
Tracking Multiple Types of Leave for One WorkerYou might encounter situations in which you need to enter multiple types of leave for the same worker. Forexample, an employee might take a six-week leave with disability pay, take the following two weeks withvacation pay, and then take an additional month without pay.
PeopleSoft Proprietary and Confidential 361

Updating Person and Job Information Chapter 13
You can enter all these leave types at the same time by inserting a new data row in the Work Location pagefor each type of leave and entering the effective date when each leave type begins. Then you access theappropriate page to make any other changes pertaining to that leave, such as compensation changes.
Entering Returns from LeaveMost workers eventually come back from leaves of absence and resume their job duties. In fact, you oftenknow at the time workers begin their leaves when they plan to return to work. Enter the return from leaveinformation at the same time that you enter the leave of absence, or as soon as you have a confirmed return date.
This table lists the pages and fields that you typically change when you enter a return from leave (you mayneed to update additional pages and fields, as well):
Affected Pages Affected Fields Comments
Work Location Effective Date
Action: Return from Leave
Reason Code (if applicable)
None
Employment Information Expected Return Date When you save the pages, the systemclears this field.
Entering Terminations and RetirementsWhen a worker retires or leaves your organization for some other reason, you enter the termination into theperson’s record.
This table lists the pages and fields that you typically change when you enter a termination or retirement (youmay need to update additional pages and fields, as well):
362 PeopleSoft Proprietary and Confidential

Chapter 13 Updating Person and Job Information
Affected Pages Affected Fields Comments
Work Location Effective Date
Action: Terminated, Terminatedwith Pay, Terminated with Benefits,Retirement, or Retirement with Pay
Reason Code, if applicable
The system treats the effectivedate that you enter as the day thetermination starts and the first daythe worker is no longer paid.
For example, if the worker’s lastday of employment is June 1, setthe effective date of termination orretirement as June 2 because that’swhen the termination begins. If youset it as June 1, the worker isn’t paidfor the last day of work.
Employment Information Termination Date The system displays the day beforethe effective date as the terminationdate and last date worked. If yourehire the worker, the system clearsboth these fields. When a workerreturns from leave, the system clearsonly the Date Last Worked field.
Entering DeathsThis table lists the pages and fields that you typically change when you enter a termination due to death:
Affected Pages Affected Fields Comments
Work Location Effective Date
Action: Terminated
Reason Code: Death
The system treats the effectivedate that you enter as the day thetermination starts and the first daythat the worker is no longer paid.
Identity/Diversity Date of Death Record the date that the worker died.
Employment Information The system displays the terminationeffective date as the terminationdate, and the day before thetermination date as the date lastworked. The system uses these datesand the effective date in payrollprocessing and reporting.
PeopleSoft Proprietary and Confidential 363

Updating Person and Job Information Chapter 13
Entering RehiresYou may want to rehire a person who worked for your company in the past. Information on a rehired worker isprobably already in PeopleSoft Enterprise Human Resources, unless the worker data was deleted or archived.Before you rehire workers, you may want to make sure that the personal, employment, and job data is current.If a rehired worker doesn’t have a record in the system, do not use the update pages. Instead, add a newemployment or contingent worker instance.
See Chapter 5, “Increasing the Workforce,” page 77.
See Chapter 2, “Setting Up the Administer Workforce Business Process,” page 5.
Because you probably rehire a worker whose previous job was in a department (organizational entity) forwhich you do not have security access, it’s helpful to provide security access to all departments to at leastone user performing rehires.
This table lists the pages and fields that you typically change when you enter a rehire (you may need to updateadditional pages and fields):
Affected Pages Affected Fields Comments
Work Location Effective Date
Action: Rehire
Reason Code, if applicable
You can rehire only workers whosepayroll or job status is Terminated,Terminated with Pay, Retired, orRetired with Pay.
Employment Information Company Seniority Date
Service Date
Rehire Date
Service Months
Service Days
You may want to change thecompany seniority date and servicedate. The company senioritydate can serve as the basis for theworker’s seniority, or you can useit for other tracking and reportingpurposes. The service date isthe date on which the worker’sservice ranking is based and is usedprimarily for benefit-related matters.
When you save the pages, the systemautomatically completes the rehiredate and recalculates the servicemonths and days.
See AlsoChapter 5, “Increasing the Workforce,” page 77
PeopleSoft Enterprise HRMS 8.9 Application Fundamentals PeopleBook, “Setting Up and AdministeringHRMS Security”
Assigning Workers to Different PositionsIf you’re organizing part or all of PeopleSoft Enterprise Human Resources by position, you often moveworkers from one position to another as a result of promotions, transfers, rehires, or other personnel actions.Because both position and worker data are already in the system, you connect the two by selecting a positionnumber, entering the effective date of the assignment, and entering any exceptions to the default data.
364 PeopleSoft Proprietary and Confidential

Chapter 13 Updating Person and Job Information
The following table lists the pages and fields that you typically change in the Job Data component whenyou enter a change of position. You may need to update additional pages and fields. When you change anassignment, the system also updates the Position Data - Work Location page. It automatically calculates anddisplays the new head count and shows the appropriate indicator in the Open/Filled field.
Affected Pages Affected Fields Comments
Work Location Effective Date
Action: Position Change, Transfer,Promotion, or Rehire
Reason Code, if applicable
Position Number
After you enter a position number,the system automatically completesposition-related fields, including jobcode, department, and location. Thesystem enters the position entry dateas the effective date of the positionchange action. You cannot changethe position entry date. To changethe entry date, you must change theeffective date for the position changeaction.
To override the position defaults,select the Position Data Overridecheck box, which makes thepreviously unavailable fieldsavailable for entry, such as Job Codeand Department. You can then enterexceptions in these fields.
The Position Management Recordcheck box is display-only. Thesystem uses this check box toindicate that it has automaticallyinserted a data row on the Job Datapages due to changes that you madeto fields on the Position Data pages.
Note. If you override the defaults,you must maintain the job datamanually—the system does notupdate position data automaticallyagain until you clear the PositionData Override check box.
The system issues a warningmessage if you assign a worker toa position that has already beenfilled by another worker and if a newappointment exceeds the maximumhead count for that position.
See AlsoPeopleSoft Enterprise Human Resources 8.9 PeopleBook: Manage Positions, “Managing Position Data”
PeopleSoft Proprietary and Confidential 365

Updating Person and Job Information Chapter 13
Paying Workers on DisabilitySome workers on disability need to be paid at a given percentage of their regular pay. Handle this situationwithout changing the worker’s salary by setting up a disability plan earnings code in the Earnings table,based on a percentage.
Note. This feature works only for hourly employees, not for salaried employees.
When you enter an action of STD (short-term disability with pay) or LTD (long-term disability with pay), thesystem changes the employee’s status to Leave With Pay.
To send 100 percent of the employee’s pay to the disability plan earnings code, access the Job Data - JobEarnings Distribution page, select the By Percent option, enter the appropriate disability earnings code, andenter a percent of 100.
Note. When you put an employee on disability, don’t forget to check additional pay records and make anynecessary changes.
Updating Salary InformationThe Pay Rate Change component provides a quick and simple option for making salary adjustments whenthe adjustment is not related to any other changes such as promotions or transfers. If any other job-relatedinformation needs to be modified for the salary change, use the Job Data component.
Note. The four pages in the Pay Rate Change component—Employee Profile, Salary Plan, Compensation,and Job Earnings Distribution—match related pages in the Job Data component (the Employee Profile pagecontains information from both the Work Location page and the Job Information page).
See AlsoChapter 13, “Updating Person and Job Information,” Updating Job Data, page 350
Chapter 5, “Increasing the Workforce,” page 77
PeopleSoft Enterprise Human Resources 8.9 PeopleBook: Manage Base Compensation and Budgeting,“Administering Salary Plans, Grades, and Steps”
PeopleSoft Enterprise Human Resources 8.9 PeopleBook: Manage Base Compensation and Budgeting,“Reviewing Worker Performance History”
366 PeopleSoft Proprietary and Confidential

Chapter 13 Updating Person and Job Information
Pages Used to Update Salary InformationPage Name Object Name Navigation Usage
Employee Profile PAY_RT_CHANGE1 Administer Workforce, JobInformation, Pay RateChange, Employee Profile
Adjust the work periods andhours if it is necessary to doso for the pay rate change.
Salary Plan PAY_RT_CHG_SALPLAN Administer Workforce, JobInformation, Pay RateChange, Salary Plan
Adjust the salary step.
Compensation PAY_RT_CHANGE2 Administer Workforce, JobInformation, Pay RateChange, Compensation
Adjust rates and frequencies.
Job Earnings Distribution PAY_RT_CHANGE3 Administer Workforce, JobInformation, Pay RateChange, Job EarningsDistribution
Adjust earningsdistributions.
Refreshing CompensationWhen you run the Employee Compensation Application Engine process (HR_PER501A) or click the DefaultPay Components button on the Compensation page, the same steps are executed, but you can update severalrecords at once with the HR_PER501A process.
The Employee Compensation process:
• Inserts a new job row when you select Add new effective date, and uses the effective date that you enteredin the As Of Date field
Alternatively, it updates the job row that is effective as of the date that you select in the As Of Date field.
• Updates any future rows (rows are considered future if they come into effect after the as of date) when youselect Update Future Rows.
• Replaces manual changes with the new default values.
Page Used to Refresh CompensationPage Name Object Name Navigation Usage
Employee Compensationpage
RUNCTL_PER501 Workforce Administration,Job Information, CalculateCompensation, EmployeeCompensation
Use to run the EmployeeCompensation process toupdate compensationpackages.
Running Job Data ReportsThis section provides an overview of reporting appointments for job data changes, lists a common element,and discusses how to:
PeopleSoft Proprietary and Confidential 367

Updating Person and Job Information Chapter 13
• (JPN) Run the Appointment Notification report.• (JPN) Run the Appointment List report.• (JPN) Run the Employee Assignment List report.
See AlsoChapter 15, “(USF) Administering Personnel Action Requests,” page 393
(JPN) Understanding Reporting Appointments forJob Data ChangesWhen workers are newly hired or transferred, or have other job-related changes, many Japanese companiesprovide individual notifications of appointment to each worker. These notifications, known as appointmentnotifications (Jirei), contain different information depending on the action and action reason entered onthe worker’s new job record.
Periodically, many companies also distribute a listing of all new hires or transfers or other changes of job. Thislist is known as the appointment list (Tsuutatsu).
When you run the Appointment Notification report, the report headings change according to the actions forwhich you are running the report—you can select actions and action reasons on the report page.
Reporting Appointments for Actions and Report OutputsThe following table illustrates what the appointment reports contain, depending on the action for whichyou run the report:
Heading andActions
Hire and Rehire Transfer Promotion Termination
Announcement date 3 3 3 3
Companydescription (ofworker’s company)
3 3 3
Department 3 3 3
Supervisor level 3 3 3
Employee status 3
Salary plan 3
Salary grade 3
368 PeopleSoft Proprietary and Confidential

Chapter 13 Updating Person and Job Information
Note. For the actions Transfer and Promotion, the system automatically populates the Reason field. For apromotion, the system populates the field with Grade Advance. For a transfer, the system populates the fieldwith Employee Request and Internal Recruitment. For all other actions in the table, you can select individualreasons (for the action that you selected) or have the system select all reasons (for the action that you selected).
With the Japanese appointment reporting functionality, if you are recording a worker’s simultaneous changeof department and supervisor level, enter the department change first. With both changes having the sameeffective date, the change of supervisor level has the higher sequence number and ensures that the systemselects the changes for reporting on both the appointment notification and appointment list.
In addition, when you record job data changes with the Japanese appointment reporting functionality, reportsare available for the following actions:
• Hire• Rehire• Termination• Transfer• Promotion
Sorting Appointment Lists Using Tree Structures and DefinitionsTo have the system sort appointment lists by department and supervisor level, use the standard tree buildingfeatures to create a tree structure and reporting definition for supervisor levels, and a reporting definition fordepartments. You then need to select only the Refer to the Tree Manager check box on the report page tohave the system use your DEPT_SECURITY tree and, depending on the job action and reason to which theappointment information relates, your SUPERVISOR_LEVEL tree.
See AlsoPeopleSoft Enterprise HRMS 8.9 Application Fundamentals PeopleBook, “Setting Up and AdministeringHRMS Security”
Common Element Used in This SectionShow Components Select if you want your report to display compensation component information.
Pages Used to Run Job Data ReportsPage Name Object Name Navigation Usage
Personnel Actions History RUNCTL_PER015 Workforce Administration,Job Information, Reports,Personnel Actions History
Run the Personnel ActionsHistory report (PER015),which lists all workersaffected by each of the jobactions that you enter.
Pending Future Actions RUNCTL_ASOFDT_COMP Workforce Administration,Workforce Reports, PendingFuture Actions
Run the Pending FutureActions report (PER021),which lists all workers withjob action notices scheduledfor a future date.
PeopleSoft Proprietary and Confidential 369

Updating Person and Job Information Chapter 13
Page Name Object Name Navigation UsageDepartment Action Notices PRCSRUNCNTL Workforce Administration,
Workforce Reports,Department Action Notices
Run the Department ActionNotices report (PER001).This report lists actionnotices that are tied to a timeperiod or expiration date.Use it as a reminder ofselected personnel actionnotices.
Note. Run the RefreshEmployees Table processbefore running this report.
Employees on Leavesof Absence
PRCSRUNCNTL Workforce Administration,Job Information, Reports,Employees on Leave ofAbsence
Run the Employees onLeave of Absence report(PER005). This report listsall workers on leave andtheir expected return dates.Use this report to comparethe return date that youentered in PeopleSoftEnterprise HumanResources with the worker’sexpected return date, or as areminder to enter the returnfrom leave information.
Note. Run the RefreshEmployees Table processbefore running this report.
Temporary Employees RUNCTL_ASOFDATE Workforce Administration,Job Information, Reports,Temporary Employees
Run the TemporaryEmployees report (PER007).This report providesan alphabetical list ofall workers marked astemporary, along with lengthof service and other detailsof employment.
Years of Service RUNCTL_PER003 Workforce Administration,Job Information, Reports,Years of Service
Run the Years of Servicereport (PER003). This reportlists workers who havecompleted the number ofyears of service that youspecify, as of the point intime that you specify. Usethis report as a reminder ofworkers who are eligiblefor vested benefits plans orservice recognition awards.
370 PeopleSoft Proprietary and Confidential

Chapter 13 Updating Person and Job Information
Page Name Object Name Navigation UsagePrimary Job Audit RUNCTL_PER058 Workforce Administration,
Workforce Reports, PrimaryJob Audit
Run the Primary Job Auditreport (PER058). Usethis report to check fordiscrepancies in the primaryjob designation for workerswith multiple jobs. Run thisreport regularly to correctdiscrepancies in worker jobrecords.
Employee TurnoverAnalysis
RUNCTL_FROMTHRU Workforce Administration,Workforce Reports,Employee Turnover Analysis
Run the Employee TurnoverAnalysis report (PER010).This report lists eachdepartment ID and providesthe worker counts as of thedate that you specify.
Official List RUNCTL_PER054_ESP Workforce Administration,Workforce Reports, OfficialList ESP
Run the Spanish Official Listreport (PER054ES), whichcompiles the informationthat you need for Matriculabook reporting. You can runthe report for all matriculabooks, which includeshistorical worker data, or forthe current book only, whichincludes only current data.
Appointment NotificationJPN
RUNCTL_NTF_JPN Workforce Administration,Job Information, Reports,Appointment NotificationJPN
Run the JPN AppointmentNotifications report(PER063JP). Depending onthe combination of actionand reason that you use inthe run control, this reportprints individual workernotifications of hire, rehire,termination, transfer, andpromotion.
Appointment List JPN RUNCTL_NTF2_JPN Workforce Administration,Job Information, Reports,Appointment List JPN
Run the Appointment ListJPN report (PER064JP),which generates anappointment list. This reportlists all workers who havebeen hired, rehired or retired,transferred or promoted. Theinformation that the reportprovides varies according tothe combination of actionand reason that you enteron the Appointment Listreport page.
PeopleSoft Proprietary and Confidential 371

Updating Person and Job Information Chapter 13
Page Name Object Name Navigation UsageJPN Employee AssignmentList
RUNCTL_EMPLIST_JPN Workforce Administration,Job Information, Reports,Employee AssignmentList JPN
Print the JPN EmployeeAssignment List report(PER066JP), which listsworkers by department,including additionalappointment employees.
(JPN) Running the Appointment Notification ReportAccess the Appointment Notification JPN page.
Appointment Notification JPN page
Report headings vary according to the combination of action and reason. Enter free-form text and a companyofficial’s title and name to appear on the report, and select the action and reason combinations on whichyou want to report.
Language Select the language for the report.
As of Date This is the effective date of worker job data rows that the system searches andreport on. It appears on the report as the announcement date.
Note. For termination notifications, enter the effective date of the terminationrow on the worker’s job record. The system sets the announcement date on theprinted notification as the As of Date minus 1 day, the same as the terminationdate on the worker’s Employment Dates page.
Company Select your company code. The company description appears by defaultin the Published by field.
372 PeopleSoft Proprietary and Confidential

Chapter 13 Updating Person and Job Information
Notification Statements Enter any comments that you want to appear as an introduction to the list onthe report: for example, Hiring order is as follows.
Publish Date Enter the publish date. This date, which appears on the report, is the date thatyour organization wants as the official publication date of the appointmentnotification.
Published by Displays the description of the company that you entered, but you canoverride the default with a free-form description of, for example, your humanresources department.
Representative Title Displays the default from the company table. You can override the default.This is the title of the company’s representative that appears on the notification.
Representative Name Displays the default from the company table. You can override the default.This is the name of the company’s representative that appears on thenotification.
Action Select an action that you want to report on. You can only select Hire, Rehire,Transfer, Promotion, or Termination.
Use All Action Reasons Click this button unless you want to select individual reasons for the actionthat you entered in the Reason Code grid. Even if you selected individualreasons in the grid, if you click this button, the system loads all reasons.
Note. You only need to select reasons (individual or all) for actions Hire,Rehire, and Termination. For actions Transfer and Promotion, the systemautomatically populates the Reason Code field. However, the process reportsonly job rows that have a reason code. If a job row has an action of Hire,Rehire, Termination, Transfer, or Promotion, but no action reason, the systemdoes not report it.
Reason Code Select all the reasons for the action that you entered that you want the reportto include. If the Use All Action Reasons check box is cleared, you mustenter at least one reason in this field. The system displays the descriptionof each reason that you select. See the previous note that discusses the UseAll Action Reasons field.
(JPN) Running the Appointment List ReportAccess the Appointment List JPN page.
PeopleSoft Proprietary and Confidential 373

Updating Person and Job Information Chapter 13
Appointment List JPN page
You can enter free-form text and a company official’s title and name to appear on the report, and you canselect the action and reason combinations that you want to report on.
As Of Date This is the effective date of worker job data rows on which the system willsearch and report.
Note. For Termination listings, you should enter the effective date of the jobtermination row. The system sets the announcement date on the printed listas the As Of Date minus 1 day, the same as the termination date on theworker’s Employment Dates page.
Company Select your company code. Unlike for appointment notification, the companydescription does not appear by default in the Published by field.
Publish Date Enter a publish date. This date, which appears on the report, is the date thatyour organization wants as the official publication date of the appointment list.
Published by Enter a free-form description of the publishing department, such as yourhuman resources department.
Action Select an action that you want to report on. You can only select Hire, Rehire,Transfer, Promotion, or Termination.
Refer to the Tree Manager Select this check box if you want the system to sort the listing by usingthe DEPT_SECURITY tree and, depending on the action and reasons, theSUPERVISOR_LEVEL tree.This is how the system sorts the listing when you select this check box:
374 PeopleSoft Proprietary and Confidential

Chapter 13 Updating Person and Job Information
• For actions Hire and Rehire, the system uses only the DEPT_SECURITYtree.
• For actions Transfer and Termination, the system uses both theDEPT_SECURITY tree and the SUPERVISOR_LEVEL tree.
• For action Promotion, the system sorts by salary plan, salary grade, andemployee ID, whether the check box is selected or cleared.Trees have no effect.
If the Refer to the Tree Manager option is cleared, the system sorts the list byemployee ID.
Note. Workers who do not have a supervisor level appear in the list bydepartment, with the Supervisor Level column blank. They are sorted byemployee ID, after all the workers who do have a supervisor level.
Use All Action Reasons Click this button unless you want to select individual reasons for the actionthat you entered in the Reason Code grid. Even if you have selected individualreasons in the grid, if you click this button, the system loads all reasons.
Note. You need to select reasons only for actions Hire, Rehire, andTermination. For actions Transfer and Promotion, the system automaticallypopulates the Reason Code field. However, the process reports only job rowsthat have an action reason. If a job row has an action of Transfer or Promotion,but no action reason, the system does not report it.
Reason Code Select all the reasons for the action that you entered that you want the report toinclude. If you click the Use All Action Reasons button, you must enter at leastone reason in this field. The system displays the description of each reasonthat you select. See the note above for the Use All Action Reasons field.
(JPN) Running the Employee Assignment List ReportAccess the JPN Employee Assignment List page.
JPN Employee Assignment List run control page
This report lists workers by department and supervisor level, including workers with additional appointments.
PeopleSoft Proprietary and Confidential 375

Updating Person and Job Information Chapter 13
To run the report, at least one department tree must be created. For the purposes of department security, theDEPT_SECURITY tree usually already exists. You can either select this tree or create a new departmenthierarchy beneath the DEPARTMENT tree structure.
The report is sorted by department, and then by workers:
• With supervisor levels registered in the Supervisor Level tree, in tree order.• With supervisor levels not registered in the Supervisor Level tree, in alphanumeric supervisor level order.• Without supervisor levels, in alphanumeric employee ID order.
Note. The Supervisor Level tree that the system uses for sorting is the one used for the AppointmentNotification and Appointment List reports. It must be named SUPERVISOR_LEVEL. If you have not defineda Supervisor Level tree with that name, sorting is in alphanumeric supervisor level order.
Viewing a Summary of All Job RecordsThis section lists the page used to view a summary of all jobs records held by a person.
Page Used to View a Summary of All Job RecordsPage Name Object Name Navigation Usage
Multiple Jobs MULTIPLE_JOBS Workforce Administration,Job Information, ReviewJob Information, MultipleJobs Summary
View a summary of all jobsand changes in job status forpeople that have more thanone employment record.
Refreshing Tables to Facilitate ReportingThis section provides overviews of the process of refreshing the Employees table and the process of refreshingthe Personal Data table, lists a common element, and lists the pages used to refresh tables to facilitate reporting.
Understanding the Process of Refreshing the Employees TableTo generate standard PeopleSoft Enterprise Human Resources reports quickly, many human resources reportsretrieve data from the Employees table (PS_EMPLOYEES). To make reporting in PeopleSoft EnterpriseHuman Resources more efficient, this table combines information from the following tables: PERSON,PERS_DATA_EFFDT, NAMES, ADDRESSES, PERSONAL_PHONE, Job (JOB), Employment Data(EMPLOYMENT), Job Code (JOBCODE_TBL), Department (DEPARTMENT_TBL), Employees NationalIDs (PERS_NID), Job Labor (JOB_LABOR), and Disability (DISABILITY) into an extract file. The extractfile’s sole purpose is as a report source. Because it isn’t updated dynamically when you add people or jobrecords to the system or update their data (doing so would have negative online processing impact), you mustrefresh the Employees table before running any reports. When you run this process, the system updates thetable with data that is valid before or on the as-of date that you specify.
376 PeopleSoft Proprietary and Confidential

Chapter 13 Updating Person and Job Information
Employees Table
Job Labor(Employee LaborRelations Table)
Job DataEmploymentPersonal
Data
DepartmentDisabilityEmployeesNational ID
Job CodeTable
Updating the Employees table by using the Refresh Employees Table process (1 of 2)
Report Names
ABS001.SQR (Employee Absence Report)ABS003.SQR (Time Lost Due to Absence)ABS004UK.SQR (Bradford Report)BEN001.SQR (Health Plan Participants)BEN002.SQR (Life Insurance Participants)ESPP005.SQR (ESPP Purchase Distribution)PAY110CN.SQR (Statisics-Canada [Educationl Institutons])PER001.SQR (Department Action Notices)PER002.SQR (Employee Birthdays)PER004.SQR (Emergency Contacts)PER005.SQR (Employees on leave of Absence)PER008.SQR (Employee Review Audit)PER009.SQR (Union Membership)PER011.SQR (Competency Inventory)PER012.SQR (Departmental Salaries)PER099.SQR (Refreash Employees Table)PER006 - Crystal Reports (Mailing Labels)
Updating the Employees table by using the Refresh Employees Table process (2 of 2)
A useful feature of the Employees table is that you can refresh it to show a specific date, so you can reportbased on how things were at that time. This might be useful if an organization needed to reconstruct itsorganization over the last several years to research its promotion policies.
Update the Employees table using the Refresh Employees Table Application Engine process (PER099) beforerunning any of these reports so that the report contains all changes made to your employee files.
PeopleSoft Proprietary and Confidential 377

Updating Person and Job Information Chapter 13
Understanding the Process of Refreshing thePersonal Data TablePeopleSoft Enterprise Human Resources reports also retrieve data from the Personal Data table. Thistable combines information from these tables: PERSON, PERS_DATA_EFFDT, NAMES, ADDRESSES,PERSONAL_PHONE. Like the Employees table, the Personal Data table is a report source only. It updatesthrough the process described below. The Personal data table is synchronized with the online changes by usinga Message Subscription process on the message PERSON_BASIC_SYNC. This means that any process thatpublishes the PERSON_BASIC_SYNC message causes the Personal Data table to be updated. You may wantto refresh the Personal Data table before running reports, but the online process should keep it up to date. Youcan refresh the Personal Data table at any time without affecting the online updates.
Common Element Used in This SectionAs Of Date Indicate the As Of Date to run the processes. The process selects the new
data based on the date that you enter and populates the table. It includes onlyworkers who are active, on leave of absence, or suspended. The processexcludes any terminated workers.
Pages Used to Refresh Tables to Facilitate ReportingPage Name Object Name Navigation Usage
Refresh Employees Table -Parameters
RUNCTL_ASOFDATE Set Up HRMS, SystemAdministration, DatabaseProcesses, RefreshEMPLOYEES Table
Reflect back to a specificdate or period for employeedata reporting.
Refresh Personal Data Table- Parameters
RUNCTL_ASOFDATE Set Up HRMS, SystemAdministration, DatabaseProcesses, Refresh PersonalData
Update the Personal Datatable.
Ad-Hoc Process Request PRCSRUNCNTL Workforce Administration,Workforce Reports, RequestAd-hoc Process
Run several or allAdminister Workforcereports that do not requireparameters.
As-of Date Request RUNCTL_ASOFDATE Workforce Administration,Workforce Reports, CreateAs-of Date Request
Run several or allAdminister Workforcereports for which youspecify an as of date.
Calendar Year Request RUNCTL_CALENDARYR Workforce Administration,Workforce Reports, CreateCalendar Year Request
Run several or allAdminister Workforcereports for which youspecify a calendar year.
From/Thru Dates Request RUNCTL_FROMTHRU Workforce Administration,Workforce Reports, CreateFrom/Thru Dates Request
Run several or allAdminister Workforcereports for which youspecify a from and throughdate range.
378 PeopleSoft Proprietary and Confidential

Chapter 13 Updating Person and Job Information
Running Database AuditsDatabase audits monitor changes, additions, or deletions made to sensitive fields such as salary amounts.
Page Used to Run Database AuditsPage Name Object Name Navigation Usage
Database Audit RUNCTL_FROMTHRU Workforce Administration,Workforce Reports, DatabaseAudit
Run the Database Auditreport (PER029).
PeopleSoft Proprietary and Confidential 379

Updating Person and Job Information Chapter 13
380 PeopleSoft Proprietary and Confidential

CHAPTER 14
Viewing Summary Workforce Information
This chapter discusses how to:
• View worker job history.• (USF) View employee personal and job data.• View other summary pages in PeopleSoft Enterprise Human Resources.
Viewing Worker Job HistoryViewing worker job history provides a quick summary of important job details of current and historic workrecords.
This section discusses how to:
• View an worker’s job history.• View compensation information.
Pages Used to View Employee Job HistoryPage Name Object Name Navigation Usage
Job Summary JOB_SUMMARY Workforce Administration,Job Information, Review JobInformation, Job Summary
View an employee’s jobhistory.
Job Summary JPN JOB_SUMMARY_JPN Workforce Administration,Job Information, Review JobInformation, Job SummaryJPN
View a Japanese employee’sjob history, includingadditional appointment total.Access details of additionalappointments.
Salary Components COMP_JOB_SUMM_SEC Click Componentson theCompensation tab of the JobSummary page.
View compensationinformation.
Comp Rate Code SecondaryPanel (compensation ratecode secondary panel)
COMP_RATECD5_SEC Click Detailson the SalaryComponents page.
Review the description,compensation rate type, andrate code class associatedwith the rate code.
PeopleSoft Proprietary and Confidential 381

Viewing Summary Workforce Information Chapter 14
See AlsoChapter 4, “Adding a Person in PeopleSoft Human Resources,” page 55
Chapter 16, “(USF) Processing Personnel Action Requests,” page 413
Viewing a Worker’s Job HistoryAccess the Job Summary page.
Job Summary page
The Job Summary page displays the person’s name and organizational relationship (contingent worker oremployee), as well the person’s EmplID.
Common Page Information
Eff Date (effective date) andSequence
Displays the effective date and effective date sequence, if any, available foreach personnel action. The effective date sequence tracks actions that occur onthe same day.
GeneralSelect the General tab.
Action and Action Reason Displays the action taken and reason for the row’s existence.
Job InformationSelect the Job Information tab.
Job Summary page: Job Information tab
382 PeopleSoft Proprietary and Confidential
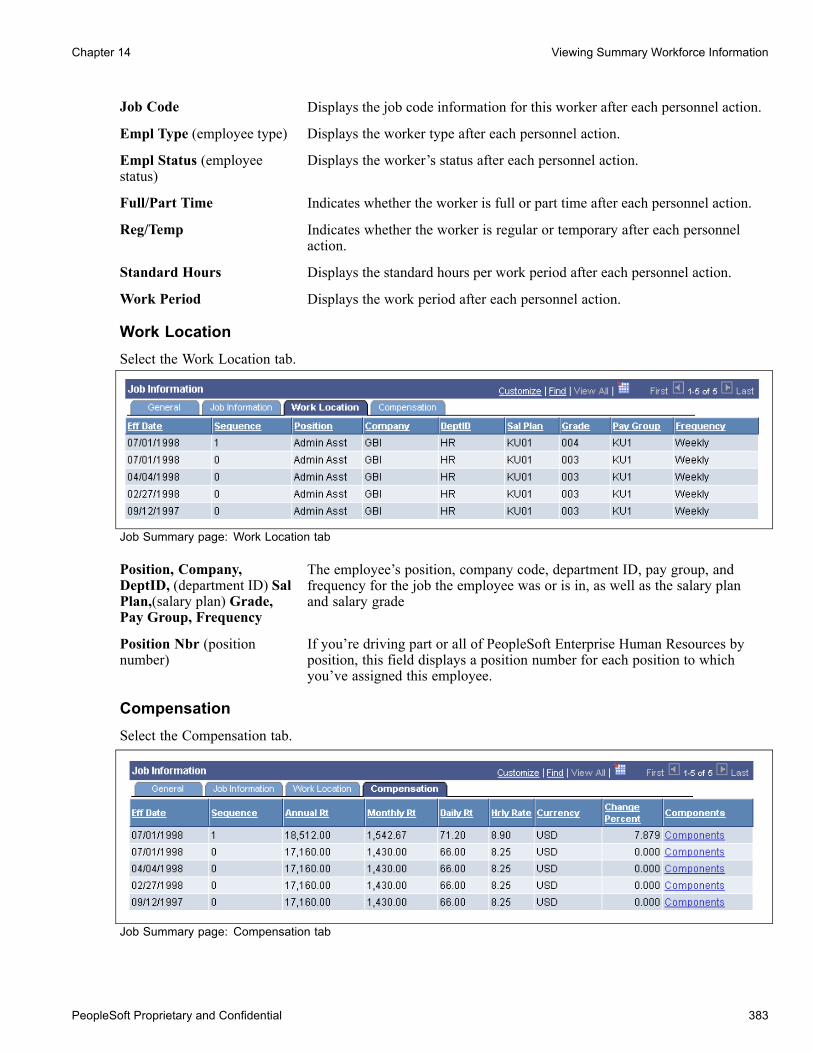
Chapter 14 Viewing Summary Workforce Information
Job Code Displays the job code information for this worker after each personnel action.
Empl Type (employee type) Displays the worker type after each personnel action.
Empl Status (employeestatus)
Displays the worker’s status after each personnel action.
Full/Part Time Indicates whether the worker is full or part time after each personnel action.
Reg/Temp Indicates whether the worker is regular or temporary after each personnelaction.
Standard Hours Displays the standard hours per work period after each personnel action.
Work Period Displays the work period after each personnel action.
Work LocationSelect the Work Location tab.
Job Summary page: Work Location tab
Position, Company,DeptID, (department ID) SalPlan,(salary plan) Grade,Pay Group, Frequency
The employee’s position, company code, department ID, pay group, andfrequency for the job the employee was or is in, as well as the salary planand salary grade
Position Nbr (positionnumber)
If you’re driving part or all of PeopleSoft Enterprise Human Resources byposition, this field displays a position number for each position to whichyou’ve assigned this employee.
CompensationSelect the Compensation tab.
Job Summary page: Compensation tab
PeopleSoft Proprietary and Confidential 383

Viewing Summary Workforce Information Chapter 14
Annual Rt (annual rate),Monthly Rt (monthly rate),Daily Rt (daily rate),Hrly Rate (hourly rate),Currency, and ChangePercent
Displays the worker’s compensation rate in annual, monthly, daily, orhourly terms in the given currency. When there has been a change in thecompensation rate for this employee, the system displays the percentageof change from the previous row.
Components Click to access the Pay Components page.
Viewing Compensation InformationAccess the Salary Components page.
Salary Components page
Common Page Elements
Rate Code Rate codes are IDs for pay components. The system displays compensationinformation associated with this rate code in the compensation grid.
Seq (sequence) Indicates multiple occurrences of the same rate code.
AmountsSelect the Amounts tab.
Comp Rate (compensationrate) and Currency
Displays the compensation rate for the pay component rate codes and thecurrency.
Frequency Displays the compensation frequency for the pay component’s rate.
Points Displays the salary points associated with this rate code, if there are any.
Percent If the rate type for this rate code is percent, the system displays the percent tobe applied to the job compensation rate or to a rate code group (if you areusing rate code groups).
Rate Code Group A rate code group enables you to be more specific when calculatingpercentage-based components as part of your worker compensation package.
ControlsSelect the Controls tab
384 PeopleSoft Proprietary and Confidential

Chapter 14 Viewing Summary Workforce Information
Salary Components page: Controls tab
Source Indicates how the pay component was assigned to the Compensation grid.Manual indicates that the pay component was added manually; Salary Stepindicates that the pay component was defaulted in from the Salary Step; JobCode indicates that the pay component was defaulted in from the job codedefinition, and so on.
Calculated by Values are:
• None: The rate value is assigned by the Rate Code definition or manuallyentered.
• Rate Matrix: The rate value is determined by a rate code matrix.• Extended: Not used.
Manually Updated Indicates whether the pay component’s value was manually entered or the payrate contains only defaulted values.
Default Without Override Indicates whether the default rate value of the pay component can beoverridden.
Details Click to access the Comp Rate Code Secondary Panel page and review thedescription, compensation rate type, and rate code class associated withthe rate code.
ChangesSelect the Changes tab.
Salary Components page: Changes tab
Change Amount Displays the overall change amount in this pay component rate relative tothe previous Job Data row.
Change Points Displays the overall change amount (in points) for this pay component. Thisfield is visible only if Salary Points is selected on the Installation Table page.
Change Percent Displays the overall change amount for this pay component. This field isn’tavailable for rate codes that have a rate code type of percent or points.
PeopleSoft Proprietary and Confidential 385
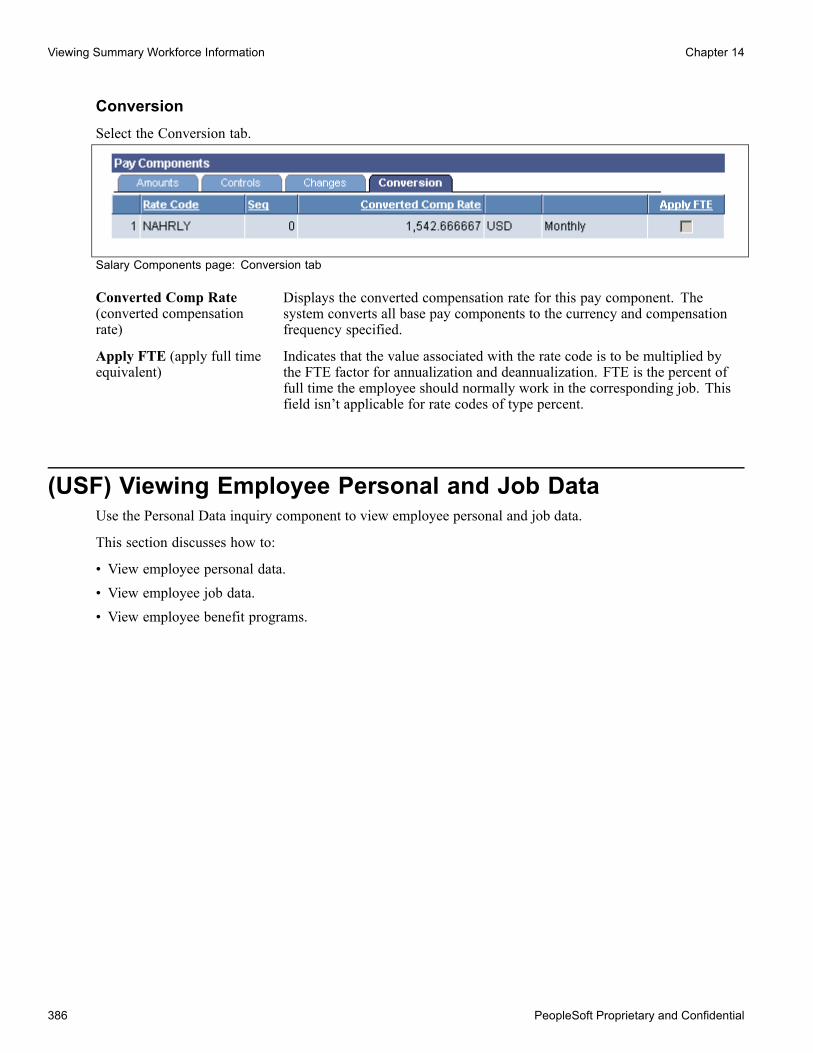
Viewing Summary Workforce Information Chapter 14
ConversionSelect the Conversion tab.
Salary Components page: Conversion tab
Converted Comp Rate(converted compensationrate)
Displays the converted compensation rate for this pay component. Thesystem converts all base pay components to the currency and compensationfrequency specified.
Apply FTE (apply full timeequivalent)
Indicates that the value associated with the rate code is to be multiplied bythe FTE factor for annualization and deannualization. FTE is the percent offull time the employee should normally work in the corresponding job. Thisfield isn’t applicable for rate codes of type percent.
(USF) Viewing Employee Personal and Job DataUse the Personal Data inquiry component to view employee personal and job data.
This section discusses how to:
• View employee personal data.• View employee job data.• View employee benefit programs.
386 PeopleSoft Proprietary and Confidential

Chapter 14 Viewing Summary Workforce Information
Pages Used to View Personal and Job DataPage Name Object Name Navigation Usage
Personal Data GVT_PERS_INQ Workforce Administration,Job Information, Review JobInformation, Personal DataUSF, Personal Data
View employee personaldata.
Mailing Address GVT_MAILADDR_SEC Click Mailing Addresson thePersonal Data page.
View the employee’s mailingaddress.
Veterans Info (veteransinformation)
GVT_VETINF_INQ_SEC Click Veterans Infoon thePersonal Data page.
View veteran’s informationfor this employee.
Job Data1 GVT_JOB_INQ Workforce Administration,Job Information, Review JobInformation, Personal DataUSF, Job Data1
View employee job data.
Benefits/Retirement Data GVT_BENDAT_INQ_SEC Click Benefits/FEHB Dataonthe Job Data1 page.
View the benefit programin which the employee isenrolled for benefits inPeopleSoft EnterpriseHuman Resources or inPeopleSoft EnterpriseBenefits Administration.
Job Data2 GVT_JOB_INQ2 Workforce Administration,Job Information, Review JobInformation, Personal DataUSF, Job Data2
View additional job data,including quoted pay andexpected pay information.
Employment Data GVT_EMPLOY_INQ Workforce Administration,Job Information, Review JobInformation, Personal DataUSF, Employment Data
View employment data.
Viewing Employee Personal DataAccess the Personal Data page.
PeopleSoft Proprietary and Confidential 387

Viewing Summary Workforce Information Chapter 14
Personal Data page
The Personal Data page displays information on employee hire date, birth date, home address, maritalstatus, birth information, citizenship, draft status, Medicare entitlement, race, and handicaps. Click theMailing Address link to view the employee’s mailing address. Click the Veterans Info link to view veteran’sinformation for this employee.
Viewing Employee Job DataAccess the Personal Data - Job Data1 page.
388 PeopleSoft Proprietary and Confidential

Chapter 14 Viewing Summary Workforce Information
Personal Data - Job Data1 page
This page displays the employee’s position number, job code, employee type, class, type of appointment,position occupied, work schedule, agency, subagency, department, location, tax location, LEO position, FLSAstatus, and other job-related information.
Click the Benefits/FEHB Data link to view information on this employee’s benefits and retirement data.
Viewing Employee Benefit ProgramsAccess the Personal Data - Job Data1: Benefits/Retirement Data page.
PeopleSoft Proprietary and Confidential 389

Viewing Summary Workforce Information Chapter 14
Personal Data - Job Data1: Benefits/Retirement Data page
See AlsoPeopleSoft Enterprise Human Resources 8.9 PeopleBook: Manage Base Benefits, “Setting Up Base BenefitsCore Tables”
PeopleSoft Enterprise Human Resources 8.9 PeopleBook: Manage Base Benefits, “Enrolling Participants”
Viewing Other Summary Pages in PeopleSoftEnterprise Human Resources
Several other display-only pages summarizing employee data are available for you to review in PeopleSoftEnterprise Human Resources. Most of them derive information that you enter in other PeopleSoft EnterpriseHuman Resources business processes, such as Planning Compensation, Track Global Assignments, andAdministering Training. However, you’ll also find them useful for planning and analysis when you workin the Workforce Administration menu.
Following are some of the summary pages:
• Employee Data Summary: Displays information on employee current status, hire date, birth date, maritalstatus, standard work hours, pay group, job code, and other job- and compensation -related information.Benefits, Employee/Dependant Information, Review HR/Job/Payroll Data
390 PeopleSoft Proprietary and Confidential

Chapter 14 Viewing Summary Workforce Information
• Organizational Summary: Displays a summary of all the organizational relationships for a person. WorkforceAdministration, Personal Information, Person Organizational Summary.
• Career Assignment summary: Displays the actual job path the employee has followed in the organization.By tracking employee movements through salary structures and manager levels, you’ll get a feel for wherethe employee has been in your organization so far. Workforce Development, Career Planning, ReviewCareer Summaries, Career Assignments.
• Compensation History: Displays the history of all pay rate changes the employee has received, which isparticularly useful when you are planning new increases. Compensation, Base Compensation, Review SalaryInformation, Employee Compensation History. The Compensation History page is also in the WorkforceDevelopment, Career Planning, Review Career Summaries folder.
• Immediate Family Summary: Lists all dependents that are a part of the employee’s immediate family.Immediate family is defined as dependents that are the employee’s spouse, son, or daughter. You’ll find thispage helpful for determining eligibility for various types of benefits your organization offers to employees,their spouses, and children. Benefits, Employee/Dependant Information, Review Dep/Ben Summary.
• Training Summary: Displays student training history, which is helpful when determining whether studentsare receiving adequate training to perform their current jobs; to see if they’ve taken all course prerequisites;and for career and succession planning. Enterprise Learning, Result Tracking, Review Training Summary.
• Injury Summary: Provides an overview of the health and safety incidents in which this individual has beeninvolved, including injuries and illnesses and the nature of the incidents. Workforce Monitoring, Health andSafety, Obtain Accident Information, Review Employee Injury Summary.
PeopleSoft Proprietary and Confidential 391

Viewing Summary Workforce Information Chapter 14
392 PeopleSoft Proprietary and Confidential
CHAPTER 15
(USF) Administering Personnel Action Requests
This chapter provides an overview of administering personnel action requests (PAR) and discusses how to:
• Track and route a personnel action request (PAR) through reviews and completion.• Initiate and request personnel actions.• Authorize and approve personnel actions.• Process human resources personnel actions.• Cancel or correct a personnel action request.• Print Request for Personnel Action (SF-52) and Notice of Personnel Action (SF-50) reports.• View summary pages.• Generate a Personnel Actions History report.• Generate a Wage and Separation report.
Understanding the Administering PAR SystemThe administering PAR system provides you with the power to process action requests quickly and easily.The system automatically routes a wide variety of requests directly to reviewing officials, and on to humanresources, in the path your agency designates.
If anyone needs further information, the system automatically routes that inquiry back to the originator. Allinvolved are included in the communication loop and always know that their requests are moving through awell-mapped review, authorization, and approval cycle.
Note. Keep in mind that the description and samples described throughout this book are illustrative, flexiblemodels that you can adapt for your agency’s personnel administration system. Your agency can set up theAdminister Workforce system routing, security, accessing, processing, and many other features to meet yourindividual agency needs and requirements.
Using a streamlined menu structure, you can navigate quickly and easily through the whole process. UsingPeopleSoft workflow, you indicate the level of authorization and the system routes the request through theprocess for you.
Significant features of the PAR system include:
• Flexible work-in-progress processing.• Cancellation and correction functionality.• Reviewed flag processing for retroactive personnel actions.
PeopleSoft Proprietary and Confidential 393

(USF) Administering Personnel Action Requests Chapter 15
• Enhanced navigation with pages.• Issuing awards and bonuses.• Detail assignment processing.• Support for the personnel office identifier (POI) signature requirement.
Common Elements Used in This ChapterPAR Status The PAR status code automatically defaults to Requested for new actions.
Leave this as a work-in-progress request with that status until you havecomplete data. After you have completed all the necessary information, keepthe PAR status as Requested to send it on to human resources officials forapproval and processing.If you aren’t ready to submit the request, change the status to Initiated, andkeep working on it until you’re done. Change the status to Requested tosubmit it.After completing the HR Request pages and reviewing the data, assign a statusof Processed by HR to approve and finalize this request.Once you assign the status of Processed by HR, the request becomes an actualevent and is posted in the system to interface with PeopleSoft EnterprisePayroll, Manage Base Benefits, or other related areas.If the request is invalid or needs further information, assign a status ofDisapproved or Return to Sender.
PrerequisitesBegin every personnel action request on the Data Control page. The first time you open the page, the mostrecent personnel action request appears automatically. Before creating a new request, you must insert a newrow for all actions or changes.
In order to save time, the system assumes you want to continue viewing and updating information onthe same employee, so when you move to a new page in the group, information for that same employeeappears automatically.
See AlsoPeopleSoft Enterprise HRMS 8.9 Application Fundamentals PeopleBook, “(USF) Setting Up HumanResources Management Tables”
PeopleSoft Enterprise HRMS 8.9 Application Fundamentals PeopleBook, “(USF) Setting Up theWork-in-Progress Management System”
Chapter 6, “(USF) Hiring Employees,” Entering Information for the Hiring Process, page 146
394 PeopleSoft Proprietary and Confidential

Chapter 15 (USF) Administering Personnel Action Requests
Understanding WorkflowMany of the tasks you perform throughout the day are part of larger tasks that involve multiple steps andseveral people in your organization working together. PeopleSoft workflow tools help you build the largerprocess into your PeopleSoft Enterprise Human Resources system, automating vital business tasks. You can tietogether the individual steps so that PeopleSoft can help coordinate the activities. Because the system hasthe big picture and knows what you are trying to accomplish, it can automatically start the next step in theworkflow, following your organization’s business rules.
Using workflow capabilities for administering personnel actions, the PAR status indicates the steps in routingand provides employees, supervisors, and human resources professionals easy access, surveillance, andsecurity in the request management process. While providing options along the way for more time, furtherinformation, or return to sender, workflow routes requests by sending personnel actions through a cycle toinitiate, request, authorize, and approve requests. Workflow then sends them on to human resources forfinal processing. The automated workflow process ensures the action request goes through all the reviewsyour agency needs until it becomes an actual event.
See AlsoPeopleSoft Enterprise HRMS 8.9 Application Fundamentals PeopleBook, “Delivered Workflows forPeopleSoft HRMS”
Tracking andRouting a PARThroughReviews andCompletionThe Employee Request, Supervisor Request, and HR Request components are identical. The only difference isin the type of data that is accessible to each group, according to security options and allowable actions.
Note. The information you need to track and route a PAR is the same type of information you enter to hireemployees. Use the same pages for both.
Your agency determines the actions and data available to employees, supervisors, and human resourcesofficials. Actions may include creating requests, issuing approvals and authorizations, and finalizing actions.Actions also include returning an action to the originator; asking for more information; or withdrawing,canceling, or correcting an action. Decisions on these issues are implemented using the WIP Activity Table(work-in-progress activity table) page.
Employees may request only their allowable actions; therefore, a user sees only certain options, such asFamily/Benefits Change or Retirement. Supervisors may request, approve, and authorize those and otherspecific actions. When a supervisor opens the pages, their list reflects whatever your agency designates, suchas promotion, demotion, detail assignment, reassignment, bonuses and awards, and others. They may alsoreturn an action to the originator for more information, or disapprove a request and render it inactive.
Human resources officials have the authority to initiate, approve, and finalize all possible actions. Therefore,human resources officials, along with hiring, tenure changes, and other actions that an employee or supervisorwouldn’t usually initiate, can access all of the personnel actions in any phase of the cycle. For finalized actionsthat have already completed the processing cycle, human resources has the exclusive right to cancel and correct.
The PAR processes provide both flexibility and modification capacity. You can process new personnelactions that are effective-dated prior to existing personnel actions and define the codes for requests in atruly user-defined environment.
PeopleSoft Proprietary and Confidential 395

(USF) Administering Personnel Action Requests Chapter 15
See AlsoChapter 6, “(USF) Hiring Employees,” Using the PAR Process to Hire Employees, page 141
Adding and Updating DataFor U.S. Federal Government customers, to add, update, or change any employee data, you create a PAR. Tosubmit and route and track a PAR automatically through the approval process, assign a PAR work-in-progressstatus code that indicates its position in the request cycle and determines where to send it.
Automatically Routing the PARBy changing the request status and saving the page, reviewers acknowledge receipt and approval, and send aPAR forward through workflow. Each review level serves as verification that the information is complete andthat the necessary documents are attached. The reviewers may also enter their own comments. Your agencycan set up and route request cycles for each type of request from creation through various reviews, including asmany or few reviews as desired, and on to final Human Resources completion.
Selecting a PAR StatusIf you want to open a request, fill in partial data and then complete it later, open a request and assign a PARstatus of Initiated. While you gather additional information, the request stays within your own domain andcontrol. You can revisit it as often as needed until you are ready to submit it for review.
When your request data is complete and you want to proceed with the automatic routing review cycle, submitthe request by assigning a PAR status of Requested. By doing so, you make the request official. Once theoriginator submits a Requested action, workflow retrieves it and automatically routes it to others who areinvolved in the processing, and the authorizing and approving officials review its merits. It may go througha review cycle that includes 1st Authorized and 2nd Authorized by specific supervisors and managers,Approved/Signed by second-level managers, and finally to the status of Processed (processed by HR),according to your agency’s requirements.
If clarification or additional information is needed, a reviewer can choose the status of Returned for MoreInformation. Returning it to the originator restarts the process. A reviewer can also disapprove a request byassigning the Disapproved status, which stops the process altogether. During the review cycle, the originatorcan also withdraw a request while it is still in a work-in-progress state.
Only the originator can cancel or change and resubmit a request that is in progress. Because other supervisors,managers, and human resources officials don’t have the ability to change request data, if a request needs tobe Canceled, you must return it to the originator.
When a user chooses a work-in-progress status and assigns a PAR status code, this code indicates the request’sstatus and position and enables workflow to route and monitor it through the approval cycle.
We provide a general example of the review cycle, though your agency can set it up differently if necessary.
An Overview of PARThis illustration shows an overview of a sample process:
396 PeopleSoft Proprietary and Confidential
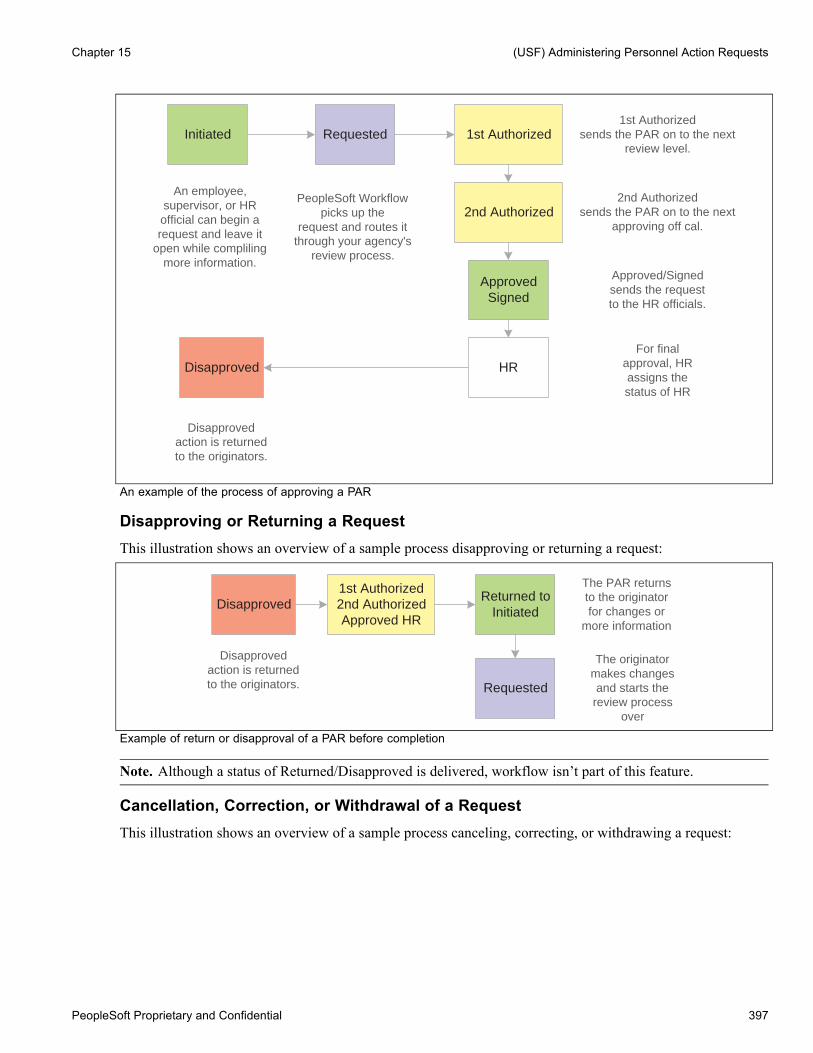
Chapter 15 (USF) Administering Personnel Action Requests
Initiated Requested 1st Authorized
2nd Authorized
ApprovedSigned
HRDisapproved
1st Authorizedsends the PAR on to the next
review level.
2nd Authorizedsends the PAR on to the next
approving off cal.
Approved/Signedsends the requestto the HR officials.
An employee,supervisor, or HRofficial can begin arequest and leave it
open while complilingmore information.
PeopleSoft Workflowpicks up the
request and routes itthrough your agency's
review process.
Disapprovedaction is returnedto the originators.
For finalapproval, HRassigns thestatus of HR
An example of the process of approving a PAR
Disapproving or Returning a RequestThis illustration shows an overview of a sample process disapproving or returning a request:
Returned toInitiated
Requested
1st Authorized2nd AuthorizedApproved HR
Disapproved
Disapprovedaction is returnedto the originators.
The PAR returnsto the originatorfor changes or
more information
The originatormakes changesand starts the
review processover
Example of return or disapproval of a PAR before completion
Note. Although a status of Returned/Disapproved is delivered, workflow isn’t part of this feature.
Cancellation, Correction, or Withdrawal of a RequestThis illustration shows an overview of a sample process canceling, correcting, or withdrawing a request:
PeopleSoft Proprietary and Confidential 397

(USF) Administering Personnel Action Requests Chapter 15
Employee orSupervisor
WithdrawnCorrected
HR
Canceled
HR may correct acompleted PAR
HR or the initiatormay cancel a
completed PAR
The initiator maywithdraw the PAR
anytime beforefinal approval
Example of cancellation, correction, or withdrawal of a PAR
Identifying PAR Status CodesFollowing are definitions for each work-in-progress status and PAR status code that are set up in the sampledata delivered with your system:
Work-In- ProgressStatus
PAR StatusCode
Definition
Initiated INI Indicates an action is open, but not yet submitted as a request. Forvarious reasons, originators may begin a request and then find they needadditional time or data before completing their work on that action. Byassigning a status of Initiated, originators can leave the request openuntil it is ready to submit.
Supervisors may need extra time to develop supporting documentation,such as job codes, and can assign a status of Initiated to designate thattheir work is in progress.
Requested REQ To submit a request, assign a status of Requested.
Most requests then go automatically to the first-level supervisor forapproval.
An exception is the request for family/benefits change; you may wantto set the system up to send this type directly to a human resources(HR) official to be processed. Or when a request originates in the HRdepartment, it may go directly to an HR official to be processed.
1st Authorized 1st The first-level reviewer assigns a status of 1st Authorized to send arequest forward to the next review level.
2nd Authorized 2nd A first-level reviewer sends a request forward to the next review levelby assigning a status of 2nd Authorized.
398 PeopleSoft Proprietary and Confidential
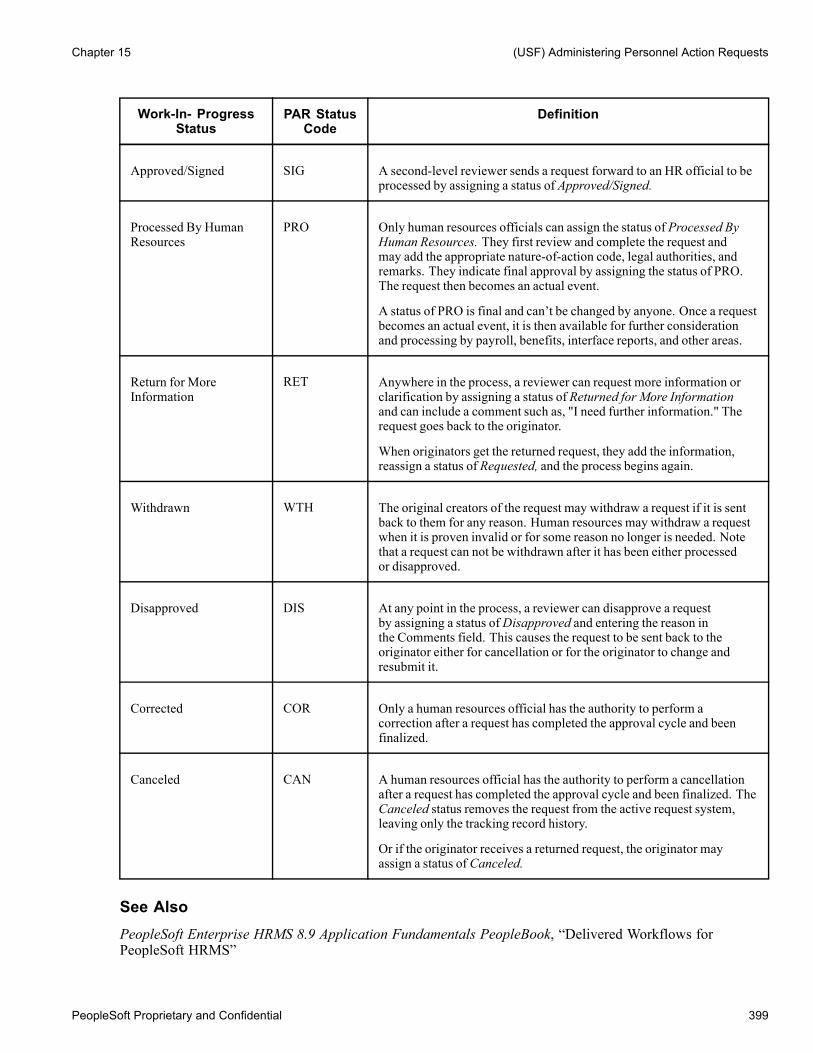
Chapter 15 (USF) Administering Personnel Action Requests
Work-In- ProgressStatus
PAR StatusCode
Definition
Approved/Signed SIG A second-level reviewer sends a request forward to an HR official to beprocessed by assigning a status of Approved/Signed.
Processed By HumanResources
PRO Only human resources officials can assign the status of Processed ByHuman Resources. They first review and complete the request andmay add the appropriate nature-of-action code, legal authorities, andremarks. They indicate final approval by assigning the status of PRO.The request then becomes an actual event.
A status of PRO is final and can’t be changed by anyone. Once a requestbecomes an actual event, it is then available for further considerationand processing by payroll, benefits, interface reports, and other areas.
Return for MoreInformation
RET Anywhere in the process, a reviewer can request more information orclarification by assigning a status of Returned for More Informationand can include a comment such as, "I need further information." Therequest goes back to the originator.
When originators get the returned request, they add the information,reassign a status of Requested, and the process begins again.
Withdrawn WTH The original creators of the request may withdraw a request if it is sentback to them for any reason. Human resources may withdraw a requestwhen it is proven invalid or for some reason no longer is needed. Notethat a request can not be withdrawn after it has been either processedor disapproved.
Disapproved DIS At any point in the process, a reviewer can disapprove a requestby assigning a status ofDisapproved and entering the reason inthe Comments field. This causes the request to be sent back to theoriginator either for cancellation or for the originator to change andresubmit it.
Corrected COR Only a human resources official has the authority to perform acorrection after a request has completed the approval cycle and beenfinalized.
Canceled CAN A human resources official has the authority to perform a cancellationafter a request has completed the approval cycle and been finalized. TheCanceled status removes the request from the active request system,leaving only the tracking record history.
Or if the originator receives a returned request, the originator mayassign a status of Canceled.
See AlsoPeopleSoft Enterprise HRMS 8.9 Application Fundamentals PeopleBook, “Delivered Workflows forPeopleSoft HRMS”
PeopleSoft Proprietary and Confidential 399

(USF) Administering Personnel Action Requests Chapter 15
Processing of PAR ActionsThe PeopleSoft Enterprise Human Resources USF functionality has separate tables for managing PAR, andthese tables hold data until each action has been approved and completed by human resources. Any recordsheld in the separate tables haven’t completed the PAR process and don’t exist to the rest of the system. Aftercompletion, the data is automatically updated to system tables to enable other processes, such as those inPeopleSoft Enterprise Payroll, Benefits Administration, and Time and Labor.
To support the PAR processing concept, all of these records have been effective-dated and have beentied together with common keys. Because the three records (GVT_JOB, GVT_PERS_DATA, andGVT_EMPLOYMENT) work as one, a row is inserted into all three records when a user inserts a row onthe Data Control page.
Once a PAR has successfully worked its way through the approval process, is processed by human resourcesas completed, and has become an actual event, it is ready to be copied into the three counterpart records(JOB, PERS_DATA_EFFDT, and EMPLOYMENT). The process is accomplished instantly, and the user isunaware of the updates to the other tables.
However, if the PAR action has an effective date that is later then the system date, only JOB is updated whenthe action is saved. PERSONAL_DATA and EMPLOYMENT are updated only when the date of the actionis equal to the system date. This is because the counterpart to GVT_JOB, which is JOB, is effective-dated.Therefore, it receives the future effective-dated action and ignores it until that date.
Initiating and Requesting Personnel ActionsMost of the various PARs are created in a similar way. A good representative example is a family/benefitschange request, which is reviewed in this chapter. Other chapters of this book cover other examples of themost highly used requests, such as hiring, awards and bonuses, leave with or without pay, data changes,and termination.
The only significant differences between submitting the various requests are the action and reason codes thatyou assign and the data that is entered. Most of the requests involve similar steps: You begin on the DataControl page, insert a new row and indicate the desired action, and then tab to another data page in thesame group to enter further information, if necessary.
For example, when you initiate a request for changing benefit choices, enter data on the Data Control page andthen move to the Personal Data page. For some requests, such as a leave without pay action, however, youenter data only on the Data Control page.
You can always view data on other pages, and view summary pages, for decision-support purposes.
See AlsoChapter 6, “(USF) Hiring Employees,” Using the PAR Process to Hire Employees, page 141
Chapter 16, “(USF) Processing Personnel Action Requests,” page 413
Authorizing and Approving Personnel ActionsOnce a request has been submitted, the PeopleSoft workflow system automatically routes the request todesignated supervisors and managers for authorizations and approvals.
400 PeopleSoft Proprietary and Confidential
Chapter 15 (USF) Administering Personnel Action Requests
Supervisors and human resources officials can approve and authorize requests that cover many possible actionsinvolving hire, return to duty, leave with or without pay, suspension, promotion, bonus, award, change in pay,and others. They can also return a request and ask for more data or disapprove it so that it is returned to theoriginator and its cycle ended.
If you are a designated reviewer, you see the request item in your worklist if you are using the PeopleSoftNavigator display. To authorize or approve a request, click Work It!, and the system automatically transfersyou to the 1st Rqst Authorization, 2nd Rqst Authorization, or Approve Request component. You can alsoaccess the request from the Workforce Administration, Job Information menu.
You see the exact same screens that the initiator entered data into, beginning with the Data Control page.However, the information you see is display only and unavailable for entry. Review the data on the DataControl page, including the PAR Remarks and Tracking Data, as well as data on any other page that is relevantto the request. To approve the request, change the PAR Status code on the Data Control page to the appropriatechoice, such as 1st Authorized, 2nd Authorized, or Approved/Signed. The request is then routed to humanresources officials for completion and processing.
If you need more information or want to disapprove the request, change the PAR Status code to Returnfor More Information or Disapproved.
The authorization process works exactly the same way regardless of what the request is, such as data change,award, bonus, or recruitment. Once the authorizing officials have completed their work and entered a new PARstatus code, the request goes automatically to the next level in the process.
Process Human Resources Personnel ActionsOnce a Personnel Action request (PAR) has been through the initiation and request process and has passed theauthorization and approval processes, it goes to the human resources office for final processing. A humanresources official can submit human resources-specific actions and review and finalize personnel actions thathave already been requested, authorized, approved, and are ready to become actual events.
The HR Processing pages are reserved specifically for the human resources officials and as a result containoverviews, controls, and additional navigational capacity. The HR Processing pages enable you to accesspersonnel actions, view data, finalize actions, and print reports.
The HR Processing (USF) component is similar to the Supervisor Request, 1st Rqst Authorization, and2nd Rqst Authorization components, however the HR Processing (USF) component contains additionalPAR Status options.
Canceling or Correcting a Personnel Action RequestOnce a request has the PAR status Processed by HR, it remains as a record in the system. However, it ispossible to correct or cancel it by, essentially, creating a new action that references the initial request and givesit a new status. Only human resources officials may perform a correction or cancellation.
Only processed rows are available for correction or cancellation. If an employee has an unprocessedtransaction, you will be unable to correct or cancel a previous transaction until all of the employee’sunprocessed rows have been successfully processed.
To access a processed request that you want to correct:
PeopleSoft Proprietary and Confidential 401

(USF) Administering Personnel Action Requests Chapter 15
1. Open a new request in the Data Control page of the Correct Personnel Action USF component.2. Click the Insert Row button or press F7 to insert a new row, and enter the correct data.The system automatically enters a PAR Status of COR.
To access a processed request that you want to cancel:
1. Open a new request in the Data Control page of the Cancel Personnel Action USF component.2. Click the Insert Row button or press F7 to insert a new row.The system automatically enters a PAR Status of CAN.
See AlsoChapter 6, “(USF) Hiring Employees,” Using the PAR Process to Hire Employees, page 141
Printing Request for Personnel Action (SF-52) and Noticeof Personnel Action (SF-50) Reports
Employees and supervisors can print an action request (SF-52) anytime. Human resources officials canalso review a personnel action request report (SF-50) that summarizes various aspects of employee and jobrequest data in printed form.
This section discusses how to:
• Print an action request (SF-52).• Run the Personnel Action Report.
402 PeopleSoft Proprietary and Confidential

Chapter 15 (USF) Administering Personnel Action Requests
Pages Used to Print a Request for Personnel Action/Notice of Personnel Action
Page Name Object Name Navigation UsageData Control GVT_JOB0 • Workforce Administration,
Job Information, HireEmployee USF, DataControl
• Workforce Administration,Job Information,Employee Request USF,Data Control
• Workforce Administration,Job Information,Supervisor Request USF,Data Control
• Workforce Administration,Job Information, HRProcessing USF, DataControl
Print an action request(SF-52).
Notice of Personnel ActionUSF - Parameters, RequestPersonnel Action USF -Parameters
RUNCTL_PAR • Workforce Administration,Job Information, Reports,Notice of PersonnelAction USF, Parameters,Parameters
• Workforce Administration,Job Information, Reports,Request PersonnelAction USF, Parameters,Parameters
Print the official Notificationof Personnel Action formused to notify employee andpayroll office of the action,record the action in theOfficial Personnel Folder,and provide a chronologicalrecord of actions that haveoccurred.
Notice of Personnel ActionUSF - Select Data, RequestPersonnel Action USF -Select Data
RUNCTL_PAR2 • Workforce Administration,Job Information, Reports,Notice of PersonnelAction USF, Parameters,Select Data
• Workforce Administration,Job Information, Reports,Request Personnel ActionUSF, Parameters, SelectData
After filtering the data withthe parameters defined onthe Parameters page, usethe Select Data page toselect employee data forprinting PARs.
Printing an Action Request (SF-52)Access the Data Control page.
To produce a printed Request for Personnel Action form (SF-52), click the Print SF-52 button. The systemasks whether to print the SF-52 to the Web or to a file. If you choose File, you must specify the file location.
PeopleSoft Proprietary and Confidential 403

(USF) Administering Personnel Action Requests Chapter 15
Before saving and printing this request, ensure that the employee ID is the one you want to appear on the form.An assistant processing an action on an authorized official’s behalf, who wants that official’s information toappear on the SF-52 and become part of the official audit trail for this action, should select the Override OprEmplID check box and enter the employee ID and employee record number of the official for the actionon the Job Tracking Info page.
If you want to print to a file, specify the name of the output file (including the drive and directory names).Once you enter these parameters, the system runs a Structured Query Report (SQR) to create the SF-52 foryou. You can print an SF-50 only when the action has a status of Processed by HR.
Running the Personnel Action ReportAccess the Notice of Personnel Action USF - Parameters page or Request Personnel Action USF - Parameterspage.
Request Personnel Action USF - Parameters page
PAR Type (personnel actionrequest)
This field is available for entry only if you selected the Request for PersonnelAction menu item. Select the type of PAR that you want to print.
Copies Requested This group box is available for entry only if you selected the Notificationof Personnel Action menu item. Select the copies that you want to print.Available values are Employee, OPF, Payroll, and Utility.
Criteria Processed The following elements appear in the Criteria Processed group box.
On-line Select if you want to immediately print the PARs you select.
Within Batch Program Select if you want to save your filtering criteria for later processing.
Filter Criteria The following elements appear in the Filter Criteria group box.
404 PeopleSoft Proprietary and Confidential

Chapter 15 (USF) Administering Personnel Action Requests
EmplID (employee ID), SSN(social security number),Name, PAR Status, NOACode (nature of action), andBusiness Unit
Filter actions by employee ID, employee social security number, PAR status,NOA code, or business unit.
PAR Status Date Range The following elements appear in the PAR Status Date Range group box.
PAR Status To filter by PAR status, select a status. The Begin Date and End Date fieldsbecome available when you select a PAR status.
Filter When you click this button, the system selects the records that match yourfilter criteria and displays them on the Select Data page.
Access the Notice of Personnel Action USF - Parameters page or Request Personnel Action USF - Parameterspage.
Request Personnel Action USF - Select Data page
Filtered Personnel Actions The system displays information about the PARs that it filtered based on theparameters you specified on the Parameters page. Use the check box at thebeginning of each data row to select individual PARs and add them to the listof Selected PARs to Print when you click Add Selected. You can click the AddAll button to add all of the PARs to the list without selecting any check boxes.
Click this button to view the values of all of the filter criteria for this PAR.
Add All Click this button to add all PARs from the Filtered PAR Data section tothe Selected PARs to Print section.
Add Selected Click this button to add the selected PARs from the Filtered PAR Data sectionto the Selected PARs to Print section.
Remove Selected Click this button to remove selected PARs from the Selected PARs to Printsection.
Remove All Click this button to remove all PARs from the Selected PARs to Print section.
PeopleSoft Proprietary and Confidential 405

(USF) Administering Personnel Action Requests Chapter 15
Selected Personnel Actionsto Print
The system transfers the information for the PARs that you selected to add tothe list. These PARs print when you run the report. If you want to removeany of the selected PARs, select the check box at the beginning of each datarow and click the Remove Selected button. Click the Remove All button toremove all PARs.
Viewing Summary PagesTo view a summary of employee data, use the dynamic inquiry pages and display-only pages that summarizedata entered in other pages throughout the system, including Job Summary, Personal Data, Job Data 1 and 2,and Employment Data pages.
See AlsoChapter 14, “Viewing Summary Workforce Information,” page 381
Generate a Personnel Action History ReportThis section discusses how to generate the Personnel Actions History report.
The Personnel Actions History report (FGHR017) lists all employees affected by each of the job actions youenter on the run control page. It prints the following information:
• Employee name.• Department.• Effective date.• Reason for the action.
For each employee the report lists:
• Original hire date.• Total years of service.• Employee type.• Regular/temporary.• Full/part-time.• Job code and title.• Salary grade.• Compensation rate associated with the action.• Supervisor’s name.
406 PeopleSoft Proprietary and Confidential
Chapter 15 (USF) Administering Personnel Action Requests
Page Used to Run the Personnel Actions History ReportPage Name Object Name Navigation Usage
Action History Report RUNCTL_FGHR017 Workforce Administration,Job Information, Reports,Personnel Actions HistoryUSF
Run the Personnel ActionsHistory report (FGHR017).
Generating a Wage and Separation ReportPeriodically, Federal agencies are required to generate a Form ES-931 report (Request for Wage and SeparationInformation). State agencies use the information in this report to determine benefit eligibility for each claimantfiling claims for Unemployment Compensation for Federal Employees (UCFE).
The generation of the ES-931 report is a two-part process.
1. Use the Setup Wage/Separation USF component to enter setup information.
2. Use the Print Wage/Separation USF component to generate the actual report.
This section discusses how to:
• Enter ES-931 employee identification information.• Enter ES-931 annual leave information.• Enter ES-931 severance pay information.• Generate the ES-931 report.
PeopleSoft Proprietary and Confidential 407
(USF) Administering Personnel Action Requests Chapter 15
Pages Used to Set Up and Run the ES-931 Wageand Separation Report
Page Name Object Name Navigation UsageSetupWage/Separation USF- Identification
GVT_UCFE_PG Workforce Administration,Job Information, Reports,SetupWage/Separation USF,Identification
Enter ES-931 identificationinformation for the wage andseparation report.
Note. The pages in the SetupWage/Separation USFcomponent pre-populatethe fields for which data isalready available and thosepre-populated fields areinaccessible. Enter data forthe remaining fields sincedata is required in all ofthe fields.
SetupWage/Separation USF- Annual Leave
GVT_UCFE_PAY_PG Workforce Administration,Job Information, Reports,SetupWage/Separation USF,Annual Leave
Enter ES-931 annual leaveinformation for the wage andseparation report.
SetupWage/Separation USF- Severance Pay
GVT_UCFE_SEV_PG Workforce Administration,Job Information, Reports,SetupWage/Separation USF,Severance Pay
Enter ES-931 severance payinformation for the wage andseparation report.
Print ES-931 GVT_PRINT_ES931 Workforce Administration,Job Information, Reports,Print Wage/Separation USF
Run the PrintWage/Separation report(ES931).
Entering ES-931 Employee Identification InformationAccess the Setup Wage/Separation USF - Identification page.
408 PeopleSoft Proprietary and Confidential

Chapter 15 (USF) Administering Personnel Action Requests
Setup Wage/Separation USF - Identification page
Request Date Enter the date the information was transmitted.
Local Office Enter the numerical ID of the requesting/record holding office.
Claim Date Enter the effective date of the claim.
Print ES931 Click to access the Print Wage and Separation component.
Does this person perform“Federal Civilian Service?”
Select if the employee performs Federal Civilian Service.
If No If the employee does not perform Federal Civilian Service, enter anexplanation.
Is payroll office addressbased on SF-8?
Select if the payroll office is based on an SF-8.
If No, has claimant receivedan SF-8?
Select if the payroll office is not based on an SF-8.
Defaulted DataThe information in this group box is pre-populated from existing data, if that data exists. If you need tochange a value in a field that was pre-populated, you can click the Edit Information link to make the fieldsaccessible for edit.
Entering ES-931 Annual Leave InformationAccess the Setup Wage/Separation USF − Annual Leave page.
PeopleSoft Proprietary and Confidential 409

(USF) Administering Personnel Action Requests Chapter 15
Setup Wage/Separation USF - Annual Leave page
If the employee received a lump-sum payment for terminal annual leave, select Received a lump-sumpayment(s) for terminal annual leave?. If selected, and the payment was received on or after the beginningdate of the base period, or if the employee is currently entitled to such a payment, enter the related data inthe Leave Payment Amount group box.
Entering ES-931 Severance Pay InformationAccess the Setup Wage/Separation USF - Severance Pay page.
Setup Wage/Separation USF - Severance Pay page
410 PeopleSoft Proprietary and Confidential

Chapter 15 (USF) Administering Personnel Action Requests
If the employee has received or is entitled to receive severance pay, select Received or is entitled to receiveseverance pay by any Federal law or agency-employee agreement. If selected, enter the related data in theSeverance Pay Information group box.
Generating the ES-931 ReportAccess the Print ES-931 page.
Once you have completed the necessary setup, run the Print Wage and Separation report (ES931). This printsan ES-931 Request for Wage and Separation Information report.
PeopleSoft Proprietary and Confidential 411

(USF) Administering Personnel Action Requests Chapter 15
412 PeopleSoft Proprietary and Confidential

CHAPTER 16
(USF) Processing Personnel Action Requests
This chapter provides an overview of personnel action requests (PARs) and discusses how to perform commonpersonnel actions.
Note. PeopleSoft delivers a database providing a sample setup of PAR data. All discussions, overviews, andexamples in this book are based on the sample setup. Your agency may choose a similar setup or vary theprocesses to reflect its own system and operational procedures.
Understanding PARsThis section discusses:
• PARs.• Sample setup of pages used by employees and supervisors.• Personnel actions and employee status.• The importance of effective dates.• Multiple actions with the same effective date.
Personnel Action RequestsAn employee’s history with an agency usually involves many job changes, such as promotions, leaves ofabsence, layoffs, retirement, pay rate changes, awards, and so on. To maintain both current records anda complete history of employee job data, your employees, supervisors, and human resources officials willregularly submit PARs for these changes in PeopleSoft Enterprise Human Resources. (Before requestingpersonnel actions, verify that you’ve selected the Multiple Jobs Allowed check box on the Installation Table -Product Specific page.)
Note. The information you need to maintain your employees’ career histories is the same type of informationyou enter to hire employees. Use the same pages for both.
Requests for updates you want to make to employee job data begin in the Workforce Administration, JobInformation menu. Depending on whether you are an employee requesting a change for yourself, a supervisorrequesting a change on behalf of someone in your department, or a human resources official, choose EmployeeRequest, Supervisor Request, or HR Request, where the system prompts you for an employee ID. Go tothe Data Control page to begin the request for a new action, and then go to other pages to enter additionalinformation for the personnel action that you’re requesting.
The differences between employee, supervisor, and human resources requests are the types of requestsavailable and the workflow routing of the requests after being submitted. Human resources officials mayrequest any of the actions.
PeopleSoft Proprietary and Confidential 413

(USF) Processing Personnel Action Requests Chapter 16
See AlsoPeopleSoft Enterprise HRMS 8.9 Application Fundamentals PeopleBook, “Setting Up and InstallingPeopleSoft HRMS,” Setting Up Implementation Defaults
Chapter 6, “(USF) Hiring Employees,” page 141
Sample Setup of Pages Used by Employees and SupervisorsThe following table lists a sample setup of the pages employees and supervisors can use to enter requestsand where those requests can be routed.
Request Type Page Submitted By Routed To
Accounting information Compensation Supervisors Authorization
Agency transfer Job Supervisors Authorization
Agency/subagency Job Supervisors Authorization
Appointment/expirationdata
Employment 1 Supervisors Authorization
Awards Award Data Supervisors Authorization
Benefits/retirement Job Supervisors Authorization
Department reassignment Job Supervisors Authorization
Departmental hierarchy(view only)
Job Supervisors Authorization
Draft status Personal Data Employees/Supervisors HR department
Earnings Compensation Supervisors Authorization
Employee type Position Supervisors Authorization
Expected pay (view only) Compensation Supervisors Authorization
FLSA status Position Supervisors Authorization
Holiday schedule Position Supervisors Authorization
414 PeopleSoft Proprietary and Confidential

Chapter 16 (USF) Processing Personnel Action Requests
Request Type Page Submitted By Routed To
Job code # Job Supervisors Authorization
LEO position Position Supervisors Authorization
Locality/LEO adjustment Compensation Supervisors Authorization
Location Job Supervisors Authorization
Marital status Personal Data Employees/supervisors HR department
Medicare entitlement date Personal Data Employees/supervisors Authorization
Military status Personal Data Employees/supervisors Authorization
Name/address/birth/phone Personal Data Employees/supervisors Authorization
Nonpay data Employment 2 Supervisors Authorization
Other pay information Compensation Supervisors Authorization
PAR remarks Data Control Supervisors Authorization
Pay group/frequency Position Supervisors Authorization
Pay plan/table/grade/step Compensation Supervisors Authorization
Permanent/RIF/tenure Employment 2 Supervisors Authorization
POI Position Supervisors Authorization
Position # Job Supervisors Authorization
Probation dates Employment 2 Supervisors Authorization
Quoted pay data Compensation Supervisors Authorization
Reports to position Job Supervisors Authorization
PeopleSoft Proprietary and Confidential 415

(USF) Processing Personnel Action Requests Chapter 16
Request Type Page Submitted By Routed To
Retained grade Employment 2 Supervisors Authorization
Review date Employment 1 Supervisors Authorization
Security info Employment 2 Supervisors Authorization
Service computation dates Employment 1 Supervisors Authorization
Service conversion dates Employment 1 Supervisors Authorization
SF-50/SF-52 Data Control Supervisors Prints reports
SF-113G ceiling Position Supervisors Authorization
Shift details Position Supervisors Authorization
Tax location Job Supervisors Authorization
Tracking (job) data Data Control Supervisors Authorization
Union information Employment 2 Supervisors Authorization
Veteran’s Info Personal Data Employees/supervisors Authorization
Within-grade-increasedata
Employment 1 Supervisors Authorization
Work schedule Position Supervisors Authorization
Personnel Actions and Employee StatusWhen you request a personnel action to make changes to employee job data, the employee status oftenchanges. For example, when you select Retirement, the employee status changes from Active to Retired.Similarly, if you terminate an employee due to death, the employee status changes from Active to Deceased.The employee status is based on either the personnel action, or in a few cases, the reason for the action, such asdeath. The system sets employee status as follows.
416 PeopleSoft Proprietary and Confidential

Chapter 16 (USF) Processing Personnel Action Requests
When you select the personnel action The system sets the employee status to
Hire.
Applicant hire.
Rehire.
Concurrent appointment.
Detail assignment.
End of detail.
Terminate detail assignment.
Return from LWOP.
Return from disability (LWP).
Recall from suspension/furlough.
Intnl assignment.
Active
Leave with pay.
Short-term disability.
Long-term disability.
Leave of Absence
Paid leave of absence.
Short-term disability with pay.
Long-term disability with pay.
Leave with Pay
Retirement with pay. Retired with Pay
Terminated with benefits.
Terminated with pay.
Terminated with Pay
Furlough.
Suspension.
Suspended
Retirement. Retired
Intl assignment completion.
Termination.
Terminated
PeopleSoft Proprietary and Confidential 417

(USF) Processing Personnel Action Requests Chapter 16
When you select the personnel action The system sets the employee status to
Termination (reason of death). Deceased
Pay rate change.
Change to lower grade.
Data change.
Earnings distribution change.
Job reclassification.
Position change.
Probation.
Completion of probation.
Promotion Extension of NTE date.
Award-monetary.
Award-nonmonetary.
Bonus.
Reassignment/conversion.
Family benefits change.
The system sets the employee status to the same statusthat’s in the previous data row. If no previous data rowexists, the system sets the status to Active.
When an employee status is set to Active, Leave with Pay, Retired with Pay, or Terminated with Pay, the systemtriggers payroll processing in PeopleSoft Enterprise Payroll and PeopleSoft Enterprise Payroll Interface.
If your agency uses PeopleSoft Enterprise Payroll for North America, payroll paysheets aren’t generatedfor employees whose status is Retired or Terminated. You may need to pay employees for a partial payperiod or for a time after they leave the agency, however, so use either the personnel action Retired with Payor Terminated with Pay to ensure that this occurs.
A change in employee status can affect PeopleSoft Enterprise Human Resources Manage Base Benefits,PeopleSoft Enterprise Benefit Administration, and PeopleSoft Enterprise Payroll processing. Specificallyfor benefits, you may need to suspend coverage during a leave of absence or a suspension. In addition, apromotion or a job reclassification might affect an employee’s benefit coverage.
Changes in an employee’s status can also impact pension administration.
Importance of Effective DatesYou usually update employee job data in PeopleSoft Enterprise Human Resources for U.S. FederalGovernment by adding effective-dated data rows to the employee records. When you insert a new row on theData Control page, the system copies the contents of the previous row into the new row so that you don’t haveto retype the information that stays the same. (So before you insert a new row, ensure that you’re on the datarow that you want to copy.) The only new information you see is the effective date, which defaults to thesystem date, usually today’s date, which you can change.
If you want to work on the Employment 1 or 2 pages, for example, first insert a new data row on the DataControl page, and then access the appropriate Employment page to enter changes.
418 PeopleSoft Proprietary and Confidential

Chapter 16 (USF) Processing Personnel Action Requests
Effective dates enable you to maintain a complete chronological history of all your data and tables, whetheryou changed them two years ago or want them to go into effect in two months. With all this information at yourfingertips, you can roll back your system to a particular time to analyze position data or employee records. Oryou can roll forward and set up tables and data before they take effect.
The system also uses effective dates to compare pages and tables to ensure that the prompt tables list only thedata that is valid as of the effective date of the page where you are working. For example, let’s say you create anew department code with an effective date of May 1, 1997. If, on the Job Data pages, you enter a new datarow for an employee or update an existing row that has an effective date beforeMay 1, 1997, then when youselect a department, you won’t see the new code as a valid choice because it isn’t in effect yet.
See AlsoPeopleSoft Enterprise HRMS 8.9 Application Fundamentals PeopleBook, “(USF) Setting Up HumanResources Management Tables”
PeopleSoft Enterprise HRMS 8.9 Application Fundamentals PeopleBook, “(USF) Setting Up theWork-in-Progress Management System”
Multiple Actions With the Same Effective DateOn occasion, you may need to enter more than one personnel action that takes effect on the same day.Entering two actions with the same effective date is particularly common when you need to track annual payadjustments and career promotions that take effect on the same day. Use effective sequence numbers tocombine multiple actions and specify which one to process first. On the Data Control page, enter an actualeffective date and assign the action, and the system automatically assigns a transaction number/sequence foreach personnel action: The first on that date as 1/1 and the second as 2/1.
For example, an employee received a pay rate change and a promotion on the same day. As a result of this payrate change, that employee’s salary was raised by about 2.5 percent. A promotion from a GS-07 position to aGS-09 position produced an additional 7.9 percent increase in salary.
Note. The sequence number for a request is always 1 unless you are canceling or correcting a request thathas already been completed and processed. In this case, the system would assign a sequence number of2 for that action.
To enter multiple personnel actions with the same effective date:
1. Open the Data Control page for the employee whose data you’re requesting to update.2. For the first personnel action, insert a new data row.3. Enter a new actual effective date.Because it is the first action processed for this actual effective date, the Transaction #/Seq # field is 1/1.
4. Enter any other information required to implement the action, either here or in other pages in the component.5. Change the PAR Status on the Data Control page to Requested so that you can continue on to enterthe next action.
6. To enter the second action, such as Promotion, insert another data row.7. Enter the same actual effective date as the first action.The system enters a Transaction#/Seq of 2/1.
8. Continue the same steps required for the first action, entering a new action each time.
PeopleSoft Proprietary and Confidential 419
(USF) Processing Personnel Action Requests Chapter 16
Employee Data Security ConsiderationsWhen you reassign employees from one department to another using a data row containing an effective-datesequence number, the system currently allows users with security access to the old or new department to haveaccess to all the employee data. PeopleSoft delivers the system this way because implementing security insystem views specific to the function Max (effseq) on PS_JOB would adversely affect online response time.
For example, when you reassign an employee from department one to department two and give the employee apromotion on the same day, because an effective-date sequence number is in the reassignment data row, userswith access to either department one or two have access to the employee data.
If you want to modify the system to prevent this, change the security views for the PeopleSoft applications youuse. Bear in mind, however, that making the change affects system performance.
See AlsoPeopleSoft Enterprise HRMS 8.9 Application Fundamentals PeopleBook, “Setting Up and AdministeringHRMS Security”
Performing Common Personnel ActionsThis section discusses how to:
• Enter promotional information.• Request departmental reassignments.• Request a leave of absence.• Enter terminations and retirement requests.• Request a supplemental or correction individual retirement record.• Request terminations due to death.• Request to rehire an employee.• Grant performance awards.
Entering Promotional InformationWhen an employee changes pay grades or moves to a new job, salary changes are typically part of thatpersonnel action.
To enter promotional information:
1. Insert a new data row on the Supervisor Request - Data Control page, and complete all fields.2. When you are ready to submit the request, ensure that the PAR Status is REQ.The workflow system then picks up this information and routes it through the process. After that, you canstill change, withdraw, or deny the information up until the point that the action has been finalized and hasa status of Processed. To correct or cancel the request after it has been completed and has a status of HRProcessed, go to the Cancellation or Correction pages.The information you change on the Data Control page and other pages varies according to the data for theformer job and the new job. You usually select a new job code or a new position number by moving to theJob page. But all of the other entries on this page could also conceivably change in the event of a promotion.
420 PeopleSoft Proprietary and Confidential

Chapter 16 (USF) Processing Personnel Action Requests
Again, the information you change on the Job page may vary, but you usually select a new pay plan, table,grade, or step and enter (or generate) a new base pay.
3. Once you’ve completed all the changes caused by the promotion, if necessary, access other pages toenter relevant information.For example, access the Personal Data page to enter new business phone numbers. Or access the Positionpage to change the pay group or employee type, or to enter other relevant position details.
4. Change the position as necessary on the Supervisor Request - Job page.5. Select a pay rate determinant on the Supervisor Request - Compensation page.6. Set the options in the Within-Grade Increase Data group box on the Supervisor Request - Employment 1page as follows:
Actions Impact
Promotion (nature of action 702)
WIGI (NOA 893)
GMWIGI (NOA 891)
Sets theWIGI status to waiting.
Sets theWIGI due date to the pay begin date, which is thefirst pay begin date after the employee has satisfied his orher next increase waiting period.
Sets the LEI date and last increase date to the effectivedate of the action.
Quality step increase (QSI) (NOA 892) Sets theWIGI status to waiting.
Sets theWIGI due date to the pay begin date, which isthe first pay begin date after the employee has satisfiedhis or her next increase waiting period. TheWIGI duedate is based on the last equivalent increase date, not theeffective date of the action.
Sets the last increase date to the effective date of theaction.
(Has no effect on the LEI Date.)
Change to lower grade (NOA 713) Issues a warning message "Warning -- Change to LowerGrade Personnel Action may have an impact onWGIDue Date -- Adjust accordingly."
Always review current or future-dated records and makemanual adjustments that may be required for any changeto lower grade action.
Temporary promotion (NOA 703) Sets theWIGI status to NA.
Sets theWIGI due date to Blank.
Requesting Departmental ReassignmentsThe description given here is for reassigning employees among departments. Agency-to-agency transfersare processed as hires and terminations.
PeopleSoft Proprietary and Confidential 421
(USF) Processing Personnel Action Requests Chapter 16
To enter a reassignment request when a person is assigned to a new department without changing job codes:
1. Use the Data Control page to enter reassignment requests.
Reassignments usually imply that there is no change in pay grade or compensation.
2. If this action is to occur on the same day as another action, insert an Action# in the Action#/Sequence field.
3. Enter the action of Reassignment/Conversion.
4. Enter the reason code, such as Employee Request or Manager Request.
5. Complete all other necessary changes, such as NOA Code and Authority (1) and (2).
6. Access the Job page to enter additional changes for the employee being reassigned.
Change the position number, job code, agency, and any other details that will change with the employeereassignment. When you select a new department for the employee, the system automatically enters a newlocation and tax location if you’ve associated a location with the department in the Department table.
7. Access other pages to enter any other employment or job information applicable to the reassignment.
For example, you may need to go to the Personal Data page to enter a new phone number. On the PersonalData page, click the Personal Phone Numbers button, and on the Personal Phone Numbers page, entera new business phone number. On Employment 2, change the supervisor ID to the manager of the newdepartment. Access other pages, such as the Position page to change the pay group, employee type, orother relevant position details.
Security ConsiderationsPeopleSoft Enterprise Human Resources enables users to assign employees into departments that they can’taccess for updates. If you want to prevent an user from reassigning an employee into a department for whichthey don’t have access, PeopleSoft Enterprise Human Resources contains a view (DEPT_TBL_ACCESS) thatdisplays only those department IDs that users can access based on their user security profiles.
If you choose to use this view, you must create a class of users who have access to all departments so thatthey can perform reassignments.
See AlsoChapter 5, “Increasing the Workforce,” page 77
PeopleSoft Enterprise HRMS 8.9 Application Fundamentals PeopleBook, “Setting Up and AdministeringHRMS Security”
Requesting Leave of AbsenceAt some point in their careers, many employees take leaves of absence. For example, when an employee or anemployee’s wife has a baby, the new parent may request a maternity or paternity leave.
To enter a leave of absence:
1. Access the Data Control page to submit a request for the employee who is temporarily leaving the agency.2. Access the Non Pay Data page to enter leave of absence data for an employee.In the Last Date Worked field, enter the last date the employee worked. When you process the PAR toreturn the employee to pay status, you must update the other fields (SCD Hours, Probation Hours, andCareer Tenure Hours), as appropriate.
3. When an employee returned from leave, return to the Data Control page to change that employee’s statusto active.
422 PeopleSoft Proprietary and Confidential

Chapter 16 (USF) Processing Personnel Action Requests
a. In the Action field, select RFL (return from leave without pay).b. In the Reason Code field, select RFL (return from leave).c. In the PAR Status field, select Requested or leave it as Initiated in case the return date changes for any reason.d. Access any other pages to make needed changes.
See AlsoPeopleTools 8.43 PeopleBook: PeopleSoft Process Scheduler
Entering Terminations and Retirement RequestsWhen employees leave the agency permanently, you render their records and their statuses inactive byregistering them as Terminated or Retired. The processes for entering terminations and retirements are almostidentical; the primary difference is the action you select on the Data Control page.
To enter termination and retirement requests:
1. Request a termination for an employee who has left the agency using the Data Control page.
The Actual Effective Date field defaults to the system date, usually today’s date, which you can change.
Normally, the system uses the effective date to represent the beginning of an action; however, when anemployee terminates or retires, the system treats the effective date you enter as the close of businessof the day of the termination.
For example, if an employee’s last day of employment is September 1, the effective date is September 1because the termination is effective at the close of business that day.
2. In the Action field, select one of the following: Termination, Terminated with Pay, Terminated withBenefits, or Retirement, and then select a reason code for the departure, if applicable.
Depending on the action you selected, the system changes the employee status from Active to Terminated,Terminated with Benefits or Pay, or Retired.
3. If the employee is suitable for rehire, save this page.
When you request a termination or retirement, the system generates an individual retirement record(IRR) control record for this employee.
Note. The IRR process is used by agencies using PeopleSoft Enterprise Payroll. Payroll detail earnings anddeductions for the fiscal history are used in the IRR process.
See AlsoPeopleSoft Enterprise Payroll for North America 8.9 PeopleBook, “(USF) Generating IRR and ROSTReports,” Understanding the IRR Process
Requesting a Supplemental or Correction IndividualRetirement RecordAfter you process an employee’s IRR, you may find that you need to supplement or make corrections tothat IRR. This requires that you create another PAR using the Workforce Administration, Job Information,Supplement to IRR or Correct IRR Supplement menu.
When you create the new PAR, the system creates an IRR control record with an IRR type of C (correction) orS (supplemental).
PeopleSoft Proprietary and Confidential 423
(USF) Processing Personnel Action Requests Chapter 16
See AlsoPeopleSoft Enterprise Payroll for North America 8.9 PeopleBook, “(USF) Generating IRR and ROSTReports,” Generating Supplemental or Correction IRRs
Requesting Terminations Due to DeathTo request termination due to death:
1. Open the Data Control page for the deceased employee.2. In the Action field, indicate that the employee is Terminated.3. In the Reason Code field, select Death as the reason for termination.The system automatically changes the Employee Status field from Active to Deceased.
Requesting to Rehire an EmployeeWhen you request to hire an employee who worked for your agency in the past, enter a Rehire action.Information on a rehired employee is already in PeopleSoft Enterprise Human Resources unless the employeedata was deleted or archived. If employee records aren’t in the system, follow the new hire process describedin “Hiring Your Workforce.”
You can rehire only employees whose employee status is Terminated, Terminated with Pay, Terminated withBenefits, Retired, or Retired with Pay. If you rehire an employee whose records already exist in the system,you may want to ensure that the personal, employment, and job data for that person is current.
If you want to rehire an employee whose previous job was in a department (organizational entity) for whichyou don’t have security access, give at least one user performing rehires security access to all departments.
To request to rehire an employee into the system:
1. Open the Data Control page for the employee and request a rehire.2. Access the other employee data pages to enter additional information.
Granting Performance AwardsRecognizing and rewarding employee performance is a critical component of attracting and keeping top talent.PeopleSoft Enterprise Human Resources handles the complexity of this human resource area by making it easyto establish, record, track, and grant employee awards and bonuses.
Begin the process to grant an award by submitting a request to issue a bonus or award. The data isautomatically sent through the approval process, tracked, approved, recorded, and issued to the employee.
To issue an award:
1. Set up the Award Action Data page to define monetary and nonmonetary award types.2. Request an award or bonus for your employee on the Data Control page.Submit your request the same as you would for other personnel actions.
3. Define the award setup using the Supervisor Request - Data Control page.
See AlsoPeopleSoft Enterprise Human Resources 8.9 PeopleBook: Manage Competencies, “Setting Up Competenciesand Accomplishments”
424 PeopleSoft Proprietary and Confidential

CHAPTER 17
(USF) Processing Automatic Actions forProbation, Tenure, and WGIs
This chapter provides an overview of Automatic Action processing and discusses how to:
• Perform automatic actions.
• Administer probation termination automatic actions.
• Administer tenure conversion automatic actions.
• Administer within-grade increases (WGIs).
Understanding Automatic Action ProcessingThis section lists prerequisites and provides an overview of processing automatic actions.
PrerequisitesFor the Automatic Actions process to work as described, you must first activate workflow and set upsupervisors in the workflow process. Consult your system administrator for information.
Before you can administer automatic actions for your employees, you must have already entered them into thesystem using the Hire Employee, Concurrent Hire, Add Non-Employee, or Hire components in WorkforceAdministration.
You should designate one or more employees, perhaps from your human resources or payroll office, toadminister the Automatic Actions processes. As delivered, the system sends supervisor notifications to theemployee’s supervisor’s worklist based on WGI, tenure, and probation information already in your system.This information, most of which you entered during the hire process, initiates the automatic action processes.Run the Automatic Action processes regularly, as determined by your organization’s needs. If necessary,manually change employee records to process special cases.
Before implementing Automatic Actions, decide how often your agency should run each process. Forexample, within-grade increases generally take effect on the first day of a pay period, so you might chooseto process step increases only once per pay period. On the other hand, if supervisors review notices everyThursday morning, you should run 60-day notification processes weekly. Some agencies run the notificationprocesses nightly to accommodate multiple supervisors and to allow for maximum time to verify upcomingemployee record changes.
PeopleSoft Proprietary and Confidential 425

(USF) Processing Automatic Actions for Probation, Tenure, and WGIs Chapter 17
See AlsoPeopleSoft Enterprise HRMS 8.9 Application Fundamentals PeopleBook, “Delivered Workflows forPeopleSoft HRMS”
Chapter 6, “(USF) Hiring Employees,” Using the PAR Process to Hire Employees, page 141
Processing Automatic ActionsYour agency’s human resources personnel have many tasks to oversee: recruiting new employees, makinghiring decisions, administering reviews, and tracking changes in employees’ personal data, among others.Unfortunately, much of their time can be spent processing routine, tedious data. PeopleSoft Enterprise HRMSUSF functionality automates some of these routine tasks, leaving your professionals free to spend time onother projects that require their professional insight and skills.
The PeopleSoft Enterprise Human Resources Administer Workforce business process offers an AutomaticActions process to administer these routine tasks:
• Probation termination.
• Tenure conversion.
• WGIs.
If you activate workflow, PeopleSoft Enterprise Human Resources alerts you of upcoming waiting periodterminations or step increases and then automatically updates employee records without user intervention.After you assign supervisors to review automatic action notices, you won’t forget these important dates.
The procedure is identical for all three automatic actions:
1. Run a process to identify employees with upcoming probation terminations, tenure conversions, orwithin-grade increases in the next 60 days.
The system creates online notifications of upcoming changes and sends them to the worklist of designatedsupervisors.
2. Review online notifications and make any necessary changes to employee records.
Unless you change status or date fields in the employee’s records to stop the update from occurring, therespective process updates the employee’s records.
3. Run a process on the specified date to change employee records.
This process also creates notices and sends them to supervisor worklists.
426 PeopleSoft Proprietary and Confidential

Chapter 17 (USF) Processing Automatic Actions for Probation, Tenure, and WGIs
60 Day NoticesProcess
EmployeeRecords
Supervisorsreview
notifications
SupervisorNotice
Employees withupcomingchanges
AutomaticAction
Process
SupervisorNotice
Processing Automatic Actions
Performing Automatic ActionsThis section provides an overview of the menus and pages used for each Automatic Action process anddiscusses how to:
• Process automatic actions.
• Run the Load Within Grade Increases process.
Understanding the Menus and Pages Used for EachAutomatic Action ProcessThe following table provides an overview of the menus and pages used for each automatic action process.However, this table does not include manual setup and verification. Run all of these processes from theWorkforce Administration, Collective Processes menu.
PeopleSoft Proprietary and Confidential 427

(USF) Processing Automatic Actions for Probation, Tenure, and WGIs Chapter 17
Step Function Navigation Option to selectin PeopleSoftProcessScheduler
Process Typeand Name
1 Identify employees,create notices,and send noticesto supervisorworklists.
Process AutomatedActions USF
60 Day ProbationTerm Notices
Application EngineFGHR003A
Or 60 Day TenureNotices
Application EngineFGHR004A
Or 60 DayWGINotices
Application EngineFGHR002A
2 Update employeerecords andsend noticesto supervisorworklists.
Process AutomatedActions USF
Process ProbationTerminations
Application EngineFGHR003B
Or Process TenureConversions
Application EngineFGHR004B
Or Process WGIAuto Action USF
LoadWithin GradeIncreases
Application EngineFGHR002B
428 PeopleSoft Proprietary and Confidential

Chapter 17 (USF) Processing Automatic Actions for Probation, Tenure, and WGIs
Pages Used to Perform Automatic ActionsPage Name Object Name Navigation Usage
Automatic Actions RUNCTL_AUTO_ACTNS Workforce Administration,Collective Processes, ProcessAutomated Actions USF,Automatic Actions
Specify automatic action runcontrol parameters for theprobation termination andtenure conversion processes.
WGI Action RUN_FGHR002B Workforce Administration,Collective Processes, ProcessWGI Auto Action USF,WGI Action
Specify automatic actionrun control parameters forprocessingWGIs.
60 Day Prob Term (60 dayprobation term)
GVT_PROB_END_NOTE Workforce Administration,Collective Processes, ProbatTerm-Supv Notif USF
View impendingprobationary periodtermination notificationsonline.
60 Day Ten Conv (60 daytenure conversion)
GVT_TEN_END_NOTICE Workforce Administration,Collective Processes, TenureConversion Notice USF
View 60-day tenurenotifications online.
WGI Notice (within-gradeincrease notice)
GVT_WGI_NOTICE Workforce Administration,Collective Processes, WithinGrade Incr Notice USF
View impendingWGInotifications online.
Processing Automatic ActionsAccess the Automatic Actions page.
Automatic Actions page
Company Enter the company for which you would like to identify employees andcreate notifications.
As Of Date The as of date is set by default to the system date. The process identifies allrows with a probation date within 60 days in the future from this date.
Process Request Click to run this request. PeopleSoft Process Scheduler runs the AutomaticActions process at user-defined intervals.
See AlsoPeopleTools 8.45 PeopleBook: PeopleSoft Process Scheduler
PeopleSoft Proprietary and Confidential 429

(USF) Processing Automatic Actions for Probation, Tenure, and WGIs Chapter 17
Running the Load Within Grade Increases ProcessAccess the WGI Action page.
WGI Action page
Company Enter the company for which you would like to process WGIs.
As Of Pay Period End Date This field is set by default to the system date, but you must change it to a validpay period end date for the pay calendar you have created. The systemprocesses within-grade increases for employees with a WGI due date beforethis date, usually the begin date for the same pay period. However, the systemalso processes WGIs due before this pay period-retroactive WGIs.
Administering Probation Termination Automatic ActionsWhen you first hire an employee, your agency usually imposes a probation period; most new regular federalemployees have one-year probation periods. Supervisory or managerial employees and Senior ExecutiveService (SES) employees often have different probation periods, which you track separately.
The probation termination automatic action, like other automatic actions, identifies employees who will reachtheir probation termination date within 60 days. After you have activated workflow, the system sends messagesto employee supervisors who are designated to process automatic actions. After the supervisors approve theprobation termination, run the process to perform the actual changes to employee records, blanking outemployee probation dates, indicating that they have met the probation period. Finally, you can send notices ofcompleted probation periods to the designated supervisors’ worklists.
This section discusses how to run the probation termination automatic action.
Running the Probation Termination Automatic ActionTo run the probation termination automatic action:
1. Verify all of the data required for automatic probation termination processing.a. Verify the employee’s probation waiting period (Probation Date) and the position to which the employee
reports (Reports To Position) on the Employment 2 page, accessed from the HR Request menu.
If the employee has multiple data rows, verify only the current row.
430 PeopleSoft Proprietary and Confidential

Chapter 17 (USF) Processing Automatic Actions for Probation, Tenure, and WGIs
b. Verify accumulated non-pay hours that affect the employee’s probation termination date on the Non PayData page.
2. Run the 60 Day Probation Term Notices process from the Automatic Actions page.
During this process, the system performs the following functions:
• Identifies employees who have a probation termination within the next 60 days, and then createssupervisor notifications. After the notices are created, the supervisor has until the probation terminationdate to request an extension of the probation period. The system processes the probation termination ifthe supervisor doesn’t respond in time.
• Adds a row to the automatic action control table (GVT_AUTO_ACTN), which records the employee ID,employee record number, automatic action type, and automatic action date.
The system differentiates among the three probation termination types: standard, supervisor, and SES.This table also indicates whether the notification was sent to the specified worklist, whether the actionwas processed, and whether notification of the processed action was sent to the specified worklist.
3. Run the Process Probation Terminations process from the Automatic Actions page.
The automatic action process updates the records of all employees previously identified in the 60 DayProbation Term Notices process unless the supervisor has extended their probation periods. The probationtermination automatic action performs the following functions on the probation termination date:
• Edits the applicable row in the automatic action control table (GVT_AUTO_ACTN) to indicate that theprobation termination was processed.
This row was created during the 60 -Day Probation Term Notices process.
• Clears the probation date on the employee’s current Employment 2 page.
• Creates a supervisor notice indicating that the probation termination was processed.
4. View notices of upcoming probation terminations on the 60 Day Prob Term page.
Supervisors and human resources officials can view 60-day notifications online. After viewing these onlinemessages of impending probationary period termination, they should verify that the employee will fulfillall of your agency’s requirements by the specified date. To extend the probation period, the supervisorshould request a personnel action to change the probation date on the employee’s Employment 2 page. Ifthe employee’s probation date isn’t changed, the probation termination will occur on the date indicated.
See AlsoChapter 6, “(USF) Hiring Employees,” Assigning Employees to Positions, page 176
Chapter 6, “(USF) Hiring Employees,” Using the PAR Process to Hire Employees, page 141
Administering Tenure Conversion Automatic ActionsMost of your conditional and career-conditional new hires are subject to tenure conversion waiting periods. Ifyou specify this period when you first hire the employee, the tenure conversion automatic action alerts you ofupcoming tenure conversion dates and changes employee records to reflect the tenure conversion.
PeopleSoft Proprietary and Confidential 431
(USF) Processing Automatic Actions for Probation, Tenure, and WGIs Chapter 17
The tenure conversion automatic action, like other automatic actions, identifies employees who will reachtheir tenure conversion dates within 60 days. After you activate workflow, the system sends messages to thesupervisors you have designated to process automatic actions. After the supervisors approve the tenureconversion, run the process to perform the actual changes to employee records—clearing tenure conversiondates and changing tenure types. Finally, you can send notices of tenure conversions to the designatedsupervisors’ worklists.
This section discusses:
• Running the tenure conversion automatic action.• Changes made to employee records during tenure conversion.
Running the Tenure Conversion Automatic ActionTo run the tenure conversion automatic action:
1. Verify all of the data required for automatic tenure conversion processing.a. Verify the employee’s service conversion dates, tenure status, and the position to which the employee reports
(Reports To Position) on the Employment 2 page, accessed from the HR Request menu.
b. Verify accumulated non-pay hours that may affect tenure conversion waiting periods on the Non Pay Datapage.
2. Run the 60 Day Tenure Notices process from the Automatic Actions page.
During this process, the system:
• Identifies employees who will reach their tenure conversion date within 60 days, and then createssupervisor notifications.
After the notices are created, the supervisor has until the tenure conversion date to request an extensionof the waiting period. The system processes the tenure conversion if the supervisor doesn’t respond.
• Adds a row to the automatic action control table (GVT_AUTO_ACTN).
This table records the Employee ID, Employee Record Number, automatic action type, and automaticaction date. The system differentiates between the two types of tenure conversions, career andcareer-conditional. This row also indicates whether the notification was sent to the specified worklist,whether the action was processed, and whether notification of the processed action was sent to thespecified worklist.
3. Run the Process Tenure Conversions process from the Automatic Actions page.
In this process, the system updates records of employees previously identified in the 60 Day Tenure Noticesprocess, unless the supervisor extended the tenure conversion date. The tenure conversion automatic actionperforms the following functions on the tenure conversion date:
• Edits the applicable row in the automatic action control table (GVT_AUTO_ACTN) to indicate thatthe tenure conversion was processed.
This row was created during the 60-Day Tenure Notices process.
• Inserts an employee data row with updated or deleted tenure conversion dates and changed tenure type.
• Creates a supervisor notice indicating that the tenure conversion was processed.
4. View notices of upcoming tenure conversions on the 60 Day Ten Conv page (60 day tenure conversionpage).
432 PeopleSoft Proprietary and Confidential

Chapter 17 (USF) Processing Automatic Actions for Probation, Tenure, and WGIs
Supervisors and Human Resources officials can view 60-day notifications online. After viewing onlinemessages of impending tenure conversion, they should verify that the employee will fulfill all of youragency’s requirements by the specified date. To extend the tenure conversion period, the supervisorshould request a personnel action to change the date on the employee’s Employment 1 page, as describedpreviously. If they don’t change the employee’s tenure conversion date, the tenure conversion will occuron the date indicated.
See AlsoChapter 6, “(USF) Hiring Employees,” Assigning Employees to Positions, page 176
Chapter 6, “(USF) Hiring Employees,” Using the PAR Process to Hire Employees, page 141
Understanding Changes Made to Employee RecordsDuring Tenure ConversionTo understand the changes made to employee records during the Tenure Conversion process, let’s look at anexample of an employee’s data rows.
EffectiveDate
NOA Conv BeginDate
Career ConvDate
Career-CondConv Date
Tenure
January 1, 1999= old CareerConv Date
880 = Change inTenure Status
Permanent
January 1,1996 = oldCareer-CondConv Date
880 = Change inTenure Status
January 1,1996 = currenteffective date
January 1, 1999= Conv BeginDate + 3 years
Conditional
January 1, 1994 101 = CareerConditionalAppointment
January 1, 1994 January 1, 1996 None
As the table demonstrates, the system inserts a row with an effective date equivalent to the career conversiondate or career-conditional conversion date and a nature of action code 880.
For career-conditional conversions, the system performs the following actions on the new row:
• Blanks out the career-conditional conversion date.• Changes the conversion begin date to the effective date of the current row.• Inserts a career conversion date three years in the future.You can change this date.
• Changes the tenure type from None to Conditional.
For career conversions, the system performs these actions on the new row:
• Blanks out the career conversion date.
• Blanks out the conversion begin date.
PeopleSoft Proprietary and Confidential 433

(USF) Processing Automatic Actions for Probation, Tenure, and WGIs Chapter 17
• Changes the tenure type from Conditional to Permanent.
Administering WGIsKeeping track of WGIs for all of your agency’s employees can be a time-consuming, labor-intensive process.Using workflow, which you activate and set up, PeopleSoft Enterprise Human Resources automates theentire process, from identifying upcoming step increases to updating employee records after the increase hasoccurred. All employees who meet minimum performance standards will receive the proper step increase andconcurrent pay raise at the end of the step waiting period.
This section provides an overview of 60 day WGI notices and of the load within grade increases process anddiscusses:
• Running the WGI automatic action.• Entering data that affects WGI automatic actions.
Understanding the 60 Day WGI NoticesThe system identifies and differentiates among employees who have a WGI Status of Waiting or Approvedand a WGI Due Date up to 60 days in the future, but do not meet all automatic WGI criteria. Employees areclassified into four different WGI automatic action types.
Automatic Action Type Explanation
Within Grade Increase These employees receive an automatic WGI within 60days.
Manual WGI You need to process these employees’ WGIs manually.For example, employees with intermittent or seasonalwork schedules require manual WGI processing.
RetroactiveWGI These employees have a WGI status ofWaiting, but weredue aWGI in a previous pay period.
WGIW/OMin. Performance These employees have an overall review rating belowSatisfactory or do not have a review within the last fifteenmonths.
Different supervisor notifications are sent for each of these types. However, the system processes WGIsautomatically for only the first and third types listed previously, Within Grade Increase and Retroactive WGI.
Understanding the Load Within Grade Increases ProcessTo understand the within-grade increase automatic action, consider what happens to an employee with thiscurrent row:
434 PeopleSoft Proprietary and Confidential

Chapter 17 (USF) Processing Automatic Actions for Probation, Tenure, and WGIs
EffectiveDate
NOA Step WGI DueDate
WGIStatus
LastIncreaseDate
LEI Date
January 1,2001
Any 1 May 18,2001
Waiting
In March, the notification process identified this employee’s upcoming WGI, after which you sent anotification to the supervisor. The supervisor approved the increase and didn’t need to change any data.
On May 18, 2001, the WGI due date, the system processes this employee’s within-grade increase. It changesthe WGI Status in the old row and inserts a new row as follows:
EffectiveDate
NOA Step WGI DueDate
WGIStatus
LastIncreaseDate
LEI Date
May 18,2001 = oldWGI duedate
893 =WGI 2 Pay periodbegin dateafter Step2 waitingperiod
Waiting May 18,2001 =oldWGI duedate
May 18,2001 =oldWGI duedate
January 1,2001
Any 1 May 18,2001
Created
As you can see, the system performs six actions during the within-grade increase process:
• Changes the WGI Status to Created in the row that was current when the WGI process occurred.If the employee has multiple rows with the same WGI due date, the system changes the status of all the rowsto Created. Only the system enters a status of Created.
• Inserts a new row with nature of action code 893 and effective date equal to the old WGI due date.• Increments the step by one in the new row, and updates step-dependent pay information.• Calculates the WGI due date for the new row.This date corresponds to the beginning of the pay period following the waiting period for the new step.
• Sets the WGI status on the new row to Waiting.• Sets both the last increase date and LEI date on the new row to the old WGI due date.
WGI increases take effect only at the beginning of a pay period. If the WGI due date is the beginning of a payperiod, the pay increase occurs on that date—the employee receives the increased pay for the entire period.However, if the WGI due date falls between the beginning and ending dates of a pay period, the pay increasetakes effect at the beginning of the following pay period.
In addition to changing employee records, the system edits the applicable row in the Automatic Action Controltable (GVT_AUTO_ACTN) to indicate that the WGI was processed. It also creates a notice indicatingthat the WGI was processed.
PeopleSoft Proprietary and Confidential 435
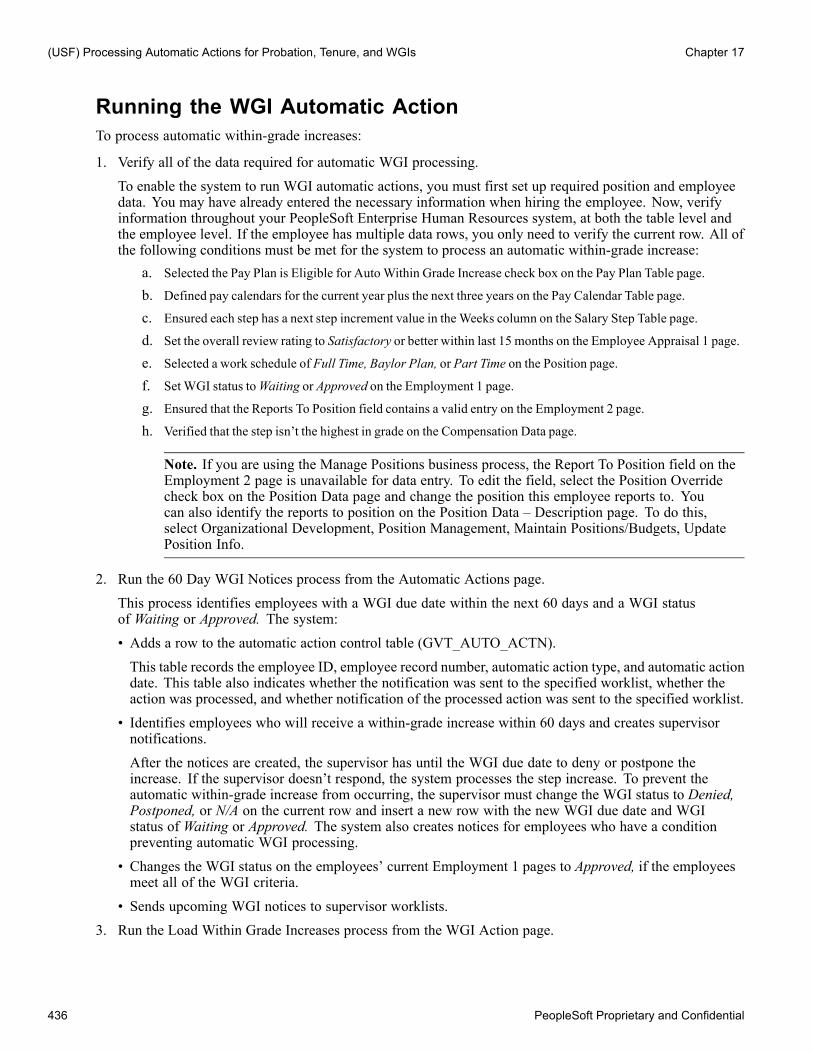
(USF) Processing Automatic Actions for Probation, Tenure, and WGIs Chapter 17
Running the WGI Automatic ActionTo process automatic within-grade increases:
1. Verify all of the data required for automatic WGI processing.To enable the system to run WGI automatic actions, you must first set up required position and employeedata. You may have already entered the necessary information when hiring the employee. Now, verifyinformation throughout your PeopleSoft Enterprise Human Resources system, at both the table level andthe employee level. If the employee has multiple data rows, you only need to verify the current row. All ofthe following conditions must be met for the system to process an automatic within-grade increase:
a. Selected the Pay Plan is Eligible for AutoWithin Grade Increase check box on the Pay Plan Table page.b. Defined pay calendars for the current year plus the next three years on the Pay Calendar Table page.c. Ensured each step has a next step increment value in theWeeks column on the Salary Step Table page.d. Set the overall review rating to Satisfactory or better within last 15 months on the Employee Appraisal 1 page.e. Selected a work schedule of Full Time, Baylor Plan, or Part Time on the Position page.f. Set WGI status toWaiting or Approved on the Employment 1 page.
g. Ensured that the Reports To Position field contains a valid entry on the Employment 2 page.h. Verified that the step isn’t the highest in grade on the Compensation Data page.
Note. If you are using the Manage Positions business process, the Report To Position field on theEmployment 2 page is unavailable for data entry. To edit the field, select the Position Overridecheck box on the Position Data page and change the position this employee reports to. Youcan also identify the reports to position on the Position Data – Description page. To do this,select Organizational Development, Position Management, Maintain Positions/Budgets, UpdatePosition Info.
2. Run the 60 Day WGI Notices process from the Automatic Actions page.This process identifies employees with a WGI due date within the next 60 days and a WGI statusof Waiting or Approved. The system:• Adds a row to the automatic action control table (GVT_AUTO_ACTN).This table records the employee ID, employee record number, automatic action type, and automatic actiondate. This table also indicates whether the notification was sent to the specified worklist, whether theaction was processed, and whether notification of the processed action was sent to the specified worklist.
• Identifies employees who will receive a within-grade increase within 60 days and creates supervisornotifications.After the notices are created, the supervisor has until the WGI due date to deny or postpone theincrease. If the supervisor doesn’t respond, the system processes the step increase. To prevent theautomatic within-grade increase from occurring, the supervisor must change the WGI status to Denied,Postponed, or N/A on the current row and insert a new row with the new WGI due date and WGIstatus of Waiting or Approved. The system also creates notices for employees who have a conditionpreventing automatic WGI processing.
• Changes the WGI status on the employees’ current Employment 1 pages to Approved, if the employeesmeet all of the WGI criteria.
• Sends upcoming WGI notices to supervisor worklists.3. Run the Load Within Grade Increases process from the WGI Action page.
436 PeopleSoft Proprietary and Confidential

Chapter 17 (USF) Processing Automatic Actions for Probation, Tenure, and WGIs
In this process, the system updates records of employees previously identified in the 60-Day WGI Noticesprocess, unless you have denied or postponed their increases.
4. View notices of upcoming WGIs on the WGI Notice page.After viewing these online messages of impending WGI due dates, verify that the employee will fulfillall of your agency’s requirements by the specified date. To prevent the WGI from occurring, you mustchange the employee’s WGI status to Denied, Postponed, or N/A on the current Employment 1 page. Also,insert a new row with an updated WGI due date and WGI status of Waiting. You can also view notices foremployees who do not receive automatic WGIs or for whom you must manually process a WGI.
See AlsoPeopleSoft Enterprise Payroll for North America 8.9 PeopleBook, “(USF) Setting Up Additional U.S. FederalPayroll Functionality,” Establishing Pay Plans
PeopleSoft Enterprise HRMS 8.9 Application Fundamentals PeopleBook, “Setting Up Pay Calendars,”Creating Pay Calendars and FLSA Calendars
PeopleSoft Enterprise Human Resources 8.9 PeopleBook: Manage Base Compensation and Budgeting,“Setting Up Base Compensation and Budgeting,” Setting Up Salary Plans, Grades, and Steps
PeopleSoft Enterprise Human Resources 8.9 PeopleBook: Manage Employee Reviews, “Managing EmployeeReviews”
Chapter 6, “(USF) Hiring Employees,” page 141
Entering Data That Affects WGI Automatic ActionsBecause the automatic WGI process obtains information from many pages, be aware of entering informationthat might affect some of the data the system uses.
• Creating a PAR for a Change to a Lower Grade.
When you create a PAR with nature of action code 713, the system updates the WGI due date to reflectthe change. However, the change may affect the WGI due date and status in many ways. You need toverify that the information entered is correct for your specific circumstances. To remind you, the systemdisplays a warning message.
• Changing the WGI due date.
When you change the WGI due date, the system checks that the date you entered is the beginning of apay period. If it isn’t, it issues a warning message.
• Based on the WGI due date you entered, the system suggests the beginning of the pay period in which yourdate falls and the beginning of the next pay period.
You can enter one of these or keep your original date. If you decide to keep the date you’ve entered, the WGIprocess still identifies this employee as eligible for a step increase. However, if you enter a WGI due date inthe middle of a pay period, the pay increase takes effect only at the beginning of the following pay period.
• Adding historical rows.
When you insert a row with an effective date earlier than an automatic WGI that has already occurred, thesystem assigns a WGI status of Waiting. You probably do not want the system to process this row in anautomatic WGI and should change the WGI status to N/A. Depending on the nature of action, you mightneed to check other information, for example step, on this and subsequent pages.
• Inserting a row with an effective date equivalent to the current WGI due date.
PeopleSoft Proprietary and Confidential 437

(USF) Processing Automatic Actions for Probation, Tenure, and WGIs Chapter 17
The system processes the WGI after all other actions with the same effective date. It increments thesequence number of the WGI row it adds.
438 PeopleSoft Proprietary and Confidential

CHAPTER 18
(USF) Managing Leave
This chapter provides an overview of leave administration and discusses how to:
• Administer automatic leave enrollment.• Set up leave transfer programs.• Administer leave donations.• Administer leave recipients.• View leave transfer data.• Report on leave transfer programs.
Understanding Leave AdministrationThis section lists prerequisites and discusses:
• Automatic leave enrollment administration.• Leave transfer management.
PrerequisitesSet up Earnings codes and Earnings Accrual Classes.
See AlsoPeopleSoft Enterprise Payroll for North America 8.9 PeopleBook, “Defining Earnings Codes and EarningsPrograms”
Automatic Leave Enrollment AdministrationUse automatic leave enrollment functionality to enroll an employee automatically in an earnings accrual classwith personnel action request (PAR) activity or approval to participate in a leave program. The systemautomatically populates the employee’s leave enrollment record with default enrollment values based on theleave class rules you set up. You can manually override the defaults.
Here are the steps in administering automatic leave enrollment:
1. Set up the Leave Class Rules template (one-time set up).2. Set up Leave Class Rule criteria (one-time set up).3. Process PAR activity or approval to participate in a leave program.4. Run the Auto Leave Enrollment process.
PeopleSoft Proprietary and Confidential 439
(USF) Managing Leave Chapter 18
5. Review the results of the Auto Leave Enrollment process.6. Adjust enrollments as necessary.
Leave Transfer ManagementEach Federal Government agency may establish and administer procedures to permit the voluntary transfer ofannual leave between Federal Government employees in a time of crisis. A crisis can be a personal medicalemergency or a situation deemed as an emergency of the agency.
There are three types of programs in which employees may donate or receive annual leave hours. Theseprograms have similar but slightly different eligibility or usage rules. Employees may participate in morethan one program.
Voluntary Leave TransferProgram (VLTP)
Employees donate and receive annual leave hours directly from each other.
Emergency Leave TransferProgram (ELTP)
Employees donate and receive hours through an agency-managed emergencybank that has been created to deal with a specific emergency.
Leave Bank Employees donate and receive hours through an agency-managed leave bank.
Administering Automatic Leave EnrollmentThis section discusses how to:
• Set up the leave class rules template.
• Set up leave class rules criteria.
• Process automatic leave enrollment.
• Review automatic leave enrollment.
• Manually enter and adjust leave enrollment.
440 PeopleSoft Proprietary and Confidential

Chapter 18 (USF) Managing Leave
Pages Used to Administer Automatic Leave EnrollmentPage Name Object Name Navigation Usage
Leave Class Rules Template GVT_LVCLSRUL_TMPLT Set Up HRMS, ProductRelated, WorkforceAdministration, Absence,Leave Class Rules CriteriaUSF
Rank five rules criteria forthe purpose of breaking tiesif an employee qualifiesunder more than one leaveclass rule.
Leave Class Rules GVT_LV_CLS_RULES Set Up HRMS, ProductRelated, WorkforceAdministration, Absence,Leave Class Rules USF
Define your organization’srules for enrolling orterminating an employeefrom an earnings (leave)accrual class.
Automatic LeaveEnrollment
RUNCTL_FGASOFDT Workforce Administration,Leave Administration USF,Manage Leave Information,Request Auto LeaveEnrollment
Run the process thatautomatically enrollsemployees in earningsaccrual classes based onthe PAR or leave programactivity and the leave classrules.
Leave Class Auto EntryAudit
GVT_LVCLS_TRGR Workforce Administration,Leave AdministrationUSF, Manage LeaveInformation, Track AutoLeave Enrollment
Review the results ofthe Leave Class AutoEnrollment process.
Employee Accruals GVT_ACCR_PLAN Workforce Administration,Leave AdministrationUSF, Manage LeaveInformation, EmployeeAccruals Enrollment
Adjust employee enrollmentin earnings accrual classes ifthere is a reason to overridethe automatic enrollment.If your organization doesnot use the automatic leaveenrollment process, use thispage to enroll employees inaccrual classes.
Setting Up the Leave Class Rules TemplateAccess the Leave Class Rules Template page.
PeopleSoft Proprietary and Confidential 441

(USF) Managing Leave Chapter 18
Leave Class Rules Template page
Set up the Leave Class Rules template only once.
Leave Rule Criteria Field Select the PAR criteria and rank them on this page. These criteria correspondto the PAR Criteria fields on the GVT Leave Class Rules page, where youselect values for each criterion. The criteria that you select and rank are:ACTION: actionACTION_REASON: action/reason.GVT_NOA_CODE: nature of action code.GVT_PAY_PLAN: pay plan.GVT_TYPE_OF_APPT: type of appointment.GVT_WORK_SCHED: work schedule.
Rank Rank each criterion in order from 1 to 5, with 1 being the highest rank.The single rule where the employee transaction meets the highest-rankingcriteria is the rule the system uses as a tiebreaker if an employee qualifiesunder more than one rule.
Example of Tie BreakingThe following example illustrates how the system uses ranking to resolve situations where the employeequalifies under two different Leave Class Criteria rules.
442 PeopleSoft Proprietary and Confidential

Chapter 18 (USF) Managing Leave
Rule 1 Definitions Rule 2 Definitions
PAR Criteria:
Action: HIR
Work Schedule: Full-time
Pay Plan: GS
PAR Criteria:
Action: HIR
Work Schedule: Full-time
NOA code: 170
Default Enrollments:
Annual Leave
Sick Leave
Default Enrollments:
Annual Leave
Sick Leave
Home Leave
The employee meets all criteria for both rules. The Action and Work Schedule criteria are the same in bothrules.
• If pay plan is ranked higher than NOA code on the Leave Class Rules template, the system uses the first ruleto enroll the employee in leave classes.
• If NOA code is ranked higher than pay plan on the Leave Class Rules template, the system uses the secondrule to enroll the employee in leave classes.
Setting Up Leave Class Rule CriteriaAccess the Leave Class Rules page.
PeopleSoft Proprietary and Confidential 443

(USF) Managing Leave Chapter 18
Leave Class Rules page
Note. You do not need to set up a Leave Class Rule for terminating employees. The PeopleSoft EnterprisePayroll for North America Final Check Process requires that the employee stay enrolled to determine howmuch pay they are eligible for upon their separation. Once an employee has Terminated status, normal payrollcalculations in PeopleSoft Enterprise Payroll for North America no longer process that employee.
Leave Class Rule ID Identify each leave class rule you create.
Leave Class Rule CriteriaType
Assign a type to each new rule when you first enter the page. This valuedetermines which additional fields are available on the page. Values are:Hire/Rehire: for rules associated with hire or rehire actions.Leave Program Status: for rules associated with leave bank and transferprocessing.Non-Hire PAR actions: for rules associated with PAR actions that are nothire or rehire.
The value you select in the Leave Class Rule Criteria Type field affects which group boxes appear on the page.
444 PeopleSoft Proprietary and Confidential

Chapter 18 (USF) Managing Leave
Leave Class Rule Criteria Type Group Boxes
Hire/Rehire or
Non-Hire PAR actions
PAR Criteria
Default Enrollments
Leave Program Status Leave Program
Default Enrollments
PAR CriteriaOnly the criteria you selected and ranked on the Leave Class template appear in this group box. Select a valuefor a criterion if you want to process leave enrollment based on a designated value for that criterion under thisrule. The system processes enrollments based on the value of this field in the employee’s PAR transaction.
Default Enrollments
Earnings Accrual Class Select the earnings accrual classes that apply to this rule.
Elect Select to enroll employees in the earnings accrual class by this rule’s criteria.
Terminate Select to terminate employees from the earnings accrual class by this rule’scriteria.
Leave Program
Leave Program Type If an employee has been approved as a recipient of one of the leave transferprograms, you can define which accruals to enroll or terminate. Select the typeof leave transfer program Bank, Emergency, or Voluntary.
See AlsoPeopleSoft Enterprise Payroll for North America 8.9 PeopleBook, “(USF) Setting Up Additional U.S. FederalPayroll Functionality,” Defining Earnings Accrual Classes
Chapter 18, “(USF) Managing Leave,” Administering Leave Donations, page 454
Processing Auto Leave EnrollmentAfter you set up the Leave Class Rules template and the Leave Class Rule Criteria, you process any hire,PAR transaction, or leave program approval as you normally would through the Workforce Administration,Job Information menu.
When you are ready to enroll employees in earnings accrual classes, access the Automatic Leave Enrollmentpage. As Of Date is the run parameter. The Leave Class Auto Enrollment process (FGHR036) compares thePAR transactions and leave program approval against the leave class rule criteria and enrolls employees in theappropriate earnings accrual classes. You can set this process to run automatically or on demand.
Reviewing Auto Leave EnrollmentAccess the Leave Class Auto Entry Audit page.
PeopleSoft Proprietary and Confidential 445

(USF) Managing Leave Chapter 18
Leave Class Auto Entry Audit page
Note. Not all page elements are visible on this page. Depending on the page arrangement, you see additionalelements by scrolling either vertically or horizontally.
Use this page to view the outcome of each transaction that was processed by the Leave Class Auto Enrollmentprocess.
View by Status Select a value to sort the data by status (Leave Class Enrollment Trigger).Values are: Completed, Error, or Pending.The system records employees on this table with the status of Pending as soonas a PAR action is completed or the employee is approved into a leave program.The status changes to Completedwhen the auto enrollment process is complete.
Purge Completed Click to delete all data rows with the status (Leave Class Enrollment Trigger)of Completed.
Manually Entering or Adjusting Leave EnrollmentAccess the Employee Accruals page.
446 PeopleSoft Proprietary and Confidential
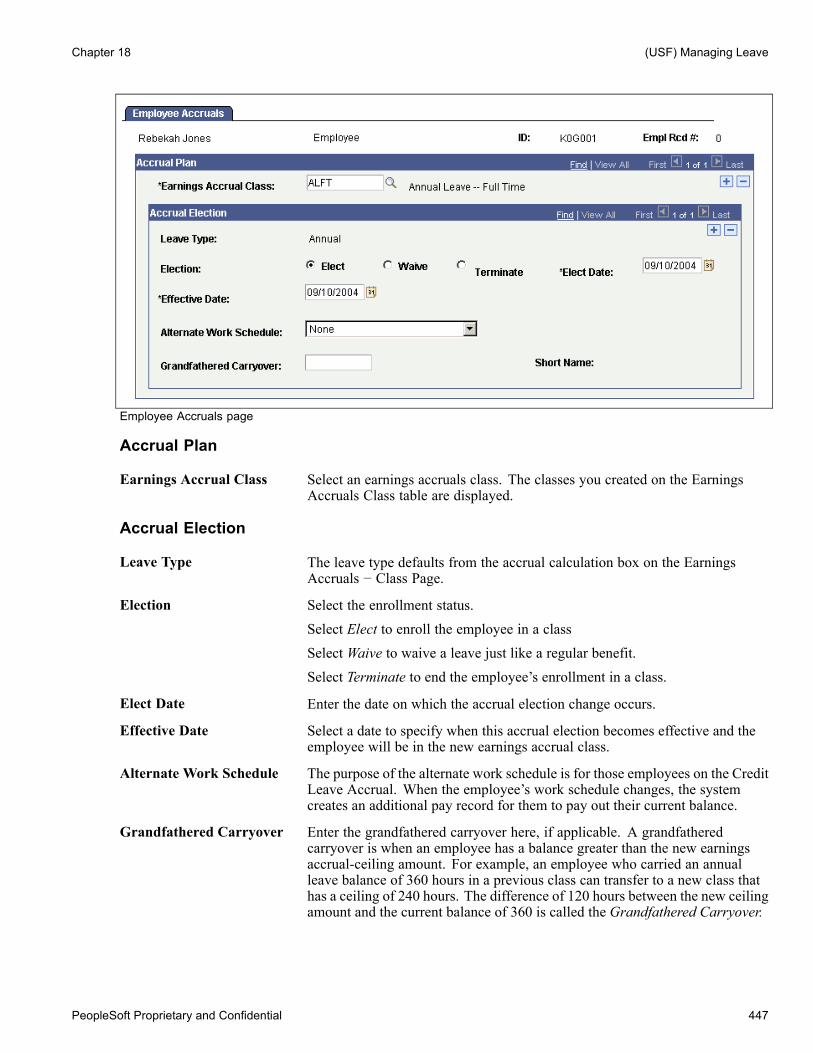
Chapter 18 (USF) Managing Leave
Employee Accruals page
Accrual Plan
Earnings Accrual Class Select an earnings accruals class. The classes you created on the EarningsAccruals Class table are displayed.
Accrual Election
Leave Type The leave type defaults from the accrual calculation box on the EarningsAccruals − Class Page.
Election Select the enrollment status.Select Elect to enroll the employee in a classSelect Waive to waive a leave just like a regular benefit.Select Terminate to end the employee’s enrollment in a class.
Elect Date Enter the date on which the accrual election change occurs.
Effective Date Select a date to specify when this accrual election becomes effective and theemployee will be in the new earnings accrual class.
Alternate Work Schedule The purpose of the alternate work schedule is for those employees on the CreditLeave Accrual. When the employee’s work schedule changes, the systemcreates an additional pay record for them to pay out their current balance.
Grandfathered Carryover Enter the grandfathered carryover here, if applicable. A grandfatheredcarryover is when an employee has a balance greater than the new earningsaccrual-ceiling amount. For example, an employee who carried an annualleave balance of 360 hours in a previous class can transfer to a new class thathas a ceiling of 240 hours. The difference of 120 hours between the new ceilingamount and the current balance of 360 is called the Grandfathered Carryover.
PeopleSoft Proprietary and Confidential 447

(USF) Managing Leave Chapter 18
See AlsoPeopleSoft Enterprise Payroll for North America 8.9 PeopleBook, “(USF) Setting Up Additional U.S. FederalPayroll Functionality,” Defining Earnings Accrual Classes
Setting Up Leave Transfer ProgramsTo set up leave transfer programs, use the Denial Code (GVT_DENIAL_CD_TBL), Leave Program TypeTable (GVT_LV_XFR_TYP_TBL), Leave Bank Details (GVT_LV_BANKMEM_SEC), and EmergencyLeave Transfer Details (GVT_LV_DON_TGT_SEC) components.
To set up leave transfer programs, you must define the programs and the earnings codes and accrual classesused for processing.
This section discusses how to:
• Set up denial codes and denial notification letter text.
• Set up leave transfer programs.
• Set up earnings codes for leave transfer.
• Set up earnings accrual classes for leave transfer.
• Set up leave class rules for leave transfer.
Pages Used to Set Up Leave TransfersPage Name Object Name Navigation Usage
Denial Code GVT_DENIAL_CD_TBL Set Up HRMS, ProductRelated, WorkforceAdministration, Absence,Leave Denial Codes USF
Set up denial reasons andspecify the text to be printedin denial notifications.
Leave Program Type Table GVT_LV_XFR_TYP_TBL Set Up HRMS, ProductRelated, WorkforceAdministration, Absence,Leave Transfer Type USF
Set up leave transferprograms, specify theprogram type, and indicatelimits on donations andbalances.
Leave Bank Details GVT_LV_BANKMEM_SEC Click the Leave Bank Detailsbutton on the Leave ProgramType Table page
Enter Leave Bank boardmembers.
Emergency Leave TransferDetails
GVT_LV_DON_TGT_SEC Click the Emergency LeaveTransfer Dt (emergencyleave transfer details) buttonon the Leave Program TypeTable page
Enter the number ofdonation hours targeted.
See AlsoPeopleSoft Enterprise Payroll for North America 8.9 PeopleBook, “(USF) Setting Up Additional U.S. FederalPayroll Functionality,” Defining Earnings Accrual Classes
Chapter 18, “(USF) Managing Leave,” Setting Up Leave Class Rule Criteria, page 443
448 PeopleSoft Proprietary and Confidential

Chapter 18 (USF) Managing Leave
Setting Up Denial Codes and Denial Notification Letter TextAccess the Denial Code page.
Denial Code page
Denial Letter Text Enter details of the reason for denial that you want to be printed on the LeaveDenial Notifications report (FGPY031).
Setting Up Leave Transfer ProgramsAccess the Leave Program Type Table page.
PeopleSoft Proprietary and Confidential 449

(USF) Managing Leave Chapter 18
Leave Program Type Table page
Leave Program Type Information
Leave Program Type Define your leave program codes.
Leave Program Select the type of leave transfer program (Bank, Emergency, Voluntary) toassociate with this Leave Program Type code.
Donation Limits andBalance Limits
Enter the Minimum Hours and Maximum Hours allowable for donationsand balances.
Leave Bank Details Click to access the Leave Bank Details page and enter the Leave Bank boardmembers and indicate those who are labor representatives. If you select Bankin the Leave Program group box, the system adds the Leave Bank Detailsbutton to the page when you save.
Emergency Leave TransferDt (emergency leave transferdetails)
Click to access the Emergency Leave Transfer Details page and record thenumber of donation target hours. If the Leave Program Type is Emergency,the system adds the Emergency Leave Transfer Details button to the pagewhen you save.
Setting Up Earnings Codes for Leave TransferSet up three unique earnings codes for three distinct purposes:
• For donors to donate leave to transfer programs.• For recipients to receive (accrue) leave from transfer programs.• For recipients to use leave accrued from transfer programs.
450 PeopleSoft Proprietary and Confidential

Chapter 18 (USF) Managing Leave
Leave Earning TypePeopleSoft provides five Leave Earning Type codes as translate values. Associate these types with earningscodes that you set up for processing leave transfers. The type code you select defines the function of theearnings code within the leave bank and transfer program. The following table summarizes the processingthat is triggered by these codes.
Leave Earn Type Leave Bank and TransferProcess
Earning Accrual Process
Donate to Bank Updates the donor’s Additional Paypage with the hours contributed to aLeave Bank Program.
Use the Leave Bank Applicationpage to enter requests.
Updates Leave Bank Ledger inquirypage with hours contributed.
Donor’s Annual:
• Increase Hours Taken YTD
• Reduce Balance YTD
Donate to Emergency Updates the donor’s Additional Paypage with the hours contributed to anEmergency Leave Transfer Program(ELTP).
Use the Leave Bank Applicationpage to enter requests.
Updates the Leave Ledger withhours contributed.
Donor’s Annual:
• Increase Hours Taken YTD
• Reduce Balance YTD
Donate to Recipient Updates the donor’s Additional Paypage with the hours contributedin the Voluntary Leave TransferProgram (VLTP).
Use the Donor Contribution page toenter requests.
Updates the Leave DonationTracking page.
Donor’s Annual:
• Increase Hours Taken YTD
• Reduce Balance YTD
PeopleSoft Proprietary and Confidential 451

(USF) Managing Leave Chapter 18
Leave Earn Type Leave Bank and TransferProcess
Earning Accrual Process
Received from Bank Updates the recipient’s AdditionalPay page with the hours receivedfrom the Bank or ELTP.
Use the Leave Recipient Info page toenter requests.
Updates Leave Ledgers with hourswithdrawn.
Leave Program Recipient:
Increase Balance YTD
Received from Donor Updates the recipient’s AdditionalPay page with the hours receivedthrough the VLTP.
Use the Leave Recipient Info page toenter requests.
Leave Program Recipient:
Increase Balance YTD
Setting Up Earnings Codes for Donors and Recipient AccrualsUse the Earnings Table component to set up earnings codes for donors and recipient accruals. You mustuse the specified values for the following fields:
• General page: In the Payment Type field, select Hours Only. Leave transfer earnings codes process hoursonly; there are no earnings or deductions associated.
• Taxes page: There are no taxes taken. In the Earning Allocation group box, select Maintain EarningsBalances.
• Federal Additional Earnings page: In the Leave Bank and Transfer Type group box, select the appropriateLeave Earnings Type.
• Calculation Page: The Multiplication Factor must be 0.0000 to ensure no earnings.
Setting Up an Earnings Code for Recipients to Use Transferred LeaveUse the Earnings Table component to set up earnings codes for recipients to use transferred leave. You mustuse the specified values for the following fields:
• General page: In the Payment Type field, select Hours Only.• Taxes page: The earnings are fully taxable. In the Earning Allocation group box, select Add to Gross,Maintain Earnings Balances, and Hours Only.
• Calculation Page: The Multiplication Factor must be 1.0000 to ensure the earning is paid at the regularhourly rate.
See AlsoPeopleSoft Enterprise Payroll for North America 8.9 PeopleBook, “Defining Earnings Codes and EarningsPrograms”
Setting Up Earnings Accrual Classes for Leave TransferSet up earning accrual classes for the following purposes:
452 PeopleSoft Proprietary and Confidential
Chapter 18 (USF) Managing Leave
• Leave program recipient.Once an employee is approved as a recipient in either a Bank, ELTP, or VLTP, they must be enrolled into anEarning Accrual Class to track hours received and used during their program participation.
• Deferred Annual/Sick Leave.When an employee is participating in either an Agency Bank or VLTP, they must terminate their enrollmentfrom regular annual and sick leave plans and enroll into the deferred annual and sick earning accrual classes.The deferred programs will track service hours and entitlement to a defined maximum accrual. For example,full time employees may accrue to the maximum of 40 hours.Employees participating in an ELTP are not subject to the accrual limit and do not need to be enrolledinto the deferred programs.
• Annual Leave.All donated hours are taken from the employee’s annual leave accrual class. Update each of your annualaccrual classes with the three donor earning codes defined with Donate to Bank, Donate to Emergency, andDonate to Recipient leave earning types.
Setting Up Earnings Accrual Classes for Leave Program RecipientsUse the Earnings Accruals component to set up earnings accrual classes for leave program recipients. Youmust use the specified values for the following fields:
• Class page: In the Leave Type field, select Leave Program.• Balance page: The values you enter depend upon the purpose of the earnings code you’re adding to the class.For earnings codes used to accrue recipient leave transfer, select Add to Hours Earned.For earnings codes used when recipients use transferred leave, select Add to Service Hours and Addto Hours Taken.
Setting Up Earnings Accrual Classes for Deferred Annual/SickUse the Earnings Accruals component to create a deferred earning accrual class for every annual and sickaccrual class that has a different accrual maximum during an employee participation in the leave bank ortransfer programs.
Deferred accrual classes need to mirror the accrual classes that they are replacing; the only difference in thetwo classes is the leave type and accrual ceiling.
For example, the Deferred Annual Accrual Class mirrors the Annual Accrual Class by having the same accrualcalculation, carryover, expiration/termination, accrual rates, and balance earning codes. The only difference inthe two classes is the Leave Type and Accrual Ceiling. In this example, enter the following information:
• Class page: In the Leave Type field, select Deferred Annual.• Ceiling/Carryover page: Set up the accrual ceiling as desired for the deferred accrual class.
Setting Up Annual Accrual Classes for Leave Transfer ProcessingAll donated hours to bank and transfer programs are withdrawn from the employee’s Annual Leave AccrualClass. You must update all your Annual Accrual Class Balance tables with the three earning codes you set upwith the leave earnings types of Donate to Bank, Donate to Emergency, and Donate to Recipient.
See AlsoPeopleSoft Enterprise Payroll for North America 8.9 PeopleBook, “(USF) Setting Up Additional U.S. FederalPayroll Functionality,” Defining Earnings Accrual Classes
PeopleSoft Proprietary and Confidential 453

(USF) Managing Leave Chapter 18
Setting Up Leave Class Rules for Leave TransferAccess the Leave Class Rules page.
You can define leave class rules to enroll an approved recipient automatically into the accrual class that youcreate to track leave program activity. Use this page to define the automatic enrollment rule for each leaveprogram type you set up.
• Select Leave Program Status as the Leave Class Rules Criteria Type.• Select the appropriate Leave Program Type.
See AlsoChapter 18, “(USF) Managing Leave,” Setting Up Leave Class Rule Criteria, page 443
Administering Leave DonationsEmployees may donate hours to an agency Leave Bank, ELTP, or VTLP. The contribution process is the samefor the Bank and ELTP programs, where hours are donated to a common pool. However, the contributionprocess is different for the VLTP, where the hours are donated directly to an employee.
This section discusses how to:
• Enter employee requests to contribute leave to a Leave Bank or ELTP.
• Enter employee donations to the VLTP.
• Enter employee requests to donate to another agency’s leave transfer program.
• Run the Leave Bank and Transfer process to process donations and update accruals, additional pay, andleave ledgers.
454 PeopleSoft Proprietary and Confidential
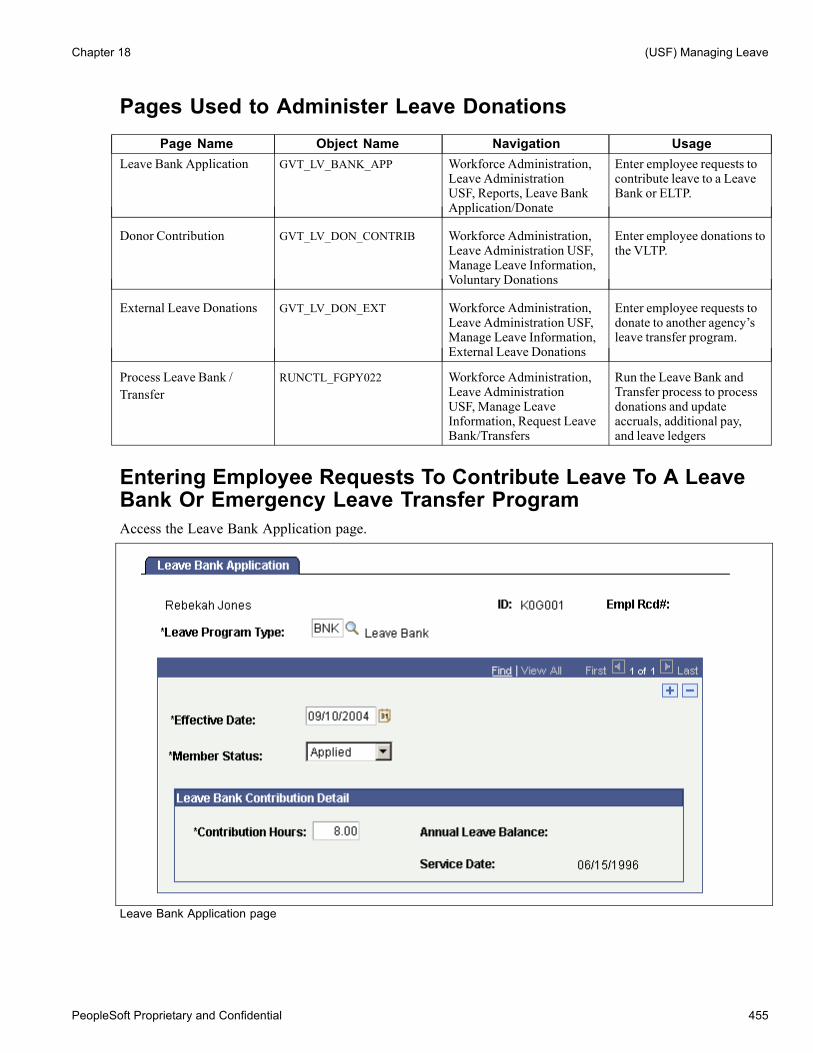
Chapter 18 (USF) Managing Leave
Pages Used to Administer Leave DonationsPage Name Object Name Navigation Usage
Leave Bank Application GVT_LV_BANK_APP Workforce Administration,Leave AdministrationUSF, Reports, Leave BankApplication/Donate
Enter employee requests tocontribute leave to a LeaveBank or ELTP.
Donor Contribution GVT_LV_DON_CONTRIB Workforce Administration,Leave Administration USF,Manage Leave Information,Voluntary Donations
Enter employee donations tothe VLTP.
External Leave Donations GVT_LV_DON_EXT Workforce Administration,Leave Administration USF,Manage Leave Information,External Leave Donations
Enter employee requests todonate to another agency’sleave transfer program.
Process Leave Bank /Transfer
RUNCTL_FGPY022 Workforce Administration,Leave AdministrationUSF, Manage LeaveInformation, Request LeaveBank/Transfers
Run the Leave Bank andTransfer process to processdonations and updateaccruals, additional pay,and leave ledgers
Entering Employee Requests To Contribute Leave To A LeaveBank Or Emergency Leave Transfer ProgramAccess the Leave Bank Application page.
Leave Bank Application page
PeopleSoft Proprietary and Confidential 455
(USF) Managing Leave Chapter 18
Leave Program Type Select the leave program type to which the employee is donating. Validvalues are the Leave Program Types you set up for Bank and Emergencyleave programs.
Effective Date The request date of the application.
Member Status Select or view the member status of the leave request. Values are:Applied: The Leave Bank Board has not processed the request and no annualleave contributions have been taken from the employee’s current EarningsAccrual Class balance.Approved: The leave review board has approved the donor’s leave request.The system processes only Approved requests.Contribute: The system processes the hours during the next payroll cycle andupdates the hours on the employee’s additional pay to reduce the balance by thedonation hours on the application. Only the system can update the applicant’srequest to Contribute; it issues an error message if you select this value.Cancelled: Indicates any other reason that the request is terminated.Denied: The Leave Bank Board has evaluated the request and denied thedonor’s leave request.
Denial Reason 1 and 2 These fields appear if you select Denied as the Member Status. You mustprovide the applicant with at least one reason for denial.
Contribution Hours Specify the number of hours the donor is contributing to the leave bankor ELTP.
Annual Leave Balance Displays the number of hours of annual leave the employee has as of thisrequest date (Effective Date).
Service Date The basis for determining the length of service, on which the requiredcontribution minimum is based.
Entering Employee Donations to Voluntary LeaveTransfer ProgramAccess the Donor Contribution page.
456 PeopleSoft Proprietary and Confidential

Chapter 18 (USF) Managing Leave
Donor Contribution page
Note. Not all page elements are visible on this page. Depending on the page arrangement, you see additionalelements by scrolling either vertically or horizontally.
Recipient information is displayed at the top of the page.
Effective Date The date of the donation.
Donor TrackingIn this group box, enter the donor information. The system enters the pay period in which the donation wasprocessed. Donations are not processed until the recipient’s application is approved.
The Return to, Returned Processed, and Pay Period Return Date assist you in recording your manual leavedonation return process. If an employee has donated leave, and it is not needed, it may be returned to the donor.
Return to Acknowledges the donor’s choice for the disposition of where the leave shouldbe returned in the case that any unused leave is returned. Valid values areDonor or Bank. This field is informational only and used to used to track thereturn of excess leave donation hours.
Returned Processed When a leave recipient has excess leave when their emergency is over, selectthis check box when the leave amount to be returned is restored to the Donor.This field is informational only and used to track the return of excess leavedonation hours.
Pay Period Return Date Enter the date the leave is restored to the donor. The field is informational onlyand used to track the return of excess leave donation hours.
Entering Employee Requests To Donate To AnotherAgency’s Leave Transfer ProgramAccess the External Leave Donations page.
PeopleSoft Proprietary and Confidential 457
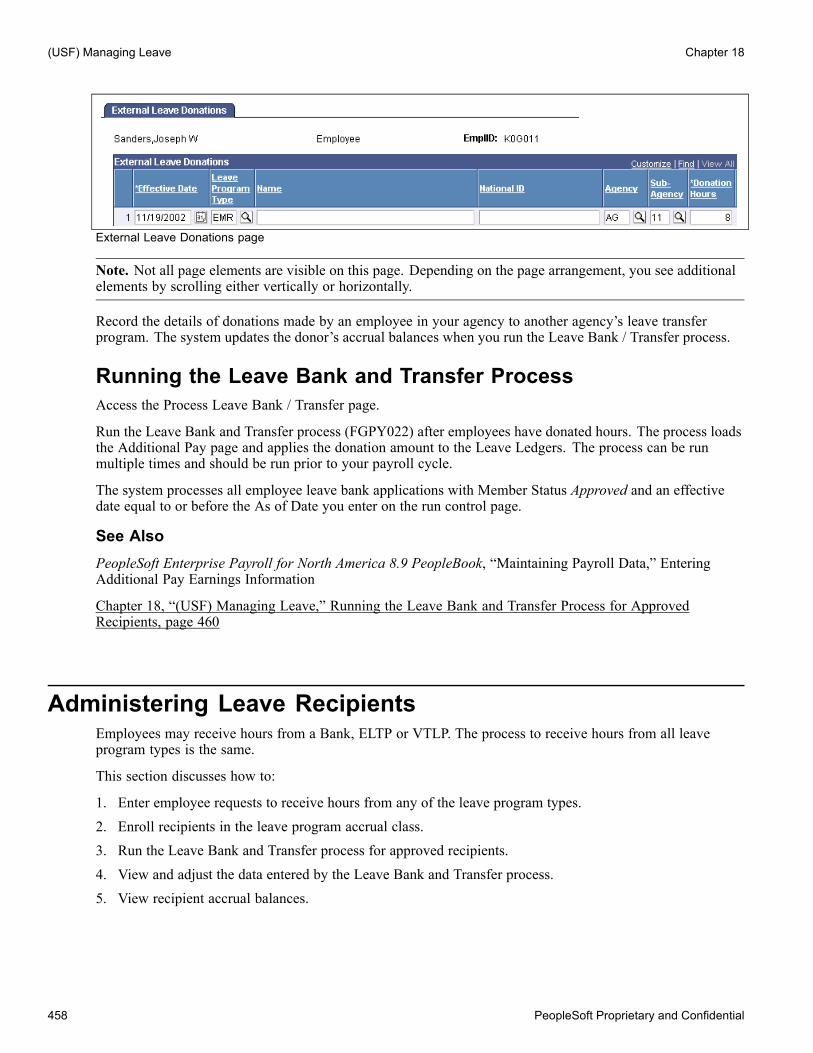
(USF) Managing Leave Chapter 18
External Leave Donations page
Note. Not all page elements are visible on this page. Depending on the page arrangement, you see additionalelements by scrolling either vertically or horizontally.
Record the details of donations made by an employee in your agency to another agency’s leave transferprogram. The system updates the donor’s accrual balances when you run the Leave Bank / Transfer process.
Running the Leave Bank and Transfer ProcessAccess the Process Leave Bank / Transfer page.
Run the Leave Bank and Transfer process (FGPY022) after employees have donated hours. The process loadsthe Additional Pay page and applies the donation amount to the Leave Ledgers. The process can be runmultiple times and should be run prior to your payroll cycle.
The system processes all employee leave bank applications with Member Status Approved and an effectivedate equal to or before the As of Date you enter on the run control page.
See AlsoPeopleSoft Enterprise Payroll for North America 8.9 PeopleBook, “Maintaining Payroll Data,” EnteringAdditional Pay Earnings Information
Chapter 18, “(USF) Managing Leave,” Running the Leave Bank and Transfer Process for ApprovedRecipients, page 460
Administering Leave RecipientsEmployees may receive hours from a Bank, ELTP or VTLP. The process to receive hours from all leaveprogram types is the same.
This section discusses how to:
1. Enter employee requests to receive hours from any of the leave program types.
2. Enroll recipients in the leave program accrual class.
3. Run the Leave Bank and Transfer process for approved recipients.
4. View and adjust the data entered by the Leave Bank and Transfer process.
5. View recipient accrual balances.
458 PeopleSoft Proprietary and Confidential
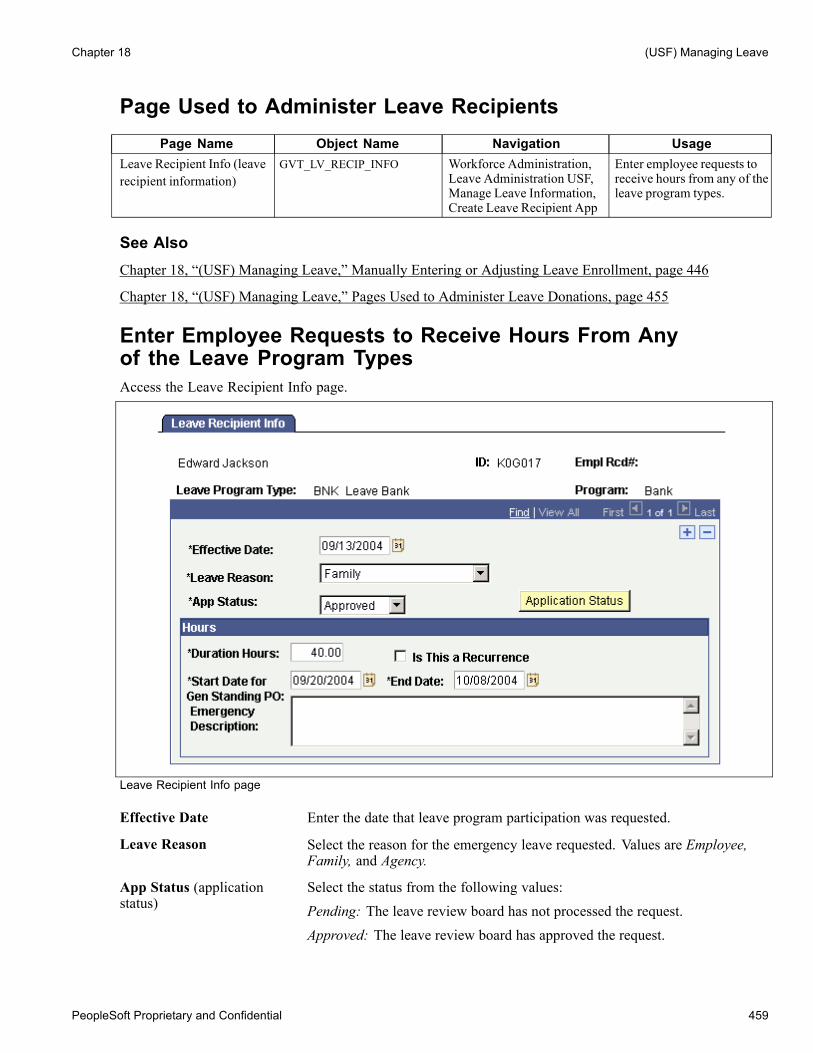
Chapter 18 (USF) Managing Leave
Page Used to Administer Leave RecipientsPage Name Object Name Navigation Usage
Leave Recipient Info (leaverecipient information)
GVT_LV_RECIP_INFO Workforce Administration,Leave Administration USF,Manage Leave Information,Create Leave Recipient App
Enter employee requests toreceive hours from any of theleave program types.
See AlsoChapter 18, “(USF) Managing Leave,” Manually Entering or Adjusting Leave Enrollment, page 446
Chapter 18, “(USF) Managing Leave,” Pages Used to Administer Leave Donations, page 455
Enter Employee Requests to Receive Hours From Anyof the Leave Program TypesAccess the Leave Recipient Info page.
Leave Recipient Info page
Effective Date Enter the date that leave program participation was requested.
Leave Reason Select the reason for the emergency leave requested. Values are Employee,Family, and Agency.
App Status (applicationstatus)
Select the status from the following values:Pending: The leave review board has not processed the request.Approved: The leave review board has approved the request.
PeopleSoft Proprietary and Confidential 459
(USF) Managing Leave Chapter 18
Denied: The leave review board has denied the request.Separated: The employee separated from Federal service before the originallyrequested end date.Cancelled: Any other reason that the request is not active.
Position Data Click to view the position number, pay plan, grade, and step of the potentialleave recipient as of the request date. Standard hours and tour of duty are usedto validate the minimum number of absence hours.
Application Status Click to identify the approver and the status Date. If the Leave RecipientApplication has a status of Denied, then you may enter up to two. You mustenter at least one denial reason. These codes are used later when generatingLeave Recipient Denial letters.
Hours
Duration Hours Enter the number of hours requested (to the quarter-hour).
Is this a recurrence Select if the reason is a recurrence.
Start Date and End Date Enter the days on which the recipient requests the leave to begin and end.
Emergency Description Detail the reasons for needing transferred leave, including a brief descriptionof the nature and severity of the emergency.
Enrolling Recipients in the Leave Program Accrual ClassWhile receiving hours from a leave program, the recipient must be enrolled in the leave program accrualclass to record hours donated and used.
If the program is either a Bank or VLTP, terminate enrollment from their regular and sick earnings accrualclasses using the Employee Accruals page. Then enroll the recipient into the deferred accrual classes to trackaccruals during the program participation and enforce the maximum entitlement.
If there is an auto enrollment leave class rule set up for the leave programs, then once the approved request issaved, the application opens the employee’s Employee Accruals page and inserts the earning accrual definedin the class rule. While in the page, you may terminate the annual and sick and enroll the employee in thedeferred annual and sick accrual classes.
See AlsoChapter 18, “(USF) Managing Leave,” Manually Entering or Adjusting Leave Enrollment, page 446
Running the Leave Bank and Transfer Processfor Approved RecipientsAccess the Process Leave Bank / Transfer page.
The Leave Bank & Transfer process (FGPY022) processes Approved recipients.
If the employee is participating in a Bank or ELTP, the process:
• Updates the recipient’s Additional Pay page with the earnings code defined on the Earnings Code Table withReceived from Bank as the Leave Earning Type.
• Updates the Leave Ledger with hours withdrawn.
460 PeopleSoft Proprietary and Confidential
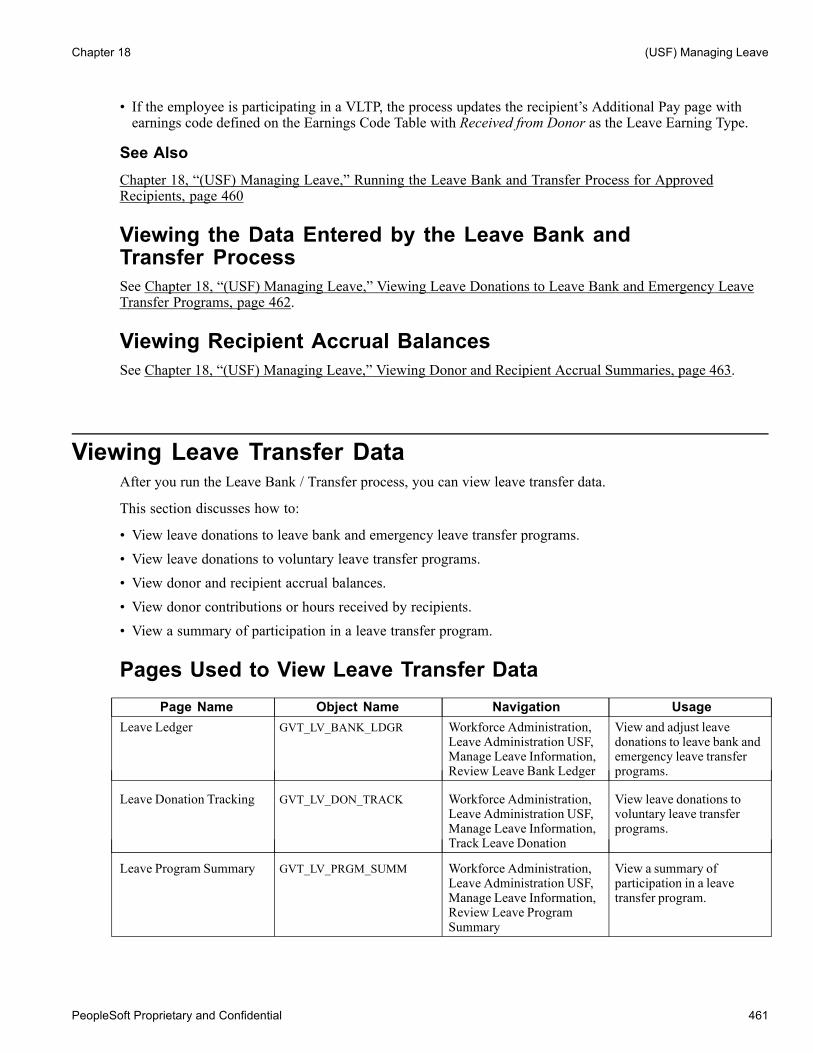
Chapter 18 (USF) Managing Leave
• If the employee is participating in a VLTP, the process updates the recipient’s Additional Pay page withearnings code defined on the Earnings Code Table with Received from Donor as the Leave Earning Type.
See AlsoChapter 18, “(USF) Managing Leave,” Running the Leave Bank and Transfer Process for ApprovedRecipients, page 460
Viewing the Data Entered by the Leave Bank andTransfer ProcessSee Chapter 18, “(USF) Managing Leave,” Viewing Leave Donations to Leave Bank and Emergency LeaveTransfer Programs, page 462.
Viewing Recipient Accrual BalancesSee Chapter 18, “(USF) Managing Leave,” Viewing Donor and Recipient Accrual Summaries, page 463.
Viewing Leave Transfer DataAfter you run the Leave Bank / Transfer process, you can view leave transfer data.
This section discusses how to:
• View leave donations to leave bank and emergency leave transfer programs.• View leave donations to voluntary leave transfer programs.• View donor and recipient accrual balances.• View donor contributions or hours received by recipients.• View a summary of participation in a leave transfer program.
Pages Used to View Leave Transfer DataPage Name Object Name Navigation Usage
Leave Ledger GVT_LV_BANK_LDGR Workforce Administration,Leave Administration USF,Manage Leave Information,Review Leave Bank Ledger
View and adjust leavedonations to leave bank andemergency leave transferprograms.
Leave Donation Tracking GVT_LV_DON_TRACK Workforce Administration,Leave Administration USF,Manage Leave Information,Track Leave Donation
View leave donations tovoluntary leave transferprograms.
Leave Program Summary GVT_LV_PRGM_SUMM Workforce Administration,Leave Administration USF,Manage Leave Information,Review Leave ProgramSummary
View a summary ofparticipation in a leavetransfer program.
PeopleSoft Proprietary and Confidential 461
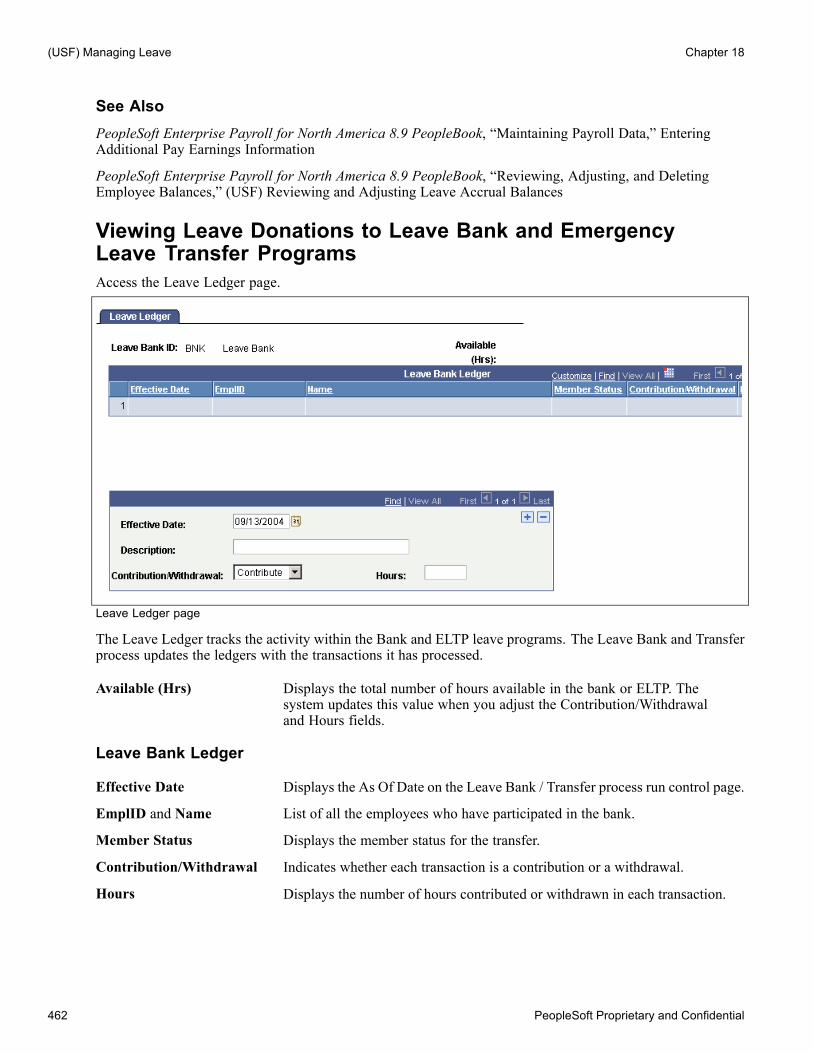
(USF) Managing Leave Chapter 18
See AlsoPeopleSoft Enterprise Payroll for North America 8.9 PeopleBook, “Maintaining Payroll Data,” EnteringAdditional Pay Earnings Information
PeopleSoft Enterprise Payroll for North America 8.9 PeopleBook, “Reviewing, Adjusting, and DeletingEmployee Balances,” (USF) Reviewing and Adjusting Leave Accrual Balances
Viewing Leave Donations to Leave Bank and EmergencyLeave Transfer ProgramsAccess the Leave Ledger page.
Leave Ledger page
The Leave Ledger tracks the activity within the Bank and ELTP leave programs. The Leave Bank and Transferprocess updates the ledgers with the transactions it has processed.
Available (Hrs) Displays the total number of hours available in the bank or ELTP. Thesystem updates this value when you adjust the Contribution/Withdrawaland Hours fields.
Leave Bank Ledger
Effective Date Displays the As Of Date on the Leave Bank / Transfer process run control page.
EmplID and Name List of all the employees who have participated in the bank.
Member Status Displays the member status for the transfer.
Contribution/Withdrawal Indicates whether each transaction is a contribution or a withdrawal.
Hours Displays the number of hours contributed or withdrawn in each transaction.
462 PeopleSoft Proprietary and Confidential

Chapter 18 (USF) Managing Leave
Agency Ledger AdjustmentsTo adjust the hours, enter the effective date, the reason for the adjustment, and the hours to add or subtract.The system updates the Available Hours balance at the top of the page.
Viewing Leave Donations to Voluntary Leave Transfer ProgramsAccess the Leave Donation Tracking page.
Leave Donation Tracking page
Note. Not all page elements are visible on this page. Depending on the page arrangement, you see additionalelements by scrolling either vertically or horizontally.
The Leave Donation Tracking page tracks the activity within the VLTP program. The Leave Bank & Transferprocess updates this page with the transactions it has processed.
The page lists the donor’s contributions by effective date and recipient.
Viewing Donor and Recipient Accrual SummariesView donor and recipient accrual balances on the Accrual Summary page after payroll is processed andleave accruals are run.
• Donors: The fields Hours Taken Year-to-Date and Hours Balance Year-to-Date are updated with the hourscontributed.
• Recipients: Leave program earning accrual is updated with the hours received. When the recipient useshours, the Hours Taken Year-to-Date and Service Hours YTD are updated.
• Recipients who terminate regular and sick accrual classes and enroll in deferred accrual classes: Thedeferred accrual class is updated with the pay period’s Service Hours YTD, Hours Earned Year-to-Date, andHours Balance Year-to-Date.
See AlsoPeopleSoft Enterprise Payroll for North America 8.9 PeopleBook, “Reviewing, Adjusting, and DeletingEmployee Balances,” (USF) Reviewing and Adjusting Leave Accrual Balances
Viewing Donor Contributions or Hours Received by RecipientsThe Leave Bank and Transfer process inserts a row in the Additional Pay page for hours donated or received.The new row contains donor contribution or hours received information in the following fields.
Earnings Code The earnings code associated with the appropriate Leave Earn Type.
PeopleSoft Proprietary and Confidential 463

(USF) Managing Leave Chapter 18
Effective Date The As Of Date on the Leave Bank / Transfer page.
Earnings End Date The end date of the pay period in which the effective date falls.
Hours The hours donated or received.
Viewing a Summary of Participation in a Leave Transfer ProgramAccess the Leave Program Summary page.
Leave Program Summary page
From Date and Thru Date Define the time period for which you want to see a summary.
Calculate Leave Summary Click after entering the date range. The system displays summary information.
Participants The system displays the number of approved participants and deniedparticipants.
Total Hours The system displays the total number of hours contributed, the total numberof hours used, and the number of hours available for use (derived from thecontribution hours and used hours).
Reporting on Leave Transfer ProgramsPeopleSoft provides the following leave transfer reports:
• FGPY028 − Leave Acceptance Notifications.• FGPY029 − Leave Bank Participants (required by OPM).• FGPY030 − Leave Transfer Participants (required by OPM).
464 PeopleSoft Proprietary and Confidential

Chapter 18 (USF) Managing Leave
• FGPY031 − Leave Denial Notifications.
See AlsoPeopleSoft Enterprise Payroll for North America 8.9 PeopleBook, “PeopleSoft Enterprise Payroll for NorthAmerica Reports”
PeopleSoft Proprietary and Confidential 465

(USF) Managing Leave Chapter 18
466 PeopleSoft Proprietary and Confidential

Glossary of PeopleSoft Terms
absence entitlement This element defines rules for granting paid time off for valid absences, such as sicktime, vacation, and maternity leave. An absence entitlement element defines theentitlement amount, frequency, and entitlement period.
absence take This element defines the conditions that must be met before a payee is entitledto take paid time off.
academic career In PeopleSoft Enterprise Campus Solutions, all course work that a student undertakesat an academic institution and that is grouped in a single student record. For example,a university that has an undergraduate school, a graduate school, and variousprofessional schools might define several academic careers—an undergraduate career,a graduate career, and separate careers for each professional school (law school,medical school, dental school, and so on).
academic institution In PeopleSoft Enterprise Campus Solutions, an entity (such as a university or college)that is independent of other similar entities and that has its own set of rules andbusiness processes.
academic organization In PeopleSoft Enterprise Campus Solutions, an entity that is part of the administrativestructure within an academic institution. At the lowest level, an academic organizationmight be an academic department. At the highest level, an academic organization canrepresent a division.
academic plan In PeopleSoft Enterprise Campus Solutions, an area of study—such as a major, minor,or specialization—that exists within an academic program or academic career.
academic program In PeopleSoft Enterprise Campus Solutions, the entity to which a student applies and isadmitted and from which the student graduates.
accounting class In PeopleSoft Enterprise Performance Management, the accounting class defines howa resource is treated for generally accepted accounting practices. The Inventoryclass indicates whether a resource becomes part of a balance sheet account, such asinventory or fixed assets, while the Non-inventory class indicates that the resource istreated as an expense of the period during which it occurs.
accounting date The accounting date indicates when a transaction is recognized, as opposed to the datethe transaction actually occurred. The accounting date and transaction date can be thesame. The accounting date determines the period in the general ledger to which thetransaction is to be posted. You can only select an accounting date that falls within anopen period in the ledger to which you are posting. The accounting date for an itemis normally the invoice date.
accounting split The accounting split method indicates how expenses are allocated or divided amongone or more sets of accounting ChartFields.
accumulator You use an accumulator to store cumulative values of defined items as they areprocessed. You can accumulate a single value over time or multiple values overtime. For example, an accumulator could consist of all voluntary deductions, or allcompany deductions, enabling you to accumulate amounts. It allows total flexibilityfor time periods and values accumulated.
action reason The reason an employee’s job or employment information is updated. The actionreason is entered in two parts: a personnel action, such as a promotion, termination, orchange from one pay group to another—and a reason for that action. Action reasonsare used by PeopleSoft Human Resources, PeopleSoft Benefits Administration,
PeopleSoft Proprietary and Confidential 467
Glossary
PeopleSoft Stock Administration, and the COBRAAdministration feature of theBase Benefits business process.
action template In PeopleSoft Receivables, outlines a set of escalating actions that the system or userperforms based on the period of time that a customer or item has been in an actionplan for a specific condition.
activity In PeopleSoft Enterprise LearningManagement, an instance of a catalog item(sometimes called a class) that is available for enrollment. The activity definessuch things as the costs that are associated with the offering, enrollment limits anddeadlines, and waitlisting capacities.
In PeopleSoft Enterprise Performance Management, the work of an organization andthe aggregation of actions that are used for activity-based costing.
In PeopleSoft Project Costing, the unit of work that provides a further breakdown ofprojects—usually into specific tasks.
In PeopleSoft Workflow, a specific transaction that you might need to perform in abusiness process. Because it consists of the steps that are used to perform a transaction,it is also known as a step map.
address usage In PeopleSoft Enterprise Campus Solutions, a grouping of address types defining theorder in which the address types are used. For example, you might define an addressusage code to process addresses in the following order: billing address, dormitoryaddress, home address, and then work address.
adjustment calendar In PeopleSoft Enterprise Campus Solutions, the adjustment calendar controls how aparticular charge is adjusted on a student’s account when the student drops classesor withdraws from a term. The charge adjustment is based on how much time haselapsed from a predetermined date, and it is determined as a percentage of the originalcharge amount.
administrative function In PeopleSoft Enterprise Campus Solutions, a particular functional area that processeschecklists, communication, and comments. The administrative function identifieswhich variable data is added to a person’s checklist or communication record when aspecific checklist code, communication category, or comment is assigned to thestudent. This key data enables you to trace that checklist, communication, or commentback to a specific processing event in a functional area.
admit type In PeopleSoft Enterprise Campus Solutions, a designation used to distinguishfirst-year applications from transfer applications.
agreement In PeopleSoft eSettlements, provides a way to group and specify processing options,such as payment terms, pay from a bank, and notifications by a buyer and supplierlocation combination.
allocation rule In PeopleSoft Enterprise Incentive Management, an expression within compensationplans that enables the system to assign transactions to nodes and participants. Duringtransaction allocation, the allocation engine traverses the compensation structurefrom the current node to the root node, checking each node for plans that containallocation rules.
alternate account A feature in PeopleSoft General Ledger that enables you to create a statutory chartof accounts and enter statutory account transactions at the detail transaction level, asrequired for recording and reporting by some national governments.
analysis database In PeopleSoft Enterprise Campus Solutions, database tables that store large amountsof student information that may not appear in standard report formats. The analysisdatabase tables contain keys for all objects in a report that an application program canuse to reference other student-record objects that are not contained in the printedreport. For instance, the analysis database contains data on courses that are consideredfor satisfying a requirement but that are rejected. It also contains information on
468 PeopleSoft Proprietary and Confidential

Glossary
courses captured by global limits. An analysis database is used in PeopleSoftEnterprise Academic Advisement.
ApplicationMessaging PeopleSoft Application Messaging enables applications within the PeopleSoftEnterprise product family to communicate synchronously or asynchronously withother PeopleSoft and third-party applications. An application message defines therecords and fields to be published or subscribed to.
AR specialist Abbreviation for receivables specialist. In PeopleSoft Receivables, an individual inwho tracks and resolves deductions and disputed items.
arbitration plan In PeopleSoft Enterprise Pricer, defines how price rules are to be applied to the baseprice when the transaction is priced.
assessment rule In PeopleSoft Receivables, a user-defined rule that the system uses to evaluate thecondition of a customer’s account or of individual items to determine whether togenerate a follow-up action.
asset class An asset group used for reporting purposes. It can be used in conjunction with the assetcategory to refine asset classification.
attribute/value pair In PeopleSoft Directory Interface, relates the data that makes up an entry in thedirectory information tree.
audience In PeopleSoft Enterprise Campus Solutions, a segment of the database that relatesto an initiative, or a membership organization that is based on constituent attributesrather than a dues-paying structure. Examples of audiences include the Class of ’65and Undergraduate Arts & Sciences.
authentication server A server that is set up to verify users of the system.
base time period In PeopleSoft Business Planning, the lowest level time period in a calendar.
benchmark job In PeopleSoft Workforce Analytics, a benchmark job is a job code for which there iscorresponding salary survey data from published, third-party sources.
billing career In PeopleSoft Enterprise Campus Solutions, the one career under which other careersare grouped for billing purposes if a student is active simultaneously in multiplecareers.
bio bit or bio brief In PeopleSoft Enterprise Campus Solutions, a report that summarizes informationstored in the system about a particular constituent. You can generate standard orspecialized reports.
book In PeopleSoft Asset Management, used for storing financial and tax information, suchas costs, depreciation attributes, and retirement information on assets.
branch A tree node that rolls up to nodes above it in the hierarchy, as defined in PeopleSoftTree Manager.
budgetary account only An account used by the system only and not by users; this type of account doesnot accept transactions. You can only budget with this account. Formerly called“system-maintained account.”
budget check In commitment control, the processing of source transactions against control budgetledgers, to see if they pass, fail, or pass with a warning.
budget control In commitment control, budget control ensures that commitments and expendituresdon’t exceed budgets. It enables you to track transactions against correspondingbudgets and terminate a document’s cycle if the defined budget conditions are not met.For example, you can prevent a purchase order from being dispatched to a vendor ifthere are insufficient funds in the related budget to support it.
PeopleSoft Proprietary and Confidential 469

Glossary
budget period The interval of time (such as 12 months or 4 quarters) into which a period is dividedfor budgetary and reporting purposes. The ChartField allows maximum flexibility todefine operational accounting time periods without restriction to only one calendar.
business activity The name of a subset of a detailed business process. This might be a specifictransaction, task, or action that you perform in a business process.
business event In PeopleSoft Receivables, defines the processing characteristics for the ReceivableUpdate process for a draft activity.
In PeopleSoft Sales Incentive Management, an original business transaction or activitythat may justify the creation of a PeopleSoft Enterprise Incentive Management event(a sale, for example).
business process A standard set of 17 business processes are defined and maintained by the PeopleSoftproduct families and are supported by Business Process Engineering group atPeopleSoft. An example of a business process is Order Fulfillment, which is a businessprocess that manages sales orders and contracts, inventory, billing, and so forth.
See also detailed business process.
business task The name of the specific function depicted in one of the business processes.
business unit A corporation or a subset of a corporation that is independent with regard to one ormore operational or accounting functions.
buyer In PeopleSoft eSettlements, an organization (or business unit, as opposed to anindividual) that transacts with suppliers (vendors) within the system. A buyer createspayments for purchases that are made in the system.
campus In PeopleSoft Enterprise Campus Solutions, an entity that is usually associated witha distinct physical administrative unit, that belongs to a single academic institution,that uses a unique course catalog, and that produces a common transcript for studentswithin the same academic career.
catalog item In PeopleSoft Enterprise LearningManagement, a specific topic that a learner canstudy and have tracked. For example, “Introduction to Microsoft Word.” A catalogitem contains general information about the topic and includes a course code,description, categorization, keywords, and delivery methods. A catalog item canhave one or more learning activities.
catalog map In PeopleSoft Catalog Management, translates values from the catalog source data tothe format of the company’s catalog.
catalog partner In PeopleSoft Catalog Management, shares responsibility with the enterprise catalogmanager for maintaining catalog content.
categorization Associates partner offerings with catalog offerings and groups them into enterprisecatalog categories.
category In PeopleSoft Enterprise Campus Solutions, a broad grouping to which specificcomments or communications (contexts) are assigned. Category codes are also linkedto 3C access groups so that you can assign data-entry or view-only privileges acrossfunctions.
channel In PeopleSoft MultiChannel Framework, email, chat, voice (computer telephoneintegration [CTI]), or a generic event.
ChartField A field that stores a chart of accounts, resources, and so on, depending on thePeopleSoft application. ChartField values represent individual account numbers,department codes, and so forth.
ChartField balancing You can require specific ChartFields to match up (balance) on the debit and the creditside of a transaction.
470 PeopleSoft Proprietary and Confidential

Glossary
ChartField combination edit The process of editing journal lines for valid ChartField combinations based onuser-defined rules.
ChartKey One or more fields that uniquely identify each row in a table. Some tables contain onlyone field as the key, while others require a combination.
checkbook In PeopleSoft Promotions Management, enables you to view financial data (such asplanned, incurred, and actual amounts) that is related to funds and trade promotions.
checklist code In PeopleSoft Enterprise Campus Solutions, a code that represents a list of plannedor completed action items that can be assigned to a staff member, volunteer, or unit.Checklists enable you to view all action assignments on one page.
class In PeopleSoft Enterprise Campus Solutions, a specific offering of a course componentwithin an academic term.
See also course.
Class ChartField A ChartField value that identifies a unique appropriation budget key when youcombine it with a fund, department ID, and program code, as well as a budget period.Formerly called sub-classification.
clearance In PeopleSoft Enterprise Campus Solutions, the period of time during which aconstituent in PeopleSoft Contributor Relations is approved for involvement in aninitiative or an action. Clearances are used to prevent development officers frommaking multiple requests to a constituent during the same time period.
clone In PeopleCode, to make a unique copy. In contrast, to copymay mean making anew reference to an object, so if the underlying object is changed, both the copy andthe original change.
cohort In PeopleSoft Enterprise Campus Solutions, the highest level of the three-levelclassification structure that you define for enrollment management. You can define acohort level, link it to other levels, and set enrollment target numbers for it.
See also population and division.
collection To make a set of documents available for searching in Verity, you must first createat least one collection. A collection is set of directories and files that allow searchapplication users to use the Verity search engine to quickly find and display sourcedocuments that match search criteria. A collection is a set of statistics and pointersto the source documents, stored in a proprietary format on a file server. Because acollection can only store information for a single location, PeopleSoft maintains a setof collections (one per language code) for each search index object.
collection rule In PeopleSoft Receivables, a user-defined rule that defines actions to take for acustomer based on both the amount and the number of days past due for outstandingbalances.
comm key See communication key.
communication key In PeopleSoft Enterprise Campus Solutions, a single code for entering a combinationof communication category, communication context, communication method,communication direction, and standard letter code. Communication keys (also calledcomm keys or speed keys) can be created for background processes as well as forspecific users.
compensation object In PeopleSoft Enterprise Incentive Management, a node within a compensationstructure. Compensation objects are the building blocks that make up a compensationstructure’s hierarchical representation.
PeopleSoft Proprietary and Confidential 471

Glossary
compensation structure In PeopleSoft Enterprise Incentive Management, a hierarchical relationship ofcompensation objects that represents the compensation-related relationship betweenthe objects.
component interface A component interface is a set of application programming interfaces (APIs) thatyou can use to access and modify PeopleSoft database information using a programinstead of the PeopleSoft client.
condition In PeopleSoft Receivables, occurs when there is a change of status for a customer’saccount, such as reaching a credit limit or exceeding a user-defined balance due.
configuration parametercatalog
Used to configure an external system with PeopleSoft. For example, a configurationparameter catalog might set up configuration and communication parameters for anexternal server.
configuration plan In PeopleSoft Enterprise Incentive Management, configuration plans hold allocationinformation for common variables (not incentive rules) and are attached to a nodewithout a participant. Configuration plans are not processed by transactions.
constituents In PeopleSoft Enterprise Campus Solutions, friends, alumni, organizations,foundations, or other entities affiliated with the institution, and about which theinstitution maintains information. The constituent types delivered with PeopleSoftEnterprise Contributor Relations Solutions are based on those defined by the Councilfor the Advancement and Support of Education (CASE).
content reference Content references are pointers to content registered in the portal registry. These aretypically either URLs or iScripts. Content references fall into three categories: targetcontent, templates, and template pagelets.
context In PeopleCode, determines which buffer fields can be contextually referenced andwhich is the current row of data on each scroll level when a PeopleCode programis running.
In PeopleSoft Enterprise Campus Solutions, a specific instance of a comment orcommunication. One or more contexts are assigned to a category, which you link to3C access groups so that you can assign data-entry or view-only privileges acrossfunctions.
In PeopleSoft Enterprise Incentive Management, a mechanism that is used todetermine the scope of a processing run. PeopleSoft Enterprise Incentive Managementuses three types of context: plan, period, and run-level.
control table Stores information that controls the processing of an application. This type ofprocessing might be consistent throughout an organization, or it might be used only byportions of the organization for more limited sharing of data.
cost profile A combination of a receipt cost method, a cost flow, and a deplete cost method. Aprofile is associated with a cost book and determines how items in that book arevalued, as well as how the material movement of the item is valued for the book.
cost row A cost transaction and amount for a set of ChartFields.
course In PeopleSoft Enterprise Campus Solutions, a course that is offered by a school andthat is typically described in a course catalog. A course has a standard syllabus andcredit level; however, these may be modified at the class level. Courses can containmultiple components such as lecture, discussion, and lab.
See also class.
course share set In PeopleSoft Enterprise Campus Solutions, a tag that defines a set of requirementgroups that can share courses. Course share sets are used in PeopleSoft EnterpriseAcademic Advisement.
472 PeopleSoft Proprietary and Confidential

Glossary
current learning In PeopleSoft Enterprise LearningManagement, a self-service repository for all of alearner’s in-progress learning activities and programs.
data acquisition In PeopleSoft Enterprise Incentive Management, the process during which rawbusiness transactions are acquired from external source systems and fed into theoperational data store (ODS).
data cube In PeopleSoft Analytic Calculation Engine, a data cube is a container for one kindof data (such as Sales data) and works with in tandem with one or more dimensions.Dimensions and data cubes in PeopleSoft Analytic Calculation Engine are unrelatedto dimensions and online analytical processing (OLAP) cubes in PeopleSoft CubeManager.
data elements Data elements, at their simplest level, define a subset of data and the rules by whichto group them.
For Workforce Analytics, data elements are rules that tell the system what measures toretrieve about your workforce groups.
dataset A data grouping that enables role-based filtering and distribution of data. You canlimit the range and quantity of data that is displayed for a user by associating datasetrules with user roles. The result of dataset rules is a set of data that is appropriatefor the user’s roles.
delivery method In PeopleSoft Enterprise LearningManagement, identifies the primary type ofdelivery method in which a particular learning activity is offered. Also providesdefault values for the learning activity, such as cost and language. This is primarilyused to help learners search the catalog for the type of delivery from which they learnbest. Because PeopleSoft Enterprise LearningManagement is a blended learningsystem, it does not enforce the delivery method.
In PeopleSoft Supply Chain Management, identifies the method by which goods areshipped to their destinations (such as truck, air, rail, and so on). The delivery method isspecified when creating shipment schedules.
delivery method type In PeopleSoft Enterprise LearningManagement, identifies how learning activities canbe delivered—for example, through online learning, classroom instruction, seminars,books, and so forth—in an organization. The type determines whether the deliverymethod includes scheduled components.
detailed business process A subset of the business process. For example, the detailed business process namedDetermine Cash Position is a subset of the business process called Cash Management.
dimension In PeopleSoft Analytic Calculation Engine, a dimension contains a list of one kindof data that can span various contexts, and it is a basic component of an analyticmodel. Within the analytic model, a dimension is attached to one or more data cubes.In PeopleSoft Cube Manager, a dimension is the most basic component of an OLAPcube and specifies the PeopleSoft metadata to be used to create the dimension’s rollupstructure. Dimensions and data cubes in PeopleSoft Analytic Calculation Engine areunrelated to dimensions and OLAP cubes in PeopleSoft Cube Manager.
directory information tree In PeopleSoft Directory Interface, the representation of a directory’s hierarchicalstructure.
division In PeopleSoft Enterprise Campus Solutions, the lowest level of the three-levelclassification structure that you define in PeopleSoft Enterprise Recruiting andAdmissions for enrollment management. You can define a division level, link it toother levels, and set enrollment target numbers for it.
See also population and cohort.
PeopleSoft Proprietary and Confidential 473

Glossary
document sequencing A flexible method that sequentially numbers the financial transactions (for example,bills, purchase orders, invoices, and payments) in the system for statutory reportingand for tracking commercial transaction activity.
dynamic detail tree A tree that takes its detail values—dynamic details—directly from a table in thedatabase, rather than from a range of values that are entered by the user.
edit table A table in the database that has its own record definition, such as the Department table.As fields are entered into a PeopleSoft application, they can be validated against anedit table to ensure data integrity throughout the system.
effective date Amethod of dating information in PeopleSoft applications. You can predateinformation to add historical data to your system, or postdate information in order toenter it before it actually goes into effect. By using effective dates, you don’t deletevalues; you enter a new value with a current effective date.
EIM ledger Abbreviation for Enterprise Incentive Management ledger. In PeopleSoft EnterpriseIncentive Management, an object to handle incremental result gathering within thescope of a participant. The ledger captures a result set with all of the appropriate tracesto the data origin and to the processing steps of which it is a result.
elimination set In PeopleSoft General Ledger, a related group of intercompany accounts that isprocessed during consolidations.
entry event In PeopleSoft General Ledger, Receivables, Payables, Purchasing, and Billing, abusiness process that generates multiple debits and credits resulting from singletransactions to produce standard, supplemental accounting entries.
equitization In PeopleSoft General Ledger, a business process that enables parent companies tocalculate the net income of subsidiaries on a monthly basis and adjust that amountto increase the investment amount and equity income amount before performingconsolidations.
equity item limit In PeopleSoft Enterprise Campus Solutions, the amounts of funds set by the institutionto be awarded with discretionary or gift funds. The limit could be reduced by amountsequal to such things as expected family contribution (EFC) or parent contribution.Students are packaged by Equity Item Type Groups and Related Equity Item Types.This limit can be used to assure that similar student populations are packaged equally.
event A predefined point either in the Component Processor flow or in the program flow.As each point is encountered, the event activates each component, triggering anyPeopleCode program that is associated with that component and that event. Examplesof events are FieldChange, SavePreChange, and RowDelete.
In PeopleSoft Human Resources, also refers to an incident that affects benefitseligibility.
event propagation process In PeopleSoft Sales Incentive Management, a process that determines, through logic,the propagation of an original PeopleSoft Enterprise Incentive Management event andcreates a derivative (duplicate) of the original event to be processed by other objects.Sales Incentive Management uses this mechanism to implement splits, roll-ups, and soon. Event propagation determines who receives the credit.
exception In PeopleSoft Receivables, an item that either is a deduction or is in dispute.
exclusive pricing In PeopleSoft Order Management, a type of arbitration plan that is associated with aprice rule. Exclusive pricing is used to price sales order transactions.
fact In PeopleSoft applications, facts are numeric data values from fields from a sourcedatabase as well as an analytic application. A fact can be anything you want to measureyour business by, for example, revenue, actual, budget data, or sales numbers. Afact is stored on a fact table.
474 PeopleSoft Proprietary and Confidential
Glossary
financial aid term In PeopleSoft Enterprise Campus Solutions, a combination of a period of time that theschool determines as an instructional accounting period and an academic career. Itis created and defined during the setup process. Only terms eligible for financial aidare set up for each financial aid career.
forecast item A logical entity with a unique set of descriptive demand and forecast data that is usedas the basis to forecast demand. You create forecast items for a wide range of uses, butthey ultimately represent things that you buy, sell, or use in your organization and forwhich you require a predictable usage.
fund In PeopleSoft Promotions Management, a budget that can be used to fund promotionalactivity. There are four funding methods: top down, fixed accrual, rolling accrual, andzero-based accrual.
gap In PeopleSoft Enterprise Campus Solutions, an artificial figure that sets aside anamount of unmet financial aid need that is not funded with Title IV funds. A gap canbe used to prevent fully funding any student to conserve funds, or it can be used topreserve unmet financial aid need so that institutional funds can be awarded.
generic process type In PeopleSoft Process Scheduler, process types are identified by a generic processtype. For example, the generic process type SQR includes all SQR process types,such as SQR process and SQR report.
gift table In PeopleSoft Enterprise Campus Solutions, a table or so-called donor pyramiddescribing the number and size of gifts that you expect will be needed to successfullycomplete the campaign in PeopleSoft Contributor Relations. The gift table enablesyou to estimate the number of donors and prospects that you need at each gift levelto reach the campaign goal.
GL business unit Abbreviation for general ledger business unit. A unit in an organization that is anindependent entity for accounting purposes. It maintains its own set of accountingbooks.
See also business unit.
GL entry template Abbreviation for general ledger entry template. In PeopleSoft Enterprise CampusSolutions, a template that defines how a particular item is sent to the general ledger.An item-type maps to the general ledger, and the GL entry template can involvemultiple general ledger accounts. The entry to the general ledger is further controlledby high-level flags that control the summarization and the type of accounting—that is,accrual or cash.
GL Interface process Abbreviation forGeneral Ledger Interface process. In PeopleSoft Enterprise CampusSolutions, a process that is used to send transactions from PeopleSoft EnterpriseStudent Financials to the general ledger. Item types are mapped to specific generalledger accounts, enabling transactions to move to the general ledger when the GLInterface process is run.
group In PeopleSoft Billing and Receivables, a posting entity that comprises one or moretransactions (items, deposits, payments, transfers, matches, or write-offs).
In PeopleSoft Human Resources Management and Supply Chain Management, anyset of records that are associated under a single name or variable to run calculationsin PeopleSoft business processes. In PeopleSoft Time and Labor, for example,employees are placed in groups for time reporting purposes.
incentive object In PeopleSoft Enterprise Incentive Management, the incentive-related objects thatdefine and support the PeopleSoft Enterprise Incentive Management calculationprocess and results, such as plan templates, plans, results data, user interaction objects,and so on.
PeopleSoft Proprietary and Confidential 475
Glossary
incentive rule In PeopleSoft Sales Incentive Management, the commands that act on transactions andturn them into compensation. A rule is one part in the process of turning a transactioninto compensation.
incur In PeopleSoft Promotions Management, to become liable for a promotional payment.In other words, you owe that amount to a customer for promotional activities.
initiative In PeopleSoft Enterprise Campus Solutions, the basis from which all advancementplans are executed. It is an organized effort targeting a specific constituency, and it canoccur over a specified period of time with specific purposes and goals. An initiativecan be a campaign, an event, an organized volunteer effort, a membership drive, orany other type of effort defined by the institution. Initiatives can be multipart, andthey can be related to other initiatives. This enables you to track individual parts of aninitiative, as well as entire initiatives.
inquiry access In PeopleSoft Enterprise Campus Solutions, a type of security access that permits theuser only to view data.
See also update access.
institution In PeopleSoft Enterprise Campus Solutions, an entity (such as a university or college)that is independent of other similar entities and that has its own set of rules andbusiness processes.
integration A relationship between two compatible integration points that enables communicationto take place between systems. Integrations enable PeopleSoft applications to workseamlessly with other PeopleSoft applications or with third-party systems or software.
integration point An interface that a system uses to communicate with another PeopleSoft application oran external application.
integration set A logical grouping of integrations that applications use for the same business purpose.For example, the integration set ADVANCED_SHIPPING_ORDER contains all of theintegrations that notify a customer that an order has shipped.
item In PeopleSoft Inventory, a tangible commodity that is stored in a business unit(shipped from a warehouse).
In PeopleSoft Demand Planning, Inventory Policy Planning, and Supply Planning, anoninventory item that is designated as being used for planning purposes only. It canrepresent a family or group of inventory items. It can have a planning bill of material(BOM) or planning routing, and it can exist as a component on a planning BOM. Aplanning item cannot be specified on a production or engineering BOM or routing,and it cannot be used as a component in a production. The quantity on hand willnever be maintained.
In PeopleSoft Receivables, an individual receivable. An item can be an invoice, acredit memo, a debit memo, a write-off, or an adjustment.
item shuffle In PeopleSoft Enterprise Campus Solutions, a process that enables you to change apayment allocation without having to reverse the payment.
joint communication In PeopleSoft Enterprise Campus Solutions, one letter that is addressed jointly to twopeople. For example, a letter might be addressed to both Mr. Sudhir Awat and Ms.Samantha Mortelli. A relationship must be established between the two individuals inthe database, and at least one of the individuals must have an ID in the database.
keyword In PeopleSoft Enterprise Campus Solutions, a term that you link to particular elementswithin PeopleSoft Student Financials, Financial Aid, and Contributor Relations.You can use keywords as search criteria that enable you to locate specific records ina search dialog box.
476 PeopleSoft Proprietary and Confidential

Glossary
KPI An abbreviation for key performance indicator. A high-level measurement of how wellan organization is doing in achieving critical success factors. This defines the datavalue or calculation upon which an assessment is determined.
LDIF file Abbreviation for Lightweight Directory Access Protocol (LDAP) Data InterchangeFormat file. Contains discrepancies between PeopleSoft data and directory data.
learner group In PeopleSoft Enterprise LearningManagement, a group of learners who are linkedto the same learning environment. Members of the learner group can share the sameattributes, such as the same department or job code. Learner groups are used to controlaccess to and enrollment in learning activities and programs. They are also used toperform group enrollments and mass enrollments in the back office.
learning components In PeopleSoft Enterprise LearningManagement, the foundational building blocksof learning activities. PeopleSoft Enterprise Learning Management supports sixbasic types of learning components: web-based, session, webcast, test, survey, andassignment. One or more of these learning component types compose a singlelearning activity.
learning environment In PeopleSoft Enterprise LearningManagement, identifies a set of categories andcatalog items that can be made available to learner groups. Also defines the defaultvalues that are assigned to the learning activities and programs that are created within aparticular learning environment. Learning environments provide a way to partition thecatalog so that learners see only those items that are relevant to them.
learning history In PeopleSoft Enterprise LearningManagement, a self-service repository for all of alearner’s completed learning activities and programs.
ledger mapping You use ledger mapping to relate expense data from general ledger accounts toresource objects. Multiple ledger line items can be mapped to one or more resourceIDs. You can also use ledger mapping to map dollar amounts (referred to as rates)to business units. You can map the amounts in two different ways: an actual amountthat represents actual costs of the accounting period, or a budgeted amount that can beused to calculate the capacity rates as well as budgeted model results. In PeopleSoftEnterprise Warehouse, you can map general ledger accounts to the EW Ledger table.
library section In PeopleSoft Enterprise Incentive Management, a section that is defined in a plan (ortemplate) and that is available for other plans to share. Changes to a library section arereflected in all plans that use it.
linked section In PeopleSoft Enterprise Incentive Management, a section that is defined in a plantemplate but appears in a plan. Changes to linked sections propagate to plans usingthat section.
linked variable In PeopleSoft Enterprise Incentive Management, a variable that is defined andmaintained in a plan template and that also appears in a plan. Changes to linkedvariables propagate to plans using that variable.
LMS Abbreviation for learning management system. In PeopleSoft Enterprise CampusSolutions, LMS is a PeopleSoft Student Records feature that provides a common setof interoperability standards that enable the sharing of instructional content and databetween learning and administrative environments.
load In PeopleSoft Inventory, identifies a group of goods that are shipped together. Loadmanagement is a feature of PeopleSoft Inventory that is used to track the weight, thevolume, and the destination of a shipment.
local functionality In PeopleSoft HRMS, the set of information that is available for a specific country.You can access this information when you click the appropriate country flag in theglobal window, or when you access it by a local country menu.
PeopleSoft Proprietary and Confidential 477

Glossary
location Locations enable you to indicate the different types of addresses—for a company, forexample, one address to receive bills, another for shipping, a third for postal deliveries,and a separate street address. Each address has a different location number. Theprimary location—indicated by a 1—is the address you use most often and may bedifferent from the main address.
logistical task In PeopleSoft Services Procurement, an administrative task that is related to hiringa service provider. Logistical tasks are linked to the service type on the work orderso that different types of services can have different logistical tasks. Logistical tasksinclude both preapproval tasks (such as assigning a new badge or ordering a newlaptop) and postapproval tasks (such as scheduling orientation or setting up the serviceprovider email). The logistical tasks can be mandatory or optional. Mandatorypreapproval tasks must be completed before the work order is approved. Mandatorypostapproval tasks, on the other hand, must be completed before a work order isreleased to a service provider.
market template In PeopleSoft Enterprise Incentive Management, additional functionality that isspecific to a given market or industry and is built on top of a product category.
mass change In PeopleSoft Enterprise Campus Solutions, mass change is a SQL generator that canbe used to create specialized functionality. Using mass change, you can set up aseries of Insert, Update, or Delete SQL statements to perform business functions thatare specific to the institution.
See also 3C engine.
match group In PeopleSoft Receivables, a group of receivables items and matching offset items.The system creates match groups by using user-defined matching criteria for selectedfield values.
MCF server Abbreviation for PeopleSoft MultiChannel Framework server. Comprises theuniversal queue server and the MCF log server. Both processes are started whenMCFServers is selected in an application server domain configuration.
merchandising activity In PeopleSoft Promotions Management, a specific discount type that is associated witha trade promotion (such as off-invoice, billback or rebate, or lump-sum payment) thatdefines the performance that is required to receive the discount. In the industry, youmay know this as an offer, a discount, a merchandising event, an event, or a tactic.
meta-SQL Meta-SQL constructs expand into platform-specific Structured Query Language(SQL) substrings. They are used in functions that pass SQL strings, such as in SQLobjects, the SQLExec function, and PeopleSoft Application Engine programs.
metastring Metastrings are special expressions included in SQL string literals. The metastrings,prefixed with a percent (%) symbol, are included directly in the string literals. Theyexpand at run time into an appropriate substring for the current database platform.
multibook In PeopleSoft General Ledger, multiple ledgers having multiple-base currencies thatare defined for a business unit, with the option to post a single transaction to all basecurrencies (all ledgers) or to only one of those base currencies (ledgers).
multicurrency The ability to process transactions in a currency other than the business unit’s basecurrency.
national allowance In PeopleSoft Promotions Management, a promotion at the corporate level that isfunded by nondiscretionary dollars. In the industry, you may know this as a nationalpromotion, a corporate promotion, or a corporate discount.
need In PeopleSoft Enterprise Campus Solutions, the difference between the cost ofattendance (COA) and the expected family contribution (EFC). It is the gap betweenthe cost of attending the school and the student’s resources. The financial aid package
478 PeopleSoft Proprietary and Confidential

Glossary
is based on the amount of financial need. The process of determining a student’sneed is called need analysis.
node-oriented tree A tree that is based on a detail structure, but the detail values are not used.
pagelet Each block of content on the home page is called a pagelet. These pagelets displaysummary information within a small rectangular area on the page. The pagelet provideusers with a snapshot of their most relevant PeopleSoft and non-PeopleSoft content.
participant In PeopleSoft Enterprise Incentive Management, participants are recipients of theincentive compensation calculation process.
participant object Each participant object may be related to one or more compensation objects.
See also compensation object.
partner A company that supplies products or services that are resold or purchased by theenterprise.
pay cycle In PeopleSoft Payables, a set of rules that define the criteria by which it should selectscheduled payments for payment creation.
payment shuffle In PeopleSoft Enterprise Campus Solutions, a process allowing payments that havebeen previously posted to a student’s account to be automatically reapplied when ahigher priority payment is posted or the payment allocation definition is changed.
pending item In PeopleSoft Receivables, an individual receivable (such as an invoice, a creditmemo, or a write-off) that has been entered in or created by the system, but hasn’tbeen posted.
PeopleCode PeopleCode is a proprietary language, executed by the PeopleSoft componentprocessor. PeopleCode generates results based on existing data or user actions. Byusing various tools provided with PeopleTools, external services are available to allPeopleSoft applications wherever PeopleCode can be executed.
PeopleCode event See event.
PeopleSoft Pure InternetArchitecture
The fundamental architecture on which PeopleSoft 8 applications are constructed,consisting of a relational database management system (RDBMS), an applicationserver, a web server, and a browser.
performance measurement In PeopleSoft Enterprise Incentive Management, a variable used to store data (similarto an aggregator, but without a predefined formula) within the scope of an incentiveplan. Performance measures are associated with a plan calendar, territory, andparticipant. Performance measurements are used for quota calculation and reporting.
period context In PeopleSoft Enterprise Incentive Management, because a participant typicallyuses the same compensation plan for multiple periods, the period context associatesa plan context with a specific calendar period and fiscal year. The period contextreferences the associated plan context, thus forming a chain. Each plan context has acorresponding set of period contexts.
person of interest A person about whom the organization maintains information but who is not part ofthe workforce.
personal portfolio In PeopleSoft Enterprise Campus Solutions, the user-accessible menu item thatcontains an individual’s name, address, telephone number, and other personalinformation.
plan In PeopleSoft Sales Incentive Management, a collection of allocation rules, variables,steps, sections, and incentive rules that instruct the PeopleSoft Enterprise IncentiveManagement engine in how to process transactions.
PeopleSoft Proprietary and Confidential 479

Glossary
plan context In PeopleSoft Enterprise Incentive Management, correlates a participant withthe compensation plan and node to which the participant is assigned, enablingthe PeopleSoft Enterprise Incentive Management system to find anything that isassociated with the node and that is required to perform compensation processing.Each participant, node, and plan combination represents a unique plan context—ifthree participants are on a compensation structure, each has a different plan context.Configuration plans are identified by plan contexts and are associated with theparticipants that refer to them.
plan template In PeopleSoft Enterprise Incentive Management, the base from which a plan is created.A plan template contains common sections and variables that are inherited by all plansthat are created from the template. A template may contain steps and sections thatare not visible in the plan definition.
planned learning In PeopleSoft Enterprise LearningManagement, a self-service repository for all ofa learner’s planned learning activities and programs.
planning instance In PeopleSoft Supply Planning, a set of data (business units, items, supplies, anddemands) constituting the inputs and outputs of a supply plan.
population In PeopleSoft Enterprise Campus Solutions, the middle level of the three-levelclassification structure that you define in PeopleSoft Enterprise Recruiting andAdmissions for enrollment management. You can define a population level, link it toother levels, and set enrollment target numbers for it.
See also division and cohort.
portal registry In PeopleSoft applications, the portal registry is a tree-like structure in which contentreferences are organized, classified, and registered. It is a central repository thatdefines both the structure and content of a portal through a hierarchical, tree-likestructure of folders useful for organizing and securing content references.
price list In PeopleSoft Enterprise Pricer, enables you to select products and conditions forwhich the price list applies to a transaction. During a transaction, the system eitherdetermines the product price based on the predefined search hierarchy for thetransaction or uses the product’s lowest price on any associated, active price lists. Thisprice is used as the basis for any further discounts and surcharges.
price rule In PeopleSoft Enterprise Pricer, defines the conditions that must be met foradjustments to be applied to the base price. Multiple rules can apply when conditionsof each rule are met.
price rule condition In PeopleSoft Enterprise Pricer, selects the price-by fields, the values for the price-byfields, and the operator that determines how the price-by fields are related to thetransaction.
price rule key In PeopleSoft Enterprise Pricer, defines the fields that are available to define price ruleconditions (which are used to match a transaction) on the price rule.
primacy number In PeopleSoft Enterprise Campus Solutions, a number that the system uses to prioritizefinancial aid applications when students are enrolled in multiple academic careers andacademic programs at the same time. The Consolidate Academic Statistics processuses the primacy number indicated for both the career and program at the institutionallevel to determine a student’s primary career and program. The system also uses thenumber to determine the primary student attribute value that is used when you extractdata to report on cohorts. The lowest number takes precedence.
primary name type In PeopleSoft Enterprise Campus Solutions, the name type that is used to link the namestored at the highest level within the system to the lower-level set of names that anindividual provides.
480 PeopleSoft Proprietary and Confidential

Glossary
process category In PeopleSoft Process Scheduler, processes that are grouped for server load balancingand prioritization.
process group In PeopleSoft Financials, a group of application processes (performed in a definedorder) that users can initiate in real time, directly from a transaction entry page.
process definition Process definitions define each run request.
process instance A unique number that identifies each process request. This value is automaticallyincremented and assigned to each requested process when the process is submitted torun.
process job You can link process definitions into a job request and process each request seriallyor in parallel. You can also initiate subsequent processes based on the return codefrom each prior request.
process request A single run request, such as a Structured Query Report (SQR), a COBOL orApplication Engine program, or a Crystal report that you run through PeopleSoftProcess Scheduler.
process run control A PeopleTools variable used to retain PeopleSoft Process Scheduler values neededat runtime for all requests that reference a run control ID. Do not confuse these withapplication run controls, which may be defined with the same run control ID, but onlycontain information specific to a given application process request.
product A PeopleSoft or third-party product. PeopleSoft organizes its software productsinto product families and product lines. Interactive Services Repository containsinformation about every release of every product that PeopleSoft sells, as well asproducts from certified third-party companies. These products are displayed withthe product name and release number.
product category In PeopleSoft Enterprise Incentive Management, indicates an application in theEnterprise Incentive Management suite of products. Each transaction in the PeopleSoftEnterprise Incentive Management system is associated with a product category.
product family A group of products that are related by common functionality. The family names thatcan be searched using Interactive Service Repository are PeopleSoft Enterprise,PeopleSoft EnterpriseOne, PeopleSoft World, and third-party, certified PeopleSoftpartners.
product line The name of a PeopleSoft product line or the company name of a third-party certifiedpartner. Integration Services Repository enables you to search for integration pointsby product line.
programs In PeopleSoft Enterprise LearningManagement, a high-level grouping that guides thelearner along a specific learning path through sections of catalog items. PeopleSoftEnterprise Learning Systems provides two types of programs—curricula andcertifications.
progress log In PeopleSoft Services Procurement, tracks deliverable-based projects. This is similarto the time sheet in function and process. The service provider contact uses theprogress log to record and submit progress on deliverables. The progress can be loggedby the activity that is performed, by the percentage of work that is completed, or by thecompletion of milestone activities that are defined for the project.
project transaction In PeopleSoft Project Costing, an individual transaction line that represents a cost,time, budget, or other transaction row.
promotion In PeopleSoft Promotions Management, a trade promotion, which is typically fundedfrom trade dollars and used by consumer products manufacturers to increase salesvolume.
PeopleSoft Proprietary and Confidential 481

Glossary
prospects In PeopleSoft Enterprise Campus Solutions, students who are interested in applying tothe institution.
In PeopleSoft Enterprise Contributor Relations, individuals and organizations that aremost likely to make substantial financial commitments or other types of commitmentsto the institution.
publishing In PeopleSoft Enterprise Incentive Management, a stage in processing that makesincentive-related results available to participants.
rating components In PeopleSoft Enterprise Campus Solutions, variables used with the Equation Editor toretrieve specified populations.
record group A set of logically and functionally related control tables and views. Record groupshelp enable TableSet sharing, which eliminates redundant data entry. Record groupsensure that TableSet sharing is applied consistently across all related tables and views.
record input VAT flag Abbreviation for record input value-added tax flag. Within PeopleSoft Purchasing,Payables, and General Ledger, this flag indicates that you are recording input VATon the transaction. This flag, in conjunction with the record output VAT flag, is usedto determine the accounting entries created for a transaction and to determine how atransaction is reported on the VAT return. For all cases within Purchasing and Payableswhere VAT information is tracked on a transaction, this flag is set to Yes. This flagis not used in PeopleSoft Order Management, Billing, or Receivables, where it isassumed that you are always recording only output VAT, or in PeopleSoft Expenses,where it is assumed that you are always recording only input VAT.
record output VAT flag Abbreviation for record output value-added tax flag.
See record input VAT flag.
recname The name of a record that is used to determine the associated field to match a valueor set of values.
recognition In PeopleSoft Enterprise Campus Solutions, the recognition type indicates whetherthe PeopleSoft Enterprise Contributor Relations donor is the primary donor of acommitment or shares the credit for a donation. Primary donors receive hard credit thatmust total 100 percent. Donors that share the credit are given soft credit. Institutionscan also define other share recognition-type values such as memo credit or vehiclecredit.
reference data In PeopleSoft Sales Incentive Management, system objects that represent the salesorganization, such as territories, participants, products, customers, channels, and so on.
reference object In PeopleSoft Enterprise Incentive Management, this dimension-type object furtherdefines the business. Reference objects can have their own hierarchy (for example,product tree, customer tree, industry tree, and geography tree).
reference transaction In commitment control, a reference transaction is a source transaction that isreferenced by a higher-level (and usually later) source transaction, in order toautomatically reverse all or part of the referenced transaction’s budget-checkedamount. This avoids duplicate postings during the sequential entry of the transaction atdifferent commitment levels. For example, the amount of an encumbrance transaction(such as a purchase order) will, when checked and recorded against a budget, causethe system to concurrently reference and relieve all or part of the amount of acorresponding pre-encumbrance transaction, such as a purchase requisition.
regional sourcing In PeopleSoft Purchasing, provides the infrastructure to maintain, display, and selectan appropriate vendor and vendor pricing structure that is based on a regional sourcingmodel where the multiple ship to locations are grouped. Sourcing may occur at alevel higher than the ship to location.
482 PeopleSoft Proprietary and Confidential

Glossary
relationship object In PeopleSoft Enterprise Incentive Management, these objects further define acompensation structure to resolve transactions by establishing associations betweencompensation objects and business objects.
remote data source data Data that is extracted from a separate database and migrated into the local database.
REN server Abbreviation for real-time event notification server in PeopleSoft MultiChannelFramework.
requester In PeopleSoft eSettlements, an individual who requests goods or services and whoseID appears on the various procurement pages that reference purchase orders.
reversal indicator In PeopleSoft Enterprise Campus Solutions, an indicator that denotes when aparticular payment has been reversed, usually because of insufficient funds.
role Describes how people fit into PeopleSoft Workflow. A role is a class of users whoperform the same type of work, such as clerks or managers. Your business rulestypically specify what user role needs to do an activity.
role user A PeopleSoft Workflow user. A person’s role user ID serves much the same purpose asa user ID does in other parts of the system. PeopleSoft Workflow uses role user IDsto determine how to route worklist items to users (through an email address, forexample) and to track the roles that users play in the workflow. Role users do not needPeopleSoft user IDs.
roll up In a tree, to roll up is to total sums based on the information hierarchy.
run control A run control is a type of online page that is used to begin a process, such as thebatch processing of a payroll run. Run control pages generally start a program thatmanipulates data.
run control ID A unique ID to associate each user with his or her own run control table entries.
run-level context In PeopleSoft Enterprise Incentive Management, associates a particular run (and batchID) with a period context and plan context. Every plan context that participates in a runhas a separate run-level context. Because a run cannot span periods, only one run-levelcontext is associated with each plan context.
SCP SCBMXMLmessage Abbreviation for Supply Chain Planning Supply Chain Business Modeler ExtensibleMarkup Language message. PeopleSoft EnterpriseOne Supply Chain BusinessModeler uses XML as the format for all data that it imports and exports.
search query You use this set of objects to pass a query string and operators to the search engine.The search index returns a set of matching results with keys to the source documents.
search/match In PeopleSoft Enterprise Campus Solutions and PeopleSoft Enterprise HumanResources Management Solutions, a feature that enables you to search for and identifyduplicate records in the database.
seasonal address In PeopleSoft Enterprise Campus Solutions, an address that recurs for the same lengthof time at the same time of year each year until adjusted or deleted.
section In PeopleSoft Enterprise Incentive Management, a collection of incentive rules thatoperate on transactions of a specific type. Sections enable plans to be segmented toprocess logical events in different sections.
security event In commitment control, security events trigger security authorization checking, suchas budget entries, transfers, and adjustments; exception overrides and notifications;and inquiries.
serial genealogy In PeopleSoft Manufacturing, the ability to track the composition of a specific,serial-controlled item.
PeopleSoft Proprietary and Confidential 483

Glossary
serial in production In PeopleSoft Manufacturing, enables the tracing of serial information formanufactured items. This is maintained in the ItemMaster record.
service impact In PeopleSoft Enterprise Campus Solutions, the resulting action triggered by a serviceindicator. For example, a service indicator that reflects nonpayment of accountbalances by a student might result in a service impact that prohibits registration forclasses.
service indicator In PeopleSoft Enterprise Campus Solutions, indicates services that may be eitherwithheld or provided to an individual. Negative service indicators indicate holds thatprevent the individual from receiving specified services, such as check-cashingprivileges or registration for classes. Positive service indicators designate specialservices that are provided to the individual, such as front-of-line service or specialservices for disabled students.
session In PeopleSoft Enterprise Campus Solutions, time elements that subdivide a term intomultiple time periods during which classes are offered. In PeopleSoft ContributorRelations, a session is the means of validating gift, pledge, membership, or adjustmentdata entry . It controls access to the data entered by a specific user ID. Sessions arebalanced, queued, and then posted to the institution’s financial system. Sessions mustbe posted to enter a matching gift or pledge payment, to make an adjustment, or toprocess giving clubs or acknowledgements.
In PeopleSoft Enterprise LearningManagement, a single meeting day of an activity(that is, the period of time between start and finish times within a day). The sessionstores the specific date, location, meeting time, and instructor. Sessions are used forscheduled training.
session template In PeopleSoft Enterprise LearningManagement, enables you to set up commonactivity characteristics that may be reused while scheduling a PeopleSoft EnterpriseLearning Management activity—characteristics such as days of the week, start andend times, facility and room assignments, instructors, and equipment. A sessionpattern template can be attached to an activity that is being scheduled. Attaching atemplate to an activity causes all of the default template information to populatethe activity session pattern.
setup relationship In PeopleSoft Enterprise Incentive Management, a relationship object type thatassociates a configuration plan with any structure node.
share driver expression In PeopleSoft Business Planning, a named planning method similar to a driverexpression, but which you can set up globally for shared use within a single planningapplication or to be shared between multiple planning applications through PeopleSoftEnterprise Warehouse.
single signon With single signon, users can, after being authenticated by a PeopleSoft applicationserver, access a second PeopleSoft application server without entering a user ID orpassword.
source key process In PeopleSoft Enterprise Campus Solutions, a process that relates a particulartransaction to the source of the charge or financial aid. On selected pages, you can drilldown into particular charges.
source transaction In commitment control, any transaction generated in a PeopleSoft or third-partyapplication that is integrated with commitment control and which can be checkedagainst commitment control budgets. For example, a pre-encumbrance, encumbrance,expenditure, recognized revenue, or collected revenue transaction.
speed key See communication key.
SpeedChart A user-defined shorthand key that designates several ChartKeys to be used for voucherentry. Percentages can optionally be related to each ChartKey in a SpeedChartdefinition.
484 PeopleSoft Proprietary and Confidential

Glossary
SpeedType A code representing a combination of ChartField values. SpeedTypes simplify theentry of ChartFields commonly used together.
staging Amethod of consolidating selected partner offerings with the offerings from theenterprise’s other partners.
standard letter code In PeopleSoft Enterprise Campus Solutions, a standard letter code used to identifyeach letter template available for use in mail merge functions. Every letter generated inthe system must have a standard letter code identification.
statutory account Account required by a regulatory authority for recording and reporting financialresults. In PeopleSoft, this is equivalent to the Alternate Account (ALTACCT)ChartField.
step In PeopleSoft Sales Incentive Management, a collection of sections in a plan. Eachstep corresponds to a step in the job run.
storage level In PeopleSoft Inventory, identifies the level of a material storage location. Materialstorage locations are made up of a business unit, a storage area, and a storage level.You can set up to four storage levels.
subcustomer qualifier A value that groups customers into a division for which you can generate detailedhistory, aging, events, and profiles.
Summary ChartField You use summary ChartFields to create summary ledgers that roll up detail amountsbased on specific detail values or on selected tree nodes. When detail values aresummarized using tree nodes, summary ChartFields must be used in the summaryledger data record to accommodate the maximum length of a node name (20characters).
summary ledger An accounting feature used primarily in allocations, inquiries, and PS/nVisionreporting to store combined account balances from detail ledgers. Summary ledgersincrease speed and efficiency of reporting by eliminating the need to summarizedetail ledger balances each time a report is requested. Instead, detail balances aresummarized in a background process according to user-specified criteria and stored onsummary ledgers. The summary ledgers are then accessed directly for reporting.
summary time period In PeopleSoft Business Planning, any time period (other than a base time period) that isan aggregate of other time periods, including other summary time periods and basetime periods, such as quarter and year total.
summary tree A tree used to roll up accounts for each type of report in summary ledgers. Summarytrees enable you to define trees on trees. In a summary tree, the detail values are reallynodes on a detail tree or another summary tree (known as the basis tree). A summarytree structure specifies the details on which the summary trees are to be built.
syndicate To distribute a production version of the enterprise catalog to partners.
system function In PeopleSoft Receivables, an activity that defines how the system generatesaccounting entries for the general ledger.
TableSet Ameans of sharing similar sets of values in control tables, where the actual data valuesare different but the structure of the tables is the same.
TableSet sharing Shared data that is stored in many tables that are based on the same TableSets. Tablesthat use TableSet sharing contain the SETID field as an additional key or uniqueidentifier.
target currency The value of the entry currency or currencies converted to a single currency for budgetviewing and inquiry purposes.
PeopleSoft Proprietary and Confidential 485

Glossary
tax authority In PeopleSoft Enterprise Campus Solutions, a user-defined element that combines adescription and percentage of a tax with an account type, an item type, and a serviceimpact.
template A template is HTML code associated with a web page. It defines the layout ofthe page and also where to get HTML for each part of the page. In PeopleSoft, youuse templates to build a page by combining HTML from a number of sources. Fora PeopleSoft portal, all templates must be registered in the portal registry, and eachcontent reference must be assigned a template.
territory In PeopleSoft Sales Incentive Management, hierarchical relationships of businessobjects, including regions, products, customers, industries, and participants.
third party A company or vendor that has extensive PeopleSoft product knowledge and whoseproducts and integrations have been certified and are compatible with PeopleSoftapplications.
3C engine Abbreviation forCommunications, Checklists, and Comments engine. In PeopleSoftEnterprise Campus Solutions, the 3C engine enables you to automate businessprocesses that involve additions, deletions, and updates to communications, checklists,and comments. You define events and triggers to engage the engine, which runsthe mass change and processes the 3C records (for individuals or organizations)immediately and automatically from within business processes.
3C group Abbreviation forCommunications, Checklists, and Comments group. In PeopleSoftEnterprise Campus Solutions, a method of assigning or restricting access privileges. A3C group enables you to group specific communication categories, checklist codes,and comment categories. You can then assign the group inquiry-only access or updateaccess, as appropriate.
TimeSpan A relative period, such as year-to-date or current period, that can be used in variousPeopleSoft General Ledger functions and reports when a rolling time frame, ratherthan a specific date, is required. TimeSpans can also be used with flexible formulas inPeopleSoft Projects.
trace usage In PeopleSoft Manufacturing, enables the control of which components will be tracedduring the manufacturing process. Serial- and lot-controlled components can betraced. This is maintained in the ItemMaster record.
transaction allocation In PeopleSoft Enterprise Incentive Management, the process of identifying the ownerof a transaction. When a raw transaction from a batch is allocated to a plan context,the transaction is duplicated in the PeopleSoft Enterprise Incentive Managementtransaction tables.
transaction state In PeopleSoft Enterprise Incentive Management, a value assigned by an incentiverule to a transaction. Transaction states enable sections to process only transactionsthat are at a specific stage in system processing. After being successfully processed,transactions may be promoted to the next transaction state and “picked up” by adifferent section for further processing.
Translate table A system edit table that stores codes and translate values for the miscellaneous fields inthe database that do not warrant individual edit tables of their own.
tree The graphical hierarchy in PeopleSoft systems that displays the relationship betweenall accounting units (for example, corporate divisions, projects, reporting groups,account numbers) and determines roll-up hierarchies.
tuition lock In PeopleSoft Enterprise Campus Solutions, a feature in the Tuition Calculationprocess that enables you to specify a point in a term after which students are charged aminimum (or locked) fee amount. Students are charged the locked fee amount even ifthey later drop classes and take less than the normal load level for that tuition charge.
486 PeopleSoft Proprietary and Confidential

Glossary
unclaimed transaction In PeopleSoft Enterprise Incentive Management, a transaction that is not claimedby a node or participant after the allocation process has completed, usually due tomissing or incomplete data. Unclaimed transactions may be manually assigned to theappropriate node or participant by a compensation administrator.
universal navigation header Every PeopleSoft portal includes the universal navigation header, intended to appear atthe top of every page as long as the user is signed on to the portal. In addition toproviding access to the standard navigation buttons (like Home, Favorites, and signoff)the universal navigation header can also display a welcome message for each user.
update access In PeopleSoft Enterprise Campus Solutions, a type of security access that permits theuser to edit and update data.
See also inquiry access.
user interaction object In PeopleSoft Sales Incentive Management, used to define the reporting componentsand reports that a participant can access in his or her context. All Sales IncentiveManagement user interface objects and reports are registered as user interactionobjects. User interaction objects can be linked to a compensation structure nodethrough a compensation relationship object (individually or as groups).
variable In PeopleSoft Sales Incentive Management, the intermediate results of calculations.Variables hold the calculation results and are then inputs to other calculations.Variables can be plan variables that persist beyond the run of an engine or localvariables that exist only during the processing of a section.
VAT exception Abbreviation for value-added tax exception. A temporary or permanent exemptionfrom paying VAT that is granted to an organization. This terms refers to both VATexoneration and VAT suspension.
VAT exempt Abbreviation for value-added tax exempt. Describes goods and services that are notsubject to VAT. Organizations that supply exempt goods or services are unable torecover the related input VAT. This is also referred to as exempt without recovery.
VAT exoneration Abbreviation for value-added tax exoneration. An organization that has been granted apermanent exemption from paying VAT due to the nature of that organization.
VAT suspension Abbreviation for value-added tax suspension. An organization that has been granted atemporary exemption from paying VAT.
warehouse A PeopleSoft data warehouse that consists of predefined ETL maps, data warehousetools, and DataMart definitions.
work order In PeopleSoft Services Procurement, enables an enterprise to create resource-basedand deliverable-based transactions that specify the basic terms and conditions forhiring a specific service provider. When a service provider is hired, the serviceprovider logs time or progress against the work order.
worker A person who is part of the workforce; an employee or a contingent worker.
workset A group of people and organizations that are linked together as a set. You can useworksets to simultaneously retrieve the data for a group of people and organizationsand work with the information on a single page.
worksheet Away of presenting data through a PeopleSoft Business Analysis Modeler interfacethat enables users to do in-depth analysis using pivoting tables, charts, notes, andhistory information.
worklist The automated to-do list that PeopleSoft Workflow creates. From the worklist, youcan directly access the pages you need to perform the next action, and then return tothe worklist for another item.
PeopleSoft Proprietary and Confidential 487
Glossary
XML link The XML Linking language enables you to insert elements into XML documents tocreate a links between resources.
XML schema An XML definition that standardizes the representation of application messages,component interfaces, or business interlinks.
XPI Abbreviation for eXtended Process Integrator. PeopleSoft XPI is the integrationinfrastructure that enables both real-time and batch communication withEnterpriseOne applications.
yield by operation In PeopleSoft Manufacturing, the ability to plan the loss of a manufactured item on anoperation-by-operation basis.
zero-rated VAT Abbreviation for zero-rated value-added tax. AVAT transaction with a VAT code thathas a tax percent of zero. Used to track taxable VAT activity where no actual VATamount is charged. Organizations that supply zero-rated goods and services can stillrecover the related input VAT. This is also referred to as exempt with recovery.
488 PeopleSoft Proprietary and Confidential
Index
Numerics/Symbols60 Day Prob Term (USF) page 42960 Day Ten Conv (USF) page 429
AAA Security JPN page 292accident insurance codes 26Accident Insurance Table – AccidentInsurance Address (DEU) page - 25Accident Insurance Table – AccidentInsurance Table (DEU) page 25Accident Insurance Table - AccidentInsurance Table (DEU) page 26Accomm Job Task page 198Accomm Option page 198Accomm Request page 198Accommodation Type Table page 197Accounting Information (USF) page 145,166accrual classes (USF) 446for deferred annual/sick 453for leave program recipients 453, 460for leave transfer processing 453setting up earnings for leavetransfers 452
Accrual Summary (USF) page 463Action History Report (USF) page 407Action Reason page - Action Reasons 7Action Reason Table page - Action ReasonReport 7Action Reason Table page - ActionReasons 10action reasons, See personnel action reasonsaction request (SF-52) 403Actions page 7Actual Headcount Report 335Ad-Hoc Process Request page 378adding a personentering name and biographicalinformation 57entering names 58
Additional Appointment Data (JPN)page 294Additional Appointment Information (JPN)page 294, 295
Additional Appointment Setup (JPN)page 289Additional Appointment Setup for ExistingBusiness Units page 289additional appointments (kenmu)adding, changing, or releasing 295designating job record codes 290distributing cost 297recording and viewing employeedata 294recording details 295setting up codes 286setting up dummy codes 289setting up security 290setting up termination handling 293understanding 285understanding setup steps 287
Additional Appointments Setup (JPN)page 290additional assignmentsadding 130setting up 132
additional documentation xxiiAdditional Info - Brazil page 48, 49additional jobsentering 133
Addl Birth Info (USF) page 144, 150ADDR History page 57Address Data (ITA) page 277Address Information (USF) page 144,151Address page 212, 214addressesentering 61entering (USF) 151modifying 348using workflow to update 348
AFI flat files 268AFI Generation (ESP) page 269Annual Leave (USF) page - SetupWage/Separation USF 408applicantshiring (USF) 177
application fundamentals xxiappointment affidavits 177
PeopleSoft Proprietary and Confidential 489

Index
Appointment Info (USF) page 145, 170Appointment List JPN page 371Appointment List report (JPN) 373Appointment Notification JPN page 371Appointment Notification report(JPN) 372appointment reportingreport outputs for actions 368sorting lists using trees 369understanding job data changes 368
As-of Date Request page 378Assign Additional Job component 130Australiadefining movement codes 11
automatic actions (USF) 425administering probationterminations 430administering tenure conversion 431overview of menus and pages 427prerequisites 425processing 429understanding 426
Automatic Actions (USF) page 429automatic leave enrollment (USF)adjusting leave enrollmentmanually 446administering 439overview 439processing 445qualifying for more than one leave classcriteria rule 442reviewing 445setting up leave class rule criteria 443setting up the leave class rulestemplate 441
Automatic Leave Enrollment (USF)page 441, 445Award Action Data (USF) page 13award actions 12Award Type Table page 13awards 424
BBA Cd Table (DEU) page 25Badge page 237badges 237Bank Account Information page 232bank accountsentering for UK workers 233
recording 232Base (BEL) page 255BEL Seniority page 252BelgiumClaeys Formula severancecalculations 251entering additional seniority 252entering protected job leave 253generating DIMONA notifications 260performing the Claeys calculation 254running the Social report 263tracking Claeys formulacalculations 243
beneficiaries, See dependentsbenefit enrollment 128Benefit Program Participation page 128benefit programs 156, 389benefit record numbersworking with multiple benefit recordnumbers 131
Benefits Program Participation page 88,133Benefits/FEHB Data (USF) page 144,156Benefits/Retirement Data (USF)page 387, 389Betriebszaehlung 268Biographical Details page 56tracking names 57, 58tracking national identifications 60
biographical historyentering 59
BrazilCAGED Report 137, 138centralizing data for reportingpurposes 53employee registration 137, 139entering setup information forreports 49running employment reports 137setting up establishments 47See Also establishments
BRCGED01 process 138Building Society Details (GBR) page 232,235business expenses 238Business Expenses page 237, 238business processes 2
490 PeopleSoft Proprietary and Confidential

Index
CC.I.A. Codes (ITA) page - CompanyCodes 31C.I.A. Codes (ITA) page - Company/EstabCodes 31CAGED File/Report page 138CAGED Report (BRA) 137, 138Caisse Primaire d’Assurance Maladie(CPAM) 22Caisse Regionale d’Assurance Maladie(CRAM) 22Calendar Year Request page 378Canadadefining reasons for personnelactions 11entering additional workforce data 265entering information for the CanadaAcademic Teaching Surveys 122entering OEE workforce surveyresponses 266entering official languages 267reviewing union membership 109running the Canadian Hire Listreport 140verifying Social Insurance Numbers forCanadian employees 60
Centralization Data (BRA) page 48centralized data 53change plansmass organization change 319
change plans for restructuring anorganizationunderstanding 320
Checklist Item Table page 18Checklist Table page 18checklists 18CI Exceptions (USF) page 174CI Exceptions page 146Citizenship / Country / Visa page 227citizenship informationentering 229entering for dependents 224managing 226tracking 228
Citizenship/Passport page 227, 228Claeys Formula calculationscalculating the severance amount 258defining reason codes for endingcontracts 245
entering termination events andconditions 245linking contract statutes to RSZcategories 247performing 254preparing to use 251recording replacement contracts 249recording terminations 248reviewing variables 255running the termination notificationreport 260setting up employment contractstatutes 246severance 251tracking 243understanding severance 251
CNT001 184comments, submitting xxvicommon elements xxviiComp Rate Code Secondary Panelpage 381companies (ESP) 46company credit cardsassigning to workers 207entering vendors 206overview 206
company propertyassigning to workers 210assigning values 209car identification 209identifying 208
Company Property page - CompanyProperty 208Company Property page - JobInformation 208, 210Company Setup (ESP) page 39, 46Company Statistics (CHE) page 268Company Statistics report(Betriebszaehlung) 268Compensation (USF) page 145, 162Compensation page 87, 114, 133Completion of IC Transfer report 318Concurrent Hire USF component 130concurrent jobsadding 130adding (USF) 177entering 133setting up 132setting up (USF) 177
PeopleSoft Proprietary and Confidential 491

Index
Contact Address/Phone page 224, 225,348contact information xxviContact Information page 56, 61tracking addresses 61tracking email addresses 62tracking phone numbers 62
contingent worker contractsadding basic information 185adding signature date and probationinformation 192adding special clauses 189defining contract types 184generating the Contract Informationreport 193setting up and tracking 182setting up standard contracts 183
contingent worker datalocating personnel records 179overview 179setting up and tracking contracts 182See Also workforce contracts
contingent worker IDs (identification)personassigning 55
contingent workersadding 77adding additional assignments 130
Contract Clause Table page 183Contract Ending (BEL) page 244, 248Contract Information page 184, 193Contract Information report 193Contract Replacement (BEL) page 244,249Contract Status/Content page 183, 185Contract Template Table page 183Contract Type Table page 183, 184Contract Type/Clauses page 183, 189contracts, See workforce contractsContribution (ESP) page 39, 44country codes (ESP) 39country-specific workforce data 265CPAM 22CRAM 22Credit Card Data page 206, 207Credit Card Vendor page 206credit cards, See company credit cardscross-references xxvCustomer Connection website xxii
DData Control (USF) page 143, 146, 403Database Audit page 379Database Audit report 379database audits 379deathsentering 363requesting terminations (USF) 424
Declaração de Informações à ReceitaFederal (DIRF) 52Denial Code (USF) page 448, 449denial notifications (USF) 449Department Action Notices page 370Departmental Hierarchy (USF) page 144departmental reassignments, entering(USF) 421departmental transfers 358Depdnt Citizenship/Passport page - DepdntIdentification Details 223Depdnt Citizenship/Passport page -DepdntIdentification Details 213Depdnt Visa/Permit Data page - DepdntIdentification Details 213, 224Dependent Data component 211Dependent Information component 211Dependent/Benef (NLD) page 212, 222Dependent/Beneficiary Riders page 212,221dependentsentering addresses 214entering court-ordered benefits 221entering dependent information 215entering identification data 223entering names 213entering visa and permit data 224tracking dependent and beneficiarydata 211understanding dependent data 211viewing list for employee 222
Detail Assignment (USF) page 144, 160DIMONA Notification (BEL) page 261DIMONA notificationscreating 261creating update and terminationnotifications 263generating 260HRBEL_DIM_AE process 262reviewing 262understanding 260
492 PeopleSoft Proprietary and Confidential
Index
DIRF 52disabilitiesdocumenting accommodations 205entering 198paying, Job Earnings Distributionpage 127running the Disability report (ITA) 205tracking 197
Disability Codes (NZL) page 37disability leavepaying workers 366
Disability page 197, 198Disability Report (ITA) page 198documentationprinted xxiirelated xxiiupdates xxii
Donor Contribution (USF) page 455, 456driver’s license dataentering 231managing 230
Drivers License page 230Drivers License Type Tbl page 14Duties Type page 17Dynamic Link page 18
EEdit Additional Appointment Information(JPN) page 294, 295education 153Education Details (USF) page 144, 153education information 175effective datesentering multiple actions with sameeffective date 356, 419using in personnel actions (USF) 418
ELTP 440email addressesentering 62
emergency contactsentering primary contactinformation 225tracking 224updating addresses 348, 349
Emergency Contacts page 224Emergency Leave Transfer Details (USF)page 448Emergency Leave Transfer Program 440Empl Comp Cd Ita page 277EmplID change 343
EmplIDs (identification)changing and deleting 342images 241
Employee Accruals (USF) page 441, 446Employee Assignment List report(JPN) 375employee contractsrecording Belgian replacementcontracts 249
employee dataadding and updating data for personnelaction requests (USF) 396additional data 179locating personnel records 179overview 179refreshing Employees table 376searching 180, 181searching by national ID 182security considerations (USF) 420setting up and tracking contracts 182See Also workforce contracts
viewing non-Administer Workforcesummary pages 390
Employee Home Address Listingpage 350employee IDs (identification)assigning 55defining types 14
employee images 241employee informationsearching by national ID 182searching for 180, 181
employee job historyviewing 381, 382viewing salary history 384
Employee Photo page 237, 241employee placement plansunderstanding 324, 333
employee registration (BRA) 137, 139Employee Registry page 138, 139Employee Request (USF) component 395employee status and personnel actions(USF) 416Employee Turnover Analysis page 371employeesadding additional assignments 130hiring 77
Employees Birthday page 350Employees on Leaves of Absencepage 370
PeopleSoft Proprietary and Confidential 493

Index
Employees table, refreshing 376Employment 1 (USF) page 145, 168Employment 2 (USF) page 145, 171employment contractsadding basic information 185adding signature date and probationinformation 192adding special clauses 189defining contract types 184defining reason codes for ending(BEL) 245generating the Contract Informationreport 193linking Belgian contract statutes to RSZcategories 247recording termination information forBelgian employees 248recording terms for ending for Belgianemployees 245setting up and tracking 182setting up Belgian employment contractstatutes 246setting up standard contracts 183
employment data 15employment data (USF) 163Employment Data (USF) page 387Employment Information page 87, 119,133End Contract Reason - BEL page 244,245End Contract Type - BEL page 244, 245end of employment information 278Enter Cost Rate Information (JPN)page 294, 297entering requests (USF) 423Equal Opportunities report 279ES-931entering identification information 408entering leave information 409entering severance pay information 410generating 407
Estab. Centralizations (BRA) page 53Establishment ID Type page 48establishment ID types 48establishmentsgrouping 53setting up 49setting up ID types 48
ethnic groupsdefining 17
Ethnic Groups page 16expected pay 165Expected Pay (USF) page 145, 164Expiration Dates (USF) page 145, 170External Leave Donations (USF)page 455, 457
FFEGLI/Retirement/FICA (USF)page 144, 157festive advances 123FGPER810 13FGSF61 178FGSF75 178finalizing employee placement plansoverview 319
finalizing organization plansoverview 319
FRA CPAM Table page 22FRA CRAM Table page 22Francedefining hours type codes 22entering additional workforce data 271entering military serviceinformation 272maintaining social security trackingcodes 22OCC_ILLNESS_FRA 23setting up occupational illnesscategories 23setting up workforce tables 21tracking mandates 272
From/Thru Dates Request page 378Function Code Table (DEU) page 26Future Employee Assignment List 334,336
GGeneral Comments page 237GermanyBerufsgenossenschaften 25Bundesanstalt fur Arbeit 25defining accident insurance codes 26defining reasons for personnelactions 11entering Nation Deuev codes 27German Deuev Directive 27industrial inspection codes 26setting up workforce tables 24
494 PeopleSoft Proprietary and Confidential
Index
social insurance codes 26understanding social insurance 25Verzeichnis derBerufsbezeichnungen 25
global assignmentsaction reasons 6entering dependent identificationdata 223entering dependent visa and permitdata 224
glossary 467GPS 51Guia de Recolhimento da PrevidênciaSocial (GPS) 51
Hheadcount plan by department 322Headcount Plan by Department 321headcount plan listing 323Headcount Plan Listing 321, 334Heavily Disabled (DEU) page 198Heavily Disabled Equaliz (DEU)page 198Hire Employee USF componentAccounting Information page 166Addl Birth Info page 150Address Information page 151Appointment Info page 170Benefits/FEHB Data page 156CI Exceptions page 174Compensation page 162Data Control page 146Detail Assignment page 160Education Details page 153Employment 1 page 168Employment 2 page 171Expected Pay page 164Expiration Dates page 170FEGLI/Retirement/FICA page 157Job page 154Job Tracking Info page 148Marital Status page 153Non Pay Data page 173Other Pay Information page 164PAR Remarks page 147Personal Data page 149Position page 160Security Info page 173Veterans Info page 152
Hire List page 140
hiringemployees and contingent workers 77
Hiring Center (ESP) page 39, 47hiring centers 47hiring employeesdistributing job earnings 125entering benefit enrollmentinformation 128entering compensation 114entering contact information 61entering job information 94entering job location and position 89entering labor agreementinformation 105entering name and biographicalinformation 57entering optional employment data 119entering payroll processing data 109entering salary plans 113United States Federal, See hiring UnitedStates Federal (USF) employeesusing the Personnel Action Request(PAR) process 141
hiring process 77See Also workforce
hiring United States Federal (USF)employeesadding concurrent jobs 177assigning positions 176education information 175employment data default values 163entering address information 151entering appointment limits 170entering birth information 150entering compensationinformation 162, 164entering current and historicalemployment information 168entering data control information 146entering education details 153entering job information 154entering job tracking information 148entering marital information 153entering PAR remarks 147entering personal information 149entering position information 160entering retirement data 157entering security and financial disclosureinformation 173entering veteran information 152
PeopleSoft Proprietary and Confidential 495

Index
expected pay 165hiring applicants 177overview 141See Also Hire Employee USFcomponent
quoted pay 165specifying benefit programs 156tracking information for employees onassignment 160viewing component interfaceexceptions 174viewing expected pay 164viewing job earnings distributions 166
historical employment information 168Hour Type Table (FRA) page 22hours type codes 22HR Request (USF) component 395See Also personnel action requests (USF)
HR statuspersonnel actions 352
HR_PER501A 342HR_REACTVTER process 196HRBEL_DIM_AE process 262
IIC Trans External Company/Deptpage 35, 289IC Trans External Superv Lvl page 35,37, 289ID Change page 343ID Delete page 343Identification (USF) page - SetupWage/Separation USF 408Ido Candidate Listing 325Ido Employee Listing 334, 337implementationoverview 3
INAIL Codes (ITA) page - CompanyCodes 31INAIL Codes (ITA) page - Company/EstabCodes 31individual retirement records 423Industrial Inspection (DEU) page 26Industry Activity (ESP) page 38INPDAI Codes (ITA) page - CompanyCodes 31INPDAI Codes (ITA) page -Company/Estab Codes 31INPS (Istituto Nazionale per la PrevidenzaSociale) codes 32
INPS Codes (ITA) page - CompanyCodes 30INPS Codes (ITA) page - Company/EstabCodes 31insurance companiesentering information (ESP) 40
Insurance Company (ESP) page 38, 40integrations 3intercompany transfers (shukkou)and search page security 316entering and maintaining home/hostdata 304multiple companies using single HRdatabase 309, 313overview 299PER065JP 318running the Completion of IC Transferreport 318selecting actions and reasons for 303setting compensation owner 304setting up employee data 303setting up intercompany transfercompany data 34single company using single HRdatabase 305summary of home/host data 299understanding 299Work Location page 93
IRR, See individual retirement recordsIT Country FCode (ITA) page 32ITA C.I.A. Table page 30ITA City Table page 30ITA Employee Documentation page 277ITA Employee Job Letter page 277ITA Employee Terms page 278ITA Equal Opportunities page 280ITA INAIL Table page 30ITA INPDAI Table page 30ITA INPS Table page 30, 32ITA Matricula Book Calc page 277ITA PREV Table page 30ITA Seniority Notification page 34Italydefining INPS codes 32defining seniority notificationperiods 34recording additional hiring data 276recording end of employmentinformation 278running the Disability report 205
496 PeopleSoft Proprietary and Confidential

Index
running the Equal Opportunitiesreport 279running the Matricula Book Calculationprocess 277setting up Italian workforce tables 29
JJapanappointment reporting for job datachanges 368intercompany transfers, Work Locationpage 93PER065JP 318running the Appointment Listreport 373running the Appointment Notificationreport 372running the Employee Assignment Listreport 375setting up intercompany transfercompany data 34setting up supervisor levels 35tracking additional appointments(kenmu) 285tracking intercompany transfers(shukkou) 299
Job (USF) page 144, 154job codes 94job dataadding and updating 77changing 340effective dates 356running reports 367security considerations forupdating 351understanding effective dates 351updating 350updating pay rate changes 359viewing (USF) 388
Job Data componentCompensation page 114Job Information page 94Payroll page 109Salary Plan page 113Work Location page 89
job data reports 367Job Data1 (USF) page 387, 388Job Data2 (USF) page 387Job Earnings Distribution page 88, 125,133
job historyviewing 381, 382viewing salary history 384
Job Information page 85, 94, 132Job Labor page 85, 105, 133job locations 89Job Summary JPN page 294, 381Job Summary pageCompensation tab 383General tab 382Job Information tab 382usage 381viewing 382Work Location tab 383
Job Tracking Info (USF) page 143, 148JPN Completion of IC Transfer page 318JPN Employee Assignment List 372
Llabor agreements 105leave bank 440Leave Bank Application (USF) page 455Leave Bank Details (USF) page 448Leave Class Auto Entry Audit (USF)page 441, 445leave class rule criteria (USF) 443leave class rules (USF) 454Leave Class Rules (USF) page 441, 443,454leave class rules template (USF) 441Leave Class Rules Template (USF)page 441leave contributionsanother agency’s leave transferprogram 457external leave transfer program 457leave bank or emergency leave transferprogram 455voluntary transfer program 456
Leave Donation Tracking (USF)page 461, 463leave donations (USF)administering 454viewing leave bank and emergency leavetransfer programs 462viewing voluntary leave transferprograms 463
leave earning types (USF) 451leave enrollment, automatic, See automaticleave enrollment (USF)
PeopleSoft Proprietary and Confidential 497

Index
leave enrollment, manual (USF) 446Leave Ledger (USF) page 461, 462Leave Program Summary (USF)page 461, 464leave program type 445Leave Program Type Table (USF)page 448, 449Leave Recipient Info (USF) page 459leave recipients (USF) 458leave transfer earnings codes (USF)donors and recipient accruals 452use for transferred leave 452
leave transfer programs (USF)reports 464setting up 449viewing a summary ofparticipation 464
leave transfers (USF)entering leave contributions 455, 456,457See Also leave contributions
entering leave requests 459overview 440setting up denial notifications 449setting up earnings accrual classes 452setting up earnings codes 450, 452See Also leave transfer earnings codes(USF)
setting up leave class rules 454setting up leave transfer programs 449setting up programs 448updating the Additional Pay page andleave ledgers 458, 460viewing accrual balances after processingpayroll 463viewing contributions or hours receivedafter running the Leave Bank andTransfer process 463viewing leave donations 462, 463See Also leave donations (USF)
viewing summary data for a leavetransfer program 464
leaves of absenceentering requests (USF) 422entering returns from leave 362overview 361tracking multiple types for oneworker 361
MMailing Address (USF) page 387Mailing Labels page 350Maintain Bank Accounts page 232Malaysiaassigning festive advance types 123setting up religions 37
Manage Positions business process 176mandates (FRA) 272Mandates (FRA) page 272Marital Status (USF) page 144, 153Mass Employee Transfer 334, 337mass organization changeunderstanding 319
maternity leave 422Matricula Book Calculation process 277Mexicoentering IMSS notificationinformation 12
military service 272Military Situation (FRA) page 272MMA Partners xxiimultiple actionsentering multiple actions with sameeffective date 356
multiple actions with same effectivedate 419multiple jobssetting up (USF) 177viewing summary data 376
Multiple Jobs page 376
NName page 212, 213namesentering 58
Nation Duvo Table (DEU) page 26, 27national identificationsentering 60
Netherlandscomplying with the SAMEN diversitylaw 28entering SAMEN diversity 274setting up SAMEN countries 28verifying the Social Security ID forDutch persons 60viewing dependent and beneficiarydata 222
New Zealand
498 PeopleSoft Proprietary and Confidential
Index
setting up disability codes 37Non Pay Data (USF) page 145, 173non-employee, See contingent workernonpay status 173notes xxvNotification of Personnel Action(SF-50) 404
Ooccupational illness (FRA) 23Occupational Illness (FRA) page 22, 23OEE Groups by Employment Type (CAN)page 266OEE Groups by OCC Group (CAN)page 266OEE Groups/Jobs Filled/Vacated (CAN)page 266OEE Workforce Survey (CAN) page 266OEE workforce survey responses 266OEE Workforce Survey Stats (CAN)page 266official languages 267Official Languages (CAN) page 266, 267Official List (ESP) page 371Org Plan Checklist 334organization plan 321, 325Organization Plan 321Organization Plan Checklist 334organizational instanceadding 77
organizational structuretree manager 320
Original Contract Data page 183Other Pay Information (USF) page 145,164Other Phone Numbers page 224Overview 1
PPAR 393See Also personnel action requests (USF)
PAR Remarks (USF) page 143, 147Parameters (SGP) page 350Parameters page - Notice of PersonnelAction USF 403, 404Parameters page - Refresh EmployeesTable 378Parameters page - Refresh Personal DataTable 378
Parameters page - Request PersonnelAction USF 403, 404Passport/Visa Expiration page 227paternity leave 422Pay Rate Change component 366pay rate changes 366updating job data 359
Payroll page 86, 109, 133payroll processing data 109payroll statuspersonnel actions 352
Pending Future Actions page 369PeopleBooksordering xxii
PeopleCode, typographicalconventions xxivPeopleSoft application fundamentals xxiPER001 370PER002 350PER003 370PER005 370PER006 350PER007 370PER010 371PER015 369PER020 350PER021 369PER029 379PER038NL 274PER039GR 198PER040GR 198PER053 280PER054ES 371PER058 371PER060 198PER063JP 371PER064JP 371PER066JP 372PER100CN 140PER103CN 266PER104CN 266PER105CN 266PER106CN 266PER710 7PER801SG 350performance awards 424permits, See visas and permitsPerson Checklist page 88Person componenttracking addresses 61
PeopleSoft Proprietary and Confidential 499

Index
tracking biographical history 59tracking email addresses 62tracking names 58tracking national identifications 60tracking phone numbers 62
person IDs (identification)assigning 55
person of interestadding 77
person pagesContact Information page 61
Person pagesBiographical Details page 57
personal datachanging 340refreshing Personal Data table 378running reports 349understanding types 345updating 345viewing (USF) 387
Personal Data (USF) page 144, 149, 387personal data reports 349personal information 61Personal Phone Numbers (USF) page 144Personal Profile page 212, 215Personal/Job Data (ITA) page 277personnel action history reports 406personnel action reasonsdefining 5, 10defining for Canadian actions 11defining for German actions 11global assignments 6positions 6understanding 5
personnel action request (PAR)process 141, 142personnel action requests (USF)adding and updating data 396administering 393affecting employee status 416authorizing and approving 400automatically routing the PAR 396cancellation, correction, orwithdrawal 397correcting or canceling actions 401disapproving or returning 397Human Resources processing 401identifying PAR status codes anddefinitions 398performing common 420
printing a Notification of PersonnelAction (SF-50) 404printing an action request (SF-52) 403process diagram 396processing actions 400processing new requests 400, 413requesting multiple actions with the sameeffective date 419running reports 406selecting a PAR status 396system features 393tracking and routing a PAR requestthrough reviews and completion 395understanding 393, 413viewing employee data summaries 406
personnel actionscreating checklists for 18defining 7effect on status 352
Personnel Actions History page 369personnel recordslocating 179See Also contingent data; employeedata
updating 342phone numbersentering 62
Phone Numbers page - PersonalProfile 212photographs 241PIS 51placement plansoverview 319
Position (USF) page 145, 160positionsaction reasons 6assigning employees (USF) 176changing a worker’s 364entering (USF) 154, 160hiring 89hiring employees (USF) 176
preliminary employment data forms 177prerequisites xxiPREV Codes (ITA) page - CompanyCodes 31PREV Codes (ITA) page - Company/EstabCodes 31Primary Job Audit page 371Print ES-931 (USF) page 408, 411printed documentation xxii
500 PeopleSoft Proprietary and Confidential

Index
prior work experience 239Prior Work Experience page 237, 239probation terminations (USF) 430Process Leave Bank/Transfer (USF)page 455, 458, 460process requestsad-hoc 378as-of date 378calendar year 378from/thru dates 378
Productive Unit (ITA) page 32Programa de Integração Social (PIS) 51promotionsentering 357entering (USF) 420
Property Value page 208, 209protected job leave 253Protection (BEL) page 252, 253Provider Info page 16
QQuery Viewer 334quoted pay 165
RRAIS 51Reactivate/Termination Update page 195,196Reason Summary page - Actions 7reassignment requests (USF) 421Reduced Charged Table (BEL) page 244Regional page 57rehiring employeesentering requests (USF) 424
rehiring workersentering 364
Relação Anual de Informações Sociais(RAIS) 51related documentation xxiiReligions MYS/SGP page 37Religions page 16replacement contracts 249Report (BEL) page 255, 260reportsAction Reason Table 7Appointment Affidavit (SF61 Report)(USF) 178Award Type Table 13CAGED (BRA) 138
Contract Information 184Database Audit 379Disability Report (ITA) 198Employee Birthdays 350Employee Home Address Listing 350Employee Listing 350Employee Registry (BRA) 138Heavily Disabled (DEU) 198Heavily Disabled Equalization(DEU) 198Hire List (CAN) 140ITA Equal Opportunities 280job data 369NLD Law SAMEN Statistics 274OEE Groups by Employment Type 266OEE Groups by Jobs Filled/Vacatd 266OEE Groups by OCC Group 266OEE Work Force Survey Stats 266Preliminary Employment Data form(SF-75) (USF) 178Temp Assignment due to Complete 195Temp Assignment w/out End Date 195
responsible parties 49Results (BEL) page 255, 258retiremententering 362entering requests (USF) 423requesting supplemental/correctionindividual retirement records(USF) 423
retirement date calculation (GBR) 69Review Notification (BEL) page 261, 262RSZ Category Table (BEL) page 244, 247
Ssalary changesfor promotions (USF) 420
Salary Components page 381, 384salary history 384Salary Plan page 86, 113, 133salary plans, employee information 113SAMEN Country Table (NLD) page 29SAMEN diversity informationestablishing ethnic status 274running the LAW SAMEN Statisticsreport 276understanding 274
SAMEN diversity law 28SAMEN Registration (NLD) page 274Scheme (ESP) page 39, 41
PeopleSoft Proprietary and Confidential 501

Index
Search by National ID page 180, 182securitydepartmental reassignments (USF) 422employee data (USF) 420for intercompany transfers(shukkou) 316setting up for tracking additionalappointments 290updating job data 351
Security Info (USF) page 146, 173SEFIP 51Select Data page - Notice of PersonnelAction USF 403Select Data page - Request PersonnelAction USF 403seniority for Claeys Formulacalculations 252Seniority Notification (ITA) page 32, 34seniority notification periods (ITA) 34Setup Wage/Separation USF – AnnualLeave (USF) page 409SetupWage/Separation USF – Identification(USF) page 408Setup Wage/Separation USF – SeverancePay (USF) page 410severance calculations 251, 258Severance Pay (USF) page - SetupWage/Separation USF 408SF-75 Run Control (USF) page 178SF61 Report (USF) page 178shukkou, See intercompany transfers(shukkou)SI Unit (DEU) page 26Signature Date/Probation Info page 184,192Singaporeassigning festive advance types 123setting up religions 37
Sistema Empresa de Recolhimento doFGTS e Informações à Previdência Social(SEFIP) 51Soc Sec Risk Code (ESP) page 38, 40Social Insurance Numbers 60Social Report (BEL) page 264social security (ESP)defining bases 42defining contribution rates andpercentages 44defining maximum and minimumceilings 41
entering country codes for reporting 39viewing risk codes 40
Social Security Country Codes (ESP)page 38, 39Social Security ID 60social security tracking codes 22Spaindefining action reason codes 12defining hiring centers 47entering company information 46entering country codes for social securityreporting 39entering insurance companyinformation 40generating AFI flat files 268setting up social security 40, 41, 42, 44setting up workforce tables 38SOCS_AFI_ESP 268workforce contracts for disabledworkers 189
standard contracts 183statuspersonnel actions 352
Statute Table (BEL) page 244, 246substantial presence test 282Substantial Presence Test (USA) page 282substantive jobssuspending for temporaryassignments 194understanding 194
suggestions, submitting xxvisupervisor levels (JPN) 35Supervisor Request (USF)component 395See Also personnel action requests (USF)
Supporting Documents Table page 14Switzerlandrunning the Company Statisticsreport 268
Ttamatsukioverview 319
Tamatsuki Placement Check List 325,331Tamatsuki to Transfer Record 325, 331Tamatsuki Transfer Candidate Entry 325Tamatsuki Transfer Candidates 329Tamatsuki Transfer Entry 325, 329TAS001 195
502 PeopleSoft Proprietary and Confidential

Index
TAS002 195Temp Assignment w/out End Datepage 195Temp Assignmt Due to Completepage 195temporary assignmentsdata processing considerations 194entering 194, 195partial 196running the update process 196understanding 194
Temporary Data Cleanup 334, 337Temporary Employees page 370tenure conversions (USF) 431career-conditional conversions 433process overview 432understanding 433viewing supervisor notifications 432
terminationsdue to death 363entering 362entering requests (USF) 423requesting terminations due to death(USF) 424running probation termination automaticactions (USF) 430
terms 467Time and Labor Data (USF) page 146Transfer Data Maintenance 325, 332Transfer Entry by Department 325, 326Transfer Entry with Trees 325, 328transfers 358Transfers After Organization Change 336transfers, leave, See leave transfers (USF)Tree Manager 321Turnover Action (ITA) page 32typographical conventions xxiv
Uunion membership 109United Kingdomentering a worker’s building societydetails 235entering banking information 233understanding the retirement datecalculation 69
United Statesdetermining residency status for foreignnationals 282entering COBRA action reason data 12
reporting to Government Agencieswhen the social security number isunknown 60reviewing union membership 109
United States Federalaction request (SF-52) 403administering automatic leaveenrollment 439See Also automatic leave enrollment(USF)
administering personnel actionrequests 393See Also personnel action requests(USF)
administering probation terminationswith automatic actions 430administering tenure conversions 431See Also tenure conversions (USF)
administering within-gradeincreases 434defining award actions 12employee data securityconsiderations 420generating a wage and separationreport 407See Also ES-931
hiring employees 141See Also hiring United States Federal(USF) employees
initiating and requesting personnelactions 400managing leave transfer programsSee Also leave transfers (USF)administering leave donations 454administering leave recipients 458setting up leave transferprograms 448viewing leave transfer data 461
printing appointment affidavitsand preliminary employment dataforms 177processing automatic actions 425See Also automatic actions (USF)
processing personnel actionrequests 413understanding workflow 395using the Personnel Action Request(PAR) process to hire employees 141viewing employee benefitprograms 389
PeopleSoft Proprietary and Confidential 503

Index
viewing employee data summaries 406viewing job data 388viewing personal data 387
Unknown Social Security ID 60update components 350job data 340personal data 340
USF, See United States Federal (USF)
Vveterans 152Veterans Info (USF) page 144, 152, 387Visa/Permit Data page 227, 229Visa/Permit Table page 14visas, See visas and permitsvisas and permitsdefining 14entering 229entering for dependents 224managing data 226tracking 228
visual cues xxvVLTP 440Voluntary Leave Transfer Program 440volunteer activities 235Volunteer Activities page 235Volunteer Organization Table page 16
WWage and Separation report (USF) 407warnings xxvWBEAA Data - NLD page 274, 276WGI, See within-grade increasesWGI Action (USF) page 429WGI Notice (USF) page 429within-grade increasesadministering for US Federal use 434creating supervisor notifications 436entering data that affects WGI automaticactions 437process overview 436running the Load Within Grade Increasesprocess 430understanding 60 day WGI notices 434understanding the Load Within GradeIncreases process 434viewing supervisor notifications 437
work experience 239Work Group (ESP) page 39, 42
Work Location page 84, 89, 132work permits and visas 14See Also visas and permits
worker images 241workflowfor personnel action requests(USF) 395updating person addresses 348
workforcehiring contingent workers 77hiring employees 77increasing 77
workforce contractsadding basic information 185adding signature date and probationinformation 192adding special clauses 189defining contract types 184generating the Contract Informationreport 193setting up and tracking 182setting up standard contracts 183
workforce dataentering 236entering employee images 236record badge numbers 236tracking business expenses 236tracking prior work experience 236
workforce informationupdating 339viewing 381
YYears of Service page 370
504 PeopleSoft Proprietary and Confidential
Copyright © 2022 FDOKUMEN