
OWNERS MANUAL - Top Gun Mobility
56
OWNERS MANUAL PHANTOM, EMPEROR & ALBATROSS
-
Upload
khangminh22 -
Category
Documents
-
view
3 -
download
0
Transcript of OWNERS MANUAL - Top Gun Mobility

OWNERS MANUAL PHANTOM, EMPEROR & ALBATROSS

AUTHORISED TOP GUN MOBILITY AFTER SALES SERVICE
We have ensured that your new Top Gun Mobility Scooter is ready to deliver! Every member of our Team is dedicated to Customer Satisfaction. By making contact with the following personnel you will be assured of Prompt and Efficient After Sales Service. Sales : _____________________________ Service : _____________________________ Spare Parts : _____________________________
WARNING
Please read the Owner’s Manual carefully before operation. If you do not fully understand any part of the Manual, please contact your dealer so as to avoid any injury or damage from misuse. Electromagnetic Interference (“EMI”) can cause powered vehicles to behave erratically, which can be dangerous to the user. For your Safety & Protection, it is IMPERATIVE that you take the time to read the Chapter on EMI prior to operating your Top Gun Mobility Scooter.
DEALER STAMP :

RETAIL ADVICE & BUYERS WARRANTY REGISTRATION Selling Dealer to complete at time of sale in order to Register Warranty with Top Gun Mobility Customers Email Address: ________________________________________________________________
Customer: __________________________________ Model: ____________________________________
Address: ___________________________________ Serial Number: ______________________________
___________________________________________ Colour: ____________________________________
State: ______________ Postcode: ______________
Date of Sale: ________________________________
Phone: _____________________________________ Type of Purchase: Consumer / Rental / Other
SELLING DEALER:
___________________________________________
__________________________________________ ___________________________________________
Customer Signature ___________________________________________
___________________________________________
_________________________________________ ___________________________________________
Dealership Representative Signature


Table of Contents INTRODUCTION ....................................................................................................................................................... 1
MODEL FEATURES & SPECIFICATIONS ..................................................................................................................... 1
BASIC OPERATING INSTRUCTIONS – PHANTOM, EMPEROR & ALBATROSS ............................................................ 5
Battery Charging ................................................................................................................................. 9
SAFETY OPERATIONAL INSTRUCTIONS .................................................................................................................. 11
General ............................................................................................................................................. 11
Modifications .................................................................................................................................... 12
Removable Parts ............................................................................................................................... 12
Weight Restrictions .......................................................................................................................... 12
Pre-Drive Safety Check ..................................................................................................................... 13
Tyre Inflation ..................................................................................................................................... 13
Incline Information ........................................................................................................................... 14
Cornering Information ...................................................................................................................... 17
Braking Information .......................................................................................................................... 17
Outdoor Driving Surfaces.................................................................................................................. 17
Public Streets and Roadways ............................................................................................................ 18

Stationary Obstacles (Steps & Curbs) ............................................................................................... 18
Precautions during Unusual Weather............................................................................................... 18
Freewheel Mode ............................................................................................................................... 19
Stairs & Escalators ............................................................................................................................ 20
Lifts/Elevation Products .................................................................................................................... 20
Batteries (also see Storage Instructions) .......................................................................................... 21
Preventing Unintended Travel .......................................................................................................... 21
Getting Onto and OFF Your Mobility Scooter ................................................................................... 22
Reaching and Bending ...................................................................................................................... 22
Prescription Drugs/Physical Limitations ........................................................................................... 23
Smoking ............................................................................................................................................ 23
Alcohol .............................................................................................................................................. 23
Adjustments ...................................................................................................................................... 24
ELECTROMAGNETIC AND RADIO FREQUENCY INTERFERENCE (EMI/RFI) ............................................................ 27
SAFETY SYMBOLS .................................................................................................................................................. 29
SAFETY INFORMATION SUMMARY ....................................................................................................................... 34
MAINTENANCE SCHEDULE ................................................................................................................................... 35

TROUBLESHOOTING (Status Warning LED) ........................................................................................................... 37
WARRANTY ............................................................................................................................................................ 38
CHANGE OF DETAILS / CHANGE OF OWNER ......................................................................................................... 41
SERVICE RECORD ................................................................................................................................................... 42


1 | P a g e
INTRODUCTION CONGRATULATIONS on the purchase of your new Top Gun Mobility Scooter. We are excited to provide you one of our Innovative Mobility Scooters. Our Scooters are designed to provide personal freedom, as well as Convenience, Comfort and the Assuredly High Performance level combined with a long life cycle.
This Owner’s Manual contains important information concerning the proper maintenance and safe operation of your Mobility Scooter. Please read this manual thoroughly and carefully prior to operating your new Mobility Scooter to familiarise yourself with all operation instructions.
MODEL FEATURES & SPECIFICATIONS PHANTOM
1. Sturdy Canopy 2. Front Protective Windscreen 3. Seat Belt 4. Deluxe orthopaedic seat that slides, reclines & swivels 5. Angle adjustment fold up arm rests 6. Automatic braking system 7. Intelligent LCD digital display 8. LED Headlights 9. Direct Drive sealed transmission/gearbox 10. Multi position tiller angle 11. Free-wheeling device 12. USB Charging

2 | P a g e
EMPEROR
1. World’s best componentry 2. Max Load Capacity 250kg 3. Extra wide bariatric bench seat 4. Extra wide tyres for driver comfort 5. 200mm Ground Clearance 6. All around adjustable heavy duty suspension 7. Safety hand brake complimenting electric brakes 8. Safe cornering steering sensors as standard 9. High visibility head and taillights 10. Adjustable tiller for driver 11. Large rear lockable box 12. USB port for phone charging – peace of mind 13. Power Save Mode

3 | P a g e
ALBATROSS 1. Large lockable rear storage box 2. Rear bumper 3. Seat Belt 4. Deluxe orthopaedic seat that slides, reclines & swivels 5. Angle adjustment fold up arm rest 6. Automatic braking system 7. Electronic cornering control 8. Panel control and digital display 9. LED headlights 10. Direct Drive sealed transmission/gearbox 11. Multi Position tiller angle 12. Free-wheeling device 13. Digital Display 14. USB Charging Port 15. Windscreen and Roof 16. Light weight, long life lithium battery 17. Power Save Mode 18. Golf Bag Holder (optional)

4 | P a g e
SPECIFICATION COMPARISON TABLE
PHANTOM EMPEROR ALBATROSS
Battery (Lead-Acid) 24V 70AH x 2pcs 24V70Ah*2 100A x 1pcs (lithium)
Motor Power 950W 1300W 1300W
Controller PG-140A PG-200A PG-200A
Electric Brake ELECTROMAGNETIC BRAKE ELECTROMAGNETC BRAKE ELECTROMAGNETIC BRAKE
Overall Dimensions 1700x830x1680mm (with roof) 1920x960x1400mm 1650x840x1680 (with roof)
Weight 96KG 150KG 150KG
Max. Loading Weight 180KG 250KG 250KG
Max. Speed (klm/hr) 10KM/H 10KM/H 10KM/H
Turning Radius 1850mm 2600mm 2600mm
Max. Climbing Grade 10◦ 10◦ 10◦
Wheel Size - Front 13" x 2pcs (tubeless) 15” x 2 pcs (tubeless) 15" x 2 pcs (tubeless)
Wheel Size - Rear 13" x 2pcs (tubeless) 15” x 2 pcs (tubeless) 16" x 2 pcs (tubeless)
Drive System rear wheel driving Rear wheel driving rear wheel driving
Ground Clearance from Seat NA NA NA
Ground Clearance 150mm 200mm 200mm
Groove Crossing Ability NA NA NA
Travel Range up to 50km Up to 70km up to 70km
Free Wheel Mode Yes Yes Yes
Wheel Hub Aluminium Alloy Aluminium Alloy Aluminium Alloy
Charger Size 24V 8A 24V 8A 24V 8A

5 | P a g e
BASIC OPERATING INSTRUCTIONS – PHANTOM, EMPEROR & ALBATROSS
# 1 The main key switch is located on side of tiller column
The key switch has two positions:
OFF: The scooter cannot be driven and the EMB is locked.
ON: Power is supplied to the scooter and the EMB is released automatically when the throttle control lever is squeezed.
To operate, insert the key in the key switch and turn it to ON (clockwise). The switch will remain in this position and the Power indicator will be lit. Note: The key switch is used to operate the scooter, not for locking.
# 2
Adjust the position of the handlebars (height and distance) as follows: 1. Push the handlebar adjustment lever (which locks the handlebars in place), and
move the handlebars to the position you want. 2. Release the lever to lock the handlebars in place.
3
Before attempting to drive the scooter, make sure the plug is disconnected from the charging socket. Insert the charger plug in the charging socket located on the right side of the tiller column to charge your scooter. Note: While the plug is in the charging socket, the scooter cannot be operated.

6 | P a g e
Standard Dashboard Configuration
Speed Control Dial
Status LED Indicator
Horn (Buzzer)
Hazard Button
Throttle control levers
Right Turning Indicator Left Turning Indicator
Headlight Switch

7 | P a g e
The Dashboard consists of an Intelligent Screen, Trouble Indicator LED, Headlight/Taillight light switch, Right Turning signal switch, High/Low Speed control knob, Left Turning signal switch, Beep Button (Horn) and an Alarm button (shown in the diagram on previous page). The function of each feature is described as below; Speed control Dial The speed limit dial is located on the handlebar panel.
When the speed limit dial is set to FAST, the scooter will drive at approx. 10 km/hr.
When the speed limit dial is set to SLOW, the scooter will drive at approximately 3km/hr. Do not change the speed limit dial setting while the scooter is moving. Set the speed limit dial to SLOW:
Until you get used to driving your new scooter, and When driving the scooter inside a building or in a crowded area Status LED Indicator There is a fault diagnosis system in the controller, it is used to identify and troubleshoot faults. If any faults occur during the operation of your mobility scooter, the trouble/fault can be identified according to how many times the LED flashes (Trouble/Fault indicator LED). The description of various fault codes is detailed in further chapters of this instruction manual. Horn (Buzzer) Your horn is located on the controller dash panel. To activate the horn you push the button and a short beeping noise will be heard. When approaching people from behind it’s a good idea to beep your horn to alert them of your approach.

8 | P a g e
Hazard Button The Hazard button activates the hazard lights (front and rear blinkers).
To turn off the hazard lights, press the button again Throttle Control Levers Gently squeeze the throttle control lever (depending on whether you want to drive forward or backward) until you reach the desired speed. Your speed is directly proportional to the deflection of the throttle control lever.
Note : You can squeeze one side of the throttle control lever towards you, or you can push the other side away from you to achieve the same effect. Throttle control selection can also be activated by fingers or thumb of both hands, use whichever method is most comfortable for you.
To Stop : Release the throttle control lever. The scooter will stop gradually (within 3mtrs when on a level surface)
Left & Right Turning Buttons: Before you turn, press the applicable indicator button.
When a turn indicator is activated, the applicable LED will flash.
To turn off the indicator, press the button again.

9 | P a g e
Battery Charging Please ensure you read this section of your Owner’s Manual prior to use. These instructions are written based on you using the charger supplied with your Mobility Scooter. To ensure the best performance and maximum battery life, we recommend frequent battery charging. Your
Scooter comes with an external battery charger for your ease and convenience. The console battery display
makes charging simple and easy. It is recommended that you charge your scooter every night before you go to
bed at night and disconnect it the next morning.
If the five indicators on controller light up (three green lights, a yellow one, a red one) that means the battery is fully charged
If the yellow and red lights up, that means the battery needs to be recharged
If there are only red lights then your battery requires immediate charging
The LED on the charger will show read whilst battery is recharging and will turn green once charge is complete
1) On a level, dry surface, turn off the power key and plug the extension cord into the charger socket
located on the steering console. Then plug the other end of the charger cord into a wall outlet.
2) Charge the battery for 6-8 hours depending on the usage before charging. Disconnect the charger
from the wall outlet, disconnect the extension cord from the scooter, insert key into tiller and check if
all gauge lights are on.

10 | P a g e
Follow these steps for battery charging.
1) Insert the charger plug (8) in the charging socket (10) located on the right side of the tiller column.
2) Plug the charger power cord (9) into a wall socket (11). 3) When charging is complete, remove the charger power cord (9) from the wall socket (11) and
then remove the charger plug (8) from the charging socket (10). 4) Under ideal storage conditions, batteries that were charged to full capacity and were not used
should be recharged every month 5) If you expect not to use your scooter for an extended period of time, we recommend charging it
for two days and then disconnecting the batteries. 6) If you have not used your scooter for an extended period of time, charge the batteries for at least
24 hours before driving.
Note:
There is NO need to disconnect the charging plug immediately after the charging is complete.
However, DO NOT leave the charger connected to the batteries FOR MORE THAN TWO WEEKS.
As long as the charging plug is in the charging socket, the electronic control of the scooter
automatically cuts all power to the electric system and it cannot be driven.
The charger supplied is suitable for charging lead acid dry/gel batteries. Use only the defined
type of charger. Before using any other type of charger, check with your dealer.
11 | P a g e
SAFETY OPERATIONAL INSTRUCTIONS
General
MANDATORY! Do not operate your new Mobility Scooter for the first time without reading and understanding this user manual completely.
Your Mobility Scooter is a state-of-the-art life-enhancement device designed to increase mobility. We provide an extensive range of products to best fit the individual needs of the user. Please be aware that the final selection and purchasing decision regarding the type of
Mobility Scooter to be used is the responsibility of a user who is capable of making such a decision and of his or her healthcare professional (i.e., medical doctor, physical therapist,
etc.)
The contents of this manual are based on the expectation that a mobility device expert has
properly fitted the appropriate model scooter to the user.
Healthcare Professionals and/or the authorized dealer to give instructions for the use of the
product.
There are certain situations, including some medical conditions, where the user will need to practice operating the scooter in the presence of a trained attendant. A trained attendant can be defined as a family member or care professional specially trained in assisting a user in
various daily living activities.

12 | P a g e
As you begin using your scooter during daily activities, you will probably encounter situations
in which you will need some practice. Simply take your time and you will soon be in full and confident control as you manoeuvre through doorways, on and off elevators, up and down
ramps, and over moderately rough terrain. Modifications
We have designed and engineered your Mobility Scooter to provide maximum mobility and utility. Under no circumstances should you modify, add, remove, or disable any feature, part, or function of your scooter. WARNING! Do not modify your Mobility Scooter in any way not authorized by the manufacturer. Do not use accessories if they have not been tested or approved by the manufacturer
Removable Parts
WARNING! Do not attempt to lift or move your Mobility Scooter by any of its removable parts, including the armrests, seat, or shroud
Weight Restrictions
Your scooter is rated for a maximum weight capacity. Refer to Specification sheet for details. Stay within the specified weight capacity for your scooter. Exceeding the weight capacity voids your warranty. We will not be held responsible for injuries and/or property damage resulting from failure to observe weight limitations.
WARNING! Do not carry passengers on your scooter as it may result in instability.

13 | P a g e
Pre-Drive Safety Check
Get to know the feel of your Mobility Scooter and its capabilities. We recommend that you perform a safety check before each use to make sure your scooter operates smoothly and safely.
Perform the following inspections prior to using your scooter:
Check for proper tyre inflation. Maintain but do not exceed the psi/bar/kPa air pressure
rating indicated on each tyre. Check all electrical connections. Make sure they are secure and not corroded.
Check all harness connections. Make sure they are secured properly.
Check the brakes.
Check the battery charge.
If you discover a problem, contact your authorised dealer for assistance. Tyre Inflation
Your scooter is equipped with pneumatic tyres. Check the tyre pressure at least once a week. Proper inflation pressures will prolong the life of your tyres and help ensure smooth operation.
WARNING! It is critically important that the psi/bar/kPa air pressure indicated on each tyre is
maintained at all times. (Generally between 30-35psi) Do not under-inflate or over-inflate your tyres. Under-inflation may result in loss of control, and over-inflation may burst the tyre. Failure to maintain the indicated pressure rating at all times may result in tyre and/or wheel failure. WARNING! Inflate your scooter tyres from a regulated air source with an attached pressure
gauge. Inflating your tyres from an unregulated air source could over-inflate them, resulting
in a burst tyre.

14 | P a g e
Incline Information
More and more buildings have ramps with specified degrees of inclination, designed for easy and safe access. Some ramps may have turning switchbacks (180-degree turns) that require you to have good cornering skills on your scooter.
Proceed with extreme caution as you approach the downgrade of a ramp or incline.
Take wide turns with your scooter around any tight corners. If you do that, the scooter’s rear wheels will follow a wide arc. Do not cut the corner short, and do not bump into or get hung up on any railing corners.
When driving down a ramp, keep the scooter’s speed adjustment set to the slowest speed setting to ensure a safely controlled descent.
Avoid sudden stops and starts.
Refer to Figure below to determine the maximum slope
Maximum Recommended Incline Angles

15 | P a g e
When driving up an incline, try to keep your scooter moving. If you must stop, start up again slowly, and then accelerate cautiously. When driving down an incline, set the speed switch to MIN and drive forward only. If your scooter starts to move down the incline faster than you want, allow it to come to a complete stop by releasing the throttle control lever, then push the throttle control lever forward slightly to ensure a safely controlled descent. WARNING! When on any incline, never place the scooter in freewheel mode while seated on it or standing next to it. WARNING! When climbing an incline, do not zigzag or drive up at an angle. Always drive your scooter straight up the incline. This greatly reduces the possibility of tipping over or a fall. Always exercise extreme caution when negotiating an incline.
WARNING! Do not drive your scooter across an incline or diagonally up or down an incline; if possible, do not stop while driving up or down an incline.
WARNING! Do not drive up or down a potentially hazardous incline (e.g., areas covered with snow, ice, cut grass, or wet leaves).
WARNING! Even though your scooter is capable of climbing slopes greater than those illustrated, do not, under any circumstances, exceed the incline guidelines or any other specifications presented in this manual. Doing so could cause your scooter to become unstable. Note that public accesses ramps are not subject to government regulation in all countries, and therefore do not necessarily have the same standard degree of slope. Other inclines may be natural or not be designed specifically for scooters.

16 | P a g e
The figure on page 14 illustrates your scooters’ stability and its ability to climb under various weight loads and under controlled testing conditions. These tests were conducted with the scooter seat in the highest position and in its farthest rearward position. Use this information as a guideline. Your scooters’ ability to travel up inclines is affected by your weight, scooter speed, your angle of approach to the incline, and your scooter setup. WARNING! Any attempt to go up or down a slope steeper than shown in Figure C may make your scooter unstable and cause it to tip. WARNING! Never carry an oxygen tank weighing more than 15 lbs (6.8 kg). Never put more than 5 Kg (11 lbs) in the front basket or more than 8 Kg (17.6lbs) in the rear basket.
Figure B. Normal Driving Position Figure C. Increased Stability Drive Position

17 | P a g e
Cornering Information Excessively high cornering speeds can result in tipping. Factors that affect the possibility of tipping include, but are not limited to, cornering speed, steering angle (how sharply you are turning), uneven road surfaces, inclined road surfaces, riding from an area of low traction to an area of high traction (such as passing from a grassy area to a paved area – especially at high speed while turning), and abrupt changes of direction. WARNING! When cornering sharply, reduce your speed and maintain a stable centre of gravity. When using your scooter at higher speeds, do not corner sharply. This greatly reduces the possibility of a tip or fall. Always exercise your common sense when cornering.
Braking Information Your scooter is equipped with two powerful braking systems:
Regenerative: Uses electricity to rapidly slow the vehicle when the throttle control lever returns to the centre/stop position.
Park Brake: Activates automatically after regenerative braking slows the vehicle to a near stop, or when power is removed from the system for any reason
Outdoor Driving Surfaces Your scooter is designed to provide optimum stability under normal driving conditions, on dry, level
surfaces of concrete, tarmac or asphalt. However, we recognize that there will be times when you will encounter other surfaces. For this reason, your scooter is designed to perform well on packed soil, grass, and gravel. Feel free to use your scooter safely on lawns and in parks.
Reduce your scooter speed when driving on uneven terrain and/or soft surfaces.
Avoid tall grass that can become tangled in the running gear.
Avoid loosely packed gravel and sand.

18 | P a g e
Public Streets and Roadways WARNING! Do not operate your scooter on public streets or roadways. It may be difficult for traffic to see you when you are seated on your scooter. Obey all local pedestrian traffic rules. Wait until your path is clear of traffic, and then proceed with extreme caution.
Stationary Obstacles (Steps & Curbs)
WARNING! Do not drive near raised surfaces, unprotected ledges, and/or drop-offs (curbs, porches, stairs, etc.). WARNING! Do not try to go up or down an obstacle that is too high. WARNING! Do not try to go backward down any step, curb, or other obstacle.
WARNING! Be sure your scooter is travelling perpendicular to any curb you may be required to go up or down. WARNING! Do not attempt to negotiate a curb that is higher than 10 cm (4").
Precautions during Unusual Weather Avoid exposing your scooter to extreme weather. If you are suddenly caught up in rain, snow, severe cold or heat while operating your scooter, proceed to shelter at the earliest opportunity. Thoroughly dry your scooter before storing, charging, or operating it. PROHIBITED! Do not operate your scooter in heavy rain, snow, salt, mist/spray conditions, or on icy slippery surfaces, as this can have an adverse effect on the electrical system. WARNING! Prolonged exposure to extreme hot or cold may affect the temperature of parts of the scooter, possibly resulting in burns. Exercise caution when using your scooter in extremely hot or cold conditions or when exposing your scooter to direct sunlight for prolonged periods of time.

19 | P a g e
Freewheel Mode Your scooter is equipped with a manual freewheel mode which can be activated by adjusting the motor brake handle.
Ensure your scooter is turned OFF.
Turn the brake handle upwards to engage freewheel mode
Disengage the drive motors only on a level surface.
Stand beside the scooter to engage or disengage freewheel mode. Never do this while sitting on the scooter.
After you have finished pushing your scooter, always return it to the drive mode to lock the brakes (return brake handle to the downwards position)
When using the freewheel lever, be careful not to touch the internal surface of the motor, as it could be very hot and cause injury.
WARNING! When your scooter is in freewheel mode, the parking system is disengaged

20 | P a g e
Stairs & Escalators Top Gun Mobility scooters are NOT designed to travel up or down stairs or escalators. Always use an elevator where available.
Doors
Determine whether the door opens toward or away from you.
Use your hand to turn the knob or to push the handle or push-bar.
If the door opens away from you, drive your scooter gently and slowly forward to push the door open.
If the door opens towards you, drive your scooter gently and slowly backwards to pull the door open.
Elevators Modern elevators have a safety mechanism on the edge of the door that, when pushed, reopens the door(s).
If you are in the doorway of an elevator when the door(s) begin to close, push on the rubber door edge or allow the rubber door edge to contact the scooter and the door will reopen.
Take care that handbags, packages, or scooter accessories do not become caught in elevator doors.
NOTE: Sometimes manoeuvring your scooter may be difficult in elevators and building entrances. Use caution when attempting to manoeuvre your scooter in small spaces, and avoid areas that might pose a problem.
Lifts/Elevation Products If you travel with your scooter, you may find it necessary to use a lift or elevation product to aid in transportation. We recommend that you closely review the manufacturer’s instructions, specifications, and safety information before using the lift/elevation product. WARNING! Never sit on your scooter when it is being used with any type of lift/elevation product. Your scooter was not designed for such use, and any damage or injury resulting from such use is not our responsibility.

21 | P a g e
Batteries (also see Storage Instructions)
In addition to following the warnings below, be sure to comply with all other battery handling information.
MANDATORY! Battery posts, terminals and related accessories contain lead and lead compounds. Wear goggles and gloves when handling batteries, and wash hands after handling.
WARNING! Scooter batteries are heavy. If you are unable to lift that much weight, be sure to get help. Use proper lifting techniques and avoid lifting beyond your capacity.
WARNING! Always protect the batteries from freezing and never charge a frozen battery.
WARNING! Connect the battery cables correctly. RED (+) cables must be connected to positive (+) battery
terminals/posts and BLACK (-) cables must be connected to negative (-) battery terminals/posts.
REPLACE damaged cables immediately. Protective caps must be installed over all battery terminals.
NOTE: If the battery is damaged or cracked, immediately enclose it in a plastic bag and contact your local waste disposal agency or authorized dealer for instructions for disposal or for recycling (which we recommend).
Preventing Unintended Travel WARNING! If you anticipate being stationary for an extended period of time, turn off the power. This will prevent unexpected travel caused by accidentally touching the throttle control lever.

22 | P a g e
Getting Onto and OFF Your Mobility Scooter
Getting onto and off your scooter requires a good sense of balance. Please observe the following safety tips when getting on and off your scooter:
Remove the key from the key switch
Ensure that your scooter is not in freewheel mode
Ensure that the seat is secured in place
Pivot the armrests up WARNING! Position yourself as far back as possible in the seat WARNING! Avoid putting all of your weight on the armrests, and do not make the armrests bear weight, such as during transfers. WARNING! Avoid putting all of your weight on the floorboard The abovementioned actions may cause your scooter to become unstable and tip, causing injury or damage
Reaching and Bending Avoid reaching or bending while driving your scooter. Bending forward creates the risk of accidentally contacting the throttle control lever. Bending to the side while seated creates the risk of tipping. It is important to maintain a stable centre of gravity, we recommend that you determine your personal limitations and practice bending and reaching in the presence of a qualified attendant. WARNING! Do not bend, lean, or reach for objects if you have to pick them up from the scooter deck or from either side of the scooter. Movements such as these may change your centre of gravity and the weight distribution of the scooter, causing it to tip. PROHIBITED! Keep your hands away from the tyres and wheels when driving. Be aware that loose-fitting clothing can become caught in tyres and wheels.

23 | P a g e
Prescription Drugs/Physical Limitations Users must exercise care and common sense when operating the scooter. This includes awareness of safety issues when taking prescription or over-the-counter drugs or when the user has specific physical limitations. WARNING! Consult your physician if you are taking prescription or over-the-counter medication or if you have certain physical limitations. Some medications and limitations may impair your ability to operate your scooter in a safe manner.
Smoking WARNING! The manufacturer strongly recommends that you do not smoke while seated on your scooter, although the seat has passed the necessary testing requirements for cigarette smoking. You must adhere to the following safety guidelines if you decide to smoke cigarettes while seated on your scooter;
Do not leave lit cigarettes unattended.
Keep ashtrays a safe distance from the seat cushions
Always make sure cigarettes are completely extinguished before responsible disposal.
Alcohol WARNING! Do not operate your scooter while you are under the influence of alcohol, as this may impair your ability to operate the scooter in a safe manner.

24 | P a g e
Adjustments
Seat Height Adjustment The pillar components of seat are designed to be adjustable, so that it will be convenient for you to adjust your seat to the most comfortable height. There are four parts of the height of the pillar of the seat, as 25mm per scope. To remove the bolt and nut from the seat pillar by using the spanner, and adjust the pillar to the suitable height then tighten the bolt and nut again firmly.

25 | P a g e
Armrest Adjustments To adjust the angle of the armrests to the most comfortable position, you may need to ask someone’s help, all operations as below: Adjustment of the angle of armrests (Refer to the diagram above)
1. Raise the armrest to the upright position. 2. Remove the cover of the elbow pipe 3. Lower the armrest to the horizontal position 4. Raise the armrest of chair that is connected with the screw by turning this screw clockwise with a M8
Allen key, and to lower the armrest by turning it anti-clockwise. 5. Please replace the armrests cover after the adjustment.
Adjustment of the width between two armrests For the suitable feeling you want, the width between two armrests is
adjustable(Refer to the diagram above) Adjustment steps as below:
1. If you look down from the armrest holder and cast a glance at the base of the seat you will find out that there are two adjustment screws in the fixed tube of every armrest.
2. Loosen the adjustment screw, and then move the armrests inward or outward to the position you need.
3. Tighten the screws. 4. Be sure the length of the holder that is inside the armrest fixed tube is more than 35mm, so that the
adjustment screws may fix the armrest holder in position.
26 | P a g e
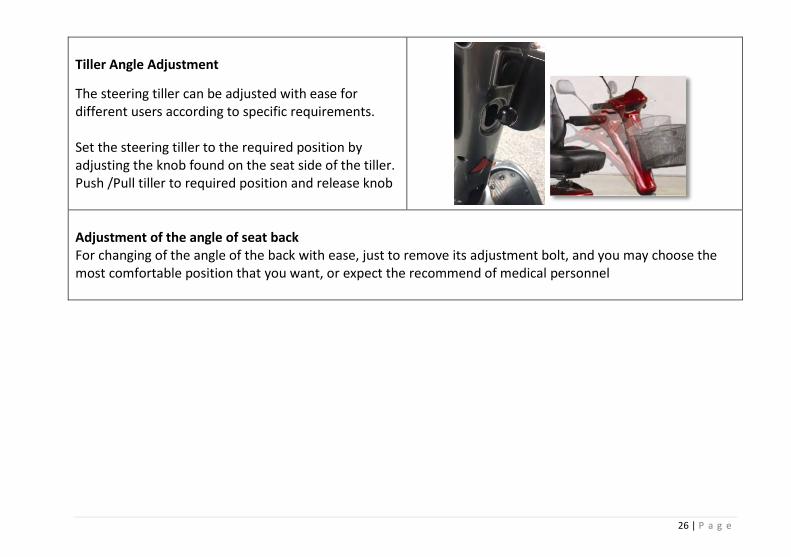
Tiller Angle Adjustment
The steering tiller can be adjusted with ease for different users according to specific requirements. Set the steering tiller to the required position by adjusting the knob found on the seat side of the tiller. Push /Pull tiller to required position and release knob
Adjustment of the angle of seat back For changing of the angle of the back with ease, just to remove its adjustment bolt, and you may choose the most comfortable position that you want, or expect the recommend of medical personnel

27 | P a g e
ELECTROMAGNETIC AND RADIO FREQUENCY INTERFERENCE (EMI/RFI)
WARNING! Laboratory tests have shown that electromagnetic and radio frequency waves can have an adverse effect on the performance of electrically powered mobility vehicles. EMI/RFI can come from sources such as cellular phones, mobile two-way radios (such as walkie-talkies), radio stations, TV stations, amateur radio (HAM) transmitters, wireless computer links, microwave signals, paging transmitters and medium- range mobile transceivers used by emergency vehicles. In some cases, they can cause unintended movement or damage to the control system. Every electrically powered mobility vehicle has an immunity (or resistance) to EMI.
WARNING! Be aware that cell phones, two-way radios, laptops, and other types of radio transmitters may cause unintended movement of your electrically powered scooter due to EMI. Exercise caution when using any of these items while operating your scooter and avoid coming into close proximity of radio and TV stations. WARNING! The addition of accessories or components to an electrically powered mobility vehicle can increase its susceptibility to EMI. Do not modify your scooter in any way not authorized by the manufacturer. WARNING! The scooter itself can interfere with other electrical devices located nearby, such as alarm systems.
Important Information:
20 volts per meter (v/m) is a generally achievable and useful immunity lever, against interference from
radio wave sources (as of May 1994) (the higher the lever, the greater the protection);
The immunity level of this product is not known.

28 | P a g e
Powered Scooter Electromagnetic Interference (EMI)
Electromagnetic interference (EMI) from sources such as radio and TV stations, amateur radio (HAM)
transmitters, two-way radios, and cellular phones can affect powered scooter and motorized scooters.
Following the warnings listed below should reduce the chance of unintended brake release or powered
scooter movement, which could result in serious injury.
1) Do not operate hand-held transceivers (transmitters-receivers), such as citizens band (CB) radios, or turn ON personal communication devices, such as cellular phones, while the powered scooter is turned ON.
2) Be aware of nearby transmitters, such as radio or TV stations, and try to avoid coming close to them;
3) If unintended movement or brake release occurs, turn the powered scooter OFF as soon as it is safe.
4) Be aware that adding accessories or components, or modifying the powered scooter, may make it
more susceptible to EMI (Note: There is no easy way to evaluate their effect on the overall immunity of the powered scooter.
5) Report all incidents of unintended movement or brake release to the powered scooter manufacturer,
and note whether there is a source of EMI nearby.
If unintended motion or brake release occurs, turn the power OFF as soon as it is safe. The following warning
label is attached to your scooter in order to make users always aware that a possibility of electromagnetic
interference exists.

29 | P a g e
SAFETY SYMBOLS
WARNING! An authorised supplier or qualified technician must perform the initial setup of this scooter, and must perform all of the procedures in this manual.
The symbols below are used throughout this Owner’s Manual and on the scooter to identify warnings and important information. It is very important for you to read and understand them.
WARNING! This indicates a potentially hazardous condition/situation. Failure to follow designated procedures can cause personal injury, component damage or malfunction.
MANDATORY! These actions must be performed as specified. Failure to perform “Mandatory” actions can cause personal injury and/or equipment damage.
PROHIBITED! This indicates that the action is prohibited. These actions must NOT be performed at any time or under any circumstance. Performing a prohibited action can cause personal injury and/or equipment damage.
PLEASE NOTE and strictly adhere to the following Safety Instructions. Additional Warnings and Notices are printed in this Owner’s Manual; it is Imperative that you carefully read all chapters of this manual before operation. It is also advisable to refresh your memory by re-reading this manual periodically.
GET ACQUAINTED with your Mobility Scooter and its operational features before driving it. Drive slowly (speed limit dial set to MIN) until you get used to your scooter, its’ various functions, safety features as well as it’s braking capabilities and limitations.

30 | P a g e
PEDESTRIANS! Watch carefully for pedestrians and drive your Mobility Scooter accordingly. In crowded areas, always drive with the speed limit dial set to MIN. Drive only where permitted according to all applicable local laws. Be mindful of the width of your particular mobility scooter and take care not to hit persons or objects around the vehicle.
NEVER remove any of the Mobility Scooter safety parts such as bumpers, plastic covers or emergency braking lever. Never remove any of the Warning Labels.
NEVER put your hands, fingers, feet or legs into any moving part or under any protective cover as moving parts and hot surfaces are generally secured under these covers.
When making adjustments (folding the seat back, adjusting armrest, moving seat forward/backward, adjusting tiller etc.) as well as when squeezing the throttle control lever, always take care that your hands and fingers are not trapped between any of the moving parts. When moving the tiller forward or backward, be careful not to trap your fingers in the mechanism.
LOAD RESTRICTIONS – The load in the rear basket must not exceed 8kg. This load in the front basket must not exceed 5kg. Your Top Gun Mobility scooter is designed to carry ONE person only (unless a dual seat model has been purchased). Never operate it with an additional person on board, including carrying a child.
TYRE INFLATION – Never inflate the tyres on your Mobility Scooter more than the manufacture’s recommended pressure shown on the tyres and within this owner’s manual.

31 | P a g e
STAIRS – Never use your Mobility Scooter on STAIRS. Do not try to go over obstacles that are more than the maximum recommended slope angle and obstacle heights given in the specification sheets for your Mobility Scooter. When driving over an obstacle, always drive so that the front the scooter is facing the obstacle.
If for any reason your Mobility Scooter does not stop when you release the throttle control lever, or takes longer to stop than it should (3 meters on a level surface), turn the key switch to OFF and immediately contact your selling dealer.
WEATHER – Do not use your Mobility Scooter in Heavy Rain or Extreme Humidity, or at temperatures below -30°C (-22°F) or above +45°C (+113°F).
The seat weights 21kgs. Each battery weights a minimum of 14kg. Be careful when lifting the seat and batteries. See instructions for lifting the seat and the batteries in the Maintenance Chapter. Always lift using your knees and legs, not your back.
BATTERIES – Only use batteries as recommended by an authorised dealer (lead acid maintenance-free sealed batteries or lithium depending on the model scooter you have purchased).
ACCIDENTS/DAMAGE – If your Mobility Scooter is involved in any kind of accident in which parts are damaged, you must arrange for a qualified technician to examine it before continuing use.
CHILDREN – Special Care must be taken to prevent children from operating your Mobility Scooter or riding as a passenger. Do not allow unsupervised children to play near your Mobility Scooter, especially when charging batteries.

32 | P a g e
Always drive carefully. Adjust your speed according to road conditions. When turning at high speed, your Mobility Scooter can become unstable. Before making sharp turns, reduce speed to a minimum to prevent roll-over.
Your Mobility Scooter is able to go up slopes higher than the recommended safe slope. HOWEVER, do not drive on slopes whose incline you do not know. Always drive very slowly and do not drive on the side of such slopes. Before starting to drive, make sure your emergency brake operates correctly.
Do NOT release the manual release lever of the electromagnetic brake (EMB) when your Mobility Scooter is on a slope. When on any sort of an incline, never place the Mobility Scooter in freewheel mode (whilst seated on or standing next to it)
The lights on your Mobility Scooter (if fitted), should be turned on when visibility is reduced, regardless of day or night.
As your seat upholstery is fire resistant, do not cover it or replace with any upholstery other than upholstery of the same kind. When removing the battery cover, watch out for hot parts. The motor, axel, EMB, electronic cards and electronic controller might be hot! DO NOT TOUCH them until you have ensured temperature is not dangerous.
Do NOT operate a mobile phone, walkie-talkie, laptop or other radio transmitter whilst operating your Mobility Scooter

33 | P a g e
Removal of the grounding prong can create an electrical hazard. If it is necessary to use a 2-pronged electrical outlet, properly install an approved 3-prong adapter.
Do NOT connect an extension cord to the AC/DC converter or to the battery charger
Keep tools and other metal objects away from the battery terminals. Contact with tools can cause an electrical shock. Do not sit on the Mobility Scooter when it is on any type of lift/elevation product.
This symbol indicates that Explosive conditions exist
Disposal and Recycling. Contact your authorised dealer for information on proper disposal of your Mobility packaging and components
Always wear safety glasses when working on the Mobility Scooter
Contains Lead
Battery Charger is for INDOOR use only
At the rear of your Mobility Scooter is the manual release lever of the EMB. When using this lever, be careful not to touch the internal surface of the motor as it could be very hot and cause injury. See the warning label at the rear of the Mobility Scooter near the lever.

34 | P a g e
SAFETY INFORMATION SUMMARY
DO NOT try to climb sharp curbs
DO NOT drive off or over obstacles exceeding 5 cm in height
DO NOT make abrupt changes in direction at high speed or while traveling on an incline
DO NOT attempt to make fast turn on flat surfaces
DO NOT climb inclines greater than 15 degrees
DO NOT back your scooter on uneven surfaces or inclines
DO NOT attempt to operate your unit in a stalled condition, such as traveling up very steep incline. This may cause the circuit break or thermal cut out, rendering your unit temporarily immobile
DO NOT travel on highways and freeways; ALWAYS stay in the bike lanes and sidewalks
DO NOT carry passengers in any manner
DO NOT operate your unit when the red battery indicator light is flashing
DO NOT operate your unit with the clutch lever in the disengaging position
DO NOT mount or dismount your unit with power switch in the “ON” position
ALWAYS make sure that the steering tiller adjustment lever is locked
ALWAYS make sure that the seat is locked so that it will not swing during operation
DO NOT turn ON or use hand-held personal communication devices, such as citizens band (CB) radios and cellular phones, while your scooter is turned ON
BE AWARE of nearby transmitters, such as radio or TV stations and hand-held or mobile two-way radios, and try to avoid coming close to them
BE AWARE that adding accessories or components, or modifying your scooter may make it more susceptible to interference from radio wave sources.

35 | P a g e
MAINTENANCE SCHEDULE Although your scooter requires very little maintenance, do not neglect it. When performing maintenance procedures on your scooter, make sure that it is parked on a level surface and that the key is not inserted. DAILY
Check brake effectiveness before you drive.
Recharge batteries fully every night. WEEKLY/FORTNIGHTLY
Check tyre pressure. The pressure should be between 30-35 psi.
Clean seat upholstery, plastic body and covers. To avoid electrical failure, do not spray water directly into your unit.
Use a damp clean rag to clean all parts.
Check and tighten the throttle lever attachment screws. MONTHLY
Check battery condition. Clean terminals if necessary.
Check all electrical wire connectors to eliminate loose connection.
Tighten all exposed bolts and nuts.
Check wheel bearings by spinning tyres and checking for free rotation. EVERY TWELVE MONTHS
Visit your dealer and have a trained technician comprehensively service your scooter
Under normal use, batteries should last between 2-3 years. These should be replaced by your dealer

36 | P a g e
BATTERY REPLACEMENT Note! To ensure your safety, Batteries must be replaced by a trained technician only. Warning! Batteries contain high energy and can spark, resulting in a possible fire hazard. Warning! Working with batteries can cause damage and Injury if not done properly. Two batteries are used in the scooter. To connect the wires to the battery correctly (as shown), reference to the tags on the frame of scooter is required.
As the diagram shows, battery A has positive to the front and negative to the rear. Battery B has the negative to the front and positive to the rear.
Lead Connection = Black wire to Negative terminals and Red wire to Positive terminals
Make sure the connecting point is clean and tighten all the screw nuts to prevent poor contact.

37 | P a g e
TROUBLESHOOTING (Status Warning LED)
Remember! Contact your dealer at any time for further professional support Replacement Parts Most replacement parts can be purchased by your selling dealer

38 | P a g e
WARRANTY This is to certify that your TOP GUN MOBILITY product offers a limited 5 Year Warranty from the date of original purchase. Should a defect or operating fault arise within this period the Dealer, from where the product was originally purchased, should be notified immediately. Failure to register the fault may invalidate the warranty. The Dealer from where the product was purchased is responsible for any warranty repairs. Top Gun Mobility warrants that if a fault occurs within this period due to faulty workmanship or materials that the product will be repaired (or replaced at the Company’s discretion) free of charge. Any unauthorised modifications will invalidate the warranty. Component parts replaced outside this period carry a six-month warranty. (Standard terms and conditions apply for this period).
FIVE-YEAR LIMITED WARRANTY
Structural frame components, including: platform, fork, seat post, and frame welds.
Drivetrain, including: differential, motor, and brake.

39 | P a g e
THREE-YEAR LIMITED WARRANTY Your Top Gun Mobility Scooter is fully guaranteed for three (3) years from the date of purchase against faults
arising due to defects in manufacture or materials. This warranty does not detract from, but is in addition to
your legal rights.
All electronic parts, including controllers and battery chargers, have a one (1) year warranty. Servicing to the
controller or battery charger must be carried out by your authorised Top Gun Mobility Provider. Any attempt
to open or dismantle these items renders the guarantee void on that item.
NOT COVERED UNDER WARRANTY
The guarantee does not extend to those items which may need replacement due to normal wear and tear
(tyres, belts, bulbs, upholstery, plastic shrouds, motor brushes, fuses, and batteries), or damage to the product
caused by misuse or accident for which Top Gun Mobility or its agent cannot be held responsible. This
warranty does not include service calls.
WARRANTY SERVICE PERIOD The service intervals are every 500klm or every twelve (12) months from date of purchase, whichever occurs first. We recommend using a Top Gun Mobility Service Provider. Proof of annual service (paid invoice receipts) must be kept and provided upon any warranty claim. This warranty will be void if annual servicing is not carried out. SERVICE CHECKS AND WARRANTY SERVICE Warranty service can be performed by an authorised Top Gun Mobility Provider. Please contact your authorised Top Gun Mobility Provider for advice on the current cost affecting the service visit.

40 | P a g e
STORAGE INSTRUCTIONS
Always store in a dry area protected from freezing to avoid damage to the scooter and premature wear of the
batteries.
Avoid exposure to rain, snow, ice, salt or stagnant water. Keep your scooter clean and dry.
Never expose the electronic components of the scooter to humidity (rain, snow, mist, or water from washing),
as it may damage electronic circuits.
Always store your scooter with batteries fully charged. When storing the scooter for more than two weeks,
charge the batteries and disconnect them.
During the storage, check the charge once a month and recharge the batteries as needed. You must complete
a full charge cycle every month or damage to batteries can occur.
Avoid extreme temperature of hot and cold during storage. Freezing can damage low charged batteries and
they may become unusable.

41 | P a g e
CHANGE OF DETAILS / CHANGE OF OWNER
If you change your address/contact details, please let us know as soon as possible. This can be done by;
Email us with the updated details as per below on [email protected]
Call us on (07) 3282 8211 and ask for Customer Service Customers Email Address: ________________________________________________________________
Customer: __________________________________
Model: ___________________________________
Address: ___________________________________ Serial Number: _____________________________
___________________________________________ Colour: ___________________________________
State: ______________ Postcode: ______________
Date of Sale: _______________________________
Phone: _____________________________________
__________________________________________
Customer Signature

42 | P a g e
SERVICE RECORD
Certification, by signature and stamp, of an Authorised Top Gun Mobility dealer/repairer is required to verify that the recommended routine maintenance has been performed on this Mobility Scooter. An accurate record is necessary to protect your warranty. Always present this book to the dealer when routine maintenance is performed or when warranty repairs are requested. Service intervals are required as per Maintenance Schedule section of this Owner’s Manual.
DEALER/REPAIRER: DATE: …………………………………….. KLMS: ……………………
DEALER/REPAIRER: DATE: …………………………………….. KLMS: ……………………
DEALER/REPAIRER: DATE: …………………………………….. KLMS: ……………………
DEALER/REPAIRER: DATE: …………………………………….. KLMS: ……………………

43 | P a g e
DEALER/REPAIRER: DATE: …………………………………….. KLMS: ……………………
DEALER/REPAIRER: DATE: …………………………………….. KLMS: ……………………
DEALER/REPAIRER: DATE: …………………………………….. KLMS: ……………………
DEALER/REPAIRER: DATE: …………………………………….. KLMS: ……………………
DEALER/REPAIRER: DATE: …………………………………….. KLMS: ……………………
DEALER/REPAIRER: DATE: …………………………………….. KLMS: ……………………


Copyright Top Gun Mobility Owner’s Manual & Warranty Booklet 2020