Operating Instructions 使用說明書 - Panasonic
108
Thank you for purchasing this Panasonic product. Before operating this unit, please read these instructions completely and save them for future use. 感謝您購買本 Panasonic 產品。 使用本產品之前,請仔細閱讀本說明書,並妥善保存以供未來使用。 1 English EN2 繁體中文 TC2 Operating Instructions 使用說明書 (Household) Massage Lounger (家用)電動按摩椅 EP-MAJ7 Model No. 型號
-
Upload
khangminh22 -
Category
Documents
-
view
1 -
download
0
Transcript of Operating Instructions 使用說明書 - Panasonic
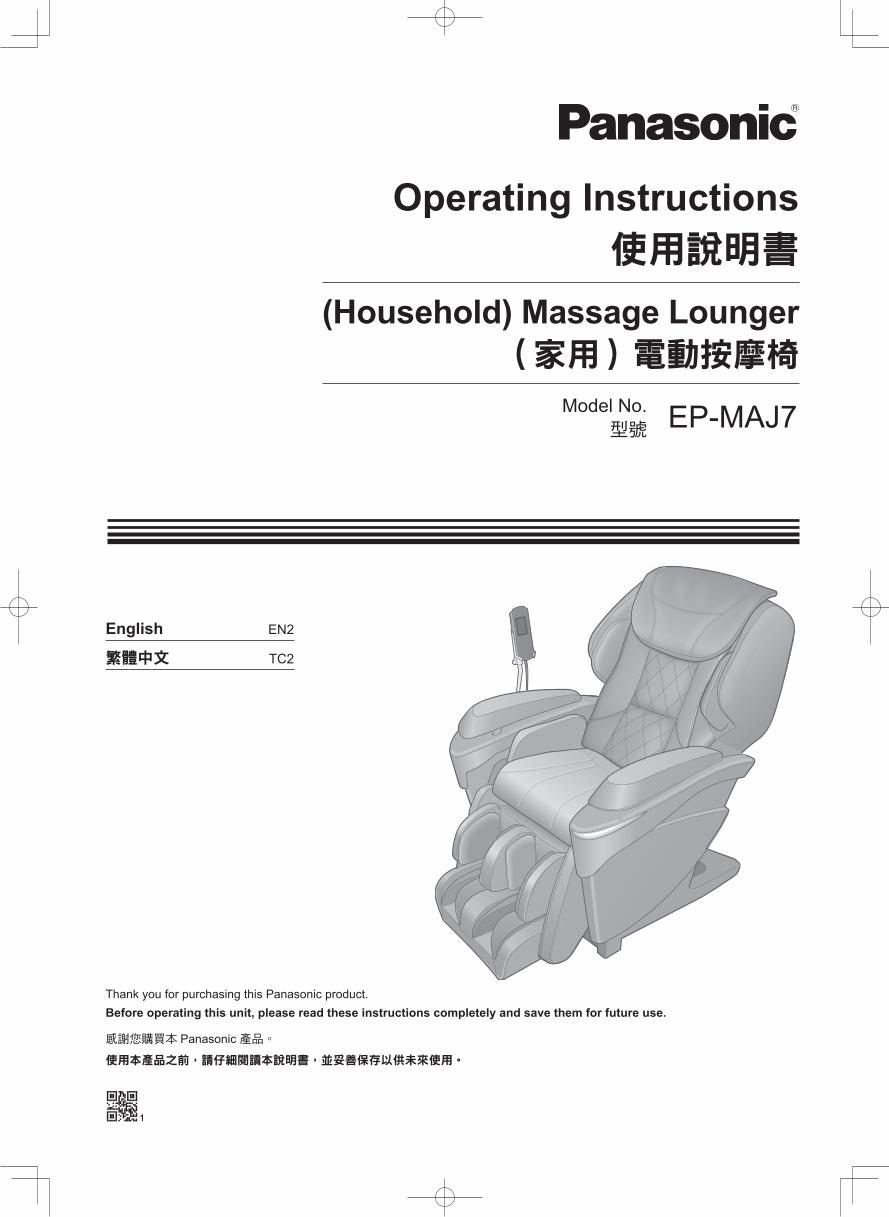
Thank you for purchasing this Panasonic product.Before operating this unit, please read these instructions completely and save them for future use.
感謝您購買本 Panasonic 產品。
使用本產品之前,請仔細閱讀本說明書,並妥善保存以供未來使用。
1
English EN2
繁體中文 TC2
Operating Instructions使用說明書
(Household) Massage Lounger(家用)電動按摩椅
EP-MAJ7Model No. 型號
EN2
Searching for FAQs has been made easier.
Page EN10Transport, installation and assembly
●Dimensions of main unit! (Page EN53)
Page EN39About heat massage
● “HEAT” operating method
Page EN51The sound is irritating!
●Operating sound, perception, etc.
Page EN20What kind of courses are there?
●The back massage intensity controller display differs according to the course and action!Back massage intensity control of auto course Back massage intensity control of manual action
Page EN36
EN3
Before UseImportant safety instructions . . . . . . . . . . . EN4
Part names and functions of main unit . . . EN8Setting up the massage lounger . . . . . . . . . .EN10Assembly . . . . . . . . . . . . . . . . . . . . . . . . . . . EN12Before sitting down . . . . . . . . . . . . . . . . . . EN16
How to Use
Part names and functions of the Controller . . . . . . . . . . . . . . . . . . . . . . . . . . . EN18Simple use . . . . . . . . . . . . . . . . . . . . . . . . . . EN20Massages●When you want a complete massage . . EN23●When you want a concentrated massage
of a particular body part with your favorite action . . . . . . . . . . . . . . . . . . . . . . . . . . . . EN24
●Air stretching and Sole massage . . . . . EN26Memory Course . . . . . . . . . . . . . . . . . . . . . EN29Adjusting the intensity . . . . . . . . . . . . . . . . EN34After completing the massage . . . . . . . . . . EN41
Moving/Maintenance
Moving the unit . . . . . . . . . . . . . . . . . . . . . . EN42Cleaning and maintenance . . . . . . . . . . . . . EN43
Important Notes
Q&A . . . . . . . . . . . . . . . . . . . . . . . . . . . . . . . EN44Troubleshooting . . . . . . . . . . . . . . . . . . . . . EN49Error display . . . . . . . . . . . . . . . . . . . . . . . . EN50Sounds and sensations of the unit . . . . . . EN51Specifications . . . . . . . . . . . . . . . . . . . . . . . EN52
ContentsPage
EN4
Important safety instructions Always follow these instructionsThis section contains instructions that you must follow to prevent personal injury or damage to property.
■ The instructions are classified according to the level of injury or damage that may occur due to the mistaken use of this unit. Please ensure that you read all instructions before using the Household Massage Lounger.
WARNING Denotes a potential hazard that could result in serious injury or death.
CAUTION Denotes a hazard that could result in minor injury or property damage.
Symptoms The following persons should not use this unit:
(1) Persons who are prohibited from receiving massages by a physician (e.g.: due to thrombosis, severe aneurism, acute varicose veins, any type of dermatitis and skin infections (including inflammation of the hypodermis), etc.)
(2) Persons suffering from osteoporosis, spine fracture, sprain or acute pain such as a pulled or torn muscle(3) Persons who have a pacemaker, defibrillator, or other personal medical devices prone to electronic interference(4) Pregnant women and women who have just given birth(5) Persons with symptoms of acute low back pain, herniated disk, spondylolisthesis, spinal stenosis,
degenerative lumbar spondylosis(6) Persons who have abnormalities or curvature of the spine
The following persons should not use the lower back/hip massage or pelvis stretch.
(1) Those with symptoms of acute inflammation around the hip area, acute hip pain, piriformis muscle syndrome or sciatic neuralgia
(2) Those suffering from osteoarthritis of the hip and bad hip joint(3) Those who feel pain, numbness, lethargy in the hip and legs during use(Doing so may worsen the symptoms.)
This unit is not intended for use by persons (including children) with reduced physical sensory or mental capabilities, or lack of experience and knowledge, unless they have been given supervision or instruction concerning use of the unit by a person responsible for their safety. Children should be supervised to ensure that they do not play with the unit.(Doing so may cause an accident or injury.)
Persons with any of the conditions listed below or who are undergoing medical treatment should consult with their physicians before using the unit.
(1) Persons who have a malignant tumor(2) Persons suffering from heart disease(3) Persons who have a loss of heat sensation(4) Persons who have sensory abnormalities due to a severe peripheral circulatory disturbance such as diabetes mellitus (5) Persons who have a wound where the massager operates(6) Persons whose body temperature is over 38 °C (who have a fever)
(E.g.: When a person has acute inflammation symptoms (fatigued, chills, blood pressure fluctuations, etc.) or when debilitated)
(7) Persons who require bed rest or who are in poor physical shape(8) Persons other than those listed above who feel unwell
If you begin to feel unwell during use or if you do not feel effects of the massage lounger, stop use immediately and consult a physician.(Failure to do so may cause an accident, injury or become unwell.)
Take note of the following points as well Absolutely do not modify. Furthermore, do not attempt to disassemble or repair the unit yourself.(Doing so may cause fire, or may cause the unit to function abnormally resulting in injury.)
WARNING

Important safety instructions
EN5
■ Instructions that you must follow are indicated using the following symbols. (The following symbols are examples.)
Denotes a specific operating procedure that must not be performed.
Denotes a specific operating procedure that must be performed.
If a malfunction or breakdown occurs If a malfunction or breakdown occurs, stop using the chair immediately and unplug the power plug from the wall socket.(Failure to do so may result in smoke/fire or electric shock.)
<Examples of malfunctions/breakdowns>
ㅡ Does not start when pressing . ㅡ The power supply goes on and off when the power cord is moved. ㅡ Burning smells or abnormal sounds occurring during operation. ㅡ The unit becomes deformed or unusually hot.
→ Contact an authorized service center immediately for inspection/repairs.
WARNINGWhen in use
When massaging the neck area, be careful of the movement of the massage heads and avoid massaging the throat area and excessively strong massage action. Do not sit on the backrest or armrests. This unit should not be used by children. Also, do not allow children to play on the unit, or to climb on the seat, backrest or armrests. Do not use the massage lounger while holding children. Do not push your hands, elbows, arms or feet against the fabric covering the moving parts of the backrest during use.(Doing so may cause an accident or injury.)
When “HEAT” are used, do not let the massage heads touch the same place for a long time.(Low temperature burns* may occur.)
* Burns may occur at relatively low temperatures (40 °C to 60 °C) when in contact with the same area of skin for long periods of time, even if you do not feel heat or pain.
Always check the fabric covering the backrest or legrest movable parts has not been ripped before using the unit. Please also check other areas to ensure the fabric has not been ripped.No matter how small the rip, if you find one then immediately stop using the unit, unplug the power plug and have the unit repaired at an authorized service center.(Failure to do so may result in injuries or electric shocks.)
Start using a gentle Swedish massage. Do not massage for more than 30 minutes a day. Do not massage any one part of your body for more than 5 minutes at a time.(Doing so may result in adverse effect or injury.)
Confirm that the shoulder position is correct when body scanning (Page EN22) is performed. If it is not properly aligned, use the POSITION button to adjust the shoulder height, or stop the massage and perform the body scanning again (when using auto course, manual operation). Make sure there are no persons or pets around the unit (front, back, underneath or sides of the unit) before using it for massaging or moving the backrest or legrest.(Failure to do so may cause an accident or injury.)
After each massage, slide the power switch on the unit backside to the “off” position, turn the lock switch to the “lock” position and then remove the lock switch key and power plug. (To prevent breakage or injury from misuse by children.)
EN6
Important safety instructions (Continued)
WARNING
Power plug, power cord etc Do not do anything that may damage the power cord or power plug.Do not scratch, modify, use near a heater, excessively bend, twist, pull, place heavy objects on top of, or bundle the cord or plug.( Doing so may cause electric shock, burning or fire due to a short circuit.)
→ Contact the nearest authorized service center for repairs to the power cord or power plug.
Do not insert or unplug the power plug with wet hands. (Doing so may cause electric shock.)
Always use sockets and wiring devices at the correct rated value. Use AC 220 V.( Cannot be used overseas, nor with a transformer.)
Always insert the power plug fully into the socket.( Failure to do so may result in electric shock or fire due to overheating.)
Dust the power plug on a regular basis. ㅡ Remove dust using a dry cloth.
( Failure to do so may result in fire, due to damp shorting the insulation.)
When unplugging the power plug, hold the plug itself and do not pull on the power cord.( Failure to do so may cause electric shock, burning or fire due to a short circuit.)
Symptoms Persons who are otherwise healthy but have any of the conditions listed below should consult with their physicians before using the unit.(1) Persons whose muscles have deteriorated due to age
or weight loss(2) Persons with symptoms of lower back and hip pain
caused by the bones and muscles, organs and nerves(3) Persons who suffer bruises or sprains easily(4) Persons who suffer from severe motion sickness(5) Persons who have undergone heart or internal surgery
in the past(Failure to do so may adversely affect health.)
The unit has a heated surface. Persons insensitive to heat must be careful when using the unit.
If symptoms such as rashes, reddening, itching, etc. occur as a result of using this unit, stop using the unit and consult a physician.(Failure to do so may cause an accident or adversely affect health.)
Installation and movement The unit should not be used on top of heating appliances, such as electric carpets, etc. (Doing so may cause a fire.)
Do not drag or push the unit in an installed state. Do not move the unit using the castors on the flooring.(Doing so may damage the flooring.)
Do not move with a person on it. (Doing so may result in falls, causing an accident or injury.)
Do not hold the sole massage section when moving the unit. (It may slide in movement, causing injury.)
Do not use in damp or humid places such as a bathroom. (Doing so may cause electric shock.) Use only on a horizontal surface. (Failure to do so may result in a falling accident.)
Place a mat or other such covering on the floor when moving the unit using the castors. (Unit may damage the flooring.)
When moving the unit on its castors, remove any obstacles from around the unit, move the backrest to the fully upright position, lift the legrest to a position below the waist (less than 80 cm from the floor) and move the unit slowly. (Page EN42) (Otherwise the unit may fall and cause injury.)
Power supply To ensure safety, connect the unit to a properly grounded outlet. (Page EN11)
ㅡ Failure to do so may cause an accident or discharge.(Failure to do so may cause electric shock.)
Always unplug the power plug from the wall socket when cleaning the unit or removing the cover. (Failure to do so may cause an electric shock or injury.)
Always unplug the power plug from the wall socket when not using. (Since dust and humidity deteriorates insulation, which may result in fire due to electrical fault.)
CAUTION

Important safety instructions
EN7
Take note of the following points as well
Do not allow children to use the controller holder fixing screw.(Doing so may cause an accident such as a child swallowing the screw.)
Do not spill water on the unit or controller.(Doing so may cause electric shock, ignition or fire due to a short circuit.)
Store the lock switch key out of the reach of children.(Failure to do so may cause an accident such as the child swallowing the key.)
In the event of a power outage, unplug the power plug immediately.(Failure to do so may cause an accident or injury when the power supply returns.)
If you have not used the unit for a while, carefully read the operating instructions again and check that the unit is operating normally before use. (Failure to do so may result in breakage or injury.)
GROUNDING INSTRUCTIONS This unit must be grounded. If it should malfunction or break down, grounding provides a path of least resistance for electric current to reduce the risk of electric shock.
This unit is equipped with a cord having an equipment-grounding conductor and a grounding plug. The plug must be plugged into an appropriate outlet that is properly installed and grounded in accordance with all local codes and ordinances.
CAUTIONBefore and during use
Do not use the massage heads on your head, stomach or bare skin. Also, do not place your hands or feet between the massage heads. Do not place your knees between the leg & sole massage section. Do not fall asleep while using the unit. Do not use the unit after drinking alcohol. Do not stand, jump on, or place objects on the seat until the air is completely extracted after the air action.(Doing so may cause an accident or injury.)
Do not insert your hands, fingers, feet or head into the following spaces:(1) Between the backrest and seat or armrest(2) Between the legrest and seat or armrest(3) Between the seat and armrest(4) Between the back cover and leg cover(5) Back of the legrest Do not unplug the power plug or turn the power switch “off” during massage. Do not use the sole massage in a standing position.(Doing so may cause injury.)
Do not sit on, stand on, or place objects on the legrest when the legrest is not completely lowered.( Doing so may cause the edge of the legrest to rotate or the unit to tip over, resulting in an accident or injury.)
Do not use at the same time as another medical device.(Doing so may cause an accident or deteriorated health.)
Check that the massage heads are in the retracted position. Be sure that all operations have stopped before getting off the unit during a massage.(Failure to do so cause an accident or injury.)
Check that there is no foreign matter between the parts of the unit before sitting down.
ㅡ Check that there are no foreign objects stuck in the backrest, legrest or hand & arm massage section.
(Hands, feet or small objects may become trapped, resulting in an accident or injury.)
Avoid wearing anything hard on your head like a hair accessory, etc. when using the unit. Do not massage with any hard objects in your trouser pockets. Remove hard objects such as false fingernails, wristwatches or rings when massaging hands or arms.(Doing so may cause injury.) Do not drop anything from your pockets, etc. into the gaps of the device. (You could lose them.)
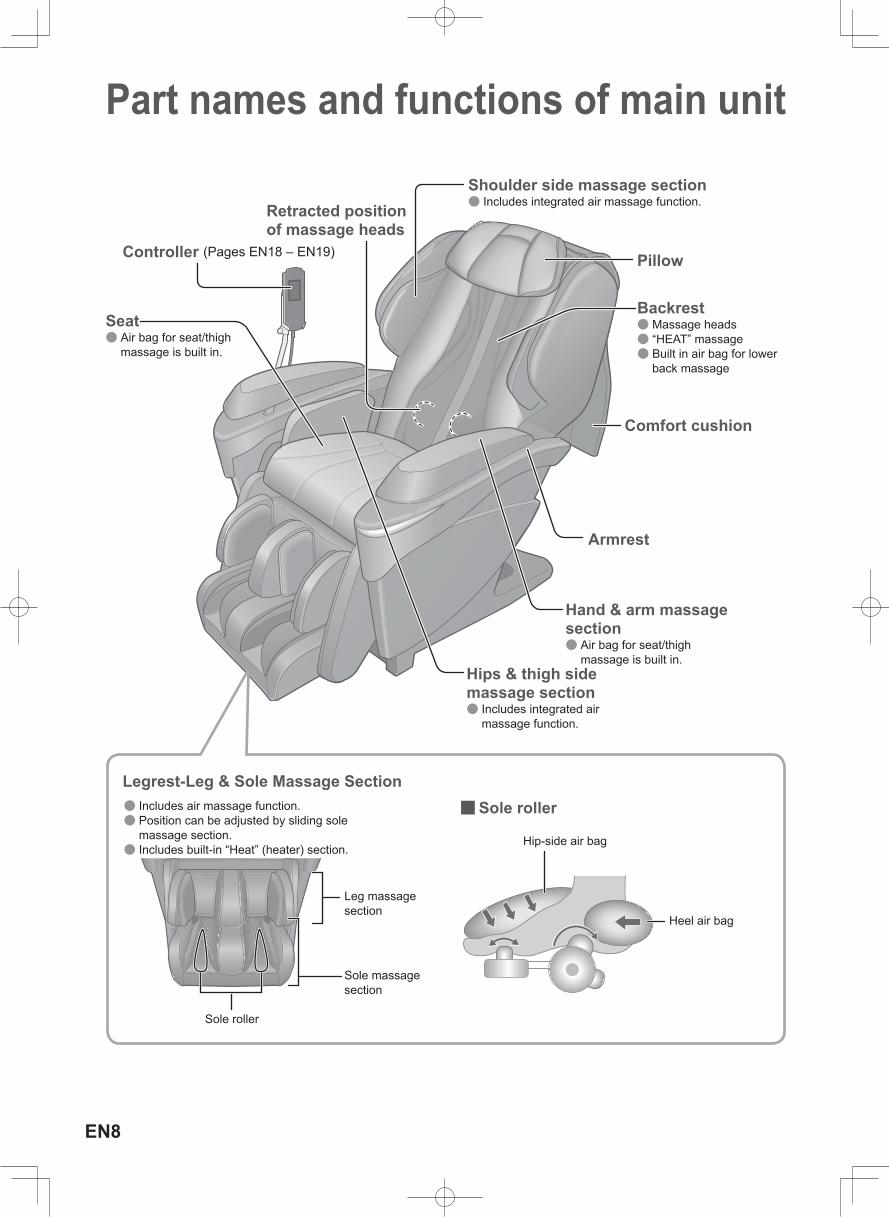
● Includes air massage function. ● Position can be adjusted by sliding sole massage section. ● Includes built-in “Heat” (heater) section.
Legrest-Leg & Sole Massage Section
Leg massage section
Sole massage section
Sole roller
Heel air bag
Hip-side air bag
EN8
Part names and functions of main unit
Controller (Pages EN18 – EN19)
Seat ● Air bag for seat/thigh massage is built in.
Retracted position of massage heads
Shoulder side massage section ● Includes integrated air massage function.
Pillow
Backrest ● Massage heads ● “HEAT” massage ● Built in air bag for lower back massage
Comfort cushion
Armrest
Hand & arm massage section
● Air bag for seat/thigh massage is built in.
Hips & thigh side massage section
● Includes integrated air massage function.
■Sole roller

lock switch
onofflock
open
power
Power cord
Back cover
Controller holder
Controller stand
Castor
CastorLeg cover
Rating sticker
Power plug
Power switch sectionLock switch
Power switch
Lock switch key
Lock switch key tag ● For preventing children from swallowing it by accident.
● Lock switch is set to “open” and power switch is set to “on” prior to leaving the factory.
Part names and functions of m
ain unit
EN9
EN10
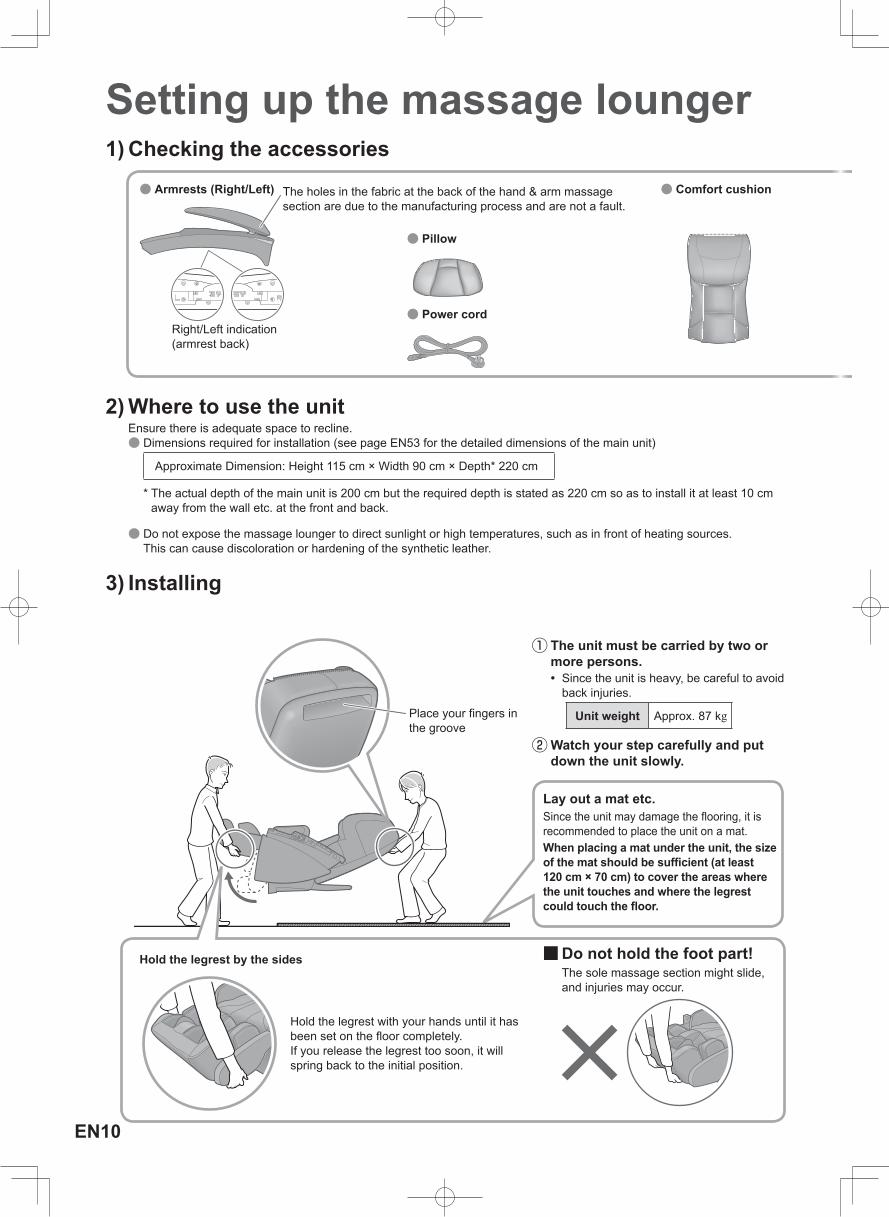
Setting up the massage lounger
Lay out a mat etc.Since the unit may damage the flooring, it is recommended to place the unit on a mat.When placing a mat under the unit, the size of the mat should be sufficient (at least 120 cm × 70 cm) to cover the areas where the unit touches and where the legrest could touch the floor.
■Do not hold the foot part!The sole massage section might slide, and injuries may occur.
① The unit must be carried by two or more persons.
ㅡ Since the unit is heavy, be careful to avoid back injuries.
Unit weight Approx. 87 kg
② Watch your step carefully and put down the unit slowly.
Place your fingers in the groove
Hold the legrest by the sides
Hold the legrest with your hands until it has been set on the floor completely.If you release the legrest too soon, it will spring back to the initial position.
● Armrests (Right/Left) The holes in the fabric at the back of the hand & arm massage section are due to the manufacturing process and are not a fault.
● Pillow
● Power cord
● Comfort cushion
Right/Left indication (armrest back)
1) Checking the accessories
2) Where to use the unitEnsure there is adequate space to recline.
● Dimensions required for installation ( see page EN53 for the detailed dimensions of the main unit)
Approximate Dimension: Height 115 cm × Width 90 cm × Depth* 220 cm
* The actual depth of the main unit is 200 cm but the required depth is stated as 220 cm so as to install it at least 10 cm away from the wall etc. at the front and back.
● Do not expose the massage lounger to direct sunlight or high temperatures, such as in front of heating sources.This can cause discoloration or hardening of the synthetic leather.
3) Installing
Setting up the massage lounger
EN11
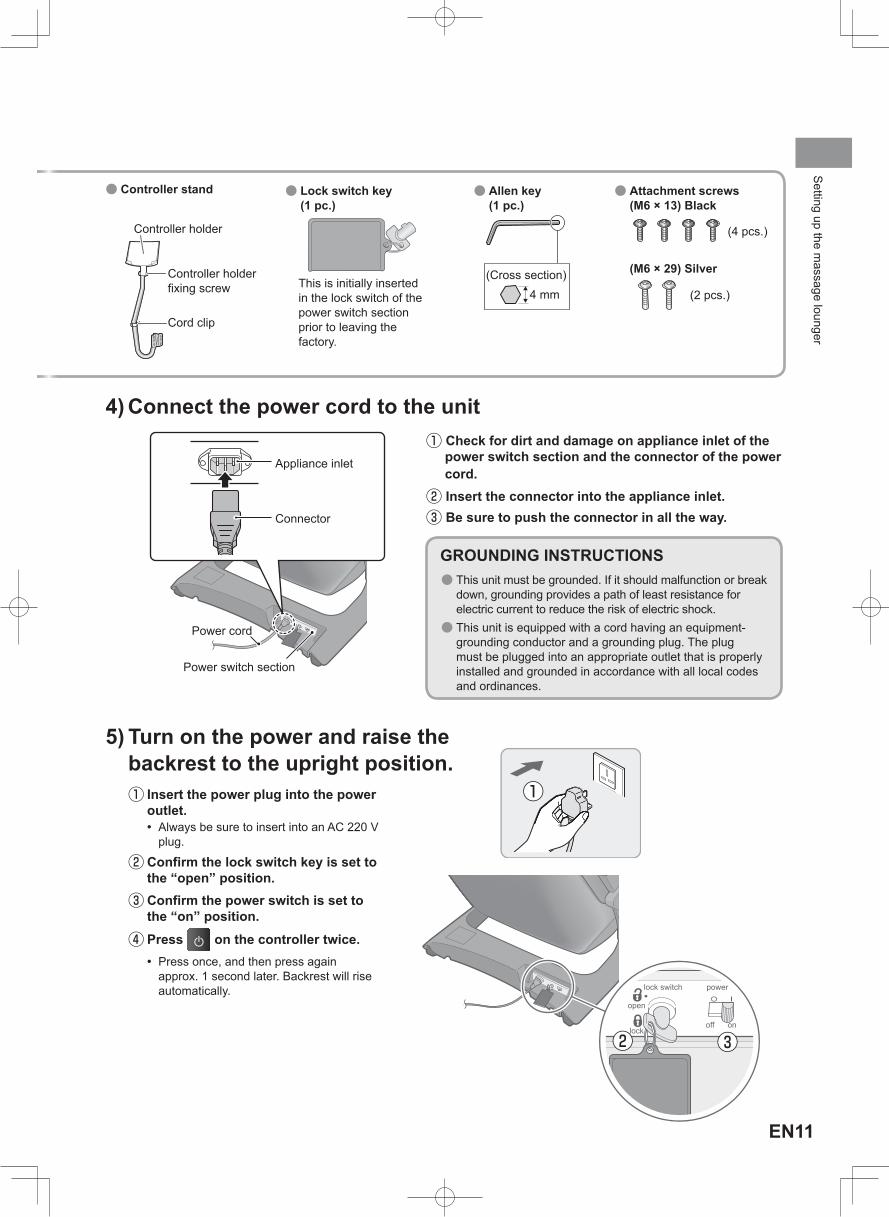
lock switch
onofflock
open
power
This is initially inserted in the lock switch of the power switch section prior to leaving the factory.
● Lock switch key (1 pc.)
4 mm
● Allen key (1 pc.)
● Attachment screws (M6 × 13) Black
(4 pcs.)
(M6 × 29) Silver
(2 pcs.)
● Controller stand
Controller holder
Controller holder fixing screw
Cord clip
(Cross section)4 mm
Appliance inlet
Connector
Power cord
Power switch section
① Check for dirt and damage on appliance inlet of the power switch section and the connector of the power cord.
② Insert the connector into the appliance inlet.③ Be sure to push the connector in all the way.
4) Connect the power cord to the unit
GROUNDING INSTRUCTIONS ● This unit must be grounded. If it should malfunction or break down, grounding provides a path of least resistance for electric current to reduce the risk of electric shock. ● This unit is equipped with a cord having an equipment-grounding conductor and a grounding plug. The plug must be plugged into an appropriate outlet that is properly installed and grounded in accordance with all local codes and ordinances.
5) Turn on the power and raise the backrest to the upright position.① Insert the power plug into the power
outlet. ㅡ Always be sure to insert into an AC 220 V plug.
② Confirm the lock switch key is set to the “open” position.
③ Confirm the power switch is set to the “on” position.
④ Press on the controller twice. ㅡ Press once, and then press again approx. 1 second later. Backrest will rise automatically.
●② ●③
①
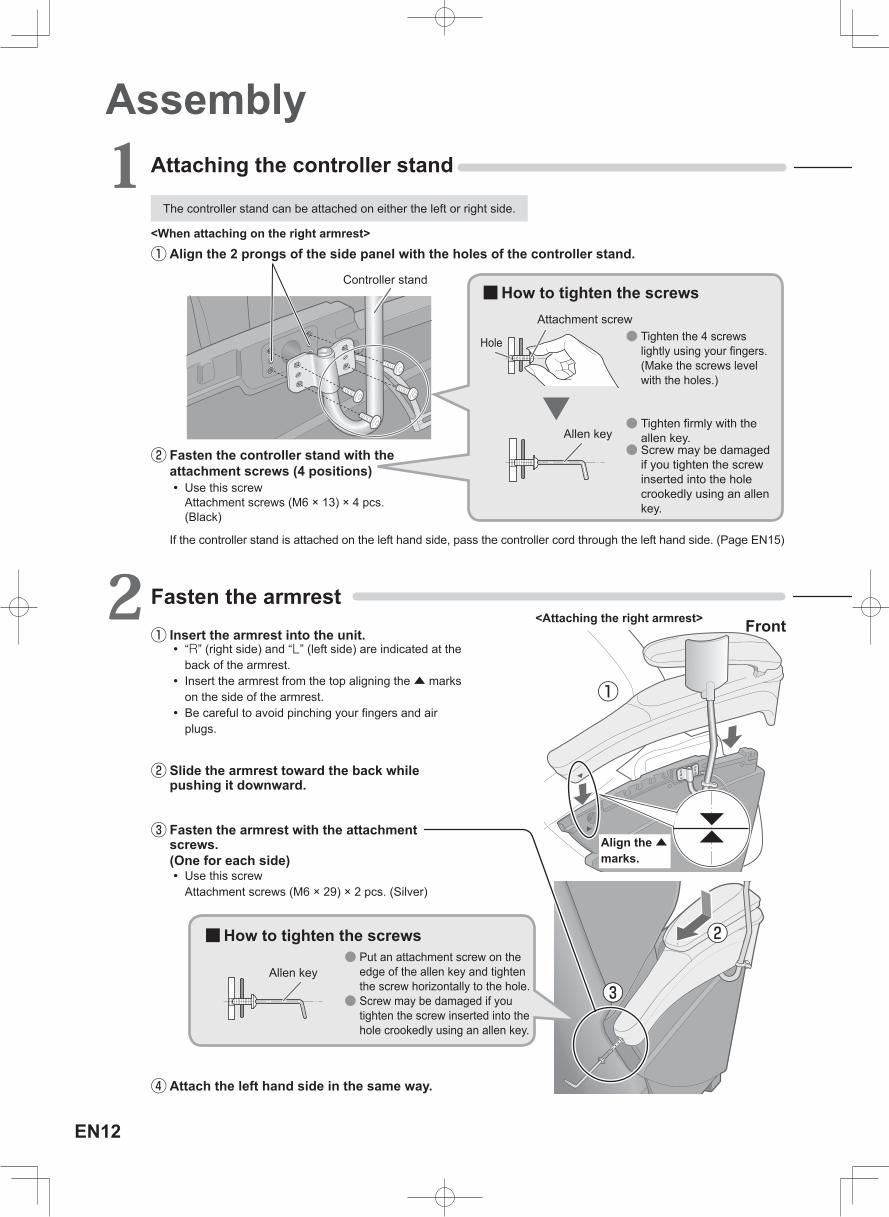
● Tighten the 4 screws lightly using your fingers. (Make the screws level with the holes.)
● Tighten firmly with the allen key. ● Screw may be damaged if you tighten the screw inserted into the hole crookedly using an allen key.
EN12
2 Fasten the armrest① Insert the armrest into the unit.
ㅡ “R” (right side) and “L” (left side) are indicated at the back of the armrest. ㅡ Insert the armrest from the top aligning the ▲ marks on the side of the armrest. ㅡ Be careful to avoid pinching your fingers and air plugs.
② Slide the armrest toward the back while pushing it downward.
③ Fasten the armrest with the attachment screws. (One for each side)
ㅡ Use this screwAttachment screws (M6 × 29) × 2 pcs. (Silver)
Assembly
② Fasten the controller stand with the attachment screws (4 positions)
ㅡ Use this screwAttachment screws (M6 × 13) × 4 pcs. (Black)
■How to tighten the screws
If the controller stand is attached on the left hand side, pass the controller cord through the left hand side. (Page EN15)
<Attaching the right armrest>
1 Attaching the controller stand
The controller stand can be attached on either the left or right side.
<When attaching on the right armrest>
① Align the 2 prongs of the side panel with the holes of the controller stand.
Attachment screw
Hole
Allen key
Controller stand
■How to tighten the screws
Allen key ● Put an attachment screw on the edge of the allen key and tighten the screw horizontally to the hole. ● Screw may be damaged if you tighten the screw inserted into the hole crookedly using an allen key.
Align the ▲ marks.
Front
①
④ Attach the left hand side in the same way.
●②
●③
Assembly
EN13▶ Continued on the next page
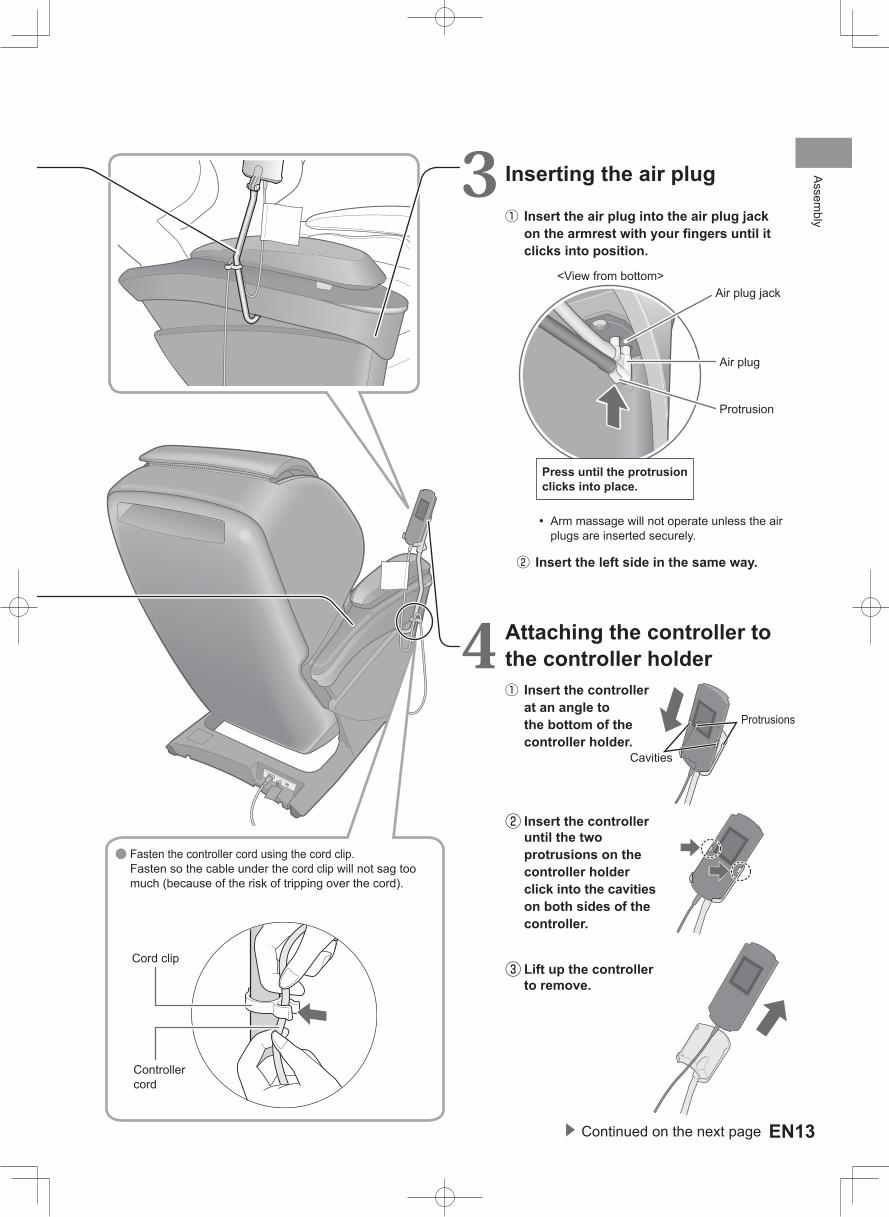
ㅡ Arm massage will not operate unless the air plugs are inserted securely.
② Insert the left side in the same way.
Air plug
Protrusion
Air plug jack<View from bottom>
Press until the protrusion clicks into place.
3 Inserting the air plug
① Insert the air plug into the air plug jack on the armrest with your fingers until it clicks into position.
4 Attaching the controller to the controller holder① Insert the controller
at an angle to the bottom of the controller holder.
Protrusions
Cavities
② Insert the controller until the two protrusions on the controller holder click into the cavities on both sides of the controller.
③ Lift up the controller to remove.
● Fasten the controller cord using the cord clip.Fasten so the cable under the cord clip will not sag too much (because of the risk of tripping over the cord).
Cord clip
Controller cord
EN14
Assembly (Continued)
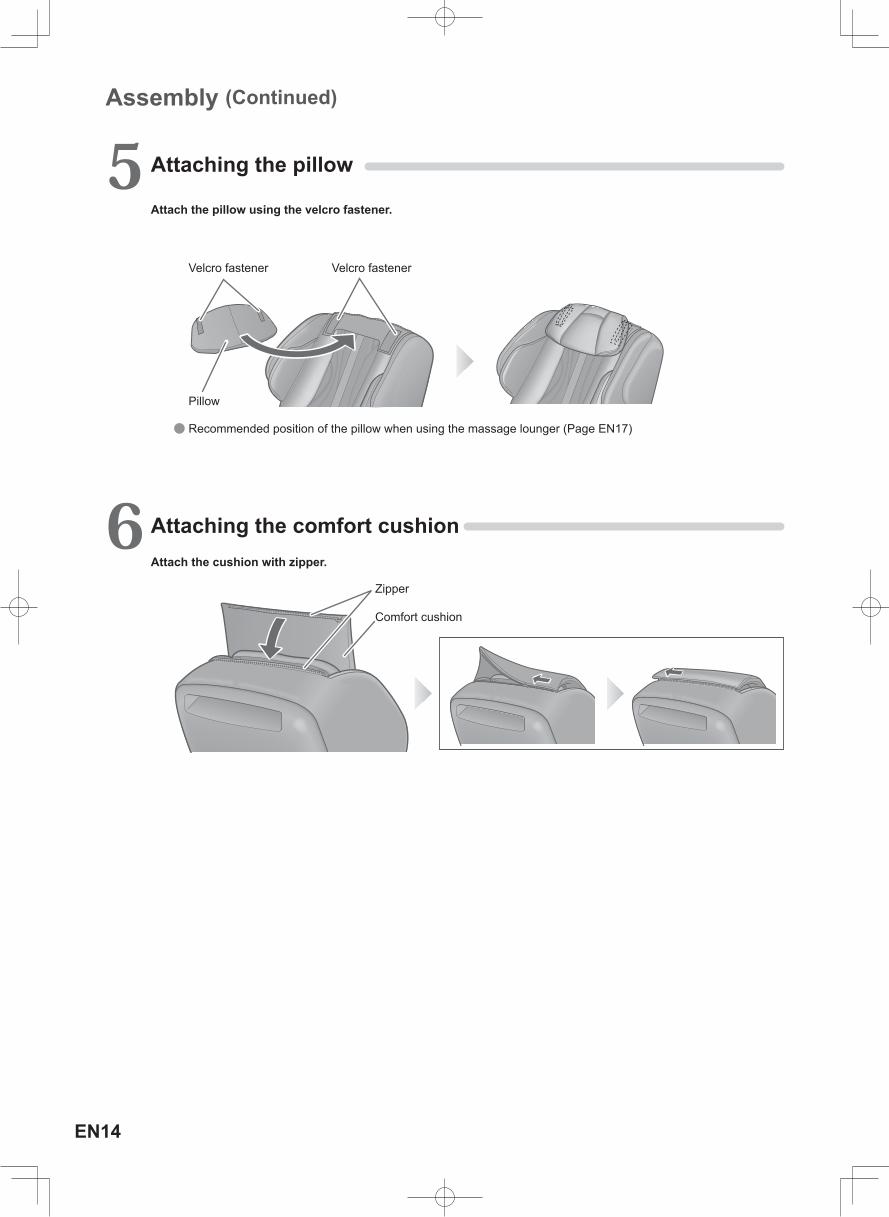
● Recommended position of the pillow when using the massage lounger (Page EN17)
Pillow
Velcro fastener Velcro fastener
Zipper
Comfort cushion
5 Attaching the pillow
Attach the pillow using the velcro fastener.
6 Attaching the comfort cushionAttach the cushion with zipper.
Assembly
EN15
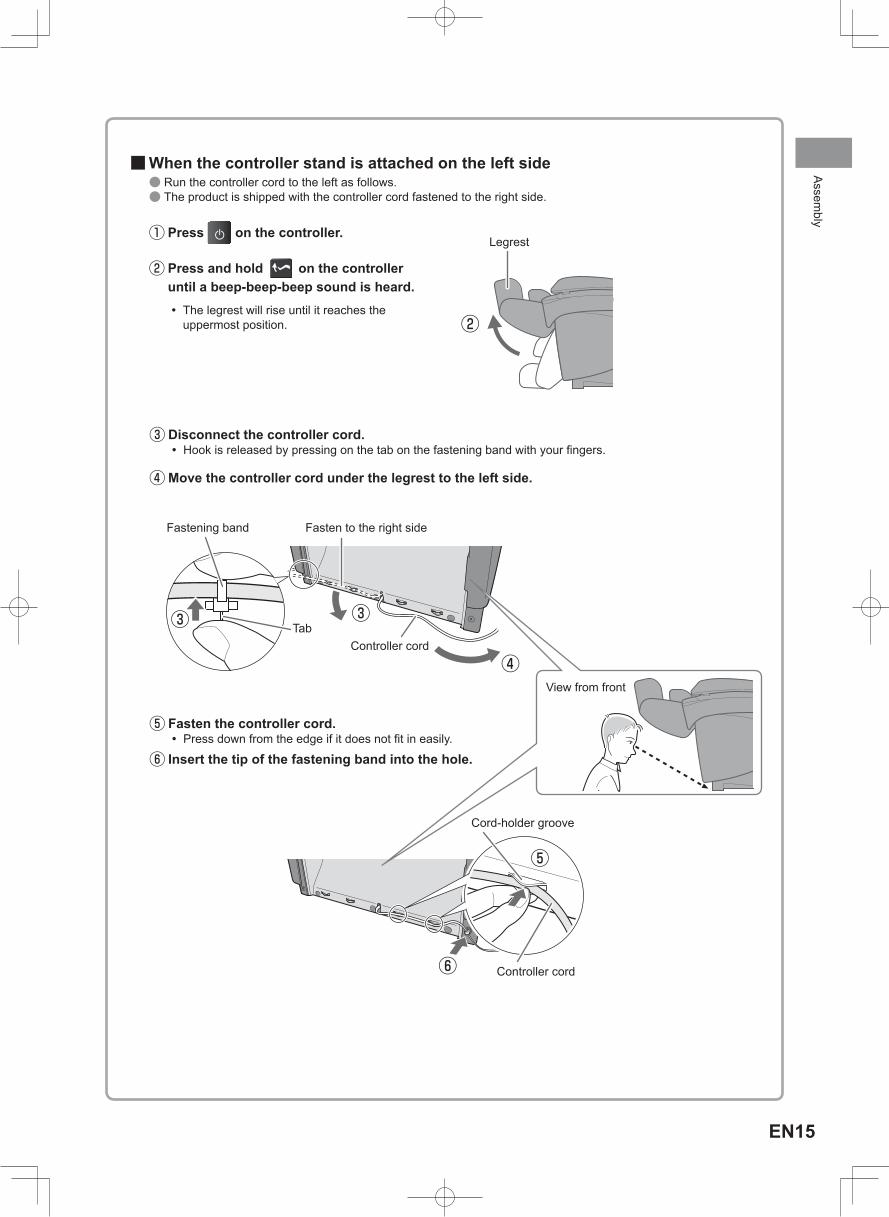
■When the controller stand is attached on the left side ● Run the controller cord to the left as follows. ● The product is shipped with the controller cord fastened to the right side.
① Press on the controller.
② Press and hold on the controller until a beep-beep-beep sound is heard.
ㅡ The legrest will rise until it reaches the uppermost position.
③ Disconnect the controller cord. ㅡ Hook is released by pressing on the tab on the fastening band with your fingers.
④ Move the controller cord under the legrest to the left side.
Fasten to the right sideFastening band
TabController cord
Controller cord
Cord-holder groove
④
⑥
⑤
Legrest
②
③ ③
⑤ Fasten the controller cord. ㅡ Press down from the edge if it does not fit in easily.
⑥ Insert the tip of the fastening band into the hole.
View from front
EN16
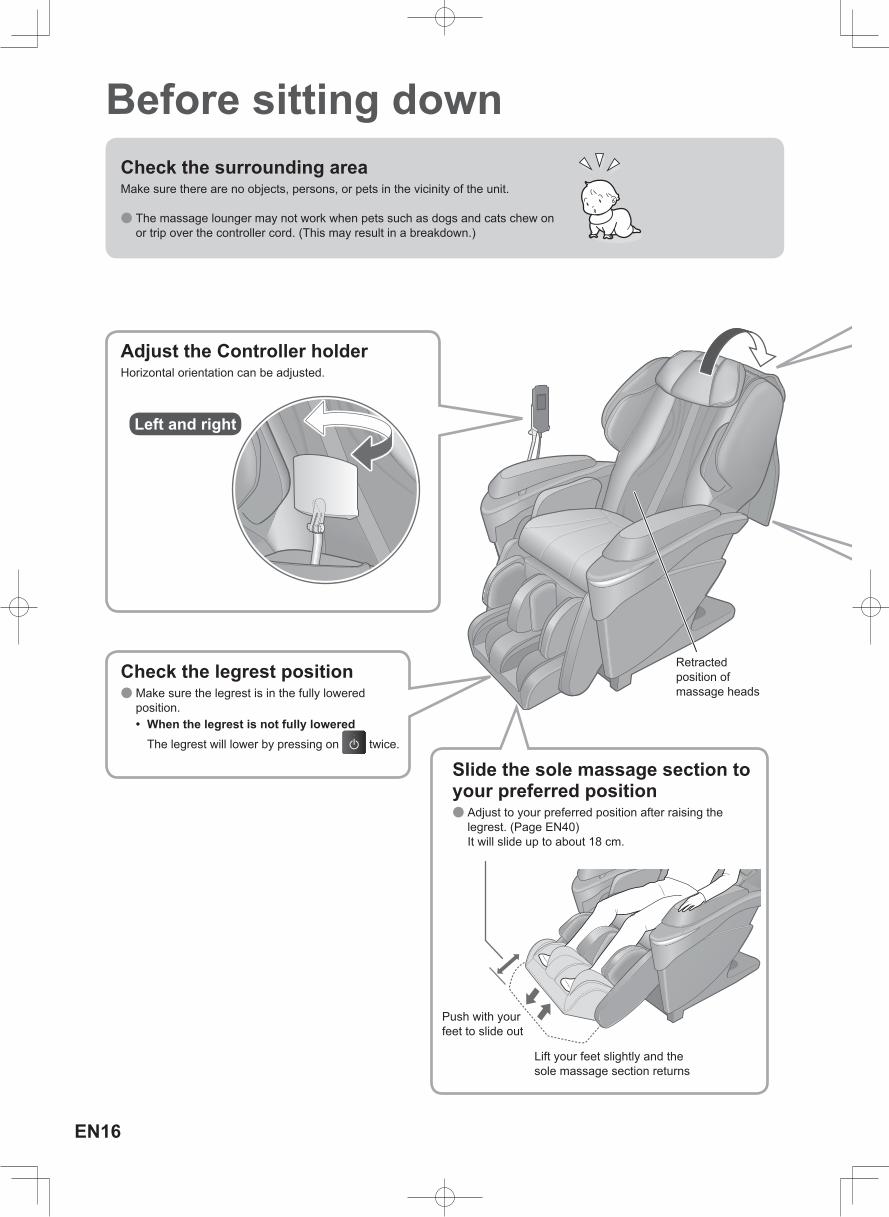
Before sitting down
Adjust the Controller holderHorizontal orientation can be adjusted.
Check the legrest position ● Make sure the legrest is in the fully lowered position.
ㅡWhen the legrest is not fully loweredThe legrest will lower by pressing on twice.
Slide the sole massage section to your preferred position
● Adjust to your preferred position after raising the legrest. (Page EN40)It will slide up to about 18 cm.
Lift your feet slightly and the sole massage section returns
Push with your feet to slide out
Retracted position of massage heads
Check the surrounding areaMake sure there are no objects, persons, or pets in the vicinity of the unit.
● The massage lounger may not work when pets such as dogs and cats chew on or trip over the controller cord. (This may result in a breakdown.)
Left and right
Before sitting down
EN17
Check the power cord and power plug before turning on the unit.(Page EN11)
Flip up the comfort cushion to check the main unitCheck the following points
● Is the fabric torn? ● Are there foreign objects sandwiched in the main unit? ● Are the massage heads in their stowed positions?
ㅡWhen the massage heads are not in the retracted position
Press twice to return the massage heads to the retracted position.
Do not massage with the comfort cushion still on the backrest.
Check your sitting positionIn order to deliver an effective massage, there is a bulging area in the center of the seat to make sure you sit all the way back.
Sit down all the way to the back with your bottom in contact with the backrest.
Adjust the pillow positionRemove the pillow and adjust the height of the pillow so that the bottom edge is at ear level.
● If positioned too low, the pillow may interfere with a massage of the area around the neck. ●When the reclining angle changes, the position of the pillow may shift. In that case, adjust the position again.
Pillow Lower edge of the pillow
Ear level
WARNING Always check the fabric covering the backrest or legrest movable parts has not been ripped before using the unit. Please also check other areas to ensure the fabric has not been ripped. No matter how small the rip, if you find one then immediately stop using the unit, unplug the power plug and have the unit repaired at an authorized service center. (Failure to do so may result in injuries or electric shocks.)
EN18
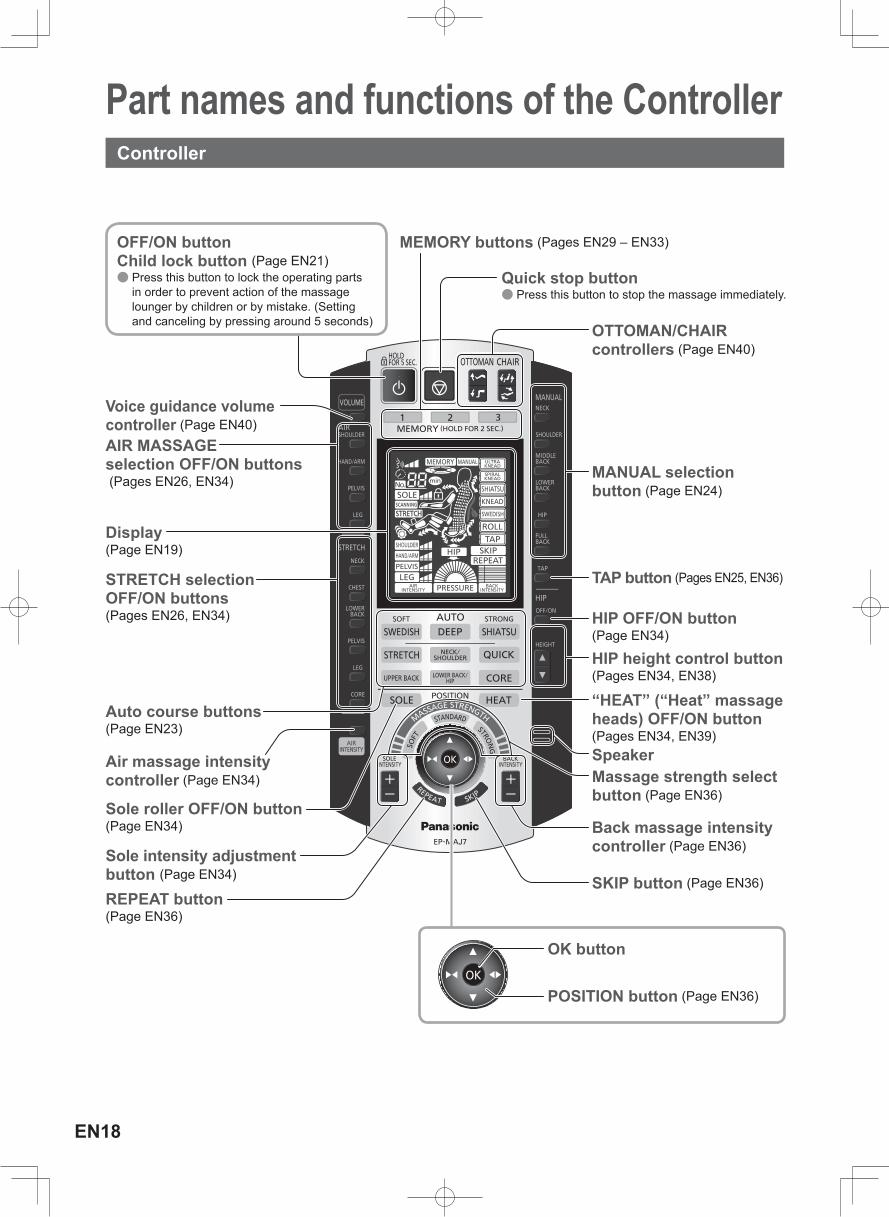
Part names and functions of the Controller
OK button
POSITION button (Page EN36)
MEMORY buttons (Pages EN29 – EN33)
Quick stop button ● Press this button to stop the massage immediately.
OTTOMAN/CHAIR controllers (Page EN40)
Voice guidance volume controller (Page EN40)
Sole intensity adjustment button (Page EN34)
Display (Page EN19)
STRETCH selection OFF/ON buttons (Pages EN26, EN34)
Auto course buttons (Page EN23)
Sole roller OFF/ON button (Page EN34)
Air massage intensity controller (Page EN34)
REPEAT button(Page EN36)
MANUAL selection button (Page EN24)
TAP button (Pages EN25, EN36)
HIP OFF/ON button (Page EN34)
HIP height control button (Pages EN34, EN38)
“HEAT” (“Heat” massage heads) OFF/ON button (Pages EN34, EN39)SpeakerMassage strength select button (Page EN36)
Back massage intensity controller (Page EN36)
SKIP button (Page EN36)
OFF/ON buttonChild lock button (Page EN21)
● Press this button to lock the operating parts in order to prevent action of the massage lounger by children or by mistake. (Setting and canceling by pressing around 5 seconds)
Controller
AIR MASSAGE selection OFF/ON buttons (Pages EN26, EN34)
Part names and functions of the C
ontroller
EN19
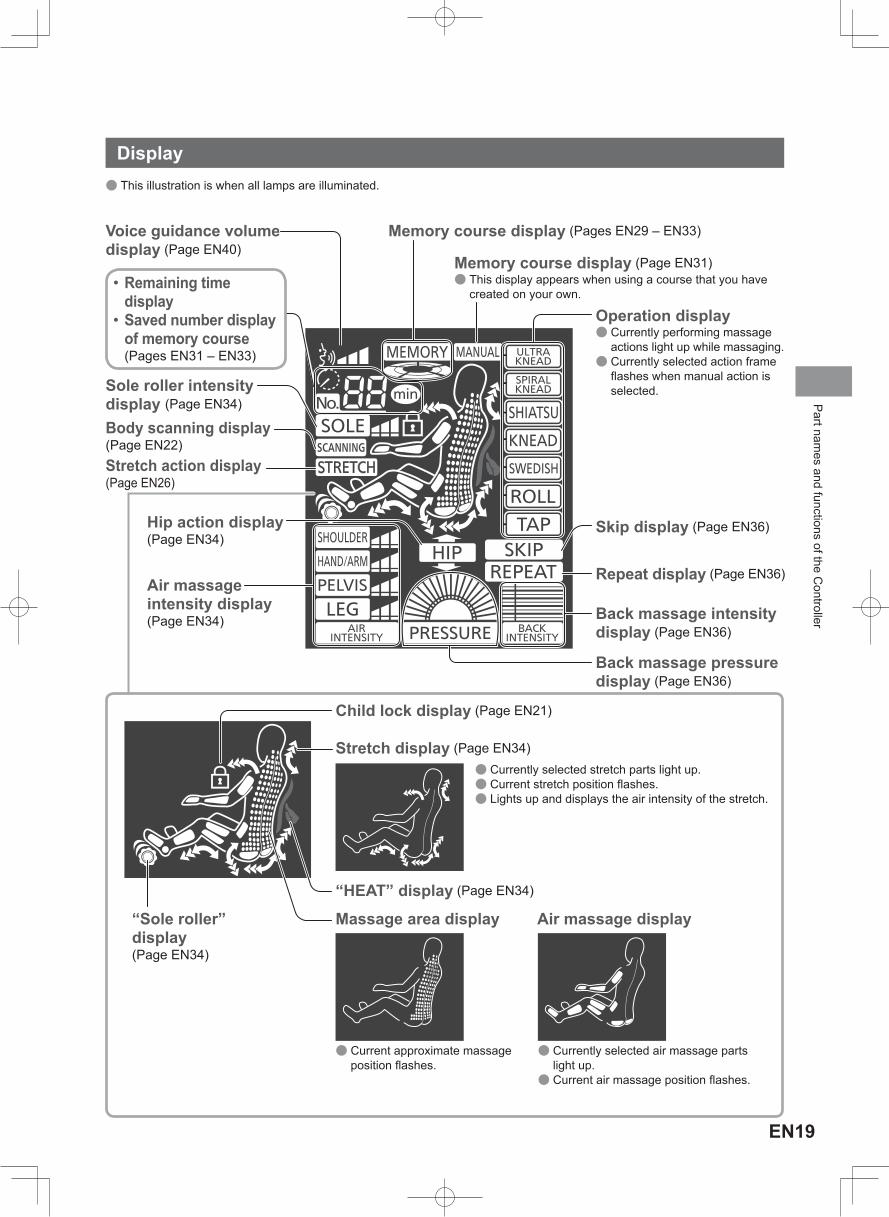
● This illustration is when all lamps are illuminated.
Voice guidance volume display (Page EN40)
Memory course display (Pages EN29 – EN33)
Memory course display (Page EN31) ● This display appears when using a course that you have created on your own.
Stretch action display (Page EN26)
Body scanning display (Page EN22)
Sole roller intensity display (Page EN34)
Hip action display (Page EN34)
Air massage intensity display (Page EN34)
Operation display ● Currently performing massage actions light up while massaging. ● Currently selected action frame flashes when manual action is selected.
Skip display (Page EN36)
Repeat display (Page EN36)
Back massage intensity display (Page EN36)
Back massage pressure display (Page EN36)
Child lock display (Page EN21)
Stretch display (Page EN34) ● Currently selected stretch parts light up. ● Current stretch position flashes. ● Lights up and displays the air intensity of the stretch.
“HEAT” display (Page EN34)
Massage area display Air massage display
● Current approximate massage position flashes.
● Currently selected air massage parts light up. ● Current air massage position flashes.
• Remaining time display
• Saved number display of memory course (Pages EN31 – EN33)
Display
“Sole roller” display(Page EN34)
EN20
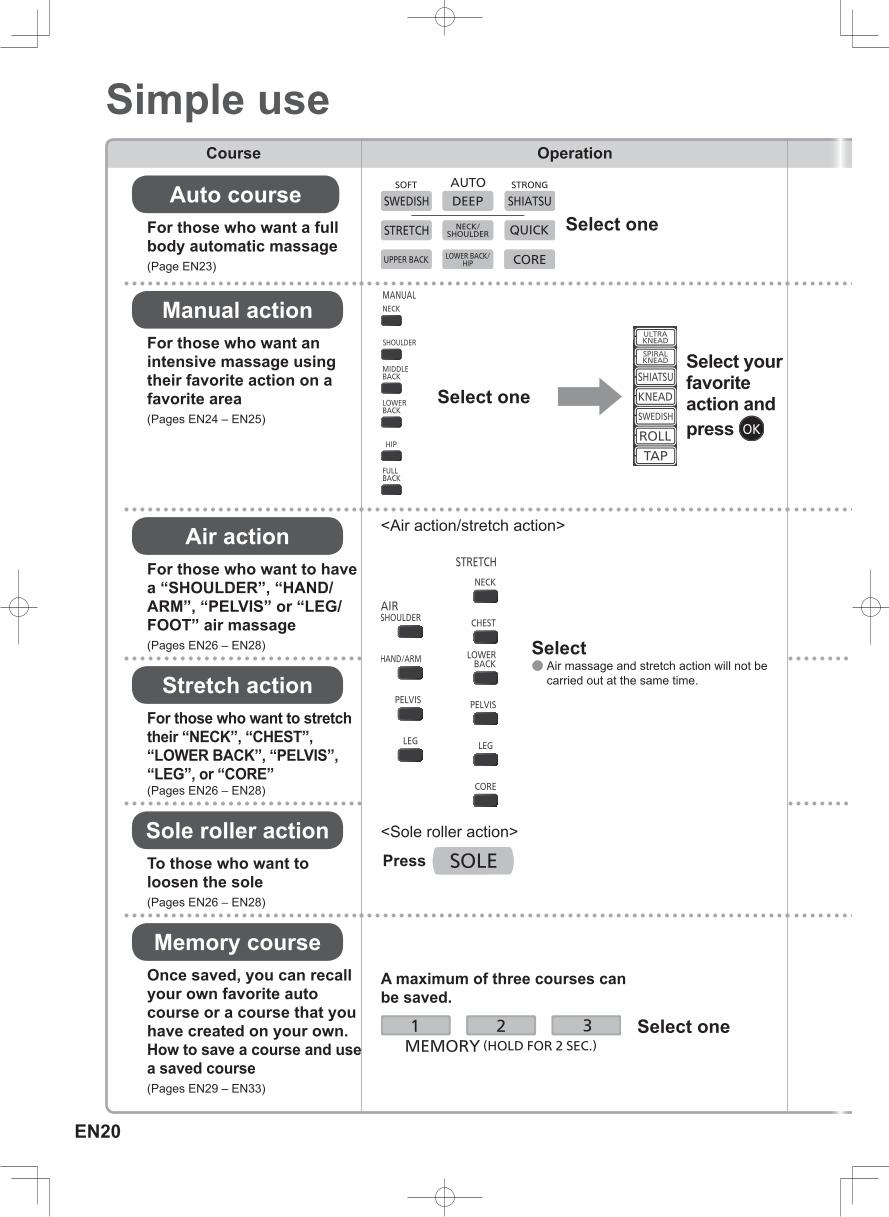
Course Operation Action
Auto courseFor those who want a full body automatic massage(Page EN23)
Select one
Body scanning (page EN
22)
Start massage
Manual actionFor those who want an intensive massage using their favorite action on a favorite area(Pages EN24 – EN25)
Select one
Select your favorite action and press
Start massage
Air actionFor those who want to have a “SHOULDER”, “HAND/ARM”, “PELVIS” or “LEG/FOOT” air massage(Pages EN26 – EN28)
<Air action/stretch action>
Select ● Air massage and stretch action will not be carried out at the same time.
<Sole roller action>
Press
Start air massage
● If air massage is selected, body scanning will not be carried out.
Stretch actionFor those who want to stretch their “NECK”, “CHEST”, “LOWER BACK”, “PELVIS”, “LEG”, or “CORE”(Pages EN26 – EN28)
Start stretch
Sole roller actionTo those who want to loosen the sole(Pages EN26 – EN28)
Start sole roller massage
● If sole roller massage is selected, body scanning will not be carried out.
Memory courseOnce saved, you can recall your own favorite auto course or a course that you have created on your own.How to save a course and use a saved course (Pages EN29 – EN33)
A maximum of three courses can be saved.
Select one Start massage
Simple use
Simple use
EN21▶ Continued on the next page
Course Operation Action
Auto courseFor those who want a full body automatic massage(Page EN23)
Select one
Body scanning (page EN
22)
Start massage
Manual actionFor those who want an intensive massage using their favorite action on a favorite area(Pages EN24 – EN25)
Select one
Select your favorite action and press
Start massage
Air actionFor those who want to have a “SHOULDER”, “HAND/ARM”, “PELVIS” or “LEG/FOOT” air massage(Pages EN26 – EN28)
<Air action/stretch action>
Select ● Air massage and stretch action will not be carried out at the same time.
<Sole roller action>
Press
Start air massage
● If air massage is selected, body scanning will not be carried out.
Stretch actionFor those who want to stretch their “NECK”, “CHEST”, “LOWER BACK”, “PELVIS”, “LEG”, or “CORE”(Pages EN26 – EN28)
Start stretch
Sole roller actionTo those who want to loosen the sole(Pages EN26 – EN28)
Start sole roller massage
● If sole roller massage is selected, body scanning will not be carried out.
Memory courseOnce saved, you can recall your own favorite auto course or a course that you have created on your own.How to save a course and use a saved course (Pages EN29 – EN33)
A maximum of three courses can be saved.
Select one Start massage
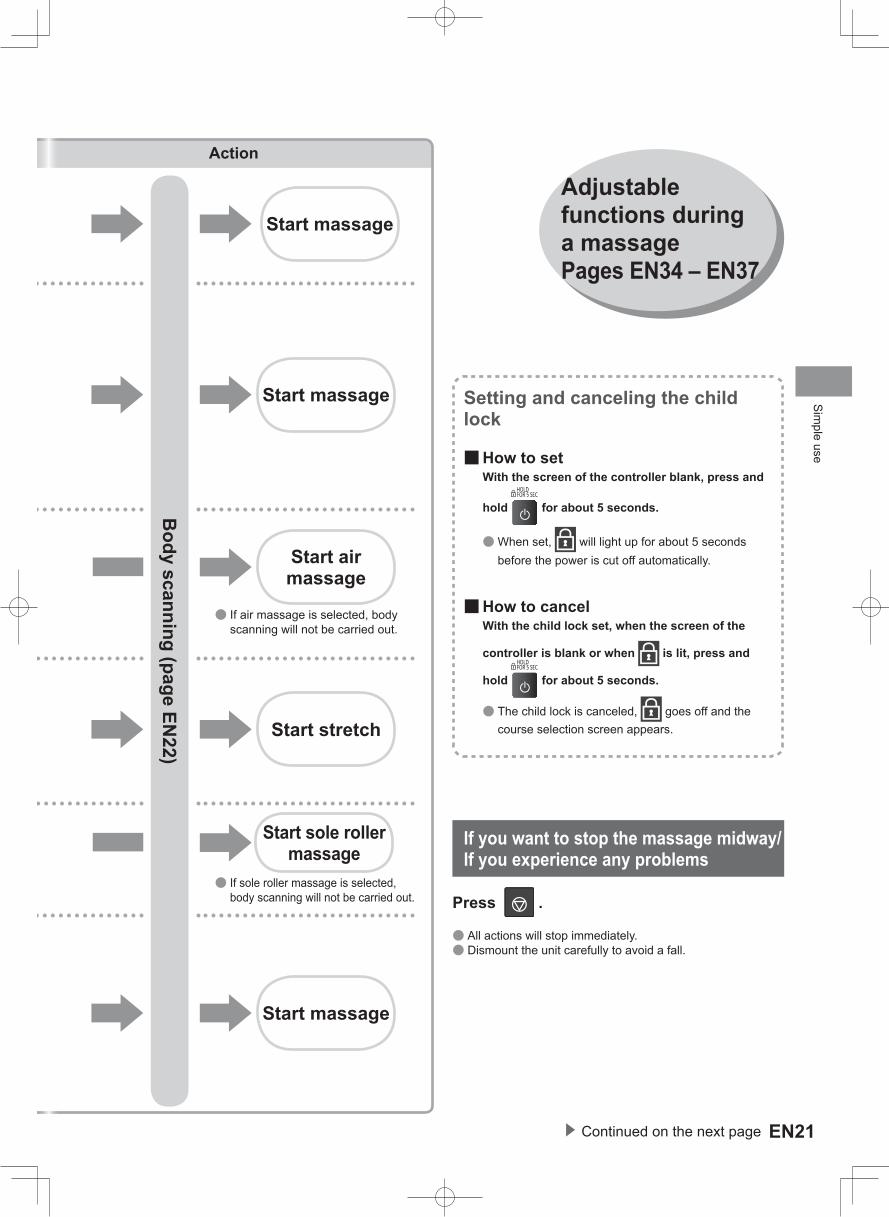
Adjustable functions during a massage Pages EN34 – EN37
Setting and canceling the child lock
■How to setWith the screen of the controller blank, press and
hold for about 5 seconds.
●When set, will light up for about 5 seconds before the power is cut off automatically.
■How to cancelWith the child lock set, when the screen of the
controller is blank or when is lit, press and
hold for about 5 seconds.
● The child lock is canceled, goes off and the course selection screen appears.
Press .
● All actions will stop immediately. ● Dismount the unit carefully to avoid a fall.
If you want to stop the massage midway/ If you experience any problems

もみ玉
たたき動作
EN22
Simple use (Continued)
Body scanning is where the massage heads move along the back and the shoulder position detected, the body shape including height is estimated, and a massage is made to suit the body shape.
● During body scanning, will flash. ● Body scanning height range is about 140 cm – 185 cm.
■To adjust the shoulder positionDuring tapping action (about 12 seconds), to adjust the height of the shoulder using the
POSITION button, push .
Sit back and lean gently back so that your head touches the pillow.
● For adjustment of the position of the pillow. (Page EN17)
About 30 seconds after the body scanning starts, the massage head will lower slowly to the shoulder position and start the tapping.
●With the body scanning sound “beep-beep ...”, the massage head will rise up the spine to the vicinity of the neck. ● Manual action (for example, “MIDDLE BACK”, or “LOWER BACK”) performs a simple sensing, but the massage head doesn’t rise up to the shoulder. ● The massage head protrudes.(It will rise again if it does not match the shoulder position and repeat the action to adjust the shoulder position.) ● Seat surface air operates to prevent the body from moving during scanning.
Reclined approx. 20 °
Raised approx. 60 °
Massage head
Tapping action
● If you have reclined deeper than the massage position, it does not automatically recline.
Moves approximately 1.2 cm up or down for each press.
Too high
Correct position of the massage head(The point where the tapping action should be felt.)
Too low ● Even during the tapping action, when you press , body scanning will end and massage will start. ● To estimate the approximate height based on the shoulder position, the legrest may automatically adjust its angle so that the sole of the foot touches. ● If the shoulder position is greatly shifted, one press of will stop the action. Rest your shoulders back against the backrest and press the button to start again.
Body scanning
AutomaticallyTo massage
position
Body scanning
Do not move your head from the pillow until tapping
action begins!It will not be able to accurately detect the shoulder position
EN23
Simple use
When you w
ant a complete m
assage
When you want a complete massage
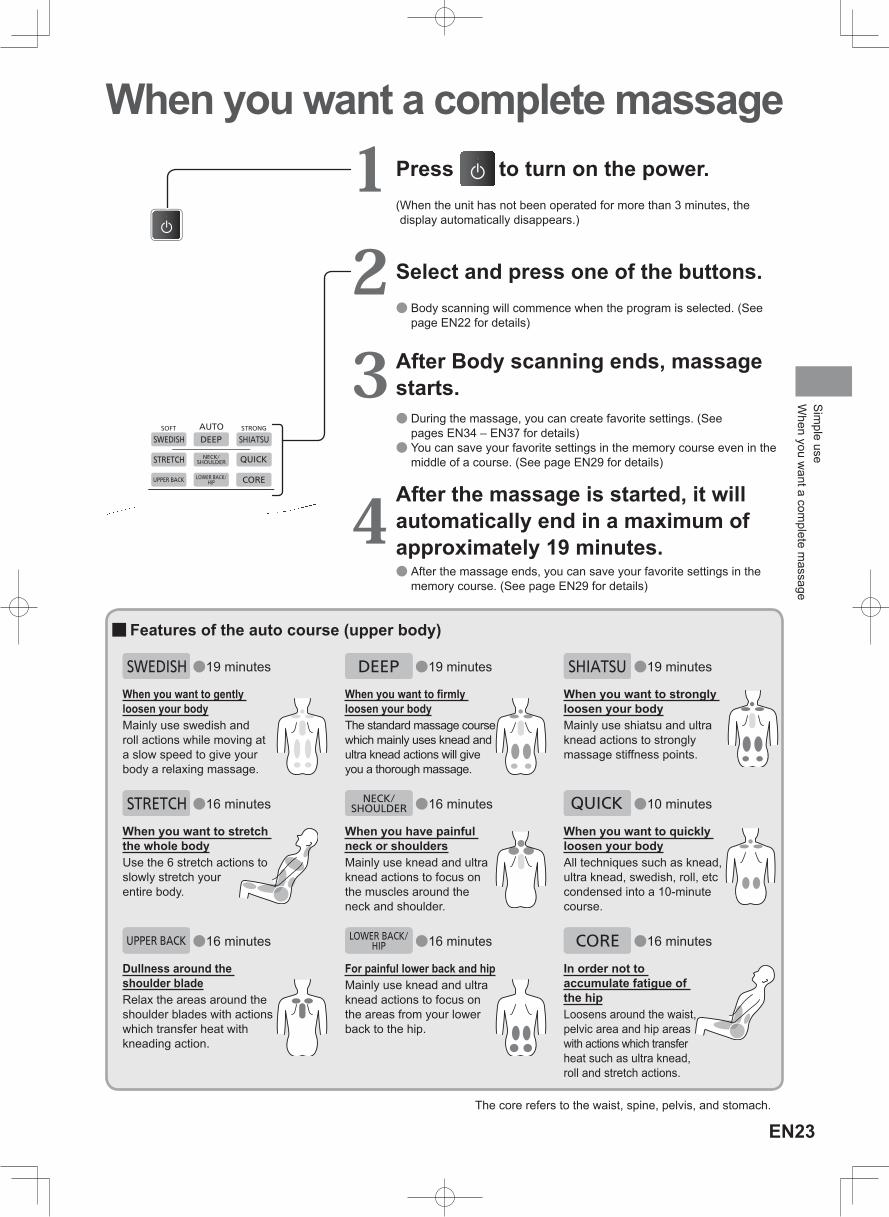
1 Press to turn on the power.( When the unit has not been operated for more than 3 minutes, the display automatically disappears.)
2 Select and press one of the buttons. ● Body scanning will commence when the program is selected. (See page EN22 for details)
3 After Body scanning ends, massage starts.
● During the massage, you can create favorite settings. (See pages EN34 – EN37 for details) ● You can save your favorite settings in the memory course even in the middle of a course. (See page EN29 for details)
4 After the massage is started, it will automatically end in a maximum of approximately 19 minutes.
● After the massage ends, you can save your favorite settings in the memory course. (See page EN29 for details)
■Features of the auto course (upper body)
●19 minutes ●19 minutes ●19 minutes
When you want to gently loosen your bodyMainly use swedish and roll actions while moving at a slow speed to give your body a relaxing massage.
When you want to firmly loosen your bodyThe standard massage course which mainly uses knead and ultra knead actions will give you a thorough massage.
When you want to strongly loosen your bodyMainly use shiatsu and ultra knead actions to strongly massage stiffness points.
●16 minutes ●16 minutes ●10 minutes
When you want to stretch the whole bodyUse the 6 stretch actions to slowly stretch your entire body.
When you have painful neck or shouldersMainly use knead and ultra knead actions to focus on the muscles around the neck and shoulder.
When you want to quickly loosen your bodyAll techniques such as knead, ultra knead, swedish, roll, etc condensed into a 10-minute course.
●16 minutes ●16 minutes ●16 minutes
Dullness around the shoulder bladeRelax the areas around the shoulder blades with actions which transfer heat with kneading action.
For painful lower back and hipMainly use knead and ultra knead actions to focus on the areas from your lower back to the hip.
In order not to accumulate fatigue of the hipLoosens around the waist, pelvic area and hip areas with actions which transfer heat such as ultra knead, roll and stretch actions.
The core refers to the waist, spine, pelvis, and stomach.
EN24
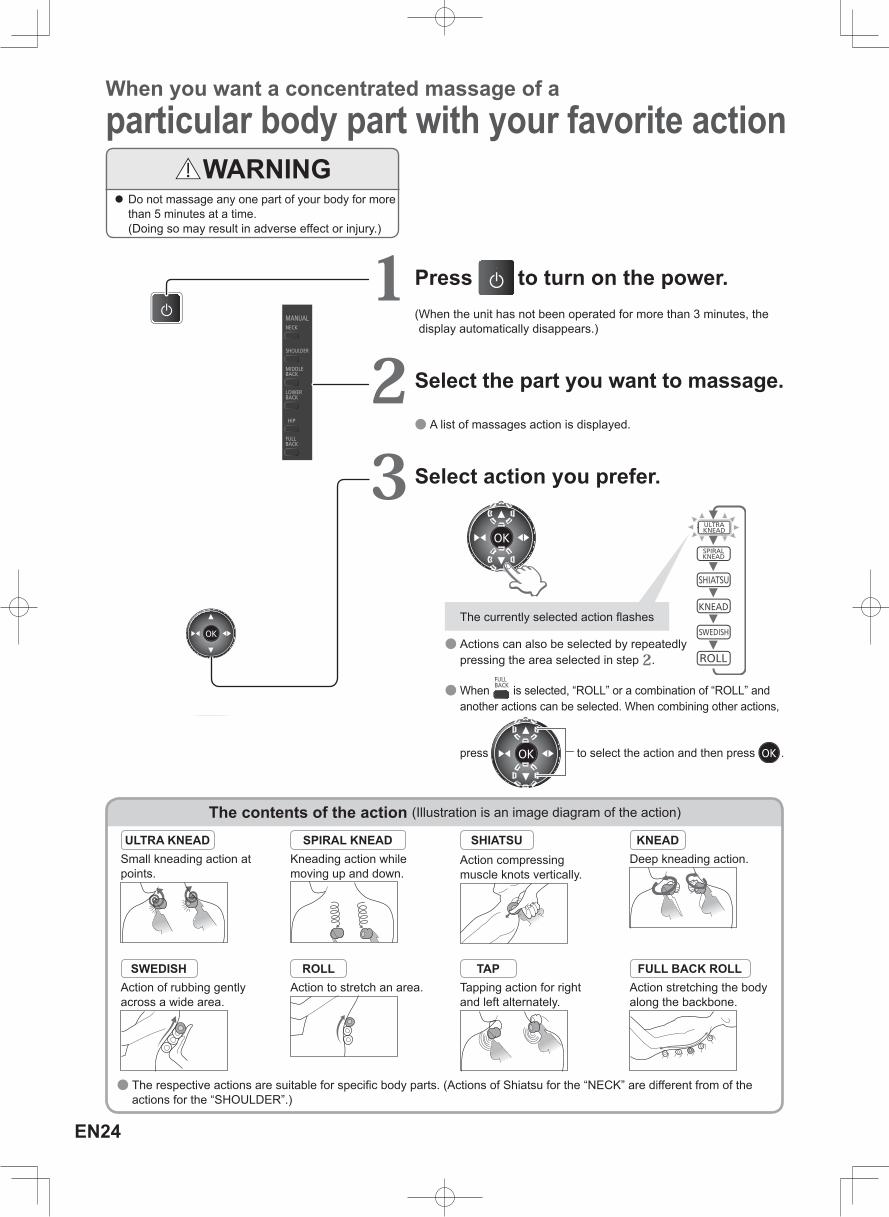
WARNING Do not massage any one part of your body for more than 5 minutes at a time. (Doing so may result in adverse effect or injury.)
● Actions can also be selected by repeatedly pressing the area selected in step 2.
●When is selected, “ROLL” or a combination of “ROLL” and another actions can be selected. When combining other actions,
press to select the action and then press .
The currently selected action flashes
1 Press to turn on the power.( When the unit has not been operated for more than 3 minutes, the display automatically disappears.)
2 Select the part you want to massage.
● A list of massages action is displayed.
3 Select action you prefer.
The contents of the action (Illustration is an image diagram of the action)
ULTRA KNEADSmall kneading action at points.
SPIRAL KNEADKneading action while moving up and down.
SHIATSUAction compressing muscle knots vertically.
KNEADDeep kneading action.
SWEDISHAction of rubbing gently across a wide area.
ROLLAction to stretch an area.
TAPTapping action for right and left alternately.
FULL BACK ROLLAction stretching the body along the backbone.
● The respective actions are suitable for specific body parts. (Actions of Shiatsu for the “NECK” are different from of the actions for the “SHOULDER”.)
When you want a concentrated massage of aparticular body part with your favorite action
EN25
Select again in steps 2 – 4 . ● Press within approximately 40 seconds of reselecting an action in step 2 , otherwise the reselection will be canceled automatically.
Press the MEMORY button for 2 seconds during the action. ● You can save your favorite manual action, stretch action and air action to create your own course. (Pages EN31 – EN33)
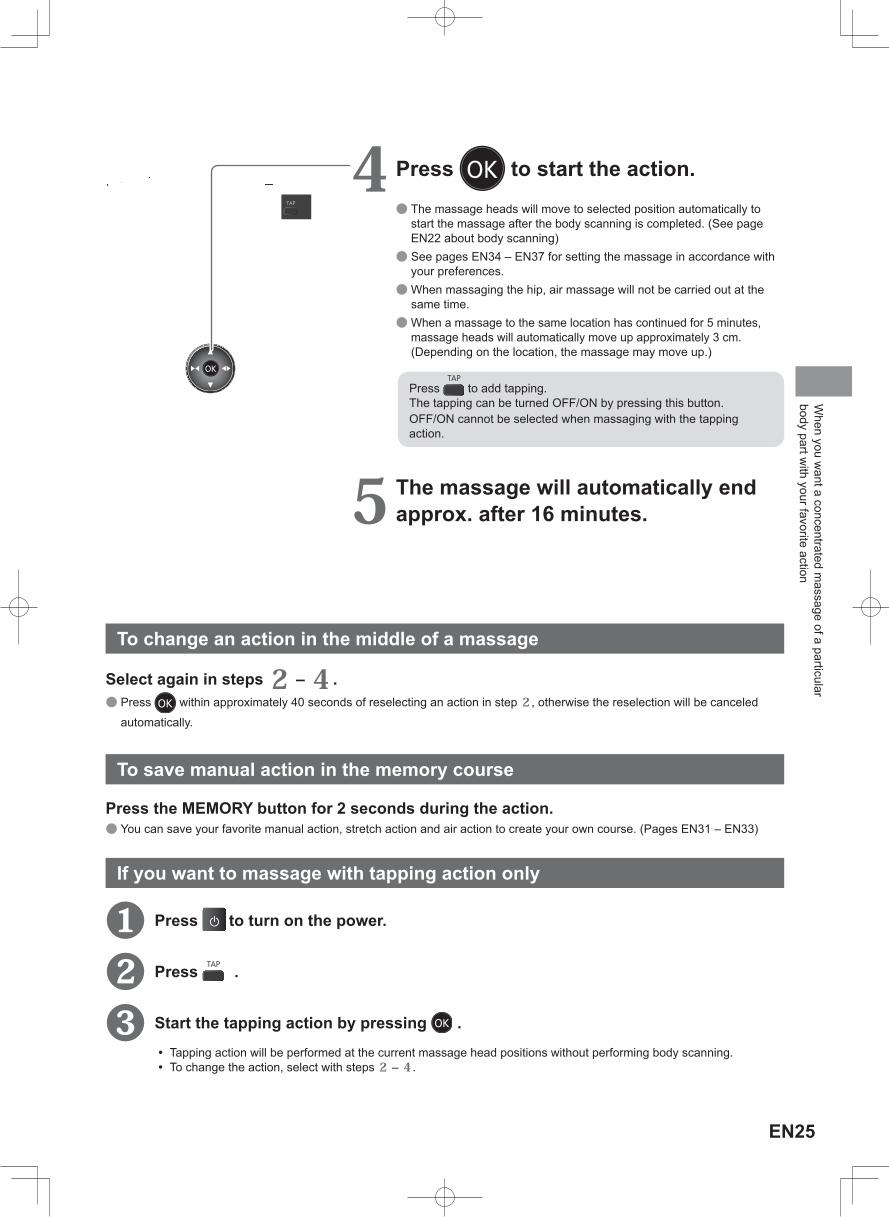
4 Press to start the action. ● The massage heads will move to selected position automatically to start the massage after the body scanning is completed. (See page EN22 about body scanning) ● See pages EN34 – EN37 for setting the massage in accordance with your preferences. ●When massaging the hip, air massage will not be carried out at the same time. ●When a massage to the same location has continued for 5 minutes, massage heads will automatically move up approximately 3 cm. (Depending on the location, the massage may move up.)
Press to add tapping. The tapping can be turned OFF/ON by pressing this button.OFF/ON cannot be selected when massaging with the tapping action.
5 The massage will automatically end approx. after 16 minutes.
To change an action in the middle of a massage
To save manual action in the memory course
If you want to massage with tapping action only
❶ Press to turn on the power.
❷ Press .
❸ Start the tapping action by pressing . ㅡ Tapping action will be performed at the current massage head positions without performing body scanning. ㅡ To change the action, select with steps 2 – 4 .
When you w
ant a concentrated massage of a particular
body part with your favorite action

EN26
Air stretching and Sole massage ■Air massage …………… “SHOULDER”, “HAND/ARM”, “PELVIS”, “LEG/FOOT” ■Stretch …………………… “NECK”, “CHEST”, “LOWER BACK”, “PELVIS”, “LEG”, “CORE”
1 Press to turn on the power.( When the unit has not been operated for more than 3 minutes, the display automatically disappears.)
2 Select the part you want to massage.
● The legrest will rise by pressing . ● The action contents of the air massage (below). ● See page EN28 for stretch specifics. ● For the stretch action, the massage heads will automatically move to the area to stretch after the body scanning, and perform stretch preparation action.
● Pressing enables sole roller massage.
3 Air massage/stretch starts.
4 The massage will automatically end approx. after 16 minutes.
You can check the air OFF/ON in the display.
Leg/Foot
Pelvis/ButtockThigh
Pelvis
ShouldersHand/Arm ㅡLit: ON ㅡUnlit: OFF
You can check the stretch OFF/ON in the display.
Leg Pelvis
Lower back
Core
NeckChest
ㅡLit: ON ㅡUnlit: OFF
The site of the air massage stretch position
Air massage and stretch action will not be carried out at the same time.If the Stretch button is pressed during an air massage, the air action will be canceled.
Air massage StretchDetailed action contents of the stretch (Page EN28)
PelvisAdds pressure so as to sandwich the waist-thigh from the side.
SolesPressing the whole foot from sole to heel, massage firmly with the sole roller.
ShouldersAdds pressure so as to sandwich the shoulders from the side.Hand/ArmAdds pressure so as to sandwich the palm and the arm vertically (will move to the left and right alternately).Leg/FootApplies upward pressure from the back across the calf from both sides.
Plevis
Lower back
NeckCore
LegChest
EN27▶ Continued on the next page
Air stretching and Sole massage
Press the MEMORY button for 2 seconds during the action. ● You can save the stretch action that you like, to create your own course. (Pages EN31 – EN32) ● Air actions can be saved at the same time when saving manual action in the memory course.
To save in the memory course
ひじ掛けの中心に手・腕を置く
手を深く入れる
● Adjust the slide and stretch the foot. (Page EN16) ● Lower the legrest.
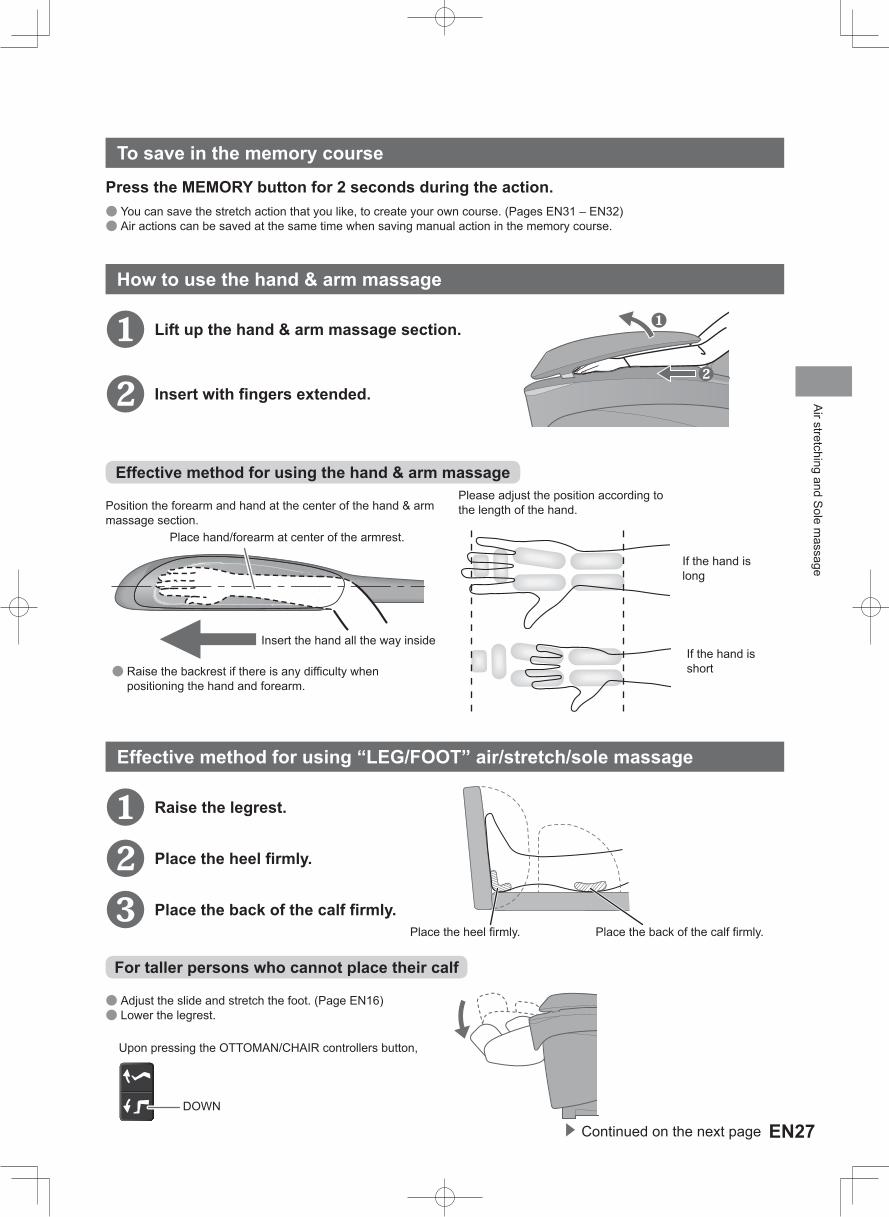
Position the forearm and hand at the center of the hand & arm massage section.
● Raise the backrest if there is any difficulty when positioning the hand and forearm.
Upon pressing the OTTOMAN/CHAIR controllers button,
DOWN
How to use the hand & arm massage
Effective method for using “LEG/FOOT” air/stretch/sole massage
Effective method for using the hand & arm massage
For taller persons who cannot place their calf
❶ Lift up the hand & arm massage section.
●❷
❷ Insert with fingers extended.
❶ Raise the legrest.
❷ Place the heel firmly.
❸ Place the back of the calf firmly.
If the hand is long
Please adjust the position according to the length of the hand.
If the hand is short
Place hand/forearm at center of the armrest.
Insert the hand all the way inside
Place the heel firmly. Place the back of the calf firmly.
●❶
EN28
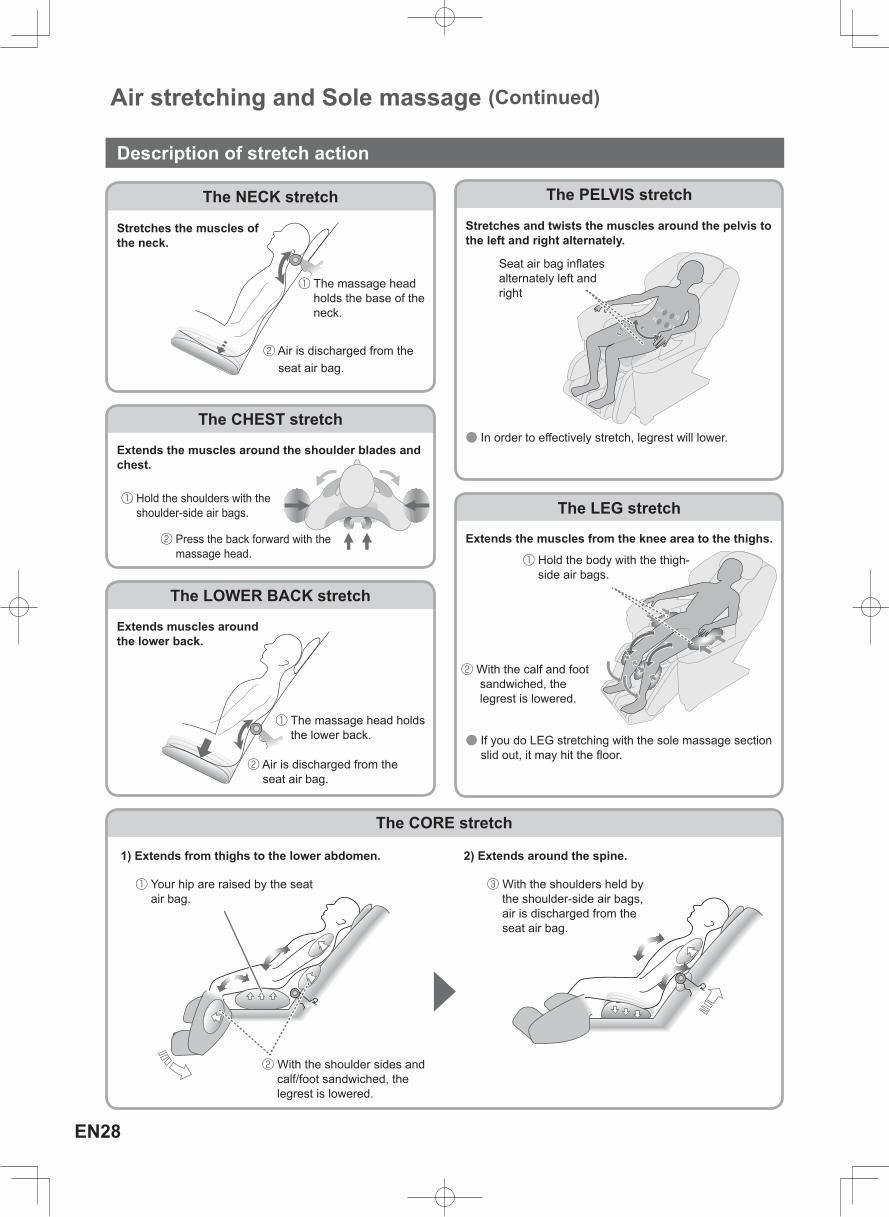
The NECK stretch
The LEG stretch
The CHEST stretch
The LOWER BACK stretch
The PELVIS stretch
Stretches the muscles of the neck.
Extends the muscles from the knee area to the thighs.
① Hold the body with the thigh-side air bags.
② With the calf and foot sandwiched, the legrest is lowered.
● If you do LEG stretching with the sole massage section slid out, it may hit the floor.
Extends the muscles around the shoulder blades and chest.
Extends muscles around the lower back.
Stretches and twists the muscles around the pelvis to the left and right alternately.
Seat air bag inflates alternately left and right
● In order to effectively stretch, legrest will lower.
Description of stretch action
① The massage head holds the base of the neck.
② Air is discharged from the seat air bag.
① The massage head holds the lower back.
② Air is discharged from the seat air bag.
The CORE stretch
1) Extends from thighs to the lower abdomen. 2) Extends around the spine.
② With the shoulder sides and calf/foot sandwiched, the legrest is lowered.
① Your hip are raised by the seat air bag.
③ With the shoulders held by the shoulder-side air bags, air is discharged from the seat air bag.
① Hold the shoulders with the shoulder-side air bags.
② Press the back forward with the massage head.
Air stretching and Sole massage (Continued)
EN29▶ Continued on the next page
Memory Course
Saving a Auto Course with My Own Favorite Settings
Up to 3 memory courses can be saved.
Refer to “Saving a Auto Course with My Own Favorite Settings” (Page EN29) and “Creating Your Own Course” (Page EN31) to see how to save a memory course.
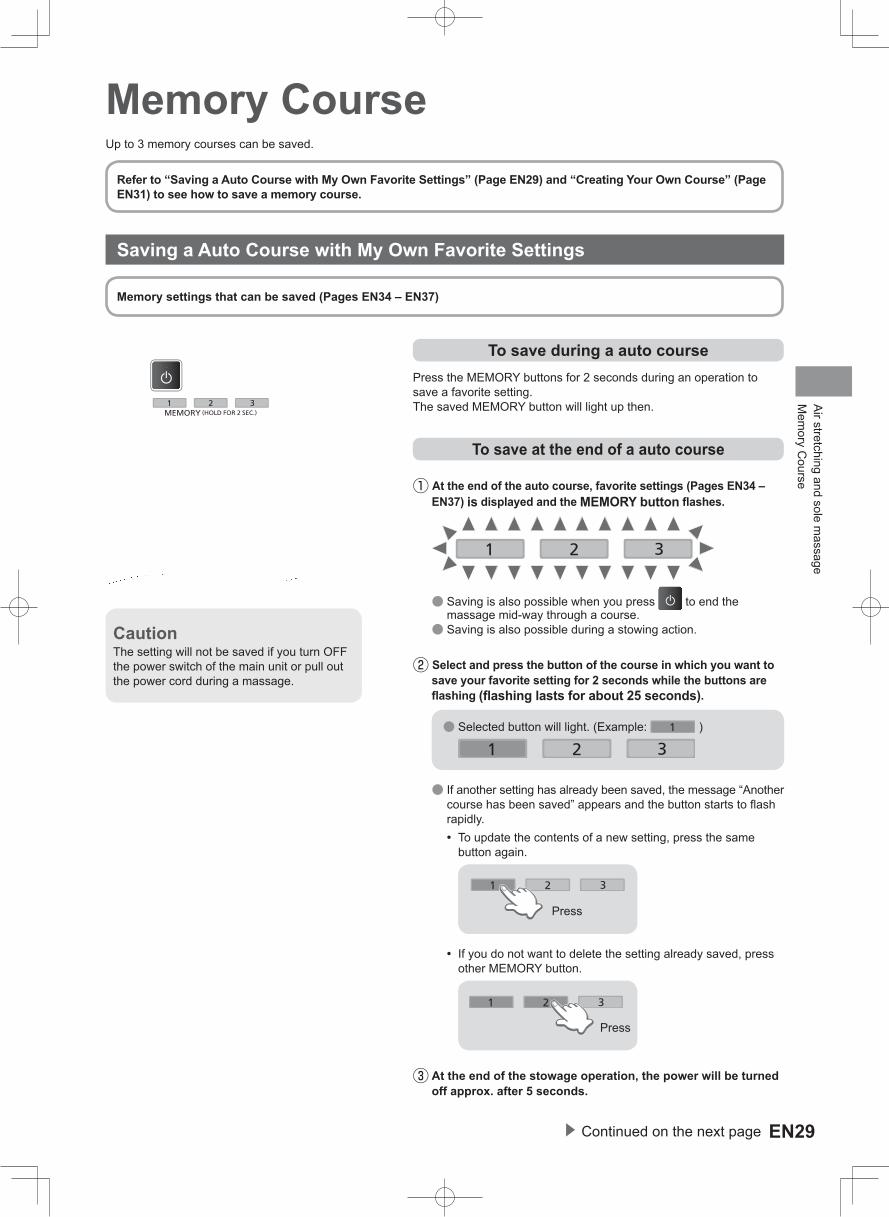
To save during a auto coursePress the MEMORY buttons for 2 seconds during an operation to save a favorite setting.The saved MEMORY button will light up then.
To save at the end of a auto course
① At the end of the auto course, favorite settings (Pages EN34 – EN37) is displayed and the MEMORY button flashes.
● Saving is also possible when you press to end the massage mid-way through a course. ● Saving is also possible during a stowing action.
② Select and press the button of the course in which you want to save your favorite setting for 2 seconds while the buttons are flashing (flashing lasts for about 25 seconds).
● Selected button will light. (Example: )
● If another setting has already been saved, the message “Another course has been saved” appears and the button starts to flash rapidly.
ㅡ To update the contents of a new setting, press the same button again.
Press
ㅡ If you do not want to delete the setting already saved, press other MEMORY button.
Press
③ At the end of the stowage operation, the power will be turned off approx. after 5 seconds.
CautionThe setting will not be saved if you turn OFF the power switch of the main unit or pull out the power cord during a massage.
Memory settings that can be saved (Pages EN34 – EN37)
Air stretching and sole massage
Mem
ory Course

EN30
Memory Course (Continued)
1 Press to turn on the power.
( When the unit has not been operated for more than 3 minutes, the display automatically disappears.)
● The saved MEMORY button will flash.
2 Select one of the MEMORY buttons with a saved course.
● Saved MEMORY button will light. (Example: )
After body scanning, massage with saved settings will start.
1 Press to turn on the power.
2 While pressing and holding the , press the MEMORY button that you want to delete for about 2 seconds.
● The MEMORY button will start to flash rapidly.
3 Press the same MEMORY button one more time while the MEMORY button is flashing (flashing lasts for about 12 seconds).The contents in the memory course will be deleted.
● will flash rapidly and then go off.
To start the saved program
To delete the saved settings

EN31▶ Continued on the next page
Mem
ory Course
Favorite settings that can be saved (Pages EN34 – EN37)
Creating Your Own Course
1 Select and activate manual action. ● Adjust the setting to suit your preference.
2 Select the MEMORY button you want to save and press it for about 2 seconds.The action currently in operation and the settings will be saved.
● The will flash, the will light up and the selected button will light up. ● The saved sequence will be displayed in .
3 Select and activate the manual action that you want to save next.The saved action will be interrupted and the selected action will start.
● The flashing of will change and the button will flash. ● Adjust the setting to suit your preference.
4 Press the same MEMORY button for about 2 seconds.The action currently in operation and the settings will be saved.
● The saved sequence will be displayed in . ● The newly saved action will be inserted after the interrupted action. ● The saved actions will start in sequence at intervals of about 1 minute. (The FULL BACK ROLL time is different).
5 Repeat steps 3 – 4 .
● Maximum 16 types can be saved.
You can freely combine a manual action with a
stretch action!!
How to save a manual action
You can create your own course by saving manual action and stretch action in sequence in one of the memory courses.Air action can also be saved simultaneously together with manual action.
EN32
Memory Course (Continued)
You can freely combine a manual action with a
stretch action!!
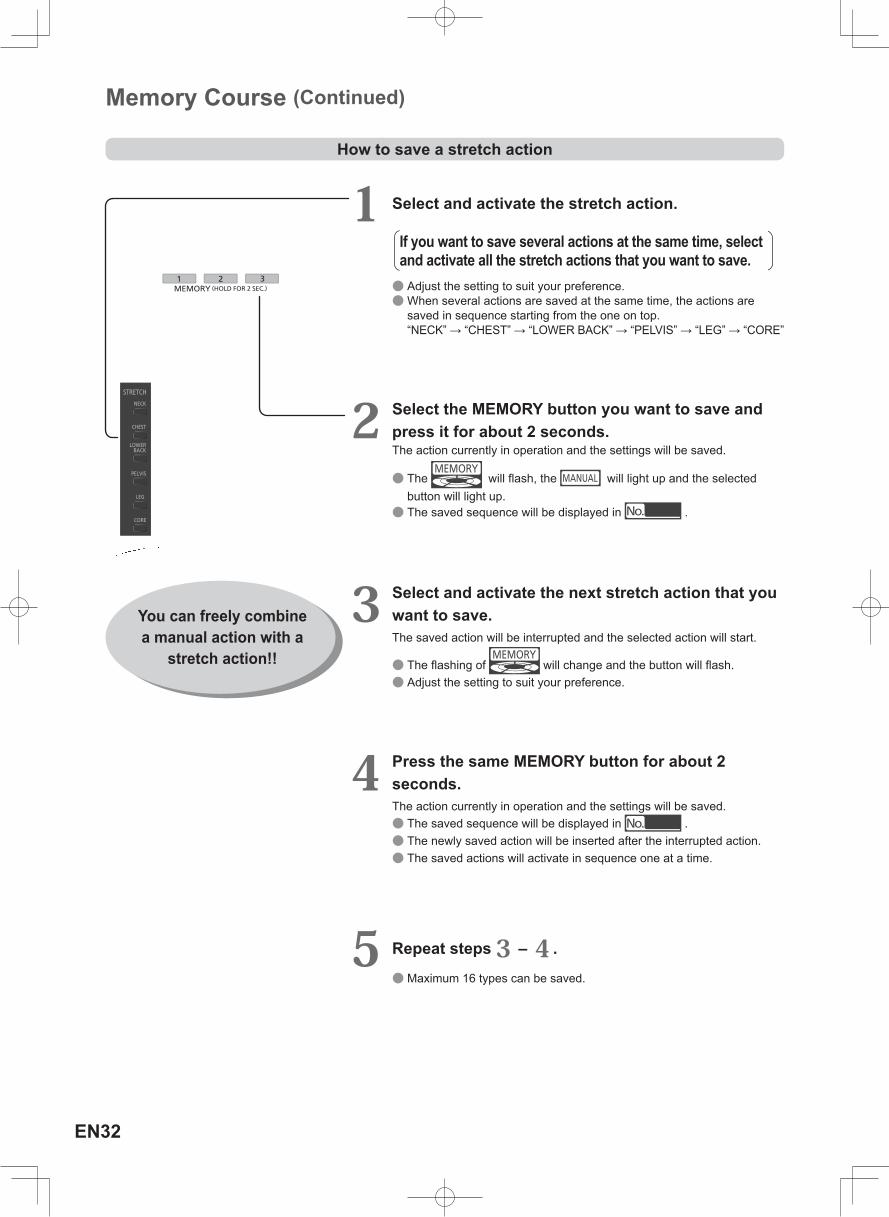
1 Select and activate the stretch action.
If you want to save several actions at the same time, select and activate all the stretch actions that you want to save. ● Adjust the setting to suit your preference. ●When several actions are saved at the same time, the actions are saved in sequence starting from the one on top.“NECK” → “CHEST” → “LOWER BACK” → “PELVIS” → “LEG” → “CORE”
2 Select the MEMORY button you want to save and press it for about 2 seconds.The action currently in operation and the settings will be saved.
● The will flash, the will light up and the selected button will light up. ● The saved sequence will be displayed in .
3 Select and activate the next stretch action that you want to save.The saved action will be interrupted and the selected action will start.
● The flashing of will change and the button will flash. ● Adjust the setting to suit your preference.
4 Press the same MEMORY button for about 2 seconds.The action currently in operation and the settings will be saved.
● The saved sequence will be displayed in . ● The newly saved action will be inserted after the interrupted action. ● The saved actions will activate in sequence one at a time.
5 Repeat steps 3 – 4 . ● Maximum 16 types can be saved.
How to save a stretch action

EN33
Mem
ory Course
An air action setting can be saved in combination with a manual action.If you want to save the setting with an air action, perform the following steps after saving the air action in the memory course.
1 Select and activate the air action.
● Adjust the setting to suit your preference.
2 Press the same MEMORY button for about 2 seconds.
● Saving is not possible when only air action is in operation. Please save the air action in combination with a manual action. ● The saved air action will be activated together with the manual action.
How to save an air action setting
■Display example among the memory courses Displays the saved
order
To start the saved program (Page EN30)
If you want to erase the contents saved in a memory course (Page EN30)
<Possible Actions> ● Adding another action.
● Press to extend the massage action currently in operation.
● Press to delete the massage action currently in operation.
● Adjusting the intensity of each action and hardness of the massage strength etc.
If you want to incorporate the above-mentioned settings into the next massage ...① Press the button to activate the manual action that you want to add or adjust.
② Press the MEMORY button for 2 seconds during selection. (The newly saved action will be inserted after the interrupted action.)
EN34
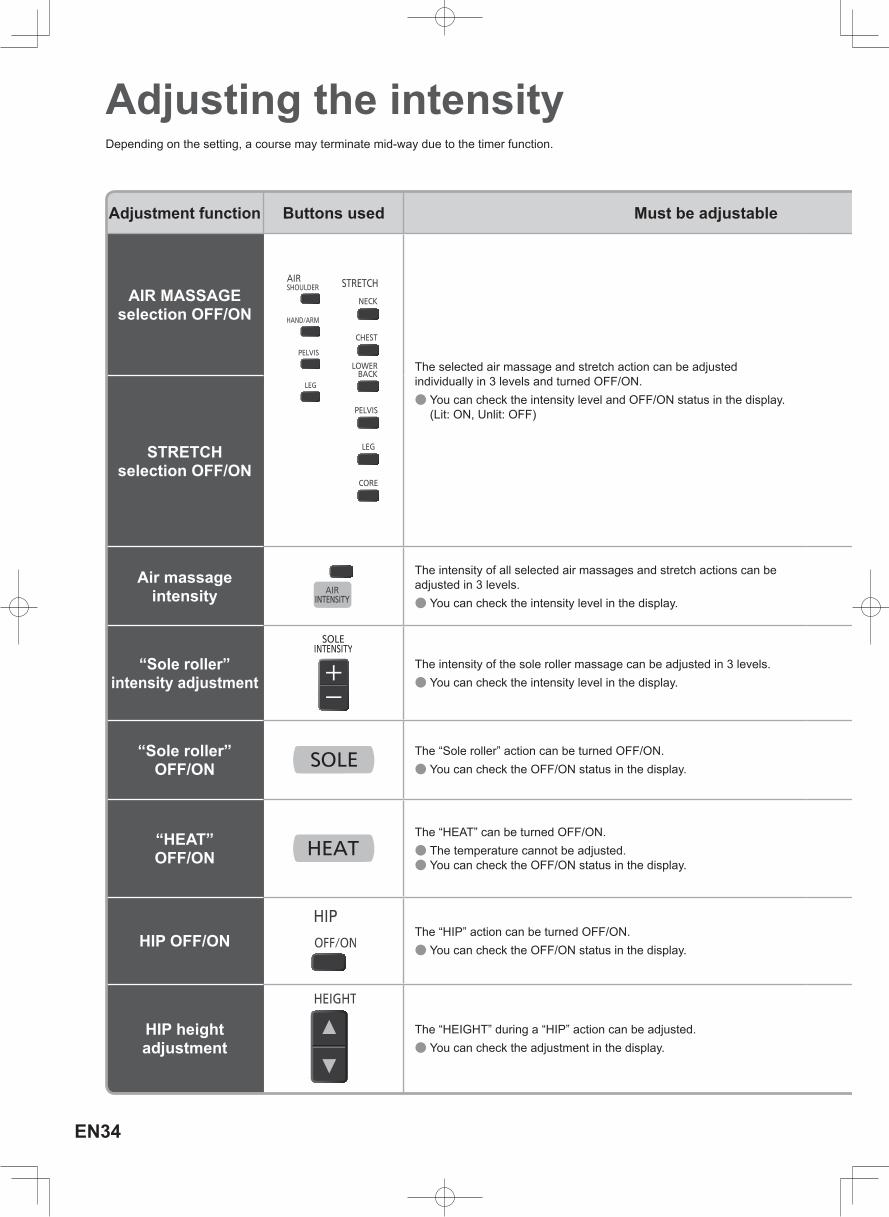
Adjusting the intensityDepending on the setting, a course may terminate mid-way due to the timer function.
Adjustment function Buttons used Must be adjustable Auto course Manual action Air action* Stretch action
AIR MASSAGE selection OFF/ON
The selected air massage and stretch action can be adjusted individually in 3 levels and turned OFF/ON.
● You can check the intensity level and OFF/ON status in the display. (Lit: ON, Unlit: OFF)
Example) Every time you press the air and
stretch , the setting can be adjusted and turned OFF/ON in the following order.
Air massage display Stretch display Intensity
No display No display Medium → Off → Gentle → Medium → Strong
○ ○ ○ -
STRETCH selection OFF/ON ○ - - ○
Air massage intensity
The intensity of all selected air massages and stretch actions can be adjusted in 3 levels.
● You can check the intensity level in the display.○ ○ ○ ○
“Sole roller” intensity adjustment
The intensity of the sole roller massage can be adjusted in 3 levels. ● You can check the intensity level in the display.
Intensity Gentle Medium StrongSole roller intensity display
○ ○ ○ -
“Sole roller” OFF/ON
The “Sole roller” action can be turned OFF/ON. ● You can check the OFF/ON status in the display.
Lit: “Sole roller” action ONUnlit: “Sole roller” action OFF
● Button also turns off.○ ○ ○ -
“HEAT” OFF/ON
The “HEAT” can be turned OFF/ON. ● The temperature cannot be adjusted. ● You can check the OFF/ON status in the display.
Lit: “HEAT” ONUnlit: “HEAT” OFF
● Button also turns off.○ ○ - ○
HIP OFF/ON The “HIP” action can be turned OFF/ON. ● You can check the OFF/ON status in the display.
Lit: “HIP” action ONUnlit: “HIP” action OFF ○ - - -
HIP height adjustment
The “HEIGHT” during a “HIP” action can be adjusted. ● You can check the adjustment in the display.
Display...Lit: AdjustableFlashing: Air is being supplied
or dischargedUnlit: Non-adjustable
○ ○ - -
EN35▶ Continued on the next page
Adjusting the intensity
* When saving a manual action in a memory course, the air action setting can also be saved in the memory course.
Adjustment function Buttons used Must be adjustable Auto course Manual action Air action* Stretch action
AIR MASSAGE selection OFF/ON
The selected air massage and stretch action can be adjusted individually in 3 levels and turned OFF/ON.
● You can check the intensity level and OFF/ON status in the display. (Lit: ON, Unlit: OFF)
Example) Every time you press the air and
stretch , the setting can be adjusted and turned OFF/ON in the following order.
Air massage display Stretch display Intensity
No display No display Medium → Off → Gentle → Medium → Strong
○ ○ ○ -
STRETCH selection OFF/ON ○ - - ○
Air massage intensity
The intensity of all selected air massages and stretch actions can be adjusted in 3 levels.
● You can check the intensity level in the display.○ ○ ○ ○
“Sole roller” intensity adjustment
The intensity of the sole roller massage can be adjusted in 3 levels. ● You can check the intensity level in the display.
Intensity Gentle Medium StrongSole roller intensity display
○ ○ ○ -
“Sole roller” OFF/ON
The “Sole roller” action can be turned OFF/ON. ● You can check the OFF/ON status in the display.
Lit: “Sole roller” action ONUnlit: “Sole roller” action OFF
● Button also turns off.○ ○ ○ -
“HEAT” OFF/ON
The “HEAT” can be turned OFF/ON. ● The temperature cannot be adjusted. ● You can check the OFF/ON status in the display.
Lit: “HEAT” ONUnlit: “HEAT” OFF
● Button also turns off.○ ○ - ○
HIP OFF/ON The “HIP” action can be turned OFF/ON. ● You can check the OFF/ON status in the display.
Lit: “HIP” action ONUnlit: “HIP” action OFF ○ - - -
HIP height adjustment
The “HEIGHT” during a “HIP” action can be adjusted. ● You can check the adjustment in the display.
Display...Lit: AdjustableFlashing: Air is being supplied
or dischargedUnlit: Non-adjustable
○ ○ - -
Items that have this mark can be saved and used with your favorite settings. (Page EN29)

EN36
Adjusting the intensity (Continued)
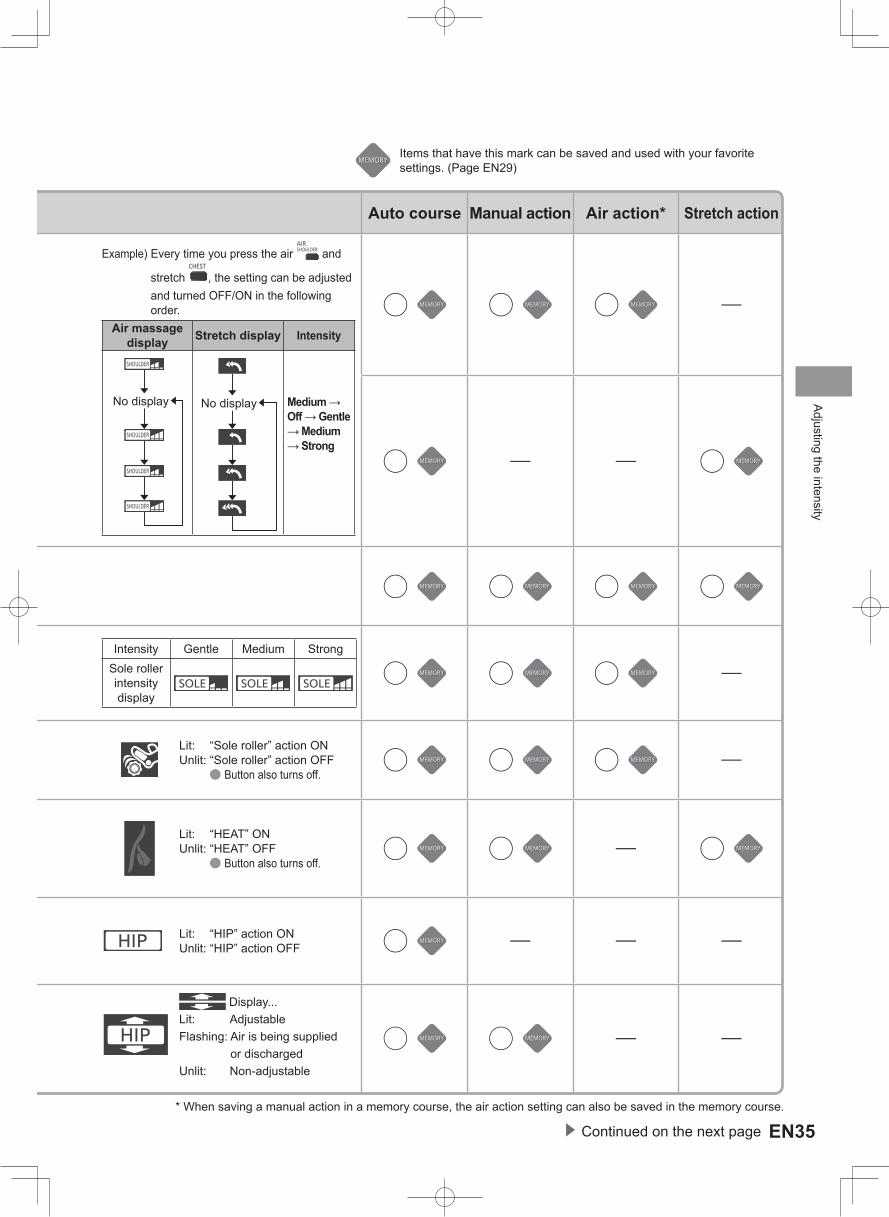
Adjustment function Buttons used Must be adjustable Auto course Manual action Air action Stretch action
Back massage intensity
adjustment
The back massage intensity can be adjusted. ● You can check the area that is currently being massaged in the display. ● The intensity adjustment differs according to the course and action.
ㅡ Auto course Stretch action ] ....... 5 levels (back massage intensity scale 2,
4, 6, 8, 10)
ㅡ Manual action ....... up to 10 levels (the level depends on the action)
● See page EN47 if the intensity is still insufficient even when set to the highest level, or if the intensity is too strong even when set to the lowest level. ● The “BACK INTENSITY” cannot be adjusted when the action is being switched.
<Back massage intensity display>
Adjustable level
Current back massage intensity
○ 5 levels of intensity
adjustment
○ Maximum 5
levels of intensity adjustment
(the level differs according to the
action)
-○
5 levels of back massage intensity
adjustment in stretch action
Massage head position
adjustment
The position of the massage head can be adjusted vertically and horizontally.If you want to adjust the position of the massage heads that are currently performing a massage, please adjust by pushing the POSITION button.
● In the case of a auto course, each adjustment can be made up to 3 times. ● In the case of a manual action, when you press and hold the up or down button, the position will continue moving until you release your finger.
● Depending on the location, adjustment may not be possible. ○ ○ - ○
Massage strength select
You can detect the back massage pressure, and intensify or soften the massage strength.
● The massage strength of each auto course has been set to the recommended intensity.
ㅡ Swedish: Soft ㅡ Deep, Shiatsu, Quick: Strong ㅡ Stretch, Neck/Shoulder, Upper back, Lower Back/Hip, Core: Standard
Adjust the setting to suit your preference.
● There is no difference between massage strength for treatments on the “NECK” and “HIP” using a single “TAP” action. ○
Adjusting the overall massage
strength of a course
○ Adjusting the
massage strength during an action
-○ Adjusting the
massage strength on the back
currently in actionBack massage pressure display ........................... Displays the back pressure
acting on the upper massage heads.
● Depending on the action, the indication in the display may not match the actual sensation. ● Treatments using a single “TAP” action on the “NECK” and “HIP” areas are not displayed.
TapTapping can be added to an action.
● Tapping cannot be turned OFF/ON when massaging with only a tapping action.
- ○ - -
RepeatThe massage action that is currently in operation can be repeated.
● “REPEAT” may not be valid when the action is being switched. ● will flash when an action is being repeated.
○ - - -
SkipSkips the massage action that is currently in operation and goes to the next action.
● “SKIP” may not be valid when the action is being switched.
● Upon pressing the “SKIP” button, will flash for about 5 seconds and then the next action will be displayed.
○ - - -
Depending on the setting, a course may terminate mid-way due to the timer function.
EN37▶ Continued on the next page
Adjusting the intensity
Adjustment function Buttons used Must be adjustable Auto course Manual action Air action Stretch action
Back massage intensity
adjustment
The back massage intensity can be adjusted. ● You can check the area that is currently being massaged in the display. ● The intensity adjustment differs according to the course and action.
ㅡ Auto course Stretch action ] ....... 5 levels (back massage intensity scale 2,
4, 6, 8, 10)
ㅡ Manual action ....... up to 10 levels (the level depends on the action)
● See page EN47 if the intensity is still insufficient even when set to the highest level, or if the intensity is too strong even when set to the lowest level. ● The “BACK INTENSITY” cannot be adjusted when the action is being switched.
<Back massage intensity display>
Adjustable level
Current back massage intensity
○ 5 levels of intensity
adjustment
○ Maximum 5
levels of intensity adjustment
(the level differs according to the
action)
-○
5 levels of back massage intensity
adjustment in stretch action
Massage head position
adjustment
The position of the massage head can be adjusted vertically and horizontally.If you want to adjust the position of the massage heads that are currently performing a massage, please adjust by pushing the POSITION button.
● In the case of a auto course, each adjustment can be made up to 3 times. ● In the case of a manual action, when you press and hold the up or down button, the position will continue moving until you release your finger.
● Depending on the location, adjustment may not be possible. ○ ○ - ○
Massage strength select
You can detect the back massage pressure, and intensify or soften the massage strength.
● The massage strength of each auto course has been set to the recommended intensity.
ㅡ Swedish: Soft ㅡ Deep, Shiatsu, Quick: Strong ㅡ Stretch, Neck/Shoulder, Upper back, Lower Back/Hip, Core: Standard
Adjust the setting to suit your preference.
● There is no difference between massage strength for treatments on the “NECK” and “HIP” using a single “TAP” action. ○
Adjusting the overall massage
strength of a course
○ Adjusting the
massage strength during an action
-○ Adjusting the
massage strength on the back
currently in actionBack massage pressure display ........................... Displays the back pressure
acting on the upper massage heads.
● Depending on the action, the indication in the display may not match the actual sensation. ● Treatments using a single “TAP” action on the “NECK” and “HIP” areas are not displayed.
TapTapping can be added to an action.
● Tapping cannot be turned OFF/ON when massaging with only a tapping action.
- ○ - -
RepeatThe massage action that is currently in operation can be repeated.
● “REPEAT” may not be valid when the action is being switched. ● will flash when an action is being repeated.
○ - - -
SkipSkips the massage action that is currently in operation and goes to the next action.
● “SKIP” may not be valid when the action is being switched.
● Upon pressing the “SKIP” button, will flash for about 5 seconds and then the next action will be displayed.
○ - - -
Items that have this mark can be saved and used with your favorite settings. (Page EN29)
EN38
Adjusting the intensity (Continued)
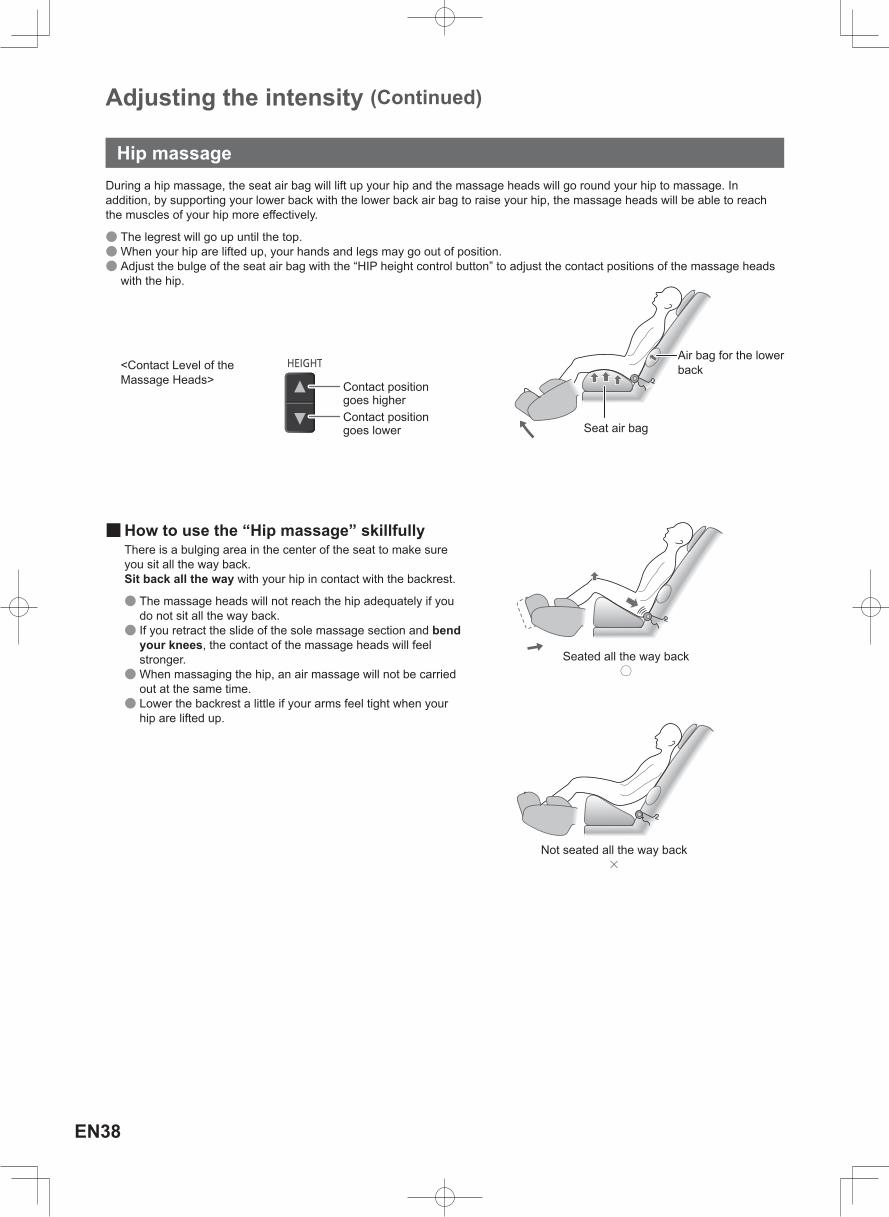
During a hip massage, the seat air bag will lift up your hip and the massage heads will go round your hip to massage. In addition, by supporting your lower back with the lower back air bag to raise your hip, the massage heads will be able to reach the muscles of your hip more effectively.
● The legrest will go up until the top. ●When your hip are lifted up, your hands and legs may go out of position. ● Adjust the bulge of the seat air bag with the “HIP height control button” to adjust the contact positions of the massage heads with the hip.
<Contact Level of the Massage Heads> Contact position
goes higherContact position goes lower
■How to use the “Hip massage” skillfullyThere is a bulging area in the center of the seat to make sure you sit all the way back.Sit back all the way with your hip in contact with the backrest.
● The massage heads will not reach the hip adequately if you do not sit all the way back. ● If you retract the slide of the sole massage section and bend your knees, the contact of the massage heads will feel stronger. ●When massaging the hip, an air massage will not be carried out at the same time. ● Lower the backrest a little if your arms feel tight when your hip are lifted up.
Seat air bag
Air bag for the lower back
Seated all the way back ○
Not seated all the way back ×
Hip massage
EN39▶ Continued on the next page
Adjusting the intensity
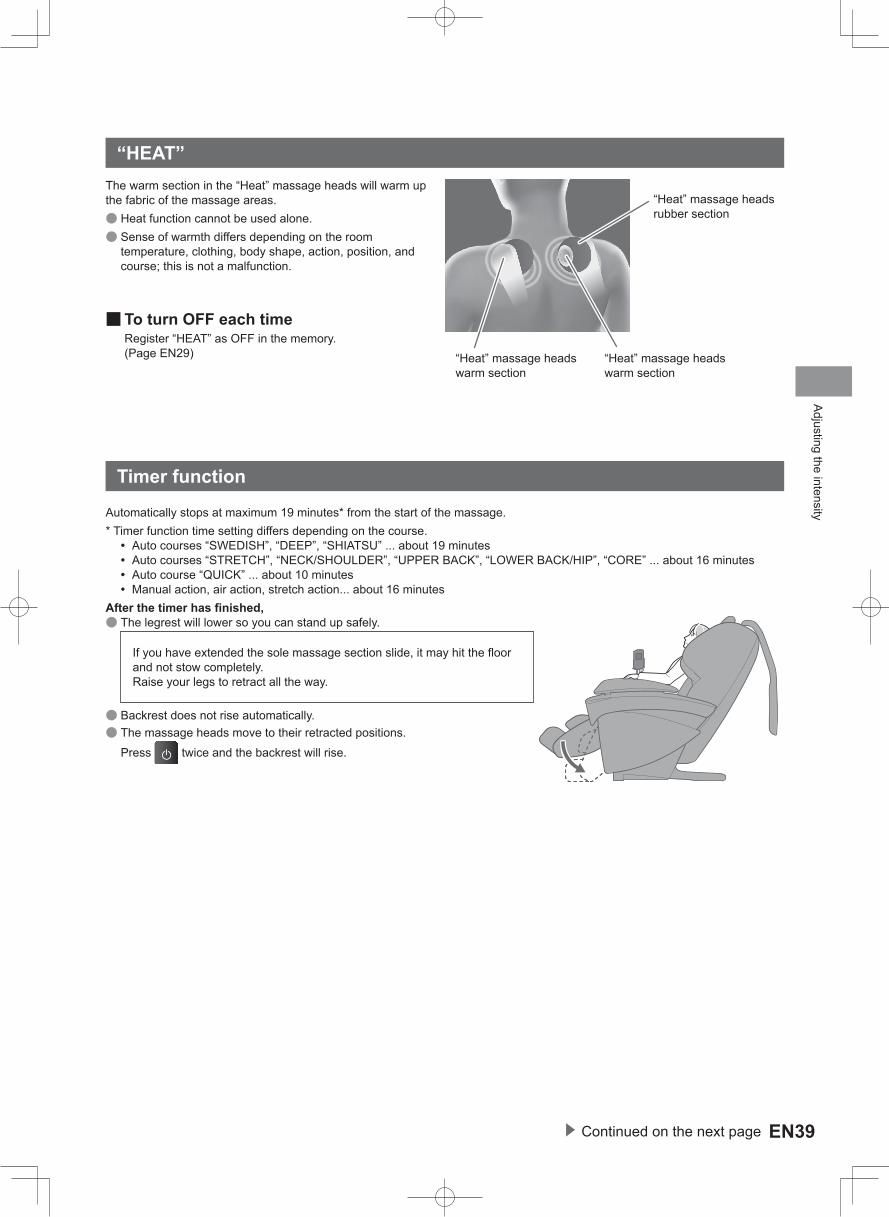
The warm section in the “Heat” massage heads will warm up the fabric of the massage areas.
● Heat function cannot be used alone. ● Sense of warmth differs depending on the room temperature, clothing, body shape, action, position, and course; this is not a malfunction.
“Heat” massage heads warm section
“Heat” massage heads warm section
“Heat” massage heads rubber section
“HEAT”
■To turn OFF each timeRegister “HEAT” as OFF in the memory. (Page EN29)
Automatically stops at maximum 19 minutes* from the start of the massage.* Timer function time setting differs depending on the course.
ㅡ Auto courses “SWEDISH”, “DEEP”, “SHIATSU” ... about 19 minutes ㅡ Auto courses “STRETCH”, “NECK/SHOULDER”, “UPPER BACK”, “LOWER BACK/HIP”, “CORE” ... about 16 minutes ㅡ Auto course “QUICK” ... about 10 minutes ㅡ Manual action, air action, stretch action... about 16 minutes
After the timer has finished, ● The legrest will lower so you can stand up safely.
If you have extended the sole massage section slide, it may hit the floor and not stow completely.Raise your legs to retract all the way.
● Backrest does not rise automatically. ● The massage heads move to their retracted positions. Press twice and the backrest will rise.
Timer function
EN40
Display
Volume
“Off” “Soft” “Medium” “Loud”(Default setting)
This is a function which briefly explains the operation procedures and contents of the action.
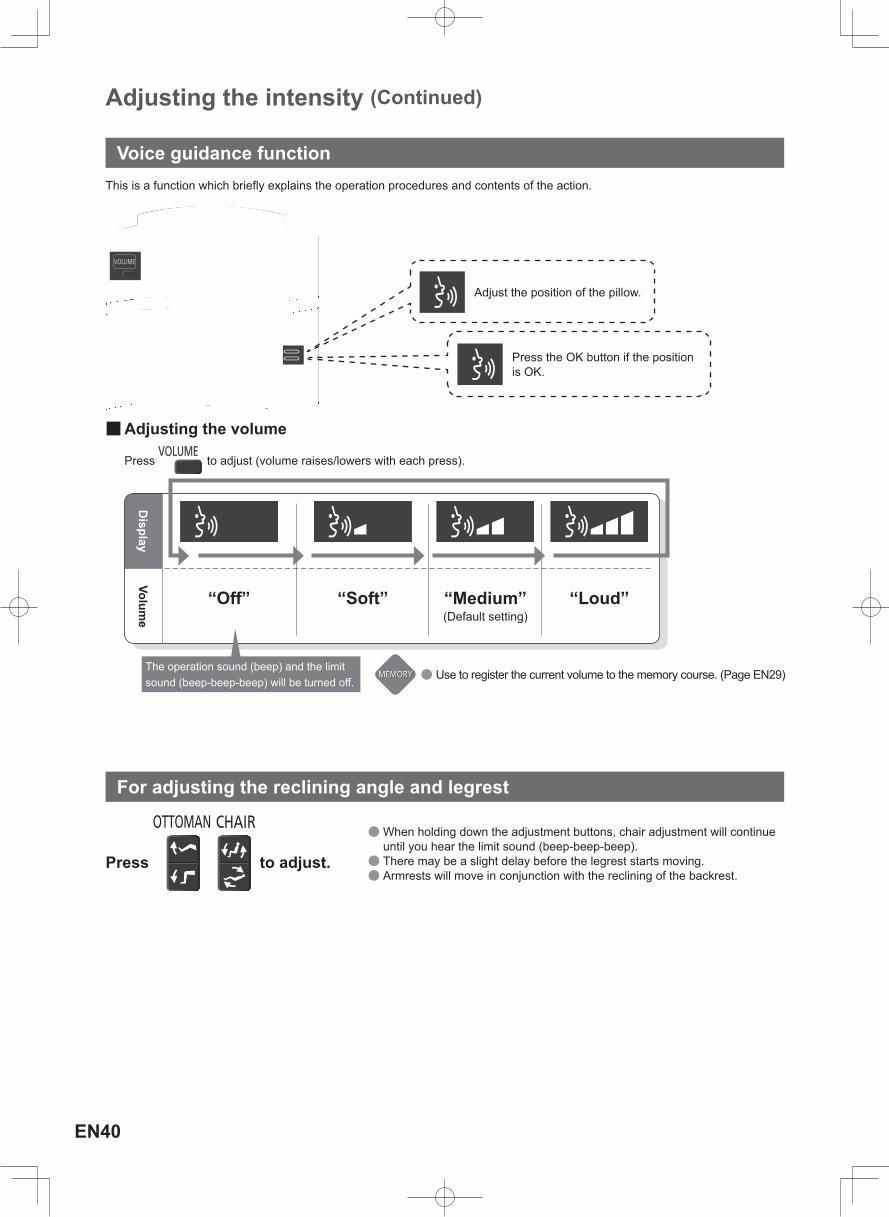
■Adjusting the volume
Press to adjust (volume raises/lowers with each press).
● Use to register the current volume to the memory course. (Page EN29)
Voice guidance function
Press the OK button if the position is OK.
Adjust the position of the pillow.
The operation sound (beep) and the limit sound (beep-beep-beep) will be turned off.
Adjusting the intensity (Continued)
Press to adjust.
For adjusting the reclining angle and legrest
●When holding down the adjustment buttons, chair adjustment will continue until you hear the limit sound (beep-beep-beep). ● There may be a slight delay before the legrest starts moving. ● Armrests will move in conjunction with the reclining of the backrest.
EN41
Adjusting the intensityAfter com
pleting the massage
After completing the massage
Fully return the sole massage section to the
original position and then press . ● The massage head will return to stowed position even with the legrest down and the backrest up.
Lift your soles slightly and the sole massage section returns.
Return your chair to normal status
Attach the comfort cushion to the backrest.
To exit in the middle of a massage
off
lock switch
onlock
open
power
Turn the power off
Power switch section
2
1
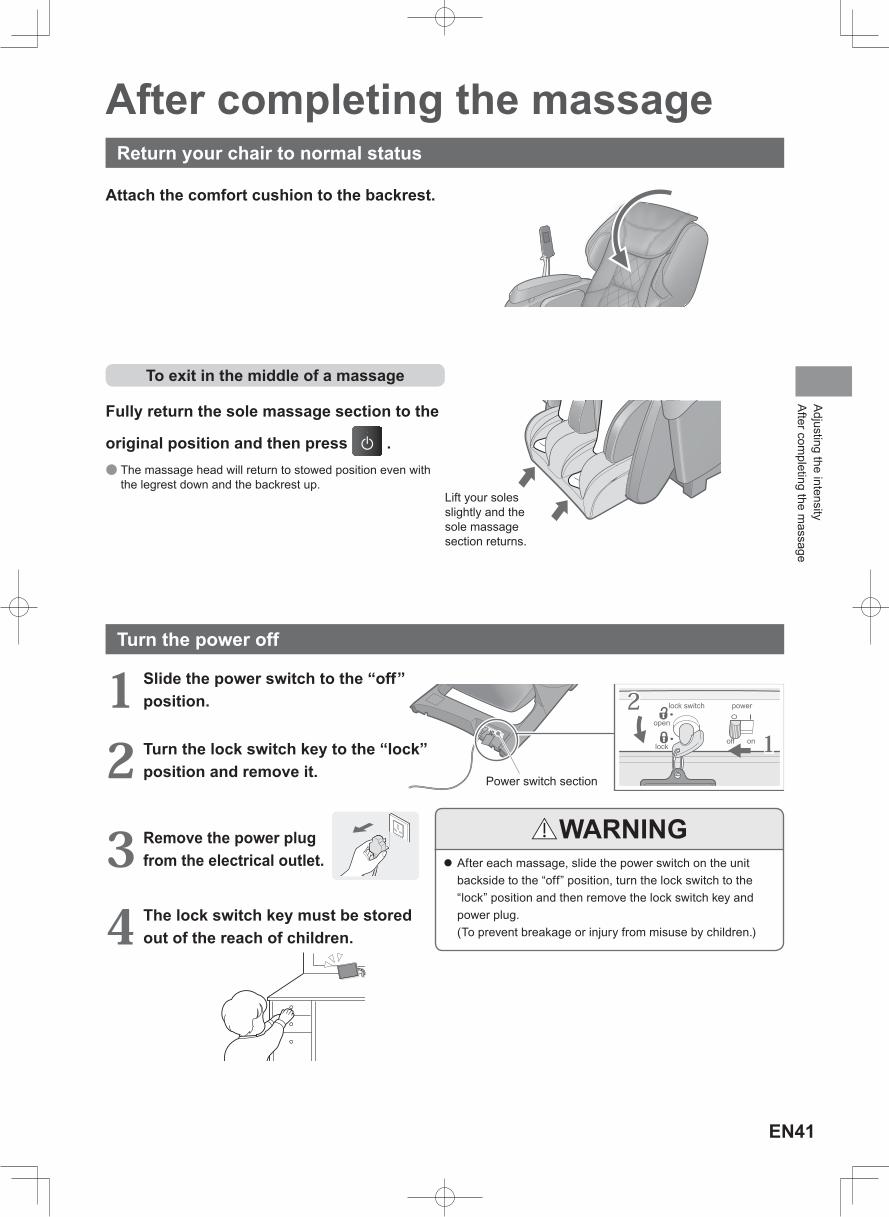
1 Slide the power switch to the “off ” position.
2 Turn the lock switch key to the “lock” position and remove it.
3 Remove the power plug from the electrical outlet.
4 The lock switch key must be stored out of the reach of children.
WARNING After each massage, slide the power switch on the unit backside to the “off” position, turn the lock switch to the “lock” position and then remove the lock switch key and power plug. (To prevent breakage or injury from misuse by children.)
EN42
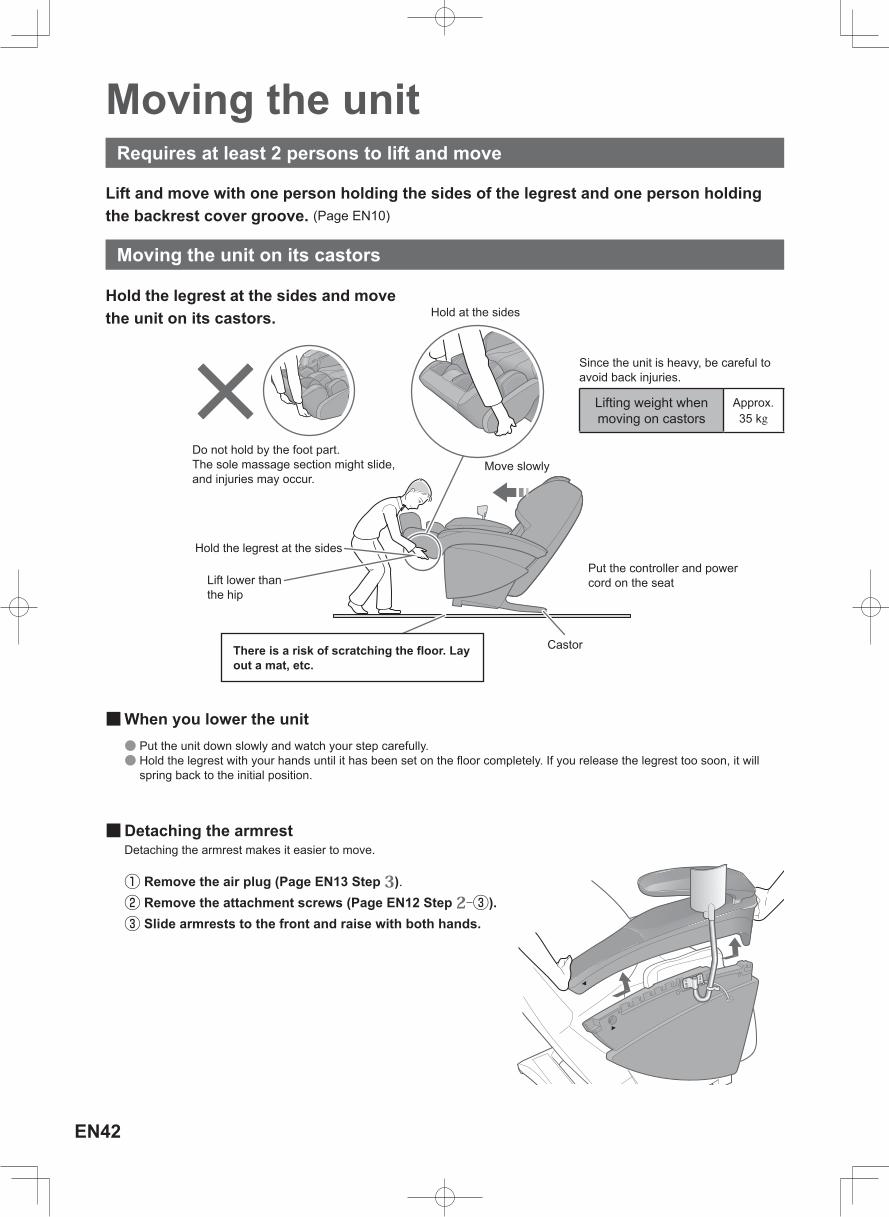
Moving the unit
Lift and move with one person holding the sides of the legrest and one person holding the backrest cover groove. (Page EN10)
Hold the legrest at the sides and move the unit on its castors. Hold at the sides
Put the controller and power cord on the seat
Hold the legrest at the sides
Lift lower than the hip
Move slowly
■When you lower the unit ● Put the unit down slowly and watch your step carefully. ● Hold the legrest with your hands until it has been set on the floor completely. If you release the legrest too soon, it will spring back to the initial position.
■Detaching the armrestDetaching the armrest makes it easier to move.
① Remove the air plug (Page EN13 Step 3).② Remove the attachment screws (Page EN12 Step 2-③).③ Slide armrests to the front and raise with both hands.
Requires at least 2 persons to lift and move
Moving the unit on its castors
There is a risk of scratching the floor. Lay out a mat, etc.
Do not hold by the foot part.The sole massage section might slide, and injuries may occur.
Since the unit is heavy, be careful to avoid back injuries.
Lifting weight when moving on castors
Approx. 35 kg
Castor
EN43
Moving the unit
Cleaning and m
aintenance
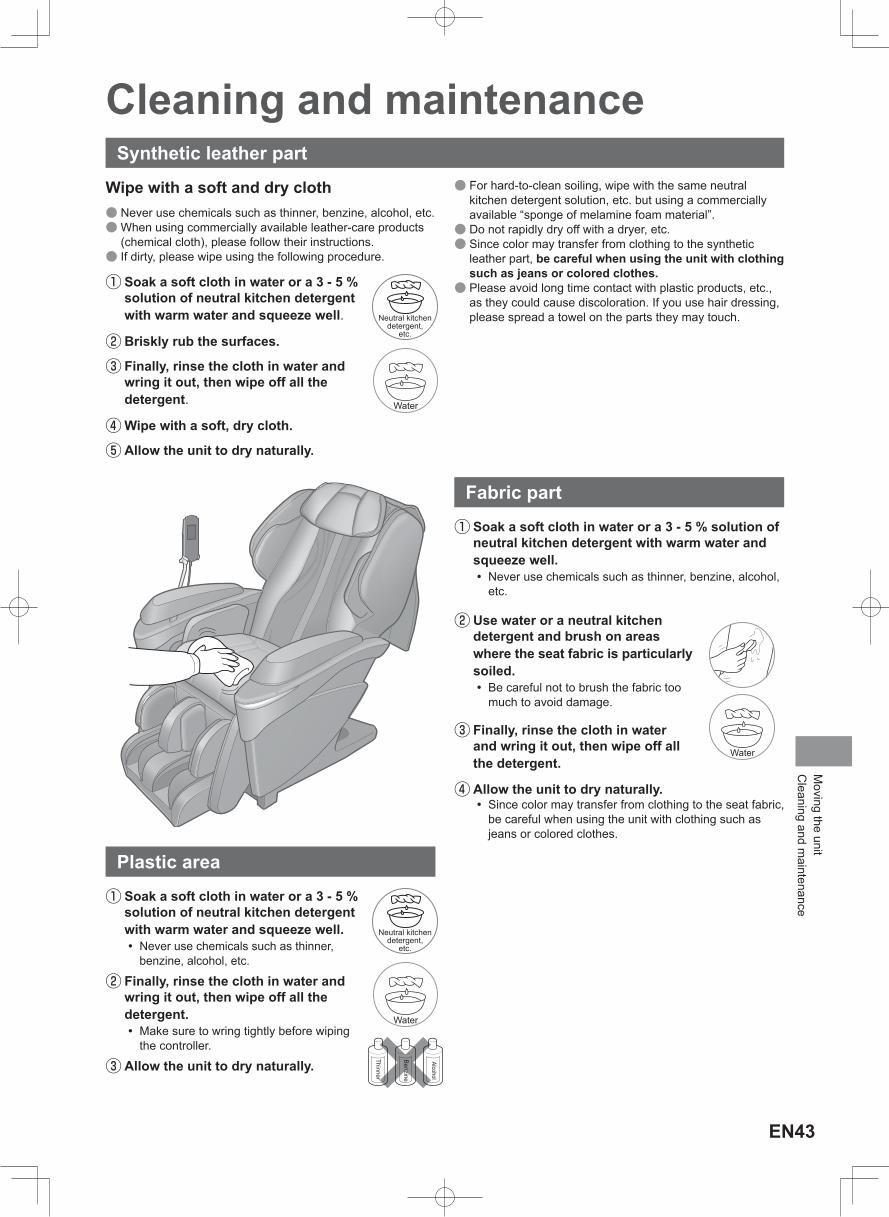
Cleaning and maintenance
① Soak a soft cloth in water or a 3 - 5 % solution of neutral kitchen detergent with warm water and squeeze well.
ㅡ Never use chemicals such as thinner, benzine, alcohol, etc.
② Use water or a neutral kitchen detergent and brush on areas where the seat fabric is particularly soiled.
ㅡ Be careful not to brush the fabric too much to avoid damage.
③ Finally, rinse the cloth in water and wring it out, then wipe off all the detergent.
④ Allow the unit to dry naturally. ㅡ Since color may transfer from clothing to the seat fabric, be careful when using the unit with clothing such as jeans or colored clothes.
① Soak a soft cloth in water or a 3 - 5 % solution of neutral kitchen detergent with warm water and squeeze well.
ㅡ Never use chemicals such as thinner, benzine, alcohol, etc.
② Finally, rinse the cloth in water and wring it out, then wipe off all the detergent.
ㅡ Make sure to wring tightly before wiping the controller.
③ Allow the unit to dry naturally.
Wipe with a soft and dry cloth ● Never use chemicals such as thinner, benzine, alcohol, etc. ●When using commercially available leather-care products (chemical cloth), please follow their instructions. ● If dirty, please wipe using the following procedure.
① Soak a soft cloth in water or a 3 - 5 % solution of neutral kitchen detergent with warm water and squeeze well.
② Briskly rub the surfaces.
③ Finally, rinse the cloth in water and wring it out, then wipe off all the detergent.
④ Wipe with a soft, dry cloth.
⑤ Allow the unit to dry naturally.
Synthetic leather part
Plastic area
Fabric part
● For hard-to-clean soiling, wipe with the same neutral kitchen detergent solution, etc. but using a commercially available “sponge of melamine foam material”. ● Do not rapidly dry off with a dryer, etc. ● Since color may transfer from clothing to the synthetic leather part, be careful when using the unit with clothing such as jeans or colored clothes. ● Please avoid long time contact with plastic products, etc., as they could cause discoloration. If you use hair dressing, please spread a towel on the parts they may touch.
Water
Water
Water
Neutral kitchen detergent,
etc.
Neutral kitchen detergent,
etc.
Thinner
Benzine
Alcohol

EN44
Q&AQuestion Answer
Before Use
Doctor Consultation
Can I use the unit if I have an illness that requires regular medical attention?
Consult your doctor before using this unit.Massage is a form of stimulation by tactile pressure in which pressure is applied to the muscles to relax them and improve blood circulation. This may exacerbate some illnesses. Be sure to consult a doctor if you have an illness. (Page EN4)
How
to use
Is it possible to massage only the upper body or legs?
Yes.For taller and shorter persons it is recommended to separate massage of the upper body from that of the legs.
● Massaging only the upper bodyRaise the comfort cushion to expose the backrest and pillow for use.
For taller persons, please use by reclining the backrest.
● Massaging only the legsUse the leg & sole massage section with the comfort cushion on the backrest.
For shorter persons, please use by raising the backrest and lifting the legrest.
Body scanning
*
Can people shorter than 140 cm or taller than 185 cm still use it?
Yes.The following methods are recommended, as the correct shoulder position may not be found during body scanning.
<If shorter than 140 cm> <If taller than 185 cm>
Place a cushion on the seat and sit firmly.
Recline the backrest and slide your body down.
Q&A
EN45▶ Continued on the next page
* Body scanning = action of measuring the body.
Question Answer
During Operation
Body scanning
*
During body scanning or a massage, the buttons flashed, 5 short beeps sounded ( , was displayed) and the action stopped. What happened?
Massages stop for safety if the body cannot be detected for one of the following reasons.
● The user is not sitting. ● The head and/or back is not touching the backrest. ● A cushion is placed against the backrest or the user is wearing thick clothing.
• Sit firmly, lean gently back so that your head touches the pillow, press and then press to start again.
● The comfort cushion is not raised.
Upper body
Back massage intensity controller may not work sometimes.
Back massage intensity controller may not work in the following cases. ● Changing massage operation (ie changing from “KNEAD” to "SWEDISH") ● Body scanning
This is intended to prevent the massage suddenly intensifying, it is not a malfunction.
There is a delay in movement when adjusting the position.
The massage heads may not move immediately depending on when the POSITION button is pushed. (There may be a small time lag. This is not an abnormality.)If you hear the limit sound (beep-beep-beep) when the button is pushed, this means that it is at the furthest position and cannot move any further.
The height (intensity) on the left feels different to that on the right. Is this OK?
It is designed to differ in some cases.An alternating tapping mechanism is used to create a more natural sensation. The massage heads therefore do not move in unison in some massages. The massage head height (intensity) on the left differs from that on the right in these massages. This is not a malfunction.
The massage heads sometimes move bit by bit in a twitching manner. Is this alright?
The chair is detecting the pressure acting on the massage heads and changing the massage strength. The massage heads may move bit by bit depending on the pressure but this is not an abnormality.
Sole
The sole roller sometimes moves before the action begins ...
Before the action begins, the sole roller moves into place. This is not an abnormality.
Air m
assage
During auto course (including memory course), air action and sole roller action may suddenly stop and transit to the next operation…
During auto course, when hip massage or stretch action starts, air action and sole roller action stops.This is to increase the efficacy of the hip massage and stretch action, by prioritizing those air actions connected to the movement of the massage heads.Therefore, when getting arm massage alternatetely left and right, the number of massages on each arm may not be equal.
Hand &
arm
Arm air pressure is applied more times on one side than on the other during the auto course.

EN46
Q&A (Continued)
Question Answer
During Operation (Continued)
Reclining
The angle of the backrest, legrest or armrest automatically changes at times.
The angle automatically changes in the following cases. ●When auto course, stretch action or manual action are started.
The chair automatically reclines to the massage position.
The angle does not change if the chair is already reclined to the massage position or further.
Reclines around 20 °Raises
around 75 °
●When is pressed to end the massage.
The chair automatically returns to the upright position.
Only the legrest returns to the original position if the massage is completed according to the timer.
If is pressed to end the massage, all operations immediately stop and the angle does not automatically change.
After Use
Hand &
armRed marks are left on the under side of my hands/arms after a hand & arm massage.
Marks may remain on the hands and arms after use. These eventually fade and are not a problem.
How to adjust the <Position>
Body scanning
*
The correct shoulder position cannot be found during body scanning. (The shoulder position slips each time.)
Correct body scanning may not be possible for some sitting positions (such as leaning forward).Adjust the shoulder position using the POSITION button. (Page EN22)For more correct scanning, sit firmly in the unit and lean back gently so that your head is touching the pillow (backrest).
* Body scanning = action of measuring the body.
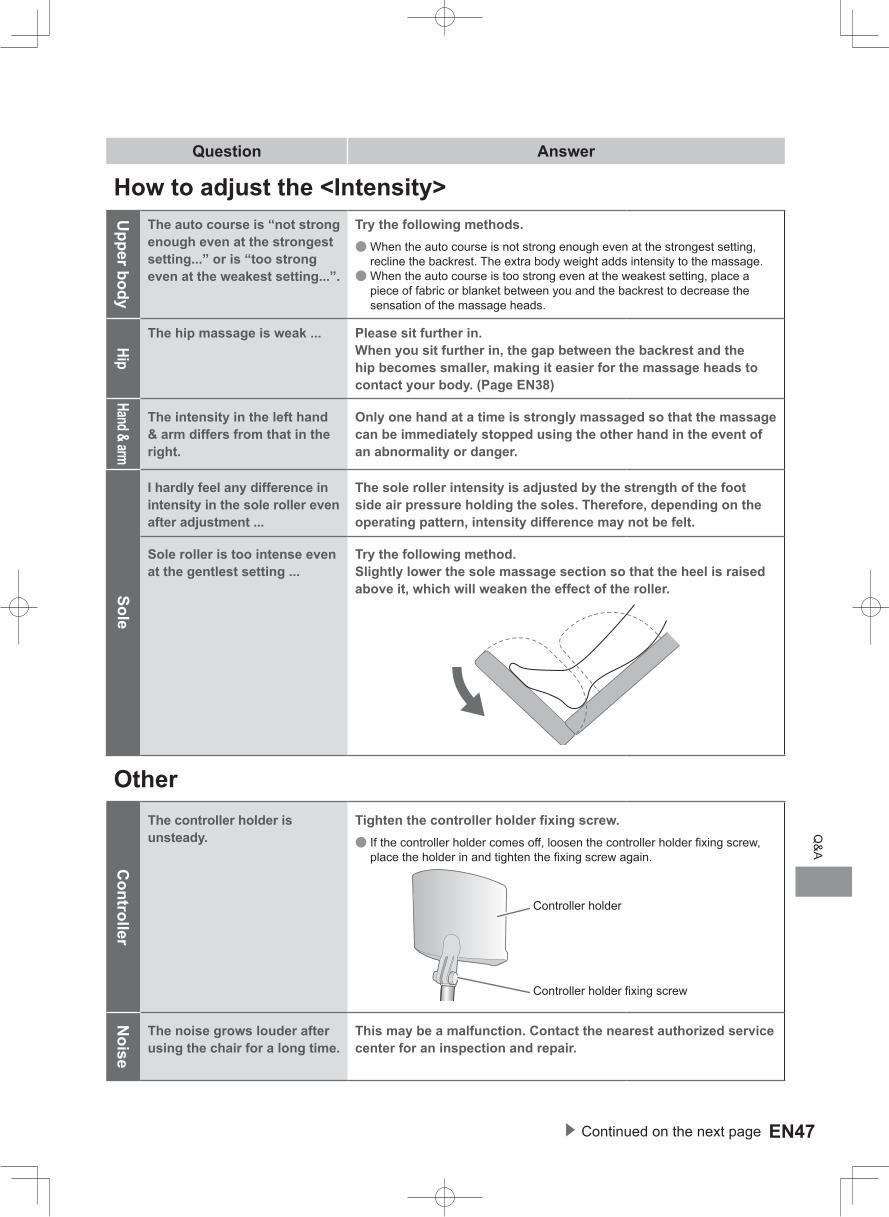
Q&A
EN47▶ Continued on the next page
Question Answer
How to adjust the <Intensity>
Upper body
The auto course is “not strong enough even at the strongest setting...” or is “too strong even at the weakest setting...”.
Try the following methods. ●When the auto course is not strong enough even at the strongest setting, recline the backrest. The extra body weight adds intensity to the massage. ●When the auto course is too strong even at the weakest setting, place a piece of fabric or blanket between you and the backrest to decrease the sensation of the massage heads.
Hip
The hip massage is weak ... Please sit further in. When you sit further in, the gap between the backrest and the hip becomes smaller, making it easier for the massage heads to contact your body. (Page EN38)
Hand & arm
The intensity in the left hand & arm differs from that in the right.
Only one hand at a time is strongly massaged so that the massage can be immediately stopped using the other hand in the event of an abnormality or danger.
Sole
I hardly feel any difference in intensity in the sole roller even after adjustment ...
The sole roller intensity is adjusted by the strength of the foot side air pressure holding the soles. Therefore, depending on the operating pattern, intensity difference may not be felt.
Sole roller is too intense even at the gentlest setting ...
Try the following method.Slightly lower the sole massage section so that the heel is raised above it, which will weaken the effect of the roller.
OtherC
ontroller
The controller holder is unsteady.
Tighten the controller holder fixing screw. ● If the controller holder comes off, loosen the controller holder fixing screw, place the holder in and tighten the fixing screw again.
Controller holder
Controller holder fixing screw
Noise
The noise grows louder after using the chair for a long time.
This may be a malfunction. Contact the nearest authorized service center for an inspection and repair.

EN48
Q&A (Continued)
Question Answer
Other (Continued)
Timer function
Is there a timer function? Yes.To prevent overuse, the massage automatically ends at a maximum of 19 minutes after starting. (Page EN39)When the timer ends, the legrest automatically lowers and the massage heads are stowed.Press to use again.
● Take a break of around 10 minutes after using for 16 minutes. ● Do not use more than 30 minutes per day.
Moving
What precautions should I take to transport the unit when moving?
Take the following precautions: ● Recline the backrest and raise the massage heads to around the center of the backrest. This moves the center of gravity to the center of the unit and makes it easier to move. ● Do not move the chair while a person is sitting in it.
① Press to turn on the power.
② Press to recline the backrest.
Hold down the two buttons until the limit beeps sound.
③ Select one of the “auto course” with the power “on”.
The massage heads move. An error occurs and the movement stops when they reach the center of the backrest.
Massage heads
④ Press to turn off the power.
Pressing automatically raises the backrest, so be sure to press .
⑤ Turn the power switch “off” and remove the power plug. (Page EN41)
If you need to move the chair with the backrest upright, follow the steps below.1. Follow steps ①→③→④ above and raise the massage heads to the center.
2. Press on the controller again, raise the backrest, then press . ● Handle the chair with care. If you do not have the original box, use packing materials to prevent damage or vibration. ●When packing, check that the power cord and controller cord are not wrapped around the main unit and take measures such as placing them on the seat with the controller to ensure that they do not scrape against the ground while moving.
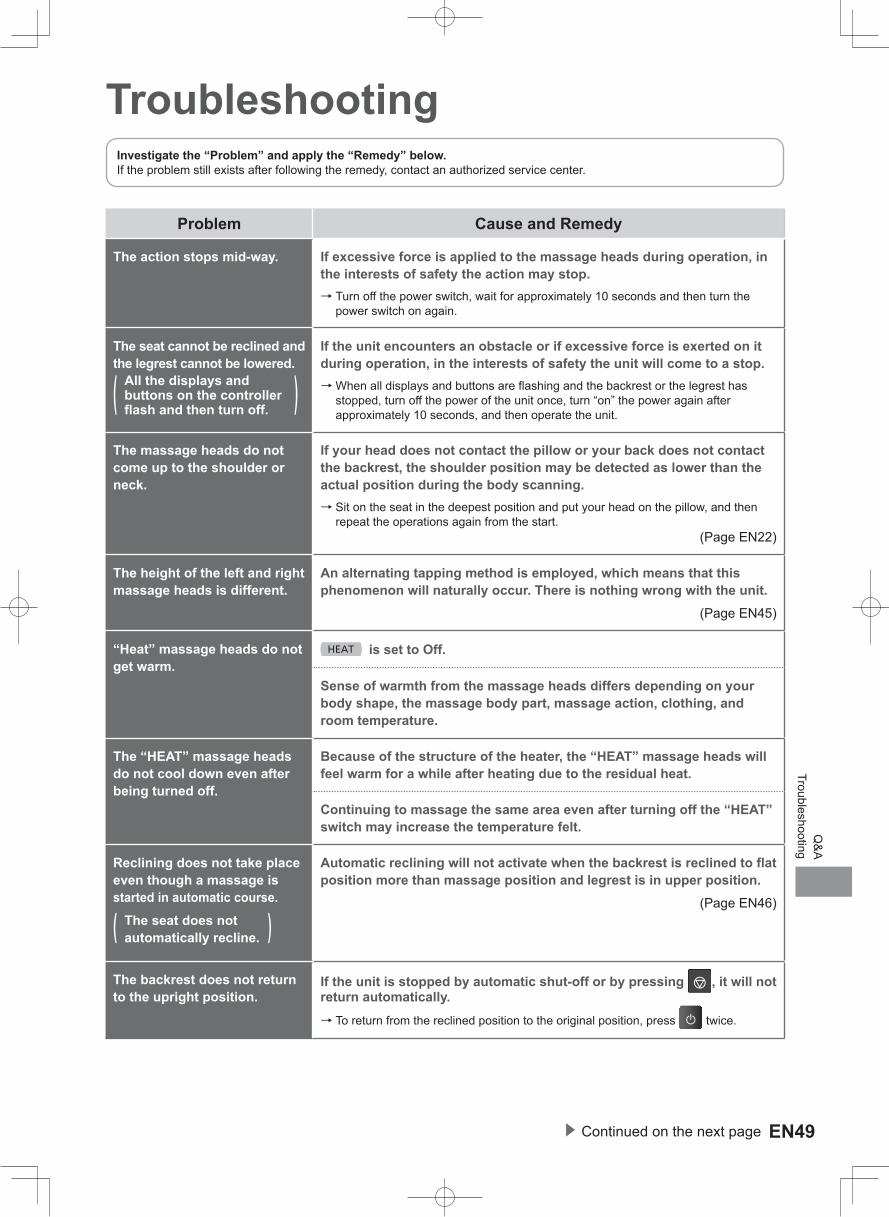
EN49▶ Continued on the next page
Q&A
Troubleshooting
TroubleshootingInvestigate the “Problem” and apply the “Remedy” below.If the problem still exists after following the remedy, contact an authorized service center.
Problem Cause and Remedy
The action stops mid-way. If excessive force is applied to the massage heads during operation, in the interests of safety the action may stop.
→ Turn off the power switch, wait for approximately 10 seconds and then turn the power switch on again.
The seat cannot be reclined and the legrest cannot be lowered.
( All the displays and buttons on the controller flash and then turn off. )
If the unit encounters an obstacle or if excessive force is exerted on it during operation, in the interests of safety the unit will come to a stop.
→When all displays and buttons are flashing and the backrest or the legrest has stopped, turn off the power of the unit once, turn “on” the power again after approximately 10 seconds, and then operate the unit.
The massage heads do not come up to the shoulder or neck.
If your head does not contact the pillow or your back does not contact the backrest, the shoulder position may be detected as lower than the actual position during the body scanning.
→ Sit on the seat in the deepest position and put your head on the pillow, and then repeat the operations again from the start.
(Page EN22)
The height of the left and right massage heads is different.
An alternating tapping method is employed, which means that this phenomenon will naturally occur. There is nothing wrong with the unit. (Page EN45)
“Heat” massage heads do not get warm.
is set to Off.
Sense of warmth from the massage heads differs depending on your body shape, the massage body part, massage action, clothing, and room temperature.
The “HEAT” massage heads do not cool down even after being turned off.
Because of the structure of the heater, the “HEAT” massage heads will feel warm for a while after heating due to the residual heat.
Continuing to massage the same area even after turning off the “HEAT” switch may increase the temperature felt.
Reclining does not take place even though a massage is started in automatic course.
( The seat does not automatically recline. )
Automatic reclining will not activate when the backrest is reclined to flat position more than massage position and legrest is in upper position. (Page EN46)
The backrest does not return to the upright position.
If the unit is stopped by automatic shut-off or by pressing , it will not return automatically.
→ To return from the reclined position to the original position, press twice.
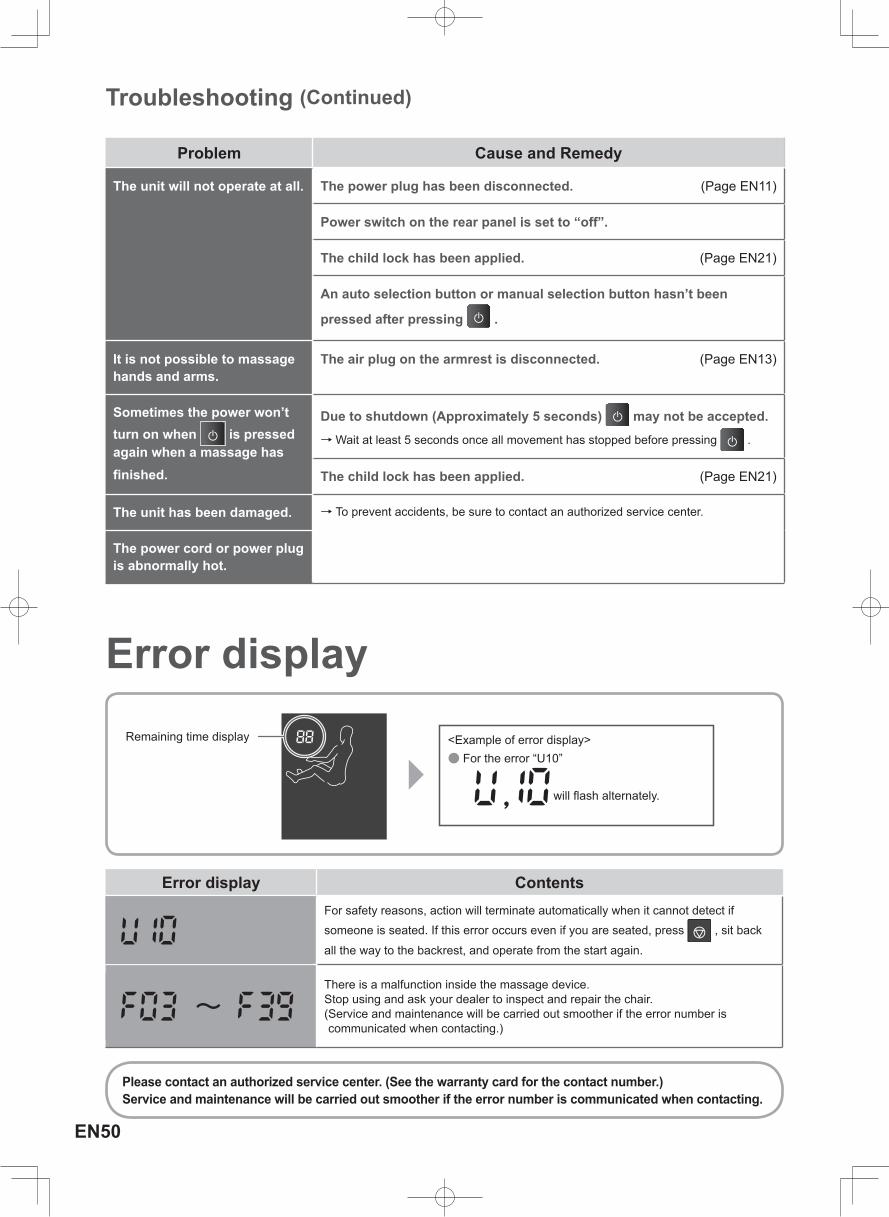
EN50
Troubleshooting (Continued)
Problem Cause and Remedy
The unit will not operate at all. The power plug has been disconnected. (Page EN11)
Power switch on the rear panel is set to “off”.
The child lock has been applied. (Page EN21)
An auto selection button or manual selection button hasn’t been
pressed after pressing .
It is not possible to massage hands and arms.
The air plug on the armrest is disconnected. (Page EN13)
Sometimes the power won’t turn on when is pressed again when a massage has finished.
Due to shutdown (Approximately 5 seconds) may not be accepted. →Wait at least 5 seconds once all movement has stopped before pressing .
The child lock has been applied. (Page EN21)
The unit has been damaged. → To prevent accidents, be sure to contact an authorized service center.
The power cord or power plug is abnormally hot.
Error display
Error display ContentsFor safety reasons, action will terminate automatically when it cannot detect if someone is seated. If this error occurs even if you are seated, press , sit back all the way to the backrest, and operate from the start again.
~There is a malfunction inside the massage device.Stop using and ask your dealer to inspect and repair the chair.( Service and maintenance will be carried out smoother if the error number is communicated when contacting.)
Remaining time display <Example of error display> ● For the error “U10”
, will flash alternately.
Please contact an authorized service center. (See the warranty card for the contact number.)Service and maintenance will be carried out smoother if the error number is communicated when contacting.
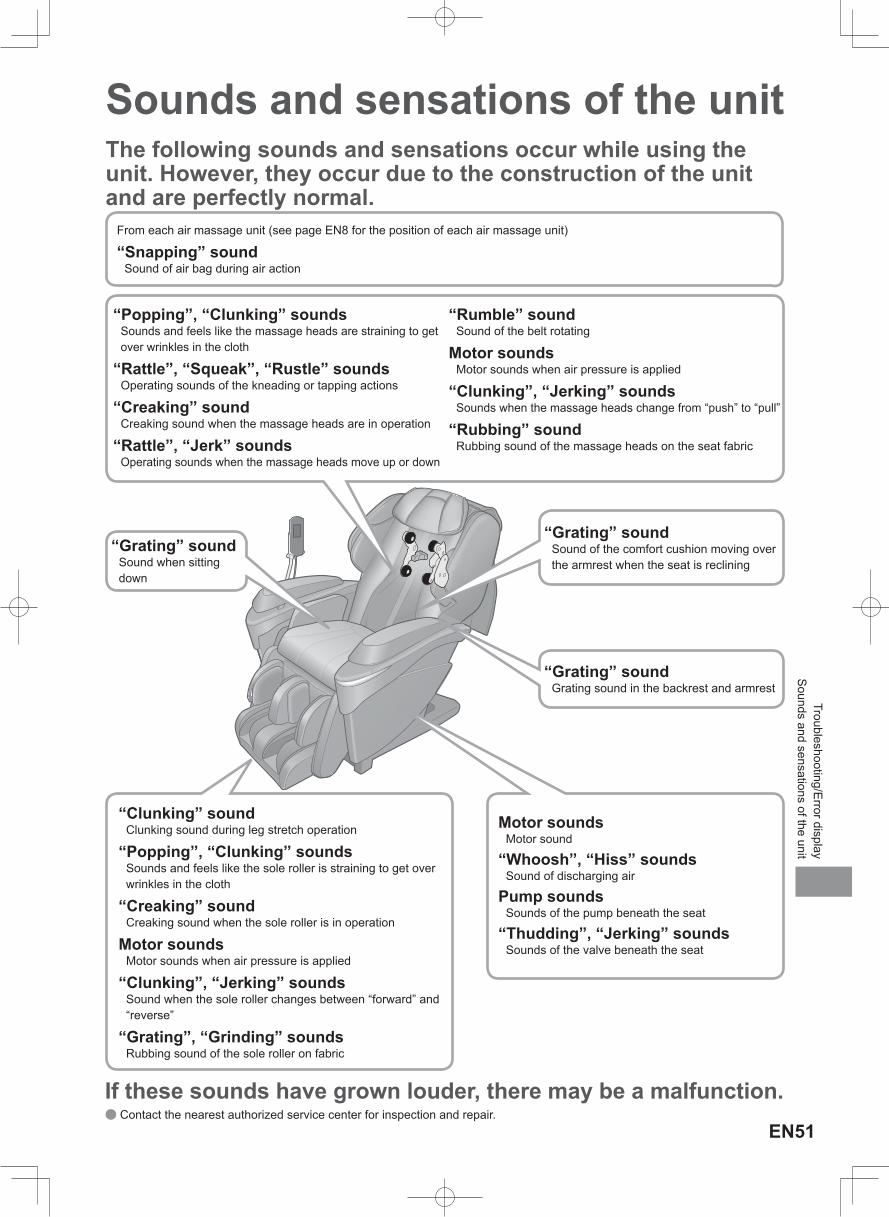
EN51
Troubleshooting/Error display Sounds and sensations of the unit
Sounds and sensations of the unitThe following sounds and sensations occur while using the unit. However, they occur due to the construction of the unit and are perfectly normal.
If these sounds have grown louder, there may be a malfunction. ● Contact the nearest authorized service center for inspection and repair.
“Grating” soundSound when sitting down
“Grating” soundSound of the comfort cushion moving over the armrest when the seat is reclining
“Grating” soundGrating sound in the backrest and armrest
Motor soundsMotor sound
“Whoosh”, “Hiss” soundsSound of discharging air
Pump soundsSounds of the pump beneath the seat
“Thudding”, “Jerking” soundsSounds of the valve beneath the seat
“Clunking” soundClunking sound during leg stretch operation
“Popping”, “Clunking” soundsSounds and feels like the sole roller is straining to get over wrinkles in the cloth
“Creaking” soundCreaking sound when the sole roller is in operation
Motor soundsMotor sounds when air pressure is applied
“Clunking”, “Jerking” soundsSound when the sole roller changes between “forward” and “reverse”
“Grating”, “Grinding” soundsRubbing sound of the sole roller on fabric
From each air massage unit (see page EN8 for the position of each air massage unit)
“Snapping” soundSound of air bag during air action
“Popping”, “Clunking” soundsSounds and feels like the massage heads are straining to get over wrinkles in the cloth
“Rattle”, “Squeak”, “Rustle” soundsOperating sounds of the kneading or tapping actions
“Creaking” soundCreaking sound when the massage heads are in operation
“Rattle”, “Jerk” soundsOperating sounds when the massage heads move up or down
“Rumble” soundSound of the belt rotating
Motor soundsMotor sounds when air pressure is applied
“Clunking”, “Jerking” soundsSounds when the massage heads change from “push” to “pull”
“Rubbing” soundRubbing sound of the massage heads on the seat fabric

EN52
SpecificationsPower supply AC 220 V 50 Hz
Power consumption 135 W(Approx. 0.3 W when the controller is “OFF”)
Upper body m
assage
Massage area (Up-Down) Approx. 79 cm (The massage heads move a total of approx. 63 cm)
Massage area (Left-Right)
Distance between massage heads during operation (including width of massage heads)Neck, shoulder, back: Approx. 5 cm – 21 cm
Lower back/hip: Approx. 5 cm – 25 cmDistance between massage heads (including width of massage heads) during back roll
and up-and-down movement: Approx. 5 cm – 17 cm
Massage area (Forward-Back) Projected range of massage head travel (intensity adjustment): Approx. 10 cm.
Massage speedKnead: From approx. 4 times/min – approx. 73 times/min
Tap: From approx. 190 times/min – approx. 520 times/min (one side)Moving speed: From approx. 1 cm/sec – approx. 5 cm/sec
Air massage
Air pressure (Calf)
3: Approx. 35 kPa2: Approx. 32 kPa1: Approx. 17 kPa
(May vary with the area slightly.)
Sole massage
section
Massage speed From approx. 8 times/min – approx. 21 times/min
Reclining angle Backrest: Approx. 120 ° – 170 °Legrest (Leg & sole massage section): Approx. 5 ° – 85 °
Automatic shut - off Around 19 minutes (automatically ends)
Dim
ensions
When not reclined (H × W × D) Approx. 115 cm × 90 cm × 130 cm
When reclined (H × W × D) Approx. 72 cm × 90 cm × 200 cm
Weight of unit Approx. 87 kg
Dimensions of box (H × W × D) Approx. 77 cm × 75 cm × 170 cm
Weight in box Approx. 108 kg
Maximum user weight Approx. 120 kg
For persons weighing 100 kg or more, the product operations may make more noise and the fabric cover may wear faster.
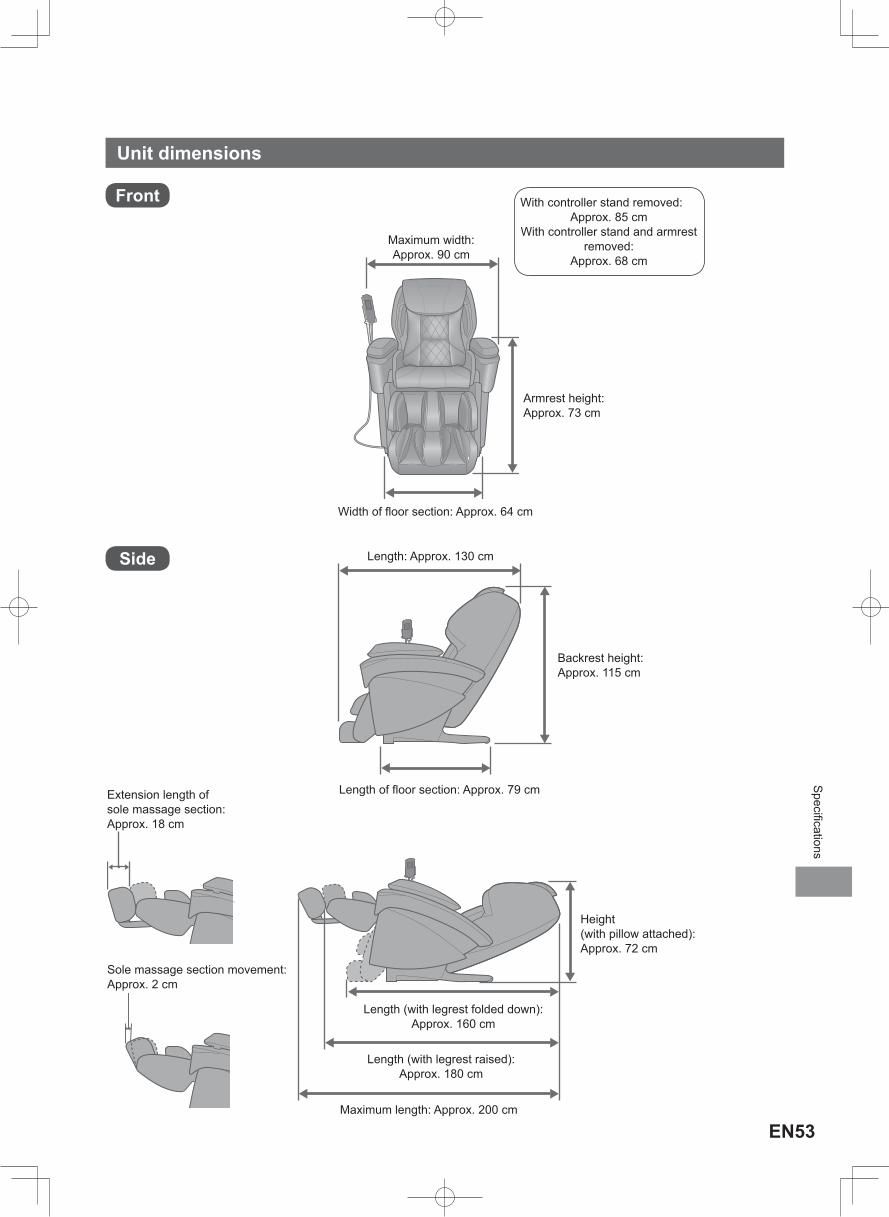
Specifications
EN53
Maximum width: Approx. 90 cm
Width of floor section: Approx. 64 cm
Length: Approx. 130 cm
Length of floor section: Approx. 79 cm
Length (with legrest folded down):Approx. 160 cm
Length (with legrest raised):Approx. 180 cm
Sole massage section movement:Approx. 2 cm
Extension length of sole massage section:Approx. 18 cm
Height(with pillow attached):Approx. 72 cm
Maximum length: Approx. 200 cm
Armrest height:Approx. 73 cm
Backrest height:Approx. 115 cm
With controller stand removed:Approx. 85 cm
With controller stand and armrest removed:
Approx. 68 cm
Unit dimensions
Front
Side
TC2
搜尋常見問題解答(FAQ)變得更容易了。
參照TC10頁搬運、設置、組裝
●主機體尺寸!(參照 TC53頁)
參照TC39頁關於溫熱按摩
●「溫熱」操作方法
參照TC51頁聲音很擾人!
●操作聲音、感覺等
參照TC20頁有什麼按摩模式?
●背部按摩的強度會根據不同模式和動作而在操作器上有不同的顯示。自動模式的背部按摩強度
自選動作的背部按摩強度參照 TC36頁
TC3
使用前
安全須知 . . . . . . . . . . . . . . . . . . . . . . . . . . . . TC4
主機體各部位名稱和功能 . . . . . . . . . . . . . . . . . TC8設置按摩椅 . . . . . . . . . . . . . . . . . . . . . . . . . . . TC10安裝 . . . . . . . . . . . . . . . . . . . . . . . . . . . . . . . . TC12坐在本機上前 . . . . . . . . . . . . . . . . . . . . . . . . . TC16
使用方法
操作器各部位名稱和功能 . . . . . . . . . . . . . . . . TC18簡單用法 . . . . . . . . . . . . . . . . . . . . . . . . . . . . TC20按摩
●當需要全身按摩 . . . . . . . . . . . . . . . . . . . . . TC23●欲為身體某個部位利用喜愛的動作進行 集中按摩 . . . . . . . . . . . . . . . . . . . . . . . . . . TC24
●氣囊伸展及腳底按摩 . . . . . . . . . . . . . . . . . TC26記憶模式 . . . . . . . . . . . . . . . . . . . . . . . . . . . . TC29調節強度 . . . . . . . . . . . . . . . . . . . . . . . . . . . . TC34完成按摩後 . . . . . . . . . . . . . . . . . . . . . . . . . . . TC41
移動/保養
移動主機體 . . . . . . . . . . . . . . . . . . . . . . . . . . . TC42清潔和保養 . . . . . . . . . . . . . . . . . . . . . . . . . . . TC43
重要事項
問答集(Q&A) . . . . . . . . . . . . . . . . . . . . . . . TC44問題解決 . . . . . . . . . . . . . . . . . . . . . . . . . . . . TC49故障顯示 . . . . . . . . . . . . . . . . . . . . . . . . . . . . TC50在意聲音或感覺時 . . . . . . . . . . . . . . . . . . . . . TC51規格 . . . . . . . . . . . . . . . . . . . . . . . . . . . . . . . . TC52
目錄頁
TC4
症狀
具有下列任何狀況或正在接受治療的人,請勿使用本機:
(1) �被醫師告知禁止按摩者(例如:血栓(塞栓)、重度動脈瘤、急性靜脈瘤、各種皮膚炎及皮膚感染症 (包含皮下組織發炎)等)
(2) 患有骨質疏鬆症、脊柱骨折、扭傷或因拉傷或撕裂肌肉而造成急性疼痛者
(3) 安裝心律調節器、除顫器或其他易受電子干擾的體內植入型醫療用器材者
(4) 孕婦、或剛生產後的婦女
(5) �患有急性下腰痛、椎間盤突出、脊椎前移、脊柱狹窄、退行性腰椎關節強硬症者
(6) 脊柱異常或彎曲者
以下人士切勿使用腰部/臀部按摩或骨盆伸展。
(1) �患有臀部周圍區域的急性炎症徵狀、急性髖關節疼痛、梨形肌綜合徵或坐骨神經痛者
(2) 患有髖關節和髖關節骨性關節炎者
(3) 在使用期間感覺疼痛、麻痺、髖關節和腿部失去知覺的人
(以防造成症狀惡化。)
本機不適用於身體感應下降或心智能力低,或缺乏經驗和知識的人(包括兒童)使用,除非他們有負責其安全的人員監督或指導的情況下使用本機。應監督兒童,切勿讓他們在主機體上遊玩。
(以防發生事故或受傷。)
具有下列任何狀況或正在接受治療的人,在使用本機之前,請務必諮詢醫生。
(1) 惡性腫瘤患者
(2) 心臟病患者
(3) 熱覺喪失者
(4) �糖尿病等高度末梢循環障礙之知覺障礙者
(5) 按摩部位有傷口者
(6) �體溫高達 38 °C以上(發燒)者 (例:急性發炎症狀(倦怠感、畏寒、血壓波動等)強烈時期、體力衰弱時)
(7) 需靜養者或身體狀態明顯不佳時
(8) 除了上述事項之外,身體有感到異常者
使用按摩椅中,若出現身體異常、或使用後仍未出現效果時,請立即停用並就醫。
(以防發生事故、受傷或身體產生異狀。)
安全須知 請務必遵守以下將說明使用規範,請務必遵守,以避免危害人體或發生財物損失。
■以下將依據各種嚴重程度,說明當用法錯誤時會發生的危害與損害程度。 請確保您在使用本按摩椅前閱讀所有說明。
若不遵守可能導致人員死亡或重傷。
若不遵守可能導致人員受到輕傷、或發生財物上的損失。
還要注意以下幾點 嚴禁改造。並切勿自行分解或維修。(以防燃火、出現異常動作而受傷。)
注意
警告
警告

安全須知
TC5
安全須知 請務必遵守 ■以下圖號,說明應遵守的事項。(以下為圖號例)
禁止事項。 強制執行事項。
若發生異常與故障時
若發生異常與故障時,請立即停用,並拔除插頭。
(以防冒煙、燃火、觸電。)
<異常、故障例 >
ㅡ有時在開啟電源開關 後也無任何動作。
ㅡ移動電源線後,有時通電、有時則無法通電。
ㅡ於動作中,發出焦味、異常聲音。
ㅡ主機體變形或異常發熱。
→ 請立即委託 Panasonic服務中心檢查/維修。
於使用時 按摩頸部週邊時,請注意按摩輪的動作,切勿對頸部前方進行按摩、或過度用力按摩。
切勿坐在靠背或扶手上。
切勿讓兒童使用。此外,切勿讓兒童在主機體上遊玩、或坐在椅座、靠背或扶手上。
切勿在抱著兒童的情況下使用按摩椅。
在使用過程中,不要將手、手肘、手臂或腳壓在覆蓋靠背移動部分的布料上。
(以防發生事故或受傷。)
使用「溫熱」按摩輪時,請勿讓按摩輪長時間接觸於相同部位。
(以防發生低溫燙傷 *。)
* 即便在較低溫度(40 °C ~ 60 °C),若長時間接觸皮膚相同部位,即使未出現熱、痛等自覺症狀,
也會造成低溫燙傷。
使用前,請務必確認靠背或腿置台可移動部分的布面有沒有破損。也一併確認其他部分的布面有
沒有破損。
即使是微小的破損,也請立即停用、拔除電源插
頭後委託維修。
( 在布面破損的狀態下使用時,可能會造成人員受傷或觸電。)
剛開始時,請用刺激較弱的揉撫進行按摩。
1天內切勿使用超過 30分鐘。
按摩同部位的時間為 5分鐘以內。(以防造成反效果或受傷。)
進行體型偵測(參照 TC22頁)時,務必確認是否符合肩膀位置。若不符合時,則使用位置調節
按鈕調節肩膀高度,或停止按摩,重新進行體型
偵測。
(自動模式、自選動作時)
按摩或移動靠背、腿置台時,務必確認周圍(主機體後方、下方、前方、側方)沒有其他人或寵物。
(以防發生事故或受傷。)
使用後,請務必「off」(關閉)本機背面電源切換鈕及「lock」(鎖定)鎖定切換鈕,並拔除鑰匙,再拔掉電源插頭。
(以防因兒童觸碰而造成事故或受傷。)
TC6
安全須知 (接續)
電源插頭、電源線等
切勿破壞電源線及電源插頭。
請勿對機器進行以下行為:破壞、加工、
接近熱能系統、過度彎曲、扭曲、拉伸、
放置重物與捆束。
( 若在受損狀態下使用,會因觸電、短路而燃燒或釀成火災。)
→ �維修電源線或電源插頭時,請聯絡最近的 Panasonic服務中心。
勿用潮濕的手插拔電源插頭。(以防觸電。)
遵守插座或配線器材的使用限度。
使用 AC 220 V。( 不能在海外使用,也不能連接變壓器使用。)
將電源插頭確實插到底。( 以防可能會因觸電或過熱而釀成火災。)
定期清理電源插頭上的灰塵。 ㅡ請用乾布拭除灰塵。
( 以防因濕氣而造成絕緣不良,進而釀成火災。)
拔除電源插頭時,切勿強拉電源線,務必手持電源插頭後再拔下。
( 以防因觸電、短路而燃火、甚至釀成火災。)
症狀
即使是身體健康者,若符合以下情況,請務必諮詢醫師後再使用。
(1) 隨著年齡增長,而出現肌肉衰退者或身體瘦弱者(2) 因骨骼或內臟問題而出現腰痛者(3) 容易挫傷或扭傷者(4) 容易嚴重暈車者(5) 過去曾接受心臟或內臟手術者
(以防影響健康。)
本設備具有加熱的表面。熱感反應較不靈敏的人在使用本設備時必須小心注意。
若因使用本產品而出現出疹、發紅、發癢等症狀時,應停用本產品並就醫。
(以防發生事故或身體不適。)
設置和移動 請勿在電熱毯等電熱器具上使用本產品。(以防發生火災。)
切勿在已設置狀態下拖曳或移動主機體。
切勿使用腳輪在地板上移動。(以防地板受損。)
切勿在椅座上有人的狀態下移動。(以防因跌倒而發生事故或受傷。)
於移動主機體時,切勿握住腳底按摩部分。(以防於移動中滑動而受傷。)
勿用於浴室等潮濕場所。(以防觸電。)
在水平之處使用。(以防主機體傾斜而發生事故。)
使用腳輪移動時,請事先鋪上護墊等物品。(以防地板受損。)
使用腳輪移動時,請清除周圍障礙物,在靠背完全立起的狀態下抬起腿置台,抬起高度應在腰部以下(自地面起算
約 80 cm以下),並緩慢移動。(參照 TC42頁)(以防因跌倒而發生事故或受傷。)
電源 為安全起見,請確實安裝接地線。(參照 TC11頁)
ㅡ以防導致故障或漏電。(以防觸電。)
保養時,務必從插座上拔除電源插頭。(以防觸電或燙傷。)
不使用時,請從插座上拔除電源插頭。( 以防可能因灰塵與濕氣而造成絕緣劣化而釀成漏電、火災。)
警告
安全須知
TC7
還要注意以下幾點 請勿讓兒童使用操作器座的固定螺絲。(以防誤食或因玩弄器具而發生事故或受傷。)
切勿對主機體或操作器淋水。(以防因觸電、短路而燃火、甚至釀成火災。)
請將鎖定切換鑰匙保管於兒童無法取得之處。(以防誤食或因玩弄器具而發生事故或受傷。)
停電時,請立即拔除電源插頭。(以防在復電時發生事故或受傷。)
若有一段時間未使用時,請重新詳閱使用說明書,於確認機器運作正常後再使用。
(以防發生事故或受傷。)
接地說明 本機必須妥善接地。一旦功能失常或損壞,接地可為電流提供最低電阻,以降低觸電的危險。
本機配備一條接地電源線。接地插頭必須插入電源插座中,而該插座是根據當地法令及標準規範
而妥善安裝的。
使用前及使用時 切勿將按摩輪貼在頭部、腹部、或肌膚上。此外,切勿將手腳放入按摩輪間。
切勿將膝蓋放入小腿及腳底按摩部分。
使用中切勿睡著。飲酒後切勿使用。
在未完全排除氣囊動作的空氣時,切勿站立、跳躍或放置重物於椅座上。
(以防發生事故或受傷。)
切勿將手、指、腳或頭伸入以下所示之主機體的 間隙:
(1) 靠背與椅座、扶手間
(2) 腿置台與椅座、扶手間
(3) 椅座與扶手間
(4) 背面外罩與腳蓋間
(5) 腿置台內側
按摩時,切勿拔除電源插頭、或「off」(關閉)電源切換鈕。
切勿站著使用腳底按摩。(以防受傷。)
當腿置台未完全降下時,切勿坐在、站在腿置台上、或在上方放置物品。
( 以防腿置台前端部分轉動、或因主機體傾斜而發生事故或受傷。)
切勿同時使用其他治療器。(以防發生事故或影響身體健康。)
確認按摩輪位於收納位置後再坐入。
按摩時,若要離開主機體,請務必停止運行動作後再離開。
(以防發生事故或受傷。)
請確認主機體上未夾入異物後再坐入。 ㅡ請確認靠背、腿置台、手及手臂按摩部分有無夾入異物。
( 以防手腳或配件夾入機器, 而發生事故、 受傷。)
請拆除頭部髮飾等硬物後再坐入。
當褲子口袋內有硬物時,請先取出後再進行按摩。
按摩手或手臂時,請先卸除腕錶、人造指甲、戒指等硬物。
(以防受傷。)
切勿將任何東西從您的口袋等掉入設備的間隙中。
(以防遺失物品。)
注意
●包括氣囊按摩功能。 ●可藉由腳底按摩部分的滑塊調整位置。 ●內置溫熱(加熱器)部。
腿置台(小腿及腳底按摩部分)
小腿按摩部分
腳底按摩部分
腳底按摩輪
腳跟氣囊
腳面氣囊
TC8
主機體各部位名稱和功能
操作器(參照 TC18 – TC19頁)
椅座 ●內置用於臀部及大腿按摩的氣囊
按摩輪縮回位置
肩側按摩部分 ●內置用於肩側按摩的氣囊
靠枕
靠背 ●以按摩輪按摩
● 「HEAT」(溫熱)按摩
●內置用於腰部按摩的氣囊
舒適墊
扶手
手及手臂按摩部分 ●內置用於手及手臂按摩的氣囊
臀部及大腿側按摩部分 ●內置用於臀部及大腿側按摩的氣囊
■腳底按摩輪

lock switch
onofflock
open
power
主機體各部位名稱和功能
TC9
電源線
背面外罩
操作器座
操作器立架
腳輪
腳輪
腳蓋
等級標籤
電源插頭
電源切換鈕區
鎖定切換鈕
電源切換鈕
鎖定切換鑰匙
鎖定切換鑰匙標籤
●避免兒童意外吞咽之用。
●出廠時鎖定切換鈕為「open」(開啟),電源切換鈕為「on」(開)。

TC10
設置按摩椅
在地板上鋪上墊子
地板可能會受損,因此建議在地板上鋪上墊子
等物品。
在地板上鋪上墊子等物品時,請準備足以涵
蓋主機體與腿置台接地部分的尺寸
(至少 120 cm×70 cm)。
■請勿握住前側!腳底按摩部分可能會滑動而造成傷害。
① 本機必須由兩人或多人搬運。 ㅡ因本機極重,因此請小心處理以避免受到傷害。
主機體重量 約 87 kg
② 慢慢放下本機並小心您的腳步。
將手指置入溝槽內
握住腿置台的側面
手持腿置台並將其放下,直到其已完全被
放在地面上。
若您在其尚未全伸展前鬆手,腿置台可能
將彈回原來的位置。
●扶手(右/左) 手及手臂按摩部分內側布面上的洞口乃屬製程之需,並非異常。
●靠枕
●電源線
●舒適墊
右/左說明
(扶手內側)
1) 檢查配件
2) 使用本機的場所確保預留足夠的傾斜空間。
●安裝所需尺寸(關於詳細的主機體的尺寸,參照 TC53頁)
大約尺寸:高 115 cm × 寬 90 cm × 深* 220 cm
* 主機體的實際深度為 200 cm,但要求預留 220 cm以確保前後離牆最少 10 cm之距離。
●不得將按摩椅曝露於陽光直射或放在熱源前面之高溫下。以免導致人造皮革褪色或變硬。
3) 設置時
TC11
設置按摩椅
●固定螺絲(M6 × 13)黑色
(4顆)
(M6 × 29)銀灰色
(2顆)
●操作器立架
操作器座
操作器座的
固定螺絲
夾子
裝運時插在電源切換鈕
區的鎖定切換鈕上。
●鎖定切換鑰匙(1把)
4 mm
●六角扳手(1个)
(斷面)
4 mm
設備電源輸入插座
設備電源輸入插頭
電源線
電源切換鈕區
① 檢查電源切換鈕區的設備電源輸入插座和電源線的插頭是否髒汙和損壞。
② 將連接器插入設備插口。
③ 務必將設備電源輸入插頭並完全推入。
4) 將電源線連接到主機體
接地說明
●本機必須妥善接地。一旦功能失常或損壞,接地可為電流提供最低電阻,以降低觸電的危險。
●本機配備一條接地電源線。接地插頭必須插入電源插座中,而該插座是根據當地法令及標準規範而妥善安裝的。
5) 開啟電源,立起靠背。① 將電源插頭插入電源插座內。
ㅡ請務必插入 AC 220 V插座。
② 確認鎖定切換鑰匙是設定在「open」(開啟)的位置。
③ 確認電源切換鈕是設定在「on」(開)的位置。
④ 按兩次操作器的 。 ㅡ先按一次,約 1秒鐘後再按一次。靠背將自動升高。
lock switch
onofflock
open
power
●② ●③
①
■螺絲的固定方法
六角扳手
●將固定螺絲放置在六角扳手的邊緣,然後將其水平對準孔並
緊固。
●對於螺絲孔,若斜著用六角扳手強行鎖緊,則有可能造成螺
絲部破損。
TC12
2固定扶手
① 將扶手插入主機體內。 ㅡ扶手底部標有「R」(右側)和「L」(左側)。 ㅡ沿著扶手側面的 ▲ 標記,從頂部插入扶手。 ㅡ請小心以避免刮到手指及氣囊插頭。
② 向下推扶手的同時並向後滑動。
③ 以固定螺絲固定扶手。(每側各一處) ㅡ使用此螺絲固定螺絲(M6 × 29) × 2顆(銀灰色)
安裝
② 用固定螺絲固定操作器立架。(4處)
ㅡ使用此螺絲固定螺絲(M6 × 13)× 4顆(黑色)
■螺絲的固定方法
如將操作器立架安裝在左側,則把操作器線引到左側。(參照 TC15頁)
<安裝右側扶手時 >
1安裝操作器立架
將操作器立架安裝到主機體的右側或左側扶手。
<在右側面板上安裝時 >
① 將側面板的 2個叉對準操作器立架的孔。
固定螺絲
洞口
六角扳手
操作器立架
對準 ▲ 標記。
正面
①
④ 以相同的方式安裝左側。
●②
●③
●用手指輕輕地轉緊 4顆螺絲。 (要將螺絲與螺絲孔保持
水平。)
●用六角扳手鎖緊。 ●對於螺絲孔,若斜著用六角扳手強行鎖緊,則有可
能造成螺絲部破損。
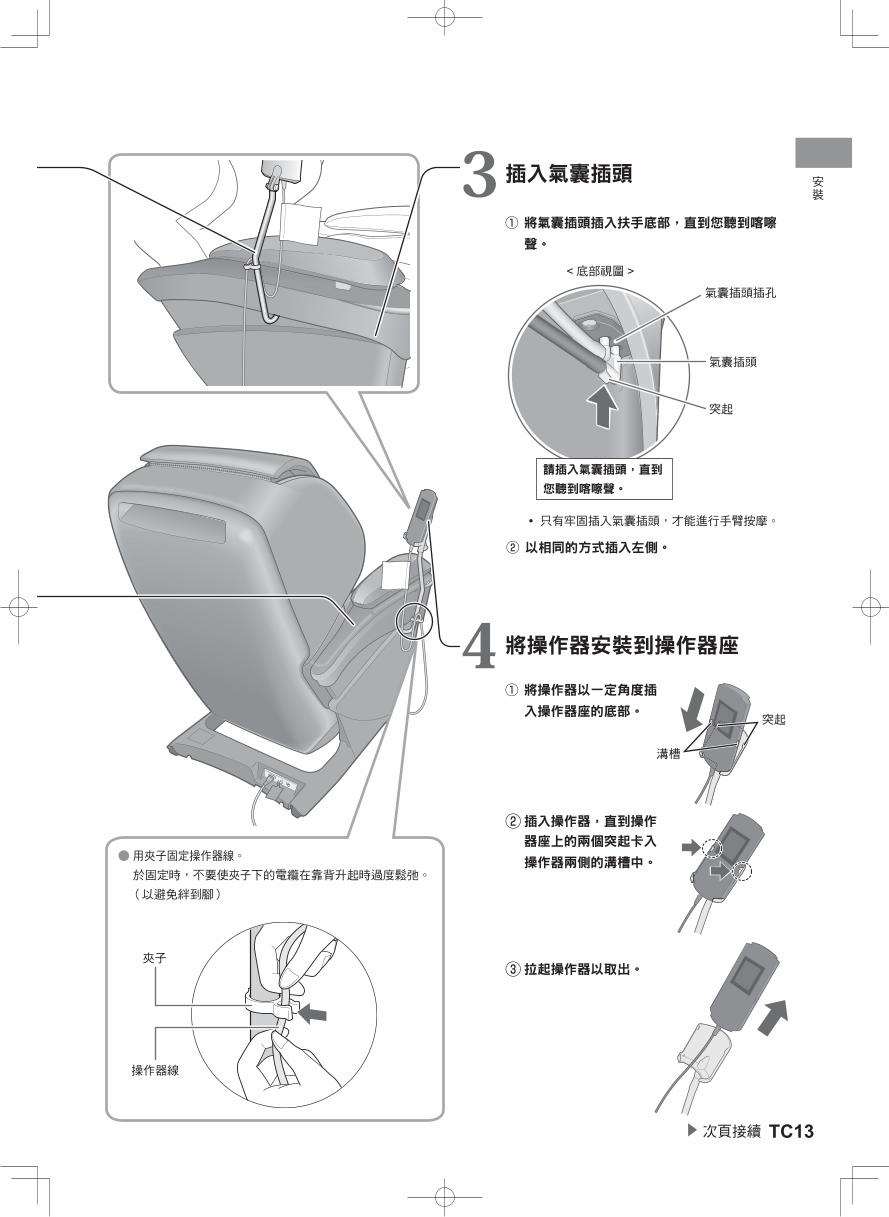
安裝
TC13▶ 次頁接續
ㅡ只有牢固插入氣囊插頭,才能進行手臂按摩。
② 以相同的方式插入左側。
氣囊插頭
突起
氣囊插頭插孔
<底部視圖 >
請插入氣囊插頭,直到
您聽到喀嚓聲。
3插入氣囊插頭
① 將氣囊插頭插入扶手底部,直到您聽到喀嚓聲。
4將操作器安裝到操作器座
① 將操作器以一定角度插入操作器座的底部。
突起
溝槽
② 插入操作器,直到操作器座上的兩個突起卡入
操作器兩側的溝槽中。
③ 拉起操作器以取出。
●用夾子固定操作器線。於固定時,不要使夾子下的電纜在靠背升起時過度鬆弛。 (以避免絆到腳)
夾子
操作器線
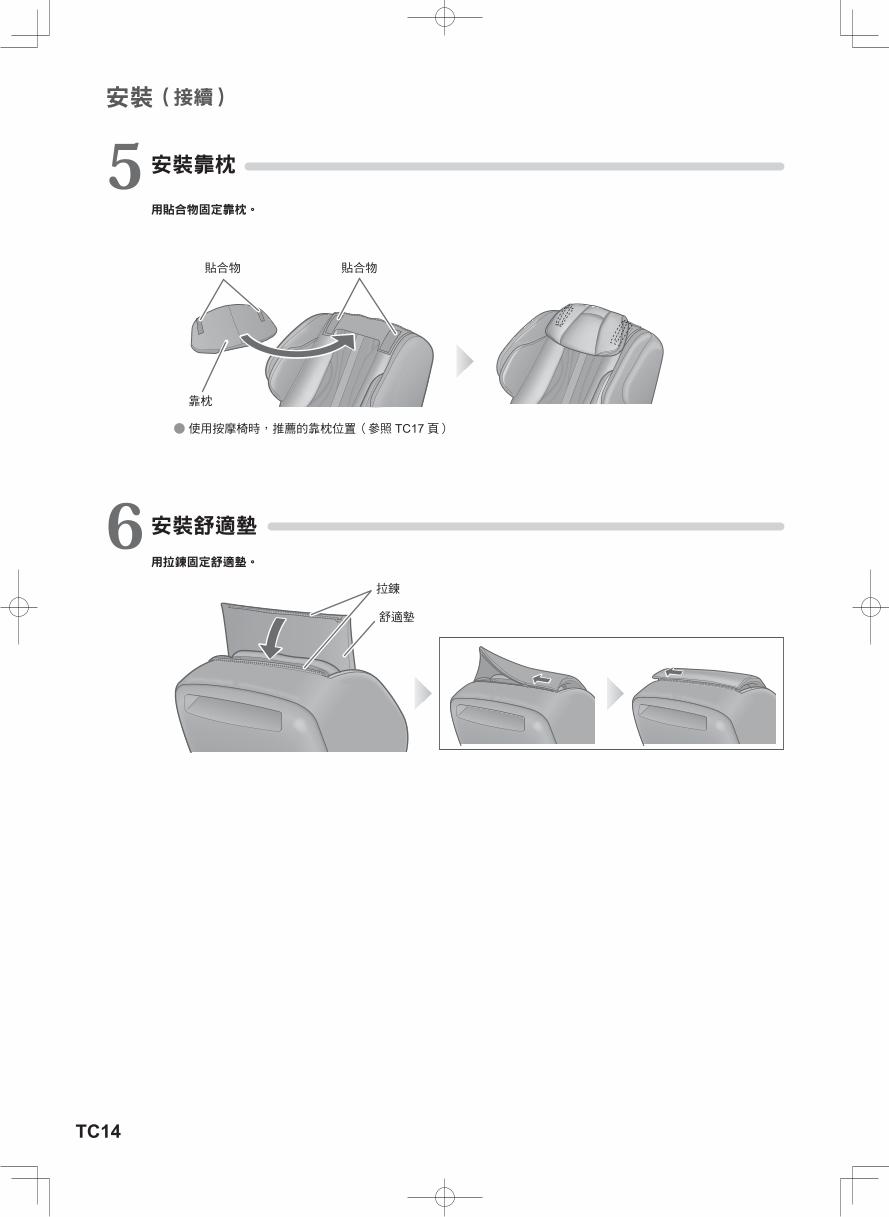
TC14
安裝(接續)
6安裝舒適墊
用拉鍊固定舒適墊。
5安裝靠枕
用貼合物固定靠枕。
●使用按摩椅時,推薦的靠枕位置(參照 TC17頁)
靠枕
貼合物 貼合物
拉鍊
舒適墊
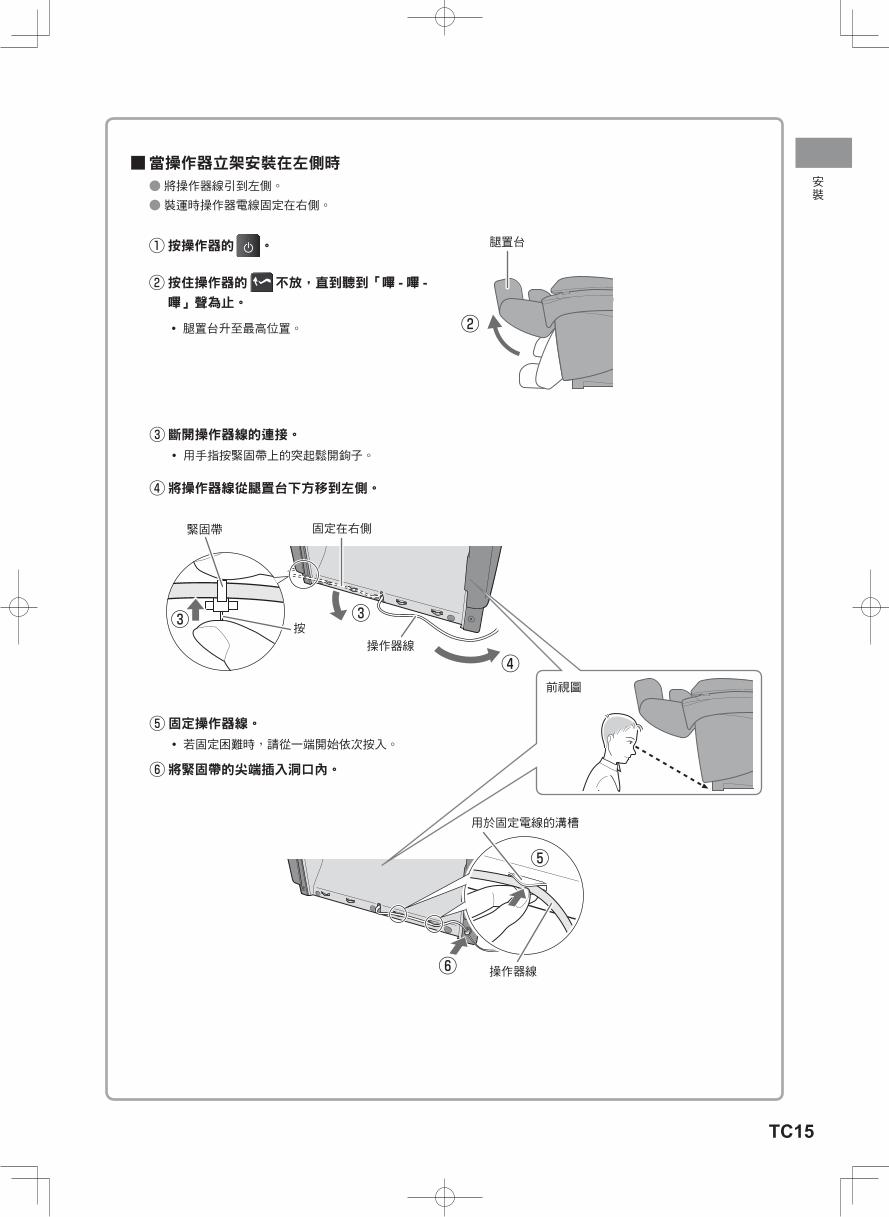
安裝
TC15
■當操作器立架安裝在左側時 ●將操作器線引到左側。 ●裝運時操作器電線固定在右側。
① 按操作器的 。
② 按住操作器的 不放,直到聽到「嗶 -嗶 -嗶」聲為止。
ㅡ腿置台升至最高位置。
③ 斷開操作器線的連接。 ㅡ用手指按緊固帶上的突起鬆開鉤子。
④ 將操作器線從腿置台下方移到左側。
固定在右側緊固帶
按
操作器線
操作器線
用於固定電線的溝槽
④
⑥
⑤
腿置台
②
③ ③
⑤ 固定操作器線。 ㅡ若固定困難時,請從一端開始依次按入。
⑥ 將緊固帶的尖端插入洞口內。
前視圖

TC16
坐在本機上前
調整操作器座水平方向可調整。
檢查腿置台位置 ●確認腿置台完全處於最低的位置。
ㅡ當腿置台未完全下降時,
按兩次 腿置台,便會下降。
將腳底按摩部分滑到自己喜歡的位置 ●於提起腿置台後,調整至自己喜歡的位置。(參照 TC40頁)它會向上滑動約 18 cm。
腳掌稍微抬起,腳底
按摩部分就會縮回
用腳板把腳底
按摩部分推出
按摩輪縮回位置
檢查週圍環境確認本機放置之區域內無任何異物、人或寵物。
●當寵物(例如狗和貓)在控制器線上咀嚼或絆倒時,按摩椅不會運作。 (這可能會導致故障。)
左和右
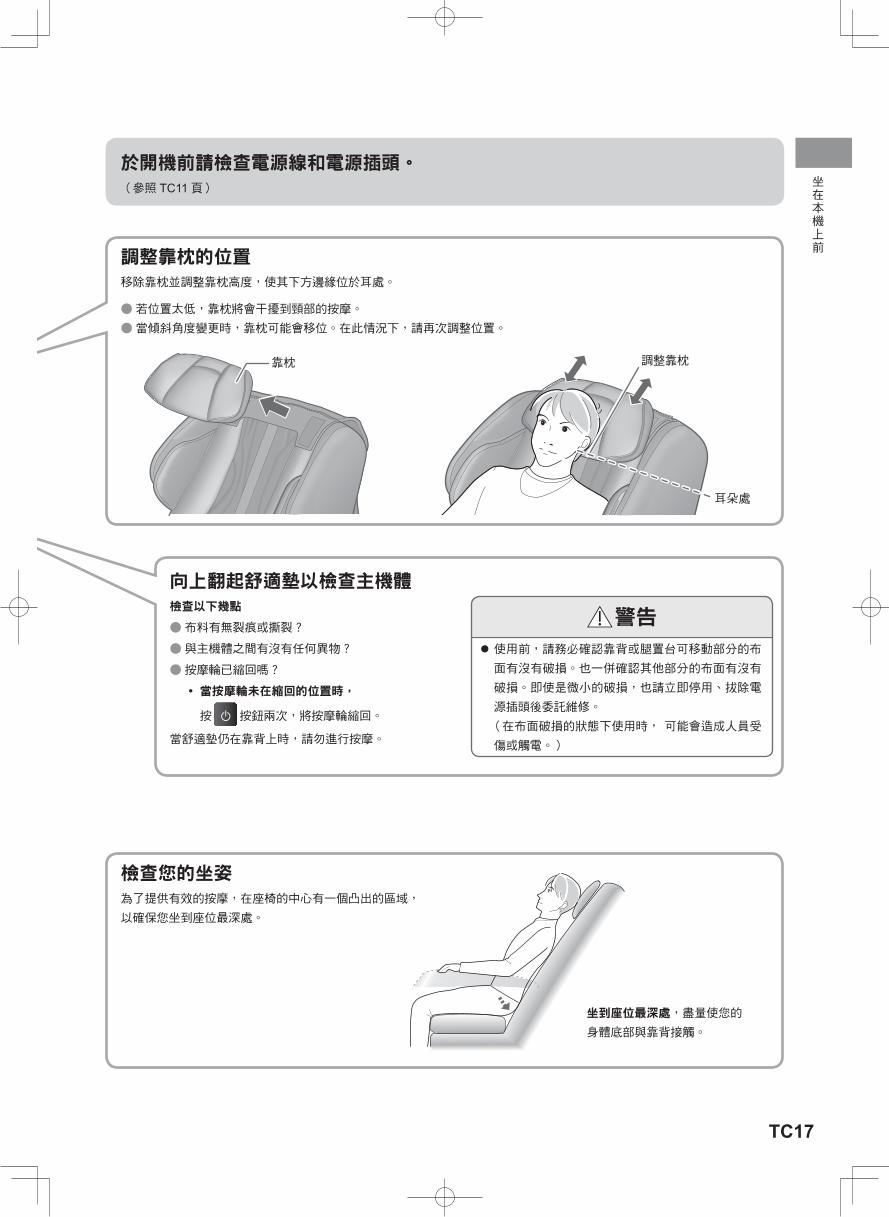
TC17
向上翻起舒適墊以檢查主機體檢查以下幾點
●布料有無裂痕或撕裂?
●與主機體之間有沒有任何異物?
●按摩輪已縮回嗎?
ㅡ當按摩輪未在縮回的位置時,
按 按鈕兩次,將按摩輪縮回。
當舒適墊仍在靠背上時,請勿進行按摩。
於開機前請檢查電源線和電源插頭。(參照 TC11頁)
檢查您的坐姿為了提供有效的按摩,在座椅的中心有一個凸出的區域,
以確保您坐到座位最深處。
坐到座位最深處,盡量使您的
身體底部與靠背接觸。
調整靠枕的位置移除靠枕並調整靠枕高度,使其下方邊緣位於耳處。
●若位置太低,靠枕將會干擾到頸部的按摩。 ●當傾斜角度變更時,靠枕可能會移位。在此情況下,請再次調整位置。
靠枕 調整靠枕
耳朵處
警告
使用前,請務必確認靠背或腿置台可移動部分的布面有沒有破損。也一併確認其他部分的布面有沒有
破損。即使是微小的破損,也請立即停用、拔除電
源插頭後委託維修。
(在布面破損的狀態下使用時, 可能會造成人員受傷或觸電。)
坐在本機上前
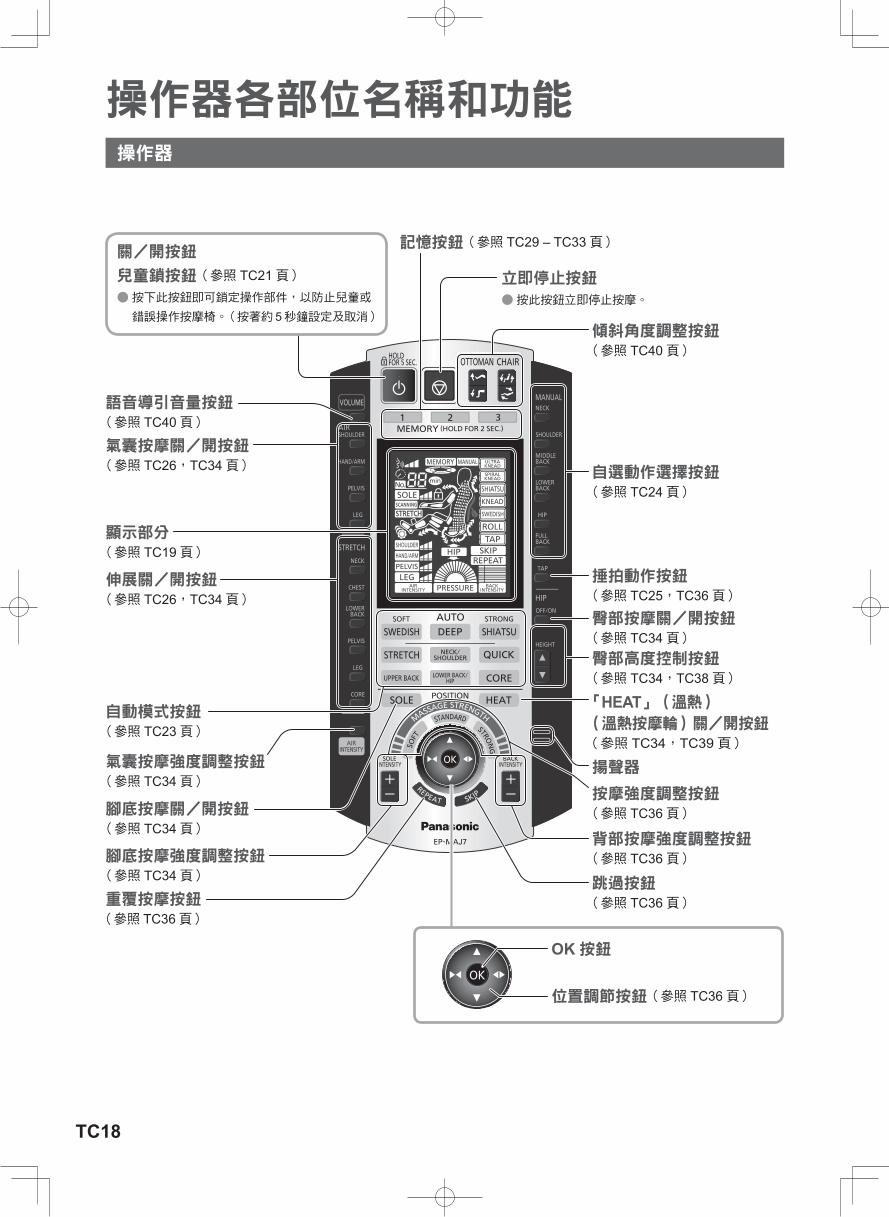
TC18
操作器各部位名稱和功能
OK按鈕
位置調節按鈕(參照 TC36頁)
記憶按鈕(參照 TC29 – TC33頁)
立即停止按鈕 ●按此按鈕立即停止按摩。
傾斜角度調整按鈕 (參照 TC40頁)
腳底按摩強度調整按鈕 (參照 TC34頁)
自動模式按鈕 (參照 TC23頁)
腳底按摩關/開按鈕 (參照 TC34頁)
氣囊按摩強度調整按鈕 (參照 TC34頁)
重覆按摩按鈕 (參照 TC36頁)
自選動作選擇按鈕 (參照 TC24頁)
捶拍動作按鈕 (參照 TC25,TC36頁)
臀部按摩關/開按鈕 (參照 TC34頁)臀部高度控制按鈕 (參照 TC34,TC38頁)
「HEAT」(溫熱) (溫熱按摩輪)關/開按鈕(參照 TC34,TC39頁)
跳過按鈕 (參照 TC36頁)
關/開按鈕
兒童鎖按鈕(參照 TC21頁) ●按下此按鈕即可鎖定操作部件,以防止兒童或錯誤操作按摩椅。(按著約 5秒鐘設定及取消)
操作器
按摩強度調整按鈕 (參照 TC36頁)
氣囊按摩關/開按鈕 (參照 TC26,TC34頁)
顯示部分 (參照 TC19頁)
伸展關/開按鈕 (參照 TC26,TC34頁)
語音導引音量按鈕 (參照 TC40頁)
背部按摩強度調整按鈕 (參照 TC36頁)
揚聲器
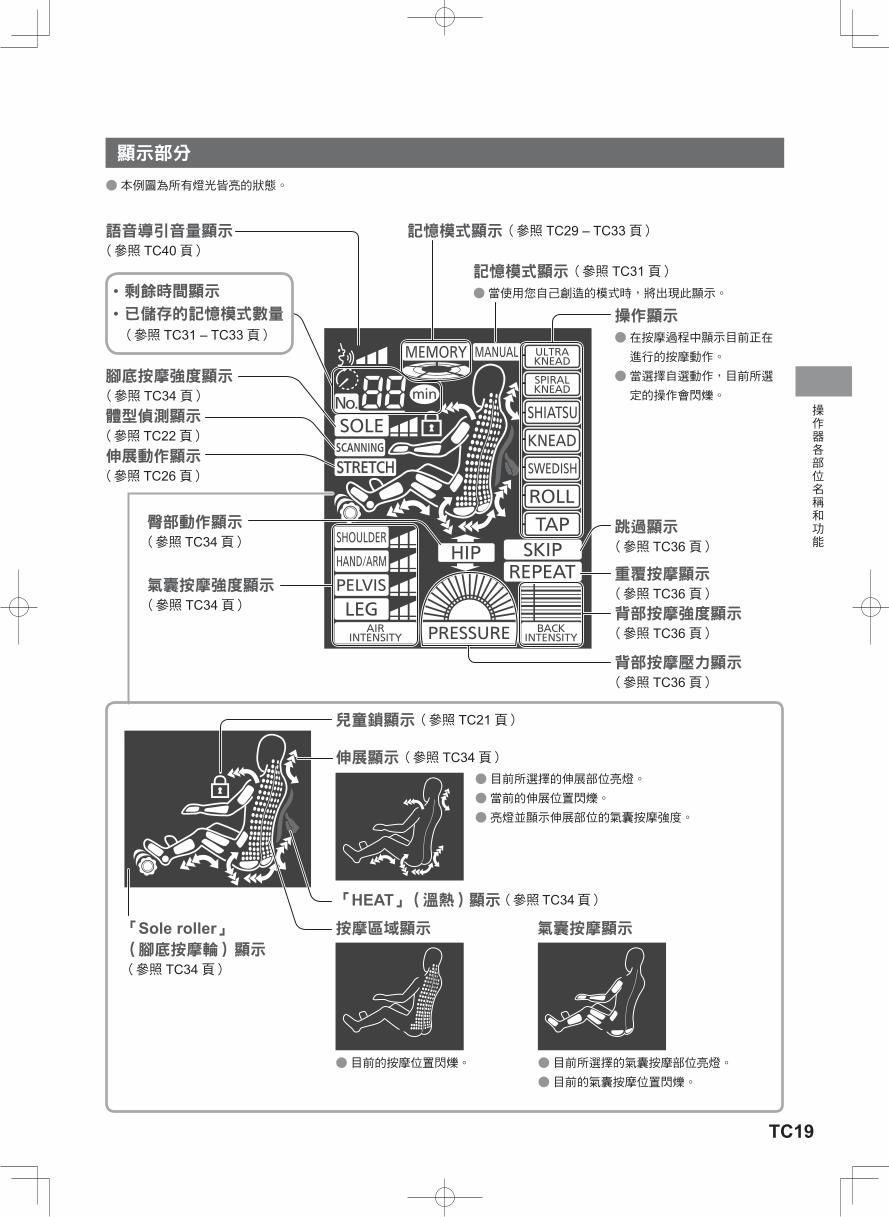
操作器各部位名稱和功能
TC19
●本例圖為所有燈光皆亮的狀態。
語音導引音量顯示 (參照 TC40頁)
記憶模式顯示(參照 TC29 – TC33頁)
記憶模式顯示(參照 TC31頁) ●當使用您自己創造的模式時,將出現此顯示。
臀部動作顯示 (參照 TC34頁)
操作顯示 ●在按摩過程中顯示目前正在進行的按摩動作。
●當選擇自選動作,目前所選定的操作會閃爍。
跳過顯示 (參照 TC36頁)
重覆按摩顯示 (參照 TC36頁)背部按摩強度顯示 (參照 TC36頁)
背部按摩壓力顯示 (參照 TC36頁)
兒童鎖顯示(參照 TC21頁)
伸展顯示(參照 TC34頁) ●目前所選擇的伸展部位亮燈。 ●當前的伸展位置閃爍。 ●亮燈並顯示伸展部位的氣囊按摩強度。
「HEAT」(溫熱)顯示(參照 TC34頁)
按摩區域顯示 氣囊按摩顯示
●目前的按摩位置閃爍。 ●目前所選擇的氣囊按摩部位亮燈。 ●目前的氣囊按摩位置閃爍。
• 剩餘時間顯示 • 已儲存的記憶模式數量(參照 TC31 – TC33頁)
顯示部分
「Sole roller」(腳底按摩輪)顯示(參照 TC34頁)
腳底按摩強度顯示 (參照 TC34頁)
氣囊按摩強度顯示 (參照 TC34頁)
伸展動作顯示 (參照 TC26頁)
體型偵測顯示 (參照 TC22頁)
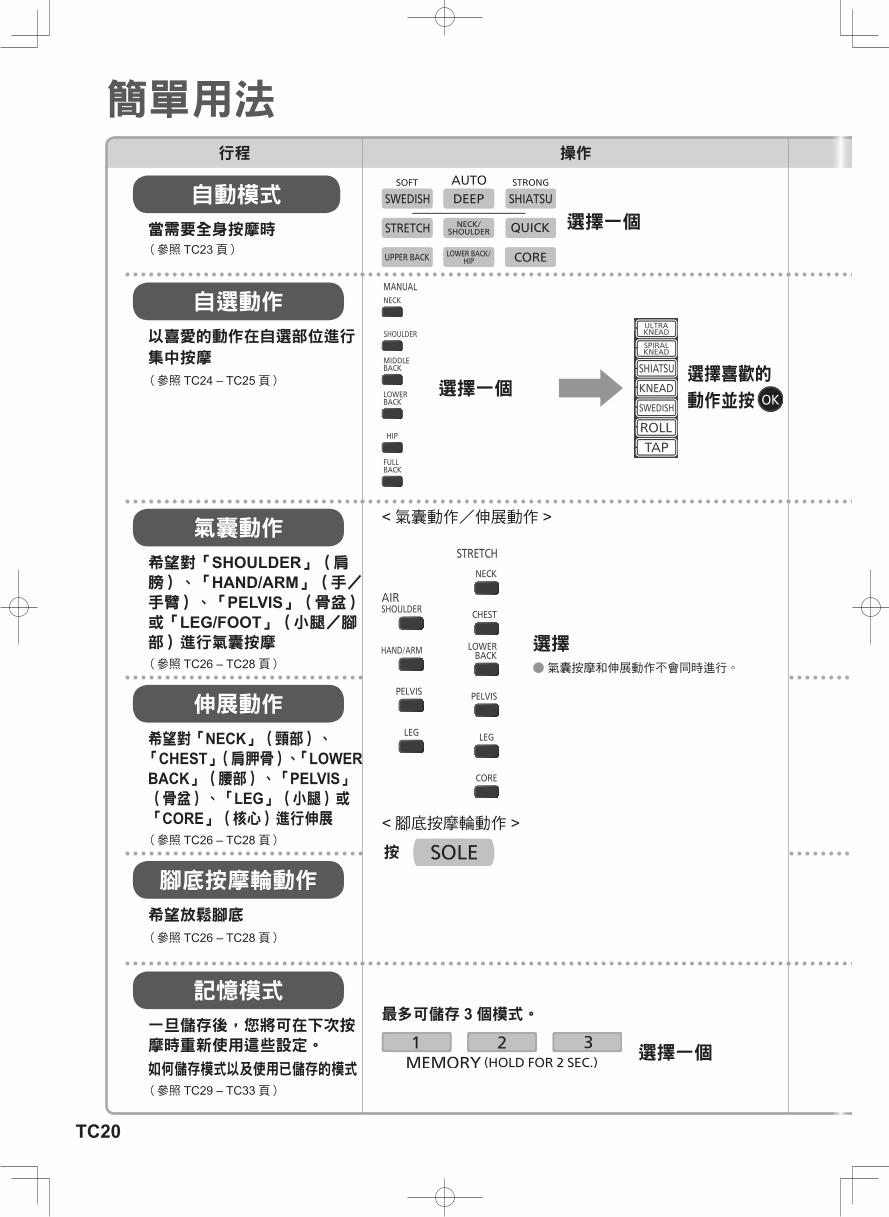
TC20
行程 操作 動作
自動模式
當需要全身按摩時 (參照 TC23頁)
選擇一個
體型偵測︵參照TC
22
頁︶
開始按摩
自選動作
以喜愛的動作在自選部位進行
集中按摩
(參照 TC24 – TC25頁)選擇一個
選擇喜歡的 動作並按 開始按摩
氣囊動作
希望對「SHOULDER」(肩膀)、「HAND/ARM」(手/手臂)、「PELVIS」(骨盆)或「LEG/FOOT」(小腿/腳部)進行氣囊按摩 (參照 TC26 – TC28頁)
<氣囊動作/伸展動作 >
選擇 ●氣囊按摩和伸展動作不會同時進行。
<腳底按摩輪動作 >
按
開始氣囊按摩動作
●如果選擇了氣囊按摩,則不會進行體型偵測。
伸展動作
希望對「NECK」(頸部)、「CHEST」(肩胛骨)、「LOWER BACK」(腰部)、「PELVIS」(骨盆)、「LEG」(小腿)或「CORE」(核心)進行伸展 (參照 TC26 – TC28頁)
開始伸展動作
腳底按摩輪動作
希望放鬆腳底
(參照 TC26 – TC28頁)
開始腳底按摩
●如果選擇了腳底按摩,則不會進行體型偵測。
記憶模式
一旦儲存後,您將可在下次按摩時重新使用這些設定。
如何儲存模式以及使用已儲存的模式 (參照 TC29 – TC33頁)
最多可儲存 3個模式。
選擇一個 開始按摩
簡單用法
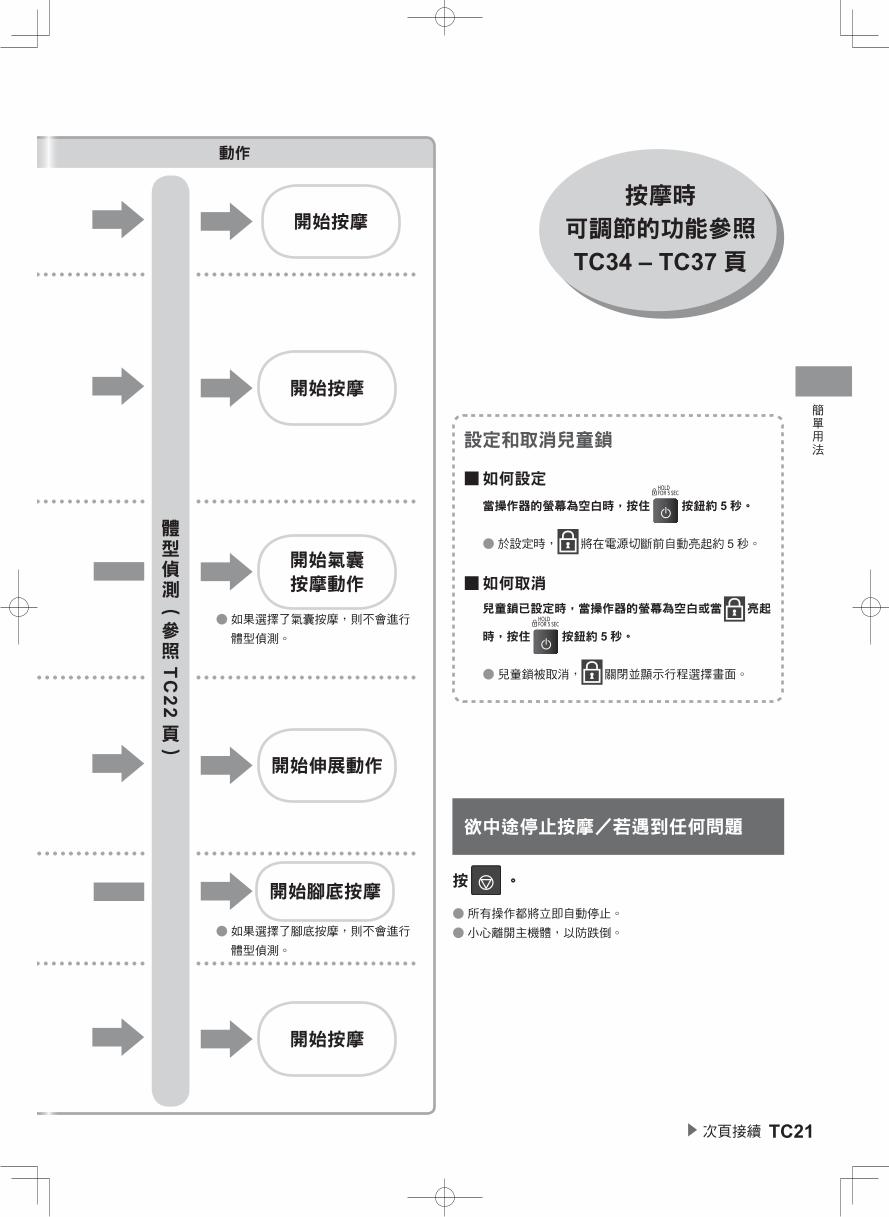
簡單用法
TC21▶ 次頁接續
行程 操作 動作
自動模式
當需要全身按摩時 (參照 TC23頁)
選擇一個
體型偵測︵參照TC
22頁︶
開始按摩
自選動作
以喜愛的動作在自選部位進行
集中按摩
(參照 TC24 – TC25頁)選擇一個
選擇喜歡的 動作並按 開始按摩
氣囊動作
希望對「SHOULDER」(肩膀)、「HAND/ARM」(手/手臂)、「PELVIS」(骨盆)或「LEG/FOOT」(小腿/腳部)進行氣囊按摩 (參照 TC26 – TC28頁)
<氣囊動作/伸展動作 >
選擇 ●氣囊按摩和伸展動作不會同時進行。
<腳底按摩輪動作 >
按
開始氣囊按摩動作
●如果選擇了氣囊按摩,則不會進行體型偵測。
伸展動作
希望對「NECK」(頸部)、「CHEST」(肩胛骨)、「LOWER BACK」(腰部)、「PELVIS」(骨盆)、「LEG」(小腿)或「CORE」(核心)進行伸展 (參照 TC26 – TC28頁)
開始伸展動作
腳底按摩輪動作
希望放鬆腳底
(參照 TC26 – TC28頁)
開始腳底按摩
●如果選擇了腳底按摩,則不會進行體型偵測。
記憶模式
一旦儲存後,您將可在下次按摩時重新使用這些設定。
如何儲存模式以及使用已儲存的模式 (參照 TC26 – TC33頁)
最多可儲存 3個模式。
選擇一個 開始按摩
按摩時
可調節的功能參照
TC34 – TC37頁
設定和取消兒童鎖
■如何設定當操作器的螢幕為空白時,按住 按鈕約 5秒。
●於設定時, 將在電源切斷前自動亮起約 5秒。
■如何取消兒童鎖已設定時,當操作器的螢幕為空白或當 亮起
時,按住 按鈕約 5秒。
●兒童鎖被取消, 關閉並顯示行程選擇畫面。
按 。
●所有操作都將立即自動停止。 ●小心離開主機體,以防跌倒。
欲中途停止按摩/若遇到任何問題
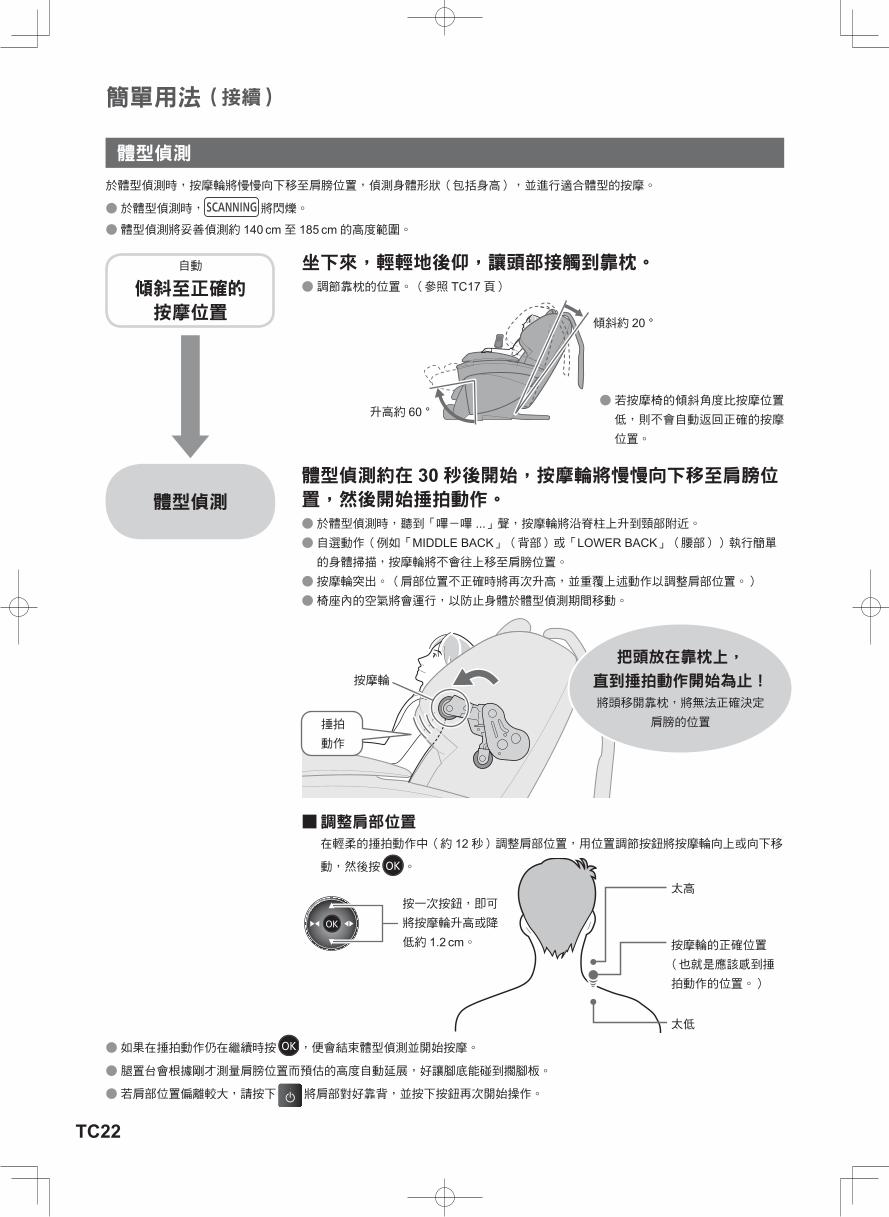
もみ玉
たたき動作
TC22
簡單用法(接續)
於體型偵測時,按摩輪將慢慢向下移至肩膀位置,偵測身體形狀(包括身高),並進行適合體型的按摩。
●於體型偵測時, 將閃爍。
●體型偵測將妥善偵測約 140 cm至 185 cm的高度範圍。
■調整肩部位置在輕柔的捶拍動作中(約 12秒)調整肩部位置,用位置調節按鈕將按摩輪向上或向下移
動,然後按 。
坐下來,輕輕地後仰,讓頭部接觸到靠枕。 ●調節靠枕的位置。(參照 TC17頁)
體型偵測約在 30秒後開始,按摩輪將慢慢向下移至肩膀位置,然後開始捶拍動作。
●於體型偵測時,聽到「嗶-嗶 ...」聲,按摩輪將沿脊柱上升到頸部附近。 ●自選動作(例如「MIDDLE BACK」(背部)或「LOWER BACK」(腰部))執行簡單的身體掃描,按摩輪將不會往上移至肩膀位置。
●按摩輪突出。(肩部位置不正確時將再次升高,並重覆上述動作以調整肩部位置。) ●椅座內的空氣將會運行,以防止身體於體型偵測期間移動。
傾斜約 20 °
升高約 60 °
按摩輪
捶拍
動作
●若按摩椅的傾斜角度比按摩位置低,則不會自動返回正確的按摩
位置。
按一次按鈕,即可
將按摩輪升高或降
低約 1.2 cm。
太高
按摩輪的正確位置
(也就是應該感到捶拍動作的位置。)
太低
●如果在捶拍動作仍在繼續時按 ,便會結束體型偵測並開始按摩。
●腿置台會根據剛才測量肩膀位置而預估的高度自動延展,好讓腳底能碰到擱腳板。
●若肩部位置偏離較大,請按下 將肩部對好靠背,並按下按鈕再次開始操作。
體型偵測
自動
傾斜至正確的按摩位置
體型偵測
把頭放在靠枕上,
直到捶拍動作開始為止!將頭移開靠枕,將無法正確決定
肩膀的位置

TC23
簡單用法
當需要全身按摩
當需要全身按摩
1按 ,開啟電源。
( 不按摩時,如果 3分鐘或更長時間無操作,顯示將自動熄滅。)
2選擇並按下其中一個按鈕。
●於選擇行程後體型偵測將會開始。(詳情請參照 TC22頁)
3在體型偵測結束後,開始按摩。
●按摩時,您可創造喜愛設定。(詳情請參照 TC34 – TC37頁) ●您可以在進行任何模式期間將自己的喜愛動作儲存在記憶模式中。(詳情請參照 TC29頁)
4當按摩開始後,它將在約 19分鐘後自動結束。
●當按摩結束後,您可以把您喜愛的設定儲存在記憶模式中。(詳情請參照 TC29頁)
■自動模式的特點(上半身)
● 19分鐘 ● 19分鐘 ● 19分鐘
當您希望溫和放鬆身體時
主要使用揉撫和滾動動作,
同時以緩慢的速度移動, 給您的身體一個放鬆的 按摩。
當您希望確實緩解疲勞時
此標準按摩模式以揉按及 深度揉捏動作為主,給你 一個徹底深層的按摩緩解。
當您希望強烈放鬆身體時
此行程主要通過指壓及深度 揉捏動作,強烈放鬆肌肉的 緊張點。
● 16分鐘 ● 16分鐘 ● 10分鐘
伸展全身
此行程會重複進行 6種 緩慢伸展動作,以伸展 您的全身。
頸部或肩膀疼痛
此行程是以揉按和深度揉 捏動作,重點式地緩解頸 椎周圍(頸部、肩部)的 肌肉。
當您希望快速放鬆身體時
此行程會使用所有的按摩 手法,包括揉按、深度揉 捏、揉撫、滾動等,為時 10分鐘。
● 16分鐘 ● 16分鐘 ● 16分鐘
肩胛骨周圍繃緊
放鬆肩胛骨周圍的區域, 用揉按動作傳遞熱感。
腰部及臀部疼痛
主要使用揉捏和深度揉捏 動作,重點針對腰部到臀 部的區域。
為了不積累臀部的疲勞
放鬆腰部周圍、骨盆區域 和臀部區域,具有傳遞熱 感的動作,例如深度揉 捏、滾動和伸展動作。
「CORE」指的是腰部、脊柱、骨盆和腹部。
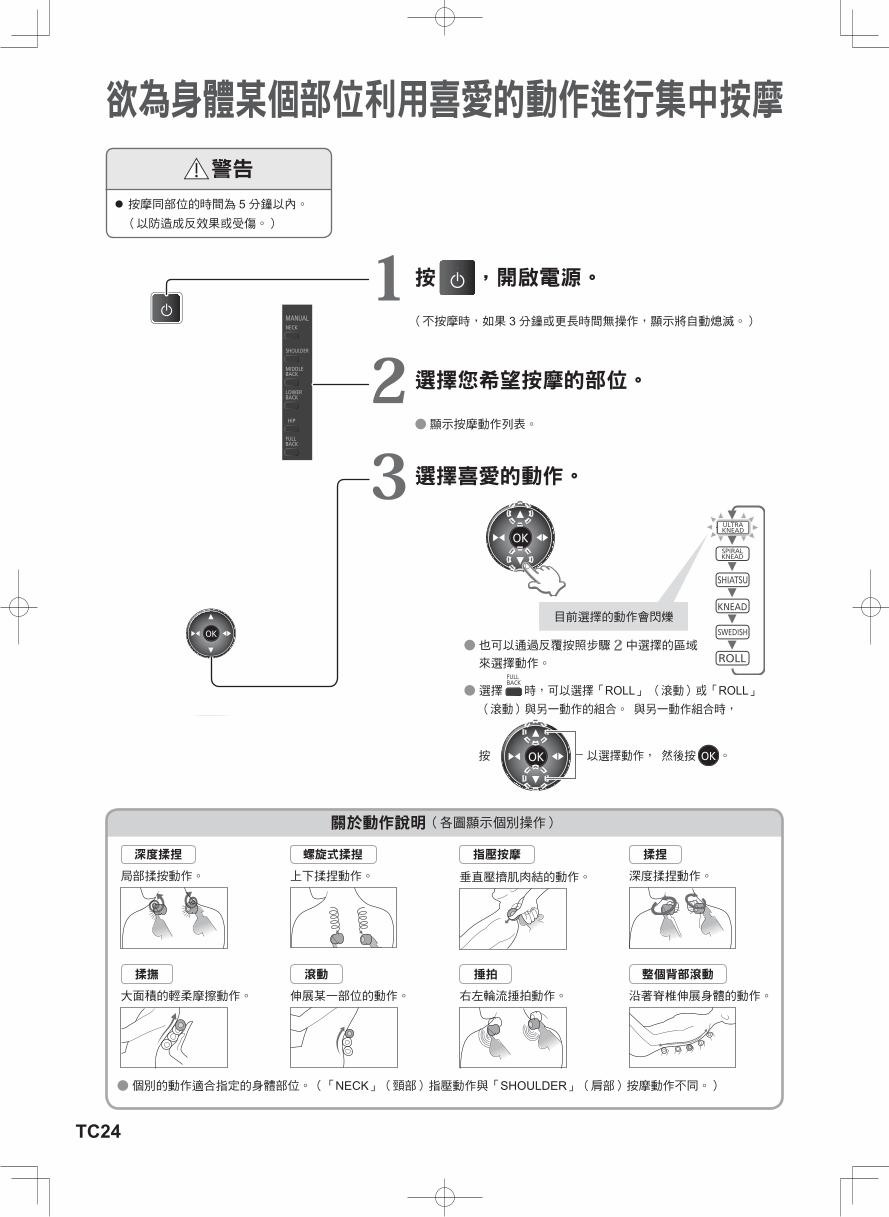
TC24
警告
按摩同部位的時間為 5分鐘以內。(以防造成反效果或受傷。)
●也可以通過反覆按照步驟 2中選擇的區域來選擇動作。
●選擇 時,可以選擇「ROLL」(滾動)或「ROLL」(滾動)與另一動作的組合。 與另一動作組合時,
按 以選擇動作, 然後按 。
目前選擇的動作會閃爍
1按 ,開啟電源。
(不按摩時,如果 3分鐘或更長時間無操作,顯示將自動熄滅。)
2選擇您希望按摩的部位。
●顯示按摩動作列表。
3選擇喜愛的動作。
關於動作說明(各圖顯示個別操作)
深度揉捏
局部揉按動作。
螺旋式揉揑
上下揉捏動作。
指壓按摩
垂直壓擠肌肉結的動作。
揉捏
深度揉捏動作。
揉撫
大面積的輕柔摩擦動作。
滾動
伸展某一部位的動作。
捶拍
右左輪流捶拍動作。
整個背部滾動
沿著脊椎伸展身體的動作。
●個別的動作適合指定的身體部位。(「NECK」(頸部)指壓動作與「SHOULDER」(肩部)按摩動作不同。)
欲為身體某個部位利用喜愛的動作進行集中按摩
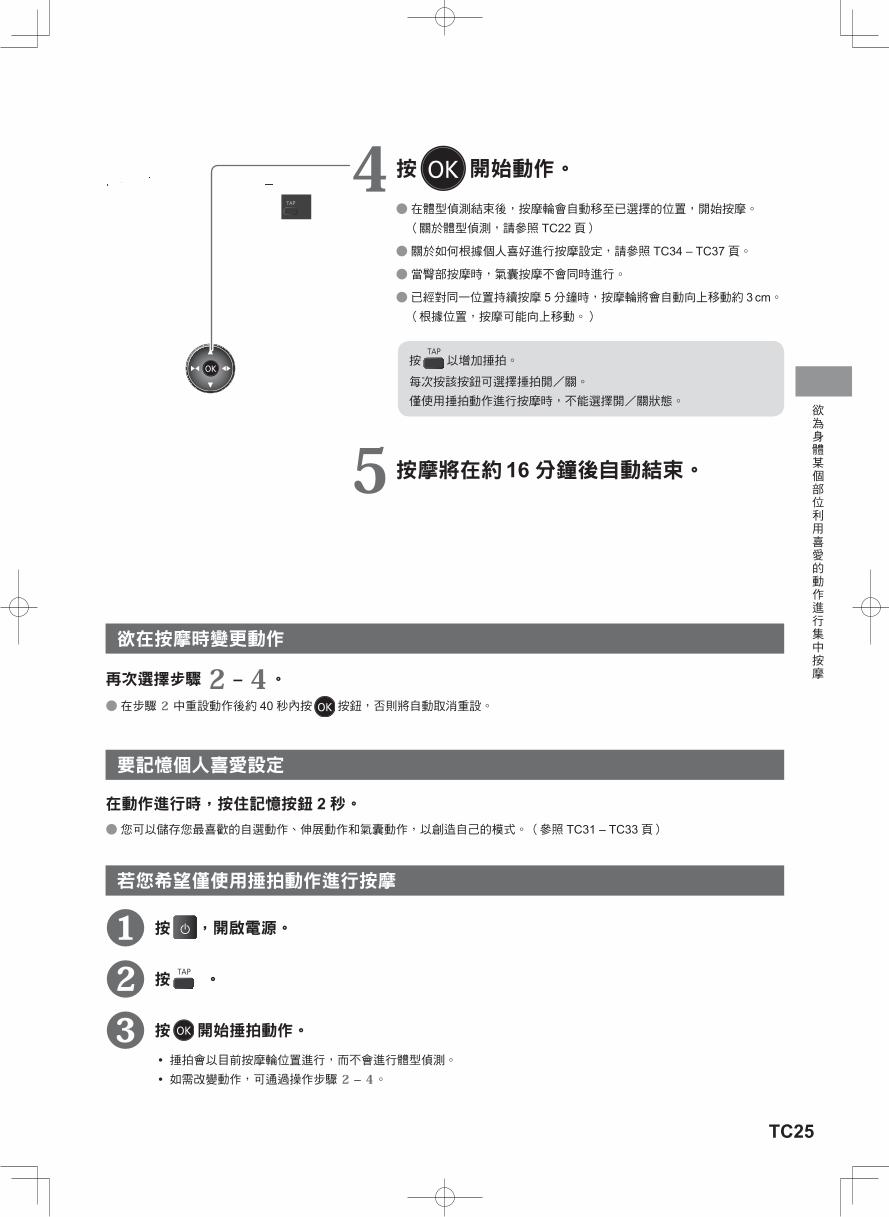
TC25
再次選擇步驟 2 – 4。 ●在步驟 2 中重設動作後約 40秒內按 按鈕,否則將自動取消重設。
4按 開始動作。 ●在體型偵測結束後,按摩輪會自動移至已選擇的位置,開始按摩。(關於體型偵測,請參照 TC22頁)
●關於如何根據個人喜好進行按摩設定,請參照 TC34 – TC37頁。
●當臀部按摩時,氣囊按摩不會同時進行。
●已經對同一位置持續按摩 5分鐘時,按摩輪將會自動向上移動約 3 cm。(根據位置,按摩可能向上移動。)
按 以增加捶拍。
每次按該按鈕可選擇捶拍開/關。
僅使用捶拍動作進行按摩時,不能選擇開/關狀態。
5按摩將在約 16分鐘後自動結束。
欲在按摩時變更動作
在動作進行時,按住記憶按鈕 2秒。 ●您可以儲存您最喜歡的自選動作、伸展動作和氣囊動作,以創造自己的模式。(參照 TC31 – TC33頁)
要記憶個人喜愛設定
若您希望僅使用捶拍動作進行按摩
❶ 按 ,開啟電源。
❷ 按 。
❸ 按 開始捶拍動作。 ㅡ捶拍會以目前按摩輪位置進行,而不會進行體型偵測。 ㅡ如需改變動作,可通過操作步驟 2 – 4。
欲為身體某個部位利用喜愛的動作進行集中按摩
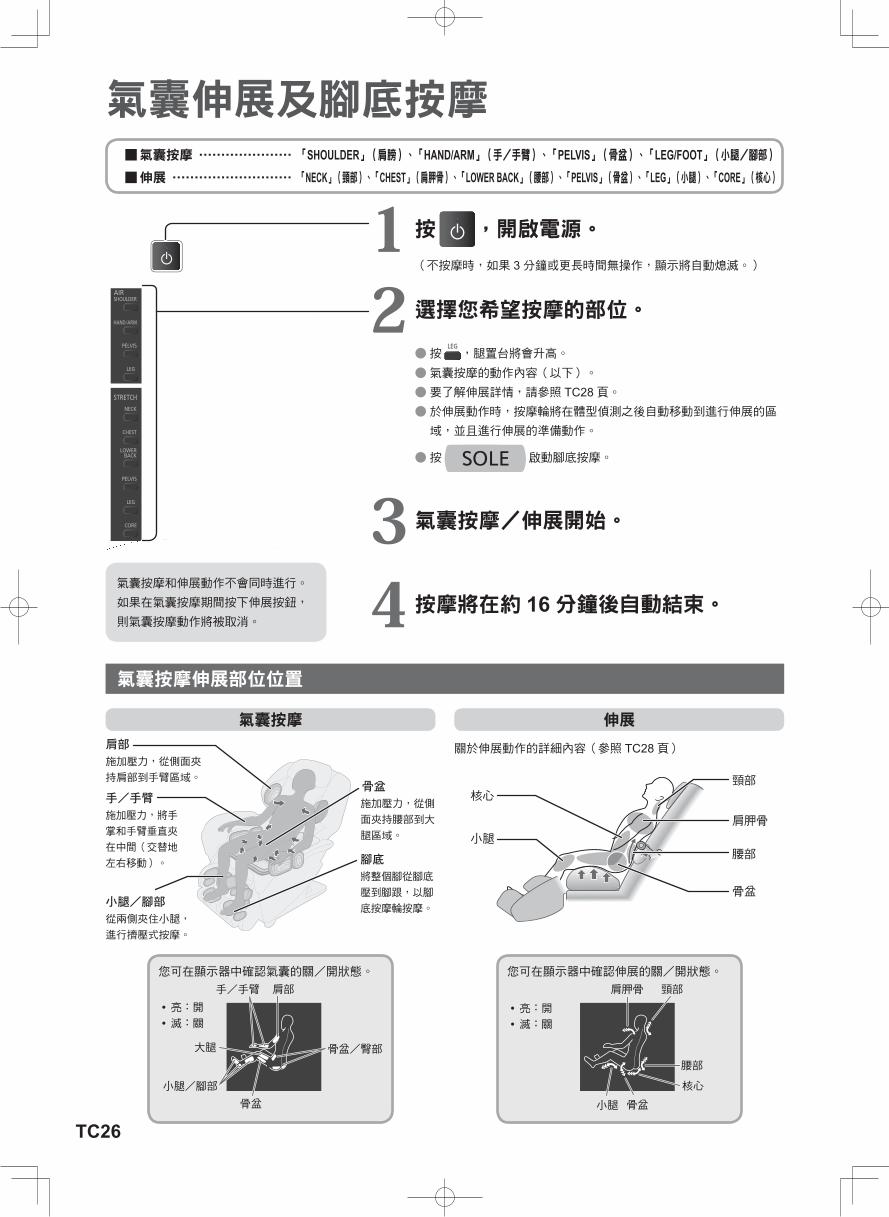
TC26
氣囊伸展及腳底按摩 ■氣囊按摩 ⋯⋯⋯⋯⋯⋯⋯ 「SHOULDER」(肩膀)、「HAND/ARM」(手/手臂)、「PELVIS」(骨盆)、「LEG/FOOT」(小腿/腳部) ■伸展 ⋯⋯⋯⋯⋯⋯⋯⋯⋯ 「NECK」(頸部)、「CHEST」(肩胛骨)、「LOWER BACK」(腰部)、「PELVIS」(骨盆)、「LEG」(小腿)、「CORE」(核心)
1按 ,開啟電源。
( 不按摩時,如果 3分鐘或更長時間無操作,顯示將自動熄滅。)
2選擇您希望按摩的部位。
●按 ,腿置台將會升高。
●氣囊按摩的動作內容(以下)。 ●要了解伸展詳情,請參照 TC28頁。 ●於伸展動作時,按摩輪將在體型偵測之後自動移動到進行伸展的區域,並且進行伸展的準備動作。
●按 啟動腳底按摩。
3氣囊按摩/伸展開始。
4按摩將在約 16分鐘後自動結束。
您可在顯示器中確認氣囊的關/開狀態。
小腿/腳部
骨盆/臀部大腿
骨盆
肩部手/手臂
ㅡ亮:開 ㅡ滅:關
您可在顯示器中確認伸展的關/開狀態。
小腿 骨盆
腰部
核心
頸部肩胛骨
ㅡ亮:開 ㅡ滅:關
氣囊按摩伸展部位位置
氣囊按摩和伸展動作不會同時進行。
如果在氣囊按摩期間按下伸展按鈕,
則氣囊按摩動作將被取消。
氣囊按摩 伸展
關於伸展動作的詳細內容(參照 TC28頁)
骨盆
施加壓力,從側
面夾持腰部到大
腿區域。
腳底
將整個腳從腳底
壓到腳跟,以腳
底按摩輪按摩。小腿/腳部
從兩側夾住小腿,
進行擠壓式按摩。
骨盆
腰部
頸部核心
小腿
肩胛骨
手/手臂
施加壓力,將手
掌和手臂垂直夾
在中間(交替地
左右移動)。
肩部
施加壓力,從側面夾
持肩部到手臂區域。
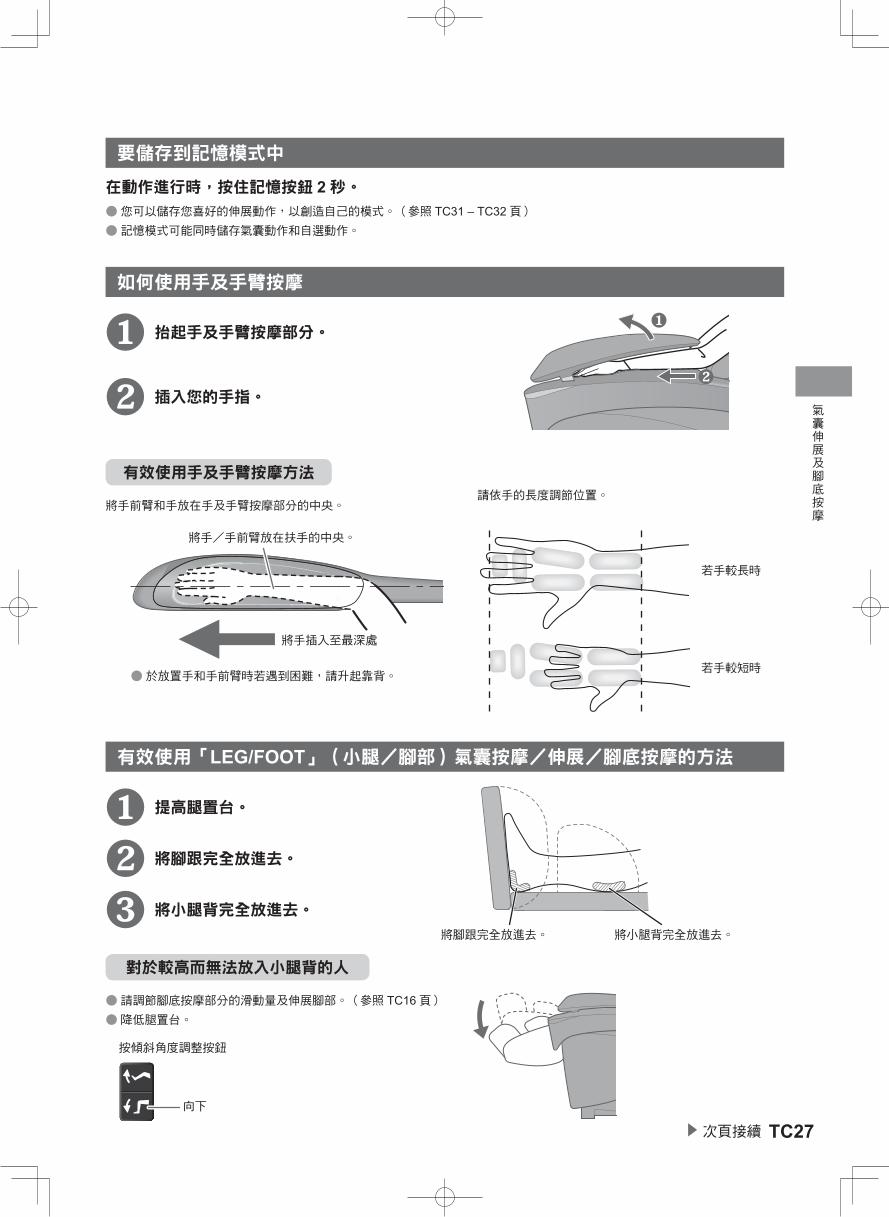
TC27▶ 次頁接續
氣囊伸展及腳底按摩
在動作進行時,按住記憶按鈕 2秒。 ●您可以儲存您喜好的伸展動作,以創造自己的模式。(參照 TC31 – TC32頁) ●記憶模式可能同時儲存氣囊動作和自選動作。
要儲存到記憶模式中
ひじ掛けの中心に手・腕を置く
手を深く入れる
●請調節腳底按摩部分的滑動量及伸展腳部。(參照 TC16頁) ●降低腿置台。
將手前臂和手放在手及手臂按摩部分的中央。
●於放置手和手前臂時若遇到困難,請升起靠背。
按傾斜角度調整按鈕
向下
如何使用手及手臂按摩
有效使用「LEG/FOOT」(小腿/腳部)氣囊按摩/伸展/腳底按摩的方法
❶ 抬起手及手臂按摩部分。
●❷
❷ 插入您的手指。
❶ 提高腿置台。
❷ 將腳跟完全放進去。
❸ 將小腿背完全放進去。
若手較長時
請依手的長度調節位置。
若手較短時
將手/手前臂放在扶手的中央。
將手插入至最深處
將腳跟完全放進去。 將小腿背完全放進去。
●❶
對於較高而無法放入小腿背的人
有效使用手及手臂按摩方法

TC28
「頸部」伸展
「小腿」伸展
「肩胛骨」伸展
「腰部」伸展
「骨盆」伸展
伸展頸部肌肉。
舒展從膝蓋區域到大腿的肌肉。
① 用大腿兩側氣囊把持身體。
② 夾持小腿和腳底,降低腿置台。
●在伸出的腳底按摩部分已滑出的狀態下進行腿部伸展時,腳底按摩部分可能會碰到地板。
舒展從肩胛骨到胸部的肌肉。
舒展腰部的肌肉。
交替地向左和向右伸展和扭動骨盆周圍的肌肉。
椅座氣囊左右
交替膨脹
●為了有效地伸展,腿置台會降低。
伸展動作的內容
① 按摩輪壓住頸根。
② 緩慢排除膨脹的椅座氣囊空氣。
① 按摩輪把持腰部。
② 排除膨脹的椅座氣囊空氣。
「CORE」伸展
1) 舒展從大腿到下腹部。 2) 舒展脊柱周圍。
② 夾持肩部和小腿背/腳部,降低腿置台。
① 椅座氣囊升高臀部。 ③ 肩側氣囊把持肩部,排出膨脹的椅座氣囊空氣。
① 肩側氣囊向內擠壓並把持兩肩。
② 用按摩輪按壓背部。
氣囊伸展及腳底按摩(接續)

TC29▶ 次頁接續
記憶模式
記憶個人喜愛設定
最多可儲存 3個模式。
參照「記憶個人喜愛設定」(參照 TC29頁)和「創造您的模式」(參照 TC31頁)以查看如何儲存模式。
於自動模式期間儲存
於操作時,按住記憶按鈕 2秒以儲存您最喜歡的設定。已儲存的記憶按鈕將亮起。
於自動模式結束時儲存
① 在自動模式結束後,將會顯示您最喜歡的設定 (參照 TC34 – TC37頁),記憶按鈕閃爍。
●在按摩過程中按 即可結束按摩,也可進行儲存。
●在動作結束期間也可以儲存。
② 當按鈕閃爍時(約 25秒),選擇並按住您想儲存的按鈕 2秒設定。
●選中的按鈕將會亮起。(例: )
●如果已經記憶了另一設定,則會通告「儲存有其他設定」及按鈕快速閃爍。
ㅡ若要更新到新設定的內容,請再次按相同的按鈕。
按
ㅡ如果不想刪除已儲存的設定,則按其他記憶按鈕。
按
③ 在結束動作時,電源約 5秒後會被關閉。
注意請注意,若在按摩過程中關閉電源切換鈕或斷
開電源線時,則不會儲存設定。
可記憶內容設定(參照 TC34 – TC37頁)
氣囊伸展及腳底按摩
記憶模式
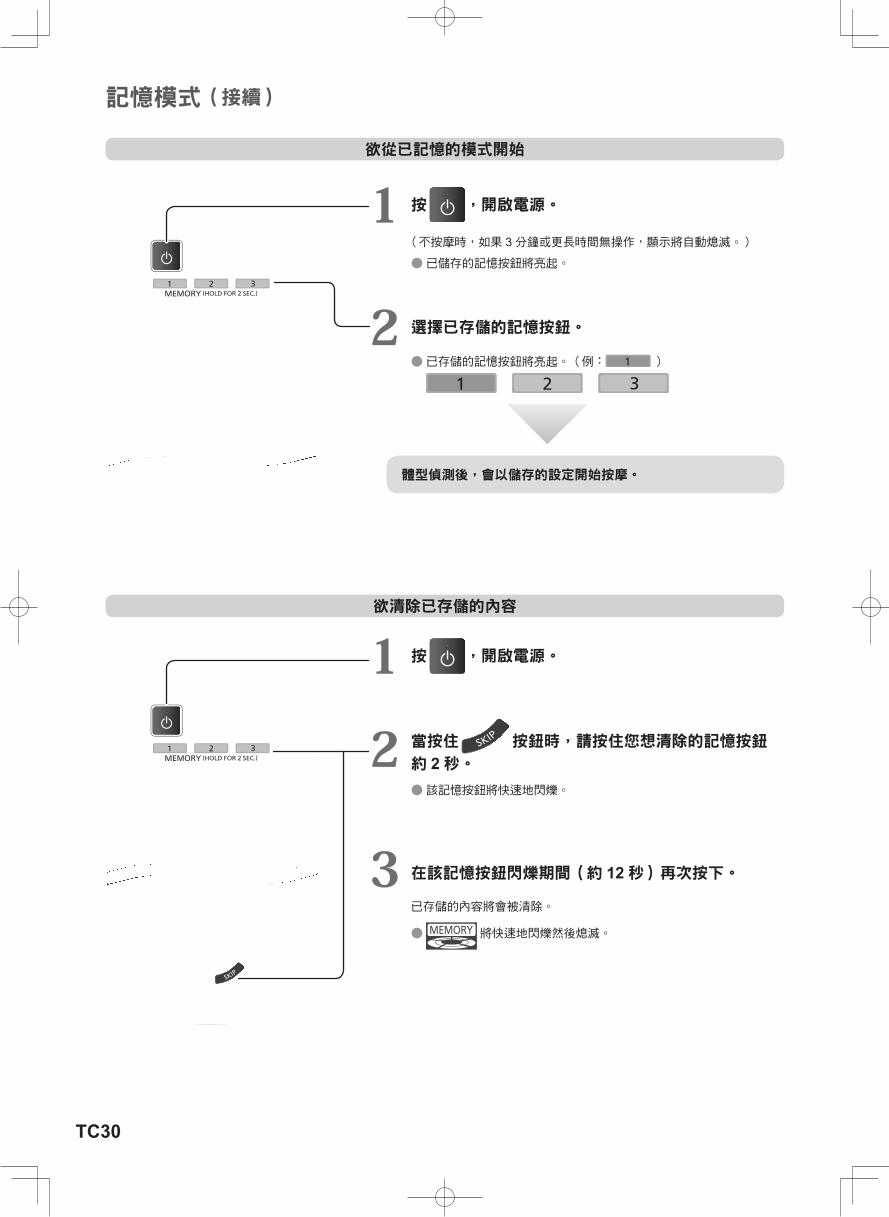
TC30
記憶模式(接續)
1 按 ,開啟電源。
( 不按摩時,如果 3分鐘或更長時間無操作,顯示將自動熄滅。)
●已儲存的記憶按鈕將亮起。
2 選擇已存儲的記憶按鈕。
●已存儲的記憶按鈕將亮起。(例: )
體型偵測後,會以儲存的設定開始按摩。
1 按 ,開啟電源。
2 當按住 按鈕時,請按住您想清除的記憶按鈕 約 2秒。
●該記憶按鈕將快速地閃爍。
3 在該記憶按鈕閃爍期間(約 12秒)再次按下。
已存儲的內容將會被清除。
● 將快速地閃爍然後熄滅。
欲從已記憶的模式開始
欲清除已存儲的內容
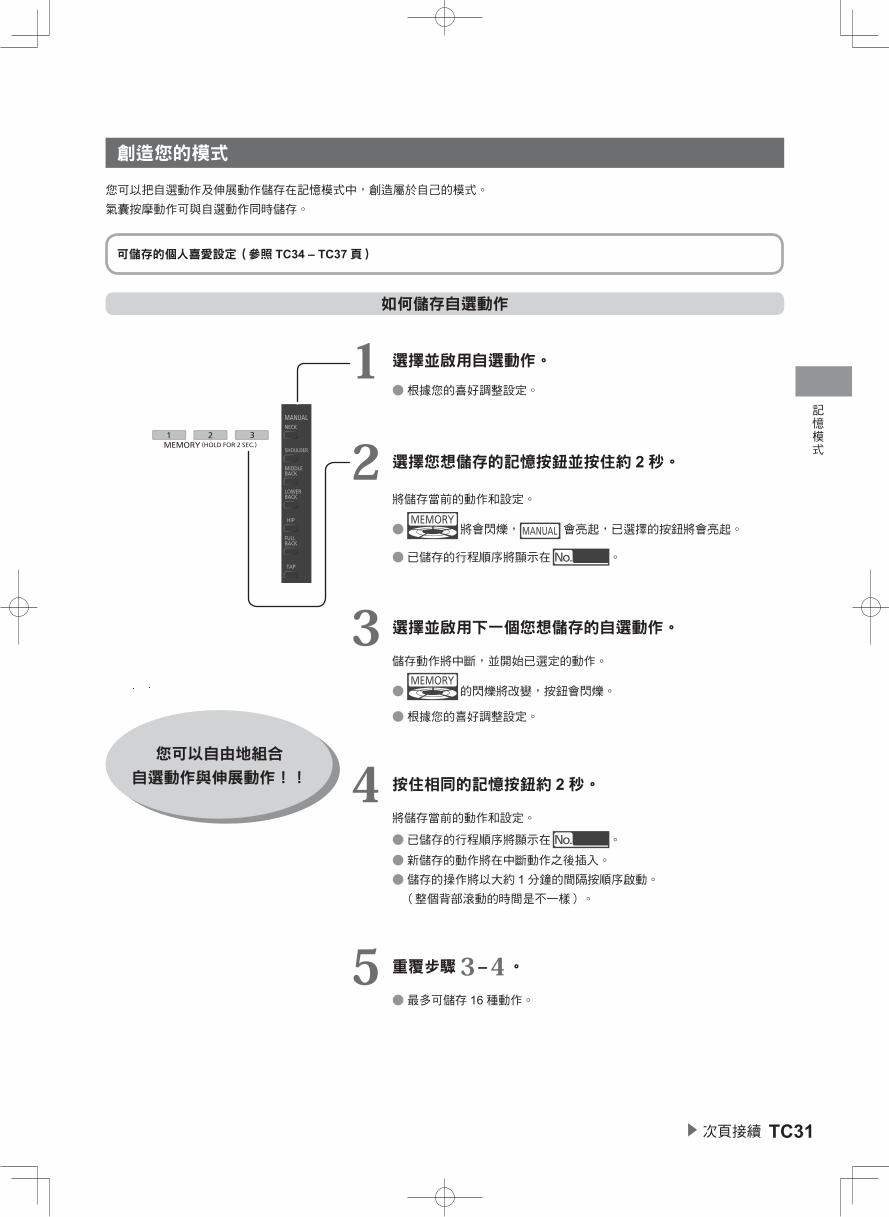
TC31▶ 次頁接續
記憶模式
可儲存的個人喜愛設定(參照 TC34 – TC37頁)
創造您的模式
1 選擇並啟用自選動作。
●根據您的喜好調整設定。
2 選擇您想儲存的記憶按鈕並按住約 2秒。
將儲存當前的動作和設定。
● 將會閃爍, 會亮起,已選擇的按鈕將會亮起。
●已儲存的行程順序將顯示在 。
3 選擇並啟用下一個您想儲存的自選動作。
儲存動作將中斷,並開始已選定的動作。
● 的閃爍將改變,按鈕會閃爍。
●根據您的喜好調整設定。
4 按住相同的記憶按鈕約 2秒。
將儲存當前的動作和設定。
●已儲存的行程順序將顯示在 。
●新儲存的動作將在中斷動作之後插入。 ●儲存的操作將以大約 1分鐘的間隔按順序啟動。 (整個背部滾動的時間是不一樣)。
5 重覆步驟3 –4。 ●最多可儲存 16種動作。
您可以自由地組合 自選動作與伸展動作!!
如何儲存自選動作
您可以把自選動作及伸展動作儲存在記憶模式中,創造屬於自己的模式。
氣囊按摩動作可與自選動作同時儲存。
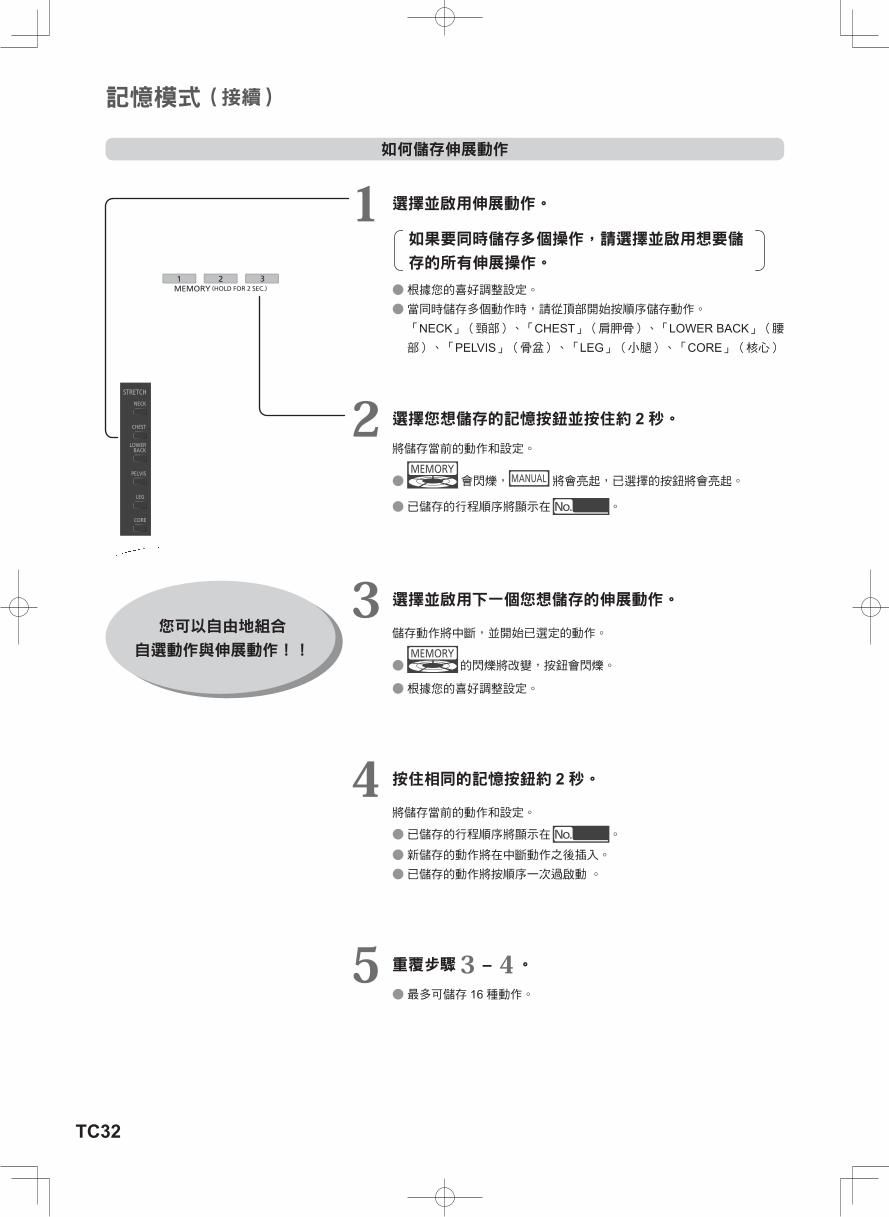
TC32
記憶模式(接續)
您可以自由地組合 自選動作與伸展動作!!
1 選擇並啟用伸展動作。
如果要同時儲存多個操作,請選擇並啟用想要儲
存的所有伸展操作。
●根據您的喜好調整設定。 ●當同時儲存多個動作時,請從頂部開始按順序儲存動作。「NECK」(頸部)、「CHEST」(肩胛骨)、「LOWER BACK」(腰部)、「PELVIS」(骨盆)、「LEG」(小腿)、「CORE」(核心)
2 選擇您想儲存的記憶按鈕並按住約 2秒。將儲存當前的動作和設定。
● 會閃爍, 將會亮起,已選擇的按鈕將會亮起。
●已儲存的行程順序將顯示在 。
3 選擇並啟用下一個您想儲存的伸展動作。
儲存動作將中斷,並開始已選定的動作。
● 的閃爍將改變,按鈕會閃爍。
●根據您的喜好調整設定。
4 按住相同的記憶按鈕約 2秒。
將儲存當前的動作和設定。
●已儲存的行程順序將顯示在 。
●新儲存的動作將在中斷動作之後插入。 ●已儲存的動作將按順序一次過啟動 。
5 重覆步驟3 – 4。 ●最多可儲存 16種動作。
如何儲存伸展動作
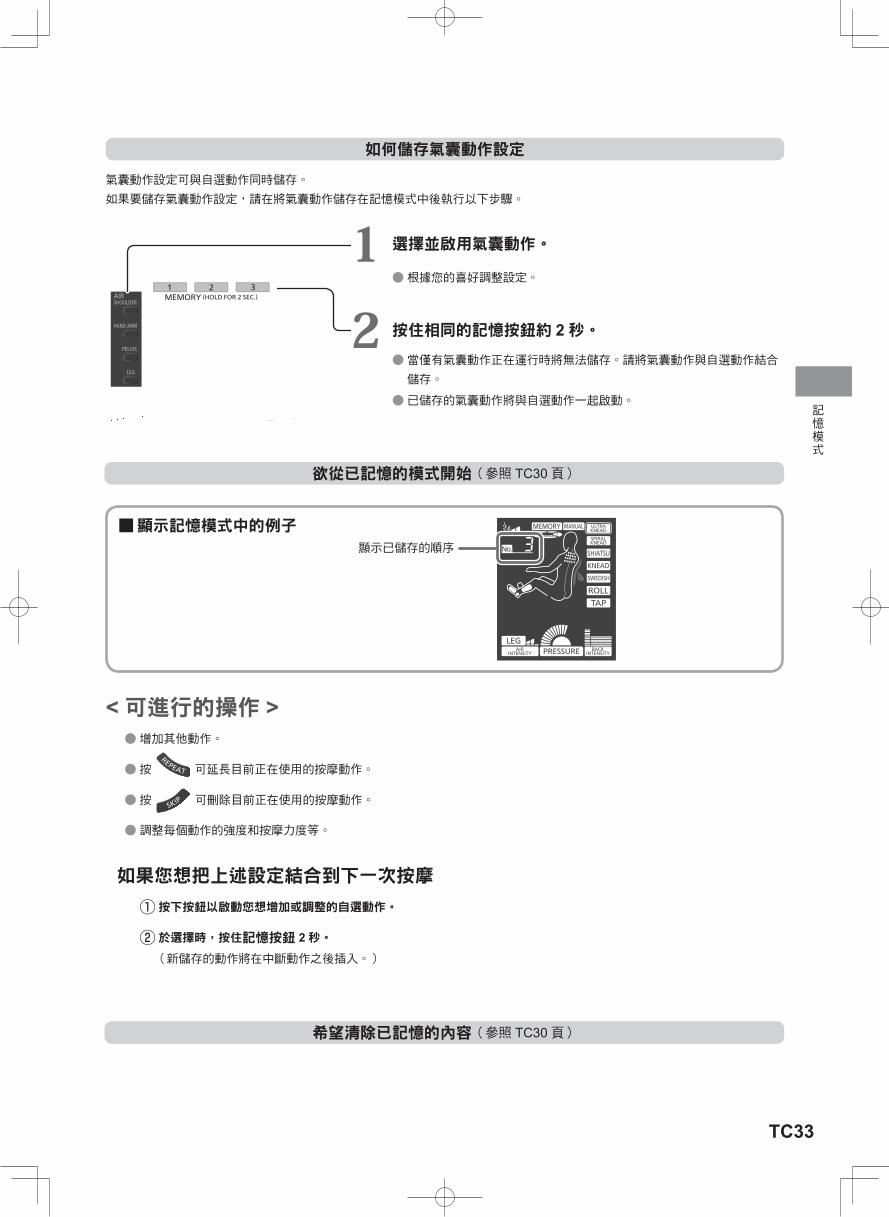
TC33
記憶模式
氣囊動作設定可與自選動作同時儲存。
如果要儲存氣囊動作設定,請在將氣囊動作儲存在記憶模式中後執行以下步驟。
1 選擇並啟用氣囊動作。
●根據您的喜好調整設定。
2 按住相同的記憶按鈕約 2秒。 ●當僅有氣囊動作正在運行時將無法儲存。請將氣囊動作與自選動作結合儲存。
●已儲存的氣囊動作將與自選動作一起啟動。
如何儲存氣囊動作設定
■顯示記憶模式中的例子顯示已儲存的順序
欲從已記憶的模式開始(參照 TC30頁)
希望清除已記憶的內容(參照 TC30頁)
<可進行的操作 > ●增加其他動作。
●按 可延長目前正在使用的按摩動作。
●按 可刪除目前正在使用的按摩動作。
●調整每個動作的強度和按摩力度等。
如果您想把上述設定結合到下一次按摩
① 按下按鈕以啟動您想增加或調整的自選動作。
② 於選擇時,按住記憶按鈕 2秒。 (新儲存的動作將在中斷動作之後插入。)
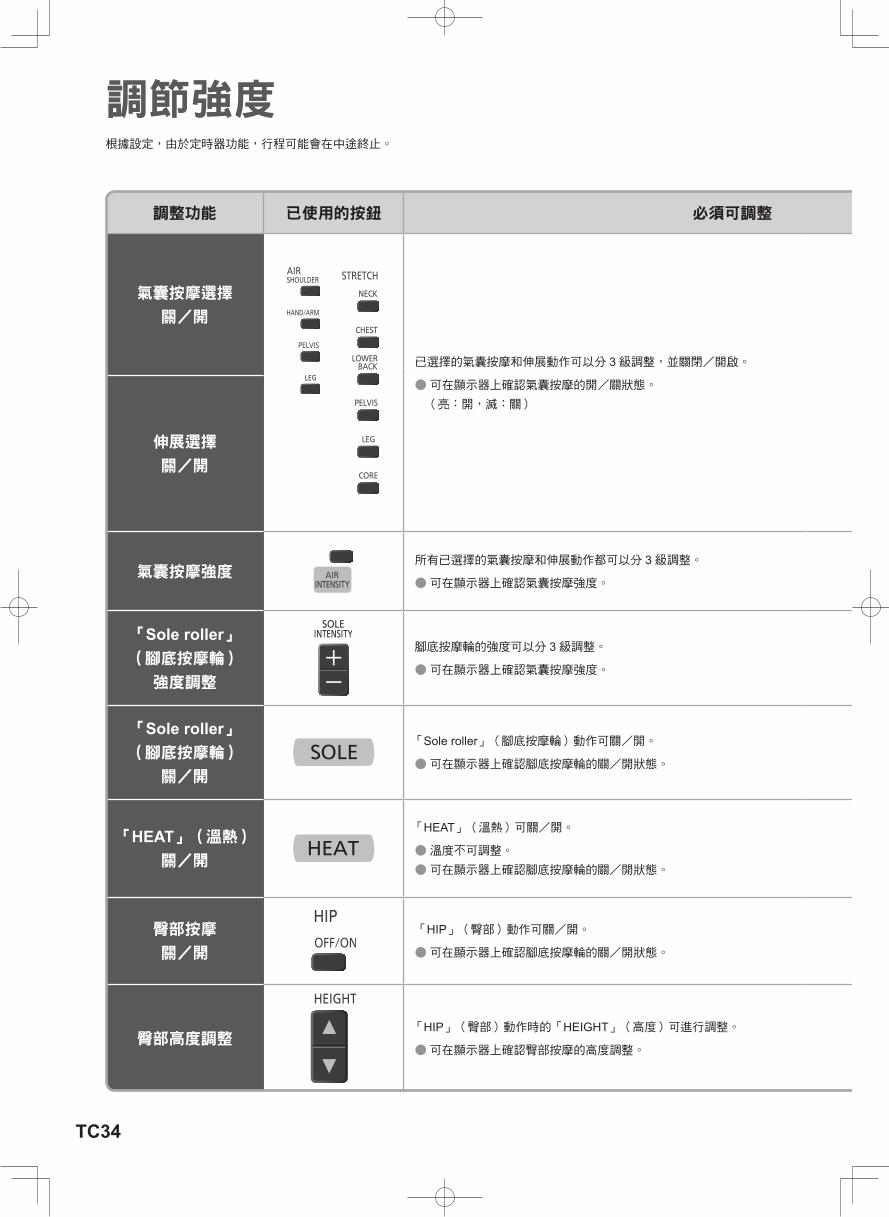
TC34
調節強度根據設定,由於定時器功能,行程可能會在中途終止。
調整功能 已使用的按鈕 必須可調整 自動模式 自選動作 氣囊動作 * 伸展動作
氣囊按摩選擇 關/開
已選擇的氣囊按摩和伸展動作可以分 3級調整,並關閉/開啟。
●可在顯示器上確認氣囊按摩的開/關狀態。 (亮:開,滅:關)
例子) 每次您按下氣囊 和伸展 按鈕,即可以下列順序調整設定及關閉/開啟。
氣囊按摩顯示 伸展顯示 強度
無顯示 無顯示 中 → 關 → 柔和 → 中 → 強
○ ○ ○ -
伸展選擇 關/開 ○ - - ○
氣囊按摩強度所有已選擇的氣囊按摩和伸展動作都可以分 3級調整。
●可在顯示器上確認氣囊按摩強度。 ○ ○ ○ ○
「Sole roller」 (腳底按摩輪) 強度調整
腳底按摩輪的強度可以分 3級調整。
●可在顯示器上確認氣囊按摩強度。
強度 柔和 中 強
腳底按摩輪
強度顯示○ ○ ○ -
「Sole roller」 (腳底按摩輪) 關/開
「Sole roller」(腳底按摩輪)動作可關/開。
●可在顯示器上確認腳底按摩輪的關/開狀態。
亮:「Sole roller」(腳底按摩輪)動作開
滅:「Sole roller」(腳底按摩輪)動作開
●按鈕也會關閉。
○ ○ ○ -
「HEAT」(溫熱) 關/開
「HEAT」(溫熱)可關/開。
●溫度不可調整。 ●可在顯示器上確認腳底按摩輪的關/開狀態。
亮:「HEAT」(溫熱)開滅:「HEAT」(溫熱)關
●按鈕也會關閉。○ ○ - ○
臀部按摩 關/開
「HIP」(臀部)動作可關/開。
●可在顯示器上確認腳底按摩輪的關/開狀態。
亮:「HIP」(臀部)動作開滅:「HIP」(臀部)動作關 ○ - - -
臀部高度調整 「HIP」(臀部)動作時的「HEIGHT」(高度)可進行調整。
●可在顯示器上確認臀部按摩的高度調整。
顯示 ...
亮: 可調整
閃爍: 氣囊正在充氣或排放滅: 不可調整
○ ○ - -
TC35▶ 次頁接續
調節強度
*當在儲存自選動作到記憶模式時,氣囊動作設定也可以儲存到記憶模式中。
調整功能 已使用的按鈕 必須可調整 自動模式 自選動作 氣囊動作 * 伸展動作
氣囊按摩選擇 關/開
已選擇的氣囊按摩和伸展動作可以分 3級調整,並關閉/開啟。
●可在顯示器上確認氣囊按摩的開/關狀態。 (亮:開,滅:關)
例子) 每次您按下氣囊 和伸展 按鈕,即可以下列順序調整設定及關閉/開啟。
氣囊按摩顯示 伸展顯示 強度
無顯示 無顯示 中 → 關 → 柔和 → 中 → 強
○ ○ ○ -
伸展選擇 關/開 ○ - - ○
氣囊按摩強度所有已選擇的氣囊按摩和伸展動作都可以分 3級調整。
●可在顯示器上確認氣囊按摩強度。 ○ ○ ○ ○
「Sole roller」 (腳底按摩輪) 強度調整
腳底按摩輪的強度可以分 3級調整。
●可在顯示器上確認氣囊按摩強度。
強度 柔和 中 強
腳底按摩輪
強度顯示○ ○ ○ -
「Sole roller」 (腳底按摩輪) 關/開
「Sole roller」(腳底按摩輪)動作可關/開。
●可在顯示器上確認腳底按摩輪的關/開狀態。
亮:「Sole roller」(腳底按摩輪)動作開
滅:「Sole roller」(腳底按摩輪)動作開
●按鈕也會關閉。
○ ○ ○ -
「HEAT」(溫熱) 關/開
「HEAT」(溫熱)可關/開。
●溫度不可調整。 ●可在顯示器上確認腳底按摩輪的關/開狀態。
亮:「HEAT」(溫熱)開滅:「HEAT」(溫熱)關
●按鈕也會關閉。○ ○ - ○
臀部按摩 關/開
「HIP」(臀部)動作可關/開。
●可在顯示器上確認腳底按摩輪的關/開狀態。
亮:「HIP」(臀部)動作開滅:「HIP」(臀部)動作關 ○ - - -
臀部高度調整 「HIP」(臀部)動作時的「HEIGHT」(高度)可進行調整。
●可在顯示器上確認臀部按摩的高度調整。
顯示 ...
亮: 可調整
閃爍: 氣囊正在充氣或排放滅: 不可調整
○ ○ - -
有標示此標記的項目,可於登錄依個人喜好所設定的內容後再使用。
(參照 TC29頁)
TC36
調節強度(接續)
調整功能 已使用的按鈕 必須可調整 自動模式 自選動作 氣囊動作 伸展動作
背部按摩強度調整
背部按摩強度可調整。
●可以通過顯示畫面確認當前正在進行按摩的部位。 ●可調整的強度級別因行程及動作而異。
ㅡ自動模式伸展動作 ] ....... 5級(背部按摩強度刻度 2、4、6、8、10)
ㅡ自選動作 ....... 最多達 10級(級別取決於動作)
●設定到最強仍感覺力道不足時、或者設定到最弱仍感覺力道太強時,請參照 TC47頁。 ●於動作切換時,「BACK INTENSITY」(背部強度)不可進行調整。
<背部按摩強度顯示 >
可調節
級別
目前背部按摩強度 ○
5個強度調整級別
○
最多 5個 強度調整級別
(強度級別因動 作而異)
-○
於伸展動作時, 有 5個背部按摩 強度調整級別
按摩輪位置調整
按摩輪的位置可以垂直和水平調整。
如果要調整目前正在進行按摩的按摩輪位置,請按位置調節按鈕進行 調整。
●於自動模式時,可調節的次數為 3次。 ●自選動作時,當您按住上下按鈕位置將會移動直至您鬆開手。
●根據位置的不同,可能無法進行調節。 ○ ○ - ○
按摩強度調整
您可以檢測背部按摩壓力,加強或降低按摩力度。
●每個自動模式的按摩力度已設定為建議的強度。 ㅡ揉撫:輕 ㅡ深度、指壓、快速:強 ㅡ伸展、頸部/肩部、上背部、腰部/臀部、核心:標準
根據您的喜好調整設定。
●使用單個「TAP」(捶拍)動作時,「NECK」(頸部)和「HIP」(臀部)的按摩力度是一樣的。
○
調整行程的 整體按摩強度
○
在動作中途 調整按摩強度
-○
調整目前背部 按摩的力度
背部按摩壓力顯示 .......... 顯示按摩輪的背部按摩壓力。
●根據操作,顯示器中的指示可能會與實際感覺不相符。
●使用單個「TAP」(捶拍)動作時,在「NECK」(頸部)和「HIP」(臀部)區域的行程將不會顯示。
捶拍可將捶拍增加到動作中。
●當僅使用捶拍動作進行按摩時,不能關閉/開啟捶拍。 - ○ - -
重覆
可以重覆目前正在進行的按摩動作。
●正在切換動作時,「REPEAT」(重覆按摩)指令可能無法被接受。
●重覆按摩時, 將閃爍。○ - - -
跳過跳過當前正在進行的按摩動作,並進入下一個動作。
●正在切換動作時,「SKIP」(跳過)指令可能無法被接受。 ●按下「SKIP」(跳過)按鈕, 將閃爍約 5秒,並顯示下一個動作。 ○ - - -
根據設定,由於定時器功能,行程可能會在中途終止。
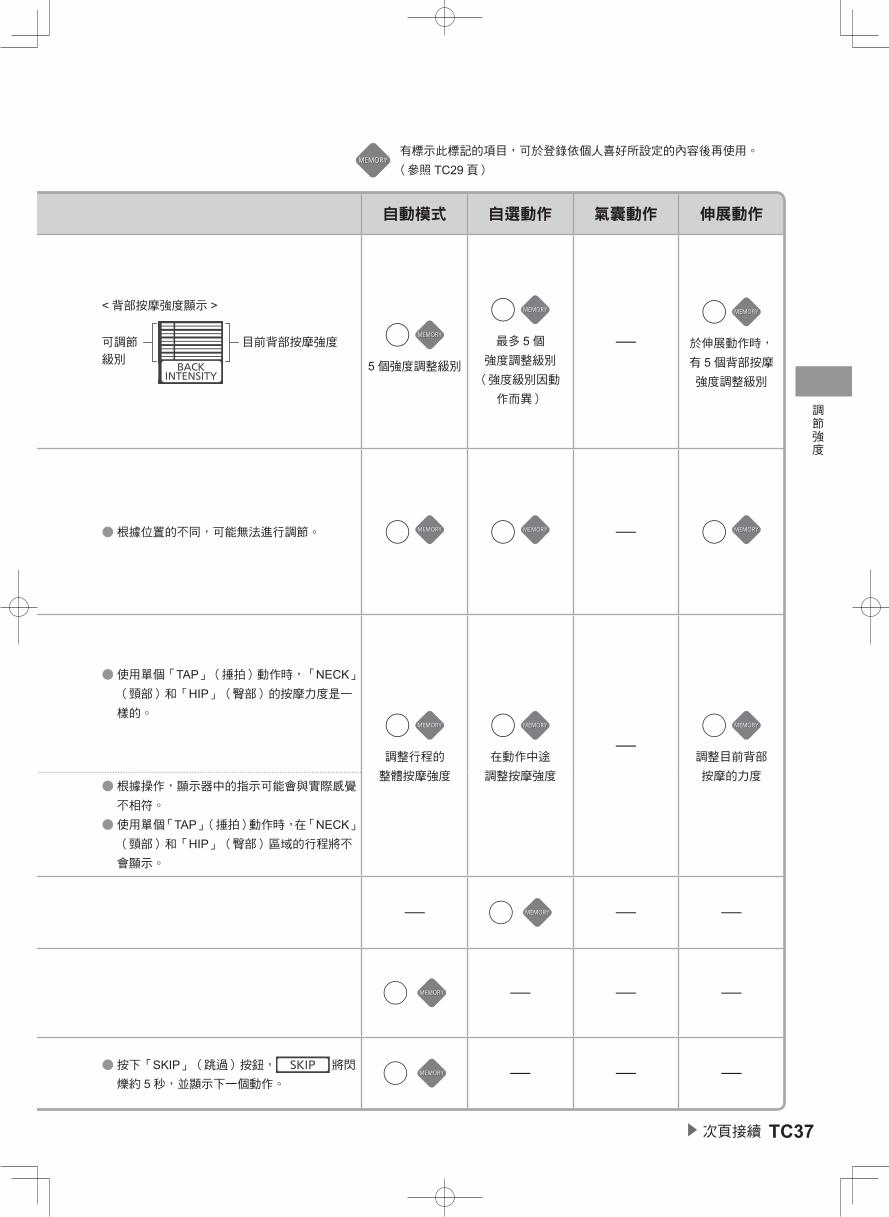
TC37▶ 次頁接續
調節強度
調整功能 已使用的按鈕 必須可調整 自動模式 自選動作 氣囊動作 伸展動作
背部按摩強度調整
背部按摩強度可調整。
●可以通過顯示畫面確認當前正在進行按摩的部位。 ●可調整的強度級別因行程及動作而異。
ㅡ自動模式伸展動作 ] ....... 5級(背部按摩強度刻度 2、4、6、8、10)
ㅡ自選動作 ....... 最多達 10級(級別取決於動作)
●設定到最強仍感覺力道不足時、或者設定到最弱仍感覺力道太強時,請參照 TC47頁。 ●於動作切換時,「BACK INTENSITY」(背部強度)不可進行調整。
<背部按摩強度顯示 >
可調節
級別
目前背部按摩強度 ○
5個強度調整級別
○
最多 5個 強度調整級別
(強度級別因動 作而異)
-○
於伸展動作時, 有 5個背部按摩 強度調整級別
按摩輪位置調整
按摩輪的位置可以垂直和水平調整。
如果要調整目前正在進行按摩的按摩輪位置,請按位置調節按鈕進行 調整。
●於自動模式時,可調節的次數為 3次。 ●自選動作時,當您按住上下按鈕位置將會移動直至您鬆開手。
●根據位置的不同,可能無法進行調節。 ○ ○ - ○
按摩強度調整
您可以檢測背部按摩壓力,加強或降低按摩力度。
●每個自動模式的按摩力度已設定為建議的強度。 ㅡ揉撫:輕 ㅡ深度、指壓、快速:強 ㅡ伸展、頸部/肩部、上背部、腰部/臀部、核心:標準
根據您的喜好調整設定。
●使用單個「TAP」(捶拍)動作時,「NECK」(頸部)和「HIP」(臀部)的按摩力度是一樣的。
○
調整行程的 整體按摩強度
○
在動作中途 調整按摩強度
-○
調整目前背部 按摩的力度
背部按摩壓力顯示 .......... 顯示按摩輪的背部按摩壓力。
●根據操作,顯示器中的指示可能會與實際感覺不相符。
●使用單個「TAP」(捶拍)動作時,在「NECK」(頸部)和「HIP」(臀部)區域的行程將不會顯示。
捶拍可將捶拍增加到動作中。
●當僅使用捶拍動作進行按摩時,不能關閉/開啟捶拍。 - ○ - -
重覆
可以重覆目前正在進行的按摩動作。
●正在切換動作時,「REPEAT」(重覆按摩)指令可能無法被接受。
●重覆按摩時, 將閃爍。○ - - -
跳過跳過當前正在進行的按摩動作,並進入下一個動作。
●正在切換動作時,「SKIP」(跳過)指令可能無法被接受。 ●按下「SKIP」(跳過)按鈕, 將閃爍約 5秒,並顯示下一個動作。 ○ - - -
有標示此標記的項目,可於登錄依個人喜好所設定的內容後再使用。
(參照 TC29頁)
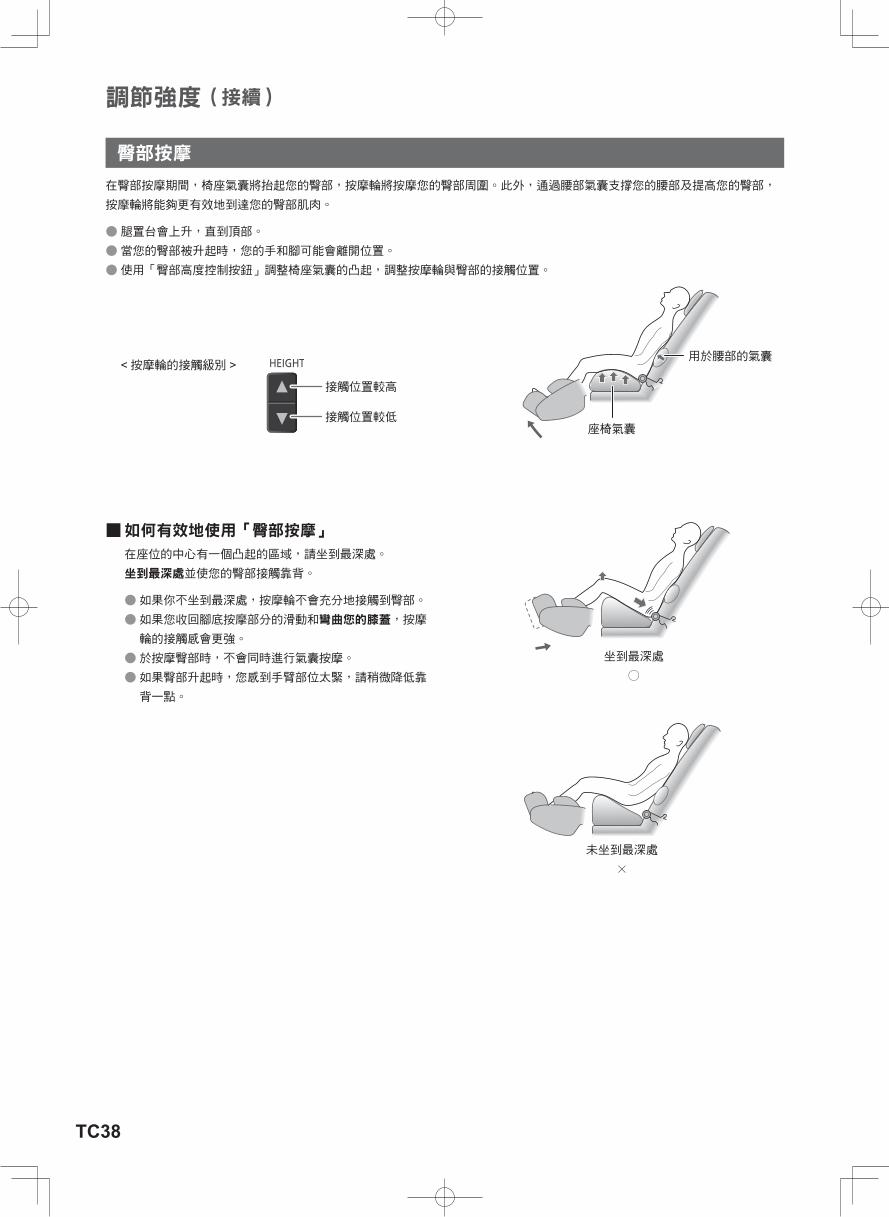
TC38
調節強度(接續)
在臀部按摩期間,椅座氣囊將抬起您的臀部,按摩輪將按摩您的臀部周圍。此外,通過腰部氣囊支撐您的腰部及提高您的臀部,
按摩輪將能夠更有效地到達您的臀部肌肉。
●腿置台會上升,直到頂部。 ●當您的臀部被升起時,您的手和腳可能會離開位置。 ●使用「臀部高度控制按鈕」調整椅座氣囊的凸起,調整按摩輪與臀部的接觸位置。
<按摩輪的接觸級別 >
接觸位置較高
接觸位置較低
■如何有效地使用「臀部按摩」在座位的中心有一個凸起的區域,請坐到最深處。
坐到最深處並使您的臀部接觸靠背。
●如果你不坐到最深處,按摩輪不會充分地接觸到臀部。 ●如果您收回腳底按摩部分的滑動和彎曲您的膝蓋,按摩輪的接觸感會更強。
●於按摩臀部時,不會同時進行氣囊按摩。 ●如果臀部升起時,您感到手臂部位太緊,請稍微降低靠背一點。
座椅氣囊
用於腰部的氣囊
坐到最深處
○
未坐到最深處
×
臀部按摩
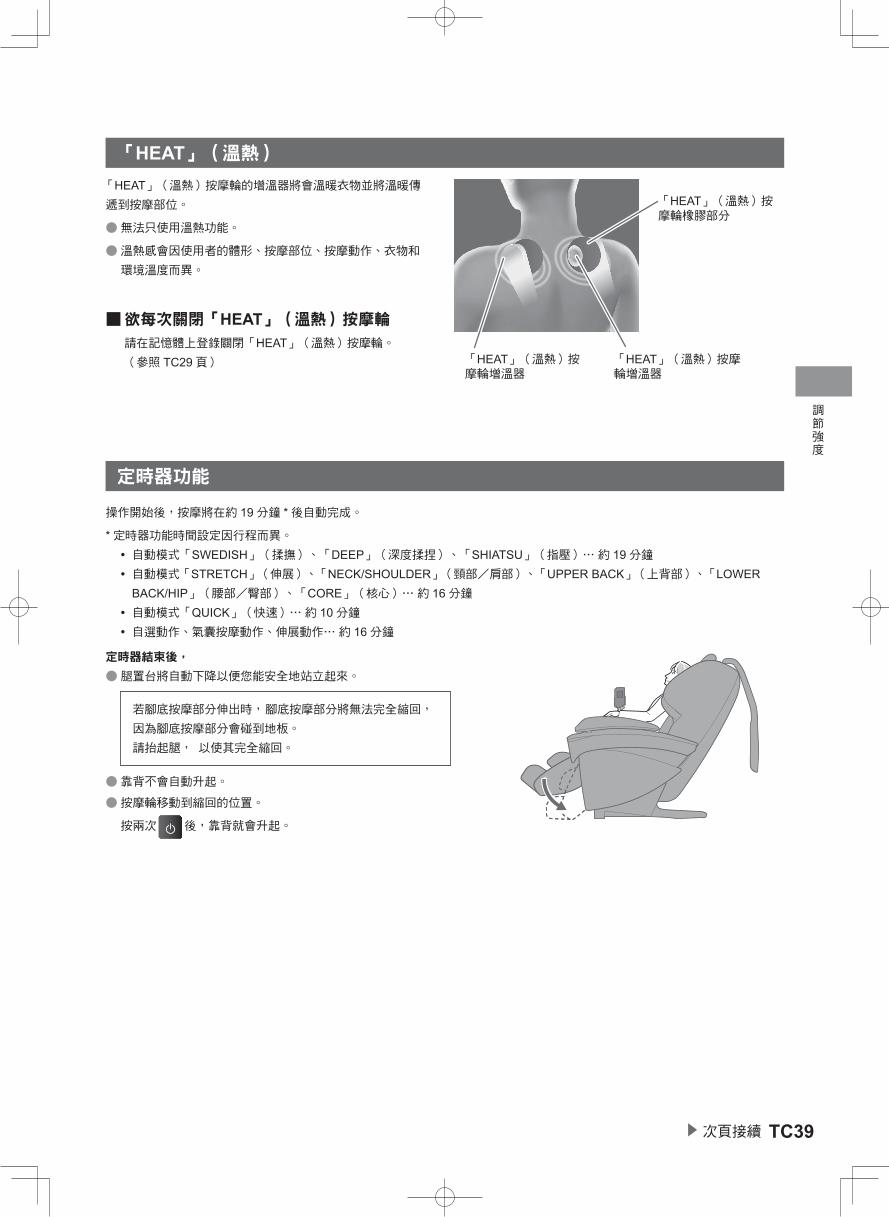
TC39▶ 次頁接續
調節強度
「HEAT」(溫熱)按摩輪的增溫器將會溫暖衣物並將溫暖傳遞到按摩部位。
●無法只使用溫熱功能。
●溫熱感會因使用者的體形、按摩部位、按摩動作、衣物和環境溫度而異。
「HEAT」(溫熱)按摩輪增溫器
「HEAT」(溫熱)按摩輪增溫器
「HEAT」(溫熱)按摩輪橡膠部分
「HEAT」(溫熱)
■欲每次關閉「HEAT」(溫熱)按摩輪請在記憶體上登錄關閉「HEAT」(溫熱)按摩輪。 (參照 TC29頁)
操作開始後,按摩將在約 19分鐘 *後自動完成。
*定時器功能時間設定因行程而異。 ㅡ自動模式「SWEDISH」(揉撫)、「DEEP」(深度揉捏)、「SHIATSU」(指壓)⋯ 約 19分鐘 ㅡ自動模式「STRETCH」(伸展)、「NECK/SHOULDER」(頸部/肩部)、「UPPER BACK」(上背部)、「LOWER BACK/HIP」(腰部/臀部)、「CORE」(核心)⋯ 約 16分鐘 ㅡ自動模式「QUICK」(快速)⋯ 約 10分鐘 ㅡ自選動作、氣囊按摩動作、伸展動作⋯ 約 16分鐘
定時器結束後,
●腿置台將自動下降以便您能安全地站立起來。
若腳底按摩部分伸出時,腳底按摩部分將無法完全縮回,
因為腳底按摩部分會碰到地板。
請抬起腿, 以使其完全縮回。
●靠背不會自動升起。
●按摩輪移動到縮回的位置。
按兩次 後,靠背就會升起。
定時器功能

TC40
顯示部分
音量
「Off」(關)
「Soft」(低)
「Medium」(中)
「Loud」(高)
(默認設定)
這是一項簡要說明操作步驟和動作內容的功能。
■調整音量
按 按鈕以調整音量(逐級增/減)。
●把目前的音量登錄到記憶模式。(參照 TC29頁)
語音導引功能
調整到所需位置後,按 OK按鈕。
調整靠枕的位置。
單嗶音和三重嗶音將會被關閉。
調節強度(接續)
按 按鈕以調整角度。
調節傾斜角度與腿置台
●按著調整按鈕,靠背將會移動,直到您聽到「嗶 -嗶 -嗶」聲為止。
●腿置台的移動也許會稍微延遲。
●扶手會根據靠背的傾斜度而移動。
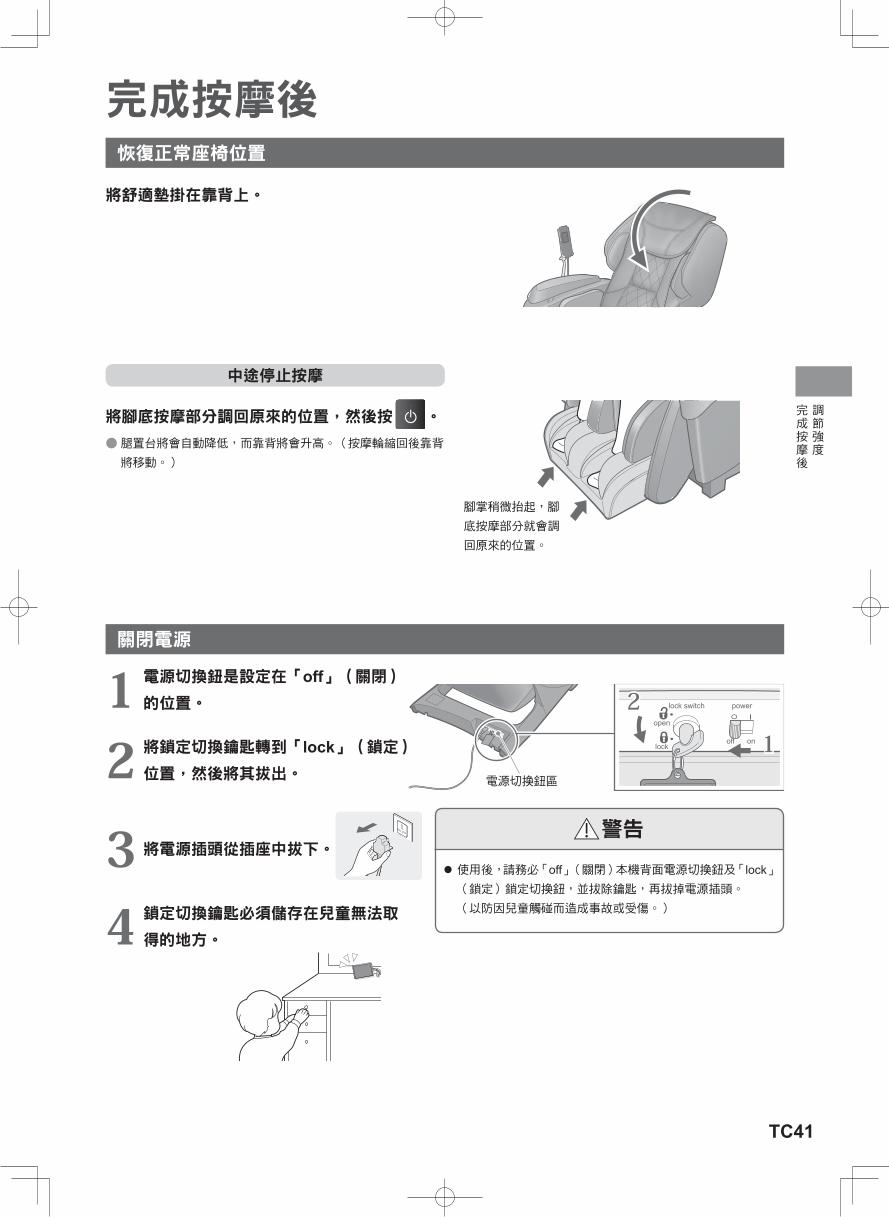
TC41
調節強度
完成按摩後
完成按摩後
將腳底按摩部分調回原來的位置,然後按 。
●腿置台將會自動降低,而靠背將會升高。(按摩輪縮回後靠背將移動。)
腳掌稍微抬起,腳
底按摩部分就會調
回原來的位置。
恢復正常座椅位置
將舒適墊掛在靠背上。
中途停止按摩
off
lock switch
onlock
open
power
關閉電源
電源切換鈕區
2
1
警告
使用後,請務必「off」(關閉)本機背面電源切換鈕及「lock」(鎖定)鎖定切換鈕,並拔除鑰匙,再拔掉電源插頭。 (以防因兒童觸碰而造成事故或受傷。)
1 電源切換鈕是設定在「off」(關閉) 的位置。
2 將鎖定切換鑰匙轉到「lock」(鎖定)位置,然後將其拔出。
3 將電源插頭從插座中拔下。
4 鎖定切換鑰匙必須儲存在兒童無法取
得的地方。
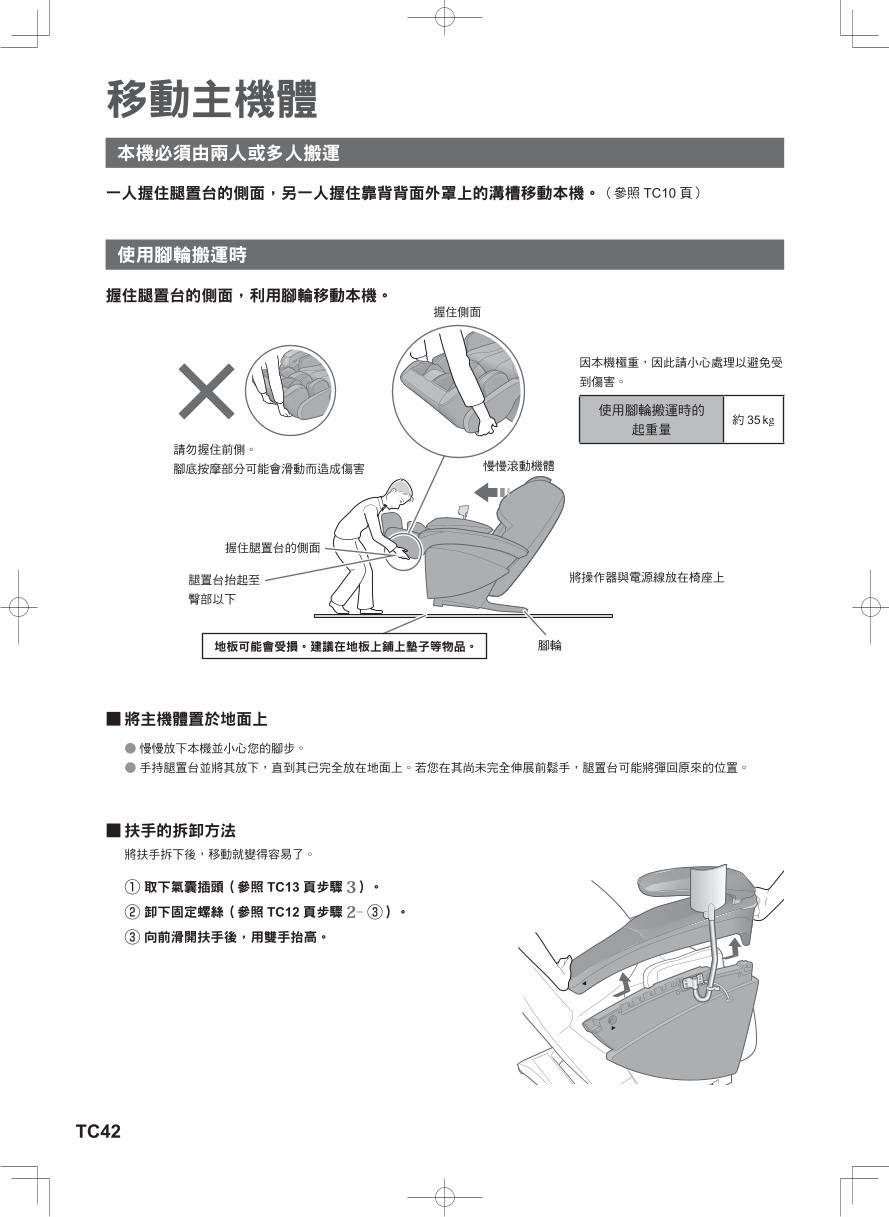
TC42
移動主機體
一人握住腿置台的側面,另一人握住靠背背面外罩上的溝槽移動本機。(參照 TC10頁)
握住腿置台的側面,利用腳輪移動本機。握住側面
將操作器與電源線放在椅座上
握住腿置台的側面
腿置台抬起至
臀部以下
慢慢滾動機體
■將主機體置於地面上 ●慢慢放下本機並小心您的腳步。 ●手持腿置台並將其放下,直到其已完全放在地面上。若您在其尚未完全伸展前鬆手,腿置台可能將彈回原來的位置。
■扶手的拆卸方法將扶手拆下後,移動就變得容易了。
① 取下氣囊插頭(參照 TC13頁步驟 3)。② 卸下固定螺絲(參照 TC12頁步驟 2-③)。③ 向前滑開扶手後,用雙手抬高。
本機必須由兩人或多人搬運
使用腳輪搬運時
地板可能會受損。建議在地板上鋪上墊子等物品。
請勿握住前側。
腳底按摩部分可能會滑動而造成傷害
因本機極重,因此請小心處理以避免受
到傷害。
使用腳輪搬運時的 起重量
約 35 kg
腳輪

TC43
移動主機體
清潔和保養
清潔和保養
① 用軟布沾清水擰乾、或以溫水加上廚房的中性清潔劑而混成 3 – 5 % 的稀釋液後,用軟布沾濕後擰乾。
ㅡ請絕對不要使用稀釋劑、汽油、酒精等化學劑
② 遇到頑強汙垢時,則用刷洗方式 ,以清水或廚房用中性清潔劑刷洗乾淨。
ㅡ過度用力洗刷將會損害布料。
③ 沖洗濕布,將之擰乾,然後再把皮革表面剩餘的洗滌劑擦去。
④ 讓本機自然風乾。 ㅡ由於可能因衣物褪色而沾染到椅座布料的表面,因此,
當穿著牛仔褲或染色衣物而使用本機時,請格外小心。
① 用軟布沾清水擰乾、或以溫水加上廚房的中性清潔劑而混成 3 – 5 % 的稀釋液後,用軟布沾濕後擰乾。
ㅡ請絕對不要使用稀釋劑、汽油、酒精等化
學劑。
② 沖洗濕布,將之擰乾,然後再把皮革表面剩餘的洗滌劑擦去。
ㅡ在擦拭操作器時,請將濕布充分擰乾。
③ 讓其自然風乾。
請使用柔軟的乾布擦拭
●請絕對不要使用稀釋劑、 汽油、 酒精等化學劑。 ●在使用市面銷售的皮革保養品(化學抹布)時, 請遵照標註的注意事項。
●若人造皮革非常骯髒, 請以下列方式擦拭之。
① 用軟布沾清水擰乾、或以溫水加上廚房的中性清潔劑而混成 3 – 5 % 的稀釋液後,用軟布沾濕後擰乾。
② 用濕布輕輕地擦拭皮革表面。
③ 沖洗濕布,將之擰乾,然後再把皮革表面剩餘的洗滌劑擦去。
④ 請使用柔軟的乾布擦拭表面。
⑤ 讓其自然風乾。
人造皮革區域
塑膠區域
布料部分
●若不易清除汙垢時,請使用市面上的「科技泡綿」沾取廚房的中性清潔劑後,再擦拭乾淨。
●不得使用吹風機快速吹乾表面。 ●由於可能因衣物褪色而沾染到人造皮革的表面,因此,當穿著牛仔褲或染色衣物而使用本機時,請格外小心。
●不得讓塑膠產品長期接觸此等區域,以避免導致皮革褪色。如果你使用頭髮造型產品時,請在頭髮可能接觸的部位鋪上
一條毛巾。
水
水
廚房用中性清
潔劑等
水
廚房用中性清
潔劑等
稀釋劑
汽油
酒精
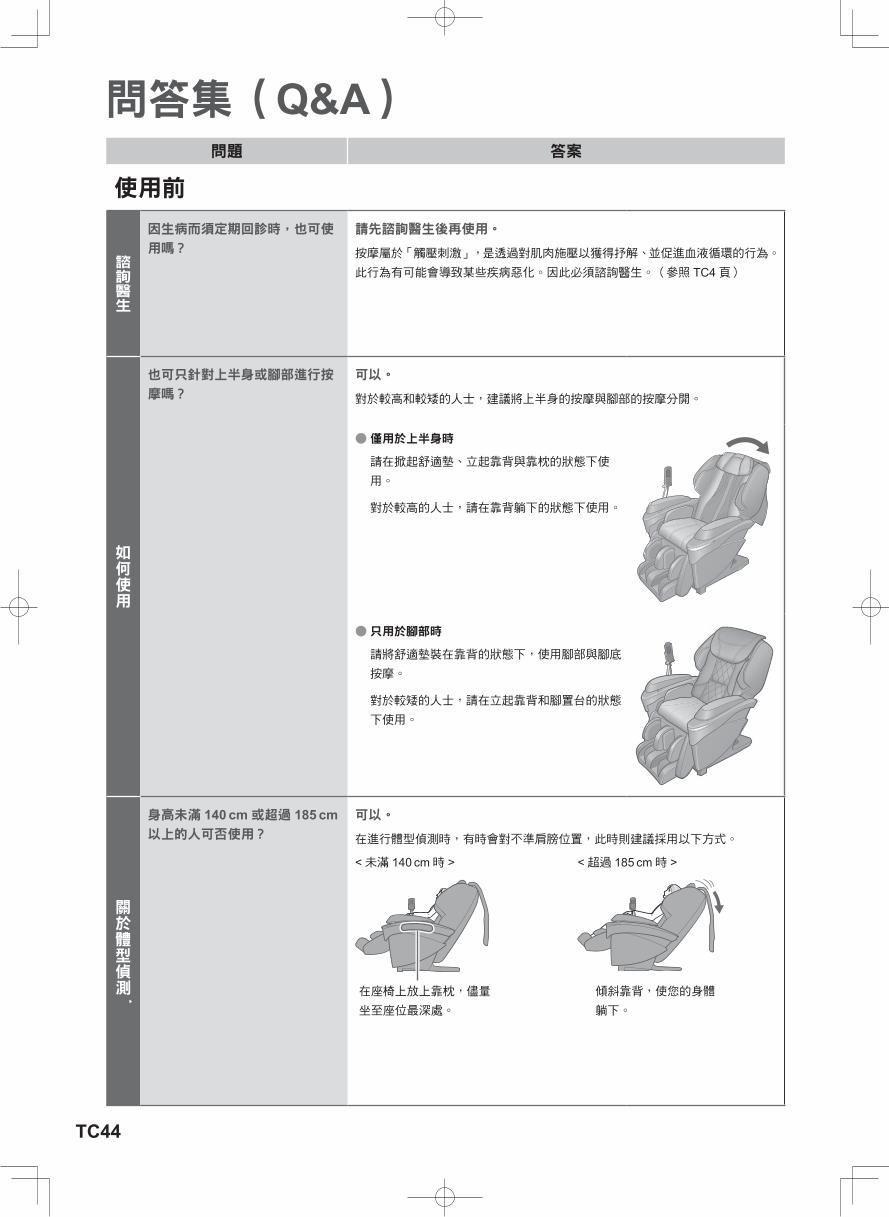
TC44
問答集(Q&A)問題 答案
使用前
諮詢醫生
因生病而須定期回診時,也可使
用嗎?
請先諮詢醫生後再使用。
按摩屬於「觸壓刺激」,是透過對肌肉施壓以獲得抒解、並促進血液循環的行為。
此行為有可能會導致某些疾病惡化。因此必須諮詢醫生。(參照 TC4頁)
如何使用
也可只針對上半身或腳部進行按
摩嗎?
可以。
對於較高和較矮的人士,建議將上半身的按摩與腳部的按摩分開。
●僅用於上半身時
請在掀起舒適墊、立起靠背與靠枕的狀態下使
用。
對於較高的人士,請在靠背躺下的狀態下使用。
●只用於腳部時
請將舒適墊裝在靠背的狀態下,使用腳部與腳底
按摩。
對於較矮的人士,請在立起靠背和腳置台的狀態
下使用。
關於體型偵測*
身高未滿 140 cm或超過 185 cm以上的人可否使用?
可以。
在進行體型偵測時,有時會對不準肩膀位置,此時則建議採用以下方式。
<未滿 140 cm時 > <超過 185 cm時 >
在座椅上放上靠枕,儘量
坐至座位最深處。
傾斜靠背,使您的身體
躺下。
TC45▶ 次頁接續
問答集︵Q
&A
︶
* 體型偵測 = 偵測體型的動作
問題 答案
操作時
關於體型偵測*
在體型偵測或按摩途中發生按鈕
閃爍,並發出「嗶嗶」5次警報聲 (顯示 , )後,便會結束動作。發生什麼事?
基於以下因素,當遇到無法偵測人體的情況時,機器會自動停止以避免
發生危險。
●使用者未坐入。 ●頭或背部離開靠背。 ●靠背上有緩衝墊等覆蓋物、或身穿厚重衣物。
• 請坐入椅座的最深處,將頭舒適地靠在靠枕上,按下 後再按下 以重新開始。
●未掀開舒適墊。
關於上半身按摩
背部按摩強度調整按鈕有時可能
無法操作。
背部按摩強度調整按鈕可能在以下情況時無法操作。
●改變按摩選項(例如由「KNEAD」(揉捏)改為「SWEDISH」(揉撫)) ●體型偵測
這是為了防止按摩強度突然加劇,並非故障。
當調節位置後仍未立即運作。 會因位置按鈕的按下,按摩輪無法立即運作。 (雖有些許的時間差,但並非異常。)
此外,按下按鈕後若發出「嗶嗶嗶」聲,即達極限點,無法再繼續調節。
感覺左右高低(強度)不同,沒
問題嗎?
以結構上來說,有時會出現左右高低(強度)不同的感覺。
為了以更自然的感覺進行按摩,因而採用交替捶拍機構。因此有時是在按摩輪位
置偏移的情況下運作。雖然有時會感覺左右高低(強度)不同,但並非故障。
按摩輪有時會逐位移動。沒問題
嗎?
椅子正在檢測在按摩輪上的壓力並改變按摩強度。雖然按摩輪會因按摩
輪上的壓力而以逐位移動,但並非故障。
關於腳底按摩
腳底按摩輪有時會在動作開始前
自行移位⋯
於動作開始前,腳底按摩輪會自行移動到位。 這並非故障。
氣囊按摩
在自動模式(包括記憶模式)中,
氣囊動作和腳底按摩輪動作可能
會突然停止,並轉移到下一個操
作⋯在自動模式中,當腰部按摩或伸展動作開始時,氣囊動作和腳底按摩輪
動作將會停止。
通過把氣囊動作連繫到按摩輪的動作,以增加腰部按摩和伸展動作的功
效。
因此,當左右交替地進行手臂按摩時,每隻手臂的按摩次數可能不同。手及手臂
在自動模式中,手臂氣囊進氣次
數左右不一。
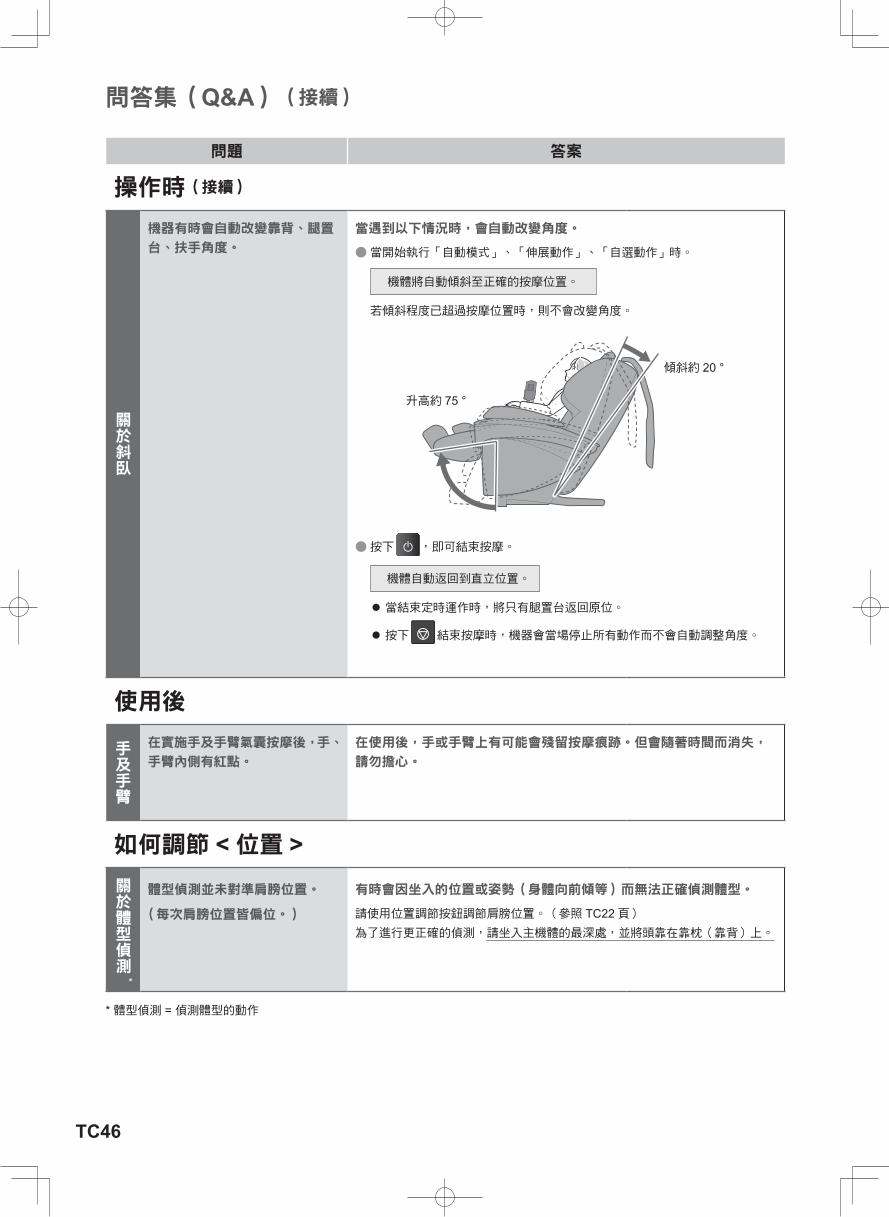
TC46
問答集(Q&A)(接續)
問題 答案
操作時(接續)
關於斜臥
機器有時會自動改變靠背、腿置
台、扶手角度。
當遇到以下情況時,會自動改變角度。
●當開始執行「自動模式」、「伸展動作」、「自選動作」時。
機體將自動傾斜至正確的按摩位置。
若傾斜程度已超過按摩位置時,則不會改變角度。
傾斜約 20 °
升高約 75 °
●按下 ,即可結束按摩。
機體自動返回到直立位置。
當結束定時運作時,將只有腿置台返回原位。
按下 結束按摩時,機器會當場停止所有動作而不會自動調整角度。
使用後
手及手臂
在實施手及手臂氣囊按摩後,手、
手臂內側有紅點。
在使用後,手或手臂上有可能會殘留按摩痕跡。但會隨著時間而消失,
請勿擔心。
如何調節 <位置 >關於體型偵測*
體型偵測並未對準肩膀位置。
(每次肩膀位置皆偏位。)
有時會因坐入的位置或姿勢(身體向前傾等)而無法正確偵測體型。
請使用位置調節按鈕調節肩膀位置。(參照 TC22頁)為了進行更正確的偵測,請坐入主機體的最深處,並將頭靠在靠枕(靠背)上。
* 體型偵測 = 偵測體型的動作
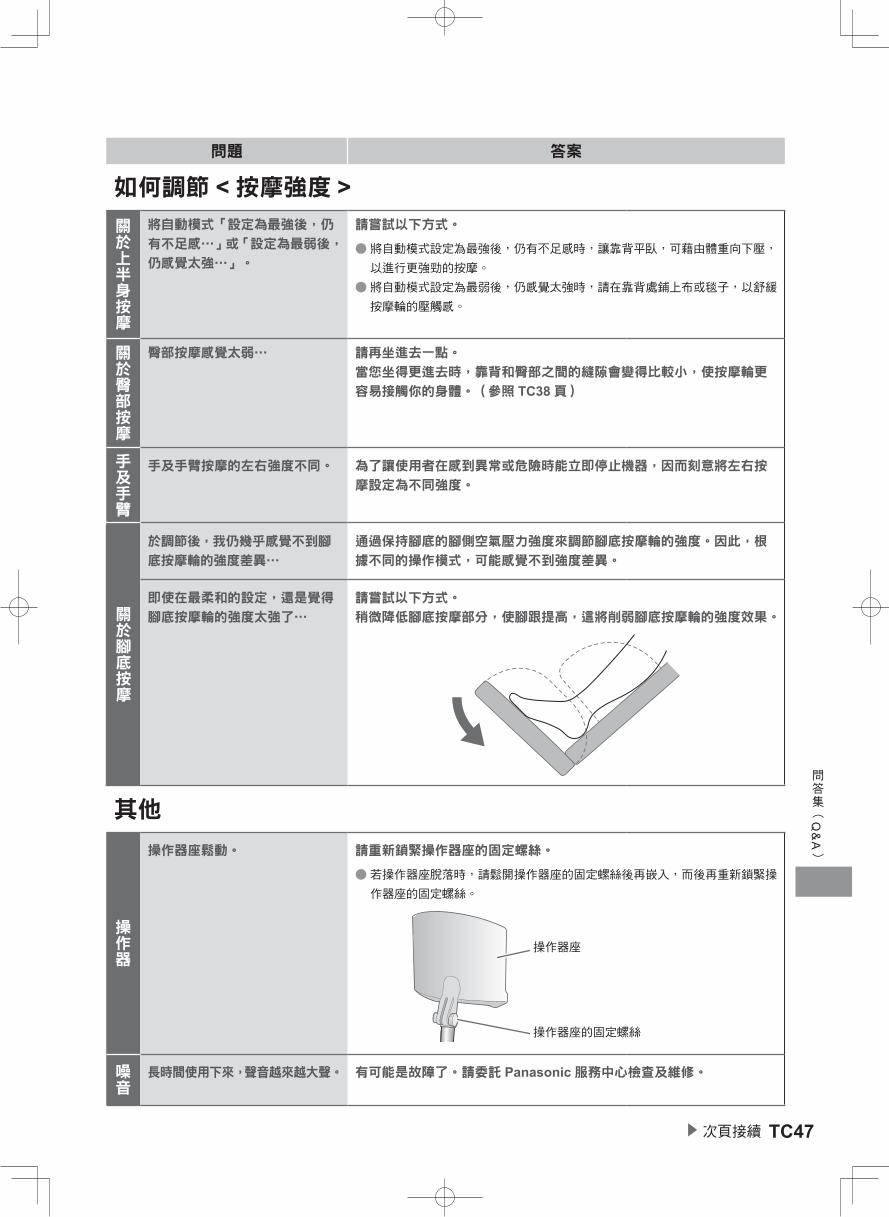
TC47▶ 次頁接續
問答集︵Q
&A
︶
問題 答案
如何調節 <按摩強度 >關於上半身按摩
將自動模式「設定為最強後,仍
有不足感⋯」或「設定為最弱後,
仍感覺太強⋯」。
請嘗試以下方式。
●將自動模式設定為最強後,仍有不足感時,讓靠背平臥,可藉由體重向下壓,以進行更強勁的按摩。
●將自動模式設定為最弱後,仍感覺太強時,請在靠背處鋪上布或毯子,以舒緩按摩輪的壓觸感。
關於臀部按摩
臀部按摩感覺太弱⋯ 請再坐進去一點。 當您坐得更進去時,靠背和臀部之間的縫隙會變得比較小,使按摩輪更
容易接觸你的身體。(參照 TC38頁)
手及手臂
手及手臂按摩的左右強度不同。 為了讓使用者在感到異常或危險時能立即停止機器,因而刻意將左右按
摩設定為不同強度。
關於腳底按摩
於調節後,我仍幾乎感覺不到腳
底按摩輪的強度差異⋯
通過保持腳底的腳側空氣壓力強度來調節腳底按摩輪的強度。因此,根
據不同的操作模式,可能感覺不到強度差異。
即使在最柔和的設定,還是覺得
腳底按摩輪的強度太強了⋯
請嘗試以下方式。
稍微降低腳底按摩部分,使腳跟提高,這將削弱腳底按摩輪的強度效果。
其他
操作器
操作器座鬆動。 請重新鎖緊操作器座的固定螺絲。
●若操作器座脫落時,請鬆開操作器座的固定螺絲後再嵌入,而後再重新鎖緊操作器座的固定螺絲。
操作器座
操作器座的固定螺絲
噪音
長時間使用下來,聲音越來越大聲。 有可能是故障了。請委託 Panasonic服務中心檢查及維修。
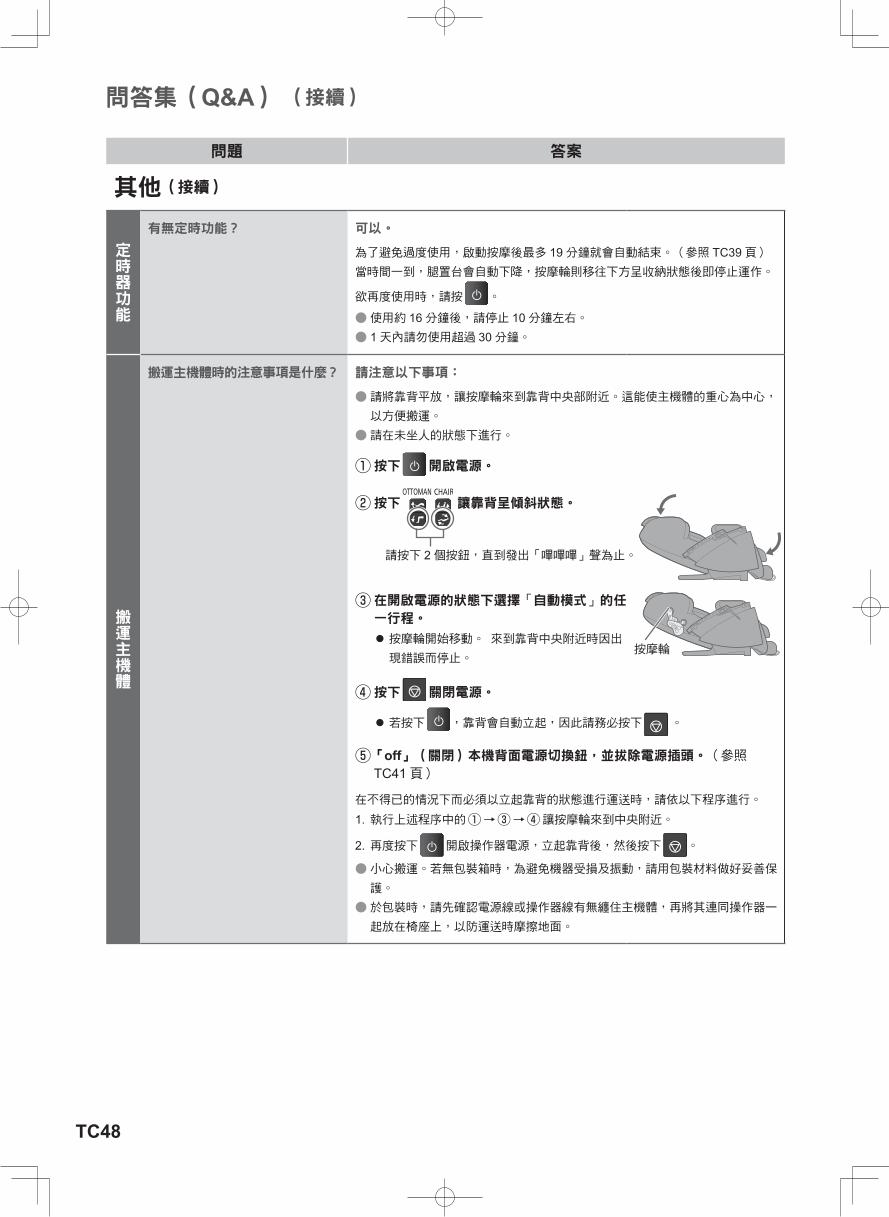
TC48
問答集(Q&A) (接續)
問題 答案
其他(接續)
定時器功能
有無定時功能? 可以。
為了避免過度使用,啟動按摩後最多 19分鐘就會自動結束。(參照 TC39頁)當時間一到,腿置台會自動下降,按摩輪則移往下方呈收納狀態後即停止運作。
欲再度使用時,請按 。
●使用約 16分鐘後,請停止 10分鐘左右。 ● 1天內請勿使用超過 30分鐘。
搬運主機體
搬運主機體時的注意事項是什麼? 請注意以下事項:
●請將靠背平放,讓按摩輪來到靠背中央部附近。這能使主機體的重心為中心,以方便搬運。
●請在未坐人的狀態下進行。
① 按下 開啟電源。
② 按下 讓靠背呈傾斜狀態。
請按下 2個按鈕,直到發出「嗶嗶嗶」聲為止。
③ 在開啟電源的狀態下選擇「自動模式」的任一行程。
按摩輪開始移動。 來到靠背中央附近時因出現錯誤而停止。
按摩輪
④ 按下 關閉電源。
若按下 ,靠背會自動立起,因此請務必按下 。
⑤ 「off」(關閉)本機背面電源切換鈕,並拔除電源插頭。(參照TC41頁)
在不得已的情況下而必須以立起靠背的狀態進行運送時,請依以下程序進行。
1. 執行上述程序中的 ①→③→④讓按摩輪來到中央附近。
2. 再度按下 開啟操作器電源,立起靠背後,然後按下 。
●小心搬運。若無包裝箱時,為避免機器受損及振動,請用包裝材料做好妥善保護。
●於包裝時,請先確認電源線或操作器線有無纏住主機體,再將其連同操作器一起放在椅座上,以防運送時摩擦地面。

TC49▶ 次頁接續
問答集︵Q
&A
︶
問題解決
問題解決請實施以下檢查與處理。
若處理後仍有異常時,請聯絡 Panasonic服務中心。
問題 原因和補救方法
按摩輪突然在作業時停止。 若按摩輪於作業時遇到過外力,為安全起見,按摩輪可能會停止運作。
→請關閉電源、靜待 10秒後再開啟電源切換鈕。
無法傾斜座椅及無法降低腿置台。
( 操作器的動作顯示部與按鈕全部閃爍、燈熄滅。 )若本機於作業時遇到阻礙物或過強外力,為安全起見,本機將停止作業。
→當所有的顯示和按鈕皆在閃爍、靠背或腿置台停止作業,請立即「關閉」主機體電源,靜待 10秒後再按下「on」(開啟)電源,然後再操作本機。
按摩輪不往上移至肩膀或頸部位
置。
若頭部並未接觸靠枕或背部並未接觸靠背,在進行體型偵測時,肩膀位置也許
會被偵測為比實際位置還低。
→請坐在座位最深處,把頭放在靠枕上,然後從頭開始重複操作一遍。(參照 TC22頁)
左右兩邊的按摩輪高度不同。 運用輪流輕拍法,因此為自然現象。機體正常。
(參照 TC45頁)
「HEAT」(溫熱)按摩輪不變熱。
按鈕呈「關閉」狀態。
按摩輪的溫熱感因使用者的體形、按摩部位、按摩動作、衣物和環境溫度而異。
即使關閉「HEAT」(溫熱)按摩輪開關,仍能感覺到熱度。
由於加熱器的結構,「HEAT」(溫熱)按摩輪在加熱後片刻依然會因為餘熱而感到溫暖。
即使「HEAT」(溫熱)按摩輪開關在「關閉」狀態下,若持續按摩相同部位,有時會提高體感溫度。
即使自動模式已開始按摩,但本
機仍沒有傾斜。
(座位無法自動傾斜。)
如果靠背的傾斜度比自動按摩位置還要傾斜、腿置台的提升高度比自動按摩位
置還要高,則座椅自動傾斜功能就不會啟動。
(參照 TC46頁)
靠背並未返回直立的位置。 若本機是自動停止或利用按 按鈕而停止,它就不會自動返回直立的位置。
→欲將傾斜角度調回原來的位置,請按 按鈕兩次。
本機完全無法運作。 電源線被切斷。 (參照 TC11頁)
主機體的電源切換鈕為「off」(關閉)。
已啟動了兒童鎖。 (參照 TC21頁)
按 之後未按自動模式按鈕或自選動作選擇按鈕。
無法按摩手及手臂。 扶手的氣囊插頭未連接。 (參照 TC13頁)
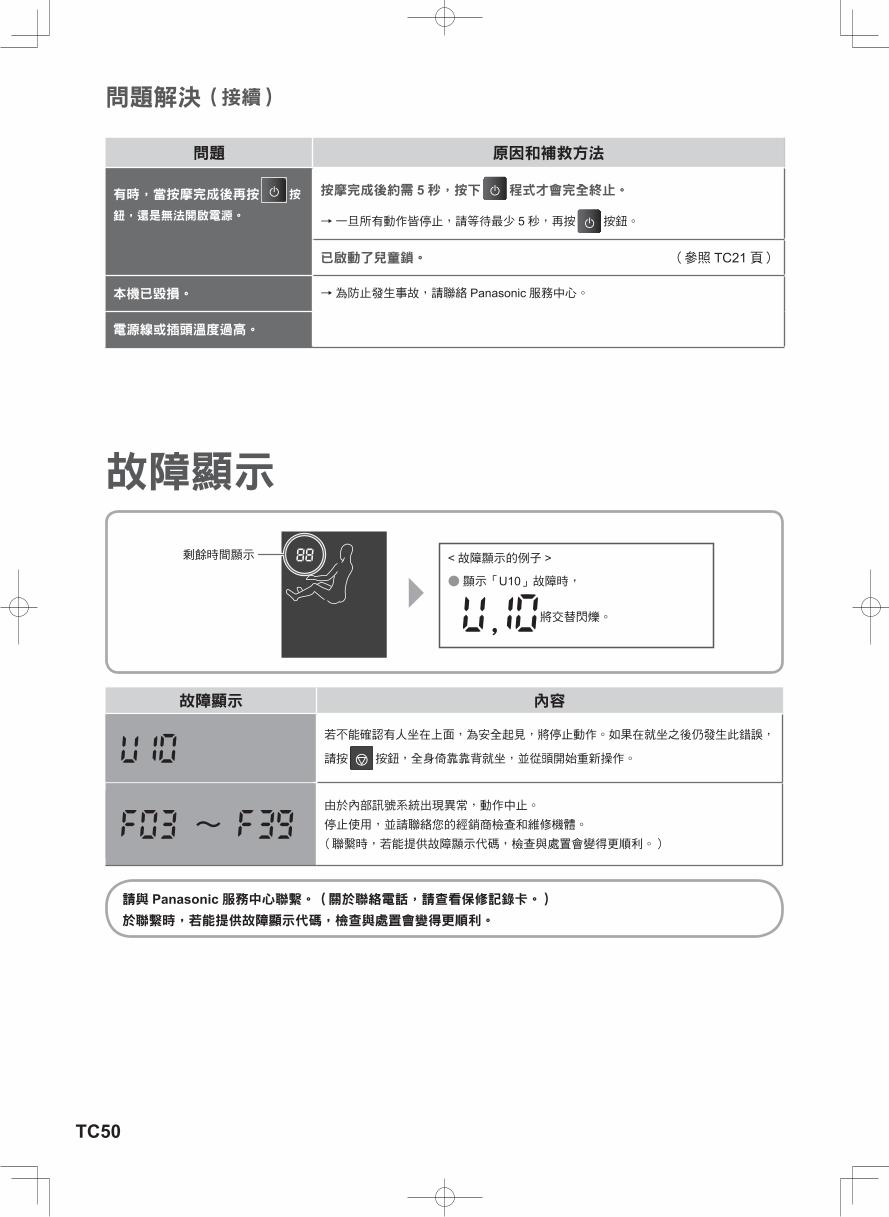
TC50
問題解決(接續)
問題 原因和補救方法
有時,當按摩完成後再按 按鈕,還是無法開啟電源。
按摩完成後約需 5秒,按下 程式才會完全終止。
→一旦所有動作皆停止,請等待最少 5秒,再按 按鈕。
已啟動了兒童鎖。 (參照 TC21頁)
本機已毀損。 →為防止發生事故,請聯絡 Panasonic服務中心。
電源線或插頭溫度過高。
故障顯示
故障顯示 內容
若不能確認有人坐在上面,為安全起見,將停止動作。如果在就坐之後仍發生此錯誤,
請按 按鈕,全身倚靠靠背就坐,並從頭開始重新操作。
~由於內部訊號系統出現異常,動作中止。
停止使用,並請聯絡您的經銷商檢查和維修機體。
( 聯繫時,若能提供故障顯示代碼,檢查與處置會變得更順利。)
剩餘時間顯示 <故障顯示的例子 >
●顯示「U10」故障時,
, 將交替閃爍。
請與 Panasonic服務中心聯繫。(關於聯絡電話,請查看保修記錄卡。)於聯繫時,若能提供故障顯示代碼,檢查與處置會變得更順利。
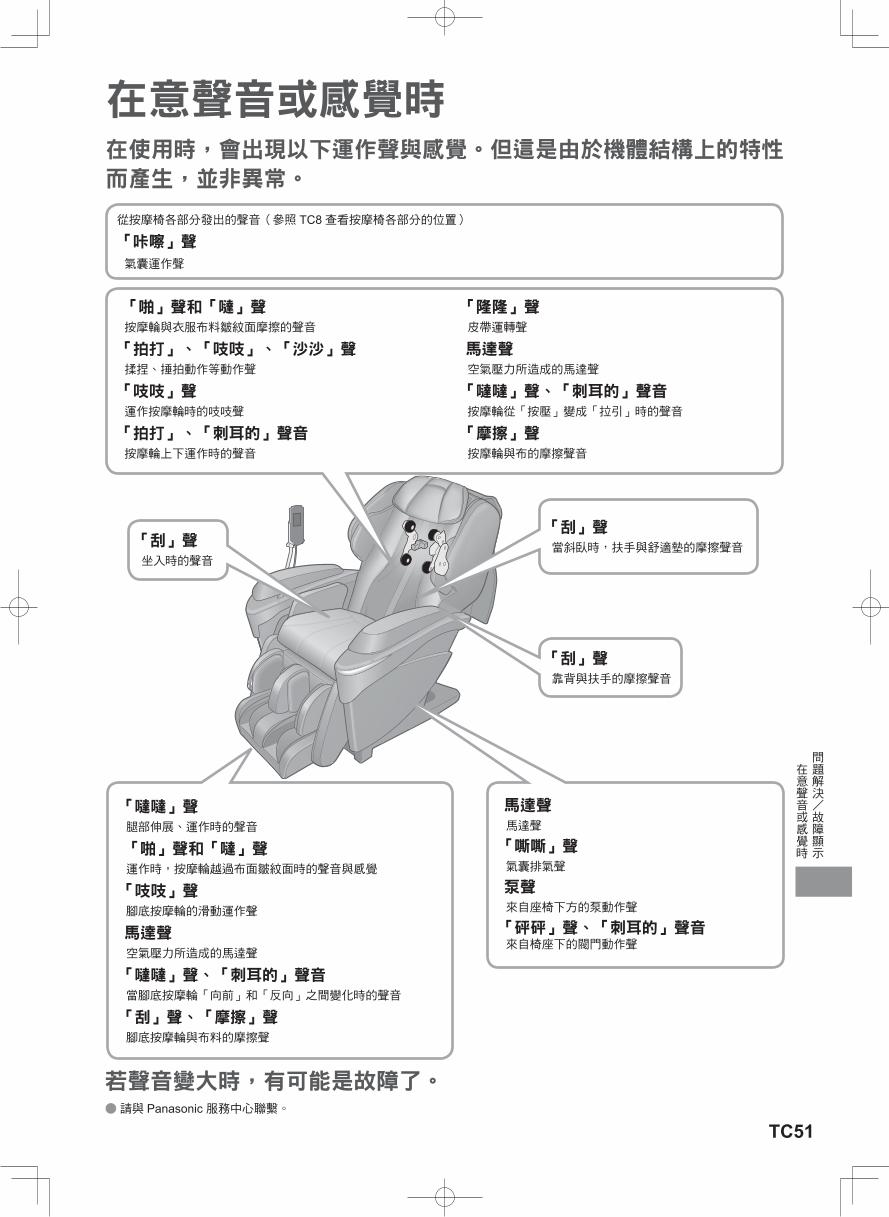
TC51
問題解決/故障顯示
在意聲音或感覺時
在意聲音或感覺時在使用時,會出現以下運作聲與感覺。但這是由於機體結構上的特性而產生,並非異常。
若聲音變大時,有可能是故障了。 ●請與 Panasonic 服務中心聯繫。
「刮」聲坐入時的聲音
「刮」聲當斜臥時,扶手與舒適墊的摩擦聲音
「刮」聲靠背與扶手的摩擦聲音
馬達聲馬達聲
「嘶嘶」聲氣囊排氣聲
泵聲來自座椅下方的泵動作聲
「砰砰」聲、「刺耳的」聲音來自椅座下的閥門動作聲
「噠噠」聲腿部伸展、運作時的聲音
「啪」聲和「噠」聲運作時,按摩輪越過布面皺紋面時的聲音與感覺
「吱吱」聲腳底按摩輪的滑動運作聲
馬達聲空氣壓力所造成的馬達聲
「噠噠」聲、「刺耳的」聲音當腳底按摩輪「向前」和「反向」之間變化時的聲音
「刮」聲、「摩擦」聲腳底按摩輪與布料的摩擦聲
從按摩椅各部分發出的聲音(參照 TC8查看按摩椅各部分的位置)
「咔嚓」聲氣囊運作聲
「啪」聲和「噠」聲按摩輪與衣服布料皺紋面摩擦的聲音
「拍打」、「吱吱」、「沙沙」聲揉捏、捶拍動作等動作聲
「吱吱」聲運作按摩輪時的吱吱聲
「拍打」、「刺耳的」聲音按摩輪上下運作時的聲音
「隆隆」聲皮帶運轉聲
馬達聲空氣壓力所造成的馬達聲
「噠噠」聲、「刺耳的」聲音按摩輪從「按壓」變成「拉引」時的聲音
「摩擦」聲按摩輪與布的摩擦聲音
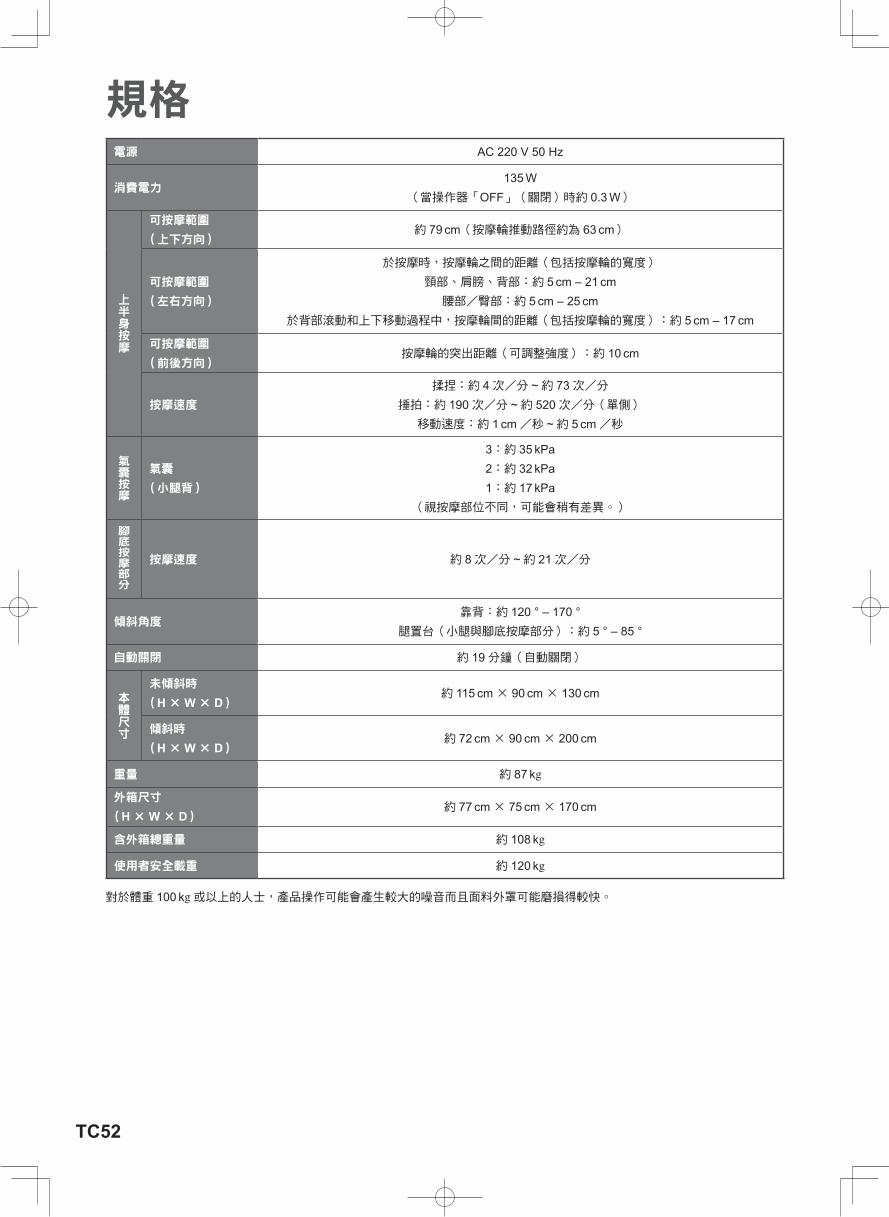
TC52
規格電源 AC 220 V 50 Hz
消費電力135 W
(當操作器「OFF」(關閉)時約 0.3 W)
上半身按摩
可按摩範圍
(上下方向) 約 79 cm(按摩輪推動路徑約為 63 cm)
可按摩範圍
(左右方向)
於按摩時,按摩輪之間的距離(包括按摩輪的寬度)
頸部、肩膀、背部:約 5 cm – 21 cm腰部/臀部:約 5 cm – 25 cm
於背部滾動和上下移動過程中,按摩輪間的距離(包括按摩輪的寬度):約 5 cm – 17 cm
可按摩範圍
(前後方向) 按摩輪的突出距離(可調整強度):約 10 cm
按摩速度
揉捏:約 4次/分 ~約 73次/分捶拍:約 190次/分 ~約 520次/分(單側) 移動速度:約 1 cm/秒 ~約 5 cm/秒
氣囊按摩
氣囊
(小腿背)
3:約 35 kPa2:約 32 kPa1:約 17 kPa
(視按摩部位不同,可能會稍有差異。)
腳底按摩部分
按摩速度 約 8次/分 ~約 21次/分
傾斜角度靠背:約 120 ° – 170 °
腿置台(小腿與腳底按摩部分):約 5 ° – 85 °
自動關閉 約 19分鐘(自動關閉)
本體尺寸
未傾斜時
(H × W × D)約 115 cm × 90 cm × 130 cm
傾斜時
(H × W × D)約 72 cm × 90 cm × 200 cm
重量 約 87 kg
外箱尺寸
(H × W × D)約 77 cm × 75 cm × 170 cm
含外箱總重量 約 108 kg
使用者安全載重 約 120 kg
對於體重 100 kg或以上的人士,產品操作可能會產生較大的噪音而且面料外罩可能磨損得較快。

規格
TC53
最大寬度:
約 90 cm
接地部分寬幅:約 64 cm
長度:約 130 cm
接地部分的長度:約 79 cm
深度(降下腿置台的狀態) :約 160 cm
深度(升起腿置台的狀態) :約 180 cm
腳底按摩部分的滑動量:
約 2 cm
腳底按摩部分的伸展長度:
約 18 cm
高度
(安裝靠枕的狀態):約 72 cm
最大深度:約 200 cm
扶手高度:
約 73 cm
靠背高度:
約 115 cm
卸除操作器立架的狀態:
約 85 cm卸除操作器立架與扶手的狀態:
約 68 cm
主機尺寸
正面
側面

MEMO
MEMO
Issued date: 2016-12-30發行日期:2016-12-30
Printed in China中國印刷
P9310MAJ7421
Panasonic Corporation© Panasonic Corporation 2016http://www.panasonic.com
No.1 EN, TC